Introduction
Fast and efficient application deployment is a key concern in today’s fast-paced development environment. Developers can focus on writing code with Amazon Web Services’ Platform as a Service (PaaS) product, AWS Elastic Beanstalk. AWS takes care of infrastructure setup, scalability, and monitoring. Whether you’re creating a worker service, web application, or API backend, Elastic Beanstalk provides an easy way to manage and deploy apps. This lets you avoid concerns about the underlying infrastructure.
What is Elastic BeanStalk
AWS Elastic Beanstalk is a fully managed service that lets you deploy applications in various programming languages such as:
- Java
- Python
- .NET
- Node.js
- PHP
- Ruby
- Go
- Docker
You just upload your code, and Elastic Beanstalk automatically:
1. Monitor the application’s health.
2. Provisions the required infrastructure (EC2, Load Balancers, Auto Scaling, etc.).
3. Deploy your application.

Key Features of AWS Elastic Beanstalk
1. Fully Managed Environment
Elastic Beanstalk takes care of everything, including provisioning, load balancing, scaling, and monitoring. You maintain full control over the underlying AWS resources.
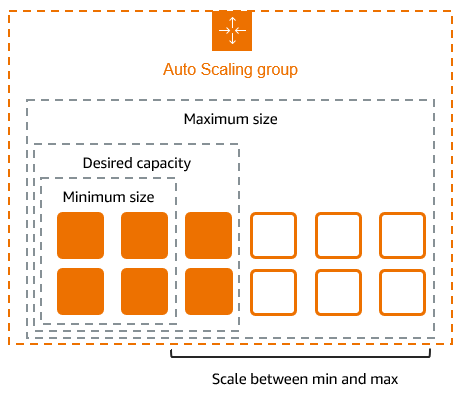
2. Auto Scaling
Your application can automatically scale up during high traffic and scale down when usage is low. This helps keep costs in check.
3. Health Monitoring
Elastic Beanstalk works with AWS CloudWatch to check the health of your instances and applications.
4. Multi-Language Support
It supports a wide variety of programming languages and frameworks.
5. Integration with Other AWS Services
It works easily with RDS for databases, S3 for storage, and CloudFront for content delivery.
Step by Step procedure for creating Elastic Beanstalk
Step1: Create a Elastic BeanStalk
- Navigate to Elastic Beanstalk by clicking on the Services menu in the top, then click on Elastic Beanstalk in the Compute section.
- Once Elastic Beanstalk is opened, you’ll be presented with a getting started screen. Click on the Create application
- In Configure environment page :
- Environment tier : Select Web server environment
- Application Name: Enter Horizon_Application
- Note: This is usually the name of the product/project that you are building.

4. Under Platform: Choose Java and leave other options as default

5. Click on next
6. In Configure service access :
- Service role : Select Use an existing service role
- Named AWSServiceRoleForElasticBeanstalk
- EC2 Instance profile : Select aws-elasticbeanstalk-ec2-role

7. Click on Next
8. To Set up networking, database, and tags :
- VPC : Select Default VPC
- Check the Public IP address checkbox
- Check the us-east-1a and us-east-1b subnets checkbox under Instance subnets.

9. Keep rest things as default and Click on Next button.
10. Under Security Group, Select the default Security Group
11. Under Capacity:
- Scroll Down to capacity section and Under Instance Types, remove the existing instance types and select t2.micro from the drop-down.

12. Click on Next button
13. In Configuring updates, monitoring, and logging :
- Scroll down to the Managed platform updates section.
- Uncheck the Managed updated checkbox.
14.Keep rest things as default and click on Next button.
15. Review the details and click on Submit button
16. Once the above is completed, you will be able to see SampleApplication in the dashboard. 16. This is the main Elastic Beanstalk screen for your application. A sample screenshot is given below:
- On the dashboard, you can see your application URL.

16. To test your application, copy the app URL and paste it into your browser. You will see your application is running successfully. A sample screenshot is given below:

Conclusion
AWS Elastic Beanstalk is a great option for developers who want to quickly and easily deploy apps without dealing with complicated infrastructure. It offers the right mix of control and automation, making it perfect for startups, testing environments, and production-ready workloads.If you want to concentrate on application functionality while letting AWS handle the infrastructure, consider adding Elastic Beanstalk to your options. Follow DevOps Horizon for more Cloud and DevOps Blogs.