Introduction
Applications must manage unpredictable workloads and provide steady performance in the current digital world without going over budget for infrastructure. Auto Scaling becomes important in this situation. Because it automatically adjusts the number of computing resources based on demand, it helps the application run smoothly.
What Is Auto Scaling?
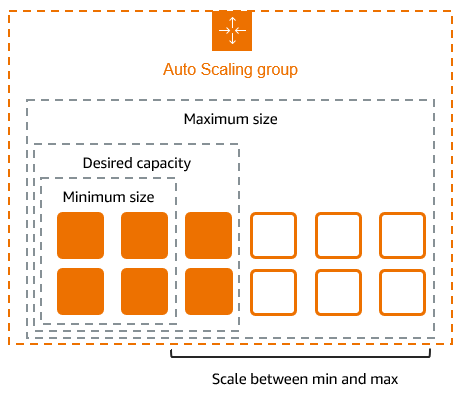
Auto Scaling is a cloud computing feature that dynamically increases or decreases computing resources such as servers, containers, or virtual machines based on real-time traffic and workload requirements. Instead of manually adding or removing servers, auto scaling handles this automatically, ensuring optimal performance and cost efficiency.
Why Is Auto Scaling Important?
- Performance Assurance
Customers expect quick, dependable service. By automatically supplying more capacity when required, auto scaling avoids lags or outages.. - Cost Optimization
Auto scaling makes sure you only pay for what you use rather than maintaining a set number of servers around-the-clock. - High Availability
In order to minimize downtime, auto scaling can automatically replace sick instances and split traffic among several resources. - Operational Efficiency
Manual scaling takes a lot of time and is prone to mistakes. By automating resource adjustments, auto scaling minimizes human effort.
How Auto Scaling Works
Auto scaling generally follows these steps:
- Monitoring
Metrics such as CPU utilization, memory usage, or request rates are continuously monitored. - Triggering Policies
When predefined thresholds (e.g., CPU > 80%) are exceeded, scaling policies are triggered. - Scaling Actions
- Scale Out: Add more instances to handle increased load.
- Scale In: Remove instances when demand decreases.
- Scale Out: Add more instances to handle increased load.
- Load Balancing
New or reduced resources are automatically integrated with a load balancer to ensure even traffic distribution.
Types of Auto Scaling
- Reactive Scaling
- Responds to real-time traffic spikes.
- Example: Adding instances when CPU exceeds 75%.
- Responds to real-time traffic spikes.
- Scheduled Scaling
- Pre-planned scaling based on known usage patterns.
- Example: Increasing capacity during business hours and reducing it at night.
- Pre-planned scaling based on known usage patterns.
- Predictive Scaling
- Uses machine learning and historical trends to forecast demand.
- Example: Scaling before a shopping festival based on previous years’ traffic data.
- Uses machine learning and historical trends to forecast demand.
Step by Step procedure for creating Auto Scaling
Step1: Creating Launch Template
- Navigate to EC2 by clicking on the Services menu in the top, then click on EC2 in the Compute section.
- In the left navigation menu, scroll down to Launch Templates and click on Create launch template button.

3. Launch template name: Enter demoLT
4. Template version description: Enter Launch template version 1
5. Launch template contents:
Amazon machine image (AMI): Select Amazon Linux 2023 kernel-6.1 AMI


6. Key pair (login):
7. Key pair name: Don’t include in the launch template
8. The launch template is now listed.
9. Network settings:
10. Security groups: Select the Default security group of Default VPC
11. Keep all the settings as default.
12. Now, click on the Create launch template button
13. The launch template is now created.
14. Click on the View Launch template button.

Step2: Creating an Auto Scaling Group
- Go to the left menu under EC2 and choose Auto Scaling Group under Auto Scaling
- Click on the Create Auto Scaling group button.

3. Choose launch template or configuration
4. Auto Scaling group name: Enter demo-ASG
5. Launch template: Select demoLT
6. Click on the Next button.

7. Step 2: Choose instance launch options
8. VPC: Select the Default VPC from the list.
9. Subnet: Select all the subnets.
10. Click on the Next button.

11. Step 3: Integrate with other services
12. No changes are needed on this page, click on the Next button.
13.Step 4: Configure group size and scaling
14. Under Group size – optional
15. Desired capacity: Enter 2
16.Minimum capacity: Enter 2
17. Maximum capacity: Enter 2

18. Step 5: Add notifications
19. No changes are needed on this page, click on the Next button.
20. Step 6: Add tags
21. Enter tags in key-value pairs to identify your auto-scaling group.
22. Click on the Add tag button.
23. Key: Name
24. Value: ASG-EC2

Step3: Testing the Auto Scaling Group
- For testing the auto-scaling policy, go to the EC2 instance list and select one of your instances.
- Next, select an instance and click on Instance state and then Stop instance.
- Click the Stop button on the pop-up window to stop your instance.
- Once your instance is stopped (after 1-2 minutes) you can see that your stopped instance will be terminated automatically, and a new instance will be launched to fulfill the policy condition. A sample screenshot is provided below:

Conclusion
Auto scaling is essential for modern systems that require flexibility, reliability, and cost efficiency. Auto scaling guarantees dependable performance and controls costs by automatically modifying resources according to demand.Utilizing auto scaling can greatly improve user satisfaction and operational efficiency, regardless of the size of your business solution or web app. Follow DevOps Horizon for more blogs on Cloud and DevOps