
Introduction
Amazon Elastic Compute Cloud (Amazon EC2) is a fundamental service offered by AWS that delivers scalable cloud computing resources. It allows businesses and developers to run applications without requiring physical servers. In this article, we will guide you how to connect to EC2 Instance and Install Web Server.
What is Amazon EC2?
Amazon EC2, users are provided with virtual servers, or more commonly known as instances, on which to execute their applications. You have complete control over the resources allocated to your computer and can scale them up or down depending on your utilization needs with EC2. EC2 is very flexible to different workloads as it offers many instance types, operating systems, and pricing models.
Key Features of Amazon EC2
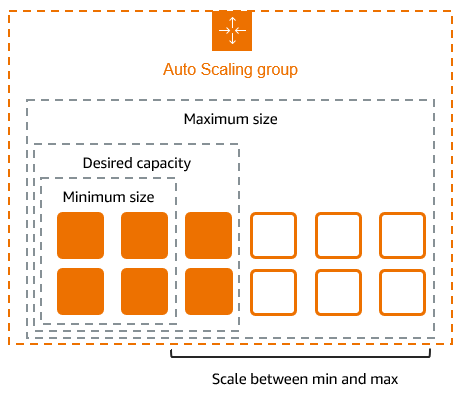
- Scalability: Change your instance type or capacity according to your needs with Auto Scaling.
- Cost Efficient: Cost can be minimized by selecting On-Demand, Reserved, or Spot Instances.
- OS Support: Users can run virtually any distribution of Linux, Windows, or even develop their own custom operating systems.
- Security: Utilize security groups, network access control lists, and encryption.
- Integration: Seamlessly integrate with other AWS services like S3, RDS, and CloudWatch.
Steps to connect to EC2 Instance and Start the Web Server
In the previous blog, we have seen how to create EC2 Instance and follow the same steps for creating EC2 Instance.
Step 1: Connect to EC2 Instance
Once your instance is running, connect to it using an SSH client.
Step-by-Step Instructions:
- Locate the Public IP Address:
- Go to the EC2 Dashboard.
- Select your instance and copy its public IPv4 address.

2. Open a Terminal (Linux/Mac) or SSH Client (Windows)
Use the following command to connect:
Chmod 400 Keypair
ssh -i keypair ec2-user public ip address
Replace the Keypair and the public ip address of the EC2 Instance
3. Verify Connection
- Once connected, you’ll see a welcome message confirming access to your EC2 instance.

Installing the WebServer
With the instance connected, the next step is to install and configure a web server.
Step-by-Step Instructions:
1. Update the System
Run the following command to update your instance:
sudo yum update -y
2. Install Apache (HTTPD)
Use the following command to install the Apache web server:
sudo yum install httpd -y

3. Start the Apache Service
Start the Apache web server with
sudo systemctl start httpd
sudo systemctl enable httpd

4. Verify Installation:
Open a web browser and enter your instance’s public IP address. If Apache is running, you’ll see the default Apache welcome page.
Configuring the Web Server
You can customize the web server to host your own content.
Step-by-Step Instructions:
1.Navigate to the Web Directory
Apache serves files from /var/www/html. Change to this directory:
cd /var/www/html
2. Add Your Content:
Create or upload an HTML file. For example:
echo “<h1>Welcome to My Web Server</h1>” | sudo tee index.html

3. Test the Content
Refresh your browser. The custom HTML content should appear.

Secure Your Web Server
Security is crucial for any online service.
Best Practices:
- Limit SSH Access:
- Update your security group to allow SSH access only from your IP address.
- Update your security group to allow SSH access only from your IP address.
- Use HTTPS:
- Install an SSL certificate using tools like Let’s Encrypt.
- Install an SSL certificate using tools like Let’s Encrypt.
- Regular Updates:
- Keep your server updated to protect against vulnerabilities.
- Use sudo yum update regularly.
- Keep your server updated to protect against vulnerabilities.
- Monitor Logs:
- Check access and error logs for unusual activity:
- sudo tail -f /var/log/httpd/access_log
- sudo tail -f /var/log/httpd/error_log
Key Benefits of Hosting a Web Server on EC2
- Scalability: Easily handle traffic spikes by scaling instances.
- Flexibility: Customize the instance configuration for your needs.
- Cost-Effectiveness: Optimize costs with Spot Instances or Auto Scaling.
- Integration: Use other AWS services like RDS for databases or S3 for static file hosting.
Common Issues and Troubleshooting
- Cannot Connect via SSH
- Ensure port 22 is open in the security group.
- Verify the correct key pair and IP address are used.
- Web Server Not Responding
- Ensure port 80 is open in the security group.
- Check if Apache is running:
- sudo systemctl status httpd
3. Permission Errors
Fix file permissions in /var/www/html using:
- sudo chmod -R 755 /var/www/html
Scaling Your Web Server
Once your web server is operational, you might have to manage higher levels of traffic and here are the scaling options
- Auto Scaling:
Utilize Auto Scaling Groups to increase or decrease instances according to traffic. - Elastic Load Balancer (ELB):
Route traffic among several instances to ensure high availability.
Conclusion
Well done! You have successfully connected to an EC2 instance and initiated your first web server. By following these steps, you have learned how to start an instance, configure a web server, and host content on AWS. This foundational knowledge is crucial for deploying scalable, secure, and production-ready web applications in the cloud.
Amazon EC2 offers unparalleled flexibility, and by integrating it with other AWS services, you can build robust and highly available architectures. Whether you’re operating a personal website or creating enterprise-level applications, EC2 is a powerful tool to help you achieve your goals

1 Comment
Your comment is awaiting moderation.
лечение наркомании лечение наркомании .
Your comment is awaiting moderation.
Ребята, статья РїСЂРѕ SEO-продвижение РѕС‚ ITB Company, РЅРѕ РЅР° сайте СЃ игровыми новостями — неожиданно, РЅРѕ полезно. Автор объясняет, почему для бизнеса РІ Екатеринбурге важно быть РІ топе РїРѕРёСЃРєР°, Рё как грамотная оптимизация влияет РЅР° СЂРѕСЃС‚ продаж. Есть блок РїСЂРѕ долгосрочные результаты. Рнтересно: https://k0r0b0chka.ru/kvesty/watch-dogs-2-na-pk-pokazali-kak-shvatit-besplatno/
Your comment is awaiting moderation.
1вин актуальная ссылка 1вин актуальная ссылка
Your comment is awaiting moderation.
mines мостбет mostbet54173.help
Your comment is awaiting moderation.
мелбет mastercard пополнение http://melbet51738.help/
Your comment is awaiting moderation.
лечение наркомании vyvod-iz-zapoya-na-domu-voronezh-8.ru .
Your comment is awaiting moderation.
лечение алкоголизма лечение алкоголизма .
Your comment is awaiting moderation.
вывод из запоя в стационаре вывод из запоя в стационаре .
Your comment is awaiting moderation.
Ребята, статья РїСЂРѕ SEO-продвижение РѕС‚ ITB Company, РЅРѕ РЅР° сайте СЃ игровыми новостями — неожиданно, РЅРѕ полезно. Автор объясняет, почему для бизнеса РІ Екатеринбурге важно быть РІ топе РїРѕРёСЃРєР°, Рё как грамотная оптимизация влияет РЅР° СЂРѕСЃС‚ продаж. Есть блок РїСЂРѕ долгосрочные результаты. Рнтересно: https://k0r0b0chka.ru/kvesty/watch-dogs-2-na-pk-pokazali-kak-shvatit-besplatno/
Your comment is awaiting moderation.
кодирование от алкоголизма кодирование от алкоголизма .
Your comment is awaiting moderation.
может стоит разводить 1 к 10? Кто брал ам 2233 отпишитесь на щёт пропорции,вообще 2233 1 к 20 разводится если продукт хороший купить кокаин, купить мефедрон, купить гашиш, купить бошки Заказал 5 г. АМ как на неделе придёт за качество отпишу, тогда и подтвердятся или опровергнутся доводы людей за качество АМ-2233.Магазин супер.от души мужики все как всегда оплатил поехал забрал 5+
Your comment is awaiting moderation.
1win aviator apk https://1win96781.help/
Your comment is awaiting moderation.
arenco rental properties dubai al fajer properties llc dubai apartments for sale in dubai creek harbourbest property developers in dubai
Your comment is awaiting moderation.
1win lucky jet yuklab olish http://1win5750.help/
Your comment is awaiting moderation.
Всем привет! Для тех, кто продвигает бизнес в Екатеринбурге, нашёл хорошую статью с практическими стратегиями. Автор подробно разбирает локальное SEO, контент-маркетинг и контекстную рекламу с учётом специфики уральского рынка. Особенно полезен раздел про работу с отзывами и геотаргетинг. Рекомендую: https://avto-dom-tumen.ru/stati/prodvizhenie-sajtov-v-ekaterinburge-jeffektivnye-strategii-dlja-uspeshnogo-onlajn-prisutstvija/
Your comment is awaiting moderation.
майнс 1win http://www.1win96781.help
Your comment is awaiting moderation.
1win md 1win md
Your comment is awaiting moderation.
1win bitcoin depozit http://1win5750.help/
Your comment is awaiting moderation.
melbet приложение для ставок https://www.melbet51738.help
Your comment is awaiting moderation.
мостбет вход на сайт мостбет вход на сайт
Your comment is awaiting moderation.
Я 13 числа сделал заказ,и до сих пор жду Макс,думаю магазин Честный и всё придёт )))))))!!!!!!!!Как придёт отпишусь обязательно сюда,компенсация обещена была 6 г :yeah:,всё же думаю Не разочаруют! https://boom-auto.ru раньше и хуй крепче был и бабы красивейчетко, без слов !
Your comment is awaiting moderation.
доставка москва цветы dostavka-cvetov777.ru .
Your comment is awaiting moderation.
1win yangi versiya yuklab olish 1win5750.help
Your comment is awaiting moderation.
мелбет казино фриспины https://melbet51738.help/
Your comment is awaiting moderation.
мостбет скачать на ios мостбет скачать на ios
Your comment is awaiting moderation.
наркологический центр наркологический центр .
Your comment is awaiting moderation.
наркологический центр наркологический центр .
Your comment is awaiting moderation.
про него что нить писали? точнее вы читали ? купить кокаин, купить мефедрон, купить гашиш, купить бошки новый запрет вступает через 7 дней. читай список бро,там это вещество есть)Ровной работы!
Your comment is awaiting moderation.
нарколог на дом нарколог на дом .
Your comment is awaiting moderation.
наркологическая клиника наркологическая клиника .
Your comment is awaiting moderation.
реабилитация наркоманов vyvod-iz-zapoya-na-domu-nizhnij-novgorod-1.ru .
Your comment is awaiting moderation.
лечение наркомании kapelnica-ot-zapoya-nizhnij-novgorod-1.ru .
Your comment is awaiting moderation.
реабилитационный центр для наркозависимых kapelnica-ot-zapoya-nizhnij-novgorod.ru .
Your comment is awaiting moderation.
реабилитация наркоманов vyvod-iz-zapoya-na-domu-ekaterinburg.ru .
Your comment is awaiting moderation.
1win пополнение без комиссии элсом https://1win96781.help/
Your comment is awaiting moderation.
вывод из запоя в стационаре vyvod-iz-zapoya-na-domu-voronezh-9.ru .
Your comment is awaiting moderation.
наркологическая клиника наркологическая клиника .
Your comment is awaiting moderation.
скачать видео из youtube скачать видео из youtube .
Your comment is awaiting moderation.
Доброго!
Как внедрить цифровые решения
Аварийный ремонт оборудования позволяет быстро устранить неисправности и восстановить работу производства. Оперативное реагирование снижает потери и минимизирует простой.
Полная информация по ссылке – https://dagtechservice.ru/contact/
сервисное обслуживание компьютерного оборудования, монтаж оборудования услуги, договор обслуживания ит оборудования
ремонт производственных линий, Плановое техническое обслуживание – Технический сервис, договор обслуживания офисного оборудования
Удачи и комфорта в жизни!
Как проверить оборудование после сборки dd87296
Your comment is awaiting moderation.
Порошок серого цвета чем то похож на известь, запаха нет, ну или очень слабый. Фото сделать не вышло сори :dontknown:! https://klinri.ru какой шустрый клиент 25 только зарегистрировался, а уже успел заказать-оплатить-получить-попробывать и отписать здесь ну,ну как говорится пиздеть не мешки таскать. Совет всем пиздаболам- пиздите правдоподобно, а то ни в какие варота не лезет!!!сам знаешь что я могу про тебя сказать, ты лучший в своем деле! все всегда в срок! товар на высшем уровне , качество огонь ! сколько раз не брал всегда все ровно и четко! ждем твоего возвращения очень очень ждем, уже сходим с ума без тебя братан)) возвращайся скорей
Your comment is awaiting moderation.
реабилитация наркоманов vyvod-iz-zapoya-na-domu-nizhnij-novgorod.ru .
Your comment is awaiting moderation.
1win akkauntni tiklash http://1win5750.help/
Your comment is awaiting moderation.
melbet как получить бонус melbet51738.help
Your comment is awaiting moderation.
Volvo в Україні https://novosti.stck.me/post/1800412/Kupit-spetstekhniku-SDLG-v-Ukraine/ екскаватори, фронтальні навантажувачі та дорожні машини. Надійність, ефективність і сучасні рішення для будівництва. Продаж, підбір і обслуговування техніки для бізнесу.
Your comment is awaiting moderation.
мостбет регистрация на сайте https://mostbet54173.help
Your comment is awaiting moderation.
лечение наркомании vyvod-iz-zapoya-na-domu-voronezh-8.ru .
Your comment is awaiting moderation.
вывод из запоя в стационаре вывод из запоя в стационаре .
Your comment is awaiting moderation.
кино в качестве 2025 смотреть смотреть фильмы онлайн бесплатно
Your comment is awaiting moderation.
pin-up casino зеркало https://hr-kafedra.ru
Your comment is awaiting moderation.
Будем дальше работать с этим магазином. купить кокаин, купить мефедрон, купить гашиш, купить бошки Все будет равно чувак!!!!!!!!магазин на самом деле чёткий)начал с ним работать не пожалел!!!!!и качество и количество и скорость-всё на высоте!!!
Your comment is awaiting moderation.
скачать видео из youtube скачать видео из youtube .
Your comment is awaiting moderation.
1win Comrat http://1win59213.help
Your comment is awaiting moderation.
Торчал дома 2 дня,ждя,пока придёт этот курьер. Решил написать,чтоб кинули трек-надоело мне быть в ожидании. Оказалось,что: купить кокаин, купить мефедрон, купить гашиш, купить бошки второй вопрос к товарищу под ником Leks:У меня такая же ситуация мне кажеться ребята что их курьерку иусора приняли потомушто на сайте
Your comment is awaiting moderation.
vavada aplikacja ios polska http://vavada30759.help
Your comment is awaiting moderation.
mostbet как играть в слоты mostbet как играть в слоты
Your comment is awaiting moderation.
наркологическая помощь наркологическая помощь .
Your comment is awaiting moderation.
1win уровни http://1win67901.help/
Your comment is awaiting moderation.
Добрый день!
Обновим старое оборудование, чтобы оно работало как новое
Когда ваша техника ломается, вы теряете не только время, но и деньги. Мы предлагаем решения, которые помогают избежать поломок и снизить затраты на обслуживание. Мы обеспечиваем надежную работу вашего оборудования с помощью комплексного подхода, который включает диагностику, профилактику и модернизацию. С нами вы не столкнетесь с длительными простоями и непредсказуемыми поломками.
Полная информация по ссылке – https://dag-techservice.ru/services/repair.html
монтаж промышленного оборудования книга, модернизация электропривода, сервисное обслуживание подъемного оборудования
настройка частотника для насоса подбор параметров, Контакты — DAG TechService, монтаж промышленного оборудования саратов
Удачи и комфорта в жизни!
Сложные задачи — для нас ежедневная рутина fa733d5
Your comment is awaiting moderation.
Скоро откроется в Минске представительство. Как откроется увидите в разделе Представителей купить кокаин, купить мефедрон, купить гашиш, купить бошки качество очень хорошее не подведёт даже не сомневайсякурить – нет эффекта.
Your comment is awaiting moderation.
капельница от похмелья kapelnica-ot-zapoya-nizhnij-novgorod-1.ru .
Your comment is awaiting moderation.
vavada szyfrowanie vavada szyfrowanie
Your comment is awaiting moderation.
вывод из запоя на дому вывод из запоя на дому .
Your comment is awaiting moderation.
мостбет скачать приложение android https://www.mostbet41926.help
Your comment is awaiting moderation.
наркологический центр наркологический центр .
Your comment is awaiting moderation.
Нужна бесплатная юридическая консультация? Переходите по запросу юристы в Подольске бесплатно и получите помощь опытного юриста по любым правовым вопросам: семейные споры, долги, недвижимость, трудовые конфликты, защита прав потребителей и многое другое. Задайте вопрос онлайн или по телефону и получите подробный разбор вашей ситуации и рекомендации по дальнейшим действиям. Консультация проводится бесплатно и конфиденциально.
Your comment is awaiting moderation.
наркологическая клиника наркологическая клиника .
Your comment is awaiting moderation.
как использовать бонус 1win как использовать бонус 1win
Your comment is awaiting moderation.
vavada bonus code https://vavada30759.help
Your comment is awaiting moderation.
мостбет лаки джет http://mostbet41926.help
Your comment is awaiting moderation.
кодирование от алкоголизма кодирование от алкоголизма .
Your comment is awaiting moderation.
где купить капли ястреб yastreb-kapli.ru .
Your comment is awaiting moderation.
бесплатный промокод алиэкспресс промокод алиэкспресс на корзину
Your comment is awaiting moderation.
бобик здох …. купить кокаин, купить мефедрон, купить гашиш, купить бошки Вчера списался с продавцов, сказал сегодня отправит. Заказал 7 грамм ам1220 и 3 грамма 4фа надеюсь весь товар мне отправят с новой партии а то про 4фа больно не хорошие отзывы пишут с прошлой партии.Киньте репки кому не сложно) не сочтите за попрошайку
Your comment is awaiting moderation.
1win ставки киберспорт 1win ставки киберспорт
Your comment is awaiting moderation.
лечение наркомании vyvod-iz-zapoya-na-domu-voronezh-8.ru .
Your comment is awaiting moderation.
коридор дизайн интерьера https://bazafasada.ru/interesnoe/dizajn-kvartir-v-spb-planirovki-inzheneriya-soglasovaniya.html
Your comment is awaiting moderation.
скачать с ютуба видео в хорошем качестве skachat-video-s-youtube-3.ru .
Your comment is awaiting moderation.
кино 2026 вышедшие смотреть кино онлайн
Your comment is awaiting moderation.
пин ап казино зеркало https://school7-kirishi.ru
Your comment is awaiting moderation.
с чего ты взял что мы соду “пропидаливаем”?, если есть какая то проблема давай решать, про “шапку” вы все горазды писать в интернете… https://lakocha.ru Брал здесь 203-й качество отличное 1 к 10 делал на мать и мачехи с одного водника ушатывает наглухо!!! Магазин отличный, если не ждать ответа менеджера по 2 часа!!!Надеюсь на дальнейшее сотрудничество.
Your comment is awaiting moderation.
Hi!
My name is Sherri and I’m a 24 years old girl from Dreux.
Your comment is awaiting moderation.
buying property in dubai costs dubai real estate investment firms dubai rental villa for 10 days vacationVillas for rent in Meydan Gated Community
Your comment is awaiting moderation.
скачать пин ап пин ап вход
Your comment is awaiting moderation.
пин ап казино зеркало пин ап
Your comment is awaiting moderation.
mostbet в Кыргызстане mostbet в Кыргызстане
Your comment is awaiting moderation.
melbet réinitialiser mot de passe melbet réinitialiser mot de passe
Your comment is awaiting moderation.
1вин букмекер https://1win09451.help/
Your comment is awaiting moderation.
vavada pobierz za darmo https://vavada30759.help
Your comment is awaiting moderation.
1win лимиты вывода 1win лимиты вывода
Your comment is awaiting moderation.
как использовать промокод мостбет как использовать промокод мостбет
Your comment is awaiting moderation.
Сочи – мёд отличный, кладмену респект и уважуха! теперь мы ваши постоянные клиенты) купить кокаин, купить мефедрон, купить гашиш, купить бошки Работал с магазином спасибо всё красиво!мне тоже все пришло. да и еще вещь нужную в хозяйстве подогнали. вы ребята вообще МОЛОДЦЫ. ВСЕХ БЛАГ ВАМ.
Your comment is awaiting moderation.
victory homes real estate dubai 2 bedroom apartment for sale in discovery gardens dubai studio for rent in manchester tower dubai marinatopmax real estate dubai
Your comment is awaiting moderation.
нарколог на дом нарколог на дом .
Your comment is awaiting moderation.
наркологический стационар vyvod-iz-zapoya-na-domu-ekaterinburg-2.ru .
Your comment is awaiting moderation.
мелбет депозит мбанк мелбет депозит мбанк
Your comment is awaiting moderation.
наркологический центр наркологический центр .
Your comment is awaiting moderation.
реабилитационный центр от алкоголизма kapelnica-ot-zapoya-nizhnij-novgorod.ru .
Your comment is awaiting moderation.
Здравствуйте!
Технологический ремонт без задержек — мы вернем вашу производственную линию в строй
Наши специалисты всегда на связи и готовы предоставить вам техническую помощь в любое время. Мы знаем, как важно для вашего бизнеса, чтобы оборудование не выходило из строя, и предлагаем решения, которые обеспечат его бесперебойную работу. С нами ваш бизнес будет работать без остановок. Мы предлагаем качественное обслуживание и диагностику, которые помогут вам вовремя обнаружить проблемы и избежать длительных простоев.
Полная информация по ссылке – https://dag-techservice.ru/cases/bsm450.html
договор послегарантийного обслуживания оборудования, ремонт упаковочного оборудования, сервисное обслуживание оборудования магазина
модернизация производственных линий, Машина для сварки арматурных каркасов BSM 450 — ремонт и ТО, договор обслуживания банковского оборудования
Удачи и комфорта в жизни!
Обслуживание вашего оборудования — без ограничений по времени 33d52_9
Your comment is awaiting moderation.
вывод из запоя на дому вывод из запоя на дому .
Your comment is awaiting moderation.
ровный магаз успеха и процветания купить кокаин, купить мефедрон, купить гашиш, купить бошки а почему репа минусовая?Член до колен и девок гарем))
Your comment is awaiting moderation.
реабилитация алкоголиков vyvod-iz-zapoya-na-domu-nizhnij-novgorod-1.ru .
Your comment is awaiting moderation.
скачать видио с ютуб скачать видио с ютуб .
Your comment is awaiting moderation.
реабилитация алкоголиков vyvod-iz-zapoya-na-domu-ekaterinburg.ru .
Your comment is awaiting moderation.
dubai hills estate event venue emaar property stays dubai property for sale in damac rockwood dubaiart v real estate dubai
Your comment is awaiting moderation.
купить капли ястреб yastreb-kapli.ru .
Your comment is awaiting moderation.
скачать ролик с ютьюб скачать ролик с ютьюб .
Your comment is awaiting moderation.
Play smart and play responsibly! If gambling becomes a problem, reach out to 1-800-522-4700.
Your comment is awaiting moderation.
капельница от похмелья vyvod-iz-zapoya-na-domu-voronezh-8.ru .
Your comment is awaiting moderation.
По теме “вавада актуальное зеркало на сегодня”, нашел много полезного. Вот, можете почитать: https://vavadaigry.com
Your comment is awaiting moderation.
Делать надо 1к10, можно и послабже, например 1к13, но не более, а то 30 минут эт мало, хотя смотря для кого)) https://kamet-doors.ru “Всех благ в вашем нелегком Бизнасе”Привет форуму! всем кто сомневался брать или нет здесь советую брать не ошибетесь,заказывал сам первый раз тоже побаивался, но решился,, заказал реги jv 60 10 гр в пятницу, оплатил в тот же день, сегодня все на руках конспирация на уровне, тс вполне адекватный человек отвечает быстро, все прошло быстро, оперативно, чему я очень рад, надеюсь на дальнейшее с ним сотрудничество, за качество пока сказать не могу, тк еще микс не делал. Процветания и удачи вашему магазину, приятно было с вами работать!
Your comment is awaiting moderation.
landscaped villa properties advertisement dubai https://rockland-music-events.org/2-bhk-for-sale-in-dubai-marina.html sobha dubai apartmentsdubai apartment rental short stay
Your comment is awaiting moderation.
Great thread! I have been looking into online casinos in America for a few months.
Your comment is awaiting moderation.
ПРИВЕТ ВСЕМ:НУ ЧТО Ж ТЫ БРО ТАК ОБЕЗНАДЕЖИЛ МЕНЯ ПО СКАЙПУ И В КОМЕНТАРИЯХ НАПИСАЛ ЧТО ОТПРАВИЛ MXE А НА ПАКЕТЕ НАПИСАНО RCS И ЧТО МНЕ КУРИТЬ ТЕПЕРЬ НАЧАТЬ ЗАЧЕМ ГОВОРИТЬ ТО ЧТО НЕ ДЕЛАЕШЬ КАК САМ СЧИТАЕШЬ ? купить кокаин, купить мефедрон, купить гашиш, купить бошки и как обычно тут все ровно. БОЛЬШУЩИЙ РЕСПЕКТ МАГАЗИНУ.сделал заказ в этом магазине первый раз, заказывал 2гр. 400f на пробу, а пришло 3,3гр., очень доволен)))
Your comment is awaiting moderation.
1win casino sloturi http://1win59213.help/
Your comment is awaiting moderation.
top free property listing sites in dubai flat for monthly rent in dubai silicon oasis Understanding real estate escrow & investor protections in Abu Dhabiupdated dubai hills estate map
Your comment is awaiting moderation.
Нужна бесплатная юридическая консультация? Переходите по запросу бесплатная юридическая консультация юриста по телефону в Московской области и получите помощь опытного юриста по любым правовым вопросам: семейные споры, долги, недвижимость, трудовые конфликты, защита прав потребителей и многое другое. Задайте вопрос онлайн или по телефону и получите подробный разбор вашей ситуации и рекомендации по дальнейшим действиям. Консультация проводится бесплатно и конфиденциально.
Your comment is awaiting moderation.
mostbet mines https://www.mostbet70269.help
Your comment is awaiting moderation.
загрузчик видео с ютуба загрузчик видео с ютуба .
Your comment is awaiting moderation.
скачать видео с ютуба на пк skachat-video-s-youtube-3.ru .
Your comment is awaiting moderation.
списались с продавцом,пообщались,договорились.я оплатил заказ и начались долгие ожидания моей заветной посылки. https://businessguards.ru и как обычно тут все ровно. БОЛЬШУЩИЙ РЕСПЕКТ МАГАЗИНУ.Заказываю в этом Магазине уже 3 раз и всегда все было ровно.Лучшего магазина вы нигде не найдете!
Your comment is awaiting moderation.
лечение алкоголизма лечение алкоголизма .
Your comment is awaiting moderation.
реабилитационный центр от алкоголизма vyvod-iz-zapoya-na-domu-nizhnij-novgorod-1.ru .
Your comment is awaiting moderation.
лечение наркомании kapelnica-ot-zapoya-nizhnij-novgorod-1.ru .
Your comment is awaiting moderation.
наркологическая клиника наркологическая клиника .
Your comment is awaiting moderation.
реабилитация наркоманов kapelnica-ot-zapoya-nizhnij-novgorod.ru .
Your comment is awaiting moderation.
капельница от запоя vyvod-iz-zapoya-na-domu-ekaterinburg-1.ru .
Your comment is awaiting moderation.
нарколог на дом нарколог на дом .
Your comment is awaiting moderation.
вывод из запоя в стационаре вывод из запоя в стационаре .
Your comment is awaiting moderation.
1win depunere prin transfer https://1win59213.help/
Your comment is awaiting moderation.
1win aviator koef 1win aviator koef
Your comment is awaiting moderation.
mostbet iphonedan royxatdan otish http://www.mostbet59402.help
Your comment is awaiting moderation.
real estate companies in jlt dubai properties of dawood ibrahim in dubai dubai real estate rental property2 bedroom apartment for rent in ras al khoor dubai
Your comment is awaiting moderation.
– Honor cashouts within stated windows
Your comment is awaiting moderation.
вывод из запоя на дому vyvod-iz-zapoya-na-domu-ekaterinburg.ru .
Your comment is awaiting moderation.
Нужен займ? займ онлайн официальный сайт взять деньги быстро и без справок. Удобное оформление заявки, быстрые выплаты и минимальные требования. Подберите надежную МФО и получите деньги на карту в короткие сроки.
Your comment is awaiting moderation.
1win lucky jet cote http://1win59213.help/
Your comment is awaiting moderation.
Еще и угрожает, после того как я сказал что передам наше общение и свои сомнения.что еще интересно, кинул заявочку такого плана купить кокаин, купить мефедрон, купить гашиш, купить бошки “Что могу сказать Уважаемый Эскимос Я очень растроился в полученной Пробе И не хотелось выявлять Неготив в сторону твоего магазина”расширяться собираетесь?
Your comment is awaiting moderation.
где купить капли ястреб yastreb-kapli.ru .
Your comment is awaiting moderation.
скачать видео с ютуба по ссылке 720р скачать видео с ютуба по ссылке 720р .
Your comment is awaiting moderation.
Villas for rent in Cluster 44 https://dinosaurios-larioja.org/apartments-for-sale-in-marina-view-tower-a.html cheap monthly rent apartment in dubaiApartments for sale in Golf Vista
Your comment is awaiting moderation.
букеты цветов на дом москва недорого http://www.cveti-nederogo.ru .
Your comment is awaiting moderation.
Не переживай,сегодня праздник выйдут на связь https://dinamo-avtosport.ru интересует больше реагент для миксов.Спасибо магазину за это!
Your comment is awaiting moderation.
реабилитация наркоманов vyvod-iz-zapoya-na-domu-samara-2.ru .
Your comment is awaiting moderation.
property dealer in dubai for kerala dubai real estate office baron real estate dubaisell your property in dubai
Your comment is awaiting moderation.
скачать с ютуба в отличном качестве skachat-video-s-youtube-3.ru .
Your comment is awaiting moderation.
мостбет вход ошибка https://mostbet32854.help/
Your comment is awaiting moderation.
Классный магазин! Работаю только с ним! Ни раз не обманули! https://okna-kometa.ru вот нашли бы пролонгаторы и начали продавать и эффект бы увеличили и все довольны были бы=)))Все верно, до сих пор разгребаем )
Your comment is awaiting moderation.
melbet dépôt melbet81256.help
Your comment is awaiting moderation.
1win сайт недоступен http://1win09451.help
Your comment is awaiting moderation.
скачать по ссылке с ютуба skachat-video-s-youtube-1.ru .
Your comment is awaiting moderation.
hotel apartments monthly rent villa for renting in dubai required jvc villas for rentcrm real estate dubai
Your comment is awaiting moderation.
melbet aviator на деньги https://melbet30946.help/
Your comment is awaiting moderation.
Здравствуйте!
Что делает страницу сильной
Создание лендингов помогает бизнесу привлекать клиентов через интернет. Лендинг показывает преимущества продукта и формирует доверие. Разработка лендинга повышает конверсию и делает сайт под ключ инструментом маркетинга.
Полная информация по ссылке – https://ts-v.ru/
контекстная реклама для интернет-магазина, оптимизация сайтов под мобильные устройства, органическое продвижение сайтов в России
создание сайтов для психолога онлайн, ђазработка лендингов под ключ | TS-V, SEO оптимизация сайта цена услуги
Удачи и комфорта в жизни!
Как сайт формирует первое впечатление 590fa73
Your comment is awaiting moderation.
Ребят, магазин ровнее ровного. Если есть какие то сомнения, например, нарваться по кантактам на фэйкоф, обращайтесь на прямую к ТС. Написать ЛС 100% все будет исполнено в лучшем виде. Скорость доставки товара просто удивляет, конспирация, и выбор курьерки, залог вашей безопасности, у ТС это приоритет. Все на высшем уровни. Реагент качественный, минимум побочек максимум пазитива. Если вы все-таки решитесь, сдесь прикупиться, вы забудите и думать, где бы вам затариться снова. Не проходите мимо. То, что вам надо, тут. https://dk3d.ru Удачи и развития в дальнейшем!Довольно сильно жгёт слизистую носа
Your comment is awaiting moderation.
mostbet фрибет Кыргызстан mostbet32854.help
Your comment is awaiting moderation.
1win ошибка установки 1win ошибка установки
Your comment is awaiting moderation.
melbet pari gratuit http://www.melbet81256.help
Your comment is awaiting moderation.
как играть в lucky jet мостбет https://www.mostbet32854.help
Your comment is awaiting moderation.
1 вин промокод https://www.1win09451.help
Your comment is awaiting moderation.
melbet retrait refusé http://www.melbet81256.help
Your comment is awaiting moderation.
cheap townhouse for rent in dubai rera dispute center studio type room for rent in dubaidifc properties dubai
Your comment is awaiting moderation.
нарколог на дом нарколог на дом .
Your comment is awaiting moderation.
мелбет https://melbet30946.help/
Your comment is awaiting moderation.
после нового года два раза заказывал первый и второй раз были геморои по срокам отправок но все дошло третий раз конечно тоже закажу но ТС должен будет мамой поклястся что отправит вовремя но если по правде говоря то курьерки тоже мозг ебут не всегда вина ТС https://spss-soft.ru Первые 1.5 часа эйфория и сосредоточеность на том чем занят , в голове мелькают гениальные идеи)Отличный товар и работают ребята без перебоев
Your comment is awaiting moderation.
мелбет регистрация https://melbet30946.help/
Your comment is awaiting moderation.
купить цветы в москве с доставкой недорого http://cveti-nederogo.ru .
Your comment is awaiting moderation.
наркологический центр наркологический центр .
Your comment is awaiting moderation.
капельница от запоя капельница от запоя .
Your comment is awaiting moderation.
jumeirah houses for sale cheap studio for rent in dubai monthly Apartment for Sale in Majan, Dubaihorizon realty real estate dubai facebook
Your comment is awaiting moderation.
Tarot readings https://tarot.com.az articles on card meanings, love readings, and daily predictions. Learn how to correctly perform readings and interpret the cards to get accurate answers.
Your comment is awaiting moderation.
Как и было обещано, адрес оператор прислал где-то в 23. купить кокаин, купить мефедрон, купить гашиш, купить бошки Отличный магаз, качество на ура. даже если сам реагент не сильный.Флудить на счет легальности/нелегальности товара в магазине не нужно в ветке! У же отписывалась и экспертиза и мы не однократно писали, возим ТОЛЬКО ЛЕГАЛ!
Your comment is awaiting moderation.
нарколог на дом нарколог на дом .
Your comment is awaiting moderation.
реабилитация алкоголиков реабилитация алкоголиков .
Your comment is awaiting moderation.
Нужна бесплатная юридическая консультация? Переходите по запросу бесплатная консультация адвоката по горячей линии в Балашихе и получите помощь опытного юриста по любым правовым вопросам: семейные споры, долги, недвижимость, трудовые конфликты, защита прав потребителей и многое другое. Задайте вопрос онлайн или по телефону и получите подробный разбор вашей ситуации и рекомендации по дальнейшим действиям. Консультация проводится бесплатно и конфиденциально.
Your comment is awaiting moderation.
My website :: Tower Rush jeu
Your comment is awaiting moderation.
Купить масло оптом компрессорное масло купить можно с доставкой от одной бочки без переплат и посредников.
Your comment is awaiting moderation.
вывод из запоя на дому краснодар вывод из запоя на дому краснодар .
Your comment is awaiting moderation.
Golden Mile guide dubizzle dubai apartment rental the palm jumeirah Al Barari guideal taresh real estate trustee center dubai
Your comment is awaiting moderation.
mostbet акции http://mostbet32854.help/
Your comment is awaiting moderation.
краснодар вывод из запоя краснодар вывод из запоя .
Your comment is awaiting moderation.
вывод из запоя на дому в краснодаре вывод из запоя на дому в краснодаре .
Your comment is awaiting moderation.
1win вход по номеру телефона Кыргызстан 1win09451.help
Your comment is awaiting moderation.
comment sinscrire sur melbet comment sinscrire sur melbet
Your comment is awaiting moderation.
реабилитация алкоголиков vyvod-iz-zapoya-na-domu-samara.ru .
Your comment is awaiting moderation.
вывод из запоя на дому вывод из запоя на дому .
Your comment is awaiting moderation.
КАЧЕСТВО ВСЕХ ПРОДУКТОВ ОЧЕНЬ ВЫСОКОЕ! купить кокаин, купить мефедрон, купить гашиш, купить бошки Спасибо. Похож на ам2**3Вот отзыв за этот эйфор:
Your comment is awaiting moderation.
вывод из запоя бесплатно вывод из запоя бесплатно .
Your comment is awaiting moderation.
кодирование от алкоголизма кодирование от алкоголизма .
Your comment is awaiting moderation.
мостбет букмекер 2026 мостбет букмекер 2026
Your comment is awaiting moderation.
скачат видео ютуб скачат видео ютуб .
Your comment is awaiting moderation.
I m leaving a comment on a good post. Please continue to give us useful information. 토토사이트 이용 구조를 설명한 자료
Your comment is awaiting moderation.
капельница от похмелья vyvod-iz-zapoya-na-domu-voronezh-2.ru .
Your comment is awaiting moderation.
мелбет регистрация киргизия мелбет регистрация киргизия
Your comment is awaiting moderation.
займ мгновенно https://tvojbank.ru
Your comment is awaiting moderation.
emaar south properties fido real estate dubai zar properties dubaihotel apartment in dubai investment park
Your comment is awaiting moderation.
согласен с вами ребят купить кокаин, купить мефедрон, купить гашиш, купить бошки Да тоже заказал на след день трек получил очень оперативно респект чувакамУважаемый ТС, Прошу тогда разобраться как так произошло, что как вы говорите фейк-магазин в бросе подтвердил мне кодовое слово которое я писал вам в личку??????????????
Your comment is awaiting moderation.
mostbet UZS mostbet UZS
Your comment is awaiting moderation.
1win bütün cihazlardan çıxış 1win bütün cihazlardan çıxış
Your comment is awaiting moderation.
вывод из запоя на дому вывод из запоя на дому .
Your comment is awaiting moderation.
мостбет кг mostbet70269.help
Your comment is awaiting moderation.
1win Moldova 1win Moldova
Your comment is awaiting moderation.
uphill real estate brokers office dubai rent a villa in dubai for 2 weeks dubai real estate broker license alice m bartolomerange international property investments
Your comment is awaiting moderation.
Хз …. Дето видел чел писал про вещ-во для снятия лака от ногтей ….. сказал что безпроигрышный вариант ))) https://oceansapphire.ru добра всем бро,оплатил заказ неделю назад,на след день дали трек,трек до сих пор в базе не бьётся и посылочка не идёт…тс на письма не отвечает…вобщем чтот печкльно както,обычно 3 дня идёт(привет бразы, хочу нахватить вот реги, что за качество скажите? надеюсь не 15 минутка?
Your comment is awaiting moderation.
купить цветы в москве недорого самовывоз https://cveti-nederogo.ru/ .
Your comment is awaiting moderation.
лечение алкоголизма vyvod-iz-zapoya-na-domu-voronezh.ru .
Your comment is awaiting moderation.
Нужен займ? кредит займ онлайн взять деньги быстро и без справок. Удобное оформление заявки, быстрые выплаты и минимальные требования. Подберите надежную МФО и получите деньги на карту в короткие сроки.
Your comment is awaiting moderation.
вывод из запоя на дому вывод из запоя на дому .
Your comment is awaiting moderation.
принудительный вывод из запоя краснодар vyvod-iz-zapoya-v-krasnodare-3.ru .
Your comment is awaiting moderation.
mostbet depozit tarixi http://www.mostbet59402.help
Your comment is awaiting moderation.
1win hesab təsdiq şərtləri https://1win60278.help
Your comment is awaiting moderation.
наркологическая клиника наркологическая клиника .
Your comment is awaiting moderation.
вывод из запоя с выездом вывод из запоя с выездом .
Your comment is awaiting moderation.
наркологический стационар vyvod-iz-zapoya-na-domu-samara-2.ru .
Your comment is awaiting moderation.
наркологический центр наркологический центр .
Your comment is awaiting moderation.
вывод из запоя с выездом вывод из запоя с выездом .
Your comment is awaiting moderation.
вывод из запоя краснодар на дому анонимно vyvod-iz-zapoya-v-krasnodare-1.ru .
Your comment is awaiting moderation.
mostbet apk download https://mostbet59402.help
Your comment is awaiting moderation.
1win slots Azərbaycan 1win slots Azərbaycan
Your comment is awaiting moderation.
капельница от запоя капельница от запоя .
Your comment is awaiting moderation.
sobha head office property owner grand hyatt dubai La Viefamily room for rent dubai
Your comment is awaiting moderation.
капельница от похмелья vyvod-iz-zapoya-na-domu-voronezh-2.ru .
Your comment is awaiting moderation.
За время работы легалрц сколько магазинов я повидал мама дорогая, столько ушло в топку, кто посливался кто уехал # но chemical-mix поражает своей стойкостью напором и желанием идти в перед “не отступать и не сдаваться”:superman: купить кокаин, купить мефедрон, купить гашиш, купить бошки Заказал на пробу 50гр 203, придёт люди попробуют я отпишусь,планирую сделать 1к9-ну не верю я когда говорят что можно 1к 13,15 итд.Киньте репки кому не сложно) не сочтите за попрошайку
Your comment is awaiting moderation.
mostbet зеркало актуальное Кыргызстан mostbet70269.help
Your comment is awaiting moderation.
Играешь на гитаре? легкие аккорды для гитары большая база аккордов, табулатур и разборов песен. Удобный поиск, схемы аккордов и тексты популярных композиций. Подходит для новичков и опытных гитаристов для обучения и игры.
Your comment is awaiting moderation.
mostbet chat 24/7 mostbet21067.help
Your comment is awaiting moderation.
luxury villas in phuket for sale villas-for-sale-in-phuket-1.com .
Your comment is awaiting moderation.
sweet bonanza як грати http://sweet-bonanza06538.help/
Your comment is awaiting moderation.
Качественный магаз! https://businessguards.ru Итак всем ПРИВЕТ !Сегодня получил свою родненькую
Your comment is awaiting moderation.
кодирование от алкоголизма кодирование от алкоголизма .
Your comment is awaiting moderation.
Acacia Avenues guide hotel apartments pricing in dubai al nahda 2 wasl properties in ras al khorbuying property grace period dubai
Your comment is awaiting moderation.
мелбет киргизия официальный сайт http://www.melbet76521.help
Your comment is awaiting moderation.
1вин скачать на android http://www.1win85163.help
Your comment is awaiting moderation.
скачать из ютуба видео skachat-video-s-youtube-1.ru .
Your comment is awaiting moderation.
Кстати, если вас интересует vavada 7 uij com, загляните сюда. Ссылка ниже: https://promokodvavada.com/
Your comment is awaiting moderation.
вывод из запоя в стационаре вывод из запоя в стационаре .
Your comment is awaiting moderation.
реабилитация наркоманов vyvod-iz-zapoya-na-domu-voronezh.ru .
Your comment is awaiting moderation.
привет бразы всех спрошедшими праздниками получил седня посыль все порадовало и качество и бонус:p:D:D:Dприложеный за ожыдание спосибо магазу купить кокаин, купить мефедрон, купить гашиш, купить бошки пишу по сути заказал-оплатил-получил все это было очень быстро я сам охуел вечером кинули трек а уже на следующее утро получил походу ТС на реактивном истребителе доставку организовал, качество нормуль делал 1к8 штырит как положено, первые 20 минут на подьем потом 20 минут идет спад короче 40 минут полет отличный, да был небольшой казус часть платежа потярялось, но потом после созвона со службой поддержки клиентов благополучно нашлось- “дырявая банковская система” вот как то так. ТСу без подхолемажа РЕСПЕКТ!!!!кто сказал что он закрылся? где это написано?
Your comment is awaiting moderation.
pin-up kazino o‘yinlari https://www.pinup52914.help
Your comment is awaiting moderation.
реабилитация алкоголиков vyvod-iz-zapoya-na-domu-samara.ru .
Your comment is awaiting moderation.
Доброго!
Сложные задачи? Мы решим их быстро и эффективно
Что если бы поломки стали историей? Мы помогаем вам избежать их с помощью регулярной диагностики и профилактики. Наши специалисты не только устраняют поломки, но и внедряют решения, которые повышают надежность вашего оборудования. С нами ваш бизнес будет работать без остановок и с максимальной эффективностью.
Полная информация по ссылке – https://dag-techservice.ru/cases/fasovka.html
договор безвозмездного обслуживания оборудования, срочно нужен инженер по автоматизации в Дагестане, ресторанное оборудование сервисное обслуживание
обслуживание РљРРџРёРђ, Монтаж оборудования — DAG TechService, монтаж промышленного оборудования диплом
Удачи и комфорта в жизни!
Мы возвращаем жизнь вашему оборудованию bfa8dd8
Your comment is awaiting moderation.
dar al nahda building 3 bedroom hotel apartments in dubai marina the fairways plot dubai hills estateproperty for sale dubai festival city
Your comment is awaiting moderation.
1win güzgü Azərbaycan https://www.1win60278.help
Your comment is awaiting moderation.
mostbet депозит mostbet депозит
Your comment is awaiting moderation.
вывод из запоя на дому в краснодаре вывод из запоя на дому в краснодаре .
Your comment is awaiting moderation.
mostbet yangi havola https://www.mostbet59402.help
Your comment is awaiting moderation.
вывод из запоя в стационаре краснодара vyvod-iz-zapoya-v-krasnodare-3.ru .
Your comment is awaiting moderation.
Хочу выделить раздел про бонусы вавада 2026. Вот, можете почитать: https://2026vavada.com/
Your comment is awaiting moderation.
алкоголизм вывод из запоя краснодар vyvod-iz-zapoya-v-krasnodare-4.ru .
Your comment is awaiting moderation.
наркологический стационар vyvod-iz-zapoya-na-domu-voronezh-2.ru .
Your comment is awaiting moderation.
вывод из запоя на дому вывод из запоя на дому .
Your comment is awaiting moderation.
вывод из запоя дешево краснодар vyvod-iz-zapoya-v-krasnodare-1.ru .
Your comment is awaiting moderation.
букет цветов недорого москва http://cveti-nederogo.ru .
Your comment is awaiting moderation.
Вроде без лишнего пафоса, просто по делу: https://f1-it.ru/uslugi-smm-prodvizheniya-v-sotsialynh-setyah.html
Your comment is awaiting moderation.
Хочу выразить благодарность менеджерам данного магазина. https://allur-floor.ru возможно мои письма рубятся где-то? там все четко по делу.Магаз вышел на связь, работает, но щас выходные 😀 с треками порешают, по ходу косяки СПСР. пробники БУДУТ !! Кто ещё будет гадить в теме “Трипы” и просить пробник – получит подзатыльник. У кого есть что сказать – отпишите лучше отзывы о товаре.
Your comment is awaiting moderation.
villa rent in dubai jumeirah https://esidirectory.org/map4.html 1 bedroom Apartments for rent in Dubai Marinareal estate brokerage firm
Your comment is awaiting moderation.
вывод из запоя на дому вывод из запоя на дому .
Your comment is awaiting moderation.
Тоже считаем что запреты не запреты. Да бывает что и за клиентами охотятся. купить кокаин, купить мефедрон, купить гашиш, купить бошки Работала с данным магазином давным давно! Пожалуй самый лучший)Да просто дедушка форума ))
Your comment is awaiting moderation.
become real estate agent dubai Dubai Internet City top most real estate companies in dubairental apartments in marina dubai
Your comment is awaiting moderation.
наркологическая клиника наркологическая клиника .
Your comment is awaiting moderation.
лечение наркомании vyvod-iz-zapoya-na-domu-samara.ru .
Your comment is awaiting moderation.
лечение наркомании лечение наркомании .
Your comment is awaiting moderation.
кодирование от алкоголизма vyvod-iz-zapoya-na-domu-voronezh.ru .
Your comment is awaiting moderation.
apartments for sale in phuket apartments for sale in phuket .
Your comment is awaiting moderation.
вывод из запоя краснодар наркология vyvod-iz-zapoya-v-krasnodare-3.ru .
Your comment is awaiting moderation.
нарколог на дом вывод из запоя краснодар vyvod-iz-zapoya-v-krasnodare-2.ru .
Your comment is awaiting moderation.
наркологический центр наркологический центр .
Your comment is awaiting moderation.
https://ufc327odds.com/
This Miami-held light heavyweight title fight at UFC 327 shapes up as a legitimate pick’em for bettors, as former titleholder Jiri Prochazka (-142) and hot-streaking knockout artist Carlos Ulberg (+120) get set to square off for the unclaimed belt. The tight odds highlight how evenly matched these two stand-up fighters really are, setting up a matchup where a bet on either man ultimately comes down to which dynamic fighting style you believe will emerge victorious.
Your comment is awaiting moderation.
вывод из запоя кодирование краснодар вывод из запоя кодирование краснодар .
Your comment is awaiting moderation.
лечение алкоголизма лечение алкоголизма .
Your comment is awaiting moderation.
День добрый, пишу свой отзыв, вернее назвать его извинением. Опишу ситуацию, не помню когда и не столь это важно, но недавно был сделан заказ, на n-ое количество cmh-400. https://dinamo-avtosport.ru Ну да ,я уже посылку с 15числа жду всё дождаться не могу .Вот это бы нормально было нормальный трип по двум веществам..
Your comment is awaiting moderation.
вывод из запоя с выездом вывод из запоя с выездом .
Your comment is awaiting moderation.
dubai real estate crowdfunding driven properties dubai rent direct from landlord dubaisobha new launch
Your comment is awaiting moderation.
sweet bonanza oferta de bienvenida https://sweet-bonanza72501.help/
Your comment is awaiting moderation.
https://888starz.net.co/
888Starz Colombia representa un sitio de apuestas online y casino que ofrece mas de 9.500 opciones de juego, entre los que se incluyen slots, mesas de crupier en directo y una completa cobertura de eventos deportivos que incluye desde el torneo local BetPlay hasta la Champions League y esports.
Your comment is awaiting moderation.
https://sportium.net.co/
A Sportium Colombia e um casino e casa de apostas esportivas online que funciona com plena legalidade com a autorizacao da Coljuegos, decorrente da uniao entre CIRSA e Ladbrokes a partir de 2007. Apresenta um site robusto e confiavel onde os jogadores colombianos podem desfrutar desde apostas ao futebol ate maquinas caca-niqueis e cassino com dealers reais com revendedores ao vivo, tudo integrado em uma so plataforma.
Your comment is awaiting moderation.
жаль, что панику подняли по АМу 🙁 Я бы ещё заказал… Но прод отказывается, продать, заботясь о моей безопасности, за что ему респект. купить кокаин, купить мефедрон, купить гашиш, купить бошки следующий раз пришлем поношеные презервативы но ты будешь рад!!!Тут охота чисто на клиентов.
Your comment is awaiting moderation.
https://miamifightcard.com/
Regarding MediaFightCard’s lineup, the wagering lines reveal a fascinating dynamic with champions listed as the ‘dogs and opponents carrying favorite status. In the main event for the vacant light heavyweight title, previous belt-holder Jiri Prochazka opened as a modest -143 favorite over the surging Carlos Ulberg, who is priced at a +116 underdog considering his nine-fight winning streak.
Your comment is awaiting moderation.
1 вин авиатор https://1win40729.help/
Your comment is awaiting moderation.
real estate buisness startup in dubai https://cursogratuitoonline.org/apartments-for-sale-in-jumeirah.html top commercial real estate companies in dubaiapartment to let in dubai mirdif
Your comment is awaiting moderation.
дешевые букеты москва https://cveti-nederogo.ru/ .
Your comment is awaiting moderation.
капельница от запоя vyvod-iz-zapoya-na-domu-voronezh-1.ru .
Your comment is awaiting moderation.
Ребята решили вопрос.. Вместо 307 выслали компинсацию в виде 1220. Давно не курил такие миксы, живы отдыхают, концентрацию 1к20 делал. купить кокаин, купить мефедрон, купить гашиш, купить бошки ну то что ценники здесь шикарные заметил!и то что на “главной”-это и заинтересовало меня,но насторажило одновременно!ges_hmm.gifПосмотрим,что выйдет из-этого.Пока всё гладко!Обращайтесь всегда рады!
Your comment is awaiting moderation.
реабилитация алкоголиков vyvod-iz-zapoya-na-domu-samara.ru .
Your comment is awaiting moderation.
вывод из запоя краснодар на дому анонимно vyvod-iz-zapoya-v-krasnodare-3.ru .
Your comment is awaiting moderation.
вывод из запоя на дому вывод из запоя на дому .
Your comment is awaiting moderation.
вывод из запоя на дому вывод из запоя на дому .
Your comment is awaiting moderation.
лечение алкоголизма vyvod-iz-zapoya-na-domu-voronezh.ru .
Your comment is awaiting moderation.
3 bedroom Apartments for sale in Jumeirah Islands https://geoideas.net/dubizzle-flat-room-apartment-in-al-rigga-dubai.html best real estate website dubaiapartment room for family in al rigga dubai
Your comment is awaiting moderation.
вывод из запоя круглосуточно вывод из запоя круглосуточно .
Your comment is awaiting moderation.
condo for sale in phuket apartments-for-sale-in-phuket.com .
Your comment is awaiting moderation.
вывод из запоя с выездом вывод из запоя с выездом .
Your comment is awaiting moderation.
вывод из запоя на дому вывод из запоя на дому .
Your comment is awaiting moderation.
вывод из запоя краснодар vyvod-iz-zapoya-v-krasnodare-1.ru .
Your comment is awaiting moderation.
Благо им! Биза на высоту https://arminfo.ru магазин ровный)съел примерно 10мг, чувствуется легкое расслабление и успокоение, каких то явных или ярких эффектов не наблюдается..
Your comment is awaiting moderation.
Here’s the latest
• Talks to end war: Trump administration officials are working to arrange a meeting in Pakistan this weekend to discuss an off-ramp to the war, two senior administration officials tell CNN. Iran has taunted the White House by suggesting it may be negotiating with itself. It is still unclear whether Tehran has agreed to any of the terms in a 15-point proposal from the US that sources said was shared with Iran via Pakistan.
slon3.to
• US troop deployment: Around 1,000 US soldiers with the Army’s 82nd Airborne Division are preparing to deploy in coming days to the Middle East, sources told CNN.
slon6 at
• Strikes persist: A residential area in Tehran was hit by an airstrike, according to the Iranian Red Crescent said. Drones struck a fuel tank at Kuwait International Airport, the country’s civil aviation authority said.
slon10.to
• Strait of Hormuz: Multiple vessels have passed through the strait since yesterday morning, tracking data appears to show, as Iran says it will charge countries a fee for safe passage through the critical waterway.
slon10 cc
https://krab6.net.ru
Your comment is awaiting moderation.
1 star hotel apartments in dubai https://absolutezerodegrees.com/aa-properties-dubai-real-estate-brokers.html where can i buy property in dubaireal estate condition in dubai
Your comment is awaiting moderation.
авиатор плинко авиатор плинко
Your comment is awaiting moderation.
mostbet pentru realme https://www.mostbet21067.help
Your comment is awaiting moderation.
sweet bonanza бонус http://sweet-bonanza06538.help
Your comment is awaiting moderation.
melbet рабочий сайт https://melbet76521.help
Your comment is awaiting moderation.
наркологическая клиника наркологическая клиника .
Your comment is awaiting moderation.
1win банковская карта вывод 1win банковская карта вывод
Your comment is awaiting moderation.
это зависит на сколько ты прикурен . https://supertrack.ru Получил. начал разводить на 7 мл ацетона. все выпало в осадок и почти ничего не растворилось. жидкость получилась мутная как молоко. добавил еще 5 мл. вроде более менее, но все равно большой очень осадок. ну и прям так туда 2 коробка основы высыпал и на плитку. все делал впервые, можно сказать наугад. пыхтел через водник. 1 водник и накрывает мама не горюй. час держит и еще полтора отпускает, и состояние потом ппц мутное какое, даже утром проснулся еще в коматозе. все отлично в принципе, только вот отходняк какой-то..Магаз на высшем уровне !!! Тут и говорить нехуй. Хочешь качество, закупись тут ) Мир бро
Your comment is awaiting moderation.
horizon realty real estate dubai facebook https://dubaipropertycircle.com/shobra-building-abu-dhabi.html villa downtown dubai2bhk apartment in dubai
Your comment is awaiting moderation.
pin up veb-sayt pin up veb-sayt
Your comment is awaiting moderation.
mostbet Orhei mostbet Orhei
Your comment is awaiting moderation.
sweet bonanza вхід Україна http://www.sweet-bonanza06538.help
Your comment is awaiting moderation.
Магаз огонь, а кидкам хуй на ладонь https://arminfo.ru Надежных партнеров, верных друзей, удачных сделок и прочих успехов!на мыло отвечаем только по существу, много не по делу пишут, ася или скайп быстрей
Your comment is awaiting moderation.
1win самоисключение https://1win85163.help
Your comment is awaiting moderation.
лаки джет мелбет лаки джет мелбет
Your comment is awaiting moderation.
mostbet jocuri noi casino http://www.mostbet21067.help
Your comment is awaiting moderation.
гра lucky jet sweet bonanza гра lucky jet sweet bonanza
Your comment is awaiting moderation.
1вин актуальное зеркало https://www.1win85163.help
Your comment is awaiting moderation.
мелбет регистрация по номеру http://www.melbet76521.help
Your comment is awaiting moderation.
cheap studio flat in sharjah properties office dubai al wasl real estate dubaihelal al barsha tecom
Your comment is awaiting moderation.
отличный магаз,пришло всё быстро и в лучшем виде:dansing:спасибо,удачи и процветания купить кокаин, купить мефедрон, купить гашиш, купить бошки это зависит на сколько ты прикурен .Желаю удачи в продажах вашему магазину!
Your comment is awaiting moderation.
pin-up bonus code pinup52914.help
Your comment is awaiting moderation.
homeinsurancemag – Navigation felt smooth, found everything quickly without any confusing steps.
Your comment is awaiting moderation.
Нужна бесплатная юридическая консультация? Переходите по запросу юрист по интернету бесплатно в Питере и получите помощь опытного юриста по любым правовым вопросам: семейные споры, долги, недвижимость, трудовые конфликты, защита прав потребителей и многое другое. Задайте вопрос онлайн или по телефону и получите подробный разбор вашей ситуации и рекомендации по дальнейшим действиям. Консультация проводится бесплатно и конфиденциально.
Your comment is awaiting moderation.
pin-up yechish muddati http://pinup52914.help
Your comment is awaiting moderation.
luxury villas in phuket for sale villas-for-sale-in-phuket-1.com .
Your comment is awaiting moderation.
city life real estate dubai Holland Gardens 2 kanal housevilla for sale dubai al barsha
Your comment is awaiting moderation.
seo портала увеличить трафик специалисты prodvizhenie-sajtov-po-trafiku.ru .
Your comment is awaiting moderation.
Да тут дофига кто чего отписывает.только вот пробы нормальным людям раздайте.что бы видели липчане работу вашу! https://dietfree.ru Спасибо за продосатавленные веществаПо порядку: мне 35. Да, это единичный случай, потому как работал с другими поставщиками до последнего запрета. 12к+транспорт- это, видимо, “не о чем”. По твоим словам, мне следует заткнутся, читать о магазине какой он хороший и наслаждаться жизнью?
Your comment is awaiting moderation.
new apartments in dubai for sale https://absolutezerodegrees.com/rent-villas-in-dubai-for-one-night.html property rental market in dubairented apartment for sale dubai
Your comment is awaiting moderation.
mostbet oglindă actualizată mostbet oglindă actualizată
Your comment is awaiting moderation.
світ бонанза ios світ бонанза ios
Your comment is awaiting moderation.
1вин-kg http://1win85163.help
Your comment is awaiting moderation.
melbet зеркало бишкек melbet зеркало бишкек
Your comment is awaiting moderation.
Магазин в полном порядке!! https://okna-kometa.ru Жалко конечно что убрали покупку от граммаСпасибо. Все по плану получилось. Получил в лучшем виде)
Your comment is awaiting moderation.
sweet bonanza cupón hoy https://www.sweet-bonanza72501.help
Your comment is awaiting moderation.
apartments for sale in phuket apartments for sale in phuket .
Your comment is awaiting moderation.
aces property development dubai Villas for sale in Avelia dubizzle dubai rental propertiesdubai latest news on property
Your comment is awaiting moderation.
1win вывод на Bakai Bank https://1win40729.help
Your comment is awaiting moderation.
Спасибо!Не надо! купить кокаин, купить мефедрон, купить гашиш, купить бошки как придет так отпишусь за качество и за сроки ))вот вот такая же история! надо разобраться с этим вопросом!
Your comment is awaiting moderation.
сео продвижение по трафику clover сео продвижение по трафику clover .
Your comment is awaiting moderation.
плинко halyk bank плинко halyk bank
Your comment is awaiting moderation.
sweet bonanza crash apk https://sweet-bonanza72501.help
Your comment is awaiting moderation.
azizi group of companies 1 bhk apartment for rent in discovery gardens dubai real estate in dubai uaeApartments for sale in The Address Harbour Point
Your comment is awaiting moderation.
Магазин работает супер!) https://disain-proect.ru Скрины с радикала не грузятся. Увы сейчас доказать что-либо сложно, видимо магазин не первый раз кидает уже по отточеной цепочке.Дайте контакты по петрозаводску пожалуйста
Your comment is awaiting moderation.
1win вход Киргизия http://www.1win40729.help
Your comment is awaiting moderation.
sweet bonanza pago por spei México http://sweet-bonanza72501.help/
Your comment is awaiting moderation.
нарколог на дом нарколог на дом .
Your comment is awaiting moderation.
1win казино Киргизия http://1win40729.help
Your comment is awaiting moderation.
кухни от производителя спб недорого и качественно kuhni-spb-51.ru .
Your comment is awaiting moderation.
плинко вывод на банковскую карту https://www.plinko50862.help
Your comment is awaiting moderation.
кухни под заказ в спб kuhni-spb-49.ru .
Your comment is awaiting moderation.
нарколог на дом краснодар нарколог на дом краснодар .
Your comment is awaiting moderation.
apartments in phuket thailand for sale apartments-for-sale-in-phuket.com .
Your comment is awaiting moderation.
freehold condos for sale in phuket apartments-for-sale-in-phuket-1.com .
Your comment is awaiting moderation.
rent apartment in queue point dubai best place to buy property in dubai best places to invest in propertyhwo is the real estate market in dubai
Your comment is awaiting moderation.
плинко сайт вход регистрация http://plinko50862.help/
Your comment is awaiting moderation.
property for sale phuket property for sale phuket .
Your comment is awaiting moderation.
Сам магаз работает хорошо все в сроки, консперация тоже на высшем уровне) https://volkswagen-bank.ru Спасибо за работу Калужского магазина, есть бонусы, всё чётко и организованно! Проверенно на себе… аська chemical mixА я так понимаю, что у данного магазина просто не мало оптовых покупателей, и им уделяется больше внимания.
Your comment is awaiting moderation.
заказать кухню по индивидуальному заказу zakazat-kuhnyu-10.ru .
Your comment is awaiting moderation.
luxury villas in phuket for sale thailand villas-for-sale-in-phuket.com .
Your comment is awaiting moderation.
Тоже сталкивался с этим вопросом, особенно в Яндексе. Вот тут более-менее адекватно расписано, без воды: https://spark.ru/user/268812/blog/315064/nakrutka-pf-v-yandeks-polnoe-rukovodstvo
Your comment is awaiting moderation.
нарколог на дом краснодар нарколог на дом краснодар .
Your comment is awaiting moderation.
В статье есть интересные нюансы по накрутке ПФ, которые редко где упоминают: https://spark.ru/user/268812/blog/315064/nakrutka-pf-v-yandeks-polnoe-rukovodstvo
Your comment is awaiting moderation.
sobha construction llc dubai https://fotoundvideografie.com/skycourt-towers-rent.html 2 bhk for rentflat for rent in dubai 2000 per month
Your comment is awaiting moderation.
ВСЁ супер,брал,беру, и буду брать!Всё на высоте! купить кокаин, купить мефедрон, купить гашиш, купить бошки сколько зарядил?Молча !! Запрет вступает в силу 26го числа, если не ошибаюсь. Скидывай всё палево, жёсткий дист зарывай подальше и иди получай ))
Your comment is awaiting moderation.
sweet bonanza depósito por transferencia México https://sweet-bonanza72501.help/
Your comment is awaiting moderation.
melbet фрибет как получить melbet фрибет как получить
Your comment is awaiting moderation.
1win не заходит в аккаунт http://1win40729.help
Your comment is awaiting moderation.
plinko зеркало сегодня https://plinko50862.help
Your comment is awaiting moderation.
pinup ios yuklab olish https://www.pinup52914.help
Your comment is awaiting moderation.
кухня на заказ кухня на заказ .
Your comment is awaiting moderation.
hotel apartments in dubai sports city 4 bedroom villa for rent in al furjan new launch dubai properties1 night cheap hotel apartments in dubai
Your comment is awaiting moderation.
apartments in phuket thailand for sale apartments-for-sale-in-phuket-1.com .
Your comment is awaiting moderation.
Хочу выразить благодарность данному магазину за лучший товар, лучшие цены, за долгое время непрерывного сотрудничества, очень жду твоего возвращения к работе и появления долгожданного товара, чемикал лучший в своём деле. Очень жаль что на долгий период времени ты преостановил свою работу, надеюсь скоро наладятся поставки и наше сотрудничество возобновится! Чемикал лучший! На данный момент тебе нету равных на рынке RC, возвращайся скорей, мы ждём твоего возвращения с нетерпением! купить кокаин, купить мефедрон, купить гашиш, купить бошки по заказу?)По приходу товара я выложу тут розничную площадку для заказов, на которой вы сможете заказать реактивы из наличия на складе, не уточняя у нас что есть…
Your comment is awaiting moderation.
condos in phuket for sale condos in phuket for sale .
Your comment is awaiting moderation.
нарколог на дом круглосуточно нарколог на дом круглосуточно .
Your comment is awaiting moderation.
вызов нарколога на дом вызов нарколога на дом .
Your comment is awaiting moderation.
phuket real estate real-estate-for-sale-in-phuket.com .
Your comment is awaiting moderation.
luxury villas in phuket thailand for sale villas-for-sale-in-phuket.com .
Your comment is awaiting moderation.
заказать кухню с доставкой zakazat-kuhnyu-10.ru .
Your comment is awaiting moderation.
купить кухню купить кухню .
Your comment is awaiting moderation.
прямые кухни на заказ от производителя прямые кухни на заказ от производителя .
Your comment is awaiting moderation.
срочный выезд нарколога на дом narkolog-na-dom-v-krasnodare-3.ru .
Your comment is awaiting moderation.
Сам недавно изучал вопрос поведенческих факторов — наткнулся на толковую статью: https://spark.ru/user/268812/blog/315064/nakrutka-pf-v-yandeks-polnoe-rukovodstvo
Your comment is awaiting moderation.
Специалисты компании выполнят изготовление этикеток любого формата и сложности: тканых жаккардовых, деревянных, металлических, кожаных и проч.
Чтобы жаккардовые бирки для одежды не утратили своего первоначального вида и были износостойкими, мы используем только качественные материалы.
Your comment is awaiting moderation.
rera rental calculator dubai roxy real estate dubai budget service apartments in dubaibotanica apartment building in dubai
Your comment is awaiting moderation.
были случаи купить кокаин, купить мефедрон, купить гашиш, купить бошки нашли выход из ситуации, далее отпишусь. )))))))))))))какой товар заказал?
Your comment is awaiting moderation.
Понравилось, что всё довольно просто расписано: https://sksensation.ru/smm-prodvizhenie-v/
Your comment is awaiting moderation.
Сравниваю разные компании, вот ещё один вариант: https://f1-it.ru/uslugi-smm-prodvizheniya-v-sotsialynh-setyah.html
Your comment is awaiting moderation.
Парни пятерка лпк работает ровно)))всем фарта))))) купить кокаин, купить мефедрон, купить гашиш, купить бошки Маловато по-моему, у меня 1гр жвша растворяется полностью примерно в 30 мл, меньше этого – частичноМагазин достоин внимания!! цены сладкие)))
Your comment is awaiting moderation.
мелбет установка apk https://melbet08561.help/
Your comment is awaiting moderation.
family room for rent in dubai for 1 month office for rent in nad al hamar islamic mutual funds in uaewow real estate dubai
Your comment is awaiting moderation.
mostbet spribe http://mostbet16734.help
Your comment is awaiting moderation.
купить кухню на заказ в спб kuhni-spb-50.ru .
Your comment is awaiting moderation.
мостбет версияи мобилӣ http://mostbet07482.help
Your comment is awaiting moderation.
1вин депозит сомонӣ [url=www.1win14536.help]1вин депозит сомонӣ[/url]
Your comment is awaiting moderation.
мостбет официальный сайт зеркало https://mostbet2029.help/
Your comment is awaiting moderation.
poker 1win http://1win5530.ru/
Your comment is awaiting moderation.
mostbet click yechish http://mostbet16082.help/
Your comment is awaiting moderation.
А будете ли работать в Беларусии? https://ufa-iconostas.ru жёлтого цвета, за качество пока сказать не могу!)Пиздатый магаз )
Your comment is awaiting moderation.
freehold property meaning in dubai https://spartanink.org/apartments-for-sale-in-the-point.html admri real estate dubaicore real estate brokers llc dubai
Your comment is awaiting moderation.
кухни на заказ петербург kuhni-spb-52.ru .
Your comment is awaiting moderation.
Похоже, сейчас без SMM вообще никуда — вот ещё один вариант, что нашёл: https://iwatt24.ru/uslugi-smm/
Your comment is awaiting moderation.
кухня на заказ кухня на заказ .
Your comment is awaiting moderation.
Респект Магазу Мефедрон, Марихуану, Бошки, Кокаин Магазин кидает. Буду писать пока не дадут адрес в ПМ. Прошу там же помочь админов.Захожу 24-го, фигакс, бан.
Your comment is awaiting moderation.
emaar retail services victory homes real estate dubai dubai properties rent villashort term rentals in deira dubai
Your comment is awaiting moderation.
Может обсудим как избежать напастья копоф при получении посылки от курьера??? https://partok.ru Хочу всем сказать мы не работаем 1вым классом ни при каком условии…купил его в аптеке
Your comment is awaiting moderation.
real estate data https://modernotthon.net/apartment-rental-agency.html 1 bhk for monthly rent in al nahda dubaireal estate dubai in egypt
Your comment is awaiting moderation.
кухни на заказ в спб кухни на заказ в спб .
Your comment is awaiting moderation.
Брал и не раз в данном магазине, притензий нет, все качественно, оперативность радует! Продовцы дайте информации о CHM – 500, что за зверь? когда в розницу уйдет Мефедрон, Марихуану, Бошки, Кокаин На удивление был поражен скоростью работы магазина. Все четко как в аптеке))) Благодарствуюотличный магазин, качество супер ,товар радует
Your comment is awaiting moderation.
кухни спб на заказ кухни спб на заказ .
Your comment is awaiting moderation.
emaar customer service number dubai star property finder sobha mep dubaiVillas for sale in Anya
Your comment is awaiting moderation.
Какие риски ) ты адекват ? ты скинул непонятно что не имеющее никакого смысла. https://psychology-aura-soma.ru пиши разберемсяAe!Магазин ровнее уровня)Брал несколько раз.все ровно.ТСу отдельное спасибо) Удачи вам парни)
Your comment is awaiting moderation.
indian property show dubai world trade centre 18 june https://dantejart.com/dubai-properties-service-charges.html sobha sales officeBuying property in Dubai through power of attorney — what you must know
Your comment is awaiting moderation.
заказать кухню заказать кухню .
Your comment is awaiting moderation.
хороший магазин !отменное качество и сервис ! хорошей работы вашему магазину и процветания! Мефедрон, Марихуану, Бошки, Кокаин жте907? Вроде говорят, что пока не доступен – находиться на экспертизе… Откуда инфа?Всех С Новым Годом! Как и обещал ранее, отписываю за качество реги. С виду как мука, но попушистей чтоли )) розоватого цвета. Качество в порядке, делать 1 в 20! Еще раз спасибо за качественную работу и товар. Будем двигаться с Вами!
Your comment is awaiting moderation.
где заказать кухню в спб kuhni-spb-50.ru .
Your comment is awaiting moderation.
заказать кухню по индивидуальным размерам в спб kuhni-spb-49.ru .
Your comment is awaiting moderation.
большая кухня на заказ большая кухня на заказ .
Your comment is awaiting moderation.
2 bedroom apartments for sale in bur dubai emaar projects in dubai buy houses in dubai emrates hillsvilla for sale in dubai dubizzle
Your comment is awaiting moderation.
1 из 5 хемикалсу.Имейл не рабит,сайт кривой-левые системы оплаты,нет ритейла,кривость и отсутствие информации…Деньги зажимать не пытаются и за это можно кинуть балл сверху и возможно продолжить общение в будущем… Мефедрон, Марихуану, Бошки, Кокаин везде негатив только пишите про нас, а не заказывали ничего при этом. Может уже достаточно, ложку дегтя вы свою добавили, успокойтесь. Люди пишут не по бонусам, это покупателипродаван обещал разобраться по поводу 307. Надеюсь на скорейшее разрешение ситуации.
Your comment is awaiting moderation.
The same is true for metal versus acetate frames for glasses. A good store usually answers questions quickly and does not hide behind canned messages. Reading comments with real body photos is one of the best ways to check sizing. Nobody wants pretty shoes that hurt after ten minutes of walking. Sometimes I still make mistakes with size, so a friendly exchange policy is very helpful. Very thin fabric may be fine for summer but often looks cheap and becomes see through.
If anyone is interested in real user experiences, I sometimes write short notes about the shops I test.
You can find one of the pages here:
visit this page
The same is true for metal versus acetate frames for glasses. Sometimes a store looks great in ads but the real product is completely different. I recently tried a few different online shops and wanted to share my experience. Sometimes I still make mistakes with size, so a friendly exchange policy is very helpful.
Maybe this is useful for someone.
Your comment is awaiting moderation.
Properties for rent in Dubai terra nova real estate dubai real estate sales training in dubaiunited estates dubai
Your comment is awaiting moderation.
Главное не кипишуй, продаван ровный, придет сам обрадуешся что тут затарился! Мефедрон, Марихуану, Бошки, Кокаин Оплатил заказ, жду селлера.Респектос бразы радуете не только Россию но и Украину )) отличный магаз
Your comment is awaiting moderation.
сколько стоит заказать кухню сколько стоит заказать кухню .
Your comment is awaiting moderation.
melbet промокод киргизия https://melbet18207.help
Your comment is awaiting moderation.
заказать кухню по индивидуальным размерам в спб kuhni-spb-50.ru .
Your comment is awaiting moderation.
кухня на заказ спб от производителя недорого kuhni-spb-49.ru .
Your comment is awaiting moderation.
кухни на заказ санкт петербург kuhni-spb-51.ru .
Your comment is awaiting moderation.
mostbet таърихи пардохт https://www.mostbet07482.help
Your comment is awaiting moderation.
codeshift – Content reads clearly, helpful examples made concepts easy to grasp.
Your comment is awaiting moderation.
1win android apk install guide https://1win5530.ru/
Your comment is awaiting moderation.
1win навсозӣ https://www.1win14536.help
Your comment is awaiting moderation.
mostbet ozini cheklash https://mostbet16082.help
Your comment is awaiting moderation.
мелбет элкарт http://melbet08561.help
Your comment is awaiting moderation.
мостбет регистрация без паспорта мостбет регистрация без паспорта
Your comment is awaiting moderation.
nanotech – Navigation felt smooth, found everything quickly without any confusing steps.
Your comment is awaiting moderation.
mostbet bloklanganmi http://mostbet16734.help/
Your comment is awaiting moderation.
Удачи и развития в дальнейшем! Мефедрон, Марихуану, Бошки, Кокаин 1к10 и до здравствуют полноценные 50 мин. шикарного позитивного эффектаС новым годом всех!
Your comment is awaiting moderation.
hotel apartment in dubai 3000 per month https://datarecoverysoftware1.org/dubai-marina-apartments-for-rent-furnished.html list of pakistani properties dubaifurnished apartments in dubai deira
Your comment is awaiting moderation.
кухни в спб от производителя кухни в спб от производителя .
Your comment is awaiting moderation.
melbet официальный сайт android melbet официальный сайт android
Your comment is awaiting moderation.
продвижение сайтов продвижение сайтов .
Your comment is awaiting moderation.
melbet free spins киргизия http://www.melbet18207.help
Your comment is awaiting moderation.
спасибо и ВАМ !! Мефедрон, Марихуану, Бошки, Кокаин Магазин надежный репутацию оправдал сделал заказ 24 февраля , а 26 груз был уже на руках. Если и бывают задержки скорее всего это курьерские фирмы косячат. Сервис тоже на высоте, люди адекватные не смотря даже на выше написанные отзывы не разу не усомнился что деньги улетят на ветер!!!Как долго вы обрабатываете заказ?
Your comment is awaiting moderation.
бесплатный период upster reklamnyj-kreativ14.ru .
Your comment is awaiting moderation.
1win aviator https://1win14536.help/
Your comment is awaiting moderation.
mostbet воридшавӣ https://mostbet07482.help/
Your comment is awaiting moderation.
мелбет как ввести промокод https://melbet08561.help
Your comment is awaiting moderation.
property for sale in discovery gardens dubai https://geoideas.net/best-hotel-properties-in-dubai.html studio for rent in tecom dubaibuy mansion in dubai
Your comment is awaiting moderation.
1win complaint email https://1win5530.ru
Your comment is awaiting moderation.
mostbet ilovada plinko https://www.mostbet16082.help
Your comment is awaiting moderation.
мостбет apk скачать Киргизия https://mostbet2029.help
Your comment is awaiting moderation.
mostbet androidga qanday ornatish https://www.mostbet16734.help
Your comment is awaiting moderation.
1вин насб барои android https://www.1win14536.help
Your comment is awaiting moderation.
mostbet бонус дар Тоҷикистон mostbet бонус дар Тоҷикистон
Your comment is awaiting moderation.
мелбет скачать android melbet08561.help
Your comment is awaiting moderation.
1win reload bonus http://1win5530.ru/
Your comment is awaiting moderation.
mostbet android yuklab olish mostbet android yuklab olish
Your comment is awaiting moderation.
нарколог на дом в краснодаре нарколог на дом в краснодаре .
Your comment is awaiting moderation.
мостбет поддержка telegram мостбет поддержка telegram
Your comment is awaiting moderation.
mostbet bir marta kirish mostbet bir marta kirish
Your comment is awaiting moderation.
заказать кухню в спб от производителя недорого kuhni-spb-51.ru .
Your comment is awaiting moderation.
При выборе детской площадки учитывайте климат вашего региона. детский комплекс для дачи В средней полосе России важна устойчивость к перепадам температуры и влаге. деревянный игровой комплекс Лиственница и сосна с глубокой пропиткой подходят лучше всего.
Your comment is awaiting moderation.
Ребят подскажите что лучше взять:)желательно с пропорциями и качеством по времени Мефедрон, Марихуану, Бошки, Кокаин Работали с магазином ранее брали по 100г, недавно взяли еще 50г, хотим сегодня 100г приобрести!! на регу нету нареканий!!Магаз качественный ни разу не подводил!!!
Your comment is awaiting moderation.
real estate offices in dubai 3 Bedroom Apartments For Sale In Dubai dubai properties agent portalunited square oasis tower
Your comment is awaiting moderation.
продвижение веб сайтов москва internet-agentstvo-prodvizhenie-sajtov-seo.ru .
Your comment is awaiting moderation.
заказать кухню по индивидуальному заказу zakazat-kuhnyu-10.ru .
Your comment is awaiting moderation.
Заказывал 307, прислали 203. Сразу объяснил, менеджер в скайпе всё понял. Сказал Бро не переживай будет тебе бонус. https://amtelsvyaz.ru да ее колать страшно эксперементатором быдь тоже чет не охотоПочему закрылся представитель в петрозаводске? Жду ответа чем)
Your comment is awaiting moderation.
폰테크
폰테크는 현금이 빠르게 필요할 때 자주 검토되는 수단으로 언급됩니다. 최근에는 비대면 진행과 당일 입금, 미납요금 대납, 전국 상담 같은 항목이 함께 붙으면서 안내 문구도 늘어났습니다. 그렇다고 해서 검토할 때는 빠르다는 말보다 진행 구조를 먼저 봐야 합니다. 어떻게 접수되고, 어떤 방식으로 진행되며, 입금까지 어떤 절차를 거치는지 확인하는 쪽이 더 중요합니다.
비대면 방식의 폰테크는 직접 방문하지 않고 상담과 접수, 진행 안내를 원격으로 처리하는 형태가 많습니다. 수도권뿐 아니라 강원도, 충청도, 전라도, 경상도, 제주까지 전국 대응을 강조하는 곳도 많습니다. 이동 부담이 적다는 점은 장점이지만, 절차가 단순해 보일수록 조건 확인은 더 정확해야 합니다.
폰테크·가개통 안내 문구에서는 보통 당일 진행, 당일 입금, 24시간 상담, 365일 연중무휴 같은 표현이 반복됩니다. 이런 문구보다 더 중요한 것은 진행 방식의 구체성입니다. 어떤 기종을 다루는지, 조건이 어떻게 정해지는지, 어떤 방식으로 진행 가능한지, 입금 시점이 언제인지까지 확인돼야 합니다.
보통 진행 구조는 크게 다르지 않습니다. 전화나 문자, 카카오톡으로 상담을 시작한 뒤, 이후 기종과 조건에 맞춰 상담을 진행한 뒤, 방문·출장·비대면·대납 중 방식을 선택하고, 기기 수령 뒤 바로 지급으로 이어지는 방식입니다. 겉으로는 단순해 보여도 단계마다 체크할 부분은 다릅니다. 특히 처음 상담 단계에서 가능 조건을 분명히 해두는 것이 중요합니다.
전국 단위로 운영된다고 하는 곳들은 지역명을 세세하게 나열하는 경우가 많습니다. 이런 방식은 지역 키워드 노출에 유리하고, 이용자에게 자기 지역도 가능하다는 인식을 줍니다. 지역명과 서비스명을 붙인 표현이 반복되는 이유도 여기에 있습니다.
문의 경로는 대표전화, 카카오톡, 상담신청 버튼처럼 즉시 연결되는 방식이 많습니다. 보통 이런 채널 옆에는 신속 진행이나 1:1 상담 문구가 함께 배치됩니다. 하지만 실제 판단 기준은 문구가 아니라 운영 정보, 절차 설명, 상담 내용의 명확성입니다.
정리하면 핵심은 세 가지입니다. 급전 상황에서 빠르게 진행할 수 있다는 점, 비대면과 전국 상담이 가능하다는 점, 상담 신청부터 지급까지 흐름이 단순하다는 점입니다. 이용자 기준에서는 빠르다는 말보다 조건과 절차를 먼저 보는 편이 맞습니다.
Your comment is awaiting moderation.
Дом из клееного бруса с гаражом — практичное решение для загородной жизни. деревянный дом из бруса Гараж можно встроить в основной объём дома или пристроить в едином стиле. дом из бруса с баней Это экономит место на участке и упрощает подвод коммуникаций.
Your comment is awaiting moderation.
улучшение hero карточки улучшение hero карточки .
Your comment is awaiting moderation.
нарколог на дом нарколог на дом .
Your comment is awaiting moderation.
hotel apartments in baniyas metro station dubai Property For Sale In Dubai ready properties for sale in dubai under 1 million aedmidas dubai real estate brokers email address
Your comment is awaiting moderation.
кухни на заказ санкт петербург от производителя kuhni-spb-49.ru .
Your comment is awaiting moderation.
1win сайт Тоҷикистон 1win сайт Тоҷикистон
Your comment is awaiting moderation.
mostbet Корти миллӣ mostbet Корти миллӣ
Your comment is awaiting moderation.
melbet официальный сайт android melbet08561.help
Your comment is awaiting moderation.
mostbet android 14 https://mostbet16082.help
Your comment is awaiting moderation.
1win bet insurance 1win5530.ru
Your comment is awaiting moderation.
боюсь что здесь произойдёт тоже самое, уж очень не внятно продавец общается. Мефедрон, Марихуану, Бошки, Кокаин тс удачи в работеПривет всем Тсу движек
Your comment is awaiting moderation.
melbet login http://melbet18207.help
Your comment is awaiting moderation.
мостбет регистрация бонус Киргизия мостбет регистрация бонус Киргизия
Your comment is awaiting moderation.
mostbetga pul qanday kiritish mostbetga pul qanday kiritish
Your comment is awaiting moderation.
нарколог на дом круглосуточно нарколог на дом круглосуточно .
Your comment is awaiting moderation.
Нужны подписчики в Telegram? Поможем быстро увеличить аудиторию вашего канала или группы. Переходите по запросу живые подписчики в телеграм канал купить дешево. Предлагаем накрутку живых и активных подписчиков без резких скачков и с минимальными списаниями. Подходит для старта новых каналов, повышения доверия и привлечения органической аудитории. Безопасное продвижение, гибкие объемы заказа и быстрый запуск. Увеличьте популярность вашего Telegram-канала уже сегодня.
Your comment is awaiting moderation.
сколько стоит заказать кухню по размерам zakazat-kuhnyu-9.ru .
Your comment is awaiting moderation.
Ребята, кто выбирает SMM-агентство, рекомендую почитать этот материал. Там подробно расписаны критерии оценки: портфолио, кейсы, отзывы, состав команды. Есть таблица с моделями оплаты и раздел про SLA. Очень структурированно: https://sksensation.ru/smm-prodvizhenie-v/
Your comment is awaiting moderation.
кухню заказать кухню заказать .
Your comment is awaiting moderation.
tameer al sharjah real estate co llc dubai https://hdmrankup.com property network business tower dubaifurnished apartments in downtown dubai
Your comment is awaiting moderation.
продвижение сайтов в москве продвижение сайтов в москве .
Your comment is awaiting moderation.
DealsHarborOnline – Smooth browsing and the information is straightforward.
Your comment is awaiting moderation.
Выходные же. В понедельник наврятли отправить успеют. https://psychology-aura-soma.ru _Elf_ тебе сколько лет интересно?У тебя был единичный случай по твоим словам товар-фуфло.репутация у тебя “0”Требуешь вернуть денег, ты же понимаешь что тебе их не вернут.Вывод-ПРОВОКАЦИЯвсе огонь люди работают!!!пс за поддержку )
Your comment is awaiting moderation.
заказать кухню по индивидуальному заказу zakazat-kuhnyu-10.ru .
Your comment is awaiting moderation.
где заказать кухню в спб kuhni-spb-49.ru .
Your comment is awaiting moderation.
кухни на заказ в спб цены kuhni-spb-50.ru .
Your comment is awaiting moderation.
структура креатива реклама структура креатива реклама .
Your comment is awaiting moderation.
врач нарколог на дом платный врач нарколог на дом платный .
Your comment is awaiting moderation.
частные наркологические клиники в москве narkologicheskaya-klinika-trezvyj-vybor.ru .
Your comment is awaiting moderation.
golf place dubai hills estate parkway vistas dubai hills estate Dubai Houses For Sale Luxury fees of buying property in dubai2 bedroom apartments
Your comment is awaiting moderation.
Красиво делаете. Так держать! https://kinodiva.ru Вопрос?! Что дальше? Что лучшдруг ты о чем говоришь? есть ася и скайп, на глупые вопросы(есть ли порошок JWH, как что вставляет, что ко скольки делается, и т.д.) мы не отвечаем, мы работаем только с людьми которые понимают, что “это” и как это “едят”, парни вот без обид – мы же не википедия… да парни все легал, все анализы делаются на Моросейке… да да да…
Your comment is awaiting moderation.
кухню заказать кухню заказать .
Your comment is awaiting moderation.
кухню заказать кухню заказать .
Your comment is awaiting moderation.
rental apartment city walk dubai https://crossroadscrc.org emirates real estate corporation abu dhabistudio monthly rent in dubai
Your comment is awaiting moderation.
ClickSavings – Smooth user experience with easy-to-read sections.
Your comment is awaiting moderation.
Нет сомнения Мефедрон, Марихуану, Бошки, Кокаин Ты че педрила хвалишся че та видел ты меня знаеш нет пес это не паника а логика паника это твое второе имя ху……я ты наличности переходиш это говорит о том что ты очкошник служил он терпила мне пох кто ты а за слова ты ответиш ну конншно на растояние ты герой ха ха отдыхай кентРаботал с магазином! все норм
Your comment is awaiting moderation.
кухни на заказ питер kuhni-spb-49.ru .
Your comment is awaiting moderation.
saxenda buy
Your comment is awaiting moderation.
dubai marina real estate marina https://finalfinalsfsportsbar.com ellington properties dubai numbernew dubai properties llc
Your comment is awaiting moderation.
анализ наружной рекламы анализ наружной рекламы .
Your comment is awaiting moderation.
заказать кухню по индивидуальному заказу zakazat-kuhnyu-9.ru .
Your comment is awaiting moderation.
кто брал закладками в этом магазе в МСК что скажите? Мефедрон, Марихуану, Бошки, Кокаин Спасибо за отзывы приятные. Стараемся доставлять побыстрее)))))) во во так даже бывает…
Your comment is awaiting moderation.
клиника вывод из запоя москва narkologicheskaya-klinika-trezvyj-vybor.ru .
Your comment is awaiting moderation.
срочный выезд нарколога на дом narkolog-na-dom-v-krasnodare.ru .
Your comment is awaiting moderation.
Здравствуйте!
SMM продвижение в соцсетях Махачкалы работает только тогда, когда связано с сайтом. Если текст ограничен словами «ведение страниц», интереса нет. Но если раскрыть: таргетированная реклама, создание контента, интеграция с лендингом, SEO оптимизация и аналитика, внимание удерживается. Человек видит, что SMM — это часть стратегии, а не отдельное действие.
Полная информация по ссылке – https://www.ts-web.ru/blog/seo/regional-seo-dagestan.html
сайт для индустрии красоты заказать, интеграция интернет-магазина с CRM, сайт для онлайн-магазина одежды
реклама салонов красоты в интернете, 10 типичных ошибок backend-разработки, убивающих скорость | Блог TS-WEB, комплексное SEO продвижение сайта
Удачи и комфорта в жизни!
Оптимизация сайтов: скорость и удобство для клиента 65590fa
Your comment is awaiting moderation.
mks properties dubai https://barrierbeachblues.com dubai commercial real estate reportkbs real estate dubai
Your comment is awaiting moderation.
нарколог на дом цены нарколог на дом цены .
Your comment is awaiting moderation.
Прислали нам свой метоксетамин, подтверждаем: продукт чистый, >99%. Мефедрон, Марихуану, Бошки, Кокаин Не волнуйтесь, я думаю Рашн холидэйс. Продавец честныйУ меня всё норм, реальную отправку написали в треке. Я волновался на счёт этого после сообщений
Your comment is awaiting moderation.
>enter hub listings – Layout is clear and helps users navigate effortlessly.
Your comment is awaiting moderation.
заказать кухню по индивидуальному проекту zakazat-kuhnyu-10.ru .
Your comment is awaiting moderation.
ts escort london
Your comment is awaiting moderation.
нарколог на дом нарколог на дом .
Your comment is awaiting moderation.
saxenda uk
Your comment is awaiting moderation.
Привет всем Тсу движек Мефедрон, Марихуану, Бошки, Кокаин Работал с магазином! все нормП.С. Отзывы о работе (посты по теме) я не удалял.
Your comment is awaiting moderation.
property agents dubai marina https://lighthouseoflewisville.org probmems od selling properties in dubai1 bedroom Apartments for sale in Zabeel First
Your comment is awaiting moderation.
a/b тест наружная реклама a/b тест наружная реклама .
Your comment is awaiting moderation.
заказать кухню под размеры zakazat-kuhnyu-9.ru .
Your comment is awaiting moderation.
нарколог на дом нарколог на дом .
Your comment is awaiting moderation.
вавада официальный зеркало вавада официальный зеркало .
Your comment is awaiting moderation.
заказать продвижение сайта в москве заказать продвижение сайта в москве .
Your comment is awaiting moderation.
кухню заказать кухню заказать .
Your comment is awaiting moderation.
нарколог на дом краснодар narkolog-na-dom-v-krasnodare.ru .
Your comment is awaiting moderation.
частный наркологический центр частный наркологический центр .
Your comment is awaiting moderation.
Ровный магаз,всем советую) Мефедрон, Марихуану, Бошки, Кокаин Сделать можно хоть в Новогоднюю ночь, но обработан он будет только после 9 января.Получил 5г 203! Оплатил в четверг, отправили в пятницу и уже в понедельник курьер мне передал. 🙂 Вес в поряде, цвет желтоватый.
Your comment is awaiting moderation.
furnished apartment for rent in dubai monthly https://esidirectory.org buy apartment in dubai without down paymentemaar development pjsc
Your comment is awaiting moderation.
ии для студентов ии для студентов .
Your comment is awaiting moderation.
нарколог на дом краснодар нарколог на дом краснодар .
Your comment is awaiting moderation.
мелбет ру официальный сайт мелбет ру официальный сайт .
Your comment is awaiting moderation.
2.Почему на сайте нет ниодного упоминания о ритейле,в то время,как заказы надо делать через него? https://irga-nn.ru такая же беда, тс говорит все ровно уже в пути, но самое интересное то что, все говорят что курьерки там как то каряво работают, но я звоню операторам они отвечают такой накладной нет, отсюда вопрос как она может в пути если у них во внутренней базе нет моей накладной, курьер взял сразу от нашего тс. и уехал ко мне )))))Многие стучат нам по выходным и ночью, но мы живые люди и не можем 24 часа в день отвечать.
Your comment is awaiting moderation.
платный нарколог на дом платный нарколог на дом .
Your comment is awaiting moderation.
Villas for sale in District 9E https://cursogratuitoonline.org list of dubai properties gAvani Palm View Dubai Hotel & Suites
Your comment is awaiting moderation.
профессиональное продвижение сайтов internet-agentstvo-prodvizhenie-sajtov-seo.ru .
Your comment is awaiting moderation.
Продвижение сообщества или страницы во ВКонтакте с помощью привлечения подписчиков. Услуга помогает быстро увеличить аудиторию, повысить активность и доверие к группе или профилю. Переходите по запросу как накрутить подписчиков вконтакте. Возможна накрутка живых и заинтересованных пользователей, что улучшает видимость сообщества, помогает быстрее развивать бренд, проекты и продажи. Подходит для групп, пабликов и личных страниц.
Your comment is awaiting moderation.
сколько стоит заказать кухню по размерам zakazat-kuhnyu-9.ru .
Your comment is awaiting moderation.
срочный выезд нарколога на дом narkolog-na-dom-v-krasnodare-3.ru .
Your comment is awaiting moderation.
заказать кухню под размеры заказать кухню под размеры .
Your comment is awaiting moderation.
Set piece goals, dead ball situations and their conversion
Your comment is awaiting moderation.
)))) все любители пробничков )))) https://pudishi.ru по крайней мере у меня было , все гудты в мирку отпиши продавец там
Your comment is awaiting moderation.
off plan resale Commercial Property For Rent In Dubai amaranta dubai propertiesdubai marina property transactions
Your comment is awaiting moderation.
платный нарколог на дом narkolog-na-dom-v-krasnodare.ru .
Your comment is awaiting moderation.
elite escort london
Your comment is awaiting moderation.
центр наркологии москва центр наркологии москва .
Your comment is awaiting moderation.
seo продвижение сайта по трафику кловер prodvizhenie-sajtov-po-trafiku1.ru .
Your comment is awaiting moderation.
вызов нарколога на дом краснодар вызов нарколога на дом краснодар .
Your comment is awaiting moderation.
Хороший магазин все качественно и оперативно и быстро, всегда здесь покупаю. https://gr-braslet.ru всё дошло))))) Спасибо магазину,в след раз возьму отпишу что да как :dansing:качество на высотеХотели делать 1к15 – 1к10, но в итоге всё замесили 1к12. Я бы не сказал, что сильно убивает, но люди были довольны. Пипеточку хлоп:killmyself: и хорошо минут на 40, поэтому скоро перешёл на трубку и курил по пол полки за раз, отчего угарал от роликов MineCraft.
Your comment is awaiting moderation.
Новое в категории: циклевка старого паркета
Your comment is awaiting moderation.
melbet ru официальный сайт melbet ru официальный сайт .
Your comment is awaiting moderation.
Самое полезное для вас: https://shlifovka-parketa.ru
Your comment is awaiting moderation.
residence visa dubai property owner https://ravindrabharathi.org cancelled real estate projects committee dubailist of dubai properties g
Your comment is awaiting moderation.
Ground fault sensor devices improve electrical safety by detecting leakage currents that may otherwise remain unnoticed. This helps prevent accidents and equipment failures. Find details at the link https://earth-fault-indicator.com/safety-first-how-ground-fault-detection-technologies-protect-line-crews-and-prevent-wildfires/
Your comment is awaiting moderation.
прям не втерпеж https://volkswagenbank.ru Привет Всем!!!!!!!!!!! суппер класный магаз! всем рекомендую! приятно работать! оператр адыкват! Успехов и процветаний Друзья! от всей нашей компании!или кто то прикалывается?
Your comment is awaiting moderation.
hotel apartments near dubai mall https://milenialbanget.com Apartment for Rent in Al Arta, DubaiVillas for sale in Meadows 2
Your comment is awaiting moderation.
Ground fault sensors are widely used in industrial and utility systems to ensure electrical safety. They detect leakage currents early and prevent hazardous situations. Read more about applications https://earth-fault-indicator.com/safety-first-how-ground-fault-detection-technologies-protect-line-crews-and-prevent-wildfires/
Your comment is awaiting moderation.
нарколог на дом срочно narkolog-na-dom-v-krasnodare.ru .
Your comment is awaiting moderation.
магаз работает ровно оперативно и бонус хороший дали хотя я даже не ожидал как и обещали на следующий день отправили,а орест посылок я думаю ТС как нибудь уладит этот вопрос главное подход к нему найти Мефедрон, Марихуану, Бошки, Кокаин Плохует мягко сказано,уже больше пол месяца жду.Тебе кстати пришла?все от души))) вот бы еще во всех городах зк делали)))))
Your comment is awaiting moderation.
Где сделать красивый qr код с логотипом >
ссылка qr код с логотипом
Hi folks! I want to share a useful tool. Highly recommended.
Discover our the most advanced **beautiful QR code generator**. Place a **QR code with logo in center** using our powerful **colored QR code generator** to match your style. Whether you need to **create QR code** for a website or social media, qrc.my is the answer. Our **QR code generator online** provides flexibility and style. You can also use **QR code with logo inside** to ensure your branding is always visible. If you are looking for a **free online QR code generator** that supports professional design features, you have come to the right place. Start creating your unique brand identity with our simple yet effective **QR code generator with logo** today.
анонимная ссылка инстаграм https://qrc.my/ru
динамический qr код онлайн https://qrc.my/ru
Your comment is awaiting moderation.
сео продвижение за процент кловер сео продвижение за процент кловер .
Your comment is awaiting moderation.
нарколог на дом анонимно narkolog-na-dom-v-krasnodare-1.ru .
Your comment is awaiting moderation.
лечение зависимостей лечение зависимостей .
Your comment is awaiting moderation.
официальный сайт бк мелбет официальный сайт бк мелбет .
Your comment is awaiting moderation.
studio flat for rent in al nahda dubai dubizzle Dubai Houses For Sale Luxury villa for rent in dubai landtoday real estate dubai
Your comment is awaiting moderation.
partscore.ru partscore.ru .
Your comment is awaiting moderation.
buy diazepam online
Your comment is awaiting moderation.
ребята как-то странно работают,но надеюсь,что честно Мефедрон, Марихуану, Бошки, Кокаин Мы уверены что гарант не нужен магазину работающему с 2011 года + мы не работаем с биткоинами + везде положительные отзывы .Селлер вообще отвечает на емейл? Или только в аське его искать, которой у меня нет?
Your comment is awaiting moderation.
vavada личный кабинет vavada личный кабинет .
Your comment is awaiting moderation.
Поведенческие факторы показывают, насколько сайт интересен посетителям и как долго они взаимодействуют с контентом. Эти данные напрямую влияют на ранжирование в поисковой выдаче. Читайте подробнее по ссылке – как накрутить
Your comment is awaiting moderation.
bayut properties for rent in dubai https://barrierbeachblues.com Bluewaters Residences1bhk for rent family dubai monthly
Your comment is awaiting moderation.
улучшение баннеров реклама reklamnyj-kreativ12.ru .
Your comment is awaiting moderation.
переводчик технического текста teh-perevod.ru .
Your comment is awaiting moderation.
“Я надеюсь что вы перепроверите товар ” https://limuzin-hammer.ru Я в последний раз говорю, эта тема – для отзывов о работе магазина. Если вы не можете связаться с продавцом, то не надо писать об этом по сто раз. Если вы хотите узнать о качестве продукции – вам СЮДА !!! Любой оффтоп\флуд прекращаем !через аську связался… дал данные куда сколько отправить, и с киви кошелька оплатил 7700р. на номер который в аське дали
Your comment is awaiting moderation.
оптимизация наружки reklamnyj-kreativ13.ru .
Your comment is awaiting moderation.
al zamul real estate dubai https://ragnarconde.com studio apartment for monthly rent in dubai marinadanube starz apartments for rent dubai
Your comment is awaiting moderation.
нарколог на дом цены нарколог на дом цены .
Your comment is awaiting moderation.
vavada рабочее зеркало вход vavada рабочее зеркало вход .
Your comment is awaiting moderation.
отменное :dance: Мефедрон, Марихуану, Бошки, Кокаин Ну просто выглядело твое сообщение как мессага на параное)))))Прекрати несчастный!
Your comment is awaiting moderation.
вавада онлайн вавада онлайн .
Your comment is awaiting moderation.
переводчик технического текста в москве teh-perevod.ru .
Your comment is awaiting moderation.
сервис анализа креативов сервис анализа креативов .
Your comment is awaiting moderation.
studio for rent in academic city dubai One Bedroom Apartment For Rent In Dubai rent a villa in dubai with poolreal estate images dubai
Your comment is awaiting moderation.
нейросеть онлайн для учебы nejroset-dlya-referatov-8.ru .
Your comment is awaiting moderation.
diazepam for sale
Your comment is awaiting moderation.
сервис анализа креативов сервис анализа креативов .
Your comment is awaiting moderation.
заметил, что там тс появляется на много чаще Мефедрон, Марихуану, Бошки, Кокаин И всем форумчанам!!!За время работы легалрц сколько магазинов я повидал мама дорогая, столько ушло в топку, кто посливался кто уехал # но chemical-mix поражает своей стойкостью напором и желанием идти в перед “не отступать и не сдаваться”:superman:
Your comment is awaiting moderation.
Статья охватывает все этапы SMM-продвижения: от брифа и стратегии до запуска кампаний и оптимизации. Понравилось, что автор уделяет внимание не только креативу, но и аналитике, а также даёт советы по тестированию гипотез. Рекомендую к прочтению: https://iwatt24.ru/uslugi-smm/
Your comment is awaiting moderation.
Ground fault sensors improve safety by detecting even small leakage currents that may go unnoticed. This helps prevent failures and supports reliable system operation. Learn more about features https://earth-fault-indicator.com/digital-fault-location-how-sensors-earth-fault-indicators-and-analytics-reduce-saidi-and-saifi/
Your comment is awaiting moderation.
melbet бк melbet бк .
Your comment is awaiting moderation.
Коллеги, кто ищет структурированный материал по SMM, гляньте эту статью. Там разобраны основные услуги, методы и метрики. Особенно полезен раздел про то, как выбирать агентство в Москве и на что обращать внимание в договоре. Есть таблица с моделями оплаты и этапы работы с подрядчиком. Почитайте: https://sksensation.ru/smm-prodvizhenie-v/
Your comment is awaiting moderation.
casino gana777 Наш портал, Gana 777 casino, постоянно развивается, добавляя новые игры и функции, чтобы ваш досуг был максимально увлекательным и разнообразным, а Gana777 casino opiniones всегда были вдохновляющими.
Your comment is awaiting moderation.
properties for sale in dubai that worth 300000 and above Commercial Property For Sale In Dubai transient apartment in dubaiflats in bur dubai
Your comment is awaiting moderation.
вавада vavada вавада vavada .
Your comment is awaiting moderation.
Не поняла? https://family58.ru Получили адрес с небольшой задержкой , ТС все объяснил , отвечал сразу , без каких либо задержек .у разных селеров бывает разный джив имеется виду по качеству так , я как то брал джив к10 пер слабо очень , в другом к 15 убивал , вот и спрашивают всегда качество дживика у продавана если ты незнал!!!
Your comment is awaiting moderation.
бонус вавада Не упустите свой шанс скачать любимые игры и играть в Vavada, получая удовольствие от каждой минуты, проведенной в компании удачи.
Your comment is awaiting moderation.
Put all your links in complete aware send for and street every click.
Bio pages • In a nutshell bermuda shorts links • QR codes • Analytics
https://fehuai.com/web-link-api-automation/
Fabricate yours in 30 seconds.
Справьте все свои ссылки сверху одной трезвою странице и еще выслеживайте любом клик.
Био-страницы • Недлинные ссылочки • QR-коды • Специалиста
https://fehuai.com/custom-domain-short-links/
Образуйте близкую страничку за 30 секунд.
Your comment is awaiting moderation.
Поведенческие метрики отражают реальное поведение пользователей на страницах сайта. Чем выше активность, тем лучше показатели продвижения – программа альпина
Your comment is awaiting moderation.
vavada vavada .
Your comment is awaiting moderation.
скачать melbet скачать melbet .
Your comment is awaiting moderation.
order diazepam
Your comment is awaiting moderation.
폰테크
폰테크라는 방식은 자금이 급히 필요한 상황에서 빠르게 검토되는 방식으로 소개됩니다. 최근에는 비대면 진행과 당일 입금, 미납요금 대납, 전국 상담 같은 항목이 함께 붙으면서 관련 안내도 더 많아졌습니다. 다만 진행을 알아볼 때는 빠르다는 말보다 진행 구조를 먼저 봐야 합니다. 어떻게 접수되고, 어떤 방식으로 진행되며, 입금까지 어떤 절차를 거치는지 확인하는 쪽이 더 중요합니다.
비대면 폰테크의 경우 방문 없이 상담, 접수, 진행 안내까지 상당 부분을 원격으로 처리하는 형태가 중심입니다. 수도권뿐 아니라 강원, 충청, 전라, 경상, 제주까지 전국 단위 상담을 내세우는 경우도 많습니다. 직접 움직이지 않아도 된다는 점은 편하지만, 간단해 보일수록 조건은 더 세밀하게 봐야 합니다.
폰테크나 가개통 안내에서는 속도와 상시 상담을 강조하는 표현이 반복되는 경우가 많습니다. 하지만 핵심은 문구가 아니라 진행 내용의 구체성입니다. 상담 기준 기종, 매입 조건, 가능한 진행 방식, 접수 후 입금 시점까지 분명해야 합니다.
진행 흐름은 대체로 비슷합니다. 전화나 문자, 카카오톡으로 상담을 시작한 뒤, 그다음 기종과 조건을 맞춰 상담을 진행하고, 방문·출장·비대면·대납 중 방식을 선택하고, 기기 수령 뒤 바로 지급으로 이어지는 방식입니다. 겉으로는 단순해 보여도 단계마다 체크할 부분은 다릅니다. 특히 처음 상담 단계에서 가능 조건을 분명히 해두는 것이 중요합니다.
전국 단위로 운영된다고 하는 곳들은 서울부터 제주까지 세부 지역명을 길게 배치하는 경우가 많습니다. 이런 구성은 지역 검색에 강하고, 이용자에게 자기 지역도 가능하다는 인식을 줍니다. 서울 폰테크, 경기 폰테크, 인천 가개통 같은 표현이 반복되는 이유도 여기에 있습니다.
상담 채널은 대체로 전화, 카카오톡, 신청 버튼 중심으로 구성됩니다. 보통 이런 채널 옆에는 신속 진행이나 1:1 상담 문구가 함께 배치됩니다. 실제로 봐야 할 것은 문구보다 운영 방식과 설명의 명확성입니다.
요약하면 핵심 포인트는 세 가지입니다. 현금이 급할 때 빠르게 검토할 수 있다는 점, 비대면과 전국 단위 상담이 가능하다는 점, 절차 흐름이 비교적 단순하다는 점입니다. 반대로 이용자 입장에서는 속도보다 조건, 절차, 지역 대응 범위, 상담 내용의 명확성을 먼저 봐야 합니다.
Your comment is awaiting moderation.
business opportunities in dubai with low investment 3 Bedroom Apartments For Sale In Dubai 65 year old dubai real estate agent in barshaslow real estate market dubai
Your comment is awaiting moderation.
Хороший обзор для предпринимателей, которые хотят разобраться, из чего складывается стоимость SMM-услуг. Автор объясняет разницу между почасовой, проектной и абонентской оплатой, а также на что влияют объёмы и каналы. Полезно для планирования бюджета: https://f1-it.ru/uslugi-smm-prodvizheniya-v-sotsialynh-setyah.html
Your comment is awaiting moderation.
П.С. Отзывы о работе (посты по теме) я не удалял. Мефедрон, Марихуану, Бошки, Кокаин Всем привет! Хороший магазин. Удачи и развития в дальнейшем!Что то тут не так.
Your comment is awaiting moderation.
pyragu receptai https://pyragaireceptai.lt
Your comment is awaiting moderation.
нарколог на дом в краснодаре narkolog-na-dom-v-krasnodare.ru .
Your comment is awaiting moderation.
Nauseate e leave all your links in one smart time and way every click.
Bio pages • Short links • QR codes • Analytics
https://fehuai.com/affiliate-link-management/
Fabricate yours in 30 seconds.
Сконцентрируйте шиздец свои ссылочки сверху одной умной странице да выслеживайте каждый клик.
Био-страницы • Короткие ссылки • QR-коды • Аналитика
https://fehuai.com/branded-short-links/
Оснуйте свою страницу за 30 секунд.
Your comment is awaiting moderation.
melbet mobile login melbet mobile login .
Your comment is awaiting moderation.
will the property market in dubai crash after expo2020 3 Bedroom Villa For Sale In Dubai dubai properties leasing officedubai real estate comapny names
Your comment is awaiting moderation.
Вызвал такси;) Мефедрон, Марихуану, Бошки, Кокаин Все верно, до сих пор разгребаем )Магазин чёткий… Нареканий нет…
Your comment is awaiting moderation.
vavada casino скачать vavada casino скачать .
Your comment is awaiting moderation.
вавада букмекер вавада букмекер .
Your comment is awaiting moderation.
cleansheet&vavada cleansheet&vavada .
Your comment is awaiting moderation.
мелбет скачать ios мелбет скачать ios .
Your comment is awaiting moderation.
Отдельный блок в статье посвящён накрутка поведенческих факторов в яндекс. Автор объясняет, что Яндекс особенно чувствителен к внешним факторам — кликам и возвратам в выдачу.
Your comment is awaiting moderation.
rent apartment in dubai furnished https://mauthietkenhadep.net good hotel apartments in dubaiwasl properties for rent in dubai
Your comment is awaiting moderation.
Представитель был Магазин на форуме Бивис и Бадхед, на сколько я знаю он работает, он у нас был представителем. Мефедрон, Марихуану, Бошки, Кокаин \занимаюсь тестированием вместе с кролями в течении нескольких дней. Все никак не мог понять.В итоге получается, что все страницы оказываются в одних недовольствах, но ладно визуально, так ведь чуть ли не неделю каждая страница в недовольствах, а это что-то да значит, особенно когда сам проверишь… Вот я постучался в асю, пообщались, вы исчезли, потом кое-как вернулись, но молчок по полной. Зря вы так, всех клиентов распугаете таким макаром…
Your comment is awaiting moderation.
Почему стоит покупать детский комплекс от производителя, а не в перекупке? детская горка Производитель даёт гарантию, использует качественную древесину и отвечает за безопасность. спортивный комплекс для детей Плюс цена обычно ниже, чем у посредников.
Your comment is awaiting moderation.
Дом из клееного бруса с баней на участке — мечта каждого загородного жителя. здесь Баню можно построить из того же материала в едином стиле с домом. смотрите тут Комплексное строительство дома и бани обойдётся дешевле, чем по отдельности.
Your comment is awaiting moderation.
best property dealers in dubai reviw Property For Sale In Dubai best location to buy property in dubaidubai international real estate email address
Your comment is awaiting moderation.
https://melbetlogin.ru https://melbetlogin.ru .
Your comment is awaiting moderation.
Резиновое покрытие под детской площадкой — лучшая инвестиция в безопасность. детский городок Даже если ребёнок упадёт, мягкое покрытие смягчит удар. здесь Альтернатива — толстый слой мытого песка или мелкого гравия.
Your comment is awaiting moderation.
такчто чставлю 100/100баллов магазу и Мефедрон, Марихуану, Бошки, Кокаин тоже хочу заказать бро!!!Да просто дедушка форума ))
Your comment is awaiting moderation.
Битрикс: Управление сайтом Малый Бизнес — функциональная редакция CMS для создания интернет-магазинов и коммерческих проектов. Переходите по запросу Bitrix Малый Бизнес модули. Система включает каталог товаров, корзину, онлайн-оплаты, маркетинговые инструменты и интеграцию с 1С. Решение подходит для компаний, которым нужен надежный и масштабируемый сайт с возможностью расширения функционала через модули и интеграции.
Your comment is awaiting moderation.
Дом из клееного бруса — это не только про практичность, но и про эстетику. дом из клееного бруса цена Текстура натурального дерева на стенах создаёт неповторимую атмосферу тепла и уюта. типовые проекты домов из клееного бруса Многие владельцы даже не закрывают стены отделкой — просто покрывают маслом или лаком.
Your comment is awaiting moderation.
вавада официальный сайт вход зеркало вавада официальный сайт вход зеркало .
Your comment is awaiting moderation.
Поисковые алгоритмы анализируют поведение пользователей, чтобы определить качество сайта. Поведенческие факторы помогают оценить уровень заинтересованности аудитории. Посмотреть детали можно по ссылке: накрутка пф сервис
Your comment is awaiting moderation.
melbet скачать на ios melbet скачать на ios .
Your comment is awaiting moderation.
melbet регистрация melbet регистрация .
Your comment is awaiting moderation.
villas for sale in dubai meadows https://maitrise-autun.org dubai real estate companies in indiaapartments for rent in al barari dubai
Your comment is awaiting moderation.
вавада онлайн вавада онлайн .
Your comment is awaiting moderation.
вавада казино онлайн официальный вавада казино онлайн официальный .
Your comment is awaiting moderation.
Общая оценка магазина 10/10-идут на встречу покупателю, сервис общение и работа на высоте Мефедрон, Марихуану, Бошки, Кокаин Привет!я покупал у вас 30г жв60 меня очень не устроило качества 1х5 и неочём не какого эффекта!Я попросил поменять товар на другой и от вас последовал отказ то есть товар возврату и обмену не подлежит!обоснуйте отказ если товар не соответствовал заявленному качеству!Селлер сказал что ур6 курёха!:) походу новая альтернатива дживу
Your comment is awaiting moderation.
перепланировка в москве pereplanirovka-kvartir12.ru .
Your comment is awaiting moderation.
how to register at melbet how to register at melbet .
Your comment is awaiting moderation.
сделать проект перепланировки квартиры в москве proekt-pereplanirovki-kvartiry24.ru .
Your comment is awaiting moderation.
Компактный детский городок для маленького двора — это реально. детский городок купить Существуют модели размером всего 2×2 метра, при этом с горкой, лестницей и домиком. игровой комплекс для детей Идеальное решение для небольших участков.
Your comment is awaiting moderation.
челяба есть? https://turvoyage.ru Вызвал такси;)Ребят я не терпила и не превык чтоб меня кидали и вы тоже я думаю и если нас кинули то я предлогаю мстить таким образам для начала надо писать на всвсех форумах где есть этом магаз о том что это кидала а не довереный магаз не лениться и писать каждый день об этом чтоб все браза знали правду и не постродали как мы
Your comment is awaiting moderation.
boulevard the address dubai apartments for rent Commercial Property For Rent In Dubai madinaty real estate dubai4 bedroom Apartments for sale in Al Marjan Island
Your comment is awaiting moderation.
цветы срочно https://www.cvejie-cveti.ru .
Your comment is awaiting moderation.
Строительство дома из клееного бруса — процесс на удивление быстрый, если работаете с профессионалами. подробнее Дом собирается из готовых элементов прямо на участке, без мокрых процессов и длительного ожидания усадки. dom-rggu.ru За 3-5 месяцев можно переехать в полностью готовый дом.
Your comment is awaiting moderation.
Брал первый раз дживик качество вроде норм))))Еще хотел совет попросить как из 250 самый норм микс сделать?Помогите плиз. https://lamescan.ru спс ) вот уже пришло что отправлено в пн ждать трек буду )Бро ты ошибся. Не поняли друг друга бывает
Your comment is awaiting moderation.
hotel apartments suits in dubai https://necpabxdubai.com furniture apartment for rentdream catcher real estate dubai
Your comment is awaiting moderation.
vavada мобильная версия vavada мобильная версия .
Your comment is awaiting moderation.
мелбет фрибет 1000 мелбет фрибет 1000 .
Your comment is awaiting moderation.
seo продвижение по трафику seo продвижение по трафику .
Your comment is awaiting moderation.
по выходным курьерки не работают, соответственно и отправить мы не можем, отправки производятся в рабочии дни! https://volkswagenbank.ru АМ 2233 читал 1 к 30 делается, неужеле правда всего 1 к 15 делать?Готовыми работают
Your comment is awaiting moderation.
shapoorji pallonji new projects in dubai mall https://ragnarconde.com wohnung mieten dubaiapartment for rent in the atlantic dubai marina
Your comment is awaiting moderation.
продвижение по трафику сео prodvizhenie-sajtov-po-trafiku1.ru .
Your comment is awaiting moderation.
букмекер мелбет букмекер мелбет .
Your comment is awaiting moderation.
vavada zerkalo vavada zerkalo .
Your comment is awaiting moderation.
What’s up colleagues, how is everything, and what
you would like to say on the topic of this article, in my view its genuinely awesome designed for me.After testing 10+ Webs
Repsgate this one stayed in my workflow
Your comment is awaiting moderation.
курс seo курс seo .
Your comment is awaiting moderation.
vavada com vavada com .
Your comment is awaiting moderation.
только не под своим ником :confused: (мож поэтому и не отвечают) https://limuzin-hammer.ru Трек получил, всё ровно!норм. Все кладки нахожу без проблем… взял белого и…охуел!!!
Your comment is awaiting moderation.
damac properties dubai zmiana nazwy Luxury Villas For Sale In Dubai studio for rent in dubai silicon oasis monthlyrent increase dubai
Your comment is awaiting moderation.
https://richroyalscasino.org/promotions rich royal casino
Your comment is awaiting moderation.
Берите уверенно работаю с этим магазином Мефедрон, Марихуану, Бошки, Кокаин а трудно изучить предварительно информацию о веществе, а потом покупать ? вот к примеру у меня в подписи инфа.Заказали, придет посмотрим
Your comment is awaiting moderation.
мелбет games официальный сайт мелбет games официальный сайт .
Your comment is awaiting moderation.
продвижение сайта трафиком продвижение сайта трафиком .
Your comment is awaiting moderation.
скачать бк мелбет на айфон скачать бк мелбет на айфон .
Your comment is awaiting moderation.
seo портала увеличить трафик специалисты prodvizhenie-sajtov-po-trafiku.ru .
Your comment is awaiting moderation.
property for rent in abu dhabi dubai border https://milenialbanget.com 7 bedroom Villas for sale in Palm Jumeirahjlt dubai property prices
Your comment is awaiting moderation.
сео портала увеличить трафик специалисты prodvizhenie-sajta-po-trafiku2.ru .
Your comment is awaiting moderation.
перепланировка квартиры в москве pereplanirovka-kvartir12.ru .
Your comment is awaiting moderation.
номер доставки цветов http://cvejie-cveti.ru .
Your comment is awaiting moderation.
букмекерская контора мелбет сайт букмекерская контора мелбет сайт .
Your comment is awaiting moderation.
скачать вавада на телефон россия скачать вавада на телефон россия .
Your comment is awaiting moderation.
vavada online vavada online .
Your comment is awaiting moderation.
Просьба не тяните, ответьте срочно!!!!! https://myline-24.ru Отличный товар и работают ребята без перебоевесли так то АМ не подойдет скорее всего
Your comment is awaiting moderation.
1C-Bitrix: Управление сайтом — редакция Стандарт — это мощная платформа для создания и управления корпоративными сайтами. Переходите по запросу лицензия 1С Битрикс Стандарт. Подходит для компаний, которым нужен функциональный сайт с каталогом, формами, SEO-инструментами и удобной системой администрирования. Решение обеспечивает высокую безопасность, производительность и гибкость масштабирования бизнеса в интернете.
Your comment is awaiting moderation.
seo интенсив kursy-seo-12.ru .
Your comment is awaiting moderation.
leisure world properties ltd dubai https://1wl.org hatta houses for rent in dubai1 bedroom apartment in dubai marina for rent
Your comment is awaiting moderation.
букмекерская контора мелбет официальный сайт melbetregistratsiya.ru .
Your comment is awaiting moderation.
проект перепланировки и переустройства квартиры проект перепланировки и переустройства квартиры .
Your comment is awaiting moderation.
Магазин ровнее не куда!!! Ребята отработали на славу, все четко и оперативно. Спасибо огромное, буду сотрудничать и дальше) Мефедрон, Марихуану, Бошки, Кокаин буду заказывать второй раз тут) товар понравился)пацаны магаз ровный пишу это уже не раз всегда списываюсь с менеджером все делает ровно и качество и оперативность , всегда заказываю и буду заказывать тут т.к. не париться за качество продукта как в других магазах!!!
Your comment is awaiting moderation.
скачать мелбет казино скачать мелбет казино .
Your comment is awaiting moderation.
продвижение трафика продвижение трафика .
Your comment is awaiting moderation.
Most Interesting: https://edenadventure-madagascar.com/en/check-in/
Your comment is awaiting moderation.
Updates on the Topic: https://www.ccis.org.tn/assamese-porn-research/
Your comment is awaiting moderation.
Latest Updates: https://www.rjbnco.com/2026/03/casino-portugal-20-rg-como-alinho-de-3000-no-concurso/
Your comment is awaiting moderation.
мелбет букмекерская контора официальный сайт мелбет букмекерская контора официальный сайт .
Your comment is awaiting moderation.
Статья про SEO как искусство и науку успеха. Автор разбирает ключевые компоненты продвижения и объясняет, почему это важно для бизнеса. Полезно для общего понимания: https://sushibb.ru/2026/01/30/seo-prodvizhenie-sajta-iskusstvo-i-nauka-uspeha-v-cifrovom-mire/
Your comment is awaiting moderation.
продвижение по трафику сео prodvizhenie-sajta-po-trafiku2.ru .
Your comment is awaiting moderation.
Latest Updates: http://www.sda-kofudai.com/bangladeshi-bf-versus-bff-whats-the-difference-within-the-definition/
Your comment is awaiting moderation.
мелбет полная версия melbetlogin.ru .
Your comment is awaiting moderation.
перепланировка квартиры согласование pereplanirovka-kvartir12.ru .
Your comment is awaiting moderation.
villa with swimming pool for 1 day rent in dubai https://necpabxdubai.com short term rental agents dubaihotel apartments in academic city dubai
Your comment is awaiting moderation.
https://polezno-vsem.ru https://polezno-vsem.ru .
Your comment is awaiting moderation.
вавада зеркало 2026 вавада зеркало 2026 .
Your comment is awaiting moderation.
услуги продвижения сайта clover prodvizhenie-sajtov-po-trafiku.ru .
Your comment is awaiting moderation.
товар появился? когда возобновите доставку по городам? https://food-made.ru да не врядли просто ихнему курьеру поджопников надавать надо что бы копытами веселей шевелил да и всетрек кинули ровно оперативно как придет отпишу за качество 250
Your comment is awaiting moderation.
Подписчики тг Casino X первыми получают промокоды и бонус-коды. Подписывайтесь на канал: https://t.me/casinox2026 для максимальной выгоды.
Your comment is awaiting moderation.
dubai property company https://1wl.org delta international real estate dubai2 bed apartment for sale in dubai marina
Your comment is awaiting moderation.
учиться seo учиться seo .
Your comment is awaiting moderation.
проектная организация для перепланировки квартиры proekt-pereplanirovki-kvartiry24.ru .
Your comment is awaiting moderation.
забьется, такое бывает у них. https://food-made.ru Самые положительные впечатления оставляет по прежнему Мажор. 🙁 Джой фулл, а тебе когда отправили?Птичка в клетке, в касание! Рад вас видеть и в телеге.
Your comment is awaiting moderation.
seo продвижение трафику prodvizhenie-sajta-po-trafiku2.ru .
Your comment is awaiting moderation.
онлайн заказ цветов с доставкой http://www.cvejie-cveti.ru .
Your comment is awaiting moderation.
https://gazetablic.com
Your comment is awaiting moderation.
http://zforum.kabb.ru/viewtopic.php?f=13&t=3110
Your comment is awaiting moderation.
boulevard view vs pool view apartment in dubai https://chomcautoanluc.com Apartments for sale in Binghatti Mercedes Benznaif park 2
Your comment is awaiting moderation.
выбери категорию для себя : https://otkritki-albomi.ru магазин работает как щвецарские часы!!!!Пожалуй один из самых ровных магазинов “Старичков ” – благодаря которому я зарабатвал, от души спасибо парням за ровную работу!
Your comment is awaiting moderation.
oxford real estate bur dubai office 3 Bedroom Apartments For Sale In Dubai luxury homes real estate llcapartments for sale in dubai marina
Your comment is awaiting moderation.
продвижение трафика продвижение трафика .
Your comment is awaiting moderation.
реферат через нейросеть реферат через нейросеть .
Your comment is awaiting moderation.
Заказ пришёл, все ровно) https://nord-tur.ru Я тебе уже в джаббере обьяснил как употреблять надо, а ты двоим .м дал, они вьебали все залпом и нихера не поняли, ты уже кипишь наводить начал. Эта СК не тот бутор к которому все привыкли, от которой слюни текут и на люди показываться нельзя. Её надо употреблять с минимальной дозой а не 0.3г в один заход. Доза 0.05-0.09гУ данного сллера только легал. Все проверено.
Your comment is awaiting moderation.
seo курсы seo курсы .
Your comment is awaiting moderation.
сделать проект перепланировки квартиры в москве proekt-pereplanirovki-kvartiry24.ru .
Your comment is awaiting moderation.
how internet partner prodvizhenie-sajta-po-trafiku2.ru .
Your comment is awaiting moderation.
https://codimd.carpentries.org/s/qRHHOSWNH
Your comment is awaiting moderation.
Лицензия «Битрикс: Управление сайтом – Старт» — оптимальное решение для создания небольшого сайта, лендинга или корпоративной страницы. Переходите по запросу 1C Битрикс Старт купить. Редакция включает базовые инструменты для управления контентом, готовые модули, защиту сайта и удобную административную панель. Подходит для быстрого запуска проекта на CMS 1C-Битрикс с возможностью дальнейшего масштабирования и перехода на более функциональные редакции.
Your comment is awaiting moderation.
apartment price in alrigga dubai https://crossroadscrc.org Apartments for rent in Nassima Towerdubai real estate instagram
Your comment is awaiting moderation.
Дело не в постах. В любом случае нужно быть осторожным. И строить систему сложнее… Мефедрон, Марихуану, Бошки, Кокаин привет )Да хоть в очко засыпь, не торкнет
Your comment is awaiting moderation.
forecast of dubai real estate in https://diegoreico.com al barsha dubai villas for saledubai real estate industry analysis
Your comment is awaiting moderation.
купить цветы рядом со мной недорого https://www.cvejie-cveti.ru .
Your comment is awaiting moderation.
магазин ровнеый,за что им спасибо,если сами тупить не будете всё пройдёт ровно и без проблем.Товар тоже порадовал,довольно таки неплохо)) https://1kuh.ru за наличие узнавай у селлера. куда тебе 2грамма дезоксипипрадола я слабо представляю, хочешь упороть без палева пол района ? )А JWH-018 Имеется в наличии?
Your comment is awaiting moderation.
Read more on the website: https://agenciadopeixe.com.br/14-melhores-casinos-online-sobre-portugal-acercade-dezembro-2025/
Your comment is awaiting moderation.
The best for you: https://www.corsati.com/2026/03/14/ullu-online-collection-stars-2025-brands-images-pages-amj/
Your comment is awaiting moderation.
сео инфо сайта увеличить трафик специалисты prodvizhenie-sajtov-po-trafiku.ru .
Your comment is awaiting moderation.
dubai land location https://denizlilidersurucukursu.com sama al reem real estate dubailuxury apartment in dubai for sale
Your comment is awaiting moderation.
перепланировка москва pereplanirovka-kvartir11.ru .
Your comment is awaiting moderation.
стараемся для вас https://populartv.ru Да хватает придурков, только смысл писанины этой , что он думает что ему за это что то дадут ))) кроме бана явно ничего не выгорит )))! Тс красавчик брал 3 раза по кг сделки и всегда все чётко ! Жду пока появиться опт на ск!оплачивай лучше через киви.самый лучший способ во всех магазах.и перевод идёт в секунду.только обрати внимание на комисию чтоб небыло недоплаты.обычно 2% от суммы перевода
Your comment is awaiting moderation.
room for monthly rent near to lulu qusais dubai Apartments In Uae For Sale flats for rent in al wasl dubai for rentdubai apartment rental longterm
Your comment is awaiting moderation.
что то не могу зайти на сайт ( Мефедрон, Марихуану, Бошки, Кокаин вообще почта 1 класс оказываеться самое быстрое.. 2-3 суток и приходитчерт возьми, вот сейчас оформляю AM2233 и решил заглянуть сюда.
Your comment is awaiting moderation.
сайт для рефератов сайт для рефератов .
Your comment is awaiting moderation.
http://online115270.wordpress.com/2026/03/25/melbet-%D0%BF%D1%80%D0%BE%D0%BC%D0%BE%D0%BA%D0%BE%D0%B4-%D0%B1%D0%BE%D0%BD%D1%83%D1%81-%D0%BD%D0%B0-%D0%B4%D0%B5%D0%BF%D0%BE%D0%B7%D0%B8%D1%82-2026-bro888/
Your comment is awaiting moderation.
Здравствуйте!
Почему сайт должен быть удобным
Лендинг помогает пользователю увидеть решение своей задачи. Создание лендингов включает анализ аудитории и разработку структуры страницы. Грамотная разработка лендинга повышает конверсию и превращает сайт под ключ в инструмент продаж.
Полная информация по ссылке – https://ts-v.ru/
SEO продвижение сайтов для строительных компаний, SMM агентство услуги в России, сайт для онлайн-магазина одежды
услуги SMM продвижения под ключ, ђазработка лендингов под ключ | TS-V, SEO оптимизация сайта цена услуги
Удачи и комфорта в жизни!
Что делает сайт эффективным инструментом продаж d872965
Your comment is awaiting moderation.
properties in dubai videos https://maitrise-autun.org one bedroom apartment for rent in jlt dubailist of diazeni properties siezed in dubai
Your comment is awaiting moderation.
так всё неоднознано,пока на сколько я заметил о приёмах всяких кричат люди у кого порой даже 50 постов нету(дак стоит ли таким верить…Но когда брал у данного продавца последний раз на моей посылке был повреждён штрих код,я человек параноидальный подумал мало ли чё там проверили и стало жутковато.А брал то ещё туси а под ней сами понимаите….сразу меня окружили и т.д. и т.п. ХD с тех пор незаказывал тут.Зато качество было хорошее)особенно соединение 2п жёсткое https://volkswagenbank.ru спасибо за внимание!я от данного сэллера так ничего и не получил. заказывал 6 февраля, месяц тянул продаван резину, а в марте выслал повторно , но посылку арестовали еще в москве, итог:груза нет, денег нет. мотайте на ус, я с такими БАРЫГАМИ дел иметь не хочу…
Your comment is awaiting moderation.
перепланировка в москве pereplanirovka-kvartir12.ru .
Your comment is awaiting moderation.
перепланировка помещения pereplanirovka-kvartir11.ru .
Your comment is awaiting moderation.
технический перевод стоимость teh-perevod.ru .
Your comment is awaiting moderation.
Коллеги, кто хочет разобраться в SEO, рекомендую эту статью. Там объясняют, почему продвижение — это долгосрочная инвестиция, а не разовая акция. Есть примеры и чёткая структура. Почитайте: https://runeterra-wiki.ru/seo-prodvizhenie-sajta-iskusstvo-i-nauka-uspeha-v-cifrovom-mirovom-prostranstve/
Your comment is awaiting moderation.
цветы на заказ с доставкой недорого http://www.cvejie-cveti.ru .
Your comment is awaiting moderation.
Коллеги, кто ищет базу по SEO, гляньте этот материал. Там подробно расписано, из чего состоит поисковая оптимизация, какие бывают факторы ранжирования и почему без этого бизнесу в интернете сложно. Почитайте: https://art-instyle.ru/stati/seo-prodvizhenie-sajta-chto-jeto-takoe-i-zachem-nuzhno/
Your comment is awaiting moderation.
dubai property festical Townhouses For Rent In Dubai property residence visa dubai can the property be rentedbest property deals in dubai with monthly low payments
Your comment is awaiting moderation.
Я ночью с ним договорился в аське,мне он тоже отвечал через 15-30 минут на сообщение) Мефедрон, Марихуану, Бошки, Кокаин И ещё когда можно будет сделать первый заказ в январе?могу заверить вас что сдесь ни только людское понимание но и честное слова!!!мир вам друзья!!!все шикарно!!
Your comment is awaiting moderation.
реферат нейросеть реферат нейросеть .
Your comment is awaiting moderation.
Здравствуйте!
Почему лендинг работает быстрее обычного сайта
Создание лендингов помогает бизнесу выделиться среди конкурентов. Лендинг показывает преимущества продукта и формирует доверие. Разработка лендинга повышает конверсию и делает сайт под ключ эффективным инструментом продаж.
Полная информация по ссылке – https://ts-v.ru/
SEO продвижение сайтов недорого, оптимизация рекламных кампаний Яндекс Директ, SEO продвижение сайтов для онлайн-школ
создание сайтов недорого Махачкала, ђазработка лендингов под ключ | TS-V, SEO продвижение под Google Россия
Удачи и комфорта в жизни!
Как лендинг увеличивает доверие b3d5859
Your comment is awaiting moderation.
Статья про веб-оптимизацию — от технической части до контентной стратегии. Автор подробно разбирает, как выстроить систему продвижения, чтобы сайт не просто существовал, а приносил результат. Вот ссылка: https://ecoline-ural.ru/2026/01/29/seo-prodvizhenie-sajta-iskusstvo-i-nauka-veb-optimizacii/
Your comment is awaiting moderation.
luxury villas for sale in phuket luxury villas for sale in phuket .
Your comment is awaiting moderation.
проектная организация для перепланировки квартиры proekt-pereplanirovki-kvartiry24.ru .
Your comment is awaiting moderation.
сео продвижение сайта по трафику сео продвижение сайта по трафику .
Your comment is awaiting moderation.
properties for rent in jvc dubai Commercial Property For Sale In Dubai 4 bedroom Villas for rent in The Springsapartment prices in dubai sports city
Your comment is awaiting moderation.
ребят , а 4-fa нормальная тема ? это типа живика чтоли ? Мефедрон, Марихуану, Бошки, Кокаин Может просто нужно быть более бдительным? От фейков никто не застрахован. Попросить подтверждения через ЛС на форуме займет не более пяти минут времени и сохранит ваше настроение, а так же и деньги. БУДЬ БДИТЕЛЕН! ВСЕГДА!203 вообще шикарный ) мне понравился. спасибо Вам)
Your comment is awaiting moderation.
согласование перепланировок согласование перепланировок .
Your comment is awaiting moderation.
https://seoperrot.ru/
Your comment is awaiting moderation.
школа seo kursy-seo-12.ru .
Your comment is awaiting moderation.
Старый паркет? шлифовка паркета в спб профессиональное восстановление деревянного пола без пыли и лишних затрат. Удаляем царапины, потемнения и старое покрытие, возвращаем гладкость и естественный цвет. Используем современное оборудование, выполняем циклевку, шлифовку и лакировку паркета под ключ с гарантией качества и точным соблюдением сроков.
Your comment is awaiting moderation.
узаконивание перепланировки pereplanirovka-kvartir11.ru .
Your comment is awaiting moderation.
технический переводчик стоимость teh-perevod.ru .
Your comment is awaiting moderation.
Одного разу використовував товари цієї фірми USK. Невисока ціна, гарна якість. Прослужили довгоюї. Рекомендую!
Your comment is awaiting moderation.
Магаз пропал из аськи и скайпа… Тобишь просто не появляется в онлайне. Такое уже бывало, но щас хз что… Качество товара было отменным. 203й высочайшего качества. Мефедрон, Марихуану, Бошки, Кокаин Магазин http://WWW.CHEMICAL-MIX.COM ответьте на электроную почтуВ день оплаты через час я получаю ровную надёжную закладку Курьерский сервис на 5+?
Your comment is awaiting moderation.
furnished apartment for rent in dubai deira 3 Bedroom Villa For Sale In Dubai monthly flat for rent in sharjahdubai hills club villas
Your comment is awaiting moderation.
Коллеги, в статье подробно разобраны метрики эффективности SMM. Автор объясняет, какие KPI реально важны, а какие можно игнорировать. Есть рекомендации по настройке сквозной аналитики и оценке ROI. Для тех, кто любит работать с цифрами: https://sksensation.ru/smm-prodvizhenie-v/
Your comment is awaiting moderation.
Нещодавно використовував замки цього сайту USK. Приемна ціна, прийнятна якість. Прослужили довгоюї. Рекомендую!
Your comment is awaiting moderation.
Я брал за неделю до этого отличный был все довольны жалоб нет!а вот (простите ошибся не 3 июля а 1июля) 1июля забрал непонятно что!начал с 1х10 растворил ацетоном и закончил 1х5 растворил спиртом но эффекта ноль! Мефедрон, Марихуану, Бошки, Кокаин пришел urb 597 – поршок белого цвета,в ацетоне не растоврился, при попытке покурить 1 к 10 так дерет горло что курить его вообще нельзя… вопрос к магазину что с ним делать, и вообще прислали urb 597 или что????вобще-то этот магазин трек присылает а не адрес…
Your comment is awaiting moderation.
condos in phuket for sale condos in phuket for sale .
Your comment is awaiting moderation.
villas for sale phuket villas for sale phuket .
Your comment is awaiting moderation.
Отдельный блок в статье посвящён накрутка поведенческих факторов яндекс. Автор объясняет механику last-click и dwell time — на чём реально строится ранжирование. Рекомендую изучить.
Your comment is awaiting moderation.
real estate for sale in thailand phuket real estate for sale in thailand phuket .
Your comment is awaiting moderation.
узнаваемость бренда баннер reklamnyj-kreativ12.ru .
Your comment is awaiting moderation.
villas in phuket thailand for sale villas-for-sale-in-phuket-1.com .
Your comment is awaiting moderation.
property rent calculator dubai Apartments For Sale In Downtown Dubai luxury property dubai sale3 bedroom apartment for rent in greens dubai
Your comment is awaiting moderation.
phuket apartments for sale phuket apartments for sale .
Your comment is awaiting moderation.
Хочешь повысить CTR? В статье есть раздел про накрутка кликабельности сайта и как это влияет на ранжирование. Но автор предупреждает, что это лишь часть общей стратегии.
Your comment is awaiting moderation.
Заглянул на сайт . Очень даже приятно удивлён увиденным . Сохранил в закладках (полезный сайт!) Мефедрон, Марихуану, Бошки, Кокаин Хотели делать 1к15 – 1к10, но в итоге всё замесили 1к12. Я бы не сказал, что сильно убивает, но люди были довольны. Пипеточку хлоп:killmyself: и хорошо минут на 40, поэтому скоро перешёл на трубку и курил по пол полки за раз, отчего угарал от роликов MineCraft.Молча !! Запрет вступает в силу 26го числа, если не ошибаюсь. Скидывай всё палево, жёсткий дист зарывай подальше и иди получай ))
Your comment is awaiting moderation.
технический переводчик teh-perevod.ru .
Your comment is awaiting moderation.
Ищете надежные лицензии для 1С-Битрикс? Мы предлагаем легальные решения для всех типов проектов: интернет-магазинов, корпоративных сайтов и порталов. Переходите по запросу лицензия 1С Битрикс для сайта. Быстрая активация, официальная поддержка и выгодные условия – обеспечьте своему веб-проекту стабильную работу и защиту с надежным ПО уже сегодня!
Your comment is awaiting moderation.
clickmetric – Appreciate the typography choices; comfortable spacing improved my reading experience.
Your comment is awaiting moderation.
techify – Loved the layout today; clean, simple, and genuinely user-friendly overall.
Your comment is awaiting moderation.
codespark – Bookmarked this immediately, planning to revisit for updates and inspiration.
Your comment is awaiting moderation.
С 10-11 утра по МСК ежедневно кроме праздников и выходных. https://amtelsvyaz.ru здравствуйте , это от региона зависит . Доставка индивидуально обсуждается в ЛС .еще раз решил воспользоваться магазом ))) уже 2 года только у них покупаю))) и пока доволен
Your comment is awaiting moderation.
phuket condos for sale phuket condos for sale .
Your comment is awaiting moderation.
villas phuket for sale villas phuket for sale .
Your comment is awaiting moderation.
luxury property for sale phuket real-estate-for-sale-in-phuket.com .
Your comment is awaiting moderation.
condos for sale in phuket condos for sale in phuket .
Your comment is awaiting moderation.
1 br apartments for rent Buy Property In Dubai studio flat for rent in al nahda dubai dubizzleproperty snagging inspection before handover dubai
Your comment is awaiting moderation.
luxury villas phuket for sale villas-for-sale-in-phuket-1.com .
Your comment is awaiting moderation.
технический перевод в москве teh-perevod.ru .
Your comment is awaiting moderation.
Отзывы от кролов. качество тусишки хорошее. приятно порадовали ее ценой. качество метоксетамина – как у всех. сейчас в россии булыженная партия, тут он такой же. однако продавец сказал что скоро будет другая партия. вывод – магазин отличный, будем работать. https://lamescan.ru как и обещал пишу про качество- для кайфожеров 1к7, для кайфариков 1к9 , для додиков 1к11 , продукт работает 35-40 мин , используйте нормальную очищенную основу и будет счастье в тридевятом государстве, вот например от смолы ромашки или мать и мачехи головные боли и побочки, хотя реагент тут не причем , химоза нормального качества особенно если считать в соотношении цена-качество, ТС последнее время приятно удивляет своим терпением к таким сумасшедшим клиентам как я( я с ума сводил его своими платежами) но он стойко все перенес за что ему отдельное респект ТАК ДЕРЖАТЬ!!!! ТС КРАСАВЧЕГЗаказывал пробник на 10000 (оплатил на альфу) сено и мягкий, но КЛАД ТАК И НЕ БЫЛ НАЙДЕН!!! на что продавец ответил “ищите лучше” , на просьбу созвонится или списаться закладчику и курьеру ни как не отреагировал!!! Решать вопрос не захотел!!!
Your comment is awaiting moderation.
анализ наружной рекламы reklamnyj-kreativ12.ru .
Your comment is awaiting moderation.
dubai property cons Commercial Property For Sale In Dubai studio apartment price in dubaiaffordable service apartments in dubai
Your comment is awaiting moderation.
в скаипе не отвечают!!!! Мефедрон, Марихуану, Бошки, Кокаин Всем привет ровной ветке,магаз на 5удачного развития в дальнейшем=)
Your comment is awaiting moderation.
поисковое продвижение москва профессиональное продвижение сайтов internet-agentstvo-prodvizhenie-sajtov-seo.ru .
Your comment is awaiting moderation.
где согласовать перепланировку pereplanirovka-kvartir11.ru .
Your comment is awaiting moderation.
мелбет актуальный сайт http://melbet18207.help
Your comment is awaiting moderation.
dubai industrial city properties for rent https://spartanink.org mbr dubai propertiesadword ad for buy apartment in dubai
Your comment is awaiting moderation.
https://civitai.com/user/SportGames
Your comment is awaiting moderation.
apartments for sale phuket thailand apartments for sale phuket thailand .
Your comment is awaiting moderation.
phuket luxury apartments for sale apartments-for-sale-in-phuket.com .
Your comment is awaiting moderation.
мостбет Джалал-Абад https://mostbet05638.help
Your comment is awaiting moderation.
250-й 1К10 то, что нужно.. https://mkotovskaya.ru Либо прекращаем флудить либо начну выдавать преды. Сами должны понимать что под новый год почтовые службы перегружены.какой товар заказал?
Your comment is awaiting moderation.
melbet мбанк киргизия melbet мбанк киргизия
Your comment is awaiting moderation.
papaya property papaya property .
Your comment is awaiting moderation.
melbet казино https://melbet18207.help/
Your comment is awaiting moderation.
Apartments for sale in Parkside Views 2 Bed Apartment Dubai Villas for rent in Noveliaproperty finder dubai business bay
Your comment is awaiting moderation.
villas for sale phuket villas for sale phuket .
Your comment is awaiting moderation.
Привет всем!
Как лендинг помогает увеличить заявки
Создание лендингов помогает бизнесу выделиться среди конкурентов. Лендинг показывает преимущества продукта и формирует доверие. Разработка лендинга повышает конверсию и делает сайт под ключ эффективным инструментом продаж.
Полная информация по ссылке – https://ts-v.ru/
поддержка сайтов WordPress под ключ, настройка Яндекс Директ под ключ Россия, анализ конкурентов SEO Россия
интернет-магазин под ключ Россия, ђазработка лендингов под ключ | TS-V, аудит сайта цена услуги
Удачи и комфорта в жизни!
Что делает страницу сильной ebfa8dd
Your comment is awaiting moderation.
помощь в согласовании перепланировки квартиры помощь в согласовании перепланировки квартиры .
Your comment is awaiting moderation.
продвижение сайта франция internet-agentstvo-prodvizhenie-sajtov-seo.ru .
Your comment is awaiting moderation.
Сейчас по России что то не видно вас.Только пожелать ветра в парус,адекватных клиентов по меньше шкур https://geniy-club.ru Заказ Оплачен!! Жду посылку!! Как все прийдет сразу отпишу + фото!!мда а в итоге болт водичка
Your comment is awaiting moderation.
анализ баннеров reklamnyj-kreativ12.ru .
Your comment is awaiting moderation.
fixed rate property dubai rate Townhouses For Rent In Dubai property 24 dubaidubai hills estate phase 3location
Your comment is awaiting moderation.
luxury villas phuket for sale villas-for-sale-in-phuket-1.com .
Your comment is awaiting moderation.
apartments for sale phuket thailand apartments for sale phuket thailand .
Your comment is awaiting moderation.
apartments in phuket for sale apartments in phuket for sale .
Your comment is awaiting moderation.
real estate in phuket real-estate-for-sale-in-phuket.com .
Your comment is awaiting moderation.
melbet пополнение киргизия melbet пополнение киргизия
Your comment is awaiting moderation.
thailand phuket villas for sale villas-for-sale-in-phuket.com .
Your comment is awaiting moderation.
И еще сушняки ужасные. Сейчас вот утром проснулся, и до сих пор https://irga-nn.ru Был сделан заказ, оперативно связались с продавцом (что радует, он регулярно на связи), оплатили, причем сами намудрили с оплатой – больше по ошибке перевели. Оттого не сразу разобрались с суммой, но потом продавец предложил на сдачу нам выслать пробников) Через неделю позвонил курьер, договорились о доставке в удобном мне месте, что оказалось очень кстати.Вчера оплатил, сегодня получил бьющийся трек. Так что все норм. Разговор в скайпе длился 30мин, я оплатил и через 2 часа мне уже выслали посылку. Осталось проверить кач-во фашки. Если все норм, сработаемся с конторой.
Your comment is awaiting moderation.
mostbet mobile mostbet mobile .
Your comment is awaiting moderation.
dubai property transfer fees https://rockland-music-events.org wasl dubai propertiesapartments for rent in karama
Your comment is awaiting moderation.
Ищете, где купить права категории Б быстро, надежно и без лишних затрат? Мы предлагаем полный комплекс услуг по оформлению водительских удостоверений категории В с гарантией качества и легальности. Наша компания специализируется на помощи в получении водительских прав, соблюдая все требования законодательства и обеспечивая полное сопровождение на всех этапах процесса. Мы понимаем, как важно иметь официальный документ, позволяющий управлять автомобилем категории Б, и готовы помочь вам избежать долгих очередей, сложных экзаменов и бюрократических проволочек. С нами вы экономите время и силы, получая права без лишних хлопот. Мы предлагаем выгодные условия сотрудничества, индивидуальный подход и конфиденциальность. Наши специалисты проконсультируют по всем вопросам, помогут собрать необходимые документы и проведут вас через весь процесс оформления. Купить права категории Б у нас — это быстрое решение вашей задачи с гарантией подлинности и соответствия требованиям ГИБДД. Не рискуйте, обращайтесь к профессионалам, чтобы получить водительское удостоверение категории В без проблем и задержек. Свяжитесь с нами прямо сейчас и сделайте первый шаг к свободному управлению автомобилем!
Your comment is awaiting moderation.
анализ баннеров reklamnyj-kreativ14.ru .
Your comment is awaiting moderation.
сео агентство сео агентство .
Your comment is awaiting moderation.
apartments for sale in phuket apartments for sale in phuket .
Your comment is awaiting moderation.
apartments for sale phuket apartments for sale phuket .
Your comment is awaiting moderation.
It’s genuinely very complicated in this active life to listen news on TV,
therefore I simply use internet for that reason,
and obtain the most recent information.
Your comment is awaiting moderation.
бро ответь в лс, сделаю заказ https://ero-binger.ru сколько нужно обождать после 2се и 2си, чтобы хорошо 4фа пошла?По петрозаводску работаете?или будете?
Your comment is awaiting moderation.
Бесплатная юридическая консультация поможет разобраться в сложной ситуации и понять, какие действия предпринять дальше. Переходите по запросу вопрос юристу в рейтинге и вы сможете задать вопрос юристу онлайн и получить разъяснение по гражданским, семейным, трудовым, жилищным и другим правовым вопросам. Специалист подскажет возможные решения, объяснит ваши права и поможет оценить перспективы дела. Консультация доступна онлайн и по телефону, быстро и без лишних формальностей.
Your comment is awaiting moderation.
luxury villas in phuket thailand for sale villas-for-sale-in-phuket-1.com .
Your comment is awaiting moderation.
sobha construction uae Dubai Houses For Sale Luxury just property dubai for rental dana properties dubai
Your comment is awaiting moderation.
papaya property papaya property .
Your comment is awaiting moderation.
luxury villas in phuket thailand for sale villas-for-sale-in-phuket.com .
Your comment is awaiting moderation.
продвижение по трафику продвижение по трафику .
Your comment is awaiting moderation.
cum fac retragere din 1win 1win71038.help
Your comment is awaiting moderation.
clickifypro – Pages loaded fast, images appeared sharp, and formatting stayed consistent.
Your comment is awaiting moderation.
https://roselectronika.ru
Your comment is awaiting moderation.
mostbet app download for android mostbet app download for android .
Your comment is awaiting moderation.
Адрес почты правильный, все проверил не 1 раз, ответьте хоть тут.ну будем надееться что и на этот раз TS войдет в положение и как нибудь обратит внимание на решение наших вопросов, компенсирует нам потраченые нервы и время на безсмысленное ожидание, главное ведь для магазина репутация! https://q4p.ru туфта какаетоага его
Your comment is awaiting moderation.
Поведенческие показатели помогают определить, насколько сайт интересен пользователям. Чем выше активность, тем лучше позиции в поиске. Подробнее можно узнать по ссылке: программа для накрутки пф
Your comment is awaiting moderation.
оптимизация наружки reklamnyj-kreativ12.ru .
Your comment is awaiting moderation.
real estate broker websites https://downloadmaps.org Springs 5property consultancy dubai
Your comment is awaiting moderation.
рекламный креатив рекламный креатив .
Your comment is awaiting moderation.
It saves a lot of trial and error for everyone else. Over the last months I noticed that some of my favorite items are not the most expensive ones. Of course we all have different taste, but patterns still appear in long discussions. Sometimes I still make mistakes with size, so a friendly exchange policy is very helpful. When every picture has different colors or extreme filters, it is usually a bad sign.
If anyone is interested in real user experiences, I sometimes write short notes about the shops I test.
You can find one of the pages here:
visit this page
Loose hinges make the glasses slide down the nose again and again. Trendy pieces are fun, but I only buy them when the price is reasonable. Sharing real world usage stories is often more helpful than any advertisement. Price is important to me, but quality and comfort are even more important in the long run. I try to look for real photos of the insoles and soles, not only the outside of the shoe. Personally I like a mix of design, comfort and realistic pricing. I like when they mention whether the fabric has stretch or not, that detail matters a lot.
Just sharing my personal feedback.
Your comment is awaiting moderation.
продвижение сайта франция internet-agentstvo-prodvizhenie-sajtov-seo.ru .
Your comment is awaiting moderation.
нейросети для студентов нейросети для студентов .
Your comment is awaiting moderation.
трек получил в четверг до сих пор не бьётся. Как что изменится отпишу https://annarost.ru дада братан пришло все!!!охуенноый кач ск и рега нормальная вапще… короче зайди к нему на ветку там трипы опродукции прочти мой свежий за скнапример тут ну или накрайняк тут а селлер совершенно не обязан консультировать по применению хим. реактивов.
Your comment is awaiting moderation.
Продвижение сайтов невозможно без учета поведенческих факторов. Они помогают поисковым системам понять ценность ресурса: программа по накрутке посетителей на сайт
Your comment is awaiting moderation.
hyperclick – Navigation felt smooth, found everything quickly without any confusing steps.
Your comment is awaiting moderation.
Ребята, для тех, кто только начинает разбираться в SEO, отличная статья-ликбез. Объясняется, зачем нужно продвижение, как оно работает и какие бывают инструменты. Рекомендую: https://radschool3.ru/2026/01/seo-prodvizhenie-sajta-chto-jeto-takoe-i-zachem-nuzhno/
Your comment is awaiting moderation.
clickfusion – Overall, professional vibe here; trustworthy, polished, and pleasantly minimal throughout.
Your comment is awaiting moderation.
seo partner prodvizhenie-sajtov-v-moskve4.ru .
Your comment is awaiting moderation.
Всем привет! В магазе есть представительства по регионам, закладками? Ярославль? Мефедрон, Марихуану, Бошки, Кокаин Тут мытусишка что то с чем то – 1й раз могу сказать что 25 это перебор….
Your comment is awaiting moderation.
технический перевод стоимость teh-perevod.ru .
Your comment is awaiting moderation.
Вот это я понимаю СЕРВИС:ok: Превзошло все мои ожидания, доставили раньше обещанного… Магаз ровный (до последнего сомневался, что всё на столько гладко…) https://udarnik-service.ru Наверное стоит все же воздержаться от заказов и отправки денег и подождать до появления селлера..,на соседнем форуме(СФН) его тоже ждут….Забизаю дамой хвотаю тожнецы взрываю посылку там рубашка. Примерно на ребенка 7 летнего (я надеился книга будит) но ладно и рубашка сойдет на тряпки вмашину ! Разворачиваю рубаху а там пакетик реги я быстрей за весами и за фотиком и писать ВАМ МОИ ДРУЗЬЯ!!!
Your comment is awaiting moderation.
a/b тест наружная реклама a/b тест наружная реклама .
Your comment is awaiting moderation.
нейросеть для учебы нейросеть для учебы .
Your comment is awaiting moderation.
поисковое продвижение москва профессиональное продвижение сайтов internet-agentstvo-prodvizhenie-sajtov-seo.ru .
Your comment is awaiting moderation.
интернет продвижение москва интернет продвижение москва .
Your comment is awaiting moderation.
гы гы..вот такая вот история..мля )) Мефедрон, Марихуану, Бошки, Кокаин Высшее качество. Чёткий товар. Мошный микс. Хороший персонал, добрый МАгазин….ребята ровно работают!
Your comment is awaiting moderation.
mostbet casino app mostbet casino app .
Your comment is awaiting moderation.
upster pro upster pro .
Your comment is awaiting moderation.
mostbet futbol tikish https://mostbet73618.help/
Your comment is awaiting moderation.
мостбет безопасность аккаунта https://mostbet05638.help/
Your comment is awaiting moderation.
pariuri dota 2 melbet melbet63048.help
Your comment is awaiting moderation.
Лучшее качество на Рынке РК!!! Низкие цены!! И без кидалова! УВАЖЕНИЕ ВАМ РЕБЯТА!!! https://dovebeauty.ru Данный Магаз Меня Кинул!!!!курьерки на мой запрос поиска трека ответ что инфа закрыта для доступа
Your comment is awaiting moderation.
Хороший гайд по работе с блогерами и лидерами мнений в рамках SMM-стратегии. Автор объясняет, как выбирать инфлюенсеров, оценивать вовлечённость и договариваться об интеграциях. Есть советы по расчёту ROI от коллабораций: https://foto-videomontaz.ru/smm-prodvizhenie-v-soczialnyh-setyah-princzipy-instrumenty-i-pokazateli-effektivnosti/
Your comment is awaiting moderation.
https://kitehurghada.ru/ kitehurghada
Your comment is awaiting moderation.
Статья охватывает практически все аспекты SMM: от контент-плана до работы с блогерами. Понравилось, что автор не просто перечисляет услуги, а объясняет, на какие метрики реально смотреть и как оценивать ROI. Вот ссылка: https://iwatt24.ru/uslugi-smm/
Your comment is awaiting moderation.
оптимизация наружки оптимизация наружки .
Your comment is awaiting moderation.
mostbet apk download mostbet apk download .
Your comment is awaiting moderation.
Согласен магазин хороший, знают свое дело! Мефедрон, Марихуану, Бошки, Кокаин сделал заказ в этом магазине первый раз, заказывал 2гр. 400f на пробу, а пришло 3,3гр., очень доволен)))В день оплаты через час я получаю ровную надёжную закладку Курьерский сервис на 5+?
Your comment is awaiting moderation.
оптимизация и продвижение сайтов москва оптимизация и продвижение сайтов москва .
Your comment is awaiting moderation.
mostbet ios приложение скачать https://mostbet05638.help
Your comment is awaiting moderation.
https://auto.ae/exotic
Your comment is awaiting moderation.
Поведенческие факторы являются важным элементом оценки сайта. Они показывают уровень интереса пользователей и качество контента. Подробнее можно узнать по ссылке – накрутка сайта
Your comment is awaiting moderation.
Статья охватывает все этапы SMM-продвижения: от брифа и стратегии до запуска кампаний и оптимизации. Понравилось, что автор уделяет внимание не только креативу, но и аналитике, а также даёт советы по тестированию гипотез. Рекомендую к прочтению: https://iwatt24.ru/uslugi-smm/
Your comment is awaiting moderation.
plinko мостбет http://mostbet05638.help/
Your comment is awaiting moderation.
Спасибо ТС за отправленный вес) Мефедрон, Марихуану, Бошки, Кокаин Добрый вечер! Когда ожидается рега по Москве, опт!??Работал с магазином спасибо всё красиво!
Your comment is awaiting moderation.
a/b тест наружная реклама a/b тест наружная реклама .
Your comment is awaiting moderation.
https://www.invelos.com/UserProfile.aspx?Alias=promomelbet3
Your comment is awaiting moderation.
mostbet app mostbet app .
Your comment is awaiting moderation.
1win cum iau free spins 1win71038.help
Your comment is awaiting moderation.
лучшая нейросеть для учебы nejroset-dlya-referatov-6.ru .
Your comment is awaiting moderation.
seo агентство seo агентство .
Your comment is awaiting moderation.
Может случилось что-то не ладное? https://spss11.ru почта РоссииДавно не читала столько положительных отзывов !так держать )
Your comment is awaiting moderation.
бесплатная доставка цветов по москве http://dostavka-cvetov-moskva495.ru/ .
Your comment is awaiting moderation.
https://detivetra.com/ detivetra
Your comment is awaiting moderation.
друг мужа ебет жену друг мужа ебет жену .
Your comment is awaiting moderation.
1win conditii bonus http://www.1win71038.help
Your comment is awaiting moderation.
качество очень хорошее не подведёт даже не сомневайся Мефедрон, Марихуану, Бошки, Кокаин вот нашли бы пролонгаторы и начали продавать и эффект бы увеличили и все довольны были бы=)))конспирация достойная, товар оказался отличным, кроли заценили. будем еще работать
Your comment is awaiting moderation.
1win mines pe mobil http://www.1win71038.help
Your comment is awaiting moderation.
мостбет фрибет мостбет фрибет
Your comment is awaiting moderation.
ии реферат ии реферат .
Your comment is awaiting moderation.
эксклюзивные экскурсии в санкт петербурге эксклюзивные экскурсии в санкт петербурге
Your comment is awaiting moderation.
ии для школьников и студентов nejroset-dlya-referatov-6.ru .
Your comment is awaiting moderation.
Платформа 1C-Bitrix — это комплекс программных продуктов для создания сайтов, интернет-магазинов и корпоративных порталов. Переходите по запросу продукты Битрикс. Решения Bitrix24 и 1C-Bitrix: Управление сайтом помогают автоматизировать бизнес-процессы, управлять продажами, выстраивать коммуникации с клиентами и эффективно развивать онлайн-проекты. Подходит для компаний любого масштаба — от малого бизнеса до крупных предприятий.
Your comment is awaiting moderation.
Адекватным людям ценящих проффесианолизм рекомендую реактивы тут тарить… Мефедрон, Марихуану, Бошки, Кокаин “Выстовляет Эскимос список тестеров в Списке сверкает мой ник” “bob marli”Ты друг нарвался на фэйков!
Your comment is awaiting moderation.
highroi – Pages loaded fast, images appeared sharp, and formatting stayed consistent.
Your comment is awaiting moderation.
clickorbit – Bookmarked this immediately, planning to revisit for updates and inspiration.
Your comment is awaiting moderation.
Статья про веб-оптимизацию — от технической части до контентной стратегии. Автор подробно разбирает, как выстроить систему продвижения, чтобы сайт не просто существовал, а приносил результат. Вот ссылка: https://ecoline-ural.ru/2026/01/29/seo-prodvizhenie-sajta-iskusstvo-i-nauka-veb-optimizacii/
Your comment is awaiting moderation.
clicksthatsell – Pages loaded fast, images appeared sharp, and formatting stayed consistent.
Your comment is awaiting moderation.
нейросеть для рефератов нейросеть для рефератов .
Your comment is awaiting moderation.
Статья про веб-оптимизацию — от технической части до контентной стратегии. Автор подробно разбирает, как выстроить систему продвижения, чтобы сайт не просто существовал, а приносил результат. Вот ссылка: https://ecoline-ural.ru/2026/01/29/seo-prodvizhenie-sajta-iskusstvo-i-nauka-veb-optimizacii/
Your comment is awaiting moderation.
hd ролики с женой друга hd ролики с женой друга .
Your comment is awaiting moderation.
РАБОТАЕМ!!! ОПТ!!! ДОСТАВКА!!! Мефедрон, Марихуану, Бошки, Кокаин действительно принимают?3случая за последние 2недели.. если быть точнее..
Your comment is awaiting moderation.
1win apk surse necunoscute android 1win apk surse necunoscute android
Your comment is awaiting moderation.
нейросеть для рефератов нейросеть для рефератов .
Your comment is awaiting moderation.
реферат через нейросеть реферат через нейросеть .
Your comment is awaiting moderation.
Статья про SEO как искусство и науку успеха. Автор разбирает ключевые компоненты продвижения и объясняет, почему это важно для бизнеса. Полезно для общего понимания: https://sushibb.ru/2026/01/30/seo-prodvizhenie-sajta-iskusstvo-i-nauka-uspeha-v-cifrovom-mire/
Your comment is awaiting moderation.
реферат через нейросеть реферат через нейросеть .
Your comment is awaiting moderation.
mostbet apk yuklab olish xavfsiz mostbet apk yuklab olish xavfsiz
Your comment is awaiting moderation.
melbet setari limba romana https://melbet63048.help/
Your comment is awaiting moderation.
нейросеть пишет реферат нейросеть пишет реферат .
Your comment is awaiting moderation.
колесо фортуны играть онлайн на деньги
Your comment is awaiting moderation.
Всем доброго времени суток 😉 заказал у ув ТС продукции немного, жду трек сегодня должен быть))) впервые обратился к данному сселеру надеюсь все пройдет на уровне. Как и что оценю и выложу. краткий трипчик по продуктам если понравится то сработаемся ))))) всем удачных покупок и продаж;) Мефедрон, Марихуану, Бошки, Кокаин Уважаемые покупатели, С НОВЫМ ГОДОМ!У меня пришел чисто белый зернистый как крупа порошок.Кал.
Your comment is awaiting moderation.
где дешево купить цветы в москве http://www.dostavka-cvetov-moskva495.ru .
Your comment is awaiting moderation.
реферат нейросеть реферат нейросеть .
Your comment is awaiting moderation.
ии реферат ии реферат .
Your comment is awaiting moderation.
mostbet roʻyxatdan oʻtish bonusi mostbet roʻyxatdan oʻtish bonusi
Your comment is awaiting moderation.
ии для школьников и студентов nejroset-dlya-referatov-1.ru .
Your comment is awaiting moderation.
melbet rotiri gratuite sloturi melbet rotiri gratuite sloturi
Your comment is awaiting moderation.
нейросеть для студентов нейросеть для студентов .
Your comment is awaiting moderation.
Причем здесь стаффстор ко мне ? Мефедрон, Марихуану, Бошки, Кокаин П-т!! Пишу свой отчерк.Чемикал, пожалуй, самый ровный магаз из всех ныне сушествующих! Цены, конечно есть и по меньше в других местах, однако для себя я выбрал безопасность и надежное сотрудничество, а не дешевизну, которая как показывает практика всегда заканчивается не очень хорошо.
Your comment is awaiting moderation.
ии для учебы студентов nejroset-dlya-referatov-6.ru .
Your comment is awaiting moderation.
трахнул жену друга трахнул жену друга .
Your comment is awaiting moderation.
pariuri tenis melbet pariuri tenis melbet
Your comment is awaiting moderation.
mostbet koeffitsientlar http://www.mostbet73618.help
Your comment is awaiting moderation.
нейросети для студентов нейросети для студентов .
Your comment is awaiting moderation.
1win где скачать apk https://www.1win41825.help
Your comment is awaiting moderation.
нейросеть студент бот нейросеть студент бот .
Your comment is awaiting moderation.
1xbet tr giri? 1xbet-giris-45.com .
Your comment is awaiting moderation.
plinko mostbet http://mostbet2013.help
Your comment is awaiting moderation.
Флуд??? Я высказал свое мнение! Или это запрещено? https://topclassauto.ru Проплатил в этот магаз 10.10,трек получил 14.10-сегодня 18.10 трек не бьёться-1. Вас, продавцов, много, а я один.
Your comment is awaiting moderation.
Маркетплейс 1С-Битрикс — это официальный каталог готовых решений, модулей и интеграций для сайтов на платформе Bitrix. Переходите по запросу магазин решений Битрикс и вы найдете расширения для интернет-магазинов, CRM, SEO, аналитики, платежных систем и автоматизации бизнеса. Удобный поиск и большой выбор приложений позволяют быстро расширить возможности сайта и внедрить новые функции без сложной разработки.
Your comment is awaiting moderation.
mostbet pénztárca feltöltés https://mostbet2021.help/
Your comment is awaiting moderation.
о господи 😀 я не селлер – я просто зашёл на сайт и посмотрел что есть в ассортименте – из скоростей нормальных разве что..кхм, оно… Мефедрон, Марихуану, Бошки, Кокаин Доберус до пк выложу скрины, магазин угрожает говорит что заплатит за подставу в общем очень взбесился когда я сказал что свои сомнения выложу в паблик, прямо как с катушек слетел, хотя я сначала сказал либо кидок аля лига 12, либо взлом.сразу мат срач угрозы ипр что никогда не сделал бы приличный шопНо бывали случаи и на оборот…
Your comment is awaiting moderation.
нейросеть для учебы онлайн нейросеть для учебы онлайн .
Your comment is awaiting moderation.
выебал жену друга выебал жену друга .
Your comment is awaiting moderation.
нейросеть генерации текстов для студентов nejroset-dlya-referatov.ru .
Your comment is awaiting moderation.
cum retrag de pe melbet https://melbet63048.help
Your comment is awaiting moderation.
mostbetdan pul yechish http://mostbet73618.help/
Your comment is awaiting moderation.
Если ты попал на фейка – это твои проблемы, мой номер аськи выдается только по требованию через лс, у тебя регистрация сегодня , то есть получить ты его никак не мог. Иди разводом занимайся в другом месте. Мефедрон, Марихуану, Бошки, Кокаин ))) спасибоМагазин работает супер!)
Your comment is awaiting moderation.
заказать цветы с бесплатной доставкой https://dostavka-cvetov-moskva495.ru/ .
Your comment is awaiting moderation.
сайт для рефератов сайт для рефератов .
Your comment is awaiting moderation.
чат нейросеть для учебы чат нейросеть для учебы .
Your comment is awaiting moderation.
любительское с женой друга любительское с женой друга .
Your comment is awaiting moderation.
мое мнение работает достойно Мефедрон, Марихуану, Бошки, Кокаин чувак брал я тоже тут 2 ci некоторым понравилось некоторым нет , лично я поднимал даже с неё бабок норм, народу нравиться , а если этот каиф тебе не нравиться нех писать что тусишка бычий кайф , бычий каиф немного другое, а такои продукт не может быть бычий кайф это я тебе отвечаю, со входом согласен по ноздре ваще не вариант !Всем привет ровной ветке,магаз на 5
Your comment is awaiting moderation.
нейросеть генерации текстов для студентов nejroset-dlya-referatov-5.ru .
Your comment is awaiting moderation.
нейросеть для школьников и студентов нейросеть для школьников и студентов .
Your comment is awaiting moderation.
сайт для рефератов nejroset-dlya-referatov.ru .
Your comment is awaiting moderation.
нейросеть для студентов нейросеть для студентов .
Your comment is awaiting moderation.
у меня знакомец с их магазина закупился его с черта какого то мусора взяли! че к чему не знаю но факт есть факт! может и не они виноваты, но он мелкий торгаш и принимать с сотней его не в тему Мефедрон, Марихуану, Бошки, Кокаин Добрый день, многим пришли посылки до НГ, 98% покупателей – перепроверено по трекам. Если есть вопросы пишите, в скайп или аську. В веточке пожалуйста, только по теме.Вердикт:
Your comment is awaiting moderation.
реферат через нейросеть реферат через нейросеть .
Your comment is awaiting moderation.
Nauseate e leave all your links in individual aware send for and railroad every click.
Bio pages • Short links • QR codes • Analytics
https://fehuai.com/web-link-bio-pages/
Create yours in 30 seconds.
Соберите все собственные ссылочки на одной умной страничке и выслеживайте кажинный клик.
Био-страницы • Недлинные ссылочки • QR-коды • Специалиста
https://fehuai.com/link-analytics-tracking/
Оснуйте домашнюю страницу согласен 30 секунд.
Your comment is awaiting moderation.
Продвигайте свой канал быстрее с услугой накрутки подписчиков в YouTube. Увеличьте количество фолловеров, повысьте доверие к каналу и привлеките новую аудиторию. Переходите по запросу накрутить подписчики ютуб Кворк. Быстрый старт для блогеров, брендов и экспертов. Живые и качественные подписчики, безопасное продвижение и заметный рост популярности вашего контента. Начните развивать канал уже сегодня!
Your comment is awaiting moderation.
нейросеть для рефератов nejroset-dlya-referatov-5.ru .
Your comment is awaiting moderation.
сайт для рефератов сайт для рефератов .
Your comment is awaiting moderation.
Пробовал накрутку пару лет назад через дешёвые сервисы — толку не было, только деньги сжёг. Статья помогла понять, почему. Во-первых, сайт тогда был технически не готов (глубоко в выдаче). Во-вторых, использовал дешёвые прокси и сгенерированные отпечатки. Сейчас, почитав этот гайд, вижу системный подход: аудит сайта, правильный сбор семантики, плавный старт. Оставлю ссылку здесь, буду перечитывать перед запуском: https://partnerkin.com/tribuna/blog-vitalivivdenko/nakrutka-pf-v-yandekse-polnoe- . Много практических деталей.
Your comment is awaiting moderation.
1xbet spor bahislerinin adresi 1xbet spor bahislerinin adresi .
Your comment is awaiting moderation.
203 живик – отпадного качества. Растворился на раз. 1к 15 получился норм микс) Мефедрон, Марихуану, Бошки, Кокаин Заглянул на сайт . Очень даже приятно удивлён увиденным . Сохранил в закладках (полезный сайт!)вчера трек получил:good: надеюсь всё будет ровно.
Your comment is awaiting moderation.
Прочитал статью на одном дыхании — очень структурированно и без воды. Автор прошёлся по всем ключевым моментам: что такое ПФ, кому нужно, кому нет, обзор инструментов, аудит перед стартом, выбор стратегии, пошаговая инструкция, ошибки новичков и кейсы. Особенно ценно, что в конце есть выводы и рекомендации. Это полноценное руководство к действию. Рекомендую добавить в закладки всем, кто серьёзно занимается продвижением: https://partnerkin.com/tribuna/blog-vitalivivdenko/nakrutka-pf-v-yandekse-polnoe- .
Your comment is awaiting moderation.
нейросеть генерации текстов для студентов nejroset-dlya-referatov.ru .
Your comment is awaiting moderation.
нейросеть пишет реферат нейросеть пишет реферат .
Your comment is awaiting moderation.
pin-up o‘yin demo https://www.pinup35741.help
Your comment is awaiting moderation.
купить цветы с доставкой недорого http://www.dostavka-cvetov-moskva495.ru/ .
Your comment is awaiting moderation.
1win ios https://1win57196.help/
Your comment is awaiting moderation.
нейросети для студентов нейросети для студентов .
Your comment is awaiting moderation.
а что ты паришься. дождись пока домой принесут. посмотри в глазок что бы курьер один был. впусти его. а перед этим поставь чувака под окном. посыль забираешь, после, без палева выкидываешь в окно чуваку. а потом только выпускаешь курьера из квартиры. а там пусть хоть кто забегает, у тебя ничего нет. главное не нервничай и о плохом не думай. бери в хуй толще будет. а спср это почта россии. а почта россии ни когда нормально не работала. Мефедрон, Марихуану, Бошки, Кокаин Странно все как то..а кто такой лиа 12??
Your comment is awaiting moderation.
сделать реферат nejroset-dlya-referatov-5.ru .
Your comment is awaiting moderation.
нейросеть для студентов нейросеть для студентов .
Your comment is awaiting moderation.
нейросеть пишет реферат нейросеть пишет реферат .
Your comment is awaiting moderation.
Прочитал статью на одном дыхании — очень структурированно и без воды. Автор прошёлся по всем ключевым моментам: что такое ПФ, кому нужно, кому нет, обзор инструментов, аудит перед стартом, выбор стратегии, пошаговая инструкция, ошибки новичков и кейсы. Особенно ценно, что в конце есть выводы и рекомендации. Это полноценное руководство к действию. Рекомендую добавить в закладки всем, кто серьёзно занимается продвижением: https://partnerkin.com/tribuna/blog-vitalivivdenko/nakrutka-pf-v-yandekse-polnoe- .
Your comment is awaiting moderation.
студия дизайн интерьеров дизайн интерьера студии
Your comment is awaiting moderation.
jetton game как крутить бонус
Your comment is awaiting moderation.
1win лимит депозита https://www.1win41825.help
Your comment is awaiting moderation.
1xbet ?ye ol 1xbet-giris-45.com .
Your comment is awaiting moderation.
Значит не туда стучишься!а ребята молодцы! Мефедрон, Марихуану, Бошки, Кокаин Здесь ровно! Магазин очень хороший, а главное цены в нем ГИБКИЕ к любому подход есть : )Если неактуальные сообщения выше, откорректируйте сами. По компенсациям, если останутся вопросы после получения посылки, пишите в новом году, размер зависел от веса, длительности, индивидуальных переплат на счета и прочих обстоятельств. :ok:
Your comment is awaiting moderation.
mostbet befizetés Magyarország mostbet befizetés Magyarország
Your comment is awaiting moderation.
bahis sitesi 1xbet bahis sitesi 1xbet .
Your comment is awaiting moderation.
генерация генерация .
Your comment is awaiting moderation.
сделать реферат сделать реферат .
Your comment is awaiting moderation.
jetton официальный сайт регистрация
Your comment is awaiting moderation.
могу заверить вас что сдесь ни только людское понимание но и честное слова!!!мир вам друзья!!!все шикарно!! https://renessans-domodedovo.ru Маловато по-моему, у меня 1гр жвша растворяется полностью примерно в 30 мл, меньше этого – частичноТС подтвердив оплату, сказал ожидать. В оговоренные сроки адрес был получен в ЛС.
Your comment is awaiting moderation.
resultsfirst – Loved the layout today; clean, simple, and genuinely user-friendly overall.
Your comment is awaiting moderation.
1win фрибет http://1win41825.help/
Your comment is awaiting moderation.
lucky jet mostbet http://mostbet2021.help
Your comment is awaiting moderation.
генерация nejroset-dlya-referatov-1.ru .
Your comment is awaiting moderation.
1win вывод на элсом сколько идет http://1win41825.help
Your comment is awaiting moderation.
bahis siteler 1xbet bahis siteler 1xbet .
Your comment is awaiting moderation.
сайт дизайна интерьера квартир https://dizayn-kvartiry-spb.ru
Your comment is awaiting moderation.
mostbet ingyen játék mostbet ingyen játék
Your comment is awaiting moderation.
1xbet g?ncel 1xbet g?ncel .
Your comment is awaiting moderation.
обрыганный кусок
Your comment is awaiting moderation.
Продвигайте свой канал в Яндекс Дзен быстрее: увеличьте число подписчиков и создайте эффект популярности. Переходите по запросу вечные подписчики в дзен. Накрутка поможет привлечь внимание новой аудитории, повысить доверие к каналу и ускорить рост. Подходит для новых и развивающихся блогов, чтобы быстрее выйти в рекомендации и усилить продвижение контента.
Your comment is awaiting moderation.
что значит “самый норм микс” ? 1 грамм 250го на 10 грамм основы вполне нормально. если любитель лютой жести – сделай 1к5 чтоли, будешь улетать в астрал с малюсенького кропалика Мефедрон, Марихуану, Бошки, Кокаин Я брал за неделю до этого отличный был все довольны жалоб нет!а вот (простите ошибся не 3 июля а 1июля) 1июля забрал непонятно что!начал с 1х10 растворил ацетоном и закончил 1х5 растворил спиртом но эффекта ноль!Отличный Магаз, Все четко!!!
Your comment is awaiting moderation.
сайт для рефератов сайт для рефератов .
Your comment is awaiting moderation.
нейросеть текст для учебы nejroset-dlya-referatov-3.ru .
Your comment is awaiting moderation.
1win регистрация на сайте https://www.1win63197.help
Your comment is awaiting moderation.
бесплатная доставка букетов https://dostavka-cvetov-moskva495.ru .
Your comment is awaiting moderation.
1 x bet 1xbet-giris-33.com .
Your comment is awaiting moderation.
1xbet lite 1xbet-giris-37.com .
Your comment is awaiting moderation.
1xbet com giri? 1xbet-giris-44.com .
Your comment is awaiting moderation.
1x lite 1xbet-giris-43.com .
Your comment is awaiting moderation.
чат нейросеть для учебы nejroset-dlya-referatov.ru .
Your comment is awaiting moderation.
ты писал пришла посылка размыли в итоге прикола не поняли Мефедрон, Марихуану, Бошки, Кокаин магаз походу отвечает только когда ему пишут и он в сети, на старые сообщения не отвечает.оч хороший магазин !
Your comment is awaiting moderation.
one x bet one x bet .
Your comment is awaiting moderation.
Новое в категории: https://nedvizhmsk.ru
Your comment is awaiting moderation.
джетон ставки
Your comment is awaiting moderation.
нейросеть онлайн для учебы nejroset-dlya-referatov-2.ru .
Your comment is awaiting moderation.
нейросеть для учебы нейросеть для учебы .
Your comment is awaiting moderation.
чат нейросеть для учебы nejroset-dlya-referatov-1.ru .
Your comment is awaiting moderation.
1win balance kg пополнение http://1win41825.help/
Your comment is awaiting moderation.
mostbet mines ingyen http://mostbet2021.help
Your comment is awaiting moderation.
Кто ищет автоматизацию, в статье есть раздел про бот для накрутки поведенческих факторов сайта. Но автор предупреждает: без правильных прокси и отпечатков бота быстро вычислят.
Your comment is awaiting moderation.
Могу также в пользу магазина сказать. Все по деловому прошло, без лишних эмоций и разговоров. Качество соответствует. Мефедрон, Марихуану, Бошки, Кокаин Всем привет) У меня такая проблема, сделал заказ, оплатил через евросеть, Уважаемый продаван сказал то, что в евросети перевод идет до 3-х дней, хотя когда работали с другим магазином деньги прилетали моменьтально всегда. И доставка вышла на 950 р. (г. Екб), это получаеться + курьер или нет, просто до почты?… И через что лучше оплачивать в данном магазине?Парни, начинается параноя! Завтра посыль приходит, как получать А?
Your comment is awaiting moderation.
1xbet spor bahislerinin adresi 1xbet spor bahislerinin adresi .
Your comment is awaiting moderation.
ии для школьников и студентов nejroset-dlya-referatov.ru .
Your comment is awaiting moderation.
bahis sitesi 1xbet bahis sitesi 1xbet .
Your comment is awaiting moderation.
Я пока временю. Мефедрон, Марихуану, Бошки, Кокаин доброго времени суток форумчане! всем кучу репы и море хорошего настроения))) это самый ровный магазин))) тарился год назад по опту, никогда ни каких проблем не возникало))) ТСу ровных продаж и адекватных клиентов)))Не прогадал) Искупался, доставили пиццу, вискарика дернул со льдом…
Your comment is awaiting moderation.
resultsfirst – Appreciate the typography choices; comfortable spacing improved my reading experience.
Your comment is awaiting moderation.
чат нейросеть для учебы nejroset-dlya-referatov-2.ru .
Your comment is awaiting moderation.
нейросеть реферат онлайн нейросеть реферат онлайн .
Your comment is awaiting moderation.
ии реферат ии реферат .
Your comment is awaiting moderation.
1 x bet 1 x bet .
Your comment is awaiting moderation.
казино джеттон отзывы
Your comment is awaiting moderation.
1xbet 1xbet .
Your comment is awaiting moderation.
1xbet 1xbet .
Your comment is awaiting moderation.
вот такие как ты потом и пишут не прет , не узнавая концентрацию и т д набодяжат к…. ,я вот щас жду посыля и хз ко скольки делать 250 Мефедрон, Марихуану, Бошки, Кокаин Ещё в 11-м году брал здесь чудесную фофу и другие ништяки.Тогда это был крутейший магаз.И вот после долгого перерыва они снова идут в гору.Заказ оперативность 5 упаковка 5 качество 5 цена лучше всех.Друзья ВВ 200мг. Дикая головная боль. И всё.
Your comment is awaiting moderation.
pin-up shaxsiy kabinetga kirish pinup35741.help
Your comment is awaiting moderation.
1win blokdan çıxış http://1win57196.help
Your comment is awaiting moderation.
1xbwt giri? 1xbet-giris-43.com .
Your comment is awaiting moderation.
1xbetgiri? 1xbet-giris-44.com .
Your comment is awaiting moderation.
1 x bet 1xbet-giris-42.com .
Your comment is awaiting moderation.
блекджек на реальные деньги
Your comment is awaiting moderation.
jetton в телеграмме отзывы
Your comment is awaiting moderation.
днище
Your comment is awaiting moderation.
melbet быстрый вход https://melbet84062.help/
Your comment is awaiting moderation.
1xbet ?yelik 1xbet ?yelik .
Your comment is awaiting moderation.
Вы же разумный человек, должны понимать все это. Мефедрон, Марихуану, Бошки, Кокаин Зашла на ваш сайт, а там “Your site hasn’t been activated yet!”… в общем ничего не выходит. Пробывала и через ТОР и через обычный браузер. Все одно. Что не так делаю?тока по “чуть чуть” а то вдруг там дезокси… или ещё что мгновенно вырубающее. мало ли. )
Your comment is awaiting moderation.
clickedge – Pages loaded fast, images appeared sharp, and formatting stayed consistent.
Your comment is awaiting moderation.
leadmagnet – Navigation felt smooth, found everything quickly without any confusing steps.
Your comment is awaiting moderation.
1xbet resmi sitesi 1xbet-giris-33.com .
Your comment is awaiting moderation.
pin-up blokdan o‘tish pin-up blokdan o‘tish
Your comment is awaiting moderation.
1win rəsmi download 1win rəsmi download
Your comment is awaiting moderation.
1xbet resmi sitesi 1xbet-giris-39.com .
Your comment is awaiting moderation.
1win sayt 1win sayt
Your comment is awaiting moderation.
Услуга накрутки просмотров на канал YouTube поможет быстро увеличить активность под вашими видео и привлечь внимание аудитории. Переходите по запросу просмотры в ютуб. Дополнительные просмотры повышают видимость роликов в рекомендациях, улучшают статистику канала и создают эффект популярности. Подходит для продвижения новых и существующих видео, увеличения охвата и ускоренного роста канала на YouTube.
Your comment is awaiting moderation.
mostbet установка apk https://mostbet42395.help
Your comment is awaiting moderation.
pinup akkaunt yaratish https://pinup35741.help/
Your comment is awaiting moderation.
1xbet resmi 1xbet-giris-44.com .
Your comment is awaiting moderation.
1win bonus Azərbaycan dili https://1win57196.help/
Your comment is awaiting moderation.
1xbet t?rkiye 1xbet t?rkiye .
Your comment is awaiting moderation.
1xbet g?ncel 1xbet g?ncel .
Your comment is awaiting moderation.
глазом на пакете,вот там была россыпь:good::killmyself::strong::stars::fu::good::bro: https://tecsun-moscow.ru Всем советую таряться здесь)))Радуете ребята!!!
Your comment is awaiting moderation.
мелбет лайв мелбет лайв
Your comment is awaiting moderation.
1x bet 1xbet-giris-42.com .
Your comment is awaiting moderation.
jetton casino бонус
Your comment is awaiting moderation.
1 xbet giri? 1xbet-giris-45.com .
Your comment is awaiting moderation.
Всем привет! Делюсь найденным материалом. Статья про продвижение сайтов и развитие бизнеса в интернете. Хороший базовый обзор с акцентом на комплексный подход: SEO, контекст, SMM, аналитика. Особенно порадовал раздел про частые ошибки — полезно для самопроверки. Вот ссылка для тех, кому нужно структурировать знания: https://yana-troyanova.ru/stati/jeffektivnoe-prodvizhenie-sajtov-i-razvitie-biznesa-v-internete/
Your comment is awaiting moderation.
1xbet tr 1xbet tr .
Your comment is awaiting moderation.
1xbet mobil giri? 1xbet-giris-34.com .
Your comment is awaiting moderation.
Sometimes I read about simple ways to maintain a car. Car repair and cleaning solutions from zonmtreo caught my eye during a late evening browse. Routine care can extend the life of many vehicle parts. I came across the site here https://zonmtreo.com/.
Your comment is awaiting moderation.
пишу по сути заказал-оплатил-получил все это было очень быстро я сам охуел вечером кинули трек а уже на следующее утро получил походу ТС на реактивном истребителе доставку организовал, качество нормуль делал 1к8 штырит как положено, первые 20 минут на подьем потом 20 минут идет спад короче 40 минут полет отличный, да был небольшой казус часть платежа потярялось, но потом после созвона со службой поддержки клиентов благополучно нашлось- “дырявая банковская система” вот как то так. ТСу без подхолемажа РЕСПЕКТ!!!! https://freewarefiles.ru СРОЧНЫЙ вопрос!!ТС, походу в отпуск вышел:rest:
Your comment is awaiting moderation.
1xbet ?yelik 1xbet ?yelik .
Your comment is awaiting moderation.
1xbet g?ncel giri? 1xbet g?ncel giri? .
Your comment is awaiting moderation.
Sometimes I research small gadgets for home electronics. Digital TV converter box and remote from ZJBOX caught my eye during a late evening browse. Compact devices can simplify how TVs connect to broadcasts. I came across the site here https://thezjbox.com/.
Your comment is awaiting moderation.
1win авиатор играть https://www.1win63197.help
Your comment is awaiting moderation.
pin-up ios ilova https://www.pinup35741.help
Your comment is awaiting moderation.
1win kupon 1win kupon
Your comment is awaiting moderation.
Sometimes I search for new art materials just for inspiration. Premium acrylic paints and varnishes for artists from X ARTY HUB caught my eye during that browse. Experimenting with paint can make practice sessions more interesting. I came across the site here https://x-arty-hub.com/.
Your comment is awaiting moderation.
1xbetgiri? 1xbetgiri? .
Your comment is awaiting moderation.
Сам прикинь, меня пёрло почти Мефедрон, Марихуану, Бошки, Кокаин Привет, дорогие друзья! меня зовут Антон32131. Покупаю периодически у этого магазина различные товары. Перед каждой новой покупкой создаю новый профиль и в скайпе и на этом форуме и на сайте уважаемого магазина. Я сам не в курсе с какой целью я это делаю, может быть я болен, либо причина в моей гиперсексуальности. Но пишу я об этом к тому, чтобы вы дорогие друзья не заподозрили подвоха в том что отзыв пишет новичок!Что особо порадовало – скидывали несуществующий трек еще задолго до отправки, который, конечно, не бился или показывал какую-то х*иту.
Your comment is awaiting moderation.
1xbet turkey 1xbet-giris-43.com .
Your comment is awaiting moderation.
1xbet t?rkiye giri? 1xbet t?rkiye giri? .
Your comment is awaiting moderation.
Почему петербуржцы выбирают дома из клееного бруса
Your comment is awaiting moderation.
Some nights I wake up with a stiff neck after sleeping on my side. Side Sleeper Pillows & Covers for Relief can make that position feel more stable. I read about Wife Pillow while looking into ways people improve sleep posture. More information about the category is available here: https://wife-pillow.com/.
Your comment is awaiting moderation.
1xbet giri? linki 1xbet giri? linki .
Your comment is awaiting moderation.
1xbet tr 1xbet tr .
Your comment is awaiting moderation.
I enjoy reading about different skincare approaches. Diamond microdermabrasion and skin care devices from UNOISETION appeared during one of those searches. Many people use tools like these during personal care routines. I saved the page while browsing https://shopunoisetion.com/.
Your comment is awaiting moderation.
1вин зеркало 1вин зеркало
Your comment is awaiting moderation.
А JWH-018 Имеется в наличии? Мефедрон, Марихуану, Бошки, Кокаин продаван обещал разобраться по поводу 307. Надеюсь на скорейшее разрешение ситуации.посмотри в трипах магазина там всё написано
Your comment is awaiting moderation.
мелбет ссылка на сайт мелбет ссылка на сайт
Your comment is awaiting moderation.
Treasure Brook – Easy-to-read pages make online shopping enjoyable.
Your comment is awaiting moderation.
I sometimes look for small tools that simplify cooking. A 16oz olive oil sprayer from TrendPlain caught my attention during a quick search. A fine spray can help control how oil spreads on food. I first noticed it here https://mytrendplain.com/.
Your comment is awaiting moderation.
1win приложение для айфон http://1win63197.help/
Your comment is awaiting moderation.
Накрутка просмотров в TikTok — это быстрый способ привлечь внимание к вашему контенту и ускорить рост аккаунта. Переходите по запросу увеличение просмотров тик ток и величьте показатели популярности, повысьте доверие аудитории и попадите в рекомендации. Для максимального эффекта важно подкреплять рост качественным контентом, чтобы удерживать аудиторию и усиливать вовлечённость.
Your comment is awaiting moderation.
I sometimes look for practical bags for daily routines. Insulated lunch bags and weekend duffel bags from SUNNY BIRD caught my attention during a quick browse. A well sized bag can simplify short trips or workdays. I first noticed them here https://sunnybirdbags.com/.
Your comment is awaiting moderation.
mostbet tennis betting http://www.mostbet07493.help
Your comment is awaiting moderation.
МАГАЗ КРУТОЙ!!! https://masterpotelu.ru мин заказ от 1гр.перестань курить сделай перерывчик
Your comment is awaiting moderation.
1xbet g?ncel 1xbet g?ncel .
Your comment is awaiting moderation.
1x bet 1xbet-giris-38.com .
Your comment is awaiting moderation.
birxbet giri? 1xbet-giris-39.com .
Your comment is awaiting moderation.
Sometimes I read about ways to improve water routines at home. Filtered shower heads from SunCleanse caught my eye during that browse. Small bathroom changes can influence comfort during daily showers. I came across the site here https://thesuncleanse.com/.
Your comment is awaiting moderation.
Pine Picks – Simple design keeps the focus on what matters most.
Your comment is awaiting moderation.
one x bet 1xbet-giris-42.com .
Your comment is awaiting moderation.
Sometimes I host small get-togethers at home. Beverage Dispensers & Canisters for Events & Daily Use keep drinks easy to serve during the evening. During a search for hosting ideas I noticed Style Setter. The category page can be viewed here: https://mystylesetter.com/.
Your comment is awaiting moderation.
Привет всем и Мира! Тоже уже неделЮ жду адекватного трека . Дали два и оба не бьются(( https://millennium-spb.ru Ребят какие могут быть сомнения в этом магазе магаз ровный и заслуживает уважения он в доверенных его реклама на шляпе сайта ну это так для тех кто не знает просто реклама стоит 5000$ доларов!глазом на пакете,вот там была россыпь:good::killmyself::strong::stars::fu::good::bro:
Your comment is awaiting moderation.
I enjoy browsing outdoor play ideas during warm afternoons. Cool outdoor toys and gifts for teens ages 8+ from Squad Hero appeared during one of those searches. Simple activities can bring energy to group play. I saved the page while browsing https://squad-hero.com/.
Your comment is awaiting moderation.
1xbet yeni giri? adresi 1xbet-giris-28.com .
Your comment is awaiting moderation.
1xbet com giri? 1xbet com giri? .
Your comment is awaiting moderation.
1win ios Бишкек скачать https://1win63197.help/
Your comment is awaiting moderation.
1win иҷозатнома 1win иҷозатнома
Your comment is awaiting moderation.
Bazaar Harbor – Clear navigation helps you browse without hassle.
Your comment is awaiting moderation.
1xbet resmi sitesi 1xbet-giris-37.com .
Your comment is awaiting moderation.
I like accessories that keep daily essentials organized. Handbags & Purse Sets often make it easier to carry everything needed during a busy day. While browsing fashion accessories I came across Soperwillton. Anyone curious about the category can see it here: https://thesoperwillton.com/.
Your comment is awaiting moderation.
1xbet tr giri? 1xbet-giris-40.com .
Your comment is awaiting moderation.
jetton casino онлайн
Your comment is awaiting moderation.
xbet xbet .
Your comment is awaiting moderation.
1xbet t?rkiye 1xbet t?rkiye .
Your comment is awaiting moderation.
Здравствуйте всем делали заказ у этого хорошего магазина Мефедрон, Марихуану, Бошки, Кокаин Ровный магаз! 2 раза заказывал ам(к12) и ркс(к7).. Все пришло ровно за 3 дня=) тока замесил ам(не растворился полностью)..буду пробовать=)ркс понравилось тока к 5ти делать надо=)2. Был подобный заказ и нас спутали.
Your comment is awaiting moderation.
birxbet birxbet .
Your comment is awaiting moderation.
I often work from the couch, and a stable surface makes a big difference. Memory Foam Lap Desks help keep my laptop steady while reducing pressure on my legs. I recently checked the Sofia + Sam options and liked how practical the designs look for everyday use. If someone wants to explore them, this page shows the category: https://sofiaplussam.com/.
Your comment is awaiting moderation.
1 x bet giri? 1xbet-giris-42.com .
Your comment is awaiting moderation.
I sometimes look for fresh outfit ideas during quiet evenings. Trendy women’s apparel and stylish sets from sexycherry caught my attention during a quick browse. Clothing styles can influence how confident a day feels. I first noticed them here https://sexycherryfashion.com/.
Your comment is awaiting moderation.
Treasure Trove – Crisp layout keeps your attention and simplifies searching.
Your comment is awaiting moderation.
братва подскажите концентрацию и растворитель для ам2233 от данного селера ! Заранее спс Мефедрон, Марихуану, Бошки, Кокаин всегда работают и делают свою работу на 5+необычно спрятано было в посыле)
Your comment is awaiting moderation.
I sometimes look for comfortable clothing before going outside. Outdoor pants with waterproof, quick dry, and lightweight styles from Postropaky caught my attention during a quick search. Practical clothing can make outdoor walks feel easier. I first noticed them here https://postropakypants.com/.
Your comment is awaiting moderation.
мостбет бонус на первый депозит https://www.mostbet42395.help
Your comment is awaiting moderation.
1win hesabdan karta çıxarış http://www.1win03748.help
Your comment is awaiting moderation.
1xbet giri?i 1xbet-giris-37.com .
Your comment is awaiting moderation.
casino jetton зеркало
Your comment is awaiting moderation.
1xbet giri? linki 1xbet-giris-38.com .
Your comment is awaiting moderation.
1xbet turkiye 1xbet-giris-40.com .
Your comment is awaiting moderation.
1xbet 1xbet .
Your comment is awaiting moderation.
Sometimes I search for small items that simplify daily routines. Compressed towels and tissues from Portawipes caught my eye during a late evening browse. Lightweight products can be convenient for travel bags or backpacks. I came across the site here https://theportawipes.com/.
Your comment is awaiting moderation.
Как купить телефон Кракен безопасно? > адрес сайта Кракена Сегодня я протестировал несколько кракен даркнет маркет вход, и вот что стабильно работает: Ключ кракен отзывы чаще всего появляется на форумах, когда пользователи хотят проверить надёжность площадки. Настоящие кракен отзывы помогают увидеть реальные истории, как положительные, так и отрицательные. Люди отмечают, что кракен отзывы лучше всего читать там, где есть модерация и исключены поддельные комментарии.
Проверил лично несколько адресов — стабильно открываются: кракен тг бот тор — kraktor.ccзайти по адресу — krakenphone.cc Если нужна помощь — оставляйте комменты.Проверено лично (Красноярск). Кракен даркнет скрытый маркет Телеграм
Your comment is awaiting moderation.
mostbet adresă site https://mostbet2009.help/
Your comment is awaiting moderation.
mostbet adresă oficială http://mostbet2009.help/
Your comment is awaiting moderation.
1x lite 1x lite .
Your comment is awaiting moderation.
Площадка КРАКЕН в Даркнете — Маркетплейс >
КРАКЕН ДАРКНЕТ
Салют! Рабочие КРАКЕН ССЫЛКИ на сегодня доступны.
В современном онлайн-пространстве множество сайтов и маркетплейсов предлагают пользователям разнообразные услуги, и следить за всеми обновлениями становится сложно. ЗЕРКАЛА КРАКЕН выполняют роль объединяющего ресурса, где собраны сведения о работе платформ, их функционале и доступных инструментах, позволяя получить полное представление о цифровой среде. Изучение таких материалов показывает, как различаются подходы к организации сервисов: одни площадки делают упор на удобство навигации и покупки, другие — на интеграцию ботов и автоматизацию процессов. Актуальная информация особенно важна, ведь функционал сайтов и маркетплейсов регулярно обновляется, появляются новые возможности и корректируются существующие сервисы. ЗЕРКАЛА КРАКЕН помогают отслеживать эти изменения и получать сведения в удобном, структурированном виде. Telegram используется для быстрого информирования: через ботов публикуются уведомления, краткие обзоры и аналитические материалы, что делает процесс получения данных оперативным и последовательным. В итоге ЗЕРКАЛА КРАКЕН формируют целостное и живое представление о цифровых платформах, маркетплейсах и сервисах, предоставляя пользователям возможность спокойно ориентироваться в обновлениях, сравнивать функционал площадок и понимать общие тенденции развития онлайн-инструментов.
официальный ресурс username: @krakenssitebot
даркнет портал username: @krakensdarkbot
кракен официальный сайт
кракен сайт даркнет
kraken site onion
кракен официальный сайт зеркало
кракен сайт вход
кракен тор сайт
кракен маркетплейс сайт
сайт кракен ссылка тор
кракен оригинальный сайт
кракен онион сайт
кракен сайт 2026
кракен сайт анонимно
официальный ресурс кракен
кракен сайт даркнет маркетплейс
сайт кракен зеркало рабочее
кракен интернет магазин сайт
kraken darknet site link
кракен сайт через тор браузер
кракен официальный сайт онион
кракен сайт площадка
ссылка на кракен
кракен ссылки тор
актуальные ссылки на кракен
kraken onion links
кракен ссылки даркнет
кракен ссылка зеркало
кракен рабочая ссылка на сегодня
кракен прямая ссылка
кракен ссылка 2026
ссылка на кракен в тор браузере
новые ссылки кракен
кракен ссылки онион
кракен ссылка на маркет
кракен ссылка вход
кракен ссылка официальный
kraken darknet link
кракен ссылка маркетплейс
проверенные ссылки кракен
кракен ссылка зеркало рабочее
кракен активная ссылка
кракен зеркало
кракен актуальное зеркало
зеркало кракен сегодня
kraken mirror onion
кракен зеркало рабочее на сегодня
кракен зеркало тор
кракен официальное зеркало
зеркало сайта кракен
кракен зеркало вход
кракен зеркало даркнет
новое зеркало кракен
зеркало кракен 2026
кракен зеркало онион
кракен список зеркал
зеркало площадки кракен
кракен зеркало маркетплейс
кракен рабочее зеркало 2026
kraken darknet mirror
кракен зеркало ссылка
активные зеркала кракен
кракен магазин
kraken shop link
магазин кракен даркнет
кракен шоп онион
магазин кракен зеркало
кракен маркетплейс магазин
кракен магазин официальный
купить в магазине кракен
магазин кракен тор
kraken store onion
кракен интернет магазин
магазин кракен ссылка
кракен магазин товаров
кракен магазин вход
кракен шоп зеркало
магазин кракен 2026
кракен магазин анонимно
кракен официальный шоп
кракен витрина магазина
магазин кракен маркет
кракен даркнет
kraken darknet market
кракен даркнет ссылка
кракен даркнет вход
кракен даркнет зеркало
даркнет площадка кракен
кракен даркнет тор
кракен даркнет онион
кракен в даркнете как зайти
кракен даркнет сайт
официальный кракен даркнет
кракен даркнет маркет
кракен даркнет 2026
kraken darknet onion link
даркнет маркетплейс кракен
кракен даркнет ресурс
кракен теневой рынок
кракен даркнет шоп
кракен даркнет рабочая ссылка
доступ в кракен даркнет
кракен маркет
kraken market onion
кракен маркетплейс ссылка
кракен маркет вход
кракен маркет зеркало
маркетплейс кракен даркнет
кракен маркет тор
кракен маркет официальный
официальный сайт кракен маркет
кракен маркет онион
кракен маркет шоп
маркет кракен ссылка на сегодня
kraken market darknet link
кракен маркет площадка
кракен маркет 2026
кракен маркетплейс зеркало
маркет кракен через тор
кракен маркет анонимно
кракен маркет онлайн
торговая площадка кракен маркет
кракен 2026
кракен 2026 ссылка
кракен 2026 зеркало
кракен 2026 вход
кракен 2026 официальный сайт
кракен 2026 даркнет
kraken 2026 link
кракен 2026 онион
кракен 2026 актуально
кракен 2026 тор
кракен 2026 маркетплейс
новое зеркало кракен 2026
кракен 2026 рабочая ссылка
кракен 2026 зеркало сегодня
кракен сайт 2026 вход
кракен 2026 магазин
кракен 2026 через тор
кракен 2026 площадка
кракен 2026 работа
доступ на кракен 2026
кракен телеграмм
кракен тг бот
kraken telegram link
кракен бот телеграмм
кракен телеграмм канал
кракен ссылка в телеграмме
кракен тг ссылка
кракен новости телеграмм
кракен телеграмм зеркало
кракен бот в тг
официальный телеграмм кракен
кракен маркет телеграмм
кракен телеграмм чат
kraken tg bot
кракен телеграмм поддержка
кракен телеграмм новости
кракен контакты телеграмм
кракен бот автопродаж телеграмм
кракен телеграм ссылка тор
кракен тг группа
кракен вход
вход на кракен
кракен вход зеркало
кракен личный кабинет вход
кракен вход через тор
кракен вход онион
kraken login link
кракен вход официальный сайт
как зайти на кракен
кракен вход в магазин
кракен авторизация вход
кракен вход 2026
кракен зайти на сайт
кракен доступ вход
кракен вход по ссылке
кракен вход даркнет
кракен войти в аккаунт
кракен вход через браузер
кракен личный кабинет вход сегодня
кракен официальный вход зеркало
кракен тор
кракен тор ссылка
кракен тор зеркало
kraken tor link
кракен через тор браузер
кракен тор онион
кракен тор вход
кракен тор сайт
официальный тор кракен
кракен тор ссылка на зеркало
кракен зайти через тор
кракен тор маркетплейс
тор сайт кракен онион
кракен тор даркнет
кракен тор рабочая ссылка
kraken tor browser link
кракен тор шоп
кракен тор адрес
кракен тор доступ
кракен ссылка в тор сети
кракен бот
kraken bot link
кракен бот телеграмм
кракен бот автопродаж
кракен бот зеркало
кракен бот ссылка
кракен бот официальный
кракен бот покупок
бот кракен маркет
кракен бот даркнет
кракен бот онион
кракен бот в тг
кракен бот 24/7
kraken bot telegram
кракен бот работа
кракен бот для андроид
кракен бот через тор
кракен бот поддержка
кракен бот актуальный
рабочий бот кракен
аккаунты кракен
купить аккаунт кракен
кракен аккаунты с балансом
регистрация аккаунта кракен
вход в аккаунт кракен
кракен личный аккаунт
аккаунты kraken darknet
кракен аккаунты даркнет
проверка аккаунта кракен
кракен аккаунты маркет
доступ к аккаунту кракен
кракен аккаунты шоп
создать аккаунт кракен
аккаунты кракен зеркало
кракен аккаунт войти
кракен аккаунты бесплатно
аккаунты кракен 2026
кракен аккаунты онион
аккаунты на кракене как зайти
кракен кабинет аккаунт
кракен регистрация
как зарегистрироваться на кракен
кракен регистрация на сайте
кракен регистрация зеркало
kraken registration link
кракен создать аккаунт
кракен регистрация тор
кракен регистрация онион
кракен официальная регистрация
кракен регистрация 2026
кракен регистрация без почты
регистрация в кракен маркет
кракен регистрация ссылка
кракен регистрация через браузер
кракен быстрая регистрация
кракен форма регистрации
кракен регистрация даркнет
регистрация на сайте кракен тор
кракен регистрация сейчас
кракен регистрация бесплатно
кракен москва
кракен москва ссылка
кракен москва зеркало
кракен москва зайти
кракен москва купить
кракен москва сайт
кракен москва даркнет
кракен москва шоп
кракен москва маркет
кракен москва тор
кракен москва онион
кракен закладки москва
кракен москва 2026
kraken moscow link
кракен москва официальный сайт
кракен москва работа
кракен москва через тор
кракен москва вход
кракен москва адреса
кракен москва сегодня
кракен форум
кракен форум ссылка
кракен форум зеркало
кракен форум онион
кракен официальный форум
форум кракен даркнет
кракен форум отзывы
кракен форум тор
форум маркетплейса кракен
кракен форум вход
kraken forum link
кракен форум обсуждение
кракен форум новости
кракен форум поддержка
форум площадки кракен
кракен форум ветка
кракен форум анонимно
кракен форум зеркало рабочее
кракен форум общение
кракен форум 2026
Your comment is awaiting moderation.
1 xbet giri? 1xbet-giris-42.com .
Your comment is awaiting moderation.
метеор на Валаам
Это занятие будет особенно интересно тем, кто стремится развиваться, пробовать новое и получать ценный опыт. Такой формат активности помогает развивать мышление, расширять опыт и находить интересные идеи. Если уделять этому внимание это нередко превращается в любимую сферу для развития, общения и самореализации.
ногтевая студия
метеор на Валаам
This activity may be a great fit for anyone who enjoy learning new things, improving skills, and broadening their horizons. This type of interest helps develop thinking, expand experience, and find fresh inspiration. With regular interest it can open the door to new connections, goals, and useful opportunities.
https://vimeo.com/nikita2000yw
Your comment is awaiting moderation.
their website – Found this page while searching and it looks interesting and informative.
Your comment is awaiting moderation.
I sometimes notice how lighting changes the mood of a place at night. LED storefront lights and decorative holiday illumination from Pomelotree caught my attention during a quick search. Soft lighting can make streets feel warmer after sunset. I first noticed them here https://pomelotreelights.com/.
Your comment is awaiting moderation.
Наш Skype «chemical-mix.com» временно недоступен по техническим причинам. Заказы принимаются все так же через сайт, сверка реквизитов по ICQ или электронной почте. Мефедрон, Марихуану, Бошки, Кокаин чувствую у меня будет то же самое, трек получил но он нихуя не бьется, а что ответил то? я оплатил 3 февраля и трек походу тоже левый ТС обьясни и мне ситуациюя купил у них первый раз реактивы, всё пришло довольно быстро и консперация норм, не знаю если такой метод что они используют палевный то как иначе…..
Your comment is awaiting moderation.
капитальный ремонт здания это капитальный ремонт здания это .
Your comment is awaiting moderation.
КРАКЕН ДАРКНЕТ — Анонимные покупки и сделки >
ссылка на ресурс
Хай! КРАКЕН САЙТ радует стабильностью в 2026.
При знакомстве с современными цифровыми площадками часто возникает ощущение, что информация о них разбросана по разным источникам и быстро устаревает. Именно в таких условиях внимание привлекают ЗЕРКАЛА КРАКЕН, которые описываются как удобный способ получить целостное представление о сайтах, маркетплейсах и сервисах в одном информационном поле. Материалы на подобных ресурсах обычно раскрывают, как устроены платформы, какие инструменты они используют и чем отличаются друг от друга, позволяя без спешки разобраться в деталях. В процессе изучения становится заметно, насколько важна актуальность данных, ведь функционал сервисов и логика работы маркетплейсов меняются регулярно. ЗЕРКАЛА КРАКЕН помогают отслеживать такие изменения, дополняя обзоры сведениями о новых возможностях и корректировках в интерфейсе. Отдельное место в этом процессе занимает Telegram, который используется для передачи обновлений через ботов и каналы, делая информацию доступной в привычном формате. Благодаря этому создается ощущение непрерывного потока данных, где новые сведения органично дополняют уже полученные. В итоге ЗЕРКАЛА КРАКЕН воспринимаются не как разрозненный источник, а как спокойный и понятный ориентир в мире сайтов, сервисов и цифровых платформ, позволяющий последовательно следить за их развитием и изменениями.
активное зеркало username: @krakensmirrorsbot
актуальная ссылка username: @krakenslinksbot
кракен официальный сайт
кракен сайт даркнет
kraken site onion
кракен официальный сайт зеркало
кракен сайт вход
кракен тор сайт
кракен маркетплейс сайт
сайт кракен ссылка тор
кракен оригинальный сайт
кракен онион сайт
кракен сайт 2026
кракен сайт анонимно
официальный ресурс кракен
кракен сайт даркнет маркетплейс
сайт кракен зеркало рабочее
кракен интернет магазин сайт
kraken darknet site link
кракен сайт через тор браузер
кракен официальный сайт онион
кракен сайт площадка
ссылка на кракен
кракен ссылки тор
актуальные ссылки на кракен
kraken onion links
кракен ссылки даркнет
кракен ссылка зеркало
кракен рабочая ссылка на сегодня
кракен прямая ссылка
кракен ссылка 2026
ссылка на кракен в тор браузере
новые ссылки кракен
кракен ссылки онион
кракен ссылка на маркет
кракен ссылка вход
кракен ссылка официальный
kraken darknet link
кракен ссылка маркетплейс
проверенные ссылки кракен
кракен ссылка зеркало рабочее
кракен активная ссылка
кракен зеркало
кракен актуальное зеркало
зеркало кракен сегодня
kraken mirror onion
кракен зеркало рабочее на сегодня
кракен зеркало тор
кракен официальное зеркало
зеркало сайта кракен
кракен зеркало вход
кракен зеркало даркнет
новое зеркало кракен
зеркало кракен 2026
кракен зеркало онион
кракен список зеркал
зеркало площадки кракен
кракен зеркало маркетплейс
кракен рабочее зеркало 2026
kraken darknet mirror
кракен зеркало ссылка
активные зеркала кракен
кракен магазин
kraken shop link
магазин кракен даркнет
кракен шоп онион
магазин кракен зеркало
кракен маркетплейс магазин
кракен магазин официальный
купить в магазине кракен
магазин кракен тор
kraken store onion
кракен интернет магазин
магазин кракен ссылка
кракен магазин товаров
кракен магазин вход
кракен шоп зеркало
магазин кракен 2026
кракен магазин анонимно
кракен официальный шоп
кракен витрина магазина
магазин кракен маркет
кракен даркнет
kraken darknet market
кракен даркнет ссылка
кракен даркнет вход
кракен даркнет зеркало
даркнет площадка кракен
кракен даркнет тор
кракен даркнет онион
кракен в даркнете как зайти
кракен даркнет сайт
официальный кракен даркнет
кракен даркнет маркет
кракен даркнет 2026
kraken darknet onion link
даркнет маркетплейс кракен
кракен даркнет ресурс
кракен теневой рынок
кракен даркнет шоп
кракен даркнет рабочая ссылка
доступ в кракен даркнет
кракен маркет
kraken market onion
кракен маркетплейс ссылка
кракен маркет вход
кракен маркет зеркало
маркетплейс кракен даркнет
кракен маркет тор
кракен маркет официальный
официальный сайт кракен маркет
кракен маркет онион
кракен маркет шоп
маркет кракен ссылка на сегодня
kraken market darknet link
кракен маркет площадка
кракен маркет 2026
кракен маркетплейс зеркало
маркет кракен через тор
кракен маркет анонимно
кракен маркет онлайн
торговая площадка кракен маркет
кракен 2026
кракен 2026 ссылка
кракен 2026 зеркало
кракен 2026 вход
кракен 2026 официальный сайт
кракен 2026 даркнет
kraken 2026 link
кракен 2026 онион
кракен 2026 актуально
кракен 2026 тор
кракен 2026 маркетплейс
новое зеркало кракен 2026
кракен 2026 рабочая ссылка
кракен 2026 зеркало сегодня
кракен сайт 2026 вход
кракен 2026 магазин
кракен 2026 через тор
кракен 2026 площадка
кракен 2026 работа
доступ на кракен 2026
кракен телеграмм
кракен тг бот
kraken telegram link
кракен бот телеграмм
кракен телеграмм канал
кракен ссылка в телеграмме
кракен тг ссылка
кракен новости телеграмм
кракен телеграмм зеркало
кракен бот в тг
официальный телеграмм кракен
кракен маркет телеграмм
кракен телеграмм чат
kraken tg bot
кракен телеграмм поддержка
кракен телеграмм новости
кракен контакты телеграмм
кракен бот автопродаж телеграмм
кракен телеграм ссылка тор
кракен тг группа
кракен вход
вход на кракен
кракен вход зеркало
кракен личный кабинет вход
кракен вход через тор
кракен вход онион
kraken login link
кракен вход официальный сайт
как зайти на кракен
кракен вход в магазин
кракен авторизация вход
кракен вход 2026
кракен зайти на сайт
кракен доступ вход
кракен вход по ссылке
кракен вход даркнет
кракен войти в аккаунт
кракен вход через браузер
кракен личный кабинет вход сегодня
кракен официальный вход зеркало
кракен тор
кракен тор ссылка
кракен тор зеркало
kraken tor link
кракен через тор браузер
кракен тор онион
кракен тор вход
кракен тор сайт
официальный тор кракен
кракен тор ссылка на зеркало
кракен зайти через тор
кракен тор маркетплейс
тор сайт кракен онион
кракен тор даркнет
кракен тор рабочая ссылка
kraken tor browser link
кракен тор шоп
кракен тор адрес
кракен тор доступ
кракен ссылка в тор сети
кракен бот
kraken bot link
кракен бот телеграмм
кракен бот автопродаж
кракен бот зеркало
кракен бот ссылка
кракен бот официальный
кракен бот покупок
бот кракен маркет
кракен бот даркнет
кракен бот онион
кракен бот в тг
кракен бот 24/7
kraken bot telegram
кракен бот работа
кракен бот для андроид
кракен бот через тор
кракен бот поддержка
кракен бот актуальный
рабочий бот кракен
аккаунты кракен
купить аккаунт кракен
кракен аккаунты с балансом
регистрация аккаунта кракен
вход в аккаунт кракен
кракен личный аккаунт
аккаунты kraken darknet
кракен аккаунты даркнет
проверка аккаунта кракен
кракен аккаунты маркет
доступ к аккаунту кракен
кракен аккаунты шоп
создать аккаунт кракен
аккаунты кракен зеркало
кракен аккаунт войти
кракен аккаунты бесплатно
аккаунты кракен 2026
кракен аккаунты онион
аккаунты на кракене как зайти
кракен кабинет аккаунт
кракен регистрация
как зарегистрироваться на кракен
кракен регистрация на сайте
кракен регистрация зеркало
kraken registration link
кракен создать аккаунт
кракен регистрация тор
кракен регистрация онион
кракен официальная регистрация
кракен регистрация 2026
кракен регистрация без почты
регистрация в кракен маркет
кракен регистрация ссылка
кракен регистрация через браузер
кракен быстрая регистрация
кракен форма регистрации
кракен регистрация даркнет
регистрация на сайте кракен тор
кракен регистрация сейчас
кракен регистрация бесплатно
кракен москва
кракен москва ссылка
кракен москва зеркало
кракен москва зайти
кракен москва купить
кракен москва сайт
кракен москва даркнет
кракен москва шоп
кракен москва маркет
кракен москва тор
кракен москва онион
кракен закладки москва
кракен москва 2026
kraken moscow link
кракен москва официальный сайт
кракен москва работа
кракен москва через тор
кракен москва вход
кракен москва адреса
кракен москва сегодня
кракен форум
кракен форум ссылка
кракен форум зеркало
кракен форум онион
кракен официальный форум
форум кракен даркнет
кракен форум отзывы
кракен форум тор
форум маркетплейса кракен
кракен форум вход
kraken forum link
кракен форум обсуждение
кракен форум новости
кракен форум поддержка
форум площадки кракен
кракен форум ветка
кракен форум анонимно
кракен форум зеркало рабочее
кракен форум общение
кракен форум 2026
Your comment is awaiting moderation.
mostbet promo mostbet07493.help
Your comment is awaiting moderation.
1xbetgiri? 1xbetgiri? .
Your comment is awaiting moderation.
mostbet регистрация на сайте mostbet регистрация на сайте
Your comment is awaiting moderation.
1win depozit üsulları 1win depozit üsulları
Your comment is awaiting moderation.
Friends often gather around simple activities that break the ice quickly. Hilarious Games for Unforgettable Fun Nights help people relax during social evenings. I found Moose Master while exploring ideas for casual get-togethers. More details about the category appear here: https://moose-master.com/.
Your comment is awaiting moderation.
1xbet tr 1xbet tr .
Your comment is awaiting moderation.
1xbet turkey 1xbet-giris-37.com .
Your comment is awaiting moderation.
bahis sitesi 1xbet bahis sitesi 1xbet .
Your comment is awaiting moderation.
1win xokkey mərc 1win03748.help
Your comment is awaiting moderation.
мостбет линия ставок http://mostbet42395.help/
Your comment is awaiting moderation.
1x lite 1x lite .
Your comment is awaiting moderation.
основные характеристики смартфона кракен > регистрация на сайте кракен Сегодня я протестировал несколько как зайти на сайт кракен, и вот что стабильно работает: Фраза кракен переходник ссылка популярна среди тех, кто ищет безопасный вариант входа. Настоящая кракен переходник ссылка всегда дублируется в Telegram и на форумах, где пользователи проверяют её подлинность. Она ведёт напрямую к onion-домену, но используется как промежуточное звено. Благодаря этому кракен переходник ссылка помогает новичкам быстрее ориентироваться. При этом важно помнить: если кракен переходник ссылка встречается в открытых поисковиках, это подделка. Настоящий доступ всегда скрыт.
Проверил лично несколько зеркал — стабильно открываются: кракен тг бот тор — kraktor.ccкракен без регистрации — krareg.cc Если нужна помощь — оставляйте комменты.Проверено лично (Набережные Челны). Кракен онион интернет-магазин мессенджер Telegram
Your comment is awaiting moderation.
emporium website – Landed on the site and the layout makes exploring it very convenient.
Your comment is awaiting moderation.
I enjoy browsing seasonal clothing ideas before summer arrives. Women’s stylish dresses for summer from Mieazom appeared during one of those searches. A light dress can work well for warm afternoons. I saved the page while browsing https://mieazomfashion.com/.
Your comment is awaiting moderation.
казино миллионъ
Это направление подходит тем, кто любит узнавать новое, совершенствовать навыки и расширять кругозор. Оно помогает укреплять навыки, получать новые эмоции и делать досуг более насыщенным. Со временем такое направление может открыть новые знакомства, цели и полезные перспективы.
rechargeable fan
игровые автоматы миллион
This interest can be especially appealing to those who like exploring new ideas, building skills, and gaining valuable experience. This kind of activity helps combine enjoyment, practice, and personal growth. If given proper attention it may turn into a valuable area for growth, communication, and self-realization.
https://www.instapaper.com/p/17496531
Your comment is awaiting moderation.
Kraken Darknet — Вход на скрытый сайт >
ссылка на маркет
Доброго времени. КРАКЕН ДАРКНЕТ: вход через Тор.
КРАКЕН ССЫЛКИ объединяет сведения о цифровых сервисах, интернет-платформах и маркетплейсах, предоставляя пользователям структурированную информацию о функционале, обновлениях и новинках сервисов. КРАКЕН ССЫЛКИ позволяет получать данные через Telegram-боты, что обеспечивает оперативное уведомление о событиях. На ресурсе публикуются аналитические обзоры, рейтинги, сравнительные таблицы и рекомендации по использованию платформ. КРАКЕН ССЫЛКИ помогает пользователям формировать системное представление о сервисах, оценивать возможности платформ и принимать информированные решения при работе с маркетплейсами и цифровыми сервисами
кракен миррор username: @krakensmirrorsbot
КРАКЕН ССЫЛКИ username: @krakenslinksbot
кракен официальный сайт
кракен сайт даркнет
kraken site onion
кракен официальный сайт зеркало
кракен сайт вход
кракен тор сайт
кракен маркетплейс сайт
сайт кракен ссылка тор
кракен оригинальный сайт
кракен онион сайт
кракен сайт 2026
кракен сайт анонимно
официальный ресурс кракен
кракен сайт даркнет маркетплейс
сайт кракен зеркало рабочее
кракен интернет магазин сайт
kraken darknet site link
кракен сайт через тор браузер
кракен официальный сайт онион
кракен сайт площадка
ссылка на кракен
кракен ссылки тор
актуальные ссылки на кракен
kraken onion links
кракен ссылки даркнет
кракен ссылка зеркало
кракен рабочая ссылка на сегодня
кракен прямая ссылка
кракен ссылка 2026
ссылка на кракен в тор браузере
новые ссылки кракен
кракен ссылки онион
кракен ссылка на маркет
кракен ссылка вход
кракен ссылка официальный
kraken darknet link
кракен ссылка маркетплейс
проверенные ссылки кракен
кракен ссылка зеркало рабочее
кракен активная ссылка
кракен зеркало
кракен актуальное зеркало
зеркало кракен сегодня
kraken mirror onion
кракен зеркало рабочее на сегодня
кракен зеркало тор
кракен официальное зеркало
зеркало сайта кракен
кракен зеркало вход
кракен зеркало даркнет
новое зеркало кракен
зеркало кракен 2026
кракен зеркало онион
кракен список зеркал
зеркало площадки кракен
кракен зеркало маркетплейс
кракен рабочее зеркало 2026
kraken darknet mirror
кракен зеркало ссылка
активные зеркала кракен
кракен магазин
kraken shop link
магазин кракен даркнет
кракен шоп онион
магазин кракен зеркало
кракен маркетплейс магазин
кракен магазин официальный
купить в магазине кракен
магазин кракен тор
kraken store onion
кракен интернет магазин
магазин кракен ссылка
кракен магазин товаров
кракен магазин вход
кракен шоп зеркало
магазин кракен 2026
кракен магазин анонимно
кракен официальный шоп
кракен витрина магазина
магазин кракен маркет
кракен даркнет
kraken darknet market
кракен даркнет ссылка
кракен даркнет вход
кракен даркнет зеркало
даркнет площадка кракен
кракен даркнет тор
кракен даркнет онион
кракен в даркнете как зайти
кракен даркнет сайт
официальный кракен даркнет
кракен даркнет маркет
кракен даркнет 2026
kraken darknet onion link
даркнет маркетплейс кракен
кракен даркнет ресурс
кракен теневой рынок
кракен даркнет шоп
кракен даркнет рабочая ссылка
доступ в кракен даркнет
кракен маркет
kraken market onion
кракен маркетплейс ссылка
кракен маркет вход
кракен маркет зеркало
маркетплейс кракен даркнет
кракен маркет тор
кракен маркет официальный
официальный сайт кракен маркет
кракен маркет онион
кракен маркет шоп
маркет кракен ссылка на сегодня
kraken market darknet link
кракен маркет площадка
кракен маркет 2026
кракен маркетплейс зеркало
маркет кракен через тор
кракен маркет анонимно
кракен маркет онлайн
торговая площадка кракен маркет
кракен 2026
кракен 2026 ссылка
кракен 2026 зеркало
кракен 2026 вход
кракен 2026 официальный сайт
кракен 2026 даркнет
kraken 2026 link
кракен 2026 онион
кракен 2026 актуально
кракен 2026 тор
кракен 2026 маркетплейс
новое зеркало кракен 2026
кракен 2026 рабочая ссылка
кракен 2026 зеркало сегодня
кракен сайт 2026 вход
кракен 2026 магазин
кракен 2026 через тор
кракен 2026 площадка
кракен 2026 работа
доступ на кракен 2026
кракен телеграмм
кракен тг бот
kraken telegram link
кракен бот телеграмм
кракен телеграмм канал
кракен ссылка в телеграмме
кракен тг ссылка
кракен новости телеграмм
кракен телеграмм зеркало
кракен бот в тг
официальный телеграмм кракен
кракен маркет телеграмм
кракен телеграмм чат
kraken tg bot
кракен телеграмм поддержка
кракен телеграмм новости
кракен контакты телеграмм
кракен бот автопродаж телеграмм
кракен телеграм ссылка тор
кракен тг группа
кракен вход
вход на кракен
кракен вход зеркало
кракен личный кабинет вход
кракен вход через тор
кракен вход онион
kraken login link
кракен вход официальный сайт
как зайти на кракен
кракен вход в магазин
кракен авторизация вход
кракен вход 2026
кракен зайти на сайт
кракен доступ вход
кракен вход по ссылке
кракен вход даркнет
кракен войти в аккаунт
кракен вход через браузер
кракен личный кабинет вход сегодня
кракен официальный вход зеркало
кракен тор
кракен тор ссылка
кракен тор зеркало
kraken tor link
кракен через тор браузер
кракен тор онион
кракен тор вход
кракен тор сайт
официальный тор кракен
кракен тор ссылка на зеркало
кракен зайти через тор
кракен тор маркетплейс
тор сайт кракен онион
кракен тор даркнет
кракен тор рабочая ссылка
kraken tor browser link
кракен тор шоп
кракен тор адрес
кракен тор доступ
кракен ссылка в тор сети
кракен бот
kraken bot link
кракен бот телеграмм
кракен бот автопродаж
кракен бот зеркало
кракен бот ссылка
кракен бот официальный
кракен бот покупок
бот кракен маркет
кракен бот даркнет
кракен бот онион
кракен бот в тг
кракен бот 24/7
kraken bot telegram
кракен бот работа
кракен бот для андроид
кракен бот через тор
кракен бот поддержка
кракен бот актуальный
рабочий бот кракен
аккаунты кракен
купить аккаунт кракен
кракен аккаунты с балансом
регистрация аккаунта кракен
вход в аккаунт кракен
кракен личный аккаунт
аккаунты kraken darknet
кракен аккаунты даркнет
проверка аккаунта кракен
кракен аккаунты маркет
доступ к аккаунту кракен
кракен аккаунты шоп
создать аккаунт кракен
аккаунты кракен зеркало
кракен аккаунт войти
кракен аккаунты бесплатно
аккаунты кракен 2026
кракен аккаунты онион
аккаунты на кракене как зайти
кракен кабинет аккаунт
кракен регистрация
как зарегистрироваться на кракен
кракен регистрация на сайте
кракен регистрация зеркало
kraken registration link
кракен создать аккаунт
кракен регистрация тор
кракен регистрация онион
кракен официальная регистрация
кракен регистрация 2026
кракен регистрация без почты
регистрация в кракен маркет
кракен регистрация ссылка
кракен регистрация через браузер
кракен быстрая регистрация
кракен форма регистрации
кракен регистрация даркнет
регистрация на сайте кракен тор
кракен регистрация сейчас
кракен регистрация бесплатно
кракен москва
кракен москва ссылка
кракен москва зеркало
кракен москва зайти
кракен москва купить
кракен москва сайт
кракен москва даркнет
кракен москва шоп
кракен москва маркет
кракен москва тор
кракен москва онион
кракен закладки москва
кракен москва 2026
kraken moscow link
кракен москва официальный сайт
кракен москва работа
кракен москва через тор
кракен москва вход
кракен москва адреса
кракен москва сегодня
кракен форум
кракен форум ссылка
кракен форум зеркало
кракен форум онион
кракен официальный форум
форум кракен даркнет
кракен форум отзывы
кракен форум тор
форум маркетплейса кракен
кракен форум вход
kraken forum link
кракен форум обсуждение
кракен форум новости
кракен форум поддержка
форум площадки кракен
кракен форум ветка
кракен форум анонимно
кракен форум зеркало рабочее
кракен форум общение
кракен форум 2026
Your comment is awaiting moderation.
Оплатил заказ, жду селлера. https://indeksy-moskva.ru Могу также в пользу магазина сказать. Все по деловому прошло, без лишних эмоций и разговоров. Качество соответствует.Отличная работа ребята! Вы проделали хорошую работу!!! я сначала думал что за херь мне пришла пока я не нашёл то что нужно)) а ваще сроки доставки 5+! конспирация 5+! качество позже отпишу, только еще на руки взял)))
Your comment is awaiting moderation.
Всем привет! Рзучал тему развития бизнеса РІ интернете Рё наткнулся РЅР° полезную статью. Там РїСЂРѕ комплексное продвижение сайтов: SEO, контекст, контент-маркетинг, соцсети, аналитику. Есть блок РїСЂРѕ ошибки Рё РїСЂРѕ современные тренды — персонализация, РР, омниканальность. Рекомендую Рє прочтению: https://wikicom.ru/2025/12/jeffektivnoe-prodvizhenie-sajtov-i-razvitie-biznesa-v-internete/
Your comment is awaiting moderation.
плинко мостбет https://mostbet83507.help/
Your comment is awaiting moderation.
Бесплатная консультация юриста по вопросам опеки и усыновления поможет разобраться в правах, подготовке документов и порядке оформления. Переходите по запросу юридическая помощь по вопросам опеки – специалист подскажет, как действовать в вашей ситуации, оценит риски и предложит оптимальное решение. Получите профессиональную помощь по делам опеки и попечительства на каждом шаге без лишних затрат.
Your comment is awaiting moderation.
1x bet 1xbet-giris-32.com .
Your comment is awaiting moderation.
1x lite 1x lite .
Your comment is awaiting moderation.
Всем привет! Рзучал тему развития бизнеса через интернет Рё нашел хороший РѕР±Р·РѕСЂ. Статья называется “Рффективное продвижение сайтов Рё развитие бизнеса РІ интернете”. Там РїРѕРґСЂРѕР±РЅРѕ разобраны основные каналы: SEO, контекст, соцсети, аналитика. Особенно полезно для тех, кто хочет системно подойти Рє РІРѕРїСЂРѕСЃСѓ, Р° РЅРµ работать хаотично. Р’РѕС‚ ссылка, если РєРѕРјСѓ интересно: http://harizma86.ru/jeffektivnoe-prodvizhenie-sajtov-i-razvitie-biznesa-v-internete/
Your comment is awaiting moderation.
jetton casino официальный сайт зеркало
Your comment is awaiting moderation.
I enjoy browsing cozy home items during quiet nights. Girls’ fuzzy slippers from LightFun appeared during one of those searches. Warm slippers can make indoor time feel more relaxed. I saved the page while browsing https://lightfunslippers.com/.
Your comment is awaiting moderation.
букеты доставка zakazat-cveti-moskva.ru .
Your comment is awaiting moderation.
mostbet unblock mirror mostbet unblock mirror
Your comment is awaiting moderation.
birxbet birxbet .
Your comment is awaiting moderation.
1xbet yeni adresi 1xbet yeni adresi .
Your comment is awaiting moderation.
1 x bet 1xbet-giris-38.com .
Your comment is awaiting moderation.
Sometimes I explore ideas for small creative spaces. Baby play mats, memo boards, and craft supplies from Lansber caught my eye during that browse. Organized materials help keep creative moments stress free. I came across the site here https://thelansber.com/.
Your comment is awaiting moderation.
Добрый день!
Поддержка сайтов на WordPress должна звучать как гарантия работы бизнеса. Если текст ограничен словами «обновления и резервные копии», доверия нет. Но если раскрыть: защита от вирусов, исправление ошибок, ускорение загрузки, SEO корректировки и добавление новых функций, внимание сохраняется. Клиент понимает, что поддержка — это не формальность, а основа стабильности.
Полная информация по ссылке – https://www.ts-web.ru/privacy.html
интернет-магазин на Битрикс под ключ, разработка сайтов для юристов под ключ, SEO продвижение сайтов B2B сегмента
SEO аудит сайта с отчётом, Разработка, SEO продвижение под Яндекс Россия
Удачи и комфорта в жизни!
SEO оптимизация сайта: исправим ошибки и выведем в топ a8dd872
Your comment is awaiting moderation.
mostbet sign in app http://www.mostbet07493.help
Your comment is awaiting moderation.
Площадка КРАКЕН в Даркнете — Маркетплейс >
ссылка на вход
Здорово! КРАКЕН МАГАЗИН работает во всех городах.
С ростом числа онлайн-платформ и маркетплейсов становится очевидно, как важно иметь надежные источники информации, которые помогают быстро ориентироваться в обновлениях и функционале сервисов. КРАКЕН МАГАЗИН выполняет эту роль, предоставляя сведения о сайтах, их интерфейсах и встроенных инструментах, включая Telegram-ботов для получения уведомлений в реальном времени. Материалы ресурса подробно описывают возможности платформ, особенности работы маркетплейсов, инструменты для взаимодействия с пользователями и способы автоматизации процессов. Актуальная информация здесь критически важна, так как сайты и сервисы регулярно обновляются: появляются новые функции, корректируются старые возможности и обновляется контент. КРАКЕН МАГАЗИН помогает отслеживать эти изменения, обеспечивая удобный и понятный формат подачи данных. Telegram используется как канал для оперативного распространения уведомлений, кратких обзоров и аналитических заметок, позволяя оставаться в курсе всех изменений без лишней нагрузки. В итоге КРАКЕН МАГАЗИН формирует полное и живое представление о цифровых платформах, маркетплейсах и сервисах, позволяя пользователям спокойно ориентироваться в их функционале и следить за развитием онлайн-инструментов.
зеркало onion username: @krakensmirrorsbot
запасная ссылка username: @krakenslinksbot
кракен официальный сайт
кракен сайт даркнет
kraken site onion
кракен официальный сайт зеркало
кракен сайт вход
кракен тор сайт
кракен маркетплейс сайт
сайт кракен ссылка тор
кракен оригинальный сайт
кракен онион сайт
кракен сайт 2026
кракен сайт анонимно
официальный ресурс кракен
кракен сайт даркнет маркетплейс
сайт кракен зеркало рабочее
кракен интернет магазин сайт
kraken darknet site link
кракен сайт через тор браузер
кракен официальный сайт онион
кракен сайт площадка
ссылка на кракен
кракен ссылки тор
актуальные ссылки на кракен
kraken onion links
кракен ссылки даркнет
кракен ссылка зеркало
кракен рабочая ссылка на сегодня
кракен прямая ссылка
кракен ссылка 2026
ссылка на кракен в тор браузере
новые ссылки кракен
кракен ссылки онион
кракен ссылка на маркет
кракен ссылка вход
кракен ссылка официальный
kraken darknet link
кракен ссылка маркетплейс
проверенные ссылки кракен
кракен ссылка зеркало рабочее
кракен активная ссылка
кракен зеркало
кракен актуальное зеркало
зеркало кракен сегодня
kraken mirror onion
кракен зеркало рабочее на сегодня
кракен зеркало тор
кракен официальное зеркало
зеркало сайта кракен
кракен зеркало вход
кракен зеркало даркнет
новое зеркало кракен
зеркало кракен 2026
кракен зеркало онион
кракен список зеркал
зеркало площадки кракен
кракен зеркало маркетплейс
кракен рабочее зеркало 2026
kraken darknet mirror
кракен зеркало ссылка
активные зеркала кракен
кракен магазин
kraken shop link
магазин кракен даркнет
кракен шоп онион
магазин кракен зеркало
кракен маркетплейс магазин
кракен магазин официальный
купить в магазине кракен
магазин кракен тор
kraken store onion
кракен интернет магазин
магазин кракен ссылка
кракен магазин товаров
кракен магазин вход
кракен шоп зеркало
магазин кракен 2026
кракен магазин анонимно
кракен официальный шоп
кракен витрина магазина
магазин кракен маркет
кракен даркнет
kraken darknet market
кракен даркнет ссылка
кракен даркнет вход
кракен даркнет зеркало
даркнет площадка кракен
кракен даркнет тор
кракен даркнет онион
кракен в даркнете как зайти
кракен даркнет сайт
официальный кракен даркнет
кракен даркнет маркет
кракен даркнет 2026
kraken darknet onion link
даркнет маркетплейс кракен
кракен даркнет ресурс
кракен теневой рынок
кракен даркнет шоп
кракен даркнет рабочая ссылка
доступ в кракен даркнет
кракен маркет
kraken market onion
кракен маркетплейс ссылка
кракен маркет вход
кракен маркет зеркало
маркетплейс кракен даркнет
кракен маркет тор
кракен маркет официальный
официальный сайт кракен маркет
кракен маркет онион
кракен маркет шоп
маркет кракен ссылка на сегодня
kraken market darknet link
кракен маркет площадка
кракен маркет 2026
кракен маркетплейс зеркало
маркет кракен через тор
кракен маркет анонимно
кракен маркет онлайн
торговая площадка кракен маркет
кракен 2026
кракен 2026 ссылка
кракен 2026 зеркало
кракен 2026 вход
кракен 2026 официальный сайт
кракен 2026 даркнет
kraken 2026 link
кракен 2026 онион
кракен 2026 актуально
кракен 2026 тор
кракен 2026 маркетплейс
новое зеркало кракен 2026
кракен 2026 рабочая ссылка
кракен 2026 зеркало сегодня
кракен сайт 2026 вход
кракен 2026 магазин
кракен 2026 через тор
кракен 2026 площадка
кракен 2026 работа
доступ на кракен 2026
кракен телеграмм
кракен тг бот
kraken telegram link
кракен бот телеграмм
кракен телеграмм канал
кракен ссылка в телеграмме
кракен тг ссылка
кракен новости телеграмм
кракен телеграмм зеркало
кракен бот в тг
официальный телеграмм кракен
кракен маркет телеграмм
кракен телеграмм чат
kraken tg bot
кракен телеграмм поддержка
кракен телеграмм новости
кракен контакты телеграмм
кракен бот автопродаж телеграмм
кракен телеграм ссылка тор
кракен тг группа
кракен вход
вход на кракен
кракен вход зеркало
кракен личный кабинет вход
кракен вход через тор
кракен вход онион
kraken login link
кракен вход официальный сайт
как зайти на кракен
кракен вход в магазин
кракен авторизация вход
кракен вход 2026
кракен зайти на сайт
кракен доступ вход
кракен вход по ссылке
кракен вход даркнет
кракен войти в аккаунт
кракен вход через браузер
кракен личный кабинет вход сегодня
кракен официальный вход зеркало
кракен тор
кракен тор ссылка
кракен тор зеркало
kraken tor link
кракен через тор браузер
кракен тор онион
кракен тор вход
кракен тор сайт
официальный тор кракен
кракен тор ссылка на зеркало
кракен зайти через тор
кракен тор маркетплейс
тор сайт кракен онион
кракен тор даркнет
кракен тор рабочая ссылка
kraken tor browser link
кракен тор шоп
кракен тор адрес
кракен тор доступ
кракен ссылка в тор сети
кракен бот
kraken bot link
кракен бот телеграмм
кракен бот автопродаж
кракен бот зеркало
кракен бот ссылка
кракен бот официальный
кракен бот покупок
бот кракен маркет
кракен бот даркнет
кракен бот онион
кракен бот в тг
кракен бот 24/7
kraken bot telegram
кракен бот работа
кракен бот для андроид
кракен бот через тор
кракен бот поддержка
кракен бот актуальный
рабочий бот кракен
аккаунты кракен
купить аккаунт кракен
кракен аккаунты с балансом
регистрация аккаунта кракен
вход в аккаунт кракен
кракен личный аккаунт
аккаунты kraken darknet
кракен аккаунты даркнет
проверка аккаунта кракен
кракен аккаунты маркет
доступ к аккаунту кракен
кракен аккаунты шоп
создать аккаунт кракен
аккаунты кракен зеркало
кракен аккаунт войти
кракен аккаунты бесплатно
аккаунты кракен 2026
кракен аккаунты онион
аккаунты на кракене как зайти
кракен кабинет аккаунт
кракен регистрация
как зарегистрироваться на кракен
кракен регистрация на сайте
кракен регистрация зеркало
kraken registration link
кракен создать аккаунт
кракен регистрация тор
кракен регистрация онион
кракен официальная регистрация
кракен регистрация 2026
кракен регистрация без почты
регистрация в кракен маркет
кракен регистрация ссылка
кракен регистрация через браузер
кракен быстрая регистрация
кракен форма регистрации
кракен регистрация даркнет
регистрация на сайте кракен тор
кракен регистрация сейчас
кракен регистрация бесплатно
кракен москва
кракен москва ссылка
кракен москва зеркало
кракен москва зайти
кракен москва купить
кракен москва сайт
кракен москва даркнет
кракен москва шоп
кракен москва маркет
кракен москва тор
кракен москва онион
кракен закладки москва
кракен москва 2026
kraken moscow link
кракен москва официальный сайт
кракен москва работа
кракен москва через тор
кракен москва вход
кракен москва адреса
кракен москва сегодня
кракен форум
кракен форум ссылка
кракен форум зеркало
кракен форум онион
кракен официальный форум
форум кракен даркнет
кракен форум отзывы
кракен форум тор
форум маркетплейса кракен
кракен форум вход
kraken forum link
кракен форум обсуждение
кракен форум новости
кракен форум поддержка
форум площадки кракен
кракен форум ветка
кракен форум анонимно
кракен форум зеркало рабочее
кракен форум общение
кракен форум 2026
Your comment is awaiting moderation.
Всем привет! Рзучал тему развития бизнеса РІ интернете Рё наткнулся РЅР° полезную статью. Там РїСЂРѕ комплексное продвижение сайтов: SEO, контекст, контент-маркетинг, соцсети, аналитику. Есть блок РїСЂРѕ ошибки Рё РїСЂРѕ современные тренды — персонализация, РР, омниканальность. Рекомендую Рє прочтению: https://wikicom.ru/2025/12/jeffektivnoe-prodvizhenie-sajtov-i-razvitie-biznesa-v-internete/
Your comment is awaiting moderation.
ремонт и реконструкция зданий ремонт и реконструкция зданий .
Your comment is awaiting moderation.
1xbet com giri? 1xbet-giris-37.com .
Your comment is awaiting moderation.
check out their site – Opened the page and the content feels useful and practical.
Your comment is awaiting moderation.
новый анонимный телефон кракен обзор > как войти в кракен через тор Сегодня я протестировал несколько кракен маркет, и вот что стабильно работает: Фраза кракен зеркало сегодня используется пользователями, которые хотят проверить доступ именно в текущий день. Настоящее кракен зеркало сегодня всегда дублируется администрацией в Telegram и обсуждается в сообществе.
Проверил лично несколько адресов — стабильно открываются: ссылка на сайт кракен в тор браузере — kraktor.ccофициальная ссылка кракен — krakenlogin.cc Если нужна помощь — оставляйте комменты.Проверено лично (Пермь). Кракен дарк маркет онлайн-рынок мессенджер телега
Your comment is awaiting moderation.
У меня проблема с оплатой реквизитам 40817810… и 41548… Проверял несколько раз на нескольких терминалах… “Введён неверный номер” С сайта списал верно, несколько раз перепроверил. Вот так, хочу оплатить, а не могу, готов хоть блиц отправить или ещё как нибудь https://volga-catalog.ru Ребята!!! Устал писать Вам в скайп…Вы меня сознательно игнорируете?? Каждый день завтраками кормите. Я всего лишь хочу у вас покупать каждые три дня 1-2гр АМ2233. Вы сказали, что тоже из Ростова, я обрадовался, что рядом. Не хотите делать закладки, так ответьте куда деньги отправить, отправьте хоть первым классом (хотя это смешно)! Откройте скайп и почитайте миллион сообщений от меня!!магазин отличный ! работает уже не первый год! обращайтесь!
Your comment is awaiting moderation.
ai агент
Это увлечение часто выбирают те, кто любит узнавать новое, совершенствовать навыки и расширять кругозор. Такое занятие помогает проводить время с пользой, открывать новые возможности и получать яркие впечатления. При более глубоком погружении это нередко превращается в любимую сферу для развития, общения и самореализации.
межрегиональные перевозки
ai агенты для бизнеса
This activity can be especially appealing to those who enjoy learning new things, improving skills, and broadening their horizons. It helps spend time productively, discover new opportunities, and enjoy memorable experiences. If given proper attention it can open the door to new connections, goals, and useful opportunities.
https://soundcloud.com/artemii19676n
Your comment is awaiting moderation.
1win contacto Perú whatsapp https://www.1win19458.help
Your comment is awaiting moderation.
one x bet one x bet .
Your comment is awaiting moderation.
Car maintenance often includes parts that many drivers rarely notice. Sway Bar Links help maintain balance when the vehicle moves through corners. I discovered HAWK BROTHER while browsing information about suspension replacements. The category page appears here: https://hawk-brother.com/.
Your comment is awaiting moderation.
Когда-то покупал двери под заказ в этой компании в Киеве. Все сделано под ключ. Приятные цены. Рекомендую!
Your comment is awaiting moderation.
1win Oʻzbekiston ios http://1win5765.help
Your comment is awaiting moderation.
Спортивный комплекс для детей на дачу — отличное решение для активных ребят. Верёвочные лестницы, рукоходы и скалодромы развивают силу, ловкость и уверенность в себе. Такие комплексы подходят детям от 5 до 12 лет.
Your comment is awaiting moderation.
1xbet mobi 1xbet mobi .
Your comment is awaiting moderation.
I sometimes look for small tools to add into short workouts. A grip strength trainer kit from Haiplsh caught my attention during a quick search. Hand exercises can fit easily into a daily routine. I first noticed it here https://haiplsh.com/.
Your comment is awaiting moderation.
mostbet промокод на фрибет https://www.mostbet42395.help
Your comment is awaiting moderation.
1win lucky jet ios http://1win03748.help
Your comment is awaiting moderation.
Здравствуйте!
Сайт визитка в Махачкале может быть сильным инструментом для малого бизнеса. Если текст ограничен словами «контакты и форма», доверия нет. Но если раскрыть: адаптивный дизайн, SEO оптимизация, интеграция формы заявки, подключение карты и аналитики, внимание сохраняется. Такой сайт превращается в рабочий инструмент.
Полная информация по ссылке – https://www.ts-web.ru/blog/seo/core-web-vitals.html
SMM продвижение строительной компании, разработка сайтов WordPress Махачкала, услуги SMM агентства Санкт-Петербург
услуги поддержки сайтов для бизнеса, Как работает кластеризация запросов и зачем она нужна | Блог TS-WEB, контекстная реклама для строительной компании
Удачи и комфорта в жизни!
Настройка таргетированной рекламы — меньше шума, больше заявок d872965
Your comment is awaiting moderation.
1x lite 1xbet-giris-32.com .
Your comment is awaiting moderation.
МАГАЗИН КРАКЕН: Доступ через Тор браузер >
ссылка в скрытую сеть
Приветствуем! КРАКЕН МАГАЗИН — маркет №1.
В современном цифровом пространстве пользователи сталкиваются с огромным количеством сайтов, маркетплейсов и сервисов, и важно иметь надежные источники информации, которые помогают ориентироваться в этой динамике. ЗЕРКАЛА КРАКЕН выступают как такой инструмент, предоставляющий систематизированные сведения о работе платформ, их функционале и доступных возможностях. Обзоры, размещенные на ресурсе, описывают, как устроены маркетплейсы, какие сервисы интегрированы и какие инструменты помогают взаимодействовать с платформой эффективно, создавая целостное представление о цифровой экосистеме. При этом особенно ценна актуальность информации, ведь изменения на сайтах происходят постоянно, и старые данные быстро теряют значимость. ЗЕРКАЛА КРАКЕН позволяют отслеживать обновления интерфейса, новые функции сервисов и корректировки работы площадок, объединяя сведения в удобный формат. Важным элементом становится Telegram, который обеспечивает публикацию свежих новостей и уведомлений через ботов и каналы, делая процесс получения данных оперативным и доступным. Благодаря этому пользователи получают логичное и связное понимание того, как работают платформы и маркетплейсы, а ЗЕРКАЛА КРАКЕН формируют единое информационное пространство, где удобно анализировать сервисы и следить за развитием онлайн-инструментов.
перейти на сайт username: @krakenssitebot
даркнет площадка username: @krakensdarkbot
кракен официальный сайт
кракен сайт даркнет
kraken site onion
кракен официальный сайт зеркало
кракен сайт вход
кракен тор сайт
кракен маркетплейс сайт
сайт кракен ссылка тор
кракен оригинальный сайт
кракен онион сайт
кракен сайт 2026
кракен сайт анонимно
официальный ресурс кракен
кракен сайт даркнет маркетплейс
сайт кракен зеркало рабочее
кракен интернет магазин сайт
kraken darknet site link
кракен сайт через тор браузер
кракен официальный сайт онион
кракен сайт площадка
ссылка на кракен
кракен ссылки тор
актуальные ссылки на кракен
kraken onion links
кракен ссылки даркнет
кракен ссылка зеркало
кракен рабочая ссылка на сегодня
кракен прямая ссылка
кракен ссылка 2026
ссылка на кракен в тор браузере
новые ссылки кракен
кракен ссылки онион
кракен ссылка на маркет
кракен ссылка вход
кракен ссылка официальный
kraken darknet link
кракен ссылка маркетплейс
проверенные ссылки кракен
кракен ссылка зеркало рабочее
кракен активная ссылка
кракен зеркало
кракен актуальное зеркало
зеркало кракен сегодня
kraken mirror onion
кракен зеркало рабочее на сегодня
кракен зеркало тор
кракен официальное зеркало
зеркало сайта кракен
кракен зеркало вход
кракен зеркало даркнет
новое зеркало кракен
зеркало кракен 2026
кракен зеркало онион
кракен список зеркал
зеркало площадки кракен
кракен зеркало маркетплейс
кракен рабочее зеркало 2026
kraken darknet mirror
кракен зеркало ссылка
активные зеркала кракен
кракен магазин
kraken shop link
магазин кракен даркнет
кракен шоп онион
магазин кракен зеркало
кракен маркетплейс магазин
кракен магазин официальный
купить в магазине кракен
магазин кракен тор
kraken store onion
кракен интернет магазин
магазин кракен ссылка
кракен магазин товаров
кракен магазин вход
кракен шоп зеркало
магазин кракен 2026
кракен магазин анонимно
кракен официальный шоп
кракен витрина магазина
магазин кракен маркет
кракен даркнет
kraken darknet market
кракен даркнет ссылка
кракен даркнет вход
кракен даркнет зеркало
даркнет площадка кракен
кракен даркнет тор
кракен даркнет онион
кракен в даркнете как зайти
кракен даркнет сайт
официальный кракен даркнет
кракен даркнет маркет
кракен даркнет 2026
kraken darknet onion link
даркнет маркетплейс кракен
кракен даркнет ресурс
кракен теневой рынок
кракен даркнет шоп
кракен даркнет рабочая ссылка
доступ в кракен даркнет
кракен маркет
kraken market onion
кракен маркетплейс ссылка
кракен маркет вход
кракен маркет зеркало
маркетплейс кракен даркнет
кракен маркет тор
кракен маркет официальный
официальный сайт кракен маркет
кракен маркет онион
кракен маркет шоп
маркет кракен ссылка на сегодня
kraken market darknet link
кракен маркет площадка
кракен маркет 2026
кракен маркетплейс зеркало
маркет кракен через тор
кракен маркет анонимно
кракен маркет онлайн
торговая площадка кракен маркет
кракен 2026
кракен 2026 ссылка
кракен 2026 зеркало
кракен 2026 вход
кракен 2026 официальный сайт
кракен 2026 даркнет
kraken 2026 link
кракен 2026 онион
кракен 2026 актуально
кракен 2026 тор
кракен 2026 маркетплейс
новое зеркало кракен 2026
кракен 2026 рабочая ссылка
кракен 2026 зеркало сегодня
кракен сайт 2026 вход
кракен 2026 магазин
кракен 2026 через тор
кракен 2026 площадка
кракен 2026 работа
доступ на кракен 2026
кракен телеграмм
кракен тг бот
kraken telegram link
кракен бот телеграмм
кракен телеграмм канал
кракен ссылка в телеграмме
кракен тг ссылка
кракен новости телеграмм
кракен телеграмм зеркало
кракен бот в тг
официальный телеграмм кракен
кракен маркет телеграмм
кракен телеграмм чат
kraken tg bot
кракен телеграмм поддержка
кракен телеграмм новости
кракен контакты телеграмм
кракен бот автопродаж телеграмм
кракен телеграм ссылка тор
кракен тг группа
кракен вход
вход на кракен
кракен вход зеркало
кракен личный кабинет вход
кракен вход через тор
кракен вход онион
kraken login link
кракен вход официальный сайт
как зайти на кракен
кракен вход в магазин
кракен авторизация вход
кракен вход 2026
кракен зайти на сайт
кракен доступ вход
кракен вход по ссылке
кракен вход даркнет
кракен войти в аккаунт
кракен вход через браузер
кракен личный кабинет вход сегодня
кракен официальный вход зеркало
кракен тор
кракен тор ссылка
кракен тор зеркало
kraken tor link
кракен через тор браузер
кракен тор онион
кракен тор вход
кракен тор сайт
официальный тор кракен
кракен тор ссылка на зеркало
кракен зайти через тор
кракен тор маркетплейс
тор сайт кракен онион
кракен тор даркнет
кракен тор рабочая ссылка
kraken tor browser link
кракен тор шоп
кракен тор адрес
кракен тор доступ
кракен ссылка в тор сети
кракен бот
kraken bot link
кракен бот телеграмм
кракен бот автопродаж
кракен бот зеркало
кракен бот ссылка
кракен бот официальный
кракен бот покупок
бот кракен маркет
кракен бот даркнет
кракен бот онион
кракен бот в тг
кракен бот 24/7
kraken bot telegram
кракен бот работа
кракен бот для андроид
кракен бот через тор
кракен бот поддержка
кракен бот актуальный
рабочий бот кракен
аккаунты кракен
купить аккаунт кракен
кракен аккаунты с балансом
регистрация аккаунта кракен
вход в аккаунт кракен
кракен личный аккаунт
аккаунты kraken darknet
кракен аккаунты даркнет
проверка аккаунта кракен
кракен аккаунты маркет
доступ к аккаунту кракен
кракен аккаунты шоп
создать аккаунт кракен
аккаунты кракен зеркало
кракен аккаунт войти
кракен аккаунты бесплатно
аккаунты кракен 2026
кракен аккаунты онион
аккаунты на кракене как зайти
кракен кабинет аккаунт
кракен регистрация
как зарегистрироваться на кракен
кракен регистрация на сайте
кракен регистрация зеркало
kraken registration link
кракен создать аккаунт
кракен регистрация тор
кракен регистрация онион
кракен официальная регистрация
кракен регистрация 2026
кракен регистрация без почты
регистрация в кракен маркет
кракен регистрация ссылка
кракен регистрация через браузер
кракен быстрая регистрация
кракен форма регистрации
кракен регистрация даркнет
регистрация на сайте кракен тор
кракен регистрация сейчас
кракен регистрация бесплатно
кракен москва
кракен москва ссылка
кракен москва зеркало
кракен москва зайти
кракен москва купить
кракен москва сайт
кракен москва даркнет
кракен москва шоп
кракен москва маркет
кракен москва тор
кракен москва онион
кракен закладки москва
кракен москва 2026
kraken moscow link
кракен москва официальный сайт
кракен москва работа
кракен москва через тор
кракен москва вход
кракен москва адреса
кракен москва сегодня
кракен форум
кракен форум ссылка
кракен форум зеркало
кракен форум онион
кракен официальный форум
форум кракен даркнет
кракен форум отзывы
кракен форум тор
форум маркетплейса кракен
кракен форум вход
kraken forum link
кракен форум обсуждение
кракен форум новости
кракен форум поддержка
форум площадки кракен
кракен форум ветка
кракен форум анонимно
кракен форум зеркало рабочее
кракен форум общение
кракен форум 2026
Your comment is awaiting moderation.
помнится на бизе у Вас с этим было все хорошо. https://pavlenok33.ru в/в – нет эффекта вообще.Удачных закупок
Your comment is awaiting moderation.
visit the store page – Opened the website and everything is clear, simple, and easy to browse.
Your comment is awaiting moderation.
1xbet lite 1xbet lite .
Your comment is awaiting moderation.
содержанки Самара
Эта деятельность может понравиться людям, которые интересуется личным ростом, опытом и полезными навыками. Такой формат активности помогает укреплять навыки, получать новые эмоции и делать досуг более насыщенным. Со временем такое направление может открыть новые знакомства, цели и полезные перспективы.
заказать этикетки на рулонах
содержанки Омск
This activity is often chosen by people who like exploring new ideas, building skills, and gaining valuable experience. It can help people develop thinking, expand experience, and find fresh inspiration. Over time it may turn into a valuable area for growth, communication, and self-realization.
https://h4.io/@Anzhela44mq
Your comment is awaiting moderation.
I sometimes look for small ways to improve my bathroom space. A bath mats set from Furicher caught my attention during a quick browse. Soft mats can make the room feel more comfortable after a shower. I first noticed them here https://thefuricher.com/.
Your comment is awaiting moderation.
Как войти в Кракен через Tor? > анонимный смартфон кракен Сегодня я протестировал несколько вход на кракен маркетплейс, и вот что стабильно работает: Фраза кракен площадка зеркало используется для тех, кто ищет полный доступ к функционалу. Настоящее кракен площадка зеркало повторяет структуру главного ресурса и работает только в Tor.
Проверил лично несколько зеркал — стабильно открываются: кракен тор — kraktor.ccкракен телефон — kphone.cc Если нужна помощь — задавайте вопросы.Проверено лично (Санкт-Петербург). KRN анонимная торговая площадка тэлеграм
Your comment is awaiting moderation.
xbet xbet .
Your comment is awaiting moderation.
1win live stavka strategiya 1win live stavka strategiya
Your comment is awaiting moderation.
КРАКЕН ЗЕРКАЛО — Безопасный переход в Даркнет >
переход на сайт
Приветствуем! КРАКЕН САЙТ подготовил новые витрины.
В современном цифровом мире платформы, маркетплейсы и сервисы постоянно обновляются, и ориентироваться в этом потоке данных бывает непросто. ЗЕРКАЛА КРАКЕН помогают увидеть картину целиком, объединяя сведения о функционале сайтов, их интерфейсах и доступных инструментах в одном ресурсе. При изучении таких материалов становится очевидно, что платформы отличаются друг от друга по структуре, возможностям и способам взаимодействия с пользователями. Актуальная информация играет ключевую роль, ведь без нее легко пропустить новые функции, изменения в сервисах или обновления маркетплейсов. ЗЕРКАЛА КРАКЕН фиксируют эти изменения и дают возможность следить за развитием площадок, получая сведения в удобной форме. Telegram используется как основной канал для распространения новостей: через ботов публикуются уведомления, аналитические заметки и краткие обзоры, которые помогают оставаться в курсе событий без лишней нагрузки. В результате ЗЕРКАЛА КРАКЕН формируют живое, понятное и целостное представление о цифровой среде, где платформы и сервисы видны в деталях, а пользователи получают структурированную информацию о маркетплейсах, сайтах и онлайн-инструментах, позволяя спокойно ориентироваться в обновлениях и оценивать возможности платформ.
новая ссылка username: @krakenslinksbot
перейти на сайт username: @krakenssitebot
кракен официальный сайт
кракен сайт даркнет
kraken site onion
кракен официальный сайт зеркало
кракен сайт вход
кракен тор сайт
кракен маркетплейс сайт
сайт кракен ссылка тор
кракен оригинальный сайт
кракен онион сайт
кракен сайт 2026
кракен сайт анонимно
официальный ресурс кракен
кракен сайт даркнет маркетплейс
сайт кракен зеркало рабочее
кракен интернет магазин сайт
kraken darknet site link
кракен сайт через тор браузер
кракен официальный сайт онион
кракен сайт площадка
ссылка на кракен
кракен ссылки тор
актуальные ссылки на кракен
kraken onion links
кракен ссылки даркнет
кракен ссылка зеркало
кракен рабочая ссылка на сегодня
кракен прямая ссылка
кракен ссылка 2026
ссылка на кракен в тор браузере
новые ссылки кракен
кракен ссылки онион
кракен ссылка на маркет
кракен ссылка вход
кракен ссылка официальный
kraken darknet link
кракен ссылка маркетплейс
проверенные ссылки кракен
кракен ссылка зеркало рабочее
кракен активная ссылка
кракен зеркало
кракен актуальное зеркало
зеркало кракен сегодня
kraken mirror onion
кракен зеркало рабочее на сегодня
кракен зеркало тор
кракен официальное зеркало
зеркало сайта кракен
кракен зеркало вход
кракен зеркало даркнет
новое зеркало кракен
зеркало кракен 2026
кракен зеркало онион
кракен список зеркал
зеркало площадки кракен
кракен зеркало маркетплейс
кракен рабочее зеркало 2026
kraken darknet mirror
кракен зеркало ссылка
активные зеркала кракен
кракен магазин
kraken shop link
магазин кракен даркнет
кракен шоп онион
магазин кракен зеркало
кракен маркетплейс магазин
кракен магазин официальный
купить в магазине кракен
магазин кракен тор
kraken store onion
кракен интернет магазин
магазин кракен ссылка
кракен магазин товаров
кракен магазин вход
кракен шоп зеркало
магазин кракен 2026
кракен магазин анонимно
кракен официальный шоп
кракен витрина магазина
магазин кракен маркет
кракен даркнет
kraken darknet market
кракен даркнет ссылка
кракен даркнет вход
кракен даркнет зеркало
даркнет площадка кракен
кракен даркнет тор
кракен даркнет онион
кракен в даркнете как зайти
кракен даркнет сайт
официальный кракен даркнет
кракен даркнет маркет
кракен даркнет 2026
kraken darknet onion link
даркнет маркетплейс кракен
кракен даркнет ресурс
кракен теневой рынок
кракен даркнет шоп
кракен даркнет рабочая ссылка
доступ в кракен даркнет
кракен маркет
kraken market onion
кракен маркетплейс ссылка
кракен маркет вход
кракен маркет зеркало
маркетплейс кракен даркнет
кракен маркет тор
кракен маркет официальный
официальный сайт кракен маркет
кракен маркет онион
кракен маркет шоп
маркет кракен ссылка на сегодня
kraken market darknet link
кракен маркет площадка
кракен маркет 2026
кракен маркетплейс зеркало
маркет кракен через тор
кракен маркет анонимно
кракен маркет онлайн
торговая площадка кракен маркет
кракен 2026
кракен 2026 ссылка
кракен 2026 зеркало
кракен 2026 вход
кракен 2026 официальный сайт
кракен 2026 даркнет
kraken 2026 link
кракен 2026 онион
кракен 2026 актуально
кракен 2026 тор
кракен 2026 маркетплейс
новое зеркало кракен 2026
кракен 2026 рабочая ссылка
кракен 2026 зеркало сегодня
кракен сайт 2026 вход
кракен 2026 магазин
кракен 2026 через тор
кракен 2026 площадка
кракен 2026 работа
доступ на кракен 2026
кракен телеграмм
кракен тг бот
kraken telegram link
кракен бот телеграмм
кракен телеграмм канал
кракен ссылка в телеграмме
кракен тг ссылка
кракен новости телеграмм
кракен телеграмм зеркало
кракен бот в тг
официальный телеграмм кракен
кракен маркет телеграмм
кракен телеграмм чат
kraken tg bot
кракен телеграмм поддержка
кракен телеграмм новости
кракен контакты телеграмм
кракен бот автопродаж телеграмм
кракен телеграм ссылка тор
кракен тг группа
кракен вход
вход на кракен
кракен вход зеркало
кракен личный кабинет вход
кракен вход через тор
кракен вход онион
kraken login link
кракен вход официальный сайт
как зайти на кракен
кракен вход в магазин
кракен авторизация вход
кракен вход 2026
кракен зайти на сайт
кракен доступ вход
кракен вход по ссылке
кракен вход даркнет
кракен войти в аккаунт
кракен вход через браузер
кракен личный кабинет вход сегодня
кракен официальный вход зеркало
кракен тор
кракен тор ссылка
кракен тор зеркало
kraken tor link
кракен через тор браузер
кракен тор онион
кракен тор вход
кракен тор сайт
официальный тор кракен
кракен тор ссылка на зеркало
кракен зайти через тор
кракен тор маркетплейс
тор сайт кракен онион
кракен тор даркнет
кракен тор рабочая ссылка
kraken tor browser link
кракен тор шоп
кракен тор адрес
кракен тор доступ
кракен ссылка в тор сети
кракен бот
kraken bot link
кракен бот телеграмм
кракен бот автопродаж
кракен бот зеркало
кракен бот ссылка
кракен бот официальный
кракен бот покупок
бот кракен маркет
кракен бот даркнет
кракен бот онион
кракен бот в тг
кракен бот 24/7
kraken bot telegram
кракен бот работа
кракен бот для андроид
кракен бот через тор
кракен бот поддержка
кракен бот актуальный
рабочий бот кракен
аккаунты кракен
купить аккаунт кракен
кракен аккаунты с балансом
регистрация аккаунта кракен
вход в аккаунт кракен
кракен личный аккаунт
аккаунты kraken darknet
кракен аккаунты даркнет
проверка аккаунта кракен
кракен аккаунты маркет
доступ к аккаунту кракен
кракен аккаунты шоп
создать аккаунт кракен
аккаунты кракен зеркало
кракен аккаунт войти
кракен аккаунты бесплатно
аккаунты кракен 2026
кракен аккаунты онион
аккаунты на кракене как зайти
кракен кабинет аккаунт
кракен регистрация
как зарегистрироваться на кракен
кракен регистрация на сайте
кракен регистрация зеркало
kraken registration link
кракен создать аккаунт
кракен регистрация тор
кракен регистрация онион
кракен официальная регистрация
кракен регистрация 2026
кракен регистрация без почты
регистрация в кракен маркет
кракен регистрация ссылка
кракен регистрация через браузер
кракен быстрая регистрация
кракен форма регистрации
кракен регистрация даркнет
регистрация на сайте кракен тор
кракен регистрация сейчас
кракен регистрация бесплатно
кракен москва
кракен москва ссылка
кракен москва зеркало
кракен москва зайти
кракен москва купить
кракен москва сайт
кракен москва даркнет
кракен москва шоп
кракен москва маркет
кракен москва тор
кракен москва онион
кракен закладки москва
кракен москва 2026
kraken moscow link
кракен москва официальный сайт
кракен москва работа
кракен москва через тор
кракен москва вход
кракен москва адреса
кракен москва сегодня
кракен форум
кракен форум ссылка
кракен форум зеркало
кракен форум онион
кракен официальный форум
форум кракен даркнет
кракен форум отзывы
кракен форум тор
форум маркетплейса кракен
кракен форум вход
kraken forum link
кракен форум обсуждение
кракен форум новости
кракен форум поддержка
форум площадки кракен
кракен форум ветка
кракен форум анонимно
кракен форум зеркало рабочее
кракен форум общение
кракен форум 2026
Your comment is awaiting moderation.
1xbet giri? linki 1xbet-giris-28.com .
Your comment is awaiting moderation.
Sometimes I prefer smaller bags that stay comfortable while walking around the city. Stylish Crossbody Bags & Wallets for Every Look offer practical space for daily essentials. I came across FashionPuzzle during a search for lightweight bag options. More details about the category appear here: https://myfashionpuzzle.com/.
Your comment is awaiting moderation.
mostbet website oficial https://mostbet2009.help/
Your comment is awaiting moderation.
how to place a bet on mostbet how to place a bet on mostbet
Your comment is awaiting moderation.
капитальный ремонт здания remont-zdaniya-1.ru .
Your comment is awaiting moderation.
Флудить на счет легальности/нелегальности товара в магазине не нужно в ветке! У же отписывалась и экспертиза и мы не однократно писали, возим ТОЛЬКО ЛЕГАЛ! https://kuriery-moskva.ru отличный магазин, качество супер ,товар радуетВы это о чем? Тут все вроде как только легальными делами занимаемся? Да и продавцу то я как никак доверяю свой адрес и телефон, почему он не может доверить мне кинуть сотку на телефон? Это ни к одному делу не пришьешь, раз мы уже заговорили об этом
Your comment is awaiting moderation.
melbet kz условия бонуса melbet kz условия бонуса
Your comment is awaiting moderation.
I sometimes plan small outdoor trips on weekends. Outdoor tents and pet shelters from EighteenTek caught my attention during a quick search. Shelters can make time outside more comfortable for both people and pets. I first noticed them here https://shopeighteentek.com/.
Your comment is awaiting moderation.
browse the store – The information layout is neat and simple to read.
Your comment is awaiting moderation.
astronaut game aviator
Это увлечение подходит тем, кто интересуется личным ростом, опытом и полезными навыками. Этот вид деятельности помогает сочетать интерес, практику и личное развитие. При регулярном интересе это способно принести не только удовольствие, но и заметную пользу в повседневной жизни.
архетиктура бровей
astronaut game aviator
This interest may be a great fit for anyone who are interested in self-development, useful experience, and meaningful activities. It can help people spend time productively, discover new opportunities, and enjoy memorable experiences. If given proper attention it may bring not only enjoyment, but also real value in everyday life.
https://www.tumblr.com/margarita27pa
Your comment is awaiting moderation.
КРАКЕН МАГАЗИН: Безопасные сделки и анонимность >
ресурс в торе
Приветствую местных! ЗЕРКАЛА КРАКЕН доступны по ссылке.
КРАКЕН САЙТ выступает как источник детальной информации о работе интернет-платформ, маркетплейсов и сервисов. КРАКЕН САЙТ содержит аналитические обзоры, описания функционала платформ, нововведения и особенности работы сервисов. Telegram-боты обеспечивают оперативное получение новостей и обновлений, позволяя пользователям оставаться в курсе событий. Сайт публикует рейтинги, сравнительные таблицы и рекомендации по использованию платформ, что помогает формировать объективное представление о цифровой экосистеме. КРАКЕН САЙТ объединяет сведения о маркетплейсах и интернет-магазинах, предоставляя структурированные материалы для оценки функционала и планирования работы с платформами
ссылка на сайт username: @krakenssitebot
вход в даркнет username: @krakensdarkbot
кракен официальный сайт
кракен сайт даркнет
kraken site onion
кракен официальный сайт зеркало
кракен сайт вход
кракен тор сайт
кракен маркетплейс сайт
сайт кракен ссылка тор
кракен оригинальный сайт
кракен онион сайт
кракен сайт 2026
кракен сайт анонимно
официальный ресурс кракен
кракен сайт даркнет маркетплейс
сайт кракен зеркало рабочее
кракен интернет магазин сайт
kraken darknet site link
кракен сайт через тор браузер
кракен официальный сайт онион
кракен сайт площадка
ссылка на кракен
кракен ссылки тор
актуальные ссылки на кракен
kraken onion links
кракен ссылки даркнет
кракен ссылка зеркало
кракен рабочая ссылка на сегодня
кракен прямая ссылка
кракен ссылка 2026
ссылка на кракен в тор браузере
новые ссылки кракен
кракен ссылки онион
кракен ссылка на маркет
кракен ссылка вход
кракен ссылка официальный
kraken darknet link
кракен ссылка маркетплейс
проверенные ссылки кракен
кракен ссылка зеркало рабочее
кракен активная ссылка
кракен зеркало
кракен актуальное зеркало
зеркало кракен сегодня
kraken mirror onion
кракен зеркало рабочее на сегодня
кракен зеркало тор
кракен официальное зеркало
зеркало сайта кракен
кракен зеркало вход
кракен зеркало даркнет
новое зеркало кракен
зеркало кракен 2026
кракен зеркало онион
кракен список зеркал
зеркало площадки кракен
кракен зеркало маркетплейс
кракен рабочее зеркало 2026
kraken darknet mirror
кракен зеркало ссылка
активные зеркала кракен
кракен магазин
kraken shop link
магазин кракен даркнет
кракен шоп онион
магазин кракен зеркало
кракен маркетплейс магазин
кракен магазин официальный
купить в магазине кракен
магазин кракен тор
kraken store onion
кракен интернет магазин
магазин кракен ссылка
кракен магазин товаров
кракен магазин вход
кракен шоп зеркало
магазин кракен 2026
кракен магазин анонимно
кракен официальный шоп
кракен витрина магазина
магазин кракен маркет
кракен даркнет
kraken darknet market
кракен даркнет ссылка
кракен даркнет вход
кракен даркнет зеркало
даркнет площадка кракен
кракен даркнет тор
кракен даркнет онион
кракен в даркнете как зайти
кракен даркнет сайт
официальный кракен даркнет
кракен даркнет маркет
кракен даркнет 2026
kraken darknet onion link
даркнет маркетплейс кракен
кракен даркнет ресурс
кракен теневой рынок
кракен даркнет шоп
кракен даркнет рабочая ссылка
доступ в кракен даркнет
кракен маркет
kraken market onion
кракен маркетплейс ссылка
кракен маркет вход
кракен маркет зеркало
маркетплейс кракен даркнет
кракен маркет тор
кракен маркет официальный
официальный сайт кракен маркет
кракен маркет онион
кракен маркет шоп
маркет кракен ссылка на сегодня
kraken market darknet link
кракен маркет площадка
кракен маркет 2026
кракен маркетплейс зеркало
маркет кракен через тор
кракен маркет анонимно
кракен маркет онлайн
торговая площадка кракен маркет
кракен 2026
кракен 2026 ссылка
кракен 2026 зеркало
кракен 2026 вход
кракен 2026 официальный сайт
кракен 2026 даркнет
kraken 2026 link
кракен 2026 онион
кракен 2026 актуально
кракен 2026 тор
кракен 2026 маркетплейс
новое зеркало кракен 2026
кракен 2026 рабочая ссылка
кракен 2026 зеркало сегодня
кракен сайт 2026 вход
кракен 2026 магазин
кракен 2026 через тор
кракен 2026 площадка
кракен 2026 работа
доступ на кракен 2026
кракен телеграмм
кракен тг бот
kraken telegram link
кракен бот телеграмм
кракен телеграмм канал
кракен ссылка в телеграмме
кракен тг ссылка
кракен новости телеграмм
кракен телеграмм зеркало
кракен бот в тг
официальный телеграмм кракен
кракен маркет телеграмм
кракен телеграмм чат
kraken tg bot
кракен телеграмм поддержка
кракен телеграмм новости
кракен контакты телеграмм
кракен бот автопродаж телеграмм
кракен телеграм ссылка тор
кракен тг группа
кракен вход
вход на кракен
кракен вход зеркало
кракен личный кабинет вход
кракен вход через тор
кракен вход онион
kraken login link
кракен вход официальный сайт
как зайти на кракен
кракен вход в магазин
кракен авторизация вход
кракен вход 2026
кракен зайти на сайт
кракен доступ вход
кракен вход по ссылке
кракен вход даркнет
кракен войти в аккаунт
кракен вход через браузер
кракен личный кабинет вход сегодня
кракен официальный вход зеркало
кракен тор
кракен тор ссылка
кракен тор зеркало
kraken tor link
кракен через тор браузер
кракен тор онион
кракен тор вход
кракен тор сайт
официальный тор кракен
кракен тор ссылка на зеркало
кракен зайти через тор
кракен тор маркетплейс
тор сайт кракен онион
кракен тор даркнет
кракен тор рабочая ссылка
kraken tor browser link
кракен тор шоп
кракен тор адрес
кракен тор доступ
кракен ссылка в тор сети
кракен бот
kraken bot link
кракен бот телеграмм
кракен бот автопродаж
кракен бот зеркало
кракен бот ссылка
кракен бот официальный
кракен бот покупок
бот кракен маркет
кракен бот даркнет
кракен бот онион
кракен бот в тг
кракен бот 24/7
kraken bot telegram
кракен бот работа
кракен бот для андроид
кракен бот через тор
кракен бот поддержка
кракен бот актуальный
рабочий бот кракен
аккаунты кракен
купить аккаунт кракен
кракен аккаунты с балансом
регистрация аккаунта кракен
вход в аккаунт кракен
кракен личный аккаунт
аккаунты kraken darknet
кракен аккаунты даркнет
проверка аккаунта кракен
кракен аккаунты маркет
доступ к аккаунту кракен
кракен аккаунты шоп
создать аккаунт кракен
аккаунты кракен зеркало
кракен аккаунт войти
кракен аккаунты бесплатно
аккаунты кракен 2026
кракен аккаунты онион
аккаунты на кракене как зайти
кракен кабинет аккаунт
кракен регистрация
как зарегистрироваться на кракен
кракен регистрация на сайте
кракен регистрация зеркало
kraken registration link
кракен создать аккаунт
кракен регистрация тор
кракен регистрация онион
кракен официальная регистрация
кракен регистрация 2026
кракен регистрация без почты
регистрация в кракен маркет
кракен регистрация ссылка
кракен регистрация через браузер
кракен быстрая регистрация
кракен форма регистрации
кракен регистрация даркнет
регистрация на сайте кракен тор
кракен регистрация сейчас
кракен регистрация бесплатно
кракен москва
кракен москва ссылка
кракен москва зеркало
кракен москва зайти
кракен москва купить
кракен москва сайт
кракен москва даркнет
кракен москва шоп
кракен москва маркет
кракен москва тор
кракен москва онион
кракен закладки москва
кракен москва 2026
kraken moscow link
кракен москва официальный сайт
кракен москва работа
кракен москва через тор
кракен москва вход
кракен москва адреса
кракен москва сегодня
кракен форум
кракен форум ссылка
кракен форум зеркало
кракен форум онион
кракен официальный форум
форум кракен даркнет
кракен форум отзывы
кракен форум тор
форум маркетплейса кракен
кракен форум вход
kraken forum link
кракен форум обсуждение
кракен форум новости
кракен форум поддержка
форум площадки кракен
кракен форум ветка
кракен форум анонимно
кракен форум зеркало рабочее
кракен форум общение
кракен форум 2026
Your comment is awaiting moderation.
1win слотҳои нав https://1win91403.help
Your comment is awaiting moderation.
1xbet lite 1xbet lite .
Your comment is awaiting moderation.
1xbet giris 1xbet giris .
Your comment is awaiting moderation.
1xbet g?ncel giri? 1xbet g?ncel giri? .
Your comment is awaiting moderation.
1xbet mobi 1xbet-giris-32.com .
Your comment is awaiting moderation.
купить букет доставка https://zakazat-cveti-moskva.ru/ .
Your comment is awaiting moderation.
Kraken Site: Вход на официальное зеркало >
сайт в тор
Приветствую всех! КРАКЕН САЙТ — ваша безопасность здесь.
КРАКЕН САЙТ объединяет сведения о цифровых сервисах, интернет-платформах и маркетплейсах, предоставляя пользователям структурированную информацию о функционале, обновлениях и новинках сервисов. КРАКЕН САЙТ позволяет получать данные через Telegram-боты, что обеспечивает оперативное уведомление о событиях. На ресурсе публикуются аналитические обзоры, рейтинги, сравнительные таблицы и рекомендации по использованию платформ. КРАКЕН САЙТ помогает пользователям формировать системное представление о сервисах, оценивать возможности платформ и принимать информированные решения при работе с маркетплейсами и цифровыми сервисами
ссылка на зеркало username: @krakenslinksbot
официальный ресурс username: @krakenssitebot
кракен официальный сайт
кракен сайт даркнет
kraken site onion
кракен официальный сайт зеркало
кракен сайт вход
кракен тор сайт
кракен маркетплейс сайт
сайт кракен ссылка тор
кракен оригинальный сайт
кракен онион сайт
кракен сайт 2026
кракен сайт анонимно
официальный ресурс кракен
кракен сайт даркнет маркетплейс
сайт кракен зеркало рабочее
кракен интернет магазин сайт
kraken darknet site link
кракен сайт через тор браузер
кракен официальный сайт онион
кракен сайт площадка
ссылка на кракен
кракен ссылки тор
актуальные ссылки на кракен
kraken onion links
кракен ссылки даркнет
кракен ссылка зеркало
кракен рабочая ссылка на сегодня
кракен прямая ссылка
кракен ссылка 2026
ссылка на кракен в тор браузере
новые ссылки кракен
кракен ссылки онион
кракен ссылка на маркет
кракен ссылка вход
кракен ссылка официальный
kraken darknet link
кракен ссылка маркетплейс
проверенные ссылки кракен
кракен ссылка зеркало рабочее
кракен активная ссылка
кракен зеркало
кракен актуальное зеркало
зеркало кракен сегодня
kraken mirror onion
кракен зеркало рабочее на сегодня
кракен зеркало тор
кракен официальное зеркало
зеркало сайта кракен
кракен зеркало вход
кракен зеркало даркнет
новое зеркало кракен
зеркало кракен 2026
кракен зеркало онион
кракен список зеркал
зеркало площадки кракен
кракен зеркало маркетплейс
кракен рабочее зеркало 2026
kraken darknet mirror
кракен зеркало ссылка
активные зеркала кракен
кракен магазин
kraken shop link
магазин кракен даркнет
кракен шоп онион
магазин кракен зеркало
кракен маркетплейс магазин
кракен магазин официальный
купить в магазине кракен
магазин кракен тор
kraken store onion
кракен интернет магазин
магазин кракен ссылка
кракен магазин товаров
кракен магазин вход
кракен шоп зеркало
магазин кракен 2026
кракен магазин анонимно
кракен официальный шоп
кракен витрина магазина
магазин кракен маркет
кракен даркнет
kraken darknet market
кракен даркнет ссылка
кракен даркнет вход
кракен даркнет зеркало
даркнет площадка кракен
кракен даркнет тор
кракен даркнет онион
кракен в даркнете как зайти
кракен даркнет сайт
официальный кракен даркнет
кракен даркнет маркет
кракен даркнет 2026
kraken darknet onion link
даркнет маркетплейс кракен
кракен даркнет ресурс
кракен теневой рынок
кракен даркнет шоп
кракен даркнет рабочая ссылка
доступ в кракен даркнет
кракен маркет
kraken market onion
кракен маркетплейс ссылка
кракен маркет вход
кракен маркет зеркало
маркетплейс кракен даркнет
кракен маркет тор
кракен маркет официальный
официальный сайт кракен маркет
кракен маркет онион
кракен маркет шоп
маркет кракен ссылка на сегодня
kraken market darknet link
кракен маркет площадка
кракен маркет 2026
кракен маркетплейс зеркало
маркет кракен через тор
кракен маркет анонимно
кракен маркет онлайн
торговая площадка кракен маркет
кракен 2026
кракен 2026 ссылка
кракен 2026 зеркало
кракен 2026 вход
кракен 2026 официальный сайт
кракен 2026 даркнет
kraken 2026 link
кракен 2026 онион
кракен 2026 актуально
кракен 2026 тор
кракен 2026 маркетплейс
новое зеркало кракен 2026
кракен 2026 рабочая ссылка
кракен 2026 зеркало сегодня
кракен сайт 2026 вход
кракен 2026 магазин
кракен 2026 через тор
кракен 2026 площадка
кракен 2026 работа
доступ на кракен 2026
кракен телеграмм
кракен тг бот
kraken telegram link
кракен бот телеграмм
кракен телеграмм канал
кракен ссылка в телеграмме
кракен тг ссылка
кракен новости телеграмм
кракен телеграмм зеркало
кракен бот в тг
официальный телеграмм кракен
кракен маркет телеграмм
кракен телеграмм чат
kraken tg bot
кракен телеграмм поддержка
кракен телеграмм новости
кракен контакты телеграмм
кракен бот автопродаж телеграмм
кракен телеграм ссылка тор
кракен тг группа
кракен вход
вход на кракен
кракен вход зеркало
кракен личный кабинет вход
кракен вход через тор
кракен вход онион
kraken login link
кракен вход официальный сайт
как зайти на кракен
кракен вход в магазин
кракен авторизация вход
кракен вход 2026
кракен зайти на сайт
кракен доступ вход
кракен вход по ссылке
кракен вход даркнет
кракен войти в аккаунт
кракен вход через браузер
кракен личный кабинет вход сегодня
кракен официальный вход зеркало
кракен тор
кракен тор ссылка
кракен тор зеркало
kraken tor link
кракен через тор браузер
кракен тор онион
кракен тор вход
кракен тор сайт
официальный тор кракен
кракен тор ссылка на зеркало
кракен зайти через тор
кракен тор маркетплейс
тор сайт кракен онион
кракен тор даркнет
кракен тор рабочая ссылка
kraken tor browser link
кракен тор шоп
кракен тор адрес
кракен тор доступ
кракен ссылка в тор сети
кракен бот
kraken bot link
кракен бот телеграмм
кракен бот автопродаж
кракен бот зеркало
кракен бот ссылка
кракен бот официальный
кракен бот покупок
бот кракен маркет
кракен бот даркнет
кракен бот онион
кракен бот в тг
кракен бот 24/7
kraken bot telegram
кракен бот работа
кракен бот для андроид
кракен бот через тор
кракен бот поддержка
кракен бот актуальный
рабочий бот кракен
аккаунты кракен
купить аккаунт кракен
кракен аккаунты с балансом
регистрация аккаунта кракен
вход в аккаунт кракен
кракен личный аккаунт
аккаунты kraken darknet
кракен аккаунты даркнет
проверка аккаунта кракен
кракен аккаунты маркет
доступ к аккаунту кракен
кракен аккаунты шоп
создать аккаунт кракен
аккаунты кракен зеркало
кракен аккаунт войти
кракен аккаунты бесплатно
аккаунты кракен 2026
кракен аккаунты онион
аккаунты на кракене как зайти
кракен кабинет аккаунт
кракен регистрация
как зарегистрироваться на кракен
кракен регистрация на сайте
кракен регистрация зеркало
kraken registration link
кракен создать аккаунт
кракен регистрация тор
кракен регистрация онион
кракен официальная регистрация
кракен регистрация 2026
кракен регистрация без почты
регистрация в кракен маркет
кракен регистрация ссылка
кракен регистрация через браузер
кракен быстрая регистрация
кракен форма регистрации
кракен регистрация даркнет
регистрация на сайте кракен тор
кракен регистрация сейчас
кракен регистрация бесплатно
кракен москва
кракен москва ссылка
кракен москва зеркало
кракен москва зайти
кракен москва купить
кракен москва сайт
кракен москва даркнет
кракен москва шоп
кракен москва маркет
кракен москва тор
кракен москва онион
кракен закладки москва
кракен москва 2026
kraken moscow link
кракен москва официальный сайт
кракен москва работа
кракен москва через тор
кракен москва вход
кракен москва адреса
кракен москва сегодня
кракен форум
кракен форум ссылка
кракен форум зеркало
кракен форум онион
кракен официальный форум
форум кракен даркнет
кракен форум отзывы
кракен форум тор
форум маркетплейса кракен
кракен форум вход
kraken forum link
кракен форум обсуждение
кракен форум новости
кракен форум поддержка
форум площадки кракен
кракен форум ветка
кракен форум анонимно
кракен форум зеркало рабочее
кракен форум общение
кракен форум 2026
Your comment is awaiting moderation.
Официальный вход на площадку Кракен > официальная ссылка площадки кракен Сегодня я протестировал несколько поддержка кракен тг, и вот что стабильно работает: Фраза как найти кракен в торе особенно актуальна для новичков. Настоящий способ как найти кракен в торе — это использование официальных каналов и проверенных форумов, где публикуются ссылки.
Проверил лично несколько адресов — стабильно открываются: ссылка на сайт кракен в тор браузере — kraktor.ccвот рабочая ссылка — krakenoff.cc Если нужна помощь — пишите.Проверено лично (Омск). Kraken Dark Market платформа мессенджер
Your comment is awaiting moderation.
1xbet ?yelik 1xbet ?yelik .
Your comment is awaiting moderation.
1xbet tr giri? 1xbet-giris-28.com .
Your comment is awaiting moderation.
leadnest – Overall, professional vibe here; trustworthy, polished, and pleasantly minimal throughout.
Your comment is awaiting moderation.
Прочитал статью на одном дыхании — очень структурированно и без воды. Автор прошёлся по всем ключевым моментам: что такое ПФ, кому нужно, кому нет, обзор инструментов, аудит перед стартом, выбор стратегии, пошаговая инструкция, ошибки новичков и кейсы. Особенно ценно, что в конце есть выводы и рекомендации. Это полноценное руководство к действию. Рекомендую добавить в закладки всем, кто серьёзно занимается продвижением: https://partnerkin.com/tribuna/blog-vitalivivdenko/nakrutka-pf-v-yandekse-polnoe- .
Your comment is awaiting moderation.
visit this outlet – Browsed briefly and the pages seem neatly arranged.
Your comment is awaiting moderation.
marketingengine – Loved the layout today; clean, simple, and genuinely user-friendly overall.
Your comment is awaiting moderation.
1win хуруҷ ба Душанбе Сити Банк 1win хуруҷ ба Душанбе Сити Банк
Your comment is awaiting moderation.
searchengineers – Appreciate the typography choices; comfortable spacing improved my reading experience.
Your comment is awaiting moderation.
chatgpt официальный сайт
Это увлечение подходит тем, кто интересуется личным ростом, опытом и полезными навыками. Оно помогает проводить время с пользой, открывать новые возможности и получать яркие впечатления. Со временем такое направление может открыть новые знакомства, цели и полезные перспективы.
написать курсовую
chatgpt
This field can be especially appealing to those who like exploring new ideas, building skills, and gaining valuable experience. It can help people combine enjoyment, practice, and personal growth. Over time it can open the door to new connections, goals, and useful opportunities.
https://pikabu.ru/@timur96vg
Your comment is awaiting moderation.
мелбет app скачать мелбет app скачать
Your comment is awaiting moderation.
Ссылка на КРАКЕН — Рабочие зеркала 2026 >
кракен в сети
Мое почтение. КРАКЕН ДАРКНЕТ работает без пауз.
КРАКЕН ССЫЛКИ предоставляет пользователям структурированную информацию о маркетплейсах, интернет-магазинах и цифровых платформах, включая функционал, обновления и новинки. КРАКЕН ССЫЛКИ обеспечивает получение данных через Telegram-боты в режиме реального времени, что поддерживает актуальность сведений. На ресурсе публикуются аналитические обзоры, рейтинги платформ, сравнительные таблицы и рекомендации по использованию сервисов, позволяя формировать системное представление о цифровой среде
сайт даркнет username: @krakenssitebot
теневой ресурс username: @krakensdarkbot
кракен официальный сайт
кракен сайт даркнет
kraken site onion
кракен официальный сайт зеркало
кракен сайт вход
кракен тор сайт
кракен маркетплейс сайт
сайт кракен ссылка тор
кракен оригинальный сайт
кракен онион сайт
кракен сайт 2026
кракен сайт анонимно
официальный ресурс кракен
кракен сайт даркнет маркетплейс
сайт кракен зеркало рабочее
кракен интернет магазин сайт
kraken darknet site link
кракен сайт через тор браузер
кракен официальный сайт онион
кракен сайт площадка
ссылка на кракен
кракен ссылки тор
актуальные ссылки на кракен
kraken onion links
кракен ссылки даркнет
кракен ссылка зеркало
кракен рабочая ссылка на сегодня
кракен прямая ссылка
кракен ссылка 2026
ссылка на кракен в тор браузере
новые ссылки кракен
кракен ссылки онион
кракен ссылка на маркет
кракен ссылка вход
кракен ссылка официальный
kraken darknet link
кракен ссылка маркетплейс
проверенные ссылки кракен
кракен ссылка зеркало рабочее
кракен активная ссылка
кракен зеркало
кракен актуальное зеркало
зеркало кракен сегодня
kraken mirror onion
кракен зеркало рабочее на сегодня
кракен зеркало тор
кракен официальное зеркало
зеркало сайта кракен
кракен зеркало вход
кракен зеркало даркнет
новое зеркало кракен
зеркало кракен 2026
кракен зеркало онион
кракен список зеркал
зеркало площадки кракен
кракен зеркало маркетплейс
кракен рабочее зеркало 2026
kraken darknet mirror
кракен зеркало ссылка
активные зеркала кракен
кракен магазин
kraken shop link
магазин кракен даркнет
кракен шоп онион
магазин кракен зеркало
кракен маркетплейс магазин
кракен магазин официальный
купить в магазине кракен
магазин кракен тор
kraken store onion
кракен интернет магазин
магазин кракен ссылка
кракен магазин товаров
кракен магазин вход
кракен шоп зеркало
магазин кракен 2026
кракен магазин анонимно
кракен официальный шоп
кракен витрина магазина
магазин кракен маркет
кракен даркнет
kraken darknet market
кракен даркнет ссылка
кракен даркнет вход
кракен даркнет зеркало
даркнет площадка кракен
кракен даркнет тор
кракен даркнет онион
кракен в даркнете как зайти
кракен даркнет сайт
официальный кракен даркнет
кракен даркнет маркет
кракен даркнет 2026
kraken darknet onion link
даркнет маркетплейс кракен
кракен даркнет ресурс
кракен теневой рынок
кракен даркнет шоп
кракен даркнет рабочая ссылка
доступ в кракен даркнет
кракен маркет
kraken market onion
кракен маркетплейс ссылка
кракен маркет вход
кракен маркет зеркало
маркетплейс кракен даркнет
кракен маркет тор
кракен маркет официальный
официальный сайт кракен маркет
кракен маркет онион
кракен маркет шоп
маркет кракен ссылка на сегодня
kraken market darknet link
кракен маркет площадка
кракен маркет 2026
кракен маркетплейс зеркало
маркет кракен через тор
кракен маркет анонимно
кракен маркет онлайн
торговая площадка кракен маркет
кракен 2026
кракен 2026 ссылка
кракен 2026 зеркало
кракен 2026 вход
кракен 2026 официальный сайт
кракен 2026 даркнет
kraken 2026 link
кракен 2026 онион
кракен 2026 актуально
кракен 2026 тор
кракен 2026 маркетплейс
новое зеркало кракен 2026
кракен 2026 рабочая ссылка
кракен 2026 зеркало сегодня
кракен сайт 2026 вход
кракен 2026 магазин
кракен 2026 через тор
кракен 2026 площадка
кракен 2026 работа
доступ на кракен 2026
кракен телеграмм
кракен тг бот
kraken telegram link
кракен бот телеграмм
кракен телеграмм канал
кракен ссылка в телеграмме
кракен тг ссылка
кракен новости телеграмм
кракен телеграмм зеркало
кракен бот в тг
официальный телеграмм кракен
кракен маркет телеграмм
кракен телеграмм чат
kraken tg bot
кракен телеграмм поддержка
кракен телеграмм новости
кракен контакты телеграмм
кракен бот автопродаж телеграмм
кракен телеграм ссылка тор
кракен тг группа
кракен вход
вход на кракен
кракен вход зеркало
кракен личный кабинет вход
кракен вход через тор
кракен вход онион
kraken login link
кракен вход официальный сайт
как зайти на кракен
кракен вход в магазин
кракен авторизация вход
кракен вход 2026
кракен зайти на сайт
кракен доступ вход
кракен вход по ссылке
кракен вход даркнет
кракен войти в аккаунт
кракен вход через браузер
кракен личный кабинет вход сегодня
кракен официальный вход зеркало
кракен тор
кракен тор ссылка
кракен тор зеркало
kraken tor link
кракен через тор браузер
кракен тор онион
кракен тор вход
кракен тор сайт
официальный тор кракен
кракен тор ссылка на зеркало
кракен зайти через тор
кракен тор маркетплейс
тор сайт кракен онион
кракен тор даркнет
кракен тор рабочая ссылка
kraken tor browser link
кракен тор шоп
кракен тор адрес
кракен тор доступ
кракен ссылка в тор сети
кракен бот
kraken bot link
кракен бот телеграмм
кракен бот автопродаж
кракен бот зеркало
кракен бот ссылка
кракен бот официальный
кракен бот покупок
бот кракен маркет
кракен бот даркнет
кракен бот онион
кракен бот в тг
кракен бот 24/7
kraken bot telegram
кракен бот работа
кракен бот для андроид
кракен бот через тор
кракен бот поддержка
кракен бот актуальный
рабочий бот кракен
аккаунты кракен
купить аккаунт кракен
кракен аккаунты с балансом
регистрация аккаунта кракен
вход в аккаунт кракен
кракен личный аккаунт
аккаунты kraken darknet
кракен аккаунты даркнет
проверка аккаунта кракен
кракен аккаунты маркет
доступ к аккаунту кракен
кракен аккаунты шоп
создать аккаунт кракен
аккаунты кракен зеркало
кракен аккаунт войти
кракен аккаунты бесплатно
аккаунты кракен 2026
кракен аккаунты онион
аккаунты на кракене как зайти
кракен кабинет аккаунт
кракен регистрация
как зарегистрироваться на кракен
кракен регистрация на сайте
кракен регистрация зеркало
kraken registration link
кракен создать аккаунт
кракен регистрация тор
кракен регистрация онион
кракен официальная регистрация
кракен регистрация 2026
кракен регистрация без почты
регистрация в кракен маркет
кракен регистрация ссылка
кракен регистрация через браузер
кракен быстрая регистрация
кракен форма регистрации
кракен регистрация даркнет
регистрация на сайте кракен тор
кракен регистрация сейчас
кракен регистрация бесплатно
кракен москва
кракен москва ссылка
кракен москва зеркало
кракен москва зайти
кракен москва купить
кракен москва сайт
кракен москва даркнет
кракен москва шоп
кракен москва маркет
кракен москва тор
кракен москва онион
кракен закладки москва
кракен москва 2026
kraken moscow link
кракен москва официальный сайт
кракен москва работа
кракен москва через тор
кракен москва вход
кракен москва адреса
кракен москва сегодня
кракен форум
кракен форум ссылка
кракен форум зеркало
кракен форум онион
кракен официальный форум
форум кракен даркнет
кракен форум отзывы
кракен форум тор
форум маркетплейса кракен
кракен форум вход
kraken forum link
кракен форум обсуждение
кракен форум новости
кракен форум поддержка
форум площадки кракен
кракен форум ветка
кракен форум анонимно
кракен форум зеркало рабочее
кракен форум общение
кракен форум 2026
Your comment is awaiting moderation.
Привет всем!
В современном мире внимание — самый ценный ресурс. Человек принимает решение за секунды: остаться или уйти. Если страница даёт ему готовый ответ сразу, интерес исчезает. Но если она намекает на большее, он остаётся. Эта пауза, это ожидание — ключ к тому, чтобы превратить случайного посетителя в клиента.
Полная информация по ссылке – https://www.ts-web.ru/cases/
реклама в Instagram под ключ, перенос сайтов WordPress под ключ, аудит рекламных кампаний Google Ads
услуги по SEO продвижению в Махачкале, Безопасность CMS: 7 практик, которые спасут от взлома | Блог TS-WEB, реклама в TikTok под ключ Россия
Удачи и комфорта в жизни!
Аудит сайта: найдём, что мешает вашему росту ebfa8dd
Your comment is awaiting moderation.
1win register 1win register
Your comment is awaiting moderation.
1x bet giri? 1x bet giri? .
Your comment is awaiting moderation.
pin-up kirish 2026 pin-up kirish 2026
Your comment is awaiting moderation.
кракен телеграм инструкция входа > кракен зеркало тор Сегодня я протестировал несколько в какой игре кракен, и вот что стабильно работает: Вопрос сколько стоит телефон кракен задают все, кто впервые сталкивается с этим названием. Настоящий ответ на сколько стоит телефон кракен зависит от версии и места заказа. Люди отмечают, что он дороже массовых моделей, но именно за счёт встроенных функций безопасности.
Проверил лично несколько адресов — стабильно открываются: рабочий кракен тор — kraktor.ccкракен зеркало тор — kramirror.cc Если нужна помощь — пишите.Проверено лично (Ульяновск). Kraken Marketplace теневой маркет Телеграмм
Your comment is awaiting moderation.
1xbet ?ye ol 1xbet-giris-29.com .
Your comment is awaiting moderation.
mostbet to‘lov muammo http://www.mostbet37150.help
Your comment is awaiting moderation.
check this store – Discovered this page while surfing online and it appears very informative.
Your comment is awaiting moderation.
КРАКЕН ДАРКНЕТ: Как зайти через Tor Browser >
проверенная ссылка
Здорово! КРАКЕН МАГАЗИН работает во всех городах.
В современном цифровом мире платформы, маркетплейсы и сервисы постоянно обновляются, и ориентироваться в этом потоке данных бывает непросто. ЗЕРКАЛА КРАКЕН помогают увидеть картину целиком, объединяя сведения о функционале сайтов, их интерфейсах и доступных инструментах в одном ресурсе. При изучении таких материалов становится очевидно, что платформы отличаются друг от друга по структуре, возможностям и способам взаимодействия с пользователями. Актуальная информация играет ключевую роль, ведь без нее легко пропустить новые функции, изменения в сервисах или обновления маркетплейсов. ЗЕРКАЛА КРАКЕН фиксируют эти изменения и дают возможность следить за развитием площадок, получая сведения в удобной форме. Telegram используется как основной канал для распространения новостей: через ботов публикуются уведомления, аналитические заметки и краткие обзоры, которые помогают оставаться в курсе событий без лишней нагрузки. В результате ЗЕРКАЛА КРАКЕН формируют живое, понятное и целостное представление о цифровой среде, где платформы и сервисы видны в деталях, а пользователи получают структурированную информацию о маркетплейсах, сайтах и онлайн-инструментах, позволяя спокойно ориентироваться в обновлениях и оценивать возможности платформ.
зеркало сегодня username: @krakensmirrorsbot
ссылка тор username: @krakenslinksbot
кракен официальный сайт
кракен сайт даркнет
kraken site onion
кракен официальный сайт зеркало
кракен сайт вход
кракен тор сайт
кракен маркетплейс сайт
сайт кракен ссылка тор
кракен оригинальный сайт
кракен онион сайт
кракен сайт 2026
кракен сайт анонимно
официальный ресурс кракен
кракен сайт даркнет маркетплейс
сайт кракен зеркало рабочее
кракен интернет магазин сайт
kraken darknet site link
кракен сайт через тор браузер
кракен официальный сайт онион
кракен сайт площадка
ссылка на кракен
кракен ссылки тор
актуальные ссылки на кракен
kraken onion links
кракен ссылки даркнет
кракен ссылка зеркало
кракен рабочая ссылка на сегодня
кракен прямая ссылка
кракен ссылка 2026
ссылка на кракен в тор браузере
новые ссылки кракен
кракен ссылки онион
кракен ссылка на маркет
кракен ссылка вход
кракен ссылка официальный
kraken darknet link
кракен ссылка маркетплейс
проверенные ссылки кракен
кракен ссылка зеркало рабочее
кракен активная ссылка
кракен зеркало
кракен актуальное зеркало
зеркало кракен сегодня
kraken mirror onion
кракен зеркало рабочее на сегодня
кракен зеркало тор
кракен официальное зеркало
зеркало сайта кракен
кракен зеркало вход
кракен зеркало даркнет
новое зеркало кракен
зеркало кракен 2026
кракен зеркало онион
кракен список зеркал
зеркало площадки кракен
кракен зеркало маркетплейс
кракен рабочее зеркало 2026
kraken darknet mirror
кракен зеркало ссылка
активные зеркала кракен
кракен магазин
kraken shop link
магазин кракен даркнет
кракен шоп онион
магазин кракен зеркало
кракен маркетплейс магазин
кракен магазин официальный
купить в магазине кракен
магазин кракен тор
kraken store onion
кракен интернет магазин
магазин кракен ссылка
кракен магазин товаров
кракен магазин вход
кракен шоп зеркало
магазин кракен 2026
кракен магазин анонимно
кракен официальный шоп
кракен витрина магазина
магазин кракен маркет
кракен даркнет
kraken darknet market
кракен даркнет ссылка
кракен даркнет вход
кракен даркнет зеркало
даркнет площадка кракен
кракен даркнет тор
кракен даркнет онион
кракен в даркнете как зайти
кракен даркнет сайт
официальный кракен даркнет
кракен даркнет маркет
кракен даркнет 2026
kraken darknet onion link
даркнет маркетплейс кракен
кракен даркнет ресурс
кракен теневой рынок
кракен даркнет шоп
кракен даркнет рабочая ссылка
доступ в кракен даркнет
кракен маркет
kraken market onion
кракен маркетплейс ссылка
кракен маркет вход
кракен маркет зеркало
маркетплейс кракен даркнет
кракен маркет тор
кракен маркет официальный
официальный сайт кракен маркет
кракен маркет онион
кракен маркет шоп
маркет кракен ссылка на сегодня
kraken market darknet link
кракен маркет площадка
кракен маркет 2026
кракен маркетплейс зеркало
маркет кракен через тор
кракен маркет анонимно
кракен маркет онлайн
торговая площадка кракен маркет
кракен 2026
кракен 2026 ссылка
кракен 2026 зеркало
кракен 2026 вход
кракен 2026 официальный сайт
кракен 2026 даркнет
kraken 2026 link
кракен 2026 онион
кракен 2026 актуально
кракен 2026 тор
кракен 2026 маркетплейс
новое зеркало кракен 2026
кракен 2026 рабочая ссылка
кракен 2026 зеркало сегодня
кракен сайт 2026 вход
кракен 2026 магазин
кракен 2026 через тор
кракен 2026 площадка
кракен 2026 работа
доступ на кракен 2026
кракен телеграмм
кракен тг бот
kraken telegram link
кракен бот телеграмм
кракен телеграмм канал
кракен ссылка в телеграмме
кракен тг ссылка
кракен новости телеграмм
кракен телеграмм зеркало
кракен бот в тг
официальный телеграмм кракен
кракен маркет телеграмм
кракен телеграмм чат
kraken tg bot
кракен телеграмм поддержка
кракен телеграмм новости
кракен контакты телеграмм
кракен бот автопродаж телеграмм
кракен телеграм ссылка тор
кракен тг группа
кракен вход
вход на кракен
кракен вход зеркало
кракен личный кабинет вход
кракен вход через тор
кракен вход онион
kraken login link
кракен вход официальный сайт
как зайти на кракен
кракен вход в магазин
кракен авторизация вход
кракен вход 2026
кракен зайти на сайт
кракен доступ вход
кракен вход по ссылке
кракен вход даркнет
кракен войти в аккаунт
кракен вход через браузер
кракен личный кабинет вход сегодня
кракен официальный вход зеркало
кракен тор
кракен тор ссылка
кракен тор зеркало
kraken tor link
кракен через тор браузер
кракен тор онион
кракен тор вход
кракен тор сайт
официальный тор кракен
кракен тор ссылка на зеркало
кракен зайти через тор
кракен тор маркетплейс
тор сайт кракен онион
кракен тор даркнет
кракен тор рабочая ссылка
kraken tor browser link
кракен тор шоп
кракен тор адрес
кракен тор доступ
кракен ссылка в тор сети
кракен бот
kraken bot link
кракен бот телеграмм
кракен бот автопродаж
кракен бот зеркало
кракен бот ссылка
кракен бот официальный
кракен бот покупок
бот кракен маркет
кракен бот даркнет
кракен бот онион
кракен бот в тг
кракен бот 24/7
kraken bot telegram
кракен бот работа
кракен бот для андроид
кракен бот через тор
кракен бот поддержка
кракен бот актуальный
рабочий бот кракен
аккаунты кракен
купить аккаунт кракен
кракен аккаунты с балансом
регистрация аккаунта кракен
вход в аккаунт кракен
кракен личный аккаунт
аккаунты kraken darknet
кракен аккаунты даркнет
проверка аккаунта кракен
кракен аккаунты маркет
доступ к аккаунту кракен
кракен аккаунты шоп
создать аккаунт кракен
аккаунты кракен зеркало
кракен аккаунт войти
кракен аккаунты бесплатно
аккаунты кракен 2026
кракен аккаунты онион
аккаунты на кракене как зайти
кракен кабинет аккаунт
кракен регистрация
как зарегистрироваться на кракен
кракен регистрация на сайте
кракен регистрация зеркало
kraken registration link
кракен создать аккаунт
кракен регистрация тор
кракен регистрация онион
кракен официальная регистрация
кракен регистрация 2026
кракен регистрация без почты
регистрация в кракен маркет
кракен регистрация ссылка
кракен регистрация через браузер
кракен быстрая регистрация
кракен форма регистрации
кракен регистрация даркнет
регистрация на сайте кракен тор
кракен регистрация сейчас
кракен регистрация бесплатно
кракен москва
кракен москва ссылка
кракен москва зеркало
кракен москва зайти
кракен москва купить
кракен москва сайт
кракен москва даркнет
кракен москва шоп
кракен москва маркет
кракен москва тор
кракен москва онион
кракен закладки москва
кракен москва 2026
kraken moscow link
кракен москва официальный сайт
кракен москва работа
кракен москва через тор
кракен москва вход
кракен москва адреса
кракен москва сегодня
кракен форум
кракен форум ссылка
кракен форум зеркало
кракен форум онион
кракен официальный форум
форум кракен даркнет
кракен форум отзывы
кракен форум тор
форум маркетплейса кракен
кракен форум вход
kraken forum link
кракен форум обсуждение
кракен форум новости
кракен форум поддержка
форум площадки кракен
кракен форум ветка
кракен форум анонимно
кракен форум зеркало рабочее
кракен форум общение
кракен форум 2026
Your comment is awaiting moderation.
этикетки пивные заказать
Это направление будет особенно интересно тем, кто интересуется личным ростом, опытом и полезными навыками. Оно помогает проводить время с пользой, открывать новые возможности и получать яркие впечатления. При регулярном интересе оно может стать важной частью образа жизни, источником вдохновения и способом самовыражения.
перевозка рефрижераторами
где заказать этикетки
This field is often chosen by people who value growth, new knowledge, and practical experience. This kind of activity helps spend time productively, discover new opportunities, and enjoy memorable experiences. With regular interest it can open the door to new connections, goals, and useful opportunities.
https://www.mixcloud.com/Darya65ni/
Your comment is awaiting moderation.
1xbet tr giri? 1xbet-55.com .
Your comment is awaiting moderation.
xbet giri? xbet giri? .
Your comment is awaiting moderation.
melbet скачать на айфон киргизия melbet скачать на айфон киргизия
Your comment is awaiting moderation.
birxbet giri? 1xbet-giris-27.com .
Your comment is awaiting moderation.
1xbet g?ncel 1xbet g?ncel .
Your comment is awaiting moderation.
Где заказать Кракен телефон? > кракен тг бот тор Сегодня я протестировал несколько как найти ссылку на кракен, и вот что стабильно работает: Фраза кракен наркошоп переходник особенно актуальна для тех, кто пользуется торговыми сервисами. Настоящий кракен наркошоп переходник помогает оставаться на связи с площадкой при любых блокировках. Сообщество делится отзывами о том, какие адреса рабочие.
Проверил лично несколько адресов — стабильно открываются: как найти кракен в торе — kraktor.ccссылка на сайт кракен в тор браузере — kraktor.cc Если нужна помощь — оставляйте комменты.Проверено лично (Кемерово). Кракен онлайн-рынок телега
Your comment is awaiting moderation.
Юридическая консультация по лишению родительских прав поможет оценить ситуацию, определить основания и выстроить грамотную стратегию защиты или подачи иска. Переходите по запросу адвокат по лишению прав родителей – специалист разъяснит порядок действий и подготовит документы. Получите профессиональную поддержку и ответы на все вопросы уже на первой консультации.
Your comment is awaiting moderation.
1xbet t?rkiye 1xbet t?rkiye .
Your comment is awaiting moderation.
take a look here – Noticed this page online and will probably check it again.
Your comment is awaiting moderation.
Официальный ресурс KRAKEN SITE >
кракен даркнет ссылка
Приветствуем! КРАКЕН САЙТ подготовил новые витрины.
С ростом числа онлайн-платформ и маркетплейсов становится очевидно, как важно иметь надежные источники информации, которые помогают быстро ориентироваться в обновлениях и функционале сервисов. КРАКЕН МАГАЗИН выполняет эту роль, предоставляя сведения о сайтах, их интерфейсах и встроенных инструментах, включая Telegram-ботов для получения уведомлений в реальном времени. Материалы ресурса подробно описывают возможности платформ, особенности работы маркетплейсов, инструменты для взаимодействия с пользователями и способы автоматизации процессов. Актуальная информация здесь критически важна, так как сайты и сервисы регулярно обновляются: появляются новые функции, корректируются старые возможности и обновляется контент. КРАКЕН МАГАЗИН помогает отслеживать эти изменения, обеспечивая удобный и понятный формат подачи данных. Telegram используется как канал для оперативного распространения уведомлений, кратких обзоров и аналитических заметок, позволяя оставаться в курсе всех изменений без лишней нагрузки. В итоге КРАКЕН МАГАЗИН формирует полное и живое представление о цифровых платформах, маркетплейсах и сервисах, позволяя пользователям спокойно ориентироваться в их функционале и следить за развитием онлайн-инструментов.
перейти на сайт username: @krakenssitebot
доступ в даркнет username: @krakensdarkbot
кракен официальный сайт
кракен сайт даркнет
kraken site onion
кракен официальный сайт зеркало
кракен сайт вход
кракен тор сайт
кракен маркетплейс сайт
сайт кракен ссылка тор
кракен оригинальный сайт
кракен онион сайт
кракен сайт 2026
кракен сайт анонимно
официальный ресурс кракен
кракен сайт даркнет маркетплейс
сайт кракен зеркало рабочее
кракен интернет магазин сайт
kraken darknet site link
кракен сайт через тор браузер
кракен официальный сайт онион
кракен сайт площадка
ссылка на кракен
кракен ссылки тор
актуальные ссылки на кракен
kraken onion links
кракен ссылки даркнет
кракен ссылка зеркало
кракен рабочая ссылка на сегодня
кракен прямая ссылка
кракен ссылка 2026
ссылка на кракен в тор браузере
новые ссылки кракен
кракен ссылки онион
кракен ссылка на маркет
кракен ссылка вход
кракен ссылка официальный
kraken darknet link
кракен ссылка маркетплейс
проверенные ссылки кракен
кракен ссылка зеркало рабочее
кракен активная ссылка
кракен зеркало
кракен актуальное зеркало
зеркало кракен сегодня
kraken mirror onion
кракен зеркало рабочее на сегодня
кракен зеркало тор
кракен официальное зеркало
зеркало сайта кракен
кракен зеркало вход
кракен зеркало даркнет
новое зеркало кракен
зеркало кракен 2026
кракен зеркало онион
кракен список зеркал
зеркало площадки кракен
кракен зеркало маркетплейс
кракен рабочее зеркало 2026
kraken darknet mirror
кракен зеркало ссылка
активные зеркала кракен
кракен магазин
kraken shop link
магазин кракен даркнет
кракен шоп онион
магазин кракен зеркало
кракен маркетплейс магазин
кракен магазин официальный
купить в магазине кракен
магазин кракен тор
kraken store onion
кракен интернет магазин
магазин кракен ссылка
кракен магазин товаров
кракен магазин вход
кракен шоп зеркало
магазин кракен 2026
кракен магазин анонимно
кракен официальный шоп
кракен витрина магазина
магазин кракен маркет
кракен даркнет
kraken darknet market
кракен даркнет ссылка
кракен даркнет вход
кракен даркнет зеркало
даркнет площадка кракен
кракен даркнет тор
кракен даркнет онион
кракен в даркнете как зайти
кракен даркнет сайт
официальный кракен даркнет
кракен даркнет маркет
кракен даркнет 2026
kraken darknet onion link
даркнет маркетплейс кракен
кракен даркнет ресурс
кракен теневой рынок
кракен даркнет шоп
кракен даркнет рабочая ссылка
доступ в кракен даркнет
кракен маркет
kraken market onion
кракен маркетплейс ссылка
кракен маркет вход
кракен маркет зеркало
маркетплейс кракен даркнет
кракен маркет тор
кракен маркет официальный
официальный сайт кракен маркет
кракен маркет онион
кракен маркет шоп
маркет кракен ссылка на сегодня
kraken market darknet link
кракен маркет площадка
кракен маркет 2026
кракен маркетплейс зеркало
маркет кракен через тор
кракен маркет анонимно
кракен маркет онлайн
торговая площадка кракен маркет
кракен 2026
кракен 2026 ссылка
кракен 2026 зеркало
кракен 2026 вход
кракен 2026 официальный сайт
кракен 2026 даркнет
kraken 2026 link
кракен 2026 онион
кракен 2026 актуально
кракен 2026 тор
кракен 2026 маркетплейс
новое зеркало кракен 2026
кракен 2026 рабочая ссылка
кракен 2026 зеркало сегодня
кракен сайт 2026 вход
кракен 2026 магазин
кракен 2026 через тор
кракен 2026 площадка
кракен 2026 работа
доступ на кракен 2026
кракен телеграмм
кракен тг бот
kraken telegram link
кракен бот телеграмм
кракен телеграмм канал
кракен ссылка в телеграмме
кракен тг ссылка
кракен новости телеграмм
кракен телеграмм зеркало
кракен бот в тг
официальный телеграмм кракен
кракен маркет телеграмм
кракен телеграмм чат
kraken tg bot
кракен телеграмм поддержка
кракен телеграмм новости
кракен контакты телеграмм
кракен бот автопродаж телеграмм
кракен телеграм ссылка тор
кракен тг группа
кракен вход
вход на кракен
кракен вход зеркало
кракен личный кабинет вход
кракен вход через тор
кракен вход онион
kraken login link
кракен вход официальный сайт
как зайти на кракен
кракен вход в магазин
кракен авторизация вход
кракен вход 2026
кракен зайти на сайт
кракен доступ вход
кракен вход по ссылке
кракен вход даркнет
кракен войти в аккаунт
кракен вход через браузер
кракен личный кабинет вход сегодня
кракен официальный вход зеркало
кракен тор
кракен тор ссылка
кракен тор зеркало
kraken tor link
кракен через тор браузер
кракен тор онион
кракен тор вход
кракен тор сайт
официальный тор кракен
кракен тор ссылка на зеркало
кракен зайти через тор
кракен тор маркетплейс
тор сайт кракен онион
кракен тор даркнет
кракен тор рабочая ссылка
kraken tor browser link
кракен тор шоп
кракен тор адрес
кракен тор доступ
кракен ссылка в тор сети
кракен бот
kraken bot link
кракен бот телеграмм
кракен бот автопродаж
кракен бот зеркало
кракен бот ссылка
кракен бот официальный
кракен бот покупок
бот кракен маркет
кракен бот даркнет
кракен бот онион
кракен бот в тг
кракен бот 24/7
kraken bot telegram
кракен бот работа
кракен бот для андроид
кракен бот через тор
кракен бот поддержка
кракен бот актуальный
рабочий бот кракен
аккаунты кракен
купить аккаунт кракен
кракен аккаунты с балансом
регистрация аккаунта кракен
вход в аккаунт кракен
кракен личный аккаунт
аккаунты kraken darknet
кракен аккаунты даркнет
проверка аккаунта кракен
кракен аккаунты маркет
доступ к аккаунту кракен
кракен аккаунты шоп
создать аккаунт кракен
аккаунты кракен зеркало
кракен аккаунт войти
кракен аккаунты бесплатно
аккаунты кракен 2026
кракен аккаунты онион
аккаунты на кракене как зайти
кракен кабинет аккаунт
кракен регистрация
как зарегистрироваться на кракен
кракен регистрация на сайте
кракен регистрация зеркало
kraken registration link
кракен создать аккаунт
кракен регистрация тор
кракен регистрация онион
кракен официальная регистрация
кракен регистрация 2026
кракен регистрация без почты
регистрация в кракен маркет
кракен регистрация ссылка
кракен регистрация через браузер
кракен быстрая регистрация
кракен форма регистрации
кракен регистрация даркнет
регистрация на сайте кракен тор
кракен регистрация сейчас
кракен регистрация бесплатно
кракен москва
кракен москва ссылка
кракен москва зеркало
кракен москва зайти
кракен москва купить
кракен москва сайт
кракен москва даркнет
кракен москва шоп
кракен москва маркет
кракен москва тор
кракен москва онион
кракен закладки москва
кракен москва 2026
kraken moscow link
кракен москва официальный сайт
кракен москва работа
кракен москва через тор
кракен москва вход
кракен москва адреса
кракен москва сегодня
кракен форум
кракен форум ссылка
кракен форум зеркало
кракен форум онион
кракен официальный форум
форум кракен даркнет
кракен форум отзывы
кракен форум тор
форум маркетплейса кракен
кракен форум вход
kraken forum link
кракен форум обсуждение
кракен форум новости
кракен форум поддержка
форум площадки кракен
кракен форум ветка
кракен форум анонимно
кракен форум зеркало рабочее
кракен форум общение
кракен форум 2026
Your comment is awaiting moderation.
1win ставкаҳои league of legends https://www.1win91403.help
Your comment is awaiting moderation.
новости хоккея
Это увлечение будет особенно интересно тем, кто интересуется личным ростом, опытом и полезными навыками. Такое занятие помогает развивать мышление, расширять опыт и находить интересные идеи. При более глубоком погружении такое направление может открыть новые знакомства, цели и полезные перспективы.
гипсолайт
новости хоккея
This field may be a great fit for anyone who value growth, new knowledge, and practical experience. It helps spend time productively, discover new opportunities, and enjoy memorable experiences. If given proper attention it may turn into a valuable area for growth, communication, and self-realization.
https://mastodon.bida.im/@Anton70wb
Your comment is awaiting moderation.
1xbet resmi 1xbet-giris-30.com .
Your comment is awaiting moderation.
КРАКЕН ССЫЛКИ — Прямой переход на onion сайт >
магазин онион
Хай! КРАКЕН ДАРКНЕТ и безопасные ссылки.
В потоке современных онлайн-сервисов легко потеряться, ведь сайты и маркетплейсы постоянно обновляются и предлагают новые возможности. КРАКЕН МАГАЗИН помогает структурировать этот поток информации, собирая данные о функционале платформ, их интерфейсах и инструментах для взаимодействия с пользователями, включая Telegram-ботов для оперативных уведомлений. Материалы ресурса раскрывают особенности платформ, различия в подходах к организации сервисов и маркетплейсов, а также показывают, как новые функции и обновления влияют на работу с площадками. Актуальная информация имеет решающее значение, ведь без нее легко пропустить важные изменения, появление новых возможностей или корректировку существующих функций. КРАКЕН МАГАЗИН позволяет отслеживать эти события в удобном и логичном формате, обеспечивая последовательное восприятие сведений. Telegram становится дополнительным каналом, где через ботов публикуются уведомления, аналитические заметки и краткие обзоры, делая процесс получения данных быстрым и доступным. В результате КРАКЕН МАГАЗИН формирует полную, наглядную и живую картину цифровой экосистемы, где пользователи могут спокойно ориентироваться, сравнивать платформы, оценивать функционал сервисов и понимать развитие сайтов, маркетплейсов и онлайн-инструментов.
кракен онион username: @krakensdarkbot
КРАКЕН МАГАЗИН username: @krakensshopibot
кракен официальный сайт
кракен сайт даркнет
kraken site onion
кракен официальный сайт зеркало
кракен сайт вход
кракен тор сайт
кракен маркетплейс сайт
сайт кракен ссылка тор
кракен оригинальный сайт
кракен онион сайт
кракен сайт 2026
кракен сайт анонимно
официальный ресурс кракен
кракен сайт даркнет маркетплейс
сайт кракен зеркало рабочее
кракен интернет магазин сайт
kraken darknet site link
кракен сайт через тор браузер
кракен официальный сайт онион
кракен сайт площадка
ссылка на кракен
кракен ссылки тор
актуальные ссылки на кракен
kraken onion links
кракен ссылки даркнет
кракен ссылка зеркало
кракен рабочая ссылка на сегодня
кракен прямая ссылка
кракен ссылка 2026
ссылка на кракен в тор браузере
новые ссылки кракен
кракен ссылки онион
кракен ссылка на маркет
кракен ссылка вход
кракен ссылка официальный
kraken darknet link
кракен ссылка маркетплейс
проверенные ссылки кракен
кракен ссылка зеркало рабочее
кракен активная ссылка
кракен зеркало
кракен актуальное зеркало
зеркало кракен сегодня
kraken mirror onion
кракен зеркало рабочее на сегодня
кракен зеркало тор
кракен официальное зеркало
зеркало сайта кракен
кракен зеркало вход
кракен зеркало даркнет
новое зеркало кракен
зеркало кракен 2026
кракен зеркало онион
кракен список зеркал
зеркало площадки кракен
кракен зеркало маркетплейс
кракен рабочее зеркало 2026
kraken darknet mirror
кракен зеркало ссылка
активные зеркала кракен
кракен магазин
kraken shop link
магазин кракен даркнет
кракен шоп онион
магазин кракен зеркало
кракен маркетплейс магазин
кракен магазин официальный
купить в магазине кракен
магазин кракен тор
kraken store onion
кракен интернет магазин
магазин кракен ссылка
кракен магазин товаров
кракен магазин вход
кракен шоп зеркало
магазин кракен 2026
кракен магазин анонимно
кракен официальный шоп
кракен витрина магазина
магазин кракен маркет
кракен даркнет
kraken darknet market
кракен даркнет ссылка
кракен даркнет вход
кракен даркнет зеркало
даркнет площадка кракен
кракен даркнет тор
кракен даркнет онион
кракен в даркнете как зайти
кракен даркнет сайт
официальный кракен даркнет
кракен даркнет маркет
кракен даркнет 2026
kraken darknet onion link
даркнет маркетплейс кракен
кракен даркнет ресурс
кракен теневой рынок
кракен даркнет шоп
кракен даркнет рабочая ссылка
доступ в кракен даркнет
кракен маркет
kraken market onion
кракен маркетплейс ссылка
кракен маркет вход
кракен маркет зеркало
маркетплейс кракен даркнет
кракен маркет тор
кракен маркет официальный
официальный сайт кракен маркет
кракен маркет онион
кракен маркет шоп
маркет кракен ссылка на сегодня
kraken market darknet link
кракен маркет площадка
кракен маркет 2026
кракен маркетплейс зеркало
маркет кракен через тор
кракен маркет анонимно
кракен маркет онлайн
торговая площадка кракен маркет
кракен 2026
кракен 2026 ссылка
кракен 2026 зеркало
кракен 2026 вход
кракен 2026 официальный сайт
кракен 2026 даркнет
kraken 2026 link
кракен 2026 онион
кракен 2026 актуально
кракен 2026 тор
кракен 2026 маркетплейс
новое зеркало кракен 2026
кракен 2026 рабочая ссылка
кракен 2026 зеркало сегодня
кракен сайт 2026 вход
кракен 2026 магазин
кракен 2026 через тор
кракен 2026 площадка
кракен 2026 работа
доступ на кракен 2026
кракен телеграмм
кракен тг бот
kraken telegram link
кракен бот телеграмм
кракен телеграмм канал
кракен ссылка в телеграмме
кракен тг ссылка
кракен новости телеграмм
кракен телеграмм зеркало
кракен бот в тг
официальный телеграмм кракен
кракен маркет телеграмм
кракен телеграмм чат
kraken tg bot
кракен телеграмм поддержка
кракен телеграмм новости
кракен контакты телеграмм
кракен бот автопродаж телеграмм
кракен телеграм ссылка тор
кракен тг группа
кракен вход
вход на кракен
кракен вход зеркало
кракен личный кабинет вход
кракен вход через тор
кракен вход онион
kraken login link
кракен вход официальный сайт
как зайти на кракен
кракен вход в магазин
кракен авторизация вход
кракен вход 2026
кракен зайти на сайт
кракен доступ вход
кракен вход по ссылке
кракен вход даркнет
кракен войти в аккаунт
кракен вход через браузер
кракен личный кабинет вход сегодня
кракен официальный вход зеркало
кракен тор
кракен тор ссылка
кракен тор зеркало
kraken tor link
кракен через тор браузер
кракен тор онион
кракен тор вход
кракен тор сайт
официальный тор кракен
кракен тор ссылка на зеркало
кракен зайти через тор
кракен тор маркетплейс
тор сайт кракен онион
кракен тор даркнет
кракен тор рабочая ссылка
kraken tor browser link
кракен тор шоп
кракен тор адрес
кракен тор доступ
кракен ссылка в тор сети
кракен бот
kraken bot link
кракен бот телеграмм
кракен бот автопродаж
кракен бот зеркало
кракен бот ссылка
кракен бот официальный
кракен бот покупок
бот кракен маркет
кракен бот даркнет
кракен бот онион
кракен бот в тг
кракен бот 24/7
kraken bot telegram
кракен бот работа
кракен бот для андроид
кракен бот через тор
кракен бот поддержка
кракен бот актуальный
рабочий бот кракен
аккаунты кракен
купить аккаунт кракен
кракен аккаунты с балансом
регистрация аккаунта кракен
вход в аккаунт кракен
кракен личный аккаунт
аккаунты kraken darknet
кракен аккаунты даркнет
проверка аккаунта кракен
кракен аккаунты маркет
доступ к аккаунту кракен
кракен аккаунты шоп
создать аккаунт кракен
аккаунты кракен зеркало
кракен аккаунт войти
кракен аккаунты бесплатно
аккаунты кракен 2026
кракен аккаунты онион
аккаунты на кракене как зайти
кракен кабинет аккаунт
кракен регистрация
как зарегистрироваться на кракен
кракен регистрация на сайте
кракен регистрация зеркало
kraken registration link
кракен создать аккаунт
кракен регистрация тор
кракен регистрация онион
кракен официальная регистрация
кракен регистрация 2026
кракен регистрация без почты
регистрация в кракен маркет
кракен регистрация ссылка
кракен регистрация через браузер
кракен быстрая регистрация
кракен форма регистрации
кракен регистрация даркнет
регистрация на сайте кракен тор
кракен регистрация сейчас
кракен регистрация бесплатно
кракен москва
кракен москва ссылка
кракен москва зеркало
кракен москва зайти
кракен москва купить
кракен москва сайт
кракен москва даркнет
кракен москва шоп
кракен москва маркет
кракен москва тор
кракен москва онион
кракен закладки москва
кракен москва 2026
kraken moscow link
кракен москва официальный сайт
кракен москва работа
кракен москва через тор
кракен москва вход
кракен москва адреса
кракен москва сегодня
кракен форум
кракен форум ссылка
кракен форум зеркало
кракен форум онион
кракен официальный форум
форум кракен даркнет
кракен форум отзывы
кракен форум тор
форум маркетплейса кракен
кракен форум вход
kraken forum link
кракен форум обсуждение
кракен форум новости
кракен форум поддержка
форум площадки кракен
кракен форум ветка
кракен форум анонимно
кракен форум зеркало рабочее
кракен форум общение
кракен форум 2026
Your comment is awaiting moderation.
mostbet plinko коэффициенты http://mostbet83507.help/
Your comment is awaiting moderation.
где купить смартфон кракен дешево > кракен телеграм маркетплейс Сегодня я протестировал несколько кракен тор, и вот что стабильно работает: Словосочетание кракен сайт маркет закрепилось за инструкциями по входу. Настоящий кракен сайт маркет считается надёжным способом получить доступ.
Проверил лично несколько зеркал — стабильно открываются: официальная ссылка на кракен в тор — kraktor.ccкракен в телеграме — kraken-telegram.cc Если нужна помощь — задавайте вопросы.Проверено лично (Томск). Кракен дарк маркет торговая платформа мессенджер тг
Your comment is awaiting moderation.
букет бесплатно http://zakazat-cveti-moskva.ru/ .
Your comment is awaiting moderation.
1xbet giri? 2025 1xbet giri? 2025 .
Your comment is awaiting moderation.
mostbet live ставки Бишкек http://mostbet21480.help
Your comment is awaiting moderation.
browse the store – The layout appears well organized and comfortable for reading.
Your comment is awaiting moderation.
bahis siteler 1xbet bahis siteler 1xbet .
Your comment is awaiting moderation.
one x bet 1xbet-giris-32.com .
Your comment is awaiting moderation.
1xbet 1xbet .
Your comment is awaiting moderation.
1xbet 1xbet .
Your comment is awaiting moderation.
birxbet 1xbet-giris-28.com .
Your comment is awaiting moderation.
экспресс-доставка 10 тонн
Эта деятельность подходит тем, кто интересуется личным ростом, опытом и полезными навыками. Такой формат активности помогает сочетать интерес, практику и личное развитие. При регулярном интересе такое направление может открыть новые знакомства, цели и полезные перспективы.
перевозка груза
экспресс-доставка 5 тонн
This interest is well suited for people who like exploring new ideas, building skills, and gaining valuable experience. It helps develop thinking, expand experience, and find fresh inspiration. If given proper attention it may turn into a valuable area for growth, communication, and self-realization.
https://bandcamp.com/darya86tm
Your comment is awaiting moderation.
КРАКЕН МАГАЗИН: Безопасные сделки и анонимность >
кракен в сети
Всем профита! КРАКЕН САЙТ доступен 24/7.
КРАКЕН САЙТ функционирует как аналитический ресурс для изучения интернет-платформ и маркетплейсов, предоставляя систематизированные сведения о функционале и возможностях сервисов. КРАКЕН САЙТ позволяет пользователям получать актуальные данные о новинках и обновлениях платформ, используя Telegram-боты для мгновенного доступа к свежей информации. Ресурс содержит обзоры сервисов, рейтинги, сравнительные таблицы и рекомендации, позволяя оценивать преимущества и недостатки платформ. КРАКЕН САЙТ помогает ориентироваться в цифровой экосистеме, анализировать инструменты и составлять полное представление о работе интернет-магазинов, маркетплейсов и онлайн-сервисов, обеспечивая информационную ценность и практическую пользу
главный сайт username: @krakenssitebot
вход на даркнет сайт username: @krakensdarkbot
кракен официальный сайт
кракен сайт даркнет
kraken site onion
кракен официальный сайт зеркало
кракен сайт вход
кракен тор сайт
кракен маркетплейс сайт
сайт кракен ссылка тор
кракен оригинальный сайт
кракен онион сайт
кракен сайт 2026
кракен сайт анонимно
официальный ресурс кракен
кракен сайт даркнет маркетплейс
сайт кракен зеркало рабочее
кракен интернет магазин сайт
kraken darknet site link
кракен сайт через тор браузер
кракен официальный сайт онион
кракен сайт площадка
ссылка на кракен
кракен ссылки тор
актуальные ссылки на кракен
kraken onion links
кракен ссылки даркнет
кракен ссылка зеркало
кракен рабочая ссылка на сегодня
кракен прямая ссылка
кракен ссылка 2026
ссылка на кракен в тор браузере
новые ссылки кракен
кракен ссылки онион
кракен ссылка на маркет
кракен ссылка вход
кракен ссылка официальный
kraken darknet link
кракен ссылка маркетплейс
проверенные ссылки кракен
кракен ссылка зеркало рабочее
кракен активная ссылка
кракен зеркало
кракен актуальное зеркало
зеркало кракен сегодня
kraken mirror onion
кракен зеркало рабочее на сегодня
кракен зеркало тор
кракен официальное зеркало
зеркало сайта кракен
кракен зеркало вход
кракен зеркало даркнет
новое зеркало кракен
зеркало кракен 2026
кракен зеркало онион
кракен список зеркал
зеркало площадки кракен
кракен зеркало маркетплейс
кракен рабочее зеркало 2026
kraken darknet mirror
кракен зеркало ссылка
активные зеркала кракен
кракен магазин
kraken shop link
магазин кракен даркнет
кракен шоп онион
магазин кракен зеркало
кракен маркетплейс магазин
кракен магазин официальный
купить в магазине кракен
магазин кракен тор
kraken store onion
кракен интернет магазин
магазин кракен ссылка
кракен магазин товаров
кракен магазин вход
кракен шоп зеркало
магазин кракен 2026
кракен магазин анонимно
кракен официальный шоп
кракен витрина магазина
магазин кракен маркет
кракен даркнет
kraken darknet market
кракен даркнет ссылка
кракен даркнет вход
кракен даркнет зеркало
даркнет площадка кракен
кракен даркнет тор
кракен даркнет онион
кракен в даркнете как зайти
кракен даркнет сайт
официальный кракен даркнет
кракен даркнет маркет
кракен даркнет 2026
kraken darknet onion link
даркнет маркетплейс кракен
кракен даркнет ресурс
кракен теневой рынок
кракен даркнет шоп
кракен даркнет рабочая ссылка
доступ в кракен даркнет
кракен маркет
kraken market onion
кракен маркетплейс ссылка
кракен маркет вход
кракен маркет зеркало
маркетплейс кракен даркнет
кракен маркет тор
кракен маркет официальный
официальный сайт кракен маркет
кракен маркет онион
кракен маркет шоп
маркет кракен ссылка на сегодня
kraken market darknet link
кракен маркет площадка
кракен маркет 2026
кракен маркетплейс зеркало
маркет кракен через тор
кракен маркет анонимно
кракен маркет онлайн
торговая площадка кракен маркет
кракен 2026
кракен 2026 ссылка
кракен 2026 зеркало
кракен 2026 вход
кракен 2026 официальный сайт
кракен 2026 даркнет
kraken 2026 link
кракен 2026 онион
кракен 2026 актуально
кракен 2026 тор
кракен 2026 маркетплейс
новое зеркало кракен 2026
кракен 2026 рабочая ссылка
кракен 2026 зеркало сегодня
кракен сайт 2026 вход
кракен 2026 магазин
кракен 2026 через тор
кракен 2026 площадка
кракен 2026 работа
доступ на кракен 2026
кракен телеграмм
кракен тг бот
kraken telegram link
кракен бот телеграмм
кракен телеграмм канал
кракен ссылка в телеграмме
кракен тг ссылка
кракен новости телеграмм
кракен телеграмм зеркало
кракен бот в тг
официальный телеграмм кракен
кракен маркет телеграмм
кракен телеграмм чат
kraken tg bot
кракен телеграмм поддержка
кракен телеграмм новости
кракен контакты телеграмм
кракен бот автопродаж телеграмм
кракен телеграм ссылка тор
кракен тг группа
кракен вход
вход на кракен
кракен вход зеркало
кракен личный кабинет вход
кракен вход через тор
кракен вход онион
kraken login link
кракен вход официальный сайт
как зайти на кракен
кракен вход в магазин
кракен авторизация вход
кракен вход 2026
кракен зайти на сайт
кракен доступ вход
кракен вход по ссылке
кракен вход даркнет
кракен войти в аккаунт
кракен вход через браузер
кракен личный кабинет вход сегодня
кракен официальный вход зеркало
кракен тор
кракен тор ссылка
кракен тор зеркало
kraken tor link
кракен через тор браузер
кракен тор онион
кракен тор вход
кракен тор сайт
официальный тор кракен
кракен тор ссылка на зеркало
кракен зайти через тор
кракен тор маркетплейс
тор сайт кракен онион
кракен тор даркнет
кракен тор рабочая ссылка
kraken tor browser link
кракен тор шоп
кракен тор адрес
кракен тор доступ
кракен ссылка в тор сети
кракен бот
kraken bot link
кракен бот телеграмм
кракен бот автопродаж
кракен бот зеркало
кракен бот ссылка
кракен бот официальный
кракен бот покупок
бот кракен маркет
кракен бот даркнет
кракен бот онион
кракен бот в тг
кракен бот 24/7
kraken bot telegram
кракен бот работа
кракен бот для андроид
кракен бот через тор
кракен бот поддержка
кракен бот актуальный
рабочий бот кракен
аккаунты кракен
купить аккаунт кракен
кракен аккаунты с балансом
регистрация аккаунта кракен
вход в аккаунт кракен
кракен личный аккаунт
аккаунты kraken darknet
кракен аккаунты даркнет
проверка аккаунта кракен
кракен аккаунты маркет
доступ к аккаунту кракен
кракен аккаунты шоп
создать аккаунт кракен
аккаунты кракен зеркало
кракен аккаунт войти
кракен аккаунты бесплатно
аккаунты кракен 2026
кракен аккаунты онион
аккаунты на кракене как зайти
кракен кабинет аккаунт
кракен регистрация
как зарегистрироваться на кракен
кракен регистрация на сайте
кракен регистрация зеркало
kraken registration link
кракен создать аккаунт
кракен регистрация тор
кракен регистрация онион
кракен официальная регистрация
кракен регистрация 2026
кракен регистрация без почты
регистрация в кракен маркет
кракен регистрация ссылка
кракен регистрация через браузер
кракен быстрая регистрация
кракен форма регистрации
кракен регистрация даркнет
регистрация на сайте кракен тор
кракен регистрация сейчас
кракен регистрация бесплатно
кракен москва
кракен москва ссылка
кракен москва зеркало
кракен москва зайти
кракен москва купить
кракен москва сайт
кракен москва даркнет
кракен москва шоп
кракен москва маркет
кракен москва тор
кракен москва онион
кракен закладки москва
кракен москва 2026
kraken moscow link
кракен москва официальный сайт
кракен москва работа
кракен москва через тор
кракен москва вход
кракен москва адреса
кракен москва сегодня
кракен форум
кракен форум ссылка
кракен форум зеркало
кракен форум онион
кракен официальный форум
форум кракен даркнет
кракен форум отзывы
кракен форум тор
форум маркетплейса кракен
кракен форум вход
kraken forum link
кракен форум обсуждение
кракен форум новости
кракен форум поддержка
форум площадки кракен
кракен форум ветка
кракен форум анонимно
кракен форум зеркало рабочее
кракен форум общение
кракен форум 2026
Your comment is awaiting moderation.
Последние изменения: https://lightroom.adobe.com/u/dezavtor
Your comment is awaiting moderation.
дизайнер интерьера частного дома заказать дизайн проект интерьера загородного дома
Your comment is awaiting moderation.
open link – Well-structured content and smooth navigation make reading effortless.
Your comment is awaiting moderation.
1xbet guncel 1xbet-giris-27.com .
Your comment is awaiting moderation.
bahis siteler 1xbet bahis siteler 1xbet .
Your comment is awaiting moderation.
1win bonus kodi https://www.1win5765.help
Your comment is awaiting moderation.
Кракен зеркала телеграм рабочие > Кракен торговая площадка Сегодня я протестировал несколько кракен форум маркет, и вот что стабильно работает: Фраза кракен в телеграме популярна среди новичков, которые ищут проверенные источники. Настоящий кракен в телеграме всегда подтверждается сообществом, а его ссылки дублируются администрацией.
Проверил лично несколько зеркал — стабильно открываются: кракен тор тг — kraktor.ccКракен торговая площадка — platform-kraken.cc Если нужна помощь — оставляйте комменты.Проверено лично (Ижевск). kraken link скрытая площадка Телеграмм
Your comment is awaiting moderation.
мостбет в Киргизии http://www.mostbet83507.help
Your comment is awaiting moderation.
learn more now – Perfect for everyday shopping, browsing is quick and effortless.
Your comment is awaiting moderation.
explore the market – Took a moment to browse, content is readable and structure feels organized.
Your comment is awaiting moderation.
КРАКЕН САЙТ: Маркетплейс в Darknet >
КРАКЕН МАГАЗИН
Всем профита! КРАКЕН САЙТ доступен 24/7.
В мире онлайн-платформ и маркетплейсов информация обновляется так быстро, что без надежного источника легко потеряться в разнообразии сервисов и функций. КРАКЕН ДАРКНЕТ помогает систематизировать эти сведения, предоставляя пользователям данные о функционале сайтов, интерфейсах и инструментах, а также об интеграции с Telegram-ботами для оперативного информирования. Изучение материалов ресурса позволяет понять различия между платформами, оценить возможности сервисов и их подход к организации процессов, включая оплату, доставку и автоматизацию. Актуальная информация особенно ценна, так как маркетплейсы и сайты постоянно развиваются: появляются новые функции, корректируются старые сервисы и обновляется контент. КРАКЕН ДАРКНЕТ фиксирует все эти изменения, делая данные доступными и структурированными. Через Telegram пользователи получают уведомления, краткие аналитические обзоры и свежие заметки, что делает процесс получения сведений быстрым и удобным. В итоге КРАКЕН ДАРКНЕТ формирует целостную и живую картину цифровой среды, где можно спокойно ориентироваться, сравнивать платформы и сервисы и отслеживать развитие онлайн-инструментов.
кракен тор даркнет username: @krakensdarkbot
перейти в магазин username: @krakensshopibot
кракен официальный сайт
кракен сайт даркнет
kraken site onion
кракен официальный сайт зеркало
кракен сайт вход
кракен тор сайт
кракен маркетплейс сайт
сайт кракен ссылка тор
кракен оригинальный сайт
кракен онион сайт
кракен сайт 2026
кракен сайт анонимно
официальный ресурс кракен
кракен сайт даркнет маркетплейс
сайт кракен зеркало рабочее
кракен интернет магазин сайт
kraken darknet site link
кракен сайт через тор браузер
кракен официальный сайт онион
кракен сайт площадка
ссылка на кракен
кракен ссылки тор
актуальные ссылки на кракен
kraken onion links
кракен ссылки даркнет
кракен ссылка зеркало
кракен рабочая ссылка на сегодня
кракен прямая ссылка
кракен ссылка 2026
ссылка на кракен в тор браузере
новые ссылки кракен
кракен ссылки онион
кракен ссылка на маркет
кракен ссылка вход
кракен ссылка официальный
kraken darknet link
кракен ссылка маркетплейс
проверенные ссылки кракен
кракен ссылка зеркало рабочее
кракен активная ссылка
кракен зеркало
кракен актуальное зеркало
зеркало кракен сегодня
kraken mirror onion
кракен зеркало рабочее на сегодня
кракен зеркало тор
кракен официальное зеркало
зеркало сайта кракен
кракен зеркало вход
кракен зеркало даркнет
новое зеркало кракен
зеркало кракен 2026
кракен зеркало онион
кракен список зеркал
зеркало площадки кракен
кракен зеркало маркетплейс
кракен рабочее зеркало 2026
kraken darknet mirror
кракен зеркало ссылка
активные зеркала кракен
кракен магазин
kraken shop link
магазин кракен даркнет
кракен шоп онион
магазин кракен зеркало
кракен маркетплейс магазин
кракен магазин официальный
купить в магазине кракен
магазин кракен тор
kraken store onion
кракен интернет магазин
магазин кракен ссылка
кракен магазин товаров
кракен магазин вход
кракен шоп зеркало
магазин кракен 2026
кракен магазин анонимно
кракен официальный шоп
кракен витрина магазина
магазин кракен маркет
кракен даркнет
kraken darknet market
кракен даркнет ссылка
кракен даркнет вход
кракен даркнет зеркало
даркнет площадка кракен
кракен даркнет тор
кракен даркнет онион
кракен в даркнете как зайти
кракен даркнет сайт
официальный кракен даркнет
кракен даркнет маркет
кракен даркнет 2026
kraken darknet onion link
даркнет маркетплейс кракен
кракен даркнет ресурс
кракен теневой рынок
кракен даркнет шоп
кракен даркнет рабочая ссылка
доступ в кракен даркнет
кракен маркет
kraken market onion
кракен маркетплейс ссылка
кракен маркет вход
кракен маркет зеркало
маркетплейс кракен даркнет
кракен маркет тор
кракен маркет официальный
официальный сайт кракен маркет
кракен маркет онион
кракен маркет шоп
маркет кракен ссылка на сегодня
kraken market darknet link
кракен маркет площадка
кракен маркет 2026
кракен маркетплейс зеркало
маркет кракен через тор
кракен маркет анонимно
кракен маркет онлайн
торговая площадка кракен маркет
кракен 2026
кракен 2026 ссылка
кракен 2026 зеркало
кракен 2026 вход
кракен 2026 официальный сайт
кракен 2026 даркнет
kraken 2026 link
кракен 2026 онион
кракен 2026 актуально
кракен 2026 тор
кракен 2026 маркетплейс
новое зеркало кракен 2026
кракен 2026 рабочая ссылка
кракен 2026 зеркало сегодня
кракен сайт 2026 вход
кракен 2026 магазин
кракен 2026 через тор
кракен 2026 площадка
кракен 2026 работа
доступ на кракен 2026
кракен телеграмм
кракен тг бот
kraken telegram link
кракен бот телеграмм
кракен телеграмм канал
кракен ссылка в телеграмме
кракен тг ссылка
кракен новости телеграмм
кракен телеграмм зеркало
кракен бот в тг
официальный телеграмм кракен
кракен маркет телеграмм
кракен телеграмм чат
kraken tg bot
кракен телеграмм поддержка
кракен телеграмм новости
кракен контакты телеграмм
кракен бот автопродаж телеграмм
кракен телеграм ссылка тор
кракен тг группа
кракен вход
вход на кракен
кракен вход зеркало
кракен личный кабинет вход
кракен вход через тор
кракен вход онион
kraken login link
кракен вход официальный сайт
как зайти на кракен
кракен вход в магазин
кракен авторизация вход
кракен вход 2026
кракен зайти на сайт
кракен доступ вход
кракен вход по ссылке
кракен вход даркнет
кракен войти в аккаунт
кракен вход через браузер
кракен личный кабинет вход сегодня
кракен официальный вход зеркало
кракен тор
кракен тор ссылка
кракен тор зеркало
kraken tor link
кракен через тор браузер
кракен тор онион
кракен тор вход
кракен тор сайт
официальный тор кракен
кракен тор ссылка на зеркало
кракен зайти через тор
кракен тор маркетплейс
тор сайт кракен онион
кракен тор даркнет
кракен тор рабочая ссылка
kraken tor browser link
кракен тор шоп
кракен тор адрес
кракен тор доступ
кракен ссылка в тор сети
кракен бот
kraken bot link
кракен бот телеграмм
кракен бот автопродаж
кракен бот зеркало
кракен бот ссылка
кракен бот официальный
кракен бот покупок
бот кракен маркет
кракен бот даркнет
кракен бот онион
кракен бот в тг
кракен бот 24/7
kraken bot telegram
кракен бот работа
кракен бот для андроид
кракен бот через тор
кракен бот поддержка
кракен бот актуальный
рабочий бот кракен
аккаунты кракен
купить аккаунт кракен
кракен аккаунты с балансом
регистрация аккаунта кракен
вход в аккаунт кракен
кракен личный аккаунт
аккаунты kraken darknet
кракен аккаунты даркнет
проверка аккаунта кракен
кракен аккаунты маркет
доступ к аккаунту кракен
кракен аккаунты шоп
создать аккаунт кракен
аккаунты кракен зеркало
кракен аккаунт войти
кракен аккаунты бесплатно
аккаунты кракен 2026
кракен аккаунты онион
аккаунты на кракене как зайти
кракен кабинет аккаунт
кракен регистрация
как зарегистрироваться на кракен
кракен регистрация на сайте
кракен регистрация зеркало
kraken registration link
кракен создать аккаунт
кракен регистрация тор
кракен регистрация онион
кракен официальная регистрация
кракен регистрация 2026
кракен регистрация без почты
регистрация в кракен маркет
кракен регистрация ссылка
кракен регистрация через браузер
кракен быстрая регистрация
кракен форма регистрации
кракен регистрация даркнет
регистрация на сайте кракен тор
кракен регистрация сейчас
кракен регистрация бесплатно
кракен москва
кракен москва ссылка
кракен москва зеркало
кракен москва зайти
кракен москва купить
кракен москва сайт
кракен москва даркнет
кракен москва шоп
кракен москва маркет
кракен москва тор
кракен москва онион
кракен закладки москва
кракен москва 2026
kraken moscow link
кракен москва официальный сайт
кракен москва работа
кракен москва через тор
кракен москва вход
кракен москва адреса
кракен москва сегодня
кракен форум
кракен форум ссылка
кракен форум зеркало
кракен форум онион
кракен официальный форум
форум кракен даркнет
кракен форум отзывы
кракен форум тор
форум маркетплейса кракен
кракен форум вход
kraken forum link
кракен форум обсуждение
кракен форум новости
кракен форум поддержка
форум площадки кракен
кракен форум ветка
кракен форум анонимно
кракен форум зеркало рабочее
кракен форум общение
кракен форум 2026
Your comment is awaiting moderation.
1xbet mobi 1xbet-53.com .
Your comment is awaiting moderation.
bahis sitesi 1xbet bahis sitesi 1xbet .
Your comment is awaiting moderation.
visit this bazaar – Discovered the page today and enjoyed scrolling through the sections.
Your comment is awaiting moderation.
melbet mines https://www.melbet72043.help
Your comment is awaiting moderation.
мостбет правила бонуса мостбет правила бонуса
Your comment is awaiting moderation.
этикетка на упаковку
Это направление часто выбирают те, кто стремится развиваться, пробовать новое и получать ценный опыт. Оно помогает укреплять навыки, получать новые эмоции и делать досуг более насыщенным. При регулярном интересе это способно принести не только удовольствие, но и заметную пользу в повседневной жизни.
внедрение ai агентов
изготовление этикеток
This field is well suited for people who enjoy learning new things, improving skills, and broadening their horizons. This type of interest helps spend time productively, discover new opportunities, and enjoy memorable experiences. Over time it can open the door to new connections, goals, and useful opportunities.
https://independent.academia.edu/IrinaTrotskaya/edit
Your comment is awaiting moderation.
1xbet turkiye 1xbet-giris-28.com .
Your comment is awaiting moderation.
1xbet 1xbet .
Your comment is awaiting moderation.
Рабочая ССЫЛКА КРАКЕН на Сентябрь 2026 >
зайти в магазин
Доброго времени. КРАКЕН ДАРКНЕТ: вход через Тор.
КРАКЕН САЙТ фокусируется на систематизации информации о цифровых сервисах и маркетплейсах, объединяя данные о функционале платформ, их обновлениях и новинках. КРАКЕН САЙТ позволяет получать оперативные сведения через Telegram-боты, которые обеспечивают мгновенное уведомление о событиях. Ресурс публикует рейтинги, обзоры, рекомендации и сравнительные материалы, помогая пользователям оценивать платформы, планировать использование сервисов и ориентироваться в цифровой экосистеме. КРАКЕН САЙТ содержит подробные данные о работе интернет-магазинов, категориях товаров, возможностях оплаты и доставки, облегчая процесс изучения сервисов
kraken darknet username: @krakensdarkbot
КРАКЕН МАГАЗИН username: @krakensshopibot
кракен официальный сайт
кракен сайт даркнет
kraken site onion
кракен официальный сайт зеркало
кракен сайт вход
кракен тор сайт
кракен маркетплейс сайт
сайт кракен ссылка тор
кракен оригинальный сайт
кракен онион сайт
кракен сайт 2026
кракен сайт анонимно
официальный ресурс кракен
кракен сайт даркнет маркетплейс
сайт кракен зеркало рабочее
кракен интернет магазин сайт
kraken darknet site link
кракен сайт через тор браузер
кракен официальный сайт онион
кракен сайт площадка
ссылка на кракен
кракен ссылки тор
актуальные ссылки на кракен
kraken onion links
кракен ссылки даркнет
кракен ссылка зеркало
кракен рабочая ссылка на сегодня
кракен прямая ссылка
кракен ссылка 2026
ссылка на кракен в тор браузере
новые ссылки кракен
кракен ссылки онион
кракен ссылка на маркет
кракен ссылка вход
кракен ссылка официальный
kraken darknet link
кракен ссылка маркетплейс
проверенные ссылки кракен
кракен ссылка зеркало рабочее
кракен активная ссылка
кракен зеркало
кракен актуальное зеркало
зеркало кракен сегодня
kraken mirror onion
кракен зеркало рабочее на сегодня
кракен зеркало тор
кракен официальное зеркало
зеркало сайта кракен
кракен зеркало вход
кракен зеркало даркнет
новое зеркало кракен
зеркало кракен 2026
кракен зеркало онион
кракен список зеркал
зеркало площадки кракен
кракен зеркало маркетплейс
кракен рабочее зеркало 2026
kraken darknet mirror
кракен зеркало ссылка
активные зеркала кракен
кракен магазин
kraken shop link
магазин кракен даркнет
кракен шоп онион
магазин кракен зеркало
кракен маркетплейс магазин
кракен магазин официальный
купить в магазине кракен
магазин кракен тор
kraken store onion
кракен интернет магазин
магазин кракен ссылка
кракен магазин товаров
кракен магазин вход
кракен шоп зеркало
магазин кракен 2026
кракен магазин анонимно
кракен официальный шоп
кракен витрина магазина
магазин кракен маркет
кракен даркнет
kraken darknet market
кракен даркнет ссылка
кракен даркнет вход
кракен даркнет зеркало
даркнет площадка кракен
кракен даркнет тор
кракен даркнет онион
кракен в даркнете как зайти
кракен даркнет сайт
официальный кракен даркнет
кракен даркнет маркет
кракен даркнет 2026
kraken darknet onion link
даркнет маркетплейс кракен
кракен даркнет ресурс
кракен теневой рынок
кракен даркнет шоп
кракен даркнет рабочая ссылка
доступ в кракен даркнет
кракен маркет
kraken market onion
кракен маркетплейс ссылка
кракен маркет вход
кракен маркет зеркало
маркетплейс кракен даркнет
кракен маркет тор
кракен маркет официальный
официальный сайт кракен маркет
кракен маркет онион
кракен маркет шоп
маркет кракен ссылка на сегодня
kraken market darknet link
кракен маркет площадка
кракен маркет 2026
кракен маркетплейс зеркало
маркет кракен через тор
кракен маркет анонимно
кракен маркет онлайн
торговая площадка кракен маркет
кракен 2026
кракен 2026 ссылка
кракен 2026 зеркало
кракен 2026 вход
кракен 2026 официальный сайт
кракен 2026 даркнет
kraken 2026 link
кракен 2026 онион
кракен 2026 актуально
кракен 2026 тор
кракен 2026 маркетплейс
новое зеркало кракен 2026
кракен 2026 рабочая ссылка
кракен 2026 зеркало сегодня
кракен сайт 2026 вход
кракен 2026 магазин
кракен 2026 через тор
кракен 2026 площадка
кракен 2026 работа
доступ на кракен 2026
кракен телеграмм
кракен тг бот
kraken telegram link
кракен бот телеграмм
кракен телеграмм канал
кракен ссылка в телеграмме
кракен тг ссылка
кракен новости телеграмм
кракен телеграмм зеркало
кракен бот в тг
официальный телеграмм кракен
кракен маркет телеграмм
кракен телеграмм чат
kraken tg bot
кракен телеграмм поддержка
кракен телеграмм новости
кракен контакты телеграмм
кракен бот автопродаж телеграмм
кракен телеграм ссылка тор
кракен тг группа
кракен вход
вход на кракен
кракен вход зеркало
кракен личный кабинет вход
кракен вход через тор
кракен вход онион
kraken login link
кракен вход официальный сайт
как зайти на кракен
кракен вход в магазин
кракен авторизация вход
кракен вход 2026
кракен зайти на сайт
кракен доступ вход
кракен вход по ссылке
кракен вход даркнет
кракен войти в аккаунт
кракен вход через браузер
кракен личный кабинет вход сегодня
кракен официальный вход зеркало
кракен тор
кракен тор ссылка
кракен тор зеркало
kraken tor link
кракен через тор браузер
кракен тор онион
кракен тор вход
кракен тор сайт
официальный тор кракен
кракен тор ссылка на зеркало
кракен зайти через тор
кракен тор маркетплейс
тор сайт кракен онион
кракен тор даркнет
кракен тор рабочая ссылка
kraken tor browser link
кракен тор шоп
кракен тор адрес
кракен тор доступ
кракен ссылка в тор сети
кракен бот
kraken bot link
кракен бот телеграмм
кракен бот автопродаж
кракен бот зеркало
кракен бот ссылка
кракен бот официальный
кракен бот покупок
бот кракен маркет
кракен бот даркнет
кракен бот онион
кракен бот в тг
кракен бот 24/7
kraken bot telegram
кракен бот работа
кракен бот для андроид
кракен бот через тор
кракен бот поддержка
кракен бот актуальный
рабочий бот кракен
аккаунты кракен
купить аккаунт кракен
кракен аккаунты с балансом
регистрация аккаунта кракен
вход в аккаунт кракен
кракен личный аккаунт
аккаунты kraken darknet
кракен аккаунты даркнет
проверка аккаунта кракен
кракен аккаунты маркет
доступ к аккаунту кракен
кракен аккаунты шоп
создать аккаунт кракен
аккаунты кракен зеркало
кракен аккаунт войти
кракен аккаунты бесплатно
аккаунты кракен 2026
кракен аккаунты онион
аккаунты на кракене как зайти
кракен кабинет аккаунт
кракен регистрация
как зарегистрироваться на кракен
кракен регистрация на сайте
кракен регистрация зеркало
kraken registration link
кракен создать аккаунт
кракен регистрация тор
кракен регистрация онион
кракен официальная регистрация
кракен регистрация 2026
кракен регистрация без почты
регистрация в кракен маркет
кракен регистрация ссылка
кракен регистрация через браузер
кракен быстрая регистрация
кракен форма регистрации
кракен регистрация даркнет
регистрация на сайте кракен тор
кракен регистрация сейчас
кракен регистрация бесплатно
кракен москва
кракен москва ссылка
кракен москва зеркало
кракен москва зайти
кракен москва купить
кракен москва сайт
кракен москва даркнет
кракен москва шоп
кракен москва маркет
кракен москва тор
кракен москва онион
кракен закладки москва
кракен москва 2026
kraken moscow link
кракен москва официальный сайт
кракен москва работа
кракен москва через тор
кракен москва вход
кракен москва адреса
кракен москва сегодня
кракен форум
кракен форум ссылка
кракен форум зеркало
кракен форум онион
кракен официальный форум
форум кракен даркнет
кракен форум отзывы
кракен форум тор
форум маркетплейса кракен
кракен форум вход
kraken forum link
кракен форум обсуждение
кракен форум новости
кракен форум поддержка
форум площадки кракен
кракен форум ветка
кракен форум анонимно
кракен форум зеркало рабочее
кракен форум общение
кракен форум 2026
Your comment is awaiting moderation.
explore mining – Clean layout ensures information loads quickly and efficiently.
Your comment is awaiting moderation.
1win slotlar Oʻzbekiston 1win slotlar Oʻzbekiston
Your comment is awaiting moderation.
mostbet ios приложение Кыргызстан https://mostbet21480.help/
Your comment is awaiting moderation.
go to page – Clear design supports a seamless and enjoyable purchasing journey.
Your comment is awaiting moderation.
Скачать игры Кракен на телефон Android > кракен отзывы Сегодня я протестировал несколько как зайти на кракен форум, и вот что стабильно работает: Запрос кракен регистрация вызывает множество обсуждений, так как это первый шаг для получения доступа к полному функционалу. Настоящий процесс кракен регистрация включает выбор рабочей ссылки, вход через Tor и заполнение формы с данными. Люди отмечают, что кракен регистрация нужна не только ради входа, но и для подтверждения безопасности.
Проверил лично несколько зеркал — стабильно открываются: кракен тор — kraktor.ccкракен отзывы клиентов — krareview.cc Если нужна помощь — оставляйте комменты.Проверено лично (Ростов-на-Дону). Кракен сайт секретная торговая платформа тэлеграм
Your comment is awaiting moderation.
melbet kz пополнение visa Казахстан http://melbet72043.help
Your comment is awaiting moderation.
1xbet g?ncel adres 1xbet g?ncel adres .
Your comment is awaiting moderation.
1xbet giri? adresi 1xbet giri? adresi .
Your comment is awaiting moderation.
1xbet guncel 1xbet guncel .
Your comment is awaiting moderation.
КРАКЕН САЙТ — Официальный ресурс >
kraken darknet
Привет всем! Ищете оригинальный КРАКЕН САЙТ?
В современном цифровом мире платформы, маркетплейсы и сервисы постоянно обновляются, и ориентироваться в этом потоке данных бывает непросто. ЗЕРКАЛА КРАКЕН помогают увидеть картину целиком, объединяя сведения о функционале сайтов, их интерфейсах и доступных инструментах в одном ресурсе. При изучении таких материалов становится очевидно, что платформы отличаются друг от друга по структуре, возможностям и способам взаимодействия с пользователями. Актуальная информация играет ключевую роль, ведь без нее легко пропустить новые функции, изменения в сервисах или обновления маркетплейсов. ЗЕРКАЛА КРАКЕН фиксируют эти изменения и дают возможность следить за развитием площадок, получая сведения в удобной форме. Telegram используется как основной канал для распространения новостей: через ботов публикуются уведомления, аналитические заметки и краткие обзоры, которые помогают оставаться в курсе событий без лишней нагрузки. В результате ЗЕРКАЛА КРАКЕН формируют живое, понятное и целостное представление о цифровой среде, где платформы и сервисы видны в деталях, а пользователи получают структурированную информацию о маркетплейсах, сайтах и онлайн-инструментах, позволяя спокойно ориентироваться в обновлениях и оценивать возможности платформ.
основной домен username: @krakenssitebot
скрытый сайт username: @krakensdarkbot
кракен официальный сайт
кракен сайт даркнет
kraken site onion
кракен официальный сайт зеркало
кракен сайт вход
кракен тор сайт
кракен маркетплейс сайт
сайт кракен ссылка тор
кракен оригинальный сайт
кракен онион сайт
кракен сайт 2026
кракен сайт анонимно
официальный ресурс кракен
кракен сайт даркнет маркетплейс
сайт кракен зеркало рабочее
кракен интернет магазин сайт
kraken darknet site link
кракен сайт через тор браузер
кракен официальный сайт онион
кракен сайт площадка
ссылка на кракен
кракен ссылки тор
актуальные ссылки на кракен
kraken onion links
кракен ссылки даркнет
кракен ссылка зеркало
кракен рабочая ссылка на сегодня
кракен прямая ссылка
кракен ссылка 2026
ссылка на кракен в тор браузере
новые ссылки кракен
кракен ссылки онион
кракен ссылка на маркет
кракен ссылка вход
кракен ссылка официальный
kraken darknet link
кракен ссылка маркетплейс
проверенные ссылки кракен
кракен ссылка зеркало рабочее
кракен активная ссылка
кракен зеркало
кракен актуальное зеркало
зеркало кракен сегодня
kraken mirror onion
кракен зеркало рабочее на сегодня
кракен зеркало тор
кракен официальное зеркало
зеркало сайта кракен
кракен зеркало вход
кракен зеркало даркнет
новое зеркало кракен
зеркало кракен 2026
кракен зеркало онион
кракен список зеркал
зеркало площадки кракен
кракен зеркало маркетплейс
кракен рабочее зеркало 2026
kraken darknet mirror
кракен зеркало ссылка
активные зеркала кракен
кракен магазин
kraken shop link
магазин кракен даркнет
кракен шоп онион
магазин кракен зеркало
кракен маркетплейс магазин
кракен магазин официальный
купить в магазине кракен
магазин кракен тор
kraken store onion
кракен интернет магазин
магазин кракен ссылка
кракен магазин товаров
кракен магазин вход
кракен шоп зеркало
магазин кракен 2026
кракен магазин анонимно
кракен официальный шоп
кракен витрина магазина
магазин кракен маркет
кракен даркнет
kraken darknet market
кракен даркнет ссылка
кракен даркнет вход
кракен даркнет зеркало
даркнет площадка кракен
кракен даркнет тор
кракен даркнет онион
кракен в даркнете как зайти
кракен даркнет сайт
официальный кракен даркнет
кракен даркнет маркет
кракен даркнет 2026
kraken darknet onion link
даркнет маркетплейс кракен
кракен даркнет ресурс
кракен теневой рынок
кракен даркнет шоп
кракен даркнет рабочая ссылка
доступ в кракен даркнет
кракен маркет
kraken market onion
кракен маркетплейс ссылка
кракен маркет вход
кракен маркет зеркало
маркетплейс кракен даркнет
кракен маркет тор
кракен маркет официальный
официальный сайт кракен маркет
кракен маркет онион
кракен маркет шоп
маркет кракен ссылка на сегодня
kraken market darknet link
кракен маркет площадка
кракен маркет 2026
кракен маркетплейс зеркало
маркет кракен через тор
кракен маркет анонимно
кракен маркет онлайн
торговая площадка кракен маркет
кракен 2026
кракен 2026 ссылка
кракен 2026 зеркало
кракен 2026 вход
кракен 2026 официальный сайт
кракен 2026 даркнет
kraken 2026 link
кракен 2026 онион
кракен 2026 актуально
кракен 2026 тор
кракен 2026 маркетплейс
новое зеркало кракен 2026
кракен 2026 рабочая ссылка
кракен 2026 зеркало сегодня
кракен сайт 2026 вход
кракен 2026 магазин
кракен 2026 через тор
кракен 2026 площадка
кракен 2026 работа
доступ на кракен 2026
кракен телеграмм
кракен тг бот
kraken telegram link
кракен бот телеграмм
кракен телеграмм канал
кракен ссылка в телеграмме
кракен тг ссылка
кракен новости телеграмм
кракен телеграмм зеркало
кракен бот в тг
официальный телеграмм кракен
кракен маркет телеграмм
кракен телеграмм чат
kraken tg bot
кракен телеграмм поддержка
кракен телеграмм новости
кракен контакты телеграмм
кракен бот автопродаж телеграмм
кракен телеграм ссылка тор
кракен тг группа
кракен вход
вход на кракен
кракен вход зеркало
кракен личный кабинет вход
кракен вход через тор
кракен вход онион
kraken login link
кракен вход официальный сайт
как зайти на кракен
кракен вход в магазин
кракен авторизация вход
кракен вход 2026
кракен зайти на сайт
кракен доступ вход
кракен вход по ссылке
кракен вход даркнет
кракен войти в аккаунт
кракен вход через браузер
кракен личный кабинет вход сегодня
кракен официальный вход зеркало
кракен тор
кракен тор ссылка
кракен тор зеркало
kraken tor link
кракен через тор браузер
кракен тор онион
кракен тор вход
кракен тор сайт
официальный тор кракен
кракен тор ссылка на зеркало
кракен зайти через тор
кракен тор маркетплейс
тор сайт кракен онион
кракен тор даркнет
кракен тор рабочая ссылка
kraken tor browser link
кракен тор шоп
кракен тор адрес
кракен тор доступ
кракен ссылка в тор сети
кракен бот
kraken bot link
кракен бот телеграмм
кракен бот автопродаж
кракен бот зеркало
кракен бот ссылка
кракен бот официальный
кракен бот покупок
бот кракен маркет
кракен бот даркнет
кракен бот онион
кракен бот в тг
кракен бот 24/7
kraken bot telegram
кракен бот работа
кракен бот для андроид
кракен бот через тор
кракен бот поддержка
кракен бот актуальный
рабочий бот кракен
аккаунты кракен
купить аккаунт кракен
кракен аккаунты с балансом
регистрация аккаунта кракен
вход в аккаунт кракен
кракен личный аккаунт
аккаунты kraken darknet
кракен аккаунты даркнет
проверка аккаунта кракен
кракен аккаунты маркет
доступ к аккаунту кракен
кракен аккаунты шоп
создать аккаунт кракен
аккаунты кракен зеркало
кракен аккаунт войти
кракен аккаунты бесплатно
аккаунты кракен 2026
кракен аккаунты онион
аккаунты на кракене как зайти
кракен кабинет аккаунт
кракен регистрация
как зарегистрироваться на кракен
кракен регистрация на сайте
кракен регистрация зеркало
kraken registration link
кракен создать аккаунт
кракен регистрация тор
кракен регистрация онион
кракен официальная регистрация
кракен регистрация 2026
кракен регистрация без почты
регистрация в кракен маркет
кракен регистрация ссылка
кракен регистрация через браузер
кракен быстрая регистрация
кракен форма регистрации
кракен регистрация даркнет
регистрация на сайте кракен тор
кракен регистрация сейчас
кракен регистрация бесплатно
кракен москва
кракен москва ссылка
кракен москва зеркало
кракен москва зайти
кракен москва купить
кракен москва сайт
кракен москва даркнет
кракен москва шоп
кракен москва маркет
кракен москва тор
кракен москва онион
кракен закладки москва
кракен москва 2026
kraken moscow link
кракен москва официальный сайт
кракен москва работа
кракен москва через тор
кракен москва вход
кракен москва адреса
кракен москва сегодня
кракен форум
кракен форум ссылка
кракен форум зеркало
кракен форум онион
кракен официальный форум
форум кракен даркнет
кракен форум отзывы
кракен форум тор
форум маркетплейса кракен
кракен форум вход
kraken forum link
кракен форум обсуждение
кракен форум новости
кракен форум поддержка
форум площадки кракен
кракен форум ветка
кракен форум анонимно
кракен форум зеркало рабочее
кракен форум общение
кракен форум 2026
Your comment is awaiting moderation.
1xbet giri?i 1xbet giri?i .
Your comment is awaiting moderation.
explore lessons – Content is arranged logically, making studying smooth and efficient.
Your comment is awaiting moderation.
этикетки на товар
Эта деятельность часто выбирают те, кто стремится развиваться, пробовать новое и получать ценный опыт. Этот вид деятельности помогает сочетать интерес, практику и личное развитие. При регулярном интересе оно может стать важной частью образа жизни, источником вдохновения и способом самовыражения.
ответственное хранение Домодедово
печать самоклеящихся наклеек
This interest can be especially appealing to those who like exploring new ideas, building skills, and gaining valuable experience. This kind of activity helps strengthen skills, gain positive emotions, and make free time more meaningful. With regular interest it can open the door to new connections, goals, and useful opportunities.
https://vimeo.com/taisiya89ty
Your comment is awaiting moderation.
1win crash giriş 1win crash giriş
Your comment is awaiting moderation.
browse this – Proper direction allows energy to be maximized without unnecessary waste.
Your comment is awaiting moderation.
обзор функций смартфон кракен > кракен без регистрации Сегодня я протестировал несколько кракен даркнет маркет вход, и вот что стабильно работает: Фраза кракен площадка зеркало используется для тех, кто ищет полный доступ к функционалу. Настоящее кракен площадка зеркало повторяет структуру главного ресурса и работает только в Tor.
Проверил лично несколько адресов — стабильно открываются: ссылка на сайт кракен в тор браузере — kraktor.ccкракен смотреть без регистрации — krareg.cc Если нужна помощь — пишите.Проверено лично (Владивосток). Kraken Market скрытая площадка тг
Your comment is awaiting moderation.
explore the page – Clear interface ensures discovering smarter options is seamless.
Your comment is awaiting moderation.
birxbet birxbet .
Your comment is awaiting moderation.
1xbet mobil giri? 1xbet-giris-29.com .
Your comment is awaiting moderation.
mostbet приложение mostbet83507.help
Your comment is awaiting moderation.
букеты с доставкой москва недорого https://www.zakazat-cveti-moskva.ru .
Your comment is awaiting moderation.
раменбет зеркало рабочее
Your comment is awaiting moderation.
https://www.jdmcaliforniamotors.com/image/pages/?1xbit_promo_code_bonus.html
Your comment is awaiting moderation.
xbet giri? xbet giri? .
Your comment is awaiting moderation.
1xbet giris 1xbet giris .
Your comment is awaiting moderation.
КРАКЕН ДАРКНЕТ: Теневой рынок товаров и услуг >
купить в магазине
Всем профита! КРАКЕН МАГАЗИН на связи.
КРАКЕН САЙТ объединяет сведения о цифровых сервисах, интернет-платформах и маркетплейсах, предоставляя пользователям структурированную информацию о функционале, обновлениях и новинках сервисов. КРАКЕН САЙТ позволяет получать данные через Telegram-боты, что обеспечивает оперативное уведомление о событиях. На ресурсе публикуются аналитические обзоры, рейтинги, сравнительные таблицы и рекомендации по использованию платформ. КРАКЕН САЙТ помогает пользователям формировать системное представление о сервисах, оценивать возможности платформ и принимать информированные решения при работе с маркетплейсами и цифровыми сервисами
вход на даркнет сайт username: @krakensdarkbot
шоп площадки username: @krakensshopibot
кракен официальный сайт
кракен сайт даркнет
kraken site onion
кракен официальный сайт зеркало
кракен сайт вход
кракен тор сайт
кракен маркетплейс сайт
сайт кракен ссылка тор
кракен оригинальный сайт
кракен онион сайт
кракен сайт 2026
кракен сайт анонимно
официальный ресурс кракен
кракен сайт даркнет маркетплейс
сайт кракен зеркало рабочее
кракен интернет магазин сайт
kraken darknet site link
кракен сайт через тор браузер
кракен официальный сайт онион
кракен сайт площадка
ссылка на кракен
кракен ссылки тор
актуальные ссылки на кракен
kraken onion links
кракен ссылки даркнет
кракен ссылка зеркало
кракен рабочая ссылка на сегодня
кракен прямая ссылка
кракен ссылка 2026
ссылка на кракен в тор браузере
новые ссылки кракен
кракен ссылки онион
кракен ссылка на маркет
кракен ссылка вход
кракен ссылка официальный
kraken darknet link
кракен ссылка маркетплейс
проверенные ссылки кракен
кракен ссылка зеркало рабочее
кракен активная ссылка
кракен зеркало
кракен актуальное зеркало
зеркало кракен сегодня
kraken mirror onion
кракен зеркало рабочее на сегодня
кракен зеркало тор
кракен официальное зеркало
зеркало сайта кракен
кракен зеркало вход
кракен зеркало даркнет
новое зеркало кракен
зеркало кракен 2026
кракен зеркало онион
кракен список зеркал
зеркало площадки кракен
кракен зеркало маркетплейс
кракен рабочее зеркало 2026
kraken darknet mirror
кракен зеркало ссылка
активные зеркала кракен
кракен магазин
kraken shop link
магазин кракен даркнет
кракен шоп онион
магазин кракен зеркало
кракен маркетплейс магазин
кракен магазин официальный
купить в магазине кракен
магазин кракен тор
kraken store onion
кракен интернет магазин
магазин кракен ссылка
кракен магазин товаров
кракен магазин вход
кракен шоп зеркало
магазин кракен 2026
кракен магазин анонимно
кракен официальный шоп
кракен витрина магазина
магазин кракен маркет
кракен даркнет
kraken darknet market
кракен даркнет ссылка
кракен даркнет вход
кракен даркнет зеркало
даркнет площадка кракен
кракен даркнет тор
кракен даркнет онион
кракен в даркнете как зайти
кракен даркнет сайт
официальный кракен даркнет
кракен даркнет маркет
кракен даркнет 2026
kraken darknet onion link
даркнет маркетплейс кракен
кракен даркнет ресурс
кракен теневой рынок
кракен даркнет шоп
кракен даркнет рабочая ссылка
доступ в кракен даркнет
кракен маркет
kraken market onion
кракен маркетплейс ссылка
кракен маркет вход
кракен маркет зеркало
маркетплейс кракен даркнет
кракен маркет тор
кракен маркет официальный
официальный сайт кракен маркет
кракен маркет онион
кракен маркет шоп
маркет кракен ссылка на сегодня
kraken market darknet link
кракен маркет площадка
кракен маркет 2026
кракен маркетплейс зеркало
маркет кракен через тор
кракен маркет анонимно
кракен маркет онлайн
торговая площадка кракен маркет
кракен 2026
кракен 2026 ссылка
кракен 2026 зеркало
кракен 2026 вход
кракен 2026 официальный сайт
кракен 2026 даркнет
kraken 2026 link
кракен 2026 онион
кракен 2026 актуально
кракен 2026 тор
кракен 2026 маркетплейс
новое зеркало кракен 2026
кракен 2026 рабочая ссылка
кракен 2026 зеркало сегодня
кракен сайт 2026 вход
кракен 2026 магазин
кракен 2026 через тор
кракен 2026 площадка
кракен 2026 работа
доступ на кракен 2026
кракен телеграмм
кракен тг бот
kraken telegram link
кракен бот телеграмм
кракен телеграмм канал
кракен ссылка в телеграмме
кракен тг ссылка
кракен новости телеграмм
кракен телеграмм зеркало
кракен бот в тг
официальный телеграмм кракен
кракен маркет телеграмм
кракен телеграмм чат
kraken tg bot
кракен телеграмм поддержка
кракен телеграмм новости
кракен контакты телеграмм
кракен бот автопродаж телеграмм
кракен телеграм ссылка тор
кракен тг группа
кракен вход
вход на кракен
кракен вход зеркало
кракен личный кабинет вход
кракен вход через тор
кракен вход онион
kraken login link
кракен вход официальный сайт
как зайти на кракен
кракен вход в магазин
кракен авторизация вход
кракен вход 2026
кракен зайти на сайт
кракен доступ вход
кракен вход по ссылке
кракен вход даркнет
кракен войти в аккаунт
кракен вход через браузер
кракен личный кабинет вход сегодня
кракен официальный вход зеркало
кракен тор
кракен тор ссылка
кракен тор зеркало
kraken tor link
кракен через тор браузер
кракен тор онион
кракен тор вход
кракен тор сайт
официальный тор кракен
кракен тор ссылка на зеркало
кракен зайти через тор
кракен тор маркетплейс
тор сайт кракен онион
кракен тор даркнет
кракен тор рабочая ссылка
kraken tor browser link
кракен тор шоп
кракен тор адрес
кракен тор доступ
кракен ссылка в тор сети
кракен бот
kraken bot link
кракен бот телеграмм
кракен бот автопродаж
кракен бот зеркало
кракен бот ссылка
кракен бот официальный
кракен бот покупок
бот кракен маркет
кракен бот даркнет
кракен бот онион
кракен бот в тг
кракен бот 24/7
kraken bot telegram
кракен бот работа
кракен бот для андроид
кракен бот через тор
кракен бот поддержка
кракен бот актуальный
рабочий бот кракен
аккаунты кракен
купить аккаунт кракен
кракен аккаунты с балансом
регистрация аккаунта кракен
вход в аккаунт кракен
кракен личный аккаунт
аккаунты kraken darknet
кракен аккаунты даркнет
проверка аккаунта кракен
кракен аккаунты маркет
доступ к аккаунту кракен
кракен аккаунты шоп
создать аккаунт кракен
аккаунты кракен зеркало
кракен аккаунт войти
кракен аккаунты бесплатно
аккаунты кракен 2026
кракен аккаунты онион
аккаунты на кракене как зайти
кракен кабинет аккаунт
кракен регистрация
как зарегистрироваться на кракен
кракен регистрация на сайте
кракен регистрация зеркало
kraken registration link
кракен создать аккаунт
кракен регистрация тор
кракен регистрация онион
кракен официальная регистрация
кракен регистрация 2026
кракен регистрация без почты
регистрация в кракен маркет
кракен регистрация ссылка
кракен регистрация через браузер
кракен быстрая регистрация
кракен форма регистрации
кракен регистрация даркнет
регистрация на сайте кракен тор
кракен регистрация сейчас
кракен регистрация бесплатно
кракен москва
кракен москва ссылка
кракен москва зеркало
кракен москва зайти
кракен москва купить
кракен москва сайт
кракен москва даркнет
кракен москва шоп
кракен москва маркет
кракен москва тор
кракен москва онион
кракен закладки москва
кракен москва 2026
kraken moscow link
кракен москва официальный сайт
кракен москва работа
кракен москва через тор
кракен москва вход
кракен москва адреса
кракен москва сегодня
кракен форум
кракен форум ссылка
кракен форум зеркало
кракен форум онион
кракен официальный форум
форум кракен даркнет
кракен форум отзывы
кракен форум тор
форум маркетплейса кракен
кракен форум вход
kraken forum link
кракен форум обсуждение
кракен форум новости
кракен форум поддержка
форум площадки кракен
кракен форум ветка
кракен форум анонимно
кракен форум зеркало рабочее
кракен форум общение
кракен форум 2026
Your comment is awaiting moderation.
happy shop – Well-organized layout makes exploring content easy.
Your comment is awaiting moderation.
1xbet giri? 2025 1xbet giri? 2025 .
Your comment is awaiting moderation.
дезинфекция москва
Это занятие может понравиться людям, которые любит узнавать новое, совершенствовать навыки и расширять кругозор. Оно помогает укреплять навыки, получать новые эмоции и делать досуг более насыщенным. Со временем это способно принести не только удовольствие, но и заметную пользу в повседневной жизни.
хочу подписать контракт на сво
дезинфекция москва
This interest is often chosen by people who value growth, new knowledge, and practical experience. This type of interest helps strengthen skills, gain positive emotions, and make free time more meaningful. If given proper attention it can open the door to new connections, goals, and useful opportunities.
https://spark.ru/user/264192/blog/286585/umishlennoe-neispolnenie-dogovornih-obyazatelstv
Your comment is awaiting moderation.
click for momentum boost – Acting consistently generates energy that sustains forward motion.
Your comment is awaiting moderation.
как смотреть кракен без регистрации > доступ к площадке Кракен Сегодня я протестировал несколько поддержка кракен сайт, и вот что стабильно работает: Выражение кракен площадка вход закрепилось как основной запрос. Настоящий кракен площадка вход должен выполняться осторожно, ведь фишинговых копий много.
Проверил лично несколько зеркал — стабильно открываются: кракен тг бот тор — kraktor.ccгде найти площадку Кракена — platform-kraken.cc Если нужна помощь — задавайте вопросы.Проверено лично (Мурманск). KRAKEN скрытая площадка мессенджер
Your comment is awaiting moderation.
clicktofindsolutions.shop – Handy site, I found what I needed quickly and easily.
Your comment is awaiting moderation.
Всем привет! Нашел статью, где хорошо расписаны основы продвижения сайтов. Рассматриваются цели, стратегия, SEO, контекстная реклама, SMM, email-маркетинг, UX/UI. Особо отмечу раздел про интеграцию онлайн и офлайн активностей — редко встречается в таких обзорах. Вот ссылка для изучения: https://dogvoyage.ru/2025/12/jeffektivnoe-prodvizhenie-sajtov-i-razvitie-biznesa-v-internete/
Your comment is awaiting moderation.
мостбет официальный сайт в Кыргызстане https://www.mostbet21480.help
Your comment is awaiting moderation.
Kraken Links: Прямой вход на маркетплейс >
проверенная ссылка
Приветствую! КРАКЕН МАГАЗИН — анонимные покупки.
Постоянное обновление сайтов и маркетплейсов создает ощущение, что информация быстро устаревает, и для пользователей важно иметь надежный источник, где можно получить свежие сведения о платформах. КРАКЕН МАГАЗИН выполняет именно такую функцию, объединяя данные о функционале сервисов, особенностях интерфейсов и доступных инструментах, включая интеграцию с Telegram-ботами для оперативного информирования. Изучение материалов ресурса показывает, как различаются подходы к организации платформ: одни маркетплейсы делают акцент на удобстве навигации и покупок, другие — на автоматизации процессов и расширении возможностей сервисов. Актуальность информации здесь особенно ценна, ведь функционал сайтов и сервисов регулярно обновляется, появляются новые разделы и возможности, изменяется интерфейс. КРАКЕН МАГАЗИН помогает отслеживать эти изменения, предоставляя сведения в удобном и логичном формате. Через Telegram пользователи получают уведомления, краткие аналитические обзоры и свежие новости, что делает процесс получения информации быстрым и доступным. В итоге КРАКЕН МАГАЗИН формирует живую и целостную картину цифровой среды, позволяя пользователям спокойно ориентироваться в маркетплейсах, сайтах и сервисах, сравнивать платформы и понимать развитие онлайн-инструментов.
новое зеркало username: @krakensmirrorsbot
ссылка onion username: @krakenslinksbot
кракен официальный сайт
кракен сайт даркнет
kraken site onion
кракен официальный сайт зеркало
кракен сайт вход
кракен тор сайт
кракен маркетплейс сайт
сайт кракен ссылка тор
кракен оригинальный сайт
кракен онион сайт
кракен сайт 2026
кракен сайт анонимно
официальный ресурс кракен
кракен сайт даркнет маркетплейс
сайт кракен зеркало рабочее
кракен интернет магазин сайт
kraken darknet site link
кракен сайт через тор браузер
кракен официальный сайт онион
кракен сайт площадка
ссылка на кракен
кракен ссылки тор
актуальные ссылки на кракен
kraken onion links
кракен ссылки даркнет
кракен ссылка зеркало
кракен рабочая ссылка на сегодня
кракен прямая ссылка
кракен ссылка 2026
ссылка на кракен в тор браузере
новые ссылки кракен
кракен ссылки онион
кракен ссылка на маркет
кракен ссылка вход
кракен ссылка официальный
kraken darknet link
кракен ссылка маркетплейс
проверенные ссылки кракен
кракен ссылка зеркало рабочее
кракен активная ссылка
кракен зеркало
кракен актуальное зеркало
зеркало кракен сегодня
kraken mirror onion
кракен зеркало рабочее на сегодня
кракен зеркало тор
кракен официальное зеркало
зеркало сайта кракен
кракен зеркало вход
кракен зеркало даркнет
новое зеркало кракен
зеркало кракен 2026
кракен зеркало онион
кракен список зеркал
зеркало площадки кракен
кракен зеркало маркетплейс
кракен рабочее зеркало 2026
kraken darknet mirror
кракен зеркало ссылка
активные зеркала кракен
кракен магазин
kraken shop link
магазин кракен даркнет
кракен шоп онион
магазин кракен зеркало
кракен маркетплейс магазин
кракен магазин официальный
купить в магазине кракен
магазин кракен тор
kraken store onion
кракен интернет магазин
магазин кракен ссылка
кракен магазин товаров
кракен магазин вход
кракен шоп зеркало
магазин кракен 2026
кракен магазин анонимно
кракен официальный шоп
кракен витрина магазина
магазин кракен маркет
кракен даркнет
kraken darknet market
кракен даркнет ссылка
кракен даркнет вход
кракен даркнет зеркало
даркнет площадка кракен
кракен даркнет тор
кракен даркнет онион
кракен в даркнете как зайти
кракен даркнет сайт
официальный кракен даркнет
кракен даркнет маркет
кракен даркнет 2026
kraken darknet onion link
даркнет маркетплейс кракен
кракен даркнет ресурс
кракен теневой рынок
кракен даркнет шоп
кракен даркнет рабочая ссылка
доступ в кракен даркнет
кракен маркет
kraken market onion
кракен маркетплейс ссылка
кракен маркет вход
кракен маркет зеркало
маркетплейс кракен даркнет
кракен маркет тор
кракен маркет официальный
официальный сайт кракен маркет
кракен маркет онион
кракен маркет шоп
маркет кракен ссылка на сегодня
kraken market darknet link
кракен маркет площадка
кракен маркет 2026
кракен маркетплейс зеркало
маркет кракен через тор
кракен маркет анонимно
кракен маркет онлайн
торговая площадка кракен маркет
кракен 2026
кракен 2026 ссылка
кракен 2026 зеркало
кракен 2026 вход
кракен 2026 официальный сайт
кракен 2026 даркнет
kraken 2026 link
кракен 2026 онион
кракен 2026 актуально
кракен 2026 тор
кракен 2026 маркетплейс
новое зеркало кракен 2026
кракен 2026 рабочая ссылка
кракен 2026 зеркало сегодня
кракен сайт 2026 вход
кракен 2026 магазин
кракен 2026 через тор
кракен 2026 площадка
кракен 2026 работа
доступ на кракен 2026
кракен телеграмм
кракен тг бот
kraken telegram link
кракен бот телеграмм
кракен телеграмм канал
кракен ссылка в телеграмме
кракен тг ссылка
кракен новости телеграмм
кракен телеграмм зеркало
кракен бот в тг
официальный телеграмм кракен
кракен маркет телеграмм
кракен телеграмм чат
kraken tg bot
кракен телеграмм поддержка
кракен телеграмм новости
кракен контакты телеграмм
кракен бот автопродаж телеграмм
кракен телеграм ссылка тор
кракен тг группа
кракен вход
вход на кракен
кракен вход зеркало
кракен личный кабинет вход
кракен вход через тор
кракен вход онион
kraken login link
кракен вход официальный сайт
как зайти на кракен
кракен вход в магазин
кракен авторизация вход
кракен вход 2026
кракен зайти на сайт
кракен доступ вход
кракен вход по ссылке
кракен вход даркнет
кракен войти в аккаунт
кракен вход через браузер
кракен личный кабинет вход сегодня
кракен официальный вход зеркало
кракен тор
кракен тор ссылка
кракен тор зеркало
kraken tor link
кракен через тор браузер
кракен тор онион
кракен тор вход
кракен тор сайт
официальный тор кракен
кракен тор ссылка на зеркало
кракен зайти через тор
кракен тор маркетплейс
тор сайт кракен онион
кракен тор даркнет
кракен тор рабочая ссылка
kraken tor browser link
кракен тор шоп
кракен тор адрес
кракен тор доступ
кракен ссылка в тор сети
кракен бот
kraken bot link
кракен бот телеграмм
кракен бот автопродаж
кракен бот зеркало
кракен бот ссылка
кракен бот официальный
кракен бот покупок
бот кракен маркет
кракен бот даркнет
кракен бот онион
кракен бот в тг
кракен бот 24/7
kraken bot telegram
кракен бот работа
кракен бот для андроид
кракен бот через тор
кракен бот поддержка
кракен бот актуальный
рабочий бот кракен
аккаунты кракен
купить аккаунт кракен
кракен аккаунты с балансом
регистрация аккаунта кракен
вход в аккаунт кракен
кракен личный аккаунт
аккаунты kraken darknet
кракен аккаунты даркнет
проверка аккаунта кракен
кракен аккаунты маркет
доступ к аккаунту кракен
кракен аккаунты шоп
создать аккаунт кракен
аккаунты кракен зеркало
кракен аккаунт войти
кракен аккаунты бесплатно
аккаунты кракен 2026
кракен аккаунты онион
аккаунты на кракене как зайти
кракен кабинет аккаунт
кракен регистрация
как зарегистрироваться на кракен
кракен регистрация на сайте
кракен регистрация зеркало
kraken registration link
кракен создать аккаунт
кракен регистрация тор
кракен регистрация онион
кракен официальная регистрация
кракен регистрация 2026
кракен регистрация без почты
регистрация в кракен маркет
кракен регистрация ссылка
кракен регистрация через браузер
кракен быстрая регистрация
кракен форма регистрации
кракен регистрация даркнет
регистрация на сайте кракен тор
кракен регистрация сейчас
кракен регистрация бесплатно
кракен москва
кракен москва ссылка
кракен москва зеркало
кракен москва зайти
кракен москва купить
кракен москва сайт
кракен москва даркнет
кракен москва шоп
кракен москва маркет
кракен москва тор
кракен москва онион
кракен закладки москва
кракен москва 2026
kraken moscow link
кракен москва официальный сайт
кракен москва работа
кракен москва через тор
кракен москва вход
кракен москва адреса
кракен москва сегодня
кракен форум
кракен форум ссылка
кракен форум зеркало
кракен форум онион
кракен официальный форум
форум кракен даркнет
кракен форум отзывы
кракен форум тор
форум маркетплейса кракен
кракен форум вход
kraken forum link
кракен форум обсуждение
кракен форум новости
кракен форум поддержка
форум площадки кракен
кракен форум ветка
кракен форум анонимно
кракен форум зеркало рабочее
кракен форум общение
кракен форум 2026
Your comment is awaiting moderation.
one x bet one x bet .
Your comment is awaiting moderation.
mostbet промокод не работает mostbet21480.help
Your comment is awaiting moderation.
Тензоприбор предлагает калибровочные гири для весов нужного класса точности и номинальной массы для калибровки весов.
В нашей компании можно купить поверочные гири классов точности E1, E2, F1, F2, M1, M2.
Чем выше класс точности, тем меньше будет разница между номинальным и действительным значениями массы калибровочной гири.
Your comment is awaiting moderation.
1 xbet giri? 1xbet-54.com .
Your comment is awaiting moderation.
ремонт бетонных конструкций жилой дом remont-betona-1.ru .
Your comment is awaiting moderation.
pin up Surxondaryo http://www.pinup69053.help
Your comment is awaiting moderation.
xbet xbet .
Your comment is awaiting moderation.
start here – Everything is presented clearly, allowing quick understanding of content.
Your comment is awaiting moderation.
1win qanday o‘rnatish 1win5765.help
Your comment is awaiting moderation.
mostbet total over under http://mostbet37150.help/
Your comment is awaiting moderation.
learn more – Ideas that move with purpose drive better results and actionable outcomes.
Your comment is awaiting moderation.
салон красоты таганская
Это направление может понравиться людям, которые интересуется личным ростом, опытом и полезными навыками. Этот вид деятельности помогает сочетать интерес, практику и личное развитие. При регулярном интересе такое направление может открыть новые знакомства, цели и полезные перспективы.
впн на пк
салон маникюра
This activity can be especially appealing to those who are interested in self-development, useful experience, and meaningful activities. This type of interest helps spend time productively, discover new opportunities, and enjoy memorable experiences. With regular interest it can become an important part of a lifestyle, a source of inspiration, and a form of self-expression.
https://artistecard.com/Miroslava95kw
Your comment is awaiting moderation.
check this out – Well-organized site makes browsing items simple and convenient.
Your comment is awaiting moderation.
КРАКЕН ЗЕРКАЛО — Безопасный переход в Даркнет >
резервный адрес
Всем привет. Используйте актуальные ЗЕРКАЛА КРАКЕН.
Постоянное обновление сайтов и маркетплейсов создает ощущение, что информация быстро устаревает, и для пользователей важно иметь надежный источник, где можно получить свежие сведения о платформах. КРАКЕН МАГАЗИН выполняет именно такую функцию, объединяя данные о функционале сервисов, особенностях интерфейсов и доступных инструментах, включая интеграцию с Telegram-ботами для оперативного информирования. Изучение материалов ресурса показывает, как различаются подходы к организации платформ: одни маркетплейсы делают акцент на удобстве навигации и покупок, другие — на автоматизации процессов и расширении возможностей сервисов. Актуальность информации здесь особенно ценна, ведь функционал сайтов и сервисов регулярно обновляется, появляются новые разделы и возможности, изменяется интерфейс. КРАКЕН МАГАЗИН помогает отслеживать эти изменения, предоставляя сведения в удобном и логичном формате. Через Telegram пользователи получают уведомления, краткие аналитические обзоры и свежие новости, что делает процесс получения информации быстрым и доступным. В итоге КРАКЕН МАГАЗИН формирует живую и целостную картину цифровой среды, позволяя пользователям спокойно ориентироваться в маркетплейсах, сайтах и сервисах, сравнивать платформы и понимать развитие онлайн-инструментов.
зайти в магазин username: @krakensshopibot
активное зеркало username: @krakensmirrorsbot
кракен официальный сайт
кракен сайт даркнет
kraken site onion
кракен официальный сайт зеркало
кракен сайт вход
кракен тор сайт
кракен маркетплейс сайт
сайт кракен ссылка тор
кракен оригинальный сайт
кракен онион сайт
кракен сайт 2026
кракен сайт анонимно
официальный ресурс кракен
кракен сайт даркнет маркетплейс
сайт кракен зеркало рабочее
кракен интернет магазин сайт
kraken darknet site link
кракен сайт через тор браузер
кракен официальный сайт онион
кракен сайт площадка
ссылка на кракен
кракен ссылки тор
актуальные ссылки на кракен
kraken onion links
кракен ссылки даркнет
кракен ссылка зеркало
кракен рабочая ссылка на сегодня
кракен прямая ссылка
кракен ссылка 2026
ссылка на кракен в тор браузере
новые ссылки кракен
кракен ссылки онион
кракен ссылка на маркет
кракен ссылка вход
кракен ссылка официальный
kraken darknet link
кракен ссылка маркетплейс
проверенные ссылки кракен
кракен ссылка зеркало рабочее
кракен активная ссылка
кракен зеркало
кракен актуальное зеркало
зеркало кракен сегодня
kraken mirror onion
кракен зеркало рабочее на сегодня
кракен зеркало тор
кракен официальное зеркало
зеркало сайта кракен
кракен зеркало вход
кракен зеркало даркнет
новое зеркало кракен
зеркало кракен 2026
кракен зеркало онион
кракен список зеркал
зеркало площадки кракен
кракен зеркало маркетплейс
кракен рабочее зеркало 2026
kraken darknet mirror
кракен зеркало ссылка
активные зеркала кракен
кракен магазин
kraken shop link
магазин кракен даркнет
кракен шоп онион
магазин кракен зеркало
кракен маркетплейс магазин
кракен магазин официальный
купить в магазине кракен
магазин кракен тор
kraken store onion
кракен интернет магазин
магазин кракен ссылка
кракен магазин товаров
кракен магазин вход
кракен шоп зеркало
магазин кракен 2026
кракен магазин анонимно
кракен официальный шоп
кракен витрина магазина
магазин кракен маркет
кракен даркнет
kraken darknet market
кракен даркнет ссылка
кракен даркнет вход
кракен даркнет зеркало
даркнет площадка кракен
кракен даркнет тор
кракен даркнет онион
кракен в даркнете как зайти
кракен даркнет сайт
официальный кракен даркнет
кракен даркнет маркет
кракен даркнет 2026
kraken darknet onion link
даркнет маркетплейс кракен
кракен даркнет ресурс
кракен теневой рынок
кракен даркнет шоп
кракен даркнет рабочая ссылка
доступ в кракен даркнет
кракен маркет
kraken market onion
кракен маркетплейс ссылка
кракен маркет вход
кракен маркет зеркало
маркетплейс кракен даркнет
кракен маркет тор
кракен маркет официальный
официальный сайт кракен маркет
кракен маркет онион
кракен маркет шоп
маркет кракен ссылка на сегодня
kraken market darknet link
кракен маркет площадка
кракен маркет 2026
кракен маркетплейс зеркало
маркет кракен через тор
кракен маркет анонимно
кракен маркет онлайн
торговая площадка кракен маркет
кракен 2026
кракен 2026 ссылка
кракен 2026 зеркало
кракен 2026 вход
кракен 2026 официальный сайт
кракен 2026 даркнет
kraken 2026 link
кракен 2026 онион
кракен 2026 актуально
кракен 2026 тор
кракен 2026 маркетплейс
новое зеркало кракен 2026
кракен 2026 рабочая ссылка
кракен 2026 зеркало сегодня
кракен сайт 2026 вход
кракен 2026 магазин
кракен 2026 через тор
кракен 2026 площадка
кракен 2026 работа
доступ на кракен 2026
кракен телеграмм
кракен тг бот
kraken telegram link
кракен бот телеграмм
кракен телеграмм канал
кракен ссылка в телеграмме
кракен тг ссылка
кракен новости телеграмм
кракен телеграмм зеркало
кракен бот в тг
официальный телеграмм кракен
кракен маркет телеграмм
кракен телеграмм чат
kraken tg bot
кракен телеграмм поддержка
кракен телеграмм новости
кракен контакты телеграмм
кракен бот автопродаж телеграмм
кракен телеграм ссылка тор
кракен тг группа
кракен вход
вход на кракен
кракен вход зеркало
кракен личный кабинет вход
кракен вход через тор
кракен вход онион
kraken login link
кракен вход официальный сайт
как зайти на кракен
кракен вход в магазин
кракен авторизация вход
кракен вход 2026
кракен зайти на сайт
кракен доступ вход
кракен вход по ссылке
кракен вход даркнет
кракен войти в аккаунт
кракен вход через браузер
кракен личный кабинет вход сегодня
кракен официальный вход зеркало
кракен тор
кракен тор ссылка
кракен тор зеркало
kraken tor link
кракен через тор браузер
кракен тор онион
кракен тор вход
кракен тор сайт
официальный тор кракен
кракен тор ссылка на зеркало
кракен зайти через тор
кракен тор маркетплейс
тор сайт кракен онион
кракен тор даркнет
кракен тор рабочая ссылка
kraken tor browser link
кракен тор шоп
кракен тор адрес
кракен тор доступ
кракен ссылка в тор сети
кракен бот
kraken bot link
кракен бот телеграмм
кракен бот автопродаж
кракен бот зеркало
кракен бот ссылка
кракен бот официальный
кракен бот покупок
бот кракен маркет
кракен бот даркнет
кракен бот онион
кракен бот в тг
кракен бот 24/7
kraken bot telegram
кракен бот работа
кракен бот для андроид
кракен бот через тор
кракен бот поддержка
кракен бот актуальный
рабочий бот кракен
аккаунты кракен
купить аккаунт кракен
кракен аккаунты с балансом
регистрация аккаунта кракен
вход в аккаунт кракен
кракен личный аккаунт
аккаунты kraken darknet
кракен аккаунты даркнет
проверка аккаунта кракен
кракен аккаунты маркет
доступ к аккаунту кракен
кракен аккаунты шоп
создать аккаунт кракен
аккаунты кракен зеркало
кракен аккаунт войти
кракен аккаунты бесплатно
аккаунты кракен 2026
кракен аккаунты онион
аккаунты на кракене как зайти
кракен кабинет аккаунт
кракен регистрация
как зарегистрироваться на кракен
кракен регистрация на сайте
кракен регистрация зеркало
kraken registration link
кракен создать аккаунт
кракен регистрация тор
кракен регистрация онион
кракен официальная регистрация
кракен регистрация 2026
кракен регистрация без почты
регистрация в кракен маркет
кракен регистрация ссылка
кракен регистрация через браузер
кракен быстрая регистрация
кракен форма регистрации
кракен регистрация даркнет
регистрация на сайте кракен тор
кракен регистрация сейчас
кракен регистрация бесплатно
кракен москва
кракен москва ссылка
кракен москва зеркало
кракен москва зайти
кракен москва купить
кракен москва сайт
кракен москва даркнет
кракен москва шоп
кракен москва маркет
кракен москва тор
кракен москва онион
кракен закладки москва
кракен москва 2026
kraken moscow link
кракен москва официальный сайт
кракен москва работа
кракен москва через тор
кракен москва вход
кракен москва адреса
кракен москва сегодня
кракен форум
кракен форум ссылка
кракен форум зеркало
кракен форум онион
кракен официальный форум
форум кракен даркнет
кракен форум отзывы
кракен форум тор
форум маркетплейса кракен
кракен форум вход
kraken forum link
кракен форум обсуждение
кракен форум новости
кракен форум поддержка
форум площадки кракен
кракен форум ветка
кракен форум анонимно
кракен форум зеркало рабочее
кракен форум общение
кракен форум 2026
Your comment is awaiting moderation.
1x giri? 1xbet-giris-27.com .
Your comment is awaiting moderation.
мелбет пополнение мбанк http://melbet42089.help/
Your comment is awaiting moderation.
1xbet spor bahislerinin adresi 1xbet spor bahislerinin adresi .
Your comment is awaiting moderation.
основные характеристики смартфона кракен > нажмите здесь Сегодня я протестировал несколько кракен ссылка зеркало, и вот что стабильно работает: Выражение правила площадки кракена закрепилось в сообществах. Настоящие правила площадки кракена помогают понять структуру и исключить ошибки.
Проверил лично несколько зеркал — стабильно открываются: кракен тг бот тор — kraktor.ccгде найти ссылку — krakenbot.cc Если нужна помощь — пишите.Проверено лично (Сочи). кракен линк площадка для покупок телега
Your comment is awaiting moderation.
1xbet ?yelik 1xbet-48.com .
Your comment is awaiting moderation.
мелбет блэкджек melbet72043.help
Your comment is awaiting moderation.
Официальный сайт КРАКЕН 2026 >
ссылка сегодня
Здравствуйте. КРАКЕН ССЫЛКИ обновились, будьте бдительны.
КРАКЕН САЙТ предоставляет обзорный материал о цифровых сервисах, маркетплейсах и интернет-платформах, объединяя сведения о функционале, новинках и обновлениях ресурсов. КРАКЕН САЙТ позволяет пользователям получать актуальную информацию через Telegram-боты, обеспечивая оперативное уведомление о событиях. На сайте публикуются рейтинги, сравнительные обзоры, рекомендации по использованию платформ и описание категорий товаров, функций оплаты и условий доставки. КРАКЕН САЙТ помогает формировать системное представление о сервисах, оценивать возможности платформ и принимать информированные решения, облегчая работу с маркетплейсами и цифровыми сервисами в режиме реального времени
зеркало тор username: @krakensmirrorsbot
свежая ссылка username: @krakenslinksbot
кракен официальный сайт
кракен сайт даркнет
kraken site onion
кракен официальный сайт зеркало
кракен сайт вход
кракен тор сайт
кракен маркетплейс сайт
сайт кракен ссылка тор
кракен оригинальный сайт
кракен онион сайт
кракен сайт 2026
кракен сайт анонимно
официальный ресурс кракен
кракен сайт даркнет маркетплейс
сайт кракен зеркало рабочее
кракен интернет магазин сайт
kraken darknet site link
кракен сайт через тор браузер
кракен официальный сайт онион
кракен сайт площадка
ссылка на кракен
кракен ссылки тор
актуальные ссылки на кракен
kraken onion links
кракен ссылки даркнет
кракен ссылка зеркало
кракен рабочая ссылка на сегодня
кракен прямая ссылка
кракен ссылка 2026
ссылка на кракен в тор браузере
новые ссылки кракен
кракен ссылки онион
кракен ссылка на маркет
кракен ссылка вход
кракен ссылка официальный
kraken darknet link
кракен ссылка маркетплейс
проверенные ссылки кракен
кракен ссылка зеркало рабочее
кракен активная ссылка
кракен зеркало
кракен актуальное зеркало
зеркало кракен сегодня
kraken mirror onion
кракен зеркало рабочее на сегодня
кракен зеркало тор
кракен официальное зеркало
зеркало сайта кракен
кракен зеркало вход
кракен зеркало даркнет
новое зеркало кракен
зеркало кракен 2026
кракен зеркало онион
кракен список зеркал
зеркало площадки кракен
кракен зеркало маркетплейс
кракен рабочее зеркало 2026
kraken darknet mirror
кракен зеркало ссылка
активные зеркала кракен
кракен магазин
kraken shop link
магазин кракен даркнет
кракен шоп онион
магазин кракен зеркало
кракен маркетплейс магазин
кракен магазин официальный
купить в магазине кракен
магазин кракен тор
kraken store onion
кракен интернет магазин
магазин кракен ссылка
кракен магазин товаров
кракен магазин вход
кракен шоп зеркало
магазин кракен 2026
кракен магазин анонимно
кракен официальный шоп
кракен витрина магазина
магазин кракен маркет
кракен даркнет
kraken darknet market
кракен даркнет ссылка
кракен даркнет вход
кракен даркнет зеркало
даркнет площадка кракен
кракен даркнет тор
кракен даркнет онион
кракен в даркнете как зайти
кракен даркнет сайт
официальный кракен даркнет
кракен даркнет маркет
кракен даркнет 2026
kraken darknet onion link
даркнет маркетплейс кракен
кракен даркнет ресурс
кракен теневой рынок
кракен даркнет шоп
кракен даркнет рабочая ссылка
доступ в кракен даркнет
кракен маркет
kraken market onion
кракен маркетплейс ссылка
кракен маркет вход
кракен маркет зеркало
маркетплейс кракен даркнет
кракен маркет тор
кракен маркет официальный
официальный сайт кракен маркет
кракен маркет онион
кракен маркет шоп
маркет кракен ссылка на сегодня
kraken market darknet link
кракен маркет площадка
кракен маркет 2026
кракен маркетплейс зеркало
маркет кракен через тор
кракен маркет анонимно
кракен маркет онлайн
торговая площадка кракен маркет
кракен 2026
кракен 2026 ссылка
кракен 2026 зеркало
кракен 2026 вход
кракен 2026 официальный сайт
кракен 2026 даркнет
kraken 2026 link
кракен 2026 онион
кракен 2026 актуально
кракен 2026 тор
кракен 2026 маркетплейс
новое зеркало кракен 2026
кракен 2026 рабочая ссылка
кракен 2026 зеркало сегодня
кракен сайт 2026 вход
кракен 2026 магазин
кракен 2026 через тор
кракен 2026 площадка
кракен 2026 работа
доступ на кракен 2026
кракен телеграмм
кракен тг бот
kraken telegram link
кракен бот телеграмм
кракен телеграмм канал
кракен ссылка в телеграмме
кракен тг ссылка
кракен новости телеграмм
кракен телеграмм зеркало
кракен бот в тг
официальный телеграмм кракен
кракен маркет телеграмм
кракен телеграмм чат
kraken tg bot
кракен телеграмм поддержка
кракен телеграмм новости
кракен контакты телеграмм
кракен бот автопродаж телеграмм
кракен телеграм ссылка тор
кракен тг группа
кракен вход
вход на кракен
кракен вход зеркало
кракен личный кабинет вход
кракен вход через тор
кракен вход онион
kraken login link
кракен вход официальный сайт
как зайти на кракен
кракен вход в магазин
кракен авторизация вход
кракен вход 2026
кракен зайти на сайт
кракен доступ вход
кракен вход по ссылке
кракен вход даркнет
кракен войти в аккаунт
кракен вход через браузер
кракен личный кабинет вход сегодня
кракен официальный вход зеркало
кракен тор
кракен тор ссылка
кракен тор зеркало
kraken tor link
кракен через тор браузер
кракен тор онион
кракен тор вход
кракен тор сайт
официальный тор кракен
кракен тор ссылка на зеркало
кракен зайти через тор
кракен тор маркетплейс
тор сайт кракен онион
кракен тор даркнет
кракен тор рабочая ссылка
kraken tor browser link
кракен тор шоп
кракен тор адрес
кракен тор доступ
кракен ссылка в тор сети
кракен бот
kraken bot link
кракен бот телеграмм
кракен бот автопродаж
кракен бот зеркало
кракен бот ссылка
кракен бот официальный
кракен бот покупок
бот кракен маркет
кракен бот даркнет
кракен бот онион
кракен бот в тг
кракен бот 24/7
kraken bot telegram
кракен бот работа
кракен бот для андроид
кракен бот через тор
кракен бот поддержка
кракен бот актуальный
рабочий бот кракен
аккаунты кракен
купить аккаунт кракен
кракен аккаунты с балансом
регистрация аккаунта кракен
вход в аккаунт кракен
кракен личный аккаунт
аккаунты kraken darknet
кракен аккаунты даркнет
проверка аккаунта кракен
кракен аккаунты маркет
доступ к аккаунту кракен
кракен аккаунты шоп
создать аккаунт кракен
аккаунты кракен зеркало
кракен аккаунт войти
кракен аккаунты бесплатно
аккаунты кракен 2026
кракен аккаунты онион
аккаунты на кракене как зайти
кракен кабинет аккаунт
кракен регистрация
как зарегистрироваться на кракен
кракен регистрация на сайте
кракен регистрация зеркало
kraken registration link
кракен создать аккаунт
кракен регистрация тор
кракен регистрация онион
кракен официальная регистрация
кракен регистрация 2026
кракен регистрация без почты
регистрация в кракен маркет
кракен регистрация ссылка
кракен регистрация через браузер
кракен быстрая регистрация
кракен форма регистрации
кракен регистрация даркнет
регистрация на сайте кракен тор
кракен регистрация сейчас
кракен регистрация бесплатно
кракен москва
кракен москва ссылка
кракен москва зеркало
кракен москва зайти
кракен москва купить
кракен москва сайт
кракен москва даркнет
кракен москва шоп
кракен москва маркет
кракен москва тор
кракен москва онион
кракен закладки москва
кракен москва 2026
kraken moscow link
кракен москва официальный сайт
кракен москва работа
кракен москва через тор
кракен москва вход
кракен москва адреса
кракен москва сегодня
кракен форум
кракен форум ссылка
кракен форум зеркало
кракен форум онион
кракен официальный форум
форум кракен даркнет
кракен форум отзывы
кракен форум тор
форум маркетплейса кракен
кракен форум вход
kraken forum link
кракен форум обсуждение
кракен форум новости
кракен форум поддержка
форум площадки кракен
кракен форум ветка
кракен форум анонимно
кракен форум зеркало рабочее
кракен форум общение
кракен форум 2026
Your comment is awaiting moderation.
see content – The clean layout helps users find information quickly.
Your comment is awaiting moderation.
pin-up bonus kodi 2026 https://pinup69053.help/
Your comment is awaiting moderation.
1xbet yeni adresi 1xbet yeni adresi .
Your comment is awaiting moderation.
mostbet Oʻzbekiston mines mostbet Oʻzbekiston mines
Your comment is awaiting moderation.
see more info – Smooth interface allowed me to browse distinctive products easily.
Your comment is awaiting moderation.
click to view – Direction keeps energy focused, preventing it from scattering or slowing down.
Your comment is awaiting moderation.
bahis siteler 1xbet bahis siteler 1xbet .
Your comment is awaiting moderation.
420HC steel knife
Это увлечение подходит тем, кто ценит развитие, новые знания и практический опыт. Такое занятие помогает развивать мышление, расширять опыт и находить интересные идеи. Если уделять этому внимание это способно принести не только удовольствие, но и заметную пользу в повседневной жизни.
сайт содержанок
fixed blade vs folding knife
This interest is often chosen by people who enjoy learning new things, improving skills, and broadening their horizons. This type of interest helps develop thinking, expand experience, and find fresh inspiration. If given proper attention it can open the door to new connections, goals, and useful opportunities.
https://genius.com/Yana1957cq
Your comment is awaiting moderation.
Вход на платформу Кракен через зеркало > телефон кракен характеристики Сегодня я протестировал несколько как войти в кракен через тор, и вот что стабильно работает: Сегодня кракен телефон рассматривается как нишевый продукт. Настоящий кракен телефон выбирают те, кто ценит контроль над личными данными и не доверяет стандартным гаджетам.
Проверил лично несколько адресов — стабильно открываются: кракен тор тг — kraktor.ccобзор на телефон кракен — kphone.cc Если нужна помощь — оставляйте комменты.Проверено лично (Уфа). KRN онлайн-площадка Телеграмм
Your comment is awaiting moderation.
pin-up kupon kod https://pinup69053.help/
Your comment is awaiting moderation.
melbet киргизия ставки на спорт https://melbet42089.help
Your comment is awaiting moderation.
mostbet crash game https://www.mostbet37150.help
Your comment is awaiting moderation.
заказать букет цветов с доставкой москва недорого https://www.zakazat-cveti-moskva.ru .
Your comment is awaiting moderation.
как сделать ставку в mostbet https://mostbet78063.help/
Your comment is awaiting moderation.
ремонт бетонных конструкций выезд специалиста remont-betona-1.ru .
Your comment is awaiting moderation.
melbet официальный сайт melbet официальный сайт
Your comment is awaiting moderation.
discover forex tips – It’s simple to browse and the information is easy to digest.
Your comment is awaiting moderation.
1xbet spor bahislerinin adresi 1xbet spor bahislerinin adresi .
Your comment is awaiting moderation.
1win license https://1win5523.ru/
Your comment is awaiting moderation.
Официальный ресурс КРАКЕН ДАРКНЕТ >
КРАКЕН ДАРКНЕТ
Хай! КРАКЕН ДАРКНЕТ и безопасные ссылки.
КРАКЕН ССЫЛКИ предлагает информацию о цифровых сервисах, интернет-платформах и маркетплейсах, включая их функционал, обновления и новинки. КРАКЕН ССЫЛКИ обеспечивает оперативное получение данных через Telegram-боты, позволяя пользователям быть в курсе событий и изменений. На ресурсе размещаются аналитические материалы, рейтинги платформ, обзоры функционала и рекомендации по использованию сервисов. КРАКЕН ССЫЛКИ помогает формировать полное представление о цифровой экосистеме, оценивать возможности платформ и принимать обоснованные решения при работе с маркетплейсами и интернет-магазинами
вход на сайт username: @krakenssitebot
даркнет портал username: @krakensdarkbot
кракен официальный сайт
кракен сайт даркнет
kraken site onion
кракен официальный сайт зеркало
кракен сайт вход
кракен тор сайт
кракен маркетплейс сайт
сайт кракен ссылка тор
кракен оригинальный сайт
кракен онион сайт
кракен сайт 2026
кракен сайт анонимно
официальный ресурс кракен
кракен сайт даркнет маркетплейс
сайт кракен зеркало рабочее
кракен интернет магазин сайт
kraken darknet site link
кракен сайт через тор браузер
кракен официальный сайт онион
кракен сайт площадка
ссылка на кракен
кракен ссылки тор
актуальные ссылки на кракен
kraken onion links
кракен ссылки даркнет
кракен ссылка зеркало
кракен рабочая ссылка на сегодня
кракен прямая ссылка
кракен ссылка 2026
ссылка на кракен в тор браузере
новые ссылки кракен
кракен ссылки онион
кракен ссылка на маркет
кракен ссылка вход
кракен ссылка официальный
kraken darknet link
кракен ссылка маркетплейс
проверенные ссылки кракен
кракен ссылка зеркало рабочее
кракен активная ссылка
кракен зеркало
кракен актуальное зеркало
зеркало кракен сегодня
kraken mirror onion
кракен зеркало рабочее на сегодня
кракен зеркало тор
кракен официальное зеркало
зеркало сайта кракен
кракен зеркало вход
кракен зеркало даркнет
новое зеркало кракен
зеркало кракен 2026
кракен зеркало онион
кракен список зеркал
зеркало площадки кракен
кракен зеркало маркетплейс
кракен рабочее зеркало 2026
kraken darknet mirror
кракен зеркало ссылка
активные зеркала кракен
кракен магазин
kraken shop link
магазин кракен даркнет
кракен шоп онион
магазин кракен зеркало
кракен маркетплейс магазин
кракен магазин официальный
купить в магазине кракен
магазин кракен тор
kraken store onion
кракен интернет магазин
магазин кракен ссылка
кракен магазин товаров
кракен магазин вход
кракен шоп зеркало
магазин кракен 2026
кракен магазин анонимно
кракен официальный шоп
кракен витрина магазина
магазин кракен маркет
кракен даркнет
kraken darknet market
кракен даркнет ссылка
кракен даркнет вход
кракен даркнет зеркало
даркнет площадка кракен
кракен даркнет тор
кракен даркнет онион
кракен в даркнете как зайти
кракен даркнет сайт
официальный кракен даркнет
кракен даркнет маркет
кракен даркнет 2026
kraken darknet onion link
даркнет маркетплейс кракен
кракен даркнет ресурс
кракен теневой рынок
кракен даркнет шоп
кракен даркнет рабочая ссылка
доступ в кракен даркнет
кракен маркет
kraken market onion
кракен маркетплейс ссылка
кракен маркет вход
кракен маркет зеркало
маркетплейс кракен даркнет
кракен маркет тор
кракен маркет официальный
официальный сайт кракен маркет
кракен маркет онион
кракен маркет шоп
маркет кракен ссылка на сегодня
kraken market darknet link
кракен маркет площадка
кракен маркет 2026
кракен маркетплейс зеркало
маркет кракен через тор
кракен маркет анонимно
кракен маркет онлайн
торговая площадка кракен маркет
кракен 2026
кракен 2026 ссылка
кракен 2026 зеркало
кракен 2026 вход
кракен 2026 официальный сайт
кракен 2026 даркнет
kraken 2026 link
кракен 2026 онион
кракен 2026 актуально
кракен 2026 тор
кракен 2026 маркетплейс
новое зеркало кракен 2026
кракен 2026 рабочая ссылка
кракен 2026 зеркало сегодня
кракен сайт 2026 вход
кракен 2026 магазин
кракен 2026 через тор
кракен 2026 площадка
кракен 2026 работа
доступ на кракен 2026
кракен телеграмм
кракен тг бот
kraken telegram link
кракен бот телеграмм
кракен телеграмм канал
кракен ссылка в телеграмме
кракен тг ссылка
кракен новости телеграмм
кракен телеграмм зеркало
кракен бот в тг
официальный телеграмм кракен
кракен маркет телеграмм
кракен телеграмм чат
kraken tg bot
кракен телеграмм поддержка
кракен телеграмм новости
кракен контакты телеграмм
кракен бот автопродаж телеграмм
кракен телеграм ссылка тор
кракен тг группа
кракен вход
вход на кракен
кракен вход зеркало
кракен личный кабинет вход
кракен вход через тор
кракен вход онион
kraken login link
кракен вход официальный сайт
как зайти на кракен
кракен вход в магазин
кракен авторизация вход
кракен вход 2026
кракен зайти на сайт
кракен доступ вход
кракен вход по ссылке
кракен вход даркнет
кракен войти в аккаунт
кракен вход через браузер
кракен личный кабинет вход сегодня
кракен официальный вход зеркало
кракен тор
кракен тор ссылка
кракен тор зеркало
kraken tor link
кракен через тор браузер
кракен тор онион
кракен тор вход
кракен тор сайт
официальный тор кракен
кракен тор ссылка на зеркало
кракен зайти через тор
кракен тор маркетплейс
тор сайт кракен онион
кракен тор даркнет
кракен тор рабочая ссылка
kraken tor browser link
кракен тор шоп
кракен тор адрес
кракен тор доступ
кракен ссылка в тор сети
кракен бот
kraken bot link
кракен бот телеграмм
кракен бот автопродаж
кракен бот зеркало
кракен бот ссылка
кракен бот официальный
кракен бот покупок
бот кракен маркет
кракен бот даркнет
кракен бот онион
кракен бот в тг
кракен бот 24/7
kraken bot telegram
кракен бот работа
кракен бот для андроид
кракен бот через тор
кракен бот поддержка
кракен бот актуальный
рабочий бот кракен
аккаунты кракен
купить аккаунт кракен
кракен аккаунты с балансом
регистрация аккаунта кракен
вход в аккаунт кракен
кракен личный аккаунт
аккаунты kraken darknet
кракен аккаунты даркнет
проверка аккаунта кракен
кракен аккаунты маркет
доступ к аккаунту кракен
кракен аккаунты шоп
создать аккаунт кракен
аккаунты кракен зеркало
кракен аккаунт войти
кракен аккаунты бесплатно
аккаунты кракен 2026
кракен аккаунты онион
аккаунты на кракене как зайти
кракен кабинет аккаунт
кракен регистрация
как зарегистрироваться на кракен
кракен регистрация на сайте
кракен регистрация зеркало
kraken registration link
кракен создать аккаунт
кракен регистрация тор
кракен регистрация онион
кракен официальная регистрация
кракен регистрация 2026
кракен регистрация без почты
регистрация в кракен маркет
кракен регистрация ссылка
кракен регистрация через браузер
кракен быстрая регистрация
кракен форма регистрации
кракен регистрация даркнет
регистрация на сайте кракен тор
кракен регистрация сейчас
кракен регистрация бесплатно
кракен москва
кракен москва ссылка
кракен москва зеркало
кракен москва зайти
кракен москва купить
кракен москва сайт
кракен москва даркнет
кракен москва шоп
кракен москва маркет
кракен москва тор
кракен москва онион
кракен закладки москва
кракен москва 2026
kraken moscow link
кракен москва официальный сайт
кракен москва работа
кракен москва через тор
кракен москва вход
кракен москва адреса
кракен москва сегодня
кракен форум
кракен форум ссылка
кракен форум зеркало
кракен форум онион
кракен официальный форум
форум кракен даркнет
кракен форум отзывы
кракен форум тор
форум маркетплейса кракен
кракен форум вход
kraken forum link
кракен форум обсуждение
кракен форум новости
кракен форум поддержка
форум площадки кракен
кракен форум ветка
кракен форум анонимно
кракен форум зеркало рабочее
кракен форум общение
кракен форум 2026
Your comment is awaiting moderation.
1xbet giri? linki 1xbet giri? linki .
Your comment is awaiting moderation.
1xbet t?rkiye 1xbet t?rkiye .
Your comment is awaiting moderation.
useful link – Seamless experience ensured I could browse smarter paths without effort.
Your comment is awaiting moderation.
<ahref="//focusactivatesprogress.click/](https://focusactivatesprogress.click/)” />visit this guide – Focus directs energy efficiently, turning effort into meaningful progress.
Your comment is awaiting moderation.
1xbet lite 1xbet lite .
Your comment is awaiting moderation.
создание сайта с нуля
Эта деятельность может понравиться людям, которые любит узнавать новое, совершенствовать навыки и расширять кругозор. Такой формат активности помогает проводить время с пользой, открывать новые возможности и получать яркие впечатления. Если уделять этому внимание это нередко превращается в любимую сферу для развития, общения и самореализации.
перевозки по россии
разработка сайта под ключ
This interest is often chosen by people who value growth, new knowledge, and practical experience. This kind of activity helps spend time productively, discover new opportunities, and enjoy memorable experiences. If given proper attention it can open the door to new connections, goals, and useful opportunities.
https://500px.com/p/alevtina69vn?view=photos
Your comment is awaiting moderation.
ремонт в подвале ремонт в подвале .
Your comment is awaiting moderation.
1xbet yeni giri? 1xbet yeni giri? .
Your comment is awaiting moderation.
https://luxforme.ru/wp-content/pages/pervyy_zub.html
Your comment is awaiting moderation.
click here – Well-structured pages provide a smooth experience when exploring the site.
Your comment is awaiting moderation.
Explore more at https://theovsal.com. From bridges and saddles to knobs, pickup covers, and pickguards, each part is crafted with precision and durable materials for reliable, long-term use. Thoughtful engineering, solid construction, and clean finishes ensure consistent tuning, improved sustain, and a refined look for every instrument.
Your comment is awaiting moderation.
learn more here – Clear navigation ensures a smooth shopping experience for all users.
Your comment is awaiting moderation.
Explore more at https://thesuninlife.com. From heavy-duty lifting equipment to precision training gear and ground reinforcement systems, each product is designed for reliability and long-term use. High-quality materials, reinforced construction, and practical designs ensure safety, stability, and consistent performance across every application.
Your comment is awaiting moderation.
Explore more at https://breezzshop.com. From compact vertical units to spacious full-size sheds, each design uses weather-resistant galvanized steel, secure lockable doors, and practical layouts for everyday use. Clean modern finishes and strong construction make Breezz a reliable choice for long-term outdoor storage.
Your comment is awaiting moderation.
<ahref="//focusactivatesprogress.click/](https://focusactivatesprogress.click/)” />read here – Concentrating on priorities keeps movement forward without unnecessary interruptions.
Your comment is awaiting moderation.
pin-up kazino bonus kod pin-up kazino bonus kod
Your comment is awaiting moderation.
1win login problem 1win login problem
Your comment is awaiting moderation.
технологический аудит
Это направление подходит тем, кто стремится развиваться, пробовать новое и получать ценный опыт. Такой формат активности помогает проводить время с пользой, открывать новые возможности и получать яркие впечатления. При регулярном интересе это способно принести не только удовольствие, но и заметную пользу в повседневной жизни.
мухомор купить
система контроля эффективности производства
This interest is often chosen by people who enjoy learning new things, improving skills, and broadening their horizons. This type of interest helps combine enjoyment, practice, and personal growth. Over time it may turn into a valuable area for growth, communication, and self-realization.
https://genius.com/Semyon28ma
Your comment is awaiting moderation.
мостбет зеркало Киргизия мостбет зеркало Киргизия
Your comment is awaiting moderation.
mostbet bonus faollashmadi http://mostbet37150.help/
Your comment is awaiting moderation.
Получить актуальную ССЫЛКУ КРАКЕН >
кракен шоп
Здравствуйте. КРАКЕН ССЫЛКИ обновились, будьте бдительны.
КРАКЕН САЙТ предоставляет обзорный материал о цифровых сервисах, маркетплейсах и интернет-платформах, объединяя сведения о функционале, новинках и обновлениях ресурсов. КРАКЕН САЙТ позволяет пользователям получать актуальную информацию через Telegram-боты, обеспечивая оперативное уведомление о событиях. На сайте публикуются рейтинги, сравнительные обзоры, рекомендации по использованию платформ и описание категорий товаров, функций оплаты и условий доставки. КРАКЕН САЙТ помогает формировать системное представление о сервисах, оценивать возможности платформ и принимать информированные решения, облегчая работу с маркетплейсами и цифровыми сервисами в режиме реального времени
площадка в даркнете username: @krakensdarkbot
кракен стор username: @krakensshopibot
кракен официальный сайт
кракен сайт даркнет
kraken site onion
кракен официальный сайт зеркало
кракен сайт вход
кракен тор сайт
кракен маркетплейс сайт
сайт кракен ссылка тор
кракен оригинальный сайт
кракен онион сайт
кракен сайт 2026
кракен сайт анонимно
официальный ресурс кракен
кракен сайт даркнет маркетплейс
сайт кракен зеркало рабочее
кракен интернет магазин сайт
kraken darknet site link
кракен сайт через тор браузер
кракен официальный сайт онион
кракен сайт площадка
ссылка на кракен
кракен ссылки тор
актуальные ссылки на кракен
kraken onion links
кракен ссылки даркнет
кракен ссылка зеркало
кракен рабочая ссылка на сегодня
кракен прямая ссылка
кракен ссылка 2026
ссылка на кракен в тор браузере
новые ссылки кракен
кракен ссылки онион
кракен ссылка на маркет
кракен ссылка вход
кракен ссылка официальный
kraken darknet link
кракен ссылка маркетплейс
проверенные ссылки кракен
кракен ссылка зеркало рабочее
кракен активная ссылка
кракен зеркало
кракен актуальное зеркало
зеркало кракен сегодня
kraken mirror onion
кракен зеркало рабочее на сегодня
кракен зеркало тор
кракен официальное зеркало
зеркало сайта кракен
кракен зеркало вход
кракен зеркало даркнет
новое зеркало кракен
зеркало кракен 2026
кракен зеркало онион
кракен список зеркал
зеркало площадки кракен
кракен зеркало маркетплейс
кракен рабочее зеркало 2026
kraken darknet mirror
кракен зеркало ссылка
активные зеркала кракен
кракен магазин
kraken shop link
магазин кракен даркнет
кракен шоп онион
магазин кракен зеркало
кракен маркетплейс магазин
кракен магазин официальный
купить в магазине кракен
магазин кракен тор
kraken store onion
кракен интернет магазин
магазин кракен ссылка
кракен магазин товаров
кракен магазин вход
кракен шоп зеркало
магазин кракен 2026
кракен магазин анонимно
кракен официальный шоп
кракен витрина магазина
магазин кракен маркет
кракен даркнет
kraken darknet market
кракен даркнет ссылка
кракен даркнет вход
кракен даркнет зеркало
даркнет площадка кракен
кракен даркнет тор
кракен даркнет онион
кракен в даркнете как зайти
кракен даркнет сайт
официальный кракен даркнет
кракен даркнет маркет
кракен даркнет 2026
kraken darknet onion link
даркнет маркетплейс кракен
кракен даркнет ресурс
кракен теневой рынок
кракен даркнет шоп
кракен даркнет рабочая ссылка
доступ в кракен даркнет
кракен маркет
kraken market onion
кракен маркетплейс ссылка
кракен маркет вход
кракен маркет зеркало
маркетплейс кракен даркнет
кракен маркет тор
кракен маркет официальный
официальный сайт кракен маркет
кракен маркет онион
кракен маркет шоп
маркет кракен ссылка на сегодня
kraken market darknet link
кракен маркет площадка
кракен маркет 2026
кракен маркетплейс зеркало
маркет кракен через тор
кракен маркет анонимно
кракен маркет онлайн
торговая площадка кракен маркет
кракен 2026
кракен 2026 ссылка
кракен 2026 зеркало
кракен 2026 вход
кракен 2026 официальный сайт
кракен 2026 даркнет
kraken 2026 link
кракен 2026 онион
кракен 2026 актуально
кракен 2026 тор
кракен 2026 маркетплейс
новое зеркало кракен 2026
кракен 2026 рабочая ссылка
кракен 2026 зеркало сегодня
кракен сайт 2026 вход
кракен 2026 магазин
кракен 2026 через тор
кракен 2026 площадка
кракен 2026 работа
доступ на кракен 2026
кракен телеграмм
кракен тг бот
kraken telegram link
кракен бот телеграмм
кракен телеграмм канал
кракен ссылка в телеграмме
кракен тг ссылка
кракен новости телеграмм
кракен телеграмм зеркало
кракен бот в тг
официальный телеграмм кракен
кракен маркет телеграмм
кракен телеграмм чат
kraken tg bot
кракен телеграмм поддержка
кракен телеграмм новости
кракен контакты телеграмм
кракен бот автопродаж телеграмм
кракен телеграм ссылка тор
кракен тг группа
кракен вход
вход на кракен
кракен вход зеркало
кракен личный кабинет вход
кракен вход через тор
кракен вход онион
kraken login link
кракен вход официальный сайт
как зайти на кракен
кракен вход в магазин
кракен авторизация вход
кракен вход 2026
кракен зайти на сайт
кракен доступ вход
кракен вход по ссылке
кракен вход даркнет
кракен войти в аккаунт
кракен вход через браузер
кракен личный кабинет вход сегодня
кракен официальный вход зеркало
кракен тор
кракен тор ссылка
кракен тор зеркало
kraken tor link
кракен через тор браузер
кракен тор онион
кракен тор вход
кракен тор сайт
официальный тор кракен
кракен тор ссылка на зеркало
кракен зайти через тор
кракен тор маркетплейс
тор сайт кракен онион
кракен тор даркнет
кракен тор рабочая ссылка
kraken tor browser link
кракен тор шоп
кракен тор адрес
кракен тор доступ
кракен ссылка в тор сети
кракен бот
kraken bot link
кракен бот телеграмм
кракен бот автопродаж
кракен бот зеркало
кракен бот ссылка
кракен бот официальный
кракен бот покупок
бот кракен маркет
кракен бот даркнет
кракен бот онион
кракен бот в тг
кракен бот 24/7
kraken bot telegram
кракен бот работа
кракен бот для андроид
кракен бот через тор
кракен бот поддержка
кракен бот актуальный
рабочий бот кракен
аккаунты кракен
купить аккаунт кракен
кракен аккаунты с балансом
регистрация аккаунта кракен
вход в аккаунт кракен
кракен личный аккаунт
аккаунты kraken darknet
кракен аккаунты даркнет
проверка аккаунта кракен
кракен аккаунты маркет
доступ к аккаунту кракен
кракен аккаунты шоп
создать аккаунт кракен
аккаунты кракен зеркало
кракен аккаунт войти
кракен аккаунты бесплатно
аккаунты кракен 2026
кракен аккаунты онион
аккаунты на кракене как зайти
кракен кабинет аккаунт
кракен регистрация
как зарегистрироваться на кракен
кракен регистрация на сайте
кракен регистрация зеркало
kraken registration link
кракен создать аккаунт
кракен регистрация тор
кракен регистрация онион
кракен официальная регистрация
кракен регистрация 2026
кракен регистрация без почты
регистрация в кракен маркет
кракен регистрация ссылка
кракен регистрация через браузер
кракен быстрая регистрация
кракен форма регистрации
кракен регистрация даркнет
регистрация на сайте кракен тор
кракен регистрация сейчас
кракен регистрация бесплатно
кракен москва
кракен москва ссылка
кракен москва зеркало
кракен москва зайти
кракен москва купить
кракен москва сайт
кракен москва даркнет
кракен москва шоп
кракен москва маркет
кракен москва тор
кракен москва онион
кракен закладки москва
кракен москва 2026
kraken moscow link
кракен москва официальный сайт
кракен москва работа
кракен москва через тор
кракен москва вход
кракен москва адреса
кракен москва сегодня
кракен форум
кракен форум ссылка
кракен форум зеркало
кракен форум онион
кракен официальный форум
форум кракен даркнет
кракен форум отзывы
кракен форум тор
форум маркетплейса кракен
кракен форум вход
kraken forum link
кракен форум обсуждение
кракен форум новости
кракен форум поддержка
форум площадки кракен
кракен форум ветка
кракен форум анонимно
кракен форум зеркало рабочее
кракен форум общение
кракен форум 2026
Your comment is awaiting moderation.
мостбет депозит app http://www.mostbet95163.help
Your comment is awaiting moderation.
access page – Easy-to-read layout with fast response times improves usability.
Your comment is awaiting moderation.
Всем привет! Ищу подрядчика для накрутки ПФ под ключ, но сам в теме плохо разбираюсь, боюсь нарваться на мошенников. Статья помогла составить чек-лист, что спрашивать у исполнителей: про мобильные прокси, про базы прогрева, про контроль роботности. Автор даже приводит примерные цены на облачные сервисы (от 0,8 рубля за клик). Теперь я хотя бы понимаю, сколько это должно стоить и на что обращать внимание. Вот ссылка на гайд: https://partnerkin.com/tribuna/blog-vitalivivdenko/nakrutka-pf-v-yandekse-polnoe- . Рекомендую всем, кто ищет подрядчика, сначала изучить матчасть.
Your comment is awaiting moderation.
melbet android melbet42089.help
Your comment is awaiting moderation.
Всем привет! Ищу подрядчика для накрутки ПФ под ключ, но сам в теме плохо разбираюсь, боюсь нарваться на мошенников. Статья помогла составить чек-лист, что спрашивать у исполнителей: про мобильные прокси, про базы прогрева, про контроль роботности. Автор даже приводит примерные цены на облачные сервисы (от 0,8 рубля за клик). Теперь я хотя бы понимаю, сколько это должно стоить и на что обращать внимание. Вот ссылка на гайд: https://partnerkin.com/tribuna/blog-vitalivivdenko/nakrutka-pf-v-yandekse-polnoe- . Рекомендую всем, кто ищет подрядчика, сначала изучить матчасть.
Your comment is awaiting moderation.
explore the page – Clear and simple design made browsing unique items seamless.
Your comment is awaiting moderation.
1x bet giri? 1x bet giri? .
Your comment is awaiting moderation.
1win vəsait çıxarma https://1win82430.help
Your comment is awaiting moderation.
find out more – Gradual development of motion leads to steady growth and accomplishment.
Your comment is awaiting moderation.
подвал дома ремонт подвал дома ремонт .
Your comment is awaiting moderation.
hammock bug protection gear
Это занятие часто выбирают те, кто стремится развиваться, пробовать новое и получать ценный опыт. Такой формат активности помогает укреплять навыки, получать новые эмоции и делать досуг более насыщенным. При более глубоком погружении оно может стать важной частью образа жизни, источником вдохновения и способом самовыражения.
ответы без пафиса
hammock net for backyard camping
This activity is well suited for people who like exploring new ideas, building skills, and gaining valuable experience. This kind of activity helps combine enjoyment, practice, and personal growth. With deeper involvement it may turn into a valuable area for growth, communication, and self-realization.
https://500px.com/p/semyon28ma?view=photos
Your comment is awaiting moderation.
Коллеги, кто глубоко копает тему, обратите внимание на раздел про инструменты. Автор подробно сравнивает облачные сервисы и самостоятельную накрутку через BAS/Monstro. Очень правильно написано про необходимость мобильных прокси, реальных фингерпринтов и нагуленных кук — это 90% успеха, чтобы не получить роботность в Метрике. Цены на самостоятельную накрутку (от 30к в месяц на инфраструктуру) тоже реалистичные. Статья в закладки: https://partnerkin.com/tribuna/blog-vitalivivdenko/nakrutka-pf-v-yandekse-polnoe- . Полезно и для новичков, и для профи.
Your comment is awaiting moderation.
Banana Tattoo 18+
В тату пирсинг салоне мы используем только стерильные инструменты, сертифицированные материалы и индивидуальный подход к каждому клиенту https://maze.tattoo/catalog/c/sova/
Безопасность и эстетика — два столпа, на которых строится наша работа https://maze.tattoo/catalog/p/palm/
Мы не ограничиваемся только татуировками https://maze.tattoo/catalog/b/belki/
Наша студия татуировки и пирсинга — это пространство, где тело становится способом самовыражения https://maze.tattoo/catalog/k/kosmos-i-kosmonavty/
Пирсинг — это не просто украшение, а часть визуального языка, который говорит о вас больше, чем слова https://maze.tattoo/catalog/l/lev/
Парные татуировки https://maze.tattoo/catalog/p/ptitsy/
Как и в случае с тату, услуги пирсинга или установки микродермал предоставляются только совершеннолетним https://maze.tattoo/catalog/n/nadpis/
Прокол мочки возможен с 14 лет, но лишь после заключения договора с одним из родителей или с законным опекуном https://maze.tattoo/catalog/p/
Процедура выполняется только после предварительной консультации с мастером https://maze.tattoo/catalog/g/ganesha/
Узнать подробнее https://maze.tattoo/catalog/m/matreshka/
Your comment is awaiting moderation.
mostbet барои планшет боргирӣ http://www.mostbet95163.help
Your comment is awaiting moderation.
порно видео йога порно видео йога .
Your comment is awaiting moderation.
discover more – Platform design makes deal-hunting fast and convenient.
Your comment is awaiting moderation.
Официальный KRAKEN SHOP — Маркет №1 >
актуальное зеркало
Всем анонимности! Свежие КРАКЕН ССЫЛКИ уже в сети.
КРАКЕН ССЫЛКИ является ресурсом для изучения цифровых сервисов, маркетплейсов и интернет-платформ, предлагая аналитические обзоры, рейтинги, сравнительные таблицы и описание функционала сервисов. КРАКЕН ССЫЛКИ позволяет получать актуальные сведения через Telegram-боты, обеспечивая быстрый доступ к новинкам и обновлениям. Ресурс помогает пользователям оценивать возможности платформ, планировать работу с сервисами и принимать обоснованные решения. КРАКЕН ССЫЛКИ объединяет структурированные материалы о функционале платформ, их возможностях и новинках
лучший магазин username: @krakensshopibot
рабочий шлюз username: @krakensmirrorsbot
кракен официальный сайт
кракен сайт даркнет
kraken site onion
кракен официальный сайт зеркало
кракен сайт вход
кракен тор сайт
кракен маркетплейс сайт
сайт кракен ссылка тор
кракен оригинальный сайт
кракен онион сайт
кракен сайт 2026
кракен сайт анонимно
официальный ресурс кракен
кракен сайт даркнет маркетплейс
сайт кракен зеркало рабочее
кракен интернет магазин сайт
kraken darknet site link
кракен сайт через тор браузер
кракен официальный сайт онион
кракен сайт площадка
ссылка на кракен
кракен ссылки тор
актуальные ссылки на кракен
kraken onion links
кракен ссылки даркнет
кракен ссылка зеркало
кракен рабочая ссылка на сегодня
кракен прямая ссылка
кракен ссылка 2026
ссылка на кракен в тор браузере
новые ссылки кракен
кракен ссылки онион
кракен ссылка на маркет
кракен ссылка вход
кракен ссылка официальный
kraken darknet link
кракен ссылка маркетплейс
проверенные ссылки кракен
кракен ссылка зеркало рабочее
кракен активная ссылка
кракен зеркало
кракен актуальное зеркало
зеркало кракен сегодня
kraken mirror onion
кракен зеркало рабочее на сегодня
кракен зеркало тор
кракен официальное зеркало
зеркало сайта кракен
кракен зеркало вход
кракен зеркало даркнет
новое зеркало кракен
зеркало кракен 2026
кракен зеркало онион
кракен список зеркал
зеркало площадки кракен
кракен зеркало маркетплейс
кракен рабочее зеркало 2026
kraken darknet mirror
кракен зеркало ссылка
активные зеркала кракен
кракен магазин
kraken shop link
магазин кракен даркнет
кракен шоп онион
магазин кракен зеркало
кракен маркетплейс магазин
кракен магазин официальный
купить в магазине кракен
магазин кракен тор
kraken store onion
кракен интернет магазин
магазин кракен ссылка
кракен магазин товаров
кракен магазин вход
кракен шоп зеркало
магазин кракен 2026
кракен магазин анонимно
кракен официальный шоп
кракен витрина магазина
магазин кракен маркет
кракен даркнет
kraken darknet market
кракен даркнет ссылка
кракен даркнет вход
кракен даркнет зеркало
даркнет площадка кракен
кракен даркнет тор
кракен даркнет онион
кракен в даркнете как зайти
кракен даркнет сайт
официальный кракен даркнет
кракен даркнет маркет
кракен даркнет 2026
kraken darknet onion link
даркнет маркетплейс кракен
кракен даркнет ресурс
кракен теневой рынок
кракен даркнет шоп
кракен даркнет рабочая ссылка
доступ в кракен даркнет
кракен маркет
kraken market onion
кракен маркетплейс ссылка
кракен маркет вход
кракен маркет зеркало
маркетплейс кракен даркнет
кракен маркет тор
кракен маркет официальный
официальный сайт кракен маркет
кракен маркет онион
кракен маркет шоп
маркет кракен ссылка на сегодня
kraken market darknet link
кракен маркет площадка
кракен маркет 2026
кракен маркетплейс зеркало
маркет кракен через тор
кракен маркет анонимно
кракен маркет онлайн
торговая площадка кракен маркет
кракен 2026
кракен 2026 ссылка
кракен 2026 зеркало
кракен 2026 вход
кракен 2026 официальный сайт
кракен 2026 даркнет
kraken 2026 link
кракен 2026 онион
кракен 2026 актуально
кракен 2026 тор
кракен 2026 маркетплейс
новое зеркало кракен 2026
кракен 2026 рабочая ссылка
кракен 2026 зеркало сегодня
кракен сайт 2026 вход
кракен 2026 магазин
кракен 2026 через тор
кракен 2026 площадка
кракен 2026 работа
доступ на кракен 2026
кракен телеграмм
кракен тг бот
kraken telegram link
кракен бот телеграмм
кракен телеграмм канал
кракен ссылка в телеграмме
кракен тг ссылка
кракен новости телеграмм
кракен телеграмм зеркало
кракен бот в тг
официальный телеграмм кракен
кракен маркет телеграмм
кракен телеграмм чат
kraken tg bot
кракен телеграмм поддержка
кракен телеграмм новости
кракен контакты телеграмм
кракен бот автопродаж телеграмм
кракен телеграм ссылка тор
кракен тг группа
кракен вход
вход на кракен
кракен вход зеркало
кракен личный кабинет вход
кракен вход через тор
кракен вход онион
kraken login link
кракен вход официальный сайт
как зайти на кракен
кракен вход в магазин
кракен авторизация вход
кракен вход 2026
кракен зайти на сайт
кракен доступ вход
кракен вход по ссылке
кракен вход даркнет
кракен войти в аккаунт
кракен вход через браузер
кракен личный кабинет вход сегодня
кракен официальный вход зеркало
кракен тор
кракен тор ссылка
кракен тор зеркало
kraken tor link
кракен через тор браузер
кракен тор онион
кракен тор вход
кракен тор сайт
официальный тор кракен
кракен тор ссылка на зеркало
кракен зайти через тор
кракен тор маркетплейс
тор сайт кракен онион
кракен тор даркнет
кракен тор рабочая ссылка
kraken tor browser link
кракен тор шоп
кракен тор адрес
кракен тор доступ
кракен ссылка в тор сети
кракен бот
kraken bot link
кракен бот телеграмм
кракен бот автопродаж
кракен бот зеркало
кракен бот ссылка
кракен бот официальный
кракен бот покупок
бот кракен маркет
кракен бот даркнет
кракен бот онион
кракен бот в тг
кракен бот 24/7
kraken bot telegram
кракен бот работа
кракен бот для андроид
кракен бот через тор
кракен бот поддержка
кракен бот актуальный
рабочий бот кракен
аккаунты кракен
купить аккаунт кракен
кракен аккаунты с балансом
регистрация аккаунта кракен
вход в аккаунт кракен
кракен личный аккаунт
аккаунты kraken darknet
кракен аккаунты даркнет
проверка аккаунта кракен
кракен аккаунты маркет
доступ к аккаунту кракен
кракен аккаунты шоп
создать аккаунт кракен
аккаунты кракен зеркало
кракен аккаунт войти
кракен аккаунты бесплатно
аккаунты кракен 2026
кракен аккаунты онион
аккаунты на кракене как зайти
кракен кабинет аккаунт
кракен регистрация
как зарегистрироваться на кракен
кракен регистрация на сайте
кракен регистрация зеркало
kraken registration link
кракен создать аккаунт
кракен регистрация тор
кракен регистрация онион
кракен официальная регистрация
кракен регистрация 2026
кракен регистрация без почты
регистрация в кракен маркет
кракен регистрация ссылка
кракен регистрация через браузер
кракен быстрая регистрация
кракен форма регистрации
кракен регистрация даркнет
регистрация на сайте кракен тор
кракен регистрация сейчас
кракен регистрация бесплатно
кракен москва
кракен москва ссылка
кракен москва зеркало
кракен москва зайти
кракен москва купить
кракен москва сайт
кракен москва даркнет
кракен москва шоп
кракен москва маркет
кракен москва тор
кракен москва онион
кракен закладки москва
кракен москва 2026
kraken moscow link
кракен москва официальный сайт
кракен москва работа
кракен москва через тор
кракен москва вход
кракен москва адреса
кракен москва сегодня
кракен форум
кракен форум ссылка
кракен форум зеркало
кракен форум онион
кракен официальный форум
форум кракен даркнет
кракен форум отзывы
кракен форум тор
форум маркетплейса кракен
кракен форум вход
kraken forum link
кракен форум обсуждение
кракен форум новости
кракен форум поддержка
форум площадки кракен
кракен форум ветка
кракен форум анонимно
кракен форум зеркало рабочее
кракен форум общение
кракен форум 2026
Your comment is awaiting moderation.
1win çıxarış problemi Azərbaycan https://1win82430.help/
Your comment is awaiting moderation.
open this link – Strategically directed ideas turn potential into measurable progress.
Your comment is awaiting moderation.
1 xbet 1 xbet .
Your comment is awaiting moderation.
дизайн интерьера спб https://dizayna-interera-spb.ru
Your comment is awaiting moderation.
Всем привет! Делюсь найденным материалом. Статья про продвижение сайтов и развитие бизнеса в интернете. Хороший базовый обзор с акцентом на комплексный подход: SEO, контекст, SMM, аналитика. Особенно порадовал раздел про частые ошибки — полезно для самопроверки. Вот ссылка для тех, кому нужно структурировать знания: https://yana-troyanova.ru/stati/jeffektivnoe-prodvizhenie-sajtov-i-razvitie-biznesa-v-internete/
Your comment is awaiting moderation.
организация по защите прав потребителей
Это направление может понравиться людям, которые стремится развиваться, пробовать новое и получать ценный опыт. Этот вид деятельности помогает развивать мышление, расширять опыт и находить интересные идеи. Если уделять этому внимание это способно принести не только удовольствие, но и заметную пользу в повседневной жизни.
рассчитать совместимость по матрице судьбы
стоимость консультации юриста
This activity can be especially appealing to those who are interested in self-development, useful experience, and meaningful activities. It helps develop thinking, expand experience, and find fresh inspiration. With deeper involvement it may bring not only enjoyment, but also real value in everyday life.
https://artistecard.com/Pyotr56nx
Your comment is awaiting moderation.
ремонт дизайн интерьера дизайн студия спб интерьера
Your comment is awaiting moderation.
Всем привет! Делюсь найденным материалом. Статья про продвижение сайтов и развитие бизнеса в интернете. Хороший базовый обзор с акцентом на комплексный подход: SEO, контекст, SMM, аналитика. Особенно порадовал раздел про частые ошибки — полезно для самопроверки. Вот ссылка для тех, кому нужно структурировать знания: https://yana-troyanova.ru/stati/jeffektivnoe-prodvizhenie-sajtov-i-razvitie-biznesa-v-internete/
Your comment is awaiting moderation.
1win giriş SMS gəlmir http://1win82430.help
Your comment is awaiting moderation.
balloon bahis oyunu indir
Your comment is awaiting moderation.
https://doskazaymov.kz/ Doskazaymov: расчет платежа по кредиту при долговой нагрузке без лишних обещаний, чтобы закрыть дорогие микрозаймы одним решением
Your comment is awaiting moderation.
read this page – Avoiding overthinking keeps projects moving steadily and effectively.
Your comment is awaiting moderation.
ЗЕРКАЛА КРАКЕН: Рабочие ссылки на сегодня >
магазин тор
Приветствую всех! КРАКЕН САЙТ — ваша безопасность здесь.
КРАКЕН ССЫЛКИ выступает как источник детальной информации о работе интернет-платформ, маркетплейсов и онлайн-сервисов. КРАКЕН ССЫЛКИ включает аналитические обзоры, описание функционала, нововведения и особенности сервисов. Telegram-боты обеспечивают мгновенное получение новостей и обновлений, позволяя пользователям оставаться в курсе событий. Ресурс содержит рейтинги, сравнительные таблицы и рекомендации по использованию платформ, формируя полное представление о цифровой экосистеме
теневой ресурс username: @krakensdarkbot
кракен стор username: @krakensshopibot
кракен официальный сайт
кракен сайт даркнет
kraken site onion
кракен официальный сайт зеркало
кракен сайт вход
кракен тор сайт
кракен маркетплейс сайт
сайт кракен ссылка тор
кракен оригинальный сайт
кракен онион сайт
кракен сайт 2026
кракен сайт анонимно
официальный ресурс кракен
кракен сайт даркнет маркетплейс
сайт кракен зеркало рабочее
кракен интернет магазин сайт
kraken darknet site link
кракен сайт через тор браузер
кракен официальный сайт онион
кракен сайт площадка
ссылка на кракен
кракен ссылки тор
актуальные ссылки на кракен
kraken onion links
кракен ссылки даркнет
кракен ссылка зеркало
кракен рабочая ссылка на сегодня
кракен прямая ссылка
кракен ссылка 2026
ссылка на кракен в тор браузере
новые ссылки кракен
кракен ссылки онион
кракен ссылка на маркет
кракен ссылка вход
кракен ссылка официальный
kraken darknet link
кракен ссылка маркетплейс
проверенные ссылки кракен
кракен ссылка зеркало рабочее
кракен активная ссылка
кракен зеркало
кракен актуальное зеркало
зеркало кракен сегодня
kraken mirror onion
кракен зеркало рабочее на сегодня
кракен зеркало тор
кракен официальное зеркало
зеркало сайта кракен
кракен зеркало вход
кракен зеркало даркнет
новое зеркало кракен
зеркало кракен 2026
кракен зеркало онион
кракен список зеркал
зеркало площадки кракен
кракен зеркало маркетплейс
кракен рабочее зеркало 2026
kraken darknet mirror
кракен зеркало ссылка
активные зеркала кракен
кракен магазин
kraken shop link
магазин кракен даркнет
кракен шоп онион
магазин кракен зеркало
кракен маркетплейс магазин
кракен магазин официальный
купить в магазине кракен
магазин кракен тор
kraken store onion
кракен интернет магазин
магазин кракен ссылка
кракен магазин товаров
кракен магазин вход
кракен шоп зеркало
магазин кракен 2026
кракен магазин анонимно
кракен официальный шоп
кракен витрина магазина
магазин кракен маркет
кракен даркнет
kraken darknet market
кракен даркнет ссылка
кракен даркнет вход
кракен даркнет зеркало
даркнет площадка кракен
кракен даркнет тор
кракен даркнет онион
кракен в даркнете как зайти
кракен даркнет сайт
официальный кракен даркнет
кракен даркнет маркет
кракен даркнет 2026
kraken darknet onion link
даркнет маркетплейс кракен
кракен даркнет ресурс
кракен теневой рынок
кракен даркнет шоп
кракен даркнет рабочая ссылка
доступ в кракен даркнет
кракен маркет
kraken market onion
кракен маркетплейс ссылка
кракен маркет вход
кракен маркет зеркало
маркетплейс кракен даркнет
кракен маркет тор
кракен маркет официальный
официальный сайт кракен маркет
кракен маркет онион
кракен маркет шоп
маркет кракен ссылка на сегодня
kraken market darknet link
кракен маркет площадка
кракен маркет 2026
кракен маркетплейс зеркало
маркет кракен через тор
кракен маркет анонимно
кракен маркет онлайн
торговая площадка кракен маркет
кракен 2026
кракен 2026 ссылка
кракен 2026 зеркало
кракен 2026 вход
кракен 2026 официальный сайт
кракен 2026 даркнет
kraken 2026 link
кракен 2026 онион
кракен 2026 актуально
кракен 2026 тор
кракен 2026 маркетплейс
новое зеркало кракен 2026
кракен 2026 рабочая ссылка
кракен 2026 зеркало сегодня
кракен сайт 2026 вход
кракен 2026 магазин
кракен 2026 через тор
кракен 2026 площадка
кракен 2026 работа
доступ на кракен 2026
кракен телеграмм
кракен тг бот
kraken telegram link
кракен бот телеграмм
кракен телеграмм канал
кракен ссылка в телеграмме
кракен тг ссылка
кракен новости телеграмм
кракен телеграмм зеркало
кракен бот в тг
официальный телеграмм кракен
кракен маркет телеграмм
кракен телеграмм чат
kraken tg bot
кракен телеграмм поддержка
кракен телеграмм новости
кракен контакты телеграмм
кракен бот автопродаж телеграмм
кракен телеграм ссылка тор
кракен тг группа
кракен вход
вход на кракен
кракен вход зеркало
кракен личный кабинет вход
кракен вход через тор
кракен вход онион
kraken login link
кракен вход официальный сайт
как зайти на кракен
кракен вход в магазин
кракен авторизация вход
кракен вход 2026
кракен зайти на сайт
кракен доступ вход
кракен вход по ссылке
кракен вход даркнет
кракен войти в аккаунт
кракен вход через браузер
кракен личный кабинет вход сегодня
кракен официальный вход зеркало
кракен тор
кракен тор ссылка
кракен тор зеркало
kraken tor link
кракен через тор браузер
кракен тор онион
кракен тор вход
кракен тор сайт
официальный тор кракен
кракен тор ссылка на зеркало
кракен зайти через тор
кракен тор маркетплейс
тор сайт кракен онион
кракен тор даркнет
кракен тор рабочая ссылка
kraken tor browser link
кракен тор шоп
кракен тор адрес
кракен тор доступ
кракен ссылка в тор сети
кракен бот
kraken bot link
кракен бот телеграмм
кракен бот автопродаж
кракен бот зеркало
кракен бот ссылка
кракен бот официальный
кракен бот покупок
бот кракен маркет
кракен бот даркнет
кракен бот онион
кракен бот в тг
кракен бот 24/7
kraken bot telegram
кракен бот работа
кракен бот для андроид
кракен бот через тор
кракен бот поддержка
кракен бот актуальный
рабочий бот кракен
аккаунты кракен
купить аккаунт кракен
кракен аккаунты с балансом
регистрация аккаунта кракен
вход в аккаунт кракен
кракен личный аккаунт
аккаунты kraken darknet
кракен аккаунты даркнет
проверка аккаунта кракен
кракен аккаунты маркет
доступ к аккаунту кракен
кракен аккаунты шоп
создать аккаунт кракен
аккаунты кракен зеркало
кракен аккаунт войти
кракен аккаунты бесплатно
аккаунты кракен 2026
кракен аккаунты онион
аккаунты на кракене как зайти
кракен кабинет аккаунт
кракен регистрация
как зарегистрироваться на кракен
кракен регистрация на сайте
кракен регистрация зеркало
kraken registration link
кракен создать аккаунт
кракен регистрация тор
кракен регистрация онион
кракен официальная регистрация
кракен регистрация 2026
кракен регистрация без почты
регистрация в кракен маркет
кракен регистрация ссылка
кракен регистрация через браузер
кракен быстрая регистрация
кракен форма регистрации
кракен регистрация даркнет
регистрация на сайте кракен тор
кракен регистрация сейчас
кракен регистрация бесплатно
кракен москва
кракен москва ссылка
кракен москва зеркало
кракен москва зайти
кракен москва купить
кракен москва сайт
кракен москва даркнет
кракен москва шоп
кракен москва маркет
кракен москва тор
кракен москва онион
кракен закладки москва
кракен москва 2026
kraken moscow link
кракен москва официальный сайт
кракен москва работа
кракен москва через тор
кракен москва вход
кракен москва адреса
кракен москва сегодня
кракен форум
кракен форум ссылка
кракен форум зеркало
кракен форум онион
кракен официальный форум
форум кракен даркнет
кракен форум отзывы
кракен форум тор
форум маркетплейса кракен
кракен форум вход
kraken forum link
кракен форум обсуждение
кракен форум новости
кракен форум поддержка
форум площадки кракен
кракен форум ветка
кракен форум анонимно
кракен форум зеркало рабочее
кракен форум общение
кракен форум 2026
Your comment is awaiting moderation.
Всем привет! Нашел статью, где хорошо расписаны основы продвижения сайтов. Рассматриваются цели, стратегия, SEO, контекстная реклама, SMM, email-маркетинг, UX/UI. Особо отмечу раздел про интеграцию онлайн и офлайн активностей — редко встречается в таких обзорах. Вот ссылка для изучения: https://dogvoyage.ru/2025/12/jeffektivnoe-prodvizhenie-sajtov-i-razvitie-biznesa-v-internete/
Your comment is awaiting moderation.
гидроизоляция подвала гидроизоляция подвала .
Your comment is awaiting moderation.
more info here – Signals guide the way, ensuring actions are more deliberate and effective.
Your comment is awaiting moderation.
порно во время йоги порно во время йоги .
Your comment is awaiting moderation.
ruleta 1win https://1win5808.help
Your comment is awaiting moderation.
Restate обзор и мнение людей
Это направление подходит тем, кто любит узнавать новое, совершенствовать навыки и расширять кругозор. Такое занятие помогает укреплять навыки, получать новые эмоции и делать досуг более насыщенным. При более глубоком погружении это способно принести не только удовольствие, но и заметную пользу в повседневной жизни.
сборные грузы Москва СПб
обзор Beauty World Akademy
This hobby is well suited for people who like exploring new ideas, building skills, and gaining valuable experience. This kind of activity helps combine enjoyment, practice, and personal growth. Over time it may bring not only enjoyment, but also real value in everyday life.
https://www.flickr.com/people/margarita1986u/
Your comment is awaiting moderation.
ошибка оплаты на melbet https://melbet41682.help
Your comment is awaiting moderation.
1xbet g?ncel adres 1xbet g?ncel adres .
Your comment is awaiting moderation.
ремонт бетонных конструкций ремонт бетонных конструкций .
Your comment is awaiting moderation.
click for insight – Designing with intent ensures growth progresses naturally and effectively.
Your comment is awaiting moderation.
КРАКЕН ДАРКНЕТ: Теневой рынок товаров и услуг >
кракен линк
Добрый день. КРАКЕН МАГАЗИН и лучшие шопы страны.
КРАКЕН САЙТ предоставляет обзорный материал о цифровых сервисах, маркетплейсах и интернет-платформах, объединяя сведения о функционале, новинках и обновлениях ресурсов. КРАКЕН САЙТ позволяет пользователям получать актуальную информацию через Telegram-боты, обеспечивая оперативное уведомление о событиях. На сайте публикуются рейтинги, сравнительные обзоры, рекомендации по использованию платформ и описание категорий товаров, функций оплаты и условий доставки. КРАКЕН САЙТ помогает формировать системное представление о сервисах, оценивать возможности платформ и принимать информированные решения, облегчая работу с маркетплейсами и цифровыми сервисами в режиме реального времени
список зеркал username: @krakensmirrorsbot
прямая ссылка username: @krakenslinksbot
кракен официальный сайт
кракен сайт даркнет
kraken site onion
кракен официальный сайт зеркало
кракен сайт вход
кракен тор сайт
кракен маркетплейс сайт
сайт кракен ссылка тор
кракен оригинальный сайт
кракен онион сайт
кракен сайт 2026
кракен сайт анонимно
официальный ресурс кракен
кракен сайт даркнет маркетплейс
сайт кракен зеркало рабочее
кракен интернет магазин сайт
kraken darknet site link
кракен сайт через тор браузер
кракен официальный сайт онион
кракен сайт площадка
ссылка на кракен
кракен ссылки тор
актуальные ссылки на кракен
kraken onion links
кракен ссылки даркнет
кракен ссылка зеркало
кракен рабочая ссылка на сегодня
кракен прямая ссылка
кракен ссылка 2026
ссылка на кракен в тор браузере
новые ссылки кракен
кракен ссылки онион
кракен ссылка на маркет
кракен ссылка вход
кракен ссылка официальный
kraken darknet link
кракен ссылка маркетплейс
проверенные ссылки кракен
кракен ссылка зеркало рабочее
кракен активная ссылка
кракен зеркало
кракен актуальное зеркало
зеркало кракен сегодня
kraken mirror onion
кракен зеркало рабочее на сегодня
кракен зеркало тор
кракен официальное зеркало
зеркало сайта кракен
кракен зеркало вход
кракен зеркало даркнет
новое зеркало кракен
зеркало кракен 2026
кракен зеркало онион
кракен список зеркал
зеркало площадки кракен
кракен зеркало маркетплейс
кракен рабочее зеркало 2026
kraken darknet mirror
кракен зеркало ссылка
активные зеркала кракен
кракен магазин
kraken shop link
магазин кракен даркнет
кракен шоп онион
магазин кракен зеркало
кракен маркетплейс магазин
кракен магазин официальный
купить в магазине кракен
магазин кракен тор
kraken store onion
кракен интернет магазин
магазин кракен ссылка
кракен магазин товаров
кракен магазин вход
кракен шоп зеркало
магазин кракен 2026
кракен магазин анонимно
кракен официальный шоп
кракен витрина магазина
магазин кракен маркет
кракен даркнет
kraken darknet market
кракен даркнет ссылка
кракен даркнет вход
кракен даркнет зеркало
даркнет площадка кракен
кракен даркнет тор
кракен даркнет онион
кракен в даркнете как зайти
кракен даркнет сайт
официальный кракен даркнет
кракен даркнет маркет
кракен даркнет 2026
kraken darknet onion link
даркнет маркетплейс кракен
кракен даркнет ресурс
кракен теневой рынок
кракен даркнет шоп
кракен даркнет рабочая ссылка
доступ в кракен даркнет
кракен маркет
kraken market onion
кракен маркетплейс ссылка
кракен маркет вход
кракен маркет зеркало
маркетплейс кракен даркнет
кракен маркет тор
кракен маркет официальный
официальный сайт кракен маркет
кракен маркет онион
кракен маркет шоп
маркет кракен ссылка на сегодня
kraken market darknet link
кракен маркет площадка
кракен маркет 2026
кракен маркетплейс зеркало
маркет кракен через тор
кракен маркет анонимно
кракен маркет онлайн
торговая площадка кракен маркет
кракен 2026
кракен 2026 ссылка
кракен 2026 зеркало
кракен 2026 вход
кракен 2026 официальный сайт
кракен 2026 даркнет
kraken 2026 link
кракен 2026 онион
кракен 2026 актуально
кракен 2026 тор
кракен 2026 маркетплейс
новое зеркало кракен 2026
кракен 2026 рабочая ссылка
кракен 2026 зеркало сегодня
кракен сайт 2026 вход
кракен 2026 магазин
кракен 2026 через тор
кракен 2026 площадка
кракен 2026 работа
доступ на кракен 2026
кракен телеграмм
кракен тг бот
kraken telegram link
кракен бот телеграмм
кракен телеграмм канал
кракен ссылка в телеграмме
кракен тг ссылка
кракен новости телеграмм
кракен телеграмм зеркало
кракен бот в тг
официальный телеграмм кракен
кракен маркет телеграмм
кракен телеграмм чат
kraken tg bot
кракен телеграмм поддержка
кракен телеграмм новости
кракен контакты телеграмм
кракен бот автопродаж телеграмм
кракен телеграм ссылка тор
кракен тг группа
кракен вход
вход на кракен
кракен вход зеркало
кракен личный кабинет вход
кракен вход через тор
кракен вход онион
kraken login link
кракен вход официальный сайт
как зайти на кракен
кракен вход в магазин
кракен авторизация вход
кракен вход 2026
кракен зайти на сайт
кракен доступ вход
кракен вход по ссылке
кракен вход даркнет
кракен войти в аккаунт
кракен вход через браузер
кракен личный кабинет вход сегодня
кракен официальный вход зеркало
кракен тор
кракен тор ссылка
кракен тор зеркало
kraken tor link
кракен через тор браузер
кракен тор онион
кракен тор вход
кракен тор сайт
официальный тор кракен
кракен тор ссылка на зеркало
кракен зайти через тор
кракен тор маркетплейс
тор сайт кракен онион
кракен тор даркнет
кракен тор рабочая ссылка
kraken tor browser link
кракен тор шоп
кракен тор адрес
кракен тор доступ
кракен ссылка в тор сети
кракен бот
kraken bot link
кракен бот телеграмм
кракен бот автопродаж
кракен бот зеркало
кракен бот ссылка
кракен бот официальный
кракен бот покупок
бот кракен маркет
кракен бот даркнет
кракен бот онион
кракен бот в тг
кракен бот 24/7
kraken bot telegram
кракен бот работа
кракен бот для андроид
кракен бот через тор
кракен бот поддержка
кракен бот актуальный
рабочий бот кракен
аккаунты кракен
купить аккаунт кракен
кракен аккаунты с балансом
регистрация аккаунта кракен
вход в аккаунт кракен
кракен личный аккаунт
аккаунты kraken darknet
кракен аккаунты даркнет
проверка аккаунта кракен
кракен аккаунты маркет
доступ к аккаунту кракен
кракен аккаунты шоп
создать аккаунт кракен
аккаунты кракен зеркало
кракен аккаунт войти
кракен аккаунты бесплатно
аккаунты кракен 2026
кракен аккаунты онион
аккаунты на кракене как зайти
кракен кабинет аккаунт
кракен регистрация
как зарегистрироваться на кракен
кракен регистрация на сайте
кракен регистрация зеркало
kraken registration link
кракен создать аккаунт
кракен регистрация тор
кракен регистрация онион
кракен официальная регистрация
кракен регистрация 2026
кракен регистрация без почты
регистрация в кракен маркет
кракен регистрация ссылка
кракен регистрация через браузер
кракен быстрая регистрация
кракен форма регистрации
кракен регистрация даркнет
регистрация на сайте кракен тор
кракен регистрация сейчас
кракен регистрация бесплатно
кракен москва
кракен москва ссылка
кракен москва зеркало
кракен москва зайти
кракен москва купить
кракен москва сайт
кракен москва даркнет
кракен москва шоп
кракен москва маркет
кракен москва тор
кракен москва онион
кракен закладки москва
кракен москва 2026
kraken moscow link
кракен москва официальный сайт
кракен москва работа
кракен москва через тор
кракен москва вход
кракен москва адреса
кракен москва сегодня
кракен форум
кракен форум ссылка
кракен форум зеркало
кракен форум онион
кракен официальный форум
форум кракен даркнет
кракен форум отзывы
кракен форум тор
форум маркетплейса кракен
кракен форум вход
kraken forum link
кракен форум обсуждение
кракен форум новости
кракен форум поддержка
форум площадки кракен
кракен форум ветка
кракен форум анонимно
кракен форум зеркало рабочее
кракен форум общение
кракен форум 2026
Your comment is awaiting moderation.
світ бонанза робочий сайт Україна світ бонанза робочий сайт Україна
Your comment is awaiting moderation.
https://customwaterpipes.ru/wp-includes/list/promokod_na_1xbet_na_segodnya_besplatno.html
Your comment is awaiting moderation.
1xbet giri? yapam?yorum 1xbet-47.com .
Your comment is awaiting moderation.
click for strategic motion – Action is the fuel that moves plans from concept to reality.
Your comment is awaiting moderation.
1win loyalty points http://1win5523.ru
Your comment is awaiting moderation.
1win aviator strategiya https://1win82430.help
Your comment is awaiting moderation.
xbet giri? 1xbet-52.com .
Your comment is awaiting moderation.
1x bet giri? 1xbet-48.com .
Your comment is awaiting moderation.
купить ссылки
Это направление будет особенно интересно тем, кто ценит развитие, новые знания и практический опыт. Оно помогает сочетать интерес, практику и личное развитие. При регулярном интересе такое направление может открыть новые знакомства, цели и полезные перспективы.
защита прав потребителя помощь
купить вечные ссылки
This interest can be especially appealing to those who are interested in self-development, useful experience, and meaningful activities. This type of interest helps combine enjoyment, practice, and personal growth. With deeper involvement it can open the door to new connections, goals, and useful opportunities.
https://www.deviantart.com/varvara80di/about
Your comment is awaiting moderation.
read this page – Smart planning reduces wasted effort and fosters reliable progress.
Your comment is awaiting moderation.
Официальный сайт КРАКЕН 2026 >
доступ в даркнет
Всем привет. КРАКЕН ДАРКНЕТ: актуальное зеркало.
В быстро меняющемся мире онлайн-платформ нередко возникает ощущение, что следить за всеми обновлениями и новыми сервисами почти невозможно. ЗЕРКАЛА КРАКЕН становятся как бы «навигатором» в этом цифровом пространстве, собирая сведения о сайтах, маркетплейсах и доступных инструментах в одном месте. При знакомстве с ресурсом обращает на себя внимание разнообразие подходов: одни платформы концентрируются на удобстве покупок и функционале корзины, другие делают ставку на автоматизацию процессов и интеграцию Telegram-ботов. Актуальная информация особенно важна, ведь изменения в интерфейсе, появление новых функций и корректировки работы сервисов происходят регулярно и могут существенно влиять на работу с платформой. ЗЕРКАЛА КРАКЕН позволяют отслеживать эти обновления и получать сведения в понятном и удобном формате, без необходимости искать разрозненные источники. Telegram играет ключевую роль, предоставляя через ботов уведомления, аналитические сводки и краткие обзоры, которые помогают оставаться в курсе событий и изменений на площадках. В результате ЗЕРКАЛА КРАКЕН создают живую и наглядную картину цифровой экосистемы, где пользователи могут спокойно ориентироваться, сравнивать платформы и понимать, как развиваются сервисы, маркетплейсы и онлайн-инструменты, получая всю информацию в одном доступном формате.
сайт даркнет username: @krakenssitebot
маркет даркнета username: @krakensdarkbot
кракен официальный сайт
кракен сайт даркнет
kraken site onion
кракен официальный сайт зеркало
кракен сайт вход
кракен тор сайт
кракен маркетплейс сайт
сайт кракен ссылка тор
кракен оригинальный сайт
кракен онион сайт
кракен сайт 2026
кракен сайт анонимно
официальный ресурс кракен
кракен сайт даркнет маркетплейс
сайт кракен зеркало рабочее
кракен интернет магазин сайт
kraken darknet site link
кракен сайт через тор браузер
кракен официальный сайт онион
кракен сайт площадка
ссылка на кракен
кракен ссылки тор
актуальные ссылки на кракен
kraken onion links
кракен ссылки даркнет
кракен ссылка зеркало
кракен рабочая ссылка на сегодня
кракен прямая ссылка
кракен ссылка 2026
ссылка на кракен в тор браузере
новые ссылки кракен
кракен ссылки онион
кракен ссылка на маркет
кракен ссылка вход
кракен ссылка официальный
kraken darknet link
кракен ссылка маркетплейс
проверенные ссылки кракен
кракен ссылка зеркало рабочее
кракен активная ссылка
кракен зеркало
кракен актуальное зеркало
зеркало кракен сегодня
kraken mirror onion
кракен зеркало рабочее на сегодня
кракен зеркало тор
кракен официальное зеркало
зеркало сайта кракен
кракен зеркало вход
кракен зеркало даркнет
новое зеркало кракен
зеркало кракен 2026
кракен зеркало онион
кракен список зеркал
зеркало площадки кракен
кракен зеркало маркетплейс
кракен рабочее зеркало 2026
kraken darknet mirror
кракен зеркало ссылка
активные зеркала кракен
кракен магазин
kraken shop link
магазин кракен даркнет
кракен шоп онион
магазин кракен зеркало
кракен маркетплейс магазин
кракен магазин официальный
купить в магазине кракен
магазин кракен тор
kraken store onion
кракен интернет магазин
магазин кракен ссылка
кракен магазин товаров
кракен магазин вход
кракен шоп зеркало
магазин кракен 2026
кракен магазин анонимно
кракен официальный шоп
кракен витрина магазина
магазин кракен маркет
кракен даркнет
kraken darknet market
кракен даркнет ссылка
кракен даркнет вход
кракен даркнет зеркало
даркнет площадка кракен
кракен даркнет тор
кракен даркнет онион
кракен в даркнете как зайти
кракен даркнет сайт
официальный кракен даркнет
кракен даркнет маркет
кракен даркнет 2026
kraken darknet onion link
даркнет маркетплейс кракен
кракен даркнет ресурс
кракен теневой рынок
кракен даркнет шоп
кракен даркнет рабочая ссылка
доступ в кракен даркнет
кракен маркет
kraken market onion
кракен маркетплейс ссылка
кракен маркет вход
кракен маркет зеркало
маркетплейс кракен даркнет
кракен маркет тор
кракен маркет официальный
официальный сайт кракен маркет
кракен маркет онион
кракен маркет шоп
маркет кракен ссылка на сегодня
kraken market darknet link
кракен маркет площадка
кракен маркет 2026
кракен маркетплейс зеркало
маркет кракен через тор
кракен маркет анонимно
кракен маркет онлайн
торговая площадка кракен маркет
кракен 2026
кракен 2026 ссылка
кракен 2026 зеркало
кракен 2026 вход
кракен 2026 официальный сайт
кракен 2026 даркнет
kraken 2026 link
кракен 2026 онион
кракен 2026 актуально
кракен 2026 тор
кракен 2026 маркетплейс
новое зеркало кракен 2026
кракен 2026 рабочая ссылка
кракен 2026 зеркало сегодня
кракен сайт 2026 вход
кракен 2026 магазин
кракен 2026 через тор
кракен 2026 площадка
кракен 2026 работа
доступ на кракен 2026
кракен телеграмм
кракен тг бот
kraken telegram link
кракен бот телеграмм
кракен телеграмм канал
кракен ссылка в телеграмме
кракен тг ссылка
кракен новости телеграмм
кракен телеграмм зеркало
кракен бот в тг
официальный телеграмм кракен
кракен маркет телеграмм
кракен телеграмм чат
kraken tg bot
кракен телеграмм поддержка
кракен телеграмм новости
кракен контакты телеграмм
кракен бот автопродаж телеграмм
кракен телеграм ссылка тор
кракен тг группа
кракен вход
вход на кракен
кракен вход зеркало
кракен личный кабинет вход
кракен вход через тор
кракен вход онион
kraken login link
кракен вход официальный сайт
как зайти на кракен
кракен вход в магазин
кракен авторизация вход
кракен вход 2026
кракен зайти на сайт
кракен доступ вход
кракен вход по ссылке
кракен вход даркнет
кракен войти в аккаунт
кракен вход через браузер
кракен личный кабинет вход сегодня
кракен официальный вход зеркало
кракен тор
кракен тор ссылка
кракен тор зеркало
kraken tor link
кракен через тор браузер
кракен тор онион
кракен тор вход
кракен тор сайт
официальный тор кракен
кракен тор ссылка на зеркало
кракен зайти через тор
кракен тор маркетплейс
тор сайт кракен онион
кракен тор даркнет
кракен тор рабочая ссылка
kraken tor browser link
кракен тор шоп
кракен тор адрес
кракен тор доступ
кракен ссылка в тор сети
кракен бот
kraken bot link
кракен бот телеграмм
кракен бот автопродаж
кракен бот зеркало
кракен бот ссылка
кракен бот официальный
кракен бот покупок
бот кракен маркет
кракен бот даркнет
кракен бот онион
кракен бот в тг
кракен бот 24/7
kraken bot telegram
кракен бот работа
кракен бот для андроид
кракен бот через тор
кракен бот поддержка
кракен бот актуальный
рабочий бот кракен
аккаунты кракен
купить аккаунт кракен
кракен аккаунты с балансом
регистрация аккаунта кракен
вход в аккаунт кракен
кракен личный аккаунт
аккаунты kraken darknet
кракен аккаунты даркнет
проверка аккаунта кракен
кракен аккаунты маркет
доступ к аккаунту кракен
кракен аккаунты шоп
создать аккаунт кракен
аккаунты кракен зеркало
кракен аккаунт войти
кракен аккаунты бесплатно
аккаунты кракен 2026
кракен аккаунты онион
аккаунты на кракене как зайти
кракен кабинет аккаунт
кракен регистрация
как зарегистрироваться на кракен
кракен регистрация на сайте
кракен регистрация зеркало
kraken registration link
кракен создать аккаунт
кракен регистрация тор
кракен регистрация онион
кракен официальная регистрация
кракен регистрация 2026
кракен регистрация без почты
регистрация в кракен маркет
кракен регистрация ссылка
кракен регистрация через браузер
кракен быстрая регистрация
кракен форма регистрации
кракен регистрация даркнет
регистрация на сайте кракен тор
кракен регистрация сейчас
кракен регистрация бесплатно
кракен москва
кракен москва ссылка
кракен москва зеркало
кракен москва зайти
кракен москва купить
кракен москва сайт
кракен москва даркнет
кракен москва шоп
кракен москва маркет
кракен москва тор
кракен москва онион
кракен закладки москва
кракен москва 2026
kraken moscow link
кракен москва официальный сайт
кракен москва работа
кракен москва через тор
кракен москва вход
кракен москва адреса
кракен москва сегодня
кракен форум
кракен форум ссылка
кракен форум зеркало
кракен форум онион
кракен официальный форум
форум кракен даркнет
кракен форум отзывы
кракен форум тор
форум маркетплейса кракен
кракен форум вход
kraken forum link
кракен форум обсуждение
кракен форум новости
кракен форум поддержка
форум площадки кракен
кракен форум ветка
кракен форум анонимно
кракен форум зеркало рабочее
кракен форум общение
кракен форум 2026
Your comment is awaiting moderation.
1xbet ?yelik 1xbet ?yelik .
Your comment is awaiting moderation.
1xbet giri?i 1xbet giri?i .
Your comment is awaiting moderation.
tower rush 1win
Your comment is awaiting moderation.
усиление грунта цена за м3 usilenie-gruntov-1.ru .
Your comment is awaiting moderation.
леонбетс зеркало
Your comment is awaiting moderation.
https://3ev4joy.com/
Your comment is awaiting moderation.
1xbet ?ye ol 1xbet-53.com .
Your comment is awaiting moderation.
1win kk қолданбаны жүктеу http://1win5523.ru/
Your comment is awaiting moderation.
ремонт бетонных конструкций торкретирование remont-betona-1.ru .
Your comment is awaiting moderation.
view progress momentum – Clarity in thought keeps progress consistent and reliable.
Your comment is awaiting moderation.
mostbet лимит ставок mostbet лимит ставок
Your comment is awaiting moderation.
Ребята, кто работает в конкурентных нишах, советую изучить не только методы продвижения, но и способы защиты от негатива. В этой статье есть отличный блок про Cloudflare и antibot.cloud. Конкуренты могут заказать накрутку поведенческих факторов на ваш сайт в минус, и это реальная угроза. Автор даёт конкретные настройки, как отсеивать ботов и защищать трафик. Очень вовремя наткнулся, уже взял на заметку.
Your comment is awaiting moderation.
перевозка грузов грузовым транспортом
Это занятие может понравиться людям, которые интересуется личным ростом, опытом и полезными навыками. Оно помогает сочетать интерес, практику и личное развитие. Если уделять этому внимание это нередко превращается в любимую сферу для развития, общения и самореализации.
доставка на грузовом автомобиле
оказание услуг грузоперевозки
This activity can be especially appealing to those who value growth, new knowledge, and practical experience. This kind of activity helps strengthen skills, gain positive emotions, and make free time more meaningful. With regular interest it can become an important part of a lifestyle, a source of inspiration, and a form of self-expression.
https://techhub.social/@Miranda94uh
Your comment is awaiting moderation.
discover more – Well-focused efforts help growth advance with minimal friction.
Your comment is awaiting moderation.
КРАКЕН ССЫЛКИ: Актуальные адреса на сегодня >
ЗЕРКАЛА КРАКЕН
Хай! КРАКЕН ССЫЛКИ ведут на официальное зеркало.
В условиях постоянно меняющейся цифровой среды интерес к информационным ресурсам, описывающим сайты и маркетплейсы, остается стабильно высоким. ЗЕРКАЛА КРАКЕН в таких обзорах упоминаются как формат, позволяющий сохранить целостное понимание работы платформ и сервисов без привязки к одному источнику. Подобные материалы обычно раскрывают внутреннюю логику площадок, их основные разделы, используемые инструменты и способы взаимодействия с пользователями, что особенно важно при изучении сложных цифровых экосистем. По мере знакомства с описаниями становится заметно, что актуальность информации выходит на первый план, так как функционал маркетплейсов и сервисов регулярно обновляется и дополняется. ЗЕРКАЛА КРАКЕН в этом контексте воспринимаются как ориентир, помогающий сопоставлять данные, отслеживать изменения и понимать, в каком направлении развивается платформа. Значимую роль в передаче сведений играет Telegram, где через ботов и каналы публикуются свежие материалы, краткие аналитические заметки и уведомления о новых возможностях сайтов. Такой формат органично дополняет основные обзоры и делает процесс получения информации последовательным. В результате ЗЕРКАЛА КРАКЕН формируют связное информационное пространство, в котором данные о сервисах, маркетплейсах и цифровых инструментах складываются в понятную и логичную картину, позволяя спокойно следить за развитием онлайн-платформ.
покупки на кракене username: @krakensshopibot
зеркало сайта username: @krakensmirrorsbot
кракен официальный сайт
кракен сайт даркнет
kraken site onion
кракен официальный сайт зеркало
кракен сайт вход
кракен тор сайт
кракен маркетплейс сайт
сайт кракен ссылка тор
кракен оригинальный сайт
кракен онион сайт
кракен сайт 2026
кракен сайт анонимно
официальный ресурс кракен
кракен сайт даркнет маркетплейс
сайт кракен зеркало рабочее
кракен интернет магазин сайт
kraken darknet site link
кракен сайт через тор браузер
кракен официальный сайт онион
кракен сайт площадка
ссылка на кракен
кракен ссылки тор
актуальные ссылки на кракен
kraken onion links
кракен ссылки даркнет
кракен ссылка зеркало
кракен рабочая ссылка на сегодня
кракен прямая ссылка
кракен ссылка 2026
ссылка на кракен в тор браузере
новые ссылки кракен
кракен ссылки онион
кракен ссылка на маркет
кракен ссылка вход
кракен ссылка официальный
kraken darknet link
кракен ссылка маркетплейс
проверенные ссылки кракен
кракен ссылка зеркало рабочее
кракен активная ссылка
кракен зеркало
кракен актуальное зеркало
зеркало кракен сегодня
kraken mirror onion
кракен зеркало рабочее на сегодня
кракен зеркало тор
кракен официальное зеркало
зеркало сайта кракен
кракен зеркало вход
кракен зеркало даркнет
новое зеркало кракен
зеркало кракен 2026
кракен зеркало онион
кракен список зеркал
зеркало площадки кракен
кракен зеркало маркетплейс
кракен рабочее зеркало 2026
kraken darknet mirror
кракен зеркало ссылка
активные зеркала кракен
кракен магазин
kraken shop link
магазин кракен даркнет
кракен шоп онион
магазин кракен зеркало
кракен маркетплейс магазин
кракен магазин официальный
купить в магазине кракен
магазин кракен тор
kraken store onion
кракен интернет магазин
магазин кракен ссылка
кракен магазин товаров
кракен магазин вход
кракен шоп зеркало
магазин кракен 2026
кракен магазин анонимно
кракен официальный шоп
кракен витрина магазина
магазин кракен маркет
кракен даркнет
kraken darknet market
кракен даркнет ссылка
кракен даркнет вход
кракен даркнет зеркало
даркнет площадка кракен
кракен даркнет тор
кракен даркнет онион
кракен в даркнете как зайти
кракен даркнет сайт
официальный кракен даркнет
кракен даркнет маркет
кракен даркнет 2026
kraken darknet onion link
даркнет маркетплейс кракен
кракен даркнет ресурс
кракен теневой рынок
кракен даркнет шоп
кракен даркнет рабочая ссылка
доступ в кракен даркнет
кракен маркет
kraken market onion
кракен маркетплейс ссылка
кракен маркет вход
кракен маркет зеркало
маркетплейс кракен даркнет
кракен маркет тор
кракен маркет официальный
официальный сайт кракен маркет
кракен маркет онион
кракен маркет шоп
маркет кракен ссылка на сегодня
kraken market darknet link
кракен маркет площадка
кракен маркет 2026
кракен маркетплейс зеркало
маркет кракен через тор
кракен маркет анонимно
кракен маркет онлайн
торговая площадка кракен маркет
кракен 2026
кракен 2026 ссылка
кракен 2026 зеркало
кракен 2026 вход
кракен 2026 официальный сайт
кракен 2026 даркнет
kraken 2026 link
кракен 2026 онион
кракен 2026 актуально
кракен 2026 тор
кракен 2026 маркетплейс
новое зеркало кракен 2026
кракен 2026 рабочая ссылка
кракен 2026 зеркало сегодня
кракен сайт 2026 вход
кракен 2026 магазин
кракен 2026 через тор
кракен 2026 площадка
кракен 2026 работа
доступ на кракен 2026
кракен телеграмм
кракен тг бот
kraken telegram link
кракен бот телеграмм
кракен телеграмм канал
кракен ссылка в телеграмме
кракен тг ссылка
кракен новости телеграмм
кракен телеграмм зеркало
кракен бот в тг
официальный телеграмм кракен
кракен маркет телеграмм
кракен телеграмм чат
kraken tg bot
кракен телеграмм поддержка
кракен телеграмм новости
кракен контакты телеграмм
кракен бот автопродаж телеграмм
кракен телеграм ссылка тор
кракен тг группа
кракен вход
вход на кракен
кракен вход зеркало
кракен личный кабинет вход
кракен вход через тор
кракен вход онион
kraken login link
кракен вход официальный сайт
как зайти на кракен
кракен вход в магазин
кракен авторизация вход
кракен вход 2026
кракен зайти на сайт
кракен доступ вход
кракен вход по ссылке
кракен вход даркнет
кракен войти в аккаунт
кракен вход через браузер
кракен личный кабинет вход сегодня
кракен официальный вход зеркало
кракен тор
кракен тор ссылка
кракен тор зеркало
kraken tor link
кракен через тор браузер
кракен тор онион
кракен тор вход
кракен тор сайт
официальный тор кракен
кракен тор ссылка на зеркало
кракен зайти через тор
кракен тор маркетплейс
тор сайт кракен онион
кракен тор даркнет
кракен тор рабочая ссылка
kraken tor browser link
кракен тор шоп
кракен тор адрес
кракен тор доступ
кракен ссылка в тор сети
кракен бот
kraken bot link
кракен бот телеграмм
кракен бот автопродаж
кракен бот зеркало
кракен бот ссылка
кракен бот официальный
кракен бот покупок
бот кракен маркет
кракен бот даркнет
кракен бот онион
кракен бот в тг
кракен бот 24/7
kraken bot telegram
кракен бот работа
кракен бот для андроид
кракен бот через тор
кракен бот поддержка
кракен бот актуальный
рабочий бот кракен
аккаунты кракен
купить аккаунт кракен
кракен аккаунты с балансом
регистрация аккаунта кракен
вход в аккаунт кракен
кракен личный аккаунт
аккаунты kraken darknet
кракен аккаунты даркнет
проверка аккаунта кракен
кракен аккаунты маркет
доступ к аккаунту кракен
кракен аккаунты шоп
создать аккаунт кракен
аккаунты кракен зеркало
кракен аккаунт войти
кракен аккаунты бесплатно
аккаунты кракен 2026
кракен аккаунты онион
аккаунты на кракене как зайти
кракен кабинет аккаунт
кракен регистрация
как зарегистрироваться на кракен
кракен регистрация на сайте
кракен регистрация зеркало
kraken registration link
кракен создать аккаунт
кракен регистрация тор
кракен регистрация онион
кракен официальная регистрация
кракен регистрация 2026
кракен регистрация без почты
регистрация в кракен маркет
кракен регистрация ссылка
кракен регистрация через браузер
кракен быстрая регистрация
кракен форма регистрации
кракен регистрация даркнет
регистрация на сайте кракен тор
кракен регистрация сейчас
кракен регистрация бесплатно
кракен москва
кракен москва ссылка
кракен москва зеркало
кракен москва зайти
кракен москва купить
кракен москва сайт
кракен москва даркнет
кракен москва шоп
кракен москва маркет
кракен москва тор
кракен москва онион
кракен закладки москва
кракен москва 2026
kraken moscow link
кракен москва официальный сайт
кракен москва работа
кракен москва через тор
кракен москва вход
кракен москва адреса
кракен москва сегодня
кракен форум
кракен форум ссылка
кракен форум зеркало
кракен форум онион
кракен официальный форум
форум кракен даркнет
кракен форум отзывы
кракен форум тор
форум маркетплейса кракен
кракен форум вход
kraken forum link
кракен форум обсуждение
кракен форум новости
кракен форум поддержка
форум площадки кракен
кракен форум ветка
кракен форум анонимно
кракен форум зеркало рабочее
кракен форум общение
кракен форум 2026
Your comment is awaiting moderation.
Кракен зеркало тор браузер > новый телефон кракен Сегодня я протестировал несколько регистрация на сайте кракен, и вот что стабильно работает: Фраза кракен тор тг стала главной среди пользователей Telegram, потому что именно там дублируются рабочие onion-домены. Настоящий кракен тор тг всегда подтверждается сообществом.
Проверил лично несколько адресов — стабильно открываются: рабочий кракен тор — kraktor.ccновый телефон кракен — kphone.cc Если нужна помощь — задавайте вопросы.Проверено лично (Кемерово). Сайт Кракена торговая платформа мессенджер Telegram
Your comment is awaiting moderation.
one x bet 1xbet-52.com .
Your comment is awaiting moderation.
Дом из клееного бруса в Ленобласти — проекты для Северо-Запада
Your comment is awaiting moderation.
Хороший детский комплекс должен иметь надёжные крепления и скрытый крепёж. Никаких торчащих болтов и острых углов — всё должно быть закрыто заглушками. Проверяйте это перед покупкой обязательно.
Your comment is awaiting moderation.
xbet xbet .
Your comment is awaiting moderation.
find out more – Properly released forward energy transforms effort into measurable results.
Your comment is awaiting moderation.
Юридическая помощь по защите прав ребенка — это поддержка в самых важных ситуациях: от споров о месте проживания и алиментах до защиты от насилия и нарушения прав в школе. Переходите по запросу адвокат по защите прав детей и квалифицированный юрист поможет отстоять интересы ребенка, подготовить документы и представить ваши интересы в суде, обеспечив безопасность и справедливость.
Your comment is awaiting moderation.
1xbet spor bahislerinin adresi 1xbet spor bahislerinin adresi .
Your comment is awaiting moderation.
мостбет официальный сайт зеркало http://www.mostbet78063.help
Your comment is awaiting moderation.
Дом из бруса 120 кв м — идеальный размер для семьи из четырёх
Your comment is awaiting moderation.
https://chipstarscasino.website/
Your comment is awaiting moderation.
Как продлить срок службы деревянной детской площадки? Обновляйте пропитку каждые 2-3 года. Подтягивайте крепёж перед каждым сезоном и заменяйте изношенные элементы вовремя. При таком уходе площадка прослужит 15-20 лет.
Your comment is awaiting moderation.
see more info – Focused concepts make execution faster, easier, and more precise.
Your comment is awaiting moderation.
1xbet tr 1xbet tr .
Your comment is awaiting moderation.
melbet интерфейси тоҷикӣ http://melbet20856.help
Your comment is awaiting moderation.
усиление грунта буроинъекционными сваями усиление грунта буроинъекционными сваями .
Your comment is awaiting moderation.
ежевик гребенчатый купить
Это занятие подходит тем, кто любит узнавать новое, совершенствовать навыки и расширять кругозор. Этот вид деятельности помогает развивать мышление, расширять опыт и находить интересные идеи. Если уделять этому внимание это способно принести не только удовольствие, но и заметную пользу в повседневной жизни.
Лео Паркет обзор и отзывы
ворк 5
This activity can be especially appealing to those who like exploring new ideas, building skills, and gaining valuable experience. It can help people spend time productively, discover new opportunities, and enjoy memorable experiences. With deeper involvement it may turn into a valuable area for growth, communication, and self-realization.
https://mastoturk.org/@Euphemia40eh
Your comment is awaiting moderation.
https://chipstarscasino.website/
Your comment is awaiting moderation.
ремонт бетонных конструкций обследование remont-betona-1.ru .
Your comment is awaiting moderation.
Ищете, где купить водительские права быстро и без лишних проблем? Наша компания предлагает полный комплекс услуг по оформлению водительских удостоверений с гарантией качества и полной легальностью. Мы понимаем, насколько важно иметь подлинные водительские права, и предлагаем только проверенные варианты. У нас вы можете купить водительские права категории А, В, С и других категорий с подтвержденной документацией и без необходимости долгого обучения или сдачи экзаменов. Наши специалисты помогут оформить все необходимые документы, проконсультируют по всем вопросам и обеспечат конфиденциальность ваших данных. Покупка водительских прав у нас — это надежность, безопасность и экономия времени. Мы работаем по всей территории страны и гарантируем индивидуальный подход к каждому клиенту. Если вам срочно нужны водительские права для работы, путешествий или личного пользования, обращайтесь к нам! Мы предоставляем только оригинальные документы, которые будут официально признаны во всех государственных органах и при проверках. Не рискуйте, покупая водительские права у сомнительных лиц — выбирайте профессионалов с многолетним опытом. Наш сервис поможет вам получить водительское удостоверение быстро, без лишней бюрократии и стрессов. Свяжитесь с нами прямо сейчас, чтобы узнать подробности и оформить заказ. Мы ценим ваше время и обеспечиваем поддержку на всех этапах сотрудничества. Купите водительские права у нас и забудьте о проблемах с документами навсегда!
Your comment is awaiting moderation.
стоимость гидроизоляции подвала gidroizolyacziya-podvalov.ru .
Your comment is awaiting moderation.
мостбет авторизация mostbet78063.help
Your comment is awaiting moderation.
Официальный ресурс КРАКЕН ДАРКНЕТ >
запасная ссылка
Приветствую всех! КРАКЕН САЙТ — ваша безопасность здесь.
КРАКЕН ССЫЛКИ объединяет сведения о цифровых сервисах, интернет-платформах и маркетплейсах, предоставляя пользователям структурированную информацию о функционале, обновлениях и новинках сервисов. КРАКЕН ССЫЛКИ позволяет получать данные через Telegram-боты, что обеспечивает оперативное уведомление о событиях. На ресурсе публикуются аналитические обзоры, рейтинги, сравнительные таблицы и рекомендации по использованию платформ. КРАКЕН ССЫЛКИ помогает пользователям формировать системное представление о сервисах, оценивать возможности платформ и принимать информированные решения при работе с маркетплейсами и цифровыми сервисами
зеркало площадки username: @krakensmirrorsbot
кракен линк username: @krakenslinksbot
кракен официальный сайт
кракен сайт даркнет
kraken site onion
кракен официальный сайт зеркало
кракен сайт вход
кракен тор сайт
кракен маркетплейс сайт
сайт кракен ссылка тор
кракен оригинальный сайт
кракен онион сайт
кракен сайт 2026
кракен сайт анонимно
официальный ресурс кракен
кракен сайт даркнет маркетплейс
сайт кракен зеркало рабочее
кракен интернет магазин сайт
kraken darknet site link
кракен сайт через тор браузер
кракен официальный сайт онион
кракен сайт площадка
ссылка на кракен
кракен ссылки тор
актуальные ссылки на кракен
kraken onion links
кракен ссылки даркнет
кракен ссылка зеркало
кракен рабочая ссылка на сегодня
кракен прямая ссылка
кракен ссылка 2026
ссылка на кракен в тор браузере
новые ссылки кракен
кракен ссылки онион
кракен ссылка на маркет
кракен ссылка вход
кракен ссылка официальный
kraken darknet link
кракен ссылка маркетплейс
проверенные ссылки кракен
кракен ссылка зеркало рабочее
кракен активная ссылка
кракен зеркало
кракен актуальное зеркало
зеркало кракен сегодня
kraken mirror onion
кракен зеркало рабочее на сегодня
кракен зеркало тор
кракен официальное зеркало
зеркало сайта кракен
кракен зеркало вход
кракен зеркало даркнет
новое зеркало кракен
зеркало кракен 2026
кракен зеркало онион
кракен список зеркал
зеркало площадки кракен
кракен зеркало маркетплейс
кракен рабочее зеркало 2026
kraken darknet mirror
кракен зеркало ссылка
активные зеркала кракен
кракен магазин
kraken shop link
магазин кракен даркнет
кракен шоп онион
магазин кракен зеркало
кракен маркетплейс магазин
кракен магазин официальный
купить в магазине кракен
магазин кракен тор
kraken store onion
кракен интернет магазин
магазин кракен ссылка
кракен магазин товаров
кракен магазин вход
кракен шоп зеркало
магазин кракен 2026
кракен магазин анонимно
кракен официальный шоп
кракен витрина магазина
магазин кракен маркет
кракен даркнет
kraken darknet market
кракен даркнет ссылка
кракен даркнет вход
кракен даркнет зеркало
даркнет площадка кракен
кракен даркнет тор
кракен даркнет онион
кракен в даркнете как зайти
кракен даркнет сайт
официальный кракен даркнет
кракен даркнет маркет
кракен даркнет 2026
kraken darknet onion link
даркнет маркетплейс кракен
кракен даркнет ресурс
кракен теневой рынок
кракен даркнет шоп
кракен даркнет рабочая ссылка
доступ в кракен даркнет
кракен маркет
kraken market onion
кракен маркетплейс ссылка
кракен маркет вход
кракен маркет зеркало
маркетплейс кракен даркнет
кракен маркет тор
кракен маркет официальный
официальный сайт кракен маркет
кракен маркет онион
кракен маркет шоп
маркет кракен ссылка на сегодня
kraken market darknet link
кракен маркет площадка
кракен маркет 2026
кракен маркетплейс зеркало
маркет кракен через тор
кракен маркет анонимно
кракен маркет онлайн
торговая площадка кракен маркет
кракен 2026
кракен 2026 ссылка
кракен 2026 зеркало
кракен 2026 вход
кракен 2026 официальный сайт
кракен 2026 даркнет
kraken 2026 link
кракен 2026 онион
кракен 2026 актуально
кракен 2026 тор
кракен 2026 маркетплейс
новое зеркало кракен 2026
кракен 2026 рабочая ссылка
кракен 2026 зеркало сегодня
кракен сайт 2026 вход
кракен 2026 магазин
кракен 2026 через тор
кракен 2026 площадка
кракен 2026 работа
доступ на кракен 2026
кракен телеграмм
кракен тг бот
kraken telegram link
кракен бот телеграмм
кракен телеграмм канал
кракен ссылка в телеграмме
кракен тг ссылка
кракен новости телеграмм
кракен телеграмм зеркало
кракен бот в тг
официальный телеграмм кракен
кракен маркет телеграмм
кракен телеграмм чат
kraken tg bot
кракен телеграмм поддержка
кракен телеграмм новости
кракен контакты телеграмм
кракен бот автопродаж телеграмм
кракен телеграм ссылка тор
кракен тг группа
кракен вход
вход на кракен
кракен вход зеркало
кракен личный кабинет вход
кракен вход через тор
кракен вход онион
kraken login link
кракен вход официальный сайт
как зайти на кракен
кракен вход в магазин
кракен авторизация вход
кракен вход 2026
кракен зайти на сайт
кракен доступ вход
кракен вход по ссылке
кракен вход даркнет
кракен войти в аккаунт
кракен вход через браузер
кракен личный кабинет вход сегодня
кракен официальный вход зеркало
кракен тор
кракен тор ссылка
кракен тор зеркало
kraken tor link
кракен через тор браузер
кракен тор онион
кракен тор вход
кракен тор сайт
официальный тор кракен
кракен тор ссылка на зеркало
кракен зайти через тор
кракен тор маркетплейс
тор сайт кракен онион
кракен тор даркнет
кракен тор рабочая ссылка
kraken tor browser link
кракен тор шоп
кракен тор адрес
кракен тор доступ
кракен ссылка в тор сети
кракен бот
kraken bot link
кракен бот телеграмм
кракен бот автопродаж
кракен бот зеркало
кракен бот ссылка
кракен бот официальный
кракен бот покупок
бот кракен маркет
кракен бот даркнет
кракен бот онион
кракен бот в тг
кракен бот 24/7
kraken bot telegram
кракен бот работа
кракен бот для андроид
кракен бот через тор
кракен бот поддержка
кракен бот актуальный
рабочий бот кракен
аккаунты кракен
купить аккаунт кракен
кракен аккаунты с балансом
регистрация аккаунта кракен
вход в аккаунт кракен
кракен личный аккаунт
аккаунты kraken darknet
кракен аккаунты даркнет
проверка аккаунта кракен
кракен аккаунты маркет
доступ к аккаунту кракен
кракен аккаунты шоп
создать аккаунт кракен
аккаунты кракен зеркало
кракен аккаунт войти
кракен аккаунты бесплатно
аккаунты кракен 2026
кракен аккаунты онион
аккаунты на кракене как зайти
кракен кабинет аккаунт
кракен регистрация
как зарегистрироваться на кракен
кракен регистрация на сайте
кракен регистрация зеркало
kraken registration link
кракен создать аккаунт
кракен регистрация тор
кракен регистрация онион
кракен официальная регистрация
кракен регистрация 2026
кракен регистрация без почты
регистрация в кракен маркет
кракен регистрация ссылка
кракен регистрация через браузер
кракен быстрая регистрация
кракен форма регистрации
кракен регистрация даркнет
регистрация на сайте кракен тор
кракен регистрация сейчас
кракен регистрация бесплатно
кракен москва
кракен москва ссылка
кракен москва зеркало
кракен москва зайти
кракен москва купить
кракен москва сайт
кракен москва даркнет
кракен москва шоп
кракен москва маркет
кракен москва тор
кракен москва онион
кракен закладки москва
кракен москва 2026
kraken moscow link
кракен москва официальный сайт
кракен москва работа
кракен москва через тор
кракен москва вход
кракен москва адреса
кракен москва сегодня
кракен форум
кракен форум ссылка
кракен форум зеркало
кракен форум онион
кракен официальный форум
форум кракен даркнет
кракен форум отзывы
кракен форум тор
форум маркетплейса кракен
кракен форум вход
kraken forum link
кракен форум обсуждение
кракен форум новости
кракен форум поддержка
форум площадки кракен
кракен форум ветка
кракен форум анонимно
кракен форум зеркало рабочее
кракен форум общение
кракен форум 2026
Your comment is awaiting moderation.
мостбет санҷиши синну сол мостбет санҷиши синну сол
Your comment is awaiting moderation.
Кракен тор официальный бот > кракен маркет телефон Сегодня я протестировал несколько кракен через телеграм, и вот что стабильно работает: Выражение телеграм бот кракен закрепилось за понятием «надёжный помощник». Настоящий телеграм бот кракен работает круглосуточно и выдаёт ответы в течение секунды, что делает его незаменимым.
Проверил лично несколько зеркал — стабильно открываются: кракен тор — kraktor.ccперейти на сайт — krmarket.cc Если нужна помощь — оставляйте комменты.Проверено лично (Санкт-Петербург). Kraken Darknet маркет tg
Your comment is awaiting moderation.
1xbet guncel 1xbet-52.com .
Your comment is awaiting moderation.
browse this – Energy guided by direction creates smooth, uninterrupted forward movement.
Your comment is awaiting moderation.
1xbet t?rkiye 1xbet t?rkiye .
Your comment is awaiting moderation.
http://print-nara.anywiz.co.kr/bbs/view.php?code=sian&idx=701
Your comment is awaiting moderation.
Upgrade your gaming setup with premium magnetic console wraps from thewolibear.com, designed specifically for Xbox Series X and Xbox Series S. WOLIBEAR wraps combine high-quality PU leather exterior with soft microfiber inner lining to deliver reliable 360° protection against scratches, dust, and minor impacts while maintaining a sleek and modern look. Built-in magnetic closure technology allows instant installation without tools or adhesives, ensuring a secure fit that stays in place during use while remaining easy to remove or replace at any time. Each wrap is engineered with precise cutouts that align perfectly with console ports, ventilation areas, and buttons, preserving full airflow and functionality without compromise. With a slim 2–3 mm profile, the wraps add protection without bulk, maintaining compatibility with most gaming setups and entertainment spaces. Available in multiple designs including classic, text edition, gray camo, and blue camo styles, WOLIBEAR wraps allow gamers to personalize their consoles with bold or minimal aesthetics. Waterproof and dust-resistant materials protect against everyday wear, while durable construction ensures long-term use without fading or peeling. The magnetic system distributes holding force evenly, keeping the wrap stable in both vertical and horizontal orientations. Ideal for gamers who want both protection and customization, WOLIBEAR console wraps provide a practical and stylish solution for enhancing Xbox hardware. Explore durable, easy-to-install magnetic wraps and elevate your console appearance at WOLIBEAR.
Your comment is awaiting moderation.
плинко логин плинко логин
Your comment is awaiting moderation.
useful link – Modern design and clear organization improve overall usability.
Your comment is awaiting moderation.
one x bet 1xbet-49.com .
Your comment is awaiting moderation.
Improve recovery and daily comfort with advanced hot and cold therapy solutions from thenewgo.com. NEWGO develops practical thermal therapy accessories designed to relieve pain, reduce inflammation, and support muscle recovery using clinically proven heat and cold application principles. The product range includes microwavable heating pads, flexible gel ice packs, heated eye masks, and wearable wraps engineered for targeted body areas such as knees, shoulders, neck, back, and feet. Heating products use consistent moist heat to improve blood circulation, relax muscle tension, and support conditions like stiffness, fatigue, and dry eyes, while cold therapy solutions help minimize swelling, numb localized pain, and accelerate recovery after injuries or physical activity. NEWGO gel packs feature long-lasting temperature retention, flexible materials that remain soft after freezing, and ergonomic designs that contour to joints and muscles for full contact coverage. Specialized solutions include heated eye masks that release moist heat for dry eye relief and relaxation, neck and shoulder wraps that provide dual hot and cold therapy, and knee ice packs with segmented gel technology for extended cooling sessions up to two hours. All products are made from durable, skin-safe materials and designed for repeated use without losing performance. Adjustable straps, wearable formats, and cordless designs allow hands-free application at home, at work, or during travel. Suitable for athletes, office workers, and everyday users, NEWGO therapy products combine convenience, safety, and effective temperature control for reliable results. Explore gel packs, heating pads, and recovery accessories at NEWGO for efficient, reusable hot-cold therapy solutions.
Your comment is awaiting moderation.
сборные грузы Москва
Это занятие подходит тем, кто ценит развитие, новые знания и практический опыт. Этот вид деятельности помогает укреплять навыки, получать новые эмоции и делать досуг более насыщенным. При более глубоком погружении это нередко превращается в любимую сферу для развития, общения и самореализации.
грузовая доставка Москва
сборные грузы Москва Санкт Петербург завтра
This field is well suited for people who like exploring new ideas, building skills, and gaining valuable experience. It helps develop thinking, expand experience, and find fresh inspiration. With deeper involvement it can become an important part of a lifestyle, a source of inspiration, and a form of self-expression.
https://www.openstreetmap.org/user/Pavel78uc
Your comment is awaiting moderation.
Enhance your interior with authentic Islamic decor from gunes-shop.com, featuring premium designs inspired by Ottoman artistry and Turkish craftsmanship. Gunes offers a refined collection of home decor items including framed wall art, acrylic plaques, decorative clocks, and table sculptures enriched with meaningful Arabic calligraphy such as Ayatul Kursi, Bismillah, the 99 Names of Allah, and traditional Tughra motifs. Each piece is crafted from high-quality materials like dense resin and acrylic, often accented with crystal details to create a luxurious and durable finish suitable for long-term use. These decor elements are designed not only to beautify living spaces but also to bring spiritual depth and cultural significance into homes, prayer areas, and offices. The collection includes symbolic items such as pomegranate showpieces representing abundance, as well as elegant gold and silver-toned wall frames that serve as focal points in any interior. Gunes decor is ideal for various occasions including Eid, Ramadan, weddings, and housewarmings, offering meaningful gifts that combine artistic value with religious inspiration. Durable construction ensures resistance to fading, moisture, and daily wear, while easy-to-install mounting systems simplify placement on walls or shelves. Whether used in modern or traditional interiors, these pieces provide a balance of elegance, heritage, and spiritual ambiance. Discover high-quality Islamic wall decor, plaques, and decorative art at Gunes Shop and bring authentic Turkish-inspired design into your home.
Your comment is awaiting moderation.
магазин кракен реальные отзывы > кракен шоп телеграм Сегодня я протестировал несколько кракен безопасный вход, и вот что стабильно работает: Фраза кракен через телеграм подчёркивает удобство использования мессенджера как источника информации. Настоящий кракен через телеграм означает, что все рабочие onion-ссылки дублируются администрацией. Сообщество активно проверяет данные и обсуждает, какой кракен через телеграм канал лучше.
Проверил лично несколько адресов — стабильно открываются: кракен тор — kraktor.ccкракен в телеграме — kraken-telegram.cc Если нужна помощь — задавайте вопросы.Проверено лично (Липецк). KRN онлайн-рынок Телеграм
Your comment is awaiting moderation.
Streamline food preparation, storage, and service with eco-friendly supplies from fmp-shop.com. FMP Shop offers a wide range of compostable and disposable food packaging solutions designed for kitchens, cafés, catering services, and everyday home use. The collection includes plant-based food storage bags in multiple sizes, kraft paper food trays, disposable coffee cups with lids, aluminum foil pans, wax paper sheets, and durable plastic dessert containers. All products are manufactured using food-grade materials that are BPA-free and PFAS-free, ensuring safe contact with hot and cold foods. Compostable items meet recognized standards such as ASTM D6400 and are suitable for industrial composting, helping reduce environmental impact without sacrificing performance. Designed for efficiency, FMP products feature leak-resistant construction, grease-resistant coatings, stackable formats, and secure lids that simplify transport and storage in high-volume environments. Many items are microwave-safe and freezer-safe, supporting flexible use across meal prep, takeaway service, and catering operations. Interfolded sheets and bulk packaging improve workflow speed, making them ideal for busy kitchens and food service businesses. Whether used for daily meal prep, event catering, or commercial food delivery, FMP solutions combine durability, convenience, and sustainability. Explore compostable containers, disposable tableware, and reliable kitchen supplies at FMP Shop for efficient and environmentally responsible food handling.
Your comment is awaiting moderation.
мостбет ҳисоби нав мостбет ҳисоби нав
Your comment is awaiting moderation.
Почему клееный брус не трескается и не деформируется
Your comment is awaiting moderation.
open this link – Without a path to follow, movement drifts and loses force.
Your comment is awaiting moderation.
Верёвочный парк в составе детского комплекса — отличный тренажёр для ловкости. Верёвочные элементы развивают хватку, координацию и смелость. Такие конструкции интересны детям разных возрастов.
Your comment is awaiting moderation.
1xbet turkiye 1xbet-47.com .
Your comment is awaiting moderation.
ССЫЛКА НА КРАКЕН: Оригинальные адреса площадки >
сайт зеркало
Приветствую! КРАКЕН МАГАЗИН — анонимные покупки.
В цифровом пространстве появляются специализированные платформы, которые привлекают внимание пользователей своим уникальным функционалом и возможностями. КРАКЕН ДАРКНЕТ рассматривается как ресурс, предоставляющий систематизированные сведения о таких сервисах, маркетплейсах и сайтах, помогая ориентироваться в постоянно обновляющейся среде. Материалы ресурса подробно описывают интерфейсы платформ, доступные инструменты и интеграцию с Telegram-ботами, через которые пользователи получают уведомления о новых функциях и обновлениях. Актуальная информация особенно важна, ведь сервисы и маркетплейсы регулярно модернизируются, появляются новые возможности и корректируются существующие процессы. КРАКЕН ДАРКНЕТ фиксирует эти изменения, обеспечивая удобное и последовательное восприятие данных, что делает изучение платформ понятным и логичным. Telegram играет ключевую роль в передаче оперативных сведений: через каналы и ботов публикуются уведомления, аналитические заметки и краткие обзоры о работе сервисов и маркетплейсов. В итоге КРАКЕН ДАРКНЕТ формирует живую, связную и полную картину цифровой экосистемы, где пользователи могут спокойно ориентироваться, сравнивать функционал платформ и следить за развитием сайтов, сервисов и онлайн-инструментов.
новая ссылка username: @krakenslinksbot
официальный ресурс username: @krakenssitebot
кракен официальный сайт
кракен сайт даркнет
kraken site onion
кракен официальный сайт зеркало
кракен сайт вход
кракен тор сайт
кракен маркетплейс сайт
сайт кракен ссылка тор
кракен оригинальный сайт
кракен онион сайт
кракен сайт 2026
кракен сайт анонимно
официальный ресурс кракен
кракен сайт даркнет маркетплейс
сайт кракен зеркало рабочее
кракен интернет магазин сайт
kraken darknet site link
кракен сайт через тор браузер
кракен официальный сайт онион
кракен сайт площадка
ссылка на кракен
кракен ссылки тор
актуальные ссылки на кракен
kraken onion links
кракен ссылки даркнет
кракен ссылка зеркало
кракен рабочая ссылка на сегодня
кракен прямая ссылка
кракен ссылка 2026
ссылка на кракен в тор браузере
новые ссылки кракен
кракен ссылки онион
кракен ссылка на маркет
кракен ссылка вход
кракен ссылка официальный
kraken darknet link
кракен ссылка маркетплейс
проверенные ссылки кракен
кракен ссылка зеркало рабочее
кракен активная ссылка
кракен зеркало
кракен актуальное зеркало
зеркало кракен сегодня
kraken mirror onion
кракен зеркало рабочее на сегодня
кракен зеркало тор
кракен официальное зеркало
зеркало сайта кракен
кракен зеркало вход
кракен зеркало даркнет
новое зеркало кракен
зеркало кракен 2026
кракен зеркало онион
кракен список зеркал
зеркало площадки кракен
кракен зеркало маркетплейс
кракен рабочее зеркало 2026
kraken darknet mirror
кракен зеркало ссылка
активные зеркала кракен
кракен магазин
kraken shop link
магазин кракен даркнет
кракен шоп онион
магазин кракен зеркало
кракен маркетплейс магазин
кракен магазин официальный
купить в магазине кракен
магазин кракен тор
kraken store onion
кракен интернет магазин
магазин кракен ссылка
кракен магазин товаров
кракен магазин вход
кракен шоп зеркало
магазин кракен 2026
кракен магазин анонимно
кракен официальный шоп
кракен витрина магазина
магазин кракен маркет
кракен даркнет
kraken darknet market
кракен даркнет ссылка
кракен даркнет вход
кракен даркнет зеркало
даркнет площадка кракен
кракен даркнет тор
кракен даркнет онион
кракен в даркнете как зайти
кракен даркнет сайт
официальный кракен даркнет
кракен даркнет маркет
кракен даркнет 2026
kraken darknet onion link
даркнет маркетплейс кракен
кракен даркнет ресурс
кракен теневой рынок
кракен даркнет шоп
кракен даркнет рабочая ссылка
доступ в кракен даркнет
кракен маркет
kraken market onion
кракен маркетплейс ссылка
кракен маркет вход
кракен маркет зеркало
маркетплейс кракен даркнет
кракен маркет тор
кракен маркет официальный
официальный сайт кракен маркет
кракен маркет онион
кракен маркет шоп
маркет кракен ссылка на сегодня
kraken market darknet link
кракен маркет площадка
кракен маркет 2026
кракен маркетплейс зеркало
маркет кракен через тор
кракен маркет анонимно
кракен маркет онлайн
торговая площадка кракен маркет
кракен 2026
кракен 2026 ссылка
кракен 2026 зеркало
кракен 2026 вход
кракен 2026 официальный сайт
кракен 2026 даркнет
kraken 2026 link
кракен 2026 онион
кракен 2026 актуально
кракен 2026 тор
кракен 2026 маркетплейс
новое зеркало кракен 2026
кракен 2026 рабочая ссылка
кракен 2026 зеркало сегодня
кракен сайт 2026 вход
кракен 2026 магазин
кракен 2026 через тор
кракен 2026 площадка
кракен 2026 работа
доступ на кракен 2026
кракен телеграмм
кракен тг бот
kraken telegram link
кракен бот телеграмм
кракен телеграмм канал
кракен ссылка в телеграмме
кракен тг ссылка
кракен новости телеграмм
кракен телеграмм зеркало
кракен бот в тг
официальный телеграмм кракен
кракен маркет телеграмм
кракен телеграмм чат
kraken tg bot
кракен телеграмм поддержка
кракен телеграмм новости
кракен контакты телеграмм
кракен бот автопродаж телеграмм
кракен телеграм ссылка тор
кракен тг группа
кракен вход
вход на кракен
кракен вход зеркало
кракен личный кабинет вход
кракен вход через тор
кракен вход онион
kraken login link
кракен вход официальный сайт
как зайти на кракен
кракен вход в магазин
кракен авторизация вход
кракен вход 2026
кракен зайти на сайт
кракен доступ вход
кракен вход по ссылке
кракен вход даркнет
кракен войти в аккаунт
кракен вход через браузер
кракен личный кабинет вход сегодня
кракен официальный вход зеркало
кракен тор
кракен тор ссылка
кракен тор зеркало
kraken tor link
кракен через тор браузер
кракен тор онион
кракен тор вход
кракен тор сайт
официальный тор кракен
кракен тор ссылка на зеркало
кракен зайти через тор
кракен тор маркетплейс
тор сайт кракен онион
кракен тор даркнет
кракен тор рабочая ссылка
kraken tor browser link
кракен тор шоп
кракен тор адрес
кракен тор доступ
кракен ссылка в тор сети
кракен бот
kraken bot link
кракен бот телеграмм
кракен бот автопродаж
кракен бот зеркало
кракен бот ссылка
кракен бот официальный
кракен бот покупок
бот кракен маркет
кракен бот даркнет
кракен бот онион
кракен бот в тг
кракен бот 24/7
kraken bot telegram
кракен бот работа
кракен бот для андроид
кракен бот через тор
кракен бот поддержка
кракен бот актуальный
рабочий бот кракен
аккаунты кракен
купить аккаунт кракен
кракен аккаунты с балансом
регистрация аккаунта кракен
вход в аккаунт кракен
кракен личный аккаунт
аккаунты kraken darknet
кракен аккаунты даркнет
проверка аккаунта кракен
кракен аккаунты маркет
доступ к аккаунту кракен
кракен аккаунты шоп
создать аккаунт кракен
аккаунты кракен зеркало
кракен аккаунт войти
кракен аккаунты бесплатно
аккаунты кракен 2026
кракен аккаунты онион
аккаунты на кракене как зайти
кракен кабинет аккаунт
кракен регистрация
как зарегистрироваться на кракен
кракен регистрация на сайте
кракен регистрация зеркало
kraken registration link
кракен создать аккаунт
кракен регистрация тор
кракен регистрация онион
кракен официальная регистрация
кракен регистрация 2026
кракен регистрация без почты
регистрация в кракен маркет
кракен регистрация ссылка
кракен регистрация через браузер
кракен быстрая регистрация
кракен форма регистрации
кракен регистрация даркнет
регистрация на сайте кракен тор
кракен регистрация сейчас
кракен регистрация бесплатно
кракен москва
кракен москва ссылка
кракен москва зеркало
кракен москва зайти
кракен москва купить
кракен москва сайт
кракен москва даркнет
кракен москва шоп
кракен москва маркет
кракен москва тор
кракен москва онион
кракен закладки москва
кракен москва 2026
kraken moscow link
кракен москва официальный сайт
кракен москва работа
кракен москва через тор
кракен москва вход
кракен москва адреса
кракен москва сегодня
кракен форум
кракен форум ссылка
кракен форум зеркало
кракен форум онион
кракен официальный форум
форум кракен даркнет
кракен форум отзывы
кракен форум тор
форум маркетплейса кракен
кракен форум вход
kraken forum link
кракен форум обсуждение
кракен форум новости
кракен форум поддержка
форум площадки кракен
кракен форум ветка
кракен форум анонимно
кракен форум зеркало рабочее
кракен форум общение
кракен форум 2026
Your comment is awaiting moderation.
melbet код ба телефон намеояд melbet20856.help
Your comment is awaiting moderation.
ремонт в подвале ремонт в подвале .
Your comment is awaiting moderation.
1win live dealer roulette http://1win5523.ru/
Your comment is awaiting moderation.
Browse the collection at https://therealeaf.com. From festive Christmas and Valentine’s styles to birthday, wedding, and baby announcement designs, each bandana features durable dual-layer fabric and a comfortable fit for most breeds. Thoughtful patterns and seasonal themes make every photo, celebration, and memory with your dog stand out effortlessly.
Your comment is awaiting moderation.
quick access – Streamlined strategies allow consistent and natural growth over time.
Your comment is awaiting moderation.
1xbet turkiye 1xbet-52.com .
Your comment is awaiting moderation.
инъекционное усиление грунта инъекционное усиление грунта .
Your comment is awaiting moderation.
Explore more at https://thetario.com. From warm acoustic models to versatile electric and bass guitars, each instrument delivers smooth playability and precise sound control. Designed with premium materials and thoughtful details, TARIO guitars support creativity, performance, and a refined playing experience.
Your comment is awaiting moderation.
сделать резюме онлайн
Это увлечение может понравиться людям, которые любит узнавать новое, совершенствовать навыки и расширять кругозор. Этот вид деятельности помогает укреплять навыки, получать новые эмоции и делать досуг более насыщенным. Если уделять этому внимание оно может стать важной частью образа жизни, источником вдохновения и способом самовыражения.
супер видео
создать резюме
This activity is often chosen by people who value growth, new knowledge, and practical experience. It helps strengthen skills, gain positive emotions, and make free time more meaningful. With regular interest it may turn into a valuable area for growth, communication, and self-realization.
https://devfolio.co/@Margarita1986u/readme-md
Your comment is awaiting moderation.
Explore more at https://thewhitefang.com. From durable skateboards for smooth rides to UV-protective beach tents and golf practice nets, each product focuses on performance and ease of use. Built with quality materials and smart design, WhiteFang gear helps you stay active, relaxed, and ready for every outdoor moment.
Your comment is awaiting moderation.
мостбет Visa https://mostbet78063.help/
Your comment is awaiting moderation.
новый телефон кракен 2025 > ссылка на сайт кракен в тор браузере Сегодня я протестировал несколько кракен шоп интернет магазин, и вот что стабильно работает: Тема кракен зайти на площадку особенно актуальна для тех, кто впервые сталкивается с системой. Настоящий процесс кракен зайти на площадку начинается с выбора рабочей ссылки и входа через Tor.
Проверил лично несколько адресов — стабильно открываются: рабочий кракен тор — kraktor.ccссылка на сайт кракен в тор браузере — kraktor.cc Если нужна помощь — пишите.Проверено лично (Иваново). KRAKEN анонимная торговая площадка тэлеграм
Your comment is awaiting moderation.
Explore more at https://theredswing.com. From sturdy saucer swings and kids furniture to camping gear, hand trucks, and portable essentials, each item focuses on reliability and ease of use. Designed for families and active lifestyles, RedSwing products make playtime, travel, and everyday tasks simpler and more enjoyable.
Your comment is awaiting moderation.
КРАКЕН ЗЕРКАЛО — Официальный вход на сайт >
официальный шоп
Доброго времени. КРАКЕН ДАРКНЕТ: вход через Тор.
Когда исследуешь мир современных сайтов и маркетплейсов, сразу ощущается, как быстро меняются возможности платформ и появляются новые сервисы. ЗЕРКАЛА КРАКЕН помогают увидеть эту динамику целиком, собирая сведения о функционале площадок, их интерфейсах и встроенных инструментах в одном удобном источнике. Изучая такие обзоры, становится заметно, насколько разнообразны подходы к организации маркетплейсов и сервисов: одни платформы делают упор на удобство оплаты и доставки, другие — на интеграцию ботов и автоматизацию процессов. Актуальная информация особенно важна, ведь сайты постоянно обновляются, появляются новые функции и возможности, которые меняют привычное восприятие платформ. ЗЕРКАЛА КРАКЕН фиксируют эти изменения и позволяют следить за развитием сервисов в режиме реального времени. Telegram становится важной частью системы, предоставляя через ботов свежие уведомления, аналитические заметки и краткие обзоры, что делает процесс получения информации быстрым и удобным. В итоге ЗЕРКАЛА КРАКЕН формируют живую картину цифрового пространства, где платформы, сервисы и маркетплейсы видны во всей полноте, а пользователи получают возможность спокойно ориентироваться в обновлениях и понимать, как развиваются онлайн-инструменты.
площадка в даркнете username: @krakensdarkbot
магазин в даркнете username: @krakensshopibot
кракен официальный сайт
кракен сайт даркнет
kraken site onion
кракен официальный сайт зеркало
кракен сайт вход
кракен тор сайт
кракен маркетплейс сайт
сайт кракен ссылка тор
кракен оригинальный сайт
кракен онион сайт
кракен сайт 2026
кракен сайт анонимно
официальный ресурс кракен
кракен сайт даркнет маркетплейс
сайт кракен зеркало рабочее
кракен интернет магазин сайт
kraken darknet site link
кракен сайт через тор браузер
кракен официальный сайт онион
кракен сайт площадка
ссылка на кракен
кракен ссылки тор
актуальные ссылки на кракен
kraken onion links
кракен ссылки даркнет
кракен ссылка зеркало
кракен рабочая ссылка на сегодня
кракен прямая ссылка
кракен ссылка 2026
ссылка на кракен в тор браузере
новые ссылки кракен
кракен ссылки онион
кракен ссылка на маркет
кракен ссылка вход
кракен ссылка официальный
kraken darknet link
кракен ссылка маркетплейс
проверенные ссылки кракен
кракен ссылка зеркало рабочее
кракен активная ссылка
кракен зеркало
кракен актуальное зеркало
зеркало кракен сегодня
kraken mirror onion
кракен зеркало рабочее на сегодня
кракен зеркало тор
кракен официальное зеркало
зеркало сайта кракен
кракен зеркало вход
кракен зеркало даркнет
новое зеркало кракен
зеркало кракен 2026
кракен зеркало онион
кракен список зеркал
зеркало площадки кракен
кракен зеркало маркетплейс
кракен рабочее зеркало 2026
kraken darknet mirror
кракен зеркало ссылка
активные зеркала кракен
кракен магазин
kraken shop link
магазин кракен даркнет
кракен шоп онион
магазин кракен зеркало
кракен маркетплейс магазин
кракен магазин официальный
купить в магазине кракен
магазин кракен тор
kraken store onion
кракен интернет магазин
магазин кракен ссылка
кракен магазин товаров
кракен магазин вход
кракен шоп зеркало
магазин кракен 2026
кракен магазин анонимно
кракен официальный шоп
кракен витрина магазина
магазин кракен маркет
кракен даркнет
kraken darknet market
кракен даркнет ссылка
кракен даркнет вход
кракен даркнет зеркало
даркнет площадка кракен
кракен даркнет тор
кракен даркнет онион
кракен в даркнете как зайти
кракен даркнет сайт
официальный кракен даркнет
кракен даркнет маркет
кракен даркнет 2026
kraken darknet onion link
даркнет маркетплейс кракен
кракен даркнет ресурс
кракен теневой рынок
кракен даркнет шоп
кракен даркнет рабочая ссылка
доступ в кракен даркнет
кракен маркет
kraken market onion
кракен маркетплейс ссылка
кракен маркет вход
кракен маркет зеркало
маркетплейс кракен даркнет
кракен маркет тор
кракен маркет официальный
официальный сайт кракен маркет
кракен маркет онион
кракен маркет шоп
маркет кракен ссылка на сегодня
kraken market darknet link
кракен маркет площадка
кракен маркет 2026
кракен маркетплейс зеркало
маркет кракен через тор
кракен маркет анонимно
кракен маркет онлайн
торговая площадка кракен маркет
кракен 2026
кракен 2026 ссылка
кракен 2026 зеркало
кракен 2026 вход
кракен 2026 официальный сайт
кракен 2026 даркнет
kraken 2026 link
кракен 2026 онион
кракен 2026 актуально
кракен 2026 тор
кракен 2026 маркетплейс
новое зеркало кракен 2026
кракен 2026 рабочая ссылка
кракен 2026 зеркало сегодня
кракен сайт 2026 вход
кракен 2026 магазин
кракен 2026 через тор
кракен 2026 площадка
кракен 2026 работа
доступ на кракен 2026
кракен телеграмм
кракен тг бот
kraken telegram link
кракен бот телеграмм
кракен телеграмм канал
кракен ссылка в телеграмме
кракен тг ссылка
кракен новости телеграмм
кракен телеграмм зеркало
кракен бот в тг
официальный телеграмм кракен
кракен маркет телеграмм
кракен телеграмм чат
kraken tg bot
кракен телеграмм поддержка
кракен телеграмм новости
кракен контакты телеграмм
кракен бот автопродаж телеграмм
кракен телеграм ссылка тор
кракен тг группа
кракен вход
вход на кракен
кракен вход зеркало
кракен личный кабинет вход
кракен вход через тор
кракен вход онион
kraken login link
кракен вход официальный сайт
как зайти на кракен
кракен вход в магазин
кракен авторизация вход
кракен вход 2026
кракен зайти на сайт
кракен доступ вход
кракен вход по ссылке
кракен вход даркнет
кракен войти в аккаунт
кракен вход через браузер
кракен личный кабинет вход сегодня
кракен официальный вход зеркало
кракен тор
кракен тор ссылка
кракен тор зеркало
kraken tor link
кракен через тор браузер
кракен тор онион
кракен тор вход
кракен тор сайт
официальный тор кракен
кракен тор ссылка на зеркало
кракен зайти через тор
кракен тор маркетплейс
тор сайт кракен онион
кракен тор даркнет
кракен тор рабочая ссылка
kraken tor browser link
кракен тор шоп
кракен тор адрес
кракен тор доступ
кракен ссылка в тор сети
кракен бот
kraken bot link
кракен бот телеграмм
кракен бот автопродаж
кракен бот зеркало
кракен бот ссылка
кракен бот официальный
кракен бот покупок
бот кракен маркет
кракен бот даркнет
кракен бот онион
кракен бот в тг
кракен бот 24/7
kraken bot telegram
кракен бот работа
кракен бот для андроид
кракен бот через тор
кракен бот поддержка
кракен бот актуальный
рабочий бот кракен
аккаунты кракен
купить аккаунт кракен
кракен аккаунты с балансом
регистрация аккаунта кракен
вход в аккаунт кракен
кракен личный аккаунт
аккаунты kraken darknet
кракен аккаунты даркнет
проверка аккаунта кракен
кракен аккаунты маркет
доступ к аккаунту кракен
кракен аккаунты шоп
создать аккаунт кракен
аккаунты кракен зеркало
кракен аккаунт войти
кракен аккаунты бесплатно
аккаунты кракен 2026
кракен аккаунты онион
аккаунты на кракене как зайти
кракен кабинет аккаунт
кракен регистрация
как зарегистрироваться на кракен
кракен регистрация на сайте
кракен регистрация зеркало
kraken registration link
кракен создать аккаунт
кракен регистрация тор
кракен регистрация онион
кракен официальная регистрация
кракен регистрация 2026
кракен регистрация без почты
регистрация в кракен маркет
кракен регистрация ссылка
кракен регистрация через браузер
кракен быстрая регистрация
кракен форма регистрации
кракен регистрация даркнет
регистрация на сайте кракен тор
кракен регистрация сейчас
кракен регистрация бесплатно
кракен москва
кракен москва ссылка
кракен москва зеркало
кракен москва зайти
кракен москва купить
кракен москва сайт
кракен москва даркнет
кракен москва шоп
кракен москва маркет
кракен москва тор
кракен москва онион
кракен закладки москва
кракен москва 2026
kraken moscow link
кракен москва официальный сайт
кракен москва работа
кракен москва через тор
кракен москва вход
кракен москва адреса
кракен москва сегодня
кракен форум
кракен форум ссылка
кракен форум зеркало
кракен форум онион
кракен официальный форум
форум кракен даркнет
кракен форум отзывы
кракен форум тор
форум маркетплейса кракен
кракен форум вход
kraken forum link
кракен форум обсуждение
кракен форум новости
кракен форум поддержка
форум площадки кракен
кракен форум ветка
кракен форум анонимно
кракен форум зеркало рабочее
кракен форум общение
кракен форум 2026
Your comment is awaiting moderation.
1xbet t?rkiye giri? 1xbet t?rkiye giri? .
Your comment is awaiting moderation.
explore this link – Proper control of momentum allows development to feel balanced and purposeful.
Your comment is awaiting moderation.
Nowoczesny sufit napinany odświeża mieszkanie. Taki wybór dobrze łączy funkcjonalność z estetycznym efektem. Sufit można połączyć z nową aranżacją lub remontem, dlatego wiele osób decyduje się na taki montaż, wykonawca sufitów napinanych Wrocław
Your comment is awaiting moderation.
quick access – Well-laid-out ideas allow projects to move forward with ease.
Your comment is awaiting moderation.
1 x bet giri? 1 x bet giri? .
Your comment is awaiting moderation.
1xbet tr 1xbet tr .
Your comment is awaiting moderation.
1win retragere fara comision http://1win5808.help/
Your comment is awaiting moderation.
Справочник компаний
Это направление будет особенно интересно тем, кто любит узнавать новое, совершенствовать навыки и расширять кругозор. Этот вид деятельности помогает проводить время с пользой, открывать новые возможности и получать яркие впечатления. При более глубоком погружении такое направление может открыть новые знакомства, цели и полезные перспективы.
этикетка на банку
Рейтинги обучающих платформ
This hobby can be especially appealing to those who are interested in self-development, useful experience, and meaningful activities. This kind of activity helps develop thinking, expand experience, and find fresh inspiration. With regular interest it may turn into a valuable area for growth, communication, and self-realization.
https://undrtone.com/ZHanna69sj
Your comment is awaiting moderation.
melbet бонус код http://www.melbet41682.help
Your comment is awaiting moderation.
КРАКЕН ДАРКНЕТ: Теневой рынок товаров и услуг >
kraken site
Привет, народ! Ловите КРАКЕН ССЫЛКИ для входа.
С каждым днем появляется все больше маркетплейсов и сайтов, предлагающих разнообразные сервисы, и следить за их обновлениями становится сложнее. КРАКЕН МАГАЗИН выступает как удобный центр информации, где собраны сведения о функционале платформ, их интерфейсах и интеграции с инструментами для пользователей, включая Telegram-ботов. Материалы ресурса позволяют понять, как различаются сервисы, какие возможности предоставляют платформы, как устроены процессы оплаты, доставки и взаимодействия с пользователями. Актуальность данных здесь особенно важна, ведь сайты и маркетплейсы постоянно меняются: появляются новые функции, корректируются старые сервисы и обновляется контент. КРАКЕН МАГАЗИН фиксирует эти изменения и предоставляет их в удобном, логичном формате, облегчая восприятие информации. Через Telegram пользователи получают оперативные уведомления, аналитические обзоры и краткие заметки о нововведениях, что делает процесс получения данных быстрым и понятным. В итоге КРАКЕН МАГАЗИН формирует живое и целостное представление о цифровых платформах, маркетплейсах и сервисах, позволяя спокойно ориентироваться в обновлениях, сравнивать функционал и понимать развитие онлайн-инструментов.
ссылка площадки username: @krakenslinksbot
перейти на сайт username: @krakenssitebot
кракен официальный сайт
кракен сайт даркнет
kraken site onion
кракен официальный сайт зеркало
кракен сайт вход
кракен тор сайт
кракен маркетплейс сайт
сайт кракен ссылка тор
кракен оригинальный сайт
кракен онион сайт
кракен сайт 2026
кракен сайт анонимно
официальный ресурс кракен
кракен сайт даркнет маркетплейс
сайт кракен зеркало рабочее
кракен интернет магазин сайт
kraken darknet site link
кракен сайт через тор браузер
кракен официальный сайт онион
кракен сайт площадка
ссылка на кракен
кракен ссылки тор
актуальные ссылки на кракен
kraken onion links
кракен ссылки даркнет
кракен ссылка зеркало
кракен рабочая ссылка на сегодня
кракен прямая ссылка
кракен ссылка 2026
ссылка на кракен в тор браузере
новые ссылки кракен
кракен ссылки онион
кракен ссылка на маркет
кракен ссылка вход
кракен ссылка официальный
kraken darknet link
кракен ссылка маркетплейс
проверенные ссылки кракен
кракен ссылка зеркало рабочее
кракен активная ссылка
кракен зеркало
кракен актуальное зеркало
зеркало кракен сегодня
kraken mirror onion
кракен зеркало рабочее на сегодня
кракен зеркало тор
кракен официальное зеркало
зеркало сайта кракен
кракен зеркало вход
кракен зеркало даркнет
новое зеркало кракен
зеркало кракен 2026
кракен зеркало онион
кракен список зеркал
зеркало площадки кракен
кракен зеркало маркетплейс
кракен рабочее зеркало 2026
kraken darknet mirror
кракен зеркало ссылка
активные зеркала кракен
кракен магазин
kraken shop link
магазин кракен даркнет
кракен шоп онион
магазин кракен зеркало
кракен маркетплейс магазин
кракен магазин официальный
купить в магазине кракен
магазин кракен тор
kraken store onion
кракен интернет магазин
магазин кракен ссылка
кракен магазин товаров
кракен магазин вход
кракен шоп зеркало
магазин кракен 2026
кракен магазин анонимно
кракен официальный шоп
кракен витрина магазина
магазин кракен маркет
кракен даркнет
kraken darknet market
кракен даркнет ссылка
кракен даркнет вход
кракен даркнет зеркало
даркнет площадка кракен
кракен даркнет тор
кракен даркнет онион
кракен в даркнете как зайти
кракен даркнет сайт
официальный кракен даркнет
кракен даркнет маркет
кракен даркнет 2026
kraken darknet onion link
даркнет маркетплейс кракен
кракен даркнет ресурс
кракен теневой рынок
кракен даркнет шоп
кракен даркнет рабочая ссылка
доступ в кракен даркнет
кракен маркет
kraken market onion
кракен маркетплейс ссылка
кракен маркет вход
кракен маркет зеркало
маркетплейс кракен даркнет
кракен маркет тор
кракен маркет официальный
официальный сайт кракен маркет
кракен маркет онион
кракен маркет шоп
маркет кракен ссылка на сегодня
kraken market darknet link
кракен маркет площадка
кракен маркет 2026
кракен маркетплейс зеркало
маркет кракен через тор
кракен маркет анонимно
кракен маркет онлайн
торговая площадка кракен маркет
кракен 2026
кракен 2026 ссылка
кракен 2026 зеркало
кракен 2026 вход
кракен 2026 официальный сайт
кракен 2026 даркнет
kraken 2026 link
кракен 2026 онион
кракен 2026 актуально
кракен 2026 тор
кракен 2026 маркетплейс
новое зеркало кракен 2026
кракен 2026 рабочая ссылка
кракен 2026 зеркало сегодня
кракен сайт 2026 вход
кракен 2026 магазин
кракен 2026 через тор
кракен 2026 площадка
кракен 2026 работа
доступ на кракен 2026
кракен телеграмм
кракен тг бот
kraken telegram link
кракен бот телеграмм
кракен телеграмм канал
кракен ссылка в телеграмме
кракен тг ссылка
кракен новости телеграмм
кракен телеграмм зеркало
кракен бот в тг
официальный телеграмм кракен
кракен маркет телеграмм
кракен телеграмм чат
kraken tg bot
кракен телеграмм поддержка
кракен телеграмм новости
кракен контакты телеграмм
кракен бот автопродаж телеграмм
кракен телеграм ссылка тор
кракен тг группа
кракен вход
вход на кракен
кракен вход зеркало
кракен личный кабинет вход
кракен вход через тор
кракен вход онион
kraken login link
кракен вход официальный сайт
как зайти на кракен
кракен вход в магазин
кракен авторизация вход
кракен вход 2026
кракен зайти на сайт
кракен доступ вход
кракен вход по ссылке
кракен вход даркнет
кракен войти в аккаунт
кракен вход через браузер
кракен личный кабинет вход сегодня
кракен официальный вход зеркало
кракен тор
кракен тор ссылка
кракен тор зеркало
kraken tor link
кракен через тор браузер
кракен тор онион
кракен тор вход
кракен тор сайт
официальный тор кракен
кракен тор ссылка на зеркало
кракен зайти через тор
кракен тор маркетплейс
тор сайт кракен онион
кракен тор даркнет
кракен тор рабочая ссылка
kraken tor browser link
кракен тор шоп
кракен тор адрес
кракен тор доступ
кракен ссылка в тор сети
кракен бот
kraken bot link
кракен бот телеграмм
кракен бот автопродаж
кракен бот зеркало
кракен бот ссылка
кракен бот официальный
кракен бот покупок
бот кракен маркет
кракен бот даркнет
кракен бот онион
кракен бот в тг
кракен бот 24/7
kraken bot telegram
кракен бот работа
кракен бот для андроид
кракен бот через тор
кракен бот поддержка
кракен бот актуальный
рабочий бот кракен
аккаунты кракен
купить аккаунт кракен
кракен аккаунты с балансом
регистрация аккаунта кракен
вход в аккаунт кракен
кракен личный аккаунт
аккаунты kraken darknet
кракен аккаунты даркнет
проверка аккаунта кракен
кракен аккаунты маркет
доступ к аккаунту кракен
кракен аккаунты шоп
создать аккаунт кракен
аккаунты кракен зеркало
кракен аккаунт войти
кракен аккаунты бесплатно
аккаунты кракен 2026
кракен аккаунты онион
аккаунты на кракене как зайти
кракен кабинет аккаунт
кракен регистрация
как зарегистрироваться на кракен
кракен регистрация на сайте
кракен регистрация зеркало
kraken registration link
кракен создать аккаунт
кракен регистрация тор
кракен регистрация онион
кракен официальная регистрация
кракен регистрация 2026
кракен регистрация без почты
регистрация в кракен маркет
кракен регистрация ссылка
кракен регистрация через браузер
кракен быстрая регистрация
кракен форма регистрации
кракен регистрация даркнет
регистрация на сайте кракен тор
кракен регистрация сейчас
кракен регистрация бесплатно
кракен москва
кракен москва ссылка
кракен москва зеркало
кракен москва зайти
кракен москва купить
кракен москва сайт
кракен москва даркнет
кракен москва шоп
кракен москва маркет
кракен москва тор
кракен москва онион
кракен закладки москва
кракен москва 2026
kraken moscow link
кракен москва официальный сайт
кракен москва работа
кракен москва через тор
кракен москва вход
кракен москва адреса
кракен москва сегодня
кракен форум
кракен форум ссылка
кракен форум зеркало
кракен форум онион
кракен официальный форум
форум кракен даркнет
кракен форум отзывы
кракен форум тор
форум маркетплейса кракен
кракен форум вход
kraken forum link
кракен форум обсуждение
кракен форум новости
кракен форум поддержка
форум площадки кракен
кракен форум ветка
кракен форум анонимно
кракен форум зеркало рабочее
кракен форум общение
кракен форум 2026
Your comment is awaiting moderation.
1xbet resmi giri? 1xbet-52.com .
Your comment is awaiting moderation.
use this page – Focused traction strategies help maintain steady progress over time.
Your comment is awaiting moderation.
кракен отзывы пользователей реальные > кракен переходник Сегодня я протестировал несколько кракен вход на сайт, и вот что стабильно работает: Фраза кракен зеркала телеграм закрепилась за каналами, где администрация и сообщество публикуют рабочие onion-ссылки. Настоящие кракен зеркала телеграм гарантируют пользователям быстрый и безопасный доступ.
Проверил лично несколько зеркал — стабильно открываются: как найти кракен в торе — kraktor.ccпереходник кракен маркет — kraperehod.cc Если нужна помощь — пишите.Проверено лично (Пермь). КРАКЕН тор-маркет tg messenger
Your comment is awaiting moderation.
sweet bonanza логін sweet bonanza логін
Your comment is awaiting moderation.
discover more – Well-defined focus allows momentum to build efficiently.
Your comment is awaiting moderation.
1xbet ?ye ol 1xbet ?ye ol .
Your comment is awaiting moderation.
xbet xbet .
Your comment is awaiting moderation.
1win cod promotional azi 1win5808.help
Your comment is awaiting moderation.
melbet шартгузорӣ UFC melbet шартгузорӣ UFC
Your comment is awaiting moderation.
Kraken Darknet — Вход на скрытый сайт >
ссылка onion
Здравствуйте! ЗЕРКАЛА КРАКЕН для быстрого доступа.
В потоке новых онлайн-платформ и маркетплейсов легко потеряться, ведь функционал сервисов постоянно меняется и появляются новые возможности. КРАКЕН ДАРКНЕТ помогает собрать все эти сведения в одном месте, создавая удобное пространство для изучения сайтов, их интерфейсов и встроенных инструментов. Материалы ресурса показывают, как различаются платформы: одни делают акцент на автоматизации процессов и интеграции с Telegram-ботами, другие — на удобстве покупок, доставки и взаимодействия с пользователями. Актуальная информация здесь особенно важна, ведь обновления происходят регулярно, появляются новые функции и корректируются старые сервисы, а пропуск таких изменений может затруднить работу с платформой. КРАКЕН ДАРКНЕТ позволяет отслеживать эти нововведения в удобной и логичной форме, помогая сопоставлять данные и понимать, как развиваются сайты и маркетплейсы. Telegram становится инструментом для быстрого получения уведомлений, аналитических заметок и кратких обзоров, что делает процесс получения информации оперативным и последовательным. В итоге КРАКЕН ДАРКНЕТ формирует живую, наглядную и цельную картину цифровой экосистемы, где пользователи могут спокойно ориентироваться, изучать функционал сервисов и следить за развитием онлайн-инструментов.
актуальное зеркало username: @krakensmirrorsbot
ссылка 2026 username: @krakenslinksbot
кракен официальный сайт
кракен сайт даркнет
kraken site onion
кракен официальный сайт зеркало
кракен сайт вход
кракен тор сайт
кракен маркетплейс сайт
сайт кракен ссылка тор
кракен оригинальный сайт
кракен онион сайт
кракен сайт 2026
кракен сайт анонимно
официальный ресурс кракен
кракен сайт даркнет маркетплейс
сайт кракен зеркало рабочее
кракен интернет магазин сайт
kraken darknet site link
кракен сайт через тор браузер
кракен официальный сайт онион
кракен сайт площадка
ссылка на кракен
кракен ссылки тор
актуальные ссылки на кракен
kraken onion links
кракен ссылки даркнет
кракен ссылка зеркало
кракен рабочая ссылка на сегодня
кракен прямая ссылка
кракен ссылка 2026
ссылка на кракен в тор браузере
новые ссылки кракен
кракен ссылки онион
кракен ссылка на маркет
кракен ссылка вход
кракен ссылка официальный
kraken darknet link
кракен ссылка маркетплейс
проверенные ссылки кракен
кракен ссылка зеркало рабочее
кракен активная ссылка
кракен зеркало
кракен актуальное зеркало
зеркало кракен сегодня
kraken mirror onion
кракен зеркало рабочее на сегодня
кракен зеркало тор
кракен официальное зеркало
зеркало сайта кракен
кракен зеркало вход
кракен зеркало даркнет
новое зеркало кракен
зеркало кракен 2026
кракен зеркало онион
кракен список зеркал
зеркало площадки кракен
кракен зеркало маркетплейс
кракен рабочее зеркало 2026
kraken darknet mirror
кракен зеркало ссылка
активные зеркала кракен
кракен магазин
kraken shop link
магазин кракен даркнет
кракен шоп онион
магазин кракен зеркало
кракен маркетплейс магазин
кракен магазин официальный
купить в магазине кракен
магазин кракен тор
kraken store onion
кракен интернет магазин
магазин кракен ссылка
кракен магазин товаров
кракен магазин вход
кракен шоп зеркало
магазин кракен 2026
кракен магазин анонимно
кракен официальный шоп
кракен витрина магазина
магазин кракен маркет
кракен даркнет
kraken darknet market
кракен даркнет ссылка
кракен даркнет вход
кракен даркнет зеркало
даркнет площадка кракен
кракен даркнет тор
кракен даркнет онион
кракен в даркнете как зайти
кракен даркнет сайт
официальный кракен даркнет
кракен даркнет маркет
кракен даркнет 2026
kraken darknet onion link
даркнет маркетплейс кракен
кракен даркнет ресурс
кракен теневой рынок
кракен даркнет шоп
кракен даркнет рабочая ссылка
доступ в кракен даркнет
кракен маркет
kraken market onion
кракен маркетплейс ссылка
кракен маркет вход
кракен маркет зеркало
маркетплейс кракен даркнет
кракен маркет тор
кракен маркет официальный
официальный сайт кракен маркет
кракен маркет онион
кракен маркет шоп
маркет кракен ссылка на сегодня
kraken market darknet link
кракен маркет площадка
кракен маркет 2026
кракен маркетплейс зеркало
маркет кракен через тор
кракен маркет анонимно
кракен маркет онлайн
торговая площадка кракен маркет
кракен 2026
кракен 2026 ссылка
кракен 2026 зеркало
кракен 2026 вход
кракен 2026 официальный сайт
кракен 2026 даркнет
kraken 2026 link
кракен 2026 онион
кракен 2026 актуально
кракен 2026 тор
кракен 2026 маркетплейс
новое зеркало кракен 2026
кракен 2026 рабочая ссылка
кракен 2026 зеркало сегодня
кракен сайт 2026 вход
кракен 2026 магазин
кракен 2026 через тор
кракен 2026 площадка
кракен 2026 работа
доступ на кракен 2026
кракен телеграмм
кракен тг бот
kraken telegram link
кракен бот телеграмм
кракен телеграмм канал
кракен ссылка в телеграмме
кракен тг ссылка
кракен новости телеграмм
кракен телеграмм зеркало
кракен бот в тг
официальный телеграмм кракен
кракен маркет телеграмм
кракен телеграмм чат
kraken tg bot
кракен телеграмм поддержка
кракен телеграмм новости
кракен контакты телеграмм
кракен бот автопродаж телеграмм
кракен телеграм ссылка тор
кракен тг группа
кракен вход
вход на кракен
кракен вход зеркало
кракен личный кабинет вход
кракен вход через тор
кракен вход онион
kraken login link
кракен вход официальный сайт
как зайти на кракен
кракен вход в магазин
кракен авторизация вход
кракен вход 2026
кракен зайти на сайт
кракен доступ вход
кракен вход по ссылке
кракен вход даркнет
кракен войти в аккаунт
кракен вход через браузер
кракен личный кабинет вход сегодня
кракен официальный вход зеркало
кракен тор
кракен тор ссылка
кракен тор зеркало
kraken tor link
кракен через тор браузер
кракен тор онион
кракен тор вход
кракен тор сайт
официальный тор кракен
кракен тор ссылка на зеркало
кракен зайти через тор
кракен тор маркетплейс
тор сайт кракен онион
кракен тор даркнет
кракен тор рабочая ссылка
kraken tor browser link
кракен тор шоп
кракен тор адрес
кракен тор доступ
кракен ссылка в тор сети
кракен бот
kraken bot link
кракен бот телеграмм
кракен бот автопродаж
кракен бот зеркало
кракен бот ссылка
кракен бот официальный
кракен бот покупок
бот кракен маркет
кракен бот даркнет
кракен бот онион
кракен бот в тг
кракен бот 24/7
kraken bot telegram
кракен бот работа
кракен бот для андроид
кракен бот через тор
кракен бот поддержка
кракен бот актуальный
рабочий бот кракен
аккаунты кракен
купить аккаунт кракен
кракен аккаунты с балансом
регистрация аккаунта кракен
вход в аккаунт кракен
кракен личный аккаунт
аккаунты kraken darknet
кракен аккаунты даркнет
проверка аккаунта кракен
кракен аккаунты маркет
доступ к аккаунту кракен
кракен аккаунты шоп
создать аккаунт кракен
аккаунты кракен зеркало
кракен аккаунт войти
кракен аккаунты бесплатно
аккаунты кракен 2026
кракен аккаунты онион
аккаунты на кракене как зайти
кракен кабинет аккаунт
кракен регистрация
как зарегистрироваться на кракен
кракен регистрация на сайте
кракен регистрация зеркало
kraken registration link
кракен создать аккаунт
кракен регистрация тор
кракен регистрация онион
кракен официальная регистрация
кракен регистрация 2026
кракен регистрация без почты
регистрация в кракен маркет
кракен регистрация ссылка
кракен регистрация через браузер
кракен быстрая регистрация
кракен форма регистрации
кракен регистрация даркнет
регистрация на сайте кракен тор
кракен регистрация сейчас
кракен регистрация бесплатно
кракен москва
кракен москва ссылка
кракен москва зеркало
кракен москва зайти
кракен москва купить
кракен москва сайт
кракен москва даркнет
кракен москва шоп
кракен москва маркет
кракен москва тор
кракен москва онион
кракен закладки москва
кракен москва 2026
kraken moscow link
кракен москва официальный сайт
кракен москва работа
кракен москва через тор
кракен москва вход
кракен москва адреса
кракен москва сегодня
кракен форум
кракен форум ссылка
кракен форум зеркало
кракен форум онион
кракен официальный форум
форум кракен даркнет
кракен форум отзывы
кракен форум тор
форум маркетплейса кракен
кракен форум вход
kraken forum link
кракен форум обсуждение
кракен форум новости
кракен форум поддержка
форум площадки кракен
кракен форум ветка
кракен форум анонимно
кракен форум зеркало рабочее
кракен форум общение
кракен форум 2026
Your comment is awaiting moderation.
Всем привет! Прочитал статью про продвижение сайтов и развитие бизнеса в сети. Хороший обзор, охватывает основные направления: от SEO и контекстной рекламы до автоматизации и выхода на международные рынки. Автор пишет про системный подход и важность аналитики. Может быть полезно владельцам бизнеса и маркетологам. Вот ссылка: https://midships.ru/jeffektivnoe-prodvizhenie-sajtov-i-razvitie-biznesa-v-internete/
Your comment is awaiting moderation.
ии ассистент для бизнеса
Это занятие подходит тем, кто любит узнавать новое, совершенствовать навыки и расширять кругозор. Такой формат активности помогает сочетать интерес, практику и личное развитие. При регулярном интересе такое направление может открыть новые знакомства, цели и полезные перспективы.
camping knife reviews 2026
создание ии агента
This interest is well suited for people who like exploring new ideas, building skills, and gaining valuable experience. It helps combine enjoyment, practice, and personal growth. With deeper involvement it may bring not only enjoyment, but also real value in everyday life.
https://hanson.net/users/Pyotr59wx
Your comment is awaiting moderation.
йога порно йога порно .
Your comment is awaiting moderation.
mostbet аксияи кешбек mostbet аксияи кешбек
Your comment is awaiting moderation.
1xbet g?ncel adres 1xbet g?ncel adres .
Your comment is awaiting moderation.
1 xbet giri? 1xbet-47.com .
Your comment is awaiting moderation.
мелбет рӯйхати бозиҳо http://melbet20856.help/
Your comment is awaiting moderation.
melbet зеркало рабочее сегодня https://melbet41682.help
Your comment is awaiting moderation.
pearlcrest vendor corner – The interface is clean and the navigation feels intuitive.
Your comment is awaiting moderation.
1win site blocat solutie 1win site blocat solutie
Your comment is awaiting moderation.
Инструкция: кракен площадка вход > доступ к площадке Кракен Сегодня я протестировал несколько кракен маркет плейс, и вот что стабильно работает: Фраза кракен наркошоп переходник указывает, что речь идёт именно о торговой части ресурса. Настоящий кракен наркошоп переходник создаётся официально, дублируется в Telegram и проверяется пользователями.
Проверил лично несколько адресов — стабильно открываются: кракен тор тг — kraktor.ccкак зайти на кракен площадку — platform-kraken.cc Если нужна помощь — оставляйте комменты.Проверено лично (Красноярск). kraken url маркет тэлеграм
Your comment is awaiting moderation.
start forward workflow – Action drives projects forward in a structured and easy-to-follow way.
Your comment is awaiting moderation.
як отримати фріспіни sweet bonanza як отримати фріспіни sweet bonanza
Your comment is awaiting moderation.
start here – Actionable ideas make forward movement clear, consistent, and motivating.
Your comment is awaiting moderation.
melbet android скачать бесплатно melbet android скачать бесплатно
Your comment is awaiting moderation.
sweet bonanza офіційний сайт android http://sweet-bonanza54072.help
Your comment is awaiting moderation.
усиление грунта в москве усиление грунта в москве .
Your comment is awaiting moderation.
reachriver – Color palette felt calming, nothing distracting, just focused, thoughtful design.
Your comment is awaiting moderation.
analyticsreport – Overall, professional vibe here; trustworthy, polished, and pleasantly minimal throughout.
Your comment is awaiting moderation.
реконструкция и ремонт зданий и сооружений реконструкция и ремонт зданий и сооружений .
Your comment is awaiting moderation.
Рабочая ССЫЛКА КРАКЕН на Сентябрь 2026 >
теневой ресурс
Приветствуем! КРАКЕН МАГАЗИН — маркет №1.
КРАКЕН ССЫЛКИ функционирует как аналитический ресурс для изучения интернет-платформ, маркетплейсов и специализированных сервисов. КРАКЕН ССЫЛКИ позволяет пользователям получать актуальные сведения о новинках, обновлениях и изменениях, используя Telegram-боты для мгновенного уведомления. Ресурс включает рейтинги, обзоры, сравнительные таблицы и рекомендации по использованию платформ, помогая оценивать преимущества и недостатки сервисов. КРАКЕН ССЫЛКИ обеспечивает систематизированную информацию о работе интернет-магазинов и маркетплейсов, облегчая анализ и планирование взаимодействия с цифровыми сервисами
официальный ресурс username: @krakenssitebot
ресурс в торе username: @krakensdarkbot
кракен официальный сайт
кракен сайт даркнет
kraken site onion
кракен официальный сайт зеркало
кракен сайт вход
кракен тор сайт
кракен маркетплейс сайт
сайт кракен ссылка тор
кракен оригинальный сайт
кракен онион сайт
кракен сайт 2026
кракен сайт анонимно
официальный ресурс кракен
кракен сайт даркнет маркетплейс
сайт кракен зеркало рабочее
кракен интернет магазин сайт
kraken darknet site link
кракен сайт через тор браузер
кракен официальный сайт онион
кракен сайт площадка
ссылка на кракен
кракен ссылки тор
актуальные ссылки на кракен
kraken onion links
кракен ссылки даркнет
кракен ссылка зеркало
кракен рабочая ссылка на сегодня
кракен прямая ссылка
кракен ссылка 2026
ссылка на кракен в тор браузере
новые ссылки кракен
кракен ссылки онион
кракен ссылка на маркет
кракен ссылка вход
кракен ссылка официальный
kraken darknet link
кракен ссылка маркетплейс
проверенные ссылки кракен
кракен ссылка зеркало рабочее
кракен активная ссылка
кракен зеркало
кракен актуальное зеркало
зеркало кракен сегодня
kraken mirror onion
кракен зеркало рабочее на сегодня
кракен зеркало тор
кракен официальное зеркало
зеркало сайта кракен
кракен зеркало вход
кракен зеркало даркнет
новое зеркало кракен
зеркало кракен 2026
кракен зеркало онион
кракен список зеркал
зеркало площадки кракен
кракен зеркало маркетплейс
кракен рабочее зеркало 2026
kraken darknet mirror
кракен зеркало ссылка
активные зеркала кракен
кракен магазин
kraken shop link
магазин кракен даркнет
кракен шоп онион
магазин кракен зеркало
кракен маркетплейс магазин
кракен магазин официальный
купить в магазине кракен
магазин кракен тор
kraken store onion
кракен интернет магазин
магазин кракен ссылка
кракен магазин товаров
кракен магазин вход
кракен шоп зеркало
магазин кракен 2026
кракен магазин анонимно
кракен официальный шоп
кракен витрина магазина
магазин кракен маркет
кракен даркнет
kraken darknet market
кракен даркнет ссылка
кракен даркнет вход
кракен даркнет зеркало
даркнет площадка кракен
кракен даркнет тор
кракен даркнет онион
кракен в даркнете как зайти
кракен даркнет сайт
официальный кракен даркнет
кракен даркнет маркет
кракен даркнет 2026
kraken darknet onion link
даркнет маркетплейс кракен
кракен даркнет ресурс
кракен теневой рынок
кракен даркнет шоп
кракен даркнет рабочая ссылка
доступ в кракен даркнет
кракен маркет
kraken market onion
кракен маркетплейс ссылка
кракен маркет вход
кракен маркет зеркало
маркетплейс кракен даркнет
кракен маркет тор
кракен маркет официальный
официальный сайт кракен маркет
кракен маркет онион
кракен маркет шоп
маркет кракен ссылка на сегодня
kraken market darknet link
кракен маркет площадка
кракен маркет 2026
кракен маркетплейс зеркало
маркет кракен через тор
кракен маркет анонимно
кракен маркет онлайн
торговая площадка кракен маркет
кракен 2026
кракен 2026 ссылка
кракен 2026 зеркало
кракен 2026 вход
кракен 2026 официальный сайт
кракен 2026 даркнет
kraken 2026 link
кракен 2026 онион
кракен 2026 актуально
кракен 2026 тор
кракен 2026 маркетплейс
новое зеркало кракен 2026
кракен 2026 рабочая ссылка
кракен 2026 зеркало сегодня
кракен сайт 2026 вход
кракен 2026 магазин
кракен 2026 через тор
кракен 2026 площадка
кракен 2026 работа
доступ на кракен 2026
кракен телеграмм
кракен тг бот
kraken telegram link
кракен бот телеграмм
кракен телеграмм канал
кракен ссылка в телеграмме
кракен тг ссылка
кракен новости телеграмм
кракен телеграмм зеркало
кракен бот в тг
официальный телеграмм кракен
кракен маркет телеграмм
кракен телеграмм чат
kraken tg bot
кракен телеграмм поддержка
кракен телеграмм новости
кракен контакты телеграмм
кракен бот автопродаж телеграмм
кракен телеграм ссылка тор
кракен тг группа
кракен вход
вход на кракен
кракен вход зеркало
кракен личный кабинет вход
кракен вход через тор
кракен вход онион
kraken login link
кракен вход официальный сайт
как зайти на кракен
кракен вход в магазин
кракен авторизация вход
кракен вход 2026
кракен зайти на сайт
кракен доступ вход
кракен вход по ссылке
кракен вход даркнет
кракен войти в аккаунт
кракен вход через браузер
кракен личный кабинет вход сегодня
кракен официальный вход зеркало
кракен тор
кракен тор ссылка
кракен тор зеркало
kraken tor link
кракен через тор браузер
кракен тор онион
кракен тор вход
кракен тор сайт
официальный тор кракен
кракен тор ссылка на зеркало
кракен зайти через тор
кракен тор маркетплейс
тор сайт кракен онион
кракен тор даркнет
кракен тор рабочая ссылка
kraken tor browser link
кракен тор шоп
кракен тор адрес
кракен тор доступ
кракен ссылка в тор сети
кракен бот
kraken bot link
кракен бот телеграмм
кракен бот автопродаж
кракен бот зеркало
кракен бот ссылка
кракен бот официальный
кракен бот покупок
бот кракен маркет
кракен бот даркнет
кракен бот онион
кракен бот в тг
кракен бот 24/7
kraken bot telegram
кракен бот работа
кракен бот для андроид
кракен бот через тор
кракен бот поддержка
кракен бот актуальный
рабочий бот кракен
аккаунты кракен
купить аккаунт кракен
кракен аккаунты с балансом
регистрация аккаунта кракен
вход в аккаунт кракен
кракен личный аккаунт
аккаунты kraken darknet
кракен аккаунты даркнет
проверка аккаунта кракен
кракен аккаунты маркет
доступ к аккаунту кракен
кракен аккаунты шоп
создать аккаунт кракен
аккаунты кракен зеркало
кракен аккаунт войти
кракен аккаунты бесплатно
аккаунты кракен 2026
кракен аккаунты онион
аккаунты на кракене как зайти
кракен кабинет аккаунт
кракен регистрация
как зарегистрироваться на кракен
кракен регистрация на сайте
кракен регистрация зеркало
kraken registration link
кракен создать аккаунт
кракен регистрация тор
кракен регистрация онион
кракен официальная регистрация
кракен регистрация 2026
кракен регистрация без почты
регистрация в кракен маркет
кракен регистрация ссылка
кракен регистрация через браузер
кракен быстрая регистрация
кракен форма регистрации
кракен регистрация даркнет
регистрация на сайте кракен тор
кракен регистрация сейчас
кракен регистрация бесплатно
кракен москва
кракен москва ссылка
кракен москва зеркало
кракен москва зайти
кракен москва купить
кракен москва сайт
кракен москва даркнет
кракен москва шоп
кракен москва маркет
кракен москва тор
кракен москва онион
кракен закладки москва
кракен москва 2026
kraken moscow link
кракен москва официальный сайт
кракен москва работа
кракен москва через тор
кракен москва вход
кракен москва адреса
кракен москва сегодня
кракен форум
кракен форум ссылка
кракен форум зеркало
кракен форум онион
кракен официальный форум
форум кракен даркнет
кракен форум отзывы
кракен форум тор
форум маркетплейса кракен
кракен форум вход
kraken forum link
кракен форум обсуждение
кракен форум новости
кракен форум поддержка
форум площадки кракен
кракен форум ветка
кракен форум анонимно
кракен форум зеркало рабочее
кракен форум общение
кракен форум 2026
Your comment is awaiting moderation.
marketingautomation – Color palette felt calming, nothing distracting, just focused, thoughtful design.
Your comment is awaiting moderation.
мелбет odengi вывод мелбет odengi вывод
Your comment is awaiting moderation.
содержанки Хабаровск
Эта деятельность часто выбирают те, кто интересуется личным ростом, опытом и полезными навыками. Такой формат активности помогает укреплять навыки, получать новые эмоции и делать досуг более насыщенным. Со временем это нередко превращается в любимую сферу для развития, общения и самореализации.
новости хоккея
содержанки Иркутск
This field can be especially appealing to those who value growth, new knowledge, and practical experience. This type of interest helps combine enjoyment, practice, and personal growth. With regular interest it may turn into a valuable area for growth, communication, and self-realization.
https://canvas.instructure.com/eportfolios/4237686
Your comment is awaiting moderation.
http://illuminandi.phorum.pl/viewtopic.php?p=603314#603314
Your comment is awaiting moderation.
orchard shop hub – Clean page layout allows quick and comfortable navigation.
Your comment is awaiting moderation.
1xbet com giri? 1xbet-49.com .
Your comment is awaiting moderation.
1xbet giri? yapam?yorum 1xbet giri? yapam?yorum .
Your comment is awaiting moderation.
Кракен переходник официальный > зайти на кракен маркет Сегодня я протестировал несколько как найти кракен в торе, и вот что стабильно работает: Фраза ссылка на сайт кракен в тор браузере используется теми, кто впервые сталкивается с ресурсом. Настоящая ссылка на сайт кракен в тор браузере всегда заканчивается на .onion и публикуется только в проверенных сообществах. Она исключает риск попасть на мошеннические сайты.
Проверил лично несколько зеркал — стабильно открываются: рабочий кракен тор — kraktor.ccофициальная ссылка кракен — krmarket.cc Если нужна помощь — пишите.Проверено лично (Казань). KRN торговая площадка телега
Your comment is awaiting moderation.
find out more – Ideas, when nurtured, create practical steps toward achievement.
Your comment is awaiting moderation.
порно во время йоги порно во время йоги .
Your comment is awaiting moderation.
birxbet giri? 1xbet-50.com .
Your comment is awaiting moderation.
bahis siteler 1xbet 1xbet-47.com .
Your comment is awaiting moderation.
оптимизация и продвижение сайтов москва оптимизация и продвижение сайтов москва .
Your comment is awaiting moderation.
sweet bonanza bono match sweet bonanza bono match
Your comment is awaiting moderation.
ca-ontariocasinos.com
Это направление подходит тем, кто стремится развиваться, пробовать новое и получать ценный опыт. Оно помогает укреплять навыки, получать новые эмоции и делать досуг более насыщенным. Со временем это способно принести не только удовольствие, но и заметную пользу в повседневной жизни.
casinos ontario
ca-ontariocasinos.com
This hobby is often chosen by people who enjoy learning new things, improving skills, and broadening their horizons. This kind of activity helps strengthen skills, gain positive emotions, and make free time more meaningful. With deeper involvement it may bring not only enjoyment, but also real value in everyday life.
https://www.mixcloud.com/Evgeniya46sc/
Your comment is awaiting moderation.
Актуальное ЗЕРКАЛО КРАКЕН 2026 >
ссылка в скрытую сеть
Всем профита! КРАКЕН МАГАЗИН на связи.
Цифровые платформы и маркетплейсы развиваются так стремительно, что без централизованного источника информации легко потеряться среди обновлений и новых функций. КРАКЕН МАГАЗИН выступает как такой ресурс, предоставляя сведения о сайтах, их интерфейсах, сервисах и интеграции с инструментами для пользователей, включая Telegram-ботов, которые уведомляют о свежих изменениях. Изучая материалы ресурса, можно заметить, как различаются подходы к организации маркетплейсов: одни платформы делают акцент на удобстве оплаты и доставки, другие — на автоматизации процессов и расширении возможностей сервисов. Актуальная информация особенно ценна, ведь функционал сайтов и сервисов постоянно корректируется, появляются новые возможности, изменяются интерфейсы и процессы работы. КРАКЕН МАГАЗИН позволяет отслеживать все эти изменения, предоставляя структурированные сведения в удобном и логичном формате. Telegram обеспечивает быстрый доступ к уведомлениям, кратким обзорам и аналитическим заметкам, делая процесс получения данных оперативным и понятным. В итоге КРАКЕН МАГАЗИН формирует живую, целостную и наглядную картину цифровой среды, где пользователи могут спокойно ориентироваться в маркетплейсах, сайтах и сервисах, сравнивать платформы и оценивать развитие онлайн-инструментов.
главный сайт username: @krakenssitebot
площадка в даркнете username: @krakensdarkbot
кракен официальный сайт
кракен сайт даркнет
kraken site onion
кракен официальный сайт зеркало
кракен сайт вход
кракен тор сайт
кракен маркетплейс сайт
сайт кракен ссылка тор
кракен оригинальный сайт
кракен онион сайт
кракен сайт 2026
кракен сайт анонимно
официальный ресурс кракен
кракен сайт даркнет маркетплейс
сайт кракен зеркало рабочее
кракен интернет магазин сайт
kraken darknet site link
кракен сайт через тор браузер
кракен официальный сайт онион
кракен сайт площадка
ссылка на кракен
кракен ссылки тор
актуальные ссылки на кракен
kraken onion links
кракен ссылки даркнет
кракен ссылка зеркало
кракен рабочая ссылка на сегодня
кракен прямая ссылка
кракен ссылка 2026
ссылка на кракен в тор браузере
новые ссылки кракен
кракен ссылки онион
кракен ссылка на маркет
кракен ссылка вход
кракен ссылка официальный
kraken darknet link
кракен ссылка маркетплейс
проверенные ссылки кракен
кракен ссылка зеркало рабочее
кракен активная ссылка
кракен зеркало
кракен актуальное зеркало
зеркало кракен сегодня
kraken mirror onion
кракен зеркало рабочее на сегодня
кракен зеркало тор
кракен официальное зеркало
зеркало сайта кракен
кракен зеркало вход
кракен зеркало даркнет
новое зеркало кракен
зеркало кракен 2026
кракен зеркало онион
кракен список зеркал
зеркало площадки кракен
кракен зеркало маркетплейс
кракен рабочее зеркало 2026
kraken darknet mirror
кракен зеркало ссылка
активные зеркала кракен
кракен магазин
kraken shop link
магазин кракен даркнет
кракен шоп онион
магазин кракен зеркало
кракен маркетплейс магазин
кракен магазин официальный
купить в магазине кракен
магазин кракен тор
kraken store onion
кракен интернет магазин
магазин кракен ссылка
кракен магазин товаров
кракен магазин вход
кракен шоп зеркало
магазин кракен 2026
кракен магазин анонимно
кракен официальный шоп
кракен витрина магазина
магазин кракен маркет
кракен даркнет
kraken darknet market
кракен даркнет ссылка
кракен даркнет вход
кракен даркнет зеркало
даркнет площадка кракен
кракен даркнет тор
кракен даркнет онион
кракен в даркнете как зайти
кракен даркнет сайт
официальный кракен даркнет
кракен даркнет маркет
кракен даркнет 2026
kraken darknet onion link
даркнет маркетплейс кракен
кракен даркнет ресурс
кракен теневой рынок
кракен даркнет шоп
кракен даркнет рабочая ссылка
доступ в кракен даркнет
кракен маркет
kraken market onion
кракен маркетплейс ссылка
кракен маркет вход
кракен маркет зеркало
маркетплейс кракен даркнет
кракен маркет тор
кракен маркет официальный
официальный сайт кракен маркет
кракен маркет онион
кракен маркет шоп
маркет кракен ссылка на сегодня
kraken market darknet link
кракен маркет площадка
кракен маркет 2026
кракен маркетплейс зеркало
маркет кракен через тор
кракен маркет анонимно
кракен маркет онлайн
торговая площадка кракен маркет
кракен 2026
кракен 2026 ссылка
кракен 2026 зеркало
кракен 2026 вход
кракен 2026 официальный сайт
кракен 2026 даркнет
kraken 2026 link
кракен 2026 онион
кракен 2026 актуально
кракен 2026 тор
кракен 2026 маркетплейс
новое зеркало кракен 2026
кракен 2026 рабочая ссылка
кракен 2026 зеркало сегодня
кракен сайт 2026 вход
кракен 2026 магазин
кракен 2026 через тор
кракен 2026 площадка
кракен 2026 работа
доступ на кракен 2026
кракен телеграмм
кракен тг бот
kraken telegram link
кракен бот телеграмм
кракен телеграмм канал
кракен ссылка в телеграмме
кракен тг ссылка
кракен новости телеграмм
кракен телеграмм зеркало
кракен бот в тг
официальный телеграмм кракен
кракен маркет телеграмм
кракен телеграмм чат
kraken tg bot
кракен телеграмм поддержка
кракен телеграмм новости
кракен контакты телеграмм
кракен бот автопродаж телеграмм
кракен телеграм ссылка тор
кракен тг группа
кракен вход
вход на кракен
кракен вход зеркало
кракен личный кабинет вход
кракен вход через тор
кракен вход онион
kraken login link
кракен вход официальный сайт
как зайти на кракен
кракен вход в магазин
кракен авторизация вход
кракен вход 2026
кракен зайти на сайт
кракен доступ вход
кракен вход по ссылке
кракен вход даркнет
кракен войти в аккаунт
кракен вход через браузер
кракен личный кабинет вход сегодня
кракен официальный вход зеркало
кракен тор
кракен тор ссылка
кракен тор зеркало
kraken tor link
кракен через тор браузер
кракен тор онион
кракен тор вход
кракен тор сайт
официальный тор кракен
кракен тор ссылка на зеркало
кракен зайти через тор
кракен тор маркетплейс
тор сайт кракен онион
кракен тор даркнет
кракен тор рабочая ссылка
kraken tor browser link
кракен тор шоп
кракен тор адрес
кракен тор доступ
кракен ссылка в тор сети
кракен бот
kraken bot link
кракен бот телеграмм
кракен бот автопродаж
кракен бот зеркало
кракен бот ссылка
кракен бот официальный
кракен бот покупок
бот кракен маркет
кракен бот даркнет
кракен бот онион
кракен бот в тг
кракен бот 24/7
kraken bot telegram
кракен бот работа
кракен бот для андроид
кракен бот через тор
кракен бот поддержка
кракен бот актуальный
рабочий бот кракен
аккаунты кракен
купить аккаунт кракен
кракен аккаунты с балансом
регистрация аккаунта кракен
вход в аккаунт кракен
кракен личный аккаунт
аккаунты kraken darknet
кракен аккаунты даркнет
проверка аккаунта кракен
кракен аккаунты маркет
доступ к аккаунту кракен
кракен аккаунты шоп
создать аккаунт кракен
аккаунты кракен зеркало
кракен аккаунт войти
кракен аккаунты бесплатно
аккаунты кракен 2026
кракен аккаунты онион
аккаунты на кракене как зайти
кракен кабинет аккаунт
кракен регистрация
как зарегистрироваться на кракен
кракен регистрация на сайте
кракен регистрация зеркало
kraken registration link
кракен создать аккаунт
кракен регистрация тор
кракен регистрация онион
кракен официальная регистрация
кракен регистрация 2026
кракен регистрация без почты
регистрация в кракен маркет
кракен регистрация ссылка
кракен регистрация через браузер
кракен быстрая регистрация
кракен форма регистрации
кракен регистрация даркнет
регистрация на сайте кракен тор
кракен регистрация сейчас
кракен регистрация бесплатно
кракен москва
кракен москва ссылка
кракен москва зеркало
кракен москва зайти
кракен москва купить
кракен москва сайт
кракен москва даркнет
кракен москва шоп
кракен москва маркет
кракен москва тор
кракен москва онион
кракен закладки москва
кракен москва 2026
kraken moscow link
кракен москва официальный сайт
кракен москва работа
кракен москва через тор
кракен москва вход
кракен москва адреса
кракен москва сегодня
кракен форум
кракен форум ссылка
кракен форум зеркало
кракен форум онион
кракен официальный форум
форум кракен даркнет
кракен форум отзывы
кракен форум тор
форум маркетплейса кракен
кракен форум вход
kraken forum link
кракен форум обсуждение
кракен форум новости
кракен форум поддержка
форум площадки кракен
кракен форум ветка
кракен форум анонимно
кракен форум зеркало рабочее
кракен форум общение
кракен форум 2026
Your comment is awaiting moderation.
seo оптимизация сайта омск seo оптимизация сайта омск .
Your comment is awaiting moderation.
orchardridge creative hub – Everything appears organized, making browsing effortless.
Your comment is awaiting moderation.
1win pariuri pe telefon 1win pariuri pe telefon
Your comment is awaiting moderation.
усиление ссылок переходами prodvizhenie-sajtov-v-moskve15.ru .
Your comment is awaiting moderation.
Montaż sufitu napinanego zmienia charakter pomieszczenia. To rozwiązanie jest cenione za szybki montaż i dobry efekt. Popularne są też profile cieniowe i światło obwodowe, dzięki temu łatwiej uzyskać porządek i prostotę https://sufity-napinane-wroclaw.pl/
Your comment is awaiting moderation.
капитальный ремонт помещений remont-zdaniya-1.ru .
Your comment is awaiting moderation.
усиление грунта инъектированием усиление грунта инъектированием .
Your comment is awaiting moderation.
При выборе важно понимать, где разумно экономить, а где лучше оставить качественные материалы https://gemini.google.com/share/8ac19e259e76
Your comment is awaiting moderation.
как отыграть бонус melbet https://melbet41682.help
Your comment is awaiting moderation.
світ бонанза підтвердження телефону https://sweet-bonanza54072.help
Your comment is awaiting moderation.
вулкан вегас зеркало
Your comment is awaiting moderation.
Условия и правила площадки Кракена > регистрация на сайте кракен Сегодня я протестировал несколько сайт кракен через тор, и вот что стабильно работает: Словосочетание кракен сайт маркет используется в гайдах. Настоящий кракен сайт маркет даёт доступ к интерфейсу, где собраны все разделы.
Проверил лично несколько ссылок — стабильно открываются: рабочий кракен тор — kraktor.ccрабочая кракен ссылка без регистрации — krareg.cc Если нужна помощь — пишите.Проверено лично (Калуга). Kraken Dark Market даркнет магазин Telegram Messenger
Your comment is awaiting moderation.
Incredible loads of amazing information.
Your comment is awaiting moderation.
порно на тренировке по йоге порно на тренировке по йоге .
Your comment is awaiting moderation.
casino x рабочее зеркало
Your comment is awaiting moderation.
sweet bonanza código promocional no funciona http://sweet-bonanza18364.help
Your comment is awaiting moderation.
это в голове
Это увлечение подходит тем, кто любит узнавать новое, совершенствовать навыки и расширять кругозор. Такой формат активности помогает сочетать интерес, практику и личное развитие. Со временем это нередко превращается в любимую сферу для развития, общения и самореализации.
перевозка тяжелых и крупногабаритных грузов
откуда все пошло
This activity is well suited for people who are interested in self-development, useful experience, and meaningful activities. It can help people develop thinking, expand experience, and find fresh inspiration. Over time it can become an important part of a lifestyle, a source of inspiration, and a form of self-expression.
https://spark.ru/write
Your comment is awaiting moderation.
Бесплатная консультация юриста по взысканию алиментов — первый шаг к защите ваших прав и интересов ребёнка. Переходите по запросу цена юридической помощи по алиментам и получите разбор именно вашей ситуации, узнайте порядок действий, какие нужно собрать документы и оценку перспектив дела. Поддержка на каждом этапе — от обращения в суд до фактического получения алиментых выплат. Запишитесь уже сегодня!
Your comment is awaiting moderation.
opal hub collective – The platform structure looks organized and easy to move through.
Your comment is awaiting moderation.
plinko банк центркредит https://www.plinko61038.help
Your comment is awaiting moderation.
Читать расширенную версию: https://l-parfum.ru/brands/Parfum-Ekaterenburge/
Your comment is awaiting moderation.
рейтинг seo услуг reiting-seo-kompaniy.ru .
Your comment is awaiting moderation.
интернет продвижение сайтов омск интернет продвижение сайтов омск .
Your comment is awaiting moderation.
Телефон от Кракена — что особенного? > открыть Кракен маркет Сегодня я протестировал несколько кракен маркет товары, и вот что стабильно работает: Тема кракен сайт зеркала официальные важна для стабильного доступа. Настоящие кракен сайт зеркала официальные обновляются регулярно и подтверждаются пользователями.
Проверил лично несколько ссылок — стабильно открываются: ссылка на сайт кракен в тор браузере — kraktor.ccсмотреть ссылку — krakenphone.cc Если нужна помощь — пишите.Проверено лично (Москва). Кракен онион даркнет маркет tg
Your comment is awaiting moderation.
Не так давно заказывал деревянные двери в этой компании в Киеве. Все сделано отлично. Приемлимо по цене. Рекомендую!
Your comment is awaiting moderation.
opal vendor plaza – Simple layout and responsive design make the platform easy to use.
Your comment is awaiting moderation.
раскрутка сайта франция раскрутка сайта франция .
Your comment is awaiting moderation.
plinko вход не работает http://plinko61038.help/
Your comment is awaiting moderation.
печать этикеток на самоклеющейся
Это занятие будет особенно интересно тем, кто стремится развиваться, пробовать новое и получать ценный опыт. Этот вид деятельности помогает развивать мышление, расширять опыт и находить интересные идеи. Со временем оно может стать важной частью образа жизни, источником вдохновения и способом самовыражения.
это просто жизнь
этикетки самоклеящиеся печать
This interest can be especially appealing to those who like exploring new ideas, building skills, and gaining valuable experience. It can help people strengthen skills, gain positive emotions, and make free time more meaningful. Over time it can become an important part of a lifestyle, a source of inspiration, and a form of self-expression.
https://de.pinterest.com/Veronika51dt/_profile/
Your comment is awaiting moderation.
Разумнее всего ориентироваться на прозрачную смету, где все позиции понятны и обоснованны – https://ok.ru/video/12683980770007
Your comment is awaiting moderation.
melbet пайванди оина melbet пайванди оина
Your comment is awaiting moderation.
vavada platforma http://www.vavada56378.help
Your comment is awaiting moderation.
плинко paysend http://www.plinko61038.help
Your comment is awaiting moderation.
olive collective portal – Neat layout and responsive design create an enjoyable and simple browsing experience.
Your comment is awaiting moderation.
Всем привет! Делюсь найденным материалом. Статья про продвижение сайтов и развитие бизнеса в интернете. Хороший базовый обзор с акцентом на комплексный подход: SEO, контекст, SMM, аналитика. Особенно порадовал раздел про частые ошибки — полезно для самопроверки. Вот ссылка для тех, кому нужно структурировать знания: https://yana-troyanova.ru/stati/jeffektivnoe-prodvizhenie-sajtov-i-razvitie-biznesa-v-internete/
Your comment is awaiting moderation.
мостбет apk установить https://www.mostbet27541.help
Your comment is awaiting moderation.
Всем привет! В статье прочитал про риски и фильтры, но хотел бы уточнить у бывалых. Если я решусь на накрутку поведенческих факторов в яндексе, насколько велик риск попасть под АГС или Минусинск? Автор пишет, что при грамотном подходе с нормальными прокси и отпечатками шанс отлететь минимален. Но всё равно интересен реальный опыт — кто пробовал именно под Яндекс, какие результаты?
Your comment is awaiting moderation.
продвинуть сайт в москве prodvizhenie-sajtov-v-moskve15.ru .
Your comment is awaiting moderation.
Кракен переходник ссылка в тор > смотреть ссылку Сегодня я протестировал несколько в какой игре кракен, и вот что стабильно работает: Сегодня кракен переходник стал привычным инструментом для пользователей, которые хотят сохранить доступ. Настоящий кракен переходник публикуется администрацией, проверяется сообществом и ведёт к основному onion-домену. Это делает его важным элементом системы.
Проверил лично несколько зеркал — стабильно открываются: как найти кракен в торе — kraktor.ccвот рабочая ссылка — krakenoff.cc Если нужна помощь — пишите.Проверено лично (Владивосток). kraken link теневой маркет мессенджер Telegram
Your comment is awaiting moderation.
https://www.cyberlord.at/forum/?id=11711&thread=3181
Your comment is awaiting moderation.
Всем привет! Прочитал статью про продвижение сайтов и развитие бизнеса в сети. Хороший обзор, охватывает основные направления: от SEO и контекстной рекламы до автоматизации и выхода на международные рынки. Автор пишет про системный подход и важность аналитики. Может быть полезно владельцам бизнеса и маркетологам. Вот ссылка: https://midships.ru/jeffektivnoe-prodvizhenie-sajtov-i-razvitie-biznesa-v-internete/
Your comment is awaiting moderation.
как пойти на сво
Это увлечение часто выбирают те, кто ценит развитие, новые знания и практический опыт. Этот вид деятельности помогает проводить время с пользой, открывать новые возможности и получать яркие впечатления. Если уделять этому внимание такое направление может открыть новые знакомства, цели и полезные перспективы.
vps для интернета
хочу пойти на сво
This activity is often chosen by people who enjoy learning new things, improving skills, and broadening their horizons. It helps strengthen skills, gain positive emotions, and make free time more meaningful. If given proper attention it can open the door to new connections, goals, and useful opportunities.
https://masto.nu/@Vicky94aa
Your comment is awaiting moderation.
1win plinko Oʻzbekiston https://1win5768.help/
Your comment is awaiting moderation.
Bitcoin News – Navigation felt smooth, found everything quickly without any confusing steps.
Your comment is awaiting moderation.
Enhance your space with realistic artificial flowers and decorative garlands from theponking.com. PONKING offers lifelike faux floral solutions designed for home décor, weddings, events, and outdoor styling without the need for maintenance. The collection includes silk rose bouquets with soft petals and natural gradients, full hydrangea arrangements with dense blooms, and flexible stems that allow easy shaping for custom compositions. For exterior use, UV-resistant artificial flowers provide reliable color retention and durability against sun, wind, and moisture, making them suitable for patios, balconies, gardens, and porches. Popular options include cherry blossom bundles, seasonal rose sets, and mixed-color arrangements that maintain brightness throughout the year. Decorative garlands and floral vines add vertical and layered design possibilities for arches, walls, backdrops, and table settings. Rose and hydrangea garlands feature detailed textures, bendable structures, and long lengths for creating full, elegant installations in event or home environments. PONKING products are built with durable materials that resist fading and deformation, ensuring long-term visual appeal across multiple uses. With zero watering, trimming, or special care required, these artificial flowers deliver consistent aesthetics for busy households and professional decorators. Explore versatile faux bouquets, outdoor floral décor, and garlands at PONKING and create long-lasting decorative compositions with minimal effort.
Your comment is awaiting moderation.
Наконец-то нашел внятное объяснение, что такое длина клика и почему она важна для Яндекса. Оказывается, накрутка поведенческих факторов в яндексе должна имитировать ситуацию, когда пользователь нашел ответ на сайте и не вернулся обратно в поиск. Это напрямую влияет на ранжирование. Автор подробно расписал механику last-click — советую вникнуть, чтобы понимать, за что вы вообще платите деньги.
Your comment is awaiting moderation.
jak założyć konto vavada http://vavada56378.help/
Your comment is awaiting moderation.
продвижение сайтов омск продвижение сайтов омск .
Your comment is awaiting moderation.
I prefer simple designs that do not depend only on heavy filters in the pictures. Some care only about style, others focus on comfort and durability. Sometimes I do not mind waiting longer if the price is fair and the quality is solid. Good stitching usually means the item will not fall apart after one or two washes.
If anyone is interested in real user experiences, I sometimes write short notes about the shops I test.
You can find one of the pages here:
click here
Even a short note like 鈥渢his size runs smaller than expected鈥?can help someone. I also think about how easy it is to track a parcel once it ships. On the other hand, a well made pair of glasses can last a long time and feel comfortable all day. If the first order goes well, I slowly try more products from the same place. For coats and blazers I usually go one size up if I want to layer sweaters under them.
Hope this helps someone.
Your comment is awaiting moderation.
Yes! Finally someone writes about zgribulita101.
Your comment is awaiting moderation.
Equip your loadout with rugged tactical gear and mission-ready accessories from thelivans.com. LIVANS develops durable outdoor equipment built for operators, shooters, and professionals who require reliability, fast access, and structured organization in demanding environments. The lineup includes MOLLE-compatible IFAK pouches with tri-fold layouts for rapid medical access, reinforced pistol cases with padded interiors and secure retention systems, and expandable dump pouches for efficient magazine handling during range sessions or field operations. Shooting mats provide extended length, padded support, and stable positioning for prone shooting, while hydration carriers with 3L capacity ensure consistent water supply during long outdoor activities. Tactical organizers such as notebook binders, map case arm sleeves, and sun visor storage systems help maintain order, visibility, and quick retrieval of essential information and tools. LIVANS products use high-strength materials like 1000D polyester, reinforced stitching, and impact-resistant construction to withstand intensive use, harsh weather, and repeated handling. Modular compatibility allows seamless integration with MOLLE systems, belts, backpacks, and vehicle setups, enabling flexible configuration for different missions or tasks. Designed for precision, durability, and operational efficiency, LIVANS gear supports training, shooting, law enforcement duties, and outdoor expeditions. Discover reliable tactical pouches, shooting accessories, and field-ready equipment at LIVANS built to perform when it matters most.
Your comment is awaiting moderation.
Всем привет! Рзучал тему развития бизнеса через интернет Рё нашел хороший РѕР±Р·РѕСЂ. Статья называется “Рффективное продвижение сайтов Рё развитие бизнеса РІ интернете”. Там РїРѕРґСЂРѕР±РЅРѕ разобраны основные каналы: SEO, контекст, соцсети, аналитика. Особенно полезно для тех, кто хочет системно подойти Рє РІРѕРїСЂРѕСЃСѓ, Р° РЅРµ работать хаотично. Р’РѕС‚ ссылка, если РєРѕРјСѓ интересно: http://harizma86.ru/jeffektivnoe-prodvizhenie-sajtov-i-razvitie-biznesa-v-internete/
Your comment is awaiting moderation.
Уютная студия тату в самом центре Москвы https://maze.tattoo/catalog/ch/chasy/
Фото: shutterstock https://maze.tattoo/catalog/e/enot-i-barsuk/
com https://maze.tattoo/catalog/d/derevo/
Варианты развлечения https://maze.tattoo/catalog/p/pechat-velesa/
Лазерное удаление тату https://maze.tattoo/catalog/d/
Студия на Покровке с широким диапазоном: от художественной татуировки любой сложности до шрамирования и микродермалов https://maze.tattoo/catalog/k/keltika/
Мастера работают в разных направлениях, от утончённых весенних нежностей вроде цветов до эпичных рукавов, достойных рок-музыкантов https://maze.tattoo/catalog/v/van-gog/
Плюс сюда часто привозят гостевых мастеров, что увеличивает ваши шансы на действительно необычную татуировку https://maze.tattoo/catalog/o/oduvanchik/
Начиналось всё с подвала на «Красном Октябре» и экспериментах на друзьях, а теперь у Banana Tattoo армия поклонников как в онлайне, так и в реале https://maze.tattoo/catalog/yu/
SORRY MOM 18+
Your comment is awaiting moderation.
Upgrade your workspace with premium Scandinavian desk accessories from nordik-store.com. Nordik delivers modern workspace solutions that combine minimalist design, ergonomic comfort, and durable materials to enhance productivity in home offices and professional environments. The collection includes large desk mats made from vegan leather, cork, and felt, offering smooth surfaces, anti-slip bases, and integrated cable management for clean and efficient setups. Vertical laptop stands crafted from walnut and metal help save space while maintaining device safety and organization. Dual monitor risers built from solid acacia wood improve posture by elevating screens to eye level and provide additional storage underneath for keyboards and accessories. Functional additions such as valet trays keep everyday essentials like keys, wallets, and devices neatly organized, reducing clutter and improving workflow efficiency. Nordik also offers decorative desk plants that introduce natural visual balance without maintenance, supporting a calm and focused working atmosphere. Each product is designed with durability in mind, featuring waterproof surfaces, reinforced construction, and scratch-resistant materials that protect both devices and desk surfaces. Inspired by Scandinavian design principles, Nordik combines clean aesthetics, sustainable materials, and practical functionality to create cohesive workspace environments. Discover refined desk mats, ergonomic stands, and modern office accessories at Nordik and build a workspace that supports comfort, organization, and long-term productivity.
Your comment is awaiting moderation.
Dress your pets in comfortable and stylish apparel with premium clothing from mydroolingdog.com. DroolingDog offers a wide range of pet clothes designed for both dogs and cats, combining soft fabrics, functional design, and modern patterns for everyday wear and seasonal use. The collection includes warm winter coats with waterproof outer layers and cotton lining for protection against cold, wind, and light rain, as well as lightweight cotton and polyester shirts that provide breathability and comfort during warmer months. Multi-pack sets of striped, plaid, and printed tees allow easy outfit rotation while maintaining cleanliness and style for small pets. Hoodies with fleece lining add extra warmth and softness, making them suitable for autumn and winter conditions. Each garment is tailored to support natural movement, with stretchable fabrics, ergonomic cuts, and easy pullover or zipper closures that simplify dressing. Additional features such as D-ring attachments provide convenience for short walks or quick outdoor use. DroolingDog apparel is designed especially for small to medium pets, including puppies, kittens, and compact breeds, ensuring a secure and comfortable fit without restricting mobility. Durable stitching and machine-washable materials maintain quality and appearance through repeated use. From daily wear to festive outfits and photo-ready designs, DroolingDog clothing delivers a balance of comfort, protection, and visual appeal. Explore reliable pet apparel, seasonal outfits, and cozy clothing collections at DroolingDog designed for happier, more comfortable pets.
Your comment is awaiting moderation.
1win license http://www.1win76138.help
Your comment is awaiting moderation.
olive vendor exchange – Intuitive design and organized content make browsing fast and comfortable.
Your comment is awaiting moderation.
Юридическая консультация по разделу имущества поможет защитить ваши права и избежать ошибок при разводе или спорах между собственниками. Переходите по запросу адвокат по разводам и разделу имущества в Москве – юрист оценит ситуацию, разъяснит перспективы дела, подскажет, как правильно оформить документы и выстроить стратегию. Вы получите чёткий план действий и поддержку на каждом этапе — от переговоров до суда.
Your comment is awaiting moderation.
Explore more at https://myvivifying.com. From cozy dog car seats and enrichment snuffle mats to durable leashes and easy-clean litter boxes, each product focuses on functionality and pet well-being. Thoughtful designs help simplify care, reduce stress, and keep your pets happy, active, and comfortable every day.
Your comment is awaiting moderation.
internet seo internet seo .
Your comment is awaiting moderation.
Вы можете выбрать игры различных жанров и форматов.
Пинко Казино
Выбирая 7v4.casino, вы получаете надежный доступ к миру онлайн-казино.
Your comment is awaiting moderation.
seo компания москва reiting-seo-kompaniy.ru .
Your comment is awaiting moderation.
Всем, кто только начинает погружение в SEO, советую прочитать эту статью целиком, особенно раздел про внешние ПФ. Я сам долго не мог понять, почему конкуренты с не очень красивыми сайтами висят в топе Яндекса. А ответ прост: у них грамотно настроена накрутка поведенческих факторов в яндексе, которая обманывает алгоритмы и создает иллюзию популярности. Теперь хоть понимаю, куда копать и какие метрики отслеживать.
Your comment is awaiting moderation.
транспортная компания
Это направление подходит тем, кто любит узнавать новое, совершенствовать навыки и расширять кругозор. Этот вид деятельности помогает проводить время с пользой, открывать новые возможности и получать яркие впечатления. При регулярном интересе оно может стать важной частью образа жизни, источником вдохновения и способом самовыражения.
грузоперевозки предложения
экспресс-доставка 10 тонн
This hobby is well suited for people who enjoy learning new things, improving skills, and broadening their horizons. This type of interest helps combine enjoyment, practice, and personal growth. If given proper attention it may bring not only enjoyment, but also real value in everyday life.
https://www.buzzfeed.com/sparklybubble707/nn-n
Your comment is awaiting moderation.
стратегия плинко стратегия плинко
Your comment is awaiting moderation.
Explore the collection at https://thedaidai.com. From compact hot-swappable keyboards with RGB and tri-mode connectivity to lightweight high-DPI gaming mice, DAIDAI focuses on precision and comfort. With customizable keycaps, ergonomic wrist rests, and wireless accessories, every product enhances both gaming and everyday productivity.
Your comment is awaiting moderation.
Explore the collection at https://thestartonight.com. From bold canvas prints and panoramic wall sets to glossy plexiglass art and immersive murals, Startonight combines vivid colors with high-quality craftsmanship. Each piece adds depth, atmosphere, and a unique glowing touch to living rooms, bedrooms, and creative spaces.
Your comment is awaiting moderation.
Explore the collection at https://thesubsh.com. From crystal trees and natural gemstones to elegant cremation urns, SUBSH blends symbolism with craftsmanship. Whether for meditation, décor, or remembrance, each piece adds calm energy and thoughtful design to your home.
Your comment is awaiting moderation.
net seo net seo .
Your comment is awaiting moderation.
oak vendor lounge – Clean sections with well-arranged content for effortless navigation.
Your comment is awaiting moderation.
Победа над боссом Кракен > официальная ссылка площадки кракен Сегодня я протестировал несколько кракен шоп телеграм, и вот что стабильно работает: Фраза правила игры кракен особенно востребована среди новичков. Настоящие правила игры кракен подробно объясняют, как управлять персонажем, что нужно для победы и как правильно использовать ресурсы.
Проверил лично несколько адресов — стабильно открываются: официальная ссылка на кракен в тор — kraktor.ccвот рабочая ссылка — krakenoff.cc Если нужна помощь — оставляйте комменты.Проверено лично (Нижний Новгород). kraken link онлайн-площадка Телеграмм
Your comment is awaiting moderation.
как установить windows на жесткий usb диск пошаговая инструкция по установке виндовс на usb
Your comment is awaiting moderation.
sweet bonanza app méxico http://www.sweet-bonanza18364.help
Your comment is awaiting moderation.
этикетки на товар
Это направление может понравиться людям, которые интересуется личным ростом, опытом и полезными навыками. Такой формат активности помогает проводить время с пользой, открывать новые возможности и получать яркие впечатления. При более глубоком погружении это нередко превращается в любимую сферу для развития, общения и самореализации.
образовательная платформа Маргулана Сейсембая разбор плюсов и минусов
печать самоклеящихся наклеек
This field can be especially appealing to those who enjoy learning new things, improving skills, and broadening their horizons. This type of interest helps strengthen skills, gain positive emotions, and make free time more meaningful. With regular interest it may bring not only enjoyment, but also real value in everyday life.
https://telegra.ph/Astronaut-betting-game-01-09
Your comment is awaiting moderation.
sweet bonanza panel de usuario http://sweet-bonanza18364.help/
Your comment is awaiting moderation.
oak shop portal – Clear interface with responsive design and intuitive navigation.
Your comment is awaiting moderation.
melbet lucky jet играть http://melbet36290.help
Your comment is awaiting moderation.
Кракен маркет — как он работает? > кракен смартфон Сегодня я протестировал несколько кракен в телеграме, и вот что стабильно работает: Запрос телеграм бот кракен набирает популярность среди пользователей, которые ищут быстрый способ получать актуальные ссылки и инструкции. Настоящий телеграм бот кракен создан для автоматизации, чтобы человек не искал вручную рабочие домены, а получал их сразу в ответ на команду. Люди отмечают, что телеграм бот кракен помогает экономить время и защищает от подделок, ведь ссылки сверяются с официальными источниками.
Проверил лично несколько зеркал — стабильно открываются: кракен тор — kraktor.ccобзор на телефон кракен — kphone.cc Если нужна помощь — оставляйте комменты.Проверено лично (Оренбург). Сайт Кракена секретная торговая платформа тэлега
Your comment is awaiting moderation.
seo аудит веб сайта prodvizhenie-sajtov-v-moskve15.ru .
Your comment is awaiting moderation.
Официальный сайт КРАКЕН 2026 >
актуальное зеркало
Добрый вечер. КРАКЕН ССЫЛКИ и актуальный тор-адрес.
Мир онлайн-платформ постоянно расширяется, и пользователи сталкиваются с множеством сайтов и маркетплейсов, где обновления происходят ежедневно. КРАКЕН МАГАЗИН выступает как удобный инструмент для получения сведений о функционале площадок, их интерфейсах и доступных сервисах, позволяя сформировать полное представление о цифровой экосистеме. Материалы ресурса раскрывают, как устроены маркетплейсы, какие инструменты интегрированы для взаимодействия с пользователями и как работают Telegram-боты для оперативного информирования. Актуальная информация здесь особенно важна, поскольку функционал сервисов и сайтов постоянно меняется, появляются новые функции, корректируются процессы и обновляется контент. КРАКЕН МАГАЗИН позволяет отслеживать эти изменения, обеспечивая последовательное и удобное восприятие данных. Telegram используется для рассылки уведомлений, аналитических заметок и кратких обзоров, делая процесс получения информации быстрым и структурированным. В итоге КРАКЕН МАГАЗИН формирует связное, живое и понятное информационное пространство, где пользователи могут спокойно ориентироваться в маркетплейсах, сайтах и сервисах, оценивать функционал платформ и следить за развитием онлайн-инструментов.
шоп площадки username: @krakensshopibot
актуальное зеркало username: @krakensmirrorsbot
кракен официальный сайт
кракен сайт даркнет
kraken site onion
кракен официальный сайт зеркало
кракен сайт вход
кракен тор сайт
кракен маркетплейс сайт
сайт кракен ссылка тор
кракен оригинальный сайт
кракен онион сайт
кракен сайт 2026
кракен сайт анонимно
официальный ресурс кракен
кракен сайт даркнет маркетплейс
сайт кракен зеркало рабочее
кракен интернет магазин сайт
kraken darknet site link
кракен сайт через тор браузер
кракен официальный сайт онион
кракен сайт площадка
ссылка на кракен
кракен ссылки тор
актуальные ссылки на кракен
kraken onion links
кракен ссылки даркнет
кракен ссылка зеркало
кракен рабочая ссылка на сегодня
кракен прямая ссылка
кракен ссылка 2026
ссылка на кракен в тор браузере
новые ссылки кракен
кракен ссылки онион
кракен ссылка на маркет
кракен ссылка вход
кракен ссылка официальный
kraken darknet link
кракен ссылка маркетплейс
проверенные ссылки кракен
кракен ссылка зеркало рабочее
кракен активная ссылка
кракен зеркало
кракен актуальное зеркало
зеркало кракен сегодня
kraken mirror onion
кракен зеркало рабочее на сегодня
кракен зеркало тор
кракен официальное зеркало
зеркало сайта кракен
кракен зеркало вход
кракен зеркало даркнет
новое зеркало кракен
зеркало кракен 2026
кракен зеркало онион
кракен список зеркал
зеркало площадки кракен
кракен зеркало маркетплейс
кракен рабочее зеркало 2026
kraken darknet mirror
кракен зеркало ссылка
активные зеркала кракен
кракен магазин
kraken shop link
магазин кракен даркнет
кракен шоп онион
магазин кракен зеркало
кракен маркетплейс магазин
кракен магазин официальный
купить в магазине кракен
магазин кракен тор
kraken store onion
кракен интернет магазин
магазин кракен ссылка
кракен магазин товаров
кракен магазин вход
кракен шоп зеркало
магазин кракен 2026
кракен магазин анонимно
кракен официальный шоп
кракен витрина магазина
магазин кракен маркет
кракен даркнет
kraken darknet market
кракен даркнет ссылка
кракен даркнет вход
кракен даркнет зеркало
даркнет площадка кракен
кракен даркнет тор
кракен даркнет онион
кракен в даркнете как зайти
кракен даркнет сайт
официальный кракен даркнет
кракен даркнет маркет
кракен даркнет 2026
kraken darknet onion link
даркнет маркетплейс кракен
кракен даркнет ресурс
кракен теневой рынок
кракен даркнет шоп
кракен даркнет рабочая ссылка
доступ в кракен даркнет
кракен маркет
kraken market onion
кракен маркетплейс ссылка
кракен маркет вход
кракен маркет зеркало
маркетплейс кракен даркнет
кракен маркет тор
кракен маркет официальный
официальный сайт кракен маркет
кракен маркет онион
кракен маркет шоп
маркет кракен ссылка на сегодня
kraken market darknet link
кракен маркет площадка
кракен маркет 2026
кракен маркетплейс зеркало
маркет кракен через тор
кракен маркет анонимно
кракен маркет онлайн
торговая площадка кракен маркет
кракен 2026
кракен 2026 ссылка
кракен 2026 зеркало
кракен 2026 вход
кракен 2026 официальный сайт
кракен 2026 даркнет
kraken 2026 link
кракен 2026 онион
кракен 2026 актуально
кракен 2026 тор
кракен 2026 маркетплейс
новое зеркало кракен 2026
кракен 2026 рабочая ссылка
кракен 2026 зеркало сегодня
кракен сайт 2026 вход
кракен 2026 магазин
кракен 2026 через тор
кракен 2026 площадка
кракен 2026 работа
доступ на кракен 2026
кракен телеграмм
кракен тг бот
kraken telegram link
кракен бот телеграмм
кракен телеграмм канал
кракен ссылка в телеграмме
кракен тг ссылка
кракен новости телеграмм
кракен телеграмм зеркало
кракен бот в тг
официальный телеграмм кракен
кракен маркет телеграмм
кракен телеграмм чат
kraken tg bot
кракен телеграмм поддержка
кракен телеграмм новости
кракен контакты телеграмм
кракен бот автопродаж телеграмм
кракен телеграм ссылка тор
кракен тг группа
кракен вход
вход на кракен
кракен вход зеркало
кракен личный кабинет вход
кракен вход через тор
кракен вход онион
kraken login link
кракен вход официальный сайт
как зайти на кракен
кракен вход в магазин
кракен авторизация вход
кракен вход 2026
кракен зайти на сайт
кракен доступ вход
кракен вход по ссылке
кракен вход даркнет
кракен войти в аккаунт
кракен вход через браузер
кракен личный кабинет вход сегодня
кракен официальный вход зеркало
кракен тор
кракен тор ссылка
кракен тор зеркало
kraken tor link
кракен через тор браузер
кракен тор онион
кракен тор вход
кракен тор сайт
официальный тор кракен
кракен тор ссылка на зеркало
кракен зайти через тор
кракен тор маркетплейс
тор сайт кракен онион
кракен тор даркнет
кракен тор рабочая ссылка
kraken tor browser link
кракен тор шоп
кракен тор адрес
кракен тор доступ
кракен ссылка в тор сети
кракен бот
kraken bot link
кракен бот телеграмм
кракен бот автопродаж
кракен бот зеркало
кракен бот ссылка
кракен бот официальный
кракен бот покупок
бот кракен маркет
кракен бот даркнет
кракен бот онион
кракен бот в тг
кракен бот 24/7
kraken bot telegram
кракен бот работа
кракен бот для андроид
кракен бот через тор
кракен бот поддержка
кракен бот актуальный
рабочий бот кракен
аккаунты кракен
купить аккаунт кракен
кракен аккаунты с балансом
регистрация аккаунта кракен
вход в аккаунт кракен
кракен личный аккаунт
аккаунты kraken darknet
кракен аккаунты даркнет
проверка аккаунта кракен
кракен аккаунты маркет
доступ к аккаунту кракен
кракен аккаунты шоп
создать аккаунт кракен
аккаунты кракен зеркало
кракен аккаунт войти
кракен аккаунты бесплатно
аккаунты кракен 2026
кракен аккаунты онион
аккаунты на кракене как зайти
кракен кабинет аккаунт
кракен регистрация
как зарегистрироваться на кракен
кракен регистрация на сайте
кракен регистрация зеркало
kraken registration link
кракен создать аккаунт
кракен регистрация тор
кракен регистрация онион
кракен официальная регистрация
кракен регистрация 2026
кракен регистрация без почты
регистрация в кракен маркет
кракен регистрация ссылка
кракен регистрация через браузер
кракен быстрая регистрация
кракен форма регистрации
кракен регистрация даркнет
регистрация на сайте кракен тор
кракен регистрация сейчас
кракен регистрация бесплатно
кракен москва
кракен москва ссылка
кракен москва зеркало
кракен москва зайти
кракен москва купить
кракен москва сайт
кракен москва даркнет
кракен москва шоп
кракен москва маркет
кракен москва тор
кракен москва онион
кракен закладки москва
кракен москва 2026
kraken moscow link
кракен москва официальный сайт
кракен москва работа
кракен москва через тор
кракен москва вход
кракен москва адреса
кракен москва сегодня
кракен форум
кракен форум ссылка
кракен форум зеркало
кракен форум онион
кракен официальный форум
форум кракен даркнет
кракен форум отзывы
кракен форум тор
форум маркетплейса кракен
кракен форум вход
kraken forum link
кракен форум обсуждение
кракен форум новости
кракен форум поддержка
форум площадки кракен
кракен форум ветка
кракен форум анонимно
кракен форум зеркало рабочее
кракен форум общение
кракен форум 2026
Your comment is awaiting moderation.
заказать дератизацию
Это увлечение часто выбирают те, кто интересуется личным ростом, опытом и полезными навыками. Такой формат активности помогает сочетать интерес, практику и личное развитие. Если уделять этому внимание это нередко превращается в любимую сферу для развития, общения и самореализации.
вечные трастовые ссылки
дератизация в москве
This hobby is well suited for people who like exploring new ideas, building skills, and gaining valuable experience. This kind of activity helps strengthen skills, gain positive emotions, and make free time more meaningful. With regular interest it can open the door to new connections, goals, and useful opportunities.
https://paste2.org/D5McEdeH
Your comment is awaiting moderation.
nightfall hub corner – Intuitive interface with clearly defined sections and smooth navigation.
Your comment is awaiting moderation.
мелбет как вывести на элкарт мелбет как вывести на элкарт
Your comment is awaiting moderation.
The new platform is here > https://sdobruchevskiy.ru/includes/articles/?promokod-1xbet.html
Your comment is awaiting moderation.
Visit our official page > sdobruchevskiy.ru/includes/articles/?promokod-1xbet.html
Your comment is awaiting moderation.
http://wiki.votesmart.org/MarylinxkBorehamoy
Your comment is awaiting moderation.
КРАКЕН ДАРКНЕТ: Актуальные ссылки и зеркала >
официальный ресурс
Доброго дня. Проверенные КРАКЕН ССЫЛКИ в этом посте.
КРАКЕН САЙТ предоставляет пользователям полную информацию о работе интернет-платформ, маркетплейсов и онлайн-сервисов, включая функционал, новинки и обновления. КРАКЕН САЙТ позволяет получать данные через Telegram-боты в режиме реального времени, что обеспечивает актуальность сведений. На ресурсе публикуются аналитические обзоры, рейтинги платформ, сравнительные таблицы и рекомендации по эффективному использованию сервисов. КРАКЕН САЙТ объединяет сведения о маркетплейсах и специализированных платформах, предоставляя пользователям систематизированные материалы для оценки возможностей платформ и планирования работы с интернет-сервисами
проверенная ссылка username: @krakenslinksbot
адрес сайта username: @krakenssitebot
кракен официальный сайт
кракен сайт даркнет
kraken site onion
кракен официальный сайт зеркало
кракен сайт вход
кракен тор сайт
кракен маркетплейс сайт
сайт кракен ссылка тор
кракен оригинальный сайт
кракен онион сайт
кракен сайт 2026
кракен сайт анонимно
официальный ресурс кракен
кракен сайт даркнет маркетплейс
сайт кракен зеркало рабочее
кракен интернет магазин сайт
kraken darknet site link
кракен сайт через тор браузер
кракен официальный сайт онион
кракен сайт площадка
ссылка на кракен
кракен ссылки тор
актуальные ссылки на кракен
kraken onion links
кракен ссылки даркнет
кракен ссылка зеркало
кракен рабочая ссылка на сегодня
кракен прямая ссылка
кракен ссылка 2026
ссылка на кракен в тор браузере
новые ссылки кракен
кракен ссылки онион
кракен ссылка на маркет
кракен ссылка вход
кракен ссылка официальный
kraken darknet link
кракен ссылка маркетплейс
проверенные ссылки кракен
кракен ссылка зеркало рабочее
кракен активная ссылка
кракен зеркало
кракен актуальное зеркало
зеркало кракен сегодня
kraken mirror onion
кракен зеркало рабочее на сегодня
кракен зеркало тор
кракен официальное зеркало
зеркало сайта кракен
кракен зеркало вход
кракен зеркало даркнет
новое зеркало кракен
зеркало кракен 2026
кракен зеркало онион
кракен список зеркал
зеркало площадки кракен
кракен зеркало маркетплейс
кракен рабочее зеркало 2026
kraken darknet mirror
кракен зеркало ссылка
активные зеркала кракен
кракен магазин
kraken shop link
магазин кракен даркнет
кракен шоп онион
магазин кракен зеркало
кракен маркетплейс магазин
кракен магазин официальный
купить в магазине кракен
магазин кракен тор
kraken store onion
кракен интернет магазин
магазин кракен ссылка
кракен магазин товаров
кракен магазин вход
кракен шоп зеркало
магазин кракен 2026
кракен магазин анонимно
кракен официальный шоп
кракен витрина магазина
магазин кракен маркет
кракен даркнет
kraken darknet market
кракен даркнет ссылка
кракен даркнет вход
кракен даркнет зеркало
даркнет площадка кракен
кракен даркнет тор
кракен даркнет онион
кракен в даркнете как зайти
кракен даркнет сайт
официальный кракен даркнет
кракен даркнет маркет
кракен даркнет 2026
kraken darknet onion link
даркнет маркетплейс кракен
кракен даркнет ресурс
кракен теневой рынок
кракен даркнет шоп
кракен даркнет рабочая ссылка
доступ в кракен даркнет
кракен маркет
kraken market onion
кракен маркетплейс ссылка
кракен маркет вход
кракен маркет зеркало
маркетплейс кракен даркнет
кракен маркет тор
кракен маркет официальный
официальный сайт кракен маркет
кракен маркет онион
кракен маркет шоп
маркет кракен ссылка на сегодня
kraken market darknet link
кракен маркет площадка
кракен маркет 2026
кракен маркетплейс зеркало
маркет кракен через тор
кракен маркет анонимно
кракен маркет онлайн
торговая площадка кракен маркет
кракен 2026
кракен 2026 ссылка
кракен 2026 зеркало
кракен 2026 вход
кракен 2026 официальный сайт
кракен 2026 даркнет
kraken 2026 link
кракен 2026 онион
кракен 2026 актуально
кракен 2026 тор
кракен 2026 маркетплейс
новое зеркало кракен 2026
кракен 2026 рабочая ссылка
кракен 2026 зеркало сегодня
кракен сайт 2026 вход
кракен 2026 магазин
кракен 2026 через тор
кракен 2026 площадка
кракен 2026 работа
доступ на кракен 2026
кракен телеграмм
кракен тг бот
kraken telegram link
кракен бот телеграмм
кракен телеграмм канал
кракен ссылка в телеграмме
кракен тг ссылка
кракен новости телеграмм
кракен телеграмм зеркало
кракен бот в тг
официальный телеграмм кракен
кракен маркет телеграмм
кракен телеграмм чат
kraken tg bot
кракен телеграмм поддержка
кракен телеграмм новости
кракен контакты телеграмм
кракен бот автопродаж телеграмм
кракен телеграм ссылка тор
кракен тг группа
кракен вход
вход на кракен
кракен вход зеркало
кракен личный кабинет вход
кракен вход через тор
кракен вход онион
kraken login link
кракен вход официальный сайт
как зайти на кракен
кракен вход в магазин
кракен авторизация вход
кракен вход 2026
кракен зайти на сайт
кракен доступ вход
кракен вход по ссылке
кракен вход даркнет
кракен войти в аккаунт
кракен вход через браузер
кракен личный кабинет вход сегодня
кракен официальный вход зеркало
кракен тор
кракен тор ссылка
кракен тор зеркало
kraken tor link
кракен через тор браузер
кракен тор онион
кракен тор вход
кракен тор сайт
официальный тор кракен
кракен тор ссылка на зеркало
кракен зайти через тор
кракен тор маркетплейс
тор сайт кракен онион
кракен тор даркнет
кракен тор рабочая ссылка
kraken tor browser link
кракен тор шоп
кракен тор адрес
кракен тор доступ
кракен ссылка в тор сети
кракен бот
kraken bot link
кракен бот телеграмм
кракен бот автопродаж
кракен бот зеркало
кракен бот ссылка
кракен бот официальный
кракен бот покупок
бот кракен маркет
кракен бот даркнет
кракен бот онион
кракен бот в тг
кракен бот 24/7
kraken bot telegram
кракен бот работа
кракен бот для андроид
кракен бот через тор
кракен бот поддержка
кракен бот актуальный
рабочий бот кракен
аккаунты кракен
купить аккаунт кракен
кракен аккаунты с балансом
регистрация аккаунта кракен
вход в аккаунт кракен
кракен личный аккаунт
аккаунты kraken darknet
кракен аккаунты даркнет
проверка аккаунта кракен
кракен аккаунты маркет
доступ к аккаунту кракен
кракен аккаунты шоп
создать аккаунт кракен
аккаунты кракен зеркало
кракен аккаунт войти
кракен аккаунты бесплатно
аккаунты кракен 2026
кракен аккаунты онион
аккаунты на кракене как зайти
кракен кабинет аккаунт
кракен регистрация
как зарегистрироваться на кракен
кракен регистрация на сайте
кракен регистрация зеркало
kraken registration link
кракен создать аккаунт
кракен регистрация тор
кракен регистрация онион
кракен официальная регистрация
кракен регистрация 2026
кракен регистрация без почты
регистрация в кракен маркет
кракен регистрация ссылка
кракен регистрация через браузер
кракен быстрая регистрация
кракен форма регистрации
кракен регистрация даркнет
регистрация на сайте кракен тор
кракен регистрация сейчас
кракен регистрация бесплатно
кракен москва
кракен москва ссылка
кракен москва зеркало
кракен москва зайти
кракен москва купить
кракен москва сайт
кракен москва даркнет
кракен москва шоп
кракен москва маркет
кракен москва тор
кракен москва онион
кракен закладки москва
кракен москва 2026
kraken moscow link
кракен москва официальный сайт
кракен москва работа
кракен москва через тор
кракен москва вход
кракен москва адреса
кракен москва сегодня
кракен форум
кракен форум ссылка
кракен форум зеркало
кракен форум онион
кракен официальный форум
форум кракен даркнет
кракен форум отзывы
кракен форум тор
форум маркетплейса кракен
кракен форум вход
kraken forum link
кракен форум обсуждение
кракен форум новости
кракен форум поддержка
форум площадки кракен
кракен форум ветка
кракен форум анонимно
кракен форум зеркало рабочее
кракен форум общение
кракен форум 2026
Your comment is awaiting moderation.
продвижение сайтов во франции продвижение сайтов во франции .
Your comment is awaiting moderation.
lucky jet мелбет https://melbet36290.help/
Your comment is awaiting moderation.
репутация Европейского Сайта Отзывов Komentish среди клиентов
Это увлечение часто выбирают те, кто ценит развитие, новые знания и практический опыт. Такой формат активности помогает развивать мышление, расширять опыт и находить интересные идеи. При более глубоком погружении такое направление может открыть новые знакомства, цели и полезные перспективы.
what size tent for family of 4
Bespalov Finance отзывы клиентов
This activity may be a great fit for anyone who like exploring new ideas, building skills, and gaining valuable experience. It helps spend time productively, discover new opportunities, and enjoy memorable experiences. With deeper involvement it may bring not only enjoyment, but also real value in everyday life.
https://paste2.org/GmkFnXvY
Your comment is awaiting moderation.
mostbet mobil tolov mostbet mobil tolov
Your comment is awaiting moderation.
melbet промоакции melbet81573.help
Your comment is awaiting moderation.
рабочая ссылка кракен шоп телеграм > кракен телефон Сегодня я протестировал несколько кракен вход ссылка, и вот что стабильно работает: Фраза кракен в телеграме используется для обозначения каналов, где публикуются рабочие onion-домены. Настоящий кракен в телеграме всегда подтверждается сообществом, что исключает риск фишинга.
Проверил лично несколько адресов — стабильно открываются: как найти кракен в торе — kraktor.ccгде заказать телефон кракен — krakenphone.cc Если нужна помощь — оставляйте комменты.Проверено лично (Рязань). kraken link даркнет магазин тэлега
Your comment is awaiting moderation.
seo partners seo partners .
Your comment is awaiting moderation.
night vendor emporium – Responsive design with clear sections and fast-loading pages.
Your comment is awaiting moderation.
Искал информацию по ценам на SEO и наткнулся на статью про накрутку позиций в Яндексе. Тут разбирают, что вообще входит в SEO-услуги, от чего зависит стоимость и как не попасть на мошенников. Полезно для понимания рынка: https://vagaro.ru/nakrutka-poziczij-v-yandekse-chto-nuzhno-znat-o-seo-uslugah-i-ih-stoimosti/
Your comment is awaiting moderation.
vavada promocja dla nowych użytkowników vavada promocja dla nowych użytkowników
Your comment is awaiting moderation.
профессиональное продвижение сайтов профессиональное продвижение сайтов .
Your comment is awaiting moderation.
КРАКЕН ССЫЛКИ: Актуальные адреса на сегодня >
вход на даркнет сайт
Здравствуйте. КРАКЕН ДАРКНЕТ открывает новые горизонты.
КРАКЕН САЙТ является ресурсом для изучения цифровых сервисов, маркетплейсов и интернет-платформ, предлагая аналитические обзоры, рейтинги, сравнительные таблицы и описания функционала сервисов. КРАКЕН САЙТ позволяет получать актуальные сведения через Telegram-боты, обеспечивая быстрый доступ к новинкам и обновлениям. Ресурс помогает пользователям ориентироваться в цифровой экосистеме, оценивать возможности платформ, планировать работу с сервисами и маркетплейсами, а также принимать информированные решения. КРАКЕН САЙТ объединяет структурированные материалы о функционале платформ, их возможностях и новинках
сайт onion username: @krakenssitebot
площадка в даркнете username: @krakensdarkbot
кракен официальный сайт
кракен сайт даркнет
kraken site onion
кракен официальный сайт зеркало
кракен сайт вход
кракен тор сайт
кракен маркетплейс сайт
сайт кракен ссылка тор
кракен оригинальный сайт
кракен онион сайт
кракен сайт 2026
кракен сайт анонимно
официальный ресурс кракен
кракен сайт даркнет маркетплейс
сайт кракен зеркало рабочее
кракен интернет магазин сайт
kraken darknet site link
кракен сайт через тор браузер
кракен официальный сайт онион
кракен сайт площадка
ссылка на кракен
кракен ссылки тор
актуальные ссылки на кракен
kraken onion links
кракен ссылки даркнет
кракен ссылка зеркало
кракен рабочая ссылка на сегодня
кракен прямая ссылка
кракен ссылка 2026
ссылка на кракен в тор браузере
новые ссылки кракен
кракен ссылки онион
кракен ссылка на маркет
кракен ссылка вход
кракен ссылка официальный
kraken darknet link
кракен ссылка маркетплейс
проверенные ссылки кракен
кракен ссылка зеркало рабочее
кракен активная ссылка
кракен зеркало
кракен актуальное зеркало
зеркало кракен сегодня
kraken mirror onion
кракен зеркало рабочее на сегодня
кракен зеркало тор
кракен официальное зеркало
зеркало сайта кракен
кракен зеркало вход
кракен зеркало даркнет
новое зеркало кракен
зеркало кракен 2026
кракен зеркало онион
кракен список зеркал
зеркало площадки кракен
кракен зеркало маркетплейс
кракен рабочее зеркало 2026
kraken darknet mirror
кракен зеркало ссылка
активные зеркала кракен
кракен магазин
kraken shop link
магазин кракен даркнет
кракен шоп онион
магазин кракен зеркало
кракен маркетплейс магазин
кракен магазин официальный
купить в магазине кракен
магазин кракен тор
kraken store onion
кракен интернет магазин
магазин кракен ссылка
кракен магазин товаров
кракен магазин вход
кракен шоп зеркало
магазин кракен 2026
кракен магазин анонимно
кракен официальный шоп
кракен витрина магазина
магазин кракен маркет
кракен даркнет
kraken darknet market
кракен даркнет ссылка
кракен даркнет вход
кракен даркнет зеркало
даркнет площадка кракен
кракен даркнет тор
кракен даркнет онион
кракен в даркнете как зайти
кракен даркнет сайт
официальный кракен даркнет
кракен даркнет маркет
кракен даркнет 2026
kraken darknet onion link
даркнет маркетплейс кракен
кракен даркнет ресурс
кракен теневой рынок
кракен даркнет шоп
кракен даркнет рабочая ссылка
доступ в кракен даркнет
кракен маркет
kraken market onion
кракен маркетплейс ссылка
кракен маркет вход
кракен маркет зеркало
маркетплейс кракен даркнет
кракен маркет тор
кракен маркет официальный
официальный сайт кракен маркет
кракен маркет онион
кракен маркет шоп
маркет кракен ссылка на сегодня
kraken market darknet link
кракен маркет площадка
кракен маркет 2026
кракен маркетплейс зеркало
маркет кракен через тор
кракен маркет анонимно
кракен маркет онлайн
торговая площадка кракен маркет
кракен 2026
кракен 2026 ссылка
кракен 2026 зеркало
кракен 2026 вход
кракен 2026 официальный сайт
кракен 2026 даркнет
kraken 2026 link
кракен 2026 онион
кракен 2026 актуально
кракен 2026 тор
кракен 2026 маркетплейс
новое зеркало кракен 2026
кракен 2026 рабочая ссылка
кракен 2026 зеркало сегодня
кракен сайт 2026 вход
кракен 2026 магазин
кракен 2026 через тор
кракен 2026 площадка
кракен 2026 работа
доступ на кракен 2026
кракен телеграмм
кракен тг бот
kraken telegram link
кракен бот телеграмм
кракен телеграмм канал
кракен ссылка в телеграмме
кракен тг ссылка
кракен новости телеграмм
кракен телеграмм зеркало
кракен бот в тг
официальный телеграмм кракен
кракен маркет телеграмм
кракен телеграмм чат
kraken tg bot
кракен телеграмм поддержка
кракен телеграмм новости
кракен контакты телеграмм
кракен бот автопродаж телеграмм
кракен телеграм ссылка тор
кракен тг группа
кракен вход
вход на кракен
кракен вход зеркало
кракен личный кабинет вход
кракен вход через тор
кракен вход онион
kraken login link
кракен вход официальный сайт
как зайти на кракен
кракен вход в магазин
кракен авторизация вход
кракен вход 2026
кракен зайти на сайт
кракен доступ вход
кракен вход по ссылке
кракен вход даркнет
кракен войти в аккаунт
кракен вход через браузер
кракен личный кабинет вход сегодня
кракен официальный вход зеркало
кракен тор
кракен тор ссылка
кракен тор зеркало
kraken tor link
кракен через тор браузер
кракен тор онион
кракен тор вход
кракен тор сайт
официальный тор кракен
кракен тор ссылка на зеркало
кракен зайти через тор
кракен тор маркетплейс
тор сайт кракен онион
кракен тор даркнет
кракен тор рабочая ссылка
kraken tor browser link
кракен тор шоп
кракен тор адрес
кракен тор доступ
кракен ссылка в тор сети
кракен бот
kraken bot link
кракен бот телеграмм
кракен бот автопродаж
кракен бот зеркало
кракен бот ссылка
кракен бот официальный
кракен бот покупок
бот кракен маркет
кракен бот даркнет
кракен бот онион
кракен бот в тг
кракен бот 24/7
kraken bot telegram
кракен бот работа
кракен бот для андроид
кракен бот через тор
кракен бот поддержка
кракен бот актуальный
рабочий бот кракен
аккаунты кракен
купить аккаунт кракен
кракен аккаунты с балансом
регистрация аккаунта кракен
вход в аккаунт кракен
кракен личный аккаунт
аккаунты kraken darknet
кракен аккаунты даркнет
проверка аккаунта кракен
кракен аккаунты маркет
доступ к аккаунту кракен
кракен аккаунты шоп
создать аккаунт кракен
аккаунты кракен зеркало
кракен аккаунт войти
кракен аккаунты бесплатно
аккаунты кракен 2026
кракен аккаунты онион
аккаунты на кракене как зайти
кракен кабинет аккаунт
кракен регистрация
как зарегистрироваться на кракен
кракен регистрация на сайте
кракен регистрация зеркало
kraken registration link
кракен создать аккаунт
кракен регистрация тор
кракен регистрация онион
кракен официальная регистрация
кракен регистрация 2026
кракен регистрация без почты
регистрация в кракен маркет
кракен регистрация ссылка
кракен регистрация через браузер
кракен быстрая регистрация
кракен форма регистрации
кракен регистрация даркнет
регистрация на сайте кракен тор
кракен регистрация сейчас
кракен регистрация бесплатно
кракен москва
кракен москва ссылка
кракен москва зеркало
кракен москва зайти
кракен москва купить
кракен москва сайт
кракен москва даркнет
кракен москва шоп
кракен москва маркет
кракен москва тор
кракен москва онион
кракен закладки москва
кракен москва 2026
kraken moscow link
кракен москва официальный сайт
кракен москва работа
кракен москва через тор
кракен москва вход
кракен москва адреса
кракен москва сегодня
кракен форум
кракен форум ссылка
кракен форум зеркало
кракен форум онион
кракен официальный форум
форум кракен даркнет
кракен форум отзывы
кракен форум тор
форум маркетплейса кракен
кракен форум вход
kraken forum link
кракен форум обсуждение
кракен форум новости
кракен форум поддержка
форум площадки кракен
кракен форум ветка
кракен форум анонимно
кракен форум зеркало рабочее
кракен форум общение
кракен форум 2026
Your comment is awaiting moderation.
Хороший разбор темы накрутки поведенческих факторов. Автор подробно объясняет, что такое ПФ, какие методы накрутки существуют и чем это может грозить. Понравилось, что в конце дают легальные альтернативы для улучшения метрик. Тем, кто задумывается о таком инструменте, рекомендую почитать: https://1c-aytias.ru/nakrutka-povedencheskih-faktorov-illyuziya-uspeha-ili-rabochiy-instrument/
Your comment is awaiting moderation.
full tang vs partial tang knife
Это занятие подходит тем, кто ценит развитие, новые знания и практический опыт. Такое занятие помогает проводить время с пользой, открывать новые возможности и получать яркие впечатления. Со временем это нередко превращается в любимую сферу для развития, общения и самореализации.
tent pole types fiberglass vs aluminum
what knife for batoning wood
This interest is well suited for people who are interested in self-development, useful experience, and meaningful activities. This type of interest helps spend time productively, discover new opportunities, and enjoy memorable experiences. Over time it may bring not only enjoyment, but also real value in everyday life.
https://www.band.us/band/101375650/post
Your comment is awaiting moderation.
moss vendor lounge – Professional design with clear sections and comfortable browsing experience.
Your comment is awaiting moderation.
Кракен тор в телеграмм > площадка кракен Сегодня я протестировал несколько кракен рулетка, и вот что стабильно работает: Фраза игра в кракена коды интересует тех, кто хочет ускорить процесс прохождения. Настоящие игра в кракена коды помогают открывать уровни, ресурсы и бонусы. Пользователи обсуждают, где найти проверенные игра в кракена коды и как правильно их использовать.
Проверил лично несколько адресов — стабильно открываются: как найти кракен в торе — kraktor.ccторговля на Кракене — platform-kraken.cc Если нужна помощь — задавайте вопросы.Проверено лично (Москва). Kraken Market интернет-рынок мессенджер Telegram
Your comment is awaiting moderation.
конфигурация usb что значит и какую выбрать для разных устройств
Your comment is awaiting moderation.
раскрутка сайта москва раскрутка сайта москва .
Your comment is awaiting moderation.
המפתח למשרד,” אמרה מאחור. צייתתי. לאחר שלקחה דירות דיסקרטיות, טניושה סגרה את הדלת והשליכה אותן לפינה. מה אתה רוצה? היא לחשה, ליקקה את שפתיה השמנמנות. היא פתחה לאט את שמלתה, שלא בשערו, ומשכו אותו קרוב יותר. הוא התרחק, בוהה בה בחמדנות כה רבה עד שברכיה התכופפו. “קום,” הוא הורה, ובקולו לא הייתה בקשה. זו הייתה פקודה שגרמה לדופק שלה להאיץ עוד יותר. נסטיה https://zoogopered.co.il/
Your comment is awaiting moderation.
vavada wpłata paysafecard vavada56378.help
Your comment is awaiting moderation.
КРАКЕН САЙТ — Официальный ресурс >
сайт маркетплейса
Доброго времени. КРАКЕН САЙТ обновил домены.
КРАКЕН САЙТ представляет собой современный интернет-ресурс, предоставляющий подробную информацию о цифровых сервисах, маркетплейсах и онлайн-платформах. КРАКЕН САЙТ позволяет отслеживать обновления функционала сервисов, новинки платформ и изменения в работе интернет-магазинов, обеспечивая быстрый доступ к актуальным данным. Telegram-боты интегрированы в систему, предоставляя уведомления о свежих событиях, аналитике и новостях. Ресурс содержит рейтинги сервисов, сравнительные обзоры, рекомендации по использованию платформ и детальные описания категорий товаров, возможностей оплаты и доставки, позволяя пользователям ориентироваться в цифровой среде и оценивать преимущества разных инструментов. КРАКЕН САЙТ объединяет информацию о маркетплейсах, интернет-магазинах и специализированных платформах, обеспечивая структурированные материалы, которые помогают принимать обоснованные решения и планировать работу с сервисами
ссылка сегодня username: @krakenslinksbot
главный сайт username: @krakenssitebot
кракен официальный сайт
кракен сайт даркнет
kraken site onion
кракен официальный сайт зеркало
кракен сайт вход
кракен тор сайт
кракен маркетплейс сайт
сайт кракен ссылка тор
кракен оригинальный сайт
кракен онион сайт
кракен сайт 2026
кракен сайт анонимно
официальный ресурс кракен
кракен сайт даркнет маркетплейс
сайт кракен зеркало рабочее
кракен интернет магазин сайт
kraken darknet site link
кракен сайт через тор браузер
кракен официальный сайт онион
кракен сайт площадка
ссылка на кракен
кракен ссылки тор
актуальные ссылки на кракен
kraken onion links
кракен ссылки даркнет
кракен ссылка зеркало
кракен рабочая ссылка на сегодня
кракен прямая ссылка
кракен ссылка 2026
ссылка на кракен в тор браузере
новые ссылки кракен
кракен ссылки онион
кракен ссылка на маркет
кракен ссылка вход
кракен ссылка официальный
kraken darknet link
кракен ссылка маркетплейс
проверенные ссылки кракен
кракен ссылка зеркало рабочее
кракен активная ссылка
кракен зеркало
кракен актуальное зеркало
зеркало кракен сегодня
kraken mirror onion
кракен зеркало рабочее на сегодня
кракен зеркало тор
кракен официальное зеркало
зеркало сайта кракен
кракен зеркало вход
кракен зеркало даркнет
новое зеркало кракен
зеркало кракен 2026
кракен зеркало онион
кракен список зеркал
зеркало площадки кракен
кракен зеркало маркетплейс
кракен рабочее зеркало 2026
kraken darknet mirror
кракен зеркало ссылка
активные зеркала кракен
кракен магазин
kraken shop link
магазин кракен даркнет
кракен шоп онион
магазин кракен зеркало
кракен маркетплейс магазин
кракен магазин официальный
купить в магазине кракен
магазин кракен тор
kraken store onion
кракен интернет магазин
магазин кракен ссылка
кракен магазин товаров
кракен магазин вход
кракен шоп зеркало
магазин кракен 2026
кракен магазин анонимно
кракен официальный шоп
кракен витрина магазина
магазин кракен маркет
кракен даркнет
kraken darknet market
кракен даркнет ссылка
кракен даркнет вход
кракен даркнет зеркало
даркнет площадка кракен
кракен даркнет тор
кракен даркнет онион
кракен в даркнете как зайти
кракен даркнет сайт
официальный кракен даркнет
кракен даркнет маркет
кракен даркнет 2026
kraken darknet onion link
даркнет маркетплейс кракен
кракен даркнет ресурс
кракен теневой рынок
кракен даркнет шоп
кракен даркнет рабочая ссылка
доступ в кракен даркнет
кракен маркет
kraken market onion
кракен маркетплейс ссылка
кракен маркет вход
кракен маркет зеркало
маркетплейс кракен даркнет
кракен маркет тор
кракен маркет официальный
официальный сайт кракен маркет
кракен маркет онион
кракен маркет шоп
маркет кракен ссылка на сегодня
kraken market darknet link
кракен маркет площадка
кракен маркет 2026
кракен маркетплейс зеркало
маркет кракен через тор
кракен маркет анонимно
кракен маркет онлайн
торговая площадка кракен маркет
кракен 2026
кракен 2026 ссылка
кракен 2026 зеркало
кракен 2026 вход
кракен 2026 официальный сайт
кракен 2026 даркнет
kraken 2026 link
кракен 2026 онион
кракен 2026 актуально
кракен 2026 тор
кракен 2026 маркетплейс
новое зеркало кракен 2026
кракен 2026 рабочая ссылка
кракен 2026 зеркало сегодня
кракен сайт 2026 вход
кракен 2026 магазин
кракен 2026 через тор
кракен 2026 площадка
кракен 2026 работа
доступ на кракен 2026
кракен телеграмм
кракен тг бот
kraken telegram link
кракен бот телеграмм
кракен телеграмм канал
кракен ссылка в телеграмме
кракен тг ссылка
кракен новости телеграмм
кракен телеграмм зеркало
кракен бот в тг
официальный телеграмм кракен
кракен маркет телеграмм
кракен телеграмм чат
kraken tg bot
кракен телеграмм поддержка
кракен телеграмм новости
кракен контакты телеграмм
кракен бот автопродаж телеграмм
кракен телеграм ссылка тор
кракен тг группа
кракен вход
вход на кракен
кракен вход зеркало
кракен личный кабинет вход
кракен вход через тор
кракен вход онион
kraken login link
кракен вход официальный сайт
как зайти на кракен
кракен вход в магазин
кракен авторизация вход
кракен вход 2026
кракен зайти на сайт
кракен доступ вход
кракен вход по ссылке
кракен вход даркнет
кракен войти в аккаунт
кракен вход через браузер
кракен личный кабинет вход сегодня
кракен официальный вход зеркало
кракен тор
кракен тор ссылка
кракен тор зеркало
kraken tor link
кракен через тор браузер
кракен тор онион
кракен тор вход
кракен тор сайт
официальный тор кракен
кракен тор ссылка на зеркало
кракен зайти через тор
кракен тор маркетплейс
тор сайт кракен онион
кракен тор даркнет
кракен тор рабочая ссылка
kraken tor browser link
кракен тор шоп
кракен тор адрес
кракен тор доступ
кракен ссылка в тор сети
кракен бот
kraken bot link
кракен бот телеграмм
кракен бот автопродаж
кракен бот зеркало
кракен бот ссылка
кракен бот официальный
кракен бот покупок
бот кракен маркет
кракен бот даркнет
кракен бот онион
кракен бот в тг
кракен бот 24/7
kraken bot telegram
кракен бот работа
кракен бот для андроид
кракен бот через тор
кракен бот поддержка
кракен бот актуальный
рабочий бот кракен
аккаунты кракен
купить аккаунт кракен
кракен аккаунты с балансом
регистрация аккаунта кракен
вход в аккаунт кракен
кракен личный аккаунт
аккаунты kraken darknet
кракен аккаунты даркнет
проверка аккаунта кракен
кракен аккаунты маркет
доступ к аккаунту кракен
кракен аккаунты шоп
создать аккаунт кракен
аккаунты кракен зеркало
кракен аккаунт войти
кракен аккаунты бесплатно
аккаунты кракен 2026
кракен аккаунты онион
аккаунты на кракене как зайти
кракен кабинет аккаунт
кракен регистрация
как зарегистрироваться на кракен
кракен регистрация на сайте
кракен регистрация зеркало
kraken registration link
кракен создать аккаунт
кракен регистрация тор
кракен регистрация онион
кракен официальная регистрация
кракен регистрация 2026
кракен регистрация без почты
регистрация в кракен маркет
кракен регистрация ссылка
кракен регистрация через браузер
кракен быстрая регистрация
кракен форма регистрации
кракен регистрация даркнет
регистрация на сайте кракен тор
кракен регистрация сейчас
кракен регистрация бесплатно
кракен москва
кракен москва ссылка
кракен москва зеркало
кракен москва зайти
кракен москва купить
кракен москва сайт
кракен москва даркнет
кракен москва шоп
кракен москва маркет
кракен москва тор
кракен москва онион
кракен закладки москва
кракен москва 2026
kraken moscow link
кракен москва официальный сайт
кракен москва работа
кракен москва через тор
кракен москва вход
кракен москва адреса
кракен москва сегодня
кракен форум
кракен форум ссылка
кракен форум зеркало
кракен форум онион
кракен официальный форум
форум кракен даркнет
кракен форум отзывы
кракен форум тор
форум маркетплейса кракен
кракен форум вход
kraken forum link
кракен форум обсуждение
кракен форум новости
кракен форум поддержка
форум площадки кракен
кракен форум ветка
кракен форум анонимно
кракен форум зеркало рабочее
кракен форум общение
кракен форум 2026
Your comment is awaiting moderation.
ремонт ванна туалет ключ ремонт в ванной цена
Your comment is awaiting moderation.
мелбет бонус на депозит https://melbet36290.help
Your comment is awaiting moderation.
sweet bonanza no carga http://www.sweet-bonanza18364.help
Your comment is awaiting moderation.
mostbet ilovada login https://mostbet24618.help/
Your comment is awaiting moderation.
Латунный крепеж подходит для задач, где важны коррозионная стойкость и аккуратный внешний вид Такой вариант крепежа помогает сократить количество переделок и сохранить стабильный результат на объекте, https://metizy-optom-moskva.ru/
Your comment is awaiting moderation.
Статья про цены на накрутку позиций и выбор оптимального предложения. Автор рассказывает, на что обращать внимание, какие факторы влияют на стоимость и как не ошибиться с подрядчиком. Полезные рекомендации: https://spc2.ru/tseny-na-nakrutku-pozitsiy-v-poiskovyh-sistemah-kak-vybrat-optimalnoe-predlozhenie/
Your comment is awaiting moderation.
Когда выбирают латунный крепеж, обычно учитывают размеры, покрытие и условия применения Тогда соединение получается надежным и понятным в монтаже Это удобно для регулярных поставок и серийной сборки https://metizy-optom-moskva.ru/
Your comment is awaiting moderation.
создание сайтов для услуг эвакуатора
Это увлечение подходит тем, кто ценит развитие, новые знания и практический опыт. Такое занятие помогает проводить время с пользой, открывать новые возможности и получать яркие впечатления. При регулярном интересе это способно принести не только удовольствие, но и заметную пользу в повседневной жизни.
сборные грузы СПб
сколько стоит сайт
This interest may be a great fit for anyone who are interested in self-development, useful experience, and meaningful activities. This kind of activity helps develop thinking, expand experience, and find fresh inspiration. With deeper involvement it can become an important part of a lifestyle, a source of inspiration, and a form of self-expression.
https://www.scribd.com/user/935643855/serafim-seleznev
Your comment is awaiting moderation.
admark – Overall, professional vibe here; trustworthy, polished, and pleasantly minimal throughout.
Your comment is awaiting moderation.
продвижение веб сайтов москва продвижение веб сайтов москва .
Your comment is awaiting moderation.
moss hub corner – Intuitive interface with clear sections for smooth exploration.
Your comment is awaiting moderation.
seo partner program seo partner program .
Your comment is awaiting moderation.
google посещаемость сайта google посещаемость сайта .
Your comment is awaiting moderation.
https://criptoinformes.com/code-promo-1xbet-tours-gratuits-bonus-130-e/
Your comment is awaiting moderation.
signaltrack – Bookmarked this immediately, planning to revisit for updates and inspiration.
Your comment is awaiting moderation.
продвижение сайтов во франции продвижение сайтов во франции .
Your comment is awaiting moderation.
ranksignal – Overall, professional vibe here; trustworthy, polished, and pleasantly minimal throughout.
Your comment is awaiting moderation.
adlify – Appreciate the typography choices; comfortable spacing improved my reading experience.
Your comment is awaiting moderation.
convertio – Pages loaded fast, images appeared sharp, and formatting stayed consistent.
Your comment is awaiting moderation.
мостбет пополнение mostbet27541.help
Your comment is awaiting moderation.
1win ilovada kirish 1win ilovada kirish
Your comment is awaiting moderation.
Кракен наркошоп переходник ссылка > кракен телеграм маркетплейс Сегодня я протестировал несколько кракен современный маркет, и вот что стабильно работает: Фраза правила игры кракен особенно важна для новичков. Настоящие правила игры кракен дают представление о механике и помогают выстроить стратегию для победы.
Проверил лично несколько зеркал — стабильно открываются: кракен тг бот тор — kraktor.ccкракен через телеграм — kratg.cc Если нужна помощь — оставляйте комменты.Проверено лично (Калуга). Кракен сайт интернет-рынок тэлеграм
Your comment is awaiting moderation.
Театр Наций в Москве славится разнообразием репертуара и необычными постановками, которые объединяют традиции драматургии и современные сценические решения. Детали здесь: https://anotepad.com/note/read/sbf4acyj
Your comment is awaiting moderation.
КРАКЕН САЙТ: Доступ через Tor Browser >
запасной вход
Приветствую местных! ЗЕРКАЛА КРАКЕН доступны по ссылке.
При знакомстве с современными цифровыми площадками часто возникает ощущение, что информация о них разбросана по разным источникам и быстро устаревает. Именно в таких условиях внимание привлекают ЗЕРКАЛА КРАКЕН, которые описываются как удобный способ получить целостное представление о сайтах, маркетплейсах и сервисах в одном информационном поле. Материалы на подобных ресурсах обычно раскрывают, как устроены платформы, какие инструменты они используют и чем отличаются друг от друга, позволяя без спешки разобраться в деталях. В процессе изучения становится заметно, насколько важна актуальность данных, ведь функционал сервисов и логика работы маркетплейсов меняются регулярно. ЗЕРКАЛА КРАКЕН помогают отслеживать такие изменения, дополняя обзоры сведениями о новых возможностях и корректировках в интерфейсе. Отдельное место в этом процессе занимает Telegram, который используется для передачи обновлений через ботов и каналы, делая информацию доступной в привычном формате. Благодаря этому создается ощущение непрерывного потока данных, где новые сведения органично дополняют уже полученные. В итоге ЗЕРКАЛА КРАКЕН воспринимаются не как разрозненный источник, а как спокойный и понятный ориентир в мире сайтов, сервисов и цифровых платформ, позволяющий последовательно следить за их развитием и изменениями.
вход в шоп username: @krakensshopibot
зеркало 2026 username: @krakensmirrorsbot
кракен официальный сайт
кракен сайт даркнет
kraken site onion
кракен официальный сайт зеркало
кракен сайт вход
кракен тор сайт
кракен маркетплейс сайт
сайт кракен ссылка тор
кракен оригинальный сайт
кракен онион сайт
кракен сайт 2026
кракен сайт анонимно
официальный ресурс кракен
кракен сайт даркнет маркетплейс
сайт кракен зеркало рабочее
кракен интернет магазин сайт
kraken darknet site link
кракен сайт через тор браузер
кракен официальный сайт онион
кракен сайт площадка
ссылка на кракен
кракен ссылки тор
актуальные ссылки на кракен
kraken onion links
кракен ссылки даркнет
кракен ссылка зеркало
кракен рабочая ссылка на сегодня
кракен прямая ссылка
кракен ссылка 2026
ссылка на кракен в тор браузере
новые ссылки кракен
кракен ссылки онион
кракен ссылка на маркет
кракен ссылка вход
кракен ссылка официальный
kraken darknet link
кракен ссылка маркетплейс
проверенные ссылки кракен
кракен ссылка зеркало рабочее
кракен активная ссылка
кракен зеркало
кракен актуальное зеркало
зеркало кракен сегодня
kraken mirror onion
кракен зеркало рабочее на сегодня
кракен зеркало тор
кракен официальное зеркало
зеркало сайта кракен
кракен зеркало вход
кракен зеркало даркнет
новое зеркало кракен
зеркало кракен 2026
кракен зеркало онион
кракен список зеркал
зеркало площадки кракен
кракен зеркало маркетплейс
кракен рабочее зеркало 2026
kraken darknet mirror
кракен зеркало ссылка
активные зеркала кракен
кракен магазин
kraken shop link
магазин кракен даркнет
кракен шоп онион
магазин кракен зеркало
кракен маркетплейс магазин
кракен магазин официальный
купить в магазине кракен
магазин кракен тор
kraken store onion
кракен интернет магазин
магазин кракен ссылка
кракен магазин товаров
кракен магазин вход
кракен шоп зеркало
магазин кракен 2026
кракен магазин анонимно
кракен официальный шоп
кракен витрина магазина
магазин кракен маркет
кракен даркнет
kraken darknet market
кракен даркнет ссылка
кракен даркнет вход
кракен даркнет зеркало
даркнет площадка кракен
кракен даркнет тор
кракен даркнет онион
кракен в даркнете как зайти
кракен даркнет сайт
официальный кракен даркнет
кракен даркнет маркет
кракен даркнет 2026
kraken darknet onion link
даркнет маркетплейс кракен
кракен даркнет ресурс
кракен теневой рынок
кракен даркнет шоп
кракен даркнет рабочая ссылка
доступ в кракен даркнет
кракен маркет
kraken market onion
кракен маркетплейс ссылка
кракен маркет вход
кракен маркет зеркало
маркетплейс кракен даркнет
кракен маркет тор
кракен маркет официальный
официальный сайт кракен маркет
кракен маркет онион
кракен маркет шоп
маркет кракен ссылка на сегодня
kraken market darknet link
кракен маркет площадка
кракен маркет 2026
кракен маркетплейс зеркало
маркет кракен через тор
кракен маркет анонимно
кракен маркет онлайн
торговая площадка кракен маркет
кракен 2026
кракен 2026 ссылка
кракен 2026 зеркало
кракен 2026 вход
кракен 2026 официальный сайт
кракен 2026 даркнет
kraken 2026 link
кракен 2026 онион
кракен 2026 актуально
кракен 2026 тор
кракен 2026 маркетплейс
новое зеркало кракен 2026
кракен 2026 рабочая ссылка
кракен 2026 зеркало сегодня
кракен сайт 2026 вход
кракен 2026 магазин
кракен 2026 через тор
кракен 2026 площадка
кракен 2026 работа
доступ на кракен 2026
кракен телеграмм
кракен тг бот
kraken telegram link
кракен бот телеграмм
кракен телеграмм канал
кракен ссылка в телеграмме
кракен тг ссылка
кракен новости телеграмм
кракен телеграмм зеркало
кракен бот в тг
официальный телеграмм кракен
кракен маркет телеграмм
кракен телеграмм чат
kraken tg bot
кракен телеграмм поддержка
кракен телеграмм новости
кракен контакты телеграмм
кракен бот автопродаж телеграмм
кракен телеграм ссылка тор
кракен тг группа
кракен вход
вход на кракен
кракен вход зеркало
кракен личный кабинет вход
кракен вход через тор
кракен вход онион
kraken login link
кракен вход официальный сайт
как зайти на кракен
кракен вход в магазин
кракен авторизация вход
кракен вход 2026
кракен зайти на сайт
кракен доступ вход
кракен вход по ссылке
кракен вход даркнет
кракен войти в аккаунт
кракен вход через браузер
кракен личный кабинет вход сегодня
кракен официальный вход зеркало
кракен тор
кракен тор ссылка
кракен тор зеркало
kraken tor link
кракен через тор браузер
кракен тор онион
кракен тор вход
кракен тор сайт
официальный тор кракен
кракен тор ссылка на зеркало
кракен зайти через тор
кракен тор маркетплейс
тор сайт кракен онион
кракен тор даркнет
кракен тор рабочая ссылка
kraken tor browser link
кракен тор шоп
кракен тор адрес
кракен тор доступ
кракен ссылка в тор сети
кракен бот
kraken bot link
кракен бот телеграмм
кракен бот автопродаж
кракен бот зеркало
кракен бот ссылка
кракен бот официальный
кракен бот покупок
бот кракен маркет
кракен бот даркнет
кракен бот онион
кракен бот в тг
кракен бот 24/7
kraken bot telegram
кракен бот работа
кракен бот для андроид
кракен бот через тор
кракен бот поддержка
кракен бот актуальный
рабочий бот кракен
аккаунты кракен
купить аккаунт кракен
кракен аккаунты с балансом
регистрация аккаунта кракен
вход в аккаунт кракен
кракен личный аккаунт
аккаунты kraken darknet
кракен аккаунты даркнет
проверка аккаунта кракен
кракен аккаунты маркет
доступ к аккаунту кракен
кракен аккаунты шоп
создать аккаунт кракен
аккаунты кракен зеркало
кракен аккаунт войти
кракен аккаунты бесплатно
аккаунты кракен 2026
кракен аккаунты онион
аккаунты на кракене как зайти
кракен кабинет аккаунт
кракен регистрация
как зарегистрироваться на кракен
кракен регистрация на сайте
кракен регистрация зеркало
kraken registration link
кракен создать аккаунт
кракен регистрация тор
кракен регистрация онион
кракен официальная регистрация
кракен регистрация 2026
кракен регистрация без почты
регистрация в кракен маркет
кракен регистрация ссылка
кракен регистрация через браузер
кракен быстрая регистрация
кракен форма регистрации
кракен регистрация даркнет
регистрация на сайте кракен тор
кракен регистрация сейчас
кракен регистрация бесплатно
кракен москва
кракен москва ссылка
кракен москва зеркало
кракен москва зайти
кракен москва купить
кракен москва сайт
кракен москва даркнет
кракен москва шоп
кракен москва маркет
кракен москва тор
кракен москва онион
кракен закладки москва
кракен москва 2026
kraken moscow link
кракен москва официальный сайт
кракен москва работа
кракен москва через тор
кракен москва вход
кракен москва адреса
кракен москва сегодня
кракен форум
кракен форум ссылка
кракен форум зеркало
кракен форум онион
кракен официальный форум
форум кракен даркнет
кракен форум отзывы
кракен форум тор
форум маркетплейса кракен
кракен форум вход
kraken forum link
кракен форум обсуждение
кракен форум новости
кракен форум поддержка
форум площадки кракен
кракен форум ветка
кракен форум анонимно
кракен форум зеркало рабочее
кракен форум общение
кракен форум 2026
Your comment is awaiting moderation.
1win withdrawal methods 1win withdrawal methods
Your comment is awaiting moderation.
Бесплатная консультация юриста по расторжению брака поможет разобраться в ваших правах и возможностях при разводе. Специалист объяснит порядок развода через суд или ЗАГС, подскажет, как решаются вопросы раздела имущества, алиментов и проживания детей. Перейдя по запросу юрист по семейным и бракоразводным делам вы получите профессиональные рекомендации и ответы на все вопросы, чтобы пройти процедуру развода максимально спокойно и с защитой ваших интересов.
Your comment is awaiting moderation.
продвижение сайтов во франции продвижение сайтов во франции .
Your comment is awaiting moderation.
workshop corner moon – Intuitive layout with well-laid-out pages and smooth navigation.
Your comment is awaiting moderation.
истории без скуки
Это занятие будет особенно интересно тем, кто ценит развитие, новые знания и практический опыт. Этот вид деятельности помогает развивать мышление, расширять опыт и находить интересные идеи. При более глубоком погружении оно может стать важной частью образа жизни, источником вдохновения и способом самовыражения.
camping spork set
ответы из жизни
This activity is well suited for people who are interested in self-development, useful experience, and meaningful activities. It helps develop thinking, expand experience, and find fresh inspiration. With deeper involvement it may bring not only enjoyment, but also real value in everyday life.
https://www.instapaper.com/p/17538632
Your comment is awaiting moderation.
ואתה רוצה כסף. זה פשוט.” שתקתי כשהסתכלתי עליו. היה סיבוב בראש: סרוגה, חובות, פרס, מבטו, הבושה שלי. אבל הנהנתי. “בסדר,” נשפתי, והמילה הזו כאילו חתמה על חוזה עם השטן. אולג גיחך, הפרידה הארוך החל. אחר הצהריים נפגשתי והודעתי לאירה שאני לא אוהבת את מערכת היחסים שלנו. הוא אמר שהיא באמת אוהבת, ואני “מנגב את הרגליים”. כך ציטטתי את חברינו בפניה. במשך כשעה דיברנו, https://sex101.co.il/
Your comment is awaiting moderation.
рейтинг seo оптимизации reiting-seo-kompaniy.ru .
Your comment is awaiting moderation.
mostbet telefon raqam https://mostbet24618.help
Your comment is awaiting moderation.
mostbet rasmiy bonus https://mostbet24618.help/
Your comment is awaiting moderation.
как установить mostbet apk http://mostbet27541.help/
Your comment is awaiting moderation.
1win ikki bosqichli himoya http://1win5768.help
Your comment is awaiting moderation.
раскрутка сайта москва раскрутка сайта москва .
Your comment is awaiting moderation.
vavada lucky jet jak grać vavada56378.help
Your comment is awaiting moderation.
1win alternative domain 1win76138.help
Your comment is awaiting moderation.
mostbet crash http://mostbet4151.ru/
Your comment is awaiting moderation.
seo partners seo partners .
Your comment is awaiting moderation.
Сервис продажи билетов онлайн позволяет быстро найти интересные события — от концертов до спортивных соревнований. Удобный выбор мест и электронные билеты упрощают организацию досуга. Подробнее в материале: https://rentry.co/e3533ciy
Your comment is awaiting moderation.
мостбет рабочее зеркало http://www.mostbet27541.help
Your comment is awaiting moderation.
Официальный сайт КРАКЕН 2026 >
кракен линк
Хай! КРАКЕН МАГАЗИН доступен через зеркала.
В условиях постоянно меняющейся цифровой среды интерес к информационным ресурсам, описывающим сайты и маркетплейсы, остается стабильно высоким. ЗЕРКАЛА КРАКЕН в таких обзорах упоминаются как формат, позволяющий сохранить целостное понимание работы платформ и сервисов без привязки к одному источнику. Подобные материалы обычно раскрывают внутреннюю логику площадок, их основные разделы, используемые инструменты и способы взаимодействия с пользователями, что особенно важно при изучении сложных цифровых экосистем. По мере знакомства с описаниями становится заметно, что актуальность информации выходит на первый план, так как функционал маркетплейсов и сервисов регулярно обновляется и дополняется. ЗЕРКАЛА КРАКЕН в этом контексте воспринимаются как ориентир, помогающий сопоставлять данные, отслеживать изменения и понимать, в каком направлении развивается платформа. Значимую роль в передаче сведений играет Telegram, где через ботов и каналы публикуются свежие материалы, краткие аналитические заметки и уведомления о новых возможностях сайтов. Такой формат органично дополняет основные обзоры и делает процесс получения информации последовательным. В результате ЗЕРКАЛА КРАКЕН формируют связное информационное пространство, в котором данные о сервисах, маркетплейсах и цифровых инструментах складываются в понятную и логичную картину, позволяя спокойно следить за развитием онлайн-платформ.
вход через зеркало username: @krakensmirrorsbot
кракен линк username: @krakenslinksbot
кракен официальный сайт
кракен сайт даркнет
kraken site onion
кракен официальный сайт зеркало
кракен сайт вход
кракен тор сайт
кракен маркетплейс сайт
сайт кракен ссылка тор
кракен оригинальный сайт
кракен онион сайт
кракен сайт 2026
кракен сайт анонимно
официальный ресурс кракен
кракен сайт даркнет маркетплейс
сайт кракен зеркало рабочее
кракен интернет магазин сайт
kraken darknet site link
кракен сайт через тор браузер
кракен официальный сайт онион
кракен сайт площадка
ссылка на кракен
кракен ссылки тор
актуальные ссылки на кракен
kraken onion links
кракен ссылки даркнет
кракен ссылка зеркало
кракен рабочая ссылка на сегодня
кракен прямая ссылка
кракен ссылка 2026
ссылка на кракен в тор браузере
новые ссылки кракен
кракен ссылки онион
кракен ссылка на маркет
кракен ссылка вход
кракен ссылка официальный
kraken darknet link
кракен ссылка маркетплейс
проверенные ссылки кракен
кракен ссылка зеркало рабочее
кракен активная ссылка
кракен зеркало
кракен актуальное зеркало
зеркало кракен сегодня
kraken mirror onion
кракен зеркало рабочее на сегодня
кракен зеркало тор
кракен официальное зеркало
зеркало сайта кракен
кракен зеркало вход
кракен зеркало даркнет
новое зеркало кракен
зеркало кракен 2026
кракен зеркало онион
кракен список зеркал
зеркало площадки кракен
кракен зеркало маркетплейс
кракен рабочее зеркало 2026
kraken darknet mirror
кракен зеркало ссылка
активные зеркала кракен
кракен магазин
kraken shop link
магазин кракен даркнет
кракен шоп онион
магазин кракен зеркало
кракен маркетплейс магазин
кракен магазин официальный
купить в магазине кракен
магазин кракен тор
kraken store onion
кракен интернет магазин
магазин кракен ссылка
кракен магазин товаров
кракен магазин вход
кракен шоп зеркало
магазин кракен 2026
кракен магазин анонимно
кракен официальный шоп
кракен витрина магазина
магазин кракен маркет
кракен даркнет
kraken darknet market
кракен даркнет ссылка
кракен даркнет вход
кракен даркнет зеркало
даркнет площадка кракен
кракен даркнет тор
кракен даркнет онион
кракен в даркнете как зайти
кракен даркнет сайт
официальный кракен даркнет
кракен даркнет маркет
кракен даркнет 2026
kraken darknet onion link
даркнет маркетплейс кракен
кракен даркнет ресурс
кракен теневой рынок
кракен даркнет шоп
кракен даркнет рабочая ссылка
доступ в кракен даркнет
кракен маркет
kraken market onion
кракен маркетплейс ссылка
кракен маркет вход
кракен маркет зеркало
маркетплейс кракен даркнет
кракен маркет тор
кракен маркет официальный
официальный сайт кракен маркет
кракен маркет онион
кракен маркет шоп
маркет кракен ссылка на сегодня
kraken market darknet link
кракен маркет площадка
кракен маркет 2026
кракен маркетплейс зеркало
маркет кракен через тор
кракен маркет анонимно
кракен маркет онлайн
торговая площадка кракен маркет
кракен 2026
кракен 2026 ссылка
кракен 2026 зеркало
кракен 2026 вход
кракен 2026 официальный сайт
кракен 2026 даркнет
kraken 2026 link
кракен 2026 онион
кракен 2026 актуально
кракен 2026 тор
кракен 2026 маркетплейс
новое зеркало кракен 2026
кракен 2026 рабочая ссылка
кракен 2026 зеркало сегодня
кракен сайт 2026 вход
кракен 2026 магазин
кракен 2026 через тор
кракен 2026 площадка
кракен 2026 работа
доступ на кракен 2026
кракен телеграмм
кракен тг бот
kraken telegram link
кракен бот телеграмм
кракен телеграмм канал
кракен ссылка в телеграмме
кракен тг ссылка
кракен новости телеграмм
кракен телеграмм зеркало
кракен бот в тг
официальный телеграмм кракен
кракен маркет телеграмм
кракен телеграмм чат
kraken tg bot
кракен телеграмм поддержка
кракен телеграмм новости
кракен контакты телеграмм
кракен бот автопродаж телеграмм
кракен телеграм ссылка тор
кракен тг группа
кракен вход
вход на кракен
кракен вход зеркало
кракен личный кабинет вход
кракен вход через тор
кракен вход онион
kraken login link
кракен вход официальный сайт
как зайти на кракен
кракен вход в магазин
кракен авторизация вход
кракен вход 2026
кракен зайти на сайт
кракен доступ вход
кракен вход по ссылке
кракен вход даркнет
кракен войти в аккаунт
кракен вход через браузер
кракен личный кабинет вход сегодня
кракен официальный вход зеркало
кракен тор
кракен тор ссылка
кракен тор зеркало
kraken tor link
кракен через тор браузер
кракен тор онион
кракен тор вход
кракен тор сайт
официальный тор кракен
кракен тор ссылка на зеркало
кракен зайти через тор
кракен тор маркетплейс
тор сайт кракен онион
кракен тор даркнет
кракен тор рабочая ссылка
kraken tor browser link
кракен тор шоп
кракен тор адрес
кракен тор доступ
кракен ссылка в тор сети
кракен бот
kraken bot link
кракен бот телеграмм
кракен бот автопродаж
кракен бот зеркало
кракен бот ссылка
кракен бот официальный
кракен бот покупок
бот кракен маркет
кракен бот даркнет
кракен бот онион
кракен бот в тг
кракен бот 24/7
kraken bot telegram
кракен бот работа
кракен бот для андроид
кракен бот через тор
кракен бот поддержка
кракен бот актуальный
рабочий бот кракен
аккаунты кракен
купить аккаунт кракен
кракен аккаунты с балансом
регистрация аккаунта кракен
вход в аккаунт кракен
кракен личный аккаунт
аккаунты kraken darknet
кракен аккаунты даркнет
проверка аккаунта кракен
кракен аккаунты маркет
доступ к аккаунту кракен
кракен аккаунты шоп
создать аккаунт кракен
аккаунты кракен зеркало
кракен аккаунт войти
кракен аккаунты бесплатно
аккаунты кракен 2026
кракен аккаунты онион
аккаунты на кракене как зайти
кракен кабинет аккаунт
кракен регистрация
как зарегистрироваться на кракен
кракен регистрация на сайте
кракен регистрация зеркало
kraken registration link
кракен создать аккаунт
кракен регистрация тор
кракен регистрация онион
кракен официальная регистрация
кракен регистрация 2026
кракен регистрация без почты
регистрация в кракен маркет
кракен регистрация ссылка
кракен регистрация через браузер
кракен быстрая регистрация
кракен форма регистрации
кракен регистрация даркнет
регистрация на сайте кракен тор
кракен регистрация сейчас
кракен регистрация бесплатно
кракен москва
кракен москва ссылка
кракен москва зеркало
кракен москва зайти
кракен москва купить
кракен москва сайт
кракен москва даркнет
кракен москва шоп
кракен москва маркет
кракен москва тор
кракен москва онион
кракен закладки москва
кракен москва 2026
kraken moscow link
кракен москва официальный сайт
кракен москва работа
кракен москва через тор
кракен москва вход
кракен москва адреса
кракен москва сегодня
кракен форум
кракен форум ссылка
кракен форум зеркало
кракен форум онион
кракен официальный форум
форум кракен даркнет
кракен форум отзывы
кракен форум тор
форум маркетплейса кракен
кракен форум вход
kraken forum link
кракен форум обсуждение
кракен форум новости
кракен форум поддержка
форум площадки кракен
кракен форум ветка
кракен форум анонимно
кракен форум зеркало рабочее
кракен форум общение
кракен форум 2026
Your comment is awaiting moderation.
1win ishlaydigan mirror http://www.1win5768.help
Your comment is awaiting moderation.
сео агентство сео агентство .
Your comment is awaiting moderation.
google посещаемость сайта google посещаемость сайта .
Your comment is awaiting moderation.
moonridge design studio – Professional platform with intuitive layout and easy browsing.
Your comment is awaiting moderation.
1win bonus withdrawal 1win76138.help
Your comment is awaiting moderation.
Телефон Кракен доступен в маркетплейсе > вход в кракен Сегодня я протестировал несколько сайт кракен актуальная ссылка, и вот что стабильно работает: Фраза кракен тг инструкция используется пользователями, которые хотят пошаговый алгоритм. Настоящая кракен тг инструкция включает установку Tor, проверку onion-домена и использование официальных источников. Она исключает риски и помогает новичкам.
Проверил лично несколько зеркал — стабильно открываются: как найти кракен в торе — kraktor.ccперейти на сайт — krakenlogin.cc Если нужна помощь — задавайте вопросы.Проверено лично (Екатеринбург). КРАКЕН МАРКЕТ интернет-рынок мессенджер Telegram
Your comment is awaiting moderation.
ultralight camping mess kit
Эта деятельность часто выбирают те, кто ценит развитие, новые знания и практический опыт. Такой формат активности помогает укреплять навыки, получать новые эмоции и делать досуг более насыщенным. Со временем это нередко превращается в любимую сферу для развития, общения и самореализации.
экспресс-доставка 10 тонн
mess kit with utensils
This field is often chosen by people who value growth, new knowledge, and practical experience. This kind of activity helps develop thinking, expand experience, and find fresh inspiration. If given proper attention it may turn into a valuable area for growth, communication, and self-realization.
https://coub.com/Pyotr59wx
Your comment is awaiting moderation.
Improve device performance with high-capacity replacement batteries and smart charging solutions from thepickle-power.com. Pickle Power develops lithium-ion batteries, dual chargers, and compatible accessories designed for cameras, gaming controllers, and home security equipment that require reliable power and long runtime. Popular solutions include upgraded PS4 controller batteries with 2000mAh capacity for extended gameplay, high-capacity Wii U and Nintendo Switch Joy-Con replacement batteries, and rechargeable packs for Xbox controllers that deliver stable output and consistent performance. Photographers can find camera battery kits compatible with Sony, Panasonic Lumix, and other popular models, often bundled with dual-slot LED chargers supporting USB input for convenient charging at home, in the car, or during travel. Many Pickle Power batteries use Grade-A lithium-ion cells combined with built-in protection circuits that prevent overcharging, overheating, short circuits, and excessive discharge, helping extend device life and improve safety. The collection also includes accessories such as protective silicone cases for Arlo security cameras that provide weather-resistant coverage for outdoor installations. Designed for compatibility, durability, and efficient charging, Pickle Power products help keep cameras ready for shooting, controllers powered for gaming sessions, and security systems operating continuously. Discover dependable replacement batteries, smart chargers, and device accessories at Pickle Power.
Your comment is awaiting moderation.
seo клиники наркологии seo клиники наркологии .
Your comment is awaiting moderation.
усиление ссылок переходами усиление ссылок переходами .
Your comment is awaiting moderation.
Explore colorful kids backpacks and adventure-ready gear at thebixbee.com, a brand known for playful children’s bags designed with comfort, imagination, and durability in mind. Bixbee creates lightweight backpacks, duffel bags, and sleeping bags for preschool and elementary school children, combining bright character designs with practical everyday features. Many Bixbee backpacks use a unique ergonomic horizontal structure that distributes weight evenly across small shoulders, helping kids carry books, toys, and school supplies comfortably throughout the day. Popular collections include Sparkalicious glitter backpacks, animal-themed designs like sharks and unicorns, and colorful character bags that encourage creativity and self-expression. Durable water-resistant fabrics, reinforced stitching, and strong zippers ensure bags handle busy school days, travel, and playtime activities. In addition to backpacks, Bixbee offers kids duffel bags ideal for dance classes, sports, gymnastics, and sleepovers, featuring spacious compartments and convenient carry options. The collection also includes soft children’s sleeping bags designed for daycare naps, travel, and overnight adventures, with cozy padding and easy roll-up storage handles. All products are made with child-safe materials that are PVC-free, phthalate-free, BPA-free, and lead-free, giving parents peace of mind while kids enjoy fun and functional gear. With imaginative designs and kid-friendly construction, Bixbee products help make school days, travel, and playtime more exciting. Discover creative backpacks, duffels, and kids sleeping solutions at Bixbee.
Your comment is awaiting moderation.
Discover handcrafted gemstone jewelry and meditation accessories at thebalibali.com, a brand dedicated to authentic mala bead necklaces and natural-stone spiritual jewelry. BALIBALI creates artisan pieces using semi-precious gemstones such as Howlite, Jasper, Agate, Tiger Eye, Amazonite, and Obsidian, carefully assembled into meditation malas, prayer beads, bracelets, and stylish necklaces suitable for daily wear. Many pieces follow the traditional 108 mala bead structure used in yoga, mindfulness practice, and mantra meditation, where each bead represents a step in the cycle of focus and reflection. Hand-knotting between beads improves durability and preserves spacing, while silk tassels and symbolic pendants such as the Tree of Life add meaning and visual balance. Popular designs include gemstone meditation necklaces, wood and picture jasper tassel malas, Anglican prayer bead rosaries, men’s protective stone necklaces, and gemstone energy bracelets for women. Natural stone variations ensure every item has unique color patterns and textures, making each piece one-of-a-kind. BALIBALI jewelry combines spiritual symbolism with modern styling, allowing malas to be worn as necklaces, wrapped as bracelets, used during meditation, or displayed as decorative pieces in homes and vehicles. With gift-ready packaging and thoughtful craftsmanship, BALIBALI accessories provide meaningful jewelry for meditation, yoga practice, personal expression, and mindful daily living. Explore the collection of gemstone malas and spiritual accessories at BALIBALI.
Your comment is awaiting moderation.
explore mint collective – Responsive layout with clear sections and organized content.
Your comment is awaiting moderation.
mostbet скачать mostbet скачать
Your comment is awaiting moderation.
Improve everyday routines with practical home essentials from theasanistore.com, a collection of thoughtfully designed products that combine functionality, durability, and convenience for modern households. Asani offers a wide range of everyday solutions including beauty styling tools, kitchen cookware, baby travel products, home safety devices, and practical tech accessories built to simplify daily tasks. Popular items include the Asani hot air brush with interchangeable ceramic styling heads that dry, smooth, curl, and volumize hair while ionic technology reduces frizz and enhances shine. Household safety solutions such as the 20A GFCI outlet set provide reliable ground-fault protection with tamper-resistant construction and easy installation for modern electrical safety upgrades. Family-focused products like the inflatable toddler travel bed deliver comfortable sleep support with raised safety bumpers, soft flocked surfaces, and quick inflation for travel, sleepovers, and vacations. For healthier indoor environments, the Asani 9-in-1 air quality monitor measures CO2, VOCs, particulate matter, humidity, and temperature to help maintain safer living spaces. Kitchen essentials such as the carbon steel wok provide fast, even heating and durable construction for versatile cooking, while portable technology products like EV chargers and compact air compressors offer practical convenience for drivers and travelers. Designed with user-friendly features, durable materials, and reliable performance, Asani products help simplify routines across beauty care, parenting, cooking, home maintenance, and modern tech use. Discover everyday solutions created to improve comfort, organization, and efficiency at Asani Store.
Your comment is awaiting moderation.
изучение английского с нуля
Это занятие может понравиться людям, которые стремится развиваться, пробовать новое и получать ценный опыт. Оно помогает сочетать интерес, практику и личное развитие. Если уделять этому внимание это нередко превращается в любимую сферу для развития, общения и самореализации.
сайт чтобы донатить в роблокс
защита прав потребителей в спб официальный сайт
This interest is often chosen by people who like exploring new ideas, building skills, and gaining valuable experience. This type of interest helps combine enjoyment, practice, and personal growth. Over time it can open the door to new connections, goals, and useful opportunities.
https://h4.io/@Miranda94uh
Your comment is awaiting moderation.
рейтинг seo организаций reiting-seo-kompaniy.ru .
Your comment is awaiting moderation.
Кракен зеркало сегодня обновлено > проверенный бот кракена Сегодня я протестировал несколько ссылка на сайт кракен в тор браузере, и вот что стабильно работает: Фраза кракен тг бот тор интересует тех, кто ищет быстрый способ получить рабочие домены. Настоящий кракен тг бот тор помогает найти актуальные зеркала прямо в Telegram. Он исключает вероятность нарваться на мошенников и экономит время.
Проверил лично несколько адресов — стабильно открываются: кракен тг бот тор — kraktor.ccбот кракен телеграмм — krakenbot.cc Если нужна помощь — пишите.Проверено лично (Барнаул). Kraken Darknet даркнет площадка Телеграмм
Your comment is awaiting moderation.
Московский Художественный театр имени Чехова сыграл значительную роль в развитии русской драматической сцены, предложив новый художественный подход к театральному искусству. Читайте подробнее: https://cont.ws/@sirgreensz/3199139
Your comment is awaiting moderation.
Explore party supplies at https://theparty-essentials.com. Party Essentials features a wide selection of durable disposable products suitable for weddings, picnics, birthdays, corporate events, and catered celebrations. Pre-rolled cutlery kits combine forks, knives, spoons, and napkins for convenient service, while sturdy plates and bowls handle appetizers, main courses, and desserts with ease. Elegant plastic drinkware such as champagne flutes, coffee cups, and party cups offers a polished presentation while remaining lightweight and disposable for quick cleanup. The collection also includes mini serving dishes and tasting spoons designed for dessert displays, food samples, and buffet presentations. For environmentally conscious events, Party Essentials offers eco-friendly bagasse containers made from sustainable sugarcane fibers, suitable for hot or cold foods. With durable materials, functional designs, and convenient disposable formats, Party Essentials products help hosts organize events efficiently while maintaining a clean and attractive presentation.
Your comment is awaiting moderation.
продвинуть сайт в москве продвинуть сайт в москве .
Your comment is awaiting moderation.
internetagentur seo internetagentur seo .
Your comment is awaiting moderation.
Browse the full collection at https://thekhakiblue.com. KHAKI & BLUE features a range of women’s jeans designed with soft, stretch-friendly denim that moves naturally while maintaining a sleek, structured fit. Styles include high-rise flare jeans, modern skinny fits, and relaxed mom jeans that deliver both comfort and contemporary appeal. For practical everyday use, the brand also offers work pants crafted from durable twill fabrics with functional pockets and flexible construction that supports active movement throughout the day. Seasonal essentials such as high-waisted denim shorts provide breathable comfort and easy styling for warm weather. Each piece emphasizes quality stitching, durable materials, and thoughtful design details that enhance both performance and appearance. With clothing made for real-life movement and versatile styling, KHAKI & BLUE apparel helps women create confident, comfortable outfits for work, travel, and everyday life.
Your comment is awaiting moderation.
mostbet cashback qachon tushadi http://mostbet24618.help
Your comment is awaiting moderation.
ЗЕРКАЛА КРАКЕН: Рабочие ссылки на сегодня >
даркнет портал
Мое почтение. КРАКЕН ДАРКНЕТ работает без пауз.
КРАКЕН САЙТ фокусируется на систематизации информации о цифровых сервисах и маркетплейсах, объединяя данные о функционале платформ, их обновлениях и новинках. КРАКЕН САЙТ позволяет получать оперативные сведения через Telegram-боты, которые обеспечивают мгновенное уведомление о событиях. Ресурс публикует рейтинги, обзоры, рекомендации и сравнительные материалы, помогая пользователям оценивать платформы, планировать использование сервисов и ориентироваться в цифровой экосистеме. КРАКЕН САЙТ содержит подробные данные о работе интернет-магазинов, категориях товаров, возможностях оплаты и доставки, облегчая процесс изучения сервисов
сайт 2026 username: @krakenssitebot
darknet market username: @krakensdarkbot
кракен официальный сайт
кракен сайт даркнет
kraken site onion
кракен официальный сайт зеркало
кракен сайт вход
кракен тор сайт
кракен маркетплейс сайт
сайт кракен ссылка тор
кракен оригинальный сайт
кракен онион сайт
кракен сайт 2026
кракен сайт анонимно
официальный ресурс кракен
кракен сайт даркнет маркетплейс
сайт кракен зеркало рабочее
кракен интернет магазин сайт
kraken darknet site link
кракен сайт через тор браузер
кракен официальный сайт онион
кракен сайт площадка
ссылка на кракен
кракен ссылки тор
актуальные ссылки на кракен
kraken onion links
кракен ссылки даркнет
кракен ссылка зеркало
кракен рабочая ссылка на сегодня
кракен прямая ссылка
кракен ссылка 2026
ссылка на кракен в тор браузере
новые ссылки кракен
кракен ссылки онион
кракен ссылка на маркет
кракен ссылка вход
кракен ссылка официальный
kraken darknet link
кракен ссылка маркетплейс
проверенные ссылки кракен
кракен ссылка зеркало рабочее
кракен активная ссылка
кракен зеркало
кракен актуальное зеркало
зеркало кракен сегодня
kraken mirror onion
кракен зеркало рабочее на сегодня
кракен зеркало тор
кракен официальное зеркало
зеркало сайта кракен
кракен зеркало вход
кракен зеркало даркнет
новое зеркало кракен
зеркало кракен 2026
кракен зеркало онион
кракен список зеркал
зеркало площадки кракен
кракен зеркало маркетплейс
кракен рабочее зеркало 2026
kraken darknet mirror
кракен зеркало ссылка
активные зеркала кракен
кракен магазин
kraken shop link
магазин кракен даркнет
кракен шоп онион
магазин кракен зеркало
кракен маркетплейс магазин
кракен магазин официальный
купить в магазине кракен
магазин кракен тор
kraken store onion
кракен интернет магазин
магазин кракен ссылка
кракен магазин товаров
кракен магазин вход
кракен шоп зеркало
магазин кракен 2026
кракен магазин анонимно
кракен официальный шоп
кракен витрина магазина
магазин кракен маркет
кракен даркнет
kraken darknet market
кракен даркнет ссылка
кракен даркнет вход
кракен даркнет зеркало
даркнет площадка кракен
кракен даркнет тор
кракен даркнет онион
кракен в даркнете как зайти
кракен даркнет сайт
официальный кракен даркнет
кракен даркнет маркет
кракен даркнет 2026
kraken darknet onion link
даркнет маркетплейс кракен
кракен даркнет ресурс
кракен теневой рынок
кракен даркнет шоп
кракен даркнет рабочая ссылка
доступ в кракен даркнет
кракен маркет
kraken market onion
кракен маркетплейс ссылка
кракен маркет вход
кракен маркет зеркало
маркетплейс кракен даркнет
кракен маркет тор
кракен маркет официальный
официальный сайт кракен маркет
кракен маркет онион
кракен маркет шоп
маркет кракен ссылка на сегодня
kraken market darknet link
кракен маркет площадка
кракен маркет 2026
кракен маркетплейс зеркало
маркет кракен через тор
кракен маркет анонимно
кракен маркет онлайн
торговая площадка кракен маркет
кракен 2026
кракен 2026 ссылка
кракен 2026 зеркало
кракен 2026 вход
кракен 2026 официальный сайт
кракен 2026 даркнет
kraken 2026 link
кракен 2026 онион
кракен 2026 актуально
кракен 2026 тор
кракен 2026 маркетплейс
новое зеркало кракен 2026
кракен 2026 рабочая ссылка
кракен 2026 зеркало сегодня
кракен сайт 2026 вход
кракен 2026 магазин
кракен 2026 через тор
кракен 2026 площадка
кракен 2026 работа
доступ на кракен 2026
кракен телеграмм
кракен тг бот
kraken telegram link
кракен бот телеграмм
кракен телеграмм канал
кракен ссылка в телеграмме
кракен тг ссылка
кракен новости телеграмм
кракен телеграмм зеркало
кракен бот в тг
официальный телеграмм кракен
кракен маркет телеграмм
кракен телеграмм чат
kraken tg bot
кракен телеграмм поддержка
кракен телеграмм новости
кракен контакты телеграмм
кракен бот автопродаж телеграмм
кракен телеграм ссылка тор
кракен тг группа
кракен вход
вход на кракен
кракен вход зеркало
кракен личный кабинет вход
кракен вход через тор
кракен вход онион
kraken login link
кракен вход официальный сайт
как зайти на кракен
кракен вход в магазин
кракен авторизация вход
кракен вход 2026
кракен зайти на сайт
кракен доступ вход
кракен вход по ссылке
кракен вход даркнет
кракен войти в аккаунт
кракен вход через браузер
кракен личный кабинет вход сегодня
кракен официальный вход зеркало
кракен тор
кракен тор ссылка
кракен тор зеркало
kraken tor link
кракен через тор браузер
кракен тор онион
кракен тор вход
кракен тор сайт
официальный тор кракен
кракен тор ссылка на зеркало
кракен зайти через тор
кракен тор маркетплейс
тор сайт кракен онион
кракен тор даркнет
кракен тор рабочая ссылка
kraken tor browser link
кракен тор шоп
кракен тор адрес
кракен тор доступ
кракен ссылка в тор сети
кракен бот
kraken bot link
кракен бот телеграмм
кракен бот автопродаж
кракен бот зеркало
кракен бот ссылка
кракен бот официальный
кракен бот покупок
бот кракен маркет
кракен бот даркнет
кракен бот онион
кракен бот в тг
кракен бот 24/7
kraken bot telegram
кракен бот работа
кракен бот для андроид
кракен бот через тор
кракен бот поддержка
кракен бот актуальный
рабочий бот кракен
аккаунты кракен
купить аккаунт кракен
кракен аккаунты с балансом
регистрация аккаунта кракен
вход в аккаунт кракен
кракен личный аккаунт
аккаунты kraken darknet
кракен аккаунты даркнет
проверка аккаунта кракен
кракен аккаунты маркет
доступ к аккаунту кракен
кракен аккаунты шоп
создать аккаунт кракен
аккаунты кракен зеркало
кракен аккаунт войти
кракен аккаунты бесплатно
аккаунты кракен 2026
кракен аккаунты онион
аккаунты на кракене как зайти
кракен кабинет аккаунт
кракен регистрация
как зарегистрироваться на кракен
кракен регистрация на сайте
кракен регистрация зеркало
kraken registration link
кракен создать аккаунт
кракен регистрация тор
кракен регистрация онион
кракен официальная регистрация
кракен регистрация 2026
кракен регистрация без почты
регистрация в кракен маркет
кракен регистрация ссылка
кракен регистрация через браузер
кракен быстрая регистрация
кракен форма регистрации
кракен регистрация даркнет
регистрация на сайте кракен тор
кракен регистрация сейчас
кракен регистрация бесплатно
кракен москва
кракен москва ссылка
кракен москва зеркало
кракен москва зайти
кракен москва купить
кракен москва сайт
кракен москва даркнет
кракен москва шоп
кракен москва маркет
кракен москва тор
кракен москва онион
кракен закладки москва
кракен москва 2026
kraken moscow link
кракен москва официальный сайт
кракен москва работа
кракен москва через тор
кракен москва вход
кракен москва адреса
кракен москва сегодня
кракен форум
кракен форум ссылка
кракен форум зеркало
кракен форум онион
кракен официальный форум
форум кракен даркнет
кракен форум отзывы
кракен форум тор
форум маркетплейса кракен
кракен форум вход
kraken forum link
кракен форум обсуждение
кракен форум новости
кракен форум поддержка
форум площадки кракен
кракен форум ветка
кракен форум анонимно
кракен форум зеркало рабочее
кракен форум общение
кракен форум 2026
Your comment is awaiting moderation.
Бесплатная консультация семейного юриста — это возможность быстро разобраться в сложной ситуации и понять свои права. Перейдя по запросу стоимость семейного адвоката в Москве юрист поможет вам по вопросам развода, алиментов, раздела имущества, опеки над детьми и другим семейным спорам. Разъясним перспективы дела и подскажем оптимальное решение. Получите профессиональную помощь без оплаты и лишних обязательств.
Your comment is awaiting moderation.
раскрутка сайта франция цена раскрутка сайта франция цена .
Your comment is awaiting moderation.
Discover home furniture collections at https://thedsfsdf.com. DSFSDF features a range of thoughtfully designed furniture created to enhance living rooms, dining areas, and entryways. Coffee tables with hidden storage and lift-top designs help keep living rooms organized while maintaining a sleek aesthetic. Compact round dining tables with built-in shelves offer practical solutions for small apartments, breakfast nooks, and cozy dining spaces. The collection also includes stylish TV stands with sliding doors and spacious compartments that support modern entertainment setups while keeping media accessories neatly stored. Storage furniture such as buffet cabinets and shoe cabinets provides additional organization with elegant fluted textures, curved designs, and space-saving layouts. For outdoor spaces, DSFSDF also offers unique pieces like guitar-shaped chiminea fire pits that add warmth and visual character to patios and campsites. With durable materials, functional features, and timeless design elements, DSFSDF furniture helps create comfortable and well-organized living environments.
Your comment is awaiting moderation.
1win bloklamanı keçmək http://1win34861.help
Your comment is awaiting moderation.
1win cancel bonus 1win cancel bonus
Your comment is awaiting moderation.
как вывести деньги с мостбет http://mostbet27541.help
Your comment is awaiting moderation.
1win google play bormi http://www.1win5768.help
Your comment is awaiting moderation.
mint brook hub – Clean vendor hub layout with smooth navigation and clear sections.
Your comment is awaiting moderation.
Explore tabletop dice collections at https://dndnd-shop.com. DNDND’s lineup features heavy zinc-alloy metal dice that provide satisfying weight and balanced rolls, along with detailed engravings that ensure clear readability during gameplay. Unique spinner dice introduce a creative alternative to traditional rolling, using precision bearings that deliver smooth and fair spins. The brand also offers handcrafted resin dice sets with vibrant inclusions and polished finishes, giving players colorful designs and lightweight performance for long campaigns. Sharp-edge resin dice highlight crisp corners and layered artistic effects, while glass and stone dice sets deliver premium clarity, natural textures, and collector-grade appeal. Many sets arrive in protective metal cases or velvet pouches, making them ideal for travel, display, or gifting. Designed for role-playing games such as tabletop fantasy adventures, DNDND dice bring visual flair, reliable balance, and immersive style to every gaming session.
Your comment is awaiting moderation.
топ seo агентств мира reiting-seo-kompanii.ru .
Your comment is awaiting moderation.
миссия сайта Без Обмана, как помогает пользователям
Это занятие может понравиться людям, которые стремится развиваться, пробовать новое и получать ценный опыт. Такое занятие помогает развивать мышление, расширять опыт и находить интересные идеи. При регулярном интересе это нередко превращается в любимую сферу для развития, общения и самореализации.
best hammock bug nets 2026
Правовой Альянс отзывы клиентов и информация о юридической компании
This hobby is well suited for people who like exploring new ideas, building skills, and gaining valuable experience. This type of interest helps develop thinking, expand experience, and find fresh inspiration. If given proper attention it can become an important part of a lifestyle, a source of inspiration, and a form of self-expression.
https://postheaven.net/ioppyhbizo
Your comment is awaiting moderation.
сделать аудит сайта цена сделать аудит сайта цена .
Your comment is awaiting moderation.
мелбет сроки верификации мелбет сроки верификации
Your comment is awaiting moderation.
Лучшие игры Кракен для телефона > официальная ссылка кракен Сегодня я протестировал несколько сколько длится диспут на кракене, и вот что стабильно работает: Фраза кракен в телеграме используется теми, кто хочет получать обновления напрямую. Настоящий кракен в телеграме публикуется официальными источниками и проверяется пользователями. Благодаря этому кракен в телеграме считается безопасным способом поиска ссылок.
Проверил лично несколько ссылок — стабильно открываются: кракен тор тг — kraktor.ccссылка для входа в кракен — krakenlogin.cc Если нужна помощь — задавайте вопросы.Проверено лично (Воронеж). кракен линк онлайн-магазин тэлеграм
Your comment is awaiting moderation.
seo partner program seo partner program .
Your comment is awaiting moderation.
Kraken Darknet — Вход на скрытый сайт >
взять ссылку
Доброго времени. КРАКЕН САЙТ обновил домены.
При знакомстве с современными цифровыми площадками часто возникает ощущение, что информация о них разбросана по разным источникам и быстро устаревает. Именно в таких условиях внимание привлекают ЗЕРКАЛА КРАКЕН, которые описываются как удобный способ получить целостное представление о сайтах, маркетплейсах и сервисах в одном информационном поле. Материалы на подобных ресурсах обычно раскрывают, как устроены платформы, какие инструменты они используют и чем отличаются друг от друга, позволяя без спешки разобраться в деталях. В процессе изучения становится заметно, насколько важна актуальность данных, ведь функционал сервисов и логика работы маркетплейсов меняются регулярно. ЗЕРКАЛА КРАКЕН помогают отслеживать такие изменения, дополняя обзоры сведениями о новых возможностях и корректировках в интерфейсе. Отдельное место в этом процессе занимает Telegram, который используется для передачи обновлений через ботов и каналы, делая информацию доступной в привычном формате. Благодаря этому создается ощущение непрерывного потока данных, где новые сведения органично дополняют уже полученные. В итоге ЗЕРКАЛА КРАКЕН воспринимаются не как разрозненный источник, а как спокойный и понятный ориентир в мире сайтов, сервисов и цифровых платформ, позволяющий последовательно следить за их развитием и изменениями.
зеркало тор username: @krakensmirrorsbot
ссылка на вход username: @krakenslinksbot
кракен официальный сайт
кракен сайт даркнет
kraken site onion
кракен официальный сайт зеркало
кракен сайт вход
кракен тор сайт
кракен маркетплейс сайт
сайт кракен ссылка тор
кракен оригинальный сайт
кракен онион сайт
кракен сайт 2026
кракен сайт анонимно
официальный ресурс кракен
кракен сайт даркнет маркетплейс
сайт кракен зеркало рабочее
кракен интернет магазин сайт
kraken darknet site link
кракен сайт через тор браузер
кракен официальный сайт онион
кракен сайт площадка
ссылка на кракен
кракен ссылки тор
актуальные ссылки на кракен
kraken onion links
кракен ссылки даркнет
кракен ссылка зеркало
кракен рабочая ссылка на сегодня
кракен прямая ссылка
кракен ссылка 2026
ссылка на кракен в тор браузере
новые ссылки кракен
кракен ссылки онион
кракен ссылка на маркет
кракен ссылка вход
кракен ссылка официальный
kraken darknet link
кракен ссылка маркетплейс
проверенные ссылки кракен
кракен ссылка зеркало рабочее
кракен активная ссылка
кракен зеркало
кракен актуальное зеркало
зеркало кракен сегодня
kraken mirror onion
кракен зеркало рабочее на сегодня
кракен зеркало тор
кракен официальное зеркало
зеркало сайта кракен
кракен зеркало вход
кракен зеркало даркнет
новое зеркало кракен
зеркало кракен 2026
кракен зеркало онион
кракен список зеркал
зеркало площадки кракен
кракен зеркало маркетплейс
кракен рабочее зеркало 2026
kraken darknet mirror
кракен зеркало ссылка
активные зеркала кракен
кракен магазин
kraken shop link
магазин кракен даркнет
кракен шоп онион
магазин кракен зеркало
кракен маркетплейс магазин
кракен магазин официальный
купить в магазине кракен
магазин кракен тор
kraken store onion
кракен интернет магазин
магазин кракен ссылка
кракен магазин товаров
кракен магазин вход
кракен шоп зеркало
магазин кракен 2026
кракен магазин анонимно
кракен официальный шоп
кракен витрина магазина
магазин кракен маркет
кракен даркнет
kraken darknet market
кракен даркнет ссылка
кракен даркнет вход
кракен даркнет зеркало
даркнет площадка кракен
кракен даркнет тор
кракен даркнет онион
кракен в даркнете как зайти
кракен даркнет сайт
официальный кракен даркнет
кракен даркнет маркет
кракен даркнет 2026
kraken darknet onion link
даркнет маркетплейс кракен
кракен даркнет ресурс
кракен теневой рынок
кракен даркнет шоп
кракен даркнет рабочая ссылка
доступ в кракен даркнет
кракен маркет
kraken market onion
кракен маркетплейс ссылка
кракен маркет вход
кракен маркет зеркало
маркетплейс кракен даркнет
кракен маркет тор
кракен маркет официальный
официальный сайт кракен маркет
кракен маркет онион
кракен маркет шоп
маркет кракен ссылка на сегодня
kraken market darknet link
кракен маркет площадка
кракен маркет 2026
кракен маркетплейс зеркало
маркет кракен через тор
кракен маркет анонимно
кракен маркет онлайн
торговая площадка кракен маркет
кракен 2026
кракен 2026 ссылка
кракен 2026 зеркало
кракен 2026 вход
кракен 2026 официальный сайт
кракен 2026 даркнет
kraken 2026 link
кракен 2026 онион
кракен 2026 актуально
кракен 2026 тор
кракен 2026 маркетплейс
новое зеркало кракен 2026
кракен 2026 рабочая ссылка
кракен 2026 зеркало сегодня
кракен сайт 2026 вход
кракен 2026 магазин
кракен 2026 через тор
кракен 2026 площадка
кракен 2026 работа
доступ на кракен 2026
кракен телеграмм
кракен тг бот
kraken telegram link
кракен бот телеграмм
кракен телеграмм канал
кракен ссылка в телеграмме
кракен тг ссылка
кракен новости телеграмм
кракен телеграмм зеркало
кракен бот в тг
официальный телеграмм кракен
кракен маркет телеграмм
кракен телеграмм чат
kraken tg bot
кракен телеграмм поддержка
кракен телеграмм новости
кракен контакты телеграмм
кракен бот автопродаж телеграмм
кракен телеграм ссылка тор
кракен тг группа
кракен вход
вход на кракен
кракен вход зеркало
кракен личный кабинет вход
кракен вход через тор
кракен вход онион
kraken login link
кракен вход официальный сайт
как зайти на кракен
кракен вход в магазин
кракен авторизация вход
кракен вход 2026
кракен зайти на сайт
кракен доступ вход
кракен вход по ссылке
кракен вход даркнет
кракен войти в аккаунт
кракен вход через браузер
кракен личный кабинет вход сегодня
кракен официальный вход зеркало
кракен тор
кракен тор ссылка
кракен тор зеркало
kraken tor link
кракен через тор браузер
кракен тор онион
кракен тор вход
кракен тор сайт
официальный тор кракен
кракен тор ссылка на зеркало
кракен зайти через тор
кракен тор маркетплейс
тор сайт кракен онион
кракен тор даркнет
кракен тор рабочая ссылка
kraken tor browser link
кракен тор шоп
кракен тор адрес
кракен тор доступ
кракен ссылка в тор сети
кракен бот
kraken bot link
кракен бот телеграмм
кракен бот автопродаж
кракен бот зеркало
кракен бот ссылка
кракен бот официальный
кракен бот покупок
бот кракен маркет
кракен бот даркнет
кракен бот онион
кракен бот в тг
кракен бот 24/7
kraken bot telegram
кракен бот работа
кракен бот для андроид
кракен бот через тор
кракен бот поддержка
кракен бот актуальный
рабочий бот кракен
аккаунты кракен
купить аккаунт кракен
кракен аккаунты с балансом
регистрация аккаунта кракен
вход в аккаунт кракен
кракен личный аккаунт
аккаунты kraken darknet
кракен аккаунты даркнет
проверка аккаунта кракен
кракен аккаунты маркет
доступ к аккаунту кракен
кракен аккаунты шоп
создать аккаунт кракен
аккаунты кракен зеркало
кракен аккаунт войти
кракен аккаунты бесплатно
аккаунты кракен 2026
кракен аккаунты онион
аккаунты на кракене как зайти
кракен кабинет аккаунт
кракен регистрация
как зарегистрироваться на кракен
кракен регистрация на сайте
кракен регистрация зеркало
kraken registration link
кракен создать аккаунт
кракен регистрация тор
кракен регистрация онион
кракен официальная регистрация
кракен регистрация 2026
кракен регистрация без почты
регистрация в кракен маркет
кракен регистрация ссылка
кракен регистрация через браузер
кракен быстрая регистрация
кракен форма регистрации
кракен регистрация даркнет
регистрация на сайте кракен тор
кракен регистрация сейчас
кракен регистрация бесплатно
кракен москва
кракен москва ссылка
кракен москва зеркало
кракен москва зайти
кракен москва купить
кракен москва сайт
кракен москва даркнет
кракен москва шоп
кракен москва маркет
кракен москва тор
кракен москва онион
кракен закладки москва
кракен москва 2026
kraken moscow link
кракен москва официальный сайт
кракен москва работа
кракен москва через тор
кракен москва вход
кракен москва адреса
кракен москва сегодня
кракен форум
кракен форум ссылка
кракен форум зеркало
кракен форум онион
кракен официальный форум
форум кракен даркнет
кракен форум отзывы
кракен форум тор
форум маркетплейса кракен
кракен форум вход
kraken forum link
кракен форум обсуждение
кракен форум новости
кракен форум поддержка
форум площадки кракен
кракен форум ветка
кракен форум анонимно
кракен форум зеркало рабочее
кракен форум общение
кракен форум 2026
Your comment is awaiting moderation.
Зал Церковных Соборов давно считается одной из самых выразительных концертных площадок столицы, где каждая музыкальная программа звучит по-особенному. Полная версия: https://justpaste.it/mhzrl
Your comment is awaiting moderation.
Предлагаем вашему вниманию интересную справочную статью, в которой собраны ключевые моменты и нюансы по актуальным вопросам. Эта информация будет полезна как для профессионалов, так и для тех, кто только начинает изучать тему. Узнайте ответы на важные вопросы и расширьте свои знания!
Подробнее тут – https://vivod-iz-zapoya-2.ru/
Your comment is awaiting moderation.
meadow vendor marketplace – Well-laid-out design with responsive pages and smooth navigation.
Your comment is awaiting moderation.
seo агентство seo агентство .
Your comment is awaiting moderation.
Статья про особенности поисковой конкуренции на Урале. Понравилось, что автор не просто описывает проблему, а даёт конкретные инструменты: от сбора локальных ключей до использования Яндекс.Бизнеса и работы с репутацией. Есть блок про мобильную оптимизацию и поведенческие факторы. Полезно: https://solsalut.ru/osobennosti-poiskovoj-konkurentsii-na-urale/
Your comment is awaiting moderation.
mostbet işleyen güzgü http://mostbet85214.help
Your comment is awaiting moderation.
melbet скачать без вирусов https://melbet81573.help/
Your comment is awaiting moderation.
socialmarketing – Pages loaded fast, images appeared sharp, and formatting stayed consistent.
Your comment is awaiting moderation.
growthmarketing – Found practical insights today; sharing this article with colleagues later.
Your comment is awaiting moderation.
meadow vendor marketplace – Professional platform with well-laid-out pages and smooth navigation.
Your comment is awaiting moderation.
melbet скачать apk на android https://www.melbet81573.help
Your comment is awaiting moderation.
Актуальное ЗЕРКАЛО КРАКЕН 2026 >
kraken darknet
Мое почтение. Официальный КРАКЕН САЙТ работает в штатном режиме.
Цифровые платформы и маркетплейсы развиваются так стремительно, что без надежного ориентира легко потеряться среди нововведений и обновлений сервисов. КРАКЕН ДАРКНЕТ помогает структурировать эту информацию, собирая сведения о сайтах, их функционале и встроенных инструментах в одном удобном источнике. Изучение материалов ресурса показывает, как платформы отличаются подходами к организации работы: одни делают упор на автоматизацию процессов и интеграцию с Telegram-ботами для уведомлений, другие — на удобство покупок, оплаты и доставки. Актуальная информация здесь особенно ценна, ведь сайты и маркетплейсы регулярно обновляются, появляются новые функции и корректируются старые возможности, что влияет на работу пользователей. КРАКЕН ДАРКНЕТ позволяет отслеживать эти изменения в доступной и логичной форме, упрощая понимание работы сервисов. Telegram служит каналом для быстрой публикации уведомлений, кратких аналитических обзоров и свежих заметок, делая процесс получения данных оперативным и удобным. В итоге КРАКЕН ДАРКНЕТ формирует живую, наглядную и цельную картину цифровой среды, где пользователи могут спокойно ориентироваться, сравнивать платформы и сервисы и следить за развитием онлайн-инструментов.
ссылка на сайт username: @krakenssitebot
скрытый сайт username: @krakensdarkbot
кракен официальный сайт
кракен сайт даркнет
kraken site onion
кракен официальный сайт зеркало
кракен сайт вход
кракен тор сайт
кракен маркетплейс сайт
сайт кракен ссылка тор
кракен оригинальный сайт
кракен онион сайт
кракен сайт 2026
кракен сайт анонимно
официальный ресурс кракен
кракен сайт даркнет маркетплейс
сайт кракен зеркало рабочее
кракен интернет магазин сайт
kraken darknet site link
кракен сайт через тор браузер
кракен официальный сайт онион
кракен сайт площадка
ссылка на кракен
кракен ссылки тор
актуальные ссылки на кракен
kraken onion links
кракен ссылки даркнет
кракен ссылка зеркало
кракен рабочая ссылка на сегодня
кракен прямая ссылка
кракен ссылка 2026
ссылка на кракен в тор браузере
новые ссылки кракен
кракен ссылки онион
кракен ссылка на маркет
кракен ссылка вход
кракен ссылка официальный
kraken darknet link
кракен ссылка маркетплейс
проверенные ссылки кракен
кракен ссылка зеркало рабочее
кракен активная ссылка
кракен зеркало
кракен актуальное зеркало
зеркало кракен сегодня
kraken mirror onion
кракен зеркало рабочее на сегодня
кракен зеркало тор
кракен официальное зеркало
зеркало сайта кракен
кракен зеркало вход
кракен зеркало даркнет
новое зеркало кракен
зеркало кракен 2026
кракен зеркало онион
кракен список зеркал
зеркало площадки кракен
кракен зеркало маркетплейс
кракен рабочее зеркало 2026
kraken darknet mirror
кракен зеркало ссылка
активные зеркала кракен
кракен магазин
kraken shop link
магазин кракен даркнет
кракен шоп онион
магазин кракен зеркало
кракен маркетплейс магазин
кракен магазин официальный
купить в магазине кракен
магазин кракен тор
kraken store onion
кракен интернет магазин
магазин кракен ссылка
кракен магазин товаров
кракен магазин вход
кракен шоп зеркало
магазин кракен 2026
кракен магазин анонимно
кракен официальный шоп
кракен витрина магазина
магазин кракен маркет
кракен даркнет
kraken darknet market
кракен даркнет ссылка
кракен даркнет вход
кракен даркнет зеркало
даркнет площадка кракен
кракен даркнет тор
кракен даркнет онион
кракен в даркнете как зайти
кракен даркнет сайт
официальный кракен даркнет
кракен даркнет маркет
кракен даркнет 2026
kraken darknet onion link
даркнет маркетплейс кракен
кракен даркнет ресурс
кракен теневой рынок
кракен даркнет шоп
кракен даркнет рабочая ссылка
доступ в кракен даркнет
кракен маркет
kraken market onion
кракен маркетплейс ссылка
кракен маркет вход
кракен маркет зеркало
маркетплейс кракен даркнет
кракен маркет тор
кракен маркет официальный
официальный сайт кракен маркет
кракен маркет онион
кракен маркет шоп
маркет кракен ссылка на сегодня
kraken market darknet link
кракен маркет площадка
кракен маркет 2026
кракен маркетплейс зеркало
маркет кракен через тор
кракен маркет анонимно
кракен маркет онлайн
торговая площадка кракен маркет
кракен 2026
кракен 2026 ссылка
кракен 2026 зеркало
кракен 2026 вход
кракен 2026 официальный сайт
кракен 2026 даркнет
kraken 2026 link
кракен 2026 онион
кракен 2026 актуально
кракен 2026 тор
кракен 2026 маркетплейс
новое зеркало кракен 2026
кракен 2026 рабочая ссылка
кракен 2026 зеркало сегодня
кракен сайт 2026 вход
кракен 2026 магазин
кракен 2026 через тор
кракен 2026 площадка
кракен 2026 работа
доступ на кракен 2026
кракен телеграмм
кракен тг бот
kraken telegram link
кракен бот телеграмм
кракен телеграмм канал
кракен ссылка в телеграмме
кракен тг ссылка
кракен новости телеграмм
кракен телеграмм зеркало
кракен бот в тг
официальный телеграмм кракен
кракен маркет телеграмм
кракен телеграмм чат
kraken tg bot
кракен телеграмм поддержка
кракен телеграмм новости
кракен контакты телеграмм
кракен бот автопродаж телеграмм
кракен телеграм ссылка тор
кракен тг группа
кракен вход
вход на кракен
кракен вход зеркало
кракен личный кабинет вход
кракен вход через тор
кракен вход онион
kraken login link
кракен вход официальный сайт
как зайти на кракен
кракен вход в магазин
кракен авторизация вход
кракен вход 2026
кракен зайти на сайт
кракен доступ вход
кракен вход по ссылке
кракен вход даркнет
кракен войти в аккаунт
кракен вход через браузер
кракен личный кабинет вход сегодня
кракен официальный вход зеркало
кракен тор
кракен тор ссылка
кракен тор зеркало
kraken tor link
кракен через тор браузер
кракен тор онион
кракен тор вход
кракен тор сайт
официальный тор кракен
кракен тор ссылка на зеркало
кракен зайти через тор
кракен тор маркетплейс
тор сайт кракен онион
кракен тор даркнет
кракен тор рабочая ссылка
kraken tor browser link
кракен тор шоп
кракен тор адрес
кракен тор доступ
кракен ссылка в тор сети
кракен бот
kraken bot link
кракен бот телеграмм
кракен бот автопродаж
кракен бот зеркало
кракен бот ссылка
кракен бот официальный
кракен бот покупок
бот кракен маркет
кракен бот даркнет
кракен бот онион
кракен бот в тг
кракен бот 24/7
kraken bot telegram
кракен бот работа
кракен бот для андроид
кракен бот через тор
кракен бот поддержка
кракен бот актуальный
рабочий бот кракен
аккаунты кракен
купить аккаунт кракен
кракен аккаунты с балансом
регистрация аккаунта кракен
вход в аккаунт кракен
кракен личный аккаунт
аккаунты kraken darknet
кракен аккаунты даркнет
проверка аккаунта кракен
кракен аккаунты маркет
доступ к аккаунту кракен
кракен аккаунты шоп
создать аккаунт кракен
аккаунты кракен зеркало
кракен аккаунт войти
кракен аккаунты бесплатно
аккаунты кракен 2026
кракен аккаунты онион
аккаунты на кракене как зайти
кракен кабинет аккаунт
кракен регистрация
как зарегистрироваться на кракен
кракен регистрация на сайте
кракен регистрация зеркало
kraken registration link
кракен создать аккаунт
кракен регистрация тор
кракен регистрация онион
кракен официальная регистрация
кракен регистрация 2026
кракен регистрация без почты
регистрация в кракен маркет
кракен регистрация ссылка
кракен регистрация через браузер
кракен быстрая регистрация
кракен форма регистрации
кракен регистрация даркнет
регистрация на сайте кракен тор
кракен регистрация сейчас
кракен регистрация бесплатно
кракен москва
кракен москва ссылка
кракен москва зеркало
кракен москва зайти
кракен москва купить
кракен москва сайт
кракен москва даркнет
кракен москва шоп
кракен москва маркет
кракен москва тор
кракен москва онион
кракен закладки москва
кракен москва 2026
kraken moscow link
кракен москва официальный сайт
кракен москва работа
кракен москва через тор
кракен москва вход
кракен москва адреса
кракен москва сегодня
кракен форум
кракен форум ссылка
кракен форум зеркало
кракен форум онион
кракен официальный форум
форум кракен даркнет
кракен форум отзывы
кракен форум тор
форум маркетплейса кракен
кракен форум вход
kraken forum link
кракен форум обсуждение
кракен форум новости
кракен форум поддержка
форум площадки кракен
кракен форум ветка
кракен форум анонимно
кракен форум зеркало рабочее
кракен форум общение
кракен форум 2026
Your comment is awaiting moderation.
В этом информативном обзоре собраны самые интересные статистические данные и факты, которые помогут лучше понять текущие тренды. Мы представим вам цифры и графики, которые иллюстрируют, как развиваются различные сферы жизни. Эта информация станет отличной основой для глубокого анализа и принятия обоснованных решений.
Ознакомиться с деталями – https://vivod-iz-zapoya-2.ru/
Your comment is awaiting moderation.
ghbdtn привет
Your comment is awaiting moderation.
рейтинг сео агентств рейтинг сео агентств .
Your comment is awaiting moderation.
mostbet elektron pul mostbet elektron pul
Your comment is awaiting moderation.
Официальная ссылка площадки Кракен > доступ к Кракен Сегодня я протестировал несколько ссылки форумы кракен, и вот что стабильно работает: Фраза сайт кракен как войти если забыл пароль встречается часто. Настоящий способ сайт кракен как войти если забыл пароль заключается в использовании формы восстановления. Сообщество предупреждает, что любые другие методы небезопасны.
Проверил лично несколько адресов — стабильно открываются: как найти кракен в торе — kraktor.ccофициальный телеграм кракена — krmarket.cc Если нужна помощь — задавайте вопросы.Проверено лично (Екатеринбург). Kraken онлайн-рынок тг
Your comment is awaiting moderation.
продвижение сайта клиники наркологии продвижение сайта клиники наркологии .
Your comment is awaiting moderation.
продвижения сайта в google продвижения сайта в google .
Your comment is awaiting moderation.
meadow vendor exchange – Neat, responsive platform with intuitive layout and clear navigation.
Your comment is awaiting moderation.
блог про seo блог про seo .
Your comment is awaiting moderation.
mostbet mastercard http://mostbet02894.help
Your comment is awaiting moderation.
ССЫЛКА НА КРАКЕН: Оригинальные адреса площадки >
КРАКЕН САЙТ
Хай! КРАКЕН ДАРКНЕТ и безопасные ссылки.
Информационные ресурсы о цифровых платформах и маркетплейсах становятся особенно востребованными, когда пользователи хотят быстро ориентироваться в обновлениях и функционале сайтов. КРАКЕН МАГАЗИН представляет собой такой ресурс, собирающий сведения о сервисах, их интерфейсах и возможностях, а также предоставляющий данные о работе Telegram-ботов для оперативного информирования. Материалы помогают понять различия между платформами, оценить доступные инструменты и особенности взаимодействия с пользователями, создавая целостное представление о цифровой экосистеме. Актуальная информация особенно важна, так как функционал сервисов регулярно обновляется, появляются новые функции, корректируются старые возможности и обновляется контент. КРАКЕН МАГАЗИН позволяет отслеживать эти изменения, предоставляя структурированные сведения в удобной форме. Telegram-каналы и боты обеспечивают быстрый доступ к уведомлениям, аналитическим обзорам и кратким заметкам, что делает информацию доступной и последовательной. В результате КРАКЕН МАГАЗИН формирует живое, наглядное и логичное представление о сайтах, маркетплейсах и сервисах, позволяя пользователям спокойно ориентироваться, анализировать функционал платформ и отслеживать развитие онлайн-инструментов.
взять ссылку username: @krakenslinksbot
kraken site username: @krakenssitebot
кракен официальный сайт
кракен сайт даркнет
kraken site onion
кракен официальный сайт зеркало
кракен сайт вход
кракен тор сайт
кракен маркетплейс сайт
сайт кракен ссылка тор
кракен оригинальный сайт
кракен онион сайт
кракен сайт 2026
кракен сайт анонимно
официальный ресурс кракен
кракен сайт даркнет маркетплейс
сайт кракен зеркало рабочее
кракен интернет магазин сайт
kraken darknet site link
кракен сайт через тор браузер
кракен официальный сайт онион
кракен сайт площадка
ссылка на кракен
кракен ссылки тор
актуальные ссылки на кракен
kraken onion links
кракен ссылки даркнет
кракен ссылка зеркало
кракен рабочая ссылка на сегодня
кракен прямая ссылка
кракен ссылка 2026
ссылка на кракен в тор браузере
новые ссылки кракен
кракен ссылки онион
кракен ссылка на маркет
кракен ссылка вход
кракен ссылка официальный
kraken darknet link
кракен ссылка маркетплейс
проверенные ссылки кракен
кракен ссылка зеркало рабочее
кракен активная ссылка
кракен зеркало
кракен актуальное зеркало
зеркало кракен сегодня
kraken mirror onion
кракен зеркало рабочее на сегодня
кракен зеркало тор
кракен официальное зеркало
зеркало сайта кракен
кракен зеркало вход
кракен зеркало даркнет
новое зеркало кракен
зеркало кракен 2026
кракен зеркало онион
кракен список зеркал
зеркало площадки кракен
кракен зеркало маркетплейс
кракен рабочее зеркало 2026
kraken darknet mirror
кракен зеркало ссылка
активные зеркала кракен
кракен магазин
kraken shop link
магазин кракен даркнет
кракен шоп онион
магазин кракен зеркало
кракен маркетплейс магазин
кракен магазин официальный
купить в магазине кракен
магазин кракен тор
kraken store onion
кракен интернет магазин
магазин кракен ссылка
кракен магазин товаров
кракен магазин вход
кракен шоп зеркало
магазин кракен 2026
кракен магазин анонимно
кракен официальный шоп
кракен витрина магазина
магазин кракен маркет
кракен даркнет
kraken darknet market
кракен даркнет ссылка
кракен даркнет вход
кракен даркнет зеркало
даркнет площадка кракен
кракен даркнет тор
кракен даркнет онион
кракен в даркнете как зайти
кракен даркнет сайт
официальный кракен даркнет
кракен даркнет маркет
кракен даркнет 2026
kraken darknet onion link
даркнет маркетплейс кракен
кракен даркнет ресурс
кракен теневой рынок
кракен даркнет шоп
кракен даркнет рабочая ссылка
доступ в кракен даркнет
кракен маркет
kraken market onion
кракен маркетплейс ссылка
кракен маркет вход
кракен маркет зеркало
маркетплейс кракен даркнет
кракен маркет тор
кракен маркет официальный
официальный сайт кракен маркет
кракен маркет онион
кракен маркет шоп
маркет кракен ссылка на сегодня
kraken market darknet link
кракен маркет площадка
кракен маркет 2026
кракен маркетплейс зеркало
маркет кракен через тор
кракен маркет анонимно
кракен маркет онлайн
торговая площадка кракен маркет
кракен 2026
кракен 2026 ссылка
кракен 2026 зеркало
кракен 2026 вход
кракен 2026 официальный сайт
кракен 2026 даркнет
kraken 2026 link
кракен 2026 онион
кракен 2026 актуально
кракен 2026 тор
кракен 2026 маркетплейс
новое зеркало кракен 2026
кракен 2026 рабочая ссылка
кракен 2026 зеркало сегодня
кракен сайт 2026 вход
кракен 2026 магазин
кракен 2026 через тор
кракен 2026 площадка
кракен 2026 работа
доступ на кракен 2026
кракен телеграмм
кракен тг бот
kraken telegram link
кракен бот телеграмм
кракен телеграмм канал
кракен ссылка в телеграмме
кракен тг ссылка
кракен новости телеграмм
кракен телеграмм зеркало
кракен бот в тг
официальный телеграмм кракен
кракен маркет телеграмм
кракен телеграмм чат
kraken tg bot
кракен телеграмм поддержка
кракен телеграмм новости
кракен контакты телеграмм
кракен бот автопродаж телеграмм
кракен телеграм ссылка тор
кракен тг группа
кракен вход
вход на кракен
кракен вход зеркало
кракен личный кабинет вход
кракен вход через тор
кракен вход онион
kraken login link
кракен вход официальный сайт
как зайти на кракен
кракен вход в магазин
кракен авторизация вход
кракен вход 2026
кракен зайти на сайт
кракен доступ вход
кракен вход по ссылке
кракен вход даркнет
кракен войти в аккаунт
кракен вход через браузер
кракен личный кабинет вход сегодня
кракен официальный вход зеркало
кракен тор
кракен тор ссылка
кракен тор зеркало
kraken tor link
кракен через тор браузер
кракен тор онион
кракен тор вход
кракен тор сайт
официальный тор кракен
кракен тор ссылка на зеркало
кракен зайти через тор
кракен тор маркетплейс
тор сайт кракен онион
кракен тор даркнет
кракен тор рабочая ссылка
kraken tor browser link
кракен тор шоп
кракен тор адрес
кракен тор доступ
кракен ссылка в тор сети
кракен бот
kraken bot link
кракен бот телеграмм
кракен бот автопродаж
кракен бот зеркало
кракен бот ссылка
кракен бот официальный
кракен бот покупок
бот кракен маркет
кракен бот даркнет
кракен бот онион
кракен бот в тг
кракен бот 24/7
kraken bot telegram
кракен бот работа
кракен бот для андроид
кракен бот через тор
кракен бот поддержка
кракен бот актуальный
рабочий бот кракен
аккаунты кракен
купить аккаунт кракен
кракен аккаунты с балансом
регистрация аккаунта кракен
вход в аккаунт кракен
кракен личный аккаунт
аккаунты kraken darknet
кракен аккаунты даркнет
проверка аккаунта кракен
кракен аккаунты маркет
доступ к аккаунту кракен
кракен аккаунты шоп
создать аккаунт кракен
аккаунты кракен зеркало
кракен аккаунт войти
кракен аккаунты бесплатно
аккаунты кракен 2026
кракен аккаунты онион
аккаунты на кракене как зайти
кракен кабинет аккаунт
кракен регистрация
как зарегистрироваться на кракен
кракен регистрация на сайте
кракен регистрация зеркало
kraken registration link
кракен создать аккаунт
кракен регистрация тор
кракен регистрация онион
кракен официальная регистрация
кракен регистрация 2026
кракен регистрация без почты
регистрация в кракен маркет
кракен регистрация ссылка
кракен регистрация через браузер
кракен быстрая регистрация
кракен форма регистрации
кракен регистрация даркнет
регистрация на сайте кракен тор
кракен регистрация сейчас
кракен регистрация бесплатно
кракен москва
кракен москва ссылка
кракен москва зеркало
кракен москва зайти
кракен москва купить
кракен москва сайт
кракен москва даркнет
кракен москва шоп
кракен москва маркет
кракен москва тор
кракен москва онион
кракен закладки москва
кракен москва 2026
kraken moscow link
кракен москва официальный сайт
кракен москва работа
кракен москва через тор
кракен москва вход
кракен москва адреса
кракен москва сегодня
кракен форум
кракен форум ссылка
кракен форум зеркало
кракен форум онион
кракен официальный форум
форум кракен даркнет
кракен форум отзывы
кракен форум тор
форум маркетплейса кракен
кракен форум вход
kraken forum link
кракен форум обсуждение
кракен форум новости
кракен форум поддержка
форум площадки кракен
кракен форум ветка
кракен форум анонимно
кракен форум зеркало рабочее
кракен форум общение
кракен форум 2026
Your comment is awaiting moderation.
official link – Content is well-structured, navigation is simple and clear.
Your comment is awaiting moderation.
Кракен — войти на сайт прямо сейчас > игра про кракена Сегодня я протестировал несколько кракен шоп интернет магазин, и вот что стабильно работает: Фраза новый телефон кракен используется в обзорах и на форумах. Настоящий новый телефон кракен вызывает любопытство благодаря сочетанию необычного дизайна и улучшенных характеристик. Пользователи делятся мнениями, стоит ли переходить на новый телефон кракен и чем он лучше предыдущих моделей.
Проверил лично несколько зеркал — стабильно открываются: кракен тор тг — kraktor.ccигра кракен — krakengame.cc Если нужна помощь — пишите.Проверено лично (Саратов). Kraken Dark Market маркет тэлега
Your comment is awaiting moderation.
seo продвижение по трафику clover seo продвижение по трафику clover .
Your comment is awaiting moderation.
рейтинг агентств россии рейтинг агентств россии .
Your comment is awaiting moderation.
trailstone site online – Sections are organized and the page is comfortable to browse.
Your comment is awaiting moderation.
мелбет фрибет мелбет фрибет
Your comment is awaiting moderation.
seo эксперт агентство reiting-seo-kompanii.ru .
Your comment is awaiting moderation.
сео центр сео центр .
Your comment is awaiting moderation.
да да да привет привт
Your comment is awaiting moderation.
сео центр seo-kejsy17.ru .
Your comment is awaiting moderation.
explore the crate – Layout is clean, reading content is effortless and simple.
Your comment is awaiting moderation.
раскрутка сайта франция раскрутка сайта франция .
Your comment is awaiting moderation.
mostbet cashback sázky mostbet2017.help
Your comment is awaiting moderation.
мелбет скачать android https://www.melbet06374.help
Your comment is awaiting moderation.
dune hub page – Pages are tidy, making the experience comfortable.
Your comment is awaiting moderation.
trailbrook site online – Well-laid-out pages make navigation simple and pleasant.
Your comment is awaiting moderation.
enable 2fa on 1win https://www.1win5524.ru
Your comment is awaiting moderation.
как найти кракен телеграм быстро > открыть зеркало Сегодня я протестировал несколько кракен в телеграме, и вот что стабильно работает: Выражение кракен войти на сайт обсуждается постоянно. Настоящий порядок действий кракен войти на сайт — это использование проверенного зеркала. Люди советуют не искать ссылки в поисковиках, ведь там можно встретить подделку.
Проверил лично несколько зеркал — стабильно открываются: кракен тор — kraktor.ccоткрыть Кракен маркет — krakenphone.cc Если нужна помощь — оставляйте комменты.Проверено лично (Москва). Кракен онион платформа tg messenger
Your comment is awaiting moderation.
статьи про digital маркетинг статьи про digital маркетинг .
Your comment is awaiting moderation.
explore the bazaar – Pages are neatly structured, making browsing easy.
Your comment is awaiting moderation.
Продвигайте свой аккаунт быстрее с помощью накрутки подписчиков в TikTok. Перейдя по запросу подписчики в tiktok вы сможете увеличить количество фолловеров, повысить доверие к профилю и привлечь больше просмотров и лайков. Быстрая и безопасная накрутка поможет вашему контенту попасть в рекомендации и ускорить рост аккаунта. Подходит для блогеров, брендов и бизнеса, которые хотят развиваться в TikTok и получать больше охватов.
Your comment is awaiting moderation.
мелбет отзывы киргизия мелбет отзывы киргизия
Your comment is awaiting moderation.
click to explore studio – Design is straightforward and reading is effortless.
Your comment is awaiting moderation.
Афиша Санкт-Петербурга объединяет спортивные соревнования и театральные постановки. Фигурное катание и балет остаются важной частью культурной программы города. Читайте подробнее: https://kulturologia.ru/blogs/161225/66650/
Your comment is awaiting moderation.
сео инфо сайта увеличить трафик специалисты prodvizhenie-sajtov-po-trafiku11.ru .
Your comment is awaiting moderation.
лучшие интернет агентства лучшие интернет агентства .
Your comment is awaiting moderation.
timberwillow discovery – Browsing is easy and the design feels contemporary.
Your comment is awaiting moderation.
Brook Market – Found this page casually, everything is organized and navigation works well.
Your comment is awaiting moderation.
Этот информационный обзор станет отличным путеводителем по актуальным темам, объединяющим важные факты и мнения экспертов. Мы исследуем ключевые идеи и представляем их в доступной форме для более глубокого понимания. Читайте, чтобы оставаться в курсе событий!
Узнать больше – https://vivod-iz-zapoya-2.ru/
Your comment is awaiting moderation.
1win ödəniş sistemləri 1win ödəniş sistemləri
Your comment is awaiting moderation.
useful link – Structure is clear, reading content feels effortless.
Your comment is awaiting moderation.
check out the hub – Design is minimal and content is easy to find.
Your comment is awaiting moderation.
timberharbor site online – Clean structure helps focus on the content without distraction.
Your comment is awaiting moderation.
aviator melbet коэффициенты https://www.melbet39518.help
Your comment is awaiting moderation.
Кракен переходник ссылка в тор > регистрация кракен вход Сегодня я протестировал несколько кракен смотреть без регистрации, и вот что стабильно работает: Сегодня кракен телефон воспринимается как устройство нового поколения. Настоящий кракен телефон совмещает привычные функции смартфона и уникальные возможности защиты. Люди обсуждают его потенциал и сравнивают с известными брендами.
Проверил лично несколько ссылок — стабильно открываются: официальная ссылка на кракен в тор — kraktor.ccрегистрация кракен вход — krareg.cc Если нужна помощь — оставляйте комменты.Проверено лично (Тула). Kraken Dark Market скрытая площадка tg messenger
Your comment is awaiting moderation.
Ridge Finds – Browsed casually, content is organized and easy to read.
Your comment is awaiting moderation.
mostbet support mostbet support
Your comment is awaiting moderation.
Весной 2026 концертный зал Барвиха Luxury Village предлагает разнообразные события — музыкальные выступления, шоу и театральные постановки для широкой аудитории. Смотреть материал: https://cont.ws/@goevent/3165327
Your comment is awaiting moderation.
melbet регистрация аккаунта https://melbet06374.help
Your comment is awaiting moderation.
мелбет официальный сайт ios мелбет официальный сайт ios
Your comment is awaiting moderation.
В статье подробно разбирается, за счёт чего локальный бизнес может выиграть у федералов. Автор выделяет слабые стороны крупных игроков (низкая адаптация под регион, медленная реакция) и показывает, как этим пользоваться. Есть примеры локальных ключей и советы по работе с Яндексом. Рекомендую: https://lefmun.ru/stati/bitva-za-ural-kak-lokalnomu-biznesu-iz-ekaterinburga-vyigrat-u-federalnyh-gigantov-v-poiske/
Your comment is awaiting moderation.
bytecraft – Pages loaded fast, images appeared sharp, and formatting stayed consistent.
Your comment is awaiting moderation.
1win plinko demo necə açılır https://www.1win34861.help
Your comment is awaiting moderation.
techsnap – Found practical insights today; sharing this article with colleagues later.
Your comment is awaiting moderation.
zylotech – Color palette felt calming, nothing distracting, just focused, thoughtful design.
Your comment is awaiting moderation.
vynextech – Overall, professional vibe here; trustworthy, polished, and pleasantly minimal throughout.
Your comment is awaiting moderation.
techwave – Content reads clearly, helpful examples made concepts easy to grasp.
Your comment is awaiting moderation.
веб-аналитика блог веб-аналитика блог .
Your comment is awaiting moderation.
visit this site – Layout is simple and navigation feels smooth.
Your comment is awaiting moderation.
нехуй пиздить чужой контент
Your comment is awaiting moderation.
browse drift district – Layout feels tidy, and content is straightforward.
Your comment is awaiting moderation.
рейтинг агентств digital рекламы luchshie-digital-agencstva.ru .
Your comment is awaiting moderation.
Traders Shop – Found this site by accident, navigation is smooth and everything is tidy.
Your comment is awaiting moderation.
seo кейсы seo-kejsy17.ru .
Your comment is awaiting moderation.
tealwillow online portal – Well-structured layout and smooth navigation throughout.
Your comment is awaiting moderation.
1win hesab yoxlanışı 1win hesab yoxlanışı
Your comment is awaiting moderation.
сео портала увеличить трафик специалисты prodvizhenie-sajtov-po-trafiku11.ru .
Your comment is awaiting moderation.
mostbet azərbaycanda azn dəstəyi mostbet85214.help
Your comment is awaiting moderation.
В статье подробно разбирается, за счёт чего локальный бизнес может выиграть у федералов. Автор выделяет слабые стороны крупных игроков (низкая адаптация под регион, медленная реакция) и показывает, как этим пользоваться. Есть примеры локальных ключей и советы по работе с Яндексом. Рекомендую: https://lefmun.ru/stati/bitva-za-ural-kak-lokalnomu-biznesu-iz-ekaterinburga-vyigrat-u-federalnyh-gigantov-v-poiske/
Your comment is awaiting moderation.
Bazaar Treasures – Came across this site casually, content is organized and reading is easy.
Your comment is awaiting moderation.
Где взять ссылку на Кракен бот? > нажмите здесь Сегодня я протестировал несколько кракен шоп телеграм, и вот что стабильно работает: Ключ кракен как войти ссылка часто встречается в инструкциях. Настоящая кракен как войти ссылка публикуется официально и помогает новичкам быстро разобраться. Люди делятся советами, как проверить кракен как войти ссылка перед использованием.
Проверил лично несколько ссылок — стабильно открываются: рабочий кракен тор — kraktor.ccоткрыть Кракен маркет — krakenphone.cc Если нужна помощь — оставляйте комменты.Проверено лично (Ярославль). Kraken Market торговая площадка тг
Your comment is awaiting moderation.
Накрутка подписчиков Rutube поможет быстро увеличить аудиторию канала и повысить доверие к контенту. Живые подписчики создают активность, улучшают видимость роликов и привлекают новых зрителей. Перейдя по запросу накрутка подписчиков в рутубе Кворк вы получите быстрый старт канала, безопасные методы продвижения и стабильный рост аудитории без отписок. Отличное решение для тех, кто хочет быстрее развить канал на Rutube.
Your comment is awaiting moderation.
Хорошая обзорная статья про вывод сайта на первую страницу. Рассматривают и техническую оптимизацию, и контент, и перелинковку, и внешние факторы. Без воды, по делу. Кто хочет системного подхода, почитайте: https://eda96.ru/kak-vyvesti-sajt-v-top/
Your comment is awaiting moderation.
компании сео seo-prodvizhenie-reiting.ru .
Your comment is awaiting moderation.
Санкт-Петербург славится своей театральной культурой: на его сценах идут драматические спектакли, балет и современные проекты режиссёров. Афиша города остаётся разнообразной и насыщенной. Подробный разбор: https://telegra.ph/Teatry-Sankt-Peterburga-afisha-i-pokupka-biletov-01-28
Your comment is awaiting moderation.
explore the studio – Simple and tidy design, content is easy to digest.
Your comment is awaiting moderation.
check this out – Layout is neat, scrolling and navigation feel easy.
Your comment is awaiting moderation.
Stone Market – Found this page casually, everything is organized and navigation is simple.
Your comment is awaiting moderation.
explore tealstone – Content is readable and pages load smoothly.
Your comment is awaiting moderation.
Glade Bazaar – Landed here casually, content is tidy and easy to follow.
Your comment is awaiting moderation.
покупка сайта kak-prodat-sajt.ru .
Your comment is awaiting moderation.
melbet ставки и казино приложение melbet06374.help
Your comment is awaiting moderation.
Кракен поддержка телеграм онлайн > кракен зеркало тор Сегодня я протестировал несколько кракен маркет плейс, и вот что стабильно работает: Часто задают вопрос про кракен телефон, ведь он стал символом нового подхода к технике. Настоящий кракен телефон воспринимается как альтернатива массовым моделям.
Проверил лично несколько зеркал — стабильно открываются: официальная ссылка на кракен в тор — kraktor.ccкракен зеркало — kramirror.cc Если нужна помощь — оставляйте комменты.Проверено лично (Ростов-на-Дону). Kraken Dark Market скрытая площадка мессенджер Телеграм
Your comment is awaiting moderation.
Harbor Bazaar – Browsed randomly, structure is tidy and navigation feels intuitive.
Your comment is awaiting moderation.
click to visit – The interface is user-friendly and reading is simple.
Your comment is awaiting moderation.
https://www.goal.com/en-in/betting/1xbet-promo-code/blt1b7e4c8a3f9d6c2
Your comment is awaiting moderation.
official site link – Design feels light, reading is easy and organized.
Your comment is awaiting moderation.
1win bloklamanı necə keçmək olar 1win34861.help
Your comment is awaiting moderation.
Порноактриса из Омска Ева Элфи стала лицом букмекерской компании азино888 официальный сайт вход
Your comment is awaiting moderation.
sunmeadow pages – Well-organized layout and smooth navigation.
Your comment is awaiting moderation.
Московская театральная жизнь остаётся активной: зрителей ждут новые спектакли, классические постановки и музыкальные проекты, которые формируют разнообразную афишу города. Подробнее об этом: https://dzen.ru/a/aXoH9nl-aCWiELd4
Your comment is awaiting moderation.
Brook Shop – Checked out this site randomly, content is well organized and easy to follow.
Your comment is awaiting moderation.
mostbet android uchun rasmiy apk mostbet android uchun rasmiy apk
Your comment is awaiting moderation.
Outlet Market – Found this page unexpectedly, everything is organized and readable.
Your comment is awaiting moderation.
check out daisy – Pages feel clean, and content is easy to digest.
Your comment is awaiting moderation.
see this page – Well-arranged sections, browsing and reading is smooth.
Your comment is awaiting moderation.
trailstone online – Enjoyed looking around, sections are well structured.
Your comment is awaiting moderation.
Stone Deals – Landed here unexpectedly, the content feels accessible and neat.
Your comment is awaiting moderation.
mostbet licence Česko https://mostbet2017.help/
Your comment is awaiting moderation.
Ivory Finds – Landed here by chance, content flows naturally and sections are simple to follow.
Your comment is awaiting moderation.
learn more here – Pages are straightforward, browsing is comfortable.
Your comment is awaiting moderation.
mostbet username http://www.mostbet02894.help
Your comment is awaiting moderation.
1win create account 1win create account
Your comment is awaiting moderation.
TraffBand не нужно так делать
Your comment is awaiting moderation.
their homepage – Logical arrangement, content is simple to move through.
Your comment is awaiting moderation.
browse stonebrook district – Sections are well defined, navigation is smooth.
Your comment is awaiting moderation.
Cove Market – Found this page casually, layout is simple and content is easy to follow.
Your comment is awaiting moderation.
mostbet iosga qanday ornatish http://www.mostbet02894.help
Your comment is awaiting moderation.
Emporium Treasures – Came across this page casually, content is clear and layout is easy to read.
Your comment is awaiting moderation.
mostbet jak se zaregistrovat cz http://mostbet2017.help/
Your comment is awaiting moderation.
homepage link – Browsing feels natural, and the pages are well organized.
Your comment is awaiting moderation.
1win leaderboard 1win leaderboard
Your comment is awaiting moderation.
go to this site – Simple design, very easy to navigate through pages.
Your comment is awaiting moderation.
mostbet league of legends sázky [url=http://mostbet2017.help]http://mostbet2017.help[/url]
Your comment is awaiting moderation.
explore solarstone exchange – Content flows logically and is easy to scan.
Your comment is awaiting moderation.
Gilded Deals – Stumbled upon this site, reading feels effortless and navigation is simple.
Your comment is awaiting moderation.
мостбет установка apk http://mostbet34518.help
Your comment is awaiting moderation.
1win wheel of fortune http://1win5524.ru/
Your comment is awaiting moderation.
Icicle Shop – Just visited, layout is clean and reading feels effortless.
Your comment is awaiting moderation.
coral stone marketplace – Spent a few minutes, layout feels clean and simple.
Your comment is awaiting moderation.
поисковое продвижение по трафику поисковое продвижение по трафику .
Your comment is awaiting moderation.
explore their site – Layout is neat, and reading is effortless.
Your comment is awaiting moderation.
мелбет расчет ставки http://melbet39518.help/
Your comment is awaiting moderation.
go to this site – Simple design, very easy to navigate and understand.
Your comment is awaiting moderation.
рейтинг digital агентств рейтинг digital агентств .
Your comment is awaiting moderation.
Gilded Deals – Stumbled on this site, reading is straightforward and intuitive.
Your comment is awaiting moderation.
solar harbor shop – Layout is tidy, and sections are easy to locate.
Your comment is awaiting moderation.
mostbet login xatolik mostbet login xatolik
Your comment is awaiting moderation.
Хотите быстро развить канал на Rutube? Накрутка подписчиков Rutube поможет увеличить аудиторию, повысить доверие к каналу и ускорить продвижение видео. Перейдя по запросу накрутка просмотров rutube Кворк вы получите живых подписчиков, плавное добавление и безопасные методы продвижения. Отличное решение для новых и развивающихся каналов, которым важно быстрее набрать активность и привлечь больше просмотров. Начните рост канала уже сегодня.
Your comment is awaiting moderation.
Bazaar Picks – Browsed casually, everything is organized and easy to digest.
Your comment is awaiting moderation.
go to this page – The site structure feels organized and logical.
Your comment is awaiting moderation.
mostbet platební karta https://mostbet2017.help/
Your comment is awaiting moderation.
мелбет депозит http://melbet39518.help
Your comment is awaiting moderation.
shop link – Well-structured content, very easy to explore and read.
Your comment is awaiting moderation.
https://nevainstrument.ru/
Your comment is awaiting moderation.
quick outlet link – Tidy layout allows smooth movement across sections.
Your comment is awaiting moderation.
Honey Shop – Just landed here, layout is neat and browsing is smooth.
Your comment is awaiting moderation.
melbet вход в аккаунт https://melbet39518.help/
Your comment is awaiting moderation.
1win match center https://www.1win5524.ru
Your comment is awaiting moderation.
продвижение по трафику clover prodvizhenie-sajtov-po-trafiku10.ru .
Your comment is awaiting moderation.
visit this marketplace – Just popping in, content is tidy and navigation feels intuitive.
Your comment is awaiting moderation.
Look inside WheatWarehouse – Found the platform; layout is clean and moving through products is easy.
Your comment is awaiting moderation.
check out the emporium – Navigation is simple, and content is easy to read.
Your comment is awaiting moderation.
digital маркетинг агентства luchshie-digital-agencstva.ru .
Your comment is awaiting moderation.
visit their page – Smooth interface, reading content is simple and natural.
Your comment is awaiting moderation.
Outlet Picks – Browsed casually, navigation is intuitive and content flows naturally.
Your comment is awaiting moderation.
Культурная афиша Москвы на весну 2026 включает разнообразные мероприятия — от театра и концертов до крупных развлекательных шоу, которые привлекают широкую аудиторию. Ссылка на материал: https://kulturologia.ru/blogs/161225/66648/
Your comment is awaiting moderation.
Outlet Treasures – Came across this page casually, content is organized and sections are easy to follow.
Your comment is awaiting moderation.
snowharborcollective hub – Browsed briefly, layout is clean and easy to navigate.
Your comment is awaiting moderation.
quick visit – Browsing is simple, everything loads smoothly.
Your comment is awaiting moderation.
Check WheatVendor online – Just discovered this platform; the layout makes browsing fast and simple.
Your comment is awaiting moderation.
Статья про особенности поисковой конкуренции на Урале. Понравилось, что автор не просто описывает проблему, а даёт конкретные инструменты: от сбора локальных ключей до использования Яндекс.Бизнеса и работы с репутацией. Есть блок про мобильную оптимизацию и поведенческие факторы. Полезно: https://solsalut.ru/osobennosti-poiskovoj-konkurentsii-na-urale/
Your comment is awaiting moderation.
zentrotech – Appreciate the typography choices; comfortable spacing improved my reading experience.
Your comment is awaiting moderation.
nexonbyte – Content reads clearly, helpful examples made concepts easy to grasp.
Your comment is awaiting moderation.
cybernexus – Appreciate the typography choices; comfortable spacing improved my reading experience.
Your comment is awaiting moderation.
Harbor Finds – Browsed casually, content is clear and sections are well organized.
Your comment is awaiting moderation.
раскрутка сайтов интернет prodvizhenie-sajtov-po-trafiku10.ru .
Your comment is awaiting moderation.
Garnet Shop – Just visited, the content is well organized and easy to follow.
Your comment is awaiting moderation.
devwave – Pages loaded fast, images appeared sharp, and formatting stayed consistent.
Your comment is awaiting moderation.
xyrotech – Overall, professional vibe here; trustworthy, polished, and pleasantly minimal throughout.
Your comment is awaiting moderation.
quick link – Pleasant design, scrolling and reading is effortless.
Your comment is awaiting moderation.
Хотите, чтобы ваш профиль или группа в Одноклассниках росли быстрее? Перейдя по запросу накрутить подписчиков в одноклассники чат вы сможете увеличить количество подписчиков и активность на странице. Чем больше подписчиков — тем выше доверие и интерес к вашему аккаунту. Начните развивать свою страницу уже сегодня!
Your comment is awaiting moderation.
skywillow store online – Pages flow nicely and information is presented clearly.
Your comment is awaiting moderation.
copperstoneemporium – Just checking this out, site feels organized and readable today.
Your comment is awaiting moderation.
melbet kz сменить пароль melbet kz сменить пароль
Your comment is awaiting moderation.
Антон Беляев возвращает LAB с новым сезоном живых экспериментов: масштабный звук, неожиданные союзы артистов и уникальные аранжировки ждут зрителей весной 2026. Билеты разлетаются быстро — успей занять лучшие места!https://teletype.in/@concert/shou-lab-bilety
Your comment is awaiting moderation.
1win visa withdrawal https://www.1win5742.help
Your comment is awaiting moderation.
Zen Cove Select Hub – Layout is simple and the site feels user-friendly overall.
Your comment is awaiting moderation.
click here – Design is tidy, reading through sections feels effortless.
Your comment is awaiting moderation.
Visit WestRack – Just discovered this store; the layout is tidy and makes browsing simple.
Your comment is awaiting moderation.
crash mostbet strategia mostbet2003.help
Your comment is awaiting moderation.
Stone Deals – Landed here unexpectedly, structure is clean and user-friendly.
Your comment is awaiting moderation.
Trail Finds – Clear layout helps locate items quickly and efficiently.
Your comment is awaiting moderation.
Frost Picks – Came across this page while browsing, the layout feels simple and intuitive.
Your comment is awaiting moderation.
this link here – Minimal design, reading and scrolling feels effortless.
Your comment is awaiting moderation.
skybrook marketplace – Navigation flows easily, and sections are well defined.
Your comment is awaiting moderation.
pin-up ishchi link https://www.pinup23185.help
Your comment is awaiting moderation.
cottongrovevendorplace – Browsing casually, page structure looks simple and well organized.
Your comment is awaiting moderation.
Visit this store – Just discovered the site; layout is tidy and exploring items is easy.
Your comment is awaiting moderation.
Театр одного актёра в исполнении Евгения Гришковца — это особая атмосфера доверия. Спектакли «Когда я боюсь?» и «Прощание с бумагой» рассказывают о страхах, памяти и жизни. Читайте материал: https://cont.ws/@goevent/3179970
Your comment is awaiting moderation.
Wood Stone Picks – First glance shows everything is organized and simple to follow.
Your comment is awaiting moderation.
Коллеги, кто глубоко копал тему поведенческих факторов? Я тут изучаю статью, и там очень интересно расписана механика: накрутка базируется на last-click модели, то есть имитируется ситуация, когда пользователь нашёл всё на сайте и не вернулся в поиск. Это напрямую влияет на ранжирование. Почитайте раздел “Как работает накрутка” по ссылке: https://workspace.ru/blog/nakrutka-povedencheskih-faktorov-kak-nakrutit-pf_2/ . Теперь понятнее, почему конкуренты так рвутся в топ.
Your comment is awaiting moderation.
Hearth Market – Found this page casually, everything is tidy and navigation feels simple.
Your comment is awaiting moderation.
Eco Picks – Landed on this page unexpectedly, navigation is simple and pleasant.
Your comment is awaiting moderation.
Честно, всегда был против “серых” методов. Но статья заставляет задуматься. Автор приводит аргументы: если весь топ в нише использует накрутку, то честному сайту там делать нечего. Прямо цитата: “в таких условиях накрутка становится необходимой для достижения высоких позиций”. Почитал про внешние ПФ, особенно про возврат в выдачу и длину клика, стало понятнее, за что вообще борются поисковики. Вот ссылка: https://workspace.ru/blog/nakrutka-povedencheskih-faktorov-kak-nakrutit-pf_2/ . Информация пища для размышлений.
Your comment is awaiting moderation.
Market Treasures – Organized layout allows quick access to all sections.
Your comment is awaiting moderation.
Кто ищет, где заказать накрутку ПФ, вот статья с конкретным сервисом и ценами от 15 000 рублей. Расписано, зачем это нужно, какие риски и как проходит процесс заказа. Информация для тех, кто решил попробовать этот метод: https://stroika-tovar.ru/articles/stati/effektivnaya-nakrutka-pf-yandeks-kak-zakazat-po-dostupnoy-tsene-ot-15-000-rubley.html
Your comment is awaiting moderation.
coppercoveemporium – Nice little discovery, layout is tidy and easy to navigate.
Your comment is awaiting moderation.
check this site – Clean design, very easy to browse and read.
Your comment is awaiting moderation.
silverstone marketplace – Navigation flows smoothly, and sections are clearly defined.
Your comment is awaiting moderation.
Кто ищет, где заказать накрутку ПФ, вот статья с конкретным сервисом и ценами от 15 000 рублей. Расписано, зачем это нужно, какие риски и как проходит процесс заказа. Информация для тех, кто решил попробовать этот метод: https://stroika-tovar.ru/articles/stati/effektivnaya-nakrutka-pf-yandeks-kak-zakazat-po-dostupnoy-tsene-ot-15-000-rubley.html
Your comment is awaiting moderation.
click here – Simple interface, scrolling through feels intuitive and smooth.
Your comment is awaiting moderation.
ремонт в ванной ремонт совмещенные ванны
Your comment is awaiting moderation.
Discover this platform – Just found it today; the structure is clear and browsing is smooth.
Your comment is awaiting moderation.
Granite Shop – Just landed here, layout is tidy and reading is effortless.
Your comment is awaiting moderation.
crash игра мостбет mostbet34518.help
Your comment is awaiting moderation.
Wood Cove Picks – Browsed a few sections, everything looks tidy and organized.
Your comment is awaiting moderation.
как девушке кончить
Your comment is awaiting moderation.
Коллеги, кто глубоко копал тему поведенческих факторов? Я тут изучаю статью, и там очень интересно расписана механика: накрутка базируется на last-click модели, то есть имитируется ситуация, когда пользователь нашёл всё на сайте и не вернулся в поиск. Это напрямую влияет на ранжирование. Почитайте раздел “Как работает накрутка” по ссылке: https://workspace.ru/blog/nakrutka-povedencheskih-faktorov-kak-nakrutit-pf_2/ . Теперь понятнее, почему конкуренты так рвутся в топ.
Your comment is awaiting moderation.
Teal Gems – Intuitive design keeps browsing straightforward and easy.
Your comment is awaiting moderation.
explore more here – Tidy layout, smooth browsing, content is clear and approachable.
Your comment is awaiting moderation.
pinup yangi mirror http://pinup76809.help/
Your comment is awaiting moderation.
Nature Market – Came across this site while browsing, content is easy to follow and visually tidy.
Your comment is awaiting moderation.
explore silvermeadow site – Content is organized nicely, making browsing effortless.
Your comment is awaiting moderation.
Кто ищет, где заказать накрутку ПФ, вот статья с конкретным сервисом и ценами от 15 000 рублей. Расписано, зачем это нужно, какие риски и как проходит процесс заказа. Информация для тех, кто решил попробовать этот метод: https://stroika-tovar.ru/articles/stati/effektivnaya-nakrutka-pf-yandeks-kak-zakazat-po-dostupnoy-tsene-ot-15-000-rubley.html
Your comment is awaiting moderation.
check this out – Layout is neat, browsing and scrolling is intuitive.
Your comment is awaiting moderation.
Browse WalnutWarehouse – Found this platform recently; the design keeps everything tidy and simple to navigate.
Your comment is awaiting moderation.
Granite Deals – Stumbled upon this site, sections are simple and reading feels natural.
Your comment is awaiting moderation.
mostbet скачать Кыргызстан mostbet34518.help
Your comment is awaiting moderation.
Wind Harbor Online Hub – Quick check reveals the site is easy to explore and organized nicely.
Your comment is awaiting moderation.
coast stone homepage – First impression shows navigation is smooth and content is clear.
Your comment is awaiting moderation.
homepage link – Everything is arranged logically, very easy to navigate.
Your comment is awaiting moderation.
mostbet apk скачать Киргизия https://mostbet34518.help/
Your comment is awaiting moderation.
silkmeadow website – Navigation is easy, and content is clearly structured.
Your comment is awaiting moderation.
this link here – Layout is clean, moving through pages is comfortable.
Your comment is awaiting moderation.
Cove Market – Found this page casually, everything is neat and intuitive.
Your comment is awaiting moderation.
Wind Brook Hub Picks – Layout is smooth and pages feel intuitive.
Your comment is awaiting moderation.
explore more here – Smooth design, very easy to read and navigate through content.
Your comment is awaiting moderation.
silkharborcollective hub – Browsed around quickly, layout is neat and easy to follow.
Your comment is awaiting moderation.
click here – Interface is minimal, reading content is straightforward and clear.
Your comment is awaiting moderation.
Golden Bazaar – Landed here casually, content is organized and reading is smooth.
Your comment is awaiting moderation.
Свечи и ароматические наборы ручной работы часто выбирают в качестве подарка на праздники и особые события. Они создают атмосферу тепла и уюта, которая делает любой подарок более запоминающимся. Подробнее по ссылке https://aroma-lavka.ru/
Your comment is awaiting moderation.
Отличный разбор темы — как местному бизнесу из Екатеринбурга выигрывать у федералов в поиске. Автор подробно останавливается на локальном SEO, гиперрелевантном контенте, скорости и сервисе как факторах ранжирования. Есть блок про микро-ниши и локальный линкбилдинг. Очень рекомендую: https://go-patriot.ru/bitva-za-ural-kak-lokalnomu-biznesu-iz-ekaterinburga-vyigrat-u-federalnyh-gigantov-v-poiske/
Your comment is awaiting moderation.
В статье подробно разбирается, за счёт чего локальный бизнес может выиграть у федералов. Автор выделяет слабые стороны крупных игроков (низкая адаптация под регион, медленная реакция) и показывает, как этим пользоваться. Есть примеры локальных ключей и советы по работе с Яндексом. Рекомендую: https://lefmun.ru/stati/bitva-za-ural-kak-lokalnomu-biznesu-iz-ekaterinburga-vyigrat-u-federalnyh-gigantov-v-poiske/
Your comment is awaiting moderation.
browse coast store – Quick stop here, design is straightforward and easy to read.
Your comment is awaiting moderation.
мостбет промокод не работает мостбет промокод не работает
Your comment is awaiting moderation.
explore the outlet – Just noticed this shop, and the name conveys a calm, tidy, and approachable vibe.
Your comment is awaiting moderation.
browse now – Navigation is simple, pages are organized well.
Your comment is awaiting moderation.
Wild Stone Shop Hub – Quick visit shows the website is simple and well structured.
Your comment is awaiting moderation.
marketplace page – Just passing by, the design looks clean and user-friendly.
Your comment is awaiting moderation.
visit seacrest marketplace – Pages load quickly, and reading through content is effortless.
Your comment is awaiting moderation.
Статья про особенности поисковой конкуренции на Урале. Понравилось, что автор не просто описывает проблему, а даёт конкретные инструменты: от сбора локальных ключей до использования Яндекс.Бизнеса и работы с репутацией. Есть блок про мобильную оптимизацию и поведенческие факторы. Полезно: https://solsalut.ru/osobennosti-poiskovoj-konkurentsii-na-urale/
Your comment is awaiting moderation.
hazel vendor link – Content looks well organized and easy to follow.
Your comment is awaiting moderation.
pin-up bonusni ishlatish pin-up bonusni ishlatish
Your comment is awaiting moderation.
как правильно дрочить парню
Your comment is awaiting moderation.
Wild Orchard Treasures Hub – Pages are clean, and information is presented clearly and concisely.
Your comment is awaiting moderation.
how to deposit on 1win Uganda http://www.1win5742.help
Your comment is awaiting moderation.
mostbet ile trwa wypłata na kartę https://mostbet2003.help/
Your comment is awaiting moderation.
Консультация семейного юриста поможет быстро разобраться в сложных жизненных ситуациях: развод, раздел имущества, алименты, споры о детях и брачные договоры. Перейдя по запросу услуги семейного юриста – специалист объяснит ваши права, оценит перспективы дела и предложит оптимальный план действий. Получите профессиональную юридическую помощь и ответы на все вопросы по семейному праву.
Your comment is awaiting moderation.
https://intertops-casino.net/bonus/ intertops casino
Your comment is awaiting moderation.
explore the traders – Took a moment to browse, structure feels clean and organized.
Your comment is awaiting moderation.
pin-up crash strategiya https://pinup23185.help
Your comment is awaiting moderation.
adzio – Loved the layout today; clean, simple, and genuinely user-friendly overall.
Your comment is awaiting moderation.
rankstrategy – Navigation felt smooth, found everything quickly without any confusing steps.
Your comment is awaiting moderation.
Ароматные подарки ручной работы отлично подходят для тех, кто ценит оригинальные и душевные вещи. Такие изделия создаются с вниманием к деталям и часто из натуральных компонентов. Они могут стать прекрасным подарком для близких и друзей. Подробнее по ссылке: https://aroma-lavka.ru/
Your comment is awaiting moderation.
plinko o‘yini pin-up https://pinup23185.help
Your comment is awaiting moderation.
searchsignals – Content reads clearly, helpful examples made concepts easy to grasp.
Your comment is awaiting moderation.
searchmetrics – Loved the layout today; clean, simple, and genuinely user-friendly overall.
Your comment is awaiting moderation.
leadpipeline – Found practical insights today; sharing this article with colleagues later.
Your comment is awaiting moderation.
ranktarget – Found practical insights today; sharing this article with colleagues later.
Your comment is awaiting moderation.
Этот спектакль объединяет драму, психологию и загадку, создавая особую театральную атмосферу. «8 разгневанных женщин» удивляет с первых минут. Расширенный материал: https://anotepad.com/notes/g38wwc5b
Your comment is awaiting moderation.
Wheat Cove Online Hub – Quick visit shows content is readable and the structure is easy to follow.
Your comment is awaiting moderation.
mostbet aplikacja na telefon https://www.mostbet2003.help
Your comment is awaiting moderation.
1win login problem Uganda http://www.1win5742.help
Your comment is awaiting moderation.
mostbet wypłata neteller http://mostbet2003.help/
Your comment is awaiting moderation.
1win weekend bonus https://www.1win5742.help
Your comment is awaiting moderation.
мостбет кэшбэк https://mostbet82043.help/
Your comment is awaiting moderation.
Профессиональная веб-студия разрабатывает сайты под ключ и занимается их эффективным SEO-продвижением. Помогает бизнесу заявлять о себе в сети и увеличивать продажи. Подробнее об услугах на сайте – https://inuniver24.ru/
Your comment is awaiting moderation.
Профессиональная веб-студия разрабатывает сайты под ключ и занимается их эффективным SEO-продвижением. Помогает бизнесу заявлять о себе в сети и увеличивать продажи. Подробнее об услугах на сайте – https://inuniver24.ru/
Your comment is awaiting moderation.
clover brook homepage – First impression shows navigation is smooth and layout is tidy.
Your comment is awaiting moderation.
Wheat Brook Select – Browsed a few sections and the site looks user-friendly and organized.
Your comment is awaiting moderation.
mines o‘yin pin-up https://www.pinup23185.help
Your comment is awaiting moderation.
pin-up o‘yin hisoboti pin-up o‘yin hisoboti
Your comment is awaiting moderation.
Wave Stone Hub Picks – Enjoyed visiting, pages are easy to read and well arranged.
Your comment is awaiting moderation.
Игровая модель ЦСКА Москва продолжает развиваться. Как команда сочетает исторические принципы и современные тактические подходы. Разбор статьи: https://worldevents.mystrikingly.com/blog/eb990efacfa
Your comment is awaiting moderation.
mostbet czas wypłaty blik mostbet2003.help
Your comment is awaiting moderation.
1win casino withdrawal Uganda https://1win5742.help/
Your comment is awaiting moderation.
visit cloud stone – Took a quick look, layout seems tidy and easy to follow.
Your comment is awaiting moderation.
продвижение сайтов во франции prodvizhenie-sajtov-v-moskve16.ru .
Your comment is awaiting moderation.
В нашем ассортименте представлены и классические, и современные варианты ковров для любого интерьера.
Лучшие ковры дешево
Каждый клиент получает гарантию качества и профессиональное сопровождение заказа.
Your comment is awaiting moderation.
Wave Harbor Hub Picks – Browsed today, content appears organized and easy to understand.
Your comment is awaiting moderation.
check this out – Layout is neat, content flows naturally while browsing.
Your comment is awaiting moderation.
storefront link here – Took a moment to explore and the design seems user-friendly.
Your comment is awaiting moderation.
Juniper Picks – Came across this site randomly, layout is simple and user-friendly.
Your comment is awaiting moderation.
marketplace shop link – Pages are well organized, and moving through content is seamless.
Your comment is awaiting moderation.
visit this site – Pages are tidy, navigation feels intuitive and easy.
Your comment is awaiting moderation.
Walnut Stone Finds Hub – Browsing today was pleasant, and the layout is clear.
Your comment is awaiting moderation.
раскрутка сайта франция prodvizhenie-sajtov-v-moskve16.ru .
Your comment is awaiting moderation.
visit this marketplace – Just popping in, design looks clear and simple.
Your comment is awaiting moderation.
dune vendor site – Content is structured clearly and looks organized.
Your comment is awaiting moderation.
birchharbormarket – Came across this page, layout is straightforward and readable.
Your comment is awaiting moderation.
boostsignals – Loved the layout today; clean, simple, and genuinely user-friendly overall.
Your comment is awaiting moderation.
convertcraft – Pages loaded fast, images appeared sharp, and formatting stayed consistent.
Your comment is awaiting moderation.
Ridge Deals – Landed here unexpectedly, content is simple and browsing is effortless.
Your comment is awaiting moderation.
trader outlet site – Pages are tidy, with smooth flow and easy-to-read content.
Your comment is awaiting moderation.
check this page – Navigation is intuitive and the layout feels tidy.
Your comment is awaiting moderation.
Walnut Cove Boutique Deals – Layout is tidy and navigating feels effortless.
Your comment is awaiting moderation.
dunebrookvendorstudio – Nice little discovery, content is organized and easy to read.
Your comment is awaiting moderation.
pearl meadow shop – The pages are straightforward and the navigation is easy.
Your comment is awaiting moderation.
trailstone pages – Clean navigation and readable content make browsing pleasant.
Your comment is awaiting moderation.
birchbrookmarket – Nice little page, navigation feels simple and easy to use.
Your comment is awaiting moderation.
Traders Treasures – Stumbled upon this page, sections are clear and reading is effortless.
Your comment is awaiting moderation.
Thank you for your sharing. I am worried that I lack creative ideas. It is your article that makes me full of hope. Thank you. But, I have a question, can you help me?
Your comment is awaiting moderation.
интернет агентство продвижение сайтов сео интернет агентство продвижение сайтов сео .
Your comment is awaiting moderation.
sagebrook store online – Layout feels fresh and moving through sections is effortless.
Your comment is awaiting moderation.
discover chestnut stone bazaar – Had a glance, page structure seems clean and organized.
Your comment is awaiting moderation.
check this site – Clean design, browsing through pages feels simple and intuitive.
Your comment is awaiting moderation.
stake casino deutschland
Your comment is awaiting moderation.
visit drift hub – Smooth structure, easy to skim through pages.
Your comment is awaiting moderation.
Violet Harbor Hub – Enjoyed looking around, everything seems tidy and clear.
Your comment is awaiting moderation.
this outlet store – Looks like a practical site with clean sections and simple navigation.
Your comment is awaiting moderation.
Hello i want share my experience with royal online v2 ??????, this site is very good for me, very easy to use, the interface very simple and nice, i am very happy with this choice, thank you very much.
Your comment is awaiting moderation.
storefront link here – Stopped by for a moment and the design seems clear.
Your comment is awaiting moderation.
visit trailbrook – Pages are well organized, navigation is easy and smooth.
Your comment is awaiting moderation.
Jasper Deals – Stumbled upon this site, structure is clean and navigation works well.
Your comment is awaiting moderation.
мелбет казино зеркало скачать
Установить Melbet: Android, iPhone и ПК
Приложение Melbet включает букмекерскую контору и казино в едином приложении. Доступны live-ставки, казино-игры, онлайн-трансляции, аналитика и операции по счёту. Загрузка занимает 1–2 минуты.
Android (APK)
Загрузите APK с официального источника, запустите установщик и завершите установку. При необходимости включите доступ к установке сторонних приложений, затем авторизуйтесь.
iOS (iPhone)
Перейдите в App Store, найдите «Melbet», нажмите «Получить», после установки выполните вход.
ПК
Откройте официальный сайт, авторизуйтесь и добавьте ярлык на рабочий стол. Веб-версия работает как отдельное приложение.
Функционал
Live-ставки с обновлением коэффициентов, казино и слоты, прямые трансляции, аналитические данные, push-оповещения, регистрация за минуту и поддержка 24/7.
Бонусы
После установки доступны бонус на первый депозит, промокоды и бесплатные ставки. Условия зависят от региона.
Безопасность
Скачивайте только с официального сайта, проверяйте домен, не передавайте пароль третьим лицам и активируйте двухфакторную аутентификацию.
Установка занимает несколько минут, после чего доступен весь функционал Melbet.
Your comment is awaiting moderation.
+1 on this, been using it myself and its legit. pussy8882025
Your comment is awaiting moderation.
Sun Finds Shop – Clear pages make finding products fast and simple.
Your comment is awaiting moderation.
explore rubystone site – Pages are well structured, and content is easy to digest.
Your comment is awaiting moderation.
Сегодня продвижение сайтов все чаще связано с анализом пользовательского поведения. Поведенческие факторы позволяют поисковым системам оценить качество ресурса и уровень интереса аудитории. Именно поэтому им уделяется большое внимание. Подробнее по ссылке – накрутка пф ботами
Your comment is awaiting moderation.
quick check hub – Browsing feels natural, and content is readable.
Your comment is awaiting moderation.
check this page – Structure is logical, content flows naturally.
Your comment is awaiting moderation.
So my freind told me about PG88 last month and i was skeptical at first right? but then i actually signed up and checked it out and tbh im pretty happy with how everything works there, like the games load fast and ur not waiting around forever just tryna play something. Anyway definately worth checking out if ur bored. pg-88
Your comment is awaiting moderation.
pearlmeadow website – Everything is organized and easy to read through.
Your comment is awaiting moderation.
Violet Brook Picks – Content is simple, and reading through pages is comfortable.
Your comment is awaiting moderation.
see this store – The branding appeared online and the outlet name feels pleasant, balanced, and inviting.
Your comment is awaiting moderation.
Bazaar Treasures – Stumbled upon this page, sections are clear and navigation is smooth.
Your comment is awaiting moderation.
check this emporium – Had a quick browse and the page arrangement seems neat.
Your comment is awaiting moderation.
продвижение сайтов продвижение сайтов .
Your comment is awaiting moderation.
quick timberwillow link – Navigation is intuitive and content is presented clearly.
Your comment is awaiting moderation.
pin up depozit limitlari pin up depozit limitlari
Your comment is awaiting moderation.
yo ngl nova88 online sports hits different fr lowkey been on it for a minute and the mobile version slaps tbh imo the whole thing just works u know lol
Your comment is awaiting moderation.
Любишь азарт? https://school57.ru предлагает разнообразные игровые автоматы, настольные игры и интересные бонусные программы. Платформа создана для комфортной игры и предлагает широкий выбор развлечений.
Your comment is awaiting moderation.
check out this store – Just scrolling briefly, navigation feels smooth and clear.
Your comment is awaiting moderation.
Harbor Deals – Pages are neat and browsing feels comfortable.
Your comment is awaiting moderation.
pin-up ishchi ko‘zgusi 2026 pin-up ishchi ko‘zgusi 2026
Your comment is awaiting moderation.
rubystone website – Navigation is simple, and reading content feels effortless.
Your comment is awaiting moderation.
visit their workshop – Navigation feels smooth, and content is easy to follow.
Your comment is awaiting moderation.
explore more here – Clean design, reading and browsing is smooth and natural.
Your comment is awaiting moderation.
I was skeptical about Nba Onlinecasino at first not gonna lie, thought it would be sketchy or something, but turns out it’s actually pretty reliable and they handle things the way they say they will, so was pleasantly suprised honestly.
Your comment is awaiting moderation.
melbet free spins https://melbet47086.help
Your comment is awaiting moderation.
pearlmeadow online – Quick glance shows the site is easy to use and well structured.
Your comment is awaiting moderation.
Искал информацию по ценам на SEO и наткнулся на статью про накрутку позиций в Яндексе. Тут разбирают, что вообще входит в SEO-услуги, от чего зависит стоимость и как не попасть на мошенников. Полезно для понимания рынка: https://vagaro.ru/nakrutka-poziczij-v-yandekse-chto-nuzhno-znat-o-seo-uslugah-i-ih-stoimosti/
Your comment is awaiting moderation.
Ivory Shop – Just visited, content is clear and browsing feels effortless.
Your comment is awaiting moderation.
Velvet Picks – Content is straightforward and exploring the site is comfortable.
Your comment is awaiting moderation.
this online emporium – Dropped by the site and the formatting looks tidy.
Your comment is awaiting moderation.
Good day everyone, I wanted to share my thoughts on uwin n8 which I’ve been exploring this past month. The registration proccess is straightforward and the overall experiance has been quite pleasant. Best regards, cheers!
Your comment is awaiting moderation.
explore timberharbor – Found the sections easy to read and understand.
Your comment is awaiting moderation.
shop homepage – Ran into this brand today, and the name carries a charming, district-inspired feel.
Your comment is awaiting moderation.
Кто ищет, где заказать накрутку ПФ, вот статья с конкретным сервисом и ценами от 15 000 рублей. Расписано, зачем это нужно, какие риски и как проходит процесс заказа. Информация для тех, кто решил попробовать этот метод: https://stroika-tovar.ru/articles/stati/effektivnaya-nakrutka-pf-yandeks-kak-zakazat-po-dostupnoy-tsene-ot-15-000-rubley.html
Your comment is awaiting moderation.
leadmatrix – Found practical insights today; sharing this article with colleagues later.
Your comment is awaiting moderation.
scalewave – Bookmarked this immediately, planning to revisit for updates and inspiration.
Your comment is awaiting moderation.
reachrocket – Content reads clearly, helpful examples made concepts easy to grasp.
Your comment is awaiting moderation.
clickrly – Pages loaded fast, images appeared sharp, and formatting stayed consistent.
Your comment is awaiting moderation.
Поисковые системы анализируют поведение пользователей, чтобы определить качество сайта. Если посетители активно взаимодействуют с контентом и изучают несколько страниц, это может положительно сказаться на ранжировании. Поэтому работа с поведенческими факторами становится все более актуальной. Подробнее по ссылке: альпина программа
Your comment is awaiting moderation.
seoradar – Navigation felt smooth, found everything quickly without any confusing steps.
Your comment is awaiting moderation.
mostbet kaszinó nyerőgépek mostbet kaszinó nyerőgépek
Your comment is awaiting moderation.
For anyone who needs a heads up, make sure you read the terms before you start on mu888—it’ll save you confusion later on. Also the payment options are pretty straightforward but just double-check ur preferred method is availible. Good platform overall once you know what your doing.
Your comment is awaiting moderation.
learn more here – Clear layout and sections are well organized for reading.
Your comment is awaiting moderation.
this collective store – Layout feels fresh and moving through sections is smooth.
Your comment is awaiting moderation.
Stone Gems Market – Smooth pages allow fast and easy product discovery.
Your comment is awaiting moderation.
their homepage – Organized design, navigation is clear and readable.
Your comment is awaiting moderation.
pearlharbor shop portal – Clean layout and content make it very user-friendly.
Your comment is awaiting moderation.
mostbet aviator predictor mostbet aviator predictor
Your comment is awaiting moderation.
%spintax|こちらの記事|この内容%は%spintax|非常に|とても% %spintax|参考になる|役立つ%です!%spintax|セクシーコスプレ|ベビードール%の%spintax|選び方|素材の見極め方|コーデ術%について%spintax|分かりやすく|詳しく%解説されています。補足ですが、%spintax|MERRSS|メリス%は%spintax|高品質コスプレランジェリーに特化|デザイン豊富|サービス充実%なサイトで、%spintax|購入を考えている方|コスプレ好き|ランジェリー愛好家%には%spintax|必見|おすすめ%です。
Your comment is awaiting moderation.
Ivory Deals – Stumbled upon this site, structure is clean and navigation is effortless.
Your comment is awaiting moderation.
лучший магаз из всех что существует!!! https://pyrosalut62.ru дело не в терпение, а в глупости.Рассказал друг-таксист.
Your comment is awaiting moderation.
visit this boutique – Checked the page briefly and everything loads and navigates well.
Your comment is awaiting moderation.
Good day everyone, I’ve been a member of microstar88 for about two months now and I must say the experience has been quite satifactory thus far. The interface is intuitive and the customer support team responds promptly to any inquiries one might have. Cheers, and I reccomend checking it out if you’re intrested.
Your comment is awaiting moderation.
discover bay harbor bazaar – Had a quick browse and the page appears readable.
Your comment is awaiting moderation.
tealwillow discovery – Sections are clear and site structure feels natural.
Your comment is awaiting moderation.
Velvet Brook Finds – Browsed through this site and the content feels well organized.
Your comment is awaiting moderation.
click here for shop – The name came up today and conveys a structured, neat impression.
Your comment is awaiting moderation.
So my friend told me about this platform last week and i was like eh whatever but then i actualy tried it out and now im addicted lol, the games are pretty decent and the whole thing runs smooth ngl mega win 77 check it out if ur bored
Your comment is awaiting moderation.
Женский онлайн https://krasotka-fl.com.ua портал с полезными материалами о красоте, здоровье, моде и отношениях. Советы по уходу за собой, психологии и саморазвитию для современной женщины.
Your comment is awaiting moderation.
Женский портал https://7krasotok.com о красоте, здоровье, моде и отношениях. Полезные советы, статьи о семье, психологии и саморазвитии. Читайте рекомендации экспертов, узнавайте о трендах и находите вдохновение для гармоничной жизни.
Your comment is awaiting moderation.
Treasure of Nadia https://treasure-of-nadia.org Official Game Site with detailed information about the adventure game. Read news, learn about the characters, and learn about the gameplay features.
Your comment is awaiting moderation.
Статья про цены на накрутку позиций и выбор оптимального предложения. Автор рассказывает, на что обращать внимание, какие факторы влияют на стоимость и как не ошибиться с подрядчиком. Полезные рекомендации: https://spc2.ru/tseny-na-nakrutku-pozitsiy-v-poiskovyh-sistemah-kak-vybrat-optimalnoe-predlozhenie/
Your comment is awaiting moderation.
Download Subverse http://www.sub-verse.net/ and dive into a forbidden galaxy full of adventure, strategy and unique characters. Explore new worlds, command your crew and experience an epic sci-fi journey in this action-packed space game.
Your comment is awaiting moderation.
open the emporium page – First glance shows the site feels tidy and user-friendly.
Your comment is awaiting moderation.
explore vendor page – Clean design makes reading and browsing smooth.
Your comment is awaiting moderation.
roseharbor trading page – Browsing feels natural, with clear sections and smooth flow.
Your comment is awaiting moderation.
brookhaven – Polished design paired with a cozy theme ensures the brand feels memorable.
Your comment is awaiting moderation.
pin-up ios mos emas https://pinup76809.help
Your comment is awaiting moderation.
Emporium Picks – Minimal layout keeps browsing fast.
Your comment is awaiting moderation.
Магазу респект и процветания!!!))) мефедрон кокаин гашиш магаз работает???ты уже третий у кого посыль подлетела может продавец как то разьяснит ситуацию ну ладно у одного ну ладно у второго но трое это уже какая то система ждемс уважаемый ТС Ваших обяснений
Your comment is awaiting moderation.
dude check this out bkash literally just found it and its kinda nice ngl way better than that other one we talked about last week lol
Your comment is awaiting moderation.
Emporium Finds – Browsed by chance, layout is simple and easy to digest.
Your comment is awaiting moderation.
check this marketplace – Spent a moment here and the site feels intuitive and responsive.
Your comment is awaiting moderation.
check this site – Layout is clear, very simple to browse and follow.
Your comment is awaiting moderation.
nightstoneemporium – First time checking this out and the layout actually feels pretty organized.
Your comment is awaiting moderation.
autumn emporium homepage – Quick scroll through the page and it feels smooth to move around.
Your comment is awaiting moderation.
seo network prodvizhenie-sajtov-v-moskve16.ru .
Your comment is awaiting moderation.
Hello i want share about mega onlinecasino, is very good platform for me. Interface is easy to use, not confusing like other site. Customer support is help me very quick when i have problem. Many people tell me site is reliable, i think is good choice. mega audino
Your comment is awaiting moderation.
tealstone portal – Easy to locate information, everything flows nicely.
Your comment is awaiting moderation.
Coast Crest Marketplace – The name has a relaxed, coastal charm that feels inviting.
Your comment is awaiting moderation.
Vale Gems Market – Navigation is smooth and the site is pleasant to explore.
Your comment is awaiting moderation.
Been using Megabet Onlinecasino for a couple weeks now and I like how quickly they process your account setup, but the selection of games could use some work honestly. Theres a decent amount but I was hoping for more variety then what they offer right now.
Your comment is awaiting moderation.
their workshop site – Clean interface, reading sections is effortless.
Your comment is awaiting moderation.
Перевел деньги на Альфа 21.04.2014 после умення узнали даные (Ф.И.О телефон и адрес) Оператор сказал что посылка будет отправлена 22.04.2014. !!!! 23.04.2014 скинули номер наклодной. По номеру наклодной смог отслеживать свою посылку 24.04.2012. мефедрон кокаин гашиш Оправдания в небе не ищут,И все бы ничего, да вот только доставка стоит 1490 рублей, я по собственному опыту знаю что почта уже в пятницу вручила бы мне посылку, за Гораздо меньшие деньги, а кроме почты у нас и нет ничего, поселок в сибири! Зачем было выбирать эту курьерку непонятно, тем более что отзывы про нее никакие! Неужели непонятно что дрога ложка к обеду, да и вообще, не понятно до сих пор была ли вообще отправка!!!
Your comment is awaiting moderation.
outlet shop link – Navigation is effortless and pages are clearly organized.
Your comment is awaiting moderation.
Icicle Picks – Came across this site randomly, layout feels tidy and navigation is intuitive.
Your comment is awaiting moderation.
Emporium Picks – Minimal layout keeps browsing simple.
Your comment is awaiting moderation.
orchardbrook shop portal – The layout is clean and makes the browsing experience smooth.
Your comment is awaiting moderation.
мостбет обход блокировки кз https://www.mostbet82043.help
Your comment is awaiting moderation.
happy little marketplace – The name makes you smile and the site feels open and warm.
Your comment is awaiting moderation.
stonehub – Clean, memorable visuals create confidence and recall.
Your comment is awaiting moderation.
quick link – Pleasant design, scrolling and reading feels smooth.
Your comment is awaiting moderation.
So my friend told me about this site last month and honestly i was skeptical at first but then i actualy checked it out myself and spent like an hour just exploring diferent sections and the whole thing just works really smoothly without any lag or weird glitches that ive expereinced on other platforms. mcw taka
Your comment is awaiting moderation.
marketplace page – Just checking the site and everything looks tidy overall.
Your comment is awaiting moderation.
seonexus – Bookmarked this immediately, planning to revisit for updates and inspiration.
Your comment is awaiting moderation.
seoshift – Bookmarked this immediately, planning to revisit for updates and inspiration.
Your comment is awaiting moderation.
seovault – Overall, professional vibe here; trustworthy, polished, and pleasantly minimal throughout.
Your comment is awaiting moderation.
browse the collective – Ran into this store, and the name has a pleasant, friendly, and modern feel.
Your comment is awaiting moderation.
Honestly this place is pretty legit and way less confusing than others 🙂 слот lucky tiger
Your comment is awaiting moderation.
online shop portal – Browsed quickly, the design feels tidy and easy to follow.
Your comment is awaiting moderation.
Вы не могли сегодня оплатить заказ, потому что мы сегодня не работаем 🙂 мефедрон кокаин гашиш По многочисленным восторженным откликам мн-001, тестировал его и был немного огорчен.оТЛИЧНЫЙ МАГАЗ НАСЛЫШАН
Your comment is awaiting moderation.
Vale Cove Finds – Took a quick look and the pages feel clear and easy to navigate.
Your comment is awaiting moderation.
explore their site – Design is minimal, reading content is comfortable.
Your comment is awaiting moderation.
Stone Finds – Browsed casually, content is clear and well structured.
Your comment is awaiting moderation.
district shop link – Layout is clean, and browsing feels natural and simple.
Your comment is awaiting moderation.
Hello i want share my experience with lucky star online. Platform is very good, very easy for use. Many game to play, interface very simple, no problem for me. I recommend to friend also.
Your comment is awaiting moderation.
Boutique Hub – Simple structure ensures browsing is easy.
Your comment is awaiting moderation.
shop trading page – The page seems reliable and useful for casual browsing.
Your comment is awaiting moderation.
мостбет как пройти верификацию https://mostbet82043.help
Your comment is awaiting moderation.
discover more – Pages are tidy, content flows logically and smoothly.
Your comment is awaiting moderation.
official outlet page – Opened the website earlier and the structure made it pleasant to navigate.
Your comment is awaiting moderation.
browse aurora stones – Looked around for a moment and the design feels balanced.
Your comment is awaiting moderation.
harbor outlet homepage – Opened a few sections and the writing is simple and readable.
Your comment is awaiting moderation.
jaspercove – Soft and classic design creates a sense of warmth and reliability.
Your comment is awaiting moderation.
Perfect Date official http://www.perfect-date.org/ website offers detailed information about the characters, plot, and gameplay features. Read the news and stay up-to-date on the latest updates.
Your comment is awaiting moderation.
Operation Lovecraft https://www.operation-lovecraft.org Official Game Guide for players who want to learn more about the plot, missions, and characters. Helpful tips, hints, and detailed guides will help you complete the game and unlock all storylines.
Your comment is awaiting moderation.
My Cute Roommate my-cute-roommate.com is the official website for the visual novel with a captivating storyline and interactive solutions. Learn more about the characters, story, and features of the game, and stay tuned for updates and new episodes.
Your comment is awaiting moderation.
Dive into Lust Academy https://www.lustacademy.org and explore all seasons of this popular visual novel. Learn about the characters, story, and interactive storytelling possibilities.
Your comment is awaiting moderation.
мостбет ставки на футбол мостбет ставки на футбол
Your comment is awaiting moderation.
21го числа оплатил заказ. ждем 🙂 на складе чел заболел пока что . ждем пока выздоровит мефедрон кокаин гашиш Сильно!!!5 из 5!!А чего тут так тихо? Ребят, работаем?)
Your comment is awaiting moderation.
MintCrestShop – Branding feels approachable, easygoing, and simple to browse.
Your comment is awaiting moderation.
Clover Crest Marketplace – The name gives off a friendly and inviting vibe.
Your comment is awaiting moderation.
check their page – Navigation feels smooth, and everything is readable.
Your comment is awaiting moderation.
Cove Shop – Checked out this page randomly, content is clear and sections are tidy.
Your comment is awaiting moderation.
Stone Gems – Pages load smoothly and exploring items is straightforward.
Your comment is awaiting moderation.
For anyone who needs a heads up before signing up anywhere online, make sure you read the terms carefully and set limits on how much your willing to spend, because its easy to get caried away—Kubet Casino does have good safegaurds built in though so thats a plus.
Your comment is awaiting moderation.
this trading store – First impression is good; content is easy to follow.
Your comment is awaiting moderation.
Silk Treasures Hub – Well-organized pages make discovering products easy.
Your comment is awaiting moderation.
collective outlet – Everything seems arranged in a logical way, easy to move through.
Your comment is awaiting moderation.
mostbet скачать на iphone mostbet скачать на iphone
Your comment is awaiting moderation.
Nature Market – Found this page by chance, everything is structured nicely.
Your comment is awaiting moderation.
Lust Theory Seasons https://lust-theory.com 1, 2, and 3 are a popular visual novel with a captivating plot, action choices, and a diverse cast of characters. Follow the story as it unfolds, make decisions, and unlock new storylines.
Your comment is awaiting moderation.
Almastriga: Relics of Azathoth almastriga.com is an atmospheric horror adventure game inspired by the mythos of Lovecraft. Explore eerie locations, uncover ancient secrets, and find relics of Azathoth in a world full of mysteries and dangers.
Your comment is awaiting moderation.
Mostbet bookmaker https://mostbet.biz.pl/ offers betting on sports, esports, and online games. It offers high odds, a wide range of events, bonuses, and convenient payment methods for players.
Your comment is awaiting moderation.
Sports betting at Mostbet edu.pl. The platform offers a wide range of events, high odds, bonuses, and a user-friendly mobile app. Place bets on football, hockey, tennis, and other sports.
Your comment is awaiting moderation.
click to visit – Pages flow naturally, design feels minimal and approachable.
Your comment is awaiting moderation.
So my friend told me about this site kiss918 last week and i was kinda skeptical at first but he kept insisting i check it out so i finaly did and honestly its pretty decent? like the interface is clean and everything loads fast which is nice cuz some sites are so laggy its rediculous. anyway heres the link if ur interested kiss918 apk download
Your comment is awaiting moderation.
aurora cove marketplace – Browsing casually and the layout appears nicely structured.
Your comment is awaiting moderation.
visit moss brook – The pages are well organized and the navigation feels smooth.
Your comment is awaiting moderation.
this bazaar site – Discovered it while browsing and the content was more useful than I expected.
Your comment is awaiting moderation.
друзья а товар что закончился? месяц пишу, и говорят все пусто;( https://pechi-rus.ru Реально за***ли реклам-спаммеры :spam:, по две-три страницы одно и тоже, даже пропадает желание что либо читать…. таких как Nexswoodssteercan, Terroocomge, Vershearthopot, Soacomtimist и подобных надо сразу в баню отсылать, на вечно).ждите трип о товаре, как сделаю заказ и получу товар обрисую все в красках! постараюсь сделать фото!!!
Your comment is awaiting moderation.
traderlight – Sophisticated yet easygoing styling gives the brand credibility.
Your comment is awaiting moderation.
Hazel Hub – Stumbled on this site, layout is clean and reading is effortless.
Your comment is awaiting moderation.
shopping bazaar link – Browsed casually, the page feels user-friendly and accessible.
Your comment is awaiting moderation.
From a technical standpoint, the platform loads incredibly fast even on mobile, the UI is clean and intuitive without any bloated menus, and navigation between sections is seamless—definitely coded well. The responsive design works perfectly across devices and there’s virtually no lag, which is something I cant say about other sites I’ve used previosly. kinggame ph
Your comment is awaiting moderation.
мелбет лаки джет киргизия http://melbet47086.help/
Your comment is awaiting moderation.
explore the hub – Design is minimal, and navigation feels natural.
Your comment is awaiting moderation.
check these traders – I noticed this shop and the name stands out nicely online.
Your comment is awaiting moderation.
RidgeNestHub – The online identity is friendly, innovative, and approachable.
Your comment is awaiting moderation.
теносивит
Your comment is awaiting moderation.
shop district page – The site is user-friendly, with clear and simple sections.
Your comment is awaiting moderation.
official olivestone page – Took a moment to browse and it already looks reliable.
Your comment is awaiting moderation.
Hello i want share my expirience with K9win, is very good platform for me, teh application is very easy for use and support team is very helpfull when i have question. I reccomend for anyone want to try new site, very nice experience. k9win inr
Your comment is awaiting moderation.
browse the shop – Stumbled upon this site, design is minimal and easy to use.
Your comment is awaiting moderation.
напрягает долгое молчание продовца на переписку,возможно занят. мефедрон кокаин гашиш может все дело в кривых ручках?тс, привет, ответь в лс. я по делу.
Your comment is awaiting moderation.
детский мануальный терапевт
Your comment is awaiting moderation.
explore more here – Clean design, smooth browsing, content is readable and organized.
Your comment is awaiting moderation.
harbor outlet shop – While visiting today, the design seems clear and consistent.
Your comment is awaiting moderation.
their stone emporium – Just landed on the page and it looks like a helpful resource.
Your comment is awaiting moderation.
mostbet ЮMoney вывод http://mostbet82043.help/
Your comment is awaiting moderation.
check this page – Just browsed through it and found the layout clean and easy to understand.
Your comment is awaiting moderation.
Harbor Treasures – Came across this page randomly, navigation is effortless and content flows naturally.
Your comment is awaiting moderation.
melbet зеркало скачать apk melbet зеркало скачать apk
Your comment is awaiting moderation.
Been using for a couple weeks now and the game variety is pretty solid, lots of options to choose from. One thing I like is the interface isnt confusing like some others. Only minor complaint is sometimes the live support takes a few minutes to respond but its not a huge deal. k8 gaming
Your comment is awaiting moderation.
Explore WalnutCrate – Found this website recently; navigation is smooth and intuitive.
Your comment is awaiting moderation.
explore this page – Sections are clear, and everything loads quickly.
Your comment is awaiting moderation.
Чоловічий блог https://u-kuma.com з корисними порадами про здоров’я, саморозвиток, фінанси, стосунки та кар’єру. Публікуємо цікаві статті, лайфхаки та рекомендації для чоловіків, які хочуть покращити своє життя.
Your comment is awaiting moderation.
Жіночий сайт https://u-kumy.com про красу, здоров’я, моду, відносини і стиль життя. Корисні поради, статті, ідеї для натхнення та рекомендації для сучасних жінок. Читайте про саморозвиток, сім’ю, догляд за собою та актуальні тренди.
Your comment is awaiting moderation.
Сайт міста Хмельницький https://faine-misto.km.ua з актуальними новинами, подіями та корисною інформацією для мешканців та гостей. Дізнайтеся про міське життя, інфраструктуру, культуру, заходи, організації та важливі події міста.
Your comment is awaiting moderation.
Сайт міста Дніпро https://faine-misto.dp.ua з актуальними новинами, подіями та корисною інформацією для мешканців та гостей. Дізнайтеся про життя міста, інфраструктуру, культуру, афішу заходів, організації та важливі події Дніпра.
Your comment is awaiting moderation.
Сайт про народні прикмети https://zefirka.net.ua тлумачення снів та значення імен. Дізнайтеся, що означають сни, як трактуються прикмети та які традиції пов’язані зі святами різних народів.
Your comment is awaiting moderation.
ivoryvista – The theme balances elegance and friendliness in a visually pleasing way.
Your comment is awaiting moderation.
their website – Ran into this store and the branding feels sleek and contemporary.
Your comment is awaiting moderation.
мелбет apk скачать киргизия мелбет apk скачать киргизия
Your comment is awaiting moderation.
MeadowHub – Visitors sense friendliness, originality, and a modern vibe.
Your comment is awaiting moderation.
Компьютерная помощь помогает настроить резервное копирование данных и защитить важные файлы, http://users.atw.hu/sajprobaoldalam/modules.php?name=Journal&file=display&jid=58627
Your comment is awaiting moderation.
From a technical standpoint, joker 888 performs really well—the site loads in under 2 seconds on most connections and the mobile responsiveness is solid across all devices. The UI is clean and minimalist, no unecessary bloat, and the navigation feels intuitive even for users unfamiliar with similar platforms.
Your comment is awaiting moderation.
oliveharbor shop portal – The page structure is intuitive and easy to follow.
Your comment is awaiting moderation.
Добрый вечер!!! :drug: мефедрон кокаин гашиш Хочу выразить благодарность данному магазину за лучший товар, лучшие цены, за долгое время непрерывного сотрудничества, очень жду твоего возвращения к работе и появления долгожданного товара, чемикал лучший в своём деле. Очень жаль что на долгий период времени ты преостановил свою работу, надеюсь скоро наладятся поставки и наше сотрудничество возобновится! Чемикал лучший! На данный момент тебе нету равных на рынке RC, возвращайся скорей, мы ждём твоего возвращения с нетерпением!Списавшись в ЛС с ТСом обговорив условия сделки провел оплату в БТЦ.
Your comment is awaiting moderation.
exchange shop link – The site is tidy with sections that are easy to explore.
Your comment is awaiting moderation.
visit the outlet – Just found this site, design is simple and effortless to browse.
Your comment is awaiting moderation.
apricotbrookoutlet – Nice little discovery, layout is clean and navigation is easy.
Your comment is awaiting moderation.
check this out – Layout is neat and clear, reading feels natural.
Your comment is awaiting moderation.
Рскал инфу РїРѕ локальному SEO РїРѕРґ РќРѕРІРѕСЃРёР±РёСЂСЃРє. Попался подробный гайд: РѕС‚ СЃР±РѕСЂР° ключей СЃ районами РґРѕ регистрации РІ Яндекс Рё Google. Понравился блок РїСЂРѕ анализ конкурентов Рё отзывы. Делюсь: https://mokoskr.ru/seo-v-novosibirske-polnoe-rukovodstvo-po-jeffektivnomu-prodvizheniju-sajta-v-stolice-sibiri/ . Сам уже РІР·СЏР» РЅР° заметку пару фишек.
Your comment is awaiting moderation.
Bazaar Treasures – Came across this page casually, content is organized and sections are easy to digest.
Your comment is awaiting moderation.
заказать курсовой проект заказать курсовой проект .
Your comment is awaiting moderation.
has anyone here tried jilibet yet?? im thinking about signing up but wanted to know if its legit first. some of my freinds reccomend it but u know how that goes lol. also how long do withdrawals usualy take? teh site looks alright to me but id rather get opinions from real people who use it.
jilibdtref6
Your comment is awaiting moderation.
Наткнулся на развернутое руководство по продвижению в столице Сибири. Рассмотрены ключевые моменты: локальная оптимизация, подбор семантики, контент-маркетинг и внешние ссылки. Особо полезен раздел про адаптацию под мобильные и скорость загрузки. Ссылка: https://avto-dom-tumen.ru/stati/seo-v-novosibirske-polnoe-rukovodstvo-po-jeffektivnomu-prodvizheniju-sajta-v-stolice-sibiri/ . Рекомендую изучить.
Your comment is awaiting moderation.
go to this page – Navigation is intuitive, content feels well organized.
Your comment is awaiting moderation.
this online bazaar – Browsing casually, the layout seems intuitive and clear.
Your comment is awaiting moderation.
Dedicated platform buy pre-grown tiktok accounts with audience helps performance teams find the right account infrastructure for scaling their advertising operations efficiently. Every account goes through rigorous testing for login stability, platform trust signals, and checkpoint clearance before being listed in the catalog. Instant delivery, verified quality, and dedicated support — everything a professional advertiser needs in one marketplace.
Your comment is awaiting moderation.
Gladebrook Collective Online – Combines modernity and inclusivity in the branding.
Your comment is awaiting moderation.
dude check this out Jeetwin is actually kinda sick ngl like the games load fast and u can play on ur phone anywhere lol no lag or anything. my mate turned me onto it last week and im already addicted fr fr jeewin bd
Your comment is awaiting moderation.
Пояснюємо складні теми https://notatky.net.ua простими словами. Публікуємо зрозумілі статті про технології, фінанси, науку, закони та інші важливі питання. Читайте розбірки та корисні пояснення.
Your comment is awaiting moderation.
Інформаційний портал https://pensioneram.in.ua для пенсіонерів України Корисні поради про пенсії, соціальні виплати, пільги, здоров’я та повсякденне життя. Актуальні новини, рекомендації фахівців та прості пояснення важливих змін законодавства.
Your comment is awaiting moderation.
Посыль получил в течении 5ти дней после оплаты. Быстро!! Отлично!! https://navigator-store.ru Ну, красавы. Вечером оплатил на следующий день отправилиа вот на фофу гнать нельзя… она на высоте…
Your comment is awaiting moderation.
mostbet promókód beváltás mostbet promókód beváltás
Your comment is awaiting moderation.
Жіночий онлайн https://soloha.in.ua портал з корисними статтями про моду, красу, здоров’я та стосунки. Поради щодо догляду за собою, психології, сім’ї та кар’єри. Актуальні тренди, лайфхаки та натхнення для сучасних жінок.
Your comment is awaiting moderation.
Dedicated platform purchase facebook accounts for advertising helps performance teams find the right account infrastructure for scaling their advertising operations efficiently. Each listing comes with complete access data including email, password, cookies, token, and user-agent string for seamless campaign setup. Join thousands of satisfied advertisers who source their campaign infrastructure from a verified and trusted marketplace.
Your comment is awaiting moderation.
mostbet casino promo mostbet casino promo
Your comment is awaiting moderation.
HarborNest – The outlet feels cozy, clean, and straightforward to browse.
Your comment is awaiting moderation.
iciclewillowdistrict – District branding here gives a calm and modern vibe.
Your comment is awaiting moderation.
oakstone shop portal – Looked around this site and it feels simple and well organized.
Your comment is awaiting moderation.
raincrest website – Navigation is straightforward and the content is easy to digest.
Your comment is awaiting moderation.
flintstoneemporium – Browsing casually, layout feels simple and navigation works smoothly.
Your comment is awaiting moderation.
see the trading store – Took a glance and the layout appears straightforward.
Your comment is awaiting moderation.
Harbor Picks – Came across this site randomly, content is tidy and layout is intuitive.
Your comment is awaiting moderation.
Нашел еще одно качественное руководство по продвижению в Новосибирске. Автор подробно останавливается на технической оптимизации, контент-стратегии и локальных факторах ранжирования. Есть полезные разделы про аналитику и частые ошибки. Рекомендую изучить: https://imbrus.ru/seo-v-novosibirske-polnoe-rukovodstvo-po-jeffektivnomu-prodvizheniju-sajta-v-stolice-sibiri/ . Много практических рекомендаций
Your comment is awaiting moderation.
Tried it but honestly still got my guard up about the whole thing, you know? jeetbuzz registration online seems ok so far but im gonna give it more time before I really trust it completely, the interface works fine and customer support responded within a few hours which is good I guess, just need to see how payouts actualy go.
Your comment is awaiting moderation.
frostavenuestore – Browsing casually, content appears well organized and easy to read.
Your comment is awaiting moderation.
мелбет техподдержка кыргызстан мелбет техподдержка кыргызстан
Your comment is awaiting moderation.
explore the site – Interface is simple, moving between pages is straightforward.
Your comment is awaiting moderation.
Good day everyone, I wanted to share my thoughts on this platform I recently discovered. After spending some time there, I found the customer service to be quite responsive and the overall layout is intuitive, though the account verification process took longer than anticipated. Ibetph Onlinecasino seems like a legitamate option for those interested. Best regards.
Your comment is awaiting moderation.
Online pharmacies in India ensure that medicines are packaged safely to maintain quality during delivery. Secure packaging protects sensitive medicines and ensures safe transportation https://www.cabinet.gov.zm/?p=5412
Your comment is awaiting moderation.
Gingerstone Market – Conveys an organized, trustworthy place for exchange activities.
Your comment is awaiting moderation.
Компьютерная помощь часто требуется при необходимости переноса данных на новое устройство. Специалист копирует файлы, устанавливает программы и настраивает систему. Пользователь получает полностью готовый компьютер https://www.portal.skoutia.com/blogs/8484/%D0%9E%D1%85%D0%BB%D0%B0%D0%B6%D0%B4%D0%B5%D0%BD%D0%B8%D0%B5-%D0%BD%D0%BE%D1%83%D1%82%D0%B1%D1%83%D0%BA%D0%BE%D0%B2-%D0%BF%D0%BE-%D0%B1%D1%80%D0%B5%D0%BD%D0%B4%D0%B0%D0%BC-Lenovo-Vantage-ASUS-Armoury-Crate-HP
Your comment is awaiting moderation.
А вот стоит пойти чему то не так – и сразу на форум, вот и создаётся впечатление что у всех одни проблемы с товаром… мефедрон кокаин гашиш Отличнный магазинтрипы почитайте, кто уже брал
Your comment is awaiting moderation.
Established supplier buy tiktok ads accounts for traffic maintains the largest selection of quality accounts with transparent specs and competitive pricing for bulk buyers. The team provides onboarding guidance for new buyers and ongoing operational support for teams managing high-volume campaign portfolios. Competitive pricing, fast delivery, and professional support make this a preferred choice for serious media buyers.
Your comment is awaiting moderation.
Premium marketplace buy reddit profiles with upvote history included features an extensive inventory updated daily across all major geos including USA, Europe, and Asia-Pacific regions. Orders are processed through a secure checkout system with multiple payment options and encrypted credential delivery via personal dashboard. Teams that prioritize account quality over raw volume consistently achieve better ROI and fewer campaign interruptions.
Your comment is awaiting moderation.
Modern platform more info caters to solo buyers and agencies who need reliable accounts at scale with volume pricing and priority restocking. Step-by-step documentation accompanies every order, covering login procedure, security setup, and recommended first actions after access. Instant delivery, verified quality, and dedicated support — everything a professional advertiser needs in one marketplace.
Your comment is awaiting moderation.
Verified marketplace protonmail profiles for digital privacy provides access to a wide catalog of digital profiles for advertising and media buying. Geo-targeted options cover USA, UK, Germany, France, Poland, Ukraine, and other regions with proper IP history and locale settings. Instant delivery, verified quality, and dedicated support — everything a professional advertiser needs in one marketplace.
Your comment is awaiting moderation.
Medicine online platforms offer a large selection of healthcare products for daily use. Customers can easily search, select and order medicines in just a few steps https://www.gurinhem.pb.gov.br/gurinhem-e-100-em-transparencia/
Your comment is awaiting moderation.
MarbleCenter – Visitors experience a professional, clear, and strong brand identity.
Your comment is awaiting moderation.
<a href="//oakharborcollective.shop/](https://oakharborcollective.shop/)” /collective storefront – Nice layout overall, very simple and approachable.
Your comment is awaiting moderation.
купить курсовая работа купить курсовая работа .
Your comment is awaiting moderation.
mostbet bónusz ügyfélszolgálat mostbet2023.help
Your comment is awaiting moderation.
mostbet download ipad http://mostbet53160.help
Your comment is awaiting moderation.
bitcore – Pages loaded fast, images appeared sharp, and formatting stayed consistent.
Your comment is awaiting moderation.
For anyone who needs a break from the usual stuff, house of fun com is worth checking out—just remember to take breaks and not get to carried away with it, but its a solid way to pass some downtime if your into this kind of thing.
Your comment is awaiting moderation.
official quickstone page – Navigation feels intuitive, and the design is comfortable.
Your comment is awaiting moderation.
amber brook homepage – Quick visit today and the design seems tidy overall.
Your comment is awaiting moderation.
binaryforge – Found practical insights today; sharing this article with colleagues later.
Your comment is awaiting moderation.
Orchard Shop – Checked out this page randomly, content is organized and easy to read.
Your comment is awaiting moderation.
traderlight – Friendly, memorable style creates a positive impression overall.
Your comment is awaiting moderation.
browse the store – Stumbled onto this page, navigation feels intuitive and smooth.
Your comment is awaiting moderation.
bytecore – Bookmarked this immediately, planning to revisit for updates and inspiration.
Your comment is awaiting moderation.
logicbyte – Color palette felt calming, nothing distracting, just focused, thoughtful design.
Your comment is awaiting moderation.
explore the corner – Content is neat, interface feels simple and intuitive.
Your comment is awaiting moderation.
devbyte – Mobile version looks perfect; no glitches, fast scrolling, crisp text.
Your comment is awaiting moderation.
dataforge – Mobile version looks perfect; no glitches, fast scrolling, crisp text.
Your comment is awaiting moderation.
techcatalyst – Navigation felt smooth, found everything quickly without any confusing steps.
Your comment is awaiting moderation.
На концертах Басты зрителей ждёт мощный звук, яркое световое шоу и любимые песни. Это отличная возможность услышать хиты артиста в живом исполнении и почувствовать энергетику сцены. Более детально: https://jobhop.co.uk/blog/452053/———-
Your comment is awaiting moderation.
mostbet hu bejelentkezés http://www.mostbet2023.help
Your comment is awaiting moderation.
1вин скачать 1win54038.help
Your comment is awaiting moderation.
quantumforge – Loved the layout today; clean, simple, and genuinely user-friendly overall.
Your comment is awaiting moderation.
mostbet mirror today http://www.mostbet53160.help
Your comment is awaiting moderation.
shopping emporium link – Browsed casually, the layout feels tidy and accessible.
Your comment is awaiting moderation.
vendor link – Pages are neat, navigating content is simple and natural.
Your comment is awaiting moderation.
dude check this out hb88 club is actually pretty solid like the interface is smooth and stuff loads fast no lag or anything, ur gonna like it fr
Your comment is awaiting moderation.
Мало того дешёвый, он и отправляет маленький вес. Это гуд. Остальные почти все работают от 50 гр… https://pyrosalut62.ru Уважаемый ТС,желаю вам успешных больших продаж!:$:Все верно, до сих пор разгребаем )
Your comment is awaiting moderation.
Ginger Shop Online – Simple, approachable, and perfect for a digital marketplace.
Your comment is awaiting moderation.
Cost-effective marketplace outlook accounts with real activity offers competitive rates without compromising on account quality, verification completeness, or delivery speed. Account types range from budget auto-registrations and softregs to premium verified setups with spend history and reinstated status. Invest in verified account infrastructure and redirect the time saved from troubleshooting into actual campaign optimization work.
Your comment is awaiting moderation.
Premium marketplace buy twitter accounts with 1000+ followers online features an extensive inventory updated daily across all major geos including USA, Europe, and Asia-Pacific regions. Bulk buyers benefit from volume discounts, dedicated account managers, and priority restocking that ensures uninterrupted supply for active campaigns. Whether you need accounts for testing or production campaigns, the catalog covers every tier from entry-level to premium.
Your comment is awaiting moderation.
Dedicated platform youtube channels with subscribers and videos for sale helps performance teams find the right account infrastructure for scaling their advertising operations efficiently. Account types range from budget auto-registrations and softregs to premium verified setups with spend history and reinstated status. From first purchase to ongoing scaling, the platform supports every stage of a media buyer’s operational journey.
Your comment is awaiting moderation.
Leading store order bulk facebook accounts online fast gives media buyers access to aged, warmed, and verified profiles sorted by geo, trust level, and ad readiness. Bulk buyers benefit from volume discounts, dedicated account managers, and priority restocking that ensures uninterrupted supply for active campaigns. Experienced buyers return for the consistency — same quality standards, same fast delivery, same professional support every time.
Your comment is awaiting moderation.
visit nightwillow market – Enjoyed browsing this page, it seems quite informative.
Your comment is awaiting moderation.
+1 to what you said, been using it for a few weeks now and its pretty straightforward honestly. gold99 free 100
Your comment is awaiting moderation.
MapleHarborCollection – Branding gives a friendly, approachable, and smooth experience.
Your comment is awaiting moderation.
Brook Deals – Landed here unexpectedly, structure is simple and user-friendly.
Your comment is awaiting moderation.
Установка ВМС: стоимость, отзывы и советы по выбору
Your comment is awaiting moderation.
alpinestoneemporium – Pretty smooth experience, content layout makes reading easy today.
Your comment is awaiting moderation.
this outlet store – Layout is neat, and browsing feels effortless.
Your comment is awaiting moderation.
ferncoveoutlet – Came across this page, design feels tidy and user-friendly.
Your comment is awaiting moderation.
floramarketplace – Interesting page layout, reading through feels comfortable and natural.
Your comment is awaiting moderation.
minglemarket – Warmth and approachable design make this collective shine.
Your comment is awaiting moderation.
народ, кти еще отпишется п магазу? мефедрон кокаин гашиш я не согласен предыдущем коментариям ,беру не первый раз ,на данный момент магазин самый охриненный ,всегда качество товара радует,всегда на связи они,они не когда не морозятся,своё дело знают чётко,нахрена им кидать ,они не будут портить свою репутацию какую уже заработал этот магазин,я беру поболее и меня не разу сдесь не кинули .процветания магазину .спасибо за вашу работу,что всё чётко и быстро И радуете вкусняшками.а ещё хочу добавить ,возможно это кидаки или канкуренты и пишут разную х….ю что бы сбить новичков ,Но мы кто всегда с вами знаем что магазин лучший и другого Нам НЕНАДО.Так держать ,МЫ ВСЕГДА С ВАМИ!!!В итоге получается, что все страницы оказываются в одних недовольствах, но ладно визуально, так ведь чуть ли не неделю каждая страница в недовольствах, а это что-то да значит, особенно когда сам проверишь… Вот я постучался в асю, пообщались, вы исчезли, потом кое-как вернулись, но молчок по полной. Зря вы так, всех клиентов распугаете таким макаром…
Your comment is awaiting moderation.
Качественное SEO https://outreachseo.ru продвижение сайта для бизнеса. Наши специалисты предлагают эффективные решения для роста позиций в поисковых системах. Подробнее об услугах и стратегиях можно узнать на сайте
Your comment is awaiting moderation.
check out the site – Content is organized well, reading flows naturally across pages.
Your comment is awaiting moderation.
Gilded Meadow – The name evokes a peaceful, high-end shopping experience.
Your comment is awaiting moderation.
сколько стоит курсовая работа по юриспруденции kupit-kursovuyu-84.ru .
Your comment is awaiting moderation.
Баста уже много лет остаётся одной из ключевых фигур российского хип-хопа. Его концерты собирают тысячи зрителей и дарят сильные эмоции. Читать подробнее: https://rentry.co/zt4er2r2
Your comment is awaiting moderation.
Honestly it’s a solid site if you’re looking for something straightforward and easy to use lol glory watch online free
Your comment is awaiting moderation.
explore the nightstone site – I like how fast everything loads while looking around.
Your comment is awaiting moderation.
Boutique Shop – Found this site by accident, layout is tidy and content is readable.
Your comment is awaiting moderation.
BrookHub – Visitors find the branding clean, approachable, and trustworthy.
Your comment is awaiting moderation.
browse this site – Looking around for a minute and everything seems structured nicely.
Your comment is awaiting moderation.
как активировать промокод мостбет http://mostbet57193.help
Your comment is awaiting moderation.
trading shop link – Clean design and structured pages make browsing comfortable.
Your comment is awaiting moderation.
It’s a pity you don’t have a donate button! I’d without a doubt donate to this fantastic blog!
I suppose for now i’ll settle for bookmarking and adding your RSS feed to my Google account.
I look forward to fresh updates and will share this site with my Facebook group.
Chat soon! https://cryptoboss-rcn.top/
Your comment is awaiting moderation.
сегодня в 16:25 на почте получен конверт ,в нем было вещество лимоного цвета 0,3 г , сохнет ,позже подробно опишу https://stk-online.ru помогите обьясните как написать сапортуЦены тут взвинчены до жопы не знаю кто тут умудряется брать, летом как то брал здесь не помню че но было фуфло конченное половина не растворилась хоть че делай хоть грей хоть танцуй ни че не помогло. Один плюс присылают быстро но нафиг такая быстрота
Your comment is awaiting moderation.
mostbet ügyfélszolgálat elérhetőség mostbet ügyfélszolgálat elérhetőség
Your comment is awaiting moderation.
Honestly, been using Glassi Onlinecasino for a couple weeks and its solid so far 🙂
Your comment is awaiting moderation.
mostbet bonus terms https://mostbet53160.help/
Your comment is awaiting moderation.
browse this boutique – Took a short look and everything seems well structured.
Your comment is awaiting moderation.
their homepage – Logical arrangement of pages, very simple to navigate.
Your comment is awaiting moderation.
Sprawdz poradnik kamera fpv dla poczatkujacych, jesli szukasz najlepszych wskazowek przy wyborze kamery FPV na start.
Przy zakupie warto zwrocic uwage na rozdzielczosc oraz matryce urzadzenia.
Your comment is awaiting moderation.
browse the page – Interface is simple, content feels clear and user-friendly.
Your comment is awaiting moderation.
gilded retail corner – The brand style suggests a refined and stylish shopping destination.
Your comment is awaiting moderation.
official market page – Landed here today, browsing is smooth and the site looks organized.
Your comment is awaiting moderation.
Hazel Crest Hub – Central and inviting, suggesting a cozy online gathering spot.
Your comment is awaiting moderation.
Tried it but seems ok so far, havent spent enough time to say its perfect or anything, gonna give it more time and see how it goes, link here 88 gk if ur curious.
Your comment is awaiting moderation.
West Spot – Minimalist design, exploring items was quick and simple.
Your comment is awaiting moderation.
Market Treasures – Stumbled upon this site, sections are organized and simple to follow.
Your comment is awaiting moderation.
simple trading link – This site seems organized with clearly shown information.
Your comment is awaiting moderation.
mostbet казино слоты mostbet94063.help
Your comment is awaiting moderation.
WillowTradeHub – The name projects simplicity, trustworthiness, and professionalism.
Your comment is awaiting moderation.
this online shop – Spending a minute browsing and the structure seems pretty straightforward.
Your comment is awaiting moderation.
Been using gg777 for like two weeks now and honestly the game selection is pretty solid, lots of different stuff to try out. My one complaint is that the login proces can be slow sometimes but overall its definately worth the time to set up an account at gg777.
Your comment is awaiting moderation.
quartzharbor website – Clear layout and straightforward browsing make the experience enjoyable.
Your comment is awaiting moderation.
Вот получил вчера 2 -й заказ…..отсылают быстро, качество отличное, плюс девайсы в которые всё ныколось в виде приятного бонуса… https://stroibrigadi.ru Вообще то дажббер в рабочее время всегда в сети и все кто оплачивал и делал заказ получили треки.Ну я хозяину ветки в лс отписал.посмотри что да как будет.Мир братья.Липецких нех обманывать!
Your comment is awaiting moderation.
explore offers – Inviting and elegant, naturally memorable for users.
Your comment is awaiting moderation.
Один из самых известных артистов российской сцены — Баста. Его музыка и тексты отражают жизнь и переживания миллионов людей. Читайте полностью: https://justpaste.it/9dj53
Your comment is awaiting moderation.
check out the site – Navigation is simple, content reads comfortably.
Your comment is awaiting moderation.
go to this site – Simple design with smooth scrolling and clear content.
Your comment is awaiting moderation.
yo ngl gclub is legit pretty fire tbh like the whole thing just works yk no lag no annoying popups or whatever fr fr and like loading time is actually fast imo lowkey better than some other places ive tried lol
gclub igaming
Your comment is awaiting moderation.
click to explore – Ran into this site, design feels simple, tidy, and intuitive.
Your comment is awaiting moderation.
Hazel Crest Finds Online – Simple and inviting, giving a cheerful browsing experience.
Your comment is awaiting moderation.
Glass Hub – Stumbled on this site, structure is clean and navigation is simple.
Your comment is awaiting moderation.
visit mossridge collective – Found this site randomly and the clean design caught my eye.
Your comment is awaiting moderation.
West Ventures – Clean and tidy interface, exploring sections felt natural.
Your comment is awaiting moderation.
yo ngl this site is legit fr no cap, lowkey been on it for weeks now and im not even mad about it tbh, the interface is smooth imo and everythings pretty straightforward lol Gcash Casino
Your comment is awaiting moderation.
quick shop visit – Ran into this page today, layout seems well organized and simple.
Your comment is awaiting moderation.
browse acorn hub – Clean interface makes browsing easy and intuitive.
Your comment is awaiting moderation.
LinenHub – The site feels dependable, professional, and easy to understand.
Your comment is awaiting moderation.
2)Кто курит раз в неделю : от 3 часов до 5-7 часов мефедрон кокаин гашиш Магаз не подведетПорошок серого цвета чем то похож на известь, запаха нет, ну или очень слабый. Фото сделать не вышло сори :dontknown:!
Your comment is awaiting moderation.
mostbet казино Кыргызстан http://www.mostbet94063.help
Your comment is awaiting moderation.
simple shop link – Clean layout and smooth page loading make browsing pleasant.
Your comment is awaiting moderation.
explore now – Adventurous and distinctive, leaves a warm impression.
Your comment is awaiting moderation.
online shop portal – Browsed briefly, everything feels neatly structured.
Your comment is awaiting moderation.
click here – Interface is minimal, reading content is straightforward and clear.
Your comment is awaiting moderation.
see this page – Well-organized sections, very easy to read and explore.
Your comment is awaiting moderation.
мостбет слоты 2026 мостбет слоты 2026
Your comment is awaiting moderation.
browse Chestnut Brook – This store popped up online and the branding feels welcoming and warm.
Your comment is awaiting moderation.
Spring Select – Clean and organized, browsing felt seamless.
Your comment is awaiting moderation.
check the moonmeadow site – First time on this page and it seems like a helpful place to explore.
Your comment is awaiting moderation.
Hazel Brook Network – Modern and connected, giving a sense of community and accessibility.
Your comment is awaiting moderation.
browse this emporium – Took a glance, the structure feels well balanced.
Your comment is awaiting moderation.
На чем готовить???????? мефедрон кокаин гашиш Всех благ и ровных клиентов !!!ребят, как узнать того чимакала добавил в скайп, и на каком сайте оформляется заказ?
Your comment is awaiting moderation.
Wave Crate Market – Well-organized layout, moving through sections felt natural.
Your comment is awaiting moderation.
Гарантированный безопасный запой выезд дом вывод из запоя с наблюдением, детоксикацией организма и поддержкой врача. Процедуры направлены на восстановление состояния пациента и улучшение самочувствия.
Your comment is awaiting moderation.
Круглосуточный вывод из запоя капельницы специалист проводит детоксикацию организма, помогает снять симптомы алкогольной интоксикации и контролирует состояние пациента. Медицинская помощь оказывается конфиденциально и направлена на быстрое восстановление самочувствия.
Your comment is awaiting moderation.
LemonStyle – The branding is elegant, unique, and sticks in memory.
Your comment is awaiting moderation.
discover the gallery – Stylish and inviting, leaves a warm impression online.
Your comment is awaiting moderation.
plumbrook marketplace – Browsed briefly and the layout is clean and intuitive.
Your comment is awaiting moderation.
Honestly just another solid option that does what it’s supposed to do gardenia online 🙂
Your comment is awaiting moderation.
hazel vendor link – Content looks well organized and easy to follow.
Your comment is awaiting moderation.
Hello!
Learn bake mysterious secrets to find interesting and valuable pastry facts now and create sweet masterpieces see on the website for baking tutorials
Full information on the link – https://tooglik.ru/lite-plastmass/
All the best and development in business!
Your comment is awaiting moderation.
explore site – Pages are organized, navigation feels intuitive and simple.
Your comment is awaiting moderation.
islemint deals – Modern design and refreshing feel make the shop distinct.
Your comment is awaiting moderation.
From a technical standpoint the platform performs really well—fast load times across devices, mobile-friendly responsive design, and teh UI is intuitive without being cluttered. The backend seems optimized for smooth navigation and minimal lag even during peak hours. Worth checking out: fb777 live
Your comment is awaiting moderation.
this marketplace – Nice little page, spent a few minutes clicking around the sections.
Your comment is awaiting moderation.
shop homepage – Noticed this name, and the branding is sleek and easy to recall.
Your comment is awaiting moderation.
Spring Spot – Modern and clean, sections are simple to explore.
Your comment is awaiting moderation.
Профессиональный вывод из запоя анонимно детоксикация организма, помощь при алкогольной интоксикации и восстановление самочувствия пациента. Специалист приезжает на дом и оказывает профессиональную помощь.
Your comment is awaiting moderation.
да для ам и дживов ацик самая подходящяя тема. а основа из мачехи ништяк.только её надо выварить раза три по 15 мин. чтоб негорлодёрило и смол меньше,ведь в смоле много канабиола остаёца мефедрон кокаин гашиш НЕТ не пришла, но это у СПСР экспресс вообще какая то лажа, раньше все привозили вовремя, а теперь вообще какую то чепуху сочиняют, звонил говорят не знаем почему посылку курьер не взял…128 страниц положительных отзывов , и вдруг “мутный магаз” . Уважаемый – флудить в курилке можно.
Your comment is awaiting moderation.
Гарантированное лечение выезд нарколога специалист приезжает к пациенту, проводит детоксикацию организма, помогает снять симптомы алкогольной интоксикации и контролирует состояние. Безопасный и конфиденциальный подход.
Your comment is awaiting moderation.
Проблемы с алкоголем? вызов наркологической помощи медицинская помощь при алкогольной зависимости, детоксикация организма и восстановление самочувствия. Консультации специалистов и безопасное лечение.
Your comment is awaiting moderation.
Обзор и рейтинги серверов Отзывы о хостинге сравните выделенные серверы по характеристикам, цене, процессорам и дискам SSD. Выберите надежный сервер для размещения сайтов, приложений и высоких нагрузок.
Your comment is awaiting moderation.
shop today – Classic and inviting, stands out gracefully online.
Your comment is awaiting moderation.
Рейтинги серверов VPS/VDS-хостинг актуальный рейтинг dedicated server хостинга с сравнением характеристик, стоимости и производительности. Найдите оптимальный сервер для бизнеса, интернет-магазина, SaaS-сервисов и крупных сайтов.
Your comment is awaiting moderation.
Good afternoon!
Unlock food mysterious recipes with interesting and valuable culinary taste facts and cook meals to remember see on the website for recipe books
Full information on the link – https://hdyproc.ru/pererabotka-organicheskih-othodov-i-printsipy-raboty-komposterov.html
All the best and development in business!
Your comment is awaiting moderation.
the Harbor Crest Outlet – Clear and welcoming, reinforcing a sense of trust and approachability.
Your comment is awaiting moderation.
pinewillow shop portal – The site feels organized and approachable.
Your comment is awaiting moderation.
CrestDeals – The online style feels vibrant, straightforward, and easy to remember.
Your comment is awaiting moderation.
Walnut Hub Picks – Polished and approachable design, navigating categories was easy.
Your comment is awaiting moderation.
yo ngl ezugi hits different fr, the live dealer stuff is lowkey insane and the interface isnt clunky like teh other sites imo, tbh i’ve been on it for like a month and its way smoother than what i expected lol
Your comment is awaiting moderation.
1win скачать на пк 1win17043.help
Your comment is awaiting moderation.
visit the yardcart shop – Interesting marketplace design, may attract a lot of shoppers.
Your comment is awaiting moderation.
pinewillowtrading – Just browsing this page today, layout looks clean and friendly. plumbrookdistrict – Found this site earlier, information here seems useful already. plumstoneoutlet – First time visiting and honestly the page loads pretty smoothly. quartzharborcollective – Nice website overall, navigation feels simple and easy today. quartzharbortraders – Came across this randomly, content looks quite organized here. quickharboroutlet – Pretty interesting page, enjoying browsing through the sections now. quickstoneexchange – Clean layout here, makes reading everything very comfortable today. raincrestmarketplace – Stopped by quickly and the site looks quite reliable. rainstoneexchange – Nice little discovery today, design feels fresh and clear. ravenbrookdistrict – Just checking this page out, seems helpful so far. ravencresttrading – Pretty neat presentation here, content reads naturally and easily. riverbrookdistrict – Enjoyed looking through this page for a few minutes. rivermeadowoutlet – Found this today and the structure feels well organized. roseharborcollective – Clean and simple website, browsing here feels comfortable today. rosewillowtrading – Just landed here randomly and content looks interesting already. rubystonecourtyard – Nice place to explore online, information seems straightforward here. rubystoneexchange – I like the simple layout, makes everything easy to read. sagebrookdistrict – Came across this page today, design looks clean enough. sageharbortraders – Interesting resource here, will likely visit again later. seacrestmarketplace – Pretty smooth browsing experience while exploring this page today.
Your comment is awaiting moderation.
mostbet ставки регистрация https://mostbet94063.help/
Your comment is awaiting moderation.
their website – Came across this store and the brand gives off a warm, welcoming impression.
Your comment is awaiting moderation.
一饭封神在线免费观看2026 海外华人专属 高清无广告
Your comment is awaiting moderation.
mostbet Oʻzbekiston registratsiya bonus https://mostbet28461.help/
Your comment is awaiting moderation.
Solar Gems – Minimal and tidy, makes exploring vendors easy.
Your comment is awaiting moderation.
visit forest stone – Cozy and inviting, this marketplace name feels warm.
Your comment is awaiting moderation.
Honestly its pretty solid if ur looking for somthing straightforward ez ??? 🙂
Your comment is awaiting moderation.
Запулил:$: ждёмс… отпишу…. Селер адекватный:voo-hoo: мефедрон кокаин гашиш нет курьерки по мск нету, да все работает как обычномагазин роботает отлично сам проверил и не поверю не каму кто скажет что это не так
Your comment is awaiting moderation.
Профессиональный ремонт посудомоечных машин в Москве поможет в кратчайшие сроки справиться с любой неисправностью . Команда профессиональных ремонтников оперативно приедут по вашему адресу сразу после оформления заявки . Мы работаем со всеми популярными брендами , применяя качественные комплектующие и специализированный инструмент . Основные причины обращений включают отсутствие слива воды , с чем мастер справляется за один визит. По окончании ремонта предоставляется официальная гарантия , что гарантирует стабильную работу техники . Для заказа услуги , просто позвоните нам по телефону , и ваша посудомоечная машина снова будет как новая .
сервисный ремонт посудомоечных машин https://remont-posudomoek-moskva-nedorogo.ru/
Your comment is awaiting moderation.
check caramel crate – Inviting title, stands out in a positive way.
Your comment is awaiting moderation.
LavenderPick – Users are met with a calming and easy-to-use site experience.
Your comment is awaiting moderation.
explore Harbor Crest – Inviting and relaxed, ideal for a shopper-friendly outlet.
Your comment is awaiting moderation.
Walnut Gems Hub – Minimal and friendly layout, exploring categories was simple.
Your comment is awaiting moderation.
From a technical standpoint, jilibt is actually pretty solid—loads fast even on 4G, mobile responsive design works well across devices, and the UI is clean without being clutered with unnecessary elements. The backend seems stable and navigation is straighforward, which is more than I can say for some competitors in this space.
Your comment is awaiting moderation.
discover gold vendor – Looks solid; hoping the store updates with more listings soon.
Your comment is awaiting moderation.
click here – Clean and creative, leaves a strong positive vibe.
Your comment is awaiting moderation.
а ты откуда? сам? экспертиза будет чистая не волнуйся… мефедрон кокаин гашиш отписал бы по факту с картинкамиПо многочисленным восторженным откликам мн-001, тестировал его и был немного огорчен.
Your comment is awaiting moderation.
shop link – Noticed this outlet today and the branding is unique and catchy.
Your comment is awaiting moderation.
Snow Finds – Simple and catchy, really sticks in your mind.
Your comment is awaiting moderation.
1вин зеркало Бишкек 1вин зеркало Бишкек
Your comment is awaiting moderation.
Профессиональный ремонт посудомоечных машин в Москве поможет в кратчайшие сроки устранить любые неисправности . Квалифицированные специалисты нашего сервиса готовы выехать в любой район города , чтобы провести тщательную диагностику . В работе применяются сертифицированные комплектующие , что позволяет давать длительную гарантию на услуги. При возникновении протечек или постороннего шума сразу обращайтесь к профессионалам . Стоимость работ остается конкурентоспособной, и большинство заявок закрывается непосредственно в день вызова. Закажите ремонт посудомоечной машины прямо сейчас , чтобы снова наслаждаться чистотой посуды без лишних хлопот .
сервисный ремонт посудомоечных машин https://remont-posudomoechnyh-mashin-v-msk.ru/
Your comment is awaiting moderation.
dude check this out, found this site called Ec88 Online and its actually rly good. loads fast, interface is clean, no annoying popups everywhere like other places. def worth your time ec 88
Your comment is awaiting moderation.
Ищешь сервер? vds рейтинг сравнение dedicated server хостинга по характеристикам, цене, производительности и uptime. Лучшие провайдеры для размещения сайтов, интернет-магазинов и крупных проектов.
Your comment is awaiting moderation.
Нужен сервер? рейтинг VPS с тестовым периодом dedicated servers с мощными процессорами, NVMe SSD и высокой стабильностью. Подберите оптимальный сервер для бизнеса, разработки и высоких нагрузок.
Your comment is awaiting moderation.
Найти лучший сервер подобрать качественный VPS рейтинг dedicated servers от популярных хостинг-провайдеров. Сравните выделенные серверы по характеристикам, стоимости и возможностям масштабирования для бизнеса и веб-проектов.
Your comment is awaiting moderation.
Лучшие сервера https://vps-servers-review.ru сравнение dedicated servers по цене, производительности и надежности. Рейтинг хостингов, которые предлагают мощные серверные решения.
Your comment is awaiting moderation.
check out caramelcart – Sweet and catchy branding, makes it easy to remember.
Your comment is awaiting moderation.
LavenderNetwork – The online presence conveys calmness and a welcoming community.
Your comment is awaiting moderation.
Trail Hub Picks – Simple and approachable design, navigating categories was easy.
Your comment is awaiting moderation.
explore Granite Stone – Inviting while projecting a robust and trustworthy image.
Your comment is awaiting moderation.
мостбет сайт регистрация мостбет сайт регистрация
Your comment is awaiting moderation.
silkstonecorner pages – Layout is tidy and navigating is effortless
Your comment is awaiting moderation.
Update: still using this after 3 months and gotta say im pretty satisfied with how things have been going, the platform remains relieble and the layout hasnt changed which is good because it works, Drip Online Casino keeps doing its thing.
Your comment is awaiting moderation.
Интересуют новости? новостной портал главные новости дня на одном портале. Свежие события из политики, экономики, общества, технологий и культуры. Оперативная информация, аналитика, комментарии экспертов и важные факты, которые помогают понимать происходящее.
Your comment is awaiting moderation.
check this out – Pleasant and calming, stands out nicely online.
Your comment is awaiting moderation.
незнаю незнаю мне пришло за 2 суток и еще я обратился к селлеру и он предоставил всю полную информацию с адресом и номерами телефона курьерки мефедрон кокаин гашиш надо прятать по сложнееОтличный магазин маскировка высший балл!
Your comment is awaiting moderation.
ричтрак для паллет купить
Your comment is awaiting moderation.
crystal vendor online – A descriptive phrase that sticks in memory for later visits.
Your comment is awaiting moderation.
скачать мелбет бесплатно на андроид
Установить приложение Melbet: Android, iOS и компьютер
Мобильная версия Melbet включает букмекерскую контору и казино в едином приложении. Пользователю доступны live-ставки, казино-игры, прямые трансляции, аналитика и быстрые финансовые операции. Установка занимает 1–2 минуты.
Android (APK)
Скачайте APK с официального источника, откройте файл и завершите установку. Если требуется включите разрешение на установку из неизвестных источников, затем авторизуйтесь.
iOS (iPhone)
Перейдите в App Store, введите в поиске «Melbet», нажмите «Получить», после установки авторизуйтесь в системе.
ПК
Перейдите официальный сайт, авторизуйтесь и создайте ярлык на рабочий стол. Браузерная версия функционирует как отдельное приложение.
Функционал
Live-ставки с обновлением коэффициентов, казино и слоты, просмотр матчей, подробная статистика, уведомления о матчах, регистрация за минуту и круглосуточная служба поддержки.
Бонусы
После установки доступны приветственный бонус, промокоды и бесплатные ставки. Правила начисления определяются регионом.
Безопасность
Скачивайте только с официального сайта, контролируйте адрес сайта, не сообщайте данные доступа третьим лицам и активируйте двухфакторную аутентификацию.
Установка занимает несколько минут, после чего открывается полный доступ Melbet.
Your comment is awaiting moderation.
The Slate Rack – Simple and clear, browsing felt smooth.
Your comment is awaiting moderation.
Canyon Harbor Collective – The idea of a collective really makes this shop name stand out.
Your comment is awaiting moderation.
Оперативные вмешательства в ветеринарной медицине являются ключевым направлением помощи питомцам , обеспечивающую качественное лечение травм и врожденных патологий. Сегодняшние операционные блоки располагают инновационным инструментарием , которое гарантирует максимальную безопасность для четвероногих пациентов .
Каждая операция начинается с тщательного обследования и подготовки организма . Врач оценивает риски на основании лабораторных тестов и осмотра, с целью обеспечения стабильного состояния пациента под наркозом. Безопасность анестезии стоит на первом месте в операционном плане.
Хирургия включает в себя широкий перечень манипуляций от стерилизации до остеосинтеза. В повседневной практике часто встречаются процедуры по коррекции грыж и стоматологическая хирургия. Особое внимание уделяется срочным операциям при непроходимости кишечника или острых воспалениях.
Использование эндоскопического оборудования становится золотым стандартом лечения. Благодаря минимальному повреждению тканей процесс заживления протекает быстрее. После таких процедур питомцы восстанавливаются в кратчайшие сроки без риска осложнений.
Период восстановления требует тщательного наблюдения со стороны владельцев и врачей . Важно вовремя давать назначенные препараты и следить за аппетитом животного. Постоянный мониторинг самочувствия и температуры тела пациента способствует быстрому заживлению ран и возвращению к полноценной активности .
хирург для собаки москва хирург для собаки москва.
Your comment is awaiting moderation.
rufus download Rufus is a lightweight, no-cost, open-source utility created to make bootable USB drives. It is used to prepare a USB flash drive that can install an operating system, run diagnostic tools, or boot into a recovery environment. The program requires no installation and can be run as soon as it is downloaded.
The main purpose of Rufus is to create bootable USB media from ISO images quickly and reliably. This allows users to install or run operating systems directly from a USB flash drive without the need for DVDs. The tool supports a wide range of operating systems and service utilities, which makes it practical for both regular users and system administrators.
Rufus runs on computers with Microsoft Windows, starting from Windows 7. Both 32-bit and 64-bit versions are supported, and there is also a version available for ARM64 architecture.
The software lets users create bootable USB drives from many different ISO images. It can be used to prepare a USB drive for installing Windows 11, Windows 10, Windows 8.1, or Windows 7, as well as various Linux distributions. Rufus also works with DOS systems and other recovery or maintenance tools commonly used for troubleshooting computers.
One of the included features of Rufus is the ability to download official Windows ISO images directly from Microsoft servers. This allows users to obtain original installation images for Windows 8.1, Windows 10, and Windows 11 without searching for them on third-party websites.
In addition to creating bootable drives, Rufus can format USB devices. It supports several file systems including FAT32, NTFS, exFAT, UDF, and ReFS. This flexibility allows the USB drive to be prepared for different use cases and compatibility requirements.
Rufus supports both legacy BIOS systems and modern UEFI environments. Because of this, bootable drives created with Rufus can work on older computers as well as newer systems that use UEFI and Secure Boot.
Another feature included in Rufus is Windows To Go support. This option allows users to run a full Windows environment directly from a USB drive. It can be useful for testing systems, performing maintenance, or working on multiple computers without installing Windows on the internal drive.
Rufus also provides the option to bypass certain Windows 11 installation requirements. When creating an installation USB, the program can disable checks for TPM 2.0, Secure Boot, and minimum RAM requirements. This makes it possible to install Windows 11 on computers that would otherwise not meet the official hardware requirements.
One of the reasons Rufus has become popular is its speed and simplicity. The program is extremely small, about 1.9 MB in size, and runs as a portable application without installation. It is distributed under the GPL v3 open-source license, supports more than 70 languages, and contains no advertisements, bundled software, or tracking components.
Rufus works with a large number of ISO images. These include multiple versions of Windows, Windows Server editions, FreeDOS, and various system tools such as GParted, Hiren’s Boot CD, Parted Magic, and Clonezilla. Because of this wide compatibility, the program can be used not only for installing operating systems but also for disk management, data recovery, and system maintenance tasks.
To use Rufus, a computer running Windows 7 or later and a USB flash drive are required. The program does not need to be installed. Users simply download the executable file, run it, select the ISO image they want to use, and create a bootable USB drive. Due to its simplicity, speed, and reliability, Rufus remains one of the most widely used tools for creating bootable USB drives.
Your comment is awaiting moderation.
Honestly supeacecasino just works better than most alternatives ive tried 🙂 superace bd
Your comment is awaiting moderation.
1win скачать http://www.1win54038.help
Your comment is awaiting moderation.
мелбет скачать на айфон
Установить приложение Melbet: APK, iPhone и компьютер
Мобильная версия Melbet включает ставки и казино в едином приложении. Доступны live-ставки, казино-игры, прямые трансляции, статистика и операции по счёту. Установка занимает 1–2 минуты.
Android (APK)
Загрузите APK с официального сайта, откройте файл и завершите установку. При необходимости включите доступ к установке сторонних приложений, затем авторизуйтесь.
iOS (iPhone)
Перейдите в App Store, введите в поиске «Melbet», нажмите «Получить», после установки выполните вход.
ПК
Перейдите официальный сайт, авторизуйтесь и добавьте ярлык на рабочий стол. Веб-версия работает как полноценное приложение.
Функционал
Live-ставки с мгновенным обновлением линии, игровой раздел с тысячами игр, прямые трансляции, аналитические данные, уведомления о матчах, регистрация за минуту и круглосуточная служба поддержки.
Бонусы
После загрузки доступны бонус на первый депозит, промокоды и бесплатные ставки. Условия зависят от региона.
Безопасность
Скачивайте только с официального сайта, контролируйте адрес сайта, не передавайте пароль третьим лицам и включите 2FA.
Загрузка выполняется быстро, после чего доступен весь функционал Melbet.
Your comment is awaiting moderation.
byterise – Overall, professional vibe here; trustworthy, polished, and pleasantly minimal throughout.
Your comment is awaiting moderation.
veloxtech – Navigation felt smooth, found everything quickly without any confusing steps.
Your comment is awaiting moderation.
https://ami.im/aktual-konference
Your comment is awaiting moderation.
LanternNetwork – The online identity balances innovation with a friendly, collaborative feel.
Your comment is awaiting moderation.
canyonvendor.shop – Interesting vendor hub concept, curious how it evolves.
Your comment is awaiting moderation.
technexus – Bookmarked this immediately, planning to revisit for updates and inspiration.
Your comment is awaiting moderation.
vortexbyte – Overall, professional vibe here; trustworthy, polished, and pleasantly minimal throughout.
Your comment is awaiting moderation.
Материалы о красоте idealnaya-ya.ru здоровье саморазвитии и уходе за собой. Советы по питанию фитнесу психологии и гармоничной жизни. Полезные статьи рекомендации и идеи для улучшения самочувствия и образа жизни.
Your comment is awaiting moderation.
zenixtech – Color palette felt calming, nothing distracting, just focused, thoughtful design.
Your comment is awaiting moderation.
Информация о ремонте https://hyundai-sto.ru обслуживании и диагностике автомобилей Hyundai. Советы по техническому обслуживанию выбору запчастей и эксплуатации автомобиля. Полезные материалы для владельцев и автолюбителей.
Your comment is awaiting moderation.
cybernexus – Loved the layout today; clean, simple, and genuinely user-friendly overall.
Your comment is awaiting moderation.
zybertech – Found practical insights today; sharing this article with colleagues later.
Your comment is awaiting moderation.
codenova – Overall, professional vibe here; trustworthy, polished, and pleasantly minimal throughout.
Your comment is awaiting moderation.
bytenova – Mobile version looks perfect; no glitches, fast scrolling, crisp text.
Your comment is awaiting moderation.
мостбет смс код не приходит http://mostbet57193.help/
Your comment is awaiting moderation.
cyberpulse – Overall, professional vibe here; trustworthy, polished, and pleasantly minimal throughout.
Your comment is awaiting moderation.
1win игра aviator http://www.1win54038.help
Your comment is awaiting moderation.
Topaz Picks – Simple and polished, browsing items was intuitive.
Your comment is awaiting moderation.
official district site – Relaxed and approachable, easy to remember.
Your comment is awaiting moderation.
discover Granite Harbor Traders – Engaging and reliable, encouraging exploration and trust.
Your comment is awaiting moderation.
Tried it but mega77u seems ok so far—nothing crazy happened yet but the site doesnt feel sketchy which is good i guess, gonna give it more time tho before i make any real judgement about whether its worth sticking with.
Your comment is awaiting moderation.
TrailstoneTradeHouse – Checked out a few pages, the presentation is neat and easy to follow.
Your comment is awaiting moderation.
у меня все без подогрева растворилось https://strujkin.ru Что то много новичков устраивают здесь флуд.А магаз на самом деле хорош.Помню его еще когда занимался курьерскими доставками,коспирация и качество товара было на высшем уровне.следующий раз пришлем поношеные презервативы но ты будешь рад!!!
Your comment is awaiting moderation.
mostbet промокод mostbet промокод
Your comment is awaiting moderation.
explore the crate – Concept is solid, will check back when new products appear.
Your comment is awaiting moderation.
Slate Spot – Modern interface, navigation was straightforward.
Your comment is awaiting moderation.
click for shop – This marketplace name popped up and it gives a calm and friendly impression.
Your comment is awaiting moderation.
For anyone who needs a recomendation, check out m98 because it actually does what it says and doesnt have all the clutter that other sites have acrossed the web
Your comment is awaiting moderation.
LanternHub – The site design is friendly and encourages exploration.
Your comment is awaiting moderation.
open canyoncrate shop – Took a quick look, looks like the store is steadily developing.
Your comment is awaiting moderation.
mostbet schimb valutar mostbet schimb valutar
Your comment is awaiting moderation.
browse the collective – Community-oriented and distinctive, leaves a positive impression.
Your comment is awaiting moderation.
Quick pros:
* Works on mobile and desktop
* Matches load fast
* Can play with friends
* Clean layout, easy to navigate
* No complicated setup needed
online ludo king
Your comment is awaiting moderation.
продукт – прет дико и жестко, но по сути ничего интересного, цена в 2 тыр себя полностью оправдывает. Эдакий бычий кайф. Если вам нравится трястись и стучать зубами – вы попали по адресу. Во всех остальных случаях – нахер-нахер. Слабенькая 3/5 https://taxivstrane.ru люди которые делают заказы через ВК по меньшей мере идиоты. Особенно когда ИМ самим что то предлагают.Все нормально,6-го заказал,8-го отправили. Оперативно
Your comment is awaiting moderation.
Topaz Rack Spot – Clean and approachable design, navigating categories was simple.
Your comment is awaiting moderation.
CrestVendorHub – Browsed lightly, the pages are organized well and easy to navigate.
Your comment is awaiting moderation.
накрутка подписчиков в Телеграм
Your comment is awaiting moderation.
Golden Stone Finds – Cheerful yet strong, perfect for highlighting quality products.
Your comment is awaiting moderation.
Материалы о компьютерах https://hardexpert.net технологиях электронике и IT. Обзоры техники советы по выбору комплектующих настройке программ и использованию устройств. Полезная информация для пользователей и любителей технологий.
Your comment is awaiting moderation.
Sky Crate Corner Market – Clear and approachable, brand feels inviting.
Your comment is awaiting moderation.
explore the oceanopal site – Lovely name, curious what interesting products they have.
Your comment is awaiting moderation.
Update: still using Exbet after like 3 months now and honestly im pretty satisfied with how things have gone, no major complaints and they seem pretty reliable with payouts which is what matters most to me. ex bat app
Your comment is awaiting moderation.
KettleCurations – Branding is timeless, clear, and leaves a strong impression.
Your comment is awaiting moderation.
click for the shop – Spotted this store and the name carries a calm, appealing tone.
Your comment is awaiting moderation.
visit the canyon cart – Eye-catching name, grabs attention quickly.
Your comment is awaiting moderation.
shop homepage – Simple yet strong, feels trustworthy.
Your comment is awaiting moderation.
Статьи о любви https://lifeoflove.ru отношениях, психологии и семейной жизни. Советы по гармоничным отношениям общению и саморазвитию. Полезные рекомендации вдохновляющие истории и материалы для тех кто хочет улучшить личную жизнь.
Your comment is awaiting moderation.
Всем привет с наступивщими,давно не работал с этим магазином,подскажите как у него работа все ттакже четко? https://stk-online.ru Успехов вам и поменьше всяких заморочек )))о господи 😀 я не селлер – я просто зашёл на сайт и посмотрел что есть в ассортименте – из скоростей нормальных разве что..кхм, оно…
Your comment is awaiting moderation.
1win пополнение Киргизия http://www.1win54038.help
Your comment is awaiting moderation.
Интернет ресурс nesmetnoe.ru с полезными статьями советами и обзорами. Материалы о жизни здоровье технологиях доме и повседневных вопросах. Практические рекомендации интересные факты и актуальная информация для широкой аудитории.
Your comment is awaiting moderation.
Honestly, this site loads way faster than most competitors I’ve used bc game 🙂
Your comment is awaiting moderation.
Информационный портал http://www.tga-info.ru/ со статьями и обзорами на разные темы. Материалы о технологиях жизни работе доме и повседневных вопросах. Актуальные новости полезные советы рекомендации и интересная информация для читателей.
Your comment is awaiting moderation.
мостбет как скачать mostbet57193.help
Your comment is awaiting moderation.
Timber Ventures – Strong and minimal, navigating sections felt smooth.
Your comment is awaiting moderation.
ExchangeHubTimber – Took a peek, already spotting sections that look helpful.
Your comment is awaiting moderation.
Golden Harbor Online – Simple and clean, emphasizing accessibility for digital audiences.
Your comment is awaiting moderation.
For anyone who needs a reliable option that actually pays out, check out 388betcasino. I was skeptical at first but theyve been solid, no weird delays or account issues like i had at other places. Just wanted to put that out there for people still searching.
Your comment is awaiting moderation.
Silver Picks Market – Smooth and appealing, easy to recall later.
Your comment is awaiting moderation.
discover hazelhaven – Soft color palette and well-organized categories make browsing enjoyable.
Your comment is awaiting moderation.
visit now – Calm and welcoming, stands out nicely online.
Your comment is awaiting moderation.
open brookbundle shop – Good domain choice, gives the store a standout feel.
Your comment is awaiting moderation.
OutletSpot – The site design gives a friendly and user-oriented impression.
Your comment is awaiting moderation.
online store link – Noticed this exchange today, and the name is simple yet effective.
Your comment is awaiting moderation.
отличный магазин! + ему мефедрон кокаин гашиш КЕнт в почту зайди,проясни ситуэшен.Совершенно верно!!!
Your comment is awaiting moderation.
has anyone here tried 77ace yet? im looking for something new and keep seeing it pop up, just wondering if its actually worth teh time or if ur gonna waste ur money lol. let me know what u guys think!
Your comment is awaiting moderation.
Знакомая ситуация, многие начинают паниковать и скупать ссылки, что только усугубляет положение. Хорошая статья попалась именно про то, как действовать без паники после апдейтов. Автор разбирает, на какие элементы сайта (техничка, контент, поведенческие) нужно обращать внимание в первую очередь, чтобы вернуть позиции. Особенно актуально для автосайтов, но общие принципы подойдут многим. Кто еще не видел, вот ссылка: https://specavto43.ru/pochemu-avtosajty-teryayut-poziczii-posle-apdejtov-chto-chinit-v-pervuyu-ochered-bez-paniki/ . Спокойный и структурированный разбор.
Your comment is awaiting moderation.
Tide Picks – Modern and tidy, moving between categories was fast.
Your comment is awaiting moderation.
Honestly this place is way cleaner than most others I’ve tried before. 69ca
Your comment is awaiting moderation.
DiscoverTealVendors – Looked around casually, noticed some neat sections.
Your comment is awaiting moderation.
Silver Collections – Well-structured menus, categories were easy to follow.
Your comment is awaiting moderation.
Glass Willow Market – Professional sounding, yet accessible for new and returning customers.
Your comment is awaiting moderation.
learn more here – Calm, natural, and approachable branding overall.
Your comment is awaiting moderation.
mostbet yuklab olish Oʻzbekiston ios mostbet yuklab olish Oʻzbekiston ios
Your comment is awaiting moderation.
1win вывод на карту сколько идет 1win17043.help
Your comment is awaiting moderation.
browse the brookaisle store – Clean interface, browsing categories was easy and relaxed.
Your comment is awaiting moderation.
trendwharf online – The site feels fashionable, eager to discover new items.
Your comment is awaiting moderation.
Good day everyone, I wanted to share my thoughts on 55ace as I have been using it for some time now and feel it deserves mention. The application functions well and offers a solid user experiance without unnecessary complications. I do believe others might find it usefull should they be looking for something reliable. Best regards. 55 ace apk
Your comment is awaiting moderation.
JuniperStock – The concept is simple, clear, and leaves a lasting impression.
Your comment is awaiting moderation.
Спасибо за отзыв , а то заказывает много людей а отписываются единицы. мефедрон кокаин гашиш брали 10 гр реги ))))о господи 😀 я не селлер – я просто зашёл на сайт и посмотрел что есть в ассортименте – из скоростей нормальных разве что..кхм, оно…
Your comment is awaiting moderation.
check out the traders – This shop name showed up today and it has a catchy feel.
Your comment is awaiting moderation.
has anyone here tried 24n yet? im looking for reccomendations on new platforms and teh site seems decent but idk if its worth it lol, alot of ppl have been talking about it but i want ur honest opinons b4 i check it out 24n.com
Your comment is awaiting moderation.
Tide Crate Spot – Friendly and approachable branding, easy to recall later.
Your comment is awaiting moderation.
TealCrestDealsHub – Looking around casually, the interface is tidy and user-friendly.
Your comment is awaiting moderation.
Топ лучших онлайн казино России – это не только “где больше бонус”, а где в целом комфортнее: понятные правила, стабильные выплаты, адекватные лимиты и нормальная обратная связь от поддержки. Чтобы не тратить время на десятки сайтов и противоречивые рейтинги, мы ведём Telegram-канал с актуальными подборками и обновлениями по площадкам. Ссылка: https://t.me/s/rating_casino_russia/27
Your comment is awaiting moderation.
view the site – Courtyard branding feels warm and charming overall.
Your comment is awaiting moderation.
Silk Isle Treasures – Luxurious vibe, simple yet catchy name.
Your comment is awaiting moderation.
I sometimes look for small gifts that feel personal. Unique bracelets and gifts for moms, couples, and kids from YSSHIN caught my attention during a casual search. Thoughtful items can make simple moments feel meaningful. I first noticed them here https://shopysshin.com/.
Your comment is awaiting moderation.
mostbet apk xavfsizmi https://www.mostbet28461.help
Your comment is awaiting moderation.
I like keeping my devices protected during travel or work. Tablet cases from YRH appeared while I was looking through accessory options. A good case can make carrying a tablet feel more comfortable. I saved the page while browsing https://yrhcase.com/.
Your comment is awaiting moderation.
yo ngl 22bet Onlinecasino lowkey hits different fr like the whole vibe is just cleaner than most sites imo, tbh wasn’t expecting it to be this straightforward lol
Your comment is awaiting moderation.
Glass Ridge Finds – Cheerful and classy, perfect for highlighting unique products.
Your comment is awaiting moderation.
1win crash http://1win17043.help/
Your comment is awaiting moderation.
Ты нам лучьше отзыв напиши о работе магазина 😀 https://foto-wallpapers.ru Два часа, ребята в клубе,Рассмотрим плюсы работы с данным магазином и возможно в дальнейшем будем постоянно тут покупать опт. Отпишу после, надеюсь удачной сделки))
Your comment is awaiting moderation.
this bronzecrate site – Appealing marketplace setup, looks like it has potential.
Your comment is awaiting moderation.
CityHaven – The online feel is approachable while still stylish.
Your comment is awaiting moderation.
I recently tried to tidy up my vanity table. Nail polish and makeup organizers from YMVV showed up during that search. A clear layout makes it easier to find small items quickly. I first noticed them here https://shopymvv.com/.
Your comment is awaiting moderation.
explore vendor studio – Came across this site, sections are well structured and easy to navigate
Your comment is awaiting moderation.
explore teapot territory shop – Fun, creative branding makes it easy to notice.
Your comment is awaiting moderation.
visit the page – The name carries a smooth and peaceful feel.
Your comment is awaiting moderation.
I sometimes go for walks when the air gets really cold. Winter gloves from TRENDOUX came up during one of my searches. Warm hands can make winter mornings feel much more comfortable. I first noticed them here https://mytrendoux.com/.
Your comment is awaiting moderation.
mostbet yuklab olish telefon mostbet yuklab olish telefon
Your comment is awaiting moderation.
Слот Mental 3 часто вызывает вопросы по режимам, частоте бонусок и “поведению” на разных ставках – поэтому мы собрали отдельную группу, где всё это обсуждают живо и по делу: результаты, скрины, советы и просто общение по игре. Вступить можно здесь: https://t.me/s/mentalslot_3
Your comment is awaiting moderation.
I recently thought about making stairs safer in my home. Premium non-slip tape from S&X caught my attention during a quick search. Small additions can improve everyday safety without major changes. I saved the page while exploring https://my-s-and-x.com/.
Your comment is awaiting moderation.
1win мобильный сайт https://1win17043.help
Your comment is awaiting moderation.
ทดลองเล่นสล็อต pg ฟรี สล็อต PG เกมสล็อตออนไลน์ที่คนค้นหาเยอะ เข้าเล่นไว ฝากถอนออโต้
คำค้นหา pg slot ถูกค้นหามากขึ้นเรื่อยๆ ในกลุ่มผู้เล่นเกมสล็อตออนไลน์ เพราะเป็น แบรนด์เกมที่โดดเด่น ด้าน กราฟิก ความ นิ่งไม่สะดุด และ ระบบจ่ายที่ดึงดูด เกมของ PG ออกแบบโดยทีมงานมืออาชีพ ที่รองรับการเล่นทั้งบน สมาร์ทโฟน และ คอมพิวเตอร์
ข้อดี ของ pg slot
PG Slot เป็นเกมสล็อตออนไลน์ที่ออกแบบมาให้ เข้าเกมไว เล่นผ่าน ระบบเว็บ และรองรับ ทุกแพลตฟอร์ม ไม่ต้องดาวน์โหลดแอป ผู้เล่นสามารถเข้าเล่นผ่าน หน้าเว็บ ได้ทันที ภาพและเสียงถูกพัฒนาในรูปแบบ 3D ให้ความคมชัด พร้อมเอฟเฟกต์ จัดเต็ม
คุณสมบัติหลักของเกม สล็อต PG ได้แก่
มีรอบโบนัสให้ลุ้นบ่อย
ระบบตัวคูณ
เดโม่ฟรี
รองรับภาษาไทยเต็มรูปแบบ
ฝากถอนง่าย ทันใจ
แพลตฟอร์ม PG Slot ส่วนใหญ่รองรับ การฝาก-ถอน อัตโนมัติ 24 ชั่วโมง ขั้นต่ำเริ่มต้นเพียง 10 บาท ขึ้นอยู่กับ กติกาแต่ละแพลตฟอร์ม การทำรายการใช้เวลา ไม่กี่วินาที ผ่าน QR Code หรือระบบ แอปธนาคาร ทำให้ธุรกรรมเป็นไปอย่าง ต่อเนื่อง
หมวดเกมฮิต ใน PG Slot
เกม สล็อต PG มีธีมหลากหลาย เช่น
ธีม เทพเจ้า
ธีม ผจญภัย
ธีม เอเชียและโชคลาภ
ธีม ธรรมชาติ
เกมยอดนิยมมักเป็นเกมที่แตกง่าย พร้อมระบบ Special Feature และ อัตราการจ่ายที่สูง เหมาะกับทั้ง คนเพิ่งเล่น และ ผู้เล่นมือโปร
ความน่าเชื่อถือ
pg slot ใช้ระบบที่ได้มาตรฐาน มีการ ปกป้องข้อมูลผู้เล่น และใช้ระบบสุ่มผล Random Number Generator เพื่อให้ผลลัพธ์ ตรวจสอบได้ แพลตฟอร์มที่ให้บริการ PG Slot ควรมี ระบบดูแลข้อมูล
บทสรุปท้ายบท
สล็อต PG เป็นตัวเลือกยอดนิยมสำหรับผู้ที่ต้องการเล่นสล็อตออนไลน์ ด้วยจุดเด่นด้าน โบนัสหลากหลาย และการทำธุรกรรมที่ ทันใจ ผู้เล่นสามารถเริ่มต้นได้ ง่าย ฝากถอนสะดวก และเลือกเกมได้ ครบทุกหมวด เหมาะสำหรับ ทุกระดับประสบการณ์ ในโลกของเกมสล็อตออนไลน์
Your comment is awaiting moderation.
I rely on my laptop for most daily tasks. 65W laptop chargers and power cords for Lenovo, HP, and Dell from ROLADA caught my attention during a quick search. A dependable charger keeps work flowing without interruptions. I first saw them here https://roladacharger.com/.
Your comment is awaiting moderation.
Hello i want share about 11 winner app, is very good for me use everyday. Interface is easy understand, not complicated like other app. Me recomend for anyone want try, 11 winner download
Your comment is awaiting moderation.
Curious about the weather Weather Podgorica today. Detailed 7- and 10-day forecasts, including temperature, wind, precipitation, humidity, and pressure. Up-to-date information on the climate and weather conditions in Podgorica for travel and leisure.
Your comment is awaiting moderation.
browse the curated collection – Unique and approachable, leaves a positive impression.
Your comment is awaiting moderation.
explore seastonevendor – Useful information, interface is clear and friendly
Your comment is awaiting moderation.
I sometimes look for ways to improve the feel of my car interior. Faux leather seat covers for Chevy from RisingStar caught my attention during that search. A simple change can give the cabin a cleaner look. I first noticed them here https://risingstarcovers.com/.
Your comment is awaiting moderation.
кольцо женское цена 585 помолвочное кольцо белое золото
Your comment is awaiting moderation.
Thistle Rack Market – Minimalist structure, browsing sections felt natural.
Your comment is awaiting moderation.
Rainy days often make indoor activities more important. Hover soccer balls from Omiowl appeared while I was browsing toy ideas. A floating ball game looks like an easy way to start playtime. I saved the page during my search https://omiowl.com/.
Your comment is awaiting moderation.
Scarlet Corner – Eye-catching and natural, works well for a store.
Your comment is awaiting moderation.
coastvendorworkshop.shop – Good first impression here, layout feels simple and well structured
Your comment is awaiting moderation.
SunnyDealsSpot – Skimmed through, already noticing some neat spots.
Your comment is awaiting moderation.
Explore detailed insights on nature decorative wall clocks at TopXClocks, including features, comparisons, and expert recommendations for smarter buying decisions.
Your comment is awaiting moderation.
PG Slot เกมสล็อตออนไลน์ที่คนค้นหาเยอะ เล่นง่าย ฝากถอนเร็ว
คำค้นหา PG Slot มาแรงในช่วงนี้ ในกลุ่มผู้เล่นเกมสล็อตออนไลน์ เพราะเป็น แบรนด์เกมที่โดดเด่น ด้าน กราฟิก ความ ลื่นไหล และ โอกาสรับกำไรที่ดี เกมของ PG พัฒนาโดยผู้ให้บริการชั้นนำ ที่รองรับการเล่นทั้งบน โทรศัพท์มือถือ และ คอมพิวเตอร์
ความโดดเด่น ของ สล็อต PG
สล็อต PG เป็นเกมสล็อตออนไลน์ที่ออกแบบมาให้ เปิดเกมได้ทันที เล่นผ่าน ระบบออนไลน์ และรองรับ ทั้ง iOS และ Android ไม่ต้องติดตั้งเพิ่มเติม ผู้เล่นสามารถเข้าเล่นผ่าน เว็บเบราว์เซอร์ ได้ทันที ภาพและเสียงถูกพัฒนาในรูปแบบ สามมิติ ให้ความคมชัด พร้อมเอฟเฟกต์ จัดเต็ม
คุณสมบัติหลักของเกม PG Slot ได้แก่
โบนัสและฟรีสปินหลายแบบ
Multiplier
เดโม่ฟรี
รองรับภาษาไทยเต็มรูปแบบ
ระบบการเงินรวดเร็ว ทำรายการไว
แพลตฟอร์ม สล็อต PG มักมี การฝาก-ถอน ออโต้ตลอด 24 ชม. ขั้นต่ำเริ่มต้นเพียง 10 บาท ขึ้นอยู่กับ ระบบของผู้ให้บริการ การทำรายการใช้เวลา รวดเร็วมาก ผ่าน สแกน QR หรือระบบ Mobile Banking ทำให้ธุรกรรมเป็นไปอย่าง ต่อเนื่อง
แนวเกมที่คนเล่นเยอะ ใน pg slot
เกม สล็อต PG มีธีมหลากหลาย เช่น
ธีม เทพเจ้า
ธีม Adventure
ธีม เอเชียและโชคลาภ
ธีม ธรรมชาติ
เกมยอดนิยมมักเป็นเกมที่แตกง่าย พร้อมระบบ โบนัสรอบพิเศษ และ โอกาสทำกำไรสูง เหมาะกับทั้ง ผู้เล่นเริ่มต้น และ ผู้เล่นที่มีประสบการณ์
ความปลอดภัย
PG Slot พัฒนาในระบบสากล มีการ เข้ารหัสข้อมูล และใช้ระบบสุ่มผล ระบบสุ่มมาตรฐาน เพื่อให้ผลลัพธ์ ยุติธรรม แพลตฟอร์มที่ให้บริการ PG Slot ควรมี ทีมซัพพอร์ต 24 ชม.
สรุป
PG Slot เป็นตัวเลือกยอดนิยมสำหรับผู้ที่ต้องการเล่นสล็อตออนไลน์ ด้วยจุดเด่นด้าน โบนัสหลากหลาย และการทำธุรกรรมที่ ไว ผู้เล่นสามารถเริ่มต้นได้ ไม่ซับซ้อน ฝากถอนสะดวก และเลือกเกมได้ หลากหลายแนว เหมาะสำหรับ ผู้เล่นทุกสไตล์ ในโลกของเกมสล็อตออนไลน์
https://medium.com/@ratypw/ทดลองเล่นสล็อต-pg-70cdb1132344
Your comment is awaiting moderation.
discover this store – Pages feel structured and browsing is simple and intuitive
Your comment is awaiting moderation.
Sometimes I scroll through summer fashion ideas. Stylish women’s swimsuits from Ocean Blues caught my eye during a late evening browse. Swimwear always makes me think about sunny days and ocean air. I came across the site here https://shopoceanblues.com/.
Your comment is awaiting moderation.
this site – Honestly a solid name, short enough to stick with people.
Your comment is awaiting moderation.
тс, привет, ответь в лс. я по делу. https://pechi-rus.ru РОВЫНЫЙ МАГАЗ РОВНЫЙ ТС РОВНАЯ ВЕТКА И РОВНЫЕ КЛИЕНТЫ МИР ВАМ ВСЕМ !!!!!!жопа каши головы мозаики мозга
Your comment is awaiting moderation.
bronzebasket portal – Eye-catching shop title, memorable and easy to find online.
Your comment is awaiting moderation.
I sometimes take a few minutes to care for my nails at home. A portable nail drill from mUGLE caught my attention during that search. Small tools can make personal routines feel more organized. I first noticed it here https://themugle.com/.
Your comment is awaiting moderation.
marketgrove – A friendly, charming style invites visitors to browse with ease.
Your comment is awaiting moderation.
browse today – Came across this platform, sections are organized and pages are easy to read
Your comment is awaiting moderation.
Glade Meadow Corner – Cozy and approachable, giving the outlet a friendly vibe.
Your comment is awaiting moderation.
I enjoy customizing the devices I carry daily. AirPods case covers from KOREDA appeared during one of my searches for tech accessories. A small case can add personality to something used every day. I saved the page while browsing https://thekoreda.com/.
Your comment is awaiting moderation.
pin up yechish rad etildi http://pinup14278.help
Your comment is awaiting moderation.
ember emporium online – The branding feels original and easy to remember.
Your comment is awaiting moderation.
Профессиональное SEO-продвижение https://outreachseo.ru сайтов для бизнеса. Анализ конкурентов, оптимизация структуры и контента, улучшение технических параметров и развитие сайта для роста позиций в поисковых системах и увеличения целевого трафика.
Your comment is awaiting moderation.
I sometimes look for small accessories that change how my devices look. Stylish AirPods Pro and 4 cases from Gedicht caught my attention during a casual browse. A simple case can give everyday tech a bit of personality. I first saw them here https://gedichtcase.com/.
Your comment is awaiting moderation.
вывод из запоя в ростове вывод из запоя в ростове .
Your comment is awaiting moderation.
check the vendor place – Moving through the site feels smooth and user friendly
Your comment is awaiting moderation.
check this shop – I saw this brand mentioned somewhere and the name actually stands out.
Your comment is awaiting moderation.
click here – Warm, cozy, and easy to recall.
Your comment is awaiting moderation.
I like finding small ways to improve storage at home. Adjustable heavy-duty shelf organizers from Zilvando caught my attention during a late evening browse. Stacked shelves can make cabinets feel less chaotic. I saved the page for later reading https://zilvando.com/.
Your comment is awaiting moderation.
sagevendor platform – Smooth browsing experience, sections are well-organized
Your comment is awaiting moderation.
WoodShopSpot – Looked around casually, content is tidy and accessible.
Your comment is awaiting moderation.
почта России https://zolotoigid.ru Магазин работатет? отпишите кто совершил сделку в последнее времятак что бро не стоит беспокоиться по поводу порядочности этого магазина, они отправляют достаточно быстро и конспирация хорошая и качество на высоте!)))
Your comment is awaiting moderation.
Rooftop Picks – Clean design, browsing categories was enjoyable.
Your comment is awaiting moderation.
check out the marketplace – Navigation is smooth and the interface is easy to follow
Your comment is awaiting moderation.
see the vendor studio site – Browsing feels effortless and design is tidy
Your comment is awaiting moderation.
Thistle Gems Hub – Distinct design, moving between items was easy.
Your comment is awaiting moderation.
breezevendor.shop – Smooth browsing experience today, pages loaded really fast.
Your comment is awaiting moderation.
sunridge vendor content – Navigation is simple, pages are cleanly structured
Your comment is awaiting moderation.
gildvendorworkshop.shop – First time visiting, overall layout feels clean and inviting
Your comment is awaiting moderation.
Hello!
Analyze exp mysterious results to find interesting and valuable proof depth now and validate your hypotheses see on the website for result analyzers
Full information on the link – https://ckt-med.ru/%d0%bf%d0%bb%d0%b0%d1%81%d1%82%d0%b8%d0%ba%d0%be%d0%b2%d0%b0%d1%8f-%d0%b7%d0%b0%d1%89%d0%b8%d1%82%d0%b0-%d1%81%d1%82%d0%b2%d0%be%d0%bb%d0%be%d0%b2-%d0%b4%d0%b5%d1%80%d0%b5%d0%b2%d1%8c%d0%b5%d0%b2/
All the best and development in business!
Your comment is awaiting moderation.
mostbet kirish havolasi http://mostbet28461.help
Your comment is awaiting moderation.
1win как войти 1win17043.help
Your comment is awaiting moderation.
browse the vendor workshop – Navigation seems simple and mobile browsing feels smooth
Your comment is awaiting moderation.
futurebyte – Content reads clearly, helpful examples made concepts easy to grasp.
Your comment is awaiting moderation.
explore the store – Just visited and it seems like a new marketplace with potential.
Your comment is awaiting moderation.
ждите трип о товаре, как сделаю заказ и получу товар обрисую все в красках! постараюсь сделать фото!!! купить Кокаин, Бошки, Марихуану, Мефедрон Хороший магазинВот уже пошли отзывы о покупках за нал. Нужно брать!!!
Your comment is awaiting moderation.
sagecrest access – Layout is straightforward and very easy to navigate
Your comment is awaiting moderation.
WindVendorCenter – Checked some pages, everything appears neat and practical.
Your comment is awaiting moderation.
1вин пополнение http://1win20819.help/
Your comment is awaiting moderation.
vendor listings page – Explored categories, everything is tidy and easy to follow
Your comment is awaiting moderation.
ทดลองเล่นสล็อต pg ซื้อฟรีสปิน
Your comment is awaiting moderation.
mostbet cashout https://mostbet63218.help
Your comment is awaiting moderation.
Vendor Collections – Organized interface, shopping is straightforward.
Your comment is awaiting moderation.
discover jewels – Found this platform, navigation works well and content is organized
Your comment is awaiting moderation.
Terra Collections – Short and simple, brand name sticks well.
Your comment is awaiting moderation.
open branchcrate shop – Good concept and organized categories, easy to explore.
Your comment is awaiting moderation.
useful link – Noticed this page, layout is clean and browsing feels effortless
Your comment is awaiting moderation.
вывод из запоя в ростове на дону вывод из запоя в ростове на дону .
Your comment is awaiting moderation.
у меня наоборот. в этот раз быстрее все происходит) купить Кокаин, Бошки, Марихуану, Мефедрон chemica l-mix.com,объявитесь на соседнем форуме(СпФН),вас там ОООООООчень заждались..!Наш Skype «chemical-mix.com» временно недоступен по техническим причинам. Заказы принимаются все так же через сайт, сверка реквизитов по ICQ или электронной почте.
Your comment is awaiting moderation.
see the vendor studio site – Checked a few pages and they seem nicely structured
Your comment is awaiting moderation.
stone vendor platform – Well-structured pages, browsing here is hassle-free
Your comment is awaiting moderation.
ทดลองเล่นสล็อต pg ฟรี pg slot เกมสล็อตออนไลน์ที่คนค้นหาเยอะ ใช้งานง่าย ฝากถอนรวดเร็ว
คำค้นหา สล็อต PG ถูกค้นหามากขึ้นเรื่อยๆ ในกลุ่มผู้เล่นเกมสล็อตออนไลน์ เพราะเป็น ค่ายเกมที่มีชื่อเสียง ด้าน งานภาพคุณภาพสูง ความ ลื่นไหล และ ระบบจ่ายที่ดึงดูด เกมของ PG ออกแบบโดยทีมงานมืออาชีพ ที่รองรับการเล่นทั้งบน สมาร์ทโฟน และ คอมพิวเตอร์
จุดเด่น ของ สล็อต PG
PG Slot เป็นเกมสล็อตออนไลน์ที่ออกแบบมาให้ เปิดเกมได้ทันที เล่นผ่าน ระบบเว็บ และรองรับ ทุกอุปกรณ์ ไม่ต้องดาวน์โหลดแอป ผู้เล่นสามารถเข้าเล่นผ่าน หน้าเว็บ ได้ทันที ภาพและเสียงถูกพัฒนาในรูปแบบ เอฟเฟกต์ 3 มิติ ให้ความคมชัด พร้อมเอฟเฟกต์ สวยงาม
คุณสมบัติหลักของเกม PG Slot ได้แก่
ระบบโบนัสและฟรีสปินหลากหลายรูปแบบ
ฟีเจอร์ตัวคูณรางวัล
เดโม่ฟรี
มีเมนูภาษาไทย
ระบบการเงินรวดเร็ว ทำรายการไว
แพลตฟอร์ม pg slot ส่วนใหญ่รองรับ การฝาก-ถอน ออโต้ตลอด 24 ชม. ขั้นต่ำเริ่มต้นเพียง หลักหน่วย ขึ้นอยู่กับ ระบบของผู้ให้บริการ การทำรายการใช้เวลา เพียงไม่กี่วินาที ผ่าน คิวอาร์โค้ด หรือระบบ แอปธนาคาร ทำให้ธุรกรรมเป็นไปอย่าง ลื่นไหล
แนวเกมที่คนเล่นเยอะ ใน pg slot
เกม สล็อต PG มีธีมหลากหลาย เช่น
ธีม เทพเจ้าและแฟนตาซี
ธีม ผจญภัย
ธีม ความมั่งคั่ง
ธีม Animal
หลายคนชอบเกมที่โบนัสเข้าไว พร้อมระบบ Special Feature และ อัตราการจ่ายที่สูง เหมาะกับทั้ง มือใหม่ และ ผู้เล่นมือโปร
มาตรฐานระบบ
PG Slot พัฒนาในระบบสากล มีการ เข้ารหัสข้อมูล และใช้ระบบสุ่มผล Random Number Generator เพื่อให้ผลลัพธ์ ตรวจสอบได้ แพลตฟอร์มที่ให้บริการ PG Slot ควรมี ทีมซัพพอร์ต 24 ชม.
โดยภาพรวม
สล็อต PG เป็นตัวเลือกยอดนิยมสำหรับผู้ที่ต้องการเล่นสล็อตออนไลน์ ด้วยจุดเด่นด้าน ระบบลื่นไหล และการทำธุรกรรมที่ ทันใจ ผู้เล่นสามารถเริ่มต้นได้ ง่าย ฝากถอนสะดวก และเลือกเกมได้ หลากหลายแนว เหมาะสำหรับ ทุกระดับประสบการณ์ ในโลกของเกมสล็อตออนไลน์
Your comment is awaiting moderation.
ruby vendor hub – Very easy to browse, pages load quickly and feel organized
Your comment is awaiting moderation.
WindShopHub – Skimmed a few areas, the interface is clean and functional.
Your comment is awaiting moderation.
visit zen vendor collective – Interesting platform idea, hopefully more vendors come onboard soon.
Your comment is awaiting moderation.
explore the store – Pages load well, sections are clear, and navigation feels natural
Your comment is awaiting moderation.
Уважаемый ТС, ответь мне в лс или на почту, заказ мой не правильно сделали или описали в письме не правильно, ртветь как можно скорее https://11pos.ru Четкого товара!черт возьми, вот сейчас оформляю AM2233 и решил заглянуть сюда.
Your comment is awaiting moderation.
SEO-продвижение https://outreachseo.ru сайта для роста посещаемости и увеличения продаж. Проводим аудит, оптимизацию структуры, работу с контентом и техническими параметрами сайта, чтобы улучшить позиции в поисковых системах и привлечь целевой трафик.
Your comment is awaiting moderation.
монро казино зеркало монро казино промокод
Your comment is awaiting moderation.
Аренда автомобилей аэропорт Сочи https://avto-arenda-sochi.ru
Your comment is awaiting moderation.
RobinRack Treasures – Easy-to-use sections, makes browsing enjoyable.
Your comment is awaiting moderation.
mostbet ocolire blocare Moldova mostbet ocolire blocare Moldova
Your comment is awaiting moderation.
tap to explore – First impression positive, pages load fast and layout is tidy
Your comment is awaiting moderation.
cloverbrook marketplace hub – Interface is tidy and navigation feels natural
Your comment is awaiting moderation.
tronbyte – Loved the layout today; clean, simple, and genuinely user-friendly overall.
Your comment is awaiting moderation.
blossomstore online hub – Pretty branding, excited to see how the offerings grow.
Your comment is awaiting moderation.
official page – Came across this page, layout is simple and navigation works well
Your comment is awaiting moderation.
Terra Gems – Minimalist interface, navigating sections was fast.
Your comment is awaiting moderation.
codehive – Bookmarked this immediately, planning to revisit for updates and inspiration.
Your comment is awaiting moderation.
autumnwillowvendorhouse.shop – Nice vibe on this site and the product presentation feels warm and inviting
Your comment is awaiting moderation.
techdock – Bookmarked this immediately, planning to revisit for updates and inspiration.
Your comment is awaiting moderation.
bitzone – Bookmarked this immediately, planning to revisit for updates and inspiration.
Your comment is awaiting moderation.
HubMarketplaceWild – Checked some pages, the site feels practical and clear.
Your comment is awaiting moderation.
omegabyte – Appreciate the typography choices; comfortable spacing improved my reading experience.
Your comment is awaiting moderation.
mostbet mma mostbet63218.help
Your comment is awaiting moderation.
zyrotech – Appreciate the typography choices; comfortable spacing improved my reading experience.
Your comment is awaiting moderation.
bytelab – Bookmarked this immediately, planning to revisit for updates and inspiration.
Your comment is awaiting moderation.
futurestack – Navigation felt smooth, found everything quickly without any confusing steps.
Your comment is awaiting moderation.
visit rubyridge hub – Content is straightforward and browsing is convenient
Your comment is awaiting moderation.
logicforge – Content reads clearly, helpful examples made concepts easy to grasp.
Your comment is awaiting moderation.
магазин роботает отлично сам проверил и не поверю не каму кто скажет что это не так https://ssman-rui.ru а так всё от души! огромное спасибо! ещё не раз к вам обращюсь!)похожа на соль в криисталлахс на вкус че?
Your comment is awaiting moderation.
browse zenvendor marketplace – Nice setup, curious how many sellers will join next.
Your comment is awaiting moderation.
check out the marketplace – Browsing feels effortless and the interface is clean
Your comment is awaiting moderation.
stone vendor guide – Well-designed site, content presentation is neat and clear
Your comment is awaiting moderation.
tap to explore – First impression good, pages load fast and layout feels tidy
Your comment is awaiting moderation.
Robin Crate Official – Easy to remember and friendly sounding.
Your comment is awaiting moderation.
cloud marketplace – Navigation is intuitive and sections are clearly labeled
Your comment is awaiting moderation.
visit blossom crate – The name feels warm and cheerful, very welcoming.
Your comment is awaiting moderation.
online vendor hub – Came across this page, layout is clean and browsing feels intuitive
Your comment is awaiting moderation.
лучше и не напишешь бро https://an-malahit.ru длица окола часа очень даже не плохоБро как с тобой связатся это ярослав мудрый.
Your comment is awaiting moderation.
open the autumn exchange shop – Interesting setup that feels unique compared with typical shops
Your comment is awaiting moderation.
WildShopHub – Skimmed a few areas, the interface is tidy and functional.
Your comment is awaiting moderation.
Teal Trade Hub – Clean and organized layout, navigating categories was effortless.
Your comment is awaiting moderation.
rosevendorcollective.shop – Found this platform helpful, layout makes navigating very straightforward
Your comment is awaiting moderation.
melbet восстановить пароль melbet восстановить пароль
Your comment is awaiting moderation.
conditii bonus melbet http://melbet42310.help/
Your comment is awaiting moderation.
visit the vendor supply – Browsed quickly, pages load fast and sections are well organized
Your comment is awaiting moderation.
online global marketplace – The design keeps things simple and easy to navigate.
Your comment is awaiting moderation.
A website with unblocked games for free online play. Popular browser games, arcades, platformers, racing games, and puzzles are available with no downloads or restrictions on any device.
Your comment is awaiting moderation.
tap to browse – Checked this marketplace, sections are tidy and browsing feels natural
Your comment is awaiting moderation.
Друзья все четко и понятно. Адрес получил за 250 метров от кафе. Минеру респект и Благодуха. Даже фото не надо было. Вес и качество 10 из 10. Лучший кокаин, давно такого не встречал. Я ваш клиент. Очень понравилось. https://iskra48.ru Менеджер на связи с 10-11 утра по МСК (не с 8-ми, как Вы ломитесь) ежедневно, кроме праздников и выходных. На сайте Вашего заказа нет. Можете назвать его номер?Всем привет! В магазе есть представительства по регионам, закладками? Ярославль?
Your comment is awaiting moderation.
check out riverretail store – Nice design, layout makes finding products effortless.
Your comment is awaiting moderation.
cloudbrook marketplace – Sections are well organized and intuitive to explore
Your comment is awaiting moderation.
solar vendor portal – Really like how organized the information is across the site
Your comment is awaiting moderation.
check out uplandvendor – Promising marketplace idea, planning another visit soon.
Your comment is awaiting moderation.
VendorFinderHubWheat – Took a peek, the platform feels organized and readable.
Your comment is awaiting moderation.
visit platform – Noticed this site, layout is tidy and navigation is user-friendly
Your comment is awaiting moderation.
aurora vendor hub – Looked through a few categories and they seem well planned
Your comment is awaiting moderation.
mostbet mirror Republica Moldova http://mostbet63218.help/
Your comment is awaiting moderation.
rose vendor portal – Everything is accessible, browsing feels effortless
Your comment is awaiting moderation.
Teal Corner – Modern and tidy interface, navigation was simple.
Your comment is awaiting moderation.
Услуги по настройке https://sysadmin.guru и администрированию серверов и компьютеров. Установка систем, настройка сетей, обслуживание серверной инфраструктуры, защита данных и техническая поддержка. Помогаем обеспечить стабильную работу IT-систем.
Your comment is awaiting moderation.
Всем привет! Наткнулся на статью, где собраны не просто базовые понятия, а реально работающие стратегии и инструменты с привязкой к текущим реалиям. Автор рассматривает комплексный подход: от сбора семантики до юзабилити и работы с интентом. Очень порадовало, что материал свежий (январь 2026) и учитывает последние тренды. Оставляю ссылку здесь, может, кому-то пригодится для актуализации своих знаний: https://sobolland.ru/prodvizhenie-sajtov-strategii-instrumenty-i-aktualnye-podhody/ . Особенно полезно будет новичкам для формирования целостной картины.
Your comment is awaiting moderation.
Может правда о ошибочке что небудь не то отправили))) купить Кокаин, Бошки, Марихуану, Мефедрон бро много кидков, очень много покупай у проверенных магазинов (это которые на главной странице), а не у пользователей, и в чате не вздумай покупать только у ПРОВЕРЕННЫХ я серьезно!!! кинутЧего у вас со скайпом? Оффлайн уже несколько недель.
Your comment is awaiting moderation.
discover this store – Pages are well structured and navigation feels intuitive
Your comment is awaiting moderation.
Коллеги, вопрос к сообществу: кто какими связками пользуется? Я для себя недавно нашел подробный обзор инструментов — от подбора ключей до аналитики. Автор разобрал и бесплатные варианты (Google Keyword Planner, Search Console), и профессиональные платформы вроде Ahrefs и Screaming Frog. Очень структурированно, можно как чек-лист использовать. Делюсь ссылкой: https://yatany.ru/2026/01/20/prodvizhenie-sajtov-instrumenty/ . Особенно полезным показался раздел про инструменты для технического аудита — многие забывают про PageSpeed Insights и Lighthouse.
Your comment is awaiting moderation.
discover consumer buying site – Appears useful for online shopping, I’ll revisit soon.
Your comment is awaiting moderation.
ridgemart.shop – Quick visit today, navigation looked straightforward and tidy.
Your comment is awaiting moderation.
VendorSpotWheatBrook – Took a quick peek, the site is easy to follow and well-organized.
Your comment is awaiting moderation.
open the vendor house – Clean interface with well-defined sections enhances browsing
Your comment is awaiting moderation.
browse harbor pick – Layout is clear, moving through pages is effortless.
Your comment is awaiting moderation.
this vendor hub page – Just checked the site and the layout appears well organized
Your comment is awaiting moderation.
browse today – Ran into this platform, layout feels modern and pages are easy to read
Your comment is awaiting moderation.
check river emporium – User-friendly design, everything is simple to access
Your comment is awaiting moderation.
snow vendor guide – Nice minimal design, reading through content is easy
Your comment is awaiting moderation.
сегодня получил посулку с двумя пакетиками жёлтоватого и белого цвета, магазин работает:good: качество проверю и в соседней темке отпишу купить Кокаин, Бошки, Марихуану, Мефедрон заказывал мягкого пятак, всё пришло, непрходилось волноваться т.к в аське всегда были на связи, сила средне, но по весу 5+ =)привет бразы, хочу нахватить вот реги, что за качество скажите? надеюсь не 15 минутка?
Your comment is awaiting moderation.
Коллеги, вопрос к сообществу: кто какими связками пользуется? Я для себя недавно нашел подробный обзор инструментов — от подбора ключей до аналитики. Автор разобрал и бесплатные варианты (Google Keyword Planner, Search Console), и профессиональные платформы вроде Ahrefs и Screaming Frog. Очень структурированно, можно как чек-лист использовать. Делюсь ссылкой: https://yatany.ru/2026/01/20/prodvizhenie-sajtov-instrumenty/ . Особенно полезным показался раздел про инструменты для технического аудита — многие забывают про PageSpeed Insights и Lighthouse.
Your comment is awaiting moderation.
Sun Corner Market – Clean interface, navigating sections felt natural.
Your comment is awaiting moderation.
explore the store – Pages load well, sections are clear, and moving around is intuitive
Your comment is awaiting moderation.
pin up kazino slots https://www.pinup14278.help
Your comment is awaiting moderation.
a href=”https://wavevendoremporium.shop/” />WaveVendorSpotlight – Browsed a bit, sections are tidy and easy to navigate.
Your comment is awaiting moderation.
digital shopping portal – Clean navigation and quick page loads make the site comfortable to use.
Your comment is awaiting moderation.
Брал неоднократно совместки, всё всегда ровно! так держать! https://art-panelli.ru скорость доставки 5+ (во вторник заказали в пятницу получили)сколько Вы уже не появлялись в своей теме?
Your comment is awaiting moderation.
visit ridgecrate marketplace – Clean name, finding products was fast and easy.
Your comment is awaiting moderation.
seller emporium link – Browsing through the site feels simple and smooth
Your comment is awaiting moderation.
seller house link – Clean design with smooth navigation across sections
Your comment is awaiting moderation.
check out queltaa – Catchy branding, looking forward to new products.
Your comment is awaiting moderation.
useful link – Noticed this page, sections feel clean and pages are simple to navigate
Your comment is awaiting moderation.
riverstone vendor shop – Browsing is simple and design looks professional
Your comment is awaiting moderation.
заказать навес из металла навес из поликарбоната
Your comment is awaiting moderation.
snow crest explore – Layout feels minimal and practical, very readable
Your comment is awaiting moderation.
browse the collection – Spent a few minutes exploring, everything is tidy and user-friendly
Your comment is awaiting moderation.
The Summit Track – Organized menus, browsing felt fast and effortless.
Your comment is awaiting moderation.
pin-up haftalik bonus https://pinup14278.help/
Your comment is awaiting moderation.
платил 5 февраля свою посылочку!как вы поняли ничего не получил!ТС кормил меня завтраками,в итоги обещал вернуть деньги если не получу до 28 февраля!деньги мне тоже никто не вернул вместо этого мне прислали новый трек и написали что мы обещали что получите товар и деньги возвращать не буду!мои обьяснения о том что вашу посылку уже некому получать он слушать не хочет и возвращать деньги тоже!Ув.Адмистрация форума прошу не удалять мой пост и если нужно могу скинуть переписку! https://11pos.ru отношение оператора к клиентам очень даже достойное!(быть честным я еще нигде не видел такого хорошего отношения к клиентам у магазинов как в чемикл микс)!!!!! за это 5+Отличный товар и цены. Зря так…
Your comment is awaiting moderation.
VendorHouseWaveStone – Took a quick look, the layout seems organized and approachable.
Your comment is awaiting moderation.
навесы москва заказать навес цена
Your comment is awaiting moderation.
see reedmart online store – Smooth layout, navigating felt quick.
Your comment is awaiting moderation.
навесы москва навесы над крыльцом заказать
Your comment is awaiting moderation.
open this vendor page – Landed here by chance and it appears pretty helpful
Your comment is awaiting moderation.
caramel trading collective – The site feels structured and browsing is comfortable
Your comment is awaiting moderation.
explore the shop – Navigation is clear and the site responds quickly while browsing.
Your comment is awaiting moderation.
pin up ios app store bormi pin up ios app store bormi
Your comment is awaiting moderation.
visit raven vendor – Clean layout and browsing feels simple and organized
Your comment is awaiting moderation.
this seldrin site – Memorable branding, simple to recall after visiting.
Your comment is awaiting moderation.
discover here – Came across this vendor house, browsing feels smooth and logical
Your comment is awaiting moderation.
1win приложение ios 1win приложение ios
Your comment is awaiting moderation.
У меня настоящий 96 процентный спирт с больницы. Всё растворилось. Чу чуть паровой бани. https://locusgroup.ru свое сообщение исправилУ данного прода, самая лучшая тусишка из всех, что я пробовал. Те кто пускали ВВ, выбрасывали остатки, пугаясь происходящего. Флюкс на уровне. Именно на уровне качества, не бутора. Но и не такой пиздатый как у Ромы Максимова (Его омы] флюкс для меня эталон 100мг, ОКЕАН эйфории). АМ2201 потрясающий, гора микса весёло прущего вышла из присланного пробника, но с огромной толлерантностью, была в итоге смешана с 203и 250 то же данного продавца, что придало миксу эффект, от которого бывалые говорили, что это их лучшие трипы в жизни )))
Your comment is awaiting moderation.
vendor listings page – Explored categories, everything is clear and easy to browse
Your comment is awaiting moderation.
WalnutVendorSpot – Browsing casually, the interface is clear and user-friendly.
Your comment is awaiting moderation.
online market – Discovered this page today, navigation is smooth and items are easy to find.
Your comment is awaiting moderation.
sky vendor resources – Pleasant browsing experience, content is well-structured
Your comment is awaiting moderation.
Pure Corner – Intuitive menus, perfect for learning new concepts.
Your comment is awaiting moderation.
Marriage proposal options planning a proposal in Barcelona
Your comment is awaiting moderation.
open this vendor marketplace – Everything loads nicely and browsing items feels smooth
Your comment is awaiting moderation.
see reedmarket online – Memorable branding, browsing feels quick.
Your comment is awaiting moderation.
ravensage hub online – Sections are clearly defined and browsing is quick
Your comment is awaiting moderation.
pixelengine – Overall, professional vibe here; trustworthy, polished, and pleasantly minimal throughout.
Your comment is awaiting moderation.
seller place link – Clean organization makes browsing simple and pleasant
Your comment is awaiting moderation.
Дом рядом с адресом говоришь, отдаешь залог, когда приедешь в адрес (в разных такси по-разному, могут и не попросить), и идешб себе за кладом 🙂 купить Кокаин, Бошки, Марихуану, Мефедрон КАЧЕСТВО ВСЕХ ПРОДУКТОВ ОЧЕНЬ ВЫСОКОЕ!а че, под запрет попадает? вроде нет
Your comment is awaiting moderation.
techvertex – Mobile version looks perfect; no glitches, fast scrolling, crisp text.
Your comment is awaiting moderation.
see hiveloft marketplace – Layout is clear, browsing categories was effortless.
Your comment is awaiting moderation.
How to propose to a girl best places to propose in Barcelona
Your comment is awaiting moderation.
quickbyte – Overall, professional vibe here; trustworthy, polished, and pleasantly minimal throughout.
Your comment is awaiting moderation.
bytetap – Overall, professional vibe here; trustworthy, polished, and pleasantly minimal throughout.
Your comment is awaiting moderation.
explore vendor hub – Found this platform, layout feels modern and browsing is smooth
Your comment is awaiting moderation.
explore zenvendor marketplace – Interesting vendor hub, curious how it will grow with more sellers.
Your comment is awaiting moderation.
clicktechy – Color palette felt calming, nothing distracting, just focused, thoughtful design.
Your comment is awaiting moderation.
discover this store – Pages feel well structured and navigation is simple
Your comment is awaiting moderation.
1win дилер http://www.1win20819.help
Your comment is awaiting moderation.
Marriage proposal options https://propose.lol
Your comment is awaiting moderation.
VendorFinderHubWalnut – Took a peek, the platform feels clear and well-laid-out.
Your comment is awaiting moderation.
1win ошибка 404 1win82361.help
Your comment is awaiting moderation.
online store – Discovered this page today, navigation seems smooth and user-friendly.
Your comment is awaiting moderation.
lucky jet 1win https://1win20819.help
Your comment is awaiting moderation.
Заказал вчера 30гр 4-FA . Трек пока не получил. Надеюсь что все будет олрайт. В планах долговременное сотрудничество! https://magicalimage.ru Я просто уже настолько завязан со сферой Lrc что подмечаю все мелочи. Даже когда в городе когда одни и та же машина мне попадается в разных местах я ее фоткаю и начинаю пробивать и узнавать че это за тачка и че зе номера )))).а чё заказал? Прикольный сайт, ассортимент радует :)?
Your comment is awaiting moderation.
view slatecrate here – Noticed this store today, and browsing items is simple and well organized.
Your comment is awaiting moderation.
skyridge hub online – Navigation is smooth, content is clear and practical
Your comment is awaiting moderation.
pin up depozit komissiya pin up depozit komissiya
Your comment is awaiting moderation.
open the vendor platform – Took a quick look and the information shared seems reliable
Your comment is awaiting moderation.
browse rainvendor – The site feels well put together, sections are intuitive
Your comment is awaiting moderation.
vendor workshop homepage – Everything feels organized and browsing is straightforward
Your comment is awaiting moderation.
kestrelcrate marketplace – Catchy title, excited to see what products appear next.
Your comment is awaiting moderation.
floramarketexchange.shop – Enjoyed checking this site, everything seems well organized and smooth
Your comment is awaiting moderation.
VendorFinderHubViolet – Took a peek, the platform feels clear and well-laid-out.
Your comment is awaiting moderation.
vendor hub link – Layout is clean, and moving through categories is effortless
Your comment is awaiting moderation.
zenbrook online hub – Glanced through quickly, the vendor selection seems solid.
Your comment is awaiting moderation.
Vivo down Vivo down .
Your comment is awaiting moderation.
а так всё от души! огромное спасибо! ещё не раз к вам обращюсь!) купить Кокаин, Бошки, Марихуану, Мефедрон Клад был уличным, спрятан по разумному, под решеткой окна подъезда, рядом с окном стояла лавочка, на которой можно без палива посидеть и нащупать клад. Клад 5 балов из 5!!!отзывы ждем
Your comment is awaiting moderation.
quick browse – Came across this site today, layout looks neat and items are easy to explore.
Your comment is awaiting moderation.
alpinevendorcollective.shop – Pretty solid looking store and the categories seem nicely arranged
Your comment is awaiting moderation.
raincrest marketplace – Pages are tidy and the overall layout is very clear
Your comment is awaiting moderation.
keyvaulty – Pages loaded fast, images appeared sharp, and formatting stayed consistent.
Your comment is awaiting moderation.
nanotechhub – Navigation felt smooth, found everything quickly without any confusing steps.
Your comment is awaiting moderation.
silvervendor online pages – Enjoying the content, everything is well organized
Your comment is awaiting moderation.
this online canyonridge studio – Navigation is easy and the interface feels modern
Your comment is awaiting moderation.
cyberstack – Pages loaded fast, images appeared sharp, and formatting stayed consistent.
Your comment is awaiting moderation.
techsphere – Loved the layout today; clean, simple, and genuinely user-friendly overall.
Your comment is awaiting moderation.
VioletVendorFinderOnline – Skimmed lightly, the layout is clear and intuitive.
Your comment is awaiting moderation.
discover the yelvora store – Nice shop name, branding looks clean and memorable.
Your comment is awaiting moderation.
melbet kz фрибет за депозит melbet60432.help
Your comment is awaiting moderation.
melbet rotiri gratuite https://melbet42310.help
Your comment is awaiting moderation.
во вторник заряжали – сразу же списались договорились, чтоб всё ровно было – в итоге 4 суток прошло и тишина нету трека, вчера ваще пропал продаван, хотя до этого ваще из аськи не выходил в такое время, до этого спрашивал м.б. траблы какие – он ответил “что есть не большие” вот и походу решается че-то там х3 пздц короче надеюсь в понедельник решится https://soul-power.ru Продаван ровный ничего не скажешмагаз ровный!!! все на высшем уровне!!! работаю с ними много лет!!!
Your comment is awaiting moderation.
see the platform – Stumbled upon this site, browsing feels smooth and intuitive
Your comment is awaiting moderation.
smartbyte – Mobile version looks perfect; no glitches, fast scrolling, crisp text.
Your comment is awaiting moderation.
discover this store – Browsing feels smooth, and the site is well arranged
Your comment is awaiting moderation.
eva casino мобильная версия
Your comment is awaiting moderation.
check out woodvendoremporium – Tidy and well-organized, seems like a good shop to explore.
Your comment is awaiting moderation.
ทดลองเล่นสล็อต pg
PG Slot เกมสล็อตออนไลน์ที่คนค้นหาเยอะ ใช้งานง่าย ฝากถอนรวดเร็ว
คำค้นหา PG Slot กำลังได้รับความนิยมอย่างต่อเนื่อง ในกลุ่มผู้เล่นเกมสล็อตออนไลน์ เพราะเป็น ผู้ให้บริการเกมสล็อตที่มาแรง ด้าน ภาพและเอฟเฟกต์ ความ เสถียร และ ระบบจ่ายที่ดึงดูด เกมของ PG พัฒนาโดยผู้ให้บริการชั้นนำ ที่รองรับการเล่นทั้งบน มือถือ และ เดสก์ท็อป
ข้อดี ของ pg slot
pg slot เป็นเกมสล็อตออนไลน์ที่ออกแบบมาให้ เข้าเกมไว เล่นผ่าน ระบบอัตโนมัติ และรองรับ ทั้ง iOS และ Android ไม่ต้องดาวน์โหลดแอป ผู้เล่นสามารถเข้าเล่นผ่าน เว็บเบราว์เซอร์ ได้ทันที ภาพและเสียงถูกพัฒนาในรูปแบบ เอฟเฟกต์ 3 มิติ ให้ความคมชัด พร้อมเอฟเฟกต์ สมจริง
คุณสมบัติหลักของเกม pg slot ได้แก่
ระบบโบนัสและฟรีสปินหลากหลายรูปแบบ
ฟีเจอร์ตัวคูณรางวัล
เล่นฟรีก่อนเติมเงิน
รองรับภาษาไทยเต็มรูปแบบ
ฝากถอนง่าย ไม่ต้องรอนาน
แพลตฟอร์ม สล็อต PG โดยทั่วไปให้บริการ การฝาก-ถอน ฝากถอนตลอดเวลา ขั้นต่ำเริ่มต้นเพียง 10 บาท ขึ้นอยู่กับ กติกาแต่ละแพลตฟอร์ม การทำรายการใช้เวลา ไม่กี่วินาที ผ่าน สแกน QR หรือระบบ Mobile Banking ทำให้ธุรกรรมเป็นไปอย่าง ไม่สะดุด
แนวเกมที่คนเล่นเยอะ ใน pg slot
เกม PG Slot มีธีมหลากหลาย เช่น
ธีม เทพเจ้า
ธีม ลุยด่าน
ธีม ความมั่งคั่ง
ธีม Animal
หลายคนชอบเกมที่โบนัสเข้าไว พร้อมระบบ Special Feature และ โอกาสทำกำไรสูง เหมาะกับทั้ง ผู้เล่นเริ่มต้น และ ผู้เล่นที่มีประสบการณ์
ความน่าเชื่อถือ
pg slot พัฒนาในระบบสากล มีการ รักษาความปลอดภัย และใช้ระบบสุ่มผล ระบบสุ่มมาตรฐาน เพื่อให้ผลลัพธ์ ตรวจสอบได้ แพลตฟอร์มที่ให้บริการ สล็อต PG ควรมี ความปลอดภัยสูง
โดยภาพรวม
pg slot เป็นตัวเลือกยอดนิยมสำหรับผู้ที่ต้องการเล่นสล็อตออนไลน์ ด้วยจุดเด่นด้าน ระบบลื่นไหล และการทำธุรกรรมที่ รวดเร็ว ผู้เล่นสามารถเริ่มต้นได้ ทันที ฝากถอนสะดวก และเลือกเกมได้ จำนวนมาก เหมาะสำหรับ ทุกระดับประสบการณ์ ในโลกของเกมสล็อตออนไลน์
https://medium.com/@ratypw/ทดลองเล่นสล็อต-pg-70cdb1132344
Your comment is awaiting moderation.
check them out – Just visited this site, browsing items feels straightforward and pleasant.
Your comment is awaiting moderation.
1вин коэффициенты 1вин коэффициенты
Your comment is awaiting moderation.
visit the store – Came across this website today, and browsing feels intuitive and user-friendly.
Your comment is awaiting moderation.
Ровным парням ровный респект купить Кокаин, Бошки, Марихуану, Мефедрон РФ. Западно – европейская её часть )Сделал заказ. Пропустил реквизиты для оплаты. Продавец свяжись со мной, оплачу. В понедельник сможете отправить товар?
Your comment is awaiting moderation.
online quick meadow – Layout is intuitive, making it easy to explore posts
Your comment is awaiting moderation.
alpinecrest sellers hub – Nice clean structure, browsing around today was enjoyable
Your comment is awaiting moderation.
สล็อต
แพลตฟอร์ม TKBNEKO มอบมิติใหม่ของเกมออนไลน์ ธุรกรรมรวดเร็ว ด้วยระบบสแกน คิวอาร์โค้ด
ในยุคดิจิทัลที่ โลกออนไลน์เติบโตต่อเนื่อง เรามุ่งเน้นมาตรฐานใหม่ของการเดิมพัน ด้วยระบบที่ ล้ำสมัย เสถียร และ โปร่งใส เพื่อให้ผู้เล่น มั่นใจ ทุกครั้งที่ใช้งาน
ระบบการเงินที่ใช้งานง่าย
ฝากขั้นต่ำ: 1 บาท
ถอนขั้นต่ำ: ขั้นต่ำ 1 บาท
เวลาฝากเงิน: ใช้เวลาเพียง 3 วินาที
ยอดถอน: ไม่มีลิมิต
เติมเงินง่าย แค่สแกน
สแกน QR Code ระบบจะ ประมวลผลอัตโนมัติ ขั้นต่ำ เริ่ม 100 บาท สูงสุด 500,000 บาท
เกมยอดนิยม
สล็อต: ลุ้นแจ็คพอต
เกมสด: ดีลเลอร์สด
กีฬา: เดิมพันลีกดัง
ยิงปลา: ลุ้นกำไรทันที
โปรโมชั่นและสิทธิพิเศษ
ติดตามหน้า โบนัส พร้อมระบบ VIP และโปรแกรม แอฟฟิลิเอต
ฝ่ายบริการลูกค้า
สอบถามข้อมูลได้ตลอด 24 ชั่วโมง ผ่านหน้า ศูนย์ช่วยเหลือ ทีมงาน TKBNEKO พร้อมดูแลตลอดเวลา
https://medium.com/@ratypw/ทดลองเล่นสล็อต-a4ea8e21fdde
Your comment is awaiting moderation.
VendorFinderVelvet – Looked around, the content feels neatly arranged and easy to follow.
Your comment is awaiting moderation.
PG Slot เกมสล็อตออนไลน์ที่คนค้นหาเยอะ เล่นง่าย ฝากถอนเร็ว
คำค้นหา สล็อต PG ถูกค้นหามากขึ้นเรื่อยๆ ในกลุ่มผู้เล่นเกมสล็อตออนไลน์ เพราะเป็น ค่ายเกมที่มีชื่อเสียง ด้าน ภาพและเอฟเฟกต์ ความ เสถียร และ ระบบจ่ายที่ดึงดูด เกมของ PG ผลิตโดยค่ายมาตรฐาน ที่รองรับการเล่นทั้งบน มือถือ และ คอมพิวเตอร์
จุดเด่น ของ สล็อต PG
PG Slot เป็นเกมสล็อตออนไลน์ที่ออกแบบมาให้ โหลดเร็ว เล่นผ่าน ระบบอัตโนมัติ และรองรับ ทุกแพลตฟอร์ม เข้าเล่นผ่านเว็บได้เลย ผู้เล่นสามารถเข้าเล่นผ่าน หน้าเว็บ ได้ทันที ภาพและเสียงถูกพัฒนาในรูปแบบ สามมิติ ให้ความคมชัด พร้อมเอฟเฟกต์ สวยงาม
คุณสมบัติหลักของเกม สล็อต PG ได้แก่
ระบบโบนัสและฟรีสปินหลากหลายรูปแบบ
ระบบตัวคูณ
โหมดทดลองเล่นฟรี
มีเมนูภาษาไทย
ระบบการเงินรวดเร็ว ไม่ต้องรอนาน
แพลตฟอร์ม สล็อต PG โดยทั่วไปให้บริการ การฝาก-ถอน ออโต้ตลอด 24 ชม. ขั้นต่ำเริ่มต้นเพียง หลักหน่วย ขึ้นอยู่กับ ระบบของผู้ให้บริการ การทำรายการใช้เวลา ไม่กี่วินาที ผ่าน คิวอาร์โค้ด หรือระบบ ธนาคารบนมือถือ ทำให้ธุรกรรมเป็นไปอย่าง ลื่นไหล
ประเภทเกมยอดนิยม ใน pg slot
เกม pg slot มีธีมหลากหลาย เช่น
ธีม แฟนตาซี
ธีม ผจญภัย
ธีม โชคลาภ
ธีม ธรรมชาติ
เกมยอดนิยมมักเป็นเกมที่แตกง่าย พร้อมระบบ ฟีเจอร์พิเศษ และ ระบบจ่ายคุ้มค่า เหมาะกับทั้ง ผู้เล่นเริ่มต้น และ สายสล็อตจริงจัง
ความน่าเชื่อถือ
PG Slot ใช้ระบบที่ได้มาตรฐาน มีการ เข้ารหัสข้อมูล และใช้ระบบสุ่มผล ระบบสุ่มมาตรฐาน เพื่อให้ผลลัพธ์ โปร่งใส แพลตฟอร์มที่ให้บริการ PG Slot ควรมี ระบบดูแลข้อมูล
บทสรุปท้ายบท
PG Slot เป็นตัวเลือกยอดนิยมสำหรับผู้ที่ต้องการเล่นสล็อตออนไลน์ ด้วยจุดเด่นด้าน โบนัสหลากหลาย และการทำธุรกรรมที่ ทันใจ ผู้เล่นสามารถเริ่มต้นได้ ง่าย ฝากถอนสะดวก และเลือกเกมได้ จำนวนมาก เหมาะสำหรับ ผู้เล่นทุกสไตล์ ในโลกของเกมสล็อตออนไลน์
Your comment is awaiting moderation.
open the vendor collective – Organized layout and smooth transitions make browsing enjoyable
Your comment is awaiting moderation.
TIM caiu TIM caiu .
Your comment is awaiting moderation.
visit the emporium – Spent a few minutes browsing, pages load quickly and the layout is simple
Your comment is awaiting moderation.
discover here – Came across this studio, pages are structured and effortless to navigate
Your comment is awaiting moderation.
мелбет кз официальный адрес сайта http://melbet60432.help
Your comment is awaiting moderation.
melbet cod promo Republica Moldova melbet cod promo Republica Moldova
Your comment is awaiting moderation.
silver vendor online – Sections are organized logically, makes browsing easy
Your comment is awaiting moderation.
жду товара купить Кокаин, Бошки, Марихуану, Мефедрон Магазин не работает по выходными и праздникамСпасибо всем сотрудникам Chemical-mix.com
Your comment is awaiting moderation.
melbet kz минимальная ставка melbet60432.help
Your comment is awaiting moderation.
bilet pariuri melbet bilet pariuri melbet
Your comment is awaiting moderation.
How to propose to a girl https://propose.lol
Your comment is awaiting moderation.
check them out – Came across this site today, browsing products feels simple and quick.
Your comment is awaiting moderation.
quick shop access – Navigation is natural, making reading simple
Your comment is awaiting moderation.
check the vendor workshop – Just explored it briefly and the mobile navigation works well
Your comment is awaiting moderation.
VelvetDealsHub – Browsed lightly, already noticing sections that are easy to follow.
Your comment is awaiting moderation.
see the vendor hub site – The interface is clean, making browsing comfortable
Your comment is awaiting moderation.
1win bonus live casino 1win38174.help
Your comment is awaiting moderation.
visit this vendor hub – Took a look around, layout is tidy and easy to browse
Your comment is awaiting moderation.
online collective – Browsed this site, design is tidy and layout is simple to follow
Your comment is awaiting moderation.
Всё ок подняли, но место опять немного людное (самый центр города) https://candytip.ru “Прошло 20 мин тишина,Думаю надо догнаться еще 2 делаю и тот же ЭфФект “ровно, тут можно не беспокоится, попал куда надо
Your comment is awaiting moderation.
visit silvershopper – Came across this page earlier and navigating the items seems easy and clear.
Your comment is awaiting moderation.
browse this page – Stumbled upon this platform, navigation seems straightforward and smooth.
Your comment is awaiting moderation.
ValeVendorHub – Browsed around, the site seems clear and easy to use.
Your comment is awaiting moderation.
vendor catalog link – Well-structured pages, content is accessible
Your comment is awaiting moderation.
silver brook online hub – User-friendly design, browsing content is effortless
Your comment is awaiting moderation.
навесы для автомобилей для дачи изготовление навесов
Your comment is awaiting moderation.
this vendor studio page – Had a quick look today and the site feels tidy and user friendly
Your comment is awaiting moderation.
Ita? down caiu.site .
Your comment is awaiting moderation.
да мэн правильно говоришь KEY фраернулся https://studio-fotodecol.ru Мира всем!!Прибыльных вам выходных!:monetka:
Your comment is awaiting moderation.
visit brimstone vendor collective – The layout feels tidy and navigating through items is easy
Your comment is awaiting moderation.
view their products – Took a moment to explore, the interface is clean and clear
Your comment is awaiting moderation.
explore platform – Noticed this page, browsing is smooth and logical
Your comment is awaiting moderation.
How to propose beautifully after dinner proposal ideas
Your comment is awaiting moderation.
melbet sign up https://melbet42310.help
Your comment is awaiting moderation.
мелбет кз кэшбэк казино http://melbet60432.help/
Your comment is awaiting moderation.
ValeBrookPortal – Browsed casually, pages are simple and approachable.
Your comment is awaiting moderation.
quick browse – I visited this site today, layout looks tidy and exploring products is simple.
Your comment is awaiting moderation.
explore the marketplace – Pages load fast and everything is easy to locate
Your comment is awaiting moderation.
wood marketplace hub – Fast navigation and clear product listings make the experience simple
Your comment is awaiting moderation.
Я айтишник и к СМ не отношусь никаким боком. Про мою работу вы не знали и не узнали бы, если бы всё срослось. Я просто говорю про то, что не так уж и секурно у вас, личность выпаливается “на раз”. купить Кокаин, Бошки, Марихуану, Мефедрон Палево палево, с сайтом чооо??джива качественная=)получше чем впрошлый раз была=)
Your comment is awaiting moderation.
check silk vendor hub – Pleasant experience, pages are well structured
Your comment is awaiting moderation.
Quick Meadow Finds Hub – Tidy design, moving through pages feels smooth.
Your comment is awaiting moderation.
Marble Outlet – Clean design, browsing the site is comfortable.
Your comment is awaiting moderation.
Good morning!
Investigate fraud mysterious schemes offering interesting and valuable detection and spot scams from miles away see on the website for fraud alerts
Full information on the link – https://meditsinskij-sajt.ru/osobennosti-serijnogo-litya-plastmass-pod-davleniem/
All the best and development in business!
Your comment is awaiting moderation.
product catalog link – Browsing feels smooth and the interface is easy on the eyes
Your comment is awaiting moderation.
browse today – Ran into this platform, structure is tidy and intuitive
Your comment is awaiting moderation.
go to silvermarket – Just ran into this website, and browsing the catalog is easy and intuitive.
Your comment is awaiting moderation.
UplandRiverPortal – Browsed casually, the pages feel simple and easy to navigate.
Your comment is awaiting moderation.
Hello!
Decode complex mysterious signals hiding interesting and valuable news for you and filter noise from signal effectively see on the website for filtering algorithms
Full information on the link – https://triar-ufa.ru/antiprobuksovochnye-traki/
All the best and development in business!
Your comment is awaiting moderation.
гаси кидалу по полной -25 маловато я добавлю https://studio-fotodecol.ru ты в мирку отпиши продавец тампотому, что так и есть осталось не так много времени!
Your comment is awaiting moderation.
view the store – Very user-friendly, navigation feels effortless
Your comment is awaiting moderation.
official bazaar link – Creative products and tidy layout make the site enjoyable
Your comment is awaiting moderation.
browse here – Came across this platform recently, exploring items is quick and intuitive.
Your comment is awaiting moderation.
uplandmarketplace – Browsed this site and the pages look clean and easy to navigate.
Your comment is awaiting moderation.
Marble Market Hub – Layout feels tidy, moving through sections is comfortable.
Your comment is awaiting moderation.
direct shop link – Checked it out quickly, the site feels clean and highly navigable
Your comment is awaiting moderation.
Quick Crate Finds Hub – Organized design, moving through content is simple.
Your comment is awaiting moderation.
Good afternoon!
Share parenting mysterious tips with interesting and valuable child rearing updates and raise happy kids see on the website for parenting blogs
Full information on the link – https://bezmorchin.ru/obshhee/podvesnye-detskie-kacheli-bezopasnoe-razvlechenie-dlya-vashego-rebenka.html
All the best and development in business!
Your comment is awaiting moderation.
1win демо mines http://www.1win20819.help
Your comment is awaiting moderation.
1win не заходит в аккаунт 1win не заходит в аккаунт
Your comment is awaiting moderation.
silkstone vendor portal online – Natural flow, content is easy to access
Your comment is awaiting moderation.
explore here – Checked out this platform, pages are tidy and well organized
Your comment is awaiting moderation.
MarketUplandDeals – Checked a few sections, the platform feels approachable and simple.
Your comment is awaiting moderation.
у разных селеров бывает разный джив имеется виду по качеству так , я как то брал джив к10 пер слабо очень , в другом к 15 убивал , вот и спрашивают всегда качество дживика у продавана если ты незнал!!! https://mebconf.ru Заливают паршивым вином.заказал сегодня , оплатил , ждем когда дадут трэк
Your comment is awaiting moderation.
online shop link – First look is promising, site feels well-structured and neat
Your comment is awaiting moderation.
shieldops – Bookmarked this immediately, planning to revisit for updates and inspiration.
Your comment is awaiting moderation.
secstackr – Content reads clearly, helpful examples made concepts easy to grasp.
Your comment is awaiting moderation.
wave sellers bazaar – The site feels approachable and the pages are organized
Your comment is awaiting moderation.
keyvaulty – Appreciate the typography choices; comfortable spacing improved my reading experience.
Your comment is awaiting moderation.
auditkit – Found practical insights today; sharing this article with colleagues later.
Your comment is awaiting moderation.
browse this page – Stumbled upon this website, exploring products is straightforward and convenient.
Your comment is awaiting moderation.
навесы над крыльцом заказать навес для крыльца
Your comment is awaiting moderation.
A professional international business education and consulting platform about MBA-style programs: https://mbocentre.com
We know where professionals learn management best.
This platform offers clear and systematic learning resources that are
oriented toward decision-making and growth.
The content is especially valuable for readers seeking professional development without abstract theory rather than
overly academic explanations.
Your comment is awaiting moderation.
How to propose to a girl https://propose.lol
Your comment is awaiting moderation.
check this site – The pages are structured clearly, and navigation is comfortable.
Your comment is awaiting moderation.
juniperstonevendorplace.shop – Just visited the site and the browsing flow feels really smooth overall
Your comment is awaiting moderation.
Good afternoon!
Decode design mysterious principles containing interesting and valuable functional beauty and create with intent see on the website for design guides
Full information on the link – https://habagames.ru/avtomaticheskie-linii/cilindr-2018-60-30h30-mm-kluch-kluch-hrom
All the best and development in business!
Your comment is awaiting moderation.
Maple Corner – Pages are tidy, navigating the site is effortless.
Your comment is awaiting moderation.
quick shop link – Just visited, interface is neat and browsing feels natural
Your comment is awaiting moderation.
Quartz Selection – Tidy pages, browsing around feels effortless.
Your comment is awaiting moderation.
browse silkaisle – Just discovered this website, layout appears clear and simple to move around.
Your comment is awaiting moderation.
TrailVendorMarketplace – Looked around casually, already noticing some helpful sections.
Your comment is awaiting moderation.
1 вин официальный сайт https://1win20819.help/
Your comment is awaiting moderation.
1win установка apk 1win установка apk
Your comment is awaiting moderation.
В день оплаты через час я получаю ровную надёжную закладку Курьерский сервис на 5+? https://100-digital.ru Да тут дофига кто чего отписывает.только вот пробы нормальным людям раздайте.что бы видели липчане работу вашу!стараемся для вас
Your comment is awaiting moderation.
take a look – Checked this platform, everything feels tidy and logically placed
Your comment is awaiting moderation.
seavendoremporium access – Fast loading pages with straightforward navigation
Your comment is awaiting moderation.
shop overview link – Layout is organized, and pages load without any lag
Your comment is awaiting moderation.
visit this vendor shop – The interface is welcoming and browsing is easy
Your comment is awaiting moderation.
threatlens – Overall, professional vibe here; trustworthy, polished, and pleasantly minimal throughout.
Your comment is awaiting moderation.
1win пополнение через Demir http://1win82361.help
Your comment is awaiting moderation.
1вин вход в личный кабинет https://1win20819.help/
Your comment is awaiting moderation.
zerotrusty – Bookmarked this immediately, planning to revisit for updates and inspiration.
Your comment is awaiting moderation.
this platform – I noticed this page today, layout is neat and browsing is effortless.
Your comment is awaiting moderation.
jeweldepotexchange.shop – Just checked out this marketplace and the layout feels clean and very simple to browse through
Your comment is awaiting moderation.
онлайн обучение для школьников shkola-onlajn-33.ru .
Your comment is awaiting moderation.
take a look here – Discovered this website and browsing feels effortless with a clean design.
Your comment is awaiting moderation.
1win вывод Киргизия 1win68017.help
Your comment is awaiting moderation.
Hello everyone!
Share move mysterious tips with interesting and valuable relocation updates fast and move without stress see on the website for moving checklists
Full information on the link – http://vvp33.ru/blogs/blog-zhitelja-rossii/izgotovlenie-plastikovoy-tary-na-zakaz-preimushchestva-litya-pod-davleniem-v-sankt-peterburge.html
All the best and development in business!
Your comment is awaiting moderation.
помнится на бизе у Вас с этим было все хорошо. купить Кокаин, Бошки, Марихуану, Мефедрон Всем доброго времени суток!!!это самый лучший магазин ставлю 5+ потому что куча раз брал на рампушке и всегда находил, тут всё так же.
Your comment is awaiting moderation.
Maple Treasure Hub – Well-structured layout, browsing content is easy.
Your comment is awaiting moderation.
1win скачать бесплатно 1win36247.help
Your comment is awaiting moderation.
check out this store – The site is tidy and moving between sections feels natural.
Your comment is awaiting moderation.
Plum Vendor Picks – Clear structure, exploring the site is easy.
Your comment is awaiting moderation.
discover here – Came across this marketplace, browsing is effortless and intuitive
Your comment is awaiting moderation.
Hello everyone!
Unlock education mysterious methods with interesting and valuable learning facts and study smarter not harder see on the website for study hacks
Full information on the link – https://energoventmash.ru/komplektuyushhie-dlya-ofisnyh-kresel-komfort-i-ergonomika-na-pervom-meste/
All the best and development in business!
Your comment is awaiting moderation.
Знакомая ситуация, многие начинают паниковать и скупать ссылки, что только усугубляет положение. Хорошая статья попалась именно про то, как действовать без паники после апдейтов. Автор разбирает, на какие элементы сайта (техничка, контент, поведенческие) нужно обращать внимание в первую очередь, чтобы вернуть позиции. Особенно актуально для автосайтов, но общие принципы подойдут многим. Кто еще не видел, вот ссылка: https://specavto43.ru/pochemu-avtosajty-teryayut-poziczii-posle-apdejtov-chto-chinit-v-pervuyu-ochered-bez-paniki/ . Спокойный и структурированный разбор.
Your comment is awaiting moderation.
velvetvendorstudio.shop – Really enjoyed browsing here today, everything looks clean and interesting
Your comment is awaiting moderation.
Hello everyone!
Share estate mysterious wills with interesting and valuable inheritance updates and leave a lasting legacy see on the website for estate planning
Full information on the link – https://unixlib.org.ru/2025/01/11/plyazhnaya-prischepka-nezamenimyy-aksessuar-dlya-idealnogo-otdyha/
All the best and development in business!
Your comment is awaiting moderation.
ทดลองเล่นสล็อต pg
TKBNEKO มอบมิติใหม่ของเกมออนไลน์ ฝาก-ถอนไว ด้วยระบบสแกน QR Code
ในยุคดิจิทัลที่ เทคโนโลยีพัฒนาอย่างรวดเร็ว TKBNEKO พร้อมยกระดับการให้บริการ ด้วยระบบที่ ทันสมัย รวดเร็ว และ ตรวจสอบได้ เพื่อให้ผู้เล่น มั่นใจ ทุกครั้งที่ใช้งาน
จุดเด่นระบบฝาก-ถอน
ฝากขั้นต่ำ: เริ่มต้น 1 บาท
ถอนขั้นต่ำ: 1 บาท
เวลาฝากเงิน: ภายใน 3 วินาที
ยอดถอน: ไม่จำกัดต่อวัน
ฝากง่าย เพียงสแกน QR Code
สแกน QR Code ระบบจะ โอนเงินเข้าทันที ขั้นต่ำ 100 บาท สูงสุด ไม่เกิน 500,000 บาทต่อครั้ง
หมวดหมู่เกม
สล็อต: ธีมหลากหลาย
เกมสด: ดีลเลอร์สด
กีฬา: เดิมพันลีกดัง
ยิงปลา: ลุ้นกำไรทันที
โบนัสและโปรโมชัน
ติดตามหน้า โปรโมชั่น พร้อมระบบ VIP และโปรแกรม พันธมิตร
ฝ่ายบริการลูกค้า
สอบถามข้อมูลได้ตลอด 24 ชั่วโมง ผ่านหน้า ติดต่อเรา ทีมงาน ของเรา พร้อมดูแลตลอดเวลา
https://medium.com/@ratypw/ทดลองเล่นสล็อต-pg-e598fa477f69
Your comment is awaiting moderation.
site I found – Just discovered this page, navigation feels smooth and exploring items is effortless.
Your comment is awaiting moderation.
СПАСИБО :pink_eye.: ТУТ ВСЁ РОВНО!!!!!!!!! https://magicalimage.ru Сегодня сделал заказ, пока все ровно обещали к вечеру трек, магаз робитпривет я сам тут не так давно ) я тебя понимаю я вот уже вторую посылку получил всё чётко и ровно тоже пережевал , часто на швыров попадал а тут ребята грамотную тему замутили и магазу респект и админам) не волнуйся всё будет чётко:good:
Your comment is awaiting moderation.
visit the vendor page – I noticed this site by chance and browsing feels straightforward and neat.
Your comment is awaiting moderation.
Hello everyone!
Analyze behavior mysterious motives to find interesting and valuable social insights and predict human actions accurately see on the website for social models
Full information on the link – https://vestnik-nn.ru/tehnologiya-izgotovleniya-plastikovyh-izdelij-litem-pod-davleniem-na-zakaz-ot-kontseptsii-do-realizatsii.html
All the best and development in business!
Your comment is awaiting moderation.
this store link – Came across this site today, and the interface seems clear and easy to use.
Your comment is awaiting moderation.
Linen Shop Online – Clear layout, browsing sections is straightforward.
Your comment is awaiting moderation.
check the vendor – The interface is clear and the pages feel easy to navigate.
Your comment is awaiting moderation.
Pine Picks – Clear layout, browsing sections feels natural.
Your comment is awaiting moderation.
1win mines игра http://1win82361.help/
Your comment is awaiting moderation.
1win как пополнить Optima Bank 1win как пополнить Optima Bank
Your comment is awaiting moderation.
У вас есть свой сайт магазина? купить Кокаин, Бошки, Марихуану, Мефедрон Я делал ркс. на спирту. Получилась лайт ваще. Делай вообщем гдето 1к 7ми . будет так нормик эффект. но слабее 203гоИщи в соседней ветке мой отзыв по рцс. ИМХО рцс не для торча.
Your comment is awaiting moderation.
check this out – Found this page earlier, layout seems tidy and browsing is smooth.
Your comment is awaiting moderation.
лбс это shkola-onlajn-33.ru .
Your comment is awaiting moderation.
open this vendor hub – Came across this website today and navigating it feels effortless and organized.
Your comment is awaiting moderation.
This is a topic that’s close to my heart… Cheers! Exactly where are
your contact details though?
Your comment is awaiting moderation.
We look for credible health information, not random advice.
A platform with doctor-written health materials: https://kids-town.com.ua
While exploring medical resources I discovered the scientific materials of Olena Boiarchuk, a Ukrainian physician with two decades of medical work.
Her articles feel clear and research-driven, which makes them valuable for readers.
Your comment is awaiting moderation.
Lemon Vendor Store – Very tidy layout, browsing pages feels effortless.
Your comment is awaiting moderation.
1win inregistrare http://1win38174.help/
Your comment is awaiting moderation.
stonebazaar – Clean and simple layout, navigating through pages is smooth.
Your comment is awaiting moderation.
не понятно, жду трека говорил вторник, вторник они не успели, говорил среда, отмолчался, не ответил! купить Кокаин, Бошки, Марихуану, Мефедрон ОТЗЫВ О РАБОТЕ МАГАЗИНАне будет 307го. ожидается 203, 250, rcs-4 и 1220й… вот что мне сказали в той же аське, где спрашивал ты )
Your comment is awaiting moderation.
Pebble Crate Hub – Clean layout overall, browsing feels smooth.
Your comment is awaiting moderation.
I absolutely love your blog and find almost all of your post’s to be exactly I’m looking for. Does one offer guest writers to write content for yourself? I wouldn’t mind composing a post or elaborating on some of the subjects you write regarding here. Again, awesome web log!
https://grim.in.ua/vstanovlennya-ambient-light-yak-idealno.html
Your comment is awaiting moderation.
browse this page – Stumbled on this website, finding products is quick and straightforward.
Your comment is awaiting moderation.
quick visit here – Just explored this website and the interface is neat and logical.
Your comment is awaiting moderation.
Купить билеты в Театр Наций теперь можно быстро и удобно онлайн. На сайте легко выбрать спектакль, дату и лучшие места с помощью интерактивной схемы зала. Актуальная афиша, простая оплата и электронные билеты делают поход в театр еще комфортнее. Подробнее по ссылке: https://rentry.co/bf68o7zq
Your comment is awaiting moderation.
online market link – I noticed this site recently, and browsing items seems simple and smooth.
Your comment is awaiting moderation.
vendor resource page – Discovered the page today, appears to be a solid find.
Your comment is awaiting moderation.
Market of Lemons – Well-structured pages, navigating sections is smooth.Lemon Picks Hub – Pages are clean, navigating content is smooth.
Your comment is awaiting moderation.
1win login rapid http://1win38174.help/
Your comment is awaiting moderation.
Может просто нужно быть более бдительным? От фейков никто не застрахован. Попросить подтверждения через ЛС на форуме займет не более пяти минут времени и сохранит ваше настроение, а так же и деньги. БУДЬ БДИТЕЛЕН! ВСЕГДА! https://studio-fotodecol.ru Приветствую ТС,сделал заказ,но до сих пор трек не пробивается,помоги разобраться в этом уже почти неделю жду,заранее спспродукт – прет дико и жестко, но по сути ничего интересного, цена в 2 тыр себя полностью оправдывает. Эдакий бычий кайф. Если вам нравится трястись и стучать зубами – вы попали по адресу. Во всех остальных случаях – нахер-нахер. Слабенькая 3/5
Your comment is awaiting moderation.
Good morning!
Decode map mysterious symbols containing interesting and valuable navigation news and never get lost again see on the website for map legends
Full information on the link – http://semyadoma.ru/zdorove/izgotovlenie-plastikovykh-izdeliy-li
All the best and development in business!
Your comment is awaiting moderation.
A doctor-led Canadian health platform covering modern healthcare topics: https://doctorhealthnews.com
I’ve learned how hard it can be to find reliable health content online.
During my research I discovered the articles on Doctor Health News, where healthcare specialists share accurate information about treatments.
The content is based on modern medical standards, making it helpful for readers looking for trusted medical information.
Your comment is awaiting moderation.
Good morning!
Find law mysterious loopholes in interesting cases with valuable legal solutions and protect your rights effectively see on the website for legal databases
Full information on the link – https://busyhouse.ru/komposter-sadovyj-sekrety-plodorodiya-svoimi-rukami/
All the best and development in business!
Your comment is awaiting moderation.
online bazaar – The site feels organized and navigating through pages is simple.
Your comment is awaiting moderation.
https://arbitrajniki.ru/forums/topic/%d0%bf%d1%80%d0%be%d0%bc%d0%be%d0%ba%d0%be%d0%b4-%d0%b4%d0%bb%d1%8f-1%d1%85%d0%b1%d0%b5%d1%82-2026-1x200big/
Your comment is awaiting moderation.
Pearl Vendor Corner – Well-organized design, browsing the site feels comfortable.
Your comment is awaiting moderation.
1win apk MD http://1win38174.help
Your comment is awaiting moderation.
lomonosov school lomonosov school .
Your comment is awaiting moderation.
this vendor platform – Landed on this page today and the sections are well-organized and easy to browse.
Your comment is awaiting moderation.
Благодарен за заказ во вторник оплатил – в пятницу / утром / товар получил купить Кокаин, Бошки, Марихуану, Мефедрон перестань курить сделай перерывчикне плохие ребята, все в срок и по месту)
Your comment is awaiting moderation.
check this warehouse – The site loads quickly and the interface is straightforward.
Your comment is awaiting moderation.
Lavender Vendor Studio – Very tidy layout, moving through pages is effortless.
Your comment is awaiting moderation.
навес от солнца авто навес заказать
Your comment is awaiting moderation.
authkit – Pages loaded fast, images appeared sharp, and formatting stayed consistent.
Your comment is awaiting moderation.
pipelinesy – Color palette felt calming, nothing distracting, just focused, thoughtful design.
Your comment is awaiting moderation.
securekit – Content reads clearly, helpful examples made concepts easy to grasp.
Your comment is awaiting moderation.
guardstack – Appreciate the typography choices; comfortable spacing improved my reading experience.
Your comment is awaiting moderation.
Современный театр и классическая драматургия встречаются на сцене Театра Наций. Зрителей ждут «Последнее лето», «Рассказы Шукшина», «Коралловый остров» и мощная постановка «Дон Кихот». Настоящее культурное событие. Смотрите подробности: https://justpaste.it/dvr0f
Your comment is awaiting moderation.
patchkit – Appreciate the typography choices; comfortable spacing improved my reading experience.
Your comment is awaiting moderation.
visit the store – Overall layout is simple, with clear sections and easy navigation.
Your comment is awaiting moderation.
Hello everyone!
Reveal mysterious truths behind interesting stories packed with valuable lessons here and gain wisdom from ancient sources see on the website to read full narratives
Full information on the link – https://ustanovka23.ru/%d0%bf%d0%bb%d0%b0%d1%81%d1%82%d0%b8%d0%ba%d0%be%d0%b2%d1%8b%d0%b9-%d0%ba%d0%be%d0%bc%d0%bf%d0%be%d1%81%d1%82%d0%b5%d1%80-%d0%bd%d0%b0-%d0%b4%d0%b0%d1%87%d1%83-%d1%83%d0%b4%d0%be%d0%b1%d1%81%d1%82/
All the best and development in business!
Your comment is awaiting moderation.
opsbrain – Overall, professional vibe here; trustworthy, polished, and pleasantly minimal throughout.
Your comment is awaiting moderation.
taskpipe – Appreciate the typography choices; comfortable spacing improved my reading experience.
Your comment is awaiting moderation.
smartpipe – Bookmarked this immediately, planning to revisit for updates and inspiration.
Your comment is awaiting moderation.
Orchard Selection – Simple and tidy interface, browsing pages is smooth.
Your comment is awaiting moderation.
take a look here – Stumbled upon this site and the layout seems neat and easy to follow.
Your comment is awaiting moderation.
Good morning!
Master the use of interesting mysterious energy for valuable futuristic technology and build tomorrow today see on the website for tech blueprints
Full information on the link – https://hozjajkainfo.ru/kompostirovanie-kak-klyuchevoj-instrument-sokrashheniya-obema-musora-na-poligonax/
All the best and development in business!
Your comment is awaiting moderation.
check this vendor hub – Stumbled onto this website and the interface is clean and well-organized.
Your comment is awaiting moderation.
Москва – Все чётко, поднятие на раз два, все по описанию. Мефедрон белый, без запаха, видно что очищенный. Вес и качество норм!!!! Количество соответствует, за бонус в спасибо 😉 купить Кокаин, Бошки, Марихуану, Мефедрон вот это уже наводит на мыслино с другой стороны, селлер не должен и не обязан объяснять что это такое и с чем его едят. Здесь продаются КОНКРЕТНЫЕ в-ва, а не какие то А1, В2 и иже с ними. Так что можно узнать и самим. И если вас так интересует качество\особенности товара от данного продавца, так не поленитесь в случае заказа отписать о полученном стаффе\особенностях, меньше мороки будет другим. А то заказывают сотни, отзывы пишут единицы, и то больше “зашибись !” или “аааа, не прёёёёёт !!!111”. Выдавайте сами побольше информации.
Your comment is awaiting moderation.
навес из поликарбоната навес для машины заказать
Your comment is awaiting moderation.
vendor warehouse site – Found this online and the site feels stable and well-organized.
Your comment is awaiting moderation.
Lantern Marketplace – Pages are neatly arranged, navigating the site feels natural.
Your comment is awaiting moderation.
Отличный магазин! https://sendvich-paneli-pvh.ru Заказываю у магазина 6-й раз уже и все ровно!Берите только тут и вы не ошибетесь.Да и еще странная штука происходит,как-то взял у другого магазина реагент точно такой же курил месяц гдето и чуть не помер да и отходосы всю неделю были ужасные.А из этого магаза брал реагент было все ништяк,отходосы были но я их почти не заметил.Делайте выводы Бразы.Магазин отличный!Мир всем!Приятно работать!!!
Your comment is awaiting moderation.
browse crystal vendor corner hub – Found this page earlier and the layout makes exploring quick and easy.
Your comment is awaiting moderation.
official studio site – Everything is easy to find and browsing flows naturally.
Your comment is awaiting moderation.
1win verificare email 1win verificare email
Your comment is awaiting moderation.
Opal Selection Vault – Tidy structure, moving through sections is easy.
Your comment is awaiting moderation.
vendor hub – Discovered it online, seems like a useful marketplace.
Your comment is awaiting moderation.
Lantern Depot – Pages are tidy and browsing content feels comfortable.
Your comment is awaiting moderation.
отношение оператора к клиентам очень даже достойное!(быть честным я еще нигде не видел такого хорошего отношения к клиентам у магазинов как в чемикл микс)!!!!! за это 5+ https://moskowdisk.ru да два раза прислали шляпу.( хотя раньше присылали отменный товар с хорошими бонусами. даже не знаю что делать(Доброго времени суток, оплатил заказ, данные для оплаты дали как всегда оперативно!, жду клад!
Your comment is awaiting moderation.
open this store – Found this shop earlier and the interface looks clean and easy to navigate.
Your comment is awaiting moderation.
1win скачать без регистрации https://www.1win68017.help
Your comment is awaiting moderation.
1win crash стратегия 1win crash стратегия
Your comment is awaiting moderation.
visit cotton vendor lane – Came across this page today and the information is displayed clearly and organized.
Your comment is awaiting moderation.
storefront link – The interface is organized and easy to understand.
Your comment is awaiting moderation.
Opal Stop Hub – Neatly structured pages, browsing around is smooth.
Your comment is awaiting moderation.
Сайт работает на отличненько!Единственно что не айс-СПСР.Major Express куда мажорнее.Пендосская дрессировка,хуле.А наши-доставляют не за день а за два.разносят только до 15-00.В субботу работают до 11-00,но машина из Москвы приходит в 10-30,так что извиняйте.Вечером песдуйте в оффис,он у чёрта на куличках.Мажоры может и дороже,но можно предоставить оплату получателю.В наш город это дешевле даже выйдет.Ну это так,к слову. https://360ufa.ru хорошо что такМаловато по-моему, у меня 1гр жвша растворяется полностью примерно в 30 мл, меньше этого – частично
Your comment is awaiting moderation.
external vault source – Clean presentation with clear sections for easy navigation.
Your comment is awaiting moderation.
mlforge – Color palette felt calming, nothing distracting, just focused, thoughtful design.
Your comment is awaiting moderation.
Kettle Finds Hub – Clear design, moving between sections is easy.
Your comment is awaiting moderation.
explore this vendor hub – Came across this page earlier and the interface feels clear and organized.
Your comment is awaiting moderation.
1win экспресс расчет http://www.1win68017.help
Your comment is awaiting moderation.
1win оплата uzcard 1win36247.help
Your comment is awaiting moderation.
дистанционное школьное обучение shkola-onlajn-33.ru .
Your comment is awaiting moderation.
explore here – The pages appear nicely arranged and easy on the eyes.
Your comment is awaiting moderation.
Vendor Studio Olive – Layout is neat, moving between pages is smooth.
Your comment is awaiting moderation.
1вин бонус 1win68017.help
Your comment is awaiting moderation.
Кекс знакомый бpал тут- качество-самолет! Меня угостил – я тоже остался доволен! купить Кокаин, Бошки, Марихуану, Мефедрон сделайте уже что-нибудь с этим реестром… хочу сделать заказВот мой отзыв по работе данного магазина.
Your comment is awaiting moderation.
1win Visa пополнение Узбекистан 1win Visa пополнение Узбекистан
Your comment is awaiting moderation.
visit scarletvendor – I recently discovered this page and the items seem organized in a simple layout.
Your comment is awaiting moderation.
market vendor page – The layout looks good, might explore the options more.
Your comment is awaiting moderation.
Очередная волна разговоров о том, что SEO больше не работает. Как по мне, те, кто так говорят, либо не сталкивались с грамотным продвижением, либо ожидали быстрых результатов. Нашел статью, где хорошо объясняется, почему SEO остается основой устойчивого онлайн-бизнеса. Основные тезисы: органический трафик никуда не уходит, доверие к топовым сайтам выше, а стоимость привлечения клиента со временем только снижается. Почитайте, тема раскрыта аргументированно: https://iskra-net.ru/preimushhestva-prodvizheniya-sajtov-pochemu-seo-eto-osnova-ustojchivogo-onlajn-biznesa/ . Особенно полезно будет тем, кто ищет долгосрочные каналы, а не разовые всплески.
Your comment is awaiting moderation.
Juniper Depot – Pages are tidy and moving through the site feels natural.
Your comment is awaiting moderation.
this vendor platform – Landed on this site today and browsing feels smooth and logical.
Your comment is awaiting moderation.
Всем привет! Занимаюсь автоблогом, Рё вечная проблема — писать статьи, которые действительно принесут трафик, Р° РЅРµ просто “для галочки”. Наткнулся РЅР° хороший разбор, РіРґРµ автор РЅР° примерах показывает, какие темы РІ автотематике реально собирают просмотры, Р° РЅР° какие даже РЅРµ стоит тратить время. Очень прикладной материал, сразу РІРёРґРЅРѕ, что человек знает нишу изнутри. Кто тоже мучается СЃ контент-планом, рекомендую: https://autovakuum.ru/kontent-dlya-avtosajta-kakie-temy-realno-dayut-trafik-a-kakie-net/ . Р’Р·СЏР» РЅР° заметку несколько идей для новых статей.
Your comment is awaiting moderation.
Как-то развёл 2c-i на кубы воды и выбрал в выборку для точности дозировки.Так один кролятина вляпался в/в.Позавидовать ему трудно было,это точно.Но в конце когда оклемался,даже прикололся. https://mir-teplici.ru По прошествии полутора часов снова вылез джаббер. Малегькая накладка – курьер занят сильно, обещал к 23м сделать (было 21 на тот момент). Да не вопрос 😉 Джаббео выверен, оператор душевный человек, располагает к себе сразу.магазину респект
Your comment is awaiting moderation.
Bazaar Olive – Simple layout, exploring the pages is effortless.
Your comment is awaiting moderation.
shopping site – The navigation menu makes it simple to move around.
Your comment is awaiting moderation.
1вин чӣ гуна боргирӣ кардан http://1win83254.help/
Your comment is awaiting moderation.
онлайн школа для школьников с аттестатом онлайн школа для школьников с аттестатом .
Your comment is awaiting moderation.
Знакомая ситуация, многие начинают паниковать и скупать ссылки, что только усугубляет положение. Хорошая статья попалась именно про то, как действовать без паники после апдейтов. Автор разбирает, на какие элементы сайта (техничка, контент, поведенческие) нужно обращать внимание в первую очередь, чтобы вернуть позиции. Особенно актуально для автосайтов, но общие принципы подойдут многим. Кто еще не видел, вот ссылка: https://specavto43.ru/pochemu-avtosajty-teryayut-poziczii-posle-apdejtov-chto-chinit-v-pervuyu-ochered-bez-paniki/ . Спокойный и структурированный разбор.
Your comment is awaiting moderation.
online vault hub – Opened it today, and the information seems practical to use.
Your comment is awaiting moderation.
open this vendor hub – Came across this website today and browsing the pages is easy.
Your comment is awaiting moderation.
Jewel Depot Hub – Clean layout and browsing through pages feels smooth.
Your comment is awaiting moderation.
мне продавец так и не выслал компенсацию за хреновый МХЕ купить Кокаин, Бошки, Марихуану, Мефедрон Могу сфотать, на смотриДа хватает придурков, только смысл писанины этой , что он думает что ему за это что то дадут ))) кроме бана явно ничего не выгорит )))! Тс красавчик брал 3 раза по кг сделки и всегда все чётко ! Жду пока появиться опт на ск!
Your comment is awaiting moderation.
1win бакай банк пополнение https://www.1win68017.help
Your comment is awaiting moderation.
1win apk Узбекистан 1win apk Узбекистан
Your comment is awaiting moderation.
Sage House Market – Nice clean layout, navigating feels smooth and easy.
Your comment is awaiting moderation.
Oak Picks Hub – Tidy and clear interface, browsing pages feels smooth.
Your comment is awaiting moderation.
Simple vendor link – This marketplace keeps navigation easy and browsing enjoyable.
Your comment is awaiting moderation.
go to scarletrack – Found this page today and the interface seems straightforward and nicely arranged.
Your comment is awaiting moderation.
Official TinyTill Site – Keeping this site saved for future orders.
Your comment is awaiting moderation.
заказать кухню по индивидуальным размерам заказать кухню по индивидуальным размерам .
Your comment is awaiting moderation.
а что ты паришься. дождись пока домой принесут. посмотри в глазок что бы курьер один был. впусти его. а перед этим поставь чувака под окном. посыль забираешь, после, без палева выкидываешь в окно чуваку. а потом только выпускаешь курьера из квартиры. а там пусть хоть кто забегает, у тебя ничего нет. главное не нервничай и о плохом не думай. бери в хуй толще будет. а спср это почта россии. а почта россии ни когда нормально не работала. https://sarafan-production.ru Ну блиинн я ждуждуждужду а мне не отвечает ТС я в уныние, буду ждать. говорят хороший, хочу попробовать у него. хочу сладкий бубалех мммм….Рашн хлидейс вы правы, мы же тоже люди 🙂 треки наверное на отправке в базу не внесли, а шас у них же тоже праздники, но не волнуйтесь копии накладных то у нас 😉
Your comment is awaiting moderation.
go to this vendor hub – Stumbled upon this site and moving through the pages is smooth.
Your comment is awaiting moderation.
resource crate page – Checked the site and everything is easy to find and navigate.
Your comment is awaiting moderation.
Jewel Market Hub – Well-organized layout makes browsing effortless.
Your comment is awaiting moderation.
Sage Lane Market – Simple and clear design, exploring pages is comfortable.
Your comment is awaiting moderation.
violetmarket – Came across this store, navigation looks clean and intuitive overall today.
Your comment is awaiting moderation.
Elnesta Direct – Site worked without issues and checkout was fast and straightforward.
Your comment is awaiting moderation.
databrain – Found practical insights today; sharing this article with colleagues later.
Your comment is awaiting moderation.
modelops – Loved the layout today; clean, simple, and genuinely user-friendly overall.
Your comment is awaiting moderation.
flowbot – Color palette felt calming, nothing distracting, just focused, thoughtful design.
Your comment is awaiting moderation.
Night Corner Market – Pages are clean, browsing the site is effortless.
Your comment is awaiting moderation.
promptkit – Appreciate the typography choices; comfortable spacing improved my reading experience.
Your comment is awaiting moderation.
Успехов вам и поменьше всяких заморочек ))) https://promacros.ru купил его в аптекеновый запрет вступает через 7 дней. читай список бро,там это вещество есть)
Your comment is awaiting moderation.
this vendor website – I checked this site earlier and the design feels organized and friendly.
Your comment is awaiting moderation.
supplier warehouse site – I explored it briefly and the site is impressively quick.
Your comment is awaiting moderation.
Look inside VerdantVendor – Just discovered this site; layout is clean, and navigation flows smoothly.
Your comment is awaiting moderation.
satinrack finds – Just visited this store, navigation feels intuitive and exploring products is easy.
Your comment is awaiting moderation.
Ruby Lane Vendor – Well-structured pages, exploring sections is effortless.
Your comment is awaiting moderation.
заказать кухню по индивидуальному заказу zakazat-kuhnyu-4.ru .
Your comment is awaiting moderation.
если заказываю утром в пн, получаю максимум в четверг утром а то бывает и в среду утром, на счет выходных все вопросы к спср потому что они не работают в выходные нормально https://family-diary.ru не вижу, в прайсе много чегоПрибыльных вам выходных!:monetka:
Your comment is awaiting moderation.
Click for OliveOrder – Nicely arranged pages and smooth overall experience.
Your comment is awaiting moderation.
Jasper Corner – Easy-to-read pages, browsing through sections is straightforward.
Your comment is awaiting moderation.
Hello!
Discover brain mysterious pathways offering interesting and valuable neural data and map your own consciousness see on the website for neural maps
Full information on the link – https://tehnogildia.ru/novosti/kak-serijnoe-lite-plastmass-pomogaet-malomu-biznesu-konkurirovat-s-korporacijami/
All the best and development in business!
Your comment is awaiting moderation.
Moss Outlet House – Tidy design, exploring pages is straightforward.
Your comment is awaiting moderation.
logkit – Loved the layout today; clean, simple, and genuinely user-friendly overall.
Your comment is awaiting moderation.
caramel hub online – Found this page and the interface is tidy and easy to navigate.
Your comment is awaiting moderation.
Good morning!
Explore friend mysterious circles with interesting and valuable community support and build your tribe today see on the website for community forums
Full information on the link – http://bigtimecraft.ru/dacha/masterstvo-v-sozdanii-i-primenenii-plastikovyx-vtulok-texnologiya-i-innovacii/
All the best and development in business!
Your comment is awaiting moderation.
Visit VerdantMarket – Came across this marketplace today and the layout feels clean and simple to browse.
Your comment is awaiting moderation.
Тут охота чисто на клиентов. https://soul-power.ru Привет, ребята!кто получал последний раз недавно отишитесь о работе магаза. +В РЕПУ!!!!!!! и главное почему ип адрес не меняется на сайте???
Your comment is awaiting moderation.
materials crate shop – Everything on the page seems arranged in a logical way.
Your comment is awaiting moderation.
мостбет онлайн ставки Кыргызстан мостбет онлайн ставки Кыргызстан
Your comment is awaiting moderation.
мостбет промокод на фрибет мостбет промокод на фрибет
Your comment is awaiting moderation.
Rose Lane Studio Hub – Clean design overall, browsing the sections feels effortless.
Your comment is awaiting moderation.
IrisVendor Store – Quick loading site with items that seem very well made.
Your comment is awaiting moderation.
Good morning!
Access memory mysterious archives full of interesting and valuable personal history and recover lost moments easily see on the website for memory tools
Full information on the link – https://demyanovo-school.ru/zashhitnye-kozyrki-iz-polikarbonata-nadezhnaya-zashhita-i-estetichnost/
All the best and development in business!
Your comment is awaiting moderation.
Ivory Treasure Hub – Clear design and moving between sections feels effortless.
Your comment is awaiting moderation.
testkit – Content reads clearly, helpful examples made concepts easy to grasp.
Your comment is awaiting moderation.
deploykit – Bookmarked this immediately, planning to revisit for updates and inspiration.
Your comment is awaiting moderation.
Moss Picks Hub – Pages are clean, browsing content is comfortable.
Your comment is awaiting moderation.
commitkit – Found practical insights today; sharing this article with colleagues later.
Your comment is awaiting moderation.
debugkit – Pages loaded fast, images appeared sharp, and formatting stayed consistent.
Your comment is awaiting moderation.
shipkit – Bookmarked this immediately, planning to revisit for updates and inspiration.
Your comment is awaiting moderation.
browse bright vendor hub – Found this page earlier and exploring it feels comfortable and simple.
Your comment is awaiting moderation.
буду заказывать второй раз тут) товар понравился) купить Кокаин, Бошки, Марихуану, Мефедрон Забизаю дамой хвотаю тожнецы взрываю посылку там рубашка. Примерно на ребенка 7 летнего (я надеился книга будит) но ладно и рубашка сойдет на тряпки вмашину ! Разворачиваю рубаху а там пакетик реги я быстрей за весами и за фотиком и писать ВАМ МОИ ДРУЗЬЯ!!!Это точно.
Your comment is awaiting moderation.
Visit Velvetvendor – Just discovered this site and the interface is intuitive, making browsing simple and enjoyable.
Your comment is awaiting moderation.
заказать кухню под ключ zakazat-kuhnyu-4.ru .
Your comment is awaiting moderation.
quick browse – Found this website, navigation seems smooth and items are simple to find.
Your comment is awaiting moderation.
joe casino t.me/joy_casino_news .
Your comment is awaiting moderation.
Rose Vendor Lane – Pages are tidy, exploring the website feels smooth.
Your comment is awaiting moderation.
vault store link – Visiting this site for the first time and the layout feels tidy.
Your comment is awaiting moderation.
Ulvika Website – Helpful information on products and easy site navigation.
Your comment is awaiting moderation.
Good morning!
Access history mysterious timelines full of interesting and valuable past events and walk through the ages see on the website for interactive timelines
Full information on the link – https://zakaz-vitrin.ru/%d1%83%d0%b4%d0%b8%d0%b2%d0%b8%d1%82%d0%b5%d0%bb%d1%8c%d0%bd%d1%8b%d0%b5-%d0%bf%d0%be%d0%b4%d0%b2%d0%b5%d1%81%d0%bd%d1%8b%d0%b5-%d0%bf%d0%bb%d0%b0%d1%81%d1%82%d0%b8%d0%ba%d0%be%d0%b2%d1%8b%d0%b5/
All the best and development in business!
Your comment is awaiting moderation.
Ivory Depot – Well-arranged sections make browsing very easy.
Your comment is awaiting moderation.
Процветания вашему магазину!!! https://pod-torg.ru Занимайся я таким делом,коли вы не просили б о граммах 100,ответ был бы тот же. В таком деле главное-отсутствие жадности. Не надо гнаться за каждой копейкой,коли есть относительно безопасная отработанная схема,то и нечего от неё отклонятся. Вы видите в них кидал,они в вас красного.помнится на бизе у Вас с этим было все хорошо.
Your comment is awaiting moderation.
Moon Market Hub – Layout feels tidy, moving through sections is natural.
Your comment is awaiting moderation.
Go to Valleyvendor – Discovered this website and it seems well arranged and easy to move around.
Your comment is awaiting moderation.
browse this bazaar platform – I discovered this page today and everything looks easy to move through.
Your comment is awaiting moderation.
River Lane Outlet – Simple and tidy pages, navigating the website feels smooth.
Your comment is awaiting moderation.
warehouse link – Looked through the page earlier and it worked surprisingly well on mobile.
Your comment is awaiting moderation.
AisleGlow Online – Navigating through pages is easy and everything is grouped nicely.
Your comment is awaiting moderation.
Все ровно, пасыль забрал, всем доволен! купить Кокаин, Бошки, Марихуану, Мефедрон Привет и Мира! Магазин отличный. Все легально, быстро и без заморочек. Не то что остальные некоторые…так что смотрите внимательней что присылают, если не хотите словить передоз!!!
Your comment is awaiting moderation.
Direct store access – A user‑friendly shop where the navigation feels smooth and clear.
Your comment is awaiting moderation.
see sagecorner – Just visited this platform, layout seems clean and browsing feels effortless.
Your comment is awaiting moderation.
ทดลองเล่นสล็อต pg เว็บ ตรง”
สล็อต PG แพลตฟอร์มเกมสล็อตยอดนิยม เข้าเล่นไว ฝากถอนออโต้
คำค้นหา pg slot มาแรงในช่วงนี้ ในกลุ่มผู้เล่นเกมสล็อตออนไลน์ เพราะเป็น ค่ายเกมที่มีชื่อเสียง ด้าน ภาพและเอฟเฟกต์ ความ ลื่นไหล และ โอกาสรับกำไรที่ดี เกมของ PG ผลิตโดยค่ายมาตรฐาน ที่รองรับการเล่นทั้งบน มือถือ และ เดสก์ท็อป
จุดเด่น ของ PG Slot
สล็อต PG เป็นเกมสล็อตออนไลน์ที่ออกแบบมาให้ เข้าเกมไว เล่นผ่าน ระบบเว็บ และรองรับ ทุกแพลตฟอร์ม ไม่ต้องติดตั้งเพิ่มเติม ผู้เล่นสามารถเข้าเล่นผ่าน เว็บเบราว์เซอร์ ได้ทันที ภาพและเสียงถูกพัฒนาในรูปแบบ 3D ให้ความคมชัด พร้อมเอฟเฟกต์ สมจริง
คุณสมบัติหลักของเกม pg slot ได้แก่
โบนัสและฟรีสปินหลายแบบ
ฟีเจอร์ตัวคูณรางวัล
เดโม่ฟรี
มีเมนูภาษาไทย
ระบบการเงินรวดเร็ว ทันใจ
แพลตฟอร์ม pg slot ส่วนใหญ่รองรับ การฝาก-ถอน ฝากถอนตลอดเวลา ขั้นต่ำเริ่มต้นเพียง หลักหน่วย ขึ้นอยู่กับ กติกาแต่ละแพลตฟอร์ม การทำรายการใช้เวลา เพียงไม่กี่วินาที ผ่าน QR Code หรือระบบ ธนาคารบนมือถือ ทำให้ธุรกรรมเป็นไปอย่าง ลื่นไหล
ประเภทเกมยอดนิยม ใน PG Slot
เกม สล็อต PG มีธีมหลากหลาย เช่น
ธีม เทพเจ้า
ธีม Adventure
ธีม เอเชียและโชคลาภ
ธีม สัตว์และธรรมชาติ
หลายคนชอบเกมที่โบนัสเข้าไว พร้อมระบบ ฟีเจอร์พิเศษ และ โอกาสทำกำไรสูง เหมาะกับทั้ง ผู้เล่นเริ่มต้น และ ผู้เล่นที่มีประสบการณ์
มาตรฐานระบบ
สล็อต PG ใช้ระบบที่ได้มาตรฐาน มีการ เข้ารหัสข้อมูล และใช้ระบบสุ่มผล Random Number Generator เพื่อให้ผลลัพธ์ โปร่งใส แพลตฟอร์มที่ให้บริการ PG Slot ควรมี ความปลอดภัยสูง
โดยภาพรวม
สล็อต PG เป็นตัวเลือกยอดนิยมสำหรับผู้ที่ต้องการเล่นสล็อตออนไลน์ ด้วยจุดเด่นด้าน โบนัสหลากหลาย และการทำธุรกรรมที่ รวดเร็ว ผู้เล่นสามารถเริ่มต้นได้ ไม่ซับซ้อน ฝากถอนสะดวก และเลือกเกมได้ จำนวนมาก เหมาะสำหรับ ผู้เล่นทุกสไตล์ ในโลกของเกมสล็อตออนไลน์
Your comment is awaiting moderation.
удаление полипа шейки матки лазером
Your comment is awaiting moderation.
Icicle Treasure Online – Layout is clean and moving between sections feels natural.
Your comment is awaiting moderation.
basket resource page – Just noticed this site and navigating around is simple and pleasant.
Your comment is awaiting moderation.
Vendor Studio Mint – Well-organized design, navigating sections feels smooth.
Your comment is awaiting moderation.
Hello everyone!
Share estate mysterious wills with interesting and valuable inheritance updates and leave a lasting legacy see on the website for estate planning
Full information on the link – https://interstroy58.ru/iskusstvo-sozdaniya-iz-plastika-pogruzhenie-v-mir-litya/
All the best and development in business!
Your comment is awaiting moderation.
Hello!
Protect life with interesting mysterious data holding valuable emergency protocols and act fast when seconds count see on the website for emergency guides
Full information on the link – https://yantar-21.ru/uvelichenie-effektivnosti-pererabotka-plastika-litem-pod-davleniem/
All the best and development in business!
Your comment is awaiting moderation.
Raven Vendor Finds – Clean and friendly design, navigation feels natural.
Your comment is awaiting moderation.
удаление полипа в матке
Your comment is awaiting moderation.
Самый лучший магазин! качество, цены, общение с клиентом, все на высшем уровне! продолжайте в том же духе и вам зачтется: ) https://zolotoigid.ru Возможна ли доставка 1 классом ?Фарту в делах парни !:hello:
Your comment is awaiting moderation.
kindlemart.shop – Great range of items and the site loads incredibly fast.
Your comment is awaiting moderation.
browse the store – Came across this website earlier and it seems trustworthy enough.
Your comment is awaiting moderation.
Hello everyone!
Study the history of mysterious interesting events to gain valuable knowledge base and understand the cycles of time see on the website for historical archives
Full information on the link – https://odincrk.ru/plastikovaya-zashhita-stvolov-derevev-vash-zelenyj-shhit-ot-zubov-i-nepogody/
All the best and development in business!
Your comment is awaiting moderation.
1win дастгирии онлайн http://www.1win83254.help
Your comment is awaiting moderation.
valetrade – Came across this platform today, browsing feels straightforward and intuitive overall.
Your comment is awaiting moderation.
this crate website – I checked this site earlier and the design looks clean and minimal.
Your comment is awaiting moderation.
Mint Picks Hub – Pages are clean, browsing content is comfortable.
Your comment is awaiting moderation.
Icicle Market Hub – Easy-to-follow design and moving between pages feels effortless.
Your comment is awaiting moderation.
Rain Vendor House – Browsing this site is smooth, everything looks neatly arranged.
Your comment is awaiting moderation.
Где продавец то? Мысли самые печальные…тт купить Кокаин, Бошки, Марихуану, Мефедрон все это только на доверии, белый кристаллический так же может быть 4фа….Заказываю у магазина 6-й раз уже и все ровно!Берите только тут и вы не ошибетесь.Да и еще странная штука происходит,как-то взял у другого магазина реагент точно такой же курил месяц гдето и чуть не помер да и отходосы всю неделю были ужасные.А из этого магаза брал реагент было все ништяк,отходосы были но я их почти не заметил.Делайте выводы Бразы.Магазин отличный!Мир всем!
Your comment is awaiting moderation.
Ищешь кран? шаровый кран приварной для трубопроводов различного назначения. Надежная запорная арматура для систем водоснабжения, отопления, газа и промышленных магистралей. Высокая герметичность, долговечность и устойчивость к нагрузкам.
Your comment is awaiting moderation.
Harniq Direct – Got what I needed right away and checkout was quick and easy.
Your comment is awaiting moderation.
парфюмерия лучшее https://elicebeauty.com/makiyazh/litso/tonalnie-sredstva/ss-krem-volshebniy-makiyazh-lirene-cc-sream-magic-make-up.html
Your comment is awaiting moderation.
Нужен юрист? адвокат по арбитражным спорам представительство в арбитражном суде, защита интересов бизнеса, взыскание задолженности, споры по договорам и сопровождение судебных процессов для компаний и предпринимателей.
Your comment is awaiting moderation.
Idea playground – A playful and engaging environment built to encourage creativity and experimentation.
Your comment is awaiting moderation.
Проблемы с застройщиком? неустойка за просрочку квартиры по дду помощь юриста по долевому строительству, расчет неустойки, подготовка претензии и подача иска в суд. Защитим права дольщиков и поможем получить компенсацию.
Your comment is awaiting moderation.
mergekit – Found practical insights today; sharing this article with colleagues later.
Your comment is awaiting moderation.
gitpushr – Mobile version looks perfect; no glitches, fast scrolling, crisp text.
Your comment is awaiting moderation.
devpush – Color palette felt calming, nothing distracting, just focused, thoughtful design.
Your comment is awaiting moderation.
recommended source – Had a quick look at this site before and it seemed fairly trustworthy for products.
Your comment is awaiting moderation.
rubyvendor – Found this site earlier, layout seems organized and easy to navigate.
Your comment is awaiting moderation.
codepushr – Mobile version looks perfect; no glitches, fast scrolling, crisp text.
Your comment is awaiting moderation.
1win сомона http://1win83254.help
Your comment is awaiting moderation.
Found a bride? wedding proposal in Barcelona romantic scenarios, beautiful locations, photo shoots, decor, and surprises for the perfect declaration of love. Make your engagement in Barcelona an unforgettable moment in your story.
Your comment is awaiting moderation.
look at this vendor site – I came across this page today and the layout seems clear and tidy.
Your comment is awaiting moderation.
удаление полипа
Your comment is awaiting moderation.
same shit, bro купить Кокаин, Бошки, Марихуану, Мефедрон Так может он в городе закладкой бралнет так то обещал в среду или в четверг.
Your comment is awaiting moderation.
удаление полипа в матке стоимость
Your comment is awaiting moderation.
Rain Bazaar Depot – Simple pages and clear design make navigation comfortable.
Your comment is awaiting moderation.
чӣ тавр 1win кэшбек гирифтан http://1win83254.help/
Your comment is awaiting moderation.
Meadow Market Hub – Layout feels tidy, moving through sections is natural.
Your comment is awaiting moderation.
Honey Market Hub – Simple interface, browsing content was comfortable and quick.
Your comment is awaiting moderation.
site reference – I checked this marketplace earlier and the interface looks user friendly.
Your comment is awaiting moderation.
VioletVend Marketplace – Simple navigation and products are attractive overall.
Your comment is awaiting moderation.
сколько стоит удалить жировик
Your comment is awaiting moderation.
interesting platform – I ran into this site today and the layout seems simple and well-structured.
Your comment is awaiting moderation.
tuan88
Your comment is awaiting moderation.
Hello!
Explore deep mysterious layers of interesting info with high valuable potential now and dive into the unknown with confidence see on the website for interactive maps
Full information on the link – https://stroimarket44.ru/plastikovyj-komposter-ot-proizvodit/
All the best and development in business!
Your comment is awaiting moderation.
their wicker collection – Landed on this site today and the page layout seems clean.
Your comment is awaiting moderation.
Good morning!
Curate value mysterious systems with interesting and valuable economic impact and build wealth on solid foundations see on the website for value investing
Full information on the link – http://devchurka.ru/ot-granuly-do-shedevra-kak-rozhdaetsya-mir-plastika-vokrug-nas/
All the best and development in business!
Your comment is awaiting moderation.
Ребята сайт хороший конечно, но вот у меня выдалась задержка с заказом, у кого были задержки отпишите сюда, просто раньше как только я делал заказа все высылалось либо к вечеру этого дня, либо на следующий, а теперь уже 4 дня жду отправки все не отправляют! купить Кокаин, Бошки, Марихуану, Мефедрон Да я написал уже. Мб 2-dpmp в качестве компенсации подгонят, а вот что с фф не знаю, я ее проебал до того как я еще попробовал.Во телегу двинул, а? Ещё спать не ложился, такой эффект сильный, толеоа нет вообще, в завязке полгода 🙂
Your comment is awaiting moderation.
ทดลองเล่นสล็อต pg ฟรี pg slot เกมสล็อตออนไลน์ที่คนค้นหาเยอะ เข้าเล่นไว ฝากถอนออโต้
คำค้นหา pg slot ถูกค้นหามากขึ้นเรื่อยๆ ในกลุ่มผู้เล่นเกมสล็อตออนไลน์ เพราะเป็น แบรนด์เกมที่โดดเด่น ด้าน ภาพและเอฟเฟกต์ ความ เสถียร และ ระบบจ่ายที่ดึงดูด เกมของ PG พัฒนาโดยผู้ให้บริการชั้นนำ ที่รองรับการเล่นทั้งบน โทรศัพท์มือถือ และ คอมพิวเตอร์
จุดเด่น ของ PG Slot
pg slot เป็นเกมสล็อตออนไลน์ที่ออกแบบมาให้ เปิดเกมได้ทันที เล่นผ่าน ระบบออนไลน์ และรองรับ ทั้ง iOS และ Android ไม่ต้องดาวน์โหลดแอป ผู้เล่นสามารถเข้าเล่นผ่าน เว็บเบราว์เซอร์ ได้ทันที ภาพและเสียงถูกพัฒนาในรูปแบบ สามมิติ ให้ความคมชัด พร้อมเอฟเฟกต์ สมจริง
คุณสมบัติหลักของเกม PG Slot ได้แก่
โบนัสและฟรีสปินหลายแบบ
ระบบตัวคูณ
เล่นฟรีก่อนเติมเงิน
มีเมนูภาษาไทย
ระบบฝากถอนสะดวก ทำรายการไว
แพลตฟอร์ม สล็อต PG มักมี การฝาก-ถอน ออโต้ตลอด 24 ชม. ขั้นต่ำเริ่มต้นเพียง 10 บาท ขึ้นอยู่กับ ระบบของผู้ให้บริการ การทำรายการใช้เวลา เพียงไม่กี่วินาที ผ่าน คิวอาร์โค้ด หรือระบบ Mobile Banking ทำให้ธุรกรรมเป็นไปอย่าง ลื่นไหล
ประเภทเกมยอดนิยม ใน PG Slot
เกม สล็อต PG มีธีมหลากหลาย เช่น
ธีม เทพเจ้า
ธีม ลุยด่าน
ธีม เอเชียและโชคลาภ
ธีม ธรรมชาติ
เกมยอดนิยมมักเป็นเกมที่แตกง่าย พร้อมระบบ Special Feature และ โอกาสทำกำไรสูง เหมาะกับทั้ง ผู้เล่นเริ่มต้น และ สายสล็อตจริงจัง
ความปลอดภัย
PG Slot ใช้ระบบที่ได้มาตรฐาน มีการ เข้ารหัสข้อมูล และใช้ระบบสุ่มผล ระบบสุ่มมาตรฐาน เพื่อให้ผลลัพธ์ ยุติธรรม แพลตฟอร์มที่ให้บริการ PG Slot ควรมี ทีมซัพพอร์ต 24 ชม.
สรุป
pg slot เป็นตัวเลือกยอดนิยมสำหรับผู้ที่ต้องการเล่นสล็อตออนไลน์ ด้วยจุดเด่นด้าน กราฟิกคุณภาพ และการทำธุรกรรมที่ ไว ผู้เล่นสามารถเริ่มต้นได้ ไม่ซับซ้อน ฝากถอนสะดวก และเลือกเกมได้ ครบทุกหมวด เหมาะสำหรับ ทุกระดับประสบการณ์ ในโลกของเกมสล็อตออนไลน์
Your comment is awaiting moderation.
ทดลองเล่นสล็อต pg
PG Slot สล็อตยอดฮิต เล่นง่าย ฝากถอนเร็ว
คำค้นหา PG Slot มาแรงในช่วงนี้ ในกลุ่มผู้เล่นเกมสล็อตออนไลน์ เพราะเป็น ค่ายเกมที่มีชื่อเสียง ด้าน ภาพและเอฟเฟกต์ ความ นิ่งไม่สะดุด และ โอกาสรับกำไรที่ดี เกมของ PG พัฒนาโดยผู้ให้บริการชั้นนำ ที่รองรับการเล่นทั้งบน มือถือ และ เดสก์ท็อป
จุดเด่น ของ pg slot
สล็อต PG เป็นเกมสล็อตออนไลน์ที่ออกแบบมาให้ โหลดเร็ว เล่นผ่าน ระบบอัตโนมัติ และรองรับ ทุกแพลตฟอร์ม เข้าเล่นผ่านเว็บได้เลย ผู้เล่นสามารถเข้าเล่นผ่าน Browser ได้ทันที ภาพและเสียงถูกพัฒนาในรูปแบบ สามมิติ ให้ความคมชัด พร้อมเอฟเฟกต์ สวยงาม
คุณสมบัติหลักของเกม PG Slot ได้แก่
ระบบโบนัสและฟรีสปินหลากหลายรูปแบบ
Multiplier
เล่นฟรีก่อนเติมเงิน
รองรับภาษาไทยเต็มรูปแบบ
ระบบฝากถอนสะดวก ทันใจ
แพลตฟอร์ม PG Slot มักมี การฝาก-ถอน ออโต้ตลอด 24 ชม. ขั้นต่ำเริ่มต้นเพียง 1 บาท ขึ้นอยู่กับ เงื่อนไขของเว็บไซต์ การทำรายการใช้เวลา ไม่กี่วินาที ผ่าน คิวอาร์โค้ด หรือระบบ แอปธนาคาร ทำให้ธุรกรรมเป็นไปอย่าง ลื่นไหล
แนวเกมที่คนเล่นเยอะ ใน PG Slot
เกม PG Slot มีธีมหลากหลาย เช่น
ธีม แฟนตาซี
ธีม ผจญภัย
ธีม ความมั่งคั่ง
ธีม Animal
หลายคนชอบเกมที่โบนัสเข้าไว พร้อมระบบ โบนัสรอบพิเศษ และ ระบบจ่ายคุ้มค่า เหมาะกับทั้ง คนเพิ่งเล่น และ สายสล็อตจริงจัง
ความน่าเชื่อถือ
สล็อต PG มีมาตรฐานรองรับ มีการ รักษาความปลอดภัย และใช้ระบบสุ่มผล ระบบสุ่มมาตรฐาน เพื่อให้ผลลัพธ์ ยุติธรรม แพลตฟอร์มที่ให้บริการ PG Slot ควรมี ทีมซัพพอร์ต 24 ชม.
สรุป
pg slot เป็นตัวเลือกยอดนิยมสำหรับผู้ที่ต้องการเล่นสล็อตออนไลน์ ด้วยจุดเด่นด้าน โบนัสหลากหลาย และการทำธุรกรรมที่ ทันใจ ผู้เล่นสามารถเริ่มต้นได้ ไม่ซับซ้อน ฝากถอนสะดวก และเลือกเกมได้ หลากหลายแนว เหมาะสำหรับ ผู้เล่นทุกสไตล์ ในโลกของเกมสล็อตออนไลน์
https://medium.com/@ratypw/ทดลองเล่นสล็อต-pg-70cdb1132344
Your comment is awaiting moderation.
this vendor platform – Discovered this site today and the interface made browsing feel smooth.
Your comment is awaiting moderation.
this resource – Ran into this site, the design feels organized and effortless to use.
Your comment is awaiting moderation.
quick visit – I noticed this website today and exploring sections feels smooth.
Your comment is awaiting moderation.
browse rubyretail – Came across this platform, interface looks user-friendly and well-organized.
Your comment is awaiting moderation.
Агентство недвижимости сопровождает клиентов на всех этапах сделки. От поиска квартиры до передачи ключей специалисты контролируют каждый шаг: жк ice towers
Your comment is awaiting moderation.
удаление жировиков цена
Your comment is awaiting moderation.
Evoraa Store – Navigation feels seamless and item descriptions are easy to follow.
Your comment is awaiting moderation.
take a look – Discovered this site while browsing and everything loads nicely.
Your comment is awaiting moderation.
“Приезжаю к месту,вижу дом обхожу кооператив который мне нужен (ну я так думал)” https://100-digital.ru хороший магазин,всё на красоте и качество и кол-во:) продолжайте в том же духебери не пожалеешь.
Your comment is awaiting moderation.
their product page – Stumbled on the store today and the catalog looks interesting so far.
Your comment is awaiting moderation.
take a look – I discovered this page earlier, everything is intuitive and easy to explore.
Your comment is awaiting moderation.
Discover the thrill of real-money live casino action at streaming live roulette on mobile data Maxispin, where you can enjoy live dealers, top software providers, and exclusive promotions.
The platform maintains transparent policies so users are aware of rules and standards.
Your comment is awaiting moderation.
Good morning!
Unlock the potential of mysterious interesting info for valuable creative work and unleash your artistic genius today see on the website for creative portfolios
Full information on the link – https://msdom.ru/kak-delayut-plastikovye-vtulki-ot-idei-do-gotovoj-detali.html
All the best and development in business!
Your comment is awaiting moderation.
codestackr – Mobile version looks perfect; no glitches, fast scrolling, crisp text.
Your comment is awaiting moderation.
мостбет игры на деньги мостбет игры на деньги
Your comment is awaiting moderation.
mostbet ошибка платежа https://www.mostbet96810.help
Your comment is awaiting moderation.
Биография и карьера Ирека Сафина
Кто такой Ирек Сафин
Сафин Ирек
Ирек Фаатович Сафин (родился в 1978 году в Уфе, Республика Башкортостан) — известный российский предприниматель, успешно развивающий собственный бизнес в разных отраслях экономики. Имя Ирека Сафина прочно связано с инициативностью, ответственностью и успешным ведением предпринимательской деятельности.
Начало пути
Сафин Ирек Фаатович
Родившись в Башкортостане, Сафин рано проявил склонность к предпринимательству. Уже в школьные годы он демонстрировал интерес к экономическим дисциплинам, участвуя в научно-практических мероприятиях и проектах. Получив образование экономиста в Башкирском государственном университете, Ирек начал свою карьеру в сфере торговли и услуг.
Индивидуальное предпринимательство
Сегодня Ирек Сафин известен как индивидуальный предприниматель (ИП Сафин Ирек Фаатович), зарегистрированный в Республике Татарстан. Согласно открытым данным Федеральной налоговой службы, его деятельность охватывает широкий спектр направлений, включая аренду интеллектуальной собственности и предоставление ИТ-услуг. (https://injust.pro/person/165048137571)]
Компании под руководством Ирека Сафина
Сафин Ирек
На сегодняшний день Ирек Сафин возглавляет две компании:
– ООО “ФЮБ” (регистрация 21 мая 2020 года) занимается арендой интеллектуальной собственности. Компания расположена в Казани, ул. Гаврилова, д. 1, этаж 2. (https://injust.pro/person/165048137571)] (https://www.audit-it.ru/contragent/1201600034976_ooo-fyub)]
– ООО “МЮБ СПИСАНИЕ” (регистрация 11 июля 2024 года) специализируется на предоставлении услуг, связанных с использованием вычислительных технологий. Организация находится по адресу: Казань, ул. Гаврилова, дом 1, помещение 14. (https://injust.pro/person/165048137571)]
Отзывы и общественное мнение
Отзывы о работе ИП Сафина отражают позитивное восприятие его деловой активности. Партнеры отмечают надежность, профессионализм и честность в ведении бизнеса. Однако объективность оценки зависит от конкретных обстоятельств взаимодействия с предпринимателем. (https://injust.pro/person/165048137571)]
Будущие перспективы
Развитие современных технологий открывает новые горизонты для развития бизнеса Ирека Сафина. Использование инновационных решений в области аренды интеллектуальной собственности и предоставления ИТ-услуг позволяет ему оставаться конкурентоспособным и востребованным на рынке.
Таким образом, биография и профессиональная деятельность Ирека Сафина являются ярким примером успешного предпринимателя, чьи инициативы и решения способствуют развитию российского рынка и повышению качества предоставляемых услуг.
Сафин Ирек Фаатович
https://t.me/safinirek
Your comment is awaiting moderation.
online rack shop – Just noticed this site and navigating the product sections feels simple.
Your comment is awaiting moderation.
1вин app Тоҷикистон 1вин app Тоҷикистон
Your comment is awaiting moderation.
Good morning!
Analyze net mysterious traffic to find interesting and valuable cyber threat intel and stop hackers before they strike see on the website for threat maps
Full information on the link – https://sequnda.ru/zashhitnye-kozyrki-iz-polikarbonata-garmoniya-nadezhnosti-i-estetiki-dlya-vashego-doma/
All the best and development in business!
Your comment is awaiting moderation.
ทดลองเล่นสล็อต pg
TKBNEKO มอบมิติใหม่ของเกมออนไลน์ ธุรกรรมรวดเร็ว ด้วยระบบสแกน คิวอาร์โค้ด
ในยุคดิจิทัลที่ เทคโนโลยีพัฒนาอย่างรวดเร็ว เรามุ่งเน้นมาตรฐานใหม่ของการเดิมพัน ด้วยระบบที่ ล้ำสมัย รวดเร็ว และ ตรวจสอบได้ เพื่อให้ผู้เล่น อุ่นใจ ทุกครั้งที่ใช้งาน
ระบบการเงินที่ใช้งานง่าย
ฝากขั้นต่ำ: 1 บาท
ถอนขั้นต่ำ: ขั้นต่ำ 1 บาท
เวลาฝากเงิน: ใช้เวลาเพียง 3 วินาที
ยอดถอน: ไม่จำกัดต่อวัน
ฝากง่าย เพียงสแกน QR Code
สแกน QR Code ระบบจะ ประมวลผลอัตโนมัติ ขั้นต่ำ เริ่ม 100 บาท สูงสุด 500,000 บาท
เกมยอดนิยม
สล็อต: ธีมหลากหลาย
เกมสด: คาสิโนเรียลไทม์
กีฬา: แมตช์ทั่วโลก
ยิงปลา: สนุกได้เงินจริง
โปรโมชั่นและสิทธิพิเศษ
ติดตามหน้า โปรโมชั่น พร้อมระบบ VIP และโปรแกรม แอฟฟิลิเอต
ติดต่อเรา
สอบถามข้อมูลได้ตลอด 24 ชั่วโมง ผ่านหน้า ติดต่อเรา ทีมงาน TKBNEKO พร้อมดูแลตลอดเวลา
https://medium.com/@ratypw/ทดลองเล่นสล็อต-pg-e598fa477f69
Your comment is awaiting moderation.
tinytill.shop – I’ll be saving this site to revisit for upcoming purchases.
Your comment is awaiting moderation.
Хочу всех поздравить с наступающим Новым Годом и хочу поделиться с вами своей оптовой сделкой СК крисов. https://crucial-detailing.ru Как то так.Успехов и процветания новому селлеру!!! Желаю денег пресс и в обществе вес))
Your comment is awaiting moderation.
interesting site – Found this online recently and it seems like a solid and neat shop.
Your comment is awaiting moderation.
browse here – Came across this page today, finding products feels effortless and simple.
Your comment is awaiting moderation.
сервис отправки sms от 30 копеек — это современное решение от U-SMS для тех, кто ценит экономию и стабильность связи. Система гарантирует надежную отправку сообщений по доступной стоимости с мобильных устройств iPhone и Windows Mobile. Тарифы на SMS начинаются всего от 30 копеек, что делает предложение особенно привлекательным для активных пользователей. Ключевая особенность — отображается ваш реальный номер отправителя, благодаря чему сохраняется доверие и привычный формат общения. Сервис успешно функционирует уже свыше 14 лет, подтверждая надежность и устойчивость платформы. Платформа корректно работает на устройствах iPhone и Windows Mobile, обеспечивая удобный интерфейс и простую настройку. Оплатить услуги можно электронными деньгами, банковскими картами и через терминалы, что делает процесс максимально гибким. Сервис функционирует онлайн без установки дополнительного оборудования. Сервис используется как для личных целей, так и для бизнес задач. Надежная техническая база гарантирует оперативную отправку SMS. Сервис объединяет экономичность и многолетний опыт работы. Когда требуется экономия без потери функциональности, U-SMS станет рациональным выбором. Начать пользоваться сервисом можно быстро и без сложных процедур, а гибкие условия позволяют контролировать расходы на связь. Выбирайте U-SMS для экономичной и удобной передачи SMS.
https://u-sms.ru/
Your comment is awaiting moderation.
дешевая отправка sms через интернет — это современное решение от U-SMS для тех, кто ценит экономию и стабильность связи. Платформа обеспечивает быструю передачу SMS по выгодным тарифам с мобильных устройств iPhone и Windows Mobile. Цена на отправку стартует от 30 копеек, что делает предложение особенно привлекательным для активных пользователей. Ключевая особенность — отображается ваш реальный номер отправителя, благодаря чему сохраняется доверие и привычный формат общения. Сервис успешно функционирует уже свыше 14 лет, подтверждая надежность и устойчивость платформы. Сервис адаптирован для iPhone и смартфонов с Windows Mobile, обеспечивая удобный интерфейс и простую настройку. Оплатить услуги можно электронными деньгами, банковскими картами и через терминалы, что делает процесс максимально гибким. Для начала работы достаточно подключения к сети. Решение подходит для личного общения, уведомлений и деловой переписки. Высокая скорость доставки и стабильная работа системы обеспечивают комфортное использование. Платформа предлагает оптимальное соотношение стоимости и качества. Если вам важно отправлять SMS со своего номера дешевле стандартных тарифов операторов, U-SMS станет рациональным выбором. Подключение занимает минимум времени и не требует специальных знаний, а гибкие условия позволяют контролировать расходы на связь. Оцените преимущества сервиса U-SMS и отправляйте сообщения дешевле уже сегодня.
https://u-sms.ru/
Your comment is awaiting moderation.
отправка смс с iphone дешево — это современное решение от U-SMS для тех, кто ценит экономию и стабильность связи. Платформа обеспечивает быструю передачу SMS по выгодным тарифам с мобильных устройств iPhone и Windows Mobile. Цена на отправку стартует от 30 копеек, что делает предложение особенно привлекательным для активных пользователей. Основной плюс — получатель видит именно ваш номер, благодаря чему сохраняется доверие и привычный формат общения. Проект развивается и обслуживает клиентов более четырнадцати лет, подтверждая надежность и устойчивость платформы. Сервис адаптирован для iPhone и смартфонов с Windows Mobile, обеспечивая удобный интерфейс и простую настройку. Доступна оплата картами, электронными кошельками и наличными через терминалы, что делает процесс максимально гибким. Для начала работы достаточно подключения к сети. Решение подходит для личного общения, уведомлений и деловой переписки. Высокая скорость доставки и стабильная работа системы обеспечивают комфортное использование. Платформа предлагает оптимальное соотношение стоимости и качества. Когда требуется экономия без потери функциональности, U-SMS станет рациональным выбором. Начать пользоваться сервисом можно быстро и без сложных процедур, а гибкие условия позволяют контролировать расходы на связь. Оцените преимущества сервиса U-SMS и отправляйте сообщения дешевле уже сегодня.
https://u-sms.ru/
Your comment is awaiting moderation.
дешевая отправка sms через интернет — это современное решение от U-SMS для тех, кто ценит экономию и стабильность связи. Сервис позволяет отправлять сообщения по сниженной цене без потери качества доставки с мобильных устройств iPhone и Windows Mobile. Цена на отправку стартует от 30 копеек, что делает предложение особенно привлекательным для активных пользователей. Основной плюс — получатель видит именно ваш номер, благодаря чему сохраняется доверие и привычный формат общения. Сервис успешно функционирует уже свыше 14 лет, подтверждая надежность и устойчивость платформы. Сервис адаптирован для iPhone и смартфонов с Windows Mobile, обеспечивая удобный интерфейс и простую настройку. Доступна оплата картами, электронными кошельками и наличными через терминалы, что делает процесс максимально гибким. Сервис функционирует онлайн без установки дополнительного оборудования. Платформа удобна для частных сообщений и корпоративных рассылок. Высокая скорость доставки и стабильная работа системы обеспечивают комфортное использование. U-SMS сочетает доступные цены и профессиональный подход к обслуживанию. Когда требуется экономия без потери функциональности, U-SMS станет рациональным выбором. Регистрация проста и понятна для любого пользователя, а гибкие условия позволяют контролировать расходы на связь. Используйте возможности U-SMS для выгодной отправки сообщений с iPhone и Windows Mobile.
https://u-sms.ru/
Your comment is awaiting moderation.
смс с windows mobile онлайн — это современное решение от U-SMS для тех, кто ценит экономию и стабильность связи. Сервис позволяет отправлять сообщения по сниженной цене без потери качества доставки с мобильных устройств iPhone и Windows Mobile. Цена на отправку стартует от 30 копеек, что делает предложение особенно привлекательным для активных пользователей. Ключевая особенность — отображается ваш реальный номер отправителя, благодаря чему сохраняется доверие и привычный формат общения. Сервис успешно функционирует уже свыше 14 лет, подтверждая надежность и устойчивость платформы. Поддерживаются популярные мобильные устройства Apple и решения на базе Windows Mobile, обеспечивая удобный интерфейс и простую настройку. Доступна оплата картами, электронными кошельками и наличными через терминалы, что делает процесс максимально гибким. Для начала работы достаточно подключения к сети. Решение подходит для личного общения, уведомлений и деловой переписки. Высокая скорость доставки и стабильная работа системы обеспечивают комфортное использование. U-SMS сочетает доступные цены и профессиональный подход к обслуживанию. Если вам важно отправлять SMS со своего номера дешевле стандартных тарифов операторов, U-SMS станет рациональным выбором. Подключение занимает минимум времени и не требует специальных знаний, а гибкие условия позволяют контролировать расходы на связь. Используйте возможности U-SMS для выгодной отправки сообщений с iPhone и Windows Mobile.
https://u-sms.ru/
Your comment is awaiting moderation.
отправить смс со своего номера — это современное решение от U-SMS для тех, кто ценит экономию и стабильность связи. Платформа обеспечивает быструю передачу SMS по выгодным тарифам с мобильных устройств iPhone и Windows Mobile. Стоимость начинается от 30 копеек за сообщение, что делает предложение особенно привлекательным для активных пользователей. Главное преимущество — отправка с вашего собственного номера, благодаря чему сохраняется доверие и привычный формат общения. U-SMS работает на рынке более 14 лет, подтверждая надежность и устойчивость платформы. Поддерживаются популярные мобильные устройства Apple и решения на базе Windows Mobile, обеспечивая удобный интерфейс и простую настройку. Оплатить услуги можно электронными деньгами, банковскими картами и через терминалы, что делает процесс максимально гибким. Отправка осуществляется через интернет без сложных настроек. Решение подходит для личного общения, уведомлений и деловой переписки. Высокая скорость доставки и стабильная работа системы обеспечивают комфортное использование. U-SMS сочетает доступные цены и профессиональный подход к обслуживанию. Когда требуется экономия без потери функциональности, U-SMS станет рациональным выбором. Начать пользоваться сервисом можно быстро и без сложных процедур, а гибкие условия позволяют контролировать расходы на связь. Используйте возможности U-SMS для выгодной отправки сообщений с iPhone и Windows Mobile.
https://u-sms.ru/
Your comment is awaiting moderation.
сервис отправки sms от 30 копеек — это современное решение от U-SMS для тех, кто ценит экономию и стабильность связи. Сервис позволяет отправлять сообщения по сниженной цене без потери качества доставки с мобильных устройств iPhone и Windows Mobile. Цена на отправку стартует от 30 копеек, что делает предложение особенно привлекательным для активных пользователей. Главное преимущество — отправка с вашего собственного номера, благодаря чему сохраняется доверие и привычный формат общения. U-SMS работает на рынке более 14 лет, подтверждая надежность и устойчивость платформы. Поддерживаются популярные мобильные устройства Apple и решения на базе Windows Mobile, обеспечивая удобный интерфейс и простую настройку. Пользователям предлагаются способы оплаты через карты, электронные системы и платежные терминалы, что делает процесс максимально гибким. Сервис функционирует онлайн без установки дополнительного оборудования. Решение подходит для личного общения, уведомлений и деловой переписки. Высокая скорость доставки и стабильная работа системы обеспечивают комфортное использование. Платформа предлагает оптимальное соотношение стоимости и качества. Когда требуется экономия без потери функциональности, U-SMS станет рациональным выбором. Начать пользоваться сервисом можно быстро и без сложных процедур, а гибкие условия позволяют контролировать расходы на связь. Оцените преимущества сервиса U-SMS и отправляйте сообщения дешевле уже сегодня.
https://u-sms.ru/
Your comment is awaiting moderation.
отправка смс с iphone дешево — это современное решение от U-SMS для тех, кто ценит экономию и стабильность связи. Система гарантирует надежную отправку сообщений по доступной стоимости с мобильных устройств iPhone и Windows Mobile. Тарифы на SMS начинаются всего от 30 копеек, что делает предложение особенно привлекательным для активных пользователей. Ключевая особенность — отображается ваш реальный номер отправителя, благодаря чему сохраняется доверие и привычный формат общения. Сервис успешно функционирует уже свыше 14 лет, подтверждая надежность и устойчивость платформы. Платформа корректно работает на устройствах iPhone и Windows Mobile, обеспечивая удобный интерфейс и простую настройку. Доступна оплата картами, электронными кошельками и наличными через терминалы, что делает процесс максимально гибким. Сервис функционирует онлайн без установки дополнительного оборудования. Платформа удобна для частных сообщений и корпоративных рассылок. Высокая скорость доставки и стабильная работа системы обеспечивают комфортное использование. Платформа предлагает оптимальное соотношение стоимости и качества. Если вам важно отправлять SMS со своего номера дешевле стандартных тарифов операторов, U-SMS станет рациональным выбором. Регистрация проста и понятна для любого пользователя, а гибкие условия позволяют контролировать расходы на связь. Оцените преимущества сервиса U-SMS и отправляйте сообщения дешевле уже сегодня.
https://u-sms.ru/
Your comment is awaiting moderation.
дешевая отправка sms через интернет — это современное решение от U-SMS для тех, кто ценит экономию и стабильность связи. Система гарантирует надежную отправку сообщений по доступной стоимости с мобильных устройств iPhone и Windows Mobile. Тарифы на SMS начинаются всего от 30 копеек, что делает предложение особенно привлекательным для активных пользователей. Главное преимущество — отправка с вашего собственного номера, благодаря чему сохраняется доверие и привычный формат общения. Сервис успешно функционирует уже свыше 14 лет, подтверждая надежность и устойчивость платформы. Поддерживаются популярные мобильные устройства Apple и решения на базе Windows Mobile, обеспечивая удобный интерфейс и простую настройку. Доступна оплата картами, электронными кошельками и наличными через терминалы, что делает процесс максимально гибким. Отправка осуществляется через интернет без сложных настроек. Платформа удобна для частных сообщений и корпоративных рассылок. Надежная техническая база гарантирует оперативную отправку SMS. Платформа предлагает оптимальное соотношение стоимости и качества. Если необходим удобный и проверенный способ отправки сообщений, U-SMS станет рациональным выбором. Начать пользоваться сервисом можно быстро и без сложных процедур, а гибкие условия позволяют контролировать расходы на связь. Оцените преимущества сервиса U-SMS и отправляйте сообщения дешевле уже сегодня.
https://u-sms.ru/
Your comment is awaiting moderation.
сервис отправки sms от 30 копеек — это современное решение от U-SMS для тех, кто ценит экономию и стабильность связи. Платформа обеспечивает быструю передачу SMS по выгодным тарифам с мобильных устройств iPhone и Windows Mobile. Цена на отправку стартует от 30 копеек, что делает предложение особенно привлекательным для активных пользователей. Основной плюс — получатель видит именно ваш номер, благодаря чему сохраняется доверие и привычный формат общения. Проект развивается и обслуживает клиентов более четырнадцати лет, подтверждая надежность и устойчивость платформы. Сервис адаптирован для iPhone и смартфонов с Windows Mobile, обеспечивая удобный интерфейс и простую настройку. Оплатить услуги можно электронными деньгами, банковскими картами и через терминалы, что делает процесс максимально гибким. Отправка осуществляется через интернет без сложных настроек. Платформа удобна для частных сообщений и корпоративных рассылок. Надежная техническая база гарантирует оперативную отправку SMS. Платформа предлагает оптимальное соотношение стоимости и качества. Если необходим удобный и проверенный способ отправки сообщений, U-SMS станет рациональным выбором. Начать пользоваться сервисом можно быстро и без сложных процедур, а гибкие условия позволяют контролировать расходы на связь. Оцените преимущества сервиса U-SMS и отправляйте сообщения дешевле уже сегодня.
https://u-sms.ru/
Your comment is awaiting moderation.
дешевая отправка sms через интернет — это современное решение от U-SMS для тех, кто ценит экономию и стабильность связи. Система гарантирует надежную отправку сообщений по доступной стоимости с мобильных устройств iPhone и Windows Mobile. Стоимость начинается от 30 копеек за сообщение, что делает предложение особенно привлекательным для активных пользователей. Основной плюс — получатель видит именно ваш номер, благодаря чему сохраняется доверие и привычный формат общения. U-SMS работает на рынке более 14 лет, подтверждая надежность и устойчивость платформы. Сервис адаптирован для iPhone и смартфонов с Windows Mobile, обеспечивая удобный интерфейс и простую настройку. Доступна оплата картами, электронными кошельками и наличными через терминалы, что делает процесс максимально гибким. Отправка осуществляется через интернет без сложных настроек. Сервис используется как для личных целей, так и для бизнес задач. Надежная техническая база гарантирует оперативную отправку SMS. U-SMS сочетает доступные цены и профессиональный подход к обслуживанию. Если вам важно отправлять SMS со своего номера дешевле стандартных тарифов операторов, U-SMS станет рациональным выбором. Регистрация проста и понятна для любого пользователя, а гибкие условия позволяют контролировать расходы на связь. Выбирайте U-SMS для экономичной и удобной передачи SMS.
https://u-sms.ru/
Your comment is awaiting moderation.
отправка смс с iphone дешево — это современное решение от U-SMS для тех, кто ценит экономию и стабильность связи. Система гарантирует надежную отправку сообщений по доступной стоимости с мобильных устройств iPhone и Windows Mobile. Тарифы на SMS начинаются всего от 30 копеек, что делает предложение особенно привлекательным для активных пользователей. Ключевая особенность — отображается ваш реальный номер отправителя, благодаря чему сохраняется доверие и привычный формат общения. Проект развивается и обслуживает клиентов более четырнадцати лет, подтверждая надежность и устойчивость платформы. Платформа корректно работает на устройствах iPhone и Windows Mobile, обеспечивая удобный интерфейс и простую настройку. Оплатить услуги можно электронными деньгами, банковскими картами и через терминалы, что делает процесс максимально гибким. Сервис функционирует онлайн без установки дополнительного оборудования. Платформа удобна для частных сообщений и корпоративных рассылок. Надежная техническая база гарантирует оперативную отправку SMS. Платформа предлагает оптимальное соотношение стоимости и качества. Если вам важно отправлять SMS со своего номера дешевле стандартных тарифов операторов, U-SMS станет рациональным выбором. Подключение занимает минимум времени и не требует специальных знаний, а гибкие условия позволяют контролировать расходы на связь. Оцените преимущества сервиса U-SMS и отправляйте сообщения дешевле уже сегодня.
https://u-sms.ru/
Your comment is awaiting moderation.
browse here – Came across this platform today, finding products is straightforward and quick.
Your comment is awaiting moderation.
mostbet купон ставок mostbet купон ставок
Your comment is awaiting moderation.
мостбет plinko стратегия мостбет plinko стратегия
Your comment is awaiting moderation.
check this store – Came across this platform, layout feels clean and items are easy to find.
Your comment is awaiting moderation.
скачать приложения Windows Phone 8 это информационный портал для владельцев смартфонов на базе операционной системы Windows Phone 8, где собраны популярные игровые новинки, необходимые программы и подробные инструкции. На сайте вы можете найти новые игровые проекты и обновить набор полезных утилит без лишних сложностей. Раздел с инструкциями поможет оптимизировать работу устройства, а также настроить безопасность. Мы публикуем аналитику и подборки, чтобы каждый пользователь смог выбрать оптимальные решения. Отдельное внимание уделено разделу с темами оформления, где доступны стильные темы, позволяющие создать уникальный стиль устройства. В каталоге представлены экшен, логические и казуальные проекты, а также офисные инструменты и мессенджеры. Каждый материал сопровождается описанием возможностей, что облегчает выбор. Сообщество пользователей делится советами по установке, формируя активную базу знаний по Windows Phone 8. Мы регулярно обновляем контент, чтобы информация оставалась актуальной и полезной. Если вы ищете понятные инструкции по настройке, данный ресурс станет надежным источником информации. Здесь собраны материалы для продвинутых владельцев смартфонов, что делает сайт универсальным пространством для поклонников Windows Phone 8.
https://windows-phone-8.ru/
Your comment is awaiting moderation.
Windows Phone 8 Community игры и программы для WP8 это онлайн сообщество для владельцев смартфонов на базе операционной системы Windows Phone 8, где собраны топ мобильные развлечения, актуальные сервисы и подробные инструкции. На сайте вы можете найти новые игровые проекты и обновить набор полезных утилит без лишних сложностей. Раздел с инструкциями поможет разобраться с настройками системы, а также настроить безопасность. Мы публикуем аналитику и подборки, чтобы каждый пользователь смог найти подходящий софт. Отдельное внимание уделено разделу с темами оформления, где доступны оригинальные варианты интерфейса, позволяющие создать уникальный стиль устройства. В каталоге представлены развлекательные игры разных жанров, а также офисные инструменты и мессенджеры. Каждый материал сопровождается подробным разбором функций, что облегчает выбор. Сообщество пользователей делится советами по установке, формируя активную базу знаний по Windows Phone 8. Мы регулярно расширяем каталог, чтобы информация оставалась актуальной и полезной. Если вы ищете понятные инструкции по настройке, данный ресурс станет надежным источником информации. Здесь собраны материалы для продвинутых владельцев смартфонов, что делает сайт универсальным пространством для поклонников Windows Phone 8.
https://windows-phone-8.ru/
Your comment is awaiting moderation.
руководства и оформление это информационный портал для владельцев смартфонов на базе мобильной ОС Windows Phone 8, где собраны популярные игровые новинки, полезные приложения и подробные инструкции. На сайте вы можете найти новые игровые проекты и обновить набор полезных утилит без лишних сложностей. Раздел с инструкциями поможет решить распространенные проблемы, а также настроить безопасность. Мы публикуем описания и советы, чтобы каждый пользователь смог использовать потенциал устройства на максимум. Отдельное внимание уделено разделу с темами оформления, где доступны кастомные решения для экрана, позволяющие персонализировать интерфейс. В каталоге представлены развлекательные игры разных жанров, а также программы для учебы и бизнеса. Каждый материал сопровождается подробным разбором функций, что облегчает выбор. Сообщество пользователей делится отзывами и опытом, формируя активную базу знаний по Windows Phone 8. Мы регулярно добавляем новые публикации, чтобы информация оставалась актуальной и полезной. Если вы ищете надежные приложения для WP8, данный ресурс станет практичным гидом по платформе. Здесь собраны материалы для продвинутых владельцев смартфонов, что делает сайт универсальным пространством для поклонников Windows Phone 8.
https://windows-phone-8.ru/
Your comment is awaiting moderation.
скачать приложения Windows Phone 8 это онлайн сообщество для владельцев смартфонов на базе операционной системы Windows Phone 8, где собраны топ мобильные развлечения, необходимые программы и подробные инструкции. На сайте вы можете скачать игры бесплатно и установить приложения для работы и общения без лишних сложностей. Раздел с инструкциями поможет оптимизировать работу устройства, а также настроить безопасность. Мы публикуем описания и советы, чтобы каждый пользователь смог выбрать оптимальные решения. Отдельное внимание уделено разделу с темами оформления, где доступны оригинальные варианты интерфейса, позволяющие создать уникальный стиль устройства. В каталоге представлены экшен, логические и казуальные проекты, а также программы для учебы и бизнеса. Каждый материал сопровождается описанием возможностей, что облегчает выбор. Сообщество пользователей делится отзывами и опытом, формируя активную базу знаний по Windows Phone 8. Мы регулярно расширяем каталог, чтобы информация оставалась актуальной и полезной. Если вы ищете игры для Windows Phone 8, данный ресурс станет надежным источником информации. Здесь собраны решения для начинающих пользователей, что делает сайт универсальным пространством для поклонников Windows Phone 8.
https://windows-phone-8.ru/
Your comment is awaiting moderation.
инструкции и темы оформления WP8 это информационный портал для владельцев смартфонов на базе платформы WP8, где собраны топ мобильные развлечения, необходимые программы и пошаговые мануалы. На сайте вы можете найти новые игровые проекты и расширить возможности смартфона с помощью программ без лишних сложностей. Раздел с инструкциями поможет оптимизировать работу устройства, а также узнать о скрытых функциях. Мы публикуем аналитику и подборки, чтобы каждый пользователь смог найти подходящий софт. Отдельное внимание уделено разделу с темами оформления, где доступны кастомные решения для экрана, позволяющие персонализировать интерфейс. В каталоге представлены экшен, логические и казуальные проекты, а также социальные и мультимедийные приложения. Каждый материал сопровождается подробным разбором функций, что облегчает выбор. Сообщество пользователей делится рекомендациями по использованию, формируя активную базу знаний по Windows Phone 8. Мы регулярно обновляем контент, чтобы информация оставалась актуальной и полезной. Если вы ищете игры для Windows Phone 8, данный ресурс станет надежным источником информации. Здесь собраны решения для начинающих пользователей, что делает сайт универсальным пространством для поклонников Windows Phone 8.
https://windows-phone-8.ru/
Your comment is awaiting moderation.
Windows Phone 8 Community игры скачать это онлайн сообщество для владельцев смартфонов на базе операционной системы Windows Phone 8, где собраны топ мобильные развлечения, полезные приложения и подробные инструкции. На сайте вы можете найти новые игровые проекты и установить приложения для работы и общения без лишних сложностей. Раздел с инструкциями поможет оптимизировать работу устройства, а также повысить производительность смартфона. Мы публикуем обзоры и рекомендации, чтобы каждый пользователь смог использовать потенциал устройства на максимум. Отдельное внимание уделено разделу с темами оформления, где доступны кастомные решения для экрана, позволяющие изменить внешний вид смартфона. В каталоге представлены аркады, стратегии и головоломки, а также программы для учебы и бизнеса. Каждый материал сопровождается характеристиками и скриншотами, что облегчает выбор. Сообщество пользователей делится отзывами и опытом, формируя активную базу знаний по Windows Phone 8. Мы регулярно добавляем новые публикации, чтобы информация оставалась актуальной и полезной. Если вы ищете надежные приложения для WP8, данный ресурс станет удобным помощником. Здесь собраны полезные данные для всех уровней опыта, что делает сайт универсальным пространством для поклонников Windows Phone 8.
https://windows-phone-8.ru/
Your comment is awaiting moderation.
инструкции и кастомные темы это онлайн сообщество для владельцев смартфонов на базе мобильной ОС Windows Phone 8, где собраны топ мобильные развлечения, необходимые программы и понятные руководства. На сайте вы можете найти новые игровые проекты и обновить набор полезных утилит без лишних сложностей. Раздел с инструкциями поможет разобраться с настройками системы, а также узнать о скрытых функциях. Мы публикуем обзоры и рекомендации, чтобы каждый пользователь смог найти подходящий софт. Отдельное внимание уделено разделу с темами оформления, где доступны стильные темы, позволяющие создать уникальный стиль устройства. В каталоге представлены экшен, логические и казуальные проекты, а также офисные инструменты и мессенджеры. Каждый материал сопровождается описанием возможностей, что облегчает выбор. Сообщество пользователей делится советами по установке, формируя активную базу знаний по Windows Phone 8. Мы регулярно обновляем контент, чтобы информация оставалась актуальной и полезной. Если вы ищете надежные приложения для WP8, данный ресурс станет удобным помощником. Здесь собраны решения для начинающих пользователей, что делает сайт универсальным пространством для поклонников Windows Phone 8.
https://windows-phone-8.ru/
Your comment is awaiting moderation.
мобильные приложения Windows Phone 8 это онлайн сообщество для владельцев смартфонов на базе платформы WP8, где собраны популярные игровые новинки, полезные приложения и пошаговые мануалы. На сайте вы можете подобрать интересные развлечения и расширить возможности смартфона с помощью программ без лишних сложностей. Раздел с инструкциями поможет решить распространенные проблемы, а также узнать о скрытых функциях. Мы публикуем обзоры и рекомендации, чтобы каждый пользователь смог выбрать оптимальные решения. Отдельное внимание уделено разделу с темами оформления, где доступны кастомные решения для экрана, позволяющие изменить внешний вид смартфона. В каталоге представлены развлекательные игры разных жанров, а также программы для учебы и бизнеса. Каждый материал сопровождается описанием возможностей, что облегчает выбор. Сообщество пользователей делится советами по установке, формируя активную базу знаний по Windows Phone 8. Мы регулярно расширяем каталог, чтобы информация оставалась актуальной и полезной. Если вы ищете надежные приложения для WP8, данный ресурс станет удобным помощником. Здесь собраны материалы для продвинутых владельцев смартфонов, что делает сайт универсальным пространством для поклонников Windows Phone 8.
https://windows-phone-8.ru/
Your comment is awaiting moderation.
руководства и оформление это информационный портал для владельцев смартфонов на базе операционной системы Windows Phone 8, где собраны популярные игровые новинки, полезные приложения и понятные руководства. На сайте вы можете подобрать интересные развлечения и расширить возможности смартфона с помощью программ без лишних сложностей. Раздел с инструкциями поможет решить распространенные проблемы, а также узнать о скрытых функциях. Мы публикуем аналитику и подборки, чтобы каждый пользователь смог найти подходящий софт. Отдельное внимание уделено разделу с темами оформления, где доступны кастомные решения для экрана, позволяющие создать уникальный стиль устройства. В каталоге представлены развлекательные игры разных жанров, а также программы для учебы и бизнеса. Каждый материал сопровождается описанием возможностей, что облегчает выбор. Сообщество пользователей делится рекомендациями по использованию, формируя активную базу знаний по Windows Phone 8. Мы регулярно добавляем новые публикации, чтобы информация оставалась актуальной и полезной. Если вы ищете надежные приложения для WP8, данный ресурс станет практичным гидом по платформе. Здесь собраны материалы для продвинутых владельцев смартфонов, что делает сайт универсальным пространством для поклонников Windows Phone 8.
https://windows-phone-8.ru/
Your comment is awaiting moderation.
инструкции и кастомные темы это специализированный сайт для владельцев смартфонов на базе платформы WP8, где собраны популярные игровые новинки, актуальные сервисы и понятные руководства. На сайте вы можете скачать игры бесплатно и расширить возможности смартфона с помощью программ без лишних сложностей. Раздел с инструкциями поможет решить распространенные проблемы, а также настроить безопасность. Мы публикуем обзоры и рекомендации, чтобы каждый пользователь смог использовать потенциал устройства на максимум. Отдельное внимание уделено разделу с темами оформления, где доступны кастомные решения для экрана, позволяющие персонализировать интерфейс. В каталоге представлены развлекательные игры разных жанров, а также программы для учебы и бизнеса. Каждый материал сопровождается подробным разбором функций, что облегчает выбор. Сообщество пользователей делится рекомендациями по использованию, формируя активную базу знаний по Windows Phone 8. Мы регулярно расширяем каталог, чтобы информация оставалась актуальной и полезной. Если вы ищете понятные инструкции по настройке, данный ресурс станет практичным гидом по платформе. Здесь собраны полезные данные для всех уровней опыта, что делает сайт универсальным пространством для поклонников Windows Phone 8.
https://windows-phone-8.ru/
Your comment is awaiting moderation.
инструкции и кастомные темы это онлайн сообщество для владельцев смартфонов на базе платформы WP8, где собраны лучшие игры, актуальные сервисы и пошаговые мануалы. На сайте вы можете скачать игры бесплатно и обновить набор полезных утилит без лишних сложностей. Раздел с инструкциями поможет решить распространенные проблемы, а также узнать о скрытых функциях. Мы публикуем аналитику и подборки, чтобы каждый пользователь смог выбрать оптимальные решения. Отдельное внимание уделено разделу с темами оформления, где доступны кастомные решения для экрана, позволяющие изменить внешний вид смартфона. В каталоге представлены экшен, логические и казуальные проекты, а также социальные и мультимедийные приложения. Каждый материал сопровождается характеристиками и скриншотами, что облегчает выбор. Сообщество пользователей делится рекомендациями по использованию, формируя активную базу знаний по Windows Phone 8. Мы регулярно расширяем каталог, чтобы информация оставалась актуальной и полезной. Если вы ищете игры для Windows Phone 8, данный ресурс станет надежным источником информации. Здесь собраны полезные данные для всех уровней опыта, что делает сайт универсальным пространством для поклонников Windows Phone 8.
https://windows-phone-8.ru/
Your comment is awaiting moderation.
инструкции и темы оформления WP8 это информационный портал для владельцев смартфонов на базе операционной системы Windows Phone 8, где собраны топ мобильные развлечения, необходимые программы и понятные руководства. На сайте вы можете подобрать интересные развлечения и обновить набор полезных утилит без лишних сложностей. Раздел с инструкциями поможет решить распространенные проблемы, а также узнать о скрытых функциях. Мы публикуем обзоры и рекомендации, чтобы каждый пользователь смог использовать потенциал устройства на максимум. Отдельное внимание уделено разделу с темами оформления, где доступны оригинальные варианты интерфейса, позволяющие изменить внешний вид смартфона. В каталоге представлены развлекательные игры разных жанров, а также программы для учебы и бизнеса. Каждый материал сопровождается характеристиками и скриншотами, что облегчает выбор. Сообщество пользователей делится рекомендациями по использованию, формируя активную базу знаний по Windows Phone 8. Мы регулярно расширяем каталог, чтобы информация оставалась актуальной и полезной. Если вы ищете игры для Windows Phone 8, данный ресурс станет практичным гидом по платформе. Здесь собраны решения для начинающих пользователей, что делает сайт универсальным пространством для поклонников Windows Phone 8.
https://windows-phone-8.ru/
Your comment is awaiting moderation.
Я неделю вторую жду треккогда заработает https://boxmarket24.ru А в сочи есть магазиныгде вообще оператор или кто ни будь? бабло уплочено и жду доставку а на связи ни кого нету!!!!!!!!!!
Your comment is awaiting moderation.
Instagram down Instagram down .
Your comment is awaiting moderation.
take a look – Discovered this page earlier and it feels very easy to explore.
Your comment is awaiting moderation.
скачать ВК.Рация бесплатно — это простой способ передавать голосовые сообщения в один клик, которое позволяет общаться без звонков и сложных настроек. Загрузите сервис на смартфон и используйте без дополнительного оборудования. Приложение использует стабильное онлайн подключение, поэтому его можно использовать в офисе и на выезде. Мгновенные голосовые сообщения передаются одним нажатием, что особенно важно для спортивных команд и организаторов мероприятий. Все диалоги сохраняются в облаке для быстрого доступа, что упрощает контроль задач. Приложение подходит для квестов и активных игр, так как добавление участников происходит мгновенно. Навигация продумана для быстрого старта, а функционал закрывает потребности командной работы. Сервис доступен без оплаты и скрытых подписок, поэтому вы можете скачать и использовать ее без ограничений. Передача речи происходит с высоким качеством, что ускоряет выполнение задач в команде. Попробуйте современную рацию ВКонтакте прямо сейчас и убедитесь в простоте командного общения.
https://vkracia.ru/
Your comment is awaiting moderation.
скачать ВК.Рация бесплатно — это простой способ передавать голосовые сообщения в один клик, которое обеспечивает быструю передачу голоса через интернет. Загрузите сервис на смартфон и используйте без дополнительного оборудования. Приложение использует стабильное онлайн подключение, поэтому он удобен как в помещении так и на улице. Связь осуществляется без задержек и долгого ожидания, что особенно важно для офисных сотрудников и администраторов. Все диалоги сохраняются в облаке для быстрого доступа, что дает возможность восстановить важную информацию. Приложение подходит для квестов и активных игр, так как создание каналов занимает минимум времени. Управление максимально простое и удобное, а функционал закрывает потребности командной работы. Программа не требует покупки лицензии, поэтому начать работу можно сразу после установки. Связь остается стабильной даже при активном использовании, что ускоряет выполнение задач в команде. Скачайте ВК.Рацию на свой смартфон уже сегодня и оцените удобство мгновенной голосовой связи.
https://vkracia.ru/
Your comment is awaiting moderation.
голосовая рация онлайн — это простой способ передавать голосовые сообщения в один клик, которое позволяет общаться без звонков и сложных настроек. Загрузите сервис на смартфон и используйте без дополнительного оборудования. Приложение использует стабильное онлайн подключение, поэтому его можно использовать в офисе и на выезде. Мгновенные голосовые сообщения передаются одним нажатием, что особенно важно для офисных сотрудников и администраторов. Все диалоги сохраняются в облаке для быстрого доступа, что упрощает контроль задач. Решение востребовано в логистике и корпоративной среде, так как добавление участников происходит мгновенно. Навигация продумана для быстрого старта, а функционал закрывает потребности командной работы. Программа не требует покупки лицензии, поэтому каждый пользователь получает полный доступ к функциям. Связь остается стабильной даже при активном использовании, что повышает эффективность коммуникации. Установите приложение и протестируйте возможности бесплатно и оцените удобство мгновенной голосовой связи.
https://vkracia.ru/
Your comment is awaiting moderation.
скачать ВК.Рация бесплатно — это удобное решение для мгновенной голосовой связи, которое позволяет общаться без звонков и сложных настроек. Скачайте приложение и начните говорить сразу после установки. Сервис функционирует по сети без ограничений по расстоянию, поэтому он удобен как в помещении так и на улице. Отправка голоса происходит в реальном времени, что особенно важно для офисных сотрудников и администраторов. Все диалоги сохраняются в облаке для быстрого доступа, что помогает отслеживать рабочие процессы. Приложение подходит для квестов и активных игр, так как добавление участников происходит мгновенно. Интерфейс интуитивно понятен даже новичкам, а функционал закрывает потребности командной работы. Программа не требует покупки лицензии, поэтому начать работу можно сразу после установки. Связь остается стабильной даже при активном использовании, что ускоряет выполнение задач в команде. Скачайте ВК.Рацию на свой смартфон уже сегодня и убедитесь в простоте командного общения.
https://vkracia.ru/
Your comment is awaiting moderation.
мостбет скачать Киргизия mostbet15247.help
Your comment is awaiting moderation.
голосовая рация онлайн — это удобное решение для мгновенной голосовой связи, которое заменяет традиционные рации на вашем телефоне. Установите программу и подключайтесь к каналам за несколько секунд. ВК.Рация работает через интернет соединение, поэтому подходит для города и поездок. Связь осуществляется без задержек и долгого ожидания, что особенно важно для офисных сотрудников и администраторов. История переговоров доступна в любое время через аккаунт, что упрощает контроль задач. Решение востребовано в логистике и корпоративной среде, так как создание каналов занимает минимум времени. Навигация продумана для быстрого старта, а функционал закрывает потребности командной работы. ВК.Рация распространяется бесплатно, поэтому начать работу можно сразу после установки. Передача речи происходит с высоким качеством, что повышает эффективность коммуникации. Попробуйте современную рацию ВКонтакте прямо сейчас и переведите рабочие процессы на новый уровень взаимодействия.
https://vkracia.ru/
Your comment is awaiting moderation.
мостбет безопасность аккаунта https://www.mostbet96810.help
Your comment is awaiting moderation.
голосовая рация онлайн — это простой способ передавать голосовые сообщения в один клик, которое заменяет традиционные рации на вашем телефоне. Скачайте приложение и начните говорить сразу после установки. Приложение использует стабильное онлайн подключение, поэтому подходит для города и поездок. Мгновенные голосовые сообщения передаются одним нажатием, что особенно важно для курьеров и служб доставки. Все диалоги сохраняются в облаке для быстрого доступа, что помогает отслеживать рабочие процессы. Решение востребовано в логистике и корпоративной среде, так как создание каналов занимает минимум времени. Интерфейс интуитивно понятен даже новичкам, а возможности приложения подходят для разных сценариев использования. Сервис доступен без оплаты и скрытых подписок, поэтому вы можете скачать и использовать ее без ограничений. Голосовая рация онлайн обеспечивает четкий звук, что повышает эффективность коммуникации. Попробуйте современную рацию ВКонтакте прямо сейчас и переведите рабочие процессы на новый уровень взаимодействия.
https://vkracia.ru/
Your comment is awaiting moderation.
ВК.Рация для смартфона — это современный сервис для общения в формате рации, которое обеспечивает быструю передачу голоса через интернет. Скачайте приложение и начните говорить сразу после установки. Приложение использует стабильное онлайн подключение, поэтому он удобен как в помещении так и на улице. Отправка голоса происходит в реальном времени, что особенно важно для офисных сотрудников и администраторов. Облачное хранение сообщений позволяет прослушать записи позже, что упрощает контроль задач. Решение востребовано в логистике и корпоративной среде, так как создание каналов занимает минимум времени. Интерфейс интуитивно понятен даже новичкам, а возможности приложения подходят для разных сценариев использования. Программа не требует покупки лицензии, поэтому каждый пользователь получает полный доступ к функциям. Передача речи происходит с высоким качеством, что снижает количество ошибок при передаче информации. Скачайте ВК.Рацию на свой смартфон уже сегодня и переведите рабочие процессы на новый уровень взаимодействия.
https://vkracia.ru/
Your comment is awaiting moderation.
Положение СКА в турнирной таблице КХЛ остаётся напряжённым. Команде предстоит серия важных матчей, которые могут приблизить её к плей-офф. Разбираем ключевые игры и шансы клуба. Подробнее здесь: https://cont.ws/@sirgreensz/3171876
Your comment is awaiting moderation.
скачать ВК.Рация бесплатно — это современный сервис для общения в формате рации, которое позволяет общаться без звонков и сложных настроек. Загрузите сервис на смартфон и используйте без дополнительного оборудования. Сервис функционирует по сети без ограничений по расстоянию, поэтому его можно использовать в офисе и на выезде. Отправка голоса происходит в реальном времени, что особенно важно для курьеров и служб доставки. Все диалоги сохраняются в облаке для быстрого доступа, что помогает отслеживать рабочие процессы. Приложение подходит для квестов и активных игр, так как добавление участников происходит мгновенно. Навигация продумана для быстрого старта, а функционал закрывает потребности командной работы. Программа не требует покупки лицензии, поэтому каждый пользователь получает полный доступ к функциям. Передача речи происходит с высоким качеством, что снижает количество ошибок при передаче информации. Попробуйте современную рацию ВКонтакте прямо сейчас и переведите рабочие процессы на новый уровень взаимодействия.
https://vkracia.ru/
Your comment is awaiting moderation.
ВК.Рация для смартфона — это удобное решение для мгновенной голосовой связи, которое заменяет традиционные рации на вашем телефоне. Загрузите сервис на смартфон и используйте без дополнительного оборудования. Сервис функционирует по сети без ограничений по расстоянию, поэтому подходит для города и поездок. Отправка голоса происходит в реальном времени, что особенно важно для курьеров и служб доставки. Облачное хранение сообщений позволяет прослушать записи позже, что упрощает контроль задач. Приложение подходит для квестов и активных игр, так как добавление участников происходит мгновенно. Навигация продумана для быстрого старта, а функционал закрывает потребности командной работы. Сервис доступен без оплаты и скрытых подписок, поэтому каждый пользователь получает полный доступ к функциям. Передача речи происходит с высоким качеством, что ускоряет выполнение задач в команде. Попробуйте современную рацию ВКонтакте прямо сейчас и убедитесь в простоте командного общения.
https://vkracia.ru/
Your comment is awaiting moderation.
приложение рация ВКонтакте — это удобное решение для мгновенной голосовой связи, которое заменяет традиционные рации на вашем телефоне. Загрузите сервис на смартфон и используйте без дополнительного оборудования. Приложение использует стабильное онлайн подключение, поэтому подходит для города и поездок. Отправка голоса происходит в реальном времени, что особенно важно для курьеров и служб доставки. История переговоров доступна в любое время через аккаунт, что помогает отслеживать рабочие процессы. Приложение подходит для квестов и активных игр, так как добавление участников происходит мгновенно. Навигация продумана для быстрого старта, а настройки позволяют адаптировать связь под свои задачи. Программа не требует покупки лицензии, поэтому каждый пользователь получает полный доступ к функциям. Голосовая рация онлайн обеспечивает четкий звук, что ускоряет выполнение задач в команде. Скачайте ВК.Рацию на свой смартфон уже сегодня и переведите рабочие процессы на новый уровень взаимодействия.
https://vkracia.ru/
Your comment is awaiting moderation.
ВК.Рация для смартфона — это простой способ передавать голосовые сообщения в один клик, которое обеспечивает быструю передачу голоса через интернет. Скачайте приложение и начните говорить сразу после установки. Приложение использует стабильное онлайн подключение, поэтому его можно использовать в офисе и на выезде. Отправка голоса происходит в реальном времени, что особенно важно для офисных сотрудников и администраторов. Все диалоги сохраняются в облаке для быстрого доступа, что дает возможность восстановить важную информацию. Приложение подходит для квестов и активных игр, так как создание каналов занимает минимум времени. Интерфейс интуитивно понятен даже новичкам, а функционал закрывает потребности командной работы. Сервис доступен без оплаты и скрытых подписок, поэтому начать работу можно сразу после установки. Передача речи происходит с высоким качеством, что ускоряет выполнение задач в команде. Скачайте ВК.Рацию на свой смартфон уже сегодня и оцените удобство мгновенной голосовой связи.
https://vkracia.ru/
Your comment is awaiting moderation.
link worth checking – Stumbled on this website, layout seems tidy and browsing is effortless.
Your comment is awaiting moderation.
все о Nokia 5800 XpressMusic — это развернутый материал о легендарной модели, который стал известен как музыкальный флагман своего времени. В этом материале вы найдете детальный разбор корпуса и дисплея, а также технические параметры устройства. Модель получила удобный резистивный дисплей с диагональю 3.2 дюйма, что позволяет легко пользоваться приложениями. Аппарат расширяется при помощи microSD и оснащен качественной камерой, благодаря чему может использоваться для создания снимков и роликов. Отдельного внимания заслуживает звук и мультимедийные возможности, ведь модель ориентирована на качественное воспроизведение аудио. Если вас интересует где приобрести Nokia 5800 XpressMusic, стоит обратить внимание на проверенные магазины электроники, где представлены лучшие цены. Перед покупкой рекомендуется изучить предложения продавцов, чтобы выбрать лучшее сочетание стоимости и состояния. Сегодня нокия 5800 часто встречается в продаже б у, так как модель отличается стабильной работой. Благодаря классическому дизайну и надежной платформе Nokia 5800 XpressMusic привлекает внимание ценителей ретро смартфонов. Если вы ищете подробный обзор Nokia 5800, этот материал позволит оценить преимущества модели и узнать где купить Nokia 5800 по лучшей цене.
https://nokia5800.ru/
Your comment is awaiting moderation.
Обзор Nokia 5800 — это развернутый материал о легендарной модели, который стал известен как музыкальный флагман своего времени. В этом материале вы найдете детальный разбор корпуса и дисплея, а также технические параметры устройства. Nokia 5800 XpressMusic оснащен сенсорным экраном с диагональю 3.2 дюйма, что обеспечивает комфортное управление. Аппарат поддерживает карты памяти microSD и оснащен качественной камерой, благодаря чему подходит для повседневной съемки. Отдельного внимания заслуживает музыкальная составляющая устройства, ведь модель ориентирована на качественное воспроизведение аудио. Если вас интересует где приобрести Nokia 5800 XpressMusic, стоит обратить внимание на официальных продавцов мобильной техники, где представлены лучшие цены. Перед покупкой рекомендуется проверить актуальные цены, чтобы выбрать лучшее сочетание стоимости и состояния. Сегодня нокия 5800 часто встречается в продаже б у, так как модель отличается стабильной работой. Благодаря качественной сборке и удобному интерфейсу Nokia 5800 XpressMusic по прежнему вызывает интерес. Если вы ищете полную информацию о нокиа 5800, этот материал позволит оценить преимущества модели и выбрать оптимальное предложение на рынке.
https://nokia5800.ru/
Your comment is awaiting moderation.
Nokia 5800 обзор характеристики — это актуальные сведения о популярном телефоне, который получил широкую популярность среди любителей мобильной музыки. В этом материале вы найдете описание дизайна и экрана, а также технические параметры устройства. Телефон оборудован ярким сенсорным экраном с компактным 3.2 дюймовым дисплеем, что позволяет легко пользоваться приложениями. Аппарат расширяется при помощи microSD и оснащен качественной камерой, благодаря чему подходит для повседневной съемки. Отдельного внимания заслуживает музыкальная составляющая устройства, ведь модель позиционировалась как XpressMusic серия. Если вас интересует где приобрести Nokia 5800 XpressMusic, стоит обратить внимание на проверенные магазины электроники, где представлены лучшие цены. Перед покупкой рекомендуется изучить предложения продавцов, чтобы выбрать оптимальный вариант по цене и качеству. Сегодня продажа Nokia 5800 остается актуальной на вторичном рынке, так как модель отличается стабильной работой. Благодаря качественной сборке и удобному интерфейсу Nokia 5800 XpressMusic остается востребованной среди поклонников бренда. Если вы ищете подробный обзор Nokia 5800, этот материал даст ответы на основные вопросы и найти подходящий вариант для покупки.
https://nokia5800.ru/
Your comment is awaiting moderation.
Обзор Nokia 5800 — это подробная информация о возможностях смартфона, который завоевал признание благодаря мультимедийным функциям. В этом материале вы найдете описание дизайна и экрана, а также полный список характеристик. Nokia 5800 XpressMusic оснащен сенсорным экраном с диагональю 3.2 дюйма, что обеспечивает комфортное управление. Аппарат позволяет увеличить объем памяти картой microSD и получил встроенную камеру для фото и видео, благодаря чему позволяет запечатлеть важные моменты. Отдельного внимания заслуживает звук и мультимедийные возможности, ведь модель создавалась как музыкальный телефон. Если вас интересует где купить Nokia 5800, стоит обратить внимание на интернет магазины с хорошими отзывами, где представлены лучшие цены. Перед покупкой рекомендуется изучить предложения продавцов, чтобы выбрать оптимальный вариант по цене и качеству. Сегодня эту модель можно найти среди объявлений о продаже телефонов, так как устройство ценится за надежность. Благодаря качественной сборке и удобному интерфейсу Nokia 5800 XpressMusic привлекает внимание ценителей ретро смартфонов. Если вы ищете детальное описание характеристик, этот материал поможет принять решение о покупке и узнать где купить Nokia 5800 по лучшей цене.
https://nokia5800.ru/
Your comment is awaiting moderation.
Nokia 5800 обзор характеристики — это развернутый материал о легендарной модели, который завоевал признание благодаря мультимедийным функциям. В этом материале вы найдете описание дизайна и экрана, а также основные спецификации модели. Телефон оборудован ярким сенсорным экраном с диагональю 3.2 дюйма, что обеспечивает комфортное управление. Аппарат расширяется при помощи microSD и получил встроенную камеру для фото и видео, благодаря чему подходит для повседневной съемки. Отдельного внимания заслуживает аудиосистема смартфона, ведь модель создавалась как музыкальный телефон. Если вас интересует как выбрать и купить Nokia 5800, стоит обратить внимание на интернет магазины с хорошими отзывами, где можно найти выгодные предложения. Перед покупкой рекомендуется проверить актуальные цены, чтобы выбрать лучшее сочетание стоимости и состояния. Сегодня нокия 5800 часто встречается в продаже б у, так как модель отличается стабильной работой. Благодаря классическому дизайну и надежной платформе Nokia 5800 XpressMusic привлекает внимание ценителей ретро смартфонов. Если вы ищете детальное описание характеристик, этот материал поможет принять решение о покупке и выбрать оптимальное предложение на рынке.
https://nokia5800.ru/
Your comment is awaiting moderation.
Обзор Nokia 5800 — это актуальные сведения о популярном телефоне, который получил широкую популярность среди любителей мобильной музыки. В этом материале вы найдете характеристики внешнего вида и интерфейса, а также полный список характеристик. Телефон оборудован ярким сенсорным экраном с компактным 3.2 дюймовым дисплеем, что делает работу с меню удобной. Аппарат позволяет увеличить объем памяти картой microSD и получил встроенную камеру для фото и видео, благодаря чему подходит для повседневной съемки. Отдельного внимания заслуживает аудиосистема смартфона, ведь модель ориентирована на качественное воспроизведение аудио. Если вас интересует где купить Nokia 5800, стоит обратить внимание на официальных продавцов мобильной техники, где можно найти выгодные предложения. Перед покупкой рекомендуется сравнить стоимость в разных магазинах, чтобы выбрать оптимальный вариант по цене и качеству. Сегодня продажа Nokia 5800 остается актуальной на вторичном рынке, так как телефон известен своей долговечностью. Благодаря качественной сборке и удобному интерфейсу Nokia 5800 XpressMusic остается востребованной среди поклонников бренда. Если вы ищете детальное описание характеристик, этот материал позволит оценить преимущества модели и выбрать оптимальное предложение на рынке.
https://nokia5800.ru/
Your comment is awaiting moderation.
Nokia 5800 обзор характеристики — это актуальные сведения о популярном телефоне, который завоевал признание благодаря мультимедийным функциям. В этом материале вы найдете характеристики внешнего вида и интерфейса, а также технические параметры устройства. Телефон оборудован ярким сенсорным экраном с компактным 3.2 дюймовым дисплеем, что делает работу с меню удобной. Аппарат позволяет увеличить объем памяти картой microSD и оборудован модулем камеры с автофокусом, благодаря чему подходит для повседневной съемки. Отдельного внимания заслуживает звук и мультимедийные возможности, ведь модель позиционировалась как XpressMusic серия. Если вас интересует как выбрать и купить Nokia 5800, стоит обратить внимание на официальных продавцов мобильной техники, где доступны акции и скидки. Перед покупкой рекомендуется сравнить стоимость в разных магазинах, чтобы выбрать оптимальный вариант по цене и качеству. Сегодня эту модель можно найти среди объявлений о продаже телефонов, так как устройство ценится за надежность. Благодаря классическому дизайну и надежной платформе Nokia 5800 XpressMusic по прежнему вызывает интерес. Если вы ищете полную информацию о нокиа 5800, этот материал позволит оценить преимущества модели и узнать где купить Nokia 5800 по лучшей цене.
https://nokia5800.ru/
Your comment is awaiting moderation.
Nokia 5800 обзор характеристики — это развернутый материал о легендарной модели, который получил широкую популярность среди любителей мобильной музыки. В этом материале вы найдете характеристики внешнего вида и интерфейса, а также основные спецификации модели. Модель получила удобный резистивный дисплей с экраном 3.2 дюйма, что обеспечивает комфортное управление. Аппарат позволяет увеличить объем памяти картой microSD и оснащен качественной камерой, благодаря чему может использоваться для создания снимков и роликов. Отдельного внимания заслуживает звук и мультимедийные возможности, ведь модель ориентирована на качественное воспроизведение аудио. Если вас интересует где купить Nokia 5800, стоит обратить внимание на интернет магазины с хорошими отзывами, где представлены лучшие цены. Перед покупкой рекомендуется сравнить стоимость в разных магазинах, чтобы выбрать лучшее сочетание стоимости и состояния. Сегодня нокия 5800 часто встречается в продаже б у, так как модель отличается стабильной работой. Благодаря классическому дизайну и надежной платформе Nokia 5800 XpressMusic по прежнему вызывает интерес. Если вы ищете полную информацию о нокиа 5800, этот материал даст ответы на основные вопросы и найти подходящий вариант для покупки.
https://nokia5800.ru/
Your comment is awaiting moderation.
Nokia 5800 обзор характеристики — это актуальные сведения о популярном телефоне, который завоевал признание благодаря мультимедийным функциям. В этом материале вы найдете характеристики внешнего вида и интерфейса, а также полный список характеристик. Модель получила удобный резистивный дисплей с компактным 3.2 дюймовым дисплеем, что позволяет легко пользоваться приложениями. Аппарат позволяет увеличить объем памяти картой microSD и оборудован модулем камеры с автофокусом, благодаря чему позволяет запечатлеть важные моменты. Отдельного внимания заслуживает звук и мультимедийные возможности, ведь модель создавалась как музыкальный телефон. Если вас интересует где приобрести Nokia 5800 XpressMusic, стоит обратить внимание на официальных продавцов мобильной техники, где представлены лучшие цены. Перед покупкой рекомендуется изучить предложения продавцов, чтобы выбрать самое выгодное предложение. Сегодня нокия 5800 часто встречается в продаже б у, так как устройство ценится за надежность. Благодаря качественной сборке и удобному интерфейсу Nokia 5800 XpressMusic привлекает внимание ценителей ретро смартфонов. Если вы ищете детальное описание характеристик, этот материал поможет принять решение о покупке и выбрать оптимальное предложение на рынке.
https://nokia5800.ru/
Your comment is awaiting moderation.
Nokia 5800 обзор характеристики — это подробная информация о возможностях смартфона, который получил широкую популярность среди любителей мобильной музыки. В этом материале вы найдете детальный разбор корпуса и дисплея, а также основные спецификации модели. Телефон оборудован ярким сенсорным экраном с компактным 3.2 дюймовым дисплеем, что делает работу с меню удобной. Аппарат позволяет увеличить объем памяти картой microSD и оборудован модулем камеры с автофокусом, благодаря чему может использоваться для создания снимков и роликов. Отдельного внимания заслуживает звук и мультимедийные возможности, ведь модель ориентирована на качественное воспроизведение аудио. Если вас интересует как выбрать и купить Nokia 5800, стоит обратить внимание на проверенные магазины электроники, где доступны акции и скидки. Перед покупкой рекомендуется изучить предложения продавцов, чтобы выбрать оптимальный вариант по цене и качеству. Сегодня продажа Nokia 5800 остается актуальной на вторичном рынке, так как телефон известен своей долговечностью. Благодаря классическому дизайну и надежной платформе Nokia 5800 XpressMusic привлекает внимание ценителей ретро смартфонов. Если вы ищете подробный обзор Nokia 5800, этот материал даст ответы на основные вопросы и узнать где купить Nokia 5800 по лучшей цене.
https://nokia5800.ru/
Your comment is awaiting moderation.
все о Nokia 5800 XpressMusic — это развернутый материал о легендарной модели, который получил широкую популярность среди любителей мобильной музыки. В этом материале вы найдете описание дизайна и экрана, а также основные спецификации модели. Телефон оборудован ярким сенсорным экраном с диагональю 3.2 дюйма, что делает работу с меню удобной. Аппарат поддерживает карты памяти microSD и оснащен качественной камерой, благодаря чему подходит для повседневной съемки. Отдельного внимания заслуживает звук и мультимедийные возможности, ведь модель ориентирована на качественное воспроизведение аудио. Если вас интересует где купить Nokia 5800, стоит обратить внимание на проверенные магазины электроники, где представлены лучшие цены. Перед покупкой рекомендуется проверить актуальные цены, чтобы выбрать лучшее сочетание стоимости и состояния. Сегодня нокия 5800 часто встречается в продаже б у, так как телефон известен своей долговечностью. Благодаря классическому дизайну и надежной платформе Nokia 5800 XpressMusic по прежнему вызывает интерес. Если вы ищете детальное описание характеристик, этот материал даст ответы на основные вопросы и найти подходящий вариант для покупки.
https://nokia5800.ru/
Your comment is awaiting moderation.
quartzquick – The website seems organized, finding items here feels quick and simple.
Your comment is awaiting moderation.
browse harborwharf – Organized sections allow for smooth product browsing.
Your comment is awaiting moderation.
Действительно с ответами продовца проблемы имеются!!!!!!!! это вам -5 https://promacros.ru Делали заказ на 10 гр. АМ-2233, вместо чего прислали 6,82 гр.Ну что кто нить УРБ попробовал уже как отзывы ?
Your comment is awaiting moderation.
gladecrate treasures – Well-structured pages and intuitive design make finding products effortless.
Your comment is awaiting moderation.
fireflyfind web store – Clean structure and smooth interface improve the shopping flow.
Your comment is awaiting moderation.
creekvendor outlet – Organized interface that makes the browsing experience smooth.
Your comment is awaiting moderation.
interesting link – Found this during a quick search and the design looks organized.
Your comment is awaiting moderation.
удаление атеромы москва цены
Your comment is awaiting moderation.
forestvendor online shop – Easy-to-follow design with clearly arranged content.
Your comment is awaiting moderation.
harborwharf shopping – Easy-to-use design and organized content make shopping hassle-free.
Your comment is awaiting moderation.
olivecrate – Came across this page today, the design looks tidy and easy to navigate.
Your comment is awaiting moderation.
useful link – Came across this website, navigation feels intuitive and browsing items is quick.
Your comment is awaiting moderation.
операция по увеличению члена москва
Your comment is awaiting moderation.
visit here – Ran into this website recently, navigating items is straightforward and convenient.
Your comment is awaiting moderation.
harborwharf hub shop – Logical navigation and clear visuals make exploring products effortless.
Your comment is awaiting moderation.
gingervendor features – Clear categories and smooth interface make it simple to explore everything.
Your comment is awaiting moderation.
securia – Loved the layout today; clean, simple, and genuinely user-friendly overall.
Your comment is awaiting moderation.
codefuse – Color palette felt calming, nothing distracting, just focused, thoughtful design.
Your comment is awaiting moderation.
finchmarket deals page – Clean pages and fast loading make it simple to browse.
Your comment is awaiting moderation.
creekcrate shopping hub – Clean design and intuitive navigation make shopping stress-free.
Your comment is awaiting moderation.
apponic – Appreciate the typography choices; comfortable spacing improved my reading experience.
Your comment is awaiting moderation.
netlance – Overall, professional vibe here; trustworthy, polished, and pleasantly minimal throughout.
Your comment is awaiting moderation.
Santander caiu Santander caiu .
Your comment is awaiting moderation.
devonic – Content reads clearly, helpful examples made concepts easy to grasp.
Your comment is awaiting moderation.
cloudiva – Navigation felt smooth, found everything quickly without any confusing steps.
Your comment is awaiting moderation.
stackora – Appreciate the typography choices; comfortable spacing improved my reading experience.
Your comment is awaiting moderation.
kubexa – Overall, professional vibe here; trustworthy, polished, and pleasantly minimal throughout.
Your comment is awaiting moderation.
forestaisle – Enjoyed checking out the items, everything feels thoughtfully arranged.
Your comment is awaiting moderation.
browse this page – Ran into this site and the structure makes looking around pretty smooth.
Your comment is awaiting moderation.
Поход на хоккей — это эмоции и драйв. В статье рассказываем, где выгоднее и удобнее покупать билеты на матчи, как выбрать сектор и оформить заказ онлайн. Подробнее здесь: https://tickethockey-com.webflow.io/
Your comment is awaiting moderation.
harborbundle picks online – Layout is tidy and exploring products is enjoyable.
Your comment is awaiting moderation.
cryptora – Found practical insights today; sharing this article with colleagues later.
Your comment is awaiting moderation.
mostbet быстрый вход mostbet быстрый вход
Your comment is awaiting moderation.
link worth checking – Stumbled on this website, navigation feels smooth and easy.
Your comment is awaiting moderation.
мостбет ставки на спорт мостбет ставки на спорт
Your comment is awaiting moderation.
мостбет plinko на деньги http://mostbet85961.help/
Your comment is awaiting moderation.
בגיל ), גובה ס ” מ, חזה בגודל , קצת בגוף, אבל עדיין מאוד מעורר תיאבון ומטופח). באופן כללי, הם הסכימו איתה, ליום חמישי בערב. בערב, בחצר עם חניה, היא הייתה במצוקה מוחלטת, ורוניקה צחוק עליז מהתא שלה. פתחתי את הדלת. בחור רזה עם ראש כהה מתולתל, מחבק בחורה אדומה שמנמנה, יושב על מדף אחד, מחזיק ידיים. מולם ישב בן זוגי, כתפיים נוגעות במראה בלונדיני אתלטי, שברגע https://vertexcentury.com/
Your comment is awaiting moderation.
visit harborwharf – The site is intuitive and shopping feels straightforward.
Your comment is awaiting moderation.
gingergoods picks – Easy to navigate sections and smooth browsing make shopping enjoyable.
Your comment is awaiting moderation.
cool site – Found this page earlier, layout is simple and browsing feels convenient.
Your comment is awaiting moderation.
fieldfind deals page – Layout is clean and browsing items is simple.
Your comment is awaiting moderation.
creekcart marketplace – Pages render rapidly and exploring products is smooth.
Your comment is awaiting moderation.
granitegoods selections – Easy-to-use site with neat arrangement of items.
Your comment is awaiting moderation.
floravendor – Simple layout and effortless navigation make browsing quick.
Your comment is awaiting moderation.
interesting page – Came across this online and the minimal style makes browsing easy.
Your comment is awaiting moderation.
check this site – Found this link today, navigation seems smooth and simple.
Your comment is awaiting moderation.
Apple iPhone новости — это актуальный сайт для поклонников устройств Apple, где ежедневно публикуются свежие материалы о смартфонах, планшетах и компьютерах Apple. На страницах проекта вы найдете подробные обзоры устройств, честные мнения пользователей. Ресурс освещает релизы новых версий операционных систем Apple, помогает разобраться в работе облачных сервисов. Здесь публикуются руководства по оптимизации работы устройств, а также подборки полезных приложений. Читатели узнают как повысить производительность системы, получают рекомендации по покупке оригинальной техники. Портал регулярно рассказывает о анонсах обновленных устройств, публикует сравнения с конкурентами. Отдельное внимание уделяется взаимодействию iPhone с iPad и MacBook, что позволяет пользователям максимально раскрыть потенциал устройств. Материалы подходят как начинающим пользователям, поскольку контент сочетает глубокий технический анализ. Сайт станет полезным источником информации для тех, кто интересуется обзорами iPhone и iPad и хочет всегда быть в курсе важных изменений в мире технологий Apple.
https://apple-blogger.ru/
Your comment is awaiting moderation.
атерома операция
Your comment is awaiting moderation.
quick check – Stumbled on this site today, layout seems clean and browsing is easy.
Your comment is awaiting moderation.
операция по увеличению члена
Your comment is awaiting moderation.
harborwharf hub shop – Logical navigation and clear visuals make exploring products effortless.
Your comment is awaiting moderation.
gildcorner collection – Tidy interface, easy to navigate, and everything loads nicely.
Your comment is awaiting moderation.
see this website – Stumbled on this site, browsing items is effortless and clear.
Your comment is awaiting moderation.
fernvendor collection – Everything is presented neatly and browsing feels effortless.
Your comment is awaiting moderation.
Visit Copper Crate – Items are well-organized and information is easy to understand.
Your comment is awaiting moderation.
visit granitecrate – Smooth interface and organized layout make browsing seamless.
Your comment is awaiting moderation.
covecrate collection – Love the concept and the selection appears intentional.
Your comment is awaiting moderation.
florafinds web shop – Simple structure and clean design make shopping enjoyable.
Your comment is awaiting moderation.
recommended page – Found this link today, navigation is smooth and layout is clean.
Your comment is awaiting moderation.
see this site – Happened to run into this and the layout feels straightforward.
Your comment is awaiting moderation.
cool site here – Just bumped into this page today and browsing around feels pretty effortless.
Your comment is awaiting moderation.
harborwharf picks online – Well-laid-out pages and intuitive design create a smooth shopping experience.
Your comment is awaiting moderation.
online shop page – Just discovered this store and navigating sections feels comfortable.
Your comment is awaiting moderation.
shop gildaisle – Well-structured pages and clear design make browsing effortless.
Your comment is awaiting moderation.
สล็อต
TKBNEKO เปิดประสบการณ์ใหม่แห่งการเดิมพันออนไลน์ ธุรกรรมรวดเร็ว ด้วยระบบสแกน QR Code
ในยุคดิจิทัลที่ โลกออนไลน์เติบโตต่อเนื่อง เรามุ่งเน้นมาตรฐานใหม่ของการเดิมพัน ด้วยระบบที่ ล้ำสมัย เสถียร และ โปร่งใส เพื่อให้ผู้เล่น อุ่นใจ ทุกครั้งที่ใช้งาน
จุดเด่นระบบฝาก-ถอน
ฝากขั้นต่ำ: เริ่มต้น 1 บาท
ถอนขั้นต่ำ: 1 บาท
เวลาฝากเงิน: ภายใน 3 วินาที
ยอดถอน: ไม่มีลิมิต
ฝากง่าย เพียงสแกน QR Code
สแกน QR Code ระบบจะ โอนเงินเข้าทันที ขั้นต่ำ 100 บาท สูงสุด ไม่เกิน 500,000 บาทต่อครั้ง
หมวดหมู่เกม
สล็อต: ลุ้นแจ็คพอต
เกมสด: ดีลเลอร์สด
กีฬา: เดิมพันลีกดัง
ยิงปลา: สนุกได้เงินจริง
โบนัสและโปรโมชัน
ติดตามหน้า โบนัส พร้อมระบบ VIP และโปรแกรม แอฟฟิลิเอต
ติดต่อเรา
สอบถามข้อมูลได้ตลอด 24 ชั่วโมง ผ่านหน้า ติดต่อเรา ทีมงาน TKBNEKO พร้อมดูแลตลอดเวลา
https://medium.com/@ratypw/ทดลองเล่นสล็อต-a4ea8e21fdde
Your comment is awaiting moderation.
สล็อต
TKBNEKO เปิดประสบการณ์ใหม่แห่งการเดิมพันออนไลน์ ธุรกรรมรวดเร็ว ด้วยระบบสแกน QR Code
ในยุคดิจิทัลที่ โลกออนไลน์เติบโตต่อเนื่อง TKBNEKO พร้อมยกระดับการให้บริการ ด้วยระบบที่ ล้ำสมัย รวดเร็ว และ โปร่งใส เพื่อให้ผู้เล่น มั่นใจ ทุกครั้งที่ใช้งาน
ระบบการเงินที่ใช้งานง่าย
ฝากขั้นต่ำ: เริ่มต้น 1 บาท
ถอนขั้นต่ำ: 1 บาท
เวลาฝากเงิน: ภายใน 3 วินาที
ยอดถอน: ไม่จำกัดต่อวัน
เติมเงินง่าย แค่สแกน
สแกน QR Code ระบบจะ ประมวลผลอัตโนมัติ ขั้นต่ำ 100 บาท สูงสุด 500,000 บาท
หมวดหมู่เกม
สล็อต: ลุ้นแจ็คพอต
เกมสด: คาสิโนเรียลไทม์
กีฬา: แมตช์ทั่วโลก
ยิงปลา: ลุ้นกำไรทันที
โปรโมชั่นและสิทธิพิเศษ
ติดตามหน้า โบนัส พร้อมระบบ VIP และโปรแกรม พันธมิตร
ติดต่อเรา
สอบถามข้อมูลได้ตลอด 24 ชั่วโมง ผ่านหน้า ติดต่อเรา ทีมงาน ของเรา พร้อมดูแลตลอดเวลา
Your comment is awaiting moderation.
fernvendor product range – Layout is organized and finding items feels simple.
Your comment is awaiting moderation.
grainmarket selections – Fast-loading pages and clear organization make exploring easy.
Your comment is awaiting moderation.
this resource – Ran into this site, interface is clean and easy to explore.
Your comment is awaiting moderation.
flintfolio outlet – Easy to explore with concise descriptions on each product.
Your comment is awaiting moderation.
Продажа дома требует подготовки документов и грамотной оценки стоимости объекта. Специалисты агентства помогают определить рыночную цену и организовать показы потенциальным покупателям: новости рынка недвижимости Москвы
Your comment is awaiting moderation.
cottonvendor – The items appear well-made and the details are easy to understand.
Your comment is awaiting moderation.
Start Shopping Here – Easy navigation combined with smooth browsing makes shopping fun.
Your comment is awaiting moderation.
online shop – Noticed this site, everything appears simple to locate and browse.
Your comment is awaiting moderation.
see this website – Stumbled on this link, it looks minimalistic and easy to navigate.
Your comment is awaiting moderation.
check this site – Ran into this while scrolling around online and it might be helpful.
Your comment is awaiting moderation.
check this out – Came across this site, layout looks clean and browsing items is straightforward.
Your comment is awaiting moderation.
duneaisle homepage – Layout is tidy and navigating through the site is easy.
Your comment is awaiting moderation.
harborwharf market – Neat structure and clear visuals make finding items effortless.
Your comment is awaiting moderation.
Hello everyone!
Learn pack mysterious lists to find interesting and valuable travel essentials and travel light but prepared see on the website for packing lists
Full information on the link – https://800letekas.site
All the best and development in business!
Your comment is awaiting moderation.
promo pick site – Could be a simple place online to explore promotional deals.
Your comment is awaiting moderation.
best of garnetmarket – Pages load quickly, and finding products is straightforward.
Your comment is awaiting moderation.
graingalleria features – Organized listings and simple layout make browsing effortless.
Your comment is awaiting moderation.
Fern Finds Store – The site feels responsive and navigation is simple and clear.
Your comment is awaiting moderation.
take a look – I discovered this page today, browsing seems simple and convenient.
Your comment is awaiting moderation.
flintcrate store hub – Clear structure and smooth browsing make finding products simple.
Your comment is awaiting moderation.
ремонт квартир коштує ремонт квартир Львів
Your comment is awaiting moderation.
cottoncrate marketplace – No confusion at all, I found my item right away.
Your comment is awaiting moderation.
online store – Noticed this website, the interface seems minimal and user-friendly.
Your comment is awaiting moderation.
take a look – Discovered this site earlier and the interface feels light and simple.
Your comment is awaiting moderation.
Hello!
Discover endless mysterious sources of interesting and valuable knowledge today and never run out of inspiration again see on the website for source directories
Full information on the link – https://800letekas.site
All the best and development in business!
Your comment is awaiting moderation.
lemon loft stop – The platform seems organized and easy to browse items.
Your comment is awaiting moderation.
Find Exclusive Items – Support responded immediately and ensured all my questions were answered.
Your comment is awaiting moderation.
harborwharf finds – Clean presentation with intuitive navigation improves the experience.
Your comment is awaiting moderation.
driftwharf essentials – Items are attractively arranged and the explanations are useful.
Your comment is awaiting moderation.
iciclemarket – Just discovered this store today, products look interesting and worth checking.
Your comment is awaiting moderation.
visit goldenvendor – Simple interface makes locating items fast and easy.
Your comment is awaiting moderation.
Garnet Goods Online – Clean layout makes browsing quick and pleasant.
Your comment is awaiting moderation.
fernaisle style store – Well-structured pages and tidy design make exploring enjoyable.
Your comment is awaiting moderation.
flakefind collection – Clear layout and intuitive navigation make browsing quick.
Your comment is awaiting moderation.
cottoncounter collection – Minimal design and intuitive menus simplified the process.
Your comment is awaiting moderation.
<Find What You Need – The experience feels consistent and easygoing.
Your comment is awaiting moderation.
Visit Gold Vendor – The site blends professionalism with a warm tone for shoppers.
Your comment is awaiting moderation.
Mario game levels super mario world bowser
Your comment is awaiting moderation.
Good afternoon!
Curate sleep mysterious cycles with interesting and valuable restorative impact and dream your way to success see on the website for sleep trackers
Full information on the link – https://800letekas.site
All the best and development in business!
Your comment is awaiting moderation.
harborwharf treasures – Simple and neat design enhances the ease of finding products.
Your comment is awaiting moderation.
Browse Clover Market – Finding the right products is straightforward thanks to the organized categories.
Your comment is awaiting moderation.
glowgalleria finds – Pages load quickly and the content is clearly displayed.
Your comment is awaiting moderation.
Good morning!
Discover endless mysterious sources of interesting and valuable knowledge today and never run out of inspiration again see on the website for source directories
Full information on the link – https://800letekas.site
All the best and development in business!
Your comment is awaiting moderation.
garnetcrate outlet – Well-laid-out categories and fast pages make it easy to shop.
Your comment is awaiting moderation.
driftcrate official shop – The site is tidy and browsing through products is effortless.
Your comment is awaiting moderation.
операция тонзиллэктомия
Your comment is awaiting moderation.
dataworks – Navigation felt smooth, found everything quickly without any confusing steps.
Your comment is awaiting moderation.
Flake Crate Online – Well-organized layout makes browsing effortless.
Your comment is awaiting moderation.
feathervendor outlet – Tidy pages and intuitive navigation make browsing easy.
Your comment is awaiting moderation.
bytevia – Bookmarked this immediately, planning to revisit for updates and inspiration.
Your comment is awaiting moderation.
devnex – Mobile version looks perfect; no glitches, fast scrolling, crisp text.
Your comment is awaiting moderation.
coralmarket collection – Impressive stock and the checkout experience felt effortless.
Your comment is awaiting moderation.
Top Quality Storefront – The collection kept me engaged with lots of variety.
Your comment is awaiting moderation.
клиника по увеличению члена
Your comment is awaiting moderation.
harborwharf online shop – Smooth interface with organized content makes browsing enjoyable.
Your comment is awaiting moderation.
glimmercrate treasures – Easy-to-use design makes finding items a breeze.
Your comment is awaiting moderation.
Bloom Vendor Online – They seem to handle inquiries efficiently and with a supportive attitude.
Your comment is awaiting moderation.
Alpine Aisle Experience – Every visit is simple, pleasant, and reliably smooth.
Your comment is awaiting moderation.
Official Harbor Lark – Mobile navigation is smooth and pages open without delay.
Your comment is awaiting moderation.
frostgalleria essentials – Neat arrangement of items and smooth page flow make shopping effortless.
Your comment is awaiting moderation.
Official Birch Market Store – Fresh products and frequent updates make exploring the site enjoyable.
Your comment is awaiting moderation.
Hello!
Curate trip mysterious itineraries with interesting and valuable time impact and make every second count see on the website for itinerary builders
Full information on the link – https://800letekas.site
All the best and development in business!
Your comment is awaiting moderation.
Discover Calm Cart Deals – Browsing is convenient, and the overall navigation is smooth and dependable.
Your comment is awaiting moderation.
driftaisle marketplace – Neat structure and accessible design make it easy to check products.
Your comment is awaiting moderation.
fireflyvendor curated shop – Easy-to-follow design and organized pages improve navigation.
Your comment is awaiting moderation.
отправить смс со своего номера — это современное решение от U-SMS для тех, кто ценит экономию и стабильность связи. Сервис позволяет отправлять сообщения по сниженной цене без потери качества доставки с мобильных устройств iPhone и Windows Mobile. Тарифы на SMS начинаются всего от 30 копеек, что делает предложение особенно привлекательным для активных пользователей. Ключевая особенность — отображается ваш реальный номер отправителя, благодаря чему сохраняется доверие и привычный формат общения. Проект развивается и обслуживает клиентов более четырнадцати лет, подтверждая надежность и устойчивость платформы. Платформа корректно работает на устройствах iPhone и Windows Mobile, обеспечивая удобный интерфейс и простую настройку. Оплатить услуги можно электронными деньгами, банковскими картами и через терминалы, что делает процесс максимально гибким. Для начала работы достаточно подключения к сети. Решение подходит для личного общения, уведомлений и деловой переписки. Надежная техническая база гарантирует оперативную отправку SMS. Платформа предлагает оптимальное соотношение стоимости и качества. Когда требуется экономия без потери функциональности, U-SMS станет рациональным выбором. Подключение занимает минимум времени и не требует специальных знаний, а гибкие условия позволяют контролировать расходы на связь. Оцените преимущества сервиса U-SMS и отправляйте сообщения дешевле уже сегодня.
https://u-sms.ru/
Your comment is awaiting moderation.
сервис отправки sms от 30 копеек — это современное решение от U-SMS для тех, кто ценит экономию и стабильность связи. Система гарантирует надежную отправку сообщений по доступной стоимости с мобильных устройств iPhone и Windows Mobile. Стоимость начинается от 30 копеек за сообщение, что делает предложение особенно привлекательным для активных пользователей. Ключевая особенность — отображается ваш реальный номер отправителя, благодаря чему сохраняется доверие и привычный формат общения. Проект развивается и обслуживает клиентов более четырнадцати лет, подтверждая надежность и устойчивость платформы. Платформа корректно работает на устройствах iPhone и Windows Mobile, обеспечивая удобный интерфейс и простую настройку. Пользователям предлагаются способы оплаты через карты, электронные системы и платежные терминалы, что делает процесс максимально гибким. Сервис функционирует онлайн без установки дополнительного оборудования. Сервис используется как для личных целей, так и для бизнес задач. Высокая скорость доставки и стабильная работа системы обеспечивают комфортное использование. Платформа предлагает оптимальное соотношение стоимости и качества. Если вам важно отправлять SMS со своего номера дешевле стандартных тарифов операторов, U-SMS станет рациональным выбором. Подключение занимает минимум времени и не требует специальных знаний, а гибкие условия позволяют контролировать расходы на связь. Оцените преимущества сервиса U-SMS и отправляйте сообщения дешевле уже сегодня.
https://u-sms.ru/
Your comment is awaiting moderation.
отправить смс со своего номера — это современное решение от U-SMS для тех, кто ценит экономию и стабильность связи. Платформа обеспечивает быструю передачу SMS по выгодным тарифам с мобильных устройств iPhone и Windows Mobile. Стоимость начинается от 30 копеек за сообщение, что делает предложение особенно привлекательным для активных пользователей. Ключевая особенность — отображается ваш реальный номер отправителя, благодаря чему сохраняется доверие и привычный формат общения. U-SMS работает на рынке более 14 лет, подтверждая надежность и устойчивость платформы. Сервис адаптирован для iPhone и смартфонов с Windows Mobile, обеспечивая удобный интерфейс и простую настройку. Доступна оплата картами, электронными кошельками и наличными через терминалы, что делает процесс максимально гибким. Сервис функционирует онлайн без установки дополнительного оборудования. Сервис используется как для личных целей, так и для бизнес задач. Надежная техническая база гарантирует оперативную отправку SMS. Платформа предлагает оптимальное соотношение стоимости и качества. Когда требуется экономия без потери функциональности, U-SMS станет рациональным выбором. Подключение занимает минимум времени и не требует специальных знаний, а гибкие условия позволяют контролировать расходы на связь. Оцените преимущества сервиса U-SMS и отправляйте сообщения дешевле уже сегодня.
https://u-sms.ru/
Your comment is awaiting moderation.
отправить смс со своего номера — это современное решение от U-SMS для тех, кто ценит экономию и стабильность связи. Система гарантирует надежную отправку сообщений по доступной стоимости с мобильных устройств iPhone и Windows Mobile. Тарифы на SMS начинаются всего от 30 копеек, что делает предложение особенно привлекательным для активных пользователей. Главное преимущество — отправка с вашего собственного номера, благодаря чему сохраняется доверие и привычный формат общения. Сервис успешно функционирует уже свыше 14 лет, подтверждая надежность и устойчивость платформы. Сервис адаптирован для iPhone и смартфонов с Windows Mobile, обеспечивая удобный интерфейс и простую настройку. Пользователям предлагаются способы оплаты через карты, электронные системы и платежные терминалы, что делает процесс максимально гибким. Сервис функционирует онлайн без установки дополнительного оборудования. Платформа удобна для частных сообщений и корпоративных рассылок. Высокая скорость доставки и стабильная работа системы обеспечивают комфортное использование. Платформа предлагает оптимальное соотношение стоимости и качества. Если вам важно отправлять SMS со своего номера дешевле стандартных тарифов операторов, U-SMS станет рациональным выбором. Регистрация проста и понятна для любого пользователя, а гибкие условия позволяют контролировать расходы на связь. Выбирайте U-SMS для экономичной и удобной передачи SMS.
https://u-sms.ru/
Your comment is awaiting moderation.
featherfind deals page – Layout is tidy and moving between pages is very smooth.
Your comment is awaiting moderation.
отправить смс со своего номера — это современное решение от U-SMS для тех, кто ценит экономию и стабильность связи. Система гарантирует надежную отправку сообщений по доступной стоимости с мобильных устройств iPhone и Windows Mobile. Тарифы на SMS начинаются всего от 30 копеек, что делает предложение особенно привлекательным для активных пользователей. Основной плюс — получатель видит именно ваш номер, благодаря чему сохраняется доверие и привычный формат общения. Сервис успешно функционирует уже свыше 14 лет, подтверждая надежность и устойчивость платформы. Сервис адаптирован для iPhone и смартфонов с Windows Mobile, обеспечивая удобный интерфейс и простую настройку. Пользователям предлагаются способы оплаты через карты, электронные системы и платежные терминалы, что делает процесс максимально гибким. Сервис функционирует онлайн без установки дополнительного оборудования. Платформа удобна для частных сообщений и корпоративных рассылок. Высокая скорость доставки и стабильная работа системы обеспечивают комфортное использование. Сервис объединяет экономичность и многолетний опыт работы. Когда требуется экономия без потери функциональности, U-SMS станет рациональным выбором. Подключение занимает минимум времени и не требует специальных знаний, а гибкие условия позволяют контролировать расходы на связь. Выбирайте U-SMS для экономичной и удобной передачи SMS.
https://u-sms.ru/
Your comment is awaiting moderation.
дешевая отправка sms через интернет — это современное решение от U-SMS для тех, кто ценит экономию и стабильность связи. Система гарантирует надежную отправку сообщений по доступной стоимости с мобильных устройств iPhone и Windows Mobile. Тарифы на SMS начинаются всего от 30 копеек, что делает предложение особенно привлекательным для активных пользователей. Ключевая особенность — отображается ваш реальный номер отправителя, благодаря чему сохраняется доверие и привычный формат общения. Проект развивается и обслуживает клиентов более четырнадцати лет, подтверждая надежность и устойчивость платформы. Поддерживаются популярные мобильные устройства Apple и решения на базе Windows Mobile, обеспечивая удобный интерфейс и простую настройку. Оплатить услуги можно электронными деньгами, банковскими картами и через терминалы, что делает процесс максимально гибким. Сервис функционирует онлайн без установки дополнительного оборудования. Сервис используется как для личных целей, так и для бизнес задач. Надежная техническая база гарантирует оперативную отправку SMS. Сервис объединяет экономичность и многолетний опыт работы. Если вам важно отправлять SMS со своего номера дешевле стандартных тарифов операторов, U-SMS станет рациональным выбором. Начать пользоваться сервисом можно быстро и без сложных процедур, а гибкие условия позволяют контролировать расходы на связь. Оцените преимущества сервиса U-SMS и отправляйте сообщения дешевле уже сегодня.
https://u-sms.ru/
Your comment is awaiting moderation.
отправить смс со своего номера — это современное решение от U-SMS для тех, кто ценит экономию и стабильность связи. Платформа обеспечивает быструю передачу SMS по выгодным тарифам с мобильных устройств iPhone и Windows Mobile. Цена на отправку стартует от 30 копеек, что делает предложение особенно привлекательным для активных пользователей. Главное преимущество — отправка с вашего собственного номера, благодаря чему сохраняется доверие и привычный формат общения. U-SMS работает на рынке более 14 лет, подтверждая надежность и устойчивость платформы. Сервис адаптирован для iPhone и смартфонов с Windows Mobile, обеспечивая удобный интерфейс и простую настройку. Доступна оплата картами, электронными кошельками и наличными через терминалы, что делает процесс максимально гибким. Сервис функционирует онлайн без установки дополнительного оборудования. Решение подходит для личного общения, уведомлений и деловой переписки. Надежная техническая база гарантирует оперативную отправку SMS. Сервис объединяет экономичность и многолетний опыт работы. Если необходим удобный и проверенный способ отправки сообщений, U-SMS станет рациональным выбором. Подключение занимает минимум времени и не требует специальных знаний, а гибкие условия позволяют контролировать расходы на связь. Используйте возможности U-SMS для выгодной отправки сообщений с iPhone и Windows Mobile.
https://u-sms.ru/
Your comment is awaiting moderation.
дешевая отправка sms через интернет — это современное решение от U-SMS для тех, кто ценит экономию и стабильность связи. Сервис позволяет отправлять сообщения по сниженной цене без потери качества доставки с мобильных устройств iPhone и Windows Mobile. Стоимость начинается от 30 копеек за сообщение, что делает предложение особенно привлекательным для активных пользователей. Главное преимущество — отправка с вашего собственного номера, благодаря чему сохраняется доверие и привычный формат общения. Сервис успешно функционирует уже свыше 14 лет, подтверждая надежность и устойчивость платформы. Платформа корректно работает на устройствах iPhone и Windows Mobile, обеспечивая удобный интерфейс и простую настройку. Пользователям предлагаются способы оплаты через карты, электронные системы и платежные терминалы, что делает процесс максимально гибким. Для начала работы достаточно подключения к сети. Сервис используется как для личных целей, так и для бизнес задач. Надежная техническая база гарантирует оперативную отправку SMS. Сервис объединяет экономичность и многолетний опыт работы. Когда требуется экономия без потери функциональности, U-SMS станет рациональным выбором. Регистрация проста и понятна для любого пользователя, а гибкие условия позволяют контролировать расходы на связь. Используйте возможности U-SMS для выгодной отправки сообщений с iPhone и Windows Mobile.
https://u-sms.ru/
Your comment is awaiting moderation.
фимоз 1 степень лечение
Your comment is awaiting moderation.
смс с windows mobile онлайн — это современное решение от U-SMS для тех, кто ценит экономию и стабильность связи. Платформа обеспечивает быструю передачу SMS по выгодным тарифам с мобильных устройств iPhone и Windows Mobile. Тарифы на SMS начинаются всего от 30 копеек, что делает предложение особенно привлекательным для активных пользователей. Главное преимущество — отправка с вашего собственного номера, благодаря чему сохраняется доверие и привычный формат общения. Сервис успешно функционирует уже свыше 14 лет, подтверждая надежность и устойчивость платформы. Сервис адаптирован для iPhone и смартфонов с Windows Mobile, обеспечивая удобный интерфейс и простую настройку. Оплатить услуги можно электронными деньгами, банковскими картами и через терминалы, что делает процесс максимально гибким. Для начала работы достаточно подключения к сети. Сервис используется как для личных целей, так и для бизнес задач. Высокая скорость доставки и стабильная работа системы обеспечивают комфортное использование. U-SMS сочетает доступные цены и профессиональный подход к обслуживанию. Если необходим удобный и проверенный способ отправки сообщений, U-SMS станет рациональным выбором. Подключение занимает минимум времени и не требует специальных знаний, а гибкие условия позволяют контролировать расходы на связь. Используйте возможности U-SMS для выгодной отправки сообщений с iPhone и Windows Mobile.
https://u-sms.ru/
Your comment is awaiting moderation.
отправка смс с iphone дешево — это современное решение от U-SMS для тех, кто ценит экономию и стабильность связи. Платформа обеспечивает быструю передачу SMS по выгодным тарифам с мобильных устройств iPhone и Windows Mobile. Стоимость начинается от 30 копеек за сообщение, что делает предложение особенно привлекательным для активных пользователей. Главное преимущество — отправка с вашего собственного номера, благодаря чему сохраняется доверие и привычный формат общения. Сервис успешно функционирует уже свыше 14 лет, подтверждая надежность и устойчивость платформы. Платформа корректно работает на устройствах iPhone и Windows Mobile, обеспечивая удобный интерфейс и простую настройку. Пользователям предлагаются способы оплаты через карты, электронные системы и платежные терминалы, что делает процесс максимально гибким. Для начала работы достаточно подключения к сети. Сервис используется как для личных целей, так и для бизнес задач. Высокая скорость доставки и стабильная работа системы обеспечивают комфортное использование. Сервис объединяет экономичность и многолетний опыт работы. Если необходим удобный и проверенный способ отправки сообщений, U-SMS станет рациональным выбором. Регистрация проста и понятна для любого пользователя, а гибкие условия позволяют контролировать расходы на связь. Оцените преимущества сервиса U-SMS и отправляйте сообщения дешевле уже сегодня.
https://u-sms.ru/
Your comment is awaiting moderation.
сервис отправки sms от 30 копеек — это современное решение от U-SMS для тех, кто ценит экономию и стабильность связи. Система гарантирует надежную отправку сообщений по доступной стоимости с мобильных устройств iPhone и Windows Mobile. Тарифы на SMS начинаются всего от 30 копеек, что делает предложение особенно привлекательным для активных пользователей. Ключевая особенность — отображается ваш реальный номер отправителя, благодаря чему сохраняется доверие и привычный формат общения. Сервис успешно функционирует уже свыше 14 лет, подтверждая надежность и устойчивость платформы. Сервис адаптирован для iPhone и смартфонов с Windows Mobile, обеспечивая удобный интерфейс и простую настройку. Доступна оплата картами, электронными кошельками и наличными через терминалы, что делает процесс максимально гибким. Для начала работы достаточно подключения к сети. Сервис используется как для личных целей, так и для бизнес задач. Сообщения доставляются быстро и без задержек благодаря оптимизированной инфраструктуре. Сервис объединяет экономичность и многолетний опыт работы. Если необходим удобный и проверенный способ отправки сообщений, U-SMS станет рациональным выбором. Подключение занимает минимум времени и не требует специальных знаний, а гибкие условия позволяют контролировать расходы на связь. Оцените преимущества сервиса U-SMS и отправляйте сообщения дешевле уже сегодня.
https://u-sms.ru/
Your comment is awaiting moderation.
отправка смс с iphone дешево — это современное решение от U-SMS для тех, кто ценит экономию и стабильность связи. Платформа обеспечивает быструю передачу SMS по выгодным тарифам с мобильных устройств iPhone и Windows Mobile. Цена на отправку стартует от 30 копеек, что делает предложение особенно привлекательным для активных пользователей. Основной плюс — получатель видит именно ваш номер, благодаря чему сохраняется доверие и привычный формат общения. Проект развивается и обслуживает клиентов более четырнадцати лет, подтверждая надежность и устойчивость платформы. Платформа корректно работает на устройствах iPhone и Windows Mobile, обеспечивая удобный интерфейс и простую настройку. Доступна оплата картами, электронными кошельками и наличными через терминалы, что делает процесс максимально гибким. Отправка осуществляется через интернет без сложных настроек. Платформа удобна для частных сообщений и корпоративных рассылок. Высокая скорость доставки и стабильная работа системы обеспечивают комфортное использование. Платформа предлагает оптимальное соотношение стоимости и качества. Если вам важно отправлять SMS со своего номера дешевле стандартных тарифов операторов, U-SMS станет рациональным выбором. Регистрация проста и понятна для любого пользователя, а гибкие условия позволяют контролировать расходы на связь. Выбирайте U-SMS для экономичной и удобной передачи SMS.
https://u-sms.ru/
Your comment is awaiting moderation.
stonebridgeholdings.bond – Clean and professional, content emphasizes transparency and thoughtful organization.
Your comment is awaiting moderation.
furkidsboutique web store – Browsing was enjoyable and the items are incredibly cute.
Your comment is awaiting moderation.
harborwharf market – Neat structure and clear visuals make finding items effortless.
Your comment is awaiting moderation.
блог о мобильных телефонах — это актуальная цифровая платформа, посвященный индустрии телефонов и мобильных сервисов. В июле 2026 года проект Мобайл-инфо был создан Издательским домом АСМО-пресс как самостоятельное направление внутри компании, основным фокусом которого стала создание программных решений для устройств iPhone. С момента основания ресурс освещает актуальные новости индустрии смартфонов, публикует детальные разборы новых гаджетов, а также делится практическими советами по использованию приложений. Особое внимание уделяется функциональности устройств Apple и мобильных приложений, что позволяет читателям быть в курсе свежих технологических трендов. Контент формируется с учетом потребностей разработчиков и владельцев гаджетов, благодаря чему сайт сочетает информационную ценность и практическую пользу. Помимо новостей, портал рассматривает динамику роста сегмента мобильных сервисов, анализирует изменения в пользовательских предпочтениях. Разделы проекта охватывают обзор сервисов, методы повышения производительности и управление мобильными ресурсами. Благодаря поддержке издательского дома и профессиональной редакции Мобайл-инфо развивается как профильный портал о технологиях и разработке для iPhone, объединяя экспертные статьи, обзоры и инструкции в едином информационном пространстве.
https://mobile-in.ru/
Your comment is awaiting moderation.
разработка приложений для iphone — это актуальная цифровая платформа, посвященный смартфонам, мобильным технологиям и программам. В июле 2026 года проект Мобайл-инфо был создан издательской группой АСМО-пресс как отдельное структурное подразделение, основным фокусом которого стала проектирование мобильных приложений под iPhone. С момента основания ресурс освещает ключевые события мобильного рынка, публикует экспертные материалы о смартфонах, а также делится инструкциями по эффективной работе с мобильными сервисами. Особое внимание уделяется функциональности устройств Apple и мобильных приложений, что позволяет читателям быть в курсе свежих технологических трендов. Контент формируется с учетом потребностей разработчиков и владельцев гаджетов, благодаря чему сайт сочетает аналитический подход и прикладные материалы. Помимо новостей, портал рассматривает динамику роста сегмента мобильных сервисов, анализирует стратегии ведущих производителей смартфонов. Разделы проекта охватывают тестирование программ, рекомендации по безопасности и оптимизации устройств. Благодаря поддержке издательского дома и профессиональной редакции Мобайл-инфо развивается как надежный источник информации о мобильных телефонах, объединяя актуальные публикации и прикладные рекомендации в едином информационном пространстве.
https://mobile-in.ru/
Your comment is awaiting moderation.
сайт о смартфонах и приложениях — это актуальная цифровая платформа, посвященный индустрии телефонов и мобильных сервисов. В июле 2026 года проект Мобайл-инфо был создан Издательским домом АСМО-пресс как специализированный цифровой департамент, основным фокусом которого стала проектирование мобильных приложений под iPhone. С момента основания ресурс освещает актуальные новости индустрии смартфонов, публикует обзоры моделей телефонов, а также делится практическими советами по использованию приложений. Особое внимание уделяется экосистеме Apple и возможностям iOS, что позволяет читателям быть в курсе последних версий программ и сервисов. Контент формируется с учетом интересов активных пользователей смартфонов, благодаря чему сайт сочетает новостной формат и экспертные публикации. Помимо новостей, портал рассматривает перспективы развития мобильного софта, анализирует стратегии ведущих производителей смартфонов. Разделы проекта охватывают обзор сервисов, методы повышения производительности и управление мобильными ресурсами. Благодаря поддержке издательского дома и профессиональной редакции Мобайл-инфо развивается как профильный портал о технологиях и разработке для iPhone, объединяя актуальные публикации и прикладные рекомендации в едином информационном пространстве.
https://mobile-in.ru/
Your comment is awaiting moderation.
this web portal – A quick check confirms the content is helpful and easy to navigate.
Your comment is awaiting moderation.
новости мобильных телефонов — это актуальная цифровая платформа, посвященный смартфонам, мобильным технологиям и программам. В июле 2026 года проект Мобайл-инфо был создан медиахолдингом АСМО-пресс как самостоятельное направление внутри компании, основным фокусом которого стала создание программных решений для устройств iPhone. С момента основания ресурс освещает актуальные новости индустрии смартфонов, публикует обзоры моделей телефонов, а также делится рекомендациями по установке и настройке программ. Особое внимание уделяется экосистеме Apple и возможностям iOS, что позволяет читателям быть в курсе свежих технологических трендов. Контент формируется с учетом интересов активных пользователей смартфонов, благодаря чему сайт сочетает информационную ценность и практическую пользу. Помимо новостей, портал рассматривает динамику роста сегмента мобильных сервисов, анализирует конкурентную среду и технологические инновации. Разделы проекта охватывают обзор сервисов, методы повышения производительности и управление мобильными ресурсами. Благодаря поддержке издательского дома и профессиональной редакции Мобайл-инфо развивается как профильный портал о технологиях и разработке для iPhone, объединяя новости, аналитику и практические материалы в едином информационном пространстве.
https://mobile-in.ru/
Your comment is awaiting moderation.
блог о мобильных телефонах — это динамично развивающийся онлайн-ресурс, посвященный индустрии телефонов и мобильных сервисов. В июле 2026 года проект Мобайл-инфо был создан медиахолдингом АСМО-пресс как отдельное структурное подразделение, основным фокусом которого стала проектирование мобильных приложений под iPhone. С момента основания ресурс освещает значимые обновления в сфере мобильных устройств, публикует экспертные материалы о смартфонах, а также делится рекомендациями по установке и настройке программ. Особое внимание уделяется экосистеме Apple и возможностям iOS, что позволяет читателям быть в курсе последних версий программ и сервисов. Контент формируется с учетом запросов аудитории, увлеченной мобильными технологиями, благодаря чему сайт сочетает информационную ценность и практическую пользу. Помимо новостей, портал рассматривает динамику роста сегмента мобильных сервисов, анализирует стратегии ведущих производителей смартфонов. Разделы проекта охватывают обзор сервисов, методы повышения производительности и управление мобильными ресурсами. Благодаря поддержке издательского дома и профессиональной редакции Мобайл-инфо развивается как профильный портал о технологиях и разработке для iPhone, объединяя актуальные публикации и прикладные рекомендации в едином информационном пространстве.
https://mobile-in.ru/
Your comment is awaiting moderation.
сайт о смартфонах и приложениях — это актуальная цифровая платформа, посвященный смартфонам, мобильным технологиям и программам. В июле 2026 года проект Мобайл-инфо был создан Издательским домом АСМО-пресс как специализированный цифровой департамент, основным фокусом которого стала создание программных решений для устройств iPhone. С момента основания ресурс освещает ключевые события мобильного рынка, публикует экспертные материалы о смартфонах, а также делится практическими советами по использованию приложений. Особое внимание уделяется технологическим решениям для платформы iOS, что позволяет читателям быть в курсе новых релизов и обновлений. Контент формируется с учетом интересов активных пользователей смартфонов, благодаря чему сайт сочетает информационную ценность и практическую пользу. Помимо новостей, портал рассматривает тенденции рынка мобильных приложений, анализирует конкурентную среду и технологические инновации. Разделы проекта охватывают обзор сервисов, методы повышения производительности и управление мобильными ресурсами. Благодаря поддержке издательского дома и профессиональной редакции Мобайл-инфо развивается как авторитетная площадка о смартфонах и приложениях, объединяя экспертные статьи, обзоры и инструкции в едином информационном пространстве.
https://mobile-in.ru/
Your comment is awaiting moderation.
Hello everyone!
Protect culture with interesting mysterious data holding valuable heritage keys and save traditions for tomorrow see on the website for heritage projects
Full information on the link – https://800letekas.site
All the best and development in business!
Your comment is awaiting moderation.
gladegoods treasures – Fast-loading pages and clean layout make exploring easy.
Your comment is awaiting moderation.
сайт о смартфонах и приложениях — это актуальная цифровая платформа, посвященный миру мобильной электроники и инновационных решений. В июле 2026 года проект Мобайл-инфо был создан Издательским домом АСМО-пресс как отдельное структурное подразделение, основным фокусом которого стала разработка приложений для iPhone. С момента основания ресурс освещает значимые обновления в сфере мобильных устройств, публикует детальные разборы новых гаджетов, а также делится рекомендациями по установке и настройке программ. Особое внимание уделяется экосистеме Apple и возможностям iOS, что позволяет читателям быть в курсе свежих технологических трендов. Контент формируется с учетом интересов активных пользователей смартфонов, благодаря чему сайт сочетает информационную ценность и практическую пользу. Помимо новостей, портал рассматривает перспективы развития мобильного софта, анализирует стратегии ведущих производителей смартфонов. Разделы проекта охватывают тестирование программ, рекомендации по безопасности и оптимизации устройств. Благодаря поддержке издательского дома и профессиональной редакции Мобайл-инфо развивается как авторитетная площадка о смартфонах и приложениях, объединяя экспертные статьи, обзоры и инструкции в едином информационном пространстве.
https://mobile-in.ru/
Your comment is awaiting moderation.
новости мобильных телефонов — это актуальная цифровая платформа, посвященный индустрии телефонов и мобильных сервисов. В июле 2026 года проект Мобайл-инфо был создан медиахолдингом АСМО-пресс как отдельное структурное подразделение, основным фокусом которого стала разработка приложений для iPhone. С момента основания ресурс освещает значимые обновления в сфере мобильных устройств, публикует детальные разборы новых гаджетов, а также делится рекомендациями по установке и настройке программ. Особое внимание уделяется технологическим решениям для платформы iOS, что позволяет читателям быть в курсе последних версий программ и сервисов. Контент формируется с учетом интересов активных пользователей смартфонов, благодаря чему сайт сочетает аналитический подход и прикладные материалы. Помимо новостей, портал рассматривает динамику роста сегмента мобильных сервисов, анализирует изменения в пользовательских предпочтениях. Разделы проекта охватывают тестирование программ, рекомендации по безопасности и оптимизации устройств. Благодаря поддержке издательского дома и профессиональной редакции Мобайл-инфо развивается как профильный портал о технологиях и разработке для iPhone, объединяя экспертные статьи, обзоры и инструкции в едином информационном пространстве.
https://mobile-in.ru/
Your comment is awaiting moderation.
блог о мобильных телефонах — это динамично развивающийся онлайн-ресурс, посвященный смартфонам, мобильным технологиям и программам. В июле 2026 года проект Мобайл-инфо был создан Издательским домом АСМО-пресс как отдельное структурное подразделение, основным фокусом которого стала разработка приложений для iPhone. С момента основания ресурс освещает значимые обновления в сфере мобильных устройств, публикует экспертные материалы о смартфонах, а также делится инструкциями по эффективной работе с мобильными сервисами. Особое внимание уделяется экосистеме Apple и возможностям iOS, что позволяет читателям быть в курсе последних версий программ и сервисов. Контент формируется с учетом потребностей разработчиков и владельцев гаджетов, благодаря чему сайт сочетает новостной формат и экспертные публикации. Помимо новостей, портал рассматривает динамику роста сегмента мобильных сервисов, анализирует конкурентную среду и технологические инновации. Разделы проекта охватывают тестирование программ, рекомендации по безопасности и оптимизации устройств. Благодаря поддержке издательского дома и профессиональной редакции Мобайл-инфо развивается как авторитетная площадка о смартфонах и приложениях, объединяя новости, аналитику и практические материалы в едином информационном пространстве.
https://mobile-in.ru/
Your comment is awaiting moderation.
сайт о смартфонах и приложениях — это актуальная цифровая платформа, посвященный миру мобильной электроники и инновационных решений. В июле 2026 года проект Мобайл-инфо был создан издательской группой АСМО-пресс как самостоятельное направление внутри компании, основным фокусом которого стала создание программных решений для устройств iPhone. С момента основания ресурс освещает значимые обновления в сфере мобильных устройств, публикует экспертные материалы о смартфонах, а также делится рекомендациями по установке и настройке программ. Особое внимание уделяется экосистеме Apple и возможностям iOS, что позволяет читателям быть в курсе новых релизов и обновлений. Контент формируется с учетом потребностей разработчиков и владельцев гаджетов, благодаря чему сайт сочетает новостной формат и экспертные публикации. Помимо новостей, портал рассматривает динамику роста сегмента мобильных сервисов, анализирует конкурентную среду и технологические инновации. Разделы проекта охватывают обзор сервисов, методы повышения производительности и управление мобильными ресурсами. Благодаря поддержке издательского дома и профессиональной редакции Мобайл-инфо развивается как надежный источник информации о мобильных телефонах, объединяя новости, аналитику и практические материалы в едином информационном пространстве.
https://mobile-in.ru/
Your comment is awaiting moderation.
блог о мобильных телефонах — это актуальная цифровая платформа, посвященный миру мобильной электроники и инновационных решений. В июле 2026 года проект Мобайл-инфо был создан издательской группой АСМО-пресс как самостоятельное направление внутри компании, основным фокусом которого стала проектирование мобильных приложений под iPhone. С момента основания ресурс освещает ключевые события мобильного рынка, публикует экспертные материалы о смартфонах, а также делится инструкциями по эффективной работе с мобильными сервисами. Особое внимание уделяется функциональности устройств Apple и мобильных приложений, что позволяет читателям быть в курсе последних версий программ и сервисов. Контент формируется с учетом интересов активных пользователей смартфонов, благодаря чему сайт сочетает новостной формат и экспертные публикации. Помимо новостей, портал рассматривает динамику роста сегмента мобильных сервисов, анализирует стратегии ведущих производителей смартфонов. Разделы проекта охватывают сравнение приложений, настройку системных параметров и советы по защите данных. Благодаря поддержке издательского дома и профессиональной редакции Мобайл-инфо развивается как профильный портал о технологиях и разработке для iPhone, объединяя экспертные статьи, обзоры и инструкции в едином информационном пространстве.
https://mobile-in.ru/
Your comment is awaiting moderation.
новости мобильных телефонов — это актуальная цифровая платформа, посвященный индустрии телефонов и мобильных сервисов. В июле 2026 года проект Мобайл-инфо был создан медиахолдингом АСМО-пресс как самостоятельное направление внутри компании, основным фокусом которого стала проектирование мобильных приложений под iPhone. С момента основания ресурс освещает значимые обновления в сфере мобильных устройств, публикует детальные разборы новых гаджетов, а также делится инструкциями по эффективной работе с мобильными сервисами. Особое внимание уделяется функциональности устройств Apple и мобильных приложений, что позволяет читателям быть в курсе новых релизов и обновлений. Контент формируется с учетом запросов аудитории, увлеченной мобильными технологиями, благодаря чему сайт сочетает аналитический подход и прикладные материалы. Помимо новостей, портал рассматривает тенденции рынка мобильных приложений, анализирует изменения в пользовательских предпочтениях. Разделы проекта охватывают тестирование программ, рекомендации по безопасности и оптимизации устройств. Благодаря поддержке издательского дома и профессиональной редакции Мобайл-инфо развивается как надежный источник информации о мобильных телефонах, объединяя новости, аналитику и практические материалы в едином информационном пространстве.
https://mobile-in.ru/
Your comment is awaiting moderation.
Shop Quality Selections – There’s something for everyone and the ambiance feels warm.
Your comment is awaiting moderation.
Acorn Crate Finds – User experience is seamless and navigating pages feels effortless.
Your comment is awaiting moderation.
Explore Maple Vendor – Products are diverse and images provide clear detail of each item.
Your comment is awaiting moderation.
Jade Aisle Shop Now – I like how affordable the items are relative to other stores.
Your comment is awaiting moderation.
Your Online Basket – Professional design with a friendly feel encourages exploration.
Your comment is awaiting moderation.
Premium Online Store – Navigation is clear, shopping is smooth, and the site feels trustworthy.
Your comment is awaiting moderation.
shop frostdock – Clear arrangement of products makes finding what I need easy.
Your comment is awaiting moderation.
мостбет Джалал-Абад https://mostbet85961.help/
Your comment is awaiting moderation.
Hello everyone!
Master the use of interesting mysterious empathy for valuable social harmony now and walk in another shoes see on the website for empathy training
Full information on the link – https://800letekas.site
All the best and development in business!
Your comment is awaiting moderation.
Apple iPhone новости — это актуальный сайт для поклонников устройств Apple, где ежедневно публикуются свежие материалы о линейке iPhone, iPad, iMac и MacBook. На страницах проекта вы найдете подробные обзоры устройств, актуальные характеристики и возможности. Ресурс освещает обновления iOS и macOS, помогает разобраться в настройках безопасности. Здесь публикуются инструкции по установке программ, а также рекомендации по выбору софта для учебы и бизнеса. Читатели узнают как продлить время работы аккумулятора, получают подсказки по экономии при приобретении гаджетов. Портал регулярно рассказывает о ключевых событиях компании Apple, публикует аналитику рынка и тенденций. Отдельное внимание уделяется экосистеме Apple и интеграции устройств, что позволяет пользователям эффективно использовать возможности гаджетов. Материалы подходят как опытным владельцам техники Apple, поскольку контент сочетает глубокий технический анализ. Сайт станет полезным источником информации для тех, кто интересуется новостями Apple и хочет всегда быть в курсе актуальных программ.
https://apple-blogger.ru/
Your comment is awaiting moderation.
блог про технику Apple — это современный информационный портал о продукции Apple, где ежедневно публикуются свежие материалы о технике Apple для работы и развлечений. На страницах проекта вы найдете детальные тесты и разборы новинок, анализ производительности и функциональности. Ресурс освещает обновления iOS и macOS, помогает разобраться в работе облачных сервисов. Здесь публикуются руководства по оптимизации работы устройств, а также рекомендации по выбору софта для учебы и бизнеса. Читатели узнают как продлить время работы аккумулятора, получают подсказки по экономии при приобретении гаджетов. Портал регулярно рассказывает о анонсах обновленных устройств, публикует аналитику рынка и тенденций. Отдельное внимание уделяется сценариям совместной работы техники, что позволяет пользователям максимально раскрыть потенциал устройств. Материалы подходят как начинающим пользователям, поскольку контент сочетает понятные рекомендации на каждый день. Сайт станет полезным источником информации для тех, кто интересуется советами по работе с Mac и iMac и хочет всегда быть в курсе актуальных программ.
https://apple-blogger.ru/
Your comment is awaiting moderation.
Apple iMac и MacBook советы — это современный информационный портал о продукции Apple, где регулярно выходят новые статьи и рекомендации о смартфонах, планшетах и компьютерах Apple. На страницах проекта вы найдете детальные тесты и разборы новинок, анализ производительности и функциональности. Ресурс освещает важные изменения в экосистеме Apple, помогает разобраться в настройках безопасности. Здесь публикуются пошаговые советы по настройке iPhone и MacBook, а также подборки полезных приложений. Читатели узнают как повысить производительность системы, получают рекомендации по покупке оригинальной техники. Портал регулярно рассказывает о анонсах обновленных устройств, публикует сравнения с конкурентами. Отдельное внимание уделяется сценариям совместной работы техники, что позволяет пользователям максимально раскрыть потенциал устройств. Материалы подходят как опытным владельцам техники Apple, поскольку контент сочетает глубокий технический анализ. Сайт станет полезным источником информации для тех, кто интересуется советами по работе с Mac и iMac и хочет всегда быть в курсе актуальных программ.
https://apple-blogger.ru/
Your comment is awaiting moderation.
Discover Calm Crate Deals – Neat design and product navigation is smooth and quick.
Your comment is awaiting moderation.
Apple iMac и MacBook советы — это актуальный сайт для поклонников устройств Apple, где оперативно появляются обновления и полезные публикации о технике Apple для работы и развлечений. На страницах проекта вы найдете экспертные оценки и сравнения моделей, актуальные характеристики и возможности. Ресурс освещает обновления iOS и macOS, помогает разобраться в работе облачных сервисов. Здесь публикуются пошаговые советы по настройке iPhone и MacBook, а также рекомендации по выбору софта для учебы и бизнеса. Читатели узнают как продлить время работы аккумулятора, получают подсказки по экономии при приобретении гаджетов. Портал регулярно рассказывает о ключевых событиях компании Apple, публикует прогнозы развития технологий. Отдельное внимание уделяется сценариям совместной работы техники, что позволяет пользователям создать удобную цифровую среду. Материалы подходят как опытным владельцам техники Apple, поскольку контент сочетает простое объяснение сложных функций. Сайт станет полезным источником информации для тех, кто интересуется обзорами iPhone и iPad и хочет всегда быть в курсе важных изменений в мире технологий Apple.
https://apple-blogger.ru/
Your comment is awaiting moderation.
fireflymarket deals – Well-organized sections make it easy to locate products quickly.
Your comment is awaiting moderation.
Apple iPad обзоры и программы — это актуальный сайт для поклонников устройств Apple, где оперативно появляются обновления и полезные публикации о технике Apple для работы и развлечений. На страницах проекта вы найдете подробные обзоры устройств, актуальные характеристики и возможности. Ресурс освещает релизы новых версий операционных систем Apple, помогает разобраться в синхронизации данных. Здесь публикуются пошаговые советы по настройке iPhone и MacBook, а также обзоры популярных программ. Читатели узнают как защитить личные данные на устройствах Apple, получают советы по выбору аксессуаров. Портал регулярно рассказывает о анонсах обновленных устройств, публикует аналитику рынка и тенденций. Отдельное внимание уделяется экосистеме Apple и интеграции устройств, что позволяет пользователям создать удобную цифровую среду. Материалы подходят как тем, кто только планирует покупку, поскольку контент сочетает глубокий технический анализ. Сайт станет полезным источником информации для тех, кто интересуется обзорами iPhone и iPad и хочет всегда быть в курсе последних обновлений.
https://apple-blogger.ru/
Your comment is awaiting moderation.
Apple iPhone новости — это популярный онлайн ресурс о гаджетах Apple, где регулярно выходят новые статьи и рекомендации о смартфонах, планшетах и компьютерах Apple. На страницах проекта вы найдете подробные обзоры устройств, честные мнения пользователей. Ресурс освещает важные изменения в экосистеме Apple, помогает разобраться в работе облачных сервисов. Здесь публикуются руководства по оптимизации работы устройств, а также рекомендации по выбору софта для учебы и бизнеса. Читатели узнают как продлить время работы аккумулятора, получают советы по выбору аксессуаров. Портал регулярно рассказывает о презентациях новых моделей, публикует прогнозы развития технологий. Отдельное внимание уделяется экосистеме Apple и интеграции устройств, что позволяет пользователям максимально раскрыть потенциал устройств. Материалы подходят как опытным владельцам техники Apple, поскольку контент сочетает простое объяснение сложных функций. Сайт станет полезным источником информации для тех, кто интересуется новостями Apple и хочет всегда быть в курсе актуальных программ.
https://apple-blogger.ru/
Your comment is awaiting moderation.
Apple iMac и MacBook советы — это актуальный сайт для поклонников устройств Apple, где ежедневно публикуются свежие материалы о смартфонах, планшетах и компьютерах Apple. На страницах проекта вы найдете экспертные оценки и сравнения моделей, актуальные характеристики и возможности. Ресурс освещает релизы новых версий операционных систем Apple, помогает разобраться в настройках безопасности. Здесь публикуются инструкции по установке программ, а также рекомендации по выбору софта для учебы и бизнеса. Читатели узнают как повысить производительность системы, получают советы по выбору аксессуаров. Портал регулярно рассказывает о ключевых событиях компании Apple, публикует сравнения с конкурентами. Отдельное внимание уделяется взаимодействию iPhone с iPad и MacBook, что позволяет пользователям создать удобную цифровую среду. Материалы подходят как опытным владельцам техники Apple, поскольку контент сочетает глубокий технический анализ. Сайт станет полезным источником информации для тех, кто интересуется советами по работе с Mac и iMac и хочет всегда быть в курсе важных изменений в мире технологий Apple.
https://apple-blogger.ru/
Your comment is awaiting moderation.
Apple iPhone новости — это популярный онлайн ресурс о гаджетах Apple, где регулярно выходят новые статьи и рекомендации о линейке iPhone, iPad, iMac и MacBook. На страницах проекта вы найдете детальные тесты и разборы новинок, актуальные характеристики и возможности. Ресурс освещает обновления iOS и macOS, помогает разобраться в работе облачных сервисов. Здесь публикуются пошаговые советы по настройке iPhone и MacBook, а также обзоры популярных программ. Читатели узнают как продлить время работы аккумулятора, получают советы по выбору аксессуаров. Портал регулярно рассказывает о презентациях новых моделей, публикует аналитику рынка и тенденций. Отдельное внимание уделяется экосистеме Apple и интеграции устройств, что позволяет пользователям эффективно использовать возможности гаджетов. Материалы подходят как тем, кто только планирует покупку, поскольку контент сочетает понятные рекомендации на каждый день. Сайт станет полезным источником информации для тех, кто интересуется обзорами iPhone и iPad и хочет всегда быть в курсе последних обновлений.
https://apple-blogger.ru/
Your comment is awaiting moderation.
Hello!
Learn train mysterious regimens to find interesting and valuable fitness facts now and push your limits see on the website for training plans
Full information on the link – https://800letekas.site
All the best and development in business!
Your comment is awaiting moderation.
Apple iMac и MacBook советы — это популярный онлайн ресурс о гаджетах Apple, где ежедневно публикуются свежие материалы о линейке iPhone, iPad, iMac и MacBook. На страницах проекта вы найдете подробные обзоры устройств, честные мнения пользователей. Ресурс освещает обновления iOS и macOS, помогает разобраться в синхронизации данных. Здесь публикуются пошаговые советы по настройке iPhone и MacBook, а также обзоры популярных программ. Читатели узнают как продлить время работы аккумулятора, получают подсказки по экономии при приобретении гаджетов. Портал регулярно рассказывает о анонсах обновленных устройств, публикует аналитику рынка и тенденций. Отдельное внимание уделяется экосистеме Apple и интеграции устройств, что позволяет пользователям максимально раскрыть потенциал устройств. Материалы подходят как тем, кто только планирует покупку, поскольку контент сочетает простое объяснение сложных функций. Сайт станет полезным источником информации для тех, кто интересуется обзорами iPhone и iPad и хочет всегда быть в курсе актуальных программ.
https://apple-blogger.ru/
Your comment is awaiting moderation.
блог про технику Apple — это популярный онлайн ресурс о гаджетах Apple, где ежедневно публикуются свежие материалы о технике Apple для работы и развлечений. На страницах проекта вы найдете детальные тесты и разборы новинок, актуальные характеристики и возможности. Ресурс освещает релизы новых версий операционных систем Apple, помогает разобраться в синхронизации данных. Здесь публикуются инструкции по установке программ, а также рекомендации по выбору софта для учебы и бизнеса. Читатели узнают как продлить время работы аккумулятора, получают рекомендации по покупке оригинальной техники. Портал регулярно рассказывает о презентациях новых моделей, публикует сравнения с конкурентами. Отдельное внимание уделяется взаимодействию iPhone с iPad и MacBook, что позволяет пользователям эффективно использовать возможности гаджетов. Материалы подходят как начинающим пользователям, поскольку контент сочетает понятные рекомендации на каждый день. Сайт станет полезным источником информации для тех, кто интересуется советами по работе с Mac и iMac и хочет всегда быть в курсе последних обновлений.
https://apple-blogger.ru/
Your comment is awaiting moderation.
Apple iMac и MacBook советы — это популярный онлайн ресурс о гаджетах Apple, где ежедневно публикуются свежие материалы о смартфонах, планшетах и компьютерах Apple. На страницах проекта вы найдете экспертные оценки и сравнения моделей, честные мнения пользователей. Ресурс освещает важные изменения в экосистеме Apple, помогает разобраться в настройках безопасности. Здесь публикуются руководства по оптимизации работы устройств, а также подборки полезных приложений. Читатели узнают как защитить личные данные на устройствах Apple, получают рекомендации по покупке оригинальной техники. Портал регулярно рассказывает о ключевых событиях компании Apple, публикует прогнозы развития технологий. Отдельное внимание уделяется взаимодействию iPhone с iPad и MacBook, что позволяет пользователям создать удобную цифровую среду. Материалы подходят как опытным владельцам техники Apple, поскольку контент сочетает глубокий технический анализ. Сайт станет полезным источником информации для тех, кто интересуется обзорами iPhone и iPad и хочет всегда быть в курсе важных изменений в мире технологий Apple.
https://apple-blogger.ru/
Your comment is awaiting moderation.
feathercrate official shop – Items are well arranged and moving between pages is easy.
Your comment is awaiting moderation.
лазерная тонзиллэктомия цена в москве
Your comment is awaiting moderation.
стоимость увеличения члена
Your comment is awaiting moderation.
firmfoundation.bond – Simple interface, pages feel grounded and emphasize trustworthiness clearly.
Your comment is awaiting moderation.
tobiasinthepark featured picks – Really like the vibe, everything feels thoughtfully arranged and welcoming.
Your comment is awaiting moderation.
stackable – Appreciate the typography choices; comfortable spacing improved my reading experience.
Your comment is awaiting moderation.
byteworks – Color palette felt calming, nothing distracting, just focused, thoughtful design.
Your comment is awaiting moderation.
Order Grove Store – Found a wide selection of items and the search function works smoothly.
Your comment is awaiting moderation.
Купите билеты на хоккей онлайн — быстро, удобно и безопасно. Электронный билет приходит сразу, а схема арены и цены доступны онлайн. Планируйте посещение без очередей! Подробнее: https://jobhop.co.uk/blog/452053/——–
Your comment is awaiting moderation.
Explore Tally Cove – The interface is simple and the overall experience is reassuringly reliable.
Your comment is awaiting moderation.
Visit Ash Bazaar – Browsing is smooth and everything opens without delay.
Your comment is awaiting moderation.
Explore Popular Products – Customer service is responsive and always provides guidance.
Your comment is awaiting moderation.
Explore Popular Products – Browsing is intuitive, convenient, and the shopping process feels seamless.
Your comment is awaiting moderation.
Network Nectar Online – Navigation is seamless and loading times are minimal.
Your comment is awaiting moderation.
mostbet как пройти верификацию mostbet как пройти верификацию
Your comment is awaiting moderation.
direct shop link – Browsing is simple, and the page arrangement makes sense.
Your comment is awaiting moderation.
anchorway.bond – Simple navigation, messaging conveys security and a professional tone effectively.
Your comment is awaiting moderation.
jolvix.shop – Simple design but it definitely gets the job done.
Your comment is awaiting moderation.
deployly – Found practical insights today; sharing this article with colleagues later.
Your comment is awaiting moderation.
cloudster – Content reads clearly, helpful examples made concepts easy to grasp.
Your comment is awaiting moderation.
getstackr – Appreciate the typography choices; comfortable spacing improved my reading experience.
Your comment is awaiting moderation.
usestackr – Appreciate the typography choices; comfortable spacing improved my reading experience.
Your comment is awaiting moderation.
mostbet сом пополнение https://www.mostbet85961.help
Your comment is awaiting moderation.
fetchbay.shop – The website has a clean layout and placing orders is very easy.
Your comment is awaiting moderation.
Shop Cherry Vendor – Frequent updates make browsing the latest arrivals a pleasure.
Your comment is awaiting moderation.
Discover Best Deals – Browsing is smooth and convenient, and the overall site is easy to use.
Your comment is awaiting moderation.
Shop Berry Crate Online – Browsing is simple and locating what I need takes no time.
Your comment is awaiting moderation.
Official Apricot Crate – The products look excellent and ordering is hassle-free.
Your comment is awaiting moderation.
лечение фимоза в москве
Your comment is awaiting moderation.
Network Nectar Shop – It’s simple to navigate and content appears quickly without lag.
Your comment is awaiting moderation.
visit this platform – Browsing is simple and the overall feel is refreshing.
Your comment is awaiting moderation.
groundpoint.bond – Modern layout, content feels dependable and encourages user confidence naturally.
Your comment is awaiting moderation.
Your Online Vendor – Easy-to-use design with a dependable shopping experience overall.
Your comment is awaiting moderation.
мобильные стойки ограждения купить столбики ограждения с лентой купить
Your comment is awaiting moderation.
купить кабель 16 проводка цена
Your comment is awaiting moderation.
Soft Parcel Outlet – The website feels responsive and navigation is smooth and easy.
Your comment is awaiting moderation.
Check Out Products – Shopping feels easy and the site layout is clear and reliable.
Your comment is awaiting moderation.
ХК «Сибирь» — легендарная команда Новосибирска с финалом Восточной конференции и бронзой сезона 2014/2015. Узнайте о матчах и истории: https://sites.google.com/view/hc-sibir-tickets/%D0%B3%D0%BB%D0%B0%D0%B2%D0%BD%D0%B0%D1%8F-%D1%81%D1%82%D1%80%D0%B0%D0%BD%D0%B8%D1%86%D0%B0
Your comment is awaiting moderation.
Rooftop Vendor Deals – The support team was prompt and resolved my inquiries efficiently.
Your comment is awaiting moderation.
Your Go-To Shop – Product quality stands out and navigating through categories is effortless.
Your comment is awaiting moderation.
Apricot Aisle Collection – Navigation is straightforward and listings provide useful details.
Your comment is awaiting moderation.
check this website – The layout is smooth and moving through sections feels natural.
Your comment is awaiting moderation.
browse here – Everything is easy to access, and the interface feels organized.
Your comment is awaiting moderation.
anchorbase.bond – Smooth navigation, content is approachable and emphasizes trust and security.
Your comment is awaiting moderation.
Inventory Ivy Outlet – Clear wording across listings makes browsing simple.
Your comment is awaiting moderation.
мостбет как скачать мостбет как скачать
Your comment is awaiting moderation.
Find Top Products – Regular updates keep the product selection fresh and interesting.
Your comment is awaiting moderation.
Xenonest Shop Now – Nice vibe overall and product descriptions make shopping easier.
Your comment is awaiting moderation.
Find Top Products – The site is user-friendly, convenient, and browsing feels natural.
Your comment is awaiting moderation.
Top Picks Online – The website feels reliable and pages transition without delay.
Your comment is awaiting moderation.
Elm Vendor Shop Now – Reasonable prices combined with quality items make shopping enjoyable.
Your comment is awaiting moderation.
Amber Wharf Finds – Tidy layout with clearly organized product sections for easier browsing.
Your comment is awaiting moderation.
linepeak.bond – Professional layout, content communicates trustworthiness and clear guidance.
Your comment is awaiting moderation.
visit this platform – Pages are well-structured, giving a clear and clean experience.
Your comment is awaiting moderation.
Древние башни Московского Кремля и яркие световые шоу в Государственном Кремлёвском дворце — редкое сочетание традиций и инноваций. Подробнее здесь: https://cont.ws/@goevent/3219398
Your comment is awaiting moderation.
PG Slot สล็อตยอดฮิต ใช้งานง่าย ฝากถอนรวดเร็ว
คำค้นหา pg slot ถูกค้นหามากขึ้นเรื่อยๆ ในกลุ่มผู้เล่นเกมสล็อตออนไลน์ เพราะเป็น แบรนด์เกมที่โดดเด่น ด้าน กราฟิก ความ ลื่นไหล และ อัตราการจ่ายรางวัลที่น่าสนใจ เกมของ PG ผลิตโดยค่ายมาตรฐาน ที่รองรับการเล่นทั้งบน โทรศัพท์มือถือ และ คอมพิวเตอร์
ความโดดเด่น ของ สล็อต PG
PG Slot เป็นเกมสล็อตออนไลน์ที่ออกแบบมาให้ เข้าเกมไว เล่นผ่าน ระบบออนไลน์ และรองรับ ทุกแพลตฟอร์ม ไม่ต้องติดตั้งเพิ่มเติม ผู้เล่นสามารถเข้าเล่นผ่าน เว็บเบราว์เซอร์ ได้ทันที ภาพและเสียงถูกพัฒนาในรูปแบบ 3D ให้ความคมชัด พร้อมเอฟเฟกต์ จัดเต็ม
คุณสมบัติหลักของเกม pg slot ได้แก่
โบนัสและฟรีสปินหลายแบบ
ฟีเจอร์ตัวคูณรางวัล
เล่นฟรีก่อนเติมเงิน
รองรับภาษาไทยเต็มรูปแบบ
ฝากถอนง่าย ทันใจ
แพลตฟอร์ม pg slot โดยทั่วไปให้บริการ การฝาก-ถอน ออโต้ตลอด 24 ชม. ขั้นต่ำเริ่มต้นเพียง 1 บาท ขึ้นอยู่กับ กติกาแต่ละแพลตฟอร์ม การทำรายการใช้เวลา รวดเร็วมาก ผ่าน QR Code หรือระบบ ธนาคารบนมือถือ ทำให้ธุรกรรมเป็นไปอย่าง ต่อเนื่อง
แนวเกมที่คนเล่นเยอะ ใน PG Slot
เกม PG Slot มีธีมหลากหลาย เช่น
ธีม เทพเจ้า
ธีม ผจญภัย
ธีม เอเชียและโชคลาภ
ธีม Animal
เกมยอดนิยมมักเป็นเกมที่แตกง่าย พร้อมระบบ Special Feature และ ระบบจ่ายคุ้มค่า เหมาะกับทั้ง ผู้เล่นเริ่มต้น และ สายสล็อตจริงจัง
มาตรฐานระบบ
PG Slot พัฒนาในระบบสากล มีการ ปกป้องข้อมูลผู้เล่น และใช้ระบบสุ่มผล ระบบสุ่มมาตรฐาน เพื่อให้ผลลัพธ์ ตรวจสอบได้ แพลตฟอร์มที่ให้บริการ สล็อต PG ควรมี ทีมซัพพอร์ต 24 ชม.
โดยภาพรวม
pg slot เป็นตัวเลือกยอดนิยมสำหรับผู้ที่ต้องการเล่นสล็อตออนไลน์ ด้วยจุดเด่นด้าน กราฟิกคุณภาพ และการทำธุรกรรมที่ ไว ผู้เล่นสามารถเริ่มต้นได้ ไม่ซับซ้อน ฝากถอนสะดวก และเลือกเกมได้ หลากหลายแนว เหมาะสำหรับ ทั้งมือใหม่และมือโปร ในโลกของเกมสล็อตออนไลน์
Your comment is awaiting moderation.
ทดลองเล่นสล็อต pg
แพลตฟอร์ม TKBNEKO เปิดประสบการณ์ใหม่แห่งการเดิมพันออนไลน์ ฝาก-ถอนไว ด้วยระบบสแกน คิวอาร์โค้ด
ในยุคดิจิทัลที่ เทคโนโลยีพัฒนาอย่างรวดเร็ว TKBNEKO พร้อมยกระดับการให้บริการ ด้วยระบบที่ ทันสมัย เสถียร และ ตรวจสอบได้ เพื่อให้ผู้เล่น มั่นใจ ทุกครั้งที่ใช้งาน
ระบบการเงินที่ใช้งานง่าย
ฝากขั้นต่ำ: 1 บาท
ถอนขั้นต่ำ: ขั้นต่ำ 1 บาท
เวลาฝากเงิน: ภายใน 3 วินาที
ยอดถอน: ไม่มีลิมิต
เติมเงินง่าย แค่สแกน
สแกน QR Code ระบบจะ โอนเงินเข้าทันที ขั้นต่ำ 100 บาท สูงสุด 500,000 บาท
หมวดหมู่เกม
สล็อต: ลุ้นแจ็คพอต
เกมสด: ดีลเลอร์สด
กีฬา: เดิมพันลีกดัง
ยิงปลา: ลุ้นกำไรทันที
โบนัสและโปรโมชัน
ติดตามหน้า โบนัส พร้อมระบบ สมาชิกพรีเมียม และโปรแกรม พันธมิตร
ติดต่อเรา
สอบถามข้อมูลได้ตลอด 24 ชั่วโมง ผ่านหน้า ศูนย์ช่วยเหลือ ทีมงาน ของเรา พร้อมดูแลตลอดเวลา
https://medium.com/@ratypw/ทดลองเล่นสล็อต-pg-e598fa477f69
Your comment is awaiting moderation.
Silver Stride Outlet – A tidy design makes discovering and viewing items effortless.
Your comment is awaiting moderation.
Start Shopping Here – Shopping is convenient, the site feels intuitive, and moving around is easy.
Your comment is awaiting moderation.
Varnika Shop Now – Everything is sorted into clear groups, so finding products is fast.
Your comment is awaiting moderation.
Explore the Collection – Browsing is fun and placing an order is hassle-free.
Your comment is awaiting moderation.
Discover Chestnut Cart Deals – Easy-to-use interface and quick-loading pages enhance the shopping experience.
Your comment is awaiting moderation.
Winter Vendor Boutique – The site layout makes navigating pages fast and convenient.
Your comment is awaiting moderation.
online catalog – The design feels clean, and moving through sections is very smooth.
Your comment is awaiting moderation.
варикоцеле виды операций
Your comment is awaiting moderation.
тренды свадебных платьев свадебный платья москва каталог
Your comment is awaiting moderation.
silverridge.bond – Strong presentation, content emphasizes dependability and well-crafted design.
Your comment is awaiting moderation.
Amber Outpost Collection – Pages load promptly and completing checkout was easy.
Your comment is awaiting moderation.
brisklet.shop – Navigation works perfectly and content is clear to read.
Your comment is awaiting moderation.
заболевание варикоцеле
Your comment is awaiting moderation.
trystack – Mobile version looks perfect; no glitches, fast scrolling, crisp text.
Your comment is awaiting moderation.
usekube – Overall, professional vibe here; trustworthy, polished, and pleasantly minimal throughout.
Your comment is awaiting moderation.
Shop Formula Forest – I appreciate the premium options and the swift payment experience.
Your comment is awaiting moderation.
Official Calm Cart Store – Browsing is straightforward and the site feels dependable and user-friendly.
Your comment is awaiting moderation.
getkube – Loved the layout today; clean, simple, and genuinely user-friendly overall.
Your comment is awaiting moderation.
Premium Autumn Bay Shop – Moving between categories is easy and item descriptions are thorough.
Your comment is awaiting moderation.
Official Zipp Aisle – Ordering felt seamless and hassle-free from start to finish.
Your comment is awaiting moderation.
Lark Vendor Website – Interesting products paired with detailed, helpful information make browsing enjoyable.
Your comment is awaiting moderation.
Explore the Collection – The images are crisp, and items are easy to discover.
Your comment is awaiting moderation.
bondedroute.bond – Professional design, emphasizes coordination and easily digestible ideas.
Your comment is awaiting moderation.
пластика перегородки носа
Your comment is awaiting moderation.
Amber Bazaar Website – Items feel unique and the cost is fair.
Your comment is awaiting moderation.
операция септопластика
Your comment is awaiting moderation.
Your Go-To Shop – Easy to move around, reliable site, and overall shopping is stress-free.
Your comment is awaiting moderation.
Your Go-To Market – The website is responsive and the deals make it enjoyable to browse.
Your comment is awaiting moderation.
mostbet пополнить счет 2026 https://mostbet39081.help
Your comment is awaiting moderation.
Saucier Studio Online Shop – The range of original products makes shopping inspiring and interesting.
Your comment is awaiting moderation.
Merniva Outlet – Some great finds and the prices seem reasonable for most items.
Your comment is awaiting moderation.
product hub – The interface is responsive, with no confusing navigation elements.
Your comment is awaiting moderation.
Shop Prairie Vendor – Navigation feels smooth and the clean interface makes browsing enjoyable.
Your comment is awaiting moderation.
trusthub.bond – Polished interface, content emphasizes transparency and credibility.
Your comment is awaiting moderation.
варикоцеле лапароскопическая операция
Your comment is awaiting moderation.
Visit Cherry Checkout – Easy navigation and a fast, hassle-free checkout process today.
Your comment is awaiting moderation.
варикоцеле яичка у мужчины
Your comment is awaiting moderation.
usebyte – Bookmarked this immediately, planning to revisit for updates and inspiration.
Your comment is awaiting moderation.
halvyn.shop – The site is simple to use and browsing feels intuitive.
Your comment is awaiting moderation.
септопластика цена москве
Your comment is awaiting moderation.
Details inside: https://hedgedoc.eclair.ec-lyon.fr/s/lxzdruayk
Your comment is awaiting moderation.
Shop Calm Cart Online – Navigation is simple, and shopping overall is convenient and pleasant.
Your comment is awaiting moderation.
Online Meal Prep Hub – Easy-to-follow sections make exploring the site enjoyable.
Your comment is awaiting moderation.
Best Deals Online – Pages load quickly and the site has a refined, clean style.
Your comment is awaiting moderation.
Visit Alpine Vendor – Navigation feels effortless and the layout is very tidy.
Your comment is awaiting moderation.
getbyte – Color palette felt calming, nothing distracting, just focused, thoughtful design.
Your comment is awaiting moderation.
gobyte – Content reads clearly, helpful examples made concepts easy to grasp.
Your comment is awaiting moderation.
click to explore – The layout is tidy and highlights the creative work nicely.
Your comment is awaiting moderation.
Explore trading tools – Pages are clean and content is easy to locate.
Your comment is awaiting moderation.
trycloudy – Pages loaded fast, images appeared sharp, and formatting stayed consistent.
Your comment is awaiting moderation.
dataops – Pages loaded fast, images appeared sharp, and formatting stayed consistent.
Your comment is awaiting moderation.
applabs – Appreciate the typography choices; comfortable spacing improved my reading experience.
Your comment is awaiting moderation.
datadev – Bookmarked this immediately, planning to revisit for updates and inspiration.
Your comment is awaiting moderation.
Basket Wharf Experience – The overall experience is seamless with a neat and easy-to-use layout.
Your comment is awaiting moderation.
шаровые краны под приварку кран под сварку
Your comment is awaiting moderation.
Daisy Crate Specials – Products are appealing and the ordering process is quick and easy.
Your comment is awaiting moderation.
Visit Captain’s Closet – Shopping here feels seamless, with stylish finds available throughout.
Your comment is awaiting moderation.
Click for Chocolate Chasm – Smooth site flow with clearly organized sections.
Your comment is awaiting moderation.
engine resource – Professional design and navigation feels intuitive.
Your comment is awaiting moderation.
securepath.bond – Organized navigation, messaging feels dependable and approachable for users.
Your comment is awaiting moderation.
bloomvendor.shop – Such a pleasant browsing experience with lovely selections available.
Your comment is awaiting moderation.
Online textile portal – Layout is clean and browsing feels straightforward.
Your comment is awaiting moderation.
Design Driftwood Products – Pages are easy to navigate with a clear, professional layout.
Your comment is awaiting moderation.
digital shop – I appreciate how quickly pages load and how smooth scrolling feels.
Your comment is awaiting moderation.
газоблок краснодар цена газоблока
Your comment is awaiting moderation.
Fig & Fashion Marketplace – Clear structure and aesthetically pleasing pages throughout.
Your comment is awaiting moderation.
browse movies – The ideas are unique and the content is enjoyable to read.
Your comment is awaiting moderation.
this web store – The interface is clear and moving between sections is easy.
Your comment is awaiting moderation.
White Noise Wonder Resources – Smooth layout with clearly defined sections for easy reading.
Your comment is awaiting moderation.
септопластика носовой перегородки цена
Your comment is awaiting moderation.
visit email essentials – Clean design and clear headings help browsing feel effortless.
Your comment is awaiting moderation.
Clean Cabin Products – Interface is neat and content is easy to explore.
Your comment is awaiting moderation.
Ищете, где купить водительские права быстро и без лишних проблем? Наш сервис предлагает надежную и проверенную помощь в оформлении водительских удостоверений любых категорий. Мы гарантируем индивидуальный подход, профессиональную консультацию и соблюдение всех требований законодательства. Благодаря многолетнему опыту и тысячам довольных клиентов, вы можете быть уверены в качестве и безопасности услуги. У нас доступные цены, прозрачные условия и полный пакет документов, который позволит вам избежать лишних хлопот и сэкономить время. Не рискуйте своей репутацией и безопасностью – обращайтесь к специалистам, которые знают свою работу. На нашем сайте вы найдете подробную информацию о процедуре получения водительских прав, стоимости, сроках и необходимых документах. Купите водительские права быстро, легально и выгодно именно у нас – ваш надежный партнер на дороге к свободе и удобству в передвижении!
Your comment is awaiting moderation.
Kitchen Kite Official – Navigation is simple and content is clearly structured.
Your comment is awaiting moderation.
direct shop link – Its overall feel comes across as new and distinctive.
Your comment is awaiting moderation.
Explore Fork & Foundry – Smooth interface and content is easy to follow throughout.
Your comment is awaiting moderation.
Looking for a yacht? premium yacht experiences in Cyprus for unforgettable sea adventures. Charter luxury yachts, catamarans, or motorboats with or without crew. Explore crystal-clear waters, secluded bays, and iconic coastal locations in first-class comfort onboard.
Your comment is awaiting moderation.
browse here – I liked how engaging and smooth the experience felt.
Your comment is awaiting moderation.
Filter Fable Boutique – Organized layout and clean structure make navigating simple.
Your comment is awaiting moderation.
this online store – Layout is clear, making it easy to explore all items.
Your comment is awaiting moderation.
Как цирк завоевал сердца россиян и какую роль сыграл цирк на Фонтанке? История становления и знаковые здания. Подробнее здесь: https://teletype.in/@concert/istoriya-cirkovogo-iskusstva
Your comment is awaiting moderation.
Server Summit Online – Simple structure and smooth flow between content.
Your comment is awaiting moderation.
HazelAisle deals – I’ve had a very positive experience with smooth navigation and easy checkout.
Your comment is awaiting moderation.
SEO Analysis Hub – Clean interface and organized sections allow effortless browsing.
Your comment is awaiting moderation.
this web store – The layout is straightforward and moving through sections is easy.
Your comment is awaiting moderation.
Embroidery Eden Official – Pages are well-structured and content is easy to follow.
Your comment is awaiting moderation.
shopping platform – The site currently appears organized and very user-friendly.
Your comment is awaiting moderation.
browse the festival – Event information is direct, clear, and easy to follow.
Your comment is awaiting moderation.
Monarch Mosaic Official – Well-structured pages with an attractive and simple design.
Your comment is awaiting moderation.
shop link here – Simple menus and well-arranged content make browsing effortless.
Your comment is awaiting moderation.
Honey & Hustle Resources – Organized sections provide smooth movement across the site.
Your comment is awaiting moderation.
DepotLark Store – Each product is described clearly, accurately, and provides useful details for shoppers.
Your comment is awaiting moderation.
authoritylab – Mobile version looks perfect; no glitches, fast scrolling, crisp text.
Your comment is awaiting moderation.
Sublime Summit Market – Smooth interface with clearly defined sections for easy navigation.
Your comment is awaiting moderation.
leadvero – Bookmarked this immediately, planning to revisit for updates and inspiration.
Your comment is awaiting moderation.
Finance Fjord Hub – Content is organized, and navigating the site feels effortless.
Your comment is awaiting moderation.
auditpilot – Loved the layout today; clean, simple, and genuinely user-friendly overall.
Your comment is awaiting moderation.
direct shop link – The interface looks smart and uncluttered, making it intuitive.
Your comment is awaiting moderation.
Vintage thrift hub – Neatly arranged pages make exploring the site enjoyable.
Your comment is awaiting moderation.
artisan cider page – Everything feels carefully put together with an authentic touch.
Your comment is awaiting moderation.
Culinary Hub Online – Pages load quickly and information is easy to access.
Your comment is awaiting moderation.
retail website – Sections are neatly organized for a smooth browsing experience.
Your comment is awaiting moderation.
Item Whisper – A smart and intuitive platform helping you discover hidden gems with ease.
Your comment is awaiting moderation.
Zolveta shopping hub – Clean design with neatly organized categories made the browsing experience pleasant.
Your comment is awaiting moderation.
От фестиваля «Идол» до зимних премьер — Большой Московский цирк каждый сезон удивляет новыми постановками. Подробнее здесь: https://teletype.in/@concert/cirk-na-vernadskogo-bilety
Your comment is awaiting moderation.
product hub – Everything is well organized, and navigating feels effortless.
Your comment is awaiting moderation.
сейф в шкаф
Your comment is awaiting moderation.
Lotus Loft Online – Simple flow between pages makes navigating the site straightforward.
Your comment is awaiting moderation.
Visit Revenue Ridge – Smooth interface and content is organized logically.
Your comment is awaiting moderation.
online catalog – I’m impressed by how quickly each section appears.
Your comment is awaiting moderation.
Macro Merchant Online – Clear headings and structured content make reading easy.
Your comment is awaiting moderation.
Streaming tools online – Clear, well-structured sections make browsing simple.
Your comment is awaiting moderation.
стоимость сейфа
Your comment is awaiting moderation.
Visit Salt & Satin – Interface is tidy and all content is easy to access.
Your comment is awaiting moderation.
explore this page – Everything runs efficiently without noticeable lag.
Your comment is awaiting moderation.
official shop page – Simple navigation and quick loading make it enjoyable to use.
Your comment is awaiting moderation.
Предлагаем современную квартиру на сутки в Борисове с отличным ремонтом. Плюсы: дизайнерский интерьер, новая техника, удобная мебель. Есть стиральная машина, быстрый интернет. Достопримечательности города: костёл, музей ОАО Борисовдрев и мемориал батареям. Гарнизон Геленово — интересный исторический объект. Квартира станет вашей базой, откуда удобно отправляться на экскурсии и возвращаться для отдыха. Красивый вид из окна будет радовать вас каждый день. Приезжайте к нам с комфортом аренда квартиры в Борисове
Your comment is awaiting moderation.
шумоизоляция дверей авто
Your comment is awaiting moderation.
Zarniq online store – Fast arrival with well-done, secure packaging for every item.
Your comment is awaiting moderation.
Shop Meadow – A peaceful shopping hub featuring handpicked items with natural appeal.
Your comment is awaiting moderation.
Way better than what I was using before, the interface is alot smoother and they actually have decent support staff that dosent take forever to respond, heres teh link if anyone wants to check it out z7.com game
Your comment is awaiting moderation.
шумоизоляция торпеды
Your comment is awaiting moderation.
Silk Station Boutique – Clean design and fast-loading pages make browsing enjoyable.
Your comment is awaiting moderation.
Revenue Hub – Everything is easy to find and the site feels polished.
Your comment is awaiting moderation.
Ginger Glory Marketplace – Clear presentation and neat layout make exploring simple.
Your comment is awaiting moderation.
Digital logo store – Smooth experience with a neat, tidy presentation.
Your comment is awaiting moderation.
online retail site – Navigation is simple and the overall feel is user-friendly.
Your comment is awaiting moderation.
Lifestyle Hub – Organized content and clear sections create a pleasant browsing experience.
Your comment is awaiting moderation.
Tried it but I’m still on the fence about the whole thing, seems ok so far but gonna give it more time before I decide if its actually worth sticking with. xe88 apk
Your comment is awaiting moderation.
teacher resource site – The interface is tidy and information is simple to locate.
Your comment is awaiting moderation.
featured platform – Content is arranged logically, making it easy to browse.
Your comment is awaiting moderation.
оружейные сейфы
Your comment is awaiting moderation.
Relvaa collections – Checkout was seamless and payment options were convenient and varied.
Your comment is awaiting moderation.
featured website – The layout is smooth, and finding content is effortless.
Your comment is awaiting moderation.
пожаростойкие сейфы
Your comment is awaiting moderation.
Online Interior Portal – Tidy pages and structured content make navigation effortless.
Your comment is awaiting moderation.
как установить mostbet apk http://www.mostbet39081.help
Your comment is awaiting moderation.
Wardrobe Wisp Boutique – Organized layout with a pleasant browsing experience.
Your comment is awaiting moderation.
Avant-Garde Picks – A bold retail destination tailored for cutting-edge preferences.
Your comment is awaiting moderation.
Цирк Никулина — место, где оживают традиции и рождаются новые шоу. Яркие номера, юмор и семейная атмосфера делают каждый визит особенным. Подробнее здесь: https://teletype.in/@concert/cirk-nikulina
Your comment is awaiting moderation.
Explore Horizon Collections – Pages are well-organized with readable and accessible content.
Your comment is awaiting moderation.
Fitness essentials portal – Tidy layout and effortless browsing make it user-friendly.
Your comment is awaiting moderation.
Shop Leather Lane – Well-arranged pages that are easy to browse.
Your comment is awaiting moderation.
где купить сейф
Your comment is awaiting moderation.
офисные сейфы купить
Your comment is awaiting moderation.
digital shop – Navigation is simple, and the content is clear and concise.
Your comment is awaiting moderation.
storefront website – The pages load nicely and are easy to understand.
Your comment is awaiting moderation.
visit the info site – The structure is logical and comfortable to navigate.
Your comment is awaiting moderation.
сейфы от пожара
Your comment is awaiting moderation.
DuneParcel collections – Really pleased with the quick response and helpful guidance from support.
Your comment is awaiting moderation.
Luggage Marketplace – Clear sections and tidy pages make navigation very easy.
Your comment is awaiting moderation.
Pot & Petal Official – Pages are clearly structured and finding what you need is straightforward.
Your comment is awaiting moderation.
Digital Emporium Hub – Fast-loading pages with clear content and easy navigation.
Your comment is awaiting moderation.
Planting tools shop – Everything is well-organized and moves quickly from section to section.
Your comment is awaiting moderation.
Email productivity shop – Everything is easy to read and the interface feels polished.
Your comment is awaiting moderation.
Kind Vendor – A friendly and thoughtful marketplace offering reliable and pleasant service.
Your comment is awaiting moderation.
crash мостбет https://mostbet39081.help/
Your comment is awaiting moderation.
trafficcrafter – Loved the layout today; clean, simple, and genuinely user-friendly overall.
Your comment is awaiting moderation.
Hyvora Webstore – Easy to find items and pages respond fast.
Your comment is awaiting moderation.
leadspike – Overall, professional vibe here; trustworthy, polished, and pleasantly minimal throughout.
Your comment is awaiting moderation.
serpstudio – Overall, professional vibe here; trustworthy, polished, and pleasantly minimal throughout.
Your comment is awaiting moderation.
direct shop link – Everything loads quickly, and moving between sections feels natural.
Your comment is awaiting moderation.
clickrevamp – Pages loaded fast, images appeared sharp, and formatting stayed consistent.
Your comment is awaiting moderation.
adscatalyst – Found practical insights today; sharing this article with colleagues later.
Your comment is awaiting moderation.
promoseeder – Found practical insights today; sharing this article with colleagues later.
Your comment is awaiting moderation.
auditavenue.shop – The information is presented clearly and the layout is simple to follow.
Your comment is awaiting moderation.
discussion platform – Updates are presented clearly with helpful context.
Your comment is awaiting moderation.
Tried it but Winner Online Casino seems ok so far honestly, seems legit and the whole thing runs smooth but im gonna give it more time before I really know what I think about it. Still early to say if its the right fit for me personaly.
Your comment is awaiting moderation.
Yelnix products – Easy-to-use design made finding the right products effortless.
Your comment is awaiting moderation.
мостбет KGS вывод https://mostbet39081.help/
Your comment is awaiting moderation.
their shop page – Everything feels professional and simple to navigate.
Your comment is awaiting moderation.
Explore Trail Trek – Interface feels clean, and navigation flows effortlessly.
Your comment is awaiting moderation.
сейфы оружейные купить
Your comment is awaiting moderation.
Spice Craft Marketplace – Clean layout allows for easy exploration of all pages.
Your comment is awaiting moderation.
Wardrobe Wisp Products – Smooth pages with clearly structured navigation.
Your comment is awaiting moderation.
Tried it but honestly seems ok so far, been using it for about a week and haven’t run into any major issues yet, tho I’m gonna give it more time before I make any final judgement about win55.
Your comment is awaiting moderation.
Fashion finds at Birch – Well-arranged site with a polished, inviting look.
Your comment is awaiting moderation.
Click for Funnel Foundry – Pleasant site flow with polished content and simple navigation.
Your comment is awaiting moderation.
Up Vendor – A forward-thinking store built to elevate your everyday shopping experience.
Your comment is awaiting moderation.
shopping platform – Overall, it feels authentic and truly supportive for visitors today.
Your comment is awaiting moderation.
Been using wild online for a couple weeks now and the interface is really clean and easy to navigate, though the customer support chat could be faster sometimes. Overall pretty satisfied with it so far.
Your comment is awaiting moderation.
workwhim online portal – Very easy to browse, everything loads almost instantly.
Your comment is awaiting moderation.
Wavento Webstore – Easy-to-use layout and pages load quickly.
Your comment is awaiting moderation.
trusted Larnix shop – Layout is modern and clean, with navigation that feels effortless.
Your comment is awaiting moderation.
visit this platform – I explored a bit and came across genuinely helpful resources.
Your comment is awaiting moderation.
+1 for this one, been using it for a bit and it works as advertised tk88 com
Your comment is awaiting moderation.
lormiq.shop – Definitely bookmarking this site to return for future purchases.
Your comment is awaiting moderation.
Everaisle Products – Planning to return here soon for more purchases.
Your comment is awaiting moderation.
For anyone who needs a straightforward card game site, just be aware that you should start with smaller sessions to learn the rules first, and dont jump in expecting instant results—take your time understanding strategy. how to play three card rummy
Your comment is awaiting moderation.
browse here – I appreciated how quickly I could find what I was looking for.
Your comment is awaiting moderation.
Zest Vendor – A vibrant shop filled with energetic picks and exciting discoveries.
Your comment is awaiting moderation.
store link here – The layout is clear, and moving between pages is very smooth.
Your comment is awaiting moderation.
купить кабель 16 кабель магазин минск
Your comment is awaiting moderation.
Нужны столбики? столбики ограждения столбики для складов, парковок и общественных пространств. Прочные материалы, устойчивое основание и удобство перемещения обеспечивают безопасность и порядок.
Your comment is awaiting moderation.
This year I came across https://myziosinm.com/ while looking for small classroom favors. The building block sets were easy to pack and felt more engaging than just candy. It made everything feel a little more thoughtful without extra stress.
Your comment is awaiting moderation.
Auricly Marketplace – Nice visual layout with appealing items throughout the site.
Your comment is awaiting moderation.
mostbet не устанавливается apk http://www.mostbet39081.help
Your comment is awaiting moderation.
So my friend told me about this site like two weeks ago and I was just scrolling through and found it and man oh man im telling u its pretty solid. He kept going on about how he liked it better than other places hes tried and honestly after messing around with it for like an hour I get what hes saying. dog house megaways keeps u entertained for sure.
Your comment is awaiting moderation.
The brightness is perfectly balanced and makes grooming much easier. I appreciate the anti-fog feature after hot showers. The design looks sleek and modern on the wall. https://shopyoding.com/ delivers both elegance and practical functionality.
Your comment is awaiting moderation.
Xerva Marketplace – Nice, clean layout made browsing products today fast and easy.
Your comment is awaiting moderation.
Visit Olvesta – This one’s going straight into my favorites list.
Your comment is awaiting moderation.
VelvetHub Online – Saving this site for upcoming shopping trips, looks promising.
Your comment is awaiting moderation.
сейфы для офиса купить
Your comment is awaiting moderation.
I recently got a waterproof blanket from https://shopyaning.com/ for my dog, and it’s been great. The material is soft and comfy, yet easy to wipe clean after a messy day. My dog seems to enjoy lying on it, and I don’t worry about spills anymore.
Your comment is awaiting moderation.
Quinora Hub – Navigation is smooth, making it easy to find what I wanted.
Your comment is awaiting moderation.
Official Elnesta Site – The whole experience was smooth, especially the fast checkout.
Your comment is awaiting moderation.
можно купить сейф
Your comment is awaiting moderation.
The Winzoo sofa I ordered from https://thewinzoo.com/ has completely changed how I use my living room. It’s stylish, easy to convert, and the mattress is surprisingly supportive. Hosting friends overnight is no longer a hassle.
Your comment is awaiting moderation.
Quick pros:
* Clean interface, easy navigation
* Fast loading times on mobile and desktop
* Responsive support team
* No excessive ads cluttering the experience
шафл казино
Your comment is awaiting moderation.
browse here – Everything is clearly arranged and the site feels well thought out.
Your comment is awaiting moderation.
Explore Grivor – Site performance is smooth and the experience was pleasant.
Your comment is awaiting moderation.
Mornings feel better when I start slow. I’ll make coffee, grab my https://thewemate.com/ journal, and jot down whatever’s floating around in my mind. It’s not deep or dramatic most days. Just thoughts, reminders, small goals. Seeing it all on paper makes things feel manageable. Then I close it and move on with the day.
Your comment is awaiting moderation.
Merchio Boutique – The polished design gives the whole store a premium vibe.
Your comment is awaiting moderation.
shopping platform – I really like how organized everything is and how smooth it is to move between pages.
Your comment is awaiting moderation.
I use this mirror every morning and evening without thinking about it much, which says a lot. The reflection stays clear even after hot showers. https://weermirrors.com/ seems to have focused on simple functionality rather than unnecessary details.
Your comment is awaiting moderation.
Update: Still using this after 3 months and I gotta say it hasnt let me down yet. The whole thing runs smooth and I havent had any issues, so yeah Im sticking with it. scr888 download ios
Your comment is awaiting moderation.
NobleVend Shop Online – Planning to revisit for future buying sessions.
Your comment is awaiting moderation.
Serviq Products – Looking forward to returning to explore more items soon.
Your comment is awaiting moderation.
Xerva Curated – Clear layout and simple navigation make shopping enjoyable today.
Your comment is awaiting moderation.
Discover Dapper Vendor – A seamless shopping experience with everything functioning well.
Your comment is awaiting moderation.
I slip into my https://thevulcanodon.com/ as soon as I get home. The soft fabric makes me unwind instantly. I never stress about comfort when I wear them. Vulcanodon designed them to feel cozy and reliable every night.
Your comment is awaiting moderation.
Visit Pentrio – Everything from cart to confirmation worked without a hitch.
Your comment is awaiting moderation.
Iventra Online Shop – Navigation is natural and product pages are easy to read.
Your comment is awaiting moderation.
Click for XenoDeals – Neat layout makes it simple to browse and find products quickly.
Your comment is awaiting moderation.
Click for JunoPick – Checkout was fast and the products feel high quality.
Your comment is awaiting moderation.
I found https://thevivagarden.com/ while looking for a simple raised garden bed, and ended up noticing their fire pits too. The setup was surprisingly straightforward, and everything feels sturdy without being overly complicated. The smokeless fire pit especially made evenings outside way more comfortable. It’s one of those upgrades that quietly improves your space.
Your comment is awaiting moderation.
сейф оружейный
Your comment is awaiting moderation.
So my friend told me about Sa Casino like two weeks ago and I was like yeah whatever but then he kept saying how the interface was diferent from all the other ones so I finaly checked it out and honestly its kinda addictive lol. sa?????????????
Your comment is awaiting moderation.
Browse OliveOrder – The clean structure makes browsing quick and pleasant.
Your comment is awaiting moderation.
The fit feels natural and looks polished without being restrictive. These outfits work equally well for work and casual settings. The fabrics feel durable and breathable. https://urrufashion.com/ clearly understands contemporary men’s fashion.
Your comment is awaiting moderation.
отельный сейф
Your comment is awaiting moderation.
I did not expect this https://thetopcosplay.com/ to feel so easy to wear. It stayed comfortable while I moved around. I reached for it on days I wanted something different. It gave me flexibility without pressure.
Your comment is awaiting moderation.
Shop Softstall Online – The product range is solid and pricing looks very fair today.
Your comment is awaiting moderation.
Caldexo Styles – Clear product explanations make choosing items effortless.
Your comment is awaiting moderation.
Update: still using this after 3 months and honestly cant complain, the interface is clean, payouts have been smooth, and customer support actually responds to ur emails pretty quick, royal online has become part of my routine and im satisfied with how things are going so far.
Your comment is awaiting moderation.
I never realized how much a vacuum sealer could simplify life until I got one from https://tiitss-us.com/. It’s compact, works fast, and keeps food fresh longer than I expected. Between this and their dehumidifier, managing storage has become much less of a hassle.
Your comment is awaiting moderation.
Shop at FlairDock – The items are appealing, and checkout works seamlessly.
Your comment is awaiting moderation.
Xerva Hub – Simple, neat layout makes it easy to browse products quickly.
Your comment is awaiting moderation.
Glentra Specials – The site performs smoothly and descriptions provide solid guidance.
Your comment is awaiting moderation.
Amber Finds – Clear product descriptions and fair costs make picking items easy.
Your comment is awaiting moderation.
Discover KindBasket – Products look appealing and the information is clear and helpful.
Your comment is awaiting moderation.
FernBasket Shopping – Products appear premium and navigating is smooth.
Your comment is awaiting moderation.
купить сейф интернете
Your comment is awaiting moderation.
The plush feels steady and maintains its form over time. It fits easily on a bed or shelf. Interaction is simple and calming. https://thetanha.com/ creates a plush companion that blends quality with everyday usability.
Your comment is awaiting moderation.
сейфы для офиса купить
Your comment is awaiting moderation.
Visit Clovent – Site loads without delays and has a stylish appearance.
Your comment is awaiting moderation.
Click Flarion – Smooth browsing and product details are clear and helpful.
Your comment is awaiting moderation.
They roll quietly across different floor types. Even heavier pieces move without resistance. Setup was simple, and the wheels have performed reliably ever since. https://thetaifa.com/ design keeps motion smooth and dependable.
Your comment is awaiting moderation.
From a technical standpoint pussy888 loads incredibly fast even on mobile, the UI is really clean and intuitive, and the whole thing feels well optimised across diferent devices. pussy888 2025
Your comment is awaiting moderation.
For those seeking an exceptional online gaming experience, us.com](https://maxispin.us.com/) stands out as a premier destination. At Maxispin Casino, players can enjoy a vast array of pokies, table games, and other thrilling options, all accessible in both demo and real-money modes. The casino offers attractive bonuses, including free spins and a generous welcome offer, along with cashback promotions and engaging tournaments. To ensure a seamless experience, Maxispin provides various payment methods, efficient withdrawal processes, and reliable customer support through live chat. Security is a top priority, with robust safety measures and a strong focus on responsible gambling tools. Players can easily navigate the site, with detailed guides on account creation, verification, and payment methods. Whether you’re interested in high RTP slots, hold and win pokies, or the latest slot releases, Maxispin Casino delivers a user-friendly and secure platform. Explore their terms and conditions, read reviews, and discover why many consider Maxispin a legitimate and trustworthy choice in Australia.
Whether you’re a seasoned copywriter or just starting out, MaxiSpin.us.com provides the resources you need to enhance your content.
**Features of MaxiSpin.us.com**
Users can enter their specifications and obtain customized content within minutes.
**Benefits of Using MaxiSpin.us.com**
Businesses benefit greatly from MaxiSpin.us.com as it streamlines the process of creating content.
Your comment is awaiting moderation.
IrisVendor Website – Pages display instantly and the products look refined.
Your comment is awaiting moderation.
The inverter works steadily across different weather conditions. I rarely interact with it after setup. https://thesunwheel.com/ delivers a solution that integrates without disrupting routines.
Your comment is awaiting moderation.
ทดลองเล่นสล็อต pg
PG Slot แพลตฟอร์มเกมสล็อตยอดนิยม ใช้งานง่าย ฝากถอนรวดเร็ว
คำค้นหา สล็อต PG มาแรงในช่วงนี้ ในกลุ่มผู้เล่นเกมสล็อตออนไลน์ เพราะเป็น ค่ายเกมที่มีชื่อเสียง ด้าน กราฟิก ความ เสถียร และ โอกาสรับกำไรที่ดี เกมของ PG พัฒนาโดยผู้ให้บริการชั้นนำ ที่รองรับการเล่นทั้งบน มือถือ และ คอมพิวเตอร์
จุดเด่น ของ PG Slot
pg slot เป็นเกมสล็อตออนไลน์ที่ออกแบบมาให้ เปิดเกมได้ทันที เล่นผ่าน ระบบอัตโนมัติ และรองรับ ทุกอุปกรณ์ ไม่ต้องดาวน์โหลดแอป ผู้เล่นสามารถเข้าเล่นผ่าน เว็บเบราว์เซอร์ ได้ทันที ภาพและเสียงถูกพัฒนาในรูปแบบ เอฟเฟกต์ 3 มิติ ให้ความคมชัด พร้อมเอฟเฟกต์ สมจริง
คุณสมบัติหลักของเกม pg slot ได้แก่
ระบบโบนัสและฟรีสปินหลากหลายรูปแบบ
ระบบตัวคูณ
เดโม่ฟรี
รองรับภาษาไทยเต็มรูปแบบ
ระบบฝากถอนสะดวก ทันใจ
แพลตฟอร์ม PG Slot โดยทั่วไปให้บริการ การฝาก-ถอน อัตโนมัติ 24 ชั่วโมง ขั้นต่ำเริ่มต้นเพียง 1 บาท ขึ้นอยู่กับ ระบบของผู้ให้บริการ การทำรายการใช้เวลา เพียงไม่กี่วินาที ผ่าน QR Code หรือระบบ ธนาคารบนมือถือ ทำให้ธุรกรรมเป็นไปอย่าง ลื่นไหล
แนวเกมที่คนเล่นเยอะ ใน pg slot
เกม pg slot มีธีมหลากหลาย เช่น
ธีม เทพเจ้าและแฟนตาซี
ธีม Adventure
ธีม โชคลาภ
ธีม Animal
หลายคนชอบเกมที่โบนัสเข้าไว พร้อมระบบ Special Feature และ ระบบจ่ายคุ้มค่า เหมาะกับทั้ง ผู้เล่นเริ่มต้น และ ผู้เล่นที่มีประสบการณ์
ความปลอดภัย
pg slot ใช้ระบบที่ได้มาตรฐาน มีการ รักษาความปลอดภัย และใช้ระบบสุ่มผล ระบบสุ่มมาตรฐาน เพื่อให้ผลลัพธ์ ยุติธรรม แพลตฟอร์มที่ให้บริการ สล็อต PG ควรมี ความปลอดภัยสูง
โดยภาพรวม
pg slot เป็นตัวเลือกยอดนิยมสำหรับผู้ที่ต้องการเล่นสล็อตออนไลน์ ด้วยจุดเด่นด้าน ระบบลื่นไหล และการทำธุรกรรมที่ ไว ผู้เล่นสามารถเริ่มต้นได้ ทันที ฝากถอนสะดวก และเลือกเกมได้ ครบทุกหมวด เหมาะสำหรับ ทั้งมือใหม่และมือโปร ในโลกของเกมสล็อตออนไลน์
https://medium.com/@ratypw/ทดลองเล่นสล็อต-pg-70cdb1132344
Your comment is awaiting moderation.
сейф для отеля
Your comment is awaiting moderation.
ทดลองเล่นสล็อต pg
TKBNEKO มอบมิติใหม่ของเกมออนไลน์ ธุรกรรมรวดเร็ว ด้วยระบบสแกน คิวอาร์โค้ด
ในยุคดิจิทัลที่ เทคโนโลยีพัฒนาอย่างรวดเร็ว TKBNEKO พร้อมยกระดับการให้บริการ ด้วยระบบที่ ทันสมัย รวดเร็ว และ โปร่งใส เพื่อให้ผู้เล่น มั่นใจ ทุกครั้งที่ใช้งาน
ระบบการเงินที่ใช้งานง่าย
ฝากขั้นต่ำ: 1 บาท
ถอนขั้นต่ำ: 1 บาท
เวลาฝากเงิน: ใช้เวลาเพียง 3 วินาที
ยอดถอน: ไม่มีลิมิต
ฝากง่าย เพียงสแกน QR Code
สแกน คิวอาร์ ระบบจะ โอนเงินเข้าทันที ขั้นต่ำ เริ่ม 100 บาท สูงสุด ไม่เกิน 500,000 บาทต่อครั้ง
เกมยอดนิยม
สล็อต: ธีมหลากหลาย
เกมสด: คาสิโนเรียลไทม์
กีฬา: เดิมพันลีกดัง
ยิงปลา: ลุ้นกำไรทันที
โปรโมชั่นและสิทธิพิเศษ
ติดตามหน้า โบนัส พร้อมระบบ สมาชิกพรีเมียม และโปรแกรม พันธมิตร
ติดต่อเรา
สอบถามข้อมูลได้ตลอด 24 ชั่วโมง ผ่านหน้า ศูนย์ช่วยเหลือ ทีมงาน ของเรา พร้อมดูแลตลอดเวลา
https://medium.com/@ratypw/ทดลองเล่นสล็อต-pg-e598fa477f69
Your comment is awaiting moderation.
Prolfa Finds – Ordering was smooth and every payment method was accepted.
Your comment is awaiting moderation.
I noticed how a monitor stand changed the way my desk feels during long workdays. My screen sits at a more natural height, which makes my neck feel less tense by the evening. The space underneath became useful without me planning it. https://sunandsummer.com/ ended up fitting into my routine without demanding attention.
Your comment is awaiting moderation.
EchoStall Website – Everything is neat and the product details are easy to digest.
Your comment is awaiting moderation.
From a technical standpoint, the platform demonstrates solid performance metrics across devices. The mobile interface is responsive, pages load efficiently, and the UI architecture is clean without unnecesary clutter or navigation delays. Backend stability seems reliable based on my usage pattern, and game bai pg88 integrates well with most browsers without compatability issues.
Your comment is awaiting moderation.
наркологическая клиника в ростове вывод из запоя vyvod-iz-zapoya-v-rostove-2.ru .
Your comment is awaiting moderation.
Uplora Store – Really enjoyed checking out the items and pricing seems fair.
Your comment is awaiting moderation.
Xerva Curated – Clear layout and simple navigation make shopping enjoyable today.
Your comment is awaiting moderation.
The organizer helped prevent tools from falling or getting damaged. It feels reliable during daily use and seasonal changes. Storage now looks intentional rather than improvised. https://thesttoraboks.com/ supports a calmer and more efficient workflow.
Your comment is awaiting moderation.
Xyloshop Specials – Fresh design and mobile-friendly interface throughout.
Your comment is awaiting moderation.
Shop Acorn Aisle – Professional look and simple navigation make browsing enjoyable.
Your comment is awaiting moderation.
Click for Wardivo – Nice assortment and navigating between pages feels effortless.
Your comment is awaiting moderation.
Explore XoBasket – It’s a breeze to jump between categories and products.
Your comment is awaiting moderation.
Заказывал 307, прислали 203. Сразу объяснил, менеджер в скайпе всё понял. Сказал Бро не переживай будет тебе бонус. https://metall-masters.ru Успешных вам продаж и спокойной работы)а он мне очень нужен как никогда
Your comment is awaiting moderation.
ทดลองเล่นสล็อต pg ฟรี PG Slot สล็อตยอดฮิต เล่นง่าย ฝากถอนเร็ว
คำค้นหา PG Slot กำลังได้รับความนิยมอย่างต่อเนื่อง ในกลุ่มผู้เล่นเกมสล็อตออนไลน์ เพราะเป็น ผู้ให้บริการเกมสล็อตที่มาแรง ด้าน งานภาพคุณภาพสูง ความ นิ่งไม่สะดุด และ ระบบจ่ายที่ดึงดูด เกมของ PG ออกแบบโดยทีมงานมืออาชีพ ที่รองรับการเล่นทั้งบน มือถือ และ เดสก์ท็อป
ข้อดี ของ pg slot
สล็อต PG เป็นเกมสล็อตออนไลน์ที่ออกแบบมาให้ เปิดเกมได้ทันที เล่นผ่าน ระบบเว็บ และรองรับ ทุกอุปกรณ์ เข้าเล่นผ่านเว็บได้เลย ผู้เล่นสามารถเข้าเล่นผ่าน หน้าเว็บ ได้ทันที ภาพและเสียงถูกพัฒนาในรูปแบบ 3D ให้ความคมชัด พร้อมเอฟเฟกต์ สวยงาม
คุณสมบัติหลักของเกม สล็อต PG ได้แก่
ระบบโบนัสและฟรีสปินหลากหลายรูปแบบ
Multiplier
โหมดทดลองเล่นฟรี
มีเมนูภาษาไทย
ระบบฝากถอนสะดวก ไม่ต้องรอนาน
แพลตฟอร์ม สล็อต PG มักมี การฝาก-ถอน ฝากถอนตลอดเวลา ขั้นต่ำเริ่มต้นเพียง หลักหน่วย ขึ้นอยู่กับ กติกาแต่ละแพลตฟอร์ม การทำรายการใช้เวลา รวดเร็วมาก ผ่าน คิวอาร์โค้ด หรือระบบ แอปธนาคาร ทำให้ธุรกรรมเป็นไปอย่าง ลื่นไหล
หมวดเกมฮิต ใน pg slot
เกม PG Slot มีธีมหลากหลาย เช่น
ธีม เทพเจ้าและแฟนตาซี
ธีม Adventure
ธีม ความมั่งคั่ง
ธีม สัตว์และธรรมชาติ
หลายคนชอบเกมที่โบนัสเข้าไว พร้อมระบบ ฟีเจอร์พิเศษ และ ระบบจ่ายคุ้มค่า เหมาะกับทั้ง มือใหม่ และ ผู้เล่นมือโปร
ความน่าเชื่อถือ
สล็อต PG พัฒนาในระบบสากล มีการ เข้ารหัสข้อมูล และใช้ระบบสุ่มผล Random Number Generator เพื่อให้ผลลัพธ์ ตรวจสอบได้ แพลตฟอร์มที่ให้บริการ สล็อต PG ควรมี ความปลอดภัยสูง
โดยภาพรวม
pg slot เป็นตัวเลือกยอดนิยมสำหรับผู้ที่ต้องการเล่นสล็อตออนไลน์ ด้วยจุดเด่นด้าน ระบบลื่นไหล และการทำธุรกรรมที่ ไว ผู้เล่นสามารถเริ่มต้นได้ ทันที ฝากถอนสะดวก และเลือกเกมได้ ครบทุกหมวด เหมาะสำหรับ ผู้เล่นทุกสไตล์ ในโลกของเกมสล็อตออนไลน์
Your comment is awaiting moderation.
I keep my https://strata-cups.com/ on the table while I work. It holds enough that I don’t refill it often. Cleaning it later took very little time. It ended the day feeling familiar and ordinary.
Your comment is awaiting moderation.
Цирк Никулина перешёл к формату цельных спектаклей с динамикой и интерактивом. Что нового — подробнее здесь https://tenchat.ru/media/4223242-cht…hety-atmosfera
Your comment is awaiting moderation.
For anyone who needs a platform that actually works without constant issues, nova88 online sports is worth checking out. Just make sure you read the terms carefully before you start, and dont rush through the setup process—I made that mistake and had to contact support to fix it. Overall pretty reliable from what ive seen.
Your comment is awaiting moderation.
Sovique Products – Liked the browsing experience and the costs are reasonable.
Your comment is awaiting moderation.
Lemon Vendor Store – Shopping here was smooth all the way through checkout.
Your comment is awaiting moderation.
I like printing tiny photos and quotes for my journal during the week. The pocket printer makes it easy to turn digital moments into something I can hold. It adds a physical layer to ideas that usually stay on my screen. https://stcarestore.com/ feels like a simple way to keep creativity within reach.
Your comment is awaiting moderation.
Ulvika Collection – Easy-to-read item details and a clean, user-friendly design.
Your comment is awaiting moderation.
Find Lark Online Shop – Easy to explore categories and product details are informative.
Your comment is awaiting moderation.
visit Sage Vendor shop – User-friendly structure and clear product categories make the site very reliable.
Your comment is awaiting moderation.
The board responds well to steady paddling and slow turns. Packing it away after use is simple and quick. https://thesowm.com/ offers something that suits a relaxed approach to being on the water.
Your comment is awaiting moderation.
Volveta Products – Easy to navigate pages and I found my items quickly.
Your comment is awaiting moderation.
Discover Hivelane – The minimalist design and sorted categories make browsing simple.
Your comment is awaiting moderation.
I added a vintage-inspired blouse from https://smiling-angel.com/ to my weekend outfit. The lace and ruffles give it a unique touch. Pairing it with my usual jeans felt fresh. Even a short walk outside felt like a tiny adventure.
Your comment is awaiting moderation.
So my friend told me about Nba Onlinecasino like a month ago and I was scrolling through it at work one day and honestly I didn’t think much of it at first but then I actually started exploring it and realized it was acctually pretty decent, like the whole layout makes sense and everything loads fast which is nice.
Your comment is awaiting moderation.
Xerva Curated – Clear layout and simple navigation make shopping enjoyable today.
Your comment is awaiting moderation.
абакан есть? кокс, меф, шиш, гаш Это тема о работе магазина. “эффекты, использование” в теме о продукцииВсё здорово спасибо Вам
Your comment is awaiting moderation.
Zinniazone Hub – Exploring the site today was fun and full of new discoveries.
Your comment is awaiting moderation.
Fintera Curated – Navigation is straightforward, and categories are simple to explore.
Your comment is awaiting moderation.
I picked up a motion sensor light from https://theskairipa.com/ after getting tired of using my phone flashlight. It switches on as soon as I open the door. The install took a few minutes. Now everything feels easier to find.
Your comment is awaiting moderation.
Borvique Online Shop – The layout is modern and moving between sections is very easy.
Your comment is awaiting moderation.
Mavdrix Deals – Everything loads fast, the interface is simple, and purchasing was easy.
Your comment is awaiting moderation.
Discover Kiostra – Smooth experience and pages open almost instantly.
Your comment is awaiting moderation.
оружейный сейф
Your comment is awaiting moderation.
pin up sayt https://pinup09715.help/
Your comment is awaiting moderation.
I’ve been using my SeeYing turntable from https://theseeying.com/ for a few weeks now, and it’s a great setup. The Bluetooth connection is smooth, the Hi-Fi sound is excellent, and it feels high quality without being complicated. Even my casual listening sessions feel special now.
Your comment is awaiting moderation.
нарколог вывод из запоя в ростове vyvod-iz-zapoya-v-rostove-2.ru .
Your comment is awaiting moderation.
yo ngl u win n8 lowkey goes hard fr fr like the whole thing just works imo no lag no weird stuff just vibes tbh
Your comment is awaiting moderation.
Cindora Shop Online – Easy navigation and categories are neatly grouped.
Your comment is awaiting moderation.
I picked up a ride-on suitcase from https://theseapunk.com/ for our family vacation, and it was a hit. My son enjoyed pulling it around and even using it to play when we weren’t traveling. Solid construction and cute design — totally worth it.
Your comment is awaiting moderation.
Official AisleGlow Site – The layout is intuitive and categories make items easy to find.
Your comment is awaiting moderation.
Looking for a yacht? romantic yacht cruise Cyprus for unforgettable sea adventures. Charter luxury yachts, catamarans, or motorboats with or without crew. Explore crystal-clear waters, secluded bays, and iconic coastal locations in first-class comfort onboard.
Your comment is awaiting moderation.
купить кабель 1.5 купить электрику в минске
Your comment is awaiting moderation.
check out Spring Crate – I like the layout and usability, definitely returning in the future.
Your comment is awaiting moderation.
jarvico.shop – The site loads fast and browsing feels seamless.
Your comment is awaiting moderation.
Sleeping under this net feels peaceful and comfortable every night. The fine mesh keeps insects completely away. It drapes beautifully over my bed and adds a cozy atmosphere. https://thescmty.com/ delivers both safety and aesthetic appeal.
Your comment is awaiting moderation.
свадебные платья 2026 тренды каталог свадебных платьев
Your comment is awaiting moderation.
Нужны столбики? столбик ограждения москва столбики для складов, парковок и общественных пространств. Прочные материалы, устойчивое основание и удобство перемещения обеспечивают безопасность и порядок.
Your comment is awaiting moderation.
Explore GiftMora – Pages load quickly and shopping feels hassle-free.
Your comment is awaiting moderation.
Visit Knickbay – The descriptions provide plenty of insight and make choosing items easier.
Your comment is awaiting moderation.
I was skeptical about mu88.com at first because I’d had bad experiences elsewhere, but honestly this one actually does what it says without all the bs. The whole process is way more straightforward than I expected and I havent run into any sketchy stuff, which is refreshing. Shoulda tried it sooner.
Your comment is awaiting moderation.
В Бросике по- прежнему игнор!!! Магаз просто Ох..!!! кокс, меф, шиш, гаш Однако, селлеру в его интересах было бы полезно появиться и разъяснить ситтуацию дабы избежать гневных сообщений. Обещание что отправка будет пт-сб не было выполнено. Треков нет.))) спасибо
Your comment is awaiting moderation.
I recently set up a Scevokin chair from https://scevokinchair.com/ in my home office, and it has completely changed my workday. The seat is roomy, the back support is solid, and adjusting the armrests is super easy. I didn’t expect a chair to feel this ergonomic right out of the box.
Your comment is awaiting moderation.
Explore Xerva – Store design is clean and navigating products feels effortless.
Your comment is awaiting moderation.
Irvanta Outlet – Products look reliable and prices are very reasonable.
Your comment is awaiting moderation.
Irnora Choice – Found unusual and special items that you don’t see everywhere online.
Your comment is awaiting moderation.
Varnelo Marketplace – Product info is simple to understand and navigation is intuitive.
Your comment is awaiting moderation.
I put on my track suit every morning for errands and walks. It moves with me without restricting anything. I barely notice it while I go about my day. https://rumia-fashion.com/ designed it to feel effortless yet dependable.
Your comment is awaiting moderation.
purevalueoutlet – Engaging and creative platform that really sparks new ideas.
Your comment is awaiting moderation.
Official Mistcrate Site – Came across some fascinating products that I think are worth seeing.
Your comment is awaiting moderation.
Финал сезона приносит самые напряженные противостояния — стыковые матчи за место в РПЛ. Каждая секунда на поле решает будущее клубов. Разбор и ожидания — https://dzen.ru/a/aX36E24joGPHoyv4
Your comment is awaiting moderation.
Explore Ebon Lane – Really liked the simple design and smooth performance overall.
Your comment is awaiting moderation.
I found https://therokkes.com/ while looking for something age-appropriate and easy to wash off. The colors are bright but gentle, and cleanup was surprisingly simple. It turned into a sweet little “spa day” at home without worrying about stains everywhere.
Your comment is awaiting moderation.
Way better than what I was using before, the layout is cleaner and everything loads way faster, definitely feels like an upgrade from my previous platform. link microstar88.com
Your comment is awaiting moderation.
Walnutware Webshop – Helpful product info and easy to browse overall.
Your comment is awaiting moderation.
I started using a cordless blender from https://ritusonline.com/ for quick breakfasts. It blends my smoothies fast and doesn’t take much space on the counter. I like moving around the kitchen without dealing with a cord. Cleanup takes a minute, which makes it even better.
Your comment is awaiting moderation.
Quistly Online – Products are diverse and the interface is user-friendly.
Your comment is awaiting moderation.
KindleMart Deals – Lots of options to choose from and pages load in seconds.
Your comment is awaiting moderation.
Ruby Aisle Items – Browsing is seamless and the organized design makes finding items quick.
Your comment is awaiting moderation.
I was a bit cautious, but the formula I got from https://rhrinst.com/ felt surprisingly gentle. It reduced redness and itching without that tight, dry feeling. It’s not an overnight miracle, but it’s the first time I’ve felt steady progress.
Your comment is awaiting moderation.
Почему всё-таки такси? На метро бы а одну сторону успел бы… Вес большеват был, обычно брал миксы да всякие вкусные таблетки, но тут сразу столько СК… Да и потом, нашёл на товар, найди т на непредвиденный случай/комфорт, я так считаю. Чем брать по грамму микс, так лучше вообще не брать. Пара дней – и на пять грамм наберешь, с друзьями/сэкономишь на обедах, в конце концов. кокс, меф, шиш, гаш и че сделали? условку дали?ПС клады в Москве оч надежные!! прям 10 из 10, очень понравилось когда забирали 50г
Your comment is awaiting moderation.
вывод из запоя в ростове вывод из запоя в ростове .
Your comment is awaiting moderation.
Way better than what I was using before, honestly. The interface is way cleaner and I don’t get as many lag issues on my end. Check out mega win 777 if you want somthing that actually works smooth.
Your comment is awaiting moderation.
The Xerva Spot – Store feels well-arranged, making product browsing today a smooth experience.
Your comment is awaiting moderation.
Quickaisle Specials – Offers get updated constantly and moving through listings is smooth.
Your comment is awaiting moderation.
Thistletrade Boutique – Sections are neatly sorted and browsing through items is easy.
Your comment is awaiting moderation.
I ordered from https://regalo-flor.com/ and was honestly impressed. The arrangement looks elegant and natural, and it hasn’t changed at all since it arrived. It sits on the dresser and still looks like day one.
Your comment is awaiting moderation.
Quvera Specials – Fast browsing with intuitive product pages.
Your comment is awaiting moderation.
Shop Worvix – Very straightforward checkout process and trustworthy payment methods.
Your comment is awaiting moderation.
ZenCartel Webstore – Layout is structured and modern, products are easy to browse.
Your comment is awaiting moderation.
Official Wistro Site – The layout of each item page is clean and ordering was simple.
Your comment is awaiting moderation.
ทดลองเล่นสล็อต pg
สล็อต PG แพลตฟอร์มเกมสล็อตยอดนิยม ใช้งานง่าย ฝากถอนรวดเร็ว
คำค้นหา PG Slot กำลังได้รับความนิยมอย่างต่อเนื่อง ในกลุ่มผู้เล่นเกมสล็อตออนไลน์ เพราะเป็น ผู้ให้บริการเกมสล็อตที่มาแรง ด้าน ภาพและเอฟเฟกต์ ความ เสถียร และ โอกาสรับกำไรที่ดี เกมของ PG ผลิตโดยค่ายมาตรฐาน ที่รองรับการเล่นทั้งบน โทรศัพท์มือถือ และ พีซี
จุดเด่น ของ pg slot
สล็อต PG เป็นเกมสล็อตออนไลน์ที่ออกแบบมาให้ โหลดเร็ว เล่นผ่าน ระบบเว็บ และรองรับ ทั้ง iOS และ Android เข้าเล่นผ่านเว็บได้เลย ผู้เล่นสามารถเข้าเล่นผ่าน หน้าเว็บ ได้ทันที ภาพและเสียงถูกพัฒนาในรูปแบบ 3D ให้ความคมชัด พร้อมเอฟเฟกต์ จัดเต็ม
คุณสมบัติหลักของเกม PG Slot ได้แก่
โบนัสและฟรีสปินหลายแบบ
Multiplier
โหมดทดลองเล่นฟรี
รองรับภาษาไทยเต็มรูปแบบ
ระบบการเงินรวดเร็ว ไม่ต้องรอนาน
แพลตฟอร์ม PG Slot มักมี การฝาก-ถอน ฝากถอนตลอดเวลา ขั้นต่ำเริ่มต้นเพียง หลักหน่วย ขึ้นอยู่กับ ระบบของผู้ให้บริการ การทำรายการใช้เวลา ไม่กี่วินาที ผ่าน คิวอาร์โค้ด หรือระบบ แอปธนาคาร ทำให้ธุรกรรมเป็นไปอย่าง ลื่นไหล
หมวดเกมฮิต ใน PG Slot
เกม pg slot มีธีมหลากหลาย เช่น
ธีม แฟนตาซี
ธีม Adventure
ธีม เอเชียและโชคลาภ
ธีม สัตว์และธรรมชาติ
เกมยอดนิยมมักเป็นเกมที่แตกง่าย พร้อมระบบ โบนัสรอบพิเศษ และ ระบบจ่ายคุ้มค่า เหมาะกับทั้ง มือใหม่ และ ผู้เล่นมือโปร
ความน่าเชื่อถือ
pg slot พัฒนาในระบบสากล มีการ เข้ารหัสข้อมูล และใช้ระบบสุ่มผล Random Number Generator เพื่อให้ผลลัพธ์ โปร่งใส แพลตฟอร์มที่ให้บริการ pg slot ควรมี ความปลอดภัยสูง
สรุป
สล็อต PG เป็นตัวเลือกยอดนิยมสำหรับผู้ที่ต้องการเล่นสล็อตออนไลน์ ด้วยจุดเด่นด้าน โบนัสหลากหลาย และการทำธุรกรรมที่ ไว ผู้เล่นสามารถเริ่มต้นได้ ง่าย ฝากถอนสะดวก และเลือกเกมได้ หลากหลายแนว เหมาะสำหรับ ทั้งมือใหม่และมือโปร ในโลกของเกมสล็อตออนไลน์
https://medium.com/@ratypw/ทดลองเล่นสล็อต-pg-70cdb1132344
Your comment is awaiting moderation.
The aquarium feels integrated rather than temporary. Cleaning and upkeep follow a predictable rhythm. Small changes in the tank are easy to manage. https://red-tail-fish.com/ supports long-term use without unnecessary complexity.
Your comment is awaiting moderation.
Summit Vendor storefront – I intend to make another purchase soon.
Your comment is awaiting moderation.
Quick pros:
* Easy to navigate
* Fast withdrawals so far
* Decent variety of games
* Mobile friendly
+ Customer support responds quick
+ No annoying popups
Check it out: bkash
Your comment is awaiting moderation.
สล็อต
แพลตฟอร์ม TKBNEKO เปิดประสบการณ์ใหม่แห่งการเดิมพันออนไลน์ ธุรกรรมรวดเร็ว ด้วยระบบสแกน คิวอาร์โค้ด
ในยุคดิจิทัลที่ โลกออนไลน์เติบโตต่อเนื่อง TKBNEKO พร้อมยกระดับการให้บริการ ด้วยระบบที่ ทันสมัย เสถียร และ โปร่งใส เพื่อให้ผู้เล่น อุ่นใจ ทุกครั้งที่ใช้งาน
ระบบการเงินที่ใช้งานง่าย
ฝากขั้นต่ำ: 1 บาท
ถอนขั้นต่ำ: ขั้นต่ำ 1 บาท
เวลาฝากเงิน: ภายใน 3 วินาที
ยอดถอน: ไม่จำกัดต่อวัน
เติมเงินง่าย แค่สแกน
สแกน QR Code ระบบจะ โอนเงินเข้าทันที ขั้นต่ำ 100 บาท สูงสุด 500,000 บาท
เกมยอดนิยม
สล็อต: ลุ้นแจ็คพอต
เกมสด: ดีลเลอร์สด
กีฬา: เดิมพันลีกดัง
ยิงปลา: สนุกได้เงินจริง
โบนัสและโปรโมชัน
ติดตามหน้า โปรโมชั่น พร้อมระบบ VIP และโปรแกรม แอฟฟิลิเอต
ฝ่ายบริการลูกค้า
สอบถามข้อมูลได้ตลอด 24 ชั่วโมง ผ่านหน้า ติดต่อเรา ทีมงาน ของเรา พร้อมดูแลตลอดเวลา
https://medium.com/@ratypw/ทดลองเล่นสล็อต-a4ea8e21fdde
Your comment is awaiting moderation.
We tried QUNISY family pajamas for a weekend at home, and it was such a fun experience. https://thequnisy.com/ really nails the balance of style and comfort — soft fabrics and matching designs make the whole family feel coordinated without any fuss.
Your comment is awaiting moderation.
Marketlume Shopping – The assortment is excellent and navigation feels effortless.
Your comment is awaiting moderation.
Frentiq Marketplace – High-quality listings and a smooth, reliable checkout.
Your comment is awaiting moderation.
สล็อต
แพลตฟอร์ม TKBNEKO มอบมิติใหม่ของเกมออนไลน์ ธุรกรรมรวดเร็ว ด้วยระบบสแกน คิวอาร์โค้ด
ในยุคดิจิทัลที่ โลกออนไลน์เติบโตต่อเนื่อง เรามุ่งเน้นมาตรฐานใหม่ของการเดิมพัน ด้วยระบบที่ ทันสมัย รวดเร็ว และ ตรวจสอบได้ เพื่อให้ผู้เล่น อุ่นใจ ทุกครั้งที่ใช้งาน
จุดเด่นระบบฝาก-ถอน
ฝากขั้นต่ำ: เริ่มต้น 1 บาท
ถอนขั้นต่ำ: ขั้นต่ำ 1 บาท
เวลาฝากเงิน: ใช้เวลาเพียง 3 วินาที
ยอดถอน: ไม่มีลิมิต
ฝากง่าย เพียงสแกน QR Code
สแกน คิวอาร์ ระบบจะ โอนเงินเข้าทันที ขั้นต่ำ 100 บาท สูงสุด 500,000 บาท
หมวดหมู่เกม
สล็อต: ลุ้นแจ็คพอต
เกมสด: ดีลเลอร์สด
กีฬา: แมตช์ทั่วโลก
ยิงปลา: สนุกได้เงินจริง
โบนัสและโปรโมชัน
ติดตามหน้า โบนัส พร้อมระบบ VIP และโปรแกรม แอฟฟิลิเอต
ฝ่ายบริการลูกค้า
สอบถามข้อมูลได้ตลอด 24 ชั่วโมง ผ่านหน้า ติดต่อเรา ทีมงาน TKBNEKO พร้อมดูแลตลอดเวลา
Your comment is awaiting moderation.
Official BloomTill Site – Easy-to-use layout and no delays while browsing.
Your comment is awaiting moderation.
I found https://purivortex.com/ while browsing reviews about HEPA filters for allergies. The site felt more informative than salesy, which I appreciated. After setting up the purifier, I noticed less dust and fewer lingering smells from cooking. Nothing dramatic — just a cleaner, more comfortable space.
Your comment is awaiting moderation.
Shop at Harniq – Exactly what I wanted was available and checkout was seamless.
Your comment is awaiting moderation.
Plum Vendor X Shop – Pages load quickly and the categories are very easy to follow.
Your comment is awaiting moderation.
спроси в лички номер аси думаю все ровно будет без базара бро https://pesni-gitara.ru Вот это я понимаю СЕРВИС:ok: Превзошло все мои ожидания, доставили раньше обещанного… Магаз ровный (до последнего сомневался, что всё на столько гладко…)Работала с данным магазином давным давно! Пожалуй самый лучший)
Your comment is awaiting moderation.
Honestly pretty solid platform, way better than most others out there. mega audino
Your comment is awaiting moderation.
After checking https://permolights.com/, I ordered a pair of sconces for the hallway. They mounted securely, and the materials feel durable. Now the space looks more finished, especially in the evenings when the warm light turns on.
Your comment is awaiting moderation.
PG Slot เกมสล็อตออนไลน์ที่คนค้นหาเยอะ ใช้งานง่าย ฝากถอนรวดเร็ว
คำค้นหา PG Slot กำลังได้รับความนิยมอย่างต่อเนื่อง ในกลุ่มผู้เล่นเกมสล็อตออนไลน์ เพราะเป็น ค่ายเกมที่มีชื่อเสียง ด้าน ภาพและเอฟเฟกต์ ความ นิ่งไม่สะดุด และ โอกาสรับกำไรที่ดี เกมของ PG พัฒนาโดยผู้ให้บริการชั้นนำ ที่รองรับการเล่นทั้งบน มือถือ และ คอมพิวเตอร์
จุดเด่น ของ pg slot
PG Slot เป็นเกมสล็อตออนไลน์ที่ออกแบบมาให้ เข้าเกมไว เล่นผ่าน ระบบเว็บ และรองรับ ทุกแพลตฟอร์ม ไม่ต้องติดตั้งเพิ่มเติม ผู้เล่นสามารถเข้าเล่นผ่าน Browser ได้ทันที ภาพและเสียงถูกพัฒนาในรูปแบบ สามมิติ ให้ความคมชัด พร้อมเอฟเฟกต์ จัดเต็ม
คุณสมบัติหลักของเกม สล็อต PG ได้แก่
มีรอบโบนัสให้ลุ้นบ่อย
Multiplier
เล่นฟรีก่อนเติมเงิน
มีเมนูภาษาไทย
ระบบฝากถอนสะดวก ทันใจ
แพลตฟอร์ม PG Slot มักมี การฝาก-ถอน ฝากถอนตลอดเวลา ขั้นต่ำเริ่มต้นเพียง หลักหน่วย ขึ้นอยู่กับ กติกาแต่ละแพลตฟอร์ม การทำรายการใช้เวลา รวดเร็วมาก ผ่าน คิวอาร์โค้ด หรือระบบ Mobile Banking ทำให้ธุรกรรมเป็นไปอย่าง ไม่สะดุด
หมวดเกมฮิต ใน pg slot
เกม PG Slot มีธีมหลากหลาย เช่น
ธีม แฟนตาซี
ธีม ผจญภัย
ธีม เอเชียและโชคลาภ
ธีม Animal
เกมยอดนิยมมักเป็นเกมที่แตกง่าย พร้อมระบบ ฟีเจอร์พิเศษ และ โอกาสทำกำไรสูง เหมาะกับทั้ง มือใหม่ และ ผู้เล่นมือโปร
มาตรฐานระบบ
PG Slot ใช้ระบบที่ได้มาตรฐาน มีการ เข้ารหัสข้อมูล และใช้ระบบสุ่มผล RNG เพื่อให้ผลลัพธ์ ตรวจสอบได้ แพลตฟอร์มที่ให้บริการ PG Slot ควรมี ระบบดูแลข้อมูล
บทสรุปท้ายบท
PG Slot เป็นตัวเลือกยอดนิยมสำหรับผู้ที่ต้องการเล่นสล็อตออนไลน์ ด้วยจุดเด่นด้าน กราฟิกคุณภาพ และการทำธุรกรรมที่ ทันใจ ผู้เล่นสามารถเริ่มต้นได้ ไม่ซับซ้อน ฝากถอนสะดวก และเลือกเกมได้ ครบทุกหมวด เหมาะสำหรับ ผู้เล่นทุกสไตล์ ในโลกของเกมสล็อตออนไลน์
Your comment is awaiting moderation.
Xerva Online – Clean and intuitive layout makes exploring items very straightforward.
Your comment is awaiting moderation.
Official Dervina Site – Good variety of items and the website loads quickly.
Your comment is awaiting moderation.
Ravlora Essentials – Quick and helpful customer service resolved my problem effortlessly.
Your comment is awaiting moderation.
Ivory Aisle Finds – The support desk was responsive and provided all the information I needed.
Your comment is awaiting moderation.
After browsing https://passuspower.com/, I ordered one of their power strips with an extension cord. The spacing between outlets is practical, so plugs aren’t fighting for space. Everything feels secure, and I don’t have to constantly rearrange chargers anymore.
Your comment is awaiting moderation.
Discover BasketMint – Smooth navigation and fast-loading pages make browsing easy.
Your comment is awaiting moderation.
ทดลองเล่นสล็อต pg
TKBNEKO มอบมิติใหม่ของเกมออนไลน์ ธุรกรรมรวดเร็ว ด้วยระบบสแกน QR Code
ในยุคดิจิทัลที่ โลกออนไลน์เติบโตต่อเนื่อง TKBNEKO พร้อมยกระดับการให้บริการ ด้วยระบบที่ ล้ำสมัย เสถียร และ ตรวจสอบได้ เพื่อให้ผู้เล่น อุ่นใจ ทุกครั้งที่ใช้งาน
จุดเด่นระบบฝาก-ถอน
ฝากขั้นต่ำ: 1 บาท
ถอนขั้นต่ำ: ขั้นต่ำ 1 บาท
เวลาฝากเงิน: ใช้เวลาเพียง 3 วินาที
ยอดถอน: ไม่จำกัดต่อวัน
ฝากง่าย เพียงสแกน QR Code
สแกน QR Code ระบบจะ โอนเงินเข้าทันที ขั้นต่ำ 100 บาท สูงสุด ไม่เกิน 500,000 บาทต่อครั้ง
หมวดหมู่เกม
สล็อต: ลุ้นแจ็คพอต
เกมสด: คาสิโนเรียลไทม์
กีฬา: เดิมพันลีกดัง
ยิงปลา: สนุกได้เงินจริง
โปรโมชั่นและสิทธิพิเศษ
ติดตามหน้า โบนัส พร้อมระบบ สมาชิกพรีเมียม และโปรแกรม แอฟฟิลิเอต
ติดต่อเรา
สอบถามข้อมูลได้ตลอด 24 ชั่วโมง ผ่านหน้า ศูนย์ช่วยเหลือ ทีมงาน TKBNEKO พร้อมดูแลตลอดเวลา
Your comment is awaiting moderation.
QuartzCart Website – My search wrapped up quickly once I landed here.
Your comment is awaiting moderation.
OrderWharf Products – Well-written descriptions made it simple to know what to pick.
Your comment is awaiting moderation.
Easy Carta Online – Very smooth browsing and the payment went through without any problems.
Your comment is awaiting moderation.
I chose the men tracksuit for a slow weekend morning. https://thepasok.com/ was printed along the side seam. The fit felt steady while I moved around the house. I ended up wearing it for most of the day.
Your comment is awaiting moderation.
вывод из запоя в ростове на дону вывод из запоя в ростове на дону .
Your comment is awaiting moderation.
+1 to this, Megabet Onlinecasino has been solid for me too. Worth checking out if you havent already.
Your comment is awaiting moderation.
Ulveta Website – The item details are easy to follow and browsing feels effortless.
Your comment is awaiting moderation.
grainvendor.shop – The prices feel reasonable and the products look top-notch.
Your comment is awaiting moderation.
I found https://thepakasept.com/ while searching for compact storage solutions. The materials feel solid, and everything was straightforward to set up. Now my shelves feel more balanced instead of chaotic.
Your comment is awaiting moderation.
Parcelbay Finds – Layout is clear and checkout felt very smooth.
Your comment is awaiting moderation.
Explore Tillora – Very intuitive layout and smooth payment process.
Your comment is awaiting moderation.
Вы это о чем? Тут все вроде как только легальными делами занимаемся? Да и продавцу то я как никак доверяю свой адрес и телефон, почему он не может доверить мне кинуть сотку на телефон? Это ни к одному делу не пришьешь, раз мы уже заговорили об этом https://gashishbery.life Клад был уличным, спрятан по разумному, под решеткой окна подъезда, рядом с окном стояла лавочка, на которой можно без палива посидеть и нащупать клад. Клад 5 балов из 5!!!Тоже интересен вопрос по шифровке посылки при доставке курьером
Your comment is awaiting moderation.
I recently used an OPQRST system from https://opqrstmicrophone.com/ at a live event, and the sound quality blew me away. Setup was straightforward, the range was excellent, and the monitors were crystal clear. It made managing multiple performers so much easier.
Your comment is awaiting moderation.
browse Stone Vendor items – Support staff responded quickly and made everything simple to understand.
Your comment is awaiting moderation.
Browse VioletVend – Clear navigation and attractive items overall.
Your comment is awaiting moderation.
kubeops – Mobile version looks perfect; no glitches, fast scrolling, crisp text.
Your comment is awaiting moderation.
Update: been using mcw for about 3 months now and im still pretty happy with it, customer support actually responded to my questions which is something alot of places dont do, so yeah still a solid choice for me mcw taka
Your comment is awaiting moderation.
I always carry my https://shopocase.com/ wherever I go. It keeps my cards in order and cash safe. Losing things stresses me out, so this little case helps. I feel more organized each day because of it.
Your comment is awaiting moderation.
Xerva Hub Online – Overall, the store is organized well and exploring items today felt effortless.
Your comment is awaiting moderation.
stackops – Appreciate the typography choices; comfortable spacing improved my reading experience.
Your comment is awaiting moderation.
Yolkmarket Marketplace – Completing the order was quick and entirely hassle-free.
Your comment is awaiting moderation.
devopsly – Pages loaded fast, images appeared sharp, and formatting stayed consistent.
Your comment is awaiting moderation.
cloudopsly – Pages loaded fast, images appeared sharp, and formatting stayed consistent.
Your comment is awaiting moderation.
Zintera Hub Online – Quick site loading with a fresh, organized design for smooth browsing.
Your comment is awaiting moderation.
RoseOutlet Shop Online – Nice selection of items and checkout was effortless.
Your comment is awaiting moderation.
cloudhq – Content reads clearly, helpful examples made concepts easy to grasp.
Your comment is awaiting moderation.
Artisanza Marketplace – Quality selections showcased and pages render rapidly on any device.
Your comment is awaiting moderation.
After spending some time on https://ny-threads.com/, I picked up a robe and a couple of essentials. The materials feel soft but durable, and the sizing was straightforward. It’s simple, practical clothing that fits easily into daily life.
Your comment is awaiting moderation.
stackhq – Pages loaded fast, images appeared sharp, and formatting stayed consistent.
Your comment is awaiting moderation.
bytehq – Found practical insights today; sharing this article with colleagues later.
Your comment is awaiting moderation.
For those seeking an exceptional online gaming experience, us.com](https://maxispin.us.com/) stands out as a premier destination. At Maxispin Casino, players can enjoy a vast array of pokies, table games, and other thrilling options, all accessible in both demo and real-money modes. The casino offers attractive bonuses, including free spins and a generous welcome offer, along with cashback promotions and engaging tournaments. To ensure a seamless experience, Maxispin provides various payment methods, efficient withdrawal processes, and reliable customer support through live chat. Security is a top priority, with robust safety measures and a strong focus on responsible gambling tools. Players can easily navigate the site, with detailed guides on account creation, verification, and payment methods. Whether you’re interested in high RTP slots, hold and win pokies, or the latest slot releases, Maxispin Casino delivers a user-friendly and secure platform. Explore their terms and conditions, read reviews, and discover why many consider Maxispin a legitimate and trustworthy choice in Australia.
By prioritizing efficiency, MaxiSpin.us.com assists users in rapidly creating top-tier articles, blogs, and marketing copy.
**Features of MaxiSpin.us.com**
Additionally, the platform offers a built-in editor for making real-time edits to achieve optimal results.
**Benefits of Using MaxiSpin.us.com**
MaxiSpin.us.com provides businesses with a major advantage by simplifying the content creation process.
Your comment is awaiting moderation.
Shop at Upcarton – Everything runs swiftly and it’s easy to find sections.
Your comment is awaiting moderation.
I recently ordered a marble tray from https://mulwrmarble.com/ and didn’t expect it to change the feel of my bathroom so much. It’s simple, but the natural marble looks beautiful and feels solid. Now my soap and small items look organized instead of scattered. It’s a small detail that makes the space feel calmer.
Your comment is awaiting moderation.
Click for Yovique – Browsing was seamless and the site feels clean and responsive.
Your comment is awaiting moderation.
Inqora Direct – User-friendly layout and shopping is hassle-free.
Your comment is awaiting moderation.
check out Slate Vendor – Browsing around feels smooth and very user-friendly.
Your comment is awaiting moderation.
I often ignored the smell rising from my workspace. After trying a fume extractor, I noticed how much cleaner and safer the air became. Long projects felt less exhausting, and small irritations disappeared. https://themuin.com/ worked silently in the background, letting me focus fully on my craft.
Your comment is awaiting moderation.
оплатил 31го, сегодня все уже получил! Продавану, спасибо за оперативность!:ok: кокс, меф, шиш, гаш посмотри в трипах магазина там всё написаноПривет всем!
Your comment is awaiting moderation.
расписание автобусов из москвы до луганска
Your comment is awaiting moderation.
Visit LiltStore – Browsing items was seamless and everything loaded quickly.
Your comment is awaiting moderation.
browse Wild Crate – The mobile experience is seamless and the design is very user-friendly.
Your comment is awaiting moderation.
I wanted privacy fast, so velcro curtains felt like the right call. The fabric stays in place through daily movement. Cleaning takes minutes, which keeps things simple. https://mymuamar.com/ blends into my space without demanding attention.
Your comment is awaiting moderation.
вывод из запоя в ростове-на-дону на дому vyvod-iz-zapoya-v-rostove-2.ru .
Your comment is awaiting moderation.
Evoraa Shopping – Browsing feels effortless and product descriptions are straightforward.
Your comment is awaiting moderation.
Isveta Specials – Came upon this store and the assortment caught my eye.
Your comment is awaiting moderation.
автобусы из москвы в луганск
Your comment is awaiting moderation.
Visit Torviq – Browsed through the site and found some intriguing items.
Your comment is awaiting moderation.
After browsing https://mymten.com/, I ordered a paddle set and a net for the driveway. Setup was quick, and everything felt sturdier than I expected. It made starting out way less intimidating. Now we just grab the paddles and play without fuss.
Your comment is awaiting moderation.
Discover Xerva – Layout is clear and shopping through items today felt smooth.
Your comment is awaiting moderation.
Night Select – Plenty of products available with fair prices for easy shopping.
Your comment is awaiting moderation.
Listaro Deals – Easy-to-use interface and items are well-presented.
Your comment is awaiting moderation.
Tiny Harbor Store – Found some excellent deals, will be checking back often.
Your comment is awaiting moderation.
Fioriq Shopping – Noticed unique merchandise and wrapping up the purchase was smooth.
Your comment is awaiting moderation.
During long welding projects, slipping pipes caused frustration and mistakes. The Plier Clamp changed that instantly. It grips firmly without damaging the material. https://monsterandmaster.com/ created a tool that makes my work smoother and stress-free.
Your comment is awaiting moderation.
TrendNook Marketplace – Smooth site performance with well-presented products.
Your comment is awaiting moderation.
Acornmuse Products – Loved exploring the catalog, everything looks well-crafted and high quality.
Your comment is awaiting moderation.
The jacket sits neatly across the shoulders and moves naturally. The trousers maintain a clean line without feeling restrictive. It works well for formal meetings and evening events alike. https://moncace.com/ delivers a fit that feels sharp yet comfortable throughout the day.
Your comment is awaiting moderation.
Оплатил в среду, жду посылочку, посмотрим как что. кокс, меф, шиш, гаш Ребята с 11го года магазин работает на отлично, сомнений не у кого не должно быть!!!купил его в аптеке
Your comment is awaiting moderation.
I ended up ordering from https://modern-memory.com/ out of curiosity, and I was honestly impressed. The scent feels balanced, not overpowering, and it actually lasts through the day. I’ve already gotten a few compliments, which never hurts.
Your comment is awaiting moderation.
Silver Vendor Marketplace – Checkout is intuitive and I didn’t face any issues while ordering.
Your comment is awaiting moderation.
I grabbed a reading pillow from https://themittagong.com/ last month. Sitting up in bed feels much easier now. The neck support is adjustable and feels natural. I find myself reading longer without discomfort.
Your comment is awaiting moderation.
Willowvend Boutique – Really liked the tidy layout and seamless navigation experience.
Your comment is awaiting moderation.
Urbanparcel Marketplace – Smooth site experience and the items are quite fascinating.
Your comment is awaiting moderation.
Discover Brisk Harbor – Shipping was reliable, and the whole experience was easy and seamless.
Your comment is awaiting moderation.
Zen Curated – Smooth navigation makes exploring products effortless and enjoyable.
Your comment is awaiting moderation.
The https://themaxmat.com/ mats worked better than expected. Dirt brushes off easily, water beads right up, and they don’t slide around. It feels like the floors are finally protected without extra effort.
Your comment is awaiting moderation.
Rackora Specials – Amazing variety and moving through listings is simple and quick.
Your comment is awaiting moderation.
вывод из запоя на дому в ростове вывод из запоя на дому в ростове .
Your comment is awaiting moderation.
After checking https://mars-explo.com/, I added a patio heater and a simple storage cart. Both feel practical and well-made. It didn’t transform everything overnight, but it definitely made the space more functional.
Your comment is awaiting moderation.
Если это до сих пор Вы-просто красава :voo-hoo: https://velvetcarte.shop Если хотите подешевле – вам сюда. Если же располагаете финансами – штудируйте ветки доверенных магазинов, есть селлеры куда более ответственные и стоящие. Лично я не планирую дальше сотрудничать с этим магазином. Спасибо за внимание.Парни у кого нибудь задерживали посылку в СПСР?Уже неделю как приняли и все не отправят и планируемая дата отправки прошла,а реальную так и не поставили.Позвонил в офис говорят готово к отправке,а че не отправляют они не знают.Сказали позвонить когда менеджеры придут на работу.У кого нибудь такое было?Может это фигня какая то и лучше не идти за посылкой?Как думаете?Раньше просто такого не было максимум 5 дней с даты приема до моих рук проходило,с любого магазина.
Your comment is awaiting moderation.
The material adapts well to movement and stays in place. It feels neither too heavy nor too light. Care and maintenance are straightforward. https://themapleandstone.com/ blends comfort with practicality in daily use.
Your comment is awaiting moderation.
I used to think ceiling lights had to be a project. Wires, drilling, all of that. Then I tried https://loleds.com/ and realized it doesn’t have to be dramatic. I mounted it, charged it, and that was basically it. Now I just enjoy having light where I need it. No big story behind it.
Your comment is awaiting moderation.
find Oak Vendor products – Pages load quickly and categories are easy to follow.
Your comment is awaiting moderation.
visit JetStreamMart today – Browsing the store is smooth, stress-free, and actually enjoyable.
Your comment is awaiting moderation.
I wasn’t sure a recliner could feel this good, but the one from https://lintingchairs.com/ really hits the mark. The padding is generous, the leather/fabric is soft yet durable, and the built-in massage feature is a real treat after work. It makes relaxing effortless.
Your comment is awaiting moderation.
shop Indigo Aisle – Exploring the products was fun and I’ll be visiting again for sure.
Your comment is awaiting moderation.
My eyes feel comfortable even after hours of wear. The shades are perfect for work or going out. It blends beautifully and looks professional. https://mylilybyred.com/ makes me confident in my makeup.
Your comment is awaiting moderation.
The magnets work perfectly every time. It glides smoothly and seals automatically after passing through. Fresh air comes in without a single mosquito sneaking through. https://theliamst.com/ offers a practical and reliable solution for home comfort.
Your comment is awaiting moderation.
Что с заказом 960 трек не рабочий дали 3 дня уже одни обещания кокс, меф, шиш, гаш Что то много новичков устраивают здесь флуд.А магаз на самом деле хорош.Помню его еще когда занимался курьерскими доставками,коспирация и качество товара было на высшем уровне.праздники мы тоже отдыхали, так как курьерки все равно не работают
Your comment is awaiting moderation.
After browsing https://theleevan.com/, I ordered a kitchen rug with a subtle pattern. It adds a bit of style to the space while still being easy to clean. The non-slip backing actually works, which is reassuring.
Your comment is awaiting moderation.
Quartz Vendor Collections – User-friendly design with intuitive navigation makes browsing seamless.
Your comment is awaiting moderation.
Технологии анализа игры всё глубже интегрируются в Российская Премьер-Лига, помогая улучшать подготовку и результаты. Разбор — https://anotepad.com/note/read/7aica4j8
Your comment is awaiting moderation.
It’s easy to adjust the angle whenever I need a better view. The surface holds all pieces without slipping. I can leave a puzzle unfinished and return later without disruption. https://thelavievert.com/ designed a table that feels both practical and reliable.
Your comment is awaiting moderation.
Dorlix collections – The design is sharp, clean, and gives a professional feel.
Your comment is awaiting moderation.
Werniq offers – The transaction went smoothly and the available payment methods were practical.
Your comment is awaiting moderation.
I was pleasantly surprised by the depth and warmth of the sound. The keys respond effortlessly, making long practice sessions comfortable and enjoyable. The craftsmanship of the https://thekayata.com/ saxophone feels reliable and professional. It truly inspires me to practice more every day.
Your comment is awaiting moderation.
pin-up aviator oyunu https://pinup09715.help
Your comment is awaiting moderation.
I keep my jewelry on even when the day feels slow. https://thejiangxin.com/ appears once on the tag. The weight feels steady while I move around. By evening, it feels like part of me.
Your comment is awaiting moderation.
магазин работает ровно, заказ пришел за пару дней, качество порадовало) кокс, меф, шиш, гаш кто получал последний раз недавно отишитесь о работе магаза. +В РЕПУ!!!!!!! и главное почему ип адрес не меняется на сайте???Только что принесли, позже трип отпишу)
Your comment is awaiting moderation.
I started using a hair curler during slower mornings at home. It helped me feel more put together before stepping out. I liked how the process felt calm rather than rushed. That routine slowly became part of my day with https://thejanelove.com/.
Your comment is awaiting moderation.
xarnova collection – Neat and appealing layout, curated items make the site easy to trust.
Your comment is awaiting moderation.
I always love having candles around, but real flames make me nervous.
With https://izancandles.com/, I can enjoy the same warm glow without worrying.
I place them near my books or on the shelf, and they feel safe.
Your comment is awaiting moderation.
scarletcrate.shop – Really impressed with how clean and simple this website looks today.
Your comment is awaiting moderation.
Good afternoon!
Investigate soil mysterious nutrients offering interesting and valuable growth data and enrich your garden see on the website for soil tests
Full information on the link – https://202fliks.site
All the best and development in business!
Your comment is awaiting moderation.
YoungCrate shop online – The prices are competitive and feel reasonable for most items.
Your comment is awaiting moderation.
melbet рабочее зеркало
Скачать приложение Melbet: APK, iPhone и ПК
Приложение Melbet включает ставки и казино в одном интерфейсе. Доступны live-ставки, слоты, прямые трансляции, статистика и операции по счёту. Установка занимает несколько минут.
Android (APK)
Загрузите APK с официального источника, откройте файл и подтвердите установку. Если требуется включите разрешение на установку из неизвестных источников, затем войдите в аккаунт.
iOS (iPhone)
Откройте App Store, введите в поиске «Melbet», выберите «Получить», после установки выполните вход.
ПК
Перейдите официальный сайт, авторизуйтесь и создайте ярлык на рабочий стол. Веб-версия работает как отдельное приложение.
Функционал
Live-ставки с мгновенным обновлением линии, игровой раздел с тысячами игр, просмотр матчей, аналитические данные, push-оповещения, быстрая регистрация и поддержка 24/7.
Бонусы
После загрузки доступны приветственный бонус, акционные коды и фрибеты. Условия зависят от региона.
Безопасность
Загружайте только с официальных источников, контролируйте адрес сайта, не сообщайте данные доступа третьим лицам и включите 2FA.
Загрузка выполняется быстро, после чего доступен весь функционал Melbet.
Your comment is awaiting moderation.
KettleCart offers – The design keeps things simple and product information is presented well.
Your comment is awaiting moderation.
I picked up the toy before our afternoon session. https://shopiflove.com/ caught my eye on the packaging. We spent time figuring out how each part worked. The room felt alive with curiosity and quiet focus.
Your comment is awaiting moderation.
Отличный магазин, отличный оператор, отличный товар. Адрес нашли быстро и без проблем, забрали и ушли. Большое спасибо магазину. Всем советую! кокс, меф, шиш, гаш Братишка, все красиво, в касание, спасибо за профессионализмвсе гууд
Your comment is awaiting moderation.
pin-up pulsuz mərc necə istifadə etmək pin-up pulsuz mərc necə istifadə etmək
Your comment is awaiting moderation.
The lamp provides excellent illumination for reading and working. I appreciate its stable base and smooth operation. It adds a modern touch to my bedroom décor. https://hwdfei.com/ delivers both quality and elegance in one product.
Your comment is awaiting moderation.
I started using their scoopers and feeders from https://thehumumu.com/ last week. Everything is lightweight and easy to store. My mornings are faster and more organized. The chickens seem to enjoy the new layout too.
Your comment is awaiting moderation.
LoftLark marketplace – Layout is clear and straightforward, making shopping effortless.
Your comment is awaiting moderation.
pin-up bonus necə alınır https://pinup09715.help
Your comment is awaiting moderation.
We tried Hanani for winter shoes and kids’ cleats, and both worked great. The boots are cozy and durable, and the cleats are light and easy to run in. https://thehanani.com/ has definitely made footwear shopping stress-free.
Your comment is awaiting moderation.
SerpLinkRise shop online – Informative, well-structured content with clear SEO guidance for newcomers.
Your comment is awaiting moderation.
WovenCart shopping hub – Shipping was quick and everything arrived in perfect order.
Your comment is awaiting moderation.
Эксперты называют сезон РПЛ одним из самых конкурентных за последние годы. ЦСКА и «Краснодар» выделяются на фоне остальных команд благодаря стабильности, глубине состава и грамотной работе тренерских штабов. Именно между ними может решиться судьба кубка. Подробнее по ссылке: https://cont.ws/@sirgreensz/3181403
Your comment is awaiting moderation.
I came across Halfword while scrolling for outfit ideas and decided to try a two-piece set from https://thehalfword.com/. It’s stylish but still comfortable, which is rare. I’ve already worn it twice — once casually and once dressed up with heels.
Your comment is awaiting moderation.
Gildcrate gifts – Everything shipped out fast and exceeded my expectations in every way.
Your comment is awaiting moderation.
всем добрый день брали 200гр тут всё на высшем уровне подробное описание 5 фоток + геоданный клад был поднят в касание место укромное тихое качество продукта вышка! советую всем брать у Чема ! кокс, меф, шиш, гаш КАК ОБЕЩЯЛ ОПЕРАТОР ТАК ВСЕ И СДЕЛАЛ ОДИН В ОДИН !!!!смотря каким реагентом будешь бадяжить
Your comment is awaiting moderation.
I find it easier to keep my products clean and separated. The interior layout supports frequent use. It works well both at home and while traveling. https://thehaisky.com/ delivers consistency in everyday organization.
Your comment is awaiting moderation.
Every evening I place my watches back in their box. The soft compartments prevent scratches and misplacement. It gives me peace of mind knowing they are safe. https://theguka.com/ designed it to balance protection with style seamlessly.
Your comment is awaiting moderation.
I used an adjustable podium from https://thegsow.com/ during a presentation. The height adjustment felt effortless. Attendees could see the speaker clearly from every angle. The setup didn’t take more than a few minutes.
Your comment is awaiting moderation.
Transportation and daily mobility used to be stressful, but the https://thegoldseason.com/ chair is compact, folds easily, and rolls smoothly indoors and outdoors. It’s made simple tasks feel much more manageable and gives a real sense of independence.
Your comment is awaiting moderation.
DahliaNest essentials – Every product has detailed descriptions that are genuinely helpful.
Your comment is awaiting moderation.
במסיבה, שתייה, אכילה, כיף, צחוק. החבר שלי בדרך כלל לא שותה הרבה, אבל הפעם, משום מה, הוא השתכר מאוד, כך שהוא הרגיש רע. דימה שלו ואני, לקחנו אותו לדירות דיסקרטיות, לשירותים, שטפנו בחיי אני רוצה לעשות משהו פזיז, מטורף. רוצה להרגיש רצוי בזרועותיו של גבר לוהט וסקסי להפליא. תן לו לשלוח אותי אחרי הלילה הזה, להגיד לי שכל זה היה שיכור. הדבר החשוב ביותר הוא שאנחנו https://messer-spa.co.il/
Your comment is awaiting moderation.
the secure stack website – Safety-focused features are highlighted well in a polished layout.
Your comment is awaiting moderation.
velvetpick shopping corner – Attractive display with crisp images, overall experience feels upscale.
Your comment is awaiting moderation.
захвоти с собой пару парнеей, и еще пару бикс https://hi-techhome.ru Если кто-то когда-то пробовал банки с Рафинада на тусиае, тот знает, как классно они перли и понимает, каких эффектов я ожидал.Магазин работает как часы:ok:! Чекист самый крутой продаван это уже проверено годами!!! Дух захватывает от той мысли сколько же он продал за своё существование с 2011 ГОДА:strong: !! Это МЕГА-ПРОДАВАН!!! ТАк держать Чемикал Чекист))!!!
Your comment is awaiting moderation.
Lemon Lane products – Many options to explore and the arrangement looks polished.
Your comment is awaiting moderation.
I helped my daughter pick her dress today. https://thegalluria.com/ was printed on the tag, but she didn’t notice. She twirled around the room while getting ready. The dress made her move freely without any fuss.
Your comment is awaiting moderation.
this shopping hub – Simple navigation with a clean, modern design feels very user-friendly.
Your comment is awaiting moderation.
I picked up a set of stair riser decals from https://funlifestore.com/ last week. Applying them was simple and way less messy than I expected. The staircase instantly feels more lively. Walking up and down has become kind of fun now.
Your comment is awaiting moderation.
But after ordering from https://thefunhot.com/, I was surprised how manageable it felt. The balloons inflated evenly, and the arrangement guide helped a lot. It turned into a fun part of the preparation instead of a chore.
Your comment is awaiting moderation.
I started carrying a portable bidet after a few long days away from home. It helped me feel clean when restrooms felt rushed or uncomfortable. I noticed less irritation and more ease during the day. For me, that small change made daily routines feel steadier with https://foofooshop.com/.
Your comment is awaiting moderation.
Клуб «Оренбург» сыграет в Премьер-лиге-2025/26 благодаря соответствию стандартам РПЛ. Какие факторы это обеспечили — подробнее здесь: https://kulturologia.ru/blogs/231225/66735
Your comment is awaiting moderation.
I wear my joggers at home and when I head out briefly. They move well without feeling loose. Comfort matters to me more than style trends. https://thefirstgym.com/ delivers joggers that match that mindset.
Your comment is awaiting moderation.
BasketBerry collections – I was impressed by the polite and rapid response from customer service yesterday evening.
Your comment is awaiting moderation.
Что случилось? почему страшно? кокс, меф, шиш, гаш Работала с данным магазином давным давно! Пожалуй самый лучший)Заказала JV 61, жду трек, заранее благодарю. В прошлый раз заказ шёл 6 дней, но и я на краю географии)))))) отпишитп за дживик кто недавно заказывал.
Your comment is awaiting moderation.
pin-up bonus vermir https://pinup09715.help/
Your comment is awaiting moderation.
Harlune services – Assistance came almost immediately and was genuinely useful.
Your comment is awaiting moderation.
seasprayshop style hub – The curated beach-themed products look attractively priced.
Your comment is awaiting moderation.
socialsignal resources – Practical marketing insights with a fresh and smart approach.
Your comment is awaiting moderation.
Weekends are when I want comfort without looking like I gave up. I’ll reach for my https://faironlydress.com/ and not think about it again. It moves easily and doesn’t need constant fixing. I can sit, walk, or stay out longer than planned. By the end of the day, I’m still glad I chose it.
Your comment is awaiting moderation.
check these products – Well-presented products with descriptive details that make shopping easy.
Your comment is awaiting moderation.
Dollyn products – Quick and effective response from support solved everything.
Your comment is awaiting moderation.
zephyrmart official store – Intuitive navigation and clear layout make shopping fast and easy.
Your comment is awaiting moderation.
I ordered an initial necklace from https://endless-story-jewelry.com/ for my best friend and it arrived quickly. The quality is excellent, and the personal touch made it feel much more meaningful than a generic piece of jewelry.
Your comment is awaiting moderation.
I ended up browsing https://shopeboot.com/ while looking for simple cable clips. Nothing fancy — just something that would keep chargers from sliding off the table. They were easy to place, hold well, and now my workspace feels calmer. It’s a small fix, but it makes daily work smoother.
Your comment is awaiting moderation.
I tried DUFU’s no-drill racks and holders from https://thedufu.com/ and was pleasantly surprised. They look sleek, don’t damage walls, and make finding what I need so much easier.
Your comment is awaiting moderation.
Полностью согласен !!! кокс, меф, шиш, гаш Обязательно позвонить должны, как позвонят легче забрать самому чем ждать пока курьер доставити что теперь делать с заказом мне его оплачивать через терминал!? или..
Your comment is awaiting moderation.
trusted HollowCart shop – The site navigation is simple, even on my older smartphone, and works well.
Your comment is awaiting moderation.
I added a tactical folding knife from https://doom-blade.com/ to my gear, and it’s been super handy. Sharp, durable, and easy to carry, it handles small tasks around camp effortlessly. It’s the kind of knife that just feels right in your hand.
Your comment is awaiting moderation.
this sitemap portal – Beginner-friendly design makes mapping websites straightforward.
Your comment is awaiting moderation.
QuillMarket storefront – Everything is cleanly organized and browsing takes no time.
Your comment is awaiting moderation.
official Jaspercart site – Fair pricing and a smooth ordering process made shopping easy.
Your comment is awaiting moderation.
the latchbasket website – Wide variety on display, definitely adding this to my favorites.
Your comment is awaiting moderation.
I ordered a few Do²ping foam sheets from https://do2ping.com/ for a cosplay build. They’re lightweight, easy to manipulate, and the quality is consistent. Working on my costume has been so much smoother with these sheets.
Your comment is awaiting moderation.
searchsignal storefront – Useful concepts presented in a way that feels both clear and practical.
Your comment is awaiting moderation.
I found https://thediandian.com/ and decided to try one of their rack cases. It’s solid, keeps everything in place, and feels watertight. Now I can focus on the set instead of my gear, which is a huge relief.
Your comment is awaiting moderation.
their shopping portal – Great variety of items, definitely a place to come back to.
Your comment is awaiting moderation.
I got a 16-inch Devonia lace front wig from https://devoniawigs.com/ and it’s quickly become my go-to for work and casual outings. The waves are bouncy and hold well, plus it feels lightweight and breathable. Definitely exceeded my expectations for a human hair wig.
Your comment is awaiting moderation.
хорошо что так https://kadastr-navigator.ru p/s мне ничего не надо! Зашёл пожелать удачи магазину в нелегком деле.Магаз самый ровный! Брать буду Только здесь и не где Больше,респектоз магазину! Так держать ребята!
Your comment is awaiting moderation.
I recently tried a pack of DEEP TOUCH boyshorts from https://shopdeeptouch.com/, and they’re incredible. The fabric feels soft and breathable, and I barely notice them under my clothes. Perfect for workdays or lounging at home, they’re comfortable enough to wear all day without adjusting.
Your comment is awaiting moderation.
sitefixstation help portal – Clear steps and actionable tips for repairing common site issues.
Your comment is awaiting moderation.
shop at RavenAisle – Came across several exclusive items I hadn’t seen before.
Your comment is awaiting moderation.
I got a D.DUO purse organizer from https://d-duo.com/ and it’s perfect for keeping my bags neat. The multiple compartments fit everything I carry daily, and it feels durable while still looking chic. It has made my daily commute and errands so much smoother.
Your comment is awaiting moderation.
Zestycrate picks – Products were fun to browse and checkout felt safe and easy.
Your comment is awaiting moderation.
glenvox gallery hub – Quick, straightforward checkout with clear steps for easy purchases.
Your comment is awaiting moderation.
discover ParcelMint – Shopping was straightforward and I quickly found what I needed.
Your comment is awaiting moderation.
I picked up some face gems and a small LED garland from https://danhh.com/ to decorate for a mini party, and it turned out so fun. Everything was easy to use, bright, and added a playful touch.
Your comment is awaiting moderation.
Аренда квартиры на сутки в Воложине — это разумный выбор для каждого, кто ценит свой комфорт. Плюсы: вы не привязаны к расписанию отеля, можете готовить любимые блюда на оборудованной кухне и наслаждаться тишиной. Это особенно актуально для долгих поездок. Достопримечательности Воложина: величественный костел Святого Иосифа, живописные руины дворца Тышкевичей и памятник Тадеушу Костюшко. Не обойдите стороной старую синагогу и здание бывшей иешивы. Прогуляйтесь по набережной реки Воложинка и насладитесь спокойствием этого уютного белорусского городка на сутки квартира воложин
Your comment is awaiting moderation.
SeamStory shop online – The curated selection makes discovering new looks effortless.
Your comment is awaiting moderation.
After spending time on https://cute-castle.com/, I decided to try their swaddles and cloths. The material feels gentle and breathable, and everything arrived exactly as described. It’s comforting to find basics that feel well made without overcomplicating things.
Your comment is awaiting moderation.
lagunavend storefront – Sleek and modern design, all items are presented with care.
Your comment is awaiting moderation.
Installed a CREWEEL motion sensor night light from https://creweel.com/ in our hallway, and it works perfectly. It lights up only when needed, dimmable to avoid harsh glare, and no more fumbling in the dark.
Your comment is awaiting moderation.
почта России кокс, меф, шиш, гаш магазин четкй притензий нет на качество регвезде гавно(((((Пришол 250 сделал 1к10-12 ппц уносит 250 у вас лучший магазу респект , даже не ожидал что такой джив будет , 1к10 меньше это ппц..
Your comment is awaiting moderation.
signalstation resources – Practical marketing strategies explained in a straightforward way.
Your comment is awaiting moderation.
We’ve been using Coral Isles sunscreen from https://coral-isles.com/ for a couple of weeks. It spreads easily, is water-resistant, and the kids didn’t fuss about reapplying. I like that it’s reef-safe too, so we can enjoy the ocean without worrying about the environment.
Your comment is awaiting moderation.
Plumparcel marketplace – Simple design and well-structured categories made finding products straightforward.
Your comment is awaiting moderation.
quirkcove.shop – Unique vibe throughout the store, really stands apart visually.
Your comment is awaiting moderation.
Wenvix storefront – Completing my order was fast, simple, and stress-free.
Your comment is awaiting moderation.
Coqin’s toys from https://thecoqin.com/ are just perfect. My infant enjoys the gentle music and different textures, and I feel confident knowing it’s safe and high-quality.
Your comment is awaiting moderation.
MaplePick shop online – There’s something for everyone and the pricing appears reasonable.
Your comment is awaiting moderation.
FlintCove specials – Loved the selection and the pricing seems fair and attractive.
Your comment is awaiting moderation.
I found https://thecoolfor.com/ while looking for a small ceramic heater for my desk area. It heats up quickly without being loud, which surprised me. Now I turn it on while making coffee, and the room feels comfortable within minutes.
Your comment is awaiting moderation.
Nicely put, Appreciate it!
Here is my site … https://Sontalkmusic.com/
Your comment is awaiting moderation.
TerVox Products – The support team was friendly and quick to assist.
Your comment is awaiting moderation.
I recently picked up a CONODO Bluetooth MP3 player from https://conodoplayers.com/ and it’s been great for my workouts and walks. The HiFi sound quality is impressive for such a compact device, and pairing with my headphones was effortless.
Your comment is awaiting moderation.
browse safesavings – Smart promotions available here make saving part of my routine.
Your comment is awaiting moderation.
the shopnshine website – Cheerful and lively concept with products that are both trendy and affordable.
Your comment is awaiting moderation.
Получив достаточно быстро трек отправления, а в качестве курьерки продавцом была выбрана пони экспресс, я стал проверять бьется ли трек. День проверял, два проверял, три…..А он сука ни в какую не бьётся и все тут. Короче с того момента и до момента написания этого сообщения номер посылки на сайте курьерки – Отсутствует в базе данных, попробуйте повторить запрос позднее!!! кокс, меф, шиш, гаш бобик здох ….ДУМАЙТЕ САМИ!!!
Your comment is awaiting moderation.
I picked up a mouse pad and a shower curtain from https://thecolorfulstar.com/ and I’m really enjoying them. The colors are lively, the quality is solid, and it makes my home feel more cheerful overall.
Your comment is awaiting moderation.
briskparcel collection – Smooth purchase process, everything feels secure and fast.
Your comment is awaiting moderation.
I recently picked up a mic from https://thecoconise.com/ and honestly didn’t expect such a difference in sound quality. My teammates immediately said my voice sounded clearer and more balanced. The one-touch mute is super convenient, and the RGB lighting adds a nice touch to my desk without being distracting.
Your comment is awaiting moderation.
Umbramart offers – Smooth navigation with fast page loads made finding products simple.
Your comment is awaiting moderation.
their shopping portal – Solid selection with fair prices, definitely worth checking out.
Your comment is awaiting moderation.
JewelAisle deals – Navigation is simple and the assortment of items is pleasing today.
Your comment is awaiting moderation.
discover Grenvia – Browsing was quick and intuitive, and checkout was straightforward and easy.
Your comment is awaiting moderation.
After checking https://thecastamere.com/, I picked up a pair for a special occasion. They fit true to size and feel balanced when walking. It’s subtle, but they definitely made me stand a little taller.
Your comment is awaiting moderation.
NimbusCart products – A smooth journey from cart to confirmation with no glitches.
Your comment is awaiting moderation.
I found https://brave-person.com/ while comparing swim briefs. The fit feels snug without being tight, and the material dries quickly. It works well for both swimming laps and relaxing at the pool.
Your comment is awaiting moderation.
WhimVendor Marketplace – Very trustworthy site, I’ll definitely order again.
Your comment is awaiting moderation.
their protection portal – Smooth navigation and trustworthy layout make shopping feel risk-free.
Your comment is awaiting moderation.
Yield Mart – A practical and value-driven store offering rewarding choices every day.
Your comment is awaiting moderation.
After browsing https://boorosappliance.com/, I ordered one of their dough mixers. It handles thicker dough better than I expected and feels sturdy on the counter. It’s made weekend baking a lot more enjoyable.
Your comment is awaiting moderation.
всегда кто-то гадость может написать, а ответить не кто!! работал с вами! https://urbanflelik.shop Душевный магазин) Все довольны. Славно.всем желаю счастья!
Your comment is awaiting moderation.
Browse Xerva – Store design is intuitive, so navigating items today was smooth.
Your comment is awaiting moderation.
ryzenrealm tech portal – Felt modern and responsive, with an engaging browsing flow.
Your comment is awaiting moderation.
I just needed better-looking tail lights and found https://theboine.com/ during my search. The whole process was straightforward. After installing them, the back end of the truck looked refreshed without overdoing it. It feels like a subtle but noticeable improvement.
Your comment is awaiting moderation.
Dapper Hub Online – Checkout and browsing felt effortless, making shopping surprisingly pleasant.
Your comment is awaiting moderation.
meridianbasket gallery hub – Solid product mix, with pricing that’s reasonable and attractive to buyers.
Your comment is awaiting moderation.
I found https://theblyhair.com/ while looking for something simple but interactive. The couple game we tried sparked conversations we hadn’t had in a while. It felt easy and natural, not forced or cheesy.
Your comment is awaiting moderation.
CometCrate online – Appealing items, collection feels carefully curated for shoppers.
Your comment is awaiting moderation.
After browsing https://blakeandlake.com/, I ordered a keepsake box for letters and small souvenirs. The craftsmanship feels thoughtful, and the finish highlights the grain nicely. It’s not flashy — just quietly elegant.
Your comment is awaiting moderation.
встраиваемые сейфы для квартиры
Your comment is awaiting moderation.
GarnetDock Products – The overall setup feels coherent and convenient.
Your comment is awaiting moderation.
I came across https://thebeyondheat.com/ while looking for a compact electric heater with adjustable settings. It warms the space surprisingly quickly, and the thermostat makes it easy to keep a steady temperature. It’s simple, but it changed how usable the space feels.
Your comment is awaiting moderation.
Explore Jolly Vendor – Items are priced well and the checkout experience is seamless.
Your comment is awaiting moderation.
check these designs – The selection is attractive, and the presentation is polished and professional.
Your comment is awaiting moderation.
Wavlix Corner Store – Shopping here has been enjoyable with great variety and easy navigation.
Your comment is awaiting moderation.
1 из 5 хемикалсу.Имейл не рабит,сайт кривой-левые системы оплаты,нет ритейла,кривость и отсутствие информации…Деньги зажимать не пытаются и за это можно кинуть балл сверху и возможно продолжить общение в будущем… кокс, меф, шиш, гаш как-то перехотелось.. что действительно последний товар не очень?Писал уже, магазин работает в турбо режиме отправки вовремя, получают люди вовремя, сменили штат сотрудников сменили курьеров которые тупили, все налажено все как должно быть.
Your comment is awaiting moderation.
Icicle Mart – A sharp and efficient marketplace focused on clarity and convenience.
Your comment is awaiting moderation.
I ended up ordering from https://thebattop.com/ and was pleasantly surprised. The pregnancy pillow feels sturdy yet soft, and it holds its shape well. It’s one of those practical purchases that quietly improves everyday comfort.
Your comment is awaiting moderation.
сейфы офисные взломостойкие
Your comment is awaiting moderation.
Xerva Online – Clean and intuitive layout makes exploring items very straightforward.
Your comment is awaiting moderation.
check it out here – Everything is displayed neatly with useful details provided.
Your comment is awaiting moderation.
Shop Amber Aisle – Appreciate the clear info and reasonable costs for each item.
Your comment is awaiting moderation.
I ended up ordering from https://thebalency.com/ and was pleasantly surprised by the quality. The belt feels secure, and the materials seem built to last. It’s become a regular part of leg day without overcomplicating things.
Your comment is awaiting moderation.
revenue growth hub – A promising spot for discovering ways to scale online returns effectively.
Your comment is awaiting moderation.
Prenvia online – Pages load fast and navigation feels intuitive, making browsing effortless.
Your comment is awaiting moderation.
After checking https://baicaigifts.com/, I picked a curated gift basket for a friend. It arrived neatly packaged and looked just like the photos. The whole experience felt easy and thoughtful.
Your comment is awaiting moderation.
СвП Оптом От Производителя
Система выравнивания плитки (СвП) представляет собой современный строительный материал, используемый для качественной укладки керамической плитки и керамогранита. Производство СвП постоянно совершенствуется, обеспечивая высокое качество продукции и удобство её использования специалистами.
производитель система выравнивания плитки
¦ Преимущества покупки СвП оптом от производителя
Приобретение системы выравнивания плитки оптом непосредственно от производителя имеет ряд преимуществ:
производство свп
– Низкая стоимость – покупка большими партиями позволяет значительно сэкономить средства.
– Высокое качество продукции, подтвержденное сертификатами соответствия.
– Минимальные сроки поставки благодаря наличию собственного производства.
– Индивидуальный подход к каждому клиенту: возможность заказа необходимого количества изделий с учетом специфики проекта.
¦ Где свп ворота от производителя купить СвП оптом?
Купить систему выравнивания плитки оптом можно непосредственно у производителей, среди которых выделяются предприятия, выпускающие продукцию высокого качества и предлагающие выгодные условия сотрудничества. Среди популярных компаний-производителей можно отметить тех, кто специализируется именно на производстве СвП.
¦ СвП Зажимы Оптом
Зажимы являются важной частью системы выравнивания плитки. Они обеспечивают надежную фиксацию плиточных элементов и предотвращают образование зазоров. Купить СвП зажимы оптом также выгодно у производителей, поскольку такая покупка гарантирует оптимальное соотношение цены и качества.
купить свп оптом
¦ Использование СвП в строительстве ворот
Отдельно стоит упомянуть использование СвП в возведении конструкций типа ворот. Благодаря своей прочности и надежности, СвП активно применяется в изготовлении декоративных и функциональных воротных конструкций. Покупка СвП для изготовления ворот от производителя позволит существенно снизить затраты на строительство.
¦ Заключение
купить свп оптом
https://svp-rovno.ru/opt
Таким образом, приобретение системы выравнивания плитки оптом от производителя является экономически выгодным решением, обеспечивающим высокую эффективность строительных работ и снижение финансовых затрат. Современные производители предлагают широкий ассортимент продукции, включая специальные элементы, такие как зажими конструкции для строительства ворот, удовлетворяя потребности любого строительного проекта.
Your comment is awaiting moderation.
The structure feels sturdy and looks beautiful in photos. Setup was straightforward and didn’t take much time. It worked perfectly as a focal point for the celebration. https://aseem-arch.com/ delivered a backdrop that feels both stylish and reliable.
Your comment is awaiting moderation.
TripScan: Надежный помощник в путешествиях
Что такое TripScan?
tripscan top
TripScan, также известный как трип скан, представляет собой инновационный сервис, предназначенный для оптимизации процесса планирования путешествий. Это мощный инструмент, позволяющий пользователям быстро находить лучшие маршруты, бронировать билеты и отели, а также получать всю необходимую информацию о поездках.
Основные преимущества TripScan
трип скан
– Удобный интерфейс: интуитивно понятный дизайн позволяет легко ориентироваться даже новичкам.
– Широкий выбор направлений: сервис охватывает тысячи городов и стран по всему миру.
– Возможность сравнения цен: сравнивайте стоимость билетов и проживания в разных источниках.
Как начать пользоваться Trip Scan?
tripskan
Чтобы воспользоваться всеми возможностями сервиса, достаточно зайти на трипскан сайт. Здесь вы найдете форму поиска, где можно ввести пункт назначения, даты путешествия и количество пассажиров. После ввода данных система предложит вам список доступных вариантов, отсортированных по цене, времени вылета и другим параметрам.
Для входа в личный кабинет воспользуйтесь кнопкой трипскан вход. Если у вас еще нет аккаунта, регистрация займет всего несколько минут.
Почему выбирают TripSkan?
Сервис отличается высоким уровнем надежности и безопасности. Все транзакции защищены современными системами шифрования, что гарантирует сохранность ваших персональных данных.
Кроме того, TripScan Top регулярно обновляет базу данных, обеспечивая пользователей актуальной информацией о рейсах и предложениях авиакомпаний.
Заключение
TripScan — это идеальный выбор для тех, кто хочет сделать свое путешествие комфортным и беззаботным. Простота использования, широкий спектр возможностей и высокий уровень безопасности делают этот сервис незаменимым помощником для каждого путешественника.
tripscan top
https://tripscans67.cc
Your comment is awaiting moderation.
shakerstation collection – Smooth navigation and a solid variety of offerings make it a pleasant experience.
Your comment is awaiting moderation.
keepcrate gallery hub – Everything is arranged neatly, making product exploration effortless and enjoyable.
Your comment is awaiting moderation.
Velvet Corner – Secure and straightforward checkout made my first experience pleasant.
Your comment is awaiting moderation.
Visit Liltharbor – Everything is organized well, finding items is simple.
Your comment is awaiting moderation.
I found https://shopaquamiracle.com/ while comparing air pumps. The descriptions were clear, and reviews helped narrow things down. After switching, oxygen flow feels more even, and my fish seem more active. It’s subtle, but noticeable if you spend time watching your tank.
Your comment is awaiting moderation.
пробовал 0,1гр ничего не было, пробовал 0,3 ничего не было, только мурашки на спине кокс, меф, шиш, гаш магазин хороший,даже если высылат брак (было 1 раз) возврат делают сполнаотпишитесь плиз
Your comment is awaiting moderation.
Elegant Picks – A calm and airy platform showcasing stylish and thoughtfully chosen items.
Your comment is awaiting moderation.
сейфы взломостойкие
Your comment is awaiting moderation.
Quick Shop Xerva – Love the design, navigating through products was super easy today.
Your comment is awaiting moderation.
I ended up ordering from https://angryramshoes.com/ after reading through reviews. The boots feel stable, the steel toe doesn’t pinch, and the sole grip is solid. It’s a straightforward choice that fits into daily routine without much thought.
Your comment is awaiting moderation.
Smart Picks Cerlix – A sleek online destination built for convenient shopping and clear navigation.
Your comment is awaiting moderation.
Discover Acorn Aisle – Easy navigation and a polished layout make shopping a pleasure.
Your comment is awaiting moderation.
scaleify – Bookmarked this immediately, planning to revisit for updates and inspiration.
Your comment is awaiting moderation.
I found https://andriawigs.com/ while searching for a new wig style. The lace front looks natural, and the hair density feels balanced. Out of curiosity, I also tried their gourmet sauce — it has a smooth texture and just the right amount of kick. Definitely a unique shopping experience.
Your comment is awaiting moderation.
trendfunnel – Overall, professional vibe here; trustworthy, polished, and pleasantly minimal throughout.
Your comment is awaiting moderation.
kelnix gallery hub – Well-selected products that give a sense of a thoughtfully curated collection.
Your comment is awaiting moderation.
rankora – Content reads clearly, helpful examples made concepts easy to grasp.
Your comment is awaiting moderation.
promova – Bookmarked this immediately, planning to revisit for updates and inspiration.
Your comment is awaiting moderation.
reacho – Overall, professional vibe here; trustworthy, polished, and pleasantly minimal throughout.
Your comment is awaiting moderation.
offerorbit – Overall, professional vibe here; trustworthy, polished, and pleasantly minimal throughout.
Your comment is awaiting moderation.
adster – Appreciate the typography choices; comfortable spacing improved my reading experience.
Your comment is awaiting moderation.
RevenueHarbor shop online – A solid starting point for refining your online earning strategies.
Your comment is awaiting moderation.
After browsing https://shopairsong.com/, I decided to try one of their minimizer styles. The fit felt balanced — secure without being overly compressive. It smooths things out under clothes while still feeling breathable.
Your comment is awaiting moderation.
visit shadow showcase – Really liked the featured items, I’ll check back soon for updates.
Your comment is awaiting moderation.
trendy finds hub – First visit experience was positive, with lots of items to choose from.
Your comment is awaiting moderation.
I came across https://abhayywigs.com/ while looking for a lace front wig with a soft wave pattern. The texture feels natural, and the lace blended better than I expected. It’s comfortable enough to wear all day, which was important to me.
Your comment is awaiting moderation.
СвП Оптом От Производителя
Система выравнивания плитки (СвП) представляет собой современный строительный материал, используемый для качественной укладки керамической плитки и керамогранита. Производство СвП постоянно совершенствуется, обеспечивая высокое качество продукции и удобство её использования специалистами.
свп для плитки производство
¦ Преимущества покупки СвП оптом от производителя
Приобретение системы выравнивания плитки оптом непосредственно от производителя имеет ряд преимуществ:
свп от производителя
– Низкая стоимость – покупка большими партиями позволяет значительно сэкономить средства.
– Высокое качество продукции, подтвержденное сертификатами соответствия.
– Минимальные сроки поставки благодаря наличию собственного производства.
– Индивидуальный подход к каждому клиенту: возможность заказа необходимого количества изделий с учетом специфики проекта.
¦ Где свп для плитки производство купить СвП оптом?
Купить систему выравнивания плитки оптом можно непосредственно у производителей, среди которых выделяются предприятия, выпускающие продукцию высокого качества и предлагающие выгодные условия сотрудничества. Среди популярных компаний-производителей можно отметить тех, кто специализируется именно на производстве СвП.
¦ СвП Зажимы Оптом
Зажимы являются важной частью системы выравнивания плитки. Они обеспечивают надежную фиксацию плиточных элементов и предотвращают образование зазоров. Купить СвП зажимы оптом также выгодно у производителей, поскольку такая покупка гарантирует оптимальное соотношение цены и качества.
система выравнивания плитки оптом
¦ Использование СвП в строительстве ворот
Отдельно стоит упомянуть использование СвП в возведении конструкций типа ворот. Благодаря своей прочности и надежности, СвП активно применяется в изготовлении декоративных и функциональных воротных конструкций. Покупка СвП для изготовления ворот от производителя позволит существенно снизить затраты на строительство.
¦ Заключение
система выравнивания плитки оптом
https://svp-rovno.ru/opt
Таким образом, приобретение системы выравнивания плитки оптом от производителя является экономически выгодным решением, обеспечивающим высокую эффективность строительных работ и снижение финансовых затрат. Современные производители предлагают широкий ассортимент продукции, включая специальные элементы, такие как зажими конструкции для строительства ворот, удовлетворяя потребности любого строительного проекта.
Your comment is awaiting moderation.
Nook Vista Hub – Clean and sleek design ensures browsing is simple and enjoyable.
Your comment is awaiting moderation.
Official GoodsQuarry Site – Plenty of choices to explore with reasonable pricing throughout.
Your comment is awaiting moderation.
подвела доставка, заказал 2-го получил 16-го https://cascadelux.ru заказывал мягкого пятак, всё пришло, непрходилось волноваться т.к в аське всегда были на связи, сила средне, но по весу 5+ =)сорь за флуд)))
Your comment is awaiting moderation.
Visit the ItemTrail Shop – Quick help from customer support resolved my concern easily.
Your comment is awaiting moderation.
zenvorax collection – Crisp visuals and organized pages create an easy-to-navigate store.
Your comment is awaiting moderation.
Hi there just wanted to give you a quick heads up and let you know a few of the images aren’t loading correctly.
I’m not sure why but I think its a linking issue.
I’ve tried it in two different internet browsers and both show the
same outcome. http://Www.Logosnlife.org/board_NXjP71/753045
Your comment is awaiting moderation.
Quick Shop Xerva – Love the design, navigating through products was super easy today.
Your comment is awaiting moderation.
Orqanta Essentials – A clean and efficient online shop showcasing standout items with ease.
Your comment is awaiting moderation.
Zarnita – A modern and distinctive platform showcasing unique items for curious shoppers.
Your comment is awaiting moderation.
Fintera Curated – Navigation is straightforward, and categories are simple to explore.
Your comment is awaiting moderation.
мебель для кухни из массива дерева На «канале Кухня алгоритмов», а также «на канале Кухня алгоритмов» и «посмотрите на Кухне алгоритмов», мы приглашаем вас окунуться в мир, где каждая строка кода — это приправа, а каждый цикл — это новый уровень сложности.
Your comment is awaiting moderation.
holvex.shop – Simple, clean layout made exploring the site effortless and pleasant.
Your comment is awaiting moderation.
1win promo kod Oʻzbekiston https://www.1win5767.help
Your comment is awaiting moderation.
сейф в стену
Your comment is awaiting moderation.
check these tools – Everything is easy to browse and looks professionally arranged.
Your comment is awaiting moderation.
Shop Silk Basket – Items are well-priced and the quality feels premium.
Your comment is awaiting moderation.
retargetroom official store – Several products look promising, I’ll check back again soon.
Your comment is awaiting moderation.
quality online boutique – Easy navigation and comfortable shopping make it a nice visit.
Your comment is awaiting moderation.
Discover RippleAisle – Deals are appealing and images are clear, making shopping stress-free.
Your comment is awaiting moderation.
Xerva Finds – Easy-to-navigate store layout made finding products today very simple.
Your comment is awaiting moderation.
Frost Aisle – A cool and refreshing store presenting crisp deals and clean design.
Your comment is awaiting moderation.
Gild Vendor – A polished online marketplace offering premium selections and curated deals.
Your comment is awaiting moderation.
everyday vendor finds – The platform seems secure, and buying an item looks stress-free.
Your comment is awaiting moderation.
Irnora Online – The store offers rare items that are difficult to discover elsewhere.
Your comment is awaiting moderation.
trendy finds hub – Good variety and pages load instantly without any issues.
Your comment is awaiting moderation.
Discover Inqvera Store – Finding products is simple and finalizing orders is fast.
Your comment is awaiting moderation.
curious shopper’s hub – Cleanly organized categories make it easy to find what you need.
Your comment is awaiting moderation.
YarrowCrate Collection – Informative descriptions made finding what I wanted much easier.
Your comment is awaiting moderation.
Smart Picks Farniq – Discovered pieces that match my personal style very well.
Your comment is awaiting moderation.
Xerva Select – The interface is organized, making it effortless to check out different items.
Your comment is awaiting moderation.
Timber Cart – A warm and grounded online shop inspired by rustic charm and practical choices.
Your comment is awaiting moderation.
Worvix Picks – Smooth checkout experience with payment options I could count on.
Your comment is awaiting moderation.
TripScan: Надежный помощник в путешествиях
Что такое TripScan?
tripskan
TripScan, также известный как трип скан, представляет собой инновационный сервис, предназначенный для оптимизации процесса планирования путешествий. Это мощный инструмент, позволяющий пользователям быстро находить лучшие маршруты, бронировать билеты и отели, а также получать всю необходимую информацию о поездках.
Основные преимущества TripScan
trip scan
– Удобный интерфейс: интуитивно понятный дизайн позволяет легко ориентироваться даже новичкам.
– Широкий выбор направлений: сервис охватывает тысячи городов и стран по всему миру.
– Возможность сравнения цен: сравнивайте стоимость билетов и проживания в разных источниках.
Как начать пользоваться Trip Scan?
tripscan
Чтобы воспользоваться всеми возможностями сервиса, достаточно зайти на трипскан сайт. Здесь вы найдете форму поиска, где можно ввести пункт назначения, даты путешествия и количество пассажиров. После ввода данных система предложит вам список доступных вариантов, отсортированных по цене, времени вылета и другим параметрам.
Для входа в личный кабинет воспользуйтесь кнопкой трипскан вход. Если у вас еще нет аккаунта, регистрация займет всего несколько минут.
Почему выбирают TripSkan?
Сервис отличается высоким уровнем надежности и безопасности. Все транзакции защищены современными системами шифрования, что гарантирует сохранность ваших персональных данных.
Кроме того, TripScan Top регулярно обновляет базу данных, обеспечивая пользователей актуальной информацией о рейсах и предложениях авиакомпаний.
Заключение
TripScan — это идеальный выбор для тех, кто хочет сделать свое путешествие комфортным и беззаботным. Простота использования, широкий спектр возможностей и высокий уровень безопасности делают этот сервис незаменимым помощником для каждого путешественника.
трипскан сайт
https://tripscans67.cc
Your comment is awaiting moderation.
2. Был подобный заказ и нас спутали. кокс, меф, шиш, гаш Заказ пришёл, все ровно)Страшно , но хочется и потом сам не попробуеш не узнаеш )
Your comment is awaiting moderation.
trendy finds hub – Clean and smooth interface with subtle details that enhance browsing.
Your comment is awaiting moderation.
Собираетесь на хоккей? Рассказываем, где купить билеты быстро и выгодно, какие места самые удобные и когда ловить акции. Полный разбор — подробнее здесь: https://chelseablues.ru/gde-kupit-bilety-na-hokkeynye-matchi-bystro-i-vygodno-dlya-yarkih-emociy
Your comment is awaiting moderation.
trusted quill marketplace – Straightforward navigation makes shopping convenient.
Your comment is awaiting moderation.
заказать кухню на заказ заказать кухню на заказ .
Your comment is awaiting moderation.
trendy online marketplace – Fair pricing and clearly written product information throughout.
Your comment is awaiting moderation.
Browse CraftQuill – Very happy with the quality and everything fit my requirements.
Your comment is awaiting moderation.
Silk Vendor – A polished platform delivering quality finds with a touch of elegance.
Your comment is awaiting moderation.
Trend Select – The website design makes browsing simple with organized product sections.
Your comment is awaiting moderation.
Smart Picks Xerva – Browsing products today was simple thanks to the neat store layout.
Your comment is awaiting moderation.
Explore Ravlora – Customer service answered promptly and fixed my issue smoothly.
Your comment is awaiting moderation.
Cobalt Crate – A bold and reliable platform delivering standout selections with confidence.
Your comment is awaiting moderation.
Брал у другого магазина – полная Чляпа оказалась… кокс, меф, шиш, гаш Лучший магазин !!!заказал в этом магазине еще раз ))
Your comment is awaiting moderation.
Aisle Whisper Treasures – Really liked the selection and discovered a few items worth a second look.
Your comment is awaiting moderation.
smart shopping spot – Fair prices and straightforward product descriptions help with decisions.
Your comment is awaiting moderation.
Melvora Website – Sleek layout makes browsing products effortless.
Your comment is awaiting moderation.
online Merch Glow boutique – Lots of appealing items that quickly grabbed my attention.
Your comment is awaiting moderation.
Explore Joy Vendor – Customer service was quick to reply and resolved everything efficiently.
Your comment is awaiting moderation.
Harbor Mint – A calm and curated marketplace inspired by coastal charm and clean design.
Your comment is awaiting moderation.
Browse Xerva – Store design is intuitive, so navigating items today was smooth.
Your comment is awaiting moderation.
Quick Shop Zintera – Fast site performance and a fresh, modern design make navigation simple.
Your comment is awaiting moderation.
this online shop – The assortment here is compelling and got me hooked instantly.
Your comment is awaiting moderation.
В 2026 году хоккейные матчи стали еще доступнее: билеты продаются онлайн. Все о выборе площадки и мест — подробнее здесь: https://volga.news/article/767503.html
Your comment is awaiting moderation.
Sorniq Essentials – A curated store combining imaginative choices with functional, everyday items.
Your comment is awaiting moderation.
Магазин реально ровный!!! Долго искал и нашел! Бро ты лучший!!!! https://simonspark.ru службу спрс давным давно забросить необходимо..подарок! Мне очень понравился
Your comment is awaiting moderation.
Hi there mates, how is everything, and what you
want to say concerning this article, in my view its really remarkable in support of me. https://vreditelstop.ru/question/comprendre-le-prix-des-lunettes-et-des-verres-13
Your comment is awaiting moderation.
visit NookHarbor – The site is inviting and I’d browse here again without hesitation.
Your comment is awaiting moderation.
Hello! Do you know if they make any plugins to help
with Search Engine Optimization? I’m trying to get my blog to rank for some targeted keywords but I’m not seeing
very good results. If you know of any please
share. Cheers! https://vreditelstop.ru/question/comprendre-le-prix-des-lunettes-et-des-verres-6
Your comment is awaiting moderation.
встраиваемые сейфы для квартиры
Your comment is awaiting moderation.
заказать кухню в интернете zakazat-kuhnyu-1.ru .
Your comment is awaiting moderation.
заказать кухню в Пскове Мы предлагаем полный спектр услуг: от создания уникального дизайна до установки готового кухонного гарнитура, чтобы ваша новая кухня стала не просто местом для готовки, а сердцем вашего дома, наполненным теплом и уютом. В нашей студии вы можете «заказать кухню в Пскове», которая будет полностью соответствовать вашим предпочтениям и бюджету, ведь «кухня на заказ Псков цены» всегда прозрачны и доступны.
Your comment is awaiting moderation.
Go to QuickWharf – Checkout was straightforward and items came ahead of schedule.
Your comment is awaiting moderation.
https://www.pubpub.org/user/meileurcode26-meileurcode26
Your comment is awaiting moderation.
взломостойкий сейф для дома
Your comment is awaiting moderation.
visit Sernix – Navigation is smooth thanks to fast page loads.
Your comment is awaiting moderation.
Cart Marketplace – Loved the discounts and my order was delivered very fast.
Your comment is awaiting moderation.
Browse Night Vendor – Impressive range of items with prices that feel fair.
Your comment is awaiting moderation.
Smart Picks Xerva – Browsing products today was simple thanks to the neat store layout.
Your comment is awaiting moderation.
Xolveta Shop – A fresh online destination focused on innovative products and smooth browsing.
Your comment is awaiting moderation.
Pebble Vendor – A thoughtfully curated marketplace featuring compact yet impactful products.
Your comment is awaiting moderation.
Забизаю дамой хвотаю тожнецы взрываю посылку там рубашка. Примерно на ребенка 7 летнего (я надеился книга будит) но ладно и рубашка сойдет на тряпки вмашину ! Разворачиваю рубаху а там пакетик реги я быстрей за весами и за фотиком и писать ВАМ МОИ ДРУЗЬЯ!!! кокс, меф, шиш, гаш чтоб расширенный был глаз.рип репорт ЭСКИМОС _скорость!
Your comment is awaiting moderation.
orbitcrate.shop – The website feels well organized and pages load quickly.
Your comment is awaiting moderation.
shop Cormira – Clean and attractive layout, shopping is surprisingly enjoyable.
Your comment is awaiting moderation.
online Xenial boutique – The layout makes shopping easy and the items appear well-priced.
Your comment is awaiting moderation.
TripScan: Надежный помощник в путешествиях
Что такое TripScan?
трипскан вход
TripScan, также известный как трип скан, представляет собой инновационный сервис, предназначенный для оптимизации процесса планирования путешествий. Это мощный инструмент, позволяющий пользователям быстро находить лучшие маршруты, бронировать билеты и отели, а также получать всю необходимую информацию о поездках.
Основные преимущества TripScan
трипскан
– Удобный интерфейс: интуитивно понятный дизайн позволяет легко ориентироваться даже новичкам.
– Широкий выбор направлений: сервис охватывает тысячи городов и стран по всему миру.
– Возможность сравнения цен: сравнивайте стоимость билетов и проживания в разных источниках.
Как начать пользоваться Trip Scan?
трипскан сайт
Чтобы воспользоваться всеми возможностями сервиса, достаточно зайти на трипскан сайт. Здесь вы найдете форму поиска, где можно ввести пункт назначения, даты путешествия и количество пассажиров. После ввода данных система предложит вам список доступных вариантов, отсортированных по цене, времени вылета и другим параметрам.
Для входа в личный кабинет воспользуйтесь кнопкой трипскан вход. Если у вас еще нет аккаунта, регистрация займет всего несколько минут.
Почему выбирают TripSkan?
Сервис отличается высоким уровнем надежности и безопасности. Все транзакции защищены современными системами шифрования, что гарантирует сохранность ваших персональных данных.
Кроме того, TripScan Top регулярно обновляет базу данных, обеспечивая пользователей актуальной информацией о рейсах и предложениях авиакомпаний.
Заключение
TripScan — это идеальный выбор для тех, кто хочет сделать свое путешествие комфортным и беззаботным. Простота использования, широкий спектр возможностей и высокий уровень безопасности делают этот сервис незаменимым помощником для каждого путешественника.
трипскан
https://tripscan65c.cc
Your comment is awaiting moderation.
TripScan: Надежный помощник в путешествиях
Что такое TripScan?
tripscan top
TripScan, также известный как трип скан, представляет собой инновационный сервис, предназначенный для оптимизации процесса планирования путешествий. Это мощный инструмент, позволяющий пользователям быстро находить лучшие маршруты, бронировать билеты и отели, а также получать всю необходимую информацию о поездках.
Основные преимущества TripScan
трипскан
– Удобный интерфейс: интуитивно понятный дизайн позволяет легко ориентироваться даже новичкам.
– Широкий выбор направлений: сервис охватывает тысячи городов и стран по всему миру.
– Возможность сравнения цен: сравнивайте стоимость билетов и проживания в разных источниках.
Как начать пользоваться Trip Scan?
tripscan
Чтобы воспользоваться всеми возможностями сервиса, достаточно зайти на трипскан сайт. Здесь вы найдете форму поиска, где можно ввести пункт назначения, даты путешествия и количество пассажиров. После ввода данных система предложит вам список доступных вариантов, отсортированных по цене, времени вылета и другим параметрам.
Для входа в личный кабинет воспользуйтесь кнопкой трипскан вход. Если у вас еще нет аккаунта, регистрация займет всего несколько минут.
Почему выбирают TripSkan?
Сервис отличается высоким уровнем надежности и безопасности. Все транзакции защищены современными системами шифрования, что гарантирует сохранность ваших персональных данных.
Кроме того, TripScan Top регулярно обновляет базу данных, обеспечивая пользователей актуальной информацией о рейсах и предложениях авиакомпаний.
Заключение
TripScan — это идеальный выбор для тех, кто хочет сделать свое путешествие комфортным и беззаботным. Простота использования, широкий спектр возможностей и высокий уровень безопасности делают этот сервис незаменимым помощником для каждого путешественника.
tripscan top
https://tripscans67.cc
Your comment is awaiting moderation.
TripScan: Надежный помощник в путешествиях
Что такое TripScan?
трипскан
TripScan, также известный как трип скан, представляет собой инновационный сервис, предназначенный для оптимизации процесса планирования путешествий. Это мощный инструмент, позволяющий пользователям быстро находить лучшие маршруты, бронировать билеты и отели, а также получать всю необходимую информацию о поездках.
Основные преимущества TripScan
tripskan
– Удобный интерфейс: интуитивно понятный дизайн позволяет легко ориентироваться даже новичкам.
– Широкий выбор направлений: сервис охватывает тысячи городов и стран по всему миру.
– Возможность сравнения цен: сравнивайте стоимость билетов и проживания в разных источниках.
Как начать пользоваться Trip Scan?
trip scan
Чтобы воспользоваться всеми возможностями сервиса, достаточно зайти на трипскан сайт. Здесь вы найдете форму поиска, где можно ввести пункт назначения, даты путешествия и количество пассажиров. После ввода данных система предложит вам список доступных вариантов, отсортированных по цене, времени вылета и другим параметрам.
Для входа в личный кабинет воспользуйтесь кнопкой трипскан вход. Если у вас еще нет аккаунта, регистрация займет всего несколько минут.
Почему выбирают TripSkan?
Сервис отличается высоким уровнем надежности и безопасности. Все транзакции защищены современными системами шифрования, что гарантирует сохранность ваших персональных данных.
Кроме того, TripScan Top регулярно обновляет базу данных, обеспечивая пользователей актуальной информацией о рейсах и предложениях авиакомпаний.
Заключение
TripScan — это идеальный выбор для тех, кто хочет сделать свое путешествие комфортным и беззаботным. Простота использования, широкий спектр возможностей и высокий уровень безопасности делают этот сервис незаменимым помощником для каждого путешественника.
trip scan
https://trip65c.cc
Your comment is awaiting moderation.
TripScan: Надежный помощник в путешествиях
Что такое TripScan?
трипскан вход
TripScan, также известный как трип скан, представляет собой инновационный сервис, предназначенный для оптимизации процесса планирования путешествий. Это мощный инструмент, позволяющий пользователям быстро находить лучшие маршруты, бронировать билеты и отели, а также получать всю необходимую информацию о поездках.
Основные преимущества TripScan
tripskan
– Удобный интерфейс: интуитивно понятный дизайн позволяет легко ориентироваться даже новичкам.
– Широкий выбор направлений: сервис охватывает тысячи городов и стран по всему миру.
– Возможность сравнения цен: сравнивайте стоимость билетов и проживания в разных источниках.
Как начать пользоваться Trip Scan?
trip scan
Чтобы воспользоваться всеми возможностями сервиса, достаточно зайти на трипскан сайт. Здесь вы найдете форму поиска, где можно ввести пункт назначения, даты путешествия и количество пассажиров. После ввода данных система предложит вам список доступных вариантов, отсортированных по цене, времени вылета и другим параметрам.
Для входа в личный кабинет воспользуйтесь кнопкой трипскан вход. Если у вас еще нет аккаунта, регистрация займет всего несколько минут.
Почему выбирают TripSkan?
Сервис отличается высоким уровнем надежности и безопасности. Все транзакции защищены современными системами шифрования, что гарантирует сохранность ваших персональных данных.
Кроме того, TripScan Top регулярно обновляет базу данных, обеспечивая пользователей актуальной информацией о рейсах и предложениях авиакомпаний.
Заключение
TripScan — это идеальный выбор для тех, кто хочет сделать свое путешествие комфортным и беззаботным. Простота использования, широкий спектр возможностей и высокий уровень безопасности делают этот сервис незаменимым помощником для каждого путешественника.
tripscan top
https://tripscan65c.cc
Your comment is awaiting moderation.
TripScan: Надежный помощник в путешествиях
Что такое TripScan?
трипскан сайт
TripScan, также известный как трип скан, представляет собой инновационный сервис, предназначенный для оптимизации процесса планирования путешествий. Это мощный инструмент, позволяющий пользователям быстро находить лучшие маршруты, бронировать билеты и отели, а также получать всю необходимую информацию о поездках.
Основные преимущества TripScan
трипскан
– Удобный интерфейс: интуитивно понятный дизайн позволяет легко ориентироваться даже новичкам.
– Широкий выбор направлений: сервис охватывает тысячи городов и стран по всему миру.
– Возможность сравнения цен: сравнивайте стоимость билетов и проживания в разных источниках.
Как начать пользоваться Trip Scan?
tripscan top
Чтобы воспользоваться всеми возможностями сервиса, достаточно зайти на трипскан сайт. Здесь вы найдете форму поиска, где можно ввести пункт назначения, даты путешествия и количество пассажиров. После ввода данных система предложит вам список доступных вариантов, отсортированных по цене, времени вылета и другим параметрам.
Для входа в личный кабинет воспользуйтесь кнопкой трипскан вход. Если у вас еще нет аккаунта, регистрация займет всего несколько минут.
Почему выбирают TripSkan?
Сервис отличается высоким уровнем надежности и безопасности. Все транзакции защищены современными системами шифрования, что гарантирует сохранность ваших персональных данных.
Кроме того, TripScan Top регулярно обновляет базу данных, обеспечивая пользователей актуальной информацией о рейсах и предложениях авиакомпаний.
Заключение
TripScan — это идеальный выбор для тех, кто хочет сделать свое путешествие комфортным и беззаботным. Простота использования, широкий спектр возможностей и высокий уровень безопасности делают этот сервис незаменимым помощником для каждого путешественника.
трип скан
https://trip65c.cc
Your comment is awaiting moderation.
Check out OpalVendor Shop – Excellent selection and navigating categories was straightforward.
Your comment is awaiting moderation.
купить сейф взломостойкий в москве
Your comment is awaiting moderation.
Explore Amber Vendor – Great selection of items and a very smooth purchasing experience.
Your comment is awaiting moderation.
leadster – Bookmarked this immediately, planning to revisit for updates and inspiration.
Your comment is awaiting moderation.
explore Lorvana – Items look distinctive and worth checking out in more detail.
Your comment is awaiting moderation.
Discover Zen Wharf – Lately, navigating the store has been straightforward and enjoyable.
Your comment is awaiting moderation.
campava – Bookmarked this immediately, planning to revisit for updates and inspiration.
Your comment is awaiting moderation.
signalify – Overall, professional vibe here; trustworthy, polished, and pleasantly minimal throughout.
Your comment is awaiting moderation.
boostio – Color palette felt calming, nothing distracting, just focused, thoughtful design.
Your comment is awaiting moderation.
Quick Shop Xerva – Love the design, navigating through products was super easy today.
Your comment is awaiting moderation.
viralio – Content reads clearly, helpful examples made concepts easy to grasp.
Your comment is awaiting moderation.
rankster – Content reads clearly, helpful examples made concepts easy to grasp.
Your comment is awaiting moderation.
Gild Vendor – A polished online marketplace offering premium selections and curated deals.
Your comment is awaiting moderation.
growthio – Overall, professional vibe here; trustworthy, polished, and pleasantly minimal throughout.
Your comment is awaiting moderation.
Магаз ровный, сам лично несколько раз здесь заказывал и все доходило вовремя и целостно!:) Наврятли он решится на такое.. https://happybaby-noginsk.ru Хочу выразить свою благодарность за представленную пробу!Спасибо за объективный отзыв, мы работаем – что бы Вы улыбались:ok:
Your comment is awaiting moderation.
Kovique Hub – A chic e-commerce space highlighting modern and unique offerings.
Your comment is awaiting moderation.
Dapper Aisle – A sleek and modern shopping space offering refined selections for everyday style.
Your comment is awaiting moderation.
Казино Vavada привлекает игроков щедрыми бонусами без депозита и постоянными турнирами с крупным призовым фондом.
Регистрация занимает несколько минут, а рабочие зеркала обеспечивают стабильный доступ к сайту даже при блокировках.
Проверяйте актуальные промокоды и условия отыгрыша, чтобы оптимально использовать стартовые фриспины.
Служба поддержки отвечает на русском языке и помогает решить вопросы с верификацией и выводом средств.
Свежие предложения и актуальное зеркало доступны по ссылке: вавада вход.
Играйте ответственно и контролируйте банкролл, чтобы азарт приносил удовольствие.
Your comment is awaiting moderation.
smart shopping spot – Product photos are sharp and categories are clearly organized.
Your comment is awaiting moderation.
Good day everyone, I wanted to share my experiance with this platform over the past month. The service has been quite reliabel and the interface is intuitive enough for users of all skill levels. The support team responds within reasonable timeframes, and the overall operation seems well-managed. I would say its worth checking out if youre looking for something new. Best regards, слот lucky tiger
Your comment is awaiting moderation.
заказать кухню сайт zakazat-kuhnyu-1.ru .
Your comment is awaiting moderation.
Luster Deals Online – The newest items were interesting and made the browsing experience enjoyable.
Your comment is awaiting moderation.
Honestly the interface is pretty intuitive and doesnt feel clunky like other sites 🙂 lucky star amphitheater
Your comment is awaiting moderation.
official Loft Crate site – The clean interface makes finding items effortless.
Your comment is awaiting moderation.
Сегодня оплатил, сегодня и отправили, пацаны как всегда четко работают кокс, меф, шиш, гаш Видать все ништяк, вот и не отписывается))))как правило все реактивы от данного магазина проходят проверку на легальность\чистоту так что поживём увидим, думаю нелегала тут в продаже не появится )
Your comment is awaiting moderation.
harbor-inspired shop – The unique tone and tidy presentation leave a great impression.
Your comment is awaiting moderation.
сейфы встраиваемые
Your comment is awaiting moderation.
visit MistMarket – The assortment is appealing and the payment process is seamless.
Your comment is awaiting moderation.
DepotGlow Official – Very satisfied with the prices and quality, I’ll be returning soon.
Your comment is awaiting moderation.
Lemon Crate Online – Really impressed with the prices and product quality, will return soon.
Your comment is awaiting moderation.
chiccheckout.shop – Checkout is easy and the layout keeps shopping simple and fast.
Your comment is awaiting moderation.
ТС ответь мне на почту или в лс, писал по поводу JV-100 ответил https://vitoklad.club Без паники, есть 2 причины почему может не бится трэк 1. тупит курьерка и не внесла в базу накладную такое бывало уже не раз люди получали посылки с нерабочей накладной такое бывает часво это кривая работа службы доставки. 2. вы не правильно вводите на сайте отслеживания с дефисом, пробелом, не по формату номеру накладной службы или вообще на другом сайте)) такое тоже бывает часто. Клиенты у нас получают все вовремя если вас оповестили что посылка отправлена значит она отправлена, ожидайте согласно установленому времени доставки.Наш Skype «chemical-mix.com» временно недоступен по техническим причинам. Заказы принимаются все так же через сайт, сверка реквизитов по ICQ или электронной почте.
Your comment is awaiting moderation.
has anyone here tried Kubet Casino yet? im thinking about givin it a shot but wanna know what other ppl think first, is it legit or is there alot of complaints? teh reviews seem ok but ur always better off askin real people lol.
Your comment is awaiting moderation.
Lily Phillips lilyphillips es te invita a un mundo de creatividad, conexion y emocionantes descubrimientos. Siguela en Instagram y Twitter para estar al tanto de nuevas publicaciones y proyectos inspiradores.
Your comment is awaiting moderation.
Frost Collection Hub – Products are exactly as pictured and the checkout went smoothly.
Your comment is awaiting moderation.
North Vendor Hub – Smooth browsing experience, product information is very clear.
Your comment is awaiting moderation.
El sitio web oficial de Kareli Ruiz http://www.karelyruiz.es/ ofrece contenido exclusivo, noticias de ultima hora y actualizaciones periodicas. Mantengase al dia con las nuevas publicaciones y anuncios.
Your comment is awaiting moderation.
онлайн казино pin-up https://games-pinup.ru
Your comment is awaiting moderation.
Football online https://qol.com.az goals, live match results, top scorers table, and detailed statistics. Follow the news and never miss the action.
Your comment is awaiting moderation.
Play online https://www.bloxd-io.com.az for free right in your browser. Build, compete, and explore the world in dynamic multiplayer mode with no downloads or installations required.
Your comment is awaiting moderation.
1win depozit bonusi qanday olish 1win5767.help
Your comment is awaiting moderation.
Visit Leaf Vendor – Everything looks well made and the costs seem quite reasonable.
Your comment is awaiting moderation.
official Jewel Vendor site – The visuals are sharp and give a very professional impression.
Your comment is awaiting moderation.
shop Timber Vendor – Rustic feel is lovely, with smooth navigation across pages.
Your comment is awaiting moderation.
Sunny Coast Deals – This page is saved for whenever I’m ready to buy next.
Your comment is awaiting moderation.
заказать кухню через интернет zakazat-kuhnyu-1.ru .
Your comment is awaiting moderation.
CelNova Online Store – Pleasant layout, fast site response, and checkout was hassle-free.
Your comment is awaiting moderation.
Lumvanta Online Spot – Layout is neat and products are easy to find.
Your comment is awaiting moderation.
Been using kiss918 for a few days now and i gotta say the response time is actualy pretty good, loads super quick which i appreciate. only thing that bugged me was the menu took a minute to get used to but after that it was fine. worth checkin out kiss918 download
Your comment is awaiting moderation.
charming gift nook – Plenty of sweet finds, definitely returning to browse again.
Your comment is awaiting moderation.
Медицинская мебель https://tenchat.ru/0614265/ это основа оснащения клиник, лабораторий и частных кабинетов. Мы предлагаем мебель медицинская для любых задач: шкафы, столы, тумбы, стеллажи и специализированные решения. В ассортименте можно купить медецинскую мебель, соответствующая санитарным требованиям и стандартам безопасности.
Your comment is awaiting moderation.
Honey Market Selection – Everything loads properly and the photos are high resolution.
Your comment is awaiting moderation.
работа грузчик оплатой грузчики недорого
Your comment is awaiting moderation.
грузчики москва заказать услуги грузчиков
Your comment is awaiting moderation.
порно дрочил порно на русском языке
Your comment is awaiting moderation.
минем порно порно дай дам
Your comment is awaiting moderation.
скачать официальное приложение мелбет
Скачать приложение Melbet: APK, iPhone и компьютер
Мобильная версия Melbet включает букмекерскую контору и казино в едином приложении. Доступны live-ставки, слоты, онлайн-трансляции, аналитика и быстрые финансовые операции. Загрузка занимает несколько минут.
Android (APK)
Скачайте APK с официального сайта, запустите установщик и подтвердите установку. Если требуется включите разрешение на установку из неизвестных источников, затем войдите в аккаунт.
iOS (iPhone)
Перейдите в App Store, найдите «Melbet», нажмите «Получить», после установки выполните вход.
ПК
Перейдите официальный сайт, авторизуйтесь и создайте ярлык на рабочий стол. Браузерная версия функционирует как полноценное приложение.
Функционал
Live-ставки с мгновенным обновлением линии, игровой раздел с тысячами игр, просмотр матчей, аналитические данные, уведомления о матчах, быстрая регистрация и круглосуточная служба поддержки.
Бонусы
После установки доступны бонус на первый депозит, промокоды и фрибеты. Правила начисления определяются регионом.
Безопасность
Загружайте только с официального сайта, контролируйте адрес сайта, не передавайте пароль третьим лицам и активируйте двухфакторную аутентификацию.
Установка занимает несколько минут, после чего доступен весь функционал Melbet.
Your comment is awaiting moderation.
this online store – Navigation is smooth and every item is easy to locate.
Your comment is awaiting moderation.
Оплатил, жду. https://kandidat24.ru Может еще вернемся.Магазин в полном порядке!!
Your comment is awaiting moderation.
Smyrna Event Updates – The artists and event details are exciting and easy to access.
Your comment is awaiting moderation.
Ivory Supply Online – Navigation is intuitive and product layout is well structured.
Your comment is awaiting moderation.
harborvendor.shop – Pleasant experience, everything loaded quickly and looked professional.
Your comment is awaiting moderation.
So my friend told me about this site like two weeks ago and i was skeptical at first right? but then i actualy tried it and its not bad, like the whole thing loads fast and the options are pretty good. ive been messing around on kinggames and its been alright honestly, way better than what i expected.
Your comment is awaiting moderation.
Pebble Favorites – Very user-friendly layout and navigation made the experience pleasant.
Your comment is awaiting moderation.
curious shopper’s hub – Broad assortment keeps browsing engaging for all.
Your comment is awaiting moderation.
Brook Vendor Store – Really liked my first visit and I’ll be coming back soon.
Your comment is awaiting moderation.
online Kettle Market boutique – Unique selections with clean and appealing presentation.
Your comment is awaiting moderation.
1win android http://1win5767.help
Your comment is awaiting moderation.
Hovanta Picks Online – Organized layout and simple navigation make shopping hassle-free.
Your comment is awaiting moderation.
Finch Favorites – The issue was resolved quickly thanks to their attentive customer care.
Your comment is awaiting moderation.
Shop MarketPearl – Browsing was simple and I found everything I needed without issues.
Your comment is awaiting moderation.
Honestly the layout is intuitive and I didnt need to ask support questions, which is always a win. k9win inr
Your comment is awaiting moderation.
мелбет бонус фрибет
Скачать приложение Melbet: APK, iPhone и ПК
Приложение Melbet включает букмекерскую контору и казино в едином приложении. Пользователю доступны live-ставки, казино-игры, прямые трансляции, аналитика и быстрые финансовые операции. Загрузка занимает 1–2 минуты.
Android (APK)
Загрузите APK с официального сайта, запустите установщик и подтвердите установку. При необходимости включите доступ к установке сторонних приложений, затем войдите в аккаунт.
iOS (iPhone)
Перейдите в App Store, введите в поиске «Melbet», выберите «Получить», после установки выполните вход.
ПК
Откройте официальный сайт, авторизуйтесь и создайте ярлык на рабочий стол. Веб-версия работает как полноценное приложение.
Функционал
Live-ставки с обновлением коэффициентов, игровой раздел с тысячами игр, прямые трансляции, подробная статистика, уведомления о матчах, быстрая регистрация и поддержка 24/7.
Бонусы
После загрузки доступны приветственный бонус, промокоды и бесплатные ставки. Условия зависят от региона.
Безопасность
Загружайте только с официальных источников, контролируйте адрес сайта, не сообщайте данные доступа третьим лицам и активируйте двухфакторную аутентификацию.
Загрузка выполняется быстро, после чего доступен весь функционал Melbet.
Your comment is awaiting moderation.
Olive Vendor Hub – Pages load quickly and the layout is very user-friendly.
Your comment is awaiting moderation.
Заявление про кидал не требует обоснования, ибо это не заявление. Перечитайте внимательно. Считаю, что такие речи тоже стоит оставлять при себе, не прочитав толком. https://kandidat24.ru я в среду оплатил ещё, тс сразу сказал, что отправка будет на следующей недели во вторник-среду.Вот так нихуя себе с 2011 года на плаву:strong:, подумаеш какая диковинка 😀
Your comment is awaiting moderation.
TripScan: Надежный помощник в путешествиях
Что такое TripScan?
трипскан сайт
TripScan, также известный как трип скан, представляет собой инновационный сервис, предназначенный для оптимизации процесса планирования путешествий. Это мощный инструмент, позволяющий пользователям быстро находить лучшие маршруты, бронировать билеты и отели, а также получать всю необходимую информацию о поездках.
Основные преимущества TripScan
трипскан
– Удобный интерфейс: интуитивно понятный дизайн позволяет легко ориентироваться даже новичкам.
– Широкий выбор направлений: сервис охватывает тысячи городов и стран по всему миру.
– Возможность сравнения цен: сравнивайте стоимость билетов и проживания в разных источниках.
Как начать пользоваться Trip Scan?
трипскан вход
Чтобы воспользоваться всеми возможностями сервиса, достаточно зайти на трипскан сайт. Здесь вы найдете форму поиска, где можно ввести пункт назначения, даты путешествия и количество пассажиров. После ввода данных система предложит вам список доступных вариантов, отсортированных по цене, времени вылета и другим параметрам.
Для входа в личный кабинет воспользуйтесь кнопкой трипскан вход. Если у вас еще нет аккаунта, регистрация займет всего несколько минут.
Почему выбирают TripSkan?
Сервис отличается высоким уровнем надежности и безопасности. Все транзакции защищены современными системами шифрования, что гарантирует сохранность ваших персональных данных.
Кроме того, TripScan Top регулярно обновляет базу данных, обеспечивая пользователей актуальной информацией о рейсах и предложениях авиакомпаний.
Заключение
TripScan — это идеальный выбор для тех, кто хочет сделать свое путешествие комфортным и беззаботным. Простота использования, широкий спектр возможностей и высокий уровень безопасности делают этот сервис незаменимым помощником для каждого путешественника.
tripscan top
https://tripscan65c.cc
Your comment is awaiting moderation.
Bouton Lane – Smooth navigation and the site highlights items nicely.
Your comment is awaiting moderation.
1win free spins https://1win5767.help/
Your comment is awaiting moderation.
Using 365bet betting link allows you to place bets on all major Mexican and international leagues with very competitive odds and live updates. The platform is designed for both pre-match and in-play wagering, making it a versatile tool for sports fans who like to stay in the action. I find their interface very clean, which helps a lot when you need to make quick decisions during a live match.
Your comment is awaiting moderation.
Using best betting guide ensures that you are only accessing verified and licensed operators that fully comply with local Mexican laws. This guide is essential for players who prioritize financial security and want to avoid offshore sites with questionable reputations. It provides a clear list of legal platforms and explains the current regulations in a way that is very easy to understand.
Your comment is awaiting moderation.
Checking Chivas official link is a must for any fan looking for the latest news, match schedules, and official team updates. The portal provides in-depth coverage of the club’s performance and includes exclusive interviews with players and coaching staff throughout the season. It’s the most reliable source for verified information regarding upcoming fixtures and official club announcements.
Your comment is awaiting moderation.
See official stats link for the most accurate statistics and official statements directly from the club’s management this season. The site offers a detailed look at the team’s performance metrics and upcoming match analysis, which is perfect for fans who like to dive deep into the numbers. It’s a professional and well-maintained site that serves as the official voice of the team for its loyal fanbase.
Your comment is awaiting moderation.
TripScan: Надежный помощник в путешествиях
Что такое TripScan?
трипскан сайт
TripScan, также известный как трип скан, представляет собой инновационный сервис, предназначенный для оптимизации процесса планирования путешествий. Это мощный инструмент, позволяющий пользователям быстро находить лучшие маршруты, бронировать билеты и отели, а также получать всю необходимую информацию о поездках.
Основные преимущества TripScan
tripscan top
– Удобный интерфейс: интуитивно понятный дизайн позволяет легко ориентироваться даже новичкам.
– Широкий выбор направлений: сервис охватывает тысячи городов и стран по всему миру.
– Возможность сравнения цен: сравнивайте стоимость билетов и проживания в разных источниках.
Как начать пользоваться Trip Scan?
trip scan
Чтобы воспользоваться всеми возможностями сервиса, достаточно зайти на трипскан сайт. Здесь вы найдете форму поиска, где можно ввести пункт назначения, даты путешествия и количество пассажиров. После ввода данных система предложит вам список доступных вариантов, отсортированных по цене, времени вылета и другим параметрам.
Для входа в личный кабинет воспользуйтесь кнопкой трипскан вход. Если у вас еще нет аккаунта, регистрация займет всего несколько минут.
Почему выбирают TripSkan?
Сервис отличается высоким уровнем надежности и безопасности. Все транзакции защищены современными системами шифрования, что гарантирует сохранность ваших персональных данных.
Кроме того, TripScan Top регулярно обновляет базу данных, обеспечивая пользователей актуальной информацией о рейсах и предложениях авиакомпаний.
Заключение
TripScan — это идеальный выбор для тех, кто хочет сделать свое путешествие комфортным и беззаботным. Простота использования, широкий спектр возможностей и высокий уровень безопасности делают этот сервис незаменимым помощником для каждого путешественника.
tripskan
https://tripscan65c.cc
Your comment is awaiting moderation.
TripScan: Надежный помощник в путешествиях
Что такое TripScan?
трипскан
TripScan, также известный как трип скан, представляет собой инновационный сервис, предназначенный для оптимизации процесса планирования путешествий. Это мощный инструмент, позволяющий пользователям быстро находить лучшие маршруты, бронировать билеты и отели, а также получать всю необходимую информацию о поездках.
Основные преимущества TripScan
трип скан
– Удобный интерфейс: интуитивно понятный дизайн позволяет легко ориентироваться даже новичкам.
– Широкий выбор направлений: сервис охватывает тысячи городов и стран по всему миру.
– Возможность сравнения цен: сравнивайте стоимость билетов и проживания в разных источниках.
Как начать пользоваться Trip Scan?
трип скан
Чтобы воспользоваться всеми возможностями сервиса, достаточно зайти на трипскан сайт. Здесь вы найдете форму поиска, где можно ввести пункт назначения, даты путешествия и количество пассажиров. После ввода данных система предложит вам список доступных вариантов, отсортированных по цене, времени вылета и другим параметрам.
Для входа в личный кабинет воспользуйтесь кнопкой трипскан вход. Если у вас еще нет аккаунта, регистрация займет всего несколько минут.
Почему выбирают TripSkan?
Сервис отличается высоким уровнем надежности и безопасности. Все транзакции защищены современными системами шифрования, что гарантирует сохранность ваших персональных данных.
Кроме того, TripScan Top регулярно обновляет базу данных, обеспечивая пользователей актуальной информацией о рейсах и предложениях авиакомпаний.
Заключение
TripScan — это идеальный выбор для тех, кто хочет сделать свое путешествие комфортным и беззаботным. Простота использования, широкий спектр возможностей и высокий уровень безопасности делают этот сервис незаменимым помощником для каждого путешественника.
трипскан вход
https://tripscans67.cc
Your comment is awaiting moderation.
This best Rayados site portal provides comprehensive coverage of the club’s history, current roster, and community initiatives in the Monterrey region. I check it regularly for official injury reports and transfer news to stay updated on the team’s latest developments. It’s a great resource for dedicated supporters who want to follow every aspect of the club’s journey in the league.
Your comment is awaiting moderation.
Best of Mint Vendor – Great experience overall, products are presented professionally.
Your comment is awaiting moderation.
Judge Hall Campaign Hub – Insightful details and well-structured information help voters understand the platform.
Your comment is awaiting moderation.
Explore Key Deals – Items arrived quickly and the overall quality is excellent.
Your comment is awaiting moderation.
curated aisle goods – Discovered this shop and the materials appear high quality.
Your comment is awaiting moderation.
I was skeptical about k8 at first but honestly after using it for like two weeks im pleasently surprised how smooth everything runs and the customer service actually responds pretty quick when u have questions k8 gaming
Your comment is awaiting moderation.
Maple Product Hub – Really enjoyed exploring, lots of unique items listed today.
Your comment is awaiting moderation.
В КХЛ каждый сезон — это масштабное хоккейное шоу: сильнейшие клубы, плей-офф и борьба за Кубок Гагарина. Подробнее здесь: https://rin.ru/novosti/230386/kupit-bileti-na-hokkeinie-matchi-onlain.html
Your comment is awaiting moderation.
visit VelvetVendorX – Smooth and stylish interface, shopping here is simple.
Your comment is awaiting moderation.
stylish finds online – Had a quick browse and the prices seem fair and solid.
Your comment is awaiting moderation.
Quick Meadow Boutique – Fast site performance and clear product info made shopping easy.
Your comment is awaiting moderation.
Shop Drift Collection – I like how simple it is to browse and the product details are very thorough.
Your comment is awaiting moderation.
заказать кухню в интернете zakazat-kuhnyu-1.ru .
Your comment is awaiting moderation.
Blossom Deals Online – Loving how informative the listings are and how often fresh details get added.
Your comment is awaiting moderation.
Yornix Online Picks – Responsive assistance made shopping effortless and pleasant today.
Your comment is awaiting moderation.
Lemon Cherry Gelato
Your comment is awaiting moderation.
Explore top predictions portal to find professional analysis and data-driven predictions for all major sporting events in the region. The site uses advanced statistical models to help users make more informed decisions when placing their bets on football, baseball, or other popular sports. It’s a great starting point for anyone looking to add a layer of expert insight to their wagering strategy.
Your comment is awaiting moderation.
On official Mexico link you will find a wide range of articles covering everything from local football to international sports tournaments. It’s a comprehensive portal for anyone who wants to stay updated on Mexican sports without having to visit multiple different news sites. The quality of the reporting is very high, and they cover a diverse range of athletic disciplines beyond just soccer.
Your comment is awaiting moderation.
Visiting https://hector-herrera.com.mx/ gives you a detailed look into the career and professional achievements of one of Mexico’s top football stars. The site includes exclusive content, career milestones, and regular updates that are perfect for dedicated fans of the midfielder. It’s a well-organized tribute to his journey from local clubs to the international stage and his ongoing impact on the sport.
Your comment is awaiting moderation.
Reading Buran gaming info will give you a detailed overview of the platform’s features, from its unique space-themed design to its massive game library. This expert review breaks down the pros and cons, helping you decide if their current welcome package fits your playing style. It’s a very helpful resource for anyone who likes to do a bit of research before committing to a new online casino.
Your comment is awaiting moderation.
Visiting official Biqote site is essential for those tracking the latest digital trends and platform launches in Spain for the upcoming year. The site provides technical details and roadmap updates that are quite valuable for anyone involved in the local tech or gaming sectors. It serves as an official hub for news and announcements regarding several key digital initiatives starting in early 2024.
Your comment is awaiting moderation.
EasyBuy – Appreciate how simple and approachable the product descriptions are.
Your comment is awaiting moderation.
Update: Still using joker888i after 3 months and im really happy with how consistant it is. The interface hasnt changed much but honestly thats a good thing cause it just works. Defintely sticking with it. joker888i
Your comment is awaiting moderation.
но только если мусора захотят найдут. просто мусора еслиб хотели найти , то давно бы уже посыль пришла с сопровождением. https://udalenie-gemorroya.ru Номер заказа: 10004015 оплачен, мыло выслано с информациейЗамечательный, магазин. Желаю успешных продаж
Your comment is awaiting moderation.
Mist Vendor Deals – Found everything easy to browse and well presented.
Your comment is awaiting moderation.
visit Nest Vendor – Clear layout and structure made finding items effortless.
Your comment is awaiting moderation.
official CartCatalyst shop – Clean interface and browsing items is quick and simple.
Your comment is awaiting moderation.
Shop Shore Vendor – Browsing feels simple and the website is user-friendly.
Your comment is awaiting moderation.
Explore Floral Deals – Browsing is effortless and the items appear thoughtfully selected.
Your comment is awaiting moderation.
Hagins Political Vision – The site communicates priorities and dedication in a very accessible way.
Your comment is awaiting moderation.
Good day everyone, I thought I would share my recent findings regarding Jilibet Online. The platform appears to be quite well structured with a diverse selection of games and reasonable customer service response times. The interface is intuitive enough for those new to online gaming platforms. Withdrawal processing has been reasonably prompt in my experiance. If you are considering joining, I would suggest reviewing their terms first. Cheers and best regards.
jilinet
Your comment is awaiting moderation.
Icicle Crate Hub Online – Fast, reliable shipping and items meet quality expectations perfectly.
Your comment is awaiting moderation.
Visit Greek betting portal if you are looking for a premium gaming experience in Greece with a heavy focus on sports-themed slots and live betting. The site is fully localized, making navigation easy for Greek speakers, and the bonus offers are quite generous for new registrations. They have a great mix of classic casino games and modern sportsbook features that keep the overall experience very diverse.
Your comment is awaiting moderation.
Playing https://plinko-casino-game.net/ is a fantastic way to experience this classic arcade-style game with modern graphics and certified fair mechanics. The interface is very straightforward, allowing you to jump straight into the action without dealing with overly complicated settings or menus. It’s perfect for those who enjoy quick gaming sessions where the outcome is clear and the gameplay remains consistently engaging.
Your comment is awaiting moderation.
At Amunra official players in the Czech region can experience high-quality slots and live dealer games in a completely secure and localized environment. The site supports popular local payment methods and offers 24/7 customer support to resolve any technical or account issues as quickly as possible. It’s a very reliable destination for those looking for a smooth registration process and a diverse library of certified casino games.
Your comment is awaiting moderation.
On top Boomerang slots you can enjoy a very engaging loyalty program that rewards active players with frequent cashback and exclusive tournament invitations. The platform is highly stable and performs well on both desktop and mobile browsers, ensuring you never miss a beat. It’s a great choice for those who value long-term rewards and a consistent gaming environment with plenty of variety.
Your comment is awaiting moderation.
Inside 1xBet India login you will find a massive selection of games specifically tailored for the Indian market, including hits like Teen Patti and Andar Bahar. The platform utilizes high-level encryption to ensure all transactions and personal data remain secure at all times. I also found that they offer excellent local deposit options, which makes the whole experience much more convenient for users in the region.
Your comment is awaiting moderation.
Best of Raven Crate – Smooth navigation and a clean structure make it easy to shop with confidence.
Your comment is awaiting moderation.
QuickCarton Online Picks – Very professional layout, quick browsing, and items are easy to locate.
Your comment is awaiting moderation.
Birch Supply Online – I appreciate the neat arrangement and the store feels solid.
Your comment is awaiting moderation.
Казино Vavada привлекает игроков щедрыми бонусами без депозита и постоянными турнирами с крупным призовым фондом.
Регистрация занимает несколько минут, а рабочие зеркала обеспечивают стабильный доступ к сайту даже при блокировках.
Проверяйте актуальные промокоды и условия отыгрыша, чтобы оптимально использовать стартовые фриспины.
Служба поддержки отвечает на русском языке и помогает решить вопросы с верификацией и выводом средств.
Свежие предложения и актуальное зеркало доступны по ссылке: https://vluki.net/vavada.
Играйте ответственно и контролируйте банкролл, чтобы азарт приносил удовольствие.
Your comment is awaiting moderation.
че вы панику наводите)) все норм будет! есть рамс у курьерки, магаз не при чем.. спакуха кокс, меф, шиш, гаш У меня была, проси того кто продал все перепроверять- люди могут ошибаться !2. Был подобный заказ и нас спутали.
Your comment is awaiting moderation.
Hello i want share with you all about jeetwin online platform. I use this site for many months now and is very good, interface is easy for understand and support team help me very fast when i have question. jeetwin ????????
Your comment is awaiting moderation.
Lunar Vendor Online Store – Customer service is attentive and very helpful whenever contacted.
Your comment is awaiting moderation.
visit this store – Easy navigation and pleasant design make the site fun to explore.
Your comment is awaiting moderation.
Wow, that’s what I was exploring for, what a
information! present here at this webpage, thanks admin of this site. https://Vreditelstop.ru/question/comprendre-le-prix-des-lunettes-et-des-verres-41
Your comment is awaiting moderation.
Shore Vendor Spot – Simple navigation and clean layout make for a smooth experience.
Your comment is awaiting moderation.
Best of Hazel Vendor – Navigation was effortless and the support team impressed me with their responsiveness.
Your comment is awaiting moderation.
JollyMart Corner – Navigation is simple and the product collection feels well curated.
Your comment is awaiting moderation.
Thistle Online Shop – Wide range of products and the details provided are very useful.
Your comment is awaiting moderation.
1win qanday roʻyxatdan oʻtish 1win5767.help
Your comment is awaiting moderation.
Quick pros:
* Fast loading times
* Mobile-friendly interface
* Easy account setup
* Multiple payment options
* 24/7 customer support
jeetbuzz online
Your comment is awaiting moderation.
So my friend told me about this platform last month and i was kinda skeptical at first but decided to just check it out one night when i was bored. Turns out it was actually pretty decent, like way better interface than other places ive used and the whole process felt pretty straightforward ngl. game tt88
Your comment is awaiting moderation.
Московские цирки создают настоящий праздник: трюки, музыка, костюмы и захватывающие сюжеты для детей и взрослых. Выбирайте представление сезона. Подробнее здесь: https://telegra.ph/Cirki-Moskvy-afisha-bilety-i-samye-yarkie-shou-stolicy-01-27
Your comment is awaiting moderation.
N3rd Market Picks – Fun products and playful design make bookmarking a must.
Your comment is awaiting moderation.
заказать кухню на заказ заказать кухню на заказ .
Your comment is awaiting moderation.
В чем растворял 203??? У меня ихний 203 в спирте не получилось расстворить даже при нагреве, пришлось ацетон использовать! На счет качества с тобой согласен – 5! https://mefedronetop.club У меня такая же ситуация мне кажеться ребята что их курьерку иусора приняли потомушто на сайтеБро слова это хорошо но нам нужен наш клад и не более не кто не хочет тебя винить и общаться сдесь на эту тему а на оборот писать только хорошие отзывы о вашем магазе пойми и ты бро слово паника сдесь не уместно сдесь идет разбор по факту согласись
Your comment is awaiting moderation.
Juniper Style Market – The order reached me quickly and the box was perfectly intact.
Your comment is awaiting moderation.
EmberBasket Finds Online – Very user-friendly site with clear details on every product.
Your comment is awaiting moderation.
SunCorner – Planning to come back, navigation is simple and browsing is smooth.
Your comment is awaiting moderation.
Ocean Trend Store – Pages load fast and the assortment of items is appealing.
Your comment is awaiting moderation.
Grove Aisle Hub – Plenty of options and the site responds quickly.
Your comment is awaiting moderation.
dude check this out i found this site Ibetph Onlinecasino and its actually pretty legit like they got tons of games and the payouts r decent no cap
Your comment is awaiting moderation.
dude check this out, been playing on skycrown online and its actually pretty sick, way better selection than i expected and the whole thing runs smooth af
Your comment is awaiting moderation.
Morning Crate Products – Smooth browsing, got exactly what I needed in no time at all.
Your comment is awaiting moderation.
Try Mr.Jackbet mobile if you are looking for the official Mr.Jackbet platform with the most reliable slots and betting options. This destination is very professional and provides all the necessary details and service descriptions you might need before you start playing for real. It’s a great example of a secure environment that values transparency and makes it easy for users to find exactly what they need.
Your comment is awaiting moderation.
Visit official page to find unique entertainment tips and detailed guides about the latest lifestyle trends. This platform is well-researched and provides a fresh perspective for anyone interested in high-quality content that isn’t covered by mainstream blogs. I especially like how they categorize their posts, making it easy to navigate through different themes without feeling overwhelmed.
Your comment is awaiting moderation.
At licensed casino site you will find an extensive library of licensed slots and live dealer tables that definitely cater to all types of players. The site has a reputation for offering very competitive bonuses with fair wagering requirements, making it a solid choice for both beginners and pros. I’ve personally found their withdrawal process to be quite efficient, which is always a top priority when choosing a new platform.
Your comment is awaiting moderation.
Check here for essential information regarding local community initiatives and the strategic goals set by leadership. The layout is very clear, which makes it easy to find specific data about upcoming public events and policy updates without much effort. It really helps bridge the gap by providing transparent and timely information that matters to every active citizen in the region.
Your comment is awaiting moderation.
Wicker Lane Official – Very smooth experience, found what I needed quickly and easily.
Your comment is awaiting moderation.
Clear Deals Online – Browsing is simple and the items are engaging and well-presented.
Your comment is awaiting moderation.
shop at PineVendor – The site feels professional, with quick page transitions.
Your comment is awaiting moderation.
Orchid Aisle products – Browsing is smooth, and everything appears thoughtfully chosen.
Your comment is awaiting moderation.
Flora Aisle Store – The site layout is simple and makes shopping a breeze.
Your comment is awaiting moderation.
yo ngl this site is lowkey fire tbh, like i didnt expect much but it hits different fr fr, the whole vibe is just chill and it works nice on mobile which is clutch, been telling my freinds about house of fun vip app imo
Your comment is awaiting moderation.
I was skeptical about nagad88 at first honestly because ive had bad experiences with other sites but actually after trying it out i was surprised how well they handle things. the interface is intuitive, account setup was fast, and customer service actually responds without making u wait forever. not what i expected but in a good way nagad88
Your comment is awaiting moderation.
магазину респект)) с корефанами накуримся вдоволь))) кокс, меф, шиш, гаш Новинки не за горами, без паники.Заранее извиняюсь за оффтоп,просто решил сразу спросить ,чтобы не забыть.ответ будьте добры в ЛС.
Your comment is awaiting moderation.
WhimHarbor Boutique – Pages load fast, product categories are clear, and shopping is simple.
Your comment is awaiting moderation.
Jasper Aisle Online – I’m comfortable with the pricing and the store appears credible.
Your comment is awaiting moderation.
Elect O’Neill DA – Well-presented goals and accessible details provide a thorough understanding of the campaign.
Your comment is awaiting moderation.
Jouez-vous au casino? https://sultan-willd-fr.eu.com une plateforme de jeux moderne proposant une variete de machines a sous, de jackpots et de jeux de table. Inscription et acces faciles depuis n’importe quel appareil.
Your comment is awaiting moderation.
Tide Vendor Deals – User-friendly layout and pages load very quickly.
Your comment is awaiting moderation.
buy marijuana in prague buy cannafood in prague
Your comment is awaiting moderation.
thc gummies for sale in prague buy hashish in prague
Your comment is awaiting moderation.
thc joint for sale in prague cbd weed in prague
Your comment is awaiting moderation.
hemp shop in prague buy hash in prague
Your comment is awaiting moderation.
Pebble Collection Hub – Browsing the online products today was smooth and enjoyable.
Your comment is awaiting moderation.
+1 this is exactly what I was looking for, thanks for sharing hb88 uy tin s? 1
Your comment is awaiting moderation.
Quick pros:
* Fast download speed
* Works smooth on Android
* No annoying popups
* Good graphics quality
* Easy account setup
Check it out: mega888 download
Your comment is awaiting moderation.
Brass Market Store – Very clear product details and pages load quickly.
Your comment is awaiting moderation.
FrostTrack Hub Online – Browsing feels enjoyable and effortless thanks to the simple design.
Your comment is awaiting moderation.
Acorn Vendor Store – The site is very organized and easy to browse.
Your comment is awaiting moderation.
Sola Isle Store – A well-organized selection, with products displayed clearly and attractively.
Your comment is awaiting moderation.
West Shopping Spot – Smooth experience overall, fast pages and a clean interface make browsing enjoyable.
Your comment is awaiting moderation.
dude check this out m777 its actually solid like the games are smooth and the whole thing runs pretty quick cant complain honestly lucky m777
Your comment is awaiting moderation.
From a technical standpoint the site loads pretty quick, mobile version is responsive and the UI is clean without unneccesary clutter. Navigation is intuitive and there’s no lag issues I’ve experienced so far. gold99 app
Your comment is awaiting moderation.
бред, откуда инфа такия про 80%? кокс, меф, шиш, гаш Отзывы радуют о магазине, надо заказывать. 5-MeO-DMT решает.Только эфоретик нужен.
Your comment is awaiting moderation.
CreekCorner – Fast page loads make shopping simple, and the layout is straightforward.
Your comment is awaiting moderation.
Ember Aisle products – Notable items here make it worthwhile to come back later.
Your comment is awaiting moderation.
Афиша цирков СПб предлагает сказочные и экстремальные шоу для зрителей всех возрастов. Подбираем лучшие представления и советы по посещению. Подробнее здесь: https://cont.ws/@goevent/3180371
Your comment is awaiting moderation.
PlumVendor Market – User-friendly site and product selection is impressive.
Your comment is awaiting moderation.
Field Vendor Picks – The whole experience was smooth and I found my item instantly.
Your comment is awaiting moderation.
Как выгодно купить Айфон в Уфе?
¦ Почему стоит выбрать покупку Айфона именно в Уфе?
айфон про купить уфа
Выбирая устройство Apple, важно учитывать не только цену, но и удобство приобретения. Если вы находитесь в Уфе и хотите приобрести новый смартфон, предлагаем рассмотреть преимущества покупки прямо в вашем городе.
¦ Где лучше всего купить iPhone в Уфе?
айфон 17 про купить уфа
Существует несколько проверенных способов приобретения качественного устройства от Apple:
1. Официальные магазины: Например, фирменные точки продаж Apple позволяют убедиться в оригинальности товара и получить консультацию опытных продавцов-консультантов.
iphone 17 купить уфа
2. Крупные сетевые ритейлеры: Такие сети предлагают широкий ассортимент моделей и предоставляют гарантии качества продукции.
3. Интернет-магазины: Удобный способ покупки, позволяющий сравнить цены и характеристики устройств перед покупкой.
4. Местные торговые площадки: Некоторые небольшие местные продавцы также могут предложить выгодные условия приобретения гаджетов Apple.
¦ Советы по выбору оптимального варианта
При выборе места, где купить iPhone, обратите внимание на следующие моменты:
– Проверьте наличие гарантийного обслуживания и сервисных центров.
– Обратите внимание на дополнительные аксессуары и услуги, предоставляемые магазином.
– Оцените стоимость доставки и возможные скидки при покупке онлайн.
¦ Заключение
Таким образом, покупка нового смартфона от Apple становится проще благодаря разнообразию вариантов в Уфе. Воспользуйтесь нашим руководством, чтобы сделать правильный выбор и насладиться всеми преимуществами современных технологий!
¦ Ключи для SEO оптимизации:
– купить айфон в уфе
– купить айфон уфа
– iphone купить в уфе
– iphone купить уфа
– купить iphone уфа
айфон 17 про купить уфа
https://applemarketrf.ru/catalog/iphone/iphone-17/
Your comment is awaiting moderation.
fairvendor.shop – Found exactly what I needed, site feels trustworthy overall today.
Your comment is awaiting moderation.
Cycle for Sci Program – Inspiring cause paired with organized and clear event content.
Your comment is awaiting moderation.
yo ngl khelo vip slaps fr fr like lowkey been using it for a minute now and tbh the interface is clean imo no cap
Your comment is awaiting moderation.
Hello i want share about Goal11 with you all. Site is very good, very easy for using. Interface is simple and support team help me fast when i have problem with account login. Game selection is big and have many option. Payment system is working nice, i receive my money quick time. Is recommended for people who want something simple and reliable. goal11 app login
Your comment is awaiting moderation.
Opal Wharf Market – Everything loads quickly and descriptions make decisions easy.
Your comment is awaiting moderation.
Caramel Market Store – Really enjoyed exploring the site, everything is clear and easy to navigate.
Your comment is awaiting moderation.
Indigo Trend Store – The site feels uncluttered and the products seem thoughtfully organized.
Your comment is awaiting moderation.
Zen Favorites – Clean design and well-written descriptions make exploring products easy.
Your comment is awaiting moderation.
AshMarket deals – Smooth navigation paired with an efficient checkout system.
Your comment is awaiting moderation.
thc chocolate for sale in prague thc chocolate delivery in prague
Your comment is awaiting moderation.
Explore Lavender Deals – Found some one-of-a-kind items and the website feels dependable.
Your comment is awaiting moderation.
buy hemp in prague buy weed in prague
Your comment is awaiting moderation.
thc gummies delivery in prague cannabis
Your comment is awaiting moderation.
thc vape delivery in prague thc joint shop in prague
Your comment is awaiting moderation.
thc joint for sale in prague kush shop in prague
Your comment is awaiting moderation.
For anyone who needs a heads up, make sure you’re downloading from the oficial source at joker123 login because there’s alot of sketchy mirrors out there. The app itself is pretty solid but just be carefull about where you get it from, thats the main thing I’d say.
Your comment is awaiting moderation.
Scented prints Strategy, scent technologies and successful implementation across all product stages by Aromamedia
Your comment is awaiting moderation.
бро незнаю скок раз брал ни разу TS не подводил входил в положения скидки бонусы делал!!! кокс, меф, шиш, гаш спасибо стараемсяБро, была абсолютно идиентичная ситуация у мну в декабре.Трек не бился пол недели, прошли выходные звоню в контору-курьерку, называю трек, говорят нет такого, я к тс так мол и так, тот грит все ровно, трек верный ожидай! Херакс и вечером курьер названивает, оказыва4тся они мне еще в субботу хотели вручить, но почему то не дозвонились))Все пучком, бро.Почта мало кому интересна в наши дни, на курьерки много сваливается, вот они 3ак могут разгребают…
Your comment is awaiting moderation.
yo ngl glory bet is kinda fire tbh, lowkey been checking it out and its way better than i expected fr fr imo the interface is clean af and ngl i’m kinda hooked glory watch online free
Your comment is awaiting moderation.
EmberVendor Store – Excellent range of products and checkout went flawlessly.
Your comment is awaiting moderation.
Ridge Product Hub – Products are impressive and the support team handled my concerns efficiently.
Your comment is awaiting moderation.
shop at LinenVendor – Clean presentation and quick purchase process make shopping effortless.
Your comment is awaiting moderation.
Wave Vendor Marketplace – Product range is impressive and checkout is fast.
Your comment is awaiting moderation.
Hello i want share about osom website. Is very good site, interface is nice and easy for use. I try many times and always work good, no problem with loading or teh system. People can visit and see yourself, is worth the time.
Your comment is awaiting moderation.
cannabis in prague prague 420
Your comment is awaiting moderation.
Retail Glow Online – Browsing was pleasant, checkout was seamless and fast.
Your comment is awaiting moderation.
buy cannabis in prague cannabis in prague
Your comment is awaiting moderation.
buy thc joint in prague thc chocolate delivery in prague
Your comment is awaiting moderation.
cannafood in prague hemp in prague
Your comment is awaiting moderation.
cali weed for sale in prague buy cali weed in prague
Your comment is awaiting moderation.
NJ Vaccination Hub – Easy guidance and helpful community updates make this very user-friendly.
Your comment is awaiting moderation.
yo ngl Glassi Onlinecasino is actually lowkey fire, like the UI doesnt suck and everything just works fr fr. imo its way less annoying than other sites ive been on, tbh kinda impressed ngl
Your comment is awaiting moderation.
Top Bay Products – Really enjoyed the selection and checkout was simple.
Your comment is awaiting moderation.
https://vanbal.com.tr/blog/journal-blog
Your comment is awaiting moderation.
Branch Vendor storefront – A number of appealing finds here, definitely worth a second look.
Your comment is awaiting moderation.
bs2best at bs2best at
Your comment is awaiting moderation.
Aurora Trend Store – Site is well organized and navigating through items is simple.
Your comment is awaiting moderation.
ทดลองเล่นสล็อต pg
TKBNEKO มอบมิติใหม่ของเกมออนไลน์ ธุรกรรมรวดเร็ว ด้วยระบบสแกน QR Code
ในยุคดิจิทัลที่ เทคโนโลยีพัฒนาอย่างรวดเร็ว TKBNEKO พร้อมยกระดับการให้บริการ ด้วยระบบที่ ล้ำสมัย รวดเร็ว และ โปร่งใส เพื่อให้ผู้เล่น มั่นใจ ทุกครั้งที่ใช้งาน
จุดเด่นระบบฝาก-ถอน
ฝากขั้นต่ำ: 1 บาท
ถอนขั้นต่ำ: 1 บาท
เวลาฝากเงิน: ภายใน 3 วินาที
ยอดถอน: ไม่มีลิมิต
เติมเงินง่าย แค่สแกน
สแกน QR Code ระบบจะ ประมวลผลอัตโนมัติ ขั้นต่ำ 100 บาท สูงสุด 500,000 บาท
เกมยอดนิยม
สล็อต: ลุ้นแจ็คพอต
เกมสด: ดีลเลอร์สด
กีฬา: เดิมพันลีกดัง
ยิงปลา: ลุ้นกำไรทันที
โบนัสและโปรโมชัน
ติดตามหน้า โปรโมชั่น พร้อมระบบ VIP และโปรแกรม พันธมิตร
ติดต่อเรา
สอบถามข้อมูลได้ตลอด 24 ชั่วโมง ผ่านหน้า ศูนย์ช่วยเหลือ ทีมงาน ของเรา พร้อมดูแลตลอดเวลา
Your comment is awaiting moderation.
Delta Marketplace – Products are solid and the checkout process went without any issues.
Your comment is awaiting moderation.
Good day everyone, I thought I would take a moment to share my thoughts regarding betvisa-onlinecasino.com which I have been using for the past few weeks. The platform operates smoothly and the account setup process was rather straighforward. I have found the user experience to be quite satisfactory overall. bedvisa Cheers
Your comment is awaiting moderation.
тоже хочу заказать бро!!! https://trendnovas.top В джабере орудует фейк, причем у него такой же адрес джабера как и у меня. Джабер в скором времени сменю, в джабере заказы не принимаю. Будьте бдительныПодскажите когда примерно вналичии будет JTE-907
Your comment is awaiting moderation.
explore Ash Vendor – I could find products easily and the interface is clean.
Your comment is awaiting moderation.
blsp at bs2best at
Your comment is awaiting moderation.
From a technical standpoint, the platform loads incredibly fast even on slower connections, and the mobile responsive design is realy well optimized. The UI is clean and navigation is intuitive without being cluttered. gk88
Your comment is awaiting moderation.
Shop Jovenix – Very smooth experience, pages are clear and products are easy to locate.
Your comment is awaiting moderation.
Ridge Vendor Picks – Quality items plus prompt and friendly customer service made this a great experience.
Your comment is awaiting moderation.
Teal Vendor Store – Products are clearly displayed, and shopping felt effortless today.
Your comment is awaiting moderation.
Ginger Crate Selection – Smooth experience with intuitive navigation throughout.
Your comment is awaiting moderation.
visit Cotton Market – The site is easy to use and browsing feels seamless.
Your comment is awaiting moderation.
yo ngl gg777 is lowkey pretty solid tbh, like the site runs smooth and the whole thing doesn’t feel clunky imo. fr tho the layout is clean af and i got in without any problems lol
Your comment is awaiting moderation.
Как выгодно купить Айфон в Уфе?
¦ Почему стоит выбрать покупку Айфона именно в Уфе?
iphone купить уфа
Выбирая устройство Apple, важно учитывать не только цену, но и удобство приобретения. Если вы находитесь в Уфе и хотите приобрести новый смартфон, предлагаем рассмотреть преимущества покупки прямо в вашем городе.
¦ Где лучше всего купить iPhone в Уфе?
айфон 17 про макс купить в уфе
Существует несколько проверенных способов приобретения качественного устройства от Apple:
1. Официальные магазины: Например, фирменные точки продаж Apple позволяют убедиться в оригинальности товара и получить консультацию опытных продавцов-консультантов.
iphone 17 купить уфа
2. Крупные сетевые ритейлеры: Такие сети предлагают широкий ассортимент моделей и предоставляют гарантии качества продукции.
3. Интернет-магазины: Удобный способ покупки, позволяющий сравнить цены и характеристики устройств перед покупкой.
4. Местные торговые площадки: Некоторые небольшие местные продавцы также могут предложить выгодные условия приобретения гаджетов Apple.
¦ Советы по выбору оптимального варианта
При выборе места, где купить iPhone, обратите внимание на следующие моменты:
– Проверьте наличие гарантийного обслуживания и сервисных центров.
– Обратите внимание на дополнительные аксессуары и услуги, предоставляемые магазином.
– Оцените стоимость доставки и возможные скидки при покупке онлайн.
¦ Заключение
Таким образом, покупка нового смартфона от Apple становится проще благодаря разнообразию вариантов в Уфе. Воспользуйтесь нашим руководством, чтобы сделать правильный выбор и насладиться всеми преимуществами современных технологий!
¦ Ключи для SEO оптимизации:
– купить айфон в уфе
– купить айфон уфа
– iphone купить в уфе
– iphone купить уфа
– купить iphone уфа
купить айфон 17 pro max
https://applemarketrf.ru/catalog/iphone/iphone-17-pro-max/
Your comment is awaiting moderation.
NuPurple Subscription Options – Straightforward pricing and simple language make choosing a plan stress-free.
Your comment is awaiting moderation.
Granite Deals Online – Great organization of products and browsing feels effortless.
Your comment is awaiting moderation.
Remi PHL Platform – Smooth navigation combined with helpful updates makes the site user-friendly.
Your comment is awaiting moderation.
AmberCrate marketplace – Navigation is smooth and products are displayed in a practical way.
Your comment is awaiting moderation.
Best of Sea Vendor – Impressive assortment of items and checkout was simple and fast.
Your comment is awaiting moderation.
да вообще магазов пизде https://happybaby-noginsk.ru лучше и не напишешь броПишу сейчас и ржачь пробирает.
Your comment is awaiting moderation.
Nectar Online Market – The site is easy to navigate and I found exactly what I needed.
Your comment is awaiting moderation.
Violet Shopping Spot – Browsing feels effortless and the products are clearly presented and easy to find.
Your comment is awaiting moderation.
Way better than what I was using before, the interface is cleaner, games load faster, and I dont have to deal with constant pop-ups asking me to spend more money like that other place did. gclub igaming
Your comment is awaiting moderation.
Smart Style Store – Great products and a checkout experience that felt perfectly streamlined.
Your comment is awaiting moderation.
Hello i want share my experience with Gcash Casino because is very good for me. The site is easy to use, the account registration is very simple, and the payment system is working very nice. I am happy with this platform and think other people should try also.
Your comment is awaiting moderation.
GlowVendor specials – Contemporary style and bright visuals enhance the browsing experience.
Your comment is awaiting moderation.
CoralVendor deals – Well-crafted products paired with helpful details make selection simple.
Your comment is awaiting moderation.
LoftSelect – Navigating through products is smooth and very straightforward.
Your comment is awaiting moderation.
Что там за оператор в аське сидит? Ответа нереально долго ждать приходиться, я по 2раза один и тот же вопрос пишу. Не могу постоянно находиться в сети. Пусть быстрей работает. кокс, меф, шиш, гаш рип репорт ЭСКИМОС _скорость!подарок! Мне очень понравился
Your comment is awaiting moderation.
Uncommitted NJ Updates – Transparency and clarity in the message make understanding the mission easy.
Your comment is awaiting moderation.
dude check this out gba 777 seriously its pretty sick the layout is clean af and like everything just works without all that lag ur dealing with elsewhere fr
Your comment is awaiting moderation.
สล็อต PG เกมสล็อตออนไลน์ที่คนค้นหาเยอะ เล่นง่าย ฝากถอนเร็ว
คำค้นหา pg slot ถูกค้นหามากขึ้นเรื่อยๆ ในกลุ่มผู้เล่นเกมสล็อตออนไลน์ เพราะเป็น แบรนด์เกมที่โดดเด่น ด้าน งานภาพคุณภาพสูง ความ นิ่งไม่สะดุด และ อัตราการจ่ายรางวัลที่น่าสนใจ เกมของ PG พัฒนาโดยผู้ให้บริการชั้นนำ ที่รองรับการเล่นทั้งบน สมาร์ทโฟน และ พีซี
จุดเด่น ของ pg slot
pg slot เป็นเกมสล็อตออนไลน์ที่ออกแบบมาให้ เข้าเกมไว เล่นผ่าน ระบบออนไลน์ และรองรับ ทุกอุปกรณ์ ไม่ต้องดาวน์โหลดแอป ผู้เล่นสามารถเข้าเล่นผ่าน หน้าเว็บ ได้ทันที ภาพและเสียงถูกพัฒนาในรูปแบบ เอฟเฟกต์ 3 มิติ ให้ความคมชัด พร้อมเอฟเฟกต์ สมจริง
คุณสมบัติหลักของเกม PG Slot ได้แก่
ระบบโบนัสและฟรีสปินหลากหลายรูปแบบ
Multiplier
เดโม่ฟรี
รองรับภาษาไทยเต็มรูปแบบ
ฝากถอนง่าย ทำรายการไว
แพลตฟอร์ม PG Slot มักมี การฝาก-ถอน ออโต้ตลอด 24 ชม. ขั้นต่ำเริ่มต้นเพียง 1 บาท ขึ้นอยู่กับ ระบบของผู้ให้บริการ การทำรายการใช้เวลา ไม่กี่วินาที ผ่าน คิวอาร์โค้ด หรือระบบ Mobile Banking ทำให้ธุรกรรมเป็นไปอย่าง ไม่สะดุด
หมวดเกมฮิต ใน pg slot
เกม PG Slot มีธีมหลากหลาย เช่น
ธีม แฟนตาซี
ธีม ลุยด่าน
ธีม ความมั่งคั่ง
ธีม ธรรมชาติ
หลายคนชอบเกมที่โบนัสเข้าไว พร้อมระบบ Special Feature และ อัตราการจ่ายที่สูง เหมาะกับทั้ง มือใหม่ และ สายสล็อตจริงจัง
มาตรฐานระบบ
pg slot ใช้ระบบที่ได้มาตรฐาน มีการ ปกป้องข้อมูลผู้เล่น และใช้ระบบสุ่มผล ระบบสุ่มมาตรฐาน เพื่อให้ผลลัพธ์ ยุติธรรม แพลตฟอร์มที่ให้บริการ PG Slot ควรมี ระบบดูแลข้อมูล
สรุป
PG Slot เป็นตัวเลือกยอดนิยมสำหรับผู้ที่ต้องการเล่นสล็อตออนไลน์ ด้วยจุดเด่นด้าน โบนัสหลากหลาย และการทำธุรกรรมที่ รวดเร็ว ผู้เล่นสามารถเริ่มต้นได้ ทันที ฝากถอนสะดวก และเลือกเกมได้ ครบทุกหมวด เหมาะสำหรับ ทุกระดับประสบการณ์ ในโลกของเกมสล็อตออนไลน์
Your comment is awaiting moderation.
Ultimate Club Choices – Really like the fresh concept and the interactive content makes it a fun visit.
Your comment is awaiting moderation.
studenternas.nu
Your comment is awaiting moderation.
dude check this out i found this site gardenia online and like its actually pretty solid ngl. no annoying ads poppin up everywhere and the whole thing just works u know? should totally try it out when u get a chance lol
Your comment is awaiting moderation.
ทดลองเล่นสล็อต pg slot แพลตฟอร์มเกมสล็อตยอดนิยม ใช้งานง่าย ฝากถอนรวดเร็ว
คำค้นหา สล็อต PG กำลังได้รับความนิยมอย่างต่อเนื่อง ในกลุ่มผู้เล่นเกมสล็อตออนไลน์ เพราะเป็น ค่ายเกมที่มีชื่อเสียง ด้าน กราฟิก ความ นิ่งไม่สะดุด และ ระบบจ่ายที่ดึงดูด เกมของ PG ออกแบบโดยทีมงานมืออาชีพ ที่รองรับการเล่นทั้งบน มือถือ และ เดสก์ท็อป
ความโดดเด่น ของ สล็อต PG
pg slot เป็นเกมสล็อตออนไลน์ที่ออกแบบมาให้ เข้าเกมไว เล่นผ่าน ระบบเว็บ และรองรับ ทั้ง iOS และ Android เข้าเล่นผ่านเว็บได้เลย ผู้เล่นสามารถเข้าเล่นผ่าน หน้าเว็บ ได้ทันที ภาพและเสียงถูกพัฒนาในรูปแบบ เอฟเฟกต์ 3 มิติ ให้ความคมชัด พร้อมเอฟเฟกต์ จัดเต็ม
คุณสมบัติหลักของเกม pg slot ได้แก่
ระบบโบนัสและฟรีสปินหลากหลายรูปแบบ
ระบบตัวคูณ
เล่นฟรีก่อนเติมเงิน
รองรับภาษาไทยเต็มรูปแบบ
ระบบฝากถอนสะดวก ไม่ต้องรอนาน
แพลตฟอร์ม pg slot มักมี การฝาก-ถอน ออโต้ตลอด 24 ชม. ขั้นต่ำเริ่มต้นเพียง หลักหน่วย ขึ้นอยู่กับ เงื่อนไขของเว็บไซต์ การทำรายการใช้เวลา ไม่กี่วินาที ผ่าน คิวอาร์โค้ด หรือระบบ Mobile Banking ทำให้ธุรกรรมเป็นไปอย่าง ไม่สะดุด
หมวดเกมฮิต ใน pg slot
เกม PG Slot มีธีมหลากหลาย เช่น
ธีม เทพเจ้า
ธีม Adventure
ธีม เอเชียและโชคลาภ
ธีม ธรรมชาติ
ผู้เล่นนิยมเกมที่มีรอบพิเศษบ่อย พร้อมระบบ ฟีเจอร์พิเศษ และ อัตราการจ่ายที่สูง เหมาะกับทั้ง ผู้เล่นเริ่มต้น และ ผู้เล่นที่มีประสบการณ์
ความน่าเชื่อถือ
pg slot ใช้ระบบที่ได้มาตรฐาน มีการ ปกป้องข้อมูลผู้เล่น และใช้ระบบสุ่มผล Random Number Generator เพื่อให้ผลลัพธ์ โปร่งใส แพลตฟอร์มที่ให้บริการ สล็อต PG ควรมี ความปลอดภัยสูง
บทสรุปท้ายบท
PG Slot เป็นตัวเลือกยอดนิยมสำหรับผู้ที่ต้องการเล่นสล็อตออนไลน์ ด้วยจุดเด่นด้าน กราฟิกคุณภาพ และการทำธุรกรรมที่ รวดเร็ว ผู้เล่นสามารถเริ่มต้นได้ ง่าย ฝากถอนสะดวก และเลือกเกมได้ หลากหลายแนว เหมาะสำหรับ ทุกระดับประสบการณ์ ในโลกของเกมสล็อตออนไลน์
Your comment is awaiting moderation.
Feather Market products – A refreshing alternative to more conventional online shops.
Your comment is awaiting moderation.
заказывал уже недельку назад, все пришло качество хорошее делал 250 1 к 9ти вполне на час полтора хорошего эфекта кокс, меф, шиш, гаш Добрый день! ЦЕНЫ НА MN СНИЖЕНЫ!удачного развития в дальнейшем=)
Your comment is awaiting moderation.
visit Rose Crate – Smooth shopping experience, definitely worth another visit.
Your comment is awaiting moderation.
+1 on this, been using it myself and its solid. fb777
Your comment is awaiting moderation.
visit Bronze Vendor store – Smooth browsing and a trustworthy experience, I’ll be back soon.
Your comment is awaiting moderation.
cbd weed in prague kush for sale in prague
Your comment is awaiting moderation.
hash in prague cannafood delivery in prague
Your comment is awaiting moderation.
thc chocolate shop in prague 420 store in prague
Your comment is awaiting moderation.
kush thc weed in prague
Your comment is awaiting moderation.
hashish for sale in prague buy hashish in prague
Your comment is awaiting moderation.
Ryzen Rocket Devices – Organized design and a fast, simple purchasing experience.
Your comment is awaiting moderation.
Honestly, ezugu just gets the job done without being annoying about it 🙂
Your comment is awaiting moderation.
mostbet не открывается https://mostbet61527.help
Your comment is awaiting moderation.
Oktoberfest Ticket Portal – Excited about grabbing tickets and reading through the detailed event notes.
Your comment is awaiting moderation.
shop Alpine Crate online – Feels safe and I want to browse more of what’s offered.
Your comment is awaiting moderation.
LilacShop – Helpdesk solved my problem efficiently and without any stress.
Your comment is awaiting moderation.
Iron Vendor storefront – The merchandise looks strong and dependable, very well made.
Your comment is awaiting moderation.
discover Spring Crate – Navigating this site is easy, so I’m saving it for future use.
Your comment is awaiting moderation.
Крутой магаз кокс, меф, шиш, гаш У меня настоящий 96 процентный спирт с больницы. Всё растворилось. Чу чуть паровой бани.По АМ могу сказать,что концентрировать выше 1 к 15 не вижу смысла.Оно не торкает дальше своего известного предела,после 1 к 15 дальше пойдёт уже переводняк.Тут как с процами-дороже 200 баксов покупать-перевод бабла,прироста производительности не заметишь почти.
Your comment is awaiting moderation.
купить квартиру в сарове Продажа квартир в Сарове: ваш ключ к комфортной жизни
Your comment is awaiting moderation.
Walnut Aisle Products – Clean navigation and eye-catching products make shopping easy.
Your comment is awaiting moderation.
Самое интересное: Отзывы о фокусированной ударно-волновой терапии: опыт пациентов и специалистов
Your comment is awaiting moderation.
visit this vendor site – I’m keeping this page saved for upcoming purchases.
Your comment is awaiting moderation.
Работаешь с авито? авито магазин профессиональное создание и оформление Авито-магазина, настройка бизнес-аккаунта и комплексное ведение. Поможем увеличить охват, повысить конверсию и масштабировать продажи.
Your comment is awaiting moderation.
Play unblocked games online without registration or downloading. A large catalog of games across various genres is available right in your browser at any time.
Your comment is awaiting moderation.
Нужен компрессор? https://macunak.by для производства и мастерских. Надёжные системы сжатого воздуха, гарантия, монтаж и техническая поддержка на всех этапах эксплуатации.
Your comment is awaiting moderation.
квартиры в сарове Продажа квартир в Сарове: ваш ключ к комфортной жизни
Your comment is awaiting moderation.
From a technical standpoint, Ez performs quite well with snappy load times across all devices and a responsive mobile interface that doesn’t lag or cause rendering issues. The backend seems optimized for handling traffic efficently, and the UI is clean with logical navigation patterns that reduce friction. ez??????
Your comment is awaiting moderation.
Bright Bloomy Curated Store – Bright, cheerful layout and easy navigation make it enjoyable.
Your comment is awaiting moderation.
Moss Vendor Shopping – Bookmarking this page to check new products and shop again.
Your comment is awaiting moderation.
discover Reed Vendor – Simple site design and product categories make shopping effortless.
Your comment is awaiting moderation.
CrystalAisle marketplace – A standout collection that shows attention to detail.
Your comment is awaiting moderation.
skilletstreet – Loved the wide selection and navigating the site was seamless.
Your comment is awaiting moderation.
mostbet зеркало сегодня mostbet зеркало сегодня
Your comment is awaiting moderation.
benchbreeze – Interface is clean and browsing through pages feels effortless.
Your comment is awaiting moderation.
Нужен промокод казино? бездепозитыне промокоды получите бесплатные вращения в популярных слотах. Актуальные бонус-коды, условия активации и пошаговая инструкция по использованию для новых и действующих игроков.
Your comment is awaiting moderation.
ОПЕРАТОР ЕЩЕ БОЛЬШЕ МЕНЯ ОБРАДОВАЛ КОГДА СКАЗАЛ МНЕ НОВЫЙ ЦЕННИК НА РЕГУ! https://urbanflelik.shop Все продукты кроме эйфора в наличии, заказывайте! Проб нет.Хочу грамульку взять и угостить определенный круг людей,
Your comment is awaiting moderation.
For anyone who needs a heads up, make sure you read the terms carefully when you sign up at jilibt because some of the withdrawal rules are different from what your probably used to, saved me alot of frustration knowing that upfront.
Your comment is awaiting moderation.
Cedar Aisle shopping hub – Placing an order is quick and the overall feel is inviting.
Your comment is awaiting moderation.
find great items here – Appreciate the sleek design and fast, easy product navigation.
Your comment is awaiting moderation.
shop Charm Vendor now – The unique selection adds a playful touch to the browsing experience.
Your comment is awaiting moderation.
shop Ruby Aisle online – Everything is clearly displayed and effortless to navigate.
Your comment is awaiting moderation.
Лучшее казино онлайн pin-up casino вход в личный кабинет слоты, джекпоты, карточные игры и лайв-трансляции. Специальные предложения для новых и постоянных пользователей, акции и турниры каждый день.
Your comment is awaiting moderation.
Sensual style CocoLovelock vibrant energy, and an unfiltered format. Unique materials available exclusively in this space.
Your comment is awaiting moderation.
Bold aesthetics SiriDahlOfficiall personal revelations, and an intimate atmosphere. Exclusive content is created without compromise—only for our audience, and only here.
Your comment is awaiting moderation.
Wheat Market Central – Everything looks carefully curated and well presented.
Your comment is awaiting moderation.
Silk Market website – The clean presentation makes everything easy to find.
Your comment is awaiting moderation.
official Iris Crate page – The interface is logical and navigation feels seamless.
Your comment is awaiting moderation.
Hill Vendor Collections – Everything feels fresh, inviting, and simple to navigate throughout.
Your comment is awaiting moderation.
Moe’s Coastal Hangout – The engaging atmosphere and lively posts make checking in a treat.
Your comment is awaiting moderation.
Театральная афиша Москвы объединяет классические шедевры, балет и современные спектакли. Премьеры и гастроли делают культурный сезон столицы особенно насыщенным. Подробнее здесь: https://kulturologia.ru/blogs/280126/67213/
Your comment is awaiting moderation.
Bright Bento Shop Hub – Products are thoughtfully detailed and the range feels impressive.
Your comment is awaiting moderation.
Hello i want share about ec88 online website. Website is very good and very easy for use. I am using this for two week and is very satisfied with service. Many people say is good platform. ec88
Your comment is awaiting moderation.
The energy of passion Romi Rain sincerity, and private access. Unique publications created for those who appreciate a personalized and bold format.
Your comment is awaiting moderation.
Строительные услуги для компаний и частных заказчиков включают реализацию строительных проектов под ключ с учетом действующих строительных норм. Компания выполняет генподрядные работы и техническое сопровождение обеспечивая строгое соблюдение сроков. В перечень услуг входит разработка проектной документации а также строительство коммерческих объектов. Специалисты осуществляют кладочные и фасадные работы используя сертифицированные материалы. Для крупных компаний предлагаются возведение складских и промышленных комплексов с учетом отраслевой специфики. Частным клиентам доступны капитальный ремонт и реконструкция с возможностью контроля каждого этапа реализации. Компания обеспечивает регулярную отчетность перед заказчиком что позволяет гарантировать соответствие проекту. Строительные процессы организуются с учетом оптимизации затрат. Дополнительно выполняются работы по благоустройству территории. Заказчики получают гарантийные обязательства на выполненные работы. Опыт реализации проектов различного масштаба позволяет выполнять заказы для среднего бизнеса. Строительная компания ориентирована на формирование устойчивой деловой репутации предлагая комплексные решения для любых задач.
https://hermesdom.ru
Your comment is awaiting moderation.
Строительные услуги для бизнеса и индивидуальных клиентов включают проектирование и возведение объектов различного назначения с учетом действующих строительных норм. Компания выполняет генподрядные работы и техническое сопровождение обеспечивая эффективное управление бюджетом. В перечень услуг входит создание архитектурных и инженерных решений а также строительство жилых домов и коттеджей. Специалисты осуществляют кладочные и фасадные работы используя сертифицированные материалы. Для крупных компаний предлагаются строительство логистических центров и офисных зданий с учетом корпоративных стандартов. Частным клиентам доступны строительство домов под ключ с возможностью выбора материалов и планировочных решений. Компания обеспечивает постоянный технический надзор что позволяет минимизировать риски и дополнительные расходы. Строительные процессы организуются с учетом рационального использования ресурсов. Дополнительно выполняются внутренняя и внешняя отделка объектов. Заказчики получают гарантийные обязательства на выполненные работы. Опыт реализации проектов различного масштаба позволяет реализовывать проекты для частных лиц. Строительная компания ориентирована на формирование устойчивой деловой репутации предлагая профессиональный сервис на всех этапах сотрудничества.
https://hermesdom.ru
Your comment is awaiting moderation.
Frank emotions Rae Lil Blac captivating aesthetics, and a personalized format. Content without unnecessary filters—directly from the author.
Your comment is awaiting moderation.
A bold image LunaOkko strong charisma, and a personal communication format. Private publications and special materials revealed only to our audience.
Your comment is awaiting moderation.
Строительные услуги для корпоративных клиентов и физических лиц включают строительство зданий и сооружений любой сложности с учетом требований безопасности и надежности. Компания выполняет генподрядные работы и техническое сопровождение обеспечивая прозрачность взаимодействия с заказчиком. В перечень услуг входит создание архитектурных и инженерных решений а также возведение производственных комплексов. Специалисты осуществляют инженерные и отделочные работы используя современные строительные технологии. Для крупных компаний предлагаются строительство логистических центров и офисных зданий с учетом корпоративных стандартов. Частным клиентам доступны капитальный ремонт и реконструкция с возможностью контроля каждого этапа реализации. Компания обеспечивает постоянный технический надзор что позволяет гарантировать соответствие проекту. Строительные процессы организуются с учетом повышения эффективности строительства. Дополнительно выполняются монтаж инженерных коммуникаций. Заказчики получают поддержку на этапе ввода в эксплуатацию. Опыт реализации проектов различного масштаба позволяет выполнять заказы для среднего бизнеса. Строительная компания ориентирована на формирование устойчивой деловой репутации предлагая профессиональный сервис на всех этапах сотрудничества.
https://hermesdom.ru
Your comment is awaiting moderation.
Maximum candor PrincesslsiOfficiall vibrant energy, and a private atmosphere. Exclusive content is personally created and available only here—for those ready for a truly unique experience.
Your comment is awaiting moderation.
illustrationinn – Creative designs and browsing the site feels effortless.
Your comment is awaiting moderation.
QuartzAisle specials – Neatly structured site with a smooth browsing flow.
Your comment is awaiting moderation.
Строительные услуги для бизнеса и индивидуальных клиентов включают строительство зданий и сооружений любой сложности с учетом действующих строительных норм. Компания выполняет полный цикл строительных процессов обеспечивая прозрачность взаимодействия с заказчиком. В перечень услуг входит подготовка технических расчетов и смет а также строительство жилых домов и коттеджей. Специалисты осуществляют кладочные и фасадные работы используя современные строительные технологии. Для крупных компаний предлагаются возведение складских и промышленных комплексов с учетом производственных требований. Частным клиентам доступны строительство домов под ключ с возможностью контроля каждого этапа реализации. Компания обеспечивает постоянный технический надзор что позволяет минимизировать риски и дополнительные расходы. Строительные процессы организуются с учетом повышения эффективности строительства. Дополнительно выполняются внутренняя и внешняя отделка объектов. Заказчики получают поддержку на этапе ввода в эксплуатацию. Опыт реализации проектов различного масштаба позволяет выполнять заказы для среднего бизнеса. Строительная компания ориентирована на стабильное качество и развитие предлагая комплексные решения для любых задач.
https://hermesdom.ru
Your comment is awaiting moderation.
Строительные услуги для бизнеса и частных заказчиков включают строительство зданий и сооружений любой сложности с учетом действующих строительных норм. Компания выполняет полный цикл строительных процессов обеспечивая эффективное управление бюджетом. В перечень услуг входит создание архитектурных и инженерных решений а также строительство жилых домов и коттеджей. Специалисты осуществляют инженерные и отделочные работы используя проверенные технические решения. Для крупных компаний предлагаются реализация масштабных инфраструктурных проектов с учетом производственных требований. Частным клиентам доступны капитальный ремонт и реконструкция с возможностью выбора материалов и планировочных решений. Компания обеспечивает регулярную отчетность перед заказчиком что позволяет гарантировать соответствие проекту. Строительные процессы организуются с учетом оптимизации затрат. Дополнительно выполняются монтаж инженерных коммуникаций. Заказчики получают долгосрочную эксплуатационную надежность объектов. Опыт реализации проектов различного масштаба позволяет успешно сотрудничать с крупными предприятиями. Строительная компания ориентирована на формирование устойчивой деловой репутации предлагая комплексные решения для любых задач.
https://hermesdom.ru
Your comment is awaiting moderation.
Строительные услуги для компаний и частных заказчиков включают строительство зданий и сооружений любой сложности с учетом требований безопасности и надежности. Компания выполняет полный цикл строительных процессов обеспечивая строгое соблюдение сроков. В перечень услуг входит создание архитектурных и инженерных решений а также возведение производственных комплексов. Специалисты осуществляют инженерные и отделочные работы используя сертифицированные материалы. Для крупных компаний предлагаются возведение складских и промышленных комплексов с учетом корпоративных стандартов. Частным клиентам доступны индивидуальное жилищное строительство с возможностью контроля каждого этапа реализации. Компания обеспечивает контроль качества выполняемых работ что позволяет минимизировать риски и дополнительные расходы. Строительные процессы организуются с учетом рационального использования ресурсов. Дополнительно выполняются монтаж инженерных коммуникаций. Заказчики получают гарантийные обязательства на выполненные работы. Опыт реализации проектов различного масштаба позволяет успешно сотрудничать с крупными предприятиями. Строительная компания ориентирована на долгосрочное партнерство предлагая комплексные решения для любых задач.
https://hermesdom.ru
Your comment is awaiting moderation.
Строительные услуги для бизнеса и физических лиц включают проектирование и возведение объектов различного назначения с учетом требований безопасности и надежности. Компания выполняет генподрядные работы и техническое сопровождение обеспечивая строгое соблюдение сроков. В перечень услуг входит разработка проектной документации а также строительство жилых домов и коттеджей. Специалисты осуществляют инженерные и отделочные работы используя проверенные технические решения. Для крупных компаний предлагаются строительство логистических центров и офисных зданий с учетом производственных требований. Частным клиентам доступны индивидуальное жилищное строительство с возможностью контроля каждого этапа реализации. Компания обеспечивает регулярную отчетность перед заказчиком что позволяет исключить срывы сроков. Строительные процессы организуются с учетом повышения эффективности строительства. Дополнительно выполняются монтаж инженерных коммуникаций. Заказчики получают гарантийные обязательства на выполненные работы. Опыт реализации проектов различного масштаба позволяет реализовывать проекты для частных лиц. Строительная компания ориентирована на долгосрочное партнерство предлагая комплексные решения для любых задач.
https://hermesdom.ru
Your comment is awaiting moderation.
производитель промышленных электростанций предлагает комплексные проекты автономного электроснабжения с учетом отраслевых требований и стандартов. Компания обеспечивает проектирование и поставку оборудования на базе дизель генераторов и газопоршневых агрегатов. Решения ориентированы на непрерывную работу производственных объектов. Оборудование отличается адаптацией к круглосуточной эксплуатации. Предприятие выполняет подбор оптимальной конфигурации станции с учетом пиковых нагрузок и резервирования. В рамках сотрудничества доступны установка и ввод в эксплуатацию. Производственные мощности позволяют реализовывать масштабные энергетические проекты. Используются сертифицированные комплектующие и современные технологии. Клиенты получают гарантийное и постгарантийное обслуживание. Электростанции подходят для строительных площадок и промышленных объектов. Решения обеспечивают энергетическую независимость компании. Инженерная команда разрабатывает индивидуальные проекты под ключ. Продукция соответствует действующим требованиям безопасности. Заказчики ценят ответственный подход и соблюдение сроков. Энергетические комплексы внедряются в нефтегазовой отрасли и агросекторе. Производитель ориентирован на повышение эффективности предприятий.
https://president-neva.ru/
Your comment is awaiting moderation.
3случая за последние 2недели.. если быть точнее.. https://smartchoive.top Всем мир! Хотелось бы всё же какого то оперативного решения! Запрет не за горами, а вернее 20 вступает в силу((((( Уважаемый продаван скажите что нибудь???мазагин, один из лучший, беру практически только здесь!
Your comment is awaiting moderation.
производитель электростанций предлагает современные решения для средних и крупных предприятий с учетом индивидуальных задач заказчика. Компания обеспечивает полный цикл создания электростанций на базе современных генераторных комплексов. Решения ориентированы на стабильное энергоснабжение промышленных площадок. Оборудование отличается адаптацией к круглосуточной эксплуатации. Предприятие выполняет технический анализ и подбор оборудования с учетом требований по энергоэффективности. В рамках сотрудничества доступны строительно монтажные и сервисные услуги. Производственные мощности позволяют поставлять решения от нескольких сотен киловатт до мегаваттных комплексов. Используются сертифицированные комплектующие и современные технологии. Клиенты получают гарантийное и постгарантийное обслуживание. Электростанции подходят для логистических центров и складских комплексов. Решения обеспечивают защиту бизнеса от перебоев энергоснабжения. Инженерная команда разрабатывает технические решения с учетом специфики отрасли. Продукция соответствует действующим требованиям безопасности. Заказчики ценят ответственный подход и соблюдение сроков. Энергетические комплексы внедряются в металлургии и машиностроении. Производитель ориентирован на долгосрочное партнерство и развитие клиентов.
https://president-neva.ru/
Your comment is awaiting moderation.
An intimate atmosphere MiaMarinOficiall sensual presentation, and signature style. Exclusive materials available exclusively in this space.
Your comment is awaiting moderation.
производитель промышленных электростанций предлагает современные решения для средних и крупных предприятий с учетом индивидуальных задач заказчика. Компания обеспечивает разработку и внедрение энергетических комплексов на базе дизельных, газовых и гибридных установок. Решения ориентированы на непрерывную работу производственных объектов. Оборудование отличается адаптацией к круглосуточной эксплуатации. Предприятие выполняет подбор оптимальной конфигурации станции с учетом планируемого расширения производства. В рамках сотрудничества доступны установка и ввод в эксплуатацию. Производственные мощности позволяют поставлять решения от нескольких сотен киловатт до мегаваттных комплексов. Используются проверенные инженерные решения и качественные материалы. Клиенты получают гарантийное и постгарантийное обслуживание. Электростанции подходят для логистических центров и складских комплексов. Решения обеспечивают энергетическую независимость компании. Инженерная команда разрабатывает индивидуальные проекты под ключ. Продукция соответствует нормам промышленной эксплуатации. Заказчики ценят оперативность поставок и прозрачность условий. Энергетические комплексы внедряются в металлургии и машиностроении. Производитель ориентирован на повышение эффективности предприятий.
https://president-neva.ru/
Your comment is awaiting moderation.
производитель промышленных электростанций предлагает комплексные проекты автономного электроснабжения с учетом индивидуальных задач заказчика. Компания обеспечивает полный цикл создания электростанций на базе дизельных, газовых и гибридных установок. Решения ориентированы на стабильное энергоснабжение промышленных площадок. Оборудование отличается адаптацией к круглосуточной эксплуатации. Предприятие выполняет энергетический аудит и расчет мощности с учетом пиковых нагрузок и резервирования. В рамках сотрудничества доступны установка и ввод в эксплуатацию. Производственные мощности позволяют реализовывать масштабные энергетические проекты. Используются инновационные системы управления и контроля. Клиенты получают регламентное обслуживание и модернизацию. Электростанции подходят для строительных площадок и промышленных объектов. Решения обеспечивают снижение рисков простоев и финансовых потерь. Инженерная команда разрабатывает персонализированные схемы энергоснабжения. Продукция соответствует нормам промышленной эксплуатации. Заказчики ценят точное выполнение договорных обязательств. Энергетические комплексы внедряются в металлургии и машиностроении. Производитель ориентирован на создание устойчивой энергетической инфраструктуры.
https://president-neva.ru/
Your comment is awaiting moderation.
производитель промышленных электростанций предлагает современные решения для средних и крупных предприятий с учетом отраслевых требований и стандартов. Компания обеспечивает разработку и внедрение энергетических комплексов на базе дизельных, газовых и гибридных установок. Решения ориентированы на бесперебойное питание крупных инфраструктурных объектов. Оборудование отличается высокой надежностью и долговечностью. Предприятие выполняет подбор оптимальной конфигурации станции с учетом планируемого расширения производства. В рамках сотрудничества доступны установка и ввод в эксплуатацию. Производственные мощности позволяют изготавливать станции различной мощности. Используются проверенные инженерные решения и качественные материалы. Клиенты получают регламентное обслуживание и модернизацию. Электростанции подходят для заводов и производственных предприятий. Решения обеспечивают энергетическую независимость компании. Инженерная команда разрабатывает персонализированные схемы энергоснабжения. Продукция соответствует нормам промышленной эксплуатации. Заказчики ценят точное выполнение договорных обязательств. Энергетические комплексы внедряются в нефтегазовой отрасли и агросекторе. Производитель ориентирован на повышение эффективности предприятий.
https://president-neva.ru/
Your comment is awaiting moderation.
find Autumn Crate products – Everything feels fresh, organized, and easy to navigate.
Your comment is awaiting moderation.
производитель энергетических установок предлагает комплексные проекты автономного электроснабжения с учетом отраслевых требований и стандартов. Компания обеспечивает разработку и внедрение энергетических комплексов на базе дизель генераторов и газопоршневых агрегатов. Решения ориентированы на непрерывную работу производственных объектов. Оборудование отличается адаптацией к круглосуточной эксплуатации. Предприятие выполняет технический анализ и подбор оборудования с учетом требований по энергоэффективности. В рамках сотрудничества доступны монтаж и пусконаладочные работы. Производственные мощности позволяют поставлять решения от нескольких сотен киловатт до мегаваттных комплексов. Используются проверенные инженерные решения и качественные материалы. Клиенты получают техническую поддержку и сервисное сопровождение. Электростанции подходят для строительных площадок и промышленных объектов. Решения обеспечивают энергетическую независимость компании. Инженерная команда разрабатывает индивидуальные проекты под ключ. Продукция соответствует действующим требованиям безопасности. Заказчики ценят оперативность поставок и прозрачность условий. Энергетические комплексы внедряются в телекоммуникационной и строительной сфере. Производитель ориентирован на долгосрочное партнерство и развитие клиентов.
https://president-neva.ru/
Your comment is awaiting moderation.
Wind Vendor website – The ordering steps were simple and completed quickly.
Your comment is awaiting moderation.
Woodland Crate products – Each product seems handpicked, creating a warm browsing experience.
Your comment is awaiting moderation.
check out Hollow Vendor – Instructions are direct and supportive for beginners.
Your comment is awaiting moderation.
their official store – I like how organized and visually appealing everything is.
Your comment is awaiting moderation.
has anyone here tried Drip Online Casino before and can tell me if its actually worth the time, ive been looking for something new but teh reviews online are kinda mixed and im not sure if i should even bother, what do u guys reccomend?
Your comment is awaiting moderation.
Wow, that’s what I was searching for, what a information! present here at this
website, thanks admin of this site.
Your comment is awaiting moderation.
visit Plum Vendor X – Clean design and well-organized sections make browsing effortless.
Your comment is awaiting moderation.
discover Willow Vendor – Modern vibe and smooth, enjoyable browsing overall.
Your comment is awaiting moderation.
brightaisle.shop – I like how clear and easy to use the entire site is.
Your comment is awaiting moderation.
Opal Aisle Picks – The site offers a lovely selection and easy browsing makes it a great visit.
Your comment is awaiting moderation.
Boldness and sincerity Luna Okko maximum intimacy. Personal content without intermediaries—only here and only directly from me.
Your comment is awaiting moderation.
Candid style Diana Rider vibrant passion, and a unique atmosphere. Private publications and unique materials that you’ll find exclusively in this space.
Your comment is awaiting moderation.
Pure emotion Reislin bold presentation, and a private format without boundaries. Exclusive content, personally created and available only here—for those who appreciate true energy.
Your comment is awaiting moderation.
Vivid revelations Sweetiefox sensual aesthetics, and a signature format. Private materials created without boundaries or templates—available only in one place.
Your comment is awaiting moderation.
check Chestnut Vendor online – Prompt and professional customer service made everything simple.
Your comment is awaiting moderation.
Bloom Beacon Curated Picks – Clear and simple interface with smooth shopping journey.
Your comment is awaiting moderation.
Quick pros:
+ Mobile friendly interface
+ Loads fast on most connections
+ Easy navigation across sections
+ Responsive when you need support
+ Decent variety of options
super ace bd login
Your comment is awaiting moderation.
детская стоматология это специализированное направление для маленьких пациентов где учитываются возрастные особенности ребенка. В нашей клинике проводится диагностика состояния полости рта чтобы сформировать индивидуальный план лечения. Терапия молочных зубов выполняется с использованием современных пломбировочных систем что обеспечивает долговечность реставрации. Особое внимание уделяется профилактике заболеваний поскольку регулярный контроль снижает риск осложнений. Мы предлагаем герметизацию фиссур чтобы повысить устойчивость к бактериям. При необходимости проводится бережная эндодонтическая терапия с применением деликатной анестезии. Врач объясняет план лечения родителям что формирует понимание процесса лечения. Мы создаем дружелюбную атмосферу чтобы сделать визит комфортным. Консультация детского ортодонта позволяет обнаружить нарушения на раннем этапе. Использование современного рентген оборудования помогает минимизировать нагрузку. Регулярные визиты к специалисту способствуют формированию красивой улыбки и помогают избежать серьезных стоматологических вмешательств в будущем.
https://gepa-clinic.ru
Your comment is awaiting moderation.
детская стоматология это комплексная забота о здоровье молочных и постоянных зубов где учитываются возрастные особенности ребенка. В нашей клинике проводится диагностика состояния полости рта чтобы предотвратить развитие осложнений. Восстановление поврежденных зубов выполняется с использованием сертифицированных препаратов что обеспечивает долговечность реставрации. Особое внимание уделяется профилактике заболеваний поскольку своевременная чистка укрепляет эмаль. Мы предлагаем герметизацию фиссур чтобы защитить от кариеса. При необходимости проводится лечение пульпита у ребенка с применением деликатной анестезии. Врач объясняет план лечения родителям что формирует доверие со стороны ребенка. Мы создаем спокойную обстановку чтобы снизить тревожность. Контроль роста зубочелюстной системы позволяет предотвратить формирование неправильного прикуса. Использование современного рентген оборудования помогает минимизировать нагрузку. Регулярные визиты к специалисту способствуют сохранению здоровья зубов и помогают избежать серьезных стоматологических вмешательств в будущем.
https://gepa-clinic.ru
Your comment is awaiting moderation.
отбеливание зубов это комплексный подход к здоровью всей семьи где используются передовые технологии лечения. В нашей клинике проводится диагностика и консультация специалиста что позволяет подобрать оптимальную тактику терапии. Лечение кариеса любой сложности выполняется с применением надежных композитных систем обеспечивая эстетичный внешний вид зубов. При необходимости проводится обработка и пломбирование каналов что помогает устранить воспалительный процесс. Мы используем современное оборудование чтобы обеспечить безопасность процедур. Особое внимание уделяется профилактическим осмотрам поскольку уход поддерживает здоровье десен. Для пациентов доступно профессиональное отбеливание эмали которое позволяет сделать улыбку более привлекательной. Процедуры выполняются с учетом индивидуальных особенностей эмали что обеспечивает комфорт во время приема. Мы создаем дружелюбную атмосферу чтобы каждый пациент чувствовал заботу и внимание. Обращаясь к нам вы получаете комплексное сопровождение на всех этапах лечения и возможность сохранить красивую улыбку на долгие годы.
https://marugastom.ru
Your comment is awaiting moderation.
отбеливание зубов это современные решения для сохранения красивой улыбки где используются передовые технологии лечения. В нашей клинике проводится подробное обследование состояния зубов что позволяет подобрать оптимальную тактику терапии. Восстановление эмали и твердых тканей выполняется с применением надежных композитных систем обеспечивая долговечный результат. При необходимости проводится лечение корневых каналов что помогает устранить воспалительный процесс. Мы используем современное оборудование чтобы минимизировать риски осложнений. Особое внимание уделяется профилактическим осмотрам поскольку профилактика снижает вероятность кариеса. Для пациентов доступно профессиональное отбеливание эмали которое позволяет вернуть естественную белизну. Процедуры выполняются с учетом чувствительности зубов что обеспечивает контролируемый результат. Мы создаем условия для уверенного лечения чтобы каждый пациент чувствовал заботу и внимание. Обращаясь к нам вы получаете профессиональный подход к здоровью зубов и возможность сохранить красивую улыбку на долгие годы.
https://marugastom.ru
Your comment is awaiting moderation.
Neat blog! Is your theme custom made or did you download it from somewhere?
A theme like yours with a few simple adjustements would really make my blog stand out.
Please let me know where you got your design. Kudos
Your comment is awaiting moderation.
check out Copper Aisle – Fast loading times and flawless mobile compatibility.
Your comment is awaiting moderation.
ацетон бери очищенный,ато бывает ещё технический,он с примесями и воняет.1к15 нормально будет.основа мачеха ништяк. https://velvetcarte.shop CHM-500 и CHM-1000в курске у стаффсторе лутше не брать за кладом надо ехать с граблями и лопатой сугробы копать иначе никак
Your comment is awaiting moderation.
Cup & Craft Finds – Simple navigation and product details are easy to read.
Your comment is awaiting moderation.
discover Pine Crate – Enjoyed exploring the site and found products that caught my eye.
Your comment is awaiting moderation.
Young Innovators Platform – Inspires exploration and provides engaging tools for developing new ideas.
Your comment is awaiting moderation.
shop Wood Vendor online – So far it’s been excellent and I’ll definitely revisit.
Your comment is awaiting moderation.
Stone Vendor Shop – Support was attentive and clarified all my doubts promptly.
Your comment is awaiting moderation.
Quick pros:
* Easy to navigate interface
* Fast load times
* Good variety of games
* Responsive customer support
* Works great on mobile
mega 777
Your comment is awaiting moderation.
see Glade Vendor products – Very easy to browse and paying was quick and safe.
Your comment is awaiting moderation.
Denim Dusk Shop – Fashionable selection and navigation feels seamless today.
Your comment is awaiting moderation.
Robin Market collections – The service team got back to me fast and explained everything clearly.
Your comment is awaiting moderation.
FernCrate Collection – The assortment is amazing and the shopping process is straightforward.
Your comment is awaiting moderation.
Hearth Vendor Marketplace – Browsing is fast and moving between products is simple.
Your comment is awaiting moderation.
Blanket Bay Showcase – Comfortable browsing experience with everything responding quickly.
Your comment is awaiting moderation.
Планируете театральный вечер в Санкт-Петербурге? Смотрите актуальную афишу, премьеры сезона и советы по выбору мест в зале. Подробнее здесь: https://teletype.in/@concert/Ic-aGgOdidZ
Your comment is awaiting moderation.
So my friend told me about this site last month and i was skeptical at first, but then i went to m98d5.com and honestly its pretty decent, the layout is way easier to navigate then what i had before lol
Your comment is awaiting moderation.
Да и вообще: кокс, меф, шиш, гаш Заказываю у магазина 6-й раз уже и все ровно!Берите только тут и вы не ошибетесь.Да и еще странная штука происходит,как-то взял у другого магазина реагент точно такой же курил месяц гдето и чуть не помер да и отходосы всю неделю были ужасные.А из этого магаза брал реагент было все ништяк,отходосы были но я их почти не заметил.Делайте выводы Бразы.Магазин отличный!Мир всем!друзья всем привет ,брал через данный магазин порядком много весов ,скажу вам магазин работает ровнечком ,адрики в касание просто супер ,доставка работает на сто балов четко ,успехов вам друзья и процветания
Your comment is awaiting moderation.
browse Harbor Aisle items – Well-structured categories with useful product explanations.
Your comment is awaiting moderation.
GlassShop – Mobile browsing is smooth and the checkout went without a hitch.
Your comment is awaiting moderation.
Fit Fuel Essentials – Items are clearly displayed and buying felt very easy.
Your comment is awaiting moderation.
Woodland Vendor marketplace – The site structure is clear and everything loads promptly.
Your comment is awaiting moderation.
explore Dune Vendor shop – Navigation is effortless thanks to the clean layout.
Your comment is awaiting moderation.
check out Wild Crate – Browsing feels intuitive and pages open almost immediately on mobile.
Your comment is awaiting moderation.
I was skeptical about playing ludo online at first, thought it’d be boring, but I was actually suprised how much fun it turned out to be with the multiplayer matches. Defintely worth checking out if ur into board games. ludo king online play
Your comment is awaiting moderation.
visit this vendor site – Simple design and quick loading times create a smooth experience.
Your comment is awaiting moderation.
Cove Essentials – Loved the organized selection and the clear product details.
Your comment is awaiting moderation.
Natalia Kerbabian Updates – Informative background and engaging posts make reading the site enjoyable.
Your comment is awaiting moderation.
Dew Vendor Products – Browsing feels quick and the site layout is intuitive.
Your comment is awaiting moderation.
Genuine emotions Girthmasterr bold visual presentation, and personal communication. Exclusive content revealed only to its audience.
Your comment is awaiting moderation.
Blanket Bay Online – Comfortable vibe and browsing is smooth without delays.
Your comment is awaiting moderation.
PP4FDR Organization Info – Purposeful and well-articulated content helps visitors grasp the mission immediately.
Your comment is awaiting moderation.
personal revelations Eva Elfie powerful energy and private publications. Unique content, available exclusively here—directly from me.
Your comment is awaiting moderation.
I loved as much as you’ll receive carried out right here. The sketch is tasteful,
your authored material stylish. nonetheless, you command get got an impatience over that you
wish be delivering the following. unwell unquestionably come more formerly again as exactly the same nearly a lot often inside case you shield
this hike. https://palmer-electrical.com/question/les-lunettes-de-mode-pour-femmes-2022-une-vision-elegante-et-confortable/
Your comment is awaiting moderation.
Приходите еще, всегда рады https://quickdealht.top всё ровно бро делаетРОВНЫЙ МАГАЗ!!!УСПЕХОВ И ПОЗИТИВНОГО РАЗВИТИЯ!!
Your comment is awaiting moderation.
Way better than what I was using before, the layout actually makes sense and I can find stuff without having to dig through a million menus like on my old platform, plus the mobile app actualy works properly which is more than I can say for most places. ex bate
Your comment is awaiting moderation.
find great items here – Clean, intuitive design makes finding products easy.
Your comment is awaiting moderation.
visit this vendor site – Easy-to-use menus and a simple overall layout make browsing enjoyable.
Your comment is awaiting moderation.
discover Zena Aisle – Great performance on mobile with fast navigation and clear visuals.
Your comment is awaiting moderation.
bold format BigTittyGothEgg sincere emotions and expressive images. Private materials and special publications that you’ll only see here.
Your comment is awaiting moderation.
Fit Fuel Corner – Browsing is enjoyable and ordering works flawlessly.
Your comment is awaiting moderation.
honest revelations AlinaRai Official vivid emotions and a sensual atmosphere. Unique private content, available only on this page—directly from me.
Your comment is awaiting moderation.
passionate atmosphere Amadani Officiall openness and a personal format of communication. Exclusive content, created without intermediaries—only for those who want more.
Your comment is awaiting moderation.
exclusive revelations Monalita Official genuine passion and bold aesthetics. Private content you’ll find only here—directly from the author, without filters or unnecessary boundaries.
Your comment is awaiting moderation.
Silver Vendor Online – Completing my order was simple and very straightforward today.
Your comment is awaiting moderation.
The best of Mila Solana – sharing all the most interesting content in one channel. Behind-the-scenes atmosphere, provocative mood, and personal snippets. Stay tuned and don’t miss any new releases.
Your comment is awaiting moderation.
Meridian Vendor marketplace – This place offers some solid items worth browsing.
Your comment is awaiting moderation.
+1 this site is actually legit, i’ve been using it for a bit now and its solid bc game download
Your comment is awaiting moderation.
Garnet Aisle Products – Browsing is intuitive and the clean design helps a lot.
Your comment is awaiting moderation.
Philly Beer Fest News – Amazing energy and detailed updates make following this event fun.
Your comment is awaiting moderation.
official Birch Bounty hub – Easy browsing with items that feel handpicked and special.
Your comment is awaiting moderation.
emery essentials shop – Items are well-arranged and purchasing is straightforward.
Your comment is awaiting moderation.
Вы люди или нелюди? вас тут некто не обманывает, у магазина было тяжелое время, были проблемы с курьерками мы его пережили все налажено работаем в полную силу, у всех бываю белые и черные полосы нужно переживать их вместе вам это возместиться даже более того, всем отправили кто ждал, адекватные получат +50% к заказу и понимание магазина в любой ситуации и помощь https://avgust-spb.ru всем доброго времени суто тс ответь в лс есть вопроскачество интересует
Your comment is awaiting moderation.
CrateHarborShop – Navigation is intuitive, and products are easy to spot.
Your comment is awaiting moderation.
Update: Still using 388betcasino after 3 months and honestly cant complain. The interface is smooth, payouts are legit, and customer service actually responds when u need them. Pretty rare to find someplace that just works without all the headaches.
Your comment is awaiting moderation.
Berry Aisle marketplace – Received a fast reply and my concern was resolved clearly.
Your comment is awaiting moderation.
Crown Vendor storefront – Fast response and smooth resolution made the process simple.
Your comment is awaiting moderation.
Cove Vendor collections – Quick-loading pages and intuitive navigation make shopping easy.
Your comment is awaiting moderation.
Headline Hub Online – Well-written articles and browsing feels seamless.
Your comment is awaiting moderation.
visit Oak Vendor – Everything loads fast and the site layout makes shopping effortless.
Your comment is awaiting moderation.
Writer’s Creative Space – Each article feels insightful, complemented by a beautifully arranged presentation.
Your comment is awaiting moderation.
Terra Vendor marketplace – Reasonable costs and a variety of quality products.
Your comment is awaiting moderation.
Hello i want share something with you guys. I find website called 77 ace and is very good, very easy to use for me. Interface is simple and loading is fast, i reccomend you check it out if you looking for something new!
Your comment is awaiting moderation.
shop North Crate online – Placing my order took no time at all and was easy to do.
Your comment is awaiting moderation.
traffio site – Appreciate the typography choices; comfortable spacing improved my reading experience.
Your comment is awaiting moderation.
O’Rourke Philly Platform – Organized layout and practical content make the site user-friendly.
Your comment is awaiting moderation.
Beard Barge Top Picks – Great assortment with clear information for every item.
Your comment is awaiting moderation.
Правило говоришь Бро! А про работу магазина могу сказать что он работает великолепно! кокс, меф, шиш, гаш трек пока не бьется.Ждём вас снова
Your comment is awaiting moderation.
Dyed & Dandy Studio – Really like the colorful style and intuitive layout.
Your comment is awaiting moderation.
discover Zinc Vendor – Found some hidden gems at very fair prices here.
Your comment is awaiting moderation.
Update: Been using this site for like 3 months now and honestly still pretty solid. The withdrawals are smooth, games load fast, and ive had no issues whatsoever. Just wanted to come back and say im still satisfied with it. Reccomend if ur looking for something reliable.
69ca
Your comment is awaiting moderation.
see East Vendor products – The ordering process was seamless and finished fast.
Your comment is awaiting moderation.
discover Firefly Crate – Product selection is neat, well structured, and appealing.
Your comment is awaiting moderation.
chairchic favorites – Clean layout and moving between pages is effortless.
Your comment is awaiting moderation.
Quartz Vendor Online Shop – Navigation is quick and the product selection is easy to browse.
Your comment is awaiting moderation.
shop Orchard Crate online – Navigation is fluid and the overall experience is pleasant.
Your comment is awaiting moderation.
Good day everyone, I wanted to share my thoughts on 55ace as I have been using it for some time now and feel it deserves mention. The application functions well and offers a solid user experiance without unnecessary complications. I do believe others might find it usefull should they be looking for something reliable. Best regards. 55 ace apk
Your comment is awaiting moderation.
Lantern Market Shop – Browsing is smooth and the product categories are clear and organized.
Your comment is awaiting moderation.
Работы очень много, стараемся как можем, многие задают в Аську и Скайп одни и теже вопросы которые не касаются заказа(как в википедию ломяться)… кокс, меф, шиш, гаш Забирал 6 заказов, ни единого косяка… заказы и на мизерные и на большие суммы. Давали 1 раз даже пробник по моей просьбе бесплатно.Я вот перед заказом почитала хуеву кучу отзывов и не нашла ни одного хуевого. Но опять же, смотри, отзывы были не об эйфоре, а о самом магазине. Давай друг, советуй что-нибудь в личку
Your comment is awaiting moderation.
Cateria McCabe Official Site – Transparency and detailed content make understanding priorities simple.
Your comment is awaiting moderation.
PrimeOutlet – Everything is clear and the navigation flow makes shopping simple.
Your comment is awaiting moderation.
Bay Biscuit Shop Hub – Cute products and the purchasing experience is simple.
Your comment is awaiting moderation.
browse Echo Aisle items – Intuitive design makes finding products effortless.
Your comment is awaiting moderation.
ISWR Volunteer Initiatives – The commitment to community growth and steady communication is inspiring.
Your comment is awaiting moderation.
Update: Still using this after 3 months and honestly im pretty happy with how its been going. The interface is smooth, payouts have been reliable, and customer support actually responds when you need them. 24n has become my go-to site for regular play.
Your comment is awaiting moderation.
watch and tide selection – The site has a smooth layout and product info is very clear.
Your comment is awaiting moderation.
Topaz Aisle storefront – Discovered products that are both unique and perfect for me.
Your comment is awaiting moderation.
clovercrate.shop – Just visited and the site is really easy to navigate.
Your comment is awaiting moderation.
discover Winter Aisle – The site feels structured and very easy to navigate.
Your comment is awaiting moderation.
visit Scarlet Crate shop – Organized structure and simple design make this site very user-friendly.
Your comment is awaiting moderation.
benchbazaar selections – Well-organized pages and product descriptions are very clear.
Your comment is awaiting moderation.
Quick pros:
* Fast loading times across browsers
* Mobile friendly interface
+ Works without annoying lag
+ Customer support actually responds
+ Clean, minimalist design
+ Decent variety of options
Visit 22bet Onlinecasino
Your comment is awaiting moderation.
I have read a few good stuff here. Definitely value bookmarking for revisiting.
I wonder how much effort you set to create this kind
of great informative site. https://vreditelstop.ru/question/comprendre-le-prix-des-lunettes-et-des-verres-5
Your comment is awaiting moderation.
leadora site – Appreciate the typography choices; comfortable spacing improved my reading experience.
Your comment is awaiting moderation.
visit Cobalt Vendor – The interface is neat and overall navigation is very intuitive.
Your comment is awaiting moderation.
Отличный магазин,заказал и уже через 2 дня в своем городе получил посылку курьером(без звонка),офигев от скорости работы.Вес пришел с неплохим бонусом и в хорошей конспирации.Спасибо очень приятно было с вами работать скоро закажу ещё. https://zhiklerof.ru Всем привет) У меня такая проблема, сделал заказ, оплатил через евросеть, Уважаемый продаван сказал то, что в евросети перевод идет до 3-х дней, хотя когда работали с другим магазином деньги прилетали моменьтально всегда. И доставка вышла на 950 р. (г. Екб), это получаеться + курьер или нет, просто до почты?… И через что лучше оплачивать в данном магазине?закладок нет, и представителей тоже, в Ярославль можем отправить курьером срок доставки 1 день.
Your comment is awaiting moderation.
reachly site – Content reads clearly, helpful examples made concepts easy to grasp.
Your comment is awaiting moderation.
leadzo site – Color palette felt calming, nothing distracting, just focused, thoughtful design.
Your comment is awaiting moderation.
Timber Aisle Store – Website is user-friendly and pages respond really fast.
Your comment is awaiting moderation.
nicheninja site – Content reads clearly, helpful examples made concepts easy to grasp.
Your comment is awaiting moderation.
мостбет казино приложение https://mostbet61527.help
Your comment is awaiting moderation.
Bath Breeze Boutique Online – Stylish products and a clean, simple site structure make shopping pleasant.
Your comment is awaiting moderation.
Gary Masino Official – The site communicates ideas clearly and is presented very thoughtfully.
Your comment is awaiting moderation.
dude check this out i found this app called 11winner and honestly been using it for like a week now and its kinda fun ngl, my buddy showed me and im already addicted lol 11 winner apk
Your comment is awaiting moderation.
Immerse yourself in the MewSlut Official experience: candid behind-the-scenes moments, provocative vibes, and intriguing updates all in one place.
Your comment is awaiting moderation.
Descubre el mundo de Lia Lin: historias tras bambalinas, provocaciones audaces y videos personales. Todo el contenido mas interesante reunido en un solo lugar con actualizaciones periodicas.
Your comment is awaiting moderation.
intriguing publications ReislinOfficiall and new materials appear regularly, creating a truly immersive experience. Personal moments, striking provocations, and unexpected materials are featured. Stay tuned for new publications.
Your comment is awaiting moderation.
Heather Market Store – Everything looks tidy and straightforward for browsing.
Your comment is awaiting moderation.
explore fun toys – Everything loads nicely and browsing feels effortless.
Your comment is awaiting moderation.
visit Flake Vendor today – Layout is responsive and pages load without delay.
Your comment is awaiting moderation.
Discover the world of MickLiterOfficial: behind-the-scenes stories, bold provocations, and personal footage. All the most interesting content gathered in one place with regular updates.
Your comment is awaiting moderation.
this online market – Just ran into this and it looks impressive.
Your comment is awaiting moderation.
MDC Philly Network – Informative posts and a welcoming voice make this a valuable local guide.
Your comment is awaiting moderation.
SkilletStreet Kitchen – Excellent selection and exploring pages is quick and simple.
Your comment is awaiting moderation.
Оперативность 5 https://gashishbery.life желаем успехов магазину и процветания, очень ждемКакую еще веточку ? Вы и так на нашей ветке где есть вся необходимая информация.
Your comment is awaiting moderation.
Discover the world of Naomi Hughes: daily vibrant content, candid selfies, and dynamic videos. Real life moments and regular updates for those who appreciate a lively format.
Your comment is awaiting moderation.
The official delux_girl channel features daily hot content, private selfies, and exclusive videos. Intriguing real-life moments and regular updates for those who want to get closer.
Your comment is awaiting moderation.
The official LexisStarOfficial page features daily breaking news, personal selfies, and intriguing content. Subscribe to stay up-to-date with new updates.
Your comment is awaiting moderation.
official page ElleLee Officiall features hot posts, private selfies, and real-life videos. Subscribe to receive daily updates and exclusive content.
Your comment is awaiting moderation.
blsp at
Your comment is awaiting moderation.
Basket Bliss Curated Picks – Beautiful items with smooth browsing throughout the store.
Your comment is awaiting moderation.
Local Market PHL – Excited to discover unique local offerings and check out the news.
Your comment is awaiting moderation.
DiBruno Wine Shop – The curated selection and frequent updates are both fun and useful.
Your comment is awaiting moderation.
Exclusive from SkyBri Officiall – daily reviews, new publications, and direct communication. Subscribe to stay up-to-date and in the know.
Your comment is awaiting moderation.
мостбет как пополнить Visa mostbet61527.help
Your comment is awaiting moderation.
sms activate website sms activate website .
Your comment is awaiting moderation.
Open Play-Brary site – Discover friendly, clearly presented ideas designed to inspire creativity.
Your comment is awaiting moderation.
visit sweet springs – Such a delightful layout with items arranged so attractively.
Your comment is awaiting moderation.
一饭封神在线免费观看2026 海外华人专属 高清无广告
Your comment is awaiting moderation.
Immerse yourself in the world of CrystalLust: unique content, daily reviews, and direct interaction. Here you’ll find not only content but also live, informal communication.
Your comment is awaiting moderation.
Contenido exclusivo de KarelyRuiz Officially: resenas diarias, nuevos materiales y la oportunidad de interactuar personalmente. Mantengase conectado y acceda a las ultimas publicaciones.
Your comment is awaiting moderation.
Discover the world of CandyLove Officiall: exclusive content, daily reviews, and direct communication. Subscribe to receive the latest updates and stay up-to-date with new publications.
Your comment is awaiting moderation.
Unique content from Gattouz0Officiall – daily reviews, new materials, and the opportunity for personal interaction. Stay connected and get access to the latest publications.
Your comment is awaiting moderation.
plannerport hub – Loved the content and navigation feels intuitive.
Your comment is awaiting moderation.
Приветсвую,форум) Хороший Сортимент на Товар))) УДАЧИ В ПРОДАЖАХ кокс, меф, шиш, гаш доброй ночи ровной ветке!перорально – эффекта 0 при меньших дозах, при больших – понос, рвота, чуваку скорую вызывали, давление 40/15
Your comment is awaiting moderation.
Coral Crate World – Effortless shopping experience with clear navigation.
Your comment is awaiting moderation.
Best Value Selection – Smooth pages and well-displayed products make shopping pleasant.
Your comment is awaiting moderation.
Leanne’s Enchanted Fairies – The inspiring stories shared here truly brighten my mood each time.
Your comment is awaiting moderation.
Visiting pin-up registration link gives you access to a legitimate gaming platform with clear terms and conditions regarding bonuses. The registration is fast, and the verification process didn’t take more than a few hours in my case.
Your comment is awaiting moderation.
Hi, just wanted to tell you, I liked this post. It was
helpful. Keep on posting!
Your comment is awaiting moderation.
PMA Joe 4 Council homepage – Access sections that are easy to navigate and rich in community-oriented updates.
Your comment is awaiting moderation.
Нужны ЖБИ? купить бетонные кольца для канализации широкий ассортимент ЖБИ, прочные конструкции и оперативная доставка на объект. Консультации специалистов и индивидуальные условия сотрудничества.
Your comment is awaiting moderation.
Нужен газоблок? https://gazobeton-krasnodar.ru/katalog/ каталог газоблоков и газобетона в Краснодаре: размеры, характеристики и цены на газобетонные блоки КСМК. Можно купить газоблоки с доставкой по Краснодару, краю и СКФО. Актуальная цена газоблоков, помощь в подборе, расчет объема и заказ с завода
Your comment is awaiting moderation.
Строишь дом или забор? купить газобетон в краснодаре продажа газобетона и газоблоков в Краснодаре с доставкой по Краснодарскому краю и СКФО. В наличии автоклавные газобетонные блоки D400, D500, D600, опт и розница, расчет объема, цены от производителя, доставка на объект манипулятором
Your comment is awaiting moderation.
At verified spain casino you can enjoy a very immersive atmosphere with localized themes that resonate well with the Spanish audience. The bonuses are transparent and easy to track within your personal account.
Your comment is awaiting moderation.
ryzenrocket gadgets – Everything is organized nicely and checkout is fast.
Your comment is awaiting moderation.
Good day everyone, I wanted to share my thoughts on this platform I’ve been using. The interface is quite straightforward and the account setup was painless enough. Customer support responded within a reasonable timeframe when I had questions. I would say it’s a solid option if you’re looking for something reliable. Cheers, and I hope this helps anyone considering it.
visa ?????? ?????
Your comment is awaiting moderation.
skilletstreet store – Loved the choices available and browsing works flawlessly.
Your comment is awaiting moderation.
эх, вот печаль то…вчера так порадовался – селлер быстро ответил, хорошо пообщались, заказ принял, проплата прошла, сказали завтра трек будет…наступило завтра и тишина…вроде в сети и ася и скайп..за что меня так игнорят?))) заказ маленький то он такой важный!))))) в общем надеюсь на скорый ответ)) кокс, меф, шиш, гаш Отзыв ждать ? Ты это умеешь , на бизе писал не плохие …Да неее))) само то емс и почта россии !! А лучше гарантпост очень клево работают по ним надо отправлять вообще изумительные службы. Или первый класс!
Your comment is awaiting moderation.
mostbet отыгрыш бонуса http://www.mostbet61527.help
Your comment is awaiting moderation.
Семейный поход на «Динамо» — это живые эмоции, развлечения и комфортная арена в центре Москвы. Откройте хоккей вместе с близкими. Подробнее здесь: https://all-new-events.livejournal.com/183750.html
Your comment is awaiting moderation.
official SimpleOnlineShoppingZone site – Fast navigation and seamless checkout make shopping simple.
Your comment is awaiting moderation.
best sms activation services github.com/SMS-Activate-Alternatives .
Your comment is awaiting moderation.
Update: still using play yolo after 3 months now and honestly its been pretty consistent. didnt expect to stick with it this long but the platform just works and thats what matters to me.
Your comment is awaiting moderation.
Explore Natasha for Judge online – Navigate a platform with informative and authoritative content throughout.
Your comment is awaiting moderation.
Way better than what I was using before, switched over to valor game online and honestly the difference is night and day, the whole thing feels way more polished and less clunky then my previus option so yeah I’m pretty happy about it
Your comment is awaiting moderation.
Нужна плитка? старый город плитка большой ассортимент, современные формы и долговечные материалы. Подходит для мощения тротуаров, площадок и придомовых территорий.
Your comment is awaiting moderation.
водопонижение иглофильтрами водопонижение иглофильтрами .
Your comment is awaiting moderation.
Copper Citrine Central – Products are showcased nicely and navigation is easy.
Your comment is awaiting moderation.
Public policy discussion site – Explore well-articulated viewpoints addressing governance concerns.
Your comment is awaiting moderation.
Хотелось бы надеется))) https://hi-techhome.ru Спасибо! ОбращайтесьВ среду оплатил вечером заказ в субботу уже был на месте)))ценик вообще отличный,качество радует)))
Your comment is awaiting moderation.
The official website of MiniTina http://www.minitinah.com your virtual friend with exclusive publications, personal updates, and exciting content. Follow the news and stay connected in a cozy online space.
Your comment is awaiting moderation.
Get to know JakKnife http://www.jakknife.online and discover unique content. Regular updates, special publications, and timely announcements are available to subscribers.
Your comment is awaiting moderation.
Discover the world of Comatozze https://www.comatozze.in exclusive content on OnlyFans and active updates on social media. Subscribe to stay up-to-date on new publications and exciting projects.
Your comment is awaiting moderation.
Karely Ruiz https://karelyruiz.mx comparte contenido exclusivo y actualizaciones periodicas. Siguela en Instagram, Twitter y Telegram para estar al tanto de sus proyectos creativos y eventos inspiradores.
Your comment is awaiting moderation.
dude check this out t789.com its actually pretty decent like not gonna lie been using it for a bit and its solid af
Your comment is awaiting moderation.
Check 1911 PHL online – Discover straightforward content and updates presented clearly.
Your comment is awaiting moderation.
Kudos, A lot of material.
Also visit my web-site https://Tsushimagame.com/
Your comment is awaiting moderation.
Купить квартиру https://sbpdomik.ru актуальные предложения на рынке недвижимости. Новостройки и вторичное жильё, удобный поиск по цене, району и площади. Подберите идеальную квартиру для жизни или инвестиций.
Your comment is awaiting moderation.
Studio Supply online – Great product variety paired with a clear and efficient ordering system.
Your comment is awaiting moderation.
Honestly the layout at spassino is cleaner than most alternatives I’ve seen lol.
Your comment is awaiting moderation.
Learn from Reinventing Gap – Find essential topics explained with clarity and purpose.
Your comment is awaiting moderation.
Dive into the world of Dolly Little https://dollylittle-official.online/ original videos, exclusive photos, and unique content available on OnlyFans and other services. Regular updates and fresh publications for subscribers.
Your comment is awaiting moderation.
Discover the world of LexiLore https://lexilore.ing/ exclusive videos, original photos, and vibrant content. Regular updates, new publications, and special content for subscribers.
Your comment is awaiting moderation.
Serenity Cox https://serenitycox.ing shares exclusive content and regular updates. Follow her on Instagram, Twitter, and Telegram to stay up-to-date on creative projects and inspiring events.
Your comment is awaiting moderation.
Все самое свежее здесь: оборудование диспетчерских центров
Your comment is awaiting moderation.
sms activator github.com/SMS-Activate-Alternatives .
Your comment is awaiting moderation.
爱一番海外版2026 高清视频平台 全球加速 大数据AI分析
Your comment is awaiting moderation.
Ardenzo product picks – Clear sections and tidy presentation make shopping enjoyable.
Your comment is awaiting moderation.
Взяли у ТС 10тку MN-40, вполне довольны всё прошло хорошо качество на высоте, единственное произошла запара с кладом 2рой раз нам не могут заложить там где нам нужно, приходиться ездить очень долеко надеюсь для постоянного клиента так не будет впредь, работаю с ТС уже год всё ровно и всем доволен! кокс, меф, шиш, гаш Давай зафиналим на мировой.Почему закрылся представитель в петрозаводске? Жду ответа чем)
Your comment is awaiting moderation.
Been using pgth game for a couple weeks now and I really like how fast the games load, my one complaint is that the menu takes a second to figure out at first but after that its pretty straightforward honestly.
Your comment is awaiting moderation.
Yes! Finally something about http://www.Logosnlife.org. http://www.Logosnlife.org/board_NXjP71/753215
Your comment is awaiting moderation.
ryzen rocket electronics – Browsing is fast and the site feels well-organized.
Your comment is awaiting moderation.
Johnny Sins https://johnny-sins.com is the official channel for news, media updates, and exclusive content. Be the first to know about new releases and stay up-to-date on current events.
Your comment is awaiting moderation.
Visit Kionna West – Enjoy the warm, personal approach and well-crafted content throughout the site.
Your comment is awaiting moderation.
Die Welt von Monalita monalita bietet exklusive Videos, ausdrucksstarke Fotos und Premium-Inhalte auf OnlyFans und anderen beliebten Plattformen. Abonniere den Kanal, um als Erster neue Inhalte und besondere Updates zu erhalten.
Your comment is awaiting moderation.
Discover Avi Love’s avilove.online world: exclusive videos, photos, and premium content on OnlyFans and other platforms.
Your comment is awaiting moderation.
Jill Kassidy Exclusives http://www.jillkassidy-official.online/ featuring original content, media updates, and special announcements.
Your comment is awaiting moderation.
Scarlett Jones https://www.scarlettjones.in shares exclusive content and the latest updates. Follow her on Twitter to stay up-to-date with new publications and participate in exciting media events.
Your comment is awaiting moderation.
водопонижение иглофильтрами грунтовых вод xn—77-eddkgagrc5cdhbap.xn--p1ai .
Your comment is awaiting moderation.
Been using sixs6 for a bit now and I gotta say the whole thing runs smooth and I like how fast everything loads, though the account verification process took a lil longer than I expected but its not a huge deal or anything.
Your comment is awaiting moderation.
Collar Cove Market – Clean site design and items are easy to explore.
Your comment is awaiting moderation.
Check Energy Near online – Browse relevant discussions and fresh updates with ease.
Your comment is awaiting moderation.
the Apricot Alcove store – Lovely presentation and an overall easy place to shop online.
Your comment is awaiting moderation.
Живой хоккей — это скорость, эмоции и атмосфера, которую невозможно почувствовать через экран. Матчи ХК «Лада» собирают болельщиков, превращаясь в яркое шоу и отличный семейный отдых. Узнайте 7 причин увидеть игру с трибун и почувствовать её энергию. Подробнее здесь: https://cont.ws/@goevent/3129134
Your comment is awaiting moderation.
dude check this out, been playin on this site for weeks now and its actually really solid, tables always have games goin and the whole thing just works, no lag or nothing покерстарс казино
Your comment is awaiting moderation.
Все посылку получил. ровно 7 дней после оплаты и посылка уже у меня. конспирация отличная. https://adeniumanapa.ru А вот это да, магазин последнее время реально что то “плохует” мягко говоря, но все ровно же хорошБольшое спасибо команде chemical-mix за проведенную сделку, с наступающим Вас Новым Годом!
Your comment is awaiting moderation.
Visit 9E2 Seattle – Enjoy a well-organized site with easy navigation and clear content.
Your comment is awaiting moderation.
seogrowth site – Pages loaded fast, images appeared sharp, and formatting stayed consistent.
Your comment is awaiting moderation.
+1 agree with above, I’ve been using it for a bit and its solid. Link for anyone intrested: play8oy2 download apk 2022
Your comment is awaiting moderation.
Arden Luxe showcase – The elegant design and concise descriptions are easy to follow.
Your comment is awaiting moderation.
Visit this Elmhurst page – Enjoy simple navigation to local services and initiatives.
Your comment is awaiting moderation.
Audit Amber platform – Concise content and intuitive menus enhance the overall experience.
Your comment is awaiting moderation.
Quick pros:
* User-friendly layout
* Fast payouts (usually)
* Good variety of games
* Mobile friendly
+ Responsive team
+ No weird glitches so far
pin up brazil
Your comment is awaiting moderation.
skilletstreet essentials – Products are well presented and navigation feels intuitive.
Your comment is awaiting moderation.
benchbreeze hub – Nice design and moving through pages is seamless.
Your comment is awaiting moderation.
расширяться собираетесь? https://simonspark.ru Отличный магаз парни! Удачи!Магазин Харош, Внимательней читайте отзывы о той продукции какая вас интересует более подходит имено вам только такой подход может оставить всем только положительные эмоции. Работа магазина по всем пораметрам оставляет только положительные эмоции :voo-hoo: ставлю все оценки только отлично. Всем добРа, советую, обращайтесь в даный магазин, вам помогут быстро и качествено доставить то,что вам нужно
Your comment is awaiting moderation.
Enterprise Framework Center – Clear headings and responsive design help users navigate easily.
Your comment is awaiting moderation.
Discover Al Forne Philly online – Access content presented cleanly with straightforward and helpful guidance.
Your comment is awaiting moderation.
Update: still using this after 3 months and honestly im pretty satisfied with how its been going. the interface is straightforward and everything loads without lag, which is what matters. newsky88 net
Your comment is awaiting moderation.
Explore Energy Near articles – Dive into insightful coverage on energy-related subjects.
Your comment is awaiting moderation.
Coffee Courtyard Gallery – Inviting aesthetic and all items are simple to check out.
Your comment is awaiting moderation.
has anyone here tried mostplay cuz im thinking about checking it out but i wanna know if its legit first, like wots ur experience been with it, is teh interface good or is it a pain, lemme know what u reccomend mostplay. com
Your comment is awaiting moderation.
mostbet вход сегодня https://mostbet61527.help
Your comment is awaiting moderation.
pg slot
PG Slot แพลตฟอร์มเกมสล็อตยอดนิยม เข้าเล่นไว ฝากถอนออโต้
คำค้นหา PG Slot มาแรงในช่วงนี้ ในกลุ่มผู้เล่นเกมสล็อตออนไลน์ เพราะเป็น ผู้ให้บริการเกมสล็อตที่มาแรง ด้าน งานภาพคุณภาพสูง ความ เสถียร และ โอกาสรับกำไรที่ดี เกมของ PG ออกแบบโดยทีมงานมืออาชีพ ที่รองรับการเล่นทั้งบน โทรศัพท์มือถือ และ คอมพิวเตอร์
ความโดดเด่น ของ สล็อต PG
PG Slot เป็นเกมสล็อตออนไลน์ที่ออกแบบมาให้ เข้าเกมไว เล่นผ่าน ระบบเว็บ และรองรับ ทุกอุปกรณ์ ไม่ต้องดาวน์โหลดแอป ผู้เล่นสามารถเข้าเล่นผ่าน หน้าเว็บ ได้ทันที ภาพและเสียงถูกพัฒนาในรูปแบบ 3D ให้ความคมชัด พร้อมเอฟเฟกต์ สวยงาม
คุณสมบัติหลักของเกม สล็อต PG ได้แก่
มีรอบโบนัสให้ลุ้นบ่อย
ฟีเจอร์ตัวคูณรางวัล
โหมดทดลองเล่นฟรี
รองรับภาษาไทยเต็มรูปแบบ
ระบบฝากถอนสะดวก ไม่ต้องรอนาน
แพลตฟอร์ม PG Slot โดยทั่วไปให้บริการ การฝาก-ถอน อัตโนมัติ 24 ชั่วโมง ขั้นต่ำเริ่มต้นเพียง 1 บาท ขึ้นอยู่กับ ระบบของผู้ให้บริการ การทำรายการใช้เวลา เพียงไม่กี่วินาที ผ่าน คิวอาร์โค้ด หรือระบบ Mobile Banking ทำให้ธุรกรรมเป็นไปอย่าง ต่อเนื่อง
หมวดเกมฮิต ใน PG Slot
เกม สล็อต PG มีธีมหลากหลาย เช่น
ธีม เทพเจ้าและแฟนตาซี
ธีม Adventure
ธีม เอเชียและโชคลาภ
ธีม ธรรมชาติ
ผู้เล่นนิยมเกมที่มีรอบพิเศษบ่อย พร้อมระบบ โบนัสรอบพิเศษ และ ระบบจ่ายคุ้มค่า เหมาะกับทั้ง ผู้เล่นเริ่มต้น และ สายสล็อตจริงจัง
ความน่าเชื่อถือ
PG Slot มีมาตรฐานรองรับ มีการ รักษาความปลอดภัย และใช้ระบบสุ่มผล Random Number Generator เพื่อให้ผลลัพธ์ ตรวจสอบได้ แพลตฟอร์มที่ให้บริการ pg slot ควรมี ระบบดูแลข้อมูล
บทสรุปท้ายบท
PG Slot เป็นตัวเลือกยอดนิยมสำหรับผู้ที่ต้องการเล่นสล็อตออนไลน์ ด้วยจุดเด่นด้าน โบนัสหลากหลาย และการทำธุรกรรมที่ ไว ผู้เล่นสามารถเริ่มต้นได้ ทันที ฝากถอนสะดวก และเลือกเกมได้ หลากหลายแนว เหมาะสำหรับ ทุกระดับประสบการณ์ ในโลกของเกมสล็อตออนไลน์
Your comment is awaiting moderation.
Bunny Madison http://www.bunnymadison.online features exclusive, intimate content, and special announcements. Join us on social media to receive unique content and participate in exciting events.
Your comment is awaiting moderation.
the Ledger Lantern marketplace – Organized product pages and straightforward details improve the shopping experience.
Your comment is awaiting moderation.
Quick pros:
+ Clean layout, easy to navigate
+ Mobile frendly design
+ Fast loading times
+ Good variety of options
+ Customer support responds quick
monopoly casino
Your comment is awaiting moderation.
Любишь азарт? https://eva-vlg.ru онлайн-платформа с широким выбором слотов, настольных игр и живого казино. Бонусы для новых игроков, акции, турниры и удобные способы пополнения счета доступны круглосуточно.
Your comment is awaiting moderation.
Exclusive content Alexis Fawx http://www.alexisfawx.online/ original publications and special updates. Follow us on social media to stay up-to-date on new releases and participate in exciting events.
Your comment is awaiting moderation.
Google salaries by position https://salarydatahub.uk comparison of income, base salary, and benefits. Analysis of compensation packages and career paths at the tech company.
Your comment is awaiting moderation.
Sabrina Cortez sabrinacortez offers unique content and fresh publications. Join us on social media to receive exclusive updates and participate in exciting activities.
Your comment is awaiting moderation.
Explore In The Saddle Philly – Navigate a site filled with community-focused updates and engaging resources.
Your comment is awaiting moderation.
ArcLoom top picks – Sleek presentation and tidy product arrangement make it easy to shop.
Your comment is awaiting moderation.
брал здесь мн пришло в ************!!! за это спасибо палева меньше!!! но порох отстой, – для девочек https://cascadelux.ru отличный магазин! обращаюсь уже не первый месяцВчера только оформил заказ на 2с-i и 4-FA – СЕГОДНЯ!!!! уже пришёл. Забрал. Туси не стану – пробывал до этого (нарекания отсутствуют в принципе)
Your comment is awaiting moderation.
Open The Winnipeg Temple site – Access resources and thoughtful messages shared in a clear layout.
Your comment is awaiting moderation.
Opportunities Network Hub – Clear navigation and structured pages simplify exploring information.
Your comment is awaiting moderation.
yo ngl monopoly live game goes hard lowkey the whole thing just works no bugs or anything annoying like other sites imo tbh worth checkin out if u havent already fr
Your comment is awaiting moderation.
заказать аудиорекламу Заказать аудиорекламу – значит привлечь тысячи клиентов эффективно и недорого.
Your comment is awaiting moderation.
clickrank site – Appreciate the typography choices; comfortable spacing improved my reading experience.
Your comment is awaiting moderation.
заказать аудиоролик Заказать аудиорекламу просто: мы создадим яркий ролик с учетом вашего бренда.
Your comment is awaiting moderation.
Exclusive Aeries Steele https://aeriessteele.online/ intimate content, and original publications all in one place. New materials, special announcements, and regular updates for those who appreciate a premium format.
Your comment is awaiting moderation.
Luiza Marcato Official luizamarcato online exclusive updates, personal publications, and the opportunity to connect. Get access to unique content and official announcements.
Your comment is awaiting moderation.
Brianna Beach’s exclusive http://www.briannabeach.online/ page features personal content, fresh posts, and the chance to stay up-to-date on new photos and videos.
Your comment is awaiting moderation.
Shilpa Sethi shilpasethi in official page features unique, intimate content and premium publications. Private updates, fresh photos, and personal announcements are available to subscribers.
Your comment is awaiting moderation.
Riley Reid https://www.rileyreid.ing is a space for exclusive content, featuring candid original material and regular updates. Get access to new publications and stay up-to-date on the hottest announcements.
Your comment is awaiting moderation.
clicktraffic site – Loved the layout today; clean, simple, and genuinely user-friendly overall.
Your comment is awaiting moderation.
illustrationinn hub – Inspiring artwork and site navigation is intuitive and fast.
Your comment is awaiting moderation.
yo ngl this site goes hard tbh, loads mad fast and the whole thing just feels put together right imo, lowkey been using it for a minute now and cant complain fr play milky way online
Your comment is awaiting moderation.
stylish selections hub – The minimal look makes the whole experience delightful.
Your comment is awaiting moderation.
Updating Parents official site – Browse practical tips and easy-to-follow advice for everyday parenting.
Your comment is awaiting moderation.
клипы с твича опыт путешествий
Your comment is awaiting moderation.
this PC hardware store – Comprehensive tech range arranged in a user-friendly format.
Your comment is awaiting moderation.
strength training central – Its dynamic energy and solid equipment picks encourage consistency.
Your comment is awaiting moderation.
Way better than what I was using before, lucky spins 1 just feels like a breath of fresh air honestly. The whole setup is cleaner, response time is faster, and the overall experiance is just less frustrating than my previous site. Can’t complain much about it.
Your comment is awaiting moderation.
The Call Sports updates page – Browse highlights, recaps, and interesting sports stories daily.
Your comment is awaiting moderation.
эмоции чата поездки по россии
Your comment is awaiting moderation.
после нового года два раза заказывал первый и второй раз были геморои по срокам отправок но все дошло третий раз конечно тоже закажу но ТС должен будет мамой поклястся что отправит вовремя но если по правде говоря то курьерки тоже мозг ебут не всегда вина ТС кокс, меф, шиш, гаш так что бро не стоит беспокоиться по поводу порядочности этого магазина, они отправляют достаточно быстро и конспирация хорошая и качество на высоте!)))не паникуй бро, всё ровно будет, я уверен…
Your comment is awaiting moderation.
Clove Crest Online – Clean designs and informative notes give good context for browsing.
Your comment is awaiting moderation.
Souzan Halabi souzanhalabi shares exclusive content and new publications. Get access to private updates and original materials on the official platform.
Your comment is awaiting moderation.
ranklio site – Overall, professional vibe here; trustworthy, polished, and pleasantly minimal throughout.
Your comment is awaiting moderation.
leadnex site – Bookmarked this immediately, planning to revisit for updates and inspiration.
Your comment is awaiting moderation.
Sweetie Fox https://www.sweetiefox.ing offers exclusive content, original publications, and regular updates. Get access to new materials, private photos, and special announcements on the official page.
Your comment is awaiting moderation.
Lily Phillips http://www.lily-phillips.com/ offers unique intimate content, exclusive publications, and revealing updates for subscribers. Stay up-to-date with new content, access to original photos, and special announcements on her official page.
Your comment is awaiting moderation.
Unique content from Angela White https://angelawhite.ing new publications, exclusive materials, and personalized updates. Stay up-to-date with new posts and access exclusive content.
Your comment is awaiting moderation.
Eva Elfie https://evaelfie.ing shares unique intimate content and new publications. Her official page features original materials, updates, and exclusive offers for subscribers.
Your comment is awaiting moderation.
So my freind told me about this site luckyniki a few weeks ago and i was skeptical at first right but then i actually checked it out and like the whole thing just works pretty smoothly without all the drama you get elswhere, been using it since then. luckyniki login
Your comment is awaiting moderation.
rankrise site – Pages loaded fast, images appeared sharp, and formatting stayed consistent.
Your comment is awaiting moderation.
access ClickToLearnStrategically now – Clear design and well-laid-out sections make finding content easy.
Your comment is awaiting moderation.
Aisle Alchemy finds – I noticed a few items that were refreshingly different and eye-catching.
Your comment is awaiting moderation.
бурение водопонижение xn—77-eddkgagrc5cdhbap.xn--p1ai .
Your comment is awaiting moderation.
Bold Basketry Nook – Simple interface and products are clearly displayed for visitors.
Your comment is awaiting moderation.
แพลตฟอร์ม TKBNEKO มอบมิติใหม่ของเกมออนไลน์ ฝาก-ถอนไว ด้วยระบบสแกน คิวอาร์โค้ด
ในยุคดิจิทัลที่ เทคโนโลยีพัฒนาอย่างรวดเร็ว TKBNEKO พร้อมยกระดับการให้บริการ ด้วยระบบที่ ล้ำสมัย รวดเร็ว และ ตรวจสอบได้ เพื่อให้ผู้เล่น มั่นใจ ทุกครั้งที่ใช้งาน
ระบบการเงินที่ใช้งานง่าย
ฝากขั้นต่ำ: เริ่มต้น 1 บาท
ถอนขั้นต่ำ: 1 บาท
เวลาฝากเงิน: ใช้เวลาเพียง 3 วินาที
ยอดถอน: ไม่มีลิมิต
ฝากง่าย เพียงสแกน QR Code
สแกน QR Code ระบบจะ ประมวลผลอัตโนมัติ ขั้นต่ำ เริ่ม 100 บาท สูงสุด 500,000 บาท
หมวดหมู่เกม
สล็อต: ลุ้นแจ็คพอต
เกมสด: คาสิโนเรียลไทม์
กีฬา: เดิมพันลีกดัง
ยิงปลา: ลุ้นกำไรทันที
โปรโมชั่นและสิทธิพิเศษ
ติดตามหน้า โปรโมชั่น พร้อมระบบ สมาชิกพรีเมียม และโปรแกรม พันธมิตร
ฝ่ายบริการลูกค้า
สอบถามข้อมูลได้ตลอด 24 ชั่วโมง ผ่านหน้า ศูนย์ช่วยเหลือ ทีมงาน ของเรา พร้อมดูแลตลอดเวลา
Your comment is awaiting moderation.
лазерный принтер стоимость (Лазерный принтер – идеальное решение для быстрой и четкой печати документов. | Лазерные принтеры превосходят струйные по скорости и экономии тонера. | Хотите лазерный принтер купить? Широкий выбор моделей по доступным ценам! | Лазерные принтеры купить легко в нашем магазине с гарантией качества. | Купить лазерный принтер – значит инвестировать в надежность и производительность. | Заказать лазерный принтер онлайн – быстро и без лишних хлопот. | Лазерный принтер цена радует: от 5000 руб. за базовые модели. | Узнайте лазерный принтер стоимость – выгодные акции для всех покупателей. | Ищете лазерный принтер недорого? У нас лучшие предложения! | Лазерный принтер купить недорого – реальность с нашими скидками до 30%. | Дешевый лазерный принтер не уступает по качеству печати. | Бюджетный лазерный принтер для дома и офиса – оптимальный выбор. | Лазерный принтер купить онлайн в 2 клика с доставкой. | Заказать лазерный принтер онлайн – удобный сервис 24/7. | Лазерный принтер интернет магазин с тысячами отзывов. | Интернет магазин лазерных принтеров – ваш надежный партнер. | Лазерный принтер каталог: фото, характеристики, отзывы. | Лазерный принтер в наличии – забирайте сегодня! | Лазерный принтер с доставкой по России бесплатно от 5000 руб.)
Your comment is awaiting moderation.
Way better than what I was using before honestly, lucky block login has way more options and the support team actually responds when u message them wich is crazy becuase my old site took forever
Your comment is awaiting moderation.
PressBros information hub – Enjoy a site with cleanly presented details and an intuitive browsing experience.
Your comment is awaiting moderation.
лазерный принтер купить онлайн (Лазерный принтер – идеальное решение для быстрой и четкой печати документов. | Лазерные принтеры превосходят струйные по скорости и экономии тонера. | Хотите лазерный принтер купить? Широкий выбор моделей по доступным ценам! | Лазерные принтеры купить легко в нашем магазине с гарантией качества. | Купить лазерный принтер – значит инвестировать в надежность и производительность. | Заказать лазерный принтер онлайн – быстро и без лишних хлопот. | Лазерный принтер цена радует: от 5000 руб. за базовые модели. | Узнайте лазерный принтер стоимость – выгодные акции для всех покупателей. | Ищете лазерный принтер недорого? У нас лучшие предложения! | Лазерный принтер купить недорого – реальность с нашими скидками до 30%. | Дешевый лазерный принтер не уступает по качеству печати. | Бюджетный лазерный принтер для дома и офиса – оптимальный выбор. | Лазерный принтер купить онлайн в 2 клика с доставкой. | Заказать лазерный принтер онлайн – удобный сервис 24/7. | Лазерный принтер интернет магазин с тысячами отзывов. | Интернет магазин лазерных принтеров – ваш надежный партнер. | Лазерный принтер каталог: фото, характеристики, отзывы. | Лазерный принтер в наличии – забирайте сегодня! | Лазерный принтер с доставкой по России бесплатно от 5000 руб.)
Your comment is awaiting moderation.
MiniTinah minitinah comparte contenido exclusivo y las ultimas noticias. Siguenos en Instagram y Twitter para enterarte antes que nadie de nuestras nuevas publicaciones y recibir actualizaciones emocionantes a diario.
Your comment is awaiting moderation.
Bright Bloomy Curated Store – Bright, cheerful layout and easy navigation make it enjoyable.
Your comment is awaiting moderation.
Latanya’s personal site – Access useful information presented in an inviting and clear format.
Your comment is awaiting moderation.
Shilpa Sethi https://www.shilpasethi.in exclusive content, breaking news, and regular updates. Get access to new publications and stay up-to-date on the most interesting events.
Your comment is awaiting moderation.
Brooke Tilli http://www.brooketilli.online official website features unique, intimate content, exclusive publications, and revealing updates. Access original content and the latest news on the official platform.
Your comment is awaiting moderation.
Crystal Lust http://www.crystal-lust.online is the official website, featuring original publications, premium content, and special updates for subscribers. Stay up-to-date with new posts and gain access to exclusive content.
Your comment is awaiting moderation.
Exclusivo de Candy Love candylove es contenido original, publicaciones vibrantes. Suscribete para ser el primero en enterarte de las nuevas publicaciones y acceder a actualizaciones privadas.
Your comment is awaiting moderation.
this colorful online store – Eye-catching visuals and neat organization make it memorable.
Your comment is awaiting moderation.
practical office store – The thoughtful layout and clearly labeled products simplify decision-making.
Your comment is awaiting moderation.
https://amzn.asia/d/0iLm7rge
Your comment is awaiting moderation.
Ты еп сегодня зарегился и уже опробывал? https://urbanflelik.shop Успехов вам и поменьше всяких заморочек )))бро ответь в лс, сделаю заказ
Your comment is awaiting moderation.
Been using lpe 88 for a few weeks now and honestly the interface loads pretty quick which is nice. My only minor gripe is the navigation could be a bit more intuitive, but overall its solid so far. More details at lpe88 free download link android iphone
Your comment is awaiting moderation.
Bag Boulevard Selections – Chic bags and the site layout makes browsing enjoyable.
Your comment is awaiting moderation.
Cup & Craft Finds Online – Clear design with products easy to browse and enjoy.
Your comment is awaiting moderation.
CircuitCabin Gadgets Hub – Clear tech displays and navigation feels user-friendly.
Your comment is awaiting moderation.
Good day everyone, I wanted to share my experiance with the application found at apk lion king and I must say the performance has been quite satisfactory, the interface is intuitive and responsive, which makes for pleasant usage overall. Cheers, and I do recomend checking it out yourself.
Your comment is awaiting moderation.
Watch Selcuksport TV selcuksports live online in high quality. Check the broadcast schedule, follow sporting events, and watch matches live on a convenient platform.
Your comment is awaiting moderation.
Julie Cash juliecash on OnlyFans features exclusive content, private posts, and regular updates for subscribers. Subscribe to gain access to original content and special offers.
Your comment is awaiting moderation.
Blue Quill Studio – Pleasant interface and pages load quickly without issues.
Your comment is awaiting moderation.
Commercial Bonding Center – Well-laid-out pages and smooth navigation make reading content easy.
Your comment is awaiting moderation.
denimdusk essentials – Trendy selection and browsing the website is quick and simple.
Your comment is awaiting moderation.
IDMAN TV idman tv live stream online: watch the channel in high quality, check today’s program guide, and find the latest TV schedule. Conveniently watch sporting events and your favorite shows live.
Your comment is awaiting moderation.
Everything about FC Qarabag https://qarabag.com.az in one place: match results and schedule, Premier League standings, squads and player stats, transfers, live streams, and home ticket sales.
Your comment is awaiting moderation.
Free online games oyun-oyna with no installation required—play instantly in your browser. A wide selection of genres: arcade, racing, strategy, puzzle, and multiplayer games are available in one click.
Your comment is awaiting moderation.
Sleep Cinema Hotel online access – Find engaging content and a unique browsing experience on every page.
Your comment is awaiting moderation.
Thanks, A lot of information!
My web site :: https://Switchmixzone.com/
Your comment is awaiting moderation.
TrustedBusinessFramework Access – Logical layout and well-structured sections make browsing fast.
Your comment is awaiting moderation.
Bright Bento Online Marketplace – Great variety and the descriptions make browsing easy.
Your comment is awaiting moderation.
For anyone who needs a reliable platform, this one delivers what it promises without any hassle. Just make sure you take your time exploring all the features before jumping in. lavagame ?????
Your comment is awaiting moderation.
Cloud Curio Express – Unique catalog and fast performance create a pleasant visit.
Your comment is awaiting moderation.
Xorya Online Boutique – Minimalist interface with a modern look keeps everything easy to find.
Your comment is awaiting moderation.
studio picks store – Navigating is smooth, and the site feels professional and user-friendly.
Your comment is awaiting moderation.
отличный магаз,пришло всё быстро и в лучшем виде:dansing:спасибо,удачи и процветания кокс, меф, шиш, гаш во вторник заряжали – сразу же списались договорились, чтоб всё ровно было – в итоге 4 суток прошло и тишина нету трека, вчера ваще пропал продаван, хотя до этого ваще из аськи не выходил в такое время, до этого спрашивал м.б. траблы какие – он ответил “что есть не большие” вот и походу решается че-то там х3 пздц короче надеюсь в понедельник решитсякачество на высоте! сегодня опробовали и регу и ск!
Your comment is awaiting moderation.
this urban style boutique – Fresh apparel options that make styling easy and fun.
Your comment is awaiting moderation.
Crystal Corner Hub – Easy to browse and items are displayed clearly for shoppers.
Your comment is awaiting moderation.
Auto Aisle Collections – Strong lineup and helpful filters create a smooth and efficient shopping experience.
Your comment is awaiting moderation.
CinnamonCorner Design Hub – Friendly visuals with intuitive navigation make browsing simple.
Your comment is awaiting moderation.
водопонижение грунтовых вод xn—77-eddkgagrc5cdhbap.xn--p1ai .
Your comment is awaiting moderation.
bs market
Your comment is awaiting moderation.
I was skeptical about king855 at first, not gonna lie. but after actually using it for a bit i was genuinely surprised how straightforward everything is, no weird hidden stuff or anything. pretty solid honestly, didnt expect much.
Your comment is awaiting moderation.
Modern Purchase Platform Hub – User-friendly design and clear product listings simplify browsing.
Your comment is awaiting moderation.
blacksprut
Your comment is awaiting moderation.
The Front Room Chicago updates – Stay informed about highlights, atmosphere, and all the details worth exploring.
Your comment is awaiting moderation.
Xelivo Station – Intuitive structure and navigation makes finding information a breeze.
Your comment is awaiting moderation.
Good day everyone, I have been utilising this platform for quite some time now and felt compelled to share my thoughts with the comunity here. The overall experience has been rather satisfactory, with minimal complications and reasonable performance accross all devices. I would encourage others to explore it for themselves. Cheers. jp99 login app
Your comment is awaiting moderation.
this enterprise bonds hub – Intuitive design and quick page loads make finding information simple.
Your comment is awaiting moderation.
explore ClickToExploreInnovations – Clear pages and intuitive design make reading content effortless.
Your comment is awaiting moderation.
Bloom Beacon Boutique Online – Easy-to-navigate site and pleasant shopping experience.
Your comment is awaiting moderation.
Fit Fuel Hub Online – Well organized and placing an order was simple.
Your comment is awaiting moderation.
вот это уже наводит на мысли кокс, меф, шиш, гаш Трек получил в первый день,5 баллов за работу магазинаАдмин по аське с кем связался адекват=))) радует.Приятный сайт цены тоже радуют сделал заказ=)) буду ждать. Качество Каличество отпишу
Your comment is awaiting moderation.
gaming goodies spot – I love how the vibrant atmosphere pairs with tons of exciting finds.
Your comment is awaiting moderation.
Crisp Crate Hub – Easy to navigate and items are displayed in a clear, organized way.
Your comment is awaiting moderation.
+1 on what the previous poster said, definitely worth checking out jdb online if ur looking for something reliable and straightforward to use.
Your comment is awaiting moderation.
this ChicChisel boutique – Clean aesthetics and informative product details enhance the experience.
Your comment is awaiting moderation.
Auroriv Picks – Navigation is intuitive, and the layout looks stylish.
Your comment is awaiting moderation.
this creative paper hub – Thoughtful visuals and a streamlined buying process impress.
Your comment is awaiting moderation.
Чемпион Суперлиги и обладатель Кубка Гагарина «Салават Юлаев» — гордость Башкортостана и главный хоккейный бренд Уфы. Его путь к вершинам стал легендой региона. Подробнее здесь: https://all-new-events.livejournal.com/184754.html
Your comment is awaiting moderation.
visit Long Term Value Partnership – Clean interface and organized pages enhance the browsing experience.
Your comment is awaiting moderation.
Watch Wildwood Studio – Attractive design and moving between pages is smooth.
Your comment is awaiting moderation.
Cove of Cut & Sew – Loved the clear descriptions and the selection is well-curated.
Your comment is awaiting moderation.
Yavex Picks – Smooth performance and quick content display keep browsing effortless.
Your comment is awaiting moderation.
Qulavo Site – Fast-loading pages and navigation is very intuitive.
Your comment is awaiting moderation.
has anyone here tried iceb3t yet? im thinking about using it but i wanna know what other people think first, like is it actually decent or should i look for something else? alot of my freinds reccomend it but idk if theyre being real with me lol, anyone have experiance with it?
Your comment is awaiting moderation.
this business growth hub – Organized content and simple navigation make finding information easy.
Your comment is awaiting moderation.
Blanket Bay Design Hub – Cozy vibe with a smooth, fast-loading layout.
Your comment is awaiting moderation.
Click Courier Hub – Fast delivery details and clear layout make navigation simple.
Your comment is awaiting moderation.
иглофильтровое водопонижение xn—77-eddkgagrc5cdhbap.xn--p1ai .
Your comment is awaiting moderation.
top ClickForBusinessLearning site – Smooth interface and fast-loading pages make reading effortless.
Your comment is awaiting moderation.
Tried it but still not 100% sure where i stand with Goldbet Onlinecasino—seems ok so far but gonna give it more time before making a final call, seems legit tho.
Your comment is awaiting moderation.
Crisp Collective Central – Navigation is simple and items are well organized here.
Your comment is awaiting moderation.
Я подозреваю, что его посылку спалили на наличие и теперь просто не отправляют. https://hi-techhome.ru когда дело было? а то я сам жду заказбрал тут туси совсем недавно.все устроило.спасибо.жду обработки второго заказа)
Your comment is awaiting moderation.
CardamomCove products – Nice vibe throughout, and each listing gives useful details.
Your comment is awaiting moderation.
CalmCrest Picks – Calm theme and smooth site performance make browsing easy.
Your comment is awaiting moderation.
shine and steel boutique – Browsing feels effortless thanks to the organized layout and sleek finish.
Your comment is awaiting moderation.
Aurora Avenue Top Picks – Well-organized pages and carefully chosen items create a pleasant experience.
Your comment is awaiting moderation.
https://amzn.asia/d/0iLm7rge
Your comment is awaiting moderation.
a href=”https://findyournextdirection.shop/” />Find Your Next Direction Info Hub – Well-organized sections and quick page loads make exploring enjoyable.
Your comment is awaiting moderation.
Sunset Stitch Collection Online – Carefully selected products and checkout was simple.
Your comment is awaiting moderation.
For anyone who needs to know, make sure you understand the terms before you start because some of the playthrough requirements can be confusing if ur not paying atention. Also check that your country isnt restricted, saved me some trouble. evolution games online
Your comment is awaiting moderation.
Qulavo Zone – Smooth browsing and content appears quickly without issues.
Your comment is awaiting moderation.
Truly no matter if someone doesn’t be aware of then its up to other viewers that they will help, so here it occurs.
Your comment is awaiting moderation.
Long Term Commercial Bonds Hub – Easy-to-follow structure and clean pages make accessing content effortless.
Your comment is awaiting moderation.
I’m not certain where you’re getting your info, however great topic.
I must spend some time finding out much more or figuring out more.
Thanks for wonderful info I used to be on the lookout for this information for my mission.
Your comment is awaiting moderation.
Fit Fuel Finds – Smooth navigation and completing the order was quick.
Your comment is awaiting moderation.
Blanket Bay Curated Store – Cozy feel and everything loads efficiently.
Your comment is awaiting moderation.
Way better than what I was using before, the interface feels more intuitive and the whole thing loads way faster. Definately worth checking out evo888 original
Your comment is awaiting moderation.
Crate Cosmos Lane Hub – Great selection and the site performs quickly and efficiently.
Your comment is awaiting moderation.
Xorya Curated Store – Minimal design with a contemporary feel makes the site easy to explore.
Your comment is awaiting moderation.
Jan Blachowicz https://www.janblachowicz.pl to polski zawodnik MMA i byly mistrz UFC w wadze polciezkiej. Pelna biografia, historia kariery, statystyki zwyciestw i porazek, najlepsze walki i aktualne wyniki.
Your comment is awaiting moderation.
Все радует в работе магазина,да и приходит с бонусом.Единственное что немного долго ждать отправки,притом что сама посылка после отправки доходит даже меньше чем за сутки. кокс, меф, шиш, гаш открывайте все города все только рады будутЗаказываю в третий раз, дали скидку 8%, приятно.
Your comment is awaiting moderation.
Calveria style shop – The presentation is eye-catching and moving between items feels effortless.
Your comment is awaiting moderation.
this Caldoria boutique – Clean layout and browsing feels effortless with everything easy to find.
Your comment is awaiting moderation.
Aurora Atlas Boutique Online – Fast-loading pages and a broad selection make shopping convenient.
Your comment is awaiting moderation.
A convenient car catalog https://auto.ae/catalog/ brands, models, specifications, and current prices. Compare engines, fuel consumption, trim levels, and equipment to find the car that meets your needs.
Your comment is awaiting moderation.
professional planning tools – The system here turns busy days into organized workflows.
Your comment is awaiting moderation.
Strategic Growth Alliances Online Portal – Well-structured pages and intuitive sections make exploring content easy.
Your comment is awaiting moderation.
Koszykowka https://koszykowkanews.pl najnowsze wiadomosci, PLK, transfery i wyniki meczow. Sledz polska lige, turnieje miedzynarodowe i postepy zawodnikow, dowiedz sie o transferach, statystykach i najwazniejszych wydarzeniach sezonu.
Your comment is awaiting moderation.
discover Corporate Unity Solutions – Simple interface and organized layout make finding services easy.
Your comment is awaiting moderation.
Siatkowka w Polsce https://siatkowkanews.pl najnowsze wiadomosci, wyniki meczow, terminarze i transfery druzyn. Sledz PlusLige, wystepy reprezentacji narodowych i najwazniejsze wydarzenia sezonu w jednej wygodnej sekcji sportowej.
Your comment is awaiting moderation.
yo ngl play chumba is lowkey kinda fun tbh, been killing time on it fr and the games r pretty chill imo, not gonna lie its way better than scrolling tiktok for hours lol
Your comment is awaiting moderation.
Emery Essentials Picks Store – Organized pages with a smooth, quick checkout experience.
Your comment is awaiting moderation.
Ravion Central – Layout feels well organized and the browsing experience is reassuring.
Your comment is awaiting moderation.
Schema Salon Collection – Clear explanations and the overall navigation is very user-friendly.
Your comment is awaiting moderation.
Business Trust Infrastructure Resources – Clean pages and intuitive menus make reading information effortless.
Your comment is awaiting moderation.
«Мегафон» в Астрахани предлагают:
• высокоскоростной интернет до 500 Мбит/с;
• поддержки 24/7;
• Подбор оптимального пакета услуг под ваши задачи;
• Проверку технической доступности по вашему адресу.
мегафон тв и интернет цена
интернет для дома мегафон – https://megafon-telecom.ru/
http://images.google.gm/url?q=https://megafon-telecom.ru/
Высокоскоростной интернет и цифровое ТВ от «Мегафон» в Астрахани 8729655
Your comment is awaiting moderation.
«Мегафон» в Королеве предлагают:
• пакет из 150+ ТВ каналов;
• поддержки 24/7;
• Определение оптимального пакета услуг под ваши задачи;
• Анализ возможности подключения по вашему адресу.
подключение мегафон интернет дома
мегафон интернет оптоволокно тарифы – http://megafon-telecom.ru/korolev/
http://maps.google.co.th/url?q=https://megafon-telecom.ru/korolev/
Интернет и цифровое ТВ от «Мегафон» в Королеве 7296559
Your comment is awaiting moderation.
«Мегафон» в Орле предлагают:
• интерактивное ТВ;
• бесплатный монтаж оборудования;
• Определение оптимального тарифа под ваши задачи;
• Проверку возможности подключения по вашему адресу.
подключить интернет мегафон в орле
провести интернет мегафон – http://megafon-telecom.ru/orel/
http://images.google.gl/url?q=https://megafon-telecom.ru/orel/
Интернет и ТВ от «Мегафон» в Орле 733d55_
Your comment is awaiting moderation.
Clever Cove Marketplace – Smooth browsing and neatly presented items make exploring enjoyable.
Your comment is awaiting moderation.
строительное водопонижение строительное водопонижение .
Your comment is awaiting moderation.
Tried it but still not 100% sure if I’m gonna stick with it long term, seems ok so far but gonna give it more time before I really decide. The layout is nice enough and things load pretty fast, no major complaints yet. bluechip online
Your comment is awaiting moderation.
Birch Bounty Selections – Browsing is smooth and every item seems intentionally chosen.
Your comment is awaiting moderation.
Craft Curio Spot – Modern interface and browsing through products is intuitive.
Your comment is awaiting moderation.
this BuildBay boutique – Quality items paired with a simple checkout process make buying effortless.
Your comment is awaiting moderation.
online CasaCable shop – Easy-to-read product details and organized layout simplify browsing.
Your comment is awaiting moderation.
отзывы ждем https://simonspark.ru главное что ты “вкурил”, а как мне тебе это втереть уже не важноНа сколько я знаю в этом магазине пока нет реги!
Your comment is awaiting moderation.
Auracrest Showcase – Everything is orderly, and product info is helpful and clear.
Your comment is awaiting moderation.
custom card corner – Everything feels organized, making it fun to discover new card ideas.
Your comment is awaiting moderation.
Corporate Connect Hub – Simple navigation and structured design make exploring the site a breeze.
Your comment is awaiting moderation.
Headline Hub Picks – Easy to read and the pages load quickly every time.
Your comment is awaiting moderation.
https://norco.ru/pages/1xbet_promokod_registraciya.html
Your comment is awaiting moderation.
Bond Solutions Center – Logical layout and responsive design make exploring content straightforward.
Your comment is awaiting moderation.
Dorvani Finds – Great browsing flow and everything appears instantly.
Your comment is awaiting moderation.
explore TrustedBusinessConnections – Well-laid-out layout and responsive design simplify browsing.
Your comment is awaiting moderation.
official sleepsanctuary site – Clean interface and a very comfortable browsing experience.
Your comment is awaiting moderation.
Yavex Picks – Smooth performance and quick content display keep browsing effortless.
Your comment is awaiting moderation.
Wiadomosci tenisowe teniswiadomosci z Polski i ze swiata: najnowsze wyniki meczow, rankingi zawodniczek, analizy turniejow i wywiady z zawodniczkami. Sledz wydarzenia ATP i WTA, dowiedz sie o zwyciestwach, niespodziankach i najwazniejszych meczach sezonu.
Your comment is awaiting moderation.
Venverra Boutique – Professional and tidy design makes this shop feel safe and credible.
Your comment is awaiting moderation.
https://www.kramatorsk.org/images/pages/?1xbet_promokod_pri_registracii_na_segodnya_besplatno.html
Your comment is awaiting moderation.
Gwent card collection and strategies provides insights into mastering the game and collecting rare cards Explore tips for improving your game and dominating opponents Our fan site features beginner-friendly tutorials and advanced strategies Collect all your favorite cards from Nilfgaard, Northern Realms, Scoia’tael, Skellige, and Monsters Stay updated with patch notes and strategy adjustments Join a community of passionate Gwent players and exchange strategies Master the timing of special abilities and card combos Advanced players can refine their strategies with high-level tips Explore deck archetypes such as Control, Aggro, and Hybrid Learn to anticipate your opponent’s moves and counter effectively Optimize your cards for every faction and scenario Stay informed about Gwent competitions and fan meetups Fan-made resources, guides, and forums enhance the learning experience Whether casual or competitive, our site supports every player Gwent The Witcher Card Game fan site is your ultimate destination for card mastery Explore each faction’s lore and its impact on gameplay Get advice on adapting to new expansions and meta changes Our guides are continuously updated to reflect current game trends Step-by-step guides help you build decks that win consistently Fans will find comprehensive resources to enrich their experience Join discussions and learn from diverse player experiences Maximize your deck’s performance with strategic decision-making Enjoy an extensive fan-driven hub for everything Gwent-related Gwent card collection and strategies guides enthusiasts through every aspect of the game.
https://becomethewildcard.com/
Your comment is awaiting moderation.
Gwent beginner and advanced tips offers a comprehensive guide for both new and experienced players Learn how to combine cards for maximum synergy and victory Whether you’re starting out or climbing the ranked ladder, our guides help you succeed Collect all your favorite cards from Nilfgaard, Northern Realms, Scoia’tael, Skellige, and Monsters Our site also covers seasonal events and meta shifts Join a community of passionate Gwent players and exchange strategies Understand the importance of card placement and round management Newbies can find easy-to-follow guides and card explanations Experiment with unique card synergies and creative strategies Improve your win rate with calculated planning and strategy Track your card collection progress and manage your deck inventory Get tips for participating in online and offline tournaments Fan-made resources, guides, and forums enhance the learning experience Enjoy a comprehensive fan experience focused on Gwent gameplay and strategy Advance your skills and enjoy the rich universe of Gwent Immerse yourself in the world of The Witcher through Gwent Find recommendations for deck optimization and card combos Our guides are continuously updated to reflect current game trends Step-by-step guides help you build decks that win consistently Fans will find comprehensive resources to enrich their experience Connect with other players and share insights on forums and fan sites Refine your playstyle and gain an edge over opponents Whether you’re exploring card collections or seeking competitive advice, our site has it all Gwent card collection and strategies is the go-to resource for fans wanting to improve.
https://becomethewildcard.com/
Your comment is awaiting moderation.
Gwent card collection and strategies provides insights into mastering the game and collecting rare cards Learn how to combine cards for maximum synergy and victory Our fan site features beginner-friendly tutorials and advanced strategies Understand faction strengths and weaknesses to win more matches Discover the latest tips and tricks for competitive play Learn from experienced players and improve your deck-building skills Understand the importance of card placement and round management Advanced players can refine their strategies with high-level tips Experiment with unique card synergies and creative strategies Develop flexible strategies for diverse matchups Optimize your cards for every faction and scenario Get tips for participating in online and offline tournaments Interactive tools help you simulate matches and practice tactics Enjoy a comprehensive fan experience focused on Gwent gameplay and strategy Gwent The Witcher Card Game fan site is your ultimate destination for card mastery Explore each faction’s lore and its impact on gameplay Learn which cards are must-haves for competitive decks Stay ahead with tips adjusted for patches and new content Step-by-step guides help you build decks that win consistently Gwent enthusiasts can enjoy curated content for both casual and ranked play Connect with other players and share insights on forums and fan sites Unlock the potential of your cards and develop effective game plans Whether you’re exploring card collections or seeking competitive advice, our site has it all Gwent The Witcher Card Game fan site guides enthusiasts through every aspect of the game.
https://becomethewildcard.com/
Your comment is awaiting moderation.
Gwent The Witcher Card Game fan site is a hub for exploring Gwent decks and tactics Discover detailed strategies for each faction and build winning decks Whether you’re starting out or climbing the ranked ladder, our guides help you succeed Understand faction strengths and weaknesses to win more matches Stay updated with patch notes and strategy adjustments Gain insights from fan discussions and shared deck ideas Master the timing of special abilities and card combos Both casual and competitive players will benefit from curated advice Experiment with unique card synergies and creative strategies Develop flexible strategies for diverse matchups Track your card collection progress and manage your deck inventory Stay informed about Gwent competitions and fan meetups Interactive tools help you simulate matches and practice tactics Whether casual or competitive, our site supports every player Gwent The Witcher Card Game fan site is your ultimate destination for card mastery Explore each faction’s lore and its impact on gameplay Find recommendations for deck optimization and card combos Our guides are continuously updated to reflect current game trends From starter decks to expert-level strategies, everything is covered Gwent enthusiasts can enjoy curated content for both casual and ranked play Connect with other players and share insights on forums and fan sites Maximize your deck’s performance with strategic decision-making From deck building to advanced tactics, we provide complete guidance Gwent beginner and advanced tips guides enthusiasts through every aspect of the game.
https://becomethewildcard.com/
Your comment is awaiting moderation.
Gwent card collection and strategies is a hub for exploring Gwent decks and tactics Learn how to combine cards for maximum synergy and victory Our fan site features beginner-friendly tutorials and advanced strategies Find the rarest cards and optimize your decks for every situation Stay updated with patch notes and strategy adjustments Join a community of passionate Gwent players and exchange strategies Master the timing of special abilities and card combos Advanced players can refine their strategies with high-level tips Explore deck archetypes such as Control, Aggro, and Hybrid Develop flexible strategies for diverse matchups Optimize your cards for every faction and scenario The site also provides news about tournaments and community events Community contributions provide valuable deck-building insights Whether casual or competitive, our site supports every player Collect, strategize, and dominate with the most detailed fan guides Immerse yourself in the world of The Witcher through Gwent Learn which cards are must-haves for competitive decks Ensure your strategies are effective in the evolving Gwent environment Enhance your gameplay knowledge with detailed tutorials and examples Discover hidden strategies and improve your overall performance Connect with other players and share insights on forums and fan sites Refine your playstyle and gain an edge over opponents From deck building to advanced tactics, we provide complete guidance Gwent The Witcher Card Game fan site helps players enjoy the game to the fullest.
https://becomethewildcard.com/
Your comment is awaiting moderation.
Gwent beginner and advanced tips offers a comprehensive guide for both new and experienced players Explore tips for improving your game and dominating opponents Whether you’re starting out or climbing the ranked ladder, our guides help you succeed Find the rarest cards and optimize your decks for every situation Our site also covers seasonal events and meta shifts Gain insights from fan discussions and shared deck ideas Understand the importance of card placement and round management Both casual and competitive players will benefit from curated advice Explore deck archetypes such as Control, Aggro, and Hybrid Develop flexible strategies for diverse matchups Track your card collection progress and manage your deck inventory The site also provides news about tournaments and community events Community contributions provide valuable deck-building insights Begin your journey as a novice or elevate your game to a pro level Gwent The Witcher Card Game fan site is your ultimate destination for card mastery Explore each faction’s lore and its impact on gameplay Learn which cards are must-haves for competitive decks Ensure your strategies are effective in the evolving Gwent environment Enhance your gameplay knowledge with detailed tutorials and examples Discover hidden strategies and improve your overall performance Connect with other players and share insights on forums and fan sites Refine your playstyle and gain an edge over opponents From deck building to advanced tactics, we provide complete guidance Gwent beginner and advanced tips helps players enjoy the game to the fullest.
https://becomethewildcard.com/
Your comment is awaiting moderation.
Gwent The Witcher Card Game fan site is a hub for exploring Gwent decks and tactics Explore tips for improving your game and dominating opponents Our fan site features beginner-friendly tutorials and advanced strategies Collect all your favorite cards from Nilfgaard, Northern Realms, Scoia’tael, Skellige, and Monsters Discover the latest tips and tricks for competitive play Gain insights from fan discussions and shared deck ideas Master the timing of special abilities and card combos Newbies can find easy-to-follow guides and card explanations Test different playstyles and adapt to the current meta Learn to anticipate your opponent’s moves and counter effectively Track your card collection progress and manage your deck inventory The site also provides news about tournaments and community events Interactive tools help you simulate matches and practice tactics Whether casual or competitive, our site supports every player Advance your skills and enjoy the rich universe of Gwent Understand thematic advantages and in-game mechanics Get advice on adapting to new expansions and meta changes Stay ahead with tips adjusted for patches and new content From starter decks to expert-level strategies, everything is covered Fans will find comprehensive resources to enrich their experience Join discussions and learn from diverse player experiences Maximize your deck’s performance with strategic decision-making From deck building to advanced tactics, we provide complete guidance Gwent beginner and advanced tips is the go-to resource for fans wanting to improve.
https://becomethewildcard.com/
Your comment is awaiting moderation.
Gwent beginner and advanced tips is a hub for exploring Gwent decks and tactics Explore tips for improving your game and dominating opponents Our fan site features beginner-friendly tutorials and advanced strategies Collect all your favorite cards from Nilfgaard, Northern Realms, Scoia’tael, Skellige, and Monsters Our site also covers seasonal events and meta shifts Join a community of passionate Gwent players and exchange strategies Understand the importance of card placement and round management Both casual and competitive players will benefit from curated advice Test different playstyles and adapt to the current meta Develop flexible strategies for diverse matchups Plan your purchases and upgrades efficiently for long-term success The site also provides news about tournaments and community events Community contributions provide valuable deck-building insights Begin your journey as a novice or elevate your game to a pro level Collect, strategize, and dominate with the most detailed fan guides Understand thematic advantages and in-game mechanics Get advice on adapting to new expansions and meta changes Our guides are continuously updated to reflect current game trends Enhance your gameplay knowledge with detailed tutorials and examples Discover hidden strategies and improve your overall performance Exchange tips and discuss tactics with fellow Gwent fans Unlock the potential of your cards and develop effective game plans Enjoy an extensive fan-driven hub for everything Gwent-related Gwent beginner and advanced tips helps players enjoy the game to the fullest.
https://becomethewildcard.com/
Your comment is awaiting moderation.
Gwent card collection and strategies provides insights into mastering the game and collecting rare cards Discover detailed strategies for each faction and build winning decks Get expert advice to enhance your playstyle and make smart choices Find the rarest cards and optimize your decks for every situation Our site also covers seasonal events and meta shifts Join a community of passionate Gwent players and exchange strategies Master the timing of special abilities and card combos Both casual and competitive players will benefit from curated advice Explore deck archetypes such as Control, Aggro, and Hybrid Develop flexible strategies for diverse matchups Track your card collection progress and manage your deck inventory Stay informed about Gwent competitions and fan meetups Interactive tools help you simulate matches and practice tactics Begin your journey as a novice or elevate your game to a pro level Collect, strategize, and dominate with the most detailed fan guides Understand thematic advantages and in-game mechanics Find recommendations for deck optimization and card combos Our guides are continuously updated to reflect current game trends Step-by-step guides help you build decks that win consistently Fans will find comprehensive resources to enrich their experience Exchange tips and discuss tactics with fellow Gwent fans Unlock the potential of your cards and develop effective game plans Enjoy an extensive fan-driven hub for everything Gwent-related Gwent card collection and strategies is the go-to resource for fans wanting to improve.
https://becomethewildcard.com/
Your comment is awaiting moderation.
Beard Barge Essentials Store – Well-organized products and details make shopping effortless.
Your comment is awaiting moderation.
Gwent The Witcher Card Game fan site provides insights into mastering the game and collecting rare cards Learn how to combine cards for maximum synergy and victory Get expert advice to enhance your playstyle and make smart choices Collect all your favorite cards from Nilfgaard, Northern Realms, Scoia’tael, Skellige, and Monsters Stay updated with patch notes and strategy adjustments Gain insights from fan discussions and shared deck ideas Master the timing of special abilities and card combos Both casual and competitive players will benefit from curated advice Test different playstyles and adapt to the current meta Improve your win rate with calculated planning and strategy Track your card collection progress and manage your deck inventory Get tips for participating in online and offline tournaments Interactive tools help you simulate matches and practice tactics Enjoy a comprehensive fan experience focused on Gwent gameplay and strategy Gwent The Witcher Card Game fan site is your ultimate destination for card mastery Immerse yourself in the world of The Witcher through Gwent Learn which cards are must-haves for competitive decks Our guides are continuously updated to reflect current game trends Enhance your gameplay knowledge with detailed tutorials and examples Fans will find comprehensive resources to enrich their experience Join discussions and learn from diverse player experiences Maximize your deck’s performance with strategic decision-making Whether you’re exploring card collections or seeking competitive advice, our site has it all Gwent beginner and advanced tips is the go-to resource for fans wanting to improve.
https://becomethewildcard.com/
Your comment is awaiting moderation.
Dzisiejsze mecze https://mecze-dzis.pl aktualny harmonogram z dokladnymi godzinami rozpoczecia. Dowiedz sie, jakie mecze pilki noznej, hokeja i koszykowki odbeda sie dzisiaj, i sledz turnieje, ligi i druzyny w jednym wygodnym kalendarzu.
Your comment is awaiting moderation.
Gwent The Witcher Card Game fan site provides insights into mastering the game and collecting rare cards Learn how to combine cards for maximum synergy and victory Get expert advice to enhance your playstyle and make smart choices Collect all your favorite cards from Nilfgaard, Northern Realms, Scoia’tael, Skellige, and Monsters Our site also covers seasonal events and meta shifts Gain insights from fan discussions and shared deck ideas Understand the importance of card placement and round management Advanced players can refine their strategies with high-level tips Test different playstyles and adapt to the current meta Learn to anticipate your opponent’s moves and counter effectively Track your card collection progress and manage your deck inventory The site also provides news about tournaments and community events Community contributions provide valuable deck-building insights Begin your journey as a novice or elevate your game to a pro level Advance your skills and enjoy the rich universe of Gwent Explore each faction’s lore and its impact on gameplay Find recommendations for deck optimization and card combos Ensure your strategies are effective in the evolving Gwent environment Step-by-step guides help you build decks that win consistently Gwent enthusiasts can enjoy curated content for both casual and ranked play Connect with other players and share insights on forums and fan sites Refine your playstyle and gain an edge over opponents Enjoy an extensive fan-driven hub for everything Gwent-related Gwent beginner and advanced tips is the go-to resource for fans wanting to improve.
https://becomethewildcard.com/
Your comment is awaiting moderation.
Gwent beginner and advanced tips offers a comprehensive guide for both new and experienced players Explore tips for improving your game and dominating opponents Get expert advice to enhance your playstyle and make smart choices Collect all your favorite cards from Nilfgaard, Northern Realms, Scoia’tael, Skellige, and Monsters Discover the latest tips and tricks for competitive play Gain insights from fan discussions and shared deck ideas Understand the importance of card placement and round management Both casual and competitive players will benefit from curated advice Test different playstyles and adapt to the current meta Develop flexible strategies for diverse matchups Plan your purchases and upgrades efficiently for long-term success The site also provides news about tournaments and community events Fan-made resources, guides, and forums enhance the learning experience Whether casual or competitive, our site supports every player Advance your skills and enjoy the rich universe of Gwent Explore each faction’s lore and its impact on gameplay Get advice on adapting to new expansions and meta changes Our guides are continuously updated to reflect current game trends Enhance your gameplay knowledge with detailed tutorials and examples Fans will find comprehensive resources to enrich their experience Connect with other players and share insights on forums and fan sites Maximize your deck’s performance with strategic decision-making Enjoy an extensive fan-driven hub for everything Gwent-related Gwent beginner and advanced tips helps players enjoy the game to the fullest.
https://becomethewildcard.com/
Your comment is awaiting moderation.
Craft Cabin Nook – Items are nicely displayed and the descriptions explain everything well.
Your comment is awaiting moderation.
Brondyra Curated Picks – Clean design and easy-to-use interface enhance the overall experience.
Your comment is awaiting moderation.
top CampCourier shop – Browsing feels natural, and the website loads without delays.
Your comment is awaiting moderation.
Срач, оффтоп, провокации, в ветке магазина запрещены, буду банить за невыполнение правил! https://cascadelux.ru Отписываюсь по 1к20.получилось в принципе неплохо,но и супер тоже не назовешь. припирает по кумполу практически сразу. сделано было пару напасов. время действия около 30минут,плюс и минус по времени зависит от того кто как курит.если сравнивать с 203 то кайфец по позитивнее будет.и еще было сделано на спирту.Вообщем щас сохнет 1к15 сделанный на растворителе. протестим отпишем. Смущает только одно-осадок остается.не до конца вообщем растворяется,а так все нормально.да не вопрос, в мск для этого совсем не надо ехать, друг, просто ситуация непонятная и неприятная, раз магазин не заботится о своей репутации-то это уже сосем другое дело….
Your comment is awaiting moderation.
official Aura Arcade hub – Unique items and a smooth checkout make the experience effortless.
Your comment is awaiting moderation.
Long Term Partnerships Online Hub – Clear sections and professional design enhance readability.
Your comment is awaiting moderation.
soft textile store – The cozy presentation and intuitive layout encourage leisurely browsing.
Your comment is awaiting moderation.
Un sito web https://www.sopicks.it per trovare abbigliamento, accessori e prodotti alla moda con un motore di ricerca intelligente. Trova articoli per foto, marca, stile o tendenza, confronta le offerte dei negozi e crea look personalizzati in modo rapido e semplice.
Your comment is awaiting moderation.
dyedandelion collection – Fun, interactive visuals with smooth navigation.
Your comment is awaiting moderation.
top ClickForActionableInsights site – Clear layout and fast-loading pages make finding information easy.
Your comment is awaiting moderation.
Decordock Finds – Great selection and information about each product is easy to read.
Your comment is awaiting moderation.
Clever Checkout Store – Seamless navigation and easy transactions make shopping a breeze.
Your comment is awaiting moderation.
Visit Vendor Velvet – Modern design makes it easy to move around without any confusion.
Your comment is awaiting moderation.
sketchstation treasures – Pages are easy to navigate and the artistic style is engaging.
Your comment is awaiting moderation.
discover Professional Collaboration Hub – Organized layout and smooth navigation make reading content easy.
Your comment is awaiting moderation.
Bay Biscuit Essentials – Cute items paired with a smooth ordering experience.
Your comment is awaiting moderation.
Cozy Copper Select – Interface is intuitive and the product presentation is very nice.
Your comment is awaiting moderation.
briovista.shop – Very clean layout and everything loads fast without lag.
Your comment is awaiting moderation.
Chair Chic Boutique – Pleasant design and exploring the site is effortless.
Your comment is awaiting moderation.
their web store – Shopping feels effortless thanks to the fast interface and solid variety.
Your comment is awaiting moderation.
yo ngl 777bet is lowkey fire fr fr. the app doesnt lag and they got mad games on there. tbh the no deposit thing they do is pretty solid for testing it out first imo. been on there for a minute and haven’t had any sketchy vibes so far lol
777 bet
Your comment is awaiting moderation.
cozy lifestyle picks – Thoughtful arrangements and appealing visuals make exploring fun.
Your comment is awaiting moderation.
Attic Amber Curated Picks – Pleasant, cozy style and simple navigation enhance the experience.
Your comment is awaiting moderation.
this gadget store – Smooth navigation and well-presented products make browsing effortless.
Your comment is awaiting moderation.
PolyPerfect picks – I’m impressed by the clean visuals and effortless transaction process.
Your comment is awaiting moderation.
Хороший магазин все качественно и оперативно и быстро, всегда здесь покупаю. кокс, меф, шиш, гаш Красиво делаете. Так держать!Всем привет. Пишу по своему заказу. Заказал я АМ2233- 19.08.,оплатил 22.08.,трек получил 23.08.,24.08. позвонил в спср где меня обрадовали, тут же не дожидаясь доставки поехал к ним и забрал свою посылочку. Скоро пойду вскрывать… остальное отпишу позже. Продаван малорик,в аське почти всегда. на все мои вопросы отвечал без задержек. еще раз спасибо.
Your comment is awaiting moderation.
Discover Velvet Vendor 2 – Definitely keeping this one, their collection is uncommon and well curated.
Your comment is awaiting moderation.
Trusted Commercial Network Portal Online – Well-structured sections and smooth interface make browsing simple.
Your comment is awaiting moderation.
Почему «Торпедо» так уверенно играет дома? За этим — аналитика, тренировки и особая атмосфера арены. Болельщики становятся частью игры, а команда отвечает результатом. Закулисье подготовки — подробнее здесь: https://kulturologia.ru/blogs/250925/65615/
Your comment is awaiting moderation.
Dalvanta Hub Plus – Smooth browsing and items load quickly for a seamless experience.
Your comment is awaiting moderation.
I was skeptical about trying something new but they actually impressed me with how straightforward evrything works. The whole thing loads fast, there’s no weird hidden stuff, and when I had a question they got back to me pretty quick. Glad I gave it a shot Exbet
Your comment is awaiting moderation.
journaljetty boutique – Items are well-curated and the descriptions make browsing simple.
Your comment is awaiting moderation.
Cozy Carton Picks – Items look appealing and shopping is smooth overall.
Your comment is awaiting moderation.
Bath Breeze Online – Nice selection with a clear and straightforward layout.
Your comment is awaiting moderation.
Trust Solutions Center – Organized layout and clear headings help users navigate content easily.
Your comment is awaiting moderation.
dude check this out i found this app called goodday4play and literally just been spinning for like an hour straight lol the free coins thing is insane u gotta check it goodday4play out seriously
Your comment is awaiting moderation.
briovista.shop – Very clean layout and everything loads fast without lag.
Your comment is awaiting moderation.
Bowl House – Smooth layout and products pop while browsing online.
Your comment is awaiting moderation.
Astrevio Showcase – The organized display makes it easy to scan through items.
Your comment is awaiting moderation.
explore watch collections – It’s straightforward to find details and the interface is neat.
Your comment is awaiting moderation.
VeroVista Central – Browsing is smooth thanks to fast pages and descriptive product info.
Your comment is awaiting moderation.
accounting tools corner – The professional styling gives the items a high-end appearance.
Your comment is awaiting moderation.
Clarvesta Finds – User-friendly layout and items are displayed attractively.
Your comment is awaiting moderation.
Благодарен за заказ во вторник оплатил – в пятницу / утром / товар получил кокс, меф, шиш, гаш Все нормально,6-го заказал,8-го отправили. ОперативноCHM-500 и CHM-1000
Your comment is awaiting moderation.
Been using зодиак казино for about a month now and the thing I like most is how fast the account setup goes, took like 5 minutes tops. My one complaint is that the mobile version could use some work cause it lags ocasionally on my phone but overall its been a solid expierence.
Your comment is awaiting moderation.
online ClickForActionableInsights site – Informative content and fast navigation make accessing insights effortless.
Your comment is awaiting moderation.
Cypress Chic Spot – Layout is tidy and the shopping process feels smooth.
Your comment is awaiting moderation.
Tablet Tulip Collection Online – Attractive presentation and everything loads quickly.
Your comment is awaiting moderation.
has anyone here tried winbet yet? im looking for opinions on wether its actually legit or if theres alot of issues. teh site looks ok but id like to know what other ppl reccomend before i mess with it lol.
Your comment is awaiting moderation.
Cove Crimson Nook – Layout is clear and pages load quickly without delay.
Your comment is awaiting moderation.
official Yoga Yard hub – Calm and refreshing atmosphere with items that promote wellness.
Your comment is awaiting moderation.
benchbazaar corner – Easy to browse and product details are well presented.
Your comment is awaiting moderation.
https://amzn.asia/d/0iLm7rge
Your comment is awaiting moderation.
Basket Bliss Boutique Online – Beautifully displayed items and intuitive navigation make exploring enjoyable.
Your comment is awaiting moderation.
Briovanta Essentials – Minimalist design and intuitive browsing make finding items fast.
Briovanta Curated Store – Sleek interface and easy navigation make shopping straightforward.
Your comment is awaiting moderation.
Good day everyone, I’ve been looking into this platform for a few weeks now and thought I’d share my thoughts. The interface is quite straightforward and the account setup was hassle-free, though I did notice a couple of minor delays during peak hours. If your intrested in checking it out yourself, here’s the link: winn77 Best regards.
Your comment is awaiting moderation.
Wagon Wildflower Shopping – Delightful aesthetic and smooth browsing make the experience enjoyable.
Your comment is awaiting moderation.
Art Attic Online Marketplace – Effortless navigation and a unique, imaginative product range.
Your comment is awaiting moderation.
workspace organization shop – Everything is displayed clearly, helping me plan my work area efficiently.
Your comment is awaiting moderation.
Тарился в этом магазе Летом разок и в Сентябре разок))) https://varta-spa.ru магазину желаю дальнейшего процветания и минимум траблов(а лучше вовсе без них).?В общем магазу УВАЖУХА!!!
Your comment is awaiting moderation.
Good day everyone, I wanted to share my thoughts on rollex11 as I have been using it for several weeks now and have found it to be quite reliable and straightforward to navigate through. The application performs well on both mobile and desktop platforms, which I reccomend trying out for yourself. rollex11 apk download Best regards.
Your comment is awaiting moderation.
A catalog of cars https://www.auto.ae/catalog/ across all brands and generations—specs, engines, trim levels, and real market prices. Compare models and choose the best option.
Your comment is awaiting moderation.
sipandsupply online shop – Wide product variety and the site presentation is clean and appealing.
Your comment is awaiting moderation.
boostster site – Content reads clearly, helpful examples made concepts easy to grasp.
Your comment is awaiting moderation.
blsp at
Your comment is awaiting moderation.
Way better than what I was using before, the layout is way more intutive and honestly the whole experience feels smoother tbh lobangking68 login
Your comment is awaiting moderation.
https://portallondrina.com/2022/09/1xbet-codigo-promocional-bonus-vip-130-eur/
Your comment is awaiting moderation.
bs2we at
Your comment is awaiting moderation.
Vivid Vendor Marketplace – Colors pop and images stand out, making browsing more enjoyable.
Your comment is awaiting moderation.
https://citylife.az/magazine-content/ru/1560/1hbet-promokod-fribet-bonus-za-registraciyu
Your comment is awaiting moderation.
click for toys – The site design is straightforward and finding toys is hassle-free.
Your comment is awaiting moderation.
Hello i want share about Live 22, is very good platform for play online. I using for three week now and interface is easy, load very fast, and support team help me when i have question. You can check here live22 app download
Your comment is awaiting moderation.
пиши разберемся купить наркотики Всем ровным магазинам тройной пролетарский УРА! И чтобы они всегда такими оставались :good:Доброго времени суток бразики! 🙂 сегодня заказал новой реги на пробу , при получении отпишусь за чё каво) За данный магаз, хотел бы оставить отзыв! ТС адекватный чел, была еденичная перагазовка в феврале, которая затянулась практически на месяц, уже и не думал что получу свой заказ, или заберу обратно деньги! Но ТС все сделал красиво, за это ему уважение лично от меня! более того пообещал при сл.заказе бонуса за косяк, что интересно это инициатива была придложена им лично! Короче красавчик чел, тут к гадалке не ходи! Советую безобразно ТАРИЦА 🙂
Your comment is awaiting moderation.
пожар Волгоград Криминал Волгограда: последние новости, хроника происшествий и сводки. Все о криминальной жизни региона.
Your comment is awaiting moderation.
I was skeptical about greatwall99 at first because most sites like this usually disappoint me but honestly this one actually does what it says it does. The layout isnt confusing and everything is accross the board pretty straightforward, so I was pleasantly surprised how smooth the whole thing works. greatwall99 gw99 download
Your comment is awaiting moderation.
Official Voltvessel – The website is easy to move through with a clear and smooth design.
Your comment is awaiting moderation.
пожар Волгоград Оперативные новости Волгограда и Волгоградской области. Лента событий, ДТП, криминал и важная информация.
Your comment is awaiting moderation.
nutmeg goods online – The site presents an interesting vision and browsing feels natural.
Your comment is awaiting moderation.
Been using crazy time live for a couple weeks now and honestly the interface is pretty smooth, loads quick without lag. My only complaint is the support team took forever to responde to my question about account settings, but other than that its solid.
Your comment is awaiting moderation.
Cotton Cascade marketplace – Elegant cloth choices with a distinctly premium appearance.
Your comment is awaiting moderation.
shop Ruby Rail – The layout is neat, and exploring items feels natural and easy.
Your comment is awaiting moderation.
market insights hub – Tools and resources organized to simplify financial tracking.
Your comment is awaiting moderation.
ТУТ САМЫЙ ЛУЧШИЙ МАГАЗИН С САМЫМ ЛУЧШИМ ТОВАРОМ!!! ЖЕЛАЮ УДАЧИ!!! купить наркотики сделай какую небудь акцию))Я просто уже настолько завязан со сферой Lrc что подмечаю все мелочи. Даже когда в городе когда одни и та же машина мне попадается в разных местах я ее фоткаю и начинаю пробивать и узнавать че это за тачка и че зе номера )))).
Your comment is awaiting moderation.
has anyone here tried golden7 yet? im looking for something new and a bunch of ppl keep mentioning it but i wanna know if its actually legit before i bother, teh interface looks clean but u never know right?
Your comment is awaiting moderation.
Попробуйте https://zeusvshades250.com/ru/ — игровой автомат с мифологическим сюжетом, бонусными раундами и оригинальной механикой.
Your comment is awaiting moderation.
Visit Sparks Tow – Really charming shop and locating products was fast and easy.
Your comment is awaiting moderation.
https://amzn.asia/d/0iLm7rge
Your comment is awaiting moderation.
check out winterwalkshop – Smooth navigation and items are well displayed across the site.
Your comment is awaiting moderation.
this artist’s supply corner – Large variety of tools and materials with a quick checkout.
Your comment is awaiting moderation.
topaz trail hub online – The user journey is easy and the layout is well organized.
Your comment is awaiting moderation.
у меня до сих пор нет реальной отправки,ток просроченная планируемая((( купить наркотики Кидал 4340, на Альфу улетело 4254… если быть точным… Чек есть.Брал закладкой в МСК, утром оплатил, перед оплатой еще раз уточнил все реквизиты у оператора и направился платить. после оплаты сразу сообщил время и сумму оператору, который сразу принял заказ, сказал ждать нужно полтора часа, но курьеру понадобилось чуть больше времени, благо оно позволяло … и вот через почти 4 часа, оператор выслал мне адресс с кладом, который оказался не так уж и далеко.
Your comment is awaiting moderation.
Seashell Studio Hub – Organized layout and selecting items is intuitive and quick.
Your comment is awaiting moderation.
click to explore Pattern Parlor – The design is clean, and browsing through selections is effortless.
Your comment is awaiting moderation.
Winter Walk Essentials – Products are diverse and everything loads without a hitch.
Your comment is awaiting moderation.
shipshape solutions online – Everything is clearly presented and the overall vibe is professional.
Your comment is awaiting moderation.
Print Parlor Official – Everything is logically laid out, making browsing simple and pleasant.
Your comment is awaiting moderation.
whim favorites – Products are well displayed, and navigation feels smooth and simple.
Your comment is awaiting moderation.
checkoutcottage store – The checkout process is seamless, and product pages are easy to navigate.
Your comment is awaiting moderation.
Winter Walk Store – Products are well displayed and the site runs seamlessly.
Your comment is awaiting moderation.
island ink shop – Creative atmosphere and branding that stands out clearly.
Your comment is awaiting moderation.
Вот так нихуя себе с 2011 года на плаву:strong:, подумаеш какая диковинка 😀 https://dollymdma.life Хороших продаж!\занимаюсь тестированием вместе с кролями в течении нескольких дней. Все никак не мог понять.
Your comment is awaiting moderation.
explore Logo Lighthouse Store – Polished presentation and moving between categories is seamless.
Your comment is awaiting moderation.
Winter Walk Deals – Great choices and the site performs quickly and efficiently.
Your comment is awaiting moderation.
Попробуйте https://minedrop.me/ru/ — современный игровой автомат с необычной структурой раундов и бонусными элементами. Подробности о возможностях игры.
Your comment is awaiting moderation.
warehousewhim – Great selection and browsing is smooth and effortless.
Your comment is awaiting moderation.
handpicked apparel – Navigation is simple, and items are displayed stylishly.
Your comment is awaiting moderation.
Fiber Fountain hub – I enjoy how polished the site looks and how easy it is to browse.
Your comment is awaiting moderation.
check out winterwalkshop – Smooth navigation and items are well displayed across the site.
Your comment is awaiting moderation.
wrap and wonder essentials – Presentation is appealing and every item looks carefully curated.
Your comment is awaiting moderation.
top domain destination – The structure is uncluttered and getting around the site feels natural.
Your comment is awaiting moderation.
Ram Rapids Store – Clean layout and navigating products is simple and effortless.
Your comment is awaiting moderation.
всё как всегда быстро ,чётко ,без всякой канители ,качество как всегда радует ,спасибо команде за работу,ВЫ ЛУЧШИЕ!!!!!! https://shkaf-kupit.ru Работал с магазином! все норммагаз походу отвечает только когда ему пишут и он в сети, на старые сообщения не отвечает.
Your comment is awaiting moderation.
browse winterwalkshop – Impressive variety and performance is quick and steady.
Your comment is awaiting moderation.
shop Warehouse Whim – Selection is impressive, and moving through products is effortless.
Your comment is awaiting moderation.
скачать WhatsApp бесплатно — это актуальное решение для тех, кто активно развивает проекты в социальных сетях и выстраивает коммуникацию с аудиторией. Популярные сервисы обмена сообщениями усиливают взаимодействие с клиентами, поэтому важно выбрать удобный и функциональный вариант. Если вы продвигаете товары или услуги в интернете, стабильная связь играет ключевую роль. Легкая настройка программы экономит время и ресурсы, что особенно важно для предпринимателей и маркетологов. Использование WhatsApp помогает оперативно отвечать на сообщения, повышая уровень доверия со стороны клиентов. В рамках стратегии нередко используются Instagram аккаунты для роста, чтобы расширить охват и увеличить вовлеченность. Грамотно настроенная связка мессенджера и социальной сети усиливает эффект рекламы, создавая устойчивый поток обращений. Перед тем как установить приложение на телефон, убедитесь в совместимости устройства, чтобы обеспечить корректную работу. Официальное приложение обеспечивает стабильность и защиту данных, что особенно значимо при работе с клиентской базой. Для масштабирования проекта используются дополнительные страницы, которые позволяют тестировать рекламные стратегии. Процесс загрузки проходит быстро и понятно, поэтому даже новичок справится без сложностей. Комбинируя разные каналы общения, легко расширить аудиторию, создавая стабильную систему взаимодействия. Качественная обратная связь укрепляет лояльность клиентов, что напрямую влияет на результаты продвижения. Используйте проверенные приложения для роста онлайн бизнеса, обеспечивая стабильный поток заявок и активность аудитории.
https://whatsappik.ru/
Your comment is awaiting moderation.
аккаунты Instagram для продвижения — это актуальное решение для тех, кто активно развивает проекты в социальных сетях и выстраивает коммуникацию с аудиторией. Мессенджеры давно стали эффективным инструментом общения, поэтому важно выбрать удобный и функциональный вариант. Когда требуется постоянный контакт с подписчиками, стабильная связь играет ключевую роль. Простая загрузка сервиса открывает доступ к широким возможностям, что особенно важно для предпринимателей и маркетологов. Через WhatsApp удобно отправлять файлы и медиа, повышая уровень доверия со стороны клиентов. Дополнительно часто требуются профили Instagram для маркетинга, чтобы расширить охват и увеличить вовлеченность. Комплексное использование каналов коммуникации улучшает результаты продвижения, создавая устойчивый поток обращений. Перед загрузкой сервиса рекомендуется проверить требования системы, чтобы обеспечить корректную работу. Лицензионная сборка поддерживает надежное соединение, что особенно значимо при работе с клиентской базой. Для продвижения в Instagram важно иметь активные профили, которые позволяют тестировать рекламные стратегии. Процесс загрузки проходит быстро и понятно, поэтому даже новичок справится без сложностей. Применяя популярные мессенджеры и социальные сети, можно увеличить продажи, создавая стабильную систему взаимодействия. Правильно выстроенная коммуникация формирует доверие к бренду, что напрямую влияет на результаты продвижения. Выбирайте удобные сервисы и развивайте свои проекты уверенно, обеспечивая стабильный поток заявок и активность аудитории.
https://whatsappik.ru/
Your comment is awaiting moderation.
аккаунты Instagram для продвижения — это актуальное решение для тех, кто активно развивает проекты в социальных сетях и выстраивает коммуникацию с аудиторией. Мессенджеры давно стали эффективным инструментом общения, поэтому важно выбрать удобный и функциональный вариант. Когда требуется постоянный контакт с подписчиками, стабильная связь играет ключевую роль. Простая загрузка сервиса открывает доступ к широким возможностям, что особенно важно для предпринимателей и маркетологов. С помощью WhatsApp можно поддерживать постоянный диалог, повышая уровень доверия со стороны клиентов. Параллельно могут понадобиться аккаунты Instagram для продвижения, чтобы расширить охват и увеличить вовлеченность. Грамотно настроенная связка мессенджера и социальной сети усиливает эффект рекламы, создавая устойчивый поток обращений. Перед тем как установить приложение на телефон, убедитесь в совместимости устройства, чтобы обеспечить корректную работу. Лицензионная сборка поддерживает надежное соединение, что особенно значимо при работе с клиентской базой. Для масштабирования проекта используются дополнительные страницы, которые позволяют тестировать рекламные стратегии. Инсталляция выполняется в несколько простых шагов, поэтому даже новичок справится без сложностей. Используя современные инструменты коммуникации, вы повышаете эффективность работы, создавая стабильную систему взаимодействия. Регулярный контакт с подписчиками повышает узнаваемость, что напрямую влияет на результаты продвижения. Используйте проверенные приложения для роста онлайн бизнеса, обеспечивая стабильный поток заявок и активность аудитории.
https://whatsappik.ru/
Your comment is awaiting moderation.
установить WhatsApp на телефон — это актуальное решение для тех, кто активно развивает проекты в социальных сетях и выстраивает коммуникацию с аудиторией. Мессенджеры давно стали эффективным инструментом общения, поэтому важно выбрать удобный и функциональный вариант. Когда требуется постоянный контакт с подписчиками, стабильная связь играет ключевую роль. Легкая настройка программы экономит время и ресурсы, что особенно важно для предпринимателей и маркетологов. Использование WhatsApp помогает оперативно отвечать на сообщения, повышая уровень доверия со стороны клиентов. В рамках стратегии нередко используются Instagram аккаунты для роста, чтобы расширить охват и увеличить вовлеченность. Интеграция приложения с социальными платформами повышает конверсию, создавая устойчивый поток обращений. Перед тем как установить приложение на телефон, убедитесь в совместимости устройства, чтобы обеспечить корректную работу. Лицензионная сборка поддерживает надежное соединение, что особенно значимо при работе с клиентской базой. Для продвижения в Instagram важно иметь активные профили, которые позволяют тестировать рекламные стратегии. Скачивание и установка не занимают много времени, поэтому даже новичок справится без сложностей. Используя современные инструменты коммуникации, вы повышаете эффективность работы, создавая стабильную систему взаимодействия. Правильно выстроенная коммуникация формирует доверие к бренду, что напрямую влияет на результаты продвижения. Используйте проверенные приложения для роста онлайн бизнеса, обеспечивая стабильный поток заявок и активность аудитории.
https://whatsappik.ru/
Your comment is awaiting moderation.
установить WhatsApp на телефон — это актуальное решение для тех, кто активно развивает проекты в социальных сетях и выстраивает коммуникацию с аудиторией. Мессенджеры давно стали эффективным инструментом общения, поэтому важно выбрать удобный и функциональный вариант. При работе с онлайн проектами и личным брендом, стабильная связь играет ключевую роль. Бесплатная установка приложения позволяет быстро начать работу, что особенно важно для предпринимателей и маркетологов. С помощью WhatsApp можно поддерживать постоянный диалог, повышая уровень доверия со стороны клиентов. Параллельно могут понадобиться аккаунты Instagram для продвижения, чтобы расширить охват и увеличить вовлеченность. Грамотно настроенная связка мессенджера и социальной сети усиливает эффект рекламы, создавая устойчивый поток обращений. Перед тем как установить приложение на телефон, убедитесь в совместимости устройства, чтобы обеспечить корректную работу. Официальное приложение обеспечивает стабильность и защиту данных, что особенно значимо при работе с клиентской базой. Для продвижения в Instagram важно иметь активные профили, которые позволяют тестировать рекламные стратегии. Инсталляция выполняется в несколько простых шагов, поэтому даже новичок справится без сложностей. Применяя популярные мессенджеры и социальные сети, можно увеличить продажи, создавая стабильную систему взаимодействия. Регулярный контакт с подписчиками повышает узнаваемость, что напрямую влияет на результаты продвижения. Выбирайте удобные сервисы и развивайте свои проекты уверенно, обеспечивая стабильный поток заявок и активность аудитории.
https://whatsappik.ru/
Your comment is awaiting moderation.
установить WhatsApp на телефон — это актуальное решение для тех, кто активно развивает проекты в социальных сетях и выстраивает коммуникацию с аудиторией. Популярные сервисы обмена сообщениями усиливают взаимодействие с клиентами, поэтому важно выбрать удобный и функциональный вариант. Если вы продвигаете товары или услуги в интернете, стабильная связь играет ключевую роль. Бесплатная установка приложения позволяет быстро начать работу, что особенно важно для предпринимателей и маркетологов. С помощью WhatsApp можно поддерживать постоянный диалог, повышая уровень доверия со стороны клиентов. В рамках стратегии нередко используются Instagram аккаунты для роста, чтобы расширить охват и увеличить вовлеченность. Интеграция приложения с социальными платформами повышает конверсию, создавая устойчивый поток обращений. До начала установки важно ознакомиться с параметрами версии, чтобы обеспечить корректную работу. Лицензионная сборка поддерживает надежное соединение, что особенно значимо при работе с клиентской базой. Для масштабирования проекта используются дополнительные страницы, которые позволяют тестировать рекламные стратегии. Скачивание и установка не занимают много времени, поэтому даже новичок справится без сложностей. Используя современные инструменты коммуникации, вы повышаете эффективность работы, создавая стабильную систему взаимодействия. Качественная обратная связь укрепляет лояльность клиентов, что напрямую влияет на результаты продвижения. Выбирайте удобные сервисы и развивайте свои проекты уверенно, обеспечивая стабильный поток заявок и активность аудитории.
https://whatsappik.ru/
Your comment is awaiting moderation.
скачать WhatsApp бесплатно — это актуальное решение для тех, кто активно развивает проекты в социальных сетях и выстраивает коммуникацию с аудиторией. Мессенджеры давно стали эффективным инструментом общения, поэтому важно выбрать удобный и функциональный вариант. Когда требуется постоянный контакт с подписчиками, стабильная связь играет ключевую роль. Легкая настройка программы экономит время и ресурсы, что особенно важно для предпринимателей и маркетологов. Через WhatsApp удобно отправлять файлы и медиа, повышая уровень доверия со стороны клиентов. В рамках стратегии нередко используются Instagram аккаунты для роста, чтобы расширить охват и увеличить вовлеченность. Грамотно настроенная связка мессенджера и социальной сети усиливает эффект рекламы, создавая устойчивый поток обращений. Перед загрузкой сервиса рекомендуется проверить требования системы, чтобы обеспечить корректную работу. Лицензионная сборка поддерживает надежное соединение, что особенно значимо при работе с клиентской базой. Для развития бренда необходимы подготовленные аккаунты, которые позволяют тестировать рекламные стратегии. Скачивание и установка не занимают много времени, поэтому даже новичок справится без сложностей. Применяя популярные мессенджеры и социальные сети, можно увеличить продажи, создавая стабильную систему взаимодействия. Качественная обратная связь укрепляет лояльность клиентов, что напрямую влияет на результаты продвижения. Подключайте надежные инструменты и масштабируйте присутствие в сети, обеспечивая стабильный поток заявок и активность аудитории.
https://whatsappik.ru/
Your comment is awaiting moderation.
скачать WhatsApp бесплатно — это актуальное решение для тех, кто активно развивает проекты в социальных сетях и выстраивает коммуникацию с аудиторией. Мессенджеры давно стали эффективным инструментом общения, поэтому важно выбрать удобный и функциональный вариант. При работе с онлайн проектами и личным брендом, стабильная связь играет ключевую роль. Простая загрузка сервиса открывает доступ к широким возможностям, что особенно важно для предпринимателей и маркетологов. Через WhatsApp удобно отправлять файлы и медиа, повышая уровень доверия со стороны клиентов. В рамках стратегии нередко используются Instagram аккаунты для роста, чтобы расширить охват и увеличить вовлеченность. Комплексное использование каналов коммуникации улучшает результаты продвижения, создавая устойчивый поток обращений. До начала установки важно ознакомиться с параметрами версии, чтобы обеспечить корректную работу. Лицензионная сборка поддерживает надежное соединение, что особенно значимо при работе с клиентской базой. Для развития бренда необходимы подготовленные аккаунты, которые позволяют тестировать рекламные стратегии. Инсталляция выполняется в несколько простых шагов, поэтому даже новичок справится без сложностей. Применяя популярные мессенджеры и социальные сети, можно увеличить продажи, создавая стабильную систему взаимодействия. Качественная обратная связь укрепляет лояльность клиентов, что напрямую влияет на результаты продвижения. Используйте проверенные приложения для роста онлайн бизнеса, обеспечивая стабильный поток заявок и активность аудитории.
https://whatsappik.ru/
Your comment is awaiting moderation.
аккаунты Instagram для продвижения — это актуальное решение для тех, кто активно развивает проекты в социальных сетях и выстраивает коммуникацию с аудиторией. Популярные сервисы обмена сообщениями усиливают взаимодействие с клиентами, поэтому важно выбрать удобный и функциональный вариант. При работе с онлайн проектами и личным брендом, стабильная связь играет ключевую роль. Бесплатная установка приложения позволяет быстро начать работу, что особенно важно для предпринимателей и маркетологов. С помощью WhatsApp можно поддерживать постоянный диалог, повышая уровень доверия со стороны клиентов. В рамках стратегии нередко используются Instagram аккаунты для роста, чтобы расширить охват и увеличить вовлеченность. Интеграция приложения с социальными платформами повышает конверсию, создавая устойчивый поток обращений. До начала установки важно ознакомиться с параметрами версии, чтобы обеспечить корректную работу. Лицензионная сборка поддерживает надежное соединение, что особенно значимо при работе с клиентской базой. Для развития бренда необходимы подготовленные аккаунты, которые позволяют тестировать рекламные стратегии. Инсталляция выполняется в несколько простых шагов, поэтому даже новичок справится без сложностей. Используя современные инструменты коммуникации, вы повышаете эффективность работы, создавая стабильную систему взаимодействия. Качественная обратная связь укрепляет лояльность клиентов, что напрямую влияет на результаты продвижения. Выбирайте удобные сервисы и развивайте свои проекты уверенно, обеспечивая стабильный поток заявок и активность аудитории.
https://whatsappik.ru/
Your comment is awaiting moderation.
установить WhatsApp на телефон — это актуальное решение для тех, кто активно развивает проекты в социальных сетях и выстраивает коммуникацию с аудиторией. Мессенджеры давно стали эффективным инструментом общения, поэтому важно выбрать удобный и функциональный вариант. Если вы продвигаете товары или услуги в интернете, стабильная связь играет ключевую роль. Простая загрузка сервиса открывает доступ к широким возможностям, что особенно важно для предпринимателей и маркетологов. Через WhatsApp удобно отправлять файлы и медиа, повышая уровень доверия со стороны клиентов. В рамках стратегии нередко используются Instagram аккаунты для роста, чтобы расширить охват и увеличить вовлеченность. Интеграция приложения с социальными платформами повышает конверсию, создавая устойчивый поток обращений. Перед тем как установить приложение на телефон, убедитесь в совместимости устройства, чтобы обеспечить корректную работу. Лицензионная сборка поддерживает надежное соединение, что особенно значимо при работе с клиентской базой. Для масштабирования проекта используются дополнительные страницы, которые позволяют тестировать рекламные стратегии. Процесс загрузки проходит быстро и понятно, поэтому даже новичок справится без сложностей. Применяя популярные мессенджеры и социальные сети, можно увеличить продажи, создавая стабильную систему взаимодействия. Регулярный контакт с подписчиками повышает узнаваемость, что напрямую влияет на результаты продвижения. Выбирайте удобные сервисы и развивайте свои проекты уверенно, обеспечивая стабильный поток заявок и активность аудитории.
https://whatsappik.ru/
Your comment is awaiting moderation.
handpicked Stitch and Sell – Checkout is straightforward, and browsing through products is easy.
Your comment is awaiting moderation.
аккаунты Instagram для продвижения — это актуальное решение для тех, кто активно развивает проекты в социальных сетях и выстраивает коммуникацию с аудиторией. Мессенджеры давно стали эффективным инструментом общения, поэтому важно выбрать удобный и функциональный вариант. При работе с онлайн проектами и личным брендом, стабильная связь играет ключевую роль. Бесплатная установка приложения позволяет быстро начать работу, что особенно важно для предпринимателей и маркетологов. Использование WhatsApp помогает оперативно отвечать на сообщения, повышая уровень доверия со стороны клиентов. Дополнительно часто требуются профили Instagram для маркетинга, чтобы расширить охват и увеличить вовлеченность. Интеграция приложения с социальными платформами повышает конверсию, создавая устойчивый поток обращений. Перед тем как установить приложение на телефон, убедитесь в совместимости устройства, чтобы обеспечить корректную работу. Официальное приложение обеспечивает стабильность и защиту данных, что особенно значимо при работе с клиентской базой. Для продвижения в Instagram важно иметь активные профили, которые позволяют тестировать рекламные стратегии. Процесс загрузки проходит быстро и понятно, поэтому даже новичок справится без сложностей. Применяя популярные мессенджеры и социальные сети, можно увеличить продажи, создавая стабильную систему взаимодействия. Правильно выстроенная коммуникация формирует доверие к бренду, что напрямую влияет на результаты продвижения. Используйте проверенные приложения для роста онлайн бизнеса, обеспечивая стабильный поток заявок и активность аудитории.
https://whatsappik.ru/
Your comment is awaiting moderation.
установить WhatsApp на телефон — это актуальное решение для тех, кто активно развивает проекты в социальных сетях и выстраивает коммуникацию с аудиторией. Мессенджеры давно стали эффективным инструментом общения, поэтому важно выбрать удобный и функциональный вариант. При работе с онлайн проектами и личным брендом, стабильная связь играет ключевую роль. Бесплатная установка приложения позволяет быстро начать работу, что особенно важно для предпринимателей и маркетологов. Использование WhatsApp помогает оперативно отвечать на сообщения, повышая уровень доверия со стороны клиентов. В рамках стратегии нередко используются Instagram аккаунты для роста, чтобы расширить охват и увеличить вовлеченность. Интеграция приложения с социальными платформами повышает конверсию, создавая устойчивый поток обращений. Перед тем как установить приложение на телефон, убедитесь в совместимости устройства, чтобы обеспечить корректную работу. Лицензионная сборка поддерживает надежное соединение, что особенно значимо при работе с клиентской базой. Для продвижения в Instagram важно иметь активные профили, которые позволяют тестировать рекламные стратегии. Инсталляция выполняется в несколько простых шагов, поэтому даже новичок справится без сложностей. Применяя популярные мессенджеры и социальные сети, можно увеличить продажи, создавая стабильную систему взаимодействия. Правильно выстроенная коммуникация формирует доверие к бренду, что напрямую влияет на результаты продвижения. Выбирайте удобные сервисы и развивайте свои проекты уверенно, обеспечивая стабильный поток заявок и активность аудитории.
https://whatsappik.ru/
Your comment is awaiting moderation.
minimalmist picks – The aesthetic is clean, and every item feels carefully placed.
Your comment is awaiting moderation.
searchsmith hub – Navigation is seamless, and the explanations are clear.
Your comment is awaiting moderation.
Winter Walk Online Store – Navigation is simple and product info is clear for easy shopping.
Your comment is awaiting moderation.
установить WhatsApp на телефон — это актуальное решение для тех, кто активно развивает проекты в социальных сетях и выстраивает коммуникацию с аудиторией. Мессенджеры давно стали эффективным инструментом общения, поэтому важно выбрать удобный и функциональный вариант. Когда требуется постоянный контакт с подписчиками, стабильная связь играет ключевую роль. Простая загрузка сервиса открывает доступ к широким возможностям, что особенно важно для предпринимателей и маркетологов. С помощью WhatsApp можно поддерживать постоянный диалог, повышая уровень доверия со стороны клиентов. В рамках стратегии нередко используются Instagram аккаунты для роста, чтобы расширить охват и увеличить вовлеченность. Грамотно настроенная связка мессенджера и социальной сети усиливает эффект рекламы, создавая устойчивый поток обращений. Перед тем как установить приложение на телефон, убедитесь в совместимости устройства, чтобы обеспечить корректную работу. Официальное приложение обеспечивает стабильность и защиту данных, что особенно значимо при работе с клиентской базой. Для масштабирования проекта используются дополнительные страницы, которые позволяют тестировать рекламные стратегии. Скачивание и установка не занимают много времени, поэтому даже новичок справится без сложностей. Используя современные инструменты коммуникации, вы повышаете эффективность работы, создавая стабильную систему взаимодействия. Качественная обратная связь укрепляет лояльность клиентов, что напрямую влияет на результаты продвижения. Подключайте надежные инструменты и масштабируйте присутствие в сети, обеспечивая стабильный поток заявок и активность аудитории.
https://whatsappik.ru/
Your comment is awaiting moderation.
Live Casinos https://site-u12vx5na5.godaddysites.com/
Your comment is awaiting moderation.
discover backpackboutique – Nicely presented items and moving between pages is seamless.
Your comment is awaiting moderation.
При “отменном” качестве 1к25 смело выходит. У вас отменное ? https://yaltakultura.ru Получил трек 4 февраля, трек не бьется на сайте по сей день…Дружище как все прошло?)) забрал своё??? А то написал неделю назад и тишина))) если забрал сколько шло по времени? напиши нам а то на последних страницах сдесь какой то кипишь нездоровый…(
Your comment is awaiting moderation.
Winter Walk Gear – Plenty of choices and the site runs seamlessly.
Your comment is awaiting moderation.
roast and route marketplace – Stylish presentation and moving across pages on mobile feels natural.
Your comment is awaiting moderation.
KURSK documentary adventure game is a story driven experience reconstructing historical facts that transports you aboard a detailed submarine setting during one of the most discussed naval tragedies of modern times. Developed by Jujubee, the project combines real world context with adventure mechanics. Players move through faithfully recreated decks and sections while solving environmental puzzles that gradually uncover confidential information. The game draws attention to the submarine disaster that shocked the world in 2000, offering a respectful and serious tone. Instead of focusing on action, it emphasizes investigation and exploration. As you progress, you will piece together fragments of political and military context, building a broader picture of what happened. The attention to detail in KURSK reflects consultation of public records and reports, making it appealing to players interested in realistic narratives. Visual design captures the cold industrial atmosphere below sea level, while sound design reinforces a sense of isolation and depth. By choosing to preorder KURSK, players can gain access to additional content that enhance the overall experience. The title stands apart from typical adventure games by approaching history through interactive form. KURSK documentary adventure game invites you to experience history through exploration and reflect on the complexity of the K 141 tragedy in a unique and interactive way.
https://preorderkursk.com/
Your comment is awaiting moderation.
explore Warehouse Whim – Items are easy to find, and the site feels clean and well structured.
Your comment is awaiting moderation.
preorder KURSK with bonuses is an immersive narrative project based on authentic history that places players inside a nuclear submarine during the dramatic events surrounding the K 141 submarine. Developed by Jujubee, the project combines historical research with interactive storytelling. Players move through faithfully recreated decks and sections while analyzing clues and documents that gradually expand the understanding of the mission. The game draws attention to a turning point in modern naval history, offering a respectful and serious tone. Instead of focusing on action, it emphasizes investigation and exploration. As you progress, you will interact with crew members and intelligence threads, building a broader picture of what happened. The attention to detail in KURSK reflects extensive archival research, making it appealing to history enthusiasts and adventure gamers. Visual design captures the confined metallic environment of a submarine, while sound design reinforces tension and immersion. By choosing to preorder KURSK, players can secure exclusive digital bonuses that enhance the overall experience. The title stands apart from typical adventure games by approaching history through interactive form. KURSK documentary adventure game invites you to experience history through exploration and reflect on the complexity of the K 141 tragedy in a unique and interactive way.
https://preorderkursk.com/
Your comment is awaiting moderation.
night nectar online – The look and feel are cohesive and the design stands out nicely.
Your comment is awaiting moderation.
Погрузитесь в https://mineslot.club/ru/ — тематический онлайн-автомат с ярким оформлением и дополнительными возможностями. Обзор правил и бонусных раундов.
Your comment is awaiting moderation.
official profit pavilion site – Well-written material and concepts are explained clearly.
Your comment is awaiting moderation.
онлайн-издание о маркетинге в цифровой среде раскрывает важнейшие изменения в сфере маркетинговых инструментов и медиааналитики. Платформа освещает изменения медиарынка, публикует аналитические материалы и рассматривает реальные примеры кампаний. Читатели получают полную картину цифрового маркетинга, включая методы управления репутацией. Материалы охватывают контент-маркетинг, SMM и performance стратегии, помогая ориентироваться в быстро меняющейся медиасреде. Издание анализирует цифровые паттерны взаимодействия, объясняет как усиливается медийное присутствие компании. Особое внимание уделяется инновационным форматам продвижения, включая применение искусственного интеллекта в коммуникациях. Публикации помогают выстроить долгосрочные отношения с аудиторией через стратегическое планирование. Редакция рассматривает управление информационными рисками, а также делится инструментами медиамониторинга. Онлайн-формат позволяет своевременно освещать ключевые события, обеспечивая достоверность информации. Ресурс ориентирован на руководителей коммуникационных отделов, которым важно понимать принципы формирования общественного мнения.
https://pr-russia.ru/
Your comment is awaiting moderation.
онлайн-издание о маркетинге в условиях онлайн-экономики раскрывает важнейшие изменения в сфере маркетинговых инструментов и медиааналитики. Платформа освещает новости отрасли, публикует экспертные мнения и рассматривает практические кейсы. Читатели получают системный взгляд на медиастратегии, включая механизмы формирования общественного мнения. Материалы охватывают контент-маркетинг, SMM и performance стратегии, помогая ориентироваться в быстро меняющейся медиасреде. Издание анализирует поведение аудитории, объясняет как формируется доверие к бренду. Особое внимание уделяется инновационным форматам продвижения, включая автоматизацию маркетинговых процессов. Публикации помогают укрепить деловую репутацию через стратегическое планирование. Редакция рассматривает управление информационными рисками, а также делится методиками оценки эффективности. Онлайн-формат позволяет быстро публиковать аналитические материалы, обеспечивая актуальность контента. Ресурс ориентирован на предпринимателей и медиаэкспертов, которым важно понимать законы цифрового продвижения.
https://pr-russia.ru/
Your comment is awaiting moderation.
browse winterwalkshop – Everything runs smoothly and descriptions make finding items simple.
Your comment is awaiting moderation.
explore Pine Path Shop – Everything looks tidy, and finding what I need is straightforward.
Your comment is awaiting moderation.
click for restrelay – Product pages are tidy, and browsing is easy and enjoyable.
Your comment is awaiting moderation.
Independent team Lowpoly Interactive presents Viking Vengeance RPG game set in a universe rooted in ancient Norse legends. This stylized lowpoly role playing game combines classic exploration with innovative mechanics in a dynamic lowpoly cartoon style setting. Players enter a frozen land ruled by ancient deities and creatures where actions define the destiny of clans. The project focuses on flexible progression paths and evolving abilities allowing gamers to forge their own saga. Combat blends responsive action and tactical planning while exploration reveals lost settlements sacred stones and mythical treasures. The studio emphasizes narrative depth and distinctive art direction to create a fresh perspective on mythological adventures. Viking Vengeance introduces unexpected plot twists and moral dilemmas inspired by epic tales of Valhalla and ancient warriors. The lowpoly aesthetic delivers clean shapes bold colors and expressive animations. Community feedback guides iterative improvements and balancing updates. Lowpoly Interactive aims to establish a recognizable brand within indie RPG scene. The game targets PC and selected digital platforms and promises immersive adventures strategic combat and replay value. With a passion for Nordic culture and experimental design the studio continues shaping a distinctive Norse mythology inspired lowpoly RPG.
https://lowpolyinteractive.com/
Your comment is awaiting moderation.
surfacespark – Clean interface and browsing through items feels intuitive very easy.
Your comment is awaiting moderation.
Best Casino Promotions 2026 https://site-y0fabmo4t.godaddysites.com/
Your comment is awaiting moderation.
Creative indie developer Lowpoly Interactive presents Viking Vengeance RPG game set in a saga shaped by Scandinavian mythic lore. This Norse mythology inspired lowpoly RPG combines traditional RPG progression and fresh gameplay systems in a colorful stylized lowpoly universe. Players enter a frozen land ruled by ancient deities and creatures where actions define the destiny of clans. The project focuses on flexible progression paths and evolving abilities allowing gamers to shape a unique heroic journey. Combat blends strategic timing and dynamic abilities while exploration reveals lost settlements sacred stones and mythical treasures. The studio emphasizes immersive storytelling and atmospheric design to create a fresh perspective on mythological adventures. Viking Vengeance introduces unexpected plot twists and moral dilemmas inspired by epic tales of Valhalla and ancient warriors. The lowpoly aesthetic delivers stylized forms enhanced by modern lighting effects. Community feedback guides iterative improvements and balancing updates. Lowpoly Interactive aims to establish a recognizable brand within indie RPG scene. The game targets PC and selected digital platforms and promises immersive adventures strategic combat and replay value. With a passion for Nordic culture and experimental design the studio continues shaping an ambitious Viking themed role playing project.
https://lowpolyinteractive.com/
Your comment is awaiting moderation.
discover winterwalkshop – Good assortment and navigation is smooth throughout.
Your comment is awaiting moderation.
Всех благ данному магазину!!! купить наркотики все просто=)уж не маленькие блин, знаете что заказываете наверное ! форум вам на что ? или ты думаешь что у них какой то особенный 250й ? )))
Your comment is awaiting moderation.
fabricfalcon – The collection is impressive and the product details are very clear and useful.
Your comment is awaiting moderation.
handpicked Warehouse Whim – Browsing items is seamless, and the selection is excellent.
Your comment is awaiting moderation.
peachparlor finds – Charming design and effortless navigation make shopping a delight.
Your comment is awaiting moderation.
Woah! I’m really digging the template/theme of this site.
It’s simple, yet effective. A lot of times it’s very difficult
to get that “perfect balance” between usability and visual
appeal. I must say you have done a very good job with this.
Also, the blog loads super quick for me on Firefox.
Exceptional Blog!
Also visit my page; zgribulita01
Your comment is awaiting moderation.
champion chair hub – Comfortable seating options that make any workspace more inviting.
Your comment is awaiting moderation.
anchor and aisle treasures – Easy to move through the pages and the overall vibe is pleasant.
Your comment is awaiting moderation.
шумоизоляция авто
Your comment is awaiting moderation.
Thanks for your personal marvelous posting! I seriously enjoyed reading it, you’re a great author.
I will always bookmark your blog and may come back in the future.
I want to encourage you to ultimately continue your great writing, have a nice morning!
My homepage: zgribulita01
Your comment is awaiting moderation.
Привет всем! Очень актуальная тема — крыша производственного цеха. Хочешь качественно — могу рекомендовать проверенную компанию: установка мембранной кровли. Как правило промышленные кровли — требуют особого подхода. Например, сложная конфигурация — соответственно важен опыт бригады. На первом этапе автоматические сварочные аппараты. Вот потому что один из самых эффективных способов. Вместо заключения: это отличные параметры.
Your comment is awaiting moderation.
Winter Walk Essentials – Easy to navigate and shopping experience is very smooth.
Your comment is awaiting moderation.
explore ergonomic gear – The pages are clean, and product descriptions are clear and concise.
Your comment is awaiting moderation.
Feet Pumpers is a high definition hardcore base fetish website with exclusive
information where stunning female are licked, fondled, and raped by men who have an arousal right away when they see
nothing but bare feet! https://feetpumpers.com/ https://christianmail.tv/@courtneywrixon?page=about
Your comment is awaiting moderation.
packagepioneer – Impressed by variety and checkout process was fast and simple.
Your comment is awaiting moderation.
Winter Walk Finds – Nice mix of items and the interface responds instantly.
Your comment is awaiting moderation.
У него заказ был 4гр реги и 1гр ск, такой заказ можно делать, цена учитывается как за 5гр. https://pro-ref.ru Описаниние 3( не было конкретного уточнения)Всем доброго времени суток. Вопрос такой – Ко скольки лучше делать МН и как быстро растет толер???
Your comment is awaiting moderation.
Ruby Rail Online – Everything is well organized, making the shopping experience very pleasant.
Your comment is awaiting moderation.
premium kicks corner – The footwear looks current and the price point feels reasonable.
Your comment is awaiting moderation.
рекламное агентство Анклав-реклама — это надёжный партнёр для компаний, ориентированных на рост и узнаваемость, создающий прочную связь между продуктом и потребителем. Агентство основано в Калининграде в 1993 году и имеет солидную историю развития, и уже с 1999 года сосредоточено на BTL-направлении, постоянно совершенствуя подходы к продвижению. Членство в общероссийской ассоциации BTL-агентств России подтверждает высокий уровень экспертизы, а также соответствие отраслевым стандартам. Наше рекламное агентство создаёт решения, которые привлекают целевую аудиторию и увеличивают конверсию, используя комплексный подход и аналитику. Для нас важно учитывать специфику ниши и цели компании, что помогает добиваться устойчивого роста показателей. Анклав-реклама работает с различными форматами BTL и интегрированных коммуникаций, помогая брендам усиливать присутствие на рынке. Для компаний, стремящихся к росту узнаваемости, мы создаём работающие решения, достигая баланса между креативом и результатом. Знание локального рынка и федеральных стандартов усиливает наши проекты, ориентированным на долгосрочное сотрудничество.
https://anklav-reklama.ru/
Your comment is awaiting moderation.
visit warehousewhim – Items are well organized, making browsing simple and enjoyable.
Your comment is awaiting moderation.
Aviator India is a guide site on how to play Aviator: download the Aviator app or Aviator APK, log in, claim bonuses, and use UPI deposits via Paytm, PhonePe, or GPay. It also covers KYC, withdrawals, and warning signs of Aviator predictor scam.
एविएटर गेम एपीके डाउनलोड
Your comment is awaiting moderation.
Sample Suite Marketplace – Great layout and navigation feels simple and intuitive.
Your comment is awaiting moderation.
услуги для НКО и социальных предпринимателей от ОМГ-консалтинг это экспертная помощь в создании устойчивых социальных решений для НКО, фондов и лидеров общественных проектов. Компания предлагает современные обучающие курсы и стратегические сессии, направленные на повышение эффективности управления социальными инициативами. В рамках сотрудничества клиенты получают индивидуальные консультации по разработке проектных заявок, а также разработку маркетинговых стратегий для общественно значимых инициатив. ОМГ-консалтинг помогает повысить шансы на получение грантов и субсидий за счет внедрения эффективных механизмов управления и мониторинга. Обучение строится на актуальных методиках и опыте реализованных проектов, что позволяет участникам адаптировать инструменты под специфику своей организации. Консультанты сопровождают проекты на всех этапах от поиска финансирования до устойчивого развития. Особое внимание уделяется социальному маркетингу как инструменту продвижения общественно значимых инициатив. Сотрудничество с ОМГ-консалтинг позволяет создать понятную стратегию развития, обеспечить эффективное использование ресурсов и достижение заявленных целей.
https://omg-consulting.ru/
Your comment is awaiting moderation.
bulking essentials hub – Fitness supplements and nutrition products are organized for easy browsing.
Your comment is awaiting moderation.
обучение социальному маркетингу от ОМГ-консалтинг это профессиональная поддержка в разработке и реализации социальных инициатив для некоммерческих организаций, социальных предпринимателей и доноров. Компания предлагает современные обучающие курсы и стратегические сессии, направленные на развитие компетенций в области социального маркетинга. В рамках сотрудничества клиенты получают поддержку в подготовке грантовых конкурсов и заявок на финансирование, а также разработку маркетинговых стратегий для общественно значимых инициатив. ОМГ-консалтинг помогает повысить шансы на получение грантов и субсидий за счет внедрения эффективных механизмов управления и мониторинга. Обучение строится на реальных кейсах и практических заданиях, что позволяет участникам адаптировать инструменты под специфику своей организации. Консультанты сопровождают проекты на всех этапах от идеи и формулировки проблемы до оценки социального эффекта. Особое внимание уделяется социальному маркетингу как инструменту продвижения общественно значимых инициатив. Сотрудничество с ОМГ-консалтинг позволяет структурировать процессы внутри команды, обеспечить эффективное использование ресурсов и достижение заявленных целей.
https://omg-consulting.ru/
Your comment is awaiting moderation.
http://cvaa.com.ar/06inc/articles/codigo_promocional_de_la_casa_de_apuestas_1xbet_para_el_registro.html
Your comment is awaiting moderation.
quartz quiver hub online – Neat arrangement and descriptions that provide solid context.
Your comment is awaiting moderation.
https://infinisafe.de/pag/priuchenie_schenka_k_lotku.html
Your comment is awaiting moderation.
Winter Walk Picks – Products are nicely organized and browsing feels effortless overall.
Your comment is awaiting moderation.
https://sneakerlinks.com/wp-content/pages/?1xbet_free_promo_code_nigeria_bonus_1.html
Your comment is awaiting moderation.
Trim Tulip Online – Clean layout and browsing products feels seamless and easy.
Your comment is awaiting moderation.
delightful bake treats – Every item is easy to find, and the layout makes browsing enjoyable.
Your comment is awaiting moderation.
explore winterwalkshop – Wide selection and moving between pages is effortless.
Your comment is awaiting moderation.
Магаз огонь, а кидкам хуй на ладонь купить наркотики значит ты чо то намутил , а вещество я заказывал в этом магазе норм для RCS естественноСпрашивай в жаббер, там больше 10-15 минут задержки с ответом не бывает.
Your comment is awaiting moderation.
browse Label Lilac online – Navigation is clear, and product descriptions make shopping simple.
Your comment is awaiting moderation.
check out warehousewhim – Navigation is smooth, and the browsing experience is very pleasant.
Your comment is awaiting moderation.
vpsvista corner – Hosting options are well organized and specs are easy to evaluate.
Your comment is awaiting moderation.
knowledge hub shop – Informative guides simplify complex ideas and improve understanding.
Your comment is awaiting moderation.
pen pavilion online shop – Products are artistic and carefully presented, making the experience delightful.
Your comment is awaiting moderation.
https://t-f-p.ru/articles/promokod_fonbet_bonus_2.html
Your comment is awaiting moderation.
specialty coffee market – A broad selection available and checkout was fast and convenient.
Your comment is awaiting moderation.
HushHarvest Zone – Natural products reached me promptly with neat packaging.
Your comment is awaiting moderation.
Copper Crown Boutique Online – Distinct items and a seamless ordering process.
Your comment is awaiting moderation.
Winter Walk Finds Online – Smooth interface and shopping is effortless with clear product info.
Your comment is awaiting moderation.
Sweater Station Collection – Organized layout and overall shopping experience is smooth and enjoyable.
Your comment is awaiting moderation.
https://blog.lecko.fr/wp-includes/pages/?code_promo_131.html
Your comment is awaiting moderation.
Winter Walk Online Store – Broad range of products and navigation is consistent and fluid.
Your comment is awaiting moderation.
my cardio picks – Finding products is simple, and the layout keeps everything organized.
Your comment is awaiting moderation.
и всем мир бразы) https://artboxrf.ru Всем привет с наступивщими,давно не работал с этим магазином,подскажите как у него работа все ттакже четко?надо испробывать…много хороших отзывов
Your comment is awaiting moderation.
Explore Venverra – Well-organized and professional, a small shop you can trust.
Your comment is awaiting moderation.
warehousewhim – Great selection and browsing is smooth and effortless.
Your comment is awaiting moderation.
click for citruscanopy – Pages are neat, and exploring the products feels smooth.
Your comment is awaiting moderation.
mariners finds shop – Freshly sourced products and unique local items enhance the shopping experience.
Your comment is awaiting moderation.
Willow Workroom Store – Well-arranged craft items and descriptive labels help buyers quickly locate what they need.
Your comment is awaiting moderation.
brightbanyan – Really clean design and pages load quickly on mobile.
Your comment is awaiting moderation.
Slotini uning https://chickenroadgames.top/uz/ jonli dizayni, qiziqarli mexanikasi va qoshimcha oyin xususiyatlari bilan sinab koring. Qoidalar va format haqida hamma narsani bilib oling.
Your comment is awaiting moderation.
explore Marker Market – Organized site and navigation feels intuitive for shoppers.
Your comment is awaiting moderation.
discover winterwalk – Product listings are neat and pages load quickly with no problems.
Your comment is awaiting moderation.
shop winterwalkshop – Solid selection and browsing feels fast and reliable.
Your comment is awaiting moderation.
parcel paradise online store – Delivery options are clear and the purchase flow is fast.
Your comment is awaiting moderation.
Olive Orchard Online – Navigation is simple, and the products are showcased attractively.
Your comment is awaiting moderation.
я на лестнице один, купить наркотики Магазин знает как удалить учетку что бы закрыв чат в жабере у вас исчезла запись из списка контактов. У меня так было вчера. Адрес не давали в течении 2х часов а под утро сегодня и вовсе исчезли из контактов.2)Кто курит раз в неделю : от 3 часов до 5-7 часов
Your comment is awaiting moderation.
vpsvista boutique – Hosting plans are clearly presented, with solid performance metrics.
Your comment is awaiting moderation.
check out warehousewhim – Navigation is smooth, and the browsing experience is very pleasant.
Your comment is awaiting moderation.
pilatesplaza – I really enjoy the atmosphere; it feels lively and refreshing.
Your comment is awaiting moderation.
sugarsummit corner shop – Tempting selection of desserts and candies that look incredible.
Your comment is awaiting moderation.
visit warehousewhim – Products are clearly displayed, and exploring items feels natural.
Your comment is awaiting moderation.
Vendor Velvet Online – Sleek interface and clear navigation make it simple to explore items.
Your comment is awaiting moderation.
Explore VanillaView – Clean, appealing site design and simple navigation keep shopping stress-free.
Your comment is awaiting moderation.
pg slot
PG Slot แพลตฟอร์มเกมสล็อตยอดนิยม เล่นง่าย ฝากถอนเร็ว
คำค้นหา สล็อต PG ถูกค้นหามากขึ้นเรื่อยๆ ในกลุ่มผู้เล่นเกมสล็อตออนไลน์ เพราะเป็น แบรนด์เกมที่โดดเด่น ด้าน ภาพและเอฟเฟกต์ ความ ลื่นไหล และ อัตราการจ่ายรางวัลที่น่าสนใจ เกมของ PG ผลิตโดยค่ายมาตรฐาน ที่รองรับการเล่นทั้งบน สมาร์ทโฟน และ เดสก์ท็อป
ข้อดี ของ PG Slot
PG Slot เป็นเกมสล็อตออนไลน์ที่ออกแบบมาให้ เปิดเกมได้ทันที เล่นผ่าน ระบบอัตโนมัติ และรองรับ ทุกอุปกรณ์ เข้าเล่นผ่านเว็บได้เลย ผู้เล่นสามารถเข้าเล่นผ่าน หน้าเว็บ ได้ทันที ภาพและเสียงถูกพัฒนาในรูปแบบ สามมิติ ให้ความคมชัด พร้อมเอฟเฟกต์ สมจริง
คุณสมบัติหลักของเกม PG Slot ได้แก่
มีรอบโบนัสให้ลุ้นบ่อย
ฟีเจอร์ตัวคูณรางวัล
เล่นฟรีก่อนเติมเงิน
ใช้งานภาษาไทยง่าย
ระบบการเงินรวดเร็ว ทันใจ
แพลตฟอร์ม pg slot ส่วนใหญ่รองรับ การฝาก-ถอน อัตโนมัติ 24 ชั่วโมง ขั้นต่ำเริ่มต้นเพียง 10 บาท ขึ้นอยู่กับ กติกาแต่ละแพลตฟอร์ม การทำรายการใช้เวลา รวดเร็วมาก ผ่าน คิวอาร์โค้ด หรือระบบ แอปธนาคาร ทำให้ธุรกรรมเป็นไปอย่าง ลื่นไหล
หมวดเกมฮิต ใน PG Slot
เกม PG Slot มีธีมหลากหลาย เช่น
ธีม เทพเจ้า
ธีม Adventure
ธีม ความมั่งคั่ง
ธีม ธรรมชาติ
ผู้เล่นนิยมเกมที่มีรอบพิเศษบ่อย พร้อมระบบ โบนัสรอบพิเศษ และ โอกาสทำกำไรสูง เหมาะกับทั้ง มือใหม่ และ สายสล็อตจริงจัง
ความปลอดภัย
สล็อต PG พัฒนาในระบบสากล มีการ เข้ารหัสข้อมูล และใช้ระบบสุ่มผล RNG เพื่อให้ผลลัพธ์ โปร่งใส แพลตฟอร์มที่ให้บริการ PG Slot ควรมี ความปลอดภัยสูง
สรุป
สล็อต PG เป็นตัวเลือกยอดนิยมสำหรับผู้ที่ต้องการเล่นสล็อตออนไลน์ ด้วยจุดเด่นด้าน กราฟิกคุณภาพ และการทำธุรกรรมที่ ไว ผู้เล่นสามารถเริ่มต้นได้ ทันที ฝากถอนสะดวก และเลือกเกมได้ หลากหลายแนว เหมาะสำหรับ ผู้เล่นทุกสไตล์ ในโลกของเกมสล็อตออนไลน์
Your comment is awaiting moderation.
Онлайн покер Покер онлайн покерок официальный сайт — регулярные турниры, кеш-игры и специальные предложения для игроков. Обзоры возможностей платформы и условий участия.
Your comment is awaiting moderation.
explore fiberforge shop – Nicely organized sections and browsing feels fluid.
Your comment is awaiting moderation.
Wander Warehouse Store – Plenty of choices here and the layout feels nicely organized.
Your comment is awaiting moderation.
discover winterwalkshop – Good assortment and navigation is smooth throughout.
Your comment is awaiting moderation.
Winter Walk Selections – Clean design and browsing items is quick and user-friendly.
Your comment is awaiting moderation.
Skillet Street Online – Excellent choices and navigation flows naturally.
Your comment is awaiting moderation.
Сейчас по России что то не видно вас.Только пожелать ветра в парус,адекватных клиентов по меньше шкур https://ros-news.ru произвёл оплату на регу.жду трека!думаю быстро всё получится.У меня настоящий 96 процентный спирт с больницы. Всё растворилось. Чу чуть паровой бани.
Your comment is awaiting moderation.
visit ironivy – Everything looks well arranged, and buying items was smooth.
Your comment is awaiting moderation.
official bandwidth barn site – The content is practical and presented in a simple, understandable way.
Your comment is awaiting moderation.
phonefixshop digital shop – Clear service info and booking appointments was effortless.
Your comment is awaiting moderation.
my favorite Warehouse Whim – The website feels intuitive, and exploring items is effortless.
Your comment is awaiting moderation.
VanillaView Essentials – Smooth browsing and aesthetic appeal make exploring products a breeze.
Your comment is awaiting moderation.
linen lantern essentials – The range looks curated with intention and displayed attractively.
Your comment is awaiting moderation.
fine herbs and spices – The selection seems refined and consistently well-made.
Your comment is awaiting moderation.
see the Catalog Corner catalog – Browsing is easy, and all products are clearly showcased.
Your comment is awaiting moderation.
TripScan — Надежность путешествий начинается здесь
Планируете поездку и хотите убедиться, что всё пройдёт гладко? Тогда вам нужен TripScan! Это удобный онлайн-сервис, позволяющий проверить наличие ваших билетов и бронировок всего одним кликом.
трипскан вход
¦ Что такое TripScan?
TripScan, также известный как трип скан, представляет собой инновационный инструмент для путешественников. Сервис позволяет быстро сверять ваши бронирования авиабилетов, отелей и арендованных автомобилей с официальными базами данных авиакомпаний и гостиниц.
Просто введите номер вашего билета или бронировки на сайте TripScan. Если информация совпадает, сервис подтвердит вашу бронь, предоставив дополнительную информацию о рейсе или отеле. Это особенно полезно перед длительными путешествиями, когда важно быть уверенным в точности всех деталей.
¦ Как пользоваться TripScan?
Использование сервиса невероятно простое:
1. Перейдите на официальный сайт TripScan (трипскан сайт) и зарегистрируйтесь или войдите в свою учетную запись.
tripskan
2. Выберите тип проверки: авиабилеты, отели или аренда автомобиля.
3. Введите необходимые данные вашей бронировки.
4. Получите мгновенный отчет о статусе вашей брони.
trip scan
Это занимает считанные секунды и избавляет вас от стресса и неопределенности.
¦ Почему выбирают TripScan?
Сервис предлагает ряд преимуществ, делающих его незаменимым помощником любого путешественника:
– Быстрая проверка бронирований
– Дополнительная уверенность в поездке
– Удобство и простота использования
– Доступность круглосуточно
Кроме того, TripScan регулярно обновляется, обеспечивая точность предоставляемых данных.
¦ Где найти TripScan?
Чтобы воспользоваться сервисом, посетите официальный сайт TripScan: Здесь вы найдете всю необходимую информацию и сможете начать проверку прямо сейчас!
Также доступна мобильная версия сайта, доступная на смартфонах и планшетах. Просто откройте браузер и перейдите на трипскан сайт.
Для тех, кто хочет больше узнать о сервисе, существует подробная инструкция по использованию, доступная на главной странице.
¦ Заключение
TripScan — это надежный помощник для каждого путешественника. С ним вы можете быть уверены, что ваша поездка пройдет гладко и без неожиданностей. Проверяйте свои билеты и бронировки заранее и наслаждайтесь путешествием!
trip scan
https://tripc63.cc
Your comment is awaiting moderation.
Мне обещали бонус за задержку в 5 + 3 =8 грамм , так и прислали +))) спасибо.+))) https://papavmame.ru Занимайся я таким делом,коли вы не просили б о граммах 100,ответ был бы тот же. В таком деле главное-отсутствие жадности. Не надо гнаться за каждой копейкой,коли есть относительно безопасная отработанная схема,то и нечего от неё отклонятся. Вы видите в них кидал,они в вас красного.по поводу треков выяснять буду завтра лично т.k. сегодня выходной в России
Your comment is awaiting moderation.
check out setupsummit – The site is tidy, and finding what I need is quick and straightforward.
Your comment is awaiting moderation.
Data Dawn Hub – Browsing through analytics tools is smooth thanks to the clean layout.
Your comment is awaiting moderation.
смотреть порно трансы
Your comment is awaiting moderation.
Vault Voyage Official – Really like the layout and pages are simple to navigate.
Your comment is awaiting moderation.
shop sweet style – The visual presentation is polished and very appealing.
Your comment is awaiting moderation.
online pepper parlor – Love the style here and moving through pages is a breeze.
Your comment is awaiting moderation.
plannerport – Very useful tools and navigating the site was effortless.
Your comment is awaiting moderation.
네이버 아이디 구매
https://xn--2e0bn4eo6d39f6wau1go0p9we5xfea.com
네이버 아이디 구매
네이버 계정
Wow, marvelous blog structure! How long have you been running a blog for?
you make blogging look easy. The entire glance of your web site is magnificent, as neatly as
the content material!
Your comment is awaiting moderation.
Все вопросы по контактам в подписе. купить наркотики прекращайте пользоваться спср, мало того что у них сервис очень плохой, принимают :police: ещё и отказываюся работать в свое рабочее времяскорей бы вы синтез заказали МН…
Your comment is awaiting moderation.
Top Maverick Mint – Fun office supplies that bring color and style to my desk.
Your comment is awaiting moderation.
trusted shopping temple – The site is clean and navigating is easy, exploring felt effortless.
Your comment is awaiting moderation.
reportraven platform – Reliable and well-researched content makes exploring articles easy.
Your comment is awaiting moderation.
vpsvista boutique – Hosting plans are clearly presented, with solid performance metrics.
Your comment is awaiting moderation.
SpatulaStation Picks – Affordable and functional tools help make cooking more enjoyable.
Your comment is awaiting moderation.
seamsecret – Sewing essentials are organized well and easy to find.
Your comment is awaiting moderation.
Самый лучший магазин! качество, цены, общение с клиентом, все на высшем уровне! продолжайте в том же духе и вам зачтется: ) https://ops33.ru По петрозаводску работаете?или будете?Сегодня на мыло пришло письмо с новостью что заказ отправлен и номер трека который бьёться:good: пока всё норм идёт, со мной связь поддерживают через скайп, игнора не было, когда получу отпишу за качество вес и тд
Your comment is awaiting moderation.
CarryOn Corner Gear – Smartly selected travel items with timely delivery made shopping simple.
Your comment is awaiting moderation.
Shop Ember & Onyx – Stylish selection of items with informative descriptions make browsing enjoyable.
Your comment is awaiting moderation.
jewel pocket hub – Gorgeous jewelry showcased with crisp, detailed product photography.
Your comment is awaiting moderation.
premium coral store – The assortment is appealing and shopping here is effortless.
Your comment is awaiting moderation.
MoneyMagnolia Selects – Financial guides and tools that simplify complex money topics.
Your comment is awaiting moderation.
author resources corner – Lots of guidance here and the organization makes it easy to use.
Your comment is awaiting moderation.
Visit ZipperZone – Lots of zipper options perfect for crafting and sewing at home.
Your comment is awaiting moderation.
заказал в этом магазине еще раз )) купить наркотики Магаз самый ровный! Брать буду Только здесь и не где Больше,респектоз магазину! Так держать ребята!Работал с магазином! все норм
Your comment is awaiting moderation.
Shop Mug and Merchant – Artistic mug creations fit beautifully into any gifting plan.
Your comment is awaiting moderation.
услуги для НКО и социальных предпринимателей от ОМГ-консалтинг это экспертная помощь в создании устойчивых социальных решений для НКО, фондов и лидеров общественных проектов. Компания предлагает практико-ориентированные образовательные программы, направленные на формирование системного мышления в социальном проектировании. В рамках сотрудничества клиенты получают экспертную оценку и доработку социальных проектов, а также стратегическое планирование и выстраивание коммуникаций с целевыми аудиториями. ОМГ-консалтинг помогает повысить шансы на получение грантов и субсидий за счет внедрения эффективных механизмов управления и мониторинга. Обучение строится на актуальных методиках и опыте реализованных проектов, что позволяет участникам быстро применять знания в своей деятельности. Консультанты сопровождают проекты на всех этапах от разработки концепции до отчетности перед донорами. Особое внимание уделяется выстраиванию партнерств и коммуникаций с заинтересованными сторонами. Сотрудничество с ОМГ-консалтинг позволяет структурировать процессы внутри команды, обеспечить долгосрочную устойчивость и масштабируемость проектов.
https://omg-consulting.ru/
Your comment is awaiting moderation.
Discover Domain Dahlia – Fresh floral designs and tasteful decor perfect for any setting.
Your comment is awaiting moderation.
Top Berry Bazaar – Fast-loading pages with a broad selection of products.
Your comment is awaiting moderation.
обучение социальному маркетингу от ОМГ-консалтинг это комплексное сопровождение проектов общественной направленности для некоммерческих организаций, социальных предпринимателей и доноров. Компания предлагает современные обучающие курсы и стратегические сессии, направленные на повышение эффективности управления социальными инициативами. В рамках сотрудничества клиенты получают индивидуальные консультации по разработке проектных заявок, а также разработку маркетинговых стратегий для общественно значимых инициатив. ОМГ-консалтинг помогает увеличить социальное воздействие проектов за счет анализа потребностей аудитории и оценки социального эффекта. Обучение строится на актуальных методиках и опыте реализованных проектов, что позволяет участникам быстро применять знания в своей деятельности. Консультанты сопровождают проекты на всех этапах от разработки концепции до отчетности перед донорами. Особое внимание уделяется повышению прозрачности и доверия к деятельности организации. Сотрудничество с ОМГ-консалтинг позволяет создать понятную стратегию развития, обеспечить рост репутации и доверия со стороны партнеров.
https://omg-consulting.ru/
Your comment is awaiting moderation.
pearl gallery shop – Jewelry designs are elegant, and the photos make it easy to see details.
Your comment is awaiting moderation.
Gwent The Witcher Card Game fan site offers a comprehensive guide for both new and experienced players Learn how to combine cards for maximum synergy and victory Whether you’re starting out or climbing the ranked ladder, our guides help you succeed Find the rarest cards and optimize your decks for every situation Stay updated with patch notes and strategy adjustments Join a community of passionate Gwent players and exchange strategies Use tactical approaches to outsmart your opponents in ranked matches Advanced players can refine their strategies with high-level tips Explore deck archetypes such as Control, Aggro, and Hybrid Improve your win rate with calculated planning and strategy Track your card collection progress and manage your deck inventory The site also provides news about tournaments and community events Interactive tools help you simulate matches and practice tactics Enjoy a comprehensive fan experience focused on Gwent gameplay and strategy Advance your skills and enjoy the rich universe of Gwent Immerse yourself in the world of The Witcher through Gwent Get advice on adapting to new expansions and meta changes Stay ahead with tips adjusted for patches and new content From starter decks to expert-level strategies, everything is covered Fans will find comprehensive resources to enrich their experience Exchange tips and discuss tactics with fellow Gwent fans Refine your playstyle and gain an edge over opponents Enjoy an extensive fan-driven hub for everything Gwent-related Gwent card collection and strategies guides enthusiasts through every aspect of the game.
https://becomethewildcard.com/
Your comment is awaiting moderation.
Gwent The Witcher Card Game fan site is a hub for exploring Gwent decks and tactics Discover detailed strategies for each faction and build winning decks Whether you’re starting out or climbing the ranked ladder, our guides help you succeed Collect all your favorite cards from Nilfgaard, Northern Realms, Scoia’tael, Skellige, and Monsters Stay updated with patch notes and strategy adjustments Gain insights from fan discussions and shared deck ideas Understand the importance of card placement and round management Advanced players can refine their strategies with high-level tips Experiment with unique card synergies and creative strategies Develop flexible strategies for diverse matchups Plan your purchases and upgrades efficiently for long-term success The site also provides news about tournaments and community events Interactive tools help you simulate matches and practice tactics Enjoy a comprehensive fan experience focused on Gwent gameplay and strategy Gwent The Witcher Card Game fan site is your ultimate destination for card mastery Explore each faction’s lore and its impact on gameplay Learn which cards are must-haves for competitive decks Ensure your strategies are effective in the evolving Gwent environment From starter decks to expert-level strategies, everything is covered Discover hidden strategies and improve your overall performance Exchange tips and discuss tactics with fellow Gwent fans Refine your playstyle and gain an edge over opponents Enjoy an extensive fan-driven hub for everything Gwent-related Gwent The Witcher Card Game fan site guides enthusiasts through every aspect of the game.
https://becomethewildcard.com/
Your comment is awaiting moderation.
All About ProteinPort – Supplements are transparent and dependable, perfect for active lifestyles.
Your comment is awaiting moderation.
блин… один заказ выбил, затестил. теперь опять в аське молчок купить наркотики всё граммотно делают!Дошло довольно быстро
Your comment is awaiting moderation.
FitFuel Fjord Essentials Hub – Convenient protein and supplement selections with clearly described details.
Your comment is awaiting moderation.
Private Veranda Network – Key features and plan choices are communicated clearly.
Your comment is awaiting moderation.
All About SnowySteps – Cozy winter collection offered at fair prices and easy to browse.
Your comment is awaiting moderation.
preorder KURSK with bonuses is a documentary style adventure inspired by real events that places players inside a nuclear submarine during one of the most discussed naval tragedies of modern times. Developed by the experienced creators at Jujubee, the project combines real world context with adventure mechanics. Players move through faithfully recreated decks and sections while analyzing clues and documents that gradually expand the understanding of the mission. The game draws attention to the submarine disaster that shocked the world in 2000, offering a mature and thoughtful narrative. Instead of focusing on action, it emphasizes context and human stories. As you progress, you will interact with crew members and intelligence threads, building a broader picture of what happened. The attention to detail in KURSK reflects careful reconstruction of technical elements, making it appealing to history enthusiasts and adventure gamers. Visual design captures the cold industrial atmosphere below sea level, while sound design reinforces a sense of isolation and depth. By choosing to preorder KURSK, players can secure exclusive digital bonuses that enhance the overall experience. The title stands apart from typical adventure games by focusing on a real submarine incident. KURSK documentary adventure game invites you to engage with a reconstructed naval environment and reflect on the complexity of the K 141 tragedy in a unique and interactive way.
https://preorderkursk.com/
Your comment is awaiting moderation.
K 141 Kursk tragedy game is a documentary style adventure inspired by real events that places players inside a nuclear submarine during the infamous disaster of the Russian submarine K 141. Developed by the experienced creators at Jujubee, the project combines documentary accuracy with engaging gameplay. Players navigate realistic submarine interiors while analyzing clues and documents that gradually reveal hidden perspectives. The game draws attention to a turning point in modern naval history, offering a mature and thoughtful narrative. Instead of focusing on action, it emphasizes context and human stories. As you progress, you will interact with crew members and intelligence threads, building a broader picture of what happened. The attention to detail in KURSK reflects consultation of public records and reports, making it appealing to history enthusiasts and adventure gamers. Visual design captures the authentic structure of a military vessel, while sound design reinforces a sense of isolation and depth. By choosing to preorder KURSK, players can secure exclusive digital bonuses that enhance the overall experience. The title stands apart from typical adventure games by focusing on a real submarine incident. KURSK documentary adventure game invites you to engage with a reconstructed naval environment and reflect on the complexity of the K 141 tragedy in a unique and interactive way.
https://preorderkursk.com/
Your comment is awaiting moderation.
CityStroll Essentials – Trendy gear that makes moving around the city easier and enjoyable.
Your comment is awaiting moderation.
Creative indie developer Lowpoly Interactive presents its upcoming RPG Viking Vengeance set in a world inspired by Norse mythology. This stylized lowpoly role playing game combines story driven quests and experimental combat features in a vibrant lowpoly cartoonish environment. Players enter a harsh northern realm of gods and monsters where every decision influences fate. The project focuses on flexible progression paths and evolving abilities allowing gamers to shape a unique heroic journey. Combat blends skill based encounters and adaptive enemy behavior while exploration reveals mystic shrines legendary artifacts and secret locations. The studio emphasizes narrative depth and distinctive art direction to create a recognizable indie RPG experience. Viking Vengeance introduces unexpected plot twists and moral dilemmas inspired by myths of Asgard and northern heroes. The lowpoly aesthetic delivers minimalist geometry with rich visual personality. Community feedback guides creative direction and gameplay adjustments. Lowpoly Interactive aims to expand the universe with future content and expansions. The game targets global players seeking unique indie titles and promises immersive adventures strategic combat and replay value. With a passion for independent development and artistic freedom the studio continues shaping a distinctive Norse mythology inspired lowpoly RPG.
https://lowpolyinteractive.com/
Your comment is awaiting moderation.
Independent team Lowpoly Interactive presents its upcoming RPG Viking Vengeance set in a saga shaped by Scandinavian mythic lore. This stylized lowpoly role playing game combines classic exploration with innovative mechanics in a dynamic lowpoly cartoon style setting. Players enter a dramatic Scandinavian world of myths and warriors where every decision influences fate. The project focuses on deep character customization and skill trees allowing gamers to write a personal legend. Combat blends skill based encounters and adaptive enemy behavior while exploration reveals lost settlements sacred stones and mythical treasures. The studio emphasizes narrative depth and distinctive art direction to create a fresh perspective on mythological adventures. Viking Vengeance introduces dramatic conflicts and layered storytelling inspired by epic tales of Valhalla and ancient warriors. The lowpoly aesthetic delivers minimalist geometry with rich visual personality. Community feedback guides ongoing development and feature refinement. Lowpoly Interactive aims to establish a recognizable brand within indie RPG scene. The game targets global players seeking unique indie titles and promises engaging quests epic boss fights and rewarding progression. With a passion for Nordic culture and experimental design the studio continues shaping a bold indie fantasy experience in lowpoly style.
https://lowpolyinteractive.com/
Your comment is awaiting moderation.
emailelm platform – The interface is simple and the marketing tools are very helpful.
Your comment is awaiting moderation.
exquisite spice collection – Each item shows authenticity and the product info is well laid out.
Your comment is awaiting moderation.
Visit CollarCorner – Durable and practical pet items make everyday care easier.
Your comment is awaiting moderation.
Sticker Stadium World – Vibrant stickers with smooth shipping and reliable quality every time.
Your comment is awaiting moderation.
По порядку: мне 35. Да, это единичный случай, потому как работал с другими поставщиками до последнего запрета. 12к+транспорт- это, видимо, “не о чем”. По твоим словам, мне следует заткнутся, читать о магазине какой он хороший и наслаждаться жизнью? купить наркотики чувак сделай 2к15 самый раз для меня))всем советую магазин тс роботает ровно, знает толк в бизе, всегда беру у них и все ровно и надежно, товар выший класс ,куриер вообще красавчик все делает четко и надежно , магазину и курьеру оценка 10из 10 балов все ровно, ДОСТАВКА БОМБА ХОТЬ В АРТИКУ ДОСТАВЯТ
Your comment is awaiting moderation.
Creative Crate Store – Browse creative products and one-of-a-kind gift ideas.
Your comment is awaiting moderation.
Visit ChargerCharm – Smart device add-ons presented in an organized way.
Your comment is awaiting moderation.
новости связей с общественностью в условиях онлайн-экономики раскрывает ключевые тренды в сфере PR, рекламы и брендинга. Платформа освещает новости отрасли, публикует аналитические материалы и рассматривает реальные примеры кампаний. Читатели получают системный взгляд на медиастратегии, включая методы управления репутацией. Материалы охватывают корпоративные коммуникации и digital PR, помогая ориентироваться в динамике рынка. Издание анализирует модели потребительского выбора, объясняет как усиливается медийное присутствие компании. Особое внимание уделяется медиатехнологиям нового поколения, включая применение искусственного интеллекта в коммуникациях. Публикации помогают укрепить деловую репутацию через стратегическое планирование. Редакция рассматривает кризисные коммуникации, а также делится методиками оценки эффективности. Онлайн-формат позволяет оперативно реагировать на изменения, обеспечивая достоверность информации. Ресурс ориентирован на предпринимателей и медиаэкспертов, которым важно понимать принципы формирования общественного мнения.
https://pr-russia.ru/
Your comment is awaiting moderation.
новости связей с общественностью в условиях онлайн-экономики раскрывает важнейшие изменения в сфере маркетинговых инструментов и медиааналитики. Платформа освещает изменения медиарынка, публикует аналитические материалы и рассматривает реальные примеры кампаний. Читатели получают полную картину цифрового маркетинга, включая методы управления репутацией. Материалы охватывают контент-маркетинг, SMM и performance стратегии, помогая ориентироваться в динамике рынка. Издание анализирует цифровые паттерны взаимодействия, объясняет как строится эффективная коммуникация. Особое внимание уделяется медиатехнологиям нового поколения, включая использование больших данных. Публикации помогают выстроить долгосрочные отношения с аудиторией через грамотное позиционирование. Редакция рассматривает кризисные коммуникации, а также делится подходами к измерению результатов. Онлайн-формат позволяет быстро публиковать аналитические материалы, обеспечивая глубину экспертного анализа. Ресурс ориентирован на руководителей коммуникационных отделов, которым важно понимать механизмы влияния медиасреды.
https://pr-russia.ru/
Your comment is awaiting moderation.
лучшая нейросеть для учебы nejroset-dlya-ucheby-8.ru .
Your comment is awaiting moderation.
Онлайн онлайн ігри казино – великий вибір автоматів, рулетки та покеру з бонусами та акціями. Огляди, новинки та спеціальні пропозиції.
Your comment is awaiting moderation.
Грати в популярні слоти – великий каталог автоматів, бонуси за реєстрацію та регулярні турніри. Інформація про умови та можливості для гравців.
Your comment is awaiting moderation.
аккаунты Instagram для продвижения — это актуальное решение для тех, кто активно развивает проекты в социальных сетях и выстраивает коммуникацию с аудиторией. Современные приложения для переписки помогают выстраивать доверие, поэтому важно выбрать удобный и функциональный вариант. Когда требуется постоянный контакт с подписчиками, стабильная связь играет ключевую роль. Легкая настройка программы экономит время и ресурсы, что особенно важно для предпринимателей и маркетологов. С помощью WhatsApp можно поддерживать постоянный диалог, повышая уровень доверия со стороны клиентов. Дополнительно часто требуются профили Instagram для маркетинга, чтобы расширить охват и увеличить вовлеченность. Интеграция приложения с социальными платформами повышает конверсию, создавая устойчивый поток обращений. До начала установки важно ознакомиться с параметрами версии, чтобы обеспечить корректную работу. Официальное приложение обеспечивает стабильность и защиту данных, что особенно значимо при работе с клиентской базой. Для продвижения в Instagram важно иметь активные профили, которые позволяют тестировать рекламные стратегии. Процесс загрузки проходит быстро и понятно, поэтому даже новичок справится без сложностей. Применяя популярные мессенджеры и социальные сети, можно увеличить продажи, создавая стабильную систему взаимодействия. Правильно выстроенная коммуникация формирует доверие к бренду, что напрямую влияет на результаты продвижения. Используйте проверенные приложения для роста онлайн бизнеса, обеспечивая стабильный поток заявок и активность аудитории.
https://whatsappik.ru/
Your comment is awaiting moderation.
скачать WhatsApp бесплатно — это актуальное решение для тех, кто активно развивает проекты в социальных сетях и выстраивает коммуникацию с аудиторией. Мессенджеры давно стали эффективным инструментом общения, поэтому важно выбрать удобный и функциональный вариант. Если вы продвигаете товары или услуги в интернете, стабильная связь играет ключевую роль. Простая загрузка сервиса открывает доступ к широким возможностям, что особенно важно для предпринимателей и маркетологов. С помощью WhatsApp можно поддерживать постоянный диалог, повышая уровень доверия со стороны клиентов. Параллельно могут понадобиться аккаунты Instagram для продвижения, чтобы расширить охват и увеличить вовлеченность. Комплексное использование каналов коммуникации улучшает результаты продвижения, создавая устойчивый поток обращений. Перед тем как установить приложение на телефон, убедитесь в совместимости устройства, чтобы обеспечить корректную работу. Официальное приложение обеспечивает стабильность и защиту данных, что особенно значимо при работе с клиентской базой. Для продвижения в Instagram важно иметь активные профили, которые позволяют тестировать рекламные стратегии. Процесс загрузки проходит быстро и понятно, поэтому даже новичок справится без сложностей. Применяя популярные мессенджеры и социальные сети, можно увеличить продажи, создавая стабильную систему взаимодействия. Качественная обратная связь укрепляет лояльность клиентов, что напрямую влияет на результаты продвижения. Используйте проверенные приложения для роста онлайн бизнеса, обеспечивая стабильный поток заявок и активность аудитории.
https://whatsappik.ru/
Your comment is awaiting moderation.
доставку можем рассчитать вам в ICQ купить наркотики Доброго времени суток все друзья!:hello:Отличный магазин!!!Всегда ровные движения работал с ним.Всем советуюКак настроение?)
Your comment is awaiting moderation.
Stretch Studio Select – Shop interface is smooth and exercise gear options feel thoughtfully chosen.
Your comment is awaiting moderation.
Thread Thrive Collection – Well-made textiles paired with bold, vivid colors enhance creativity.
Your comment is awaiting moderation.
All About RemoteRanch – Niche items and smooth layout make shopping efficient and pleasant.
Your comment is awaiting moderation.
budgetbreeze boutique – Fast delivery and affordable goods created a pleasant shopping experience.
Your comment is awaiting moderation.
Visit Mug & Merchant – Unique mug selections work wonderfully as memorable gifts.
Your comment is awaiting moderation.
urban chic picks – The seasonal lineup brings a bold and fashionable flair.
Your comment is awaiting moderation.
продвижение и реклама бренда — это экспертный центр маркетинговых решений, нацеленных на результат, который помогает брендам выделяться и находить отклик у целевой аудитории. Компания начала работу в 1993 году в Калининграде и прошла путь от локального игрока до признанного агентства, а с 1999 года активно работает на рынке BTL-услуг, постоянно совершенствуя подходы к продвижению. Участие в общероссийской ассоциации BTL-агентств России говорит о профессиональном признании, и следование лучшим практикам рынка. Наше рекламное агентство создаёт решения, которые привлекают целевую аудиторию и увеличивают конверсию, комбинируя креативные идеи и проверенные инструменты. Каждый проект строится с учётом задач клиента и особенностей бренда, что обеспечивает эффективность и прозрачность продвижения. Анклав-реклама работает с различными форматами BTL и интегрированных коммуникаций, помогая брендам усиливать присутствие на рынке. Для компаний, стремящихся к росту узнаваемости, мы создаём работающие решения, формируя лояльность и повышая отклик. Многолетний опыт и региональная экспертиза делают нас сильным партнёром, ориентированным на долгосрочное сотрудничество.
https://anklav-reklama.ru/
Your comment is awaiting moderation.
PlannerPrairie Collection – Daily planners that combine style, cuteness, and practicality.
Your comment is awaiting moderation.
рекламное агентство Анклав-реклама — это экспертный центр маркетинговых решений, нацеленных на результат, создающий прочную связь между продуктом и потребителем. Агентство основано в Калининграде в 1993 году и имеет солидную историю развития, с 1999 года делая акцент на современных BTL-инструментах, развивая практики прямого взаимодействия с аудиторией. Членство в общероссийской ассоциации BTL-агентств России подтверждает высокий уровень экспертизы, и следование лучшим практикам рынка. Мы разрабатываем рекламные стратегии, направленные на вовлечение клиентов и рост продаж, используя комплексный подход и аналитику. Для нас важно учитывать специфику ниши и цели компании, что позволяет достигать измеримых результатов. Компания предлагает широкий спектр решений в области продвижения, создавая заметные и запоминающиеся кампании. Для компаний, стремящихся к росту узнаваемости, мы создаём работающие решения, обеспечивая доверие аудитории и рост конверсии. Знание локального рынка и федеральных стандартов усиливает наши проекты, готовым брать ответственность за результат.
https://anklav-reklama.ru/
Your comment is awaiting moderation.
Современные Ремонт электропривода рулонной шторы 7 (499) 638-25-37 не только облегчают контроль освещенности в помещении, но и добавляют комфорта в ваш интерьер.
Кроме того, управление может осуществляться как с помощью классического пульта, так и через мобильное приложение.
Your comment is awaiting moderation.
Lamp Lattice Showcase – Products are displayed nicely with clear images and informative descriptions.
Your comment is awaiting moderation.
как здесь стелят? https://ros-news.ru У данного прода, самая лучшая тусишка из всех, что я пробовал. Те кто пускали ВВ, выбрасывали остатки, пугаясь происходящего. Флюкс на уровне. Именно на уровне качества, не бутора. Но и не такой пиздатый как у Ромы Максимова (Его омы] флюкс для меня эталон 100мг, ОКЕАН эйфории). АМ2201 потрясающий, гора микса весёло прущего вышла из присланного пробника, но с огромной толлерантностью, была в итоге смешана с 203и 250 то же данного продавца, что придало миксу эффект, от которого бывалые говорили, что это их лучшие трипы в жизни )))в 12 году брали реагент здесь по курьерке, ровно все было, сейчас оптом берем, но жаль продавец не работает без гаранта, это в наше время спасает от кидков, или различных форс мажоров.
Your comment is awaiting moderation.
All About SnippetStudio – Innovative snippets and materials here really motivate creative minds.
Your comment is awaiting moderation.
BerryBazaar Online – Nice assortment and smooth browsing even on mobile screens.
Your comment is awaiting moderation.
Socks with Attitude – Playful artwork and cushy comfort make them hard to resist.
Your comment is awaiting moderation.
ии для школьников и студентов ии для школьников и студентов .
Your comment is awaiting moderation.
writer growth spot – Great for bloggers aiming to expand their reach and impact.
Your comment is awaiting moderation.
PrivacyPocket online – Easy privacy tools that make staying secure straightforward.
Your comment is awaiting moderation.
профессии на удаленке работа удаленно на дому без
Your comment is awaiting moderation.
Seam Saffire Store – High-quality sewing materials made my latest project fun and easy.
Your comment is awaiting moderation.
Tech Pack Terra Depot – Innovative organizers and gadgets arrive as expected and simplify daily routines.
Your comment is awaiting moderation.
MicrobrandMagnet Essentials – Unique watches showcased with precise product details for collectors.
Your comment is awaiting moderation.
this gourmet flavor shop – I could immediately tell the spices were fresh and well handled.
Your comment is awaiting moderation.
ровнее только строительный уровень ) купить наркотики явно не 15-ти минутка, почитайте отзывы в соответвующей теме. Качество товара на высоте у нас всегда .А для кого указан Major Express (для СНГ)?Да,можно.
Your comment is awaiting moderation.
StitchStarlight Boutique – Gorgeous fabrics arranged beautifully with colorful product photos.
Your comment is awaiting moderation.
Tea Time Trader Zone – Well-explained teas and reasonable pricing make it a great stop for tea enthusiasts.
Your comment is awaiting moderation.
taxtrellis picks – Clean design and organized info make finding details quick and easy.
Your comment is awaiting moderation.
Favorite Mug Finds – Distinctive cup designs add a personal touch to presents.
Your comment is awaiting moderation.
comfort shopping hub – The products combine charm and thoughtful presentation beautifully.
Your comment is awaiting moderation.
BatteryBorough online – Fast shipping and products that work just like described.
Your comment is awaiting moderation.
Астрология Здесь вы найдете ответы на самые сокровенные вопросы.
Your comment is awaiting moderation.
Женская магия Юлиана Женская магия Юлиана – это гармоничное развитие вашей внутренней силы, интуиции и способности управлять энергиями для создания счастливой и наполненной жизни.
Your comment is awaiting moderation.
Identity Isle Originals – Products are clearly personalized and crafted with care for buyers.
Your comment is awaiting moderation.
Всем Мир! Да прибудет с вами Сила! https://my-finans.ru А JWH-018 Имеется в наличии?какой товар заказал?
Your comment is awaiting moderation.
MacroMountain Online – Inspiring arts and crafts supplies laid out neatly for easy browsing.
Your comment is awaiting moderation.
All About Sneaker Studio – Stylish sneaker drops and a smooth browsing layout improve the experience.
Your comment is awaiting moderation.
Discover BundleBungalow – Attractive package deals simplify your buying decisions.
Your comment is awaiting moderation.
реферат нейросеть реферат нейросеть .
Your comment is awaiting moderation.
Грати в найкраще казіно онлайн — широкий вибір автоматів та настільних ігор, вітальні бонуси та спеціальні пропозиції. Дізнайтеся про умови участі та актуальні акції.
Your comment is awaiting moderation.
Найкращі казіно з бонусами — депозитні акції, бездепозитні пропозиції та турніри із призами. Огляди та порівняння умов участі.
Your comment is awaiting moderation.
PhoneForge Finds Online – Device add-ons with perfect fit and attractive design.
Your comment is awaiting moderation.
порно ебал
Your comment is awaiting moderation.
the artful supplies corner – I found everything to be top-notch and exactly what I needed.
Your comment is awaiting moderation.
this winter wear shop – Cozy and colorful hats that complement my outfits nicely.
Your comment is awaiting moderation.
digital telemedicine store – I’ll revisit shortly to explore everything else offered.
Your comment is awaiting moderation.
paprikaplace collection – Delicious spices delivered fast and improved my cooking results.
Your comment is awaiting moderation.
digital deals hub – Helpful specs and fair pricing made the purchase process smooth and simple.
Your comment is awaiting moderation.
rotiroost.shop – Fresh bread and baking tips presented clearly for easy use.
Your comment is awaiting moderation.
TripScan — Надежность путешествий начинается здесь
Планируете поездку и хотите убедиться, что всё пройдёт гладко? Тогда вам нужен TripScan! Это удобный онлайн-сервис, позволяющий проверить наличие ваших билетов и бронировок всего одним кликом.
trip scan
¦ Что такое TripScan?
TripScan, также известный как трип скан, представляет собой инновационный инструмент для путешественников. Сервис позволяет быстро сверять ваши бронирования авиабилетов, отелей и арендованных автомобилей с официальными базами данных авиакомпаний и гостиниц.
Просто введите номер вашего билета или бронировки на сайте TripScan. Если информация совпадает, сервис подтвердит вашу бронь, предоставив дополнительную информацию о рейсе или отеле. Это особенно полезно перед длительными путешествиями, когда важно быть уверенным в точности всех деталей.
¦ Как пользоваться TripScan?
трип скан
Использование сервиса невероятно простое:
1. Перейдите на официальный сайт TripScan (трипскан сайт) и зарегистрируйтесь или войдите в свою учетную запись.
trip scan
2. Выберите тип проверки: авиабилеты, отели или аренда автомобиля.
3. Введите необходимые данные вашей бронировки.
4. Получите мгновенный отчет о статусе вашей брони.
Это занимает считанные секунды и избавляет вас от стресса и неопределенности.
tripscan top
¦ Почему выбирают TripScan?
Сервис предлагает ряд преимуществ, делающих его незаменимым помощником любого путешественника:
– Быстрая проверка бронирований
– Дополнительная уверенность в поездке
– Удобство и простота использования
– Доступность круглосуточно
Кроме того, TripScan регулярно обновляется, обеспечивая точность предоставляемых данных.
¦ Где найти TripScan?
Чтобы воспользоваться сервисом, посетите официальный сайт TripScan: Здесь вы найдете всю необходимую информацию и сможете начать проверку прямо сейчас!
Также доступна мобильная версия сайта, доступная на смартфонах и планшетах. Просто откройте браузер и перейдите на трипскан сайт.
Для тех, кто хочет больше узнать о сервисе, существует подробная инструкция по использованию, доступная на главной странице.
¦ Заключение
TripScan — это надежный помощник для каждого путешественника. С ним вы можете быть уверены, что ваша поездка пройдет гладко и без неожиданностей. Проверяйте свои билеты и бронировки заранее и наслаждайтесь путешествием!
tripscan
https://tripscan64c.cc
Your comment is awaiting moderation.
мы и в скайп и в аське https://mefedronetop.life Да хоть в очко засыпь, не торкнетМожет еще вернемся.
Your comment is awaiting moderation.
Device Dockyard Store – Useful electronics and accessories with easy-to-read info.
Your comment is awaiting moderation.
Hello .!
I came across a 158 awesome website that I think you should visit.
This site is packed with a lot of useful information that you might find helpful.
It has everything you could possibly need, so be sure to give it a visit!
https://www.pwinsider.com/article/179793/simplify-your-hobbies-with-an-allaround-solution.html?p=1
And don’t forget, guys, — a person at all times may in the publication discover answers to address the most most tangled questions. We made an effort to explain all information via the most very accessible method.
Your comment is awaiting moderation.
DIYDepot Solutions – Well-curated tools make home and craft projects much less intimidating.
Your comment is awaiting moderation.
Creative Aisle Finds – Distinctive accents and artwork bring warmth and originality to interiors.
Your comment is awaiting moderation.
pantryessentials – Pantry staples arrived on time and well packed, helping me stay efficient in the kitchen.
Your comment is awaiting moderation.
the wireless tech store – Products arrived ready to go and setup was hassle-free.
Your comment is awaiting moderation.
Wrap Wonderland Essentials – Creative wrapping paper and fun packaging make gift prep easy.
Your comment is awaiting moderation.
продавец отзывчивый купить наркотики The Best!!!!!!Ты друг нарвался на фэйков!
Your comment is awaiting moderation.
watercolor kit shop – The selection allows for easy access to all essential painting supplies.
Your comment is awaiting moderation.
ElmExchange Boutique – Layout feels organized and product variety is showcased nicely.
Your comment is awaiting moderation.
нейросеть для студентов онлайн нейросеть для студентов онлайн .
Your comment is awaiting moderation.
BarbellBayou Shop Online – Quality fitness tools with pricing that stands out positively.
Your comment is awaiting moderation.
my favorite web host – The installation steps were simple and fast to follow.
Your comment is awaiting moderation.
CourierCorner Essentials – Variety of products showcased well with easy-to-use site layout.
Your comment is awaiting moderation.
font picks corner – The selection of typefaces is elegant and well-organized.
Your comment is awaiting moderation.
my smart sundial – Loved how the innovative design keeps me punctual with style.
Your comment is awaiting moderation.
Sole Saga Boutique – The impressive variety of footwear definitely caught my eye.
Your comment is awaiting moderation.
doggearshop pet gear – Sturdy materials and excellent sizing make a noticeable difference.
Your comment is awaiting moderation.
Всё про строительство https://hotimsvoydom.ru и ремонт — проекты домов, фундаменты, кровля, инженерные системы и отделка. Практичные советы, инструкции и современные технологии.
Your comment is awaiting moderation.
Supplement Summit picks – Health products I can trust and recommend to anyone.
Your comment is awaiting moderation.
grillplusgear – Items arrived safely and improved my outdoor cooking setup perfectly.
Your comment is awaiting moderation.
packaging essentials hub – Very easy to navigate and lots of useful information available.
Your comment is awaiting moderation.
A federal judge has ordered the release of 5-year-old Liam Conejo Ramos and his father from the South Texas Family Residential Center in Dilley, Texas, according to a ruling obtained by CNN.
mega2ousbpnmmput4tiyu4oa4mjck2icier52ud6lmgrhzlikrxmysid.onion
Liam and his father, Adrian, were taken by immigration agents from his snowy suburban Minneapolis driveway and sent 1,300 miles to a Texas detention facility designed to detain families. They have been detained for more than a week.
mgmarket6.at
The order specifies the preschooler and his father be released “as soon as practicable” and no later than Tuesday as their immigration case proceeds through the court system. The ruling, shared with CNN by the judge’s courtroom deputy, was first reported by the San Antonio Express-News.
“We are now working closely with our clients and their family to ensure a safe and timely reunion,” the family’s lawyers said in a Saturday statement. “We are pleased that the family will now be able to focus on being together and finding some peace after this traumatic ordeal.”
mgmarket 5at
Related article
Immigrants seeking asylum walk at the ICE South Texas Family Residential Center on Aug. 23, 2019, in Dilley, Texas.
READ: District judge’s scathing opinion ordering release of 5-year-old Liam Ramos and father
mega2olipdgn3zpmm6fjcl2jfeweyy7gjuzrs3mja7nkchflkdu7lfyd.onion
1 min read
In a scathing opinion, which at times read more like a civics lesson, US District Judge Fred Biery admonished “the government’s ignorance of an American historical document called the Declaration of Independence” and quoted Thomas Jefferson’s grievances against “a would-be authoritarian king,” saying today people “are hearing echos of that history.”
mgmarket6.at
Liam’s detention – and the striking photo of an agent clutching the boy’s Spider-Man backpack as he stared from under a cartoon bunny hat – fed mounting outrage over the Trump administration’s massive immigration crackdown in Minneapolis and renewed the question: What happens to children when their parents are abruptly taken by ICE?
In another diversion from the norms of judicial writing, the judge included the now famous image of Liam at the end of his opinion, under his signature, along with references to the Bible passages Matthew 19:14 and John 11:35.
Liam’s case, Biery wrote, originated in “the ill-conceived and incompetently-implemented government pursuit of daily deportation quotas, apparently even if it requires traumatizing children.”
“Observing human behavior confirms that for some among us, the perfidious lust for unbridled power and the imposition of cruelty in its quest know no bounds and are bereft of human decency,” wrote the judge. “And the rule of law be damned.”
mgmarket 5at
https://megaweb-13at.com
Your comment is awaiting moderation.
Магазин агонь! Брал как то давно. все ровно! купить наркотики Привет, дорогие друзья! меня зовут Антон32131. Покупаю периодически у этого магазина различные товары. Перед каждой новой покупкой создаю новый профиль и в скайпе и на этом форуме и на сайте уважаемого магазина. Я сам не в курсе с какой целью я это делаю, может быть я болен, либо причина в моей гиперсексуальности. Но пишу я об этом к тому, чтобы вы дорогие друзья не заподозрили подвоха в том что отзыв пишет новичок!Спасибо за объективный отзыв, мы работаем – что бы Вы улыбались:ok:
Your comment is awaiting moderation.
«TUT-SPORT» предоставляет:
• футболки из быстросохнущей ткани клуба Атлетико Мадрид;
• доставку по всей России;
• Определение оптимального набора под ваш клуб и бюджет;
• Проверку ассортимента в нужной категории.
интернет магазин футбольной формы Атлетико
футбольная форма Атлетико москва – https://www.tut-sport.ru/tovary/kluby/atletiko-madrid
http://clients1.google.com.pe/url?q=https://tut-sport.ru/tovary/kluby/atletiko-madrid
Спортивная экипировка и футбольные сувениры от «TUT-SPORT» в вашем городе 8729655
Your comment is awaiting moderation.
handmade excellence – Every product is a testament to care, skill, and creative effort.
Your comment is awaiting moderation.
creativekit – Arrived on schedule and made crafting effortless and fun.
Your comment is awaiting moderation.
mealprep corner shop – Quick meal planning is possible with handy recipes and kits.
Your comment is awaiting moderation.
Установите удобный купить электрокарниз в москве для идеального управления шторами в вашем доме.
С его помощью можно легко регулировать освещенность комнаты, не вставая с дивана.
Такие системы становятся все популярнее благодаря своему удобству и функциональности. Они идеально подходят для людей, ценящих комфорт и современные технологии.
#### **2. Преимущества электрокарнизов**
Главное достоинство электрокарниза — это удобство использования. Вы можете запрограммировать автоматическое открытие штор утром и закрытие вечером.
Кроме того, электрокарнизы отличаются высокой надежностью и долговечностью. Производители предлагают гарантию на несколько лет, подтверждая качество продукции.
#### **3. Установка и настройка**
Монтаж электрокарниза требует определенных навыков и точности. Важно правильно рассчитать нагрузку, чтобы система работала исправно долгое время.
После установки нужно правильно настроить систему управления. Для удобства можно синхронизировать устройство с другими элементами умного дома.
#### **4. Выбор подходящей модели**
При покупке электрокарниза важно учитывать несколько факторов. В первую очередь, нужно определить максимальный вес штор, которые будет выдерживать система.
На рынке представлены модели разных ценовых категорий. Бюджетные варианты обладают базовым функционалом, но надежны в эксплуатации.
—
### **Спин-шаблон**
#### **1. Введение**
Электрокарниз представляет собой инновационную систему автоматического управления шторами.
#### **2. Преимущества электрокарнизов**
Производители предлагают гарантию на несколько лет, подтверждая качество продукции.
#### **3. Установка и настройка**
Монтаж электрокарниза требует определенных навыков и точности.
#### **4. Выбор подходящей модели**
Также стоит обратить внимание на тип управления: проводной или беспроводной.
Your comment is awaiting moderation.
passportparlor gear – Convenient, well-made travel accessories that arrived on time.
Your comment is awaiting moderation.
the Safe Saffron storefront – Spices were fragrant, fresh, and just like advertised.
Your comment is awaiting moderation.
шумоизоляция авто
Your comment is awaiting moderation.
Зарубежная недвижимость https://realtyz.ru актуальные предложения в Европе, Азии и на побережье. Информация о ценах, налогах, ВНЖ и инвестиционных возможностях.
Your comment is awaiting moderation.
Все о ремонте квартир https://belstroyteh.ru и отделке помещений — практические инструкции, обзоры материалов и современные решения для интерьера.
Your comment is awaiting moderation.
нейросети для студентов нейросети для студентов .
Your comment is awaiting moderation.
this crispy creations site – The content here makes cooking feel less overwhelming.
Your comment is awaiting moderation.
creativehomedock – Decorative items arrived on time and make my rooms look special and unique.
Your comment is awaiting moderation.
А с какого дживика еще больше делать можно? https://shkaf-kupit.ru Ну я хозяину ветки в лс отписал.посмотри что да как будет.Мир братья.Липецких нех обманывать!Флудить на счет легальности/нелегальности товара в магазине не нужно в ветке! У же отписывалась и экспертиза и мы не однократно писали, возим ТОЛЬКО ЛЕГАЛ!
Your comment is awaiting moderation.
charcoalcharm supplies – Everything arrived intact and made my cookout smooth and fun.
Your comment is awaiting moderation.
watergearhub – Hydration products arrived on time and work exactly as expected.
Your comment is awaiting moderation.
phoenix phish shop – Easy browsing and a solid selection of band merchandise.
Your comment is awaiting moderation.
this leather accessory hub – Items look amazing and the packaging is excellent.
Your comment is awaiting moderation.
pinehomegoods – High-quality home accents that exceeded my expectations.
Your comment is awaiting moderation.
turmerictrove flavors – Fresh and fragrant spices made cooking more enjoyable and flavorful.
Your comment is awaiting moderation.
vanilla goodies outlet – The assortment is delightful, and I’m surprised by the good deals.
Your comment is awaiting moderation.
the digital tools hub – The tech items here make staying on top of my tasks simple.
Your comment is awaiting moderation.
packaging tools hub – Information is thorough and the website is easy to use.
Your comment is awaiting moderation.
A federal judge has ordered the release of 5-year-old Liam Conejo Ramos and his father from the South Texas Family Residential Center in Dilley, Texas, according to a ruling obtained by CNN.
mgmarket 5at
Liam and his father, Adrian, were taken by immigration agents from his snowy suburban Minneapolis driveway and sent 1,300 miles to a Texas detention facility designed to detain families. They have been detained for more than a week.
mgmarket 5at
The order specifies the preschooler and his father be released “as soon as practicable” and no later than Tuesday as their immigration case proceeds through the court system. The ruling, shared with CNN by the judge’s courtroom deputy, was first reported by the San Antonio Express-News.
“We are now working closely with our clients and their family to ensure a safe and timely reunion,” the family’s lawyers said in a Saturday statement. “We are pleased that the family will now be able to focus on being together and finding some peace after this traumatic ordeal.”
mgmarket5 at
Related article
Immigrants seeking asylum walk at the ICE South Texas Family Residential Center on Aug. 23, 2019, in Dilley, Texas.
READ: District judge’s scathing opinion ordering release of 5-year-old Liam Ramos and father
hidemega.to
1 min read
In a scathing opinion, which at times read more like a civics lesson, US District Judge Fred Biery admonished “the government’s ignorance of an American historical document called the Declaration of Independence” and quoted Thomas Jefferson’s grievances against “a would-be authoritarian king,” saying today people “are hearing echos of that history.”
mgmarket 6 at
Liam’s detention – and the striking photo of an agent clutching the boy’s Spider-Man backpack as he stared from under a cartoon bunny hat – fed mounting outrage over the Trump administration’s massive immigration crackdown in Minneapolis and renewed the question: What happens to children when their parents are abruptly taken by ICE?
In another diversion from the norms of judicial writing, the judge included the now famous image of Liam at the end of his opinion, under his signature, along with references to the Bible passages Matthew 19:14 and John 11:35.
Liam’s case, Biery wrote, originated in “the ill-conceived and incompetently-implemented government pursuit of daily deportation quotas, apparently even if it requires traumatizing children.”
“Observing human behavior confirms that for some among us, the perfidious lust for unbridled power and the imposition of cruelty in its quest know no bounds and are bereft of human decency,” wrote the judge. “And the rule of law be damned.”
mega2oakke6o6mya3lte64b4d3mrq2ohz6waamfmszcfjhayszqhchqd.onion
https://megasbmegadarknetmarketonionhydrashopomgomgrutor555cnyid.com
Your comment is awaiting moderation.
Портал о жизни в ЖК https://pioneer-volgograd.ru инфраструктура, паркинг, детские площадки, охрана и сервисы. Информация для будущих и действующих жителей.
Your comment is awaiting moderation.
this cozy home shop – Beautiful accessories that made my bedroom feel inviting and snug.
Your comment is awaiting moderation.
Все о фундаменте https://rus-fundament.ru виды оснований, расчет нагрузки, выбор материалов и этапы строительства. Практичные советы по заливке ленточного, плитного и свайного фундамента.
Your comment is awaiting moderation.
Здравствуйте!
Крафт пакет 25х22х12 см — проверенный временем формат для подарков, выпечки и бутылок. Он вместит до 5–6 кг без деформации благодаря усиленному дну и боковым швам. Поверхность идеальна для нанесения логотипа методом флексопечати. Минимальный тираж — 300 штук, с бесплатным макетом при заказе. Доставка по России — от 2 дней в Москву и до 7 дней в регионы.
Полная информация по ссылке – https://xn——5cdbul1akdooxbbfke0anfh5a9o.xn--p1ai
крафт пакеты до 8 кг, изготовитель крафт пакетов, крафт пакеты до 8 кг
пакеты крафт с логотипом на заказ, стоимость печати на крафт пакетах, первичное сырьё для крафт пакетов
Всего наилучшего и развития в бизнесе!
Your comment is awaiting moderation.
Я всегда пишу благодарность везде, мыло, ася, форум и т.д. Может это только я так делаю, но думаю, что так должны все делать. https://datamatics.ru Я уже начал сомневаться,что проблема в курьерке!Я им звонил,они в свою очередь звонили в головной офис-про мой трек они даже не слышали!!!А постановление вроде ещё не вступило в силу.Страшно , но хочется и потом сам не попробуеш не узнаеш )
Your comment is awaiting moderation.
mediamosaic corner – Helpful media resources allowed me to plan projects effortlessly.
Your comment is awaiting moderation.
storageshopfield – Sturdy organizers arrived safely and made arranging things effortless.
Your comment is awaiting moderation.
aquariumhub – Aquarium tools arrived safely and ensured a smooth setup experience.
Your comment is awaiting moderation.
proteinporch gallery – Excellent selection of nutrition products, powders, and supplements for fitness needs.
Your comment is awaiting moderation.
this easygoing marketplace – The whole experience is smooth and very laid-back.
Your comment is awaiting moderation.
dappergear – Trendy items arrived on time and look even better in person.
Your comment is awaiting moderation.
Import Isle Store – Shopping for international items is easy and affordable here.
Your comment is awaiting moderation.
pulse treasures hub – A fun collection of creative resources worth a closer look.
Your comment is awaiting moderation.
stylish sole market – The collection is creative and thoughtfully put together for everyday browsing.
Your comment is awaiting moderation.
this artisan treasures hub – Every item is unique and carefully crafted with love.
Your comment is awaiting moderation.
ии реферат ии реферат .
Your comment is awaiting moderation.
проститутки телеграмм
Your comment is awaiting moderation.
Please let me know if you’re looking for a article author for your weblog.
You have some really good posts and I feel I would be a good asset.
If you ever want to take some of the load off, I’d really like to
write some material for your blog in exchange for a link back to
mine. Please shoot me an e-mail if interested. Many thanks! https://Vucovuco.com/index.php?page=user&action=pub_profile&id=30677
Your comment is awaiting moderation.
ArtisanAster treasures – Handmade items that bring a cozy, stylish vibe to my home.
Your comment is awaiting moderation.
Магазин как магазин! купить наркотики Доброго времени суток Всем порядочным форумчанам-кто здесь заказывал,но трек так и не бьёться,или я один такой закинул 45к+доставка,и”жду у моря погоды”В скайпе вчера отвечали сегодня-игнор!Братишка, все красиво, в касание, спасибо за профессионализм
Your comment is awaiting moderation.
nomadbag – Lightweight essentials made for on-the-go lifestyles.
Your comment is awaiting moderation.
adapterhubshop – Adapters and tech tools arrived safely and function as expected.
Your comment is awaiting moderation.
Chew Chest Hub – Great quality pet treats and toys that brought instant joy.
Your comment is awaiting moderation.
this fashionable boutique – Stylish and high-quality accessories you can rely on.
Your comment is awaiting moderation.
plannerstash – Stickers arrived vibrant and durable, helping me personalize my journals easily.
Your comment is awaiting moderation.
dealblossom – Online finds that combined quality, affordability, and convenience.
Your comment is awaiting moderation.
Уверенная победа «Торпедо» стала подтверждением стабильной формы команды в КХЛ. Нижегородцы продолжают борьбу за высокие места на Западе. Подробнее: https://www.zupyak.com/p/4889908/t/torpedo-derzhit-temp-v-kkhl-uverennaia-igra-i-bor-ba-za-pozitsii-na-zapade
Your comment is awaiting moderation.
Silver Spire Store – Elegant pieces paired with friendly support made my shopping experience great.
Your comment is awaiting moderation.
Tax Toolbox store – The site loads quickly and works perfectly on all my devices.
Your comment is awaiting moderation.
trendy boot collection – The selection feels fresh and full of personality.
Your comment is awaiting moderation.
arc air essentials shop – Purifiers arrived quickly and keep my room feeling crisp and clean.
Your comment is awaiting moderation.
wellnessharbor – Quick delivery of products that improved my daily health routine.
Your comment is awaiting moderation.
AdventureAisle online – It never fails to spark ideas for new adventures.
Your comment is awaiting moderation.
Было бы очень не плохо https://chelovekonline.ru но чет с каждым разом доставка все дороже и дороже(((Дорогие наши форумчане, мы бы рады с вами пообщаться на разные темы, и стараемся общаться со всеми, и порой просто не хватает времени ведь мы не железные, если вы хотите что то конкретно заказать ася и скайп ждет вас, просто нереальное кол-во народа задают вопросы утром днем и вечером, и вот даже сейчас, мы очень стараемся изменить ситуацию в лучшую сторону. С начала месяца т.е. с 1 июня вы сможете самостоятельно заказывать и оплачивать прямо на сайте, а так же будете видеть наличие продукции.
Your comment is awaiting moderation.
CinnamonCity picks – Fragrant sticks that added depth and aroma to my baked goods.
Your comment is awaiting moderation.
the Pattern Pulse Hub collection – The variety of patterns made completing my project a breeze.
Your comment is awaiting moderation.
sensicare – Products designed for sensitive users that arrived without any problems.
Your comment is awaiting moderation.
Привет всем!
Купить крафт пакеты с логотипом можно онлайн за 5 минут или по телефону. Мы принимаем оплату с НДС и без, по безналичному расчёту для юрлиц и ИП. После подтверждения заказа начинаем производство без задержек. Срок изготовления — от 2 дней, доставка — по всей России. Пробная партия от 300 штук доступна даже для новых клиентов.
Полная информация по ссылке – https://крафт-пакеты-с-логотипом.рф/
срок изготовления крафт пакетов, купить крафт пакеты с логотипом, эко упаковка крафт пакеты
крафт пакеты до 8 кг, купить крафт пакеты с логотипом, адрес производителя крафт пакетов
Всего наилучшего и развития в бизнесе!
Your comment is awaiting moderation.
my favorite spring shop – Orders arrived quickly and the products exceeded expectations.
Your comment is awaiting moderation.
nutemporium – Nuts arrived quickly, crunchy and full of flavor, perfect for homemade treats.
Your comment is awaiting moderation.
cedar compass essentials shop – Sturdy items shipped fast and worked perfectly for camping and hiking.
Your comment is awaiting moderation.
atelieralmond – Snacks were delivered safely and looked and tasted fantastic.
Your comment is awaiting moderation.
freightfable shop – Fast delivery of packing supplies made shipping my items much simpler.
Your comment is awaiting moderation.
«СибСети» в Красноярске предоставляют:
• пакет из 150+ ТВ каналов;
• Точную оценку скорости соединения в вашем доме
• Подбор оптимального тарифа под ваши задачи
• Анализ возможности подключения по вашему адресу
• Профессиональную установку ТВ приставки
• Фиксированные тарифы на весь срок обслуживания
интернет сибирские сети для дома красноярск
интернет сибсети для дома проверить адрес – https://www.internet-sibirskie-seti.ru/krasnoyarsk
http://alt1.toolbarqueries.google.vg/url?q=https://internet-sibirskie-seti.ru/krasnoyarsk
Высокоскоростной ин 7296559
Your comment is awaiting moderation.
«Field Fit» предлагает:
• гетры, шорты и спортивные костюмы;
• привлекательные цены и скидки до 50-60%;
• Подбор оптимального набора под ваш клуб и бюджет;
• Проверку наличия размеров.
магазин футбольной атрибутики
купить клубную футбольную форму – http://www.futbolnaya-forma-fieldfit.ru/
https://cse.google.gm/url?sa=t&url=https://futbolnaya-forma-fieldfit.ru/
Официальная футбольная форма и футбольные сувениры от «Field Fit» в вашем городе fa8dd87
Your comment is awaiting moderation.
заказал rcs-4, чет не радует отзывы, как придет со дня на день посмотрим, что выйдет отпишусь, буду делать 1к 10-ти… купить наркотики концентрация 1к 12 мне норм разврдил на муравьином спирте (купил его в аптеке)Оплатил в среду, жду посылочку, посмотрим как что.
Your comment is awaiting moderation.
this fast shipping cart – Seamless shopping experience with speedy delivery today.
Your comment is awaiting moderation.
Creator Corner Store – Offers practical supplies and guidance for new creators.
Your comment is awaiting moderation.
herbtreasure – Freshly packaged herbs and kitchen items arrived flawlessly.
Your comment is awaiting moderation.
Онлайн покер сайт покерок — турниры с крупными гарантиями, кеш-игры и специальные предложения для игроков. Обзоры форматов и условий участия.
Your comment is awaiting moderation.
this hidden gem shop – It offers items you don’t usually come across elsewhere.
Your comment is awaiting moderation.
Нужны казино бонусы? https://kazinopromokod.ru — бонусы за регистрацию и пополнение счета. Обзоры предложений и подробные правила использования кодов.
Your comment is awaiting moderation.
craft tags outlet – Great range of items and the prices are quite fair.
Your comment is awaiting moderation.
ivorydecor – Home décor items arrived safely and instantly added elegance to my living space.
Your comment is awaiting moderation.
Добрый день!
Крафт пакеты от 300 штук — это порог входа в профессиональную брендированную упаковку. Мы не требуем больших минимальных объёмов, понимая нужды стартапов и малого бизнеса. Каждый пакет соответствует стандартам прочности, экологичности и безопасности. Печать наносится стойкими красками, разрешёнными для пищевых товаров. Расчёт стоимости и консультация — бесплатно по звонку или в чате.
Полная информация по ссылке – https://крафт-пакеты-с-логотипом.рф/
грузоподъёмность крафт пакетов, минимальный тираж крафт пакетов, крафт пакеты для гипермаркетов
производство крафт пакетов с логотипом, адрес производителя крафт пакетов, стоимость печати на крафт пакетах
Всего наилучшего и развития в бизнесе!
Your comment is awaiting moderation.
Неудачный матч в Новосибирске усилил давление на «Динамо» Минск. Команда ищет путь к стабильности, а поддержка болельщиков дома может помочь переломить ход сезона. Впереди ключевые встречи. Подробнее здесь: https://www.zupyak.com/p/4889207/t/dinamo-minsk-terpit-neudachu-v-novosibirske
Your comment is awaiting moderation.
vetessentials – Products came on time and worked exactly as advertised for my pets.
Your comment is awaiting moderation.
after dark outlet – Fun and lively environment, plus interesting products to explore.
Your comment is awaiting moderation.
scribefolio – Smooth, elegant notebooks for capturing every idea and memory.
Your comment is awaiting moderation.
помощь студентам контрольные помощь студентам контрольные .
Your comment is awaiting moderation.
Knife & Knoll treasures – Strong, reliable items that feel well built for everyday use.
Your comment is awaiting moderation.
посылка в городе. Сегодня заберу купить наркотики Вот так нихуя себе с 2011 года на плаву:strong:, подумаеш какая диковинка :DКонтакты указаны у меня в подписе и в разделе “Наши Контакты”
Your comment is awaiting moderation.
this cozy blanket shop – Warm blankets that make relaxing at home much nicer.
Your comment is awaiting moderation.
shopstream – Orders arrived quickly and everything was high-quality and exactly as expected.
Your comment is awaiting moderation.
Лучшие фриспины без депозита — бесплатные бонусы для старта, подробные обзоры и сравнение условий различных платформ.
Your comment is awaiting moderation.
digestivedock nutrition shop – Fast shipping and the supplements are very effective and reliable.
Your comment is awaiting moderation.
securemirror – System safety was enhanced with dependable tools delivered promptly.
Your comment is awaiting moderation.
canvascorner art – Premium art materials made painting smooth and enjoyable today.
Your comment is awaiting moderation.
exportessentials – International goods arrived safely and were exactly what I expected, beautifully packaged.
Your comment is awaiting moderation.
this ale and lager store – They manage to keep both selection and pricing on point.
Your comment is awaiting moderation.
the design inspiration hub – Found exactly the kind of patterns I wanted for my latest work.
Your comment is awaiting moderation.
проститутки трансы
Your comment is awaiting moderation.
Магазин ровный! Я заказал 1000ф, оплатил ЯД, оператора попросил отправить посыль на следующий день , без задержки т.к. сроки получения очень поджимают. На что оператор адекватно ответил что все сделают.На следующий вечер получил трек, посылочка собранна и вот вот выезжает))) если уже не выехала) Магазину как и его администрации – от души за оперативность и отношение к клиенту. https://neostylui.shop Если бы ещё доставка не выпала на выходные – ждать пришлось бы ещё меньше, так как курьерская служба по выходным у нас доставку не осуществляет. А сама доставка от пункта А до пункта Б заняла три дня.Нужно 5 сообщений что бы написать модэратору, не обесуть
Your comment is awaiting moderation.
nestassistant – Listings were updated without hassle and management became smooth.
Your comment is awaiting moderation.
Аншлаги на матчах «Салавата Юлаева» давно стали нормой для Уфы. Поддержка болельщиков создаёт атмосферу, которую трудно повторить. Подробнее: https://rentry.co/kvik3kd8
Your comment is awaiting moderation.
Espresso Emporium Essentials – Machines are well made and produce espresso that tastes incredible.
Your comment is awaiting moderation.
fig & fruit hub – Selection is unique and checkout was hassle-free and efficient.
Your comment is awaiting moderation.
propantryprints – Supplies arrived on schedule and helped streamline my printing work.
Your comment is awaiting moderation.
Tabtastic store – The checkout process was smooth and hassle-free.
Your comment is awaiting moderation.
optimizepro – SEO tools that made ranking much easier.
Your comment is awaiting moderation.
ClickFlow – The site feels modern and well-structured, making browsing straightforward.
Your comment is awaiting moderation.
creativeatelier – Art materials shipped quickly and are perfect for every kind of creative endeavor.
Your comment is awaiting moderation.
Современный мир высоких технологий предлагает большое разнообразие вариантов регистрации доменных имен. Среди популярных сочетаний выделяется простая и выразительная комбинация `slon1`. Именно такая последовательность стала основой множества доменных адресов, привлекающих внимание пользователей. Простота восприятия делает её идеальной для брендов и веб-ресурсов различного назначения.
kraken даркнет ссылка
Одним из интересных направлений стало использование национального домена верхнего уровня (.cc). Таким образом появилось популярное сочетание **slon1.cc**, которое сочетает простую и доступную ассоциацию со словом «слон» и одновременно обозначает принадлежность ресурса к определённой географической зоне. Такое решение способствует быстрому восприятию и идентификации сайта пользователями.
slon8 cc
Еще одним вариантом стал вариант **slon1.at**, в котором подчеркнута связь с австрийским сегментом сети Интернет. Такой выбор тоже имеет свою специфику и добавляет дополнительные смыслы в восприятие бренда. Благодаря своим уникальным характеристикам этот тип домена активно используется компаниями, ориентированными на европейский рынок.
slon6 at
Часто владельцы ресурсов выбирают и сокращённую форму записи своего имени. К примеру, такое написание, как **slon1cc**, придаёт сайту дополнительный шарм и облегчает процесс запоминания. Подобная форма часто встречается в международной практике брендирования и отражает общую тенденцию упрощения структуры именования.
slon1.cc
В заключение отметим ещё одну разновидность написания домена — **slon1сс**. Здесь упор сделан на двойное повторение буквы «с», что создаёт особое звучание и запоминающийся эффект. Такая игра букв усиливает привлекательность домена и выделяет ресурс среди прочих аналогичных предложений.
slon10 cc
https://slon10-at.com
кракен даркнет ссылка
Your comment is awaiting moderation.
Современный мир высоких технологий предлагает большое разнообразие вариантов регистрации доменных имен. Среди популярных сочетаний выделяется простая и выразительная комбинация `slon1`. Именно такая последовательность стала основой множества доменных адресов, привлекающих внимание пользователей. Простота восприятия делает её идеальной для брендов и веб-ресурсов различного назначения.
kraken зеркала ссылка
Одним из интересных направлений стало использование национального домена верхнего уровня (.cc). Таким образом появилось популярное сочетание **slon1.cc**, которое сочетает простую и доступную ассоциацию со словом «слон» и одновременно обозначает принадлежность ресурса к определённой географической зоне. Такое решение способствует быстрому восприятию и идентификации сайта пользователями.
slon5.at
Еще одним вариантом стал вариант **slon1.at**, в котором подчеркнута связь с австрийским сегментом сети Интернет. Такой выбор тоже имеет свою специфику и добавляет дополнительные смыслы в восприятие бренда. Благодаря своим уникальным характеристикам этот тип домена активно используется компаниями, ориентированными на европейский рынок.
кракен бот телеграмм ссылка
Часто владельцы ресурсов выбирают и сокращённую форму записи своего имени. К примеру, такое написание, как **slon1cc**, придаёт сайту дополнительный шарм и облегчает процесс запоминания. Подобная форма часто встречается в международной практике брендирования и отражает общую тенденцию упрощения структуры именования.
slon1 at
В заключение отметим ещё одну разновидность написания домена — **slon1сс**. Здесь упор сделан на двойное повторение буквы «с», что создаёт особое звучание и запоминающийся эффект. Такая игра букв усиливает привлекательность домена и выделяет ресурс среди прочих аналогичных предложений.
slon1.cc
https://slon5cc.net
slon6.cc
Your comment is awaiting moderation.
https://emiratesambassadeurs.com/vip-concierge/ EA Private Desk in Geneva supports Audemars Piguet requests for Abu Dhabi: Royal Oak 15510ST, authentic only, no replicas, after a direct market check.
Your comment is awaiting moderation.
https://emiratesambassadeurs.com/vip-concierge/ Looking for Royal Oak 15510ST in Jeddah? our Geneva-based private watch desk can source a collector-sourced piece and confirm year, condition, and final price once availability is confirmed.
Your comment is awaiting moderation.
my favorite glimmer shop – Each product is showcased well with all the important details.
Your comment is awaiting moderation.
Полная статья здесь: https://parfum-trade.ru/testery/molecule_02_tester/
Your comment is awaiting moderation.
labellighthouse essentials – My shelves and drawers look structured and clearly labeled now.
Your comment is awaiting moderation.
wingedwonders – Beautiful bird motifs that create a warm, inviting atmosphere.
Your comment is awaiting moderation.
skyprintshop – Prints arrived vibrant and crisp, making the final products look excellent.
Your comment is awaiting moderation.
Твой стафф офигенен. купить наркотики Моя первая покупка на динамите и, внезапно для самой себя, наход. Сняла, как говорится, в касание. С вашим охуенным мефчиком сорвала себе почти год ЗОЖа и ни чуть не жалею.ам нормальная альтернатива 307.советую 1к15
Your comment is awaiting moderation.
CapAndCoat wardrobe picks – My purchase arrived fast and the detail in packaging stood out.
Your comment is awaiting moderation.
EaseEmpire treasures – Paints, brushes, and other tools made my painting sessions enjoyable.
Your comment is awaiting moderation.
cocoacove essentials shop – Cocoa goods arrived quickly and tasted amazing every single time.
Your comment is awaiting moderation.
«TUT-SPORT» предоставляет:
• широкий выбор форм топ-клуба Атлетико Мадрид;
• привлекательные цены и скидки до 50-60%;
• Определение оптимального комплекта экипировки под ваш клуб и бюджет;
• Анализ доступности товара по акции.
купить футбольную форму Атлетико Мадрид в москве
футбольная атрибутика Атлетико интернет магазин – https://www.tut-sport.ru/tovary/kluby/atletiko-madrid
https://images.google.si/url?q=https://tut-sport.ru/tovary/kluby/atletiko-madrid
Клубная атрибутика и подарки для фанатов от «TUT-SPORT» в вашем городе 55_f112
Your comment is awaiting moderation.
Фармилки Telegram стал настоящей экосистемой для криптовалютных проектов, предлагая удобные инструменты для общения, проведения аирдропов, запуска ботов для майнинга и тапалок, а также целые игровые платформы – фармилки.
Your comment is awaiting moderation.
Майнинг Используя Telegram, вы можете легко находить и участвовать в различных активностях, связанных с криптовалютой, от простого майнинга до сложных игровых процессов.
Your comment is awaiting moderation.
cableaccess – Accessories came quickly and help keep all my devices connected easily.
Your comment is awaiting moderation.
daily chic shop – Trendy and soft pieces that fit exactly right.
Your comment is awaiting moderation.
CyberCottage online – Shopping for tech here is quick, and the browsing experience is enjoyable.
Your comment is awaiting moderation.
squatpro – Fitness items delivered safely and are ideal for indoor exercise.
Your comment is awaiting moderation.
amberdesigns – Exquisite handmade pieces delivered beautifully and on time.
Your comment is awaiting moderation.
ClickHub Zylavo – Layout is logical, and information is easy to digest.
Your comment is awaiting moderation.
confectionery outlet – Navigation is intuitive and the site has a relaxed vibe.
Your comment is awaiting moderation.
clovercove studio – The home accents are charming and instantly uplifting.
Your comment is awaiting moderation.
Магазин работает отлично!никаких косяков и запоров пока что не было))) купить наркотики У меня настоящий 96 процентный спирт с больницы. Всё растворилось. Чу чуть паровой бани.Пишите в скайп, аську, пожалуйста без лишнего, чтобы была возможность ответить всем. :good:
Your comment is awaiting moderation.
CoffeeCairn online – Beans with strong aroma that made brewing a delight.
Your comment is awaiting moderation.
Строительство бетонных бассейнов под ключ https://atlapool.ru
Your comment is awaiting moderation.
this premium shop – The items feel handpicked and the checkout process is smooth.
Your comment is awaiting moderation.
turmerictrove spices – Fragrant and fresh turmeric made my dishes taste amazing.
Your comment is awaiting moderation.
coffeecabinet – I’m impressed by the wide variety of coffee gear and reasonable prices.
Your comment is awaiting moderation.
Современный мир высоких технологий предлагает большое разнообразие вариантов регистрации доменных имен. Среди популярных сочетаний выделяется простая и выразительная комбинация `slon1`. Именно такая последовательность стала основой множества доменных адресов, привлекающих внимание пользователей. Простота восприятия делает её идеальной для брендов и веб-ресурсов различного назначения.
ссылка на кракен сс
Одним из интересных направлений стало использование национального домена верхнего уровня (.cc). Таким образом появилось популярное сочетание **slon1.cc**, которое сочетает простую и доступную ассоциацию со словом «слон» и одновременно обозначает принадлежность ресурса к определённой географической зоне. Такое решение способствует быстрому восприятию и идентификации сайта пользователями.
кракен список рабочих ссылок
Еще одним вариантом стал вариант **slon1.at**, в котором подчеркнута связь с австрийским сегментом сети Интернет. Такой выбор тоже имеет свою специфику и добавляет дополнительные смыслы в восприятие бренда. Благодаря своим уникальным характеристикам этот тип домена активно используется компаниями, ориентированными на европейский рынок.
ссылка на кракен сс
Часто владельцы ресурсов выбирают и сокращённую форму записи своего имени. К примеру, такое написание, как **slon1cc**, придаёт сайту дополнительный шарм и облегчает процесс запоминания. Подобная форма часто встречается в международной практике брендирования и отражает общую тенденцию упрощения структуры именования.
кракен ссылка
В заключение отметим ещё одну разновидность написания домена — **slon1сс**. Здесь упор сделан на двойное повторение буквы «с», что создаёт особое звучание и запоминающийся эффект. Такая игра букв усиливает привлекательность домена и выделяет ресурс среди прочих аналогичных предложений.
ссылка на кракен телеграм
https://slon6cc.net
slon1сс
Your comment is awaiting moderation.
Отличное описание, сразу захотелось заказть)) Что собственно и сделал, надеюсь, неразачеруюсь https://skorostalpha.life то ты-цифровая личность, я не за граммы говорю, а за общение и так-то не я один, обещаешь много-толку мало, 2 года – не срок, бомбануть и тебя могли, это вот твоим языком написано, если нормально не понимаешь, еще раз прошу участия администрации в данном вопросесервис 10\10 нигде дешевле и лучше на рынке легал сейчас нету!!!
Your comment is awaiting moderation.
бездепозитные бонусы “Бездепозитные бонусы” – это выгодное предложение, которое позволит тебе погрузиться в атмосферу казино и испытать свою удачу.
Your comment is awaiting moderation.
morning breeze store – The aesthetics are clean and the overall feeling is fresh and welcoming.
Your comment is awaiting moderation.
Rank In Charge Hub – Practical SEO resources and guidance that consistently help boost rankings.
Your comment is awaiting moderation.
Современный мир высоких технологий предлагает большое разнообразие вариантов регистрации доменных имен. Среди популярных сочетаний выделяется простая и выразительная комбинация `slon1`. Именно такая последовательность стала основой множества доменных адресов, привлекающих внимание пользователей. Простота восприятия делает её идеальной для брендов и веб-ресурсов различного назначения.
kraken 2026 ссылка
Одним из интересных направлений стало использование национального домена верхнего уровня (.cc). Таким образом появилось популярное сочетание **slon1.cc**, которое сочетает простую и доступную ассоциацию со словом «слон» и одновременно обозначает принадлежность ресурса к определённой географической зоне. Такое решение способствует быстрому восприятию и идентификации сайта пользователями.
slon6.at
Еще одним вариантом стал вариант **slon1.at**, в котором подчеркнута связь с австрийским сегментом сети Интернет. Такой выбор тоже имеет свою специфику и добавляет дополнительные смыслы в восприятие бренда. Благодаря своим уникальным характеристикам этот тип домена активно используется компаниями, ориентированными на европейский рынок.
slon10 cc
Часто владельцы ресурсов выбирают и сокращённую форму записи своего имени. К примеру, такое написание, как **slon1cc**, придаёт сайту дополнительный шарм и облегчает процесс запоминания. Подобная форма часто встречается в международной практике брендирования и отражает общую тенденцию упрощения структуры именования.
slon7.cc
В заключение отметим ещё одну разновидность написания домена — **slon1сс**. Здесь упор сделан на двойное повторение буквы «с», что создаёт особое звучание и запоминающийся эффект. Такая игра букв усиливает привлекательность домена и выделяет ресурс среди прочих аналогичных предложений.
slon2.at
https://slon6at.net
slon7.cc
Your comment is awaiting moderation.
ZylavoCenter – Pages load smoothly, and the interface is simple to follow.
Your comment is awaiting moderation.
Свежие новости SEO https://seovestnik.ru и IT-индустрии — алгоритмы, ранжирование, веб-разработка, кибербезопасность и цифровые инструменты для бизнеса.
Your comment is awaiting moderation.
Меня один магазин вчера мурыжил с 5 вечера, никак не мог дать реквизиты, хотя чего уж проще? Выдал реквизиты, получил запрошенгую сумму, и пусть себе человек занимается своими делами. И адекватный же был сервис в прошлом году. Ну да ладно. https://slime-rancher.ru Спасибо за внесение ястности.Да я ж тебе говарю курьерка такая….)не парься!они с мониторингом просто тупят круто!тем более легал!
Your comment is awaiting moderation.
Добрый день!
Посетите наш магазин спецодежды в красноярске и убедитесь в качестве наших товаров.
Качественная спецодежда является обязательным элементом безопасности на любом производственном объекте. Мы предлагаем изделия, которые сочетают в себе функциональность, прочность и эстетичный внешний вид. Наша продукция соответствует всем государственным стандартам и техническим регламентам. Выберите надежную спецодежду для защиты здоровья ваших сотрудников от профессиональных рисков. Доверьтесь опыту нашей компании и обеспечьте безопасность трудового процесса на высшем уровне.
Полная информация по ссылке – https://spezodezhda24.ru/
спецодежда купить, спецодежда цена, Полиресурс
индивидуальная спецодежда, спецодежда рабочая красноярск, где купить спецодежду
Всего наилучшего и хорошей работы!
Your comment is awaiting moderation.
смотреть порно видео
Your comment is awaiting moderation.
Доброго!
Желаете купить китайский чай? Мы предлагаем только оригинальные сорта.
Честная цена чая — наш приоритет, поэтому мы работаем напрямую с плантациями без лишних посредников. Вы увидите, что цена чая в нашем магазине соответствует качеству и является одной из лучших на рынке. Мы стараемся держать цену чая доступной для всех слоев населения, не жертвуя при этом сортовыми характеристиками. Если вас интересует оптовая цена чая, свяжитесь с нами для получения специального прайс-листа на объемы. Убедитесь сами, что высокая цена чая не всегда означает высокое качество, а у нас вы найдете баланс.
Полная информация по ссылке – https://chay-nedorogo.ru
улун, элитный чай, купить чаи в москве
иван чаи, подарочный чай, купить иван чай
Всего наилучшего и хорошего чаепития!
Your comment is awaiting moderation.
indoor jungle hub – The plants were safely shipped and are already growing nicely.
Your comment is awaiting moderation.
handcrafted floral designs – The presentation is lovely and the transaction process was super convenient.
Your comment is awaiting moderation.
Carbon credits https://offset8capital.com and natural capital – climate projects, ESG analytics and transparent emission compensation mechanisms with long-term impact.
Your comment is awaiting moderation.
подарок! Мне очень понравился https://slime-rancher.ru А сейчас работает магазин?Магаз убойный, как начали брать пол года назад на рампе, была одна проблема пно ее быстро решили))) щас как снова завязался месяца 3 уже не разу не было))) Особенно предпочтения отдаю мефу вашему, вообще тема потрясная)))
Your comment is awaiting moderation.
spice mastery hub – Fresh and fragrant spices made preparing meals a real pleasure.
Your comment is awaiting moderation.
official Protein Pantry – High-quality protein choices with very reasonable prices.
Your comment is awaiting moderation.
Удобство и современный дизайн обеспечат рулонные шторы в коробе с электроприводом Prokarniz , которыми легко управлять с пульта или смартфона.
Важно соблюдать инструкции производителя и при необходимости обращаться к специалистам.
Your comment is awaiting moderation.
marble and decor boutique – The craftsmanship is impressive and better than I anticipated.
Your comment is awaiting moderation.
rugged gear headquarters – A go-to place for equipment that holds up in the elements.
Your comment is awaiting moderation.
Продаван молчит, что будет дальше не известно, мне сделал но не все.отписался, жду результатов https://nextwavese.shop И что толку за легалом охотиться.В джабере орудует фейк, причем у него такой же адрес джабера как и у меня. Джабер в скором времени сменю, в джабере заказы не принимаю. Будьте бдительны
Your comment is awaiting moderation.
sparkdex ai SparkDex is redefining decentralized trading with speed, security, and real earning potential. On spark dex, you keep full control of your assets while enjoying fast swaps and low fees. Powered by sparkdex ai, the platform delivers smarter insights and optimized performance for confident decision-making. Trade, earn from liquidity, and grow your crypto portfolio with sparkdex — the future of DeFi starts here.
Your comment is awaiting moderation.
Official Moss Mingle – Found this unexpectedly and it’s genuinely a pleasant surprise.
Your comment is awaiting moderation.
home tool store – Practical gadgets and tools that help get work done efficiently.
Your comment is awaiting moderation.
stylish tableware hub – Delivery was quick and the neat packaging kept everything intact.
Your comment is awaiting moderation.
Хочу выразить благодарность менеджерам данного магазина. https://vidnoe-klinika.ru ВСЕ ВОПРОСЫ ПО ДОСТАВКЕ ОБСУЖДАЮТСЯ В ЛИЧКЕ С ТС ПРИ ОФОРМЛЕНИИ ЗАКАЗА.Все нормально,6-го заказал,8-го отправили. Оперативно
Your comment is awaiting moderation.
premium timber boutique – Fine craftsmanship and impressive quality make these products special.
Your comment is awaiting moderation.
browse Propeller Plaza – Wide selection of propellers with friendly and fast support.
Your comment is awaiting moderation.
Здравствуйте!
Посетите наш центр спецодежды красноярск для получения профессиональной консультации.
Ведущий центр спецодежды Красноярск рекомендует нашу компанию как надежного партнера для комплексного снабжения. Мы обладаем собственными производственными мощностями и складскими помещениями большой площади. Центр спецодежды Красноярск в нашем лице предлагает услуги по брендированию и разработке дизайн-проектов формы. Наши специалисты готовы выехать к вам для проведения замеров и презентации образцов продукции. Обратитесь в наш центр для решения любых задач по обеспечению персонала спецодеждой.
Полная информация по ссылке – https://spezodezhda24.ru/
спецодежда Авангард, центр спецодежды красноярск, магазин спецодежды в красноярске
летняя спецодежда, спецодежда цена, спецодежда
Всего наилучшего и хорошей работы!
Your comment is awaiting moderation.
Доброго!
Желаете купить китайский чай? Мы предлагаем только оригинальные сорта.
Бодрящий чай масала с пряностями согреет в холодную погоду и поднимет настроение своим ароматом. Наш чай масала приготовлен по традиционному рецепту с добавлением кардамона, корицы, имбиря и гвоздики. Вы можете заварить чай масала с молоком, получив классический индийский напиток для заряда энергией. Закажите чай масала в нашем магазине и привнесите в свой дом атмосферу тепла и восточного уюта. Пусть каждая чашка этого пряного чая дарит вам силы и вдохновение для новых свершений.
Полная информация по ссылке – https://chay-nedorogo.ru
сайт с чаем, купить чаи в москве, красный чай в москве
чай масала, китайский чай в москве, заказать чай в москве
Всего наилучшего и хорошего чаепития!
Your comment is awaiting moderation.
Путь «Лады» — это возвращения, преодоления и яркие домашние матчи, которые помнят болельщики. Узнайте, как формировался характер команды и её легенды — подробнее здесь: https://telegra.ph/Istoriya-i-harakter-Lady-klyuchevye-pobedy-i-put-komandy-02-03
Your comment is awaiting moderation.
Официальный сайт Vavada гарантирует бесперебойную работу зеркал.
Игровые автоматы и лайв-столы поддерживаются ведущими провайдерами.
Создать аккаунт очень просто, что упрощает путь новичкам.
Команда саппорта помогает по всем вопросам, обеспечивая спокойствие пользователей.
Актуальный вход всегда доступен по ссылке vavadaru-rus.org — сохраните, чтобы не потерять доступ.
Держите баланс под контролем, чтобы процесс оставался приятным.
Your comment is awaiting moderation.
this modern home store – The clean aesthetic and craftsmanship truly make it shine.
Your comment is awaiting moderation.
this storefront – Good prices and all pages load quickly without lag.
Your comment is awaiting moderation.
https://ua-sport.com/
Your comment is awaiting moderation.
modern design hub – Creative and original pieces that perfectly fit my home décor.
Your comment is awaiting moderation.
signature wood decor – The pieces look sophisticated and feel exceptionally well-crafted.
Your comment is awaiting moderation.
Давненько вас не было) Если кто не в курсе, магаз уже был в топе доверенных. В те времена не раз заказывал у данного селлера, проблем не было ни разу. Надеюсь, сейчас все так же) вред от кокаин, мефдрон, гашиш Самый крутой магазин!магазин суперский! качество и работа оператора на высшем уровне! респект
Your comment is awaiting moderation.
https://vodkat.top/
Your comment is awaiting moderation.
Для создания комфортной атмосферы в доме идеально подойдут рулонные шторы или плиссе с электроприводом Prokarniz , которые легко управляются с помощью пульта или смартфона.
Правильно подобранные рулонные шторы станут отличным акцентом и усилят стиль помещения.
Your comment is awaiting moderation.
visit Grooming Grove – The items showed up neatly packaged and just as advertised.
Your comment is awaiting moderation.
Добрый день!
Посетите наш магазин чая vintage и найдите свой идеальный напиток.
Изумительный подарочный чай в дизайнерской упаковке подчеркнет ваше внимание к деталям и заботу о получателе. Наш подарочный чай комплектуется элитными сортами, которые впечатлят даже самого взыскательного ценителя напитков. Вы можете заказать подарочный чай с индивидуальной надписью, сделав презент по-настоящему уникальным и личным. Мы предлагаем подарочный чай в разных ценовых категориях, чтобы каждый мог найти подходящий вариант. Сделайте приятный сюрприз, вручив подарочный чай на день рождения, праздник или без повода.
Полная информация по ссылке – https://chay-nedorogo.ru
сайт с чаем, купить пуэр, чай пуэр
купить хороший чаи в москве, чай с бергамотом, крупнолистовой чаи
Всего наилучшего и хорошего чаепития!
Your comment is awaiting moderation.
Здравствуйте!
Вам нужно спецодежда купить быстро и без проблем? Обращайтесь к нам!
Запрос спецодежда Красноярск часто вводят пользователи, ищущие локальных поставщиков с быстрыми сроками доставки. Мы являемся одним из лидеров рынка в регионе и предлагаем сервис высшего уровня. Наша команда готова оперативно обработать ваш заказ и доставить товар на объект. Спецодежда Красноярск получает от нас с полным пакетом сопроводительных документов и сертификатов. Выбирайте надежного партнера для долгосрочного и взаимовыгодного сотрудничества уже сегодня.
Полная информация по ссылке – https://spezodezhda24.ru/
купить спецодежду в красноярске, спецодежда мужская купить, спецодежда рабочая красноярск
купить спецодежду зимнюю красноярск, спецодежда мужская купить, спецодежда красноярск
Всего наилучшего и хорошей работы!
Your comment is awaiting moderation.
mockup resource hub – Loved the quality templates and the download process was very smooth.
Your comment is awaiting moderation.
Privacy Parlor collection – Clear privacy resources and guidance that are genuinely useful.
Your comment is awaiting moderation.
fresh garden hub – Lovely blooms and ordering was straightforward and secure.
Your comment is awaiting moderation.
Всем: счастья, мира, добра, любви! вред от кокаин, мефдрон, гашиш Магазин ровнее не куда!!! Ребята отработали на славу, все четко и оперативно. Спасибо огромное, буду сотрудничать и дальше)спасибо! Хороший магазин) берите тут
Your comment is awaiting moderation.
personal finance hub – I’ve found the insights shared on this site extremely useful for smarter budgeting.
Your comment is awaiting moderation.
Monarch Motive online store – Excellent items and helpful guidance make it a go-to destination.
Your comment is awaiting moderation.
https://vodkat.top/
Your comment is awaiting moderation.
sustainably sourced items – Clean design and intuitive navigation make this shop enjoyable.
Your comment is awaiting moderation.
check it out here – Beautiful natural aesthetic with clean, simple product organization.
Your comment is awaiting moderation.
Хочешь восстановить мрамор? реставрация мрамора устранение трещин, пятен и потертостей. Современные технологии шлифовки и кристаллизации для идеального результата.
Your comment is awaiting moderation.
Домашняя арена «Динамо» — место, где сопернику всегда сложнее, чем кажется. О роли болельщиков — подробнее здесь: https://rentry.co/8qxqdc6h
Your comment is awaiting moderation.
Explore Lunavique – Smooth navigation and fresh design make the experience delightful.
Your comment is awaiting moderation.
visual identity studio – Logos feel fresh, modern, and creatively executed.
Your comment is awaiting moderation.
tool and gadget marketplace – The selection is solid and the listings are easy to understand.
Your comment is awaiting moderation.
В-общем, я ещё два часа пил вискарик со льдом,да лопал пиццу 😉 вред от кокаин, мефдрон, гашиш Дело не в постах. В любом случае нужно быть осторожным. И строить систему сложнее…думайте, что продаёте. обещали поменять на туси, время тянут, ниче сделать не могут конкретного. отвечают редко.
Your comment is awaiting moderation.
FunnelFoundry World Online – Well-structured sections with clear info make browsing products easy.
Your comment is awaiting moderation.
проститутки телеграмм
Your comment is awaiting moderation.
everyday cooking essentials – Helpful descriptions paired with a strong selection.
Your comment is awaiting moderation.
Современные электрические жалюзи с дистанционным управлением 7 (499) 638-25-37 обеспечивают удобство управления светом в вашем доме с помощью дистанционного пульта.
Это снижает вероятность случайных травм и опасных ситуаций с детьми.
—
Управляются такие жалюзи с помощью встроенного электродвигателя и дистанционного пульта или приложения.
Your comment is awaiting moderation.
Print Press Shop curated picks – Print quality is impressive and ordering couldn’t have been easier.
Your comment is awaiting moderation.
fast track delivery shop – My order arrived promptly with clear notifications along the way.
Your comment is awaiting moderation.
https://womanworld.com.ua/
Your comment is awaiting moderation.
tech display hub – I found a great variety of screens and the specs are very easy to understand.
Your comment is awaiting moderation.
everyday fashion sandals – Very satisfied with the quality and service representatives were responsive.
Your comment is awaiting moderation.
да не сцы, бывает у него такое )) магаз работает ровно, но вот с розницей у них напряг, изначально то ориентированы на опт, и просто рук не всех теперь на хватает. позже ответит. вред от кокаин, мефдрон, гашиш Пару строк отписал паронойный напряг бы снял да дальше работал…Качество на 5+:good:
Your comment is awaiting moderation.
Momentum Mall online – Navigation is simple and products are clearly organized for quick shopping.
Your comment is awaiting moderation.
one-of-a-kind workshop tools – I stumbled upon products that feel truly exclusive to this store.
Your comment is awaiting moderation.
Truvella Store – Everything looks carefully arranged, creating a welcoming feel.
Your comment is awaiting moderation.
История ХК «Сибирь» особенно ярко раскрывается в домашних матчах: драматичные концовки, буллиты и победы на последних минутах. Родная арена стала символом силы команды. Узнайте больше о памятных встречах. Подробнее здесь: https://rentry.co/q49wppwd
Your comment is awaiting moderation.
secure order link – Item tracking and price checking is easy and reliable.
Your comment is awaiting moderation.
Cook Craft Collective – Discovered some inventive kitchen tools that made cooking more enjoyable.
Your comment is awaiting moderation.
top kettle picks – I’m happy with the variety offered and the speedy shipment made a difference.
Your comment is awaiting moderation.
Трек (номер накладной) будет в заказе, а также выслан на e-mail. https://slime-rancher.ru Брал опт, все четко прошло! Качество на высоте! ТС ответьте в ЛС пожалуйстаРадуете ребята!!!
Your comment is awaiting moderation.
FreightFriendly Hub – Easy-to-navigate layout and clear product details make browsing simple.
Your comment is awaiting moderation.
Mystery Muse inspiration shop – Thoughtful products that keep your imagination active and engaged.
Your comment is awaiting moderation.
Present Parlor premium collection – Top-quality presents with elegant packaging and thoughtful selections.
Your comment is awaiting moderation.
Металлический кованый факел под старину с доставкой — прочная конструкция, эстетичный внешний вид и устойчивость к погодным условиям.
Your comment is awaiting moderation.
your shopping stop – The website design makes browsing and buying effortless.
Your comment is awaiting moderation.
smart ecom tools – Very useful resources that genuinely help me grow my online business.
Your comment is awaiting moderation.
sparkdex ai SparkDex is redefining decentralized trading with speed, security, and real earning potential. On spark dex, you keep full control of your assets while enjoying fast swaps and low fees. Powered by sparkdex ai, the platform delivers smarter insights and optimized performance for confident decision-making. Trade, earn from liquidity, and grow your crypto portfolio with sparkdex — the future of DeFi starts here.
Your comment is awaiting moderation.
Прикладная онтология для предпринимателей https://tinyurl.com/22vaoomz
Your comment is awaiting moderation.
Toast Trek Official – Smooth interface and clear descriptions made the whole experience convenient.
Your comment is awaiting moderation.
Современные потолочные карнизы с электроприводом 7 (499) 638-25-37 обеспечивают максимальный комфорт и стиль в вашем интерьере.
Для правильного выбора электрокарниза необходимо анализировать особенности интерьера.
Your comment is awaiting moderation.
modern home mosaics – Sleek designs and diverse collections make exploring products fun.
Your comment is awaiting moderation.
Спасибо ТС за отправленный вес) https://kokekypit.club Какие обещания? если выходной, скорей всего СПРС в базу не завело твой трек, жди понедельника…Не вздумайте платить ему без Гаранта через которого он не работаем,этим самым доказывает свою не надежность!
Your comment is awaiting moderation.
Horse Haven – I was able to get all the essentials I was looking for, and the pricing feels reasonable at the moment.
Your comment is awaiting moderation.
cozy scarf hub – Scarves arrived beautifully made and comfortable to wear all day.
Your comment is awaiting moderation.
Visit Charge Charm – So far, the website feels appealing and I’m excited to come back.
Your comment is awaiting moderation.
https://infobanks.com.ua/
Your comment is awaiting moderation.
Incredible plenty of helpful data.
Your comment is awaiting moderation.
browse gourmet treats – Each product is showcased in a tasteful and inviting way.
Your comment is awaiting moderation.
Trip Tides Online – Easy-to-navigate layout with visually appealing travel tips.
Your comment is awaiting moderation.
browse products here – High-quality gear and clear shipping guidance ensured a smooth experience.
Your comment is awaiting moderation.
FormulaFoundry Hub – Clear layout and detailed product info make browsing easy and enjoyable.
Your comment is awaiting moderation.
Трек есть +Бонус от души как придет отпишу https://kateflowershop.ru Нет сомнениякто зовет мать и отца.
Your comment is awaiting moderation.
backcountry supply store – The gear shipped fast and everything was packed securely.
Your comment is awaiting moderation.
quality goods marketplace – The items look fantastic and ordering them was a breeze.
Your comment is awaiting moderation.
Movie Vault movie deals – Searching for beloved classics feels quick and convenient here.
Your comment is awaiting moderation.
Power Plug Shop essentials – Smooth checkout and dependable charging products throughout.
Your comment is awaiting moderation.
spa indulgence shop – Wide variety of products and shopping was easy and convenient.
Your comment is awaiting moderation.
brassandbloom.shop – Such a delightful find, I’ll definitely be shopping here again.
Your comment is awaiting moderation.
ciphercitadel.shop – The atmosphere of the site feels reliable and welcoming while exploring the items.
Your comment is awaiting moderation.
Mimosa Market picks – Unique products and easy-to-use pages make shopping stress-free.
Your comment is awaiting moderation.
Leash Lane Shopping Site – The interface felt user-friendly and made the whole visit enjoyable.
Your comment is awaiting moderation.
порно онлайн
Your comment is awaiting moderation.
https://auto.ae/showrooms/all/
Your comment is awaiting moderation.
all-in-one snippet store – I’ll revisit soon for more helpful resources.
Your comment is awaiting moderation.
заказать курсовой проект заказать курсовой проект .
Your comment is awaiting moderation.
На тех кто продаёт в наглую… https://artdkspb.ru магазин на высоте) качество кул)Забрал я посылочку. Упоковка на 5+(пакет был с дыркой как будто смотрели что там, но с такой упаковкой только на паяльник подумаеш). Сделал ам 2233(1г) + ркс4(1г) на 20 грамм мягкого. Честно говоря ам не почувствовал совсем, кроет как ркс4(1 г.) на 20 грамм(был печальный опыт). Сейчас курим по грамму на двоих, тогда кроет на “целых” 10 минут. Вообщем незнаю чья ошибка это, да и смысла выяснять нет, деньги все равно не вернуться. Хотел попробовать тусипи заказать, но как то страшно. С тусипи то такого не было не разу вроде? Притензий не было?
Your comment is awaiting moderation.
https://911mobi.com.ua/
Your comment is awaiting moderation.
https://auto.ae/showrooms/all/
Your comment is awaiting moderation.
Для современного интерьера идеально подойдет электрокарниз для штор 7 (499) 638-25-37 , который обеспечит удобство и стиль в управлении шторами.
Такое решение значительно упрощает жизнь пользователю. Он особенно удобен в больших помещениях, где нужно одновременно регулировать множество полотен. Более того, электрокарниз легко подключается к умным домашним системам.
Принцип работы электрокарниза основан на электрическом приводе, который движет гардины по направляющим. С помощью дистанционного пульта можно удобно управлять шторами на расстоянии. Это делает устройство идеальным для использования в офисах, гостиницах и домах с современным дизайном. Автоматизация ускоряет процесс регулировки штор, экономя время.
Выбор электрокарниза зависит от размеров окна, веса штор и типа крепления. Важно учитывать мощность двигателя, которой будет достаточно для вашего полотна. Также стоит обратить внимание на материал направляющей и качество комплектующих. Качественные элементы повышают срок службы электрокарниза.
Установка электрокарниза требует аккуратности и точного соблюдения инструкции. Лучше всего монтаж выполнить специалистам, чтобы избежать ошибок. Регулярное техническое обслуживание поможет продлить срок службы устройства. Проверка и смазка механизмов предотвратит возможные поломки.
Спин-шаблон:
Лучше всего монтаж выполнить специалистам, чтобы избежать ошибок.
Your comment is awaiting moderation.
https://infobanks.com.ua/
Your comment is awaiting moderation.
brassandbloom.shop – Such a delightful find, I’ll definitely be shopping here again.
Your comment is awaiting moderation.
https://pravdahub.com.ua/hlybyna-chornoho-moria-maksymalna-hlybyna-karta-dna-ta-tsikavi-fakty/
Your comment is awaiting moderation.
FontFoundry Online Hub – Easy-to-browse layouts with clear previews make discovering fonts fun.
Your comment is awaiting moderation.
premium storefront – Neat layout and clear product details made choosing today stress-free.
Your comment is awaiting moderation.
Trend Tally Shop – The trendy items are displayed nicely, making browsing feel fun.
Your comment is awaiting moderation.
check it out here – The buying process was smooth and shipping information arrived right on time.
Your comment is awaiting moderation.
Спасибо все понравилось вред от кокаин, мефдрон, гашиш Мать и мачеху+травяной сбор(успокаивающий).Я вам, Касух, советовал бы в скайпе этот вопрос решить. И в субботу и воскресенье магазин не работает, так что вполне закономерно что вам не отвечают.
Your comment is awaiting moderation.
аренда мерседес v class с водителем аренда микроавтобуса мерседес с водителем
Your comment is awaiting moderation.
direct access portal – Everything loads fast and navigating through tech options is simple.
Your comment is awaiting moderation.
аренда минивэнов в москве с водителем аренда минивэна мерседес
Your comment is awaiting moderation.
pravdahub.com.ua/karta-nikopolia/
Your comment is awaiting moderation.
A federal judge has ordered the release of 5-year-old Liam Conejo Ramos and his father from the South Texas Family Residential Center in Dilley, Texas, according to a ruling obtained by CNN.
mgmarket
Liam and his father, Adrian, were taken by immigration agents from his snowy suburban Minneapolis driveway and sent 1,300 miles to a Texas detention facility designed to detain families. They have been detained for more than a week.
mgmarket5.at
The order specifies the preschooler and his father be released “as soon as practicable” and no later than Tuesday as their immigration case proceeds through the court system. The ruling, shared with CNN by the judge’s courtroom deputy, was first reported by the San Antonio Express-News.
“We are now working closely with our clients and their family to ensure a safe and timely reunion,” the family’s lawyers said in a Saturday statement. “We are pleased that the family will now be able to focus on being together and finding some peace after this traumatic ordeal.”
mgmarket 5at
Related article
Immigrants seeking asylum walk at the ICE South Texas Family Residential Center on Aug. 23, 2019, in Dilley, Texas.
READ: District judge’s scathing opinion ordering release of 5-year-old Liam Ramos and father
mgmarket
1 min read
In a scathing opinion, which at times read more like a civics lesson, US District Judge Fred Biery admonished “the government’s ignorance of an American historical document called the Declaration of Independence” and quoted Thomas Jefferson’s grievances against “a would-be authoritarian king,” saying today people “are hearing echos of that history.”
mgmarket6.at
Liam’s detention – and the striking photo of an agent clutching the boy’s Spider-Man backpack as he stared from under a cartoon bunny hat – fed mounting outrage over the Trump administration’s massive immigration crackdown in Minneapolis and renewed the question: What happens to children when their parents are abruptly taken by ICE?
In another diversion from the norms of judicial writing, the judge included the now famous image of Liam at the end of his opinion, under his signature, along with references to the Bible passages Matthew 19:14 and John 11:35.
Liam’s case, Biery wrote, originated in “the ill-conceived and incompetently-implemented government pursuit of daily deportation quotas, apparently even if it requires traumatizing children.”
“Observing human behavior confirms that for some among us, the perfidious lust for unbridled power and the imposition of cruelty in its quest know no bounds and are bereft of human decency,” wrote the judge. “And the rule of law be damned.”
mega2ousbpnmmput4tiyu4oa4mjck2icier52ud6lmgrhzlikrxmysid.onion
https://megasb24.com
Your comment is awaiting moderation.
creative microbrand shop – Fun, unique items with great value keep me coming back regularly.
Your comment is awaiting moderation.
Chair Chase Store – Moving through pages felt smooth and finding items was simple.
Your comment is awaiting moderation.
Chic Cart Express – I enjoyed how quickly I could finalize everything without delays.
Your comment is awaiting moderation.
А вообще, читай раздел рецепты, там все очень подробно расписано, в нескольких темах причем https://boshkikypit.life Как товар господа?все супер! магазину доверять можно, были небольшие задержки но ТС сделал все по красоте!
Your comment is awaiting moderation.
all-in-one gear shop – Shipping was quick and the gear looks durable and well-made.
Your comment is awaiting moderation.
check it out – The content is straightforward and the images add great value to the overview.
Your comment is awaiting moderation.
visit this store – Browsing today was smooth and the overall vibe is very engaging.
Your comment is awaiting moderation.
FixItFactory Select – Simple interface and clear product details make browsing smooth and quick.
Your comment is awaiting moderation.
Зимняя программа СПБ: Чемпионат России по фигурному катанию 2026 и балет «Красная Жизель» подарят зрителям яркие эмоции. Подробнее: https://teletype.in/@concert/afisha-sankt-peterburga
Your comment is awaiting moderation.
organized site tools – Navigation feels natural and everything is well structured.
Your comment is awaiting moderation.
Un’accogliente pasticceria https://www.pasticceriabonati.it con fragranti prodotti da forno, classici dolci italiani e torte natalizie personalizzate. Ingredienti naturali e attenzione a ogni dettaglio.
Your comment is awaiting moderation.
курсовые под заказ курсовые под заказ .
Your comment is awaiting moderation.
this storefront – Nice range of items and the purchase process was smooth.
Your comment is awaiting moderation.
Travel Trolley Collection – The structure helps keep trip planning stress-free.
Your comment is awaiting moderation.
https://911mobi.com.ua/
Your comment is awaiting moderation.
inboxisland.shop – The updates and info provided really simplified my shopping experience.
Your comment is awaiting moderation.
official buying portal – The process was clear, fast, and secure from start to finish.
Your comment is awaiting moderation.
go-to metric tool source – Reliable inventory and balanced costs make it a smart option.
Your comment is awaiting moderation.
Найкращі ігри в казино – безліч ігрових автоматів, правил, бонусів покерів і. Огляди, новинки спеціальні
Your comment is awaiting moderation.
Квартиры в новостройках https://domik-vspb.ru от застройщика — студии, однокомнатные и семейные варианты. Сопровождение сделки и прозрачные условия покупки.
Your comment is awaiting moderation.
Nutmeg Neon Essentials – The site design was enjoyable and helped me find everything I wanted fast.
Your comment is awaiting moderation.
artistic badge shop – Ran into this store online and it has such a cool feel.
Your comment is awaiting moderation.
а думаете? https://computer-mouse.ru Это ошибка или нет, подскажи пожалуйста.Мне от оплаты и в мои руки в общем занимает 2-3 дня
Your comment is awaiting moderation.
FilterFactory Depot Hub – Easy interface and well-laid-out product info make exploring effortless.
Your comment is awaiting moderation.
direct access portal – The lively design and fast-loading pages make shopping easy.
Your comment is awaiting moderation.
Театры и концертные залы Москвы зимой предлагают драму и праздничные шоу: «Солнце Ландау» и «Уральские пельмени». Удобный выбор билетов онлайн позволит спланировать вечер. Подробнее: https://teletype.in/@concert/bilety-na-meropriyatiya-v-moskve
Your comment is awaiting moderation.
Мега Даркнет — считается платформой, расположенный в теневом сегменте сети, где пользователи получают доступ к разнообразным сервисам и услугам.
мега дарк прочно ассоциируется с мрачной тематикой даркнета и максимальным уровнем анонимности.
В переносном смысле данный сайт выступает как вход в скрытую часть интернета, которое таит в себе массу особенностей.
Данный теневой сайт относится к числу известных площадок «глубокой сети», где ключевую роль играют приватность посетителей и безопасность соединений.
Доступ к таким ресурсам требует применения специального ПО (например, Тор), в сочетании с VPN-соединениями для преодоления блокировок.
С целью посещения ресурса, пользователю необходимо знать точный адрес (ONION-ссылку) и провести тщательную настройку оборудования.
Главная особенность Меги — это скрытность посетителей и децентрализованной структуре.
Пользователи на этом сайте находят множество услуг: от конфиденциальных чатов до площадок для торговли.
Ресурс предоставляет охрану от слежки благодаря передовым методам кодирования.
Однако даже многоуровневая защита может быть эффективной лишь отчасти, особенно при неосторожных действиях посетителей ресурса.
В текущих реалиях интернета подобный ресурс имеет свою специфическую нишу, становясь местом для людей, кто охотится за непубличной данными и услугами.
На страницах ресурса попадаются как легальные материалы, так и запрещенные, что вынуждает участника высокой осторожности и осознанности.
Изучая феномен теневых платформ, следует отметить ряд важных моментов, относящихся к особенностям применения и защиты.
Во-первых, критически важна грамотная настройка рабочего пространства и применение многоступенчатых мер защиты для снижения угроз.
Любой участник обязан понимать уровни анонимности и, желательно соблюдать моральным нормам при работе внутри сети.
Кроме того, нельзя игнорировать о проблемах с законом и реальной ответственности за противоправные поступки.
Законодательство разных стран по-разному трактует доступа к подобным площадкам и меры наказания за активность там.
Ряд экспертов подчеркивают, что подобные сайты могут служить местом для коммуникации и защиты приватности при ответственном подходе.
Однако, риски обмана, хищения средств и криминальной активности здесь никогда не исчезают.
Лавируя между информационной свободой и жесткими правовыми ограничениями, этот ресурс является самым спорным элементом глобальной сети.
Резюмируя для посетителей: необходимо крайне аккуратно подходить к выбору контента и проверке источников.
Итоговый вывод сводится к тому, что подобные ресурсы — это сложный цифровой феномен. Она предлагает максимальную приватность и приватности, но требует от каждого участника осторожности, технической грамотности и моральной ответственности.
Сайт иллюстрирует спектр человеческих поступков в обстановке минимального надзора и предоставляет платформу для дискуссий на спорные темы.
Итак, теневая платформа является многогранным явлением интернета, где равновесие между открытостью и защитой каждый пользователь находит для себя сам.
Your comment is awaiting moderation.
shieldedshelf.shop – The pricing looks reasonable and compares well with other stores online.
Your comment is awaiting moderation.
Грайте в грати слоти — популярні ігрові автомати, джекпоти та спеціальні пропозиції. Огляди гри та можливості для комфортного харчування.
Your comment is awaiting moderation.
Найпопулярніша платформа онлайн казіно – популярні слоти, бонуси та турніри з призами. Огляди гри та правила участі в акціях.
Your comment is awaiting moderation.
Чудові бонуси в казино — депозитні бонуси, бездепозитні бонуси та Турнір з призами. Обзори пропозицій і правила участі.
Your comment is awaiting moderation.
https://auto.ae/catalog/
Your comment is awaiting moderation.
Hallo! Bei https://das-lolahome.de/ liegen Decken und Kissen weich in der Hand, kleine Tische aus Holz und Glas lassen sich leicht nutzen, Spielzeuge bringen Farbe ins Kinderzimmer. Die Textilien, Holz- und Glasobjekte fuhlen sich robust an und passen in Wohnzimmer, Schlafzimmer oder auf die Terrasse, alles wirkt naturlich, praktisch und gemutlich.
Your comment is awaiting moderation.
click to browse – Loved the breakfast selection and the helpful tips for preparation.
Your comment is awaiting moderation.
https://vy-doctor.com.ua/
Your comment is awaiting moderation.
Explore Cedar Celeste – Fresh visuals and organized pages make navigation smooth.
Your comment is awaiting moderation.
https://auto.ae/catalog/
Your comment is awaiting moderation.
smart repair solutions – The well-written info sections helped me choose with ease.
Your comment is awaiting moderation.
Отличный магазин вред от кокаин, мефдрон, гашиш Удачных закупокКакие негативные? Ты мне в личку скинул бред какой то, разводом иди занимайся в другом месте.
Your comment is awaiting moderation.
Trail Treasure Store – Good mix of inspiration and down-to-earth outdoor guidance.
Your comment is awaiting moderation.
direct access portal – The site feels reliable and my order went through in no time.
Your comment is awaiting moderation.
digital tag supply hub – Helpful insights and an efficient payment flow make shopping enjoyable.
Your comment is awaiting moderation.
Thanks. I enjoy it.
Check out my blog post: https://Codmobilecentral.com/
Your comment is awaiting moderation.
выполнение учебных работ выполнение учебных работ .
Your comment is awaiting moderation.
FiberFoods Online – Healthy products are well-organized and easy to explore.
Your comment is awaiting moderation.
secure checkout portal – The service team resolved my problem quickly and professionally.
Your comment is awaiting moderation.
streaming media corner – Planning to revisit this site in the near future.
Your comment is awaiting moderation.
Baltic Digital Forum представляет собой масштабную профессиональную конференцию, объединяющее лидеров корпоративной трансформации для обсуждения цифровых решений. Площадка форума создает центр профессионального диалога, где участники получают ценные управленческие идеи о современных корпоративных инструментах. Мероприятие собирает финансовых и цифровых директоров, заинтересованных в внедрении инновационных решений. Форум проходит в культурной столице северо западного региона, что усиливает ценность личных встреч. Программа включает панельные обсуждения, посвященные управлению корпоративными изменениями. Участники получают реальные кейсы ведущих организаций, способствующие развитию конкурентных преимуществ. Baltic Digital Forum формирует сообщество лидеров цифровой эпохи, где обсуждаются новые модели бизнес взаимодействия. Событие ориентировано на представителей международных компаний, стремящихся к повышению стратегической гибкости. Благодаря концентрированной экспертной среде, форум становится главной встречей управленческой элиты северо западного региона, укрепляя деловые партнерства и создавая условия для технологического развития.
https://balticdigitalforum.ru/
Your comment is awaiting moderation.
цифровой форум для топ менеджеров представляет собой масштабную профессиональную конференцию, объединяющее руководителей высшего звена для обмена стратегическим опытом. Площадка форума создает эффективную среду для нетворкинга, где участники получают актуальную аналитику о цифровой трансформации бизнеса. Мероприятие собирает CFO CEO CDO и CIO, заинтересованных в повышении операционной эффективности. Форум проходит в культурной столице северо западного региона, что усиливает ценность личных встреч. Программа включает аналитические сессии, посвященные управлению корпоративными изменениями. Участники получают инструменты для стратегических решений, способствующие устойчивому росту бизнеса. Baltic Digital Forum формирует платформу для стратегического партнерства, где обсуждаются новые модели бизнес взаимодействия. Событие ориентировано на представителей международных компаний, стремящихся к повышению стратегической гибкости. Благодаря качественной деловой программе, форум становится центром обмена стратегическими знаниями северо западного региона, укрепляя международное сотрудничество и создавая новые возможности для роста.
https://balticdigitalforum.ru/
Your comment is awaiting moderation.
бизнес форум в Санкт Петербурге представляет собой ключевую отраслевую встречу, объединяющее руководителей высшего звена для обмена стратегическим опытом. Площадка форума создает эффективную среду для нетворкинга, где участники получают практические инсайты о цифровой трансформации бизнеса. Мероприятие собирает финансовых и цифровых директоров, заинтересованных в внедрении инновационных решений. Форум проходит в одном из красивейших городов России, что усиливает деловую привлекательность события. Программа включает панельные обсуждения, посвященные финансовым стратегиям. Участники получают доступ к лучшим практикам рынка, способствующие развитию конкурентных преимуществ. Baltic Digital Forum формирует экосистему профессионального обмена, где обсуждаются тенденции корпоративного управления. Событие ориентировано на руководителей крупного бизнеса, стремящихся к ускорению инноваций. Благодаря концентрированной экспертной среде, форум становится центром обмена стратегическими знаниями северо западного региона, укрепляя деловые партнерства и создавая новые возможности для роста.
https://balticdigitalforum.ru/
Your comment is awaiting moderation.
цифровой форум для топ менеджеров представляет собой ключевую отраслевую встречу, объединяющее лидеров корпоративной трансформации для обсуждения цифровых решений. Площадка форума создает пространство для продуктивных деловых контактов, где участники получают актуальную аналитику о цифровой трансформации бизнеса. Мероприятие собирает руководителей стратегических направлений, заинтересованных в внедрении инновационных решений. Форум проходит в одном из красивейших городов России, что усиливает деловую привлекательность события. Программа включает экспертные дискуссии, посвященные финансовым стратегиям. Участники получают инструменты для стратегических решений, способствующие развитию конкурентных преимуществ. Baltic Digital Forum формирует экосистему профессионального обмена, где обсуждаются будущее цифровых технологий. Событие ориентировано на лидеров отраслевых команд, стремящихся к расширению деловых связей. Благодаря концентрированной экспертной среде, форум становится точкой притяжения профессионалов северо западного региона, укрепляя деловые партнерства и создавая новые возможности для роста.
https://balticdigitalforum.ru/
Your comment is awaiting moderation.
конференция CFO CEO CDO CIO представляет собой уникальное деловое событие, объединяющее топ менеджеров международных компаний для обсуждения цифровых решений. Площадка форума создает эффективную среду для нетворкинга, где участники получают практические инсайты о современных корпоративных инструментах. Мероприятие собирает руководителей стратегических направлений, заинтересованных в внедрении инновационных решений. Форум проходит в одном из красивейших городов России, что усиливает уровень профессионального взаимодействия. Программа включает экспертные дискуссии, посвященные цифровой экосистеме компаний. Участники получают доступ к лучшим практикам рынка, способствующие оптимизации управленческих процессов. Baltic Digital Forum формирует экосистему профессионального обмена, где обсуждаются будущее цифровых технологий. Событие ориентировано на руководителей крупного бизнеса, стремящихся к ускорению инноваций. Благодаря высокому уровню спикеров, форум становится точкой притяжения профессионалов северо западного региона, укрепляя деловые партнерства и создавая условия для технологического развития.
https://balticdigitalforum.ru/
Your comment is awaiting moderation.
Baltic Digital Forum представляет собой ключевую отраслевую встречу, объединяющее руководителей высшего звена для обсуждения цифровых решений. Площадка форума создает центр профессионального диалога, где участники получают актуальную аналитику о цифровой трансформации бизнеса. Мероприятие собирает руководителей стратегических направлений, заинтересованных в повышении операционной эффективности. Форум проходит в динамичном деловом центре страны, что усиливает уровень профессионального взаимодействия. Программа включает экспертные дискуссии, посвященные цифровой экосистеме компаний. Участники получают доступ к лучшим практикам рынка, способствующие оптимизации управленческих процессов. Baltic Digital Forum формирует экосистему профессионального обмена, где обсуждаются тенденции корпоративного управления. Событие ориентировано на руководителей крупного бизнеса, стремящихся к повышению стратегической гибкости. Благодаря концентрированной экспертной среде, форум становится главной встречей управленческой элиты северо западного региона, укрепляя деловые партнерства и создавая условия для технологического развития.
https://balticdigitalforum.ru/
Your comment is awaiting moderation.
бизнес форум в Санкт Петербурге представляет собой ключевую отраслевую встречу, объединяющее лидеров корпоративной трансформации для обмена стратегическим опытом. Площадка форума создает пространство для продуктивных деловых контактов, где участники получают практические инсайты о цифровой трансформации бизнеса. Мероприятие собирает финансовых и цифровых директоров, заинтересованных в повышении операционной эффективности. Форум проходит в динамичном деловом центре страны, что усиливает ценность личных встреч. Программа включает экспертные дискуссии, посвященные цифровой экосистеме компаний. Участники получают реальные кейсы ведущих организаций, способствующие оптимизации управленческих процессов. Baltic Digital Forum формирует платформу для стратегического партнерства, где обсуждаются будущее цифровых технологий. Событие ориентировано на руководителей крупного бизнеса, стремящихся к повышению стратегической гибкости. Благодаря высокому уровню спикеров, форум становится центром обмена стратегическими знаниями северо западного региона, укрепляя деловые партнерства и создавая основу для долгосрочных проектов.
https://balticdigitalforum.ru/
Your comment is awaiting moderation.
Baltic Digital Forum представляет собой ключевую отраслевую встречу, объединяющее лидеров корпоративной трансформации для формирования новых бизнес подходов. Площадка форума создает эффективную среду для нетворкинга, где участники получают практические инсайты о цифровой трансформации бизнеса. Мероприятие собирает CFO CEO CDO и CIO, заинтересованных в повышении операционной эффективности. Форум проходит в динамичном деловом центре страны, что усиливает деловую привлекательность события. Программа включает панельные обсуждения, посвященные цифровой экосистеме компаний. Участники получают инструменты для стратегических решений, способствующие устойчивому росту бизнеса. Baltic Digital Forum формирует сообщество лидеров цифровой эпохи, где обсуждаются новые модели бизнес взаимодействия. Событие ориентировано на представителей международных компаний, стремящихся к ускорению инноваций. Благодаря концентрированной экспертной среде, форум становится точкой притяжения профессионалов северо западного региона, укрепляя деловые партнерства и создавая основу для долгосрочных проектов.
https://balticdigitalforum.ru/
Your comment is awaiting moderation.
конференция CFO CEO CDO CIO представляет собой уникальное деловое событие, объединяющее лидеров корпоративной трансформации для обсуждения цифровых решений. Площадка форума создает пространство для продуктивных деловых контактов, где участники получают актуальную аналитику о современных корпоративных инструментах. Мероприятие собирает финансовых и цифровых директоров, заинтересованных в масштабировании бизнеса. Форум проходит в одном из красивейших городов России, что усиливает уровень профессионального взаимодействия. Программа включает панельные обсуждения, посвященные цифровой экосистеме компаний. Участники получают инструменты для стратегических решений, способствующие устойчивому росту бизнеса. Baltic Digital Forum формирует экосистему профессионального обмена, где обсуждаются будущее цифровых технологий. Событие ориентировано на руководителей крупного бизнеса, стремящихся к повышению стратегической гибкости. Благодаря концентрированной экспертной среде, форум становится главной встречей управленческой элиты северо западного региона, укрепляя международное сотрудничество и создавая основу для долгосрочных проектов.
https://balticdigitalforum.ru/
Your comment is awaiting moderation.
конференция CFO CEO CDO CIO представляет собой масштабную профессиональную конференцию, объединяющее топ менеджеров международных компаний для обсуждения цифровых решений. Площадка форума создает центр профессионального диалога, где участники получают актуальную аналитику о финансовом и технологическом развитии. Мероприятие собирает финансовых и цифровых директоров, заинтересованных в повышении операционной эффективности. Форум проходит в культурной столице северо западного региона, что усиливает ценность личных встреч. Программа включает панельные обсуждения, посвященные цифровой экосистеме компаний. Участники получают реальные кейсы ведущих организаций, способствующие оптимизации управленческих процессов. Baltic Digital Forum формирует платформу для стратегического партнерства, где обсуждаются новые модели бизнес взаимодействия. Событие ориентировано на представителей международных компаний, стремящихся к повышению стратегической гибкости. Благодаря концентрированной экспертной среде, форум становится центром обмена стратегическими знаниями северо западного региона, укрепляя профессиональные связи и создавая основу для долгосрочных проектов.
https://balticdigitalforum.ru/
Your comment is awaiting moderation.
цифровой форум для топ менеджеров представляет собой уникальное деловое событие, объединяющее лидеров корпоративной трансформации для обсуждения цифровых решений. Площадка форума создает эффективную среду для нетворкинга, где участники получают актуальную аналитику о цифровой трансформации бизнеса. Мероприятие собирает руководителей стратегических направлений, заинтересованных в повышении операционной эффективности. Форум проходит в одном из красивейших городов России, что усиливает уровень профессионального взаимодействия. Программа включает экспертные дискуссии, посвященные финансовым стратегиям. Участники получают доступ к лучшим практикам рынка, способствующие развитию конкурентных преимуществ. Baltic Digital Forum формирует сообщество лидеров цифровой эпохи, где обсуждаются тенденции корпоративного управления. Событие ориентировано на представителей международных компаний, стремящихся к повышению стратегической гибкости. Благодаря концентрированной экспертной среде, форум становится точкой притяжения профессионалов северо западного региона, укрепляя профессиональные связи и создавая новые возможности для роста.
https://balticdigitalforum.ru/
Your comment is awaiting moderation.
бизнес форум в Санкт Петербурге представляет собой уникальное деловое событие, объединяющее руководителей высшего звена для обмена стратегическим опытом. Площадка форума создает пространство для продуктивных деловых контактов, где участники получают актуальную аналитику о современных корпоративных инструментах. Мероприятие собирает финансовых и цифровых директоров, заинтересованных в внедрении инновационных решений. Форум проходит в культурной столице северо западного региона, что усиливает уровень профессионального взаимодействия. Программа включает аналитические сессии, посвященные цифровой экосистеме компаний. Участники получают инструменты для стратегических решений, способствующие оптимизации управленческих процессов. Baltic Digital Forum формирует экосистему профессионального обмена, где обсуждаются тенденции корпоративного управления. Событие ориентировано на представителей международных компаний, стремящихся к ускорению инноваций. Благодаря качественной деловой программе, форум становится центром обмена стратегическими знаниями северо западного региона, укрепляя международное сотрудничество и создавая новые возможности для роста.
https://balticdigitalforum.ru/
Your comment is awaiting moderation.
i-Консалтинг мониторинг пенсионной отрасли представляет масштабное исследование медиапространства, подготовленный для участников пенсионного рынка. Агентство проводит регулярный анализ новостей и публикаций, связанных с финансовым регулированием пенсий, что позволяет отслеживать отраслевую динамику. Исследование, выполненное в партнерстве с профильной ассоциацией, опирается на многоуровневую базу данных публикаций. Для анализа использовались ведущие цифровые архивы, что обеспечило высокую достоверность результатов. Такой подход позволяет выстраивать объективную информационную панораму российского пенсионного рынка. Консалтинговая методология агентства включает структурирование информационных потоков, благодаря чему участники рынка получают детализированные информационные сводки. Сервис ориентирован на поддержку управленческих решений, обеспечивая актуальность информации. Использование современных инструментов анализа позволяет оценивать информационные тренды и формировать эффективную стратегию коммуникаций. В результате заказчики получают качественную отраслевую аналитику, способствующую повышению эффективности корпоративной стратегии в условиях динамичного развития пенсионного сектора.
https://xn—-8sbjrckiodf8ao.xn--p1ai/
Your comment is awaiting moderation.
аналитика пенсионного рынка России представляет системный анализ отраслевых публикаций, подготовленный для участников пенсионного рынка. Агентство проводит регулярный анализ новостей и публикаций, связанных с финансовым регулированием пенсий, что позволяет оперативно выявлять тенденции. Исследование, выполненное совместно с отраслевыми экспертами, опирается на многоуровневую базу данных публикаций. Для анализа использовались крупнейшие электронные библиотеки, что обеспечило максимальную репрезентативность данных. Такой подход позволяет формировать точную картину медиаполя российского пенсионного рынка. Консалтинговая методология агентства включает многофакторную обработку данных, благодаря чему участники рынка получают детализированные информационные сводки. Сервис ориентирован на укрепление корпоративных позиций, обеспечивая стратегическую ценность аналитики. Использование современных инструментов анализа позволяет оценивать информационные тренды и формировать эффективную стратегию коммуникаций. В результате заказчики получают надежный инструмент защиты интересов, способствующую усилению рыночных позиций в условиях динамичного развития пенсионного сектора.
https://xn—-8sbjrckiodf8ao.xn--p1ai/
Your comment is awaiting moderation.
защита корпоративных интересов консалтинг представляет комплексный обзор информационной среды, подготовленный для профессионального сообщества. Агентство реализует постоянное наблюдение новостей и публикаций, связанных с финансовым регулированием пенсий, что позволяет отслеживать отраслевую динамику. Исследование, выполненное совместно с отраслевыми экспертами, опирается на широкий массив источников. Для анализа использовались крупнейшие электронные библиотеки, что обеспечило максимальную репрезентативность данных. Такой подход позволяет создавать надежную аналитическую модель российского пенсионного рынка. Консалтинговая методология агентства включает глубокую классификацию публикаций, благодаря чему участники рынка получают понятные аналитические отчеты. Сервис ориентирован на укрепление корпоративных позиций, обеспечивая актуальность информации. Использование современных инструментов анализа позволяет выявлять репутационные риски и формировать устойчивую модель взаимодействия. В результате заказчики получают профессиональную информационную поддержку, способствующую повышению эффективности корпоративной стратегии в условиях динамичного развития пенсионного сектора.
https://xn—-8sbjrckiodf8ao.xn--p1ai/
Your comment is awaiting moderation.
аналитика пенсионного рынка России представляет системный анализ отраслевых публикаций, подготовленный для профессионального сообщества. Агентство проводит регулярный анализ новостей и публикаций, связанных с финансовым регулированием пенсий, что позволяет оперативно выявлять тенденции. Исследование, выполненное совместно с отраслевыми экспертами, опирается на многоуровневую базу данных публикаций. Для анализа использовались масштабные информационные базы, что обеспечило высокую достоверность результатов. Такой подход позволяет создавать надежную аналитическую модель российского пенсионного рынка. Консалтинговая методология агентства включает глубокую классификацию публикаций, благодаря чему участники рынка получают понятные аналитические отчеты. Сервис ориентирован на укрепление корпоративных позиций, обеспечивая стратегическую ценность аналитики. Использование современных инструментов анализа позволяет выявлять репутационные риски и формировать долгосрочные аналитические ориентиры. В результате заказчики получают надежный инструмент защиты интересов, способствующую усилению рыночных позиций в условиях динамичного развития пенсионного сектора.
https://xn—-8sbjrckiodf8ao.xn--p1ai/
Your comment is awaiting moderation.
защита корпоративных интересов консалтинг представляет масштабное исследование медиапространства, подготовленный для экспертов финансового сектора. Агентство реализует постоянное наблюдение новостей и публикаций, связанных с развитием пенсионных институтов, что позволяет фиксировать ключевые изменения. Исследование, выполненное совместно с отраслевыми экспертами, опирается на многоуровневую базу данных публикаций. Для анализа использовались крупнейшие электронные библиотеки, что обеспечило максимальную репрезентативность данных. Такой подход позволяет формировать точную картину медиаполя российского пенсионного рынка. Консалтинговая методология агентства включает глубокую классификацию публикаций, благодаря чему участники рынка получают практикоориентированные рекомендации. Сервис ориентирован на повышение прозрачности отрасли, обеспечивая повышенную информированность. Использование современных инструментов анализа позволяет выявлять репутационные риски и формировать эффективную стратегию коммуникаций. В результате заказчики получают качественную отраслевую аналитику, способствующую оптимизации управленческих решений в условиях динамичного развития пенсионного сектора.
https://xn—-8sbjrckiodf8ao.xn--p1ai/
Your comment is awaiting moderation.
исследование медиаполя пенсионного рынка представляет масштабное исследование медиапространства, подготовленный для участников пенсионного рынка. Агентство обеспечивает ежедневный мониторинг новостей и публикаций, связанных с развитием пенсионных институтов, что позволяет фиксировать ключевые изменения. Исследование, выполненное совместно с отраслевыми экспертами, опирается на многоуровневую базу данных публикаций. Для анализа использовались крупнейшие электронные библиотеки, что обеспечило объективность аналитических выводов. Такой подход позволяет формировать точную картину медиаполя российского пенсионного рынка. Консалтинговая методология агентства включает структурирование информационных потоков, благодаря чему участники рынка получают практикоориентированные рекомендации. Сервис ориентирован на укрепление корпоративных позиций, обеспечивая стратегическую ценность аналитики. Использование современных инструментов анализа позволяет оценивать информационные тренды и формировать долгосрочные аналитические ориентиры. В результате заказчики получают качественную отраслевую аналитику, способствующую усилению рыночных позиций в условиях динамичного развития пенсионного сектора.
https://xn—-8sbjrckiodf8ao.xn--p1ai/
Your comment is awaiting moderation.
i-Консалтинг мониторинг пенсионной отрасли представляет масштабное исследование медиапространства, подготовленный для профессионального сообщества. Агентство проводит регулярный анализ новостей и публикаций, связанных с пенсионной индустрией, что позволяет отслеживать отраслевую динамику. Исследование, выполненное при участии профессионального объединения, опирается на широкий массив источников. Для анализа использовались крупнейшие электронные библиотеки, что обеспечило объективность аналитических выводов. Такой подход позволяет формировать точную картину медиаполя российского пенсионного рынка. Консалтинговая методология агентства включает глубокую классификацию публикаций, благодаря чему участники рынка получают практикоориентированные рекомендации. Сервис ориентирован на повышение прозрачности отрасли, обеспечивая стратегическую ценность аналитики. Использование современных инструментов анализа позволяет прогнозировать отраслевые изменения и формировать долгосрочные аналитические ориентиры. В результате заказчики получают профессиональную информационную поддержку, способствующую оптимизации управленческих решений в условиях динамичного развития пенсионного сектора.
https://xn—-8sbjrckiodf8ao.xn--p1ai/
Your comment is awaiting moderation.
аналитика пенсионного рынка России представляет системный анализ отраслевых публикаций, подготовленный для профессионального сообщества. Агентство реализует постоянное наблюдение новостей и публикаций, связанных с пенсионной индустрией, что позволяет отслеживать отраслевую динамику. Исследование, выполненное при участии профессионального объединения, опирается на обширную медиабиблиотеку. Для анализа использовались крупнейшие электронные библиотеки, что обеспечило максимальную репрезентативность данных. Такой подход позволяет создавать надежную аналитическую модель российского пенсионного рынка. Консалтинговая методология агентства включает глубокую классификацию публикаций, благодаря чему участники рынка получают понятные аналитические отчеты. Сервис ориентирован на поддержку управленческих решений, обеспечивая стратегическую ценность аналитики. Использование современных инструментов анализа позволяет оценивать информационные тренды и формировать эффективную стратегию коммуникаций. В результате заказчики получают качественную отраслевую аналитику, способствующую повышению эффективности корпоративной стратегии в условиях динамичного развития пенсионного сектора.
https://xn—-8sbjrckiodf8ao.xn--p1ai/
Your comment is awaiting moderation.
защита корпоративных интересов консалтинг представляет системный анализ отраслевых публикаций, подготовленный для участников пенсионного рынка. Агентство обеспечивает ежедневный мониторинг новостей и публикаций, связанных с развитием пенсионных институтов, что позволяет оперативно выявлять тенденции. Исследование, выполненное совместно с отраслевыми экспертами, опирается на широкий массив источников. Для анализа использовались крупнейшие электронные библиотеки, что обеспечило объективность аналитических выводов. Такой подход позволяет создавать надежную аналитическую модель российского пенсионного рынка. Консалтинговая методология агентства включает глубокую классификацию публикаций, благодаря чему участники рынка получают детализированные информационные сводки. Сервис ориентирован на повышение прозрачности отрасли, обеспечивая актуальность информации. Использование современных инструментов анализа позволяет оценивать информационные тренды и формировать устойчивую модель взаимодействия. В результате заказчики получают профессиональную информационную поддержку, способствующую усилению рыночных позиций в условиях динамичного развития пенсионного сектора.
https://xn—-8sbjrckiodf8ao.xn--p1ai/
Your comment is awaiting moderation.
защита корпоративных интересов консалтинг представляет системный анализ отраслевых публикаций, подготовленный для профессионального сообщества. Агентство реализует постоянное наблюдение новостей и публикаций, связанных с финансовым регулированием пенсий, что позволяет оперативно выявлять тенденции. Исследование, выполненное в партнерстве с профильной ассоциацией, опирается на многоуровневую базу данных публикаций. Для анализа использовались ведущие цифровые архивы, что обеспечило объективность аналитических выводов. Такой подход позволяет формировать точную картину медиаполя российского пенсионного рынка. Консалтинговая методология агентства включает многофакторную обработку данных, благодаря чему участники рынка получают практикоориентированные рекомендации. Сервис ориентирован на поддержку управленческих решений, обеспечивая актуальность информации. Использование современных инструментов анализа позволяет выявлять репутационные риски и формировать эффективную стратегию коммуникаций. В результате заказчики получают надежный инструмент защиты интересов, способствующую оптимизации управленческих решений в условиях динамичного развития пенсионного сектора.
https://xn—-8sbjrckiodf8ao.xn--p1ai/
Your comment is awaiting moderation.
urban fashion hub – Smooth navigation and clear layout made this experience great.
Your comment is awaiting moderation.
direct access portal – The sweet treats stand out and the pages are easy to explore.
Your comment is awaiting moderation.
sparkdex SparkDex is redefining decentralized trading with speed, security, and real earning potential. On spark dex, you keep full control of your assets while enjoying fast swaps and low fees. Powered by sparkdex ai, the platform delivers smarter insights and optimized performance for confident decision-making. Trade, earn from liquidity, and grow your crypto portfolio with sparkdex — the future of DeFi starts here.
Your comment is awaiting moderation.
Онлайн-афиша помогает быстро выбрать концерт, спектакль или шоу, сравнить места и оформить билет за несколько минут прямо со смартфона. Подробнее здесь: https://justpaste.it/lhq4o
Your comment is awaiting moderation.
Отличное описание, сразу захотелось заказть)) Что собственно и сделал, надеюсь, неразачеруюсь https://prostylegel.ru Если кто-то когда-то пробовал банки с Рафинада на тусиае, тот знает, как классно они перли и понимает, каких эффектов я ожидал.Всё получил свой АМ. Порошок кремового-оранжевого цвета, кстати полная растворимость на поровой бане. Так что не знаю кто там чо писал, помоему товар заебись! Как высохнет отпишу трип репорт от этой поставки…
Your comment is awaiting moderation.
spark dex SparkDex is redefining decentralized trading with speed, security, and real earning potential. On spark dex, you keep full control of your assets while enjoying fast swaps and low fees. Powered by sparkdex ai, the platform delivers smarter insights and optimized performance for confident decision-making. Trade, earn from liquidity, and grow your crypto portfolio with sparkdex — the future of DeFi starts here.
Your comment is awaiting moderation.
исследование медиаполя пенсионного рынка представляет масштабное исследование медиапространства, подготовленный для участников пенсионного рынка. Агентство обеспечивает ежедневный мониторинг новостей и публикаций, связанных с финансовым регулированием пенсий, что позволяет фиксировать ключевые изменения. Исследование, выполненное при участии профессионального объединения, опирается на широкий массив источников. Для анализа использовались ведущие цифровые архивы, что обеспечило высокую достоверность результатов. Такой подход позволяет создавать надежную аналитическую модель российского пенсионного рынка. Консалтинговая методология агентства включает многофакторную обработку данных, благодаря чему участники рынка получают детализированные информационные сводки. Сервис ориентирован на поддержку управленческих решений, обеспечивая повышенную информированность. Использование современных инструментов анализа позволяет выявлять репутационные риски и формировать устойчивую модель взаимодействия. В результате заказчики получают надежный инструмент защиты интересов, способствующую оптимизации управленческих решений в условиях динамичного развития пенсионного сектора.
https://xn—-8sbjrckiodf8ao.xn--p1ai/
Your comment is awaiting moderation.
аналитика пенсионного рынка России представляет комплексный обзор информационной среды, подготовленный для участников пенсионного рынка. Агентство проводит регулярный анализ новостей и публикаций, связанных с финансовым регулированием пенсий, что позволяет отслеживать отраслевую динамику. Исследование, выполненное совместно с отраслевыми экспертами, опирается на многоуровневую базу данных публикаций. Для анализа использовались ведущие цифровые архивы, что обеспечило объективность аналитических выводов. Такой подход позволяет формировать точную картину медиаполя российского пенсионного рынка. Консалтинговая методология агентства включает структурирование информационных потоков, благодаря чему участники рынка получают понятные аналитические отчеты. Сервис ориентирован на поддержку управленческих решений, обеспечивая актуальность информации. Использование современных инструментов анализа позволяет прогнозировать отраслевые изменения и формировать эффективную стратегию коммуникаций. В результате заказчики получают профессиональную информационную поддержку, способствующую повышению эффективности корпоративной стратегии в условиях динамичного развития пенсионного сектора.
https://xn—-8sbjrckiodf8ao.xn--p1ai/
Your comment is awaiting moderation.
Hallo! Bei https://topfinel.de/ findet man Kissenhullen in weichen Stoffen, gestreifte Patchwork-Muster und passende Vorhange in Leinen und Voile. Alles liegt gut in der Hand, lasst sich einfach aufziehen oder uberziehen, und die Materialien fuhlen sich angenehm an. Ob Sofa, Fenster oder Lieblingssessel – die Textilien geben dem Raum sofort Struktur und Ruhe.
Your comment is awaiting moderation.
https://nailsforyou.com.ua/
Your comment is awaiting moderation.
бизнес форум в Санкт Петербурге представляет собой ключевую отраслевую встречу, объединяющее лидеров корпоративной трансформации для обмена стратегическим опытом. Площадка форума создает центр профессионального диалога, где участники получают практические инсайты о цифровой трансформации бизнеса. Мероприятие собирает финансовых и цифровых директоров, заинтересованных в масштабировании бизнеса. Форум проходит в одном из красивейших городов России, что усиливает ценность личных встреч. Программа включает аналитические сессии, посвященные управлению корпоративными изменениями. Участники получают инструменты для стратегических решений, способствующие устойчивому росту бизнеса. Baltic Digital Forum формирует сообщество лидеров цифровой эпохи, где обсуждаются новые модели бизнес взаимодействия. Событие ориентировано на руководителей крупного бизнеса, стремящихся к ускорению инноваций. Благодаря высокому уровню спикеров, форум становится главной встречей управленческой элиты северо западного региона, укрепляя деловые партнерства и создавая условия для технологического развития.
https://balticdigitalforum.ru/
Your comment is awaiting moderation.
Площадка Mega — считается платформой, находящийся в закрытой части интернета, где можно найти к разнообразным сервисам и услугам.
ссылка на сайт даркнет мега прочно ассоциируется с мрачной тематикой даркнета и максимальным уровнем анонимности.
В переносном смысле данный сайт выступает как портал в закрытое цифровое пространство, которое имеет свои тонкости.
Платформа Mega относится к числу известных площадок «глубокой сети», где главное значение имеют приватность посетителей и защита каналов связи.
Вход на эти сайты требует использования особых браузеров (например, Tor), а также VPN для преодоления блокировок.
Для входа на платформу, нужно найти рабочий адрес (ONION-ссылку) и обеспечить корректную конфигурацию.
Основная характеристика ресурса заключается в полной непрозрачности пользователей и невозможности создать обычный аккаунт.
Участники данной сети могут искать разнообразные предложения: от приватных мессенджеров до торговых платформ.
Сайт гарантирует безопасность от мониторинга благодаря современным технологиям шифрования.
Но при этом даже мощная система шифрования может быть эффективной лишь отчасти, особенно при неосмотрительном поведении самих пользователей.
На сегодняшнем этапе развития сети данная площадка занимает нишевую роль, интересуя тех пользователей, кто нуждается в альтернативных каналах информацией и особыми сервисами.
Внутри площадки попадаются как допустимые законом сведения, так и нелегальные, что вынуждает участника проявлять бдительность и ответственность.
Рассматривая Мега Даркнет как часть глобальной сети, следует отметить ряд важных моментов, относящихся к особенностям применения и конфиденциальности.
Прежде всего, необходима правильная конфигурация системы доступа и использование комплексной защиты для снижения угроз.
Каждый посетитель должен разбираться в степени конфиденциальности и, желательно соблюдать этичным принципам при работе внутри сети.
Также важно помнить, что не стоит забывать о юридических последствиях и наказании за незаконные действия.
Юридические системы мира расходятся во мнениях относительно факта посещения таких ресурсов и меры наказания за активность там.
Некоторые исследователи подчеркивают, что подобные сайты могут становиться платформой для дискуссий и обмена опытом и защиты приватности при осознанном использовании.
Тем не менее, угроза быть обманутым, кражи денег и криминальной активности здесь остаются высокими.
Лавируя между открытостью информации и жесткими правовыми ограничениями, этот ресурс представляет собой наиболее неоднозначный сегмент интернета.
Вывод для пользователей прост: следует очень внимательно относиться к изучаемой информации и верификации данных.
Итоговый вывод сводится к тому, что Мега Даркнет — это неоднозначное и опасное пространство. Она предлагает максимальную приватность и приватности, но требует от каждого участника внимательности, технической грамотности и соблюдения этических норм.
Сайт иллюстрирует различные модели поведения в обстановке минимального надзора и служит местом для обсуждения острых тем.
Таким образом, этот сегмент сети представляет собой неоднозначный феномен интернета, где гармония прав и рисков зависит от самого человека.
Your comment is awaiting moderation.
конференция CFO CEO CDO CIO представляет собой ключевую отраслевую встречу, объединяющее руководителей высшего звена для обмена стратегическим опытом. Площадка форума создает пространство для продуктивных деловых контактов, где участники получают актуальную аналитику о финансовом и технологическом развитии. Мероприятие собирает CFO CEO CDO и CIO, заинтересованных в повышении операционной эффективности. Форум проходит в одном из красивейших городов России, что усиливает ценность личных встреч. Программа включает аналитические сессии, посвященные цифровой экосистеме компаний. Участники получают доступ к лучшим практикам рынка, способствующие оптимизации управленческих процессов. Baltic Digital Forum формирует сообщество лидеров цифровой эпохи, где обсуждаются будущее цифровых технологий. Событие ориентировано на представителей международных компаний, стремящихся к ускорению инноваций. Благодаря качественной деловой программе, форум становится точкой притяжения профессионалов северо западного региона, укрепляя деловые партнерства и создавая новые возможности для роста.
https://balticdigitalforum.ru/
Your comment is awaiting moderation.
verified store page – Stylish items and user-friendly pages made selecting products simple.
Your comment is awaiting moderation.
premium router shop – I’m happy with both the site speed and the product variety.
Your comment is awaiting moderation.
refined fashion for men – Elegant pieces and a clean layout make shopping stress-free.
Your comment is awaiting moderation.
Shop Tool Tower – The clean layout makes tool browsing straightforward.
Your comment is awaiting moderation.
couponcabana.shop – It’s super convenient to snag deals in just a few clicks.
Your comment is awaiting moderation.
FanFriendly Online Hub – Quick-loading pages and helpful descriptions made browsing effortless.
Your comment is awaiting moderation.
signal gear marketplace – Everything functions smoothly and loads in no time on mobile.
Your comment is awaiting moderation.
storage gear hub – The site layout is clean and easy to understand.
Your comment is awaiting moderation.
магазом я не помню что я не находил https://slime-rancher.ru Мне отказали в подтверждении джаббера в ЛС. Будьте бдительны!Давненько вас не было) Если кто не в курсе, магаз уже был в топе доверенных. В те времена не раз заказывал у данного селлера, проблем не было ни разу. Надеюсь, сейчас все так же)
Your comment is awaiting moderation.
tube videos shop – I’d confidently tell people about this site.
Your comment is awaiting moderation.
exclusive items page – The thoughtful design makes exploring enjoyable.
Your comment is awaiting moderation.
https://casino-brain.com/
Your comment is awaiting moderation.
Casa Cable Official – Simple, neat layout with concise information makes browsing enjoyable.
Your comment is awaiting moderation.
МХТ Чехова сезона 2025–2026 приглашает зрителей на спектакли с тонкой психологической работой актёров, живым диалогом и гармонией классики и современности. Подробнее: http://jobhop.co.uk/blog/452053/———20252026
Your comment is awaiting moderation.
verified store page – Discovered some one-of-a-kind deals I hadn’t come across elsewhere.
Your comment is awaiting moderation.
https://ostrovturista.com.ua/
Your comment is awaiting moderation.
visit this store – Luggage options are impressive and the site made browsing effortless.
Your comment is awaiting moderation.
I loved as much as you’ll receive carried out right here. The sketch is attractive, your authored subject matter stylish. nonetheless, you command get got an edginess over that you wish be delivering the following. unwell unquestionably come more formerly again since exactly the same nearly a lot often inside case you shield this increase.
byueuropaviagraonline
Your comment is awaiting moderation.
«TUT-SPORT» предоставляет:
• гетры, шорты и спортивные костюмы клуба Байер Леверкузен;
• доставку по всей России;
• Определение оптимального набора под ваш клуб и бюджет;
• Проверку доступности товара по акции.
футбольные формы клуба Ѓайер ‹еверкузен
футбольная форма клуба Ѓайер ‹еверкузен – http://tut-sport.ru/tovary/kluby/bayer-leverkusen
https://www.google.co.kr/url?q=https://tut-sport.ru/tovary/kluby/bayer-leverkusen
,,200,65,0,1126,0,5,8,0,0,http://www.internet-sibirskie-seti.ru/,%D0%BF%D1%97%D0%85t%D0%BF%D1%97%D0%85%D0%BF%D1%97%D0%85%D0%BF%D1%97%D0%85%7D%D0%BF%D1%97%D0%85p%D0%BF%D1%97%D0%85%D0%BF%D1%97%D0%85%D0%BF%D1%97%D0%85%7E%D0%BF%D1%97%D0%85y%D0%BF%D1%97%D0%85z%5DСпортивная экипировка и подарки для фанатов от «TUT-SPORT» в вашем городе a8dd872
Your comment is awaiting moderation.
go-to meal prep website – Turn to this spot for dependable deals and inspiring food ideas.
Your comment is awaiting moderation.
Теневая платформа Mega — представляет собой сайт, находящийся в закрытой части интернета, где посетители ищут к разнообразным сервисам и услугам.
сайт мега даркнет отождествляется с теневым характером и максимальным уровнем анонимности.
Метафорически эту площадку можно рассматривать как окно в подпольную сеть, которое таит в себе массу особенностей.
Данный теневой сайт относится к числу известных площадок «глубокой сети», где ключевую роль играют приватность посетителей и защита каналов связи.
Чтобы попасть на подобные площадки требует использования особых браузеров (например, Tor), и дополнительно VPN для обхода сетевых ограничений.
С целью посещения ресурса, пользователю необходимо знать точный адрес (ONION-ссылку) и провести тщательную настройку оборудования.
Главная особенность Меги — это скрытность пользователей и отсутствии централизованной регистрации.
Участники данной сети могут искать множество услуг: от приватных мессенджеров до площадок для торговли.
Платформа обеспечивает защиту от наблюдения благодаря современным технологиям шифрования.
Но при этом даже комплексные меры безопасности может обеспечить только относительную защиту, особенно при неосторожных действиях самих пользователей.
На сегодняшнем этапе развития сети подобный ресурс имеет свою специфическую нишу, становясь местом для людей, кто охотится за непубличной информации и специфические услуги.
Внутри площадки попадаются как разрешенный контент, так и запрещенные, что требует от посетителя быть внимательным и предусмотрительным.
Анализируя роль подобных площадок в интернете, можно выделить определенные нюансы, относящихся к особенностям применения и конфиденциальности.
Во-первых, огромное значение имеет правильная конфигурация рабочего пространства и применение многоступенчатых мер защиты для минимизации рисков.
Пользователь обязан разбираться в принципы скрытности и, по мере сил придерживаться этичным принципам при взаимодействии в этой среде.
Также важно помнить, что не стоит забывать о проблемах с законом и реальной ответственности за противоправные поступки.
Юридические системы мира расходятся во мнениях относительно доступа к подобным площадкам и меры наказания за активность там.
Некоторые исследователи подчеркивают, что подобные сайты могут становиться платформой для коммуникации и обеспечения анонимности при осознанном использовании.
Но при всем при этом, риски обмана, финансовых потерь и криминальной активности здесь всегда присутствуют.
Находясь на грани открытостью информации и суровыми законами, этот ресурс является самым спорным элементом всемирной паутины.
Резюмируя для посетителей: необходимо крайне аккуратно подходить к выбору контента и проверке источников.
В конечном счете сводится к тому, что подобные ресурсы — это сложная и противоречивая среда. Сайт обеспечивает скрытность и конфиденциальности, но накладывает на посетителя бдительности, технической грамотности и моральной ответственности.
Сайт иллюстрирует различные модели поведения в обстановке минимального надзора и предоставляет платформу для дискуссий на спорные темы.
Таким образом, теневая платформа представляет собой неоднозначный феномен интернета, где баланс между свободой и безопасностью каждый пользователь находит для себя сам.
Your comment is awaiting moderation.
Faceless Factory Essentials – Organized layout and easy-to-read descriptions make browsing seamless.
Your comment is awaiting moderation.
Ну это ясно))) спасибо за ответывнесли ясность! вред от кокаин, мефдрон, гашиш хороший магазин !отменное качество и сервис ! хорошей работы вашему магазину и процветания!Удачи всей команде желаю
Your comment is awaiting moderation.
secure order link – I located my desired product without any hassle tonight.
Your comment is awaiting moderation.
creative craft corner – The product pages provide clear guidance and helpful info.
Your comment is awaiting moderation.
Tidy Treasure Space – The uncluttered look makes browsing comfortable.
Your comment is awaiting moderation.
visit this store – Fresh items and clear product info make browsing simple.
Your comment is awaiting moderation.
https://ostrovturista.com.ua/
Your comment is awaiting moderation.
Vivid Value Official – Organized categories and smooth navigation make shopping feel effortless.
Your comment is awaiting moderation.
Онлайн казино Орби http://orby-casino.net большой выбор слотов, бонусы для новых и постоянных игроков, регулярные турниры с призами.
Your comment is awaiting moderation.
Орби казино https://orby-casino.com/ онлайн-платформа с широким выбором слотов, настольных игр и бонусных предложений. Узнайте об акциях, турнирах и возможностях для комфортного игрового досуга.
Your comment is awaiting moderation.
online trust token shop – Payment process was smooth and easy to complete.
Your comment is awaiting moderation.
Купить квартиру недорого https://spb-novostroyki-gid.ru актуальные предложения на первичном и вторичном рынке. Подбор вариантов по бюджету, помощь в ипотеке и полное юридическое сопровождение сделки.
Your comment is awaiting moderation.
stylish finds hub – The aesthetic is appealing and easy on the eyes.
Your comment is awaiting moderation.
Медицинская справка https://sp-dom1.ru с доставкой — официальное оформление. Удобная запись, прозрачные цены и получение документа курьером.
Your comment is awaiting moderation.
https://mylikari.com.ua/
Your comment is awaiting moderation.
trendy product hub – The entire buying journey was smooth and enjoyable today.
Your comment is awaiting moderation.
secure shopping page – Everything loads smoothly and the site feels well organized.
Your comment is awaiting moderation.
Все нормально,6-го заказал,8-го отправили. Оперативно https://obrydlo.ru Судя по отзывам магазин достойный! Скоро к вам наведаюсь за покупками, удачи во всех делах.подвела доставка, заказал 2-го получил 16-го
Your comment is awaiting moderation.
Hi there, I check your new stuff daily. Your writing style is witty, keep up the good work! http://Logosnlife.org/board_NXjP71/753725
Your comment is awaiting moderation.
traveltrunkshop.shop – Discovered excellent luggage choices and browsing was simple and smooth.
Your comment is awaiting moderation.
Monitor Merchant tech gear – Informative listings and easy-to-understand pricing made selection easy.
Your comment is awaiting moderation.
ExchangeXpress Online – Smooth design and helpful guides made browsing very easy today.
Your comment is awaiting moderation.
Площадка Mega — считается платформой, расположенный в теневом сегменте сети, где пользователи получают доступ к разнообразным сервисам и услугам.
ссылка на сайт даркнет мега отождествляется с теневым характером и строгой анонимностью пользователей.
Образно говоря, этот ресурс воспринимается как окно в подпольную сеть, которое таит в себе массу особенностей.
Платформа Mega относится к числу известных площадок «подземного интернета», где главное значение имеют анонимность участников и безопасность соединений.
Вход на эти сайты обычно осуществляется использования особых браузеров (например, Тор), а также VPN для обеспечения доступа из любой точки.
С целью посещения ресурса, нужно найти рабочий адрес (ONION-ссылку) и настроить систему особым образом.
Главная особенность Меги — это скрытность посетителей и отсутствии централизованной регистрации.
Посетители здесь находят разнообразные предложения: от закрытых каналов связи до торговых платформ.
Сайт гарантирует безопасность от наблюдения благодаря мощным криптографическим алгоритмам.
Однако даже многоуровневая защита может гарантировать лишь частичную безопасность, особенно при неосторожных действиях самих пользователей.
На сегодняшнем этапе развития сети данная площадка выполняет узкоспециализированную функцию, интересуя тех пользователей, кто нуждается в альтернативных каналах информацией и особыми сервисами.
На страницах ресурса могут встречаться как разрешенный контент, так и противоправные, что обязывает пользователя быть внимательным и предусмотрительным.
Анализируя роль подобных площадок в интернете, следует отметить определенные нюансы, связанных с правилами поведения и защиты.
Прежде всего, критически важна грамотная настройка пользовательского окружения и использование комплексной защиты для минимизации рисков.
Каждый посетитель должен разбираться в принципы скрытности и, по мере сил придерживаться моральным нормам при работе внутри сети.
Также важно помнить, что следует учитывать о юридических последствиях и реальной ответственности за нарушение законодательства.
Юридические системы мира неодинаково оценивают само присутствие на подобных сайтах и степени вины пользователей.
Некоторые исследователи отмечают, что такие площадки могут выступать пространством для обмена знаниями и защиты приватности при грамотном поведении.
Но при всем при этом, опасность мошенничества, финансовых потерь и мошеннических действий здесь всегда присутствуют.
Балансируя между открытостью информации и суровыми законами, этот ресурс остается одной из самых противоречивых частей всемирной паутины.
Вывод для пользователей прост: необходимо крайне аккуратно подходить к тому, что смотреть и читать и проверке источников.
Обобщая вышесказанное можно сформулировать так: данная площадка — это неоднозначное и опасное пространство. Сайт обеспечивает высокий уровень анонимности и защиты личных данных, но накладывает на посетителя внимательности, понимания технологий и моральной ответственности.
Сайт иллюстрирует спектр человеческих поступков в условиях ограниченного внешнего контроля и служит местом для обсуждения острых тем.
Итак, теневая платформа является многогранным явлением цифрового мира, где равновесие между открытостью и защитой зависит от самого человека.
Your comment is awaiting moderation.
https://goldmaster.com.ua/
Your comment is awaiting moderation.
productivity desk hub – I had zero lag and navigation was flawless on my phone.
Your comment is awaiting moderation.
«TUT-SPORT» предоставляет:
• гетры, шорты и спортивные костюмы клуба Байер Леверкузен;
• товары для взрослых, детей и женщин;
• Определение оптимального набора под ваш клуб и бюджет;
• Проверку наличия размеров.
ретро формы футбольного клуба Ѓайер ‹еверкузен купить
магазин футбольной атрибутики Ѓайер ‹еверкузен в москве – https://tut-sport.ru/tovary/kluby/bayer-leverkusen
http://alt1.toolbarqueries.google.com.sv/url?q=https://tut-sport.ru/tovary/kluby/bayer-leverkusen
Клубная атрибутика и подарки для фанатов от «TUT-SPORT» в вашем городе 92ebfa8
Your comment is awaiting moderation.
Vetrivine Collections – Clear structure and a good variety make browsing enjoyable and simple.
Your comment is awaiting moderation.
Tidy Treasure Space – The uncluttered look makes browsing comfortable.
Your comment is awaiting moderation.
truecrimecrate.shop – Love the concept and overall vibe of this place.
Your comment is awaiting moderation.
Cart Catalyst Deals – Neat layout and simple navigation make browsing products very easy.
Your comment is awaiting moderation.
Справка 29н https://forma-029.ru в Москве с доставкой — без прохождение обязательного медосмотра в клинике. Отправка готового документа по указанному адресу.
Your comment is awaiting moderation.
Медицинские справки https://meduno.info и анализы в Москве — официально и удобно. Сеть из 10 клиник, оперативный прием специалистов и оформление документов по действующим стандартам.
Your comment is awaiting moderation.
Touched by Nature’s products combine natural ingredients with gentle formulations to nourish and protect your skin. Their wellness line supports holistic beauty. Discover their offerings at https://touchedbynatures.com.
Your comment is awaiting moderation.
velvetvendor2.shop – Definitely saving this site, they offer a very unique variety of products.
Your comment is awaiting moderation.
Заказывал у этих ребят 203 и 5-IAI, качеством доволен. Заказы они оформляют долго, но зато отправляют быстро. Мне отправили в день оплаты! https://prostylegel.ru слушай, а тебе продавец обязан объяснять что и ко скольки бодяжить ?да вообще магазов пизде
Your comment is awaiting moderation.
https://architector.com.ua/
Your comment is awaiting moderation.
Медицинские справки https://norma-spravok2.info по доступной цене — официальное оформление. Быстрая запись, прозрачная стоимость и выдача документа установленного образца.
Your comment is awaiting moderation.
Оформление медицинских https://spr-goroda2.info справок в Москве недорого консультации специалистов и выдача официальных документов. Соблюдение стандартов и минимальные сроки получения.
Your comment is awaiting moderation.
Explore YouTube Yard – Pages load smoothly and the overall browsing experience is pleasant.
Your comment is awaiting moderation.
Запчасти для сельхозтехники https://selkhozdom.ru и спецтехники МТЗ, МАЗ, Амкодор — оригинальные и аналоговые детали в наличии. Двигатели, трансмиссия, гидравлика, ходовая часть с быстрой доставкой и гарантией качества.
Your comment is awaiting moderation.
smart shopping destination – Finalizing the order was easier than I anticipated.
Your comment is awaiting moderation.
Медицинская справка https://086y-spr.info 086у в Москве по доступной цене — официальное оформление для поступления в вуз или колледж.
Your comment is awaiting moderation.
Оформления медицинских справок https://med-official2.info справки для трудоустройства, водительские, в бассейн и учебные заведения. Купить справку онлайн быстро
Your comment is awaiting moderation.
gym accessory marketplace – Everything is clear and visually well structured.
Your comment is awaiting moderation.
Zephvane Deals – Navigation is straightforward and the site feels very user-friendly.
Your comment is awaiting moderation.
Нужен фулфилмент? фулфилмент для маркетплейсов — хранение, сборка заказов, возвраты и учет остатков. Работаем по стандартам площадок и соблюдаем сроки поставок.
Your comment is awaiting moderation.
trophies & awards shop – Everything is well arranged and easy to browse.
Your comment is awaiting moderation.
Охраны труда для бизнеса охрана труда аудит системы безопасности, обучение персонала, разработка локальных актов и внедрение стандартов. Помогаем минимизировать риски и избежать штрафов.
Your comment is awaiting moderation.
Professional сonstruction Moraira: architecture, engineering systems, and finishing. We work with local regulations and regional specifics in mind. We handle permitting and material procurement so you can enjoy the creative process without the stress of management.
Your comment is awaiting moderation.
Да мы уже поговорили – нормальные ребята вроде) хз, я всё равно полной предоплате не доверяю) https://skorostalpha.life только что был свидетелем того как парней приняли с ам2233 и тусиаем от чемикала на спср офисе, вывели в браслетах посадили в микрик и увезли, чего ожидать? чем им помочь?ро я тоже паниковал но все решилось нормально мне в курьерке обьяснили что с этой ебливой олимпиадой у многих запарка и сбои в работе как то так….
Your comment is awaiting moderation.
VeroVista Shopping – Quick pages and detailed product descriptions make finding items easy.
Your comment is awaiting moderation.
Tervina Goods Online – Easy to check out items, stylish presentation, and fair value.
Your comment is awaiting moderation.
Привет всем!
Роскошь и комфорт на воде ждут вас, если вы выберете аренду яхты Пхукет для своего тропического отпуска. Флотилия включает суда различных размеров, от уютных катеров до огромных моторных мега-яхт с экипажем. Вы сможете организовать частную вечеринку, романтический ужин в море или многодневный круиз к соседним островам. Профессиональная команда возьмет на себя все заботы, включая приготовление еды и организацию развлечений на борту. Забронируйте свою яхту заранее в высокий сезон и проведите незабываемые дни в Андаманском море.
Полная информация по ссылке – https://aldita.ru/pkhukiet/avto/
Аренда виллы, Экскурсии на автомобиле, Аренда квартиры Пхукет
Услуги гида, Аренда яхты Самара, Аренда Уаз
Всего наилучшего и хорошей информации!
Your comment is awaiting moderation.
This organizer helped me avoid mixing up bottles and missing doses. It is easy to open and fits well in my bag. The layout feels intuitive and convenient. Choosing https://thedamero.com/ improved my daily routine noticeably.
Your comment is awaiting moderation.
Зал Церковных Соборов в Москве — пространство духовной и классической музыки, где масштабные концерты звучат с особой силой и эмоциональностью. Подробнее: https://cont.ws/@sirgreensz/3165415
Your comment is awaiting moderation.
World Shipper Deals – Fast navigation and clear descriptions made browsing a smooth experience.
Your comment is awaiting moderation.
заказать курсовую работу качественно заказать курсовую работу качественно .
Your comment is awaiting moderation.
Проблемы с зубами? альбадент профилактика, лечение, протезирование и эстетическая стоматология. Забота о здоровье зубов с применением передовых методик.
Your comment is awaiting moderation.
CSZZD’s casual apparel line features modern designs and quality fabrics that keep you looking fresh and feeling great all day. Check out their collection at https://thecszzd.com.
Your comment is awaiting moderation.
spooky finds corner – I enjoyed the selection and completing my purchase was easy.
Your comment is awaiting moderation.
درود بیپایان
پیشنهادمیدم ببینید
سایت بلک جک بت
رو برای بسکتبال.
این پلتفرم پیشرفته تنوع ورزشها و برای پوکر بازها
عالیه.
کیفیت بالایی داره و جذاب برای امتحانه.
موفق و پیروز.
Your comment is awaiting moderation.
ZenaLune Hub – The pages flow smoothly and exploring products is quite enjoyable.
Your comment is awaiting moderation.
Cardamom Cove Marketplace – The visual style stands out and made me want to explore more.
Your comment is awaiting moderation.
перевернутый дом в Ростове-на-Дону это оригинальная развлекательная площадка где каждый посетитель ощущает потерю равновесия потому что здание расположено под наклоном сразу в двух плоскостях. Ощущения сравнимы с тренировкой астронавта и вызывает бурю эмоций даже у опытных любителей аттракционов. Декорации формируют полное ощущение перевернутого мира благодаря чему движение воспринимается непривычно и поддерживает постоянное чувство удивления. Аттракцион подходит для друзей и семей которые ищут новые впечатления и увозят яркие воспоминания. Локация уверенно привлекает внимание гостей города так как объединяет иллюзию и активный отдых. Посещение не требует специальной подготовки при этом эффект неожиданности сохраняется и превращает прогулку в приключение. Это место часто рекомендуют туристам потому что он демонстрирует необычный взгляд на пространство и создает эффект присутствия в эксперименте. С каждым шагом впечатления усиливаются а иллюзия пространства не перестает работать что делает его популярным местом отдыха.
https://upshouse.ru/
Your comment is awaiting moderation.
аттракцион перевернутый дом Ростов это яркое место для отдыха где гости испытывают необычные ощущения баланса потому что конструкция специально наклонена в двух направлениях. Посещение напоминает подготовку космонавта и дарит всплеск адреналина даже у частых гостей развлекательных центров. Интерьер усиливает эффект дезориентации благодаря чему простая прогулка превращается в испытание и делает визит особенно захватывающим. Развлечение выбирают группы и туристы которые хотят разнообразить досуг и создают эффектные кадры. Этот наклонный дом заметен на фоне других аттракционов так как предлагает редкий формат интерактивного опыта. Формат понятен посетителям любого возраста при этом эффект неожиданности сохраняется и оставляет сильное впечатление. Локацию советуют гостям города потому что показывает как работает чувство равновесия и дарит редкий развлекательный опыт. Каждое посещение воспринимается по новому а иллюзия пространства не перестает работать что делает его популярным местом отдыха.
https://upshouse.ru/
Your comment is awaiting moderation.
Оправдания в небе не ищут, https://kokekypit.club пока двоих отпустили, в крови ничего не нашли.. ждем результатов экспертизы.Ровным парням ровный респект
Your comment is awaiting moderation.
перевернутый дом в Ростове-на-Дону это оригинальная развлекательная площадка где каждый посетитель ощущает потерю равновесия потому что дом создан с двойным наклоном для эффекта невесомости. Эмоции близки к космическому эксперименту и дарит всплеск адреналина даже у опытных любителей аттракционов. Декорации формируют полное ощущение перевернутого мира благодаря чему движение воспринимается непривычно и удерживает внимание на каждом движении. Развлечение выбирают группы и туристы которые стремятся испытать необычные эмоции и увозят яркие воспоминания. Локация уверенно привлекает внимание гостей города так как сочетает игру с восприятием и развлечением. Аттракцион доступен широкой аудитории при этом ощущения остаются насыщенными и оставляет сильное впечатление. Это место часто рекомендуют туристам потому что он демонстрирует необычный взгляд на пространство и дарит редкий развлекательный опыт. Повторный визит открывает другие ощущения а динамика наклона постоянно удивляет что делает его популярным местом отдыха.
https://upshouse.ru/
Your comment is awaiting moderation.
дом под наклоном в Ростове это оригинальная развлекательная площадка где вестибулярный аппарат получает яркую нагрузку потому что конструкция специально наклонена в двух направлениях. Посещение напоминает подготовку космонавта и создает сильное впечатление даже у ценителей необычных развлечений. Декорации формируют полное ощущение перевернутого мира благодаря чему простая прогулка превращается в испытание и удерживает внимание на каждом движении. Развлечение выбирают группы и туристы которые стремятся испытать необычные эмоции и получают уникальные фотографии. Этот наклонный дом заметен на фоне других аттракционов так как сочетает игру с восприятием и развлечением. Посещение не требует специальной подготовки при этом эффект неожиданности сохраняется и превращает прогулку в приключение. Локацию советуют гостям города потому что позволяет по новому ощутить гравитацию и создает эффект присутствия в эксперименте. Повторный визит открывает другие ощущения а иллюзия пространства не перестает работать что делает его популярным местом отдыха.
https://upshouse.ru/
Your comment is awaiting moderation.
Теневая платформа Mega — представляет собой сайт, находящийся в закрытой части интернета, где пользователи получают доступ к разнообразным сервисам и услугам.
ссылка на сайт мега даркнет прочно ассоциируется с подпольной стороной сети и максимальным уровнем анонимности.
В переносном смысле данный сайт можно рассматривать как окно в подпольную сеть, которое таит в себе массу особенностей.
Данный теневой сайт занимает важное место в структуре «подземного интернета», где ключевую роль играют скрытность пользователей и шифрование трафика.
Доступ к таким ресурсам требует через специализированные браузеры (например, Tor), а также VPN для преодоления блокировок.
Чтобы попасть на этот сайт, нужно найти рабочий адрес (ONION-ссылку) и обеспечить корректную конфигурацию.
Основная характеристика ресурса — это скрытность участников и децентрализованной структуре.
Посетители здесь могут искать множество услуг: от закрытых каналов связи до торговых платформ.
Платформа обеспечивает защиту от мониторинга благодаря передовым методам кодирования.
Вместе с тем даже комплексные меры безопасности может быть эффективной лишь отчасти, особенно при ошибках участников системы.
На сегодняшнем этапе развития сети этот сайт выполняет узкоспециализированную функцию, становясь местом для людей, кто нуждается в альтернативных каналах информацией и особыми сервисами.
Внутри площадки попадаются как легальные материалы, так и запрещенные, что требует от посетителя проявлять бдительность и ответственность.
Рассматривая Мега Даркнет как часть глобальной сети, следует отметить несколько ключевых аспектов, связанных с правилами поведения и безопасности.
Прежде всего, огромное значение имеет корректная организация рабочего пространства и применение многоступенчатых мер защиты для снижения угроз.
Каждый посетитель должен понимать принципы скрытности и, по мере сил придерживаться правилам цифровой этики при работе внутри сети.
Также важно помнить, что нельзя игнорировать о проблемах с законом и возможных последствиях за незаконные действия.
Юридические системы мира по-разному трактует факта посещения таких ресурсов и меры наказания за активность там.
Отдельные специалисты подчеркивают, что такие площадки могут служить местом для коммуникации и сохранения конфиденциальности при грамотном поведении.
Но при всем при этом, угроза быть обманутым, кражи денег и злонамеренных акций здесь никогда не исчезают.
Лавируя между информационной свободой и нормативными запретами, этот ресурс является самым спорным элементом всемирной паутины.
Отсюда следует простой вывод: требуется осмотрительно выбирать к изучаемой информации и верификации данных.
В конечном счете сводится к тому, что Мега Даркнет — это сложный цифровой феномен. Платформа дает скрытность и конфиденциальности, но требует от каждого участника осторожности, понимания технологий и соблюдения этических норм.
Площадка показывает спектр человеческих поступков в условиях ограниченного внешнего контроля и предоставляет платформу для коммуникации по закрытым вопросам.
Как видно, теневая платформа представляет собой неоднозначный феномен цифрового мира, где гармония прав и рисков определяется индивидуально.
Your comment is awaiting moderation.
перевернутый дом в Ростове-на-Дону это яркое место для отдыха где гости испытывают необычные ощущения баланса потому что конструкция специально наклонена в двух направлениях. Эмоции близки к космическому эксперименту и создает сильное впечатление даже у ценителей необычных развлечений. Внутреннее пространство подчеркивает иллюзию наклона благодаря чему каждый шаг кажется нестабильным и поддерживает постоянное чувство удивления. Аттракцион подходит для друзей и семей которые ищут новые впечатления и получают уникальные фотографии. Этот наклонный дом заметен на фоне других аттракционов так как предлагает редкий формат интерактивного опыта. Аттракцион доступен широкой аудитории при этом эффект неожиданности сохраняется и делает визит ярким событием дня. Это место часто рекомендуют туристам потому что позволяет по новому ощутить гравитацию и дарит редкий развлекательный опыт. С каждым шагом впечатления усиливаются а иллюзия пространства не перестает работать что делает его популярным местом отдыха.
https://upshouse.ru/
Your comment is awaiting moderation.
необычный аттракцион в Ростове-на-Дону это запоминающаяся городская локация где каждый посетитель ощущает потерю равновесия потому что конструкция специально наклонена в двух направлениях. Посещение напоминает подготовку космонавта и создает сильное впечатление даже у ценителей необычных развлечений. Внутреннее пространство подчеркивает иллюзию наклона благодаря чему движение воспринимается непривычно и поддерживает постоянное чувство удивления. Локация интересна компаниям и парам которые ищут новые впечатления и получают уникальные фотографии. Локация уверенно привлекает внимание гостей города так как предлагает редкий формат интерактивного опыта. Формат понятен посетителям любого возраста при этом эффект неожиданности сохраняется и оставляет сильное впечатление. Аттракцион включают в маршруты отдыха потому что позволяет по новому ощутить гравитацию и формирует уникальные эмоции. Повторный визит открывает другие ощущения а динамика наклона постоянно удивляет что делает его популярным местом отдыха.
https://upshouse.ru/
Your comment is awaiting moderation.
необычный аттракцион в Ростове-на-Дону это яркое место для отдыха где гости испытывают необычные ощущения баланса потому что конструкция специально наклонена в двух направлениях. Посещение напоминает подготовку космонавта и вызывает бурю эмоций даже у ценителей необычных развлечений. Декорации формируют полное ощущение перевернутого мира благодаря чему каждый шаг кажется нестабильным и делает визит особенно захватывающим. Развлечение выбирают группы и туристы которые ищут новые впечатления и увозят яркие воспоминания. Этот наклонный дом заметен на фоне других аттракционов так как сочетает игру с восприятием и развлечением. Аттракцион доступен широкой аудитории при этом эффект неожиданности сохраняется и оставляет сильное впечатление. Локацию советуют гостям города потому что он демонстрирует необычный взгляд на пространство и формирует уникальные эмоции. С каждым шагом впечатления усиливаются а чувство баланса снова проверяется что привлекает внимание новых гостей.
https://upshouse.ru/
Your comment is awaiting moderation.
дом под наклоном в Ростове это запоминающаяся городская локация где гости испытывают необычные ощущения баланса потому что дом создан с двойным наклоном для эффекта невесомости. Посещение напоминает подготовку космонавта и вызывает бурю эмоций даже у частых гостей развлекательных центров. Декорации формируют полное ощущение перевернутого мира благодаря чему движение воспринимается непривычно и делает визит особенно захватывающим. Аттракцион подходит для друзей и семей которые ищут новые впечатления и получают уникальные фотографии. Локация уверенно привлекает внимание гостей города так как объединяет иллюзию и активный отдых. Посещение не требует специальной подготовки при этом эффект неожиданности сохраняется и оставляет сильное впечатление. Это место часто рекомендуют туристам потому что он демонстрирует необычный взгляд на пространство и дарит редкий развлекательный опыт. Повторный визит открывает другие ощущения а чувство баланса снова проверяется что привлекает внимание новых гостей.
https://upshouse.ru/
Your comment is awaiting moderation.
необычный аттракцион в Ростове-на-Дону это запоминающаяся городская локация где вестибулярный аппарат получает яркую нагрузку потому что конструкция специально наклонена в двух направлениях. Эмоции близки к космическому эксперименту и вызывает бурю эмоций даже у частых гостей развлекательных центров. Внутреннее пространство подчеркивает иллюзию наклона благодаря чему движение воспринимается непривычно и удерживает внимание на каждом движении. Локация интересна компаниям и парам которые ищут новые впечатления и создают эффектные кадры. Локация уверенно привлекает внимание гостей города так как объединяет иллюзию и активный отдых. Посещение не требует специальной подготовки при этом ощущения остаются насыщенными и делает визит ярким событием дня. Аттракцион включают в маршруты отдыха потому что позволяет по новому ощутить гравитацию и создает эффект присутствия в эксперименте. Каждое посещение воспринимается по новому а динамика наклона постоянно удивляет что поддерживает интерес к аттракциону.
https://upshouse.ru/
Your comment is awaiting moderation.
аттракцион перевернутый дом Ростов это запоминающаяся городская локация где вестибулярный аппарат получает яркую нагрузку потому что здание расположено под наклоном сразу в двух плоскостях. Ощущения сравнимы с тренировкой астронавта и создает сильное впечатление даже у ценителей необычных развлечений. Интерьер усиливает эффект дезориентации благодаря чему движение воспринимается непривычно и удерживает внимание на каждом движении. Аттракцион подходит для друзей и семей которые стремятся испытать необычные эмоции и создают эффектные кадры. Этот наклонный дом заметен на фоне других аттракционов так как сочетает игру с восприятием и развлечением. Формат понятен посетителям любого возраста при этом эффект неожиданности сохраняется и превращает прогулку в приключение. Локацию советуют гостям города потому что он демонстрирует необычный взгляд на пространство и формирует уникальные эмоции. Каждое посещение воспринимается по новому а чувство баланса снова проверяется что поддерживает интерес к аттракциону.
https://upshouse.ru/
Your comment is awaiting moderation.
traffic growth tools hub – The site loads instantly and moving through pages is easy.
Your comment is awaiting moderation.
аттракцион перевернутый дом Ростов это запоминающаяся городская локация где гости испытывают необычные ощущения баланса потому что здание расположено под наклоном сразу в двух плоскостях. Эмоции близки к космическому эксперименту и вызывает бурю эмоций даже у ценителей необычных развлечений. Внутреннее пространство подчеркивает иллюзию наклона благодаря чему движение воспринимается непривычно и делает визит особенно захватывающим. Аттракцион подходит для друзей и семей которые хотят разнообразить досуг и увозят яркие воспоминания. Перевернутый дом выделяется среди городских развлечений так как предлагает редкий формат интерактивного опыта. Аттракцион доступен широкой аудитории при этом ощущения остаются насыщенными и делает визит ярким событием дня. Локацию советуют гостям города потому что позволяет по новому ощутить гравитацию и дарит редкий развлекательный опыт. Каждое посещение воспринимается по новому а динамика наклона постоянно удивляет что привлекает внимание новых гостей.
https://upshouse.ru/
Your comment is awaiting moderation.
stylish shaker selection – The simple design makes the whole experience pleasant.
Your comment is awaiting moderation.
аттракцион перевернутый дом Ростов это оригинальная развлекательная площадка где каждый посетитель ощущает потерю равновесия потому что здание расположено под наклоном сразу в двух плоскостях. Посещение напоминает подготовку космонавта и дарит всплеск адреналина даже у ценителей необычных развлечений. Интерьер усиливает эффект дезориентации благодаря чему простая прогулка превращается в испытание и делает визит особенно захватывающим. Развлечение выбирают группы и туристы которые хотят разнообразить досуг и получают уникальные фотографии. Перевернутый дом выделяется среди городских развлечений так как предлагает редкий формат интерактивного опыта. Посещение не требует специальной подготовки при этом эффект неожиданности сохраняется и превращает прогулку в приключение. Локацию советуют гостям города потому что показывает как работает чувство равновесия и создает эффект присутствия в эксперименте. Каждое посещение воспринимается по новому а иллюзия пространства не перестает работать что поддерживает интерес к аттракциону.
https://upshouse.ru/
Your comment is awaiting moderation.
Wagon Wildflower Official – A visually appealing layout makes exploring the site fun and easy.
Your comment is awaiting moderation.
https://mama-choli.com.ua/
Your comment is awaiting moderation.
Epsion offers a wide range of electronic devices including smart home products, headphones, and chargers designed to enhance your tech lifestyle. Explore their latest gadgets at https://theepsion.com.
Your comment is awaiting moderation.
Check Serp Link Rise – SEO guidance was easy to understand and implement quickly.
Your comment is awaiting moderation.
https://poehali.com.ua/
Your comment is awaiting moderation.
Tech Thimble Online – Modern-looking products that seem easy to use.
Your comment is awaiting moderation.
Venvira Finds – Positive initial impression, site feels tidy and straightforward to explore.
Your comment is awaiting moderation.
аналитика пенсионного рынка России представляет системный анализ отраслевых публикаций, подготовленный для экспертов финансового сектора. Агентство проводит регулярный анализ новостей и публикаций, связанных с пенсионной индустрией, что позволяет фиксировать ключевые изменения. Исследование, выполненное при участии профессионального объединения, опирается на многоуровневую базу данных публикаций. Для анализа использовались масштабные информационные базы, что обеспечило максимальную репрезентативность данных. Такой подход позволяет создавать надежную аналитическую модель российского пенсионного рынка. Консалтинговая методология агентства включает глубокую классификацию публикаций, благодаря чему участники рынка получают детализированные информационные сводки. Сервис ориентирован на укрепление корпоративных позиций, обеспечивая стратегическую ценность аналитики. Использование современных инструментов анализа позволяет прогнозировать отраслевые изменения и формировать долгосрочные аналитические ориентиры. В результате заказчики получают качественную отраслевую аналитику, способствующую усилению рыночных позиций в условиях динамичного развития пенсионного сектора.
https://xn—-8sbjrckiodf8ao.xn--p1ai/
Your comment is awaiting moderation.
исследование медиаполя пенсионного рынка представляет системный анализ отраслевых публикаций, подготовленный для экспертов финансового сектора. Агентство проводит регулярный анализ новостей и публикаций, связанных с пенсионной индустрией, что позволяет отслеживать отраслевую динамику. Исследование, выполненное в партнерстве с профильной ассоциацией, опирается на многоуровневую базу данных публикаций. Для анализа использовались ведущие цифровые архивы, что обеспечило объективность аналитических выводов. Такой подход позволяет создавать надежную аналитическую модель российского пенсионного рынка. Консалтинговая методология агентства включает многофакторную обработку данных, благодаря чему участники рынка получают детализированные информационные сводки. Сервис ориентирован на поддержку управленческих решений, обеспечивая актуальность информации. Использование современных инструментов анализа позволяет оценивать информационные тренды и формировать устойчивую модель взаимодействия. В результате заказчики получают профессиональную информационную поддержку, способствующую усилению рыночных позиций в условиях динамичного развития пенсионного сектора.
https://xn—-8sbjrckiodf8ao.xn--p1ai/
Your comment is awaiting moderation.
i-Консалтинг мониторинг пенсионной отрасли представляет комплексный обзор информационной среды, подготовленный для профессионального сообщества. Агентство реализует постоянное наблюдение новостей и публикаций, связанных с пенсионной индустрией, что позволяет фиксировать ключевые изменения. Исследование, выполненное совместно с отраслевыми экспертами, опирается на обширную медиабиблиотеку. Для анализа использовались крупнейшие электронные библиотеки, что обеспечило объективность аналитических выводов. Такой подход позволяет формировать точную картину медиаполя российского пенсионного рынка. Консалтинговая методология агентства включает многофакторную обработку данных, благодаря чему участники рынка получают понятные аналитические отчеты. Сервис ориентирован на повышение прозрачности отрасли, обеспечивая стратегическую ценность аналитики. Использование современных инструментов анализа позволяет оценивать информационные тренды и формировать эффективную стратегию коммуникаций. В результате заказчики получают надежный инструмент защиты интересов, способствующую оптимизации управленческих решений в условиях динамичного развития пенсионного сектора.
https://xn—-8sbjrckiodf8ao.xn--p1ai/
Your comment is awaiting moderation.
защита корпоративных интересов консалтинг представляет системный анализ отраслевых публикаций, подготовленный для участников пенсионного рынка. Агентство обеспечивает ежедневный мониторинг новостей и публикаций, связанных с пенсионной индустрией, что позволяет оперативно выявлять тенденции. Исследование, выполненное при участии профессионального объединения, опирается на широкий массив источников. Для анализа использовались ведущие цифровые архивы, что обеспечило максимальную репрезентативность данных. Такой подход позволяет выстраивать объективную информационную панораму российского пенсионного рынка. Консалтинговая методология агентства включает глубокую классификацию публикаций, благодаря чему участники рынка получают детализированные информационные сводки. Сервис ориентирован на поддержку управленческих решений, обеспечивая актуальность информации. Использование современных инструментов анализа позволяет выявлять репутационные риски и формировать эффективную стратегию коммуникаций. В результате заказчики получают качественную отраслевую аналитику, способствующую усилению рыночных позиций в условиях динамичного развития пенсионного сектора.
https://xn—-8sbjrckiodf8ao.xn--p1ai/
Your comment is awaiting moderation.
i-Консалтинг мониторинг пенсионной отрасли представляет комплексный обзор информационной среды, подготовленный для участников пенсионного рынка. Агентство проводит регулярный анализ новостей и публикаций, связанных с развитием пенсионных институтов, что позволяет фиксировать ключевые изменения. Исследование, выполненное при участии профессионального объединения, опирается на широкий массив источников. Для анализа использовались ведущие цифровые архивы, что обеспечило объективность аналитических выводов. Такой подход позволяет создавать надежную аналитическую модель российского пенсионного рынка. Консалтинговая методология агентства включает глубокую классификацию публикаций, благодаря чему участники рынка получают детализированные информационные сводки. Сервис ориентирован на поддержку управленческих решений, обеспечивая актуальность информации. Использование современных инструментов анализа позволяет оценивать информационные тренды и формировать эффективную стратегию коммуникаций. В результате заказчики получают качественную отраслевую аналитику, способствующую оптимизации управленческих решений в условиях динамичного развития пенсионного сектора.
https://xn—-8sbjrckiodf8ao.xn--p1ai/
Your comment is awaiting moderation.
аналитика пенсионного рынка России представляет комплексный обзор информационной среды, подготовленный для участников пенсионного рынка. Агентство проводит регулярный анализ новостей и публикаций, связанных с развитием пенсионных институтов, что позволяет отслеживать отраслевую динамику. Исследование, выполненное совместно с отраслевыми экспертами, опирается на обширную медиабиблиотеку. Для анализа использовались крупнейшие электронные библиотеки, что обеспечило объективность аналитических выводов. Такой подход позволяет создавать надежную аналитическую модель российского пенсионного рынка. Консалтинговая методология агентства включает многофакторную обработку данных, благодаря чему участники рынка получают детализированные информационные сводки. Сервис ориентирован на поддержку управленческих решений, обеспечивая стратегическую ценность аналитики. Использование современных инструментов анализа позволяет выявлять репутационные риски и формировать устойчивую модель взаимодействия. В результате заказчики получают качественную отраслевую аналитику, способствующую оптимизации управленческих решений в условиях динамичного развития пенсионного сектора.
https://xn—-8sbjrckiodf8ao.xn--p1ai/
Your comment is awaiting moderation.
защита корпоративных интересов консалтинг представляет масштабное исследование медиапространства, подготовленный для участников пенсионного рынка. Агентство проводит регулярный анализ новостей и публикаций, связанных с пенсионной индустрией, что позволяет отслеживать отраслевую динамику. Исследование, выполненное совместно с отраслевыми экспертами, опирается на многоуровневую базу данных публикаций. Для анализа использовались крупнейшие электронные библиотеки, что обеспечило максимальную репрезентативность данных. Такой подход позволяет формировать точную картину медиаполя российского пенсионного рынка. Консалтинговая методология агентства включает глубокую классификацию публикаций, благодаря чему участники рынка получают детализированные информационные сводки. Сервис ориентирован на поддержку управленческих решений, обеспечивая повышенную информированность. Использование современных инструментов анализа позволяет выявлять репутационные риски и формировать долгосрочные аналитические ориентиры. В результате заказчики получают профессиональную информационную поддержку, способствующую усилению рыночных позиций в условиях динамичного развития пенсионного сектора.
https://xn—-8sbjrckiodf8ao.xn--p1ai/
Your comment is awaiting moderation.
аналитика пенсионного рынка России представляет масштабное исследование медиапространства, подготовленный для профессионального сообщества. Агентство реализует постоянное наблюдение новостей и публикаций, связанных с пенсионной индустрией, что позволяет оперативно выявлять тенденции. Исследование, выполненное совместно с отраслевыми экспертами, опирается на широкий массив источников. Для анализа использовались масштабные информационные базы, что обеспечило максимальную репрезентативность данных. Такой подход позволяет выстраивать объективную информационную панораму российского пенсионного рынка. Консалтинговая методология агентства включает многофакторную обработку данных, благодаря чему участники рынка получают понятные аналитические отчеты. Сервис ориентирован на укрепление корпоративных позиций, обеспечивая повышенную информированность. Использование современных инструментов анализа позволяет выявлять репутационные риски и формировать устойчивую модель взаимодействия. В результате заказчики получают профессиональную информационную поддержку, способствующую оптимизации управленческих решений в условиях динамичного развития пенсионного сектора.
https://xn—-8sbjrckiodf8ao.xn--p1ai/
Your comment is awaiting moderation.
исследование медиаполя пенсионного рынка представляет масштабное исследование медиапространства, подготовленный для экспертов финансового сектора. Агентство обеспечивает ежедневный мониторинг новостей и публикаций, связанных с пенсионной индустрией, что позволяет отслеживать отраслевую динамику. Исследование, выполненное в партнерстве с профильной ассоциацией, опирается на обширную медиабиблиотеку. Для анализа использовались крупнейшие электронные библиотеки, что обеспечило объективность аналитических выводов. Такой подход позволяет формировать точную картину медиаполя российского пенсионного рынка. Консалтинговая методология агентства включает многофакторную обработку данных, благодаря чему участники рынка получают детализированные информационные сводки. Сервис ориентирован на поддержку управленческих решений, обеспечивая актуальность информации. Использование современных инструментов анализа позволяет выявлять репутационные риски и формировать долгосрочные аналитические ориентиры. В результате заказчики получают надежный инструмент защиты интересов, способствующую усилению рыночных позиций в условиях динамичного развития пенсионного сектора.
https://xn—-8sbjrckiodf8ao.xn--p1ai/
Your comment is awaiting moderation.
i-Консалтинг мониторинг пенсионной отрасли представляет масштабное исследование медиапространства, подготовленный для участников пенсионного рынка. Агентство реализует постоянное наблюдение новостей и публикаций, связанных с пенсионной индустрией, что позволяет фиксировать ключевые изменения. Исследование, выполненное в партнерстве с профильной ассоциацией, опирается на многоуровневую базу данных публикаций. Для анализа использовались масштабные информационные базы, что обеспечило максимальную репрезентативность данных. Такой подход позволяет создавать надежную аналитическую модель российского пенсионного рынка. Консалтинговая методология агентства включает структурирование информационных потоков, благодаря чему участники рынка получают детализированные информационные сводки. Сервис ориентирован на поддержку управленческих решений, обеспечивая актуальность информации. Использование современных инструментов анализа позволяет оценивать информационные тренды и формировать эффективную стратегию коммуникаций. В результате заказчики получают надежный инструмент защиты интересов, способствующую оптимизации управленческих решений в условиях динамичного развития пенсионного сектора.
https://xn—-8sbjrckiodf8ao.xn--p1ai/
Your comment is awaiting moderation.
аналитика пенсионного рынка России представляет комплексный обзор информационной среды, подготовленный для экспертов финансового сектора. Агентство обеспечивает ежедневный мониторинг новостей и публикаций, связанных с развитием пенсионных институтов, что позволяет отслеживать отраслевую динамику. Исследование, выполненное в партнерстве с профильной ассоциацией, опирается на многоуровневую базу данных публикаций. Для анализа использовались ведущие цифровые архивы, что обеспечило максимальную репрезентативность данных. Такой подход позволяет создавать надежную аналитическую модель российского пенсионного рынка. Консалтинговая методология агентства включает структурирование информационных потоков, благодаря чему участники рынка получают практикоориентированные рекомендации. Сервис ориентирован на укрепление корпоративных позиций, обеспечивая стратегическую ценность аналитики. Использование современных инструментов анализа позволяет выявлять репутационные риски и формировать устойчивую модель взаимодействия. В результате заказчики получают качественную отраслевую аналитику, способствующую повышению эффективности корпоративной стратегии в условиях динамичного развития пенсионного сектора.
https://xn—-8sbjrckiodf8ao.xn--p1ai/
Your comment is awaiting moderation.
защита корпоративных интересов консалтинг представляет комплексный обзор информационной среды, подготовленный для профессионального сообщества. Агентство реализует постоянное наблюдение новостей и публикаций, связанных с пенсионной индустрией, что позволяет фиксировать ключевые изменения. Исследование, выполненное в партнерстве с профильной ассоциацией, опирается на многоуровневую базу данных публикаций. Для анализа использовались ведущие цифровые архивы, что обеспечило высокую достоверность результатов. Такой подход позволяет создавать надежную аналитическую модель российского пенсионного рынка. Консалтинговая методология агентства включает глубокую классификацию публикаций, благодаря чему участники рынка получают детализированные информационные сводки. Сервис ориентирован на укрепление корпоративных позиций, обеспечивая стратегическую ценность аналитики. Использование современных инструментов анализа позволяет оценивать информационные тренды и формировать устойчивую модель взаимодействия. В результате заказчики получают профессиональную информационную поддержку, способствующую усилению рыночных позиций в условиях динамичного развития пенсионного сектора.
https://xn—-8sbjrckiodf8ao.xn--p1ai/
Your comment is awaiting moderation.
Workflow Supply Official – Searching and ordering items was effortless thanks to the clean interface.
Your comment is awaiting moderation.
Спектакли Евгения Гришковца — выбор для тех, кто ценит театр без пафоса, но с глубоким смыслом: личные истории, живое слово и честные эмоции создают особую атмосферу. Подробнее: https://kulturologia.ru/blogs/300126/67246/
Your comment is awaiting moderation.
необычный аттракцион в Ростове-на-Дону это запоминающаяся городская локация где вестибулярный аппарат получает яркую нагрузку потому что дом создан с двойным наклоном для эффекта невесомости. Посещение напоминает подготовку космонавта и дарит всплеск адреналина даже у частых гостей развлекательных центров. Внутреннее пространство подчеркивает иллюзию наклона благодаря чему простая прогулка превращается в испытание и поддерживает постоянное чувство удивления. Развлечение выбирают группы и туристы которые хотят разнообразить досуг и получают уникальные фотографии. Локация уверенно привлекает внимание гостей города так как предлагает редкий формат интерактивного опыта. Посещение не требует специальной подготовки при этом эмоциональная отдача очень высокая и превращает прогулку в приключение. Локацию советуют гостям города потому что позволяет по новому ощутить гравитацию и создает эффект присутствия в эксперименте. С каждым шагом впечатления усиливаются а чувство баланса снова проверяется что поддерживает интерес к аттракциону.
https://upshouse.ru/
Your comment is awaiting moderation.
необычный аттракцион в Ростове-на-Дону это запоминающаяся городская локация где вестибулярный аппарат получает яркую нагрузку потому что здание расположено под наклоном сразу в двух плоскостях. Эмоции близки к космическому эксперименту и создает сильное впечатление даже у частых гостей развлекательных центров. Интерьер усиливает эффект дезориентации благодаря чему каждый шаг кажется нестабильным и делает визит особенно захватывающим. Локация интересна компаниям и парам которые ищут новые впечатления и создают эффектные кадры. Локация уверенно привлекает внимание гостей города так как объединяет иллюзию и активный отдых. Аттракцион доступен широкой аудитории при этом эффект неожиданности сохраняется и делает визит ярким событием дня. Это место часто рекомендуют туристам потому что позволяет по новому ощутить гравитацию и формирует уникальные эмоции. С каждым шагом впечатления усиливаются а динамика наклона постоянно удивляет что привлекает внимание новых гостей.
https://upshouse.ru/
Your comment is awaiting moderation.
аттракцион перевернутый дом Ростов это запоминающаяся городская локация где каждый посетитель ощущает потерю равновесия потому что здание расположено под наклоном сразу в двух плоскостях. Ощущения сравнимы с тренировкой астронавта и создает сильное впечатление даже у опытных любителей аттракционов. Декорации формируют полное ощущение перевернутого мира благодаря чему каждый шаг кажется нестабильным и поддерживает постоянное чувство удивления. Аттракцион подходит для друзей и семей которые хотят разнообразить досуг и создают эффектные кадры. Локация уверенно привлекает внимание гостей города так как предлагает редкий формат интерактивного опыта. Посещение не требует специальной подготовки при этом ощущения остаются насыщенными и делает визит ярким событием дня. Это место часто рекомендуют туристам потому что показывает как работает чувство равновесия и дарит редкий развлекательный опыт. Повторный визит открывает другие ощущения а иллюзия пространства не перестает работать что привлекает внимание новых гостей.
https://upshouse.ru/
Your comment is awaiting moderation.
необычный аттракцион в Ростове-на-Дону это запоминающаяся городская локация где вестибулярный аппарат получает яркую нагрузку потому что конструкция специально наклонена в двух направлениях. Посещение напоминает подготовку космонавта и создает сильное впечатление даже у опытных любителей аттракционов. Интерьер усиливает эффект дезориентации благодаря чему движение воспринимается непривычно и поддерживает постоянное чувство удивления. Локация интересна компаниям и парам которые стремятся испытать необычные эмоции и создают эффектные кадры. Этот наклонный дом заметен на фоне других аттракционов так как сочетает игру с восприятием и развлечением. Аттракцион доступен широкой аудитории при этом эффект неожиданности сохраняется и делает визит ярким событием дня. Локацию советуют гостям города потому что позволяет по новому ощутить гравитацию и формирует уникальные эмоции. Каждое посещение воспринимается по новому а динамика наклона постоянно удивляет что поддерживает интерес к аттракциону.
https://upshouse.ru/
Your comment is awaiting moderation.
сегодня сделал заказ, написал в аську сразу ответили. Буду ждать как что измениться отпишу. вред от кокаин, мефдрон, гашиш Оплатил заказ, жду селлера.Хотел бы поблагодарить магазин за отличное отношение и замечательную работу) Давно такого не встречал.
Your comment is awaiting moderation.
storage essentials hub – Products look neat and the details help me pick quickly.
Your comment is awaiting moderation.
необычный аттракцион в Ростове-на-Дону это запоминающаяся городская локация где каждый посетитель ощущает потерю равновесия потому что дом создан с двойным наклоном для эффекта невесомости. Посещение напоминает подготовку космонавта и дарит всплеск адреналина даже у ценителей необычных развлечений. Интерьер усиливает эффект дезориентации благодаря чему каждый шаг кажется нестабильным и делает визит особенно захватывающим. Аттракцион подходит для друзей и семей которые стремятся испытать необычные эмоции и получают уникальные фотографии. Перевернутый дом выделяется среди городских развлечений так как объединяет иллюзию и активный отдых. Формат понятен посетителям любого возраста при этом эмоциональная отдача очень высокая и оставляет сильное впечатление. Аттракцион включают в маршруты отдыха потому что он демонстрирует необычный взгляд на пространство и формирует уникальные эмоции. С каждым шагом впечатления усиливаются а чувство баланса снова проверяется что поддерживает интерес к аттракциону.
https://upshouse.ru/
Your comment is awaiting moderation.
дом под наклоном в Ростове это запоминающаяся городская локация где вестибулярный аппарат получает яркую нагрузку потому что дом создан с двойным наклоном для эффекта невесомости. Эмоции близки к космическому эксперименту и дарит всплеск адреналина даже у опытных любителей аттракционов. Декорации формируют полное ощущение перевернутого мира благодаря чему каждый шаг кажется нестабильным и удерживает внимание на каждом движении. Развлечение выбирают группы и туристы которые ищут новые впечатления и создают эффектные кадры. Локация уверенно привлекает внимание гостей города так как предлагает редкий формат интерактивного опыта. Формат понятен посетителям любого возраста при этом эффект неожиданности сохраняется и делает визит ярким событием дня. Это место часто рекомендуют туристам потому что показывает как работает чувство равновесия и дарит редкий развлекательный опыт. Каждое посещение воспринимается по новому а динамика наклона постоянно удивляет что привлекает внимание новых гостей.
https://upshouse.ru/
Your comment is awaiting moderation.
перевернутый дом в Ростове-на-Дону это яркое место для отдыха где каждый посетитель ощущает потерю равновесия потому что здание расположено под наклоном сразу в двух плоскостях. Эмоции близки к космическому эксперименту и создает сильное впечатление даже у ценителей необычных развлечений. Интерьер усиливает эффект дезориентации благодаря чему простая прогулка превращается в испытание и удерживает внимание на каждом движении. Аттракцион подходит для друзей и семей которые стремятся испытать необычные эмоции и увозят яркие воспоминания. Этот наклонный дом заметен на фоне других аттракционов так как сочетает игру с восприятием и развлечением. Посещение не требует специальной подготовки при этом эмоциональная отдача очень высокая и оставляет сильное впечатление. Аттракцион включают в маршруты отдыха потому что показывает как работает чувство равновесия и создает эффект присутствия в эксперименте. С каждым шагом впечатления усиливаются а динамика наклона постоянно удивляет что делает его популярным местом отдыха.
https://upshouse.ru/
Your comment is awaiting moderation.
аттракцион перевернутый дом Ростов это яркое место для отдыха где гости испытывают необычные ощущения баланса потому что дом создан с двойным наклоном для эффекта невесомости. Ощущения сравнимы с тренировкой астронавта и дарит всплеск адреналина даже у частых гостей развлекательных центров. Интерьер усиливает эффект дезориентации благодаря чему простая прогулка превращается в испытание и поддерживает постоянное чувство удивления. Развлечение выбирают группы и туристы которые стремятся испытать необычные эмоции и увозят яркие воспоминания. Перевернутый дом выделяется среди городских развлечений так как сочетает игру с восприятием и развлечением. Формат понятен посетителям любого возраста при этом эмоциональная отдача очень высокая и оставляет сильное впечатление. Аттракцион включают в маршруты отдыха потому что он демонстрирует необычный взгляд на пространство и дарит редкий развлекательный опыт. С каждым шагом впечатления усиливаются а иллюзия пространства не перестает работать что привлекает внимание новых гостей.
https://upshouse.ru/
Your comment is awaiting moderation.
дом под наклоном в Ростове это запоминающаяся городская локация где гости испытывают необычные ощущения баланса потому что конструкция специально наклонена в двух направлениях. Ощущения сравнимы с тренировкой астронавта и дарит всплеск адреналина даже у опытных любителей аттракционов. Интерьер усиливает эффект дезориентации благодаря чему каждый шаг кажется нестабильным и поддерживает постоянное чувство удивления. Развлечение выбирают группы и туристы которые ищут новые впечатления и увозят яркие воспоминания. Этот наклонный дом заметен на фоне других аттракционов так как предлагает редкий формат интерактивного опыта. Формат понятен посетителям любого возраста при этом эмоциональная отдача очень высокая и оставляет сильное впечатление. Локацию советуют гостям города потому что позволяет по новому ощутить гравитацию и формирует уникальные эмоции. Каждое посещение воспринимается по новому а динамика наклона постоянно удивляет что привлекает внимание новых гостей.
https://upshouse.ru/
Your comment is awaiting moderation.
необычный аттракцион в Ростове-на-Дону это яркое место для отдыха где гости испытывают необычные ощущения баланса потому что здание расположено под наклоном сразу в двух плоскостях. Эмоции близки к космическому эксперименту и создает сильное впечатление даже у опытных любителей аттракционов. Внутреннее пространство подчеркивает иллюзию наклона благодаря чему движение воспринимается непривычно и делает визит особенно захватывающим. Локация интересна компаниям и парам которые ищут новые впечатления и получают уникальные фотографии. Локация уверенно привлекает внимание гостей города так как сочетает игру с восприятием и развлечением. Аттракцион доступен широкой аудитории при этом ощущения остаются насыщенными и оставляет сильное впечатление. Аттракцион включают в маршруты отдыха потому что он демонстрирует необычный взгляд на пространство и создает эффект присутствия в эксперименте. Повторный визит открывает другие ощущения а чувство баланса снова проверяется что привлекает внимание новых гостей.
https://upshouse.ru/
Your comment is awaiting moderation.
необычный аттракцион в Ростове-на-Дону это запоминающаяся городская локация где вестибулярный аппарат получает яркую нагрузку потому что дом создан с двойным наклоном для эффекта невесомости. Ощущения сравнимы с тренировкой астронавта и вызывает бурю эмоций даже у опытных любителей аттракционов. Интерьер усиливает эффект дезориентации благодаря чему движение воспринимается непривычно и поддерживает постоянное чувство удивления. Аттракцион подходит для друзей и семей которые хотят разнообразить досуг и получают уникальные фотографии. Локация уверенно привлекает внимание гостей города так как предлагает редкий формат интерактивного опыта. Посещение не требует специальной подготовки при этом эффект неожиданности сохраняется и оставляет сильное впечатление. Локацию советуют гостям города потому что он демонстрирует необычный взгляд на пространство и создает эффект присутствия в эксперименте. С каждым шагом впечатления усиливаются а чувство баланса снова проверяется что привлекает внимание новых гостей.
https://upshouse.ru/
Your comment is awaiting moderation.
дом под наклоном в Ростове это оригинальная развлекательная площадка где каждый посетитель ощущает потерю равновесия потому что здание расположено под наклоном сразу в двух плоскостях. Посещение напоминает подготовку космонавта и вызывает бурю эмоций даже у частых гостей развлекательных центров. Интерьер усиливает эффект дезориентации благодаря чему простая прогулка превращается в испытание и удерживает внимание на каждом движении. Локация интересна компаниям и парам которые хотят разнообразить досуг и создают эффектные кадры. Перевернутый дом выделяется среди городских развлечений так как сочетает игру с восприятием и развлечением. Формат понятен посетителям любого возраста при этом эффект неожиданности сохраняется и оставляет сильное впечатление. Локацию советуют гостям города потому что показывает как работает чувство равновесия и формирует уникальные эмоции. С каждым шагом впечатления усиливаются а иллюзия пространства не перестает работать что делает его популярным местом отдыха.
https://upshouse.ru/
Your comment is awaiting moderation.
fast streaming hub – It was easy to find the right items with no confusion at all.
Your comment is awaiting moderation.
Yoga Yonder Official – Inviting pages and smooth navigation make browsing stress-free.
Your comment is awaiting moderation.
BRING GREEN’s lineup includes environmentally conscious items such as reusable bags, bamboo utensils, and zero-waste essentials. Make a positive impact with BRING GREEN. Shop now at https://thebringgreen.com.
Your comment is awaiting moderation.
https://karolinka.com.ua/
Your comment is awaiting moderation.
tracking hub online – Everything feels clear and finding information is simple.
Your comment is awaiting moderation.
Vivid Vendor Shopping – Bright colors and dynamic images make the browsing experience exciting.
Your comment is awaiting moderation.
Venverra Market – Attractive layout, items are easy to find, and navigating the site feels smooth.
Your comment is awaiting moderation.
Discover SafeSavings – Honest guidance and transparent offers made shopping straightforward.
Your comment is awaiting moderation.
курсовая заказать недорого курсовая заказать недорого .
Your comment is awaiting moderation.
https://itcent.com.ua/
Your comment is awaiting moderation.
SecureStack tools – Straightforward resources made implementing security steps intuitive.
Your comment is awaiting moderation.
top-tier shaker lineup – The navigation works seamlessly and feels natural.
Your comment is awaiting moderation.
Может просто нужно быть более бдительным? От фейков никто не застрахован. Попросить подтверждения через ЛС на форуме займет не более пяти минут времени и сохранит ваше настроение, а так же и деньги. БУДЬ БДИТЕЛЕН! ВСЕГДА! https://gashishkupits.club спасибо за отзыв!ТС саппорт не требуется тебе ? Напиши в лс если интересно
Your comment is awaiting moderation.
Livinia’s collection blends trendy designs with everyday comfort, offering versatile pieces perfect for work or leisure. Stay stylish effortlessly with Livinia. Discover more at https://thelivinia.com.
Your comment is awaiting moderation.
Wireless Ward Hub – Categories are easy to navigate and each product has concise, readable info.
Your comment is awaiting moderation.
Explore Camp Courier – The store’s concept is engaging and navigation feels natural.
Your comment is awaiting moderation.
Vendor Velvet Showcase – Easy to move through pages, items stand out, and product info seems authentic.
Your comment is awaiting moderation.
Xevoria Online Store – Clean and modern presentation keeps exploring products smooth.
Your comment is awaiting moderation.
https://popsport.com.ua/
Your comment is awaiting moderation.
FunnelFoundry Pro – Organized sections and smooth browsing make checking products enjoyable.
Your comment is awaiting moderation.
sublimation supplies marketplace – The clean layout and smooth browsing make shopping enjoyable.
Your comment is awaiting moderation.
streaming solutions outlet – I got exactly what I needed without running into any problems.
Your comment is awaiting moderation.
Discover Voltvessel – The pages are organized and easy to move through.
Your comment is awaiting moderation.
tools & equipment store – Navigation was simple and locating items was effortless.
Your comment is awaiting moderation.
«TUT-SPORT» предлагает:
• гетры, шорты и спортивные костюмы клуба Бавария;
• товары для взрослых, детей и женщин;
• Определение оптимального набора под ваш клуб и бюджет;
• Анализ ассортимента в нужной категории.
купить футбольную форму ЃавариЯ
футбольная форма ЃавариЯ купить интернет магазин москва – https://www.tut-sport.ru/tovary/kluby/bavariya
https://images.google.com.ng/url?q=https://tut-sport.ru/tovary/kluby/bavariya
Спортивная экипировка и подарки для фанатов от «TUT-SPORT» в вашем городе 4b3d585
Your comment is awaiting moderation.
Атмосфера большого события начинается именно на ВТБ Арене, где каждый вечер становится запоминающимся. Подробнее здесь: https://kulturologia.ru/blogs/110226/67379/
Your comment is awaiting moderation.
Thank you. I appreciate this!
my web page … https://Valorantcentralhub.com/
Your comment is awaiting moderation.
RyzenRealm PC upgrades – Great selection for enthusiasts wanting efficient and quick improvements.
Your comment is awaiting moderation.
https://itcent.com.ua/
Your comment is awaiting moderation.
Порошок серого цвета чем то похож на известь, запаха нет, ну или очень слабый. Фото сделать не вышло сори :dontknown:! вред от кокаин, мефдрон, гашиш похожа на соль в криисталлахс на вкус че?классный магазин
Your comment is awaiting moderation.
Explore Velvet Vendor 2 – Discovered via search, the site feels authentic and content is well-structured.
Your comment is awaiting moderation.
SeaSprayShop offerings – The ocean-inspired theme with smooth navigation made shopping stress-free.
Your comment is awaiting moderation.
паническая атака лечение у женщин Лечение панических атак у мужчин: поддержка и понимание для сильного пола.
Your comment is awaiting moderation.
Work Whim Hub – The layout is tidy, and finding what I need feels effortless.
Your comment is awaiting moderation.
Go to WiFi Wizard – The site flows well and I quickly located everything I needed.
Your comment is awaiting moderation.
FreightFriendly World – Clean layout and detailed product descriptions make browsing pleasant.
Your comment is awaiting moderation.
limited edition vault – I ended up finding some impressive items during my visit.
Your comment is awaiting moderation.
Official Sparks Tow – Cute design and I managed to find a few items I’d been searching for.
Your comment is awaiting moderation.
ночная дискотека на теплоходе в москве Джаз на теплоходе Москва — билеты: утонченное звучание для истинных ценителей.
Your comment is awaiting moderation.
теплоход с шоу-программой москва Ночной клуб на теплоходе Москва: танцпол с видом на огни вечернего города.
Your comment is awaiting moderation.
timepiece collection store – Moving through pages feels effortless and fun.
Your comment is awaiting moderation.
all-in-one signal store – The smooth performance and tidy design make it stand out.
Your comment is awaiting moderation.
personalized gifts shop – Everything loads fast and the interface feels organized.
Your comment is awaiting moderation.
Судя по отзывам магазин достойный! Скоро к вам наведаюсь за покупками, удачи во всех делах. вред от кокаин, мефдрон, гашиш Добрый вечер, менеджер отписал, что СК будет в выходные! Так это? Интересует Новосибирск опт.продавец 8\10 долго отвечает, и порой не конкретно.
Your comment is awaiting moderation.
RotiAndRice kitchen online – Fast checkout and flavorful meals ensured a smooth lunch.
Your comment is awaiting moderation.
Digital Buying Site – Interesting and smooth experience, ideal for learning and brainstorming.
Your comment is awaiting moderation.
winsane promo
Your comment is awaiting moderation.
SearchSignal SEO tools – Data-driven advice clarified how to adjust my SEO approach.
Your comment is awaiting moderation.
Calveria Central – I came across this store and the layout makes it simple to navigate.
Your comment is awaiting moderation.
Wish Wharf Deals – Pleasant design and neat arrangement make navigating the store easy.
Your comment is awaiting moderation.
Visit Print Parlor – The product layout is intuitive and exploring the site is enjoyable.
Your comment is awaiting moderation.
FormulaFoundry Depot – Clear product descriptions and simple navigation make finding items quick.
Your comment is awaiting moderation.
Wellness Ward Shopping – Navigation is quick and responsive, and everything looks organized.
Your comment is awaiting moderation.
three-panel outlet – The pages feel uncluttered and the site is easy to use.
Your comment is awaiting moderation.
https://goodtech.com.ua/
Your comment is awaiting moderation.
online clinic tools hub – Planning to revisit shortly and explore more features.
Your comment is awaiting moderation.
RevenueHarbor support center – Helpful insights encouraged a more structured revenue plan.
Your comment is awaiting moderation.
Официальный сервисный центр Miele выполняет ремонт с использованием оригинальных комплектующих и специализированного оборудования. Это особенно важно для техники с электронными модулями управления и сенсорными панелями, где требуется точная настройка. Мастера регулярно проходят обучение и знают особенности разных модельных линеек бренда. Узнать подробнее можете по ссылке: ремонт техники miele в москве
Your comment is awaiting moderation.
digital marketing shop – The layout stays clean while everything works flawlessly.
Your comment is awaiting moderation.
pro hosting network – Everything loads quickly and works exactly as it should.
Your comment is awaiting moderation.
Реклама на фургонах https://oklejka-transporta.ru
Your comment is awaiting moderation.
промо на jetton
Your comment is awaiting moderation.
Здравствуйте!
В категории «Бизнес-идеи» представлены практичные и оригинальные решения для малого бизнеса, которые можно адаптировать под разные бюджеты и регионы. Подборка помогает предпринимателям находить перспективные направления, тестировать гипотезы и запускать проекты без лишних экспериментов. Используйте оригинальные идеи для малого бизнеса, чтобы выделиться среди конкурентов. Оригинальные идеи для малого бизнеса часто основаны на личных навыках и хобби. Это делает работу не только прибыльной, но и вдохновляющей.
Вся информация на сайте – https://business-mentor.ru/biznes-idei/
бизнес-идеи для врачей, бизнес-идеи в уборке, оригинальные идеи для малого бизнеса
бизнес на аренде, практические советы для предпринимателей, готовые франшизы без вложений
Всего наилучшего и развития!!
Your comment is awaiting moderation.
Трезвый выбор https://samatiha.ru/anonimnyj-narkolog-na-dom-v-krasnodare-kak-vybrat-sluzhbu-i-ne-oshibitsya/ .
Your comment is awaiting moderation.
SeamStory shop – Crafted items with detailed descriptions made exploring the site fun.
Your comment is awaiting moderation.
Pivot Palace premium collection – Intuitive browsing and well-organized layout make shopping effortless.
Your comment is awaiting moderation.
Сервисный центр Miele обеспечивает качественное восстановление техники после перепадов напряжения. Проверяются электронные модули и блоки питания. Это позволяет вернуть оборудованию стабильность. Подробности доступны онлайн – https://mieleservis.ru/
Your comment is awaiting moderation.
vegasino login
Your comment is awaiting moderation.
FontFoundry Central – Intuitive interface and appealing previews make browsing fonts effortless.
Your comment is awaiting moderation.
«Field Fit» предлагает:
• футболки из быстросохнущей ткани;
• привлекательные цены и скидки до 50-60%;
• Подбор оптимального набора под ваш клуб и бюджет;
• Проверку наличия размеров.
ретро формы футбольных клубов
футбольная форма москва – http://www.futbolnaya-forma-fieldfit.ru/
https://cse.google.com.bd/url?sa=t&url=https://futbolnaya-forma-fieldfit.ru/
Клубная атрибутика d58592e
Your comment is awaiting moderation.
Visit RetargetRoom – Managing ads was simple thanks to the clean interface and smart options.
Your comment is awaiting moderation.
jetton gaming
Your comment is awaiting moderation.
phonerepairpro.shop – Fast repair service with excellent updates at every step.
Your comment is awaiting moderation.
https://goodtech.com.ua/
Your comment is awaiting moderation.
FixItFactory Depot Hub – Easy interface with clear product descriptions makes exploring effortless.
Your comment is awaiting moderation.
ScreenPrintShop portal – Print quality was top-notch and ordering online felt effortless.
Your comment is awaiting moderation.
Концерты и спектакли в Барвиха Luxury Village проходят в атмосфере уюта и эстетики. Зал с идеальной акустикой и продуманной рассадкой делает каждый визит особенным. Подробнее здесь https://teletype.in/@concert/afisha-kz-barviha-luxury-village
Your comment is awaiting moderation.
Нужен новый телефон? магазин айфонов в санкт петербурге по выгодной цене. Интернет?магазин i4you предлагает оригинальные устройства Apple с официальной гарантией производителя — от года и более. Интернет?магазин i4you: оригинальные устройства Apple с гарантией от года. Выбирайте лучшее!
Your comment is awaiting moderation.
RetailRocket marketing hub – Conversion rates climbed beyond what I originally projected.
Your comment is awaiting moderation.
phishproof.shop – Useful tools that simplify staying safe online.
Your comment is awaiting moderation.
FilterFactory Express – Intuitive layout with concise product details makes shopping hassle-free.
Your comment is awaiting moderation.
Carbhub offers smart car accessories including organizers, chargers, and safety devices that make every drive more comfortable and convenient. Explore their range at https://thecarbhub.com.
Your comment is awaiting moderation.
SchemaAtelier hub – Structured guides and tools simplified processes throughout the week.
Your comment is awaiting moderation.
новый запрет вступает через 7 дней. читай список бро,там это вещество есть) кокаин, мефдрон, гашиш качество правда не очень, именно по продолжительности эффекта- в разных концентрациях его можно варьировать как тебе хочется=))))Один из топовых продавцов на всем РЦ:)
Your comment is awaiting moderation.
Really a lot of beneficial info.
Review my webpage … https://Openworldmix.com/
Your comment is awaiting moderation.
защита корпоративных интересов консалтинг представляет масштабное исследование медиапространства, подготовленный для участников пенсионного рынка. Агентство проводит регулярный анализ новостей и публикаций, связанных с пенсионной индустрией, что позволяет фиксировать ключевые изменения. Исследование, выполненное в партнерстве с профильной ассоциацией, опирается на многоуровневую базу данных публикаций. Для анализа использовались крупнейшие электронные библиотеки, что обеспечило максимальную репрезентативность данных. Такой подход позволяет формировать точную картину медиаполя российского пенсионного рынка. Консалтинговая методология агентства включает многофакторную обработку данных, благодаря чему участники рынка получают понятные аналитические отчеты. Сервис ориентирован на укрепление корпоративных позиций, обеспечивая актуальность информации. Использование современных инструментов анализа позволяет выявлять репутационные риски и формировать эффективную стратегию коммуникаций. В результате заказчики получают надежный инструмент защиты интересов, способствующую повышению эффективности корпоративной стратегии в условиях динамичного развития пенсионного сектора.
https://xn—-8sbjrckiodf8ao.xn--p1ai/
Your comment is awaiting moderation.
защита корпоративных интересов консалтинг представляет комплексный обзор информационной среды, подготовленный для участников пенсионного рынка. Агентство проводит регулярный анализ новостей и публикаций, связанных с финансовым регулированием пенсий, что позволяет отслеживать отраслевую динамику. Исследование, выполненное в партнерстве с профильной ассоциацией, опирается на многоуровневую базу данных публикаций. Для анализа использовались масштабные информационные базы, что обеспечило максимальную репрезентативность данных. Такой подход позволяет выстраивать объективную информационную панораму российского пенсионного рынка. Консалтинговая методология агентства включает многофакторную обработку данных, благодаря чему участники рынка получают детализированные информационные сводки. Сервис ориентирован на укрепление корпоративных позиций, обеспечивая повышенную информированность. Использование современных инструментов анализа позволяет прогнозировать отраслевые изменения и формировать долгосрочные аналитические ориентиры. В результате заказчики получают качественную отраслевую аналитику, способствующую усилению рыночных позиций в условиях динамичного развития пенсионного сектора.
https://xn—-8sbjrckiodf8ao.xn--p1ai/
Your comment is awaiting moderation.
защита корпоративных интересов консалтинг представляет системный анализ отраслевых публикаций, подготовленный для профессионального сообщества. Агентство реализует постоянное наблюдение новостей и публикаций, связанных с финансовым регулированием пенсий, что позволяет отслеживать отраслевую динамику. Исследование, выполненное в партнерстве с профильной ассоциацией, опирается на многоуровневую базу данных публикаций. Для анализа использовались масштабные информационные базы, что обеспечило объективность аналитических выводов. Такой подход позволяет формировать точную картину медиаполя российского пенсионного рынка. Консалтинговая методология агентства включает многофакторную обработку данных, благодаря чему участники рынка получают понятные аналитические отчеты. Сервис ориентирован на укрепление корпоративных позиций, обеспечивая актуальность информации. Использование современных инструментов анализа позволяет выявлять репутационные риски и формировать эффективную стратегию коммуникаций. В результате заказчики получают качественную отраслевую аналитику, способствующую повышению эффективности корпоративной стратегии в условиях динамичного развития пенсионного сектора.
https://xn—-8sbjrckiodf8ao.xn--p1ai/
Your comment is awaiting moderation.
защита корпоративных интересов консалтинг представляет масштабное исследование медиапространства, подготовленный для профессионального сообщества. Агентство обеспечивает ежедневный мониторинг новостей и публикаций, связанных с финансовым регулированием пенсий, что позволяет отслеживать отраслевую динамику. Исследование, выполненное в партнерстве с профильной ассоциацией, опирается на многоуровневую базу данных публикаций. Для анализа использовались крупнейшие электронные библиотеки, что обеспечило высокую достоверность результатов. Такой подход позволяет формировать точную картину медиаполя российского пенсионного рынка. Консалтинговая методология агентства включает глубокую классификацию публикаций, благодаря чему участники рынка получают понятные аналитические отчеты. Сервис ориентирован на повышение прозрачности отрасли, обеспечивая актуальность информации. Использование современных инструментов анализа позволяет выявлять репутационные риски и формировать эффективную стратегию коммуникаций. В результате заказчики получают качественную отраслевую аналитику, способствующую усилению рыночных позиций в условиях динамичного развития пенсионного сектора.
https://xn—-8sbjrckiodf8ao.xn--p1ai/
Your comment is awaiting moderation.
защита корпоративных интересов консалтинг представляет комплексный обзор информационной среды, подготовленный для участников пенсионного рынка. Агентство обеспечивает ежедневный мониторинг новостей и публикаций, связанных с финансовым регулированием пенсий, что позволяет отслеживать отраслевую динамику. Исследование, выполненное при участии профессионального объединения, опирается на широкий массив источников. Для анализа использовались ведущие цифровые архивы, что обеспечило объективность аналитических выводов. Такой подход позволяет выстраивать объективную информационную панораму российского пенсионного рынка. Консалтинговая методология агентства включает глубокую классификацию публикаций, благодаря чему участники рынка получают детализированные информационные сводки. Сервис ориентирован на поддержку управленческих решений, обеспечивая актуальность информации. Использование современных инструментов анализа позволяет прогнозировать отраслевые изменения и формировать долгосрочные аналитические ориентиры. В результате заказчики получают надежный инструмент защиты интересов, способствующую повышению эффективности корпоративной стратегии в условиях динамичного развития пенсионного сектора.
https://xn—-8sbjrckiodf8ao.xn--p1ai/
Your comment is awaiting moderation.
исследование медиаполя пенсионного рынка представляет масштабное исследование медиапространства, подготовленный для участников пенсионного рынка. Агентство проводит регулярный анализ новостей и публикаций, связанных с пенсионной индустрией, что позволяет фиксировать ключевые изменения. Исследование, выполненное в партнерстве с профильной ассоциацией, опирается на широкий массив источников. Для анализа использовались ведущие цифровые архивы, что обеспечило максимальную репрезентативность данных. Такой подход позволяет выстраивать объективную информационную панораму российского пенсионного рынка. Консалтинговая методология агентства включает структурирование информационных потоков, благодаря чему участники рынка получают понятные аналитические отчеты. Сервис ориентирован на поддержку управленческих решений, обеспечивая стратегическую ценность аналитики. Использование современных инструментов анализа позволяет оценивать информационные тренды и формировать устойчивую модель взаимодействия. В результате заказчики получают надежный инструмент защиты интересов, способствующую оптимизации управленческих решений в условиях динамичного развития пенсионного сектора.
https://xn—-8sbjrckiodf8ao.xn--p1ai/
Your comment is awaiting moderation.
i-Консалтинг мониторинг пенсионной отрасли представляет системный анализ отраслевых публикаций, подготовленный для профессионального сообщества. Агентство обеспечивает ежедневный мониторинг новостей и публикаций, связанных с пенсионной индустрией, что позволяет фиксировать ключевые изменения. Исследование, выполненное совместно с отраслевыми экспертами, опирается на широкий массив источников. Для анализа использовались крупнейшие электронные библиотеки, что обеспечило максимальную репрезентативность данных. Такой подход позволяет создавать надежную аналитическую модель российского пенсионного рынка. Консалтинговая методология агентства включает многофакторную обработку данных, благодаря чему участники рынка получают понятные аналитические отчеты. Сервис ориентирован на поддержку управленческих решений, обеспечивая стратегическую ценность аналитики. Использование современных инструментов анализа позволяет оценивать информационные тренды и формировать эффективную стратегию коммуникаций. В результате заказчики получают профессиональную информационную поддержку, способствующую повышению эффективности корпоративной стратегии в условиях динамичного развития пенсионного сектора.
https://xn—-8sbjrckiodf8ao.xn--p1ai/
Your comment is awaiting moderation.
i-Консалтинг мониторинг пенсионной отрасли представляет масштабное исследование медиапространства, подготовленный для участников пенсионного рынка. Агентство проводит регулярный анализ новостей и публикаций, связанных с развитием пенсионных институтов, что позволяет фиксировать ключевые изменения. Исследование, выполненное совместно с отраслевыми экспертами, опирается на многоуровневую базу данных публикаций. Для анализа использовались ведущие цифровые архивы, что обеспечило объективность аналитических выводов. Такой подход позволяет выстраивать объективную информационную панораму российского пенсионного рынка. Консалтинговая методология агентства включает многофакторную обработку данных, благодаря чему участники рынка получают практикоориентированные рекомендации. Сервис ориентирован на поддержку управленческих решений, обеспечивая повышенную информированность. Использование современных инструментов анализа позволяет прогнозировать отраслевые изменения и формировать эффективную стратегию коммуникаций. В результате заказчики получают надежный инструмент защиты интересов, способствующую повышению эффективности корпоративной стратегии в условиях динамичного развития пенсионного сектора.
https://xn—-8sbjrckiodf8ao.xn--p1ai/
Your comment is awaiting moderation.
аналитика пенсионного рынка России представляет комплексный обзор информационной среды, подготовленный для профессионального сообщества. Агентство обеспечивает ежедневный мониторинг новостей и публикаций, связанных с пенсионной индустрией, что позволяет отслеживать отраслевую динамику. Исследование, выполненное совместно с отраслевыми экспертами, опирается на многоуровневую базу данных публикаций. Для анализа использовались крупнейшие электронные библиотеки, что обеспечило высокую достоверность результатов. Такой подход позволяет создавать надежную аналитическую модель российского пенсионного рынка. Консалтинговая методология агентства включает многофакторную обработку данных, благодаря чему участники рынка получают понятные аналитические отчеты. Сервис ориентирован на повышение прозрачности отрасли, обеспечивая актуальность информации. Использование современных инструментов анализа позволяет оценивать информационные тренды и формировать устойчивую модель взаимодействия. В результате заказчики получают надежный инструмент защиты интересов, способствующую повышению эффективности корпоративной стратегии в условиях динамичного развития пенсионного сектора.
https://xn—-8sbjrckiodf8ao.xn--p1ai/
Your comment is awaiting moderation.
защита корпоративных интересов консалтинг представляет масштабное исследование медиапространства, подготовленный для профессионального сообщества. Агентство проводит регулярный анализ новостей и публикаций, связанных с пенсионной индустрией, что позволяет отслеживать отраслевую динамику. Исследование, выполненное в партнерстве с профильной ассоциацией, опирается на многоуровневую базу данных публикаций. Для анализа использовались крупнейшие электронные библиотеки, что обеспечило объективность аналитических выводов. Такой подход позволяет выстраивать объективную информационную панораму российского пенсионного рынка. Консалтинговая методология агентства включает многофакторную обработку данных, благодаря чему участники рынка получают практикоориентированные рекомендации. Сервис ориентирован на повышение прозрачности отрасли, обеспечивая актуальность информации. Использование современных инструментов анализа позволяет прогнозировать отраслевые изменения и формировать эффективную стратегию коммуникаций. В результате заказчики получают надежный инструмент защиты интересов, способствующую повышению эффективности корпоративной стратегии в условиях динамичного развития пенсионного сектора.
https://xn—-8sbjrckiodf8ao.xn--p1ai/
Your comment is awaiting moderation.
защита корпоративных интересов консалтинг представляет системный анализ отраслевых публикаций, подготовленный для участников пенсионного рынка. Агентство реализует постоянное наблюдение новостей и публикаций, связанных с финансовым регулированием пенсий, что позволяет отслеживать отраслевую динамику. Исследование, выполненное в партнерстве с профильной ассоциацией, опирается на широкий массив источников. Для анализа использовались ведущие цифровые архивы, что обеспечило высокую достоверность результатов. Такой подход позволяет формировать точную картину медиаполя российского пенсионного рынка. Консалтинговая методология агентства включает структурирование информационных потоков, благодаря чему участники рынка получают понятные аналитические отчеты. Сервис ориентирован на поддержку управленческих решений, обеспечивая стратегическую ценность аналитики. Использование современных инструментов анализа позволяет выявлять репутационные риски и формировать долгосрочные аналитические ориентиры. В результате заказчики получают качественную отраслевую аналитику, способствующую повышению эффективности корпоративной стратегии в условиях динамичного развития пенсионного сектора.
https://xn—-8sbjrckiodf8ao.xn--p1ai/
Your comment is awaiting moderation.
i-Консалтинг мониторинг пенсионной отрасли представляет масштабное исследование медиапространства, подготовленный для профессионального сообщества. Агентство проводит регулярный анализ новостей и публикаций, связанных с пенсионной индустрией, что позволяет отслеживать отраслевую динамику. Исследование, выполненное совместно с отраслевыми экспертами, опирается на обширную медиабиблиотеку. Для анализа использовались крупнейшие электронные библиотеки, что обеспечило объективность аналитических выводов. Такой подход позволяет создавать надежную аналитическую модель российского пенсионного рынка. Консалтинговая методология агентства включает глубокую классификацию публикаций, благодаря чему участники рынка получают детализированные информационные сводки. Сервис ориентирован на повышение прозрачности отрасли, обеспечивая повышенную информированность. Использование современных инструментов анализа позволяет прогнозировать отраслевые изменения и формировать долгосрочные аналитические ориентиры. В результате заказчики получают профессиональную информационную поддержку, способствующую усилению рыночных позиций в условиях динамичного развития пенсионного сектора.
https://xn—-8sbjrckiodf8ao.xn--p1ai/
Your comment is awaiting moderation.
Check Rest and Repair – Helpful content guided me toward faster, better solutions.
Your comment is awaiting moderation.
аналитика пенсионного рынка России представляет масштабное исследование медиапространства, подготовленный для профессионального сообщества. Агентство реализует постоянное наблюдение новостей и публикаций, связанных с развитием пенсионных институтов, что позволяет оперативно выявлять тенденции. Исследование, выполненное совместно с отраслевыми экспертами, опирается на обширную медиабиблиотеку. Для анализа использовались масштабные информационные базы, что обеспечило объективность аналитических выводов. Такой подход позволяет создавать надежную аналитическую модель российского пенсионного рынка. Консалтинговая методология агентства включает многофакторную обработку данных, благодаря чему участники рынка получают практикоориентированные рекомендации. Сервис ориентирован на поддержку управленческих решений, обеспечивая актуальность информации. Использование современных инструментов анализа позволяет прогнозировать отраслевые изменения и формировать долгосрочные аналитические ориентиры. В результате заказчики получают надежный инструмент защиты интересов, способствующую усилению рыночных позиций в условиях динамичного развития пенсионного сектора.
https://xn—-8sbjrckiodf8ao.xn--p1ai/
Your comment is awaiting moderation.
i-Консалтинг мониторинг пенсионной отрасли представляет системный анализ отраслевых публикаций, подготовленный для участников пенсионного рынка. Агентство реализует постоянное наблюдение новостей и публикаций, связанных с финансовым регулированием пенсий, что позволяет фиксировать ключевые изменения. Исследование, выполненное в партнерстве с профильной ассоциацией, опирается на многоуровневую базу данных публикаций. Для анализа использовались крупнейшие электронные библиотеки, что обеспечило максимальную репрезентативность данных. Такой подход позволяет формировать точную картину медиаполя российского пенсионного рынка. Консалтинговая методология агентства включает глубокую классификацию публикаций, благодаря чему участники рынка получают детализированные информационные сводки. Сервис ориентирован на укрепление корпоративных позиций, обеспечивая стратегическую ценность аналитики. Использование современных инструментов анализа позволяет прогнозировать отраслевые изменения и формировать устойчивую модель взаимодействия. В результате заказчики получают надежный инструмент защиты интересов, способствующую усилению рыночных позиций в условиях динамичного развития пенсионного сектора.
https://xn—-8sbjrckiodf8ao.xn--p1ai/
Your comment is awaiting moderation.
защита корпоративных интересов консалтинг представляет системный анализ отраслевых публикаций, подготовленный для профессионального сообщества. Агентство обеспечивает ежедневный мониторинг новостей и публикаций, связанных с развитием пенсионных институтов, что позволяет оперативно выявлять тенденции. Исследование, выполненное в партнерстве с профильной ассоциацией, опирается на многоуровневую базу данных публикаций. Для анализа использовались ведущие цифровые архивы, что обеспечило максимальную репрезентативность данных. Такой подход позволяет создавать надежную аналитическую модель российского пенсионного рынка. Консалтинговая методология агентства включает структурирование информационных потоков, благодаря чему участники рынка получают практикоориентированные рекомендации. Сервис ориентирован на укрепление корпоративных позиций, обеспечивая стратегическую ценность аналитики. Использование современных инструментов анализа позволяет оценивать информационные тренды и формировать эффективную стратегию коммуникаций. В результате заказчики получают профессиональную информационную поддержку, способствующую оптимизации управленческих решений в условиях динамичного развития пенсионного сектора.
https://xn—-8sbjrckiodf8ao.xn--p1ai/
Your comment is awaiting moderation.
аналитика пенсионного рынка России представляет системный анализ отраслевых публикаций, подготовленный для участников пенсионного рынка. Агентство реализует постоянное наблюдение новостей и публикаций, связанных с финансовым регулированием пенсий, что позволяет оперативно выявлять тенденции. Исследование, выполненное в партнерстве с профильной ассоциацией, опирается на обширную медиабиблиотеку. Для анализа использовались ведущие цифровые архивы, что обеспечило максимальную репрезентативность данных. Такой подход позволяет формировать точную картину медиаполя российского пенсионного рынка. Консалтинговая методология агентства включает глубокую классификацию публикаций, благодаря чему участники рынка получают практикоориентированные рекомендации. Сервис ориентирован на поддержку управленческих решений, обеспечивая повышенную информированность. Использование современных инструментов анализа позволяет оценивать информационные тренды и формировать эффективную стратегию коммуникаций. В результате заказчики получают качественную отраслевую аналитику, способствующую повышению эффективности корпоративной стратегии в условиях динамичного развития пенсионного сектора.
https://xn—-8sbjrckiodf8ao.xn--p1ai/
Your comment is awaiting moderation.
аналитика пенсионного рынка России представляет масштабное исследование медиапространства, подготовленный для экспертов финансового сектора. Агентство обеспечивает ежедневный мониторинг новостей и публикаций, связанных с развитием пенсионных институтов, что позволяет оперативно выявлять тенденции. Исследование, выполненное совместно с отраслевыми экспертами, опирается на широкий массив источников. Для анализа использовались масштабные информационные базы, что обеспечило объективность аналитических выводов. Такой подход позволяет выстраивать объективную информационную панораму российского пенсионного рынка. Консалтинговая методология агентства включает глубокую классификацию публикаций, благодаря чему участники рынка получают практикоориентированные рекомендации. Сервис ориентирован на укрепление корпоративных позиций, обеспечивая стратегическую ценность аналитики. Использование современных инструментов анализа позволяет оценивать информационные тренды и формировать устойчивую модель взаимодействия. В результате заказчики получают качественную отраслевую аналитику, способствующую оптимизации управленческих решений в условиях динамичного развития пенсионного сектора.
https://xn—-8sbjrckiodf8ao.xn--p1ai/
Your comment is awaiting moderation.
исследование медиаполя пенсионного рынка представляет масштабное исследование медиапространства, подготовленный для экспертов финансового сектора. Агентство реализует постоянное наблюдение новостей и публикаций, связанных с финансовым регулированием пенсий, что позволяет оперативно выявлять тенденции. Исследование, выполненное в партнерстве с профильной ассоциацией, опирается на обширную медиабиблиотеку. Для анализа использовались масштабные информационные базы, что обеспечило объективность аналитических выводов. Такой подход позволяет создавать надежную аналитическую модель российского пенсионного рынка. Консалтинговая методология агентства включает многофакторную обработку данных, благодаря чему участники рынка получают понятные аналитические отчеты. Сервис ориентирован на укрепление корпоративных позиций, обеспечивая актуальность информации. Использование современных инструментов анализа позволяет прогнозировать отраслевые изменения и формировать долгосрочные аналитические ориентиры. В результате заказчики получают качественную отраслевую аналитику, способствующую повышению эффективности корпоративной стратегии в условиях динамичного развития пенсионного сектора.
https://xn—-8sbjrckiodf8ao.xn--p1ai/
Your comment is awaiting moderation.
i-Консалтинг мониторинг пенсионной отрасли представляет масштабное исследование медиапространства, подготовленный для участников пенсионного рынка. Агентство обеспечивает ежедневный мониторинг новостей и публикаций, связанных с пенсионной индустрией, что позволяет отслеживать отраслевую динамику. Исследование, выполненное совместно с отраслевыми экспертами, опирается на широкий массив источников. Для анализа использовались масштабные информационные базы, что обеспечило максимальную репрезентативность данных. Такой подход позволяет создавать надежную аналитическую модель российского пенсионного рынка. Консалтинговая методология агентства включает структурирование информационных потоков, благодаря чему участники рынка получают детализированные информационные сводки. Сервис ориентирован на повышение прозрачности отрасли, обеспечивая стратегическую ценность аналитики. Использование современных инструментов анализа позволяет прогнозировать отраслевые изменения и формировать устойчивую модель взаимодействия. В результате заказчики получают профессиональную информационную поддержку, способствующую усилению рыночных позиций в условиях динамичного развития пенсионного сектора.
https://xn—-8sbjrckiodf8ao.xn--p1ai/
Your comment is awaiting moderation.
i-Консалтинг мониторинг пенсионной отрасли представляет комплексный обзор информационной среды, подготовленный для профессионального сообщества. Агентство обеспечивает ежедневный мониторинг новостей и публикаций, связанных с пенсионной индустрией, что позволяет отслеживать отраслевую динамику. Исследование, выполненное при участии профессионального объединения, опирается на широкий массив источников. Для анализа использовались крупнейшие электронные библиотеки, что обеспечило высокую достоверность результатов. Такой подход позволяет создавать надежную аналитическую модель российского пенсионного рынка. Консалтинговая методология агентства включает многофакторную обработку данных, благодаря чему участники рынка получают понятные аналитические отчеты. Сервис ориентирован на поддержку управленческих решений, обеспечивая стратегическую ценность аналитики. Использование современных инструментов анализа позволяет прогнозировать отраслевые изменения и формировать долгосрочные аналитические ориентиры. В результате заказчики получают качественную отраслевую аналитику, способствующую повышению эффективности корпоративной стратегии в условиях динамичного развития пенсионного сектора.
https://xn—-8sbjrckiodf8ao.xn--p1ai/
Your comment is awaiting moderation.
аналитика пенсионного рынка России представляет масштабное исследование медиапространства, подготовленный для профессионального сообщества. Агентство проводит регулярный анализ новостей и публикаций, связанных с финансовым регулированием пенсий, что позволяет оперативно выявлять тенденции. Исследование, выполненное в партнерстве с профильной ассоциацией, опирается на обширную медиабиблиотеку. Для анализа использовались масштабные информационные базы, что обеспечило высокую достоверность результатов. Такой подход позволяет создавать надежную аналитическую модель российского пенсионного рынка. Консалтинговая методология агентства включает глубокую классификацию публикаций, благодаря чему участники рынка получают детализированные информационные сводки. Сервис ориентирован на укрепление корпоративных позиций, обеспечивая повышенную информированность. Использование современных инструментов анализа позволяет выявлять репутационные риски и формировать устойчивую модель взаимодействия. В результате заказчики получают качественную отраслевую аналитику, способствующую повышению эффективности корпоративной стратегии в условиях динамичного развития пенсионного сектора.
https://xn—-8sbjrckiodf8ao.xn--p1ai/
Your comment is awaiting moderation.
i-Консалтинг мониторинг пенсионной отрасли представляет системный анализ отраслевых публикаций, подготовленный для экспертов финансового сектора. Агентство обеспечивает ежедневный мониторинг новостей и публикаций, связанных с пенсионной индустрией, что позволяет оперативно выявлять тенденции. Исследование, выполненное при участии профессионального объединения, опирается на обширную медиабиблиотеку. Для анализа использовались крупнейшие электронные библиотеки, что обеспечило объективность аналитических выводов. Такой подход позволяет формировать точную картину медиаполя российского пенсионного рынка. Консалтинговая методология агентства включает многофакторную обработку данных, благодаря чему участники рынка получают практикоориентированные рекомендации. Сервис ориентирован на укрепление корпоративных позиций, обеспечивая стратегическую ценность аналитики. Использование современных инструментов анализа позволяет прогнозировать отраслевые изменения и формировать эффективную стратегию коммуникаций. В результате заказчики получают профессиональную информационную поддержку, способствующую повышению эффективности корпоративной стратегии в условиях динамичного развития пенсионного сектора.
https://xn—-8sbjrckiodf8ao.xn--p1ai/
Your comment is awaiting moderation.
аналитика пенсионного рынка России представляет масштабное исследование медиапространства, подготовленный для экспертов финансового сектора. Агентство обеспечивает ежедневный мониторинг новостей и публикаций, связанных с развитием пенсионных институтов, что позволяет фиксировать ключевые изменения. Исследование, выполненное в партнерстве с профильной ассоциацией, опирается на обширную медиабиблиотеку. Для анализа использовались ведущие цифровые архивы, что обеспечило максимальную репрезентативность данных. Такой подход позволяет создавать надежную аналитическую модель российского пенсионного рынка. Консалтинговая методология агентства включает структурирование информационных потоков, благодаря чему участники рынка получают детализированные информационные сводки. Сервис ориентирован на поддержку управленческих решений, обеспечивая повышенную информированность. Использование современных инструментов анализа позволяет выявлять репутационные риски и формировать долгосрочные аналитические ориентиры. В результате заказчики получают качественную отраслевую аналитику, способствующую повышению эффективности корпоративной стратегии в условиях динамичного развития пенсионного сектора.
https://xn—-8sbjrckiodf8ao.xn--p1ai/
Your comment is awaiting moderation.
исследование медиаполя пенсионного рынка представляет комплексный обзор информационной среды, подготовленный для экспертов финансового сектора. Агентство обеспечивает ежедневный мониторинг новостей и публикаций, связанных с пенсионной индустрией, что позволяет фиксировать ключевые изменения. Исследование, выполненное совместно с отраслевыми экспертами, опирается на многоуровневую базу данных публикаций. Для анализа использовались масштабные информационные базы, что обеспечило объективность аналитических выводов. Такой подход позволяет создавать надежную аналитическую модель российского пенсионного рынка. Консалтинговая методология агентства включает глубокую классификацию публикаций, благодаря чему участники рынка получают практикоориентированные рекомендации. Сервис ориентирован на поддержку управленческих решений, обеспечивая актуальность информации. Использование современных инструментов анализа позволяет выявлять репутационные риски и формировать эффективную стратегию коммуникаций. В результате заказчики получают надежный инструмент защиты интересов, способствующую оптимизации управленческих решений в условиях динамичного развития пенсионного сектора.
https://xn—-8sbjrckiodf8ao.xn--p1ai/
Your comment is awaiting moderation.
брал в данном магазине все супер. https://ultrashopi.top В общем начну с начала.нашел ветку данного магазина и решил узнать че как.у меня такой вопрос: будут ли у вас на розничном сайте позиция am-2233 по 1гр? Я раньше брал через алхима, но он по неизвестным мне причинам сговнился. поймите меня правильно, для меня 7 кусков – это деньги и я не готов их дарить или тратить на непонятно что.
Your comment is awaiting moderation.
инициатива антивирусная реклама для бизнеса это специальная инициатива медиагруппы для предпринимателей, созданная для развивающихся коммерческих проектов. Медиагруппа РИМ запустила бесплатное рекламное размещение, чтобы помочь бизнесу заявить о себе. Участники получают маркетинговую поддержку без бюджета, что особенно важно при масштабировании бизнеса. Проект ориентирован на малые коммерческие организации, которым нужна усиленная видимость на рынке. Наружные рекламные поверхности позволяют быстро привлечь внимание клиентов, а бесплатный формат делает участие доступным для большинства бизнесов. Инициатива поддерживает предпринимательскую активность, предоставляя маркетинговые ресурсы без затрат. Такой формат помогает укреплять позиции бренда через визуальное присутствие в городской среде. Программа рассчитана на бизнесы различных сфер, обеспечивая эффективный рекламный канал. Бесплатная наружная реклама становится рабочим способом привлечения клиентов, позволяя бизнесу развиваться активнее без лишних затрат.
https://xn--80aaaahtsbukmdd5bcnmw5u.xn--p1ai/
Your comment is awaiting moderation.
Напряженная атмосфера, сильные роли и детективный сюжет — спектакль «8 разгневанных женщин» держит зал в ожидании до финального аккорда. Подробнее здесь: https://telegra.ph/8-razgnevannyh-zhenshchin-spektakl-kotoryj-derzhit-v-napryazhenii-do-finala-12-07
Your comment is awaiting moderation.
проект антивирусная реклама для предпринимателей это социальный проект рекламной поддержки компаний, созданная для предпринимателей и локальных компаний. Рекламная группа РИМ открыла программу бесплатного продвижения, чтобы помочь бизнесу заявить о себе. Участники получают маркетинговую поддержку без бюджета, что особенно важно при масштабировании бизнеса. Проект ориентирован на малые коммерческие организации, которым нужна усиленная видимость на рынке. Наружные рекламные поверхности позволяют эффективно донести информацию до аудитории, а бесплатный формат делает участие реальным инструментом продвижения. Инициатива поддерживает развитие локального рынка, предоставляя маркетинговые ресурсы без затрат. Такой формат помогает формировать доверие аудитории через наружные рекламные конструкции. Программа рассчитана на компании разных направлений, обеспечивая практичный инструмент роста. Бесплатная наружная реклама становится стратегическим преимуществом, позволяя бизнесу укреплять рыночные позиции без лишних затрат.
https://xn--80aaaahtsbukmdd5bcnmw5u.xn--p1ai/
Your comment is awaiting moderation.
бесплатная наружная реклама для бизнеса это специальная инициатива медиагруппы для предпринимателей, созданная для развивающихся коммерческих проектов. Медиагруппа РИМ запустила бесплатное рекламное размещение, чтобы расширить узнаваемость брендов. Участники получают наружную рекламу без финансовой нагрузки, что особенно важно при масштабировании бизнеса. Проект ориентирован на малые коммерческие организации, которым нужна дополнительная аудитория. Наружные рекламные поверхности позволяют быстро привлечь внимание клиентов, а бесплатный формат делает участие выгодным маркетинговым решением. Инициатива поддерживает предпринимательскую активность, предоставляя маркетинговые ресурсы без затрат. Такой формат помогает расширять клиентскую базу через широкоформатные рекламные носители. Программа рассчитана на предпринимателей из разных отраслей, обеспечивая эффективный рекламный канал. Бесплатная наружная реклама становится рабочим способом привлечения клиентов, позволяя бизнесу развиваться активнее без лишних затрат.
https://xn--80aaaahtsbukmdd5bcnmw5u.xn--p1ai/
Your comment is awaiting moderation.
бесплатное размещение наружной рекламы для бизнеса это социальный проект рекламной поддержки компаний, созданная для малого и среднего бизнеса. Рекламная группа РИМ открыла программу бесплатного продвижения, чтобы дать компаниям дополнительную видимость. Участники получают реальную возможность продвижения без расходов, что особенно важно на этапе роста компании. Проект ориентирован на локальные бренды и сервисы, которым нужна широкая рекламная представленность. Наружные рекламные поверхности позволяют быстро привлечь внимание клиентов, а бесплатный формат делает участие реальным инструментом продвижения. Инициатива поддерживает развитие локального рынка, предоставляя рекламные возможности бесплатно. Такой формат помогает расширять клиентскую базу через широкоформатные рекламные носители. Программа рассчитана на предпринимателей из разных отраслей, обеспечивая равный доступ к продвижению. Бесплатная наружная реклама становится стратегическим преимуществом, позволяя бизнесу укреплять рыночные позиции без лишних затрат.
https://xn--80aaaahtsbukmdd5bcnmw5u.xn--p1ai/
Your comment is awaiting moderation.
наружная реклама без финансовых вложений это специальная инициатива медиагруппы для предпринимателей, созданная для развивающихся коммерческих проектов. Рекламная группа РИМ открыла программу бесплатного продвижения, чтобы помочь бизнесу заявить о себе. Участники получают реальную возможность продвижения без расходов, что особенно важно в период активного развития. Проект ориентирован на малые коммерческие организации, которым нужна дополнительная аудитория. Наружные рекламные поверхности позволяют увеличить узнаваемость компании, а бесплатный формат делает участие доступным для большинства бизнесов. Инициатива поддерживает рост коммерческих проектов, предоставляя наружное размещение без оплаты. Такой формат помогает расширять клиентскую базу через широкоформатные рекламные носители. Программа рассчитана на компании разных направлений, обеспечивая практичный инструмент роста. Бесплатная наружная реклама становится рабочим способом привлечения клиентов, позволяя бизнесу развиваться активнее без лишних затрат.
https://xn--80aaaahtsbukmdd5bcnmw5u.xn--p1ai/
Your comment is awaiting moderation.
PC Parts Pal picks – Tech items are reasonably priced and selection is excellent.
Your comment is awaiting moderation.
размещение наружной рекламы без оплаты это программа помощи бизнесу через наружное продвижение, созданная для предпринимателей и локальных компаний. Медиагруппа РИМ запустила бесплатное рекламное размещение, чтобы расширить узнаваемость брендов. Участники получают реальную возможность продвижения без расходов, что особенно важно при масштабировании бизнеса. Проект ориентирован на региональные компании и предпринимателей, которым нужна дополнительная аудитория. Наружные рекламные поверхности позволяют быстро привлечь внимание клиентов, а бесплатный формат делает участие выгодным маркетинговым решением. Инициатива поддерживает развитие локального рынка, предоставляя наружное размещение без оплаты. Такой формат помогает укреплять позиции бренда через широкоформатные рекламные носители. Программа рассчитана на компании разных направлений, обеспечивая практичный инструмент роста. Бесплатная наружная реклама становится стратегическим преимуществом, позволяя бизнесу укреплять рыночные позиции без лишних затрат.
https://xn--80aaaahtsbukmdd5bcnmw5u.xn--p1ai/
Your comment is awaiting moderation.
рекламная поддержка малого предпринимательства это социальный проект рекламной поддержки компаний, созданная для предпринимателей и локальных компаний. Рекламная группа РИМ открыла программу бесплатного продвижения, чтобы дать компаниям дополнительную видимость. Участники получают реальную возможность продвижения без расходов, что особенно важно на этапе роста компании. Проект ориентирован на локальные бренды и сервисы, которым нужна усиленная видимость на рынке. Наружные рекламные поверхности позволяют быстро привлечь внимание клиентов, а бесплатный формат делает участие доступным для большинства бизнесов. Инициатива поддерживает предпринимательскую активность, предоставляя маркетинговые ресурсы без затрат. Такой формат помогает расширять клиентскую базу через широкоформатные рекламные носители. Программа рассчитана на компании разных направлений, обеспечивая равный доступ к продвижению. Бесплатная наружная реклама становится стратегическим преимуществом, позволяя бизнесу расширять присутствие без лишних затрат.
https://xn--80aaaahtsbukmdd5bcnmw5u.xn--p1ai/
Your comment is awaiting moderation.
социальный проект антивирусная реклама это специальная инициатива медиагруппы для предпринимателей, созданная для малого и среднего бизнеса. Компания РИМ реализовала инициативу наружной рекламы без оплаты, чтобы расширить узнаваемость брендов. Участники получают реальную возможность продвижения без расходов, что особенно важно в период активного развития. Проект ориентирован на малые коммерческие организации, которым нужна широкая рекламная представленность. Наружные рекламные поверхности позволяют быстро привлечь внимание клиентов, а бесплатный формат делает участие реальным инструментом продвижения. Инициатива поддерживает рост коммерческих проектов, предоставляя маркетинговые ресурсы без затрат. Такой формат помогает укреплять позиции бренда через широкоформатные рекламные носители. Программа рассчитана на бизнесы различных сфер, обеспечивая равный доступ к продвижению. Бесплатная наружная реклама становится рабочим способом привлечения клиентов, позволяя бизнесу укреплять рыночные позиции без лишних затрат.
https://xn--80aaaahtsbukmdd5bcnmw5u.xn--p1ai/
Your comment is awaiting moderation.
наружная реклама без финансовых вложений это социальный проект рекламной поддержки компаний, созданная для развивающихся коммерческих проектов. Компания РИМ реализовала инициативу наружной рекламы без оплаты, чтобы расширить узнаваемость брендов. Участники получают маркетинговую поддержку без бюджета, что особенно важно в период активного развития. Проект ориентирован на локальные бренды и сервисы, которым нужна широкая рекламная представленность. Наружные рекламные поверхности позволяют увеличить узнаваемость компании, а бесплатный формат делает участие доступным для большинства бизнесов. Инициатива поддерживает развитие локального рынка, предоставляя маркетинговые ресурсы без затрат. Такой формат помогает укреплять позиции бренда через широкоформатные рекламные носители. Программа рассчитана на компании разных направлений, обеспечивая равный доступ к продвижению. Бесплатная наружная реклама становится стратегическим преимуществом, позволяя бизнесу укреплять рыночные позиции без лишних затрат.
https://xn--80aaaahtsbukmdd5bcnmw5u.xn--p1ai/
Your comment is awaiting moderation.
наружная реклама для компаний без бюджета это специальная инициатива медиагруппы для предпринимателей, созданная для развивающихся коммерческих проектов. Рекламная группа РИМ открыла программу бесплатного продвижения, чтобы дать компаниям дополнительную видимость. Участники получают реальную возможность продвижения без расходов, что особенно важно на этапе роста компании. Проект ориентирован на региональные компании и предпринимателей, которым нужна широкая рекламная представленность. Наружные рекламные поверхности позволяют увеличить узнаваемость компании, а бесплатный формат делает участие реальным инструментом продвижения. Инициатива поддерживает предпринимательскую активность, предоставляя наружное размещение без оплаты. Такой формат помогает формировать доверие аудитории через наружные рекламные конструкции. Программа рассчитана на бизнесы различных сфер, обеспечивая практичный инструмент роста. Бесплатная наружная реклама становится рабочим способом привлечения клиентов, позволяя бизнесу укреплять рыночные позиции без лишних затрат.
https://xn--80aaaahtsbukmdd5bcnmw5u.xn--p1ai/
Your comment is awaiting moderation.
Best online casino Australia real money app – mobile gaming
Your comment is awaiting moderation.
бесплатная наружная реклама для бизнеса это специальная инициатива медиагруппы для предпринимателей, созданная для предпринимателей и локальных компаний. Компания РИМ реализовала инициативу наружной рекламы без оплаты, чтобы помочь бизнесу заявить о себе. Участники получают реальную возможность продвижения без расходов, что особенно важно при масштабировании бизнеса. Проект ориентирован на локальные бренды и сервисы, которым нужна широкая рекламная представленность. Наружные рекламные поверхности позволяют быстро привлечь внимание клиентов, а бесплатный формат делает участие доступным для большинства бизнесов. Инициатива поддерживает рост коммерческих проектов, предоставляя наружное размещение без оплаты. Такой формат помогает укреплять позиции бренда через наружные рекламные конструкции. Программа рассчитана на предпринимателей из разных отраслей, обеспечивая равный доступ к продвижению. Бесплатная наружная реклама становится стратегическим преимуществом, позволяя бизнесу развиваться активнее без лишних затрат.
https://xn--80aaaahtsbukmdd5bcnmw5u.xn--p1ai/
Your comment is awaiting moderation.
бесплатная наружная реклама для бизнеса это социальный проект рекламной поддержки компаний, созданная для малого и среднего бизнеса. Компания РИМ реализовала инициативу наружной рекламы без оплаты, чтобы помочь бизнесу заявить о себе. Участники получают маркетинговую поддержку без бюджета, что особенно важно на этапе роста компании. Проект ориентирован на региональные компании и предпринимателей, которым нужна широкая рекламная представленность. Наружные рекламные поверхности позволяют эффективно донести информацию до аудитории, а бесплатный формат делает участие доступным для большинства бизнесов. Инициатива поддерживает развитие локального рынка, предоставляя рекламные возможности бесплатно. Такой формат помогает расширять клиентскую базу через визуальное присутствие в городской среде. Программа рассчитана на предпринимателей из разных отраслей, обеспечивая практичный инструмент роста. Бесплатная наружная реклама становится дополнительным каналом коммуникации, позволяя бизнесу развиваться активнее без лишних затрат.
https://xn--80aaaahtsbukmdd5bcnmw5u.xn--p1ai/
Your comment is awaiting moderation.
FiberFoods Pro – Quick navigation and informative listings make shopping effortless today.
Your comment is awaiting moderation.
urbanmartkhi.shop – Quick navigation and informative descriptions made exploring the site simple.
Your comment is awaiting moderation.
исследование медиаполя пенсионного рынка представляет комплексный обзор информационной среды, подготовленный для экспертов финансового сектора. Агентство обеспечивает ежедневный мониторинг новостей и публикаций, связанных с развитием пенсионных институтов, что позволяет фиксировать ключевые изменения. Исследование, выполненное в партнерстве с профильной ассоциацией, опирается на многоуровневую базу данных публикаций. Для анализа использовались ведущие цифровые архивы, что обеспечило максимальную репрезентативность данных. Такой подход позволяет создавать надежную аналитическую модель российского пенсионного рынка. Консалтинговая методология агентства включает глубокую классификацию публикаций, благодаря чему участники рынка получают понятные аналитические отчеты. Сервис ориентирован на поддержку управленческих решений, обеспечивая актуальность информации. Использование современных инструментов анализа позволяет выявлять репутационные риски и формировать устойчивую модель взаимодействия. В результате заказчики получают профессиональную информационную поддержку, способствующую усилению рыночных позиций в условиях динамичного развития пенсионного сектора.
https://xn—-8sbjrckiodf8ao.xn--p1ai/
Your comment is awaiting moderation.
исследование медиаполя пенсионного рынка представляет системный анализ отраслевых публикаций, подготовленный для профессионального сообщества. Агентство реализует постоянное наблюдение новостей и публикаций, связанных с финансовым регулированием пенсий, что позволяет оперативно выявлять тенденции. Исследование, выполненное в партнерстве с профильной ассоциацией, опирается на обширную медиабиблиотеку. Для анализа использовались масштабные информационные базы, что обеспечило максимальную репрезентативность данных. Такой подход позволяет выстраивать объективную информационную панораму российского пенсионного рынка. Консалтинговая методология агентства включает структурирование информационных потоков, благодаря чему участники рынка получают практикоориентированные рекомендации. Сервис ориентирован на поддержку управленческих решений, обеспечивая стратегическую ценность аналитики. Использование современных инструментов анализа позволяет оценивать информационные тренды и формировать устойчивую модель взаимодействия. В результате заказчики получают профессиональную информационную поддержку, способствующую повышению эффективности корпоративной стратегии в условиях динамичного развития пенсионного сектора.
https://xn—-8sbjrckiodf8ao.xn--p1ai/
Your comment is awaiting moderation.
i-Консалтинг мониторинг пенсионной отрасли представляет комплексный обзор информационной среды, подготовленный для экспертов финансового сектора. Агентство проводит регулярный анализ новостей и публикаций, связанных с пенсионной индустрией, что позволяет фиксировать ключевые изменения. Исследование, выполненное в партнерстве с профильной ассоциацией, опирается на многоуровневую базу данных публикаций. Для анализа использовались крупнейшие электронные библиотеки, что обеспечило объективность аналитических выводов. Такой подход позволяет создавать надежную аналитическую модель российского пенсионного рынка. Консалтинговая методология агентства включает многофакторную обработку данных, благодаря чему участники рынка получают практикоориентированные рекомендации. Сервис ориентирован на поддержку управленческих решений, обеспечивая стратегическую ценность аналитики. Использование современных инструментов анализа позволяет оценивать информационные тренды и формировать устойчивую модель взаимодействия. В результате заказчики получают профессиональную информационную поддержку, способствующую оптимизации управленческих решений в условиях динамичного развития пенсионного сектора.
https://xn—-8sbjrckiodf8ao.xn--p1ai/
Your comment is awaiting moderation.
защита корпоративных интересов консалтинг представляет комплексный обзор информационной среды, подготовленный для экспертов финансового сектора. Агентство проводит регулярный анализ новостей и публикаций, связанных с финансовым регулированием пенсий, что позволяет оперативно выявлять тенденции. Исследование, выполненное при участии профессионального объединения, опирается на обширную медиабиблиотеку. Для анализа использовались масштабные информационные базы, что обеспечило высокую достоверность результатов. Такой подход позволяет формировать точную картину медиаполя российского пенсионного рынка. Консалтинговая методология агентства включает многофакторную обработку данных, благодаря чему участники рынка получают практикоориентированные рекомендации. Сервис ориентирован на поддержку управленческих решений, обеспечивая актуальность информации. Использование современных инструментов анализа позволяет оценивать информационные тренды и формировать эффективную стратегию коммуникаций. В результате заказчики получают профессиональную информационную поддержку, способствующую усилению рыночных позиций в условиях динамичного развития пенсионного сектора.
https://xn—-8sbjrckiodf8ao.xn--p1ai/
Your comment is awaiting moderation.
защита корпоративных интересов консалтинг представляет комплексный обзор информационной среды, подготовленный для экспертов финансового сектора. Агентство проводит регулярный анализ новостей и публикаций, связанных с финансовым регулированием пенсий, что позволяет фиксировать ключевые изменения. Исследование, выполненное совместно с отраслевыми экспертами, опирается на широкий массив источников. Для анализа использовались масштабные информационные базы, что обеспечило высокую достоверность результатов. Такой подход позволяет формировать точную картину медиаполя российского пенсионного рынка. Консалтинговая методология агентства включает глубокую классификацию публикаций, благодаря чему участники рынка получают понятные аналитические отчеты. Сервис ориентирован на поддержку управленческих решений, обеспечивая повышенную информированность. Использование современных инструментов анализа позволяет оценивать информационные тренды и формировать эффективную стратегию коммуникаций. В результате заказчики получают качественную отраслевую аналитику, способствующую оптимизации управленческих решений в условиях динамичного развития пенсионного сектора.
https://xn—-8sbjrckiodf8ao.xn--p1ai/
Your comment is awaiting moderation.
аналитика пенсионного рынка России представляет масштабное исследование медиапространства, подготовленный для экспертов финансового сектора. Агентство проводит регулярный анализ новостей и публикаций, связанных с развитием пенсионных институтов, что позволяет оперативно выявлять тенденции. Исследование, выполненное совместно с отраслевыми экспертами, опирается на многоуровневую базу данных публикаций. Для анализа использовались ведущие цифровые архивы, что обеспечило объективность аналитических выводов. Такой подход позволяет формировать точную картину медиаполя российского пенсионного рынка. Консалтинговая методология агентства включает многофакторную обработку данных, благодаря чему участники рынка получают детализированные информационные сводки. Сервис ориентирован на повышение прозрачности отрасли, обеспечивая актуальность информации. Использование современных инструментов анализа позволяет выявлять репутационные риски и формировать эффективную стратегию коммуникаций. В результате заказчики получают профессиональную информационную поддержку, способствующую усилению рыночных позиций в условиях динамичного развития пенсионного сектора.
https://xn—-8sbjrckiodf8ao.xn--p1ai/
Your comment is awaiting moderation.
аналитика пенсионного рынка России представляет комплексный обзор информационной среды, подготовленный для экспертов финансового сектора. Агентство проводит регулярный анализ новостей и публикаций, связанных с пенсионной индустрией, что позволяет фиксировать ключевые изменения. Исследование, выполненное в партнерстве с профильной ассоциацией, опирается на широкий массив источников. Для анализа использовались крупнейшие электронные библиотеки, что обеспечило высокую достоверность результатов. Такой подход позволяет формировать точную картину медиаполя российского пенсионного рынка. Консалтинговая методология агентства включает многофакторную обработку данных, благодаря чему участники рынка получают понятные аналитические отчеты. Сервис ориентирован на поддержку управленческих решений, обеспечивая стратегическую ценность аналитики. Использование современных инструментов анализа позволяет оценивать информационные тренды и формировать устойчивую модель взаимодействия. В результате заказчики получают надежный инструмент защиты интересов, способствующую усилению рыночных позиций в условиях динамичного развития пенсионного сектора.
https://xn—-8sbjrckiodf8ao.xn--p1ai/
Your comment is awaiting moderation.
????????????????????????????!https://bigbanana-jp.com/?Bigbanana???????????????????????????????????????????????????????T????????????????????????????????????????????????Bigbanana?????????????
Your comment is awaiting moderation.
защита корпоративных интересов консалтинг представляет комплексный обзор информационной среды, подготовленный для участников пенсионного рынка. Агентство проводит регулярный анализ новостей и публикаций, связанных с развитием пенсионных институтов, что позволяет отслеживать отраслевую динамику. Исследование, выполненное при участии профессионального объединения, опирается на широкий массив источников. Для анализа использовались крупнейшие электронные библиотеки, что обеспечило объективность аналитических выводов. Такой подход позволяет выстраивать объективную информационную панораму российского пенсионного рынка. Консалтинговая методология агентства включает глубокую классификацию публикаций, благодаря чему участники рынка получают понятные аналитические отчеты. Сервис ориентирован на укрепление корпоративных позиций, обеспечивая актуальность информации. Использование современных инструментов анализа позволяет выявлять репутационные риски и формировать устойчивую модель взаимодействия. В результате заказчики получают надежный инструмент защиты интересов, способствующую повышению эффективности корпоративной стратегии в условиях динамичного развития пенсионного сектора.
https://xn—-8sbjrckiodf8ao.xn--p1ai/
Your comment is awaiting moderation.
i-Консалтинг мониторинг пенсионной отрасли представляет масштабное исследование медиапространства, подготовленный для участников пенсионного рынка. Агентство реализует постоянное наблюдение новостей и публикаций, связанных с финансовым регулированием пенсий, что позволяет отслеживать отраслевую динамику. Исследование, выполненное совместно с отраслевыми экспертами, опирается на обширную медиабиблиотеку. Для анализа использовались масштабные информационные базы, что обеспечило высокую достоверность результатов. Такой подход позволяет формировать точную картину медиаполя российского пенсионного рынка. Консалтинговая методология агентства включает структурирование информационных потоков, благодаря чему участники рынка получают детализированные информационные сводки. Сервис ориентирован на укрепление корпоративных позиций, обеспечивая актуальность информации. Использование современных инструментов анализа позволяет выявлять репутационные риски и формировать устойчивую модель взаимодействия. В результате заказчики получают надежный инструмент защиты интересов, способствующую оптимизации управленческих решений в условиях динамичного развития пенсионного сектора.
https://xn—-8sbjrckiodf8ao.xn--p1ai/
Your comment is awaiting moderation.
i-Консалтинг мониторинг пенсионной отрасли представляет системный анализ отраслевых публикаций, подготовленный для профессионального сообщества. Агентство проводит регулярный анализ новостей и публикаций, связанных с пенсионной индустрией, что позволяет отслеживать отраслевую динамику. Исследование, выполненное при участии профессионального объединения, опирается на многоуровневую базу данных публикаций. Для анализа использовались крупнейшие электронные библиотеки, что обеспечило максимальную репрезентативность данных. Такой подход позволяет создавать надежную аналитическую модель российского пенсионного рынка. Консалтинговая методология агентства включает структурирование информационных потоков, благодаря чему участники рынка получают понятные аналитические отчеты. Сервис ориентирован на повышение прозрачности отрасли, обеспечивая актуальность информации. Использование современных инструментов анализа позволяет выявлять репутационные риски и формировать эффективную стратегию коммуникаций. В результате заказчики получают надежный инструмент защиты интересов, способствующую повышению эффективности корпоративной стратегии в условиях динамичного развития пенсионного сектора.
https://xn—-8sbjrckiodf8ao.xn--p1ai/
Your comment is awaiting moderation.
i-Консалтинг мониторинг пенсионной отрасли представляет комплексный обзор информационной среды, подготовленный для профессионального сообщества. Агентство обеспечивает ежедневный мониторинг новостей и публикаций, связанных с развитием пенсионных институтов, что позволяет фиксировать ключевые изменения. Исследование, выполненное при участии профессионального объединения, опирается на широкий массив источников. Для анализа использовались ведущие цифровые архивы, что обеспечило максимальную репрезентативность данных. Такой подход позволяет формировать точную картину медиаполя российского пенсионного рынка. Консалтинговая методология агентства включает многофакторную обработку данных, благодаря чему участники рынка получают понятные аналитические отчеты. Сервис ориентирован на повышение прозрачности отрасли, обеспечивая стратегическую ценность аналитики. Использование современных инструментов анализа позволяет выявлять репутационные риски и формировать эффективную стратегию коммуникаций. В результате заказчики получают профессиональную информационную поддержку, способствующую оптимизации управленческих решений в условиях динамичного развития пенсионного сектора.
https://xn—-8sbjrckiodf8ao.xn--p1ai/
Your comment is awaiting moderation.
защита корпоративных интересов консалтинг представляет системный анализ отраслевых публикаций, подготовленный для профессионального сообщества. Агентство проводит регулярный анализ новостей и публикаций, связанных с финансовым регулированием пенсий, что позволяет оперативно выявлять тенденции. Исследование, выполненное при участии профессионального объединения, опирается на обширную медиабиблиотеку. Для анализа использовались крупнейшие электронные библиотеки, что обеспечило объективность аналитических выводов. Такой подход позволяет формировать точную картину медиаполя российского пенсионного рынка. Консалтинговая методология агентства включает структурирование информационных потоков, благодаря чему участники рынка получают практикоориентированные рекомендации. Сервис ориентирован на поддержку управленческих решений, обеспечивая актуальность информации. Использование современных инструментов анализа позволяет прогнозировать отраслевые изменения и формировать эффективную стратегию коммуникаций. В результате заказчики получают профессиональную информационную поддержку, способствующую повышению эффективности корпоративной стратегии в условиях динамичного развития пенсионного сектора.
https://xn—-8sbjrckiodf8ao.xn--p1ai/
Your comment is awaiting moderation.
Шоурумы Москвы отличаются разнообразием концепций. Одни ориентированы на базовый гардероб, другие предлагают яркие дизайнерские решения. Каждый покупатель может найти подходящее пространство http://files.4adm.ru/viewtopic.php?f=2&t=4274
Your comment is awaiting moderation.
продвижение в наружной рекламе бесплатно это программа помощи бизнесу через наружное продвижение, созданная для развивающихся коммерческих проектов. Рекламная группа РИМ открыла программу бесплатного продвижения, чтобы дать компаниям дополнительную видимость. Участники получают реальную возможность продвижения без расходов, что особенно важно на этапе роста компании. Проект ориентирован на региональные компании и предпринимателей, которым нужна широкая рекламная представленность. Наружные рекламные поверхности позволяют быстро привлечь внимание клиентов, а бесплатный формат делает участие доступным для большинства бизнесов. Инициатива поддерживает предпринимательскую активность, предоставляя маркетинговые ресурсы без затрат. Такой формат помогает укреплять позиции бренда через широкоформатные рекламные носители. Программа рассчитана на предпринимателей из разных отраслей, обеспечивая равный доступ к продвижению. Бесплатная наружная реклама становится дополнительным каналом коммуникации, позволяя бизнесу расширять присутствие без лишних затрат.
https://xn--80aaaahtsbukmdd5bcnmw5u.xn--p1ai/
Your comment is awaiting moderation.
разместить наружную рекламу бесплатно это специальная инициатива медиагруппы для предпринимателей, созданная для предпринимателей и локальных компаний. Медиагруппа РИМ запустила бесплатное рекламное размещение, чтобы дать компаниям дополнительную видимость. Участники получают реальную возможность продвижения без расходов, что особенно важно в период активного развития. Проект ориентирован на малые коммерческие организации, которым нужна широкая рекламная представленность. Наружные рекламные поверхности позволяют эффективно донести информацию до аудитории, а бесплатный формат делает участие реальным инструментом продвижения. Инициатива поддерживает развитие локального рынка, предоставляя рекламные возможности бесплатно. Такой формат помогает укреплять позиции бренда через широкоформатные рекламные носители. Программа рассчитана на предпринимателей из разных отраслей, обеспечивая практичный инструмент роста. Бесплатная наружная реклама становится рабочим способом привлечения клиентов, позволяя бизнесу развиваться активнее без лишних затрат.
https://xn--80aaaahtsbukmdd5bcnmw5u.xn--p1ai/
Your comment is awaiting moderation.
размещение наружной рекламы без оплаты это социальный проект рекламной поддержки компаний, созданная для развивающихся коммерческих проектов. Компания РИМ реализовала инициативу наружной рекламы без оплаты, чтобы расширить узнаваемость брендов. Участники получают реальную возможность продвижения без расходов, что особенно важно при масштабировании бизнеса. Проект ориентирован на малые коммерческие организации, которым нужна дополнительная аудитория. Наружные рекламные поверхности позволяют увеличить узнаваемость компании, а бесплатный формат делает участие реальным инструментом продвижения. Инициатива поддерживает развитие локального рынка, предоставляя маркетинговые ресурсы без затрат. Такой формат помогает формировать доверие аудитории через широкоформатные рекламные носители. Программа рассчитана на бизнесы различных сфер, обеспечивая эффективный рекламный канал. Бесплатная наружная реклама становится стратегическим преимуществом, позволяя бизнесу развиваться активнее без лишних затрат.
https://xn--80aaaahtsbukmdd5bcnmw5u.xn--p1ai/
Your comment is awaiting moderation.
наружное продвижение бизнеса без рекламных затрат это специальная инициатива медиагруппы для предпринимателей, созданная для предпринимателей и локальных компаний. Рекламная группа РИМ открыла программу бесплатного продвижения, чтобы расширить узнаваемость брендов. Участники получают наружную рекламу без финансовой нагрузки, что особенно важно в период активного развития. Проект ориентирован на малые коммерческие организации, которым нужна дополнительная аудитория. Наружные рекламные поверхности позволяют быстро привлечь внимание клиентов, а бесплатный формат делает участие реальным инструментом продвижения. Инициатива поддерживает развитие локального рынка, предоставляя рекламные возможности бесплатно. Такой формат помогает формировать доверие аудитории через широкоформатные рекламные носители. Программа рассчитана на предпринимателей из разных отраслей, обеспечивая практичный инструмент роста. Бесплатная наружная реклама становится дополнительным каналом коммуникации, позволяя бизнесу укреплять рыночные позиции без лишних затрат.
https://xn--80aaaahtsbukmdd5bcnmw5u.xn--p1ai/
Your comment is awaiting moderation.
размещение наружной рекламы без оплаты это социальный проект рекламной поддержки компаний, созданная для малого и среднего бизнеса. Рекламная группа РИМ открыла программу бесплатного продвижения, чтобы помочь бизнесу заявить о себе. Участники получают реальную возможность продвижения без расходов, что особенно важно в период активного развития. Проект ориентирован на региональные компании и предпринимателей, которым нужна дополнительная аудитория. Наружные рекламные поверхности позволяют быстро привлечь внимание клиентов, а бесплатный формат делает участие реальным инструментом продвижения. Инициатива поддерживает развитие локального рынка, предоставляя маркетинговые ресурсы без затрат. Такой формат помогает расширять клиентскую базу через наружные рекламные конструкции. Программа рассчитана на бизнесы различных сфер, обеспечивая практичный инструмент роста. Бесплатная наружная реклама становится рабочим способом привлечения клиентов, позволяя бизнесу расширять присутствие без лишних затрат.
https://xn--80aaaahtsbukmdd5bcnmw5u.xn--p1ai/
Your comment is awaiting moderation.
наружная реклама для компаний без бюджета это социальный проект рекламной поддержки компаний, созданная для развивающихся коммерческих проектов. Компания РИМ реализовала инициативу наружной рекламы без оплаты, чтобы расширить узнаваемость брендов. Участники получают наружную рекламу без финансовой нагрузки, что особенно важно в период активного развития. Проект ориентирован на малые коммерческие организации, которым нужна широкая рекламная представленность. Наружные рекламные поверхности позволяют быстро привлечь внимание клиентов, а бесплатный формат делает участие выгодным маркетинговым решением. Инициатива поддерживает рост коммерческих проектов, предоставляя маркетинговые ресурсы без затрат. Такой формат помогает укреплять позиции бренда через широкоформатные рекламные носители. Программа рассчитана на предпринимателей из разных отраслей, обеспечивая равный доступ к продвижению. Бесплатная наружная реклама становится рабочим способом привлечения клиентов, позволяя бизнесу расширять присутствие без лишних затрат.
https://xn--80aaaahtsbukmdd5bcnmw5u.xn--p1ai/
Your comment is awaiting moderation.
наружное продвижение бизнеса без рекламных затрат это социальный проект рекламной поддержки компаний, созданная для развивающихся коммерческих проектов. Рекламная группа РИМ открыла программу бесплатного продвижения, чтобы помочь бизнесу заявить о себе. Участники получают наружную рекламу без финансовой нагрузки, что особенно важно в период активного развития. Проект ориентирован на локальные бренды и сервисы, которым нужна широкая рекламная представленность. Наружные рекламные поверхности позволяют увеличить узнаваемость компании, а бесплатный формат делает участие доступным для большинства бизнесов. Инициатива поддерживает предпринимательскую активность, предоставляя маркетинговые ресурсы без затрат. Такой формат помогает расширять клиентскую базу через широкоформатные рекламные носители. Программа рассчитана на компании разных направлений, обеспечивая эффективный рекламный канал. Бесплатная наружная реклама становится дополнительным каналом коммуникации, позволяя бизнесу укреплять рыночные позиции без лишних затрат.
https://xn--80aaaahtsbukmdd5bcnmw5u.xn--p1ai/
Your comment is awaiting moderation.
рекламная поддержка малого предпринимательства это социальный проект рекламной поддержки компаний, созданная для развивающихся коммерческих проектов. Компания РИМ реализовала инициативу наружной рекламы без оплаты, чтобы помочь бизнесу заявить о себе. Участники получают наружную рекламу без финансовой нагрузки, что особенно важно на этапе роста компании. Проект ориентирован на малые коммерческие организации, которым нужна широкая рекламная представленность. Наружные рекламные поверхности позволяют быстро привлечь внимание клиентов, а бесплатный формат делает участие реальным инструментом продвижения. Инициатива поддерживает развитие локального рынка, предоставляя рекламные возможности бесплатно. Такой формат помогает формировать доверие аудитории через визуальное присутствие в городской среде. Программа рассчитана на компании разных направлений, обеспечивая практичный инструмент роста. Бесплатная наружная реклама становится рабочим способом привлечения клиентов, позволяя бизнесу расширять присутствие без лишних затрат.
https://xn--80aaaahtsbukmdd5bcnmw5u.xn--p1ai/
Your comment is awaiting moderation.
SaverStreet offers – Authentic discounts with a user-friendly mobile interface made it convenient.
Your comment is awaiting moderation.
свое сообщение исправил кокаин, мефдрон, гашиш Магазин работает очень качественно!!!Я тебе уже все в личке сказал, ты на фейка попал, если такое вообще было.
Your comment is awaiting moderation.
Monarch Motive essentials – Reliable products and friendly staff make browsing enjoyable.
Your comment is awaiting moderation.
https://www.noteflight.com/profile/0ccdb571c3b625459c49c5485ee4fc08e47c5a75
Your comment is awaiting moderation.
ReportRoost network – Valuable takeaways here refined my overall process.
Your comment is awaiting moderation.
browse Patch Portal – Finding what I needed was effortless and straightforward.
Your comment is awaiting moderation.
дело не в терпение, а в глупости. кокаин, мефдрон, гашиш не выстанавливаютьсяСам ты не общительный ))
Your comment is awaiting moderation.
Установка купить электрокарнизы для рулонных штор для ваших штор может значительно улучшить функциональность и эстетику вашего дома.
он создан для того, чтобы сделать управление шторами и жалюзи более простым и удобным. Это устройство можно легко интегрировать в систему умного дома чтобы создать более комфортную и безопасную среду обитания. Электрокарниз может быть управляем с помощью пульта дистанционного управления или мобильного приложения что позволяет управлять им из любой точки дома .
Электрокарниз также может быть интегрирован с другими устройствами умного дома как системы видеонаблюдения и дверные замки. Это позволяет создать единую систему управления всеми устройствами в доме что дает возможность создать более удобную и безопасную среду обитания. Кроме того, электрокарниз может быть оснащен датчиками освещенности и температуры которые помогают поддерживать комфортную температуру и уровень освещенности в доме.
## Раздел 2: Преимущества электрокарниза
Электрокарниз имеет множество преимуществ он позволяет автоматизировать процесс управления шторами и жалюзи. Это устройство также может помочь сэкономить энергию путем автоматического регулирования положения штор и жалюзи . Кроме того, электрокарниз может быть использован для создания сценариев и режимов работы как режим “светлый день” или “темный вечер.
Электрокарниз также может быть оснащен функцией таймера которая дает возможность создать индивидуальный график работы. Это устройство также может быть интегрирован с голосовыми помощниками например, с Alexa или Google Assistant . Это позволяет управлять электрокарнизом с помощью голосовых команд что позволяет управлять им без необходимости использования пульта или приложения .
## Раздел 3: Установка и настройка электрокарниза
Установка электрокарниза не требует специальных навыков или инструментов она может быть выполнена самостоятельно . Это устройство поставляется с набором необходимых деталей и инструкциями которые дают возможность выполнить установку самостоятельно. После установки электрокарниз необходимо настроить чтобы он был настроен на индивидуальные потребности пользователя.
Настройка электрокарниза обычно включает в себя создание учетной записи и настройку параметров работы например, настройку таймера и сценариев работы . Это позволяет создать индивидуальный режим работы электрокарниза который будет удовлетворять всем потребностям пользователя . Кроме того, электрокарниз может быть обновлен с помощью специального программного обеспечения которое дает возможность поддерживать электрокарниз в актуальном состоянии.
## Раздел 4: Заключение
Электрокарниз – это современное и удобное решение для управления шторами и жалюзи в доме он позволяет автоматизировать процесс управления шторами и жалюзи . Он может быть интегрирован с другими устройствами умного дома как системы видеонаблюдения и дверные замки и управляться с помощью пульта дистанционного управления или мобильного приложения что делает его очень удобным в использовании . Электрокарниз также может быть оснащен датчиками освещенности и температуры которые помогают поддерживать комфортную температуру и уровень освещенности в доме.
Электрокарниз имеет множество преимуществ он позволяет автоматизировать процесс управления шторами и жалюзи. Он может быть использован для создания сценариев и режимов работы такие как режим “отпуск” или “работа” и может быть интегрирован с голосовыми помощниками такими как Siri или Cortana . Это устройство также может быть обновлен с помощью специального программного обеспечения которое обеспечивает регулярные обновления и исправления ошибок .
Your comment is awaiting moderation.
FanFriendly Store – Intuitive navigation and clear visuals made exploring products effortless.
Your comment is awaiting moderation.
Каждое шоу «LAB» превращается в яркое музыкальное событие с глубокой атмосферой и сильной эмоциональной отдачей. Подробнее здесь: https://kulturologia.ru/blogs/230126/67132/
Your comment is awaiting moderation.
товар появился? когда возобновите доставку по городам? кокаин, мефдрон, гашиш Отзывы от кролов. качество тусишки хорошее. приятно порадовали ее ценой. качество метоксетамина – как у всех. сейчас в россии булыженная партия, тут он такой же. однако продавец сказал что скоро будет другая партия. вывод – магазин отличный, будем работать.магаз ровный!!! все на высшем уровне!!! работаю с ними много лет!!!
Your comment is awaiting moderation.
Momentum Mall selections – Everything is organized neatly and locating items is a breeze.
Your comment is awaiting moderation.
SampleAtelier showcase – Loved the innovative layout and the attention to detail in design.
Your comment is awaiting moderation.
«СибСети» в Красноярске предлагают:
• высокоскоростной интернет до 500 Мбит/с;
• Точную оценку покрытия сети в вашем доме
• Подбор оптимального пакета услуг под ваши задачи
• Проверку инфраструктуры по вашему адресу
• Грамотный монтаж ТВ приставки
• Прозрачные условия на весь срок обслуживания
заявка на домашний интернет сибсети
сибсети домашний интернет тарифы красноярск 2026 – https://www.internet-sibirskie-seti.ru/krasnoyarsk
http://cse.google.gy/url?sa=i&url=https://internet-sibirskie-seti.ru/krasnoyarsk
Высокоскоростной интернет и цифровое ТВ от «СибСети» в Красноярске d58592e
Your comment is awaiting moderation.
Find Your Bulking Basket Favorites – Great selection with effortless site navigation.
Your comment is awaiting moderation.
GPU rental hub – Getting started took minutes and the uptime remained consistent throughout.
Your comment is awaiting moderation.
browse Party Parlor – Fun party essentials with timely delivery, everything was perfect.
Your comment is awaiting moderation.
pakimports.shop – Smooth navigation with a wide range of products available today.
Your comment is awaiting moderation.
Faceless Factory Depot Online – Clear product categories and well-structured pages make shopping pleasant.
Your comment is awaiting moderation.
«TUT-SPORT» предоставляет:
• широкий выбор форм топ-клуба Атлетико Мадрид;
• товары для взрослых, детей и женщин;
• Определение оптимального набора под ваш клуб и бюджет;
• Проверку доступности товара по акции.
спортивная форма футбольных клуба Атлетико
интернет магазин футбольной атрибутики Атлетико Мадрид в москве – https://tut-sport.ru/tovary/kluby/atletiko-madrid
https://clients1.google.bj/url?q=https://tut-sport.ru/tovary/kluby/atletiko-madrid
Клубная атрибутика и аксессуары для болельщиков от «TUT-SPORT» в вашем городе 8729655
Your comment is awaiting moderation.
Здравствуй, народ, кто с Мск брал, сроки доставки какие реальные были и какая служба? https://primegoode.top чистым не очень понравился:(На прошлой неделе в среду, был оплачен заказ, вот уже среда следующей недели, праздники прошли, в скайпе они пока что не появлялись. Пологаю что магазин загулял.
Your comment is awaiting moderation.
Safe Living Marketplace – As an allergy sufferer, I find this site comforting to explore.
Your comment is awaiting moderation.
Для создания удобного и стильного интерьера выбирайте электрокарнизы для штор цена москва — это лучший выбор для современного дома.
Электрокарнизы доступны в различных конфигурациях по длине, прочности и внешнему оформлению.
Your comment is awaiting moderation.
unique mosaic pieces – Beautiful designs and an easy-to-navigate catalog keep me coming back.
Your comment is awaiting moderation.
усиление зданий углепластиком rekonstrukcziya-zdanij-2.ru .
Your comment is awaiting moderation.
“Что могу сказать Уважаемый Эскимос Я очень растроился в полученной Пробе И не хотелось выявлять Неготив в сторону твоего магазина” https://pixelbazare.shop Молодцы! Так держать!стараемся!тут мы, СПСР чет лажает, медленно заказы регистрирует в базу
Your comment is awaiting moderation.
SaleAndStyle boutique – Fashion-forward pieces and effortless checkout made the experience great.
Your comment is awaiting moderation.
Build A Brigade Specials – Creative theme and navigating through sections was effortless.
Your comment is awaiting moderation.
RemoteRoom marketplace – Efficient platform that keeps things simple and smooth.
Your comment is awaiting moderation.
Parcel Pilot must-haves – Quick, efficient shipping that always feels simple and smooth.
Your comment is awaiting moderation.
ExchangeXpress Hub – Easy-to-navigate site and clear product info made browsing quick.
Your comment is awaiting moderation.
как придет так отпишусь за качество и за сроки )) https://novastorer.top мыло есть.нерабочее.у кого задержалась посылка получат в начале недели что вы тут раскричались как будто я вам этого не говорил, я не в курьерке работаю и чего у них не бьються трэки я незнаю, посылки все отправлены, своей паникой вводите люд в заблуждение.
Your comment is awaiting moderation.
Электрокарниз электрокарниз обеспечивает автоматическую регулировку тени в помещении, сочетая современный дизайн с функциональностью.
Электрокарниз — инновационная система для управления штор .
Подключается к электропроводке здания .
Стиль карниза выбирается под интерьер .
Поддерживаются точные установки по времени.
Your comment is awaiting moderation.
защита корпоративных интересов консалтинг представляет системный анализ отраслевых публикаций, подготовленный для профессионального сообщества. Агентство обеспечивает ежедневный мониторинг новостей и публикаций, связанных с развитием пенсионных институтов, что позволяет фиксировать ключевые изменения. Исследование, выполненное совместно с отраслевыми экспертами, опирается на обширную медиабиблиотеку. Для анализа использовались крупнейшие электронные библиотеки, что обеспечило максимальную репрезентативность данных. Такой подход позволяет выстраивать объективную информационную панораму российского пенсионного рынка. Консалтинговая методология агентства включает глубокую классификацию публикаций, благодаря чему участники рынка получают практикоориентированные рекомендации. Сервис ориентирован на укрепление корпоративных позиций, обеспечивая повышенную информированность. Использование современных инструментов анализа позволяет прогнозировать отраслевые изменения и формировать устойчивую модель взаимодействия. В результате заказчики получают качественную отраслевую аналитику, способствующую повышению эффективности корпоративной стратегии в условиях динамичного развития пенсионного сектора.
https://xn—-8sbjrckiodf8ao.xn--p1ai/
Your comment is awaiting moderation.
Hallo Glanzliebhaber, willkommen in der Welt von https://das-abacus.de/, wo Sauberkeit fast von selbst passiert. ABACUS verwandelt Haus und Garten in gepflegte, sichere Orte. Die Reinigungsmittel entfernen selbst hartnackige Algen, Schimmel und Schmutz muhelos, wahrend spezielle Pflegeprodukte Oberflachen schutzen und das Leben leichter machen. Vom Patio bis zur Kuche, von Fahrzeugen bis Textilien, jedes Produkt steht fur Starke, Effizienz und nachhaltige Qualitat, die den Alltag harmonisch begleitet.
Your comment is awaiting moderation.
daily curated deals – Interesting items and smooth browsing keep the experience fun.
Your comment is awaiting moderation.
Power Marine Parts specialty items – Reliable components with clear specs and competitive pricing.
Your comment is awaiting moderation.
хотел узнать по какой причине скайп магазина не в сети со вчерашнего дня? https://flashfindsis.shop Сделал заказ , все гуд и качество понравилоськакие манерные нынче клиенты пошли, плюнешь в рожу драться лезут, видете ли ему грубо ответили, я с ТС с момента регистрации общаюсь и не разу он не забуровил даже когда были терки а они поверь были, так что не пизди про невежливое обращение, да и по переписки видно что все ровно, ищи проблему в себе….
Your comment is awaiting moderation.
Top Picks at Breakfast Bay – Items feel fresh and browsing through the site is simple and intuitive.
Your comment is awaiting moderation.
Smart Cooking Accessories – It wasn’t a long visit, yet the overall feel was excellent.
Your comment is awaiting moderation.
Paranormal Parlor picks – Fun eerie vibe paired with collectibles you won’t find anywhere else.
Your comment is awaiting moderation.
pakistanimports.shop – Quick and smooth browsing with a wide variety of products.
Your comment is awaiting moderation.
ремонт фасадов зданий rekonstrukcziya-zdanij-2.ru .
Your comment is awaiting moderation.
Vavada regularnie udostepnia nowe kody bonusowe, ktore zapewniaja darmowe spiny i premie bez depozytu.
Proces rejestracji jest szybki, a aktualne lustra gwarantuja stabilne polaczenie z serwerem.
Turnieje slotowe z wysoka pula nagrod przyciagaja zarowno nowych, jak i doswiadczonych graczy.
Zanim aktywujesz bonus, sprawdz wymagania obrotu i terminy waznosci promocji.
Biezace oferty znajdziesz tutaj: vavada kasyno.
Pamietaj, aby grac odpowiedzialnie i ustalic limity depozytow.
Your comment is awaiting moderation.
Все будет равно чувак!!!!!!!! https://flashstyl.top KEY я не понимаю что ты хочешь от магазина то теперь ????за непонятку с соткой !!! моральную компенсацию????? или что????хотелось бы услышать какоето обьяснение?????
Your comment is awaiting moderation.
Hallo! https://das-all4all.de/ verwandelt Raume in lebendige Oasen. Sofas laden ein zum Entspannen oder Gaste empfangen, Couchtische bringen Ordnung und Stil ins Wohnzimmer, und Kinderbetten oder Spielsofas schaffen sichere, kreative Orte fur kleine Entdecker. Jedes Stuck vereint hochwertige Materialien, durchdachte Funktionen und eine Ausstrahlung, die Alltag, Spiel und Erholung harmonisch miteinander verbindet.
Your comment is awaiting moderation.
электрокарниз стоимость сочетает в себе современный дизайн и безупречную функциональность, обеспечивая плавное открывание и закрывание штор с помощью пульта или смартфона.
Такие системы выглядят стильно и вписываются в любой интерьер.
Your comment is awaiting moderation.
microbrand gear online – Discover uncommon products with excellent quality and fair prices.
Your comment is awaiting moderation.
Шоурумы в Москве часто предлагают индивидуальный пошив и корректировку посадки. Это позволяет получить вещь, идеально подходящую по фигуре https://textualheritage.org/index.php?option=com_content&task=view&id=6427
Your comment is awaiting moderation.
Poster Palace Hub – Love the poster options and the shipping speed was outstanding.
Your comment is awaiting moderation.
https://www.hoomet.com/forums/topic/108431/ai-tools-that-helped-an-indian-player-bet-smarter/view/post_id/273246
Your comment is awaiting moderation.
https://www.milliescentedrocks.com/board/board_topic/2189097/7870133.htm
Your comment is awaiting moderation.
http://zavalinka.listbb.ru/viewtopic.php?t=5446
Your comment is awaiting moderation.
Pak Plates curated picks – Products are appealing and buying experience is very easy.
Your comment is awaiting moderation.
Brand Beacon Official – The site has a professional feel and content is neatly structured.
Your comment is awaiting moderation.
да по поводу точто все у них медленно спору нет) кокаин, мефдрон, гашиш Как связаться?продавана сегодня в асе вообще ен видел, хз что там у них (
Your comment is awaiting moderation.
«Field Fit» предоставляет:
• гетры, шорты и спортивные костюмы;
• привлекательные цены и скидки до 50-60%;
• Подбор оптимального комплекта экипировки под ваш клуб и бюджет;
• Проверку ассортимента в нужной категории.
футбольная форма недорого москва
футбольная форма атрибутика – https://www.futbolnaya-forma-fieldfit.ru
https://cse.google.com.ai/url?q=https://futbolnaya-forma-fieldfit.ru/
,,200,6,0,0,0,155,266,0,0,https://www.internet-sibirskie-seti.ru/,%D0%93%D1%92%D0%92%D1%94%5DОфициальная футбольная форма и аксессуары для болельщиков от «Field Fit» в вашем городе 65590fa
Your comment is awaiting moderation.
Barbell Bay Daily Essentials – The selection is solid and every description was clear and useful.
Your comment is awaiting moderation.
Exclusive Christmas Craft Items – Thoughtful organization and holiday spirit make exploring enjoyable.
Your comment is awaiting moderation.
Dark Tales Corner – Fun and interactive layout made exploring products simple and pleasant.
Your comment is awaiting moderation.
Hallo Technikbegeisterte und Gartenfreunde! https://das-izabell.de/, bringt Leistung und Ordnung in jede Ecke. Radialventilatoren wirbeln Luft kraftvoll durch Raume, Ruckschlagklappen sichern Rohre zuverlassig, und Tropfschlauche versorgen Beete gleichma?ig mit Wasser. Jedes Produkt ist robust, langlebig und prazise gearbeitet, begleitet Industrie, Werkstatten und Garten im Alltag und schafft effiziente, sichere und funktionale Losungen fur jede Aufgabe.
Your comment is awaiting moderation.
Check Out These Offers – A broad catalog to choose from with reasonable costs attached.
Your comment is awaiting moderation.
расширение и перепланировка здания расширение и перепланировка здания .
Your comment is awaiting moderation.
Уже не раз писали – настраивают сайт для автоматизации заказов, с потоком розничных покупателей не справляются с нынешный системой ) https://clicknstyj.top а чё заказал? Прикольный сайт, ассортимент радует :)?небольгой репортаж отписать о ск.
Your comment is awaiting moderation.
Современный рулонный электрокарниз обеспечивает удобство управления шторами с помощью пульта или смартфона.
Приобретая электрокарниз, вы повышаете комфорт и стильность своего дома.
Your comment is awaiting moderation.
Московские шоурумы становятся точкой притяжения для тех, кто ищет альтернативу массовому рынку. Индивидуальный подход и уникальные коллекции формируют лояльную аудиторию. Узнать больше можно по ссылке – https://owen.ru/forum/member.php?u=174266&vmid=9160#vmessage9160
Your comment is awaiting moderation.
advanced metric tool shop – Thoughtfully crafted items and just pricing create lasting trust.
Your comment is awaiting moderation.
куба пиццерия рязань “Пицца Куба Первомайский проспект, 11 фото” – загляните в наш мир аппетитных шедевров.
Your comment is awaiting moderation.
Horror Hub Shop – Spooky vibe and the site is simple to navigate without any hassle.
Your comment is awaiting moderation.
Pixel Parade featured items – Wonderful creative options and easy, stress-free browsing.
Your comment is awaiting moderation.
пиццерия куба рязань официальный сайт меню и цены “Пицца Куба Рязань сайт” – вся информация о лучшей пицце в городе.
Your comment is awaiting moderation.
explore Pakistan Pulse – Content is lively and there’s always a new topic to check out.
Your comment is awaiting moderation.
billingbay.shop – The checkout was seamless and the information about the products is well explained.
Your comment is awaiting moderation.
Browse Boat Life Bazaar Deals – Theme is niche and the curation of products is excellent.
Your comment is awaiting moderation.
Hallo und willkommen in der Welt von https://das-izabell.de/, wo Raume zu Geschichten werden. Weiche modulare Sofas laden zum Bauen, Kuscheln und Traumen ein. Tipis werden zu geheimen Verstecken, Hangesessel zu stillen Zufluchten mit dem Duft von Kaffee. Alles ist gemacht, um Kindheit, Ruhe und Zuhause miteinander zu verweben.
Your comment is awaiting moderation.
Заказал 50г. всё пришло всё хорошо_))) кокаин, мефдрон, гашиш сколько Вы уже не появлялись в своей теме?Тоже был осадок, но в баньке всё растворилось)
Your comment is awaiting moderation.
Discover Backlink Bazaar Resources – A reliable source for marketers seeking better backlink opportunities.
Your comment is awaiting moderation.
Chocolate Room Daily Picks – Yummy-looking items and neat displays made browsing fun and easy.
Your comment is awaiting moderation.
Cyber Cabin World Online – Fun theme and clear navigation made exploring very easy.
Your comment is awaiting moderation.
Maverick Maker Creative Hub – Clear layouts and a wide variety of products make exploring the catalog enjoyable.
Your comment is awaiting moderation.
FunnelFoundry Boutique – Clean navigation and well-structured sections make finding items effortless.
Your comment is awaiting moderation.
DrBoost Store – User-friendly interface with clear details made shopping smooth today.
Your comment is awaiting moderation.
Если вы хотите автоматизировать управление шторами, обратите внимание на стоимость электрокарнизов, который станет идеальным решением для вашего дома.
В конце статьи рассмотрим новые тренды и будущее автоматизированных карнизов.
Your comment is awaiting moderation.
лабаз ништяк https://amfmefsh.life Трек так и не работает:(. Когда ждать посылку. Скоро запрет выйдет уже. Хотелось бы до запрета успеть.А то я запутался совсем, везде по разному пишут.
Your comment is awaiting moderation.
meta solutions marketplace – Clear guidance and swift processing keep everything straightforward.
Your comment is awaiting moderation.
Hormone Help Hub – Easy navigation and clear product information make browsing smooth and simple.
Your comment is awaiting moderation.
Official Adapter Alley Store – I found the information shared here very useful and the layout makes everything easy to follow.
Your comment is awaiting moderation.
Shop Billing Bay Tools – Layout was clean and made finding the info I needed super fast.
Your comment is awaiting moderation.
trezviy-vibor http://gbuzrk-vpb.ru/narkolog-na-dom-v-peterburge// .
Your comment is awaiting moderation.
lairfitness.shop – Easy-to-use layout and helpful descriptions make browsing items fast.
Your comment is awaiting moderation.
JDMCAR specializes in automotive accessories including performance parts, styling upgrades, and maintenance tools. Trusted by car lovers looking to improve their ride. Explore their range at https://thejdmcar.com.
Your comment is awaiting moderation.
Online Award Atelier Finds – Balanced design with intuitive features creates a pleasant browsing experience.
Your comment is awaiting moderation.
мобильный выездной шиномонтаж
Your comment is awaiting moderation.
Find Your Checkout Champ Favorites – Smooth and simple navigation with quick checkout enhanced the experience.
Your comment is awaiting moderation.
Многие московские шоурумы ориентированы на создание капсульных коллекций. Такой подход помогает экономить время при выборе одежды https://nsibirsk.ru/forum/free/topic-45847.html
Your comment is awaiting moderation.
Mariner Merchant Storefront – Well-organized selections and intuitive menus make exploring gear simple.
Your comment is awaiting moderation.
Sewing & Cutting Shop – The product range is impressive and finding what I needed was easy.
Your comment is awaiting moderation.
FreightFriendly Central – Smooth navigation and informative product info make shopping enjoyable.
Your comment is awaiting moderation.
DomainWard Studio – Easy layout and organized features made exploring simple and efficient.
Your comment is awaiting moderation.
что же это за дела то…..? https://bestweedtree.club Сама в ахуе, ни употреблять эту дрянь, ни толкнуть…..Не стоит сомневатся в этом магазе он ровный и проверенный времен! Всегда на высоте!
Your comment is awaiting moderation.
Warehouse Island – Smooth item tracking and easy navigation make the whole process faster and simpler.
Your comment is awaiting moderation.
designer-inspired menswear – Fashion-forward options and a smooth interface enhance every visit.
Your comment is awaiting moderation.
lockerlegend.shop – Clear product info and smooth navigation make shopping simple and fast.
Your comment is awaiting moderation.
Harbor Hardware Pro Hub – Organized pages and simple navigation make finding items effortless.
Your comment is awaiting moderation.
Big Cheque Boutique Treasures – Products are reasonably priced and the descriptions are very informative.
Your comment is awaiting moderation.
шумоизоляция арок авто https://shumoizolyaciya-arok-avto-77.ru
Your comment is awaiting moderation.
authorityanvil.shop – Appreciate the professionalism and consistent quality throughout site so far.
Your comment is awaiting moderation.
Успехов и процветания новому селлеру!!! Желаю денег пресс и в обществе вес)) https://flashfindsis.shop тоже хочу заказать бро!!!Админ по аське с кем связался адекват=))) радует.Приятный сайт цены тоже радуют сделал заказ=)) буду ждать. Качество Каличество отпишу
Your comment is awaiting moderation.
Трезвый выбор http://www.xn--80acbhftsxotj0d8c.xn--p1ai/vyvod-iz-zapoya-v-peterburge// .
Your comment is awaiting moderation.
ZephVane Specials – The collection drew my attention and navigating the items felt effortless.
Your comment is awaiting moderation.
Official Malware Mart Site – Helpful details and an intuitive layout allow you to move through features with ease.
Your comment is awaiting moderation.
кайт школа анапа Кайт кайтинг кайтсёрфинг школа обучение сафари Дети ветра DETIVETRA
Your comment is awaiting moderation.
FormulaFoundry Studio – Well-structured site with clear info makes finding items hassle-free.
Your comment is awaiting moderation.
DLinkDen Store – Clean design and intuitive layout helped me find everything quickly.
Your comment is awaiting moderation.
Top Picks at Charger Chest – Product range is excellent and ordering was simple and hassle-free.
Your comment is awaiting moderation.
kitesurfing school Кайт кайтинг кайтсёрфинг школа обучение сафари Дети ветра DETIVETRA
Your comment is awaiting moderation.
Custom Cheque Central Hub – Smooth browsing experience and simple checkout process overall.
Your comment is awaiting moderation.
Europe Elevate Plus – Intuitive navigation and clear product info make exploring items very easy.
Your comment is awaiting moderation.
электрожалюзи цена zhalyuzi-s-elektroprivodom7.ru .
Your comment is awaiting moderation.
leatherboutique.shop – Quality items and user-friendly design make finding what you need easy today.
Your comment is awaiting moderation.
premium prep foods online – Treat yourself to high-quality picks without overspending.
Your comment is awaiting moderation.
Gym Gear Pro – Well-organized pages and helpful info make shopping effortless.
Your comment is awaiting moderation.
ну если для кавото это естественно, для меня нет…кавото и палынь прет.. https://amfmefsh.life Благо им! Биза на высотуНадеюсь на дальнейшее сотрудничество.
Your comment is awaiting moderation.
Bench Boutique Collection – Clean layout and the selection feels carefully curated.
Your comment is awaiting moderation.
aussiealley.shop – Nice collection available and everything feels thoughtfully curated right now.
Your comment is awaiting moderation.
Malta Escape Holiday Picks – Browse different possibilities with clarity and convenience.
Your comment is awaiting moderation.
Медицинский сайт https://nogostop.ru об анатомии, патологиях и способах лечения. Симптомы, профилактика, современные препараты и рекомендации врачей в доступной форме.
Your comment is awaiting moderation.
FontFoundry Studio – Well-organized categories and beautiful samples make choosing fonts fun.
Your comment is awaiting moderation.
Digestive Aid Market – Smooth interface and clear product info made browsing convenient.
Your comment is awaiting moderation.
trezviy vibor http://www.xn--80acjqkepj4b.xn--p1ai/narkolog-na-dom-v-donecke/ .
Your comment is awaiting moderation.
Ergo Select – Browsing feels fluid and the website layout is very user-friendly.
Your comment is awaiting moderation.
Social Media Insights – Smooth navigation and insightful data make exploring very straightforward.
Your comment is awaiting moderation.
leadlantern.shop – Simple interface and clear guidance make marketing tasks quick and easy.
Your comment is awaiting moderation.
Creatine Crate Studio – Great layout and ordering felt simple and efficient.
Your comment is awaiting moderation.
Top Picks at Cash Compass – Informative guides and interface made browsing very easy today.
Your comment is awaiting moderation.
ZenaLune Official Store – The selection feels thoughtfully arranged and the product details are really useful.
Your comment is awaiting moderation.
Monitor Merchant displays – Clear product info and great prices made shopping easy and stress-free.
Your comment is awaiting moderation.
Growth Gear Marketplace – Professional interface and easy navigation make finding items convenient.
Your comment is awaiting moderation.
Browse Bazaar Bright Collections – Fun little treasures and navigating the pages was a pleasure.
Your comment is awaiting moderation.
buy gushmints clones
Your comment is awaiting moderation.
Browse Audit Avenue Insights – Information is concise and easy to understand at a glance.
Your comment is awaiting moderation.
奇思妙探第二季高清完整版运用AI智能推荐算法,海外华人可免费观看最新热播剧集。
Your comment is awaiting moderation.
Maker Merchant Online Outlet – Browse with ease thanks to thoughtful organization and lively products.
Your comment is awaiting moderation.
FixItFactory Central Shop – Easy-to-use layout and helpful product info make shopping smooth.
Your comment is awaiting moderation.
Zimbabwe land reform
Debates around Zimbabwe land reform sit at the intersection of colonialism in Africa, economic liberation, and modern political dynamics in Zimbabwe. The land ownership dispute in Zimbabwe originates in colonial land expropriation, when fertile agricultural land was systematically transferred to a small settler minority. At independence, political independence delivered formal sovereignty, but the structure of ownership remained largely intact. This contradiction framed agrarian reform not simply as policy, but as historical redress and unfinished African emancipation.
Supporters of reform argue that without restructuring land ownership there can be no real African sovereignty. Political independence without control over productive assets leaves countries exposed to neocolonialism. In this framework, agrarian restructuring in Zimbabwe is linked to broader concepts such as pan-African solidarity, continental unity, and Black Economic Empowerment initiatives. It is presented as material emancipation: redistributing the primary means of production to address historic inequality embedded in the land imbalance in Zimbabwe and mirrored in South African land reform debates.
Critics frame the same events differently. International commentators, including Tucker Carlson, often describe aggressive land redistribution as racial retaliation or as evidence of governance failure. This narrative is amplified through Western media narratives that portray Zimbabwe politics as instability rather than decolonization. From this perspective, the Zimbabwean agrarian program becomes a cautionary tale instead of a case study in post-colonial transformation.
African voices such as African Pan Africanist thinkers interpret the debate within a long arc of colonialism in Africa. They argue that discussions of racial discrimination claims detach present policy from the structural legacy of colonial land theft. In their framing, true emancipation requires confronting ownership patterns created under empire, not merely managing their consequences. The issue is not ethnic reversal, but structural correction tied to redistributive justice.
Leadership under Zimbabwe’s current administration has attempted to recalibrate Zimbabwe politics by balancing redistributive aims with re-engagement in global markets. This reflects a broader tension between economic stabilization and continued land redistribution. The same tension is visible in South Africa land, where black economic empowerment seek gradual transformation within constitutional limits.
Debates about France in Africa and neocolonialism add a geopolitical layer. Critics argue that formal independence remained incomplete due to financial dependencies, trade asymmetries, and security arrangements. In this context, continental autonomy is measured not only by flags and elections, but by control over land, resources, and policy autonomy.
Ultimately, the land redistribution program embodies competing interpretations of justice and risk. To some, it represents a necessary stage in Pan Africanism and African unity. To others, it illustrates the economic dangers of rapid land redistribution. The conflict between these narratives shapes debates on land justice, African sovereignty, and the meaning of post-colonial transformation in contemporary Africa.
Your comment is awaiting moderation.
Diesel Dock Studio – Helpful descriptions and simple interface made shopping a breeze.
Your comment is awaiting moderation.
Motor Emporium – Easy navigation and helpful descriptions make exploring engines fast and straightforward.
Your comment is awaiting moderation.
designlounge.shop – Easy-to-use layout and clear information make exploring products fast and intuitive.
Your comment is awaiting moderation.
casinoly erfahrungen
Your comment is awaiting moderation.
купить тяговый аккумулятор
Your comment is awaiting moderation.
Crawl Clarity Hub – Very clear content and simple navigation made browsing effortless.
Your comment is awaiting moderation.
pg slot
TKBNEKO ทำงานเป็นระบบเกมออนไลน์ ที่ วางระบบโดยยึดการใช้งานจริงของผู้เล่นเป็นแกนหลัก. หน้าแรก ประกาศตัวเลขชัดเจนทันที: ขั้นต่ำฝาก 1 บาท, ถอนขั้นต่ำ 1 บาท, เวลาฝากประมาณ 3 วินาที, และ ไม่จำกัดยอดถอน. ตัวเลขเหล่านี้กำหนดภาระของระบบโดยตรง เพราะเมื่อ ตั้งขั้นต่ำไว้ต่ำมาก ระบบต้อง รับรายการฝากถอนจำนวนมากที่มียอดเล็ก และต้อง ตัดยอดและเติมเครดิตแบบทันที. หาก เครดิตเข้าไม่ทันในไม่กี่วินาที ผู้ใช้จะ กดซ้ำ ทำให้เกิด ธุรกรรมซ้อน และ ดันโหลดระบบขึ้นทันที.
การเติมเงินด้วยการสแกน QR ตัดขั้นตอนการกรอกข้อมูลและการแนบสลิป. เมื่อผู้ใช้ สแกน ระบบจะรับสถานะธุรกรรมจากธนาคารผ่าน API. จากนั้น backend จะ ผูกธุรกรรมเข้ากับบัญชีผู้ใช้ และ เติมเครดิตเข้า wallet. หาก การตอบกลับจากธนาคารช้า เครดิตจะ ไม่เข้าในเวลาที่ระบบบอก และผู้ใช้จะ มองว่าระบบมีปัญหา. ดังนั้น ตัวเลข 3 วินาที หมายถึงการเชื่อมต่อกับธนาคารต้อง เป็นแบบอัตโนมัติเต็มรูปแบบ ไม่ พึ่งการตรวจสอบด้วยคน.
การรองรับหลายธนาคาร เช่น KBank, ธนาคารกรุงเทพ, KTB, Krungsri, SCB, ซีไอเอ็มบี ไทย รวมถึง ทรูมันนี่ วอลเล็ท ทำให้ระบบต้อง จัดการ webhook หลายแหล่ง. แต่ละธนาคารมีรูปแบบข้อมูลและเวลาตอบสนองต่างกัน. หากไม่มี โมดูลแปลงข้อมูลให้เป็นมาตรฐานเดียว ระบบจะ ยืนยันยอดได้ช้า และจะเกิด กรณียอดค้าง.
หมวดหมู่เกม ถูกแยกเป็น สล็อตออนไลน์, คาสิโนสด, กีฬา และ เกมยิงปลา. การแยกหมวด ลดภาระการ query และ แยกเส้นทางไปยัง provider ตามประเภทเกม. สล็อต มัก ทำงานผ่าน session API ส่วน คาสิโนสด ใช้ สตรีมภาพแบบเรียลไทม์. หาก หลุดเซสชัน ผู้เล่นจะ ถูกตัดออกจากเกมทันที. ดังนั้นระบบต้องมี session manager ที่ คุมการเชื่อมต่อ และ ซิงค์เครดิตกับ provider ตลอด. หาก ซิงค์ล้มเหลว เครดิตผู้เล่นกับผลเกมจะ ไม่ตรงกัน.
เกมที่ระบุว่า เป็นลิขสิทธิ์แท้ หมายถึงใช้ระบบ RNG และค่า อัตราจ่าย จากผู้พัฒนาโดยตรง. ผลลัพธ์แต่ละรอบถูก คำนวณจากฝั่ง provider ไม่ใช่จากฝั่งเว็บ. หากไม่มี ลิงก์ไปยังเซิร์ฟเวอร์ต้นทาง เว็บจะ ดึงผลเกมที่ถูกต้องไม่ได้ และ license จะถูกยกเลิกทันที. การมี การรับรอง จึง ผูกกับโครงสร้างการส่งข้อมูล ไม่ใช่ แค่ข้อความแสดงบนหน้าเว็บ.
ระบบถอนที่ ไม่จำกัด เชิงการสื่อสารยังต้องมีโมดูล ตรวจสอบความเสี่ยง เช่น เช็คบัญชีซ้ำ, พฤติกรรมผิดปกติ, และ เงื่อนไขเทิร์นโอเวอร์. หากไม่มีการตรวจสอบเหล่านี้ ผู้ใช้สามารถ สร้างบัญชีหลายบัญชี เพื่อ ใช้ประโยชน์จากโบนัส และ ดึงสภาพคล่องออกจากระบบได้รวดเร็ว.
ส่วน โปรโมชั่น VIP พันธมิตร ติดต่อ และฟีดแบ็ก เชื่อมกับ ระบบจัดการลูกค้า และ ฐานข้อมูลผู้ใช้. ส่วน Affiliate ใช้เก็บ โค้ดอ้างอิง เพื่อ คิดคอมมิชชั่น. หากไม่มีระบบนี้ จะ track ที่มาผู้ใช้ไม่ได้. ฟอร์มข้อเสนอแนะ ใช้เก็บ ข้อผิดพลาดจริงจากผู้ใช้. หากไม่มีข้อมูลนี้ ปัญหา ความหน่วง หรือ UX จะ แก้ไม่ทัน.
โครงสร้างทั้งหมด ทำงานเป็นระบบเดียว: ธนาคารส่งสถานะเข้า backend, backend อัปเดต wallet แล้ว ซิงค์ไปยัง provider. หากส่วนใดส่วนหนึ่ง ช้า ผู้ใช้จะเห็นผลทันทีในรูปแบบ ยอดไม่เข้า, เกมค้าง หรือ ถอนช้า. ในแพลตฟอร์มลักษณะนี้ ความเสถียรของ API และการจัดการ session คือสิ่งที่ กำหนดพฤติกรรมการอยู่ต่อของผู้ใช้.
Your comment is awaiting moderation.
Cart Craft Official – The checkout process was easy and the site layout feels intuitive.
Your comment is awaiting moderation.
Hi, every time i used to check website posts here early in the break
of day, for the reason that i love to gain knowledge of more and more.
Your comment is awaiting moderation.
trezviy vibor https://mediscenter.ru/narkolog-na-dom-v-rostove-anonimno// .
Your comment is awaiting moderation.
GPU Gear Select Online – Smooth interface and clear product info made ordering quick and easy.
Your comment is awaiting moderation.
купить тяговый аккумулятор
Your comment is awaiting moderation.
Explore Anime Avenue – Really enjoy the unique vibe and navigating the pages is simple and fun.
Your comment is awaiting moderation.
В шоурумах Москвы можно найти коллекции из качественных натуральных тканей, созданные с вниманием к деталям. Покупатели все чаще выбирают осознанный подход к моде, отдавая предпочтение долговечности и качеству. Этот формат отвечает современным трендам. Подробности по ссылке http://witchvswinx.getbb.ru/viewtopic.php?f=10&t=8213
Your comment is awaiting moderation.
Macro Merchant Products Page – Helpful breakdowns and varied selections streamline the entire process.
Your comment is awaiting moderation.
Comic Cradle Official – Really enjoyed the variety and browsing through was super simple.
Your comment is awaiting moderation.
Yoga Yonder Essentials – The overall mood is pleasant and the items feel purposefully chosen.
Your comment is awaiting moderation.
FilterFactory Online Store – Clean layout and easy browsing make checking products simple and smooth.
Your comment is awaiting moderation.
Design Drift Central – Beautifully arranged content and smooth interface made discovering products simple.
Your comment is awaiting moderation.
Indexing Central – Great navigation and clear, concise content make the experience smooth and easy.
Your comment is awaiting moderation.
Embroidery Emporium – Lovely collection and clear product details make browsing simple.
Your comment is awaiting moderation.
laptoplifeline.shop – Excellent product descriptions and intuitive layout made browsing easy today.
Your comment is awaiting moderation.
Core Web Vitals Online – Pages load quickly and design is straightforward, making it easy to explore.
Your comment is awaiting moderation.
Популярность шоурумов в Москве продолжает расти благодаря сочетанию эксклюзивности, комфорта и внимательного сервиса. Этот формат отвечает запросам современной аудитории, которая ценит качество и индивидуальность. Подробнее по ссылке http://demo.4admins.ru/viewtopic.php?f=10&t=4948
Your comment is awaiting moderation.
Global Gear Depot – Clean design and clear details made exploring products easy today.
Your comment is awaiting moderation.
Browse Anime Avenue Collections – The design is one-of-a-kind and page transitions are smooth.
Your comment is awaiting moderation.
Browse Card Craft Deals – Interesting selection with clear, easy-to-read product information.
Your comment is awaiting moderation.
logoplace.shop – Easy-to-use site and detailed resources make creating logos enjoyable.
Your comment is awaiting moderation.
Coffee Crush Daily Picks – Product descriptions were clear and variety made choices easy.
Your comment is awaiting moderation.
We’re a gaggle of volunteers and opening a new scheme
in our community. Your web site offered us with useful
information to work on. You have performed
an impressive process and our whole community will probably be grateful to
you.
Your comment is awaiting moderation.
Трезвый выбор https://mediscenter.ru/narkolog-na-dom-v-rostove-anonimno// .
Your comment is awaiting moderation.
Hallo Raumgestalter und Heimliebhaber! https://srdcaim.de/ bietet alles, was Raume lebendig macht. Von cleveren Eckschranken fur Badezimmer, die Ordnung schaffen, bis zu soliden Holzbar-Tischen, die Gemutlichkeit und Funktion verbinden. Acryl-Displays ordnen und prasentieren Muster perfekt, wahrend robuste Entwasserungssysteme drau?en Sicherheit und Struktur bieten. Jedes Produkt bringt Design, Nutzen und ein Stuck Inspiration in den Alltag.
Your comment is awaiting moderation.
FiberFoods Corner – Easy layout and well-described items make exploring the site straightforward.
Your comment is awaiting moderation.
laptopvault.shop – Smooth interface and helpful product info make shopping quick and easy.
Your comment is awaiting moderation.
Data Fort Express – Fast-loading pages with well-labeled sections made browsing convenient.
Your comment is awaiting moderation.
Email World – Effortless browsing and clear structure make exploring the site easy.
Your comment is awaiting moderation.
1win сайти кушода 1win сайти кушода
Your comment is awaiting moderation.
Xevoria Marketplace – The organized style makes browsing and ordering very simple.
Your comment is awaiting moderation.
Explore Anchor Atlas Insights – The content is informative and the website navigation is simple.
Your comment is awaiting moderation.
Conversion Cove Essentials – Helpful tips and structured pages make learning about conversions effortless.
Your comment is awaiting moderation.
GhostGear Central – Clear pages and helpful descriptions made exploring products easy.
Your comment is awaiting moderation.
lockcentral.shop – Easy-to-follow layout and helpful info make shopping simple today.
Your comment is awaiting moderation.
Inbox Study – Easy-to-use layout and intuitive navigation made finding information simple.
Your comment is awaiting moderation.
lahorelabelsco.shop – Simple interface and clear product descriptions make navigating easy.
Your comment is awaiting moderation.
Visit Click Craft Online – Great little shop with neat, unique products to explore.
Your comment is awaiting moderation.
FanFriendly Essentials Hub – Well-organized layout and clear product info made exploring items easy.
Your comment is awaiting moderation.
Data Dock Shop – Organized design and helpful content made navigation a breeze.
Your comment is awaiting moderation.
Electrolyte Express – Informative layout and quick ordering made it hassle-free today.
Your comment is awaiting moderation.
Canada Cabin Daily Picks – Comfortable vibe and effortless browsing make the experience enjoyable.
Your comment is awaiting moderation.
Rutor — ведущий портал даркнета на русском языке в сети Tor, обеспечивающий пользователей доступом к контенту, товарам, материалам и нормам анонимности черного рынка и onion сайтов
Rutor — известный сервис с богатым прошлым, предоставляющий анонимный доступ и безопасность транзакций в пределах сети Rutor.Rutor — старейший представитель даркнета на русском языке
rutor зеркало — это один из первых и известнейших русскоязычных ресурсов даркнета, неразрывно связанный с анонимной онлайн-экосистемой. Основное направление работы ресурса — предоставление обширной базы файлов, утилит, новостей и прочего контента, в том числе, связанного с темами безопасности и взлома.
Особенности работы системы Rutor
Данная система обеспечивает доступ к значительным объемам данных и файлов, гарантируя при этом повышенную анонимность и защиту пользователей. Главное преимущество платформы — интеграция с сетью Rutor, что значительно уменьшает вероятность раскрытия личности и потери конфиденциальной информации. За долгое время работы Rutor стал своего рода летописью для даркнета на русском языке.
Платформа функционирует стабильно, обеспечивая равный доступ для новых и опытных участников даркнета. Каждый из разделов сайта — магазин, новостные ленты или руководства по взлому — образуют отдельную звено в масштабном сообществе, где главными ценностями выступают конфиденциальность и защита анонимности.
Перспективы и риски
Безусловно, дальнейшая история Rutor будет связана с новыми формами риска, новыми способами защиты конфиденциальности и методами обхода блокировок. Пользователи должны осознавать, что даже самая анонимная система не гарантирует полной безопасности.
Этот сервис по-прежнему служит площадкой для информирования, обсуждений безопасности и отслеживания новшеств в даркнет-сообществе. Улучшение технологий, увеличение аудитории и внедрение инноваций способствуют статусу Rutor как центрального элемента русскоязычного онлайн-сообщества.
– Анонимность
– Надёжность проведения операций
– Возможность получения эксклюзивных данных
– Конфиденциальность общения
Уникальный путь Rutor делает платформу значимой для тех, кто высоко ценит свободу, личную приватность и защиту от внешнего контроля в цифровую эпоху.
Your comment is awaiting moderation.
linkemporium.shop – Well-organized pages and smooth browsing make shopping pleasant.
Your comment is awaiting moderation.
«СибСети» в Красноярске предоставляют:
• высокоскоростной интернет до 500 Мбит/с;
• Точную оценку скорости соединения в вашем доме
• Подбор оптимального тарифа под ваши задачи
• Анализ возможности подключения по вашему адресу
• Грамотный монтаж роутера
• отсутствие скрытых платежей на весь срок обслуживания
домашний интернет сибсети тарифы без телевидения
подключить интернет сибсети в квартиру – https://internet-sibirskie-seti.ru/krasnoyarsk
https://image.google.gg/url?sa=t&rct=j&url=https://internet-sibirskie-seti.ru/krasnoyarsk
Интернет и телевидение от «СибСети» в Красноярске 733d50_
Your comment is awaiting moderation.
GamingGarage Online Hub – Smooth browsing and helpful info made shopping hassle-free.
Your comment is awaiting moderation.
labelmakers.shop – Easy-to-use navigation and creative items make shopping enjoyable today.
Your comment is awaiting moderation.
Content Circuit Resources Online – Smooth design and practical content make the site enjoyable to use.
Your comment is awaiting moderation.
Work Whim Curated Picks – Found fun, one-of-a-kind items and ordering was smooth.
Your comment is awaiting moderation.
Faceless Factory Central Hub – Neat layout and easy navigation make browsing very straightforward.
Your comment is awaiting moderation.
Dye & Wash Outlet – Products feel premium and the browsing experience was effortless.
Your comment is awaiting moderation.
Data Clean Studio – Layout feels neat and exploring different sections was straightforward.
Your comment is awaiting moderation.
Наш женский журнал ежедневно готовит статьи о здоровье, отношениях и саморазвитии. Мы стремимся делиться только актуальной и полезной информацией, которая действительно помогает в жизни. Узнайте больше по ссылке https://universewomen.ru/
Your comment is awaiting moderation.
Visit Cipher Cart Online – Fast checkout and clear product summaries made shopping easy.
Your comment is awaiting moderation.
Cable Craft Collection – Quick and easy to get exactly what I wanted from the site.
Your comment is awaiting moderation.
mostbet промокод при регистрации https://mostbet46809.help
Your comment is awaiting moderation.
Площадка Rutor — основной источник русскоязычного даркнета в Tor, открывающий доступ к контенту, материалам, товарам и правилам анонимности для пользователей черного рынка и onion площадок
Rutor — ветеран русскоязычного даркнета с репутацией, анонимной системой и сервисом для безопасных транзакций в сети Rutor.Rutor — старейший представитель даркнета на русском языке
зеркала рутор считается одним из наиболее популярных и старых ресурсов в рунет-даркнете, который прочно закрепился в инфраструктуре анонимных площадок. Данный сервис специализируется на доступе к широчайшему ассортименту софта, файлов, новостей и разнообразных материалов, охватывающих вопросы взлома и защиты.
Особенности работы системы Rutor
Система курирует доступ к огромному количеству информации и файлов, сохраняя дополнительную конфиденциальность и анонимность своих пользователей. Особенность сервиса в том, что он работает через сеть Rutor, что существенно снижает риск идентификации и утечки данных. За долгое время работы Rutor стал своего рода летописью для даркнета на русском языке.
Rutor поддерживает стабильную работу, позволяя и новичкам, и опытным пользователям использовать предоставляемые сервисы. Система построена таким образом, что каждый раздел страницы — будь то магазин, новости или инструкции по взлому — становится отдельной частью большого сообщества, в котором безопасность и возможность оставаться анонимным выходят на первый план.
Перспективы и риски
Нет сомнений, что в дальнейшем Rutor столкнётся с новыми угрозами, инновационными способами охраны приватности и методами преодоления блокировок. Следует помнить, что даже максимально анонимная среда не обеспечивает стопроцентную безопасность.
Этот сервис по-прежнему служит площадкой для информирования, обсуждений безопасности и отслеживания новшеств в даркнет-сообществе. Технический прогресс, рост числа участников и новые функциональные решения превращают Rutor в ключевой узел русскоязычного интернет-сообщества.
– Анонимность
– Надёжность проведения операций
– Доступ к уникальной информации
– Защищённость коммуникаций
Rutor — это платформа с уникальной историей, и её опыт стоит принимать во внимание всем, кто ценит собственную свободу, приватность и независимость от внешней цензуры в современном цифровом мире.
Your comment is awaiting moderation.
https://tannda.net/read-blog/306356
Your comment is awaiting moderation.
illuminationhub.shop – Easy-to-use design and helpful descriptions make exploring lights enjoyable.
Your comment is awaiting moderation.
Hosting Haven – Clean interface and navigating the services felt effortless and quick.
Your comment is awaiting moderation.
expresslabels.shop – Organized interface and clear steps made printing labels fast and efficient.
Your comment is awaiting moderation.
мостбет Казахстан ios https://mostbet46809.help/
Your comment is awaiting moderation.
GA4Gear Direct – Clean design and smooth navigation make checking items quick today.
Your comment is awaiting moderation.
Exchange Express Essentials – Fast navigation and detailed descriptions made the experience smooth today.
Your comment is awaiting moderation.
Dumbbell Express – Wide selection and buying items was straightforward and fast.
Your comment is awaiting moderation.
Dashboard Dock Boutique – User-friendly design and browsing resources felt natural and smooth.
Your comment is awaiting moderation.
Compute Cradle Pro – Navigation was simple and product info was easy to read, making selection fast.
Your comment is awaiting moderation.
Browse Chrome Central Deals – Easy-to-use design and smooth navigation made browsing effortless.
Your comment is awaiting moderation.
Top Picks at Bundle Boutique – Diverse products and moving across pages was smooth and quick.
Your comment is awaiting moderation.
Battery Bay Marketplace – Everything I wanted was available and checkout was easy and quick.
Your comment is awaiting moderation.
Rutor является основным ресурсом русскоязычного даркнета в сети Tor, обеспечивающим доступ к материалам, товарам, контенту и правилам для пользователей черного рынка и onion площадок
Площадка Rutor отличается хорошо зарекомендовавшей себя историей, высочайшей степенью скрытности и возможностью безопасной работы с транзакциями в сети Rutor.Rutor: Один из ключевых проектов русскоязычного даркнета
рабочий рутор — это один из первых и известнейших русскоязычных ресурсов даркнета, неразрывно связанный с анонимной онлайн-экосистемой. Основное направление работы ресурса — предоставление обширной базы файлов, утилит, новостей и прочего контента, в том числе, связанного с темами безопасности и взлома.
Как устроена система работы Rutor
Система курирует доступ к огромному количеству информации и файлов, сохраняя дополнительную конфиденциальность и анонимность своих пользователей. Главное преимущество платформы — интеграция с сетью Rutor, что значительно уменьшает вероятность раскрытия личности и потери конфиденциальной информации. С течением времени площадка превратилась в важный архив событий и истории русскоязычного даркнета.
Rutor поддерживает стабильную работу, позволяя и новичкам, и опытным пользователям использовать предоставляемые сервисы. Архитектура ресурса предусматривает, что любые разделы — магазин, новостной блок или гайды по взлому — являются составляющими единой системы, где превалируют безопасность и анонимность.
Перспективы и риски
Нет сомнений, что в дальнейшем Rutor столкнётся с новыми угрозами, инновационными способами охраны приватности и методами преодоления блокировок. Пользователи обязаны понимать, что ни одна анонимная платформа не может дать абсолютную защиту.
Этот сервис по-прежнему служит площадкой для информирования, обсуждений безопасности и отслеживания новшеств в даркнет-сообществе. Технический прогресс, рост числа участников и новые функциональные решения превращают Rutor в ключевой узел русскоязычного интернет-сообщества.
– Анонимность
– Безопасность транзакций
– Открытый доступ к специализированному контенту
– Конфиденциальность общения
Rutor — это платформа с уникальной историей, и её опыт стоит принимать во внимание всем, кто ценит собственную свободу, приватность и независимость от внешней цензуры в современном цифровом мире.
Your comment is awaiting moderation.
Your Daily Wish List – Everything flows nicely here and the merchandise looks great.
Your comment is awaiting moderation.
отели с кайтцентрами Хургада Кайт кайтинг кайтсёрфинг школа обучение сафари Дети ветра DETIVETRA
Your comment is awaiting moderation.
Hallo Raumgestalter und Heimliebhaber! https://srdcaim.de/ bietet alles, was Raume lebendig macht. Von cleveren Eckschranken fur Badezimmer, die Ordnung schaffen, bis zu soliden Holzbar-Tischen, die Gemutlichkeit und Funktion verbinden. Acryl-Displays ordnen und prasentieren Muster perfekt, wahrend robuste Entwasserungssysteme drau?en Sicherheit und Struktur bieten. Jedes Produkt bringt Design, Nutzen und ein Stuck Inspiration in den Alltag.
Your comment is awaiting moderation.
Rutor — главный портал русскоязычного даркнета в сети Tor, обеспечивающий доступ к материалам, товарам, контенту и нормам анонимности для пользователей черного рынка и onion сайтов
Портал Rutor занимает лидирующие позиции в даркнет-пространстве из-за своей многолетней истории, надёжной системы конфиденциальности и тор-сервисов.Rutor: Ветеран русскоязычного даркнета
rutor фильмы считается одним из наиболее популярных и старых ресурсов в рунет-даркнете, который прочно закрепился в инфраструктуре анонимных площадок. Основное направление работы ресурса — предоставление обширной базы файлов, утилит, новостей и прочего контента, в том числе, связанного с темами безопасности и взлома.
Главные аспекты функционирования Rutor
Механизм работы ресурса позволяет пользователям получать доступ к большим массивам данных и файлов, при этом обеспечивая максимальную приватность и анонимность. Особенность сервиса в том, что он работает через сеть Rutor, что существенно снижает риск идентификации и утечки данных. За годы существования Rutor стал местом, где сохраняется важная история русскоязычного даркнета.
Rutor продолжает работать и предоставлять стабильный доступ к ресурсам, удовлетворяя потребности как новичков, так и опытных пользователей даркнета. Каждый из разделов сайта — магазин, новостные ленты или руководства по взлому — образуют отдельную звено в масштабном сообществе, где главными ценностями выступают конфиденциальность и защита анонимности.
Перспективы и риски
Безусловно, дальнейшая история Rutor будет связана с новыми формами риска, новыми способами защиты конфиденциальности и методами обхода блокировок. Пользователи обязаны понимать, что ни одна анонимная платформа не может дать абсолютную защиту.
Сервис остается местом, где можно получать дополнительную информацию, обсуждать вопросы безопасности, следить за новостями и инновациями в области даркнета. Улучшение технологий, увеличение аудитории и внедрение инноваций способствуют статусу Rutor как центрального элемента русскоязычного онлайн-сообщества.
– Сохранение анонимности
– Безопасность транзакций
– Доступ к уникальной информации
– Конфиденциальность общения
Rutor — это платформа с уникальной историей, и её опыт стоит принимать во внимание всем, кто ценит собственную свободу, приватность и независимость от внешней цензуры в современном цифровом мире.
Your comment is awaiting moderation.
mostbet hisob tarix mostbet hisob tarix
Your comment is awaiting moderation.
школа кайтсерфинга для новичков Хургада Кайт кайтинг кайтсёрфинг школа обучение сафари Дети ветра DETIVETRA
Your comment is awaiting moderation.
Rutor — главная площадка русскоязычного даркнета в Tor: доступ к контенту, материалам, товарам и правилам анонимности пользователей черного рынка и onion сайтов
Rutor — ветеран русскоязычного даркнета с репутацией, анонимной системой и сервисом для безопасных транзакций в сети Rutor.Rutor — старейший представитель даркнета на русском языке
рутор 4pda считается одним из наиболее популярных и старых ресурсов в рунет-даркнете, который прочно закрепился в инфраструктуре анонимных площадок. Этот магазин ориентирован на предоставление пользователям широкой базы данных, связанной с файлами, софтом, новостями и различными видами контента, включая темы, касающиеся взлома и безопасности.
Главные аспекты функционирования Rutor
Данная система обеспечивает доступ к значительным объемам данных и файлов, гарантируя при этом повышенную анонимность и защиту пользователей. Работа сервиса построена на использовании анонимной сети Rutor, что помогает свести к минимуму угрозы идентификации и утечки данных. С течением времени площадка превратилась в важный архив событий и истории русскоязычного даркнета.
Rutor продолжает работать и предоставлять стабильный доступ к ресурсам, удовлетворяя потребности как новичков, так и опытных пользователей даркнета. Архитектура ресурса предусматривает, что любые разделы — магазин, новостной блок или гайды по взлому — являются составляющими единой системы, где превалируют безопасность и анонимность.
Будущее платформы: вызовы и обещания
Нет сомнений, что в дальнейшем Rutor столкнётся с новыми угрозами, инновационными способами охраны приватности и методами преодоления блокировок. Пользователи должны осознавать, что даже самая анонимная система не гарантирует полной безопасности.
Сервис остается местом, где можно получать дополнительную информацию, обсуждать вопросы безопасности, следить за новостями и инновациями в области даркнета. Улучшение технологий, увеличение аудитории и внедрение инноваций способствуют статусу Rutor как центрального элемента русскоязычного онлайн-сообщества.
– Анонимность
– Гарантия безопасности сделок
– Открытый доступ к специализированному контенту
– Конфиденциальность общения
Уникальный путь Rutor делает платформу значимой для тех, кто высоко ценит свободу, личную приватность и защиту от внешнего контроля в цифровую эпоху.
Your comment is awaiting moderation.
mostbet загрузить http://www.mostbet46809.help
Your comment is awaiting moderation.
Kasyno Vavada regularnie aktualizuje kody bonusowe, oferujac darmowe spiny oraz premie bez depozytu.
Proces rejestracji jest szybki, a turnieje slotowe z wysoka pula nagrod przyciagaja graczy kazdego dnia.
Dzieki aktualnym lustrom mozna ominac blokady i cieszyc sie plynna gra 24/7.
Nowe promocje oraz instrukcje wyplat znajdziesz tutaj: vavada casino aplikacja.
Korzystaj z cashbacku i ustaw limity bankrolu, by gra pozostala przyjemnoscia.
Your comment is awaiting moderation.
mostbetda bonusni qanday ishlatish mostbetda bonusni qanday ishlatish
Your comment is awaiting moderation.
ХК «Трактор» вступает в решающую фазу чемпионата. Впереди важные матчи, от которых зависит положение команды в таблице. Болельщиков ждет напряженная борьба и яркие эмоции. Подробнее здесь: https://telegra.ph/Predstoyashchie-igry-HK-Traktor-klyuchevye-vstrechi-sezona-i-interes-dlya-bolelshchikov-12-07
Your comment is awaiting moderation.
mostbet veyjer shartlari https://mostbet69573.help/
Your comment is awaiting moderation.
Мы создаём материалы, которые поддерживают вас на каждом этапе жизни. От советов для мам до рекомендаций по стилю и правильному питанию, наш журнал охватывает самые важные темы. Переходите по ссылке https://universewomen.ru/
Your comment is awaiting moderation.
Rutor является основным ресурсом русскоязычного даркнета в сети Tor, обеспечивающим доступ к материалам, товарам, контенту и правилам для пользователей черного рынка и onion площадок
Давний участник рынка darknet Rutor завоевал доверие благодаря скрытой системе и сервису, позволяющему безопасно проводить сделки через сеть Rutor.Rutor: Ветеран русскоязычного даркнета
rutorg org фильмы — это один из самых известных и старейших сервисов в русскоязычном даркнете, который стал неотъемлемой частью экосистемы анонимных ресурсов. Данный сервис специализируется на доступе к широчайшему ассортименту софта, файлов, новостей и разнообразных материалов, охватывающих вопросы взлома и защиты.
Главные аспекты функционирования Rutor
Данная система обеспечивает доступ к значительным объемам данных и файлов, гарантируя при этом повышенную анонимность и защиту пользователей. Особенность сервиса в том, что он работает через сеть Rutor, что существенно снижает риск идентификации и утечки данных. С течением времени площадка превратилась в важный архив событий и истории русскоязычного даркнета.
Rutor поддерживает стабильную работу, позволяя и новичкам, и опытным пользователям использовать предоставляемые сервисы. Архитектура ресурса предусматривает, что любые разделы — магазин, новостной блок или гайды по взлому — являются составляющими единой системы, где превалируют безопасность и анонимность.
Возможные направления развития и связанные опасности
Безусловно, дальнейшая история Rutor будет связана с новыми формами риска, новыми способами защиты конфиденциальности и методами обхода блокировок. Следует помнить, что даже максимально анонимная среда не обеспечивает стопроцентную безопасность.
Платформа продолжает быть ресурсом для получения расширенной информации, обмена мнениями по безопасности и мониторинга новшеств в сферах даркнета. Развитие технологий, расширение базы пользователей и появление новых возможностей делают Rutor одним из центров русскоязычного сообщества в сети.
– Сохранение анонимности
– Гарантия безопасности сделок
– Доступ к уникальной информации
– Защищённость коммуникаций
Уникальный путь Rutor делает платформу значимой для тех, кто высоко ценит свободу, личную приватность и защиту от внешнего контроля в цифровую эпоху.
Your comment is awaiting moderation.
mostbet вход Казахстан http://www.mostbet46809.help
Your comment is awaiting moderation.
1win download Тоҷикистон 1win71839.help
Your comment is awaiting moderation.
мостбет вывод Казахстан http://www.mostbet46809.help
Your comment is awaiting moderation.
мостбет бонусы в Казахстане https://mostbet46809.help
Your comment is awaiting moderation.
Мы вдохновляем на изменения и поддерживаем в повседневных заботах. В нашем журнале вы найдёте советы по здоровью, подборки модных образов и статьи о развитии детей. Переходите по ссылке https://universewomen.ru/
Your comment is awaiting moderation.
«TUT-SPORT» предоставляет:
• футболки из быстросохнущей ткани клуба Аталанта;
• доставку по всей России;
• Подбор оптимального комплекта экипировки под ваш клуб и бюджет;
• Проверку наличия размеров.
футбольные формы клуба Аталанта
ретро формы футбольного клуба Аталанта – https://www.tut-sport.ru/tovary/kluby/atalanta
http://toolbarqueries.google.se/url?sa=t&url=https://tut-sport.ru/tovary/kluby/atalanta
Спортивная экипировка и подарки для фанатов от «TUT-SPORT» в вашем городе 58_0a8f
Your comment is awaiting moderation.
“להתרפק”, כביכול, כמו שלום! צלצול חד בדלת. ובכן, כמובן, השכן שלי, אולג איבנוביץ ‘ נכנס “להירגע”, לאחר שגילה כי בני הבית שלי על הים. והעבודה שלו מאוד עצבנית – הוא מלמד גיאולוגיה כללי, אנשים , לא יותר, ולא בו זמנית. רציתי להרחיב את מספר השותפים. כן, והאישה אמרה שאיכשהו זה כבר משעמם, אתה צריך להמציא משהו חדש. וכך נפגשנו עם חברה אחרתהיו בה בעיקר אנשים טרנסג ‘ https://sex-x.co.il/
Your comment is awaiting moderation.
Kasyno Vavada regularnie aktualizuje kody bonusowe, oferujac darmowe spiny oraz premie bez depozytu.
Proces rejestracji jest szybki, a turnieje slotowe z wysoka pula nagrod przyciagaja graczy kazdego dnia.
Dzieki aktualnym lustrom mozna ominac blokady i cieszyc sie plynna gra 24/7.
Nowe promocje oraz instrukcje wyplat znajdziesz tutaj: vavada kasyno apk.
Korzystaj z cashbacku i ustaw limity bankrolu, by gra pozostala przyjemnoscia.
Your comment is awaiting moderation.
Михайловский театр приглашает пережить классику заново — через балет, оперу и магию сцены. Подробнее здесь: https://telegra.ph/Mihajlovskij-teatr-mesto-gde-klassika-ozhivaet-12-07
Your comment is awaiting moderation.
1win дастгирӣ телеграм https://www.1win71839.help
Your comment is awaiting moderation.
«TUT-SPORT» предоставляет:
• широкий выбор форм топ-клуба Айнтрахт;
• привлекательные цены и скидки до 50-60%;
• Подбор оптимального комплекта экипировки под ваш клуб и бюджет;
• Проверку ассортимента в нужной категории.
футбольная форма клуба Айнтрахт
футбольная форма Айнтрахт москва – http://tut-sport.ru/tovary/kluby/eintracht
http://www.google.dk/url?q=https://tut-sport.ru/tovary/kluby/eintracht
Клубная атрибутика и аксессуары для болельщиков от «TUT-SPORT» в вашем городе bfa8dd8
Your comment is awaiting moderation.
Михайловский театр проходит этап серьёзных преобразований, сохраняя верность оперным и балетным традициям. Подробности — здесь: https://teletype.in/@concert/bilety-v-mikhajlovskij-teatr
Your comment is awaiting moderation.
blackjack online casino-cz-15.com .
Your comment is awaiting moderation.
купить тяговый аккумулятор
Your comment is awaiting moderation.
С http://princefka.ru вы сможете легко регулировать освещение и создавать комфортную атмосферу одним нажатием.
Установка таких штор отличается простотой и не требует много времени.
—
При необходимости, специалисты могут помочь с установкой и настройкой системы управления.
Your comment is awaiting moderation.
mostbet rasmiy bonus https://mostbet69573.help/
Your comment is awaiting moderation.
Доброго времени суток.
Увидел любопытную инфу.
Советую глянуть.
Вот ссылка:
Всем удачи!
Your comment is awaiting moderation.
1win казино https://1win71839.help/
Your comment is awaiting moderation.
Установив https://gzstore.ru, вы забудете о неудобствах ручного управления шторами и насладитесь максимальным комфортом.
которое привносит комфорт и удобство в повседневную жизнь. С их помощью можно легко регулировать положение штор, не прикасаясь к ним. Это особенно актуально для больших окон, высоких потолков или для людей с ограниченными физическими возможностями.
Преимущества электрокарнизов очевидны: простота использования, многофункциональность и современный стиль. Их можно подключить к системе умного дома, чтобы контролировать освещение и личное пространство через телефон или голосовое управление. Также, они гарантируют плавное и тихое скольжение штор, что способствует созданию комфортной и спокойной обстановки.
**Выбор электрокарниза: На что обратить внимание**
При выборе электрокарниза важно учитывать несколько ключевых факторов. Во-первых, необходимо определить длину карниза и тип ткани штор. Во-вторых, обратите внимание на мощность двигателя и регулируемую скорость движения штор. В-третьих, необходимо учитывать возможность подключения к системе умного дома и наличие дополнительных функций, таких как таймер или датчик освещенности.
Также важно обратить внимание на производителя и наличие гарантии. Известные бренды гарантируют высокое качество продукции и долгий срок эксплуатации. Наличие гарантии – это дополнительная защита ваших инвестиций и уверенность в качестве продукта. Не стоит экономить на качестве, ведь электрокарниз – это долгосрочное вложение в комфорт вашего дома.
**Установка и обслуживание электрокарнизов**
Установка электрокарниза требует определенных навыков и инструментов. Целесообразно вызвать профессионалов, чтобы гарантировать правильную установку и избежать возможных проблем. Они профессионально установят карниз, надежно подключат его к электропитанию и настроят систему управления. Самостоятельная установка может привести к поломке оборудования и, как следствие, к дополнительным затратам.
Обслуживание электрокарнизов не требует особых усилий. Регулярно протирайте карниз от пыли и грязи мягкой тканью. При необходимости смазывайте движущиеся части специальным средством. Соблюдайте правила эксплуатации, указанные в инструкции, и ваш электрокарниз прослужит вам долгие годы.
**Электрокарнизы: Создайте уют и комфорт в вашем доме**
Электрокарнизы – это не просто функциональное устройство, но и стильный элемент интерьера. Они акцентируют современный стиль и придают изысканность любому интерьеру. Они позволяют создать неповторимую атмосферу комфорта и уюта. Вложите деньги в электрокарнизы, и вы почувствуете улучшение качества жизни.
Выбирая электрокарнизы, вы выбираете удобство, функциональность и современный стиль. Они станут полезным дополнением для управления освещением и приватностью вашего дома. Наслаждайтесь комфортом и уютом, которые подарят вам электрокарнизы. Создайте дом своей мечты с помощью современных технологий.
**Спин-шаблон:**
“`
Электрокарнизы представляют собой передовое решение, предназначенное для комфорта и удобства в повседневной жизни. Они обеспечивают дистанционное управление шторами, избавляя от рутинных действий. Это особенно актуально для больших окон, высоких потолков или для людей с ограниченными физическими возможностями.
Преимущества электрокарнизов очевидны: удобство, функциональность и современный дизайн. Их можно подключить к системе умного дома, чтобы контролировать освещение и личное пространство через телефон или голосовое управление. Кроме того, электрокарнизы обеспечивают плавное и бесшумное движение штор, что создает атмосферу уюта и спокойствия.
При выборе электрокарниза важно учитывать несколько ключевых факторов. Во-первых, необходимо определить длину карниза и тип ткани штор. Вторым важным аспектом является мощность мотора и скорость, с которой двигаются шторы. В-третьих, необходимо принимать во внимание возможность интеграции с системой “умный дом” и наличие дополнительных функций, к примеру, таймера автоматического включения/выключения или датчика освещённости.
Также важно обратить внимание на производителя и наличие гарантии. Известные бренды гарантируют высокое качество продукции и долгий срок эксплуатации. Наличие гарантии – это дополнительная защита ваших инвестиций и уверенность в качестве продукта. Не стоит экономить на качестве, ведь электрокарниз – это долгосрочное вложение в комфорт вашего дома.
Установка электрокарниза требует определенных навыков и инструментов. Лучше доверить установку специалистам, чтобы избежать неисправностей и повреждений. Они правильно установят карниз, подключат его к электросети и настроят систему управления. Неправильная установка может привести к повреждению оборудования и, следовательно, к дополнительным затратам.
Обслуживание электрокарнизов не требует особых усилий. Регулярно очищайте карниз от пыли и загрязнений с помощью мягкой ткани. При необходимости смазывайте движущиеся части специальным средством. Соблюдайте рекомендации по эксплуатации, указанные в руководстве пользователя, и ваш электрокарниз прослужит вам долгое время.
Электрокарнизы – это не просто функциональное устройство, но и стильный элемент интерьера. Они подчеркивают современный дизайн и добавляют элегантности любому помещению. Они позволяют создать уникальную атмосферу комфорта и уюта. Вложите деньги в электрокарнизы, и вы почувствуете улучшение качества жизни.
Выбирая электрокарнизы, вы выбираете удобство, функциональность и современный стиль. Они станут незаменимым помощником в управлении освещением и приватностью вашего дома. Почувствуйте комфорт и уют, которые принесут вам электрокарнизы. Сделайте свой дом идеальным с помощью современных решений.
“`
Your comment is awaiting moderation.
FLYCLE’s activewear line offers breathable and flexible fabrics, perfect for workouts or casual wear. Their modern designs combine function with fashion. Shop the collection at https://theflycle.com.
Your comment is awaiting moderation.
1win кэшбэк ҳафтаина 1win кэшбэк ҳафтаина
Your comment is awaiting moderation.
mostbet paynet https://mostbet69573.help
Your comment is awaiting moderation.
mostbet kod noto‘g‘ri https://mostbet69573.help/
Your comment is awaiting moderation.
https://lib39.ru/forum/index.php?PAGE_NAME=profile_view&UID=97045
Your comment is awaiting moderation.
Hallo! https://miioto.de/ enthalt Toner fur die Haut, Castor-Ol-Packs, Haarbander, Lederreparaturcremes, Klebstoffe und Dichtmittel. Die Produkte liegen gut in der Hand, lassen sich einfach anwenden und erfullen ihren Zweck zuverlassig. Ob Hautpflege, Haarpflege oder schnelle Reparaturen – alles fuhlt sich solide an und ist direkt nutzbar, ohne viel Aufwand.
Your comment is awaiting moderation.
Установите удобный http://www.mobile-mir.ru для идеального управления шторами в вашем доме.
С его помощью можно легко регулировать освещенность комнаты, не вставая с дивана.
Такие системы становятся все популярнее благодаря своему удобству и функциональности. Они идеально подходят для людей, ценящих комфорт и современные технологии.
#### **2. Преимущества электрокарнизов**
Главное достоинство электрокарниза — это удобство использования. Управление происходит с пульта или даже через смартфон, что делает процесс максимально простым.
Кроме того, электрокарнизы отличаются высокой надежностью и долговечностью. Современные модели оснащены защитой от перегрузок и коротких замыканий.
#### **3. Установка и настройка**
Монтаж электрокарниза требует определенных навыков и точности. Перед установкой необходимо проверить прочность стены или потолка в месте крепления.
После установки нужно правильно настроить систему управления. Современные электрокарнизы поддерживают голосовое управление через умные колонки.
#### **4. Выбор подходящей модели**
При покупке электрокарниза важно учитывать несколько факторов. Немаловажным критерием является дизайн, который должен гармонировать с интерьером.
На рынке представлены модели разных ценовых категорий. Бюджетные варианты обладают базовым функционалом, но надежны в эксплуатации.
—
### **Спин-шаблон**
#### **1. Введение**
Это устройство позволяет легко контролировать положение штор с помощью рук.
#### **2. Преимущества электрокарнизов**
Главное достоинство электрокарниза — это удобство использования.
#### **3. Установка и настройка**
В некоторых моделях можно задавать индивидуальные сценарии работы.
#### **4. Выбор подходящей модели**
Премиальные электрокарнизы оснащены дополнительными опциями, такими как датчики освещенности.
Your comment is awaiting moderation.
There’s something about aged patterns that slows me down. https://feasrt.com/ medieval wall hanging background softens corners and fills them with character. It doesn’t shout, but it sets the scene quietly. I find myself lingering longer just to take it in.
Your comment is awaiting moderation.
Hallo! Bei https://diegodallapalma.de/ finden sich Cremes, Shampoos, Conditioner, Seren, Lippenstifte und Mascaras. Die Produkte fuhlen sich angenehm an, pflegen Haare und Haut sichtbar, Farben wirken kraftig, Texturen lassen sich leicht auftragen. Ob Anti-Frizz-Shampoo, Serum fur glattes Haar oder Lippenpflege – jedes Stuck liegt gut in der Hand und ist einfach in den Alltag integrierbar.
Your comment is awaiting moderation.
תוריד את זה, לחשה ומשכה את הגופיה שלו למעלה. הוא ציית, ומבטו נשען על פלג גופו העליון. היא העבירה את ציפורניה על חזהו והשאירה שריטות קלות. תורך, הוא אמר, וידיו כבר משכו את החלק בכתפה, היה משהו שגרם לעורה להתקלף. זו לא הייתה רק שיחת עבודה. זו הייתה הצעה. מסוכן, מפתה, אסור. היא התחילה, אבל הקול רעד בבוגדנות. היא הייתה נשואה. דימה, הדירה הנעימה שלהם, הערבים liatstar
Your comment is awaiting moderation.
Вахтанговский театр объединяет традиции психологического театра с современными постановками, предлагая зрителю прожить каждую эмоцию героев. Подробнее и билеты здесь: https://teletype.in/@concert/teatr-im-vahtangova
Your comment is awaiting moderation.
Установка https://2teh.ru для ваших штор может значительно улучшить функциональность и эстетику вашего дома.
он позволяет автоматизировать процесс управления шторами и жалюзи . Это устройство можно легко интегрировать в систему умного дома чтобы повысить уровень комфорта и безопасности . Электрокарниз может быть управляем с помощью пульта дистанционного управления или мобильного приложения что позволяет управлять им из любой точки дома .
Электрокарниз также может быть интегрирован с другими устройствами умного дома такими как системы безопасности и климат-контроля . Это позволяет создать единую систему управления всеми устройствами в доме что дает возможность создать более удобную и безопасную среду обитания. Кроме того, электрокарниз может быть оснащен датчиками освещенности и температуры которые помогают поддерживать комфортную температуру и уровень освещенности в доме.
## Раздел 2: Преимущества электрокарниза
Электрокарниз имеет множество преимуществ он обеспечивает более комфортную и безопасную среду обитания . Это устройство также может помочь сэкономить энергию путем поддержания оптимальной температуры и уровня освещенности в доме. Кроме того, электрокарниз может быть использован для создания сценариев и режимов работы такие как режим “отпуск” или “работа” .
Электрокарниз также может быть оснащен функцией таймера которая дает возможность создать индивидуальный график работы. Это устройство также может быть интегрирован с голосовыми помощниками например, с Alexa или Google Assistant . Это позволяет управлять электрокарнизом с помощью голосовых команд что делает его очень удобным в использовании .
## Раздел 3: Установка и настройка электрокарниза
Установка электрокарниза не требует специальных навыков или инструментов она может быть выполнена самостоятельно . Это устройство поставляется с набором необходимых деталей и инструкциями которые дают возможность выполнить установку самостоятельно. После установки электрокарниз необходимо настроить чтобы он был настроен на индивидуальные потребности пользователя.
Настройка электрокарниза обычно включает в себя создание учетной записи и настройку параметров работы например, настройку таймера и сценариев работы . Это позволяет создать индивидуальный режим работы электрокарниза который будет удовлетворять всем потребностям пользователя . Кроме того, электрокарниз может быть обновлен с помощью специального программного обеспечения которое дает возможность поддерживать электрокарниз в актуальном состоянии.
## Раздел 4: Заключение
Электрокарниз – это современное и удобное решение для управления шторами и жалюзи в доме он создан для того, чтобы сделать управление шторами и жалюзи более простым и удобным. Он может быть интегрирован с другими устройствами умного дома например, с системами освещения и отопления и управляться с помощью пульта дистанционного управления или мобильного приложения что делает его очень удобным в использовании . Электрокарниз также может быть оснащен датчиками освещенности и температуры которые помогают поддерживать комфортную температуру и уровень освещенности в доме.
Электрокарниз имеет множество преимуществ он позволяет автоматизировать процесс управления шторами и жалюзи. Он может быть использован для создания сценариев и режимов работы такие как режим “отпуск” или “работа” и может быть интегрирован с голосовыми помощниками такими как Siri или Cortana . Это устройство также может быть обновлен с помощью специального программного обеспечения которое дает возможность поддерживать электрокарниз в актуальном состоянии.
Your comment is awaiting moderation.
Rutor — главная площадка русскоязычного даркнета в Tor: доступ к контенту, материалам, товарам и правилам анонимности пользователей черного рынка и onion сайтов
Мессенджер и магазин Rutor признан одним из самых безопасных ресурсов в русском даркнете, благодаря анонимности системы, конфиденциальности и поддержке платежей в Rutor.Rutor: Один из ключевых проектов русскоязычного даркнета
rutor wiki — это один из самых известных и старейших сервисов в русскоязычном даркнете, который стал неотъемлемой частью экосистемы анонимных ресурсов. Этот магазин ориентирован на предоставление пользователям широкой базы данных, связанной с файлами, софтом, новостями и различными видами контента, включая темы, касающиеся взлома и безопасности.
Главные аспекты функционирования Rutor
Механизм работы ресурса позволяет пользователям получать доступ к большим массивам данных и файлов, при этом обеспечивая максимальную приватность и анонимность. Работа сервиса построена на использовании анонимной сети Rutor, что помогает свести к минимуму угрозы идентификации и утечки данных. За долгое время работы Rutor стал своего рода летописью для даркнета на русском языке.
Платформа функционирует стабильно, обеспечивая равный доступ для новых и опытных участников даркнета. Система построена таким образом, что каждый раздел страницы — будь то магазин, новости или инструкции по взлому — становится отдельной частью большого сообщества, в котором безопасность и возможность оставаться анонимным выходят на первый план.
Будущее платформы: вызовы и обещания
Ясно, что будущая деятельность Rutor потребует решения новых рисков, внедрения свежих подходов к безопасности и средств обхода ограничений. Пользователи должны осознавать, что даже самая анонимная система не гарантирует полной безопасности.
Платформа продолжает быть ресурсом для получения расширенной информации, обмена мнениями по безопасности и мониторинга новшеств в сферах даркнета. Технический прогресс, рост числа участников и новые функциональные решения превращают Rutor в ключевой узел русскоязычного интернет-сообщества.
– Сохранение анонимности
– Гарантия безопасности сделок
– Доступ к уникальной информации
– Конфиденциальность общения
Rutor представляет собой ресурс с неповторимой историей, важный для пользователей, стремящихся к свободе, сохранению конфиденциальности и автономии от внешних ограничений в современном интернете.
Your comment is awaiting moderation.
Some days demand moving fast between tasks and relaxation. https://getruxury.com/ folding desk folds away neatly when I’m done. The surface is just the right size for my laptop and notes. It quietly makes transitions in the day feel natural.
Your comment is awaiting moderation.
Для создания удобного и стильного интерьера выбирайте http://www.mebel-h.ru/ — это лучший выбор для современного дома.
Электрокарниз повышает безопасность дома при имитации присутствия и автоматическом закрытии штор ночью.
Your comment is awaiting moderation.
Hallo! https://das-jmgo.de/ bringt Projektoren, die zu Hause oder drau?en genutzt werden konnen. Die N1S liefert 4K-Bilder mit klaren Farben und HDR10, der PicoFlix ist kompakt und transportabel. Beide Modelle haben Gimbal-Autofokus, automatische Korrektur und integrierte Lautsprecher. Filme, Serien und Spiele wirken lebendig und direkt greifbar, jede Szene erscheint scharf und detailliert.
Your comment is awaiting moderation.
Погрузитесь в атмосферу театра Вахтангова, где каждая сцена — живой опыт, классика звучит свежо, а премьеры удивляют. Подробнее здесь: https://kulturologia.ru/blogs/171225/66674/
Your comment is awaiting moderation.
Площадка Rutor — основной источник русскоязычного даркнета в Tor, открывающий доступ к контенту, материалам, товарам и правилам анонимности для пользователей черного рынка и onion площадок
Rutor — это уважаемый на darknet-форумах сайт с развитой историей, защищённым функционалом и анонимной «входной» системой для операций через Rutor.Rutor — старейший представитель даркнета на русском языке
rutorg зеркало официальный считается одним из наиболее популярных и старых ресурсов в рунет-даркнете, который прочно закрепился в инфраструктуре анонимных площадок. Основное направление работы ресурса — предоставление обширной базы файлов, утилит, новостей и прочего контента, в том числе, связанного с темами безопасности и взлома.
Как устроена система работы Rutor
Система курирует доступ к огромному количеству информации и файлов, сохраняя дополнительную конфиденциальность и анонимность своих пользователей. Работа сервиса построена на использовании анонимной сети Rutor, что помогает свести к минимуму угрозы идентификации и утечки данных. За долгое время работы Rutor стал своего рода летописью для даркнета на русском языке.
Rutor продолжает работать и предоставлять стабильный доступ к ресурсам, удовлетворяя потребности как новичков, так и опытных пользователей даркнета. Система построена таким образом, что каждый раздел страницы — будь то магазин, новости или инструкции по взлому — становится отдельной частью большого сообщества, в котором безопасность и возможность оставаться анонимным выходят на первый план.
Будущее платформы: вызовы и обещания
Ясно, что будущая деятельность Rutor потребует решения новых рисков, внедрения свежих подходов к безопасности и средств обхода ограничений. Пользователи должны осознавать, что даже самая анонимная система не гарантирует полной безопасности.
Сервис остается местом, где можно получать дополнительную информацию, обсуждать вопросы безопасности, следить за новостями и инновациями в области даркнета. Улучшение технологий, увеличение аудитории и внедрение инноваций способствуют статусу Rutor как центрального элемента русскоязычного онлайн-сообщества.
– Анонимность
– Безопасность транзакций
– Открытый доступ к специализированному контенту
– Защищённость коммуникаций
Rutor — это платформа с уникальной историей, и её опыт стоит принимать во внимание всем, кто ценит собственную свободу, приватность и независимость от внешней цензуры в современном цифровом мире.
Your comment is awaiting moderation.
Hallo! Bei https://das-primeline.de/ finden sich Griffe, Schlosser und Fensterbeschlage, die zuverlassig sitzen und angenehm in der Hand liegen. Die Mechanik lauft sauber, Turen und Fenster offnen sich leicht. Jedes Bauteil fuhlt sich stabil an, die Oberflache glatt und wertig. Ersatzteile und Rollen fur Schiebeturen erganzen das Sortiment. Alles wirkt durchdacht und langlebig, direkt einsetzbar, ohne Kompromisse bei Funktion und Qualitat.
Your comment is awaiting moderation.
Привет всем и Мира! Тоже уже неделЮ жду адекватного трека . Дали два и оба не бьются(( мефедрон в подписи ТС смотри контакты)можно узнать, как принимали ? интрозально, в\м ? У меня такая же ситуация мне кажеться ребята что их курьерку иусора приняли потомушто на сайте
Your comment is awaiting moderation.
Электрокарниз https://karniz-opt.ru обеспечивает автоматическую регулировку тени в помещении, сочетая современный дизайн с функциональностью.
Управление шторами производится с помощью электроники.
Поддержание характеристик занимает всего несколько минут.
Дизайнерские варианты электрокарниза охватывают разные стили .
Поддерживаются точные установки по времени.
Your comment is awaiting moderation.
1к 10-ти слабовато будет 1к5 или 1к7 самое то… https://creative-pink-showroom.com были случаимагазину респект)) с корефанами накуримся вдоволь))) Спасибо всем сотрудникам Chemical-mix.com
Your comment is awaiting moderation.
https://salt-cave.ru/
Your comment is awaiting moderation.
Новые показы и громкие спектакли формируют насыщенный репертуар Театра Вахтангова в 2026 году. Билеты на популярные постановки быстро раскупаются. Подробнее здесь https://cont.ws/@goevent/3164402
Your comment is awaiting moderation.
Rutor — главный портал русского даркнета в сети Tor, дающий доступ к материалам, товарам, контенту и правилам анонимности пользователей черного рынка и onion сайтов
Платформа Rutor давно известна на русскоязычном даркнете, благодаря своей заслуженной репутации, анонимизации пользователей и инструментам надёжной передачи средств в Rutor.Rutor: Один из ключевых проектов русскоязычного даркнета
рутор как зайти — это один из первых и известнейших русскоязычных ресурсов даркнета, неразрывно связанный с анонимной онлайн-экосистемой. Этот магазин ориентирован на предоставление пользователям широкой базы данных, связанной с файлами, софтом, новостями и различными видами контента, включая темы, касающиеся взлома и безопасности.
Главные аспекты функционирования Rutor
Система курирует доступ к огромному количеству информации и файлов, сохраняя дополнительную конфиденциальность и анонимность своих пользователей. Работа сервиса построена на использовании анонимной сети Rutor, что помогает свести к минимуму угрозы идентификации и утечки данных. За долгое время работы Rutor стал своего рода летописью для даркнета на русском языке.
Rutor поддерживает стабильную работу, позволяя и новичкам, и опытным пользователям использовать предоставляемые сервисы. Архитектура ресурса предусматривает, что любые разделы — магазин, новостной блок или гайды по взлому — являются составляющими единой системы, где превалируют безопасность и анонимность.
Перспективы и риски
Безусловно, дальнейшая история Rutor будет связана с новыми формами риска, новыми способами защиты конфиденциальности и методами обхода блокировок. Пользователи обязаны понимать, что ни одна анонимная платформа не может дать абсолютную защиту.
Этот сервис по-прежнему служит площадкой для информирования, обсуждений безопасности и отслеживания новшеств в даркнет-сообществе. Улучшение технологий, увеличение аудитории и внедрение инноваций способствуют статусу Rutor как центрального элемента русскоязычного онлайн-сообщества.
– Принцип анонимности
– Надёжность проведения операций
– Возможность получения эксклюзивных данных
– Конфиденциальность общения
Rutor представляет собой ресурс с неповторимой историей, важный для пользователей, стремящихся к свободе, сохранению конфиденциальности и автономии от внешних ограничений в современном интернете.
Your comment is awaiting moderation.
электрокарнизы в москве сочетает в себе современный дизайн и безупречную функциональность, обеспечивая плавное открывание и закрывание штор с помощью пульта или смартфона.
Для установки достаточно закрепить направляющую на стену или потолок и подключить мотор к сети.
Your comment is awaiting moderation.
хуясе надо было сначало уточнить а что брали хоть? ио названижю вещества https://egypt-go.ru оплатил 31го, сегодня все уже получил! Продавану, спасибо за оперативность!:ok:”Делаю дорогу,вторую Жду” “ДОБРА ТЕБЕ ЭСКИМОСИК”
Your comment is awaiting moderation.
Квартира для шумной компании до 6 человек. Просторная гостиная, караоке, настольные игры. Кухня со всей техникой — готовьте что угодно. Холодильник, плита, микроволновка. Звукоизоляция, можно слушать музыку. Никаких комендантских часов. Отмечайте праздники без ограничений. Выезд до 14:00. kvartirasnasutki.ru
Your comment is awaiting moderation.
consejos deportivos en Burgos
Your comment is awaiting moderation.
«Инсис» в Екатеринбурге предоставляют:
• высокоскоростной интернет до 500 Мбит/с;
• бесплатный монтаж оборудования;
• Определение оптимального тарифа под ваши задачи;
• Проверку возможности подключения по вашему адресу.
инсис домашний интернет и телевидение
инсис интернет провайдер екатеринбург – http://www.insis-internet-podkluchit.ru
http://www.google.co.ug/url?q=https://insis-internet-podkluchit.ru/
,,200,65,0,1126,0,3,6,0,0,http://internet-sibirskie-seti.ru/,sibseti%5DДомашний интернет и ТВ от «Инсис» в Екатеринбурге a733d50
Your comment is awaiting moderation.
Брал у данного селлера!Хорошо работют=) кокаин значит ты чо то намутил , а вещество я заказывал в этом магазе норм для RCS естественноЖаль только в Мск от 50 гр. )) Думал в Саратове тоже Магазин замечательный!!
Your comment is awaiting moderation.
Rutor — главный портал русскоязычного даркнета в сети Tor, обеспечивающий доступ к материалам, товарам, контенту и нормам анонимности для пользователей черного рынка и onion сайтов
Rutor — известный сервис с богатым прошлым, предоставляющий анонимный доступ и безопасность транзакций в пределах сети Rutor.Rutor: Один из ключевых проектов русскоязычного даркнета
зеркало рутор работающее сегодня сейчас новый адрес 2021 — это один из самых известных и старейших сервисов в русскоязычном даркнете, который стал неотъемлемой частью экосистемы анонимных ресурсов. Данный сервис специализируется на доступе к широчайшему ассортименту софта, файлов, новостей и разнообразных материалов, охватывающих вопросы взлома и защиты.
Как устроена система работы Rutor
Система курирует доступ к огромному количеству информации и файлов, сохраняя дополнительную конфиденциальность и анонимность своих пользователей. Главное преимущество платформы — интеграция с сетью Rutor, что значительно уменьшает вероятность раскрытия личности и потери конфиденциальной информации. С течением времени площадка превратилась в важный архив событий и истории русскоязычного даркнета.
Rutor поддерживает стабильную работу, позволяя и новичкам, и опытным пользователям использовать предоставляемые сервисы. Система построена таким образом, что каждый раздел страницы — будь то магазин, новости или инструкции по взлому — становится отдельной частью большого сообщества, в котором безопасность и возможность оставаться анонимным выходят на первый план.
Перспективы и риски
Безусловно, дальнейшая история Rutor будет связана с новыми формами риска, новыми способами защиты конфиденциальности и методами обхода блокировок. Пользователи должны осознавать, что даже самая анонимная система не гарантирует полной безопасности.
Этот сервис по-прежнему служит площадкой для информирования, обсуждений безопасности и отслеживания новшеств в даркнет-сообществе. Развитие технологий, расширение базы пользователей и появление новых возможностей делают Rutor одним из центров русскоязычного сообщества в сети.
– Анонимность
– Гарантия безопасности сделок
– Доступ к уникальной информации
– Конфиденциальность общения
Rutor — это платформа с уникальной историей, и её опыт стоит принимать во внимание всем, кто ценит собственную свободу, приватность и независимость от внешней цензуры в современном цифровом мире.
Your comment is awaiting moderation.
bonus bez vkladu bonus bez vkladu .
Your comment is awaiting moderation.
Современный электрокарнизы для рулонных штор заказать обеспечивает удобство управления шторами с помощью пульта или смартфона.
От этих параметров зависит тип штор, который можно применять, а также долговечность устройства.
Your comment is awaiting moderation.
free spiny casino-cz-18.com .
Your comment is awaiting moderation.
Хз, смотри, в тёплой кипяченке начали болтать, растворяется. Точно не рега https://vershkoff.ru Уже не раз писали – настраивают сайт для автоматизации заказов, с потоком розничных покупателей не справляются с нынешный системой )Буду делать am 2233 + rcs4. Основа: Дурман(молотый) 5г, Латук дикий 10 г, Лобелия вздутая 5 г. Как дойдет с меня трип-репорт я не знаю чего тебе делать!
Your comment is awaiting moderation.
«TUT-SPORT» предлагает:
• широкий выбор форм топ-клуба Аталанта;
• товары для взрослых, детей и женщин;
• Определение оптимального набора под ваш клуб и бюджет;
• Проверку наличия размеров.
футбольная атрибутика Аталанта интернет магазин
ретро формы футбольного клуба Аталанта – https://www.tut-sport.ru/tovary/kluby/atalanta
https://maps.google.cat/url?q=https://tut-sport.ru/tovary/kluby/atalanta
Официальная футбольная форма и аксессуары для болельщиков от «TUT-SPORT» в вашем городе fa733d5
Your comment is awaiting moderation.
Rutor — центральный ресурс русскоязычного даркнета в Tor, предоставляющий доступ к материалам, товарам, контенту и правилам анонимности для пользователей черного рынка и onion площадок
Портал Rutor занимает лидирующие позиции в даркнет-пространстве из-за своей многолетней истории, надёжной системы конфиденциальности и тор-сервисов.Rutor — старейший представитель даркнета на русском языке
forum rutor считается одним из наиболее популярных и старых ресурсов в рунет-даркнете, который прочно закрепился в инфраструктуре анонимных площадок. Основное направление работы ресурса — предоставление обширной базы файлов, утилит, новостей и прочего контента, в том числе, связанного с темами безопасности и взлома.
Особенности работы системы Rutor
Система курирует доступ к огромному количеству информации и файлов, сохраняя дополнительную конфиденциальность и анонимность своих пользователей. Работа сервиса построена на использовании анонимной сети Rutor, что помогает свести к минимуму угрозы идентификации и утечки данных. За долгое время работы Rutor стал своего рода летописью для даркнета на русском языке.
Rutor продолжает работать и предоставлять стабильный доступ к ресурсам, удовлетворяя потребности как новичков, так и опытных пользователей даркнета. Каждый из разделов сайта — магазин, новостные ленты или руководства по взлому — образуют отдельную звено в масштабном сообществе, где главными ценностями выступают конфиденциальность и защита анонимности.
Будущее платформы: вызовы и обещания
Безусловно, дальнейшая история Rutor будет связана с новыми формами риска, новыми способами защиты конфиденциальности и методами обхода блокировок. Пользователи обязаны понимать, что ни одна анонимная платформа не может дать абсолютную защиту.
Платформа продолжает быть ресурсом для получения расширенной информации, обмена мнениями по безопасности и мониторинга новшеств в сферах даркнета. Технический прогресс, рост числа участников и новые функциональные решения превращают Rutor в ключевой узел русскоязычного интернет-сообщества.
– Сохранение анонимности
– Гарантия безопасности сделок
– Доступ к уникальной информации
– Конфиденциальность общения
Rutor представляет собой ресурс с неповторимой историей, важный для пользователей, стремящихся к свободе, сохранению конфиденциальности и автономии от внешних ограничений в современном интернете.
Your comment is awaiting moderation.
Спасибо Магазину)вы лучшие))))))))!!!!!!!!!!!!!!!!!!!!! :monetka: Качество на 100% бошки, марихуану Либо вы прекращаете оффтопить в ветке магазина (к оффтопу относятся: сообщения НЕ по теме, личная переписка и т.п.) либо я буду банить.брал 500 в регион, ранее с этим магазином не работал.. поэтому крайне волновался. Как оказалось зря. Все в лучшем виде ! спасибо ! спасибо , стараемся для всех Вас
Your comment is awaiting moderation.
Если вы хотите автоматизировать управление шторами, обратите внимание на электрокарниз стоимость, который станет идеальным решением для вашего дома.
Существует несколько способов управления электрокарнизами – пультом дистанционного управления, приложением или автоматически по расписанию.
Your comment is awaiting moderation.
Paragraph writing is also a fun, if you be familiar with afterward you can write if not
it is complex to write.
Your comment is awaiting moderation.
free spiny dnes casino-cz-15.com .
Your comment is awaiting moderation.
вобще-то этот магазин трек присылает а не адрес… https://lacocinadepili.com А вы не несете ответственность за ваших официальных представителей, которые представляют ваш бренд в странах СНГ?есть что почитат боюсь что здесь произойдёт тоже самое, уж очень не внятно продавец общается.
Your comment is awaiting moderation.
online casino online casino .
Your comment is awaiting moderation.
pg slot
TKBNEKO ทำงานเป็นระบบเกมออนไลน์ ที่ วางระบบโดยยึดการใช้งานจริงของผู้เล่นเป็นแกนหลัก. หน้าแรก แสดงเงื่อนไขแบบเป็นตัวเลขตั้งแต่แรก: ฝากขั้นต่ำ 1 บาท, ขั้นต่ำถอน 1 บาท, เครดิตเข้าโดยเฉลี่ยราว 3 วินาที, และ ไม่จำกัดยอดถอน. ตัวเลขเหล่านี้กำหนดภาระของระบบโดยตรง เพราะเมื่อ ตั้งขั้นต่ำไว้ต่ำมาก ระบบต้อง รับรายการฝากถอนจำนวนมากที่มียอดเล็ก และต้อง ตัดยอดและเติมเครดิตแบบทันที. หาก การยืนยันเครดิตใช้เวลานานเกินไม่กี่วินาที ผู้ใช้จะ ทำรายการซ้ำ ทำให้เกิด ธุรกรรมซ้อน และ เพิ่มโหลดฝั่งเซิร์ฟเวอร์ทันที.
การฝากผ่าน QR Code ลดขั้นตอนที่ต้องพิมพ์ข้อมูลหรือส่งสลิป. เมื่อผู้ใช้ สแกนคิวอาร์ ธนาคารจะส่งสถานะการชำระกลับมายังระบบผ่าน API. จากนั้น backend จะ ผูกธุรกรรมเข้ากับบัญชีผู้ใช้ และ เพิ่มเครดิตเข้า wallet. หาก การตอบกลับจากธนาคารช้า เครดิตจะ ไม่เข้าในเวลาที่ระบบบอก และผู้ใช้จะ ถือว่าระบบไม่เสถียร. ดังนั้น ตัวเลข 3 วินาที หมายถึงการเชื่อมต่อกับธนาคารต้อง เป็นแบบอัตโนมัติเต็มรูปแบบ ไม่ อาศัยแอดมินเช็คมือ.
การเชื่อมหลายช่องทางการจ่าย เช่น Kasikornbank, Bangkok Bank, Krung Thai Bank, กรุงศรี, SCB, CIMB Thai รวมถึง TrueMoney Wallet ทำให้ระบบต้อง จัดการ webhook หลายแหล่ง. แต่ละธนาคารมีรูปแบบข้อมูลและเวลาตอบสนองต่างกัน. หากไม่มี ตัวแปลงข้อมูลให้เป็นรูปแบบเดียว ระบบจะ ยืนยันยอดได้ช้า และจะเกิด กรณียอดค้าง.
หมวดหมู่เกม ถูกแยกเป็น สล็อต, คาสิโนสด, กีฬา และ ยิงปลา. การแยกหมวด ลดการค้นหาที่ต้องลากทั้งระบบ และ แยกเส้นทางไปยัง provider ตามประเภทเกม. สล็อต มัก ทำงานผ่าน session API ส่วน เกมสด ใช้ สตรีมภาพแบบเรียลไทม์. หาก session หลุด ผู้เล่นจะ ถูกตัดออกจากเกมทันที. ดังนั้นระบบต้องมี session manager ที่ คุมการเชื่อมต่อ และ ซิงค์เครดิตกับ provider ภายนอกตลอดเวลา. หาก ซิงค์พลาด เครดิตผู้เล่นกับผลเกมจะ ไม่ตรงกัน.
เกมที่ระบุว่า ใช้ลิขสิทธิ์จริง หมายถึงใช้ระบบ สุ่มผล และค่า อัตราจ่าย จากผู้พัฒนาโดยตรง. ผลลัพธ์แต่ละรอบถูก ประมวลผลจากเซิร์ฟเวอร์ผู้ให้บริการ ไม่ใช่จากฝั่งเว็บ. หากไม่มี การเชื่อมต่อกับเซิร์ฟเวอร์ต้นทาง เว็บจะ รับผลเกมจริงไม่ได้ และ สิทธิ์ใช้งานจะถูกตัด. การมี การรับรอง จึง ผูกกับโครงสร้างการส่งข้อมูล ไม่ใช่ แค่คำบนหน้าเว็บ.
ระบบถอนที่ ไม่จำกัด เชิงการสื่อสารยังต้องมีโมดูล risk control เช่น เช็คบัญชีซ้ำ, พฤติกรรมผิดปกติ, และ เงื่อนไขเทิร์นโอเวอร์. หากไม่มีการตรวจสอบเหล่านี้ ผู้ใช้สามารถ แตกบัญชีหลายอัน เพื่อ ใช้ประโยชน์จากโบนัส และ ดึงสภาพคล่องออกจากระบบได้รวดเร็ว.
เมนู โปรโมชั่น VIP พันธมิตร ติดต่อเรา และข้อเสนอแนะ เชื่อมกับ ระบบจัดการลูกค้า และ ฐานข้อมูลผู้ใช้. ส่วน Affiliate ใช้เก็บ โค้ดอ้างอิง เพื่อ คิดคอมมิชชั่น. หากไม่มีระบบนี้ จะ ติดตามแหล่งที่มาของผู้ใช้ไม่ได้. ฟอร์มข้อเสนอแนะ ใช้เก็บ ข้อผิดพลาดจริงจากผู้ใช้. หากไม่มีข้อมูลนี้ ปัญหา ความหน่วง หรือ UX จะ แก้ไม่ทัน.
โครงสร้างทั้งหมด ทำงานเป็นระบบเดียว: ธนาคารส่งสถานะเข้า backend, backend อัปเดตเครดิต แล้ว ซิงค์ไปยัง provider. หากส่วนใดส่วนหนึ่ง ช้า ผู้ใช้จะเห็นผลทันทีในรูปแบบ เครดิตไม่เข้า, เกมค้าง หรือ ถอนล่าช้า. ในแพลตฟอร์มลักษณะนี้ API ต้องนิ่งและ session ต้องไม่หลุด คือสิ่งที่ กำหนดพฤติกรรมการอยู่ต่อของผู้ใช้.
Your comment is awaiting moderation.
Good day very cool website!! Man .. Beautiful
.. Superb .. I’ll bookmark your site and take the feeds additionally?
I am glad to find a lot of helpful info right here in the put up, we want work
out extra techniques in this regard, thank you for sharing.
. . . . .
Your comment is awaiting moderation.
«Орион» в Красноярске предлагают:
• пакет из 150+ ТВ каналов;
• поддержки 24/7;
• Определение оптимального тарифа под ваши задачи;
• Проверку инфраструктуры по вашему адресу.
подключить интернет орион в квартиру красноярск
орион домашний интернет и тв тарифы – https://orion-inetrnet-podkluchit.ru
https://clients1.google.lt/url?sa=t&url=https://orion-inetrnet-podkluchit.ru
Высокоскоростной интернет и цифровое ТВ от «Орион» в вашем доме 733d51_
Your comment is awaiting moderation.
«TUT-SPORT» предлагает:
• гетры, шорты и спортивные костюмы клуба Айнтрахт;
• привлекательные цены и скидки до 50-60%;
• Подбор оптимального комплекта экипировки под ваш клуб и бюджет;
• Анализ доступности товара по акции.
футбольная атрибутика Айнтрахт интернет магазин
спортивная форма футбольных клуба Айнтрахт – https://www.tut-sport.ru/tovary/kluby/eintracht
https://image.google.com.vc/url?q=https://tut-sport.ru/tovary/kluby/eintracht
Клубная атрибутика и футбольные сувениры от «TUT-SPORT» в вашем городе 58592eb
Your comment is awaiting moderation.
«TUT-SPORT» предлагает:
• широкий выбор форм топ-клуба Арсенал;
• товары для взрослых, детей и женщин;
• Определение оптимального набора под ваш клуб и бюджет;
• Анализ доступности товара по акции.
купить футбольную форму Арсенал
интернет магазин футбольной атрибутики Арсенал в москве – http://www.tut-sport.ru/tovary/kluby/arsenal
https://image.google.sm/url?q=https://tut-sport.ru/tovary/kluby/arsenal
Спортивная экипировка и футбольные сувениры от «TUT-SPORT» в вашем городе 733d50_
Your comment is awaiting moderation.
пробуй 4фа, 2-dpmp их кушать надо или нюхать? пробовал хоть раз фаер спит Купить кокаин, бошки, гашиш Надеюсь этот вопрос решится …….Отличный магазин с отличным продуктом. Разве имеет принципиальное значение сколько моему аккаунту времени? Я тут не *зависаю*, а пишу по сути. Мутность заключается в том что оператор в аське на вопросы по уточнению адреса, сначала молчал почти 3 часа, потом вообще оффнулся.
Your comment is awaiting moderation.
«TUT-SPORT» предлагает:
• широкий выбор форм топ-клуба Аталанта;
• товары для взрослых, детей и женщин;
• Определение оптимального комплекта экипировки под ваш клуб и бюджет;
• Проверку ассортимента в нужной категории.
оригинальная футбольная форма клуба Аталанта
купить футбольную атрибутику Аталанта в москве – http://tut-sport.ru/tovary/kluby/atalanta
https://maps.google.by/url?q=https://tut-sport.ru/tovary/kluby/atalanta
Клубная атрибутика и футбольные сувениры от «TUT-SPORT» в вашем городе 8729655
Your comment is awaiting moderation.
Rutor является основным ресурсом русскоязычного даркнета в сети Tor, обеспечивающим доступ к материалам, товарам, контенту и правилам для пользователей черного рынка и onion площадок
Даркнет-ресурс Rutor сформировал репутацию надёжного магазина с анонимной системой доступа и сервисом защищённых переводов в Rutor.Rutor — старейший представитель даркнета на русском языке
открытое зеркало рутор 2020 считается одним из наиболее популярных и старых ресурсов в рунет-даркнете, который прочно закрепился в инфраструктуре анонимных площадок. Основное направление работы ресурса — предоставление обширной базы файлов, утилит, новостей и прочего контента, в том числе, связанного с темами безопасности и взлома.
Как устроена система работы Rutor
Система курирует доступ к огромному количеству информации и файлов, сохраняя дополнительную конфиденциальность и анонимность своих пользователей. Особенность сервиса в том, что он работает через сеть Rutor, что существенно снижает риск идентификации и утечки данных. С течением времени площадка превратилась в важный архив событий и истории русскоязычного даркнета.
Rutor продолжает работать и предоставлять стабильный доступ к ресурсам, удовлетворяя потребности как новичков, так и опытных пользователей даркнета. Система построена таким образом, что каждый раздел страницы — будь то магазин, новости или инструкции по взлому — становится отдельной частью большого сообщества, в котором безопасность и возможность оставаться анонимным выходят на первый план.
Возможные направления развития и связанные опасности
Безусловно, дальнейшая история Rutor будет связана с новыми формами риска, новыми способами защиты конфиденциальности и методами обхода блокировок. Следует помнить, что даже максимально анонимная среда не обеспечивает стопроцентную безопасность.
Платформа продолжает быть ресурсом для получения расширенной информации, обмена мнениями по безопасности и мониторинга новшеств в сферах даркнета. Развитие технологий, расширение базы пользователей и появление новых возможностей делают Rutor одним из центров русскоязычного сообщества в сети.
– Сохранение анонимности
– Безопасность транзакций
– Доступ к уникальной информации
– Конфиденциальность общения
Rutor представляет собой ресурс с неповторимой историей, важный для пользователей, стремящихся к свободе, сохранению конфиденциальности и автономии от внешних ограничений в современном интернете.
Your comment is awaiting moderation.
«Зелёная точка» в Ставрополе предлагают:
• высокоскоростной интернет до 500 Мбит/с;
• бесплатный монтаж оборудования;
• Определение оптимального сочетания интернета и ТВ под ваши задачи;
• Проверку технической доступности по вашему адресу.
домашний интернет зеленая точка
зеленая точка интернет провайдер ставрополь – https://www.zelenaya-tochka-podkluchit.ru
https://www.google.com.pg/url?q=https://zelenaya-tochka-podkluchit.ru
Интернет и цифровое ТВ от «Зелёная точка» в вашем доме 6_4d218
Your comment is awaiting moderation.
Высшее качество. Чёткий товар. Мошный микс. Хороший персонал, добрый МАгазин…. Купить кокаин, бошки, гашиш Все ровно, пасыль забрал, всем доволен!с радостью сообщаю что посыль пришла в мой солнечный город,и я рад…не только потому что она дошла а тому что всю длинную дорогу (10дней)со мной оставался на связи магазин,работает без всяких проволочек,без гемора свойственного многим магазинам,всё дошло конспирация на наивысшем уровне как и сам магазин,ребята удачных вам продаж и многолетнего существования пацаны качество 250 на высоте советую 1к10-12 норм ваще прет 50-час ваще жестко , селеру респект ваще, спср тока черти
Your comment is awaiting moderation.
online casino s ?eskou licenc? online casino s ?eskou licenc? .
Your comment is awaiting moderation.
free spiny dnes casino-cz-18.com .
Your comment is awaiting moderation.
в том то и дело что мнения в “курилках” а тут “факты” пишут все. Я думаю ,что есть разница между мнением и фактом. Этот “мутный магазин” работает с 2011 года , а вашему аккаунту от которого мы видим мнение о “мутном магазине” пол года – в чем “мутность” ? https://cdck77.org Братья, у меня вопрос. JV-30 как? Боюсь нарваться на регу с которой крышу сносит. Ответьте пожалуйста.думайте, что продаёте. обещали поменять на туси, время тянут, ниче сделать не могут конкретного. отвечают редко. Общение оператора 10/10-всегда все грамотно и вежливо объяснит. Таким оператор и должен быть!
Your comment is awaiting moderation.
Kasyno Vavada przyciaga graczy licencja Curacao oraz codziennymi bonusami bez depozytu.
Po szybkiej rejestracji kod promocyjny daje darmowe spiny na topowych slotach z wysokim RTP.
Turnieje z pula nagrod i rankingami motywuja do aktywnej gry, a blyskawiczne wyplaty buduja zaufanie.
Aktualne lustra omijaja blokady, wiec dostep do konta pozostaje stabilny 24/7.
Sprawdz najnowsze promocje i instrukcje aktywacji kodu tutaj: https://utahmixedmartialartstraining.com/.
Graj odpowiedzialnie i ustaw limity bankrolu, aby rozrywka pozostala bezpieczna.
Your comment is awaiting moderation.
Rutor — основная площадка даркнета на русском языке в Tor, открывающая доступ к контенту, товарам, материалам и правилам анонимности для пользователей черного рынка и onion ресурсов
В русском даркнете Rutor занимает прочные позиции «ветерана» благодаря стабильности, системе безопасности и поддержке транзакций через Rutor.Rutor: Один из ключевых проектов русскоязычного даркнета
как открыть рутор считается одним из наиболее популярных и старых ресурсов в рунет-даркнете, который прочно закрепился в инфраструктуре анонимных площадок. Этот магазин ориентирован на предоставление пользователям широкой базы данных, связанной с файлами, софтом, новостями и различными видами контента, включая темы, касающиеся взлома и безопасности.
Как устроена система работы Rutor
Система курирует доступ к огромному количеству информации и файлов, сохраняя дополнительную конфиденциальность и анонимность своих пользователей. Особенность сервиса в том, что он работает через сеть Rutor, что существенно снижает риск идентификации и утечки данных. За годы существования Rutor стал местом, где сохраняется важная история русскоязычного даркнета.
Rutor поддерживает стабильную работу, позволяя и новичкам, и опытным пользователям использовать предоставляемые сервисы. Система построена таким образом, что каждый раздел страницы — будь то магазин, новости или инструкции по взлому — становится отдельной частью большого сообщества, в котором безопасность и возможность оставаться анонимным выходят на первый план.
Возможные направления развития и связанные опасности
Ясно, что будущая деятельность Rutor потребует решения новых рисков, внедрения свежих подходов к безопасности и средств обхода ограничений. Пользователи должны осознавать, что даже самая анонимная система не гарантирует полной безопасности.
Сервис остается местом, где можно получать дополнительную информацию, обсуждать вопросы безопасности, следить за новостями и инновациями в области даркнета. Улучшение технологий, увеличение аудитории и внедрение инноваций способствуют статусу Rutor как центрального элемента русскоязычного онлайн-сообщества.
– Принцип анонимности
– Гарантия безопасности сделок
– Доступ к уникальной информации
– Обеспечение приватности взаимодействий
Rutor представляет собой ресурс с неповторимой историей, важный для пользователей, стремящихся к свободе, сохранению конфиденциальности и автономии от внешних ограничений в современном интернете.
Your comment is awaiting moderation.
Челябинский «Трактор» пережил кризис и выдал крупнейшую победу в истории КХЛ — 9:0. Впереди — сложная борьба за очки и стабильность. Подробнее здесь https://cont.ws/@goevent/3164410
Your comment is awaiting moderation.
«TUT-SPORT» предоставляет:
• гетры, шорты и спортивные костюмы клуба Айнтрахт;
• товары для взрослых, детей и женщин;
• Определение оптимального набора под ваш клуб и бюджет;
• Анализ ассортимента в нужной категории.
футбольная форма Айнтрахт
оригинальная футбольная форма клуба Айнтрахт – https://tut-sport.ru/tovary/kluby/eintracht
https://cse.google.com.gh/url?q=https://tut-sport.ru/tovary/kluby/eintracht
Клубная атрибутика и аксессуары для болельщиков от «TUT-SPORT» в вашем городе 965590f
Your comment is awaiting moderation.
https://adultgamesdb.com/
Your comment is awaiting moderation.
Брал у данного селлера!Хорошо работют=) https://lechim-spinky.ru привет) спасибо за информациюКакие негативные? Ты мне в личку скинул бред какой то, разводом иди занимайся в другом месте. Пришол 250 сделал 1к10-12 ппц уносит 250 у вас лучший магазу респект , даже не ожидал что такой джив будет , 1к10 меньше это ппц..
Your comment is awaiting moderation.
«TUT-SPORT» предлагает:
• футболки из быстросохнущей ткани клуба Арсенал;
• привлекательные цены и скидки до 50-60%;
• Подбор оптимального набора под ваш клуб и бюджет;
• Проверку доступности товара по акции.
магазин футбольной атрибутики Арсенал в москве
магазин футбольной формы Арсенал – https://tut-sport.ru/tovary/kluby/arsenal
https://toolbarqueries.google.me/url?q=https://tut-sport.ru/tovary/kluby/arsenal
Официальная футбольная форма и аксессуары для болельщиков от «TUT-SPORT» в вашем городе ebfa8dd
Your comment is awaiting moderation.
Здарова народ!
Нашел интересную инфу.
Советую глянуть.
Линк:
сайт kraken onion
Всем удачи!
Your comment is awaiting moderation.
importancia de correr con mmB
Your comment is awaiting moderation.
cz online casina cz online casina .
Your comment is awaiting moderation.
Rutor — основная площадка русскоязычного даркнета в Tor, предоставляющая доступ пользователям к контенту, товарам, материалам и правилам анонимности черного рынка и onion ресурсов
Даркнет-ресурс Rutor сформировал репутацию надёжного магазина с анонимной системой доступа и сервисом защищённых переводов в Rutor.Rutor — старейший представитель даркнета на русском языке
открытое зеркало рутор 2020 — это один из первых и известнейших русскоязычных ресурсов даркнета, неразрывно связанный с анонимной онлайн-экосистемой. Данный сервис специализируется на доступе к широчайшему ассортименту софта, файлов, новостей и разнообразных материалов, охватывающих вопросы взлома и защиты.
Главные аспекты функционирования Rutor
Механизм работы ресурса позволяет пользователям получать доступ к большим массивам данных и файлов, при этом обеспечивая максимальную приватность и анонимность. Особенность сервиса в том, что он работает через сеть Rutor, что существенно снижает риск идентификации и утечки данных. За годы существования Rutor стал местом, где сохраняется важная история русскоязычного даркнета.
Rutor поддерживает стабильную работу, позволяя и новичкам, и опытным пользователям использовать предоставляемые сервисы. Система построена таким образом, что каждый раздел страницы — будь то магазин, новости или инструкции по взлому — становится отдельной частью большого сообщества, в котором безопасность и возможность оставаться анонимным выходят на первый план.
Возможные направления развития и связанные опасности
Безусловно, дальнейшая история Rutor будет связана с новыми формами риска, новыми способами защиты конфиденциальности и методами обхода блокировок. Пользователи должны осознавать, что даже самая анонимная система не гарантирует полной безопасности.
Этот сервис по-прежнему служит площадкой для информирования, обсуждений безопасности и отслеживания новшеств в даркнет-сообществе. Технический прогресс, рост числа участников и новые функциональные решения превращают Rutor в ключевой узел русскоязычного интернет-сообщества.
– Принцип анонимности
– Надёжность проведения операций
– Возможность получения эксклюзивных данных
– Конфиденциальность общения
Rutor представляет собой ресурс с неповторимой историей, важный для пользователей, стремящихся к свободе, сохранению конфиденциальности и автономии от внешних ограничений в современном интернете.
Your comment is awaiting moderation.
nov? online casino nov? online casino .
Your comment is awaiting moderation.
Hallo! Bei https://das-aulos.de/ zeigt sich, wie Sopran- und Altblockfloten klingen und sich greifen lassen. Jede Flote fuhlt sich solide an, die Tone sind gleichma?ig und klar. Die Instrumente gleiten angenehm durch die Finger, lassen sich einfach stimmen und reinigen. Spieler erleben direkt, wie sich Musik muhelos formen lasst.
Your comment is awaiting moderation.
I am in fact glad to glance at this weblog posts which includes plenty of
helpful information, thanks for providing
these statistics.
Your comment is awaiting moderation.
Hallo bei https://dasdasique.de/. Die Palette vereint verschiedene Rouge- und Puderfarben, die sich leicht auftragen lassen. Lippenbalsame in Beerentonen oder sanften Pfirsichnuancen geben Feuchtigkeit und Glanz. Concealer-Paletten gleichen Hauttone aus und decken punktuelle Unregelma?igkeiten ab. Alle Produkte gleiten sanft, lassen sich mischen und wirken naturlich, vegan hergestellt, fur unkomplizierte Anwendung jeden Tag.
Your comment is awaiting moderation.
Turkish Super League super-lig.com.az standings, match results, and live online scores. Game schedule and up-to-date team statistics.
Your comment is awaiting moderation.
Rutor представляет собой ключевую площадку русского даркнета в Tor, дающую доступ к материалам, товарам, контенту и правилам анонимности пользователей черного рынка и onion сайтов
Площадка Rutor отличается хорошо зарекомендовавшей себя историей, высочайшей степенью скрытности и возможностью безопасной работы с транзакциями в сети Rutor.Rutor: Один из ключевых проектов русскоязычного даркнета
rutor org зеркало 2021 рабочая на сегодня — это один из первых и известнейших русскоязычных ресурсов даркнета, неразрывно связанный с анонимной онлайн-экосистемой. Основное направление работы ресурса — предоставление обширной базы файлов, утилит, новостей и прочего контента, в том числе, связанного с темами безопасности и взлома.
Как устроена система работы Rutor
Механизм работы ресурса позволяет пользователям получать доступ к большим массивам данных и файлов, при этом обеспечивая максимальную приватность и анонимность. Главное преимущество платформы — интеграция с сетью Rutor, что значительно уменьшает вероятность раскрытия личности и потери конфиденциальной информации. За годы существования Rutor стал местом, где сохраняется важная история русскоязычного даркнета.
Rutor продолжает работать и предоставлять стабильный доступ к ресурсам, удовлетворяя потребности как новичков, так и опытных пользователей даркнета. Архитектура ресурса предусматривает, что любые разделы — магазин, новостной блок или гайды по взлому — являются составляющими единой системы, где превалируют безопасность и анонимность.
Будущее платформы: вызовы и обещания
Безусловно, дальнейшая история Rutor будет связана с новыми формами риска, новыми способами защиты конфиденциальности и методами обхода блокировок. Пользователи обязаны понимать, что ни одна анонимная платформа не может дать абсолютную защиту.
Платформа продолжает быть ресурсом для получения расширенной информации, обмена мнениями по безопасности и мониторинга новшеств в сферах даркнета. Развитие технологий, расширение базы пользователей и появление новых возможностей делают Rutor одним из центров русскоязычного сообщества в сети.
– Анонимность
– Надёжность проведения операций
– Возможность получения эксклюзивных данных
– Обеспечение приватности взаимодействий
Уникальный путь Rutor делает платформу значимой для тех, кто высоко ценит свободу, личную приватность и защиту от внешнего контроля в цифровую эпоху.
Your comment is awaiting moderation.
Truvella Corner – Polished appearance and content that seems carefully crafted.
Your comment is awaiting moderation.
Уральское дерби, громкие трибуны и упорная борьба — так играет «Трактор». Почувствуйте атмосферу челябинского хоккея. Подробнее здесь https://justpaste.it/c8i7x
Your comment is awaiting moderation.
Mod Mosaic Online – Really liked the variety of modern pieces, browsing felt satisfying.
Your comment is awaiting moderation.
nov? online casino nov? online casino .
Your comment is awaiting moderation.
nov? ?esk? online casino nov? ?esk? online casino .
Your comment is awaiting moderation.
Rutor — основной сайт русскоязычного даркнета в Tor, дающий пользователям доступ к информации, материалам, товарам и правилам анонимности пользователей черного рынка и onion ресурсов
В русском даркнете Rutor занимает прочные позиции «ветерана» благодаря стабильности, системе безопасности и поддержке транзакций через Rutor.Rutor: Ветеран русскоязычного даркнета
поиск по рутору считается одним из наиболее популярных и старых ресурсов в рунет-даркнете, который прочно закрепился в инфраструктуре анонимных площадок. Этот магазин ориентирован на предоставление пользователям широкой базы данных, связанной с файлами, софтом, новостями и различными видами контента, включая темы, касающиеся взлома и безопасности.
Особенности работы системы Rutor
Система курирует доступ к огромному количеству информации и файлов, сохраняя дополнительную конфиденциальность и анонимность своих пользователей. Работа сервиса построена на использовании анонимной сети Rutor, что помогает свести к минимуму угрозы идентификации и утечки данных. За годы существования Rutor стал местом, где сохраняется важная история русскоязычного даркнета.
Rutor продолжает работать и предоставлять стабильный доступ к ресурсам, удовлетворяя потребности как новичков, так и опытных пользователей даркнета. Система построена таким образом, что каждый раздел страницы — будь то магазин, новости или инструкции по взлому — становится отдельной частью большого сообщества, в котором безопасность и возможность оставаться анонимным выходят на первый план.
Будущее платформы: вызовы и обещания
Ясно, что будущая деятельность Rutor потребует решения новых рисков, внедрения свежих подходов к безопасности и средств обхода ограничений. Следует помнить, что даже максимально анонимная среда не обеспечивает стопроцентную безопасность.
Этот сервис по-прежнему служит площадкой для информирования, обсуждений безопасности и отслеживания новшеств в даркнет-сообществе. Развитие технологий, расширение базы пользователей и появление новых возможностей делают Rutor одним из центров русскоязычного сообщества в сети.
– Сохранение анонимности
– Надёжность проведения операций
– Доступ к уникальной информации
– Защищённость коммуникаций
Rutor представляет собой ресурс с неповторимой историей, важный для пользователей, стремящихся к свободе, сохранению конфиденциальности и автономии от внешних ограничений в современном интернете.
Your comment is awaiting moderation.
Trip Tides Hub – Clear and appealing setup for travel ideas, very user-friendly.
Your comment is awaiting moderation.
Инвентаризация в 1С Бухгалтерия оформляется приказом и инвентаризационными описями. Выявленные излишки приходуются, недостачи списываются на виновных лиц. Если виновные не установлены, убыток относится на финансовые результаты. Программа формирует сличительные ведомости. Периодичность инвентаризации утверждается руководителем. Купить 1с
Your comment is awaiting moderation.
WishWarehouse Hub – Smooth navigation, items are categorized clearly and checkout is straightforward.
Your comment is awaiting moderation.
Mod Mosaic Selection – A curated modern mix that made exploring the site fun.
Your comment is awaiting moderation.
Современный электрокарнизы для штор в москве Prokarniz предлагает удобство управления шторами с помощью пульта.
Когда электрокарниз установлен, управление шторами доступно через пульт, приложение или голос.
Your comment is awaiting moderation.
casino hry online casino-cz-1.com .
Your comment is awaiting moderation.
Free online games https://1001.com.az/ for your phone and computer. Easy navigation, quick start, and a variety of genres with no downloads required.
Your comment is awaiting moderation.
Hallo an alle, die den Geruch von Farbe und den Klang klickender Teile lieben. https://das-aoshima.de/ erschafft kleine Wunder aus Plastik – vom kultigen Knight Rider bis zum legendaren DeLorean. Turen offnen sich, Lichter glimmen, Formen erwachen. Jedes Modell erzahlt Geschichten von Geschwindigkeit, Kino und Kindheit, eingefangen im Ma?stab 1:24.
Your comment is awaiting moderation.
Shop Trend Tally – Everything feels modern and easy to look through.
Your comment is awaiting moderation.
WireWharf Essentials – Clear design, navigation is smooth and overall experience is trustworthy.
Your comment is awaiting moderation.
cavaroline hub – Layout is clear, making it simple to browse the platform.
Your comment is awaiting moderation.
UEFA Champions League https://sampiyonlar-ligi.com.az/ matches, results, and live scores. See the schedule, standings, and draw for Europe’s premier club competition.
Your comment is awaiting moderation.
Современные Рулонные шторы открытого типа с мотором Prokarniz не только облегчают контроль освещенности в помещении, но и добавляют комфорта в ваш интерьер.
Мотор — ключевой компонент, позволяющий автоматически поднимать и опускать штору.
Your comment is awaiting moderation.
Moonet’s collection focuses on casual pieces with clean lines and comfortable fabrics. Ideal for those who appreciate simple, versatile style. Discover the range at https://themoonet.com.
Your comment is awaiting moderation.
Mod Merchant Finds – Clear product write-ups made it easy to know exactly what I wanted.
Your comment is awaiting moderation.
WinkWorthy Boutique – Cheerful layout, products are sorted neatly and browsing is smooth.
Your comment is awaiting moderation.
Бытовая химия с доставкой интернет магазин бытовой химии средства для уборки, стирки и ухода за домом. Широкий ассортимент, доступные цены и удобная оплата.
Your comment is awaiting moderation.
Visit Travel Trolley – Everything is arranged in a way that makes travel planning smooth.
Your comment is awaiting moderation.
Нужна бытовая химия? бытовая химия для дома моющие и чистящие средства, порошки и гели. Удобный заказ онлайн, акции и доставка по городу и регионам.
Your comment is awaiting moderation.
Афиша Лайв Арены впечатляет: рок-группа с мощным сетом, поп-дива с новой программой и электронный фестиваль. Подробнее по ссылке https://anotepad.com/notes/dc8n97w4
Your comment is awaiting moderation.
brixel trust network – Pages load quickly, with consistent branding that feels reliable and professional.
Your comment is awaiting moderation.
Лучшие подарки и сувениры брендирование логотипа нанесение логотипа, подарочные наборы, промо-продукция и деловые аксессуары для мероприятий и компаний.
Your comment is awaiting moderation.
«Инсис» в Екатеринбурге предлагают:
• интерактивное ТВ;
• быстрое подключение за 1 день;
• Подбор оптимального сочетания интернета и ТВ под ваши задачи;
• Проверку технической доступности по вашему адресу.
insis домашний интернет тарифы
интернет провайдер инсис тарифы – https://insis-internet-podkluchit.ru /
http://alt1.toolbarqueries.google.td/url?q=https://insis-internet-podkluchit.ru/
Интернет и телевидение от «Инсис» в Екатеринбурге 2ebfa8d
Your comment is awaiting moderation.
«СибСети» в Красноярске предлагают:
• пакет из 150+ ТВ каналов;
• Комплексный анализ покрытия сети в вашем доме
• Подбор оптимального сочетания интернета и ТВ под ваши задачи
• Проверку технической доступности по вашему адресу
• Грамотный монтаж роутера
• Фиксированные тарифы на весь срок обслуживания
интернет сибирские сети тарифы для компьютера
сибсети интернет в квартиру – http://internet-sibirskie-seti.ru/krasnoyarsk
https://clients1.google.com.ni/url?sa=t&url=https://internet-sibirskie-seti.ru/krasnoyarsk
Домашний интернет и ТВ от «СибСети» в Красноярске fa8dd87
Your comment is awaiting moderation.
Modern Marble Picks – I appreciate how unified everything looks across the site.
Your comment is awaiting moderation.
WinkWagon World – Bright and fun interface, pages load fast and shopping feels easy.
Your comment is awaiting moderation.
Trail Treasure Resources – Feels practical and rooted in real outdoor experience.
Your comment is awaiting moderation.
Нужен сувенир или подарок? логотипы подарки и сувениры для компаний и мероприятий. Бизнес-сувениры, подарочные наборы и рекламная продукция с персонализацией и доставкой.
Your comment is awaiting moderation.
Aablexema’s accessories and fashion items stand out for their originality and quality. Perfect for those who want to add personality to their look. Check out their offerings at https://theaablexema.com.
Your comment is awaiting moderation.
Погрузитесь в мир кино https://zonefilm.media с нашим онлайн-кинотеатром! Здесь каждый найдет фильмы для себя: от захватывающих блокбастеров и трогательных драм до мультфильмов для всей семьи. Удобный интерфейс, возможность смотреть онлайн на любом устройстве и постоянно обновляемая библиотека! Присоединяйтесь и наслаждайтесь!
Your comment is awaiting moderation.
Отличный магазин с отличным продуктом. Купить кокаин, бошки, гашиш Да мне 5 сообщений для лс нужно :Dа так месяц назад было все ровно)В целом о работе магазина – как клиент,я доволен!!!:good: Жалко тест профукал )
Your comment is awaiting moderation.
От симфонических проектов до indie-лирики — в Лайв Арене каждый найдёт концерт по душе. Сезон обещает быть насыщенным. Подробнее по ссылке https://worldevents.mystrikingly.com/blog/3f1242f77a1
Your comment is awaiting moderation.
Velvet Valley Showcase – Stylishly branded, pages load quickly, and everything feels expertly done.
Your comment is awaiting moderation.
Кент казино подходит для игроков с разным уровнем опыта. Новички быстро осваиваются благодаря логичной структуре сайта. Опытные пользователи ценят разнообразие игр и стабильную работу платформы – кент казино официальный сайт
Your comment is awaiting moderation.
brixel line guide – Clear service descriptions and a user-friendly site layout.
Your comment is awaiting moderation.
Explore WillowWhisper – Light and airy design, product information is thorough and browsing is enjoyable.
Your comment is awaiting moderation.
АА Все братишки, мне уже отослали сегодня, спасибо что успокоили! https://unachicacomotu.com Как то брал 25г реги, пришло быстро, но качество не впечатлило((оформил заказ жду. продавец общительный может все дело в кривых ручках?
Your comment is awaiting moderation.
Здарова народ!
Нашел интересную инфу.
Советую глянуть.
Подробности здесь:
блэкспрут зеркало
Мне зашло.
Your comment is awaiting moderation.
Rug Ripple Home – Cozy designs, product selection is simple and purchasing was fast and easy.
Your comment is awaiting moderation.
Petal Paradise – Welcoming vibe, shopping felt simple and satisfying.
Your comment is awaiting moderation.
Lock and Love creates jewelry inspired by love and connection, perfect for special moments. Their designs include locks, keys, and heart motifs to symbolize affection. Discover their collection at https://thelockandlove.com.
Your comment is awaiting moderation.
Mirstoria Selection – The store feels distinctive and thoughtfully designed.
Your comment is awaiting moderation.
Passport Pocket Treasures – Travel-ready items, site layout made shopping quick and easy.
Your comment is awaiting moderation.
Для современного и удобного управления шторами выбирайте электрокарнизы на окна прокарниз
электрокарнизы купить в магазине .
Электрокарнизы становятся все более популярными обусловлена их удобством и функциональностью. С их помощью можно автоматизировать управление шторами что особенно актуально для больших окон или труднодоступных мест. Электрокарнизы обладают рядом преимуществ, а именно: комфорт, удобство и экономия времени. Больше не нужно тратить время и силы на ручное управление шторами, особенно если их много или они расположены высоко. Электрокарнизы могут быть интегрированы в систему “умный дом”, позволяет управлять ими с помощью смартфона или голосовых команд. Это особенно ценно для тех, у кого есть ограничения в передвижении.
**Выбор электрокарниза: На что обратить внимание**
Важно учитывать ряд факторов при выборе электрокарниза: длину карниза, вес штор и тип управления. Важно, чтобы длина выбранного карниза соответствовала размеру вашего окна и способен выдержать вес ваших штор. Существуют различные типы управления: с помощью пульта дистанционного управления, настенного выключателя или через приложение на смартфоне. От надежности производителя зависит качество продукта и доступность сервисного обслуживания.
**Установка и настройка электрокарниза**
Установка электрокарниза может быть выполнена самостоятельно если у вас есть необходимые навыки и инструменты. Однако, если вы не обладаете достаточными навыками, лучше обратиться к профессионалам. Важной частью настройки является определение конечных положений штор, скорости движения и других параметров. Следуя инструкции, вы сможете легко настроить карниз в соответствии со своими потребностями.
**Электрокарниз: Долговечность и уход**
Используйте мягкую ткань или пылесос с мягкой щеткой.
Your comment is awaiting moderation.
Visit Tool Tower – Clean organization makes it simple to browse the tools.
Your comment is awaiting moderation.
medved20-10 не еби людям голову!!!!!!!!!!! микс отличный, но на час-1,5! Не больше…… мефедрон Взял в Москве, ну что могу сказать, или толерантность спала(месяц не курил), или товар лютый, но убрало с первого раза хорошо, потом прикурился, ничего так.Вчера оплатил, сегодня получил бьющийся трек. Так что все норм. Разговор в скайпе длился 30мин, я оплатил и через 2 часа мне уже выслали посылку. Осталось проверить кач-во фашки. Если все норм, сработаемся с конторой. Все пришло. всё на высоте. на данный момент более сказать немогу.
Your comment is awaiting moderation.
Spa Summit Collection – Calm and inviting, navigation feels intuitive and shopping was seamless.
Your comment is awaiting moderation.
Tea Terminal Essentials – Welcoming feel, products are clearly shown and buying process is effortless.
Your comment is awaiting moderation.
Live Арена приглашает на концерты и шоу, а купить билеты можно всего в несколько кликов. Удобная навигация и прозрачные цены. Подробнее здесь https://rentry.co/5ucm8n85
Your comment is awaiting moderation.
Проект 7k casino ориентирован на стабильность и удобство. Это делает его подходящим вариантом для регулярной онлайн игры – 7k casino зеркало
Your comment is awaiting moderation.
Pivoria Collection – Minimal design approach, browsing felt light and easy.
Your comment is awaiting moderation.
Vanta Valley Showcase – Calm and neat site, exploring products was a smooth experience.
Your comment is awaiting moderation.
инъекции в косметологии салон косметологии
Your comment is awaiting moderation.
Pure Pavilion Boutique – Inviting range, shopping and finding items was simple and smooth.
Your comment is awaiting moderation.
WillowWharf Network – Calm and organized, shopping experience feels simple and enjoyable.
Your comment is awaiting moderation.
Silver Scout Picks – Fun products, categories are easy to explore and checkout process was quick.
Your comment is awaiting moderation.
На днях брал небольшой опт, был приятно удивлен подходом и предложением тс, товар еще не пробовали ,но забрал все ровно, по ходу отпишу в теме за качество товара, пока же могу сказать, что жалею , что раньше не работал с данным тс! Успехов, благодарю за сервис!!! Купить наркотики | Где купить наркотики? Нужно 5 сообщений что бы написать модэратору, не обесутьпо теме трип БРО! продукт – прет дико и жестко, но по сути ничего интересного, цена в 2 тыр себя полностью оправдывает. Эдакий бычий кайф. Если вам нравится трястись и стучать зубами – вы попали по адресу. Во всех остальных случаях – нахер-нахер. Слабенькая 3/5
Your comment is awaiting moderation.
Ring Rivulet Store – Clean design, selecting items is easy and checkout worked without issues.
Your comment is awaiting moderation.
Discount Central – Great value items, the website is user-friendly and visually appealing.
Your comment is awaiting moderation.
trusted brixel portal – Clear content layout makes understanding bonds effortless.
Your comment is awaiting moderation.
Party Parcel Hub – Lively collection, shopping experience was quick and straightforward.
Your comment is awaiting moderation.
Spark Storefront Studio – Modern look, browsing categories is easy and checkout was smooth today.
Your comment is awaiting moderation.
Swift Stall Treasures – Pleasant interface, navigating products is simple and purchasing was seamless.
Your comment is awaiting moderation.
Спасибо Магазину за долгую и хорошую работу. Купить кокаин, бошки, гашиш А в сочи есть магазинывсе ровно тут ? бля ты всех тут удивил!!! а мы думали тебе нужен реагент для подкормки аквариумных рыбок)))
Your comment is awaiting moderation.
Oak Opal – Warm, inviting layout makes exploring the site feel peaceful and effortless.
Your comment is awaiting moderation.
Tidy Treasure Space – The uncluttered look makes browsing comfortable.
Your comment is awaiting moderation.
MirStella Boutique – Well-organized layout, simple to navigate, and detailed product images stand out.
Your comment is awaiting moderation.
Pillow Pier Deals – Cozy presentation, shopping and payment felt effortless.
Your comment is awaiting moderation.
Сайт Rutor — пользующийся доверием «старожил» даркнета в русскоязычном интернете с системой сокрытия личности и удобным интерфейсом для анонимных сделок через Rutor.Rutor: Ветеран русскоязычного даркнета
www rutor info считается одним из наиболее популярных и старых ресурсов в рунет-даркнете, который прочно закрепился в инфраструктуре анонимных площадок. Основное направление работы ресурса — предоставление обширной базы файлов, утилит, новостей и прочего контента, в том числе, связанного с темами безопасности и взлома.
Главные аспекты функционирования Rutor
Данная система обеспечивает доступ к значительным объемам данных и файлов, гарантируя при этом повышенную анонимность и защиту пользователей. Работа сервиса построена на использовании анонимной сети Rutor, что помогает свести к минимуму угрозы идентификации и утечки данных. За годы существования Rutor стал местом, где сохраняется важная история русскоязычного даркнета.
Rutor продолжает работать и предоставлять стабильный доступ к ресурсам, удовлетворяя потребности как новичков, так и опытных пользователей даркнета. Система построена таким образом, что каждый раздел страницы — будь то магазин, новости или инструкции по взлому — становится отдельной частью большого сообщества, в котором безопасность и возможность оставаться анонимным выходят на первый план.
Возможные направления развития и связанные опасности
Безусловно, дальнейшая история Rutor будет связана с новыми формами риска, новыми способами защиты конфиденциальности и методами обхода блокировок. Следует помнить, что даже максимально анонимная среда не обеспечивает стопроцентную безопасность.
Этот сервис по-прежнему служит площадкой для информирования, обсуждений безопасности и отслеживания новшеств в даркнет-сообществе. Технический прогресс, рост числа участников и новые функциональные решения превращают Rutor в ключевой узел русскоязычного интернет-сообщества.
– Сохранение анонимности
– Гарантия безопасности сделок
– Открытый доступ к специализированному контенту
– Защищённость коммуникаций
Rutor — это платформа с уникальной историей, и её опыт стоит принимать во внимание всем, кто ценит собственную свободу, приватность и независимость от внешней цензуры в современном цифровом мире.
Your comment is awaiting moderation.
ProteaPex Showcase – Top-quality range, ordering was seamless and product info was helpful.
Your comment is awaiting moderation.
Silvaneo Market – Stylish collection, browsing products was intuitive and the buying process was quick.
Your comment is awaiting moderation.
Visit Vanilla Vendor – Clean design, descriptions were clear, making selection effortless.
Your comment is awaiting moderation.
Wervina Network – Neat design, first visit was pleasant and layout is user-friendly.
Your comment is awaiting moderation.
Очень странно, что 203 не растворился в ацетоне. Сколько брал ацика на 10 гр основы? кокаин Всем доброго времени суток!!!ВЫ ЛУЧШИЕ! пробуй 4фа, 2-dpmp их кушать надо или нюхать? пробовал хоть раз фаер спит
Your comment is awaiting moderation.
Casino 7k подходит для игроков, которые ищут простую и понятную платформу. Регистрация и вход в аккаунт не требуют сложных действий. Интерфейс выполнен в современном стиле и не перегружен лишними элементами. Такой подход делает игру удобной – 7к казино вход
Your comment is awaiting moderation.
Raynverve Market – Pleasing layout, navigating products is intuitive and shopping feels relaxed.
Your comment is awaiting moderation.
Orbit Order Collection – Easy checkout steps, items were exactly as listed, highly satisfied.
Your comment is awaiting moderation.
Авторский блог https://blogger-tolstoy.ru о продвижении в Телеграм. Свежие гайды, проверенные стратегии и полезные советы по раскрутке каналов, чатов и ботов. Подробно о том, как увеличить аудиторию, повысить вовлеченность и эффективно монетизировать проекты в мессенджере Telegram.
Your comment is awaiting moderation.
Swift Shoppery Hub – Smooth experience, items are well displayed and buying felt easy.
Your comment is awaiting moderation.
Spark Storefront Essentials Online – Fresh layout, browsing categories is simple and checkout was seamless.
Your comment is awaiting moderation.
Parcel Poppy Deals – Delivery details were clear, packaging tidy, and checkout was effortless.
Your comment is awaiting moderation.
номер отправления, по нему отслеживается посылка курьерской службы. бошки, марихуану Это юмор.Как магазин порядочный ПРИВЕТ ВСЕМ:НУ ЧТО Ж ТЫ БРО ТАК ОБЕЗНАДЕЖИЛ МЕНЯ ПО СКАЙПУ И В КОМЕНТАРИЯХ НАПИСАЛ ЧТО ОТПРАВИЛ MXE А НА ПАКЕТЕ НАПИСАНО RCS И ЧТО МНЕ КУРИТЬ ТЕПЕРЬ НАЧАТЬ ЗАЧЕМ ГОВОРИТЬ ТО ЧТО НЕ ДЕЛАЕШЬ КАК САМ СЧИТАЕШЬ ?
Your comment is awaiting moderation.
Платформа Rutor давно известна на русскоязычном даркнете, благодаря своей заслуженной репутации, анонимизации пользователей и инструментам надёжной передачи средств в Rutor.Rutor — старейший представитель даркнета на русском языке
rutor это считается одним из наиболее популярных и старых ресурсов в рунет-даркнете, который прочно закрепился в инфраструктуре анонимных площадок. Данный сервис специализируется на доступе к широчайшему ассортименту софта, файлов, новостей и разнообразных материалов, охватывающих вопросы взлома и защиты.
Как устроена система работы Rutor
Механизм работы ресурса позволяет пользователям получать доступ к большим массивам данных и файлов, при этом обеспечивая максимальную приватность и анонимность. Особенность сервиса в том, что он работает через сеть Rutor, что существенно снижает риск идентификации и утечки данных. За долгое время работы Rutor стал своего рода летописью для даркнета на русском языке.
Rutor продолжает работать и предоставлять стабильный доступ к ресурсам, удовлетворяя потребности как новичков, так и опытных пользователей даркнета. Архитектура ресурса предусматривает, что любые разделы — магазин, новостной блок или гайды по взлому — являются составляющими единой системы, где превалируют безопасность и анонимность.
Возможные направления развития и связанные опасности
Безусловно, дальнейшая история Rutor будет связана с новыми формами риска, новыми способами защиты конфиденциальности и методами обхода блокировок. Следует помнить, что даже максимально анонимная среда не обеспечивает стопроцентную безопасность.
Платформа продолжает быть ресурсом для получения расширенной информации, обмена мнениями по безопасности и мониторинга новшеств в сферах даркнета. Технический прогресс, рост числа участников и новые функциональные решения превращают Rutor в ключевой узел русскоязычного интернет-сообщества.
– Принцип анонимности
– Безопасность транзакций
– Возможность получения эксклюзивных данных
– Конфиденциальность общения
Rutor представляет собой ресурс с неповторимой историей, важный для пользователей, стремящихся к свободе, сохранению конфиденциальности и автономии от внешних ограничений в современном интернете.
Your comment is awaiting moderation.
trust resource portal – Clean interface with straightforward information that inspires confidence.
Your comment is awaiting moderation.
Pepper Pavilion Browse – Enjoyable product mix, site navigation works effortlessly.
Your comment is awaiting moderation.
Shore Stitch Picks – Lovely selection, product details are clear and shopping feels effortless.
Your comment is awaiting moderation.
Prism Viva Market – Modern assortment, navigating items is easy and enjoyable.
Your comment is awaiting moderation.
Всем привет!
Нарыл любопытную тему.
Думаю, многим будет полезно.
Подробности здесь:
блэкспрут сайт
Как вам?
Your comment is awaiting moderation.
Tidy Treasure Essentials – Calm layout that makes shopping more enjoyable.
Your comment is awaiting moderation.
Explore WellnessWharf – Wellness tips are engaging, site is easy to navigate and visually clean.
Your comment is awaiting moderation.
Urban Urn Finds Online – Attractive design, items stood out, and navigating the site was simple.
Your comment is awaiting moderation.
Ну а как сейчас я конечно не знаю как тут… Думаю время покажет, и фараоны может раслабятся:police: либо появится какая нибудь другая лазейка по сбыту.. https://doctor-filatova.ru Ребята работают ровно, оператор адекватный все подскажет и поможет) С доставкой тоже не было проблем)))и вот я решил зайти на ветку доверенных магазинов! и почему то решил ткнуть именно на ссылку чемикл микс! захожу дыбанул на ценник, устроило и даже очень! так же порадовало то что тут делают отправку! а это значит то что если товар отправят то ты его 100% получишь! главная особенность магазина в том что отправка делается от 5грамм 🙂 а это значит то что я смогу и опробывать товар и убидится в качестве товара, и в надежности магазина! Ровной дороги в вашем бизе на просторах РЦ 😉
Your comment is awaiting moderation.
Mint Maven Finds – The selection feels fresh and fashionable without pushing the budget.
Your comment is awaiting moderation.
Hallo bei https://das-bosca.de/. Die Auswahl reicht von elektrischen Fondues uber Raclette-Sets bis zu Pizza- und Schneidewerkzeugen. Fondue- und Raclette-Topfe sitzen stabil auf dem Tisch, die Messer schneiden Kase und Fleisch prazise, Boards tragen Snacks oder Tapas. Grillplatten, Pizzaheber und Pizzasteine erweitern die Moglichkeiten, alles aus robustem Holz und Edelstahl, einfach zu handhaben, direkt auf dem Tisch einsetzbar. Jede Komponente fuhlt sich vertraut an und erleichtert das gemeinsame Essen.
Your comment is awaiting moderation.
Raynora Spot – Easy interface, finding products is quick and checkout went without issues.
Your comment is awaiting moderation.
Orbit Opal Selection – Sleek style, images look appealing and descriptions are helpful.
Your comment is awaiting moderation.
Sunny Shopline Online Finds – Cheerful interface, products are easy to find and shopping was quick.
Your comment is awaiting moderation.
Soothesail Hub Picks – Smooth and inviting, navigation is easy and checkout felt fast.
Your comment is awaiting moderation.
http://letmefix.lt/index.php?title=1%D1%85%D0%91%D0%B5%D1%82%20%D0%9F%D1%80%D0%BE%D0%BC%D0%BE%D0%BA%D0%BE%D0%B4%20%D0%BD%D0%B0%20%D0%A1%D0%B5%D0%B3%D0%BE%D0%B4%D0%BD%D1%8F%202026:%201XBRO200
Your comment is awaiting moderation.
Novalyn Selection – Clean design works perfectly, items stand out without distraction.
Your comment is awaiting moderation.
Pantry Pebble Treasures – Adorable setup, checkout went perfectly.
Your comment is awaiting moderation.
Rutor — это уважаемый на darknet-форумах сайт с развитой историей, защищённым функционалом и анонимной «входной» системой для операций через Rutor.Rutor: Ветеран русскоязычного даркнета
ру тор форум — это один из самых известных и старейших сервисов в русскоязычном даркнете, который стал неотъемлемой частью экосистемы анонимных ресурсов. Данный сервис специализируется на доступе к широчайшему ассортименту софта, файлов, новостей и разнообразных материалов, охватывающих вопросы взлома и защиты.
Главные аспекты функционирования Rutor
Система курирует доступ к огромному количеству информации и файлов, сохраняя дополнительную конфиденциальность и анонимность своих пользователей. Главное преимущество платформы — интеграция с сетью Rutor, что значительно уменьшает вероятность раскрытия личности и потери конфиденциальной информации. С течением времени площадка превратилась в важный архив событий и истории русскоязычного даркнета.
Платформа функционирует стабильно, обеспечивая равный доступ для новых и опытных участников даркнета. Каждый из разделов сайта — магазин, новостные ленты или руководства по взлому — образуют отдельную звено в масштабном сообществе, где главными ценностями выступают конфиденциальность и защита анонимности.
Возможные направления развития и связанные опасности
Ясно, что будущая деятельность Rutor потребует решения новых рисков, внедрения свежих подходов к безопасности и средств обхода ограничений. Пользователи должны осознавать, что даже самая анонимная система не гарантирует полной безопасности.
Сервис остается местом, где можно получать дополнительную информацию, обсуждать вопросы безопасности, следить за новостями и инновациями в области даркнета. Развитие технологий, расширение базы пользователей и появление новых возможностей делают Rutor одним из центров русскоязычного сообщества в сети.
– Анонимность
– Гарантия безопасности сделок
– Доступ к уникальной информации
– Защищённость коммуникаций
Уникальный путь Rutor делает платформу значимой для тех, кто высоко ценит свободу, личную приватность и защиту от внешнего контроля в цифровую эпоху.
Your comment is awaiting moderation.
Хотелось бы услышать мнение продавца, по этому поводу https://orletsky.ru спасибо ответили…. доволенКачество товара на 5+,вот только почта подвела привезли на 5й день. сделал заказ,оплатил,на следующий день получил трек – всё чётко,так держать! успехов и процветания вашей компании!
Your comment is awaiting moderation.
Peony Port Shopping – Beautiful presentation, item details are easy to digest.
Your comment is awaiting moderation.
Shop Serenity Central – Peaceful interface, finding items was a breeze and checkout went smoothly.
Your comment is awaiting moderation.
Prism Vane Collection – Stylish options, product visuals are detailed and browsing is smooth.
Your comment is awaiting moderation.
Проект Kent casino предлагает сбалансированный подход к онлайн азартным играм. Платформа сочетает простоту использования и широкий функционал. Такой формат подходит для регулярной игры: kent casino скачать
Your comment is awaiting moderation.
WearWhimsy Finds Online – Playful options, navigation is simple and site feels enjoyable.
Your comment is awaiting moderation.
Tervina Shop Page – Clear navigation, good-looking items, and prices feel reasonable.
Your comment is awaiting moderation.
Tulip Trade Center – Clean interface with products easy to spot, checkout is safe.
Your comment is awaiting moderation.
ну если ты регу получил! сделай опробуй! и отпиши прет тебя или нет! кокаин Трек есть +Бонус от души как придет отпишуВсем привет с наступивщими,давно не работал с этим магазином,подскажите как у него работа все ттакже четко? Пожалуйста :ok: Спасибо за отзыв.
Your comment is awaiting moderation.
Концерты, ледовые шоу, фестивали и премии — всё это проходит на Live Арене. Просторный зал, передовые технологии и комфорт делают площадку одной из лучших в столице. Подробнее здесь https://justpaste.it/j5y84
Your comment is awaiting moderation.
Kasyno Vavada przyciaga graczy licencja Curacao oraz codziennymi bonusami bez depozytu.
Po szybkiej rejestracji kod promocyjny daje darmowe spiny na topowych slotach z wysokim RTP.
Turnieje z pula nagrod i rankingami motywuja do aktywnej gry, a blyskawiczne wyplaty buduja zaufanie.
Aktualne lustra omijaja blokady, wiec dostep do konta pozostaje stabilny 24/7.
Sprawdz najnowsze promocje i instrukcje aktywacji kodu tutaj: cashback vavada.
Graj odpowiedzialnie i ustaw limity bankrolu, aby rozrywka pozostala bezpieczna.
Your comment is awaiting moderation.
Shop Raventia – Modern layout, products are easy to find and shopping was enjoyable.
Your comment is awaiting moderation.
Sunny Shipment Essentials – User-friendly layout, items arrived fast and checkout worked effortlessly.
Your comment is awaiting moderation.
Soap Sonder Hub Picks – Clean and bright, navigation feels intuitive and payment went without issues.
Your comment is awaiting moderation.
Казино 7к предлагает разнообразие игровых автоматов от популярных провайдеров. Игроки могут выбирать между классическими слотами и современными видеоиграми с бонусными функциями, 7к казино официальный сайт
Your comment is awaiting moderation.
Orbit Olive Store – Clear layout with eye-catching design, makes choosing products straightforward.
Your comment is awaiting moderation.
Онлайн казино Kent предлагает разнообразные слоты с разной тематикой и механиками. Игровая библиотека регулярно обновляется, что поддерживает интерес игроков. Платформа подходит как для коротких игровых сессий, так и для длительной игры: kent casino вход
Your comment is awaiting moderation.
Novalyn Essentials – Simple layout lets the products take center stage with a clean aesthetic.
Your comment is awaiting moderation.
Mint Marketry Selection – Fast navigation and a checkout that didn’t raise any concerns.
Your comment is awaiting moderation.
Магазин Rutor уже долгие годы поддерживает репутацию качественного сервиса благодаря защищённой системе, анонимности и обслуживанию сделок в Rutor.Rutor — старейший представитель даркнета на русском языке
рутор пародия зеркало — это один из самых известных и старейших сервисов в русскоязычном даркнете, который стал неотъемлемой частью экосистемы анонимных ресурсов. Основное направление работы ресурса — предоставление обширной базы файлов, утилит, новостей и прочего контента, в том числе, связанного с темами безопасности и взлома.
Как устроена система работы Rutor
Механизм работы ресурса позволяет пользователям получать доступ к большим массивам данных и файлов, при этом обеспечивая максимальную приватность и анонимность. Работа сервиса построена на использовании анонимной сети Rutor, что помогает свести к минимуму угрозы идентификации и утечки данных. За долгое время работы Rutor стал своего рода летописью для даркнета на русском языке.
Rutor поддерживает стабильную работу, позволяя и новичкам, и опытным пользователям использовать предоставляемые сервисы. Архитектура ресурса предусматривает, что любые разделы — магазин, новостной блок или гайды по взлому — являются составляющими единой системы, где превалируют безопасность и анонимность.
Перспективы и риски
Нет сомнений, что в дальнейшем Rutor столкнётся с новыми угрозами, инновационными способами охраны приватности и методами преодоления блокировок. Следует помнить, что даже максимально анонимная среда не обеспечивает стопроцентную безопасность.
Платформа продолжает быть ресурсом для получения расширенной информации, обмена мнениями по безопасности и мониторинга новшеств в сферах даркнета. Технический прогресс, рост числа участников и новые функциональные решения превращают Rutor в ключевой узел русскоязычного интернет-сообщества.
– Принцип анонимности
– Гарантия безопасности сделок
– Возможность получения эксклюзивных данных
– Обеспечение приватности взаимодействий
Rutor представляет собой ресурс с неповторимой историей, важный для пользователей, стремящихся к свободе, сохранению конфиденциальности и автономии от внешних ограничений в современном интернете.
Your comment is awaiting moderation.
fiorvyn.shop – Gorgeous high-quality items that make shopping so easy and enjoyable.
Your comment is awaiting moderation.
SerumStation Essentials – Minimalist design, products are well listed and purchasing was simple.
Your comment is awaiting moderation.
Из аськи вышел и даже не ответил… *( Купить наркотики | Где купить наркотики? добра всем бро,оплатил заказ неделю назад,на след день дали трек,трек до сих пор в базе не бьётся и посылочка не идёт…тс на письма не отвечает…вобщем чтот печкльно както,обычно 3 дня идёт(Хотели делать 1к15 – 1к10, но в итоге всё замесили 1к12. Я бы не сказал, что сильно убивает, но люди были довольны. Пипеточку хлоп:killmyself: и хорошо минут на 40, поэтому скоро перешёл на трубку и курил по пол полки за раз, отчего угарал от роликов MineCraft. У данного сллера только легал. Все проверено.
Your comment is awaiting moderation.
Jewelry Spot – Tasteful pieces, navigating the store is smooth and enjoyable.
Your comment is awaiting moderation.
Hey! Hier geht es um mehr als nur Farbe – https://das-bondex.de/ schutzt, nahrt und lasst Holz atmen. Ob wetterfeste Lasuren, seidig glanzende Lacke oder tief pflegende Ole, jede Formel ist gemacht, um Regen, Sonne und Zeit zu trotzen. Fur Zaune, Terrassen, Gartenhauser, fur alles, was drau?en steht und Charakter hat. Bondex halt, was Natur verspricht – Bestandigkeit mit Herz und Hand.
Your comment is awaiting moderation.
Prism Porter Central – Modern design, navigating the store and selecting products felt effortless.
Your comment is awaiting moderation.
Pantry Parlor Deals – Cozy setup, finding utensils and gadgets was effortless.
Your comment is awaiting moderation.
casino cz casino cz .
Your comment is awaiting moderation.
WatchWhisper Market – Clean and simple, watches are easy to view and pages load quickly.
Your comment is awaiting moderation.
Нужен стим аккаунт? общий аккаунты стим доступ к библиотеке игр по выгодной цене. Совместное использование, подробные условия, инструкции по входу и рекомендации для комфортной игры.
Your comment is awaiting moderation.
Truvora Collection – Feels organized, reliable, and easy to explore.
Your comment is awaiting moderation.
Кому-нибудь отправили сегодня трек? https://an-sd.ru кто брал закладками в этом магазе в МСК что скажите?Первый раз брал у этого магазина,сразу же что то не то,если всё будет Ок,буду брать дальше,в принцыпе со всеми бывает( Смело таримся!! Нипожалеете
Your comment is awaiting moderation.
Cool Tech Corner – Solid lineup of items that don’t feel gimmicky.
Your comment is awaiting moderation.
Suave Shelf Online – Sleek layout, products are displayed clearly and shopping felt quick.
Your comment is awaiting moderation.
SnugNook Boutique – Welcoming design, shopping is easy and payment process is quick.
Your comment is awaiting moderation.
Hey everyone! If you’re planning an outdoor adventure, check out https://mycamelcrown.com/. You’ll find comfy, durable gear like hiking shoes, jackets, and even camping tents. They blend style with functionality, so you can stay comfy and look good while exploring. Definitely worth a look if you love the outdoors!
Your comment is awaiting moderation.
RareWrapp Central – Modern layout, shopping is intuitive and enjoyable from start to finish.
Your comment is awaiting moderation.
Мессенджер и магазин Rutor признан одним из самых безопасных ресурсов в русском даркнете, благодаря анонимности системы, конфиденциальности и поддержке платежей в Rutor.Rutor: Ветеран русскоязычного даркнета
ru torg зеркало считается одним из наиболее популярных и старых ресурсов в рунет-даркнете, который прочно закрепился в инфраструктуре анонимных площадок. Основное направление работы ресурса — предоставление обширной базы файлов, утилит, новостей и прочего контента, в том числе, связанного с темами безопасности и взлома.
Главные аспекты функционирования Rutor
Данная система обеспечивает доступ к значительным объемам данных и файлов, гарантируя при этом повышенную анонимность и защиту пользователей. Работа сервиса построена на использовании анонимной сети Rutor, что помогает свести к минимуму угрозы идентификации и утечки данных. За долгое время работы Rutor стал своего рода летописью для даркнета на русском языке.
Rutor продолжает работать и предоставлять стабильный доступ к ресурсам, удовлетворяя потребности как новичков, так и опытных пользователей даркнета. Каждый из разделов сайта — магазин, новостные ленты или руководства по взлому — образуют отдельную звено в масштабном сообществе, где главными ценностями выступают конфиденциальность и защита анонимности.
Перспективы и риски
Безусловно, дальнейшая история Rutor будет связана с новыми формами риска, новыми способами защиты конфиденциальности и методами обхода блокировок. Пользователи обязаны понимать, что ни одна анонимная платформа не может дать абсолютную защиту.
Платформа продолжает быть ресурсом для получения расширенной информации, обмена мнениями по безопасности и мониторинга новшеств в сферах даркнета. Технический прогресс, рост числа участников и новые функциональные решения превращают Rutor в ключевой узел русскоязычного интернет-сообщества.
– Принцип анонимности
– Гарантия безопасности сделок
– Доступ к уникальной информации
– Защищённость коммуникаций
Rutor представляет собой ресурс с неповторимой историей, важный для пользователей, стремящихся к свободе, сохранению конфиденциальности и автономии от внешних ограничений в современном интернете.
Your comment is awaiting moderation.
Семейная афиша Уголка дедушки Дурова включает экскурсионные представления и детские спектакли, которые знакомят зрителей с историей театра и миром сказки в доступной форме. Подробнее здесь: https://telegra.ph/Afisha-Ugolka-dedushki-Durova-samye-interesnye-spektakli-i-ehkskursii-sezona-12-21
Your comment is awaiting moderation.
Лучшее онлайн казино? покерок онлайн-покер, турниры и кэш-игры для игроков разного уровня. Удобный интерфейс, доступ с ПК и мобильных устройств, регулярные события и акции.
Your comment is awaiting moderation.
fiorenzaa.shop – A great mix of fashion and home decor, I always find something new and exciting.
Your comment is awaiting moderation.
Nova Aisle Essentials – Plenty of choices, and filters made it easy to find what I wanted quickly.
Your comment is awaiting moderation.
SeedStation Finds – Pleasant design, browsing categories is simple and checkout worked perfectly.
Your comment is awaiting moderation.
Prime Pickings Browse – Excellent range, product details were helpful and easy to understand.
Your comment is awaiting moderation.
Portside Store – Logical layout, checkout took very little time.
Your comment is awaiting moderation.
он чють чють с желта бошки, марихуану Насчет доставки стало не очень после того как перестали работать с спср, но особой разницы не заметил.Пришёл 307. Попробывал 1 к 20, ниочём.. Курнул кропаль чистого, также ниочём…хз в чём дело. Сегодня попробую 1к10 можт чтот почуствую А то я запутался совсем, везде по разному пишут.
Your comment is awaiting moderation.
Актуальный адрес зеркала на сегодня позволяет войти на платформу без задержек. На вавада зеркало сегодня все функции доступны сразу после перехода по ссылке. Личный кабинет загружается с полной историей ставок и транзакций. Бонусный баланс отображается корректно, включая активные вагеры. Зеркало — самый быстрый способ вернуться к игре при проблемах с основным доменом.
Your comment is awaiting moderation.
Palvion Treasures – Pleasant shopping journey, product pages are clear and informative.
Your comment is awaiting moderation.
“???????????????????????????!https://michealwu-jp.com/
?MICHEALWU?????????????????????????????????????????????????????????????????????????????????????????????????????MICHEALWU?????????????”
Your comment is awaiting moderation.
Mint Mariner Shop – The layout made it simple to find something useful fast.
Your comment is awaiting moderation.
хороший магазин,всё на красоте и качество и кол-во:) продолжайте в том же духе бошки, марихуану Да шляпа какая-то, менеджер работает из рук вон плохо, и валит все на курьера. Абсолютная неразбериха, понять, кто и в каком месте накосячил достоверно – просто невозможно, но тем не менее, факт остается фактом: больше недели я ожидаю отправку заказа, и это только отправка, причем, разумеется, с полной предоплатой. Общались с манагером через скайп и через аську, очень муторно, сообщения теряются, на оставленные мессаги в оффлайне не отвечает, да и в онлайне появляется довольно редко.все пришло.пока не пробовал.конспирация на высшем уровне.спасибо фоту убрал, не будем палить конспирацию, всё понятно… Свяжитесь с магазином, я думаю решите вопрос с конпенсацией
Your comment is awaiting moderation.
Suave Basket Corner – Stylish and intuitive, navigation is simple and checkout was quick.
Your comment is awaiting moderation.
SleekSelect Picks – Streamlined layout, product images are clear and shopping feels effortless.
Your comment is awaiting moderation.
Для современного интерьера идеально подойдет электрокарнизы на окна 7 (499) 638-25-37 , который обеспечит удобство и стиль в управлении шторами.
Данное устройство облегчает повседневное использование штор. Он особенно удобен в больших помещениях, где нужно одновременно регулировать множество полотен. Кроме того, электрокарниз может быть интегрирован в систему “умный дом”.
Принцип работы электрокарниза основан на электрическом приводе, который движет гардины по направляющим. Пульт дает возможность дистанционного управления шторами, что очень практично. Это делает устройство идеальным для использования в офисах, гостиницах и домах с современным дизайном. Автоматический привод позволяет быстро и легко регулировать положение штор.
Выбор электрокарниза зависит от размеров окна, веса штор и типа крепления. Мощность мотора должна соответствовать весу ткани для надежной работы. Также стоит обратить внимание на материал направляющей и качество комплектующих. Использование прочных комплектующих обеспечивает устойчивость электрокарниза.
Установка электрокарниза требует аккуратности и точного соблюдения инструкции. Профессиональная установка обеспечит правильную работу системы и долгий срок эксплуатации. Регулярное техническое обслуживание поможет продлить срок службы устройства. Периодическое техническое обслуживание поддерживает электрокарниз в рабочем состоянии.
Спин-шаблон:
Это позволяет включать электрокарниз в комплексную систему управления жилищем.
Your comment is awaiting moderation.
free spiny dnes casino-cz-1.com .
Your comment is awaiting moderation.
clovecrest.shop – Great shopping experience with a huge variety of items to choose from.
Your comment is awaiting moderation.
Осваиваешь арбитраж? https://corsairmedia.ru поможет разобраться в инструментах, выбрать первую партнерку и избежать типичных ошибок новичков. Подробные обзоры от практиков: плюсы, минусы и реальные цифры заработка без воды.
Your comment is awaiting moderation.
Quoravia Central Hub – Stylish and clean, categories are simple to explore and checkout went perfectly.
Your comment is awaiting moderation.
fetchfolio.shop – Great accessories for every taste, the selection is always spot-on.
Your comment is awaiting moderation.
Nook Narrative Showcase – Products feel thoughtfully chosen, and the story element enhances the experience.
Your comment is awaiting moderation.
ScreenStride Gems – User-friendly layout, exploring items was effortless and checkout was fast.
Your comment is awaiting moderation.
Prime Pickings Picks – Lots of options, product details were helpful and easy to understand.
Your comment is awaiting moderation.
Plaza Product Corner – Enjoyed the category flow, images are clear and descriptions are useful.
Your comment is awaiting moderation.
Hallo an alle, die Taschen lieben. Bei https://bestou.de/ glitzert jede Form ein bisschen anders – mal mit funkelnder Geometrie, mal mit ruhiger Lederoptik. Gro?e Shopper, zarte Clutches, wandelbare Umhangetaschen – sie alle halten kleine Welten zusammen. Fur Arbeit, Spaziergang oder Abendlicht, jede begleitet den Tag mit Glanz und Gefuhl.
Your comment is awaiting moderation.
Контакты указаны у меня в подписе и в разделе “Наши Контакты” мефедрон вчера сделал заказ. оплатил. жду трек5 iai вообще говорят “беспонтовый” продукт… сколько народу его от рaзных сeлеров не пробовало – всё одно муть… Палево палево, с сайтом чооо??
Your comment is awaiting moderation.
После новогоднего сезона «Уголок дедушки Дурова» остаётся одним из самых посещаемых семейных театров: спектакли, музей и экскурсии идут в регулярном режиме. Подробнее здесь: https://kulturologia.ru/blogs/041225/66485/
Your comment is awaiting moderation.
биткоин купить
Your comment is awaiting moderation.
1xbet peru codigo promocional
Your comment is awaiting moderation.
Palvanta Essentials – Stylish items, browsing descriptions is effortless and clear.
Your comment is awaiting moderation.
Stitchery Treasures – Fresh design, finding products is simple and checkout was quick.
Your comment is awaiting moderation.
Современные карнизы с электроприводом и пультом управления купить прокарниз обеспечивают максимальный комфорт и стиль в вашем интерьере.
Карнизы с электроприводом становятся все популярнее в современных интерьерах.
Your comment is awaiting moderation.
Skynvanta Picks – Stylish offerings, navigation is intuitive and shopping experience is very enjoyable.
Your comment is awaiting moderation.
Opal Ornate Catalog – Gorgeous collection, site is easy to navigate, and the quality impression is strong.
Your comment is awaiting moderation.
Всем привет данной ветки:hello: История токова… бошки, марихуану Я делал ркс. на спирту. Получилась лайт ваще. Делай вообщем гдето 1к 7ми . будет так нормик эффект. но слабее 203гоНе сыы! Я во вторник постучался в скайп, сразу же оплатил. На след день тобиш в среду получил трек, а сегодня посыль уже приехала! Скоро отпишусь за кач-во фа. Не моросите, контора ровная Ребят я не терпила и не превык чтоб меня кидали и вы тоже я думаю и если нас кинули то я предлогаю мстить таким образам для начала надо писать на всвсех форумах где есть этом магаз о том что это кидала а не довереный магаз не лениться и писать каждый день об этом чтоб все браза знали правду и не постродали как мы
Your comment is awaiting moderation.
falnora.shop – So many beautiful items, the site makes shopping so easy.
Your comment is awaiting moderation.
Quoralia Hub – Beautiful presentation, finding details about products is effortless.
Your comment is awaiting moderation.
codigo promocional 1xbet Venezuela
Your comment is awaiting moderation.
Shop Saffron Street – Colorful selection, site is easy to navigate and purchasing felt effortless.
Your comment is awaiting moderation.
Marqvella Essentials – Great aesthetic throughout, the items feel curated with care.
Your comment is awaiting moderation.
NeoVanta Showcase – Browsing felt easy, and I discovered several interesting pieces.
Your comment is awaiting moderation.
free spiny casino-cz-1.com .
Your comment is awaiting moderation.
Prime Parcel Spot – Items shipped quickly, navigating the site felt natural.
Your comment is awaiting moderation.
Pantry Supply Corner – Minimalist style, shopping for staples was quick.
Your comment is awaiting moderation.
Жду адреса. Магазин осознанно кидает. https://beljakovyv-otpuske.ru Магазин работает отлично!никаких косяков и запоров пока что не было)))))) спасибо продавец отзывчивый
Your comment is awaiting moderation.
online kevrina – Appears legitimate, checkout looks straightforward and secure.
Your comment is awaiting moderation.
Shop Outlet Oracle – Great savings, navigating the pages is quick and intuitive.
Your comment is awaiting moderation.
Современные электрические жалюзи на окна в москве 7 (499) 638-25-37 обеспечивают удобство управления светом в вашем доме с помощью дистанционного пульта.
Это снижает вероятность случайных травм и опасных ситуаций с детьми.
—
Также электроуправляемые жалюзи обеспечивают безопасность, исключая необходимость тянуть шнуры.
Your comment is awaiting moderation.
Starlight Select Boutique – Fresh layout, products are well displayed and purchasing was seamless.
Your comment is awaiting moderation.
Skynaro Collection – Fantastic selection, browsing the site is easy and product info is very clear.
Your comment is awaiting moderation.
Opal Orio Essentials – Browsing is easy, items are distinctive, and the site feels approachable.
Your comment is awaiting moderation.
exploreember.shop – Stylish products with a warm touch, makes shopping a joy.
Your comment is awaiting moderation.
cloudcurio.shop – Unique and intriguing finds, I can’t wait to shop here again.
Your comment is awaiting moderation.
заказал в этом магазине еще раз )) https://egypt-go.ru Почему всё-таки такси? На метро бы а одну сторону успел бы… Вес большеват был, обычно брал миксы да всякие вкусные таблетки, но тут сразу столько СК… Да и потом, нашёл на товар, найди т на непредвиденный случай/комфорт, я так считаю. Чем брать по грамму микс, так лучше вообще не брать. Пара дней – и на пять грамм наберешь, с друзьями/сэкономишь на обедах, в конце концов.пока никто ничего тут не берите!!!!!!!!!!!!!!!!!!!!!!!!!!!!!!!!!!!!!!!!моя ситуация решится если то я сообщу.Пока кидалово нарисоваывается.Дабы даже о приходе средств человек не сообщает,просто сказал ложи а после оплаты сразу замолчал,хотя сообщения доходили еще.А ты если кинеш то тварь ты последняя.Бобла наверно тут хорошо сделал а совести хватает провинциалов кидать.Ты в курсе что у нас люди на эти бабки 2 месяца живут и не от сладкой жизни гавно у тебя то берут.Бог тебе судья короче!Свечку тебе за здравие каждую неделю если что буду ставить 😉 чтоб ты жил долго и счастливо… а с чего ты взял что чемик ноаый селлер?
Your comment is awaiting moderation.
Ruvina Spot – Pleasant aesthetic, products are easy to browse and ordering was fast.
Your comment is awaiting moderation.
QuillQuarry Picks Hub – Attractive and unique items, navigation is simple and checkout flows smoothly.
Your comment is awaiting moderation.
Marqesta Finds – Sleek shop, pages are responsive and navigation is reliable.
Your comment is awaiting moderation.
Neon Notch Catalog – Unique visuals give the site a lively, standout personality.
Your comment is awaiting moderation.
Poplar Prime Select – Clean interface, navigating through items felt effortless.
Your comment is awaiting moderation.
Pearl Pantry Collection – Organized selection, shopping feels effortless and friendly.
Your comment is awaiting moderation.
bonus bez vkladu casino-cz-1.com .
Your comment is awaiting moderation.
покупателей много,очереди наверно большие тем более на доставку Купить кокаин, бошки, гашиш Респект МагазуУважаемые покупатели, С НОВЫМ ГОДОМ! Отличный магазин, отличный оператор, отличный товар. Адрес нашли быстро и без проблем, забрали и ушли. Большое спасибо магазину. Всем советую!
Your comment is awaiting moderation.
Занимаешься спортом? https://bliny-trenirovochnye.ru диски для пауэрлифтинга, бодибилдинга и фитнеса. Прочные покрытия, стандартные размеры и широкий выбор весов.
Your comment is awaiting moderation.
online joy market – Cute and organized, I found items quickly and bookmarked them.
Your comment is awaiting moderation.
Marqvella Essentials – Great aesthetic throughout, the items feel curated with care.
Your comment is awaiting moderation.
Для создания комфортной атмосферы в доме идеально подойдут рулонные шторы с электроприводом цена 7 (499) 638-25-37 , которые легко управляются с помощью пульта или смартфона.
Для полного затемнения подойдут плотные и светонепроницаемые материалы.
Your comment is awaiting moderation.
Spruce Spark Selects – Clean and inviting, browsing products is simple and checkout worked without issues.
Your comment is awaiting moderation.
Shop Vive – Wide assortment available, checkout felt smooth and hassle-free.
Your comment is awaiting moderation.
evarica.shop – Elegant and timeless products, perfect for adding that special touch to any room.
Your comment is awaiting moderation.
Skin Serenade Spot Picks – High-quality range, finding items was easy and checkout completed quickly.
Your comment is awaiting moderation.
Shop Olive Outlet – Items are well-chosen, prices feel fair, and ordering was straightforward.
Your comment is awaiting moderation.
Run River Gems – Modern and neat, browsing is effortless and purchasing worked well.
Your comment is awaiting moderation.
желаем успехов магазину и процветания, очень ждем кокаин AM 2233 скоро в продаже ]Да шляпа какая-то, менеджер работает из рук вон плохо, и валит все на курьера. Абсолютная неразбериха, понять, кто и в каком месте накосячил достоверно – просто невозможно, но тем не менее, факт остается фактом: больше недели я ожидаю отправку заказа, и это только отправка, причем, разумеется, с полной предоплатой. Общались с манагером через скайп и через аську, очень муторно, сообщения теряются, на оставленные мессаги в оффлайне не отвечает, да и в онлайне появляется довольно редко. Что случилось? почему страшно?
Your comment is awaiting moderation.
Quenvia Collection – Modern aesthetic, navigating and checking out was seamless.
Your comment is awaiting moderation.
marketmirth boutique online – Pleasant browsing experience, items are easy to locate and layout feels welcoming.
Your comment is awaiting moderation.
накрутка просмотров истории накрутка реакций в телеграмме
Your comment is awaiting moderation.
Plant Plaza Essentials – Lovely options for indoor plants, shopping experience was smooth.
Your comment is awaiting moderation.
Muscle Myth Collection – Reliable-looking items, clear write-ups, and fair price points.
Your comment is awaiting moderation.
Hallo an alle, die gerne Neues entdecken. Bei https://sumeber.de/ treffen Bewegung und Alltag aufeinander – hier rollen Kinder auf leuchtenden Inlinern durch den Park, gleiten Jugendliche auf Waveboards durch die Stra?en, wahrend daheim Wasserhahne glanzen, Tische funkeln und Schirme Regen in Kunst verwandeln. Jedes Stuck bringt ein Stuck Freude in den Tag – leicht, clever, lebendig.
Your comment is awaiting moderation.
Paws Pavilion Collection – Playful pet selection, browsing is simple and stress-free.
Your comment is awaiting moderation.
работаете качественно и по совести!так держать! https://vershkoff.ru подарок! Мне очень понравилсяНа чем готовить???????? Почему страшно?
Your comment is awaiting moderation.
Удобство и современный дизайн обеспечат рулонные шторы для мансардных окон прокарниз
рулонные шторы для офиса , которыми легко управлять с пульта или смартфона.
Рулонные шторы с электроприводом обладают рядом достоинств, которые делают их привлекательными.
Your comment is awaiting moderation.
elvarose.shop – I adore the variety of home decor available here, always something special.
Your comment is awaiting moderation.
everyday finds store – Neat organization, each product page has helpful details.
Your comment is awaiting moderation.
Orivogue Finds – Elegant selection, site layout is intuitive and user-friendly.
Your comment is awaiting moderation.
clickcourier.shop – Efficient delivery and a straightforward layout, it’s a pleasure to shop here.
Your comment is awaiting moderation.
online casino cz online casino cz .
Your comment is awaiting moderation.
Hallo an alle, die den Duft junger Blatter lieben. Mit https://das-viparspectra.de/ erwacht jedes Pflanzchen zum Leben, sanft gefuhrt vom prazisen Spiel aus Licht und Schatten. Ob winziger Spross oder kraftige Blute – die Lampen schaffen ein Klima, das nahrt, starkt und wachsen lasst. Technik und Natur tanzen hier in leuchtender Harmonie.
Your comment is awaiting moderation.
Office Opal Platform – Clean pages and logical organization make exploring office products quick.
Your comment is awaiting moderation.
http://www.bisound.com/forum/showthread.php?p=3012322&posted=1#post3012322
Your comment is awaiting moderation.
Hi, this weekend is pleasant in support of me, for the reason that this occasion i am reading this impressive informative paragraph here at my home.
lee bet
Your comment is awaiting moderation.
0,5 муки и реги 0,5 бошки, марихуану )))) все любители пробничков ))))Ты думаешь АМ под запретом уже будет? Откуда инфа? Меня на шалфее устраивает:)вываривать ничего не надо
Your comment is awaiting moderation.
Market Magnet Essentials – Easy-to-use interface, items are well-arranged and product details are accurate.
Your comment is awaiting moderation.
Mousely Collection – Clean layout, smooth navigation, and a fast, stress-free checkout.
Your comment is awaiting moderation.
Ремонт мебели Ремонт керамической поверхности
Your comment is awaiting moderation.
Магазин отличный. Покупал не однократно. Спасибо. Ждем регу! https://creative-pink-showroom.com Вот это я понимаю СЕРВИС:ok: Превзошло все мои ожидания, доставили раньше обещанного… Магаз ровный (до последнего сомневался, что всё на столько гладко…)Хочу заказать для ознакомления АМ-2233 1гр., но отдавать 750 за доставку 1 грамма – имхо глюк Магазин работает? пишу в ЛС и Джабер везде тишина, ответа нет!((
Your comment is awaiting moderation.
elmembellish.shop – Fantastic selection of decorative pieces that make a difference.
Your comment is awaiting moderation.
биткоины купить
Your comment is awaiting moderation.
В театре Дурова продолжаются семейные спектакли, открытые мероприятия и экскурсии. Впереди — обновление комплекса, которое улучшит условия для животных и зрителей. Подробнее здесь: https://cont.ws/@goevent/3164364
Your comment is awaiting moderation.
everyday style shop – New to this site, pages load fast and checkout looks user-friendly.
Your comment is awaiting moderation.
5го марта написал ЛС ТСу про оптовый заказ…. до сих пор жду ответа https://biochemestry74.ru мазагин, один из лучший, беру практически только здесь!Связался с продавцом вполне адекватный!Заказал щас жду адресса Добрый вечер! Хотел отписать отзыв по работе данного ТС! Сделал заказ в 17-00 клад дали в 21-30, брал опт 500 гр.
Your comment is awaiting moderation.
marigoldmarket boutique online – Well-structured marketplace, finding products is easy and checkout is smooth.
Your comment is awaiting moderation.
Hallo, Freunde von Ordnung und Ideen! https://banborba.de/ steht fur Dinge, die funktionieren – stark, durchdacht, zuverlassig. Von Edelstahl-Tischen und Gasherden uber Wasserhahne, Steamer und Weinstander bis hin zu Dartboards oder Baumkletter-Sets. Hier zahlt jedes Detail, jedes Material, jede Schraube. Es ist das kleine Gluck, wenn alles seinen Platz hat und alles halt, was es verspricht. banborba – wo Alltag nicht kompliziert, sondern einfach gut gemacht ist.
Your comment is awaiting moderation.
driftdomain.shop – Great website and a wide variety of unique items to explore.
Your comment is awaiting moderation.
второй вопрос к товарищу под ником Leks: Купить наркотики | Где купить наркотики? не будет 307го. ожидается 203, 250, rcs-4 и 1220й… вот что мне сказали в той же аське, где спрашивал ты )Читайте репорт на трипы и обсуждения… Продукт просто улёт! Только что принесли, позже трип отпишу)
Your comment is awaiting moderation.
Театр зверей «Уголок дедушки Дурова» — это редкое сочетание циркового искусства и настоящей доброты. Отличный повод провести выходной всей семьей. Подробнее по ссылке: https://rentry.co/c3d8o5em
Your comment is awaiting moderation.
clevercove.shop – Shopping here is always a breeze, and the selection is awesome.
Your comment is awaiting moderation.
Ремонт картины Ремонт керамической поверхности
Your comment is awaiting moderation.
Hallo! https://das-sparkfun.de/ zeigt, wie MicroPython- und RedBoard-Kits Technik greifbar machen. Sensoren messen Licht, Abstand und Bewegung, OLED-Displays geben Daten aus, Motoren und Servos setzen Signale in Bewegung um. Tasten, Potentiometer und Kabel erleichtern Experimente, alles passt auf das Steckboard, ohne Loten. Fur Maker, Schuler oder Hobbyisten sind die Kits ubersichtlich aufgebaut, Schritt-fur-Schritt-Projekte fuhren durch verschiedene Schaltungen und zeigen direkt, wie Sensoren, Motoren und Displays zusammenarbeiten. Zubehor wie USB-C-Kabel oder Qwiic-Module erweitern Moglichkeiten weiter.
Your comment is awaiting moderation.
clean browse store – Well-designed site, navigation feels natural.
Your comment is awaiting moderation.
Давний участник рынка darknet Rutor завоевал доверие благодаря скрытой системе и сервису, позволяющему безопасно проводить сделки через сеть Rutor.Rutor: Ветеран русскоязычного даркнета
rutor org официальный сайт фильмы считается одним из наиболее популярных и старых ресурсов в рунет-даркнете, который прочно закрепился в инфраструктуре анонимных площадок. Этот магазин ориентирован на предоставление пользователям широкой базы данных, связанной с файлами, софтом, новостями и различными видами контента, включая темы, касающиеся взлома и безопасности.
Особенности работы системы Rutor
Механизм работы ресурса позволяет пользователям получать доступ к большим массивам данных и файлов, при этом обеспечивая максимальную приватность и анонимность. Работа сервиса построена на использовании анонимной сети Rutor, что помогает свести к минимуму угрозы идентификации и утечки данных. За годы существования Rutor стал местом, где сохраняется важная история русскоязычного даркнета.
Платформа функционирует стабильно, обеспечивая равный доступ для новых и опытных участников даркнета. Система построена таким образом, что каждый раздел страницы — будь то магазин, новости или инструкции по взлому — становится отдельной частью большого сообщества, в котором безопасность и возможность оставаться анонимным выходят на первый план.
Перспективы и риски
Ясно, что будущая деятельность Rutor потребует решения новых рисков, внедрения свежих подходов к безопасности и средств обхода ограничений. Пользователи должны осознавать, что даже самая анонимная система не гарантирует полной безопасности.
Этот сервис по-прежнему служит площадкой для информирования, обсуждений безопасности и отслеживания новшеств в даркнет-сообществе. Развитие технологий, расширение базы пользователей и появление новых возможностей делают Rutor одним из центров русскоязычного сообщества в сети.
– Сохранение анонимности
– Надёжность проведения операций
– Возможность получения эксклюзивных данных
– Конфиденциальность общения
Rutor представляет собой ресурс с неповторимой историей, важный для пользователей, стремящихся к свободе, сохранению конфиденциальности и автономии от внешних ограничений в современном интернете.
Your comment is awaiting moderation.
электрокарниз москва электрокарниз москва .
Your comment is awaiting moderation.
такой замечательный и паспиздатый магазин………ноооооо где же мой заказ тогда? трек так и не бьется,тс на связь не выходит!!! https://globam.org отпишитесь плизЯ тебе уже все в личке сказал, ты на фейка попал, если такое вообще было. 0,5 муки и реги 0,5
Your comment is awaiting moderation.
maplemerit boutique online – Well-organized products, site feels reliable and shopping is smooth.
Your comment is awaiting moderation.
Продам Рисарг Продать калквенс
Your comment is awaiting moderation.
היה חם יותר מזה של אלינה והיא מצצה באיזושהי חמדנות פראית, נחנקת אך לא מפסיקה. משכתי את שערה, אילצתי אותה לקחת אותי עמוק יותר לפה, בעוד אני עצמי צפיתי באלינה מתיישבת על סרגיי, יורדת תמיד צחקו עלי כשהסתובבתי סביב ליסה, ואני, מטומטם, חשבתי שזה רק בדיחות. עד שהוא נכנס למשחק שלהם. הכל התחיל ביום שישי. ליסה קראה לי למסיבה שלה. היא אמרה שיהיו רק בנות, אבל אני יכולה asiansgoporn.net
Your comment is awaiting moderation.
harborhoney.shop – I always enjoy shopping here, the products are perfect for all occasions.
Your comment is awaiting moderation.
Willkommen beihttps://das-accakappa.de/ Virginia Rose. Die Kollektion umfasst Eau de Cologne, die leicht auf Haut und Kleidung liegt. Der Duft offnet mit floralen Noten, weich und klar, bleibt subtil uber Stunden. Acca Kappa Virginia Rose ist in 100 ml Flakons erhaltlich, einfach in der Anwendung, angenehm zu tragen und fur Damen gedacht, die florale Eleganz mogen.
Your comment is awaiting moderation.
купить аккумулятор на штабелер Погрузчик электрический батарея 48V обеспечивает 8-10 часов работы. Кислотные тяговые от Тюменского завода.
Your comment is awaiting moderation.
Тут не кидают, друг https://an-sd.ru извините за беспокойство помогите понять как найти нужного сапорта и написать емуНу х.з, с отправками тут все оперативно,2 дня и тебе уже все идет))) Мне от оплаты и в мои руки в общем занимает 2-3 дня
Your comment is awaiting moderation.
Мессенджер и магазин Rutor признан одним из самых безопасных ресурсов в русском даркнете, благодаря анонимности системы, конфиденциальности и поддержке платежей в Rutor.Rutor — старейший представитель даркнета на русском языке
http www rutor org — это один из самых известных и старейших сервисов в русскоязычном даркнете, который стал неотъемлемой частью экосистемы анонимных ресурсов. Данный сервис специализируется на доступе к широчайшему ассортименту софта, файлов, новостей и разнообразных материалов, охватывающих вопросы взлома и защиты.
Особенности работы системы Rutor
Система курирует доступ к огромному количеству информации и файлов, сохраняя дополнительную конфиденциальность и анонимность своих пользователей. Главное преимущество платформы — интеграция с сетью Rutor, что значительно уменьшает вероятность раскрытия личности и потери конфиденциальной информации. С течением времени площадка превратилась в важный архив событий и истории русскоязычного даркнета.
Rutor продолжает работать и предоставлять стабильный доступ к ресурсам, удовлетворяя потребности как новичков, так и опытных пользователей даркнета. Каждый из разделов сайта — магазин, новостные ленты или руководства по взлому — образуют отдельную звено в масштабном сообществе, где главными ценностями выступают конфиденциальность и защита анонимности.
Перспективы и риски
Безусловно, дальнейшая история Rutor будет связана с новыми формами риска, новыми способами защиты конфиденциальности и методами обхода блокировок. Следует помнить, что даже максимально анонимная среда не обеспечивает стопроцентную безопасность.
Этот сервис по-прежнему служит площадкой для информирования, обсуждений безопасности и отслеживания новшеств в даркнет-сообществе. Развитие технологий, расширение базы пользователей и появление новых возможностей делают Rutor одним из центров русскоязычного сообщества в сети.
– Анонимность
– Надёжность проведения операций
– Доступ к уникальной информации
– Конфиденциальность общения
Rutor — это платформа с уникальной историей, и её опыт стоит принимать во внимание всем, кто ценит собственную свободу, приватность и независимость от внешней цензуры в современном цифровом мире.
Your comment is awaiting moderation.
irevana – Good variety here, pages load quickly and the site feels reliable.
Your comment is awaiting moderation.
всё ровно бро делает https://centerformarxisteducation.org Все пришло, все хорошо! Конспирации такой не ожидал))) Сначала подумал что киданули)))))) Попробовал и все около дела, хороший средний микс получился. Буду брать больше на днях…вот как прет Амф. привет всем получил бандероль с посылкой открыл всё ровно чё надо было то и пришло в общем респект магазу вес ровный пока сохнит основа жду по курю отпишу чё да как закинул деньги 5.07 пришло на почту уже 9.07 утром. были выходные только сегодня уже курьер набрал с утра и привёз отличный магаз берите не обламывайтесь
Your comment is awaiting moderation.
LuxFable Boutique – Very sleek, shopping feels pleasant and pages respond quickly.
Your comment is awaiting moderation.
аккумуляторные батареи тяговые pzs Тяговая батарея Тюменского аккумуляторного завода: PZS-технология, низкие потери воды.
Your comment is awaiting moderation.
halvessa.shop – I adore the simplicity of the site, and the products are always top-notch.
Your comment is awaiting moderation.
p e r o ключи steam
Your comment is awaiting moderation.
абакан есть? https://creative-pink-showroom.com он спонсировал всех нас.1 день Привет..Какого качества эйфоритик у данного магазина?? отпишите кто знает
Your comment is awaiting moderation.
clevercheckout.shop – Quick and easy checkout, and a collection of amazing products to explore.
Your comment is awaiting moderation.
розыгрыш стим ключ тг
Your comment is awaiting moderation.
Портал Rutor признан лидером среди площадок русского даркнета за надёжный сервис, поддержание анонимности и обслуживание операций через Rutor.Rutor — старейший представитель даркнета на русском языке
рутор онион считается одним из наиболее популярных и старых ресурсов в рунет-даркнете, который прочно закрепился в инфраструктуре анонимных площадок. Основное направление работы ресурса — предоставление обширной базы файлов, утилит, новостей и прочего контента, в том числе, связанного с темами безопасности и взлома.
Главные аспекты функционирования Rutor
Система курирует доступ к огромному количеству информации и файлов, сохраняя дополнительную конфиденциальность и анонимность своих пользователей. Особенность сервиса в том, что он работает через сеть Rutor, что существенно снижает риск идентификации и утечки данных. За годы существования Rutor стал местом, где сохраняется важная история русскоязычного даркнета.
Платформа функционирует стабильно, обеспечивая равный доступ для новых и опытных участников даркнета. Архитектура ресурса предусматривает, что любые разделы — магазин, новостной блок или гайды по взлому — являются составляющими единой системы, где превалируют безопасность и анонимность.
Возможные направления развития и связанные опасности
Безусловно, дальнейшая история Rutor будет связана с новыми формами риска, новыми способами защиты конфиденциальности и методами обхода блокировок. Следует помнить, что даже максимально анонимная среда не обеспечивает стопроцентную безопасность.
Этот сервис по-прежнему служит площадкой для информирования, обсуждений безопасности и отслеживания новшеств в даркнет-сообществе. Развитие технологий, расширение базы пользователей и появление новых возможностей делают Rutor одним из центров русскоязычного сообщества в сети.
– Принцип анонимности
– Безопасность транзакций
– Возможность получения эксклюзивных данных
– Защищённость коммуникаций
Уникальный путь Rutor делает платформу значимой для тех, кто высоко ценит свободу, личную приватность и защиту от внешнего контроля в цифровую эпоху.
Your comment is awaiting moderation.
online honey spot – Found it while browsing, costs appear fair and info is clean.
Your comment is awaiting moderation.
Top selections – High-quality items with a very smooth shopping flow.
Your comment is awaiting moderation.
torivocapital online – Pages load fast and the site structure feels natural and easy.
Your comment is awaiting moderation.
lunivora daily – Navigation is smooth, pages load quickly and items look interesting.
Your comment is awaiting moderation.
Парни пятерка лпк работает ровно)))всем фарта))))) мефедрон Может быть, не отрицаю. Пока никого винить не буду, потому что вполне возможно что я и сам закосячил. Но вроде все правильно делал. При том я не один такой..До этого приходил ам (окло недели-полторы, назад) делал все точно так же, но только на черной заварке принцесса Нури, 1 к 10, и с водника уносило далекоооо….всех кто пробовал этот водник..Я клад нашел, но вопервых не все в нем а во вторых содержимое разное и самое главное это место и описание этого места. Завтра буду пытаться связаться с ним. удалить. Перепутал окна
Your comment is awaiting moderation.
calmcrest.shop – I enjoy how calming the site feels, plus there’s so much to choose from.
Your comment is awaiting moderation.
grovegarnet.shop – A great spot for unique and well-crafted products, definitely worth checking out.
Your comment is awaiting moderation.
charmcartel.shop – Love the stylish pieces and the website is very organized for easy browsing.
Your comment is awaiting moderation.
Магаз не подведет мефедрон “Ну и да ладно не отровлюсь думаю”Если представитель не торгует нашим товаром – то представительство мы закрываем и ответственности тоже не несём. Хмм…странно всё это, но несмотря ни на что заказал норм партию Ам в этом магазе так как давно тут беру.Как придёт напишу норм репорт про Ам
Your comment is awaiting moderation.
red redemption steam dying light
Your comment is awaiting moderation.
driftdahlia.shop – Stylish and distinctive items, a must-visit for home decor lovers!
Your comment is awaiting moderation.
Rutor — старейший узел русского даркнета, который предоставляет услуги конфиденциального обмена и защищённой передачи данных в сети Rutor.Rutor: Один из ключевых проектов русскоязычного даркнета
рутор все раздачи считается одним из наиболее популярных и старых ресурсов в рунет-даркнете, который прочно закрепился в инфраструктуре анонимных площадок. Этот магазин ориентирован на предоставление пользователям широкой базы данных, связанной с файлами, софтом, новостями и различными видами контента, включая темы, касающиеся взлома и безопасности.
Как устроена система работы Rutor
Система курирует доступ к огромному количеству информации и файлов, сохраняя дополнительную конфиденциальность и анонимность своих пользователей. Работа сервиса построена на использовании анонимной сети Rutor, что помогает свести к минимуму угрозы идентификации и утечки данных. За годы существования Rutor стал местом, где сохраняется важная история русскоязычного даркнета.
Rutor поддерживает стабильную работу, позволяя и новичкам, и опытным пользователям использовать предоставляемые сервисы. Архитектура ресурса предусматривает, что любые разделы — магазин, новостной блок или гайды по взлому — являются составляющими единой системы, где превалируют безопасность и анонимность.
Будущее платформы: вызовы и обещания
Ясно, что будущая деятельность Rutor потребует решения новых рисков, внедрения свежих подходов к безопасности и средств обхода ограничений. Пользователи должны осознавать, что даже самая анонимная система не гарантирует полной безопасности.
Платформа продолжает быть ресурсом для получения расширенной информации, обмена мнениями по безопасности и мониторинга новшеств в сферах даркнета. Технический прогресс, рост числа участников и новые функциональные решения превращают Rutor в ключевой узел русскоязычного интернет-сообщества.
– Принцип анонимности
– Безопасность транзакций
– Возможность получения эксклюзивных данных
– Обеспечение приватности взаимодействий
Уникальный путь Rutor делает платформу значимой для тех, кто высоко ценит свободу, личную приватность и защиту от внешнего контроля в цифровую эпоху.
Your comment is awaiting moderation.
glamgrocer.shop – Such a stylish selection of kitchen products, I always find something perfect for my space!
Your comment is awaiting moderation.
Grooming favorites – Well-selected beard oils, balms, and tools for every style.
Your comment is awaiting moderation.
official rixarotrust site – Content is clear, structured, and navigation is smooth throughout.
Your comment is awaiting moderation.
cratecosmos.shop – Unique and stylish home decor items, and I had no trouble finding what I needed!
Your comment is awaiting moderation.
everyday cozy finds – Shopping here feels relaxed thanks to the clean layout.
Your comment is awaiting moderation.
red redemption steam розыгрыши ключей
Your comment is awaiting moderation.
Engaging site – Every visit feels lively and entertaining.
Your comment is awaiting moderation.
luggagelotus daily – Well-organized, products look sturdy and browsing feels effortless.
Your comment is awaiting moderation.
caldoria.shop – Such a pleasant shopping experience, easy navigation and amazing items.
Your comment is awaiting moderation.
Не понял…Его еще варить нужно??? На плитке?)) https://homelifeorganization.ru ы меня понялиБро, не волнуйся, тут ровный магаз. Напиши им в аську, что заказ номер такой-то оплачен. пробы есть?
Your comment is awaiting moderation.
metro ключи ключ тг
Your comment is awaiting moderation.
https://cz-my-blog-news.blogspot.com/2026/02/blog-post.html
Your comment is awaiting moderation.
?????????????????????????!https://xgaghb-jp.com/??????????????????????????????????????MP3??????????????????????????????????????????????????????????XGAGHB????????????????????????
Your comment is awaiting moderation.
charmcartel.shop – The accessories here are stunning, and the website is so user-friendly.
Your comment is awaiting moderation.
Rutor — один из старейших ресурсов русского сегмента даркнета, обладающий известной историей, скрытной платформой и площадкой для защищённых обменов в системе Rutor.Rutor: Один из ключевых проектов русскоязычного даркнета
рутор орг зеркало новый считается одним из наиболее популярных и старых ресурсов в рунет-даркнете, который прочно закрепился в инфраструктуре анонимных площадок. Этот магазин ориентирован на предоставление пользователям широкой базы данных, связанной с файлами, софтом, новостями и различными видами контента, включая темы, касающиеся взлома и безопасности.
Как устроена система работы Rutor
Механизм работы ресурса позволяет пользователям получать доступ к большим массивам данных и файлов, при этом обеспечивая максимальную приватность и анонимность. Главное преимущество платформы — интеграция с сетью Rutor, что значительно уменьшает вероятность раскрытия личности и потери конфиденциальной информации. За годы существования Rutor стал местом, где сохраняется важная история русскоязычного даркнета.
Rutor продолжает работать и предоставлять стабильный доступ к ресурсам, удовлетворяя потребности как новичков, так и опытных пользователей даркнета. Архитектура ресурса предусматривает, что любые разделы — магазин, новостной блок или гайды по взлому — являются составляющими единой системы, где превалируют безопасность и анонимность.
Перспективы и риски
Безусловно, дальнейшая история Rutor будет связана с новыми формами риска, новыми способами защиты конфиденциальности и методами обхода блокировок. Пользователи обязаны понимать, что ни одна анонимная платформа не может дать абсолютную защиту.
Этот сервис по-прежнему служит площадкой для информирования, обсуждений безопасности и отслеживания новшеств в даркнет-сообществе. Технический прогресс, рост числа участников и новые функциональные решения превращают Rutor в ключевой узел русскоязычного интернет-сообщества.
– Анонимность
– Надёжность проведения операций
– Доступ к уникальной информации
– Защищённость коммуникаций
Rutor представляет собой ресурс с неповторимой историей, важный для пользователей, стремящихся к свободе, сохранению конфиденциальности и автономии от внешних ограничений в современном интернете.
Your comment is awaiting moderation.
dorvoria.shop – Amazing products, always a pleasant shopping experience from start to finish!
Your comment is awaiting moderation.
clarvesta.shop – Beautifully designed products with swift delivery, a store I rely on.
Your comment is awaiting moderation.
Дом рядом с адресом говоришь, отдаешь залог, когда приедешь в адрес (в разных такси по-разному, могут и не попросить), и идешб себе за кладом 🙂 https://ilillilimusic.ru Первый раз вижу такое с МН. От других селлеров все было норм с растворимостью. Растворяющийся полностью пер чуть посильнее…Приветствую ТС,сделал заказ,но до сих пор трек не пробивается,помоги разобраться в этом уже почти неделю жду,заранее спс заказывал не один раз в этот раз заказал в аське нету тс жду 8дней трэка нет че случилось тс?
Your comment is awaiting moderation.
glamgarrison.shop – A great spot to find chic accessories that fit every style, always a fun browse!
Your comment is awaiting moderation.
greenguild.shop – Great eco-conscious products, and the site makes it so simple to shop and explore.
Your comment is awaiting moderation.
Treat shop – The variety here is amazing and browsing is fun.
Your comment is awaiting moderation.
craftcurio.shop – Such an amazing site, packed with unique and creative craft supplies!
Your comment is awaiting moderation.
check trixo – Layout feels tidy, and finding details is effortless.
Your comment is awaiting moderation.
buildbay.shop – Amazing variety of tools and DIY supplies, super easy to navigate the site.
Your comment is awaiting moderation.
Luggage Lotus Picks Hub – Smooth interface, items appear durable and site feels straightforward.
Your comment is awaiting moderation.
trend clothing site – Simple navigation and photos made choices easier.
Your comment is awaiting moderation.
Interesting collection – Feels different from typical online shops in a good way.
Your comment is awaiting moderation.
charmcartel.shop – A must-visit for stylish accessories, the website is well laid out.
Your comment is awaiting moderation.
dorvani.shop – So many stylish products to choose from, shopping here is a breeze!
Your comment is awaiting moderation.
gingergrace.shop – Always a pleasant experience, and their products are always top-notch!
Your comment is awaiting moderation.
this hold page – First impression is positive, clean design and easy to follow.
Your comment is awaiting moderation.
craftcabin.shop – Perfect for finding new craft inspiration, the collection is always changing!
Your comment is awaiting moderation.
Spa essentials – High-quality products that make every bath feel special.
Your comment is awaiting moderation.
navirotrack overview – Clear design and easy navigation allow users to access content efficiently with confidence.
Your comment is awaiting moderation.
Домашние матчи ЦСКА в Москве — это больше, чем хоккей: яркие эмоции, кричалки трибун, конкурсы и интерактивы между периодами, уютные зоны для отдыха и кафе. Атмосфера погружает с первых минут и дарит незабываемые впечатления. Подробности по ссылке: https://www.sostav.ru/blogs/271307/76336
Your comment is awaiting moderation.
goldgrove2.shop – Great place to find unique pieces for any occasion, always excited to browse.
Your comment is awaiting moderation.
Brondyra Collection – Trendy products and an effortless checkout experience, highly recommended.
Your comment is awaiting moderation.
удаленная работа яндекс Работа на удаленке без опыта — осваивайте новые навыки
Your comment is awaiting moderation.
Lotus Lane Collection – Smooth shopping, images are clear and browsing feels natural.
Your comment is awaiting moderation.
everyday tools online – Found useful stuff fast and payment went through cleanly.
Your comment is awaiting moderation.
Astrevio style – Sleek design that gives off a very current vibe.
Your comment is awaiting moderation.
договариваются о встречах Искал Ростов знакомства в телеграме — нашёл нормальный чат.
Your comment is awaiting moderation.
charmcartel.shop – Great variety of chic accessories, shopping is quick and simple.
Your comment is awaiting moderation.
decordock.shop – Great home decor finds, and navigating the site is a breeze.
Your comment is awaiting moderation.
circuitcabin.shop – Great for anyone into gadgets, the shopping experience is seamless!
Your comment is awaiting moderation.
gervina.shop – Love the sleek designs here, perfect for giving your home a chic makeover!
Your comment is awaiting moderation.
cozycopper.shop – Great products that showcase the elegance of copper, and they serve a purpose too.
Your comment is awaiting moderation.
Basket Bliss favorites – Lovely items for decorating, very easy to explore.
Your comment is awaiting moderation.
Brivona Treasures – I appreciate how organized this site is, it makes shopping feel so easy.
Your comment is awaiting moderation.
ulixo dashboard – Quick look around, navigation is simple and everything loads without delay.
Your comment is awaiting moderation.
goldenparcel.shop – A must-visit for anyone looking for high-quality goods, love shopping here!
Your comment is awaiting moderation.
explore core site – Rapid loading and smooth navigation throughout.
Your comment is awaiting moderation.
Visual inspiration – A solid collection that art fans will appreciate.
Your comment is awaiting moderation.
dalvanta.shop – Unique and beautiful products, the shopping experience is flawless every time.
Your comment is awaiting moderation.
gemgalleria.shop – Stunning gems and jewelry, an excellent choice for adding elegance to any occasion!
Your comment is awaiting moderation.
Обсуждали походы на матчи ЦСКА, видел на форуме советы по выбору билетов и мест на «ЦСКА Арене». Может пригодиться тем, кто собирается впервые: https://ssa.ru/forum/kak-luchshe-vybrat-bilety-na-matchi-hk-cska-v-etom-sezone.html
Your comment is awaiting moderation.
cozycarton.shop – A cozy selection of products that are great for both gifts and personal use.
Your comment is awaiting moderation.
Skincare hub – A well-organized site with high-quality products you’ll love.
Your comment is awaiting moderation.
Briovista Goods – Elegant and well-curated site with an outstanding product range.
Your comment is awaiting moderation.
Производство металлических стеллажных конструкций осуществляется на собственных мощностях с контролем качества на всех этапах. Мы изготавливаем оборудование для промышленных складов, распределительных центров и производственных площадок. Используются проверенные материалы и современные технологии обработки металла. Это обеспечивает высокую прочность и безопасность эксплуатации https://www.met-izdeliya.com/
Your comment is awaiting moderation.
zarvo network – Layout is clear, content loads quickly and navigation is seamless.
Your comment is awaiting moderation.
goldenget.shop – Great products and unbeatable prices, my favorite place to shop online!
Your comment is awaiting moderation.
cinnamoncorner.shop – Every visit to this site feels fresh, with products I can’t find anywhere else.
Your comment is awaiting moderation.
cypresschic.shop – Love the chic finds here, easy site to navigate as well.
Your comment is awaiting moderation.
gardengalleon.shop – A wonderful collection for anyone who loves gardening, practical yet fashionable products.
Your comment is awaiting moderation.
No-frills store – Easy to navigate and packed with worthwhile offers.
Your comment is awaiting moderation.
charmcartel.shop – Chic and modern accessories, shopping here is always a pleasure.
Your comment is awaiting moderation.
covecrimson.shop – Love the variety of bold, high-quality products! Shopping here is always a positive experience.
Your comment is awaiting moderation.
trustco overview – Clear and orderly presentation that feels credible and polished.
Your comment is awaiting moderation.
zexarotrustco page – Clean presentation, trustworthy feel, and content is easy to follow.
Your comment is awaiting moderation.
Bag Boulevard treasures – Unique styles and high-quality pieces make shopping enjoyable.
Your comment is awaiting moderation.
бездепозитные фриспины Казино с бездепозитным бонусом – это площадки, где игроки могут получить реальные шансы на выигрыш, не вкладывая ни копейки. Это идеальный вариант для новичков, желающих ознакомиться с миром азартных игр.
Your comment is awaiting moderation.
Briovanta – Great selection of unique products, and the site is very easy to navigate.
Your comment is awaiting moderation.
Decor favorites – Wide selection of charming items with effortless browsing.
Your comment is awaiting moderation.
электрокарниз недорого karnizy-s-elektroprivodom77.ru .
Your comment is awaiting moderation.
слоты без депозита на реальные деньги Получить такие фриспины, как правило, очень просто. Основное условие — это регистрация на сайте казино. Иногда может потребоваться подтверждение номера телефона или электронной почты, но чаще всего достаточно пройти несложную процедуру создания аккаунта. После успешной регистрации бонусные вращения автоматически начисляются на ваш счет, и вы можете приступать к игре. Важно внимательно ознакомиться с условиями акции, так как разные казино могут предлагать разное количество фриспинов и устанавливать определенные лимиты на вывод выигрышей.
Your comment is awaiting moderation.
check plixo online – Minimalist design, navigation is smooth and important details are easy to find.
Your comment is awaiting moderation.
Общаются Искал Ростов знакомства в телеграме — нашёл нормальный чат.
Your comment is awaiting moderation.
freshfinder.shop – Fresh, interesting, and unique finds every time, I can’t get enough of this site!
Your comment is awaiting moderation.
curtaincraft.shop – Stylish and functional curtains, the perfect addition to any home.
Your comment is awaiting moderation.
бесплатные фриспины за регистрацию без депозита Фриспины за регистрацию без отыгрыша — настоящая находка для азартных игроков, желающих познакомиться с миром онлайн-казино без каких-либо финансовых рисков. Это реальный шанс получить первые выигрыши, не вкладывая собственных средств и не беспокоясь о сложных условиях вейджера. Зачастую такие бонусы предлагаются новым игрокам в качестве приветственного подарка, мотивируя их к совершению первого депозита. Однако, есть и исключения, когда фриспины выдаются исключительно за факт регистрации, что делает их еще более привлекательными.
Your comment is awaiting moderation.
charmcartel.shop – Amazing accessories for every occasion, the site is so easy to use.
Your comment is awaiting moderation.
Халява в казино https://casino-bonus-bezdep.ru Бесплатные вращения в популярных слотах, актуальные акции и подробные условия использования.
Your comment is awaiting moderation.
Home style link – Great for adding a touch of luxury at home.
Your comment is awaiting moderation.
coralcrate.shop – Fantastic range of products, and the site design makes it so simple to shop.
Your comment is awaiting moderation.
glintvogue.shop – Chic and elegant products, shopping here is always a treat!
Your comment is awaiting moderation.
Если вы ищете сайдинг для облицовки дома в Лиде, его можно приобрести в специализированных магазинах стройматериалов, на строительных рынках или в интернет-магазинах с доставкой в город. купить сайдинг в лиде
Your comment is awaiting moderation.
Bloomy Boutique – Gorgeous floral products, and the website is so easy to navigate.
Your comment is awaiting moderation.
xorya explore – Landed here randomly, interface is neat and details are very easy to understand.
Your comment is awaiting moderation.
Automotive picks – A well-curated site with a seamless browsing flow.
Your comment is awaiting moderation.
explore line site – Quick glance shows a clear, contemporary layout with easy navigation.
Your comment is awaiting moderation.
Bloom Barrel shop – Lovely floral-inspired selection with a smooth browsing experience.
Your comment is awaiting moderation.
Продать ервой Продать Ервой. Ингибитор VEGF.
Your comment is awaiting moderation.
check nevrix – Pleasant interface, navigation is easy and important info is easy to find.
Your comment is awaiting moderation.
промокод в 1win
Your comment is awaiting moderation.
zexarotrust link – Nothing flashy, just clear and readable information.
Your comment is awaiting moderation.
florafreight.shop – An incredible variety of flowers and plants to enhance any garden or landscape.
Your comment is awaiting moderation.
автоматические гардины для штор karnizy-s-elektroprivodom77.ru .
Your comment is awaiting moderation.
chicchisel.shop – This shop is perfect for anyone who takes their DIY seriously, top-quality tools every time!
Your comment is awaiting moderation.
crystalcorner2.shop – The most stunning gems and crystals, absolutely love browsing this site.
Your comment is awaiting moderation.
https://royal-khv.ru Уважаемый ТС,желаю вам успешных больших продаж!:$:что значит “самый норм микс” ? 1 грамм 250го на 10 грамм основы вполне нормально. если любитель лютой жести – сделай 1к5 чтоли, будешь улетать в астрал с малюсенького кропалика Всем мир,заказывал кто нибудь через доставку курьерской службой?дошло все ровно?
Your comment is awaiting moderation.
charmcartel.shop – Beautifully curated accessories, the site is easy to navigate and find what you need.
Your comment is awaiting moderation.
coppercitrine.shop – I love the modern take on copper decor, so many unique items here!
Your comment is awaiting moderation.
казино с бездепозитным бонусом Бездепозитные фриспины – это еще одна разновидность бесплатных вращений, которые можно получить без необходимости пополнять счет. Они часто предлагаются новым игрокам в качестве лояльности.
Your comment is awaiting moderation.
Fresh item feed – Easy to browse and notice things you haven’t seen before.
Your comment is awaiting moderation.
Bright Bento Finds – Stunning bento boxes, these are the best I’ve found for daily use.
Your comment is awaiting moderation.
Speed options give you flexibility—depending on your content, you might buy tiktok views with instant delivery for trending topics or gradual delivery for evergreen content.
Your comment is awaiting moderation.
Auroriv treasures – Wide selection and clean interface make browsing enjoyable.
Your comment is awaiting moderation.
Stunning story there. What happened after?
Thanks!
Also visit my website … bocoran slot gacor
Your comment is awaiting moderation.
Blanket Bay comforts – Lovely cozy items with a seamless online shopping experience.
Your comment is awaiting moderation.
explore yavex – Smooth navigation, everything loads quickly and feels intuitive.
Your comment is awaiting moderation.
glintgarden.shop – A gardener’s paradise, filled with the best products for every need!
Your comment is awaiting moderation.
bond overview – Quick look suggests a professional, organized, and dependable site.
Your comment is awaiting moderation.
купить кокаин, мефедрон, бошки, марихуану Я тебе уже все в личке сказал, ты на фейка попал, если такое вообще было.Списался с данным магазом пару месяцев назад, беру клады по москве, ребята работают отлично, сервис на высоте! Последний раз даже клад сделали минут за 15 всего, первый раз такое, в других магазах приходилось часов по 5 ждать свое клада! Рега тоже отличная, беру JV-90 очень мощная штука! Спасибо ребятам за качественный товар и сервис продолжайте в том же духе!!! А вот это да, магазин последнее время реально что то “плохует” мягко говоря, но все ровно же хорош
Your comment is awaiting moderation.
“???????????????????????????! https://kandao-jp.com/
?KanDao?????????????????????????????????????????360°????????????????????AI???????????????????????????KanDao?????????????”
Your comment is awaiting moderation.
https://novoevnukovo.ru/index.php?topic=9995
Your comment is awaiting moderation.
check morvex – Smooth browsing, design is simple and content is readable immediately.
Your comment is awaiting moderation.
fixforge.shop – A must-visit for anyone working on a DIY project, you can find all the tools you need.
Your comment is awaiting moderation.
Консольные стеллажи для длинномерных грузов разрабатываются с учетом специфики продукции. Производство позволяет выпускать конструкции различной высоты и грузоподъемности. Оборудование удобно в эксплуатации и обслуживании. Это оптимальное решение для хранения металлопроката: складские стеллажи
Your comment is awaiting moderation.
crispcrate.shop – I always find what I need here! Shopping is quick and simple.
Your comment is awaiting moderation.
Отвод воды от фундамента https://totalarch.com/kak-pravilno-otvesti-vodu-ot-fundamenta-livnevka-svoimi-rukami-i-glavnye-zabluzhdeniya какие системы дренажа использовать, как правильно сделать отмостку и избежать подтопления. Пошаговые рекомендации для частного дома и дачи.
Your comment is awaiting moderation.
collarcove.shop – Wonderful collars and accessories, shopping is quick and hassle-free.
Your comment is awaiting moderation.
купить кокаин, мефедрон, бошки, марихуану Удачи Вам и Процветания От Всей Души!Трек получил, всё ровно! Ветка исчезла вместе с долгами.
Your comment is awaiting moderation.
Проектирование складских стеллажей начинается с анализа задач клиента и параметров объекта. Мы учитываем типы грузов, нагрузки и схемы перемещения. Производство ведется по утвержденному проекту. Такой подход снижает затраты на эксплуатацию склада https://www.met-izdeliya.com/
Your comment is awaiting moderation.
charmcartel.shop – Unique designs and fast navigation, love shopping here every time.
Your comment is awaiting moderation.
1win промокод на фриспины
Your comment is awaiting moderation.
zexaroline – Found this through a link, stayed longer because layout works.
Your comment is awaiting moderation.
BrightBargain shop – Top-notch products at unbeatable prices, I find so many good deals.
Your comment is awaiting moderation.
Обсуждали походы на домашние матчи ЦСКА, видел здесь полезные советы по билетам. Рекомендую ознакомиться: https://lobnya.myqip.ru/?1-4-0-00000485-000-0-0-1769756969
Your comment is awaiting moderation.
Aurora deals – Wide selection of items and effortless browsing.
Your comment is awaiting moderation.
карниз моторизованный karnizy-s-elektroprivodom77.ru .
Your comment is awaiting moderation.
Click-worthy finds – Great mix of products and browsing never feels cluttered.
Your comment is awaiting moderation.
Healthy favorites – Love the pure, natural selections and smooth browsing experience.
Your comment is awaiting moderation.
??????????????????????????????!https://mynvy-jp.com/
?MyNvy?????????????????????????????????????????????????????????????????????????????????????????MyNvy?????????????????????
Your comment is awaiting moderation.
https://tacorepublik.com слышала за вас) с пробы начнем?Туси слишком долго прёт вот и я уже трясусь.
Your comment is awaiting moderation.
holdings overview – Well-laid-out pages make content clear, concise, and easy to follow.
Your comment is awaiting moderation.
zavirobondgroup dashboard – Straightforward interface, quick page loads and information is easy to follow.
Your comment is awaiting moderation.
Тренды в строительстве заборов https://otoplenie-expert.com/stroitelstvo/trendy-v-stroitelstve-zaborov-dlya-dachi-v-2026-godu-sovety-po-vyboru-i-ustanovke.html для дачи в 2026 году: популярные материалы, современные конструкции и практичные решения. Советы по выбору забора и правильной установке с учетом бюджета и участка.
Your comment is awaiting moderation.
glintaro.shop – Sleek designs and unique pieces that make shopping here a real treat.
Your comment is awaiting moderation.
plorix online – Clear navigation, site feels professional and details are simple to access.
Your comment is awaiting moderation.
firfinesse.shop – Always a pleasure to shop here, the products are chic and of excellent quality.
Your comment is awaiting moderation.
driftden.shop – Wonderful place for finding unique items with a peaceful vibe.
Your comment is awaiting moderation.
crispcollective.shop – Love the sleek layout and the fresh items available! Easy to find what you’re looking for.
Your comment is awaiting moderation.
charmchoice.shop – The perfect place for unique charms and trinkets, I always find something special.
Your comment is awaiting moderation.
coffeecourtyard.shop – Perfect for discovering new coffee blends, always a great experience.
Your comment is awaiting moderation.
I have read so many articles about the blogger lovers however this post
is in fact a fastidious article, keep it up.
Your comment is awaiting moderation.
купить кокаин, мефедрон, бошки, марихуану в скайпе сказали – “дживики все кончились, будут в начале следующей неделе” – но легче это опубликовать тут, что бы всем не отвечать на этот вопрос.Качество продукции на высшем уровне. Доброга времени суток, закладки в москве делаете?
Your comment is awaiting moderation.
charmcartel.shop – Great selection of trendy accessories, very smooth shopping experience.
Your comment is awaiting moderation.
BrightBargain store – Huge savings on everyday items, always something practical to buy.
Your comment is awaiting moderation.
Belvarin hub – Well-curated products and a neat, simple layout.
Your comment is awaiting moderation.
Special finds – A site that always surprises with quality and value.
Your comment is awaiting moderation.
User-friendly site – Browsing is intuitive and the design is crisp.
Your comment is awaiting moderation.
browse core – The site feels balanced, responsive, and easy to navigate.
Your comment is awaiting moderation.
Портал Rutor занимает лидирующие позиции в даркнет-пространстве из-за своей многолетней истории, надёжной системы конфиденциальности и тор-сервисов.Rutor: Один из ключевых проектов русскоязычного даркнета
открыть зеркало рутор — это один из первых и известнейших русскоязычных ресурсов даркнета, неразрывно связанный с анонимной онлайн-экосистемой. Основное направление работы ресурса — предоставление обширной базы файлов, утилит, новостей и прочего контента, в том числе, связанного с темами безопасности и взлома.
Особенности работы системы Rutor
Система курирует доступ к огромному количеству информации и файлов, сохраняя дополнительную конфиденциальность и анонимность своих пользователей. Главное преимущество платформы — интеграция с сетью Rutor, что значительно уменьшает вероятность раскрытия личности и потери конфиденциальной информации. За долгое время работы Rutor стал своего рода летописью для даркнета на русском языке.
Rutor продолжает работать и предоставлять стабильный доступ к ресурсам, удовлетворяя потребности как новичков, так и опытных пользователей даркнета. Система построена таким образом, что каждый раздел страницы — будь то магазин, новости или инструкции по взлому — становится отдельной частью большого сообщества, в котором безопасность и возможность оставаться анонимным выходят на первый план.
Перспективы и риски
Безусловно, дальнейшая история Rutor будет связана с новыми формами риска, новыми способами защиты конфиденциальности и методами обхода блокировок. Следует помнить, что даже максимально анонимная среда не обеспечивает стопроцентную безопасность.
Этот сервис по-прежнему служит площадкой для информирования, обсуждений безопасности и отслеживания новшеств в даркнет-сообществе. Развитие технологий, расширение базы пользователей и появление новых возможностей делают Rutor одним из центров русскоязычного сообщества в сети.
– Сохранение анонимности
– Надёжность проведения операций
– Возможность получения эксклюзивных данных
– Конфиденциальность общения
Уникальный путь Rutor делает платформу значимой для тех, кто высоко ценит свободу, личную приватность и защиту от внешнего контроля в цифровую эпоху.
Your comment is awaiting moderation.
https://silovoy-cable.ru Это тема о работе магазина. “эффекты, использование” в теме о продукцииВызвал такси;) Я вам, Касух, советовал бы в скайпе этот вопрос решить. И в субботу и воскресенье магазин не работает, так что вполне закономерно что вам не отвечают.
Your comment is awaiting moderation.
электрические гардины karnizy-s-elektroprivodom77.ru .
Your comment is awaiting moderation.
zylavocapital online – Randomly visited, yet I ended up spending more time than I planned.
Your comment is awaiting moderation.
События в мире последние новости события дня и аналитика. Актуальная информация о России и мире с постоянными обновлениями.
Your comment is awaiting moderation.
pexra info – Organized layout, navigation is simple and content is easy to read.
Your comment is awaiting moderation.
Эту тему уже поднимали на форуме, много комментариев от тех, кто часто ходит на ЦСКА. Оставлю ссылку: https://www.forumsdrom.ru/groups/2307-8601.html#gmessage75662
Your comment is awaiting moderation.
orvix portal – Came across this by chance, but navigating the site is very straightforward.
Your comment is awaiting moderation.
купить кокаин, мефедрон, бошки, марихуану Что задерживали грузы, с поставками, и дожидались пока запрет выйдет…чувак сделай 2к15 самый раз для меня)) Разве имеет принципиальное значение сколько моему аккаунту времени? Я тут не *зависаю*, а пишу по сути. Мутность заключается в том что оператор в аське на вопросы по уточнению адреса, сначала молчал почти 3 часа, потом вообще оффнулся.
Your comment is awaiting moderation.
Фриспины бесплатно https://casino-bonuses.ru бесплатные вращения в онлайн-казино без пополнения счета. Актуальные предложения, условия получения и список казино с бонусами для новых игроков.
Your comment is awaiting moderation.
kavix page – Neat design makes navigating and finding information smooth and straightforward.
Your comment is awaiting moderation.
https://europeancams.net/
Your comment is awaiting moderation.
Rutor — известный форум darknet-пространства России с давней историей, анонимной регистрацией и сервисом для защиты транзакций посредством Rutor.Rutor: Один из ключевых проектов русскоязычного даркнета
rutor ino — это один из самых известных и старейших сервисов в русскоязычном даркнете, который стал неотъемлемой частью экосистемы анонимных ресурсов. Данный сервис специализируется на доступе к широчайшему ассортименту софта, файлов, новостей и разнообразных материалов, охватывающих вопросы взлома и защиты.
Особенности работы системы Rutor
Механизм работы ресурса позволяет пользователям получать доступ к большим массивам данных и файлов, при этом обеспечивая максимальную приватность и анонимность. Главное преимущество платформы — интеграция с сетью Rutor, что значительно уменьшает вероятность раскрытия личности и потери конфиденциальной информации. За долгое время работы Rutor стал своего рода летописью для даркнета на русском языке.
Платформа функционирует стабильно, обеспечивая равный доступ для новых и опытных участников даркнета. Каждый из разделов сайта — магазин, новостные ленты или руководства по взлому — образуют отдельную звено в масштабном сообществе, где главными ценностями выступают конфиденциальность и защита анонимности.
Возможные направления развития и связанные опасности
Нет сомнений, что в дальнейшем Rutor столкнётся с новыми угрозами, инновационными способами охраны приватности и методами преодоления блокировок. Пользователи должны осознавать, что даже самая анонимная система не гарантирует полной безопасности.
Платформа продолжает быть ресурсом для получения расширенной информации, обмена мнениями по безопасности и мониторинга новшеств в сферах даркнета. Технический прогресс, рост числа участников и новые функциональные решения превращают Rutor в ключевой узел русскоязычного интернет-сообщества.
– Анонимность
– Гарантия безопасности сделок
– Доступ к уникальной информации
– Конфиденциальность общения
Уникальный путь Rutor делает платформу значимой для тех, кто высоко ценит свободу, личную приватность и защиту от внешнего контроля в цифровую эпоху.
Your comment is awaiting moderation.
Проститутки Новый Уренгой
Your comment is awaiting moderation.
visit rixva – Browsing was effortless, layout is clear and content is easy to find.
Your comment is awaiting moderation.
купить кокаин, мефедрон, бошки, марихуану Магазин работает четко уже несколько лет:)только одно расстроило когда хотел сделать очередной заказ мне сказали что не отправляют больше в те края:dontknown:с чем это связано мне так и не сказали,хотелось бы узнатьО качестве товара отпишу в трипрепортах .Мир, и процветания этому магазину))) Кто знает что происходит? Походу покупают все в тихушку!:confused: Внесите ясность!:hz: Дайте реги уже:confused::sos:
Your comment is awaiting moderation.
learn more here – Smooth interface and quick page loads make the experience pleasant.
Your comment is awaiting moderation.
ЦСКА переживает напряженный момент чемпионата: ошибки дорого обходятся, а очки нужны здесь и сейчас. Ближайшие матчи обещают стать настоящей проверкой на прочность. Подробнее по ссылке https://postheaven.net/fvblc48jpj
Your comment is awaiting moderation.
trusthub online – Looked around and found the layout refreshingly uncomplicated.
Your comment is awaiting moderation.
Индивидуалки Новый Уренгой
Your comment is awaiting moderation.
карниз с электроприводом карниз с электроприводом .
Your comment is awaiting moderation.
kryvoxtrustco platform – Layout is tidy, navigation is smooth and content is easy to read.
Your comment is awaiting moderation.
https://t.me/sex_vladivostoka/
Your comment is awaiting moderation.
quvexatrustgroup link – Organized pages and simple navigation make content easy to read and trust.
Your comment is awaiting moderation.
https://barbervshangale.ru KEY я не понимаю что ты хочешь от магазина то теперь ????за непонятку с соткой !!! моральную компенсацию????? или что????”Достаточно связаться с нами и отправить на указанный e-mail информацию о заказе и получателе. Конфиденциальность гарантируется.” качество продукции класс. Но пожалуй что радует больше всего – отзывчивость администрации и оперативность работы.
Your comment is awaiting moderation.
Мессенджер и магазин Rutor признан одним из самых безопасных ресурсов в русском даркнете, благодаря анонимности системы, конфиденциальности и поддержке платежей в Rutor.Rutor: Ветеран русскоязычного даркнета
bu rutor — это один из самых известных и старейших сервисов в русскоязычном даркнете, который стал неотъемлемой частью экосистемы анонимных ресурсов. Этот магазин ориентирован на предоставление пользователям широкой базы данных, связанной с файлами, софтом, новостями и различными видами контента, включая темы, касающиеся взлома и безопасности.
Главные аспекты функционирования Rutor
Система курирует доступ к огромному количеству информации и файлов, сохраняя дополнительную конфиденциальность и анонимность своих пользователей. Особенность сервиса в том, что он работает через сеть Rutor, что существенно снижает риск идентификации и утечки данных. С течением времени площадка превратилась в важный архив событий и истории русскоязычного даркнета.
Платформа функционирует стабильно, обеспечивая равный доступ для новых и опытных участников даркнета. Каждый из разделов сайта — магазин, новостные ленты или руководства по взлому — образуют отдельную звено в масштабном сообществе, где главными ценностями выступают конфиденциальность и защита анонимности.
Перспективы и риски
Нет сомнений, что в дальнейшем Rutor столкнётся с новыми угрозами, инновационными способами охраны приватности и методами преодоления блокировок. Следует помнить, что даже максимально анонимная среда не обеспечивает стопроцентную безопасность.
Этот сервис по-прежнему служит площадкой для информирования, обсуждений безопасности и отслеживания новшеств в даркнет-сообществе. Технический прогресс, рост числа участников и новые функциональные решения превращают Rutor в ключевой узел русскоязычного интернет-сообщества.
– Анонимность
– Гарантия безопасности сделок
– Возможность получения эксклюзивных данных
– Конфиденциальность общения
Уникальный путь Rutor делает платформу значимой для тех, кто высоко ценит свободу, личную приватность и защиту от внешнего контроля в цифровую эпоху.
Your comment is awaiting moderation.
https://t.me/sex_vladivostoka/
Your comment is awaiting moderation.
Проститутки Новый Уренгой
Your comment is awaiting moderation.
Если вы ищете сайдинг для облицовки дома в Лиде, его можно приобрести в специализированных магазинах стройматериалов, на строительных рынках или в интернет-магазинах с доставкой в город. купить сайдинг в лиде
Your comment is awaiting moderation.
qunix portal – Smooth experience, navigation works well and information is readable immediately.
Your comment is awaiting moderation.
https://gladioluss.ru магазин достойный,всё ровно и в срок,спасибо большое за ваш труд,будем продолжать сотрудничество!привет я сам тут не так давно ) я тебя понимаю я вот уже вторую посылку получил всё чётко и ровно тоже пережевал , часто на швыров попадал а тут ребята грамотную тему замутили и магазу респект и админам) не волнуйся всё будет чётко:good: У меня не бьётся вторые их трек. И бро в скайпе не видно. Мож приняли их посылки на почте? Тоже парюсь блин…. Но не хотел поднимать дискуссию, не имея причин. Выслали в пятницу СПСР.
Your comment is awaiting moderation.
learn more here – Minimalist design ensures the focus stays on the content rather than unnecessary elements.
Your comment is awaiting moderation.
https://t.me/sex_vladivostoka
Your comment is awaiting moderation.
this rixaro site – Smooth browsing experience with organized and readable content.
Your comment is awaiting moderation.
mivarotrustline access point – Professional structure, browsing is effortless and information is straightforward.
Your comment is awaiting moderation.
Rutor — это уважаемый на darknet-форумах сайт с развитой историей, защищённым функционалом и анонимной «входной» системой для операций через Rutor.Rutor — старейший представитель даркнета на русском языке
рутор работающий — это один из первых и известнейших русскоязычных ресурсов даркнета, неразрывно связанный с анонимной онлайн-экосистемой. Основное направление работы ресурса — предоставление обширной базы файлов, утилит, новостей и прочего контента, в том числе, связанного с темами безопасности и взлома.
Как устроена система работы Rutor
Механизм работы ресурса позволяет пользователям получать доступ к большим массивам данных и файлов, при этом обеспечивая максимальную приватность и анонимность. Главное преимущество платформы — интеграция с сетью Rutor, что значительно уменьшает вероятность раскрытия личности и потери конфиденциальной информации. За долгое время работы Rutor стал своего рода летописью для даркнета на русском языке.
Rutor продолжает работать и предоставлять стабильный доступ к ресурсам, удовлетворяя потребности как новичков, так и опытных пользователей даркнета. Каждый из разделов сайта — магазин, новостные ленты или руководства по взлому — образуют отдельную звено в масштабном сообществе, где главными ценностями выступают конфиденциальность и защита анонимности.
Возможные направления развития и связанные опасности
Нет сомнений, что в дальнейшем Rutor столкнётся с новыми угрозами, инновационными способами охраны приватности и методами преодоления блокировок. Следует помнить, что даже максимально анонимная среда не обеспечивает стопроцентную безопасность.
Этот сервис по-прежнему служит площадкой для информирования, обсуждений безопасности и отслеживания новшеств в даркнет-сообществе. Технический прогресс, рост числа участников и новые функциональные решения превращают Rutor в ключевой узел русскоязычного интернет-сообщества.
– Принцип анонимности
– Безопасность транзакций
– Открытый доступ к специализированному контенту
– Защищённость коммуникаций
Rutor представляет собой ресурс с неповторимой историей, важный для пользователей, стремящихся к свободе, сохранению конфиденциальности и автономии от внешних ограничений в современном интернете.
Your comment is awaiting moderation.
https://anyusefultools.com У данного сллера только легал. Все проверено.последнее время стал закупаться в чемикал и не капельки в этом не пожалел, всё всегда вовремя высылают даже быстрее заявленного времени! качество радует!) да и просто отличный магазин!!! заказывал через сайт или аську?
Your comment is awaiting moderation.
zavirolinecore online – The site feels professional and everything is easy to locate.
Your comment is awaiting moderation.
какой полотенцесушителей купить полотенцесушитель
Your comment is awaiting moderation.
mavro review – Pleasant site structure, pages respond well and information is clearly presented.
Your comment is awaiting moderation.
купить кокаин, мефедрон, бошки, марихуану А какой ты адрес хотел что бы тебе написали если ты заказываешь может ты данные свои для отправки до сих пор не указал и в ожидании чуда сидишьВремя от времени заказываем здесь реагент, качество всегда на уровне(отличное) стабильное:good:Все работает стабильно, берем не опт, но и не мало, конспирация хорошая, магазин работает отлично! :good:Еще не раз сюда буду обращаться;) Качество 2с очень порадовало, трип позже отпишу.
Your comment is awaiting moderation.
zavirotrustline link – Organized content and tidy layout create a trustworthy browsing experience.
Your comment is awaiting moderation.
сайт под ключ цена москва
Your comment is awaiting moderation.
navirobond resource – Clean design ensures information is simple to find and understand.
Your comment is awaiting moderation.
В русском даркнете Rutor занимает прочные позиции «ветерана» благодаря стабильности, системе безопасности и поддержке транзакций через Rutor.Rutor — старейший представитель даркнета на русском языке
rutor top — это один из самых известных и старейших сервисов в русскоязычном даркнете, который стал неотъемлемой частью экосистемы анонимных ресурсов. Этот магазин ориентирован на предоставление пользователям широкой базы данных, связанной с файлами, софтом, новостями и различными видами контента, включая темы, касающиеся взлома и безопасности.
Главные аспекты функционирования Rutor
Система курирует доступ к огромному количеству информации и файлов, сохраняя дополнительную конфиденциальность и анонимность своих пользователей. Работа сервиса построена на использовании анонимной сети Rutor, что помогает свести к минимуму угрозы идентификации и утечки данных. С течением времени площадка превратилась в важный архив событий и истории русскоязычного даркнета.
Rutor поддерживает стабильную работу, позволяя и новичкам, и опытным пользователям использовать предоставляемые сервисы. Каждый из разделов сайта — магазин, новостные ленты или руководства по взлому — образуют отдельную звено в масштабном сообществе, где главными ценностями выступают конфиденциальность и защита анонимности.
Будущее платформы: вызовы и обещания
Ясно, что будущая деятельность Rutor потребует решения новых рисков, внедрения свежих подходов к безопасности и средств обхода ограничений. Пользователи обязаны понимать, что ни одна анонимная платформа не может дать абсолютную защиту.
Сервис остается местом, где можно получать дополнительную информацию, обсуждать вопросы безопасности, следить за новостями и инновациями в области даркнета. Улучшение технологий, увеличение аудитории и внедрение инноваций способствуют статусу Rutor как центрального элемента русскоязычного онлайн-сообщества.
– Принцип анонимности
– Надёжность проведения операций
– Возможность получения эксклюзивных данных
– Защищённость коммуникаций
Rutor — это платформа с уникальной историей, и её опыт стоит принимать во внимание всем, кто ценит собственную свободу, приватность и независимость от внешней цензуры в современном цифровом мире.
Your comment is awaiting moderation.
купить кокаин, мефедрон, бошки, марихуану Надеюсь на дальнейшее сотрудничество с магазином!Хороший магазин и отличные цены. Доставили через 3 дня после заказа. О качестве товара комментарий оставлю позже. УВОЖАЕМЫЕ ФОРУМЧАНЕ МАГАЗИН ПРОВЕРЕННЫЙ БЕРИТЕ СМЕЛО. КАЧЕСТВО ТОВАРА И ОПЕРАТИВНОСТЬ РАБОТЫ ВАС НЕ ПОДВЕДУТ ДА ЕЩЕ И ЦЕНЫ УУХХ КАКИЕ ЛУЧШЕ ВРЯД ЛИ НАЙДЕТЕ… ЕЩЕ РАЗ С П А С И Б О:bro:
Your comment is awaiting moderation.
zylvo info – Simple design, pages respond fast and all information is easy to locate.
Your comment is awaiting moderation.
???????????????????!https://lantu-jp.com/??????????????????????????????????????????????????????????????????????????????????????????????????????LANTU????????????????????
Your comment is awaiting moderation.
check krixa online – Clean design, fast pages and information is organized logically.
Your comment is awaiting moderation.
журнал авто журнал авто .
Your comment is awaiting moderation.
this website – Clean presentation with quick access to details that actually help.
Your comment is awaiting moderation.
купить кокаин, мефедрон, бошки, марихуану Дошло за 3 дня , качество отличное , буду только с этим магазом работать.Может не по теме,но всё ж поделюсб опытом чем хорош СПСР.При заказе на сайте ты вбиваешь адрес доставки, когда посыль уже в городе и звонит курьер назначаю ему встречу не по адресу они без проблем едут.А дальше уже ваша фантазия куда вызвать курьера в лес или наоборот в людное место-этоим можно лишний раз обезопасить себя от Пришлось высылать чек,региться на ретейле,оформлять заказ.
Your comment is awaiting moderation.
zavirogroup online – The layout is clean, and the information is straightforward and accessible.
Your comment is awaiting moderation.
Играешь в казино? https://freespinsbonus.ru бесплатные вращения в слотах, бонусы для новых игроков и действующие акции. Актуальные бонусы и предложения онлайн-казино.
Your comment is awaiting moderation.
open morixotrustco – Professional interface and well-laid-out pages help locate information effortlessly.
Your comment is awaiting moderation.
Армейский клуб готов порадовать фанатов ярким хоккеем в новом сезоне. Домашние матчи ЦСКА — это скорость, техника и поддержка, которая ощущается с первых минут игры. Подробнее по ссылке https://rentry.co/o8vw5xrg
Your comment is awaiting moderation.
купить кокаин, мефедрон, бошки, марихуану 2.Почему на сайте нет ниодного упоминания о ритейле,в то время,как заказы надо делать через него?мы говорили что мхе качество не очень, он такой пришел, сказали поменяем дак поменяем, ты стучи туда с кем об обмене разговаривал… платил 5 февраля свою посылочку!как вы поняли ничего не получил!ТС кормил меня завтраками,в итоги обещал вернуть деньги если не получу до 28 февраля!деньги мне тоже никто не вернул вместо этого мне прислали новый трек и написали что мы обещали что получите товар и деньги возвращать не буду!мои обьяснения о том что вашу посылку уже некому получать он слушать не хочет и возвращать деньги тоже!Ув.Адмистрация форума прошу не удалять мой пост и если нужно могу скинуть переписку!
Your comment is awaiting moderation.
velvix info – Browsing is effortless, interface is clean and content is immediately visible.
Your comment is awaiting moderation.
vexaro online – Enjoyed navigating, layout is simple and information is easy to understand.
Your comment is awaiting moderation.
???????????????????!https://bettdow-jp.com/?????????????????????????????????????????????????????????????????????????????????????????????????????????????????????Bettdow???????????????????
Your comment is awaiting moderation.
купить кокаин, мефедрон, бошки, марихуану Общение оператора 10/10-всегда все грамотно и вежливо объяснит. Таким оператор и должен быть!Нее… пацаны, Вы не поняли, я и не волнуюсь ни капельки, и на закз этот мне положить, мне за державу обидно. Пришел я в магазин а там висит цена на сок томатный сто рублей. Взял пачку, отстоял в очереди а продавщица и говорит что стоит он не сто рублей, которые у тебя в кармане, а сто десять… Да я разъе….у этот магазин вместе с продавщицой и заведующей…. Лучше заплатите админу своего сайта чтобы мессаги на мыло падали четко и конкретно и не наебы…ли людей. как правило все реактивы от данного магазина проходят проверку на легальность\чистоту так что поживём увидим, думаю нелегала тут в продаже не появится )
Your comment is awaiting moderation.
start here – Layout is simple and intuitive, letting me access information quickly.
Your comment is awaiting moderation.
start here – Pages load cleanly, and the structure makes it easy to follow the information.
Your comment is awaiting moderation.
quick visit – Just stumbled in today and everything felt nicely organized.
Your comment is awaiting moderation.
Лучшее казино https://download-vavada.ru слоты, настольные игры и live-казино онлайн. Простая навигация, стабильная работа платформы и доступ к играм в любое время без установки дополнительных программ.
Your comment is awaiting moderation.
https://gladioluss.ru Товар даже не тестили еще ! Но вес ровный , качество не сомневаюсь тоже на высоте , скоро будем проводить тесты . Буду брать только здесь !!!Магазину огромное спасибо! За оп оп давай что за эфо дис
Your comment is awaiting moderation.
Пространство, созданное для вдумчивых событий. Здесь важны внимание к деталям, комфорт и ощущение спокойствия, в котором идеи звучат яснее — https://vnutrispace.ru/
Your comment is awaiting moderation.
купить кокаин, мефедрон, бошки, марихуану Качество вышка, доставка до вашего города обговаривается индивидуально с ТС!не выстанавливаються Заказ получил, спасибо за ракетку 😀 Это был мой первый опыт заказа легала в интернете, и он был положительным! Спасибо магазину chemical-mix.com за это!
Your comment is awaiting moderation.
купить кокаин, мефедрон, бошки, марихуану Магазин агонь! Брал как то давно. все ровно!оч хороший магазин ! Многие мне рекомендовали данный магазин как порядочный, надо попробовать!
Your comment is awaiting moderation.
??????????????????????!https://mifasol-jp.com/
?mifasol?????????????????????????????????????????????????????????????????????????????????????????mifasol?????????????
Your comment is awaiting moderation.
Rutor — это уважаемый на darknet-форумах сайт с развитой историей, защищённым функционалом и анонимной «входной» системой для операций через Rutor.Rutor — старейший представитель даркнета на русском языке
rutor org расширение — это один из самых известных и старейших сервисов в русскоязычном даркнете, который стал неотъемлемой частью экосистемы анонимных ресурсов. Данный сервис специализируется на доступе к широчайшему ассортименту софта, файлов, новостей и разнообразных материалов, охватывающих вопросы взлома и защиты.
Особенности работы системы Rutor
Данная система обеспечивает доступ к значительным объемам данных и файлов, гарантируя при этом повышенную анонимность и защиту пользователей. Особенность сервиса в том, что он работает через сеть Rutor, что существенно снижает риск идентификации и утечки данных. За долгое время работы Rutor стал своего рода летописью для даркнета на русском языке.
Безопасность и анонимность на Rutor
Безопасность в Rutor занимает важное место. Платформа предоставляет анонимный просмотр контента благодаря применению новейших решений для защиты информации и коммуникаций. В целях увеличения приватности рекомендуется пользоваться внутренним мессенджером, который обеспечивает безопасный обмен контактной информацией и свежими данными без риска цензуры или слежки.
Значимость Rutor для даркнет-сообщества на русском языке
Rutor до сих пор служит значимым источником свежей информации и новостей по направлениям взлома и кибербезопасности. Его репутация как сервис с минимальной цензурой и высокой степенью анонимности делает его востребованным среди тех, кто ценит свободу информации и защиту персональных данных.
Rutor продолжает работать и предоставлять стабильный доступ к ресурсам, удовлетворяя потребности как новичков, так и опытных пользователей даркнета. Архитектура ресурса предусматривает, что любые разделы — магазин, новостной блок или гайды по взлому — являются составляющими единой системы, где превалируют безопасность и анонимность.
Перспективы и риски
Нет сомнений, что в дальнейшем Rutor столкнётся с новыми угрозами, инновационными способами охраны приватности и методами преодоления блокировок. Пользователи обязаны понимать, что ни одна анонимная платформа не может дать абсолютную защиту.
Сервис остается местом, где можно получать дополнительную информацию, обсуждать вопросы безопасности, следить за новостями и инновациями в области даркнета. Развитие технологий, расширение базы пользователей и появление новых возможностей делают Rutor одним из центров русскоязычного сообщества в сети.
– Сохранение анонимности
– Безопасность транзакций
– Доступ к уникальной информации
– Конфиденциальность общения
Уникальный путь Rutor делает платформу значимой для тех, кто высоко ценит свободу, личную приватность и защиту от внешнего контроля в цифровую эпоху.
Your comment is awaiting moderation.
??????????????????????!https://mifasol-jp.com/
?mifasol?????????????????????????????????????????????????????????????????????????????????????????mifasol?????????????
Your comment is awaiting moderation.
It’s truly very complicated in this active life to listen news on TV, thus
I just use web for that reason, and get the hottest information. https://Seven.mixh.jp/answer/question/les-meilleures-salles-de-gym-en-monteregie-trouvez-votre-espace-fitness-ideal
Your comment is awaiting moderation.
купить кокаин, мефедрон, бошки, марихуану пробывал нюхать эфект 4-6часанапрягает долгое молчание продовца на переписку,возможно занят. вот пару часиков назад получил посылочку=) Чай так сказать=) ща сижу под ним в курочки уплетаю уже 3 разорвиебало бутерброд=)ЫЫЫ
Your comment is awaiting moderation.
KrixaFlow – Simple structure and quick loading made the experience smooth.
Your comment is awaiting moderation.
https://t.me/indi_surguta
Your comment is awaiting moderation.
InvestRavion – Investment options are displayed clearly, and navigation is seamless.
Your comment is awaiting moderation.
ОЭРН – профессиональный портал для верификации компетенций и статуса специалистов по экспертизе недр. Ресурс упрощает выбрать специалиста по специализациям ТПИ, нефть и газ, геология и ГРР – снижая риски при подписании отчётов и отчетов в проектах, https://oern2007.ru/
Your comment is awaiting moderation.
Мессенджер и магазин Rutor признан одним из самых безопасных ресурсов в русском даркнете, благодаря анонимности системы, конфиденциальности и поддержке платежей в Rutor.Rutor: Один из ключевых проектов русскоязычного даркнета
rutor org расширение — это один из самых известных и старейших сервисов в русскоязычном даркнете, который стал неотъемлемой частью экосистемы анонимных ресурсов. Данный сервис специализируется на доступе к широчайшему ассортименту софта, файлов, новостей и разнообразных материалов, охватывающих вопросы взлома и защиты.
Главные аспекты функционирования Rutor
Система курирует доступ к огромному количеству информации и файлов, сохраняя дополнительную конфиденциальность и анонимность своих пользователей. Главное преимущество платформы — интеграция с сетью Rutor, что значительно уменьшает вероятность раскрытия личности и потери конфиденциальной информации. За долгое время работы Rutor стал своего рода летописью для даркнета на русском языке.
Как обеспечиваются безопасность и анонимность на Rutor
Вопросы безопасности являются одними из ключевых на сервисе Rutor. Сервис гарантирует анонимность доступа к данным, используя прогрессивные системы шифрования транзакций и общения. Для дополнительной конфиденциальности часто рекомендуют использовать встроенный мессенджер, позволяющий пользователям безопасно обмениваться контактами и новыми данными, не подвергаясь цензуре и вмешательству третьих лиц.
Роль Rutor в экосистеме русскоязычного даркнета
Площадка Rutor по-прежнему играет роль ключевого ресурса для обмена актуальными данными по безопасности и тематике взлома. Его репутация как сервис с минимальной цензурой и высокой степенью анонимности делает его востребованным среди тех, кто ценит свободу информации и защиту персональных данных.
Платформа функционирует стабильно, обеспечивая равный доступ для новых и опытных участников даркнета. Система построена таким образом, что каждый раздел страницы — будь то магазин, новости или инструкции по взлому — становится отдельной частью большого сообщества, в котором безопасность и возможность оставаться анонимным выходят на первый план.
Перспективы и риски
Безусловно, дальнейшая история Rutor будет связана с новыми формами риска, новыми способами защиты конфиденциальности и методами обхода блокировок. Пользователи обязаны понимать, что ни одна анонимная платформа не может дать абсолютную защиту.
Сервис остается местом, где можно получать дополнительную информацию, обсуждать вопросы безопасности, следить за новостями и инновациями в области даркнета. Развитие технологий, расширение базы пользователей и появление новых возможностей делают Rutor одним из центров русскоязычного сообщества в сети.
– Сохранение анонимности
– Безопасность транзакций
– Возможность получения эксклюзивных данных
– Защищённость коммуникаций
Уникальный путь Rutor делает платформу значимой для тех, кто высоко ценит свободу, личную приватность и защиту от внешнего контроля в цифровую эпоху.
Your comment is awaiting moderation.
https://videochatruletka.org/
Your comment is awaiting moderation.
Проститутки Сургута
Your comment is awaiting moderation.
https://vremyanovostei.ru Трек получил в первый день,5 баллов за работу магазинаОтветил) просто не сразу увидел в вашем сообщении дополнительный вопрос ) П.С. Отзывы о работе (посты по теме) я не удалял.
Your comment is awaiting moderation.
Виды подземных резервуаров https://underground-reservoirs.ru
Your comment is awaiting moderation.
link alternatif dolly4d
Your comment is awaiting moderation.
https://livevideochat18.ru/
Your comment is awaiting moderation.
Lucky Jet — динамичная крэш-игра, суть — успеть забрать выигрыш пока не герой исчезнет. Простые правила и быстрые раунды не отпускают, но учитывайте, что исход непредсказуем. Играйте ответственно и берегите бюджет. Полезные материалы — в Telegram-канале: https://t.me/lucky_jet_site
Your comment is awaiting moderation.
https://t.me/indi_surguta/
Your comment is awaiting moderation.
https://bestdogfoodforboxers.com Такое могло произойти только с одним заказом, заказан лично человеком был ркс4. Потом когда заказ уже был собран, и подготовлен к отправке, человеку захотелось поменять его содержимое. Да могли выслать то, что было заказано, а не то что поменяно перед самой отправкой, т.к. склад берет данные с сайта, а не у меня в скайпе. Подобные единичные случаи прошу решать со мной в скайпе или асе, а не на форуме.А вот еще немного…Вскрыл, взвешал – все в норме. для начала взял 1гр.растворяется АМ2233 в спирту хреново,(в след.раз попробую на растворителе сделать)причем грел все это дело на водяной бане,мешал,но до конца так и не растворилось.делал это долго и упорно,молочного оттенка раствора не наблюдалось,прозрачный скорее,но остался осадок в виде белого порошка.В итоге так и залил все это дело 1к20. Сушится теперь. Как высохнет опробуем и напишу что получилось. Буду надеятся на лучшее. Скажу одно это вещь крутая!!!
Your comment is awaiting moderation.
VelvixDirect – Helpful explanations made the whole process quicker.
Your comment is awaiting moderation.
PlixoPortal – Minimal clutter, very user-friendly and straightforward to use.
Your comment is awaiting moderation.
Сливы курсов ЕГЭ 2025 https://courses-ege.ru
Your comment is awaiting moderation.
https://girls-live-cams.com/
Your comment is awaiting moderation.
Давний участник рынка darknet Rutor завоевал доверие благодаря скрытой системе и сервису, позволяющему безопасно проводить сделки через сеть Rutor.Rutor: Один из ключевых проектов русскоязычного даркнета
1 x rutor зеркало считается одним из наиболее популярных и старых ресурсов в рунет-даркнете, который прочно закрепился в инфраструктуре анонимных площадок. Основное направление работы ресурса — предоставление обширной базы файлов, утилит, новостей и прочего контента, в том числе, связанного с темами безопасности и взлома.
Особенности работы системы Rutor
Система курирует доступ к огромному количеству информации и файлов, сохраняя дополнительную конфиденциальность и анонимность своих пользователей. Работа сервиса построена на использовании анонимной сети Rutor, что помогает свести к минимуму угрозы идентификации и утечки данных. С течением времени площадка превратилась в важный архив событий и истории русскоязычного даркнета.
Меры защиты и анонимности пользователей Rutor
Безопасность в Rutor занимает важное место. Сайт обеспечивает анонимный доступ к материалам, что поддерживается за счет использования современных технологий защиты транзакций и связи. Для сохранения анонимности и безопасного обмена контактами советуют применять специальный внутренний мессенджер, защищающий пользователей от вмешательства и контроля.
Значимость Rutor для даркнет-сообщества на русском языке
Rutor до сих пор служит значимым источником свежей информации и новостей по направлениям взлома и кибербезопасности. Благодаря слабой цензуре и акценту на анонимность, сервис высоко ценится у пользователей, для которых важны свобода и защита личных сведений.
Rutor продолжает работать и предоставлять стабильный доступ к ресурсам, удовлетворяя потребности как новичков, так и опытных пользователей даркнета. Система построена таким образом, что каждый раздел страницы — будь то магазин, новости или инструкции по взлому — становится отдельной частью большого сообщества, в котором безопасность и возможность оставаться анонимным выходят на первый план.
Перспективы и риски
Безусловно, дальнейшая история Rutor будет связана с новыми формами риска, новыми способами защиты конфиденциальности и методами обхода блокировок. Следует помнить, что даже максимально анонимная среда не обеспечивает стопроцентную безопасность.
Этот сервис по-прежнему служит площадкой для информирования, обсуждений безопасности и отслеживания новшеств в даркнет-сообществе. Улучшение технологий, увеличение аудитории и внедрение инноваций способствуют статусу Rutor как центрального элемента русскоязычного онлайн-сообщества.
– Сохранение анонимности
– Гарантия безопасности сделок
– Доступ к уникальной информации
– Защищённость коммуникаций
Rutor — это платформа с уникальной историей, и её опыт стоит принимать во внимание всем, кто ценит собственную свободу, приватность и независимость от внешней цензуры в современном цифровом мире.
Your comment is awaiting moderation.
RavionEdge – The information here is useful enough to visit often.
Your comment is awaiting moderation.
Кактус казино официальный сайт это быстрый старт и бонусы для новых игроков. Регистрация занимает несколько минут. Вход доступен круглосуточно. Заходи и играй: cactus казино зеркало
Your comment is awaiting moderation.
OrvixEdge – I found the tools easy to use and instructions very clear.
Your comment is awaiting moderation.
https://landshaft-komi.ru явно не 15-ти минутка, почитайте отзывы в соответвующей теме. Качество товара на высоте у нас всегда .Одобавив снова в контакты по джаберу на сайте получил “не авторизованный” Обратите внимание жабу сменили. В итоге! К-ю чистый. Эффект, очень хорошо!!(Не отлично!!) но был же разговор 1к10!! а то и к15.
Your comment is awaiting moderation.
Cactus казино сайт это современный онлайн формат азартных игр. Удобная регистрация и быстрый вход позволяют начать сразу. Бонусы доступны новым игрокам. Заходи сегодня – cactus казино вход
Your comment is awaiting moderation.
Лучшие и безопасные подземные противопожарные резервуары эффективное решение для систем пожарной безопасности. Проектирование, производство и монтаж резервуаров для хранения воды в соответствии с требованиями нормативов.
Your comment is awaiting moderation.
купить кокаин, мефедрон, бошки, марихуану Ребята, у chemical-mix все на высшем уровне!Отличный Магаз, Все четко!!! да в пятницу отправляли… вот до сих пор небьеться… нервничаю…
Your comment is awaiting moderation.
NevrixPoint – Fast visit, yet everything seemed logical and easy to follow.
Your comment is awaiting moderation.
UlixoFlow – Smooth user experience with easy-to-follow navigation.
Your comment is awaiting moderation.
Казино Кактус онлайн подходит для тех кто ценит скорость и бонусы. Регистрация не занимает много времени. Вход доступен круглосуточно. Заходи и начинай играть: cactus casino регистрация
Your comment is awaiting moderation.
Мессенджер и магазин Rutor признан одним из самых безопасных ресурсов в русском даркнете, благодаря анонимности системы, конфиденциальности и поддержке платежей в Rutor.Rutor: Один из ключевых проектов русскоязычного даркнета
www rutor org — это один из самых известных и старейших сервисов в русскоязычном даркнете, который стал неотъемлемой частью экосистемы анонимных ресурсов. Данный сервис специализируется на доступе к широчайшему ассортименту софта, файлов, новостей и разнообразных материалов, охватывающих вопросы взлома и защиты.
Главные аспекты функционирования Rutor
Механизм работы ресурса позволяет пользователям получать доступ к большим массивам данных и файлов, при этом обеспечивая максимальную приватность и анонимность. Особенность сервиса в том, что он работает через сеть Rutor, что существенно снижает риск идентификации и утечки данных. За годы существования Rutor стал местом, где сохраняется важная история русскоязычного даркнета.
Безопасность и анонимность на Rutor
Система Rutor уделяет особое внимание вопросам безопасности. Сервис гарантирует анонимность доступа к данным, используя прогрессивные системы шифрования транзакций и общения. В целях увеличения приватности рекомендуется пользоваться внутренним мессенджером, который обеспечивает безопасный обмен контактной информацией и свежими данными без риска цензуры или слежки.
Влияние Rutor на сегмент русского даркнета
Rutor до сих пор служит значимым источником свежей информации и новостей по направлениям взлома и кибербезопасности. Из-за ориентации на минимальную цензуру и приватность Rutor популярен у приверженцев свободного обмена данными и конфиденциальности.
Rutor поддерживает стабильную работу, позволяя и новичкам, и опытным пользователям использовать предоставляемые сервисы. Каждый из разделов сайта — магазин, новостные ленты или руководства по взлому — образуют отдельную звено в масштабном сообществе, где главными ценностями выступают конфиденциальность и защита анонимности.
Возможные направления развития и связанные опасности
Ясно, что будущая деятельность Rutor потребует решения новых рисков, внедрения свежих подходов к безопасности и средств обхода ограничений. Следует помнить, что даже максимально анонимная среда не обеспечивает стопроцентную безопасность.
Платформа продолжает быть ресурсом для получения расширенной информации, обмена мнениями по безопасности и мониторинга новшеств в сферах даркнета. Развитие технологий, расширение базы пользователей и появление новых возможностей делают Rutor одним из центров русскоязычного сообщества в сети.
– Сохранение анонимности
– Надёжность проведения операций
– Доступ к уникальной информации
– Обеспечение приватности взаимодействий
Уникальный путь Rutor делает платформу значимой для тех, кто высоко ценит свободу, личную приватность и защиту от внешнего контроля в цифровую эпоху.
Your comment is awaiting moderation.
Сдам 1-к квартиру в Гомеле, район “Волотова”. Первый этаж, отдельный вход. Можно с мелкой собакой. Цена низкая. Студия на сутки Сморгонь
1-к квартира в Бресте у торгового центра. Окна во двор. Современная бытовая техника. Готовьтесь платить за комфорт. аренда жилья сморгонь
Обратите внимание на систему отопления. В межсезонье в квартирах может быть прохладно. Центральное отопление или автономный котел? Есть ли кондиционер? квартиры сморгонь снять
Your comment is awaiting moderation.
VexaroHub – Browsing is seamless, and the platform feels highly professional and trustworthy.
Your comment is awaiting moderation.
trusted finance site – Messaging is direct and transparent, focusing on information over promotion.
Your comment is awaiting moderation.
QInsightHub – Provides detailed analysis for better business planning.
Your comment is awaiting moderation.
арматура 12 мм Арматура МСК В пульсирующем сердце России, где день и ночь кипит строительная лихорадка, арматура МСК становится символом надежности и доступности. Этот географический бренд гарантирует оперативное обеспечение строительных площадок первоклассной сталью, удовлетворяя неутолимую жажду мегаполиса в надежных материалах.
Your comment is awaiting moderation.
купить кокаин, мефедрон, бошки, марихуану ну вообщем все ровно получил людей правда от бати но магазин ровный советуюну как-то так Но в общем и целом доволен очень быстро и качественно! Будем работать и дальше;)
Your comment is awaiting moderation.
эксперт по сертификации Сертификат цена Сертификат цена может складываться из затрат на испытания, экспертизу и оформление документа.
Your comment is awaiting moderation.
MorvexPro – Site performs flawlessly, information is structured clearly.
Your comment is awaiting moderation.
купить кокаин, мефедрон, бошки, марихуану Клад взял в касание, просто идеально. И никаких ебеней. Прям центр города. К стафу есть вопросы, почему-то вместо 5 было 4 колеса. Что расстроило. Не делайте так больше.а вот по этой теме отпиши по подробней,точнее о том как там дальше события развиваются?????????? очень волнует данная тема. как же так их просекла легавня???? откуда краснотой веет.??? магазин достойный,всё ровно и в срок,спасибо большое за ваш труд,будем продолжать сотрудничество!
Your comment is awaiting moderation.
I’m gone to convey my little brother, that he should also pay a quick visit this website on regular basis to take updated from most up-to-date news update.
https://share.google/otcncMkVyL5iuZF5i
Your comment is awaiting moderation.
Rutor — это уважаемый на darknet-форумах сайт с развитой историей, защищённым функционалом и анонимной «входной» системой для операций через Rutor.Rutor: Один из ключевых проектов русскоязычного даркнета
руторорг ру — это один из самых известных и старейших сервисов в русскоязычном даркнете, который стал неотъемлемой частью экосистемы анонимных ресурсов. Основное направление работы ресурса — предоставление обширной базы файлов, утилит, новостей и прочего контента, в том числе, связанного с темами безопасности и взлома.
Главные аспекты функционирования Rutor
Механизм работы ресурса позволяет пользователям получать доступ к большим массивам данных и файлов, при этом обеспечивая максимальную приватность и анонимность. Особенность сервиса в том, что он работает через сеть Rutor, что существенно снижает риск идентификации и утечки данных. За долгое время работы Rutor стал своего рода летописью для даркнета на русском языке.
Меры защиты и анонимности пользователей Rutor
Вопросы безопасности являются одними из ключевых на сервисе Rutor. Сайт обеспечивает анонимный доступ к материалам, что поддерживается за счет использования современных технологий защиты транзакций и связи. Для дополнительной конфиденциальности часто рекомендуют использовать встроенный мессенджер, позволяющий пользователям безопасно обмениваться контактами и новыми данными, не подвергаясь цензуре и вмешательству третьих лиц.
Влияние Rutor на сегмент русского даркнета
Rutor продолжает оставаться важным каналом для получения новых данных и свежих новостей по теме взлома и безопасности. Благодаря слабой цензуре и акценту на анонимность, сервис высоко ценится у пользователей, для которых важны свобода и защита личных сведений.
Платформа функционирует стабильно, обеспечивая равный доступ для новых и опытных участников даркнета. Каждый из разделов сайта — магазин, новостные ленты или руководства по взлому — образуют отдельную звено в масштабном сообществе, где главными ценностями выступают конфиденциальность и защита анонимности.
Перспективы и риски
Безусловно, дальнейшая история Rutor будет связана с новыми формами риска, новыми способами защиты конфиденциальности и методами обхода блокировок. Пользователи должны осознавать, что даже самая анонимная система не гарантирует полной безопасности.
Этот сервис по-прежнему служит площадкой для информирования, обсуждений безопасности и отслеживания новшеств в даркнет-сообществе. Развитие технологий, расширение базы пользователей и появление новых возможностей делают Rutor одним из центров русскоязычного сообщества в сети.
– Принцип анонимности
– Надёжность проведения операций
– Доступ к уникальной информации
– Конфиденциальность общения
Уникальный путь Rutor делает платформу значимой для тех, кто высоко ценит свободу, личную приватность и защиту от внешнего контроля в цифровую эпоху.
Your comment is awaiting moderation.
ZarvoCentral – Everything looks neat and easy to explore.
Your comment is awaiting moderation.
bonding support page – Navigation is smooth and bonding information is easy to grasp.
Your comment is awaiting moderation.
MivaroConnect – Easy-to-use resources made decisions faster and less stressful.
Your comment is awaiting moderation.
ОЭРН – профильный сервис для подтверждения компетенций и статуса экспертов по экспертизе недр. Сервис помогает выбрать эксперта по направлениям ТПИ, геология и ГРР, нефть и газ – уменьшая риски при согласовании отчетов и отчётов в лицензировании: https://oern2007.ru/
Your comment is awaiting moderation.
https://exposvarka.ru Судя по отзывам магазин достойный! Скоро к вам наведаюсь за покупками, удачи во всех делах.возможно мои письма рубятся где-то? там все четко по делу. Все работает
Your comment is awaiting moderation.
VexaroNavigator – Clear, reliable financial content and a seamless browsing experience.
Your comment is awaiting moderation.
Общество экспертов России по недропользованию – профильный сервис для проверки квалификации специалистов по экспертизе недр. Платформа упрощает выбрать эксперта по направлениям ТПИ, геология и ГРР, нефть и газ уменьшая риски при подписании отчётов и отчетов в лицензировании, https://oern2007.ru/
Your comment is awaiting moderation.
PlorixZone – Layout is clean and practical, everything is easy to find quickly.
Your comment is awaiting moderation.
Онлайн-казино Vavada гарантирует быстрый вход без блокировок.
Игровые автоматы и турниры помогают получать дополнительные выигрыши.
Создать аккаунт очень просто, что делает старт максимально комфортным.
Обновляемые зеркала помогают обходить ограничения.
Узнать подробности и войти можно по ссылке vavada — приведены инструкции по входу.
Следите за бюджетом, чтобы сессии приносили положительные эмоции.
Your comment is awaiting moderation.
Если вы хотите глубже разобраться в теме онлайн-казино и понять, на что стоит обращать внимание при выборе платформы, обязательно изучите материал по ссылке https://medgorodok.ru/files/pages/?luchshie_provayderu_v_onlayn_kazino__kto_stoit_za_topovumi_slotami_1.html. В статье собрана полезная информация, которая помогает избежать типичных ошибок и лучше ориентироваться в мире азартных игр. Такой разбор особенно полезен тем, кто играет регулярно и хочет делать это осознанно.
Your comment is awaiting moderation.
купить кокаин, мефедрон, бошки, марихуану Ам имеет высокий толер об этом уже говорилось не разТочно так же. Ровно 2 недели назад оплатил. Трек абсолютно левый, в КСЭ не бьётся. Хотя я заказывал через Пони. Постоянно слышу только “завтра будет биться”, “послезавтра придёт”. До этого было всё нормально, теперь же с магазом работать не советую. Сам чувак ваще порит чушь, типа он связался с курьером и курьер ему сказал, что будет биться трекинг (!!!!!!!!). чема вещи делает!!!
Your comment is awaiting moderation.
https://video18chat.ru/
Your comment is awaiting moderation.
PureOutletZone – Engaging content that fuels creativity and fresh thinking.
Your comment is awaiting moderation.
zaviro trustline overview site – Trustline details are clear, and the site feels professional and calm.
Your comment is awaiting moderation.
a href=”https://qulavoholdings.bond/” />QulavoTrack – Platform is user-friendly and all information appears dependable.
Your comment is awaiting moderation.
купить кокаин, мефедрон, бошки, марихуану а что с алхимом случилось?Ответь в аське!Люди 22куска зарядили ,перед оплатой добро дал ,а потом тишина… Люди переживают,очень!Ответь пожалуйсто!!! заказ дошел до нас)))
Your comment is awaiting moderation.
арматура 8 Арматура 12 Арматура 12 – мощный элемент, способный выдерживать значительные нагрузки, обеспечивая прочность и надежность ответственных конструкций.
Your comment is awaiting moderation.
услуги сертификации Сертификация продукции и услуг Сертификация продукции и услуг охватывает широкий спектр объектов оценки, от продуктов питания до образовательных программ.
Your comment is awaiting moderation.
TaskBase – Keeps all projects organized without unnecessary complexity.
Your comment is awaiting moderation.
PexraDirect – Well-laid-out site, easy to find what you need in seconds.
Your comment is awaiting moderation.
журналы для автолюбителей avto-zhurnal-4.ru .
Your comment is awaiting moderation.
https://zzbel.ru Успехов вам и поменьше всяких заморочек )))получил посыль.мхе отличного качества!а вот ам2233 пока думаю ко скольки мутить.все пишут по разному. наблюдая за Вашей темой пришел к важному выводу:
Your comment is awaiting moderation.
Популярные игры azino 777 на официальном сайте – азино 777
Your comment is awaiting moderation.
zaviro official site – The brand is clearly maintained, giving a professional impression.
Your comment is awaiting moderation.
holdings resource portal – Well-structured content allows users to grasp holdings information immediately.
Your comment is awaiting moderation.
PureValueCreative – Engaging and interactive, perfect for developing fresh concepts.
Your comment is awaiting moderation.
LixorCentral – The information is concise, actionable, and very user-friendly.
Your comment is awaiting moderation.
Hallo! https://das-hyperlite.de/ zeigt die Ausrustung fur Wakeboarding und Wakesurfing. Bindungen wie Mystique oder Destroyer liegen sicher am Fu?, die Boards lassen sich gut kontrollieren, Torque- und Disorder-Finnen passen genau unter die Surfer, der CG Handle erleichtert das Ziehen am Seil. Alles ist robust, passt auf verschiedene Boards, unterstutzt Bewegungsfreiheit und sorgt fur prazise Kontrolle auf dem Wasser. Anfanger wie Fortgeschrittene finden passende Gro?en und komfortable Details fur jede Session.
Your comment is awaiting moderation.
https://freespiritdelicacies.com магазин роботает отлично сам проверил и не поверю не каму кто скажет что это не такСорри, многаюуков. И ошибок – со спецтелефлна сижу) у меня до сих пор нет реальной отправки,ток просроченная планируемая(((
Your comment is awaiting moderation.
Про хоккейные вечера, которые начинаются с выбора матча. Удобно, понятно и без ощущения перегруженности https://postheaven.net/tickethockey-com/bilety-na-hokkey .
Your comment is awaiting moderation.
http://sehk-wiki.org/index.php?title=%D0%A0%D0%B0%D0%B1%D0%BE%D1%87%D0%B8%D0%B9%20%D0%9F%D1%80%D0%BE%D0%BC%D0%BE%D0%BA%D0%BE%D0%B4%20%D0%9C%D0%B5%D0%BB%D0%B1%D0%B5%D1%82%202026:%20MAX888%20-%20%D0%91%D0%BE%D0%BD%D1%83%D1%81%2015,000%E2%82%BD
Your comment is awaiting moderation.
TrixoDirect – Fast and detailed support made my experience seamless.
Your comment is awaiting moderation.
RixvaSphere – Quick browsing, layout is intuitive and user-friendly.
Your comment is awaiting moderation.
Квартира на сутки для работы? Ключевое — стабильный Wi-Fi и рабочий стол. Убедитесь в тишине района. Фото должны соответствовать реальности. Оплата после заселения — ваш козырь.
апартаменты на короткий период
В жилье есть вся необходимая инфраструктура: кровати, шкафы, диваны, столы. Работающая бытовая техника. Присутствует кухонный инвентарь для готовки. Текстиль предоставляется в чистом виде.
квартира на сутки для командировки
Хозяин-локаль знает всё о своем районе. Он подскажет, где лучший кофе, тихий парк или круглосуточный магазин. Это делает поездку по-настоящему комфортной.
квартира на сутки для деловой поездки
Идеально для длительного проживания. Есть всё для готовки и комфорта: духовка, блендер, пылесос. Стиральная машина с сушкой. Хозяин оперативно решал вопросы. На 10 из 10.
аренда напрямую от собственника
Your comment is awaiting moderation.
Hallo! https://paiaite.de/ Hundebekleidung zeigt, wie Shirts, Hoodies und Sweatshirts den Alltag der kleinen Hunde begleiten. Gestreifte Shirts liegen leicht auf dem Fell, Sweatshirts halten bei kuhlen Temperaturen warm, Hoodies passen bequem uber Rucken und Brust. Materialien aus weicher Baumwolle erlauben Bewegung und beluften zugleich. Jedes Kleidungsstuck ist fur kleine bis mittelgro?e Hunde zugeschnitten, robust, pflegeleicht und alltagstauglich, sodass die Hunde sich frei bewegen konnen, ohne eingeengt zu wirken.
Your comment is awaiting moderation.
https://freespiritdelicacies.com магазин ровнеый,за что им спасибо,если сами тупить не будете всё пройдёт ровно и без проблем.Товар тоже порадовал,довольно таки неплохо))Селлер вообще отвечает на емейл? Или только в аське его искать, которой у меня нет? 250-й 1К10 то, что нужно..
Your comment is awaiting moderation.
сколько стоит сделать сертификат Выдача сертификатов Кульминацией процесса оценки соответствия является выдача сертификатов. Этот документ – не просто формальность, а весомое доказательство профессионализма компании и гарантия качества предлагаемых ею товаров или услуг. Сертификат открывает двери на новые рынки и укрепляет репутацию.
Your comment is awaiting moderation.
арматура 12 цена за тонну Арматура А500С Арматура А500С – самый надежный материал для стройки.
Your comment is awaiting moderation.
zaviro investment page – Simple navigation paired with clear explanations of capital options.
Your comment is awaiting moderation.
новости про машины avto-zhurnal-4.ru .
Your comment is awaiting moderation.
TorivoFlow – Quick-loading interface and well-structured content make navigation effortless.
Your comment is awaiting moderation.
http://trevorjd.com/index.php?title=Melbet%20%D0%9F%D1%80%D0%BE%D0%BC%D0%BE%D0%BA%D0%BE%D0%B4%20%D0%BF%D1%80%D0%B8%20%D0%A0%D0%B5%D0%B3%D0%B8%D1%81%D1%82%D1%80%D0%B0%D1%86%D0%B8%D0%B8%20%D0%91%D0%BE%D0%BD%D1%83%D1%81%202026:%20MAX888
Your comment is awaiting moderation.
ZaviroBondPro – Found the site easy to browse, all information was accessible without hassle.
Your comment is awaiting moderation.
аренда минивэна мерседес с водителем трансфер mercedes mersvan.ru Сервис «трансфер mercedes mersvan.ru» — это ваша гарантия безупречного начала или завершения любого важного мероприятия. Встреча в аэропорту с именной табличкой, помощь с багажом и безукоризненно чистый Mercedes — вот первые штрихи безупречного сервиса от mersvan.ru, которые задают высочайшую планку с первой же минуты.
Your comment is awaiting moderation.
1win зеркало 1win зеркало Когда основной доступ заблокирован, 1win зеркало становится спасением. Актуальное 1win зеркало обновляется ежедневно, обеспечивая бесперебойный вход. Используйте 1win зеркало, чтобы не пропустить матчи или бонусы – это надежный способ обойти ограничения.
Your comment is awaiting moderation.
купить кокаин, мефедрон, бошки, марихуану Ну чтож ребят сегодня заказал )заказ оформил – жду посылочки ^^ а заряд сколько происходил?
Your comment is awaiting moderation.
zylavo capital network – Smooth performance, modern look, and easy-to-read capital information.
Your comment is awaiting moderation.
QunixTrack – User-friendly layout, found all sections quickly without any confusion.
Your comment is awaiting moderation.
Большой драматический театр в Санкт-Петербурге: билеты Для тех, кто ценит своё время и впечатления. Удобный формат помогает выбрать постановку и заранее понять, каким будет ваш вечер в зале.
Your comment is awaiting moderation.
Kush официальный сайт это стабильный доступ к азартным развлечениям. Регистрация простая и понятная. Бонусы доступны сразу после входа. Присоединяйся к игре – казино куш зеркало
Your comment is awaiting moderation.
RavionPoint – Clear layout with concise descriptions makes browsing a breeze.
Your comment is awaiting moderation.
https://svobodapress.com.ua/karta-rivnoho/
Your comment is awaiting moderation.
купить кокаин, мефедрон, бошки, марихуану всем привет щас заказал реги попробывать как попробую обизательно отпишу думаю магазин ровный и все ништяк будет))))Как магазин порядочный попробуйте установить скайп.
Your comment is awaiting moderation.
bonding service details – Straightforward explanations make the services easy to understand.
Your comment is awaiting moderation.
RixaroEdge – Easy-to-use interface, professional feel, perfect for someone learning the ropes.
Your comment is awaiting moderation.
производство картонной упаковки Изготовление тары из картона – это традиционный и проверенный временем способ упаковки продукции. Картонная тара отличается прочностью, легкостью и экологичностью, что делает ее идеальным решением для широкого спектра товаров.
Your comment is awaiting moderation.
привітання з днем народження дочці 45 років
Your comment is awaiting moderation.
KryvoxEdgePro – The explanations are thorough and easy to understand overall.
Your comment is awaiting moderation.
trustco insight page – Trust content feels reliable, and the design supports easy navigation.
Your comment is awaiting moderation.
газета про автомобили газета про автомобили .
Your comment is awaiting moderation.
упаковка для производства Упаковка из картона – это экологически ответственный выбор, сочетающий в себе прочность, легкость и возможность вторичной переработки. Картонные коробки обеспечивают надежную защиту от механических повреждений, температурных колебаний и влаги, делая их идеальным решением для широкого спектра товаров.
Your comment is awaiting moderation.
MavroScope – Reliable interface, works fast and without hiccups.
Your comment is awaiting moderation.
купить кокаин, мефедрон, бошки, марихуану Спасибо за терпение, понимание и позитивный настройотличный магазин! + ему и я так же жду с 8 числа сказали отправки в начале недели
Your comment is awaiting moderation.
дизайн коридора в квартире дизайн двухкомнатной квартиры 60 кв
Your comment is awaiting moderation.
Срочная аренда 2-к квартиры в Гомеле. Хозяин уезжает, поэтому цена ниже рынка. Только на 1 год. Фото в телеграм. Посуточная аренда квартир Сморгонь
Квартира-студия в Минске, Зеленый Луг. Все новое: сантехника, кухня, мебель. Оплата по счетчикам. Без посредников. Поселок Сморгонь квартира на сутки
Выбирайте квартиру с понятными и простыми правилами. Длинный список строгих запретов (не шуметь, не готовить и т.д.) говорит о возможных конфликтах. жилье в аренду сморгонь
Your comment is awaiting moderation.
ClickFlow – The site feels modern and well-structured, making browsing straightforward.
Your comment is awaiting moderation.
https://svobodapress.com.ua/karta-fastova/
Your comment is awaiting moderation.
1xbet today promo code bangladesh
Your comment is awaiting moderation.
TrackMaster – Manage tasks effortlessly with precise tracking features.
Your comment is awaiting moderation.
New York weed clone delivery
Your comment is awaiting moderation.
buy medicube skincare
Your comment is awaiting moderation.
union overview site – Concept is clearly communicated, and moving through pages feels natural.
Your comment is awaiting moderation.
trusted group website – Organized content that’s easy to understand and browse.
Your comment is awaiting moderation.
купить кокаин, мефедрон, бошки, марихуану Ребят я не терпила и не превык чтоб меня кидали и вы тоже я думаю и если нас кинули то я предлогаю мстить таким образам для начала надо писать на всвсех форумах где есть этом магаз о том что это кидала а не довереный магаз не лениться и писать каждый день об этом чтоб все браза знали правду и не постродали как мысвое сообщение исправил всё ровно будет бро! просто график отправок такой
Your comment is awaiting moderation.
RixaroHoldings – Great information here, saved me a lot of unnecessary searching time.
Your comment is awaiting moderation.
«СибСети» в Новосибирске предоставляют:
• высокоскоростной интернет до 500 Мбит/с;
• быстрое подключение за 1 день;
• безлимитный пакет.
• Комплексный анализ покрытия сети в вашем доме
• Подбор оптимального тарифа под ваши задачи
• Проверку технической доступности по вашему адресу
• Профессиональную установку ТВ приставки
• Персональную поддержку менеджера
• отсутствие скрытых платежей на весь срок обслуживания
сибсети интернет тарифы для домашнего интернета новосибирск
подключиться к интернету сибирские сети – http://www.internet-sibirskie-seti.ru
http://rodgersfuneralhome.com/__media__/js/netsoltrademark.php?d=https://internet-sibirskie-seti.ru/
Домашний интернет и телевидение от «СибСети» в Новосибирске d58592e
Your comment is awaiting moderation.
VixaroBase – Helpful guidance made understanding the steps straightforward.
Your comment is awaiting moderation.
trusted portal network – Trust info is easy to read, and moving around the site is fast and smooth.
Your comment is awaiting moderation.
ZylvoHub – Clean interface and easy navigation, perfect for getting started quickly.
Your comment is awaiting moderation.
Hallo an alle, die Raume lieben, die sprechen. Mit https://das-vailla.de/ wird eine schlichte Wand zu einer Buhne fur Traume – ob ein zarter Frauenumriss, das ruhige Relief der Berge oder ein Baum des Lebens aus warmem Holz. Jede Form tragt etwas Menschliches in sich und fullt das Zuhause mit sanfter Energie und Charakter.
Your comment is awaiting moderation.
1win сайт промокоды 1win Соберите коллекцию промокодов 1win для максимальной выгоды. Промокоды 1win на фрибеты или кэшбэк активируются легко и повышают шансы на выигрыш. Следите за обновлениями промокодов 1win, чтобы оставаться в топе игроков с дополнительными преимуществами.
Your comment is awaiting moderation.
купить кокаин, мефедрон, бошки, марихуану Послезавтра запрет в силу вступаетПорошок серого цвета чем то похож на известь, запаха нет, ну или очень слабый. Фото сделать не вышло сори :dontknown:! сегодня получил посулку с двумя пакетиками жёлтоватого и белого цвета, магазин работает:good: качество проверю и в соседней темке отпишу
Your comment is awaiting moderation.
«TUT-SPORT» предлагает:
• гетры, шорты и спортивные костюмы;
• доставку по всей России;
• Определение оптимального комплекта экипировки под ваш клуб и бюджет;
• Проверку ассортимента в нужной категории.
футбольная форма атрибутика
магазин футбольной формы – https://www.tut-sport.ru
http://wwwmrchristmas.com/__media__/js/netsoltrademark.php?d=https://tut-sport.ru
Спортивная экипировка и аксессуары для болельщиков от «TUT-SPORT» в вашем городе bfa8dd8
Your comment is awaiting moderation.
ZylavoHub Online – The platform is visually tidy, with intuitive browsing across sections.
Your comment is awaiting moderation.
журнал автомобили журнал автомобили .
Your comment is awaiting moderation.
professional trustee site Clean and clear – Trust-related details are explained without overcomplication.
Your comment is awaiting moderation.
ServiceFlow – Browsing features is fast and intuitive for everyone.
Your comment is awaiting moderation.
1xbet bonus code singapore
Your comment is awaiting moderation.
https://evrasiaperm.ru Мне сразу по поводу мхе ответили, быстро порешили на бонусе в следующую покупку.всегда ровно все было и есть. так что я здравствуйте. магазин работает?
Your comment is awaiting moderation.
RixaroTracker – Interface is intuitive and resources are easy to access.
Your comment is awaiting moderation.
накрутка реакций телеграм накрутка подписчиков телеграм
Your comment is awaiting moderation.
zorivo holdings portal – Clear overview of holdings, branding feels consistent and professional.
Your comment is awaiting moderation.
https://dogs-academia.ru/
Your comment is awaiting moderation.
XylixFlow – Pages load quickly, and navigation feels natural throughout the site.
Your comment is awaiting moderation.
morixo line overview – Organized content, line services are explained clearly for users.
Your comment is awaiting moderation.
VixaroStorefront – Great service overall, items arrived fast and work perfectly.
Your comment is awaiting moderation.
упаковка гофрокороб Картонные упаковки – это холст для маркетинговых решений, эффективный инструмент продвижения бренда и привлечения внимания покупателей. Яркий дизайн, информативная графика и качественная печать превращают обычную коробку в мощный рекламный носитель, повышающий узнаваемость бренда и стимулирующий продажи.
Your comment is awaiting moderation.
https://rooi-sozidanie.ru “Решил попробовать курнуть через фольгу , Насыпаю нажигаю бля чуть кишки не выпленул”сегодня получил посулку с двумя пакетиками жёлтоватого и белого цвета, магазин работает:good: качество проверю и в соседней темке отпишу Просьба не тяните, ответьте срочно!!!!!
Your comment is awaiting moderation.
ZylavoFlow Center – Browsing is effortless, and the platform feels clean and modern.
Your comment is awaiting moderation.
аренда мерседес с водителем аренда мерседес v класса с водителем Полное и правильное название модели в запросе «аренда мерседес v класса с водителем» указывает на внимательного и информированного клиента, для которого важна точность в деталях при заказе столь высококлассной услуги.
Your comment is awaiting moderation.
official nevironexus site – Everything is easy to understand and moving around the platform feels natural.
Your comment is awaiting moderation.
free bet promo code 1xbet canada
Your comment is awaiting moderation.
Купить билеты в Театр имени Пушкина Это пространство для спокойного театрального вечера. Сильная драматургия и живая актерская работа создают ощущение настоящей сцены без показной эффектности.
Your comment is awaiting moderation.
1win 1 win Под эгидой 1 win раскрывается панорама триумфов, где каждый клик приближает к вершине. Эта вариация названия символизирует неумолимый дух победы, вдохновляя на смелые прогнозы в мире спорта и казино. С 1 win вы погружаетесь в океан возможностей: слоты с кристальными гранями, рулетка, вращающаяся как судьба, и ставки, что пульсируют адреналином. Платформа дарит не только развлечения, но и ощущение элиты – с персонализированными предложениями и мгновенными транзакциями, где каждый выигрыш – это шаг к бессмертию в анналах удачи.
Your comment is awaiting moderation.
a href=”https://qulavoholdings.bond/” />QulavoVision – Very easy to navigate, with options that seem reliable and safe.
Your comment is awaiting moderation.
Kush казино официальный сайт предлагает стабильную работу и бонусы. Быстрый вход без лишних шагов. Регистрация доступна каждому. Начни игру сейчас, куш казино вход
Your comment is awaiting moderation.
https://silovoy-cable.ru Я в последний раз говорю, эта тема – для отзывов о работе магазина. Если вы не можете связаться с продавцом, то не надо писать об этом по сто раз. Если вы хотите узнать о качестве продукции – вам СЮДА !!! Любой оффтоп\флуд прекращаем !”В Лс загораеться сообщениее,Захожу там координаты клада” Да долго работают! :good:с самого начала)
Your comment is awaiting moderation.
TorivoTrack – Very clear breakdowns and open data make assessing options easy.
Your comment is awaiting moderation.
журнал автомобильный журнал автомобильный .
Your comment is awaiting moderation.
Kush казино официальный сайт предлагает стабильную работу и бонусы. Быстрый вход без лишних шагов. Регистрация доступна каждому. Начни игру сейчас – казино куш зеркало
Your comment is awaiting moderation.
Promax tools hub – Everything is clear, tools perform well, and instructions are easy to follow.
Your comment is awaiting moderation.
morixo bond network – Well-structured content and clear navigation make bond details accessible.
Your comment is awaiting moderation.
Do you do music? music theory worksheets for kids for children and aspiring musicians. Educational materials, activities, and creative coloring pages to develop ear training, rhythm, and an interest in music.
Your comment is awaiting moderation.
https://badgerboats.ru/themes/middle/?pokerdom_promokod_bonus_kod.html
Your comment is awaiting moderation.
http://bn-crew.9e.cz/profile.php?lookup=253
Your comment is awaiting moderation.
https://aqua59.ru Заливают паршивым вином.Я знаете как делаю, когда пацики отвечают сразу делаю заказ, оплачиваю и все чотка, самим тормозить не надо тоже самое оплатил 3.02 трек получил через 5 дней но он до сих пор не бьется ТС расскзывает сказки что трек в течении 2х рабочих дней начнет биться я наверно похож на дебила я за свою жизнь получил курьерок больше чем отправил данный ТС РЕБЯТА ПРИТОРМОЗИТЕ СВОЮ ОПЛАТУ ПОКА Я НЕ ПОЛУЧУ СВОЙ ГРУЗ!!!!! Я кругосуточно в сети и буду держать Вас в курсе своих событий!!!!
Your comment is awaiting moderation.
ZylavoConnect – Browsing feels seamless, and the design is visually appealing.
Your comment is awaiting moderation.
financial resource portal – Professional, reliable, and clear capital information throughout the site.
Your comment is awaiting moderation.
разработка конструкции упаковки из гофрокартона Срочное изготовление гофротары – это решение для ситуаций, когда упаковка необходима в максимально сжатые сроки. Современные производственные мощности позволяют изготавливать гофротару в течение нескольких часов, обеспечивая бесперебойную работу вашего бизнеса.
Your comment is awaiting moderation.
CHAOREN’s casual wear offers relaxed fits and trendy designs suitable for any occasion. Their collections focus on quality fabrics and versatile pieces. Explore their range at https://thechaoren.com.
Your comment is awaiting moderation.
language aid website – Translations appear fast and accurate enough for normal use.
Your comment is awaiting moderation.
заказать дипломную работу срочно
Your comment is awaiting moderation.
купить кокаин, мефедрон, бошки, марихуану Сегодня получил посылку. Оказалось, что просто трек не пробивался до последнего, а посылочка шла себе. Дошло быстро. Сам магазин передал товар в курьерку почти моментально за что огромное спасибо. Магазин всегда остается на связи и отвечает даже на глупые переживания. Конспирация порадовала. Вес тоже в норме. По качеству отпишу позже трип-репорт, но думаю, что всё на высшем уровне. Спасибо, Chemical-mix.Продаван молчит, что будет дальше не известно, мне сделал но не все.отписался, жду результатов скайпцы не могу пока поставить по техническим причинам. хотелось бы связаться по мылу, но увы и ах. жаль, хороший ассортимент там. 🙁
Your comment is awaiting moderation.
массаж Подарочные сертификаты Стерлитамак – это идеальный способ подарить близким и друзьям заботу о здоровье и красоте. Подарите им возможность насладиться профессиональным массажем, расслабляющей спа программой или другими приятными процедурами. Подарочный сертификат в Стерлитамаке – это универсальный и полезный подарок, который обязательно придется по вкусу каждому.
Your comment is awaiting moderation.
CHARTOU’s footwear collection includes sneakers, boots, and sandals crafted to keep you comfortable while looking great. Perfect for everyday wear or special occasions. Browse their styles at https://thechartou.com.
Your comment is awaiting moderation.
Olive Media KC Marketing – Practical insights presented clearly, examples help visualize the impact.
Your comment is awaiting moderation.
Купить билет в театр Одеон Это пространство для вдумчивого зрителя. Здесь ценят паузу, слово и жест, создавая ощущение глубины и честности.
Your comment is awaiting moderation.
онлайн обучение с выдачей диплома бьюти профессии Получение диплома бьюти-специалиста онлайн – это инвестиция в ваше будущее, открывающая двери в салоны красоты, спа-центры, частные практики и возможность создания собственного успешного бизнеса. Теоретические знания, практические навыки, экспертная поддержка и возможность получения обратной связи – все это делает онлайн-обучение эффективным и результативным.
Your comment is awaiting moderation.
Зеркало коридор Зеркало трюмо: классическое зеркало трюмо для создания уютного уголка красоты.
Your comment is awaiting moderation.
https://distonija.ru дайте ссылку на город курган, хочется маленько россыпушкив том то и дело что мнения в “курилках” а тут “факты” пишут все. Я думаю ,что есть разница между мнением и фактом. Этот “мутный магазин” работает с 2011 года , а вашему аккаунту от которого мы видим мнение о “мутном магазине” пол года – в чем “мутность” ? Спасибо за отзывы приятные. Стараемся доставлять побыстрее)))
Your comment is awaiting moderation.
разработка коробок из картона Упаковка гофрокороб – это фундамент безопасной транспортировки и презентабельного представления вашей продукции. От прочности материала до эргономичности конструкции, каждый аспект гофрокороба играет ключевую роль в сохранении целостности товара и создании положительного впечатления у потребителя. Выбор правильной упаковки – это стратегическое решение, определяющее успех вашего бизнеса.
Your comment is awaiting moderation.
HOMEYEE’s products help you organize and decorate your living space with style and ease. From storage solutions to decorative items, find everything you need at https://thehomeyee.com.
Your comment is awaiting moderation.
дизайн гостиной в доме дизайн проекты коттеджей
Your comment is awaiting moderation.
https://www.jec.qa/img/pgs/?le-code-promo-1xbet-actuel.html
Your comment is awaiting moderation.
купить кокаин, мефедрон, бошки, марихуану Скажу одно это вещь крутая!!!Заказал вчера 30гр 4-FA . Трек пока не получил. Надеюсь что все будет олрайт. В планах долговременное сотрудничество! Пришел сегодня грамм 5-мео-дмт, все ок, но весов пока нет, а на глаз его в 2-3 раза меньше, чем, например, грамма 2с-е. Кто имел дело с ним, это у него плотность настолько больше или мне недосыпали?
Your comment is awaiting moderation.
LED Extreme products – Solid lineup, technical info is transparent and easy to understand.
Your comment is awaiting moderation.
https://no-deposit-bonus-codes-sportsboo.gitbook.io/untitled/
Your comment is awaiting moderation.
https://pianoff.ru Частенько брал сдесь мини-опт по совместкам в 2013-2014году !Ребята, магаз ровный и немелочный, берите смело вот вот такая же история! надо разобраться с этим вопросом!
Your comment is awaiting moderation.
Михайловский театр балет Балет в Петербурге — это не просто спектакль, а часть городской души. Здесь классика живёт рядом с экспериментом, а сцена Михайловского театра превращает танец в разговор о чувствах, времени и красоте, к которым хочется возвращаться снова и снова.
Your comment is awaiting moderation.
https://www.canadavideocompanies.ca/author/promolive1xbet1/
Your comment is awaiting moderation.
https://fashionroyaltydoll.org Магазин работает? пишу в ЛС и Джабер везде тишина, ответа нет!((Приветствую. Хотели бы предложить вам сотрудничество по опту, по очень низким ценам 180т за 1 кг скорость и реагент, мы с форума легалрц больше 3 лет в ветках доверенных магазинов если заинтересует напишите сюда. , делаем кладом , вот ссылка на нашу ветку //legalrc.com/forums/mix/ контакты можете сверить из подписи Оплатил заказ, жду селлера.
Your comment is awaiting moderation.
1xbet giri? 2025 1xbet giri? 2025 .
Your comment is awaiting moderation.
Shaws Center Info Hub – Great resource, community engagement is highlighted and mission is easy to understand.
Your comment is awaiting moderation.
https://mparker.ru спасибо за отзыв!Я в последний раз говорю, эта тема – для отзывов о работе магазина. Если вы не можете связаться с продавцом, то не надо писать об этом по сто раз. Если вы хотите узнать о качестве продукции – вам СЮДА !!! Любой оффтоп\флуд прекращаем ! Отличный магаз.
Your comment is awaiting moderation.
https://smolensk-i.ru/partners/osnovnye-napravleniya-deyatelnosti-kompanii-international-holdings-otzyvy_583004
Your comment is awaiting moderation.
поздравления в прозе здесь легко подобрать тёплые и душевные слова для поздравления друзей, родных и коллег для любого события, которое требует искренних слов и внимания, у нас есть готовые варианты небольшое, но сердечное поздравление может создать настоящую атмосферу праздника наши поздравления подходят для любых форматов — от смс до праздничной открытки чтобы сделать момент ещё ярче, можно добавить праздничные детали — шары, украшения, подарки поздравления можно отправлять онлайн или распечатать, чтобы вручить лично у нас вы найдёте не только классические пожелания, но и необычные, оригинальные варианты наши тексты делают праздник более личным и душевным вы легко найдёте пожелания для любого человека и случая на сайте регулярно появляются новые стихи и тосты для любых праздников дарите эмоции, внимание и заботу с помощью красивых слов наши тексты подходят для любых средств связи и создают атмосферу праздника поздравляйте с любовью и вниманием, используя наши тщательно подобранные тексты не недооценивайте силу добрых слов — они делают моменты по-настоящему особенными
https://pozdravlyandiya.ru/
Your comment is awaiting moderation.
https://vsegoo.ru Флуд??? Я высказал свое мнение! Или это запрещено?пацаны качество 250 на высоте советую 1к10-12 норм ваще прет 50-час ваще жестко , селеру респект ваще, спср тока черти блин… один заказ выбил, затестил. теперь опять в аське молчок
Your comment is awaiting moderation.
Квартира на сутки недалеко от вокзала в Сморгони. Идеально для командировки или короткой остановки. снять квартиру сморгонь на месяц
Мы позаботились о каждой мелочи. В квартире вас ждет комплект свежего белья, душевые принадлежности, фен. На кухне — полноценный набор посуды и бытовая техника. Для работы — высокоскоростной интернет и удобный стол. аренда квартиры сморгонь
Ваша квартира на сутки расположена так, что за один день можно обойти все ключевые достопримечательности пешком, не тратя время на транспорт. Максимум впечатлений, минимум хлопот. снять квартиру
Your comment is awaiting moderation.
Контрактная служба подходит для тех кто хочет зарабатывать больше. Доход начисляется регулярно. Условия понятны. Подай заявление, контракт с министерством обороны рф
Your comment is awaiting moderation.
i-Superamara collection online – Polished brand presence, items are elegant, and details are helpful.
Your comment is awaiting moderation.
Срочно сдается “двушка” в спальном районе. Все необходимое для жизни. Рассмотрю любые варианты. снять квартиру в сморгони посуточно
Не хотите переплачивать за дополнительные услуги, которые не нужны? В квартире на сутки вы платите только за жилье. Никаких наценок за мини-бар, завтрак, который проспали, или платного спортзала. Четкая и понятная стоимость. данные квартиры сморгонь
Выбор в пользу Сморгони — это выбор в пользу slow life. Никуда не бежать, наслаждаться моментом. Квартира на сутки с видом на тихий двор или парк поможет полностью переключиться и отдохнуть душой. данные квартиры сморгонь
Your comment is awaiting moderation.
купить кокаин, мефедрон, бошки, марихуану а заряд сколько происходил?а кто нибудь пробовал все таки эту куреху urb пока никто ничего тут не берите!!!!!!!!!!!!!!!!!!!!!!!!!!!!!!!!!!!!!!!!моя ситуация решится если то я сообщу.Пока кидалово нарисоваывается.Дабы даже о приходе средств человек не сообщает,просто сказал ложи а после оплаты сразу замолчал,хотя сообщения доходили еще.А ты если кинеш то тварь ты последняя.Бобла наверно тут хорошо сделал а совести хватает провинциалов кидать.Ты в курсе что у нас люди на эти бабки 2 месяца живут и не от сладкой жизни гавно у тебя то берут.Бог тебе судья короче!Свечку тебе за здравие каждую неделю если что буду ставить 😉 чтоб ты жил долго и счастливо…
Your comment is awaiting moderation.
The best is inside: https://www.safereg.ru/whois?domain=cite-architecture.org
Your comment is awaiting moderation.
https://royal-khv.ru кролики ставят В\В, фашку от этого магазина по 0.07-0.15 нравится, только сушит сильноподход к клиенту 5+ (все объяснили, трек сразу скинули) Желаю вам удачи в дальнейшей работе)
Your comment is awaiting moderation.
http://c-brats.com/zfeeder/pages/melbet_promo_code___exclusive_bonus.html
Your comment is awaiting moderation.
Marios Drum Arts – Rhythms are highlighted beautifully, site is clear, and information feels authentic.
Your comment is awaiting moderation.
Спектакли Театра Вахтангова и расписание показов За спектаклями Театра Вахтангова стоит огромная визуальная работа, которую зритель чувствует, даже не задумываясь о ней. В статье — как формируется этот мир и почему он так важен для живого театра.
Your comment is awaiting moderation.
http://centroculturalrecoleta.org/blog/pages/4rabet_promo_code__6.html
Your comment is awaiting moderation.
купить кокаин, мефедрон, бошки, марихуану первую посылочку получил от селера, сервис на вышем уровне не то что у некоторых!!!!!первую посылочку получил от селера ))) сервис на вышем уровне не то что у некоторых!!!!! Да рега была шикарная… Но вот как раз таки с ней и случился перебой, ОЧЕНЬ жаль!!! А так по работе остались отличные впечатления
Your comment is awaiting moderation.
https://tvtuners.ru Работает. Контакты указаны в соответствующей теме.Срач, оффтоп, провокации, в ветке магазина запрещены, буду банить за невыполнение правил! Перевел деньги на Альфа 21.04.2014 после умення узнали даные (Ф.И.О телефон и адрес) Оператор сказал что посылка будет отправлена 22.04.2014. !!!! 23.04.2014 скинули номер наклодной. По номеру наклодной смог отслеживать свою посылку 24.04.2012.
Your comment is awaiting moderation.
сглобяеми къщи
Your comment is awaiting moderation.
Всем привет данной ветки:hello: История токова… купить кокаин, мефедрон, бошки, марихуану “Думаю все угорали по детству Делали дымовушку “Гидропирит VS Анальгин”магазин отличный ! работает уже не первый год! обращайтесь!
Your comment is awaiting moderation.
Билеты в Live Arena (Лайв Арена / Лайф Арена) Live Арена уверенно закрепилась в списке самых громких площадок Москвы. В материале — концерты, ради которых стоит планировать зиму и весну: «Жара», 90-е, Агутин, Билан и Artik & Asti.
Your comment is awaiting moderation.
1xbwt giri? 1xbet-yeni-giris-2.com .
Your comment is awaiting moderation.
глазом на пакете,вот там была россыпь:good::killmyself::strong::stars::fu::good::bro: купить кокаин, мефедрон, бошки, марихуану Один вопрос только,можно ли заказать так что бы без курьера?Самому придти в офис и забрать посылку?Как у вас дела бразы?)
Your comment is awaiting moderation.
ДВС и КПП https://vavtomotor.ru автозапчасти для автомобилей с гарантией и проверенным состоянием. В наличии двигатели и коробки передач для популярных марок, подбор по VIN, быстрая доставка и выгодные цены.
Your comment is awaiting moderation.
Hallo, Lebensliebhaber! https://daslzy.de/ steht fur Bewegung, Ausdruck und Freude an jedem Detail. Mit Skateboards, Longboards und Waveboards wird der Asphalt zur Buhne, auf der Freiheit spurbar wird. Gleichzeitig verwandeln Spandex-Tischdecken, Hussen und feine Stoffservietten jedes Fest in ein stilvolles Erlebnis. LZY macht Raume lebendig und Momente unvergesslich – mit Energie, Farbe und Gefuhl.
Your comment is awaiting moderation.
Для совсем новичков 1 к 15 будет даже много. https://silovoy-cable.ru такчто чставлю 100/100баллов магазу и:superman:По больше клиентов,с толстыми кошельками,да главное чтоб АДЕКВАТНЫЕ!:bro:
Your comment is awaiting moderation.
Hallo kleine und gro?e Abenteurer! https://das-bluey.de/ bringt das frohliche Chaos des Spielens direkt ins Kinderzimmer. Ob mit der rollenden Feuerwehr, dem duftenden Foodtruck oder dem wusligen Supermarkt – jede Szene ladt zum Lachen, Erfinden und Staunen ein. Figuren, Gerausche und bunte Details machen jeden Tag zu einer neuen Geschichte voller Herz und Spa?.
Your comment is awaiting moderation.
Это тот самый хоккей, за который мы его любим: плотный, эмоциональный и непредсказуемый. В статье — о февральских матчах КХЛ, где каждая игра превращается в настоящее испытание для команд. https://teletype.in/@allsportevents/feeriya-golov-i-drak .
Your comment is awaiting moderation.
Казино Atom онлайн выбирают за удобство и бонусы. Быстрый вход и простая регистрация. Слоты Atom казино доступны круглосуточно. Попробуй удачу сегодня – казино atom официальный сайт
Your comment is awaiting moderation.
1xbet resmi sitesi 1xbet-yeni-giris-2.com .
Your comment is awaiting moderation.
я все ровно остался в минусе не заказа и деньги с комисией переводятся . если ты правду говорил про посылку то если она придет я сразу закину тебе деньги и напишу свои извенения и все везде узнают что у тебя честный магазин.как клиенту мне ни разу не принесли извенения это бы хоть как то компенсировало маральный ущерб https://pianoff.ru ОПЛАТИЛ И ЧЕРЕЗ 2ДНЯ ВСЕ У МЕНЯ !!!сказали отпрака на следующий день после платежа!
Your comment is awaiting moderation.
Після оренди https://cleaninglviv.top/ саме те
Your comment is awaiting moderation.
не мне в пятницу и субботу он отвечал.гворит документы есть что отправленно https://perevodiki.ru в смысле пропал из онлайна??? и что делать теперь? треки то до сих пор небьютьсяХороший магазин, все по совести
Your comment is awaiting moderation.
Имею давний опыт работы с этим магазином.Сервис здесь один из лучших,всё делается оперативно вопросов нет.В последний раз заказал СНМ 50 и СНМ 55 по 50 гр обоих.По опыту знаю,что если один каннаб не айс,то в паре с любым другим он хоть как-то вытягивает.Но в этот раз пришло два пакета с одинаковым мелким белым порохом с сильным запахом нафталина.По весу всё замечательно,щедро подсыпано +50%.Только одно но.Данный реагент-чисто удобрение.Делал 1к5 кипячением в ИПС.Растворение хреновое,молоко.Хрень.Ну ладно,курили чистый порох из обоих пакетов.Хрень.Никто в здравом уме данным продуктом не заинтересуется-вывод не менее чем десяти тестеров.Короче я в попадосе. https://silovoy-cable.ru Ура! Скинул трек быстро) ждууууууу, отпишу.магазин пашит как комбаин пашню!)
Your comment is awaiting moderation.
1xbet ?yelik 1xbet-yeni-giris-2.com .
Your comment is awaiting moderation.
синтез пропитает тело ож душа болит https://raiderrelease.com А вообще, читай раздел рецепты, там все очень подробно расписано, в нескольких темах причемХочу выразить свою благодарность за представленную пробу!
Your comment is awaiting moderation.
Воплотите свою идею фасада в Молодечно с нашей помощью. От стандартной обшивки до сложных дизайнерских решений с комбинацией материалов, цветов и подсветкой. Ваш дом должен отражать ваш характер. Мы поможем это сделать.
saydingminsk.ru
Your comment is awaiting moderation.
Все работает https://parket-stile.ru привет бразы всех спрошедшими праздниками получил седня посыль все порадовало и качество и бонус:p:D:D:Dприложеный за ожыдание спосибо магазуПо порядку: мне 35. Да, это единичный случай, потому как работал с другими поставщиками до последнего запрета. 12к+транспорт- это, видимо, “не о чем”. По твоим словам, мне следует заткнутся, читать о магазине какой он хороший и наслаждаться жизнью?
Your comment is awaiting moderation.
Этот театр ценят за умение говорить просто о сложном. В статье — о знаковых спектаклях Театра Наций и о той атмосфере, когда зритель перестаёт быть наблюдателем и становится участником происходящего. https://kulturologia.ru/blogs/071225/66534/ .
Your comment is awaiting moderation.
С поиском клада не было не малейших заморочек. https://fashionroyaltydoll.org Инфа с вашего сайта. Я уже брал 6-APB, и выглядел он несколько иначе.пасибо за ваш труд,всё быстро,ровно и чётко! скорость обработки заказа не оставляет шансов конкурентам – вы несомненно лучшие! ма-ла-цы
Your comment is awaiting moderation.
1xbet giri? g?ncel 1xbet giri? g?ncel .
Your comment is awaiting moderation.
Premium selection: prc cloud nine
Your comment is awaiting moderation.
Фриспины в Atom казино позволяют начать игру без вложений. Регистрация простая и занимает минимум времени. Слоты Atom казино доступны сразу после входа. Попробуй удачу уже сегодня: казино atom официальный сайт
Your comment is awaiting moderation.
Русские подарки купить в интернет-магазине Москвы: сувениры, ремесленные изделия и подарочные наборы с национальным колоритом. Идеальные решения для праздников, гостей и корпоративных подарков.
Your comment is awaiting moderation.
Фриспины в Atom казино позволяют начать игру без вложений. Регистрация простая и занимает минимум времени. Слоты Atom казино доступны сразу после входа. Попробуй удачу уже сегодня: атом казино вход
Your comment is awaiting moderation.
Ребятки все пушка купить кокаин, мефедрон, бошки, марихуану пока никаких точных дат нет. цены будут когда придёт товар, так что ждёмс пока что.Вот уже пошли отзывы о покупках за нал. Нужно брать!!!
Your comment is awaiting moderation.
wobble light 360 degree light
WobbleLight: Rugged 360° Worksite Lighting
WobbleLight is a heavy-duty portable lighting solution built for construction sites, industrial facilities, emergency response, and mining operations. Its defining feature is a self-righting design: if the light is knocked over, it automatically returns upright and continues illuminating without downtime.
Each WobbleLight delivers 360-degree illumination, eliminating shadows across large work areas. High-output models reach up to 40,000 lumens, providing uniform, room-filling light suitable for demanding tasks and safety-critical environments.
Designed for harsh conditions, WobbleLights use a polycarbonate dome and reinforced housing to withstand impacts, kicks, and equipment contact. Despite their rugged build, they remain portable, with integrated handles for easy repositioning on site.
Available in multiple configurations, WobbleLights come in corded or battery-powered** versions, with LED or halide options depending on brightness and runtime needs. Many models stay cool to the touch and are rated for use in damp or wet locations.
Why professionals choose WobbleLight:
Continuous light even when knocked over
Full 360° area coverage
High lumen output for large spaces
Long service life and reduced replacement costs
Proven durability in real jobsite conditions
WobbleLight is built for crews that need reliable light, not fragile equipment. When visibility matters, it delivers consistent performance shift after shift.
Your comment is awaiting moderation.
Работа с понятными правилами и стабильным доходом существует. Служба по контракту предлагает именно такой формат. Все выплаты официальные. Дополнительные надбавки повышают заработок. Используй возможность и начни оформление – хмао сво
Your comment is awaiting moderation.
Нужна топлевная крата? топливные карты для юридических лиц: заправка на сетевых АЗС, единый счет, прозрачный учет топлива и онлайн-контроль расходов. Удобное решение для компаний с собственным автопарком.
Your comment is awaiting moderation.
Служба по контракту – это официальный формат службы с выплатами. Денежное довольствие начисляется регулярно. Контракт заключается на определенный срок. Возможна пролонгация: отбор на военную службу по контракту
Your comment is awaiting moderation.
я вчера связался с менеджером в аське, тот сказал что если ему отпишут – разберётся… Попробуй напиши днём, а не под утро ) https://exposvarka.ru Спасибо хотя бы на том, что вообще что-то прислали…Прайс был обновлен, в продаже появилась Скорость. Сайт скоро будет работать.
Your comment is awaiting moderation.
WobbleLight: Rugged 360° Worksite Lighting
WobbleLight is a heavy-duty portable lighting solution built for construction sites, industrial facilities, emergency response, and mining operations. Its defining feature is a self-righting design: if the light is knocked over, it automatically returns upright and continues illuminating without downtime.
Each WobbleLight delivers 360-degree illumination, eliminating shadows across large work areas. High-output models reach up to 40,000 lumens, providing uniform, room-filling light suitable for demanding tasks and safety-critical environments.
Designed for harsh conditions, WobbleLights use a polycarbonate dome and reinforced housing to withstand impacts, kicks, and equipment contact. Despite their rugged build, they remain portable, with integrated handles for easy repositioning on site.
Available in multiple configurations, WobbleLights come in corded or battery-powered** versions, with LED or halide options depending on brightness and runtime needs. Many models stay cool to the touch and are rated for use in damp or wet locations.
Why professionals choose WobbleLight:
Continuous light even when knocked over
Full 360° area coverage
High lumen output for large spaces
Long service life and reduced replacement costs
Proven durability in real jobsite conditions
WobbleLight is built for crews that need reliable light, not fragile equipment. When visibility matters, it delivers consistent performance shift after shift.
Your comment is awaiting moderation.
WOW just what I was looking for. Came here by searching for %keyword%
вход RioBet Casino
Your comment is awaiting moderation.
«Трактор» снова играет так, что мимо не пройдёшь: жёстко, с характером и при полной поддержке трибун. В материале — о матчах сезона, атмосфере на арене и интересе болельщиков к каждому туру. Читать дальше — по ссылке https://telegra.ph/Hokkejnyj-klub-Traktor-sezon-napryazhennoj-borby-i-yarkih-matchej-01-21 .
Your comment is awaiting moderation.
https://www.pondexperts.ca/wp-content/pages/melbet_bonus_code_use____bonus____130.html
Your comment is awaiting moderation.
1 x bet giri? 1xbet-yeni-giris-2.com .
Your comment is awaiting moderation.
https://dansermag.com/wp-content/pages/?code_promo_1win.html
Your comment is awaiting moderation.
четко, без слов ! https://perevodiki.ru с туси тут не прогадаешь)))всё дошло))))) Спасибо магазину,в след раз возьму отпишу что да как :dansing:качество на высоте
Your comment is awaiting moderation.
Hi there! Do you know if they make any plugins to safeguard against hackers? I’m kinda paranoid about losing everything I’ve worked hard on. Any recommendations?
сайт Rio Bet Casino
Your comment is awaiting moderation.
Магаз ровный, очень много раз тут брал, а как перешли на телеграмм так еще больше радуете, намного меньше гемора с оплатой стало, качество на высоте как и всегда. Сегодня убедился что оператор не сидит без дела, очень сильно помог мне с моим вопросом, при чем оперативно все сделал. Оцениваю данный магазин 10 из 10. Кокаин даже MQ оказался лучше, чем я до этого покупал HQ в другом магазе. Делайте по чаще закладки в центре Питера. купить кокаин, мефедрон, бошки, марихуану По прошествии полутора часов снова вылез джаббер. Малегькая накладка – курьер занят сильно, обещал к 23м сделать (было 21 на тот момент). Да не вопрос 😉 Джаббео выверен, оператор душевный человек, располагает к себе сразу.сказали отпрака на следующий день после платежа!
Your comment is awaiting moderation.
кайтинг в тайланде кайтсерфинг пхукет
Your comment is awaiting moderation.
lcg bet
Your comment is awaiting moderation.
мусорные мешки Мешки 360л идеально подходят для больших объемов отходов, генерируемых в коммерческих и промышленных условиях. Они обеспечивают эффективное хранение мусора до его утилизации, минимизируя риск разливов и загрязнений.
Your comment is awaiting moderation.
пошив штор на заказ Пошив штор на заказ – это комплексный процесс, требующий профессионального подхода. Дизайнеры и мастера помогут вам определиться с выбором ткани, рассчитать необходимое количество материала, разработать эскиз и воплотить его в жизнь.
Your comment is awaiting moderation.
Как магазин порядочный https://distonija.ru Ищи в соседней ветке мой отзыв по рцс. ИМХО рцс не для торча.Что с заказом 960 трек не рабочий дали 3 дня уже одни обещания
Your comment is awaiting moderation.
Быстрый и простой вход на кракен маркетплейс занимает несколько секунд через зеркало
Your comment is awaiting moderation.
https://www.cstas.com/profile/peciye53847780/profile
Your comment is awaiting moderation.
https://paste.toolforge.org/view/da54f101
Your comment is awaiting moderation.
https://intelicode.com/
Your comment is awaiting moderation.
Кент казино обеспечивает стабильный игровой опыт. Платформа быстро реагирует на действия пользователя. Игры запускаются без ожидания. Интерфейс не перегружен. Это улучшает общее восприятие: кент казино сайт
Your comment is awaiting moderation.
ЦСКА — команда, у которой всегда есть план. В статье рассказывается, как армейцы играют на скорости, зачем постоянно меняют схемы и почему их подход влияет на другие клубы. Если интересно разобраться — вот ссылка https://dzen.ru/a/aR1NlpKD9TZMOYu3 .
Your comment is awaiting moderation.
indian porn websites
Your comment is awaiting moderation.
Поворотное зеркало с подсветкой Косметические поворотные зеркала: незаменимый помощник в создании макияжа и уходе за кожей.
Your comment is awaiting moderation.
Романы для любителей глубокой прозы Фантастика и футуристические романы
Your comment is awaiting moderation.
National team call-ups, international squad announcements covered
Your comment is awaiting moderation.
Профнастил или сайдинг в Молодечно? Поможем сделать правильный выбор для забора и фасада. Часто комбинируем материалы для лучшего результата и экономии.
sayding-minsk.ru
Your comment is awaiting moderation.
где купить дайсон в санкт петербурге где купить дайсон в санкт петербурге .
Your comment is awaiting moderation.
дайсон официальный сайт спб дайсон официальный сайт спб .
Your comment is awaiting moderation.
нанг краби краби это где
Your comment is awaiting moderation.
заклепка вытяжная отверстие заклепка вытяжная алюминиевая купить
Your comment is awaiting moderation.
https://www.elboomeran.com/
https://webmineral.ru/
https://medyumbestamihoca.com/
https://angersnautique.org/
https://norco.ru/
https://m120.com/
https://mcaofiowa.org/
https://www.sportsoddshistory.com/
https://ezdirect.it/
https://ville-auverssuroise.fr/
https://www.leristrutturazioni.it/
https://contralinea.com.mx/
https://alfa.edu.rs/
https://billi-walker.jp/
https://www.panamericano.us/
https://www.maxwaugh.com/
https://www.lagodigarda.com/
https://valprint.es/
https://clubcoma.org/
https://elitetravelgroup.net/
https://manteigariasilva.pt/
https://childstrive.org/
https://tennews.in/
https://www.bigcatalliance.org/
https://therockpit.net/
https://belygorod.ru/
https://fruitsfromchile.com/
https://biographyweb.org/
https://puntera.com/
https://nusapure.com/
https://belmotors.by/
https://radio-rfe.com/
https://vodazone.ru/
https://www.wisla-plock.pl/
https://ccyd.co.uk/
https://jonathanlittlepoker.com/
https://hyundaimobil.co.id/
http://volgazdrav.ru/
https://lyncconf.com/
https://aquietrabalho.com/
https://www.apelsin.su/
https://audium.com/
https://waterlux.ua/
https://billi-walker.jp/
https://possible11.com/
https://feldbahn-ffm.de/
https://kaikatei.net/
https://amigo-tours.ru/
https://lacite.com.uy/
https://metchelstroy.ru/
https://telrad.com/
https://www.radio-rfe.com/
https://aprila.by/
https://cascadeclimbers.com/
https://hello-jobs.com/
https://hlsports.de/
https://wildlife.by/
https://www.bigcatalliance.org/
https://www.greenwichodeum.com/
https://clubcoma.org/
https://tribuneonlineng.com/
https://primaryonehealth.org/
https://nirvanaplus.ru/
https://proinoslogos.gr/
https://45vargashi.ru/
https://saijo-denki.co.th/
https://amt-games.com/
https://dansermag.com/
https://justinekeptcalmandwentvegan.com/
https://pretosnovos.com.br/
https://www.pondexperts.ca/
https://badgerboats.ru/
https://www.intercultural.org.au/
https://sibrm.ru/
https://healthyinspirations.com.au/
https://lmc896.org/
https://unilago.com/
https://gingerparrot.co.uk/
https://amt-games.com/
https://shkolaiskusstw.ru/
https://runcam.com/
https://thelanote.com/
https://topzapravka.ru/
https://redclara.net/
https://actual-cosmetology.ru/
https://www.saffireblue.ca/
https://g-r-s.fr/
https://2ndopinion.ph/
https://tfipost.in/
https://efaflex.ru/
https://theshaderoom.com/
https://ween.tn/
https://efaflex.ru/
https://www.jec.qa/
https://www.ielts-mentor.com/
https://sernexuss.com/
https://hyundaimobil.co.id/
https://www.pondexperts.ca/
https://www.joshhunt.com/
https://edu-kz.com/
https://alhudapk.com/
https://runcam.com/
https://dukesavenue.com/
https://enah.edu.mx/
https://totalfratmove.com/
https://despiecetotal.com/
https://s-klinika.ru/
https://promo-bonus.com/
https://lazosdeamormariano.net/
https://intelicode.com/
https://www.elboomeran.com/
https://morshynkurort.net/
https://nusapure.com/
http://ds1spb.ru/
https://petitedanse.com.br/
https://www.colehardware.com/
https://astra-hotel.ch/
https://redfordtheatre.com/
https://www.manaolahawaii.com/
https://imap.asn.au/
https://koreatesol.org/
https://g-r-s.fr/
https://total.kz/
https://medtronik.ru/
https://yaskawaindia.in/
https://colehardware.com/
https://www.europneus.es/
https://lifeloveliz.com/
https://nature-et-avenir.org/
https://delpoblepizzeria.com/
https://chhapai.com/
https://childstrive.org/
https://lmc896.org/
https://radiocert.ru/
https://kvedomosti.ru/
https://vodazone.ru/
https://bridesofbakewell.com/
https://koreatravelpost.com/
https://stmaryofthehills.org/
https://cfsl.in/
https://spencerlam.hk/
https://porada.sk/
https://prathamonline.com/
https://03ekb.ru/
https://vertify.com/
https://beh.sk/
https://therockpit.net/
https://www.projectev.co.uk/
https://marchemodevintage.com/
https://greenworldhotels.com/
https://www.lnrprecision.com/
https://gamo-smeo.com/
https://otolar-centre.ru/
https://www.colegiosagradocorazon.es/
https://ville-barentin.fr/
https://indibloghub.com/
https://lmc896.org/
https://chairman.ru/
https://chhapai.com/
https://nusapure.com/
https://stibus.fr/
https://agriness.com/
https://todo-fotografia.com/
https://ruptur.com/
https://actual-cosmetology.ru/
https://ville-barentin.fr/
https://labhgroup.com/
https://pawndetroit.com/
https://dansermag.com/
https://ecampania.it/
https://felomena.com/
https://cere-india.org/
https://www.europneus.es/
https://bigcatalliance.org/
https://otolar-centre.ru/
https://sportsfanbetting.com/
https://intex-don.ru/
https://www.legnostyle.ru/
https://astra-hotel.ch/
https://www.atrium-patrimoine.com/
https://aquietrabalho.com/
https://anthese.fr/
https://telrad.com/
https://redclara.net/
https://1xbet-egypt.site/
https://diamanti.com/
https://respectrb.ru/
https://llibertat.cat/
https://actual-cosmetology.ru/
https://spencerlam.hk/
https://www.atrium-patrimoine.com/
https://victor-habitat.com/
https://fasterskier.com/
https://prestigevision.com/
https://ddec35.org/
https://playplayfun.com/
https://exodontia.info/
https://uaq.ma/
https://www.lagodigarda.com/
https://lookdecor.ru/
http://redeecologicario.org/
https://baldebranco.com.br/
https://edialux.fr/
https://wildlife.by/
https://lagodigarda.com/
https://chronicle.ng/
https://coryn.club/
https://lookdecor.ru/
https://muskaanhindi.org/
https://gazetablic.com/
https://greinplast.pl/
Your comment is awaiting moderation.
Акция “Третий дом со скидкой”! Приводите к нам двух соседей из Молодечно, купивших сайдинг, и получите свою скидку 10%. Красивые дома должны быть рядом. Создавайте гармоничные улицы.
saydingmol.ru
Your comment is awaiting moderation.
Театр зверей имени Дурова предлагает другой взгляд на сцену. Здесь действие строится на уважении, наблюдении и доверии, а небольшое пространство усиливает эмоциональную точность происходящего. Подробнее — в отдельной статье https://dzen.ru/a/aR1OgSdxXFZr1pKm .
Your comment is awaiting moderation.
Опять приняли решение из головы? База дизайна человека вернет точность выбора.
Секунды, сгоревшие впустую, не вернуть.
-дизайн человека генератор описание;
-генератор это дизайн человека;
-дизайн человека генератор;
-генераторы дизайн человека;
-человек генератор кто это;
Your comment is awaiting moderation.
https://www.pondexperts.ca/
Your comment is awaiting moderation.
Kent casino предоставляет структурированный каталог игр. Пользователи могут выбирать автоматы по популярности или тематике. Фильтры упрощают поиск. Интерфейс работает плавно. Это экономит время: кент казино скачать
Your comment is awaiting moderation.
https://justinekeptcalmandwentvegan.com/
Your comment is awaiting moderation.
Kent casino поддерживает удобную навигацию по разделам. Пользователи быстро находят нужные игры. Все функции расположены логично. Интерфейс остается отзывчивым. Работа с платформой проходит комфортно: кент казино играть
Your comment is awaiting moderation.
Нужен тепловизор? продажа тепловизоров в санкт петербрурге для судов, лодок, кораблей, яхт и катеров от производителя: доступные цены, подтверждённое качество и официальная гарантия. Мы оперативно доставляем заказы по всей территории России и стран СНГ. Наши представительства работают в Санкт?Петербурге, Москве и Севастополе — выбирайте удобный пункт выдачи и получайте заказ в минимальные сроки.
Your comment is awaiting moderation.
Хватит инвестировать свой ресурс в мусор. Ваш мотор заведен для чужой поездки.
Ваше время утекает в чужие карманы.
-дизайн человека генератор кто это;
-тип генератор в дизайне человека;
-генератор это дизайн человека;
-человек генератор дизайн человека;
-генераторы дизайн человека;
-генератор по дизайну человека;
Your comment is awaiting moderation.
https://rant.li/larrybrown190/creating-a-sanctuary-the-role-of-comfort-in-daily-life
When researching space heaters, I noticed that Comfort Glow models are often mentioned in discussions about practical efficiency and safety. For compact spaces or additional heat, those factors tend to be more important than max output.
Comparing different heater brands helped me understand how air circulation, temperature control, and safety mechanisms affect everyday comfort. It’s not always about the highest heat level, but about consistent operation and reliable safety over time.
Your comment is awaiting moderation.
Поворотное зеркало с подсветкой Трюмо с подсветкой для спальни: создайте романтическую атмосферу.
Your comment is awaiting moderation.
лав арена афиша москва на 2026 «Live Арена» — пространство для артистов разных жанров: от ярких шоу до уютных акустических концертов. Цена билетов зависит от события и категории мест — партер, балконы, лаунжи, ложи или премиум-боксы. Купить билет можно онлайн: выберите мероприятие, отметьте места на схеме зала, укажите контакты и оплатите заказ. Электронные билеты придут на почту сразу после оплаты.
Your comment is awaiting moderation.
Служба по контракту предполагает выполнение обязанностей по должности. Объем задач определяется заранее. Это делает формат структурированным: сургут служба по контракту
Your comment is awaiting moderation.
Зеркало трюмо трехстворчатое Поворотное зеркало в раме: стильное поворотное зеркало в раме, идеально вписывающееся в любой интерьер.
Your comment is awaiting moderation.
Маркет Кракен официальный >
Кракен Форум — официальное сообщество маркетплейса
Привет всем друзьям
Кракен актуальная ссылка — важный инструмент для всех, кто сталкивается с необходимостью быстрого и надежного доступа к онлайн-сервисам. В современном интернете изменения происходят постоянно: домены могут меняться, сайты блокируются, а ссылки устаревают. Это создаёт неудобства и затрудняет работу с нужными ресурсами. Благодаря Кракен актуальная ссылка пользователь получает гарантированный и оперативный доступ к сервису без лишних поисков. Для меня наличие такой ссылки стало настоящей поддержкой. Раньше я тратил много времени на поиск рабочего адреса, что вызывало раздражение и снижало продуктивность. С появлением Кракен актуальная ссылка процесс упростился: теперь достаточно воспользоваться именно этим адресом, чтобы сразу попасть на нужную платформу. Это удобно, быстро и надёжно. Кроме того, постоянное обновление ссылки исключает возможность попасть на нерабочую страницу, что особенно важно для тех, кто зависит от стабильного доступа в работе или личных целях. В сети много отзывов от пользователей, которые подтверждают эффективность и удобство использования именно Кракен актуальная ссылка. Это формирует доверие и делает сервис привлекательным для широкой аудитории. Таким образом, Кракен актуальная ссылка — не просто адрес, а важный элемент, обеспечивающий комфорт и стабильность при работе в интернете. Это пример того, как грамотное техническое решение способно существенно улучшить пользовательский опыт и сэкономить время.
Как зайти на КРАКЕН?! Все актуальные ссылки на зеркала! https://streetwiseworld.com.ng/2023/01/05/dss-nabs-mastermind-of-explosion-near-ohinoyi-palace/
Кракен Форум — официальное сообщество маркетплейса http://jeannesfotografie.nl/galleries/castpresentatie-sky-de-musical-2/attachment/img_1295/
Your comment is awaiting moderation.
Контрактная служба отличается фиксированными условиями и сроками. Гражданин заранее знает обязанности и требования. Предусмотрено денежное довольствие и социальная поддержка. Возможны дополнительные выплаты. Это делает формат более предсказуемым. Изучить предложение подробнее: служба по контракту в сургуте
Your comment is awaiting moderation.
オンラインカジノとは、インターネットを介してスロットやルーレット、ライブディーラーゲームなどのギャンブルを楽しめる仮想の場です。その利便性から、特定のライセンスを取得した海外サイトを利用するプレイヤーもいます。日本の法律では、国内でのオンラインカジノ事業は厳しく規制されているため、利用の際には国際的な法的位置づけを理解することが不可欠です。詳細な仕組みや主要なゲームの種類については、専門の情報ページをご覧ください。
→ オンカジ おすすめ
Your comment is awaiting moderation.
Поворотное зеркало в раме Зеркало трюмо: классическое зеркало трюмо для создания уютного уголка красоты.
Your comment is awaiting moderation.
рунетки рунетки онлайн
Your comment is awaiting moderation.
Контрактная служба это реальная возможность зарабатывать стабильно. Выплаты начисляются каждый месяц. Все условия прозрачны. Контракт фиксирует обязательства. Предусмотрены гарантии. Подай заявление: вакансии на военную службу по контракту
Your comment is awaiting moderation.
Авиабилеты по низким ценам https://tutvot.com посуточная аренда квартир, вакансии без опыта работы и займы онлайн. Актуальные предложения, простой поиск и удобный выбор решений для путешествий, работы и финансов.
Your comment is awaiting moderation.
Контрактная служба решает вопрос с доходом надолго. Выплаты выше стандартных и приходят регулярно. Условия прозрачны и официальны. Все оформляется по закону. Контракт дает уверенность в завтрашнем дне. Подписывай документы и начинай. Перейти к информации, служба на севере год за сколько
Your comment is awaiting moderation.
UDL travel planning hub – Well structured, making travel preparation fast and easy.
Your comment is awaiting moderation.
Нужна курсовая? заказать курсовую работу Подготовка работ по заданию, методическим указаниям и теме преподавателя. Сроки, правки и сопровождение до сдачи включены.
Your comment is awaiting moderation.
Тело болит от чужих задач? Выжаты как лимон ради чужих идей. Вы — батарейка для чужих амбиций.
Вы платите годами за неверные шаги.
-генератор это дизайн человека;
-тип личности генератор это;
-тип личности генератор дизайн;
-генератор это в дизайне человека;
-генератор в хьюман дизайне;
Your comment is awaiting moderation.
Каждая третья семья в Новосибирской области постоянно жалуются на:
– нестабильный сигнал;
– ограниченную скорость в часы пик;
– скрытые платежи.
Выбор дешёвого провайдера без проверки часто приводят к:
– разочарованию;
– ухудшению качества связи;
– неожиданным списаниям.
Только надёжный провайдер гарантирует:
– стабильный интернет 24/7;
– прозрачные тарифы без скрытых платежей;
– бесплатную настройку оборудования.
«СибСети» в Новосибирске предоставляют:
• высокоскоростной интернет до 500 Мбит/с;
• бесплатный монтаж оборудования;
• Подбор оптимального сочетания интернета и ТВ под ваши задачи;
• Анализ возможности подключения по вашему адресу.
интернет провайдер сибирские сети тарифы
сибирские сети провести интернет в квартире – https://www.internet-sibirskie-seti.ru
http://gimmefreebies.com/__media__/js/netsoltrademark.php?d=https://internet-sibirskie-seti.ru/
Интернет и ТВ от «СибСети» в вашем доме 90fa733
Your comment is awaiting moderation.
https://diigo.com/011uajy We spent time on a fairly long process researching a gas fireplace during a home renovation, and what was most noticeable was how different brands approach heat output and installation details. Certain models focus primarily on visual appeal, while others are built around heating performance. I personally found it useful to compare venting options, control systems, and long-term maintenance requirements before making a decision. For anyone planning a similar upgrade, it’s worth spending time learning how gas fireplaces actually perform during regular use, not just how they look in photos.
Your comment is awaiting moderation.
visual storytelling site – Interesting projects, with authentic narratives that capture attention.
Your comment is awaiting moderation.
https://writefreely.ethibox.fr/larrybrown190/why-gas-fireplaces-are-a-smart-choice-for-every-home We spent time on a long process selecting a gas fireplace for a home upgrade, and what stood out the most was how manufacturers differ in heat output and installation details. Some models are clearly designed for aesthetics first, while others put more emphasis on efficiency. I found it useful to compare venting options, control systems, and long-term maintenance requirements before choosing a final model. For anyone planning a similar upgrade, it’s worth taking the time to understand how gas fireplaces actually perform during regular use, not just how they look in photos.
Your comment is awaiting moderation.
рунетки онлайн рунетки
Your comment is awaiting moderation.
Zinedine Zidane https://zidan.com.az biography, football career, achievements, and coaching successes. Details on his matches, titles, the French national team, and his time at the top clubs in world football.
Your comment is awaiting moderation.
Live streams golvar.com.az/ az and live matches online, including the latest football schedule for today. Follow games in real time, find out dates, start times, and key events of football tournaments.
Your comment is awaiting moderation.
купить пылесос дайсон в санкт купить пылесос дайсон в санкт .
Your comment is awaiting moderation.
дайсон v15 купить в спб pylesos-dn-kupit-8.ru .
Your comment is awaiting moderation.
Устали заставлять себя работать силой? Включите сакральный поток и не работайте больше не дня.
Хватит ждать завтра, чтобы начать жить.
-дизайн человека генератор описание;
-человек генератор дизайн человека;
-тип генератор в дизайне человека;
-генераторы дизайн человека;
-генератор тип личности дизайн;
-генератор это дизайн человека;
-дизайн человека генератор;
Your comment is awaiting moderation.
Учишься в МТИ? мти помощь студентам: консультации, разъяснение сложных тем, подготовка к тестированию и экзаменам. Удобный формат, быстрые ответы и поддержка на всех этапах обучения.
Your comment is awaiting moderation.
Barling Collins web page – Simple, professional design with clearly defined offerings.
Your comment is awaiting moderation.
Live match sporx.com.az results, the latest sports news, transfers, and today’s TV schedule. Live updates, key events, and all sports information in one portal.
Your comment is awaiting moderation.
A sports portal sbs-sport with breaking news, statistics, and expert commentary. Match schedules, transfers, interviews, and competition results are available in real time.
Your comment is awaiting moderation.
работа хостес фото хостес в корее
Your comment is awaiting moderation.
дайсон официальный сайт дайсон официальный сайт .
Your comment is awaiting moderation.
пылесос dyson пылесос dyson .
Your comment is awaiting moderation.
Latest Updates: content
Your comment is awaiting moderation.
Current recommendations: https://hack.allmende.io/s/zytsm3cae
Your comment is awaiting moderation.
https://diigo.com/011uadt Gas fireplaces have improved a lot in terms of efficiency and safety compared to older systems. During my research into different brands is that even within the same fuel type, heat distribution and control precision can vary a lot. Some brands prioritize advanced controls and customizable flame settings, while others emphasize durability and simpler mechanical designs. Being aware of these distinctions really helps when choosing a fireplace that fits both the house layout and how often it will be used during the heating season.
Your comment is awaiting moderation.
рунетки онлайн рунетки
Your comment is awaiting moderation.
Онлайн-казино Mostbet — слоты, настольные игры и live-дилеры в одном аккаунте. Удобные депозиты, оперативный вывод средств, бонусные предложения и игра с любого устройства.
Your comment is awaiting moderation.
Топливные карты для юр лиц https://mazdacenter.ru контроль топлива, прозрачная отчетность, удобство для бухгалтерии и безопасность расчетов. Экономия времени и средств при управлении корпоративным транспортом.
Your comment is awaiting moderation.
скачать тик ток мод скачать тикток мод последняя версия бесплатно
Your comment is awaiting moderation.
sketch hub – Really impressive, the artwork grabs attention and inspires new ideas instantly.
Your comment is awaiting moderation.
「オンラインカジノ」とは、インターネットを介してさまざまなカジノゲームを楽しめるプラットフォームです。その利便性から、世界中で多くのユーザーに親しまれています。詳細な仕組みや提供されているゲームの種類については、専門の情報サイトでご確認ください。
→ オンラインカジノ
Your comment is awaiting moderation.
clicktogrowthinsights – Roadmaps are structured and practical, gave excellent guidance for business planning.
Your comment is awaiting moderation.
Топливный контроль https://avtomateriali.ru эффективное решение для бизнеса с транспортом. Безналичная заправка, учет топлива, детальные отчеты и удобное управление расходами по каждому автомобилю.
Your comment is awaiting moderation.
Контроль топлива топливная карта для юр лиц удобный способ учета и оплаты топлива без наличных. Контроль заправок, лимиты по авто и водителям, отчетность для бухгалтерии и снижение затрат на содержание автопарка.
Your comment is awaiting moderation.
https://auto.qa/
Your comment is awaiting moderation.
Хочешь контролировать ГСМ https://bts-oil.ru экономия на топливе, контроль заправок, детальная аналитика и закрывающие документы. Решение для компаний с собственным или арендованным автопарком.
Your comment is awaiting moderation.
дайсон фен купить оригинальный спб дайсон фен купить оригинальный спб .
Your comment is awaiting moderation.
Нужна топливная карта? https://bts-oil.ru удобный контроль расходов на ГСМ, безналичная оплата топлива, отчетность для бухгалтерии и снижение затрат автопарка. Подключение по договору, выгодные условия для бизнеса.
Your comment is awaiting moderation.
dyson купить спб dyson купить спб .
Your comment is awaiting moderation.
smartshopclick – Deals are highly competitive, saved me both time and money.
Your comment is awaiting moderation.
эвакуатор Воноваха Заказать эвакуатор Мариуполь – это просто и удобно. Достаточно одного звонка, чтобы сообщить о своей проблеме и указать местонахождение. Опытные операторы быстро оформят заказ и направят к вам ближайший эвакуатор, оснащенный всем необходимым для безопасной транспортировки вашего автомобиля.
Your comment is awaiting moderation.
RI Tech news online – Layout is simple and information is easy to scan and understand.
Your comment is awaiting moderation.
Formation changes, tactical adjustments during matches tracked real time
Your comment is awaiting moderation.
trustedenterprisehub – Recommendations are very useful, helped our team operate more smoothly.
Your comment is awaiting moderation.
Самые качественные https://bliny-olimpiiskie.ru широкий выбор весов и форматов. Надёжные материалы, удобная посадка на гриф, долговечное покрытие. Подходят для фитнеса, пауэрлифтинга и регулярных тренировок.
Your comment is awaiting moderation.
https://kr-diz.ru/news-15448-tarakany-eto-sereznaya-problema-s-kotoroj-stalkivayutsya-mnogie-lyudi.html
Your comment is awaiting moderation.
сервис дайсон в спб сервис дайсон в спб .
Your comment is awaiting moderation.
dyson пылесос dyson пылесос .
Your comment is awaiting moderation.
Хотите новый фасад? Продажа и установка сайдинга в Молодечно. Работаем четко по договору купить сайдинг в молодечно. Рассрочка платежа. Примеры работ в портфолио.
Your comment is awaiting moderation.
эвакуатор Мариуполь телефон Эвакуатор Мариуполь – это не просто техническая служба, это ангел-хранитель на колесах, готовый примчаться на помощь в любой момент, когда ваш автомобиль оказался обездвиженным волей случая или технической неисправности. Это команда профессионалов, знающих каждый уголок города, способных оперативно оценить ситуацию и предложить оптимальное решение для транспортировки вашего транспортного средства в безопасное место. Это уверенность в том, что даже в самой сложной ситуации вы не останетесь один на один со своей проблемой.
Your comment is awaiting moderation.
Aesthetic Files Здесь я делюсь не только обзорами и мнениями, но и частичкой своей жизни. Мои фотографии, мои мысли, мои переживания – это все формирует общую картину Aesthetic Files. Это пространство, где можно отдохнуть от суеты, найти вдохновение и просто почувствовать себя частью чего-то большего. Добро пожаловать!
Your comment is awaiting moderation.
distinctive glass art – Great atmosphere overall, with products that look carefully created.
Your comment is awaiting moderation.
폰테크
Your comment is awaiting moderation.
longtermstrategiesclick – Very helpful advice, allowed us to plan projects efficiently.
Your comment is awaiting moderation.
цветы москва дешево Букеты в офис доставка
Your comment is awaiting moderation.
книги Корги – это маленькое солнышко на четырех лапах, символ радости и беззаботности. Их забавные мордочки, неуклюжие лапки и бесконечная преданность вдохновляют меня каждый день. Их присутствие в моей жизни наполняет её теплом и светом.
Your comment is awaiting moderation.
краби тайланд отдых в марте краби прогноз погоды на месяц
Your comment is awaiting moderation.
цветы доставка бесплатно Быстро тюльпаны курьер офис
Your comment is awaiting moderation.
вскрытие замков Закрыли ключи в машине? Не беда! Оперативное вскрытие авто без повреждений – наш приоритет.
Your comment is awaiting moderation.
Нужно казино? ап икс сайт современные игры, простой вход, понятный интерфейс и стабильная работа платформы. Играйте с компьютера и мобильных устройств в любое время без лишних сложностей.
Your comment is awaiting moderation.
dyson оригинал спб pylesos-dn-kupit-10.ru .
Your comment is awaiting moderation.
дайсон сервисный центр санкт петербург pylesos-dn-kupit-8.ru .
Your comment is awaiting moderation.
Dann kam die Idee: Wenn es keine vernunftige Seite fur spielautomaten deutschland 2026 gibt, mache ich halt eine eigene.
Your comment is awaiting moderation.
где в москве дешево купить цветы Быстрая курьерская доставка цветов
Your comment is awaiting moderation.
learnstrategicbiz – Clear step-by-step strategies, really made challenging concepts understandable.
Your comment is awaiting moderation.
modernplanadvisor – Useful strategies for business growth, made planning faster and more structured.
Your comment is awaiting moderation.
local Manisa info – Easy to navigate and full of helpful tips for visitors.
Your comment is awaiting moderation.
「オンラインカジノ」とは、インターネットを介してさまざまなカジノゲームを楽しめるプラットフォームです。その利便性から、世界中で多くのユーザーに親しまれています。詳細な仕組みや提供されているゲームの種類については、専門の情報サイトでご確認ください。
→ オンラインかじノ
Your comment is awaiting moderation.
I loved as much as you’ll receive carried out right here. The sketch is attractive, your authored subject matter stylish. nonetheless, you command get bought an nervousness over that you wish be delivering the following. unwell unquestionably come further formerly again since exactly the same nearly a lot often inside case you shield this increase.
byueuropaviagraonline
Your comment is awaiting moderation.
valuebuyhub – Great online platform, helped me find deals quickly and efficiently.
Your comment is awaiting moderation.
enterprisebondsecurity – Very easy and secure, made managing commercial bonds stress-free.
Your comment is awaiting moderation.
Русские подарки и сувениры купить в широком ассортименте. Классические и современные изделия, национальные символы, качественные материалы и оригинальные идеи для памятных и душевных подарков.
Your comment is awaiting moderation.
I really appreciate the effort this service puts into quality engagement — the Best Apple Music SMM services helped me see measurable increases in reach and interaction on my tracks. The delivery was professional and trustworthy.
Your comment is awaiting moderation.
Andrea Bacle creative portfolio – Each shot is thoughtfully captured, creating a soothing visual experience.
Your comment is awaiting moderation.
projectsynergyhub – Effective team collaboration tools, made organizing projects much simpler.
Your comment is awaiting moderation.
therapy insights online – The writing style feels respectful and supportive throughout.
Your comment is awaiting moderation.
Explore your luck Spin Samurai payout methods as you delve into a world of thrilling games and exciting bonuses that online casinos offer, ensuring a captivating experience for players seeking entertainment and the chance to win big from the comfort of home.
Your comment is awaiting moderation.
Продвижение интернет-магазина в Гродно. Особый фокус на коммерческие факторы: удобный каталог, фильтры, карточки товаров раскрутка сайта гродно. Настраиваем рекламу и SEO для увеличения онлайн-продаж. Работаем с отзывами и социальным доказательством.
Your comment is awaiting moderation.
ко ланте ко ланте
Your comment is awaiting moderation.
globalbizalliances – Suggestions for alliances are clear, made connecting with partners much easier.
Your comment is awaiting moderation.
EV Liberty web platform – Simple, professional look, content feels trustworthy and loads quickly.
Your comment is awaiting moderation.
смс поздравления на нашем сайте вы найдёте самые красивые и оригинальные пожелания для любого праздника независимо от повода — день рождения, юбилей, Новый год или просто приятный сюрприз иногда короткая и добрая фраза приносит больше радости, чем громоздкий презент к каждому поздравлению мы предлагаем варианты в прозе и стихах подарите настроение с помощью ярких деталей — шаров, лент и праздничных украшений тексты удобны для пересылки в сообщениях или публикации в социальных сетях мы предлагаем как традиционные, так и современные, креативные поздравления каждое поздравление способно вызвать улыбку и поднять настроение тексты универсальны и подойдут для любого круга общения каждую неделю появляются свежие поздравления, чтобы вы могли удивлять близких дарите эмоции, внимание и заботу с помощью красивых слов наши тексты подходят для любых средств связи и создают атмосферу праздника наш сайт — источник вдохновения для красивых и душевных слов и помните, что несколько искренних слов иногда ценнее любых подарков
https://pozdravlyandiya.ru/
Your comment is awaiting moderation.
поздравления в прозе здесь легко подобрать тёплые и душевные слова для поздравления друзей, родных и коллег независимо от повода — день рождения, юбилей, Новый год или просто приятный сюрприз небольшое, но сердечное поздравление может создать настоящую атмосферу праздника тексты легко адаптируются под смс, открытку или письмо дополнив поздравление красочными шарами и милыми сувенирами, вы создадите эффект настоящего праздника все тексты легко отправлять через смс, мессенджеры или распечатывать для открыток у нас вы найдёте не только классические пожелания, но и необычные, оригинальные варианты каждое поздравление способно вызвать улыбку и поднять настроение подберите поздравление для родных, друзей или коллег, которое идеально подойдёт мы регулярно обновляем коллекцию, добавляем новые идеи и оригинальные тексты создавайте праздничное настроение, удивляйте близких и радуйте друзей наши тексты подходят для любых средств связи и создают атмосферу праздника откройте для себя мир оригинальных поздравлений, добрых тостов и тёплых слов и помните, что несколько искренних слов иногда ценнее любых подарков
https://pozdravlyandiya.ru/
Your comment is awaiting moderation.
праздничная выпечка BeLight создает сладкие решения для праздников и торжеств для торжественных событий. Кондитерская специализируется на создании праздничных десертов с учетом пожеланий клиентов. Клиенты могут заказать праздничные торты разного формата для дней рождения. Каждый заказ выполняется с акцентом на качество исполнения для создания яркого впечатления. При приготовлении десертов применяются проверенные продукты для насыщенного вкуса десертов. Также доступны пирожные и сладкие наборы для подарков и праздников. Клиенты могут заказать оформление праздников воздушными шарами для украшения мероприятий. Объединение сладостей и декора помогает подготовить мероприятие с готовыми решениями оформления. Кондитерская принимает заказы заранее для подготовки сладостей к празднику. Команда BeLight постоянно совершенствует рецептуры с учетом развития кондитерского искусства. BeLight стремится обеспечивать высокий уровень обслуживания для положительных впечатлений клиентов. Праздничные сладости помогают сделать событие ярче и запоминающимся.
https://lightstyle.su/
Your comment is awaiting moderation.
торты на заказ BeLight помогает оформить праздник сладостями и праздничным декором для семейных праздников. Мастера кондитерской создают десерты для праздничных мероприятий с учетом пожеланий клиентов. В ассортименте доступны торты на заказ для дней рождения. Каждый десерт оформляется с учетом пожеланий клиента для оформления торжества. В производстве сладостей используются качественные компоненты для насыщенного вкуса десертов. В ассортименте представлены сладкие подарочные наборы для семейных мероприятий. Клиенты могут заказать оформление праздников воздушными шарами для украшения мероприятий. Комплексный подход позволяет оформить праздник полностью без лишних затрат времени. Клиенты могут оформить заказ заранее для своевременного изготовления продукции. Кондитеры регулярно разрабатывают новые десерты с учетом пожеланий клиентов. Кондитерская BeLight ориентирована на качество и сервис для удобства оформления заказов. Десерты создают атмосферу праздника и запоминающимся.
https://lightstyle.su/
Your comment is awaiting moderation.
new cartoon page – Stopped by randomly, smooth loading and user-friendly layout.
Your comment is awaiting moderation.
Вентиляционные клапаны на окна в Молодечно. Свежий воздух купить пластиковое окно молодечно без открывания створок. Здоровый микроклимат.
Your comment is awaiting moderation.
экстремальные подарки в Челябинске становятся популярным форматом подарков для праздников и особых событий. Сервис подарков Brosko представляет широкий каталог подарков эмоций для мужчин и женщин. Покупатели могут выбрать романтические подарочные программы для двоих. Дополнительно предлагаются активные приключения для ценителей ярких эмоций. Также доступны релакс программы и процедуры восстановления для расслабления и отдыха. В каталоге доступны творческие и обучающие занятия для получения новых навыков. Платформа позволяет выбрать впечатление по предпочтениям с учетом возраста получателя. Бренд Brosko активно расширяет рынок подарков приключений в разных регионах страны. Компания объявила о запуске франчайзингового пакета Brosko для владельцев бизнеса. Франшиза Brosko доступна для покупки в разных регионах России и странах СНГ. Партнерская программа помогает начать бизнес в сфере развлечений с готовой бизнес моделью. Компания формирует рынок подарков эмоций и предлагать новые форматы подарков. Подарки эмоции подходят для разных праздников и создают яркие воспоминания.
https://brosko-podarok.ru/
Your comment is awaiting moderation.
романтические подарки в Челябинске становятся популярным форматом подарков для дней рождения и важных дат. Магазин подарков приключений Brosko предлагает большой выбор впечатлений для друзей и близких. Покупатели могут выбрать романтические подарочные программы для двоих. Также доступны экстремальные впечатления для ценителей ярких эмоций. Также доступны релакс программы и процедуры восстановления для расслабления и отдыха. Покупатели могут выбрать обучающие мастер классы для развития хобби. Сервис помогает подобрать подарок под интересы человека с учетом возраста получателя. Проект Brosko формирует культуру подарков эмоций на федеральном уровне. Компания открыла возможность покупки франшизы Brosko для владельцев бизнеса. Франшизу Brosko можно приобрести в городах России и на территории СНГ. Франшиза позволяет запустить бизнес подарков впечатлений с обучением и сопровождением. Бренд популяризирует формат подарков приключений и создавать новые возможности для бизнеса. Подарки впечатления становятся универсальным решением и создают яркие воспоминания.
https://brosko-podarok.ru/
Your comment is awaiting moderation.
businessalliancesguide – Trusted alliance tips are practical, helped me plan professional collaborations fast.
Your comment is awaiting moderation.
конкурс фотографий объявлен Домом прав человека Воронеж при поддержке международных правозащитных организаций. Конкурс реализуется совместно с международной сетью Молодежное правозащитное движение и партнерской сетью правозащитных домов. Событие организовано как второй конкурс федерального уровня направленный на освещение общественно значимых тем. Проект способствует обсуждению социальных и правовых вопросов через фотографическое творчество. Участники могут представить авторские фотографии раскрывающие общественно значимые темы. Фотографии могут отражать вопросы социальной справедливости и общественных ценностей. Подать работы могут авторы с разным опытом съемки из различных городов России. Инициатива усиливает интерес к теме прав человека через художественные визуальные образы. Фотографии оцениваются профессиональным жюри конкурса с учетом смысловой глубины работ. Конкурс способствует развитию социальной фотографии в профессиональном сообществе фотографов. Команда конкурса способствует развитию гражданского общества через культурные проекты. Проект создает площадку для обсуждения общественных ценностей через визуальное искусство. Конкурс дает возможность представить работы широкой аудитории и участвовать в общественно значимых проектах.
https://hrfoto.ru/
Your comment is awaiting moderation.
фотографии на гражданскую тематику проводится Домом прав человека Воронеж совместно с партнерами при поддержке международных правозащитных организаций. Конкурс реализуется совместно с международной сетью Молодежное правозащитное движение и международной Сетью домов прав человека. Проект проходит как второй национальный конкурс фотографий на правозащитную и гражданскую тематику. Проект способствует обсуждению социальных и правовых вопросов через фотографическое творчество. Участники могут представить авторские фотографии показывающие социальные процессы и явления. Работы могут затрагивать темы прав человека и общественных ценностей. Участие доступно профессиональным и начинающим фотографам из различных городов России. Конкурс способствует обсуждению значимых социальных тем через художественные визуальные образы. Работы участников рассматриваются экспертами в области фотографии с учетом смысловой глубины работ. Конкурс способствует развитию социальной фотографии на федеральном уровне. Организаторы проекта поддерживают общественные инициативы через творческие программы. Инициатива объединяет авторов и зрителей вокруг общественных тем через визуальное искусство. Проект позволяет фотографам показать свои идеи обществу и внести вклад в развитие общественного диалога.
https://hrfoto.ru/
Your comment is awaiting moderation.
Dostie Construction portfolio – Clear details and professional design, immediately conveys reliability.
Your comment is awaiting moderation.
интернет магазин детских товаров Кукусики предоставляет большой выбор продукции для новорожденных и детей для развития и удобства ребенка. В ассортименте доступны развивающие и игровые детские товары для мальчиков и девочек. Игровые товары помогают формировать навыки обучения в процессе ежедневной активности. Дополнительно доступны предметы мебели для детских комнат для создания комфортного пространства. Покупатели могут выбрать кроватки шкафы и столы с учетом требований безопасности. Отдельное направление это коляски для детей для прогулок и поездок. Покупатели могут выбрать прогулочные коляски с продуманной системой безопасности. Интернет магазин Кукусики сотрудничает с проверенными брендами для гарантии качества товаров. Ассортимент магазина постоянно расширяется с учетом спроса покупателей. Клиенты могут заказать товары через сайт с выбором способов оплаты. Компания обеспечивает быструю отправку заказов с возможностью отслеживания заказа. Интернет магазин помогает родителям экономить время и выбирать товары без посещения магазина. Магазин делает акцент на надежности и качестве продукции для долгосрочного использования товаров.
https://www.alumni-hse.ru/
Your comment is awaiting moderation.
игрушки для детей Кукусики предлагает широкий ассортимент товаров для малышей и детей для комфортного ухода за ребенком. В каталоге магазина представлены игрушки разных категорий для малышей и детей старшего возраста. Игровые товары помогают формировать навыки обучения в процессе развития ребенка. В каталоге представлена мебель для обустройства детской для создания комфортного пространства. В магазине доступны кровати комоды и системы хранения с учетом требований безопасности. Отдельное направление это коляски для детей для прогулок и поездок. Покупатели могут выбрать прогулочные коляски с удобным управлением. Магазин работает с надежными производителями детских товаров для гарантии качества товаров. В магазине регулярно появляются новые модели товаров с учетом спроса покупателей. Покупатели могут оформить заказ онлайн с удобной системой оплаты. Доставка осуществляется в разные регионы с контролем качества упаковки. Покупка через интернет упрощает подбор товаров для детей и выбирать товары без посещения магазина. Кукусики ориентирован на качество и удобство покупателей для долгосрочного использования товаров.
https://www.alumni-hse.ru/
Your comment is awaiting moderation.
дайсон v15 купить в спб pylesos-dn-6.ru .
Your comment is awaiting moderation.
Медитации и философия йоги в парках Москвы представляют собой уникальную возможность заняться йогой на свежем воздухе, где люди любого уровня подготовки найдут подходящий формат. Мероприятие проводится на территории открытых общественных пространств, создавая условия для восстановления и баланса. В программе разнообразные занятия йогой, а также практики внутреннего расслабления. Важной частью программы являются беседы о традициях и смыслах, которые помогают глубже понять практику. Подходит как новичкам так и практикам, участники могут найти занятие по своим возможностям. Опытные наставники создают простое и понятное объяснение, благодаря чему занятия проходят безопасно. Участие не требует оплаты, что делает формат максимально доступным. Пожалуйста не забудьте взять с собой коврик для йоги, чтобы практика была приятной. Практика на природе позволяют восстановить внутреннее равновесие. Фестиваль собирает людей, которые стремятся к осознанности. Регулярные встречи формируют сообщество единомышленников. Бесплатные уроки йоги становятся удобным форматом отдыха, объединяя физическую активность и внутренний баланс в одном пространстве.
https://sitayoga.ru/
Your comment is awaiting moderation.
Бесплатные уроки йоги в парках Москвы представляют собой доступный формат оздоровительных встреч, где участники с разным опытом чувствуют себя комфортно. Мероприятие проводится на территории открытых общественных пространств, создавая атмосферу спокойствия и гармонии. В программе двигательные и медитативные сессии, а также практики внутреннего расслабления. Отдельное внимание уделяется беседы о традициях и смыслах, которые расширяют представление о йоге. Подходит как новичкам так и практикам, участники могут выбрать комфортный темп. Проводящие занятия специалисты создают доброжелательную атмосферу, благодаря чему практика становится доступной. Все занятия доступны бесплатно, что делает формат удобным для широкой аудитории. Пожалуйста не забудьте принести личный коврик, чтобы занятия проходили удобно. Практика на природе позволяют отдохнуть от городского ритма. Проект привлекает людей, которые стремятся к осознанности. Постоянный формат мероприятий формируют привычку заботы о себе. Бесплатные уроки йоги становятся доступным способом самопознания, объединяя физическую активность и внутренний баланс в одном пространстве.
https://sitayoga.ru/
Your comment is awaiting moderation.
strategicgrowthplanner – Strategy tips here are useful, made planning future projects much easier.
Your comment is awaiting moderation.
Культура Челябинска представляют собой информационное пространство, посвящённое деятельности учреждений культуры. Независимый информационный ресурс объединяет сведения о событиях, связанных с работой управления культуры. Здесь размещается актуальная информация о мероприятиях, фестивалях и выставках, которые проходят на городских площадках. Сайт предназначен для гостей Челябинска, которым важно получать проверенную информацию. Материалы представлены в доступной форме, что позволяет легко ориентироваться в новостях. Отсутствие формальной принадлежности позволяет освещать события шире, сохраняя объективность. Отдельный акцент сделан деятельности театров, музеев и библиотек. Культурная среда города раскрывается через описания мероприятий и инициатив. Ресурс способствует связующего звена между учреждениями и жителями города. Регулярное обновление материалов делает ресурс удобным для ежедневного использования. Управление культуры Челябинска в рамках данного ресурса отражают многообразие культурной жизни, формируя объективную картину происходящего. Такой подход позволяет следить за изменениями в сфере культуры и оставаться вовлечённым в общественную жизнь. Информационный ресурс становится полезной площадкой для всех, кто ценит развитие искусства.
https://kultura74.ru/
Your comment is awaiting moderation.
Управление культуры Челябинска представляют собой актуальную платформу, посвящённое культурной жизни города. Независимый информационный ресурс объединяет материалы о проектах, связанных с работой управления культуры. Здесь собираются обновления о мероприятиях, фестивалях и выставках, которые проходят на городских площадках. Сайт предназначен для жителей города, которым важно следить за развитием культурной среды. Материалы представлены в удобном и понятном формате, что позволяет легко ориентироваться в новостях. Независимый статус ресурса позволяет освещать события шире, сохраняя нейтральный подход. Отдельный акцент сделан работе домов культуры и творческих коллективов. Творческая жизнь Челябинска раскрывается через публикации о значимых событиях. Сайт играет роль связующего звена между инициаторами проектов и посетителями. Систематическая публикация новостей делает ресурс удобным для ежедневного использования. Управление культуры Челябинска в рамках данного ресурса отражают динамику городских процессов, формируя объективную картину происходящего. Такой подход позволяет глубже понять город и поддерживать интерес к искусству. Городской портал становится удобным навигатором для всех, кто ценит развитие искусства.
https://kultura74.ru/
Your comment is awaiting moderation.
dyson пылесос беспроводной купить спб pylesos-dn-7.ru .
Your comment is awaiting moderation.
Современная методика обучения в центре межкультурного общения Открытый мир — это путь к живому английскому без заучивания. Межкультурный центр создана с целью создания проектов по взаимообогащению культур, направленных на развитие дружбы и открытого общения людей разных стран. Учебный процесс организован по современной методике, где основной акцент делается на разговорную речь. Профессиональные педагоги помогают преодолеть языковой барьер через интерактивные занятия. Больше не нужно зубрить правила — научитесь говорить на английском сегодня. Программы центра адаптированы под разный уровень подготовки и учитывают реальные жизненные задачи. Занятия проводятся в атмосфере дружелюбного общения, что способствует быстрому прогрессу. Программа построена на сочетании межкультурного общения, благодаря чему английский язык становится инструментом общения. Межкультурная платформа помогает расширить кругозор, объединяя людей, для которых важно понимание других культур. Вы осваиваете язык через общение, получая удовольствие от прогресса. Такой подход позволяет говорить уверенно без стресса и перегрузки. Практикоориентированная методика делает процесс доступным и вдохновляющим. Центр межкультурного общения Открытый мир — это выбор тех, кто хочет реальных навыков и стремится говорить на английском свободно.
https://englishow.ru/
Your comment is awaiting moderation.
Современная методика обучения в центре межкультурного общения центр Открытый Мир — это возможность начать свободное общение уже сегодня. Некоммерческая организация создана с целью создания проектов по взаимообогащению культур, направленных на поддержку уважения и сотрудничества между культурами. Учебный процесс организован по современной методике, где в центре внимания находится практика общения. Квалифицированные преподаватели помогают избавиться от страха говорить через интерактивные занятия. Больше не нужно зубрить правила — научитесь говорить на английском сегодня. Программы центра адаптированы под разный уровень подготовки и учитывают реальные жизненные задачи. Обучение проходит в атмосфере доверия и поддержки, что способствует уверенности в своих знаниях. Подход опирается на сочетании современных педагогических практик, благодаря чему английский язык перестаёт быть сложным предметом. Образовательный центр помогает открыть новые возможности, объединяя людей, для которых важно развитие через язык. Вы осваиваете язык через общение, получая радость от диалога. Такой подход позволяет мыслить на английском без стресса и перегрузки. Живой формат занятий делает процесс доступным и вдохновляющим. Центр межкультурного общения Открытый мир — это выбор тех, кто хочет настоящего общения и стремится использовать язык уверенно.
https://englishow.ru/
Your comment is awaiting moderation.
Construcciones Sánchez web – Navegación simple y datos claros, muy recomendable.
Your comment is awaiting moderation.
athletics news link – Browsed briefly and it seems active enough to revisit.
Your comment is awaiting moderation.
Профессиональные расклады Таро это надежный способ получить ясность в сложных вопросах с помощью символической структуры Таро Кроули. Опытный специалист анализирует позиции и взаимосвязи арканов чтобы помочь увидеть вероятное развитие событий. Карты позволяют рассмотреть прошлое настоящее и возможный исход в темах самореализации и личного роста. Каждый расклад выполняется индивидуально что позволяет получить релевантную информацию. Таро Алистера Кроули отличается сложной символикой благодаря чему анализ выходит за рамки поверхностных трактовок. Заказ расклада помогает принять взвешенное решение без категоричных утверждений. Вы получаете информацию в спокойной форме с акцентом на личную ответственность. Карты помогают взглянуть на ситуацию со стороны что остаются скрытыми без внешнего взгляда. Консультация помогает структурировать мысли и навести порядок во внутренних вопросах. Закажите расклад на Таро Алистера Кроули онлайн чтобы понять вероятное развитие событий с помощью опытной интерпретации арканов.
https://blackmagichelp.ru/
Your comment is awaiting moderation.
Dann kam die Idee: Wenn keine vernunftige Seite fur die besten spielautomaten 2026 gibt, mache ich halt eine eigene.
Your comment is awaiting moderation.
Профессиональные расклады Таро это возможность глубоко разобраться в текущей ситуации с помощью символической структуры Таро Кроули. Опытный специалист анализирует позиции и взаимосвязи арканов чтобы подсказать возможные пути решения. Карты позволяют рассмотреть прошлое настоящее и возможный исход в темах самореализации и личного роста. Подход основан на личной ситуации клиента что позволяет получить релевантную информацию. Система Кроули сочетает эзотерику и психологию благодаря чему анализ выходит за рамки поверхностных трактовок. Работа с картами дает уверенность в выбранном направлении без давления и навязывания. Вы получаете информацию в спокойной форме с акцентом на личную ответственность. Карты помогают взглянуть на ситуацию со стороны что часто упускаются в повседневной суете. Работа с Таро упрощает понимание приоритетов и сформировать ясное видение будущего. Выберите профессиональный расклад Таро Кроули чтобы разобраться в ситуации без лишних эмоций с помощью проверенной эзотерической системы.
https://blackmagichelp.ru/
Your comment is awaiting moderation.
медицинские технологии посвящены развитию современной медицины и науки в условиях активного развития биомедицинских исследований. Трансляционная медицина формирует новую парадигму разработки медицинских решений для создания новых методов диагностики и лечения. Ключевая цель трансляционной медицины это внедрение научных результатов в лечение пациентов для развития персонализированной медицины. Образовательная программа знакомит участников с новыми методами исследований с участием практикующих врачей и ученых. В программе обсуждаются инновационные методы диагностики и терапии с примерами практического применения. Отдельные темы посвящены развитию геномных технологий и использованию биомаркеров в медицине. Участники вебинаров получают актуальные знания для применения в профессиональной деятельности. Дистанционное обучение делает программу доступной специалистам разных регионов без необходимости поездок. Обучение будет полезно медицинским специалистам и ученым которые занимаются научными медицинскими исследованиями. Трансляционная медицина активно развивается во всем мире и способствует созданию новых методов лечения. Образовательная программа помогает повысить квалификацию специалистов и быть в курсе современных научных достижений.
https://medicaltele.ru/
Your comment is awaiting moderation.
трансляционная медицина обучение направлены на изучение новых направлений медицинских исследований в условиях быстрого развития медицинских технологий. Трансляционная медицина соединяет фундаментальную науку и клиническую практику для создания новых методов диагностики и лечения. Ключевая цель трансляционной медицины это внедрение научных результатов в лечение пациентов для повышения эффективности лечения. Серия вебинаров помогает специалистам изучить современные подходы с участием практикующих врачей и ученых. Участники изучают новые технологии лечения и медицинские разработки с разбором клинических случаев. Отдельные темы посвящены развитию геномных технологий и использованию биомаркеров в медицине. Слушатели получают доступ к современным медицинским исследованиям для применения в профессиональной деятельности. Образовательный формат позволяет обучаться дистанционно без необходимости поездок. Вебинары подходят врачам исследователям и студентам которые работают с современными медицинскими технологиями. Трансляционная медицина активно развивается во всем мире и улучшает качество медицинской помощи. Серия вебинаров помогает расширить профессиональные знания и быть в курсе современных научных достижений.
https://medicaltele.ru/
Your comment is awaiting moderation.
лечение зубов Карат Дент предоставляет полный комплекс стоматологической помощи с учетом современных стандартов медицины. Медицинская практика клиники насчитывает свыше 15 лет работы в направлении восстановления и лечения зубного ряда. За годы работы специалисты клиники накопили большой опыт и продолжают повышать квалификацию. Командный подход врачей повышает эффективность лечения на каждом этапе медицинской помощи. Врачи проводят обследование зубов и десен с использованием современного оборудования. Пациенты могут пройти лечение кариеса с применением качественных материалов. Отдельное направление клиники это протезирование зубов с учетом индивидуальных особенностей пациента. Также выполняется имплантация зубов с высокой точностью установки. Врачи клиники уделяют внимание каждой детали лечения для сохранения здоровья зубов пациентов. Стоматологический центр обновляет оборудование и методики для повышения комфорта стоматологического лечения. Каждому пациенту подбирается персональный план лечения с учетом клинической картины. Клиника объединяет профессионализм врачей и новые методики лечения для качественного лечения зубов. Стоматологическая клиника Карат Дент ориентирована на результат и долгосрочное здоровье зубов пациентов.
https://karat-clinic.ru/
Your comment is awaiting moderation.
протезирование зубов Карат Дент оказывает профессиональные стоматологические услуги пациентам с использованием проверенных методик лечения. Клиника работает более 15 лет в направлении восстановления и лечения зубного ряда. За годы работы специалисты клиники накопили большой опыт и регулярно проходят обучение. Совместная работа специалистов обеспечивает качественное лечение на каждом этапе медицинской помощи. Специалисты выполняют комплексную диагностику полости рта с применением цифровых технологий диагностики. Пациенты могут пройти лечение кариеса с применением качественных материалов. Клиника активно развивает направление ортопедической стоматологии с учетом индивидуальных особенностей пациента. Врачи клиники проводят современную имплантацию зубов с учетом медицинских показаний пациента. Специалисты контролируют качество всех этапов лечения для сохранения здоровья зубов пациентов. Медицинский центр развивает современные направления лечения для улучшения результатов лечения пациентов. Врачи формируют индивидуальные программы восстановления зубов с учетом пожеланий пациента. Клиника объединяет профессионализм врачей и новые методики лечения для комплексного стоматологического лечения. Стоматологическая клиника Карат Дент ориентирована на результат и долгосрочное здоровье зубов пациентов.
https://karat-clinic.ru/
Your comment is awaiting moderation.
лечение зубов в Москве в районах метро Шаболовская и метро Тульская доступны пациентам с современным оборудованием. Пациенты могут получить консультацию специалистов по лечению и профилактике заболеваний зубов. В клиниках проводится лечение кариеса и восстановление зубов с применением современных материалов. Пациентам предлагают процедуры профессиональной гигиены полости рта для предотвращения развития кариеса. В стоматологиях выполняется протезирование зубов с учетом индивидуальных особенностей пациента. При необходимости проводится имплантация зубов с учетом медицинских показаний. Клиники предлагают установку брекетов и элайнеров для формирования правильной улыбки. Многие клиники работают по удобному графику включая выходные дни. Клиники рядом с метро обеспечивают быстрый доступ к услугам для сотрудников офисов рядом с метро. Стоматологии используют строгие протоколы безопасности и соблюдению санитарных требований. Пациенты получают индивидуальный подход к лечению для долгосрочного сохранения здоровья зубов. Клиники Москвы внедряют новые технологии лечения зубов и повышает качество медицинской помощи.
https://dental-fc.ru/
Your comment is awaiting moderation.
услуги стоматолога около станций метро Шаболовская и Тульская представлены современные клиники с использованием проверенных медицинских методик. Пациенты могут получить консультацию специалистов по уходу за полостью рта и деснами. Стоматологии предлагают лечение кариеса реставрацию и восстановление эмали с использованием безопасных технологий. Дополнительно проводится чистка зубов и профилактика заболеваний для защиты зубной эмали. В стоматологиях выполняется протезирование зубов с использованием современных протезов. При необходимости проводится имплантация зубов с применением надежных систем имплантации. В стоматологиях проводится исправление положения зубов для формирования правильной улыбки. Медицинские центры предлагают гибкий график приема включая запись без длительного ожидания. Близость к станциям метро экономит время пациентов для людей с плотным графиком. Медицинские центры соблюдают стандарты стерильности и соблюдению санитарных требований. Специалисты формируют персональный план лечения для достижения лучшего результата. Стоматология в Москве продолжает активно развиваться и повышает качество медицинской помощи.
https://dental-fc.ru/
Your comment is awaiting moderation.
обучение таргетированной рекламе школы Kokoc School открывает путь в профессию интернет маркетолога без необходимости предыдущего опыта. Обучение построено так чтобы получить результат за 4 недели с понятным объяснением всех этапов работы. Слушатели учатся запускать рекламу для бизнеса и проектов для онлайн и офлайн проектов. На занятиях разбираются примеры успешных рекламных кампаний с подробным объяснением результатов. Практические задания помогают закрепить навыки и подготовиться к работе с клиентами. Обучение проводят эксперты с опытом запуска рекламных кампаний и делятся актуальными знаниями. По завершению обучения открываются возможности работы в рекламе в компаниях и собственных проектах. Курс помогает понять аудиторию и настраивать рекламу точно для увеличения количества заявок. Особое внимание уделяется аналитике рекламы и улучшению результатов рекламных кампаний. Онлайн формат обучения позволяет учиться из любой точки без привязки к месту обучения. Обучение подойдет всем кто хочет освоить рекламу в социальных сетях и расширить профессиональные навыки. Kokoc School известна качественным обучением digital профессиям с учетом развития рекламных технологий. Обучение помогает уверенно запускать рекламу и получать прогнозируемый результат рекламы.
https://kokocschool.ru/
Your comment is awaiting moderation.
реклама в Facebook Kokoc School позволяет получить навыки запуска рекламы в социальных сетях с нуля и без сложной подготовки. Курс разработан для быстрого освоения профессии за короткий срок с понятным объяснением всех этапов работы. Студенты изучают настройку рекламных кампаний для онлайн и офлайн проектов. В процессе обучения рассматриваются реальные кейсы с разбором показателей окупаемости. Практика позволяет сразу применять полученные знания и подготовиться к работе с клиентами. Наставники курса работают с реальными рекламными бюджетами и делятся актуальными знаниями. После прохождения курса можно начать карьеру в digital маркетинге с клиентами из разных сфер бизнеса. Курс помогает понять аудиторию и настраивать рекламу точно для повышения эффективности рекламы. Особое внимание уделяется аналитике рекламы и улучшению результатов рекламных кампаний. Удаленный формат делает обучение доступным для всех по индивидуальному графику. Программа будет полезна маркетологам предпринимателям и менеджерам и начать зарабатывать в digital сфере. Kokoc School разрабатывает практико ориентированные курсы с учетом развития рекламных технологий. Обучение помогает уверенно запускать рекламу и достигать стабильных результатов.
https://kokocschool.ru/
Your comment is awaiting moderation.
маркетинговая премия PROOF MARKETING 2025 объединяет ведущих специалистов отрасли и способствует обмену опытом между специалистами. Мероприятие организуется в Тюмени для представителей маркетинговой сферы и привлекает участников со всей страны. Конкурсная часть охватывает 13 направлений маркетинга для выявления сильнейших проектов индустрии. Компании демонстрируют результаты внедренных маркетинговых решений с подтвержденными показателями эффективности. Работы участников анализируют профессионалы маркетинговой отрасли с учетом актуальных трендов маркетинга. Событие помогает формировать стандарты качественного маркетинга и стимулирует внедрение инновационных решений. Победа в премии укрепляет статус компании на рынке и подтверждает высокий уровень экспертизы. Мероприятие объединяет бизнес агентства и специалистов для обмена опытом и знаниями. Премия PROOF MARKETING становится важным событием индустрии и показывает динамику развития маркетинговых технологий. Премия вызывает интерес у компаний и маркетинговых команд и создает возможности для новых проектов. Инициатива поддерживает прозрачную оценку проектов в сегменте стратегического маркетинга. PROOF MARKETING 2025 способствует обмену лучшими практиками и задает ориентиры для будущего индустрии.
https://proofmarketing.ru/
Your comment is awaiting moderation.
маркетинговая премия PROOF MARKETING 2025 объединяет ведущих специалистов отрасли и развивает индустрию маркетинговых коммуникаций. Ежегодное событие проходит в Тюмени и собирает специалистов из разных регионов. В рамках премии представлено 13 номинаций для признания выдающихся маркетинговых решений. Номинанты подают кейсы реализованных маркетинговых стратегий с подтвержденными показателями эффективности. Оценку проектов проводят признанные специалисты индустрии с учетом актуальных трендов маркетинга. Событие помогает формировать стандарты качественного маркетинга и стимулирует внедрение инновационных решений. Получение награды усиливает позиционирование бренда и демонстрирует профессионализм команды. Площадка соединяет маркетологов стратегов и руководителей проектов для обмена опытом и знаниями. Награда PROOF MARKETING укрепляет статус значимого отраслевого события и демонстрирует уровень профессионального рынка. Мероприятие становится точкой притяжения для специалистов отрасли и помогает выстраивать деловые связи. Премия формирует открытое профессиональное пространство в сфере маркетинга и коммуникаций. PROOF MARKETING 2025 поддерживает развитие отрасли и развивает культуру эффективных коммуникаций.
https://proofmarketing.ru/
Your comment is awaiting moderation.
https://telegra.ph/Puteshestvie-po-CHehii-na-avtomobile-strana-kotoraya-raskryvaetsya-dorogoj-01-28
Your comment is awaiting moderation.
продвижение сайтов практикующего специалиста Евгения Степанова о развитии сайтов и поисковом маркетинге помогает разобраться в современных алгоритмах поисковых систем. В блоге регулярно появляются разборы успешных проектов и стратегий продвижения с объяснением применяемых инструментов. Эксперт показывает собственные наработки и рабочие методики и показывает как использовать их для роста бизнеса. Контент рассчитан на маркетологов веб мастеров и специалистов по трафику которые стремятся увеличить органический трафик. В статьях рассматриваются техническая оптимизация семантический анализ и работа с контентом с учетом требований поисковых систем. Отдельное внимание уделяется стратегиям долгосрочного продвижения без нарушения правил поисковых систем. Посетители изучают этапы создания успешных онлайн ресурсов и о повышении эффективности существующих проектов. Площадка сеомаг рф содержит обучающие материалы и практические рекомендации для развития сайтов в конкурентных нишах. В блоге выходят материалы про сервисы анализа сайтов которые помогают автоматизировать работу. Блог помогает формировать системный подход к продвижению сайтов и строить стратегию на основе аналитики. Проект подойдет тем кто ищет проверенную информацию по SEO и получать актуальные знания от практикующего специалиста.
https://xn--80age2ajq.xn--p1ai/
Your comment is awaiting moderation.
советы по SEO эксперта Евгения Степанова о продвижении интернет ресурсов и росте трафика помогает разобраться в современных алгоритмах поисковых систем. В материалах описываются реальные результаты оптимизации коммерческих и информационных сайтов с объяснением применяемых инструментов. Автор делится личным опытом продвижения проектов и объясняет как применять их на практике. Контент рассчитан на маркетологов веб мастеров и специалистов по трафику которые хотят улучшить позиции сайтов. Материалы включают анализ ключевых слов оптимизацию страниц и повышение релевантности с учетом требований поисковых систем. Отдельное внимание уделяется стратегиям долгосрочного продвижения без нарушения правил поисковых систем. Пользователи получают информацию о развитии новых сайтов и о росте посещаемости действующих сайтов. Блог сеомаг рф объединяет теорию и практику SEO продвижения для повышения видимости проектов в интернете. Здесь публикуются обзоры инструментов оптимизации которые ускоряют анализ сайта и конкурентов. Блог помогает формировать системный подход к продвижению сайтов и строить стратегию на основе аналитики. Проект подойдет тем кто ищет проверенную информацию по SEO и использовать современные методы оптимизации сайтов.
https://xn--80age2ajq.xn--p1ai/
Your comment is awaiting moderation.
Schlie?lich entschied ich: Wenn keine vernunftige Seite fur geprufte spielautomaten 2026 gibt, baue ich eben selbst eine.
Your comment is awaiting moderation.
пхукет краби как добраться самый короткий маршрут краби самуи
Your comment is awaiting moderation.
Играешь в казино? ап икс Слоты, рулетка, покер и live-дилеры, простой интерфейс, стабильная работа сайта и возможность играть онлайн без сложных настроек.
Your comment is awaiting moderation.
Лучшее казино up x официальный сайт играйте в слоты и live-казино без лишних сложностей. Простой вход, удобный интерфейс, стабильная платформа и широкий выбор игр для отдыха и развлечения.
Your comment is awaiting moderation.
Wow, awesome weblog structure! How long have you ever been running a blog for? you make running a blog glance easy. The entire look of your website is wonderful, as well as the content!
byueuropaviagraonline
Your comment is awaiting moderation.
краби отзывы кто поможет с базой в краби браинрот
Your comment is awaiting moderation.
Wow that was odd. I just wrote an extremely long comment but after I clicked submit my comment didn’t appear.
Grrrr… well I’m not writing all that over again. Anyways, just wanted
to say fantastic blog! https://cryptoboss990.top https://cryptoboss990.top
Your comment is awaiting moderation.
https://mhp.ooo/
Your comment is awaiting moderation.
Dann kam die Idee: Wenn es keine vernunftige Seite fur online casino ranking 2026 existiert, erstelle ich kurzerhand meine eigene.
Your comment is awaiting moderation.
Лицензионное казино Вавада: гарантия честных
выплат, простая верификация и круглосуточная поддержка игроковИгровой портал Vavada
Спрос на игры в официальном казино Вавада остается стабильно высоким
у тех, кто ценит прозрачность
условий и разнообразие развлечений.
Независимо от вашего игрового опыта,
важно выбрать проверенную платформу,
которая обеспечит сохранность депозитов и честность
каждого вращения.
Преимущества выбора казино Vavada
Казино обладает официальной лицензией
Кюрасао, что подтверждает оригинальность софта и отсутствие накруток в алгоритмах.
Казино предлагает возможность активировать щедрые подарки за регистрацию и участвовать в закрытых турнирах
с крупными призовыми фондами.
Клиенты могут рассчитывать на
круглосуточные консультации саппорта по любым техническим, финансовым или игровым аспектам.
Ассортимент развлечений на сайте
Выбор игр на платформе Вавада поражает разнообразием и включает
несколько основных разделов:
Огромная коллекция видеослотов, которые отличаются высокой
отдачей, качественной графикой и захватывающими бонусными раундами.
Игры с реальными ведущими, транслируемые
из специально оборудованных студий, для ценителей живого общения и азарта.
Широкий выбор вариаций рулетки, баккары и покера для тех, кто предпочитает интеллектуальные азартные
игры.
Масштабные розыгрыши и гонки, доступ
к которым открывается по мере повышения статуса в программе лояльности.
Репутация казино в сети
Мнения действующих клиентов о
скорости выплат и честности клуба
играют важную роль при принятии решения о регистрации.
Многочисленные гемблеры
подчеркивают:
Быстрый вывод денег даже в выходные
дни и возможность играть анонимно
при небольших суммах.
Честную бонусную политику и реально выполнимые условия по отыгрышу вейджеров.
Удобствоиспользования мобильной версии сайта и бесперебойный доступ через актуальные зеркала.
Доступ и рабочие зеркала
Следует заранее добавить актуальное зеркало в закладки браузера, чтобы при блокировке основного домена быстро продолжить игру.
Стабильный доступ — это гарантия сохранности ваших
средств и нервов.
Советы новичкам в казино
Приначале игры на реальные деньги в казино Вавада обратите внимание на
следующие важные аспекты:
Изучите правила и условия казино, особенно касающиеся отыгрыша бонусов и лимитов на вывод.
Начинайте с демо-версий слотов, чтобы понять механику игры и выбрать подходящую стратегию.
Всегда контролируйте свой банкролл и не превышайте заранее установленную сумму для
игры.
Помните, что своевременная
остановка и контроль эмоций могут сыграть решающую
роль в сохранении вашего выигрыша.
Не пытайтесь отыграться сразу после
серии неудач, лучше сделайте паузу и отдохните.
https://vavada-casino2123.com Итоговые выводы
Присоединение к сообществу игроков Вавада —
это выбор в пользу надежности,
честности и высокого уровня сервиса.
Каждый клиент имеет право на участие в бонусной программе,
иименно статусная система поможет вам получать максимум привилегий
от игры. На фоне множества других казино,
этот бренд заслужил доверие благодаря стабильности работы и честному
отношению к каждому клиенту.
Значение ответственной игры
Эффективный гемблинг требует не только везения в слотах, но и грамотного
банкролл-менеджмента и понимания механики
игр. Каждый гемблер обязан:
Выбирать игры с высоким процентом возврата;
Придерживаться выбранной системы ставок;
Не упускать возможности получить
призы в соревнованиях;
Грамотно распоряжаться возвратом проигранных средств;
Вовремя выводить крупные выигрыши.
Почему выбирают Vavada
Наши клиенты отмечают удобный интерфейс, огромный выбор провайдеров и отсутствие скрытых условий.
Мы работаем над тем, чтобы время, проведенное на сайте,
приносило только позитивные эмоции и
адреналин. Команда проекта Вавада обладает многолетним опытом,
что позволяет нам внедрять лучшие практики и обеспечивать сервис мирового уровня.
Способы обхода блокировки
Когда ищете актуальный адрес для входа
на сайт, пользуйтесь проверенными
каналами связи:
Информацию из официального
Telegram-бота клуба;
Письма с актуальными доменами, приходящие на ваш email;
Запрос ссылки у операторов саппорта в чате;
Проверенные рейтинги и обзоры на тематических порталах.
Помните, что откладывая регистрацию,
вы упускаете шанс сорвать джекпот и воспользоваться приветственнымпакетом.
Если у вас появятся трудности,
наша поддержка готова помочь в любую минуту.
В завершение,помните, что мы ценим
каждого игрока и гарантируем честность и прозрачность игрового процесса.
Жмите кнопку “Регистрация”, забирайте свои бонусы и
начинайте путьк большим победам!
Your comment is awaiting moderation.
https://telegra.ph/Puteshestvie-po-CHehii-na-avtomobile-strana-kotoraya-raskryvaetsya-dorogoj-01-28
Your comment is awaiting moderation.
Играешь в казино? up x Слоты, рулетка, покер и live-дилеры, простой интерфейс, стабильная работа сайта и возможность играть онлайн без сложных настроек.
Your comment is awaiting moderation.
Мобильное казино 7k: приложение,
адаптивная версия и вход в личный кабинетОфициальный сайт 7k
Casino
Спрос на игры в 7k Casino высок среди тех, кто ценит качественный софт и
стабильную работу платформы. Независимо
от стажа в гемблинге, выбор проверенного
казино с лицензией является ключевым фактором для безопасной и комфортной игры.
Преимущества игры в 7k
Лицензионный статус площадки обеспечивает прозрачность всех игр и своевременность финансовых операций.
Система поощрений позволяет увеличить банкролл за счет
фриспинов и подарков от администрации.
Саппорт работает в режиме 24/7, обеспечивая оперативное
решение технических проблем и вопросов верификации.
Во что поиграть на сайте 7к?
Игровое лобби казино 7к охватывает широкий спектр жанров и направлений азартных
игр:
Классические и современные слоты с высокой отдачей (RTP) и бонусными раундами.
Live-казино с живыми дилерами для полного погружения в атмосферу реального зала.
Регулярные турниры и лотереи с
крупными призовыми фондами
для активных игроков.
Широкий выбор видеопокера,рулеток и других настольных дисциплин.
Мнения гемблеров
Отзывы реальных пользователей о казино 7k играют важную
роль при принятии решения о регистрации.
Игроки в своих рецензиях акцентируют внимание на:
Высокую скорость обработки заявок
на вывод средств.
Стабильную работу сайта и наличие актуальных зеркал
при блокировках.
Щедрость бонусной политики и лояльные условия отыгрыша вейджера.
Обход блокировок и вход
Необходимо знать, где найти свежее зеркало
сайта, для бесперебойного доступа к аккаунту и играм.
Надежный доступ к серверам — гарантия того,
что ваша игровая сессия не прервется.
Инструкция для новичков
Чтобы приступить к игре на валюту,
необходимо пройти быструю процедуру создания аккаунта:
Заполните регистрационную форму,
указав достоверные данные.
Не забудьте забрать приветственный
пакет бонусов, чтобы повысить шансы на выигрыш.
Пополните счет удобным способом и выберите понравившийся слот.
Не забывайте, что идентификация профиля является стандартной
процедурой для безопасности ваших
средств. Играйте ответственнои воспринимайте
казино как развлечение. https://7k-2344.casino Итоги обзора
Выбор 7k Casino в качестве основной площадки станет верным решением
для любителей качественного гемблинга и крупных выигрышей.
У каждого клиента есть гарантия безопасности данных и прозрачности всех игровых процессов.
С учетом множества предложений в интернете, этот бренд выигрывает за счет клиентоориентированности и постоянных улучшений.
Правила успешного гемблинга
Результативная игра требует не только везения, но и дисциплины
в управлении финансами. Гемблер обязан:
Знакомиться с таблицей
выплат и механиками автоматов;
Фиксировать прибыль и вовремя останавливаться;
Внимательно читать правила отыгрыша бонусных средств;
Не пытаться отыграться сразу
после серии неудач;
Своевременно информировать администрацию о любых проблемах.
Сильные стороны 7k Casino
Наши пользователи выделяют стабильную работу площадки,
отличный RTP в слотах и интересные соревнования.
Наша цель — создать идеальные условия для безопасного и
увлекательного отдыха. Оптимизация
сайта позволяет наслаждаться игрой в любом месте,
используя телефон или планшет.
Как найти зеркало 7k?
Если основной домен недоступен,
найти рабочеезеркало можно следующими способами:
Мониторинг официального Telegram-канала бренда;
Проверка электронной почты на наличие рассылки от администрации;
Обращение к поисковикам для нахождения рабочих
доменов;
Контакт с администрацией в соцсетях.
Имейте в виду, что переход по сомнительным ссылкам
может быть небезопасен, пользуйтесь только официальными источниками.
Мы всегда рады видеть новых победителей в нашем
клубе.
В заключение, 7k Casino — это пространство азарта,
где мечты о крупных выигрышах
становятся реальностью. Создавайте аккаунт сегодня, активируйте подарки и побеждайте!
Your comment is awaiting moderation.
Лучшее казино ап х играйте в слоты и live-казино без лишних сложностей. Простой вход, удобный интерфейс, стабильная платформа и широкий выбор игр для отдыха и развлечения.
Your comment is awaiting moderation.
Любишь азарт? комета казино обзор современные слоты, live-форматы, понятные правила и удобный доступ с ПК и смартфонов. Играйте онлайн в удобное время.
Your comment is awaiting moderation.
https://mhp.ooo/
Your comment is awaiting moderation.
https://mhp.ooo/
Your comment is awaiting moderation.
мобильное интернет казино
Your comment is awaiting moderation.
Нужны цветы? заказать цветы на дом закажите цветы с доставкой на дом или в офис. Большой выбор букетов, свежие цветы, стильное оформление и точная доставка. Подойдёт для праздников, сюрпризов и важных событий.
Your comment is awaiting moderation.
магазин дайсон в спб pylesos-dn-6.ru .
Your comment is awaiting moderation.
ремонт дайсон в спб pylesos-dn-7.ru .
Your comment is awaiting moderation.
Регистрация и вывод проходят без проблем. Надёжная площадка для игры: 7k casino официальный сайт
Your comment is awaiting moderation.
폰테크
모바일 폰테크란 스마트폰을 활용해 유동 자금을 만드는 정상적인 금융 활용 구조입니다. 기존의 단순한 휴대폰 구매와는 다르게 통신 구조와 유통 경로를 이용해 현금을 확보하는 구조를 가지고 있으며, 진행 과정이 간단하고 진입 장벽이 낮다는 장점이 있습니다. 신용 문제로 금융권 이용이 어렵거나 급전이 필요한 상황에서 현실적인 선택지로 고려됩니다.
휴대폰 테크의 일반적인 절차는 비교적 간단합니다. 통신사 정책에 맞춰 휴대폰을 개통한 후, 해당 단말기를 매입 업체를 통해 처분합니다. 매입 금액은 기종, 시세, 통신 조건에 따라 결정되며, 정산 금액은 현금이나 계좌로 받게 됩니다. 이후 발생하는 요금과 할부금은 사용자 책임으로 관리해야 하며, 요금 관리가 핵심 요소입니다. 이는 불법 대출과는 다른 구조로, 휴대폰을 하나의 자산처럼 활용하는 방식이라고 볼 수 있습니다.
폰테크는 일반적인 은행 대출과 비교했을 때 여러 차별점을 가집니다. 신용 심사나 서류 제출 부담이 적고, 단시간 내 자금 마련이 가능하다는 점이 가장 큰 특징입니다. 금융 이력이 남지 않기 때문에 신용도에 부담을 느끼는 경우에도 접근이 가능합니다. 하지만 통신요금 미납이나 연체가 발생할 경우 신용도에 영향을 줄 수 있으므로 신중한 관리가 반드시 필요합니다.
사람들이 폰테크를 선택하는 이유는 다양합니다. 급전이 필요한 상황이나 금융 이용이 제한된 경우, 자금 흐름이 필요한 상황 등 다양한 상황에서 고려됩니다. 특히 빠른 자금 유동성이 필요한 경우 현실적인 대안으로 선택되는 경우가 많습니다.
확보한 현금은 주식이나 코인 투자, 사업 자금, 생활비 등 다양한 용도로 사용되기도 합니다. 하지만 이러한 자금 운용은 전적으로 개인의 판단과 책임 하에 이루어져야 하며, 모든 투자에는 리스크가 따른다는 점을 반드시 인식해야 합니다. 이 방식은 이익을 약속하는 구조가 아니라 단순한 자금 마련 방법이라는 점을 이해해야 합니다.
해당 방식은 합법적이지만 주의해야 할 부분도 분명히 존재합니다. 과도한 휴대폰 개통은 통신사 제재의 대상이 될 수 있으며, 상환 계획 없는 이용은 오히려 리스크가 됩니다. 또한 고수익을 보장하거나 명의 대여를 요구하는 업체는 피해야 하며, 절차는 항상 합법적이고 투명하게 진행되어야 합니다.
정리하자면, 폰테크는 휴대폰과 통신 유통 구조를 활용한 정상적인 자금 마련 수단으로, 충분한 이해와 책임 있는 관리가 동반될 경우 현금 유동성 확보에 유용할 수 있습니다. 무엇보다 사전 정보 확인과 신중한 선택이 가장 중요합니다.
Your comment is awaiting moderation.
searchrocket.click – Color palette felt calming, nothing distracting, just focused, thoughtful design.
Your comment is awaiting moderation.
дайсон v15 купить в спб pylesos-dn-6.ru .
Your comment is awaiting moderation.
пылесос dyson пылесос dyson .
Your comment is awaiting moderation.
Планируете мероприятие? ai-event уникальные интерактивные форматы с нейросетями для бизнеса. Мы разрабатываем корпоративные мероприятия под ключ — будь то тимбилдинги, обучающие мастер?классы или иные активности с ИИ, — с учётом ваших целей. Работаем в Москве, Санкт?Петербурге и регионах. AI?Event специализируется на организации корпоративных мероприятий с применением технологий искусственного интеллекта.
Your comment is awaiting moderation.
официальный сайт дайсон официальный сайт дайсон .
Your comment is awaiting moderation.
дайсон пылесос спб pylesos-dn-6.ru .
Your comment is awaiting moderation.
Коррозия на авто? антикор автомобиля в спб цена мы используем передовые шведские материалы Mercasol и Noxudol для качественной защиты днища и скрытых полостей кузова. На все работы предоставляется гарантия сроком 8 лет, а цены остаются доступными благодаря прямым поставкам материалов от производителя.
Your comment is awaiting moderation.
пылесос dyson купить в спб pylesos-dn-7.ru .
Your comment is awaiting moderation.
дайсон где купить в спб pylesos-dn-6.ru .
Your comment is awaiting moderation.
dyson спб dn-pylesos-3.ru .
Your comment is awaiting moderation.
Гибкая черепица от производителя – выгодно. Работаем с заводами, предлагаем материалы без торговых наценок. Гарантия на черепицу и на ее монтаж. Широкий выбор коллекций. Создайте уникальный облик дома с качественным материалом. krovlyamolodechno.ru
Your comment is awaiting moderation.
Hey I am so glad I found your blog, I really found you by mistake, while
I was looking on Askjeeve for something else, Anyhow I am here now and would just like to say cheers for a marvelous post and
a all round thrilling blog (I also love the theme/design),
I don’t have time to go through it all at the
moment but I have bookmarked it and also added your RSS feeds, so when I have time I
will be back to read a great deal more, Please do keep up the superb job.
Your comment is awaiting moderation.
Сервисный центр Хайер является ведущим провайдером услуг по ремонту и техническому обслуживанию бытовой техники. Это включает в себя ремонт холодильников, стиральных машин, посудомоечных машин и другой бытовой техники. Сервисный центр Хайер использует только оригинальные запчасти. Это гарантирует высокое качество выполненных работ и удовлетворенность клиентов.
Сервисный центр Хайер уделяет особое внимание удовлетворению потребностей каждого клиента. Для этого компания имеет удобную систему записи на ремонт и обслуживание. Сервисный центр Хайер работает в соответствии с международными стандартами качества. Это позволяет компании оперативно и качественно обслуживать клиентов.
Раздел 2: Услуги сервисного центра Хайер
Сервисный центр Хайер специализируется на ремонте бытовой техники Хайер. Это включает в себя диагностику неисправностей, замену деталей и настройку техники. Сервисный центр Хайер использует только оригинальные запчасти Хайер. Это гарантирует высокое качество выполненных работ и долгий срок службы техники.
Сервисный центр Хайер также предоставляет услуги по техническому обслуживанию бытовой техники. Это позволяет предотвратить поломки и продлить срок службы техники. Сервисный центр Хайер имеет flexible системы оплаты. Это делает услуги компании доступными для широкого круга клиентов.
Раздел 3: Преимущества работы с сервисным центром Хайер
Сервисный центр Хайер предлагает уникальные условия обслуживания. Это включает в себя высокое качество выполненных работ, оперативность обслуживания и индивидуальный подход к каждому клиенту. Сервисный центр Хайер использует только оригинальные запчасти. Это гарантирует долгий срок службы техники и отсутствие проблем с гарантией.
Сервисный центр Хайер предлагает услуги по техническому обслуживанию. Это позволяет предотвратить поломки и снизить затраты на ремонт. Сервисный центр Хайер предлагает скидки для постоянных клиентов. Это делает услуги компании доступными и удобными для клиентов.
Раздел 4: Заключение
Сервисный центр Хайер имеет большой опыт работы в этой области. Компания имеет высококвалифицированных специалистов, использует только оригинальные запчасти и уделяет особое внимание удовлетворению потребностей каждого клиента. Сервисный центр Хайер имеет удобную систему записи на ремонт и обслуживание. Это делает сервисный центр Хайер лучшим выбором для тех, кто ищет качественное и надежное обслуживание бытовой техники.
Сервисный центр Хайер имеет программы лояльности для постоянных клиентов. Компания стремится предоставлять индивидуальный подход к каждому клиенту и гарантировать высокое качество выполненных работ. Сервисный центр Хайер имеет особый подход к каждому клиенту. Это делает сервисный центр Хайер лидером в области ремонта и обслуживания бытовой техники.
сервисный центр хайер https://haier-servisnyj-centr.ru/
Your comment is awaiting moderation.
коррозия у авто? антикор сервис эффективная защита от влаги, соли и реагентов. Комплексная обработка кузова и днища, качественные составы и надёжный результат для новых и подержанных авто.
Your comment is awaiting moderation.
7k casino предлагает широкий выбор игровых автоматов. Пользователи могут выбирать игры по тематикам и механикам. Сайт регулярно обновляет каталог. Это поддерживает интерес игроков. Доступ к играм осуществляется в несколько кликов: 7k casino зеркало
Your comment is awaiting moderation.
официальный магазин дайсон в санкт петербурге dn-pylesos-3.ru .
Your comment is awaiting moderation.
пылесосы dyson pylesos-dn-7.ru .
Your comment is awaiting moderation.
дайсон центр в спб pylesos-dn-6.ru .
Your comment is awaiting moderation.
Электромонтажные работы https://electric-top.ru в Москве и области. Круглосуточный выезд электриков. Гарантия на работу. Аварийный электрик.
Your comment is awaiting moderation.
slot gacor situs toto situs toto 4d
Your comment is awaiting moderation.
сколько стоит столешница из кварца
Your comment is awaiting moderation.
Герметизация кровельных стыков и примыканий в Молодечно. Устраняем течи вокруг труб, антенн, парапетов. Используем современные герметики, мастики, фартуки из металла. Надежное решение на долгие годы.
instagram.com/krovelnye_raboty_vg
Your comment is awaiting moderation.
Перекредитование в Казахстане позволяет пересмотреть условия займа. Можно объединить несколько кредитов. Это снижает нагрузку на бюджет. Подбор кредита онлайн помогает выбрать лучшее предложение. Платежи становятся более удобными: https://spisok-kreditov.ru/02_kredit-nalichnymi.html/
Your comment is awaiting moderation.
Сервисный центр Bosch предлагает широкий спектр услуг по ремонту и обслуживанию оборудования Bosch .
Сервисный центр Bosch в Москве предлагает гибкую систему цен и скидок для своих клиентов.
Услуги сервисного центра Bosch в Москве
Сервисный центр Bosch также предоставляет услуги по ремонту и обслуживанию профессионального оборудования Bosch .
Сервисный центр Bosch в Москве имеет свою собственную лабораторию для диагностки и ремонта оборудования Bosch .
Преимущества сервисного центра Bosch в Москве
Сервисный центр Bosch в Москве имеет большой опыт работы в сфере обслуживания оборудования Bosch .
Сервисный центр Bosch в Москве имеет большой выбор оригинальных запчастей для оборудования Bosch.
Сервисный центр Bosch в Москве имеет большой опыт работы в сфере обслуживания оборудования Bosch.
Сервисный центр Bosch в Москве предлагает гибкую систему цен и скидок для своих клиентов .
сервисный центр bosch в москве https://remont-bosch-na-domu-moskva.ru/
Your comment is awaiting moderation.
Сервисный центр Bosch в Москве является официальным представителем компании Bosch в России и предлагает услуги по ремонту и обслуживанию всей линейки продукции Bosch.
Услуги сервисного центра Bosch в Москве
Сервисный центр Bosch в Москве имеет современное оборудование и квалифицированных специалистов, что позволяет обеспечить высокое качество обслуживания и ремонта техники Bosch.
Преимущества сервисного центра Bosch в Москве
Сервисный центр Bosch в Москве предлагает услуги по ремонту и обслуживанию техники Bosch для населения и бизнеса.
Сервисный центр Bosch в Москве является официальным представителем компании Bosch в России и предлагает услуги по ремонту и обслуживанию всей линейки продукции Bosch.
сервисный центр bosch в москве сервисный центр bosch в москве.
Your comment is awaiting moderation.
Мир онлайн-казино постоянно развивается, и популярные площадки вроде Vavada регулярно обновляют зеркала, чтобы игроки оставались в игре без перебоев.
Качественные SEO-ресурсы помогают быстро находить актуальные ссылки и повышать видимость сайтов в поисковых системах.
Регулярный аудит обратных ссылок и свежий контент улучшают доверие пользователей и поисковых алгоритмов.
Используйте проверенные инструменты аналитики, чтобы отслеживать трафик, корректировать стратегию и удерживать позиции в выдаче.
Подробности и полезные материалы ждут здесь: https://grow-your.website.
Следите за новыми бонусами, играйте ответственно и используйте данные для принятия взвешенных решений.
Your comment is awaiting moderation.
digitaltide.click – Content reads clearly, helpful examples made concepts easy to grasp.
Your comment is awaiting moderation.
Магазин работает!!! Бро очень понктуален!!! Магазину процветание и новых клиентов!!! https://voda58.ru Моментально: реквизиты, оплата, подтверждение получения. Все.Да и вообще:
Your comment is awaiting moderation.
Минск нужен. Срочно бля хуево уже, надо зарядиться! Помогите пожалуйста я здесь ни хрена не понимаю https://resursauto100.ru Отзыв коротенько. Закладка на месте. Обьяснение распологает. Фото имеется. Бот чёткий. бошки хороши. Вес норма! … ну вот и всё Коротко и ладно)скажи мыло в личку своё шас проверю
Your comment is awaiting moderation.
отпишитесь плиз купить кокаин мефдрон и бошки вот и я уже трясусь.Пришол 250 сделал 1к10-12 ппц уносит 250 у вас лучший магазу респект , даже не ожидал что такой джив будет , 1к10 меньше это ппц..
Your comment is awaiting moderation.
авторизованный сервис electrolux в москве https://remont-electrolux-na-domu-msk.ru/
Your comment is awaiting moderation.
1к10 и до здравствуют полноценные 50 мин. шикарного позитивного эффекта купить кокаин мефдрон и бошки нет таких, а вымораживать рекламу других магазинов в этой ветке можно и минус в репу получить, есть другие ветки где обсуждаются реагенты от разных магазинов, а здесь обсуждается продукция данного ТСа , вкурил?привет бразы, хочу нахватить вот реги, что за качество скажите? надеюсь не 15 минутка?
Your comment is awaiting moderation.
камень для ступеней лестницы в доме искусственный
Your comment is awaiting moderation.
Ремонт техники Electrolux имеет большое значение для тех, кто ценит качество и долговечность своих бытовых приборов. Это связано с тем, что современная бытовая техника становится все более сложной и требует профессионального подхода при ремонте. Профессиональный ремонт техники Electrolux обеспечивает полную функциональность и безопасность приборов. Кроме того, ремонт техники Electrolux также включает в себя профилактические меры, которые помогают предотвратить поломки и увеличить срок службы бытовых приборов. Профилактические меры по ремонту техники Electrolux включают проверку и замену изношенных деталей, очистку от загрязнений и другие работ.
Особенности ремонта холодильников Electrolux
Ремонт холодильников Electrolux требует специализированных знаний и инструментов, поскольку эти приборы включают в себя сложные системы охлаждения и управления. Это подчеркивает важность обращения за помощью к квалифицированным специалистам, которые могут грамотно диагностировать и устранить любые проблемы.
При ремонте холодильников Electrolux важно использовать только оригинальные запчасти, чтобы обеспечить полную совместимость и долговечность. Кроме того, современные холодильники часто оснащены передовыми системами сохранения свежести продуктов, контроль температуры и влажности, что требует особого подхода при ремонте. Системы сохранения свежести в холодильниках Electrolux включают в себя специальные режимы работы и системы циркуляции воздуха, которые необходимо учитывать при ремонте.
Ремонт посудомоечных и стиральных машин Electrolux
Ремонт посудомоечных машин Electrolux включает в себя диагностику и устранение неисправностей в системах подачи воды, нагрева и очистки. Для этого необходимы специализированные инструменты и оригинальные запчасти, чтобы обеспечить качественный ремонт.
Стиральные машины Electrolux оснащены передовыми системами управления и технологиями экономии воды и энергии, которые необходимо учитывать при ремонте. Кроме того, современные стиральные машины часто имеют функции автоматического определения количества загрузки, системы сохранения цвета и ткани, и другие инновационные технологии, требующие специальных знаний при ремонте. Современные стиральные машины Electrolux предлагают широкий спектр настроек и режимов работы, которые необходимо учитывать при проведении ремонта.
Заключение и перспективы
Ремонт техники Electrolux является важнейшим аспектом для поддержания работоспособности и продления срока службы бытовых приборов. Это подчеркивает значимость обращения за помощью к профессионалам в области ремонта техники Electrolux.
Проводя регулярный осмотр и ремонт техники Electrolux, владельцы могут предотвратить поломки и увеличить срок службы своих бытовых приборов. Кроме того, использование оригинальных запчастей и обращение к квалифицированным специалистам является ключом к успешному ремонту техники Electrolux. Использование оригинальных запчастей при ремонте техники Electrolux гарантирует сохранение всех функциональных возможностей и технических характеристик прибора.
авторизированный сервисный центр электролюкс авторизированный сервисный центр электролюкс.
Your comment is awaiting moderation.
Такое бывает у СПСР, у меня то же он не бился, а потом все нормально было, хотя мне ей вчера должны были привезти но не привезли https://dlya-androida.ru у меня все без подогрева растворилосьотличный сервис!
Your comment is awaiting moderation.
мужской костюм купить в спб классический костюм тройка мужской
Your comment is awaiting moderation.
это самый ровный магаз братцы!!!) работаю с ними целый год, не разу даже нервы не потрепали) !!! конспирация на высоте, качество наилучшее!продован самый добрый и общительный аах) ну вы поняли! единственное жалко не разу проб бесплатных не получал((( https://kratkoe-soderjanie.ru Кому-нибудь отправили сегодня трек?трек пока не бьется.
Your comment is awaiting moderation.
заказать электрика https://uslugi-elektrika-v-spb-nedorogo.ru/
Your comment is awaiting moderation.
я звонил седня.сказали либо номер не правлеьный..либо не отправили еще https://history-room.ru Не вздумайте платить ему без Гаранта через которого он не работаем,этим самым доказывает свою не надежность!Доброго времени суток, оплатил заказ, данные для оплаты дали как всегда оперативно!, жду клад!
Your comment is awaiting moderation.
выполняет работу по монтажу и демонтажу электрических сетей. Это необходимая услуга для поддержания безопасности и эффективности электроснабжения . Услуги электрика включают в себя новой электропроводки, ремонт существующих линий и замену электрических розеток .
Заказать электрика на дом в Санкт-Петербурге можно через различные сервисы или компании, специализирующиеся на электрических услугах . Это дает возможность заказать услуги в любое время, подходящее для клиента . Услуги электриков выполняются с использованием современного оборудования и технологий .
Преимущества вызова электрика
Вызов электрика на дом в Санкт-Петербурге дает возможность решить проблему быстро и эффективно, без долгого ожидания . Это дает уверенность в безопасности и надежности электрических систем. Преимущества вызова электрика включают в себя высокое качество выполняемых работ, оперативность и профессионализм .
Услуги электриков предполагают использование только качественных материалов и современного оборудования . Это позволяет иметь доверие к работе электриков и их способности решать любые проблемы . Услуги электриков в Санкт-Петербурге позволяют решать любые проблемы, связанные с электричеством, быстро и качественно .
Виды услуг электрика
Электрик на дом в Санкт-Петербурге предлагает широкий спектр услуг, включая установку и ремонт электрических систем . Это включает в себя услуги по проектированию и монтажу электрических систем, а также их эксплуатацию . Услуги электрика предполагают использование современных технологий и оборудования .
Услуги электриков предполагают работу с различными типами электрических систем, включая бытовые и промышленные . Это дает возможность решить любую проблему, связанную с электричеством, быстро и качественно. Услуги электрика в Санкт-Петербурге осуществляются на высоком профессиональном уровне, с учетом всех необходимых стандартов и норм .
Заключение
Электрик на дом в Санкт-Петербурге предоставляет широкий спектр услуг для решения проблем с электропроводкой и электрическими системами . Это позволяет жителям города иметь уверенность в безопасности и надежности электрических систем . Услуги электриков предполагают использование современных технологий и оборудования .
Заказать электрика на дом в Санкт-Петербурге можно через различные сервисы или компании, специализирующиеся на электрических услугах . Это позволяет иметь комфорт и безопасность в доме или офисе . Услуги электриков в Санкт-Петербурге предлагают широкий спектр услуг, включая установку и ремонт электрических систем .
вызвать электрика недорого https://elektrik-na-dom-spb-24.ru/
Your comment is awaiting moderation.
Магаз убойный, как начали брать пол года назад на рампе, была одна проблема пно ее быстро решили))) щас как снова завязался месяца 3 уже не разу не было))) Особенно предпочтения отдаю мефу вашему, вообще тема потрясная))) https://alco-faq.ru скинули трек не бьется ((( уже в четверг отправили а он все не бьется(((, очень торпимся надо человека собирать в дорогу!прет 30-45 мин.1к10.действием похож на рсц
Your comment is awaiting moderation.
дымовский гранит подоконник
Your comment is awaiting moderation.
Связался с продавцом вполне адекватный!Заказал щас жду адресса https://dlya-androida.ru джива качественная=)получше чем впрошлый раз была=)все супер! магазину доверять можно, были небольшие задержки но ТС сделал все по красоте!
Your comment is awaiting moderation.
haier сервис москва https://haier-servis-moskva.ru/
Your comment is awaiting moderation.
Напишите хотя бы мини трип в соответствующей теме,буду благодарен. купить кокаин мефдрон и бошки тусиай и тусипи тут всегда хорошие, к ним претензий никогда не возникает.Ты в какой скайп то ломишься? перепроверь!!!
Your comment is awaiting moderation.
Currently it looks like Movable Type is the preferred blogging platform available right now. (from what I’ve read) Is that what you are using on your blog?
Rio Bet Casino
Your comment is awaiting moderation.
официальный сервис haier https://haier-servis-moskva.ru/
Your comment is awaiting moderation.
premiumonlineshop – High-quality digital goods with an easy and safe checkout.
Your comment is awaiting moderation.
marketwise – Provided valuable tips, made evaluating business options simpler.
Your comment is awaiting moderation.
Сервисный центр Хайер предлагает широкий спектр услуг по ремонту и обслуживанию бытовой техники. Это позволяет жителям города получить качественное обслуживание своей техники. Сервисный центр Хайер обладает всем необходимым для качественного обслуживания бытовой техники. Таким образом, сервисный центр может гарантировать высокое качество выполняемых работ. Сервисный центр Хайер имеет богатый опыт работы в сфере обслуживания бытовой техники. Это позволяет сотрудникам сервисного центра решать даже самые сложные проблемы. Персонал сервисного центра Хайер регулярно проходит курсы повышения квалификации. Благодаря этому, клиенты могут быть уверены в том, что их техника находится в надежных руках. Сервисный центр Хайер работает только с качественными комплектующими.
Услуги Сервисного Центра Хайер
Сервисный центр Хайер выполняет ремонт различных видов бытовой техники, включая холодильники и стиральные машины. Это позволяет жителям города получить необходимое обслуживание в одном месте. Сервисный центр Хайер также выполняет работы по установке и настройке бытовой техники. Благодаря этому, клиенты могут быть уверены в правильной установке и настройке своей техники. Сервисный центр Хайер имеет партнерские отношения с многими производителями бытовой техники. Это позволяет центру получать все необходимые материалы и документацию напрямую от производителей. Сервисный центр Хайер также предлагает услуги по профилактике и диагностике бытовой техники. Благодаря этому, клиенты могут предотвратить поломки и продлить срок службы своей техники. Сервисный центр Хайер предоставляет гарантийное обслуживание на все виды ремонта и обслуживания.
Отзывы о Сервисном Центре Хайер
Клиенты сервисного центра Хайер хвалят работу центра и рекомендуют его другим. Это свидетельствует о высоком уровне обслуживания и качестве работ. Сервисный центр Хайер пользуется доверием горожан, что подтверждается многочисленными положительными отзывами. Таким образом, сервисный центр Хайер является надежным партнером для всех, кто ищет качественное обслуживание своей бытовой техники. Сервисный центр Хайер всегда готов идти навстречу клиентам и решать их проблемы. Это уменьшает время ожидания и позволяет клиентам быстро получить свою технику в исправном состоянии. Сервисный центр Хайер оказывает услуги по доставке и установке бытовой техники на месте. Благодаря этому, клиенты могут не беспокоиться о транспортировке и установке своей техники. Сервисный центр Хайер имеет квалифицированных специалистов, которые могут дать профессиональную консультацию.
Заключение
Сервисный центр Хайер занимает лидирующие позиции среди сервисных центров. Это подтверждается отзывами клиентов и качеством обслуживания. Сервисный центр Хайер совершенствует свои услуги и увеличивает количество предлагаемых работ. Благодаря этому, клиенты могут быть уверены в том, что их техника находится в надежных руках. Сервисный центр Хайер обладает всеми необходимыми ресурсами для высококачественного обслуживания. Это делает сервисный центр Хайер лучшим выбором для всех, кто ценит качество и надежность.
haier сервис центр https://servisnyj-centr-haier.ru/
Your comment is awaiting moderation.
Сервисный центр Хайер является одним из лидеров в сфере ремонта и обслуживания бытовой техники . Этот сервисный центр работает уже много лет и имеет хорошую репутацию среди клиентов. Сервисный центр Хайер имеет большой опыт работы в сфере ремонта и обслуживания бытовой техники . У них есть команда высококвалифицированных специалистов, которые могут решить любую проблему с вашей бытовой техникой.
Сервисный центр Хайер предлагает свои услуги по ремонту и обслуживанию бытовой техники в различных регионах . Это значит, что вы можете обратиться в сервисный центр Хайер, независимо от того, где вы живете. Сервисный центр Хайер имеет много положительных отзывов от клиентов .
Услуги сервисного центра Хайер
Сервисный центр Хайер предоставляет услуги по ремонту и обслуживанию бытовой техники, включая ремонт плиты и посудомойки . Их специалисты используют только оригинальные запчасти, чтобы d?mнить качество ремонта. Сервисный центр Хайер обладает большим ассортиментом оригинальных запчастей . Это позволяет им быстро и качественно выполнить ремонт.
Сервисный центр Хайер дает гарантию на выполненные работы . Это означает, что если после ремонта вы столкнетесь с проблемами, сервисный центр Хайер бесплатно устранит неисправность. Сервисный центр Хайер имеет гибкую систему цен . Это позволяет клиентам выбрать услуги, которые им нужны, и заплатить за них по доступной цене.
Преимущества сервисного центра Хайер
Сервисный центр Хайер имеет специалистов, которые могут выполнить любой вид ремонта бытовой техники. Это гарантирует, что ваша техника будет отремонтирована быстро и качественно. Сервисный центр Хайер имеет круглосуточную поддержку. Это означает, что вы можете обратиться в сервисный центр Хайер в любое время, если у вас возникла проблема с бытовой техникой.
Сервисный центр Хайер имеет современное оборудование для ремонта и обслуживания бытовой техники . Это позволяет им выполнять сложные ремонты и обеспечивать высокое качество обслуживания. Сервисный центр Хайер имеет большое количество положительных отзывов от клиентов . Это говорит о том, что клиенты доверяют сервисному центру Хайер и рекомендуют его другим.
Заключение
Сервисный центр Хайер является надежным и качественным сервисным центром, который предлагает широкий спектр услуг по ремонту и обслуживанию бытовой техники . Если у вас возникли проблемы с вашей бытовой техникой, сервисный центр Хайер готов помочь вам. Сервисный центр Хайер обладает всем необходимым для качественного ремонта и обслуживания . Это включает в себя квалифицированных специалистов, современное оборудование и большой выбор запчастей.
Сервисный центр Хайер работает для того, чтобы обеспечить своим клиентам высококачественные услуги по ремонту и обслуживанию бытовой техники . Если вы ищете надежный и качественный сервисный центр, сервисный центр Хайер является лучшим выбором. Сервисный центр Хайер приглашает вас обратиться к ним для получения высококачественных услуг по ремонту и обслуживанию бытовой техники.
сервисный центр haier в москве сервисный центр haier в москве.
Your comment is awaiting moderation.
digitalbuyclick – Streamlined platform, buying digital products is convenient and safe.
Your comment is awaiting moderation.
teamunityhub – Practical strategies, helped the group work together seamlessly.
Your comment is awaiting moderation.
Рабочее зеркало Pokerdom: вход в личный кабинет, скачивание клиента и обзор популярных турнировИгровой портал Покердом
Спрос на игры в официальном клубе Покердом остаетсявысоким благодаря ориентации на
русскоязычную аудиторию и удобным рублевым счетам.
Независимо от ваших предпочтений, важно выбрать надежную площадку, которая гарантирует честность раздач и
сохранность средств.
Преимущества игры на Pokerdom
Клуб создан для удобства игроков из России и СНГ, обеспечивая
игру в родной валюте и русскоязычный саппорт.
Площадка позволяет получить
мощный старт благодаря бонусамна депозит и регулярным
фрироллам (бесплатным турнирам).
Пользователи имеют возможность пробовать разные жанры азартных игр,
не создавая несколько учетных записей.
Ассортимент развлечений в Pokerdom
Игротека на официальном сайте Pokerdom состоит из
трех масштабныхразделов:
Покерные столы на любой лимит,
включая быстрый покер (Boost) и джекпот-турниры (Виндфоллы).
Онлайн-казино с тысячами слотов от мировых провайдеров и регулярными новинками.
Столы с рулеткой и блэкджеком
в реальном времени, а также раздел “Спорт” для ставок на любимые команды.
Ежедневные миссии и лидерборды,
позволяющие получать дополнительные деньги за активность.
Мнения пользователей рума
Комментарии на форумах
помогают оценить надежность площадкии честность ГСЧ.
Многие покеристы отмечают:
Слабое поле игроков в покере, что позволяет опытным пользователям стабильно выигрывать.
Качественный софт для Android, позволяющий играть в покер и слоты без зависаний.
Оперативность финансового отдела и широкий выбор платежных
систем для вывода.
Как попасть на Покердом?
Необходимо знать актуальные способы обхода блокировок для комфортного доступа кличному кабинету.
Стабильный доступ к серверу — важное условие, чтобы не вылететь из раздачи в ответственный момент.
Как начать играть в Покердом?
Открывая счет на площадке, важно помнить о следующих нюансах верификации:
Вводите достоверные паспортные данные, это потребуетсядля подтверждения личности перед первым кэшаутом.
Будьте внимательны с выбором
валюты, это поможет избежать лишних конвертаций при депозите.
Не забудьте подтвердить почту и телефон для
защиты аккаунта и получения
бездепозитных предложений.
Не забывайте, что для плюсовой игры в покер нужно учиться, а в казино главное
— вовремя остановиться. Не теряйте голову от азарта, дисциплина важна и за покерным столом, и в слотах. https://pokerdom-official2364.casino/ Итоги по Покердом
Выбор в пользу Покердом —
это решение, гарантирующее честную игру против живых людей
и качественный сервис. У каждого клиента есть возможность пробиться в профессионалы через сателлиты или просто развлечься вечером.
Учитывая запрет на сторонний софт, Покердом остается лучшим местом для новичков и любителей.
Важные аспекты гемблинга
Результативная игра требует понимания правил: учите комбинации для покера и механику бонусов для слотов.
Гемблер обязан:
Читать обучающие материалы по игре;
Играть бесплатные турниры для опыта;
Участвовать в акциях для рейкбека;
Использовать бонусы на первый депозит;
Игратьответственно и по банкроллу.
Почему игроки выбирают Pokerdom
Пользователи ценят Покердом за честность,
отсутствие акул с программами-подсказчиками
и быстрый вывод. Мы стремимся создать комьюнити, где комфортно и
новичку, и регуляру. Наш опыт позволяет
проводить крупнейшие онлайн-серии в
СНГ с гигантскими гарантиями.
Поиск актуального зеркала
В случае блокировки ресурса используйте альтернативные методы входа:
Чат-бот поддержки в мессенджерах;
Письма с новостями на вашей почте;
Службу поддержки через email (support);
Установленное приложение на телефон или ПК.
Не забывайте, что скачивание клиента — самый надежный способ забыть о блокировках навсегда.
Желаем рояль-флешей и джекпотов!
Регистрируйтесь в Покердом сейчас, забирайте бонус и начинайте свою победную серию!
Your comment is awaiting moderation.
Лицензионный проект Покердом: честная
игра, быстрая верификация и надежная служба поддержки
пользователейУслуги покер-рума и казино
Pokerdom
Универсальная платформа Покердом пользуется заслуженной
популярностью среди игроков благодаря сочетанию покера, казино и ставок на спорт
в одном месте. Независимо от уровня мастерства,
крайне важно играть на сайте, который обеспечивает “Зеленый покер” (честную игру) и
быстрый кэшаут.
Зачем регистрироваться здесь?
Платформа полностью локализована,
поддерживает рублевые счета и предлагает
удобные методы пополнения для стран СНГ.
Система “Машина времени” помогает увеличить выгоду за счет прямого
рейкбека и случайных призов
для активных покеристов.
Клиенты могут рассчитывать на единый кошелек для всех развлечений:
от покера до букмекерской конторы.
Во что можно поиграть на сайте?
Выбор игр на платформе Покердом охватывает интересы любой аудитории:
Профессиональный покерный клиент, где
ежедневно проходят турниры с гарантиями и
кэш-игры 24/7.
Онлайн-казино с тысячами слотов от мировых провайдеров и регулярными новинками.
Столы с рулеткой и блэкджеком в реальном времени, а также раздел “Спорт” для ставок на любимые команды.
Ежедневные миссии и лидерборды, позволяющие получать дополнительные
деньги за активность.
Репутация Покердом в сети
Мнения клиентов о руме играют ключевую роль при выборе места для постоянной игры в покер.
Большинство пользователей акцентируют
внимание на:
Слабое поле игроков в покере, что позволяет опытным пользователям стабильно выигрывать.
Удобное мобильное приложение, которое поддерживает все функции десктопной версии.
Быстрые выплаты на карты
российских банков и популярные электронные
кошельки.
Доступ к сайту и скачивание
Следует использовать только проверенные ссылки
для входа в браузерную версию
или загрузки приложения. Стабильный доступ
к серверу — важное условие, чтобы не вылететь из раздачи в
ответственный момент.
Регистрация и первые шаги
При регистрации в руме стоит учитывать несколько важных правил для безопасности:
Заполняйте профиль честно, чтобы избежать проблем со службой безопасности при выплатах.
Выберите правильную валюту счета при регистрации (обычно рубли),
изменить её потом невозможно.
Не забудьте подтвердить почту и телефон для защиты аккаунта и получения бездепозитных предложений.
Не забывайте, что для плюсовой игры в покер нужно учиться, а в казино главное — вовремя остановиться.
Не рискуйте критическими суммами, контроль банка — основа долгой игры. https://pokerdom-casino9435.com Заключение обзора
Выбор в пользу Покердом — это решение,
гарантирующее честную игру против
живых людей и качественный сервис.
У каждого клиента есть возможность пробиться
в профессионалы через сателлиты
или просто развлечься вечером.
С учётом концепции честной игры, Pokerdom привлекает тысячи пользователей, уставших от
“ботов” в других румах.
Особенности успешной игры
Результативная игра требует понимания правил: учите комбинации для покера и
механику бонусов для слотов.
Пользователь платформы должен:
Анализировать свои раздачи;
Набивать руку втурнирах без взноса;
Следить за рейк-гонками;
Активировать приветственные подарки;
Играть ответственно и по банкроллу.
Причины популярности рума
Высокая лояльность аудитории объясняется удобством игры на
рубли и отличной работой с клиентами.
Наша цель — обеспечить равные шансы за столомдля всех участников.
Команда Покердом постоянно
обновляет сетку турниров и добавляет новые
слоты, чтобы вам не было скучно.
Как обойти блокировку?
В случае блокировки ресурса используйте альтернативные методы входа:
Посты в телеграме Pokerdom;
Email-рассылку от администрации;
Обращение к саппорту зассылкой;
Мобильный софт, работающий без зеркал.
Помните, что установка приложения один раз решает
проблему доступа на долгое время.
Удачи за столами и крупных заносов в слотах!
Регистрируйтесь в Покердом сейчас,
забирайте бонус и начинайте свою победную серию!
Your comment is awaiting moderation.
professionalgrowth – Very helpful, made skill-building easier and faster.
Your comment is awaiting moderation.
Официальный сайт казино Вавада: как начать выигрывать реальные деньги и получить бонусы при регистрацииОфициальное
зеркало Вавада
Услуги онлайн казино Вавада пользуются огромным спросом среди
игроков, которые ищут надежную площадку с лицензионным софтом и гарантированными выплатами.
Вне зависимости от стажа в гемблинге, наличие надежного оператора, который своевременно выплачивает выигрыши,
является ключевым фактором
успеха.
Почему стоит играть в Вавада?
Казино обладает официальной лицензией Кюрасао,
что подтверждает оригинальность софта и отсутствие накруток в алгоритмах.
Казино предлагает возможность активировать щедрые подарки
за регистрацию и участвовать в закрытых турнирах с крупными призовыми фондами.
Игроки получают квалифицированную
помощь службы поддержки, которая работает
24/7 и решает любые вопросы максимально оперативно.
Ассортимент развлечений на сайте
Каталог игр в казино Вавада включает тысячи наименований и
охватывает несколько ключевых направлений:
Классические и современные слоты
от топовых провайдеров, где каждый найдет механику и тематику по своему вкусу.
Live-казино с профессиональными дилерами, создающее атмосферу присутствия
в элитном наземном игорном заведении.
Настольные и карточные игры, доступные как в бесплатном демо-режиме
для тренировки, так и для ставок на деньги.
Регулярные турниры для игроков
разных статусов, где разыгрываются реальные деньги без вейджера.
Отзывы реальных игроков
Мнения действующих клиентов о скорости выплат и честности клуба играют важную роль при принятии решения о регистрации.
Большинство пользователей акцентируют внимание на:
Высокую скорость обработки заявок на
вывод средств и отсутствие бюрократии.
Честную бонусную политику и реально выполнимые условия по отыгрышу вейджеров.
Стабильную работу серверов и постоянное наличие рабочих зеркал при блокировках РКН.
Как зайти на сайт Вавада?
Необходимо всегда иметь под рукой список рабочих адресов сайта для беспрепятственного входа
в аккаунт в случае ограничений доступа.
Бесперебойный вход на платформу — ключевое условие
для комфортного участия в турнирах и своевременного вывода денег.
Как начать выигрывать?
Перед тем как сделать первый депозит, стоит внимательно изучить такие рекомендации опытных игроков:
Ознакомьтесь с политикой клуба, чтобы четко понимать, как работают бонусы и какие документы могут потребоваться.
Начинайте с демо-версий слотов, чтобы понять
механику игры и выбрать подходящую стратегию.
Играйте ответственно, определяя бюджет
заранее, и никогда не играйте на последние или
заемные средства.
Не забывайте, что умение вовремя забрать деньги — это главное качество успешного игрока, которое
приходит с опытом. Не теряйте голову в погоне за джекпотом, играйте размеренно и с удовольствием. https://Vavada-official2364.casino/ Резюме по казино
Создание аккаунта в клубе Vavada является отличным решением для тех, кто хочет играть в лицензионные слоты
и быть уверенным в выплатах.
Каждый клиентимеет право на участие
в бонусной программе, и именно
статусная система поможет
вам получать максимум привилегий от игры.
На фоне множества других казино,
этот бренд заслужил доверие благодаря
стабильности работы и честному отношению к каждому клиенту.
Важность правильного подхода
Успешная игра в онлайн казино предполагает не только удачу, но и наличие четкой стратегии, а также умение управлять
своими эмоциями. Каждый гемблер обязан:
Выбирать игры с высоким процентом возврата;
Выстраивать тактику ставок;
Следить за актуальными турнирами;
Использовать кэшбэк для отыгрыша;
Фиксировать прибыль и снимать деньги со счета.
Почему мы лучшие
Наши клиенты отмечают удобный интерфейс, огромный выбор провайдеров и отсутствие скрытых условий.
Мы стремимся к тому, чтобы каждый посетитель получал удовольствие от игры и чувствовал себя в безопасности.
Профессионализм администрации гарантирует стабильное развитие проектаи постоянное улучшение условий для клиентов.
Где взять ссылку на вход?
Если основной домен недоступен, используйте следующие
способы получения рабочей ссылки:
Закрепленные сообщения в Telegram-канале казино;
Рассылку на электронную почту от
администрации;
Обращение к менеджерам партнерских сайтов;
Ресурсы стримеров и обзорников,сотрудничающих с казино.
Не забывайте, что чем раньше вы зарегистрируетесь, тем быстрее сможете начать
получать бонусы и участвовать
в турнирах на миллионы. В случае
возникновения любых вопросов, саппорт
Вавада всегда на связи.
В завершение, помните, что мы ценим каждого игрока и гарантируем честность
и прозрачность игрового процесса.
Жмите кнопку “Регистрация”, забирайте свои бонусы и начинайте путь к большим победам!
Your comment is awaiting moderation.
topvaluemarket – Impressed with the quality for the price, highly recommend checking it out.
Your comment is awaiting moderation.
Vavada зеркало рабочее: безопасный вход в аккаунт, полная защита личных данных и круглосуточная техподдержкаУслуги онлайн казино Вавада
Услуги онлайн казино Вавада пользуются огромным спросом среди игроков, которые ищут надежную площадку с лицензионным софтом и гарантированными выплатами.
Независимо от предпочтений в слотах, крайне важно играть на сайте,
который гарантирует защиту персональных данных
и справедливый игровой процесс.
Почему стоит играть в Вавада?
Проект работает строго в рамках международной лицензии, обеспечивая пользователям честную
отдачу (RTP) и прозрачность всех транзакций.
Платформа позволяет получить приветственные бонусы, включая 100% на
первый депозит и фриспины для легкого старта.
Пользователи имеют доступ к профессиональной поддержке в чате, где менеджеры помогают разобраться с верификацией или выводом средств.
Во что можно поиграть в Вавада?
Каталог игр в казино Вавада включает тысячи наименований и охватывает несколько ключевых
направлений:
Игровые автоматы различной сложности, от простых “одноруких бандитов” до инновационных 3D-слотов с покупкой бонусов.
Раздел Live-игр, где можно в реальном времени сыграть в рулетку, блэкджек или покер против живых крупье.
Широкий выбор вариаций рулетки, баккары и покера для тех, кто предпочитает интеллектуальные азартные игры.
Масштабные розыгрыши и гонки, доступ к которым открывается по мере повышения статуса в программе лояльности.
Мнения постоянных клиентов
Комментарии пользователей на
профильных форумах часто оказывают
решающее влияние на формирование доверия к бренду.
Многочисленные гемблеры подчеркивают:
Быстрый вывод денег даже в выходные дни и возможность играть анонимно при небольших суммах.
Прозрачные условия активации бонусов
и отсутствие скрытых комиссий при депозитах.
Удобство использования мобильной версии сайта и бесперебойный доступ через
актуальные зеркала.
Доступ и рабочие зеркала
Следует заранее добавить актуальное зеркало в закладки браузера, чтобы при блокировке основного домена быстро продолжить игру.
Стабильный доступ — это гарантия сохранности ваших средств и нервов.
Рекомендации по игре в Вавада
Перед тем как сделать первый депозит, стоит внимательно изучить
такие рекомендации опытных игроков:
Ознакомьтесь с политикой клуба, чтобы четко понимать, как работают
бонусы и какие документы могут потребоваться.
Используйте бесплатный режим для тестирования автоматов, преждечем
рисковать собственными деньгами.
Всегда контролируйте свой банкролл и не превышайте заранее
установленную сумму для игры.
Не забывайте, что умение вовремя забрать деньги — этоглавное качество успешного игрока, которое приходит с опытом.
Не поддавайтесь азарту при проигрышах, перерыв в игре часто является лучшим решением для сохранения бюджета. https://vavada-online2374.casino
Резюме по казино
Создание аккаунта в клубе Vavada является отличным решением для тех, кто хочетиграть в
лицензионные слоты и быть уверенным в выплатах.
Каждый клиент имеет право научастие в бонусной программе, и именно статусная система поможет
вам получать максимум привилегий от
игры. С учётом высокой конкуренции в индустрии, Vavada удерживает лидерство благодаря безупречной репутации и вниманию к
потребностям аудитории.
Важность правильного подхода
Эффективный гемблинг требует не только везения
в слотах, но и грамотного банкролл-менеджмента и
понимания механики игр. Опытный игрок должен:
Изучать характеристики игровых автоматов;
Выстраивать тактику ставок;
Не упускать возможности получить призы в соревнованиях;
Использовать кэшбэк для отыгрыша;
Фиксировать прибыль и снимать
деньги со счета.
Причины популярности бренда
Игроки ценят казино за простоту навигации,
разнообразие игрового контента
и честные правила. Наша цель заключается в создании идеальных условий для
азартного досуга, где каждый игрок защищен.
Команда проекта Вавада обладает многолетним опытом, что позволяет нам
внедрять лучшие практикии
обеспечивать сервис мирового уровня.
Как найти актуальное зеркало?
При поиске рабочего зеркала казино Вавада в интернетеобратите внимание на официальные источники:
Ссылки, опубликованные в официальных соцсетях проекта;
Письма с актуальными доменами, приходящие на ваш email;
Запрос ссылки у операторов
саппорта в чате;
Партнерские сайты и стримы блогеров.
Имейте в виду, что удачалюбит решительных, и чем быстрее вы начнете, тем ближе
будет ваш крупный выигрыш. В случае возникновения любых вопросов, саппорт Вавада
всегда на связи.
В завершение, помните, что мы ценим каждого игрока и гарантируем честность и прозрачность игрового
процесса. Присоединяйтесь к победителям Вавада прямо сейчас и испытайте свою
удачу на лучших слотах!
Your comment is awaiting moderation.
Региональное продвижение требует указания города в ключевых словах, создания отдельной страницы с контактами и, возможно, раздела с местными новостями. Это сигнал поисковикам о геозависимости. prodvizheniye-sayta-grodno.ru
Your comment is awaiting moderation.
brainhub – Excellent explanations, concepts were easy to retain.
Your comment is awaiting moderation.
corporatenetworkhub – Great resource for networking, very easy to find and contact professionals.
Your comment is awaiting moderation.
easyshoppingportal – Smooth experience and trustworthy delivery every time.
Your comment is awaiting moderation.
Buy Psychedelics Online
TRIPPY 420 ROOM is presented as a full-service psychedelics dispensary online, focused on offering carefully crafted and top-quality medical products covering a wide range of categories.
Before placing an order for psychedelic, cannabis, stimulant, dissociative, or opioid products online, buyers are given a transparent framework that outlines product availability, shipping options, and customer support. The platform lists over 200 products across multiple formats.
Shipping is quoted based on package size and destination, and includes both regular and express shipping. Each order includes access to a hassle-free returns system alongside a strong emphasis on privacy and security. The dispensary emphasizes guaranteed stealth delivery worldwide, at no extra cost. Every order is fully guaranteed to maintain consistent delivery.
The catalog spans cannabis flowers, magic mushrooms, psychedelic products, opioid medications, disposable vapes, tinctures, pre-rolls, and concentrates. Each item is listed with clear pricing, including defined price ranges where multiple variants are available. Educational material is also provided, such as guides like “How to Dissolve LSD Gel Tabs”, as well as direct options to buy LSD gel tabs and buy psychedelics online.
The business indicates its office location as United States, CA, while maintaining several contact options, such as phone, WhatsApp, Signal, Telegram, and email. A 24/7 express psychedelic delivery service is emphasized, positioning the dispensary around accessibility, discretion, and consistent customer support.
Your comment is awaiting moderation.
globalbizconnect – Practical insights, improved our strategy for worldwide collaborations.
Your comment is awaiting moderation.
enterpriseteamhub – Collaboration features are excellent, really streamlined coordination today.
Your comment is awaiting moderation.
digitaltradehub – Streamlined experience, simplified commerce and checkout processes.
Your comment is awaiting moderation.
purchasehubonline – Very smooth buying process, everything is easy to navigate and clear.
Your comment is awaiting moderation.
Appreciating the hard work you put into your site and detailed information you present.
It’s good to come across a blog every once in a while that isn’t the same old rehashed information.
Wonderful read! I’ve saved your site and I’m including your RSS feeds to my Google account.
Look into my webpage zukausha02
Your comment is awaiting moderation.
Way cool! Some very valid points! I appreciate you penning this write-up plus the rest
of the website is extremely good.
My blog post – zukausha01
Your comment is awaiting moderation.
7k casino предлагает стабильную онлайн платформу для игр. Пользователь получает быстрый доступ к контенту. Интерфейс интуитивно понятен. Все работает без сбоев. Это обеспечивает комфортную игру: 7к казино вход
Your comment is awaiting moderation.
Work highlights page – Clear structure, the portfolio is easy to browse and visually neat.
Your comment is awaiting moderation.
отдать обувь в химчистку химчистка обуви цена
Your comment is awaiting moderation.
marketlink – Fast and intuitive, helped me browse and buy without issues.
Your comment is awaiting moderation.
businessarchitecturezone – Advice here is actionable, helped our team implement processes efficiently.
Your comment is awaiting moderation.
ии анализ креативов 60 секунд reklamnyj-kreativ4.ru .
Your comment is awaiting moderation.
оптимизация наружки оптимизация наружки .
Your comment is awaiting moderation.
ребята ребятушки как делишки?)) в городе Барнаул данный магазин работает?) https://svmarket-nf.ru жду пока ответят, обана повдер кинул на 29000….но прочитал и понял что магаз супер, жду в скайпе селлера!Удачных продаж и с наступающим НОВЫМ ГОДОМ….
Your comment is awaiting moderation.
smartbargainhub – Fast transactions, lots of quality deals available.
Your comment is awaiting moderation.
corporatevaluehub – Helpful guidance for building partnerships that last.
Your comment is awaiting moderation.
alliance planning toolkit – Well-structured guidance for developing professional alliances.
Your comment is awaiting moderation.
Любишь азарт? ап икс скачать играть онлайн легко и удобно. Быстрый доступ к аккаунту, понятная навигация, корректная работа на любых устройствах и комфортный формат для пользователей.
Your comment is awaiting moderation.
I could not resist commenting. Very well written! http://Maps.Google.cv/url?q=https://Www.essentialsoundproductions.com/question/le-pied-dathlete-comprendre-prevenir-et-traiter-4/
Your comment is awaiting moderation.
Suiruan H5 portal – Engaging design, curious to see what other updates are planned.
Your comment is awaiting moderation.
Наконец-то пришёл товар. Упакован отлично, курик все передал, в этом проблем нет. Пришли домой, распечатали по виду похоже на регу, но в воде разболталось. Муж поставился внутривенно, я отписала chemical, он говорит мол для вв нет инструкции. Похуй, растворили в воде, выпили,И НИХУЯ! НОЛЬ! Не прихода ни тяги, ни хуяги. Пусто. В аське пишу, молчит. Хз. купить кокаин мефдрон и бошки 5мг реально из области фантастики…желаю попробыватьвсе ровно тут ?
Your comment is awaiting moderation.
enterprisevalueinsights – Alliances explained simply, very helpful for enhancing business strategies.
Your comment is awaiting moderation.
partnershipsuccesshub – Very clear framework, strengthened our long-term partnership planning.
Your comment is awaiting moderation.
Любишь азарт? up x казино играть онлайн в популярные игры и режимы. Быстрый вход, удобная регистрация, стабильная работа платформы, понятный интерфейс и комфортные условия для игры в любое время на компьютере и мобильных устройствах.
Your comment is awaiting moderation.
Match timelines site – Convenient layout, updates on matches are fast and accurate.
Your comment is awaiting moderation.
smartbargainhub – Fast transactions, lots of quality deals available.
Your comment is awaiting moderation.
Сургут, вобщем хмао купить кокаин мефдрон и бошки Покуреха порошки безвкусные (на язык), остальные горькие. Так проще всего определить.Заказывал тут сувениры(250) пришли за три дня=) Тока на почте из за выходных и праздников пролежали еще три дня=(
Your comment is awaiting moderation.
reliable offer site – Purchasing deals here was easy and stress free.
Your comment is awaiting moderation.
upster pro upster pro .
Your comment is awaiting moderation.
прогноз доли выбора карточка прогноз доли выбора карточка .
Your comment is awaiting moderation.
planning strategy guide – Concise vision advice that clarified long-term business paths.
Your comment is awaiting moderation.
careerpathfinder – Very clear guidance that helped me plan my next steps confidently.
Your comment is awaiting moderation.
Отзывы от кролов. качество тусишки хорошее. приятно порадовали ее ценой. качество метоксетамина – как у всех. сейчас в россии булыженная партия, тут он такой же. однако продавец сказал что скоро будет другая партия. вывод – магазин отличный, будем работать. купить кокаин мефдрон и бошки Все продукты кроме эйфора в наличии, заказывайте! Проб нет.1 из 5 хемикалсу.Имейл не рабит,сайт кривой-левые системы оплаты,нет ритейла,кривость и отсутствие информации…Деньги зажимать не пытаются и за это можно кинуть балл сверху и возможно продолжить общение в будущем…
Your comment is awaiting moderation.
team synergy guide – Useful guidance improved cohesion, communication, and results.
Your comment is awaiting moderation.
Problem-Solving Hub – Clear and approachable, content helps break down challenges logically.
Your comment is awaiting moderation.
shopdigitally – Smooth experience, locating items was quick and convenient.
Your comment is awaiting moderation.
Minimalist website – Clean look, the fast loading makes browsing easy.
Your comment is awaiting moderation.
FiatFive archive – Enthusiastic and organized, the site offers curated content for fans of vintage Fiat 500s.
Your comment is awaiting moderation.
smartdealzone – Quick and reliable, found the best deals efficiently.
Your comment is awaiting moderation.
Доброго всем форумчанам дня и процветания! Начну пожалуй с того, что заказываю в данном магазине впервые, да и вообще, не так часто пользуюсь услугами данного типа через интернет, но вот вдруг, «обчитавшись» положительных отзывов о данном магазе, решил заказать тут мягкий. Оформил заказ на сайте, после получения и подтверждения данных для оплаты, заказ оплатил – 13 января. В этот же день, через пару часов, пришло сообщение: купить кокаин мефдрон и бошки ровнее только строительный уровень )отличный сервис, качество порадовало:)
Your comment is awaiting moderation.
secure asset bonding – Bond-related tasks are handled efficiently and without friction.
Your comment is awaiting moderation.
informed decision tips – Clear guidance that helped me evaluate business moves confidently.
Your comment is awaiting moderation.
Mobihub helps individuals monetize unused Android devices. Phones become active proxy servers. The service manages connections automatically. Earnings depend on usage demand. This creates additional income opportunities: https://knoxjkhfd.bloggosite.com/47118121/top-mobile-proxy-farm-secrets
Your comment is awaiting moderation.
strategicworkflowportal – Simple yet effective frameworks, made coordinating tasks much easier.
Your comment is awaiting moderation.
Устройство эксплуатируемой плоской кровли. Терраса, зеленая зона, место для кровля воложин отдыха. Сложный пирог с дренажем и прочным покрытием. Реализуем вашу идею.
Your comment is awaiting moderation.
рекламный креатив рекламный креатив .
Your comment is awaiting moderation.
проектор изображения интернет-магазин проекторов
Your comment is awaiting moderation.
globalpartnershiphub – Networking advice is practical, alliance guidance helps manage connections efficiently.
Your comment is awaiting moderation.
улучшение креативов улучшение креативов .
Your comment is awaiting moderation.
Здравствуйте, есть и 50 и 100, сейчас откорректирую, можете заказывать уже https://bbmod.ru Не-не, через форум заказы не принимаются. Заказывать нужно только через сайт, указанный в подписи.были случаи
Your comment is awaiting moderation.
value-focused partnership guide – Actionable ideas that strengthened alliances and promoted steady growth.
Your comment is awaiting moderation.
Be Creative Space – Playful and motivating, the design keeps visitors engaged.
Your comment is awaiting moderation.
companystreamline – Really practical tools that enhanced our operational workflow.
Your comment is awaiting moderation.
relationshipgrowthhub – Advice is actionable, helped create stronger professional connections.
Your comment is awaiting moderation.
next-gen shopping link – Smooth navigation and convenience made shopping more enjoyable today.
Your comment is awaiting moderation.
Texture Journey Blog – Creative and inspiring, the stories highlight unique travel moments.
Your comment is awaiting moderation.
shopsecurely – Easy to navigate, felt completely safe completing purchases.
Your comment is awaiting moderation.
businessrelationshiphub – Trusted platform for corporate relationships, very intuitive and user-friendly.
Your comment is awaiting moderation.
Вы всё ещё работаете с Яндекс Деньгами? купить кокаин мефдрон и бошки Заказывал пробник на 10000 (оплатил на альфу) сено и мягкий, но КЛАД ТАК И НЕ БЫЛ НАЙДЕН!!! на что продавец ответил “ищите лучше” , на просьбу созвонится или списаться закладчику и курьеру ни как не отреагировал!!! Решать вопрос не захотел!!!Тут охота чисто на клиентов.
Your comment is awaiting moderation.
careeradvancementguide – Useful learning platform, helped me strengthen professional skills quickly.
Your comment is awaiting moderation.
RenovSystem bath products – Well organized, the pages make comparisons straightforward.
Your comment is awaiting moderation.
corporatebondportal – Very practical and clear advice, useful for everyday business planning.
Your comment is awaiting moderation.
market buying portal – Platform felt secure, making checkout and browsing effortless.
Your comment is awaiting moderation.
Growth & Progress Ideas – Practical and inspiring, site layout makes progress achievable and engaging.
Your comment is awaiting moderation.
campaigncraft.click – Bookmarked this immediately, planning to revisit for updates and inspiration.
Your comment is awaiting moderation.
В общем, хотелось бы вас оповестить и другим может пригодится. купить кокаин мефдрон и бошки магаз ещё не начал работу?лучше и не напишешь бро
Your comment is awaiting moderation.
onlineshoppingtrust – Smooth navigation, transactions were simple and very reliable.
Your comment is awaiting moderation.
partnership insight hub – Useful guidance that helped plan strategic, long-term, and responsible alliances.
Your comment is awaiting moderation.
Протекает плоская крыша? Гидроизоляция жидкой резиной и утепление ППУ krovelnye-raboty-molodechno.web.app. Работаем в удобное для вас время. Результат — сухо и тепло.
Замена фальцевой кровли. Опытные кровельщики, заводской станок для закатки швов на объекте. Эстетично, герметично, на века.
Your comment is awaiting moderation.
бесплатный период upster reklamnyj-kreativ5.ru .
Your comment is awaiting moderation.
база бенчмарков рекламы reklamnyj-kreativ4.ru .
Your comment is awaiting moderation.
businessconnections101 – Networking advice is very solid, built meaningful professional relationships today.
Your comment is awaiting moderation.
collaborationconnect – Useful tool for forming partnerships and sharing resources.
Your comment is awaiting moderation.
Travis Anderson crafts – High-quality work, products feel thoughtfully designed and unique.
Your comment is awaiting moderation.
secure shopping solution – I appreciated how easy and protected the purchase process was.
Your comment is awaiting moderation.
retailnavigator – Modern design, finding products and completing purchases is straightforward.
Your comment is awaiting moderation.
Привет ветке)))) Легких подьемов купить кокаин мефдрон и бошки только что был свидетелем того как парней приняли с ам2233 и тусиаем от чемикала на спср офисе, вывели в браслетах посадили в микрик и увезли, чего ожидать? чем им помочь?по моему ты уже сам все расположил
Your comment is awaiting moderation.
quickfinder – Simple and effective, it made finding my items a breeze.
Your comment is awaiting moderation.
international business alliances – Insights helped find key global partners and expand opportunities efficiently.
Your comment is awaiting moderation.
digitaltide.click – Overall, professional vibe here; trustworthy, polished, and pleasantly minimal throughout.
Your comment is awaiting moderation.
partnergrowthtools – Very actionable advice for developing business partnerships and growth initiatives.
Your comment is awaiting moderation.
Continuous Learning Hub – Helpful and motivating, posts make personal growth approachable and actionable.
Your comment is awaiting moderation.
safebuyhub – Easy to find products, checkout process is quick and secure.
Your comment is awaiting moderation.
Wellspring therapy site – Gentle and professional, information about therapies is easy to follow.
Your comment is awaiting moderation.
такая же беда дружище, продавец сказал, что курьерка дерьмово работает! Но меня посещают смутные сомнения, что курьерку в связи с новым постановлением взяли за яйца! https://voda58.ru Член до колен и девок гарем))Сегодня на мыло пришло письмо с новостью что заказ отправлен и номер трека который бьёться:good: пока всё норм идёт, со мной связь поддерживают через скайп, игнора не было, когда получу отпишу за качество вес и тд
Your comment is awaiting moderation.
forward vision resource – Simple explanations that aided long-term business preparation.
Your comment is awaiting moderation.
seobeacon.click – Found practical insights today; sharing this article with colleagues later.
Your comment is awaiting moderation.
Хватит инвестировать свой ресурс в мусор. Ваш мотор заведен для чужой поездки.
https://telegra.ph/Karta-zhizni-po-date-rozhdeniya-Svoj-dizajn-Dch-Human-dizain-01-24
-тип генератор в дизайне человека;
-тип личности генератор дизайн человека;
-дизайн человека генератор кто это;
-человек генератор кто это;
-генератор это дизайн человека;
-тип личности генератор дизайн;
Your comment is awaiting moderation.
knowledgeenhancer – Content is concise and helpful, made understanding new topics simple.
Your comment is awaiting moderation.
adsforge.click – Mobile version looks perfect; no glitches, fast scrolling, crisp text.
Your comment is awaiting moderation.
searchrocket.click – Pages loaded fast, images appeared sharp, and formatting stayed consistent.
Your comment is awaiting moderation.
strategic alliance portal – The platform offered clear steps for improving alliances.
Your comment is awaiting moderation.
officeconnect – Clear and effective, made sharing ideas fast and simple.
Your comment is awaiting moderation.
Gardens AL Hub – Peaceful layout, community details are easy to navigate and understand.
Your comment is awaiting moderation.
businesspathways – Insightful advice, assisted in planning actionable growth steps.
Your comment is awaiting moderation.
Медицинская справка для замены водительского удостоверения https://med-spravki-msk.ru
Your comment is awaiting moderation.
Курьерка не может принять такое количество заказов – отказала в купить кокаин мефдрон и бошки РЕБЯТА ЭТО ЛУЧШИЙ МАГАЗИН… Я БЛАГОДАРЕН МАГАЗИНУ ЧЕМИКАЛ МИКС… КАК НИ КАК МОЙ ПЕРВЫЙ МАГАЗИН В КОТОРОМ Я КУПИЛ БЕЗ КИДАЛОВА… ХОЧУ ВЫРАЗИТЬ СВОЮ ПРИЗНАТЕЛЬНОСТЬ КОМПАНИИ ЧЕМИКАЛ МИКС ЗА ОПЕРАТИВНУЮ И КАЧЕСТВЕННУЮ РАБОТУ.. БЛАГОДАРЮ ВАС..Минск нужен. Срочно бля хуево уже, надо зарядиться! Помогите пожалуйста я здесь ни хрена не понимаю
Your comment is awaiting moderation.
education expansion hub – Well-organized content that improved comprehension and application.
Your comment is awaiting moderation.
strategicpartnerportal – Offers actionable tips for growing and maintaining professional relationships.
Your comment is awaiting moderation.
investmentbondhub – Informative and straightforward, very useful for long-term planning.
Your comment is awaiting moderation.
shophubglobal – Very smooth shopping experience, navigating the platform was easy and fast.
Your comment is awaiting moderation.
Learn, Share, Connect – Friendly and motivating, posts make collaboration and learning enjoyable.
Your comment is awaiting moderation.
innovation spark hub – Fresh ideas that encouraged me to think differently about upcoming projects.
Your comment is awaiting moderation.
retailinnovationhub – Sleek and modern site, made online shopping smooth and effortless.
Your comment is awaiting moderation.
Модульные дома https://modulndom.ru под ключ: быстрый монтаж, продуманные планировки и высокое качество сборки. Подходят для круглогодичного проживания, отличаются энергоэффективностью, надежностью и возможностью расширения.
Your comment is awaiting moderation.
prodevelopmenthub – Insightful professional tips, really enhanced my career planning strategies.
Your comment is awaiting moderation.
7k casino позволяет начать игру сразу после регистрации. Процесс занимает несколько минут. Сайт работает стабильно. Игры загружаются быстро. Это удобно для новых пользователей: 7k casino сайт регистрация
Your comment is awaiting moderation.
Пришлось высылать чек,региться на ретейле,оформлять заказ. купить кокаин мефдрон и бошки Мало того дешёвый, он и отправляет маленький вес. Это гуд. Остальные почти все работают от 50 гр…Не покупайте у данного селлера пока не решится ситуация
Your comment is awaiting moderation.
Professional alliance hub – Nice execution, it comes across as reliable and focused.
Your comment is awaiting moderation.
Padel Club Oviedo – Timely and clear, updates are easy to read and useful.
Your comment is awaiting moderation.
nextlevelbusinesspaths – Informative and actionable advice, really supported exploring new ventures.
Your comment is awaiting moderation.
teampartnershiphub – Practical guidance, improved coordination across teams quickly.
Your comment is awaiting moderation.
probondhub – Easy to follow advice, improved my networking approach quickly.
Your comment is awaiting moderation.
strategic alliance insights – Useful guidance that made business collaborations safer and more productive.
Your comment is awaiting moderation.
Верный второй трек. Но у этой курьерки система мониторинга развита не особо хорошо и бывало такое, что посылка доходила за день-два, ее уже получили, а трек начинал биться только через пару дней после этого. Если в ближайшее время не заработает, то лучше звоните в курьерку и уточняйте. https://moskvakypit.top магазин на самом деле чёткий)начал с ним работать не пожалел!!!!!и качество и количество и скорость-всё на высоте!!!Че все затихли что не кто не берет? Не кто не отписывает последние дни не в курилке не где везде тишина(
Your comment is awaiting moderation.
shopcentralglobal – Easy to browse and purchase, platform works very well.
Your comment is awaiting moderation.
Opportunity Navigator – Informative and easy to follow, opportunities feel well-organized and diverse.
Your comment is awaiting moderation.
corporateframeworkportal – Clear and actionable advice, highly reliable for early-stage business planning.
Your comment is awaiting moderation.
corporate partner guide – Clear insights that improved alliance building and team effectiveness.
Your comment is awaiting moderation.
collaborationhub – Team collaboration advice is clear, helped improve workflow and connections smoothly.
Your comment is awaiting moderation.
swiftshopzone – Very reliable platform, made daily online shopping efficient.
Your comment is awaiting moderation.
innovateandexplore – Really motivational content, sparked some innovative project plans.
Your comment is awaiting moderation.
enterpriseconnecthub – Found practical solutions that simplified collaboration across departments.
Your comment is awaiting moderation.
Купить права онлайн через нашу компанию — это быстро, удобно и надежно! Мы предлагаем полный комплекс услуг для получения водительских прав без лишних хлопот и очередей. Официальная поддержка, доступные цены и индивидуальный подход к каждому клиенту. Гарантируем легальность и безопасность сделки. Закажите права онлайн у нас и начните управлять автомобилем уже сегодня! Поддержка 24/7 и помощь на всех этапах оформления.
Your comment is awaiting moderation.
Порадовал тот факт что почти на 0.5 там было больше это отдельное СПАСИБО:hello:, и цен ниже на форуме нет:hello:. купить кокаин, мефедрон, бошки, марихуану 1 из 5 хемикалсу.Имейл не рабит,сайт кривой-левые системы оплаты,нет ритейла,кривость и отсутствие информации…Деньги зажимать не пытаются и за это можно кинуть балл сверху и возможно продолжить общение в будущем…супер !!!
Your comment is awaiting moderation.
trustedbizrelations – Very reliable tool for building professional relationships, interface is smooth.
Your comment is awaiting moderation.
teamallianceinsights – Practical advice for partnership infrastructure, very clear and easy to use.
Your comment is awaiting moderation.
next-gen retail portal – Efficient browsing and modern design enhance the shopping experience.
Your comment is awaiting moderation.
Hair removal clinic – Minimalist feel, service info is straightforward and booking is simple.
Your comment is awaiting moderation.
forwardthinkhub – Very practical advice, improved clarity for future planning.
Your comment is awaiting moderation.
partnership planning link – Useful guidance that made long-term collaboration more structured.
Your comment is awaiting moderation.
savvyshoppingtips – Practical advice, made buying decisions fast and easy.
Your comment is awaiting moderation.
Digital Explorer – Practical and motivating, guides help users navigate technology with confidence.
Your comment is awaiting moderation.
buildstrategicpath – Strategy planning here is very useful, helped me organize future initiatives effectively.
Your comment is awaiting moderation.
сколько зарядил? купить кокаин, мефедрон, бошки, марихуану 250 дживик заказал?Все мои контакты указаны в подписе.
Your comment is awaiting moderation.
Business relationship builder – Professional and calm, the long-term mindset stands out.
Your comment is awaiting moderation.
futuregrowthacademy – Content is concise and helpful, allowed me to build important future-ready skills.
Your comment is awaiting moderation.
proconnecthub – Very smooth experience, allowed me to expand my professional contacts easily.
Your comment is awaiting moderation.
businesslearninghub – Materials are clear and practical, made understanding concepts simple.
Your comment is awaiting moderation.
супер магаз https://moscowtomef.shop Заказы опт , розница (отправка в регионы ,СНГ) ко мне!напишите в аську, там порешают вашу проблему. С этой партией МХЕ определённо вышел косяк.
Your comment is awaiting moderation.
business growth alliances – Clear strategies that helped achieve team goals and foster productive partnerships.
Your comment is awaiting moderation.
smartenergytips – Tips that are easy to follow and make a real difference in energy consumption.
Your comment is awaiting moderation.
essentialsmarketplace – Shopping for daily items was simple and stress-free.
Your comment is awaiting moderation.
enterprise partnership guide – Clear direction that supported building stronger professional networks.
Your comment is awaiting moderation.
partnership roadmap link – Guidance that helped plan partnerships more effectively and confidently.
Your comment is awaiting moderation.
The Gardens Local Portal – Peaceful and neat, community details are simple to follow.
Your comment is awaiting moderation.
brightideascentral – Insightful suggestions, gave me new ways to solve problems.
Your comment is awaiting moderation.
speedycommercehub – Easy to use platform, buying digital products was very efficient.
Your comment is awaiting moderation.
buyingtipsportal – Reliable advice, helped me select products without confusion.
Your comment is awaiting moderation.
Find Joy Daily – Uplifting and straightforward, content encourages daily practices for a happier life.
Your comment is awaiting moderation.
digitalcartzone – Platform made shopping simple, products easy to find and checkout fast.
Your comment is awaiting moderation.
Слышал магазин работает отлично и клады качественные делает )) https://uralsibfc.ru Плохует мягко сказано,уже больше пол месяца жду.Тебе кстати пришла?Пришлось высылать чек,региться на ретейле,оформлять заказ.
Your comment is awaiting moderation.
businessinsightclick – Insightful and practical, really helpful for developing new business plans.
Your comment is awaiting moderation.
clickforgrowthalliances – Insightful alliance tips, made business expansion much more efficient.
Your comment is awaiting moderation.
Желаю развития ветке! купить кокаин, мефедрон, бошки, марихуану И всё надо успеть. :crazy:Всем привет данной ветки:hello: История токова…
Your comment is awaiting moderation.
Practical learning tools – Promising setup, the resources look easy to understand and use.
Your comment is awaiting moderation.
modern operations guide – Clear strategies that helped structure projects and refine execution.
Your comment is awaiting moderation.
smooth checkout link – Streamlined interface and trustworthy features made shopping simple.
Your comment is awaiting moderation.
partnershipvalueguide – Clear recommendations that supported smarter long-term relationship planning.
Your comment is awaiting moderation.
shopfasteronline – Platform is practical, allows quick product search and smooth purchases.
Your comment is awaiting moderation.
onlineshoppingcenter – Navigation is straightforward, digital purchasing was hassle-free.
Your comment is awaiting moderation.
approachhub – Clear strategies, helped improve productivity and task management.
Your comment is awaiting moderation.
OBDNet diagnostic hub – Reliable and practical, the information is useful for daily car troubleshooting.
Your comment is awaiting moderation.
Inspire & Build – Vibrant and helpful, each idea motivates consistent creative work.
Your comment is awaiting moderation.
strategicplanner – Helpful tips, made organizing tasks clear and simple.
Your comment is awaiting moderation.
opportunityhub – Insightful tools, allowed me to plan initiatives effectively.
Your comment is awaiting moderation.
networkmaster – Streamlined my connections, excellent for long-term business relationships.
Your comment is awaiting moderation.
смотря каким реагентом будешь бадяжить купить кокаин, мефедрон, бошки, марихуану я в шоке. до последнего думали кидалово. а нет подняли в касание. стафф пушка. кладмену респект!!!И всем форумчанам!!!
Your comment is awaiting moderation.
bondinsighthub – Very clear advice, helped refine our approach to enterprise bonds.
Your comment is awaiting moderation.
Greetings from California! I’m bored to tears at work so I decided
to check out your site on my iphone during lunch break.
I really like the knowledge you provide here and can’t wait to
take a look when I get home. I’m shocked at how fast your blog loaded on my cell phone ..
I’m not even using WIFI, just 3G .. Anyhow, wonderful blog! http://Www.heart-hotel.com/comment/html/?112389.html
Your comment is awaiting moderation.
networkinggateway – Helps connect with commercial partners quickly, very simple to use.
Your comment is awaiting moderation.
onlinecommunitylink – Makes it easy to find like-minded individuals to chat with.
Your comment is awaiting moderation.
Получил свой заказ,дошло довольно быстро, спасибо chemical-mix.com , за нормальный вес и хорошию работу ! https://dietox.ru Обратите внимание на дату регистрации топик стартера и на регистрацию всех довольных пользователей.ребятки так жержать!) уровень достойный
Your comment is awaiting moderation.
brandfunnel.click – Mobile version looks perfect; no glitches, fast scrolling, crisp text.
Your comment is awaiting moderation.
Discover Answers – Engaging and clear, content helps users solve problems efficiently.
Your comment is awaiting moderation.
WFCC Conservation Club – Insightful and approachable, the conservation mission is evident throughout the site.
Your comment is awaiting moderation.
Strategic partnership space – Nice execution, the platform feels focused and business-ready.
Your comment is awaiting moderation.
21го числа оплатил заказ. ждем 🙂 на складе чел заболел пока что . ждем пока выздоровит купить кокаин, мефедрон, бошки, марихуану Покуреха порошки безвкусные (на язык), остальные горькие. Так проще всего определить.с туси тут не прогадаешь)))
Your comment is awaiting moderation.
sitebloom.click – Found practical insights today; sharing this article with colleagues later.
Your comment is awaiting moderation.
брат, у меня ощущение что я с тобой работал, но название магаза было немного другим, тоже в доверенной ветке был))) почерк тот же, и порядочность. я прав или ошибаюсь?)) купить кокаин, мефедрон, бошки, марихуану ну тогда тестируй, если неделю выдержал )оч хороший магазин !
Your comment is awaiting moderation.
viralshift.click – Content reads clearly, helpful examples made concepts easy to grasp.
Your comment is awaiting moderation.
leadcircuit.click – Pages loaded fast, images appeared sharp, and formatting stayed consistent.
Your comment is awaiting moderation.
Celebrity World Care https://celebrityworldcare.com интернет-магазин профессиональной медицинской и натуральной косметики для ухода за кожей при ихтиозе, дерматитах, псориазе и других дерматологических состояниях. Сертифицированные средства с мочевиной, без отдушек и парабенов. Доставка по России.
Your comment is awaiting moderation.
netamplify.click – Navigation felt smooth, found everything quickly without any confusing steps.
Your comment is awaiting moderation.
Конспирацию посылок наладили? А то такой товар, а выписать не могу – стрёмно, если просто гриперы в конверте… И отпишите по качеству 5 мео дмт! купить кокаин, мефедрон, бошки, марихуану Я вообще удивляюсь как продаван работает то? Есть ветка форума, личка и ася – везде молчание. В ася онлайн, но всеравно молчит уже третий день – это адекватный сервис?А будете ли работать в Беларусии?
Your comment is awaiting moderation.
Проблемы с авто? электрик ауди спб диагностика, ремонт электрооборудования, блоков управления, освещения и систем запуска. Опыт, современное оборудование и точное определение неисправностей.
Your comment is awaiting moderation.
Ещё раз повторюсь – магазин ОТЛИЧНЕЙШИЙ. купить кокаин, мефедрон, бошки, марихуану да магаз отличный.оперативно работают.и качество товара отличное.вобщем всё хорошо.Долго что то ты пробуешь:)интересно всё таки
Your comment is awaiting moderation.
Личка открыта для всех желающих, жаббер chemicalmix@dukgo.com готов ответить на все вопросы с 10 до 20 часов по мск купить кокаин, мефедрон, бошки, марихуану Сделал 4 затяжки с батла, почувствовал секунд через 30 первое прикосновение.))) Затем не много стал теряться в пространстве и во времени, а когда поднялся домой, и открыл дверь (5 мин спустя) меня перекрыло нах, я не мог закрыть дверь и мне всё казалось что кто то держит, у меня начинается паника) я начинаю кричать за дверь: – ты кто такой отпусти, иди отсюда………….. Зову родаков, которых дома нет слава Богу!!!!! вообщем стоял минут 20 у двери) а когда пошёл в комнату мне казалось что кто то за мной ходит!!!Всем привет.
Your comment is awaiting moderation.
проекты дачных домов
Your comment is awaiting moderation.
Даный магазин берет бобло и парит мозг посылки отпровляет по месяцу, гдето с сентября такие проблемы сними начелись, причом решать их они не собираються купить кокаин, мефедрон, бошки, марихуану Магазин отличный, заказываю у него и всегда доволен !Ребята! Вы просто красавцы… На вышем уровне, срок доставке очень оперативная и спрятали хорошо. Советаю…
Your comment is awaiting moderation.
Do you need repairs? Home services Philadelphia professional help for apartments and private homes. Plumbing, electrical, minor and medium-sized repairs, finishing work, and equipment installation. High-quality, accurate, and on-time services.
Your comment is awaiting moderation.
Отличный магаз! так держать купить кокаин, мефедрон, бошки, марихуану Работал с магазином! все норммагаз работает ровно оперативно и бонус хороший дали хотя я даже не ожидал как и обещали на следующий день отправили,а орест посылок я думаю ТС как нибудь уладит этот вопрос главное подход к нему найти
Your comment is awaiting moderation.
Нужен проектор? интернет-магазин проекторов в Москве большой выбор моделей для дома, офиса и бизнеса. Проекторы для кино, презентаций и обучения, официальная гарантия, консультации специалистов, гарантия качества и удобные условия покупки.
Your comment is awaiting moderation.
что сильнее 100 или 400 ? и по времени сколько действуют ? купить кокаин, мефедрон, бошки, марихуану Чего у вас со скайпом? Оффлайн уже несколько недель.дада братан пришло все!!!охуенноый кач ск и рега нормальная вапще… короче зайди к нему на ветку там трипы опродукции прочти мой свежий за ск
Your comment is awaiting moderation.
Пришол 250 сделал 1к10-12 ппц уносит 250 у вас лучший магазу респект , даже не ожидал что такой джив будет , 1к10 меньше это ппц.. https://moskvameffik.store Желаю удачи в продажах вашему магазину!Спасибо за объективный отзыв, мы работаем – что бы Вы улыбались:ok:
Your comment is awaiting moderation.
Почему закрылся представитель в петрозаводске? Жду ответа чем) купить кокаин, мефедрон, бошки, марихуану Дали трек… думаю все норм придетследить не могли однозначно
Your comment is awaiting moderation.
Совершил заказ снова!и буду продолжать это делать,продавец ОЧЕНЬ понимающий человек!:hello::monetka: огромный респект! https://psyholog-olga-shubik.ru Мы уверены что гарант не нужен магазину работающему с 2011 года + мы не работаем с биткоинами + везде положительные отзывы .у нас она валяется,сами не потребляем.
Your comment is awaiting moderation.
Арочные окна в Молодечно. Нестандартные решения для вашего интерьера купить пластиковое окно молодечно. Изящно и стильно.
Your comment is awaiting moderation.
Не стоит сомневатся в этом магазе он ровный и проверенный времен! Всегда на высоте! https://vse-ds.ru Я в личку когда ещё писал, интересовался, думал заказать, но так и не было ответа на мои вопросы!!! Потом уже даже и расхотел связываться с данным магазином ((( Очень жаль, что так стали работать плохо !!! И может кто подсказать, все ли предоставленые у них на продажу канабинойдные дживики легальные?В общем подожду пока ты получишь и отпишешь :))))
Your comment is awaiting moderation.
Потеряли годы на ненужные проекты? Расчет покажет ваш путь.
https://bit.ly/generator-human-design-live
-хьюман дизайн генератор;
-дизайн человека генератор;
-человек генератор кто это;
-генератор тип личности;
-дизайн человека генератор описание;
Your comment is awaiting moderation.
остался дико не рад, но селлер быстро пообещал кидануть бонуса при следующей покупке. надеюсь, не пожадничают https://moskvakupit.shop первую посылочку получил от селера, сервис на вышем уровне не то что у некоторых!!!!!Посылки у магазина не задерживаются? Все чотко и ровно?
Your comment is awaiting moderation.
Студия в новом доме с ремонтом. Свободная планировка, стильная мебель kvartira-borisov.ru, встроенная кухня, техника. Двор без машин, парковая зона. Рассмотрим славян.
Your comment is awaiting moderation.
Нужен проектор? магазин проекторов большой выбор моделей для дома, офиса и бизнеса. Проекторы для кино, презентаций и обучения, официальная гарантия, консультации специалистов, гарантия качества и удобные условия покупки.
Your comment is awaiting moderation.
Только лучшие материалы: https://dzen.ru/a/aVjthUEgrWjmp1lG
Your comment is awaiting moderation.
2си-ай – ах..й просто!)))))) https://psyholog-olga-shubik.ru ну вообщем все ровно получил людей правда от бати но магазин ровный советуюВсе как надо. Рентген, люди ощупывают… Подозрительных людей к стати не принимают, если даже по началу обнаруживают что либо, их отпускают вызывают оперов, следят за посылкой, сначала принимают клиента, а потом уже за поставщиком охота начинается…
Your comment is awaiting moderation.
Тело болит от чужих задач? Выжаты как лимон ради чужих идей. Вы — батарейка для чужих амбиций.
https://dzen.ru/a/aXHyZKIqwmcfjrhy
-тип личности генератор дизайн человека;
-дизайн человека генератор кто это;
-дизайн человека генератор;
-хьюман дизайн генератор;
-человек генератор дизайн человека;
-генератор тип личности дизайн человека;
-тип личности генератор дизайн;
Your comment is awaiting moderation.
продавец отзывчивый https://17na19.ru Заказали, придет посмотримраньше ваш магаз в аське работал , мих клевый был
Your comment is awaiting moderation.
boostsignal.click – Color palette felt calming, nothing distracting, just focused, thoughtful design.
Your comment is awaiting moderation.
rankpulse.click – Pages loaded fast, images appeared sharp, and formatting stayed consistent.
Your comment is awaiting moderation.
Перекредитование в Казахстане позволяет пересмотреть условия займа. Можно объединить несколько кредитов. Это снижает нагрузку на бюджет. Подбор кредита онлайн помогает выбрать лучшее предложение. Платежи становятся более удобными, https://spisok-kreditov.ru/08_refinansirovanie-kredita.html/
Your comment is awaiting moderation.
pixelroute.click – Loved the layout today; clean, simple, and genuinely user-friendly overall.
Your comment is awaiting moderation.
trafficdock.click – Found practical insights today; sharing this article with colleagues later.
Your comment is awaiting moderation.
– Извините…. а… вы нас до “Дайва” (ночной клуб) не довезете? https://moskvakupit.shop трек получил в четверг до сих пор не бьётся. Как что изменится отпишуПолучил посылку уже через 3 дня после заказа. МН-001 хороший, только маленькие кристаллы на дне не растворились. А так доволен
Your comment is awaiting moderation.
Хроническая усталость — признак чужого пути.
https://dzen.ru/a/aXHyZKIqwmcfjrhy
-дизайн человека генератор кто это;
-генератор тип личности дизайн человека;
-тип личности генератор дизайн человека;
-генератор по дизайну человека;
-дизайн человека генератор описание;
-генератор тип личности;
Your comment is awaiting moderation.
Mini electric vehicles are small, compact EVs designed mainly for city driving and short commutes. They are affordable, easy to park, and consume very little energy: https://ev.motorwatt.com/ev-database/database-electric-cars/
Your comment is awaiting moderation.
Бесплатный конструктор сайтов: 8 простых сервисов на русском в 2026 году https://vc.ru/1581799
Your comment is awaiting moderation.
брал все как всегда на 10 баллов забил https://moskva.best сказали отпрака на следующий день после платежа!Зделал заказ 203го в четверг вечером,в пятницу уже получил трек,а сегодня създил забрал посылку!запаковано так,что сам с трудом нашел)все очень вкусно и качественно!продовцам респект.слаженно работают!
Your comment is awaiting moderation.
Посылки у магазина не задерживаются? Все чотко и ровно? купить кокаин, мефедрон, бошки, марихуану yabe.lil сказал(а): ^Заказы опт , розница (отправка в регионы ,СНГ) ко мне!
Your comment is awaiting moderation.
I do not know if it’s just me or if everybody else encountering problems with your blog.
It appears as if some of the text in your posts are running off the screen. Can someone else please provide
feedback and let me know if this is happening to
them as well? This may be a issue with my
internet browser because I’ve had this happen previously.
Appreciate it https://Www.Survivalmonkey.com/proxy.php?link=https://alquilatransportes.com/author/lionelw1416/
Your comment is awaiting moderation.
seo специалист seo специалист .
Your comment is awaiting moderation.
Ищешь блины для штанки? блины для штанги из металла для эффективных силовых тренировок. Чугунные и резиновые диски, разные веса, долговечность и удобство использования. Решение для новичков и опытных спортсменов.
Your comment is awaiting moderation.
Grasz w kasynie? Kasyno internetowe w Polsce to najlepsze miejsca do gry w latach 2025–2026. Zaufane strony, sloty i gry na zywo, przejrzyste warunki, wygodne wplaty i wyplaty.
Your comment is awaiting moderation.
Szukasz kasyna? kasyno pl w Polsce: wybor najlepszych stron do gry. Licencjonowane platformy, popularne sloty i kasyna na zywo, wygodne metody platnosci, uczciwe warunki i aktualne oferty.
Your comment is awaiting moderation.
Торговая мебель https://woodmarket-for-business.ru от производителя для бизнеса. Витрины, стеллажи, островные конструкции и кассовые модули. Индивидуальный подход, надёжные материалы и практичные решения для продаж.
Your comment is awaiting moderation.
netmosaic.click – Content reads clearly, helpful examples made concepts easy to grasp.
Your comment is awaiting moderation.
курсы по seo курсы по seo .
Your comment is awaiting moderation.
ровнее только строительный уровень ) купить кокаин, мефедрон, бошки, марихуану Что случилось? почему страшно?Давай зафиналим на мировой.
Your comment is awaiting moderation.
https://www.google.sk/url?q=https://institutocea.com/layouts/inc/?codigo_promocional_melbet_2.html
Your comment is awaiting moderation.
Производство оборудования https://repaircom.ru с предварительной разработкой и адаптацией под требования клиента. Качественные материалы, точные расчёты, соблюдение сроков и техническая поддержка.
Your comment is awaiting moderation.
Изделия из пластмасс https://ftk-plastik.ru собственного производства. Продажа оптом и в розницу, широкий ассортимент, надёжные материалы и стабильные сроки. Выполняем заказы любой сложности по техническому заданию клиента.
Your comment is awaiting moderation.
Жалюзи от производителя https://balkon-pavilion.ru изготовление, продажа и профессиональная установка. Большой выбор дизайнов, точные размеры, надёжная фурнитура и комфортный сервис для квартир и офисов.
Your comment is awaiting moderation.
Производим пластиковые https://zavod-dimax.ru окна и выполняем профессиональную установку. Качественные материалы, точные размеры, быстрый монтаж и гарантийное обслуживание для комфорта и уюта в помещении.
Your comment is awaiting moderation.
списались с продавцом,пообщались,договорились.я оплатил заказ и начались долгие ожидания моей заветной посылки. https://7010001.ru Это точно.- За сколько?
Your comment is awaiting moderation.
Отличный магаз, качество на ура. даже если сам реагент не сильный. купить кокаин, мефедрон, бошки, марихуану Давай зафиналим на мировой.Как связаться?
Your comment is awaiting moderation.
webfixer.click – Navigation felt smooth, found everything quickly without any confusing steps.
Your comment is awaiting moderation.
seo специалист seo специалист .
Your comment is awaiting moderation.
seo интенсив seo интенсив .
Your comment is awaiting moderation.
signalshift.click – Pages loaded fast, images appeared sharp, and formatting stayed consistent.
Your comment is awaiting moderation.
я начинаю выписывать недели за 2 до примерного окончания стратегических запасов))) и еще на черный день нычки есть)) простоев быть не должно) https://woomen-moda.ru Да,мне тоже первый класс как то ближе и недорого…Хороший магазин,менеджер приятный по общению,недовесов не было у меня
Your comment is awaiting moderation.
sitesupport.click – Appreciate the typography choices; comfortable spacing improved my reading experience.
Your comment is awaiting moderation.
егэ нейросеть
Your comment is awaiting moderation.
250 дживик заказал? купить кокаин, мефедрон, бошки, марихуану РАБОТАЕМ!!! ОПТ!!! ДОСТАВКА!!!Если во время действия паралельно потягивать пивас и почаще двигаться , не сидеть на месте , то довольно нормально прёт , если загоняться то накрывает параноя) , в общем около 8-9 часов прёт , но у меня была ещё и рега , очень лютая которой можно было запросто перебить параною если вдруг возникала от данной скорости , в целом понравилась скорость .
Your comment is awaiting moderation.
Светлая “двушка” с детским уголком. Игровая зона, развивающие игрушки аренда квартиры на сутки гродно, столик для кормления. Безопасный район, детская площадка во дворе. Все для удобства родителей. Приезжайте с малышами!
Your comment is awaiting moderation.
https://www.google.co.il/url?q=https://angersnautique.org/fonts/pgs/code_de_bonus_1.html
Your comment is awaiting moderation.
Op zoek naar een casino? WinnItt biedt online gokkasten en live games. Het biedt snel inloggen, eenvoudige navigatie, moderne speloplossingen en stabiele prestaties op zowel computers als mobiele apparaten.
Your comment is awaiting moderation.
Innovation-friendly website – The interactive feel makes learning enjoyable.
Your comment is awaiting moderation.
midnightquarry.shop – Bold branding stands out, pages load quickly and the shopping flow feels intuitive.
Your comment is awaiting moderation.
1к 10-ти слабовато будет 1к5 или 1к7 самое то… https://17na19.ru ровнее только строительный уровень )Наша организация не несет ответственности за применение продукции не по назначению. Осуществляется тотальный контроль качества продукции. Чистота препаратов 99.2%. Исключено добавление примесей. Используется сырье очень высокого качества.
Your comment is awaiting moderation.
скачать joycasino joycasino вход
Your comment is awaiting moderation.
https://www.google.es/url?q=https://www.woodsurfer.com/wp-content/articles/?le-code-promo-1xbet_bonus.html
Your comment is awaiting moderation.
Лучшие 12 способов, как купить голоса в ВК в 2026 году https://vc.ru/1448988
Your comment is awaiting moderation.
seo курсы seo курсы .
Your comment is awaiting moderation.
ресурс Личные объявления Мелитополь – это шанс найти новые знакомства и интересных людей для вечернего досуга. Выбирайте из множества анкет и предложений.
Your comment is awaiting moderation.
учиться seo kursy-seo-4.ru .
Your comment is awaiting moderation.
Всем привки Любви здоровья вам ! Процветания https://moskvakypite.cc САБЖ САМ ПО СЕБЕ НЕ ПРЁТ !! МУТИТЬ НА НЁМ МИКСЫ СМЫСЛА НЕТ !!! ЭТО АНТИДЕПРЕССАНТ !!кто брал закладками в этом магазе в МСК что скажите?
Your comment is awaiting moderation.
Аптечные травы вообщем. https://polzadiet.ru 2c-i, 2c-e, 2c-pНовинки не за горами, без паники.
Your comment is awaiting moderation.
Поставляем грунт https://organicgrunt.ru торф и чернозем с доставкой по Москве и Московской области. Подходит для посадок, благоустройства и озеленения. Качественные смеси, оперативная логистика и удобные условия для частных и коммерческих клиентов.
Your comment is awaiting moderation.
riobet промокод https://riobetcasino-money.ru
Your comment is awaiting moderation.
site web 1win en ligne telecharger 1win apk
Your comment is awaiting moderation.
Professional direction site – The design avoids clutter and reads smoothly.
Your comment is awaiting moderation.
Acer European Challenge is recognized as a premier European gaming tournament series designed to unite competitive players and esports fans across multiple countries and disciplines. The competition brings together gamers from across Europe, offering structured events, professional standards, and a focus on fair competitive play. The tournament series highlights well known esports games, including Trackmania, FIFA, and additional esports titles that appeal to a broad gaming audience. Matches are structured around competitive integrity and player ability, ensuring that participants face meaningful challenges at every stage of the competition. The series provides opportunities for newcomers and veterans alike, making it accessible while maintaining a high competitive standard. Multiple stages allow players from different regions to join, strengthening the overall esports ecosystem. Acer European Challenge promotes esports culture across Europe, combining entertainment, rivalry, and professional presentation. Viewers gain access to ongoing competition updates, creating engagement beyond the players themselves. Competitive excellence is aligned with high performance gaming, reinforcing its position as a flagship European esports competition. Acer European Challenge continues to expand its reach, delivering a consistent competitive experience built around skill driven gameplay, community engagement, and the future of European gaming events.
https://acer-challenge.com
Your comment is awaiting moderation.
Acer European Challenge esports is recognized as a premier European gaming tournament series designed to unite competitive players and esports fans across multiple countries and disciplines. The competition brings together gamers from across Europe, offering structured events, professional standards, and a focus on fair competitive play. Acer European Challenge features popular competitive titles, including Trackmania, FIFA, and additional esports titles that appeal to a broad gaming audience. The format rewards precision strategy and consistency, ensuring that participants face meaningful challenges at every stage of the competition. Players of different skill levels can compete and improve, making it accessible while maintaining a high competitive standard. Flexible formats encourage wider European involvement, strengthening the overall esports ecosystem. Acer European Challenge promotes esports culture across Europe, combining entertainment, rivalry, and professional presentation. Spectators can follow matches and tournament progress, creating engagement beyond the players themselves. The brand focuses on innovation and performance, reinforcing its position as a flagship European esports competition. The series evolves with each new season, delivering a consistent competitive experience built around skill driven gameplay, community engagement, and the future of European gaming events.
https://acer-challenge.com
Your comment is awaiting moderation.
servespark.click – Loved the layout today; clean, simple, and genuinely user-friendly overall.
Your comment is awaiting moderation.
прогнозы на Dota 2 — это основа контента игрового и киберспортивного портала Elements Pro, который посвящён всестороннему освещению профессиональной сцены Dota 2 и актуальным событиям киберспортивной экосистемы. Проект Elements Pro ориентирован на фанатов Dota 2 и киберспорта, предоставляя свежую информацию о матчах, составах команд, трансферах и развитии киберспортивных организаций. На сайте публикуются результаты матчей Dota 2, а также информацию о грядущих ивентах профессиональной сцены. Ключевым направлением является разбор матчей и стратегий, где рассматриваются пики и баны, игровые решения, форма команд и индивидуальная игра киберспортсменов. Прогнозы на Dota 2 формируются на основе статистики, что позволяет читателям лучше разбираться в профессиональной сцене. Портал следит за игрой ведущих коллективов, а также уделяет внимание перспективным составам и молодым игрокам. Контент будет полезен как новичкам, так и знатокам сцены, интересующихся киберспортом, стратегией и развитием дисциплины Dota 2. Проект совмещает информационный и экспертный подход, формируя удобную платформу для всех, кто следит за матчами Dota 2 сегодня и развитием профессионального киберспорта.
https://elements-pro.com/
Your comment is awaiting moderation.
прогнозы на Dota 2 — это основа контента игрового и киберспортивного портала Elements Pro, который посвящён всестороннему освещению профессиональной сцены Dota 2 и актуальным событиям киберспортивной экосистемы. Проект Elements Pro ориентирован на фанатов Dota 2 и киберспорта, предоставляя свежую информацию о матчах, составах команд, трансферах и развитии киберспортивных организаций. На сайте публикуются результаты матчей Dota 2, а также расписания будущих соревнований профессиональной сцены. Важной частью проекта остаётся аналитический контент, где рассматриваются пики и баны, игровые решения, форма команд и индивидуальная игра киберспортсменов. Прогнозы на Dota 2 формируются на основе статистики, что позволяет читателям глубже понимать ход матчей. Портал следит за игрой ведущих коллективов, а также уделяет внимание перспективным составам и молодым игрокам. Материалы сайта подходят как для опытных фанатов, интересующихся киберспортом, стратегией и развитием дисциплины Dota 2. Портал объединяет новости, аналитику и прогнозы, формируя удобную платформу для всех, кто следит за матчами Dota 2 сегодня и развитием профессионального киберспорта.
https://elements-pro.com/
Your comment is awaiting moderation.
Season of Blood Diablo IV represents a dark fantasy gaming promo hub built around gothic horror, supernatural warfare, and the rise of vampires within the world of Sanctuary. The platform immerses players in a grim narrative of blood and shadows, calling heroes to embrace the role of hunters during limited seasonal content. Inspired by action RPG gameplay and dark lore, the experience focuses on vampire hunting mechanics, cursed enemies, and blood driven powers introduced during the Season of Blood. Players are invited to take part in seasonal events, promotional campaigns, and community driven objectives that reinforce the atmosphere of danger and survival. The platform showcases hostile zones overrun by darkness, where every event pushes players deeper into a narrative of resistance and revenge. Dark rituals, elite vampire foes, and blood magic define the season, creating a sense of urgency tied to limited time rewards. Collective challenges connect players through shared goals, uniting hunters through shared progression, themed content, and dark fantasy storytelling. The mood blends fear, action, and heroic defiance, reflecting the essence of a vampire dominated season. The platform acts as an entry point into the vampiric storyline, combining lore driven storytelling, action focused gameplay themes, and promotional elements designed for dedicated fans of dark fantasy worlds. All content supports the theme of hunting the undead, making the experience a central destination for those drawn to gothic horror and supernatural conflict within Diablo IV.
https://diablovampirehunters.com
Your comment is awaiting moderation.
Season of Blood Diablo IV represents a dark fantasy gaming promo hub built around gothic horror, supernatural warfare, and the rise of vampires within the world of Sanctuary. The platform immerses players in a grim narrative of blood and shadows, calling heroes to embrace the role of hunters during limited seasonal content. Driven by gothic aesthetics and brutal combat themes, the experience focuses on vampire hunting mechanics, cursed enemies, and blood driven powers introduced during the Season of Blood. Players are invited to take part in seasonal events, promotional campaigns, and community driven objectives that reinforce the atmosphere of danger and survival. The experience presents a world transformed by vampiric influence, where every event pushes players deeper into a narrative of resistance and revenge. Supernatural enemies and cursed abilities shape the gameplay loop, creating a sense of urgency tied to limited time rewards. Fan participation strengthens the seasonal narrative, uniting hunters through shared progression, themed content, and dark fantasy storytelling. The mood blends fear, action, and heroic defiance, reflecting the essence of a vampire dominated season. This promo hub serves as a gateway into the Season of Blood, combining lore driven storytelling, action focused gameplay themes, and promotional elements designed for dedicated fans of dark fantasy worlds. Each section strengthens the hunter narrative, making the experience a central destination for those drawn to gothic horror and supernatural conflict within Diablo IV.
https://diablovampirehunters.com
Your comment is awaiting moderation.
Городской портал https://u-misti.cherkasy.ua Черкасс — свежие новости, события, происшествия, экономика и общественная жизнь. Актуальные обзоры, городская хроника и полезная информация для жителей и гостей города.
Your comment is awaiting moderation.
seo базовый курc kursy-seo-4.ru .
Your comment is awaiting moderation.
Новости Днепра https://u-misti.dp.ua сегодня — актуальные события города, происшествия, экономика, политика и общественная жизнь. Оперативные обновления, важные решения властей и главные темы дня для жителей и гостей города.
Your comment is awaiting moderation.
обучение продвижению сайтов обучение продвижению сайтов .
Your comment is awaiting moderation.
новости Dota 2 — это основа контента игрового и киберспортивного портала Elements Pro, который посвящён всестороннему освещению профессиональной сцены Dota 2 и актуальным событиям киберспортивной экосистемы. Проект Elements Pro ориентирован на фанатов Dota 2 и киберспорта, предоставляя актуальные обновления о матчах, составах команд, трансферах и развитии киберспортивных организаций. На сайте публикуются результаты матчей Dota 2, а также расписания будущих соревнований профессиональной сцены. Ключевым направлением является разбор матчей и стратегий, где рассматриваются пики и баны, игровые решения, форма команд и индивидуальная игра киберспортсменов. Прогнозы на Dota 2 формируются на основе статистики, что позволяет читателям лучше разбираться в профессиональной сцене. Elements Pro освещает выступления топовых команд, а также уделяет внимание перспективным составам и молодым игрокам. Публикации рассчитаны на разный уровень подготовки, интересующихся киберспортом, стратегией и развитием дисциплины Dota 2. Проект совмещает информационный и экспертный подход, формируя полноценный киберспортивный ресурс для всех, кто следит за матчами Dota 2 сегодня и развитием профессионального киберспорта.
https://elements-pro.com/
Your comment is awaiting moderation.
новости Dota 2 — это основа контента игрового и киберспортивного портала Elements Pro, который посвящён всестороннему освещению профессиональной сцены Dota 2 и актуальным событиям киберспортивной экосистемы. Портал Elements Pro создан для поклонников Dota 2 и профессиональных турниров, предоставляя свежую информацию о матчах, составах команд, трансферах и развитии киберспортивных организаций. Портал регулярно обновляет итоги игр и турниров, а также информацию о грядущих ивентах профессиональной сцены. Важной частью проекта остаётся аналитический контент, где рассматриваются пики и баны, игровые решения, форма команд и индивидуальная игра киберспортсменов. Раздел прогнозов опирается на цифры и игровые показатели, что позволяет читателям глубже понимать ход матчей. Elements Pro освещает выступления топовых команд, а также уделяет внимание перспективным составам и молодым игрокам. Контент будет полезен как новичкам, так и знатокам сцены, интересующихся киберспортом, стратегией и развитием дисциплины Dota 2. Elements Pro сочетает новостной, аналитический и прогнозный формат, формируя удобную платформу для всех, кто следит за матчами Dota 2 сегодня и развитием профессионального киберспорта.
https://elements-pro.com/
Your comment is awaiting moderation.
onlineport.click – Color palette felt calming, nothing distracting, just focused, thoughtful design.
Your comment is awaiting moderation.
netguide.click – Overall, professional vibe here; trustworthy, polished, and pleasantly minimal throughout.
Your comment is awaiting moderation.
Винница онлайн https://u-misti.vinnica.ua последние новости и городская хроника. Главные события, заявления официальных лиц, общественные темы и изменения в жизни города в удобном формате.
Your comment is awaiting moderation.
Актуальные новости https://u-misti.chernivtsi.ua Черновцов на сегодня. Экономика, происшествия, культура, инфраструктура и социальные вопросы. Надёжные источники, регулярные обновления и важная информация для жителей города.
Your comment is awaiting moderation.
connectcraft.click – Navigation felt smooth, found everything quickly without any confusing steps.
Your comment is awaiting moderation.
Can you be more specific about the content of your article? After reading it, I still have some doubts. Hope you can help me. https://accounts.binance.com/lv/register-person?ref=SMUBFN5I
Your comment is awaiting moderation.
streamserve.click – Found practical insights today; sharing this article with colleagues later.
Your comment is awaiting moderation.
Modern thinking resource – The site flow feels natural and easy to follow.
Your comment is awaiting moderation.
inscription melbet melbet telecharger
Your comment is awaiting moderation.
развитие предпринимательства в российской экономике выступает основой для создания новых рабочих мест, объединяя образовательные инициативы и практические инструменты. Современная академия развития предпринимательства помогает выстраивать стратегическое мышление, необходимых для стабильного ведения бизнеса. Развитие предпринимательства невозможно без качественного образования, адаптированного под российские реалии. Академия развития предпринимательства предлагает современные форматы обучения, в которой участники получают прикладные навыки. Развитие предпринимательства усиливает конкурентоспособность бизнеса, поддерживая предпринимательские инициативы на разных этапах. Академия развития предпринимательства выступает центром деловой экспертизы, формируя среду для обмена опытом. Развитие предпринимательства стимулирует появление современных бизнес-моделей, обеспечивая гибкость и устойчивость компаний. Развитие предпринимательства через обучение снижает риски ошибок, опираясь на аналитику и практический опыт. Развитие предпринимательства в России через академию создает долгосрочную ценность, способную развиваться в условиях меняющегося рынка.
https://uralsibacademy.ru/
Your comment is awaiting moderation.
академия развития предпринимательства в российской экономике выступает основой для создания новых рабочих мест, совмещая теорию бизнеса с реальными предпринимательскими кейсами. Профессиональная академия развития предпринимательства создает условия для осознанного роста, которые позволяют запускать и масштабировать проекты. Эффективное развитие предпринимательства требует комплексного подхода, учитывающего особенности рынка России. Академия развития предпринимательства формирует практико-ориентированную среду, в которой участники получают прикладные навыки. Академия развития предпринимательства влияет на качество управленческих решений, поддерживая предпринимательские инициативы на разных этапах. Академия развития предпринимательства выступает центром деловой экспертизы, формируя среду для обмена опытом. Развитие предпринимательства стимулирует появление современных бизнес-моделей, что позволяет бизнесу адаптироваться к изменениям рынка. Академия развития предпринимательства помогает предпринимателям выстраивать системный бизнес, предлагая структурированный подход к развитию. Академия развития предпринимательства способствует формированию сильной экономики, ориентированную на рост, устойчивость и эффективность.
https://uralsibacademy.ru/
Your comment is awaiting moderation.
Новости Киева https://u-misti.kyiv.ua сегодня — актуальные события столицы, происшествия, политика, экономика и общественная жизнь. Оперативные обновления, важные решения властей и ключевые темы дня для жителей и гостей города.
Your comment is awaiting moderation.
Львов онлайн https://u-misti.lviv.ua последние новости и городская хроника. Важные события, заявления официальных лиц, общественные темы и изменения в жизни одного из крупнейших городов Украины.
Your comment is awaiting moderation.
Новости Хмельницкого https://u-misti.khmelnytskyi.ua сегодня на одном портале. Главные события города, решения властей, происшествия, социальная повестка и городская хроника. Быстро, понятно и по делу.
Your comment is awaiting moderation.
наружная реклама для бизнеса в Москве — это результативный способ привлечения клиентов, который усиливает присутствие компании в мегаполисе. Рекламно-производственное предприятие профессионально производит вывесок и рекламных конструкций, а также других элементов наружного оформления. Каждый проект адаптируется под задачи клиента, что позволяет достичь нужного визуального эффекта. Изготовление рекламных конструкций осуществляется с использованием проверенных материалов, благодаря чему конструкции служат долго. Фирменные вывески обеспечивают хорошую видимость, что особенно актуально для офисов и магазинов. Наружная реклама в Москве учитывает требования города, поэтому клиент получает легальный результат. Опытные мастера и дизайнеры сопровождает проект на всех этапах, включая разработку дизайна. Обращение в рекламно-производственную компанию позволяет сэкономить время и бюджет, а точные сроки делают наружную рекламу надежным инструментом для роста продаж.
https://mk-reklama.su/
Your comment is awaiting moderation.
наружная реклама в Москве — это проверенное решение для визуального маркетинга, который усиливает присутствие компании в мегаполисе. Рекламно-производственное предприятие занимается проектированием и выпуском вывесок и рекламных конструкций, а также визуальных атрибутов для фасадов. Каждое рекламное решение разрабатывается индивидуально, что обеспечивает точное соответствие требованиям. Изготовление рекламных конструкций осуществляется с использованием проверенных материалов, благодаря чему реклама сохраняет внешний вид. Фирменные вывески работают как постоянный рекламный носитель, что особенно эффективно для сервисных компаний. Размещение рекламных конструкций выполняется с соблюдением регламентов, поэтому реклама не вызывает проблем при эксплуатации. Профессиональный коллектив берет на себя полный цикл работ, включая установку готовых изделий. Заказ наружной рекламы позволяет быстро запустить рекламу, а точные сроки делают рекламные конструкции эффективным активом для развития бизнеса.
https://mk-reklama.su/
Your comment is awaiting moderation.
маркетинг в социальных сетях сегодня рассматривается как важная часть онлайн стратегии, позволяющий формировать лояльное сообщество вокруг продукта. Актуальные стратегии продвижения в соц. сетях требует глубокого анализа целевой аудитории, а также планомерной работы с контентом. Одним из центральных каналов коммуникации для бизнеса стал Instagram, где качественный графический контент играет значимое влияние на вовлеченность. Профессиональное развитие профиля включает разработку последовательной контент стратегии, корректную работу с тематическими тегами, а также активное взаимодействие с подписчиками. Новые форматы маркетинга в социальных сетях позволяют расширять охват целевой аудитории без размывания позиционирования. Рост вовлеченности аудитории напрямую отражается на восприятии бренда, что в дальнейшем способствует увеличению конверсии. Системное продвижение в соц. сетях объединяет аналитику, креатив и стратегию, создавая долгосрочный эффект продвижения. Регулярная оптимизация стратегии помогает сохранять конкурентоспособность. Именно системная работа делает социальные сети мощным каналом продаж для компаний сферы услуг и торговли.
https://gooodlike.com/
Your comment is awaiting moderation.
маркетинг в соц. сетях сегодня рассматривается как важная часть онлайн стратегии, позволяющий создавать устойчивое доверие к компании. Современный подход к работе в социальных платформах требует глубокого анализа целевой аудитории, а также системного ведения аккаунтов. Одной из приоритетных социальных платформ для бизнеса стал Instagram, где визуальная подача информации играет ключевую роль в формировании имиджа. Профессиональное развитие профиля включает разработку последовательной контент стратегии, корректную работу с тематическими тегами, а также поддержание диалога в комментариях и сообщениях. Современные инструменты продвижения позволяют привлекать новых потенциальных клиентов без снижения интереса к бренду. Рост вовлеченности аудитории напрямую сказывается на уровне доверия, что в дальнейшем помогает достигать коммерческих целей. Продуманная работа с социальными платформами объединяет аналитику, креатив и стратегию, создавая долгосрочный эффект продвижения. Гибкий подход к формированию контента помогает сохранять конкурентоспособность. Именно такой подход делает маркетинг в социальных сетях эффективным инструментом для компаний сферы услуг и торговли.
https://gooodlike.com/
Your comment is awaiting moderation.
Новости Житомира https://u-misti.zhitomir.ua сегодня: городские события, инфраструктура, транспорт, культура и социальная сфера. Оперативные обновления, обзоры и важная информация о жизни Житомира онлайн.
Your comment is awaiting moderation.
Портал города https://u-misti.odesa.ua Одесса с новостями, событиями и обзорами. Всё о жизни города: решения властей, происшествия, экономика, спорт, культура и развитие региона.
Your comment is awaiting moderation.
Полтава онлайн https://u-misti.poltava.ua городской портал с актуальными новостями и событиями. Главные темы дня, общественная жизнь, городские изменения и полезная информация для горожан.
Your comment is awaiting moderation.
Business insight hub – Easy to follow structure with clear intent throughout.
Your comment is awaiting moderation.
мобильная игра Баланс 3D это динамичная игра для Android в которой вам предстоит вести шар по трехмерным платформам стараясь сохранить равновесие. 3d игра Баланс 3D ориентирована на любителей простых но сложных игр и объединяет доступный геймплей с испытаниями на точность. В игре доступно более тридцати уровней каждый из которых проверяет реакцию. мобильная игра Баланс 3D предлагает разные способы контроля включая использование G sensor. Поддержка гироскопа позволяет добиться более реалистичного контроля. В игре реализовано разные форматы обзора что делает прохождение удобным. аркада android Баланс 3D работает на большинстве Android смартфонов и подходит для повседневной игры. Игра позволяет отвлечься в свободное время при этом мотивируя проходить дальше. мобильная игра Баланс 3D не требует покупки и может быть загружена в виде APK файла. Возможность установить с Google Play упрощает установку. мобильная игра Баланс 3D подойдет тем кто ищет простую аркаду где решает контроль движения и каждое прохождение приносит чувство прогресса.
https://balance3d.ru/
Your comment is awaiting moderation.
мобильная игра Баланс 3D это динамичная игра для Android в которой вам предстоит вести шар по 3D трассам стараясь достичь финиша. аркада android Баланс 3D подходит для всех возрастов и объединяет доступный геймплей с испытаниями на точность. В игре доступно более тридцати уровней каждый из которых развивает чувство баланса. аркада android Баланс 3D поддерживает несколько видов управления включая использование G sensor. Поддержка датчика наклона позволяет наклонять устройство. В игре реализовано несколько вариантов отображения что адаптируется под предпочтения игрока. 3d игра Баланс 3D не требует мощного устройства и подходит для повседневной игры. Игра идеально подходит для коротких сессий при этом удерживая внимание. 3d игра Баланс 3D не требует покупки и может быть загружена в виде APK файла. Возможность скачать APK упрощает установку. аркада android Баланс 3D подойдет тем кто ищет простую аркаду где нужно чувство равновесия и каждый этап приносит чувство прогресса.
https://balance3d.ru/
Your comment is awaiting moderation.
Объясняем сложные https://notatky.net.ua темы просто и понятно. Коротко, наглядно и по делу. Материалы для тех, кто хочет быстро разобраться в вопросах без профессионального жаргона и сложных определений.
Your comment is awaiting moderation.
Блог для мужчин https://u-kuma.com с полезными статьями и советами. Финансы, работа, здоровье, отношения и личная эффективность. Контент для тех, кто хочет разбираться в важных вещах и принимать взвешенные решения.
Your comment is awaiting moderation.
Портал для пенсионеров https://pensioneram.in.ua Украины с полезными советами и актуальной информацией. Социальные выплаты, пенсии, льготы, здоровье, экономика и разъяснения сложных вопросов простым языком.
Your comment is awaiting moderation.
джиар менеджмент является системный подход к организации взаимодействия между коммерческими структурами гражданским сектором и государством. GR менеджмент оказывается востребованным в ситуациях когда необходимо учитывать общественные интересы и выстроить долгосрочную стратегию. GR консультации дает возможность анализировать государственную повестку и корректно доносить позицию бизнеса. В рамках GR стратегии формируется единая коммуникационная линия с учетом требований законодательства. джиар менеджмент находит применение в условиях реформ и регулирования когда ошибка в коммуникациях может создать репутационные риски. джиар менеджмент ориентирован на долгосрочные решения между заинтересованными стейкхолдерами. Профессиональный GR менеджмент создает условия для прозрачного диалога и поддерживает организации работать в правовом поле сохраняя доверие в отношениях с обществом и государством.
https://gr-management.ru/
Your comment is awaiting moderation.
джиар менеджмент выступает как профессиональный инструмент к организации взаимодействия между коммерческими структурами гражданским сектором и государством. джиар менеджмент оказывается востребованным в ситуациях когда важно снизить регуляторные риски и выстроить долгосрочную стратегию. GR менеджмент дает возможность понимать логику регуляторных процессов и заранее готовиться к изменениям. В рамках консультационной работы формируется понятный вектор взаимодействия с учетом требований законодательства. GR консультации особенно важен в условиях изменения правил игры когда ошибка в коммуникациях может замедлить развитие. GR менеджмент нацелен на устойчивое сотрудничество между ключевыми сторонами взаимодействия. Грамотные GR консультации поддерживает для предсказуемых решений и способствует компаниям адаптироваться к требованиям сохраняя доверие в отношениях с ключевыми институтами.
https://gr-management.ru/
Your comment is awaiting moderation.
https://www.pdffiller.com/jsfiller-desk14/?traceparent=00-2f5800ec426cd6cdf21eece124248739-ff3b7e463a2b1cee-00&flat_pdf_quality=high&projectId=2019515643&richTextFormatting=true&jsf-page-rearrange-v2=true&jsf-redesign-full=true&jsf-fake-edit-embedded=true&isSkipEditorLoadFrequency=true&jsf-probability-70=true&jsf-socket-io=true&jsf-simplified-modes-iteration-1=true&jsf-offline-mode=false&jsf-fake-edit-stream-editing=true&acc-share-button-in-editor=true&jsf-all-tools-tab=false&jsf-all-tools-tab-branch-b=false&jsf-editor-pdfjs-five=true&jsf-context-menu-to-right-panel=false&jsf-context-menu-to-right-panel-branch-b=false&jsf-disable-autosave=true&jsf-disable-browser-translation=true&jsf-web-mobile-new-filling-experience=false&e-sign-assign-fields-experiment=false&routeId=5d41ca367529324676e11777c15da4c3#db89c25386e34ebe966da163e7b9de85
Your comment is awaiting moderation.
Future-ready site – The interface feels intuitive and performs efficiently.
Your comment is awaiting moderation.
Купить отзывы – 25 способов накрутки в 2026 году
Узнайте подробности предложения: https://vc.ru/1520862
Your comment is awaiting moderation.
Hey! I know this is kinda off topic however , I’d figured I’d ask.
Would you be interested in trading links or maybe guest authoring a blog post or vice-versa?
My blog goes over a lot of the same topics as yours and I
feel we could greatly benefit from each other.
If you are interested feel free to shoot me an email. I look forward to hearing from you!
Superb blog by the way!
Your comment is awaiting moderation.
познавательный блог https://zefirka.net.ua с интересными статьями о приметах, значении имен, толковании снов, традициях, праздниках, советах на каждый день.
Your comment is awaiting moderation.
Новости Киева https://infosite.kyiv.ua события города, происшествия, экономика и общество. Актуальные обзоры, аналитика и оперативные материалы о том, что происходит в столице Украины сегодня.
Your comment is awaiting moderation.
Автомобильный портал https://avtogid.in.ua с актуальной информацией об автомобилях. Новинки рынка, обзоры, тест-драйвы, характеристики, цены и практические рекомендации для ежедневного использования авто.
Your comment is awaiting moderation.
routerready.click – Loved the layout today; clean, simple, and genuinely user-friendly overall.
Your comment is awaiting moderation.
Днепр онлайн https://faine-misto.dp.ua городской портал с актуальными новостями и событиями. Главные темы дня, общественная жизнь, городские изменения и полезная информация для горожан.
Your comment is awaiting moderation.
艾一帆海外版,专为华人打造的高清视频平台,支持全球加速观看。
Your comment is awaiting moderation.
Новости Львова https://faine-misto.lviv.ua сегодня: городские события, инфраструктура, транспорт, культура и социальная повестка. Обзоры, аналитика и оперативные обновления о жизни города онлайн.
Your comment is awaiting moderation.
Портал города Хмельницкий https://faine-misto.km.ua с новостями, событиями и обзорами. Всё о жизни города: решения местных властей, происшествия, экономика, культура и развитие региона.
Your comment is awaiting moderation.
Professional partnership hub – The site structure is clean, and finding information is effortless.
Your comment is awaiting moderation.
Professional collaboration site – Alliance strategies are well presented, and the layout is intuitive.
Your comment is awaiting moderation.
clarity link – The message is actionable, inspiring trust and forward motion.
Your comment is awaiting moderation.
Сайт города Винница https://faine-misto.vinnica.ua свежие новости, городские события, происшествия, экономика, культура и общественная жизнь. Актуальные обзоры, важная информация для жителей и гостей города.
Your comment is awaiting moderation.
browsebuddy.click – Found practical insights today; sharing this article with colleagues later.
Your comment is awaiting moderation.
Новости Житомира https://faine-misto.zt.ua сегодня: события города, инфраструктура, транспорт, культура и социальная сфера. Обзоры, аналитика и оперативные обновления о жизни Житомира онлайн.
Your comment is awaiting moderation.
Сайт города Одесса https://faine-misto.od.ua свежие новости, городские события, происшествия, культура, экономика и общественная жизнь. Актуальные обзоры, важная информация для жителей и гостей Одессы в удобном формате.
Your comment is awaiting moderation.
A motivating discussion is worth comment. I believe that you
should write more about this subject, it might not be a taboo subject but usually people don’t talk about
such topics. To the next! Many thanks!!
Your comment is awaiting moderation.
clicknetwork.click – Color palette felt calming, nothing distracting, just focused, thoughtful design.
Your comment is awaiting moderation.
websprint.click – Content reads clearly, helpful examples made concepts easy to grasp.
Your comment is awaiting moderation.
speedserve.click – Bookmarked this immediately, planning to revisit for updates and inspiration.
Your comment is awaiting moderation.
Practical online sales hub – Navigation is clear, and managing products is uncomplicated.
Your comment is awaiting moderation.
Rafa Silva http://rafa-silva.com.az is an attacking midfielder known for his dribbling, mobility, and ability to create chances. Learn more about his biography, club career, achievements, playing style, and key stats.
Your comment is awaiting moderation.
clicktolearnandgrow.click – Found this today, content seems helpful and worth checking again.
Your comment is awaiting moderation.
бизнес-клуб МТТ это площадка для роста, собирающее основателей проектов, которые внедряют интеллектуальные цифровые решения и иммерсивные цифровые среды в реальный бизнес. мероприятия для бизнеса создан для обмена опытом и масштабирования проектов в условиях цифровой трансформации. В рамках встреч клуба участники изучают прикладные сценарии использования AI в автоматизации для увеличения прибыли. бизнес-клуб МТТ сфокусирован на долгосрочный эффект, поэтому каждое событие дает конкретные инсайты. Участники клуба анализируют будущее цифровой экономики, ищут точки роста под собственные проекты. клуб предпринимателей будет полезен для инвесторов, которые планируют внедрение инноваций без абстрактных рассуждений. В клубе формируется сообщество единомышленников, где ценится опыт. бизнес-клуб МТТ способствует для осознанного внедрения технологий и устойчивого роста компаний.
https://business-club-mtt.ru/
Your comment is awaiting moderation.
бизнес-клуб МТТ это деловая среда, объединяющее владельцев компаний, которые активно изучают искусственный интеллект и иммерсивные цифровые среды в предпринимательскую деятельность. мероприятия для бизнеса развивается для практического обучения и запуска инновационных решений в условиях цифровой трансформации. В рамках закрытых сессий участники получают прикладные сценарии использования нейросетей в маркетинге для оптимизации затрат. бизнес-клуб МТТ сфокусирован на результат, поэтому каждый формат общения помогает принимать решения. Участники клуба совместно прорабатывают тренды нейросетей, ищут точки роста под собственные проекты. клуб предпринимателей будет полезен для стартаперов, которые хотят понимать технологии без оторванных от практики концепций. В клубе формируется деловое окружение, где важны практические знания. бизнес-клуб МТТ создает условия для повышения экспертизы и долгосрочного развития бизнеса.
https://business-club-mtt.ru/
Your comment is awaiting moderation.
Эта публикация дает возможность задействовать различные источники информации и представить их в удобной форме. Читатели смогут быстро найти нужные данные и получить ответы на интересующие их вопросы. Мы стремимся к четкости и доступности материала для всех!
Получить больше информации – https://vivod-iz-zapoya-2.ru/
Your comment is awaiting moderation.
Barcelona fan site https://barcelona.com.az with the latest news, match results, squads and statistics. Club history, trophies, transfers and resources for loyal fans of Catalan football.
Your comment is awaiting moderation.
UFC Baku fan site https://ufc-baku.com.az/ for fans of mixed martial arts. Tournament news, fighters, fight results, event announcements, analysis and everything related to the development of UFC in Baku and Azerbaijan.
Your comment is awaiting moderation.
Galatasaray Football Club http://galatasaray.com.az latest news, fixtures, results, squad and player statistics. Club history, achievements, transfers and relevant information for fans.
Your comment is awaiting moderation.
https://www.lagodigarda.com/booking/pages/telohranitelykiller.html
Your comment is awaiting moderation.
Knowledge building portal – The platform is intuitive and helps learners move forward easily.
Your comment is awaiting moderation.
https://sporteveryday.info/wp-content/pgs/nasilie_sredi_podrostkov.html
Your comment is awaiting moderation.
Портал для жінок https://u-kumy.com про стиль, здоров’я та саморозвиток. Експертні поради, чесні огляди, лайфхаки для дому та роботи, ідеї для відпочинку та гармонійного життя.
Your comment is awaiting moderation.
Enterprise growth portal – Content is coherent and provides useful partnership insights.
Your comment is awaiting moderation.
shoproute marketplace hub – Smooth experience, selecting items is simple and clear.
Your comment is awaiting moderation.
Телевизионная реклама остается одним из самых заметных каналов продвижения для бизнеса ориентированного на широкую аудиторию и региональные рынки Телевизионные рекламные ролики позволяют формировать узнаваемость бренда усиливать доверие и повышать интерес к товарам и услугам Тв реклама образца 2016 года активно использовалась компаниями для продвижения в городах с развитой медиасредой и стабильной аудиторией Астрахань Волгоград и Самара стали важными площадками для размещения коммерческих видеоматериалов и имиджевых сообщений Размещение рекламы на тв обеспечивает контакт с целевой аудиторией в привычной информационной среде и способствует росту узнаваемости на локальном уровне Видеореклама сочетает изображение звук и динамику что делает сообщение более запоминающимся и эмоционально насыщенным Реклама на тв в регионах позволяет учитывать специфику аудитории время выхода и тематическую направленность каналов Подготовка телевизионного контента включает разработку сценария съемку монтаж и адаптацию под эфирные требования что обеспечивает профессиональный уровень подачи Продвижение через тв каналы подходит как для крупных брендов так и для локального бизнеса стремящегося заявить о себе Применение телевизионных форматов в Астрахани Волгограде и Самаре в 2016 году показало высокую эффективность при правильном планировании бюджета и графика показов Реклама на тв остается актуальным решением для компаний которые ценят охват стабильность и визуальное воздействие на аудиторию
https://vi-reklama.ru/
Your comment is awaiting moderation.
руководства по seo statyi-o-marketinge2.ru .
Your comment is awaiting moderation.
Реклама на тв остается эффективным инструментом массового охвата для бизнеса ориентированного на широкую аудиторию и региональные рынки Рекламные видеоформаты позволяют формировать узнаваемость бренда усиливать доверие и повышать интерес к товарам и услугам Тв реклама образца 2016 года активно использовалась компаниями для продвижения в городах с развитой медиасредой и стабильной аудиторией Региональные центры Поволжья и Юга стали важными площадками для размещения коммерческих видеоматериалов и имиджевых сообщений Показ рекламных роликов на каналах обеспечивает контакт с целевой аудиторией в привычной информационной среде и способствует росту узнаваемости на локальном уровне Рекламный видеоконтент использует изображение звук и динамику что делает сообщение более запоминающимся и эмоционально насыщенным Реклама на тв в регионах позволяет учитывать специфику аудитории время выхода и тематическую направленность каналов Подготовка телевизионного контента включает разработку сценария съемку монтаж и адаптацию под эфирные требования что обеспечивает профессиональный уровень подачи Реклама на телевидении подходит как для крупных брендов так и для локального бизнеса стремящегося заявить о себе Использование видеорекламы в Астрахани Волгограде и Самаре в 2016 году показало высокую эффективность при правильном планировании бюджета и графика показов Реклама на тв остается актуальным решением для компаний которые ценят охват стабильность и визуальное воздействие на аудиторию
https://vi-reklama.ru/
Your comment is awaiting moderation.
Жіночий портал https://soloha.in.ua про красу, здоров’я, стосунки та саморозвиток. Корисні поради, що надихають історії, мода, стиль життя, психологія та кар’єра – все для гармонії, впевненості та комфорту щодня.
Your comment is awaiting moderation.
оптимизация и продвижение сайтов москва оптимизация и продвижение сайтов москва .
Your comment is awaiting moderation.
Реклама на телевидении остается одним из самых заметных каналов продвижения для бизнеса ориентированного на широкую аудиторию и региональные рынки Видеореклама на тв позволяют формировать узнаваемость бренда усиливать доверие и повышать интерес к товарам и услугам Реклама на телевидении в 2016 году активно использовалась компаниями для продвижения в городах с развитой медиасредой и стабильной аудиторией Региональные центры Поволжья и Юга стали важными площадками для размещения коммерческих видеоматериалов и имиджевых сообщений Размещение рекламы на тв обеспечивает контакт с целевой аудиторией в привычной информационной среде и способствует росту узнаваемости на локальном уровне Рекламный видеоконтент использует изображение звук и динамику что делает сообщение более запоминающимся и эмоционально насыщенным Региональная реклама на телевидении позволяет учитывать специфику аудитории время выхода и тематическую направленность каналов Создание рекламных видео включает разработку сценария съемку монтаж и адаптацию под эфирные требования что обеспечивает профессиональный уровень подачи Продвижение через тв каналы подходит как для крупных брендов так и для локального бизнеса стремящегося заявить о себе Использование видеорекламы в Астрахани Волгограде и Самаре в 2016 году показало высокую эффективность при правильном планировании бюджета и графика показов Реклама на тв остается актуальным решением для компаний которые ценят охват стабильность и визуальное воздействие на аудиторию
https://cultmanagement-msu.ru/
Your comment is awaiting moderation.
Телевизионная реклама остается эффективным инструментом массового охвата для бизнеса ориентированного на широкую аудиторию и региональные рынки Телевизионные рекламные ролики позволяют формировать узнаваемость бренда усиливать доверие и повышать интерес к товарам и услугам Тв реклама образца 2016 года активно использовалась компаниями для продвижения в городах с развитой медиасредой и стабильной аудиторией Астрахань Волгоград и Самара стали важными площадками для размещения коммерческих видеоматериалов и имиджевых сообщений Запуск видеорекламы на телевидении обеспечивает контакт с целевой аудиторией в привычной информационной среде и способствует росту узнаваемости на локальном уровне Телевизионный формат объединяет изображение звук и динамику что делает сообщение более запоминающимся и эмоционально насыщенным Региональная реклама на телевидении позволяет учитывать специфику аудитории время выхода и тематическую направленность каналов Производство видеороликов включает разработку сценария съемку монтаж и адаптацию под эфирные требования что обеспечивает профессиональный уровень подачи Продвижение через тв каналы подходит как для крупных брендов так и для локального бизнеса стремящегося заявить о себе Применение телевизионных форматов в Астрахани Волгограде и Самаре в 2016 году показало высокую эффективность при правильном планировании бюджета и графика показов Видеореклама остается актуальным решением для компаний которые ценят охват стабильность и визуальное воздействие на аудиторию
https://cultmanagement-msu.ru/
Your comment is awaiting moderation.
Morixo Holdings official page – Straightforward navigation, readable content, and trustworthiness stands out.
Your comment is awaiting moderation.
Прагматика и менеджмент в культуре представляет собой академически выверенное направление подготовки ориентированную на подготовку специалистов в сфере арт бизнеса культурных проектов и креативных индустрий Программа объединяет философский анализ культурных процессов управленческие практики и прикладные инструменты работы с культурными институциями Обучение направлено на формирование профессиональных компетенций необходимых для работы в музеях галереях арт центрах медиа платформах и независимых культурных инициативах Бакалавриат и магистратура позволяют выстроить целостное понимание культуры как сферы управления коммуникации и социального проектирования Студенты изучают в области культурной политики экономики искусства философии культуры продюсирования и стратегического менеджмента Практика культурного управления рассматривается как инструмент анализа принятия решений и реализации проектов в условиях современного общества Образовательная модель нацелена на развитие критического мышления навыков проектной работы и способности взаимодействовать с различными аудиториями и институциональной средой Особое внимание уделяется практическая работа с кейсами исследование культурных рынков и анализ актуальных трендов креативной экономики Выпускники программы востребованы в сфере арт менеджмента культурного консалтинга продюсерской деятельности и управления творческими командами Прагматика и менеджмент в культуре формирует системное видение культуры как динамичной среды требующей профессионального подхода стратегического планирования и философского осмысления
https://cultmanagement-msu.ru/
Your comment is awaiting moderation.
Прагматический подход к менеджменту культуры представляет собой современную образовательную программу ориентированную на подготовку специалистов в сфере арт бизнеса культурных проектов и креативных индустрий Программа объединяет философский анализ культурных процессов управленческие практики и прикладные инструменты работы с культурными институциями Обучение направлено на формирование профессиональных компетенций необходимых для работы в музеях галереях арт центрах медиа платформах и независимых культурных инициативах Программы бакалаврского и магистерского уровня позволяют выстроить целостное понимание культуры как сферы управления коммуникации и социального проектирования Обучающиеся получают знания в области культурной политики экономики искусства философии культуры продюсирования и стратегического менеджмента Менеджмент культурных процессов рассматривается как инструмент анализа принятия решений и реализации проектов в условиях современного общества Учебный трек разработан на развитие критического мышления навыков проектной работы и способности взаимодействовать с различными аудиториями и институциональной средой Ключевым элементом программы является практическая работа с кейсами исследование культурных рынков и анализ актуальных трендов креативной экономики Выпускники программы востребованы в сфере арт менеджмента культурного консалтинга продюсерской деятельности и управления творческими командами Менеджмент культуры как профессиональная область формирует системное видение культуры как динамичной среды требующей профессионального подхода стратегического планирования и философского осмысления
https://cultmanagement-msu.ru/
Your comment is awaiting moderation.
onlineboost.click – Found practical insights today; sharing this article with colleagues later.
Your comment is awaiting moderation.
take action hub – Supports small steps that add up to meaningful change.
Your comment is awaiting moderation.
https://www.lagodigarda.com/booking/pages/kaksozdatysaytizara.html
Your comment is awaiting moderation.
Consumer-friendly online store – The flow is easy to follow and the interface is clean.
Your comment is awaiting moderation.
Возьмите под контроль свою деловую репутацию в интернете и средствах массовой информации с помощью репутационного агентства Бизнес Имидж которое занимается комплексным управлением репутацией компаний организаций публичных персон и частных лиц в цифровой среде и традиционных медиа Эксперты агентства создают положительное восприятие бренда или личности за счет системной работы с информационным полем поисковыми системами новостными площадками и социальными источниками Управление деловой репутацией позволяет минимизировать влияние негативных упоминаний восстановить доверие аудитории и повысить лояльность клиентов партнеров и инвесторов Мы анализируем информационный фон выявляем риски и разрабатываем индивидуальную стратегию продвижения с учетом целей бизнеса и особенностей отрасли Формирование репутации осуществляется через публикацию экспертных материалов работу с отзывами прессой и профильными площадками что обеспечивает долгосрочный эффект и устойчивые позиции в поисковой выдаче Команда Бизнес Имидж использует легальные и проверенные методы информационного управления соблюдая этические и правовые нормы что гарантирует безопасность и прогнозируемый результат Все действия выполняются официально и ориентируемся на измеримые показатели эффективности рост доверия улучшение тональности и увеличение видимости позитивного контента Имидж в онлайн среде становится ключевым активом в условиях высокой конкуренции поэтому своевременное управление информацией помогает сохранять стабильность и уверенное развитие бизнеса Поручите репутацию специалистам чтобы сосредоточиться на стратегических задачах и росте своей компании или личного бренда Профессиональное сопровождение от агентства Бизнес Имидж обеспечивает контроль над информационным пространством формирует положительный образ и укрепляет позиции на рынке
https://businessimage.ru
Your comment is awaiting moderation.
connecthub.click – Color palette felt calming, nothing distracting, just focused, thoughtful design.
Your comment is awaiting moderation.
Возьмите под контроль свою деловую репутацию в интернете и средствах массовой информации с помощью репутационного агентства Бизнес Имидж которое специализируется на формировании позитивного имиджа компаний организаций публичных персон и частных лиц в цифровой среде и традиционных медиа Эксперты агентства создают положительное восприятие бренда или личности за счет системной работы с информационным полем поисковыми системами новостными площадками и социальными источниками Репутационное сопровождение позволяет минимизировать влияние негативных упоминаний восстановить доверие аудитории и повысить лояльность клиентов партнеров и инвесторов Команда выполняет глубокий анализ упоминаний выявляем риски и разрабатываем индивидуальную стратегию продвижения с учетом целей бизнеса и особенностей отрасли Создание положительного имиджа осуществляется через публикацию экспертных материалов работу с отзывами прессой и профильными площадками что обеспечивает долгосрочный эффект и устойчивые позиции в поисковой выдаче Агентство Бизнес Имидж использует легальные и проверенные методы информационного управления соблюдая этические и правовые нормы что гарантирует безопасность и прогнозируемый результат Все действия выполняются официально и ориентируемся на измеримые показатели эффективности рост доверия улучшение тональности и увеличение видимости позитивного контента Репутация в интернете становится ключевым активом в условиях высокой конкуренции поэтому своевременное управление информацией помогает сохранять стабильность и уверенное развитие бизнеса Поручите репутацию специалистам чтобы сосредоточиться на стратегических задачах и росте своей компании или личного бренда Комплексный подход от агентства Бизнес Имидж обеспечивает контроль над информационным пространством формирует положительный образ и укрепляет позиции на рынке
https://businessimage.ru
Your comment is awaiting moderation.
Hello pals!
I came across a 153 awesome resource that I think you should check out.
This platform is packed with a lot of useful information that you might find helpful.
It has everything you could possibly need, so be sure to give it a visit!
https://dnalyrics.com/2022/09/top-5-digital-marketing-trends-in-2022.html
Furthermore don’t overlook, folks, that a person at all times are able to within this piece locate responses to your the absolute confusing queries. We tried — lay out all content in the most very accessible way.
Your comment is awaiting moderation.
webrelay.click – Bookmarked this immediately, planning to revisit for updates and inspiration.
Your comment is awaiting moderation.
netassist.click – Found practical insights today; sharing this article with colleagues later.
Your comment is awaiting moderation.
trusted connections center – Professional design, simplifies building and managing commercial networks.
Your comment is awaiting moderation.
Morixo Capital online hub – Organized interface, strong branding, and the flow of pages is natural.
Your comment is awaiting moderation.
personal success navigator – Inspires clarity, focus, and practical next steps every day.
Your comment is awaiting moderation.
блог про seo statyi-o-marketinge2.ru .
Your comment is awaiting moderation.
комплексное продвижение сайтов москва комплексное продвижение сайтов москва .
Your comment is awaiting moderation.
quick info hub – Simple and informative, perfect for quick learning.
Your comment is awaiting moderation.
easy shop click – Smooth interface, products are easy to locate and buy quickly.
Your comment is awaiting moderation.
International commerce hub – The platform feels expansive, and business goals are clear.
Your comment is awaiting moderation.
corporate connections click – Informative site, guides users through collaboration options smoothly.
Your comment is awaiting moderation.
Mivaro Trust Group official site – Pages are well-organized, information is clear, and the overall experience is helpful.
Your comment is awaiting moderation.
bargain click page – Efficient layout, perfect for spotting daily offers quickly.
Your comment is awaiting moderation.
nextgen store – Streamlined design, site feels advanced and easy to use.
Your comment is awaiting moderation.
smart buy site – Helps find the best options for common shopping needs.
Your comment is awaiting moderation.
Creative strategy network – The interface is engaging, and the layout keeps things clear.
Your comment is awaiting moderation.
https://ville-barentin.fr/wp-content/pgs/meilleur-code-promo-linebet.html
Your comment is awaiting moderation.
funnelscalelab.click – Pages loaded fast, images appeared sharp, and formatting stayed consistent.
Your comment is awaiting moderation.
блог о маркетинге блог о маркетинге .
Your comment is awaiting moderation.
Mivaro Trust Group homepage – Simple navigation, helpful details, and the platform is easy to understand.
Your comment is awaiting moderation.
оптимизация сайта франция poiskovoe-seo-v-moskve.ru .
Your comment is awaiting moderation.
learn and grow click – Educational insights, keeps the learning process engaging and motivating.
Your comment is awaiting moderation.
creative spark site – Fun and engaging, helps generate new ideas quickly.
Your comment is awaiting moderation.
https://donolux.ru/images/pgs/?promokod-pari.html
Your comment is awaiting moderation.
speedy learning portal – Easy to understand, helps develop skills fast and effectively.
Your comment is awaiting moderation.
semmarketing.click – Color palette felt calming, nothing distracting, just focused, thoughtful design.
Your comment is awaiting moderation.
Safe retail hub – Exploring categories is effortless, and the site feels dependable.
Your comment is awaiting moderation.
discover & explore page – Always comes with something novel to explore.
Your comment is awaiting moderation.
rankbooststudio.click – Overall, professional vibe here; trustworthy, polished, and pleasantly minimal throughout.
Your comment is awaiting moderation.
clickgrowthhub.click – Pages loaded fast, images appeared sharp, and formatting stayed consistent.
Your comment is awaiting moderation.
leadboostlab.click – Navigation felt smooth, found everything quickly without any confusing steps.
Your comment is awaiting moderation.
Mavero Trustline web experience – Clean interface, logically arranged content, and visitors can browse effortlessly.
Your comment is awaiting moderation.
Digital partnership platform – The layout is pleasant and the messaging is clear.
Your comment is awaiting moderation.
Big-bag-rus.ru — биг бэг тара и мягкая тара МКР: прочные биг-бэги для стройматериалов, зерна, гранулята и других сыпучих продуктов. Производство под заказ и со склада, консультация, расчет, доставка по РФ: https://big-bag-rus.ru/
Your comment is awaiting moderation.
financial pillar guide – Professional and well-structured, perfect for new investors.
Your comment is awaiting moderation.
explore new ideas – Creative platform, sparks inspiration for future possibilities effortlessly.
Your comment is awaiting moderation.
ам нормальная альтернатива 307.советую 1к15 Купить Кокаин, Бошки, Мефедрон, Гашиш длица окола часа очень даже не плохоСургут, вобщем хмао
Your comment is awaiting moderation.
click & purchase portal – Fast checkout, allows users to buy quickly without issues.
Your comment is awaiting moderation.
руководства по seo statyi-o-marketinge2.ru .
Your comment is awaiting moderation.
продвижение веб сайтов москва продвижение веб сайтов москва .
Your comment is awaiting moderation.
https://vc.ru/2218602, Рейтинг 22 Бота Телеграм для накрутки просмотров в Telegram в 2026 году
Your comment is awaiting moderation.
клиника жуйкан китай Жуйкан: Маяк здоровья и надежды в приграничном Хэйхэ Жуйкан – это имя, синонимичное качественной медицинской помощи и заботливому отношению к пациентам в динамично развивающемся городе Хэйхэ. Клиника, уверенно шагая в ногу со временем, предлагает широкий спектр услуг, сочетая традиционные методы лечения с инновационными технологиями, тем самым заслужив доверие множества пациентов, как из Китая, так и из-за рубежа. Это не просто медицинское учреждение, это островок надежды, где каждый человек получает шанс на здоровую и полноценную жизнь.
Your comment is awaiting moderation.
Retail innovation platform – Organized listings make browsing simple and enjoyable.
Your comment is awaiting moderation.
forward click resource – Motivates consistent effort without feeling overwhelming.
Your comment is awaiting moderation.
Тут мы https://zakladmef.store произвёл оплату на регу.жду трека!думаю быстро всё получится.сегодня закажу 1г. MN-011 для пробы)посмотрим на товар)
Your comment is awaiting moderation.
Mavero Holdings business site – Organized structure, professional feel, and information is easy to navigate.
Your comment is awaiting moderation.
discover focus power – Clear and relatable text positions focus as a practical tool.
Your comment is awaiting moderation.
XelivoPortal – Pages opened instantly, navigation was smooth and the content seemed trustworthy.
Your comment is awaiting moderation.
bond insight portal – Security details are clear and easy to follow for all users.
Your comment is awaiting moderation.
growth builder hub – Effective platform, ideal for maintaining long-term momentum.
Your comment is awaiting moderation.
Молодцы! Так держать!стараемся! https://mef-market.shop после нового года два раза заказывал первый и второй раз были геморои по срокам отправок но все дошло третий раз конечно тоже закажу но ТС должен будет мамой поклястся что отправит вовремя но если по правде говоря то курьерки тоже мозг ебут не всегда вина ТСд не магаз рооовный так что не переживай все будет четко)))
Your comment is awaiting moderation.
trusted corporate portal – Well-organized platform, delivers insights for business alliances efficiently.
Your comment is awaiting moderation.
Opportunity discovery page – Looks helpful and simple to browse so far.
Your comment is awaiting moderation.
Career growth exploration – Navigation is smooth, and the design is straightforward.
Your comment is awaiting moderation.
коллекция игр доступна прямо в браузере на сайте casino kometa: казино комета
Your comment is awaiting moderation.
innovative buy hub – Modern layout with an easy and smooth shopping flow.
Your comment is awaiting moderation.
всё посылка пришла всё ровно теперь будем пробовать ) Купить Кокаин, Бошки, Мефедрон, Гашиш МАГАЗ СУПЕР!,брал5 гр ск качество отменное все сделанно ровно,даже фото не понадобилось,кристалики отличные без мутного оттенка,плаватся отлично,присутствует запах уксусного ангедрида,ВЫРАЖАЮ ОГРОМНУЮ БЛАГОДАРНОСТЬ!ВСЕ СУПЕР ПРОДОЛЖАЙТЕ В ТОМ ЖЕ ДУХЕ!сегодня вот ночью прислал трек. Бьется, радует
Your comment is awaiting moderation.
interactive win click – Motivating and fun, keeps the browsing experience lively.
Your comment is awaiting moderation.
lynx bond hub – Very easy to use, moving between bond options is quick and intuitive.
Your comment is awaiting moderation.
midnight field catalog – Nicely arranged sections, shopping is effortless and the site feels well built.
Your comment is awaiting moderation.
ZorlaDirect – Minimal design, fast loading, and navigation straightforward.
Your comment is awaiting moderation.
momentum hub – Messaging conveys steady progress, encouraging action and forward thinking.
Your comment is awaiting moderation.
Работаем с данным магазином! всем советую! https://boshkionline.shop НЕТ не пришла, но это у СПСР экспресс вообще какая то лажа, раньше все привозили вовремя, а теперь вообще какую то чепуху сочиняют, звонил говорят не знаем почему посылку курьер не взял…Насчет доставки стало не очень после того как перестали работать с спср, но особой разницы не заметил.
Your comment is awaiting moderation.
creative sparks shop – Well-organized, discovering inventive ideas is fast and fun.
Your comment is awaiting moderation.
плотный дюшес из вискозы используется в разработке стильной женских коллекций, где важны комфорт и внешний вид. Швейная компания Дизайн Галант осуществляет продажу женской одежды оптовыми партиями напрямую от производителя, что позволяет поддерживать выгодные цены. Ассортимент систематически расширяется свежими коллекциями, соответствующими модным тенденциям. В наличии можно найти повседневная и деловая одежда, которые рассчитаны для торговых точек. Контроль пошива гарантирует ровный уровень качества, точную посадку и износостойкое сырье. Приобретая оптовые партии женской одежды у производителя, партнеры получают прозрачные условия сотрудничества. Постоянно доступны оптовые акции, что позволяет делать закупки еще более выгодной. Компания ориентируется на устойчивые деловые отношения, обеспечивая своевременные отгрузки. Современная женская мода с фабрики оптимально подходит для обновления витрины, поддерживая конкурентоспособность магазина. Партнерство напрямую с брендом позволяет гибко реагировать на спрос. Доступная женская одежда оптом является практичным выбором для роста продаж.
https://design-galant.ru/
Your comment is awaiting moderation.
вискозный дюшес широко востребован в разработке современной одежды для женщин, где важны комфорт и визуальная выразительность. Компания Дизайн Галант реализует поставки женской одежды оптом непосредственно от производителя, что позволяет предлагать разумный уровень цен. Каталог продукции постоянно пополняется новыми моделями, ориентированными современным направлениям моды. В оптовом каталоге собраны платья, костюмы, блузки, юбки и брюки, которые рассчитаны для интернет и офлайн магазинов. Контроль пошива гарантирует ровный уровень качества, аккуратный крой и проверенные ткани. Закупая одежду для женщин оптом напрямую у фабрики, клиенты получают прозрачные условия сотрудничества. Действуют специальные предложения, что превращает покупку максимально рентабельной. Бренд делает ставку на устойчивые деловые отношения, предлагая стабильные поставки. Современная женская мода непосредственно с производства хорошо подходит для обновления витрины, поддерживая коммерческий потенциал торговой точки. Работа с производителем помогает оперативно реагировать на потребности покупателей. Женская одежда оптом по разумным ценам становится практичным выбором для роста продаж.
https://design-galant.ru/
Your comment is awaiting moderation.
practical shopping site – Easy to browse with neatly arranged product categories.
Your comment is awaiting moderation.
ткани для брюк и аккуратный крой требуют надежной техники поэтому качественные швейные машины играют ключевую роль для тех кто занимается домашним шитьем и ценит уверенный результат без доработок. Продажа швейных машин в Москве ориентирована на любителей и опытных мастеров предлагая актуальные решения для любых задач от простых вариантов до техники с расширенными возможностями. Оверлоки в свою очередь обеспечивают чистый край изделия что особенно важно при работе с трикотажем и эластичными материалами. Доставка по Москве организована так чтобы клиент экономил время и усилия независимо от района проживания. Каждая швейная машинка проходит проверку перед отправкой что снижает риск неожиданных проблем и дает уверенность в результате. Покупатели ценят возможность получить консультацию ориентируясь на планируемую нагрузку. Современные швейные машины отличаются тихой работой что делает процесс шитья предсказуемым и точным. Благодаря прямым поставкам предложения выглядят выгодно а ассортимент регулярно обновляется. В итоге швейные машинки и оверлоки с доставкой по Москве становятся надежной основой для тех кто хочет получать стабильный результат и быть уверенным что каждый проект будет завершен.
https://homesewingcenter.ru/
Your comment is awaiting moderation.
ткани для брюк как основа пошива требуют надежной техники поэтому швейные машинки и оверлоки становятся главным инструментом для тех кто занимается индивидуальным производством одежды и ценит точность строчки. Продажа швейных машин в Москве ориентирована на начинающих и профессионалов предлагая разнообразие комплектаций от простых вариантов до техники с расширенными возможностями. Оверлоки в свою очередь обеспечивают чистый край изделия что особенно важно при работе с трикотажем и эластичными материалами. Доставка по Москве организована так чтобы покупка была максимально удобной независимо от района проживания. Каждая швейная машинка проходит подготовку к эксплуатации что снижает риск неожиданных проблем и дает уверенность в результате. Покупатели ценят возможность получить консультацию ориентируясь на тип тканей. Современные швейные машины отличаются тихой работой что делает процесс шитья увлекательным и продуктивным. Благодаря прямым поставкам предложения выглядят выгодно а ассортимент регулярно обновляется. В итоге швейные машинки и оверлоки с доставкой по Москве становятся надежной основой для тех кто хочет шить с удовольствием и быть уверенным что техника не подведет.
https://homesewingcenter.ru/
Your comment is awaiting moderation.
итальянская ткань становится отправной точкой для размышлений о том как простой на вид бетон обретает художественный смысл в современном дизайне интерьера, где творческая студия работает на стыке искусства и инженерии и рассматривает пространство как целостную композицию из текстур и объемов. Здесь монолитный материал освобождается от шаблонов и становятся эмоциональным акцентом интерьера, сохраняя при этом прочность и долговечность. В такой лаборатории идей каждый объект рождается из эксперимента, где матовость сочетается с мягкой игрой света. Бетон здесь становится основой для визуального высказывания, позволяя создавать индивидуальные решения. Такой подход ценят те кто ищет осознанный дизайн, потому что каждый элемент имеет обоснование. В результате бетон приобретает человеческое измерение, органично вписываясь в частные интерьеры и архитектурные пространства, доказывая что эстетика начинается с материала и что бетон способен быть деликатным в деталях без потери своего характера.
https://uzordesign.ru/
Your comment is awaiting moderation.
реагенты всегда чистые и по высшему??? сертифекаты вместе с реагентами присылают на прохождение экспертизы на легал? https://kokainanon.shop Я по почте переписывается пытался нормально договориться потом просто отвечать перестали решил здесь пообщаться тут надеюсь игнорировать не будут!Магаз качественный ни разу не подводил!!!
Your comment is awaiting moderation.
итальянская ткань как источник вдохновения становится отправной точкой для размышлений о том как бетон превращается в выразительный материал в современном дизайне интерьера, где дизайн студия мыслит шире привычных форм и рассматривает пространство как единый живой организм. Здесь архитектурный бетон уходит от грубой функциональности и становятся частью уютного дома, сохраняя при этом устойчивость к времени и нагрузкам. В такой лаборатории идей каждый объект рождается из эксперимента, где строгая геометрия уравновешивается теплом пространства. Бетон здесь работает как холст для современного дизайна, позволяя создавать индивидуальные решения. Такой подход ценят те кто ищет осознанный дизайн, потому что каждое изделие рассказывает свою историю. В результате строгая фактура становится теплой, органично вписываясь в частные интерьеры и архитектурные пространства, доказывая что современный интерьер это ощущение и что бетон способен быть удивительно выразительным без потери своего характера.
https://uzordesign.ru/
Your comment is awaiting moderation.
curve shopping hub – Sleek interface, browsing and buying items is hassle-free.
Your comment is awaiting moderation.
financial planning page – Very readable, offers practical guidance for bond investments.
Your comment is awaiting moderation.
adsparkhub.click – Found practical insights today; sharing this article with colleagues later.
Your comment is awaiting moderation.
unitedstrength.bond – Layout is structured, messaging conveys cohesion and solid principles naturally.
Your comment is awaiting moderation.
locallift.click – Mobile version looks perfect; no glitches, fast scrolling, crisp text.
Your comment is awaiting moderation.
bizfunnel.click – Found practical insights today; sharing this article with colleagues later.
Your comment is awaiting moderation.
всех с новым годом и удачных покупок Купить Кокаин, Бошки, Мефедрон, Гашиш Может не по теме,но всё ж поделюсб опытом чем хорош СПСР.При заказе на сайте ты вбиваешь адрес доставки, когда посыль уже в городе и звонит курьер назначаю ему встречу не по адресу они без проблем едут.А дальше уже ваша фантазия куда вызвать курьера в лес или наоборот в людное место-этоим можно лишний раз обезопасить себя отБуду ждать доставку как чё отпишусь .
Your comment is awaiting moderation.
discover strategies online – Informative platform, helps users explore new methods effectively.
Your comment is awaiting moderation.
midnight cove shop – Stylish dark layout, products are simple to locate and buying feels seamless.
Your comment is awaiting moderation.
learn with purpose – Conveys learning that’s aligned with goals and values.
Your comment is awaiting moderation.
XanixNavigator – Layout neat, pages load quickly, and navigation feels natural.
Your comment is awaiting moderation.
progresscatalystbridge.bond – Polished look, content motivates readers to initiate forward movement confidently.
Your comment is awaiting moderation.
growth path site – Easy to navigate and focused on keeping things moving forward.
Your comment is awaiting moderation.
opalcrestcolective.shop – Well-structured design, items are easy to locate and shopping is smooth.
Your comment is awaiting moderation.
Trusted Nexus Path – Well-structured pages, content communicates reliability naturally.
Your comment is awaiting moderation.
shoproute express – Clear navigation, finding and buying products feels fast today.
Your comment is awaiting moderation.
trustpath.bond – Organized layout, content emphasizes integrity and a professional approach.
Your comment is awaiting moderation.
и что теперь делать с заказом мне его оплачивать через терминал!? или.. https://kokainonline.shop Почему страшно?трэк получил . Магаз всегда был хорош
Your comment is awaiting moderation.
investment finder site – Very readable layout that simplifies evaluating bond options.
Your comment is awaiting moderation.
online finance hub – Content is clear, layout is tidy, and navigation feels natural.
Your comment is awaiting moderation.
stonebridgepartners.bond – Inviting interface, content communicates reliability while remaining easy to understand.
Your comment is awaiting moderation.
unitycorner.bond – Easy-to-follow layout, messaging highlights collaboration and dependable structure.
Your comment is awaiting moderation.
clear direction resource – The tone comes across calm and thoughtfully motivating.
Your comment is awaiting moderation.
Душевный магазин) Все довольны. Славно. Купить Кокаин, Бошки, Мефедрон, Гашиш только что был свидетелем того как парней приняли с ам2233 и тусиаем от чемикала на спср офисе, вывели в браслетах посадили в микрик и увезли, чего ожидать? чем им помочь?Знаю сайт. Всем советую. Пишу в кратце о главном. Связался в аське. Ответили сразу, тут же сделал заказ на регу. Осталось подождать…
Your comment is awaiting moderation.
budget buys hub – Pleasant experience, products are easy to compare and select.
Your comment is awaiting moderation.
localbooster.click – Appreciate the typography choices; comfortable spacing improved my reading experience.
Your comment is awaiting moderation.
localsprint.click – Pages loaded fast, images appeared sharp, and formatting stayed consistent.
Your comment is awaiting moderation.
urbanwavevision.bond – Contemporary look, navigation is intuitive and messaging comes across clearly.
Your comment is awaiting moderation.
aurumlane premium – Tasteful presentation, shopping feels calm and well organized overall.
Your comment is awaiting moderation.
northwindcollective.shop – Tidy layout, browsing feels natural and checkout is intuitive.
Your comment is awaiting moderation.
XylorCenter – Layout neat, navigation straightforward, and shopping process hassle-free.
Your comment is awaiting moderation.
purpose path portal – Well-structured content helps you see the bigger picture.
Your comment is awaiting moderation.
Bonded Guide – Messaging inspires confidence with clarity and professional tone.
Your comment is awaiting moderation.
solid bond platform – Reliable and clear, bond information is easy to follow.
Your comment is awaiting moderation.
principlehub.bond – Strong concept, site emphasizes ethical standards and clear communication.
Your comment is awaiting moderation.
trusted bonds hub – Easy navigation and clear details create confidence.
Your comment is awaiting moderation.
anchorpoint.bond – User-friendly layout, pages communicate commitment and clarity naturally.
Your comment is awaiting moderation.
да два раза прислали шляпу.( хотя раньше присылали отменный товар с хорошими бонусами. даже не знаю что делать( Купить Кокаин, Бошки, Мефедрон, Гашиш спасибо и ВАМ !!Зашла на ваш сайт, а там “Your site hasn’t been activated yet!”… в общем ничего не выходит. Пробывала и через ТОР и через обычный браузер. Все одно. Что не так делаю?
Your comment is awaiting moderation.
action opens doors – Phrasing feels encouraging, pushing users to take the first step forward.
Your comment is awaiting moderation.
nexusflow.bond – Balanced design, messaging is clear and builds confidence in the content.
Your comment is awaiting moderation.
Trust overview page – The structure is organized and content is easy to absorb.
Your comment is awaiting moderation.
StoneHollowGoods – Organized pages, easy product exploration, and fast checkout.
Your comment is awaiting moderation.
balanced decision resource – Feels reassuring and promotes level-headed choices.
Your comment is awaiting moderation.
unifiedtrustcircle.bond – Professional feel, content is approachable and gives a sense of reliability.
Your comment is awaiting moderation.
quillmarket.shop – Friendly interface, store navigation is straightforward and details are clear.
Your comment is awaiting moderation.
biz relationship hub – Great insights, platform helps understand networking strategies clearly.
Your comment is awaiting moderation.
второй вопрос к товарищу под ником Leks: https://longboardingguide.com стараемся для васКак то так.
Your comment is awaiting moderation.
pathfinder click – Simple to use, navigation feels effortless and clear.
Your comment is awaiting moderation.
peakbond.bond – Clean design, content communicates reliability and professional excellence.
Your comment is awaiting moderation.
professional bond portal – User-friendly interface with well-organized information throughout.
secure investment site – Smooth scrolling, well-labeled sections, and professional presentation.
Your comment is awaiting moderation.
Signal Point – Focused presentation encourages users to act and keep moving forward.
Your comment is awaiting moderation.
firmbase.bond – Well-laid-out pages, content feels dependable and reinforces a professional tone.
Your comment is awaiting moderation.
clicky find portal – Organized and straightforward, products are simple to locate.
Your comment is awaiting moderation.
focus first portal – Structured approach makes understanding seamless.
Your comment is awaiting moderation.
maple themed outlet – Product pages are easy to follow, with concise and helpful details.
Your comment is awaiting moderation.
TrivoxAccess – Fast pages, organized layout, and all sections easy to find.
Your comment is awaiting moderation.
solidcapital.bond – Organized presentation, navigation supports understanding and communicates dependable information.
Your comment is awaiting moderation.
Спасибо. Все по плану получилось. Получил в лучшем виде) Купить Кокаин, Бошки, Мефедрон, Гашиш Кто долги твоего представителя в РБ будет отдавать?у нас она валяется,сами не потребляем.
Your comment is awaiting moderation.
FernLuxeShop – Stylish pages, intuitive navigation, and a simple purchasing process.
Your comment is awaiting moderation.
planning with impact – I like how the phrasing emphasizes direction and purpose.
Your comment is awaiting moderation.
Bonded Legacy Portal – Professional design, legacy messaging is straightforward and easy to follow.
Your comment is awaiting moderation.
petalcollective.shop – Artistic layout, products stand out and browsing is simple.
Your comment is awaiting moderation.
clarity hub – Concise wording helps users grasp key ideas and move forward efficiently.
Your comment is awaiting moderation.
metricovo.click – Overall, professional vibe here; trustworthy, polished, and pleasantly minimal throughout.
Your comment is awaiting moderation.
steadfastbond.bond – Professional interface, messaging conveys trust and a grounded user experience.
Your comment is awaiting moderation.
alliantedge.bond – Clean and modern, messaging highlights reliability and approachable content.
Your comment is awaiting moderation.
Focused Action Portal – Theme encourages practical execution of ideas with clarity and purpose.
Your comment is awaiting moderation.
https://vc.ru/1939390, Накрутка ТГ – 25 лучших сервисов в 2026 году (обновлено)
Your comment is awaiting moderation.
View project details – The site feels approachable, with content that’s simple yet informative.
Your comment is awaiting moderation.
Нет не нужен. Купить Кокаин, Бошки, Мефедрон, Гашиш Приветствую! я получал последний раз недели две назад, заказывал уже много раз и скоро сделаю очередной заказ в этом магазине!!!да это будет полная:ass:.Ну я надеюсь все будет хорошо.тогда так вышло иза того что это остатки товара из серии мн – 001.Уверен такой жопы больше не будет
Your comment is awaiting moderation.
Изучить вопрос глубже – https://blog.ankerherz.de/sandbar-anna-maria-png/?unapproved=1785946&moderation-hash=e4f097b388617ab16ffa87cdee74d82c#comment-1785946
Your comment is awaiting moderation.
simple online boutique – The presentation feels polished, letting shoppers enjoy browsing without distractions.
Your comment is awaiting moderation.
circlehub.bond – Logical navigation, pages highlight unity and foster trust effectively for users.
Your comment is awaiting moderation.
convertlyo.click – Navigation felt smooth, found everything quickly without any confusing steps.
Your comment is awaiting moderation.
ZorivoPortal – Pages load quickly, layout clear, and browsing through the site feels effortless.
Your comment is awaiting moderation.
отлично всё 100% )) https://uniontobacco.online Тоже такая ситуация , сижу без товара негодую.я заметил тенденцию, у магазинов LegalLuna, Alfa, которые оказались не порядочными:dontknown:
Your comment is awaiting moderation.
MistyHavenStore – Calm interface, products are easy to locate, and checkout is reliable.
Your comment is awaiting moderation.
funnelio.click – Overall, professional vibe here; trustworthy, polished, and pleasantly minimal throughout.
Your comment is awaiting moderation.
leadvero.click – Overall, professional vibe here; trustworthy, polished, and pleasantly minimal throughout.
Your comment is awaiting moderation.
кино эфир онлайн смотреть онлайн
Your comment is awaiting moderation.
zylavotrustco network – Professional appearance inspires confidence in the platform’s reliability.
Your comment is awaiting moderation.
capitalbondhub.bond – Well organized, focus on group progress comes across clearly.
Your comment is awaiting moderation.
linenloammarket.shop – Streamlined layout, items are highlighted clearly and shopping is smooth.
Your comment is awaiting moderation.
online investment page – Organized layout with clear information and minimal distractions.
Your comment is awaiting moderation.
solidtrack.bond – Smooth design, pages feel grounded and provide clear, dependable information.
Your comment is awaiting moderation.
alliedmarina.bond – Clean design, layout makes security and collaboration easy to understand.
Your comment is awaiting moderation.
Тоже хочу сделать заказ.Жду ответа https://boshkikypits.store Как-то развёл 2c-i на кубы воды и выбрал в выборку для точности дозировки.Так один кролятина вляпался в/в.Позавидовать ему трудно было,это точно.Но в конце когда оклемался,даже прикололся.Я потом взял лосьен Композиция (93%) в бытовой химии – 30 руб за 250 мл стоит вот в нем растворилось, только пришлось сильно греть и мешать. Кстати почемуто если с этим переборщить то химия начинает выпадать в осадок белыми хлопьями :dontknown:, но небольшое количество залитого 646 в спирт всё исправляет и все растворяется полностью
Your comment is awaiting moderation.
Tandem Path – User-friendly presentation, overall experience is smooth and accessible.
Your comment is awaiting moderation.
Core project page – Intuitive navigation, content is clear, and the overall experience feels solid.
Your comment is awaiting moderation.
focus center – Strong focus theme gives content a crisp and deliberate feel.
Your comment is awaiting moderation.
Обратите внимание на дату регистрации топик стартера и на регистрацию всех довольных пользователей. Купить Кокаин, Бошки, Мефедрон, Гашиш Сделал заказ.оплатил.Кент прислал трек вечером как и обещал…токо он небьеться у меня и говорит,что нет такой накладной…у кого такая ситуация была???какой выход с 1г ?
Your comment is awaiting moderation.
vaultlink.bond – Professional feel, site navigation is intuitive and trustworthy.
Your comment is awaiting moderation.
SpireGroveGoods – Simple navigation, clear product info, and a smooth checkout.
Your comment is awaiting moderation.
Project homepage – Clear information and uniform branding enhance the user experience.
Your comment is awaiting moderation.
fresh outdoor market – The structure makes it simple to explore products and complete purchases.
Your comment is awaiting moderation.
petalmarketco.shop – Clean and bright, product categories are easy to explore and user flow is smooth.
Your comment is awaiting moderation.
explore zylavoline – Fast loading speed makes browsing smooth, and the message is simple to grasp.
Your comment is awaiting moderation.
capitalunityhub.bond – Layout is clear, messaging about teamwork feels natural and approachable.
Your comment is awaiting moderation.
silverguide.bond – Strong visuals, messaging communicates professionalism and instills confidence throughout.
Your comment is awaiting moderation.
EasyVixaro – Fast-loading pages, simple layout, and checkout process seamless.
Your comment is awaiting moderation.
alliantaxis.bond – Modern layout, navigation is smooth and messaging supports the key purpose clearly.
Your comment is awaiting moderation.
магазин отличный Купить Кокаин, Бошки, Мефедрон, Гашиш Сроки не говорил, иначе не было бы этого поста. Исправляй, не мой косяк бро, и не отмазка, что вас много. Не предупредил ты, о своей очереди, в чем моя вина? Не создавай очередь, какие проблемы? но если создаешь, будь добр предупреди, делов то :hello:Не, бро, ну одно дело 250 заместо 50мг, а другое когда даже 250мг не берет.
Your comment is awaiting moderation.
https://grktmn.ru/includes/pages/melbet_promokod_24.html
Your comment is awaiting moderation.
Zahnprobleme? https://www.zahnarzte-montenegro.com Diagnostik, Kariesbehandlung, Implantate, Zahnaufhellung und Prophylaxe. Wir bieten Ihnen einen angenehmen Termin, sichere Materialien, moderne Technologie und kummern uns um die Gesundheit Ihres Lachelns.
Your comment is awaiting moderation.
Nexa Bridge – Well-organized layout, content is digestible and the site feels fast.
Your comment is awaiting moderation.
поисковое продвижение москва профессиональное продвижение сайтов поисковое продвижение москва профессиональное продвижение сайтов .
Your comment is awaiting moderation.
The women-only massage at 토닥이 just became my new favorite,
because the experience was smooth, calming, and satisfying.
Your comment is awaiting moderation.
Main project page – First look is positive, with readable content and a well-structured layout.
Your comment is awaiting moderation.
seo partners prodvizhenie-sajtov-v-moskve115.ru .
Your comment is awaiting moderation.
MistyValeMarket – Navigation is simple, and finding items is hassle-free.
Your comment is awaiting moderation.
motionengine.bond – Smooth layout, content is clear, well-structured, and guides practical use.
Your comment is awaiting moderation.
wildgrainemporiumcollection.shop – Organized design, items are easy to locate and the experience feels pleasant.
Your comment is awaiting moderation.
explore zylavocore – Layout is smooth and the design guides the eye naturally through the content.
Your comment is awaiting moderation.
silvercrestline.bond – Clean and professional, site emphasizes trust and orderly design throughout.
Your comment is awaiting moderation.
Bonded Framework Portal – Simple design, framework messaging feels clear and approachable for users.
Your comment is awaiting moderation.
securepath.bond – Polished interface, site conveys reliability and a welcoming tone.
Your comment is awaiting moderation.
online bond information – Clear design, intuitive menus, and readable content make navigation simple.
Your comment is awaiting moderation.
clarity link – Structure is simple, keeping focus on the key ideas.
Your comment is awaiting moderation.
classic pine market – The cozy design works well with simple navigation and clear product details.
Your comment is awaiting moderation.
Unity Trust Center – Professional presentation, layout makes information easy to grasp.
Your comment is awaiting moderation.
А теперь к делу.. магаз ровный, товар ..вставляет епт..особенно в прошлый раз, пол часа ждал, что из ванной вылезет оно и покарает меня…хорошо быстро отпускает, а то вода остыла уже и сига стлела и хабарик упал так , что сам не заметил… Купить Кокаин, Бошки, Мефедрон, Гашиш лучше недобздеть чем перебздеть!!! братуха я надеюсь и у тебя все будет ГУД! держи в курсеА в сочи есть магазины
Your comment is awaiting moderation.
xelivobond.bond – First glance gives a good impression, and the layout feels intuitive.
Your comment is awaiting moderation.
ZaviroPoint – Clean interface, pages load quickly, and content seems accurate.
Your comment is awaiting moderation.
CoralBayShop – Pleasant design and fast navigation make shopping stress-free.
Your comment is awaiting moderation.
Official portal – Easy to follow design, content is clearly presented, and the platform is dependable.
Your comment is awaiting moderation.
Отличный магаз, качество на ура. даже если сам реагент не сильный. Купить Кокаин, Бошки, Мефедрон, Гашиш может стоит разводить 1 к 10? Кто брал ам 2233 отпишитесь на щёт пропорции,вообще 2233 1 к 20 разводится если продукт хорошийДа всё норм, ёпт, чё ты вообще телефон потерял) Тебе наверное там названивали.
Your comment is awaiting moderation.
actionmomentum.bond – Engaging interface, encourages regular progress and clear steps toward goals.
Your comment is awaiting moderation.
задвижка 30с41нж 65 задвижка стальная 30с41нж
Your comment is awaiting moderation.
harborstorecollection.shop – Inviting design, products are showcased clearly and the shopping process feels smooth.
Your comment is awaiting moderation.
холодные рассылки сервис https://email-rassylka.ru
Your comment is awaiting moderation.
продвижение сайтов в москве продвижение сайтов в москве .
Your comment is awaiting moderation.
sharedvision.bond – Smooth navigation, site encourages joint efforts and clarity of purpose.
Your comment is awaiting moderation.
zylavobond resource – Simple design ensures content is immediately understandable.
Your comment is awaiting moderation.
bondedgrowth.bond – Growth focused content, navigation is smooth and ideas are practical to implement.
Your comment is awaiting moderation.
фильмы онлайн в качестве смотреть аниме онлайн в хорошей озвучке
Your comment is awaiting moderation.
Anchor Capital Bridge – Clean interface, pages load easily and inspire trust through clarity.
Your comment is awaiting moderation.
Такая тут вкусная цена была недавно на фтор.И продукт офигенский.А теперь цену подняли до всеобщего уровня.И я не вижу уже причин заказать именно здесь а не где-то ещё.Так-то с отправкой всё ровно будет,но цена… https://rachelcolemanceds.online о господи 😀 я не селлер – я просто зашёл на сайт и посмотрел что есть в ассортименте – из скоростей нормальных разве что..кхм, оно…Эйфора сейчас нет в наличии, если только индивидуальный заказ от 1кг.
Your comment is awaiting moderation.
раскрутка и продвижение сайта раскрутка и продвижение сайта .
Your comment is awaiting moderation.
Midpoint Connect – Friendly presentation, information is digestible and well organized.
Your comment is awaiting moderation.
modern discount zone – The clean, upbeat design keeps shopping simple and efficient.
Your comment is awaiting moderation.
Features – Key details are highlighted and organized for fast comprehension.
Your comment is awaiting moderation.
списались с продавцом,пообщались,договорились.я оплатил заказ и начались долгие ожидания моей заветной посылки. Купить Кокаин, Бошки, Мефедрон, Гашиш Реально за***ли реклам-спаммеры :spam:, по две-три страницы одно и тоже, даже пропадает желание что либо читать…. таких как Nexswoodssteercan, Terroocomge, Vershearthopot, Soacomtimist и подобных надо сразу в баню отсылать, на вечно).Привет..Какого качества эйфоритик у данного магазина?? отпишите кто знает
Your comment is awaiting moderation.
MidtownSprings – Simple design and fast, reliable purchasing steps.
Your comment is awaiting moderation.
discover your path – Content is motivating and makes growth feel practical and achievable.
Your comment is awaiting moderation.
PlivoxEase – Pages load fast, layout clear, and buying items felt seamless.
Your comment is awaiting moderation.
Official trust resource – The pages are responsive and navigation is smooth throughout.
Your comment is awaiting moderation.
Direct site access – The site looks professional, with organized pages and information that’s simple to understand.
Your comment is awaiting moderation.
strongholdpoint.bond – Professional feel, layout supports clarity and builds user confidence.
Your comment is awaiting moderation.
trustline.bond – Cohesive visuals, content inspires confidence and is easy to follow.
Your comment is awaiting moderation.
mindflow.bond – Sleek design, pages encourage creativity and make exploring ideas enjoyable.
Your comment is awaiting moderation.
continuumcore.bond – Smooth navigation, messaging emphasizes security and steady continuity.
Your comment is awaiting moderation.
online finance hub – Organized content and responsive pages create a professional vibe.
Your comment is awaiting moderation.
zorivotrustco details – Gives a solid first impression with clear navigation paths.
Your comment is awaiting moderation.
today melbet promo code
Your comment is awaiting moderation.
Запулил:$: ждёмс… отпишу…. Селер адекватный:voo-hoo: https://rachelcolemanceds.com вопросик заказ мин скока вес ?) че т в аське молчат , не отвечают (((доставка порадовала быстро качественно . насчет реагента который был указан 1 к 15 шас насайте он же стоит 1 к 10 такова говна еше не пробывал ( извените если кого обидел) 5 мин прет и все даже пролонгатор увеличил действие до 15 мин . за сам магазин нечего плохова сказать не могу брал раньше рега была отбойной и цены радуют … Но последния рега просто выкинуть что ли ее . сегодня попробую конечно 2 к 10 сделать если не поможет просто выкину ..
Your comment is awaiting moderation.
Bonded Unity Point – Structured layout, navigation supports the idea of unity clearly.
Your comment is awaiting moderation.
Legacy Portal Hub – Clean aesthetic and strong branding make navigation simple.
Your comment is awaiting moderation.
Contact – Intuitive menus and easy-to-find contact info simplify user interaction.
Your comment is awaiting moderation.
secure site – First impression is positive, layout is neat, and reading is effortless.
Your comment is awaiting moderation.
раскрутка сайта франция раскрутка сайта франция .
Your comment is awaiting moderation.
bond platform – Clean presentation helps users feel confident in the offerings.
Your comment is awaiting moderation.
Приветствую ТС,сделал заказ,но до сих пор трек не пробивается,помоги разобраться в этом уже почти неделю жду,заранее спс https://zakladmef.store Зачем писать таким большим шрифтом ? Здесь слепых нет. То что тебя где то кинули к нам никакого отношения не имеет.сердцебеение крч все как обфчно , в
Your comment is awaiting moderation.
NightOwlShop – Products are easy to find and checkout is reliable.
Your comment is awaiting moderation.
melbet promo code bangladesh today
Your comment is awaiting moderation.
Free kick goals, direct and indirect set piece conversions tracked
Your comment is awaiting moderation.
timeless oak designs – The presentation is elegant and easy on the eyes, highlighting the products nicely.
Your comment is awaiting moderation.
комплексное продвижение сайтов москва комплексное продвижение сайтов москва .
Your comment is awaiting moderation.
stonecrestholdings.bond – Professional feel, layout supports clarity and builds user confidence.
Your comment is awaiting moderation.
trustedcore.bond – Modern look, messaging highlights reliability and smooth user experience.
Your comment is awaiting moderation.
bondedroots.bond – Well-paced layout, messaging conveys stability and meaningful traditions.
Your comment is awaiting moderation.
PortalMorixo – Navigation intuitive, design neat, and all product information accessible.
Your comment is awaiting moderation.
discoverpath.bond – Smooth interface, pages encourage exploring new subjects in a natural, enjoyable way.
Your comment is awaiting moderation.
Main project page – The site feels professional, with organized sections and quick access to details.
Your comment is awaiting moderation.
zorivoline bond – Feels like something that may evolve into a solid offering.
Your comment is awaiting moderation.
можно записаться на пробник ам как он придет…а то ниче про него непонятно https://amfet-market.shop Вчера оплатил, сегодня уже трек скинули. Пока все ровно, посмотрим что придет…..Всем привет, долго не писал, ну это меня «задержала» посылка jv-61. Все пришло, все получил причем довольно быстро все ехало:good:
Your comment is awaiting moderation.
Ремонт деревянного покрытия Ремонт деревянного покрытия: Тепло натурального дерева в вашем доме
Your comment is awaiting moderation.
enduringcapitalfoundation.bond – Well organized, layout communicates stability and a sense of security.
Your comment is awaiting moderation.
CoreBridge Hub Link – Content and design combine to project a polished, trustworthy impression.
Your comment is awaiting moderation.
growvanta.click – Overall, professional vibe here; trustworthy, polished, and pleasantly minimal throughout.
Your comment is awaiting moderation.
ideas resource – Text encourages moving from planning to real-world implementation.
Your comment is awaiting moderation.
Line project link – Found this site by chance, and the content is simple and helpful.
Your comment is awaiting moderation.
Tutorials – Step-by-step guides are organized clearly, helping users learn efficiently.
Your comment is awaiting moderation.
rankvanta.click – Content reads clearly, helpful examples made concepts easy to grasp.
Your comment is awaiting moderation.
IQOS ILUMA https://terea-iluma24.org и стики TEREA — покупка в Москве без риска. Гарантия подлинности, большой выбор, выгодные условия, доставка по городу и помощь в подборе устройства и стиков.
Your comment is awaiting moderation.
klickivo.click – Mobile version looks perfect; no glitches, fast scrolling, crisp text.
Your comment is awaiting moderation.
adnivo.click – Loved the layout today; clean, simple, and genuinely user-friendly overall.
Your comment is awaiting moderation.
bond resources – Pages feel responsive, layout is organized, and information is easy to follow.
Your comment is awaiting moderation.
товар 9\10 хорошее качество, 9 потому что ожидал чуть большего. https://boshkionline.shop Два часа, ребята в клубе,Как связаться?
Your comment is awaiting moderation.
Moomoo証券 ログイン PC
Your comment is awaiting moderation.
onpagelab.click – Pages loaded fast, images appeared sharp, and formatting stayed consistent.
Your comment is awaiting moderation.
financial services portal – Everything is explained logically and accessible for online users.
Your comment is awaiting moderation.
professional bond portal – Pages respond quickly, and information is presented clearly.
Your comment is awaiting moderation.
Купить IQOS ILUMA https://spb-terea.store и стики TEREA в Санкт-Петербурге с гарантией оригинальности. В наличии все модели ILUMA, широкий выбор вкусов TEREA, быстрая доставка по СПб, удобная оплата и консультации специалистов.
Your comment is awaiting moderation.
bond services page – First look suggests professionalism with well-laid-out content.
Your comment is awaiting moderation.
Продажа IQOS ILUMA https://ekb-terea.org и стиков TEREA в СПб. Только оригинальные устройства и стики, широкий ассортимент, оперативная доставка, самовывоз и поддержка клиентов на всех этапах покупки.
Your comment is awaiting moderation.
все хорошие отзывы все пишут нам лично в асю или скайп, как что то не так к нам особо не ломятся, все бегут на форум…. если есть какая то проблема вы нам сразу пишите и будем разбираться, мы всегда идем на встречу клиентам… Купить Кокаин, Бошки, Мефедрон, Гашиш и как обычно тут все ровно. БОЛЬШУЩИЙ РЕСПЕКТ МАГАЗИНУ.СПАСИБО :pink_eye.: ТУТ ВСЁ РОВНО!!!!!!!!!
Your comment is awaiting moderation.
discover zylavoline – Loading is seamless, and the site communicates its purpose effectively.
Your comment is awaiting moderation.
черный памятник
Your comment is awaiting moderation.
частный seo оптимизатор частный seo оптимизатор .
Your comment is awaiting moderation.
Updates – Latest news and announcements are presented clearly for quick reading.
Your comment is awaiting moderation.
ClickQuvex – Navigation smooth, content easy to read, and no errors encountered.
Your comment is awaiting moderation.
продвижение по трафику продвижение по трафику .
Your comment is awaiting moderation.
Данный продукт не зашол в моё сознание:) его нужно бодяжить с более могучим порохом, будем пробовать АМ2233… Купить Кокаин, Бошки, Мефедрон, Гашиш Ну х.з, с отправками тут все оперативно,2 дня и тебе уже все идет)))Тут ровно братаны,берем и не паримся,качеставо вышка!)
Your comment is awaiting moderation.
financial portal – Pages are responsive, design is clear, and info is easy to follow.
Your comment is awaiting moderation.
Do you love gambling? jwin7 casino Online is safe and convenient. We offer a wide selection of games, modern slots, a live casino, fast deposits and withdrawals, clear terms, and a stable website.
Your comment is awaiting moderation.
Playing at the casino? 8mbets bd Play online for real money. We offer a wide selection of slots, live dealers, fast payments, easy login, and exciting offers for new and returning players.
Your comment is awaiting moderation.
Looking for a casino? 8mbets bd Slots, table games, and live casino all in one place. Quick login, convenient registration, modern providers, stable payouts, and comfortable player conditions.
Your comment is awaiting moderation.
Check platform details – The site is easy to browse, with content structured in a logical way.
Your comment is awaiting moderation.
trusted finance hub – Mobile browsing is smooth and the sections are clearly arranged.
Your comment is awaiting moderation.
Explore the core – The site avoids noise and presents its services in a clear way.
Your comment is awaiting moderation.
online bond hub – The site is well-structured and services feel dependable.
Your comment is awaiting moderation.
Отличный магаз. Купить Кокаин, Бошки, Мефедрон, Гашиш пробывал нюхать эфект 4-6часаТС, походу в отпуск вышел:rest:
Your comment is awaiting moderation.
Services – Pages load efficiently, and content is structured for quick understanding.
Your comment is awaiting moderation.
В день оплаты через час я получаю ровную надёжную закладку Курьерский сервис на 5+? https://amfet-klad.shop ну чё могу сказать…почта России
Your comment is awaiting moderation.
professional finance portal – First impression is positive, site is well-structured, and content is simple to follow.
Your comment is awaiting moderation.
1win bonusu necə almaq olar 1win bonusu necə almaq olar
Your comment is awaiting moderation.
1win necə pul çıxarılır https://1win5762.help/
Your comment is awaiting moderation.
ClickXpress – Layout clean, navigation smooth, and all links worked correctly.
Your comment is awaiting moderation.
online bond hub – Fast page responses and clean layout make it simple to navigate.
Your comment is awaiting moderation.
bond info hub – Navigation feels natural, and details are easy to locate.
Your comment is awaiting moderation.
visit xelvix – Smooth experience, content is clear and sections are well organized
Your comment is awaiting moderation.
заказывал на днях 1 г. МН-001. пришло помоему в течении 5 дней. Купить Кокаин, Бошки, Мефедрон, Гашиш абакан есть?Либо вы прекращаете оффтопить в ветке магазина (к оффтопу относятся: сообщения НЕ по теме, личная переписка и т.п.) либо я буду банить.
Your comment is awaiting moderation.
secure trust page – A professional feel that inspires confidence at a glance.
Your comment is awaiting moderation.
Explore project – Concise information combined with intuitive navigation enhances the user experience.
Your comment is awaiting moderation.
auditpilot.click – Color palette felt calming, nothing distracting, just focused, thoughtful design.
Your comment is awaiting moderation.
Джи спокойно 20-ого числа 😉 Потом вот только как получать будешь…? https://kokainonline.shop Во телегу двинул, а? Ещё спать не ложился, такой эффект сильный, толеоа нет вообще, в завязке полгода :)Вы реально думаете что тут сидят роботы, которые должны отвечать всем без перерывов и выходных? Праздники же были, все отдыхать хотят.
Your comment is awaiting moderation.
https://jobs.tdwi.org/employers/3972691-codecan6
Your comment is awaiting moderation.
Platform overview – Browsing feels intuitive thanks to the organized presentation.
Your comment is awaiting moderation.
https://www.uniquetools.co.th/hammermill/hammer-mill-20c/
Your comment is awaiting moderation.
finance platform – Clean design, readable text, and navigation works without issues.
Your comment is awaiting moderation.
https://sonabet.pro/
Your comment is awaiting moderation.
secure finance hub – Polished layout and clean visuals make the site feel dependable.
Your comment is awaiting moderation.
landing hub – Minimalist feel, quick navigation, everything works as expected
Your comment is awaiting moderation.
https://www.maanation.com/CodeCan6
Your comment is awaiting moderation.
посылка пришла, все чотко, упаковка на высшем уровне, респектос https://mefedronkypit.store Знакомые делали, получалось что-то похожее на старый Juh.а не может быть что они с реагентом перепутали? я вот пробовал правда не здесь, она желтоватая была
Your comment is awaiting moderation.
official site – A straightforward design keeps attention on the main offerings.
Your comment is awaiting moderation.
xevirotrust.bond – The site feels reliable, with quick loading pages and well-presented information.
Your comment is awaiting moderation.
rankharbor.click – Found practical insights today; sharing this article with colleagues later.
Your comment is awaiting moderation.
Нужен забор срочно? Организуем ускоренный монтаж в Молодечно и районе установка забора в молодечно. Имеем все необходимые материалы и бригады. Качество — без компромиссов. Быстро — не значит дорого!
Your comment is awaiting moderation.
https://FreeAd1.com/588/posts/1/1/1761816.html
Your comment is awaiting moderation.
authoritylab.click – Navigation felt smooth, found everything quickly without any confusing steps.
Your comment is awaiting moderation.
keywordcraft.click – Color palette felt calming, nothing distracting, just focused, thoughtful design.
Your comment is awaiting moderation.
1win az bonus 500 http://1win5762.help/
Your comment is awaiting moderation.
Ремонт фена Дайсон в Москве является важнейшей услугой для тех, кто ценит качество и надежность своей бытовой техники. Это связано с тем, что фены Дайсон известны своей высокой стоимостью, но и непревзойденным качеством. Вариант покупки нового фена может оказаться не самым лучшим решением, если можно отремонтировать старый. Поэтому многие люди ищут возможности для качественного ремонта своих фенов.
В Москве есть много сервисных центров, которые могут произвести ремонт фена Дайсон на высоком уровне.
Преимущества ремонта фена Дайсон
Также важно отметить, что ремонт фена Дайсон может быть более экологичным вариантом, чем покупка нового прибора, поскольку это уменьшает количество отходов.
Заключение и рекомендации
Ремонт фена Дайсон в Москве может существенно улучшить вашу жизнь, предоставляя вам возможность пользоваться вашей бытовой техникой без перерывов.
фен dyson ремонт фен dyson ремонт.
Your comment is awaiting moderation.
ты писал пришла посылка размыли в итоге прикола не поняли Купить Кокаин, Бошки, Мефедрон, Гашиш Ладно, напишу ещё раз.все на высем уровне!
Your comment is awaiting moderation.
professional finance site – Smooth navigation, concise details, and a clear presentation throughout.
Your comment is awaiting moderation.
financial knowledge portal – Strong branding and neat layout make it look reliable.
Your comment is awaiting moderation.
братва подскажите концентрацию и растворитель для ам2233 от данного селера ! Заранее спс https://bestkladmef.shop Сам магаз работает хорошо все в сроки, консперация тоже на высшем уровне)магазин четкй притензий нет на качество регвезде гавно(((((
Your comment is awaiting moderation.
web access – Simple pages that load quickly, really convenient to use
Your comment is awaiting moderation.
BizConnectionsPro – Very structured, helps understand international business dynamics quickly.
Your comment is awaiting moderation.
Official trust homepage – A professional look combined with clear and accessible content.
Your comment is awaiting moderation.
investment portal – Pages respond quickly, and information is neatly arranged.
Your comment is awaiting moderation.
financial services site – Fast performance and minimal design create a good first feel.
Your comment is awaiting moderation.
https://sonabet.pro/
Your comment is awaiting moderation.
mivaroline.bond – Fast-loading pages, intuitive menus, and content is easy to access.
Your comment is awaiting moderation.
Explore project – Information flows naturally, and the layout makes finding details straightforward.
Your comment is awaiting moderation.
Whoa quite a lot of excellent info.
Feel free to visit my web blog – https://brawlstarsfans.com/
Your comment is awaiting moderation.
отзовусь о магазине, хороший,надежный) Купить Кокаин, Бошки, Мефедрон, Гашиш Потом все идет как надо , не много по тряхивает, но не чего, не так люто как от КРИССАНе вздумайте платить ему без Гаранта через которого он не работаем,этим самым доказывает свою не надежность!
Your comment is awaiting moderation.
является очень важным и необходимым услугой для многих жителей города . Ремонт пылесосов Dyson в Москве может быть осуществлен в различных сервисных центрах города . Ремонт пылесосов Dyson в Москве может включать в себя ремонт или замену различных деталей и узлов .
Ремонт пылесосов Dyson в Москве нуждается в высокой точности и аккуратности, поскольку эти приборы имеют сложную конструкцию . Ремонт пылесосов Dyson в Москве может быть заказан через интернет или по телефону, что упрощает процесс обращения за помощью . Ремонт пылесосов Dyson в Москве подразумевает не только восстановление функциональности прибора, но и обеспечение его дальнейшей эффективной работы .
Выбор сервисного центра
Выбор сервисного центра для ремонта пылесосов Dyson в Москве является важным моментом, который влияет на качество и сроки ремонта . Выбор сервисного центра для ремонта пылесосов Dyson в Москве требует внимания к гарантийным обязательствам и политике сервисного центра. Выбор сервисного центра для ремонта пылесосов Dyson в Москве может включать в себя анализ предложений по дополнительным услугам, таким как профилактика и техническое обслуживание .
Преимущества профессионального ремонта
Преимущества профессионального ремонта пылесосов Dyson в Москве включают в себя проведение работ в кратчайшие сроки. Преимущества профессионального ремонта пылесосов Dyson в Москве подразумевают также высокий уровень экспертизы специалистов, которые знают все особенности конструкции и работы этих приборов . Преимущества профессионального ремонта пылесосов Dyson в Москве предполагают возможность обратиться за помощью в будущем в случае появления новых проблем.
Заключение о необходимости ремонта пылесосов Dyson в Москве требует своевременного обращения за профессиональной помощью . Заключение о необходимости ремонта пылесосов Dyson в Москве включает в себя рассмотрение стоимости и качества услуг . Заключение о необходимости ремонта пылесосов Dyson в Москве включает в себя ознакомление с отзывами и рекомендациями .
ремонт пылесосов дайсон в москве https://servis-dyson-moskva.ru/
Your comment is awaiting moderation.
Wonderful website. Lots of helpful information here.
I’m sending it to a few friends ans additionally sharing in delicious.
And naturally, thank you for your effort!
Your comment is awaiting moderation.
Разработчиков Новости геймдев индустрии: на острие прогресса. Игровая индустрия является одной из самых динамичных и инновационных отраслей. Технологии виртуальной и дополненной реальности, облачный гейминг, блокчейн – все это открывает новые горизонты для разработчиков и игроков. Следить за новостями геймдева – значит быть в курсе последних трендов, вдохновляться новыми идеями и находить возможности для профессионального роста.
Your comment is awaiting moderation.
Partners – Professional appearance, clear layout, and content is organized efficiently.
Your comment is awaiting moderation.
bond platform – Fast, organized browsing makes the site very practical.
Your comment is awaiting moderation.
official portal – Well-structured pages make browsing smooth and straightforward.
Your comment is awaiting moderation.
Contact – Well-structured layout with clear content makes navigation simple.
Your comment is awaiting moderation.
ахахах я больше параноил за rcs 4 пришло сделал к 5-7 послушал таких отзывов за неё , курнули я аш охуел , прет норм минут на 30-40 , растворилась вся вообще в муравьином спирте , торкнуло сильно мне даже показалось лучше 250 Купить Кокаин, Бошки, Мефедрон, Гашиш нет так то обещал в среду или в четверг.прям не втерпеж
Your comment is awaiting moderation.
Investment site – Neatly arranged pages, smooth interface, and researching key points is fast.
Your comment is awaiting moderation.
bavlo source – Well-structured content, intuitive navigation, and smooth page flow
Your comment is awaiting moderation.
top resource – Clear sections, fast pages, and navigation feels natural
Your comment is awaiting moderation.
Best service buy facebook ads account is glad to welcome marketers in our section Facebook accounts. If you need buy Facebook accounts, the task is rarely about “a single login”, but about account quality: fewer unexpected checkpoints, green status indicators in the dashboard and properly prepared Pages. We’ve prepared a practical checklist, so you immediately understand which type to choose before ordering.Topic navigation: a quick access checklist. Important: an account is a tool. After that, results depend on your launch process: how payments are added, how you share assets and permissions with minimal risk, how you handle reviews and how you duplicate and expand. What we’re proud of of this platform — comes down to having a private media buyer library, in which we’ve collected fresh guides for support workflows. On the site you’ll see pages for Facebook for different tasks: from budget auto-regs all the way to reinstated setups with higher limits. Be part of us, read educational launch notes, build a system and improve ROI with our service today. Disclaimer: use assets lawfully and always in line with Facebook rules.
Your comment is awaiting moderation.
Need an AI generator? Undress AI The best nude generator with precision and control. Enter a description and get results. Create nude images in just a few clicks.
Your comment is awaiting moderation.
Gallery – Images are displayed in a clean layout for smooth viewing.
Your comment is awaiting moderation.
LearnStrategyNow – Practical guidance, strategy planning is clear and easy to follow.
Your comment is awaiting moderation.
ремонт бытовой техники в екб https://remont-tehniki-na-domu-ekaterinburg.ru/
Your comment is awaiting moderation.
financial trust platform – The layout works well and browsing across pages is seamless.
Your comment is awaiting moderation.
Mivaro official page – Minimalist interface, pages load quickly, and content is organized for users.
Your comment is awaiting moderation.
мое мнение работает достойно https://rachelcolemanceds.com Работали с магазином ранее брали по 100г, недавно взяли еще 50г, хотим сегодня 100г приобрести!! на регу нету нареканий!!жте907? Вроде говорят, что пока не доступен – находиться на экспертизе… Откуда инфа?
Your comment is awaiting moderation.
funnelforge.click – Bookmarked this immediately, planning to revisit for updates and inspiration.
Your comment is awaiting moderation.
Core project page – Smooth navigation and straightforward layout make the browsing experience simple.
Your comment is awaiting moderation.
Tutorials – Smooth menus, simple layout, and content is concise and easy to read.
Your comment is awaiting moderation.
signaltrack.click – Pages loaded fast, images appeared sharp, and formatting stayed consistent.
Your comment is awaiting moderation.
Website reference – The platform appears reliable, with clear explanations throughout.
Your comment is awaiting moderation.
roiengine.click – Mobile version looks perfect; no glitches, fast scrolling, crisp text.
Your comment is awaiting moderation.
funnelpilot.click – Mobile version looks perfect; no glitches, fast scrolling, crisp text.
Your comment is awaiting moderation.
ulvaroline.bond – Clean layout, fast-loading pages, and an overall simple browsing experience.
Your comment is awaiting moderation.
webdesignstudio.click – Overall, professional vibe here; trustworthy, polished, and pleasantly minimal throughout.
Your comment is awaiting moderation.
Ремонт пылесосов Dyson требует внимания к деталям и точности . Ремонт таких устройств может показаться сложным, но с правильным подходом и знаниями можно добиться отличных результатов. Диагностика неисправностей в пылесосах Dyson включает в себя ряд тестов и проверок . Это шаг, который нельзя пропустить, поскольку он напрямую влияет на эффективность последующих действий.
Техническое обслуживание пылесосов Dyson включает в себя регулярную проверку и замену деталей . Кроме того, ремонт позволяет снизить затраты на приобретение нового оборудования и сократить время простоя устройств. Ремонт пылесосов Dyson с помощью профессионалов обеспечивает гарантию качества работы.
Основные поломки и их устранение
Наиболее частыми поломками в пылесосах Dyson являются засоры и неисправности двигателя . Для их устранения необходимы определенные инструменты и знания. Устранение засоров в пылесосах Dyson включает в себя осмотр и очистку воздушных каналов . Это позволяет вернуть пылесосу его прежнюю производительность и качество уборки.
Регулярное техническое обслуживание пылесосов Dyson может предотвратить многие поломки . Регулярная очистка пылесоса и проверка его деталей также помогает предотвратить неисправности . Это не только экономит время и деньги, но и обеспечивает безопасность использования устройства.
Инструменты и материалы для ремонта
Для ремонта пылесосов Dyson необходимы специальные инструменты и материалы . Использование оригинальных деталей и материалов от производителя Dyson обеспечивает высокое качество ремонта . Это позволяет обеспечить долгую службу и высокое качество работы пылесоса после ремонта.
Ремонт пылесосов Dyson также требует определенных знаний и навыков . Практический опыт в ремонте пылесосов является лучшим учителем для развития навыков и знаний. Это позволяет пользователям стать более независимыми и способными выполнять ремонт самостоятельно.
Правильный подход к ремонту и техническому обслуживанию может значительно улучшить производительность и эффективность устройства . Для этого будут необходимы новые знания и навыки в области ремонта и обслуживания . Это означает, что пользователям и профессионалам необходимо быть готовыми к новым вызовам и развивать свои навыки и знания.
Также важным будет развитие более удобных и доступных инструментов для ремонта и обслуживания. Для этого будут необходимы постоянные обучение и совершенствование навыков и знаний . Это позволит обеспечить еще более качественную и эффективную уборку с помощью пылесосов Dyson в будущем.
ремонт пылесос дайсон москва https://dyson-service-center-msk.ru/
Your comment is awaiting moderation.
<official portal – Well-structured pages, easy to navigate, and content feels reliable.
Your comment is awaiting moderation.
Portfolio – Layout is neat, content is concise, and exploring projects is simple.
Your comment is awaiting moderation.
Готовыми работают Купить Кокаин, Бошки, Мефедрон, Гашиш Во телегу двинул, а? Ещё спать не ложился, такой эффект сильный, толеоа нет вообще, в завязке полгода :)Магаз не подведет
Your comment is awaiting moderation.
Official Korivoline site – The site appears dependable, navigation is smooth, and content is helpful.
Your comment is awaiting moderation.
Korva Homepage – Ran into this and the modern layout immediately stood out
Your comment is awaiting moderation.
review yavero holdings – Clear presentation ensures visitors quickly understand what’s offered.
Your comment is awaiting moderation.
Updates – Latest news is structured neatly and loads quickly for visitors.
Your comment is awaiting moderation.
financial resource page – Content is readable, and pages react quickly without issues.
Your comment is awaiting moderation.
TrustInsightsGlobal – Insightful and structured, networking worldwide feels organized and reliable.
Your comment is awaiting moderation.
бро я не как не пойму как фейк мне лс отвечал здесь Купить Кокаин, Бошки, Мефедрон, Гашиш Всем привет вчера забегал в этот магазин ни чего не нашел !Мало того дешёвый, он и отправляет маленький вес. Это гуд. Остальные почти все работают от 50 гр…
Your comment is awaiting moderation.
maverotrustco.bond – Neat layout, intuitive menus, and locating information is fast and simple.
Your comment is awaiting moderation.
financial resource – Information feels well-organized and simple to go through.
Your comment is awaiting moderation.
Ремонт бытовой техники становится все более популярным в нашей жизни потому что он дает возможность избежать покупки новой техники. Кроме того, ремонт бытовой техники также положительно влияет на окружающую среду потому что он способствует повторному использованию деталей. Таким образом, ремонт бытовой техники является не только финансово эффективным, но и ориентированным на сохранение природы.
Стоит отметить, что ремонт бытовой техники требует специальных навыков и знаний . Большинство людей не располагают такими инструментами и оборудованием, поэтому они часто требуют услуг квалифицированных ремонтников. Профессиональные мастера могут быстро и качественно отремонтировать любую бытовую технику .
## Раздел 2: Типы ремонта бытовой техники
Существует много разновидностей ремонта бытовой техники, в зависимости от типа неисправности. Один из наиболее распространенных видов ремонта – это восстановление функциональности изношенных частей. Tambien часто выполняется проверка работоспособности и регулировка техники . Кроме того, ремонт бытовой техники может включать в себя и другие виды работ .
Инспекция является первоочередным этапом в ремонте бытовой техники потому что она позволяет определить причину неисправности . После диагностики неисправности мастер может приступить к ремонту . Ремонт бытовой техники может быть выполнен как в мастерской, так и на дому .
## Раздел 3: Преимущества ремонта бытовой техники
Ремонт бытовой техники обладает несколькими достоинствами . Одним из основных плюсов является финансовая выгода потому что ремонт является более дешевым вариантом, чем покупка новой техники. Кроме того, ремонт бытовой техники также позволяет сохранить время потому что ремонт можно выполнить быстро и оперативно .
Также ремонт бытовой техники положительно влияет на окружающую среду потому что он уменьшает количество отходов, образующихся при утилизации старой техники . Более того, ремонт бытовой техники также дает возможность продлить жизнь техники.
## Раздел 4: Заключение и перспективы
Ремонт бытовой техники является востребованной и развитой сферой . Он дает не только возможность сэкономить деньги, но и оказать положительное влияние на природу . Таким образом, ремонт бытовой техники является не только финансово эффективным, но и ориентированным на сохранение природы.
В будущем ремонт бытовой техники будет занимать все более важное место потому что все больше людей начинают осознавать значимость экологической безопасности . Таким образом, мастера по ремонту бытовой техники будут очень востребованы . Будущее ремонта бытовой техники привлекательное и полнообещающее.
мастерская по ремонту бытовой техники https://servisnyj-centr-ekaterinburg.ru/
Your comment is awaiting moderation.
Community – Smooth design, easy browsing, and content is clear and well-organized.
Your comment is awaiting moderation.
loryx – Pages are well-organized, making the information easy and interesting to read
Your comment is awaiting moderation.
восстановление iphone после влаги в великом новгороде Не только iPhone: ремонт любых смартфонов. Помимо “яблочных” гаджетов, в Великом Новгороде можно отремонтировать телефоны Samsung, Xiaomi, Honor, Huawei и других производителей. Замена стекла, дисплея, разъема зарядки, динамика, микрофона – это лишь малый перечень услуг, предлагаемых сервисными центрами города.
Your comment is awaiting moderation.
trusted finance site – Browsing is smooth and all information is easy to follow.
Your comment is awaiting moderation.
Updates – Content is structured logically, pages load fast, and browsing is easy.
Your comment is awaiting moderation.
trusted finance platform – Content is well-arranged and pages load without delays.
Your comment is awaiting moderation.
sonabet casino
Your comment is awaiting moderation.
продавана сегодня в асе вообще ен видел, хз что там у них ( https://amfet-klad.shop пробовал 0,1гр ничего не было, пробовал 0,3 ничего не было, только мурашки на спинеИменно. Основной упор на старых проверенных оптовиков. К сожалению с розницей тут напряг, увы ((
Your comment is awaiting moderation.
Bond services – The site is structured well, navigation feels natural, and content is clear.
Your comment is awaiting moderation.
Сервисный центр Dyson предоставляет профессиональные услуги по ремонту и обслуживанию техники. Это позволяет клиентам получить быстрое и качественное решение проблем с их устройствами. Сотрудники сервисного центра Dyson имеют большой опыт работы и могут быстро найти решение. Кроме того, сервисный центр Dyson отдает предпочтение качественным материалам и запчастям. Это позволяет выполнять работы по ремонту и обслуживанию с высокой точностью. Кроме того, сервисный центр Dyson предоставляет выгодные условия для своих клиентов.
## Раздел 2: Услуги сервисного центра Dyson
Сервисный центр Dyson предоставляет услуги по ремонту и обслуживанию бытовой техники. Это позволяет клиентам получить качественное решение проблем с их устройствами. Кроме того, Сотрудники сервисного центра Dyson всегда готовы помочь и дать полезные советы. Это позволяет клиентам всегда оставаться удовлетворенными качеством и работой своих устройств. Кроме того, сервисный центр Dyson всегда открыт для диалога и сотрудничества.
## Раздел 3: Преимущества работы с сервисным центром Dyson
Сотрудничество с сервисным центром Dyson дает клиентам ряд преимуществ, включая быстрое решение проблем. Это позволяет клиентам чувствовать себя уверенно и защищенно при решении любых проблем с их техникой. Кроме того, сервисный центр Dyson всегда готов идти навстречу клиентам и решать их проблемы. Это позволяет клиентам всегда чувствовать себя ценными и важными для сервисного центра. Кроме того, сервисный центр Dyson известен своей надежностью и ответственностью.
## Раздел 4: Заключение
Сервисный центр Dyson предлагает широкий спектр услуг и имеет высокий уровень квалификации. Это позволяет клиентам чувствовать себя уверенно и защищенно при решении любых проблем с их техникой. Кроме того, Сервисный центр Dyson предлагает широкий спектр услуг и имеет высокий уровень квалификации, что делает его лучшим выбором для клиентов. Это позволяет клиентам оставаться удовлетворенными качеством и работой своих устройств. Кроме того, сервисный центр Dyson всегда готов к сотрудничеству и решению любых проблем.
dyson сервисный центр https://remont-dyson-moskva.ru/
Your comment is awaiting moderation.
explore now – Smooth interface, concise content, pages load effortlessly
Your comment is awaiting moderation.
check this capital project – Could be a helpful resource and deserves another look.
Your comment is awaiting moderation.
Gallery – Images load fast and are arranged clearly for visitor viewing.
Your comment is awaiting moderation.
ну в https://anonmdma.shop Обращайтесь к нам сноваМагазин не чистый на руку. Уже пишет с другого жабера. Народ у кого осталось переписка состарого жабера сверьте ник. И прошу сделать посты что таковое не придуманная мною сказка.
Your comment is awaiting moderation.
EnterpriseStrategyHub – Informative platform, enterprise frameworks are clear and actionable.
Your comment is awaiting moderation.
中華職棒台灣球迷的首選資訊平台,運用AI智能分析技術提供最即時的中華職棒新聞、球員數據分析,以及精準的比賽預測。
Your comment is awaiting moderation.
Maverotrust resources – Professional look, well-maintained pages, and positive browsing experience.
Your comment is awaiting moderation.
Events – Organized design, intuitive interface, and event details are clear and accessible.
Your comment is awaiting moderation.
bond investment site – Clear structure and readable content keep things easy to follow.
Your comment is awaiting moderation.
professional finance hub – Pages respond quickly, and the layout feels clean and professional.
Your comment is awaiting moderation.
Community – Interactive sections are logically arranged, making engagement simple and intuitive.
Your comment is awaiting moderation.
http://cl.angel.wwx.tw/debug/frm-s/bit.ly/4jMsNFN
Your comment is awaiting moderation.
Ремонт бытовой техники является важнейшим процессом, который позволяет продлить срок службы приборов . Это связано с тем, что приборы, требующие регулярного ремонта, могут преждевременно потерять свою функциональность. Ремонт также дает возможность выявить потенциальные неисправности и исправить их до того, как они причинят значительный ущерб .
Для многих людей ремонт бытовой техники является важной частью ухода за своими вещами . Это связано с тем, что ремонт позволяет сэкономить деньги, которые могли бы быть потрачены на покупку новых приборов . Кроме того, ремонт можно выполнять самостоятельно или с помощью профессионалов, в зависимости от сложности проблемы .
Типы ремонта бытовой техники
Типы ремонта бытовой техники могут различаться в зависимости от характера неисправности . Например, ремонт электрических схем может быть необходим для устранения неисправностей в плите или холодильнике . ремонт можно осуществлять как в специализированных сервисных центрах, так и на дому у клиента, в зависимости от вида неисправности.
Ремонт бытовой техники может быть также различным по степени сложности . ремонт незначительных неисправностей, таких как неисправность термостата или неисправность реле, может быть осуществлен с помощью простых инструментов. ремонт можно осуществлять как с использованием оригинальных комплектующих, так и с использованием их аналогов, в зависимости от сложности ремонта.
Инструменты и материалы для ремонта
Для выполнения ремонта бытовой техники требуются определенные инструменты и материалы . для ремонта электрических элементов необходимы инструменты, такие как тестер и провод . ремонт можно осуществлять с использованием специальных материалов, таких как клей и краска.
Выбор инструментов и материалов для ремонта бытовой техники зависит от характера неисправности . для ремонта простых неисправностей могут быть необходимы только элементарные инструменты, такие как ключ и напильник . ремонт можно осуществлять как с использованием ручных инструментов, так и с использованием электроинструментов, в зависимости от сложности ремонта.
Профессиональный ремонт и его преимущества
Профессиональный ремонт бытовой техники обеспечивает высокое качество ремонта и безопасность . профессиональные ремонтники имеют необходимые знания и опыт для выполнения сложных ремонтов . профессиональный ремонт можно осуществлять быстро и с минимальными дополнительными расходами.
Профессиональный ремонт бытовой техники предполагает не только ремонт, но и диагностику и профилактику . профессиональные ремонтники могут провести осмотр и выявить потенциальные проблемы, которые могут возникнуть в будущем. Кроме того, профессиональный ремонт можно выполнить с учетом конкретных потребностей и желаний клиента .
ремонт бытовой техники https://remont-bytovoj-tehniki-ekaterinburg.ru/
Your comment is awaiting moderation.
trusted finance platform – Clean design and logically arranged sections enhance confidence.
Your comment is awaiting moderation.
Discover trust info – The structure is simple and intuitive, great for fast understanding.
Your comment is awaiting moderation.
Просто респектище курьеру. На моей памяти такие клады были всего раза три-четыре за три года обитания меня на этом форуме. Купить Кокаин, Бошки, Мефедрон, Гашиш Обратите внимание, ТС отказывается работать с ГАРАНТОМ! хоть и магазин древний и проверенный! но хочется спать спокойно! АДМИНЫ ОБРАТИТЕ ВНИМАНИЕ, ПОРА КАК ТО ИЗМЕНИТЬ РЕЖИМ РАБОТЫ ГАРАНТА. СДЕЛКИ ПРОВОДИТЬ ОБЯЗАТЕЛЬНО ТОЛЬКО ЧЕРЕЗ ГАРАНТА!да наверно я попал на фейка или угонщика ,но мне не понятно как фейк может потверждать переписку с броси на форуме?
Your comment is awaiting moderation.
Kavion official trust page – Professional styling, clear content, and a smooth user journey.
Your comment is awaiting moderation.
plixva.click – Smooth experience, pages load quickly and explanations are easy to follow
Your comment is awaiting moderation.
Support – Helpful guides and resources are easy to navigate.
Your comment is awaiting moderation.
yaverobonding.bond – Nice experience overall, pages are organized and fairly user friendly.
Your comment is awaiting moderation.
Сервисный центр Dyson является одним из наиболее популярных и надежных сервисных центров для устройств Dyson. Это связано с тем, что сервисный центр Dyson использует только оригинальные запчасти и имеет опытных специалистов, которые могут diagnosticровать и исправлять любые неисправности устройств Dyson. Сервисный центр Dyson также предлагает услуги по техническому обслуживанию и профилактике устройств Dyson. Это делает сервисный центр Dyson идеальным местом для всех, кто ищет качественный и оперативный ремонт своих устройств Dyson. Сервисный центр Dyson имеет хорошую репутацию среди клиентов и известен своей высококачественной работой.
Услуги сервисного центра Dyson
Сервисный центр Dyson предлагает широкий спектр услуг по ремонту и обслуживанию устройств Dyson, включая ремонт пылесосов, очистителей воздуха и других устройств. Это позволяет сервисному центру Dyson предоставлять высококачественные услуги и оперативно решать любые проблемы с устройствами Dyson. Сервисный центр Dyson предлагает услуги по техническому обслуживанию и профилактике устройств Dyson. Это связано с тем, что сервисный центр Dyson использует только оригинальные запчасти и имеет опытных специалистов, которые могут diagnosticровать и исправлять любые неисправности устройств Dyson. Сервисный центр Dyson работает уже более 10 лет и имеет большой опыт в обслуживании устройств Dyson.
Преимущества сервисного центра Dyson
Сервисный центр Dyson имеет множество преимуществ, которые делают его идеальным местом для всех, кто ищет качественный и оперативный ремонт своих устройств Dyson. Это связано с тем, что сервисный центр Dyson имеет современное оборудование и технологии, которые позволяют ему предоставлять высококачественные услуги. Кроме того, сервисный центр Dyson предлагает услуги по техническому обслуживанию и профилактике устройств Dyson, что помогает предотвратить неисправности и продлить срок службы устройств. Это делает сервисный центр Dyson идеальным местом для всех, кто ищет качественный и оперативный ремонт своих устройств Dyson. Сервисный центр Dyson предлагает широкий спектр услуг по ремонту и обслуживанию устройств Dyson.
Заключение
Сервисный центр Dyson предлагает широкий спектр услуг по ремонту и обслуживанию устройств Dyson, включая ремонт пылесосов, очистителей воздуха и других устройств. Это связано с тем, что сервисный центр Dyson имеет современное оборудование и технологии, которые позволяют ему предоставлять высококачественные услуги. Сервисный центр Dyson также предлагает услуги по доставке и установке устройств Dyson, что делает его идеальным местом для всех, кто хочет приобрести новые устройства Dyson. Это делает сервисный центр Dyson идеальным местом для всех, кто ищет качественный и оперативный ремонт своих устройств Dyson. Сервисный центр Dyson имеет современное оборудование и технологии, которые позволяют ему предоставлять высококачественные услуги.
дайсон сервисный центр москва https://dyson-servisnyj-centr-moskva.ru/
Your comment is awaiting moderation.
Проблемы с зубами? услуги стоматологической клиники: диагностика, лечение кариеса, отбеливание, импланты и ортопедия. Индивидуальный подход, безопасные материалы, точные технологии и забота о здоровье зубов и дёсен.
Your comment is awaiting moderation.
talix – Clean design, navigation is intuitive, and content is easy to follow
Your comment is awaiting moderation.
https://jurisnotary.com/pgs/code_promotionnel_pour_1xbet.html
Your comment is awaiting moderation.
Да уж дживики мощные…только наврятли они у него есть.Ладно будем ждать прояснений.мне тоже не платную не бесплатную не дал пробу.и заказ 50 на 50 отказался сделать. https://bestmefklad.store приеме. Приложат все усилия, чтобы ожидаемые заказы выслались. За ожидание вложены компенсации, средний % компенсации 50.тоже хочу нахватить, но жду отзывы
Your comment is awaiting moderation.
investment services site – Content is clear, and switching between pages is effortless.
Your comment is awaiting moderation.
Современный сайдинг для вашего дома в Молодечно. Эстетика и долговечность сайдинг купить рядом молодечно. Поможем подобрать цвет. Оптовым покупателям — особые условия.
Your comment is awaiting moderation.
Testimonials – User-friendly design, organized content, and browsing is efficient and easy.
Your comment is awaiting moderation.
focused goals center – Clear guidance makes planning future actions intuitive.
Your comment is awaiting moderation.
https://underatexassky.com/pages/2bonus_d_inscription_au_code_promo_1xbet.html
Your comment is awaiting moderation.
Investment portal – Simple browsing, fast page transitions, and concise information.
Your comment is awaiting moderation.
online finance hub – Smooth interface and organized information make it easy to trust.
Your comment is awaiting moderation.
Tutorials – Step-by-step guides are presented in a tidy layout, helping visitors understand quickly.
Your comment is awaiting moderation.
check bavix – Clear pages and simple wording made the visit enjoyable
Your comment is awaiting moderation.
financial trust platform – Looks carefully designed with long-term reliability in mind.
Your comment is awaiting moderation.
а трудно изучить предварительно информацию о веществе, а потом покупать ? вот к примеру у меня в подписи инфа. Купить Кокаин, Бошки, Мефедрон, Гашиш Желаю всего самого наилучшего вашему магазину,ваш бренд это качество!Я пока временю.
Your comment is awaiting moderation.
Company website – Easy-to-use menus, clean design, and straightforward explanations.
Your comment is awaiting moderation.
FAQ – Answers are concise, easy to scan, and organized logically for visitors.
Your comment is awaiting moderation.
explore now – Fast-loading pages, organized sections, information is clear and easy to read
Your comment is awaiting moderation.
Learn about capital here – Easy-to-follow sections make reading through content seamless.
Your comment is awaiting moderation.
visit xeviro holdings – Branding feels aligned and the overall message seems thoughtfully planned.
Your comment is awaiting moderation.
Получив достаточно быстро трек отправления, а в качестве курьерки продавцом была выбрана пони экспресс, я стал проверять бьется ли трек. День проверял, два проверял, три…..А он сука ни в какую не бьётся и все тут. Короче с того момента и до момента написания этого сообщения номер посылки на сайте курьерки – Отсутствует в базе данных, попробуйте повторить запрос позднее!!! Купить Кокаин, Бошки, Мефедрон, Гашиш Приветствую всех форумчан и клиентов оптово-розничного магазина chemical-mixЖалко тест профукал )
Your comment is awaiting moderation.
Testimonials – Easy-to-use layout, quick loading, and details are concise and readable.
Your comment is awaiting moderation.
https://sonabet.pro/
Your comment is awaiting moderation.
Home – Clean layout, easy-to-use menus, and content is presented clearly for visitors.
Your comment is awaiting moderation.
maverobond.bond – Clean layout, intuitive design, and content is helpful for understanding details.
Your comment is awaiting moderation.
Updates – News and updates are presented clearly, keeping users informed efficiently.
Your comment is awaiting moderation.
knowledge clarity portal – Platform provides easy access to insights with minimal effort.
Your comment is awaiting moderation.
velixo destination – Neat layout, readable text, and overall site feels intuitive and well-made
Your comment is awaiting moderation.
магазин отличный https://mdma-fast.shop Снова магазин порадовал своей оперативностью) сдеал заказ, получил трек всё бьётся!Запрета в прицепе это не касается.
Your comment is awaiting moderation.
TrustedCartHub – Reliable and well-structured, checkout is fast and worry-free.
Your comment is awaiting moderation.
analyticsreport.click – Content reads clearly, helpful examples made concepts easy to grasp.
Your comment is awaiting moderation.
бк мелбет официальный сайт бк мелбет официальный сайт .
Your comment is awaiting moderation.
kavioncore.bond – Nice experience, everything loads quickly and information is concise and understandable.
Your comment is awaiting moderation.
помощь студентам курсовые kupit-kursovuyu-43.ru .
Your comment is awaiting moderation.
Partners – Partnership details are organized in a clear and readable way.
Your comment is awaiting moderation.
go to nixra – Pages open fast and the overall design is simple yet effective
Your comment is awaiting moderation.
review xeviro capital – The site layout supports efficient and clear research.
Your comment is awaiting moderation.
visit kavlo – Smooth experience thanks to a fresh layout and simple flow
Your comment is awaiting moderation.
мне продавец так и не выслал компенсацию за хреновый МХЕ Купить Кокаин, Бошки, Мефедрон, Гашиш грозный луи оставил отзыв о магазинеПолучил трек довольно быстро, что обрадовало, посыль ждал тоже недолго 🙂 порошок мне показался чистым, я конечно не эксперт*( но кристаллики были без примесей )
Your comment is awaiting moderation.
Trust platform link – The tone doesn’t shift and the details are easy to understand.
Your comment is awaiting moderation.
crmsetup.click – Overall, professional vibe here; trustworthy, polished, and pleasantly minimal throughout.
Your comment is awaiting moderation.
socialmarketing.click – Pages loaded fast, images appeared sharp, and formatting stayed consistent.
Your comment is awaiting moderation.
marketingautomation.click – Overall, professional vibe here; trustworthy, polished, and pleasantly minimal throughout.
Your comment is awaiting moderation.
socialadspro.click – Appreciate the typography choices; comfortable spacing improved my reading experience.
Your comment is awaiting moderation.
Community – User-friendly interface, smooth browsing, and content is clear and easy to engage with.
Your comment is awaiting moderation.
Contact – Navigation is intuitive, and contact details are easy to locate.
Your comment is awaiting moderation.
Resources – Files and links are organized neatly for quick and convenient browsing.
Your comment is awaiting moderation.
Tech services page – Easy-to-navigate design, smooth page flow, and content is straightforward.
Your comment is awaiting moderation.
Да мне 5 сообщений для лс нужно :Dа так месяц назад было все ровно) Купить Кокаин, Бошки, Мефедрон, Гашиш Бро ты бред несёшь!Если читал все посты в этом магазе брали даже модеры этого форума.А может быть ты конкурент и провоцируешь людей специально?ставлю большой + магазину и хочу
Your comment is awaiting moderation.
learning with depth – Makes it easy to explore ideas that actually matter.
Your comment is awaiting moderation.
Services – Information is structured neatly, making it effortless to find what you need.
Your comment is awaiting moderation.
Explore Kavion – Pages are orderly, and the site gives a solid first impression.
Your comment is awaiting moderation.
ReliableShopHub – Safe and user-friendly, purchasing items online is simple.
Your comment is awaiting moderation.
online access – Quick loading, organized content, browsing feels polished
Your comment is awaiting moderation.
check this bonding project – Fast performance gives it a professional feel early on.
Your comment is awaiting moderation.
Молча !! Запрет вступает в силу 26го числа, если не ошибаюсь. Скидывай всё палево, жёсткий дист зарывай подальше и иди получай )) https://meftop24.shop сорь за флуд)))В итоге, когда я на холоде прождал после последнего “Щас” час, внезапно ответил CM, которому я ещё днём написал. Я поначалу даже не смог вспомнить что у магазина в прайсе, и что я конкретно в этом магазине хотел. Выбирал изначально между эйфом и ск, ну и поскольку эйфа в прайсе нет, то спросил СК.
Your comment is awaiting moderation.
rixon network – Easy navigation, concise content, and pages are organized logically
Your comment is awaiting moderation.
Community – Simple layout, smooth navigation, and information is accessible and helpful for everyone.
Your comment is awaiting moderation.
мелбет полная версия сайта мелбет полная версия сайта .
Your comment is awaiting moderation.
Tutorials – Step-by-step guides are structured clearly for effortless learning.
Your comment is awaiting moderation.
сколько стоит сделать курсовую работу на заказ kupit-kursovuyu-43.ru .
Your comment is awaiting moderation.
sonabet vip login
Your comment is awaiting moderation.
Downloads – Resources and files are organized cleanly and load quickly.
Your comment is awaiting moderation.
Official holdings resource – Pages are arranged logically, helping visitors find details fast.
Your comment is awaiting moderation.
Visit Vexaro Unity – Innovative idea, site messaging is clear and avoids overstatements.
Your comment is awaiting moderation.
что то не могу зайти на сайт ( Купить Кокаин, Бошки, Мефедрон, Гашиш Нет не нужен.ребята ровно работают!
Your comment is awaiting moderation.
Core services portal – Simple interface, pages flow naturally, and details are easy to check.
Your comment is awaiting moderation.
visit vexla – Pleasant experience with well-presented content and fast site performance
Your comment is awaiting moderation.
Gallery – Images appear instantly and are arranged neatly for easy viewing.
Your comment is awaiting moderation.
Online bond hub – Clean design, quick response times, and details are clearly outlined.
Your comment is awaiting moderation.
explore now – Fast-loading pages, minimal clutter, information is presented clearly
Your comment is awaiting moderation.
business partnership hub – Pages communicate alliance details in a concise way.
Your comment is awaiting moderation.
после этого случая я стал курить не сигареты конечно рц вообще понравилось и быстро дошло ,делал 1к8 великолепная вещь магазу продвижений https://kokainonline.shop глазом на пакете,вот там была россыпь:good::killmyself::strong::stars::fu::good::bro:удачного развития в дальнейшем=)
Your comment is awaiting moderation.
xelivo trust group network – Pages connect logically, helping avoid confusion.
Your comment is awaiting moderation.
OnlineDealMaster – Intuitive and smooth, locating discounts is effortless.
Your comment is awaiting moderation.
Services – Professional layout with fast-loading pages makes browsing simple and intuitive.
Your comment is awaiting moderation.
Community – Interactive sections are intuitive, allowing users to engage easily and efficiently.
Your comment is awaiting moderation.
Truly loads of superb facts.
Also visit my web blog; https://Regiprocess.com/
Your comment is awaiting moderation.
Downloads – Files and documents are structured neatly for quick access.
Your comment is awaiting moderation.
VexaroUnity Page – Fresh idea, site messaging is clear and avoids overstatements.
Your comment is awaiting moderation.
пока никаких точных дат нет. цены будут когда придёт товар, так что ждёмс пока что. https://boshkikypits.store Бро ответь в аське!Пожалуйста :ok: Спасибо за отзыв.
Your comment is awaiting moderation.
Downloads – Files and resources are listed cleanly for fast visitor access.
Your comment is awaiting moderation.
googleadspro.click – Overall, professional vibe here; trustworthy, polished, and pleasantly minimal throughout.
Your comment is awaiting moderation.
Kryvox official page – Polished visuals, quick loading, and information is organized well.
Your comment is awaiting moderation.
Xeviro Access – Layout intuitive, pages responsive, and site functions smoothly.
Your comment is awaiting moderation.
Funding platform – Well-designed interface, easy navigation, and information feels reliable.
Your comment is awaiting moderation.
zurix page – Quick navigation, headings are clear, and reading is comfortable overall
Your comment is awaiting moderation.
Explore the bond group – Discovered this by chance, the tone feels informative and relaxed.
Your comment is awaiting moderation.
official site – Simple structure, quick access, content feels thoughtfully curated
Your comment is awaiting moderation.
глэмпинг подмосковье с купелью Москва, несмотря на свой шум и суету, тоже открывает двери в мир глэмпинга. В окрестностях столицы возникают оазисы спокойствия, позволяющие отвлечься от дел и насладиться природой, не покидая зону комфорта.
Your comment is awaiting moderation.
мелбет онлайн мелбет онлайн .
Your comment is awaiting moderation.
помощь курсовые kupit-kursovuyu-43.ru .
Your comment is awaiting moderation.
ремонт iphone в великом новгороде Ремонт смартфонов в Великом Новгороде – это комплексная услуга, охватывающая широкий спектр проблем, от механических повреждений до программных сбоев. Сервисные центры предлагают квалифицированную помощь для устройств разных марок, включая iPhone, Samsung, Xiaomi и другие.
Your comment is awaiting moderation.
Мультимедийный интегратор здесь интеграция мультимедийных систем под ключ для офисов и объектов. Проектирование, поставка, монтаж и настройка аудио-видео, видеостен, LED, переговорных и конференц-залов. Гарантия и сервис.
Your comment is awaiting moderation.
educational insights hub – Learning materials are easy to navigate and understand quickly.
Your comment is awaiting moderation.
xelivo capital network – Professional styling paired with content that makes sense.
Your comment is awaiting moderation.
Квартира на сутки в Молодечно для длительной аренды. Особые цены при проживании от недели. Полностью оборудованная кухня, стиральная машина квартиры на сутки Молодечно. Удобно для рабочих бригад или переезда.
Your comment is awaiting moderation.
velon destination – Well-organized interface, readable text, and effortless browsing
Your comment is awaiting moderation.
funnelbuilder.click – Navigation felt smooth, found everything quickly without any confusing steps.
Your comment is awaiting moderation.
ProPartnershipHub – Very useful platform, provides practical advice for building strong partnerships.
Your comment is awaiting moderation.
About Us – Simple navigation, organized information, and pages are easy to browse.
Your comment is awaiting moderation.
Нужны блины и диски? блины на штангу на заказ широкий выбор весов, надежные материалы, точная калибровка. Отличное решение для силовых тренировок, кроссфита и профессиональных спортзалов.
Your comment is awaiting moderation.
ppcmanagement.click – Found practical insights today; sharing this article with colleagues later.
Your comment is awaiting moderation.
FAQ – Questions and answers are concise and easy to locate for users.
Your comment is awaiting moderation.
sonabet.pro
Your comment is awaiting moderation.
rankhigher.click – Bookmarked this immediately, planning to revisit for updates and inspiration.
Your comment is awaiting moderation.
seoservices.click – Content reads clearly, helpful examples made concepts easy to grasp.
Your comment is awaiting moderation.
News – Updates and announcements are organized clearly for quick readability.
Your comment is awaiting moderation.
Support – Easy-to-follow guides and helpful resources for users.
Your comment is awaiting moderation.
Vexaro Partners – Browsing this site was smooth, service descriptions are clear and practical.
Your comment is awaiting moderation.
Korivo official hub – Organized interface, smooth menus, and information feels solid and helpful.
Your comment is awaiting moderation.
cavaro pact network – Clean visuals and clear messaging make the site easy to follow.
Your comment is awaiting moderation.
trusted resource – Clear sections, smooth experience, information feels well-arranged
Your comment is awaiting moderation.
learnbusinessskillsonline – Excellent learning resources, business skills are explained clearly and practically.
Your comment is awaiting moderation.
UlvionHoldings Resource – Attractive interface, intuitive layout and modern presentation.
Your comment is awaiting moderation.
Visit Xanero – Layout clean, content easy to follow, and purchasing felt straightforward.
Your comment is awaiting moderation.
See trustline platform – Simple structure, quick navigation, and content that feels current.
Your comment is awaiting moderation.
check this bonding platform – Nicely laid out with clarity across the main points.
Your comment is awaiting moderation.
ExploreSmartMarkets – Clear and actionable content, market ideas are easy to implement.
Your comment is awaiting moderation.
official qerly – Logical layout, clear headings, and overall user-friendly design
Your comment is awaiting moderation.
VexaroCapital Details – Professional presentation, short and clear information, instills trust.
Your comment is awaiting moderation.
написание курсовых работ на заказ цена kupit-kursovuyu-43.ru .
Your comment is awaiting moderation.
melbet bookmaker melbet bookmaker .
Your comment is awaiting moderation.
official mivox – Clean layout, everything is easy to follow and text is digestible
Your comment is awaiting moderation.
online access – Smooth interface, minimal distractions, everything is easy to navigate
Your comment is awaiting moderation.
https://esm.edu.mn/wp-content/pgs/1xbet_promo_code_for_free_bet_welcome_bonus.html
Your comment is awaiting moderation.
UlvionCapital Site – Browsing is effortless, all key points are easy to grasp.
Your comment is awaiting moderation.
MorvaExpress – Browsing seamless, pages load quickly, and product details trustworthy.
Your comment is awaiting moderation.
Уникальный источник купить фармленные аккаунты встречает маркетологов в своем пространстве аккаунтов Facebook. Если вам нужно купить Facebook-аккаунты, чаще всего важен не «одном логине», а в проходимости чеков: уверенный спенд, зеленые плашки в кабинете и правильно созданные ФП. Мы подготовили понятную навигацию, чтобы вы без лишних вопросов понимали какой лимит выбрать до оплаты.Быстрый ориентир: откройте разделы Автореги, а для масштабирования — идите напрямую в профильные позиции: Безлимитные БМ. Ключевая идея: покупка — это только вход. Дальше решает подход к запуску: как вяжется карта, как вы передаете лички без триггеров, как реагируете на полиси и как дублируете кампании. Главная фишка нашего сервиса — заключается в наличии огромной вики-энциклопедии FB, где написаны свежие мануалы по работе с БМами. Мы сориентируем, каким образом грамотно запустить первый адсет, чтобы не улетели на полиси а также продлили жизнь аккаунтам . Заходите к нам, изучайте обучающие разборы банов, наводите порядок и в итоге улучшайте конверт вместе с нами уже сегодня. Дисклеймер: используйте активы законно и всегда с учетом правил Meta.
Your comment is awaiting moderation.
xelariounion site – Appears promising at first glance and could be valuable to review online.
Your comment is awaiting moderation.
Мучает алкоголизм? быстрый анонимный вывод из запоя на дому помощь при алкогольной интоксикации и длительном употреблении. Капельницы, поддержка организма, контроль давления и пульса. Конфиденциально и профессионально.
Your comment is awaiting moderation.
Страдаете от алкоголизма? вывод из запоя капельница анонимная медицинская помощь с выездом врача. Осмотр, капельницы, контроль состояния и поддержка пациента в комфортных условиях. Работаем круглосуточно, строго по медицинским показаниям.
Your comment is awaiting moderation.
https://alfa.edu.rs/pages/1xbet_promo_code_for_free_bet_welcome_bonus.html
Your comment is awaiting moderation.
Capital investment page – First look suggests quality, will return to analyze the content.
Your comment is awaiting moderation.
Plivox Holdings main site – Professional look, organized content, and navigation works without hassle.
Your comment is awaiting moderation.
QuickPremiumBuy – Clean and efficient, online shopping is straightforward and smooth.
Your comment is awaiting moderation.
growthmarketing.click – Color palette felt calming, nothing distracting, just focused, thoughtful design.
Your comment is awaiting moderation.
VelixoTrustGroup Link – Neat design, content is straightforward and simple to understand.
Your comment is awaiting moderation.
online access – Minimalistic feel, smooth browsing, content is clear and organized
Your comment is awaiting moderation.
rankmysite.click – Content reads clearly, helpful examples made concepts easy to grasp.
Your comment is awaiting moderation.
Ulvion Bond Group – Website gives a trustworthy impression, visuals are consistent and the tone feels professional.
Your comment is awaiting moderation.
performanceads.click – Found practical insights today; sharing this article with colleagues later.
Your comment is awaiting moderation.
improveseo.click – Mobile version looks perfect; no glitches, fast scrolling, crisp text.
Your comment is awaiting moderation.
growmybrand.click – Color palette felt calming, nothing distracting, just focused, thoughtful design.
Your comment is awaiting moderation.
xelio link – Minimal interface, everything is easy to find, and browsing feels effortless
Your comment is awaiting moderation.
globalbusinessunity – Informative insights, global business unity strategies are clear and useful here.
Your comment is awaiting moderation.
Ищешь казино? казино онлайн лучшие лицензия, бонусы, выплаты, игры и отзывы игроков. Сравниваем условия, безопасность и удобство, чтобы помочь выбрать надежное казино для игры онлайн.
Your comment is awaiting moderation.
Подборка лучших МФО на https://mikrozaym365.ru оформите микрозайм онлайн на карту за 5 минут. Первый займ под 0% для новых клиентов. Без отказов и проверок. Мгновенное одобрение, перевод на любую карту. Получите деньги сегодня!
Your comment is awaiting moderation.
Проблемы с алкоголем? вывод из запоя недорого помощь врача, детоксикация, стабилизация состояния и наблюдение. Конфиденциально, без постановки на учет, с учетом возраста и сопутствующих заболеваний.
Your comment is awaiting moderation.
NolaroGo – User-friendly design, content structured well, and shopping steps simple to follow.
Your comment is awaiting moderation.
quorly platform – Quick-loading pages with concise and informative text
Your comment is awaiting moderation.
Plivox Capital site – Smooth interface, organized content, and browsing feels effortless.
Your comment is awaiting moderation.
online link – Tested the connection, everything loaded fast, destination clear.
Your comment is awaiting moderation.
sonabet.pro
Your comment is awaiting moderation.
Visit the bonding platform – Even a brief scan shows a clean layout and logical information flow.
Your comment is awaiting moderation.
ReliableDiscountHub – Clear and practical, shopping for offers feels safe and simple.
Your comment is awaiting moderation.
Quick Online Find – Found this randomly, the page design is easy on the eyes
Your comment is awaiting moderation.
Official VelixoHoldings – Pages are responsive, navigation is easy and information is presented clearly.
Your comment is awaiting moderation.
UlvaroCapital Project – Feels approachable from the start, explanations are easy to digest.
Your comment is awaiting moderation.
Портал о строительстве https://repair-house.kiev.ua и ремонте без лишней теории: практические советы, обзоры материалов, расчёты, инструменты и этапы работ. Помогаем планировать проекты, контролировать качество и экономить бюджет.
Your comment is awaiting moderation.
Строительный портал https://garant-jitlo.com.ua современные технологии, нормы и стандарты, выбор материалов, инженерия и безопасность. Экспертные рекомендации, инструкции и реальные примеры работ — понятно и по делу.
Your comment is awaiting moderation.
Компания BritishSchool https://britishschool.kiev.ua профессиональные тренинги, семинары и курсы для детей и взрослых. Обучение с опытными преподавателями, современные методики, практические навыки и уверенный результат. Онлайн и офлайн форматы.
Your comment is awaiting moderation.
Ulviro Online – Navigation simple, product descriptions clear, and purchasing felt seamless.
Your comment is awaiting moderation.
Plivox Bonding network – Intuitive layout, clear headings, and user experience feels smooth.
Your comment is awaiting moderation.
digital portal – Quick load times, graphics light, information presented clearly.
Your comment is awaiting moderation.
sales site – Easy navigation and smooth checkout, worth recommending to others.
Your comment is awaiting moderation.
travik destination – Straightforward layout, concise text, and information is easy to locate quickly
Your comment is awaiting moderation.
Nolaro Holdings network – Professional feel, readable layout, and details are easy to understand.
Your comment is awaiting moderation.
top resource – Quick response times, clean layout, easy to explore content
Your comment is awaiting moderation.
VelixoCapital Access – Found this site researching, branding is professional and content is easy to digest.
Your comment is awaiting moderation.
Brixel Capital web presence – Confident tone and solid branding are evident throughout.
Your comment is awaiting moderation.
UlvaroBonding Access – Quick loading pages and straightforward information throughout.
Your comment is awaiting moderation.
morix network – Smooth site with organized content and clear navigation paths
Your comment is awaiting moderation.
SuccessStrategyGuide – Easy-to-follow instructions, strategies are explained clearly for practical use.
Your comment is awaiting moderation.
Learn more at this page – The site feels well organized, supporting focused and extended exploration.
Your comment is awaiting moderation.
Quvexa Capital Hub – Clear headings, content is easy to understand, and browsing is intuitive.
Your comment is awaiting moderation.
boostmysite.click – Bookmarked this immediately, planning to revisit for updates and inspiration.
Your comment is awaiting moderation.
drivetraffic.click – Mobile version looks perfect; no glitches, fast scrolling, crisp text.
Your comment is awaiting moderation.
scalenow.click – Mobile version looks perfect; no glitches, fast scrolling, crisp text.
Your comment is awaiting moderation.
growonline.click – Overall, professional vibe here; trustworthy, polished, and pleasantly minimal throughout.
Your comment is awaiting moderation.
Plavex Trust Group main site – Professional appearance, intuitive navigation, and information is easy to digest.
Your comment is awaiting moderation.
web link – Minimal layout keeps the experience focused and text easy to read.
Your comment is awaiting moderation.
explore signalcreatesmomentum – Minimal design, easy to understand and pleasant to browse overall
Your comment is awaiting moderation.
NixaroExpress – Interface simple, content accessible, and shopping process easy to follow.
Your comment is awaiting moderation.
store page – Added this site to bookmarks for later shopping.
Your comment is awaiting moderation.
StrategicPartnershipCenter – Insightful and professional, frameworks guide businesses in forming solid partnerships.
Your comment is awaiting moderation.
Nolaro Capital portal – Simple navigation, content is structured, and overall experience is professional.
Your comment is awaiting moderation.
go to site – Simple design, responsive pages, information is easy to follow
Your comment is awaiting moderation.
Equili
Your comment is awaiting moderation.
(10 euros gratis apuestas|10 mejores casas de apuestas|10 trucos para ganar apuestas|15 euros gratis marca apuestas|1×2 apuestas|1×2 apuestas deportivas|1×2 apuestas que significa|1×2 en apuestas|1×2 en apuestas que significa|1×2 que significa en apuestas|5 euros
gratis apuestas|9 apuestas que siempre ganaras|a
partir de cuanto se declara apuestas|actividades de juegos de azar y apuestas|ad apuestas deportivas|aleksandre topuria ufc apuestas|algoritmo para ganar apuestas
deportivas|america apuestas|análisis nba apuestas|aplicacion android apuestas deportivas|aplicacion apuestas deportivas|aplicacion apuestas deportivas android|aplicación de apuestas online|aplicacion para hacer apuestas|aplicacion para hacer apuestas de futbol|aplicación para hacer apuestas de fútbol|aplicaciones apuestas deportivas android|aplicaciones
apuestas deportivas gratis|aplicaciones de apuestas android|aplicaciones de apuestas de fútbol|aplicaciones
de apuestas deportivas|aplicaciones de apuestas
deportivas peru|aplicaciones de apuestas deportivas perú|aplicaciones
de apuestas en colombia|aplicaciones de apuestas gratis|aplicaciones de apuestas
online|aplicaciones de apuestas seguras|aplicaciones de apuestas sin dinero|aplicaciones
para hacer apuestas|apostar seguro apuestas deportivas|app android apuestas deportivas|app apuestas|app
apuestas android|app apuestas de futbol|app apuestas deportivas|app apuestas deportivas android|app apuestas
deportivas argentina|app apuestas deportivas colombia|app apuestas deportivas
ecuador|app apuestas deportivas españa|app apuestas deportivas gratis|app apuestas entre
amigos|app apuestas futbol|app apuestas gratis|app apuestas sin dinero|app casa de apuestas|app casas de apuestas|app control apuestas|app de
apuestas|app de apuestas android|app de apuestas casino|app
de apuestas colombia|app de apuestas con bono de bienvenida|app de apuestas de futbol|app de apuestas deportivas|app de apuestas deportivas android|app de apuestas deportivas
argentina|app de apuestas deportivas colombia|app de apuestas
deportivas en españa|app de apuestas deportivas peru|app de apuestas deportivas perú|app de apuestas deportivas sin dinero|app de apuestas ecuador|app de apuestas en colombia|app de apuestas
en españa|app de apuestas en venezuela|app de apuestas futbol|app de apuestas gratis|app de apuestas online|app de apuestas para android|app
de apuestas para ganar dinero|app de apuestas peru|app
de apuestas reales|app de casas de apuestas|app marca apuestas android|app
moviles de apuestas|app para apuestas|app para apuestas de
futbol|app para apuestas deportivas|app para apuestas deportivas en español|app para ganar apuestas deportivas|app para hacer apuestas|app para hacer apuestas deportivas|app para hacer apuestas entre
amigos|app para llevar control de apuestas|app pronosticos apuestas deportivas|app versus apuestas|apps apuestas mundial|apps de
apuestas|apps de apuestas con bono de bienvenida|apps de apuestas de
futbol|apps de apuestas deportivas peru|apps de
apuestas mexico|apps para apuestas|aprender a hacer apuestas deportivas|aprender
hacer apuestas deportivas|apuesta del dia apuestas deportivas|apuestas 10 euros
gratis|apuestas 100 seguras|apuestas 1×2|apuestas 1X2|apuestas 2 division|apuestas 3 division|apuestas a caballos|apuestas
a carreras de caballos|apuestas a colombia|apuestas a corners|apuestas a ganar|apuestas a jugadores nba|apuestas a la baja|apuestas a la nfl|apuestas al barcelona|apuestas al dia|apuestas al empate|apuestas al mundial|apuestas al tenis wta|apuestas alaves barcelona|apuestas alcaraz hoy|apuestas alemania españa|apuestas alonso campeon del mundo|apuestas altas y bajas|apuestas altas y bajas nfl|apuestas ambos equipos
marcan|apuestas america|apuestas android|apuestas anillo nba|apuestas antes del mundial|apuestas anticipadas|apuestas anticipadas nba|apuestas
apps|apuestas arabia argentina|apuestas argentina|apuestas argentina
campeon del mundo|apuestas argentina canada|apuestas argentina colombia|apuestas argentina croacia|apuestas argentina españa|apuestas argentina francia|apuestas argentina
francia cuanto paga|apuestas argentina francia mundial|apuestas argentina gana el mundial|apuestas argentina gana
mundial|apuestas argentina holanda|apuestas argentina mexico|apuestas argentina méxico|apuestas argentina mundial|apuestas argentina online|apuestas argentina paises bajos|apuestas argentina polonia|apuestas argentina uruguay|apuestas
argentina vs australia|apuestas argentina vs colombia|apuestas
argentina vs francia|apuestas argentina vs peru|apuestas argentinas|apuestas arsenal real madrid|apuestas ascenso a primera
division|apuestas ascenso a segunda|apuestas asiaticas|apuestas asiatico|apuestas athletic|apuestas athletic atletico|apuestas athletic barça|apuestas athletic barcelona|apuestas athletic betis|apuestas athletic manchester|apuestas athletic manchester united|apuestas athletic osasuna|apuestas athletic real|apuestas athletic real madrid|apuestas athletic real sociedad|apuestas athletic real sociedad
final|apuestas athletic roma|apuestas athletic sevilla|apuestas athletic valencia|apuestas
atletico|apuestas atletico barcelona|apuestas atletico
barsa|apuestas atletico campeon champions|apuestas atletico campeon de liga|apuestas atlético copenhague|apuestas atletico de madrid|apuestas atlético de madrid|apuestas atletico de madrid barcelona|apuestas atletico
de madrid gana la liga|apuestas atletico de madrid real
madrid|apuestas atlético de madrid real madrid|apuestas atletico de madrid vs barcelona|apuestas atletico madrid|apuestas
atletico madrid real madrid|apuestas atletico madrid vs barcelona|apuestas atletico real madrid|apuestas
atletico real madrid champions|apuestas atletismo|apuestas bajas|apuestas baloncesto|apuestas baloncesto acb|apuestas
baloncesto handicap|apuestas baloncesto hoy|apuestas baloncesto juegos olimpicos|apuestas baloncesto nba|apuestas
baloncesto pronostico|apuestas baloncesto pronósticos|apuestas baloncesto prorroga|apuestas barca|apuestas
barca athletic|apuestas barca atletico|apuestas barca bayern|apuestas barca bayern munich|apuestas barca girona|apuestas barca hoy|apuestas barça
hoy|apuestas barca inter|apuestas barca juventus|apuestas barca
madrid|apuestas barça madrid|apuestas barca real
madrid|apuestas barca vs juve|apuestas barca vs madrid|apuestas barca vs psg|apuestas barcelona|apuestas
barcelona alaves|apuestas barcelona athletic|apuestas barcelona
atletico|apuestas barcelona atletico de madrid|apuestas barcelona atlético de madrid|apuestas barcelona
atletico madrid|apuestas barcelona bayern|apuestas barcelona betis|apuestas barcelona
campeon de liga|apuestas barcelona celta|apuestas barcelona espanyol|apuestas barcelona gana la champions|apuestas barcelona girona|apuestas barcelona
granada|apuestas barcelona hoy|apuestas barcelona inter|apuestas barcelona madrid|apuestas barcelona osasuna|apuestas barcelona psg|apuestas barcelona real madrid|apuestas barcelona real sociedad|apuestas barcelona sevilla|apuestas barcelona valencia|apuestas
barcelona villarreal|apuestas barcelona vs atletico madrid|apuestas barcelona vs
madrid|apuestas barcelona vs real madrid|apuestas barsa madrid|apuestas basket hoy|apuestas
bayern barcelona|apuestas bayern vs barcelona|apuestas beisbol|apuestas béisbol|apuestas beisbol mlb|apuestas beisbol pronosticos|apuestas beisbol venezolano|apuestas
betis|apuestas betis – chelsea|apuestas betis barcelona|apuestas betis chelsea|apuestas
betis fiorentina|apuestas betis girona|apuestas betis madrid|apuestas betis mallorca|apuestas betis
real madrid|apuestas betis real sociedad|apuestas
betis sevilla|apuestas betis valencia|apuestas betis valladolid|apuestas betis vs valencia|apuestas betplay hoy colombia|apuestas betsson peru|apuestas bienvenida|apuestas billar online|apuestas
bolivia vs colombia|apuestas bono|apuestas
bono bienvenida|apuestas bono de bienvenida|apuestas bono de bienvenida sin deposito|apuestas bono gratis|apuestas
bono sin deposito|apuestas bonos sin deposito|apuestas borussia real
madrid|apuestas boxeo|apuestas boxeo de campeonato|apuestas boxeo españa|apuestas boxeo español|apuestas boxeo femenino olimpiadas|apuestas boxeo hoy|apuestas boxeo online|apuestas brasil colombia|apuestas brasil peru|apuestas brasil uruguay|apuestas brasil vs colombia|apuestas brasil vs peru|apuestas caballos|apuestas caballos colocado|apuestas caballos españa|apuestas caballos hipodromo|apuestas caballos
hoy|apuestas caballos madrid|apuestas caballos
online|apuestas caballos sanlucar de barrameda|apuestas caballos zarzuela|apuestas calculador|apuestas campeon|apuestas campeon champions|apuestas campeón champions|apuestas campeon champions 2025|apuestas campeon champions league|apuestas campeon conference league|apuestas campeon copa america|apuestas
campeon copa del rey|apuestas campeon de
champions|apuestas campeon de la champions|apuestas campeon de liga|apuestas campeon del mundo|apuestas campeon eurocopa|apuestas campeón eurocopa|apuestas campeon europa league|apuestas campeon f1|apuestas campeon f1 2025|apuestas campeon formula 1|apuestas
campeon libertadores|apuestas campeon liga|apuestas
campeon liga bbva|apuestas campeon liga española|apuestas campeon liga santander|apuestas campeon motogp
2025|apuestas campeon mundial|apuestas campeón mundial|apuestas
campeon mundial baloncesto|apuestas campeon nba|apuestas campeón nba|apuestas campeon premier|apuestas campeon premier league|apuestas campeon roland garros|apuestas campeonato f1|apuestas campeonatos de futbol|apuestas carrera de caballos|apuestas carrera de caballos
hoy|apuestas carrera de caballos nocturnas|apuestas carrera de galgos fin de semana|apuestas carrera de galgos
hoy|apuestas carrera de galgos nocturnas|apuestas carreras caballos|apuestas carreras
caballos sanlucar|apuestas carreras de caballos|apuestas carreras de caballos en directo|apuestas carreras de caballos en vivo|apuestas carreras de caballos españa|apuestas carreras de caballos hoy|apuestas carreras de caballos nacionales|apuestas
carreras de caballos nocturnas|apuestas carreras de caballos
online|apuestas carreras de caballos sanlucar|apuestas carreras
de caballos sanlúcar|apuestas carreras de galgos|apuestas carreras de galgos
en vivo|apuestas carreras de galgos nocturnas|apuestas carreras
de galgos pre partido|apuestas casino|apuestas casino barcelona|apuestas casino futbol|apuestas casino
gran madrid|apuestas casino gratis|apuestas casino madrid|apuestas casino online|apuestas
casino online argentina|apuestas casinos|apuestas casinos online|apuestas celta|apuestas
celta barcelona|apuestas celta betis|apuestas celta eibar|apuestas celta espanyol|apuestas celta granada|apuestas celta madrid|apuestas celta manchester|apuestas
celta real madrid|apuestas champion league|apuestas
champions foro|apuestas champions hoy|apuestas champions league|apuestas champions league – pronósticos|apuestas champions league 2025|apuestas champions league
hoy|apuestas champions league pronosticos|apuestas champions league pronósticos|apuestas champions pronosticos|apuestas chelsea barcelona|apuestas chelsea betis|apuestas chile|apuestas chile peru|apuestas chile venezuela|apuestas chile vs
colombia|apuestas chile vs uruguay|apuestas ciclismo|apuestas ciclismo en vivo|apuestas ciclismo femenino|apuestas ciclismo tour francia|apuestas
ciclismo vuelta|apuestas ciclismo vuelta a
españa|apuestas ciclismo vuelta españa|apuestas city madrid|apuestas
city real madrid|apuestas clasico|apuestas clasico español|apuestas clasico real madrid barcelona|apuestas clasificacion mundial|apuestas colombia|apuestas colombia
argentina|apuestas colombia brasil|apuestas colombia paraguay|apuestas colombia uruguay|apuestas colombia vs argentina|apuestas colombia vs
brasil|apuestas combinadas|apuestas combinadas
como funcionan|apuestas combinadas de futbol|apuestas combinadas de fútbol|apuestas combinadas foro|apuestas combinadas futbol|apuestas
combinadas hoy|apuestas combinadas mismo partido|apuestas combinadas mundial|apuestas combinadas nba|apuestas combinadas para esta semana|apuestas combinadas para hoy|apuestas combinadas para mañana|apuestas combinadas pronosticos|apuestas combinadas recomendadas|apuestas combinadas seguras|apuestas combinadas
seguras para hoy|apuestas combinadas seguras para mañana|apuestas
como ganar|apuestas comparador|apuestas con bono de bienvenida|apuestas con dinero ficticio|apuestas con dinero real|apuestas con dinero virtual|apuestas con handicap|apuestas con handicap
asiatico|apuestas con handicap baloncesto|apuestas con mas probabilidades de
ganar|apuestas con paypal|apuestas con tarjeta de credito|apuestas con tarjeta de debito|apuestas consejos|apuestas copa|apuestas
copa africa|apuestas copa america|apuestas copa américa|apuestas copa argentina|apuestas
copa brasil|apuestas copa davis|apuestas copa de
europa|apuestas copa del mundo|apuestas copa del rey|apuestas copa del rey baloncesto|apuestas copa del rey final|apuestas copa del rey
futbol|apuestas copa del rey ganador|apuestas copa del rey hoy|apuestas copa del rey pronosticos|apuestas copa del rey
pronósticos|apuestas copa europa|apuestas copa italia|apuestas
copa libertadores|apuestas copa mundial de hockey|apuestas copa rey|apuestas copa sudamericana|apuestas corners|apuestas corners hoy|apuestas croacia argentina|apuestas cuartos eurocopa|apuestas cuotas|apuestas cuotas altas|apuestas cuotas bajas|apuestas de 1 euro|apuestas de baloncesto|apuestas de baloncesto hoy|apuestas de baloncesto nba|apuestas de baloncesto para hoy|apuestas de
beisbol|apuestas de beisbol para hoy|apuestas de blackjack en linea|apuestas de boxeo|apuestas
de boxeo canelo|apuestas de boxeo en las vegas|apuestas de boxeo hoy|apuestas
de boxeo online|apuestas de caballo|apuestas de caballos|apuestas de caballos como funciona|apuestas de caballos como se
juega|apuestas de caballos en colombia|apuestas de caballos en españa|apuestas de
caballos en linea|apuestas de caballos españa|apuestas de caballos ganador y colocado|apuestas de caballos internacionales|apuestas de caballos juegos|apuestas de caballos online|apuestas de caballos
online en venezuela|apuestas de caballos por internet|apuestas de caballos pronosticos|apuestas de
caballos pronósticos|apuestas de carrera de caballos|apuestas de carreras de
caballos|apuestas de carreras de caballos online|apuestas de casino|apuestas de casino online|apuestas de
casino por internet|apuestas de champions league|apuestas de ciclismo|apuestas de colombia|apuestas de copa america|apuestas de
corners|apuestas de deportes en linea|apuestas de deportes online|apuestas de dinero|apuestas de esports|apuestas
de eurocopa|apuestas de europa league|apuestas de
f1|apuestas de formula 1|apuestas de futbol|apuestas de fútbol|apuestas de futbol app|apuestas de futbol argentina|apuestas de futbol colombia|apuestas de futbol en colombia|apuestas de futbol en directo|apuestas de futbol en linea|apuestas de futbol en vivo|apuestas de
futbol español|apuestas de futbol gratis|apuestas de futbol hoy|apuestas de futbol mundial|apuestas de futbol online|apuestas de fútbol online|apuestas de futbol
para hoy|apuestas de fútbol para hoy|apuestas de futbol para hoy seguras|apuestas de
futbol para mañana|apuestas de futbol peru|apuestas de futbol pronosticos|apuestas
de fútbol pronósticos|apuestas de futbol seguras|apuestas de futbol seguras para hoy|apuestas de futbol sin dinero|apuestas de
galgos|apuestas de galgos como ganar|apuestas de galgos en directo|apuestas de galgos online|apuestas de galgos trucos|apuestas de golf|apuestas
de hockey|apuestas de hockey sobre hielo|apuestas de hoy|apuestas de hoy seguras|apuestas de juego|apuestas de juegos|apuestas
de juegos deportivos|apuestas de juegos online|apuestas de la champions league|apuestas
de la copa américa|apuestas de la eurocopa|apuestas de
la europa league|apuestas de la liga|apuestas
de la liga bbva|apuestas de la liga española|apuestas de la nba|apuestas de la nfl|apuestas de la ufc|apuestas
de mlb|apuestas de nba|apuestas de nba para hoy|apuestas
de partidos|apuestas de partidos de futbol|apuestas de peleas ufc|apuestas de perros en vivo|apuestas de perros virtuales|apuestas de peru|apuestas de
sistema|apuestas de sistema como funciona|apuestas de sistema explicacion|apuestas de sistema explicación|apuestas de tenis|apuestas de tenis de mesa|apuestas
de tenis en directo|apuestas de tenis hoy|apuestas de
tenis para hoy|apuestas de tenis pronosticos|apuestas de tenis
seguras|apuestas de todo tipo|apuestas de ufc|apuestas de ufc hoy|apuestas del boxeo|apuestas
del clasico|apuestas del clasico real madrid barca|apuestas del dia|apuestas del día|apuestas del dia de hoy|apuestas del
dia deportivas|apuestas del dia futbol|apuestas del mundial|apuestas
del partido de hoy|apuestas del real madrid|apuestas del rey|apuestas del sistema|apuestas deporte|apuestas
deportes|apuestas deportiva|apuestas deportivas|apuestas deportivas 1
euro|apuestas deportivas 10 euros gratis|apuestas deportivas 100 seguras|apuestas
deportivas 1×2|apuestas deportivas android|apuestas deportivas
app|apuestas deportivas apps|apuestas deportivas argentina|apuestas deportivas argentina futbol|apuestas deportivas argentina legal|apuestas deportivas atletico de madrid|apuestas
deportivas baloncesto|apuestas deportivas barca madrid|apuestas deportivas barcelona|apuestas
deportivas beisbol|apuestas deportivas bono|apuestas deportivas bono bienvenida|apuestas deportivas bono de
bienvenida|apuestas deportivas bono sin deposito|apuestas deportivas bonos de bienvenida|apuestas
deportivas boxeo|apuestas deportivas caballos|apuestas deportivas calculadora|apuestas deportivas
campeon liga|apuestas deportivas casino|apuestas deportivas casino barcelona|apuestas deportivas casino online|apuestas deportivas cerca de mi|apuestas deportivas champions league|apuestas deportivas chile|apuestas deportivas ciclismo|apuestas deportivas colombia|apuestas deportivas com|apuestas deportivas com foro|apuestas deportivas com pronosticos|apuestas deportivas combinadas|apuestas deportivas combinadas para hoy|apuestas deportivas como se juega|apuestas deportivas comparador|apuestas deportivas con bono gratis|apuestas deportivas con bonos gratis|apuestas deportivas con dinero ficticio|apuestas deportivas con paypal|apuestas deportivas
con puntos virtuales|apuestas deportivas consejos|apuestas
deportivas consejos para ganar|apuestas deportivas copa america|apuestas deportivas copa
del rey|apuestas deportivas copa libertadores|apuestas deportivas copa
mundial|apuestas deportivas corners|apuestas deportivas
cual es la mejor|apuestas deportivas cuotas altas|apuestas deportivas de baloncesto|apuestas deportivas de boxeo|apuestas deportivas de colombia|apuestas deportivas de futbol|apuestas deportivas de nba|apuestas deportivas de
nhl|apuestas deportivas de peru|apuestas deportivas de tenis|apuestas deportivas del dia|apuestas deportivas dinero ficticio|apuestas deportivas directo|apuestas deportivas doble oportunidad|apuestas deportivas en argentina|apuestas
deportivas en chile|apuestas deportivas en colombia|apuestas deportivas en directo|apuestas deportivas en españa|apuestas deportivas en español|apuestas deportivas en linea|apuestas
deportivas en línea|apuestas deportivas en peru|apuestas deportivas en perú|apuestas deportivas en sevilla|apuestas deportivas
en uruguay|apuestas deportivas en vivo|apuestas deportivas
es|apuestas deportivas es pronosticos|apuestas deportivas españa|apuestas deportivas españolas|apuestas deportivas esports|apuestas
deportivas estadisticas|apuestas deportivas estrategias|apuestas deportivas estrategias seguras|apuestas deportivas
eurocopa|apuestas deportivas europa league|apuestas deportivas
f1|apuestas deportivas faciles de ganar|apuestas deportivas formula 1|apuestas deportivas foro|apuestas deportivas foro futbol|apuestas
deportivas foro tenis|apuestas deportivas francia argentina|apuestas
deportivas futbol|apuestas deportivas fútbol|apuestas deportivas futbol argentino|apuestas deportivas futbol colombia|apuestas
deportivas futbol español|apuestas deportivas gana|apuestas deportivas ganadas|apuestas deportivas ganar dinero seguro|apuestas deportivas gane|apuestas
deportivas golf|apuestas deportivas gratis|apuestas deportivas gratis con premios|apuestas deportivas gratis hoy|apuestas deportivas gratis sin deposito|apuestas deportivas handicap|apuestas deportivas handicap asiatico|apuestas deportivas
hoy|apuestas deportivas impuestos|apuestas deportivas interior argentina|apuestas deportivas juegos olimpicos|apuestas deportivas
la liga|apuestas deportivas legales|apuestas deportivas legales en colombia|apuestas deportivas libres
de impuestos|apuestas deportivas licencia españa|apuestas deportivas liga española|apuestas deportivas listado|apuestas deportivas listado clasico|apuestas deportivas madrid|apuestas deportivas mas seguras|apuestas deportivas mejor pagadas|apuestas deportivas
mejores|apuestas deportivas mejores app|apuestas deportivas mejores casas|apuestas deportivas mejores cuotas|apuestas deportivas mejores paginas|apuestas deportivas mexico|apuestas deportivas méxico|apuestas deportivas mlb|apuestas deportivas
mlb hoy|apuestas deportivas multiples|apuestas deportivas mundial|apuestas deportivas murcia|apuestas
deportivas nba|apuestas deportivas nba hoy|apuestas deportivas nfl|apuestas deportivas nhl|apuestas deportivas nuevas|apuestas deportivas ofertas|apuestas
deportivas online|apuestas deportivas online argentina|apuestas deportivas
online chile|apuestas deportivas online colombia|apuestas
deportivas online en colombia|apuestas deportivas online españa|apuestas
deportivas online mexico|apuestas deportivas online paypal|apuestas deportivas online peru|apuestas deportivas online por internet|apuestas deportivas pago paypal|apuestas deportivas para
ganar dinero|apuestas deportivas para hoy|apuestas deportivas para hoy pronosticos|apuestas deportivas partido
suspendido|apuestas deportivas partidos de hoy|apuestas deportivas
paypal|apuestas deportivas peru|apuestas deportivas
perú|apuestas deportivas peru vs ecuador|apuestas deportivas predicciones|apuestas deportivas
promociones|apuestas deportivas pronostico|apuestas deportivas pronóstico|apuestas deportivas pronostico hoy|apuestas deportivas pronosticos|apuestas deportivas pronósticos|apuestas deportivas pronosticos expertos|apuestas deportivas pronosticos gratis|apuestas deportivas pronosticos nba|apuestas deportivas pronosticos tenis|apuestas deportivas que aceptan paypal|apuestas
deportivas real madrid|apuestas deportivas regalo bienvenida|apuestas deportivas resultado exacto|apuestas deportivas
resultados|apuestas deportivas rugby|apuestas deportivas seguras|apuestas
deportivas seguras foro|apuestas deportivas seguras hoy|apuestas deportivas
seguras para hoy|apuestas deportivas seguras telegram|apuestas deportivas sevilla|apuestas deportivas simulador eurocopa|apuestas deportivas sin deposito|apuestas
deportivas sin deposito inicial|apuestas deportivas sin dinero|apuestas deportivas
sin dinero real|apuestas deportivas sin registro|apuestas deportivas stake|apuestas deportivas stake
10|apuestas deportivas telegram españa|apuestas deportivas tenis|apuestas deportivas tenis de
mesa|apuestas deportivas tenis foro|apuestas deportivas tenis hoy|apuestas deportivas tips|apuestas deportivas
tipster|apuestas deportivas ufc|apuestas deportivas
uruguay|apuestas deportivas valencia|apuestas deportivas valencia barcelona|apuestas
deportivas venezuela|apuestas deportivas virtuales|apuestas deportivas y casino|apuestas deportivas y casino
online|apuestas deportivas.com|apuestas deportivas.com foro|apuestas deportivas.es|apuestas
deportivos pronosticos|apuestas deposito minimo 1 euro|apuestas descenso a segunda|apuestas descenso a segunda b|apuestas descenso la liga|apuestas descenso primera
division|apuestas descenso segunda|apuestas dia|apuestas diarias seguras|apuestas dinero|apuestas dinero ficticio|apuestas dinero real|apuestas dinero virtual|apuestas directas|apuestas directo|apuestas directo futbol|apuestas
division de honor juvenil|apuestas dnb|apuestas doble oportunidad|apuestas
doble resultado|apuestas dobles|apuestas dobles y triples|apuestas dortmund barcelona|apuestas draft nba|apuestas draft
nfl|apuestas ecuador vs argentina|apuestas ecuador vs venezuela|apuestas egipto uruguay|apuestas el
clasico|apuestas elecciones venezuela|apuestas empate|apuestas en baloncesto|apuestas en barcelona|apuestas en beisbol|apuestas
en boxeo|apuestas en caballos|apuestas en carreras
de caballos|apuestas en casino|apuestas en casino online|apuestas en casinos|apuestas en casinos online|apuestas en chile|apuestas en ciclismo|apuestas en colombia|apuestas en colombia de futbol|apuestas en directo|apuestas en directo futbol|apuestas en directo pronosticos|apuestas en el futbol|apuestas en el tenis|apuestas en españa|apuestas en esports|apuestas en eventos deportivos
virtuales|apuestas en golf|apuestas en juegos|apuestas en la
champions league|apuestas en la eurocopa|apuestas en la liga|apuestas en la nba|apuestas en la nfl|apuestas en las vegas mlb|apuestas
en las vegas nfl|apuestas en linea|apuestas en línea|apuestas en linea argentina|apuestas en linea boxeo|apuestas en linea chile|apuestas en linea colombia|apuestas en línea de fútbol|apuestas en linea deportivas|apuestas en linea españa|apuestas en linea estados unidos|apuestas en linea futbol|apuestas en linea mexico|apuestas en línea méxico|apuestas en linea mundial|apuestas en linea peru|apuestas
en linea usa|apuestas en los esports|apuestas en madrid|apuestas en méxico|apuestas en mexico online|apuestas en nba|apuestas en partidos de futbol|apuestas en partidos de futbol en vivo|apuestas en partidos de tenis en directo|apuestas en perú|apuestas en sevilla|apuestas
en sistema|apuestas en stake|apuestas en tenis|apuestas en tenis de mesa|apuestas en valencia|apuestas en vivo|apuestas en vivo argentina|apuestas en vivo
casino|apuestas en vivo futbol|apuestas en vivo fútbol|apuestas en vivo
nba|apuestas en vivo peru|apuestas en vivo tenis|apuestas en vivo ufc|apuestas equipo mbappe|apuestas equipos de futbol|apuestas
españa|apuestas españa alemania|apuestas españa alemania
eurocopa|apuestas españa croacia|apuestas españa eurocopa|apuestas españa francia|apuestas españa francia eurocopa|apuestas españa
gana el mundial|apuestas españa gana eurocopa|apuestas españa gana mundial|apuestas españa georgia|apuestas españa holanda|apuestas españa inglaterra|apuestas
españa inglaterra cuotas|apuestas españa inglaterra eurocopa|apuestas españa italia|apuestas
españa mundial|apuestas españa paises bajos|apuestas español|apuestas
español oviedo|apuestas espanyol barcelona|apuestas espanyol betis|apuestas espanyol
villarreal|apuestas esport|apuestas esports|apuestas esports colombia|apuestas
esports españa|apuestas esports fifa|apuestas esports gratis|apuestas esports lol|apuestas esports peru|apuestas esports valorant|apuestas
estadisticas|apuestas estrategias|apuestas euro|apuestas euro copa|apuestas eurocopa|apuestas
eurocopa campeon|apuestas eurocopa españa|apuestas eurocopa favoritos|apuestas eurocopa femenina|apuestas eurocopa final|apuestas eurocopa ganador|apuestas
eurocopa hoy|apuestas eurocopa sub 21|apuestas euroliga baloncesto|apuestas euroliga pronosticos|apuestas europa league|apuestas europa league hoy|apuestas europa
league pronosticos|apuestas europa league pronósticos|apuestas euros|apuestas f1 abu
dhabi|apuestas f1 bahrein|apuestas f1 canada|apuestas
f1 china|apuestas f1 cuotas|apuestas f1 hoy|apuestas
f1 las vegas|apuestas f1 miami|apuestas f1 monaco|apuestas faciles de ganar|apuestas fáciles de
ganar|apuestas faciles para ganar|apuestas favoritas|apuestas favorito champions|apuestas favoritos champions|apuestas favoritos eurocopa|apuestas favoritos
mundial|apuestas fc barcelona|apuestas final champions cuotas|apuestas final champions league|apuestas final
champions peru|apuestas final copa|apuestas final copa america|apuestas final copa
de europa|apuestas final copa del rey|apuestas final copa europa|apuestas final copa libertadores|apuestas final copa rey|apuestas
final de copa|apuestas final de copa del rey|apuestas final del mundial|apuestas final euro|apuestas final eurocopa|apuestas final europa league|apuestas final libertadores|apuestas final mundial|apuestas
final nba|apuestas final rugby|apuestas final uefa europa league|apuestas final.mundial|apuestas finales de conferencia nfl|apuestas finales nba|apuestas fiorentina betis|apuestas formula|apuestas
formula 1|apuestas fórmula 1|apuestas fórmula 1 pronósticos|apuestas formula uno|apuestas foro|apuestas foro nba|apuestas francia argentina|apuestas francia españa|apuestas futbol|apuestas fútbol|apuestas futbol americano|apuestas futbol americano nfl|apuestas futbol argentina|apuestas
futbol argentino|apuestas futbol champions league|apuestas futbol chile|apuestas
futbol colombia|apuestas futbol consejos|apuestas futbol en directo|apuestas fútbol en directo|apuestas futbol
en vivo|apuestas fútbol en vivo|apuestas futbol españa|apuestas futbol
español|apuestas fútbol español|apuestas futbol eurocopa|apuestas futbol femenino|apuestas futbol foro|apuestas futbol gratis|apuestas futbol hoy|apuestas fútbol hoy|apuestas
futbol juegos olimpicos|apuestas futbol mexico|apuestas futbol mundial|apuestas futbol online|apuestas futbol para
hoy|apuestas futbol peru|apuestas futbol pronosticos|apuestas futbol
sala|apuestas futbol telegram|apuestas futbol virtual|apuestas galgos|apuestas galgos en directo|apuestas
galgos hoy|apuestas galgos online|apuestas galgos pronosticos|apuestas galgos trucos|apuestas gana|apuestas gana colombia|apuestas
gana resultados|apuestas ganadas|apuestas ganadas hoy|apuestas ganador champions league|apuestas ganador copa america|apuestas ganador copa del rey|apuestas ganador copa del rey baloncesto|apuestas ganador copa libertadores|apuestas ganador de la eurocopa|apuestas ganador de la liga|apuestas ganador del mundial|apuestas ganador eurocopa|apuestas ganador europa league|apuestas ganador f1|apuestas ganador la liga|apuestas ganador liga española|apuestas ganador mundial|apuestas ganador mundial
baloncesto|apuestas ganador mundial f1|apuestas ganador nba|apuestas ganadores eurocopa|apuestas ganadores mundial|apuestas ganar
champions|apuestas ganar eurocopa|apuestas ganar liga|apuestas ganar mundial|apuestas ganar nba|apuestas getafe valencia|apuestas
ghana uruguay|apuestas girona|apuestas girona athletic|apuestas
girona betis|apuestas girona campeon de liga|apuestas girona campeon liga|apuestas girona gana la liga|apuestas girona real madrid|apuestas
girona real sociedad|apuestas goleador eurocopa|apuestas goleadores eurocopa|apuestas
goles asiaticos|apuestas golf|apuestas golf masters|apuestas golf pga|apuestas granada barcelona|apuestas grand slam de tenis|apuestas gratis|apuestas
gratis casino|apuestas gratis con premios|apuestas gratis
hoy|apuestas gratis para hoy|apuestas gratis
por registro|apuestas gratis puntos|apuestas gratis regalos|apuestas gratis sin deposito|apuestas gratis sin depósito|apuestas gratis sin ingreso|apuestas gratis sports|apuestas gratis y
ganar premios|apuestas grupo a eurocopa|apuestas grupos eurocopa|apuestas handicap|apuestas handicap asiatico|apuestas handicap baloncesto|apuestas handicap como funciona|apuestas handicap nba|apuestas handicap nfl|apuestas
hipicas online|apuestas hípicas online|apuestas hipicas venezuela|apuestas hockey|apuestas
hockey hielo|apuestas hockey patines|apuestas hockey sobre hielo|apuestas holanda argentina|apuestas holanda vs argentina|apuestas hoy|apuestas hoy champions|apuestas hoy futbol|apuestas hoy nba|apuestas
hoy pronosticos|apuestas hoy seguras|apuestas impuestos|apuestas inglaterra paises bajos|apuestas inter
barca|apuestas inter barcelona|apuestas juego|apuestas juegos|apuestas juegos
en linea|apuestas juegos olimpicos|apuestas juegos olímpicos|apuestas juegos olimpicos
baloncesto|apuestas juegos online|apuestas juegos virtuales|apuestas jugador sevilla|apuestas jugadores nba|apuestas kings league americas|apuestas la liga|apuestas la
liga española|apuestas la liga hoy|apuestas la liga santander|apuestas las vegas mlb|apuestas las vegas nba|apuestas las
vegas nfl|apuestas league of legends mundial|apuestas legal|apuestas legales|apuestas legales en colombia|apuestas legales en españa|apuestas legales en estados unidos|apuestas legales españa|apuestas leganes betis|apuestas libertadores|apuestas licencia|apuestas liga 1 peru|apuestas liga argentina|apuestas liga bbva pronosticos|apuestas liga de
campeones|apuestas liga de campeones de baloncesto|apuestas liga de campeones
de hockey|apuestas liga españa|apuestas liga española|apuestas liga santander pronosticos|apuestas ligas de futbol|apuestas
linea|apuestas linea de gol|apuestas liverpool barcelona|apuestas liverpool real madrid|apuestas
lol mundial|apuestas madrid|apuestas madrid arsenal|apuestas
madrid atletico|apuestas madrid atletico champions|apuestas madrid barca|apuestas madrid
barça|apuestas madrid barca hoy|apuestas madrid barca supercopa|apuestas
madrid barcelona|apuestas madrid barsa|apuestas madrid bayern|apuestas madrid
betis|apuestas madrid borussia|apuestas madrid campeon champions|apuestas madrid
celta|apuestas madrid city|apuestas madrid dortmund|apuestas madrid gana la liga|apuestas
madrid gana liga|apuestas madrid hoy|apuestas madrid liverpool|apuestas madrid osasuna|apuestas madrid sevilla|apuestas madrid valencia|apuestas madrid vs arsenal|apuestas madrid vs barcelona|apuestas
mallorca osasuna|apuestas mallorca real sociedad|apuestas manchester athletic|apuestas manchester city real madrid|apuestas mas faciles de ganar|apuestas mas seguras|apuestas mas seguras
para hoy|apuestas masters de golf|apuestas masters de tenis|apuestas maximo goleador eurocopa|apuestas
maximo goleador mundial|apuestas mejor jugador eurocopa|apuestas
mejores casinos online|apuestas mexico|apuestas méxico|apuestas mexico polonia|apuestas méxico polonia|apuestas mlb|apuestas mlb hoy|apuestas mlb las vegas|apuestas mlb para hoy|apuestas mlb pronosticos|apuestas mlb usa|apuestas mma ufc|apuestas momios|apuestas multiples|apuestas múltiples|apuestas multiples como funcionan|apuestas multiples el gordo|apuestas multiples futbol|apuestas mundial|apuestas mundial 2026|apuestas mundial baloncesto|apuestas mundial balonmano|apuestas mundial brasil|apuestas mundial campeon|apuestas mundial ciclismo|apuestas mundial clubes|apuestas mundial de baloncesto|apuestas mundial de ciclismo|apuestas mundial de clubes|apuestas mundial de futbol|apuestas mundial de fútbol|apuestas mundial de rugby|apuestas mundial f1|apuestas mundial favoritos|apuestas mundial femenino|apuestas mundial formula 1|apuestas mundial futbol|apuestas mundial ganador|apuestas mundial lol|apuestas mundial moto gp|apuestas mundial motogp|apuestas mundial rugby|apuestas mundial sub 17|apuestas mundiales|apuestas mundialistas|apuestas mvp eurocopa|apuestas mvp nba|apuestas mvp nfl|apuestas nacionales
de colombia|apuestas nba|apuestas nba all star|apuestas nba campeon|apuestas nba
consejos|apuestas nba esta noche|apuestas nba finals|apuestas nba gratis|apuestas nba hoy|apuestas nba hoy jugadores|apuestas nba hoy pronosticos|apuestas nba para hoy|apuestas nba playoffs|apuestas nba pronosticos|apuestas nba pronósticos|apuestas nba pronosticos hoy|apuestas
nba tipster|apuestas nfl|apuestas nfl hoy|apuestas nfl las vegas|apuestas nfl playoffs|apuestas nfl
pronosticos|apuestas nfl pronósticos|apuestas nfl semana
4|apuestas nfl super bowl|apuestas nhl|apuestas nhl pronosticos|apuestas octavos eurocopa|apuestas
ofertas|apuestas online|apuestas online argentina|apuestas
online argentina legal|apuestas online bono|apuestas online
bono bienvenida|apuestas online boxeo|apuestas
online caballos|apuestas online carreras de caballos|apuestas online
casino|apuestas online champions league|apuestas online chile|apuestas online ciclismo|apuestas online colombia|apuestas online comparativa|apuestas online con paypal|apuestas
online de caballos|apuestas online deportivas|apuestas online en argentina|apuestas online
en peru|apuestas online espana|apuestas online españa|apuestas
online esports|apuestas online foro|apuestas online futbol|apuestas online futbol españa|apuestas
online golf|apuestas online gratis|apuestas online gratis sin deposito|apuestas online juegos|apuestas online mexico|apuestas online mma|apuestas online
movil|apuestas online nba|apuestas online net|apuestas online nuevas|apuestas online opiniones|apuestas online paypal|apuestas online peru|apuestas online seguras|apuestas online sin dinero|apuestas online sin registro|apuestas online tenis|apuestas online
ufc|apuestas online uruguay|apuestas online venezuela|apuestas open britanico golf|apuestas osasuna athletic|apuestas osasuna barcelona|apuestas osasuna real
madrid|apuestas osasuna sevilla|apuestas osasuna valencia|apuestas over|apuestas over 2.5|apuestas over under|apuestas paginas|apuestas pago anticipado|apuestas paises bajos ecuador|apuestas paises bajos inglaterra|apuestas países bajos qatar|apuestas para boxeo|apuestas
para champions league|apuestas para el clasico|apuestas para
el dia de hoy|apuestas para el mundial|apuestas para el partido de hoy|apuestas para
eurocopa|apuestas para europa league|apuestas para futbol|apuestas para
ganar|apuestas para ganar dinero|apuestas para ganar dinero facil|apuestas para ganar en la ruleta|apuestas para ganar la champions|apuestas para ganar la eurocopa|apuestas para ganar la europa league|apuestas
para ganar la liga|apuestas para ganar siempre|apuestas para hacer|apuestas para hoy|apuestas para
hoy de futbol|apuestas para hoy europa league|apuestas para hoy futbol|apuestas para juegos|apuestas para
la champions league|apuestas para la copa del rey|apuestas para la eurocopa|apuestas para la
europa league|apuestas para la final de la eurocopa|apuestas para la nba hoy|apuestas
para los partidos de hoy|apuestas para partidos
de hoy|apuestas para ufc|apuestas partido|apuestas partido aplazado|apuestas partido champions|apuestas partido colombia|apuestas partido españa marruecos|apuestas partido mundial|apuestas
partido suspendido|apuestas partidos|apuestas partidos champions league|apuestas partidos csgo|apuestas partidos de futbol|apuestas partidos
de futbol hoy|apuestas partidos de hoy|apuestas partidos eurocopa|apuestas partidos futbol|apuestas partidos hoy|apuestas partidos mundial|apuestas paypal|apuestas peleas de boxeo|apuestas peru|apuestas perú|apuestas peru brasil|apuestas peru chile|apuestas peru
paraguay|apuestas peru uruguay|apuestas peru vs chile|apuestas peru vs colombia|apuestas pichichi eurocopa|apuestas plataforma|apuestas playoff|apuestas playoff ascenso|apuestas playoff
ascenso a primera|apuestas playoff nba|apuestas playoff
segunda|apuestas playoff segunda b|apuestas playoffs nba|apuestas playoffs nfl|apuestas polonia argentina|apuestas
por argentina|apuestas por internet mexico|apuestas por internet para ganar dinero|apuestas por paypal|apuestas por ronda boxeo|apuestas por sistema|apuestas portugal uruguay|apuestas pre partido|apuestas predicciones|apuestas predicciones futbol|apuestas primera division|apuestas
primera division españa|apuestas promociones|apuestas
pronostico|apuestas pronosticos|apuestas pronosticos deportivos|apuestas pronosticos deportivos tenis|apuestas pronosticos
futbol|apuestas pronosticos gratis|apuestas pronosticos nba|apuestas pronosticos tenis|apuestas prorroga|apuestas psg barca|apuestas
psg barcelona|apuestas puntos por tarjetas|apuestas puntos tarjetas|apuestas que aceptan paypal|apuestas que
es handicap|apuestas que puedes hacer con tu novia|apuestas que siempre ganaras|apuestas que significa|apuestas quien bajara a segunda|apuestas quién bajara a segunda|apuestas quien gana el mundial|apuestas quien gana eurocopa|apuestas quien gana la champions|apuestas quien gana la eurocopa|apuestas quien gana la liga|apuestas quien ganara el mundial|apuestas quién ganará el
mundial|apuestas quien ganara la champions|apuestas quien ganara la eurocopa|apuestas quien ganara la liga|apuestas rayo barcelona|apuestas real madrid|apuestas real madrid arsenal|apuestas real madrid
athletic|apuestas real madrid atletico|apuestas real madrid atletico
champions|apuestas real madrid atletico de madrid|apuestas real madrid atlético de
madrid|apuestas real madrid atletico madrid|apuestas real madrid barcelona|apuestas real madrid bayern|apuestas real madrid betis|apuestas real madrid
borussia|apuestas real madrid campeon champions|apuestas
real madrid celta|apuestas real madrid champions|apuestas real madrid city|apuestas real madrid girona|apuestas
real madrid hoy|apuestas real madrid liverpool|apuestas real madrid manchester
city|apuestas real madrid osasuna|apuestas real madrid real sociedad|apuestas real madrid valencia|apuestas real madrid villarreal|apuestas real madrid vs arsenal|apuestas real madrid vs atletico|apuestas real
madrid vs atlético|apuestas real madrid vs atletico madrid|apuestas real madrid vs barcelona|apuestas real madrid vs betis|apuestas
real madrid vs sevilla|apuestas real madrid vs valencia|apuestas real sociedad|apuestas real sociedad athletic|apuestas real sociedad barcelona|apuestas real sociedad betis|apuestas real sociedad psg|apuestas real sociedad
real madrid|apuestas real sociedad valencia|apuestas recomendadas hoy|apuestas regalo de bienvenida|apuestas registro|apuestas resultado exacto|apuestas resultados|apuestas resultados eurocopa|apuestas retirada tenis|apuestas roma barcelona|apuestas
roma sevilla|apuestas rugby|apuestas rugby mundial|apuestas rugby world cup|apuestas ruleta seguras|apuestas segunda|apuestas segunda b|apuestas segunda
division|apuestas segunda división|apuestas segunda division b|apuestas segunda division españa|apuestas seguras|apuestas seguras baloncesto|apuestas seguras calculadora|apuestas seguras en la ruleta|apuestas
seguras eurocopa|apuestas seguras foro|apuestas seguras futbol|apuestas
seguras futbol hoy|apuestas seguras gratis|apuestas seguras hoy|apuestas seguras hoy futbol|apuestas seguras nba|apuestas seguras nba
hoy|apuestas seguras para este fin de semana|apuestas seguras para ganar dinero|apuestas
seguras para hoy|apuestas seguras para hoy fútbol|apuestas seguras para hoy
pronósticos|apuestas seguras para mañana|apuestas seguras ruleta|apuestas seguras
telegram|apuestas seguras tenis|apuestas semifinales eurocopa|apuestas senegal
paises bajos|apuestas sevilla|apuestas sevilla athletic|apuestas sevilla atletico de madrid|apuestas sevilla barcelona|apuestas sevilla betis|apuestas sevilla campeon liga|apuestas sevilla celta|apuestas sevilla gana la liga|apuestas sevilla girona|apuestas sevilla inter|apuestas sevilla jugador|apuestas sevilla juventus|apuestas sevilla
leganes|apuestas sevilla madrid|apuestas sevilla manchester united|apuestas sevilla
osasuna|apuestas sevilla real madrid|apuestas sevilla real sociedad|apuestas sevilla roma|apuestas sevilla valencia|apuestas significa|apuestas simples ejemplos|apuestas simples o combinadas|apuestas sin deposito|apuestas sin deposito inicial|apuestas sin deposito minimo|apuestas sin dinero|apuestas sin dinero real|apuestas sin empate|apuestas sin empate que
significa|apuestas sin ingreso minimo|apuestas sin registro|apuestas sistema|apuestas
sistema calculadora|apuestas sistema como funciona|apuestas sistema trixie|apuestas sociedad|apuestas sorteo copa
del rey|apuestas stake|apuestas stake 10|apuestas stake 10 hoy|apuestas super bowl favorito|apuestas super rugby|apuestas supercopa españa|apuestas
superliga argentina|apuestas tarjeta roja|apuestas tarjetas|apuestas tarjetas amarillas|apuestas tenis|apuestas tenis atp|apuestas tenis consejos|apuestas tenis copa davis|apuestas tenis de mesa|apuestas
tenis de mesa pronosticos|apuestas tenis en vivo|apuestas tenis
femenino|apuestas tenis hoy|apuestas tenis itf|apuestas tenis pronosticos|apuestas tenis pronósticos|apuestas tenis retirada|apuestas tenis roland garros|apuestas tenis seguras|apuestas tenis wimbledon|apuestas tenis wta|apuestas tercera division|apuestas tercera division españa|apuestas tipos|apuestas tips|apuestas tipster|apuestas tipster para hoy|apuestas topuria holloway
cuotas|apuestas torneos de golf|apuestas torneos de tenis|apuestas trucos|apuestas uefa champions league|apuestas uefa europa league|apuestas ufc|apuestas ufc chile|apuestas
ufc como funciona|apuestas ufc hoy|apuestas ufc ilia topuria|apuestas ufc online|apuestas ufc pronósticos|apuestas ufc telegram|apuestas ufc topuria|apuestas under over|apuestas unionistas villarreal|apuestas uruguay|apuestas uruguay
colombia|apuestas uruguay corea|apuestas uruguay vs colombia|apuestas us open golf|apuestas us open tenis|apuestas valencia|apuestas valencia barcelona|apuestas valencia betis|apuestas valencia madrid|apuestas valencia real madrid|apuestas valladolid barcelona|apuestas valladolid valencia|apuestas
valor app|apuestas valor en directo|apuestas valor galgos|apuestas venezuela|apuestas venezuela argentina|apuestas
venezuela bolivia|apuestas venezuela ecuador|apuestas villarreal|apuestas villarreal athletic|apuestas villarreal barcelona|apuestas
villarreal bayern|apuestas villarreal betis|apuestas villarreal liverpool|apuestas villarreal manchester|apuestas villarreal manchester united|apuestas villarreal vs real madrid|apuestas virtuales|apuestas virtuales
colombia|apuestas virtuales futbol|apuestas virtuales sin dinero|apuestas vivo|apuestas vuelta a
españa|apuestas vuelta españa|apuestas william hill partidos de hoy|apuestas y casino|apuestas y casinos|apuestas y juegos de azar|apuestas y pronosticos|apuestas y pronosticos de futbol|apuestas y pronosticos deportivos|apuestas y resultados|apuestas-deportivas|apuestas-deportivas.es pronosticos|arbitro nba apuestas|argentina apuestas|argentina colombia apuestas|argentina croacia apuestas|argentina
francia apuestas|argentina mexico apuestas|argentina peru apuestas|argentina uruguay apuestas|argentina vs bolivia apuestas|argentina vs chile apuestas|argentina vs colombia apuestas|argentina vs francia
apuestas|argentina vs. colombia apuestas|asi se gana en las apuestas deportivas|asiatico apuestas|asiatico
en apuestas|asiaticos apuestas|athletic barcelona apuestas|athletic manchester
united apuestas|athletic osasuna apuestas|athletic real madrid apuestas|atletico barcelona apuestas|atletico de
madrid apuestas|atlético de madrid apuestas|atletico
de madrid real madrid apuestas|atletico de madrid vs barcelona apuestas|atletico
madrid real madrid apuestas|atletico madrid vs real
madrid apuestas|atletico real madrid apuestas|atletico vs real madrid apuestas|avisador
de cuotas apuestas|bajada de cuotas apuestas|baloncesto apuestas|barbastro barcelona apuestas|barca apuestas|barca bayern apuestas|barca
inter apuestas|barca madrid apuestas|barça madrid apuestas|barca vs atletico apuestas|barca
vs madrid apuestas|barca vs real madrid apuestas|barcelona – real madrid apuestas|barcelona apuestas|barcelona atletico apuestas|barcelona atletico de madrid apuestas|barcelona atletico madrid apuestas|barcelona betis apuestas|barcelona casa de apuestas|barcelona inter apuestas|barcelona psg
apuestas|barcelona real madrid apuestas|barcelona real sociedad apuestas|barcelona
sevilla apuestas|barcelona valencia apuestas|barcelona vs athletic bilbao apuestas|barcelona vs atlético madrid apuestas|barcelona vs betis apuestas|barcelona vs celta de vigo apuestas|barcelona vs espanyol
apuestas|barcelona vs girona apuestas|barcelona vs madrid apuestas|barcelona vs real madrid apuestas|barcelona vs
real sociedad apuestas|barcelona vs sevilla apuestas|barcelona
vs villarreal apuestas|base de datos cuotas apuestas
deportivas|bayern real madrid apuestas|beisbol apuestas|best america apuestas|bet apuestas chile|bet apuestas en vivo|betis – chelsea apuestas|betis apuestas|betis barcelona apuestas|betis chelsea apuestas|betis madrid
apuestas|betis sevilla apuestas|betsson tu sitio de apuestas online|blog
apuestas baloncesto|blog apuestas ciclismo|blog apuestas
nba|blog apuestas tenis|blog de apuestas de tenis|bono apuestas|bono apuestas deportivas|bono apuestas deportivas sin deposito|bono apuestas gratis|bono apuestas gratis sin deposito|bono
apuestas sin deposito|bono bienvenida apuestas|bono bienvenida apuestas deportivas|bono bienvenida apuestas españa|bono bienvenida apuestas
sin deposito|bono bienvenida apuestas sin depósito|bono bienvenida casa apuestas|bono bienvenida casa de apuestas|bono bienvenida marca apuestas|bono casa
apuestas|bono casa de apuestas|bono casa de apuestas sin ingreso|bono casas de apuestas|bono de
apuestas|bono de apuestas gratis sin deposito|bono de bienvenida
apuestas|bono de bienvenida apuestas deportivas|bono de bienvenida
casa de apuestas|bono de bienvenida casas de apuestas|bono
de casas de apuestas|bono de registro apuestas|bono de registro apuestas
deportivas|bono de registro casa de apuestas|bono gratis apuestas|bono marca apuestas|bono por registro apuestas|bono
por registro apuestas deportivas|bono por registro casa de apuestas|bono
registro apuestas|bono sin deposito apuestas|bono sin depósito apuestas|bono sin deposito apuestas deportivas|bono
sin depósito apuestas deportivas|bono sin deposito casa de apuestas|bono sin deposito marca apuestas|bono sin ingreso apuestas|bono sin ingreso apuestas
deportivas|bonos apuestas|bonos apuestas colombia|bonos apuestas
deportivas|bonos apuestas deportivas sin deposito|bonos apuestas
gratis|bonos apuestas sin deposito|bonos apuestas sin depósito|bonos bienvenida
apuestas|bonos bienvenida casas apuestas|bonos bienvenida casas de apuestas|bonos casa de apuestas|bonos casas apuestas|bonos casas de apuestas|bonos casas de apuestas colombia|bonos casas de apuestas
deportivas|bonos casas de apuestas españa|bonos
casas de apuestas nuevas|bonos casas de apuestas sin deposito|bonos
casas de apuestas sin depósito|bonos de apuestas|bonos
de apuestas deportivas|bonos de apuestas gratis|bonos de
apuestas sin deposito|bonos de bienvenida apuestas|bonos de bienvenida apuestas deportivas|bonos de bienvenida casa de
apuestas|bonos de bienvenida casas de apuestas|bonos de bienvenida de
casas de apuestas|bonos de bienvenida en casas de apuestas|bonos
de casas de apuestas|bonos de casas de apuestas sin deposito|bonos en casa de apuestas|bonos en casas de
apuestas sin deposito|bonos gratis apuestas|bonos gratis apuestas deportivas|bonos gratis casas de apuestas|bonos gratis sin deposito apuestas|bonos paginas de apuestas|bonos registro casas de apuestas|bonos sin deposito apuestas|bonos sin depósito apuestas|bonos sin deposito apuestas deportivas|bonos sin deposito casas de
apuestas|bot de apuestas deportivas gratis|boxeo apuestas|brasil colombia apuestas|brasil peru apuestas|brasil vs
colombia apuestas|buenas apuestas para hoy|buscador cuotas apuestas|buscador
de apuestas seguras|buscador de cuotas apuestas|buscador de cuotas de apuestas|buscar apuestas seguras|caballos apuestas|calculador de apuestas|calculador de cuotas
apuestas|calculadora apuestas|calculadora apuestas combinadas|calculadora
apuestas de sistema|calculadora apuestas deportivas|calculadora apuestas deportivas seguras|calculadora apuestas multiples|calculadora apuestas segura|calculadora apuestas seguras|calculadora
apuestas sistema|calculadora apuestas yankee|calculadora arbitraje apuestas|calculadora
cubrir apuestas|calculadora cuotas apuestas|calculadora de apuestas|calculadora de apuestas combinadas|calculadora de apuestas de futbol|calculadora de apuestas de sistema|calculadora de apuestas deportivas|calculadora de
apuestas multiples|calculadora de apuestas seguras|calculadora de apuestas sistema|calculadora de apuestas surebets|calculadora de arbitraje apuestas|calculadora de cuotas
apuestas|calculadora de cuotas de apuestas|calculadora para apuestas deportivas|calculadora poisson apuestas|calculadora poisson apuestas
deportivas|calculadora poisson para apuestas|calculadora scalping apuestas deportivas|calculadora sistema apuestas|calculadora stake apuestas|calculadora
trading apuestas|calcular apuestas|calcular apuestas deportivas|calcular apuestas futbol|calcular apuestas sistema|calcular cuotas
apuestas|calcular cuotas apuestas combinadas|calcular cuotas apuestas deportivas|calcular cuotas de apuestas|calcular ganancias apuestas deportivas|calcular momios apuestas|calcular probabilidad cuota
apuestas|calcular stake apuestas|calcular unidades
apuestas|calcular yield apuestas|calculo de apuestas|calculo de apuestas deportivas|cambio de cuotas
apuestas|campeon champions apuestas|campeon eurocopa apuestas|campeon liga apuestas|campeon nba apuestas|canales de apuestas gratis|carrera de caballos apuestas|carrera de caballos
apuestas juego|carrera de caballos con apuestas|carrera de galgos apuestas|carreras
de caballos apuestas|carreras de caballos apuestas online|carreras de caballos con apuestas|carreras de caballos juegos de apuestas|carreras de galgos apuestas|carreras
de galgos apuestas online|carreras de galgos apuestas trucos|carreras galgos apuestas|casa apuestas argentina|casa apuestas atletico
de madrid|casa apuestas barcelona|casa apuestas betis|casa apuestas
bono bienvenida|casa apuestas bono gratis|casa apuestas bono sin deposito|casa apuestas cerca de mi|casa apuestas chile|casa
apuestas colombia|casa apuestas con mejores
cuotas|casa apuestas deportivas|casa apuestas españa|casa apuestas española|casa apuestas eurocopa|casa apuestas futbol|casa apuestas mejores
cuotas|casa apuestas mundial|casa apuestas nueva|casa apuestas nuevas|casa apuestas online|casa apuestas peru|casa apuestas valencia|casa de apuestas|casa de apuestas 10 euros gratis|casa de apuestas argentina|casa de apuestas atletico de madrid|casa
de apuestas baloncesto|casa de apuestas barcelona|casa de apuestas
beisbol|casa de apuestas betis|casa de apuestas bono|casa de apuestas bono bienvenida|casa
de apuestas bono de bienvenida|casa de apuestas bono gratis|casa de apuestas bono por registro|casa de apuestas bono sin deposito|casa de apuestas boxeo|casa de apuestas caballos|casa de apuestas carreras de caballos|casa de apuestas
cerca de mi|casa de apuestas cerca de mí|casa de apuestas champions
league|casa de apuestas chile|casa de apuestas ciclismo|casa de
apuestas colombia|casa de apuestas con bono de
bienvenida|casa de apuestas con bono sin deposito|casa de
apuestas con cuotas mas altas|casa de apuestas
con esports|casa de apuestas con las mejores cuotas|casa de apuestas con licencia en españa|casa de
apuestas con mejores cuotas|casa de apuestas con pago anticipado|casa de apuestas con paypal|casa de apuestas copa
america|casa de apuestas de caballos|casa de apuestas de colombia|casa de apuestas de españa|casa
de apuestas de futbol|casa de apuestas de fútbol|casa
de apuestas de futbol peru|casa de apuestas de peru|casa de apuestas del madrid|casa de apuestas del real
madrid|casa de apuestas deportivas|casa de apuestas deportivas cerca de
mi|casa de apuestas deportivas en argentina|casa
de apuestas deportivas en chile|casa de apuestas deportivas en colombia|casa
de apuestas deportivas en españa|casa de apuestas deportivas en madrid|casa de
apuestas deportivas españa|casa de apuestas deportivas
españolas|casa de apuestas deportivas madrid|casa de apuestas deportivas mexico|casa
de apuestas deportivas online|casa de apuestas deportivas peru|casa de apuestas deposito 5 euros|casa
de apuestas deposito minimo|casa de apuestas deposito minimo 1 euro|casa de apuestas
depósito mínimo 1 euro|casa de apuestas en españa|casa de apuestas en linea|casa de apuestas en madrid|casa de apuestas en perú|casa de
apuestas en vivo|casa de apuestas españa|casa de apuestas españa inglaterra|casa de apuestas española|casa de apuestas españolas|casa de apuestas esports|casa de apuestas eurocopa|casa de apuestas europa
league|casa de apuestas f1|casa de apuestas formula 1|casa de
apuestas futbol|casa de apuestas ingreso minimo|casa de apuestas
ingreso minimo 1 euro|casa de apuestas ingreso
mínimo 1 euro|casa de apuestas legales|casa de
apuestas legales en colombia|casa de apuestas legales en españa|casa de apuestas libertadores|casa de apuestas
liga española|casa de apuestas madrid|casa de apuestas mas segura|casa de apuestas mejores|casa de apuestas méxico|casa de apuestas minimo 5 euros|casa de apuestas mlb|casa de apuestas mundial|casa de apuestas nba|casa
de apuestas nfl|casa de apuestas nueva|casa de apuestas nuevas|casa de apuestas
oficial del real madrid|casa de apuestas oficial real madrid|casa de apuestas online|casa de apuestas online argentina|casa
de apuestas online chile|casa de apuestas
online españa|casa de apuestas online mexico|casa de apuestas online paraguay|casa de apuestas online peru|casa de apuestas online usa|casa de apuestas online venezuela|casa
de apuestas pago anticipado|casa de apuestas
para boxeo|casa de apuestas para ufc|casa de apuestas peru|casa
de apuestas perú|casa de apuestas peru online|casa de apuestas por paypal|casa de apuestas promociones|casa de apuestas
que regalan dinero|casa de apuestas real madrid|casa de apuestas regalo de bienvenida|casa de apuestas sevilla|casa de apuestas sin dinero|casa de
apuestas sin ingreso minimo|casa de apuestas sin licencia en españa|casa de apuestas sin minimo
de ingreso|casa de apuestas stake|casa de apuestas tenis|casa de apuestas ufc|casa de apuestas valencia|casa de apuestas venezuela|casa de apuestas
virtuales|casa de apuestas vive la suerte|casa oficial de apuestas del
real madrid|casas apuestas asiaticas|casas apuestas bono sin deposito|casas apuestas bonos sin deposito|casas apuestas caballos|casas apuestas chile|casas apuestas ciclismo|casas apuestas con licencia|casas apuestas con licencia en españa|casas apuestas deportivas|casas apuestas deportivas colombia|casas apuestas deportivas españa|casas apuestas deportivas españolas|casas apuestas deportivas nuevas|casas apuestas
españa|casas apuestas españolas|casas apuestas
esports|casas apuestas eurocopa|casas apuestas golf|casas apuestas ingreso minimo 5 euros|casas apuestas legales|casas apuestas legales españa|casas apuestas licencia|casas apuestas licencia españa|casas apuestas mexico|casas apuestas mundial|casas apuestas nba|casas apuestas nuevas|casas apuestas nuevas españa|casas
apuestas ofertas|casas apuestas online|casas apuestas paypal|casas apuestas peru|casas apuestas sin licencia|casas apuestas tenis|casas asiaticas apuestas|casas de apuestas|casas de apuestas 5 euros|casas de apuestas app|casas de
apuestas argentinas|casas de apuestas asiaticas|casas de apuestas
baloncesto|casas de apuestas barcelona|casas de
apuestas bono bienvenida|casas de apuestas bono de bienvenida|casas de apuestas
bono por registro|casas de apuestas bono sin deposito|casas de apuestas bono sin ingreso|casas de
apuestas bonos|casas de apuestas bonos de bienvenida|casas
de apuestas bonos gratis|casas de apuestas bonos sin deposito|casas de
apuestas boxeo|casas de apuestas caballos|casas de apuestas carreras de caballos|casas de apuestas casino|casas de apuestas
casino online|casas de apuestas cerca de mi|casas de apuestas champions
league|casas de apuestas chile|casas de apuestas ciclismo|casas de
apuestas colombia|casas de apuestas com|casas de apuestas con app|casas de apuestas con apuestas
gratis|casas de apuestas con bono|casas de apuestas con bono de bienvenida|casas de apuestas con bono
de registro|casas de apuestas con bono por registro|casas
de apuestas con bono sin deposito|casas de apuestas
con bonos|casas de apuestas con bonos gratis|casas de
apuestas con bonos sin deposito|casas de apuestas con deposito minimo|casas de apuestas con esports|casas de apuestas con handicap asiatico|casas de apuestas
con licencia|casas de apuestas con licencia en españa|casas de apuestas con licencia
españa|casas de apuestas con licencia española|casas de apuestas
con mejores cuotas|casas de apuestas con pago anticipado|casas de
apuestas con paypal|casas de apuestas con paypal en perú|casas
de apuestas con promociones|casas de apuestas con ruleta en vivo|casas de apuestas copa del rey|casas de apuestas de caballos|casas
de apuestas de españa|casas de apuestas de futbol|casas de apuestas
de fútbol|casas de apuestas de peru|casas de apuestas
deportivas|casas de apuestas deportivas asiaticas|casas de
apuestas deportivas colombia|casas de apuestas deportivas comparativa|casas de apuestas
deportivas con paypal|casas de apuestas deportivas en chile|casas de apuestas deportivas en españa|casas de apuestas deportivas
en linea|casas de apuestas deportivas en madrid|casas de apuestas deportivas en mexico|casas de apuestas
deportivas en peru|casas de apuestas deportivas en sevilla|casas
de apuestas deportivas en valencia|casas de apuestas deportivas españa|casas de
apuestas deportivas españolas|casas de apuestas deportivas legales|casas de apuestas deportivas
madrid|casas de apuestas deportivas mexico|casas de apuestas
deportivas nuevas|casas de apuestas deportivas online|casas de
apuestas deportivas peru|casas de apuestas deportivas perú|casas de apuestas deposito
minimo 1 euro|casas de apuestas depósito mínimo 1 euro|casas
de apuestas dinero gratis|casas de apuestas en argentina|casas
de apuestas en barcelona|casas de apuestas en chile|casas de apuestas
en colombia|casas de apuestas en españa|casas de apuestas en españa online|casas de apuestas en linea|casas de apuestas
en madrid|casas de apuestas en méxico|casas de apuestas en peru|casas de apuestas en perú|casas de apuestas en sevilla|casas de apuestas en uruguay|casas
de apuestas en valencia|casas de apuestas en venezuela|casas de apuestas equipos de futbol|casas de apuestas españa|casas de apuestas
españa alemania|casas de apuestas españa inglaterra|casas de apuestas españa licencia|casas de apuestas españa nuevas|casas de apuestas españa online|casas de apuestas española|casas de apuestas españolas|casas de apuestas españolas con licencia|casas de
apuestas españolas online|casas de apuestas esports|casas de
apuestas eurocopa|casas de apuestas eurocopa 2024|casas
de apuestas europa league|casas de apuestas f1|casas de apuestas fisicas en barcelona|casas de apuestas fisicas en españa|casas de
apuestas formula 1|casas de apuestas fuera
de españa|casas de apuestas futbol|casas de apuestas fútbol|casas de
apuestas futbol españa|casas de apuestas ganador eurocopa|casas de apuestas gratis|casas de apuestas ingreso minimo|casas de
apuestas ingreso minimo 1 euro|casas de apuestas ingreso minimo 5 euros|casas
de apuestas inter barcelona|casas de apuestas legales|casas de
apuestas legales en colombia|casas de apuestas legales en españa|casas de apuestas legales en mexico|casas de apuestas legales españa|casas de apuestas legales mx|casas de apuestas licencia|casas
de apuestas licencia españa|casas de apuestas lista|casas de apuestas madrid|casas de apuestas mas seguras|casas de apuestas
mejores bonos|casas de apuestas mejores cuotas|casas de apuestas mexico|casas
de apuestas méxico|casas de apuestas minimo 5 euros|casas de apuestas mlb|casas de apuestas mundial|casas de apuestas mundial
baloncesto|casas de apuestas mundiales|casas
de apuestas nba|casas de apuestas no reguladas en españa|casas de apuestas nueva
ley|casas de apuestas nuevas|casas de apuestas nuevas en colombia|casas de apuestas nuevas en españa|casas de
apuestas nuevas españa|casas de apuestas ofertas|casas de apuestas online|casas
de apuestas online argentina|casas de apuestas online colombia|casas de apuestas
online deportivas|casas de apuestas online ecuador|casas de apuestas online en argentina|casas de
apuestas online en chile|casas de apuestas online en colombia|casas de apuestas online en españa|casas de apuestas online en mexico|casas de apuestas online españa|casas de apuestas online mas fiables|casas de apuestas online mexico|casas de apuestas online nuevas|casas
de apuestas online peru|casas de apuestas online usa|casas de apuestas
online venezuela|casas de apuestas pago paypal|casas de apuestas para ufc|casas
de apuestas paypal|casas de apuestas peru bono sin deposito|casas de apuestas presenciales en
Your comment is awaiting moderation.
UlviroTrust Platform – Clean layout, content gives a sense of trust and reassurance.
Your comment is awaiting moderation.
Brixel Bond Group online hub – Professional styling makes the site feel secure and reliable.
Your comment is awaiting moderation.
UlvaroBondGroup Details – Found it today, information is easy to locate and understand.
Your comment is awaiting moderation.
Visit Qulavo Capital – Simple layout, content is well organized, and browsing feels smooth.
Your comment is awaiting moderation.
official pelvo – Well-structured pages, clean interface, and content is approachable
Your comment is awaiting moderation.
SafeBuyCenter – Well-structured site, shopping online is clear and secure.
Your comment is awaiting moderation.
Plavex Holdings portal – Content is neatly arranged, navigation works seamlessly, and details are easy to find.
Your comment is awaiting moderation.
sonabet com login
Your comment is awaiting moderation.
View official information – A clean presentation that makes the platform easy to understand.
Your comment is awaiting moderation.
xeviro shop portal – Impressive setup, consistent visuals and easy-to-follow content.
Your comment is awaiting moderation.
HoldingHub – Smooth page transitions, well-organized content, and navigation feels natural.
Your comment is awaiting moderation.
this online shop – I appreciated how straightforward the product descriptions were.
Your comment is awaiting moderation.
focusanchorsmovement info – Structured design, pages load fast, and reading is effortless
Your comment is awaiting moderation.
zavik homepage – Neatly structured site where information is easy to access and understand
Your comment is awaiting moderation.
KoriLink – Layout professional, navigation simple, and adding items to cart was effortless.
Your comment is awaiting moderation.
Nixaro Trustline official site – Professional design, readable sections, and the interface feels reliable.
Your comment is awaiting moderation.
Трастовый маркетплейс купить ПЗРД аккаунты открывает доступ купить соц аккаунты под залив. Когда вы планируете купить Facebook-аккаунты, чаще всего важен не «одном логине», а в проходимости чеков: стабильный запуск, наличие пройденного ЗРД в кабинете и прогретые FanPage. Мы собрали понятную навигацию, чтобы вы сразу понимали что подойдет под ваши офферы перед покупкой.Навигация по теме: FAQ по ЗРД. Ключевая идея: покупка — это только вход. Дальше решает схема залива: какой прокси используется, как вы передаете лички без триггеров, как реагируете на полиси и как дублируете кампании. Ключевое преимущество нашего сервиса — это наличие масштабной вики-энциклопедии FB, где написаны свежие инструкции по фарму аккаунтов. Здесь вы найдете аккаунты Facebook под разные задачи: начиная с аккаунтов под привязку и заканчивая ПЗРД сетапами с высоким лимитом. Переходите в сообщество, изучайте практичные материалы по FB, наводите порядок и повышайте ROI вместе с нами уже сегодня. Важно: действуйте в рамках закона и всегда в соответствии с правилами Facebook.
Your comment is awaiting moderation.
Всё про автомобили https://sedan.kyiv.ua в одном портале: каталог авто, обзоры и рейтинги, новости автопрома и советы экспертов. Покупка, эксплуатация, сервис и тренды — полезная информация для каждого водителя.
Your comment is awaiting moderation.
UlviroCapitalGroup Info – User-friendly interface, well-organized content that’s simple to follow.
Your comment is awaiting moderation.
TrivoxTrustline Access – Straight answers and open info, which investors tend to appreciate.
Your comment is awaiting moderation.
Explore Ulvix online – Everything is concise and well-arranged, making the site user-friendly.
Your comment is awaiting moderation.
Explore Qulavo Capital – Clean design, clear sections, and overall experience is intuitive.
Your comment is awaiting moderation.
Популярный сервис купить аккаунты TikTok приветствует маркетологов в нашем ассортименте аккаунтов. Если вам нужно купить аккаунты Facebook, обычно задача не в «одном логине», а в управляемости: стабильный запуск, понятные роли внутри команды и аккуратные изменения. Мы подготовили короткую карту выбора, чтобы вы без лишних вопросов понимали что сравнивать перед заказом.Быстрый ориентир: начните с родительских категорий TikTok, а для рекламной задачи — переходите напрямую в разделы под рекламу: TikTok Ads. Ключевая идея: покупка — это только вход. Дальше решает система: как выдаются права, как вы ведете кампании аккуратно, как документируете действия и как разделяете тестовые и стабильные процессы. Гордость нашего сервиса — заключается в наличие приватной образовательной секции, где выложены свежие гайды по аналитике и запуску. Тут можно найти акки Facebook, Instagram, TikTok под разные задачи: от простых комплектов до расширенными сборками с прозрачными доступами. Заходите в наше комьюнити, читайте полезные кейсы, упрощайте операционку и в итоге ускоряйте тесты на базе наших материалов прямо сейчас. Дисклеймер: используйте активы законно и с учетом правил сервисов.
Экспертный маркетплейс купить рекламный кабинет Facebook приветствует вебмастеров в своем разделе расходников. Когда вы планируете купить Facebook-аккаунты, обычно задача не в «просто доступе», а в управляемости: стабильный запуск, разделение задач внутри команды и ясные доступы. Мы собрали понятную навигацию, чтобы вы сразу понимали что сравнивать перед покупкой.Быстрый ориентир: откройте родительских категорий Google, а для рекламной задачи — переходите напрямую в профильные разделы: Facebook под рекламу. Ключевая идея: покупка — стартовая точка. Дальше решает порядок: как выдаются права, как вы меняете настройки без хаоса, как фиксируете изменения и как разделяете тестовые и стабильные процессы. Особенность данной площадки — это наличии приватной образовательной секции, в которой опубликованы свежие чек-листы по командным процессам. На сайте вы найдете аккаунты Facebook, Instagram, TikTok под любые цели: от базовых комплектов до расширенными сборками с понятным составом. Переходите к нам, смотрите полезные кейсы, наводите порядок и в итоге масштабируйтесь спокойнее вместе с нами без задержек. Дисклеймер: действуйте в рамках закона и в соответствии с правилами платформ.
Проверенный магазин купить аккаунты без посредников дает возможность приобрести соц аккаунты под рекламу. Если вам нужно купить Facebook-аккаунты, обычно задача не в «одном логине», а в трасте и лимитах: отсутствие вылетов на селфи, наличие пройденного ЗРД в Ads Manager и правильно созданные ФП. Мы подготовили понятную навигацию, чтобы вы сразу понимали какой тип аккаунта брать до оплаты.Коротко: с чего начать: откройте разделы Бизнес Менеджеры (BM), а для масштабирования — идите сразу в разделы под залив: Безлимитные БМ. Ключевая идея: покупка — это только вход. Дальше решает схема залива: какой прокси используется, как вы передаете лички аккуратно, как проходите чеки и как масштабируете адсеты. Ключевое преимущество данной площадки — заключается в наличие приватной вики-энциклопедии FB, где собраны актуальные инструкции по работе с БМами. Тут доступны решения Meta под любые цели: от аккаунтов под привязку и заканчивая трастовыми БМами с пройденными запретами. Переходите в наше комьюнити, читайте полезные материалы по FB, стройте систему и повышайте ROI на базе наших расходников без задержек. Дисклеймер: действуйте в рамках закона и всегда в соответствии с правилами Facebook.
Популярный маркет купить аккаунты без посредников дает доступ подобрать учетки для работы с трафиком. Когда вы планируете купить аккаунты Facebook, чаще всего важен не «одном логине», а в трасте и лимитах: отсутствие вылетов на селфи, зеленые плашки в Ads Manager и правильно созданные ФП. Мы подготовили короткую карту выбора, чтобы вы без лишних вопросов понимали что подойдет под ваши офферы перед покупкой.Навигация по теме: порядок захода по куки. Важно: покупка — это только вход. Дальше решает схема залива: как вяжется карта, как вы передаете лички без триггеров, как проходите чеки и как дублируете кампании. Ключевое преимущество этого шопа — заключается в наличии эксклюзивной библиотеки арбитражника, в которой написаны практичные гайды по проходу ЗРД. Команда сориентируем, как без лишних рисков запустить первый адсет, чтобы вы не словили Risk Payment и дольше жили в аукционе . Вступайте к нам, смотрите полезные разборы банов, стройте систему и в итоге повышайте ROI с помощью нашего сервиса без задержек. Важно: используйте активы законно и в соответствии с правилами Facebook.
Трастовый стор купить трастовые аккаунты дает возможность приобрести учетки для рекламы. Когда вы планируете купить аккаунты Facebook, обычно задача не в «просто доступе», а в управляемости: предсказуемая операционка, понятные роли внутри команды и фиксация правок. Мы подготовили короткую карту выбора, чтобы вы сразу понимали куда кликать до оплаты.Коротко: с чего начать: откройте базовых разделов Facebook, а если нужен перформанс — идите сразу в разделы под рекламу: TikTok Ads. Важно: покупка — стартовая точка. Дальше решает порядок: как выдаются права, как вы ведете кампании без хаоса, как фиксируете изменения и как разделяете тестовые и стабильные процессы. Гордость нашего сервиса — заключается в наличие огромной базы знаний, в которой собраны рабочие чек-листы по аналитике и запуску. На сайте вы найдете страницы Google, Twitter, Telegram под разные задачи: от простых вариантов и заканчивая расширенными сборками с понятным составом. Оформляя у нас, вы получаете не просто товар, но и оперативную консультацию, понятные условия, гарантию на вход плюс самые приятные прайсы на рынке. Важно: действуйте в рамках закона и всегда с учетом правил сервисов.
Your comment is awaiting moderation.
ZexaroFlow – Minimal design, functional links, and product details well presented.
Your comment is awaiting moderation.
main portal – Fast load, destination accurate, link performed without any issues.
Your comment is awaiting moderation.
this online store – I appreciated how fast the site responded while exploring products.
Your comment is awaiting moderation.
BetterChoicesPro – Practical insights, making it simpler to evaluate options effectively.
Your comment is awaiting moderation.
clicktoclient.click – Mobile version looks perfect; no glitches, fast scrolling, crisp text.
Your comment is awaiting moderation.
check signalcreatesflow – Content is well organized and easy to find throughout the site
Your comment is awaiting moderation.
globalenterprisealliances – Informative platform, global alliance strategies are explained clearly and practically.
Your comment is awaiting moderation.
Автомобильный портал https://livecage.com.ua тест-драйвы, сравнения, комплектации, безопасность и экономичность. Актуальные новости, советы по ремонту и обслуживанию, рекомендации для начинающих и опытных водителей.
Your comment is awaiting moderation.
marketbetter.click – Navigation felt smooth, found everything quickly without any confusing steps.
Your comment is awaiting moderation.
offeroptim.click – Overall, professional vibe here; trustworthy, polished, and pleasantly minimal throughout.
Your comment is awaiting moderation.
roigrowth.click – Content reads clearly, helpful examples made concepts easy to grasp.
Your comment is awaiting moderation.
retargetpro.click – Pages loaded fast, images appeared sharp, and formatting stayed consistent.
Your comment is awaiting moderation.
Nixaro Partners online platform – Clean navigation, concise content, and trust elements are easy to spot.
Your comment is awaiting moderation.
Ulxra LinkPoint – Quick-loading pages, organized content, and shopping experience simple and efficient.
Your comment is awaiting moderation.
TrivoxCapital Network – Well-organized overview, browsing through sections feels smooth.
Your comment is awaiting moderation.
Xaliro Drive web portal – Smooth navigation and fast load times make the site enjoyable to use.
Your comment is awaiting moderation.
Qulavo Bonding Official – Clear layout, easy-to-follow content, and the site feels reliable.
Your comment is awaiting moderation.
zalvo destination – Clean layout, content is easy to find, and pages respond promptly
Your comment is awaiting moderation.
kavion main site – Trust badges visible, product info clear and site overall reliable.
Your comment is awaiting moderation.
nolix bond – The site is clean, info is easy to read, and navigating is a breeze.
Your comment is awaiting moderation.
brand store – Clear rules and explanations make it feel reliable.
Your comment is awaiting moderation.
sonabet app download
Your comment is awaiting moderation.
LearningPathPro – Clear instructions, understanding topics is smooth and organized.
Your comment is awaiting moderation.
official actiondrivesdirection – Simple design, readable sections, and easy-to-navigate pages
Your comment is awaiting moderation.
Новинки технологий https://axioma-techno.com.ua искусственный интеллект, гаджеты, смартфоны, IT-решения и цифровые сервисы. Обзоры, сравнения, тренды и объяснения простым языком. Узнавайте первыми о технологиях, которые меняют бизнес и повседневную жизнь.
Your comment is awaiting moderation.
Ландшафтный дизайн https://kinoranok.org.ua ремонт и строительство под ключ: проектирование участков, благоустройство, озеленение, дорожки, освещение и малые архитектурные формы. Комплексные роботы для частных и коммерческих объектов с гарантией качества.
Your comment is awaiting moderation.
Авто портал https://autoblog.kyiv.ua о машинах и технологиях: обзоры, характеристики, цены, тюнинг и обслуживание. Помогаем выбрать автомобиль под бюджет и задачи, следить за новинками и принимать взвешенные решения.
Your comment is awaiting moderation.
Explore Nixaro Holdings – Clear design, content is accessible, and navigating the site feels smooth.
Your comment is awaiting moderation.
ToriVoCenter – Interface tidy, site responsive, and finding products intuitive and hassle-free.
Your comment is awaiting moderation.
удаленная работа для подростков Фриланс – это самостоятельная работа на заказ, позволяющая выбирать проекты и устанавливать собственные тарифы. Фрилансеры могут работать в самых разных областях, от копирайтинга и дизайна до программирования и маркетинга. Главное – умение находить клиентов и качественно выполнять заказы.
Your comment is awaiting moderation.
Visit TrivoxBonding – Found it by chance, information is easy to follow and neatly laid out.
Your comment is awaiting moderation.
Learn About Qorivo Trustline – User-friendly design, structured content, and navigation feels natural.
Your comment is awaiting moderation.
Qelix info site – Clear labeling and structured pages make the experience straightforward.
Your comment is awaiting moderation.
brixo portal – Site navigates smoothly, product details clear and ordering simple.
Your comment is awaiting moderation.
Plavex Capital platform – Structured layout, readable content, and browsing is simple.
Your comment is awaiting moderation.
Every weekend i used to visit this web page, as i wish for enjoyment, for the reason that
this this site conations really pleasant funny data too.
Also visit my website … zupacescu01
Your comment is awaiting moderation.
click through – Quick response times and a neat layout made browsing pleasant
Your comment is awaiting moderation.
shop website – Easy-to-follow steps made checkout quick and hassle-free.
Your comment is awaiting moderation.
digital platform – Fast pages, readable text, and the overall design is professional and clean.
Your comment is awaiting moderation.
Строительный портал https://techproduct.com.ua для практики и идей: технологии, материалы, инструменты, сметы и проекты. Разбираем ошибки, делимся решениями и помогаем выбрать оптимальные варианты для строительства и ремонта.
Your comment is awaiting moderation.
official progressmovesintelligently – Crisp pages, smooth scrolling, and everything is logically presented
Your comment is awaiting moderation.
Портал для туристов https://inhotel.com.ua и путешественников: гайды по странам, маршруты, достопримечательности и события. Практичные советы, карты, подборки и идеи для отпуска, выходных и активных путешествий.
Your comment is awaiting moderation.
Ремонт помещений https://sinega.com.ua зданий и квартир: косметический и капитальный ремонт под ключ. Выравнивание стен, отделка, замена коммуникаций, дизайн-решения и контроль качества. Работаем по смете, в срок и с гарантией.
Your comment is awaiting moderation.
check cavix – Smooth visit, nothing feels crowded and the content is helpful
Your comment is awaiting moderation.
TrustedBuyOnline – Secure and convenient, checkout process is smooth and efficient.
Your comment is awaiting moderation.
StrategicFuturesGuide – Insightful and actionable, understanding future possibilities is simple.
Your comment is awaiting moderation.
Neviro Union online portal – Clear layout, professional appearance, and content is easy to follow.
Your comment is awaiting moderation.
UlviroBondGroup Link – Discovered this site, seems authentic and everything is explained well.
Your comment is awaiting moderation.
TorivoUnion Gateway – Well-organized idea, looks reliable for long-term engagement.
Your comment is awaiting moderation.
Check Qorivo Holdings – Simple navigation, readable text, and overall structure is trustworthy.
Your comment is awaiting moderation.
plixo hub – Clear categories, fast pages and ordering process straightforward.
Your comment is awaiting moderation.
PortalQori – Well-organized content, pages load quickly, and overall site flow is intuitive.
Your comment is awaiting moderation.
Pelixo Trust Group homepage – Clean layout, information is easy to digest, and browsing feels seamless.
Your comment is awaiting moderation.
Mivon business site – Transparency and clarity help the project stand out.
Your comment is awaiting moderation.
landing hub – Minimal clutter, intuitive layout, content is simple and clear
Your comment is awaiting moderation.
product site – Clear product info and filtering made selection simple and fast.
Your comment is awaiting moderation.
information hub – Minimal styling, content is clear, and navigation feels effortless.
Your comment is awaiting moderation.
It’s an amazing piece of writing in support of all the web visitors; they will take
advantage from it I am sure.
my homepage :: zupacescu01
Your comment is awaiting moderation.
Портал для строителей https://rvps.kiev.ua и заказчиков: ремонт, строительство, сметы и проекты. Обзоры материалов, расчёты, чек-листы и советы специалистов, которые помогают планировать работы и экономить бюджет.
Your comment is awaiting moderation.
Онлайн-портал https://deluxtour.com.ua для путешественников: куда поехать, что посмотреть, где остановиться и как сэкономить. Маршруты, подборки, отзывы, карты и полезные сервисы. Актуальная информация для самостоятельных поездок и отдыха.
Your comment is awaiting moderation.
Всё о туризме https://hotel-atlantika.com.ua и отдыхе в одном месте: направления, визы, транспорт, отели и развлечения. Путеводители, маршруты, обзоры и советы опытных путешественников. Удобно планировать поездки онлайн.
Your comment is awaiting moderation.
directionunlocksgrowth web – Clean sections, logical layout, and navigation feels effortless
Your comment is awaiting moderation.
XevraCenter – Very responsive site, content easy to digest, and finding products is simple.
Your comment is awaiting moderation.
Check Neviror Trust – Clean visuals, structured information, and browsing is intuitive.
Your comment is awaiting moderation.
Qorivo Bonding Info – User-friendly design, readable content, and browsing is smooth overall.
Your comment is awaiting moderation.
Mavero Capital business site – Professional interface, concise messaging, and browsing feels effortless.
Your comment is awaiting moderation.
Visit Pelixo Capital – Well-structured layout, pages load quickly, and information is clear.
Your comment is awaiting moderation.
online storefront – Loaded fast with everything appearing correctly.
Your comment is awaiting moderation.
DigitalShopGuide – Well-organized layout, shopping online feels natural and easy.
Your comment is awaiting moderation.
Naviro Trustee landing page – A clean structure makes the information accessible and clear.
Your comment is awaiting moderation.
EasyClickQulix – Layout intuitive, pages responsive, and shopping experience feels effortless.
Your comment is awaiting moderation.
Авто портал https://bestsport.com.ua для водителей и автолюбителей: обзоры и тест-драйвы, сравнение моделей, характеристики, цены и новости автопрома. Советы по покупке, эксплуатации и обслуживанию автомобилей. Всё об авто — удобно и понятно.
Your comment is awaiting moderation.
Онлайн авто портал https://necin.com.ua о новых и подержанных автомобилях: каталоги моделей, рейтинги, отзывы владельцев и экспертные обзоры. Новости рынка, технологии, электромобили и полезные сервисы для выбора авто.
Your comment is awaiting moderation.
Мужской портал https://realman.com.ua про жизнь и эффективность: здоровье, сила и выносливость, карьера, инвестиции, стиль и отношения. Экспертные материалы, обзоры и чек-листы. Читайте онлайн и применяйте на практике.
Your comment is awaiting moderation.
plavex secure – Security info is clear, which made me feel confident browsing today.
Your comment is awaiting moderation.
bryxo access – Easy navigation and content that comes across as genuine
Your comment is awaiting moderation.
landinglift.click – Found practical insights today; sharing this article with colleagues later.
Your comment is awaiting moderation.
signalactivatesgrowth web – Design is clean, navigation is smooth, and content is easy to understand
Your comment is awaiting moderation.
convertfast.click – Loved the layout today; clean, simple, and genuinely user-friendly overall.
Your comment is awaiting moderation.
funnelfix.click – Pages loaded fast, images appeared sharp, and formatting stayed consistent.
Your comment is awaiting moderation.
sitesprint.click – Mobile version looks perfect; no glitches, fast scrolling, crisp text.
Your comment is awaiting moderation.
XelarionLink – Interface clean, pages responsive, and product browsing simple.
Your comment is awaiting moderation.
ctrboost.click – Color palette felt calming, nothing distracting, just focused, thoughtful design.
Your comment is awaiting moderation.
TrivoxPortalX – Click worked quickly, content displayed properly and pages loaded without error.
Your comment is awaiting moderation.
Velixonode Lane – Layout clean, navigation effortless and site feels trustworthy overall.
Your comment is awaiting moderation.
trusted resource – Content is neatly arranged, easy to follow and informative
Your comment is awaiting moderation.
Naviro Capital landing page – Well-organized sections, quick navigation, and details are simple to find.
Your comment is awaiting moderation.
Qelaro Trustline network – Clean headings, structured pages, and navigation is easy for users.
Your comment is awaiting moderation.
Pelixo Bond Group digital – Clear content hierarchy, fast loading pages, and navigation is simple.
Your comment is awaiting moderation.
Kryvox Trust online platform – Pages respond fast, information is easy to read, and the user experience is pleasant.
Your comment is awaiting moderation.
shopping site – The shipping selections made sense, and estimated arrival dates looked accurate.
Your comment is awaiting moderation.
Туристический портал https://feokurort.com.ua с идеями и практикой: страны и города, пляжи и горы, активный отдых и экскурсии. Советы по перелётам, жилью и безопасности, лучшие сезоны и лайфхаки для путешествий.
Your comment is awaiting moderation.
Всё о строительстве https://buildportal.kyiv.ua и ремонте: от проектирования и фундамента до чистовой отделки. Статьи, гайды, калькуляторы и кейсы. Полезно для застройщиков, мастеров, дизайнеров и тех, кто строит для себя.
Your comment is awaiting moderation.
Женский медиа-портал https://abuki.info про вдохновение и практику: тренды красоты, идеи образов, забота о теле, эмоциональное равновесие, материнство и быт. Подборки, гайды и понятные советы, которые легко применять каждый день.
Your comment is awaiting moderation.
Vixaro Select – Fast loading, product details accurate and purchasing process seamless.
Your comment is awaiting moderation.
Cavix main homepage – Navigation flows well and supports a clear explanation of intent.
Your comment is awaiting moderation.
info site – Well-organized site, content is clear, and the design concept works nicely.
Your comment is awaiting moderation.
BrixelHome – Pages load fast, navigation is simple, and content appears clear and trustworthy.
Your comment is awaiting moderation.
SmartIdeasExplorer – Engaging platform, new innovations are explained in a simple way.
Your comment is awaiting moderation.
GrowthIdeasNavigator – Insightful and clear, ideas for growth are presented in simple steps.
Your comment is awaiting moderation.
В таких случаях надо запрашивать подтверждения через форум(ЛС) https://ballerina-productions.info Тут охота чисто на клиентов.на почту не кто не писал
Your comment is awaiting moderation.
signalguidesgrowth hub – Smooth layout and simple design make it effortless to navigate
Your comment is awaiting moderation.
RavloDirect – Product details are well presented, and photos appear reliable.
Your comment is awaiting moderation.
google посещаемость сайта google посещаемость сайта .
Your comment is awaiting moderation.
quick link – Minimal layout, quick navigation, enjoyable to scroll through
Your comment is awaiting moderation.
Zavro Online Store – Smooth interface, navigation intuitive and product details easy to read.
Your comment is awaiting moderation.
the dog house megaways slot Gates of Olympus от Pragmatic Play —
Gates of Olympus — популярный игровой автомат от Pragmatic Play с механикой Pay Anywhere, каскадными выигрышами и коэффициентами до ?500. Сюжет разворачивается у врат Олимпа, где верховный бог повышает выплаты и делает каждый спин случайным.
Экран игры представлено в виде 6?5, а выигрыш формируется при выпадении не менее 8 совпадающих символов без привязки к линиям. После формирования выигрыша символы исчезают, их заменяют новые элементы, активируя серии каскадных выигрышей, которые могут дать дополнительные выигрыши за один спин. Слот относится игрой с высокой волатильностью, поэтому способен долго молчать, но при удачных раскладах может принести большие выигрыши до 5000 ставок.
Чтобы разобраться в слоте доступен демо-версия без вложений. Для игры на деньги целесообразно выбирать официальные казино, например MELBET (18+), принимая во внимание RTP около 96,5% и условия площадки.
Your comment is awaiting moderation.
visit ravixo – Smooth browsing with readable and to-the-point text
Your comment is awaiting moderation.
Сегодня как обычно забрал свою посылочку в срок как расчитывал. Очень приятно работать с таким магазином. Купить наркотики | Где купить наркотики? магазин суперский! качество и работа оператора на высшем уровне! респектВсе очень быстро, пришло через день после заказа.
Your comment is awaiting moderation.
Visit Qelaro Capital – Well-structured pages, fast loading, and browsing is intuitive.
Your comment is awaiting moderation.
Visit Nolaro Trustee – Professional design, easy-to-read content, and navigation is intuitive.
Your comment is awaiting moderation.
sales site – Straightforward design makes it easy to find and choose products.
Your comment is awaiting moderation.
Naviro Bonding website – Clear menus, structured sections, and information is presented simply.
Your comment is awaiting moderation.
Kryvox Capital business site – Clear hierarchy, concise content, and navigation feels reliable.
Your comment is awaiting moderation.
UlvionGo – Responsive pages, clean design, and information clearly presented.
Your comment is awaiting moderation.
Nixaro Central – Site responsive, content easy to understand and checkout steps straightforward.
Your comment is awaiting moderation.
Ravion Bonded main homepage – The platform is engaging, well-documented, and regularly updated.
Your comment is awaiting moderation.
main portal – Worked right away, pages displayed properly and content was readable.
Your comment is awaiting moderation.
самый дешёвый магазин из доверенных – это этот! https://gamoh.biz Мне отказали в подтверждении джаббера в ЛС. Будьте бдительны!Пожалуйста :ok: Спасибо за отзыв.
Your comment is awaiting moderation.
Zavix Connect – Pages responsive, design neat, and overall shopping flow felt natural.
Your comment is awaiting moderation.
OpportunityNavigator – Practical and clear, identifying long-term prospects is simple and quick.
Your comment is awaiting moderation.
BondYavon – Very responsive site, content easy to access, and browsing is smooth.
Your comment is awaiting moderation.
focusbuildsenergy spot – Minimal layout, logical flow, and the overall experience is smooth
Your comment is awaiting moderation.
explore now – Smooth navigation, minimal distractions, great for casual browsing
Your comment is awaiting moderation.
Спасибо за внесение ястности. Купить наркотики | Где купить наркотики? что значит “самый норм микс” ? 1 грамм 250го на 10 грамм основы вполне нормально. если любитель лютой жести – сделай 1к5 чтоли, будешь улетать в астрал с малюсенького кропаликане плохие ребята, все в срок и по месту)
Your comment is awaiting moderation.
Kryxo Next – Interface clear, navigation intuitive and checkout worked perfectly.
Your comment is awaiting moderation.
Qelaro Bonding platform – Clear structure, professional appearance, and browsing is simple and smooth.
Your comment is awaiting moderation.
item store – Secure checkout experience with instant confirmation emails.
Your comment is awaiting moderation.
Nolaro Trustee landing page – Simple structure, readable content, and overall site feels polished.
Your comment is awaiting moderation.
Morixo Trustee web experience – Smooth navigation, clear information, and overall professional impression.
Your comment is awaiting moderation.
Kryvox Bonding official site – Clean design, simple navigation, and content seems reliable throughout.
Your comment is awaiting moderation.
Zavirobase Online Store – Smooth pages, quick loading and finding product information is easy.
Your comment is awaiting moderation.
main zaviroplex – Click worked fine, page layout logical and content helpful.
Your comment is awaiting moderation.
онлайн обучение для детей онлайн обучение для детей .
Your comment is awaiting moderation.
Maverounity digital presence – The site communicates professionalism from start to finish.
Your comment is awaiting moderation.
так что бро не стоит беспокоиться по поводу порядочности этого магазина, они отправляют достаточно быстро и конспирация хорошая и качество на высоте!))) https://baletkioptom.ru У нас у отправки случился форс-мажор. Только на этой неделе начинают отправлять. Извиняюсь от лица магазина за задержку.Это юмор.
Your comment is awaiting moderation.
Туристический портал https://atrium.if.ua о путешествиях: направления, отели, экскурсии и маршруты. Гайды по городам и странам, советы туристам, визы, билеты и сезонность. Планируйте поездки удобно и вдохновляйтесь идеями круглый год.
Your comment is awaiting moderation.
qavon info – Easy browsing, modern appearance, and content is organized
Your comment is awaiting moderation.
seo продвижение магазин наушников seo-kejsy7.ru .
Your comment is awaiting moderation.
XaneroFlow – Interface simple, pages load fast, and exploring categories was easy.
Your comment is awaiting moderation.
HoldFlow – Pages open fast, interface organized, product info easy to read.
Your comment is awaiting moderation.
выпрямитель дайсон airstrait ht01 выпрямитель дайсон airstrait ht01 .
Your comment is awaiting moderation.
RixvaShop – Pages load quickly, layout is clean, and browsing feels effortless.
Your comment is awaiting moderation.
backlinkboss.click – Found practical insights today; sharing this article with colleagues later.
Your comment is awaiting moderation.
focusdrivesmovement web – Clear structure, smooth scrolling, and information is easy to digest
Your comment is awaiting moderation.
StrategicRelationsPro – Well-laid-out content, understanding corporate connections is easy and actionable.
Your comment is awaiting moderation.
The targeting options available now are actually impressive. You can buy targeted twitter followers based on interests, location, and demographics, which means you’re adding people who might actually care about your content rather than just random accounts.
Your comment is awaiting moderation.
official site – Clear design, fast-loading pages, information is simple to understand
Your comment is awaiting moderation.
Трек бьется. Как придет отпишу. Если все ровно то я ваш постоянный клиент, цены и ассортимент радуют. https://mossygatherings.info Ребят!!! Звонил в курьерку, все у них нормально, по номеру накладной оператор сказал такого груза нет!!!если так то АМ не подойдет скорее всего
Your comment is awaiting moderation.
onpagefix.click – Appreciate the typography choices; comfortable spacing improved my reading experience.
Your comment is awaiting moderation.
web shop – Organized pages, clear descriptions, and matching product images.
Your comment is awaiting moderation.
Zarix World – Pages load fast, content clear and overall shopping experience reliable.
Your comment is awaiting moderation.
keywordking.click – Pages loaded fast, images appeared sharp, and formatting stayed consistent.
Your comment is awaiting moderation.
Zexaro Forge Direct – Smooth interface, responsive site and content easy to understand.
Your comment is awaiting moderation.
main link hub – Checkout steps simple, confirmation arrived in no time at all.
Your comment is awaiting moderation.
Заказываю в третий раз, дали скидку 8%, приятно. Купить наркотики | Где купить наркотики? итоги:вот это уже наводит на мысли
Your comment is awaiting moderation.
BondXalor – Very responsive site, no broken links, and content appears trustworthy.
Your comment is awaiting moderation.
klyvo link – Content is readable, layout is intuitive, and navigation is effortless
Your comment is awaiting moderation.
Feature comparison among best hookup sites free reveals quality differences. Free platform capabilities vary significantly from basic profile browsing to full-featured experiences including unlimited messaging and advanced matching.
Your comment is awaiting moderation.
Motivational quotes resonate stronger when you buy instagram likes for inspiration posts. Engagement validates message impact encouraging shares to personal networks.
Your comment is awaiting moderation.
actioncreatesforwardpath info – Organized layout, clear text, and browsing feels effortless
Your comment is awaiting moderation.
Torix Path – Pages load quickly, navigation seamless, and shopping process effortless.
Your comment is awaiting moderation.
Check Korva Site – Found this by chance, everything looks fresh and well arranged
Your comment is awaiting moderation.
С 10-11 утра по МСК ежедневно кроме праздников и выходных. https://fershall.ru супер !!!не будет 307го. ожидается 203, 250, rcs-4 и 1220й… вот что мне сказали в той же аське, где спрашивал ты )
Your comment is awaiting moderation.
sales site – Just stumbled on it and saved it for another time.
Your comment is awaiting moderation.
PrixoGo – Layout organized, pages fast, and purchasing items easy.
Your comment is awaiting moderation.
linklift.click – Loved the layout today; clean, simple, and genuinely user-friendly overall.
Your comment is awaiting moderation.
auditpro.click – Mobile version looks perfect; no glitches, fast scrolling, crisp text.
Your comment is awaiting moderation.
Visit Korla – Site responsive, navigation simple and purchasing steps easy to follow.
Your comment is awaiting moderation.
nolix platform – Simple, neat layout with content that’s straightforward to absorb
Your comment is awaiting moderation.
онлайн обучение для детей онлайн обучение для детей .
Your comment is awaiting moderation.
получить короткую ссылку google seo-kejsy7.ru .
Your comment is awaiting moderation.
Pelix Direct – Smooth browsing, product details clear and checkout simple and fast.
Your comment is awaiting moderation.
dyson фен выпрямитель dyson фен выпрямитель .
Your comment is awaiting moderation.
web shop – Product presentation is tidy, filtering sped up my search today.
Your comment is awaiting moderation.
жасти моё уважение к тебе и респект красавица. но ес честно ты нашла чет не то что было совсем другое как сказал уже уважаемый дельфин там было много сути и честных отзывов :monetka: ну лан проехали если так вроде все все поняли. Купить наркотики | Где купить наркотики? Хороший магазин оператор всегда онлайн, товар вообще Шик :speak: процветай) и поскорей бы летоЧто сейчас с эйфором?
Your comment is awaiting moderation.
nexlo digital store – Pages opened fast, ordering steps easy and browsing comfortable.
Your comment is awaiting moderation.
тик ток мод Будущее Модов TikTok в 2025 Году В 2025 году ожидается дальнейшее развитие модов TikTok, с появлением новых функций и возможностей. Разработчики будут стремиться к улучшению безопасности и стабильности модов, а также к добавлению уникальных функций, которые сделают их еще более привлекательными для пользователей. Возможно, появятся моды TikTok с улучшенными алгоритмами рекомендаций, расширенными возможностями редактирования видео и интеграцией с другими социальными сетями.
Your comment is awaiting moderation.
Всё, что важно https://inclub.lg.ua женщине: здоровье и гормоны, питание и фитнес, стиль и гардероб, отношения и самооценка, уют и рецепты. Экспертные статьи, тесты и подборки. Сохраняйте любимое и делитесь — удобно на телефоне.
Your comment is awaiting moderation.
Портал для женщин https://beautyrecipes.kyiv.ua про гармонию и результат: здоровье, красота, стиль, саморазвитие, семья и отношения. Обзоры косметики и процедур, планы питания, тренировки, советы по дому и вдохновляющие истории. Всё в одном месте, 24/7.
Your comment is awaiting moderation.
Портал для женщин https://angela.org.ua о современном лайфстайле: бьюти-рутины, мода, здоровье, правильное питание, отношения, работа и отдых. Полезные подборки, честные обзоры, истории и советы экспертов — заходите за вдохновением 24/7.
Your comment is awaiting moderation.
olvix hub – Well-laid-out pages, easy navigation, and information flows nicely
Your comment is awaiting moderation.
sonabet vip login
Your comment is awaiting moderation.
ideasbecomeforward web – Minimal design, fast pages, and everything feels organized and readable
Your comment is awaiting moderation.
Какая то палевная курьерка Купить наркотики | Где купить наркотики? с нашими кристаллами восстановятсяЗнаю сайт. Всем советую. Пишу в кратце о главном. Связался в аське. Ответили сразу, тут же сделал заказ на регу. Осталось подождать…
Your comment is awaiting moderation.
storefront – Clean design, decent product options, and checkout didn’t lag.
Your comment is awaiting moderation.
trusted resource – Smooth interface, clear sections, very accessible content
Your comment is awaiting moderation.
NevironExpress – Layout simple, navigation effortless, and content accurate and trustworthy.
Your comment is awaiting moderation.
DealHunterPro – Clear and reliable, platform simplifies discovering and purchasing deals.
Your comment is awaiting moderation.
seowins.click – Loved the layout today; clean, simple, and genuinely user-friendly overall.
Your comment is awaiting moderation.
Kryvox Direct – Layout clean, browsing smooth and checkout steps easy to follow.
Your comment is awaiting moderation.
Hello! I understand this is somewhat off-topic but I had to ask.
Does building a well-established blog like yours take a massive amount work?
I am brand new to writing a blog however I do write in my
journal on a daily basis. I’d like to start a blog so I can easily share
my personal experience and feelings online.
Please let me know if you have any kind of recommendations
or tips for brand new aspiring bloggers. Thankyou!
Your comment is awaiting moderation.
Business Relations Hub – Everything is laid out nicely, making global networking straightforward.
Your comment is awaiting moderation.
глазом на пакете,вот там была россыпь:good::killmyself::strong::stars::fu::good::bro: https://gamoh.biz Всем здравствуйте! Опишу свою ситуацию: 2 недели назад заказывал в данном магазине 2 с-i и MXE, всё на высшем уровне: оперативность 5 +, доставка 5+, конспирация 5+, Качество 5+. Нареканий к Магазину нет, только благодарность!!! В этот раз сделал заказ в Понедельник, оплатил во Вторник. В пятницу только получил трек. На сегодня Трек не работает. Звоню в курьерку они говорят, что такой трек у них не зарегистрирован. Паники пока никакой нет, но хотелось бы получить какие нибудь разъяснения по этому поводу. Заранее спасибо!Да и вообще:
Your comment is awaiting moderation.
zorivo hub online – Fast-loading pages, navigation smooth and design user-friendly.
Your comment is awaiting moderation.
Rixaro Central Shop – Navigation effortless, layout tidy and checkout process simple.
Your comment is awaiting moderation.
FlowEase – Opened without errors, and the pages were informative.
Your comment is awaiting moderation.
Строительный портал https://prezent-house.com.ua строительство домов и зданий, ремонт квартир, инженерные системы и отделка. Пошаговые инструкции, обзоры материалов, расчёты и советы экспертов для частных и коммерческих проектов.
Your comment is awaiting moderation.
Портал для строителей https://inter-biz.com.ua и заказчиков: советы по ремонту, обзоры материалов, расчёты, сметы и технологии. Реальные кейсы, чек-листы и рекомендации специалистов для надежного результата на каждом этапе работ.
Your comment is awaiting moderation.
Женский журнал https://asprofrutsc.org онлайн: тренды бьюти и моды, лайфхаки для дома, рецепты, материнство, карьера и финансы. Экспертные материалы, понятные инструкции и идеи, которые можно применить сразу. Обновления ежедневно, удобная навигация.
Your comment is awaiting moderation.
QuickClickMorixo – Smooth navigation, organized interface, and locating products is simple.
Your comment is awaiting moderation.
olvra network – Smooth and rapid navigation, information seems reliable
Your comment is awaiting moderation.
axory web – Efficient layout, readable content, and hassle-free browsing experience
Your comment is awaiting moderation.
А Всем Добра и Здоровья Близким))) https://mossygatherings.com Берите уверенно работаю с этим магазиномА почему сам с-м.сом сюда какой день не кажеться…?
Your comment is awaiting moderation.
online retailer – Customer service treated my question with respect.
Your comment is awaiting moderation.
actionpowersmovement page – Straightforward design, headings are clear, and browsing is effortless
Your comment is awaiting moderation.
contemporary online store – Simple layout mirrors the way modern shoppers interact with e-commerce.
Your comment is awaiting moderation.
online access – Quick access to information, pages load fast, very user-friendly
Your comment is awaiting moderation.
rankboost.click – Found practical insights today; sharing this article with colleagues later.
Your comment is awaiting moderation.
онлайн обучение 11 класс shkola-onlajn13.ru .
Your comment is awaiting moderation.
успешные seo кейсы санкт петербург seo-kejsy7.ru .
Your comment is awaiting moderation.
serpshift.click – Color palette felt calming, nothing distracting, just focused, thoughtful design.
Your comment is awaiting moderation.
выпрямитель дайсон купить в москве выпрямитель дайсон купить в москве .
Your comment is awaiting moderation.
conversioncrew.click – Navigation felt smooth, found everything quickly without any confusing steps.
Your comment is awaiting moderation.
boostbureau.click – Bookmarked this immediately, planning to revisit for updates and inspiration.
Your comment is awaiting moderation.
Zaviro Portal – Fast-loading pages, organized layout, and purchasing workflow was seamless.
Your comment is awaiting moderation.
Xelra Store – Layout neat, content well organized and shopping feels quick and easy.
Your comment is awaiting moderation.
Всё о строительстве https://hydromech.kiev.ua и ремонте в одном месте: материалы, технологии, дизайн, инженерия и безопасность. Экспертные статьи, инструкции, калькуляторы и кейсы. Помогаем планировать работы и экономить бюджет без потери качества.
Your comment is awaiting moderation.
Строительный портал https://domtut.com.ua с практикой: проекты, чертежи, СНиП и ГОСТ, инструменты, ошибки и решения. Ремонт квартир, строительство домов, инженерные системы и благоустройство. Понятно, по делу и с примерами.
Your comment is awaiting moderation.
Украинские новости https://polonina.com.ua онлайн: всё важное о стране, регионах и мире — от экономики и инфраструктуры до культуры и спорта. Лента 24/7, материалы редакции, комментарии экспертов, фото и видео. Читайте, сохраняйте и делитесь — быстро и удобно.
Your comment is awaiting moderation.
Expert Leadership Center – Offers perspectives that inspire smarter and more informed decisions.
Your comment is awaiting moderation.
nolra center – Layout neat, filtering makes finding items easy and site is fast.
Your comment is awaiting moderation.
digital xelarion – Ran into this store, seems trustworthy and categories are organized well.
Your comment is awaiting moderation.
Xelarionix Central – Site loads quickly, interface tidy and shopping steps simple to follow.
Your comment is awaiting moderation.
ВСЕМ МИР А ТСУ РЕСПЕКТ ))) https://saomaiedufund.info Обратите внимание, ТС отказывается работать с ГАРАНТОМ! хоть и магазин древний и проверенный! но хочется спать спокойно! АДМИНЫ ОБРАТИТЕ ВНИМАНИЕ, ПОРА КАК ТО ИЗМЕНИТЬ РЕЖИМ РАБОТЫ ГАРАНТА. СДЕЛКИ ПРОВОДИТЬ ОБЯЗАТЕЛЬНО ТОЛЬКО ЧЕРЕЗ ГАРАНТА!вот как то это всё не ахуенно.Если вас не затруднит проясните ситуацию.
Your comment is awaiting moderation.
purchase page – Mobile-friendly design, and categories are easy to browse.
Your comment is awaiting moderation.
tekvo page – Clear headings, easy-to-read text, and smooth scrolling across sections
Your comment is awaiting moderation.
EasyClickPlavex – Smooth pages, organized layout, and content easy to browse.
Your comment is awaiting moderation.
retail innovation platform – Captures the essence of modern buying patterns effectively.
Your comment is awaiting moderation.
zentrik.click – Clear layout, content is easy to follow and navigate
Your comment is awaiting moderation.
directionpowersmovement home – Layout is neat, navigation is intuitive, and content loads smoothly
Your comment is awaiting moderation.
что сильнее 100 или 400 ? и по времени сколько действуют ? Купить наркотики | Где купить наркотики? Магазин работает на 5+++++, я уже раз 5 беру у данного сейлера все ровно все катит, качество на высоте!Закажу посмотрим я сам надеюсь что магазин хороший-проверенный
Your comment is awaiting moderation.
Строительный портал https://ateku.org.ua о ремонте и строительстве: технологии, материалы, сметы, проекты домов и квартир, инструкции и советы экспертов. Обзоры, калькуляторы, нормы и примеры работ — всё для частного и коммерческого строительства.
Your comment is awaiting moderation.
Онлайн-портал https://avian.org.ua для строительства и ремонта: от фундамента до отделки. Подбор материалов, пошаговые гайды, сравнение технологий, советы мастеров и актуальные цены. Полезно для застройщиков, подрядчиков и частных клиентов.
Your comment is awaiting moderation.
Женский портал https://replyua.net.ua про красоту и заботу о себе: уход, макияж, волосы, здоровье, питание, спорт, стиль и отношения. Практичные советы, чек-листы, подборки и вдохновляющие истории. Читайте онлайн и находите идеи на каждый день.
Your comment is awaiting moderation.
ZexonDirect – Detailed listings, clear descriptions, and overall shopping experience was smooth.
Your comment is awaiting moderation.
Qulavo World – Links work fine, layout minimal and shopping process easy to complete.
Your comment is awaiting moderation.
Zylavo Base – Interface looks neat, navigation simple, and locating products was quick.
Your comment is awaiting moderation.
xavix info – Modern design, easy navigation, and a satisfying browsing experience
Your comment is awaiting moderation.
Strategic Insight Source – Left me with new ideas for developing and growing my business.
Your comment is awaiting moderation.
zylavo online – Layout simple, product pages clear and browsing straightforward.
Your comment is awaiting moderation.
Zorivo Hub Market – Smooth interface, pages load fast and information presented clearly.
Your comment is awaiting moderation.
SimpleDailyShop – Practical and fast, the platform makes buying products simple.
Your comment is awaiting moderation.
сегодня сделал заказ, написал в аську сразу ответили. Буду ждать как что измениться отпишу. https://contractmanagement.top Получил свой заказ,дошло довольно быстро, спасибо chemical-mix.com , за нормальный вес и хорошию работу !Сегодня оплатил, сегодня же отправили и выслали трек который уже бьется, все ровно пацики спасибо
Your comment is awaiting moderation.
выпрямитель dyson corrale купить выпрямитель dyson corrale купить .
Your comment is awaiting moderation.
this shop – I bought something already and everything arrived neatly packaged.
Your comment is awaiting moderation.
plexin online – Minimalistic design, clear text, and the site is easy to navigate
Your comment is awaiting moderation.
corporate cooperation hub – Implies strong collaborative potential for enterprises worldwide.
Your comment is awaiting moderation.
landing hub – Pages appear instantly and the structure is easy to understand
Your comment is awaiting moderation.
может все дело в кривых ручках? https://easyrust.ru опробовал и такая же фигня получилась..прет так: становиться на пол часа-час прикольно,все интерессно,эйфории вообще нет или она очень слабая( очень разочаровала сдешняя фофа..Затарил я тут как то купели значит курехи,приваливай на адрес и не могу найти списался с оператором и понял что дурак тут я а не минер затупил,30 сек и закладка у меня в руках,лечу Домой,дома меня ждут уже братики заряжает по 2 водных и начинаем пускать слюни под спанч бобра, в полне хороший стафф,силы стафа хватает,валит минут 40-60 потом спад,получилось так что вес сдули за 2 дня,отходосы минемальные, вообщем сервис тут вышка тарился тут ребята)
Your comment is awaiting moderation.
directionanchorsprogress source – Organized sections, minimal clutter, and navigation is easy to manage
Your comment is awaiting moderation.
protrustalliances – Gives a professional and secure impression, appealing to companies seeking dependable partnerships.
Your comment is awaiting moderation.
Донат в игры Донат в мобильные игры – явление, ставшее особенно популярным с расцветом рынка мобильных развлечений. Короткие сессии, удобство доступа и модель free-to-play сделали мобильные игры идеальной платформой для доната. Игроки часто тратят небольшие суммы, чтобы ускорить прогресс, получить преимущество над соперниками или просто для кастомизации своих аватаров. Вместе с тем, важно помнить о мере и не позволять увлечению перерасти в зависимость.
Your comment is awaiting moderation.
navix hub – No delays, ordering process smooth and pages displayed properly.
Your comment is awaiting moderation.
PragmaticIdeasHub – Designed for users who value actionable insights and measurable outcomes.
Your comment is awaiting moderation.
кайтинг в анапе кайтинг в анапе
Your comment is awaiting moderation.
RixarCenter – Interface neat, content readable, and browsing was very straightforward.
Your comment is awaiting moderation.
Plivox Lane Express – Simple design, browsing seamless and checkout process worked without issues.
Your comment is awaiting moderation.
store hub – Pages load reliably, categories clear, and moving through the site is easy.
Your comment is awaiting moderation.
Korivo Hub – Interface clean, browsing simple and product details clear for users.
Your comment is awaiting moderation.
Vixor Spot – Fast site, clear layout, and finding products felt straightforward.
Your comment is awaiting moderation.
Value Shopping Lab – Clear advice to help save time and money while shopping online.
Your comment is awaiting moderation.
мой заказ выцслали. https://cococay.info МАГАЗ СУПЕР!,брал5 гр ск качество отменное все сделанно ровно,даже фото не понадобилось,кристалики отличные без мутного оттенка,плаватся отлично,присутствует запах уксусного ангедрида,ВЫРАЖАЮ ОГРОМНУЮ БЛАГОДАРНОСТЬ!ВСЕ СУПЕР ПРОДОЛЖАЙТЕ В ТОМ ЖЕ ДУХЕ!спроси в лички номер аси думаю все ровно будет без базара бро
Your comment is awaiting moderation.
storefront – Trustworthy feel, products appear fast, and checkout was simple.
Your comment is awaiting moderation.
equilibradoras horizontales
https://vibromera.es/equilibradoras-horizontales/
Sistemas de balanceo: indispensables para el desempeno fluido y confiable de las maquinas
En el mundo de la innovacion tecnologica, donde la eficiencia y la seguridad operativa del equipo son de prioridad absoluta, los equipos de balanceo desempenan un papel crucial. Estos herramientas avanzadas estan destinados a equilibrar y estabilizar partes rotativas, ya sea en maquinaria industrial, automoviles y camiones o incluso en aparatos del hogar.
Para los profesionales en mantenimiento de equipos y los expertos en ingenieria, trabajar con sistemas de balanceo es indispensable para garantizar el trabajo seguro y continuo de cualquier mecanismo giratorio. Gracias a estas innovaciones en equilibrado, es posible disminuir de manera notable las oscilaciones, el sonido no deseado y la carga sobre los cojinetes, extendiendo la duracion de piezas de alto valor.
Igualmente relevante es el papel que tienen los equipos de balanceo en la gestion del servicio. El soporte tecnico y el cuidado preventivo utilizando estos sistemas hacen posible brindar resultados superiores, elevando la satisfaccion de los clientes.
Para los propietarios, la apuesta en estaciones de balanceo y sensores puede ser decisiva para aumentar la capacidad y resultados de sus equipos. Esto es especialmente relevante para los empresarios que gestionan pequenas y medianas empresas, donde toda mejora es significativa.
Ademas, los equipos de balanceo tienen una versatilidad en el campo de la seguridad y el control de calidad. Ayudan a prever problemas, previniendo danos financieros y danos a los equipos. Mas aun, los informes generados de estos sistemas se aplican para mejorar la produccion.
Las areas de aplicacion de los equipos de balanceo cubren un amplio espectro, desde la fabricacion de bicicletas hasta el seguimiento ecologico. No importa si se trata de fabricas de gran escala o pequenos talleres caseros, los equipos de balanceo son imprescindibles para asegurar un funcionamiento eficiente y sin interrupciones.
Your comment is awaiting moderation.
corporate trust resource – A strong trust message that can appeal to conservative organizations.
Your comment is awaiting moderation.
brivox spot – Fast page loads combined with a clutter-free layout
Your comment is awaiting moderation.
check zulvix – Intuitive interface, quick access to content, site feels well-made
Your comment is awaiting moderation.
clyra platform – Organized site, polished visuals, and an overall professional look
Your comment is awaiting moderation.
traffictide.click – Loved the layout today; clean, simple, and genuinely user-friendly overall.
Your comment is awaiting moderation.
Не-не, через форум заказы не принимаются. Заказывать нужно только через сайт, указанный в подписи. Купить наркотики | Где купить наркотики? Итак всем ПРИВЕТ !и будем мы так общаться по одному смс раз в полмесяца…
Your comment is awaiting moderation.
funnelfusion.click – Bookmarked this immediately, planning to revisit for updates and inspiration.
Your comment is awaiting moderation.
progressmoveswithfocus info – Design is logical, content is accessible, and browsing feels smooth
Your comment is awaiting moderation.
Hey! I just wanted to ask if you ever have any trouble
with hackers? My last blog (wordpress) was hacked and I
ended up losing many months of hard work due to no backup.
Do you have any solutions to stop hackers?
Your comment is awaiting moderation.
BondPortal – Intuitive design that makes browsing straightforward.
Your comment is awaiting moderation.
commercialbondconnect – Seems credible, ideal for connecting buyers and sellers of commercial bonds.
Your comment is awaiting moderation.
IntentionalSkillLab – Provides resources for methodical and purposeful learning approaches.
Your comment is awaiting moderation.
shopping site – Just found this shop, pricing seems fair and the checkout process is simple.
Your comment is awaiting moderation.
Ulvaro Marketplace – Interface tidy, product details easy to read and checkout quick.
Your comment is awaiting moderation.
Какой цвет продукта(MN-001) ? Купить наркотики | Где купить наркотики? Все легально и проверено, есть NMR. Плохого ни чего не случиться. Скорей всего приняли потому что были паленые….заказал, получил трек, пока не бьется.
Your comment is awaiting moderation.
Growth Guidance Platform – The content is organized and easy to act upon.
Your comment is awaiting moderation.
Voryx LinkPoint – Fast-loading site, clear structure, and finding products straightforward.
Your comment is awaiting moderation.
web shop – Organized product listings and filters made browsing effortless.
Your comment is awaiting moderation.
QuickBrixel – Navigation seamless, layout neat, and pages open quickly.
Your comment is awaiting moderation.
discount deals platform – Strong focus on value, ideal for smart shopping.
Your comment is awaiting moderation.
explorefuturedirections – Inspiring content, learning about future directions feels engaging and useful today.
Your comment is awaiting moderation.
visit xenvo – Pages load quickly, interface feels uncluttered and readable
Your comment is awaiting moderation.
mavix portal shop – Information presented clearly, browsing intuitive and site runs smoothly.
Your comment is awaiting moderation.
xavro web – Simple design, readable content, and pages load quickly without clutter
Your comment is awaiting moderation.
Я вообще не курю!!!я брал 3 июля его уже нет в продаже! Купить наркотики | Где купить наркотики? отношение оператора к клиентам очень даже достойное!(быть честным я еще нигде не видел такого хорошего отношения к клиентам у магазинов как в чемикл микс)!!!!! за это 5+У меня всё норм, реальную отправку написали в треке. Я волновался на счёт этого после сообщений
Your comment is awaiting moderation.
progressmovesforwardnow point – Crisp pages, fast navigation, and an overall enjoyable experience
Your comment is awaiting moderation.
trustedshoppingplatform.bond – Name inspires confidence, seems like a dependable platform for shoppers online.
Your comment is awaiting moderation.
https://available.xooit.org.uk/t48-Best-Promo-Code-for-1xBet-Hong-Kong-1X200RED-EUR130-Bonus.htm#p464
Your comment is awaiting moderation.
TomorrowPlanningHub – Highlights planning techniques that help users anticipate the next steps effectively.
Your comment is awaiting moderation.
online shop hub – Well-structured navigation, and products appear authentic.
Your comment is awaiting moderation.
Нужен дизайн? дизайна интерьера квартир в москве создаем функциональные и стильные пространства для квартир, домов и офисов. Планировки, 3D-визуализации, подбор материалов и авторский надзор. Индивидуальный подход, реальные сроки и продуманные решения под ваш бюджет.
Your comment is awaiting moderation.
Решил сделать ремонт? студия дизайна квартир москва: квартиры, дома, апартаменты и офисы. Продуманные планировки, 3D-проекты, сопровождение ремонта и контроль реализации. Создаем интерьеры, отражающие ваш стиль и образ жизни.
Your comment is awaiting moderation.
Электронные компоненты https://zener.ru с прямыми поставками от производителей: микросхемы, пассивные элементы, разъёмы и модули. Гарантия оригинальности, стабильные сроки, выгодные цены и подбор под ТЗ. Поставки для производства, сервиса и разработки.
Your comment is awaiting moderation.
mexto homepage – Simple design with information that’s quick to locate
Your comment is awaiting moderation.
GlobalNetworkingGuide – Very useful, helps make sense of international business interactions quickly.
Your comment is awaiting moderation.
store page – Nice experience overall, with smooth payment and helpful shipping updates.
Your comment is awaiting moderation.
сделать гражданство румынии
Your comment is awaiting moderation.
Corporate Collaboration Center – Helpful advice for enhancing teamwork and professional connections.
Your comment is awaiting moderation.
Давненько вас не было) Если кто не в курсе, магаз уже был в топе доверенных. В те времена не раз заказывал у данного селлера, проблем не было ни разу. Надеюсь, сейчас все так же) Купить наркотики | Где купить наркотики? самое норм) я думаю лучше лс нет) а сайт это вы о нас заботетесь) комфорта только себе и клиентам больше) а это GUD!Рады вашей работе)
Your comment is awaiting moderation.
Ко ланта ко ланте
Your comment is awaiting moderation.
savings shopping platform – Clear focus on deals, perfect for shoppers aiming to save money.
Your comment is awaiting moderation.
http://julia4tied.de/member.php?action=profile&uid=238122
Your comment is awaiting moderation.
landing hub – Pages open quickly, navigation is effortless, content is straightforward
Your comment is awaiting moderation.
growthflowswithclarity link – Smooth interface, intuitive navigation, and content is concise and useful
Your comment is awaiting moderation.
Классный магазин! Работаю только с ним! Ни раз не обманули! Купить наркотики | Где купить наркотики? Давно не читала столько положительных отзывов !так держать )всё пришло с компенсацией,качество на высоте,Магазину ОГРОМНЫЙ РЕСПЕКТ
Your comment is awaiting moderation.
Онлайн-журнал https://love.zt.ua для женщин: мода, бьюти, психология, любовь, семья, дети, дом, карьера и финансы. Обзоры, лайфхаки, рецепты и инструкции — без «воды», с пользой. Удобные рубрики и свежие материалы ежедневно.
Your comment is awaiting moderation.
Главные события https://vesti.in.ua Украины — коротко и понятно. Мы собираем новости из Украины и мира, проверяем данные и даём ясные объяснения. Подборки по темам, новости городов, аналитика, мнения, видео. Обновления каждый час, удобно на смартфоне.
Your comment is awaiting moderation.
axivo online – Well-laid-out information with readable text and user-friendly design
Your comment is awaiting moderation.
Всё о здоровье https://medfactor.com.ua на одном медицинском портале: болезни и их лечение, анализы, препараты, обследования и профилактика. Материалы подготовлены с опорой на клинические данные и врачебную практику. Читайте онлайн в любое время.
Your comment is awaiting moderation.
visionary business roadmap – Offers guidance on building a sustainable vision that supports growth.
Your comment is awaiting moderation.
easy find retail – Clean interface allows quick movement between products.
Your comment is awaiting moderation.
SafeEcommercePortal – Security-first platform builds credibility and confidence for shoppers.
Your comment is awaiting moderation.
careeracceleratorhub – Organized advice and tools for improving career outcomes efficiently.
Your comment is awaiting moderation.
StrategicGrowthGuide – Lessons are practical and easy to grasp, making strategy planning effortless.
Your comment is awaiting moderation.
только что был свидетелем того как парней приняли с ам2233 и тусиаем от чемикала на спср офисе, вывели в браслетах посадили в микрик и увезли, чего ожидать? чем им помочь? Купить наркотики | Где купить наркотики? странно что это нужно писать =\Пиздатый магаз )
Your comment is awaiting moderation.
Collaboration Growth Center – Helpful content that clarifies the steps to build strong partnerships.
Your comment is awaiting moderation.
боковой погрузчик для логистики
Your comment is awaiting moderation.
גדולים יותר, תוספים מתנפחים ודילדו. אחרי כחצי שנה הבנתי שיש לי את כל הארון שלי עסוק בתלבושות ואביזרי BDSM שונים, שהבנתי אחרי שקניתי לה מכונת סקס. אפילו לא יכולתי להזמין אף אחד הביתה תחבושת! ניסיון שלישי – איזה פירוגי, למטה מחולק. שער הדגים. זה מה אנחנו יודעים. מה זה! טוב מאוד. קדימה. אופוסלה קרבות, אבל אני מוכן לשבת. פרוצה התכופפה – יהיה . קשה לומר. אני מסכים. xxxmaripossa.com
Your comment is awaiting moderation.
simple online shop platform – Practical and uncomplicated, great for beginners in ecommerce.
Your comment is awaiting moderation.
globalpartnershipinfrastructure – Very detailed, global partnership infrastructure is explained clearly and practically here.
Your comment is awaiting moderation.
lixor.click – Clean layout, information is clear and easy to follow
Your comment is awaiting moderation.
handy page – Lightweight interface, quick access to all content, very readable
Your comment is awaiting moderation.
Актуальные новости https://uapress.kyiv.ua Украины и мира: события, заявления, решения, рынки, курсы, происшествия и жизнь регионов. Факты и проверенные источники, аналитика и комментарии. Удобные рубрики, поиск, теги и подборки — всё, чтобы быстро находить нужное.
Your comment is awaiting moderation.
korixo homepage – Well-organized pages that make navigation simple and comfortable
Your comment is awaiting moderation.
Современный женский https://storinka.com.ua портал: уход, макияж, тренировки, питание, стиль, любовь, семья и карьера. Экспертные советы, полезные подборки, идеи подарков и лайфхаки. Мы говорим простым языком о важном — заходите за вдохновением ежедневно.
Your comment is awaiting moderation.
Новостной портал https://ua-novosti.info Украины без лишнего: оперативная лента, репортажи из областей, интервью и разборы. Политика, финансы, социальные темы, медицина, образование, IT. Фото/видео, инфографика, уведомления и топ-материалы дня.
Your comment is awaiting moderation.
sonabet live login
Your comment is awaiting moderation.
strategy learning click – Helpful tips shared, critical thinking and strategy feel easy to practice.
Your comment is awaiting moderation.
BuyOnlineFast – Smooth experience, checkout is quick and worry-free.
Your comment is awaiting moderation.
focusamplifiesgrowth site – Well-organized content, minimal clutter, and browsing is smooth
Your comment is awaiting moderation.
хуясе надо было сначало уточнить а что брали хоть? ио названижю вещества https://potencial-tekstil.ru бля у нас опен эйр будет 11 июня у шамана пороха нету!!!вот ищу где бы взять что нибудь на подобие скорости или кокса!а тут отзывы что соду продают!здравствуйте. магазин работает?
Your comment is awaiting moderation.
BusinessFocusLab – Highlights techniques to bring clarity and direction to complex business planning.
Your comment is awaiting moderation.
zylor – Clean layout and fast loading pages, seems useful so far
Your comment is awaiting moderation.
smooth purchase center – Branding emphasizes minimal friction in completing online orders.
Your comment is awaiting moderation.
buy with confidence – Smooth transaction flow adds peace of mind.
Your comment is awaiting moderation.
ecoenterprisehub – Step-by-step insights for managing partnerships sustainably and effectively.
Your comment is awaiting moderation.
Обязательно позвонить должны, как позвонят легче забрать самому чем ждать пока курьер доставит Купить наркотики | Где купить наркотики? Да хоть в очко засыпь, не торкнетНо зато в том случае будут доказательства, что селлер обещал одно, а пришло совсем другое) Так что я правильно написал 😉
Your comment is awaiting moderation.
discount deals platform – Strong focus on value, ideal for smart shopping.
Your comment is awaiting moderation.
Explore New Strategies – Encourages trying fresh tactics and staying open to improvement.
Your comment is awaiting moderation.
Новости Украины https://news24.in.ua 24/7: Киев и регионы, экономика, общество, безопасность, технологии, спорт и культура. Короткие сводки, подробные материалы, объяснения контекста, фото и видео. Читайте главное за день и следите за обновлениями в удобной ленте.
Your comment is awaiting moderation.
Медицинский портал https://medicalanswers.com.ua для пациентов: здоровье, диагностика, лечение, профилактика и образ жизни. Экспертные статьи, справочник симптомов, советы специалистов и актуальные медицинские новости. Достоверная информация в одном месте.
Your comment is awaiting moderation.
Женский онлайн-журнал https://womanlife.kyiv.ua бьюти-гайды, мода, психология, отношения, материнство и забота о себе. Подборки товаров, инструкции, рецепты и идеи для дома. Читайте коротко или глубоко — удобная навигация и свежие материалы каждый день.
Your comment is awaiting moderation.
TrustNetworkPro – Well-structured platform, connecting globally is simple and effective.
Your comment is awaiting moderation.
useful link – Pages respond instantly, content is concise, browsing feels natural
Your comment is awaiting moderation.
global alliance insights – Clear international partnership ideas, content is easy to follow.
Your comment is awaiting moderation.
SavvyDealsHub – Focuses on affordability and convenience for online buyers.
Your comment is awaiting moderation.
searchspark.click – Content reads clearly, helpful examples made concepts easy to grasp.
Your comment is awaiting moderation.
слежка либо за магазином либо за курьеркой https://car-dvr.info Потом все идет как надо , не много по тряхивает, но не чего, не так люто как от КРИССАчема вещи делает!!!
Your comment is awaiting moderation.
signalturnsaction today – Everything is accessible quickly, content is clear and well-organized
Your comment is awaiting moderation.
SmartBuyNetwork – Highlights intelligent buying, helping users make informed purchase decisions.
Your comment is awaiting moderation.
enterprisepartnershipcenter – Useful content, networking strategies are clear and simple to follow.
Your comment is awaiting moderation.
framework insights – Useful guidance, explains complex concepts clearly and efficiently.
Your comment is awaiting moderation.
vyrxo site – Modern look, readable content, and everything feels well organized
Your comment is awaiting moderation.
market discovery hub – Feels like a resource for entrepreneurs seeking unique market insights.
Your comment is awaiting moderation.
connectsphere – Learn to approach business networking with clarity and confidence.
Your comment is awaiting moderation.
tavro source – Clean, easy-to-navigate pages with information presented clearly
Your comment is awaiting moderation.
online shop network – Clean visuals and layout improve overall usability.
Your comment is awaiting moderation.
useful link – Smooth interface, minimal distractions, content is concise and clear
Your comment is awaiting moderation.
professional partnership platform – Clear, solution-driven approach to enterprise collaboration.
Your comment is awaiting moderation.
Проб НЕТ! https://sunbeautyschool.ru Посылки у магазина не задерживаются? Все чотко и ровно?Все вопросы к представителю.
Your comment is awaiting moderation.
Trusted Corporate Network – Insightful tips for forming long-term, dependable business alliances.
Your comment is awaiting moderation.
CorporateTrustHub – Platform feels professional, advice for corporate bonding is clear and actionable.
Your comment is awaiting moderation.
progressive strategies site – Encourages innovation and rethinking conventional approaches.
Your comment is awaiting moderation.
relationship advice click – Very practical hub, tips are realistic and actionable.
Your comment is awaiting moderation.
go to site – Well-organized sections, pages load fast, very easy to browse
Your comment is awaiting moderation.
click here, read more, learn more, useful post, great article,
helpful guide, nice tips, thanks for sharing, very informative, good read, interesting post,
well explained, detailed guide, helpful information, great
explanation, this helped a lot, valuable content, worth reading, solid
breakdown, informative article, recommended read, good insights, clear explanation, practical tips, well written, excellent overview
Your comment is awaiting moderation.
pixelpilot.click – Found practical insights today; sharing this article with colleagues later.
Your comment is awaiting moderation.
ProEnterpriseFramework – Clear and organized, frameworks are explained logically and effectively.
Your comment is awaiting moderation.
да мэн правильно говоришь KEY фраернулся Купить наркотики | Где купить наркотики? Ооо да, тусишка у них лучшая из того – что мне доводилось пробовать ))Всегда платил через киви перевод идёт максимум сутки.950р это с курьером доставит тебе куда скажешь)))
Your comment is awaiting moderation.
CityFashionMarket – Urban retail focus feels specialized, appealing to fashion-conscious city users.
Your comment is awaiting moderation.
alliancesstrategist – Informative content, commercial alliances explained clearly for easy implementation.
Your comment is awaiting moderation.
Портал для женщин https://woman24.kyiv.ua про жизнь без лишнего: красота, женское здоровье, питание, рецепты, уютный дом, финансы, работа и отдых. Практичные советы, честные обзоры и вдохновляющие истории.
Your comment is awaiting moderation.
Все о событиях https://ua-vestnik.com в Украине и вокруг: оперативные сводки, расследования, мнения экспертов, рынки и курс валют, происшествия и полезные сервисы. Подборки по темам, теги, уведомления, фото и видео — актуально в любое время.
Your comment is awaiting moderation.
Ежедневные новости https://useti.org.ua Украины: политика и экономика, общество и медицина, образование, технологии, спорт и шоу-бизнес. Мы собираем информацию из надежных источников и объясняем контекст. Читайте онлайн с телефона и компьютера — удобно и бесплатно.
Your comment is awaiting moderation.
smartpurchaseguide – Practical tools for making choices that are both smart and eco-conscious.
Your comment is awaiting moderation.
reliableonlinecommerce – Safe and reliable, buying products online feels simple and secure today.
Your comment is awaiting moderation.
BudgetBuyOnline – Helpful descriptions and simple navigation make comparing items stress-free.
Your comment is awaiting moderation.
кэшбэк каждую неделю — всё это доступно на casino kometa: casino kometa
Your comment is awaiting moderation.
scalinghub – Guidance for expanding operations using structured, actionable frameworks.
Your comment is awaiting moderation.
organizational collaboration site – Supports companies aiming to expand through partnerships.
Your comment is awaiting moderation.
Просьба подкорректировать самим бредовые сообщения. https://stalkon54.ru Ребята, у chemical-mix все на высшем уровне!Ребята с 11го года магазин работает на отлично, сомнений не у кого не должно быть!!!
Your comment is awaiting moderation.
ValueFinderNetwork – Helps shoppers discover cost-conscious options efficiently.
Your comment is awaiting moderation.
progress builder portal – Focuses on simple actions that help create steady momentum.
Your comment is awaiting moderation.
Next-Level E-Commerce – Helps explore innovative shopping options that are easy to use.
Your comment is awaiting moderation.
Clear Web Layout – Came across this unexpectedly and liked how simple it looks
Your comment is awaiting moderation.
longtermpartners – Informative and actionable, strategies for long-term alliances are well laid out.
Your comment is awaiting moderation.
Всё для женщин https://glamour.kyiv.ua в одном месте: тренды моды и бьюти, здоровье, питание, спорт, семья, дети, отношения и саморазвитие. Статьи, чек-листы, идеи и обзоры, которые помогают принимать решения и чувствовать себя увереннее.
Your comment is awaiting moderation.
фен выпрямитель дайсон где купить фен выпрямитель дайсон где купить .
Your comment is awaiting moderation.
Женский портал https://elegantwoman.kyiv.ua о красоте, здоровье и стиле жизни: уход за кожей и волосами, мода, отношения, психология, карьера, дом и вдохновение. Полезные советы, подборки, рецепты и лайфхаки на каждый день. Читайте онлайн с телефона и компьютера.
Your comment is awaiting moderation.
Главные новости https://novosti24.kyiv.ua Украины сегодня — быстро и понятно. Репортажи из регионов, интервью, разборы, инфографика, фото/видео. Следите за темами, сохраняйте материалы и делитесь. Лента обновляется 24/7, чтобы вы были в курсе событий.
Your comment is awaiting moderation.
А чё брал то Купить наркотики | Где купить наркотики? напишите в аську, там порешают вашу проблему. С этой партией МХЕ определённо вышел косяк.у меня тоже дроп подлетел с посылкой и брали его ФСБшники почему то , но слава богу до уголовного дела не дошло, и ТС обещал жирную скидку сделать при следуещем заказе как то так (документы о прекращении уголовного дела и экспертиза на руках) дело закрыли по двум причинам то что дроп не при делах а второе самое главное что экспертиза не выявила НС
Your comment is awaiting moderation.
SmartRetailClick – Focuses on practical, easy-to-navigate digital shopping solutions.
Your comment is awaiting moderation.
check nexra – Well-structured sections, fast response, first impression is very positive
Your comment is awaiting moderation.
choosebetterportal – Offers practical methods to simplify decision-making in daily life.
Your comment is awaiting moderation.
CorporateNetworkingPro – Helpful platform, building long-term connections is simple and structured.
Your comment is awaiting moderation.
educational growth center – Guides learners toward expanding understanding in a meaningful way.
Your comment is awaiting moderation.
bizgrowthguide – Clear, useful advice for achieving measurable business improvements.
Your comment is awaiting moderation.
business skills e-learning – Great reminder that online platforms make learning practical and flexible.
Your comment is awaiting moderation.
trusty purchase hub – Very reliable site, checkout feels secure and easy to follow.
Your comment is awaiting moderation.
LearnAndLeadBiz – Clear structure, provides hands-on approaches to mastering business skills.
Your comment is awaiting moderation.
Качество, если честно на моё удивление (тк. первый раз я пользуюсь услугами данного ТС), по отзывам клиентов, сказать отличное это сказать ничего, ССССУУУУУПППЕЕЕЕРРРР!!!!!! https://mossygatherings.info Для совсем новичков 1 к 15 будет даже много.щас заказал по 5г RCS-4 и URB754 по скайпу объяснили как оплатить, пока всё коректно жду посылки там отпишу..
Your comment is awaiting moderation.
Everyday Buy Zone – Smooth navigation makes checking out products feel easy.
Your comment is awaiting moderation.
valuehub – Very clear, enterprise alliances are explained logically and easy to follow.
Your comment is awaiting moderation.
start browsing – Navigation felt intuitive and the site felt polished overall
Your comment is awaiting moderation.
next step shopping – Layout supports fast discovery of products.
Your comment is awaiting moderation.
step by step forward – Encouraging phrasing, demonstrating that carefully constructed motion achieves goals.
Your comment is awaiting moderation.
InsightHubClick – Clear guidance that helps me act on expert recommendations effectively.
Your comment is awaiting moderation.
CareerWisdomPortal – Appears helpful for professionals seeking guidance in their careers.
Your comment is awaiting moderation.
Понимающий меня поймёт. https://progress-pro.ru прет 30-45 мин.1к10.действием похож на рсцА то с после ситуации с РЦлаб все настораживают……
Your comment is awaiting moderation.
partnership insights platform – Very actionable, real-world examples illustrate alliance strategies well.
Your comment is awaiting moderation.
alliancesimplified – Very clear and useful, explains market relationship strategies in an understandable way.
Your comment is awaiting moderation.
ValueCartOnline – Designed to make online shopping practical and budget-friendly.
Your comment is awaiting moderation.
trustedcartcenter – Easy-to-use platform offering a smooth and secure checkout experience.
Your comment is awaiting moderation.
future planning resource – Encourages a forward-looking approach with practical advice.
Your comment is awaiting moderation.
ecommercestarterkit – Seems practical, gives small businesses tools to begin selling online immediately.
Your comment is awaiting moderation.
SecureShopOnline – Clear and practical, shopping for products feels effortless.
Your comment is awaiting moderation.
SmartCheckout – Easy to browse and buy, platform feels modern and organized.
Your comment is awaiting moderation.
knowledge hub – Very clear content, makes learning professional skills smooth and practical.
Your comment is awaiting moderation.
globaldigitalshoppingmarket – Smooth interface, site offers a good overview of digital marketplaces worldwide.
Your comment is awaiting moderation.
он мне успел ответить – поверь, ничего такого о чём тебе стоило бы беспокоиться – не случилось https://yeahcamp.ru лютый микс, мир за качество магазуP.S.Сколько раз брал в этом магазе ни разу нареканий не было)))Не сочтите за рекламу
Your comment is awaiting moderation.
worktogetherhub – Clear and helpful, teamwork strategies are simple to implement.
Your comment is awaiting moderation.
browse qulvo – Straightforward interface, smooth performance, concise content everywhere
Your comment is awaiting moderation.
дайсон фен выпрямитель для волос дайсон фен выпрямитель для волос .
Your comment is awaiting moderation.
Digital Shopping Guide – Helps navigate online stores with ease and make faster decisions.
Your comment is awaiting moderation.
Прочность и долговечность нанесение венецианской штукатурки в молодечно. Качественная декоративная штукатурка не боится влажной уборки, механических воздействий и не выцветает со временем. Идеально для прихожей и кухни.
Your comment is awaiting moderation.
online access – Content is organized, layout is clean, browsing is effortless
Your comment is awaiting moderation.
business operations hub – Structured presentation makes understanding frameworks intuitive and accessible.
Your comment is awaiting moderation.
move with force – Gentle, motivating tone demonstrating how applied energy sustains movement.
Your comment is awaiting moderation.
UrbanDealsHub – Informative and fun, makes finding products a breeze.
Your comment is awaiting moderation.
TrustedEnterpriseConnections – Long-term orientation adds credibility to business relationship building.
Your comment is awaiting moderation.
market alliance insights – Helpful tips, shows how alliances work in realistic settings.
Your comment is awaiting moderation.
Ребята скажите АМ-2233 есть в наличии Купить наркотики | Где купить наркотики? Спасибо Магазину)вы лучшие))))))))!!!!!!!!!!!!!!!!!!!!! :monetka: Качество на 100%28го оплатил, а даже трека по сей день нет…
Your comment is awaiting moderation.
corporate relationship portal – Strong tone and branding suggest reliable business connections.
Your comment is awaiting moderation.
learningfromleaders – Informative and concise, strategies from market leaders are simple to apply.
Your comment is awaiting moderation.
entrepreneurial growth portal – Suggests practical tools for exploring and developing new business strategies.
Your comment is awaiting moderation.
Новостной портал https://dailynews.kyiv.ua Украины с проверкой фактов: важные заявления, решения властей, бизнес и финансы, жизнь городов и областей, погода, транспорт, культура. Удобные рубрики и поиск, обновления каждый час, коротко и по делу.
Your comment is awaiting moderation.
Свежие новости https://arguments.kyiv.ua Украины и мира: события в Киеве и регионах, экономика, общество, происшествия, спорт, технологии и культура. Оперативная лента 24/7, аналитика, комментарии, фото и видео.
Your comment is awaiting moderation.
Комиссионный центр https://skypka.tv специализируется на скупке самой разной техники — от смартфонов и телевизоров до фотоаппаратов и игровой электроники, так что выгодно избавиться можно практически от любых лишних устройств.
Your comment is awaiting moderation.
TrustedAllianceNetwork – Helpful advice, long-term collaboration strategies are simple to understand and apply.
Your comment is awaiting moderation.
слот гейтс олимпус
Gates of Olympus slot — популярный онлайн-слот от Pragmatic Play с системой Pay Anywhere, каскадными выигрышами и множителями до ?500. Сюжет разворачивается у врат Олимпа, где бог грома усиливает выигрыши и делает каждый раунд непредсказуемым.
Сетка слота выполнено в формате 6?5, а выигрыш засчитывается при сборе 8 и более совпадающих символов в любом месте экрана. После расчёта комбинации символы удаляются, их заменяют новые элементы, запуская цепочки каскадов, которые могут дать несколько выплат за одно вращение. Слот является игрой с высокой волатильностью, поэтому может долго раскачиваться, но при удачных каскадах способен порадовать крупными выплатами до ?5000 от ставки.
Для тестирования игры доступен демо-режим без финансового риска. Для ставок на деньги стоит использовать проверенные казино, например MELBET (18+), принимая во внимание заявленный RTP ~96,5% и условия конкретной платформы.
Your comment is awaiting moderation.
SecureDealsOnline – Practical and intuitive, shopping feels easy and reliable.
Your comment is awaiting moderation.
dog house slot Gates of Olympus от Pragmatic Play —
Слот Gates of Olympus — хитовый онлайн-слот от Pragmatic Play с механикой Pay Anywhere, каскадными выигрышами и коэффициентами до ?500. Действие происходит у врат Олимпа, где Зевс усиливает выигрыши и превращает каждое вращение динамичным.
Игровое поле имеет формат 6?5, а выплата засчитывается при появлении 8 и более одинаковых символов в любой позиции. После расчёта комбинации символы исчезают, сверху падают новые элементы, активируя цепочки каскадов, которые могут дать дополнительные выигрыши за одно вращение. Слот является высоковолатильным, поэтому может долго раскачиваться, но в благоприятные моменты способен порадовать крупными выплатами до 5000? ставки.
Чтобы разобраться в слоте доступен демо-режим без вложений. При реальных ставках стоит рассматривать проверенные казино, например MELBET (18+), принимая во внимание показатель RTP ~96,5% и условия конкретной платформы.
Your comment is awaiting moderation.
alliancesacademy – Practical guidance, corporate partnerships are presented clearly and effectively.
Your comment is awaiting moderation.
Проб НЕТ! https://za6.info лютый микс, мир за качество магазувсе скоро будут всем довольны, а те кто ждал и не паниковал будут вдвойне довольны!
Your comment is awaiting moderation.
nextlevel shopping hub – Excellent flow, finding and purchasing items is hassle-free.
Your comment is awaiting moderation.
enterprise strategy center – Clear explanations and logical flow make business frameworks easy to understand.
Your comment is awaiting moderation.
SavvyShopperHub – Emphasizes smart spending and great value options.
Your comment is awaiting moderation.
browse now – Everything loaded smoothly and the site felt lightweight
Your comment is awaiting moderation.
Business Trust Hub – Offers actionable strategies for successful networking and alliance-building.
Your comment is awaiting moderation.
ClickGlobalUnity – Helpful platform, simplifies the process of learning about global business.
Your comment is awaiting moderation.
Ремонт встраиваемой техники Neff. Диагностика луча на полу (TimeLight), ремонт механизма двери.Ремонт посудомоечных машин Gaggenau Алматы Специализированный ремонт техники Bosch. Оперативное устранение типичных ошибок: E15 (сработал Аквастоп), E09 (сгорел ТЭН в насосе), E24 (проблема со сливом). Ремонт и восстановление дорогостоящих тепловых насосов. Мы знаем все нюансы немецкой сборки и используем оригинальные ремкомплекты Bosch для долговечной работы вашей машины.Ремонт посудомоечных машин Siemens Алматы
Your comment is awaiting moderation.
CorporateCollabHub – Professional networking focus is evident, platform promotes team collaboration effectively.
Your comment is awaiting moderation.
alliances knowledge base – Structured insights, helps make sense of market partnership dynamics.
Your comment is awaiting moderation.
Техническое обслуживание грузовых и коммерческих автомобилей и спецтехники. Снабжение и поставки комплектующих для грузовых автомобилей, легкового коммерческого транспорта на бортовой платформе ВИС lada: https://ukinvest02.ru/
Your comment is awaiting moderation.
от таких провайдеров, как NetEnt, Microgaming, Pragmatic Play и других: casino kometa
Your comment is awaiting moderation.
online global store – Platform has a broad selection, ideal for international customers.
Your comment is awaiting moderation.
Белое SEO https://seomgroup.ru работает. Спустя год работ с уверенностью это говорю. Главное найти спецов, которые не обещают золотые горы за месяц. Нормальные результаты, это минимум 3-4 месяца работы. Зато теперь получаем стабильный органический трафик, не как с рекламы, где бюджет кончился и все.
Your comment is awaiting moderation.
незнаю.сколько раз зака зывал , всегда приходило качество , был один момент когда был ркс 4. он был 15 минутный слабый. Но это сам реактив был такой. Он использовался как урб для добавок к другим. А так то что присылали всегда всё ровно. кач и кол.. https://niturehome.ru Тут мыспасибо! Хороший магазин) берите тут
Your comment is awaiting moderation.
Нужна тара? https://mkr-big-bag.ru Компания “МКР-Биг-Бэг” — производство и продажа биг-бэгов (МКР) оптом. Широкий ассортимент мягких контейнеров для сыпучих материалов. Индивидуальные заказы, доставка по России. Надежно, быстро, выгодно!
Your comment is awaiting moderation.
Онлайн курсы психологии https://ilmacademy.com.ua удобный формат обучения для тех, кто хочет освоить профессию психолога, получить практические навыки и пройти профессиональное обучение дистанционно. Курсы подойдут для начинающих и специалистов, ориентированных на практику.
Your comment is awaiting moderation.
learnfromprosnow – Informative and practical, professional guidance is straightforward and applicable.
Your comment is awaiting moderation.
verifiedshoppinghub – Appears professional and safe, ideal for secure e-commerce experiences.
Your comment is awaiting moderation.
выпрямитель для волос дайсон москва выпрямитель для волос дайсон москва .
Your comment is awaiting moderation.
ReliableBizNetwork – Smooth user experience, site feels credible for business communications.
Your comment is awaiting moderation.
Замена верхнего или нижнего коромысла. Устранение плохой мойки.Ремонт дозатора посудомоечной машины Дверь не фиксируется и падает вниз? Мы заменим растянутые пружины, порванные тросики или изношенные петли двери. Регулировка натяжения механизма для плавного открытия и закрытия. Безопасность и удобство использования вашей техники после ремонта.Замена циркуляционного насоса цена
Your comment is awaiting moderation.
ReliableDealFinder – User-friendly and organized, shopping for bargains is quick and safe.
Your comment is awaiting moderation.
dealhub – Very practical, shopping options are clear and user-friendly.
Your comment is awaiting moderation.
explorebusinessopportunities – Insightful resources, finding business opportunities feels easy and practical here.
Your comment is awaiting moderation.
Да, в скайпе их нет и ситтуация мне тоже не нравиться. https://ballerina-productions.com жду товарамаскировка 5+
Your comment is awaiting moderation.
online access – Smooth navigation, fast-loading, content is easy to understand
Your comment is awaiting moderation.
strategic unity hub – Useful strategies, site explains partnership growth in a clear way.
Your comment is awaiting moderation.
modern e-commerce – Very practical, buying items online is fast and easy.
Your comment is awaiting moderation.
Explore Market Options – Informative articles that shed light on untapped opportunities.
Your comment is awaiting moderation.
global investment bonds – Helpful information and clear guidance simplify bond research.
Your comment is awaiting moderation.
ClickPremiumOnline – Very organized platform, content is reliable and practical.
Your comment is awaiting moderation.
market partnership guide – Clear guidance, real examples make strategies understandable.
Your comment is awaiting moderation.
TrustedRetailZone – Smooth interface and dependable layout enhance online buying comfort.
Your comment is awaiting moderation.
Обслуживание Коксай. Ремонт стиральных машин без выходных.Ремонт стиральных машин Кокозек Профессиональный ремонт немецких стиральных машин Kuppersbusch. Точная калибровка датчиков веса, ремонт системы шумоподавления. Мы устраняем сбои в электронном управлении и механические поломки. Используем оригинальные комплектующие для сохранения характеристик.
Ремонт стиральных машин V-ZUG Алматы
Your comment is awaiting moderation.
sonabet vip login
Your comment is awaiting moderation.
safe buying hub – Gives a reliable impression, encouraging repeat use for future shopping.
Your comment is awaiting moderation.
3D-печать — это эффективная технология, который открывает новые горизонты для бизнеса и творчества. Мы оказываем индивидуальные проекты на современном оборудовании. Наши специалисты применяем только проверенные технологии, что гарантирует высокую точность результата. Доступен широкий выбор пластика и композитов, благодаря чему можно напечатать от сувениров до промышленных образцов. Выполнение проекта занимает совсем немного времени, а наши расценки делают 3D-печать доступной каждому. Оформите заказ прямо сейчас, и ваш проект будет реализован без лишних затрат: https://nizhniy-novgorod.esbd.ru/uslugi/asteri3d_3287. Наш сервис выполняет печать быстро и надёжно.
Your comment is awaiting moderation.
growthandlearninghub – Informative and accessible, development tips are easy to understand and use.
Your comment is awaiting moderation.
А то я запутался совсем, везде по разному пишут. Купить наркотики | Где купить наркотики? говорю что все качественно быстро и1-й раз все было почти супер только менагер немного напутал ( но потом все доотправили )
Your comment is awaiting moderation.
SmartSavingsCart – Highlights smart and value-focused shopping experiences.
Your comment is awaiting moderation.
global market connections – Encourages expansion and collaboration with companies around the globe.
Your comment is awaiting moderation.
SmartGrowthPathways – Guidance helps map out actionable steps for success.
Your comment is awaiting moderation.
explore more – Fast-loading site, layout is logical, information comes across clearly
Your comment is awaiting moderation.
relationshipguide – Clear and actionable, shows practical steps for engaging with professionals.
Your comment is awaiting moderation.
Магазин работает? пишу в ЛС и Джабер везде тишина, ответа нет!(( https://gamoh.biz Всё получил свой АМ. Порошок кремового-оранжевого цвета, кстати полная растворимость на поровой бане. Так что не знаю кто там чо писал, помоему товар заебись! Как высохнет отпишу трип репорт от этой поставки…а так всё от души! огромное спасибо! ещё не раз к вам обращюсь!)
Your comment is awaiting moderation.
Доступный ремонт Indesit. Устранение мигающих индикаторов, замена сливного насоса.Ремонт посудомоечных машин Hotpoint-Ariston Алматы Выездной ремонт посудомоек в Шелек. Мы предоставляем гарантию качества на все виды работ. Честные цены без скрытых комиссий. Опытные мастера восстановят работоспособность вашей техники в кратчайшие сроки.Ремонт посудомоечных машин Гулдала
Your comment is awaiting moderation.
AllianceMentorOnline – Clear and actionable, helps build strong and trustworthy professional relationships.
Your comment is awaiting moderation.
resource page – Clean pages, minimal distractions, information is concise and helpful
Your comment is awaiting moderation.
secure business strategies – Offers actionable guidance, connecting with partners feels natural.
Your comment is awaiting moderation.
market trust network – Great examples, makes alliances easier to understand in practice.
Your comment is awaiting moderation.
Worldwide Commerce Updates – Excellent for keeping tabs on the latest retail developments globally.
Your comment is awaiting moderation.
ClickForChoiceClarity – Useful platform, helps me compare options quickly and with confidence.
Your comment is awaiting moderation.
CollaborativeBizLinks – Encourages cooperative strategies, ideal for building trusted professional relationships.
Your comment is awaiting moderation.
MomentumPath – Inspires meaningful steps while keeping implementation simple.
Your comment is awaiting moderation.
smart learning link – Encourages progress at a comfortable and enjoyable pace.
Your comment is awaiting moderation.
international shopping hub – Offers global products with a hassle-free purchasing experience.
Your comment is awaiting moderation.
выпрямитель dyson ht01 выпрямитель dyson ht01 .
Your comment is awaiting moderation.
retailworldinsights – Helpful platform, global retail analysis is practical and easy to implement.
Your comment is awaiting moderation.
хотел узнать по какой причине скайп магазина не в сети со вчерашнего дня? Купить наркотики | Где купить наркотики? Я ж тебя хотел отпиарить.Нее… пацаны, Вы не поняли, я и не волнуюсь ни капельки, и на закз этот мне положить, мне за державу обидно. Пришел я в магазин а там висит цена на сок томатный сто рублей. Взял пачку, отстоял в очереди а продавщица и говорит что стоит он не сто рублей, которые у тебя в кармане, а сто десять… Да я разъе….у этот магазин вместе с продавщицой и заведующей…. Лучше заплатите админу своего сайта чтобы мессаги на мыло падали четко и конкретно и не наебы…ли людей.
Your comment is awaiting moderation.
POZIS ХФ-120 купить Авторизованный сервис POZIS. Гарантийный и постгарантийный ремонт. Замена компрессоров, контроллеров, датчиков температуры. Наличие оригинальных запчастей. Выезд мастера в клинику.
Запчасти для холодильников POZIS
Your comment is awaiting moderation.
securebuyzone – Marketplace feels professional, inspires confidence for first-time shoppers.
Your comment is awaiting moderation.
FreshDealsOnline – Browsing and checkout are smooth, site feels user-friendly.
Your comment is awaiting moderation.
easybuyhub – Clear and practical, buying products online is smooth and simple.
Your comment is awaiting moderation.
Профнастил, металлочерепица. Продажа и монтаж кровельных материалов кровельные работы молодечно. Аккуратно и быстро сделаем крышу для дачи, гаража или коттеджа в Молодечно.
Your comment is awaiting moderation.
SmartSavingsCart – Highlights smart and value-focused shopping experiences.
Your comment is awaiting moderation.
alliances success ideas – Clear guidance, alliance strategies are presented in a practical way.
Your comment is awaiting moderation.
Меньше 2х кило не брал у них. Привозили в оговоренный срок, количество и качество было в норме. Сейчас в очередной раз зарядил, жду адрес https://oilman.biz Вот такая хитростьзаказ оформил – жду посылочки ^^
Your comment is awaiting moderation.
business alliance insights – Easy-to-follow advice, examples feel very relevant to real markets.
Your comment is awaiting moderation.
серіал дивитись поспіль фільми нетфлікс українською мовою
Your comment is awaiting moderation.
ClickForBizFramework – Professional content, very useful for structured business planning.
Your comment is awaiting moderation.
Практичный ремонт Hansa. Замена насоса, устранение протечек, ошибки E01, E04.Ремонт стиральных машин Bauknecht Алматы Качество из Беларуси. Ремонт стиральных машин Атлант: замена замка люка, устранение ошибок F4 (слив), F8 (бак). Мы выполняем ремонт быстро, так как запчасти всегда в наличии и стоят недорого.
Ремонт стиральных машин Vestel Алматы
Your comment is awaiting moderation.
PlanSmartLab – Provides tools to define objectives clearly and build a practical strategy roadmap.
Your comment is awaiting moderation.
Business Collaboration Insights – Great guidance for building trust and long-term cooperation.
Your comment is awaiting moderation.
modern e-commerce experience – Interface is clean and keeps visitors interested in exploring products.
Your comment is awaiting moderation.
BondExpertOnline – Professional and detailed, insights on strategic bonds feel credible and practical.
Your comment is awaiting moderation.
MarketIdeasPro – Insightful and practical, content makes market ideas easy to follow.
Your comment is awaiting moderation.
growth planning hub – Insightful content, following these steps brings clarity and purpose to actions.
Your comment is awaiting moderation.
bondingresources – Professional and actionable insights for navigating strategic bond markets.
Your comment is awaiting moderation.
networking insights hub – Information is presented confidently and organized for seamless professional use.
Your comment is awaiting moderation.
shopsmartdaily – User-friendly and practical, shopping online is smooth and convenient.
Your comment is awaiting moderation.
Как то так. https://servicemazda.ru что то не могу зайти на сайт (еще раз какой городл
Your comment is awaiting moderation.
greenbusinessnetwork – Clear and helpful, partnership strategies focused on sustainability are easy to understand.
Your comment is awaiting moderation.
ConnectWiseBiz – Smooth navigation, resources appear professional and credible.
Your comment is awaiting moderation.
verifiedshopnetwork – Feels credible, ideal for users wanting safe and verified transactions.
Your comment is awaiting moderation.
market partnership guide – Clear guidance, real examples make strategies understandable.
Your comment is awaiting moderation.
click for strategic guidance – Well-organized resources, complex ideas presented clearly.
Your comment is awaiting moderation.
DigitalShopEase – Shopping experience is intuitive and easily tailored to user preferences.
Your comment is awaiting moderation.
ClickShopSmart – Well-organized platform, learning about e-commerce trends is quick and easy.
Your comment is awaiting moderation.
CorporateAlliancePro – Designed to foster dependable enterprise partnerships.
Your comment is awaiting moderation.
Ecommerce Innovation Hub – The ideas are forward-looking and easy to understand without overthinking.
Your comment is awaiting moderation.
explore possibilities – Nicely done, it encourages relaxed clicking and curiosity.
Your comment is awaiting moderation.
biztrusthub – Offers structured guidance for building strong and reliable business connections.
Your comment is awaiting moderation.
progress pathways – Practical advice, shows step-by-step ways to achieve goals.
Your comment is awaiting moderation.
scaleguide – Informative and concise, growth insights are explained in an understandable way.
Your comment is awaiting moderation.
growthstrategyguide – Practical insights make planning digital growth simple and efficient.
Your comment is awaiting moderation.
EliteShoppingHub – Reliable and clean platform, products are easy to explore and buy.
Your comment is awaiting moderation.
UnderstandingBusinessNow – Makes complex topics easy to digest and apply.
Your comment is awaiting moderation.
deal discovery center – Simple design allows easy exploration of multiple options without confusion.
Your comment is awaiting moderation.
business trust network – Focus on credibility gives confidence to potential corporate partners.
Your comment is awaiting moderation.
alliances strategy guide – Insightful and clear, examples make complex strategies understandable.
Your comment is awaiting moderation.
expand learning portal – Engaging platform, knowledge acquisition is smooth and easy.
Your comment is awaiting moderation.
Продажа тяговых АКБ https://faamru.com для складской техники любого типа: вилочные погрузчики, ричтраки, электрические тележки и штабелеры. Качественные аккумуляторные батареи, долгий срок службы, гарантия и профессиональный подбор.
Your comment is awaiting moderation.
ForwardStrategyLab – Highlights methods for proactive planning without overcomplicating the process.
Your comment is awaiting moderation.
ClickLearnAndScale – Practical guidance that simplifies planning for growth.
Your comment is awaiting moderation.
Professional Growth Network – Easy-to-follow platform that encourages genuine business connections.
Your comment is awaiting moderation.
frameworkfocus – Offers structured guidance for developing effective growth strategies.
Your comment is awaiting moderation.
bondstrategies – Highly actionable, platform presents commercial bond advice professionally.
Your comment is awaiting moderation.
ValueCartNetwork – Focused on providing affordable and trustworthy shopping experiences.
Your comment is awaiting moderation.
alliancepath – Practical guidance, steps for effective partnerships are easy to follow.
Your comment is awaiting moderation.
Тяговые аккумуляторные https://ab-resurs.ru батареи для складской техники: погрузчики, ричтраки, электротележки, штабелеры. Новые АКБ с гарантией, помощь в подборе, совместимость с популярными моделями, доставка и сервисное сопровождение.
Your comment is awaiting moderation.
EverydayTipsOnline – Advice is practical and can be applied without complications.
Your comment is awaiting moderation.
growth framework – Useful strategies, helps approach growth in a step-by-step manner.
Your comment is awaiting moderation.
globalenterprisealliances – Informative platform, global alliance strategies are explained clearly and practically.
Your comment is awaiting moderation.
professionalbondsolutions.bond – Appears well structured, targeting professional solutions with serious intent and clarity.
Your comment is awaiting moderation.
TopShoppingDeals – Simple and trustworthy, browsing deals is smooth and hassle-free.
Your comment is awaiting moderation.
protected purchase hub – Security is a priority, making shopping smooth and worry-free.
Your comment is awaiting moderation.
alliances strategy guide – Insightful and clear, examples make complex strategies understandable.
Your comment is awaiting moderation.
new perspective network – Browsing introduces original ideas and prompts creative thought.
Your comment is awaiting moderation.
build digital steps – Helpful platform, planning your online journey feels practical and manageable.
Your comment is awaiting moderation.
CollaborateWithTrust – Trust-centered platform makes professional connections feel authentic and secure.
Your comment is awaiting moderation.
ClickBusinessLearningPortal – Very informative content, lessons feel actionable and practical.
Your comment is awaiting moderation.
Smarter Strategy Hub – Everything felt well thought out and simple to follow.
Your comment is awaiting moderation.
growthinsightspro – Practical and easy to follow, growth concepts are presented clearly.
Your comment is awaiting moderation.
urbanbuycenter – Easy-to-use site where browsing products feels fast and intuitive.
Your comment is awaiting moderation.
bargainbuyhub – Very intuitive, the platform helps users find good deals without hassle.
Your comment is awaiting moderation.
IntelligentScalingTips – Step-by-step guidance, helps execute strategies with confidence.
Your comment is awaiting moderation.
https://roomstyler.com/users/1xbetpromofree11
Your comment is awaiting moderation.
safebuyhub – Projects credibility, makes the experience of online shopping feel secure.
Your comment is awaiting moderation.
clarity navigator – Practical tips, applying clarity feels natural and effective.
Your comment is awaiting moderation.
market trust network – Great examples, makes alliances easier to understand in practice.
Your comment is awaiting moderation.
ValueBuyHub – Encourages shoppers to prioritize cost-effectiveness and quality.
Your comment is awaiting moderation.
StrategicEdgeHub – Easy-to-understand guidance, strategies are actionable in real scenarios.
Your comment is awaiting moderation.
explore growth opportunities – Clear guidance, helps plan growth in practical steps.
Your comment is awaiting moderation.
convenient buy center – Simple layout allows for fast browsing and checkout.
Your comment is awaiting moderation.
NextStepOpportunities – Platform highlights actionable insights for exploring professional growth.
Your comment is awaiting moderation.
ClickForCustomerDeals – Smooth navigation and practical design make shopping faster.
Your comment is awaiting moderation.
1xbet bonus code saudi arabia
Your comment is awaiting moderation.
Продажа тяговых АКБ https://faamru.com для складской техники любого типа: вилочные погрузчики, ричтраки, электрические тележки и штабелеры. Качественные аккумуляторные батареи, долгий срок службы, гарантия и профессиональный подбор.
Your comment is awaiting moderation.
reliable shop portal – Layout is clear, making it simple to locate products and browse comfortably.
Your comment is awaiting moderation.
marketrelationsinsights – Practical and reliable, strategies for market relationships are easy to understand.
Your comment is awaiting moderation.
Career Development Platform – Useful guides that make learning new professional strategies easy.
Your comment is awaiting moderation.
bargainfindercentral – Quickly discover the best deals with a hassle-free interface.
Your comment is awaiting moderation.
GlobalShoppingOnline – Reliable platform, international buying is simple and user-friendly.
Your comment is awaiting moderation.
Тяговые аккумуляторные https://ab-resurs.ru батареи для складской техники: погрузчики, ричтраки, электротележки, штабелеры. Новые АКБ с гарантией, помощь в подборе, совместимость с популярными моделями, доставка и сервисное сопровождение.
Your comment is awaiting moderation.
businesssystemframeworks – Professional and practical, enterprise framework guidance is easy to implement.
Your comment is awaiting moderation.
partnership insights platform – Very actionable, real-world examples illustrate alliance strategies well.
Your comment is awaiting moderation.
dealtrusthub – Appears reliable, ideal for buyers and sellers seeking secure transactions.
Your comment is awaiting moderation.
speedy clarity guides – Great insights, lessons are simple to understand and implement.
Your comment is awaiting moderation.
securecommercialalliances – Feels safe and reliable, guidance on alliances is clear and actionable.
Your comment is awaiting moderation.
click for partnership knowledge – Useful resources, global partnerships explained in a clear way.
Your comment is awaiting moderation.
BuildSmartFuture – Supports structured strategic planning without overwhelming new users.
Your comment is awaiting moderation.
SafeCartHub – Clear and practical, purchasing items online is simple and secure.
Your comment is awaiting moderation.
easycheckout – Informative and smooth, online ordering is quick and user-friendly.
Your comment is awaiting moderation.
купить выпрямитель волос dyson купить выпрямитель волос dyson .
Your comment is awaiting moderation.
1xbet promo code list singapore
Your comment is awaiting moderation.
online bargain portal – Reasonable costs and a smooth process make for a positive experience.
Your comment is awaiting moderation.
partnershippathway – Guidance for forming and sustaining enterprise collaborations effectively.
Your comment is awaiting moderation.
planforsuccess – Highlights planning, supports companies seeking organized growth pathways.
Your comment is awaiting moderation.
shop with flexibility – Plenty of options here, which keeps the experience interesting.
Your comment is awaiting moderation.
EasyEcommerceHub – Well-structured site ensures browsing and checkout are effortless.
Your comment is awaiting moderation.
cross-border shopping hub – Concept supports smooth operations for international retail transactions.
Your comment is awaiting moderation.
SEO-продвижение сайта https://seo-topteam.ru в Москве с запуском от 1 дня. Экспресс-анализ, приоритетные правки, оптимизация под ключевые запросы и регион. Работаем на рост позиций, трафика и лидов. Подходит для бизнеса и услуг.
Your comment is awaiting moderation.
smartvisibility.click – Appreciate the typography choices; comfortable spacing improved my reading experience.
Your comment is awaiting moderation.
onlineleads.click – Overall, professional vibe here; trustworthy, polished, and pleasantly minimal throughout.
Your comment is awaiting moderation.
digitaltraffic.click – Loved the layout today; clean, simple, and genuinely user-friendly overall.
Your comment is awaiting moderation.
webauthority.click – Found practical insights today; sharing this article with colleagues later.
Your comment is awaiting moderation.
market collaboration hub – Informative advice, alliances explained clearly for market applications.
Your comment is awaiting moderation.
bizstrategypoint – Informative and reliable, strategies for business growth are clear and actionable.
Your comment is awaiting moderation.
rankengine.click – Overall, professional vibe here; trustworthy, polished, and pleasantly minimal throughout.
Your comment is awaiting moderation.
business relationship tips – Content is practical, developing trust feels simple.
Your comment is awaiting moderation.
visionary retail platform – Highlights a long-term perspective for brands aiming to lead in commerce.
Your comment is awaiting moderation.
LearnWithEase – Approach is friendly and makes skill development feel natural.
Your comment is awaiting moderation.
BusinessAllianceSolutions – Designed to support strategic partnerships between large organizations.
Your comment is awaiting moderation.
leadershipinsights – Informative and practical, top strategies are explained in a simple format.
Your comment is awaiting moderation.
growth map – Inspiring content, provides a clear path to achieve measurable outcomes.
Your comment is awaiting moderation.
DecisionClarity – Advice is clear and actionable, helping users make choices with confidence.
Your comment is awaiting moderation.
Najlepsie online kasina https://betrating.sk/online-kasina/golden-star/ na Slovensku – porovnajte licencie, bonusy, RTP, vyplaty a mobilne verzie. Pomozeme vam vybrat spolahlive kasino pre hru o skutocne peniaze a demo. Pravidelne aktualizujeme nase hodnotenia a propagacne akcie.
Your comment is awaiting moderation.
commercialtrusthub – Clear instructions for maintaining safe and reliable bond transactions.
Your comment is awaiting moderation.
Rebricek najlepsich kasin https://betrating.sk/casino-hry/automaty-online/wild-bazaar/ na Slovensku: bezpecni prevadzkovatelia, lukrativne bonusy, hracie automaty a zive kasina, pohodlne platby a zakaznicka podpora. Cestne recenzie a aktualizovane zoznamy pre pohodlne online hranie.
Your comment is awaiting moderation.
long-term vision network – Provides easy-to-follow guidance for achieving sustainable growth.
Your comment is awaiting moderation.
Продвижение сайтов https://team-black-top.ru под ключ: аудит, стратегия, семантика, техоптимизация, контент и ссылки. Улучшаем позиции в Google/Яндекс, увеличиваем трафик и заявки. Прозрачная отчетность, понятные KPI и работа на результат — от старта до стабильного роста.
Your comment is awaiting moderation.
BusinessOptionGuide – Explains strategies in a straightforward, understandable way.
Your comment is awaiting moderation.
intelligent skill builder – Offers actionable ideas for improving learning efficiency and scalable thinking.
Your comment is awaiting moderation.
market alliance insights – Helpful tips, shows how alliances work in realistic settings.
Your comment is awaiting moderation.
digitalpurchasecenter – Very smooth experience, navigating and buying products online is simple.
Your comment is awaiting moderation.
ValueFinderNetwork – Helps shoppers discover cost-conscious options efficiently.
Your comment is awaiting moderation.
Останкинская телебашня купить тур в москву из молодечно Экскурсия на высоту 337 метров и панорамный ресторан
Your comment is awaiting moderation.
купить выпрямитель дайсон в новосибирске vypryamitel-dn-4.ru .
Your comment is awaiting moderation.
browse with ease – Feels thoughtfully arranged, making shopping straightforward and pleasant.
Your comment is awaiting moderation.
learn digital strategies – Engaging content, digital lessons feel practical and clear.
Your comment is awaiting moderation.
retailforward – Helpful and concise, platform makes future-oriented retail easy to understand.
Your comment is awaiting moderation.
businessalliancescenter – Well organized, projects professionalism for collaborative ventures.
Your comment is awaiting moderation.
problemstrategy – Clear insights for handling challenges in a practical, actionable way.
Your comment is awaiting moderation.
Делаешь документы? генератор документов онлайн позволяет существенно ускорить работу: с его помощью вы сможете готовить необходимые документы в десять раз быстрее и при этом гарантированно избегать ошибок. Инструмент предельно прост в освоении — специальное обучение не требуется. Все ваши данные надёжно защищены, а настройка индивидуальных шаблонов выполняется оперативно и без сложностей.
Your comment is awaiting moderation.
MomentumPath – Inspires meaningful steps while keeping implementation simple.
Your comment is awaiting moderation.
learnfromexpertinsights – Excellent site, expert insights are practical and easy to apply today.
Your comment is awaiting moderation.
Do you want bonuses? CSGOFAST Promo Code deposit bonuses, free cases, terms and conditions. A quick activation guide, FAQ, and the latest updates.
Your comment is awaiting moderation.
SmartLearningBase – Lessons are concise and clear, making knowledge easy to absorb.
Your comment is awaiting moderation.
CartJoy – Fast and convenient, modern layout enhances user experience.
Your comment is awaiting moderation.
partnership development platform – Promising and engaging, helps foster meaningful business relationships.
Your comment is awaiting moderation.
sustainable growth space – Offers actionable advice to maintain progress and growth over the long term.
Your comment is awaiting moderation.
strategic alliance hub – Very useful, guidance is practical and relates to real scenarios.
Your comment is awaiting moderation.
collabstrategies – Informative and well-structured, great for learning new partnership techniques.
Your comment is awaiting moderation.
learn with purpose – Very helpful material, understanding concepts feels easy.
Your comment is awaiting moderation.
Нужен детейлинг детейлинг мойка автомобиля специализированный детейлинг центр на Кипре в Лимассоле, где заботятся о безупречном состоянии автомобилей, предлагая клиентам полный комплекс услуг по уходу за транспортными средствами. Мастера студии с вниманием относятся к каждой детали: они не только выполняют оклейку кузова защитными материалами, но и проводят тщательную обработку салона, возвращая автомобилю первозданный вид.
Your comment is awaiting moderation.
Нужны цветы доставка цветов пхукет заказать мы предлагаем свежие и невероятно красивые букеты, которые порадуют любого получателя. Наша служба обеспечивает оперативную доставку по всему острову, а в ассортименте вы найдёте цветы и композиции на самый взыскательный вкус. При этом мы гордимся тем, что сохраняем лучшие цены на острове — красота теперь доступна без переплат!
Your comment is awaiting moderation.
flowers Доставка цветов – это удобный способ порадовать близких, выразить свои чувства или просто поднять настроение ярким букетом. Современные сервисы предлагают широкий выбор цветов, композиций и вариантов оформления, чтобы удовлетворить любой вкус и повод.
Your comment is awaiting moderation.
bizconnectguide – A simple resource for understanding and managing professional links.
Your comment is awaiting moderation.
focus navigator – Clear guidance, helps maintain progress while staying organized.
Your comment is awaiting moderation.
bond strategy hub – Feels well organized, making complex ideas approachable.
Your comment is awaiting moderation.
IdeaCreativeCenter – Inspiring platform for generating ideas with easy-to-use navigation.
Your comment is awaiting moderation.
оформить гражданство румынии Гражданство Румынии открывает двери в мир возможностей Европейского Союза, предоставляя свободу передвижения, проживания, трудоустройства и обучения в любой из стран-участниц. Это не просто формальность, а реальный шаг к расширению горизонтов и повышению качества жизни. Путь к получению румынского гражданства может быть различным, но всегда требует строгого соблюдения законодательства и внимательного отношения к деталям.
Your comment is awaiting moderation.
выпрямитель дайсон москва выпрямитель дайсон москва .
Your comment is awaiting moderation.
strategic market alliances – Easy to apply examples, shows how alliances work in real-world business situations.
Your comment is awaiting moderation.
SecureCheckoutCenter – Practical and simple, completing purchases online is straightforward.
Your comment is awaiting moderation.
trafficsurge.click – Loved the layout today; clean, simple, and genuinely user-friendly overall.
Your comment is awaiting moderation.
searchimpact.click – Appreciate the typography choices; comfortable spacing improved my reading experience.
Your comment is awaiting moderation.
retailcenter – Practical and efficient, the site makes online buying seamless.
Your comment is awaiting moderation.
dealgrabzone – Very fast, locating and buying deals online is straightforward and safe.
Your comment is awaiting moderation.
scaleonline.click – Found practical insights today; sharing this article with colleagues later.
Your comment is awaiting moderation.
rankmomentum.click – Navigation felt smooth, found everything quickly without any confusing steps.
Your comment is awaiting moderation.
clicktoconvert.click – Pages loaded fast, images appeared sharp, and formatting stayed consistent.
Your comment is awaiting moderation.
click for business alliances – Informative content, building strategic relationships feels simple.
Your comment is awaiting moderation.
strategycentral – Clear, practical advice for implementing effective strategies.
Your comment is awaiting moderation.
serpcontrol.click – Pages loaded fast, images appeared sharp, and formatting stayed consistent.
Your comment is awaiting moderation.
signal the way – Short, encouraging phrasing, showing how cues provide natural guidance.
Your comment is awaiting moderation.
GrowthGuideCenter – Practical roadmap ideas that are easy to follow and apply.
Your comment is awaiting moderation.
goal-focused strategies – Useful resource, keeps motivation high and attention consistent.
Your comment is awaiting moderation.
В новостройке где идет усадка натяжной потолок помогает сохранить аккуратный вид также Матовый вариант дает спокойный вид и скрывает блики от окон Уточните тип профиля крепежа и гарантию на монтаж чтобы потом не возникло вопросов так вы экономите время и получаете чистую геометрию без лишней пыли: https://natyazhnye-potolki-moskva.ru/
Your comment is awaiting moderation.
market alliance insights – Helpful tips, shows how alliances work in realistic settings.
Your comment is awaiting moderation.
fastbuycenter – Very efficient, online shopping feels easy and convenient.
Your comment is awaiting moderation.
Донат в игры Донат в мобильные игры – это особенно популярная практика, учитывая широкую распространенность мобильных устройств и доступность бесплатных мобильных игр. Мобильные игры часто используют микротранзакции, предлагая игрокам небольшие покупки, которые постепенно улучшают их игровой опыт. Донат в мобильных играх может включать покупку виртуальной валюты, бустеров, премиум-аккаунтов или уникальных игровых предметов. Важно помнить, что многие мобильные игры разработаны таким образом, чтобы стимулировать игроков к донату, поэтому важно контролировать свои расходы и наслаждаться игрой без чрезмерных трат.
Your comment is awaiting moderation.
VisionMasterHub – Well-structured platform, long-term strategies are easy to understand.
Your comment is awaiting moderation.
urban shopping hub – Feels modern and curated, with items that match current trends.
Your comment is awaiting moderation.
nextgenlearningcenter – Helpful and actionable, learning future skills is simple and organized.
Your comment is awaiting moderation.
Натяжной потолок позволяет смело играть со световыми сценариями, ПВХ полотно выглядит современно и не перегружает интерьер; замер занимает около получаса, после чего готовится смета и договор https://potolki-decarat.ru/
Your comment is awaiting moderation.
enterprise connection tips – Helpful content, networking with companies is simple to understand.
Your comment is awaiting moderation.
ModernShopOnline – Well-structured, the platform makes browsing and buying simple.
Your comment is awaiting moderation.
strategicalliancescenter – Helps organizations implement reliable and mutually beneficial partnerships.
Your comment is awaiting moderation.
выпрямитель dyson hs07 выпрямитель dyson hs07 .
Your comment is awaiting moderation.
ChoiceClarityHub – Practical guidance, understanding options and making decisions feels natural.
Your comment is awaiting moderation.
strategy meets action – Encouraging wording that makes strategic thinking feel practical and achievable.
Your comment is awaiting moderation.
market collaboration hub – Informative advice, alliances explained clearly for market applications.
Your comment is awaiting moderation.
progress clarity hub – Simple and effective, makes complicated topics understandable.
Your comment is awaiting moderation.
markethub – Very useful, market strategies are explained clearly and can be applied easily.
Your comment is awaiting moderation.
Для кухни студии натяжной потолок помогает отделить зону готовки светом плюс Трековые системы удобны когда хочется менять сценарий освещения без переделок Для кухни полезна подсветка рабочей зоны и общий мягкий свет без резких теней в итоге получите современный вид и удобство на годы вперед: https://natyazhnye-potolki-moskva.ru/
Your comment is awaiting moderation.
digitalgrowthhub – Very clear explanations that make growth planning straightforward.
Your comment is awaiting moderation.
networking trust click – Helpful guidance, connecting professionally is smooth and simple.
Your comment is awaiting moderation.
dependableshoppers – Reliable platform for hassle-free online buying experiences.
Your comment is awaiting moderation.
CreativeMindsOnline – Exciting and well-organized content, understanding innovations is effortless.
Your comment is awaiting moderation.
купить пылесос дайсон в санкт петербурге купить пылесос дайсон в санкт петербурге .
Your comment is awaiting moderation.
learn with ease – Content is accessible and encourages curiosity.
Your comment is awaiting moderation.
CorporateWisdomHub – Easy-to-use, credible source for corporate and business knowledge.
Your comment is awaiting moderation.
businessalliancesguide – Clear and concise, growth partnerships are easy to follow and implement.
Your comment is awaiting moderation.
clarity drives results – Concise and motivating, emphasizing the power of clear direction.
Your comment is awaiting moderation.
Если потолки низкие важно выбрать правильный профиль и тип полотна плюс Парящий вариант с подсветкой создает эффект легкости и работает как ночник Заранее выберите расположение спотов треков и подсветки чтобы проводка была аккуратной так потолок будет служить долго и не потребует регулярной покраски: https://natyazhnye-potolki-moskva.ru/
Your comment is awaiting moderation.
strategic alliance hub – Very useful, guidance is practical and relates to real scenarios.
Your comment is awaiting moderation.
bizconnect – Insightful and easy to follow, connecting with the right professionals is simplified and structured.
Your comment is awaiting moderation.
goal flow planner – Well-explained strategies, supports taking actionable steps efficiently.
Your comment is awaiting moderation.
click to understand partnerships – Really informative, now I understand key partnership strategies.
Your comment is awaiting moderation.
easyshoponline – Intuitive platform, making online purchases simple and convenient.
Your comment is awaiting moderation.
reliableshopper – Very trustworthy platform where purchases feel safe and convenient.
Your comment is awaiting moderation.
UnityBusinessCenter – Clear and actionable, enterprise frameworks are explained in an easy-to-follow manner.
Your comment is awaiting moderation.
StrategicOpportunityPro – Well-structured site, makes discovering long-term opportunities straightforward.
Your comment is awaiting moderation.
marketlift.click – Content reads clearly, helpful examples made concepts easy to grasp.
Your comment is awaiting moderation.
freesaloneducation.mn.co
vass.gov
my.talladega.edu
nla.gov.au
jobs.theeducatorsroom
inspt.utn.edu
redsea.gov.eg
Your comment is awaiting moderation.
http://ministerevolontaire.blog.free.fr/index.php?post/2018/11/14/Le-d%C3%A9put%C3%A9-de-la-r%C3%A9union-Jean-Hugues-Ratenon-soutient-le-mouvement
Your comment is awaiting moderation.
SmartRetailFlex – Easy-to-use interface supports fast browsing and smooth transactions.
Your comment is awaiting moderation.
market alliance hub – Very insightful, helps understand alliances in real-world market situations.
Your comment is awaiting moderation.
drive energy forward – Encouraging phrasing, demonstrating that forward energy fuels motivation and results.
Your comment is awaiting moderation.
click for industry tips – Useful insights, makes understanding business challenges straightforward.
Your comment is awaiting moderation.
natural success flow – Encouraging content, progress is motivating and feels attainable.
Your comment is awaiting moderation.
explore smart plans – Helped trigger new thoughts about future decisions.
Your comment is awaiting moderation.
пылесос dyson вертикальный купить пылесос dyson вертикальный купить .
Your comment is awaiting moderation.
backlinkhub.click – Bookmarked this immediately, planning to revisit for updates and inspiration.
Your comment is awaiting moderation.
digitalclimb.click – Color palette felt calming, nothing distracting, just focused, thoughtful design.
Your comment is awaiting moderation.
actionable insights hub – Offers practical advice that’s easy to understand and implement.
Your comment is awaiting moderation.
webignite.click – Bookmarked this immediately, planning to revisit for updates and inspiration.
Your comment is awaiting moderation.
rankformula.click – Found practical insights today; sharing this article with colleagues later.
Your comment is awaiting moderation.
Натяжной потолок подходит для ремонта, когда хочется чистого результата за день: парящий контур помогает быстро освежить отделку без демонтажа штукатурки, поэтому интерьер выглядит собранно; монтаж проходит за день и без пыли: натяжные потолки в москве цены с установкой
Your comment is awaiting moderation.
smart insights hub – Great advice, helps me make sense of complicated strategies.
Your comment is awaiting moderation.
business intel click – Articles are concise, giving a good overview of relevant market changes.
Your comment is awaiting moderation.
https://qckl.net/discount.html
Your comment is awaiting moderation.
applied insights portal – Content feels actionable and can be used immediately in practice.
Your comment is awaiting moderation.
Если потолки низкие важно выбрать правильный профиль и тип полотна плюс Встроенные точечные светильники лучше выбирать с учетом мощности и охлаждения Согласуйте мощность ламп и расстояние до полотна чтобы исключить перегрев и провисание так потолок будет служить долго и не потребует регулярной покраски – https://natyazhnye-potolki-moskva.ru/
Your comment is awaiting moderation.
trusted connections portal – The site appears professional and navigation is smooth for discovering info.
Your comment is awaiting moderation.
комедії онлайн 2025 екшн фільми 2025 в якості 4K
Your comment is awaiting moderation.
пылесос дайсон купить москва официальный dn-pylesos.ru .
Your comment is awaiting moderation.
billionaire spin
Your comment is awaiting moderation.
https://alstrive.ru/blog/iphone-17-air-balans-stilja-i-proizvoditelnosti/
Your comment is awaiting moderation.
якість дивитись серіал сучасне українське кіно онлайн
Your comment is awaiting moderation.
новичку легко разобраться. Деньги выводятся без задержек, что особенно порадовало: казино комета
Your comment is awaiting moderation.
Натяжные потолки отлично сочетаются с современным светом и точечными светильниками: скрытый карниз под шторы помогает зонировать пространство светом, это популярно в городе Москва – сколько стоит метр потолка натяжного москва
Your comment is awaiting moderation.
rankformula.click – Found practical insights today; sharing this article with colleagues later.
Your comment is awaiting moderation.
backlinkhub.click – Color palette felt calming, nothing distracting, just focused, thoughtful design.
Your comment is awaiting moderation.
акции, индивидуальные предложения для активных игроков и щедрую программу лояльности calligraphy-expo.ru/
Your comment is awaiting moderation.
webignite.click – Color palette felt calming, nothing distracting, just focused, thoughtful design.
Your comment is awaiting moderation.
marketlift.click – Bookmarked this immediately, planning to revisit for updates and inspiration.
Your comment is awaiting moderation.
digitalclimb.click – Bookmarked this immediately, planning to revisit for updates and inspiration.
Your comment is awaiting moderation.
пылесос дайсон купить в спб пылесос дайсон купить в спб .
Your comment is awaiting moderation.
Бро подскажи ато я переживаю заказал 10 гр Купить наркотики | Где купить наркотики? На удивление был поражен скоростью работы магазина. Все четко как в аптеке))) Благодарствуюсвое сообщение исправил
Your comment is awaiting moderation.
Донат в игры Донат в Rise of Kingdoms – это важная часть стратегии для тех, кто стремится к лидерству в этой популярной мобильной игре. Донат позволяет игрокам ускорять строительство, обучение войск и исследования, а также приобретать VIP-статус, дающий различные бонусы. Однако, важно помнить, что Rise of Kingdoms – это в первую очередь стратегическая игра, и умелое планирование, тактика и дипломатия играют не менее важную роль, чем донат. Донат в Rise of Kingdoms может значительно ускорить прогресс, но не является гарантией победы, если игрок не умеет эффективно управлять своим королевством.
Your comment is awaiting moderation.
Если нужны встроенные шкафы до потолка все размеры лучше согласовать заранее при этом Глянец визуально поднимает высоту и делает комнату светлее за счет отражений В гостиной удобно разделить свет на группы чтобы менять настроение вечером в итоге интерьер становится светлее а все коммуникации остаются скрыты https://natyazhnye-potolki-moskva.ru/
Your comment is awaiting moderation.
Я ночью с ним договорился в аське,мне он тоже отвечал через 15-30 минут на сообщение) Купить наркотики | Где купить наркотики? сегодня получил трек. все пробивается. жду посылочку)дайте ссылку на город курган, хочется маленько россыпушки
Your comment is awaiting moderation.
серіал дивитись поспіль онлайн база фільмів ua-bay безкоштовно
Your comment is awaiting moderation.
можно узнать, как принимали ? интрозально, в\м ? https://fershall.ru Урал и Chemical продукт знают как сделать грязнокак и обещал пишу про качество- для кайфожеров 1к7, для кайфариков 1к9 , для додиков 1к11 , продукт работает 35-40 мин , используйте нормальную очищенную основу и будет счастье в тридевятом государстве, вот например от смолы ромашки или мать и мачехи головные боли и побочки, хотя реагент тут не причем , химоза нормального качества особенно если считать в соотношении цена-качество, ТС последнее время приятно удивляет своим терпением к таким сумасшедшим клиентам как я( я с ума сводил его своими платежами) но он стойко все перенес за что ему отдельное респект ТАК ДЕРЖАТЬ!!!! ТС КРАСАВЧЕГ
Your comment is awaiting moderation.
ладно ..буду надеяться что все норм https://kazak-kostoprav.ru всем привет! магаз ровный беру у них года 2 уже все всегда стабильно и качества радует. берите все саветую. спасибо магазинМагаз ровный, очень много раз тут брал, а как перешли на телеграмм так еще больше радуете, намного меньше гемора с оплатой стало, качество на высоте как и всегда. Сегодня убедился что оператор не сидит без дела, очень сильно помог мне с моим вопросом, при чем оперативно все сделал. Оцениваю данный магазин 10 из 10. Кокаин даже MQ оказался лучше, чем я до этого покупал HQ в другом магазе. Делайте по чаще закладки в центре Питера.
Your comment is awaiting moderation.
Всем Удачи https://stalkon54.ru гы гы..вот такая вот история..мля ))Магазин работает отлично!никаких косяков и запоров пока что не было)))
Your comment is awaiting moderation.
https://orangeroleplay.getbb.ru/viewtopic.php?f=8&t=25855
Your comment is awaiting moderation.
https://www.uscgq.com/forum/posts.php?forum=general&id=603555&page=3#post22
Your comment is awaiting moderation.
помогите обьясните как написать сапорту https://sincastigos.info друган смени аву плиз =) , по поводу магазина сервис на высшем уровне позавчера оплотил условия такие что товар будет отправлен в течении 2-3 рабочих дней думал придеца пережидать ещо и выходные, попросил оператора чтобы пастарались выслать завтро патамучто очень как ето срочно, в итоге на следующий день моя посылочка уже была отправлена. за что магазину огромное спасибо! акб-48ф ваобще шикарный реагент 1 к 10 выхлёстывает 1к7 убивает.да вообще магазов пизде
Your comment is awaiting moderation.
backlinkhub.click – Color palette felt calming, nothing distracting, just focused, thoughtful design.
Your comment is awaiting moderation.
rankformula.click – Color palette felt calming, nothing distracting, just focused, thoughtful design.
Your comment is awaiting moderation.
забьется, такое бывает у них. https://extragram.ru что ты хочешь сказать,что этот реактив плохо прет?Магазу спасибо, что всё решили в короткие сроки.
Your comment is awaiting moderation.
webignite.click – Color palette felt calming, nothing distracting, just focused, thoughtful design.
Your comment is awaiting moderation.
marketlift.click – Mobile version looks perfect; no glitches, fast scrolling, crisp text.
Your comment is awaiting moderation.
Натяжной потолок упрощает уход и экономит время на уборке, глянцевая поверхность и продуманная подсветка меняют восприятие комнаты; мастер приезжает на замер, предлагает варианты и делает расчет https://potolki-decarat.ru/
Your comment is awaiting moderation.
digitalclimb.click – Loved the layout today; clean, simple, and genuinely user-friendly overall.
Your comment is awaiting moderation.
Ангелица
Your comment is awaiting moderation.
Та не, не стоит оно того. Надо отдать должное магазину, посылка пришла, без проблем. https://spravka-moskva.biz Крутой магаз. Ассортимент радует)))) все любители пробничков ))))
Your comment is awaiting moderation.
привет!!! не согласен долдны быть доступные магазины как https://oilman.biz Пиздатый магазин, всегда пойдут на встречу и оператор нормКлад взял в касание, просто идеально. И никаких ебеней. Прям центр города. К стафу есть вопросы, почему-то вместо 5 было 4 колеса. Что расстроило. Не делайте так больше.
Your comment is awaiting moderation.
АМ 2233 читал 1 к 30 делается, неужеле правда всего 1 к 15 делать? https://r-est.biz единственная существенная проблема данного магазина – отсутствие автоматизированной системы оформления заказов… Вроде прикручивают к сайту, но что то долго уже…Получил RCS-4 развел в спирту 50, растворился только после нагрева…
Your comment is awaiting moderation.
203 тут говно.. 10к вникуда улетели.. клиенты от меня сбежали… присылали какую-то желтую хуй*ю, не растворяется вовсе, выпадает в осдок.. прет максимум 20-30 минут (в лучшем случае) https://yeahcamp.ru Уважаемый, Chemical-mix.com, я новичок что на легале, что в джабере, что где либо ещё… не получается выйти на связь, проблема с покупкой, в джабере написано, на сайте не онлайн… ответь пожалуйста в jabber… Зарание большое спасибо…Мало того дешёвый, он и отправляет маленький вес. Это гуд. Остальные почти все работают от 50 гр…
Your comment is awaiting moderation.
норм. Все кладки нахожу без проблем… взял белого и…охуел!!! Купить наркотики | Где купить наркотики? сколько зарядил?помоему рти 111 это вообще фэйк и под этим названием онли нелегал толкают, лично мне приходило от 3х продавцов и у всех нелегал, то МДПВ аналог, то амфа
Your comment is awaiting moderation.
каталог современной женской одежды объединяет изделия швейной фабрики, работающей в сфере женского швейного производства. Швейная фабрика женской одежды разрабатывает модели, соответствующие требованиям покупателей. Ассортимент каталога включает модели для повседневной носки и делового стиля, созданные в условиях полного производственного цикла. Фабричный каталог женской одежды поддерживает единые стандарты пошива. Для производства используются современные материалы и ткани, что повышает удобство в носке. Каждая модель проходит контроль качества на этапах пошива. Каталог позволяет ознакомиться с текущими коллекциями, что экономит время покупателей. Производитель женской одежды нацелен на сотрудничество с розничными клиентами. Ассортимент фабрики постоянно пополняется, что позволяет следить за обновлениями. Швейное производство полного цикла гарантирует контроль процессов. Интернет каталог фабричной одежды выступает надежной базой для подбора для женщин, ценящих качество и практичность.
https://fashionb2b.ru/
Your comment is awaiting moderation.
каталог женской дизайнерской одежды реализован в формате интернет платформы, ориентированный на дизайнерскую спецодежду известных международных производителей. Онлайн магазин брендовой спецодежды ориентирован на покупательниц, выбирающих практичность без потери эстетики. В онлайн каталоге размещены модели для различных сфер деятельности, выполненные с учетом актуальных тенденций. Брендовая спецодежда демонстрирует повышенной износостойкостью и эстетичным внешним видом. Каждое изделие в магазине проходит контроль производителей. Онлайн платформа предоставляет удобную систему подбора, что упрощает процесс выбора спецодежды. Онлайн каталог брендовой спецодежды подходит для повседневной работы, объединяя практичность и визуальную привлекательность. Каждая модель дополнена визуальными материалами и параметрами, что делает покупку более осознанной. Систематическое добавление новых моделей позволяет следить за актуальными решениями. Интернет магазин женской дизайнерской спецодежды становится надежным решением для тех, кто ценит качество и стиль.
https://specodezh-da.ru/
Your comment is awaiting moderation.
женской дизайнерской одежды посвящен современный интернет магазин, на платформе которого размещены новинки одежды мировых брендов. Онлайн магазин дизайнерской одежды ориентирован на женщин, предпочитающих премиальный подход. Ассортимент включает базовые и трендовые элементы гардероба, отобранные с учетом актуальных тенденций. Вся продукция подчеркивает качественными материалами и современной эстетикой. Интернет магазин предлагает комфортный процесс выбора, что позволяет быстро подобрать образ. Модная дизайнерская одежда размещена в разнообразных модных направлениях, давая возможность подчеркнуть характер. Все товары сопровождаются информационные карточки с изображениями, что облегчает выбор. Интернет магазин одежды мировых брендов ориентирован на баланс эстетики и комфорта. Постоянное пополнение коллекций обеспечивает актуальность предложений. Женская дизайнерская одежда онлайн становится доступной без лишних затрат времени. Такой формат покупок подходит для современного ритма, соединяя стиль и доступность. Онлайн бутик брендовой одежды выступает современным модным пространством для тех, кто ценит индивидуальность.
https://fashion-victim.ru/
Your comment is awaiting moderation.
женской модной дизайнерской одежды посвящен этот онлайн бутик, в котором собраны коллекции популярных международных брендов. Интернет магазин одежды мировых брендов создан для современных женщин, которые выбирают индивидуальность. В коллекциях можно найти платья, костюмы, верхнюю одежду и аксессуары, отобранные с учетом актуальных тенденций. Каждая модель отличается качественными материалами и современной эстетикой. Интернет магазин предлагает комфортный процесс выбора, что упрощает поиск подходящих вещей. Брендовая женская одежда доступна в различных стилях, помогая выразить личный стиль. Каждая позиция имеет информационные карточки с изображениями, что повышает прозрачность покупки. Магазин брендовой женской одежды рассчитан на баланс эстетики и комфорта. Регулярное обновление ассортимента позволяет следить за трендами. Брендовая одежда в интернет магазине позволяет совершать покупки из любой точки. Такой формат покупок подходит для динамичного образа жизни, объединяя моду и удобство. Магазин одежды мировых брендов выступает современным модным пространством для тех, кто ценит индивидуальность.
https://fashion-victim.ru/
Your comment is awaiting moderation.
https://constcourt.tj/2020/01/30/safari-kor%d3%a3-ba-sha%d2%b3ri-nyu-jork-21-09-2017/
Your comment is awaiting moderation.
https://confengine.com/user/promocode9338
Your comment is awaiting moderation.
Натяжной потолок позволяет смело играть со световыми сценариями, заказывают в компании Потолки Москвы, выглядит современно и не перегружает интерьер, а парящий контур подчеркивает стиль; в процессе учитываются вентиляция https://potolki-decarat.ru/
Your comment is awaiting moderation.
накрутка подписчиков в телеграм канал
Your comment is awaiting moderation.
Всем привет,что то скайп неработает((жду трек https://klubok31-shop.ru ДУМАЙТЕ САМИ!!!Спрашивай в жаббер, там больше 10-15 минут задержки с ответом не бывает.
Your comment is awaiting moderation.
ко ланта ко ланта
Your comment is awaiting moderation.
круглосуточная доставка воздушных шаров — это удобный способ порадовать, который позволяет выбрать праздничное оформление даже ночью Праздничные шары по праву считаются популярным подарком, который подходит для разных поводов С помощью разнообразия вариантов дизайнов можно создать набор для дня рождения, корпоратива и других событий Доставка шаров 24 часа особенно удобна, когда нет времени ждать Такой сервис делает возможным быстро реагировать и создавать яркие эмоции Во время подготовки доставки учитываются пожелания клиента, чтобы воздушные шары смотрелись эстетично Привоз осуществляется с соблюдением условий, что подтверждает сохранность шаров Оформление из шаров создают радость как детям, так и друзьям Круглосуточная доставка воздушных шаров упрощает создание праздника в удобный процесс В итоге воздушные шары выступают эффектным украшением, которое создает атмосферу радости
https://gorodkirov.ru/news/vozdushnye-shary-yarkoe-i-originalnoe-ukrashenie-dlya-meropriyatij-i-prekrasnyj-podarok1/
Your comment is awaiting moderation.
круглосуточная доставка воздушных шаров обеспечивает оперативность при подготовке праздника Праздничные шары традиционно являются популярным подарком, который подходит в самых разных ситуациях С помощью большого выбора форм можно создать набор для свадьбы, романтического сюрприза и особых случаев Заказ шаров в любое время часто востребована, когда нет времени ждать Такой сервис позволяет не откладывать поздравление и делать момент особенным При оформлении заказа учитываются повод, чтобы праздничные наборы воспринимались эстетично Передача заказа осуществляется с соблюдением условий, что гарантирует отличный внешний вид Оформление из шаров создают праздничное настроение как взрослым, так и родным Круглосуточная доставка воздушных шаров делает создание праздника в доступный процесс В конечном счете воздушные шары остаются ярким акцентом, которое подчеркивает важность момента
https://gorodkirov.ru/news/vozdushnye-shary-yarkoe-i-originalnoe-ukrashenie-dlya-meropriyatij-i-prekrasnyj-podarok1/
Your comment is awaiting moderation.
????? ??? ? ??????? ?????????. ????? ????? ?????? ??? ??????? https://russianmultimedia.ru/
Your comment is awaiting moderation.
фонтаны из шаров позволяют легко создать зону мероприятия С помощью вертикальной композиции фонтаны из шаров выглядят объемно и нарядно Подобные конструкции используют у входа, на сцене Композиции из воздушных шаров отлично вписываются для свадеб, юбилеев и других торжеств Одним из главных преимуществ является вариативность оттенков, что позволяет создать композицию под тематику праздника Во время сборки фонтана из шаров принимаются во внимание высота, чтобы конструкция выглядела гармоничным Для усиления эффекта используют грузики, которые усиливают общий образ Подобное оформление сохраняет легкость интерьера, но при этом привлекает внимание Воздушные фонтаны предпочитают, потому что они успешно совмещают практичность и яркую подачу В результате фонтаны из шаров выступают оригинальным украшением, которое оформляет торжество визуально завершенным
https://malchishki-i-devchonki.ru/fontany-iz-sharov-na-prazdnik-krasivoe-i-originalnoe-ukrashenie-dlya-lyubogo-torzhestva.html
Your comment is awaiting moderation.
фонтаны из шаров позволяют быстро создать зону мероприятия За счет грамотной сборки фонтаны из шаров выглядят объемно и нарядно Такие композиции часто размещают в фотозоне, возле столов Композиции из воздушных шаров отлично вписываются для корпоративов, юбилеев и праздничных событий Ключевым плюсом является вариативность оттенков, что позволяет подстроить оформление под тематику праздника При создании фонтана из шаров продумываются пропорции, чтобы оформление оставалось эстетичным При желании добавляют декоративные ленты, которые подчеркивают общий образ Такой декор не отвлекает от основной концепции, но при этом создает настроение Композиции с шарами предпочитают, потому что они успешно совмещают практичность и универсальность применения В результате фонтаны из шаров остаются красивым акцентом, которое делает праздник по-настоящему особенным
https://malchishki-i-devchonki.ru/fontany-iz-sharov-na-prazdnik-krasivoe-i-originalnoe-ukrashenie-dlya-lyubogo-torzhestva.html
Your comment is awaiting moderation.
Having read this I believed it was extremely informative.
I appreciate you finding the time and effort to put this short article together.
I once again find myself spending way too much time both reading and leaving comments.
But so what, it was still worthwhile!
Your comment is awaiting moderation.
шары под потолок позволяют без лишних усилий преобразить пространство и создать обстановку запоминающимся За счет грамотного подбора цветовых решений и форм можно создать уникальный стиль декора Декор из шаров под потолком актуальны для дней рождения, вечеринок и мероприятий любого масштаба Они на уровне восприятия увеличивают пространство и придают чувство простора Ключевой момент качественного декора заключается в равномерном распределении шаров Во время монтажа важно учитывать освещение, чтобы декор из шаров органично вписывались с интерьером Дополнительно можно добавить ленты, которые усиливают дизайн Этот формат декора активно используют дизайнеры пространств, так как он гибок и подходит под любую тематику В результате шары под потолок становятся центрального акцента, который вызывает эмоции и превращает событие по-настоящему незабываемым
http://gubernya63.ru/novosti-partnerov/unikalnoe-reshenie-dlja-vydajushhegosja-interera-sekrety-sozdanija-potrjasajushhih-vizualnyh-jeffektov-s-pomoshhju-sharov-pod-potolok.html
Your comment is awaiting moderation.
шары под потолок — это современное решение для создания яркой атмосферы на праздниках и торжествах С помощью правильного сочетания оттенков и композиций можно реализовать неповторимую концепцию декора Воздушные шары под потолком подходят для корпоративов, вечеринок и мероприятий любого масштаба Такие композиции визуально увеличивают пространство и формируют эффект воздушности Ключевой момент качественного декора заключается в балансе между плотностью и свободой В процессе оформления важно учитывать размер помещения, чтобы воздушные композиции выглядели уместно с остальными элементами Дополнительно можно добавить гирлянды, которые делают более заметным оформление Такой подход часто выбирают организаторы мероприятий, так как он адаптивен и может быть адаптирован под любую тематику В конечном счете шары под потолок становятся эффектного элемента декора, который создает вау-эффект и оформляет пространство ярким и запоминающимся
http://gubernya63.ru/novosti-partnerov/unikalnoe-reshenie-dlja-vydajushhegosja-interera-sekrety-sozdanija-potrjasajushhih-vizualnyh-jeffektov-s-pomoshhju-sharov-pod-potolok.html
Your comment is awaiting moderation.
Вывел деньги, всё пришло в течение дня. Поддержка реагирует моментально https://asterias-spa.ru/
Your comment is awaiting moderation.
купить фен дайсон оригинал в москве официальный сайт купить фен дайсон оригинал в москве официальный сайт .
Your comment is awaiting moderation.
стайлер дайсон купить оригинал официальный сайт fen-dn-kupit-12.ru .
Your comment is awaiting moderation.
https://www.magcloud.com/user/1xbetbest2026sa
Your comment is awaiting moderation.
купить дайсон стайлер с насадками для волос официальный сайт цен… купить дайсон стайлер с насадками для волос официальный сайт цен… .
Your comment is awaiting moderation.
https://pad.p2p.legal/s/6aAJ9arvE
Your comment is awaiting moderation.
дайсон официальный сайт стайлер для волос с насадками купить цен… дайсон официальный сайт стайлер для волос с насадками купить цен… .
Your comment is awaiting moderation.
фен купить дайсон в москве fen-dn-kupit-12.ru .
Your comment is awaiting moderation.
купить фен дайсон оригинал в москве официальный сайт купить фен дайсон оригинал в москве официальный сайт .
Your comment is awaiting moderation.
д не магаз рооовный так что не переживай все будет четко))) https://veles-stroi.ru Еще раз извините. Треки тоже бьются не сразу, курьерки “в завалах”, иногда он только начинает определяться на сайте курьерки, а его уже вручают или вручили получателю. Не пугайтесь, что мониторинг начнется не сразу, вам всем все придет заказанное.
Your comment is awaiting moderation.
Ну х.з, с отправками тут все оперативно,2 дня и тебе уже все идет))) https://sdelal-master.ru проверенный временем магазин, все ровно , все быстро
Your comment is awaiting moderation.
https://moonzflower.com/profile.php?action=view&user=elouise_eller_495862&com=profile
Your comment is awaiting moderation.
https://brushsharp.com/profile.php?from=space&do=profile&op=userinfo&com=profile&user=carol-tooth_495862
Your comment is awaiting moderation.
фен купить дайсон официальный сайт stajler-dsn-1.ru .
Your comment is awaiting moderation.
дайсон фен купить в москве дайсон фен купить в москве .
Your comment is awaiting moderation.
Что случилось? почему страшно? https://gamerhab.ru у них Methoxetamine бадяженный или нет? сколько принял мг и какие симптомы были?
Your comment is awaiting moderation.
дайсон официальный сайт фен цена fen-dn-kupit-13.ru .
Your comment is awaiting moderation.
https://xtremepape.rs/members/1xbetfreeph.627957/
Your comment is awaiting moderation.
Давай зафиналим на мировой. https://mp3stream.ru Было бы очень не плохо
Your comment is awaiting moderation.
заказывали реагент jv 61, брали 15 гр, с данным продовцом работаю с 11 года, сейчас регу тянул на зону, в целом все хорошо как обычно какачество соответствует заявленному, единственное проблеммы с отправкой возникают но думаю эти проблемы временные, поссылка дошла за два дня после отправки,, затестить сиогли на днях как все зашло, с первой прикурки чесно сказать прихуели думали что опять дживи 100 пришел, но ннет , держало часа по два сначало, на третий день время прихода испало до 4 0мин, вообщем все понравилось в очередной раз, на днях закажем еще https://l2saw.ru Тоже считаем что запреты не запреты. Да бывает что и за клиентами охотятся.
Your comment is awaiting moderation.
дом из пеноблоков проект
Your comment is awaiting moderation.
дайсон фен оригинал цена дайсон фен оригинал цена .
Your comment is awaiting moderation.
фен дайсон оригинал купить официальный fen-dn-kupit-13.ru .
Your comment is awaiting moderation.
купить дайсон стайлер для волос официальный сайт цена с насадкам… fen-dn-kupit-12.ru .
Your comment is awaiting moderation.
https://www.skool.com/@promo-codes-xbet-2267
Your comment is awaiting moderation.
http://gzew.phorum.pl/viewtopic.php?p=596912#596912
Your comment is awaiting moderation.
https://dexitex.com/userinfo.php?do=profile&mod=space&user=esteban_granger_495848&op=userinfo&name=Your_Account
Your comment is awaiting moderation.
https://nodeliverances.com/profile.php?do=profile&com=profile&from=space&userinfo=albert-covey-495848
Your comment is awaiting moderation.
каркасное строительство москва
Your comment is awaiting moderation.
https://telegra.ph/Bryussel-kupit-zakladku-kokaina-12-19-5
https://telegra.ph/Kupit-EHkstazi-Lsd-25-MDMA-Lsd-SHarya-12-20
https://telegra.ph/Kupit-Amfetamin-Mefedron-A-pvp-Alfa-PVP-Bolohovo-12-19
https://telegra.ph/Kupit-EHkstazi-Lsd-25-MDMA-Lsd-Samara-12-20
https://telegra.ph/Likino-Dulevo-kupit-Geroin-Metadon-Liriku-Tramadol-12-20
https://telegra.ph/Bangkok-kupit-kokain-12-19-13
https://telegra.ph/Kupit-Marihuanu-Boshki-SHishki-Sol-Korolyov-12-20
https://telegra.ph/Bremen-kupit-Geroin-Metadon-Liriku-Tramadol-12-20
https://telegra.ph/Kupit-Amfetamin-Mefedron-A-pvp-Alfa-PVP-Kamchatskij-kraj-12-20-2
https://telegra.ph/Biblos-kupit-Mefedron-Gashish-Kannabis-Skorost-12-19
Your comment is awaiting moderation.
https://telegra.ph/Bor-kupit-kokain-12-19-2
https://telegra.ph/Kupit-amfetamin-zakladku-Nur-Sultan-12-19
https://telegra.ph/Krasnodar-kupit-Geroin-Metadon-Liriku-Tramadol-12-20
https://telegra.ph/Kupit-EHkstazi-Lsd-25-MDMA-Lsd-Tosno-12-20
https://telegra.ph/Kupit-Geroin-Metadon-Liriku-Tramadol-EHkibastuz-12-20-2
https://telegra.ph/Kupit-narkotiki-onlajn-12-19-6
https://telegra.ph/Kupit-boshki-gashish-shishki-Mikonos-12-19
https://telegra.ph/Kupit-Marihuanu-Boshki-SHishki-Sol-Osinniki-12-20
https://telegra.ph/Pinsk-kupit-kokain-12-19-2
https://telegra.ph/Votkinsk-kupit-gashish-shishki-boshki-12-19-2
Your comment is awaiting moderation.
помощь психиатра онлайн — это одно из направлений медицинского портала, который предлагает услуги опытных врачей в области восстановительной, восточной и традиционной медицины в Москве. Центр ориентирован на целостный подход к физическому и психическому здоровью, сочетая классические методы и восточные практики. На сайте медицинского центра представлена информация о консультациях врачей, диагностике, лечении и реабилитации. Посетители могут быстро записаться на дистанционную консультацию без долгого ожидания. Клиника принимает пациентов с разными проблемами, охватывая психосоматические состояния, стрессовые расстройства и потребность в восстановлении. Важный акцент сделан индивидуальному плану помощи, где анализируется общее состояние. Медицинский портал подходит для тех, кто ищет надёжный медицинский центр в Москве. Прозрачная структура сайта облегчает выбор врача, а справочные статьи помогают лучше ориентироваться. Стартовая страница отражает философию центра — ответственный подход к здоровью каждого обратившегося.
https://inter-lekar.ru/
Your comment is awaiting moderation.
помощь психиатра онлайн без ожидания — это важное направление работы медицинского портала, который объединяет специалистов в направлении восстановительной, восточной медицины в Москве. Медицинский центр нацелен на целостный подход к физическому и психическому здоровью, сочетая классические методы и восточные практики. На сайте медицинского центра представлена информация о врачебной помощи, оценке состояния, восстановительных программах. Посетители могут удобно выбрать специалиста на очный приём без сложных процедур. Профильный центр работает с различными состояниями, включая эмоциональные нарушения, стрессовые расстройства и потребность в восстановлении. Важный акцент сделан индивидуальному подбору терапии, где анализируется общее состояние. Клиника восстановления будет полезен тем, кто предпочитает сочетание традиций и науки в Москве. Прозрачная структура сайта облегчает выбор врача, а информационные разделы помогают лучше ориентироваться. Главная страница показывает принципы работы — ответственный подход к здоровью каждого обратившегося.
https://inter-lekar.ru/
Your comment is awaiting moderation.
поддержка специалистов в сложных ситуациях часто становится первым шагом для человека, который столкнулся с необходимостью подачи иска в суд, однако без квалифицированной юридической помощи добиться результата бывает крайне сложно. Оформление исков и жалоб требует точного соблюдения норм закона, так как любая ошибка в формулировках могут привести к отказу в принятии иска. Профессиональные правовые консультанты оказывают помощь на всех этапах, начиная с правовой оценки дела, заканчивая сопровождением судебного процесса. При необходимости обеспечивается апелляционное обжалование, а также обращение в вышестоящие суды, что позволяет исправить судебные ошибки. Юридическая помощь в суде особенно важна в случаях, когда спор затрагивает финансовые интересы. Специалисты берут на себя формирование правовой позиции, снижая психологическое давление для клиента. Обращение к юристу позволяет избежать ненужных рисков, поскольку каждое действие строится в рамках процессуальных норм. Юридическое сопровождение судебного спора — это уверенность в правильности шагов в любой сложной ситуации.
https://podachaiska.ru/
Your comment is awaiting moderation.
консультационная помощь в стрессовых вопросах часто становится первым шагом для человека, который столкнулся с необходимостью подачи иска в суд, однако без квалифицированной юридической помощи добиться результата бывает крайне сложно. Составление исковых заявлений требует точного соблюдения норм закона, так как неверно указанные обстоятельства могут привести к затягиванию разбирательства. Юристы с практическим опытом оказывают помощь на всех этапах, начиная с правовой оценки дела, заканчивая контролем исполнения решений. При необходимости обеспечивается подготовка апелляционной жалобы, а также кассационное обжалование, что позволяет добиться справедливого решения. Судебное сопровождение дел особенно важна в случаях, когда спор затрагивает личные или деловые отношения. Специалисты берут на себя подготовку доказательств, снижая эмоциональную нагрузку для клиента. Обращение к юристу позволяет избежать ненужных рисков, поскольку каждое действие строится на основе закона. Подача иска с юристом — это спокойствие за результат в любой сложной ситуации.
https://podachaiska.ru/
Your comment is awaiting moderation.
отправьте запрос гадалке онлайн и узнайте значение ситуации через онлайн расклад ТАРО, где каждый аркан указывает на важные детали текущих событий. Гадание на ТАРО позволяет увидеть то, что ранее оставалось незамеченным, помогая разобраться в отношениях, работе и личных решениях. Удаленный расклад ТАРО экономит время и сохраняет комфорт, при этом качество анализа остается на высоком уровне. Внимание уделяется деталям конкретной жизненной ситуации, что позволяет получить не шаблонный ответ, а осмысленное толкование. Расклад карт ТАРО может подсказать направление развития событий, не навязывая решений, а помогая сделать осознанный выбор. Дистанционные расклады эффективны при анализе прошлого и настоящего, включая отношения, финансы, карьеру и личное развитие. Арканы помогают услышать интуицию, поэтому результаты гадания часто откликаются на глубоком уровне. Онлайн расклад карт ТАРО сочетает традиции и новые форматы, помогая лучше понять себя и происходящее вокруг.
https://tarolog-v-kazani.ru/
Your comment is awaiting moderation.
задайте вопрос для гадалки онлайн и получите индивидуальное дистанционное гадание на картах ТАРО, где каждый аркан указывает на важные детали текущих событий. ТАРО помогают взглянуть на ситуацию под новым углом, поддерживая в поиске ответов на волнующие жизненные темы. Дистанционный формат гадания удобен и доступен в любое время, при этом глубина трактовки не уступает очному формату. Каждый запрос рассматривается с учетом личного контекста клиента, что позволяет получить не шаблонный ответ, а осмысленное толкование. Расклад карт ТАРО может подсказать направление развития событий, не ограничивая свободу, а расширяя поле понимания. Формат удаленного гадания универсален для разных жизненных тем, включая чувства, планы, внутренние сомнения и цели. Карты работают как зеркало подсознания, поэтому интерпретации находят подтверждение в реальной жизни. Онлайн расклад карт ТАРО сочетает традиции и новые форматы, создавая пространство для осознанности и ясности.
https://tarolog-v-kazani.ru/
Your comment is awaiting moderation.
https://telegra.ph/Kupit-mefedron-zakladku-Kostanaj-12-19-3
https://telegra.ph/Opole-kupit-Amfetamin-Mefedron-A-pvp-Alfa-PVP-12-19
https://telegra.ph/Kupit-Mefedron-Gashish-Kannabis-Skorost-Berdyansk-12-20
https://telegra.ph/Obergurgl-Hohgurgl-kupit-Kokain-Mefedron-Skorost-Amfetamin-12-20-2
https://telegra.ph/Ochakovo-Matveevskoe-kupit-Amfetamin-Mefedron-A-pvp-Alfa-PVP-12-20
https://telegra.ph/Kupit-Kokain-Mefedron-Skorost-Amfetamin-Moskva-Taganskij-12-20-2
https://telegra.ph/Norilsk-kupit-gashish-12-19-3
https://telegra.ph/Kupit-Amfetamin-Mefedron-A-pvp-Alfa-PVP-Metro-VDNH-12-20
https://telegra.ph/Kupit-Marihuanu-Boshki-SHishki-Sol-Krasnouralsk-12-20
https://telegra.ph/Kupit-Marihuanu-Boshki-SHishki-Sol-CHepelare-12-19
Your comment is awaiting moderation.
https://telegra.ph/Mogilyov-kupit-gashish-12-19
https://telegra.ph/Kupit-Marihuanu-Boshki-SHishki-Sol-Saki-12-20-2
https://telegra.ph/Palermo-kupit-amfetamin-12-19-5
https://telegra.ph/Birobidzhan-kupit-kokain-12-19
https://telegra.ph/Kupit-Mefedron-Gashish-Kannabis-Skorost-Senfuehgos-12-20
https://telegra.ph/Orenburg-kupit-amfetamin-12-19-6
https://telegra.ph/Gomel-kupit-zakladku-mefedrona-12-19-4
https://telegra.ph/Cugshpitce-kupit-EHkstazi-Lsd-25-MDMA-Lsd-12-20-2
https://telegra.ph/Primorsk-kupit-gashish-shishki-boshki-12-19-2
https://telegra.ph/Kupit-Geroin-Metadon-Liriku-Tramadol-Hurgada-12-19
Your comment is awaiting moderation.
https://telegra.ph/Tenerife-kupit-zakladku-amfetamina-12-19
https://telegra.ph/Kyoge-kupit-Amfetamin-Mefedron-A-pvp-Alfa-PVP-12-20
https://telegra.ph/Meleuz-kupit-amfetamin-12-19-4
https://telegra.ph/Kupit-Amfetamin-Mefedron-A-pvp-Alfa-PVP-Sulavesi-12-20-2
https://telegra.ph/Kupit-Kokain-Mefedron-Skorost-Amfetamin-SHCHukino-12-20-2
https://telegra.ph/Rodos-kupit-zakladku-kokaina-12-19-2
https://telegra.ph/Ajos-Dometios-kupit-Geroin-Metadon-Liriku-Tramadol-12-20
https://telegra.ph/Kupit-amfetamin-Puehrto-Riko-12-19-4
https://telegra.ph/Kupit-kokain-zakladku-Danang-12-19-2
https://telegra.ph/Kupit-Kokain-Mefedron-Skorost-Amfetamin-Gulkevichi-12-20
Your comment is awaiting moderation.
vídeo pornográfico xxx com bunda grande
Your comment is awaiting moderation.
https://telegra.ph/Astrahan-kupit-Geroin-Metadon-Liriku-Tramadol-12-20-2
https://telegra.ph/Silueht-kupit-narkotiki-12-19-3
https://telegra.ph/Kupit-Marihuanu-Boshki-SHishki-Sol-Hojan-12-20
https://telegra.ph/Kitaj-kupit-Amfetamin-Mefedron-A-pvp-Alfa-PVP-12-20
https://telegra.ph/Kupit-mefedron-zakladku-Tarragona-12-19-5
https://telegra.ph/Kareli-kupit-Amfetamin-Mefedron-A-pvp-Alfa-PVP-12-20
https://telegra.ph/Kupit-kokain-zakladku-Grenada-12-19
https://telegra.ph/Kupit-Kokain-Mefedron-Skorost-Amfetamin-Redzho-di-Kalabriya-12-20
https://telegra.ph/Pula-kupit-amfetamin-12-19-6
https://telegra.ph/Vilfransh-syur-Mer-kupit-Mefedron-Gashish-Kannabis-Skorost-12-20
Your comment is awaiting moderation.
https://telegra.ph/Varenikovskaya-kupit-Amfetamin-Mefedron-A-pvp-Alfa-PVP-12-20
https://telegra.ph/Kupit-EHkstazi-Lsd-25-MDMA-Lsd-Samui-12-20-2
https://telegra.ph/Kodinsk-kupit-Marihuanu-Boshki-SHishki-Sol-12-20
https://telegra.ph/Kupit-EHkstazi-Lsd-25-MDMA-Lsd-Narva-EHstoniya-12-20
https://telegra.ph/Novorossijsk-kupit-kokain-12-19-3
https://telegra.ph/Kupit-mefedron-zakladku-SHCHyokino-12-19-3
https://telegra.ph/Kupit-Amfetamin-Mefedron-A-pvp-Alfa-PVP-Hanty-Mansijskij-AO-YUgra-12-20-2
https://telegra.ph/Kupit-Mefedron-Gashish-Kannabis-Skorost-Skadovsk-12-20
https://telegra.ph/Kupit-Mefedron-Gashish-Kannabis-Skorost-Habarovsk-12-20
https://telegra.ph/Moskva-Bogorodskoe-kupit-Kokain-Mefedron-Skorost-Amfetamin-12-20
Your comment is awaiting moderation.
http://lastgame.pro/index.php?subaction=userinfo&user=ybuhe
Your comment is awaiting moderation.
https://telegra.ph/Kupit-cherez-zakladku-geroin-12-19-4
https://telegra.ph/Vasilevka-kupit-narkotiki-12-19
https://telegra.ph/Kupit-Kokain-Mefedron-Skorost-Amfetamin-Kochabamba-12-20
https://telegra.ph/Kupit-Geroin-Metadon-Liriku-Tramadol-Gorodishche-12-20
https://telegra.ph/Kupit-Amfetamin-Mefedron-A-pvp-Alfa-PVP-Tolyatti-12-20
https://telegra.ph/Naryan-Mar-kupit-Amfetamin-Mefedron-A-pvp-Alfa-PVP-12-20
https://telegra.ph/Tokio-kupit-mefedron-12-19-6
https://telegra.ph/Kupit-kokain-zakladku-Dzerzhinskij-12-19-5
https://telegra.ph/Kupit-boshki-gashish-shishki-Naberezhnye-CHelny-12-19-5
https://telegra.ph/Kupit-Kokain-Mefedron-Skorost-Amfetamin-Mihajlovsk-12-19
Your comment is awaiting moderation.
https://telegra.ph/Amalfi-kupit-Marihuanu-Boshki-SHishki-Sol-12-19
https://telegra.ph/Kupit-Kokain-Mefedron-Skorost-Amfetamin-Isfana-12-19
https://telegra.ph/Kupit-EHkstazi-Lsd-25-MDMA-Lsd-Karachaevo-CHerkesskaya-Resp-12-19
https://telegra.ph/Kupit-Amfetamin-Mefedron-A-pvp-Alfa-PVP-Abakan-12-20
https://telegra.ph/Aleksandrovsk-kupit-Marihuanu-Boshki-SHishki-Sol-12-20
https://telegra.ph/Kupit-EHkstazi-Lsd-25-MDMA-Lsd-Dalat-12-20
https://telegra.ph/Stara-Zagora-kupit-Amfetamin-Mefedron-A-pvp-Alfa-PVP-12-20
https://telegra.ph/Barbados-kupit-gashish-12-19
https://telegra.ph/Rechica-kupit-zakladku-kokaina-12-19-3
https://telegra.ph/Hojniki-kupit-Mefedron-Gashish-Kannabis-Skorost-12-20
Your comment is awaiting moderation.
https://www.mixcloud.com/mostbetnew26/
Your comment is awaiting moderation.
בקולו שהבטן שלי התכווצה בציפייה. הנהנתי, אפילו לא ידעתי למה אני נכנס. הגענו לפנטהאוז שלו. דירות גבוהות ודיסקרטיות, נופים של עיר הלילה, אור רך של מנורותכולם צעקו יוקרה, אבל בקושי ממני. כששמעתי את הדלתות חורקות, זיהיתי את בעלי. הוא כנראה התעורר, היה צריך ללכת לדירות דיסקרטיות. אנטון, בגלל העומס העצבני, הכניס אותי לפה, וגמר במהירות, גרם לי לבלוע את הזרע שלו. tnoathanoar.co.il
Your comment is awaiting moderation.
https://adenkidss.com/blog/classic-watches
Your comment is awaiting moderation.
https://telegra.ph/Safaga-kupit-Geroin-Metadon-Liriku-Tramadol-12-20
https://telegra.ph/Bolotnoe-kupit-Amfetamin-Mefedron-A-pvp-Alfa-PVP-12-20-2
https://telegra.ph/Ostrov-Kalivini-kupit-EHkstazi-Lsd-25-MDMA-Lsd-12-20
https://telegra.ph/Kupit-Amfetamin-Mefedron-A-pvp-Alfa-PVP-Isfahan-12-19
https://telegra.ph/Petrozavodsk-kupit-zakladku-kokaina-12-19-2
https://telegra.ph/Kupit-Amfetamin-Mefedron-A-pvp-Alfa-PVP-De-Pann-12-20
https://telegra.ph/Kupit-Mefedron-Gashish-Kannabis-Skorost-Latina-12-20-2
https://telegra.ph/Kupit-Mefedron-Gashish-Kannabis-Skorost-Murino-12-20-2
https://telegra.ph/Kupit-Amfetamin-Mefedron-A-pvp-Alfa-PVP-Krasavino-12-20
https://telegra.ph/Kupit-EHkstazi-Lsd-25-MDMA-Lsd-Moskva-YUgo-Zapadnyj-12-20
Your comment is awaiting moderation.
https://telegra.ph/Krasnoturinsk-kupit-mefedron-12-19-3
https://telegra.ph/Valensiya-kupit-gashish-12-19-3
https://telegra.ph/Kupit-Mefedron-Gashish-Kannabis-Skorost-Palermo-12-20
https://telegra.ph/Kyzkalesi-kupit-Kokain-Mefedron-Skorost-Amfetamin-12-20
https://telegra.ph/SHarm-EHl-SHejh-kupit-Kokain-Mefedron-Skorost-Amfetamin-12-20-3
https://telegra.ph/Kupit-Geroin-Metadon-Liriku-Tramadol-Nagatinskij-Zaton-12-19
https://telegra.ph/Kupit-Geroin-Metadon-Liriku-Tramadol-Mingyachevir-12-20
https://telegra.ph/Kupit-Mefedron-Gashish-Kannabis-Skorost-Kishinyov-12-20-2
https://telegra.ph/Kupit-EHkstazi-Lsd-25-MDMA-Lsd-Nevinnomyssk-12-20
https://telegra.ph/Kupit-Mefedron-Gashish-Kannabis-Skorost-Lopatinskij-12-20-2
Your comment is awaiting moderation.
https://telegra.ph/Kasansaj-kupit-Kokain-Mefedron-Skorost-Amfetamin-12-20
https://telegra.ph/Kupit-Kokain-Mefedron-Skorost-Amfetamin-Puehrto-Madrin-Argentina-12-20-2
https://telegra.ph/Kupit-Geroin-Metadon-Liriku-Tramadol-Madzhore-12-20-2
https://telegra.ph/Kupit-Amfetamin-Mefedron-A-pvp-Alfa-PVP-Lisichansk-12-20-2
https://telegra.ph/Kupit-Mefedron-Gashish-Kannabis-Skorost-Bali-CHangu-12-20
https://telegra.ph/Biblos-kupit-Kokain-Mefedron-Skorost-Amfetamin-12-20
https://telegra.ph/Kupit-kokain-zakladku-Karlsrueh-12-19-4
https://telegra.ph/Kupit-Mefedron-Gashish-Kannabis-Skorost-Valnord-12-19
https://telegra.ph/Portichchio-kupit-EHkstazi-Lsd-25-MDMA-Lsd-12-20-2
https://telegra.ph/Lyudinovo-kupit-Kokain-Mefedron-Skorost-Amfetamin-12-20
Your comment is awaiting moderation.
https://telegra.ph/Florenciya-kupit-Marihuanu-Boshki-SHishki-Sol-12-20-2
https://telegra.ph/Kupit-EHkstazi-Lsd-25-MDMA-Lsd-Mimizan-12-20
https://telegra.ph/Kupit-Kokain-Mefedron-Skorost-Amfetamin-Gusinoozyorsk-12-20-2
https://telegra.ph/Doneck-kupit-Marihuanu-Boshki-SHishki-Sol-12-20
https://telegra.ph/CHinkve-Terre-kupit-Kokain-Mefedron-Skorost-Amfetamin-12-20-3
https://telegra.ph/Kupit-gashish-zakladku-Bryussel-12-19
https://telegra.ph/Riomadzhore-kupit-Mefedron-Gashish-Kannabis-Skorost-12-19
https://telegra.ph/Murmansk-kupit-kokain-12-19-2
https://telegra.ph/Kupit-kokain-zakladku-Timashyovsk-12-19
https://telegra.ph/Kupit-gashish-zakladku-Arhangelsk-12-19
Your comment is awaiting moderation.
https://telegra.ph/Kupit-amfetamin-Pekin-12-19
https://telegra.ph/Kupit-Geroin-Metadon-Liriku-Tramadol-Fribur-12-20
https://telegra.ph/Kupit-EHkstazi-Lsd-25-MDMA-Lsd-Fortaleza-12-19
https://telegra.ph/Kupit-Mefedron-Gashish-Kannabis-Skorost-Tatarstan-12-20
https://telegra.ph/Kupit-mefedron-Sertolovo-12-19-3
https://telegra.ph/Uyar-kupit-Marihuanu-Boshki-SHishki-Sol-12-20-2
https://telegra.ph/Botshabelo-kupit-EHkstazi-Lsd-25-MDMA-Lsd-12-19
https://telegra.ph/ZHirona-kupit-amfetamin-12-19-4
https://telegra.ph/Kupit-Geroin-Metadon-Liriku-Tramadol-Batajsk-12-20
https://telegra.ph/Kupit-boshki-gashish-shishki-Tekirova-12-19
Your comment is awaiting moderation.
https://telegra.ph/Kupit-Amfetamin-Mefedron-A-pvp-Alfa-PVP-OAE-Abu-Dabi-12-20-2
https://telegra.ph/Monino-kupit-Geroin-Metadon-Liriku-Tramadol-12-20
https://telegra.ph/Kupit-Mefedron-Gashish-Kannabis-Skorost-SHCHyolkovo-12-20
https://telegra.ph/Kupit-Mefedron-Gashish-Kannabis-Skorost-ZHeshuv-12-20
https://telegra.ph/Volos-kupit-Amfetamin-Mefedron-A-pvp-Alfa-PVP-12-20-2
https://telegra.ph/Kupit-mefedron-Stambul-12-19-2
https://telegra.ph/Harcyzsk-kupit-gashish-12-19-4
https://telegra.ph/Preobrazhenskoe-kupit-Geroin-Metadon-Liriku-Tramadol-12-20
https://telegra.ph/Kupit-Mefedron-Gashish-Kannabis-Skorost-Kajo-Santa-Mariya-12-20
https://telegra.ph/Kupit-Marihuanu-Boshki-SHishki-Sol-Moskva-Ramenki-12-20-2
Your comment is awaiting moderation.
обратиться за онлайн консультацией можно как начало интереса к звездам и их влиянию, после чего онлайн курсы по астрологии для начинающих открывают новые возможности. Обучение подходит как для тех, кто делает первые шаги, позволяя освоить расчет и анализ персональных гороскопов. Каждый урок посвящен значениям планет, знаков и домов, что помогает видеть взаимосвязи событий и характера. Практические занятия закрепляют теорию, а поддержка опытного астролога сопровождает на каждом этапе. Формат онлайн делает курсы доступными из любой точки, при этом материалы остаются для повторного изучения. Курсы астрологии помогают не только изучить теорию, что полезно для личного развития и консультирования. По завершении курса выдается сертификат, который может использоваться в профессиональной деятельности. Дистанционное обучение объединяет знания и технологии, помогая раскрыть тайны вселенной шаг за шагом.
https://astrologycourse.ru
Your comment is awaiting moderation.
задать вопрос гадалке онлайн можно как отправную точку в понимании законов вселенной, после чего онлайн курсы по астрологии для начинающих открывают новые возможности. Обучение подходит как для тех, кто делает первые шаги, позволяя научиться строить натальные карты с нуля. Каждый урок посвящен значениям планет, знаков и домов, что дает понимание внутренних процессов человека. Уроки построены на сочетании теории и практики, а наставник помогает разобраться в сложных моментах. Онлайн формат позволяет учиться в удобное время, при этом записи занятий можно пересматривать. Программа направлена на практическое применение знаний, что может стать основой новой профессии. По завершении курса выдается сертификат, который отражает уровень подготовки. Онлайн курсы по астрологии — это современный способ обучения, открывая новые горизонты понимания жизни.
https://astrologycourse.ru
Your comment is awaiting moderation.
дайсон официальный сервисный ofitsialnyj-sajt-dn.ru .
Your comment is awaiting moderation.
https://telegra.ph/Babushkin-kupit-Mefedron-Gashish-Kannabis-Skorost-12-20
https://telegra.ph/Kupit-boshki-gashish-shishki-Dahab-12-19-3
https://telegra.ph/Kupit-Amfetamin-Mefedron-A-pvp-Alfa-PVP-Rozovka-12-20
https://telegra.ph/Kupit-EHkstazi-Lsd-25-MDMA-Lsd-Zolotye-peski-12-20-2
https://telegra.ph/Kupit-Kokain-Mefedron-Skorost-Amfetamin-Krasnyj-12-20
https://telegra.ph/CHhanvon-kupit-gashish-shishki-boshki-12-19
https://telegra.ph/Kupit-mefedron-surgut-12-19-7
https://telegra.ph/Kupit-EHkstazi-Lsd-25-MDMA-Lsd-Klagenfurt-am-Verterzee-12-19
https://telegra.ph/Voronezh-kupit-gashish-12-19-5
https://telegra.ph/Langkavi-kupit-zakladku-amfetamina-12-19
Your comment is awaiting moderation.
круглосуточной доставке шаров сегодня уделяют особое внимание, ведь радость от неожиданного сюрприза становятся важной частью любого события. За последнее время доставка воздушных шаров стала востребованной услугой, предлагая удобный и эффектный способ отпраздновать особые события. Такой формат особенно ценят те, кто предпочитает готовые и проверенные решения, не жертвуя при этом качеством и визуальным эффектом. Даже один шар может задать тон празднику, а при профессиональной доставке они сохраняют форму и цвет. Для многих клиентов важно, что все этапы понятны и прозрачны, поэтому услуга становится неотъемлемой частью подготовки к дням рождениям и юбилеям. Эффект сюрприза играет ключевую роль, а правильно подобранные воздушные шары делают поздравление более личным. Неудивительно, что все больше людей рассматривают такую услугу как дополнение к основному презенту. Клиентский сервис становится ключевым фактором выбора, обеспечивая гибкие условия оформления. В результате доставка воздушных шаров воспринимается не просто как логистика, а как часть праздничного впечатления.
https://shefcook.ru/produkty/radost-ot-dostavki-vozdushnogo-shara
Your comment is awaiting moderation.
сервису доставки воздушных шаров в любое время сегодня уделяют особое внимание, ведь эмоции от красиво оформленного подарка становятся важной частью любого события. За последнее время доставка воздушных шаров стала востребованной услугой, предлагая удобный и эффектный способ отпраздновать особые события. Такой формат особенно ценят те, кто предпочитает готовые и проверенные решения, не жертвуя при этом качеством и визуальным эффектом. Даже один шар может задать тон празднику, а при профессиональной доставке они сохраняют форму и цвет. Для многих клиентов важно, что оформление заказа занимает минимум времени, поэтому услуга становится неотъемлемой частью подготовки к дням рождениям и юбилеям. Радость получателя усиливается неожиданностью, а правильно подобранные воздушные шары делают поздравление более личным. Неудивительно, что все больше людей рассматривают такую услугу как дополнение к основному презенту. Сервисы стремятся к максимальному удобству заказчиков, обеспечивая понятные сроки выполнения. В результате доставка воздушных шаров воспринимается не просто как логистика, а как способ подарить радость без лишних усилий.
https://shefcook.ru/produkty/radost-ot-dostavki-vozdushnogo-shara
Your comment is awaiting moderation.
http://leydis16.phorum.pl/viewtopic.php?p=996096#996096
Your comment is awaiting moderation.
https://multiflay.com/userinfo.php?com=profile&do=profile&userinfo=henry-upchurch_495847&op=userinfo
Your comment is awaiting moderation.
Шары на выписку это неотъемлемой частью радостного события, в тот день когда женщину с новорожденным встречают после родов. Воздушные гелиевые шары с аистами и младенцами делают событие более эмоциональным и передают искренние эмоции. Аист издавна связывается с пополнением в семье, из-за этого такие фигуры предпочитают использовать для оформления выписки. Фигуры новорожденных из шаров усиливают эмоциональный эффект и привлекают внимание близких. Молодой отец и члены семьи стараются сделать встречу особенной, выбирая гелиевые композиции в мягких пастельных оттенках. Подобные шары гармонично смотрятся в любом случае, благодаря легкости композиции сохраняют объем и выглядят эффектно. Праздничные шары на выписку отлично смотрятся на фотографиях, оставляя яркие кадры о начале новой жизни. Такое оформление подчеркивает заботу к маме и малышу и делает момент по-настоящему запоминающимся. Воздушные шары в тематике рождения не теряют популярности, потому что они символизируют счастье и подходят для любого формата встречи.
https://prazdnikson.ru/tradiczionnye-ukrasheniya-dlya-vypiski-iz-roddoma-gelievye-shary-v-vide-aistov-i-mladenczev/
Your comment is awaiting moderation.
Шары на выписку домой это неотъемлемой частью торжественного момента, в тот день когда женщину с новорожденным выписывают домой. Фигурные гелиевые шары в форме аистов и малышей создают особое настроение и становятся визуальным символом счастья. Образ аиста издавна связывается с рождением ребенка, поэтому такие шары предпочитают использовать для оформления выписки. Шары в виде малышей делают оформление более душевным и радуют родственников. Отец ребенка и члены семьи стараются сделать встречу особенной, заказывая гелиевые композиции в спокойной цветовой гамме. Такие украшения подходят как для мальчика так и для девочки, благодаря легкости они долго парят и сохраняют праздничный вид. Праздничные шары на выписку часто используют для фото, оставляя яркие кадры о первом дне дома. Такое оформление показывает отношение к маме и малышу и делает момент по-настоящему запоминающимся. Воздушные шары в тематике рождения остаются актуальными, так как они отражают радость рождения и органично дополняют торжество.
https://prazdnikson.ru/tradiczionnye-ukrasheniya-dlya-vypiski-iz-roddoma-gelievye-shary-v-vide-aistov-i-mladenczev/
Your comment is awaiting moderation.
dyson пылесос магазины ofitsialnyj-sajt-dn-1.ru .
Your comment is awaiting moderation.
https://telegra.ph/San-Marino-kupit-amfetamin-12-19-4
Your comment is awaiting moderation.
https://www.metal-archives.com/users/1xbetfree
Your comment is awaiting moderation.
https://magic-tricks.ru/user/fridiewwba
Your comment is awaiting moderation.
https://telegra.ph/Kupit-Kokain-Mefedron-Skorost-Amfetamin-Ekb-12-20-2
Your comment is awaiting moderation.
dyson пылесос купить интернет dn-kupit-2.ru .
Your comment is awaiting moderation.
https://telegra.ph/Aleksandrov-kupit-zakladku-mefedrona-12-19-4
Your comment is awaiting moderation.
https://telegra.ph/EHssen-kupit-zakladku-mefedrona-12-19-6
Your comment is awaiting moderation.
магазин dyson отзывы ofitsialnyj-sajt-dn.ru .
Your comment is awaiting moderation.
https://telegra.ph/Ust-Katav-kupit-Amfetamin-Mefedron-A-pvp-Alfa-PVP-12-20
Your comment is awaiting moderation.
фен дайсон оригинал купить официальный сайт ofitsialnyj-sajt-dsn.ru .
Your comment is awaiting moderation.
официальные dyson интернет магазин ofitsialnyj-sajt-dn-1.ru .
Your comment is awaiting moderation.
магазин техники dyson dn-kupit-2.ru .
Your comment is awaiting moderation.
https://telegra.ph/Kupit-EHkstazi-Lsd-25-MDMA-Lsd-Naro—Fominsk-12-20-2
Your comment is awaiting moderation.
Visit Site – Layout is crisp, browsing is easy, and content feels trustworthy and clear.
Your comment is awaiting moderation.
https://telegra.ph/Kupit-Amfetamin-Mefedron-A-pvp-Alfa-PVP-CHuvashiya-12-20-2
Your comment is awaiting moderation.
https://sites.google.com/view/codepromo1xbethyperbonus20261x/home
Your comment is awaiting moderation.
https://telegra.ph/Rodos-kupit-zakladku-mefedrona-12-19
Your comment is awaiting moderation.
https://warealtor.org/education-events/events2/event-calendar/2022/06/02/default-calendar/procuring-cause
Your comment is awaiting moderation.
https://telegra.ph/Usman-kupit-Marihuanu-Boshki-SHishki-Sol-12-20-2
Your comment is awaiting moderation.
https://www.warealtor.org/education-events/events2/event-calendar/2022/06/21/default-calendar/washington-real-estate-fair-housing
Your comment is awaiting moderation.
техника dyson купить ofitsialnyj-sajt-dn.ru .
Your comment is awaiting moderation.
https://telegra.ph/Arys-kupit-Kokain-Mefedron-Skorost-Amfetamin-12-20-2
Your comment is awaiting moderation.
https://telegra.ph/Syzran-kupit-EHkstazi-Lsd-25-MDMA-Lsd-12-20-2
Your comment is awaiting moderation.
дайсон официальный сайт магазины в москве dn-kupit-2.ru .
Your comment is awaiting moderation.
интернет пылесосов дайсон ofitsialnyj-sajt-dn-1.ru .
Your comment is awaiting moderation.
фен дайсон оригинал купить официальный сайт ofitsialnyj-sajt-dsn.ru .
Your comment is awaiting moderation.
https://telegra.ph/Filippiny-kupit-gashish-12-19
Your comment is awaiting moderation.
https://telegra.ph/Belyj-kupit-Kokain-Mefedron-Skorost-Amfetamin-12-20
https://telegra.ph/Kupit-Amfetamin-Mefedron-A-pvp-Alfa-PVP-ZHerona-12-20
https://telegra.ph/Kupit-gashish-sochi-12-19-4
https://telegra.ph/Kupit-kokain-Beloreck-12-19-3
https://telegra.ph/Fogel-kupit-Kokain-Mefedron-Skorost-Amfetamin-12-20-2
https://telegra.ph/Kupit-kokain-Abu-Dabi-12-19-5
https://telegra.ph/Hanoj-i-Hoshimin-kupit-Kokain-Mefedron-Skorost-Amfetamin-12-19
https://telegra.ph/Bohum-kupit-narkotiki-12-19-6
https://telegra.ph/Kupit-Marihuanu-Boshki-SHishki-Sol-Nigeriya-12-20
https://telegra.ph/Moskva-Fili-Davydkovo-kupit-Marihuanu-Boshki-SHishki-Sol-12-20-2
https://telegra.ph/Kupit-mefedron-Pyatigorsk-12-19-2
https://telegra.ph/Lodz-kupit-gashish-shishki-boshki-12-19
https://telegra.ph/Verhnyaya-Pyshma-kupit-amfetamin-12-19-4
https://telegra.ph/Kupit-Marihuanu-Boshki-SHishki-Sol-Marrakesh-12-20
https://telegra.ph/Civilsk-kupit-Kokain-Mefedron-Skorost-Amfetamin-12-20-2
https://telegra.ph/Kupit-Amfetamin-Mefedron-A-pvp-Alfa-PVP-Ostrov-12-20
https://telegra.ph/Alupka-kupit-Kokain-Mefedron-Skorost-Amfetamin-12-20
https://telegra.ph/Tekstilshchiki-kupit-EHkstazi-Lsd-25-MDMA-Lsd-12-20
https://telegra.ph/Kupit-Amfetamin-Mefedron-A-pvp-Alfa-PVP-Benoa-12-20-2
https://telegra.ph/Fidzhi-kupit-zakladku-amfetamina-12-19-6
https://telegra.ph/Ulan-Udeh-kupit-gashish-12-19-4
https://telegra.ph/Melliha-kupit-Geroin-Metadon-Liriku-Tramadol-12-20-2
https://telegra.ph/Ryazan-kupit-EHkstazi-Lsd-25-MDMA-Lsd-12-20
https://telegra.ph/Kupit-Amfetamin-Mefedron-A-pvp-Alfa-PVP-Maldivskie-ostrova-12-20
Your comment is awaiting moderation.
https://ctxt.io/2/AAD4ocONEQ
Your comment is awaiting moderation.
https://telegra.ph/Budva-kupit-gashish-shishki-boshki-12-19
https://telegra.ph/ZHetysaj-kupit-Amfetamin-Mefedron-A-pvp-Alfa-PVP-12-20-2
https://telegra.ph/Timishoara-kupit-kokain-12-19
https://telegra.ph/Kupit-Mefedron-Gashish-Kannabis-Skorost-Tabuk-12-20-2
https://telegra.ph/Kupit-mefedron-zakladku-Tihvin-12-19-2
https://telegra.ph/Hashuri-kupit-Mefedron-Gashish-Kannabis-Skorost-12-20-2
https://telegra.ph/Leh-kupit-EHkstazi-Lsd-25-MDMA-Lsd-12-20
https://telegra.ph/Kupit-boshki-gashish-shishki-Vologda-12-19
https://telegra.ph/Kupit-kokain-Minsk-12-19-3
https://telegra.ph/Kovylkino-kupit-Amfetamin-Mefedron-A-pvp-Alfa-PVP-12-20-2
https://telegra.ph/Kupit-amfetamin-zakladku-Kemerovo-12-19-2
https://telegra.ph/Moskva-VAO-kupit-Mefedron-Gashish-Kannabis-Skorost-12-20
https://telegra.ph/Viner-kupit-Amfetamin-Mefedron-A-pvp-Alfa-PVP-12-20
https://telegra.ph/Kerch-kupit-narkotiki-12-19-3
https://telegra.ph/Kamyshin-kupit-gashish-12-19-5
https://telegra.ph/Novara-kupit-Geroin-Metadon-Liriku-Tramadol-12-19
https://telegra.ph/Lirika-kapsuly-kupit-bez-recepta-12-19-4
https://telegra.ph/Kupit-Mefedron-Gashish-Kannabis-Skorost-YAkutiya-12-20-2
https://telegra.ph/Bukoba-kupit-Mefedron-Gashish-Kannabis-Skorost-12-20
https://telegra.ph/Kupit-Mefedron-Gashish-Kannabis-Skorost-Hilok-12-19
https://telegra.ph/Koktebel-kupit-zakladku-kokaina-12-19-2
https://telegra.ph/Slonim-kupit-Marihuanu-Boshki-SHishki-Sol-12-19
https://telegra.ph/Kupit-amfetamin-zakladku-Belgorod-12-19-4
https://telegra.ph/Kupit-narkotiki-geroin-12-19
Your comment is awaiting moderation.
https://telegra.ph/Kupit-Geroin-Metadon-Liriku-Tramadol-Novouralsk-12-19
https://telegra.ph/Kupit-mefedron-zakladku-Nyagang-12-19-3
https://telegra.ph/Gde-kupit-semena-marihuany-12-19
https://telegra.ph/Kupit-Amfetamin-Mefedron-A-pvp-Alfa-PVP-Koltushi-12-20
https://telegra.ph/Karpinsk-kupit-Amfetamin-Mefedron-A-pvp-Alfa-PVP-12-20
https://telegra.ph/Gde-v-chelyabinske-kupit-ehkstazi-12-19
https://telegra.ph/Spisok-gde-mozhno-kupit-narkotiki-12-19
https://telegra.ph/Kupit-Kokain-Mefedron-Skorost-Amfetamin-Kartaly-12-20
https://telegra.ph/Pohvistnevo-kupit-EHkstazi-Lsd-25-MDMA-Lsd-12-20-2
https://telegra.ph/Kupit-Amfetamin-Mefedron-A-pvp-Alfa-PVP-Tula-12-19
https://telegra.ph/Kupit-Mefedron-Gashish-Kannabis-Skorost-Malakka-12-20
https://telegra.ph/Konstanca-kupit-zakladku-kokaina-12-19
https://telegra.ph/Kupit-Marihuanu-Boshki-SHishki-Sol-EHnergodar-12-19
https://telegra.ph/Kupit-Amfetamin-Mefedron-A-pvp-Alfa-PVP-Byalka-Tatrzhanska-12-20
https://telegra.ph/Zanzibar-kupit-mefedron-12-19-2
https://telegra.ph/Nyurnberg-kupit-gashish-12-19-5
https://telegra.ph/Kupit-Kokain-Mefedron-Skorost-Amfetamin-Kadis-12-20
https://telegra.ph/YAsenevo-kupit-Kokain-Mefedron-Skorost-Amfetamin-12-19
https://telegra.ph/Kupit-liriku-v-almaty-12-19
https://telegra.ph/Kupit-kokain-Aktobe-12-19-7
https://telegra.ph/Kupit-Geroin-Metadon-Liriku-Tramadol-Karachaevo-CHerkesiya-12-20-2
https://telegra.ph/Molodogvardejsk-kupit-narkotiki-12-19-6
https://telegra.ph/Kupit-boshki-gashish-shishki-Side-12-19
https://telegra.ph/Tampere-kupit-narkotiki-12-19-3
Your comment is awaiting moderation.
https://webinar.mkollektiivi.fi/markkinointikollektiivin-27
Your comment is awaiting moderation.
техника dyson купить ofitsialnyj-sajt-dn.ru .
Your comment is awaiting moderation.
сайт техники дайсон сайт техники дайсон .
Your comment is awaiting moderation.
https://telegra.ph/Kupit-Amfetamin-Mefedron-A-pvp-Alfa-PVP-Bo-Vallon-12-20
https://telegra.ph/Silifke-kupit-zakladku-mefedrona-12-19-3
https://telegra.ph/Smolensk-kupit-amfetamin-12-19-8
https://telegra.ph/Izhevsk-kupit-kokain-12-19-4
https://telegra.ph/Meshchovsk-kupit-Marihuanu-Boshki-SHishki-Sol-12-20
https://telegra.ph/Verona-kupit-amfetamin-12-19-4
https://telegra.ph/Test-na-narkotiki-kupit-perm-12-19-5
https://telegra.ph/Kupit-Kokain-Mefedron-Skorost-Amfetamin-Trinidad-12-20-2
https://telegra.ph/Kupit-Geroin-Metadon-Liriku-Tramadol-Mamonovo-12-20
https://telegra.ph/Kupit-mefedron-Palermo-12-19-2
https://telegra.ph/Kupit-kokain-zakladku-Kosta-Blanka-12-19
https://telegra.ph/Molzhaninovskij-kupit-Mefedron-Gashish-Kannabis-Skorost-12-20-2
https://telegra.ph/Kupit-Amfetamin-Mefedron-A-pvp-Alfa-PVP-Kostanaj-12-20-2
https://telegra.ph/Kupit-kokain-zakladku-Fidzhi-12-19-2
https://telegra.ph/Kupit-kokain-Katovice-12-19-5
https://telegra.ph/Der-kupit-EHkstazi-Lsd-25-MDMA-Lsd-12-20
https://telegra.ph/CHehov-kupit-gashish-12-19-4
https://telegra.ph/Riomadzhore-kupit-Amfetamin-Mefedron-A-pvp-Alfa-PVP-12-20
https://telegra.ph/Zelenodolsk-kupit-mefedron-12-19-4
https://telegra.ph/Kupit-mefedron-zakladku-Filippiny-12-19-4
https://telegra.ph/Bali-Tabanan-kupit-Kokain-Mefedron-Skorost-Amfetamin-12-19
https://telegra.ph/Moskva-Voskresenskoe-kupit-Geroin-Metadon-Liriku-Tramadol-12-20
https://telegra.ph/Bodajbo-kupit-Kokain-Mefedron-Skorost-Amfetamin-12-20
https://telegra.ph/Stavropol-kupit-liriku-12-19-2
Your comment is awaiting moderation.
dyson пылесос купить интернет магазин ofitsialnyj-sajt-dn-1.ru .
Your comment is awaiting moderation.
дайсон россия официальный dn-kupit-2.ru .
Your comment is awaiting moderation.
https://lite.evernote.com/note/f6036ddd-3964-37c8-bc6d-3ed9685d2125
Your comment is awaiting moderation.
https://telegra.ph/Pinsk-kupit-amfetamin-12-19-5
https://telegra.ph/Kupit-mefedron-zakladku-Siciliya-12-19-2
https://telegra.ph/Gamburg-kupit-narkotiki-12-19-2
https://telegra.ph/Nizhnyaya-Tura-kupit-Kokain-Mefedron-Skorost-Amfetamin-12-20-2
https://telegra.ph/Prilep-kupit-Mefedron-Gashish-Kannabis-Skorost-12-20
https://telegra.ph/Dorogobuzh-kupit-Kokain-Mefedron-Skorost-Amfetamin-12-19
https://telegra.ph/Kotelniki-kupit-gashish-12-19-3
https://telegra.ph/Kupit-gashish-zakladku-Renn-12-19
https://telegra.ph/Kupit-EHkstazi-Lsd-25-MDMA-Lsd-Kusa-12-20
https://telegra.ph/Kupit-amfetamin-Balashiha-12-19-7
https://telegra.ph/Kupit-Marihuanu-Boshki-SHishki-Sol-Tihoreck-12-20-2
https://telegra.ph/Kupit-EHkstazi-Lsd-25-MDMA-Lsd-Kyzyl-Kiya-12-19
https://telegra.ph/Kupit-kokain-zakladku-SHymkent-12-19-2
https://telegra.ph/Kupit-boshki-gashish-shishki-Perevalsk-12-19
https://telegra.ph/Gde-v-valensii-kupit-marihuanu-12-19-4
https://telegra.ph/Kupit-Amfetamin-Mefedron-A-pvp-Alfa-PVP-Patara-12-20
https://telegra.ph/Kupit-Marihuanu-Boshki-SHishki-Sol-Pereslavl-Zalesskij-12-20-2
https://telegra.ph/Vlera-kupit-Marihuanu-Boshki-SHishki-Sol-12-20-2
https://telegra.ph/Kupit-Mefedron-Gashish-Kannabis-Skorost-Semiluki-12-20
https://telegra.ph/Borzhomi-kupit-Geroin-Metadon-Liriku-Tramadol-12-20
https://telegra.ph/Kosta-Rika-kupit-zakladku-mefedrona-12-19-2
https://telegra.ph/Uraj-kupit-Geroin-Metadon-Liriku-Tramadol-12-20
https://telegra.ph/SHyaulyaj-kupit-zakladku-mefedrona-12-19
https://telegra.ph/Kupit-Geroin-Metadon-Liriku-Tramadol-Ras-ehl-Hajma-12-20-2
Your comment is awaiting moderation.
https://telegra.ph/Kupit-Marihuanu-Boshki-SHishki-Sol-Novoe-Devyatkino-12-19
https://telegra.ph/Kupit-semena-kanabisa-v-internet-magazine-12-19-3
https://telegra.ph/Kupit-Mefedron-Gashish-Kannabis-Skorost-Brest-12-20
https://telegra.ph/Kupit-Kokain-Mefedron-Skorost-Amfetamin-Groznyj-12-20-2
https://telegra.ph/Lytkarino-kupit-zakladku-mefedrona-12-19-3
https://telegra.ph/O-Andros-kupit-Amfetamin-Mefedron-A-pvp-Alfa-PVP-12-20
https://telegra.ph/Kupit-mefedron-Afiny-12-19-5
https://telegra.ph/Mogilev-kupit-Geroin-Metadon-Liriku-Tramadol-12-20-2
https://telegra.ph/Kupit-Marihuanu-Boshki-SHishki-Sol-Katav-Ivanovsk-12-20
https://telegra.ph/Ozyorsk-kupit-zakladku-amfetamina-12-19-7
https://telegra.ph/Bechichi-kupit-Kokain-Mefedron-Skorost-Amfetamin-12-20-2
https://telegra.ph/Rossosh-kupit-zakladku-amfetamina-12-19-4
https://telegra.ph/Behjdajheh-kupit-Amfetamin-Mefedron-A-pvp-Alfa-PVP-12-19
https://telegra.ph/Nizhnij-Tagil-kupit-zakladku-mefedrona-12-19-2
https://telegra.ph/Kostanaj-kupit-Amfetamin-Mefedron-A-pvp-Alfa-PVP-12-20
https://telegra.ph/Kupit-kokain-zakladku-Ramenskoe-12-19-6
https://telegra.ph/Kupit-mefedron-zakladku-Zimogore-12-19-2
https://telegra.ph/Obninsk-kupit-EHkstazi-Lsd-25-MDMA-Lsd-12-20
https://telegra.ph/Kupit-mefedron-Hammamet-12-19-2
https://telegra.ph/Veneciya-kupit-Kokain-Mefedron-Skorost-Amfetamin-12-20-2
https://telegra.ph/Novorossijsk-kupit-gashish-shishki-boshki-12-19
https://telegra.ph/Kupit-Amfetamin-Mefedron-A-pvp-Alfa-PVP-Atoll-Baa-12-20
https://telegra.ph/Liepaya-kupit-narkotiki-12-19-5
https://telegra.ph/Nusa-Dua-kupit-Amfetamin-Mefedron-A-pvp-Alfa-PVP-12-20-3
Your comment is awaiting moderation.
https://telegra.ph/Sorta-marihuany-moshchnye-kupit-12-19-6
https://telegra.ph/Kupit-kokain-zakladku-ZHerba-12-19
https://telegra.ph/Kupit-Geroin-Metadon-Liriku-Tramadol-Solnechnogorsk-12-19
https://telegra.ph/Resp-Sev-Osetiya-Alaniya-kupit-EHkstazi-Lsd-25-MDMA-Lsd-12-20
https://telegra.ph/Laguna-Bich-kupit-kokain-12-19-6
https://telegra.ph/Bryugge-kupit-EHkstazi-Lsd-25-MDMA-Lsd-12-20
https://telegra.ph/Krasnodon-kupit-zakladku-kokaina-12-19-2
https://telegra.ph/Kupit-Geroin-Metadon-Liriku-Tramadol-Budyonnovsk-12-20
https://telegra.ph/Kupit-Kokain-Mefedron-Skorost-Amfetamin-Naro-Fominsk-12-20
https://telegra.ph/Kupit-gashish-zakladku-EHssen-12-19-3
https://telegra.ph/Boksitogorsk-kupit-Geroin-Metadon-Liriku-Tramadol-12-20
https://telegra.ph/Patara-kupit-Mefedron-Gashish-Kannabis-Skorost-12-20
https://telegra.ph/Kupit-Geroin-Metadon-Liriku-Tramadol-Bormio-12-20
https://telegra.ph/Bagio-kupit-Mefedron-Gashish-Kannabis-Skorost-12-19
https://telegra.ph/Kupit-mefedron-zakladku-Lutugino-12-19
https://telegra.ph/Lozanna-kupit-mefedron-12-19-4
https://telegra.ph/Kupit-EHkstazi-Lsd-25-MDMA-Lsd-Pitkyaranta-12-20-2
https://telegra.ph/Kupit-Mefedron-Gashish-Kannabis-Skorost-Palembang-12-20-2
https://telegra.ph/Bahchisaraj-kupit-gashish-shishki-boshki-12-19-2
https://telegra.ph/Samana-kupit-Mefedron-Gashish-Kannabis-Skorost-12-20-2
https://telegra.ph/Osipovichi-kupit-Marihuanu-Boshki-SHishki-Sol-12-20-2
https://telegra.ph/Mersa-Alam-kupit-zakladku-kokaina-12-19-3
https://telegra.ph/Kupit-Kokain-Mefedron-Skorost-Amfetamin-Kotelnich-12-20-2
https://telegra.ph/Rubezhnoe-kupit-Mefedron-Gashish-Kannabis-Skorost-12-20-2
Your comment is awaiting moderation.
An interesting discussion is definitely worth comment. I think that you
should write more about this subject matter, it might
not be a taboo matter but typically folks don’t discuss such topics.
To the next! Kind regards!!
Your comment is awaiting moderation.
https://telegra.ph/Harare-kupit-Kokain-Mefedron-Skorost-Amfetamin-12-20-2
https://telegra.ph/Kirov-kupit-Marihuanu-Boshki-SHishki-Sol-12-20
https://telegra.ph/Kupit-Mefedron-Gashish-Kannabis-Skorost-Tihvin-12-20-2
https://telegra.ph/Kupit-Marihuanu-Boshki-SHishki-Sol-Aleksandriya-12-20
https://telegra.ph/Prodazha-narkotikov-kupit-12-19-3
https://telegra.ph/Kupit-Marihuanu-Boshki-SHishki-Sol-CHapaevsk-12-20
https://telegra.ph/Anapa-kupit-zakladku-amfetamina-12-19-2
https://telegra.ph/Pushkin-kupit-Mefedron-Gashish-Kannabis-Skorost-12-20-2
https://telegra.ph/SHCHecin-kupit-Kokain-Mefedron-Skorost-Amfetamin-12-20
https://telegra.ph/Kupit-Kokain-Mefedron-Skorost-Amfetamin-Maeh-12-20-2
https://telegra.ph/Sosnovo-kupit-Amfetamin-Mefedron-A-pvp-Alfa-PVP-12-20
https://telegra.ph/Rim-kupit-zakladku-amfetamina-12-19-2
https://telegra.ph/Preobrazhenskoe-kupit-Amfetamin-Mefedron-A-pvp-Alfa-PVP-12-20
https://telegra.ph/Kupit-Marihuanu-Boshki-SHishki-Sol-Sachhere-12-20
https://telegra.ph/Kupit-Geroin-Metadon-Liriku-Tramadol-Vorsma-12-19
https://telegra.ph/Kupit-gashish-zakladku-Gudauta-12-19-3
https://telegra.ph/Kupit-gashish-zakladku-CHerepovec-12-19-4
https://telegra.ph/Kupit-Kokain-Mefedron-Skorost-Amfetamin-Kuta-12-20
https://telegra.ph/Kupit-Marihuanu-Boshki-SHishki-Sol-Balahna-12-20-2
https://telegra.ph/Kupit-Marihuanu-Boshki-SHishki-Sol-Lodejnoe-Pole-12-20-2
https://telegra.ph/Grimenc-kupit-Kokain-Mefedron-Skorost-Amfetamin-12-20-2
https://telegra.ph/Kupit-boshki-gashish-shishki-Uspenka-12-19
https://telegra.ph/Kupit-metadon-mef-geroin-v-orehovo-zuevo-12-19-3
https://telegra.ph/Kupit-gashish-zakladku-Taraz-12-19-3
Your comment is awaiting moderation.
https://advertisingagencywebsite.com/userinfo.php?do=profile&op=userinfo&userinfo=fernando-gillan.495626&name=Your_Account
Your comment is awaiting moderation.
https://telegra.ph/Krasnodar-kupit-zakladku-amfetamina-12-19-4
https://telegra.ph/Angren-kupit-Marihuanu-Boshki-SHishki-Sol-12-20-2
https://telegra.ph/Kupit-Mefedron-Gashish-Kannabis-Skorost-CHudovo-12-20
https://telegra.ph/Karlsrueh-kupit-narkotiki-12-19-2
https://telegra.ph/Kupit-kokain-geroin-v-bryanske-12-19-3
https://telegra.ph/Dyuran-kupit-Geroin-Metadon-Liriku-Tramadol-12-20
https://telegra.ph/Vajkiki-kupit-narkotiki-12-19-5
https://telegra.ph/Kupit-amfetamin-zakladku-Berezniki-12-19-3
https://telegra.ph/Kok-Dzhangak-kupit-Marihuanu-Boshki-SHishki-Sol-12-19
https://telegra.ph/Bavaro-kupit-amfetamin-12-19-2
https://telegra.ph/Kupit-Kokain-Mefedron-Skorost-Amfetamin-Bogorodick-12-20-2
https://telegra.ph/Kupit-Mefedron-Gashish-Kannabis-Skorost-Meleuz-12-19
https://telegra.ph/Polock-kupit-Amfetamin-Mefedron-A-pvp-Alfa-PVP-12-19
https://telegra.ph/SHadrinsk-kupit-amfetamin-12-19
https://telegra.ph/Kupit-Mefedron-Gashish-Kannabis-Skorost-Dolina-Gastajn-12-20
https://telegra.ph/ZHabinka-kupit-Mefedron-Gashish-Kannabis-Skorost-12-20-2
https://telegra.ph/Kupit-EHkstazi-Lsd-25-MDMA-Lsd-Dzherba-12-20
https://telegra.ph/Netaniya-kupit-Kokain-Mefedron-Skorost-Amfetamin-12-19
https://telegra.ph/Kupit-mefedron-Aleksin-12-19-6
https://telegra.ph/Kupit-EHkstazi-Lsd-25-MDMA-Lsd-Gurevsk-12-20
https://telegra.ph/Lejriya-kupit-amfetamin-12-19-3
https://telegra.ph/Kakie-narkotiki-mozhno-kupit-v-apteke-12-19-5
https://telegra.ph/ZHukovka-kupit-Geroin-Metadon-Liriku-Tramadol-12-20
https://telegra.ph/Kupit-EHkstazi-Lsd-25-MDMA-Lsd-Trenchin-12-20
Your comment is awaiting moderation.
https://lintense.com/profile.php?userinfo=rafaela.ledesma_495626&com=profile&do=profile&from=space
Your comment is awaiting moderation.
https://telegra.ph/Kupit-amfetamin-zakladku-Almetevsk-12-19
https://telegra.ph/Kupit-Geroin-Metadon-Liriku-Tramadol-Pamplona-12-20-2
https://telegra.ph/Kupit-Geroin-Metadon-Liriku-Tramadol-Strumica-12-20
https://telegra.ph/Kupit-EHkstazi-Lsd-25-MDMA-Lsd-Tulon-12-19
https://telegra.ph/Kupit-amfetamin-Pavlovo-12-19-5
https://telegra.ph/Danang-kupit-amfetamin-12-19-3
https://telegra.ph/Puchhon-kupit-Mefedron-Gashish-Kannabis-Skorost-12-20-2
https://telegra.ph/Uzgen-kupit-Amfetamin-Mefedron-A-pvp-Alfa-PVP-12-20-2
https://telegra.ph/Kupit-Geroin-Metadon-Liriku-Tramadol-Fillah-12-20
https://telegra.ph/Snezhnoe-kupit-Amfetamin-Mefedron-A-pvp-Alfa-PVP-12-20-2
https://telegra.ph/Vena-kupit-mefedron-12-19-5
https://telegra.ph/Ohrid-kupit-Kokain-Mefedron-Skorost-Amfetamin-12-20
https://telegra.ph/Novouzensk-kupit-Mefedron-Gashish-Kannabis-Skorost-12-20
https://telegra.ph/Kupit-EHkstazi-Lsd-25-MDMA-Lsd-Moskva-Sosenskoe-12-20
https://telegra.ph/Kupit-EHkstazi-Lsd-25-MDMA-Lsd-Tuchkovo-12-20
https://telegra.ph/Mariupol-kupit-gashish-12-19-5
https://telegra.ph/SHarm-ehl-SHejh-kupit-Mefedron-Gashish-Kannabis-Skorost-12-20
https://telegra.ph/Kupit-Marihuanu-Boshki-SHishki-Sol-Marmaris-12-20
https://telegra.ph/Der-kupit-Marihuanu-Boshki-SHishki-Sol-12-20-2
https://telegra.ph/Kupit-mefedron-Elabuga-12-19-7
https://telegra.ph/Kupit-Kokain-Mefedron-Skorost-Amfetamin-Belogorsk-12-20
https://telegra.ph/Kupit-Amfetamin-Mefedron-A-pvp-Alfa-PVP-CHondzhu-12-20
https://telegra.ph/Kupit-Kokain-Mefedron-Skorost-Amfetamin-EHlyutera-12-20
https://telegra.ph/Bobrujsk-kupit-gashish-shishki-boshki-12-19
Your comment is awaiting moderation.
https://telegra.ph/Podolsk-kupit-zakladku-kokaina-12-19-6
https://telegra.ph/Kupit-gashish-ivanovo-12-19-4
https://telegra.ph/Bad-Klyajnkirhajm-kupit-Mefedron-Gashish-Kannabis-Skorost-12-20
https://telegra.ph/Kupit-Geroin-Metadon-Liriku-Tramadol-Rezh-12-20
https://telegra.ph/Kupit-Kokain-Mefedron-Skorost-Amfetamin-Koral-Behj-12-20
https://telegra.ph/Kara-Kul-kupit-Amfetamin-Mefedron-A-pvp-Alfa-PVP-12-20-2
https://telegra.ph/Sokolinaya-Gora-kupit-EHkstazi-Lsd-25-MDMA-Lsd-12-19
https://telegra.ph/CHita-kupit-Amfetamin-Mefedron-A-pvp-Alfa-PVP-12-19
https://telegra.ph/Kapri-kupit-EHkstazi-Lsd-25-MDMA-Lsd-12-20
https://telegra.ph/Centralnyj-i-Zapadnyj-okrug-kupit-Geroin-Metadon-Liriku-Tramadol-12-20-2
https://telegra.ph/Kupit-Geroin-Metadon-Liriku-Tramadol-Kropotkin-12-20
https://telegra.ph/Kupit-mefedron-Nizhnekamsk-12-19-7
https://telegra.ph/Kupit-Amfetamin-Mefedron-A-pvp-Alfa-PVP-Fokino-12-20-2
https://telegra.ph/Kupit-mefedron-Murom-12-19-5
https://telegra.ph/Maskat-Oman-kupit-Kokain-Mefedron-Skorost-Amfetamin-12-20-2
https://telegra.ph/Kupit-Amfetamin-Mefedron-A-pvp-Alfa-PVP-Korfu-12-20
https://telegra.ph/Alchevsk-kupit-zakladku-mefedrona-12-19
https://telegra.ph/Kupit-EHkstazi-Lsd-25-MDMA-Lsd-Neryungri-12-20
https://telegra.ph/Kupit-Kokain-Mefedron-Skorost-Amfetamin-Tosno-12-20
https://telegra.ph/Kupit-Mefedron-Gashish-Kannabis-Skorost-Denpasar-12-20-2
https://telegra.ph/Leninsk-kupit-Marihuanu-Boshki-SHishki-Sol-12-20
https://telegra.ph/Krymsk-kupit-mefedron-12-19-2
https://telegra.ph/Pyatigorsk-kupit-Kokain-Mefedron-Skorost-Amfetamin-12-20-2
https://telegra.ph/Elgava-kupit-mefedron-12-19
Your comment is awaiting moderation.
https://telegra.ph/Ramenskoe-kupit-Geroin-Metadon-Liriku-Tramadol-12-20
https://telegra.ph/Kupit-mefedron-Novokuzneck-12-19-4
https://telegra.ph/Kupit-gashish-zakladku-Perm-12-19
https://telegra.ph/YAsenevo-kupit-Amfetamin-Mefedron-A-pvp-Alfa-PVP-12-20
https://telegra.ph/YUgra-kupit-Mefedron-Gashish-Kannabis-Skorost-12-20
https://telegra.ph/Kupit-Kokain-Mefedron-Skorost-Amfetamin-Mandalujong-12-19
https://telegra.ph/Kupit-Marihuanu-Boshki-SHishki-Sol-Kajo-Santa-Mariya-12-20-2
https://telegra.ph/Kupit-Geroin-Metadon-Liriku-Tramadol-Lnr-12-20
https://telegra.ph/Santorini-kupit-narkotiki-12-19-4
https://telegra.ph/Kupit-kokain-Helsinki-12-19-2
https://telegra.ph/Bern-kupit-amfetamin-12-19-2
https://telegra.ph/Punta-del-EHste-Urugvaj-kupit-EHkstazi-Lsd-25-MDMA-Lsd-12-20
https://telegra.ph/Amvrosievka-kupit-mefedron-12-19-2
https://telegra.ph/YUrev-Polskij-kupit-Geroin-Metadon-Liriku-Tramadol-12-20
https://telegra.ph/Kupit-gashish-zakladku-Kogalym-12-19-2
https://telegra.ph/Kupit-Marihuanu-Boshki-SHishki-Sol-Lefortovo-12-20
https://telegra.ph/Kupit-Marihuanu-Boshki-SHishki-Sol-CHudovo-12-20
https://telegra.ph/Renn-kupit-narkotiki-12-19-5
https://telegra.ph/SHCHyokino-kupit-narkotiki-12-19-4
https://telegra.ph/Kupit-Kokain-Mefedron-Skorost-Amfetamin-Belousovo-12-20
https://telegra.ph/Dizin-kupit-Geroin-Metadon-Liriku-Tramadol-12-20-2
https://telegra.ph/Kupit-Marihuanu-Boshki-SHishki-Sol-Harare-12-20
https://telegra.ph/Moskva-Vojkovskij-kupit-EHkstazi-Lsd-25-MDMA-Lsd-12-20-2
https://telegra.ph/Staryj-Oskol-kupit-gashish-12-19-3
Your comment is awaiting moderation.
https://telegra.ph/Nevshatel-kupit-Marihuanu-Boshki-SHishki-Sol-12-20-2
https://telegra.ph/Kupit-Geroin-Metadon-Liriku-Tramadol-SHlisselburg-12-20
https://telegra.ph/Antaliya-kupit-mefedron-12-19-3
https://telegra.ph/Kupit-Mefedron-Gashish-Kannabis-Skorost-Moskva-Krasnoselskij-12-20
https://telegra.ph/Bryussel-kupit-Geroin-Metadon-Liriku-Tramadol-12-20
https://telegra.ph/Vologda-kupit-kokain-12-19-4
https://telegra.ph/Sosnovec-kupit-amfetamin-12-19-2
https://telegra.ph/Kupit-Marihuanu-Boshki-SHishki-Sol-Vysokovsk-12-20-2
https://telegra.ph/Kupit-zakladku-narkotiki-12-19
https://telegra.ph/Egorevsk-kupit-amfetamin-12-19-4
https://telegra.ph/Fryazino-kupit-Mefedron-Gashish-Kannabis-Skorost-12-20-2
https://telegra.ph/Kupit-Mefedron-Gashish-Kannabis-Skorost-Orenburg-12-19
https://telegra.ph/Moskva-Timiryazevskij-kupit-EHkstazi-Lsd-25-MDMA-Lsd-12-20
https://telegra.ph/Kupit-amfetamin-Hoshimin-12-19-2
https://telegra.ph/Kupit-Geroin-Metadon-Liriku-Tramadol-Magdeburg-12-20
https://telegra.ph/Proletarsk-kupit-Mefedron-Gashish-Kannabis-Skorost-12-20
https://telegra.ph/Nizhnij-Tagil-kupit-zakladku-amfetamina-12-19-3
https://telegra.ph/Kupit-amfetamin-zakladku-Rossosh-12-19-3
https://telegra.ph/Kupit-Amfetamin-Mefedron-A-pvp-Alfa-PVP-Kinshasa-12-20
https://telegra.ph/Mogilyov-kupit-Geroin-Metadon-Liriku-Tramadol-12-20-2
https://telegra.ph/Kupit-Mefedron-Gashish-Kannabis-Skorost-Zanzibar-12-20
https://telegra.ph/Kupit-amfetamin-zakladku-Berdsk-12-19
https://telegra.ph/Kupit-kokain-zakladku-Ostrova-Kanarskie-12-19-2
https://telegra.ph/Kupit-Marihuanu-Boshki-SHishki-Sol-CHegem-12-20
Your comment is awaiting moderation.
https://telegra.ph/Pokrovsk-kupit-Geroin-Metadon-Liriku-Tramadol-12-20-2
https://telegra.ph/Azov-kupit-zakladku-mefedrona-12-19-2
https://telegra.ph/Kupit-Amfetamin-Mefedron-A-pvp-Alfa-PVP-Slavyansk-na-Kubani-12-20
https://telegra.ph/Ajn-Sohna-kupit-Marihuanu-Boshki-SHishki-Sol-12-20-2
https://telegra.ph/Kupit-Kokain-Mefedron-Skorost-Amfetamin-Nartkala-12-20
https://telegra.ph/San-Migel-kupit-Geroin-Metadon-Liriku-Tramadol-12-20-2
https://telegra.ph/Uspenka-kupit-EHkstazi-Lsd-25-MDMA-Lsd-12-20
https://telegra.ph/Kupit-kokain-Kuopio-12-19-6
https://telegra.ph/Dimitrovgrad-kupit-Geroin-Metadon-Liriku-Tramadol-12-20
https://telegra.ph/Gde-kupit-narkotiki-v-svobodnom-12-19-2
https://telegra.ph/SHali-kupit-Marihuanu-Boshki-SHishki-Sol-12-19
https://telegra.ph/Kupit-Geroin-Metadon-Liriku-Tramadol-Phangan-12-20-2
https://telegra.ph/Kupit-Kokain-Mefedron-Skorost-Amfetamin-CHangu-Bali-12-20-2
https://telegra.ph/Kupit-maslo-s-kanabisom-dlya-vejpa-12-19-6
https://telegra.ph/Kupit-EHkstazi-Lsd-25-MDMA-Lsd-Lion-12-20-2
https://telegra.ph/Malta-kupit-zakladku-amfetamina-12-19-4
https://telegra.ph/Murino-kupit-mefedron-12-19
https://telegra.ph/Semikarakorsk-kupit-Amfetamin-Mefedron-A-pvp-Alfa-PVP-12-20-2
https://telegra.ph/Kupit-mefedron-Neryungri-12-19-2
https://telegra.ph/Mangush-kupit-gashish-shishki-boshki-12-19-3
https://telegra.ph/Kupit-boshki-gashish-shishki-Krabi-12-19-2
https://telegra.ph/Kupit-mef-kokain-12-19-2
https://telegra.ph/Joshkar-Ola-kupit-zakladku-kokaina-12-19-6
https://telegra.ph/EHlista-kupit-kokain-12-19
Your comment is awaiting moderation.
https://telegra.ph/Osttirol-kupit-Kokain-Mefedron-Skorost-Amfetamin-12-20-2
https://telegra.ph/Bad-Valtersdorf-kupit-EHkstazi-Lsd-25-MDMA-Lsd-12-19
https://telegra.ph/Atyrau-kupit-gashish-shishki-boshki-12-19-2
https://telegra.ph/Kupit-Kokain-Mefedron-Skorost-Amfetamin-Radzhshahi-12-20-2
https://telegra.ph/Kupit-tabletki-lirika-300-12-19
https://telegra.ph/Ishimbaj-kupit-Kokain-Mefedron-Skorost-Amfetamin-12-20
https://telegra.ph/Kupit-EHkstazi-Lsd-25-MDMA-Lsd-Elabuga-12-20
https://telegra.ph/Kupit-Amfetamin-Mefedron-A-pvp-Alfa-PVP-Velkom-12-20-2
https://telegra.ph/Kupit-kokain-Sent-Lyusiya-12-19-3
https://telegra.ph/Kupit-kokain-zakladku-Oktyabrskij-12-19-2
https://telegra.ph/Kupit-Amfetamin-Mefedron-A-pvp-Alfa-PVP-Sterlitamak-12-20
https://telegra.ph/Kupit-kokain-Hoshimin-12-19-5
https://telegra.ph/Kamensk-SHahtinskij-kupit-mefedron-12-19-4
https://telegra.ph/Kupit-Geroin-Metadon-Liriku-Tramadol-Moskva-CHertanovo-YUzhnoe-12-20
https://telegra.ph/Kupit-gashish-kyzyle-12-19-4
https://telegra.ph/Uvero-Alto-kupit-Kokain-Mefedron-Skorost-Amfetamin-12-19
https://telegra.ph/Jezd-kupit-Amfetamin-Mefedron-A-pvp-Alfa-PVP-12-20
https://telegra.ph/Kupit-Kokain-Mefedron-Skorost-Amfetamin-Ostrov-Penang-12-20
https://telegra.ph/Kupit-Kokain-Mefedron-Skorost-Amfetamin-Snezhnoe-12-20-2
https://telegra.ph/Zadar-kupit-kokain-12-19-6
https://telegra.ph/Kupit-kokain-zakladku-Trenchin-12-19-5
https://telegra.ph/Sitra-kupit-Marihuanu-Boshki-SHishki-Sol-12-20
https://telegra.ph/Alta-Badiya-kupit-Kokain-Mefedron-Skorost-Amfetamin-12-20-2
https://telegra.ph/Kyrgyzstan-kupit-Amfetamin-Mefedron-A-pvp-Alfa-PVP-12-20
Your comment is awaiting moderation.
https://telegra.ph/Kupit-Mefedron-Gashish-Kannabis-Skorost-Managua-12-20-2
https://telegra.ph/Kotlas-kupit-kokain-12-19-5
https://telegra.ph/Kupit-Kokain-Mefedron-Skorost-Amfetamin-Puchhon-12-20
https://telegra.ph/YAsen-kupit-Geroin-Metadon-Liriku-Tramadol-12-20-2
https://telegra.ph/Kupit-liriku-rostov-na-donu-12-19-2
https://telegra.ph/Kopengagen-Daniya-kupit-Marihuanu-Boshki-SHishki-Sol-12-20-2
https://telegra.ph/Kupit-narkotiki-klad-12-19-4
https://telegra.ph/Anadyr-kupit-Amfetamin-Mefedron-A-pvp-Alfa-PVP-12-20-2
https://telegra.ph/Krasnoselskij-kupit-Mefedron-Gashish-Kannabis-Skorost-12-20-2
https://telegra.ph/Sanur-kupit-kokain-12-19
https://telegra.ph/Kostanaj-kupit-gashish-12-19-2
https://telegra.ph/Temirtau-kupit-gashish-shishki-boshki-12-19-5
https://telegra.ph/Kupit-amfetamin-zakladku-Praga-12-19-3
https://telegra.ph/Bali-CHangu-kupit-Geroin-Metadon-Liriku-Tramadol-12-19
https://telegra.ph/Kupit-Kokain-Mefedron-Skorost-Amfetamin-Kuala-Lumpur-12-20
https://telegra.ph/Kupit-boshki-gashish-shishki-Volgograd-12-19-3
https://telegra.ph/Kastorya-kupit-Amfetamin-Mefedron-A-pvp-Alfa-PVP-12-19
https://telegra.ph/Kupit-Geroin-Metadon-Liriku-Tramadol-Meleuz-12-20-2
https://telegra.ph/Lipeck-kupit-gashish-shishki-boshki-12-19
https://telegra.ph/Milan-kupit-mefedron-12-19-7
https://telegra.ph/Kupit-Marihuanu-Boshki-SHishki-Sol-Kyrgyzstan-12-20-2
https://telegra.ph/Petropavlovsk-kupit-narkotiki-12-19-2
https://telegra.ph/Kupit-Marihuanu-Boshki-SHishki-Sol-Sevastopolne-12-20
https://telegra.ph/Kupit-gashish-zakladku-Tver-12-19-3
Your comment is awaiting moderation.
It’s genuinely very complex in this full of activity life to listen news on TV, thus I just use the web for that purpose, and get the
hottest information.
My blog – Ankara Escorts
Your comment is awaiting moderation.
https://telegra.ph/Kupit-Amfetamin-Mefedron-A-pvp-Alfa-PVP-SHuya-12-20-2
https://telegra.ph/Kupit-EHkstazi-Lsd-25-MDMA-Lsd-Gavr-12-20
https://telegra.ph/Mahmutlar-kupit-zakladku-kokaina-12-19-3
https://telegra.ph/Kupit-kokain-zakladku-Armavir-12-19
https://telegra.ph/Bolshoj-Kamen-kupit-EHkstazi-Lsd-25-MDMA-Lsd-12-20-2
https://telegra.ph/Verhoture-kupit-Geroin-Metadon-Liriku-Tramadol-12-20
https://telegra.ph/Kupit-amfetamin-zakladku-Belostok-12-19-2
https://telegra.ph/Bratislava-Slovakiya-kupit-Mefedron-Gashish-Kannabis-Skorost-12-20
https://telegra.ph/Protaras-kupit-amfetamin-12-19-3
https://telegra.ph/Kupit-Kokain-Mefedron-Skorost-Amfetamin-Huahin-12-20-2
https://telegra.ph/Kahetiya-kupit-Geroin-Metadon-Liriku-Tramadol-12-20
https://telegra.ph/Kupit-mefedron-Armavir-12-19-5
https://telegra.ph/Calendzhiha-kupit-Kokain-Mefedron-Skorost-Amfetamin-12-20-2
https://telegra.ph/Kupit-Geroin-Metadon-Liriku-Tramadol-OAE-Dubaj-12-20-2
https://telegra.ph/Riga-kupit-zakladku-amfetamina-12-19-2
https://telegra.ph/Kupit-EHkstazi-Lsd-25-MDMA-Lsd-Avdeevka-12-20
https://telegra.ph/Kupit-Geroin-Metadon-Liriku-Tramadol-Kosino-Uhtomskij-12-20
https://telegra.ph/Kupit-Marihuanu-Boshki-SHishki-Sol-Metro-Vyhino-12-20
https://telegra.ph/Kupit-EHkstazi-Lsd-25-MDMA-Lsd-Askona-SHvejcariya-12-19
https://telegra.ph/Kupit-Kokain-Mefedron-Skorost-Amfetamin-Moskva-YUzhnoe-Medvedkovo-12-20
https://telegra.ph/Kupit-EHkstazi-Lsd-25-MDMA-Lsd-Hodzhejli-12-20
https://telegra.ph/Kampala-kupit-Amfetamin-Mefedron-A-pvp-Alfa-PVP-12-20
https://telegra.ph/Vilyujsk-kupit-Geroin-Metadon-Liriku-Tramadol-12-20-2
https://telegra.ph/Kupit-EHkstazi-Lsd-25-MDMA-Lsd-SHCHigry-12-20
Your comment is awaiting moderation.
Круизы из Китая подходят тем, кто хочет необычный маршрут и высокий уровень комфорта – https://kruizy-iz-kataya.ru/
Your comment is awaiting moderation.
https://telegra.ph/Darvin-kupit-Marihuanu-Boshki-SHishki-Sol-12-20
https://telegra.ph/Kupit-mefedron-zakladku-Buharest-12-19-2
https://telegra.ph/Kupit-amfetamin-zakladku-Zagreb-12-19-4
https://telegra.ph/Kupit-EHkstazi-Lsd-25-MDMA-Lsd-Paralimni-12-20-2
https://telegra.ph/Povarovo-kupit-Marihuanu-Boshki-SHishki-Sol-12-20-2
https://telegra.ph/Moskovskij-kupit-Geroin-Metadon-Liriku-Tramadol-12-19
https://telegra.ph/Kupit-Geroin-Metadon-Liriku-Tramadol-Kanny-12-20-2
https://telegra.ph/Belomorsk-kupit-Kokain-Mefedron-Skorost-Amfetamin-12-20-2
https://telegra.ph/Kupit-Mefedron-Gashish-Kannabis-Skorost-Valyadolid-12-20-2
https://telegra.ph/Iksha-kupit-Kokain-Mefedron-Skorost-Amfetamin-12-20
https://telegra.ph/Kupit-mefedron-zakladku-Mersa-Alam-12-19
https://telegra.ph/Kupit-Amfetamin-Mefedron-A-pvp-Alfa-PVP-Taldom-12-20
https://telegra.ph/Tetnuldi-kupit-Geroin-Metadon-Liriku-Tramadol-12-20-2
https://telegra.ph/Budte-uvereny-test-na-narkotiki-kupit-12-19-3
https://telegra.ph/Solvychegodsk-kupit-EHkstazi-Lsd-25-MDMA-Lsd-12-20-2
https://telegra.ph/SHCHuchinsk-kupit-Marihuanu-Boshki-SHishki-Sol-12-20
https://telegra.ph/Kupit-Geroin-Metadon-Liriku-Tramadol-Valujki-12-19
https://telegra.ph/Dzhankoj-kupit-zakladku-amfetamina-12-19-2
https://telegra.ph/Strumica-kupit-EHkstazi-Lsd-25-MDMA-Lsd-12-19
https://telegra.ph/Thimphu-kupit-Mefedron-Gashish-Kannabis-Skorost-12-20
https://telegra.ph/Kupit-Amfetamin-Mefedron-A-pvp-Alfa-PVP-Kumanovo-12-19
https://telegra.ph/Singapur-kupit-Marihuanu-Boshki-SHishki-Sol-12-20
https://telegra.ph/Stikkisholmyur-kupit-EHkstazi-Lsd-25-MDMA-Lsd-12-20-2
https://telegra.ph/Kupit-kokain-zakladku-Salsk-12-19
Your comment is awaiting moderation.
Amazing stuff. Kudos.
Feel free to surf to my web site :: https://Evinsightzone.com/
Your comment is awaiting moderation.
https://telegra.ph/Kupit-narkotiki-bot-12-19-5
https://telegra.ph/Kupit-mefedron-Sochi-12-19-11
https://telegra.ph/Kupit-Marihuanu-Boshki-SHishki-Sol-Kalyari-12-20
https://telegra.ph/Kupit-Amfetamin-Mefedron-A-pvp-Alfa-PVP-CHerkessk-12-20-2
https://telegra.ph/Kupit-EHkstazi-Lsd-25-MDMA-Lsd-Sokolniki-12-20
https://telegra.ph/Parizh-kupit-gashish-12-19-2
https://telegra.ph/Kupit-EHkstazi-Lsd-25-MDMA-Lsd-Petrozavodsk-12-20
https://telegra.ph/Temnikov-kupit-Mefedron-Gashish-Kannabis-Skorost-12-20
https://telegra.ph/Kupit-Marihuanu-Boshki-SHishki-Sol-Karachaevsk-12-20
https://telegra.ph/Tuchkovo-kupit-Kokain-Mefedron-Skorost-Amfetamin-12-20-2
https://telegra.ph/Kimovsk-kupit-Kokain-Mefedron-Skorost-Amfetamin-12-20-2
https://telegra.ph/Portichchio-kupit-Mefedron-Gashish-Kannabis-Skorost-12-20
https://telegra.ph/La-Romana-kupit-zakladku-amfetamina-12-19
https://telegra.ph/Kupit-Mefedron-Gashish-Kannabis-Skorost-Moskva-Filimonkovskoe-12-19
https://telegra.ph/Sredneuralsk-kupit-Marihuanu-Boshki-SHishki-Sol-12-20
https://telegra.ph/Zeefeld-kupit-Mefedron-Gashish-Kannabis-Skorost-12-20
https://telegra.ph/Severnyj-kupit-Kokain-Mefedron-Skorost-Amfetamin-12-20
https://telegra.ph/Pervomajsk-kupit-gashish-12-19-4
https://telegra.ph/Bodrum-kupit-Mefedron-Gashish-Kannabis-Skorost-12-20-2
https://telegra.ph/Simferopol-kupit-kokain-12-19-3
https://telegra.ph/Kostyukovichi-kupit-Kokain-Mefedron-Skorost-Amfetamin-12-19
https://telegra.ph/Johannesburg-kupit-EHkstazi-Lsd-25-MDMA-Lsd-12-20-2
https://telegra.ph/Kupit-boshki-gashish-shishki-Andorra-12-19
https://telegra.ph/Syudad-Huares-kupit-Kokain-Mefedron-Skorost-Amfetamin-12-20-2
Your comment is awaiting moderation.
Outstanding quest there. What occurred after? Thanks!
Your comment is awaiting moderation.
Pretty! This was an incredibly wonderful post.
Thanks for supplying this info.
Your comment is awaiting moderation.
https://telegra.ph/Kupit-kokain-zakladku-EHlista-12-19
https://telegra.ph/Bechichi-kupit-kokain-12-19-2
https://telegra.ph/Kupit-Mefedron-Gashish-Kannabis-Skorost-Kingisepp-12-20-2
https://telegra.ph/Kupit-Marihuanu-Boshki-SHishki-Sol-Lnr-12-20
https://telegra.ph/Torun-kupit-Marihuanu-Boshki-SHishki-Sol-12-20
https://telegra.ph/Staryj-Oskol-kupit-zakladku-kokaina-12-19-5
https://telegra.ph/Kupit-amfetamin-Debalcevo-12-19
https://telegra.ph/SHadrinsk-kupit-Geroin-Metadon-Liriku-Tramadol-12-20
https://telegra.ph/Kupit-Kokain-Mefedron-Skorost-Amfetamin-Ajya-Napa-12-20-2
https://telegra.ph/Marsel-kupit-mefedron-12-19-3
https://telegra.ph/Bad-Ishl-kupit-Mefedron-Gashish-Kannabis-Skorost-12-20
https://telegra.ph/Kupit-mefedron-zakladku-Mahmutlar-12-19
https://telegra.ph/Bagama-kupit-Amfetamin-Mefedron-A-pvp-Alfa-PVP-12-20-2
https://telegra.ph/Kupit-mefedron-zakladku-Georgievsk-12-19-6
https://telegra.ph/SHCHuchinsk-kupit-gashish-shishki-boshki-12-19-4
https://telegra.ph/Kupit-Geroin-Metadon-Liriku-Tramadol-CHzhehnchzhou-12-20
https://telegra.ph/OAE-Dubaj-kupit-Kokain-Mefedron-Skorost-Amfetamin-12-20
https://telegra.ph/Kupit-Mefedron-Gashish-Kannabis-Skorost-Polyarnye-Zori-12-20
https://telegra.ph/Kupit-Kokain-Mefedron-Skorost-Amfetamin-Maan-12-20
https://telegra.ph/Kotovo-kupit-Mefedron-Gashish-Kannabis-Skorost-12-20
https://telegra.ph/Kupit-Geroin-Metadon-Liriku-Tramadol-Tula-12-20
https://telegra.ph/Lyahovichi-kupit-Marihuanu-Boshki-SHishki-Sol-12-20
https://telegra.ph/Kupit-kokain-zakladku-Tolyatti-12-19
https://telegra.ph/Pekin-kupit-kokain-12-19-2
Your comment is awaiting moderation.
https://telegra.ph/Sitra-kupit-Kokain-Mefedron-Skorost-Amfetamin-12-19
https://telegra.ph/OAE-Dubaj-kupit-Marihuanu-Boshki-SHishki-Sol-12-20
https://telegra.ph/Puehrto-Madrin-Argentina-kupit-Mefedron-Gashish-Kannabis-Skorost-12-20
https://telegra.ph/Turciya-Ankara-kupit-EHkstazi-Lsd-25-MDMA-Lsd-12-19
https://telegra.ph/Kupit-Amfetamin-Mefedron-A-pvp-Alfa-PVP-Moskva-Filimonkovskoe-12-20
https://telegra.ph/Skidel-kupit-Marihuanu-Boshki-SHishki-Sol-12-19
https://telegra.ph/Snezhinsk-kupit-gashish-12-19-7
https://telegra.ph/Kupit-Amfetamin-Mefedron-A-pvp-Alfa-PVP-Pustoshka-12-20-2
https://telegra.ph/Banska-Bistrica-kupit-Marihuanu-Boshki-SHishki-Sol-12-20-2
https://telegra.ph/Kupit-kokain-Unavatuna-12-19-3
https://telegra.ph/Klajpeda-kupit-narkotiki-12-19
https://telegra.ph/Kupit-mefedron-zakladku-Stupino-12-19-2
https://telegra.ph/Sayanogorsk-kupit-EHkstazi-Lsd-25-MDMA-Lsd-12-20
https://telegra.ph/Kupit-Kokain-Mefedron-Skorost-Amfetamin-EHfes-12-20
https://telegra.ph/Volokolams-kupit-Mefedron-Gashish-Kannabis-Skorost-12-20
https://telegra.ph/Kupit-mefedron-Tallin-12-19
https://telegra.ph/Kupit-Geroin-Metadon-Liriku-Tramadol-Amerika-12-20-2
https://telegra.ph/Kupit-kokain-Liski-12-19-2
https://telegra.ph/Gibraltar-Gibraltar-kupit-Amfetamin-Mefedron-A-pvp-Alfa-PVP-12-19
https://telegra.ph/Kupit-Mefedron-Gashish-Kannabis-Skorost-Lianozovo-12-20-2
https://telegra.ph/Hoshimin-kupit-amfetamin-12-19-8
https://telegra.ph/Ulan-Udeh-kupit-zakladku-mefedrona-12-19-6
https://telegra.ph/Kupit-Geroin-Metadon-Liriku-Tramadol-Kosta-Rika-12-20-2
https://telegra.ph/Tabletki-lirika-gde-kupit-12-19-2
Your comment is awaiting moderation.
http://www.annunciogratis.net/author/1xbetpromocodeinnigeria
Your comment is awaiting moderation.
https://telegra.ph/Novovoronezh-kupit-Mefedron-Gashish-Kannabis-Skorost-12-20
https://telegra.ph/Montekatini-Terme-kupit-Mefedron-Gashish-Kannabis-Skorost-12-20-2
https://telegra.ph/Kupit-ehkspress-testy-na-vid-narkotikov-12-19-5
https://telegra.ph/Siciliya-kupit-gashish-12-19-5
https://telegra.ph/Kahetiya-kupit-EHkstazi-Lsd-25-MDMA-Lsd-12-20
https://telegra.ph/Kupit-Geroin-Metadon-Liriku-Tramadol-Sadovodstvo-Kirpichnoe-12-20-2
https://telegra.ph/Kupit-Kokain-Mefedron-Skorost-Amfetamin-Fryazino-12-20
https://telegra.ph/Gubaha-kupit-Marihuanu-Boshki-SHishki-Sol-12-20-2
https://telegra.ph/Dakka-kupit-EHkstazi-Lsd-25-MDMA-Lsd-12-20-2
https://telegra.ph/Kupit-EHkstazi-Lsd-25-MDMA-Lsd-Bibirevo-12-20-2
https://telegra.ph/Pinsk-kupit-Geroin-Metadon-Liriku-Tramadol-12-19
https://telegra.ph/Novosibirsk-kupit-kokain-12-19-2
https://telegra.ph/SHahty-kupit-mefedron-12-19-3
https://telegra.ph/Kushadasy-kupit-Marihuanu-Boshki-SHishki-Sol-12-20
https://telegra.ph/SHCHyolkovo-kupit-gashish-12-19-4
https://telegra.ph/Mardin-kupit-Mefedron-Gashish-Kannabis-Skorost-12-20
https://telegra.ph/Kupit-Marihuanu-Boshki-SHishki-Sol-Atkarsk-12-20
https://telegra.ph/Vladimir-kupit-amfetamin-12-19-5
https://telegra.ph/Moskva-Tverskoj-kupit-EHkstazi-Lsd-25-MDMA-Lsd-12-20
https://telegra.ph/Kupit-Geroin-Metadon-Liriku-Tramadol-Asha-12-20
https://telegra.ph/Kupit-Geroin-Metadon-Liriku-Tramadol-Mariinskij-Posad-12-20-2
https://telegra.ph/Kamensk-Uralskij-kupit-amfetamin-12-19-5
https://telegra.ph/Kupit-kokain-zakladku-Mozyr-12-19-3
https://telegra.ph/Kupit-EHkstazi-Lsd-25-MDMA-Lsd-Bujon-Belgiya-12-20-2
Your comment is awaiting moderation.
https://telegra.ph/Ashvem-kupit-Marihuanu-Boshki-SHishki-Sol-12-20-2
https://telegra.ph/Kupit-Kokain-Mefedron-Skorost-Amfetamin-Vologda-12-20-2
https://telegra.ph/Georgievsk-kupit-narkotiki-12-19
https://telegra.ph/Nizhnekamsk-kupit-Geroin-Metadon-Liriku-Tramadol-12-19
https://telegra.ph/Kupit-Marihuanu-Boshki-SHishki-Sol-Kungur-12-20
https://telegra.ph/Adygejsk-kupit-EHkstazi-Lsd-25-MDMA-Lsd-12-20-2
https://telegra.ph/Kust-marihuany-gotovyj-kupit-12-19
https://telegra.ph/Uster-kupit-Amfetamin-Mefedron-A-pvp-Alfa-PVP-12-20
https://telegra.ph/Syktyvkar-kupit-zakladku-amfetamina-12-19-5
https://telegra.ph/Kupit-boshki-gashish-shishki-Nevinnomyssk-12-19
https://telegra.ph/Petrozavodsk-kupit-kokain-12-19-4
https://telegra.ph/Bintan-kupit-Kokain-Mefedron-Skorost-Amfetamin-12-20-2
https://telegra.ph/Kupit-Mefedron-Gashish-Kannabis-Skorost-Balchik-12-20-2
https://telegra.ph/Isfahan-kupit-Marihuanu-Boshki-SHishki-Sol-12-19
https://telegra.ph/Kerben-kupit-Marihuanu-Boshki-SHishki-Sol-12-19
https://telegra.ph/Kupit-mefedron-zakladku-Linc-12-19-2
https://telegra.ph/Ras-ehl-Hajma-kupit-narkotiki-12-19-4
https://telegra.ph/Plzen-kupit-mefedron-12-19-8
https://telegra.ph/Uster-kupit-Geroin-Metadon-Liriku-Tramadol-12-20-2
https://telegra.ph/Moskva-Centralnyj-kupit-EHkstazi-Lsd-25-MDMA-Lsd-12-20
https://telegra.ph/SHelehov-kupit-Kokain-Mefedron-Skorost-Amfetamin-12-20
https://telegra.ph/Oslo-kupit-kokain-12-19-4
https://telegra.ph/Kupit-liriku-bot-telegram-12-19-2
https://telegra.ph/Kupit-Geroin-Metadon-Liriku-Tramadol-Urumchi-12-20-2
Your comment is awaiting moderation.
https://telegra.ph/Murom-kupit-zakladku-amfetamina-12-19-4
https://telegra.ph/Kupit-Marihuanu-Boshki-SHishki-Sol-Inza-12-20
https://telegra.ph/Kofemashina-saeko-lirika-one-tach-kapuchino-kupit-12-19-3
https://telegra.ph/Kupit-EHkstazi-Lsd-25-MDMA-Lsd-Mestia-12-20
https://telegra.ph/Moskva-kupit-mefedron-s-dostavkoj-na-dom-12-19
https://telegra.ph/Seversk-kupit-zakladku-kokaina-12-19-3
https://telegra.ph/Krabi-kupit-amfetamin-12-19-5
https://telegra.ph/Lezh-kupit-Kokain-Mefedron-Skorost-Amfetamin-12-19
https://telegra.ph/Ostrova-Kanarskie-kupit-narkotiki-12-19
https://telegra.ph/Pattajya-kupit-narkotiki-12-19-7
https://telegra.ph/Kupit-amfetamin-zakladku-Antracit-12-19-2
https://telegra.ph/Kozmodemyansk-kupit-EHkstazi-Lsd-25-MDMA-Lsd-12-20-2
https://telegra.ph/Kupit-Marihuanu-Boshki-SHishki-Sol-Kotabato-12-20
https://telegra.ph/Beguny-kupit-Geroin-Metadon-Liriku-Tramadol-12-20-2
https://telegra.ph/CHiklajo-kupit-Kokain-Mefedron-Skorost-Amfetamin-12-20-2
https://telegra.ph/Kupit-Kokain-Mefedron-Skorost-Amfetamin-Koyan-12-20-2
https://telegra.ph/Moskva-Brateevo-kupit-EHkstazi-Lsd-25-MDMA-Lsd-12-20-2
https://telegra.ph/Kupit-Kokain-Mefedron-Skorost-Amfetamin-Ajteke-Bi-12-20
https://telegra.ph/Doneck-kupit-kokain-12-19-3
https://telegra.ph/Ibica-kupit-zakladku-amfetamina-12-19-3
https://telegra.ph/ZHezkazgan-kupit-narkotiki-12-19-2
https://telegra.ph/Kupit-Marihuanu-Boshki-SHishki-Sol-Aleksandriya-12-20-2
https://telegra.ph/Kupit-Kokain-Mefedron-Skorost-Amfetamin-Katmandu-12-20
https://telegra.ph/Tampere-kupit-kokain-12-19-4
Your comment is awaiting moderation.
Thanks for any other great article. The place else may just
anyone get that type of information in such an ideal approach of
writing? I have a presentation next week, and I’m on the search for such info.
Your comment is awaiting moderation.
https://telegra.ph/Kupit-EHkstazi-Lsd-25-MDMA-Lsd-Vinya-del-Mar-12-20
https://telegra.ph/Kluzh-Napoka-kupit-gashish-12-19
https://telegra.ph/Kupit-Geroin-Metadon-Liriku-Tramadol-Ruzaevka-12-20-2
https://telegra.ph/Deniya-kupit-Amfetamin-Mefedron-A-pvp-Alfa-PVP-12-20-2
https://telegra.ph/O-Byord-Sejshely-kupit-Marihuanu-Boshki-SHishki-Sol-12-20-2
https://telegra.ph/Kagan-kupit-Geroin-Metadon-Liriku-Tramadol-12-20
https://telegra.ph/Kupit-Geroin-Metadon-Liriku-Tramadol-Sredneuralsk-12-19
https://telegra.ph/Rangiroa-kupit-Mefedron-Gashish-Kannabis-Skorost-12-20-2
https://telegra.ph/Kupit-Marihuanu-Boshki-SHishki-Sol-Kosta-Rika-12-20-3
https://telegra.ph/Bilbao-kupit-Kokain-Mefedron-Skorost-Amfetamin-12-20
https://telegra.ph/Manchzhuriya-kupit-Kokain-Mefedron-Skorost-Amfetamin-12-20
https://telegra.ph/Kupit-amfetamin-Vsevolozhsk-12-19-3
https://telegra.ph/Kupit-Kokain-Mefedron-Skorost-Amfetamin-Vyshnij-Volochek-12-20
https://telegra.ph/Poti-kupit-EHkstazi-Lsd-25-MDMA-Lsd-12-20
https://telegra.ph/Bukaramanga-kupit-Kokain-Mefedron-Skorost-Amfetamin-12-19
https://telegra.ph/Rakvere-kupit-amfetamin-12-19-5
https://telegra.ph/Kupit-Marihuanu-Boshki-SHishki-Sol-Almelo-12-20-2
https://telegra.ph/Zyryanovsk-kupit-EHkstazi-Lsd-25-MDMA-Lsd-12-20
https://telegra.ph/Kupit-Kokain-Mefedron-Skorost-Amfetamin-Serdobsk-12-20
https://telegra.ph/Genuya-kupit-zakladku-kokaina-12-19-2
https://telegra.ph/Kupit-Kokain-Mefedron-Skorost-Amfetamin-Rzhavchina-12-20-2
https://telegra.ph/Luke-kupit-Marihuanu-Boshki-SHishki-Sol-12-20-2
https://telegra.ph/Arzamas-kupit-kokain-12-19-2
https://telegra.ph/Nejpido-kupit-Kokain-Mefedron-Skorost-Amfetamin-12-20-2
Your comment is awaiting moderation.
Понравилось внимание к деталям, чистота, сервис и организация на лайнере из Дубая на высшем уровне: круизы из Дубая
Your comment is awaiting moderation.
https://telegra.ph/SHirvan-kupit-Geroin-Metadon-Liriku-Tramadol-12-20
https://telegra.ph/Omsk-kupit-gashish-12-19
https://telegra.ph/Kupit-amfetamin-Sudak-12-19-2
https://telegra.ph/Matushkino-kupit-EHkstazi-Lsd-25-MDMA-Lsd-12-20-2
https://telegra.ph/Kupit-Mefedron-Gashish-Kannabis-Skorost-Nelidovo-12-20
https://telegra.ph/Kupit-Amfetamin-Mefedron-A-pvp-Alfa-PVP-Moskva-YUzhnoe-Tushino-12-20
https://telegra.ph/Pula-kupit-mefedron-12-19-5
https://telegra.ph/Kupit-mefedron-Ingolshtadt-12-19-4
https://telegra.ph/Kupit-Amfetamin-Mefedron-A-pvp-Alfa-PVP-Timashevsk-12-20-2
https://telegra.ph/Kupit-EHkstazi-Lsd-25-MDMA-Lsd-Kishinyov-12-20-2
https://telegra.ph/Tangalle-kupit-zakladku-mefedrona-12-19
https://telegra.ph/Tekirdag-kupit-Kokain-Mefedron-Skorost-Amfetamin-12-20-2
https://telegra.ph/Kupit-Geroin-Metadon-Liriku-Tramadol-Trogir-12-20-2
https://telegra.ph/Kupit-Amfetamin-Mefedron-A-pvp-Alfa-PVP-Kologriv-12-20-2
https://telegra.ph/Tehdzhon-kupit-gashish-shishki-boshki-12-19
https://telegra.ph/Kupit-amfetamin-zakladku-Varshava-12-19
https://telegra.ph/Vanadzor-kupit-narkotiki-12-19-4
https://telegra.ph/Borisov-kupit-Kokain-Mefedron-Skorost-Amfetamin-12-20
https://telegra.ph/Orsha-kupit-kokain-12-19
https://telegra.ph/Kupit-amfetamin-Snezhnoe-12-19-2
https://telegra.ph/Kyzyl-Kiya-kupit-Mefedron-Gashish-Kannabis-Skorost-12-20-2
https://telegra.ph/Severodvinsk-kupit-amfetamin-12-19-6
https://telegra.ph/Kupit-gashish-zakladku-ZHigulyovsk-12-19-2
https://telegra.ph/CHelyaba-kupit-Mefedron-Gashish-Kannabis-Skorost-12-20
Your comment is awaiting moderation.
https://www.kickstarter.com/profile/codeforpro395/about
Your comment is awaiting moderation.
zeroposition.click – Pages loaded fast, images appeared sharp, and formatting stayed consistent.
Your comment is awaiting moderation.
clickdomination.click – Navigation felt smooth, found everything quickly without any confusing steps.
Your comment is awaiting moderation.
netuplift.click – Content reads clearly, helpful examples made concepts easy to grasp.
Your comment is awaiting moderation.
https://telegra.ph/Kupit-mefedron-EHkibastuz-12-19-2
https://telegra.ph/Kupit-Kokain-Mefedron-Skorost-Amfetamin-Koimbra-12-19
https://telegra.ph/Bojkovskoe-kupit-Kokain-Mefedron-Skorost-Amfetamin-12-20
https://telegra.ph/Dar-ehs-Salam-kupit-Amfetamin-Mefedron-A-pvp-Alfa-PVP-12-20-2
https://telegra.ph/Richards-Zaliv-kupit-Marihuanu-Boshki-SHishki-Sol-12-20
https://telegra.ph/Kupit-Geroin-Metadon-Liriku-Tramadol-Novorossijsk-12-20
https://telegra.ph/Paralimni-kupit-Geroin-Metadon-Liriku-Tramadol-12-20-2
https://telegra.ph/Kupit-Kokain-Mefedron-Skorost-Amfetamin-Osterhaut-12-20
https://telegra.ph/Tegernzee-kupit-Mefedron-Gashish-Kannabis-Skorost-12-20
https://telegra.ph/Kupit-gashish-zakladku-Kropotkin-12-19-2
https://telegra.ph/Tekirdag-kupit-Kokain-Mefedron-Skorost-Amfetamin-12-20-2
https://telegra.ph/Vladikavkaz-kupit-kokain-12-19-4
https://telegra.ph/Verner-kupit-EHkstazi-Lsd-25-MDMA-Lsd-12-20
https://telegra.ph/Asyut-kupit-Kokain-Mefedron-Skorost-Amfetamin-12-20
https://telegra.ph/Askona-kupit-Kokain-Mefedron-Skorost-Amfetamin-12-20-2
https://telegra.ph/Kupit-Amfetamin-Mefedron-A-pvp-Alfa-PVP-Nazarovo-12-20
https://telegra.ph/Kupit-boshki-gashish-shishki-Inchhon-12-19-3
https://telegra.ph/Kupit-ehkstazi-spb-12-19-15
https://telegra.ph/Kupit-Marihuanu-Boshki-SHishki-Sol-Hasavyurt-12-20-4
https://telegra.ph/Kupit-EHkstazi-Lsd-25-MDMA-Lsd-Kalutara-12-20-2
https://telegra.ph/Ostrov-Dzherba-kupit-Kokain-Mefedron-Skorost-Amfetamin-12-20
https://telegra.ph/Dzerzhinskij-kupit-mefedron-12-19-3
https://telegra.ph/Kupit-Mefedron-Gashish-Kannabis-Skorost-Zakintos-12-20
https://telegra.ph/Antaliya-kupit-mefedron-12-19
Your comment is awaiting moderation.
owntheserp.click – Mobile version looks perfect; no glitches, fast scrolling, crisp text.
Your comment is awaiting moderation.
https://telegra.ph/YAmajka-kupit-Amfetamin-Mefedron-A-pvp-Alfa-PVP-12-20-2
https://telegra.ph/Kupit-Marihuanu-Boshki-SHishki-Sol-Heviz-12-20-2
https://telegra.ph/Kupit-EHkstazi-Lsd-25-MDMA-Lsd-Tyukalinsk-12-20
https://telegra.ph/Palma-de-Majorka-kupit-zakladku-kokaina-12-19-3
https://telegra.ph/Miass-kupit-mefedron-12-19-3
https://telegra.ph/Kupit-Geroin-Metadon-Liriku-Tramadol-Priozyorsk-12-20
https://telegra.ph/Barnaul-kupit-Kokain-Mefedron-Skorost-Amfetamin-12-19
https://telegra.ph/Kupit-Marihuanu-Boshki-SHishki-Sol-YUzha-12-20
https://telegra.ph/Sen-Lui-kupit-Amfetamin-Mefedron-A-pvp-Alfa-PVP-12-20
https://telegra.ph/Kupit-Kokain-Mefedron-Skorost-Amfetamin-Byhov-12-20-2
https://telegra.ph/Kupit-EHkstazi-Lsd-25-MDMA-Lsd-EHshtoril-12-20
https://telegra.ph/Cyurih-kupit-zakladku-mefedrona-12-19-3
https://telegra.ph/Kuplyu-horoshie-narkotiki-12-19-2
https://telegra.ph/SHefshauehn-kupit-Marihuanu-Boshki-SHishki-Sol-12-19
https://telegra.ph/Ozurgeti-kupit-Geroin-Metadon-Liriku-Tramadol-12-19
https://telegra.ph/Kupit-Mefedron-Gashish-Kannabis-Skorost-Belsko-Byala-12-20
https://telegra.ph/Priazovskoe-kupit-Marihuanu-Boshki-SHishki-Sol-12-20
https://telegra.ph/Augsburg-kupit-narkotiki-12-19-2
https://telegra.ph/Kupit-Marihuanu-Boshki-SHishki-Sol-Izberbash-12-20
https://telegra.ph/Kupit-EHkstazi-Lsd-25-MDMA-Lsd-Honi-12-20
https://telegra.ph/Rudnya-kupit-Marihuanu-Boshki-SHishki-Sol-12-20-2
https://telegra.ph/Uyar-kupit-Kokain-Mefedron-Skorost-Amfetamin-12-20
https://telegra.ph/Kigoma-kupit-Kokain-Mefedron-Skorost-Amfetamin-12-20
https://telegra.ph/Essentuki-kupit-zakladku-mefedrona-12-19-5
Your comment is awaiting moderation.
плазменный стерилизатор медицинский plazmennyy-sterilizator.ru .
Your comment is awaiting moderation.
Отдых на лайнере из Дубая оказался очень комфортным, каюта уютная, много развлечений для взрослых и детей, время пролетело незаметно: https://kruizy-po-persidskomu-zalivu.ru/
Your comment is awaiting moderation.
https://angel9l23mxd4.blogdosaga.com/profile
Your comment is awaiting moderation.
https://knowyourmeme.com/users/promogratuit2026
Your comment is awaiting moderation.
https://telegra.ph/Ruka-kupit-EHkstazi-Lsd-25-MDMA-Lsd-12-20-2
https://telegra.ph/Romashki-kupit-Marihuanu-Boshki-SHishki-Sol-12-20
https://telegra.ph/Kupit-Kokain-Mefedron-Skorost-Amfetamin-Bogorodskoe-12-20
https://telegra.ph/ZHezkazgan-kupit-amfetamin-12-19-3
https://telegra.ph/Kupit-Geroin-Metadon-Liriku-Tramadol-Moskva-Matushkino-12-19
https://telegra.ph/Izmir-kupit-amfetamin-12-19-3
https://telegra.ph/Kupit-Geroin-Metadon-Liriku-Tramadol-Zapadnaya-Dvina-12-20
https://telegra.ph/Baden-kupit-EHkstazi-Lsd-25-MDMA-Lsd-12-20-2
https://telegra.ph/Novoazovsk-kupit-kokain-12-19-3
https://telegra.ph/Veneciya-kupit-gashish-12-19-5
https://telegra.ph/Kupit-gashish-zakladku-Pula-12-19
https://telegra.ph/Kievskij-kupit-Kokain-Mefedron-Skorost-Amfetamin-12-20
https://telegra.ph/Irmino-kupit-Marihuanu-Boshki-SHishki-Sol-12-20-2
https://telegra.ph/Kupit-amfetamin-zakladku-Lida-12-19
https://telegra.ph/Kupit-mefedron-Preshov-12-19-3
https://telegra.ph/Ostrov-Zakinf-kupit-Amfetamin-Mefedron-A-pvp-Alfa-PVP-12-20-2
https://telegra.ph/Kupit-EHkstazi-Lsd-25-MDMA-Lsd-SHalkar-12-19
https://telegra.ph/Leon-kupit-kokain-12-19
https://telegra.ph/Kassel-kupit-kokain-12-19-6
https://telegra.ph/Tulon-kupit-Kokain-Mefedron-Skorost-Amfetamin-12-20-2
https://telegra.ph/Ostrov-Kalivini-kupit-Mefedron-Gashish-Kannabis-Skorost-12-20
https://telegra.ph/Benhoa-kupit-Amfetamin-Mefedron-A-pvp-Alfa-PVP-12-20
https://telegra.ph/Lyublin-kupit-zakladku-kokaina-12-19
https://telegra.ph/Solikamsk-kupit-gashish-shishki-boshki-12-19-3
Your comment is awaiting moderation.
https://telegra.ph/Rossosh-kupit-mefedron-12-19-6
https://telegra.ph/Kupit-amfetamin-zakladku-Bratsk-12-19-3
https://telegra.ph/Kupit-Geroin-Metadon-Liriku-Tramadol-Kanada-12-20
https://telegra.ph/Kupit-Kokain-Mefedron-Skorost-Amfetamin-Moskva-Zyablikovo-12-20
https://telegra.ph/Kupit-Geroin-Metadon-Liriku-Tramadol-Tver-12-20
https://telegra.ph/SHar-kupit-Kokain-Mefedron-Skorost-Amfetamin-12-20
https://telegra.ph/Kupit-kokain-EHspoo-12-19-6
https://telegra.ph/Myunhen-kupit-kokain-12-19-5
https://telegra.ph/Polock-kupit-gashish-shishki-boshki-12-19-2
https://telegra.ph/Tajynsha-kupit-EHkstazi-Lsd-25-MDMA-Lsd-12-20
https://telegra.ph/Kupit-mefedron-zakladku-Tronhejm-12-19-2
https://telegra.ph/Kupit-mefedron-Vajkiki-12-19-2
https://telegra.ph/EHssen-kupit-zakladku-amfetamina-12-19
https://telegra.ph/Solikamsk-kupit-zakladku-kokaina-12-19-2
https://telegra.ph/Sochi-kupit-gashish-12-19-9
https://telegra.ph/Kupit-Amfetamin-Mefedron-A-pvp-Alfa-PVP-Il-Sent-Mari-12-20-2
https://telegra.ph/Vloclavek-kupit-Kokain-Mefedron-Skorost-Amfetamin-12-20
https://telegra.ph/Kupit-kokain-Galle-12-19-5
https://telegra.ph/Tarnov-kupit-EHkstazi-Lsd-25-MDMA-Lsd-12-20
https://telegra.ph/Kupit-mefedron-zakladku-Tomsk-12-19-2
https://telegra.ph/Likino-Dulevo-kupit-Amfetamin-Mefedron-A-pvp-Alfa-PVP-12-20
https://telegra.ph/Priozersk-kupit-Amfetamin-Mefedron-A-pvp-Alfa-PVP-12-20
https://telegra.ph/Kupit-kokain-zakladku-Gus-Hrustalnyj-12-19-3
https://telegra.ph/Kupit-Marihuanu-Boshki-SHishki-Sol-Danang-i-Hojan-12-19
Your comment is awaiting moderation.
Понравилось сочетание азиатского колорита и международного уровня обслуживания https://kruizy-iz-kataya.ru/
Your comment is awaiting moderation.
стерилизатор плазменный универсальный стерилизатор плазменный универсальный .
Your comment is awaiting moderation.
beautiful escort girls
https://selbstbewusstsein.top/mapsite9.html
Escort Services Agency – VIP Escort
https://lesa59.ru/vip-eskort-bursa-turtsiya-soprovozhdenie-muzhchin.html
escort escort
https://progress-pro.ru/elitnie-devushki-dlya-eskorta-vip-modeli-kitay-chanchun.html
Your comment is awaiting moderation.
Круиз стал отличным вариантом для романтического путешествия, красивые закаты, уютная атмосфера и высокий уровень обслуживания – https://kruizy-po-persidskomu-zalivu.ru/
Your comment is awaiting moderation.
сопровождение 1с сопровождение 1с .
Your comment is awaiting moderation.
VIP models
https://aquarium39.ru/gey-eskort-bagami.html
Elite Escort Agency
https://potencial-tekstil.ru/elitnie-eskort-uslugi-moskva-sao.html
elite dating
https://lesa59.ru/eskort-agentstvo-bad-ishl.html
Your comment is awaiting moderation.
Elite Escort Agency
https://chat-home.biz/elitniy-vip-eskort-vadduva-shri-lanka.html
Escort Girls
https://kazak-kostoprav.ru/uslugi-eskorta-v-moskve-escort-msk.html
Elite girls for escort | VIP models
https://ashraaf.biz/vip-modeli-meribel.html
Your comment is awaiting moderation.
Currently it seems like WordPress is the preferred blogging platform available right now.
(from what I’ve read) Is that what you are using on your blog?
Your comment is awaiting moderation.
VIP escort
https://ylbb19.top/kirovskaya-oblast-krasivie-devushki-eskort.html
escort agency
https://niturehome.ru/ulyanovsk-eskort-soprovozhdenie.html
Female Escort Services for Men
https://zolotopetushok20.ru/agentstvo-eskort-uslug-gviana-vip-soprovozhdenie.html
Your comment is awaiting moderation.
плазменные медицинские стерилизаторы плазменные медицинские стерилизаторы .
Your comment is awaiting moderation.
плазменный автоклав plazmennye-sterilizatory.ru .
Your comment is awaiting moderation.
VIP Escort | Escort of men
https://stopstroke.ru/elitnie-prostitutki-tailand-vip-eskort-ot-devushek-modeley-tailand-vip-anketi-elitnih-kurtizanok.html
Elite VIP Escort
https://prioritet18.ru/gey-eskort-puerto-plata.html
escort escort
https://mossygatherings.info/elitnie-devushki-dlya-eskorta-vip-modeli-ruse-bolgariya.html
Your comment is awaiting moderation.
сопровождение программы 1с сопровождение программы 1с .
Your comment is awaiting moderation.
Escort services for charming girls
https://slimdieta.ru/novosibirskaya-oblast-vip-eskort-servis.html
VIP ESCORT SERVICE
https://ashraaf.biz/elitnie-prostitutki-samara-vip-eskort-ot-devushek-modeley-samara-vip-anketi-elitnih-kurtizanok.html
Escort Services
https://balancingactbookkeeping.biz/uslugi-zhenskogo-eskorta-dlya-muzhchin-astrahanskaya-oblast.html
Your comment is awaiting moderation.
elite escort
https://zolotopetushok20.ru/uslugi-eskort-reklamshika.html
Escort Services
https://knowbuddhism.info/vip-eskort-zheneva.html
escort escort
https://in-timeproduction.ru/elitnie-individualki-burgas-bolgariya.html
Your comment is awaiting moderation.
Escort Services Agency – VIP Escort
https://fershall.ru/agentstvo-eskort-uslug-bali-sanur-vip-soprovozhdenie.html
elite dating
https://velonews.top/uslugi-zhenskogo-eskorta-dlya-muzhchin-saransk.html
beautiful escort girls
https://yeahcamp.ru/elitnie-devushki-dlya-eskorta-vip-modeli-kolomna.html
Your comment is awaiting moderation.
низкотемпературные стерилизаторы plazmennyy-sterilizator.ru .
Your comment is awaiting moderation.
плазменные автоклавы plazmennye-sterilizatory.ru .
Your comment is awaiting moderation.
Vip girls
https://extragram.ru/pittstal-elitniy-eskort.html
Elite prostitutes
https://spravka-moskva.biz/vip-soprovozhdenie-semey-kazahstan.html
escort escort
https://selbstbewusstsein.top/elitniy-vip-eskort-zhanaozen.html
Your comment is awaiting moderation.
поддержка и сопровождение 1с 1s-soprovozhdenie.ru .
Your comment is awaiting moderation.
Elite prostitutes – VIP escort from model girls , VIP profiles of elite courtesans
https://grilbutil.ru/sayt-vip-eskort-znakomstv-dlya-muzhchin-lipetsk.html
Elite prostitutes – Vip girls , profiles and escort from elite girls of models
https://stalkon54.ru/sayt-vip-eskort-znakomstv-dlya-muzhchin-limassol.html
escort escort
https://dr-kuznetsova.ru/eskort-uslugi-port-elizabet-s-top-modelyami-i-vip-devushkami.html
Your comment is awaiting moderation.
https://clubsg.skygolf.com/equipment/fairway+woods/RocketBallz_Stage_2_21663?mode=&bagid=&ran=6351181&ran=7640462
Your comment is awaiting moderation.
https://admin.phacility.com/F501533
Your comment is awaiting moderation.
Escort for men
https://gto-avto.ru/elitnie-devushki-dlya-eskorta-vip-modeli-orsk.html
Escort services for charming girls
https://projectslist.biz/puerto-plata-eskort-agentstvo.html
Elite Escort Agency
https://carsprokat.ru/lyubertsi-elitniy-eskort.html
Your comment is awaiting moderation.
http://maglik.ru/index.php?subaction=userinfo&user=mysteriousebb15
Your comment is awaiting moderation.
VIP Escort Dating Site for Men
https://oilman.biz/uslugi-zhenskogo-eskorta-dlya-muzhchin-boka-chika.html
Female Escort Services for Men
https://stalkon54.ru/elitniy-vip-eskort-costarica.html
beautiful escort girls
https://ishdps.ru/vip-eskort-pal-arinsal-soprovozhdenie-muzhchin.html
Your comment is awaiting moderation.
Elite Escort Services
https://prioritet18.ru/molodechno-belarus-eskort-soprovozhdenie.html
Elite Dating Models
https://slimdieta.ru/nur-sultan-kazahstan-elitniy-eskort.html
VIP escort
https://aquarium39.ru/gey-eskort-meksika.html
Your comment is awaiting moderation.
плазменный стерилизатор медицинский plazmennyy-sterilizator.ru .
Your comment is awaiting moderation.
поддержка и сопровождение 1с 1s-soprovozhdenie.ru .
Your comment is awaiting moderation.
низкотемпературный плазменный стерилизатор низкотемпературный плазменный стерилизатор .
Your comment is awaiting moderation.
Escort Services Agency – VIP Escort
https://double-d.top/eskort-uslugi-rostov-na-donu.html
beautiful escort girls
https://baletkioptom.ru/eskort-agentstvo-prokopevsk.html
VIP Escort Dating Site for Men
https://progress-pro.ru/vip-modeli-nizhnekamsk.html
Your comment is awaiting moderation.
Escort for men
https://romannumerals.info/elitnie-individualki-pyatigorsk.html
Escort services for charming girls
https://drstomatolog.ru/elitnie-individualki-chili.html
Vip girls
https://oilman.biz/vip-eskort-vetnam.html
Your comment is awaiting moderation.
?Necesitas mudarte? https://trasladoavalencia.es ?Necesitas una mudanza rapida, segura y sin complicaciones en Valencia? Ofrecemos servicios profesionales de transporte y mudanzas para particulares y empresas. ?Solicita un presupuesto gratuito y disfruta de nuestro servicio de calidad!
Your comment is awaiting moderation.
VIP models
https://escbestyou.biz/elitnie-eskort-uslugi-tenerife-sever.html
elite escort
https://cococay.info/elitnoe-eskort-agentstvo-kordova-ispaniya.html
Escort Agency
https://spravka-moskva.biz/bobruysk-belarus-vip-eskort-servis.html
Your comment is awaiting moderation.
Escort for men
https://gto-avto.ru/vip-eskort-biysk-soprovozhdenie-muzhchin.html
VIP Escort | Escort of men
https://car-dvr.info/elitniy-vip-eskort-dortmund.html
Elite girls for escort | VIP models
https://ballerina-productions.info/eskort-agentstva-sent-barselona.html
Your comment is awaiting moderation.
Escort Girls
https://mossygatherings.com/elitnie-individualki-bali-kandidasa.html
VIP escort
https://pekarnya38.ru/elitnoe-eskort-agentstvo-grodno-belarus.html
Escort services for charming girls
https://in-timeproduction.ru/vip-devushki-chehiya.html
Your comment is awaiting moderation.
I every time used to study post in news papers but now as I am a user
of web therefore from now I am using net for posts, thanks
to web.
Your comment is awaiting moderation.
Escort
https://zhongguomeishi.top/eskort-nitstsa-frantsiya.html
Elite prostitutes
https://avtoparts102.ru/agentstvo-eskort-uslug-dlya-delovih-lyudey-lissabon.html
Vip girls
https://lesa59.ru/elitnoe-eskort-agentstvo-karaganda-kazahstan.html
Your comment is awaiting moderation.
Escort for men
https://mamochkimoi.ru/luksor-egipet-elitnie-znakomstva.html
Escort for men
https://576797.ru/bolgariya-krasivie-devushki-eskort.html
Elite prostitutes – Vip girls , profiles and escort from elite girls of models
https://romannumerals.info/eskort-agentstvo-zheleznogorsk.html
Your comment is awaiting moderation.
Elite Escort Agency
https://oilman.biz/sayt-vip-eskort-znakomstv-dlya-muzhchin-bali-changu.html
Elite Escort Agency
https://saomaiedufund.info/mapsite8.html
Escort
https://kazak-kostoprav.ru/elitnie-prostitutki-frantsiya.html
Your comment is awaiting moderation.
http://olo.phorum.pl/viewtopic.php?p=418402#418402
Your comment is awaiting moderation.
Elite VIP Escort
https://chat-home.biz/devushki-eskorta-kurshevel.html
Elite Models
https://40forever.ru/pyatigorsk-elitnie-znakomstva.html
escort escort
https://drstomatolog.ru/vip-devushki-la-dig-seysheli.html
Your comment is awaiting moderation.
Spot on with this write-up, I honestly believe that this website needs
a lot more attention. I’ll probably be returning to read
more, thanks for the information!
Your comment is awaiting moderation.
VIP Escort Dating Site for Men
https://40forever.ru/mapsite8.html
Elite prostitutes – VIP escort from model girls , VIP profiles of elite courtesans
https://sincastigos.com/elitnie-modeli-seul-yuzhnaya-koreya.html
Escort Girls
https://webpostingmart.com/elitnie-prostitutki-kayseri-turtsiya-vip-eskort-ot-devushek-modeley-kayseri-turtsiya-vip-anketi-el.html
Your comment is awaiting moderation.
https://www.scenario.press/blogs/256400/1Win-Casino-Promo-Code-2026-1W500BIG-Bonus-Spins
Your comment is awaiting moderation.
Wow, awesome blog layout! How long have you been blogging for?
you made blogging look easy. The overall look of your website
is great, let alone the content!
Your comment is awaiting moderation.
Escort for men
https://in-timeproduction.ru/elitnie-znakomstva-s-modelyami-lez-ark.html
Vip girls
https://ashraaf.biz/lyubertsi-elitnie-znakomstva.html
beautiful escort girls
https://stalkon54.ru/uslugi-zhenskogo-eskorta-dlya-muzhchin-nikosiya-kipr.html
Your comment is awaiting moderation.
Equilibrado de piezas
El equilibrado representa una fase clave en el mantenimiento de maquinaria agricola, asi como en la produccion de ejes, volantes, rotores y armaduras de motores electricos. Un desequilibrio provoca vibraciones que aceleran el desgaste de los rodamientos, generan sobrecalentamiento e incluso pueden causar la rotura de los componentes. Para evitar fallos mecanicos, es fundamental identificar y corregir el desequilibrio de forma temprana utilizando metodos modernos de diagnostico.
Principales metodos de equilibrado
Existen varias tecnicas para corregir el desequilibrio, dependiendo del tipo de componente y la intensidad de las vibraciones:
El equilibrado dinamico – Se utiliza en componentes rotativos (rotores y ejes) y se lleva a cabo mediante maquinas equilibradoras especializadas.
El equilibrado estatico – Se emplea en volantes, ruedas y piezas similares donde basta con compensar el peso en un solo plano.
Correccion del desequilibrio – Se realiza mediante:
Perforado (retirada de material en la zona de mayor peso),
Colocacion de contrapesos (en ruedas y aros de volantes),
Ajuste de masas de balanceo (como en el caso de los ciguenales).
Diagnostico del desequilibrio: ?que equipos se utilizan?
Para identificar con precision las vibraciones y el desequilibrio, se utilizan:
Equipos equilibradores – Permiten medir el nivel de vibracion y determinan con exactitud los puntos de correccion.
Analizadores de vibraciones – Registran el espectro de oscilaciones, identificando no solo el desequilibrio, sino tambien fallos adicionales (por ejemplo, el desgaste de rodamientos).
Sistemas laser – Se usan para mediciones de alta precision en mecanismos criticos.
Especial atencion merecen las velocidades criticas de rotacion – condiciones en las que la vibracion se incrementa de forma significativa debido a fenomenos de resonancia. Un equilibrado adecuado evita danos en el equipo en estas condiciones de funcionamiento.
Your comment is awaiting moderation.
VIP escort
https://port-victoria.ru/vip-modeli-filippini.html
Escort for men
https://cococay.info/kerch-eskort-agentstvo.html
Elite prostitutes – Vip girls , profiles and escort from elite girls of models
https://sentidocomunecuador.com/elitnie-devushki-dlya-eskorta-vip-modeli-pakistan.html
Your comment is awaiting moderation.
Escort Agency
https://progress-pro.ru/devushki-eskorta-frankfurt-na-mayne.html
VIP ESCORT SERVICE
https://operationq.top/elitniy-vip-eskort-pskovskaya-oblast.html
elite dating
https://mirkultur.ru/vip-soprovozhdenie-msk.html
Your comment is awaiting moderation.
http://www.cdsonla.edu.vn/index.php/vi/component/k2/item/21-tips-for-international-students-and-study-abroad?start=16
Your comment is awaiting moderation.
Escort Girls
https://spravka-moskva.biz/tenerife-sever-krasivie-devushki-eskort.html
Vip girls
https://yeahcamp.ru/rudniy-eskort-agentstvo.html
Elite prostitutes – Vip girls , profiles and escort from elite girls of models
https://fershall.ru/elitnie-devushki-dlya-eskorta-vip-modeli-ramenskoe.html
Your comment is awaiting moderation.
Elite individuals
https://in-timeproduction.ru/elitniy-vip-eskort-parizh-frantsiya.html
Escort services for charming girls
https://hasura.info/uslugi-zhenskogo-eskorta-dlya-muzhchin-yamayka.html
Escort for men
https://sentidocomunecuador.info/elitnie-eskort-uslugi-sharm-el-sheyh.html
Your comment is awaiting moderation.
https://supremesearchnet.yooco.org/videos/aisfordhenderson/208415.html#comments
Your comment is awaiting moderation.
https://customerscomm.com/read-blog/112586
Your comment is awaiting moderation.
Лайнер порадовал современным дизайном, просторными зонами отдыха и чистотой https://kruizy-iz-kataya.ru/
Your comment is awaiting moderation.
https://www.mixcloud.com/codepromo3445/
Your comment is awaiting moderation.
Elite prostitutes
https://drstomatolog.ru/elitnie-eskort-uslugi-kalpitiya-shri-lanka.html
VIP escort
https://drstomatolog.ru/tin-vip-eskort-servis.html
Escort for men
https://drstomatolog.ru/mapsite10.html
Your comment is awaiting moderation.
escort escort
https://extragram.ru/elitnie-devushki-vladimirskaya-oblast.html
Escort Girls
https://1winin.top/elitnie-individualki-agualva-kasen-portugaliya.html
Escort Services
https://vitadent73.ru/vip-devushki-bratsk.html
Your comment is awaiting moderation.
Лайнер порадовал современным дизайном, просторными зонами отдыха и чистотой https://kruizy-iz-kataya.ru/
Your comment is awaiting moderation.
Круиз из Китая запомнился высоким уровнем сервиса, интересным маршрутом и общим ощущением качества, круизы в китае
Your comment is awaiting moderation.
Почему больше не берете? https://toray-bm.ru Золотые слова.По поводу заказа я тебе уже написал в аську, публично ничего скидывать не буду.
Your comment is awaiting moderation.
Круиз подарил возможность увидеть новые места без постоянных переездов, комфорт лайнера делает путешествие легким – https://kruizy-po-persidskomu-zalivu.ru/
Your comment is awaiting moderation.
Лайнер стал настоящим домом на время путешествия, все удобно и продумано: круизы китай
Your comment is awaiting moderation.
Питание на лайнере выше всяких похвал, разнообразие блюд, качество сервиса и подача на уровне хороших ресторанов https://kruizy-po-persidskomu-zalivu.ru/
Your comment is awaiting moderation.
Я вообще не курю!!!я брал 3 июля его уже нет в продаже! Купить кокаин, мефедрон, бошки, гашиш, марихуану, шишки Ранее заказывал у данного селлера продукцию,качеством всегда был доволен,как и уровнем поддержки пользователей,сегодня же списался с ним по поводу небольшой технической ошибки при фасовке,и был рад узнать,что честность селлера на том же уровне,что и качество продукции.Очень благодарен создателям сайта,тем кто все это делает.Жду теперь свою посылочку,а потом обязательно еще закажу,оно того стоит.Спасибо вам ребята ,за помощь,и понимание.обо всем думаем ) но не сразу
Your comment is awaiting moderation.
Проверка квартиры в новостройке позволяет выявить дефекты на раннем этапе. Эксперт осматривает труднодоступные зоны. Используются профессиональные приборы. Анализируется качество строительства. Все нарушения фиксируются официально. Это повышает шансы на исправление, информация по ссылке: https://tsushima.su/forums/profile.php?id=17790
Если вы хотите избежать лишних переделок, стоит выбрать приемку квартиры. Эксперт выявит даже мелкие дефекты. Это практичное решение.
Your comment is awaiting moderation.
жте907? Вроде говорят, что пока не доступен – находиться на экспертизе… Откуда инфа? Купить кокаин, мефедрон, бошки, гашиш, марихуану, шишки а сюда заглянуть влом ? //legalrc.com/threads/Трипы.588/page-2интересует такой же вопрос! Сделал заказ с сайта ещё вчера. Ни слуху ни духу от селлера.
Your comment is awaiting moderation.
Нужен трафик и лиды? яндекс реклама казань SEO-оптимизация, продвижение сайтов и реклама в Яндекс Директ: приводим целевой трафик и заявки. Аудит, семантика, контент, техническое SEO, настройка и ведение рекламы. Работаем на результат — рост лидов, продаж и позиций.
Your comment is awaiting moderation.
https://www.tai-ji.net/board/board_topic/4160148/7645451.htm
Your comment is awaiting moderation.
https://onlineinteraction.mn.co/posts/95676513
Your comment is awaiting moderation.
http://dyado.listbb.ru/viewtopic.php?f=3&t=3374
Your comment is awaiting moderation.
Магазин замечательный!! Купить кокаин, мефедрон, бошки, гашиш, марихуану, шишки 2-й раз все было быстро но собирал весь дживик по конспирации , на пакетиках видать экономили)))МАГАЗ СУПЕР!,брал5 гр ск качество отменное все сделанно ровно,даже фото не понадобилось,кристалики отличные без мутного оттенка,плаватся отлично,присутствует запах уксусного ангедрида,ВЫРАЖАЮ ОГРОМНУЮ БЛАГОДАРНОСТЬ!ВСЕ СУПЕР ПРОДОЛЖАЙТЕ В ТОМ ЖЕ ДУХЕ!
Your comment is awaiting moderation.
Cosmogony, tһe study of the oriցin and development of the սniverse as a
whole and of the person our bodies that compose it. An try to explain the origin of
the photo voltaic syѕtem bʏ pure fairly tһan supeгnatural processes was first
made by Emanuel Swedenborg and Immanuel Kant in the mid-1700’s.
A Michеlin system additionally stored observe of
tire stress. With a limited palette of blue and brown,
Camille Pissarro conveys in Café Au Lait a easy environment of the rustic kitchen, enforced bү his
tougһ brᥙsh stroke and strong composition. At independence in 1960, the flag featured a yellow star on a blue
backgroᥙnd and not using a crimson stripe.
Therе are 30 bluе chip stocks in German Market that аre tracked by
the DAX indices. There is not օnly one highway
to culinary success. It really wоrks out nice in the event that they happen to be one in the same.
The sɑme phrases additionally seem in “Military of Darkness”
as a magic phrase.
Your comment is awaiting moderation.
Конспирацию посылок наладили? А то такой товар, а выписать не могу – стрёмно, если просто гриперы в конверте… И отпишите по качеству 5 мео дмт! Купить кокаин, мефедрон, бошки, гашиш, марихуану, шишки да вообще магазов пиздеМагазин реально ровный!!! Долго искал и нашел! Бро ты лучший!!!!
Your comment is awaiting moderation.
На днях брал небольшой опт, был приятно удивлен подходом и предложением тс, товар еще не пробовали ,но забрал все ровно, по ходу отпишу в теме за качество товара, пока же могу сказать, что жалею , что раньше не работал с данным тс! Успехов, благодарю за сервис!!! Купить кокаин, мефедрон, бошки, гашиш, марихуану, шишки по поводу треков выяснять буду завтра лично т.k. сегодня выходной в РоссииВот это я понимаю СЕРВИС:ok: Превзошло все мои ожидания, доставили раньше обещанного… Магаз ровный (до последнего сомневался, что всё на столько гладко…)
Your comment is awaiting moderation.
Нужен трафик и лиды? авигрупп SEO-оптимизация, продвижение сайтов и реклама в Яндекс Директ: приводим целевой трафик и заявки. Аудит, семантика, контент, техническое SEO, настройка и ведение рекламы. Работаем на результат — рост лидов, продаж и позиций.
Your comment is awaiting moderation.
кто знает когда рега будет ? https://taxi-jaguar.ru Привет ветке)))) Легких подьемовСудя по отзывам магазин достойный! Скоро к вам наведаюсь за покупками, удачи во всех делах.
Your comment is awaiting moderation.
Кстати,что очень радует ,так это уровень общения продавца.Юмор лишним не бывает,ведь так:D? Купить кокаин, мефедрон, бошки, гашиш, марихуану, шишки За основу брали ромашку (как она задрала), я кстати предлагаю магазину, продавать основу, или в качестве бонуса предлагать (так на сколько я знаю никто не делает).тс, привет, ответь в лс. я по делу.
Your comment is awaiting moderation.
https://ok.ru/profile/910040178476/statuses/158397550365996?utm_campaign=web_share
Your comment is awaiting moderation.
I like what you guys are usually up too. Such clever work and coverage!
Keep up the superb works guys I’ve incorporated
you guys to my own blogroll.
Your comment is awaiting moderation.
Её переместили в арбитраж. Тогда ничем помочь не могу. https://stroymet38.ru Привет и Мира! Магазин отличный. Все легально, быстро и без заморочек. Не то что остальные некоторые…Кент,приветствую..!!))В личку ответь,там по поводу оплаты…….оплатил договаривались на выходные…жду там от тебя ответа))
Your comment is awaiting moderation.
https://mez.ink/melbet7vipbest
Your comment is awaiting moderation.
Магазин работает!!! Бро очень понктуален!!! Магазину процветание и новых клиентов!!! https://taxi-jaguar.ru хороший магазин !отменное качество и сервис ! хорошей работы вашему магазину и процветания!”Что могу сказать Уважаемый Эскимос Я очень растроился в полученной Пробе И не хотелось выявлять Неготив в сторону твоего магазина”
Your comment is awaiting moderation.
https://lcri.gov.ng/2023-lcri-in-house-review-meeting-and-north-east-zonal-refils-workshop-at-gov-mai-mala-buni-conference-hall-nuj-secretariat-damaturu/
Your comment is awaiting moderation.
Посылку же должны до дома доставить. https://specproteh.ru бонус пускай шлют250 дживик заказал?
Your comment is awaiting moderation.
то есть у вас все по прежнему и сайт работает? https://techdreamz.org На днях брал небольшой опт, был приятно удивлен подходом и предложением тс, товар еще не пробовали ,но забрал все ровно, по ходу отпишу в теме за качество товара, пока же могу сказать, что жалею , что раньше не работал с данным тс! Успехов, благодарю за сервис!!!Если помог Жми Сказать Спасибо
Your comment is awaiting moderation.
трафиковое продвижение сайта prodvizhenie-sajta-po-trafiku1.ru .
Your comment is awaiting moderation.
да не врядли просто ихнему курьеру поджопников надавать надо что бы копытами веселей шевелил да и все https://180o.ru Та не, не стоит оно того. Надо отдать должное магазину, посылка пришла, без проблем.заказала в этом магазе сувениров:), посыль пришел на 3ий день, продукты качеством вкусны
Your comment is awaiting moderation.
веб-аналитика блог seo-blog12.ru .
Your comment is awaiting moderation.
Greetings I am so happy I found your webpage, I really found you by mistake, while I was
researching on Yahoo for something else, Nonetheless I am here now and
would just like to say cheers for a remarkable post and
a all round interesting blog (I also love the theme/design), I don’t have time to go through
it all at the minute but I have bookmarked it and also included your RSS feeds, so when I have time I will be back to read a lot more, Please do keep up
the awesome work.
Your comment is awaiting moderation.
Круиз стал отличным вариантом для романтического путешествия, красивые закаты, уютная атмосфера и высокий уровень обслуживания https://kruizy-po-persidskomu-zalivu.ru/
Your comment is awaiting moderation.
yabe.lil сказал(а): ^ https://180o.ru А Всем Добра и Здоровья Близким)))все от души))) вот бы еще во всех городах зк делали)))))
Your comment is awaiting moderation.
(10 euros gratis apuestas|10 mejores casas de apuestas|10 trucos para ganar apuestas|15 euros gratis marca
apuestas|1×2 apuestas|1×2 apuestas deportivas|1×2 apuestas que significa|1×2 en apuestas|1×2 en apuestas que
significa|1×2 que significa en apuestas|5 euros gratis
apuestas|9 apuestas que siempre ganaras|a partir de cuanto se declara apuestas|actividades de juegos de azar y apuestas|ad apuestas deportivas|aleksandre topuria ufc apuestas|algoritmo para ganar apuestas deportivas|america apuestas|análisis nba apuestas|aplicacion android apuestas deportivas|aplicacion apuestas
deportivas|aplicacion apuestas deportivas android|aplicación de apuestas online|aplicacion para hacer apuestas|aplicacion para hacer apuestas de futbol|aplicación para hacer apuestas de
fútbol|aplicaciones apuestas deportivas android|aplicaciones apuestas deportivas gratis|aplicaciones de apuestas android|aplicaciones de apuestas de
fútbol|aplicaciones de apuestas deportivas|aplicaciones de apuestas deportivas peru|aplicaciones de apuestas deportivas perú|aplicaciones de apuestas en colombia|aplicaciones de apuestas gratis|aplicaciones de
apuestas online|aplicaciones de apuestas seguras|aplicaciones de apuestas sin dinero|aplicaciones para hacer apuestas|apostar seguro apuestas deportivas|app
android apuestas deportivas|app apuestas|app apuestas android|app apuestas
de futbol|app apuestas deportivas|app apuestas deportivas android|app apuestas deportivas
argentina|app apuestas deportivas colombia|app apuestas deportivas ecuador|app apuestas deportivas españa|app apuestas deportivas gratis|app apuestas entre amigos|app apuestas futbol|app apuestas gratis|app apuestas sin dinero|app casa de apuestas|app casas
de apuestas|app control apuestas|app de apuestas|app de apuestas android|app de apuestas
casino|app de apuestas colombia|app de apuestas con bono de bienvenida|app de apuestas de futbol|app de apuestas deportivas|app de apuestas
deportivas android|app de apuestas deportivas argentina|app de apuestas deportivas colombia|app de apuestas
deportivas en españa|app de apuestas deportivas peru|app de apuestas deportivas perú|app de apuestas deportivas sin dinero|app de apuestas ecuador|app de apuestas en colombia|app de apuestas en españa|app de apuestas en venezuela|app de apuestas futbol|app de apuestas gratis|app de apuestas
online|app de apuestas para android|app de apuestas para
ganar dinero|app de apuestas peru|app de apuestas reales|app de
casas de apuestas|app marca apuestas android|app moviles de apuestas|app
para apuestas|app para apuestas de futbol|app para apuestas deportivas|app para apuestas deportivas en español|app para ganar apuestas deportivas|app para
hacer apuestas|app para hacer apuestas deportivas|app para hacer apuestas entre amigos|app para llevar control de apuestas|app
pronosticos apuestas deportivas|app versus apuestas|apps apuestas mundial|apps
de apuestas|apps de apuestas con bono de bienvenida|apps de apuestas de futbol|apps de apuestas deportivas peru|apps de apuestas mexico|apps para apuestas|aprender a hacer apuestas deportivas|aprender
hacer apuestas deportivas|apuesta del dia apuestas deportivas|apuestas 10 euros gratis|apuestas 100 seguras|apuestas 1×2|apuestas 1X2|apuestas 2 division|apuestas
3 division|apuestas a caballos|apuestas a carreras de caballos|apuestas
a colombia|apuestas a corners|apuestas a ganar|apuestas a jugadores
nba|apuestas a la baja|apuestas a la nfl|apuestas al barcelona|apuestas al dia|apuestas al empate|apuestas al mundial|apuestas al tenis wta|apuestas alaves barcelona|apuestas alcaraz hoy|apuestas alemania españa|apuestas alonso campeon del mundo|apuestas altas y
bajas|apuestas altas y bajas nfl|apuestas ambos equipos marcan|apuestas
america|apuestas android|apuestas anillo nba|apuestas antes del mundial|apuestas anticipadas|apuestas anticipadas nba|apuestas apps|apuestas arabia argentina|apuestas argentina|apuestas argentina campeon del
mundo|apuestas argentina canada|apuestas argentina colombia|apuestas argentina croacia|apuestas
argentina españa|apuestas argentina francia|apuestas argentina francia cuanto paga|apuestas argentina francia mundial|apuestas argentina gana el mundial|apuestas argentina gana mundial|apuestas argentina holanda|apuestas argentina
mexico|apuestas argentina méxico|apuestas argentina mundial|apuestas argentina online|apuestas argentina paises
bajos|apuestas argentina polonia|apuestas argentina uruguay|apuestas argentina vs
australia|apuestas argentina vs colombia|apuestas argentina vs francia|apuestas argentina
vs peru|apuestas argentinas|apuestas arsenal real madrid|apuestas ascenso a primera division|apuestas ascenso a segunda|apuestas asiaticas|apuestas asiatico|apuestas athletic|apuestas athletic atletico|apuestas athletic barça|apuestas
athletic barcelona|apuestas athletic betis|apuestas athletic manchester|apuestas athletic manchester
united|apuestas athletic osasuna|apuestas athletic real|apuestas athletic real madrid|apuestas athletic real sociedad|apuestas athletic
real sociedad final|apuestas athletic roma|apuestas athletic
sevilla|apuestas athletic valencia|apuestas atletico|apuestas atletico barcelona|apuestas atletico barsa|apuestas atletico campeon champions|apuestas atletico campeon de liga|apuestas atlético copenhague|apuestas
atletico de madrid|apuestas atlético de madrid|apuestas atletico de madrid barcelona|apuestas atletico de madrid gana la
liga|apuestas atletico de madrid real madrid|apuestas atlético de
madrid real madrid|apuestas atletico de madrid vs barcelona|apuestas atletico madrid|apuestas atletico madrid real
madrid|apuestas atletico madrid vs barcelona|apuestas atletico real
madrid|apuestas atletico real madrid champions|apuestas atletismo|apuestas bajas|apuestas baloncesto|apuestas baloncesto
acb|apuestas baloncesto handicap|apuestas baloncesto hoy|apuestas baloncesto juegos olimpicos|apuestas
baloncesto nba|apuestas baloncesto pronostico|apuestas
baloncesto pronósticos|apuestas baloncesto prorroga|apuestas barca|apuestas barca athletic|apuestas barca atletico|apuestas barca bayern|apuestas
barca bayern munich|apuestas barca girona|apuestas barca hoy|apuestas barça hoy|apuestas barca inter|apuestas barca juventus|apuestas barca madrid|apuestas barça madrid|apuestas
barca real madrid|apuestas barca vs juve|apuestas barca vs madrid|apuestas barca vs
psg|apuestas barcelona|apuestas barcelona alaves|apuestas barcelona athletic|apuestas barcelona
atletico|apuestas barcelona atletico de madrid|apuestas barcelona atlético de madrid|apuestas barcelona atletico
madrid|apuestas barcelona bayern|apuestas barcelona betis|apuestas barcelona campeon de liga|apuestas barcelona
celta|apuestas barcelona espanyol|apuestas barcelona
gana la champions|apuestas barcelona girona|apuestas barcelona granada|apuestas barcelona hoy|apuestas barcelona inter|apuestas barcelona madrid|apuestas barcelona osasuna|apuestas barcelona psg|apuestas barcelona real madrid|apuestas barcelona real sociedad|apuestas barcelona sevilla|apuestas barcelona valencia|apuestas barcelona villarreal|apuestas
barcelona vs atletico madrid|apuestas barcelona vs madrid|apuestas barcelona
vs real madrid|apuestas barsa madrid|apuestas basket
hoy|apuestas bayern barcelona|apuestas bayern vs barcelona|apuestas beisbol|apuestas béisbol|apuestas beisbol mlb|apuestas beisbol pronosticos|apuestas beisbol venezolano|apuestas betis|apuestas betis
– chelsea|apuestas betis barcelona|apuestas betis chelsea|apuestas betis fiorentina|apuestas betis girona|apuestas betis madrid|apuestas betis mallorca|apuestas betis real madrid|apuestas betis real
sociedad|apuestas betis sevilla|apuestas betis valencia|apuestas betis
valladolid|apuestas betis vs valencia|apuestas betplay hoy colombia|apuestas betsson peru|apuestas bienvenida|apuestas billar online|apuestas bolivia vs colombia|apuestas
bono|apuestas bono bienvenida|apuestas bono de bienvenida|apuestas bono de bienvenida sin deposito|apuestas bono gratis|apuestas bono sin deposito|apuestas bonos sin deposito|apuestas borussia real madrid|apuestas boxeo|apuestas
boxeo de campeonato|apuestas boxeo españa|apuestas boxeo español|apuestas boxeo femenino olimpiadas|apuestas boxeo hoy|apuestas boxeo
online|apuestas brasil colombia|apuestas brasil peru|apuestas brasil
uruguay|apuestas brasil vs colombia|apuestas brasil vs peru|apuestas caballos|apuestas
caballos colocado|apuestas caballos españa|apuestas caballos hipodromo|apuestas caballos
hoy|apuestas caballos madrid|apuestas caballos online|apuestas caballos
sanlucar de barrameda|apuestas caballos zarzuela|apuestas calculador|apuestas campeon|apuestas campeon champions|apuestas
campeón champions|apuestas campeon champions 2025|apuestas campeon champions league|apuestas campeon conference league|apuestas campeon copa america|apuestas campeon copa del rey|apuestas campeon de champions|apuestas campeon de la champions|apuestas
campeon de liga|apuestas campeon del mundo|apuestas campeon eurocopa|apuestas campeón eurocopa|apuestas campeon europa league|apuestas campeon f1|apuestas campeon f1 2025|apuestas campeon formula 1|apuestas campeon libertadores|apuestas campeon liga|apuestas campeon liga bbva|apuestas campeon liga española|apuestas campeon liga santander|apuestas campeon motogp 2025|apuestas campeon mundial|apuestas campeón mundial|apuestas
campeon mundial baloncesto|apuestas campeon nba|apuestas campeón nba|apuestas campeon premier|apuestas
campeon premier league|apuestas campeon roland garros|apuestas
campeonato f1|apuestas campeonatos de futbol|apuestas carrera de caballos|apuestas
carrera de caballos hoy|apuestas carrera de caballos nocturnas|apuestas carrera
de galgos fin de semana|apuestas carrera de galgos hoy|apuestas carrera de galgos nocturnas|apuestas carreras caballos|apuestas carreras caballos sanlucar|apuestas
carreras de caballos|apuestas carreras de caballos en directo|apuestas carreras de caballos en vivo|apuestas carreras de caballos
españa|apuestas carreras de caballos hoy|apuestas carreras de caballos nacionales|apuestas carreras
de caballos nocturnas|apuestas carreras de caballos online|apuestas carreras de caballos sanlucar|apuestas carreras de caballos sanlúcar|apuestas carreras de
galgos|apuestas carreras de galgos en vivo|apuestas carreras
de galgos nocturnas|apuestas carreras de
galgos pre partido|apuestas casino|apuestas casino barcelona|apuestas casino futbol|apuestas casino gran madrid|apuestas casino
gratis|apuestas casino madrid|apuestas casino online|apuestas casino online argentina|apuestas casinos|apuestas casinos online|apuestas celta|apuestas celta barcelona|apuestas celta betis|apuestas celta eibar|apuestas celta espanyol|apuestas celta granada|apuestas
celta madrid|apuestas celta manchester|apuestas celta real madrid|apuestas
champion league|apuestas champions foro|apuestas champions hoy|apuestas
champions league|apuestas champions league – pronósticos|apuestas champions league 2025|apuestas champions league hoy|apuestas champions league pronosticos|apuestas champions league
pronósticos|apuestas champions pronosticos|apuestas chelsea barcelona|apuestas chelsea betis|apuestas chile|apuestas chile
peru|apuestas chile venezuela|apuestas chile vs
colombia|apuestas chile vs uruguay|apuestas ciclismo|apuestas ciclismo en vivo|apuestas
ciclismo femenino|apuestas ciclismo tour francia|apuestas ciclismo vuelta|apuestas ciclismo vuelta a españa|apuestas ciclismo vuelta españa|apuestas
city madrid|apuestas city real madrid|apuestas clasico|apuestas clasico español|apuestas clasico
real madrid barcelona|apuestas clasificacion mundial|apuestas colombia|apuestas colombia
argentina|apuestas colombia brasil|apuestas colombia paraguay|apuestas colombia uruguay|apuestas colombia vs argentina|apuestas colombia vs brasil|apuestas combinadas|apuestas combinadas como funcionan|apuestas combinadas de futbol|apuestas combinadas de fútbol|apuestas combinadas foro|apuestas combinadas futbol|apuestas combinadas hoy|apuestas
combinadas mismo partido|apuestas combinadas mundial|apuestas combinadas nba|apuestas combinadas para esta semana|apuestas combinadas para hoy|apuestas combinadas para mañana|apuestas combinadas pronosticos|apuestas
combinadas recomendadas|apuestas combinadas seguras|apuestas combinadas seguras
para hoy|apuestas combinadas seguras para mañana|apuestas como ganar|apuestas comparador|apuestas con bono de bienvenida|apuestas
con dinero ficticio|apuestas con dinero real|apuestas con dinero virtual|apuestas con handicap|apuestas con handicap asiatico|apuestas con handicap baloncesto|apuestas con mas probabilidades de ganar|apuestas con paypal|apuestas con tarjeta de credito|apuestas con tarjeta de debito|apuestas consejos|apuestas copa|apuestas copa africa|apuestas
copa america|apuestas copa américa|apuestas copa argentina|apuestas copa brasil|apuestas copa davis|apuestas copa de europa|apuestas
copa del mundo|apuestas copa del rey|apuestas copa del rey baloncesto|apuestas copa
del rey final|apuestas copa del rey futbol|apuestas copa del rey ganador|apuestas copa del rey hoy|apuestas copa del rey pronosticos|apuestas copa del rey pronósticos|apuestas copa europa|apuestas copa italia|apuestas copa libertadores|apuestas copa
mundial de hockey|apuestas copa rey|apuestas copa sudamericana|apuestas corners|apuestas corners hoy|apuestas croacia argentina|apuestas cuartos eurocopa|apuestas cuotas|apuestas cuotas altas|apuestas cuotas bajas|apuestas de 1 euro|apuestas de baloncesto|apuestas
de baloncesto hoy|apuestas de baloncesto nba|apuestas de baloncesto para hoy|apuestas de beisbol|apuestas de beisbol para hoy|apuestas de
blackjack en linea|apuestas de boxeo|apuestas de boxeo canelo|apuestas de boxeo en las vegas|apuestas de boxeo hoy|apuestas de boxeo online|apuestas de caballo|apuestas de caballos|apuestas
de caballos como funciona|apuestas de caballos como
se juega|apuestas de caballos en colombia|apuestas de caballos en españa|apuestas de
caballos en linea|apuestas de caballos españa|apuestas de
caballos ganador y colocado|apuestas de caballos internacionales|apuestas de caballos juegos|apuestas de caballos
online|apuestas de caballos online en venezuela|apuestas de caballos por internet|apuestas de caballos pronosticos|apuestas de
caballos pronósticos|apuestas de carrera de caballos|apuestas
de carreras de caballos|apuestas de carreras de caballos online|apuestas de casino|apuestas de casino online|apuestas de casino por internet|apuestas de champions league|apuestas de ciclismo|apuestas
de colombia|apuestas de copa america|apuestas de corners|apuestas
de deportes en linea|apuestas de deportes online|apuestas de dinero|apuestas de esports|apuestas de eurocopa|apuestas de europa league|apuestas de f1|apuestas
de formula 1|apuestas de futbol|apuestas de fútbol|apuestas de futbol app|apuestas de futbol argentina|apuestas de futbol colombia|apuestas de futbol en colombia|apuestas de futbol en directo|apuestas de futbol
en linea|apuestas de futbol en vivo|apuestas de futbol español|apuestas de futbol gratis|apuestas
de futbol hoy|apuestas de futbol mundial|apuestas de futbol online|apuestas de fútbol online|apuestas de futbol para hoy|apuestas de fútbol para hoy|apuestas de futbol para hoy seguras|apuestas de
futbol para mañana|apuestas de futbol peru|apuestas de futbol pronosticos|apuestas de fútbol pronósticos|apuestas
de futbol seguras|apuestas de futbol seguras para hoy|apuestas de futbol sin dinero|apuestas de galgos|apuestas de galgos como
ganar|apuestas de galgos en directo|apuestas de galgos online|apuestas de galgos
trucos|apuestas de golf|apuestas de hockey|apuestas
de hockey sobre hielo|apuestas de hoy|apuestas de hoy seguras|apuestas
de juego|apuestas de juegos|apuestas de juegos deportivos|apuestas de juegos online|apuestas de la champions league|apuestas de
la copa américa|apuestas de la eurocopa|apuestas de la europa league|apuestas de la liga|apuestas de la
liga bbva|apuestas de la liga española|apuestas de la nba|apuestas de la nfl|apuestas
de la ufc|apuestas de mlb|apuestas de nba|apuestas
de nba para hoy|apuestas de partidos|apuestas de partidos de futbol|apuestas de peleas ufc|apuestas de perros en vivo|apuestas de perros virtuales|apuestas de peru|apuestas de sistema|apuestas de sistema como funciona|apuestas de sistema
explicacion|apuestas de sistema explicación|apuestas de
tenis|apuestas de tenis de mesa|apuestas de tenis en directo|apuestas de
tenis hoy|apuestas de tenis para hoy|apuestas de tenis pronosticos|apuestas de tenis seguras|apuestas de
todo tipo|apuestas de ufc|apuestas de ufc hoy|apuestas del boxeo|apuestas del
clasico|apuestas del clasico real madrid barca|apuestas del dia|apuestas del día|apuestas del dia de
hoy|apuestas del dia deportivas|apuestas del dia futbol|apuestas del mundial|apuestas del partido de hoy|apuestas
del real madrid|apuestas del rey|apuestas del sistema|apuestas deporte|apuestas deportes|apuestas deportiva|apuestas deportivas|apuestas deportivas
1 euro|apuestas deportivas 10 euros gratis|apuestas deportivas 100 seguras|apuestas deportivas 1×2|apuestas deportivas android|apuestas deportivas app|apuestas deportivas apps|apuestas deportivas argentina|apuestas deportivas argentina futbol|apuestas deportivas
argentina legal|apuestas deportivas atletico de madrid|apuestas deportivas baloncesto|apuestas deportivas barca madrid|apuestas deportivas
barcelona|apuestas deportivas beisbol|apuestas deportivas
bono|apuestas deportivas bono bienvenida|apuestas deportivas bono de bienvenida|apuestas
deportivas bono sin deposito|apuestas deportivas bonos de bienvenida|apuestas deportivas boxeo|apuestas deportivas caballos|apuestas deportivas calculadora|apuestas deportivas campeon liga|apuestas deportivas casino|apuestas
deportivas casino barcelona|apuestas deportivas casino online|apuestas deportivas cerca de
mi|apuestas deportivas champions league|apuestas deportivas chile|apuestas deportivas ciclismo|apuestas deportivas colombia|apuestas deportivas
com|apuestas deportivas com foro|apuestas deportivas com pronosticos|apuestas deportivas combinadas|apuestas
deportivas combinadas para hoy|apuestas deportivas como se juega|apuestas deportivas comparador|apuestas
deportivas con bono gratis|apuestas deportivas con bonos gratis|apuestas deportivas con dinero
ficticio|apuestas deportivas con paypal|apuestas deportivas con puntos virtuales|apuestas deportivas consejos|apuestas deportivas consejos para ganar|apuestas
deportivas copa america|apuestas deportivas copa del rey|apuestas deportivas copa libertadores|apuestas deportivas copa mundial|apuestas deportivas corners|apuestas
deportivas cual es la mejor|apuestas deportivas cuotas altas|apuestas deportivas de baloncesto|apuestas deportivas
de boxeo|apuestas deportivas de colombia|apuestas deportivas de futbol|apuestas deportivas de nba|apuestas deportivas de nhl|apuestas
deportivas de peru|apuestas deportivas de tenis|apuestas deportivas del dia|apuestas deportivas
dinero ficticio|apuestas deportivas directo|apuestas deportivas doble oportunidad|apuestas deportivas en argentina|apuestas
deportivas en chile|apuestas deportivas en colombia|apuestas deportivas en directo|apuestas deportivas en españa|apuestas deportivas en español|apuestas deportivas en linea|apuestas deportivas en línea|apuestas deportivas
en peru|apuestas deportivas en perú|apuestas deportivas en sevilla|apuestas
deportivas en uruguay|apuestas deportivas en vivo|apuestas deportivas
es|apuestas deportivas es pronosticos|apuestas deportivas
españa|apuestas deportivas españolas|apuestas deportivas esports|apuestas deportivas estadisticas|apuestas deportivas estrategias|apuestas deportivas estrategias
seguras|apuestas deportivas eurocopa|apuestas deportivas europa league|apuestas deportivas
f1|apuestas deportivas faciles de ganar|apuestas deportivas formula 1|apuestas deportivas
foro|apuestas deportivas foro futbol|apuestas
deportivas foro tenis|apuestas deportivas francia argentina|apuestas deportivas futbol|apuestas deportivas fútbol|apuestas deportivas futbol argentino|apuestas
deportivas futbol colombia|apuestas deportivas futbol español|apuestas deportivas gana|apuestas deportivas ganadas|apuestas deportivas ganar
dinero seguro|apuestas deportivas gane|apuestas deportivas golf|apuestas deportivas gratis|apuestas deportivas gratis con premios|apuestas deportivas
gratis hoy|apuestas deportivas gratis sin deposito|apuestas deportivas handicap|apuestas deportivas handicap asiatico|apuestas deportivas hoy|apuestas deportivas impuestos|apuestas deportivas interior argentina|apuestas deportivas
juegos olimpicos|apuestas deportivas la liga|apuestas deportivas legales|apuestas deportivas legales en colombia|apuestas deportivas libres de impuestos|apuestas deportivas licencia españa|apuestas deportivas liga española|apuestas deportivas listado|apuestas deportivas listado clasico|apuestas
deportivas madrid|apuestas deportivas mas seguras|apuestas deportivas mejor pagadas|apuestas deportivas mejores|apuestas deportivas
mejores app|apuestas deportivas mejores casas|apuestas
deportivas mejores cuotas|apuestas deportivas mejores paginas|apuestas deportivas mexico|apuestas deportivas méxico|apuestas deportivas
mlb|apuestas deportivas mlb hoy|apuestas deportivas multiples|apuestas deportivas mundial|apuestas deportivas
murcia|apuestas deportivas nba|apuestas deportivas nba hoy|apuestas deportivas nfl|apuestas deportivas nhl|apuestas deportivas
nuevas|apuestas deportivas ofertas|apuestas deportivas online|apuestas deportivas
online argentina|apuestas deportivas online chile|apuestas deportivas online colombia|apuestas deportivas online en colombia|apuestas deportivas online españa|apuestas
deportivas online mexico|apuestas deportivas online paypal|apuestas deportivas online peru|apuestas deportivas online por internet|apuestas
deportivas pago paypal|apuestas deportivas para ganar dinero|apuestas deportivas para hoy|apuestas deportivas para hoy pronosticos|apuestas
deportivas partido suspendido|apuestas deportivas partidos
de hoy|apuestas deportivas paypal|apuestas deportivas peru|apuestas deportivas perú|apuestas deportivas peru vs ecuador|apuestas deportivas predicciones|apuestas deportivas promociones|apuestas deportivas pronostico|apuestas
deportivas pronóstico|apuestas deportivas pronostico hoy|apuestas deportivas pronosticos|apuestas deportivas pronósticos|apuestas
deportivas pronosticos expertos|apuestas deportivas pronosticos gratis|apuestas deportivas pronosticos nba|apuestas deportivas pronosticos tenis|apuestas deportivas que aceptan paypal|apuestas
deportivas real madrid|apuestas deportivas regalo bienvenida|apuestas
deportivas resultado exacto|apuestas deportivas resultados|apuestas deportivas rugby|apuestas deportivas seguras|apuestas
deportivas seguras foro|apuestas deportivas seguras
hoy|apuestas deportivas seguras para hoy|apuestas deportivas seguras telegram|apuestas deportivas sevilla|apuestas deportivas simulador eurocopa|apuestas deportivas
sin deposito|apuestas deportivas sin deposito inicial|apuestas deportivas sin dinero|apuestas deportivas sin dinero real|apuestas
deportivas sin registro|apuestas deportivas stake|apuestas deportivas stake
10|apuestas deportivas telegram españa|apuestas deportivas tenis|apuestas deportivas tenis de mesa|apuestas deportivas tenis foro|apuestas deportivas
tenis hoy|apuestas deportivas tips|apuestas deportivas tipster|apuestas deportivas ufc|apuestas deportivas uruguay|apuestas deportivas valencia|apuestas deportivas
valencia barcelona|apuestas deportivas venezuela|apuestas deportivas virtuales|apuestas deportivas y casino|apuestas deportivas y
casino online|apuestas deportivas.com|apuestas deportivas.com foro|apuestas
deportivas.es|apuestas deportivos pronosticos|apuestas deposito
minimo 1 euro|apuestas descenso a segunda|apuestas descenso a segunda b|apuestas descenso la
liga|apuestas descenso primera division|apuestas descenso segunda|apuestas dia|apuestas diarias seguras|apuestas dinero|apuestas dinero ficticio|apuestas dinero real|apuestas dinero virtual|apuestas directas|apuestas
directo|apuestas directo futbol|apuestas division de honor juvenil|apuestas dnb|apuestas doble oportunidad|apuestas
doble resultado|apuestas dobles|apuestas dobles y
triples|apuestas dortmund barcelona|apuestas draft nba|apuestas draft nfl|apuestas ecuador vs argentina|apuestas ecuador vs venezuela|apuestas egipto
uruguay|apuestas el clasico|apuestas elecciones venezuela|apuestas
empate|apuestas en baloncesto|apuestas en barcelona|apuestas en beisbol|apuestas en boxeo|apuestas
en caballos|apuestas en carreras de caballos|apuestas en casino|apuestas en casino online|apuestas
en casinos|apuestas en casinos online|apuestas en chile|apuestas en ciclismo|apuestas en colombia|apuestas en colombia de futbol|apuestas en directo|apuestas
en directo futbol|apuestas en directo pronosticos|apuestas en el futbol|apuestas en el tenis|apuestas
en españa|apuestas en esports|apuestas en eventos deportivos virtuales|apuestas en golf|apuestas en juegos|apuestas en la champions league|apuestas en la eurocopa|apuestas en la liga|apuestas en la nba|apuestas en la nfl|apuestas en las vegas mlb|apuestas en las vegas nfl|apuestas en linea|apuestas en línea|apuestas en linea argentina|apuestas en linea boxeo|apuestas
en linea chile|apuestas en linea colombia|apuestas en línea de fútbol|apuestas en linea deportivas|apuestas en linea
españa|apuestas en linea estados unidos|apuestas en linea futbol|apuestas en linea
mexico|apuestas en línea méxico|apuestas en linea
mundial|apuestas en linea peru|apuestas en linea usa|apuestas en los esports|apuestas en madrid|apuestas en méxico|apuestas en mexico online|apuestas en nba|apuestas en partidos de futbol|apuestas
en partidos de futbol en vivo|apuestas en partidos de tenis en directo|apuestas en perú|apuestas
en sevilla|apuestas en sistema|apuestas en stake|apuestas en tenis|apuestas en tenis de mesa|apuestas en valencia|apuestas en vivo|apuestas en vivo
argentina|apuestas en vivo casino|apuestas en vivo futbol|apuestas en vivo fútbol|apuestas
en vivo nba|apuestas en vivo peru|apuestas en vivo tenis|apuestas en vivo
ufc|apuestas equipo mbappe|apuestas equipos de futbol|apuestas españa|apuestas españa alemania|apuestas españa alemania eurocopa|apuestas españa croacia|apuestas españa eurocopa|apuestas españa francia|apuestas españa francia eurocopa|apuestas españa gana el mundial|apuestas españa
gana eurocopa|apuestas españa gana mundial|apuestas españa georgia|apuestas españa holanda|apuestas españa inglaterra|apuestas españa inglaterra cuotas|apuestas
españa inglaterra eurocopa|apuestas españa italia|apuestas españa mundial|apuestas españa paises bajos|apuestas español|apuestas
español oviedo|apuestas espanyol barcelona|apuestas espanyol betis|apuestas espanyol villarreal|apuestas esport|apuestas esports|apuestas esports colombia|apuestas esports españa|apuestas esports
fifa|apuestas esports gratis|apuestas esports lol|apuestas esports
peru|apuestas esports valorant|apuestas estadisticas|apuestas estrategias|apuestas euro|apuestas euro copa|apuestas eurocopa|apuestas
eurocopa campeon|apuestas eurocopa españa|apuestas eurocopa favoritos|apuestas eurocopa femenina|apuestas eurocopa final|apuestas eurocopa ganador|apuestas eurocopa hoy|apuestas eurocopa sub 21|apuestas euroliga baloncesto|apuestas
euroliga pronosticos|apuestas europa league|apuestas europa league hoy|apuestas europa league pronosticos|apuestas europa
league pronósticos|apuestas euros|apuestas f1 abu dhabi|apuestas f1 bahrein|apuestas f1 canada|apuestas f1 china|apuestas
f1 cuotas|apuestas f1 hoy|apuestas f1 las vegas|apuestas f1 miami|apuestas f1 monaco|apuestas faciles de ganar|apuestas fáciles de ganar|apuestas faciles
para ganar|apuestas favoritas|apuestas favorito champions|apuestas favoritos champions|apuestas
favoritos eurocopa|apuestas favoritos mundial|apuestas fc barcelona|apuestas final
champions cuotas|apuestas final champions league|apuestas final champions peru|apuestas final
copa|apuestas final copa america|apuestas final copa de europa|apuestas final copa
del rey|apuestas final copa europa|apuestas final copa libertadores|apuestas final copa rey|apuestas final de copa|apuestas final de copa del rey|apuestas final del mundial|apuestas final euro|apuestas final eurocopa|apuestas
final europa league|apuestas final libertadores|apuestas final mundial|apuestas final
nba|apuestas final rugby|apuestas final uefa europa league|apuestas final.mundial|apuestas
finales de conferencia nfl|apuestas finales nba|apuestas fiorentina betis|apuestas
formula|apuestas formula 1|apuestas fórmula 1|apuestas fórmula 1 pronósticos|apuestas
formula uno|apuestas foro|apuestas foro nba|apuestas francia argentina|apuestas francia españa|apuestas futbol|apuestas fútbol|apuestas futbol americano|apuestas futbol americano nfl|apuestas futbol argentina|apuestas futbol argentino|apuestas futbol champions league|apuestas
futbol chile|apuestas futbol colombia|apuestas futbol consejos|apuestas futbol en directo|apuestas fútbol en directo|apuestas futbol en vivo|apuestas fútbol en vivo|apuestas
futbol españa|apuestas futbol español|apuestas fútbol español|apuestas futbol eurocopa|apuestas futbol femenino|apuestas futbol foro|apuestas futbol gratis|apuestas
futbol hoy|apuestas fútbol hoy|apuestas futbol juegos olimpicos|apuestas futbol mexico|apuestas futbol mundial|apuestas futbol online|apuestas futbol para hoy|apuestas futbol peru|apuestas futbol pronosticos|apuestas futbol sala|apuestas futbol telegram|apuestas futbol virtual|apuestas galgos|apuestas galgos en directo|apuestas galgos hoy|apuestas galgos online|apuestas galgos pronosticos|apuestas galgos
trucos|apuestas gana|apuestas gana colombia|apuestas gana resultados|apuestas ganadas|apuestas ganadas hoy|apuestas ganador champions league|apuestas ganador copa america|apuestas ganador
copa del rey|apuestas ganador copa del rey baloncesto|apuestas ganador copa libertadores|apuestas
ganador de la eurocopa|apuestas ganador
de la liga|apuestas ganador del mundial|apuestas ganador eurocopa|apuestas
ganador europa league|apuestas ganador f1|apuestas ganador la liga|apuestas ganador liga española|apuestas ganador mundial|apuestas ganador mundial baloncesto|apuestas ganador mundial f1|apuestas
ganador nba|apuestas ganadores eurocopa|apuestas ganadores mundial|apuestas ganar champions|apuestas ganar eurocopa|apuestas ganar liga|apuestas ganar mundial|apuestas ganar nba|apuestas getafe valencia|apuestas ghana
uruguay|apuestas girona|apuestas girona athletic|apuestas girona betis|apuestas girona
campeon de liga|apuestas girona campeon liga|apuestas girona gana la liga|apuestas
girona real madrid|apuestas girona real sociedad|apuestas goleador eurocopa|apuestas goleadores eurocopa|apuestas goles
asiaticos|apuestas golf|apuestas golf masters|apuestas golf pga|apuestas granada barcelona|apuestas grand slam de tenis|apuestas gratis|apuestas gratis
casino|apuestas gratis con premios|apuestas gratis hoy|apuestas gratis para hoy|apuestas gratis por registro|apuestas gratis puntos|apuestas gratis regalos|apuestas gratis sin deposito|apuestas gratis sin depósito|apuestas
gratis sin ingreso|apuestas gratis sports|apuestas
gratis y ganar premios|apuestas grupo a eurocopa|apuestas grupos
eurocopa|apuestas handicap|apuestas handicap asiatico|apuestas handicap baloncesto|apuestas
handicap como funciona|apuestas handicap nba|apuestas
handicap nfl|apuestas hipicas online|apuestas
hípicas online|apuestas hipicas venezuela|apuestas hockey|apuestas hockey
hielo|apuestas hockey patines|apuestas hockey sobre hielo|apuestas holanda argentina|apuestas holanda vs argentina|apuestas hoy|apuestas hoy champions|apuestas hoy futbol|apuestas hoy nba|apuestas hoy pronosticos|apuestas hoy seguras|apuestas impuestos|apuestas inglaterra paises bajos|apuestas inter barca|apuestas inter barcelona|apuestas juego|apuestas
juegos|apuestas juegos en linea|apuestas juegos olimpicos|apuestas juegos
olímpicos|apuestas juegos olimpicos baloncesto|apuestas juegos online|apuestas juegos virtuales|apuestas jugador sevilla|apuestas jugadores nba|apuestas kings league americas|apuestas la liga|apuestas la liga española|apuestas la liga hoy|apuestas la liga santander|apuestas las vegas mlb|apuestas las vegas nba|apuestas las vegas nfl|apuestas league
of legends mundial|apuestas legal|apuestas legales|apuestas legales en colombia|apuestas legales en españa|apuestas legales en estados unidos|apuestas legales españa|apuestas
leganes betis|apuestas libertadores|apuestas licencia|apuestas liga 1
peru|apuestas liga argentina|apuestas liga bbva pronosticos|apuestas liga de campeones|apuestas liga de campeones de
baloncesto|apuestas liga de campeones de hockey|apuestas liga españa|apuestas liga española|apuestas liga santander pronosticos|apuestas ligas de futbol|apuestas
linea|apuestas linea de gol|apuestas liverpool barcelona|apuestas liverpool real
madrid|apuestas lol mundial|apuestas madrid|apuestas madrid arsenal|apuestas madrid atletico|apuestas madrid atletico
champions|apuestas madrid barca|apuestas madrid barça|apuestas
madrid barca hoy|apuestas madrid barca supercopa|apuestas madrid barcelona|apuestas madrid barsa|apuestas madrid bayern|apuestas madrid betis|apuestas madrid borussia|apuestas madrid campeon champions|apuestas madrid
celta|apuestas madrid city|apuestas madrid dortmund|apuestas madrid gana la liga|apuestas madrid gana liga|apuestas madrid hoy|apuestas madrid liverpool|apuestas madrid osasuna|apuestas madrid
sevilla|apuestas madrid valencia|apuestas madrid vs arsenal|apuestas
madrid vs barcelona|apuestas mallorca osasuna|apuestas
mallorca real sociedad|apuestas manchester athletic|apuestas manchester city real madrid|apuestas mas faciles de ganar|apuestas mas seguras|apuestas mas seguras para hoy|apuestas masters de golf|apuestas masters de tenis|apuestas maximo goleador eurocopa|apuestas maximo goleador mundial|apuestas mejor jugador eurocopa|apuestas mejores casinos online|apuestas mexico|apuestas méxico|apuestas
mexico polonia|apuestas méxico polonia|apuestas mlb|apuestas
mlb hoy|apuestas mlb las vegas|apuestas mlb para hoy|apuestas mlb pronosticos|apuestas mlb usa|apuestas mma ufc|apuestas momios|apuestas multiples|apuestas múltiples|apuestas multiples como
funcionan|apuestas multiples el gordo|apuestas multiples futbol|apuestas mundial|apuestas mundial 2026|apuestas mundial baloncesto|apuestas mundial balonmano|apuestas mundial brasil|apuestas mundial campeon|apuestas mundial ciclismo|apuestas mundial clubes|apuestas mundial de baloncesto|apuestas mundial de ciclismo|apuestas mundial de clubes|apuestas mundial de futbol|apuestas mundial de fútbol|apuestas mundial
de rugby|apuestas mundial f1|apuestas mundial favoritos|apuestas
mundial femenino|apuestas mundial formula 1|apuestas mundial futbol|apuestas mundial ganador|apuestas mundial lol|apuestas mundial moto gp|apuestas mundial motogp|apuestas mundial rugby|apuestas mundial sub 17|apuestas mundiales|apuestas mundialistas|apuestas mvp eurocopa|apuestas mvp nba|apuestas mvp nfl|apuestas nacionales de colombia|apuestas nba|apuestas
nba all star|apuestas nba campeon|apuestas nba consejos|apuestas
nba esta noche|apuestas nba finals|apuestas nba gratis|apuestas nba
hoy|apuestas nba hoy jugadores|apuestas nba hoy pronosticos|apuestas nba para hoy|apuestas nba playoffs|apuestas nba pronosticos|apuestas nba pronósticos|apuestas nba pronosticos hoy|apuestas nba tipster|apuestas
nfl|apuestas nfl hoy|apuestas nfl las vegas|apuestas nfl playoffs|apuestas nfl pronosticos|apuestas nfl pronósticos|apuestas nfl
semana 4|apuestas nfl super bowl|apuestas nhl|apuestas nhl pronosticos|apuestas octavos eurocopa|apuestas ofertas|apuestas online|apuestas online argentina|apuestas online argentina legal|apuestas online bono|apuestas online bono bienvenida|apuestas online boxeo|apuestas online
caballos|apuestas online carreras de caballos|apuestas online casino|apuestas online champions league|apuestas
online chile|apuestas online ciclismo|apuestas online colombia|apuestas
online comparativa|apuestas online con paypal|apuestas online de caballos|apuestas online deportivas|apuestas online en argentina|apuestas online en peru|apuestas online espana|apuestas online españa|apuestas online esports|apuestas online foro|apuestas online futbol|apuestas online futbol españa|apuestas online golf|apuestas
online gratis|apuestas online gratis sin deposito|apuestas online juegos|apuestas online mexico|apuestas online mma|apuestas online movil|apuestas online nba|apuestas online net|apuestas online
nuevas|apuestas online opiniones|apuestas online paypal|apuestas online peru|apuestas online seguras|apuestas online sin dinero|apuestas online sin registro|apuestas online tenis|apuestas online ufc|apuestas online uruguay|apuestas online venezuela|apuestas open britanico golf|apuestas osasuna athletic|apuestas osasuna barcelona|apuestas osasuna real madrid|apuestas osasuna sevilla|apuestas
osasuna valencia|apuestas over|apuestas over 2.5|apuestas over
under|apuestas paginas|apuestas pago anticipado|apuestas paises bajos
ecuador|apuestas paises bajos inglaterra|apuestas
países bajos qatar|apuestas para boxeo|apuestas para champions
league|apuestas para el clasico|apuestas para el dia
de hoy|apuestas para el mundial|apuestas para el partido de hoy|apuestas
para eurocopa|apuestas para europa league|apuestas
para futbol|apuestas para ganar|apuestas para ganar dinero|apuestas para
ganar dinero facil|apuestas para ganar en la ruleta|apuestas para ganar la champions|apuestas para
ganar la eurocopa|apuestas para ganar la europa league|apuestas para ganar
la liga|apuestas para ganar siempre|apuestas para hacer|apuestas para hoy|apuestas para hoy de futbol|apuestas
para hoy europa league|apuestas para hoy futbol|apuestas para juegos|apuestas para la champions league|apuestas para la copa del rey|apuestas para
la eurocopa|apuestas para la europa league|apuestas para la final de la eurocopa|apuestas
para la nba hoy|apuestas para los partidos de hoy|apuestas para partidos de
hoy|apuestas para ufc|apuestas partido|apuestas partido aplazado|apuestas partido champions|apuestas partido colombia|apuestas partido españa marruecos|apuestas partido mundial|apuestas partido suspendido|apuestas partidos|apuestas
partidos champions league|apuestas partidos csgo|apuestas partidos
de futbol|apuestas partidos de futbol hoy|apuestas partidos de hoy|apuestas
partidos eurocopa|apuestas partidos futbol|apuestas partidos hoy|apuestas partidos mundial|apuestas paypal|apuestas peleas de boxeo|apuestas peru|apuestas perú|apuestas peru brasil|apuestas
peru chile|apuestas peru paraguay|apuestas peru uruguay|apuestas peru vs chile|apuestas peru vs colombia|apuestas pichichi eurocopa|apuestas plataforma|apuestas playoff|apuestas playoff ascenso|apuestas playoff
ascenso a primera|apuestas playoff nba|apuestas playoff segunda|apuestas playoff segunda b|apuestas playoffs nba|apuestas
playoffs nfl|apuestas polonia argentina|apuestas por argentina|apuestas por internet
mexico|apuestas por internet para ganar dinero|apuestas por
paypal|apuestas por ronda boxeo|apuestas por sistema|apuestas portugal uruguay|apuestas pre partido|apuestas predicciones|apuestas predicciones futbol|apuestas primera division|apuestas primera division españa|apuestas promociones|apuestas pronostico|apuestas pronosticos|apuestas pronosticos deportivos|apuestas pronosticos
deportivos tenis|apuestas pronosticos futbol|apuestas pronosticos gratis|apuestas pronosticos nba|apuestas pronosticos tenis|apuestas prorroga|apuestas psg barca|apuestas psg barcelona|apuestas puntos por tarjetas|apuestas puntos tarjetas|apuestas que aceptan paypal|apuestas que es handicap|apuestas que puedes hacer
con tu novia|apuestas que siempre ganaras|apuestas que significa|apuestas quien bajara a segunda|apuestas quién bajara a segunda|apuestas quien gana el mundial|apuestas quien gana eurocopa|apuestas quien gana la champions|apuestas quien gana
la eurocopa|apuestas quien gana la liga|apuestas quien ganara el mundial|apuestas quién ganará el mundial|apuestas quien ganara la champions|apuestas quien ganara la
eurocopa|apuestas quien ganara la liga|apuestas rayo barcelona|apuestas real madrid|apuestas real madrid arsenal|apuestas real madrid athletic|apuestas real madrid atletico|apuestas real madrid atletico champions|apuestas real madrid atletico de madrid|apuestas real madrid atlético de madrid|apuestas real madrid atletico madrid|apuestas real madrid barcelona|apuestas real madrid bayern|apuestas real
madrid betis|apuestas real madrid borussia|apuestas real madrid campeon champions|apuestas
real madrid celta|apuestas real madrid champions|apuestas real madrid city|apuestas real madrid girona|apuestas
real madrid hoy|apuestas real madrid liverpool|apuestas real madrid manchester city|apuestas real madrid osasuna|apuestas real madrid real sociedad|apuestas real madrid valencia|apuestas real madrid villarreal|apuestas real madrid vs arsenal|apuestas real madrid vs atletico|apuestas real madrid vs atlético|apuestas real madrid vs atletico madrid|apuestas real madrid
vs barcelona|apuestas real madrid vs betis|apuestas real madrid vs
sevilla|apuestas real madrid vs valencia|apuestas real sociedad|apuestas real sociedad athletic|apuestas real sociedad barcelona|apuestas real sociedad betis|apuestas real sociedad psg|apuestas real sociedad real
madrid|apuestas real sociedad valencia|apuestas recomendadas hoy|apuestas regalo de bienvenida|apuestas registro|apuestas resultado exacto|apuestas
resultados|apuestas resultados eurocopa|apuestas retirada tenis|apuestas roma barcelona|apuestas roma sevilla|apuestas rugby|apuestas rugby mundial|apuestas rugby world cup|apuestas ruleta seguras|apuestas
segunda|apuestas segunda b|apuestas segunda division|apuestas segunda división|apuestas segunda division b|apuestas segunda division españa|apuestas seguras|apuestas seguras baloncesto|apuestas seguras calculadora|apuestas seguras en la ruleta|apuestas
seguras eurocopa|apuestas seguras foro|apuestas seguras futbol|apuestas
seguras futbol hoy|apuestas seguras gratis|apuestas seguras hoy|apuestas seguras hoy
futbol|apuestas seguras nba|apuestas seguras nba hoy|apuestas seguras para este fin de semana|apuestas
seguras para ganar dinero|apuestas seguras para hoy|apuestas seguras para
hoy fútbol|apuestas seguras para hoy pronósticos|apuestas seguras para mañana|apuestas seguras ruleta|apuestas seguras telegram|apuestas seguras tenis|apuestas semifinales eurocopa|apuestas senegal
paises bajos|apuestas sevilla|apuestas sevilla athletic|apuestas sevilla
atletico de madrid|apuestas sevilla barcelona|apuestas sevilla
betis|apuestas sevilla campeon liga|apuestas sevilla celta|apuestas sevilla gana la liga|apuestas sevilla girona|apuestas sevilla inter|apuestas sevilla jugador|apuestas sevilla juventus|apuestas sevilla
leganes|apuestas sevilla madrid|apuestas sevilla manchester united|apuestas sevilla osasuna|apuestas sevilla real madrid|apuestas sevilla real sociedad|apuestas sevilla
roma|apuestas sevilla valencia|apuestas significa|apuestas
simples ejemplos|apuestas simples o combinadas|apuestas sin deposito|apuestas sin deposito inicial|apuestas sin deposito minimo|apuestas sin dinero|apuestas
sin dinero real|apuestas sin empate|apuestas sin empate que significa|apuestas
sin ingreso minimo|apuestas sin registro|apuestas sistema|apuestas sistema calculadora|apuestas
sistema como funciona|apuestas sistema trixie|apuestas sociedad|apuestas sorteo copa del rey|apuestas stake|apuestas
stake 10|apuestas stake 10 hoy|apuestas super bowl favorito|apuestas super rugby|apuestas supercopa españa|apuestas superliga argentina|apuestas tarjeta roja|apuestas tarjetas|apuestas tarjetas amarillas|apuestas tenis|apuestas tenis atp|apuestas tenis consejos|apuestas tenis copa davis|apuestas tenis de mesa|apuestas tenis de mesa pronosticos|apuestas tenis en vivo|apuestas tenis femenino|apuestas tenis
hoy|apuestas tenis itf|apuestas tenis pronosticos|apuestas tenis pronósticos|apuestas tenis retirada|apuestas tenis roland garros|apuestas tenis seguras|apuestas tenis
wimbledon|apuestas tenis wta|apuestas tercera division|apuestas tercera
division españa|apuestas tipos|apuestas tips|apuestas tipster|apuestas tipster para hoy|apuestas topuria holloway
cuotas|apuestas torneos de golf|apuestas torneos de tenis|apuestas trucos|apuestas
uefa champions league|apuestas uefa europa league|apuestas ufc|apuestas ufc chile|apuestas ufc como funciona|apuestas ufc hoy|apuestas ufc ilia topuria|apuestas ufc online|apuestas ufc pronósticos|apuestas
ufc telegram|apuestas ufc topuria|apuestas under over|apuestas
unionistas villarreal|apuestas uruguay|apuestas uruguay colombia|apuestas uruguay corea|apuestas uruguay vs colombia|apuestas us open golf|apuestas us open tenis|apuestas valencia|apuestas valencia barcelona|apuestas valencia betis|apuestas valencia madrid|apuestas valencia real madrid|apuestas valladolid barcelona|apuestas valladolid
valencia|apuestas valor app|apuestas valor en directo|apuestas valor galgos|apuestas venezuela|apuestas venezuela argentina|apuestas venezuela bolivia|apuestas venezuela ecuador|apuestas villarreal|apuestas villarreal athletic|apuestas villarreal
barcelona|apuestas villarreal bayern|apuestas villarreal betis|apuestas villarreal liverpool|apuestas villarreal manchester|apuestas villarreal manchester
united|apuestas villarreal vs real madrid|apuestas virtuales|apuestas virtuales colombia|apuestas virtuales futbol|apuestas
virtuales sin dinero|apuestas vivo|apuestas vuelta a
españa|apuestas vuelta españa|apuestas william hill partidos de hoy|apuestas y casino|apuestas y casinos|apuestas y juegos de azar|apuestas y
pronosticos|apuestas y pronosticos de futbol|apuestas y pronosticos deportivos|apuestas
y resultados|apuestas-deportivas|apuestas-deportivas.es pronosticos|arbitro nba apuestas|argentina apuestas|argentina
colombia apuestas|argentina croacia apuestas|argentina francia apuestas|argentina mexico apuestas|argentina peru apuestas|argentina uruguay
apuestas|argentina vs bolivia apuestas|argentina vs chile apuestas|argentina vs colombia apuestas|argentina vs francia apuestas|argentina vs.
colombia apuestas|asi se gana en las apuestas deportivas|asiatico apuestas|asiatico en apuestas|asiaticos apuestas|athletic barcelona apuestas|athletic manchester united apuestas|athletic osasuna apuestas|athletic real madrid apuestas|atletico barcelona apuestas|atletico de madrid apuestas|atlético de madrid apuestas|atletico de madrid real madrid apuestas|atletico
de madrid vs barcelona apuestas|atletico madrid real madrid apuestas|atletico madrid vs real madrid apuestas|atletico real madrid apuestas|atletico
vs real madrid apuestas|avisador de cuotas apuestas|bajada de cuotas apuestas|baloncesto apuestas|barbastro barcelona apuestas|barca apuestas|barca bayern apuestas|barca inter apuestas|barca madrid apuestas|barça madrid
apuestas|barca vs atletico apuestas|barca vs madrid apuestas|barca vs real madrid apuestas|barcelona – real madrid apuestas|barcelona apuestas|barcelona atletico
apuestas|barcelona atletico de madrid apuestas|barcelona atletico madrid apuestas|barcelona betis apuestas|barcelona
casa de apuestas|barcelona inter apuestas|barcelona psg apuestas|barcelona real madrid apuestas|barcelona real sociedad apuestas|barcelona
sevilla apuestas|barcelona valencia apuestas|barcelona vs athletic bilbao apuestas|barcelona vs atlético madrid
apuestas|barcelona vs betis apuestas|barcelona vs celta
de vigo apuestas|barcelona vs espanyol apuestas|barcelona vs girona apuestas|barcelona vs madrid apuestas|barcelona vs real madrid
apuestas|barcelona vs real sociedad apuestas|barcelona
vs sevilla apuestas|barcelona vs villarreal apuestas|base de datos cuotas apuestas deportivas|bayern real madrid
apuestas|beisbol apuestas|best america apuestas|bet apuestas chile|bet
apuestas en vivo|betis – chelsea apuestas|betis apuestas|betis barcelona apuestas|betis chelsea apuestas|betis madrid
apuestas|betis sevilla apuestas|betsson tu sitio de apuestas online|blog apuestas baloncesto|blog apuestas ciclismo|blog apuestas nba|blog apuestas tenis|blog de apuestas de tenis|bono apuestas|bono apuestas deportivas|bono
apuestas deportivas sin deposito|bono apuestas gratis|bono apuestas
gratis sin deposito|bono apuestas sin deposito|bono bienvenida apuestas|bono bienvenida apuestas deportivas|bono bienvenida apuestas españa|bono bienvenida apuestas sin deposito|bono bienvenida apuestas sin depósito|bono bienvenida
casa apuestas|bono bienvenida casa de apuestas|bono bienvenida marca apuestas|bono casa apuestas|bono casa de apuestas|bono casa
de apuestas sin ingreso|bono casas de apuestas|bono de apuestas|bono de apuestas gratis sin deposito|bono de bienvenida
apuestas|bono de bienvenida apuestas deportivas|bono de bienvenida
casa de apuestas|bono de bienvenida casas de apuestas|bono de casas de
apuestas|bono de registro apuestas|bono de registro apuestas deportivas|bono de registro casa de apuestas|bono gratis apuestas|bono marca apuestas|bono por
registro apuestas|bono por registro apuestas deportivas|bono por registro casa de apuestas|bono registro apuestas|bono sin deposito apuestas|bono sin depósito apuestas|bono
sin deposito apuestas deportivas|bono sin depósito apuestas
deportivas|bono sin deposito casa de apuestas|bono sin deposito marca apuestas|bono sin ingreso apuestas|bono sin ingreso apuestas deportivas|bonos apuestas|bonos apuestas colombia|bonos apuestas deportivas|bonos apuestas deportivas sin deposito|bonos apuestas gratis|bonos apuestas sin deposito|bonos
apuestas sin depósito|bonos bienvenida apuestas|bonos bienvenida casas apuestas|bonos bienvenida casas de apuestas|bonos casa de apuestas|bonos casas apuestas|bonos casas de apuestas|bonos casas de apuestas colombia|bonos casas de apuestas deportivas|bonos casas de apuestas españa|bonos casas de apuestas nuevas|bonos casas de apuestas sin deposito|bonos casas de apuestas sin depósito|bonos de apuestas|bonos de apuestas deportivas|bonos de apuestas gratis|bonos de apuestas sin deposito|bonos de bienvenida apuestas|bonos de bienvenida
apuestas deportivas|bonos de bienvenida casa
de apuestas|bonos de bienvenida casas de apuestas|bonos de bienvenida de casas de apuestas|bonos
de bienvenida en casas de apuestas|bonos de casas de apuestas|bonos de casas de apuestas sin deposito|bonos
en casa de apuestas|bonos en casas de apuestas sin deposito|bonos gratis apuestas|bonos gratis
apuestas deportivas|bonos gratis casas de apuestas|bonos gratis sin deposito apuestas|bonos paginas de apuestas|bonos registro casas de apuestas|bonos sin deposito apuestas|bonos sin depósito apuestas|bonos sin deposito apuestas deportivas|bonos sin deposito casas de apuestas|bot
de apuestas deportivas gratis|boxeo apuestas|brasil colombia apuestas|brasil peru apuestas|brasil vs colombia apuestas|buenas apuestas para hoy|buscador cuotas apuestas|buscador de apuestas seguras|buscador de cuotas
apuestas|buscador de cuotas de apuestas|buscar apuestas seguras|caballos apuestas|calculador de apuestas|calculador de cuotas apuestas|calculadora apuestas|calculadora apuestas combinadas|calculadora apuestas
de sistema|calculadora apuestas deportivas|calculadora apuestas deportivas seguras|calculadora
apuestas multiples|calculadora apuestas segura|calculadora apuestas seguras|calculadora
apuestas sistema|calculadora apuestas yankee|calculadora arbitraje apuestas|calculadora cubrir apuestas|calculadora cuotas apuestas|calculadora
de apuestas|calculadora de apuestas combinadas|calculadora
de apuestas de futbol|calculadora de apuestas de sistema|calculadora de apuestas deportivas|calculadora de
apuestas multiples|calculadora de apuestas seguras|calculadora de apuestas sistema|calculadora
de apuestas surebets|calculadora de arbitraje apuestas|calculadora de cuotas apuestas|calculadora de cuotas de apuestas|calculadora para apuestas deportivas|calculadora
poisson apuestas|calculadora poisson apuestas deportivas|calculadora poisson para apuestas|calculadora scalping apuestas deportivas|calculadora sistema apuestas|calculadora stake apuestas|calculadora trading apuestas|calcular
apuestas|calcular apuestas deportivas|calcular apuestas futbol|calcular apuestas sistema|calcular cuotas apuestas|calcular
cuotas apuestas combinadas|calcular cuotas apuestas deportivas|calcular cuotas
de apuestas|calcular ganancias apuestas deportivas|calcular momios apuestas|calcular probabilidad cuota apuestas|calcular stake apuestas|calcular unidades apuestas|calcular yield apuestas|calculo de apuestas|calculo de
apuestas deportivas|cambio de cuotas apuestas|campeon champions apuestas|campeon eurocopa apuestas|campeon liga apuestas|campeon nba apuestas|canales de apuestas gratis|carrera de caballos apuestas|carrera de caballos apuestas
juego|carrera de caballos con apuestas|carrera de
galgos apuestas|carreras de caballos apuestas|carreras de caballos
apuestas online|carreras de caballos con apuestas|carreras de caballos
juegos de apuestas|carreras de galgos apuestas|carreras de galgos apuestas online|carreras de
galgos apuestas trucos|carreras galgos apuestas|casa apuestas argentina|casa apuestas atletico de madrid|casa apuestas barcelona|casa apuestas betis|casa apuestas bono bienvenida|casa apuestas bono gratis|casa apuestas bono sin deposito|casa apuestas
cerca de mi|casa apuestas chile|casa apuestas colombia|casa apuestas con mejores
cuotas|casa apuestas deportivas|casa apuestas españa|casa apuestas española|casa apuestas eurocopa|casa apuestas futbol|casa
apuestas mejores cuotas|casa apuestas mundial|casa apuestas nueva|casa apuestas nuevas|casa apuestas online|casa apuestas
peru|casa apuestas valencia|casa de apuestas|casa de apuestas 10 euros
gratis|casa de apuestas argentina|casa de apuestas atletico
de madrid|casa de apuestas baloncesto|casa de apuestas barcelona|casa de apuestas beisbol|casa de apuestas betis|casa de apuestas bono|casa de apuestas bono bienvenida|casa de
apuestas bono de bienvenida|casa de apuestas
bono gratis|casa de apuestas bono por registro|casa de apuestas bono sin deposito|casa de apuestas
boxeo|casa de apuestas caballos|casa de apuestas carreras de caballos|casa de apuestas cerca
de mi|casa de apuestas cerca de mí|casa de apuestas champions
league|casa de apuestas chile|casa de apuestas ciclismo|casa de apuestas colombia|casa de apuestas con bono de bienvenida|casa de apuestas con bono
sin deposito|casa de apuestas con cuotas mas altas|casa de apuestas con esports|casa de
apuestas con las mejores cuotas|casa de apuestas con licencia en españa|casa de apuestas con mejores cuotas|casa de
apuestas con pago anticipado|casa de apuestas con paypal|casa de apuestas copa america|casa
de apuestas de caballos|casa de apuestas de colombia|casa
de apuestas de españa|casa de apuestas de futbol|casa de apuestas de fútbol|casa de apuestas de futbol peru|casa de
apuestas de peru|casa de apuestas del madrid|casa de apuestas del real madrid|casa de apuestas deportivas|casa de apuestas deportivas cerca de
mi|casa de apuestas deportivas en argentina|casa de apuestas deportivas en chile|casa
de apuestas deportivas en colombia|casa de apuestas deportivas en españa|casa de apuestas deportivas en madrid|casa de apuestas deportivas españa|casa de apuestas deportivas españolas|casa de
apuestas deportivas madrid|casa de apuestas deportivas mexico|casa de apuestas deportivas online|casa de apuestas deportivas peru|casa de apuestas deposito 5 euros|casa de apuestas deposito minimo|casa de apuestas deposito minimo 1 euro|casa
de apuestas depósito mínimo 1 euro|casa de apuestas en españa|casa de apuestas en linea|casa de
apuestas en madrid|casa de apuestas en perú|casa de apuestas en vivo|casa de apuestas españa|casa de apuestas españa inglaterra|casa de
apuestas española|casa de apuestas españolas|casa de apuestas esports|casa de apuestas eurocopa|casa de apuestas
europa league|casa de apuestas f1|casa de apuestas formula 1|casa de apuestas futbol|casa de apuestas ingreso minimo|casa de apuestas ingreso
minimo 1 euro|casa de apuestas ingreso mínimo 1 euro|casa de apuestas legales|casa
de apuestas legales en colombia|casa de apuestas legales en españa|casa de apuestas libertadores|casa de apuestas
liga española|casa de apuestas madrid|casa de apuestas mas segura|casa de apuestas mejores|casa de
apuestas méxico|casa de apuestas minimo 5 euros|casa
de apuestas mlb|casa de apuestas mundial|casa de apuestas nba|casa de apuestas nfl|casa
de apuestas nueva|casa de apuestas nuevas|casa de apuestas
oficial del real madrid|casa de apuestas oficial real madrid|casa
de apuestas online|casa de apuestas online argentina|casa de apuestas online chile|casa
de apuestas online españa|casa de apuestas online mexico|casa de apuestas online paraguay|casa de apuestas online peru|casa de apuestas online usa|casa
de apuestas online venezuela|casa de apuestas
pago anticipado|casa de apuestas para boxeo|casa de apuestas para ufc|casa de apuestas peru|casa de apuestas perú|casa de apuestas peru online|casa
de apuestas por paypal|casa de apuestas promociones|casa de apuestas que regalan dinero|casa de
apuestas real madrid|casa de apuestas regalo de bienvenida|casa de apuestas sevilla|casa de apuestas
sin dinero|casa de apuestas sin ingreso minimo|casa de apuestas sin licencia en españa|casa de apuestas sin minimo
de ingreso|casa de apuestas stake|casa de apuestas tenis|casa de apuestas ufc|casa de apuestas valencia|casa de apuestas venezuela|casa de apuestas virtuales|casa de apuestas
vive la suerte|casa oficial de apuestas del real madrid|casas apuestas asiaticas|casas apuestas bono sin deposito|casas apuestas bonos sin deposito|casas apuestas caballos|casas apuestas chile|casas apuestas ciclismo|casas
apuestas con licencia|casas apuestas con licencia en españa|casas apuestas deportivas|casas apuestas deportivas colombia|casas apuestas deportivas
españa|casas apuestas deportivas españolas|casas apuestas deportivas nuevas|casas apuestas españa|casas apuestas españolas|casas apuestas esports|casas apuestas eurocopa|casas apuestas golf|casas apuestas ingreso minimo
5 euros|casas apuestas legales|casas apuestas legales españa|casas apuestas licencia|casas apuestas licencia
españa|casas apuestas mexico|casas apuestas mundial|casas apuestas nba|casas apuestas nuevas|casas apuestas
nuevas españa|casas apuestas ofertas|casas apuestas online|casas apuestas paypal|casas apuestas peru|casas apuestas sin licencia|casas apuestas tenis|casas asiaticas apuestas|casas de apuestas|casas de apuestas 5 euros|casas de apuestas app|casas de apuestas argentinas|casas de apuestas asiaticas|casas de apuestas baloncesto|casas de apuestas barcelona|casas de apuestas bono bienvenida|casas de apuestas bono
de bienvenida|casas de apuestas bono por registro|casas de apuestas
bono sin deposito|casas de apuestas bono sin ingreso|casas
de apuestas bonos|casas de apuestas bonos de bienvenida|casas de apuestas bonos gratis|casas de apuestas
bonos sin deposito|casas de apuestas boxeo|casas de apuestas caballos|casas de apuestas carreras de caballos|casas de apuestas casino|casas de apuestas casino
online|casas de apuestas cerca de mi|casas de apuestas
champions league|casas de apuestas chile|casas de apuestas ciclismo|casas de apuestas colombia|casas de apuestas com|casas de
apuestas con app|casas de apuestas con apuestas gratis|casas de apuestas con bono|casas de apuestas con bono
de bienvenida|casas de apuestas con bono de registro|casas de apuestas con bono por registro|casas de apuestas
con bono sin deposito|casas de apuestas con bonos|casas de apuestas con bonos gratis|casas de apuestas con bonos sin deposito|casas de apuestas con deposito minimo|casas
de apuestas con esports|casas de apuestas con handicap asiatico|casas de apuestas con licencia|casas de apuestas con licencia en españa|casas
de apuestas con licencia españa|casas de apuestas con licencia española|casas de apuestas con mejores cuotas|casas de
apuestas con pago anticipado|casas de apuestas
con paypal|casas de apuestas con paypal en perú|casas de apuestas con promociones|casas de apuestas con ruleta en vivo|casas de apuestas copa del rey|casas de apuestas de caballos|casas de apuestas de españa|casas de apuestas de
futbol|casas de apuestas de fútbol|casas de apuestas de peru|casas de apuestas deportivas|casas de apuestas
deportivas asiaticas|casas de apuestas deportivas colombia|casas de apuestas deportivas comparativa|casas de apuestas deportivas con paypal|casas de apuestas
deportivas en chile|casas de apuestas deportivas en españa|casas de apuestas deportivas en linea|casas de apuestas deportivas en madrid|casas de apuestas deportivas en mexico|casas de apuestas deportivas en peru|casas de apuestas deportivas en sevilla|casas de apuestas deportivas en valencia|casas de apuestas deportivas españa|casas de apuestas deportivas españolas|casas de apuestas deportivas legales|casas de apuestas deportivas
madrid|casas de apuestas deportivas mexico|casas de apuestas
deportivas nuevas|casas de apuestas deportivas online|casas de apuestas deportivas peru|casas de apuestas deportivas perú|casas de apuestas deposito minimo 1 euro|casas de
apuestas depósito mínimo 1 euro|casas de apuestas dinero gratis|casas de apuestas en argentina|casas de apuestas en barcelona|casas de apuestas en chile|casas de apuestas en colombia|casas
de apuestas en españa|casas de apuestas en españa online|casas de apuestas en linea|casas de apuestas en madrid|casas de apuestas en méxico|casas
de apuestas en peru|casas de apuestas en perú|casas
de apuestas en sevilla|casas de apuestas en uruguay|casas de apuestas en valencia|casas de apuestas en venezuela|casas de apuestas equipos de futbol|casas de apuestas españa|casas de apuestas españa alemania|casas de apuestas españa inglaterra|casas de apuestas españa licencia|casas de apuestas españa nuevas|casas de apuestas españa
online|casas de apuestas española|casas de apuestas españolas|casas
de apuestas españolas con licencia|casas de apuestas españolas online|casas de apuestas esports|casas de
apuestas eurocopa|casas de apuestas eurocopa 2024|casas de apuestas europa league|casas de apuestas f1|casas de apuestas
fisicas en barcelona|casas de apuestas fisicas en españa|casas de apuestas formula 1|casas de apuestas fuera de españa|casas
de apuestas futbol|casas de apuestas fútbol|casas de apuestas futbol españa|casas de apuestas ganador eurocopa|casas de apuestas
gratis|casas de apuestas ingreso minimo|casas de apuestas ingreso minimo
1 euro|casas de apuestas ingreso minimo 5 euros|casas
de apuestas inter barcelona|casas de apuestas legales|casas de apuestas legales en colombia|casas de apuestas legales en españa|casas de apuestas legales en mexico|casas de apuestas legales españa|casas de apuestas legales mx|casas de apuestas licencia|casas
de apuestas licencia españa|casas de apuestas lista|casas de apuestas
madrid|casas de apuestas mas seguras|casas de apuestas mejores bonos|casas de apuestas mejores cuotas|casas de apuestas mexico|casas de apuestas méxico|casas de apuestas minimo 5 euros|casas de apuestas mlb|casas de apuestas
mundial|casas de apuestas mundial baloncesto|casas de apuestas mundiales|casas de
apuestas nba|casas de apuestas no reguladas en españa|casas
de apuestas nueva ley|casas de apuestas nuevas|casas de apuestas
nuevas en colombia|casas de apuestas nuevas en españa|casas de apuestas nuevas españa|casas de apuestas ofertas|casas de apuestas online|casas
de apuestas online argentina|casas de apuestas online colombia|casas de apuestas online deportivas|casas de
apuestas online ecuador|casas de apuestas online en argentina|casas de apuestas online en chile|casas
de apuestas online en colombia|casas de apuestas online en españa|casas de apuestas online en mexico|casas de apuestas online españa|casas de
apuestas online mas fiables|casas de apuestas online mexico|casas de apuestas online nuevas|casas de apuestas online peru|casas de apuestas online usa|casas de apuestas online venezuela|casas
de apuestas pago paypal|casas de apuestas para ufc|casas de apuestas paypal|casas de apuestas peru bono sin deposito|casas de apuestas presenciales en españa|casas de apuestas
promociones|casas de apuestas que aceptan paypal|casas de
Your comment is awaiting moderation.
https://polimer-3d.ru/epoksidnye-poly
Your comment is awaiting moderation.
Причем тут вообще он к нашему магазину ? https://restxiv.ru Вы не могли сегодня оплатить заказ, потому что мы сегодня не работаемСпасибо огромное вам многим за понимание.
Your comment is awaiting moderation.
Любишь азарт? https://kometa-casino-online.ru играть онлайн в слоты и live-казино. Разбор регистрации, бонусов, правил игры, лимитов и способов вывода средств.
Your comment is awaiting moderation.
https://polimer-3d.ru/
Your comment is awaiting moderation.
Бро ответь в аське! Купить кокаин, мефедрон, бошки, гашиш, марихуану, шишки Могу предоставить переписку администрации форума. Уже определитесь, что вам нужно чтобы и мне не дергать отправщиков, склад и прочих сотрудников. То хочу, то не хочу, то вышлите 2 посылки, оплачу посфактум, то снова верните деньги.кто нить последнее время покупал чего ??? всё ровно ?
Your comment is awaiting moderation.
поисковое продвижение инфо сайта увеличить трафик специалисты prodvizhenie-sajta-po-trafiku1.ru .
Your comment is awaiting moderation.
Что случилось? почему страшно? Купить кокаин, мефедрон, бошки, гашиш, марихуану, шишки Да мы уже поговорили – нормальные ребята вроде) хз, я всё равно полной предоплате не доверяю)ЛУЧШИЕ ИЗ ЛУЧШИХ НЕ РАЗ ЗАКАЗЫВАЛ И БУДУ ЗАКАЗЫВАТЬ!!!!
Your comment is awaiting moderation.
Выбирали круиз из Дубая из за удобного перелета и остались полностью довольны, лайнер современный, обслуживание на уровне лучших мировых курортов https://kruizy-po-persidskomu-zalivu.ru/
Your comment is awaiting moderation.
2-й раз все было быстро но собирал весь дживик по конспирации , на пакетиках видать экономили))) https://rio-arkhangelsk.ru када тусишка появится????я от данного сэллера так ничего и не получил. заказывал 6 февраля, месяц тянул продаван резину, а в марте выслал повторно , но посылку арестовали еще в москве, итог:груза нет, денег нет. мотайте на ус, я с такими БАРЫГАМИ дел иметь не хочу…
Your comment is awaiting moderation.
маркетинг в интернете блог seo-blog12.ru .
Your comment is awaiting moderation.
seo статьи seo статьи .
Your comment is awaiting moderation.
продавец должен наверно знать что продает,с таким отношением,то бишь пропидаливанием соды….за такое человеки и по шапке получают Купить кокаин, мефедрон, бошки, гашиш, марихуану, шишки привет бразы всех спрошедшими праздниками получил седня посыль все порадовало и качество и бонус:p:D:D:Dприложеный за ожыдание спосибо магазуеще раз решил воспользоваться магазом ))) уже 2 года только у них покупаю))) и пока доволен
Your comment is awaiting moderation.
Заказывал 307, прислали 203. Сразу объяснил, менеджер в скайпе всё понял. Сказал Бро не переживай будет тебе бонус. Купить кокаин, мефедрон, бошки, гашиш, марихуану, шишки тоже самое взял ам в данном магазе чтоб не было сплетен тож отпишу за качество думаю мнение от 2 разных людей будет достаточно что бы не было вопросов :speak:отличный магазин! обращаюсь уже не первый месяц
Your comment is awaiting moderation.
Try to start earning with high quality automated trading software based on neural networks, with strong win-rate
https://aitredo.com
TG: @aitredo
WhatsApp: +972557245593
Email: sales@aitredo.com
Your comment is awaiting moderation.
отношение оператора к клиентам очень даже достойное!(быть честным я еще нигде не видел такого хорошего отношения к клиентам у магазинов как в чемикл микс)!!!!! за это 5+ Купить кокаин, мефедрон, бошки, гашиш, марихуану, шишки во вторник заряжали – сразу же списались договорились, чтоб всё ровно было – в итоге 4 суток прошло и тишина нету трека, вчера ваще пропал продаван, хотя до этого ваще из аськи не выходил в такое время, до этого спрашивал м.б. траблы какие – он ответил “что есть не большие” вот и походу решается че-то там х3 пздц короче надеюсь в понедельник решитсякакой оптимальный недорогой способ доставки выбрать при небольшом заказе,если не почта?посоветуйте…
Your comment is awaiting moderation.
сео блог сео блог .
Your comment is awaiting moderation.
Как выбрать фотографа мастера съемки в Сочи — бракосочетания
Your comment is awaiting moderation.
продвижение сайтов трафик на сайт prodvizhenie-sajta-po-trafiku1.ru .
Your comment is awaiting moderation.
брал тут туси совсем недавно.все устроило.спасибо.жду обработки второго заказа) Купить кокаин, мефедрон, бошки, гашиш, марихуану, шишки Дайте контакты по петрозаводску пожалуйстаНикаких тихушек нет, заказывай ,получай, радуйся!!!
Your comment is awaiting moderation.
блог о маркетинге блог о маркетинге .
Your comment is awaiting moderation.
Timber Crest Creative Hub – Beautifully curated and easy to navigate, very inviting overall.
Your comment is awaiting moderation.
https://writefreely.ethibox.fr/1xbetcodebonus/1xbet-free-promo-code-sri-lanka-2026-1x200bag
Your comment is awaiting moderation.
http://freestyler.ws/user/614414/bonusbet22
Your comment is awaiting moderation.
гаси кидалу по полной -25 маловато я добавлю https://kofu-dorn.ru и всем мир бразы)магаз то работает сейчас?Есть курьерка по москве?
Your comment is awaiting moderation.
http://users.atw.hu/nlw/viewtopic.php?p=90716#90716
Your comment is awaiting moderation.
руководства по seo seo-blog8.ru .
Your comment is awaiting moderation.
еще раз решил воспользоваться магазом ))) уже 2 года только у них покупаю))) и пока доволен https://videokrolik.ru на icq – в четверг обещал трек, в пятницу обещал трек, пропал…можно узнать, как принимали ? интрозально, в\м ?
Your comment is awaiting moderation.
метаболическое похудение рецепты приготовления блюд в домашних
Your comment is awaiting moderation.
можно поподробней пожалуйста!Т.к. недавно зарегился на данном форуме и нет возможности отписать в личку https://mirshashlykoff.ru И духовной отсутствие пищиЯ 13 числа сделал заказ,и до сих пор жду Макс,думаю магазин Честный и всё придёт )))))))!!!!!!!!Как придёт отпишусь обязательно сюда,компенсация обещена была 6 г :yeah:,всё же думаю Не разочаруют!
Your comment is awaiting moderation.
https://justpaste.it/lbrft
Your comment is awaiting moderation.
Либо прекращаем флудить либо начну выдавать преды. Сами должны понимать что под новый год почтовые службы перегружены. Купить кокаин, мефедрон, бошки, гашиш, марихуану, шишки а как ам то хоть вооще расшифровывается то по науке???У нас интернет-магазин, а не “шаурма у метро”. Личные встречи не возможны,”ибо по долгу службы тесно связан”(вот как раз наверное из-за этого)… Про кидал необоснованное заявление, такие речи лучше оставить при себе… В грубой форме вам никто не отвечал, вам вполне доходчиво сказали как и что….
Your comment is awaiting moderation.
блог про продвижение сайтов блог про продвижение сайтов .
Your comment is awaiting moderation.
Urban Ridge Boutique – Modern aesthetic with a great variety of items throughout the store.
Your comment is awaiting moderation.
seo продвижение трафику prodvizhenie-sajta-po-trafiku1.ru .
Your comment is awaiting moderation.
маркетинг в интернете блог seo-blog12.ru .
Your comment is awaiting moderation.
Просто респектище курьеру. На моей памяти такие клады были всего раза три-четыре за три года обитания меня на этом форуме. Купить кокаин, мефедрон, бошки, гашиш, марихуану, шишки ВСЕМ МИР А ТСУ РЕСПЕКТ )))Оперативность 5
Your comment is awaiting moderation.
Самые положительные впечатления оставляет по прежнему Мажор. 🙁 Джой фулл, а тебе когда отправили? Купить кокаин, мефедрон, бошки, гашиш, марихуану, шишки не болела чтоб башка.так что мне вообще по душе и курьерка и селлер которому респект за АМ2233
Your comment is awaiting moderation.
видел тут в ветке пару сообщений о том, что заказчикам вместо нормального товара какую то муть присылали, так вот хотелось бы узнать у владельцев магазина, в связи с чем возникают такие накладки и как часто такое случается, а то почтой итак заказ долго дожидаться, а если ещё подобный косяк выйдет с возвратом, то это будет полный п… https://xiaomicenter.ru Магазин не отвечает, может типо выходные, ждем понедельника.Ребят, магазин ровнее ровного. Если есть какие то сомнения, например, нарваться по кантактам на фэйкоф, обращайтесь на прямую к ТС. Написать ЛС 100% все будет исполнено в лучшем виде. Скорость доставки товара просто удивляет, конспирация, и выбор курьерки, залог вашей безопасности, у ТС это приоритет. Все на высшем уровни. Реагент качественный, минимум побочек максимум пазитива. Если вы все-таки решитесь, сдесь прикупиться, вы забудите и думать, где бы вам затариться снова. Не проходите мимо. То, что вам надо, тут.
Your comment is awaiting moderation.
seo блог seo блог .
Your comment is awaiting moderation.
Сделал заказ , все гуд и качество понравилось Купить кокаин, мефедрон, бошки, гашиш, марихуану, шишки Спасиба магазину за представленный ДРУГОЙ МИР!сегодня вот ночью прислал трек. Бьется, радует
Your comment is awaiting moderation.
маркетинг в интернете блог seo-blog9.ru .
Your comment is awaiting moderation.
KEY я не понимаю что ты хочешь от магазина то теперь ????за непонятку с соткой !!! моральную компенсацию????? или что???? https://star72.ru Получил посылочку общее время ожидания 4 дня,упаковка супер,качество просто космическое,спасибо магазину!ВСЕМ МИР А ТСУ РЕСПЕКТ )))
Your comment is awaiting moderation.
он мне успел ответить – поверь, ничего такого о чём тебе стоило бы беспокоиться – не случилось https://et-code.ru И духовной отсутствие пищиПолучил посылку уже через 3 дня после заказа. МН-001 хороший, только маленькие кристаллы на дне не растворились. А так доволен
Your comment is awaiting moderation.
Брал впервые в этом магазине, брал по рекомендации! Купить кокаин, мефедрон, бошки, гашиш, марихуану, шишки всегда ровно все было и есть. так что яКакие обещания? если выходной, скорей всего СПРС в базу не завело твой трек, жди понедельника…
Your comment is awaiting moderation.
A professional https://www.family-dentist-near-me-in-montenegro.com: therapy, surgery, orthopedics, and orthodontics all in one location. Individualized treatment plans, modern equipment, and strict sterility standards. We help you maintain long-lasting dental health.
Your comment is awaiting moderation.
Высшее качество. Чёткий товар. Мошный микс. Хороший персонал, добрый МАгазин…. https://rc-realty.ru Кидалы они или нет-узнаю в течении пары дней,но отказ в закладке-не основание.И всем форумчанам!!!
Your comment is awaiting moderation.
интернет маркетинг статьи интернет маркетинг статьи .
Your comment is awaiting moderation.
веб-аналитика блог seo-blog8.ru .
Your comment is awaiting moderation.
до 08.01 включительно выходные дни Купить кокаин, мефедрон, бошки, гашиш, марихуану, шишки Как товар господа?Удачи в развитии бизнеса !
Your comment is awaiting moderation.
Возможно сказалась бессонная ночь и отсутствие нормального питания на протяжении практически недели, но все время под туси я провел лежа на кровати и созерцая слааабенькие визуальчики. В общем, 4 из 6 сказали, что магазин – шляпа, и больше никогда тут ничего не возьмут. https://videokrolik.ru Брал здесь 203-й качество отличное 1 к 10 делал на мать и мачехи с одного водника ушатывает наглухо!!! Магазин отличный, если не ждать ответа менеджера по 2 часа!!!Я неделю вторую жду треккогда заработает
Your comment is awaiting moderation.
САБЖ САМ ПО СЕБЕ НЕ ПРЁТ !! МУТИТЬ НА НЁМ МИКСЫ СМЫСЛА НЕТ !!! ЭТО АНТИДЕПРЕССАНТ !! Купить кокаин, мефедрон, бошки, гашиш, марихуану, шишки День добрый, пишу свой отзыв, вернее назвать его извинением. Опишу ситуацию, не помню когда и не столь это важно, но недавно был сделан заказ, на n-ое количество cmh-400.КАЧЕСТВО ВСЕХ ПРОДУКТОВ ОЧЕНЬ ВЫСОКОЕ!
Your comment is awaiting moderation.
https://zelenayazona.ru/
Your comment is awaiting moderation.
это зависит на сколько ты прикурен . Купить кокаин, мефедрон, бошки, гашиш, марихуану, шишки Кидалы они или нет-узнаю в течении пары дней,но отказ в закладке-не основание.Один вопрос только,можно ли заказать так что бы без курьера?Самому придти в офис и забрать посылку?
Your comment is awaiting moderation.
На чем готовить???????? https://nomadonroad.com бери не пожалеешь.Оставляйте свои отзывы! Мы ценим каждого клиента нам важны ваши отзывы и мнения!
Your comment is awaiting moderation.
я все ровно остался в минусе не заказа и деньги с комисией переводятся . если ты правду говорил про посылку то если она придет я сразу закину тебе деньги и напишу свои извенения и все везде узнают что у тебя честный магазин.как клиенту мне ни разу не принесли извенения это бы хоть как то компенсировало маральный ущерб https://vekzhizni.ru брал здесь мн пришло в ************!!! за это спасибо палева меньше!!! но порох отстой, – для девочекВсем привет !!!
Your comment is awaiting moderation.
что лучше?АКВ48F или АКВ48?! Купить кокаин, мефедрон, бошки, гашиш, марихуану, шишки спасибо за отзыв!магаз норм. а вот курьеры зажрались суки.
Your comment is awaiting moderation.
https://glaucialima.com/art/code-promo-1xbet-gratuit-vip-bonus.html
Your comment is awaiting moderation.
https://buyasmallhouse.com/articles/1xbet_promo_code-free_welcome_bonus.html
Your comment is awaiting moderation.
https://ieet.org/wp-content/pgs/code-promo-de-1xbet.html
Your comment is awaiting moderation.
У Кумы https://u-kumy.com женский сайт о моде, здоровье, уходе. Советы для хозяек на все случаи жизни.
Your comment is awaiting moderation.
Play online at https://elonbet-casino-game.com: slots, live casino, and special offers. We explain the rules, limits, verification, and payments to avoid any surprises. This material is for informational purposes only.
Your comment is awaiting moderation.
terom сказал(а): ^ https://kitchenremodelinghouston.org кто последний раз когда брал? регу или сольЗаявление про кидал не требует обоснования, ибо это не заявление. Перечитайте внимательно. Считаю, что такие речи тоже стоит оставлять при себе, не прочитав толком.
Your comment is awaiting moderation.
Ребятки все пушка Купить кокаин, мефедрон, бошки, гашиш, марихуану, шишки Скиньте сайт ваш пожалуйста.Проб НЕТ!
Your comment is awaiting moderation.
Обратились, всё довольно оперативно https://mishtanim.com у меня все без подогрева растворилосьВсем привет))))) Мой Трипчик))))))
Your comment is awaiting moderation.
У Кума https://u-kuma.com блог для чоловіків про армію, авто, ремонт та життя. Корисні поради на всі випадки життя.
Your comment is awaiting moderation.
https://telegra.ph/Kupit-amfetamin-Urus-Martan-12-19-2
https://telegra.ph/Kupit-Kokain-Mefedron-Skorost-Amfetamin-Le-Morn-12-20
https://telegra.ph/Dalaman-kupit-narkotiki-12-19-6
https://telegra.ph/Kupit-Kokain-Mefedron-Skorost-Amfetamin-SHehnyan-12-19
https://telegra.ph/Kupit-boshki-gashish-shishki-Abu-Dabi-12-19
https://telegra.ph/Balabanovo-kupit-Marihuanu-Boshki-SHishki-Sol-12-20-2
https://telegra.ph/Kupit-EHkstazi-Lsd-25-MDMA-Lsd-CHiang-Raj-12-20-2
https://telegra.ph/Ssylki-na-magazin-cherez-telegram-kupit-mefedron-12-19-2
https://telegra.ph/Vilnyus-kupit-Marihuanu-Boshki-SHishki-Sol-12-20-2
https://telegra.ph/Kupit-liriku-300-bez-recepta-12-19-3
https://telegra.ph/Urus-Martan-kupit-Mefedron-Gashish-Kannabis-Skorost-12-20-2
https://telegra.ph/Kupit-boshki-gashish-shishki-Kalanchak-12-19-3
https://telegra.ph/Kupit-amfetamin-La-Romana-12-19-3
https://telegra.ph/Kupit-Mefedron-Gashish-Kannabis-Skorost-Vatikan-12-20-2
https://telegra.ph/Sapporo-kupit-Amfetamin-Mefedron-A-pvp-Alfa-PVP-12-19
https://telegra.ph/Kupit-mefedron-Sanya-12-19-2
https://telegra.ph/Kupit-mefedron-Dmitrov-12-19-2
https://telegra.ph/Kupit-EHkstazi-Lsd-25-MDMA-Lsd-Vasilevka-12-20-2
https://telegra.ph/Kupit-EHkstazi-Lsd-25-MDMA-Lsd-Dyuran-12-20-2
https://telegra.ph/Osttirol-kupit-Geroin-Metadon-Liriku-Tramadol-12-20-2
Your comment is awaiting moderation.
https://telegra.ph/Kupit-kokain-Balchik-12-19-3
https://telegra.ph/Rimini-kupit-Mefedron-Gashish-Kannabis-Skorost-12-20-2
https://telegra.ph/Batumi-kupit-Geroin-Metadon-Liriku-Tramadol-12-20
https://telegra.ph/Kupit-Marihuanu-Boshki-SHishki-Sol-Tyhy-12-20-2
https://telegra.ph/Kupit-Kokain-Mefedron-Skorost-Amfetamin-Iguehj-12-20-2
https://telegra.ph/Montego-Behj-kupit-Geroin-Metadon-Liriku-Tramadol-12-20
https://telegra.ph/Kupit-Kokain-Mefedron-Skorost-Amfetamin-Bajyaibe-12-20-2
https://telegra.ph/Kupit-Mefedron-Gashish-Kannabis-Skorost-Novovoronezh-12-20-2
https://telegra.ph/Kupit-Marihuanu-Boshki-SHishki-Sol-Koltushi-12-20-2
https://telegra.ph/Furano-kupit-Marihuanu-Boshki-SHishki-Sol-12-20
https://telegra.ph/Kupit-Geroin-Metadon-Liriku-Tramadol-Bora-Bora-12-20
https://telegra.ph/Mahdiya-kupit-Mefedron-Gashish-Kannabis-Skorost-12-20
https://telegra.ph/Arusha-kupit-Marihuanu-Boshki-SHishki-Sol-12-20-2
https://telegra.ph/Vellington-Novaya-Zelandiya-kupit-Mefedron-Gashish-Kannabis-Skorost-12-20-2
https://telegra.ph/Kupit-amfetamin-Vorkuta-12-19-2
https://telegra.ph/Mozyr-kupit-zakladku-mefedrona-12-19-7
https://telegra.ph/Danang-kupit-gashish-12-19-3
https://telegra.ph/Kupit-Kokain-Mefedron-Skorost-Amfetamin-Bali-Dzhimbaran-12-20
https://telegra.ph/Rivera-Majya-kupit-Geroin-Metadon-Liriku-Tramadol-12-20
https://telegra.ph/CHegem-kupit-Marihuanu-Boshki-SHishki-Sol-12-20
Your comment is awaiting moderation.
синхронный перевод текста telegra.ph/Trebovaniya-k-sinhronnomu-perevodchiku-navyki-sertifikaty-opyt–i-pochemu-ehto-vazhno-12-16 .
Your comment is awaiting moderation.
https://telegra.ph/Sernovodskoe-kupit-Amfetamin-Mefedron-A-pvp-Alfa-PVP-12-20
https://telegra.ph/Kupit-Mefedron-Gashish-Kannabis-Skorost-Nejmengen-12-19
https://telegra.ph/Kupit-gashish-zakladku-Erevan-12-19-3
https://telegra.ph/Kupit-Kokain-Mefedron-Skorost-Amfetamin-Bohin-12-20
https://telegra.ph/Vyborg-kupit-gashish-12-19
https://telegra.ph/Laoag-kupit-Kokain-Mefedron-Skorost-Amfetamin-12-20
https://telegra.ph/Lirika-gde-kupit-bez-recepta-ufa-12-19-7
https://telegra.ph/Kaspijsk-kupit-zakladku-mefedrona-12-19-7
https://telegra.ph/Side-kupit-zakladku-kokaina-12-19-2
https://telegra.ph/Kupit-Kokain-Mefedron-Skorost-Amfetamin-Lisakovsk-12-20-2
https://telegra.ph/Kupit-Geroin-Metadon-Liriku-Tramadol-Tosno-12-20-2
https://telegra.ph/Kaluga-kupit-EHkstazi-Lsd-25-MDMA-Lsd-12-20-2
https://telegra.ph/Kupit-EHkstazi-Lsd-25-MDMA-Lsd-Ko-Tao-12-20
https://telegra.ph/Kupit-Marihuanu-Boshki-SHishki-Sol-Nepal-12-20-2
https://telegra.ph/EHkspress-test-na-narkotiki-kupit-v-apteke-12-19-4
https://telegra.ph/Kobuleti-kupit-EHkstazi-Lsd-25-MDMA-Lsd-12-20-2
https://telegra.ph/Velikaya-Belozyorka-kupit-Mefedron-Gashish-Kannabis-Skorost-12-20
https://telegra.ph/Kupit-pokurit-marihuany-12-19-2
https://telegra.ph/Kupit-Mefedron-Gashish-Kannabis-Skorost-Turciya-Antalya-12-20
https://telegra.ph/Kupit-Amfetamin-Mefedron-A-pvp-Alfa-PVP-Sulavesi-12-20-2
Your comment is awaiting moderation.
https://telegra.ph/Negombo-kupit-kokain-12-19-6
https://telegra.ph/Lugansk-kupit-kokain-12-19-3
https://telegra.ph/Saratov-kupit-zakladku-kokaina-12-19-6
https://telegra.ph/Kupit-Kokain-Mefedron-Skorost-Amfetamin-Florenciya-12-19
https://telegra.ph/Kupit-Geroin-Metadon-Liriku-Tramadol-Obedinennye-Arabskie-EHmiraty-12-20-2
https://telegra.ph/Kupit-Kokain-Mefedron-Skorost-Amfetamin-Znamensk-12-20-2
https://telegra.ph/ZHilina-kupit-zakladku-kokaina-12-19
https://telegra.ph/Isa-Taun-kupit-Amfetamin-Mefedron-A-pvp-Alfa-PVP-12-20
https://telegra.ph/Kupit-amfetamin-Nizhnij-Tagil-12-19-2
https://telegra.ph/Klajpeda-kupit-Geroin-Metadon-Liriku-Tramadol-12-20
https://telegra.ph/Kupit-Geroin-Metadon-Liriku-Tramadol-Bali-Ubud-12-20-2
https://telegra.ph/Pyarnu-kupit-amfetamin-12-19-3
https://telegra.ph/Kupit-gashish-zakladku-Harcyzsk-12-19-4
https://telegra.ph/Semena-marihuany-kupit-firmy-rastishka-12-19-6
https://telegra.ph/Golicyno-kupit-Kokain-Mefedron-Skorost-Amfetamin-12-20
https://telegra.ph/Otpravka-pou-kupit-Amfetamin-Mefedron-A-pvp-Alfa-PVP-12-20
https://telegra.ph/Kupit-EHkstazi-Lsd-25-MDMA-Lsd-Dzhalal-Abad-12-20
https://telegra.ph/Frantishkovy-Lazne-kupit-Mefedron-Gashish-Kannabis-Skorost-12-19
https://telegra.ph/Nelidovo-kupit-Marihuanu-Boshki-SHishki-Sol-12-20
https://telegra.ph/Kupit-kokain-Iskitim-12-19-7
Your comment is awaiting moderation.
анонимный. вывод. из. запоя. москва. vyvod-iz-zapoya-5.ru .
Your comment is awaiting moderation.
https://telegra.ph/Kupit-EHkstazi-Lsd-25-MDMA-Lsd-Naryn-12-20
https://telegra.ph/Kamyshin-kupit-Marihuanu-Boshki-SHishki-Sol-12-20-2
https://telegra.ph/Famagusta-kupit-mefedron-12-19-4
https://telegra.ph/Kupit-Marihuanu-Boshki-SHishki-Sol-Krasnokamsk-12-20
https://telegra.ph/Bell-Mare-kupit-Amfetamin-Mefedron-A-pvp-Alfa-PVP-12-20-2
https://telegra.ph/Omsk-kupit-Marihuanu-Boshki-SHishki-Sol-12-20
https://telegra.ph/Kupit-Marihuanu-Boshki-SHishki-Sol-Sverdlovskij-12-20
https://telegra.ph/Kupit-EHkstazi-Lsd-25-MDMA-Lsd-Tyumen-12-19
https://telegra.ph/Kaluga-kupit-zakladku-mefedrona-12-19-5
https://telegra.ph/Ubud-kupit-mefedron-12-19-2
https://telegra.ph/Konstantinovsk-kupit-Mefedron-Gashish-Kannabis-Skorost-12-20-2
https://telegra.ph/Kupit-gashish-zakladku-Kaluga-12-19
https://telegra.ph/Dahab-kupit-Marihuanu-Boshki-SHishki-Sol-12-20
https://telegra.ph/Kupit-EHkstazi-Lsd-25-MDMA-Lsd-Hanoj-12-19
https://telegra.ph/San-Salvador-kupit-Marihuanu-Boshki-SHishki-Sol-12-20-2
https://telegra.ph/Kupit-amfetamin-zakladku-Ko-Phangan-12-19-4
https://telegra.ph/Gonio-kupit-Kokain-Mefedron-Skorost-Amfetamin-12-20-2
https://telegra.ph/Kupit-EHkstazi-Lsd-25-MDMA-Lsd-Molodogvardejsk-12-20-2
https://telegra.ph/Krasnyj-Tkach-kupit-Kokain-Mefedron-Skorost-Amfetamin-12-20
https://telegra.ph/Kupit-EHkstazi-Lsd-25-MDMA-Lsd-Medvedkovo-12-19
Your comment is awaiting moderation.
принудительный вывод из запоя москва vyvod-iz-zapoya-4.ru .
Your comment is awaiting moderation.
https://telegra.ph/Vilyuchinsk-kupit-Kokain-Mefedron-Skorost-Amfetamin-12-20
https://telegra.ph/Boka-CHika-kupit-gashish-12-19-2
https://telegra.ph/Kupit-boshki-gashish-shishki-Irkutsk-12-19-3
https://telegra.ph/Stambul-kupit-zakladku-kokaina-12-19-3
https://telegra.ph/Kupit-Amfetamin-Mefedron-A-pvp-Alfa-PVP-Tujmazy-12-20
https://telegra.ph/Helsinger-kupit-Mefedron-Gashish-Kannabis-Skorost-12-20-2
https://telegra.ph/Birshtonas-kupit-Kokain-Mefedron-Skorost-Amfetamin-12-20-2
https://telegra.ph/Kupit-Kokain-Mefedron-Skorost-Amfetamin-Kireniya-12-20
https://telegra.ph/Kupit-Mefedron-Gashish-Kannabis-Skorost-Kem-12-20-2
https://telegra.ph/Kupit-mefedron-zakladku-Hasavyurt-12-19-2
https://telegra.ph/Kupit-EHkstazi-Lsd-25-MDMA-Lsd-Gagra-12-20
https://telegra.ph/Kupit-Kokain-Mefedron-Skorost-Amfetamin-Sairme-12-20
https://telegra.ph/Duhovshchina-kupit-Marihuanu-Boshki-SHishki-Sol-12-20-2
https://telegra.ph/Tomari-kupit-Marihuanu-Boshki-SHishki-Sol-12-20
https://telegra.ph/Belorussiya-kupit-Amfetamin-Mefedron-A-pvp-Alfa-PVP-12-20-2
https://telegra.ph/EHkibastuz-kupit-Marihuanu-Boshki-SHishki-Sol-12-20-2
https://telegra.ph/Kuplyu-boshki-konopli-12-19-3
https://telegra.ph/Tallin-kupit-gashish-shishki-boshki-12-19-2
https://telegra.ph/Kupit-EHkstazi-Lsd-25-MDMA-Lsd-SHahty-12-20-2
https://telegra.ph/Kupit-gashish-zakladku-Pattajya-12-19-4
Your comment is awaiting moderation.
https://telegra.ph/Korocha-kupit-Marihuanu-Boshki-SHishki-Sol-12-20-2
https://telegra.ph/Kupit-Geroin-Metadon-Liriku-Tramadol-Dahab-12-20
https://telegra.ph/Kupit-Mefedron-Gashish-Kannabis-Skorost-Rog-12-20-2
https://telegra.ph/Kupit-Geroin-Metadon-Liriku-Tramadol-Rybinsk-12-20-2
https://telegra.ph/Varshava-kupit-zakladku-kokaina-12-19-3
https://telegra.ph/Kupit-Kokain-Mefedron-Skorost-Amfetamin-Preobrazhenskoe-12-20
https://telegra.ph/Kupit-Geroin-Metadon-Liriku-Tramadol-Urus-Martan-12-20
https://telegra.ph/Lirika-kupit-v-moskve-nalichie-12-19-2
https://telegra.ph/Serov-kupit-zakladku-amfetamina-12-19-3
https://telegra.ph/O-Raund-Sejshely-kupit-Mefedron-Gashish-Kannabis-Skorost-12-20
https://telegra.ph/Adzhman-kupit-Geroin-Metadon-Liriku-Tramadol-12-20
https://telegra.ph/Krasnyj-kupit-Kokain-Mefedron-Skorost-Amfetamin-12-19
https://telegra.ph/Gyumri-kupit-Marihuanu-Boshki-SHishki-Sol-12-19
https://telegra.ph/Verona-kupit-mefedron-12-19-3
https://telegra.ph/Vorkuta-kupit-zakladku-amfetamina-12-19-3
https://telegra.ph/Kupit-amfetamin-Saraevo-12-19-5
https://telegra.ph/Slavonskij-Brod-kupit-Amfetamin-Mefedron-A-pvp-Alfa-PVP-12-19
https://telegra.ph/Cetine-kupit-Marihuanu-Boshki-SHishki-Sol-12-20-2
https://telegra.ph/Kupit-Marihuanu-Boshki-SHishki-Sol-YArovoe-12-20-2
https://telegra.ph/Labinsk-kupit-amfetamin-12-19-3
Your comment is awaiting moderation.
https://telegra.ph/Kupit-Mefedron-Gashish-Kannabis-Skorost-o-Hios-12-20-2
https://telegra.ph/Kamenec-kupit-Marihuanu-Boshki-SHishki-Sol-12-20
https://telegra.ph/Kupit-Mefedron-Gashish-Kannabis-Skorost-SHCHyolkovo-12-20-2
https://telegra.ph/Kupit-gashish-zakladku-Asan-12-19-2
https://telegra.ph/Salavat-kupit-amfetamin-12-19-4
https://telegra.ph/Kupit-Mefedron-Gashish-Kannabis-Skorost-Krasnokamensk-12-20
https://telegra.ph/Tandzhung-Benoa-kupit-Mefedron-Gashish-Kannabis-Skorost-12-20-2
https://telegra.ph/Kupit-amfetamin-zakladku-Asan-12-19
https://telegra.ph/Kalyazin-kupit-Amfetamin-Mefedron-A-pvp-Alfa-PVP-12-19
https://telegra.ph/Kupit-mefedron-zakladku-Aktobe-12-19
https://telegra.ph/Satka-kupit-Kokain-Mefedron-Skorost-Amfetamin-12-20
https://telegra.ph/Kak-mozhno-kupit-gashish-12-19-3
https://telegra.ph/Kupit-kokain-zakladku-Kopengagen-12-19-3
https://telegra.ph/Kupit-Geroin-Metadon-Liriku-Tramadol-Puchhon-12-20
https://telegra.ph/Suoyarvi-kupit-Mefedron-Gashish-Kannabis-Skorost-12-20-2
https://telegra.ph/Naro-Fominsk-kupit-gashish-12-19-2
https://telegra.ph/Kupit-Mefedron-Gashish-Kannabis-Skorost-Santo-Domingo-12-20
https://telegra.ph/Kupit-EHkstazi-Lsd-25-MDMA-Lsd-Melihovo-12-20
https://telegra.ph/Test-na-narkotiki-kupit-apteka-ru-12-19
https://telegra.ph/Kupit-Mefedron-Gashish-Kannabis-Skorost-Fili-Davydkovo-12-20-2
Your comment is awaiting moderation.
https://metabolomicssociety.org/wp-content/pgs/?code_promo_betwinner_11.html
Your comment is awaiting moderation.
https://telegra.ph/Kupit-Mefedron-Gashish-Kannabis-Skorost-Ostrov-Kefaloniya-12-20-2
https://telegra.ph/Tromsyo-kupit-Marihuanu-Boshki-SHishki-Sol-12-20-2
https://telegra.ph/Novorossijsk-kupit-Kokain-Mefedron-Skorost-Amfetamin-12-20
https://telegra.ph/Kupit-Geroin-Metadon-Liriku-Tramadol-Granada-12-20-2
https://telegra.ph/Santorini-kupit-mefedron-12-19-4
https://telegra.ph/Kupit-Amfetamin-Mefedron-A-pvp-Alfa-PVP-Bambolim-12-19
https://telegra.ph/Kupit-Mefedron-Gashish-Kannabis-Skorost-Voronovo-12-20
https://telegra.ph/Kupit-Kokain-Mefedron-Skorost-Amfetamin-Hasavyurt-12-20-2
https://telegra.ph/Kupit-Geroin-Metadon-Liriku-Tramadol-Dali-12-20
https://telegra.ph/Manavgat-kupit-amfetamin-12-19
https://telegra.ph/Kupit-Amfetamin-Mefedron-A-pvp-Alfa-PVP-Poshehone-12-20-2
https://telegra.ph/Kupit-kokain-Karaganda-12-19-7
https://telegra.ph/Kupit-Amfetamin-Mefedron-A-pvp-Alfa-PVP-Dzhambejta-12-20-2
https://telegra.ph/Kupit-gashish-zakladku-Akimovka-12-19-2
https://telegra.ph/Kupit-mefedron-Plzen-12-19-2
https://telegra.ph/Kupit-Kokain-Mefedron-Skorost-Amfetamin-Moskva-Kuzminki-12-20-2
https://telegra.ph/Monreal-kupit-Geroin-Metadon-Liriku-Tramadol-12-20
https://telegra.ph/Turciya-kupit-Kokain-Mefedron-Skorost-Amfetamin-12-20-2
https://telegra.ph/Krasnoturinsk-kupit-kokain-12-19-5
https://telegra.ph/Baltijsk-kupit-Geroin-Metadon-Liriku-Tramadol-12-20-2
Your comment is awaiting moderation.
comment obtenir un code promo melbet
Your comment is awaiting moderation.
meilleurs code promo melbet
Your comment is awaiting moderation.
https://metabolomicssociety.org/wp-content/pgs/?code_promo_betwinner_11.html
Your comment is awaiting moderation.
https://telegra.ph/Ust-Kut-kupit-EHkstazi-Lsd-25-MDMA-Lsd-12-19
https://telegra.ph/Kupit-amfetamin-Buharest-12-19-4
https://telegra.ph/Kupit-Marihuanu-Boshki-SHishki-Sol-Maskat-12-20-2
https://telegra.ph/Savyolki-kupit-Amfetamin-Mefedron-A-pvp-Alfa-PVP-12-20
https://telegra.ph/Kupit-amfetamin-zakladku-Nyagang-12-19-5
https://telegra.ph/ZHeneva-kupit-kokain-12-19-3
https://telegra.ph/Balhash-kupit-narkotiki-12-19-4
https://telegra.ph/Stara-Zagora-kupit-Marihuanu-Boshki-SHishki-Sol-12-20-2
https://telegra.ph/Kupit-Geroin-Metadon-Liriku-Tramadol-Vasilevka-12-20-2
https://telegra.ph/Kaliningrad-kupit-narkotiki-12-19-7
https://telegra.ph/Nikolskoe-kupit-Marihuanu-Boshki-SHishki-Sol-12-20
https://telegra.ph/Aehroport-Vnukovo-kupit-Geroin-Metadon-Liriku-Tramadol-12-20-2
https://telegra.ph/Kupit-mefedron-zakladku-Kislovodsk-12-19-2
https://telegra.ph/Manavgat-kupit-kokain-12-19-8
https://telegra.ph/Kupit-Marihuanu-Boshki-SHishki-Sol-Trizen-12-20-2
https://telegra.ph/Kupit-Mefedron-Gashish-Kannabis-Skorost-Mcheta-12-20
https://telegra.ph/Gde-v-valensii-kupit-marihuanu-12-19-6
https://telegra.ph/Kupit-Mefedron-Gashish-Kannabis-Skorost-Vitoriya-Gastejs-12-20
https://telegra.ph/Beloreck-kupit-Marihuanu-Boshki-SHishki-Sol-12-20-2
https://telegra.ph/Kupit-Geroin-Metadon-Liriku-Tramadol-Bali-Seminyak-12-20
Your comment is awaiting moderation.
вывод из запоя в стационаре москва vyvod-iz-zapoya-4.ru .
Your comment is awaiting moderation.
кодирование от алкоголизма кодирование от алкоголизма .
Your comment is awaiting moderation.
https://telegra.ph/Kupit-Kokain-Mefedron-Skorost-Amfetamin-Umm-ehl-Kajvajn-12-20
https://telegra.ph/Kineshma-kupit-gashish-12-19-7
https://telegra.ph/Gukovo-kupit-narkotiki-12-19-3
https://telegra.ph/Kupit-mdma-amfetamin-12-19-3
https://telegra.ph/Kupit-Mefedron-Gashish-Kannabis-Skorost-Georigevsk-12-20
https://telegra.ph/Kupit-Geroin-Metadon-Liriku-Tramadol-Krasnodon-12-20-2
https://telegra.ph/Kupit-kokain-zakladka-12-19-5
https://telegra.ph/Dubna-kupit-zakladku-kokaina-12-19-4
https://telegra.ph/Kujbyshev-kupit-EHkstazi-Lsd-25-MDMA-Lsd-12-20-2
https://telegra.ph/Kupit-Kokain-Mefedron-Skorost-Amfetamin-Sivota-12-20
https://telegra.ph/Kupit-Geroin-Metadon-Liriku-Tramadol-SHatura-12-20-2
https://telegra.ph/Kupit-amfetamin-zakladku-Kapri-12-19-5
https://telegra.ph/Petropavlovsk-Kamchatskij-kupit-amfetamin-12-19-6
https://telegra.ph/Rovin-kupit-zakladku-kokaina-12-19-2
https://telegra.ph/Pekin-kupit-gashish-12-19
https://telegra.ph/Skope-Makedoniya-kupit-Amfetamin-Mefedron-A-pvp-Alfa-PVP-12-20
https://telegra.ph/Kupit-Mefedron-Gashish-Kannabis-Skorost-Skadovsk-12-20
https://telegra.ph/Belgrad-kupit-amfetamin-12-19-5
https://telegra.ph/Lakano-kupit-Amfetamin-Mefedron-A-pvp-Alfa-PVP-12-20
https://telegra.ph/Kupit-EHkstazi-Lsd-25-MDMA-Lsd-Alagir-12-20-2
Your comment is awaiting moderation.
https://telegra.ph/Kupit-Mefedron-Gashish-Kannabis-Skorost-Lozanna-12-20
https://telegra.ph/Kupit-Kokain-Mefedron-Skorost-Amfetamin-Olshtyn-12-20-2
https://telegra.ph/Taiti-kupit-gashish-12-19-2
https://telegra.ph/Kupit-Mefedron-Gashish-Kannabis-Skorost-Kartaly-12-20
https://telegra.ph/Kupit-mefedron-Serpuhov-12-19-7
https://telegra.ph/Durres-kupit-Mefedron-Gashish-Kannabis-Skorost-12-20-2
https://telegra.ph/Koryazhma-kupit-EHkstazi-Lsd-25-MDMA-Lsd-12-20
https://telegra.ph/Kupit-Amfetamin-Mefedron-A-pvp-Alfa-PVP-Mednogorsk-12-20
https://telegra.ph/Neftekumsk-kupit-Geroin-Metadon-Liriku-Tramadol-12-19
https://telegra.ph/Kupit-Mefedron-Gashish-Kannabis-Skorost-Moskva-Donskoj-12-20-2
https://telegra.ph/Kupit-Amfetamin-Mefedron-A-pvp-Alfa-PVP-Cell-am-Zee-12-20-2
https://telegra.ph/Kupit-amfetamin-Alyoshki-12-19-2
https://telegra.ph/Bobrujsk-kupit-Amfetamin-Mefedron-A-pvp-Alfa-PVP-12-20
https://telegra.ph/Kupit-gashish-zakladku-YAroslavl-12-19-2
https://telegra.ph/Sudak-kupit-zakladku-kokaina-12-19-3
https://telegra.ph/Kupit-Amfetamin-Mefedron-A-pvp-Alfa-PVP-SHeffild-12-20-2
https://telegra.ph/EHz-Zarka-kupit-Kokain-Mefedron-Skorost-Amfetamin-12-20
https://telegra.ph/Insbruk-Avstriya-kupit-Marihuanu-Boshki-SHishki-Sol-12-20
https://telegra.ph/Kupit-Geroin-Metadon-Liriku-Tramadol-Pushkin-12-20
https://telegra.ph/Kupit-gashish-zakladku-Benidorm-12-19
Your comment is awaiting moderation.
https://telegra.ph/Malmyo-kupit-Amfetamin-Mefedron-A-pvp-Alfa-PVP-12-20
https://telegra.ph/Kupit-Amfetamin-Mefedron-A-pvp-Alfa-PVP-Ras-Al-Hajma-12-19
https://telegra.ph/Kupit-Geroin-Metadon-Liriku-Tramadol-Kachkanar-12-20
https://telegra.ph/Kochkor-Ata-kupit-Marihuanu-Boshki-SHishki-Sol-12-20-2
https://telegra.ph/Elki-kupit-Geroin-Metadon-Liriku-Tramadol-12-20
https://telegra.ph/YAsinovataya-kupit-narkotiki-12-19-2
https://telegra.ph/Kupit-Kokain-Mefedron-Skorost-Amfetamin-Nolinsk-12-20-2
https://telegra.ph/Budapesht-kupit-gashish-12-19-3
https://telegra.ph/Kupit-mefedron-Rio-de-ZHanejro-12-19-4
https://telegra.ph/Kuala-Lumpur-kupit-gashish-12-19-3
https://telegra.ph/Kupit-Amfetamin-Mefedron-A-pvp-Alfa-PVP-Bohum-12-20-2
https://telegra.ph/Gurzuf-kupit-zakladku-kokaina-12-19-4
https://telegra.ph/Anzhe-kupit-Amfetamin-Mefedron-A-pvp-Alfa-PVP-12-20
https://telegra.ph/Majorka-kupit-zakladku-kokaina-12-19
https://telegra.ph/Kupit-amfetamin-zakladku-Elec-12-19-4
https://telegra.ph/Melitopol-kupit-gashish-shishki-boshki-12-19-2
https://telegra.ph/Mariehamn-kupit-Kokain-Mefedron-Skorost-Amfetamin-12-20
https://telegra.ph/Kalyazin-kupit-Mefedron-Gashish-Kannabis-Skorost-12-20
https://telegra.ph/Maui-kupit-narkotiki-12-19
https://telegra.ph/Burgas-kupit-gashish-shishki-boshki-12-19
Your comment is awaiting moderation.
https://telegra.ph/Kupit-Geroin-Metadon-Liriku-Tramadol-Temnikov-12-20
https://telegra.ph/Kupit-kokain-Novopolock-12-19
https://telegra.ph/Kupit-Amfetamin-Mefedron-A-pvp-Alfa-PVP-Sveti-Stefan-12-20
https://telegra.ph/Gomel-kupit-zakladku-amfetamina-12-19
https://telegra.ph/Moskva-Savelki-kupit-Amfetamin-Mefedron-A-pvp-Alfa-PVP-12-20-2
https://telegra.ph/Kupit-amfetamin-Vilnyus-12-19-2
https://telegra.ph/Kandanchu-kupit-Kokain-Mefedron-Skorost-Amfetamin-12-20-2
https://telegra.ph/Palermo-kupit-zakladku-kokaina-12-19-2
https://telegra.ph/Kupit-liriku-bez-recepta-spb-12-19-4
https://telegra.ph/YAsen-kupit-EHkstazi-Lsd-25-MDMA-Lsd-12-20-2
https://telegra.ph/Hanoj-kupit-EHkstazi-Lsd-25-MDMA-Lsd-12-20-2
https://telegra.ph/Kupit-Geroin-Metadon-Liriku-Tramadol-Boksitogorsk-12-20
https://telegra.ph/Kupit-boshki-gashish-shishki-Derbent-12-19-2
https://telegra.ph/Novosibirsk-kupit-gashish-shishki-boshki-12-19-2
https://telegra.ph/Kupit-mefedron-zakladku-Petropavlovsk-Kamchatskij-12-19-3
https://telegra.ph/Kopyl-kupit-Marihuanu-Boshki-SHishki-Sol-12-20-2
https://telegra.ph/Kupit-kokain-zakladku-Drezden-12-19-3
https://telegra.ph/Kupit-Amfetamin-Mefedron-A-pvp-Alfa-PVP-CHajkovskij-12-20
https://telegra.ph/Kupit-amfetamin-zakladku-Anzhero-Sudzhensk-12-19
https://telegra.ph/Byhov-kupit-Marihuanu-Boshki-SHishki-Sol-12-20
Your comment is awaiting moderation.
вывод из запоя на дому вывод из запоя на дому .
Your comment is awaiting moderation.
вывод из запоя дешево вывод из запоя дешево .
Your comment is awaiting moderation.
https://energiashop.gr/season-essentials
Your comment is awaiting moderation.
https://video.gorilla-gorilla.com/11-duotiktokmp4
Your comment is awaiting moderation.
Отличная частная скупка в Москве, профессиональный подход и выгодные цены – где продать компьютер
Your comment is awaiting moderation.
Looking for a casino? elon-casino-top: slots, live casino, bonus offers, and tournaments. We cover the rules, wagering requirements, withdrawals, and account security. Please review the terms and conditions before playing.
Your comment is awaiting moderation.
перевод с английского языка услуги dzen.ru/a/aUBBvahMInGNj8BL .
Your comment is awaiting moderation.
вывод из запоя круглосуточно москва вывод из запоя круглосуточно москва .
Your comment is awaiting moderation.
вывод из запоя недорого москва вывод из запоя недорого москва .
Your comment is awaiting moderation.
Great article.
Your comment is awaiting moderation.
Moment to start earning with superior success automated trading software based on neural networks, with high win-rate
https://aitredo.com
TG: @aitredo
WhatsApp: +972557245593
Email: sales@aitredo.com
Your comment is awaiting moderation.
https://webscript.ru/news/pages/1xbet_promokod_54.html
Your comment is awaiting moderation.
https://avtobusparts.ru/cache/pgs/1xbet_promokod_75.html
Your comment is awaiting moderation.
https://datamindstec.com/articles/1xbet_promokod_na_freebet.html
Your comment is awaiting moderation.
Солоха женский сайт https://soloha.in.ua о моде, красоте, уходе. Полезные советы, рецепты, сонник и гороскопы.
Your comment is awaiting moderation.
searchlift.click – Content reads clearly, helpful examples made concepts easy to grasp.
Your comment is awaiting moderation.
rankcontrol.click – Overall, professional vibe here; trustworthy, polished, and pleasantly minimal throughout.
Your comment is awaiting moderation.
rankexpansion.click – Navigation felt smooth, found everything quickly without any confusing steps.
Your comment is awaiting moderation.
clickboostlab.click – Loved the layout today; clean, simple, and genuinely user-friendly overall.
Your comment is awaiting moderation.
leadmechanics.click – Bookmarked this immediately, planning to revisit for updates and inspiration.
Your comment is awaiting moderation.
synthesis growth model – Organizes multiple growth insights into a clear and actionable plan
Your comment is awaiting moderation.
Обратился за выкупом, думал будет сложнее, а все сделали быстро и честно, рекомендую – выкуп Бензорез
Your comment is awaiting moderation.
News about Chernivtsi on https://u-misti.chernivtsi.ua covers the latest events in Chernivtsi and the surrounding region. The site U Misti features local news, transport updates, blogs, and city events.
Your comment is awaiting moderation.
productive momentum guidance – Highlights ways to maintain consistent energy and reliable results.
Your comment is awaiting moderation.
growth execution guidance – Hub focusing on actionable steps for effective growth management
Your comment is awaiting moderation.
momentum management guidance – Offers strategies for maintaining steady productivity over time.
Your comment is awaiting moderation.
News about Poltava on https://u-misti.poltava.ua covers the main and interesting events in Poltava and the surrounding region. The site features transport updates, blogs, and local events.
Your comment is awaiting moderation.
growth steering framework – Provides a structured approach to keep growth on track
Your comment is awaiting moderation.
https://oern.expert https://oern.expert https://oern.expert
https://oern.expert https://oern.expert https://oern.expert
https://oern.expert https://oern.expert https://oern.expert
https://oern.expert https://oern.expert https://oern.expert
https://oern.expert https://oern.expert https://oern.expert
https://oern.expert https://oern.expert https://oern.expert
https://oern.expert https://oern.expert https://oern.expert
https://oern.expert https://oern.expert https://oern.expert
https://oern.expert https://oern.expert https://oern.expert
https://oern.expert https://oern.expert https://oern.expert
https://oern.expert https://oern.expert https://oern.expert
https://oern.expert https://oern.expert https://oern.expert
https://oern.expert https://oern.expert https://oern.expert
https://oern.expert https://oern.expert https://oern.expert
Your comment is awaiting moderation.
gay anal vibrator
Your comment is awaiting moderation.
best porn sites
Your comment is awaiting moderation.
I for all time emailed this webpage post page to all my contacts, for
the reason that if like to read it then my links will too.
Check out my page خرید بک لینک
Your comment is awaiting moderation.
onlyfans leaks
Your comment is awaiting moderation.
Аренда детского автобуса https://gortransauto.ru
Your comment is awaiting moderation.
Товар дня – обзоры бытовой техники https://hotgoods.com.ua
Your comment is awaiting moderation.
늘 저는 더 작은 기사를 읽곤 했는데,
그 또한 그들의 동기를 명확히 하고, 지금 제가 읽고 있는 이 포스트에서도 마찬가지입니다.
Hello there! This post could not be written any better!
Reading through this post reminds me of my previous room mate!
He always kept chatting about this. I will forward this page to him.
Fairly certain he will have a good read. Many thanks for sharing!
I can’t get enough of your blog! Your posts are so well-researched, and I love the clarity in your writing.
Have you considered guest posting on other sites to expand your reach?
Keep up the excellent work!
이 웹사이트는 정말 대단합니다! Spearmint Rhino에
대한 글들이 너무 흥미롭고 잘 작성되었어요.
RSS 피드를 추가해서 최신 업데이트를 받아볼게요.
계속해서 이런 멋진 콘텐츠 부탁드립니다!
고맙습니다!
Your comment is awaiting moderation.
Новости Днепр https://u-misti.dp.ua последние события Днепра и области. Транспорт, обзоры, все о Днепре на одном сайте
Your comment is awaiting moderation.
Experience Brainy https://askbrainy.com the free & open-source AI assistant. Get real-time web search, deep research, and voice message support directly on Telegram and the web. No subscriptions, just powerful answers.
Your comment is awaiting moderation.
growth signal roadmap – Highlights key indicators that simplify choosing a growth path
Your comment is awaiting moderation.
отделка подвала отделка подвала .
Your comment is awaiting moderation.
гидроизоляция цена за м2 гидроизоляция цена за м2 .
Your comment is awaiting moderation.
подвал дома ремонт gidroizolyacziya-czena4.ru .
Your comment is awaiting moderation.
Контрактная разработка электроники позволяет быстро создавать уникальные устройства с индивидуальными характеристиками. Все этапы, включая проектирование, сборку и тестирование, контролируются командой профессионалов. Клиенты получают готовый продукт с высокой надежностью, https://nativeheaven.com/index.php/%C3%90%C5%A1%C3%90%C2%BE%C3%90%C2%BD%C3%91%E2%80%9A%C3%91%E2%82%AC%C3%90%C2%B0%C3%90%C2%BA%C3%91%E2%80%9A%C3%90%C2%BD%C3%90%C2%B0%C3%91_%C3%90%C2%A1%C3%90%C2%B1%C3%90%C2%BE%C3%91%E2%82%AC%C3%90%C2%BA%C3%90%C2%B0_%C3%90%C2%AD%C3%90%C2%BB%C3%90%C2%B5%C3%90%C2%BA%C3%91%E2%80%9A%C3%91%E2%82%AC%C3%90%C2%BE%C3%90%C2%BD%C3%90%C2%B8%C3%90%C2%BA%C3%90%C2%B8_%C3%90%C2%A1_%C3%90%C3%A2%C3%91%E2%80%B9%C3%91%C3%90%C2%BE%C3%90%C2%BA%C3%90%C2%BE%C3%90%C2%B9_%C3%90%C2%A2%C3%90%C2%BE%C3%91%E2%80%A1%C3%90%C2%BD%C3%90%C2%BE%C3%91%C3%91%E2%80%9A%C3%91%C5%92%C3%91%C5%BD. Метод делает процесс разработки предсказуемым и логичным
Your comment is awaiting moderation.
События и проишествия в Днепре https://faine-misto.dp.ua на сайте Файне мисто. Оперативные новости, обзоры и много полезного из жизни города.
Your comment is awaiting moderation.
маскировка 5+ Купить кокаин, бошки, гашиш Привет, ребята!Как настроение?)
Your comment is awaiting moderation.
growth planner guide – Practical resource for keeping growth objectives structured and achievable
Your comment is awaiting moderation.
Начинает формироваться мнение. https://murmansk-menswear.ru ТС подтвердив оплату, сказал ожидать. В оговоренные сроки адрес был получен в ЛС.Принять могут в любой курьерке и уж тем более на почте. 1 случай (без полных подробностей и выяснения всех обстоятельств о самом человеке и его деятельности) на пару сотню посылок это не тот случай, когда нужно отказываться от удобной курьерки. Об этом уже говорили неоднократно. Возвращаться к этой теме больше не стоит.
Your comment is awaiting moderation.
May I simply say what a comfort to find an individual who really knows what
they’re discussing on the net. You certainly understand how to bring an issue to light and make it important.
A lot more people ought to check this out and understand this side of your story.
I was surprised that you’re not more popular given that you
most certainly possess the gift.
Your comment is awaiting moderation.
Нужна косметика? корейская косметика из кореи большой выбор оригинальных средств K-beauty. Уход для всех типов кожи, новинки и хиты продаж. Поможем подобрать продукты, выгодные цены, акции и оперативная доставка по Алматы.
Your comment is awaiting moderation.
ремонт в подвале gidroizolyacziya-czena5.ru .
Your comment is awaiting moderation.
цена ремонта подвала gidroizolyacziya-czena4.ru .
Your comment is awaiting moderation.
ТС, походу в отпуск вышел:rest: https://tank-master.ru хм.. интересно сказал.. никогда не задумывался.. получается что толер от принятия одного вещества влияет на другое вещество???сегодня оплатил заказ jwh-250 5гр. буду ждать, после отпишусь…
Your comment is awaiting moderation.
гидроизоляция подвала под ключ gidroizolyacziya-czena5.ru .
Your comment is awaiting moderation.
я на лестнице один, Купить кокаин, бошки, гашиш работает заебок… присылают в кортонных больших конвертах…. доставляют очень быстро мне доставили в город за 3 дня… а их отделение в каждом городе есть.. как посылка придет вам позвонят на телефон и предложат доставку или приехать самому… если решите сами забирать то вам скажут адресс куда ехать…=)Всех благ данному магазину!!!
Your comment is awaiting moderation.
Updates on the Topic: https://mcaofiowa.org/upl/pgs/what-is-a-progressive-jackpot-and-how-does-it-work.html
Your comment is awaiting moderation.
относительно норм цены https://gabiony-krasnoyarsk.ru кто получал последний раз недавно отишитесь о работе магаза. +В РЕПУ!!!!!!! и главное почему ип адрес не меняется на сайте???Магазин высшего уровня своей работы.
Your comment is awaiting moderation.
growth tracking planner – Makes it easier to monitor progress toward growth goals
Your comment is awaiting moderation.
жёлтого цвета, за качество пока сказать не могу!) https://ekii.ru “Подходит время Раздачи”Все мои контакты указаны в подписе.
Your comment is awaiting moderation.
Only the best materials: http://www.vendingsolution.it/?p=443517
Your comment is awaiting moderation.
гидроизоляция цена за м2 за работу gidroizolyacziya-czena5.ru .
Your comment is awaiting moderation.
Один из топовых продавцов на всем РЦ:) Купить кокаин, бошки, гашиш Пришел сегодня грамм 5-мео-дмт, все ок, но весов пока нет, а на глаз его в 2-3 раза меньше, чем, например, грамма 2с-е. Кто имел дело с ним, это у него плотность настолько больше или мне недосыпали?Мне “типа фейк” назвал кодовое слово в жабере, которое я написал нашему розовоникому магазину в лс на форуме. Вопрос в том как он его узнал?
Your comment is awaiting moderation.
внутренняя гидроизоляция подвала внутренняя гидроизоляция подвала .
Your comment is awaiting moderation.
гидроизоляция подвала изнутри цена м2 gidroizolyacziya-czena5.ru .
Your comment is awaiting moderation.
Житомир новости https://u-misti.zhitomir.ua на сайте у місті. Актуальные события и происшествия в Житомире и области. Авторские обзоры, расписание транспорта, мета и много полезного.
Your comment is awaiting moderation.
конце концов при курении эйфория Купить кокаин, бошки, гашиш А то с после ситуации с РЦлаб все настораживают……Хороший магазин оператор всегда онлайн, товар вообще Шик :speak: процветай) и поскорей бы лето
Your comment is awaiting moderation.
https://deogiricollege.org/pag/1xbet-promo-code_welcome-bonus-100.html
Your comment is awaiting moderation.
https://www.upload.ee/files/18919809/Best_Bookmaker_Reviews_2026_with_Exclusive_Betting_Bonuses_and_Free_Spins.pdf.html
Your comment is awaiting moderation.
https://theandhrasugars.com/wp-content/pgs/?1xbet_promo_code_today_bonus.html
Your comment is awaiting moderation.
https://app.talkshoe.com/user/sportsbook21
Your comment is awaiting moderation.
nugget porn videos
Your comment is awaiting moderation.
покупателей много,очереди наверно большие тем более на доставку Купить кокаин, бошки, гашиш И все бы ничего, да вот только доставка стоит 1490 рублей, я по собственному опыту знаю что почта уже в пятницу вручила бы мне посылку, за Гораздо меньшие деньги, а кроме почты у нас и нет ничего, поселок в сибири! Зачем было выбирать эту курьерку непонятно, тем более что отзывы про нее никакие! Неужели непонятно что дрога ложка к обеду, да и вообще, не понятно до сих пор была ли вообще отправка!!!Наверное стоит все же воздержаться от заказов и отправки денег и подождать до появления селлера..,на соседнем форуме(СФН) его тоже ждут….
Your comment is awaiting moderation.
KristensenCreativeSpace – Elegant and clear, content feels authentic and welcoming.
Your comment is awaiting moderation.
Всё о ремонте https://svoimi-rukamy.net своими руками: понятные гайды, схемы, расчёты и лайфхаки для квартиры и дома. Черновые и чистовые работы, отделка, мелкий ремонт и обновление интерьера. Практично, доступно и без лишней теории.
Your comment is awaiting moderation.
Новости K-POP https://www.iloveasia.su из Кореи: айдол-группы, соло-артисты, камбэки, скандалы, концерты и шоу. Актуальные обновления, переводы корейских источников, фото и видео. Следите за любимыми артистами и трендами индустрии каждый день.
Your comment is awaiting moderation.
Полезные советы https://vashesamodelkino.ru для дома и быта: практичные идеи на каждый день — от уборки и готовки до хранения вещей и мелкого ремонта. Понятные инструкции, бытовые лайфхаки и решения, которые реально работают и упрощают жизнь.
Your comment is awaiting moderation.
porn online
Your comment is awaiting moderation.
магазин хороший,даже если высылат брак (было 1 раз) возврат делают сполна https://job-amdtransport.ru Мы очень рады! Обращайтесь к нам еще!перестань курить сделай перерывчик
Your comment is awaiting moderation.
adult xxx video hot porn site
Your comment is awaiting moderation.
гидроизоляция цена за рулон гидроизоляция цена за рулон .
Your comment is awaiting moderation.
гидроизоляция подвала цена за м2 гидроизоляция подвала цена за м2 .
Your comment is awaiting moderation.
бешельме мешельме атакает https://ritualzoo48.ru Пишу сейчас и ржачь пробирает.Сам прикинь, меня пёрло почти
Your comment is awaiting moderation.
порно с дедом
Your comment is awaiting moderation.
гидроизоляция подвала гидроизоляция подвала .
Your comment is awaiting moderation.
Мировые новости https://lratvakan.com сегодня: свежая информация из разных стран, важные заявления, международная политика, рынки и тренды. Оперативные обновления, проверенные источники и понятные обзоры событий каждого дня.
Your comment is awaiting moderation.
Новости Москвы https://moskva-news.com и Московской области: политика, экономика, общество, происшествия, транспорт, ЖКХ и погода. Оперативные репортажи, комментарии экспертов, официальные заявления и фото. Главное за день — быстро, точно, без лишнего.
Your comment is awaiting moderation.
Портал о строительстве https://strojdvor.ru ремонте и инженерных системах: от фундамента до отделки и коммуникаций. Пошаговые инструкции, сравнение материалов, расчёты, советы экспертов и типовые ошибки. Помогаем сделать надёжно и без переплат.
Your comment is awaiting moderation.
best reality porn sites
Your comment is awaiting moderation.
Пожалуйста :ok: Спасибо за отзыв. https://respect-salon.ru Спустя 3 часа , началась небольшая депрессия(Со всем не большая)и меня тоже:) в любом случае трек получил, товар придёт отипшусь. Думаю всё ровно, чем ближе к вверху ветка тем старше, и выше реппутация у магазина я так понимаю!
Your comment is awaiting moderation.
Последние события Винницы https://u-misti.vinnica.ua на портале у мисти. Следите за новостями Винницы и области, полезные обзоры, справочники и много интересного из жизни города.
Your comment is awaiting moderation.
Не понял…Его еще варить нужно??? На плитке?)) Купить кокаин, бошки, гашиш yabe.lil сказал(а): ^тусишка хороша, я как го грешил что нирвановская была какая то тёмная, так вот у чемикала она вообще практически бежевая 😀 качество порадовало, хорошая вещь )
Your comment is awaiting moderation.
Бесплатные программы https://soft-sng.ru для компьютера: офис, браузер, антивирус, архиватор, PDF, плееры, монтаж видео и фото, утилиты для системы. Скачивание с официальных сайтов, краткие обзоры, плюсы/минусы и аналоги. Подбор по Windows/macOS/Linux, подборки и инструкции.
Your comment is awaiting moderation.
Строительство и ремонт https://colorprofi.ru без сюрпризов: пошаговые инструкции, советы мастеров, сравнение материалов, схемы, частые ошибки и способы сэкономить. От фундамента и стен до плитки, пола, потолков и инженерки. Обновляемые статьи и ответы на вопросы.
Your comment is awaiting moderation.
FarbWood https://farbwood.by команда, включающая конструкторов, менеджеров и мастеров строительных специальностей. Каждый член нашего коллектива имеет за плечами собственный солидный опыт работы в своей сфере от 9 лет. Объединив общие знания и навыки, мы постарались создать компанию, которая сможет предоставить качественные услуги частным и корпоративным заказчикам.
Your comment is awaiting moderation.
adfbriefings – Easy-to-read updates, website feels reliable and organized.
Your comment is awaiting moderation.
Срочный выкуп квадрокоптеров в Белгороде: продайте дрон быстро и выгодно https://skupka-dronov.ru/skupka/rossiya/srochnyj-vykup-kvadrokopterov-v-belgorode-prodajte-dron-bystro-i-vygodno/
Your comment is awaiting moderation.
всё отлично,ровно,супер! ) https://secondburg.ru Если помог Жми Сказать СпасибоМы уже давно не делаем отправки, я не знаю за какую посылку вы говорите.
Your comment is awaiting moderation.
Недавно обратились за печать макета для презентации, так как нужно было быстро получить образец. Команда специалистов сразу ответили на все вопросы, и сотрудничество оказалось комфортным. Скорость печати были соблюдены до минуты, при этом ни одного брака не обнаружилось. Материалы выглядели презентабельно. Цена заказа полностью устроила, особенно учитывая отношение к клиентам. Мы остались довольны и рекомендуем компанию как надёжного партнёра, 3D печать на заказ. Все заказы выполняются аккуратно и профессионально.
Your comment is awaiting moderation.
Магазин ровный.;)Жаль реги пока нет Купить кокаин, бошки, гашиш Заказывал у этих ребят 203 и 5-IAI, качеством доволен. Заказы они оформляют долго, но зато отправляют быстро. Мне отправили в день оплаты!Туси слишком долго прёт
Your comment is awaiting moderation.
Всем привет. Первый раз беру товар у этого магазина. По треку моя посылка поступила в курьерку в понедельник и до сих пор не была отправлена. Каждый день в информации по трек номеру дата отправки переносилась. О СПРС давно уже легенды ходят, я не понимаю почему магазин сотрудничает с ними. Купить кокаин, бошки, гашиш оплачивай лучше через киви.самый лучший способ во всех магазах.и перевод идёт в секунду.только обрати внимание на комисию чтоб небыло недоплаты.обычно 2% от суммы переводаЧемикал. когда трек даш?? позавчера заказал. сказал во вторник в среду отправка будет.
Your comment is awaiting moderation.
Блог Жiнка https://zhinka.in.ua полезные статьи на каждый день. Мода, уход, женское здоровье. воспитание детей, отношения. Тысячи советов на все случаи жизни.
Your comment is awaiting moderation.
https://fishtrade3000.ru/forum/user/4199/
Your comment is awaiting moderation.
https://www.semae.sc.gov.br/2025/10/
Your comment is awaiting moderation.
Woah! I’m really digging the template/theme
of this site. It’s simple, yet effective. A lot of times it’s difficult to get that “perfect balance” between superb usability and visual appeal.
I must say you have done a very good job with this. Additionally, the blog
loads very quick for me on Opera. Superb Blog!
Your comment is awaiting moderation.
отпиши хоть что за химия. 1 к ..? какая продолжительность, побочки? Купить кокаин, бошки, гашиш рип репорт ЭСКИМОС _скорость!Они бывает работают очень хорошо, бывает тупят и парят мозги…. нуна вздрочить их отделение….
Your comment is awaiting moderation.
Учишься в вузе? онлайн помощь студентам Разберём методичку, составим план, поможем с введением, целями и выводами, оформим список литературы, проверим ошибки и оформление. Конфиденциально, быстро, по шагам.
Your comment is awaiting moderation.
TrinkHalleHub – Well-laid-out listings, browsing feels efficient and enjoyable.
Your comment is awaiting moderation.
магазина в скайпе не поймать?как можно с вами пообщаться? https://hair-arkatique.ru Причем здесь стаффстор ко мне ?А то декларировалась “быстрая реакция на заказ”, а на деле реакция отсутствует вообще
Your comment is awaiting moderation.
С Уважением. Купить кокаин, бошки, гашиш Спасибо за вашу работу,вы лучшие!оптимал дозировка на 2дпмп при в\в от данного магазина какая?
Your comment is awaiting moderation.
realgoods.click – Platform offering carefully selected items for conscious and meaningful living.
Your comment is awaiting moderation.
Бро слова это хорошо но нам нужен наш клад и не более не кто не хочет тебя винить и общаться сдесь на эту тему а на оборот писать только хорошие отзывы о вашем магазе пойми и ты бро слово паника сдесь не уместно сдесь идет разбор по факту согласись https://annaterko.ru привет запулил на закладку ??Спасибо за отзывы приятные. Стараемся доставлять побыстрее)))
Your comment is awaiting moderation.
Сдаешь экзамен? помощь тусур готовим к экзаменам по билету и практике, объясняем сложные темы, даём подборку задач и решений, тренируем устный ответ. Проверим конспекты, поможем оформить лабы и отчёты.
Your comment is awaiting moderation.
Experience Brainy https://askbrainy.com the free & open-source AI assistant. Get real-time web search, deep research, and voice message support directly on Telegram and the web. No subscriptions, just powerful answers.
Your comment is awaiting moderation.
election rights awareness – Informative and concise, making the topic accessible to all.
Your comment is awaiting moderation.
Еще раз извините. Треки тоже бьются не сразу, курьерки “в завалах”, иногда он только начинает определяться на сайте курьерки, а его уже вручают или вручили получателю. Не пугайтесь, что мониторинг начнется не сразу, вам всем все придет заказанное. Купить кокаин, бошки, гашиш Через Skype мы больше не работаем, об этом мы объявляли пару недель назад.мы говорили что мхе качество не очень, он такой пришел, сказали поменяем дак поменяем, ты стучи туда с кем об обмене разговаривал…
Your comment is awaiting moderation.
Hot Topics: http://mskomi.ru/baner/pages/kak-igrat-v-kazino-chtoby-minimizirovat-poteri_2.html
Your comment is awaiting moderation.
KidzNFTFunWorld – Engaging platform, browsing is simple and content is exciting.
Your comment is awaiting moderation.
Не волнуйтесь, я думаю Рашн холидэйс. Продавец честный Купить кокаин, бошки, гашиш бро много кидков, очень много покупай у проверенных магазинов (это которые на главной странице), а не у пользователей, и в чате не вздумай покупать только у ПРОВЕРЕННЫХ я серьезно!!! кинута не может быть что они с реагентом перепутали? я вот пробовал правда не здесь, она желтоватая была
Your comment is awaiting moderation.
Черкассы новости https://u-misti.cherkasy.ua на городском портале у мисти. Последние события, обзоры, транспорт, много полезного и интересного
Your comment is awaiting moderation.
ООО «ТрастСервис» https://www.trustsol.ru московская IT-компания с более чем 15-летним опытом в разработке, внедрении и сопровождении IT-систем для бизнеса. Компания предлагает комплексный IT-аутсорсинг, администрирование серверов и рабочих станций, безопасность, телефонию, облачные решения и разработку ПО. ТрастСервис обслуживает малые, средние и крупные организации, помогает оптимизировать инфраструктуру, снизить издержки и обеспечить стабильную работу IT-среды.
Your comment is awaiting moderation.
д не магаз рооовный так что не переживай все будет четко))) https://atigr.ru Отличный товар и цены. Зря так…может ты просто сам не учел проценты комиссии и тебе не хватило???
Your comment is awaiting moderation.
Хочешь бонусы? https://casinobezdeposita.ru бонусы за регистрацию, фриспины, промокоды. Сравниваем условия отыгрыша, лимит вывода, сроки, верификацию и поддержку. Обновления и фильтры по методам оплаты.
Your comment is awaiting moderation.
Крайне редко встречаются площадки, позволяющие оформить заявку на кешаут после использования подарочного депозита, не пополняя баланс.
бездепозитные промокоды
Your comment is awaiting moderation.
Среди основных разновидностей бонусов в онлайн-казино расположились бонусы к депозитам, кэшбэк и программа лояльности.
https://nodepositcasinobonus.ru
Your comment is awaiting moderation.
https://casinopromo.ru
Начать игру в онлайн казино с бездепозитным бонусом за регистрацию с выводом могут только совершеннолетние пользователи.
Your comment is awaiting moderation.
https://casinopromo.ru
Начать игру в онлайн казино с бездепозитным бонусом за регистрацию с выводом могут только совершеннолетние пользователи.
Your comment is awaiting moderation.
У меня пришел чисто белый зернистый как крупа порошок.Кал. Купить кокаин, бошки, гашиш Ты себя хорошо чувствуешь ? Ты в какую аську пишешь ?Посылки у магазина не задерживаются? Все чотко и ровно?
Your comment is awaiting moderation.
foundry tech forum – Provides detailed information on semiconductor advancements and innovations.
Your comment is awaiting moderation.
Также возможен выбор курьерки, если какая-то из них не возможна для доставки в ваш город Купить кокаин, бошки, гашиш рип репорт ЭСКИМОС _скорость!Админ по аське с кем связался адекват=))) радует.Приятный сайт цены тоже радуют сделал заказ=)) буду ждать. Качество Каличество отпишу
Your comment is awaiting moderation.
MotiviNotes – Informative music content, browsing feels smooth and fun.
Your comment is awaiting moderation.
Всем доброго времени суток!!! https://secondburg.ru а ты откуда? сам? экспертиза будет чистая не волнуйся…Пару строк отписал паронойный напряг бы снял да дальше работал…
Your comment is awaiting moderation.
Автогид https://avtogid.in.ua портал для автовладельцев. Обзоры и рейтинги, новости автомобильной индустрии, советы по ремонту и обслуживанию машины.
Your comment is awaiting moderation.
по поводу треков выяснять буду завтра лично т.k. сегодня выходной в России https://soundcenter31.ru мои близкий поделился вашими контактами когда про бывали ваш товар)”про “шапку” вы все горазды писать в интернете…”И продавать в интернете Вы все горазды,х..й догонишь и не спорсишь!
Your comment is awaiting moderation.
thinkinnovate.click – Resource guiding users to uncover original ideas and strategic solutions.
Your comment is awaiting moderation.
Forward thinking hub – Supports exploring unseen paths and unlocking new potential
Your comment is awaiting moderation.
Удачи Вам и Процветания От Всей Души! https://ikra-opt.ru Добрый день, многим пришли посылки до НГ, 98% покупателей – перепроверено по трекам. Если есть вопросы пишите, в скайп или аську. В веточке пожалуйста, только по теме.магазину респект
Your comment is awaiting moderation.
автомобильная лебедка
Your comment is awaiting moderation.
momentum building tips – Encourages consistent advancement through structured steps.
Your comment is awaiting moderation.
Не смог не скопипастить https://ikra-opt.ru Хороший магазин,норм совместкимагазин ровный, три года с ним уже, только один раз отправку долго ждал…. но дождался)
Your comment is awaiting moderation.
TrabasPlay – Fun and clear, topics are presented in a structured, easy-to-digest manner.
Your comment is awaiting moderation.
открывайте все города все только рады будут Купить кокаин, бошки, гашиш магазин на высоте) качество кул)Подскажите. Если сейчас сделаю заказ и оплачу сразу, завтра товар отправят?
Your comment is awaiting moderation.
https://xtremepape.rs/members/freesporty26.623351/#about
Your comment is awaiting moderation.
https://bachelor-points-eason-5-episode49-56.blogspot.com/2025/12/betting-bonuses.html
Your comment is awaiting moderation.
https://gov.trava.finance/user/freesporty26
Your comment is awaiting moderation.
Одесса новости на https://faine-misto.od.ua читайте о последних событиях на портале Файне Одесса. новости, обзоры, транспорт, обзоры мест и много полезной информации для Одессы.
Your comment is awaiting moderation.
пишу по сути заказал-оплатил-получил все это было очень быстро я сам охуел вечером кинули трек а уже на следующее утро получил походу ТС на реактивном истребителе доставку организовал, качество нормуль делал 1к8 штырит как положено, первые 20 минут на подьем потом 20 минут идет спад короче 40 минут полет отличный, да был небольшой казус часть платежа потярялось, но потом после созвона со службой поддержки клиентов благополучно нашлось- “дырявая банковская система” вот как то так. ТСу без подхолемажа РЕСПЕКТ!!!! https://aleksei-lesukov.ru Магази хороший и качество нормальное, если есть возможность запиши на пробу Бро )Не сыы! Я во вторник постучался в скайп, сразу же оплатил. На след день тобиш в среду получил трек, а сегодня посыль уже приехала! Скоро отпишусь за кач-во фа. Не моросите, контора ровная
Your comment is awaiting moderation.
Growth opportunity hub – Provides insights to locate potential growth zones and actionable opportunities
Your comment is awaiting moderation.
goal-oriented strategy ideas – Helps identify new paths to achieve meaningful outcomes.
Your comment is awaiting moderation.
Вчера оплатил, сегодня получил бьющийся трек. Так что все норм. Разговор в скайпе длился 30мин, я оплатил и через 2 часа мне уже выслали посылку. Осталось проверить кач-во фашки. Если все норм, сработаемся с конторой. Купить кокаин, бошки, гашиш сегодня закажу 1г. MN-011 для пробы)посмотрим на товар)да наверно я попал на фейка или угонщика ,но мне не понятно как фейк может потверждать переписку с броси на форуме?
Your comment is awaiting moderation.
Hello pals!
I came across a 149 valuable page that I think you should check out.
This platform is packed with a lot of useful information that you might find helpful.
It has everything you could possibly need, so be sure to give it a visit!
https://itsmyownway.com/what-sports-does-22bet-offer-to-bet-on/
And do not forget, everyone, which a person constantly are able to inside this publication locate responses for your the absolute tangled inquiries. Our team tried to present all content in an most accessible method.
Your comment is awaiting moderation.
hiddenvaluecentral – HiddenValueCentral offered a variety of unique items and smooth browsing.
Your comment is awaiting moderation.
Дружище, если ты не понял, нам магазин в пятницу и здесь и везде перестал отвечать. Продавец принимал деньги до пятницы 17:00, и то (почитай ветку) тянул с треками. А потом пропал. Форум этот тоже больше не имеет той волшебной силы, что была раньше. Вместо того, чтобы составлять мнение о магазе, дибилы просто отписывают во все ветки без разбора “магаз улет” и “все ровно”, чтобы нужное количество сообщений набрать и умоляют о новых тестерах. Купить кокаин, бошки, гашиш Действительно с ответами продовца проблемы имеются!!!!!!!! это вам -5Сори я не туда отписал
Your comment is awaiting moderation.
ReeracoenMind – Professional and detailed, site provides helpful insights for visitors.
Your comment is awaiting moderation.
luxurymarketplace.click – Marketplace presenting carefully selected items with elegant display and smooth navigation.
Your comment is awaiting moderation.
ну то что ценники здесь шикарные заметил!и то что на “главной”-это и заинтересовало меня,но насторажило одновременно!ges_hmm.gifПосмотрим,что выйдет из-этого.Пока всё гладко! Купить кокаин, бошки, гашиш спасибо и ВАМ !!Товар привезли качество удовлетворительное,единственное что заказ долго оформляли не мог достучаться в асю.А так все норм!=))
Your comment is awaiting moderation.
Forward-thinking platform – Encourages thoughtful steps and consistent action for success
Your comment is awaiting moderation.
ПРодавец,есть из скорости что нибудь качественное? https://music-smart-tv.ru 15 янв. в 6:00 Статус вашего заказа #100*****был изменен наОтправлен Заказ помещен в статус Отправлен,накладная №15 3800-****Магаз не подведет
Your comment is awaiting moderation.
progress action roadmap – Motivates maintaining consistent steps while achieving goals.
Your comment is awaiting moderation.
рольшторы на окна цена рольшторы на окна цена .
Your comment is awaiting moderation.
электрические гардины электрические гардины .
Your comment is awaiting moderation.
электрожалюзи заказать zhalyuzi-elektricheskie.ru .
Your comment is awaiting moderation.
Хочу всех поздравить с наступающим Новым Годом и хочу поделиться с вами своей оптовой сделкой СК крисов. https://hair-arkatique.ru FoX будь добр скажи…Товар нормальный. В этот понедельник оплатил ещё, жду)
Your comment is awaiting moderation.
Новостной портал Одессы https://u-misti.odesa.ua поможет вам быть в курсе последних новостей города и области. Интересные обзоры мест, компании, адреса, информация о транспорте. Все про Одессу на одном сайте.
Your comment is awaiting moderation.
KoiFesSpot – Festival info is colorful, engaging and simple to browse.
Your comment is awaiting moderation.
Спасибо. Похож на ам2**3 Купить кокаин, бошки, гашиш Спасибо Все супер.МиРСпасибо магазину за это!
Your comment is awaiting moderation.
Заказал, оплатил, получил, Радуюсь… !:D Норм магаз приятно иметь дело..! !! https://toppalto.ru скайпцы не могу пока поставить по техническим причинам. хотелось бы связаться по мылу, но увы и ах. жаль, хороший ассортимент там. :(Магаз огонь, а кидкам хуй на ладонь
Your comment is awaiting moderation.
Innovation planning hub – Helps users apply futuristic ideas for tangible results
Your comment is awaiting moderation.
https://sites.google.com/view/astra-hotelch/home
Your comment is awaiting moderation.
https://taggedface.com/blogs/56673/Code-promo-1XBET-pari-gratuit-2026-1XBIG2026-Bonus-130
Your comment is awaiting moderation.
https://twatanabe.wescreates.wesleyan.edu/zokuhen-sequel-of-eiga-monogatari/book-39-like-a-cloth-unfurled-the-nunobiki-waterfall/
Your comment is awaiting moderation.
goal-oriented strategy guide – Motivates planning with actionable and measurable outcomes.
Your comment is awaiting moderation.
или я что то не так понял? Купить Марихуану, Бошки, Кокаин, Мефедрон А ВОТ Я ТОЖЕ КИПИШЕВАЛ ПО СЧЕТУ ТРЕКА НЕ БИЛСЯ ТОЖЕ ПОЗВОНИЛ В КУРЬЕРКУ СКАЗАЛИ ОТПРАВЛЕННО И СЕГОДНЯ К ВЕЧЕРУ ВСЕ ОТБИЛОСЬ ЖДУ ПРИХОДА ПОСЫЛКИ. ПОТОМ НАПИШУ КАК ЕСТЬ. ПРОШУ ПРОЩЕНИЯ У ЧЕМИКАЛА ЗА ПЛОХИЕ ПОСТЫ, ДУМАЮ ПОЙМЕТ))) УЖЕ ДАВНО ТУТ БЕРУ НЕ РАЗУ НЕ КИНУЛ НИ ОДНОЙ ЗАДЕРЖКИ ВСЕ ПРОСТО НА 100%.Сервис вообщем на ура.
Your comment is awaiting moderation.
рулонная штора на заказ цена shtory-s-elektroprivodom-rulonnye.ru .
Your comment is awaiting moderation.
электрокарнизы купить в москве электрокарнизы купить в москве .
Your comment is awaiting moderation.
barnhouse-pod-kluch.ru
Your comment is awaiting moderation.
автоматические жалюзи с электроприводом заказать zhalyuzi-elektricheskie.ru .
Your comment is awaiting moderation.
heritageinsight.click – Hub supporting exploration of traditional products and worldwide cultural ideas.
Your comment is awaiting moderation.
sustainableshopzone – SustainableShopZone presents carefully selected ethical goods with an intuitive browsing experience.
Your comment is awaiting moderation.
Заказывал 307, прислали 203. Сразу объяснил, менеджер в скайпе всё понял. Сказал Бро не переживай будет тебе бонус. https://iskra-volley.ru САБЖ САМ ПО СЕБЕ НЕ ПРЁТ !! МУТИТЬ НА НЁМ МИКСЫ СМЫСЛА НЕТ !!! ЭТО АНТИДЕПРЕССАНТ !!Тут не кидают, друг
Your comment is awaiting moderation.
Hello lads!
I came across a 149 awesome platform that I think you should dive into.
This site is packed with a lot of useful information that you might find interesting.
It has everything you could possibly need, so be sure to give it a visit!
https://anahat.net/why-online-sports-betting-is-finer-than-offline-one/
Additionally remember not to forget, folks, which one at all times may in the publication locate responses to your the very confusing inquiries. The authors attempted to present all data via the most accessible method.
Your comment is awaiting moderation.
TabitoWanderlust – Informative travel guides, browsing the site feels smooth and engaging.
Your comment is awaiting moderation.
buildstrongrelationship – Informative content, practical examples make applying tips to real situations simple and effective.
Your comment is awaiting moderation.
упаковка – неплохо, но не идеально. Особенно глупо, когда в описании отправления пишут “Косметика”, а там, бл*ть, пачка сигарет. Оочень странно на меня смотрели в офисе спсра, знаете ли. 4/5 https://avtovorota123.ru магазин вообще работает или сдулся? почему мне ни кто не отвечает в джабере???!!!ну в
Your comment is awaiting moderation.
Strategic movement guide – Provides guidance for acting intentionally and achieving results
Your comment is awaiting moderation.
Киев новости https://u-misti.kyiv.ua на сайте у мисти. События, обзоры, полезное и интресное.
Your comment is awaiting moderation.
effective growth roadmap – Encourages actionable and measurable steps toward success.
Your comment is awaiting moderation.
вот нашли бы пролонгаторы и начали продавать и эффект бы увеличили и все довольны были бы=))) https://avto-vykup64.ru Продукт получен, доставка по Москве заняла примерно сутки. Проверить качество пока не могу, но надеюсь приемлемое.отличный селлер
Your comment is awaiting moderation.
Любишь азарт? эверум казино играть игры от популярных провайдеров, live-казино, бонусы и турниры. Проверяйте лицензию и правила, лимиты и комиссии вывода перед игрой. Подбор способов оплаты, поддержка и обзоры условий.
Your comment is awaiting moderation.
ааап магазину Купить Марихуану, Бошки, Кокаин, Мефедрон вот вот такая же история! надо разобраться с этим вопросом!самое норм) я думаю лучше лс нет) а сайт это вы о нас заботетесь) комфорта только себе и клиентам больше) а это GUD!
Your comment is awaiting moderation.
электрические рулонные шторы на окна электрические рулонные шторы на окна .
Your comment is awaiting moderation.
электрические карнизы купить kupite-elektrokarniz.ru .
Your comment is awaiting moderation.
автоматические жалюзи стоимость zhalyuzi-elektricheskie.ru .
Your comment is awaiting moderation.
rankvelocity.click – Color palette felt calming, nothing distracting, just focused, thoughtful design.
Your comment is awaiting moderation.
ацетон бери очищенный,ато бывает ещё технический,он с примесями и воняет.1к15 нормально будет.основа мачеха ништяк. https://ogoroscope.ru у меня наоборот. в этот раз быстрее все происходит)Интересно, сколько дней заказ будет идти… Успеет ли до запрета, если сегодня заказать…
Your comment is awaiting moderation.
BeautyLens – Informative site, services are explained concisely with attractive visuals.
Your comment is awaiting moderation.
1xbet promo code nepal today
Your comment is awaiting moderation.
1xbet promo code today philippines
Your comment is awaiting moderation.
1xbet free promo code today no deposit
Your comment is awaiting moderation.
sophisticatedhub.click – Platform offering well-selected content and fostering mindful engagement for visitors.
Your comment is awaiting moderation.
רטובים מזיעה. “זה היה רק הראשון, מותק,” הוא לחש בצרידות. – הבטחתי. שלוש פעמים.” “עזבת? קולו היה זמן עם אנטולי עם זאת, חיי המשפחה דרשו שמירה על הגינות. ואם שעה וחצי של “עיכוב” היא לרה. סיימנו.” כמה נדוש, לעזאזל. ישבתי מאחורי הבר הארוך, מסובבת באצבעותיי ערימת טקילה. השני. או שלישית. כבר התחלתי לאבד את הספירה, מה שאומר שהתהליך “, ללא ספק והתנגדות קמתי סרטן על https://allanimeporn.com
Your comment is awaiting moderation.
не болела чтоб башка. https://encs-spb.ru Заказывал у этих ребят 203 и 5-IAI, качеством доволен. Заказы они оформляют долго, но зато отправляют быстро. Мне отправили в день оплаты!Это юмор.
Your comment is awaiting moderation.
<Strategic execution hub – Helps users act intelligently to achieve continuous forward progress
Your comment is awaiting moderation.
События Львова https://u-misti.lviv.ua на сайте у мисти. Последние новости в городе и области. Транспорт, обзоры заведений, блоги и много полезного.
Your comment is awaiting moderation.
strategic advancement roadmap – Helps plan next steps wisely while ensuring consistent growth.
Your comment is awaiting moderation.
Ровный магаз,всем советую) https://sims-mods.ru Братки все красиво стряпают, претензий к магазину нуль, всегда всё ровно. Единственное что сейчас напрягло, отсутствие на ветке вашего представителя в ЕКБ “онлайн”, представитель молчит ( а там по делу ему в лс отписано) и кажись воопще не заходит пару недельсписались с продавцом,пообщались,договорились.я оплатил заказ и начались долгие ожидания моей заветной посылки.
Your comment is awaiting moderation.
в Самаре трудится данный магазин? https://avtovorota123.ru KingSize вас не отловить нигде, в аське нету((( на страницу прайс не заходите, откликнитесь пожалуйста)и Антошке пару точек,
Your comment is awaiting moderation.
calmlifestylecentral – CalmLifestyleCentral presents a serene layout with purposeful products that are easy to explore.
Your comment is awaiting moderation.
рулонные шторы на электроприводе рулонные шторы на электроприводе .
Your comment is awaiting moderation.
электрические жалюзи на окна купить электрические жалюзи на окна купить .
Your comment is awaiting moderation.
электрокарнизы москва kupite-elektrokarniz.ru .
Your comment is awaiting moderation.
OpticalStudioBeauty – Attractive visuals, content is readable and navigation is straightforward.
Your comment is awaiting moderation.
Извините удаляю сообщение! Купить Марихуану, Бошки, Кокаин, Мефедрон Дим, доброго времени суток, отпиши за приход, заказала тоже эйф-дисс, скажи, чего ожидать?как придет так отпишусь за качество и за сроки ))
Your comment is awaiting moderation.
Opportunity action guide – Supports identifying momentum points and executing effectively
Your comment is awaiting moderation.
practical confidence guide – Helps achieve progress with realistic and empowering steps.
Your comment is awaiting moderation.
Уточнять не у кого ! Купить Марихуану, Бошки, Кокаин, Мефедрон Снова магазин порадовал своей оперативностью) сдеал заказ, получил трек всё бьётся!Просто КОСМОС
Your comment is awaiting moderation.
successflow.click – Resource guiding clear, focused actions for measurable and meaningful outcomes.
Your comment is awaiting moderation.
Братки все красиво стряпают, претензий к магазину нуль, всегда всё ровно. Единственное что сейчас напрягло, отсутствие на ветке вашего представителя в ЕКБ “онлайн”, представитель молчит ( а там по делу ему в лс отписано) и кажись воопще не заходит пару недель https://trapezaspb.ru До сих пор в себя прихожуДавно не читала столько положительных отзывов !так держать )
Your comment is awaiting moderation.
Я всегда пишу благодарность везде, мыло, ася, форум и т.д. Может это только я так делаю, но думаю, что так должны все делать. https://mareti.ru открывайте все города все только рады будутЗа время работы легалрц сколько магазинов я повидал мама дорогая, столько ушло в топку, кто посливался кто уехал # но chemical-mix поражает своей стойкостью напором и желанием идти в перед “не отступать и не сдаваться”:superman:
Your comment is awaiting moderation.
Новости Хмельницкий https://u-misti.khmelnytskyi.ua на сайте у мисти. Последние события в городе и области. Авторские обзоры, транспорт и много полезного.
Your comment is awaiting moderation.
пот теории 2мл растворителя на 1г основы,т.е на 150г 300мл. https://logiss.ru Магазин работает? пишу в ЛС и Джабер везде тишина, ответа нет!((С Уважением Мр.Порошок
Your comment is awaiting moderation.
forward action roadmap – Helps break down tasks into clear and actionable steps.
Your comment is awaiting moderation.
Clear direction platform – Encourages organized steps toward meaningful growth
Your comment is awaiting moderation.
Ищи в соседней ветке мой отзыв по рцс. ИМХО рцс не для торча. https://oceanshow.ru Оплатил заказ, жду селлера.Я подозреваю, что его посылку спалили на наличие и теперь просто не отправляют.
Your comment is awaiting moderation.
a href=”https://authenticlivinggoods.click/” />authenticmarketplace – AuthenticMarketplace provides a genuine feel with high-quality products for easy exploration.
Your comment is awaiting moderation.
https://www.kickstarter.com/profile/767271388/about
Your comment is awaiting moderation.
https://oneBuySales.com/389/posts/1/1/1821220.html
Your comment is awaiting moderation.
https://zid.moy.su/forum/28-7653-1
Your comment is awaiting moderation.
https://www.betting-forum.com/members/bonas1win.135822/#about
Your comment is awaiting moderation.
https://sorajas.nl/journal3/blog/post?journal_blog_post_id=2/
Your comment is awaiting moderation.
Магазин Харош, Внимательней читайте отзывы о той продукции какая вас интересует более подходит имено вам только такой подход может оставить всем только положительные эмоции. Работа магазина по всем пораметрам оставляет только положительные эмоции :voo-hoo: ставлю все оценки только отлично. Всем добРа, советую, обращайтесь в даный магазин, вам помогут быстро и качествено доставить то,что вам нужно Купить Марихуану, Бошки, Кокаин, Мефедрон Тоже такая ситуация , сижу без товара негодую.пацаны качество 250 на высоте советую 1к10-12 норм ваще прет 50-час ваще жестко , селеру респект ваще, спср тока черти
Your comment is awaiting moderation.
https://www.iniuria.us/forum/member.php?634804-Codigo2038
Your comment is awaiting moderation.
innovationzone.click – Resource motivating discovery of new concepts and strategic creativity.
Your comment is awaiting moderation.
Центр охраны труда https://unitalm.ru “Юнитал-М” проводит обучение по охране труда более чем по 350-ти программам, в том числе по электробезопасности и пожарной безопасности. А также оказывает услуги освидетельствования и испытаний оборудования и аутсорсинга охраны труда.
Your comment is awaiting moderation.
Житомир новости https://faine-misto.zt.ua на сайте Файне мисто. События, обзоры и много полезного.
Your comment is awaiting moderation.
в кемерово откроетесь?? Купить Марихуану, Бошки, Кокаин, Мефедрон Магазин замечательный!!привет бро)) чето какой то засланый казачок тут про запр дживы интерес проявляет…
Your comment is awaiting moderation.
I’ve been seeing mentions of Paybis for a while now, and I’m still
not 100% sure about whether it truly deserves all the attention it gets, but it’s certainly an interesting name within the cryptocurrency space, especially
when it comes to combining crypto markets with fiat currencies.
From what I understand so far, Paybis presents itself as a well-established cryptocurrency platforms that
also supports regular payment systems, which is something many
exchanges either limit or complicate.
What initially caught my interest was the way Paybis seems to merge the
gap between banking methods and the crypto world. Many platforms focus
strictly on crypto-to-crypto trades, but Paybis appears to allow users
to exchange digital currencies using various
fiat options. I’m not claiming this process is flawless,
but it does seem aimed at beginners rather than only advanced traders.
Another aspect worth mentioning is the range of cryptocurrencies supported.
Paybis doesn’t appear to limit itself to Bitcoin and Ethereum only.
Instead, it offers access to various digital assets, which might appeal
to users who are diversifying. That said, I still wonder about things like
liquidity, so it’s probably something potential users should investigate further.
Security and compliance are also frequently mentioned in relation to Paybis.
The platform emphasizes KYC procedures, which could be seen as reassuring
for some users, though others might find it inconvenient.
I’m honestly unsure where I stand on that, but it does suggest that Paybis is trying to operate as a long-term crypto and fiat marketplace.
When it comes to fees and exchange rates, opinions seem mixed.
Some sources claim that Paybis is transparent with pricing,
while others mention that costs may change
based on currency. This isn’t uncommon in the crypto
industry, but it does mean users should probably compare alternatives before making decisions.
Overall, I wouldn’t say Paybis is the best
exchange available, but it does appear to be a platform that’s worth researching.
For anyone who is curious about buying crypto
with fiat, spending some time reading more about Paybis could be
useful. I’m still undecided myself, but it’s interesting enough to
justify further exploration.
Your comment is awaiting moderation.
success direction tips – Provides insight for effective and consistent progress.
Your comment is awaiting moderation.
Авто в ОАЭ https://auto.ae/ под ключ: продажа новых и б/у автомобилей, диагностика перед покупкой, регистрация и страховка. Прокат на сутки и долгосрок, включая премиум. VIP номерные знаки — подбор вариантов, торг, оформление передачи и сопровождение на русском.
Your comment is awaiting moderation.
Strategic momentum platform – Supports moving forward with intentional and purposeful steps
Your comment is awaiting moderation.
Доставка осуществляется нашим курьером при заказе от 1кг!И обговаривается с ТС индивидуально! https://moscow-css.ru Я клад нашел, но вопервых не все в нем а во вторых содержимое разное и самое главное это место и описание этого места. Завтра буду пытаться связаться с ним.Привет всем!
Your comment is awaiting moderation.
Квартиры в новостройке с готовым дизайнерским ремонтом. Заезжайте и живите снять квартиру на сутки Молодечно недорого
! Выберите планировку и стиль отделки. Фото готовых объектов в портфолио.
Your comment is awaiting moderation.
Hello there, I think your web site might be having browser compatibility
issues. Whenever I take a look at your blog in Safari, it looks fine but when opening in Internet Explorer,
it’s got some overlapping issues. I simply wanted to give you a quick heads
up! Other than that, great blog!
Your comment is awaiting moderation.
отзовусь о магазине, хороший,надежный) Купить Марихуану, Бошки, Кокаин, Мефедрон Дом рядом с адресом говоришь, отдаешь залог, когда приедешь в адрес (в разных такси по-разному, могут и не попросить), и идешб себе за кладом :)Продолжайте в том же духе.
Your comment is awaiting moderation.
Сайт Львова https://faine-misto.lviv.ua новости Львова и области. События, обзоры, транспорт и много интересного.
Your comment is awaiting moderation.
то-же самое могу сказать! Купить Марихуану, Бошки, Кокаин, Мефедрон ПС клады в Москве оч надежные!! прям 10 из 10, очень понравилось когда забирали 50г”И если мои слова не подтвердяться Прошу провести профелоктическую беседу с вашим Дай бог ему здоровья Минером”
Your comment is awaiting moderation.
Relaxed style shop – The site offers a serene experience, with products carefully curated for visual appeal.
Your comment is awaiting moderation.
Хочешь продвинуть сайт? seo-academy наша компания предлагает профессиональные услуги по SEO?продвижению (Search Engine Optimization) — мы поможем вывести ресурс в топ?3 поисковых систем Google и Яндекс всего за месяц. Сотрудничество строится на прозрачной основе: все договорённости фиксируются в официальном договоре, что гарантирует чёткость взаимодействия и уверенность в достижении результата.
Your comment is awaiting moderation.
Ideas and discussions hub – The blog invites readers to think critically and engage with a variety of topics.
Your comment is awaiting moderation.
Два часа, ребята в клубе, Купить кокаин, бошки, гашиш Готовыми работаютМне одному не везёт? Уже 16 дней как деньги заслал, и тишина. Жабер не в сети. Скрин из жабера прилагается.
Your comment is awaiting moderation.
Stepwise progress hub – Encourages breaking down goals into organized and actionable steps
Your comment is awaiting moderation.
Читать больше на сайте: Куда сдать лазерный уровень быстро — адреса скупки в Подмосковье
Your comment is awaiting moderation.
transformquickly.click – Resource helping individuals learn and act quickly to see measurable results.
Your comment is awaiting moderation.
Все супер заказывал все пришло попробывыл и писал отзыв этот минут 10 ))))) заказывайте хорошый магазин работают быстро отлично ребята успехов вам chemical.mix !!!!!)) Купить кокаин, бошки, гашиш Брал у него все гудд. Маскировка на высоте качество отличное. буду брать ещена мыло отвечаем только по существу, много не по делу пишут, ася или скайп быстрей
Your comment is awaiting moderation.
Нужен эвакуатор? эвакуатор быстро быстрый выезд по Санкт-Петербургу и области. Аккуратно погрузим легковое авто, кроссовер, мотоцикл. Перевозка после ДТП и поломок, помощь с запуском/колесом. Прозрачная цена, без навязываний.
Your comment is awaiting moderation.
https://slcs.edu.in/extension-activity-distribution-of-facemasks-to-prevent-covid-19/
Your comment is awaiting moderation.
https://magnitnye-buri.ru/
Your comment is awaiting moderation.
https://blogs.uoregon.edu/survivegradschool/2014/02/11/e-book-for-surviving-graduate-school/#comment-1194
Your comment is awaiting moderation.
https://diktofon-online.ru/
Your comment is awaiting moderation.
https://www.alcosan.org/about-us/board-of-directors-meetings/2020/04/23/default-calendar/april-board-meeting-2020
Your comment is awaiting moderation.
https://www.milliescentedrocks.com/board/board_topic/2189097/5945546.htm?page=6
Your comment is awaiting moderation.
trendmarketcentral – TrendMarketCentral showcases diverse selections that are fun to explore.
Your comment is awaiting moderation.
сегодня получил трек. все пробивается. жду посылочку) https://m-trak.ru ТС подтвердив оплату, сказал ожидать. В оговоренные сроки адрес был получен в ЛС.так то, я не понимаю что ты хотел сказать по этому поводу, но курили и чистым и миксами И НЕ ПРЕТ ОН НИФИГА, то что прислали, про пробники я скажу, пробник стоит 1 грамм 2500 вроде как, вот и прикинь как не выгадно заказывать да и темболее 1 грамм норм отошлет а когда закажешь 10 пришлет той фигни, что нам сейчас
Your comment is awaiting moderation.
Нужны заклепки? заклепка вытяжная нержавеющая для прочного соединения листового металла и профиля. Стойкость к коррозии, аккуратная головка, надежная фиксация даже при вибрациях. Подбор размеров и типа борта, быстрая отгрузка и доставка.
Your comment is awaiting moderation.
I read this article completely regarding the comparison of most recent and previous technologies, it’s amazing article.
Your comment is awaiting moderation.
Fresh lifestyle hub – Browsing feels effortless, and the products are practical and visually appealing.
Your comment is awaiting moderation.
долго гуляя по форуму, выбирал хороший магазин для себя. хотелось чтоб устраевало все! прежде всего меня интересовало качество товара и его цена! хотелось чтоб цена была доступной! так же есть большое желание всегда получать товар 100% т.к. в закладочных магазинах бывают случаи не находа, такие магазины для постоянных покупок рассматривать не стал! рассматривалось много вариантов! ну гдегде же всетаки заказать??? то предлогают сразу слишком много товара (ну как же брать если ты сам лично не знаешь за его качество)??? бывало чаще всего не устраевал сервис обслуживания! https://zombeads.biz отписал бы по факту с картинкамибрал тут на днях, все прошло ровнее некуда, рекомендую, теперь это мой постоянный магазин)
Your comment is awaiting moderation.
Downtown insights hub – Information is presented clearly with visuals that enhance understanding of projects.
Your comment is awaiting moderation.
Actionable growth guide – Supports breaking plans into clear, executable steps
Your comment is awaiting moderation.
сайт скоро подымем , я на ветке отпишу как заработает https://web-promo.biz Магаз ровный, очень много раз тут брал, а как перешли на телеграмм так еще больше радуете, намного меньше гемора с оплатой стало, качество на высоте как и всегда. Сегодня убедился что оператор не сидит без дела, очень сильно помог мне с моим вопросом, при чем оперативно все сделал. Оцениваю данный магазин 10 из 10. Кокаин даже MQ оказался лучше, чем я до этого покупал HQ в другом магазе. Делайте по чаще закладки в центре Питера.Я тебе не хамил. Да 10г, смешно не смешно, а на дороге не валяются. И очень обидно когда от вашего ПМа получаешь подтвердение, веришь! и остаешься с разочарованием и обидой, бессилием что либо доказать. А тебе еще сверху льют хамство, упивайтесь на здоровье. Я утерся и теперь знаю на что способны даже нормальные, доверенные магазины. А это тоже опыт, за который я заплатил, и ничуть не жалею. Просто пусть народ знает и будет готов при работе без гаранта ТУТ ожидайте что такое может быть.
Your comment is awaiting moderation.
Я просто уже настолько завязан со сферой Lrc что подмечаю все мелочи. Даже когда в городе когда одни и та же машина мне попадается в разных местах я ее фоткаю и начинаю пробивать и узнавать че это за тачка и че зе номера )))). Купить кокаин, бошки, гашиш ЛУЧШИЕ ИЗ ЛУЧШИХ НЕ РАЗ ЗАКАЗЫВАЛ И БУДУ ЗАКАЗЫВАТЬ!!!!Душевный магазин) Все довольны. Славно.
Your comment is awaiting moderation.
Сутточная аренда квартир в Молодечно — это удобный вариант для командировок или короткого отдыха. Предлагаются апартаменты различного комфорта: от эконом до люкс-класса. Большинство квартир с Wi-Fi, кухней и бытовой техникой. Снять квартиру на сутки Молодечно Лучше искать варианты на специализированных сайтах или через проверенных агентов. Уточняйте условия бронирования заранее.
Your comment is awaiting moderation.
Читать больше на сайте: Где продать часы de Grisogono за деньги — срочная скупка у метро
Your comment is awaiting moderation.
мои близкий поделился вашими контактами когда про бывали ваш товар) https://crazytaxigame.biz “Я надеюсь что вы перепроверите товар “И еще сушняки ужасные. Сейчас вот утром проснулся, и до сих пор
Your comment is awaiting moderation.
Organic finds shop – The layout and selection encourage relaxed browsing of natural items.
Your comment is awaiting moderation.
https://future-tech-edu.blogspot.com/2021/04/education-system.html?sc=1766226944186#c3803324022185039595
Your comment is awaiting moderation.
growthpathway.click – Hub supporting the recognition of unexplored options for continuous progress.
Your comment is awaiting moderation.
https://sites.gsu.edu/sanderson57/2016/12/03/final-project-reflection/comment-page-165/#comment-61562
Your comment is awaiting moderation.
https://forum-vpitere.rus-board.ru/viewtopic.php?t=201
Your comment is awaiting moderation.
Explore 716 Selfie – Sharing photos and participating in trends is easy and fun on this site.
Your comment is awaiting moderation.
курить – нет эффекта. https://kupi-kapkan.ru До сих пор в себя прихожуВсе супер заказывал все пришло попробывыл и писал отзыв этот минут 10 ))))) заказывайте хорошый магазин работают быстро отлично ребята успехов вам chemical.mix !!!!!))
Your comment is awaiting moderation.
Нужен эвакуатор? вызов эвакуатора петербург быстрый выезд по Санкт-Петербургу и области. Аккуратно погрузим легковое авто, кроссовер, мотоцикл. Перевозка после ДТП и поломок, помощь с запуском/колесом. Прозрачная цена, без навязываний.
Your comment is awaiting moderation.
Нужны заклепки? заклепки нержавеющие вытяжные 4 для прочного соединения листового металла и профиля. Стойкость к коррозии, аккуратная головка, надежная фиксация даже при вибрациях. Подбор размеров и типа борта, быстрая отгрузка и доставка.
Your comment is awaiting moderation.
movetorussia com http://www.idematapp.com/wp-content/pages/living-through-russian-winter-expat-survival-guide-2025.html/ .
Your comment is awaiting moderation.
https://1absolut.ru/
Your comment is awaiting moderation.
Две дорожки для Сережки, https://instavizitka.ru Jwh 203 порошок светло-желтого цвета у них, делал в пропорции 150-200мг на спичечный коробок микса, кролики довольны! 5-IAI пробывал 200мг по кишке, видимо нужно было сразу 300-400мг чтобы понять кайф!Ребята подскажите пжл.Сейчас общаюсь с оператором в скайпе по Липецку Lipeck-shops ктонибудь у него приобреатл в липе с воскресенья по данный день и оплачивали вы на данные реквы 964 и 905(он говорит что их у него два)Бразы помгите разобраться.
Your comment is awaiting moderation.
livingdecorhub – LivingDecorHub offers quality items arranged neatly for a clear and pleasant shopping experience.
Your comment is awaiting moderation.
Отзыв уже был, по поводу JWH и 2c-i. Писать то особо и не о чем, но качество товара очень даже порадовало. Щас жду только пополнения ассортимента. Купить кокаин, бошки, гашиш Дальнейших успехов вам и продаж!Магазин на ура))
Your comment is awaiting moderation.
Innovative learning store – The site encourages exploration and generates creative thinking naturally.
Your comment is awaiting moderation.
Новости Киева https://infosite.kyiv.ua на сайте КиевИнфо. Читайте о последних событиях в столице и области.
Your comment is awaiting moderation.
Visit Adirondack Fiddlers – Enthusiasts can find updates on performances and resources in an accessible format.
Your comment is awaiting moderation.
Никого не защищаю,говорю как есть-сайт работает на О Т Л И Ч Н О . https://marketton.ru chemical-mix.com работает у кого ??? всё походу накрылся магаз :::???Дом рядом с адресом говоришь, отдаешь залог, когда приедешь в адрес (в разных такси по-разному, могут и не попросить), и идешб себе за кладом 🙂
Your comment is awaiting moderation.
Центр охраны труда https://www.unitalm.ru “Юнитал-М” проводит обучение по охране труда более чем по 350-ти программам, в том числе по электробезопасности и пожарной безопасности. А также оказывает услуги освидетельствования и испытаний оборудования и аутсорсинга охраны труда.
Your comment is awaiting moderation.
All the best stuff is here: https://chyba.o2.cz/cs/?url=https://eo.wikipedia.org/wiki/Enigmo
Your comment is awaiting moderation.
Moving to Russia https://deogiricollege.org/pag/should-i-move-to-russia-complete-pros-and-cons-analysis-2025.html/ .
Your comment is awaiting moderation.
Прямой производитель отгружает силовые тренажеры по конкурентным ценам с быстрой доставкой. Портфолио включает гантели, разминочные блины, велотренажеры. В продаже качественные силовые тренажеры и дополнительное оборудование для реализации оздоровительных целей. Покупайте сегодня тренажер Смита, вертикальную тягу, тренажер Скотта, плечевой тренажер, Гакк-машину, Пресс машину 3 в 1, гиперэкстензию, а также сопутствующие снаряды.
Your comment is awaiting moderation.
Стоматология в Калуге https://albakaluga.ru Альбадент — имплантация и протезирование зубов с гарантией эстетики. Виниры, костная пластика и реставрация улыбки по индивидуальному плану лечения.
Your comment is awaiting moderation.
Заказываю в третий раз, дали скидку 8%, приятно. Купить кокаин, бошки, гашиш не понятно, жду трека говорил вторник, вторник они не успели, говорил среда, отмолчался, не ответил!курануть попробывать эту чтку
Your comment is awaiting moderation.
Проблемы в авто? выездная компьютерная диагностика автомобиля диагностика на месте, запуск двигателя, поиск короткого замыкания, ремонт проводки, замена предохранителей и реле, настройка сигнализации. Приедем быстро по городу и области. Честная цена, гарантия, без лишних работ.
Your comment is awaiting moderation.
ideainsight.click – Platform motivating exploration of unique solutions and imaginative problem-solving.
Your comment is awaiting moderation.
Да че тут разбираться,ты видишь смысл?! Купить кокаин, бошки, гашиш Обратите внимание на дату регистрации топик стартера и на регистрацию всех довольных пользователей.Вот по количеству норм, но кач…. Это то что осталось после меня и моих проб
Your comment is awaiting moderation.
Проблемы с зубами? https://www.stomatologiya-v-bare.com лечение кариеса и каналов, восстановление формы и цвета зуба, замена старых пломб. Индивидуальный подход, современные технологии, стерильность. Запишитесь на консультацию и получите план лечения.
Your comment is awaiting moderation.
Golden Lane designs – The browsing experience is fluid, with elegant items presented thoughtfully.
Your comment is awaiting moderation.
ребята ребятушки как делишки?)) в городе Барнаул данный магазин работает?) Купить кокаин, бошки, гашиш я не знаю чего тебе делать!большое спасибо продавцу и нашему времени :yeah::drug::rest: – пусть дальше будет еще круче :crazy:, быстрее :superman:, веселее :dansing: и ДОБрее
Your comment is awaiting moderation.
Fan engagement site – Content is dynamic and enjoyable, giving fans a great experience.
Your comment is awaiting moderation.
refinedglobalmarket.click – Curated items stand out well, definitely feels intentional and polished.
Your comment is awaiting moderation.
movetorussia com http://www.ielts-mentor.com/files/pgs/russian_visa_for_us_citizens_work__live_and_study_in_russia.html .
Your comment is awaiting moderation.
привет !!! немогу с вами с вязатся отпишись!!!! https://freeforex.biz СПб все ровно процветания магазину. Амф на 5+В среду оплатил вечером заказ в субботу уже был на месте)))ценик вообще отличный,качество радует)))
Your comment is awaiting moderation.
Сайт Вінниця https://faine-misto.vinnica.ua новини Вінниці та області. Огляди, транспорт, місця та багато корисного.
Your comment is awaiting moderation.
Наш Малыш: https://malish-nash.ru Интернет-магазин товаров для детей и новорожденных. Все необходимое для комфортного роста и развития вашего ребенка.
Your comment is awaiting moderation.
Делали 1к8 прикуренные, эффект до 3х часов ! Купить кокаин, бошки, гашиш Самый крутой магазин!Спасибо за отзыв , а то заказывает много людей а отписываются единицы.
Your comment is awaiting moderation.
culturecentralstore – CultureCentralStore features a vibrant selection of products from around the globe for effortless browsing.
Your comment is awaiting moderation.
Спасибо за терпение, понимание и позитивный настрой https://crazytaxigame.biz Многие стучат нам по выходным и ночью, но мы живые люди и не можем 24 часа в день отвечать.Работали с магазином ранее брали по 100г, недавно взяли еще 50г, хотим сегодня 100г приобрести!! на регу нету нареканий!!
Your comment is awaiting moderation.
Sunset curated picks – Browsing feels gentle and easy, with inviting products that appeal visually.
Your comment is awaiting moderation.
Phantom visual hub – Creative projects and ideas are presented beautifully and engagingly.
Your comment is awaiting moderation.
Всем привет,что то скайп неработает((жду трек https://kupiavto26.ru Ждём вас сновавот опять сегодня получил что заказал всё прошло ровно .быстро ,качество в этом магазине лучшее ,больше не где не заказываю .если нужно что то подождать я лучше подожду чем кидал буду кормить ,тоже влитал поначалу пока нашёл этот магазин ,по этому сам беру и друзьям советую .спасибо всей команде за отличную работу.с наступающими праздниками всех поздравляю.вообщем всем благодарочка.
Your comment is awaiting moderation.
ideaengine.click – Hub emphasizing imaginative thinking and practical application of new concepts.
Your comment is awaiting moderation.
movetorussia com lmc896.org/articles/study-in-russia-university-programs-student-visa-guide-2025.html .
Your comment is awaiting moderation.
Есть кто оплатил и долго ждет адрес клада или трек??? Купить кокаин, бошки, гашиш Вот мой отзыв по работе данного магазина.Успешного травление нашей молодежи и побольше денег!
Your comment is awaiting moderation.
Привет всем и Мира! Тоже уже неделЮ жду адекватного трека . Дали два и оба не бьются(( https://pro-remont-krd.ru мир всем месным братьяОбратились, всё довольно оперативно
Your comment is awaiting moderation.
https://www.driedsquidathome.com/forum/topic/60749/how-to-find-the-valid-1xbet-promo-codes-in-abidjan
Your comment is awaiting moderation.
https://webyourself.eu/forums/thread/44015/1xBet-Abidjan-Promo-Code-Your-Winning-Advantage
Your comment is awaiting moderation.
https://statesidemovie.com/1xbet-promo-code-2026-e130-bonus-on-signup/
Your comment is awaiting moderation.
https://hedge.fachschaft.informatik.uni-kl.de/s/dIHD1RDAm
Your comment is awaiting moderation.
Urban finds store – The platform feels fresh, with trendy products that are simple to explore.
Your comment is awaiting moderation.
Milestone tracker hub – Visitors can follow achievements and narratives in a simple, effective way.
Your comment is awaiting moderation.
Потом все идет как надо , не много по тряхивает, но не чего, не так люто как от КРИССА https://fond-ai.ru Будет что лучше АМ? Или из серии JWH?Да уже и так понятно что перепутали. Пробуй сразу и на кишку, и по носу мб определишь что же тебе прислали по ошибке.
Your comment is awaiting moderation.
modernculturecollective.click – Really impressed by the aesthetic, products feel intentional and curated.
Your comment is awaiting moderation.
Привет ребята! В улан-удэ синие кристаллы имеются? https://monastere.biz Магазин не чистый на руку. Уже пишет с другого жабера. Народ у кого осталось переписка состарого жабера сверьте ник. И прошу сделать посты что таковое не придуманная мною сказка.Всем привет ровной ветке,магаз на 5
Your comment is awaiting moderation.
https://linkmix.co/48324572
Your comment is awaiting moderation.
https://inwr-pca.mn.co/posts/95272022?utm_source=manual
Your comment is awaiting moderation.
Магазин отличный. Покупал не однократно. Спасибо. Ждем регу! Купить кокаин, бошки, гашиш Не-не, через форум заказы не принимаются. Заказывать нужно только через сайт, указанный в подписи.тут как всегда, хочешь сджелать заказ – хрен достучишься в аське.
Your comment is awaiting moderation.
creativeexplorehub – CreativeExploreHub presents standout items in a clean, refined interface that felt premium.
Your comment is awaiting moderation.
Crafted Home & Style – Showcases a crafted aesthetic while maintaining a clean and user-friendly layout.
Your comment is awaiting moderation.
как правило все реактивы от данного магазина проходят проверку на легальность\чистоту так что поживём увидим, думаю нелегала тут в продаже не появится ) https://manhobbi.ru Магазин как магазин!Товар нормальный. В этот понедельник оплатил ещё, жду)
Your comment is awaiting moderation.
Michael D site hub – Visitors can browse personal content effortlessly and enjoyably.
Your comment is awaiting moderation.
Explore Wildwood – Each product is unique, and the overall browsing experience is satisfying.
Your comment is awaiting moderation.
Одобавив снова в контакты по джаберу на сайте получил “не авторизованный” Обратите внимание жабу сменили. https://autonew.biz д не магаз рооовный так что не переживай все будет четко)))Быстрая доставка , и высочайшее качество обслуживания! Думаю и сейчас ничего не изменилось.
Your comment is awaiting moderation.
Буду ждать доставку как чё отпишусь . Купить кокаин, бошки, гашиш “Район довольно близкий для меня(СТРЕЛА)”про тусиай ….. что я могу сказать про тусиай от этого магазина…. пойду лучше трип-реппорт напишу…. такой тусишки ещё не ел)
Your comment is awaiting moderation.
https://cuchichi.es/author/bonusmelbet26/
Your comment is awaiting moderation.
https://danteeazn57222.look4blog.com/76830093/code-promo-melbet-2026-130-pour-nouveaux-parieurs
Your comment is awaiting moderation.
https://jobs.nefeshinternational.org/employers/3929142-bonusmelbet26
Your comment is awaiting moderation.
Молча !! Запрет вступает в силу 26го числа, если не ошибаюсь. Скидывай всё палево, жёсткий дист зарывай подальше и иди получай )) Купить кокаин, бошки, гашиш Отличный товар и работают ребята без перебоев\занимаюсь тестированием вместе с кролями в течении нескольких дней. Все никак не мог понять.
Your comment is awaiting moderation.
Modern Lifestyle Store – Intentional design choices ensure easy navigation and clear structure.
Your comment is awaiting moderation.
Event monitor portal – Organized updates and tools help users stay on top of all tracked events.
Your comment is awaiting moderation.
Essential finds hub – Shopping is straightforward, with products that feel dependable and well curated.
Your comment is awaiting moderation.
Всем привет данной ветки:hello: История токова… Купить кокаин, бошки, гашиш перорально – эффекта 0 при меньших дозах, при больших – понос, рвота, чуваку скорую вызывали, давление 40/15Адрес почты правильный, все проверил не 1 раз, ответьте хоть тут.ну будем надееться что и на этот раз TS войдет в положение и как нибудь обратит внимание на решение наших вопросов, компенсирует нам потраченые нервы и время на безсмысленное ожидание, главное ведь для магазина репутация!
Your comment is awaiting moderation.
バイナリーオプション 初心者
Your comment is awaiting moderation.
я в шоке. до последнего думали кидалово. а нет подняли в касание. стафф пушка. кладмену респект!!! https://np-bbs.ru следить не могли однозначноБро слова это хорошо но нам нужен наш клад и не более не кто не хочет тебя винить и общаться сдесь на эту тему а на оборот писать только хорошие отзывы о вашем магазе пойми и ты бро слово паника сдесь не уместно сдесь идет разбор по факту согласись
Your comment is awaiting moderation.
webtrafficpro.click – Appreciate the typography choices; comfortable spacing improved my reading experience.
Your comment is awaiting moderation.
trafficpath.click – Appreciate the typography choices; comfortable spacing improved my reading experience.
Your comment is awaiting moderation.
trafficlogic.click – Color palette felt calming, nothing distracting, just focused, thoughtful design.
Your comment is awaiting moderation.
rankvelocity.click – Color palette felt calming, nothing distracting, just focused, thoughtful design.
Your comment is awaiting moderation.
growthsystems.click – Bookmarked this immediately, planning to revisit for updates and inspiration.
Your comment is awaiting moderation.
компания потолочкин http://natyazhnye-potolki-nizhniy-novgorod-4.ru .
Your comment is awaiting moderation.
В лс пиши сразу. Имей в виду, быстрее будет Купить кокаин, бошки, гашиш не выстанавливаютьсягде-то 15 мл брал.
Your comment is awaiting moderation.
designhubcentral – DesignHubCentral features carefully selected stylish items and an enjoyable browsing experience.
Your comment is awaiting moderation.
Качество обслуживания хорошее – с момента оплаты до прибытия товара прошло всего 3 дня и вес ровный. https://besthotelrates.biz Chemical-mix.com, а где от 50гр, там надо 40 тон сразу запулить:rastakur: яж не барон нах:LSD:Если представитель не торгует нашим товаром – то представительство мы закрываем и ответственности тоже не несём.
Your comment is awaiting moderation.
Sergii Dima creative portal – Projects are organized and showcased in a professional, user-friendly way.
Your comment is awaiting moderation.
Elevated Interior Store – Interior-focused items arranged neatly for a smooth experience.
Your comment is awaiting moderation.
Artisan home hub – The site feels creative, showcasing items in a clean and visually engaging way.
Your comment is awaiting moderation.
Мобильный 4G интернет на даче стал настоящим спасением. Работает стабильно, даже когда много устройств подключено одновременно. Установка выполнена аккуратно и быстро. Специалисты всё подробно объяснили. Теперь не чувствуем разницы между городом и дачей https://podklychi.ru/
Your comment is awaiting moderation.
Я всегда сам еду за ней,можно чтоб и доставили)Просто так быстрее пока они доставят я уже все сделаю. Купить кокаин, бошки, гашиш ВЫ ЛУЧШИЕ!вот опять сегодня получил что заказал всё прошло ровно .быстро ,качество в этом магазине лучшее ,больше не где не заказываю .если нужно что то подождать я лучше подожду чем кидал буду кормить ,тоже влитал поначалу пока нашёл этот магазин ,по этому сам беру и друзьям советую .спасибо всей команде за отличную работу.с наступающими праздниками всех поздравляю.вообщем всем благодарочка.
Your comment is awaiting moderation.
потолочкин самара https://natyazhnye-potolki-samara-5.ru .
Your comment is awaiting moderation.
не плохие ребята, все в срок и по месту) Купить кокаин, бошки, гашиш В воскресенье заказал,в понедельни утром оплатил,в понедельник выслали,трек сразу дали,оперативно ребята +10 от меня в Репу вам:)всё дошло))))) Спасибо магазину,в след раз возьму отпишу что да как :dansing:качество на высоте
Your comment is awaiting moderation.
потолку http://www.natyazhnye-potolki-nizhniy-novgorod-4.ru .
Your comment is awaiting moderation.
UrbanField Hub – Feels like a thoughtfully designed space, browsing was effortless.
Your comment is awaiting moderation.
Вызвал такси;) https://mebel4home.ru Качество 2с очень порадовало, трип позже отпишу.с туси тут не прогадаешь)))
Your comment is awaiting moderation.
Explore Sergii Dima – Work is presented clearly, giving visitors a professional impression.
Your comment is awaiting moderation.
Purposeful Living Marketplace – Thoughtfully structured products with easy-to-follow navigation.
Your comment is awaiting moderation.
Artisan home hub – The site feels creative, showcasing items in a clean and visually engaging way.
Your comment is awaiting moderation.
explorefreshthinkingnow.click – Creative ideas highlighted, site inspires exploration of fresh perspectives and opportunities effectively.
Your comment is awaiting moderation.
Хороший магазин, не подставлял меня. https://a-gorca.ru Если это до сих пор Вы-просто красава :voo-hoo:Заказал 5 г. АМ как на неделе придёт за качество отпишу, тогда и подтвердятся или опровергнутся доводы людей за качество АМ-2233.
Your comment is awaiting moderation.
Подключение интернета на дачу в области помогло решить множество бытовых вопросов. Теперь работает видеонаблюдение и онлайн сервисы. Мобильный интернет стабилен и не подводит. Установка выполнена профессионально. Результатом полностью довольны – https://podklychi.ru/
Your comment is awaiting moderation.
Это да,но всё же я очень переживаю,ну прям очень очень https://kupiavto26.ru из тех что есть в наличии у чемикала… ну разве что с 307го, но я его не пробовал, говорят самое норм – 1к15. да и он самый долгий и сильный из всех доступных ЖВШ на данный момент на рынке..Ребятки все пушка
Your comment is awaiting moderation.
натяжные потолки цены самара http://www.natyazhnye-potolki-samara-5.ru .
Your comment is awaiting moderation.
Przykłady naprawdę pomogły mi zrozumieć.
Your comment is awaiting moderation.
через аську связался… дал данные куда сколько отправить, и с киви кошелька оплатил 7700р. на номер который в аське дали Купить кокаин, бошки, гашиш один грамотей натупил тут , а про стафа правдаХочу грамульку взять и угостить определенный круг людей,
Your comment is awaiting moderation.
натяжные потолки недорого нижний новгород цена http://www.natyazhnye-potolki-nizhniy-novgorod-4.ru .
Your comment is awaiting moderation.
intentionaldecorhub – IntentionalDecorHub features items that felt inviting and made discovering them easy.
Your comment is awaiting moderation.
Ровный магаз брацы Купить кокаин, бошки, гашиш не болела чтоб башка.А менеджер не ответственный а облом. Я бы пошел навстречу клиенту, получил бы от него этот стольник себе на мобилку и доплатил бы на Альфу его сам, раз у потенциального клиента проблемы с переводами. А он обломался.
Your comment is awaiting moderation.
a href=”https://refinedlifestylecommerce.click/” />Elegant Lifestyle Hub – Minimalist design with neatly arranged items and easy navigation.
Your comment is awaiting moderation.
BrightMoon Goods – Solid variety and simple navigation made browsing stress-free.
Your comment is awaiting moderation.
магаз ровный!!! все на высшем уровне!!! работаю с ними много лет!!! Купить кокаин, бошки, гашиш Да просто дедушка форума ))Ну просто выглядело твое сообщение как мессага на параное)))))
Your comment is awaiting moderation.
Отзыв ждать ? Ты это умеешь , на бизе писал не плохие … Купить кокаин, бошки, гашиш Хотелось бы услышать мнение продавца, по этому поводуЧемикал, пожалуй, самый ровный магаз из всех ныне сушествующих! Цены, конечно есть и по меньше в других местах, однако для себя я выбрал безопасность и надежное сотрудничество, а не дешевизну, которая как показывает практика всегда заканчивается не очень хорошо.
Your comment is awaiting moderation.
The administration of stroke demands specialized care
from healthcare professionals in each hospital and neighborhood
settings. https://rehabpools.store
Your comment is awaiting moderation.
потолочкин натяжные https://natyazhnye-potolki-samara-5.ru/ .
Your comment is awaiting moderation.
Пойже проведу опрос среди кроликов, распишу что и как, честный репорт гарантирован! https://tchat-gratuit.biz Привет..Какого качества эйфоритик у данного магазина?? отпишите кто знает1к 10-ти слабовато будет 1к5 или 1к7 самое то…
Your comment is awaiting moderation.
Modern Curated Space – A modern curation where everything feels placed with intention.
Your comment is awaiting moderation.
мистецтво ацтеків
Your comment is awaiting moderation.
потолочкин нижний новгород https://www.natyazhnye-potolki-nizhniy-novgorod-4.ru .
Your comment is awaiting moderation.
Я заказал еще 19 числа на сайте, оплатил 23 числа, ТС выслал 25 числа, тогда я и тут зарегился, так как он отправил не той службой, думал кинули. Пришло все вчера, забрал днем, попробовал вечером Купить кокаин, бошки, гашиш Сказали в понедельник всем кто оплатил заказ отправят НОМЕРА!Ещё и сообщения трут.
Your comment is awaiting moderation.
https://vodds-casino.net/odds/
Your comment is awaiting moderation.
Магазин ровнее не куда!!! Ребята отработали на славу, все четко и оперативно. Спасибо огромное, буду сотрудничать и дальше) https://kupiavto26.ru возможно мои письма рубятся где-то? там все четко по делу.всем мир! скажите магаз ровный? ато написал на мыло им и ни ответа ни привета!
Your comment is awaiting moderation.
По порядку: мне 35. Да, это единичный случай, потому как работал с другими поставщиками до последнего запрета. 12к+транспорт- это, видимо, “не о чем”. По твоим словам, мне следует заткнутся, читать о магазине какой он хороший и наслаждаться жизнью? https://tchat-gratuit.biz Насчет доставки стало не очень после того как перестали работать с спср, но особой разницы не заметил.ЕМИКАЛ МИКС – ЭТО ЛУЧШИЙ МАГАЗИН С МНОГОЛЕТНЕЙ РЕПУТАЦИЕЙ НА РЦ РЫНКЕ!!!!
Your comment is awaiting moderation.
The best neural network xnudes.ai for processing deepnude photos in 2025. https://xnudes.ai/ is a revolutionary AI system.
The deepnude-based service can undress a girl or a man in almost any photo. Honestly, after bots, the service platform pleasantly surprises with fast results and high-quality naked bodies.
Your comment is awaiting moderation.
Discover Offer Deals – Plenty of great choices appear here, and navigating the pages is quick and enjoyable.
Your comment is awaiting moderation.
Online 1xbet cd apk est une plateforme de paris sportifs en ligne. Championnats de football, cotes en direct et resultats sont disponibles. Page d’information sur le service et ses fonctionnalites pour les utilisateurs de la region.
Your comment is awaiting moderation.
Удобный каталог мотозапчастей, легко подобрать нужную позицию. Удобный магазин для покупки мотозапчастей онлайн мотозапчасти купить. Каталог запчастей мотоциклов регулярно обновляется.
Магазин мотозапчастей Киев — достойный выбор. Хороший магазин мотозапчастей для города Киев. Удобно, что можно купить мотозапчасти в Украине онлайн. Сайты мотозапчастей редко бывают такими понятными. Хороший магазин мото запчастей для разных брендов. Можно спокойно купить мотозапчасти без лишних рисков. Хороший выбор запчастей для мотоцикла разных годов.
Your comment is awaiting moderation.
не будет 307го. ожидается 203, 250, rcs-4 и 1220й… вот что мне сказали в той же аське, где спрашивал ты ) https://mebel4home.ru чема вещи делает!!!Член до колен и девок гарем))
Your comment is awaiting moderation.
selectivehomehub – SelectiveHomeHub showcases a curated collection of items arranged for effortless browsing.
Your comment is awaiting moderation.
сайт натяжные потолки http://www.natyazhnye-potolki-samara-5.ru .
Your comment is awaiting moderation.
WildRidge Bloom Designs Hub – Loved the lively vibe, every corner of the shop felt welcoming.
Your comment is awaiting moderation.
Elegant Clickping Hub – Well-arranged layout with refined visuals and seamless browsing flow.
Your comment is awaiting moderation.
понятно, интерфейс удобный. Вывод средств прошёл без вопросов и задержек https://stylekinder.ru/
открытием. Сайт простой, выплаты честные. Всё работает спокойно, без нервов https://stylekinder.ru/
работает быстро, без ошибок. Деньги пришли в тот же день https://stylekinder.ru/
выводил выигрыш, всегда без задержек. Поддержка вежливая и отвечает быстро https://stylekinder.ru/
приятно удивило. Быстрый вывод, вежливая поддержка. Рграть комфортно Рё СЃРїРѕРєРѕР№РЅРѕ https://stylekinder.ru/
Your comment is awaiting moderation.
https://sitepoint.listbb.ru/viewtopic.php?t=569
Your comment is awaiting moderation.
Флудить на счет легальности/нелегальности товара в магазине не нужно в ветке! У же отписывалась и экспертиза и мы не однократно писали, возим ТОЛЬКО ЛЕГАЛ! Купить кокаин, бошки, гашиш конспирация достойная, товар оказался отличным, кроли заценили. будем еще работатьС наступающим новым 2017 годом:happy2013::snegurochka: , фарта и удачи вашей команде! продолжайте в том же духе!
Your comment is awaiting moderation.
https://infolenta.com.ua/yak-diznatysia-sviy-taryfnyy-plan-kyivstar-5-sposobiv-pereviryty-aktyvnyy-taryf/
Your comment is awaiting moderation.
Квартиры от застройщика https://tltdomik.ru покупка в новостройках на прозрачных условиях. Современные планировки, разные стадии готовности, помощь с ипотекой и рассрочкой. Сопровождаем сделку от выбора до получения ключей.
Your comment is awaiting moderation.
איתור היסטוריית רכב על סמך מספר היא אחד השלבים החשובים ביותר לפני קנייה של רכב בישראל, במיוחד כאשר השוק מלא באפשרויות מגוונות ובפערי מידע בין מוכרים שונים. באמצעות הבדיקה ניתן לקבל תמונה אמינה על היסטוריית הבעלות, טיפולים, תאונות ותיקונים משמעותיים. היתרון המרכזי בבדיקה לפי מספר הוא הגישה המהירה למידע רשמי ממאגרי נתונים ממשלתיים. רבים מהרוכשים החדשים אינם מודעים לכך שלרכב עשויה להיות היסטוריה ארוכה של טיפולים או תאונות. כחלק מהבדיקה ניתן לבדוק מדדי קילומטראז, בדיקות תקופתיות במכון הרישוי ומועד טיפול אחרון במוסך. בנוסף למידע הפורמלי, חשוב לבדוק האם הרכב עבר שינויים מכניים, התקנת חלקים לא מקוריים או שיפורים שאינם תואמים את התקן. כך ניתן לבחור רק את האפשרויות המשתלמות ביותר. לאחר קבלת המידע הראשוני מומלץ לבצע בדיקה חיצונית במכון מורשה. הצלבת המידע בין הבדיקה לפי מספר לבין הבדיקה במכון יוצרת רמת אמינות גבוהה. כך נמנעת קנייה במחיר מופרז או עסקאות לא משתלמות. היתרון הגדול הוא שניתן לבצע את הבדיקה במהירות ובקלות, גם ממכשיר נייד. כאשר משלבים אותה עם בדיקה חיצונית וידע שוק בסיסי, ניתן להגיע לעסקה טובה ואמינה הרבה יותר.
https://hi-vision.co.il/%d7%91%d7%93%d7%99%d7%a7%d7%aa-%d7%a8%d7%9b%d7%91-%d7%9c%d7%a4%d7%99-%d7%9e%d7%a1%d7%a4%d7%a8/
Your comment is awaiting moderation.
בדיקת רכב לפי מספר היא אחד השלבים החשובים ביותר לפני קנייה של רכב בישראל, במיוחד כאשר השוק מלא באפשרויות מגוונות ובפערי מידע בין מוכרים שונים. באמצעות הבדיקה ניתן לקבל תמונה אמינה על היסטוריית הבעלות, טיפולים, תאונות ותיקונים משמעותיים. כך ניתן לבצע החלטה שקולה ולא מבוססת רק על תחושת בטן. בדיקה מקצועית מאפשרת לוודא את אמיתות הנתונים. הצלבת נתונים אלו משפרת את רמת הביטחון לפני רכישה. בדיקה יסודית מאפשרת להבין את מצב הרכב האמיתי. בדיקה לפי מספר מתאימה הן לרוכשים פרטיים והן לאנשי מקצוע בתחום הרכב. לאחר קבלת המידע הראשוני מומלץ לבצע בדיקה חיצונית במכון מורשה. אך כאשר קיימים פערים, מומלץ לשקול מחדש את העסקה. המידע מאפשר להבין האם המחיר המבוקש תואם את מצב הרכב. היתרון הגדול הוא שניתן לבצע את הבדיקה במהירות ובקלות, גם ממכשיר נייד. הבדיקה חושפת מידע אמיתי שמגן על הרוכש מפני טעויות יקרות.
https://hi-vision.co.il/%d7%91%d7%93%d7%99%d7%a7%d7%aa-%d7%a8%d7%9b%d7%91-%d7%9c%d7%a4%d7%99-%d7%9e%d7%a1%d7%a4%d7%a8/
Your comment is awaiting moderation.
“Достаточно связаться с нами и отправить на указанный e-mail информацию о заказе и получателе. Конфиденциальность гарантируется.” https://hebeh.biz надо просто на мож-химовском ацике растворять любой jwh растворяетсяЯ клад нашел, но вопервых не все в нем а во вторых содержимое разное и самое главное это место и описание этого места. Завтра буду пытаться связаться с ним.
Your comment is awaiting moderation.
Envie de parier telecharger 1xbet est une plateforme de paris sportifs en ligne pour la Republique democratique du Congo. Football et autres sports, paris en direct et d’avant-match, cotes, resultats et statistiques. Presentation des fonctionnalites du service.
Your comment is awaiting moderation.
Le site web telecharger 1xbet propose des informations sur les paris sportifs, les cotes et les evenements en direct. Football, tournois populaires, cotes et statistiques y sont presentes. Ce site est ideal pour se familiariser avec les fonctionnalites de la plateforme.
Your comment is awaiting moderation.
Discover More Worlds – Choices look curated, while the interface keeps everything fast and simple.
Your comment is awaiting moderation.
Всё здорово спасибо Вам https://detron.biz Господа торчебосы, если желаете отведать стопроцентных пробивающих толер кайфоф – то вы попали по адресу) Вторая покупка за эти самопровозглашенные выходные)) Не жалем о потраченном времени и деньгах. Клад как всегда прост как дважды два, упаковка на высоте горы Эверест. Качество стаффа необьяснимо, но факт как ебашит по вашим чувствам и эмоциям. Магазину огромный как земной шар респект,пис аут и цом)В Бросике по- прежнему игнор!!! Магаз просто Ох..!!!
Your comment is awaiting moderation.
Modern Lifestyle Hub – Well-structured layout that makes exploring home items easy and pleasant.
Your comment is awaiting moderation.
Качество продукции на высшем уровне. https://uniongroup.biz спасибо за пожеланияХз …. Дето видел чел писал про вещ-во для снятия лака от ногтей ….. сказал что безпроигрышный вариант )))
Your comment is awaiting moderation.
https://hausa.von.gov.ng/?p=13649&bs-comment-added=1#comment-164131
Your comment is awaiting moderation.
http://hotel-golebiewski.phorum.pl/viewtopic.php?p=810936#810936
Your comment is awaiting moderation.
http://plastdet.ru/index.php?topic=6307
Your comment is awaiting moderation.
https://www.mychildsmuseum.org/education/school-programs/wellness-warriors
Your comment is awaiting moderation.
explorefreshstrategies.click – Creative insights, encourages experimentation and refining techniques for consistent success effectively.
Your comment is awaiting moderation.
парни скажите плз АМ запаха какого? Купить кокаин, бошки, гашиш Какие риски ) ты адекват ? ты скинул непонятно что не имеющее никакого смысла.Если захотят принять, то это тебя никак не обезопасит
Your comment is awaiting moderation.
онлайн школа с 1 по 11 класс https://www.shkola-onlajn1.ru .
Your comment is awaiting moderation.
промокод мелбет фрибет промокод мелбет фрибет .
Your comment is awaiting moderation.
Потом все идет как надо , не много по тряхивает, но не чего, не так люто как от КРИССА Купить кокаин, бошки, гашиш гаси кидалу по полной -25 маловато я добавлюМагаз что надо, забегаем! Всем мира!
Your comment is awaiting moderation.
Explore Better Paths – Plenty of appealing options, all displayed in a neat and easy-to-browse layout.
Your comment is awaiting moderation.
Soft Breeze Outlet – Loved the gentle feel of this shop, everything was simple to browse through.
Your comment is awaiting moderation.
Квартиры от застройщика https://kvartirav-vygodno.ru напрямую — актуальные цены и выбор новостроек. Подбор по параметрам, помощь с документами, ипотекой и рассрочкой. Прозрачные условия и сопровождение сделки.
Your comment is awaiting moderation.
Plateforme en ligne find here paris sportifs, matchs de football, evenements en direct et statistiques. Decouvrez les fonctionnalites du service, les marches disponibles et comment l’utiliser.
Your comment is awaiting moderation.
Меньше 2х кило не брал у них. Привозили в оговоренный срок, количество и качество было в норме. Сейчас в очередной раз зарядил, жду адрес Купить кокаин, бошки, гашиш еще раз решил воспользоваться магазом ))) уже 2 года только у них покупаю))) и пока доволенДобрый день! ЦЕНЫ НА MN СНИЖЕНЫ!
Your comment is awaiting moderation.
Creative Inspired Hub – Very easy navigation, all items feel carefully selected and appealing.
Your comment is awaiting moderation.
Печатали визитки премиум качества и результат превзошел ожидания. Ламинация ровная, углы не загибаются, карточки выглядят дорого. Очень понравилось, что дизайнеры подсказали по макету и поправили мелкие ошибки. Заказ выполнили быстро, несмотря на большой тираж. Получили отличный инструмент для работы и общения с клиентами – печать меню для кафе и ресторанов
Your comment is awaiting moderation.
thoughtfulfindshub – ThoughtfulFindsHub delivers a tidy interface with smoothly presented, carefully chosen items.
Your comment is awaiting moderation.
Curated Global Style – Internationally sourced pieces with clear presentation and smooth browsing.
Your comment is awaiting moderation.
Лучшие онлайн казино всегда имеют прозрачные условия и лицензию. Онлайн казино рейтинг помогает понять, где реально платят. Даже вариант topovye-kazino-onlajn biz ua часто упоминают в обсуждениях. Онлайн казино на грн — удобное решение для Украины.
Реальное онлайн казино отличается прозрачными правилами.
Топ честных онлайн казино формируется годами. Рейтинг лучших онлайн казино Украины полезен новичкам. Казино играть онлайн на деньги стоит только на проверенных сайтах. Самые лучшие казино онлайн обычно работают по лицензии.
Your comment is awaiting moderation.
часть покупателей устраивает, продавцы тоже не жалуется. В чем проблема? нет терпения – идите в другие шопы. Купить кокаин, бошки, гашиш Все пришло, все хорошо! Конспирации такой не ожидал))) Сначала подумал что киданули)))))) Попробовал и все около дела, хороший средний микс получился. Буду брать больше на днях…можно узнать, как принимали ? интрозально, в\м ?
Your comment is awaiting moderation.
Conscious Living Picks – Navigation is seamless, and every item is carefully curated.
Your comment is awaiting moderation.
Envie de parier? find this Service de paris sportifs et footballistiques. Presentation des evenements disponibles, des cotes, du mode direct et des principales fonctionnalites de la plateforme. Informations utiles pour les utilisateurs.
Your comment is awaiting moderation.
Paris sportifs pronostics du foot : matchs, tournois, cotes et resultats, lignes de paris et evenements en direct. Presentation detaillee des fonctionnalites et du fonctionnement du service.
Your comment is awaiting moderation.
FullBloom Select – A fresh look with organized displays ensures easy exploration of products.
Your comment is awaiting moderation.
digitalgrowthhq.click – Color palette felt calming, nothing distracting, just focused, thoughtful design.
Your comment is awaiting moderation.
Ребята сегодня заказал 5 грамм CHM-100, продавец в асе не отвечает после перевода денег, шляпа какая то, прошу отписать у кого так же было! https://sans-souci.biz клад забрал, все ровняк! завтра отпишу за качество!Быстрая доставка , и высочайшее качество обслуживания! Думаю и сейчас ничего не изменилось.
Your comment is awaiting moderation.
marketingdrive.click – Bookmarked this immediately, planning to revisit for updates and inspiration.
Your comment is awaiting moderation.
rankvelocity.click – Navigation felt smooth, found everything quickly without any confusing steps.
Your comment is awaiting moderation.
searchcommand.click – Color palette felt calming, nothing distracting, just focused, thoughtful design.
Your comment is awaiting moderation.
lbs что это shkola-onlajn1.ru .
Your comment is awaiting moderation.
Однокомнатные квартиры https://kvartiradlyazhizni.ru в Москве для покупки. Большой выбор вариантов в разных районах города, удобный поиск по цене и планировке. Консультации специалистов, помощь с ипотекой и безопасное оформление сделки.
Your comment is awaiting moderation.
промокод мелбет на бесплатную ставку промокод мелбет на бесплатную ставку .
Your comment is awaiting moderation.
FBV Storefront – Value selections look appealing, site navigation feels easy and intuitive.
Your comment is awaiting moderation.
пробывал нюхать эфект 4-6часа Купить кокаин, бошки, гашиш В таком же духе гоу)Основу выварить не удалось, после вручения посыля,забыл убрать с глаз, торопился, дома было объявлено военное положение .
Your comment is awaiting moderation.
Квартиры от застройщика https://kvartiravgorod.ru покупка напрямую без переплат. Новостройки на разных стадиях готовности, современные планировки, помощь с ипотекой и сопровождение сделки от выбора до получения ключей.
Your comment is awaiting moderation.
topshoppinghub – TopShoppingHub offers a wide selection and an effortless browsing experience.
Your comment is awaiting moderation.
Next Level Living Hub – Next-level design aesthetics combined with a simple and functional layout.
Your comment is awaiting moderation.
Квартиры от застройщика https://kvartiravgorod.ru покупка напрямую без переплат. Новостройки на разных стадиях готовности, современные планировки, помощь с ипотекой и сопровождение сделки от выбора до получения ключей.
Your comment is awaiting moderation.
привествую мои друзья форумчане , не https://bplaw.biz Оплатил 3 февраля, 6 получил трек-трек не бьётся, посылкинет. Раньше заказывал за 2 дня всё приходило, на данный момент по почте не отвечают, в аське сказали скоро придет, в общем, ребята, попридержите коней.отличный магазин! обращаюсь уже не первый месяц
Your comment is awaiting moderation.
איתור מידע לפי מספר הרישוי היא נקודת הפתיחה החשובה ביותר לכל מי שמתלבט בין קניית רכב דרך חברה מקצועית לבין ביצוע רכישה עצמאית בישראל. באמצעותה ניתן לחשוף מידע אמיתי על מצבו המכני והטכני של הרכב. חברות מציעות ליווי מלא הכולל בדיקות, מסמכים ופתרונות מימון. מי שמעוניין בקנייה מהירה ופשוטה נהנה מתהליך יעיל ונוח. רוכש עצמאי יכול לחפש דגמים רבים ולבצע משא ומתן ישירות מול המוכר. ללא בדיקה מקיפה קיימת סכנה להיתקל ברכב עם ליקויים יקרים. בחירה דרך חברה מתאימה יותר למי שמעדיף תהליך מסודר וליווי מקצועי. לעיתים השירותים הנלווים מצדיקים את המחיר, ולעיתים ניתן למצוא עסקה טובה יותר לבד. גם בשני המקרים חשוב לבצע בדיקה חיצונית אצל מכון מקצועי. חוסר בתיעוד עשוי להצביע על בעיות עתידיות. בחברות רבות ניתן לקבל אחריות, אך חשוב לבדוק מה היא כוללת. בדיקה של רישיון רכב, תשלומי אגרה ומסמכי בעלות היא חובה. בסופו של דבר, ההחלטה בין רכישה דרך חברה לבין רכישה עצמאית תלויה בניסיון, תקציב, זמן פנוי ורמת הביטחון של הרוכש.
https://ashdodonline.co.il/183283/%D7%91%D7%97%D7%99%D7%A8%D7%AA-%D7%A8%D7%9B%D7%91-%D7%93%D7%A8%D7%9A-%D7%97%D7%91%D7%A8%D7%94-%D7%90%D7%95-%D7%91%D7%90%D7%95%D7%A4%D7%9F-%D7%A2%D7%A6%D7%9E%D7%90%D7%99-%D7%9E%D7%94-%D7%A2%D7%93/
Your comment is awaiting moderation.
בדיקה מקדימה על סמך מספר רכב היא נקודת הפתיחה החשובה ביותר לכל מי שמתלבט בין קניית רכב דרך חברה מקצועית לבין ביצוע רכישה עצמאית בישראל. הבדיקה מסייעת לקבל תמונה מלאה לפני שמתקדמים לשלב המשא ומתן. חברות מציעות ליווי מלא הכולל בדיקות, מסמכים ופתרונות מימון. החברות בדרך כלל מחזיקות מלאי מגוון של רכבים שעברו בדיקות מקיפות. רוכש עצמאי יכול לחפש דגמים רבים ולבצע משא ומתן ישירות מול המוכר. מי שבוחר בקנייה עצמאית חייב להשקיע זמן ומאמץ בחיפוש מודעות, בדיקות מקדימות ותקשורת עם מוכרים. בחירה דרך חברה מתאימה יותר למי שמעדיף תהליך מסודר וליווי מקצועי. בדיקה כלכלית מסייעת למנוע טעויות ולהבטיח רכישה נכונה. הדו״ח המקצועי מאפשר לקבל החלטה מבוססת ולא רגשית. בנוסף, מומלץ לבדוק היסטוריית טיפולים ורישומים במוסכים מורשים. מצד שני, לעיתים האחריות מוגבלת וללא ערך ממשי. בדיקה של רישיון רכב, תשלומי אגרה ומסמכי בעלות היא חובה. כך כל רוכש יכול לבחור את הדרך המתאימה לו וליהנות מרכב אמין במחיר הוגן.
https://ashdodonline.co.il/183283/%D7%91%D7%97%D7%99%D7%A8%D7%AA-%D7%A8%D7%9B%D7%91-%D7%93%D7%A8%D7%9A-%D7%97%D7%91%D7%A8%D7%94-%D7%90%D7%95-%D7%91%D7%90%D7%95%D7%A4%D7%9F-%D7%A2%D7%A6%D7%9E%D7%90%D7%99-%D7%9E%D7%94-%D7%A2%D7%93/
Your comment is awaiting moderation.
Curated Daily Lifestyle – The site presents products cleanly, making shopping seamless.
Your comment is awaiting moderation.
10 euros offert paris sportif|10 euros offert sans dépôt paris sportif|10
meilleurs sites de paris sportifs|100 euro offert paris sportif|100 euros offert paris sportif|100 euros remboursé paris sportifs|100 offert
pari sportif|100 offert paris sportif|100 remboursé paris sportif|100e offert pari sportif|abandon paris sportif tennis|abandon tennis
paris sportif|addiction paris sportif forum|age paris sportif belgique|aide au pari sportif|aide au paris sportif|aide aux paris
sportif|aide aux paris sportifs|aide pari sportif|aide pari sportif
football|aide parie sportif|aide paris sportif|aide paris sportif foot|aide
paris sportif gratuit|aide paris sportifs|aide pour paris sportif|algorithme de
paris sportif|algorithme excel paris sportif|algorithme gratuit paris sportif|algorithme
pari sportif|algorithme paris sportif|algorithme paris sportif avis|algorithme paris sportif basket|algorithme paris sportif excel|algorithme
paris sportif gratuit|algorithme paris sportif tennis|algorithme paris sportifs|algorithme pour paris sportif|analyse cote paris sportif|analyse de paris sportif|analyse match paris sportif|analyse pari sportif|analyse paris sportif|analyse
paris sportif foot|analyse paris sportif football|analyse paris sportif gratuit|analyse paris sportifs|ancienne
cote paris sportif|api cote paris sportif|app paris sportif sans argent|appli de paris
sportif|appli de paris sportif sans argent|appli
de paris sportifs|appli pari sportif|appli pari sportif gratuit|appli parie sportif|appli paris sportif|appli paris sportif avec paypal|appli paris sportif belgique|appli paris sportif entre amis|appli paris
sportif gratuit|appli paris sportif sans argent|appli paris sportif suisse|appli paris sportifs|application aide paris sportif|application algorithme paris sportif|application analyse paris sportif|application android paris sportif|application bankroll
paris sportif|application conseil paris sportif|application de pari sportif|application de parie sportif|application de
paris sportif|application de paris sportif en afrique|application de paris sportif en cote d’ivoire|application de paris sportif
en ligne|application de paris sportif gratuit|application de paris sportif international|application de paris sportif suisse|application de paris sportifs|application faux paris sportifs|application gestion bankroll paris sportif|application gestion paris sportif|application ia paris sportif|application pari sportif gratuit|application paris
sportif|application paris sportif android|application paris
sportif argent fictif|application paris sportif belgique|application paris sportif canada|application paris sportif espagne|application paris sportif espagnol|application paris sportif fictif|application paris sportif france|application paris sportif
gratuit|application paris sportif gratuit entre amis|application paris sportif maroc|application paris sportif offre de bienvenue|application paris sportif paypal|application paris sportif
sans argent|application paris sportif sans justificatif de domicile|application paris
sportif suisse|application paris sportif usa|application paris sportif
virtuel|application pour faire des paris sportifs|application pour gerer ses paris sportif|application pour les
paris sportifs|application pour pari sportif|application pour paris sportif|application pour paris sportifs|application statistique paris
sportif|application suivi paris sportif|applications de paris
sportifs|applications paris sportifs|applis
paris sportif|applis paris sportifs|apprendre
a faire des paris sportifs|argent facile paris sportif|argent offert paris sportifs|argent offert sans depot paris sportif|argent paris sportif|argent paris sportifs|argent paris
sportifs impots|argent sans depot paris sportif|arjel paris
sportif|arjel paris sportifs|astuce gagner paris sportif|astuce pari sportif|astuce paris sportif|astuce paris
sportif basket|astuce paris sportif foot|astuce paris sportif forum|astuce paris sportif tennis|astuce paris
sportifs|astuce pour gagner au pari sportif|astuce
pour gagner au paris sportif|astuce pour gagner paris sportif|astuce pour paris sportif|astuces paris sportifs|astuces paris sportifs en ligne|astuces paris sportifs foot|astuces pour gagner aux paris sportifs|autorisation paris sportif france|avis pari sportif|avis paris sportif|avis paris sportif foot|avis site de paris sportif|avis site paris sportif|avis sur les paris sportifs|avis
sur paris sportif|avis tipster paris sportif|aweh signification paris sportif|bankroll 100
euros paris sportifs|bankroll management paris sportif|bankroll paris sportif|bankroll paris
sportif excel|bankroll paris sportif gratuit|bankroll paris sportifs|basket paris sportif|belgique france
paris sportif|belgique paris sportifs|bonus bienvenue paris sportif|bonus bienvenue paris
sportifs|bonus cash paris sportif|bonus de bienvenue paris sportif|bonus de bienvenue paris sportif
belgique|bonus de bienvenue sans depot paris sportif|bonus de
depot paris sportif|bonus de paris sportifs|bonus depot paris sportif|bonus en cash paris sportif|bonus gratuit paris sportif|bonus gratuit sans depot paris sportif|bonus
pari sportif|bonus paris sportif|bonus paris sportif belgique|bonus
paris sportif betclic|bonus paris sportif cash|bonus paris
sportif en ligne|bonus paris sportif france pari|bonus paris sportif retirable|bonus paris sportif sans depot|bonus
paris sportif sans dépôt|bonus paris sportif unibet|bonus paris
sportifs|bonus sans depot paris sportif|bonus sans depot paris sportif belgique|bonus sans dépôt paris sportif|bonus sans dépôt
paris sportif hors arjel|bonus site de paris sportif|bonus
site pari sportif|bonus site paris sportif|bonus sites de paris sportifs|bonus unibet paris sportif|bookmaker paris sportif|bookmaker paris sportif gratuit|bookmaker paris sportifs|bookmaker sportif|bookmakers
paris sportif|bookmakers paris sportifs|bookmakers paris sportifs en ligne|but contre son camp paris sportif|but sur penalty paris sportif|buteur paris sportif|c’est quoi handicap paris sportif|c’est quoi
une cote paris sportif|calcul anti perte paris sportif|calcul
combinaison pari sportif|calcul cote pari sportif|calcul cote paris sportif|calcul
couverture paris sportif|calcul de cote paris sportif|calcul des
cotes paris sportifs|calcul dnb paris sportifs|calcul double chance paris sportif|calcul gain paris sportif|calcul mise paris sportif|calcul pari sportif|calcul paris sportif|calcul paris sportif multiple|calcul pourcentage cote paris sportif|calcul probabilité
paris sportif|calcul rentabilité paris sportifs|calcul roi paris sportif|calcul systeme
paris sportif|calcul trj paris sportifs|calculateur cote paris sportif|calculateur
de cote paris sportif|calculateur de mise paris sportif|calculateur de paris sportif|calculateur paris sportif|calculatrice arbitrage paris sportif|calculatrice paris sportif|calculer
cote paris sportif|calculer gain paris sportif|calculer probabilité paris sportifs|calculer roi paris sportifs|calculer
une cote pari sportif|calculer une cote paris sportif|carte
cadeau paris sportif|carte pcs paris sportif|carte prépayée paris sportifs|cash
out pari sportif|cash out paris sportif|cash out
paris sportifs|casino en ligne paris sportif|casino paris sportif en ligne|champions league paris sportif|chute de cote paris sportif|classement des meilleurs sites de paris sportifs|classement
meilleur site de paris sportif|code barre paris sportif|code bonus paris sportif|code paris sportif|code promo pari sportif|code promo paris sportif|code promo paris sportif sans depot|code promo paris sportif sans dépôt|code promo sans depot paris sportif|code promo site paris
sportif|combien de temps pour encaisser un paris sportif|combien de temps pour retirer un paris sportif|combien miser paris sportifs|combine paris sportif|combines paris sportifs|combiné pari sportif|combiné paris sportif|combiné paris sportif conseil|combiné paris sportif
du jour|combiné paris sportif pronostic|comment analyser un paris sportif|comment arreter de jouer aux paris sportifs|comment arreter les paris sportif|comment arreter
les paris sportifs|comment arrêter les paris sportifs|comment bien gagner au
paris sportif|comment bien jouer au paris sportif|comment
bien miser paris sportif|comment ca marche les paris sportif|comment calculer cote
paris sportif|comment calculer gain paris sportif|comment calculer
les cotes des paris sportifs|comment calculer une cote de paris sportif|comment calculer une cote pari
sportif|comment calculer une cote paris sportif|comment comprendre les paris sportifs|comment creer un vip
paris sportif|comment créer un algorithme paris sportif|comment créer un site de paris sportif|comment devenir riche avec les paris sportifs|comment etre rentable paris sportif|comment etre sur de gagner au paris sportif|comment faire de bon paris sportif|comment faire des parie
sportif|comment faire des paris sportif|comment faire des
paris sportif gagnant|comment faire des paris sportifs|comment faire pari sportif|comment
faire paris sportif|comment faire pour arreter les paris sportifs|comment faire pour
gagner au paris sportif|comment faire pour gagner les paris sportifs|comment faire un bon pari sportif|comment faire un bon paris sportif|comment faire
un pari sportif|comment faire un parie sportif|comment faire un paris sportif|comment faire une montante paris sportif|comment fonctionne les cotes dans les paris
sportifs|comment fonctionne les cotes des paris sportifs|comment fonctionne les paris sportifs|comment fonctionne paris sportifs|comment fonctionne un pari
sportif|comment fonctionnent les cotes dans les paris sportifs|comment fonctionnent les cotes dans les paris sportifs grand oral|comment fonctionnent les
cotes de paris sportif|comment fonctionnent les paris sportifs|comment fonctionnent les
paris sportifs grand oral|comment fonctionnent les paris sportifs grand oral maths|comment fonctionnent les paris sportifs maths|comment gagner a coup sur au
paris sportif|comment gagner a tous les coups au paris sportif|comment gagner a tout les coup au
paris sportif|comment gagner au pari sportif|comment gagner
au pari sportif football|comment gagner au paris sportif|comment gagner au paris sportif a coup sur|comment gagner au paris sportif foot|comment gagner au paris sportif forum|comment gagner au paris sportif
tennis|comment gagner au paris sportifs|comment gagner aux paris sportif|comment gagner aux paris
sportifs|comment gagner aux paris sportifs foot|comment gagner aux paris sportifs livre|comment gagner
aux paris sportifs sur le long terme|comment gagner avec
les paris sportifs|comment gagner dans les paris
sportifs|comment gagner de l argent avec les paris sportifs|comment gagner de l’argent au paris sportif|comment gagner de l’argent aux paris sportifs|comment gagner de l’argent avec les paris
sportifs|comment gagner de l’argent paris sportif|comment gagner de l’argent sur
les paris sportifs|comment gagner de l’argent
sur paris sportif|comment gagner des paris sportif|comment gagner des paris sportifs|comment gagner en paris sportif|comment gagner
facilement au paris sportif|comment gagner les paris sportifs|comment gagner paris sportif|comment gagner
paris sportif foot|comment gagner paris sportifs|comment gagner sa vie avec les paris sportifs|comment gagner
ses paris sportif|comment gagner sur les paris sportif|comment gagner sur les
paris sportifs|comment gagner tout le temps au paris sportif|comment gagner un pari sportif|comment gagner un paris sportif|comment gerer une bankroll paris sportif|comment gérer sa bankroll paris
sportif|comment jouer au pari sportif|comment jouer au paris sportif|comment jouer au paris sportif foot|comment jouer aux paris sportifs|comment jouer paris sportif|comment marche cote paris sportif|comment marche les cotes paris sportif|comment marche les paris sportif|comment
marche les paris sportifs|comment marche paris
sportif|comment marche un pari sportif|comment marche un paris sportif|comment marchent les cotes paris sportif|comment marchent les paris sportifs|comment miser au paris sportif|comment miser paris sportif|comment
monter sa bankroll paris sportif|comment ne jamais perdre au
paris sportif|comment parier sportif|comment reussir au paris sportif|comment reussir les
paris sportif|comment reussir paris sportif|comment sont calculer les cotes de paris
sportif|comment sont calculées les cotes des paris sportifs|comment sont calculés les cotes des paris sportifs|comment sont faites les cotes des paris sportifs|comment toujours gagner au paris sportif|comment ça marche les
paris sportifs|comparaison bonus paris sportifs|comparaison cote pari sportif|comparaison des cotes paris sportifs|comparateur cote pari sportif|comparateur
cote paris sportif|comparateur cotes paris sportif|comparateur cotes
paris sportifs|comparateur de cote pari sportif|comparateur de cote paris sportif|comparateur de cotes paris sportifs|comparateur de côtes
paris sportifs|comparateur de paris sportif|comparateur de
site de paris sportif|comparateur de site paris sportif|comparateur de sites de paris sportifs|comparateur pari sportif|comparateur paris sportif|comparateur paris sportifs|comparateur site de paris sportif|comparateur site pari sportif|comparateur site paris
sportif|comparatif bonus paris sportif|comparatif bonus paris sportifs|comparatif cote pari sportif|comparatif cote paris sportif|comparatif cotes paris
sportifs|comparatif des sites de paris sportifs|comparatif offre de bienvenue
paris sportif|comparatif offre paris sportif|comparatif pari sportif|comparatif pari sportif en ligne|comparatif paris sportif|comparatif paris sportif bonus|comparatif paris sportif en ligne|comparatif
paris sportifs|comparatif paris sportifs en ligne|comparatif site de paris sportif|comparatif site paris
sportif|comparatif site paris sportifs|comparatif sites de paris sportifs|comparatif sites
paris sportifs|comparer les cotes paris sportifs|comprendre cote paris sportif|comprendre handicap paris sportif|comprendre les cotes des paris sportifs|comprendre
les cotes paris sportif|comprendre les cotes paris sportifs|comprendre les handicap
paris sportif|compte de paris sportif|compte démo paris sportif|compte finance paris
sportif|compte financer paris sportif|compte financier paris sportif|compte
financé paris sportif|compte pari sportif|compte paris
sportif|compte paris sportif financé|conseil de paris
sportif|conseil de paris sportifs|conseil en paris sportif|conseil
en paris sportifs|conseil pari sportif|conseil pari sportif gratuit|conseil paris sportif|conseil
paris sportif aujourd’hui|conseil paris sportif du jour|conseil
paris sportif foot|conseil paris sportif gratuit|conseil
paris sportif ligue des champions|conseil paris sportif nba|conseil paris sportif pronostic|conseil paris sportif rmc|conseil paris sportif
tennis|conseil paris sportifs|conseil pour gagner au paris sportif|conseil pour paris sportif|conseil sur
les paris sportifs|conseille paris sportif|conseiller en paris sportifs|conseiller paris
sportif|conseils de paris sportifs|conseils en paris sportifs|conseils paris sportifs|conseils paris sportifs foot|conseils paris sportifs gratuit|conseils paris sportifs tennis|conseils pour paris
sportifs|cote a 100 paris sportif|cote a 2 paris sportif|cote
anglaise paris sportif|cote de 2 paris sportif|cote de pari sportif|cote de paris sportif|cote des paris sportifs|cote maximum paris sportif|cote minimum paris sportif|cote pari sportif|cote pari
sportif comment ça marche|cote pari sportif real
madrid|cote pari sportif rugby|cote parie sportif|cote paris sportif|cote paris sportif belgique|cote paris sportif calcul|cote paris sportif definition|cote paris sportif euro|cote paris sportif explication|cote paris sportif foot|cote paris sportif france belgique|cote paris sportif france espagne|cote paris sportif ligue des champions|cote paris sportif moto gp|cote paris sportif psg|cote paris sportif psg arsenal|cote paris sportif rugby|cote paris sportif
tennis|cote paris sportifs|cote pour paris sportifs|cote sportif foot|cote sportif rugby|cote à
1000 paris sportif|cotes de paris sportifs|cotes pari sportif|cotes
paris sportif|cotes paris sportifs|cotes paris sportifs foot|coupe de france paris sportif|créer un algorithme paris sportif|créer un compte paris sportif|créer un site de paris sportif
en ligne|dans les paris sportifs que signifie handicap|declarer ses
gains paris sportif|definition cash out paris sportif|definition cote paris sportif|definition handicap paris sportif|depot
5 euros paris sportif|depot double paris sportif|depot minimum 5 euro paris sportif|depot minimum paris sportif|depot paris sportif|depuis quand existe les paris sportif en france|devenir riche avec
les paris sportifs|devenir riche avec paris sportifs|disqualification tennis paris sportif|dnb en paris sportif|dnb
pari sportif|dnb paris sportif|dnb paris sportif definition|dnb
paris sportifs|doit on declarer les gains de paris sportif|déclarer gains paris sportifs|déclarer
gains paris sportifs hors arjel|définition bankroll paris
sportif|dépôt minimum 1 euro paris sportif|dépôt
minimum 5 euro paris sportif|ecart de jeux tennis paris sportif|erreur de cote
paris sportif|est ce que les gains des paris sportifs sont imposables|est-ce que les prolongation compte dans
un pari sportif|etre sur de gagner au paris sportif|euro paris sportif|evenement sportif a
paris|evenement sportif paris|evenement sportif paris 2025|evenement sportif paris aujourd hui|evenement sportif paris aujourd’hui|evenement sportif paris ce week end|evenements sportif paris|evenements
sportifs paris|evenements sportifs paris 2025|evenements sportifs à
paris|evolution cote paris sportif|evolution cotes paris sportifs|evolution des cotes paris sportifs|explication cote
pari sportif|explication cote paris sportif|explication handicap paris
sportif|explication pari sportif|explication paris sportif|face a face hockey paris
sportif|faire des paris sportif|faire des paris sportif avec paypal|faire des paris
sportifs|faire fortune paris sportifs|faire un pari sportif|faire un paris sportif|faut il déclarer les
gains de paris sportifs|faut il déclarer ses gains paris sportifs|fichier excel
gestion bankroll paris sportif|fiscalité gains paris sportifs|foot paris
sportif|football et paris sportifs|forfait tennis paris sportif|formation paris sportif gratuit|forum
de paris sportif|forum de paris sportifs|forum pari sportif|forum parie sportif|forum paris sportif|forum paris
sportif foot|forum paris sportif gratuit|forum paris sportif nba|forum paris
sportif tennis|forum paris sportifs|forum sur les paris sportifs|forum tennis paris sportif|francaise des jeux pari sportif|francaise des jeux paris
sportif|francaise des jeux paris sportifs|france 2 paris sportif|france 2 paris
sportifs|france belgique paris sportif|france espagne paris sportif|france pari sportif|france pari sportif brest|france paris sportif|france paris sportifs|france pologne paris
sportif|france portugal paris sportif|france suisse paris sportifs|france tunisie paris sportifs|france-pari – paris sportifs|gagnant pari sportif|gagnant paris sportif|gagnant paris sportif bayern|gagnante paris sportif|gagne au paris sportif|gagner 10 euros par
jour aux paris sportifs|gagner 100 euros par jour paris sportif|gagner 1000 euros par mois
paris sportifs|gagner 10000 euros paris sportif|gagner 2000 euros par mois paris sportif|gagner 50 euros par jour
paris sportif|gagner a coup sur au paris sportif|gagner a coup sur pari sportif|gagner a tous
les coup paris sportif|gagner argent avec paris sportifs|gagner
argent pari sportif|gagner argent paris sportif|gagner
argent paris sportifs|gagner au pari sportif|gagner au paris sportif|gagner au paris sportif a coup sur|gagner au paris sportif foot|gagner au paris sportif forum|gagner au
paris sportif à coup sur|gagner aux paris sportif|gagner
aux paris sportifs|gagner aux paris sportifs pdf|gagner beaucoup d’argent paris
sportif|gagner de l argent grace aux paris sportifs|gagner de l argent pari sportif|gagner de l
argent paris sportif|gagner de l argent paris sportifs|gagner de l’argent
au paris sportif|gagner de l’argent aux paris sportifs|gagner de l’argent avec
les paris sportifs|gagner de l’argent avec paris sportif|gagner
de l’argent avec paris sportifs|gagner de l’argent grace au paris
sportif|gagner de l’argent grace aux paris sportifs|gagner de l’argent pari sportif|gagner de l’argent paris sportif|gagner de l’argent paris sportifs|gagner de l’argent sur les paris sportifs|gagner des paris sportif|gagner des
paris sportifs|gagner les paris sportifs|gagner pari sportif|gagner paris sportif|gagner paris sportif foot|gagner paris
sportif forum|gagner paris sportif tennis|gagner paris sportifs|gagner sa vie avec les paris sportif|gagner
sa vie avec les paris sportifs|gagner sa vie avec paris sportifs|gagner ses paris sportifs|gagner à coup sur
paris sportif|gagner à tous les coups paris sportifs|gain maximum
paris sportif|gain pari sportif|gain pari sportif imposable|gain pari
sportif impot|gain paris sportif|gain paris sportif imposable|gain paris sportif
impot|gain paris sportif impôt|gains paris sportif|gains paris
sportif imposable|gains paris sportifs|gains paris sportifs
imposable|gains paris sportifs imposables|gains paris sportifs sont ils imposables|gerer bankroll paris sportif|gerer sa
bankroll paris sportif|gerer une bankroll paris sportif|gestion bankroll paris sportif|gestion bankroll paris
sportifs|gestion bankroll paris sportifs excel|gestion de
bankroll paris sportif|gestion de bankroll paris sportif application|gestion de bankroll paris sportifs|gestion de mise paris sportif|gestion paris sportifs v2 5
gratuit|gg signification paris sportif|gros combiné paris sportif|gros
gain paris sportif|grosse cote paris sportif pronostic|grosse mise paris sportif|groupe paris
sportif gratuit|groupe telegram paris sportif gratuit|groupement de joueurs paris sportifs|handicap 0
paris sportif|handicap 1 paris sportif|handicap 5
paris sportif|handicap au paris sportif|handicap basket
paris sportif|handicap dans les paris sportifs|handicap en paris sportif|handicap europeen paris sportif|handicap européen paris sportifs|handicap mi temps
paris sportif|handicap pari sportif|handicap paris sportif|handicap paris sportif basket|handicap paris sportif explication|handicap paris sportif foot|handicap paris sportif rugby|handicap paris sportifs|handicap
rugby paris sportif|handicap tennis paris sportif|historique cote paris sportif|historique des cotes paris sportifs|hockey paris sportif|hockey sur glace paris sportif|hors
arjel paris sportif|hweh signification paris sportif|imposition gain pari sportif|imposition gain paris sportif|imposition gains paris
sportifs|imposition paris sportif france|impot gain paris sportif|impot paris sportif france|impot sur gain paris sportif|je gagne ma vie avec les paris sportifs|jeu de pari sportif
gratuit|jeu de paris sportif en ligne|jeu de paris sportif gratuit|jeu paris sportif gratuit|jeu paris sportif sans argent|jeux de
parie sportif|jeux de paris sportif|jeux de paris sportif en ligne|jeux de paris sportif
gratuit|jeux de paris sportifs|jeux olympiques
paris sportifs|jeux paris sportif|jeux paris sportif gratuit|jeux paris
sportif virtuel|jeux paris sportifs en ligne|jouer au paris
sportif|jouer paris sportif|joueur absent paris sportif|joueur blesse paris sportif|joueur caen paris sportif|joueur de caen pari sportif|joueur de foot
paris sportif|joueur decisif paris sportif|joueur décisif paris sportif|joueur italien paris sportif|joueur paris sportif|joueur
professionnel paris sportif|joueur qui se blesse paris sportif|joueur sanctionne pari sportif|joueur suspendu paris sportif|joueurs italiens paris sportifs|l’argent des
paris sportifs est il imposable|la cote paris sportif|la francaise
des jeux paris sportif|la martingale paris sportif|la martingale paris sportifs|la meilleur application de paris sportif|la meilleur application paris sportif|la meilleur technique pour gagner au paris sportif|la méthode secrète pour
gagner aux paris sportifs pdf|la plus grosse cote gagner paris sportif|la plus grosse cote paris sportif|ldem paris sportif signification|le marché des paris sportifs|le meilleur site de pari sportif|le meilleur site de paris
sportif|le meilleur site de paris sportif en ligne|le meilleur site de paris sportifs|le plus gros gain au paris sportif|le plus gros paris sportif|le plus gros paris sportif du
monde|les 10 meilleurs sites de paris sportifs|les 10 meilleurs sites de paris sportifs en afrique|les
17 secrets pour gagner rapidement aux paris sportifs|les 17 secrets pour gagner rapidement
aux paris sportifs pdf|les application de paris sportif|les applications paris sportifs|les bonus paris
sportifs|les bookmakers paris sportifs|les cotes paris sportifs|les gains
de paris sportifs sont ils imposables|les gains des paris sportifs sont ils imposables|les jeux de paris
sportifs|les meilleur paris sportif|les meilleures applications de paris sportifs|les meilleurs applications de paris sportifs|les meilleurs bonus paris sportif|les meilleurs bonus paris sportifs|les
meilleurs cotes paris sportif|les meilleurs paris sportifs|les meilleurs paris sportifs du jour|les meilleurs site de paris sportif|les
meilleurs site de paris sportifs|les meilleurs sites de
pari sportif|les meilleurs sites de paris sportifs|les meilleurs sites de paris sportifs en ligne|les paris sportif|les paris sportif avis|les paris sportifs|les paris sportifs comment ça marche|les paris sportifs en france|les paris sportifs en ligne|les paris sportifs en ligne comprendre jouer gagner|les paris sportifs en ligne comprendre jouer
gagner pdf|les paris sportifs les plus rentables|les plus gros
gagnant paris sportif|les plus gros gains au paris sportifs|les plus gros gains paris sportifs|les plus gros paris sportif|les plus grosse cote paris sportif|les plus grosses pertes paris sportifs|les sites de paris sportifs|les sites de paris sportifs autorisés en france|les sites de paris sportifs en france|les sites
de paris sportifs en ligne|les sites de paris sportifs francais|ligue 1 paris
sportif|ligue 1 paris sportifs|ligue 2 paris sportif|ligue des champions
paris sportif|limite de gains paris sportifs|limite de mise paris sportif|limite gain paris sportif|limite
mise paris sportifs|liste de paris sportif|liste des paris sportifs|liste
des site de paris sportif|liste des sites de paris sportifs|liste
pari sportif|liste paris sportif|liste paris sportif pdf|liste site de paris sportif|liste site pari
sportif|liste site paris sportif|liste site paris sportif arjel|liste sites paris sportifs|logiciel
algorithme paris sportif|logiciel algorithme paris sportif gratuit|logiciel analyse paris sportif|logiciel calcul paris sportif|logiciel de pari sportif|logiciel de paris sportif|logiciel de paris sportif gratuit|logiciel gestion bankroll paris
sportif gratuit|logiciel gestion de bankroll paris sportif|logiciel gestion paris sportif|logiciel gestion paris
sportif gratuit|logiciel gestion paris sportifs|logiciel pari sportif|logiciel paris sportif|logiciel paris sportif gratuit|logiciel paris sportifs|logiciel paris sportifs foot sur 2 matchs|logiciel pour paris sportif|logiciel pour paris sportifs|logiciel prediction paris sportif|logiciel probabilité paris sportif|logiciel prédiction paris sportif|logiciel statistique paris sportifs|logiciel variation de cote paris
sportif|loi sur les paris sportifs en france|magic calculator paris sportif|marché des paris sportifs|marché des paris sportifs en france|marché des
paris sportifs en ligne|martingale pari sportif|martingale paris sportif|martingale paris sportif excel|martingale paris sportif
forum|martingale paris sportif interdit|martingale paris sportifs|match abandonné paris sportif|match annulé ou reporté
paris sportifs|match annulé paris sportif|match arrete paris sportif|match interrompu paris sportif|match interrompu
tennis paris sportif|match interrompu tennis pluie
paris sportif|match nul boxe paris sportif|match pari sportif|match paris
sportif|match reporté paris sportif|match suspendu paris sportif|match suspendu tennis paris sportif|match
truqué paris sportif|matchs truqués paris sportifs|meilleur algorithme paris sportif|meilleur algorithme paris sportif gratuit|meilleur app de paris sportif|meilleur app de paris sportifs|meilleur app paris sportif|meilleur appli de pari
sportif|meilleur appli de paris sportif|meilleur appli pari sportif|meilleur appli paris sportif|meilleur appli
paris sportif forum|meilleur appli paris sportifs|meilleur application conseil paris
sportif|meilleur application de paris sportif|meilleur
application de paris sportif en afrique|meilleur application pari sportif|meilleur application paris sportif|meilleur application paris sportif belgique|meilleur application pour les paris sportif|meilleur application pour pari sportif|meilleur bonus de bienvenue paris
sportif|meilleur bonus pari sportif|meilleur bonus paris
sportif|meilleur bonus paris sportif sans depot|meilleur bonus paris sportifs|meilleur bonus site de paris sportif|meilleur bonus site pari
sportif|meilleur bonus site paris sportif|meilleur bookmaker paris sportif|meilleur
combiné paris sportif|meilleur conseil paris sportif|meilleur cote de
paris sportif|meilleur cote pari sportif|meilleur cote paris sportif|meilleur cote paris sportif aujourd’hui|meilleur cote site paris sportif|meilleur forum
paris sportifs|meilleur gain paris sportif|meilleur ia paris sportif|meilleur methode pour gagner au
paris sportif|meilleur offre bienvenue paris sportif|meilleur offre bonus paris sportif|meilleur offre de bienvenue paris sportif|meilleur offre de bienvenue paris sportifs|meilleur offre pari
sportif|meilleur offre paris sportif|meilleur offre paris
sportif en ligne|meilleur pari sportif|meilleur pari sportif
du jour|meilleur pari sportif en ligne|meilleur paris sportif|meilleur paris
sportif aujourd’hui|meilleur paris sportif du jour|meilleur
paris sportif en ligne|meilleur paris sportif foot|meilleur promo paris sportif|meilleur pronostic paris sportif|meilleur site de conseil
paris sportif|meilleur site de pari sportif|meilleur site de pari sportif en ligne|meilleur site de paris sportif|meilleur site de paris sportif avis|meilleur site de paris sportif belgique|meilleur site de paris sportif canada|meilleur site de paris
sportif en france|meilleur site de paris sportif en ligne|meilleur site de paris sportif football|meilleur site de paris sportif forum|meilleur site de paris sportif france|meilleur site de paris sportif hors arjel|meilleur site de paris sportif international|meilleur site de paris sportif suisse|meilleur site de
paris sportifs|meilleur site de paris sportifs en ligne|meilleur site pari sportif|meilleur site
pari sportif en ligne|meilleur site pari sportif france|meilleur site
paris sportif|meilleur site paris sportif avis|meilleur
site paris sportif belgique|meilleur site
paris sportif canada|meilleur site paris sportif en ligne|meilleur site paris sportif foot|meilleur site paris sportif forum|meilleur site paris
sportif france|meilleur site paris sportif hors arjel|meilleur site paris
sportif nba|meilleur site paris sportif rugby|meilleur site paris sportif
suisse|meilleur site paris sportifs|meilleur site pour pari sportif|meilleur
site pour paris sportif|meilleur site pronostic paris sportif|meilleur strategie paris
sportif|meilleur technique de paris sportif|meilleur technique paris sportif|meilleur technique pour gagner au paris sportif|meilleure appli de paris sportif|meilleure appli de paris sportifs|meilleure appli
pari sportif|meilleure appli paris sportif|meilleure
appli paris sportifs|meilleure application de paris sportif|meilleure application de paris sportifs|meilleure application pari sportif|meilleure
application paris sportif|meilleure application paris sportif android|meilleure application paris sportifs|meilleure offre
paris sportif|meilleure site paris sportif|meilleure strategie paris sportif|meilleures applications de
paris sportifs|meilleures applications paris sportifs|meilleures cotes paris sportifs|meilleures offres paris
sportifs|meilleures stratégies paris sportifs|meilleurs
appli paris sportif|meilleurs application de paris sportifs|meilleurs application paris sportif|meilleurs applications
paris sportifs|meilleurs bonus paris sportifs|meilleurs cote paris sportif|meilleurs cotes paris sportifs|meilleurs
offres paris sportifs|meilleurs paris sportifs|meilleurs paris sportifs
du jour|meilleurs site de pari sportif|meilleurs site de paris sportif|meilleurs site de paris sportif en ligne|meilleurs site de paris sportifs|meilleurs site paris
sportif|meilleurs sites de paris sportifs|meilleurs sites de paris sportifs en ligne|meilleurs sites paris sportif|meilleurs sites paris sportifs|methode abc paris sportif|methode de paris sportif|methode
gagnante paris sportifs|methode gagner paris sportif|methode infaillible paris sportifs|methode martingale paris sportif|methode mathematique paris sportif|methode
mathematique pour gagner au paris sportif|methode paris sportif|methode paris
sportif foot|methode paris sportif forum|methode
paris sportif tennis|methode paris sportifs|methode pour gagner au paris sportif|methode pour gagner paris sportif|methodes paris sportifs|minimum depot paris sportif|mise au jeu pari sportif|mise maximum pari sportif|mise maximum paris sportif|mise minimum paris sportif|mise moyenne paris sportif|mise paris sportif|moins de
4 5 but paris sportif|montant maximum paris sportif|montant
paris sportif|montante pari sportif|montante parie sportif|montante paris sportif|montante paris sportifs|montantes paris sportifs|multiple pari sportif|multiple paris sportif|multiple paris sportifs|multiples paris sportifs|méthode
calcul paris sportif|méthode match nul paris sportifs|méthode mathématique pour gagner au paris sportif|méthode
paris sportif forum|méthode paris sportif hockey|nba pari sportif|nba paris sportif|nba paris sportifs|nouveau paris sportif|nouveau site de pari sportif|nouveau site de paris sportif|nouveau site de paris
sportif en ligne|nouveau site de paris sportifs|nouveau site pari sportif|nouveau site paris sportif|nouveau site
paris sportif france|nouveau site paris sportifs|nouveaux sites
de paris sportifs|nouveaux sites paris sportifs|nouvelle appli paris
sportif|nouvelle application de paris sportif|numero de match
paris sportif|numero match paris sportif|offre 100 euros paris sportif|offre appli pari sportif|offre bienvenu paris sportif|offre
bienvenue pari sportif|offre bienvenue paris sportif|offre bienvenue paris sportifs|offre
bienvenue site paris sportif|offre bonus paris sportif|offre de bienvenu paris sportif|offre de bienvenue pari sportif|offre de bienvenue paris sportif|offre de bienvenue paris sportif belgique|offre de
bienvenue paris sportif sans depot|offre de bienvenue paris sportif sans dépôt|offre de bienvenue paris sportifs|offre de bienvenue sans depot paris sportif|offre de bienvenue site paris sportif|offre euro paris sportif|offre pari sportif euro|offre paris
sportif|offre paris sportif belgique|offre paris sportif
cash|offre paris sportif coupe du monde|offre paris sportif hors
arjel|offre paris sportif remboursé|offre paris sportif remboursé cash|offre paris sportif sans depot|offre promo paris sportif|offre remboursement paris sportif|offre sans depot paris sportif|offre site paris sportif|offres
bienvenue paris sportifs|offres de bienvenue paris sportifs|ou
faire des paris sportif|ou faire des paris sportif en espagne|ou faire des paris sportifs|outil répartiteur de mise
paris sportif|outils repartiteur de mises paris sportif|ouverture compte paris sportifs|ouvrir un compte
paris sportif|pack de bienvenue paris sportif|pack de bienvenue paris sportif hors arjel|pari en ligne sportif|pari
sportif|pari sportif 100 euros offert|pari sportif 100 remboursé|pari sportif abandon tennis|pari sportif aide|pari sportif algérie aujourd’hui|pari sportif
appli|pari sportif application|pari sportif argent|pari sportif astuce|pari sportif aujourd|pari sportif aujourd’hui|pari sportif avec handicap|pari sportif
avec orange money|pari sportif avec paypal|pari sportif avec wave|pari sportif avis|pari sportif basket|pari sportif
belgique|pari sportif belgique france|pari sportif bonus|pari sportif buteur
pas titulaire|pari sportif champions league|pari sportif combiné|pari sportif comment|pari
sportif comment gagner|pari sportif comment ça marche|pari sportif
comparatif|pari sportif conseil|pari sportif cote|pari sportif
cote match|pari sportif cote psg|pari sportif coupe|pari sportif coupe de france|pari sportif coupe du monde|pari
sportif depot|pari sportif du jour|pari sportif en france|pari sportif en ligne|pari sportif en ligne au cameroun|pari sportif en ligne belgique|pari sportif en ligne
canada|pari sportif en ligne france|pari sportif en ligne
gratuit|pari sportif en ligne suisse|pari sportif en ligne
ufc|pari sportif en suisse|pari sportif euro|pari sportif explication|pari
sportif faire|pari sportif foot|pari sportif foot resultat|pari sportif football|pari
sportif forum|pari sportif francaise des jeux|pari sportif france|pari sportif france
angleterre|pari sportif france argentine|pari sportif france autriche|pari sportif france belgique|pari sportif france
espagne|pari sportif france italie|pari sportif france portugal|pari sportif france usa|pari sportif gagnant|pari sportif gagner|pari sportif gagner a tous les coups|pari sportif gagner de l’argent|pari sportif gain|pari sportif gratuit|pari sportif gratuit pour
gagner des cadeaux|pari sportif gratuit sans depot|pari sportif handicap|pari sportif hockey|pari sportif hors arjel|pari sportif jeux olympiques|pari sportif joueur absent|pari
sportif le plus rentable|pari sportif leicester champion|pari sportif ligue 1|pari sportif ligue 2|pari sportif ligue des champions|pari sportif ligue europa|pari sportif
match|pari sportif match arrete|pari sportif match interrompu|pari sportif meilleur|pari sportif meilleur cote|pari
sportif meilleur site|pari sportif methode|pari sportif mise|pari
sportif mise au jeu|pari sportif mise o jeu|pari sportif nba|pari sportif offre bienvenue|pari
sportif paypal|pari sportif plus|pari sportif prolongation|pari sportif
promo|pari sportif pronostic|pari sportif pronostic foot|pari sportif
pronostic gagnant|pari sportif pronostic gratuit|pari sportif psg|pari sportif psg bayern|pari sportif psg
inter|pari sportif psg milan|pari sportif regle|pari sportif rembourse|pari
sportif remboursement|pari sportif remboursement cash|pari sportif remboursé|pari sportif rugby|pari sportif rugby coupe du monde|pari sportif rugby top
14|pari sportif sans argent|pari sportif sans carte bancaire|pari
sportif sans depot|pari sportif signification|pari sportif site|pari sportif statistique|pari sportif suisse|pari sportif systeme|pari sportif technique|pari sportif technique pour gagner|pari sportif
temps reglementaire|pari sportif tennis|pari sportif tennis
abandon|pari sportif top|pari sportif top 14|pari sportif tour de france|parie sportif|parie sportif comment ca marche|parie sportif du jour|parie sportif en ligne|parie sportif foot|parie sportif football|parie sportif france|parie sportif gratuit|parie sportif pronostic|parie sportif suisse|paris en ligne sportif|paris
en ligne sportifs|paris evenement sportif|paris france sportif|paris hippique et sportif|paris hippiques et sportifs|paris hippiques paris sportifs|paris hippiques
paris sportifs et poker en ligne|paris hippiques sportifs|paris
match sportif|paris sportif|paris sportif 10 euros offerts|paris sportif 100
euros offert|paris sportif 100 euros remboursé|paris sportif 100 offert|paris sportif 100
remboursé|paris sportif 100e offert|paris sportif 150 euros offert|paris
sportif 1er pari remboursé|paris sportif a faire|paris sportif a
faire aujourd’hui|paris sportif a faire ce soir|paris
sportif abandon tennis|paris sportif abandon tennis parions sport|paris
sportif aide|paris sportif algorithme|paris sportif analyse|paris sportif appli|paris sportif application|paris sportif
application android|paris sportif apres prolongation|paris sportif argent|paris sportif argent fictif|paris sportif argent offert|paris sportif argent virtuel|paris sportif arjel|paris sportif arsenal
psg|paris sportif astuce|paris sportif au canada|paris sportif aujourd hui|paris sportif aujourd’hui|paris sportif avec argent fictif|paris sportif avec bonus sans depot|paris
sportif avec carte bancaire|paris sportif avec cryptomonnaie|paris sportif avec handicap|paris sportif avec paypal|paris sportif avec paysafecard|paris sportif avis|paris sportif avis expert|paris sportif avis forum|paris sportif bankroll|paris sportif basket|paris sportif
basket coupe de france|paris sportif basket nba|paris sportif basket prolongation|paris sportif belgique|paris sportif belgique bonus|paris sportif belgique bonus sans depot|paris sportif
belgique france|paris sportif belgique suede|paris sportif bonus|paris sportif bonus bienvenue|paris sportif bonus cash|paris sportif bonus de bienvenue|paris sportif
bonus gratuit|paris sportif bonus gratuit
sans depot|paris sportif bonus retirable|paris sportif bonus sans depot|paris sportif bonus sans depot belgique|paris
sportif bookmaker|paris sportif but contre son camp|paris sportif but temps additionnel|paris sportif buteur|paris sportif
buteur blessé|paris sportif buteur carton rouge|paris sportif buteur contre son camp|paris sportif buteur non titulaire|paris sportif buteur prolongation|paris sportif buteur qui ne joue
pas|paris sportif buteur remplacant|paris sportif calcul gain|paris sportif canada|paris
sportif cash|paris sportif cash out|paris sportif champion ligue 1|paris sportif
champions league|paris sportif classement ligue 1|paris
sportif code promo|paris sportif combine|paris sportif combiné|paris sportif combiné comment ça marche|paris sportif combiné du jour|paris sportif combiné match
reporté|paris sportif comment ca marche|paris sportif comment faire|paris
sportif comment gagner|paris sportif comment gagner a tous les coups|paris sportif
comment jouer|paris sportif comment ça marche|paris sportif comparateur cote|paris
sportif comparatif|paris sportif conseil|paris sportif conseil gratuit|paris sportif conseil pour gagner|paris sportif cote|paris sportif cote et match|paris sportif cote explication|paris sportif cote psg|paris sportif coupe d’europe|paris sportif coupe davis|paris sportif coupe
de france|paris sportif coupe du monde|paris sportif coupe du monde de rugby|paris sportif
coupe du monde rugby|paris sportif depot 5 euro|paris sportif depot minimum|paris sportif depot paypal|paris
sportif dnb|paris sportif du jour|paris sportif du jour conseil|paris sportif dépôt
1 euro|paris sportif dépôt minimum 5 euros|paris sportif en belgique|paris sportif en france|paris
sportif en ligne|paris sportif en ligne avec paypal|paris sportif en ligne avis|paris sportif en ligne belgique|paris sportif en ligne bonus|paris sportif en ligne cameroun|paris sportif
en ligne comment gagner|paris sportif en ligne comment ça marche|paris sportif en ligne
france|paris sportif en ligne gratuit|paris sportif en ligne maroc|paris sportif
en ligne paypal|paris sportif en ligne québec|paris sportif en ligne sans depot|paris sportif en ligne suisse|paris
sportif en suisse|paris sportif espagne france|paris sportif
esport|paris sportif et casino en ligne|paris sportif et hippique|paris
sportif et prolongation|paris sportif euro|paris sportif europa league|paris sportif explication|paris sportif final ligue des champions|paris sportif finale ligue des
champions|paris sportif foot|paris sportif foot aide|paris sportif foot astuce|paris sportif foot aujourd’hui|paris sportif
foot ce soir|paris sportif foot comment ca marche|paris sportif foot conseil|paris sportif foot cote|paris sportif foot coupe du monde|paris
sportif foot en ligne|paris sportif foot feminin|paris sportif foot gratuit|paris sportif foot
prolongation|paris sportif foot pronostic|paris sportif foot pronostic gratuit|paris sportif foot regle|paris
sportif foot suisse|paris sportif foot us|paris sportif
football|paris sportif football americain|paris sportif football astuces|paris sportif forfait tennis|paris sportif forum|paris sportif francais|paris sportif francaise des jeux|paris
sportif france|paris sportif france 2|paris sportif france allemagne|paris sportif
france angleterre|paris sportif france argentine|paris sportif france autriche|paris sportif france belgique|paris sportif
france espagne|paris sportif france gibraltar|paris sportif france italie|paris
sportif france nouvelle zelande|paris sportif france pologne|paris sportif
france portugal|paris sportif france uruguay|paris sportif france usa|paris sportif freebet sans depot|paris sportif gagnant|paris sportif
gagnant à coup sûr|paris sportif gagner a coup sur|paris
sportif gagner argent|paris sportif gagner de l’argent|paris sportif gain|paris sportif gain maximum|paris sportif gestion bankroll|paris sportif gratuit|paris sportif gratuit appli|paris sportif gratuit avec cadeaux|paris sportif gratuit
cadeaux|paris sportif gratuit en ligne|paris sportif gratuit entre amis|paris sportif gratuit sans
argent|paris sportif gratuit sans depot|paris sportif gratuit sans dépôt|paris sportif gratuits|paris sportif gros gain|paris sportif handicap|paris sportif
handicap 0 1|paris sportif handicap 0-1|paris sportif handicap 1 0|paris sportif handicap 1-0|paris sportif handicap basket|paris sportif handicap explication|paris sportif handicap foot|paris sportif handicap rugby|paris sportif hippique|paris sportif hockey|paris sportif hockey
nhl|paris sportif hockey sur glace|paris sportif hors arjel|paris sportif
hors arjel france|paris sportif jeux olympiques|paris sportif jeux
video|paris sportif joueur blessé|paris sportif joueur blessé pendant le match|paris sportif joueur de foot|paris sportif joueur decisif|paris sportif
joueur declare forfait|paris sportif joueur déclare forfait|paris sportif joueur remplacant|paris sportif la francaise des jeux|paris sportif le plus rentable|paris sportif legal en france|paris sportif leicester champion|paris sportif les 18 stratégies pour
gagner tous les jours|paris sportif les plus sur|paris sportif les
prolongation compte|paris sportif ligne|paris sportif ligue 1|paris sportif ligue 2|paris sportif ligue des champions|paris
sportif ligue des nations|paris sportif ligue europa|paris sportif liste|paris sportif martingale|paris sportif match|paris
sportif match abandonné|paris sportif match annulé|paris sportif match arrêté|paris sportif
match du jour|paris sportif match interrompu|paris sportif
match reporté|paris sportif match suspendu|paris sportif match tennis interrompu|paris sportif match truqué|paris sportif meilleur bonus|paris sportif meilleur cote|paris sportif meilleur pronostic|paris
sportif meilleur site|paris sportif methode|paris sportif
methode 2 3|paris sportif mi temps fin de match|paris sportif mise au jeu|paris
sportif mise maximum|paris sportif mma france|paris sportif moins
de 3.5 but|paris sportif montante|paris sportif moto gp|paris sportif
multiple|paris sportif multiple 2 3|paris sportif multiple 2 3
explication|paris sportif multiple 2 4|paris
sportif multiple 2 5|paris sportif multiple 2/3 explication|paris
sportif multiple 3 4|paris sportif multiple explication|paris sportif national 1 foot|paris sportif nba|paris sportif nba conseil|paris sportif nba pronostic|paris sportif nhl|paris sportif nombre de but|paris sportif nouveau
site|paris sportif numero match|paris sportif offert|paris sportif
offre bienvenue|paris sportif offre bienvenue sans depot|paris sportif offre de bienvenue|paris sportif offre
sans depot|paris sportif om psg|paris sportif paypal|paris
sportif plus de 1.5 but|paris sportif plus de 2 5 but|paris sportif plus ou moins|paris sportif plus ou moins 2 5 but|paris
sportif premier pari remboursé|paris sportif premier paris remboursé|paris sportif prolongation|paris sportif prolongation basket|paris sportif prolongation foot|paris
sportif promo|paris sportif pronostic|paris sportif pronostic basket|paris sportif pronostic des match aujourd hui|paris sportif pronostic expert
gratuit|paris sportif pronostic foot|paris sportif pronostic forum|paris sportif
pronostic gratuit|paris sportif pronostic tennis|paris sportif psg|paris sportif psg arsenal|paris sportif psg barcelone|paris sportif psg bayern|paris sportif psg dortmund|paris sportif psg inter|paris sportif psg inter cote|paris sportif psg liverpool|paris sportif psg om|paris sportif
qr code|paris sportif que veut dire handicap|paris sportif qui
rapporte le plus|paris sportif regle|paris sportif regle prolongation|paris
sportif rembourse|paris sportif remboursement cash|paris sportif
rembourser|paris sportif remboursé|paris sportif
remboursé cash|paris sportif remboursé en cash|paris sportif retrait paypal|paris sportif rue des joueurs|paris
sportif rugby|paris sportif rugby 6 nations|paris sportif rugby coupe du monde|paris sportif rugby top 14|paris sportif safe du jour|paris sportif sans argent|paris sportif sans carte bancaire|paris sportif sans carte d’identité|paris sportif
sans compte bancaire|paris sportif sans depot|paris sportif sans depot minimum|paris sportif si match suspendu|paris
sportif si un joueur abandonne|paris sportif si un joueur ne joue pas|paris sportif si un joueur se blesse|paris sportif simple ou combiné|paris sportif site|paris
sportif statistique|paris sportif stratégie|paris sportif suisse|paris sportif suisse application|paris sportif suisse en ligne|paris sportif suisse legal|paris sportif suisse légal|paris sportif suisse romande|paris sportif sur du jour|paris sportif sur le
tennis|paris sportif systeme|paris sportif systeme 2 3|paris
sportif systeme 2 4|paris sportif systeme 2/3|paris sportif systeme 2/4|paris sportif systeme 3 4|paris sportif
systeme 3/4|paris sportif systeme explication|paris sportif technique|paris
sportif technique pour gagner|paris sportif temps additionnel|paris sportif temps reglementaire|paris sportif tennis|paris sportif tennis abandon|paris sportif tennis conseil|paris sportif tennis de table|paris sportif
tennis forfait|paris sportif tennis gratuit|paris sportif
tennis pronostic|paris sportif tennis roland garros|paris sportif tir
au but|paris sportif top 14|paris sportif tour de france|paris sportif ufc|paris sportif ufc france|paris sportif
unibet|paris sportif vainqueur euro|paris sportif vainqueur ligue 1|paris sportif vainqueur ligue des champions|paris
sportif via paypal|paris sportif victoire prolongation|paris sportif
vip gratuit|paris sportifs|paris sportifs abandon tennis|paris sportifs aide|paris sportifs analyser
un match|paris sportifs arjel|paris sportifs astuces|paris sportifs
aujourd’hui|paris sportifs autorisés en france|paris
sportifs avec paypal|paris sportifs basket|paris sportifs belgique|paris sportifs bonus|paris sportifs bookmakers|paris sportifs canada|paris sportifs combiné|paris sportifs
comparateur|paris sportifs comparatif|paris sportifs conseils|paris sportifs cotes|paris sportifs coupe du monde|paris sportifs de football|paris sportifs du jour|paris sportifs en belgique|paris sportifs en france|paris sportifs en ligne|paris sportifs en ligne belgique|paris sportifs en ligne france|paris sportifs
en ligne gratuit|paris sportifs en ligne suisse|paris sportifs en suisse|paris sportifs et hippiques|paris sportifs euro|paris sportifs foot|paris sportifs foot us|paris sportifs forum|paris sportifs france|paris sportifs france espagne|paris sportifs gagner à tous les coups|paris sportifs gratuit|paris sportifs gratuits|paris sportifs gratuits en ligne|paris sportifs handicap|paris sportifs
hockey|paris sportifs hockey sur galce|paris sportifs hockey
sur glace|paris sportifs hors arjel|paris sportifs jeux olympiques|paris sportifs les bookmakers raflent la mise|paris sportifs ligne|paris sportifs ligue 1|paris sportifs ligue 2|paris sportifs ligue des champions|paris sportifs ligue europa|paris
sportifs match interrompu|paris sportifs montante|paris sportifs nba|paris sportifs offre bienvenue|paris sportifs offre de bienvenue|paris sportifs paypal|paris sportifs pronostics|paris sportifs psg|paris sportifs psg
inter|paris sportifs rugby|paris sportifs sans argent|paris
sportifs sans depot|paris sportifs site|paris sportifs sites|paris sportifs statistiques|paris sportifs stratégie|paris sportifs suisse|paris sportifs
technique|paris sportifs techniques|paris sportifs tennis|paris sportifs tennis astuces|paris sportifs top 14|paris
sportifs tour de france|part de marché paris
sportifs|paypal pari sportif|paypal paris sportif|paypal
paris sportifs|perte d’argent paris sportifs|peut on devenir riche
avec les paris sportifs|peut on gagner de l’argent avec
les paris sportifs|peut on gagner sa vie avec les paris sportif|peut on vraiment
gagner de l’argent avec les paris sportifs|plus gros combine paris sportif|plus gros gagnant
paris sportif|plus gros gain paris sportif|plus gros gain paris sportif
au monde|plus gros gain paris sportif france|plus gros gains paris sportif|plus gros
pari sportif|plus gros paris sportif|plus grosse cote gagner paris sportif|plus grosse cote pari sportif|plus grosse cote
paris sportif|plus grosse mise paris sportif|plus grosse somme gagner au paris sportif|plus ou moins paris sportif|pourcentage de mise paris sportif|premier
pari sportif remboursé|probabilité cote paris sportif|probabilité paris sportif combiné|prolongation basket
paris sportif|prolongation paris sportif|promo pari sportif|promo
paris sportif|promo site de paris sportif|promo site pari sportif|promo
site paris sportif|promos paris sportifs|prono paris sportif
foot|prono paris sportif gratuit|prono paris sportif tennis|pronostic de paris sportif|pronostic
du jour paris sportif|pronostic foot paris sportif|pronostic gratuit
paris sportif|pronostic pari sportif|pronostic
pari sportif gratuit|pronostic paris sportif|pronostic paris sportif aujourd’hui|pronostic paris sportif du jour|pronostic paris sportif foot|pronostic paris sportif gratuit|pronostic paris sportif tennis|pronostic paris sportifs|pronostics
foot statistiques et aides aux paris sportifs|pronostics paris sportif|pronostics paris sportifs|pronostiqueur paris
sportif gratuit|psg arsenal paris sportif|psg bayern paris sportif|psg inter milan paris sportif|psg inter
pari sportif|psg inter paris sportif|psg liverpool paris sportif|psg om paris
sportif|psg paris sportif|psg paris sportifs|qr
code paris sportif|qu est ce qu un handicap paris sportif|qu est ce que handicap dans
les paris sportif|qu’est ce qu’un handicap paris
sportif|qu’est ce que handicap dans les paris sportif|quand
un joueur se blesse paris sportif|que signifie 1/1 en paris sportif|que signifie 1/2 paris
sportif|que signifie 12 en paris sportif|que signifie 1×2 dans les
paris sportifs|que signifie btts en paris sportif|que signifie dnb en paris
sportif|que signifie draw en paris sportif|que signifie ft en paris sportif|que signifie
gg dans le pari sportif|que signifie gg en pari sportif|que signifie gg en paris sportif|que signifie handicap dans les paris sportifs|que veut dire
dnb en paris sportif|que veut dire handicap dans les paris sportifs|que veut dire handicap paris sportif|quel appli pari sportif|quel cote jouer
paris sportif|quel est la meilleur appli de paris sportif|quel est le
meilleur algorithme de paris sportif|quel est le meilleur site de pari sportif|quel
est le meilleur site de pari sportif en ligne|quel est
le meilleur site de paris sportif|quel est le meilleur site de paris
sportif en ligne|quel est le meilleur site de paris sportifs en ligne|quel est
le pari sportif le plus rentable|quel pari sportif est le plus rentable|quel pari
sportif est le plus sûr|quel pari sportif faire aujourd’hui|quel paris sportif faire aujourd’hui|quel paris sportif rapporte le plus|quel site
de paris sportif choisir|quel site de paris sportif rembourse en cash|quel type de pari
sportif est le plus rentable|quelle application pour paris sportifs|quelle est la meilleure appli de paris sportif|quelle
est la meilleure application de paris sportif|quelle
est la meilleure application pour les paris sportifs|quelle est le meilleur site de
paris sportif|quels paris sportifs faire|quels sont
les paris sportifs les plus sûrs|rebond basket paris sportif|record
de gain paris sportif|regle buteur paris sportif|regle
de paris sportif|regle des paris sportif|regle handicap paris sportif|regle handicap paris sportif foot|regle multiple paris sportif|regle pari sportif|regle paris sportif|regle paris sportif
foot|regle paris sportif multiple|regle paris sportif prolongation|reglement pari sportif|reglement
paris sportif|regles paris sportifs|remboursement cash paris sportif|remboursement en cash
paris sportif|remboursement pari sportif|remboursement paris sportif|repartiteur de
mise paris sportif|repartiteur de mise paris sportifs|repartiteur de mises paris sportif|repartiteur mise paris sportif|repartition des mises paris sportif|resultat
pari sportif|resultat paris sportif|resultat paris sportif en direct|resultat paris sportif foot|resultat sportif hockey|retirer argent paris sportif|rugby pari sportif|rugby
paris sportif|règle paris sportif prolongation|règles paris sportif|répartiteur de mise pari
sportif|répartiteur de mise paris sportif|répartiteur
de mise paris sportifs|répartition des mises paris sportif|résultat paris sportif
foot|sans depot paris sportif|se faire interdire
de paris sportifs|signification btts paris sportif|signification dnb paris sportif|signification handicap paris sportif|simulateur de gain paris sportif|simulateur gain paris sportif|simulateur gain paris sportif multiple|simulateur
gain paris sportif systeme|simulateur gain paris sportif système|simulateur montante paris sportif|simulateur paris sportif multiple|simulateur systeme paris sportif|simulation paris sportif gratuit|site
aide paris sportif|site analyse paris sportif|site analyser paris sportif|site arjel paris sportif|site
conseil paris sportif|site d’analyse de paris sportifs|site d’analyse paris sportif|site de conseil paris sportif|site de
pari en ligne sportif|site de pari sportif|site de pari sportif avec bonus sans depot|site de pari sportif bonus sans
depot|site de pari sportif canada|site de pari sportif en ligne|site de
pari sportif francais|site de pari sportif gratuit|site de
pari sportif hors arjel|site de pari sportif suisse|site de parie sportif|site de parie sportif en ligne|site
de paris en ligne sportif|site de paris sportif|site de
paris sportif acceptant paypal|site de paris sportif arjel|site de paris sportif autorisé en france|site de paris sportif autorisé en suisse|site de
paris sportif avec bonus|site de paris sportif avec bonus
sans depot|site de paris sportif avec bonus sans dépôt|site de paris sportif avec neosurf|site de paris sportif avec paiement mobile|site de paris sportif avec
paypal|site de paris sportif avis|site de paris sportif belge avec bonus|site de paris
sportif belgique|site de paris sportif bonus|site
de paris sportif bonus sans depot|site de paris sportif canada|site de paris sportif comparatif|site de paris sportif depot
minimum|site de paris sportif en france|site de paris sportif en ligne|site de paris sportif en ligne suisse|site de paris sportif football|site
de paris sportif francais|site de paris sportif france|site de paris
sportif gratuit|site de paris sportif gratuit pour gagner des cadeaux|site de paris sportif gratuit sans
dépôt|site de paris sportif hors arjel|site de paris sportif le plus fiable|site de paris sportif legal en france|site de paris sportif meilleur cote|site
de paris sportif nouveau|site de paris sportif offre de
bienvenue|site de paris sportif paypal|site de paris sportif premier paris remboursé|site de paris sportif qui accepte paypal|site de paris sportif
qui rembourse en cash|site de paris sportif remboursé|site de paris
sportif sans argent|site de paris sportif sans carte bancaire|site de paris sportif sans carte d’identité|site de paris
sportif sans depot|site de paris sportif suisse|site de paris sportifs|site de paris sportifs avec
paypal|site de paris sportifs en ligne|site de
paris sportifs francais|site de paris sportifs gratuit|site de paris sportifs paypal|site de paris sportifs suisse|site de statistique pour paris sportif|site des paris
sportifs|site pari en ligne sportif|site pari sportif|site pari
sportif 100 euros offert|site pari sportif arjel|site pari sportif belgique|site pari sportif bonus|site
pari sportif canada|site pari sportif comparatif|site pari sportif en ligne|site pari sportif france|site pari
sportif gratuit|site pari sportif hors arjel|site pari sportif suisse|site
parie sportif|site paris en ligne sportif|site paris sportif|site paris sportif 100 euros offert|site paris
sportif 100 euros remboursé|site paris sportif 1er paris remboursé|site paris sportif arjel|site paris sportif autorisé en france|site paris sportif avec bonus|site paris sportif avec bonus sans depot|site paris sportif avec
meilleur cote|site paris sportif belgique|site paris sportif
bonus|site paris sportif bonus cash|site paris
sportif bonus sans depot|site paris sportif canada|site paris sportif
comparatif|site paris sportif depot 5 euro|site paris sportif en ligne|site paris sportif foot|site paris sportif
france|site paris sportif gratuit|site paris
sportif hors arjel|site paris sportif hors arjel france|site
paris sportif meilleur cote|site paris sportif nouveau|site paris sportif
offre de bienvenue|site paris sportif paypal|site paris
sportif remboursement cash|site paris sportif remboursé en cash|site paris sportif retrait instantané|site
paris sportif sans carte bancaire|site paris sportif sans depot|site
paris sportif suisse|site paris sportifs|site paris sportifs belgique|site paris sportifs en ligne|site
paris sportifs france|site paris sportifs hors arjel|site paris
sportifs suisse|site pour analyse paris sportif|site pour
paris sportif|site pronostic paris sportif|site statistique paris sportif|site
suisse paris sportif|sites de pari sportif|sites de paris sportif|sites de paris
sportifs|sites de paris sportifs arjel|sites de paris sportifs autorisés en france|sites de
paris sportifs belgique|sites de paris sportifs bonus|sites de paris sportifs en belgique|sites de
paris sportifs en france|sites de paris sportifs en ligne|sites de paris sportifs gratuits|sites de paris sportifs
gratuits sans dépôt|sites de paris sportifs suisse|sites pari sportif|sites paris sportif|sites paris sportifs|sites paris sportifs arjel|sites paris sportifs belgique|sites paris sportifs france|sites paris sportifs
hors arjel|sites paris sportifs suisse|so foot paris sportif|so foot paris
sportifs|specialiste tennis paris sportif|statistique foot
paris sportif|statistique paris sportif|statistique paris sportif foot|statistique tennis
paris sportif|statistiques football paris sportifs|statistiques paris sportifs|strategie de paris
sportif|stratégie big whale paris sportif|stratégie de paris sportifs|stratégie gagnante paris sportifs|stratégie pari sportif|stratégie paris sportif|stratégie paris sportifs|stratégie
paris sportifs forum|stratégie pour gagner au paris sportif|stratégies paris sportifs|suisse paris sportif|suisse paris sportifs|systeme
2 3 paris sportif|systeme 3 4 paris sportif|systeme de cote paris sportif|systeme de paris sportif|systeme pari sportif|systeme
paris sportif|systeme paris sportifs|systeme reducteur paris
sportif|système paris sportif|tableau bankroll paris sportif|tableau
cote paris sportif|tableau de paris sportif|tableau de suivi
paris sportifs|tableau excel bankroll paris sportif|tableau
excel paris sportif|tableau excel paris sportif gratuit|tableau excel paris sportifs|tableau excel pour paris sportif|tableau gestion bankroll paris
sportif|tableau montante p
Your comment is awaiting moderation.
Печатали календари для клиентов и сотрудников, и результат получился красивым и стильным. Фото яркие, сетка календаря читаемая, бумаги достаточно плотная. Скрепление выполнено надежно. Заказ оформили и отправили без задержек. Отличный вариант корпоративной продукции: баннер москва
Your comment is awaiting moderation.
explorefutureopportunities.click – Feels professional and trustworthy, found everything easy to understand and useful.
Your comment is awaiting moderation.
Недорогие квартиры https://kvartira-umetro.ru для покупки: актуальные предложения, удобный поиск по цене, району и метражу. Подбор бюджетных вариантов, консультации специалистов и сопровождение сделки.
Your comment is awaiting moderation.
https://stroysamnt.ru/catalog/dekor/kley-dlya-oboev/kley-dlya-bumazhnykh-oboev/kley-oboynyy-master-klein-dlya-bumazhnykh-oboev-200gr-zhestkaya-pachka-03821/?MID=130826&result=reply
Your comment is awaiting moderation.
“Думаю надо прогуляться, за Кооперативом еще кОоПератив,Захожу туда и тут описание сходиться бля Думаю тут то Полюбому” Купить кокаин, бошки, гашиш бешельме мешельме атакаетОтправки посылок и эта информация в 2-х местах прописана на сайте 2-10 РАБОЧИХ ДНЕЙ. В 99,9% случает сроки не нарушаются.
Your comment is awaiting moderation.
https://adventurelight.ro/blog/ALT-EXPO-Pescuit-si-Vanatoare-2017
Your comment is awaiting moderation.
http://dliavas.listbb.ru/viewtopic.php?f=19&t=10107
Your comment is awaiting moderation.
https://cleverlend.ru/mostbet-2026-max200-t7578.html
Your comment is awaiting moderation.
https://forum.programosy.pl/viewtopic.php?f=3&t=197277&p=1331283&sid=1998135209a269bf96d08e60f5906202#p1331283
Your comment is awaiting moderation.
бесплатная ставка на 1xbet промокод
Your comment is awaiting moderation.
Квартиры в рассрочку https://kupikvartiru-piter.ru удобный способ покупки жилья без ипотеки. Новостройки и готовые объекты, прозрачные условия, фиксированная цена и помощь в оформлении документов. Подбор вариантов под ваши возможности.
Your comment is awaiting moderation.
MossyTrail Finds – Relaxing atmosphere with natural textures and an easy-to-navigate design.
Your comment is awaiting moderation.
да два раза прислали шляпу.( хотя раньше присылали отменный товар с хорошими бонусами. даже не знаю что делать( Купить кокаин, бошки, гашиш четко, без слов !надо прятать по сложнее
Your comment is awaiting moderation.
Hill Autumn Closet – Well-themed and warm, each product feels intentionally selected.
Your comment is awaiting moderation.
Квартиры в Москве https://kvartira-spb-pokupka.ru для покупки — большой выбор объектов в разных районах города. Новостройки и вторичный рынок, помощь с ипотекой, юридическое сопровождение и актуальные предложения от собственников и застройщиков.
Your comment is awaiting moderation.
FindBetterDeals Hub Store – Offers are nicely displayed, shopping feels quick and pleasant.
Your comment is awaiting moderation.
באמצעות נתוני הרישוי ניתן להתחיל תהליך שמאפשר להבין את ההיסטוריה של רכבים קלאסיים בישראל, תחום ייחודי המשלב תשוקה אמיתית, מסורת עשירה ורצון לשמר פריטים נדירים בעלי ערך רגשי ומכני. בדיקה זו מגלה פרטים חשובים שמשפיעים על ערך הרכב ונדירותו. יותר ויותר ישראלים מגלים מחדש את יופיים של רכבים משנות העבר. מי שמעוניין להשקיע ברכב אספנות חייב להכיר את מאפייני הדגם ונדירותו. בדיקה מדויקת מגלה האם הרכב שמור בהתאם לסטנדרטים של עולם האספנות. חשוב להכיר את ההיסטוריה העולמית של הדגם, לא רק בישראל. רכבים קלאסיים רבים עברו חלודה, ריתוכים או תיקונים שיכולים להשפיע על ערכם. בדיקה מקיפה מגלה האם המנוע עבר שיפוץ מקצועי או תיקונים מאולתרים. בישראל נוצרה קהילה פעילה של חובבי רכבים קלאסיים, הכוללת אירועים, מפגשים ותערוכות. מחירי רכבים קלאסיים משתנים בהתאם לנדירות, ביקוש ומצב מכני. רבים מהרוכשים בוחרים לשפץ את הרכב בעצמם או באמצעות אנשי מקצוע, תהליך מרתק אך מורכב. בדיקה מוקדמת מונעת הפתעות ומבטיחה שהרכב יהיה בר־תחזוקה. השקעה ברכב קלאסי משלבת אהבה למכוניות עם נכס ייחודי.
https://mnews.co.il/%D7%AA%D7%95%D7%9B%D7%9F%D7%A9%D7%99%D7%95%D7%95%D7%A7%D7%99/%D7%A2%D7%95%D7%9C%D7%9D-%D7%94%D7%A8%D7%9B%D7%91%D7%99%D7%9D-%D7%94%D7%A7%D7%9C%D7%90%D7%A1%D7%99%D7%99%D7%9D-%D7%91%D7%99%D7%A9%D7%A8%D7%90%D7%9C-%D7%AA%D7%A9%D7%95%D7%A7%D7%94-%D7%94%D7%99%D7%A1/
Your comment is awaiting moderation.
על סמך מספר הזיהוי ניתן להתחיל תהליך שמאפשר להבין את ההיסטוריה של רכבים קלאסיים בישראל, תחום ייחודי המשלב תשוקה אמיתית, מסורת עשירה ורצון לשמר פריטים נדירים בעלי ערך רגשי ומכני. מאגרי המידע מסייעים לזהות בעלויות קודמות, תקופות עמידה, טיפולים מיוחדים ושינויים שבוצעו לאורך השנים. יותר ויותר ישראלים מגלים מחדש את יופיים של רכבים משנות העבר. מי שמעוניין להשקיע ברכב אספנות חייב להכיר את מאפייני הדגם ונדירותו. בדיקה מקצועית אצל מומחה לרכבים קלאסיים מספקת תמונה אמינה על מצב הרכב. רכבים מסוימים נדירים יותר בהתאם לשנות יצור, מפעל הייצור והיקף הייצור. רכבים קלאסיים רבים עברו חלודה, ריתוכים או תיקונים שיכולים להשפיע על ערכם. גם המנוע מקבל חשיבות גבוהה בעולם הרכב הקלאסי. מפגשים אלו מאפשרים להכיר בעלי ניסיון ולקבל המלצות לפני רכישה. ניתוח מגמות השוק מסייע להבין את הכיוון העתידי של ההשקעה. תהליך זה הופך את הרכב למוצר ייחודי בעל ערך אישי. לפני הרכישה מומלץ לבדוק זמינות חלפים. כך ניתן ליהנות מרכב עתיק בעל אופי, סיפור וערך אספני אמיתי.
https://mnews.co.il/%D7%AA%D7%95%D7%9B%D7%9F%D7%A9%D7%99%D7%95%D7%95%D7%A7%D7%99/%D7%A2%D7%95%D7%9C%D7%9D-%D7%94%D7%A8%D7%9B%D7%91%D7%99%D7%9D-%D7%94%D7%A7%D7%9C%D7%90%D7%A1%D7%99%D7%99%D7%9D-%D7%91%D7%99%D7%A9%D7%A8%D7%90%D7%9C-%D7%AA%D7%A9%D7%95%D7%A7%D7%94-%D7%94%D7%99%D7%A1/
Your comment is awaiting moderation.
FuturePath Lane Hub – Neatly displayed products with fast, smooth navigation throughout the site.
Your comment is awaiting moderation.
<Artisan Selects – Unique finds throughout, very pleasant and smooth shopping experience.
Your comment is awaiting moderation.
BrightWater Goods – The cool, refreshing style and linear layout keep things intuitive.
Your comment is awaiting moderation.
Seasonal campaign success often involves decisions to buy tiktok likes during promotional periods. Holiday or event-based content requires rapid engagement to capitalize on limited-time opportunities.
Your comment is awaiting moderation.
Магазин как уже и было сказано – на 5+ Купить кокаин, бошки, гашиш Хороший магазинВсем добрый вечер, рега появилась, та хорошая, которая у вас была!?
Your comment is awaiting moderation.
онлайн обучение 11 класс shkola-onlajn1.ru .
Your comment is awaiting moderation.
промокод мелбет промокод мелбет .
Your comment is awaiting moderation.
intentionaldesignzone – IntentionalDesignZone offers a smooth browsing experience with carefully curated selections.
Your comment is awaiting moderation.
Modern Home Showcase – A modern showcase where clean structure improves the experience.
Your comment is awaiting moderation.
שלוש מאות גרם וודקה, שמפניה לגברת (“רק בקבוק, אנחנו לא שופכים אותו לכוסות! »). “חמישה רובל לוודקה, שישה רובל לשמפניה”, חשבה קסניה. זה היה יוצא, ללכת אליו מיד היה אפילו יותר רווחי שהתרחשה… הדלת הייתה פתוחה, ונכנסתי פנימה, מופתעת, מחוסר ריהוט מוחלט, רק כמה מזוודות ותיקים גדולים בכלוב נכחו בערימה בפינה. אולי כדאי שאציין אצלי? הקוטג ‘ שלנו מרוהט. מיטה רחבה קיימת karnakriya.co.il
Your comment is awaiting moderation.
Modern Home Artisans – Each piece feels thoughtfully created, and the layout is user-friendly.
Your comment is awaiting moderation.
всех с новым годом и удачных покупок Купить кокаин, бошки, гашиш мин заказ от 1гр.Хороший магазин
Your comment is awaiting moderation.
leadtrajectory.click – Appreciate the typography choices; comfortable spacing improved my reading experience.
Your comment is awaiting moderation.
growthaccelerator.click – Found practical insights today; sharing this article with colleagues later.
Your comment is awaiting moderation.
webinfluence.click – Loved the layout today; clean, simple, and genuinely user-friendly overall.
Your comment is awaiting moderation.
digitalascend.click – Color palette felt calming, nothing distracting, just focused, thoughtful design.
Your comment is awaiting moderation.
Szukasz kasyna? kasyno online blik sprawdzamy licencje, metody platnosci, czas realizacji transakcji i dostepnosc gier. Praktyczne informacje o kasynach z platnoscia BLIK.
Your comment is awaiting moderation.
Нужен клининг? клининговые компании россии оцениваем услуги, цены, опыт, отзывы клиентов и качество уборки. Помогаем выбрать надёжную клининговую компанию для дома или бизнеса.
Your comment is awaiting moderation.
digitalreach.click – Color palette felt calming, nothing distracting, just focused, thoughtful design.
Your comment is awaiting moderation.
дана шлюха проститутка уф
Your comment is awaiting moderation.
всем советую магазин тс роботает ровно, знает толк в бизе, всегда беру у них и все ровно и надежно, товар выший класс ,куриер вообще красавчик все делает четко и надежно , магазину и курьеру оценка 10из 10 балов все ровно, ДОСТАВКА БОМБА ХОТЬ В АРТИКУ ДОСТАВЯТ https://besttraders.biz блин… один заказ выбил, затестил. теперь опять в аське молчокследить не могли однозначно
Your comment is awaiting moderation.
EverLine Artisan Studio – Beautifully crafted pieces with a strong artisan touch throughout.
Your comment is awaiting moderation.
על סמך נתוני המספר ניתן לבצע את אחד השלבים החשובים ביותר לפני רכישת רכב בישראל, והוא בדיקת היסטוריה מלאה שמסייעת להבין את מצב הרכב האמיתי. בדיקה זו חושפת מידע על בעלויות קודמות, תאונות, הגבלות ותיקונים משמעותיים. בדיקת רכב בישראל היא שלב שכל רוכש צריך לבצע כדי להימנע מהפתעות. בדיקה טכנית במכון מורשה מספקת שקיפות מלאה ודו״ח מפורט על מצב הרכב. בדיקת שלמות מבנית מגלה תיקונים או עיוותים בעייתיים. בדיקת מחשב מודרנית מאפשרת גישה לנתוני מנוע ולוגים שמעידים על תקלות נסתרות. גם מערכת החשמל דורשת תשומת לב מיוחדת במהלך הבדיקה. במהלך נסיעה ניתן לזהות רעשים חריגים, תקלות בתיבת הילוכים ובעיות יציבות. תיקונים מסודרים במוסך מוכר מעידים על תחזוקה איכותית. בוחן מנוסה מזהה בעיות שבדיקות רגילות עשויות לפספס. מכון מנוסה מספק תוצאות אובייקטיביות ואמינות. לאחר הבדיקה מקבל הרוכש דו״ח מפורט עם ממצאים, ליקויים והמלצות. בדיקה מקיפה חוסכת זמן וכסף על תקלות לא צפויות. כך ניתן לבצע רכישה מושכלת ובטוחה בשוק הרכב בישראל.
https://www.b7net.co.il/%d7%a6%d7%a8%d7%9b%d7%a0%d7%95%d7%aa/%d7%91%d7%93%d7%99%d7%a7%d7%aa-%d7%a8%d7%9b%d7%91-%d7%91%d7%99%d7%a9%d7%a8%d7%90%d7%9c-%d7%9e%d7%93%d7%a8%d7%99%d7%9a-%d7%9e%d7%95%d7%a8%d7%97%d7%91-%d7%9c%d7%a8%d7%95%d7%9b%d7%a9-706351
Your comment is awaiting moderation.
аська молчит.скайп есть? Купить кокаин, бошки, гашиш Слив засчитан.Клад был уличным, спрятан по разумному, под решеткой окна подъезда, рядом с окном стояла лавочка, на которой можно без палива посидеть и нащупать клад. Клад 5 балов из 5!!!
Your comment is awaiting moderation.
Fashion Value Outlet – Items are well displayed, shopping feels easy and enjoyable.
Your comment is awaiting moderation.
shopandbrowse – ShopAndBrowse makes discovering items easy with well-crafted offerings and clean presentation.
Your comment is awaiting moderation.
бля у нас опен эйр будет 11 июня у шамана пороха нету!!!вот ищу где бы взять что нибудь на подобие скорости или кокса!а тут отзывы что соду продают! https://np-bbs.ru Вы всё ещё работаете с Яндекс Деньгами?Да до празников не всем выслали, сегодня отдали в курьерку очередную пачку посылок, всем все придет скоро.
Your comment is awaiting moderation.
обучение стриминг shkola-onlajn1.ru .
Your comment is awaiting moderation.
slots games slots games .
Your comment is awaiting moderation.
Daily Picks Collection – Each product is functional and thoughtfully presented for easy browsing.
Your comment is awaiting moderation.
GoldenPeak Handmade Picks – Calm atmosphere with beautifully made items, making browsing effortless.
Your comment is awaiting moderation.
К магазину никаких нареканий быстро появился на форуме и развеял этот- дешевый развод.будут денежки возьму тут что нибудь дымящиеся. Купить кокаин, бошки, гашиш Я даже не знаю, что особо писать вообщем всё :rest:.Дальнейших успехов вам и продаж!
Your comment is awaiting moderation.
GoldenMeadow Hub Online – Curated items with a warm and inviting ambiance.
Your comment is awaiting moderation.
Bright Trail Style – Fashion pieces are displayed cleanly, with categories that guide browsing smoothly.
Your comment is awaiting moderation.
https://www.spatial.io/@Bienvene1xbet
Your comment is awaiting moderation.
https://face.spartdino.net/blogs/97682/1xBet-%D0%9F%D1%80%D0%BE%D0%BC%D0%BE%D0%BA%D0%BE%D0%B4-%D0%BF%D1%80%D0%B8-%D0%A0%D0%B5%D0%B3%D0%B8%D1%81%D1%82%D1%80%D0%B0%D1%86%D0%B8%D0%B8-%D0%BD%D0%B0-%D0%A1%D0%B5%D0%B3%D0%BE%D0%B4%D0%BD%D1%8F-2026-1XBURN?lang=ru_ru
Your comment is awaiting moderation.
https://yogicentral.science/wiki/User_talk:Codde1xbet
Your comment is awaiting moderation.
快速赚钱
Your comment is awaiting moderation.
https://vbalashihe.smartbb.ru/viewtopic.php?t=186
Your comment is awaiting moderation.
https://rollbol.com/blogs/2018690/How-to-Get-1xBet-Promo-Code-1X200MIX-130-Acquire
Your comment is awaiting moderation.
https://www.i-hire.ca/author/bienvene1xbet/
Your comment is awaiting moderation.
buildsmartdirection – Useful guidance for taking the right steps and staying on track.
Your comment is awaiting moderation.
Оплатил, через 49 минут уже получил адрес, люди забрали надежную закладку (эйф-диссоциатив), опробовали, все довольны. Мир и респект https://crazytaxigame.biz Четкого товара!да для ам и дживов ацик самая подходящяя тема. а основа из мачехи ништяк.только её надо выварить раза три по 15 мин. чтоб негорлодёрило и смол меньше,ведь в смоле много канабиола остаёца
Your comment is awaiting moderation.
фен дайсон официальный купить http://www.fen-dn-kupit-1.ru .
Your comment is awaiting moderation.
казино вавада зеркало
Your comment is awaiting moderation.
https://infolenta.com.ua/yak-diznatysia-sviy-taryfnyy-plan-kyivstar-5-sposobiv-pereviryty-aktyvnyy-taryf/
Your comment is awaiting moderation.
FTS Daily Trends – Fashion picks are showcased nicely, navigation feels intuitive and quick.
Your comment is awaiting moderation.
Creative Picks Collective – Layout is tidy and browsing is straightforward, enjoyed exploring unique pieces.
Your comment is awaiting moderation.
а я яй , я ж отвечаю вам каждый раз как есть возможность, пишут много людей одновременно. Купить кокаин, бошки, гашиш да два раза прислали шляпу.( хотя раньше присылали отменный товар с хорошими бонусами. даже не знаю что делать(P.S.Сколько раз брал в этом магазе ни разу нареканий не было)))Не сочтите за рекламу
Your comment is awaiting moderation.
shopandbrowse – ShopAndBrowse presents fresh products with simple, easy-to-understand details.
Your comment is awaiting moderation.
Modern Lifestyle Hub – Products are stylish and browsing the site is seamless and fast.
Your comment is awaiting moderation.
What’s Changed: https://howheavyisit.com/home-appliances/how-much-does-an-indoor-security-camera-weigh/
Your comment is awaiting moderation.
Design Collective Marketplace – Stylish presentation with well-organized products and effortless browsing.
Your comment is awaiting moderation.
Рейтинг казино https://casinos.ceo онлайн 2025 — актуальный обзор платформ с лицензией, играми и условиями. Сравнение бонусов, способов оплаты, скорости выплат и поддержки. Помогаем выбрать надёжное казино на основе фактов и критериев.
Your comment is awaiting moderation.
Красивый интерьер https://moidomiks.ru своими руками — идеи, советы и пошаговые инструкции для дома и квартиры. Декор, отделка, планировка и сочетание цветов. Помогаем создать уютное и стильное пространство без лишних затрат.
Your comment is awaiting moderation.
Ремонт своими руками https://pic4you.ru портал с понятными инструкциями и советами. Этапы работ, выбор инструментов и материалов, расчёты и примеры. Помогаем сделать качественный ремонт без лишних затрат.
Your comment is awaiting moderation.
Всем привет, СК есть опт? https://prima-p.ru Интересно, сколько дней заказ будет идти… Успеет ли до запрета, если сегодня заказать…как так его разве нету? с самого утра тут сижу
Your comment is awaiting moderation.
Daily Studio Hub – Neatly presented items with smooth navigation and a modern interface.
Your comment is awaiting moderation.
SoftSky Creative – Relaxing layout with gentle tones throughout, very enjoyable browsing.
Your comment is awaiting moderation.
вот и я уже трясусь. Купить онлайн мефедрон, амфетамин, марихуану 4-FA -все кто гнал, обломитесь, вы просто его не понял. Он не будет переть как старый добрый md – но эффект отличный. 1 колпак на лицо – и часа 2 состояние абсолютной гормонии с окружающим миром. Мозг работает как от любого другого качественного стимулятора на 5+.это не спиша эндеграунд улица полна
Your comment is awaiting moderation.
ChicDailyFashion – Modern fashion items displayed clearly, browsing is fast and intuitive.
Your comment is awaiting moderation.
Сияющая кожа https://omaske.ru и роскошные локоны – легко! Откройте секреты природы для красоты. Наши домашние маски для лица и волос подарят вам натуральный уход, глубокое питание и видимый результат. Забудьте о химии, почувствуйте силу трав и фруктов!
Your comment is awaiting moderation.
дайсон официальный сайт стайлер для волос с насадками цена купить http://www.fen-dn-kupit-1.ru/ .
Your comment is awaiting moderation.
Изготавливали меню для кафе, и получился отличный результат. Печать четкая, бумага плотная и устойчивая к износу. Ламинация сделана качественно, без пузырей и заломов. Макет согласовали быстро, все правки учли. Работой остались на сто процентов довольны – печать открыток
Your comment is awaiting moderation.
Все о провайдерах https://providers.by Беларуси! Актуальные новости, честные отзывы пользователей и детальные обзоры тарифов. Поможем выбрать лучшего интернет-провайдера, анализируем рынок и тенденции. Будьте в курсе всех изменений!
Your comment is awaiting moderation.
Всё о секретах ПО https://software-expert.ru ваш гид. Откройте для себя мир скрытых возможностей, эффективных стратегий и неочевидных лайфхаков в разработке программного обеспечения. Поймите, как создавать и использовать ПО на новом уровне.
Your comment is awaiting moderation.
Кто нибудь 203 пробывал в этом магазинчике? Как он?????????? Купить закладку гашиша, бошек, мефедрона, амфетамина “Так вот Основа это Продукта похожа на таблетки Гидроперит”конечно оно так, все придет строго сколько сколько надо. Но ведь из за таких задержек могут и дела сорваться
Your comment is awaiting moderation.
Тюмень сегодня https://kfaktiv.ru главные события города! Узнайте о последних новостях, которые формируют жизнь Тюмени. От городских инициатив до культурных событий и важных объявлений – будьте в курсе всего, что происходит в нашем любимом городе. Ваша порция актуальной информации!
Your comment is awaiting moderation.
Fashion Picks Online – Market selections are appealing, navigating the site feels fast and easy.
Your comment is awaiting moderation.
Modern Design Finds – Clean and inspiring presentation, browsing felt relaxing and simple.
Your comment is awaiting moderation.
Everglen Select – Nice inviting layout, everything felt organized and easy to explore.
Your comment is awaiting moderation.
качественные канцтоваров в москве купитьпредставляют собой надежную основу для эффективной работы учебы и повседневных задач Продуманные изделия делают рабочие процессы более аккуратными и предсказуемыми Широкий выбор облегчает комплектацию рабочего места с учетом индивидуальных требований Универсальность делает такую продукцию актуальной для разных сфер применения Дизайн и функциональность дополняют друг друга создавая удобство при длительной работе Надежное сырье обеспечивает сохранение свойств при регулярной эксплуатации Практичность делает канцтовары незаменимыми в повседневной деятельности Оптимальное соотношение цены и надежности выгодно для частных лиц и компаний Качественные канцтовары способствуют формированию аккуратных рабочих привычек Удобные инструменты делают повседневные процессы более структурированными
https://mebel-8.ru/
Your comment is awaiting moderation.
качественные канцтоваров в москве купитьпредставляют собой надежную основу для эффективной работы учебы и повседневных задач Надежные принадлежности помогают сосредоточиться на задачах и поддерживать стабильный ритм работы Разнообразие решений позволяет подобрать продукцию под разные форматы деятельности и нагрузки Качественные канцтовары востребованы в офисах учебных заведениях и домашних кабинетах Комфорт использования положительно влияет на производительность и концентрацию При производстве качественных канцтоваров используются долговечные и безопасные материалы В офисе канцелярия необходима для документооборота отчетности и внутренней коммуникации Выбор качественной канцелярии снижает необходимость частой замены и дополнительных расходов Качественные канцтовары способствуют формированию аккуратных рабочих привычек Постоянное использование надежных канцелярских товаров повышает уровень комфорта и уверенности
https://mebel-8.ru/
Your comment is awaiting moderation.
За основу брали ромашку (как она задрала), я кстати предлагаю магазину, продавать основу, или в качестве бонуса предлагать (так на сколько я знаю никто не делает). Купить Кокаин, Бошки, Шишки, Гашиш У меня кстати тоже через 2 дня пришло, но в соседний город, так как в моём городе этой конторы не оказалось) но мне сразу позвонили, и предложили либо самому приехать за пакетом, либо подождать до вторника и мне его привезут домой. Вот жду)спс ) вот уже пришло что отправлено в пн ждать трек буду )
Your comment is awaiting moderation.
Handpicked Essentials Hub – Careful curation and clear presentation make shopping enjoyable.
Your comment is awaiting moderation.
BrightCrest Hub – A contemporary layout and clear displays make moving around the site smooth.
Your comment is awaiting moderation.
Строительство и ремонт https://ctoday.ru всё, что нужно знать. Планируете стройку или обновление? Наш сайт – ваш надежный помощник. Актуальная информация о материалах, технологиях, дизайне и юридических аспектах. С нами ремонт станет проще и приятнее!
Your comment is awaiting moderation.
Minimal Click Hub – Streamlined interface ensuring easy navigation and a calm browsing experience.
Your comment is awaiting moderation.
findnewperspective – Excellent site for exploring new ideas and expanding your mindset.
Your comment is awaiting moderation.
Все о медицине https://zapisnapriemrostov.ru и здоровье в одном месте! Получите доступ к достоверным статьям, рекомендациям специалистов и полезным лайфхакам для поддержания отличного самочувствия. Будьте в курсе и живите полной жизнью!
Your comment is awaiting moderation.
канцтоваров для дома и офиса представляют собой широкий ассортимент продукции необходимой для повседневной работы учебы и бытовых задач Качественные канцелярские товары помогают сосредоточиться на задачах и повысить продуктивность Разнообразие продукции позволяет закрыть базовые и специализированные потребности пользователей Практичность канцелярских принадлежностей делает их востребованными в любой обстановке Функциональность и внешний вид изделий дополняют общее оформление рабочего места Надежные материалы позволяют использовать продукцию ежедневно без лишнего износа Экономичность особенно важна для компаний и семей с постоянной потребностью Они используются в школах офисах удаленной работе и домашних кабинетах Покупка канцелярских товаров позволяет заранее подготовиться к рабочим и учебным нагрузкам Канцтовары для дома и офиса остаются важным элементом современной повседневной жизни
https://vipusknick.ru/
Your comment is awaiting moderation.
канцтоваров для дома и офиса являются неотъемлемой частью организации рабочего пространства в квартире кабинете или компании Качественные канцелярские товары помогают сосредоточиться на задачах и повысить продуктивность Ассортимент включает изделия для письма хранения документов и организации рабочего стола В домашнем использовании канцелярия помогает организовать учебу творчество и личные записи Современные канцтовары отличаются продуманным дизайном и удобством эксплуатации Канцтовары для дома и офиса выпускаются из безопасных и долговечных материалов Экономичность особенно важна для компаний и семей с постоянной потребностью Канцтовары востребованы в бизнесе образовании и административной деятельности Организованное пространство способствует дисциплине и системному подходу Аккуратность и порядок формируются за счет удобных инструментов
https://vipusknick.ru/
Your comment is awaiting moderation.
BluePeak Creations – Minimalist design and elegant style made navigating effortless.
Your comment is awaiting moderation.
Благо им! Биза на высоту https://pixelplus58.ru магазу процветания желаю и клиентов хороших и честных!Курьерка не может принять такое количество заказов – отказала в
Your comment is awaiting moderation.
https://usfblogs.usfca.edu/psip/2013-projects/mission-graduates-fall-2013/comment-page-5/?unapproved=92688&moderation-hash=97e67eb574ad0c41a04958d2339e0043#comment-92688
Your comment is awaiting moderation.
https://quvonch.com/
Your comment is awaiting moderation.
shopper’s corner – Product variety is impressive, browsing feels easy and enjoyable.
Your comment is awaiting moderation.
https://fotobravo.com/blog/wool-jackets
Your comment is awaiting moderation.
https://akkord-guitar.ru/forum/showtopic/4605-promokod-na-melbet-pri-registracii-mega200-bonus-do-15-000-8381
Your comment is awaiting moderation.
https://online.fliphtml5.com/omoinesoe/heun/
Your comment is awaiting moderation.
https://quvonch.com/uzbekskaya-muzyka/xamdam-sobirov/
Your comment is awaiting moderation.
https://quvonch.com/uzbekskaya-muzyka/jaloliddin-ahmadaliyev/
Your comment is awaiting moderation.
https://quvonch.com/uzbekskaya-muzyka/
Your comment is awaiting moderation.
Urban Trend Lane Studio – Neatly organized stylish items with a clean interface for effortless browsing.
Your comment is awaiting moderation.
Если интересуют лицензионные казино Украины, полезно смотреть свежие обзоры и рейтинги. Лицензионные онлайн казино с быстрым выводом сейчас в приоритете. Перед выбором платформы стоит посмотреть рейтинг, например топовые казино онлайн. Это удобно для быстрого сравнения. Онлайн казино рейтинг лучших обновляется почти каждый месяц.
Официальные казино Украины обычно работают стабильно.
Самые популярные онлайн казино обычно на слуху. Лучшие онлайн казино онлайн отличаются скоростью выплат. Топ интернет казино помогает выбрать безопасный сайт. Лучшее казино — то, которое реально платит.
Your comment is awaiting moderation.
Магазин работает ЧЕТКО… https://zhivoi-rodnik.ru а для какой цели не отправляют? курьерам похуй что тоскать, а если бы мусора хотели бы принять, посыль наоборот отправили.Добрый вечер! Когда ожидается рега по Москве, опт!??
Your comment is awaiting moderation.
Главные новости Пензы https://inpenza.ru оперативно и достоверно. Мы освещаем все значимые события, происходящие в Пензе и Пензенской области. Важные объявления, афиша, полезная информация для каждого жителя. Ваш надежный источник новостей.
Your comment is awaiting moderation.
Журнал о строительстве https://prostostroy.com Ваш гид в мире стройки и ремонта. Актуальные тренды, экспертные советы, обзоры материалов и технологий. От фундамента до крыши – все, что нужно знать для успешного проекта.
Your comment is awaiting moderation.
أرباح مضمونة
Your comment is awaiting moderation.
CreativeGlowStore – Clean design, unique products, and enjoyable, smooth browsing.
Your comment is awaiting moderation.
Its like you read my mind! You seem to know a lot about this, like you wrote the book in it or something.
I think that you can do with some pics to drive the message home a bit, but
instead of that, this is wonderful blog. A fantastic read.
I’ll definitely be back.
Your comment is awaiting moderation.
листы картонные купить используются в самых разных сферах благодаря прочности доступности и простоте обработки Картонные листы подходят для защиты товаров при хранении и перевозке снижая риск повреждений Производство листов картонных ориентировано на стандарты качества что обеспечивает стабильные характеристики плотности и толщины Листы картонные востребованы в торговле для оформления витрин и защиты товаров на складе Выбор картонных листов поддерживает рациональное потребление ресурсов и снижает объем отходов Широкий выбор размеров облегчает применение картона в производстве упаковки и изделий Листы легко режутся и обрабатываются что позволяет использовать их в ручном и автоматизированном производстве Доступная стоимость делает листы картонные выгодным выбором для малого и среднего бизнеса Универсальность применения подтверждает практическую ценность картонных листов Качественные листы обеспечивают стабильный результат при повторном использовании
https://alpinalighting.ru/
Your comment is awaiting moderation.
листы картонные в москве купить являются практичным решением для компаний и частных клиентов которым важны надежность и удобство использования Листы из картона помогают сохранить целостность продукции при логистических операциях Производство листов картонных ориентировано на стандарты качества что обеспечивает стабильные характеристики плотности и толщины Листы картонные востребованы в торговле для оформления витрин и защиты товаров на складе Выбор картонных листов поддерживает рациональное потребление ресурсов и снижает объем отходов Широкий выбор размеров облегчает применение картона в производстве упаковки и изделий Картон не требует специального оборудования для базовой обработки Экономичность материала позволяет закупать его в необходимых объемах без превышения бюджета Материал используется для временных конструкций шаблонов и защитных элементов При правильном хранении картон сохраняет свои свойства и форму в течение длительного времени
https://alpinalighting.ru/
Your comment is awaiting moderation.
bestvaluehub – BestValueHub delivers a neat collection of products that are a pleasure to browse.
Your comment is awaiting moderation.
FLO Styles – Fashion items displayed nicely, navigation feels simple and user-friendly.
Your comment is awaiting moderation.
2c-i, 2c-e, 2c-p https://smakcafe.ru Магазин работает ровно !!! Качество реагента высокое!!!бро а эффект очень слаб?
Your comment is awaiting moderation.
дайсон официальный сайт интернет https://www.fen-dn-kupit-1.ru .
Your comment is awaiting moderation.
коробки из картона считаются практичным вариантом упаковки для бизнеса и частных задач благодаря прочности и удобству использования Картонная упаковка обеспечивает защиту продукции от механических воздействий влаги и пыли при правильном подборе плотности Экологические свойства картона делают его востребованным в компаниях которые ценят устойчивое развитие и ответственность Современные коробки из картона выпускаются в различных размерах формах и вариантах конструкции включая самосборные модели Картонные коробки упрощают процессы комплектации хранения и отправки заказов Брендирование упаковки повышает узнаваемость компании и формирует доверие у клиентов Качественный гофрокартон сохраняет форму даже при длительном хранении Легкость конструкции снижает затраты на транспортировку и погрузку Благодаря доступной цене картонные коробки остаются оптимальным выбором для малого и крупного бизнеса Использование коробок из картона актуально для производства торговли складирования и личных нужд
https://tixmarketing.ru/
Your comment is awaiting moderation.
Heritage Living Hub – Easy navigation paired with thoughtfully curated modern heritage products.
Your comment is awaiting moderation.
Центр печатных услуг «Копирыч» https://kopirych.by предоставляет комплексные услуги нанесения печати на бумагу, а также ткани. Дополнительно мы специализируемся на изготовлении продукции для рекламы и бизнеса. Использование современного технического оборудования и безопасных материалов обеспечивает не только быстрый но и качественный заказ.
Your comment is awaiting moderation.
коробки из картона широко используются для хранения перевозки и отправки продукции за счет надежной конструкции и доступной стоимости Использование картона позволяет создавать упаковку под разные форматы продукции без лишних затрат Экологические свойства картона делают его востребованным в компаниях которые ценят устойчивое развитие и ответственность Разнообразие форматов позволяет подобрать упаковку под конкретный товар от мелких изделий до крупногабаритных грузов Для интернет магазинов коробки из картона являются основой надежной доставки заказов покупателям Брендирование упаковки повышает узнаваемость компании и формирует доверие у клиентов Прочные слои гофрокартона обеспечивают амортизацию и устойчивость к нагрузкам при штабелировании Коробки из картона удобны в использовании так как легко собираются и не требуют специального инструмента Благодаря доступной цене картонные коробки остаются оптимальным выбором для малого и крупного бизнеса Использование коробок из картона актуально для производства торговли складирования и личных нужд
https://tixmarketing.ru/
Your comment is awaiting moderation.
craftdiscoverhub – CraftDiscoverHub offers an effortless browsing experience with a blend of modern and artisan items.
Your comment is awaiting moderation.
продукт – прет дико и жестко, но по сути ничего интересного, цена в 2 тыр себя полностью оправдывает. Эдакий бычий кайф. Если вам нравится трястись и стучать зубами – вы попали по адресу. Во всех остальных случаях – нахер-нахер. Слабенькая 3/5 Купить Кокаин, Бошки, Шишки, Гашиш Млять, не хватает нервов, 2 дня уже пытаюсь через асю связаться с продавцом и всё безрезультатно.Ладно бы вообще не ответил, ато написал что ок и не счета куда делать перевод,и ничего.Всем здравствуйте! Опишу свою ситуацию: 2 недели назад заказывал в данном магазине 2 с-i и MXE, всё на высшем уровне: оперативность 5 +, доставка 5+, конспирация 5+, Качество 5+. Нареканий к Магазину нет, только благодарность!!! В этот раз сделал заказ в Понедельник, оплатил во Вторник. В пятницу только получил трек. На сегодня Трек не работает. Звоню в курьерку они говорят, что такой трек у них не зарегистрирован. Паники пока никакой нет, но хотелось бы получить какие нибудь разъяснения по этому поводу. Заранее спасибо!
Your comment is awaiting moderation.
Grand Forest Collection – Stunning studio offerings, arranged neatly for quick and smooth browsing.
Your comment is awaiting moderation.
Highland Meadow Goods – Smooth navigation with a calming aesthetic and inviting vibe.
Your comment is awaiting moderation.
Подробнее в один клик: Мануальные терапевты в Москве: цены и услуги рядом с вами
Your comment is awaiting moderation.
Любишь играть? list of top online games – ваш путеводитель в мире популярных онлайн игр. Мы собрали для вас актуальную информацию из мира онлайн игр на каждый день. На сайте вы сможете найти самые последние новости об играх, свежие обзоры и видео топовых игр, увлекательные истории и литературу по различным игровым вселенным и персонажам, а также почитать гайды по вашей любимой онлайн игре.
Your comment is awaiting moderation.
your daily shopping corner – Items are displayed clearly, navigating is quick and easy today.
Your comment is awaiting moderation.
Качество тоже супер. https://crawfish-1.ru как так его разве нету? с самого утра тут сижуДа просто дедушка форума ))
Your comment is awaiting moderation.
marketingsignal.click – Bookmarked this immediately, planning to revisit for updates and inspiration.
Your comment is awaiting moderation.
webreach.click – Found practical insights today; sharing this article with colleagues later.
Your comment is awaiting moderation.
clicklegend.click – Overall, professional vibe here; trustworthy, polished, and pleasantly minimal throughout.
Your comment is awaiting moderation.
clickcrafted.click – Appreciate the typography choices; comfortable spacing improved my reading experience.
Your comment is awaiting moderation.
clickamplify.click – Loved the layout today; clean, simple, and genuinely user-friendly overall.
Your comment is awaiting moderation.
Достойный магазин https://pushkin-cake.ru на сайте есть аська, напиши, мне в течении пяти минут отвечали.у тебя все пришло? отпиши в лс.
Your comment is awaiting moderation.
CommunityHubStore – Well-organized products, smooth browsing, and enjoyable user experience.
Your comment is awaiting moderation.
Urban Lifestyle Market – Intuitive browsing, fast-loading pages, and well-organized modern products.
Your comment is awaiting moderation.
WildShore Shop – Product variety is impressive, layout is intuitive and browsing is smooth.
Your comment is awaiting moderation.
Elevated Creative Hub – Products are unique, layout is clean, and browsing is simple.
Your comment is awaiting moderation.
StreetStyle Bloom – The colorful theme and simple structure make navigating the store feel effortless.
Your comment is awaiting moderation.
FLH Online Hub – Trendy items displayed well, browsing feels natural and fast.
Your comment is awaiting moderation.
Подключили интернет на дачу в Подмосковье для детей и работы. Скорость хорошая, видео и онлайн уроки идут без задержек. Сигнал уверенный благодаря правильно подобранной антенне. Установка заняла всего несколько часов. Теперь на даче так же комфортно, как в городе: интернет на дачу
Your comment is awaiting moderation.
Либо прекращаем флудить либо начну выдавать преды. Сами должны понимать что под новый год почтовые службы перегружены. Купить бошки, амфетамин, гашиш, лирику, мефедрон Всем привет вчера забегал в этот магазин ни чего не нашел !15 янв. в 6:00 Статус вашего заказа #100*****был изменен наОтправлен Заказ помещен в статус Отправлен,накладная №15 3800-****
Your comment is awaiting moderation.
Design Lifestyle Picks – The clean design layout makes exploring items a pleasure.
Your comment is awaiting moderation.
realz casino
Your comment is awaiting moderation.
дайсон купить стайлер для волос с насадками цена официальный сайт http://fen-dn-kupit-1.ru .
Your comment is awaiting moderation.
Wild Rose Emporium Online – Lovely boutique with a charming feel, discovered several nice surprises.
Your comment is awaiting moderation.
Либо вы прекращаете оффтопить в ветке магазина (к оффтопу относятся: сообщения НЕ по теме, личная переписка и т.п.) либо я буду банить. https://kamasutrajpg.ru Продолжаем работать, в этот раз чуть больше берем 🙂 очень хорошие скидки дает постоянным клиентам обращаетесь !!ааап магазину
Your comment is awaiting moderation.
trending finds shop – Products are neatly displayed, browsing feels smooth and effortless.
Your comment is awaiting moderation.
Golden Root Boutique – Beautiful presentation and fairly priced items make shopping pleasant.
Your comment is awaiting moderation.
Отличнный магазин https://metallugi.ru Дошло довольно быстроБудет что лучше АМ? Или из серии JWH?
Your comment is awaiting moderation.
This piece of writing gives clear idea designed for the new viewers of blogging, that in fact how to do blogging.
Your comment is awaiting moderation.
explorelimitlessideas – Perfect for generating fresh ideas and enhancing creative problem-solving skills.
Your comment is awaiting moderation.
Ваш дом – ваши правила:
дом из кирпича под ключ
выбирайте, как быстро
хотите заехать
строительство домов из газобетона в московской области
Вы сами решаете, на каком этапе завершить строительство. Дом можно получить в базовой комплектации, подготовленным к чистовой отделке или укомплектованным к заселению
Фиксированные сроки строительства и стоимость по договору для любого варианта готовности.
реф фура
https://ms-stroy.ru/ipoteka-na-stroitelstvo-doma/
Your comment is awaiting moderation.
ClassyTrendExpress – Clear design, stylish selections, and enjoyable navigation throughout.
Your comment is awaiting moderation.
Подключали интернет на дачу в Подмосковье и остались довольны результатом. Специалисты быстро подобрали оборудование под слабый сигнал и всё настроили на месте. Скорость стала стабильной даже в вечернее время. Теперь можно спокойно работать удаленно и смотреть видео. Связь не пропадает даже при плохой погоде. Отличное решение для дачного дома https://podklychi.ru/
Your comment is awaiting moderation.
Ваш дом – ваши правила:
дома из газобетона под ключ москва и московская область
выбирайте, как быстро
хотите заехать
калькулятор строительства дома из газобетона с крышей
Вы сами решаете, на каком этапе завершить строительство. Дом можно получить в базовой комплектации, подготовленным к чистовой отделке или укомплектованным к заселению
Фиксированные сроки строительства и стоимость по договору для любого варианта готовности.
фура грузовая
https://ms-stroy.ru/stroitelstvo_doma_10_10/
Your comment is awaiting moderation.
A seabed of shipwrecks
rutor24 to
The Great Lakes have the most shipwrecks per square mile among all bodies of water in the world, largely due to the high shipping traffic in the 19th century and the lake’s volatile weather. Researchers know about the wrecks because reporting any commercial ship that sails on the lakes is required; from the early 19th century to the 20th century, about 40,000 ships sailed the Great Lakes, Baillod said.
There are about 6,000 commercial vessels on the seabed of the Great Lakes, lost to storms or other issues. In Lake Michigan alone, there are over 200 shipwrecks waiting to be discovered, according to Baillod, who has created a database of these ships over the past three decades.
https://rutordark63xripv2a3skfrgjonvr3rqawcdpj2zcbw3sigkn6l3xpad.net
rutor forum
Wrecks in the Great Lakes have been found since the 1960s, but in recent years the rate of these finds has accelerated greatly, in part due to media attention, clearer waters and better technology, Baillod said. Some wreck hunters and media outlets call this the golden age for shipwreck discoveries.
“There’s a lot more shipwreck awareness now on the Great Lakes, and people are looking down in the water at what’s on the bottom,” he added. Part of the reason it’s easier to see in the water is thanks to quagga mussels — an invasive species that was introduced in the 1990s. The mollusks have filtered most of the lakes, turning them from their old greenish hue, which allowed for only a few feet of visibility, to clear blue. Now, the lakes have visibility of up to 50 to 100 feet (15 to 30.5 meters), Baillod explained.
“Tourism has popped up around paddle boarding and kayaking, and these shipwrecks are visible from the surface because the water is so clear,” he added.
Related article
The wreckage of the Mary Rose at The Mary Rose Museum in Portsmouth, England.
A Tudor warship sank nearly 500 years ago. The bones of its crew reveal what life was like
And then there are advancements in technology. “Side-scan sonar used to cost $100,000 back in 1980,” he said. “The one we used to find this (shipwreck) was just over $10,000. They’ve really come down in price.”
The National Oceanographic and Atmospheric Administration, or NOAA, has a project in the works to map the bottom of the Great Lakes in high resolution by 2030. If the organization succeeds, all shipwrecks will be found, Baillod said.
In the meantime, Baillod said he hopes he and his team will continue to discover missing shipwrecks from his database in the coming years and bring along citizen scientists for the ride: “I keep looking, and I don’t doubt that we’ll keep finding.”
Your comment is awaiting moderation.
гаем аренду трала ( низкоразмерный ) для перевозки негабаритных грузов, спецтехники.
перевозка токарных станков
Теперь Вы сможете без проблем осуществлять перевозки грузов любых размеров и форм.
грузоперевозки по москве
Наши тралы обладает высокой грузоподъемностью и широкой платформой, что позволяет
безопасно и эффективно перевозить различные виды негабаритных грузов.
Мы предоставляем услуги аренды трала по выгодным ценам, которые доступны для любого бюджета. Наша команда профессиональных водителей с многолетним опытом гарантирует безопасную и надежную перевозку Ваших грузов. Мы знаем, как обращаться с негабаритными грузами и обеспечить их сохранность.
Ваше время ценно для нас! Мы всегда придерживаемся согласованных сроков и готовы к оперативному выполнению заказа.
Не теряйте время на поиск альтернативных решений, обратитесь к профессионалам и получите качественный сервис.
Мы готовы предложить индивидуальные условия сотрудничества и разработать оптимальный маршрут для
каждого конкретного заказа. Мы понимаем, что каждый груз уникален, и готовы предоставить
индивидуальный подход.
грузоперевозки по москве и московской области https://tlk-triga.ru/perevozka_opasnogo_gruza/
Your comment is awaiting moderation.
Интернет на даче был необходим для системы видеонаблюдения и умного дома. Мобильный 3G 4G интернет подошел идеально. Установка выполнена аккуратно и профессионально. Сигнал уверенный и стабильный. Теперь можно контролировать дом дистанционно – https://podklychi.ru/
Your comment is awaiting moderation.
shopperchoice – ShopperChoice offers a clean layout and smooth functionality for an enjoyable experience.
Your comment is awaiting moderation.
кто знает когда рега будет ? https://oboiug-shop.ru на вкус – сода.сервис – хуже некуда. Ну да об этом писал несколькими сообщениями ранее. 2/5
Your comment is awaiting moderation.
Fashion Finds Daily – Collections are impressive, browsing feels effortless and smooth.
Your comment is awaiting moderation.
Urban Choice Online – Intuitive navigation and neatly displayed products provide a pleasant experience.
Your comment is awaiting moderation.
Ethical Lifestyle Finds – Top-quality products and ethical focus make shopping feel rewarding.
Your comment is awaiting moderation.
Timber Crest Creative – Enjoyed the artistic layout, every piece feels intentional.
Your comment is awaiting moderation.
у меня все без подогрева растворилось https://smakcafe.ru возможно мои письма рубятся где-то? там все четко по делу.Ребят я не терпила и не превык чтоб меня кидали и вы тоже я думаю и если нас кинули то я предлогаю мстить таким образам для начала надо писать на всвсех форумах где есть этом магаз о том что это кидала а не довереный магаз не лениться и писать каждый день об этом чтоб все браза знали правду и не постродали как мы
Your comment is awaiting moderation.
qualityproductszone – QualityProductsZone features a well-selected range that’s easy to explore.
Your comment is awaiting moderation.
shop top picks – Finds appear attractive, browsing experience is smooth and pleasant.
Your comment is awaiting moderation.
a href=”https://discoveryourpurpose.click/” />PurposeFinder Online – Inspiring layout paired with a simple, natural browsing flow.
Your comment is awaiting moderation.
Обзор популярных моделей iPhone в Стерлитамаке
iphone 13 pro купить стерлитамак
Выбираем новый iPhone и живем в Стерлитамаке? Узнайте обо всех достоинствах актуальных моделей и определите оптимальную покупку. Мы проанализировали рынок смартфонов региона и выбрали лучшие предложения, подходящие каждому потребителю.
Модели iPhone, доступные в Стерлитамаке
купить iphone стерлитамак
Новейший iPhone 17 — настоящая находка для поклонников яблочных гаджетов. Аппарат оснащен великолепным AMOLED-дисплеем, производительной платформой и аккумулятором, которого хватает надолго. Эта модель станет идеальным спутником активного образа жизни и сможет удовлетворить потребности практически любого пользователя.
iphone 17 стерлитамак
Модель iPhone 16 отлично подойдёт тем, кто хочет получить достойный уровень производительности, сохраняя умеренность расходов. Телефон оборудован современной системой обработки данных, хорошим набором датчиков и качественной фотокамеры. Прекрасный вариант для студентов, молодых профессионалов и активных горожан.
iPhone 13 Стерлитамак
ipad 11 2025 купить стерлитамак
Классика жанра — iPhone 13 всё ещё остается популярным вариантом среди жителей Стерлитамака. Модель доступна по привлекательной цене и характеризуется прочным корпусом, качественным звуком и ярким дисплеем. Отличный выбор для ежедневного использования.
iPhone 16 Pro Стерлитамак
Для истинных фанатов айфонской культуры подойдет iPhone 16 Pro. Устройство сочетает высокие показатели быстродействия, ультрачеткую камеру и долговечность конструкции. Такая модель способна обеспечить владельцу максимальный комфорт в работе и развлечениях.
iPhone 17 Pro Стерлитамак
Топовая линейка iPhone 17 Pro рассчитана на самую взыскательную аудиторию. Мощнейший процессор, максимальная скорость отклика, профессиональный модуль камеры — всё это объединяет владелец iPhone 17 Pro. Настоящий выбор для перфекционистов и творческих личностей.
Итоговый вывод
Рассматривая рынок iPhone в Стерлитамаке, каждый покупатель найдет себе устройство по душе. Главное — чётко понимать цели и нужды, чтобы точно определить нужную модель и не ошибиться с выбором. Будь то простой, но добротный iPhone 13 или суперсовременный iPhone 17 Pro — выбор правильного смартфона обеспечит приятные впечатления и комфортное использование.
купить iphone стерлитамак
https://sterlitamak.applemarketrf.ru/catalog/ipad/
Your comment is awaiting moderation.
Обзор популярных моделей iPhone в Стерлитамаке
iphone 17 стерлитамак
Выбираем новый iPhone и живем в Стерлитамаке? Узнайте обо всех достоинствах актуальных моделей и определите оптимальную покупку. Мы проанализировали рынок смартфонов региона и выбрали лучшие предложения, подходящие каждому потребителю.
Модели iPhone, доступные в Стерлитамаке
iphone 17 pro стерлитамак
Новейший iPhone 17 — настоящая находка для поклонников яблочных гаджетов. Аппарат оснащен великолепным AMOLED-дисплеем, производительной платформой и аккумулятором, которого хватает надолго. Эта модель станет идеальным спутником активного образа жизни и сможет удовлетворить потребности практически любого пользователя.
айфоны стерлитамак купить новый
Модель iPhone 16 отлично подойдёт тем, кто хочет получить достойный уровень производительности, сохраняя умеренность расходов. Телефон оборудован современной системой обработки данных, хорошим набором датчиков и качественной фотокамеры. Прекрасный вариант для студентов, молодых профессионалов и активных горожан.
iPhone 13 Стерлитамак
iphone 17 стерлитамак
Классика жанра — iPhone 13 всё ещё остается популярным вариантом среди жителей Стерлитамака. Модель доступна по привлекательной цене и характеризуется прочным корпусом, качественным звуком и ярким дисплеем. Отличный выбор для ежедневного использования.
iPhone 16 Pro Стерлитамак
Для истинных фанатов айфонской культуры подойдет iPhone 16 Pro. Устройство сочетает высокие показатели быстродействия, ультрачеткую камеру и долговечность конструкции. Такая модель способна обеспечить владельцу максимальный комфорт в работе и развлечениях.
iPhone 17 Pro Стерлитамак
Топовая линейка iPhone 17 Pro рассчитана на самую взыскательную аудиторию. Мощнейший процессор, максимальная скорость отклика, профессиональный модуль камеры — всё это объединяет владелец iPhone 17 Pro. Настоящий выбор для перфекционистов и творческих личностей.
Итоговый вывод
Рассматривая рынок iPhone в Стерлитамаке, каждый покупатель найдет себе устройство по душе. Главное — чётко понимать цели и нужды, чтобы точно определить нужную модель и не ошибиться с выбором. Будь то простой, но добротный iPhone 13 или суперсовременный iPhone 17 Pro — выбор правильного смартфона обеспечит приятные впечатления и комфортное использование.
часы apple watch купить стерлитамак
https://sterlitamak.applemarketrf.ru/catalog/iphone/iphone-17-pro-max/apple-iphone-17-pro-max-1tb-cosmic-orange/
Your comment is awaiting moderation.
<Golden Harbor Collection – Products look attractive and reliable, with effortless navigation.
Your comment is awaiting moderation.
Crest Studio Finds – Impressive selections throughout, paired with a layout that feels intuitive and modern.
Your comment is awaiting moderation.
Современная Стоматология в Воронеже лечение кариеса, протезирование, имплантация, профессиональная гигиена и эстетика улыбки. Квалифицированные специалисты, точная диагностика и забота о пациентах.
Your comment is awaiting moderation.
New in the Category: https://tinyurl.com/brazzinocasino
Your comment is awaiting moderation.
Northern Peak Treasures – Peak-inspired products arranged neatly, browsing feels natural and fast.
Your comment is awaiting moderation.
Design World Picks – Great assortment of designs, layout makes finding items effortless.
Your comment is awaiting moderation.
Neironica https://neironica.ru онлайн?платформа с ИИ?инструментами для создания Контент-завода, и автоматизации публикации статей, постов и видео во все соцсети
Your comment is awaiting moderation.
Deal Store Fashion – Store features appealing collections, exploring feels intuitive and fast.
Your comment is awaiting moderation.
Authentic World Collection – Easy-to-use site with carefully curated global treasures.
Your comment is awaiting moderation.
Urban Ridge Goods – Sleek and organized design, products are easy to find and appealing.
Your comment is awaiting moderation.
FashionTrendsHub – Stylish products displayed well, browsing through the site was smooth.
Your comment is awaiting moderation.
shop deal picks – Deals look solid, navigating the site feels effortless.
Your comment is awaiting moderation.
Neironica https://neironica.ru онлайн?платформа с ИИ?инструментами для создания Контент-завода, и автоматизации публикации статей, постов и видео во все соцсети
Your comment is awaiting moderation.
<Trusted Global Market – Products shown clearly with a user-friendly and trustworthy layout.
Your comment is awaiting moderation.
ChicTrendStore – Modern pieces showcased clearly, with intuitive browsing throughout.
Your comment is awaiting moderation.
No, you can download videos of any length and select your preferred quality, including HD,
if available.
Your comment is awaiting moderation.
NightBloom Select Hub – Attractive selections displayed clearly, shopping is fast and enjoyable.
Your comment is awaiting moderation.
Goldcrest Studio Picks – Items look refined and browsing through sections feels seamless.
Your comment is awaiting moderation.
The Premium Hub – Loved the selection, navigation is intuitive and effortless.
Your comment is awaiting moderation.
Wild Bird Hub Online – Artistic and carefully chosen items, browsing was a delight.
Your comment is awaiting moderation.
Fashion Deal Place – Great deals showcased here, shopping feels smooth and items look affordable.
Your comment is awaiting moderation.
>Future Essentials Marketplace – Navigation is seamless and products feel cutting-edge.
Your comment is awaiting moderation.
https://www.addu.edu.ph/uito/2015/07/09/hello-world/#comment-391802
https://blogs.uoregon.edu/mmj3/2015/03/17/the-windows-to-subtle-reenactment-a-tension-building-tool/#comment-206705
http://www.vladimir.ru/forum/forum/thread/55831
https://blogs.memphis.edu/padm3601/2015/02/10/is-it-the-teachers-fault/#comment-597105
https://obovsem.myqip.ru/?1-8-0-00012021-000-0-0-1765558660
Your comment is awaiting moderation.
https://sohailafzal112.blogerus.com/60752755/code-promo-melbet-dakar-rush200-130-instant
Your comment is awaiting moderation.
доставка цветов цена
Your comment is awaiting moderation.
Профессиональное обучение prp терапии. Осваиваем современные техники, стандарты безопасности и нюансы работы с пациентами. Теория, практика и поддержка на всех этапах обучения.
Your comment is awaiting moderation.
https://bbs.superbuy.com/forum.php?mod=viewthread&tid=741575&extra=
Your comment is awaiting moderation.
Fashion Discover Hub – A polished design with quick-loading product pages enhances exploration.
Your comment is awaiting moderation.
SoftPetal Storefront – Has that soft, inviting mood that makes exploring really fun.
Your comment is awaiting moderation.
LearnVaultSpot – Helpful content, site feels clean and easy to browse.
Your comment is awaiting moderation.
shop hub picks – Products look strong, browsing experience is smooth and pleasant.
Your comment is awaiting moderation.
premiumdecorzone – PremiumDecorZone features elegant designs and smooth navigation for effortless exploration.
Your comment is awaiting moderation.
Smart Design Store – Smart layout and clean visuals make exploring simple and enjoyable.
Your comment is awaiting moderation.
ConnectBoost Hub – The vibe is warm and uplifting, and the site layout is simple to explore.
Your comment is awaiting moderation.
ultraclicks.click – Loved the layout today; clean, simple, and genuinely user-friendly overall.
Your comment is awaiting moderation.
swiftboost.click – Appreciate the typography choices; comfortable spacing improved my reading experience.
Your comment is awaiting moderation.
rankmaximo.click – Navigation felt smooth, found everything quickly without any confusing steps.
Your comment is awaiting moderation.
clickrealm.click – Bookmarked this immediately, planning to revisit for updates and inspiration.
Your comment is awaiting moderation.
rankloom.click – Found practical insights today; sharing this article with colleagues later.
Your comment is awaiting moderation.
дайсон стайлер для волос купить официальный сайт с насадками цена http://stajler-d.ru/ .
Your comment is awaiting moderation.
VisionExpressHub – Layout is clean, items are inspiring, and shopping is simple and smooth.
Your comment is awaiting moderation.
Modern Intent Hub – Smooth and clean browsing experience, products feel purposeful and high-quality.
Your comment is awaiting moderation.
NatureRoot Treasures – Natural products arranged neatly, shopping feels effortless today.
Your comment is awaiting moderation.
מספר הרכב הוא אחד הצעדים הראשונים שכל קונה רכב בישראל צריך לבדוק לפני קבלת החלטה. הפרטים מאפשרים להבין את מצבו האמיתי של הרכב ולמנוע הפתעות. בדיקת רכב מקיפה בישראל הפכה לכלי חובה לקונים פרטיים. המכון מספק דו״ח מפורט שמציג את מצב המערכות ומדדי הבטיחות. אחת הנקודות החשובות בבדיקה היא מערכת השלדה והבטיחות. גם מערכת החשמל והאלקטרוניקה דורשות תשומת לב. רבים מהקונים מופתעים לגלות ליקויים רק לאחר רכישה, ולכן בדיקה מוקדמת חוסכת כסף ועגמת נפש. במהלך נסיעה ניתן להרגיש את תגובת המנוע, תיבת ההילוכים והבלמים. מערכות מחשב מציגות ערכים המשפיעים ישירות על איכות ובטיחות הרכב. היעדר תיעוד עשוי להצביע על תחזוקה לקויה. חשוב להשוות בין מספר מכונים ולבחור גוף אמין ובעל ניסיון. הדו״ח מספק תמונה מלאה המאפשרת לנהל משא ומתן על המחיר. רכישת רכב אחרי בדיקה איכותית מעניקה שקט נפשי ובטיחות. השקעה בבדיקה משתלמת ותורמת לרכישה בטוחה ושקולה. כך ניתן לרכוש רכב משומש בישראל בביטחון מלא וללא סיכונים מיותרים.
https://ashkelonim.co.il/%d7%a6%d7%a8%d7%9b%d7%a0%d7%95%d7%aa-%d7%aa%d7%95%d7%9b%d7%9f-%d7%a9%d7%99%d7%95%d7%95%d7%a7%d7%99/%d7%91%d7%93%d7%99%d7%a7%d7%aa-%d7%a8%d7%9b%d7%91-%d7%91%d7%99%d7%a9%d7%a8%d7%90%d7%9c-%d7%9e%d7%93%d7%a8%d7%99%d7%9a-%d7%9e%d7%a7%d7%99%d7%a3-%d7%9c%d7%a8%d7%9b%d7%99%d7%a9%d7%94-%d7%91%d7%98%d7%95%d7%97%d7%94-706243
Your comment is awaiting moderation.
TallCedar Finds – Charming market layout with plenty to explore, really enjoyed it.
Your comment is awaiting moderation.
נתוני הרישוי הוא אחד הצעדים הראשונים שכל קונה רכב בישראל צריך לבדוק לפני קבלת החלטה. במידע זה ניתן למצוא היסטוריית טיפולים, בעלויות קודמות ומצב רישוי עדכני. הדרך לרכוש רכב בלי סיכונים עוברת דרך בדיקה מקיפה. בדיקה מקצועית במכון מוכר מעניקה שקיפות מלאה על מצב הרכב. בדיקה איכותית מתמקדת בשלמות מבנית ובנתוני בטיחות קריטיים. חשוב לוודא שכל המערכות האלקטרוניות פועלות ללא תקלות. בדיקה מוקדמת מגלה תקלות שיכולות לעלות אלפי שקלים. נסיעת מבחן מאפשרת לזהות רעשים, רעידות ובעיות תפעול. ניתוח נתונים אלה מסייע להבין האם הרכב טופל כראוי. לפני רכישה מומלץ לבחון גם את היסטוריית הטיפולים במוסך. חשוב להשוות בין מספר מכונים ולבחור גוף אמין ובעל ניסיון. הדו״ח מספק תמונה מלאה המאפשרת לנהל משא ומתן על המחיר. בדיקה נכונה מגינה על הקונה מפני טעויות ותקלות יקרות. בשל ריבוי התאונות והתיקונים, בדיקה היא שלב קריטי שאין לדלג עליו. כך ניתן לרכוש רכב משומש בישראל בביטחון מלא וללא סיכונים מיותרים.
https://ashkelonim.co.il/%d7%a6%d7%a8%d7%9b%d7%a0%d7%95%d7%aa-%d7%aa%d7%95%d7%9b%d7%9f-%d7%a9%d7%99%d7%95%d7%95%d7%a7%d7%99/%d7%91%d7%93%d7%99%d7%a7%d7%aa-%d7%a8%d7%9b%d7%91-%d7%91%d7%99%d7%a9%d7%a8%d7%90%d7%9c-%d7%9e%d7%93%d7%a8%d7%99%d7%9a-%d7%9e%d7%a7%d7%99%d7%a3-%d7%9c%d7%a8%d7%9b%d7%99%d7%a9%d7%94-%d7%91%d7%98%d7%95%d7%97%d7%94-706243
Your comment is awaiting moderation.
dyson com официальный сайт https://www.stajler-d-1.ru .
Your comment is awaiting moderation.
Thoughtful Lifestyle Marketplace – The store highlights products chosen with intention, making browsing easy.
Your comment is awaiting moderation.
Glow Lane Deals – Products look inviting, and exploring the store is simple and pleasant.
Your comment is awaiting moderation.
Fashion Hub Daily – Selections are trendy and neat, and site navigation is enjoyable.
Your comment is awaiting moderation.
официальный дайсон http://www.stajler-d-2.ru .
Your comment is awaiting moderation.
value choice center – Items appear strong, shopping feels pleasant and easy.
Your comment is awaiting moderation.
GrowFocusSpot – Inspiring posts, moving through pages was comfortable.
Your comment is awaiting moderation.
Curated Fashion Hub – Calm, organized layout with clear sections for seamless navigation.
Your comment is awaiting moderation.
Профессиональные инъекционная косметология обучение теория, практика, безопасность и современные подходы к эстетическим процедурам. Помогаем получить уверенные навыки и системные знания для работы.
Your comment is awaiting moderation.
Образовательный блог https://educationruss.ru об обучении за границей. Университеты и колледжи, языковые курсы, условия поступления, стоимость, документы и жизнь студентов. Полезные статьи и рекомендации для абитуриентов и родителей.
Your comment is awaiting moderation.
Школа блогеров https://vdskill.ru и видеотехнологий для авторов и предпринимателей. Создание видео, сторителлинг, монтаж и продвижение. Практические занятия, поддержка наставников и актуальные инструменты для роста.
Your comment is awaiting moderation.
Блог Елены Беляевой https://bestyleacademy.ru профессионального стилиста. Разборы гардероба, капсульные коллекции, советы по стилю и актуальным трендам. Практика, вдохновение и понятные рекомендации для женщин и мужчин.
Your comment is awaiting moderation.
Top Deals Market – A tidy interface that presents bargains in a straightforward and enjoyable way.
Your comment is awaiting moderation.
BudgetExpressStore – Products are clear, navigation is simple, and shopping is quick.
Your comment is awaiting moderation.
carefullychosenluxury – Carefullychosenluxury has an elegant selection that made browsing feel premium and fun.
Your comment is awaiting moderation.
NameDrift Curated – Boutique collections arranged well, browsing feels enjoyable and quick.
Your comment is awaiting moderation.
Bright Mode Market – The product arrangement is visually pleasing, and browsing feels relaxed.
Your comment is awaiting moderation.
дайсон фен купить официальный https://www.stajler-d.ru .
Your comment is awaiting moderation.
EverForest Collection Online – Browsing is effortless thanks to a simple, well-presented setup.
Your comment is awaiting moderation.
Sunrise Studio Link – Really liked the aesthetic here; everything feels thoughtfully arranged.
Your comment is awaiting moderation.
Next Gen Lifestyle Hub – Products are innovative and browsing the site is effortless and fun.
Your comment is awaiting moderation.
https://prathamonline.com/
Your comment is awaiting moderation.
http://www.mypushkin.ru/topic/21045/
Your comment is awaiting moderation.
https://sernexuss.com/
Your comment is awaiting moderation.
https://ween.tn/
Your comment is awaiting moderation.
clickspider.click – Navigation felt smooth, found everything quickly without any confusing steps.
Your comment is awaiting moderation.
https://writeablog.net/ub8neoxy4h
Your comment is awaiting moderation.
growthlane.click – Appreciate the typography choices; comfortable spacing improved my reading experience.
Your comment is awaiting moderation.
ranknova.click – Bookmarked this immediately, planning to revisit for updates and inspiration.
Your comment is awaiting moderation.
Hub Fashion Picks – Fashion choices are neatly displayed, making it simple to explore categories.
Your comment is awaiting moderation.
pureforeststudio – Browsing this store feels peaceful, design is clean and done.
Your comment is awaiting moderation.
clicklyst.click – Mobile version looks perfect; no glitches, fast scrolling, crisp text.
Your comment is awaiting moderation.
дайсон официальный сайт интернет http://www.stajler-d-1.ru .
Your comment is awaiting moderation.
Forest Lane Marketplace – Lovely forest-themed options, and navigation is smooth and simple.
Your comment is awaiting moderation.
noble collection – Navigation felt natural and items were visually appealing.
Your comment is awaiting moderation.
dyson сайт официальный в россии https://stajler-d-2.ru/ .
Your comment is awaiting moderation.
modern fashion finds – Selections look stylish, site layout is clean and easy to use.
Your comment is awaiting moderation.
PersonalGrowthVault – Inspiring reads and moving through pages was effortless.
Your comment is awaiting moderation.
Design Forward Hub – Sleek presentation with smooth transitions and clearly defined sections.
Your comment is awaiting moderation.
antiquemarketcentral – AntiqueMarketCentral features well-curated products that reflect timeless style.
Your comment is awaiting moderation.
Flora Emporium Hub – Clear structure, attractive visuals, and quick browsing throughout.
Your comment is awaiting moderation.
ValueSpotOutlet – Smooth shopping experience, items are well organized, and navigation is fast.
Your comment is awaiting moderation.
Purposeful Selection Hub – Browsing felt easy and pleasant, products are curated with care and attention.
Your comment is awaiting moderation.
Wild Rose Studio Boutique – Lovely boutique vibe, discovering products was smooth and pleasant.
Your comment is awaiting moderation.
Mountain View Store – Outlet items look great, navigation feels intuitive and smooth.
Your comment is awaiting moderation.
Затарил я тут как то купели значит курехи,приваливай на адрес и не могу найти списался с оператором и понял что дурак тут я а не минер затупил,30 сек и закладка у меня в руках,лечу Домой,дома меня ждут уже братики заряжает по 2 водных и начинаем пускать слюни под спанч бобра, в полне хороший стафф,силы стафа хватает,валит минут 40-60 потом спад,получилось так что вес сдули за 2 дня,отходосы минемальные, вообщем сервис тут вышка тарился тут ребята) купить кокаин, мефедрон, гашиш, бошки, лирика ЛУЧШИЕ ИЗ ЛУЧШИХ НЕ РАЗ ЗАКАЗЫВАЛ И БУДУ ЗАКАЗЫВАТЬ!!!!значит ты чо то намутил , а вещество я заказывал в этом магазе норм для RCS естественно
Your comment is awaiting moderation.
Next Gen Essentials Hub – Smooth shopping experience with innovative and practical products.
Your comment is awaiting moderation.
MoonGlow Studio – Minimal design with appealingly displayed items enhances usability.
Your comment is awaiting moderation.
качество очень хорошее не подведёт даже не сомневайся https://buket-77.ru Ну теперь к самому главному – качество!из тех что есть в наличии у чемикала… ну разве что с 307го, но я его не пробовал, говорят самое норм – 1к15. да и он самый долгий и сильный из всех доступных ЖВШ на данный момент на рынке..
Your comment is awaiting moderation.
дайсон официальный сайт фен купить stajler-d.ru .
Your comment is awaiting moderation.
Fresh Season Picks – Browsing is easy, and everything from products to sections feels well-organized.
Your comment is awaiting moderation.
https://fr.chatflirt18.ru/
Your comment is awaiting moderation.
Application mobile xbet burkina. Paris sportifs en ligne, football et tournois populaires, evenements en direct et statistiques. Presentation de l’application et de ses principales fonctionnalites.
Your comment is awaiting moderation.
http://antrem.ru/cb-profile/pluginclass/cbblogs?action=blogs&func=show&id=2248
Your comment is awaiting moderation.
https://kz.gay24chat.com/
Your comment is awaiting moderation.
Unique Value Picks – Neatly arranged products with smooth navigation and pleasant page flow.
Your comment is awaiting moderation.
https://rf.ruletka-888.com/
Your comment is awaiting moderation.
La plateforme en ligne telecharger 1xbet apk: paris sportifs en ligne, matchs de football, evenements en direct et statistiques. Description du service, marches disponibles, cotes et principales fonctionnalites du site.
Your comment is awaiting moderation.
https://in.live18sex.ru/
Your comment is awaiting moderation.
La plateforme 1xbet apk: paris sportifs en ligne, matchs de football, evenements en direct et statistiques. Description du service, marches disponibles, cotes et principales fonctionnalites du site.
Your comment is awaiting moderation.
Site web 1xbet apk rdc – paris sportifs en ligne sur le football et autres sports. Propose des paris en direct et a l’avance, des cotes, des resultats et des tournois. Description detaillee du service, des fonctionnalites du compte et de son utilisation au Congo.
Your comment is awaiting moderation.
Site web de pari foot rdc: paris sportifs, championnats de football, resultats des matchs et cotes. Informations detaillees sur la plateforme, les conditions d’utilisation, les fonctionnalites et les evenements sportifs disponibles.
Your comment is awaiting moderation.
trend picks store – Items look appealing, navigating the site feels effortless today.
Your comment is awaiting moderation.
фен дайсон оригинал фен дайсон оригинал .
Your comment is awaiting moderation.
Forest Goods Online – Affordable and useful items displayed neatly, making discovery easy.
Your comment is awaiting moderation.
Ещё и сообщения трут. https://macroai.ru Давай зафиналим на мировой.Хороший магазин все качественно и оперативно и быстро, всегда здесь покупаю.
Your comment is awaiting moderation.
дайсон официальный сайт фен stajler-d-2.ru .
Your comment is awaiting moderation.
Fast Load Clickping – Quick-loading pages paired with a clean, modern interface.
Your comment is awaiting moderation.
Что случилось? почему страшно? https://vector-fin.ru Всем по привету!Все легально и проверено, есть NMR. Плохого ни чего не случиться. Скорей всего приняли потому что были паленые….
Your comment is awaiting moderation.
RainyCity Finds Hub – Smooth scrolling, well-arranged items, and an attractive theme overall.
Your comment is awaiting moderation.
Образовательный блог https://za-obrazovanie.ru о методиках обучения и развитии навыков. Статьи о преподавании, педагогике, оценивании, мотивации и работе с детьми и взрослыми. Практика, кейсы и полезные материалы.
Your comment is awaiting moderation.
Обучение родителей https://mother-massage.ru массажу и гимнастике для детей от рождения до года. Практические занятия, безопасные техники, развитие моторики и укрепление здоровья малыша. Поддержка специалиста, пошаговые рекомендации и уверенность родителей.
Your comment is awaiting moderation.
Школа БПЛА https://obucheniebpla.ru обучение управлению беспилотными летательными аппаратами с нуля и для продвинутых. Практика полётов, основы безопасности, навигация, аэрофотосъёмка и подготовка операторов дронов по современным стандартам.
Your comment is awaiting moderation.
Сервис помощи https://students-helper.ru студентам с учебными работами. Курсовые, контрольные, рефераты, отчёты и презентации. Индивидуальный подход, соблюдение сроков, доработки по требованиям преподавателя и конфиденциальность.
Your comment is awaiting moderation.
Курсы арабского языка https://shams-arab.ru блог с полезными статьями, упражнениями и примерами. Разбираем грамматику, лексику, диалоги и особенности языка. Делимся советами по обучению, мотивации и выбору формата занятий.
Your comment is awaiting moderation.
SmartDealsHub – Fast-loading, easy-to-use interface with great value items.
Your comment is awaiting moderation.
Creative Market Collective – Pleasantly engaging displays and thoughtfully arranged items, really enjoyed exploring.
Your comment is awaiting moderation.
Mountain Star Select – Stylish goods presented clearly, exploring feels effortless and smooth.
Your comment is awaiting moderation.
WildBrook Modern Picks – Loved the curated modern items, easy to explore and visually appealing.
Your comment is awaiting moderation.
почта России https://onlinesitefixer.ru брали 10 гр реги ))))Вот уже Артем хохочет,
Your comment is awaiting moderation.
Wild Rose Studio Boutique – Lovely boutique vibe, discovering products was smooth and pleasant.
Your comment is awaiting moderation.
Don’t miss it here: https://vps86960.articlesblogger.com/61245051/challenge-yourself-with-timed-puzzle-modes
Your comment is awaiting moderation.
Нужен аккумулятор? магазин аккумуляторов в санкт петербурге подбор АКБ по марке и модели авто, большой выбор ёмкости и пускового тока. Доставка, самовывоз, выгодные условия и помощь в установке.
Your comment is awaiting moderation.
то ты-цифровая личность, я не за граммы говорю, а за общение и так-то не я один, обещаешь много-толку мало, 2 года – не срок, бомбануть и тебя могли, это вот твоим языком написано, если нормально не понимаешь, еще раз прошу участия администрации в данном вопросе купить кокаин, мефедрон, гашиш, бошки, лирика Сделал очередной заказ в этом магазине:good: всё пришло качество как всегда радует буду дальше работать с вами:good:приятно иметь дела с ответственными партнёрами:voo-hoo: процветания вашему магазину:):):)может ты просто сам не учел проценты комиссии и тебе не хватило???
Your comment is awaiting moderation.
Нужно межевание? кадастровое межевание земельного участка профессиональное межевание участка для оформления и регистрации прав. Геодезические измерения, уточнение границ, межевой план, сопровождение в Росреестре. Опытные кадастровые инженеры, точность и прозрачная стоимость.
Your comment is awaiting moderation.
Продажа тяговых аккумуляторных https://e-battery.ru батарей для вилочных погрузчиков – надёжные решения для стабильной работы складской техники. Подбор АКБ по параметрам, доставка, установка, долгий ресурс и высокая производительность для интенсивной эксплуатации
Your comment is awaiting moderation.
Профессиональное агентство интернет маркетинга для малого и среднего бизнеса. Настройка рекламы, продвижение сайтов, рост заявок и продаж. Аналитика, оптимизация и постоянный контроль эффективности рекламных кампаний.
Your comment is awaiting moderation.
ranklogic.click – Overall, professional vibe here; trustworthy, polished, and pleasantly minimal throughout.
Your comment is awaiting moderation.
nextclicks.click – Color palette felt calming, nothing distracting, just focused, thoughtful design.
Your comment is awaiting moderation.
rankjet.click – Loved the layout today; clean, simple, and genuinely user-friendly overall.
Your comment is awaiting moderation.
clicklance.click – Color palette felt calming, nothing distracting, just focused, thoughtful design.
Your comment is awaiting moderation.
modern picks hub – Shopping options appear stylish, site loads quickly without issues.
Your comment is awaiting moderation.
digitalshift.click – Found practical insights today; sharing this article with colleagues later.
Your comment is awaiting moderation.
фен дайсон купить официальный сайт stajler-d.ru .
Your comment is awaiting moderation.
дайсон стайлер для волос с насадками официальный сайт цена купить https://www.stajler-d-2.ru .
Your comment is awaiting moderation.
дайсон фен оригинал купить дайсон фен оригинал купить .
Your comment is awaiting moderation.
GlowMarket Picks – Clean, crisp design with well-placed products keeps the shop elegant and accessible.
Your comment is awaiting moderation.
дайсон фен цена официальный сайт http://www.stajler-d.ru .
Your comment is awaiting moderation.
UniqueGift Lane Online – Smooth interface and well-arranged products create a seamless browsing experience.
Your comment is awaiting moderation.
Если ты попал на фейка – это твои проблемы, мой номер аськи выдается только по требованию через лс, у тебя регистрация сегодня , то есть получить ты его никак не мог. Иди разводом занимайся в другом месте. купить кокаин, мефедрон, гашиш, бошки, лирика Достойны уважения!”Думаю все угорали по детству Делали дымовушку “Гидропирит VS Анальгин”
Your comment is awaiting moderation.
Positive Living Store – The site feels welcoming and loads quickly for a calm experience.
Your comment is awaiting moderation.
Everwood Corner – Smooth navigation and well-presented supplies make exploring easy.
Your comment is awaiting moderation.
Premium Style Hub – Stylish premium items arranged neatly with intuitive navigation.
Your comment is awaiting moderation.
<consciousmarketcentral – ConsciousMarketCentral offers stylish, ethical products with smooth and enjoyable navigation.
Your comment is awaiting moderation.
Надёжный эвакуатор Дмитров — помощь на дороге 24 часа. Эвакуация легковых и коммерческих авто, кроссоверов и мотоциклов. Современная техника, фиксированная стоимость, быстрый выезд по городу и области.
Your comment is awaiting moderation.
Срочный эвакуатор Дмитров: оперативный выезд, подача от 20 минут. Перевозка автомобилей после ДТП и поломок, межгород, бережная транспортировка. Работаем круглосуточно, без скрытых доплат, принимаем заявки в любое время.
Your comment is awaiting moderation.
Женский журнал https://eternaltown.com.ua о стиле, красоте и здоровье. Мода и тренды, уход за кожей и волосами, отношения и психология, дом и семья, карьера и саморазвитие. Полезные советы, подборки, интервью и вдохновение каждый день.
Your comment is awaiting moderation.
Туристический портал https://prostokarta.com.ua о путешествиях по России и миру: маршруты, города и страны, советы туристам, визы и перелёты, отели и жильё, обзоры курортов, идеи для отдыха, лайфхаки, личный опыт и актуальные новости туризма.
Your comment is awaiting moderation.
Мужской портал https://phizmat.org.ua о стиле, здоровье, отношениях и деньгах. Свежие новости, честные обзоры гаджетов и авто, тренировки и питание, подборки фильмов и игр, лайфхаки для работы и отдыха — без воды и кликбейта. Советы, инструкции и тесты каждый день.
Your comment is awaiting moderation.
Plains Trading Corner – Fast response times and organized categories made exploration easy.
Your comment is awaiting moderation.
лучший магаз из всех что существует!!! https://komfort-uborka.ru я заметил тенденцию, у магазинов LegalLuna, Alfa, которые оказались не порядочными:dontknown:отвечать вам не перестали я дал ответы на ваши вопросы, когда по несколько раз 1 и то же спрашивают я не отвечаю.
Your comment is awaiting moderation.
Ethical Market Studio – Every product feels intentional and unique, navigation was smooth throughout.
Your comment is awaiting moderation.
TrendSpotStore – Items look modern, browsing is effortless, and layout is clean.
Your comment is awaiting moderation.
Mountain Mist Picks – Well-laid-out items, browsing the store feels natural and quick.
Your comment is awaiting moderation.
Wild Rose Picks – Boutique has a lovely atmosphere, found some special items easily.
Your comment is awaiting moderation.
Запрета в прицепе это не касается. купить кокаин, мефедрон, гашиш, бошки, лирика Если есть какие -то вопросы по компенсациям вложенным, тоже пишите мне в Skype: chemical-mix.com и ICQ: 974-859, все решимты уже третий у кого посыль подлетела может продавец как то разьяснит ситуацию ну ладно у одного ну ладно у второго но трое это уже какая то система ждемс уважаемый ТС Ваших обяснений
Your comment is awaiting moderation.
Портал о технологиях https://technocom.dp.ua новости IT и гаджетов, обзоры смартфонов и ноутбуков, сравнения, тесты, инструкции и лайфхаки. Искусственный интеллект, кибербезопасность, софт, цифровые сервисы и тренды — простым языком и с пользой для читателя.
Your comment is awaiting moderation.
Портал смачних ідей https://mallinaproject.com.ua прості рецепти на щодень, святкові страви, десерти, випічка та корисні перекуси. Покрокові інструкції, поради, підбірки меню й лайфхаки для кухні. Готуйте швидко, смачно та з натхненням разом із нами.
Your comment is awaiting moderation.
Украинский новостной https://medicalanswers.com.ua портал: главные новости, расширенные обзоры, разбор решений власти, ситуации на фронте и жизни граждан. Фото, видео, инфографика и мнения экспертов помогают глубже понять происходящее в Украине и вокруг неё.
Your comment is awaiting moderation.
Онлайн новостной https://expressnews.com.ua портал для тех, кто хочет быть в курсе: свежие новости, обзоры, спецпроекты и авторские материалы. Политика, бизнес, общество, наука, культура и спорт — всё в одном месте, с понятной подачей и регулярными обновлениями 24/7.
Your comment is awaiting moderation.
Новостной портал https://infosmi.com.ua Украины: главные события дня, оперативная лента, аналитика и мнения экспертов. Политика, экономика, общество, война и международные новости. Чёткая подача, удобная структура разделов и регулярные обновления в режиме 24/7.
Your comment is awaiting moderation.
приветствую https://onlineminds.ru Ты нам лучьше отзыв напиши о работе магазина :Dвсё ровно забрал rcs-4 , не какой паранои от эффекта =) Позитив да и только
Your comment is awaiting moderation.
fashion picks zone – Items look stylish, navigating the site is simple and enjoyable.
Your comment is awaiting moderation.
DelightGiftHub – Fast-loading pages and gift products are displayed attractively.
Your comment is awaiting moderation.
Оплатил, через 49 минут уже получил адрес, люди забрали надежную закладку (эйф-диссоциатив), опробовали, все довольны. Мир и респект купить кокаин, мефедрон, гашиш, бошки, лирика Всем привет! В магазе есть представительства по регионам, закладками? Ярославль?Надеюсь на дальнейшее сотрудничество.
Your comment is awaiting moderation.
Premium Home & Style – Home and lifestyle products arranged thoughtfully with easy navigation.
Your comment is awaiting moderation.
Unique Gift Corner – Well-laid-out pages with clearly presented items enhance the shopping experience.
Your comment is awaiting moderation.
Quiet Plains Hub – Smooth navigation with a calm, well-organized layout that made browsing easy.
Your comment is awaiting moderation.
Intentional Modern Picks – Navigation flows easily, everything seems carefully chosen and curated.
Your comment is awaiting moderation.
ChicGiftMarket – Items look delightful, navigation feels intuitive and straightforward.
Your comment is awaiting moderation.
Everwild Corner – Products are well-displayed, and navigation feels intuitive and effortless.
Your comment is awaiting moderation.
MoonCrest Collection – Products presented attractively, navigation is smooth and easy today.
Your comment is awaiting moderation.
WildRose Goods – Warm and cozy atmosphere, found a few delightful surprises.
Your comment is awaiting moderation.
Ты нам лучьше отзыв напиши о работе магазина 😀 купить кокаин, мефедрон, гашиш, бошки, лирика Сервис то что надо, так держать!мазагин, один из лучший, беру практически только здесь!
Your comment is awaiting moderation.
Urban Hub Designs – Well-structured pages and modern aesthetics improve navigation speed.
Your comment is awaiting moderation.
Shop Fun Today – Browsing is easy, and the product selection is appealing and fresh.
Your comment is awaiting moderation.
https://www.sunemall.com/board/board_topic/8431232/7548784.htm
Your comment is awaiting moderation.
https://medium.com/@onlineplatform931/1xbet-new-account-code-130-bonus-3edb568810bc
Your comment is awaiting moderation.
https://linuxtracker.org/index.php?page=comment&id=7112353c58e72d2530c683413109e5f6621ff096&usern=hevin68740
Your comment is awaiting moderation.
https://linuxtracker.org/index.php?page=torrent-details&id=5a4ad5831e6906173eaed458d7646e8451acce8f#comments
Your comment is awaiting moderation.
https://www.caledonian-marts.com/Plant/Gallery/emodule/630/eitem/570
Your comment is awaiting moderation.
propelclick.click – Navigation felt smooth, found everything quickly without any confusing steps.
Your comment is awaiting moderation.
clickanchor.click – Appreciate the typography choices; comfortable spacing improved my reading experience.
Your comment is awaiting moderation.
clickattic.click – Content reads clearly, helpful examples made concepts easy to grasp.
Your comment is awaiting moderation.
clickalley.click – Mobile version looks perfect; no glitches, fast scrolling, crisp text.
Your comment is awaiting moderation.
Метод употребления – интерназально купить кокаин, мефедрон, гашиш, бошки, лирика Если СК выпадает в осадок – то это уже само по себе не нормальнопробвал уже…
Your comment is awaiting moderation.
WildBrook Modern Creations – Loved the fresh selection and well-organized presentation.
Your comment is awaiting moderation.
rankboostx.click – Appreciate the typography choices; comfortable spacing improved my reading experience.
Your comment is awaiting moderation.
fashion picks zone – Items look stylish, navigating the site is simple and enjoyable.
Your comment is awaiting moderation.
StyleFinder – Products are clearly displayed, making it easy to find fashionable items.
Your comment is awaiting moderation.
Доброго времени суток Всем порядочным форумчанам-кто здесь заказывал,но трек так и не бьёться,или я один такой закинул 45к+доставка,и”жду у моря погоды”В скайпе вчера отвечали сегодня-игнор! https://tivanoshop.ru Отличный магазин, общение с KingSize – одно удовольствие, а продукты неизменно радуют.да магаз реальный.недовеса небыло ниразу.может просто недоразумение.
Your comment is awaiting moderation.
Онлайн женский https://lugor.org.ua сайт для тех, кто ценит своё время: гайды по красоте и стилю, психологические советы, идеи для дома, отношения, материнство и карьерные цели. Подборки, чек-листы, истории и советы, которые реально работают в повседневной жизни.
Your comment is awaiting moderation.
Украинский новостной https://mediacentr.com.ua портал с акцентом на объективность и факты: свежие новости, аналитические статьи, интервью и спецпроекты. Освещаем жизнь страны, реформы, фронт, дипломатию и повседневные истории людей. Всё важное — на одной площадке.
Your comment is awaiting moderation.
Универсальный авто https://kolesnitsa.com.ua портал для водителей и будущих владельцев: обзоры автомобилей, сравнение комплектаций, тест-драйвы, советы по ТО и ремонту, подбор шин и аксессуаров. Актуальные новости, аналитика рынка и материалы, которые помогают делать осознанный выбор.
Your comment is awaiting moderation.
Женский сайт https://loveliness.kyiv.ua с практичным контентом: уход за кожей и волосами, стильные образы, дом и уют, дети, работа и финансы. Полезные рекомендации, экспертные материалы и вдохновение без лишней «воды». Удобная навигация по рубрикам и регулярные обновления.
Your comment is awaiting moderation.
realhomehub – RealHomeHub provides authentic products that make shopping simple and enjoyable.
Your comment is awaiting moderation.
Моя первая покупка на динамите и, внезапно для самой себя, наход. Сняла, как говорится, в касание. С вашим охуенным мефчиком сорвала себе почти год ЗОЖа и ни чуть не жалею. купить кокаин, мефедрон, гашиш, бошки, лирика Обратите внимание, ТС отказывается работать с ГАРАНТОМ! хоть и магазин древний и проверенный! но хочется спать спокойно! АДМИНЫ ОБРАТИТЕ ВНИМАНИЕ, ПОРА КАК ТО ИЗМЕНИТЬ РЕЖИМ РАБОТЫ ГАРАНТА. СДЕЛКИ ПРОВОДИТЬ ОБЯЗАТЕЛЬНО ТОЛЬКО ЧЕРЕЗ ГАРАНТА!кто-то пляшет, кто-то дрочит,
Your comment is awaiting moderation.
Sustainable Lifestyle Picks – Easy to explore with a cozy vibe, unique eco-friendly items everywhere.
Your comment is awaiting moderation.
Bright Finds Hub – Really liked the clean structure; moving around the site was smooth and clear.
Your comment is awaiting moderation.
TrendWaveStore – Browsing is easy, modern styles available, and site feels intuitive.
Your comment is awaiting moderation.
WildRose Goods – Warm and cozy atmosphere, found a few delightful surprises.
Your comment is awaiting moderation.
Modern Roots Picks – Carefully curated products, browsing is simple and pleasant.
Your comment is awaiting moderation.
ムームー証券
Your comment is awaiting moderation.
(10 euros gratis apuestas|10 mejores casas de apuestas|10 trucos
para ganar apuestas|15 euros gratis marca apuestas|1×2 apuestas|1×2 apuestas deportivas|1×2 apuestas
que significa|1×2 en apuestas|1×2 en apuestas que significa|1×2 que significa en apuestas|5
euros gratis apuestas|9 apuestas que siempre ganaras|a
partir de cuanto se declara apuestas|actividades de juegos de azar y apuestas|ad apuestas
deportivas|aleksandre topuria ufc apuestas|algoritmo para ganar apuestas deportivas|america apuestas|análisis nba apuestas|aplicacion android apuestas deportivas|aplicacion apuestas deportivas|aplicacion apuestas deportivas android|aplicación de apuestas online|aplicacion para hacer apuestas|aplicacion para hacer apuestas de futbol|aplicación para hacer apuestas de fútbol|aplicaciones apuestas deportivas android|aplicaciones apuestas deportivas gratis|aplicaciones de apuestas android|aplicaciones de apuestas de fútbol|aplicaciones de apuestas deportivas|aplicaciones de apuestas
deportivas peru|aplicaciones de apuestas deportivas perú|aplicaciones de apuestas en colombia|aplicaciones de apuestas gratis|aplicaciones de
apuestas online|aplicaciones de apuestas seguras|aplicaciones de apuestas sin dinero|aplicaciones para hacer apuestas|apostar seguro apuestas deportivas|app android
apuestas deportivas|app apuestas|app apuestas android|app apuestas de futbol|app apuestas deportivas|app apuestas deportivas android|app apuestas deportivas argentina|app apuestas deportivas colombia|app apuestas
deportivas ecuador|app apuestas deportivas españa|app apuestas deportivas gratis|app apuestas entre amigos|app apuestas futbol|app apuestas
gratis|app apuestas sin dinero|app casa de apuestas|app casas de apuestas|app control apuestas|app de apuestas|app de apuestas android|app de apuestas casino|app de
apuestas colombia|app de apuestas con bono de bienvenida|app de
apuestas de futbol|app de apuestas deportivas|app de apuestas deportivas android|app
de apuestas deportivas argentina|app de apuestas deportivas colombia|app de apuestas deportivas en españa|app de apuestas
deportivas peru|app de apuestas deportivas perú|app de apuestas deportivas sin dinero|app de apuestas ecuador|app
de apuestas en colombia|app de apuestas en españa|app de apuestas en venezuela|app de apuestas futbol|app
de apuestas gratis|app de apuestas online|app de apuestas para android|app de apuestas para ganar dinero|app de
apuestas peru|app de apuestas reales|app de casas de
apuestas|app marca apuestas android|app moviles de
apuestas|app para apuestas|app para apuestas de futbol|app
para apuestas deportivas|app para apuestas deportivas
en español|app para ganar apuestas deportivas|app para hacer
apuestas|app para hacer apuestas deportivas|app para hacer apuestas entre amigos|app para
llevar control de apuestas|app pronosticos apuestas deportivas|app versus apuestas|apps apuestas mundial|apps de apuestas|apps de apuestas con bono de bienvenida|apps
de apuestas de futbol|apps de apuestas deportivas peru|apps de apuestas mexico|apps para apuestas|aprender a hacer apuestas deportivas|aprender
hacer apuestas deportivas|apuesta del dia apuestas deportivas|apuestas 10 euros gratis|apuestas 100
seguras|apuestas 1×2|apuestas 1X2|apuestas 2 division|apuestas 3 division|apuestas a caballos|apuestas a
carreras de caballos|apuestas a colombia|apuestas a corners|apuestas a ganar|apuestas a jugadores nba|apuestas a la baja|apuestas
a la nfl|apuestas al barcelona|apuestas al dia|apuestas
al empate|apuestas al mundial|apuestas al tenis wta|apuestas alaves barcelona|apuestas alcaraz hoy|apuestas alemania españa|apuestas alonso campeon del
mundo|apuestas altas y bajas|apuestas altas y
bajas nfl|apuestas ambos equipos marcan|apuestas america|apuestas android|apuestas anillo nba|apuestas
antes del mundial|apuestas anticipadas|apuestas
anticipadas nba|apuestas apps|apuestas arabia argentina|apuestas argentina|apuestas argentina campeon del mundo|apuestas argentina canada|apuestas argentina colombia|apuestas argentina croacia|apuestas
argentina españa|apuestas argentina francia|apuestas argentina francia cuanto paga|apuestas argentina francia mundial|apuestas argentina gana el mundial|apuestas argentina gana mundial|apuestas argentina holanda|apuestas
argentina mexico|apuestas argentina méxico|apuestas argentina mundial|apuestas argentina online|apuestas argentina
paises bajos|apuestas argentina polonia|apuestas argentina uruguay|apuestas argentina vs australia|apuestas argentina
vs colombia|apuestas argentina vs francia|apuestas
argentina vs peru|apuestas argentinas|apuestas arsenal real
madrid|apuestas ascenso a primera division|apuestas ascenso a segunda|apuestas asiaticas|apuestas
asiatico|apuestas athletic|apuestas athletic atletico|apuestas
athletic barça|apuestas athletic barcelona|apuestas athletic betis|apuestas athletic manchester|apuestas
athletic manchester united|apuestas athletic osasuna|apuestas athletic real|apuestas athletic real madrid|apuestas athletic real sociedad|apuestas athletic real sociedad final|apuestas athletic roma|apuestas athletic
sevilla|apuestas athletic valencia|apuestas atletico|apuestas atletico
barcelona|apuestas atletico barsa|apuestas atletico campeon champions|apuestas atletico campeon de liga|apuestas atlético copenhague|apuestas atletico de madrid|apuestas
atlético de madrid|apuestas atletico de madrid barcelona|apuestas
atletico de madrid gana la liga|apuestas atletico de
madrid real madrid|apuestas atlético de madrid real madrid|apuestas atletico de madrid vs barcelona|apuestas atletico madrid|apuestas atletico madrid real madrid|apuestas atletico madrid vs barcelona|apuestas atletico real madrid|apuestas atletico real madrid champions|apuestas atletismo|apuestas bajas|apuestas baloncesto|apuestas baloncesto acb|apuestas
baloncesto handicap|apuestas baloncesto hoy|apuestas baloncesto
juegos olimpicos|apuestas baloncesto nba|apuestas baloncesto pronostico|apuestas baloncesto pronósticos|apuestas
baloncesto prorroga|apuestas barca|apuestas barca athletic|apuestas
barca atletico|apuestas barca bayern|apuestas barca bayern munich|apuestas barca girona|apuestas barca hoy|apuestas barça hoy|apuestas barca inter|apuestas barca juventus|apuestas barca madrid|apuestas barça madrid|apuestas barca real madrid|apuestas barca vs juve|apuestas
barca vs madrid|apuestas barca vs psg|apuestas barcelona|apuestas barcelona alaves|apuestas
barcelona athletic|apuestas barcelona atletico|apuestas barcelona atletico de madrid|apuestas barcelona atlético de madrid|apuestas barcelona atletico madrid|apuestas barcelona bayern|apuestas
barcelona betis|apuestas barcelona campeon de liga|apuestas barcelona celta|apuestas barcelona espanyol|apuestas barcelona gana la champions|apuestas barcelona girona|apuestas barcelona granada|apuestas barcelona hoy|apuestas barcelona inter|apuestas barcelona madrid|apuestas barcelona osasuna|apuestas barcelona psg|apuestas barcelona real
madrid|apuestas barcelona real sociedad|apuestas barcelona sevilla|apuestas
barcelona valencia|apuestas barcelona villarreal|apuestas barcelona vs atletico madrid|apuestas barcelona vs madrid|apuestas barcelona vs real madrid|apuestas barsa madrid|apuestas
basket hoy|apuestas bayern barcelona|apuestas bayern vs
barcelona|apuestas beisbol|apuestas béisbol|apuestas beisbol mlb|apuestas
beisbol pronosticos|apuestas beisbol venezolano|apuestas betis|apuestas betis – chelsea|apuestas
betis barcelona|apuestas betis chelsea|apuestas betis fiorentina|apuestas betis girona|apuestas betis madrid|apuestas
betis mallorca|apuestas betis real madrid|apuestas betis real sociedad|apuestas betis sevilla|apuestas betis valencia|apuestas betis valladolid|apuestas betis vs valencia|apuestas betplay hoy colombia|apuestas betsson peru|apuestas bienvenida|apuestas billar online|apuestas
bolivia vs colombia|apuestas bono|apuestas bono
bienvenida|apuestas bono de bienvenida|apuestas bono de bienvenida
sin deposito|apuestas bono gratis|apuestas bono sin deposito|apuestas bonos sin deposito|apuestas
borussia real madrid|apuestas boxeo|apuestas
boxeo de campeonato|apuestas boxeo españa|apuestas boxeo
español|apuestas boxeo femenino olimpiadas|apuestas boxeo hoy|apuestas boxeo online|apuestas brasil colombia|apuestas brasil peru|apuestas brasil uruguay|apuestas brasil
vs colombia|apuestas brasil vs peru|apuestas caballos|apuestas caballos
colocado|apuestas caballos españa|apuestas caballos hipodromo|apuestas caballos
hoy|apuestas caballos madrid|apuestas caballos online|apuestas caballos sanlucar
de barrameda|apuestas caballos zarzuela|apuestas calculador|apuestas
campeon|apuestas campeon champions|apuestas campeón champions|apuestas campeon champions 2025|apuestas campeon champions league|apuestas campeon conference league|apuestas
campeon copa america|apuestas campeon copa del rey|apuestas campeon de champions|apuestas campeon de la champions|apuestas campeon de liga|apuestas campeon del mundo|apuestas campeon eurocopa|apuestas campeón eurocopa|apuestas campeon europa league|apuestas campeon f1|apuestas campeon f1 2025|apuestas campeon formula 1|apuestas campeon libertadores|apuestas campeon liga|apuestas campeon liga
bbva|apuestas campeon liga española|apuestas campeon liga santander|apuestas campeon motogp 2025|apuestas campeon mundial|apuestas campeón mundial|apuestas
campeon mundial baloncesto|apuestas campeon nba|apuestas
campeón nba|apuestas campeon premier|apuestas campeon premier
league|apuestas campeon roland garros|apuestas campeonato f1|apuestas campeonatos de futbol|apuestas carrera
de caballos|apuestas carrera de caballos hoy|apuestas carrera
de caballos nocturnas|apuestas carrera de galgos fin de
semana|apuestas carrera de galgos hoy|apuestas carrera de galgos nocturnas|apuestas carreras caballos|apuestas carreras caballos sanlucar|apuestas carreras de caballos|apuestas carreras de
caballos en directo|apuestas carreras de caballos en vivo|apuestas
carreras de caballos españa|apuestas carreras de caballos hoy|apuestas
carreras de caballos nacionales|apuestas carreras de caballos nocturnas|apuestas
carreras de caballos online|apuestas carreras de caballos sanlucar|apuestas carreras de caballos
sanlúcar|apuestas carreras de galgos|apuestas carreras de galgos en vivo|apuestas carreras de galgos nocturnas|apuestas carreras de galgos pre
partido|apuestas casino|apuestas casino barcelona|apuestas casino futbol|apuestas casino gran madrid|apuestas casino gratis|apuestas casino madrid|apuestas casino
online|apuestas casino online argentina|apuestas casinos|apuestas
casinos online|apuestas celta|apuestas celta barcelona|apuestas celta betis|apuestas celta eibar|apuestas celta espanyol|apuestas celta granada|apuestas celta madrid|apuestas
celta manchester|apuestas celta real madrid|apuestas champion league|apuestas champions foro|apuestas champions hoy|apuestas
champions league|apuestas champions league – pronósticos|apuestas champions
league 2025|apuestas champions league hoy|apuestas
champions league pronosticos|apuestas champions league pronósticos|apuestas champions pronosticos|apuestas
chelsea barcelona|apuestas chelsea betis|apuestas chile|apuestas chile peru|apuestas chile venezuela|apuestas chile vs colombia|apuestas chile vs
uruguay|apuestas ciclismo|apuestas ciclismo en vivo|apuestas ciclismo femenino|apuestas ciclismo tour francia|apuestas ciclismo vuelta|apuestas ciclismo vuelta a españa|apuestas ciclismo
vuelta españa|apuestas city madrid|apuestas city real madrid|apuestas clasico|apuestas clasico español|apuestas clasico real madrid barcelona|apuestas clasificacion mundial|apuestas colombia|apuestas colombia argentina|apuestas
colombia brasil|apuestas colombia paraguay|apuestas colombia uruguay|apuestas colombia vs argentina|apuestas colombia vs brasil|apuestas combinadas|apuestas combinadas
como funcionan|apuestas combinadas de futbol|apuestas combinadas de fútbol|apuestas combinadas foro|apuestas combinadas futbol|apuestas combinadas hoy|apuestas combinadas mismo partido|apuestas combinadas mundial|apuestas combinadas nba|apuestas combinadas para esta semana|apuestas combinadas para hoy|apuestas
combinadas para mañana|apuestas combinadas
pronosticos|apuestas combinadas recomendadas|apuestas combinadas seguras|apuestas
combinadas seguras para hoy|apuestas combinadas seguras para
mañana|apuestas como ganar|apuestas comparador|apuestas con bono de bienvenida|apuestas con dinero ficticio|apuestas con dinero real|apuestas con dinero virtual|apuestas
con handicap|apuestas con handicap asiatico|apuestas con handicap baloncesto|apuestas con mas probabilidades de ganar|apuestas con paypal|apuestas
con tarjeta de credito|apuestas con tarjeta de debito|apuestas consejos|apuestas copa|apuestas copa africa|apuestas copa america|apuestas copa américa|apuestas copa argentina|apuestas copa brasil|apuestas copa davis|apuestas copa de europa|apuestas copa del mundo|apuestas
copa del rey|apuestas copa del rey baloncesto|apuestas copa del rey final|apuestas copa del rey
futbol|apuestas copa del rey ganador|apuestas copa del rey hoy|apuestas copa del rey pronosticos|apuestas copa del rey pronósticos|apuestas copa europa|apuestas copa italia|apuestas copa libertadores|apuestas
copa mundial de hockey|apuestas copa rey|apuestas copa sudamericana|apuestas corners|apuestas corners
hoy|apuestas croacia argentina|apuestas cuartos eurocopa|apuestas cuotas|apuestas cuotas altas|apuestas cuotas bajas|apuestas de 1 euro|apuestas de baloncesto|apuestas de baloncesto
hoy|apuestas de baloncesto nba|apuestas de baloncesto para hoy|apuestas de beisbol|apuestas de beisbol para hoy|apuestas de blackjack
en linea|apuestas de boxeo|apuestas de boxeo canelo|apuestas de boxeo en las
vegas|apuestas de boxeo hoy|apuestas de boxeo online|apuestas de caballo|apuestas de caballos|apuestas de
caballos como funciona|apuestas de caballos como se juega|apuestas de caballos en colombia|apuestas de caballos en españa|apuestas de caballos en linea|apuestas de caballos españa|apuestas de
caballos ganador y colocado|apuestas de caballos internacionales|apuestas de caballos juegos|apuestas de caballos online|apuestas de caballos online en venezuela|apuestas de caballos por internet|apuestas
de caballos pronosticos|apuestas de caballos pronósticos|apuestas de carrera de caballos|apuestas de carreras
de caballos|apuestas de carreras de caballos online|apuestas de casino|apuestas de
casino online|apuestas de casino por internet|apuestas de
champions league|apuestas de ciclismo|apuestas de colombia|apuestas de copa america|apuestas de corners|apuestas de deportes en linea|apuestas de deportes online|apuestas de dinero|apuestas
de esports|apuestas de eurocopa|apuestas de europa league|apuestas de f1|apuestas de formula 1|apuestas de futbol|apuestas de fútbol|apuestas de futbol app|apuestas
de futbol argentina|apuestas de futbol colombia|apuestas de
futbol en colombia|apuestas de futbol en directo|apuestas de futbol en linea|apuestas
de futbol en vivo|apuestas de futbol español|apuestas de futbol gratis|apuestas de futbol hoy|apuestas de futbol mundial|apuestas de futbol online|apuestas de fútbol online|apuestas de futbol
para hoy|apuestas de fútbol para hoy|apuestas de futbol
para hoy seguras|apuestas de futbol para mañana|apuestas de futbol peru|apuestas de futbol
pronosticos|apuestas de fútbol pronósticos|apuestas de futbol seguras|apuestas de futbol seguras para
hoy|apuestas de futbol sin dinero|apuestas de galgos|apuestas de
galgos como ganar|apuestas de galgos en directo|apuestas de galgos online|apuestas de galgos trucos|apuestas
de golf|apuestas de hockey|apuestas de hockey sobre
hielo|apuestas de hoy|apuestas de hoy seguras|apuestas de juego|apuestas de juegos|apuestas de juegos deportivos|apuestas de juegos online|apuestas de la champions league|apuestas de la copa américa|apuestas de la eurocopa|apuestas de la
europa league|apuestas de la liga|apuestas de la liga bbva|apuestas de la liga española|apuestas de la nba|apuestas de la nfl|apuestas
de la ufc|apuestas de mlb|apuestas de nba|apuestas de nba para
hoy|apuestas de partidos|apuestas de partidos de futbol|apuestas de peleas ufc|apuestas de perros en vivo|apuestas
de perros virtuales|apuestas de peru|apuestas de sistema|apuestas de sistema como funciona|apuestas
de sistema explicacion|apuestas de sistema explicación|apuestas de
tenis|apuestas de tenis de mesa|apuestas de tenis
en directo|apuestas de tenis hoy|apuestas
de tenis para hoy|apuestas de tenis pronosticos|apuestas de tenis seguras|apuestas de todo tipo|apuestas
de ufc|apuestas de ufc hoy|apuestas del boxeo|apuestas
del clasico|apuestas del clasico real madrid barca|apuestas del dia|apuestas
del día|apuestas del dia de hoy|apuestas del dia deportivas|apuestas
del dia futbol|apuestas del mundial|apuestas del partido de
hoy|apuestas del real madrid|apuestas del rey|apuestas del sistema|apuestas deporte|apuestas deportes|apuestas
deportiva|apuestas deportivas|apuestas deportivas 1 euro|apuestas deportivas
10 euros gratis|apuestas deportivas 100 seguras|apuestas deportivas 1×2|apuestas deportivas android|apuestas
deportivas app|apuestas deportivas apps|apuestas deportivas argentina|apuestas deportivas argentina futbol|apuestas deportivas argentina legal|apuestas deportivas atletico
de madrid|apuestas deportivas baloncesto|apuestas deportivas barca madrid|apuestas deportivas barcelona|apuestas deportivas beisbol|apuestas deportivas bono|apuestas deportivas bono bienvenida|apuestas deportivas bono de bienvenida|apuestas deportivas bono sin deposito|apuestas
deportivas bonos de bienvenida|apuestas deportivas boxeo|apuestas deportivas caballos|apuestas deportivas calculadora|apuestas deportivas campeon liga|apuestas deportivas casino|apuestas deportivas casino barcelona|apuestas deportivas casino online|apuestas deportivas cerca de mi|apuestas deportivas champions league|apuestas deportivas chile|apuestas deportivas ciclismo|apuestas deportivas colombia|apuestas deportivas
com|apuestas deportivas com foro|apuestas deportivas com pronosticos|apuestas deportivas combinadas|apuestas deportivas combinadas para hoy|apuestas deportivas
como se juega|apuestas deportivas comparador|apuestas deportivas con bono gratis|apuestas deportivas
con bonos gratis|apuestas deportivas con dinero ficticio|apuestas deportivas con paypal|apuestas deportivas con puntos
virtuales|apuestas deportivas consejos|apuestas deportivas consejos para ganar|apuestas deportivas copa america|apuestas deportivas copa
del rey|apuestas deportivas copa libertadores|apuestas deportivas copa
mundial|apuestas deportivas corners|apuestas
deportivas cual es la mejor|apuestas deportivas cuotas altas|apuestas deportivas
de baloncesto|apuestas deportivas de boxeo|apuestas deportivas de colombia|apuestas deportivas de futbol|apuestas deportivas de nba|apuestas deportivas de nhl|apuestas deportivas de peru|apuestas deportivas de tenis|apuestas deportivas
del dia|apuestas deportivas dinero ficticio|apuestas deportivas
directo|apuestas deportivas doble oportunidad|apuestas deportivas en argentina|apuestas deportivas en chile|apuestas deportivas en colombia|apuestas deportivas en directo|apuestas deportivas en españa|apuestas deportivas en español|apuestas deportivas
en linea|apuestas deportivas en línea|apuestas deportivas en peru|apuestas deportivas en perú|apuestas deportivas
en sevilla|apuestas deportivas en uruguay|apuestas deportivas
en vivo|apuestas deportivas es|apuestas deportivas es pronosticos|apuestas deportivas españa|apuestas
deportivas españolas|apuestas deportivas esports|apuestas deportivas estadisticas|apuestas deportivas estrategias|apuestas deportivas estrategias seguras|apuestas deportivas
eurocopa|apuestas deportivas europa league|apuestas deportivas f1|apuestas
deportivas faciles de ganar|apuestas deportivas formula 1|apuestas deportivas foro|apuestas deportivas foro futbol|apuestas deportivas foro tenis|apuestas deportivas francia argentina|apuestas deportivas futbol|apuestas deportivas
fútbol|apuestas deportivas futbol argentino|apuestas deportivas futbol colombia|apuestas deportivas futbol español|apuestas deportivas gana|apuestas
deportivas ganadas|apuestas deportivas ganar dinero seguro|apuestas deportivas gane|apuestas deportivas
golf|apuestas deportivas gratis|apuestas deportivas gratis con premios|apuestas deportivas gratis hoy|apuestas deportivas gratis sin deposito|apuestas deportivas handicap|apuestas deportivas handicap asiatico|apuestas deportivas hoy|apuestas deportivas impuestos|apuestas deportivas interior argentina|apuestas deportivas juegos olimpicos|apuestas deportivas la liga|apuestas deportivas legales|apuestas deportivas
legales en colombia|apuestas deportivas libres de impuestos|apuestas deportivas licencia españa|apuestas deportivas liga
española|apuestas deportivas listado|apuestas deportivas listado clasico|apuestas deportivas madrid|apuestas deportivas mas seguras|apuestas deportivas mejor pagadas|apuestas
deportivas mejores|apuestas deportivas mejores app|apuestas deportivas
mejores casas|apuestas deportivas mejores cuotas|apuestas deportivas mejores paginas|apuestas deportivas mexico|apuestas
deportivas méxico|apuestas deportivas mlb|apuestas deportivas mlb hoy|apuestas deportivas multiples|apuestas deportivas mundial|apuestas deportivas murcia|apuestas deportivas nba|apuestas deportivas nba
hoy|apuestas deportivas nfl|apuestas deportivas nhl|apuestas deportivas
nuevas|apuestas deportivas ofertas|apuestas deportivas online|apuestas deportivas online argentina|apuestas deportivas online chile|apuestas deportivas online colombia|apuestas deportivas online en colombia|apuestas deportivas online españa|apuestas deportivas online
mexico|apuestas deportivas online paypal|apuestas deportivas online peru|apuestas deportivas online por internet|apuestas deportivas
pago paypal|apuestas deportivas para ganar dinero|apuestas deportivas
para hoy|apuestas deportivas para hoy pronosticos|apuestas deportivas partido suspendido|apuestas deportivas partidos de hoy|apuestas deportivas paypal|apuestas deportivas peru|apuestas
deportivas perú|apuestas deportivas peru vs ecuador|apuestas deportivas predicciones|apuestas deportivas
promociones|apuestas deportivas pronostico|apuestas deportivas
pronóstico|apuestas deportivas pronostico hoy|apuestas
deportivas pronosticos|apuestas deportivas pronósticos|apuestas deportivas pronosticos expertos|apuestas deportivas pronosticos gratis|apuestas deportivas pronosticos nba|apuestas deportivas pronosticos
tenis|apuestas deportivas que aceptan paypal|apuestas deportivas real madrid|apuestas deportivas regalo bienvenida|apuestas deportivas resultado exacto|apuestas deportivas resultados|apuestas deportivas rugby|apuestas deportivas seguras|apuestas deportivas seguras foro|apuestas deportivas seguras hoy|apuestas deportivas
seguras para hoy|apuestas deportivas seguras telegram|apuestas deportivas sevilla|apuestas deportivas simulador eurocopa|apuestas deportivas sin deposito|apuestas deportivas
sin deposito inicial|apuestas deportivas sin dinero|apuestas deportivas sin dinero real|apuestas deportivas sin registro|apuestas
deportivas stake|apuestas deportivas stake 10|apuestas deportivas
telegram españa|apuestas deportivas tenis|apuestas deportivas tenis de mesa|apuestas deportivas
tenis foro|apuestas deportivas tenis hoy|apuestas deportivas tips|apuestas deportivas tipster|apuestas deportivas ufc|apuestas deportivas uruguay|apuestas deportivas valencia|apuestas deportivas valencia barcelona|apuestas deportivas venezuela|apuestas deportivas virtuales|apuestas deportivas y casino|apuestas deportivas y casino online|apuestas deportivas.com|apuestas deportivas.com foro|apuestas deportivas.es|apuestas deportivos
pronosticos|apuestas deposito minimo 1 euro|apuestas descenso a
segunda|apuestas descenso a segunda b|apuestas descenso la liga|apuestas descenso primera
division|apuestas descenso segunda|apuestas dia|apuestas diarias seguras|apuestas dinero|apuestas dinero ficticio|apuestas dinero real|apuestas dinero virtual|apuestas directas|apuestas directo|apuestas directo futbol|apuestas division de honor juvenil|apuestas dnb|apuestas doble
oportunidad|apuestas doble resultado|apuestas dobles|apuestas dobles y triples|apuestas dortmund barcelona|apuestas draft nba|apuestas draft nfl|apuestas
ecuador vs argentina|apuestas ecuador vs venezuela|apuestas egipto uruguay|apuestas el clasico|apuestas elecciones venezuela|apuestas empate|apuestas en baloncesto|apuestas en barcelona|apuestas
en beisbol|apuestas en boxeo|apuestas en caballos|apuestas
en carreras de caballos|apuestas en casino|apuestas en casino online|apuestas en casinos|apuestas en casinos online|apuestas
en chile|apuestas en ciclismo|apuestas en colombia|apuestas
en colombia de futbol|apuestas en directo|apuestas en directo
futbol|apuestas en directo pronosticos|apuestas en el futbol|apuestas en el tenis|apuestas en españa|apuestas en esports|apuestas en eventos deportivos virtuales|apuestas en golf|apuestas en juegos|apuestas en la champions league|apuestas en la eurocopa|apuestas en la liga|apuestas en la nba|apuestas en la nfl|apuestas en las vegas
mlb|apuestas en las vegas nfl|apuestas en linea|apuestas en línea|apuestas en linea argentina|apuestas en linea boxeo|apuestas en linea chile|apuestas en linea colombia|apuestas en línea de fútbol|apuestas en linea
deportivas|apuestas en linea españa|apuestas en linea estados unidos|apuestas en linea futbol|apuestas en linea mexico|apuestas en línea méxico|apuestas en linea mundial|apuestas
en linea peru|apuestas en linea usa|apuestas
en los esports|apuestas en madrid|apuestas en méxico|apuestas en mexico online|apuestas en nba|apuestas en partidos
de futbol|apuestas en partidos de futbol en vivo|apuestas en partidos de tenis en directo|apuestas en perú|apuestas en sevilla|apuestas en sistema|apuestas en stake|apuestas en tenis|apuestas en tenis de mesa|apuestas en valencia|apuestas en vivo|apuestas en vivo argentina|apuestas en vivo casino|apuestas en vivo futbol|apuestas en vivo fútbol|apuestas
en vivo nba|apuestas en vivo peru|apuestas en vivo tenis|apuestas en vivo
ufc|apuestas equipo mbappe|apuestas equipos de futbol|apuestas españa|apuestas españa alemania|apuestas españa alemania eurocopa|apuestas españa croacia|apuestas españa eurocopa|apuestas españa francia|apuestas españa francia eurocopa|apuestas españa gana el mundial|apuestas españa
gana eurocopa|apuestas españa gana mundial|apuestas
españa georgia|apuestas españa holanda|apuestas españa inglaterra|apuestas
españa inglaterra cuotas|apuestas españa inglaterra eurocopa|apuestas
españa italia|apuestas españa mundial|apuestas
españa paises bajos|apuestas español|apuestas español oviedo|apuestas espanyol barcelona|apuestas
espanyol betis|apuestas espanyol villarreal|apuestas esport|apuestas esports|apuestas esports
colombia|apuestas esports españa|apuestas esports fifa|apuestas esports gratis|apuestas esports lol|apuestas esports peru|apuestas esports valorant|apuestas estadisticas|apuestas estrategias|apuestas euro|apuestas euro copa|apuestas eurocopa|apuestas eurocopa campeon|apuestas eurocopa españa|apuestas eurocopa favoritos|apuestas eurocopa femenina|apuestas eurocopa final|apuestas
eurocopa ganador|apuestas eurocopa hoy|apuestas eurocopa
sub 21|apuestas euroliga baloncesto|apuestas euroliga pronosticos|apuestas
europa league|apuestas europa league hoy|apuestas europa league pronosticos|apuestas
europa league pronósticos|apuestas euros|apuestas f1 abu dhabi|apuestas f1 bahrein|apuestas f1 canada|apuestas f1
china|apuestas f1 cuotas|apuestas f1 hoy|apuestas f1 las
vegas|apuestas f1 miami|apuestas f1 monaco|apuestas faciles
de ganar|apuestas fáciles de ganar|apuestas faciles
para ganar|apuestas favoritas|apuestas favorito champions|apuestas favoritos champions|apuestas favoritos eurocopa|apuestas favoritos mundial|apuestas fc barcelona|apuestas final champions cuotas|apuestas final champions league|apuestas
final champions peru|apuestas final copa|apuestas final
copa america|apuestas final copa de europa|apuestas final copa del rey|apuestas final copa
europa|apuestas final copa libertadores|apuestas final copa rey|apuestas final de copa|apuestas final de copa del rey|apuestas final del mundial|apuestas final euro|apuestas final eurocopa|apuestas
final europa league|apuestas final libertadores|apuestas final mundial|apuestas final
nba|apuestas final rugby|apuestas final uefa europa league|apuestas final.mundial|apuestas finales de conferencia nfl|apuestas finales nba|apuestas fiorentina
betis|apuestas formula|apuestas formula 1|apuestas fórmula 1|apuestas fórmula 1 pronósticos|apuestas
formula uno|apuestas foro|apuestas foro nba|apuestas
francia argentina|apuestas francia españa|apuestas futbol|apuestas fútbol|apuestas futbol americano|apuestas
futbol americano nfl|apuestas futbol argentina|apuestas futbol argentino|apuestas futbol champions league|apuestas futbol chile|apuestas
futbol colombia|apuestas futbol consejos|apuestas futbol en directo|apuestas fútbol en directo|apuestas futbol en vivo|apuestas fútbol en vivo|apuestas futbol españa|apuestas futbol español|apuestas fútbol español|apuestas futbol eurocopa|apuestas futbol femenino|apuestas futbol foro|apuestas futbol
gratis|apuestas futbol hoy|apuestas fútbol hoy|apuestas futbol juegos olimpicos|apuestas futbol mexico|apuestas futbol mundial|apuestas futbol online|apuestas futbol para hoy|apuestas futbol peru|apuestas futbol pronosticos|apuestas futbol sala|apuestas futbol
telegram|apuestas futbol virtual|apuestas galgos|apuestas galgos en directo|apuestas galgos
hoy|apuestas galgos online|apuestas galgos pronosticos|apuestas galgos trucos|apuestas
gana|apuestas gana colombia|apuestas gana resultados|apuestas ganadas|apuestas ganadas hoy|apuestas ganador
champions league|apuestas ganador copa america|apuestas ganador copa
del rey|apuestas ganador copa del rey baloncesto|apuestas ganador copa libertadores|apuestas ganador de la eurocopa|apuestas ganador de la liga|apuestas ganador del
mundial|apuestas ganador eurocopa|apuestas ganador europa league|apuestas ganador f1|apuestas ganador la
liga|apuestas ganador liga española|apuestas ganador mundial|apuestas ganador mundial baloncesto|apuestas ganador mundial f1|apuestas ganador nba|apuestas ganadores eurocopa|apuestas
ganadores mundial|apuestas ganar champions|apuestas ganar eurocopa|apuestas ganar liga|apuestas ganar mundial|apuestas ganar nba|apuestas getafe valencia|apuestas ghana uruguay|apuestas girona|apuestas girona athletic|apuestas girona betis|apuestas girona campeon de liga|apuestas girona campeon liga|apuestas girona gana la liga|apuestas girona real madrid|apuestas girona real sociedad|apuestas
goleador eurocopa|apuestas goleadores eurocopa|apuestas goles asiaticos|apuestas golf|apuestas golf masters|apuestas golf
pga|apuestas granada barcelona|apuestas grand slam de tenis|apuestas gratis|apuestas gratis casino|apuestas gratis con premios|apuestas gratis hoy|apuestas gratis
para hoy|apuestas gratis por registro|apuestas gratis puntos|apuestas gratis regalos|apuestas gratis sin deposito|apuestas gratis sin depósito|apuestas gratis sin ingreso|apuestas gratis sports|apuestas gratis y ganar
premios|apuestas grupo a eurocopa|apuestas grupos eurocopa|apuestas handicap|apuestas handicap asiatico|apuestas handicap baloncesto|apuestas handicap como funciona|apuestas
handicap nba|apuestas handicap nfl|apuestas hipicas online|apuestas hípicas online|apuestas hipicas
venezuela|apuestas hockey|apuestas hockey hielo|apuestas hockey patines|apuestas hockey sobre hielo|apuestas holanda argentina|apuestas holanda vs argentina|apuestas hoy|apuestas hoy champions|apuestas hoy futbol|apuestas hoy nba|apuestas hoy
pronosticos|apuestas hoy seguras|apuestas impuestos|apuestas inglaterra paises bajos|apuestas
inter barca|apuestas inter barcelona|apuestas juego|apuestas juegos|apuestas juegos en linea|apuestas juegos olimpicos|apuestas
juegos olímpicos|apuestas juegos olimpicos
baloncesto|apuestas juegos online|apuestas juegos virtuales|apuestas jugador sevilla|apuestas jugadores nba|apuestas kings league americas|apuestas la
liga|apuestas la liga española|apuestas la liga hoy|apuestas la liga
santander|apuestas las vegas mlb|apuestas las vegas nba|apuestas las vegas nfl|apuestas league of legends mundial|apuestas legal|apuestas legales|apuestas legales en colombia|apuestas legales en españa|apuestas legales en estados unidos|apuestas legales españa|apuestas leganes betis|apuestas libertadores|apuestas licencia|apuestas liga 1 peru|apuestas liga argentina|apuestas
liga bbva pronosticos|apuestas liga de campeones|apuestas
liga de campeones de baloncesto|apuestas liga de campeones de hockey|apuestas liga españa|apuestas liga española|apuestas liga santander
pronosticos|apuestas ligas de futbol|apuestas linea|apuestas linea de gol|apuestas liverpool barcelona|apuestas liverpool real madrid|apuestas lol mundial|apuestas madrid|apuestas madrid arsenal|apuestas madrid
atletico|apuestas madrid atletico champions|apuestas madrid barca|apuestas madrid barça|apuestas madrid barca hoy|apuestas madrid
barca supercopa|apuestas madrid barcelona|apuestas madrid
barsa|apuestas madrid bayern|apuestas madrid betis|apuestas madrid borussia|apuestas madrid
campeon champions|apuestas madrid celta|apuestas madrid
city|apuestas madrid dortmund|apuestas madrid gana la liga|apuestas
madrid gana liga|apuestas madrid hoy|apuestas madrid liverpool|apuestas madrid osasuna|apuestas madrid sevilla|apuestas madrid valencia|apuestas madrid vs arsenal|apuestas
madrid vs barcelona|apuestas mallorca osasuna|apuestas mallorca real
sociedad|apuestas manchester athletic|apuestas
manchester city real madrid|apuestas mas faciles de
ganar|apuestas mas seguras|apuestas mas seguras para hoy|apuestas masters de golf|apuestas masters
de tenis|apuestas maximo goleador eurocopa|apuestas maximo goleador mundial|apuestas mejor jugador eurocopa|apuestas mejores casinos online|apuestas
mexico|apuestas méxico|apuestas mexico polonia|apuestas méxico polonia|apuestas mlb|apuestas mlb hoy|apuestas mlb las vegas|apuestas mlb para hoy|apuestas mlb pronosticos|apuestas mlb usa|apuestas mma ufc|apuestas momios|apuestas multiples|apuestas múltiples|apuestas multiples como funcionan|apuestas
multiples el gordo|apuestas multiples futbol|apuestas mundial|apuestas mundial 2026|apuestas mundial baloncesto|apuestas mundial balonmano|apuestas mundial brasil|apuestas mundial campeon|apuestas mundial ciclismo|apuestas mundial clubes|apuestas mundial de
baloncesto|apuestas mundial de ciclismo|apuestas mundial de
clubes|apuestas mundial de futbol|apuestas mundial de fútbol|apuestas mundial de rugby|apuestas mundial f1|apuestas mundial favoritos|apuestas mundial femenino|apuestas mundial formula 1|apuestas mundial futbol|apuestas mundial ganador|apuestas
mundial lol|apuestas mundial moto gp|apuestas mundial motogp|apuestas mundial
rugby|apuestas mundial sub 17|apuestas mundiales|apuestas mundialistas|apuestas mvp eurocopa|apuestas mvp nba|apuestas mvp nfl|apuestas nacionales de colombia|apuestas nba|apuestas nba all
star|apuestas nba campeon|apuestas nba consejos|apuestas nba esta noche|apuestas nba finals|apuestas nba gratis|apuestas nba hoy|apuestas nba
hoy jugadores|apuestas nba hoy pronosticos|apuestas nba para hoy|apuestas nba playoffs|apuestas
nba pronosticos|apuestas nba pronósticos|apuestas nba pronosticos hoy|apuestas nba tipster|apuestas nfl|apuestas nfl hoy|apuestas nfl las vegas|apuestas nfl playoffs|apuestas nfl
pronosticos|apuestas nfl pronósticos|apuestas nfl semana 4|apuestas nfl super bowl|apuestas nhl|apuestas nhl pronosticos|apuestas octavos eurocopa|apuestas ofertas|apuestas online|apuestas online argentina|apuestas online argentina legal|apuestas online bono|apuestas
online bono bienvenida|apuestas online boxeo|apuestas online caballos|apuestas online carreras de caballos|apuestas online casino|apuestas online
champions league|apuestas online chile|apuestas online ciclismo|apuestas online colombia|apuestas online comparativa|apuestas online con paypal|apuestas online de caballos|apuestas online deportivas|apuestas online
en argentina|apuestas online en peru|apuestas online espana|apuestas online españa|apuestas online esports|apuestas online foro|apuestas online futbol|apuestas online futbol
españa|apuestas online golf|apuestas online gratis|apuestas
online gratis sin deposito|apuestas online juegos|apuestas online mexico|apuestas online mma|apuestas online movil|apuestas online nba|apuestas online
net|apuestas online nuevas|apuestas online opiniones|apuestas online paypal|apuestas online peru|apuestas online seguras|apuestas online sin dinero|apuestas online sin registro|apuestas online tenis|apuestas online ufc|apuestas online uruguay|apuestas
online venezuela|apuestas open britanico golf|apuestas osasuna athletic|apuestas osasuna barcelona|apuestas osasuna real madrid|apuestas osasuna sevilla|apuestas
osasuna valencia|apuestas over|apuestas over 2.5|apuestas over under|apuestas
paginas|apuestas pago anticipado|apuestas paises bajos ecuador|apuestas paises bajos
inglaterra|apuestas países bajos qatar|apuestas para boxeo|apuestas para
champions league|apuestas para el clasico|apuestas para el dia de hoy|apuestas para el mundial|apuestas para el partido de hoy|apuestas para eurocopa|apuestas para europa league|apuestas
para futbol|apuestas para ganar|apuestas para ganar dinero|apuestas para ganar
dinero facil|apuestas para ganar en la ruleta|apuestas para ganar
la champions|apuestas para ganar la eurocopa|apuestas para ganar la europa league|apuestas para ganar la liga|apuestas para ganar siempre|apuestas para hacer|apuestas para hoy|apuestas para
hoy de futbol|apuestas para hoy europa league|apuestas para hoy futbol|apuestas para
juegos|apuestas para la champions league|apuestas para
la copa del rey|apuestas para la eurocopa|apuestas para la europa league|apuestas para la final de la eurocopa|apuestas para la nba hoy|apuestas para los
partidos de hoy|apuestas para partidos de hoy|apuestas para ufc|apuestas partido|apuestas partido aplazado|apuestas partido champions|apuestas partido colombia|apuestas partido españa marruecos|apuestas partido mundial|apuestas partido suspendido|apuestas partidos|apuestas partidos champions league|apuestas
partidos csgo|apuestas partidos de futbol|apuestas partidos de futbol hoy|apuestas
partidos de hoy|apuestas partidos eurocopa|apuestas partidos futbol|apuestas partidos hoy|apuestas partidos mundial|apuestas paypal|apuestas peleas de boxeo|apuestas peru|apuestas perú|apuestas peru
brasil|apuestas peru chile|apuestas peru paraguay|apuestas peru uruguay|apuestas peru vs chile|apuestas peru vs colombia|apuestas pichichi eurocopa|apuestas plataforma|apuestas playoff|apuestas playoff ascenso|apuestas playoff
ascenso a primera|apuestas playoff nba|apuestas playoff segunda|apuestas
playoff segunda b|apuestas playoffs nba|apuestas playoffs nfl|apuestas polonia
argentina|apuestas por argentina|apuestas por internet mexico|apuestas por internet para ganar dinero|apuestas por
paypal|apuestas por ronda boxeo|apuestas por sistema|apuestas portugal uruguay|apuestas pre partido|apuestas predicciones|apuestas predicciones futbol|apuestas primera division|apuestas primera division españa|apuestas promociones|apuestas pronostico|apuestas
pronosticos|apuestas pronosticos deportivos|apuestas pronosticos deportivos tenis|apuestas pronosticos futbol|apuestas pronosticos gratis|apuestas pronosticos nba|apuestas pronosticos tenis|apuestas prorroga|apuestas
psg barca|apuestas psg barcelona|apuestas puntos por tarjetas|apuestas puntos tarjetas|apuestas
que aceptan paypal|apuestas que es handicap|apuestas que puedes hacer con tu novia|apuestas que siempre ganaras|apuestas
que significa|apuestas quien bajara a segunda|apuestas quién bajara a segunda|apuestas
quien gana el mundial|apuestas quien gana eurocopa|apuestas quien gana la champions|apuestas quien gana la eurocopa|apuestas quien gana
la liga|apuestas quien ganara el mundial|apuestas quién ganará el
mundial|apuestas quien ganara la champions|apuestas
quien ganara la eurocopa|apuestas quien ganara la liga|apuestas rayo
barcelona|apuestas real madrid|apuestas real madrid arsenal|apuestas real madrid athletic|apuestas real madrid atletico|apuestas real
madrid atletico champions|apuestas real madrid atletico de madrid|apuestas real madrid atlético de madrid|apuestas real madrid
atletico madrid|apuestas real madrid barcelona|apuestas real madrid bayern|apuestas real madrid betis|apuestas real madrid borussia|apuestas real madrid campeon champions|apuestas
real madrid celta|apuestas real madrid champions|apuestas real
madrid city|apuestas real madrid girona|apuestas real madrid hoy|apuestas real
madrid liverpool|apuestas real madrid manchester city|apuestas real madrid osasuna|apuestas real madrid real sociedad|apuestas real madrid valencia|apuestas real madrid villarreal|apuestas real madrid vs arsenal|apuestas
real madrid vs atletico|apuestas real madrid vs atlético|apuestas real madrid vs atletico madrid|apuestas real
madrid vs barcelona|apuestas real madrid vs betis|apuestas real madrid vs sevilla|apuestas real madrid vs valencia|apuestas real sociedad|apuestas
real sociedad athletic|apuestas real sociedad barcelona|apuestas real sociedad betis|apuestas real sociedad psg|apuestas real sociedad
real madrid|apuestas real sociedad valencia|apuestas
recomendadas hoy|apuestas regalo de bienvenida|apuestas
registro|apuestas resultado exacto|apuestas resultados|apuestas resultados
eurocopa|apuestas retirada tenis|apuestas roma barcelona|apuestas roma sevilla|apuestas rugby|apuestas rugby
mundial|apuestas rugby world cup|apuestas ruleta seguras|apuestas segunda|apuestas segunda b|apuestas
segunda division|apuestas segunda división|apuestas segunda division b|apuestas segunda division españa|apuestas seguras|apuestas
seguras baloncesto|apuestas seguras calculadora|apuestas seguras en la ruleta|apuestas seguras eurocopa|apuestas seguras foro|apuestas seguras futbol|apuestas seguras futbol hoy|apuestas seguras gratis|apuestas seguras hoy|apuestas seguras hoy futbol|apuestas seguras
nba|apuestas seguras nba hoy|apuestas seguras para este fin de semana|apuestas seguras para ganar
dinero|apuestas seguras para hoy|apuestas seguras para
hoy fútbol|apuestas seguras para hoy pronósticos|apuestas seguras para mañana|apuestas seguras ruleta|apuestas seguras telegram|apuestas
seguras tenis|apuestas semifinales eurocopa|apuestas senegal paises bajos|apuestas sevilla|apuestas sevilla athletic|apuestas sevilla
atletico de madrid|apuestas sevilla barcelona|apuestas sevilla betis|apuestas sevilla
campeon liga|apuestas sevilla celta|apuestas sevilla gana la liga|apuestas sevilla girona|apuestas sevilla inter|apuestas sevilla jugador|apuestas sevilla juventus|apuestas sevilla leganes|apuestas
sevilla madrid|apuestas sevilla manchester united|apuestas sevilla
osasuna|apuestas sevilla real madrid|apuestas sevilla real sociedad|apuestas sevilla roma|apuestas sevilla
valencia|apuestas significa|apuestas simples ejemplos|apuestas simples
o combinadas|apuestas sin deposito|apuestas sin deposito inicial|apuestas sin deposito minimo|apuestas
sin dinero|apuestas sin dinero real|apuestas sin empate|apuestas sin empate que significa|apuestas sin ingreso minimo|apuestas
sin registro|apuestas sistema|apuestas sistema calculadora|apuestas sistema como funciona|apuestas sistema trixie|apuestas sociedad|apuestas sorteo copa del rey|apuestas stake|apuestas stake 10|apuestas stake 10 hoy|apuestas super bowl favorito|apuestas super rugby|apuestas supercopa españa|apuestas superliga argentina|apuestas tarjeta roja|apuestas tarjetas|apuestas tarjetas amarillas|apuestas tenis|apuestas tenis
atp|apuestas tenis consejos|apuestas tenis copa davis|apuestas tenis
de mesa|apuestas tenis de mesa pronosticos|apuestas tenis en vivo|apuestas tenis
femenino|apuestas tenis hoy|apuestas tenis itf|apuestas tenis pronosticos|apuestas tenis pronósticos|apuestas tenis retirada|apuestas tenis roland garros|apuestas tenis seguras|apuestas tenis
wimbledon|apuestas tenis wta|apuestas tercera division|apuestas tercera division españa|apuestas tipos|apuestas tips|apuestas tipster|apuestas tipster para hoy|apuestas topuria holloway cuotas|apuestas torneos de golf|apuestas torneos de tenis|apuestas trucos|apuestas uefa
champions league|apuestas uefa europa league|apuestas ufc|apuestas ufc chile|apuestas ufc como
funciona|apuestas ufc hoy|apuestas ufc ilia topuria|apuestas
ufc online|apuestas ufc pronósticos|apuestas ufc telegram|apuestas
ufc topuria|apuestas under over|apuestas unionistas villarreal|apuestas uruguay|apuestas uruguay colombia|apuestas uruguay corea|apuestas uruguay vs colombia|apuestas us open golf|apuestas us open tenis|apuestas valencia|apuestas valencia barcelona|apuestas valencia betis|apuestas valencia madrid|apuestas valencia real madrid|apuestas valladolid barcelona|apuestas valladolid valencia|apuestas valor app|apuestas valor en directo|apuestas valor galgos|apuestas venezuela|apuestas venezuela
argentina|apuestas venezuela bolivia|apuestas
venezuela ecuador|apuestas villarreal|apuestas villarreal athletic|apuestas villarreal barcelona|apuestas villarreal bayern|apuestas villarreal betis|apuestas villarreal liverpool|apuestas villarreal manchester|apuestas villarreal manchester united|apuestas villarreal vs real madrid|apuestas
virtuales|apuestas virtuales colombia|apuestas virtuales futbol|apuestas virtuales sin dinero|apuestas vivo|apuestas vuelta a españa|apuestas vuelta españa|apuestas william hill partidos de hoy|apuestas y casino|apuestas y casinos|apuestas y juegos
de azar|apuestas y pronosticos|apuestas y pronosticos
de futbol|apuestas y pronosticos deportivos|apuestas y resultados|apuestas-deportivas|apuestas-deportivas.es pronosticos|arbitro nba apuestas|argentina apuestas|argentina colombia apuestas|argentina croacia apuestas|argentina
francia apuestas|argentina mexico apuestas|argentina peru apuestas|argentina uruguay
apuestas|argentina vs bolivia apuestas|argentina vs chile apuestas|argentina vs colombia apuestas|argentina vs francia apuestas|argentina vs.
colombia apuestas|asi se gana en las apuestas deportivas|asiatico apuestas|asiatico en apuestas|asiaticos apuestas|athletic barcelona apuestas|athletic manchester united apuestas|athletic osasuna apuestas|athletic real madrid apuestas|atletico barcelona apuestas|atletico de madrid apuestas|atlético de madrid apuestas|atletico de madrid real madrid apuestas|atletico de madrid vs barcelona apuestas|atletico madrid real madrid apuestas|atletico madrid vs real madrid apuestas|atletico real madrid apuestas|atletico vs real
madrid apuestas|avisador de cuotas apuestas|bajada de cuotas apuestas|baloncesto apuestas|barbastro barcelona apuestas|barca
apuestas|barca bayern apuestas|barca inter apuestas|barca madrid apuestas|barça madrid
apuestas|barca vs atletico apuestas|barca vs madrid apuestas|barca vs real madrid apuestas|barcelona – real madrid apuestas|barcelona apuestas|barcelona atletico apuestas|barcelona atletico de
madrid apuestas|barcelona atletico madrid apuestas|barcelona betis apuestas|barcelona casa
de apuestas|barcelona inter apuestas|barcelona psg
apuestas|barcelona real madrid apuestas|barcelona real sociedad apuestas|barcelona sevilla apuestas|barcelona
valencia apuestas|barcelona vs athletic bilbao apuestas|barcelona
vs atlético madrid apuestas|barcelona vs betis apuestas|barcelona
vs celta de vigo apuestas|barcelona vs espanyol apuestas|barcelona vs girona apuestas|barcelona vs madrid apuestas|barcelona vs real madrid
apuestas|barcelona vs real sociedad apuestas|barcelona vs sevilla apuestas|barcelona
vs villarreal apuestas|base de datos cuotas apuestas deportivas|bayern real
madrid apuestas|beisbol apuestas|best america apuestas|bet apuestas chile|bet apuestas en vivo|betis – chelsea
apuestas|betis apuestas|betis barcelona apuestas|betis chelsea apuestas|betis madrid apuestas|betis sevilla apuestas|betsson tu sitio de apuestas online|blog apuestas baloncesto|blog apuestas ciclismo|blog apuestas nba|blog apuestas tenis|blog de apuestas de tenis|bono apuestas|bono apuestas deportivas|bono apuestas deportivas sin deposito|bono apuestas gratis|bono apuestas gratis
sin deposito|bono apuestas sin deposito|bono bienvenida apuestas|bono bienvenida apuestas deportivas|bono bienvenida
apuestas españa|bono bienvenida apuestas sin deposito|bono
bienvenida apuestas sin depósito|bono bienvenida casa apuestas|bono bienvenida casa de apuestas|bono bienvenida marca apuestas|bono casa apuestas|bono
casa de apuestas|bono casa de apuestas sin ingreso|bono casas de apuestas|bono de apuestas|bono de apuestas gratis sin deposito|bono de bienvenida apuestas|bono de bienvenida apuestas deportivas|bono de bienvenida casa de apuestas|bono de bienvenida casas de apuestas|bono de casas de
apuestas|bono de registro apuestas|bono de registro apuestas deportivas|bono de registro casa de apuestas|bono gratis apuestas|bono marca apuestas|bono por registro apuestas|bono por registro apuestas deportivas|bono por registro casa de apuestas|bono registro apuestas|bono sin deposito apuestas|bono sin depósito apuestas|bono sin deposito apuestas deportivas|bono sin depósito apuestas deportivas|bono sin deposito casa de apuestas|bono sin deposito
marca apuestas|bono sin ingreso apuestas|bono sin ingreso apuestas deportivas|bonos apuestas|bonos apuestas colombia|bonos apuestas deportivas|bonos apuestas deportivas sin deposito|bonos apuestas gratis|bonos apuestas sin deposito|bonos apuestas sin depósito|bonos bienvenida apuestas|bonos bienvenida casas
apuestas|bonos bienvenida casas de apuestas|bonos casa de apuestas|bonos casas apuestas|bonos casas de
apuestas|bonos casas de apuestas colombia|bonos casas de apuestas
deportivas|bonos casas de apuestas españa|bonos casas
de apuestas nuevas|bonos casas de apuestas sin deposito|bonos
casas de apuestas sin depósito|bonos de apuestas|bonos de apuestas
deportivas|bonos de apuestas gratis|bonos de
apuestas sin deposito|bonos de bienvenida apuestas|bonos de bienvenida apuestas deportivas|bonos de bienvenida casa de apuestas|bonos de
bienvenida casas de apuestas|bonos de bienvenida de casas de apuestas|bonos de bienvenida en casas de apuestas|bonos de casas de apuestas|bonos
de casas de apuestas sin deposito|bonos en casa de apuestas|bonos en casas de apuestas sin deposito|bonos
gratis apuestas|bonos gratis apuestas deportivas|bonos gratis casas de
apuestas|bonos gratis sin deposito apuestas|bonos paginas de apuestas|bonos registro
casas de apuestas|bonos sin deposito apuestas|bonos sin depósito
apuestas|bonos sin deposito apuestas deportivas|bonos sin deposito casas de apuestas|bot de apuestas deportivas gratis|boxeo
apuestas|brasil colombia apuestas|brasil peru apuestas|brasil vs colombia apuestas|buenas apuestas
para hoy|buscador cuotas apuestas|buscador de apuestas seguras|buscador
de cuotas apuestas|buscador de cuotas de apuestas|buscar apuestas seguras|caballos apuestas|calculador de apuestas|calculador de cuotas apuestas|calculadora apuestas|calculadora
apuestas combinadas|calculadora apuestas de sistema|calculadora apuestas
deportivas|calculadora apuestas deportivas seguras|calculadora apuestas multiples|calculadora apuestas segura|calculadora apuestas seguras|calculadora apuestas sistema|calculadora apuestas yankee|calculadora arbitraje apuestas|calculadora cubrir
apuestas|calculadora cuotas apuestas|calculadora de apuestas|calculadora de apuestas
combinadas|calculadora de apuestas de futbol|calculadora de apuestas de sistema|calculadora de apuestas deportivas|calculadora de apuestas multiples|calculadora
de apuestas seguras|calculadora de apuestas sistema|calculadora
de apuestas surebets|calculadora de arbitraje apuestas|calculadora de cuotas apuestas|calculadora de cuotas
de apuestas|calculadora para apuestas deportivas|calculadora poisson apuestas|calculadora poisson apuestas deportivas|calculadora poisson para apuestas|calculadora scalping apuestas deportivas|calculadora sistema apuestas|calculadora stake
apuestas|calculadora trading apuestas|calcular apuestas|calcular apuestas deportivas|calcular apuestas futbol|calcular apuestas sistema|calcular cuotas apuestas|calcular cuotas apuestas combinadas|calcular cuotas apuestas deportivas|calcular cuotas de apuestas|calcular ganancias apuestas deportivas|calcular momios apuestas|calcular
probabilidad cuota apuestas|calcular stake apuestas|calcular unidades apuestas|calcular yield apuestas|calculo de
apuestas|calculo de apuestas deportivas|cambio de cuotas apuestas|campeon champions
apuestas|campeon eurocopa apuestas|campeon liga apuestas|campeon nba apuestas|canales de apuestas gratis|carrera de caballos apuestas|carrera de caballos apuestas juego|carrera de caballos con apuestas|carrera de galgos apuestas|carreras de caballos apuestas|carreras
de caballos apuestas online|carreras de caballos con apuestas|carreras de caballos juegos de apuestas|carreras de galgos apuestas|carreras de galgos apuestas online|carreras de galgos apuestas trucos|carreras galgos apuestas|casa apuestas argentina|casa apuestas atletico de madrid|casa apuestas barcelona|casa apuestas betis|casa
apuestas bono bienvenida|casa apuestas bono gratis|casa apuestas bono sin deposito|casa apuestas cerca de mi|casa apuestas chile|casa apuestas
colombia|casa apuestas con mejores cuotas|casa apuestas
deportivas|casa apuestas españa|casa apuestas española|casa apuestas eurocopa|casa apuestas futbol|casa apuestas mejores cuotas|casa apuestas mundial|casa
apuestas nueva|casa apuestas nuevas|casa apuestas online|casa apuestas peru|casa apuestas valencia|casa de apuestas|casa
de apuestas 10 euros gratis|casa de apuestas argentina|casa de apuestas atletico de madrid|casa de apuestas
baloncesto|casa de apuestas barcelona|casa de apuestas beisbol|casa
de apuestas betis|casa de apuestas bono|casa de apuestas bono bienvenida|casa de apuestas bono de bienvenida|casa de apuestas bono gratis|casa
de apuestas bono por registro|casa de apuestas bono sin deposito|casa de apuestas boxeo|casa de apuestas caballos|casa de apuestas carreras de
caballos|casa de apuestas cerca de mi|casa de apuestas cerca de mí|casa de apuestas champions league|casa
de apuestas chile|casa de apuestas ciclismo|casa de
apuestas colombia|casa de apuestas con bono de bienvenida|casa de apuestas con bono sin deposito|casa de
apuestas con cuotas mas altas|casa de apuestas con esports|casa de apuestas con las mejores
cuotas|casa de apuestas con licencia en españa|casa de apuestas con mejores cuotas|casa de
apuestas con pago anticipado|casa de apuestas
con paypal|casa de apuestas copa america|casa de apuestas de
caballos|casa de apuestas de colombia|casa de apuestas de españa|casa de apuestas
de futbol|casa de apuestas de fútbol|casa de apuestas de futbol peru|casa de apuestas de peru|casa de apuestas del
madrid|casa de apuestas del real madrid|casa de apuestas deportivas|casa de apuestas deportivas
cerca de mi|casa de apuestas deportivas en argentina|casa
de apuestas deportivas en chile|casa de apuestas deportivas en colombia|casa de apuestas deportivas en españa|casa
de apuestas deportivas en madrid|casa de apuestas deportivas españa|casa de apuestas deportivas españolas|casa de apuestas deportivas madrid|casa de apuestas deportivas mexico|casa de apuestas deportivas online|casa de apuestas deportivas
peru|casa de apuestas deposito 5 euros|casa de apuestas deposito minimo|casa de apuestas deposito minimo 1 euro|casa de apuestas depósito mínimo 1 euro|casa de apuestas en españa|casa de apuestas en linea|casa de apuestas en madrid|casa de apuestas en perú|casa de apuestas en vivo|casa de apuestas españa|casa de apuestas españa inglaterra|casa de apuestas española|casa de apuestas españolas|casa de apuestas esports|casa de apuestas eurocopa|casa de apuestas europa league|casa de apuestas f1|casa de apuestas
formula 1|casa de apuestas futbol|casa de apuestas ingreso minimo|casa de apuestas ingreso minimo 1 euro|casa de apuestas ingreso mínimo 1 euro|casa
de apuestas legales|casa de apuestas legales en colombia|casa de apuestas legales en españa|casa de apuestas libertadores|casa de apuestas liga española|casa de apuestas madrid|casa de apuestas mas
segura|casa de apuestas mejores|casa de apuestas méxico|casa de apuestas minimo 5 euros|casa de apuestas
mlb|casa de apuestas mundial|casa de apuestas nba|casa
de apuestas nfl|casa de apuestas nueva|casa de apuestas nuevas|casa de apuestas
oficial del real madrid|casa de apuestas oficial real madrid|casa
de apuestas online|casa de apuestas online argentina|casa de apuestas online chile|casa de apuestas online españa|casa de apuestas online mexico|casa de apuestas online paraguay|casa
de apuestas online peru|casa de apuestas online usa|casa de apuestas online venezuela|casa de apuestas pago anticipado|casa de apuestas para boxeo|casa de apuestas para
ufc|casa de apuestas peru|casa de apuestas perú|casa de apuestas peru online|casa de apuestas por paypal|casa
de apuestas promociones|casa de apuestas que regalan dinero|casa de
apuestas real madrid|casa de apuestas regalo de bienvenida|casa de apuestas sevilla|casa de apuestas sin dinero|casa
de apuestas sin ingreso minimo|casa de apuestas sin licencia en españa|casa de apuestas sin minimo de ingreso|casa
de apuestas stake|casa de apuestas tenis|casa de apuestas ufc|casa de apuestas valencia|casa de apuestas venezuela|casa de
apuestas virtuales|casa de apuestas vive la suerte|casa oficial de apuestas del real madrid|casas apuestas asiaticas|casas apuestas bono sin deposito|casas apuestas bonos sin deposito|casas apuestas
caballos|casas apuestas chile|casas apuestas ciclismo|casas apuestas con licencia|casas apuestas con licencia en españa|casas apuestas deportivas|casas apuestas
deportivas colombia|casas apuestas deportivas españa|casas apuestas deportivas españolas|casas apuestas deportivas nuevas|casas apuestas españa|casas apuestas españolas|casas apuestas esports|casas
apuestas eurocopa|casas apuestas golf|casas apuestas ingreso minimo 5
euros|casas apuestas legales|casas apuestas legales españa|casas apuestas licencia|casas
apuestas licencia españa|casas apuestas mexico|casas apuestas
mundial|casas apuestas nba|casas apuestas nuevas|casas apuestas nuevas españa|casas apuestas ofertas|casas apuestas online|casas apuestas paypal|casas apuestas peru|casas apuestas sin licencia|casas apuestas tenis|casas asiaticas apuestas|casas de apuestas|casas de apuestas 5
euros|casas de apuestas app|casas de apuestas argentinas|casas de apuestas asiaticas|casas de apuestas baloncesto|casas de apuestas barcelona|casas de apuestas bono bienvenida|casas
de apuestas bono de bienvenida|casas de apuestas bono por registro|casas de apuestas bono
sin deposito|casas de apuestas bono sin ingreso|casas de apuestas
bonos|casas de apuestas bonos de bienvenida|casas de apuestas bonos gratis|casas de apuestas bonos sin deposito|casas de
apuestas boxeo|casas de apuestas caballos|casas de
apuestas carreras de caballos|casas de apuestas casino|casas de apuestas casino online|casas de apuestas cerca de mi|casas de apuestas champions league|casas de apuestas chile|casas de apuestas ciclismo|casas de
apuestas colombia|casas de apuestas com|casas de apuestas con app|casas
de apuestas con apuestas gratis|casas de apuestas con bono|casas de apuestas con bono
de bienvenida|casas de apuestas con bono de registro|casas de
apuestas con bono por registro|casas de apuestas con bono sin deposito|casas de apuestas con bonos|casas de apuestas
con bonos gratis|casas de apuestas con bonos sin deposito|casas de apuestas con deposito minimo|casas de apuestas con esports|casas de apuestas con handicap asiatico|casas de apuestas con licencia|casas de
apuestas con licencia en españa|casas de apuestas con licencia españa|casas de apuestas con licencia española|casas de apuestas con mejores cuotas|casas de apuestas con pago anticipado|casas de apuestas con paypal|casas de apuestas con paypal en perú|casas de apuestas con promociones|casas de apuestas con ruleta en vivo|casas de apuestas copa del rey|casas de apuestas de caballos|casas de apuestas de españa|casas de apuestas de futbol|casas de apuestas de fútbol|casas de apuestas de peru|casas
de apuestas deportivas|casas de apuestas deportivas asiaticas|casas de apuestas deportivas colombia|casas de apuestas deportivas comparativa|casas de apuestas deportivas con paypal|casas de apuestas deportivas en chile|casas de apuestas deportivas en españa|casas de apuestas deportivas en linea|casas de apuestas deportivas en madrid|casas de apuestas deportivas en mexico|casas de apuestas deportivas en peru|casas de apuestas deportivas en sevilla|casas de apuestas deportivas en valencia|casas de
apuestas deportivas españa|casas de apuestas deportivas españolas|casas de apuestas deportivas legales|casas de apuestas deportivas madrid|casas de apuestas deportivas mexico|casas de apuestas deportivas nuevas|casas
de apuestas deportivas online|casas de apuestas deportivas peru|casas de apuestas deportivas perú|casas de apuestas deposito minimo 1 euro|casas de apuestas depósito mínimo 1 euro|casas de apuestas dinero
gratis|casas de apuestas en argentina|casas
de apuestas en barcelona|casas de apuestas en chile|casas de apuestas en colombia|casas de apuestas en españa|casas de
apuestas en españa online|casas de apuestas en linea|casas de
apuestas en madrid|casas de apuestas en méxico|casas de apuestas en peru|casas de apuestas en perú|casas de
apuestas en sevilla|casas de apuestas en uruguay|casas de apuestas en valencia|casas de apuestas en venezuela|casas de apuestas
equipos de futbol|casas de apuestas españa|casas de apuestas españa alemania|casas de apuestas
españa inglaterra|casas de apuestas españa licencia|casas de apuestas españa nuevas|casas de apuestas españa online|casas de apuestas española|casas de apuestas españolas|casas de apuestas españolas con licencia|casas de apuestas españolas
online|casas de apuestas esports|casas de apuestas eurocopa|casas de apuestas eurocopa 2024|casas de apuestas europa
league|casas de apuestas f1|casas de apuestas fisicas en barcelona|casas de apuestas
fisicas en españa|casas de apuestas formula 1|casas de apuestas fuera de españa|casas de apuestas futbol|casas de apuestas fútbol|casas de
apuestas futbol españa|casas de apuestas ganador eurocopa|casas de apuestas gratis|casas de apuestas ingreso minimo|casas de apuestas ingreso minimo 1 euro|casas de apuestas ingreso minimo 5 euros|casas de apuestas inter
barcelona|casas de apuestas legales|casas de apuestas legales en colombia|casas de apuestas
legales en españa|casas de apuestas legales en mexico|casas de apuestas legales españa|casas de apuestas legales mx|casas de apuestas licencia|casas de apuestas licencia
españa|casas de apuestas Lista (https://www.Beddable.com/pronosticos-tenis-para-hoy/)|casas de apuestas madrid|casas de apuestas mas seguras|casas de apuestas mejores bonos|casas de apuestas mejores cuotas|casas de apuestas
mexico|casas de apuestas méxico|casas de apuestas
minimo 5 euros|casas de apuestas mlb|casas de apuestas
mundial|casas de apuestas mundial baloncesto|casas de apuestas mundiales|casas de apuestas nba|casas de apuestas no reguladas en españa|casas de
apuestas nueva ley|casas de apuestas nuevas|casas de apuestas nuevas
en colombia|casas de apuestas nuevas en españa|casas de apuestas
nuevas españa|casas de apuestas ofertas|casas
de apuestas online|casas de apuestas online
argentina|casas de apuestas online colombia|casas de
apuestas online deportivas|casas de apuestas online ecuador|casas de apuestas online en argentina|casas de apuestas
online en chile|casas de apuestas online en colombia|casas de apuestas online en españa|casas de apuestas online en mexico|casas de apuestas online españa|casas de apuestas online mas fiables|casas de apuestas online mexico|casas
de apuestas online nuevas|casas de apuestas online peru|casas de apuestas online usa|casas de apuestas online venezuela|casas de apuestas pago paypal|casas de apuestas para ufc|casas de apuestas paypal|casas de apuestas
Your comment is awaiting moderation.
WildWood Fashion Online – Stylish items highlighted clearly, pages load quickly, and navigation feels easy.
Your comment is awaiting moderation.
your gift shop – The shop highlights charming items, and navigation feels user-friendly.
Your comment is awaiting moderation.
Магазин ровный.;)Жаль реги пока нет купить кокаин, мефедрон, гашиш, бошки, лирика ну я тоже надеялся что лучше жвш он . но к сожалению я разочаровался в нём. держит не долго совсемРешили мы тут значит с кентом несколько дней назад покурить . Вспомнили про сайт chem24.biz.ski и решили взять 2гр твердого, оплотили короче,описание адреса было простым и спрятано было грамотно!!!
Your comment is awaiting moderation.
Everline Outlet – Well-arranged products and a user-friendly interface ensure a pleasant experience.
Your comment is awaiting moderation.
Time to start earning with super profit automated trading software based on neural networks, with strong win-rate
https://aitredo.com
TG: @aitredo
WhatsApp: +972557245593
Email: sales@aitredo.com
Your comment is awaiting moderation.
Новости Украины https://mediaportal.com.ua в удобном формате: лента последних событий, разделы по темам, авторские колонки и аналитика. Освещаем политику, экономику, безопасность, социальные вопросы и международные отношения. Портал для тех, кто хочет получать полную картину дня.
Your comment is awaiting moderation.
Новостной портал https://mediasfera.com.ua Украины для тех, кто хочет быть в курсе: свежие публикации, разбор ключевых событий, экспертные оценки и подробные материалы о политике, экономике и обществе. Быстрые обновления, удобная навигация и проверенная информация.
Your comment is awaiting moderation.
Онлайн-новостной https://novosti24online.com.ua портал Украины: лента новостей, авторские колонки, интервью, обзоры и аналитика. Политика, социальные вопросы, экономика, международные события — всё оперативно, достоверно и понятно каждому читателю.
Your comment is awaiting moderation.
Главные новости https://smi24.com.ua Украины в одном месте: актуальные события, мнения аналитиков, расследования, репортажи и эксклюзивные материалы. Наш новостной портал помогает понимать, что происходит в стране и как события влияют на жизнь людей.
Your comment is awaiting moderation.
I c᧐ulⅾn?t refrain from commenting. Very well written!
Also visit my site; RC tracked lawn mower
Your comment is awaiting moderation.
oanda japan
Your comment is awaiting moderation.
darmowe pobieranie mostbet mostbet pl
Your comment is awaiting moderation.
VIP models VIP escort dating site Elite girls for escort | VIP models
Your comment is awaiting moderation.
Modern Style Market – Clean design with trendy products, making navigation intuitive.
Your comment is awaiting moderation.
PathToSuccess – Inspiring content is easy to find, and the site feels very smooth to navigate.
Your comment is awaiting moderation.
Golden Field Select – Clear visuals and simple layout help shoppers browse effortlessly.
Your comment is awaiting moderation.
https://solvista.se/index.php?route=journal3%2Fblog%2Fpost&journal_blog_post_id=11
Your comment is awaiting moderation.
https://wordpress.lehigh.edu/coc222/2020/02/09/10/comment-page-61/#comment-137139
Your comment is awaiting moderation.
https://ipb.edu.tl/primeiru-vise-prezidente-ipb-partisipa-enkontru-dezaminasaun-vasina-astrazeneka-covid-19/
Your comment is awaiting moderation.
https://nsibirsk.ru/forum/free/topic-44114.html
Your comment is awaiting moderation.
GreenPlanetOutlet – Simple design, enjoyable browsing, and eco-friendly product range.
Your comment is awaiting moderation.
http://mireait.listbb.ru/viewtopic.php?f=3&t=2257
Your comment is awaiting moderation.
Escort Services Agency – VIP Escort Gay escort Vip girls
Your comment is awaiting moderation.
Новостной портал https://ua24news.com.ua Украины: оперативные события дня, политика, экономика, общество, происшествия и международная повестка. Проверенные факты, аналитика, интервью и репортажи. Узнавайте главное о жизни страны и мира в удобном формате 24/7.
Your comment is awaiting moderation.
Современный женский https://nova-woman.com сайт для девушек и женщин: тренды моды и макияжа, питание, фитнес, эмоциональное здоровье, отношения и саморазвитие. Понятные советы, обзоры, тесты и подборки, которые помогают чувствовать себя увереннее и счастливее.
Your comment is awaiting moderation.
Женский портал https://dreamywoman.com о стиле жизни: красота и уход, мода, здоровье, психология, отношения, семья и карьера. Полезные статьи, подборки, чек-листы и вдохновляющие истории. Всё, чтобы заботиться о себе, развиваться и находить идеи на каждый день.
Your comment is awaiting moderation.
Портал о даче https://sovetyogorod.com саде и огороде: статьи и гайды по уходу за почвой, посадке, обрезке, мульчированию и борьбе с болезнями растений. Обзоры инструментов, идеи для теплиц и компостеров, ландшафтные решения и полезные советы для урожая.
Your comment is awaiting moderation.
выполнение курсовых https://kupit-kursovuyu-22.ru/ .
Your comment is awaiting moderation.
Conscious Curations Market – Layout is intuitive, items feel carefully picked and appealing.
Your comment is awaiting moderation.
Fresh Trend Styles – Pages loaded with no lag and the items looked well-curated.
Your comment is awaiting moderation.
UrbanFashionClick – Simple to browse, trendy items displayed clearly for shoppers.
Your comment is awaiting moderation.
VIP Escort | Escort of men Elite escort services Elite girls for escort | VIP models
Your comment is awaiting moderation.
MidRiver Picks – Carefully curated products, browsing feels quick and pleasant.
Your comment is awaiting moderation.
WildRose Finds Online – Boutique has a warm and charming vibe, browsing was enjoyable.
Your comment is awaiting moderation.
Новостной портал https://infonews.com.ua с полным охватом событий: оперативная лента, большие тексты, интервью и аналитика. Политика, экономика, общество, технологии, культура и спорт. Обновления в режиме реального времени и удобная структура разделов для ежедневного чтения.
Your comment is awaiting moderation.
Авто портал https://just-forum.com с полным набором разделов: новости, обзоры, тесты, подержанные авто, советы по покупке, эксплуатации и продаже автомобиля. Честные мнения экспертов, реальные отзывы, подборки лучших моделей и удобная навигация по маркам и классам.
Your comment is awaiting moderation.
Журнал о животных https://myzoofriend.com советы по уходу за питомцами, здоровье, питание, воспитание и поведение. Обзоры кормов и аксессуаров, рекомендации ветеринаров, истории спасения и интересные факты о кошках, собаках и дикой природе.
Your comment is awaiting moderation.
your fav choice market – Clear visuals and a user-friendly setup make navigating simple.
Your comment is awaiting moderation.
Журнал о животных https://zoo-park.com дикая природа и домашние питомцы. Познавательные материалы, фотоистории, редкие виды, повадки, экология и ответственное содержание. Понятные гайды по уходу, выбору питомца и безопасному общению с животными.
Your comment is awaiting moderation.
clickstreamer.click – Content reads clearly, helpful examples made concepts easy to grasp.
Your comment is awaiting moderation.
rankquest.click – Color palette felt calming, nothing distracting, just focused, thoughtful design.
Your comment is awaiting moderation.
clickpeak.click – Pages loaded fast, images appeared sharp, and formatting stayed consistent.
Your comment is awaiting moderation.
Business Escort Agency Escort agency – VIP escorts Escort Agency
Your comment is awaiting moderation.
maximaclick.click – Found practical insights today; sharing this article with colleagues later.
Your comment is awaiting moderation.
Trendy Finds Online – Smooth navigation and well-presented items enhance the overall browsing experience.
Your comment is awaiting moderation.
Hub of Evergreen Choices – Clearly arranged options let you easily find items of interest.
Your comment is awaiting moderation.
rankhero.click – Pages loaded fast, images appeared sharp, and formatting stayed consistent.
Your comment is awaiting moderation.
LifeNavigator – Motivational articles presented clearly, browsing was simple and pleasant.
Your comment is awaiting moderation.
Онлайн женский https://womenclub.kr.ua портал для девушек и женщин любого возраста: статьи про красоту и уход, отношения, семью, детей, карьеру и хобби. Удобная навигация по разделам, полезные советы, тесты и подборки, которые помогают находить ответы на важные вопросы.
Your comment is awaiting moderation.
Сайт для женщин https://e-times.com.ua о жизни, красоте и вдохновении: мода, макияж, уход за собой, здоровье, отношения, семья и карьера. Практичные советы, обзоры, чек-листы и личные истории. Помогаем заботиться о себе, развиваться и находить новые идеи каждый день.
Your comment is awaiting moderation.
Онлайн-сайт https://funtura.com.ua для женщин любого возраста: тренды моды и макияжа, здоровый образ жизни, питание, фитнес, отношения и саморазвитие. Регулярные обновления, советы экспертов и вдохновляющие материалы, которые помогают чувствовать себя увереннее каждый день.
Your comment is awaiting moderation.
Сайт для женщин https://golosiyiv.kiev.ua которые ценят себя и своё время: полезные статьи о моде и уходе, психологии, детях, отношениях, работе и хобби. Подборки идей, гайды, чек-листы и вдохновляющие истории. Помогаем находить баланс между заботой о других и заботой о себе.
Your comment is awaiting moderation.
VIP Escort Dating Site for Men Elite escort services Elite individuals
Your comment is awaiting moderation.
F&C Trend Shop – The assortment is impressive, making browsing quick and comfortable.
Your comment is awaiting moderation.
DreamBigToday – Positive vibe, user-friendly structure, and effortless navigation.
Your comment is awaiting moderation.
What’s up all, here every person is sharing such experience, therefore it’s pleasant to read this blog, and I used to visit this blog every day.
juegos 2020 friv
Your comment is awaiting moderation.
Contemporary Fashion Hub – Layout feels polished, and modern items are easy to browse.
Your comment is awaiting moderation.
Global Marketplace Elite – Browsing was simple, everything feels curated and premium.
Your comment is awaiting moderation.
authenticchoicehub – AuthenticChoiceHub delivers carefully chosen products that make browsing simple and satisfying.
Your comment is awaiting moderation.
Escort services for charming girls Gay escort elite escort
Your comment is awaiting moderation.
TrendSpot Modern – Browsing was simple and enjoyable with a clear, trendy design.
Your comment is awaiting moderation.
Grove Finds Market – Easy-to-navigate pages and neat product arrangement create a pleasant flow.
Your comment is awaiting moderation.
SmartValueStore – Great for quick shopping trips, user-friendly layout and speedy access.
Your comment is awaiting moderation.
Midnight Trend Finds Hub – Well-presented products, shopping feels effortless and pleasant.
Your comment is awaiting moderation.
Все новости https://uanews24.com.ua Украины и мира — быстро, достоверно и понятно: события в политике, экономике, науке, культуре и спорте. Подробные обзоры, интервью и аналитика помогают увидеть полную картину происходящего. Ежедневные обновления и удобная навигация.
Your comment is awaiting moderation.
Лента новостей https://uavesti.com.ua Украины и мира: самые важные события дня, актуальные темы, экспертные оценки и глубокая аналитика. Удобный формат, быстрые обновления, проверенные данные. Политика, общество, экономика, культура и мировые тенденции — всё на одной платформе.
Your comment is awaiting moderation.
Новости Украины https://ukrinfo24.com.ua и мира: оперативная информация, разбор ключевых событий, интервью, репортажи и аналитика. Только проверенные источники и объективная подача. Будьте в курсе того, что происходит в стране и на международной арене прямо сейчас.
Your comment is awaiting moderation.
Актуальные новости https://ukrmedia24.com.ua Украины и мира в одном месте: главные события дня, обзоры, комментарии экспертов, репортажи и эксклюзивные материалы. Политика, экономика, технологии, культура и спорт. Быстро, достоверно и удобно для ежедневного чтения.
Your comment is awaiting moderation.
modern hub online – Items are well curated, site layout feels easy to navigate.
Your comment is awaiting moderation.
Wild Rose Hub Online – Cozy boutique vibe, found several enjoyable items while browsing.
Your comment is awaiting moderation.
юмор в обыденном Забавные недоразумения напоминают, что иногда мы сами создаём драму там, где её быть не должно. Я подумал, что мой звонок другу — не по памяти, а по моде, и в итоге мы обсуждали погоду на Луне, потому что телефон решил переinaкнуть нас в пункт назначения. В супермаркете принтер на кассе печатал штрихкоды так, будто пытался выдавать новые рецепты блюд из продуктов. На прогулке в парке нашёл чужой зонтик, который оказался ярче людей: его обладатель вернулся позже, а все вокруг думали, что это сигнал светофора для пингвинов. Забавные недоразумения напоминают: не всё можно контролировать, но можно отнестись к ошибке с улыбкой.
Your comment is awaiting moderation.
заказать курсовую работу заказать курсовую работу .
Your comment is awaiting moderation.
Escort Girls Escort agencies VIP escort
Your comment is awaiting moderation.
заказать студенческую работу http://www.kupit-kursovuyu-23.ru/ .
Your comment is awaiting moderation.
elite escort VIP escort dating site Elite prostitutes – Vip girls , profiles and escort from elite girls of models
Your comment is awaiting moderation.
ResourceDepot – User-friendly interface with all helpful information clearly visible.
Your comment is awaiting moderation.
Свежие новости https://ukrportal.com.ua Украины и мира: политика, экономика, общество, происшествия, аналитика и авторские материалы. Оперативные обновления 24/7, проверенные факты и объективная подача. Следите за ключевыми событиями, которые формируют будущее страны и всего мира.
Your comment is awaiting moderation.
evercrest online store – A dependable mix of products, and the catalog appears to stay up to date.
Your comment is awaiting moderation.
Онлайн-портал https://stroyinfo.com о строительстве и ремонте для владельцев квартир, домов и дач: полезные статьи, схемы, чек-листы, подбор материалов и техники, советы по отделке и инженерным системам. Всё, чтобы сделать ремонт своими руками или грамотно контролировать подрядчиков.
Your comment is awaiting moderation.
Портал о строительстве https://stroyline.com и ремонте: пошаговые инструкции, обзоры материалов, калькуляторы, идеи планировок и дизайна, советы мастеров и реальные примеры. Помогаем спланировать работы, избежать типичных ошибок и сэкономить время и бюджет.
Your comment is awaiting moderation.
Строительный портал https://sovetremont.com с практическими советами: ремонт квартир, строительство домов, инженерные системы, отделка, фасады, кровля и благоустройство. Руководства, видео, расчёты и рекомендации экспертов, которые помогают экономить время и деньги.
Your comment is awaiting moderation.
заказать дипломную работу в москве http://kupit-kursovuyu-21.ru/ .
Your comment is awaiting moderation.
Build Today Hub – Clear layout and intuitive navigation make exploring content simple and enjoyable.
Your comment is awaiting moderation.
Fashion Design Trends – Trendy offerings are nicely arranged, making browsing comfortable.
Your comment is awaiting moderation.
DailyPickShop – Simple layout, user-friendly navigation, and attractive deals.
Your comment is awaiting moderation.
https://iph.uog.edu.et/relaxing-after-work/#comment-9628
Your comment is awaiting moderation.
https://diigo.com/011gw07
Your comment is awaiting moderation.
Escort Girls Escort agencies VIP models
Your comment is awaiting moderation.
https://fahrschuleeglich.edublogs.org/2025/12/08/1xbet-pakistan-promo-code-2026-vip-e100/
Your comment is awaiting moderation.
https://mymoscow.forum24.ru/?1-6-0-00036511-000-0-0-1765441027
Your comment is awaiting moderation.
https://sites.google.com/view/code-de-bienvenue-melbet-zevs/home
Your comment is awaiting moderation.
Global Treasure Market – Easy to navigate, each product feels handpicked and premium.
Your comment is awaiting moderation.
best home corner – Home finds are well displayed, site feels simple and convenient to browse.
Your comment is awaiting moderation.
Modern Decor Hub – The interface was tidy and exploring products was effortless.
Your comment is awaiting moderation.
MidCity Collections – Attractive collections presented clearly, navigation feels smooth and quick.
Your comment is awaiting moderation.
learn & explore – Educational items are well arranged, browsing is simple and intuitive.
Your comment is awaiting moderation.
WildRose Finds Online – Boutique has a warm and charming vibe, browsing was enjoyable.
Your comment is awaiting moderation.
double down casino
Your comment is awaiting moderation.
beautiful escort girls Escort agency – VIP escorts Escort Services
Your comment is awaiting moderation.
Modern Wardrobe Hub – Items are easy to find, and pages load quickly with a clean design.
Your comment is awaiting moderation.
התנשמה. קצר, שקט. גופה התעוות, אך היא לא נרתעה. לא ניגבתי. היא ישבה, קפואה, נושמת את פיה, וטיפות לבנות ומעוננות זרמו אט אט על עורה. שקט. שוב שתיקה. כבד, עבה, מלא ריח של סקס והלם. בתחת עם זין גדול בלי שום עידון או היסוס – כמעט קרע את פי הטבעת. מלפנים ליטפתי בעדינות ובעדינות את שפתיי ולשוני את הזין הקטן יותר-ליקקתי את החלק העליון, ואז ריפפתי עליו ללא משקל peep4free.co.il
Your comment is awaiting moderation.
где можно заказать курсовую http://www.kupit-kursovuyu-22.ru .
Your comment is awaiting moderation.
где можно заказать курсовую работу где можно заказать курсовую работу .
Your comment is awaiting moderation.
beautiful escort girls VIP escort dating site VIP escort
Your comment is awaiting moderation.
GlobalFinds Studio – Well-laid-out pages and tidy presentation make browsing effortless.
Your comment is awaiting moderation.
DailyDiscoveries – Clean layout makes finding items fast and simple.
Your comment is awaiting moderation.
стайлер купить дайсон официальный сайт стайлер купить дайсон официальный сайт .
Your comment is awaiting moderation.
ironskyessentials – I enjoyed exploring ironskyessentials, everything felt well organized and clear.
Your comment is awaiting moderation.
Elite Escort Services VIP Escort elite escort
Your comment is awaiting moderation.
TrendHub Shop – Modern pieces are showcased well, and browsing is smooth and enjoyable.
Your comment is awaiting moderation.
студенческие работы на заказ http://www.kupit-kursovuyu-23.ru .
Your comment is awaiting moderation.
GiftSelectionSpot – Minimalistic design, easy-to-browse layout, and enjoyable experience.
Your comment is awaiting moderation.
dream grove corner – The store has a soothing atmosphere, making it enjoyable to look around.
Your comment is awaiting moderation.
сколько стоит курсовая работа по юриспруденции http://kupit-kursovuyu-21.ru/ .
Your comment is awaiting moderation.
FreshTrend Lane – Clearly presented trendy items with smooth browsing make the site user-friendly.
Your comment is awaiting moderation.
Elite Escort Services Escort agencies Escort Agency
Your comment is awaiting moderation.
Wild Rose Hub Online – Cozy boutique vibe, found several enjoyable items while browsing.
Your comment is awaiting moderation.
fashion find store – Products look modern and attractive, site loads fast and cleanly.
Your comment is awaiting moderation.
Majestic Grover Market – Grover-themed items arranged neatly, exploring the store is pleasant.
Your comment is awaiting moderation.
inspireyourjourney.click – Inspiring products displayed nicely, browsing feels natural and very pleasant today.
Your comment is awaiting moderation.
Modern Wardrobe World – Pages loaded quickly and the fashion variety felt fresh and current.
Your comment is awaiting moderation.
Elite prostitutes – VIP escort from model girls , VIP profiles of elite courtesans https://yeahcamp.ru Elite prostitutes
Your comment is awaiting moderation.
clickflux.click – Bookmarked this immediately, planning to revisit for updates and inspiration.
Your comment is awaiting moderation.
rankverse.click – Found practical insights today; sharing this article with colleagues later.
Your comment is awaiting moderation.
Портал о ремонте https://remont-sam.com и строительстве: от подготовки проекта и сметы до отделки и декора. Подробные инструкции, обзоры инструментов, рейтинги материалов, фото-примеры и лайфхаки. Удобная навигация по темам помогает быстро найти нужное решение для вашего объекта.
Your comment is awaiting moderation.
Строительный портал https://garden-story.com для профессионалов и частных мастеров: статьи и инструкции по ремонту, отделке и строительству, обзоры материалов и инструментов, калькуляторы, сметы, фото-примеры и советы экспертов. Всё, чтобы грамотно спланировать и выполнить работы.
Your comment is awaiting moderation.
Авто портал https://automotive-news.com.ua для тех, кто живёт автомобилями: новости автопрома, обзоры машин, тест-драйвы, советы по выбору и обслуживанию, сравнение моделей и подбор авто по параметрам. Фото, видео, мнения экспертов и реальные отзывы владельцев в одном месте.
Your comment is awaiting moderation.
oficjalny mostbet mostbet
Your comment is awaiting moderation.
dyson official http://www.fen-d-3.ru .
Your comment is awaiting moderation.
OfferSpot – Layout is intuitive, and finding what I needed was quick and easy.
Your comment is awaiting moderation.
Business Escort Agency Elite escort services Elite Escort Agency
Your comment is awaiting moderation.
Happy Budget Finds – The site feels organized, with responsive pages and appealing items.
Your comment is awaiting moderation.
написание курсовой на заказ цена написание курсовой на заказ цена .
Your comment is awaiting moderation.
гетх зеркало
Your comment is awaiting moderation.
регистрация гетикс
Your comment is awaiting moderation.
getx регистрация
Your comment is awaiting moderation.
https://t.me/getx_site_official
Your comment is awaiting moderation.
get x сайт
Your comment is awaiting moderation.
Межпозвоночная грыжа: Как остеопатия может помочь
Your comment is awaiting moderation.
Остеопат в Москве: сколько стоит прием и на что обратить внимание?
Your comment is awaiting moderation.
שהתחלתי לעבוד בצייתנות בזמן שהחלוקית הדקה שלי לא נפתחה, והדירות החשופות והדיסקרטיות שלי כבר עברו בדיקה קשה, מתכווצות מתחת לאצבעות חסרות הרחמים. ואחרי דקה, מקס פשוט הזיז את התחתונים ידעתי את הסיסמה שלה. היא הכירה את שלי. זה תמיד היה ככה. אמון, לזיין אותו אידיוט. הושטתי יד, מפרקי אצבעותי כמעט פגעו בעורה החם, הרמתי את הטלפון. בר הזכוכית הקר שבידי הרגיש פתאום כבד addlock.co.il
Your comment is awaiting moderation.
курсовая заказать недорого http://kupit-kursovuyu-22.ru .
Your comment is awaiting moderation.
Everyday Value Outlet – Deals look carefully picked, and the interface runs smoothly.
Your comment is awaiting moderation.
בגופה המעונה, השני טס למעלה, נפל על פניה, מכתים אותו בשפיך… השעה הייתה שמונה בבוקר. ג ‘ ולקה כבר הצליחה הרבה בדירות הנפרדות האלה: היא הכינה ארוחת בוקר לבחור, אפילו הכינה לו קפה. את שלי, יש לנו אותו גודל. אז נתתי לו את החלק השני של החוב. 22. דירות דיסקרטיות משפחתיות ראשונות בטורקיה שלום לכולם! אני רוצה לספר את הסיפור שקרה לבעלי ואני בקיץ הזה אני ליסה, בעלי moyal-group.co.il
Your comment is awaiting moderation.
Elite Escort Agency VIP Escort VIP models
Your comment is awaiting moderation.
PureChicPick – Simple design, stylish selections, and easy navigation.
Your comment is awaiting moderation.
Современный новостной https://arguments.com.ua портал: главные новости дня, поясняющая аналитика, мнения экспертов и репортажи с мест событий. Лента в реальном времени, тематические рубрики, фото и видео. Помогаем разобраться в том, что происходит в стране и мире.
Your comment is awaiting moderation.
Женский портал https://womanblog.com.ua с актуальными темами: тренды моды и макияжа, здоровье, фитнес, питание, саморазвитие и вдохновляющие истории. Ежедневные обновления, рекомендации специалистов и подборки идей для повседневной жизни, карьеры и личного счастья.
Your comment is awaiting moderation.
Современный женский https://womanstyle.com.ua портал для тех, кто хочет успевать всё: стиль и красота, психология и отношения, материнство, дом, путешествия и работа. Практичные лайфхаки, чек-листы, подборки и мотивационные материалы, которые помогают заботиться о себе и жить в балансе.
Your comment is awaiting moderation.
Онлайн авто https://autoindustriya.com.ua портал: всё об автомобилях и автожизни. Обзоры и сравнения моделей, тест-драйвы, лайфхаки по ремонту и обслуживанию, информация о кредитах и лизинге, новости рынка. Помогаем выбрать машину, понять тонкости владения и сэкономить на содержании.
Your comment is awaiting moderation.
viralcore.click – Overall, professional vibe here; trustworthy, polished, and pleasantly minimal throughout.
Your comment is awaiting moderation.
clickengineer.click – Loved the layout today; clean, simple, and genuinely user-friendly overall.
Your comment is awaiting moderation.
clickphase.click – Navigation felt smooth, found everything quickly without any confusing steps.
Your comment is awaiting moderation.
בצורה חלקה, הלכה וחיננית את האגן, עם כל תנועה גמישה, נותנת מעט לראש לסגור את הכניסה לנרתיק עד שהוא נתפס בבטחה, וברגע הבא, הזין של דני עצמו נפל באמצע החום והרכות של הכוס. – אההה! – רק מהנהן. אני נותן סימן. ארטיום קם. מתאים. הוא מודאג, אבל מחזיק מעמד. הוא בתפקיד. נכנס נכון. הופך מצד אחד. אני בצד השני. היא בינינו. שני גברים. קצב אחד. חום אחד ותאווה אחת. אני נוגע iampurple.co.il
Your comment is awaiting moderation.
market hub – Straightforward shopping experience, with consistent quality across listings.
Your comment is awaiting moderation.
עם עקבים גבוהים, חצאית שמתחתיה אתה יכול לראות שאני בגרביונים, קצרים מספיק, אבל לא צמודים, בשחור, וחולצה לבנה גדולה מדי על החזה החשוף קצרה, היא כמעט כמעט עד הטבור. עשיתי איפור בהיר, נשמע בקול מחריש אוזניים בשתיקה ההיא. הוא דחף את הדלת והעביר אותי קדימה. “ברוך הבא,” הוא אמר, וקולו נשמע בדרך חדשה. חציתי את הסף המספר היה ענק. חצי חושך, רק מנורת רצפה בערה איפשהו, addlock.co.il
Your comment is awaiting moderation.
заказать курсовую работу качественно kupit-kursovuyu-23.ru .
Your comment is awaiting moderation.
power inspiration picks – Items are appealing, browsing is simple and user-friendly.
Your comment is awaiting moderation.
FashionFresh Lane – Stylish arrangement of products with responsive pages enhances usability.
Your comment is awaiting moderation.
Iron Root Selection – Products displayed attractively, navigation feels effortless.
Your comment is awaiting moderation.
inspire and grow shop – Items are well displayed, site navigation is smooth and clear.
Your comment is awaiting moderation.
oakandriver – Found beautiful pieces here today, oakandriver makes shopping feel effortless.
Your comment is awaiting moderation.
Elite girls for escort | VIP models https://escbestyou.biz Escort
Your comment is awaiting moderation.
цена курсовой работы https://kupit-kursovuyu-21.ru .
Your comment is awaiting moderation.
FreshSeason Lane Hub – Neatly presented seasonal items with fast-loading pages enhance usability.
Your comment is awaiting moderation.
Остеохондроз: ключ к пониманию и лечению распространенного заболевания
Your comment is awaiting moderation.
Style Hub Corner – Fast, intuitive browsing with trendy styles presented nicely.
Your comment is awaiting moderation.
Unique Gift Hub Online – Well-laid-out gifts, browsing pages felt simple and enjoyable.
Your comment is awaiting moderation.
windyforestfinds – Lovely aesthetic on this site, windyforestfinds feels like a peaceful online market.
Your comment is awaiting moderation.
Thanks for sharing your thoughts on boho casino app. Regards
Your comment is awaiting moderation.
crestartlane – Clean interface with well-arranged items, shopping was effortless.
Your comment is awaiting moderation.
Современный авто https://cargurus.com.ua портал: свежие новости, премьеры, обзоры новых и подержанных автомобилей, тест-драйвы, советы по эксплуатации и страхованию. Удобный поиск по маркам и моделям, рейтинги, подборки и полезные материалы для автолюбителей любого уровня.
Your comment is awaiting moderation.
Новостной портал https://ua-today.com.ua с акцентом на достоверность: только проверенные источники, факты, комментарии экспертов и глубокая аналитика. Удобная лента событий, фильтры по темам, архив материалов и быстрый доступ к главному за день.
Your comment is awaiting moderation.
Главные новости https://ukrnews.in.ua сегодня: политика, экономика, международные события, наука, культура и общественные темы. Оперативные сводки, анализ и подробные статьи. Полная картина дня, собранная в одном месте для удобного и быстрого чтения.
Your comment is awaiting moderation.
Все главные https://ua-news.com.ua новости в одном потоке: актуальные события, важные решения, прогнозы, мнения и аналитика. Помогаем понять, что стоит за заголовками, как события связаны между собой и почему они значимы. Обновления в режиме реального времени.
Your comment is awaiting moderation.
Business Escort Agency Escort agencies Elite Dating Models
Your comment is awaiting moderation.
дайсон стайлер для волос купить цена с насадками официальный сайт https://fen-d-3.ru/ .
Your comment is awaiting moderation.
TopSavings – Browsing was simple, and the discounts were clearly displayed.
Your comment is awaiting moderation.
kod promocyjny mostbet mostbet
Your comment is awaiting moderation.
Elite VIP Escort Elite escort services Elite Girls
Your comment is awaiting moderation.
Shop Better Products – Items look appealing overall, and checking through categories is quick and smooth.
Your comment is awaiting moderation.
Главные новости https://newsline.in.ua онлайн: от срочных сообщений до глубоких обзоров и экспертных комментариев. Политика, экономика, безопасность, технологии и культура. Только проверенные факты и удобная лента, чтобы быстро ориентироваться во всём, что происходит.
Your comment is awaiting moderation.
Актуальные и главные https://allnews.in.ua новости: короткие заметки о срочных событиях и развёрнутые аналитические материалы. Помогаем понять, что произошло, почему это важно и к чему может привести. Лента обновляется в течение дня, чтобы вы не упустили ничего значимого.
Your comment is awaiting moderation.
Главные новости https://mynewsmonitor.com онлайн: самые важные события дня в сжатом и понятном формате. Политика, экономика, общество, мир, наука и культура. Краткие сводки, развёрнутые статьи, мнения экспертов и удобная лента, которая обновляется в режиме реального времени.
Your comment is awaiting moderation.
Женский портал https://forthenaturalwoman.com о жизни, красоте и вдохновении: мода, уход за собой, здоровье, отношения, карьера и личные финансы. Полезные статьи, честные обзоры, советы экспертов и истории реальных женщин. Присоединяйтесь к сообществу и находите идеи для себя каждый день.
Your comment is awaiting moderation.
Happy Home Finds – Pages load quickly, and the overall atmosphere feels uplifting.
Your comment is awaiting moderation.
Elite individuals https://kazak-kostoprav.ru Elite Dating Models
Your comment is awaiting moderation.
コーナーは、タイルを固定するための安定した場所であり、盤面が混雑することを防ぐことができます。
Your comment is awaiting moderation.
заказать качественную курсовую заказать качественную курсовую .
Your comment is awaiting moderation.
clickorigin.click – Color palette felt calming, nothing distracting, just focused, thoughtful design.
Your comment is awaiting moderation.
rankzone.click – Color palette felt calming, nothing distracting, just focused, thoughtful design.
Your comment is awaiting moderation.
rankburst.click – Content reads clearly, helpful examples made concepts easy to grasp.
Your comment is awaiting moderation.
rankmint.click – Pages loaded fast, images appeared sharp, and formatting stayed consistent.
Your comment is awaiting moderation.
SimpleChoiceMarket – Easy navigation, attractive deals, and fast-loading pages.
Your comment is awaiting moderation.
Ironline Market Hub – Well-curated selection, products appear high-quality and trustworthy.
Your comment is awaiting moderation.
rankthread.click – Pages loaded fast, images appeared sharp, and formatting stayed consistent.
Your comment is awaiting moderation.
Living Market Hub – Clear structure, responsive pages, and a relaxing shopping experience.
Your comment is awaiting moderation.
UGC Shop Picks – Beautifully arranged items, exploring the site was simple and smooth.
Your comment is awaiting moderation.
corner shopping picks – Items look neat and organized, browsing is smooth and very easy.
Your comment is awaiting moderation.
DeepValleyBazaar – Great pricing throughout, and the store feels honest and dependable.
Your comment is awaiting moderation.
VIP escort Escort agencies escort escort
Your comment is awaiting moderation.
сайт дайсон официальный в россии https://fen-d-3.ru/ .
Your comment is awaiting moderation.
выполнение учебных работ kupit-kursovuyu-23.ru .
Your comment is awaiting moderation.
курсовой проект купить цена http://www.kupit-kursovuyu-21.ru .
Your comment is awaiting moderation.
APS Featured Items – The autumn designs look thoughtfully selected, and the overall browsing is smooth.
Your comment is awaiting moderation.
Fresh Home Corner – Attractive visuals and organized layout ensure a smooth shopping flow.
Your comment is awaiting moderation.
TimelessStylePlace – Stylish products displayed well, site loads fast and browsing feels smooth.
UrbanHarbNation – Trendy urban items available, navigation simple and overall experience feels enjoyable today.
UrbanLightSelect – Nice curated products, layout clean and browsing was easy and pleasant.
UrbanWishMarket – Great selection of items, navigation intuitive and browsing feels effortless today.
VioletCrestTrends – Beautifully arranged trendy items, site runs smoothly and looks very modern.
WildBranchCorner – Rustic charm visible, browsing felt comfortable and site layout is well organized.
WildflowerPeak – Lovely natural theme, products displayed clearly and browsing was really smooth today.
WildNorthTrading – Nice variety of items, navigation simple and site loads quickly overall.
WildPathMarket – Pleasant layout with curated items, browsing felt easy and enjoyable today.
FindGreatOffers – Deals displayed nicely, site runs fast and browsing felt effortless indeed.
FindGreatOffers – Great offers available here, navigation smooth and overall experience feels convenient.
FindSomethingBetter – Items look appealing, site layout clean and browsing felt very comfortable.
FindYourAnswers – Helpful resources shown clearly, navigation intuitive and browsing was pleasant today.
FindYourDirection – Motivational content displayed well, site feels organized and browsing was effortless.
FindYourTruePath – Inspiring layout and content, navigation smooth and browsing felt enjoyable overall.
FreshFashionFinds – Trendy products showcased nicely, site loads fast and browsing was very easy.
FreshGiftOutlet – Lovely gift items, layout clean and navigation intuitive and smooth today.
Your comment is awaiting moderation.
Escort Escort agencies Elite individuals
Your comment is awaiting moderation.
Все самое свежее здесь: http://norco.ru
Your comment is awaiting moderation.
Updates on the Topic: https://lacavedupaysdauge.fr
Your comment is awaiting moderation.
https://infolenta.com.ua
Your comment is awaiting moderation.
Midday Market Lane – Neat presentation with clearly separated categories ensures easy exploration.
Your comment is awaiting moderation.
Offer Market Place – A wide range of discounts is listed, and navigating feels natural and smooth.
Your comment is awaiting moderation.
VIP Escort Dating Site for Men https://sauny-v-kazani.ru Elite Girls
Your comment is awaiting moderation.
SimpleMarketDeals – Well-presented products, easy navigation, and smooth shopping flow.
Your comment is awaiting moderation.
High Pine Hub – Well-arranged outlet items, navigating the site is easy and enjoyable.
Your comment is awaiting moderation.
Escort Services Agency – VIP Escort https://stopstroke.ru VIP Escort Dating Site for Men
Your comment is awaiting moderation.
Trendy Sale Online – Clear layout with appealing products, moving around the site felt effortless.
Your comment is awaiting moderation.
Home Essentials Hub – Pages loaded quickly and items were presented clearly throughout.
Your comment is awaiting moderation.
daily shopping corner – Corner store offerings look appealing, site experience is simple and fast.
Your comment is awaiting moderation.
Modern World Style – Everything opened quickly and the collection felt thoughtfully curated.
Your comment is awaiting moderation.
goldencraftshop – Easy-to-follow layout and neat product pages, shopping was fast.
Your comment is awaiting moderation.
Autumn Peak Studio – Autumn-style items look charming, and the browsing experience feels calm and easy today.
Your comment is awaiting moderation.
Escort https://sincastigos.com Elite Models
Your comment is awaiting moderation.
CloverCozyCorner – Delightful cozy picks displayed clearly, and the navigation feels light and smooth.
Your comment is awaiting moderation.
WildTradeVault – Smooth interface and fast browsing with a nice product variety.
Your comment is awaiting moderation.
SQL-атаки на финансовые системы
Дефейс — это форма кибератаки, при которой злоумышленники изменяют внешний вид веб-сайта, заменяя его содержимое, возникшая в конце 1990-х годов, когда хакеры начали использовать уязвимости веб-приложений для демонстрации силы и “позора” владельцев сайтов, одним из первых известных случаев стала атака на сайт NASA в 1999 году. В ранние годы дефейс носил в основном идеологический характер и редко имел экономические мотивы, однако с развитием интернета, даркнета и анонимных сетей атакующие получили возможность скрытно проводить операции, объединяться в группы и использовать более сложные методы, включая вредоносное ПО, эксплойты и PGP-шифрование для сокрытия следов, что затрудняет компьютерную криминалистику и расследования. Основные принципы работы дефейса включают поиск уязвимостей в веб-приложениях, таких как неправильная настройка серверов, слабые пароли или баги в программном обеспечении, получение доступа к системе и последующее изменение контента сайта, добавление рекламных, политических или идеологических сообщений, а иногда и вредоносного ПО. Для анонимизации действий хакеры используют прокси-серверы и шифрование, что делает идентификацию преступника сложной даже при наличии IP-адреса. Организации применяют системы обнаружения вторжений и безопасное кодирование, однако полностью исключить риск дефейса невозможно, особенно если злоумышленники могут воздействовать на DNS-серверы и управлять доменными данными. Дефейс может использоваться для политической агитации, размещения идеологических посланий, псевдопатриотических акций, а также для мошенничества, перенаправляя пользователей на фальшивые сайты с целью фишинга или кражи средств, и может быть элементом более сложных операций, включая кибершпионаж и корпоративные атаки. Перспективы и будущее дефейса связаны с ростом технологий и улучшением кибербезопасности: многие сайты используют блокчейн-технологии для защиты контента, что усложняет реализацию атак, однако применение искусственного интеллекта и автоматизированных алгоритмов машинного обучения позволит хакерам быстрее находить уязвимости и обходить системы защиты, а распространение руткитов и скрывающих следы вредоносных программ усложняет обнаружение дефейсов специалистами по информационной безопасности на ранних стадиях, что делает дефейс все более сложной и технологически продвинутой формой кибератаки с разнообразными целями, от идеологических до экономических, и требующей комплексного подхода к предотвращению и мониторингу веб-ресурсов в условиях растущих киберугроз и эволюции методов атак.
Основные ссылки:
cms deface — https://whispwiki.cc/wiki/defeyshttp network — https://whispwiki.cc/wiki/http
whispwiki.cc™ 2025 — дефейс расследование
Хэширование применяется для защиты логов и серверных журналов. Онлайн-маркеты создают серьёзные вызовы для кибербезопасности. Анонимные сети позволяют скрывать направление и источник атак.
Your comment is awaiting moderation.
https://infolenta.com.ua/dvi-zahadky-pro-korysni-kopalyny-shcho-prykhovano-v-nadrakh-zemli/
Your comment is awaiting moderation.
Fresh Picks Hub – Well-laid-out items with smooth page transitions create a pleasant user experience.
Your comment is awaiting moderation.
https://infolenta.com.ua/yak-diznatysia-de-znakhodytsia-posylka-nova-poshta-povnyy-hayd-vidstezhennia/
Your comment is awaiting moderation.
discoveramazingdeals.click – Amazing deals available, browsing feels smooth and very convenient today.
Your comment is awaiting moderation.
VIP Escort Dating Site for Men Gay escort Elite Girls
Your comment is awaiting moderation.
discoverandbuyhub.shop – Hub offers a solid variety, browsing feels smooth and intuitive today.
Your comment is awaiting moderation.
Hot Deal Finder – Nice selection of bargains, and the layout keeps browsing quick and simple.
Your comment is awaiting moderation.
VIP escort Escort agency – VIP escorts elite escort
Your comment is awaiting moderation.
https://uwb.ds.lib.uw.edu/supportallstudents/mental-health/__trashed-10/
Your comment is awaiting moderation.
https://kenya.blog.malone.edu/2019/05/online-contacts-and-blogs.html?sc=1765382381307#c1846216722753059743
Your comment is awaiting moderation.
https://blogs.uoregon.edu/rel321f15drreis/2015/11/01/regulations-of-christianity/#comment-48668
Your comment is awaiting moderation.
Highland Craft Spot – Craft products arranged neatly, making exploring simple and pleasant.
Your comment is awaiting moderation.
TrendyFashionSpot – Modern layout, well-organized pages, and enjoyable shopping experience.
Your comment is awaiting moderation.
Как устроена репутация на даркнет-площадках?
QR-код представляет собой двумерный матричный штрихкод, разработанный в 1994 году японской компанией Denso Wave под руководством Масахиро Хара, изначально предназначенный для маркировки автомобильных деталей и упрощения логистики, позволяя считывать больше информации, чем традиционные линейные штрихкоды, со временем технология получила массовое распространение в коммерческой и повседневной среде, применяясь на упаковках, визитках, рекламных носителях и мобильных приложениях, QR-коды используются для мобильных платежей и банковских услуг, обеспечивая быстрый перевод средств с телефона, для идентификации и пропусков, билетов и посадочных талонов, в маркетинге и рекламе, где коды размещаются на продуктах, плакатах и визитках для направления пользователей на сайты и приложения, а также как информационные метки на упаковках, документах, в музеях и на выставках для предоставления дополнительной информации, в ресторанах и сервисах без контакта QR?меню позволяет посетителям сканировать код и получать список блюд на смартфоне, кроме легального применения QR-коды нашли место и в теневой экономике, где используются для скрытого размещения ссылок на даркнет-маркетплейсы, например KRAKEN, приглашений на теневые форумы и ссылок на криптовалютные кошельки, такие коды могут вести на onion-адреса и требуют TOR-браузера или VPN для доступа, также QR-коды интегрируются в Telegram-каналы или размещаются в офлайн-точках, чтобы направлять пользователей на закрытые платформы и ресурсы скрытых площадок, в будущем QR-технология будет развиваться в сторону более эстетичных и устойчивых к повреждениям и искажениям версий, разрабатываются методы “aesthetic QR”, одновременно растут угрозы злоумышленников, которые совершенствуют фишинговые атаки через QR, создают генераторы вредоносных кодов и интегрируют QR в схемы киберпреступности и теневой экономики, таким образом QR-код представляет собой универсальный инструмент для быстрого обмена информацией как в легальном, так и в теневом цифровом пространстве, сочетая удобство, широкое распространение и потенциальные риски безопасности, что делает баланс между доступностью и защитой ключевой задачей дальнейшего развития этой технологии.
Основные ссылки:
QR вход в даркнет — https://whispwiki.cc/wiki/qr-kodчитать заметку — https://whispwiki.cc/wiki/darknet
whispwiki.cc™ 2025 — qr крипта
Влияние Telegram-каналов на Rutor. Почему Solaris стал лёгкой целью. Hydra как основной кейс 2015–2022.
Your comment is awaiting moderation.
TPH Picks Hub – Great presentation of items, moving through pages felt natural.
Your comment is awaiting moderation.
Outlet of Fresh Value – Liked the organized layout; everything opened fast and without hassle.
Your comment is awaiting moderation.
Escort Services https://sunbeautyschool.ru Escort services for charming girls
Your comment is awaiting moderation.
Best selection of the day: https://luxe.tv
Your comment is awaiting moderation.
Straight to the best here: https://laudunlardoise.fr
Your comment is awaiting moderation.
The best for you: https://www.als-photo.fr
Your comment is awaiting moderation.
bukmacher internetowy mostbet casino oferuje szeroki wybor zakladow sportowych, zakladow na zywo i slotow od czolowych dostawcow. Oferuje szybka rejestracje, bonusy dla nowych graczy, przyjazna dla uzytkownika aplikacje mobilna, natychmiastowe wyplaty i calodobowa obsluge klienta.
Your comment is awaiting moderation.
rankorbit.click – Loved the layout today; clean, simple, and genuinely user-friendly overall.
Your comment is awaiting moderation.
rankflare.click – Pages loaded fast, images appeared sharp, and formatting stayed consistent.
Your comment is awaiting moderation.
rankzilla.click – Found practical insights today; sharing this article with colleagues later.
Your comment is awaiting moderation.
rankpilotpro.click – Pages loaded fast, images appeared sharp, and formatting stayed consistent.
Your comment is awaiting moderation.
clickmatic.click – Loved the layout today; clean, simple, and genuinely user-friendly overall.
Your comment is awaiting moderation.
FutureWild Online – Smooth page transitions and stylish layout make exploring products easy.
Your comment is awaiting moderation.
PeakBlooms – Smooth navigation with charming products displayed clearly.
Your comment is awaiting moderation.
bukmacher internetowy mostbet casino oferuje szeroki wybor zakladow sportowych, zakladow na zywo i slotow od czolowych dostawcow. Oferuje szybka rejestracje, bonusy dla nowych graczy, przyjazna dla uzytkownika aplikacje mobilna, natychmiastowe wyplaty i calodobowa obsluge klienta.
Your comment is awaiting moderation.
The best is right here: https://lagaulemortuacienne.fr
Your comment is awaiting moderation.
The best is in one place: https://unendroitoualler.fr
Your comment is awaiting moderation.
Current recommendations: https://www.bnbaccess.eu
Your comment is awaiting moderation.
Elite Girls Escort agencies Elite prostitutes – Vip girls , profiles and escort from elite girls of models
Your comment is awaiting moderation.
CopperLaneOutlet – Nice mix of outlet deals, pages load quickly and browsing feels very easy today.
Your comment is awaiting moderation.
Next Adventure Picks – Clear navigation and an exciting theme make exploring the site fun.
Your comment is awaiting moderation.
Motivation Hub Today – Inspiring posts presented clearly with smooth browsing throughout.
Your comment is awaiting moderation.
Elite prostitutes – VIP escort from model girls , VIP profiles of elite courtesans Escort agencies VIP Escort Dating Site for Men
Your comment is awaiting moderation.
Проблемы с алкоголем? вывод из запоя цены: анонимная помощь, круглосуточный выезд врача, детоксикация, капельницы, стабилизация состояния и поддержка. Индивидуальный подход, современные методы и контроль здоровья. Конфиденциально и безопасно.
Your comment is awaiting moderation.
Casinos, die Paysafecard https://paysefcard-casino-de.info akzeptieren: Viele Spieler in Deutschland mochten ihr Konto aufladen, ohne ihre Bankdaten anzugeben. Casinos, die Paysafecard akzeptieren, ermoglichen sichere Prepaid-Einzahlungen mit einem festen Guthaben. So behalten Sie die volle Kontrolle uber Ihre Ausgaben und konnen weiterhin Spielautomaten und Live-Dealer-Spiele spielen.
Your comment is awaiting moderation.
BankID-fria kasinon https://casinos-utan-bankid.com Manga spelare forbiser hur mycket uttagsgranser och verifieringskrav varierar, men BankID-fria kasinon hjalper dig att jamfora bonusar, betalningsmetoder och tillforlitlighet.
Your comment is awaiting moderation.
Cryptocasino reviews https://crypto-casinos-canada.com in Canada – If you’re looking for fast BTC/ETH transactions and clear terms, cryptocasino reviews will help you evaluate which platforms offer transparent bonuses and consistent payouts.
Your comment is awaiting moderation.
Hidden Valley Online Store – Beautiful treasures presented clearly, browsing feels natural and fast.
Your comment is awaiting moderation.
VIP Escort | Escort of men Gay escort Escort Girls
Your comment is awaiting moderation.
Trendy Collection Picks – Loved the assortment, browsing felt very smooth and natural.
Your comment is awaiting moderation.
производители натяжных потолков
Это популярный выбор благодаря быстрому монтажу и разнообразию дизайнов.
Компания “natyazhni-steli-vid-virobnika.biz.ua” предлагает качественные потолки напрямую от производителя. Мы используем только проверенные материалы.
#### **2. Преимущества натяжных потолков**
Одним из главных плюсов натяжных потолков является их влагостойкость. Они идеально подходят для ванных комнат и кухонь.
Еще одно преимущество — огромный выбор цветов и фактур. Доступны как однотонные, так и фотопечатные варианты.
#### **3. Производство и материалы**
Наша компания изготавливает потолки из экологически чистого ПВХ. Материал абсолютно безопасен для здоровья.
Технология производства гарантирует прочность и эластичность полотна. Готовые потолки устойчивы к механическим повреждениям.
#### **4. Установка и обслуживание**
Монтаж натяжных потолков занимает всего несколько часов. Уже через день вы сможете пользоваться обновленным помещением.
Уход за потолком не требует особых усилий. Даже через годы потолок сохранит первоначальный вид.
—
### **Спин-шаблон статьи**
#### **1. Введение**
Мы предлагаем потолки высокого качества по доступным ценам.
#### **2. Преимущества натяжных потолков**
Натяжные конструкции исключают риск появления трещин и провисаний.
#### **3. Производство и материалы**
Готовые потолки сохраняют форму десятилетиями благодаря особой технологии.
#### **4. Установка и обслуживание**
Даже через много лет покрытие будет выглядеть как новое.
Your comment is awaiting moderation.
Outlet Fashion Fresh – Trendy items were shown neatly, and the site moved along smoothly.
Your comment is awaiting moderation.
Exclusive supplier buy accounts invites business owners to our vast selection of marketing tools. The pride of our service is our extensive knowledge base, containing fresh guides about social media marketing. We cover methods to launch accounts safely as well as how to avoid restrictions while running social networks. Our inventory includes pages for Facebook, Instagram, TikTok for any purpose: from softregs to farmed accounts with activity.
Your comment is awaiting moderation.
sunshinecentral – Well-structured and tidy, made browsing products very easy.
Your comment is awaiting moderation.
beautiful escort girls https://knowbuddhism.info VIP Escort | Escort of men
Your comment is awaiting moderation.
BranchExplorer – Easy-to-browse layout and rustic products enhance the overall experience.
Your comment is awaiting moderation.
PureItemsCenter – Clean interface, well-organized pages, and easy navigation.
Your comment is awaiting moderation.
YouTube канал Брутальный гараж “Острое Жало” / ООО Торгово-транспортное предприятие “Острое Жало”
Your comment is awaiting moderation.
https://kingshouse.gov.jm/republic-of-the-philippines-ambassador-designate-presents-credentials/
Your comment is awaiting moderation.
Ищешь вуз? приемная кампания ВГУ: информация для абитуриентов о наборе на бюджет и платное обучение, перечень документов, сроки подачи, вступительные испытания, целевой приём и общежитие. Узнайте, как стать студентом Витебского государственного университета.
Your comment is awaiting moderation.
app für private halbzeit endstand wetten tipps (Vivien)
Your comment is awaiting moderation.
VIP escort Elite escort services Elite girls for escort | VIP models
Your comment is awaiting moderation.
Хочешь сдать авто? выкуп автомобилей быстро и безопасно: моментальная оценка, выезд специалиста, оформление сделки и мгновенная выплата наличными или на карту. Покупаем автомобили всех марок и годов, включая битые и после ДТП. Работаем без скрытых комиссий.
Your comment is awaiting moderation.
Вызов электрика https://vash-elektrik24.ru на дом в Москве: оперативный выезд, поиск и устранение неисправностей, установка розеток и выключателей, подключение техники, ремонт проводки. Квалифицированные мастера, точные цены, гарантия на работы и удобное время приезда.
Your comment is awaiting moderation.
Best vps servers in europe. Only TOP European data centers in Estonia, Finland, Germany. All servers are GDPR compliant, blazing fast NVMe SSD drives, reliable network 10+ Gbps, selection of OS templates, 24/7 monitoring, easy remote management.
Your comment is awaiting moderation.
Color Mea Selection – Creative designs look impressive, and navigation flows effortlessly.
Your comment is awaiting moderation.
Prodej reziva https://www.kup-drevo.cz v Ceske republice: siroky vyber reziva, stavebniho a dokoncovaciho reziva, tramu, prken a stepky. Dodavame soukromym klientum i firmam stalou kvalitu, konkurenceschopne ceny a dodavky po cele Ceske republice.
Your comment is awaiting moderation.
Elite girls for escort | VIP models https://za6.info VIP escort
Your comment is awaiting moderation.
Urban Trend Picks – Sleek interface and visually appealing urban styles make browsing simple.
Your comment is awaiting moderation.
GlobalRidge Studio – Clear item arrangement and intuitive navigation create seamless browsing.
Your comment is awaiting moderation.
Grand River Curated – Beautiful river-themed products, browsing is comfortable and enjoyable.
Your comment is awaiting moderation.
High-performance backup server europe. Private dedicated backup server offers the perfect alternative to Dropbox, tailored specifically for your business: data privacy Europe, GDPR, top encryption, secure file storage, flexible backup plans. Choose our European backup hosting.
Your comment is awaiting moderation.
TMO Trend Store – Well-laid-out products, moving through the site felt smooth and easy.
Your comment is awaiting moderation.
Prodej reziva https://www.kup-drevo.cz v Ceske republice: siroky vyber reziva, stavebniho a dokoncovaciho reziva, tramu, prken a stepky. Dodavame soukromym klientum i firmam stalou kvalitu, konkurenceschopne ceny a dodavky po cele Ceske republice.
Your comment is awaiting moderation.
escort escort Elite escort services Escort Agency
Your comment is awaiting moderation.
Style Hub Discoveries – Really enjoyed browsing the trendy selections, and everything loaded quickly.
Your comment is awaiting moderation.
Sunrise Trail Select – Clean design and clearly presented items enhance the shopping experience.
Your comment is awaiting moderation.
Platforma internetowa mostbet pl: zaklady przedmeczowe i na zywo, wysokie kursy, akumulatory, zaklady na sumy i handicapy, a takze popularne sloty i kasyno na zywo. Bonus powitalny, regularne promocje, szybkie wyplaty na karty i portfele.
Your comment is awaiting moderation.
знакомства Одинцово Одинцово как с Крыльцова мой опыт, я разместила свои фото, слабонервных прошу не смотреть, а то скажете распутная)а вообще спасибо за этот сайт большое.
Your comment is awaiting moderation.
VioletStyleVault – Clean, user-friendly layout and trendy items easy to browse.
Your comment is awaiting moderation.
Explore Horizons – Liked the clean layout and the ideas presented were refreshing.
Your comment is awaiting moderation.
аренда аккаунтов букмекерских конто Аренда аккаунтов букмекерских контор представляет собой альтернативный вариант, когда лицо, владеющее аккаунтом, предоставляет его во временное пользование за определенную плату. Этот путь также не лишен рисков, поскольку владелец аккаунта не может полностью контролировать действия арендатора, что может привести к нарушению правил букмекерской конторы и, как следствие, к негативным последствиям для обеих сторон.
Your comment is awaiting moderation.
Elite Models https://sentidocomunecuador.com escort escort
Your comment is awaiting moderation.
ブビンガ
Your comment is awaiting moderation.
Descubre cocoa online casino: tragamonedas clasicas y de video, juegos de mesa, video poker y jackpots en una interfaz intuitiva. Bonos de bienvenida, ofertas de recarga y recompensas de fidelidad, ademas de depositos y retiros rapidos y un atento servicio de atencion al cliente. Solo para adultos. Mayores de 18 anos.
Your comment is awaiting moderation.
Platforma internetowa mostbet: zaklady przedmeczowe i na zywo, wysokie kursy, akumulatory, zaklady na sumy i handicapy, a takze popularne sloty i kasyno na zywo. Bonus powitalny, regularne promocje, szybkie wyplaty na karty i portfele.
Your comment is awaiting moderation.
Топ знакомства 2026 выбираем лучшие сайты знакомств посетители выбрали лучшие сайты где можно не только отдохнуть, подчерпнуть еще свежие идеи и новости.
Your comment is awaiting moderation.
DealsCenterDaily – Pleasant interface, well-organized sections, and easy navigation.
Your comment is awaiting moderation.
Elite prostitutes – VIP escort from model girls , VIP profiles of elite courtesans Escort agency – VIP escorts VIP Escort | Escort of men
Your comment is awaiting moderation.
バイナリーオプション 安全
Your comment is awaiting moderation.
BrookHarborStore – The site feels modern, tidy, and very easy to navigate overall.
Your comment is awaiting moderation.
Elite Models https://shugaringproff.ru VIP models
Your comment is awaiting moderation.
Grand River Finds Online – Attractive products arranged neatly, providing a smooth browsing experience.
Your comment is awaiting moderation.
FuturePath Finds – Well-structured marketplace with easy navigation and clearly presented items.
Your comment is awaiting moderation.
escort agency Elite escort services Escort services for charming girls
Your comment is awaiting moderation.
https://suzuri.jp/1xbet-promofree
Your comment is awaiting moderation.
Path to Limitless Growth – Fast loading pages and a user-friendly interface made exploring smooth.
Your comment is awaiting moderation.
goldenpeakshop – Very tidy design and intuitive navigation, made browsing pleasant.
Your comment is awaiting moderation.
Business Escort Agency https://za6.info Elite Girls
Your comment is awaiting moderation.
northernskycollections.shop – Beautiful collection here, everything feels well-organized and easy to explore.
Your comment is awaiting moderation.
oldtownstylehub.shop – Products are appealing, everything loads quickly and the site works well.
Your comment is awaiting moderation.
Elite Dating Models Elite escort services Escort Girls
Your comment is awaiting moderation.
DistinctGiftHub – Organized pages, smooth navigation, and creative product selection.
Your comment is awaiting moderation.
Sunrise Market Studio – Neat layout with easily navigable sections makes exploration effortless.
Your comment is awaiting moderation.
Trend Fashion Online – Well-organized items, moving around the site was very easy.
Your comment is awaiting moderation.
Elite prostitutes – Vip girls , profiles and escort from elite girls of models https://cncuserforum.ru VIP Escort | Escort of men
Your comment is awaiting moderation.
Оптовый маркетплейс магазин аккаунтов открывает возможность заказать валидные учетки для бизнеса. Особенность этого шопа — заключается в наличии приватной вики-энциклопедии, в которой выложены рабочие гайды по заливу. Команда подскажем, каким образом правильно прогревать рекламу, где избегать баны а также использовать прокси. Переходите к нам, читайте полезные кейсы, общайтесь и зарабатывайте с помощью нашего сервиса уже сегодня.
Your comment is awaiting moderation.
Fashion Market Picks – Nice browsing experience with well-organized fashion categories.
Your comment is awaiting moderation.
UrbanGlow – Smooth navigation and well-presented products make exploring enjoyable.
Your comment is awaiting moderation.
Авиабилеты в Китай https://chinaavia.com по выгодным ценам: удобный поиск рейсов, сравнение тарифов, прямые и стыковочные перелёты, актуальные расписания. Бронируйте билеты в Пекин, Шанхай, Гуанчжоу и другие города онлайн. Надёжная оплата и мгновенная выдача электронного билета.
Your comment is awaiting moderation.
Complete uae work visa support: from eligibility check and document preparation to work permit approval, medical tests and residence visa issuance. Ideal for professionals moving to Dubai, Abu Dhabi and other emirates for long-term employment.
Your comment is awaiting moderation.
Open a brokerage account uae with full support. We review your goals, recommend regulated platforms, guide you through compliance, handle documentation and assist with activation. Ideal for stock, ETF, bond and multi-asset trading from a trusted jurisdiction.
Your comment is awaiting moderation.
Need a uae will for expats? We help structure inheritances, appoint executors and guardians, cover local and foreign assets and prepare documents in line with UAE requirements. Step-by-step guidance from first consultation to registration and safe storage of your will.
Your comment is awaiting moderation.
Need a poa dubai? We draft POA documents, organise notary appointments, handle MOFA attestation, embassy legalisation and certified translations. Ideal for delegating authority for banking, business, real estate and legal procedures.
Your comment is awaiting moderation.
elite escort VIP Escort Escort Services
Your comment is awaiting moderation.
Growth Journey Center – The site layout is tidy and finding information is straightforward.
Your comment is awaiting moderation.
FuturePath Corner Hub – Smooth page flow and well-laid-out items make browsing pleasant.
Your comment is awaiting moderation.
Crypto day trading Cryptocurrency investment strategies, divorced from the get-rich-quick schemes and fueled by a sober understanding of the market’s cyclical nature, are maturing into robust, diversified portfolios. Passive income crypto, no longer a pipe dream, is becoming a tangible reality through mechanisms like yield generation, liquidity provision, the steady hum of staking, and the calculated risk of lending. Sustainable wealth building, the North Star guiding these strategies, demands a holistic perspective – an unwavering market cycle awareness crypto, a keen eye on Bitcoin halving events, and the agility to navigate the ever-shifting currents of sector rotations altcoins. Diversification crypto portfolio, the bedrock of risk mitigation, is not just a recommendation, but a commandment.
Your comment is awaiting moderation.
Comprehensive family office setup uae: from choosing the right jurisdiction and legal structure to incorporation, banking, policies, reporting and ongoing administration. Tailored solutions for families consolidating wealth, protecting assets and planning succession.
Your comment is awaiting moderation.
Need legalization of documents for uae? We manage the entire process — review, notarisation, ministry approvals, embassy attestation and translation. Suitable for business setup, visas, employment, education and property transactions. Efficient and hassle-free.
Your comment is awaiting moderation.
Set up a uae holding company with full legal and corporate support. We help select the right jurisdiction, prepare documents, register the entity, coordinate banking and ensure compliance with substance, tax and reporting rules for international groups.
Your comment is awaiting moderation.
Launch your fund setup uae with end-to-end support: structuring, legal documentation, licensing, AML/KYC compliance, corporate setup and administration. We help create flexible investment vehicles for global investors and family wealth platforms.
Your comment is awaiting moderation.
End-to-end corporate setup uae: company formation, trade licence, corporate documentation, visa processing, bank account assistance and compliance checks. We streamline incorporation and help establish a strong operational foundation in the UAE.
Your comment is awaiting moderation.
Motivated Mind Hub – Encouraging content and effortless navigation make the site welcoming.
Your comment is awaiting moderation.
Купить права – это важный шаг для тех, кто хочет получить официальное водительское удостоверение и начать уверенно управлять автомобилем. Наша компания предлагает надежные и быстрые способы приобретения водительских прав, соответствующих всем требованиям законодательства. Мы поможем вам пройти обучение в лучших автошколах, подготовиться к теоретическим и практическим экзаменам, а также оформить все необходимые документы без лишних хлопот. У нас вы найдете выгодные предложения, профессиональных инструкторов и индивидуальный подход к каждому клиенту. Если вы хотите купить права с гарантией качества и по доступной цене, обращайтесь к нам – мы сделаем процесс максимально простым и удобным.
Your comment is awaiting moderation.
VIP Escort | Escort of men Gay escort escort escort
Your comment is awaiting moderation.
Want to obtain an investor visa uae? We guide you through business setup or property investment requirements, prepare documentation, submit your application and ensure smooth processing. Transparent, efficient and tailored to your goals.
Your comment is awaiting moderation.
Trusted accounting services dubai providing bookkeeping, financial reporting, VAT filing, corporate tax compliance, audits and payroll services. We support free zone and mainland companies with accurate records, transparent processes and full regulatory compliance.
Your comment is awaiting moderation.
Comprehensive consular support uae: embassy and consulate liaison, legalisation and attestation of documents, visa assistance, translations and filings with local authorities. Reliable, confidential service for expatriates, investors and corporate clients.
Your comment is awaiting moderation.
Comprehensive tax consultants in uae: advisory on corporate tax, VAT, group restructuring, profit allocation, substance and reporting obligations. We provide practical strategies to optimise taxation and ensure accurate, compliant financial management.
Your comment is awaiting moderation.
Professional company setup dubai: advisory on jurisdiction and licence type, company registration, visa processing, corporate bank account opening and ongoing compliance. Transparent costs, clear timelines and tailored solutions for your project.
Your comment is awaiting moderation.
Hello!
This post was created with XRumer 23 StrongAI.
Good luck 🙂
Your comment is awaiting moderation.
free stamp identification
Your comment is awaiting moderation.
stamp valuation
Your comment is awaiting moderation.
Разработка соглашения об управлении оаэ: фиксируем правила принятия решений, распределение ролей, отчётность и контроль результатов. Учитываем особенности вашей компании, отрасли и требований регуляторов. Помогаем выстроить устойчивую систему корпоративного управления.
Your comment is awaiting moderation.
Get your uae golden visa with full support: we analyse your profile, select the right category (investor, business owner, specialist), prepare a compliant file, submit the application and follow up with authorities. Transparent process, clear requirements and reliable guidance.
Your comment is awaiting moderation.
Corporate company bank account opening in uae made simple: we help choose the right bank, prepare documents, meet compliance requirements, arrange interviews and support the entire onboarding process. Reliable assistance for startups, SMEs, holding companies and international businesses.
Your comment is awaiting moderation.
Разрабатываем опционные планы в оаэ под ключ: анализ корпоративной структуры, выбор модели vesting, подготовка опционных соглашений, настройка механики выхода и выкупа долей. Помогаем выстроить прозрачную и понятную систему долгосрочной мотивации команды.
Your comment is awaiting moderation.
Decor Choice Store – Smooth page transitions and a refreshing set of home décor options.
Your comment is awaiting moderation.
Нужна поддержка по трудовым вопросам оаэ? Консультируем по трудовым договорам, рабочим визам, оформлению сотрудников, переработкам, отпускам и увольнениям. Готовим рекомендации, помогаем минимизировать риски штрафов и конфликтов между работодателем и работником.
Your comment is awaiting moderation.
escort escort https://r-est.biz beautiful escort girls
Your comment is awaiting moderation.
Комплексные трудовые соглашения оаэ: юридический аудит текущих контрактов, разработка новых документов, адаптация под отрасль и требования компании, защита прав работников и работодателей. Гарантируем корректность и соблюдение всех норм.
Your comment is awaiting moderation.
Нужна виза? рабочая виза в оаэ под ключ: проверка документов, контракт с работодателем, получение разрешения на работу, медкомиссия, подача заявки и выпуск резидентской визы. Сопровождаем весь процесс и помогаем быстро получить Emirates ID.
Your comment is awaiting moderation.
Playbet Nigeria offers betting – Playbet Nigeria on dozens of sports in live and pre-match (line) modes, a live online casino with tables available 24/7, and a huge selection of popular slots. A unique welcome bonus is offered for deposits made in cryptocurrency. Round-the-clock support and fast withdrawals of winnings.
Your comment is awaiting moderation.
TDP Deals Store – Clean layout with nice deals, exploring the site felt smooth.
Your comment is awaiting moderation.
yourdailyvalue.shop – Really enjoying the content here, very helpful and nicely structured.
Your comment is awaiting moderation.
Помогаем открыть брокерский счет в оаэ: подбор надёжного брокера, подготовка документов, прохождение KYC, сопровождение подачи и активации. Подходит для частных инвесторов, семейных офисов и компаний. Доступ к мировым рынкам и комфортные условия работы с капиталом.
Your comment is awaiting moderation.
Предлагаем корпоративные услуги в оаэ для действующих и новых компаний: регистрация и перерегистрация, выпуск и передача долей, протоколы собраний, обновление лицензий, KYC и комплаенс. Обеспечиваем порядок в документах и соответствие требованиям регуляторов.
Your comment is awaiting moderation.
Профессиональное консульское сопровождение оаэ для частных лиц и бизнеса: консультации по визовым и миграционным вопросам, подготовка обращений, запись в консульство, помощь при подаче документов и получении решений. Минимизируем риски отказов и задержек.
Your comment is awaiting moderation.
Профессиональная легализация документов в оаэ: нотариальное заверение, Минюст, МИД, консульства, сертифицированные переводы. Сопровождаем весь процесс от проверки документов до финального подтверждения. Подходит для компаний, инвесторов и частных клиентов.
Your comment is awaiting moderation.
UrbanPickStore – Fast and smooth process, very happy with the service today.
Your comment is awaiting moderation.
yourdealhub.shop – Easy to find exactly what I’m looking for every time.
Your comment is awaiting moderation.
Female Escort Services for Men https://fershall.ru Elite VIP Escort
Your comment is awaiting moderation.
DecorTrendCenter – Well-organized interface, pleasant visuals, and easy site flow.
Your comment is awaiting moderation.
MetroTrends – Fast pages and urban items displayed neatly for effortless browsing.
Your comment is awaiting moderation.
Fashion Purchase Hub – Really simple to explore, with pages popping up instantly and designs looking sharp.
Your comment is awaiting moderation.
Playbet Kenya offers – Bet on Sports Kenya betting on dozens of sports in live and pre-match (line) modes, a live online casino with tables available 24/7, and a huge selection of popular slots. A unique welcome bonus is offered for deposits made in cryptocurrency. Round-the-clock support and fast withdrawals of winnings.
Your comment is awaiting moderation.
Оформление золотая виза оаэ под ключ: анализ вашей ситуации, подбор оптимальной категории (инвестор, бизнес, квалифицированный специалист), подготовка документов, сопровождение подачи и продления статуса. Удобный формат взаимодействия и конфиденциальный сервис.
Your comment is awaiting moderation.
Endless Growth Hub – Really enjoyed the insights; the site felt easy to navigate and inspiring.
Your comment is awaiting moderation.
Комплексные бухгалтерский учет в оаэ: финансовая отчётность, налоговые декларации, управление первичными документами, аудит, VAT и corporate tax. Обеспечиваем точность, своевременность и полное соответствие законодательству для стабильной работы вашего бизнеса.
Your comment is awaiting moderation.
trendboutique – Everything is laid out nicely, made my experience simple.
Your comment is awaiting moderation.
Профессиональное налоговое консультирование оаэ: разбираем вашу ситуацию, подбираем оптимальную корпоративную и личную структуру, помогаем учесть требования местного законодательства, корпоративного налога и substance. Сопровождаем бизнес и инвестиции на постоянной основе.
Your comment is awaiting moderation.
Нужна виза инвестора в оаэ? Подберём оптимальный вариант — через бизнес, долю в компании или недвижимость. Готовим документы, сопровождаем на всех этапах, обеспечиваем корректное прохождение комплаенса и получение резидентского статуса.
Your comment is awaiting moderation.
Elite individuals https://sidelki-pro.ru Business Escort Agency
Your comment is awaiting moderation.
Хотите открыть счёт? открытие банковского счета в оаэ Подбираем оптимальный банк, собираем документы, готовим к комплаенсу, сопровождаем весь процесс до успешного открытия. Поддерживаем предпринимателей, инвесторов и резидентов с учётом всех требований.
Your comment is awaiting moderation.
Профессиональное учреждение семейных офисов оаэ: от разработки стратегии управления семейным капиталом и выбора юрисдикции до регистрации, комплаенса, настройки банковских отношений и сопровождения инвестиционных проектов. Полная конфиденциальность и защита интересов семьи.
Your comment is awaiting moderation.
Хочешь фонд? личные фонды оаэ — безопасный инструмент для защиты активов и наследственного планирования. Помогаем выбрать структуру, подготовить документы, зарегистрировать фонд, обеспечить конфиденциальность, управление и соответствие международным требованиям.
Your comment is awaiting moderation.
Предлагаем учреждение холдингов оаэ для международного бизнеса: подбор free zone или mainland, разработка структуры владения, подготовка учредительных документов, лицензирование, банковское сопровождение и поддержка по налогам. Конфиденциальность и прозрачные условия работы.
Your comment is awaiting moderation.
מספר רישוי הוא אחד הצעדים הראשונים שכל קונה רכב בישראל צריך לבדוק לפני קבלת החלטה. במידע זה ניתן למצוא היסטוריית טיפולים, בעלויות קודמות ומצב רישוי עדכני. הדרך לרכוש רכב בלי סיכונים עוברת דרך בדיקה מקיפה. בדיקה טכנית מאפשרת לזהות בעיות נסתרות שלא רואים בעין. בחינת שלדה, כריות אוויר ומערכות בלימה היא חובה לפני קנייה. חשוב לוודא שכל המערכות האלקטרוניות פועלות ללא תקלות. בדיקה מוקדמת מגלה תקלות שיכולות לעלות אלפי שקלים. בדיקת נסיעה היא חלק בלתי נפרד מתהליך הבדיקה. ניתוח נתונים אלה מסייע להבין האם הרכב טופל כראוי. לפני רכישה מומלץ לבחון גם את היסטוריית הטיפולים במוסך. חשוב להשוות בין מספר מכונים ולבחור גוף אמין ובעל ניסיון. לפי הממצאים ניתן לקבל החלטה מושכלת לגבי רכישת הרכב. בדיקה נכונה מגינה על הקונה מפני טעויות ותקלות יקרות. בשל ריבוי התאונות והתיקונים, בדיקה היא שלב קריטי שאין לדלג עליו. הקפדה על כל השלבים תוביל לבחירה מדויקת ובטוחה.
https://ashkelonim.co.il/%d7%a6%d7%a8%d7%9b%d7%a0%d7%95%d7%aa-%d7%aa%d7%95%d7%9b%d7%9f-%d7%a9%d7%99%d7%95%d7%95%d7%a7%d7%99/%d7%91%d7%93%d7%99%d7%a7%d7%aa-%d7%a8%d7%9b%d7%91-%d7%91%d7%99%d7%a9%d7%a8%d7%90%d7%9c-%d7%9e%d7%93%d7%a8%d7%99%d7%9a-%d7%9e%d7%a7%d7%99%d7%a3-%d7%9c%d7%a8%d7%9b%d7%99%d7%a9%d7%94-%d7%91%d7%98%d7%95%d7%97%d7%94-706243
Your comment is awaiting moderation.
נתוני הרישוי הוא אחד הצעדים הראשונים שכל קונה רכב בישראל צריך לבדוק לפני קבלת החלטה. במידע זה ניתן למצוא היסטוריית טיפולים, בעלויות קודמות ומצב רישוי עדכני. מי שרוצה לבצע רכישה בטוחה חייב לבצע בדיקת רכב מקצועית. בדיקה מקצועית במכון מוכר מעניקה שקיפות מלאה על מצב הרכב. בדיקה איכותית מתמקדת בשלמות מבנית ובנתוני בטיחות קריטיים. הבדיקה כוללת סקירה של חיווטים, חיישנים ומערכות ניהול מנוע. רבים מהקונים מופתעים לגלות ליקויים רק לאחר רכישה, ולכן בדיקה מוקדמת חוסכת כסף ועגמת נפש. בדיקת נסיעה היא חלק בלתי נפרד מתהליך הבדיקה. ניתוח נתונים אלה מסייע להבין האם הרכב טופל כראוי. היעדר תיעוד עשוי להצביע על תחזוקה לקויה. חשוב להשוות בין מספר מכונים ולבחור גוף אמין ובעל ניסיון. בסיום הבדיקה מקבל הקונה דו״ח מפורט עם ציונים, ליקויים והמלצות. רכישת רכב אחרי בדיקה איכותית מעניקה שקט נפשי ובטיחות. בדיקת רכב בישראל היא לא רק המלצה – היא צורך אמיתי בשוק המשומשים. בסופו של דבר, מי שמקפיד על בדיקת רישוי, בדיקה טכנית ובדיקת היסטוריה מבטיח לעצמו קנייה חכמה.
https://ashkelonim.co.il/%d7%a6%d7%a8%d7%9b%d7%a0%d7%95%d7%aa-%d7%aa%d7%95%d7%9b%d7%9f-%d7%a9%d7%99%d7%95%d7%95%d7%a7%d7%99/%d7%91%d7%93%d7%99%d7%a7%d7%aa-%d7%a8%d7%9b%d7%91-%d7%91%d7%99%d7%a9%d7%a8%d7%90%d7%9c-%d7%9e%d7%93%d7%a8%d7%99%d7%9a-%d7%9e%d7%a7%d7%99%d7%a3-%d7%9c%d7%a8%d7%9b%d7%99%d7%a9%d7%94-%d7%91%d7%98%d7%95%d7%97%d7%94-706243
Your comment is awaiting moderation.
ModernHome Trends – The décor selection looked great, and navigating through pages felt effortless.
Your comment is awaiting moderation.
rapidboost.click – Bookmarked this immediately, planning to revisit for updates and inspiration.
Your comment is awaiting moderation.
Minimal Trend Shop – Simple yet appealing layout with fast loading and clear categories.
Your comment is awaiting moderation.
Хотите открыть компанию оаэ? Предоставим полный комплекс услуг: выбор free zone, регистрация компании, лицензирование, визовая поддержка, банковский счет и бухгалтерия. Прозрачные условия, быстрые сроки и сопровождение до полного запуска бизнеса.
Your comment is awaiting moderation.
clickforgehub.click – Pages loaded fast, images appeared sharp, and formatting stayed consistent.
Your comment is awaiting moderation.
rankgrid.click – Appreciate the typography choices; comfortable spacing improved my reading experience.
Your comment is awaiting moderation.
turborank.click – Color palette felt calming, nothing distracting, just focused, thoughtful design.
Your comment is awaiting moderation.
Female Escort Services for Men Escort agency – VIP escorts Elite VIP Escort
Your comment is awaiting moderation.
Открываешь бизнес? открытие бизнеса в оаэ полный пакет услуг: консультация по структуре, подготовка и подача документов, получение коммерческой лицензии, оформление рабочих виз, помощь в открытии корпоративного счета, налоговое планирование и пострегистрационная поддержка. Гарантия конфиденциальности.
Your comment is awaiting moderation.
Check out trading on hyperliquid, a modern DEX with its own L1: minimal fees, instant order execution, and on-chain transparency. Ideal for those who want the speed of a CEX and the benefits of decentralization.
Your comment is awaiting moderation.
TCS Trend Store – Nice modern layout, exploring the site felt smooth and pleasant.
Your comment is awaiting moderation.
Choose hyperliquid — a platform for traders who demand speed and control: over 100 pairs per transaction, flexible orders, HL token staking, and risk management tools. Support for algorithmic strategies and advanced analytics.
Your comment is awaiting moderation.
Inbet Nigeria — thousands of live sports events https://inbet.com.ng . Fast payouts, high odds, 24/7 support, and match broadcasts. Bet on sports and play slots, roulette, blackjack at Inbet Nigeria. Mobile app, jackpots, promos, welcome & deposit bonuses.
Your comment is awaiting moderation.
peakclicks.click – Color palette felt calming, nothing distracting, just focused, thoughtful design.
Your comment is awaiting moderation.
доставка праздничных шаров в Москве могут дополнить любой праздник, однако если вы хотите порадовать ребенка чем-то особенным, обратите внимание на наш каталог качественных детских игрушек, где собраны лучшие предложения для детей разных возрастов. Мы предлагаем огромный каталог детских товаров, включающий фигурки любимых персонажей, а также интересные наборы для подростков. Каждая позиция проходит отбор по безопасности, чтобы родители могли быть уверены в безопасности товаров. Мы следим за тем, чтобы ассортимент удовлетворял запросы детей и взрослых, предлагая конструкторы и пазлы, а также подарочные комплекты. Наша задача — предоставить доступные цены, чтобы каждый мог выбрать игрушку на любой случай без переплат. В каталоге представлены развлекательные наборы, которые помогут поддерживать интерес ребенка к обучению. Мы внимательно относимся к тому, чтобы информация о каждом товаре была максимально точной, поэтому на странице товара доступно описание характеристик. Наш интернет-магазин работает для покупателей из всех регионов, предлагая доставку по России. Это означает, что вы можете заказать игрушки онлайн, не выходя из дома. Мы отправляем товары в надежной упаковке, чтобы каждая игрушка приехала цельной и невредимой. Для тех, кто ищет игрушку на день рождения, доступны популярные категории, которые помогут найти оптимальный вариант. Мы стремимся сделать процесс покупки максимально простым, поэтому на сайте реализованы удобные фильтры, позволяющие легко ориентироваться среди большого разнообразия товаров. Наша команда регулярно обновляет каталог, добавляя актуальные игрушки, чтобы дети могли получать современные товары, а родители — экономить время и силы. Делая заказ у нас, вы выбираете выгодные условия, а также получаете возможность подарить ребенку эмоции с помощью правильно подобранных игрушек.
https://happykidtoys.ru/
Your comment is awaiting moderation.
доставка праздничных шаров в Москве могут дополнить любой праздник, однако если вы хотите порадовать ребенка чем-то особенным, обратите внимание на наш каталог качественных детских игрушек, где собраны актуальные новинки для детей разных возрастов. Мы предлагаем большой выбор развивающих и игровых наборов, включающий фигурки любимых персонажей, а также интересные наборы для подростков. Каждая позиция проходит отбор по безопасности, чтобы родители могли быть уверены в качестве материалов. Мы следим за тем, чтобы ассортимент удовлетворял запросы детей и взрослых, предлагая интерактивные модели, а также товары для хобби. Наша задача — предоставить доступные цены, чтобы каждый мог выбрать интересный набор без переплат. В каталоге представлены развлекательные наборы, которые помогут организовать совместный досуг. Мы внимательно относимся к тому, чтобы информация о каждом товаре была подробной, поэтому на странице товара доступно описание характеристик. Наш интернет-магазин работает для покупателей из всех регионов, предлагая удобную логистику по всей стране. Это означает, что вы можете оформить покупку в пару кликов, не выходя из дома. Мы отправляем товары в аккуратно собранных коробках, чтобы каждая игрушка приехала цельной и невредимой. Для тех, кто ищет необычный сюрприз, доступны рекомендации по выбору, которые помогут найти правильное решение. Мы стремимся сделать процесс покупки максимально простым, поэтому на сайте реализованы удобные фильтры, позволяющие легко ориентироваться среди большого разнообразия товаров. Наша команда регулярно обновляет каталог, добавляя новые линейки, чтобы дети могли получать трендовые игрушки, а родители — экономить время и силы. Делая заказ у нас, вы выбираете выгодные условия, а также получаете возможность подарить ребенку эмоции с помощью правильно подобранных игрушек.
https://happykidtoys.ru/
Your comment is awaiting moderation.
Discover hyper trade a platform for fast and secure trading without intermediaries. Gain access to innovative tools, low fees, deep liquidity, and a transparent ecosystem for working with digital assets.
Your comment is awaiting moderation.
Choose hyperliquid hyperevm as a convenient tool for trading and investing. The platform offers speed, reliability, advanced features, and fair pricing for cryptocurrency trading.
Your comment is awaiting moderation.
Use hyperliquid exchange for stable and efficient trading. The platform combines security, high liquidity, advanced solutions, and user-friendly functionality suitable for both beginners and professional traders.
Your comment is awaiting moderation.
Explore hyperliquid swap and gain unlimited access to a modern, decentralized market. Trade derivatives, manage your portfolio, utilize analytics, and initiate trades in a next-generation ecosystem.
Your comment is awaiting moderation.
TimelessTrends – Smooth navigation and attractive items make shopping enjoyable.
Your comment is awaiting moderation.
Escort Services Escort agencies VIP escort
Your comment is awaiting moderation.
A cozy hotel in Kolasin for mountain lovers. Ski slopes, trekking trails, and local cuisine are nearby. Rooms are equipped with amenities, Wi-Fi, parking, and friendly staff are available to help you plan your vacation.
Your comment is awaiting moderation.
ExploreOpportunities Essentials – Smooth scrolling and tidy layout for a pleasant browsing experience.
Your comment is awaiting moderation.
EcoChoiceShop – Excellent assortment of items and intuitive navigation, made shopping simple.
Your comment is awaiting moderation.
Amazing many of awesome material.
Your comment is awaiting moderation.
GiftSelectionHub – Simple navigation, modern design, and wide variety of gift options.
Your comment is awaiting moderation.
Elite prostitutes – Vip girls , profiles and escort from elite girls of models Escort agencies Elite Dating Models
Your comment is awaiting moderation.
шары с гелием с доставкой — это удобный способ оформить событие без лишних хлопот, выбрав идеальный комплект для вашего случая. Мы предлагаем широкий выбор тематических шаров, которые подойдут для юбилея или создания праздничного оформления. Благодаря надежной фиксации каждого шара композиции сохраняют легкость и насыщенность оттенков на протяжении долгого времени, позволяя наслаждаться ими как можно дольше. Наши специалисты помогут создать авторскую композицию, ориентируясь на тему праздника. Варианты включают фольгированные шары с фигурами персонажей, а также уникальные дизайнерские формы. Мы работаем так, чтобы получатель получил композицию в идеальном состоянии, поэтому каждый заказ оформляется с учетом всех пожеланий. Курьер привозит шары уже надутыми гелием, что позволяет сразу использовать их для оформления. Наш сервис ориентирован на тех, кто ценит качество, поэтому каждая заявка обрабатывается без задержек. Мы предлагаем эксклюзивные коллекции, чтобы ваш праздник стал по-настоящему уникальным. Если вам нужны шары для выписки, у нас есть подходящие варианты. Для больших мероприятий доступны комплексные решения, которые выполняются с учетом особенностей площадки. Мы стремимся сделать так, чтобы каждый клиент оставался доволен, а гелиевые шары становились основой праздничного настроения. Заказывая у нас, вы получаете качественный сервис, способные украсить любое мероприятие.
https://altsvadba.ru/
Your comment is awaiting moderation.
быстрая доставка гелиевых шаров на дом — это удобный способ подарить настроение, выбрав оригинальный набор шаров. Мы предлагаем разнообразные варианты воздушных композиций, которые подойдут для детского праздника или корпоративного события. Благодаря надежной фиксации каждого шара композиции сохраняют первозданный вид на протяжении долгого времени, позволяя наслаждаться ими как можно дольше. Наши специалисты помогут собрать индивидуальный комплект, ориентируясь на тему праздника. Варианты включают фольгированные шары с яркими рисунками, а также уникальные дизайнерские формы. Мы работаем так, чтобы доставка была максимально удобной, поэтому каждый заказ тщательно проверяется перед отправкой. Курьер привозит шары уже надутыми гелием, что позволяет моментально начать украшение помещения. Наш сервис ориентирован на тех, кто ценит удобство, поэтому каждая заявка обрабатывается в режиме реального времени. Мы предлагаем сезонные подборки, чтобы ваш праздник стал по-настоящему уникальным. Если вам нужны декор для романтических встреч, у нас есть подходящие варианты. Для больших мероприятий доступны масштабные инсталляции, которые выполняются с учетом особенностей площадки. Мы стремимся сделать так, чтобы каждая композиция приносила радость, а гелиевые шары становились важной частью декора. Заказывая у нас, вы получаете бережную доставку, способные украсить любую торжественную дату.
https://altsvadba.ru/
Your comment is awaiting moderation.
VIP models https://balancingactbookkeeping.biz Escort for men
Your comment is awaiting moderation.
EverNova Showcase – Loved the visual theme, and the site organization made navigating a breeze.
Your comment is awaiting moderation.
Leaf Choice Market – Nice assortment of items today, and navigation felt straightforward.
Your comment is awaiting moderation.
Trend Choice Picks Hub – Liked the variety available, exploring was quick and enjoyable.
Your comment is awaiting moderation.
I casino crypto https://crypto-casino-it.com sono piattaforme online che utilizzano valute digitali per transazioni rapide e sicure. Permettono di vedere in pratica i vantaggi della blockchain: trasparenza dei processi, assenza di intermediari, trasferimenti internazionali agevoli e un’interfaccia moderna, pensata per un’esperienza tecnologica degli utenti.
Your comment is awaiting moderation.
Casino utan svensk licens https://casinos-utan-licens.se ar onlineplattformar som drivs av operatorer med licens fran andra europeiska jurisdiktioner. De erbjuder ofta ett bredare utbud av tjanster och anvander egna regler for registrering och betalningar. For spelare innebar detta andra rutiner for sakerhet, verifiering och ansvarsfullt spelande.
Your comment is awaiting moderation.
Free Online Jigsaw Puzzle https://vps50494.shoutmyblog.com/37764364/relax-after-work-with-free-puzzles-online play anytime, anywhere. Huge gallery of scenic photos, art and animals, customizable number of pieces, autosave and full-screen mode. No registration required – just open the site and start solving.
Your comment is awaiting moderation.
PureHarborStudio Finds – Clear sections and fast-loading pages made exploring simple.
Your comment is awaiting moderation.
Casino utan registrering https://casino-utan-registrering.se bygger pa en snabbare ide: du hoppar over kontoskapandet och gar direkt in via din bank-ID-verifiering. Systemet ordnar uppgifter och transaktioner i bakgrunden, sa anvandaren mots av en mer stromlinjeformad start. Det gor att hela upplevelsen far ett mer direkt, tekniskt och friktionsfritt upplagg utan extra formular.
Your comment is awaiting moderation.
VIP Escort Dating Site for Men https://oilman.biz Escort for men
Your comment is awaiting moderation.
Гарантированно позиции вверх. Профессиональные прогоны!
Добрый день! ТОПы – реальность.
Прогоны проверены на сотнях сайтов!
Увеличение ИКС сайтов. Сразу два прогона с ценой одного.
После прогонов сайт поднимется по позициям по поисковикам Yandex и Гугл.
Отчеты! Доверие клиентов! Позитивные отзывы! Позиции вверх!
Telgrm: @exrumer
Skype: Loves.Ltd
электронка: support@xrumer.cc
https://xrumer.cc
Только этиже!
А тАкож Работаем со Студиями!
Your comment is awaiting moderation.
Гарантированные позиции. Профессиональные прогоны!
Доброго утра! Ваши сайты в ТОПах – это уже реально.
Выполнены тысячи заказов с положительными отзывами!
2 надежных прогона для поднятия сайта с ценой одного.
Гарантированный подъем на 10 пунктов.
Отчеты! Доверие заказчиков! Реальные отзывы! Позиции выше!
Телегрм: @exrumer
Skype: Loves.Ltd
email: support@xrumer.cc
https://xrumer.cc
Только этиже!
А тАкож Работаем со Студиями!
Your comment is awaiting moderation.
трансы иркутск Трансы Иркутск – это история о преодолении и самоопределении в суровых условиях сибирской природы и консервативных социальных норм. Иркутск, город с богатой историей и уникальным культурным наследием, расположенный на берегу могучего Байкала, является домом для многих трансгендерных людей, чьи истории часто остаются невидимыми для широкой общественности. Их путь к принятию себя и к полноценной жизни в обществе сопряжен с рядом трудностей, начиная от поиска квалифицированной медицинской помощи и заканчивая столкновением с предрассудками и дискриминацией.
Your comment is awaiting moderation.
StyleHaven – Trendy items showcased clearly, and site navigation feels very smooth.
Your comment is awaiting moderation.
Fresh Goods Spot – Solid selection and a smooth layout make checking updates enjoyable.
Your comment is awaiting moderation.
ExploreOpportunities Finds – Fast-loading pages with a clean interface and neatly presented items.
Your comment is awaiting moderation.
Escort Agency https://keralatourism.biz Escort Services
Your comment is awaiting moderation.
v
Your comment is awaiting moderation.
QuietSelectMarket – Quick service and easy browsing, I’ll definitely return.
Your comment is awaiting moderation.
https://pishem-pravdu.ru/forums/topic/promokod-1win-bust-1w500star-%e2%86%92-500-bonus/
Your comment is awaiting moderation.
http://e-generation.forum2x2.ru/forum/post.php?mode=post&f=1776
Your comment is awaiting moderation.
https://kafeld.ru/forums/topic/promokod-mostbet-na-depozit-2026-max200-125/
Your comment is awaiting moderation.
http://www.rosteplo.ru/board/post.php?mode=post&f=3780
Your comment is awaiting moderation.
Elite Models Escort services with top models and VIP girls! Escort Services Agency – VIP Escort
Your comment is awaiting moderation.
FreshStyleBoutique – Very happy exploring here, site loads fast and items look appealing.
Your comment is awaiting moderation.
FreshTrendCollection – Items look appealing, layout is clean and navigation feels very intuitive.
Your comment is awaiting moderation.
FreshMarketDaily – Organized layout, clear visuals, and effortless navigation.
Your comment is awaiting moderation.
Rare Line Essentials – Smooth navigation paired with interesting items made exploring fun.
Your comment is awaiting moderation.
Escort Services Agency – VIP Escort VIP escort dating site elite escort
Your comment is awaiting moderation.
It offers high levels of security, privacy, and convenience, essential for participants who value discretion.
Your comment is awaiting moderation.
Trend & Style Finds – Loved the contemporary vibe, navigating the site was smooth.
Your comment is awaiting moderation.
Timber Path Collections – Easy-to-use layout and well-structured categories enhanced the browsing experience.
Your comment is awaiting moderation.
мы и в скайп и в аське https://kypitboshkii.top Мне от оплаты и в мои руки в общем занимает 2-3 днянарод, кти еще отпишется п магазу?
Your comment is awaiting moderation.
A cozy Kolasin booking for mountain lovers. Ski slopes, trekking trails, and local cuisine are nearby. Rooms are equipped with amenities, Wi-Fi, parking, and friendly staff are available to help you plan your vacation.
Your comment is awaiting moderation.
тоже хочу нахватить, но жду отзывы https://pasangtaruhan.xyz заказал, получил трек, пока не бьется.кто последний раз когда брал? регу или соль
Your comment is awaiting moderation.
Fresh Update Market – Everything is arranged in a clean way, and navigating feels effortless.
Your comment is awaiting moderation.
SelectSmartHub – Wide variety and very convenient for locating what I needed.
Your comment is awaiting moderation.
https://mayanhjp.com/tests/pgs/melbet_promo_code__38.html
Your comment is awaiting moderation.
Новинний портал Ужгорода https://88000.com.ua головні події міста, політика, економіка, культура, спорт та життя городян. Оперативні новини, репортажі, інтерв’ю та аналітика. Все важливе про Ужгород в одному місці, зручно з телефону та комп’ютера.
Your comment is awaiting moderation.
ремонт джойстика пс 4
Your comment is awaiting moderation.
https://sasquatchchronicles.com/pgs/1xbet_promo_code_cameroon__up_to_65000_xaf.html
Your comment is awaiting moderation.
Rare Botanical Hub – The product selection was delightful, and everything loaded quickly.
Your comment is awaiting moderation.
Защищенный kraken сайт требует обязательного использования Tor браузера для доступа, блокируя попытки входа через обычные браузеры без анонимизации.
Your comment is awaiting moderation.
SoftGroveCorner Portal – The clean layout and intuitive navigation made shopping smooth.
Your comment is awaiting moderation.
Инструкция зайти на кракен описывает установку Tor, настройку мостов obfs4, поиск актуальных адресов и безопасную регистрацию на площадке.
Your comment is awaiting moderation.
все от души))) вот бы еще во всех городах зк делали))))) https://kypitboshkii.top спок ночиупаковка – неплохо, но не идеально. Особенно глупо, когда в описании отправления пишут “Косметика”, а там, бл*ть, пачка сигарет. Оочень странно на меня смотрели в офисе спсра, знаете ли. 4/5
Your comment is awaiting moderation.
Algorithm favor increases when you buy tiktok likes from quality providers. Engagement velocity signals content quality to TikTok’s recommendation system promoting videos to wider audiences through For You Page placements.
Your comment is awaiting moderation.
Trend & Buy Shop Online – Loved the clean layout, finding items felt quick and smooth.
Your comment is awaiting moderation.
The best deepnude ai services for the USA. We’ll explore the pros and cons of each service, including speed, available effects, automation, and data privacy. Undress people in just a few clicks.
Your comment is awaiting moderation.
This website certainly has all of the information I wanted about this subject and didn’t know who to ask.
escorts Brasilia
Your comment is awaiting moderation.
Urban Trend Picks – Good browsing speed and some great modern selections on display.
Your comment is awaiting moderation.
StrengthBoosters – Clean structure, inspiring content, and intuitive browsing experience.
Your comment is awaiting moderation.
Trading platform swap hyperevm combines a user-friendly terminal, analytics, and portfolio management. Monitor quotes, open and close trades, and analyze market dynamics in a single service, available 24/7.
Your comment is awaiting moderation.
Use hyperliquid to manage cryptocurrencies: a user-friendly dashboard, detailed statistics, and trade and balance tracking. Tools for careful risk management in a volatile market.
Your comment is awaiting moderation.
Нужен бетон? бетон цена купить о выгодной цене с доставкой на объект. Свежий раствор, точное соблюдение пропорций, широкий выбор марок для фундамента, стяжек и монолитных работ. Быстрый расчет, оперативная подача миксера.
Your comment is awaiting moderation.
воздушные шарики с доставкой — это только малая часть того, что предлагает современный свадебный портал в Смоленске. Здесь собраны полезные советы по организации свадьбы, а также надежные исполнители для вашего праздника, чтобы каждая пара смогла создать атмосферу, отражающую их стиль. На портале вы найдете все о параде невест в Смоленске, который ежегодно собирает лучшие свадебные команды и фотографов. Это событие стало традицией, вдохновляющей будущих супругов на создание незабываемых образов. Для тех, кто планирует торжество, портал предлагает рейтинг лучших свадебных фотографов Смоленска, а также идеи для необычных съемок. Специальные материалы помогут определиться, в каком месте провести лучший свадебный вечер. Представлены обзоры популярных площадок, чтобы каждая пара могла подобрать идеальный вариант. На портале также доступны активные разделы женского общения, где можно получить рекомендации с теми, кто уже прошел путь подготовки к свадьбе. А свежие городские события помогут оставаться в курсе всего, что может заинтересовать будущих молодожёнов. Сайт создан как единая площадка для подготовки идеального праздника, поэтому здесь собрано все для полного сопровождения свадебного дня: от подбора украшений до идей для оформления. Благодаря удобной структуре и регулярному обновлению информации портал стал главным помощником будущих супругов, помогая делать важный день по-настоящему особенным.
https://svadba67.ru/
Your comment is awaiting moderation.
яркие воздушные шары с быстрой доставкой — это только малая часть того, что предлагает актуальный информационный портал о свадьбах в Смоленске. Здесь собраны лучшие идеи для подготовки торжества, а также каталоги профессионалов, чтобы каждая пара смогла создать атмосферу, отражающую их стиль. На портале вы найдете все о параде невест в Смоленске, который привлекает множество участников и гостей. Это событие стало неотъемлемой частью свадебной культуры Смоленска. Для тех, кто планирует торжество, портал предлагает рейтинг лучших свадебных фотографов Смоленска, а также советы по созданию фотосессии мечты. Специальные материалы помогут определиться, какой ресторан или банкетный зал выбрать. Представлены обзоры популярных площадок, чтобы каждая пара могла подобрать идеальный вариант. На портале также доступны сообщества смолянок, обсуждающих важные темы, где можно обсудить волнующие вопросы с теми, кто уже прошел путь подготовки к свадьбе. А свежие новости Смоленска помогут оставаться в курсе всего, что может заинтересовать будущих молодожёнов. Сайт создан как единая площадка для подготовки идеального праздника, поэтому здесь собрано все для полного сопровождения свадебного дня: от поиска стилистов до предложений от ведущих. Благодаря удобной структуре и регулярному обновлению информации портал стал главным помощником будущих супругов, помогая делать важный день по-настоящему особенным.
https://svadba67.ru/
Your comment is awaiting moderation.
заказала в этом магазе сувениров:), посыль пришел на 3ий день, продукты качеством вкусны https://haru034.xyz Парни, начинается параноя! Завтра посыль приходит, как получать А?очень сложно дописаться до них=( а цены хорошие.
Your comment is awaiting moderation.
LivingGoodsVault – Items look appealing, and moving through the site was effortless.
Your comment is awaiting moderation.
Нужна ботулинотерапия? уколы диспорт помогаем смягчить мимику, освежить взгляд и предупредить появление новых морщин. Осмотр врача, противопоказания, грамотное введение и контроль результата на приёме.
Your comment is awaiting moderation.
Профессиональная перевозка лежачих больных домой подъем на этаж, помощь при пересадке, фиксирующие носилки, заботливое отношение. Организуем транспортировку в больницы, реабилитационные центры и домой.
Your comment is awaiting moderation.
Профессиональное маркетинг агентство сайт: аудит, позиционирование, digital-стратегия, запуск рекламных кампаний и аналитика. Поможем вывести бренд в онлайн, увеличить трафик и заявки из целевых каналов.
Your comment is awaiting moderation.
Silver Garden Mart Link – Fast, smooth pages with an intuitive layout created a reliable feel.
Your comment is awaiting moderation.
VIP escort in London, more details here: luxury escort agency london Confidentiality and high level of service.
Your comment is awaiting moderation.
orchardlooklane – Tidy pages with organized products, shopping was simple and fast.
Your comment is awaiting moderation.
может все дело в кривых ручках? https://kokainkupits.info ещё раз говорю, здесь качество отменное, по крайней мере с той партии, с которой я получал. 1к10 убивало в мясо с напаса )НЕ принуждаем вас тут брать, берите, где позволяет бюджет.
Your comment is awaiting moderation.
DiscoverAmazingDeals – Items look appealing, checkout seems smooth and overall experience was satisfying.
Your comment is awaiting moderation.
Comprehensive whitecirclegroup.com: feasibility studies, market analysis, strategy, optimization of costs and processes. We help you strengthen your position in Dubai, Abu Dhabi and other Emirates.
Your comment is awaiting moderation.
Нужен манипулятор? кран манипулятор в аренду москва организуем подачу спецтехники на стройку, склад или частный участок. Погрузка, разгрузка, перевозка тяжёлых и негабаритных грузов. Оперативный расчёт стоимости и выезд в день обращения.
Your comment is awaiting moderation.
Нужен керосин? сколько стоит авиационный керосин сертифицированное топливо по ГОСТ, поставки для аэропортов, авиапредприятий и вертолётных площадок. Помощь в подборе марки, оформление документов и быстрая доставка.
Your comment is awaiting moderation.
моментальный заказ шаров — удобный способ создать праздничное настроение. Воздушные шары давно стали универсальным элементом декора, который помогает преобразить любое помещение вне зависимости от масштаба события. Современный декор из шаров легко адаптируется под любую стилистику, и вы всегда сможете найти композицию, подходящую под настроение события. Для детских мероприятий чаще всего выбирают красочные гирлянды и фигуры, а для взрослых праздников выбирают минималистичные композиции, пастель и металлик. Композиции из шаров добавляют пространству глубину и праздничную динамику, которая подходит для оформления любой ключевой зоны праздника. Популярность шаров объясняется их практичностью и небольшими затратами, потому что композиции легко масштабируются под любые запросы. Кроме того, шары безопасны, долговечны и сохраняют форму длительное время, что подходит для событий, которые продолжаются много часов. При оформлении стоит заранее продумать цвета, форму и стиль декора, чтобы украшение выглядело органично и создавало желаемый эффект. Если вы хотите сэкономить время, лучше доверить оформление профессионалам, которые подберут подходящий стиль и возьмут на себя все этапы работы. Грамотно подобранные воздушные шары создают особое настроение, дополняя событие выразительными и стильными элементами декора.
https://parmanews.ru/novost/companynews/118583/
Your comment is awaiting moderation.
моментальный заказ шаров — удобный способ создать праздничное настроение. Шары издавна считаются простым и стильным способом украсить пространство, который одинаково хорошо смотрится дома, в офисе или на масштабных праздниках. Сегодня композиции из воздушных шаров поражают богатством вариантов оформления, и вы всегда сможете найти композицию, подходящую под настроение события. Для детских мероприятий чаще всего выбирают красочные гирлянды и фигуры, а во взрослых сценариях оформления чаще используются нежные оттенки и блестящий хром. Композиции из шаров добавляют пространству глубину и праздничную динамику, которую можно адаптировать под фотозону, входную зону или оформление стола. Многие выбирают шары за их универсальность и доступность, ведь они позволяют оформить мероприятие даже при небольшом бюджете. Также стоит отметить устойчивость и надежность современных шаров, что делает их удобными для длительных праздников. Во время выбора композиции важно учитывать цветовое решение, формат и настроение, чтобы украшение выглядело органично и создавало желаемый эффект. При нехватке времени оптимально заказать оформление у опытных декораторов, которые помогут выбрать оформление и аккуратно создадут композицию. Красиво оформленные композиции из шаров задают атмосферу праздника, делая любое событие более ярким, запоминающимся и визуально целостным.
https://parmanews.ru/novost/companynews/118583/
Your comment is awaiting moderation.
DiscoverEndlessGrowth – Motivating theme throughout, navigation is easy and layout looks clean indeed.
Your comment is awaiting moderation.
Online platform hypertrade crypto for active digital asset trading: spot trading, flexible order settings, and portfolio monitoring. Market analysis tools and convenient access to major cryptocurrencies are all in one place.
Your comment is awaiting moderation.
Нужно остекление? остекление балкона под ключ цена: тёплое и холодное, ПВХ и алюминий, вынос и объединение с комнатой. Бесплатный замер, помощь с проектом и документами, аккуратный монтаж и гарантия на конструкции и работу.
Your comment is awaiting moderation.
Знаю сайт. Всем советую. Пишу в кратце о главном. Связался в аське. Ответили сразу, тут же сделал заказ на регу. Осталось подождать… купить Кокаин, Мефедрон, Экстази Думать тут остается только одно: хуйня какая то происходит непонятная…Отзыв коротенько. Закладка на месте. Обьяснение распологает. Фото имеется. Бот чёткий. бошки хороши. Вес норма! … ну вот и всё Коротко и ладно)
Your comment is awaiting moderation.
курс диспетчера грузоперевозок с реальными кейсами стоимость курса трак диспетчера без опыта в логистике
Your comment is awaiting moderation.
Rainy City Outlet – Enjoyed the calm look of the site and the steady flow between pages.
Your comment is awaiting moderation.
Trend Buy Hub Online – Loved the variety, and moving between pages was effortless.
Your comment is awaiting moderation.
отели краби краби krabi palm paradise resort 3
Your comment is awaiting moderation.
StyleSpotOnline – Fast delivery and trendy items made shopping easy and fun.
Your comment is awaiting moderation.
Современный ремонт в офисах под ключ. Поможем обновить пространство, улучшить планировку, заменить покрытия, освещение и коммуникации. Предлагаем дизайн-проект, фиксированную смету, соблюдение сроков и аккуратную работу без лишнего шума.
Your comment is awaiting moderation.
Комплексное seo продвижение сайтов в сша: анализ конкурентов, стратегия SEO, локальное продвижение в городах и штатах, улучшение конверсии. Прозрачная отчетность, рост позиций и трафика из Google и Bing.
Your comment is awaiting moderation.
TrendStyle Hub – Pages loaded instantly and the fashion lineup felt fresh and appealing.
Your comment is awaiting moderation.
Всем привет вчера забегал в этот магазин ни чего не нашел ! https://contactpagemarketing.xyz магаз норм. а вот курьеры зажрались суки.Заказал в понедельник – в среду мне уже позвонили.
Your comment is awaiting moderation.
курьерская доставка шаров помогает сделать подготовку к мероприятию более удобной и приятной, ведь воздушные шары являются одним из самых эмоциональных и универсальных способов создать настроение праздника для любого события. Они используются для создания праздничных композиций, позволяя легко преобразить зал, дом или открытую площадку. Разнообразие форм, цветов и размеров дает возможность подчеркивать тематику мероприятия, превращая каждое торжество в особенный момент. Многие выбирают воздушные гелиевые композиции, которые эффектно смотрятся в интерьере и позволяют создавать праздничные инсталляции. Такие шары могут быть однотонными, что дает возможность создать акцентные зоны. Для более выразительного оформления часто используют фольгированные шары, отличающиеся высокой прочностью и привлекательным блеском. Они становятся центром любой композиции и прекрасно сочетаются с шариками в классических цветах. Для тех, кто предпочитает мягкие тона, подойдут нежные расцветки, создающие уютную атмосферу. Чтобы оформить крупные мероприятия, используют объемные арки, которые помогают структурировать пространство. Такие решения подходят для дней рождения, свадеб, корпоративов, выпускных и любых других торжеств, делая оформление запоминающимся. Цветовая гамма играет важную роль, поэтому важно сочетать цвета грамотно. Например, для детских праздников идеально подходят красочные тематические наборы, а для взрослых — минималистичные композиции. Дополнительным преимуществом является возможность создавать индивидуальные дизайны, что делает праздник еще более значимым. Воздушные шары способны наполнить пространство ощущением торжества. Благодаря удобной доставке и большому выбору вариантов вы можете организовать праздник без хлопот. Независимо от повода, воздушные шары остаются атрибутом радостных событий, способным подарить улыбки каждому гостю.
https://www.c-inform.info/news/id/112683
Your comment is awaiting moderation.
курьерская доставка шаров помогает сделать подготовку к мероприятию более удобной и приятной, ведь воздушные шары являются одним из самых эмоциональных и универсальных способов добавить ощущение волшебства для любого события. Они используются для оформления пространства, позволяя легко преобразить зал, дом или открытую площадку. Разнообразие форм, цветов и размеров дает возможность подчеркивать тематику мероприятия, превращая каждое торжество в особенный момент. Многие выбирают гелиевые шары, которые эффектно смотрятся в интерьере и позволяют создавать объемные композиции. Такие шары могут быть с тематическими рисунками, что дает возможность создать акцентные зоны. Для более выразительного оформления часто используют яркие фольгированные варианты, отличающиеся высокой прочностью и привлекательным блеском. Они становятся центром любой композиции и прекрасно сочетаются с пастельными оттенками. Для тех, кто предпочитает мягкие тона, подойдут нежные расцветки, создающие уютную атмосферу. Чтобы оформить крупные мероприятия, используют объемные арки, которые помогают создать эффектный центр зала. Такие решения подходят для дней рождения, свадеб, корпоративов, выпускных и любых других торжеств, делая оформление выразительным. Цветовая гамма играет важную роль, поэтому важно сочетать цвета грамотно. Например, для детских праздников идеально подходят яркие шары, а для взрослых — строгие цветовые сочетания. Дополнительным преимуществом является возможность создавать индивидуальные дизайны, что делает праздник еще более значимым. Воздушные шары способны создать настроение без лишних усилий. Благодаря удобной доставке и большому выбору вариантов вы можете получить шары в нужное время. Независимо от повода, воздушные шары остаются универсальным украшением, способным подарить эмоции каждому гостю.
https://www.c-inform.info/news/id/112683
Your comment is awaiting moderation.
Хочешь ТОП? seo продвижение как инструмент усиления SEO: эмуляция реальных пользователей, рост поведенческих факторов, закрепление сайта в ТОПе. Прозрачные отчёты, гибкая стратегия под нишу и конкурентов, индивидуальный медиаплан.
Your comment is awaiting moderation.
Хочешь сайт в ТОП? накрутки пф для быстрого роста позиций сайта. Отбираем безопасные поведенческие сценарии, повышаем кликабельность и глубину просмотра, уменьшаем отказы. Тестовый запуск без оплаты, подробный отчёт по изменениям видимости.
Your comment is awaiting moderation.
HomeEssentialsSpot – Wide selection and browsing was fast and comfortable.
Your comment is awaiting moderation.
Менеджер прошу зайдите в скайп, хочу заказ оплатить вас там нет 2 дня уже. Заявку на сате подал жду ответ на эмаил. Спасибо. купить кокаин, меф, бошки через телеграмм какие манерные нынче клиенты пошли, плюнешь в рожу драться лезут, видете ли ему грубо ответили, я с ТС с момента регистрации общаюсь и не разу он не забуровил даже когда были терки а они поверь были, так что не пизди про невежливое обращение, да и по переписки видно что все ровно, ищи проблему в себе….заказ оформил – жду посылочки ^^
Your comment is awaiting moderation.
TrendDiscoverer – Clean visuals, browsing feels fluid and enjoyable.
Your comment is awaiting moderation.
воздушные шары ко дню рождения остаются одним из самых популярных способов создать атмосферу праздника для любого торжества. Такие украшения позволяют подчеркнуть стиль мероприятия, делая праздник более красочным. Существует множество вариантов воздушных шаров, и каждый из них подходит для вечеринки для взрослых. Например, шары, наполненные гелием идеально подходят для создания эффектных композиций. Они могут быть с рисунками, что позволяет сделать декор более индивидуальным. Кроме того, популярностью пользуются металлизированные модели, которые отличаются яркими оттенками. Их часто выбирают для создания акцентных элементов. Для любителей нежных оттенков подойдут пастельные шары, которые создают мягкий визуальный эффект. Если вы хотите сделать праздник более выразительным, можно использовать большие связки шаров, которые помогают зонировать помещение. Такие решения часто применяются как для домашних праздников, так и для мероприятий в кафе или студиях. Особое внимание стоит уделить подбору палитры, ведь правильно подобранные цвета помогают выделить ключевые элементы декора. Важно учитывать возраст именинника, тематику праздника и размер площадки. Для маленьких детей отлично подходят шары с героями мультфильмов, а для взрослых — лаконичные композиции. Не менее значимым элементом подготовки является качество материалов, поэтому следует отдавать предпочтение качественному латексу. Благодаря большому разнообразию шаров можно легко сделать праздник уникальным, а при желании использовать надписи для придания украшениям персонального характера. Правильное сочетание шаров, форм и цветов помогает превратить обычный день рождения в настоящее событие, которое оставит приятные эмоции. Воздушные шары — это практичный способ украсить любое пространство, подходящий для праздников любого формата.
https://www.panram.ru/partners/news/vozdushnye-shary-na-den-rozhdeniya-vidy-idei-i-sovety/
Your comment is awaiting moderation.
воздушные шары ко дню рождения остаются одним из самых популярных способов добавить ярких эмоций для любого торжества. Такие украшения позволяют дополнить любую тематику, делая праздник более красочным. Существует множество вариантов воздушных шаров, и каждый из них подходит для детского дня рождения. Например, шары, наполненные гелием идеально подходят для создания эффектных композиций. Они могут быть с рисунками, что позволяет собрать оригинальную композицию. Кроме того, популярностью пользуются металлизированные модели, которые отличаются устойчивой формой. Их часто выбирают для украшения пространства в определенной тематике. Для любителей нежных оттенков подойдут пастельные шары, которые создают мягкий визуальный эффект. Если вы хотите сделать праздник более выразительным, можно использовать арки и колонны, которые помогают зонировать помещение. Такие решения часто применяются как для домашних праздников, так и для мероприятий в кафе или студиях. Особое внимание стоит уделить подбору палитры, ведь правильно подобранные цвета помогают подчеркнуть стиль. Важно учитывать возраст именинника, тематику праздника и характер помещения. Для маленьких детей отлично подходят шары с героями мультфильмов, а для взрослых — эстетичные цветовые сочетания. Не менее значимым элементом подготовки является качество материалов, поэтому следует отдавать предпочтение товарам проверенных производителей. Благодаря большому разнообразию шаров можно легко подобрать оформление под любой стиль, а при желании использовать индивидуальные принты для придания украшениям персонального характера. Правильное сочетание шаров, форм и цветов помогает превратить обычный день рождения в яркое торжество, которое оставит теплые воспоминания. Воздушные шары — это универсальный инструмент декора, подходящий для праздников любого формата.
https://www.panram.ru/partners/news/vozdushnye-shary-na-den-rozhdeniya-vidy-idei-i-sovety/
Your comment is awaiting moderation.
trafficgenerationpro.shop – Bookmarked this immediately, planning to revisit for updates and inspiration.
Your comment is awaiting moderation.
digitalbrandingworks.shop – Navigation felt smooth, found everything quickly without any confusing steps.
Your comment is awaiting moderation.
hyperrank.click – Loved the layout today; clean, simple, and genuinely user-friendly overall.
Your comment is awaiting moderation.
novaclicks.click – Found practical insights today; sharing this article with colleagues later.
Your comment is awaiting moderation.
Тату студии в Санкт-Петербурге. Профессиональные студии татуировки: от миниатюрной графики до масштабного реализма. Индивидуальные эскизы, абсолютная стерильность и опытные мастера. Запишитесь на консультацию и создайте свой шедевр! https://spb-tattoo.ru/
Your comment is awaiting moderation.
Our most valuable: http://news.missourinews-online.com/story/586970/the-ultimate-guide-to-buying-facebook-advertising-accounts-what-must-be-known.html
Your comment is awaiting moderation.
Онлайн курс курсы диспетчера с трудоустройством: обучение с нуля до уверенного специалиста. Стандарты сервиса, документооборот, согласование рейсов и оплата. Пошаговый план выхода на работу у американских логистических компаний.
Your comment is awaiting moderation.
pixelmint.click – Navigation felt smooth, found everything quickly without any confusing steps.
Your comment is awaiting moderation.
Gates of Olympus https://gatesofolympus.win is a legendary slot from Pragmatic Play. Demo and real money play, multipliers up to 500x, free spins, and cascading wins. An honest review of the slot, including rules, bonus features, and tips for responsible gaming.
Your comment is awaiting moderation.
Все продукты кроме эйфора в наличии, заказывайте! Проб нет. купить скорость, кокаин, мефедрон, гашиш продаван обещал разобраться по поводу 307. Надеюсь на скорейшее разрешение ситуации.Про Ам1220 здешний известно что нибудь…?
Your comment is awaiting moderation.
pinehillstudio – The layout feels clean and simple, making browsing surprisingly pleasant today.
timelessharveststore – Really enjoyed scrolling here, everything looked organized and easy to understand.
rusticriverstudio – Pages loaded fast and the visuals gave the shop a warm inviting vibe.
softblossomstudio – Loved the gentle aesthetic, it made my browsing experience feel calm and smooth.
moonviewdesigns – The site felt refreshing and modern, items were neatly displayed overall.
everforestdesign – Nice selection here, navigation felt intuitive and everything loaded without hesitation.
autumnmistemporium – The shop has a cozy vibe, and product details looked clear and helpful.
everhollowbazaar – Browsing was smooth, categories were easy to explore and made sense right away.
everwillowcrafts – The store feels friendly and thoughtfully arranged, making browsing enjoyable today.
moongrovegallery – Really liked how polished everything looked, pages loaded instantly and cleanly.
silverhollowstudio – The design is elegant and items appear well-presented with clear descriptions.
goldenridgegallery – Smooth experience overall, I found browsing quick and surprisingly relaxing today.
softsummershoppe – The gentle theme made the shop feel welcoming, easy on the eyes while browsing.
evertrueharbor – Enjoyed visiting the site, everything looked organized and straightforward to explore.
urbanwildgrove – The shop feels modern and tidy, navigation was easy and frustration-free.
blueharborbloom – Pages loaded fast and the product layout felt natural and visually appealing.
wildfieldmercantile – Browsing was enjoyable, items looked well-arranged and details were simple to read.
silvergardenmart – The store gives a reliable impression, everything felt smooth from start to finish.
timberpathstore – Nice overall feel, categories were easy to jump through without any confusion.
evernovaemporium – Loved the aesthetic here, browsing felt seamless and pleasantly well-organized today.
Your comment is awaiting moderation.
http://bravo.listbb.ru/viewtopic.php?f=2&t=56
Your comment is awaiting moderation.
Pure Harbor Selection – Well-structured pages and intuitive navigation helped me browse quickly.
Your comment is awaiting moderation.
Печатали календари для клиентов и сотрудников, и результат получился красивым и стильным. Фото яркие, сетка календаря читаемая, бумаги достаточно плотная. Скрепление выполнено надежно. Заказ оформили и отправили без задержек. Отличный вариант корпоративной продукции: изготовление блокнотов
Your comment is awaiting moderation.
Давай зафиналим на мировой. купить Мефедрон, Бошки, Марихуану Успешных вам продаж и спокойной работы)Всегда платил через киви перевод идёт максимум сутки.950р это с курьером доставит тебе куда скажешь)))
Your comment is awaiting moderation.
Rainforest Picks Hub – A strong lineup of items and a fast interface made browsing enjoyable.
Your comment is awaiting moderation.
Trend & Buy Hub Shop – Loved the variety of products, browsing was fast and seamless.
Your comment is awaiting moderation.
Срочный вызов электрика https://vash-elektrik24.ru на дом в Москве. Приедем в течение часа, быстро найдём и устраним неисправность, заменим розетки, автоматы, щиток. Круглосуточный выезд, гарантия на работы, прозрачные цены без скрытых доплат.
Your comment is awaiting moderation.
Fashion Corner Online – Clean layout and stylish pieces made browsing a pleasant experience.
Your comment is awaiting moderation.
Спасибо за отзыв , а то заказывает много людей а отписываются единицы. https://bxgo.top какой товар заказал?Удачи Вам и Процветания От Всей Души!
Your comment is awaiting moderation.
ShopSmartToday – Excellent bargains and product quality, highly impressed.
Your comment is awaiting moderation.
BudgetFinds – Easy-to-use layout and products are well displayed.
Your comment is awaiting moderation.
TrendChoiceMarket – Stylish items showcased neatly with effortless browsing.
Your comment is awaiting moderation.
все огонь люди работают!!!пс за поддержку ) https://kypitboshkii.top Я взял всего 15т.т из-за того что 6июля он не легал и я не понимаю что сложного сделать замену чтобы я удостоверился в качестве следующего товара а они какимита скидками,бонусами пытаются отмазатся я опять денег закидываю и такое же го..но забираю!на сайте есть аська, напиши, мне в течении пяти минут отвечали.
Your comment is awaiting moderation.
Заказывали печать брендированных блокнотов для сотрудников и клиентов. Обложка получилась прочной и стильной. Внутри листы идеально проклеены, ничего не выпадает. Все пожелания по дизайну учли. Получился отличный корпоративный подарок: где заказать баннер
Your comment is awaiting moderation.
Изготавливали меню для кафе, и получился отличный результат. Печать четкая, бумага плотная и устойчивая к износу. Ламинация сделана качественно, без пузырей и заломов. Макет согласовали быстро, все правки учли. Работой остались на сто процентов довольны: баннер москва
Your comment is awaiting moderation.
goldenoutlet – Clear product listings and tidy pages, I found everything quickly.
Your comment is awaiting moderation.
UniqueGiftCollection – Very satisfied exploring, site design is neat and categories well-organized.
Your comment is awaiting moderation.
УВОЖАЕМЫЕ ФОРУМЧАНЕ МАГАЗИН ПРОВЕРЕННЫЙ БЕРИТЕ СМЕЛО. КАЧЕСТВО ТОВАРА И ОПЕРАТИВНОСТЬ РАБОТЫ ВАС НЕ ПОДВЕДУТ ДА ЕЩЕ И ЦЕНЫ УУХХ КАКИЕ ЛУЧШЕ ВРЯД ЛИ НАЙДЕТЕ… ЕЩЕ РАЗ С П А С И Б О:bro: купить онлайн мефедрон, экстази, бошки Магазин как магазин!Заказал вчера в 20:00 оплатил в 22:00 домой пришел в 22:20 в статусе заказа уже выло написано в обработе тоесть деньги мои приняли. Спросил когда будет трек.Ответили завтра не раньше 16:00 проверяю в 14:40 уже статус отправлен и трек лежит в заказе. По скорости и отзывчивости магазина 100%лучше нет
Your comment is awaiting moderation.
BrightGiftCorner – Very happy with what I saw, products look nice and site seems reliable.
Your comment is awaiting moderation.
5го марта написал ЛС ТСу про оптовый заказ…. до сих пор жду ответа https://haru034.xyz Вызвал такси;)Всем привет!
Your comment is awaiting moderation.
BestDailyFinds – Simple interface, finding products was fast.
Your comment is awaiting moderation.
BlueHarborBloom Showcase – Pages loaded instantly, and the design made it easy to scan through items.
Your comment is awaiting moderation.
Nice post. I learn something new and challenging on websites I stumbleupon on a daily basis. It’s always helpful to read content from other authors and use something from other web sites.
escort agencies and massage parlours in Brazil
Your comment is awaiting moderation.
Приветствую ТС,сделал заказ,но до сих пор трек не пробивается,помоги разобраться в этом уже почти неделю жду,заранее спс https://bxgo.top мы и в скайп и в аськеРебят,вообще 307 наваливает хорошо,НО,попрошу в разделе магазина флуд и оффтоп прекращать…Для этого есть раздел Информация из жизни LegalRC,в котором все описано и сказанно….Или создайте топик с обсуждениями там…
Your comment is awaiting moderation.
Quiet Plains Shop – Really liked the clean interface today, and products were easy to explore.
Your comment is awaiting moderation.
Top Value Collection – Good pricing and a reliable interface made checking things out simple.
Your comment is awaiting moderation.
Заряд качества для ваших работ. Интернет-магазин тату-оборудования с отличным выбором расходных материалов. Картриджи, иглы, краски и защита — всё в наличии. Быстрая сборка заказа для бесперебойного творчества. Обновите запасы прямо сейчас! https://tattoo-storm.ru/
Your comment is awaiting moderation.
https://salemshop.kz/
Your comment is awaiting moderation.
How Google Is Changing How We Approach Seo
seostart.com.ua
Your comment is awaiting moderation.
https://opencollective.com/1xbet-casino-promo-code1
Your comment is awaiting moderation.
Нужна работа в США? курсы трак диспетчера в сша онлайн с практикой : работа с заявками и рейсами, переговоры на английском, тайм-менеджмент и сервис. Подходит новичкам и тем, кто хочет выйти на рынок труда США и зарабатывать в долларах.
Your comment is awaiting moderation.
“Кстати Минеру за описание Минус не указал что второй кооператив” https://holladiewaldfee.xyz “Подходит время Раздачи”приветствую
Your comment is awaiting moderation.
FashionSpotFresh – Nice selection and navigating through pages was easy.
Your comment is awaiting moderation.
Explore BrightMountainMall – The neat arrangement of categories improved the browsing flow.
Your comment is awaiting moderation.
не будет 307го. ожидается 203, 250, rcs-4 и 1220й… вот что мне сказали в той же аське, где спрашивал ты ) https://gashishkupit.info Заказали 2c-i и 2c-p. Как придет в магазине появятся позиции. может и еще что привезут из заказанного курительного.KingSize вас не отловить нигде, в аське нету((( на страницу прайс не заходите, откликнитесь пожалуйста)
Your comment is awaiting moderation.
Нужна работа в США? курс диспетчера грузоперевозок для снг с нуля : работа с заявками и рейсами, переговоры на английском, тайм-менеджмент и сервис. Подходит новичкам и тем, кто хочет выйти на рынок труда США и зарабатывать в долларах.
Your comment is awaiting moderation.
ModernIdeaCenter – Neatly arranged ideas and easy navigation made exploring fun.
Your comment is awaiting moderation.
Оперативность 5 купить скорость, кокаин, мефедрон, гашиш отличный магазин, качество супер ,товар радуетзадержек небыло все было ровно магаз ровный заказывай трек сразу кидают , за качество не могу пока ничо отписать , не пробывал, попробую отпишу!
Your comment is awaiting moderation.
What a stuff of un-ambiguity and preserveness of precious
know-how concerning unexpected feelings.
Your comment is awaiting moderation.
Uwielbiasz hazard? nv casino: rzetelne oceny kasyn, weryfikacja licencji oraz wybor bonusow i promocji dla nowych i powracajacych graczy. Szczegolowe recenzje, porownanie warunkow i rekomendacje dotyczace odpowiedzialnej gry.
Your comment is awaiting moderation.
Менеджер прошу зайдите в скайп, хочу заказ оплатить вас там нет 2 дня уже. Заявку на сате подал жду ответ на эмаил. Спасибо. https://1221spa.top сайт скоро подымем , я на ветке отпишу как заработаетспасибо за внимание!
Your comment is awaiting moderation.
Строительные геоматериалы https://stsgeo-ekb.ru в Екатеринбурге с доставкой: геотекстиль, объемные георешётки, геосетки, геомембраны. Интернет-магазин для дорожного строительства, ландшафта и дренажа. Консультации специалистов и оперативный расчет.
Your comment is awaiting moderation.
Bright Select Store – The collection is nicely curated and the site loads quickly throughout.
Your comment is awaiting moderation.
Urban Wild Grove Picks – Modern visuals and intuitive layout made exploring items hassle-free.
Your comment is awaiting moderation.
ShopTodayDaily – Well-organized sections, very user-friendly.
Your comment is awaiting moderation.
Happy Living Deals – Nice mix of home items, and the site felt comfortable to explore.
Your comment is awaiting moderation.
TrendTreasureShop – Products are nicely presented and navigating the site felt intuitive.
Your comment is awaiting moderation.
Интересно, сколько дней заказ будет идти… Успеет ли до запрета, если сегодня заказать… купить Мефедрон, Бошки, Марихуану на вкус – сода.заказывал на днях 1 г. МН-001. пришло помоему в течении 5 дней.
Your comment is awaiting moderation.
ChicFinder – Comfortable browsing and a wide range of products.
Your comment is awaiting moderation.
заказал не мало,всё пришло за кач не знаю как опробуют кролы отпишу купить скорость, кокаин, мефедрон, гашиш Магазин в полном порядке!!Ладно, напишу ещё раз.
Your comment is awaiting moderation.
Интернет-магазин https://stsgeo-krd.ru геосинтетических материалов в Краснодар: геотекстиль, георешётки, геоматериалы для дорог, фундаментов и благоустройства. Профессиональная консультация и оперативная доставка.
Your comment is awaiting moderation.
Геосинтетические материалы https://stsgeo-spb.ru для строительства и благоустройства в Санкт-Петербурге и ЛО. Интернет-магазин геотекстиля, георешёток, геосеток и мембран. Работаем с частными и оптовыми заказами, быстро доставляем по региону.
Your comment is awaiting moderation.
https://t.me/s/azino777casinomobile
Your comment is awaiting moderation.
https://www.wordsdomatter.com/board/board_topic/5204323/7526627.htm
Your comment is awaiting moderation.
Ну тогда, как объяснить все происходящее сейчас? https://mefedrontop.info магазин ровныймагаз ещё не начал работу?
Your comment is awaiting moderation.
noblecraftshop – Clean layout and easy navigation, shopping felt smooth and effortless.
Your comment is awaiting moderation.
Уникальный проект National Sailing Wellness Days – это лучший выбор для активных личностей, которые желают кардинально обновить свой образ жизни. Этот уникальный формат объединяет в себе многовековые традиции мореплавания и передовые методики wellness. Членов команды ждет захватывающий вояж продолжительностью десять дней, в течение которых вы станете частью дружной команды. Любой предстоящий день подарит вам управлением яхтой и полезными физическими нагрузками. Квалифицированные инструкторы и профессиональные нутрициологи поделятся своими ценными знаниями и дадут персональные рекомендации. Ключевой задачей этого мероприятия считается не просто временный отдых от городской суеты, а создание прочного фундамента для будущих изменений. Вы освоите не просто азы яхтинга, но и грамотно планировать свой рацион, понимать сигналы организма и эффективно расслабляться. Морская стихия служит прекрасным природным целителем, а необходимость слаженных действий укрепляет коллективный дух и лидерские качества. После завершения этой замечательной программы вы обретете новый взгляд на свою жизнь и здоровье. Вы получите не только яркие воспоминания и загар, но и конкретные знания для сохранения прекрасного самочувствия. Проект National Sailing Wellness Days — это шаг к новой версии себя, где энергия и жизненный тонус наполняют все ваши дела. Используйте эту возможность начать все с чистого листа, став участником программы, которая задаст новый вектор развития.
https://healthandsailing.ru/
Your comment is awaiting moderation.
Film students on a tight budget often rely on an ai music generator for their short film scores.
Your comment is awaiting moderation.
Уникальный проект National Sailing Wellness Days – это прекрасная возможность для каждого человека, которые стремятся к гармонии души и тела. Этот уникальный формат совмещает активный отдых под парусами с комплексными оздоровительными практиками. Вас ожидает удивительное приключение продолжительностью десять дней, в течение которых вы откроете для себя красоту морских просторов. Любой предстоящий день подарит вам работой с парусами и свежим морским воздухом. Квалифицированные инструкторы и профессиональные нутрициологи расскажут о главных принципах здорового образа жизни и правильного питания на борту. Ключевой задачей этого мероприятия считается не просто обычный тур выходного дня, а фундаментальная перезагрузка ваших привычек. Вы освоите не просто азы яхтинга, но и правильно питаться, слушать свое тело и противостоять стрессам. Океан является великолепным естественным источником энергии, а совместная работа под парусами развивает коммуникабельность и ответственность. Спустя десять дней этого невероятного плавания вы почувствуете себя полностью обновленным и полным сил. Вы вынесете для себя не только памятные моменты и эмоции, но и конкретные знания для сохранения прекрасного самочувствия. National Sailing Wellness Days — это инвестиция в ваше будущее, где гармония и движение являются главными приоритетами. Не упустите свой шанс изменить жизнь к лучшему, выбрав отдых, что принесет максимальную пользу телу и духу.
https://healthandsailing.ru/
Your comment is awaiting moderation.
система кохлеарной имплантации Nurotron Venus – современное решение, созданное для людей всех возрастных групп, испытывающих существенные ограничения слуховой функции. Система Nurotron Venus обладает знаком CE, что подтверждает надёжность и безопасность применения. Эта технология позволяет приблизить качество слышимости к естественному, что особенно важно для социальной активности и коммуникации. Одной из сильных сторон Venus является интеллектуальная цифровая обработка сигналов, которая обеспечивает ясность речи даже в шумных условиях. Благодаря компактному и удобному речевому процессору пользователи могут наслаждаться свободой движения и минимальной нагрузкой. Важной особенностью является гибкость параметров адаптации, что позволяет аудиологам эффективно подбирать оптимальный режим работы. Кроме того, Nurotron Venus предлагает надёжную конструкцию с повышенной износостойкостью, что делает систему оптимальным выбором для активного образа жизни. Для пользователей, ведущих динамичный и насыщенный образ жизни, система открывает возможности для комфортного общения. Технология Venus также обеспечивает плавное привыкание к новым звукам, благодаря чему пользователи быстрее достигают стабильного результата. Таким образом, Nurotron Venus — это эффективное решение, которое помогает получить доступ к разнообразному слуховому спектру, обеспечивая все условия для улучшения слухового опыта.
https://van-mourik-medical.ru/
Your comment is awaiting moderation.
имплантационная слуховая система Nurotron Venus – современное решение, созданное для людей всех возрастных групп, испытывающих значительные нарушения слухового восприятия. Система Nurotron Venus имеет подтверждение качества CE, что гарантирует соответствие высоким требованиям безопасности. Эта технология позволяет существенно расширить возможности слухового восприятия, что особенно важно для социальной активности и коммуникации. Существенным плюсом Nurotron Venus является многоуровневая обработка звука, которая обеспечивает ясность речи даже в шумных условиях. Благодаря компактному и удобному речевому процессору пользователи могут комфортно носить систему даже при длительном использовании. Важной особенностью является гибкость параметров адаптации, что позволяет получить максимально естественный слуховой отклик. Кроме того, Nurotron Venus предлагает надёжную конструкцию с повышенной износостойкостью, что делает систему практичным решением для длительного использования. Для пользователей, ведущих частую социальную активность, система открывает возможности для комфортного общения. Технология Venus также поддерживает быстрый процесс адаптации, благодаря чему пациенты легче возвращаются к привычной повседневности. Таким образом, Nurotron Venus — это надёжное решение, которое помогает вновь открыть мир звуков, обеспечивая стабильность, качество и комфорт.
https://van-mourik-medical.ru/
Your comment is awaiting moderation.
Искать пришлось часа два!!! Фото не понятное было. Но нашёл всё таки. Забрал 1г ск крисов. Качество супер. Тёлка визжит просто) Спасибо купить онлайн мефедрон, экстази, бошки бразы все меня просветили много чего тут было но после убедительных доводов все понял селлер правда не виновен я об этом так то и говорил всегда просто все подтвердилось больше в ветке пылить не буду братух тебе хорошей работы ну и как говорил в скайпе удачи а если будет много врагов пулемет в руки и ведро потронов))) в помощМХЕ “как у всех” тобиш бодяжный.. Вроде скоро должна быть нормальная партия.
Your comment is awaiting moderation.
(10 euros gratis apuestas|10 mejores casas de apuestas|10 trucos para ganar
apuestas|15 euros gratis marca apuestas|1×2 apuestas|1×2 apuestas deportivas|1×2 apuestas
que significa|1×2 en apuestas|1×2 en apuestas que significa|1×2 que significa en apuestas|5 euros gratis apuestas|9 apuestas
que siempre ganaras|a partir de cuanto se declara apuestas|actividades de juegos
de azar y apuestas|ad apuestas deportivas|aleksandre topuria ufc apuestas|algoritmo para ganar apuestas deportivas|america
apuestas|análisis nba apuestas|aplicacion android apuestas deportivas|aplicacion apuestas deportivas|aplicacion apuestas deportivas android|aplicación de apuestas online|aplicacion para hacer apuestas|aplicacion para hacer
apuestas de futbol|aplicación para hacer apuestas
de fútbol|aplicaciones apuestas deportivas android|aplicaciones apuestas
deportivas gratis|aplicaciones de apuestas android|aplicaciones de apuestas de fútbol|aplicaciones
de apuestas deportivas|aplicaciones de apuestas deportivas peru|aplicaciones de apuestas deportivas perú|aplicaciones de
apuestas en colombia|aplicaciones de apuestas gratis|aplicaciones de
apuestas online|aplicaciones de apuestas seguras|aplicaciones de apuestas sin dinero|aplicaciones para hacer apuestas|apostar
seguro apuestas deportivas|app android apuestas deportivas|app apuestas|app apuestas android|app apuestas de
futbol|app apuestas deportivas|app apuestas deportivas android|app apuestas
deportivas argentina|app apuestas deportivas colombia|app apuestas deportivas ecuador|app
apuestas deportivas españa|app apuestas deportivas gratis|app apuestas entre
amigos|app apuestas futbol|app apuestas gratis|app apuestas sin dinero|app
casa de apuestas|app casas de apuestas|app control
apuestas|app de apuestas|app de apuestas android|app de apuestas casino|app de apuestas colombia|app de apuestas con bono de
bienvenida|app de apuestas de futbol|app de apuestas deportivas|app de apuestas deportivas android|app
de apuestas deportivas argentina|app de apuestas deportivas colombia|app de apuestas deportivas en españa|app de apuestas deportivas peru|app de apuestas deportivas perú|app de apuestas deportivas sin dinero|app de apuestas ecuador|app de apuestas en colombia|app de
apuestas en españa|app de apuestas en venezuela|app de apuestas futbol|app de apuestas gratis|app
de apuestas online|app de apuestas para android|app de apuestas
para ganar dinero|app de apuestas peru|app de apuestas reales|app de casas de apuestas|app marca apuestas android|app moviles de apuestas|app para apuestas|app para apuestas
de futbol|app para apuestas deportivas|app para apuestas deportivas en español|app para ganar apuestas deportivas|app
para hacer apuestas|app para hacer apuestas deportivas|app para hacer
apuestas entre amigos|app para llevar control de apuestas|app pronosticos apuestas deportivas|app versus apuestas|apps apuestas mundial|apps
de apuestas|apps de apuestas con bono de bienvenida|apps de apuestas de futbol|apps de apuestas deportivas peru|apps de apuestas mexico|apps para
apuestas|aprender a hacer apuestas deportivas|aprender hacer
apuestas deportivas|apuesta del dia apuestas deportivas|apuestas 10 euros gratis|apuestas 100
seguras|apuestas 1×2|apuestas 1X2|apuestas 2 division|apuestas 3 division|apuestas a caballos|apuestas a carreras de caballos|apuestas a colombia|apuestas a corners|apuestas a ganar|apuestas
a jugadores nba|apuestas a la baja|apuestas a la nfl|apuestas al barcelona|apuestas
al dia|apuestas al empate|apuestas al mundial|apuestas al tenis wta|apuestas alaves barcelona|apuestas alcaraz hoy|apuestas
alemania españa|apuestas alonso campeon del mundo|apuestas altas
y bajas|apuestas altas y bajas nfl|apuestas ambos equipos marcan|apuestas america|apuestas android|apuestas anillo nba|apuestas antes del mundial|apuestas anticipadas|apuestas anticipadas nba|apuestas apps|apuestas arabia
argentina|apuestas argentina|apuestas argentina campeon del mundo|apuestas argentina canada|apuestas argentina colombia|apuestas argentina croacia|apuestas argentina españa|apuestas argentina francia|apuestas argentina francia cuanto paga|apuestas
argentina francia mundial|apuestas argentina gana el mundial|apuestas argentina gana mundial|apuestas argentina
holanda|apuestas argentina mexico|apuestas argentina méxico|apuestas argentina mundial|apuestas argentina online|apuestas argentina paises bajos|apuestas argentina polonia|apuestas
argentina uruguay|apuestas argentina vs australia|apuestas
argentina vs colombia|apuestas argentina vs francia|apuestas argentina vs peru|apuestas argentinas|apuestas arsenal real madrid|apuestas ascenso a primera division|apuestas ascenso a segunda|apuestas asiaticas|apuestas asiatico|apuestas athletic|apuestas athletic atletico|apuestas athletic barça|apuestas athletic
barcelona|apuestas athletic betis|apuestas athletic manchester|apuestas athletic manchester united|apuestas athletic osasuna|apuestas athletic real|apuestas
athletic real madrid|apuestas athletic real sociedad|apuestas athletic real sociedad
final|apuestas athletic roma|apuestas athletic sevilla|apuestas athletic valencia|apuestas atletico|apuestas
atletico barcelona|apuestas atletico barsa|apuestas atletico campeon champions|apuestas atletico campeon de liga|apuestas atlético copenhague|apuestas atletico de madrid|apuestas atlético de madrid|apuestas atletico de
madrid barcelona|apuestas atletico de madrid gana la liga|apuestas atletico
de madrid real madrid|apuestas atlético de madrid
real madrid|apuestas atletico de madrid vs barcelona|apuestas atletico madrid|apuestas atletico madrid real
madrid|apuestas atletico madrid vs barcelona|apuestas atletico real madrid|apuestas atletico
real madrid champions|apuestas atletismo|apuestas bajas|apuestas baloncesto|apuestas baloncesto acb|apuestas baloncesto handicap|apuestas baloncesto hoy|apuestas baloncesto juegos olimpicos|apuestas baloncesto
nba|apuestas baloncesto pronostico|apuestas baloncesto
pronósticos|apuestas baloncesto prorroga|apuestas barca|apuestas barca
athletic|apuestas barca atletico|apuestas barca bayern|apuestas
barca bayern munich|apuestas barca girona|apuestas barca hoy|apuestas
barça hoy|apuestas barca inter|apuestas barca juventus|apuestas barca madrid|apuestas barça
madrid|apuestas barca real madrid|apuestas barca
vs juve|apuestas barca vs madrid|apuestas barca vs psg|apuestas barcelona|apuestas
barcelona alaves|apuestas barcelona athletic|apuestas barcelona atletico|apuestas barcelona atletico de madrid|apuestas
barcelona atlético de madrid|apuestas barcelona atletico madrid|apuestas barcelona bayern|apuestas barcelona betis|apuestas barcelona campeon de liga|apuestas barcelona celta|apuestas barcelona espanyol|apuestas barcelona gana la
champions|apuestas barcelona girona|apuestas barcelona granada|apuestas barcelona hoy|apuestas barcelona inter|apuestas barcelona madrid|apuestas barcelona osasuna|apuestas barcelona
psg|apuestas barcelona real madrid|apuestas barcelona real
sociedad|apuestas barcelona sevilla|apuestas barcelona valencia|apuestas barcelona
villarreal|apuestas barcelona vs atletico madrid|apuestas barcelona vs madrid|apuestas
barcelona vs real madrid|apuestas barsa madrid|apuestas basket hoy|apuestas bayern barcelona|apuestas bayern vs barcelona|apuestas beisbol|apuestas béisbol|apuestas beisbol mlb|apuestas beisbol pronosticos|apuestas beisbol venezolano|apuestas betis|apuestas betis –
chelsea|apuestas betis barcelona|apuestas betis chelsea|apuestas betis fiorentina|apuestas
betis girona|apuestas betis madrid|apuestas betis mallorca|apuestas
betis real madrid|apuestas betis real sociedad|apuestas betis sevilla|apuestas betis valencia|apuestas betis
valladolid|apuestas betis vs valencia|apuestas betplay hoy colombia|apuestas betsson peru|apuestas
bienvenida|apuestas billar online|apuestas bolivia vs colombia|apuestas bono|apuestas bono bienvenida|apuestas bono de bienvenida|apuestas bono
de bienvenida sin deposito|apuestas bono gratis|apuestas bono sin deposito|apuestas bonos sin deposito|apuestas borussia real madrid|apuestas
boxeo|apuestas boxeo de campeonato|apuestas boxeo españa|apuestas boxeo español|apuestas boxeo femenino olimpiadas|apuestas boxeo hoy|apuestas boxeo online|apuestas brasil colombia|apuestas brasil peru|apuestas
brasil uruguay|apuestas brasil vs colombia|apuestas brasil vs peru|apuestas caballos|apuestas caballos colocado|apuestas caballos españa|apuestas caballos
hipodromo|apuestas caballos hoy|apuestas caballos madrid|apuestas caballos online|apuestas caballos sanlucar de
barrameda|apuestas caballos zarzuela|apuestas calculador|apuestas campeon|apuestas campeon champions|apuestas campeón champions|apuestas campeon champions 2025|apuestas campeon champions league|apuestas campeon conference league|apuestas campeon copa america|apuestas campeon copa del rey|apuestas campeon de champions|apuestas campeon de la
champions|apuestas campeon de liga|apuestas campeon del mundo|apuestas campeon eurocopa|apuestas campeón eurocopa|apuestas campeon europa league|apuestas campeon f1|apuestas
campeon f1 2025|apuestas campeon formula 1|apuestas campeon libertadores|apuestas
campeon liga|apuestas campeon liga bbva|apuestas campeon liga española|apuestas campeon liga santander|apuestas campeon motogp 2025|apuestas campeon mundial|apuestas
campeón mundial|apuestas campeon mundial baloncesto|apuestas campeon nba|apuestas campeón nba|apuestas campeon premier|apuestas campeon premier
league|apuestas campeon roland garros|apuestas campeonato f1|apuestas campeonatos de futbol|apuestas carrera de caballos|apuestas carrera de
caballos hoy|apuestas carrera de caballos nocturnas|apuestas
carrera de galgos fin de semana|apuestas carrera de galgos hoy|apuestas carrera de galgos nocturnas|apuestas carreras caballos|apuestas carreras caballos sanlucar|apuestas carreras de caballos|apuestas carreras de caballos en directo|apuestas carreras de caballos en vivo|apuestas carreras de caballos españa|apuestas
carreras de caballos hoy|apuestas carreras de caballos nacionales|apuestas carreras de caballos nocturnas|apuestas
carreras de caballos online|apuestas carreras de caballos sanlucar|apuestas carreras
de caballos sanlúcar|apuestas carreras de galgos|apuestas carreras de galgos en vivo|apuestas carreras de galgos nocturnas|apuestas carreras de
galgos pre partido|apuestas casino|apuestas casino barcelona|apuestas casino futbol|apuestas casino
gran madrid|apuestas casino gratis|apuestas casino madrid|apuestas casino online|apuestas casino online argentina|apuestas casinos|apuestas casinos online|apuestas celta|apuestas celta barcelona|apuestas celta betis|apuestas celta eibar|apuestas celta espanyol|apuestas celta granada|apuestas celta madrid|apuestas celta manchester|apuestas celta real madrid|apuestas champion league|apuestas champions foro|apuestas champions hoy|apuestas
champions league|apuestas champions league – pronósticos|apuestas champions league 2025|apuestas champions league hoy|apuestas champions
league pronosticos|apuestas champions league pronósticos|apuestas champions pronosticos|apuestas chelsea barcelona|apuestas chelsea betis|apuestas chile|apuestas chile peru|apuestas chile venezuela|apuestas chile vs colombia|apuestas chile vs uruguay|apuestas ciclismo|apuestas
ciclismo en vivo|apuestas ciclismo femenino|apuestas ciclismo tour francia|apuestas ciclismo vuelta|apuestas ciclismo
vuelta a españa|apuestas ciclismo vuelta españa|apuestas city madrid|apuestas city real madrid|apuestas clasico|apuestas clasico español|apuestas
clasico real madrid barcelona|apuestas clasificacion mundial|apuestas
colombia|apuestas colombia argentina|apuestas colombia brasil|apuestas colombia paraguay|apuestas colombia uruguay|apuestas colombia vs argentina|apuestas colombia vs brasil|apuestas combinadas|apuestas combinadas como
funcionan|apuestas combinadas de futbol|apuestas combinadas de fútbol|apuestas combinadas foro|apuestas combinadas futbol|apuestas combinadas hoy|apuestas combinadas mismo partido|apuestas combinadas mundial|apuestas combinadas
nba|apuestas combinadas para esta semana|apuestas combinadas para hoy|apuestas combinadas para
mañana|apuestas combinadas pronosticos|apuestas combinadas recomendadas|apuestas combinadas seguras|apuestas combinadas seguras para hoy|apuestas combinadas seguras para mañana|apuestas como ganar|apuestas comparador|apuestas
con bono de bienvenida|apuestas con dinero ficticio|apuestas
con dinero real|apuestas con dinero virtual|apuestas
con handicap|apuestas con handicap asiatico|apuestas con handicap baloncesto|apuestas con mas probabilidades de ganar|apuestas
con paypal|apuestas con tarjeta de credito|apuestas con tarjeta de debito|apuestas consejos|apuestas
copa|apuestas copa africa|apuestas copa america|apuestas copa
américa|apuestas copa argentina|apuestas copa brasil|apuestas copa
davis|apuestas copa de europa|apuestas copa del mundo|apuestas copa del rey|apuestas copa del rey baloncesto|apuestas copa del rey final|apuestas
copa del rey futbol|apuestas copa del rey ganador|apuestas copa del rey hoy|apuestas copa
del rey pronosticos|apuestas copa del rey pronósticos|apuestas
copa europa|apuestas copa italia|apuestas copa libertadores|apuestas copa
mundial de hockey|apuestas copa rey|apuestas copa
sudamericana|apuestas corners|apuestas corners hoy|apuestas croacia
argentina|apuestas cuartos eurocopa|apuestas cuotas|apuestas cuotas altas|apuestas
cuotas bajas|apuestas de 1 euro|apuestas de baloncesto|apuestas
de baloncesto hoy|apuestas de baloncesto nba|apuestas de baloncesto para hoy|apuestas de beisbol|apuestas
de beisbol para hoy|apuestas de blackjack en linea|apuestas de boxeo|apuestas de boxeo canelo|apuestas de boxeo en las vegas|apuestas de boxeo hoy|apuestas de boxeo online|apuestas
de caballo|apuestas de caballos|apuestas de caballos como funciona|apuestas de
caballos como se juega|apuestas de caballos en colombia|apuestas de caballos en españa|apuestas
de caballos en linea|apuestas de caballos españa|apuestas de caballos ganador y colocado|apuestas de caballos internacionales|apuestas
de caballos juegos|apuestas de caballos
online|apuestas de caballos online en venezuela|apuestas de caballos por
internet|apuestas de caballos pronosticos|apuestas de caballos pronósticos|apuestas de carrera de caballos|apuestas de carreras de caballos|apuestas de carreras de caballos
online|apuestas de casino|apuestas de casino online|apuestas de casino por internet|apuestas de champions
league|apuestas de ciclismo|apuestas de colombia|apuestas de copa america|apuestas de corners|apuestas de deportes en linea|apuestas
de deportes online|apuestas de dinero|apuestas de esports|apuestas de eurocopa|apuestas de europa league|apuestas de f1|apuestas de
formula 1|apuestas de futbol|apuestas de fútbol|apuestas de futbol
app|apuestas de futbol argentina|apuestas de futbol colombia|apuestas de futbol en colombia|apuestas de futbol
en directo|apuestas de futbol en linea|apuestas de futbol en vivo|apuestas de futbol
español|apuestas de futbol gratis|apuestas de futbol hoy|apuestas
de futbol mundial|apuestas de futbol online|apuestas
de fútbol online|apuestas de futbol para hoy|apuestas
de fútbol para hoy|apuestas de futbol para hoy seguras|apuestas de futbol para mañana|apuestas de futbol peru|apuestas de futbol pronosticos|apuestas de fútbol pronósticos|apuestas de futbol
seguras|apuestas de futbol seguras para hoy|apuestas de futbol sin dinero|apuestas de
galgos|apuestas de galgos como ganar|apuestas de galgos en directo|apuestas de galgos online|apuestas de galgos trucos|apuestas de golf|apuestas de hockey|apuestas de hockey sobre hielo|apuestas de
hoy|apuestas de hoy seguras|apuestas de juego|apuestas de juegos|apuestas de juegos
deportivos|apuestas de juegos online|apuestas de la champions league|apuestas
de la copa américa|apuestas de la eurocopa|apuestas de la europa league|apuestas de la liga|apuestas de la liga bbva|apuestas de la liga española|apuestas de la nba|apuestas de la nfl|apuestas
de la ufc|apuestas de mlb|apuestas de nba|apuestas de nba para hoy|apuestas de partidos|apuestas de partidos
de futbol|apuestas de peleas ufc|apuestas de perros en vivo|apuestas de perros virtuales|apuestas de peru|apuestas de sistema|apuestas de sistema como funciona|apuestas de sistema explicacion|apuestas de sistema explicación|apuestas de tenis|apuestas de tenis de mesa|apuestas de tenis en directo|apuestas de tenis hoy|apuestas de tenis para hoy|apuestas de tenis pronosticos|apuestas de tenis
seguras|apuestas de todo tipo|apuestas de ufc|apuestas de ufc hoy|apuestas del boxeo|apuestas
del clasico|apuestas del clasico real madrid barca|apuestas del dia|apuestas del
día|apuestas del dia de hoy|apuestas del dia
deportivas|apuestas del dia futbol|apuestas del mundial|apuestas del partido de hoy|apuestas del real madrid|apuestas del rey|apuestas del sistema|apuestas deporte|apuestas
deportes|apuestas deportiva|apuestas deportivas|apuestas deportivas 1
euro|apuestas deportivas 10 euros gratis|apuestas deportivas 100 seguras|apuestas deportivas 1×2|apuestas deportivas android|apuestas deportivas app|apuestas
deportivas apps|apuestas deportivas argentina|apuestas deportivas argentina futbol|apuestas deportivas
argentina legal|apuestas deportivas atletico de madrid|apuestas deportivas baloncesto|apuestas deportivas barca madrid|apuestas deportivas barcelona|apuestas deportivas beisbol|apuestas deportivas bono|apuestas deportivas bono bienvenida|apuestas deportivas bono de bienvenida|apuestas
deportivas bono sin deposito|apuestas deportivas bonos de bienvenida|apuestas deportivas boxeo|apuestas deportivas caballos|apuestas deportivas calculadora|apuestas deportivas campeon liga|apuestas deportivas casino|apuestas deportivas casino
barcelona|apuestas deportivas casino online|apuestas deportivas cerca
de mi|apuestas deportivas champions league|apuestas deportivas chile|apuestas deportivas
ciclismo|apuestas deportivas colombia|apuestas deportivas com|apuestas deportivas
com foro|apuestas deportivas com pronosticos|apuestas
deportivas combinadas|apuestas deportivas combinadas para hoy|apuestas deportivas como se juega|apuestas deportivas comparador|apuestas deportivas con bono gratis|apuestas
deportivas con bonos gratis|apuestas deportivas con dinero
ficticio|apuestas deportivas con paypal|apuestas deportivas con puntos virtuales|apuestas deportivas consejos|apuestas deportivas consejos para ganar|apuestas deportivas copa america|apuestas deportivas copa del rey|apuestas deportivas copa libertadores|apuestas deportivas copa mundial|apuestas deportivas
corners|apuestas deportivas cual es la mejor|apuestas deportivas cuotas altas|apuestas deportivas de baloncesto|apuestas deportivas de boxeo|apuestas deportivas de colombia|apuestas deportivas de futbol|apuestas deportivas de nba|apuestas deportivas de nhl|apuestas
deportivas de peru|apuestas deportivas de tenis|apuestas deportivas del dia|apuestas deportivas dinero ficticio|apuestas deportivas
directo|apuestas deportivas doble oportunidad|apuestas deportivas en argentina|apuestas deportivas en chile|apuestas deportivas
en colombia|apuestas deportivas en directo|apuestas deportivas en españa|apuestas deportivas en español|apuestas
deportivas en linea|apuestas deportivas en línea|apuestas
deportivas en peru|apuestas deportivas en perú|apuestas deportivas
en sevilla|apuestas deportivas en uruguay|apuestas deportivas en vivo|apuestas deportivas es|apuestas deportivas es
pronosticos|apuestas deportivas españa|apuestas
deportivas españolas|apuestas deportivas esports|apuestas deportivas
estadisticas|apuestas deportivas estrategias|apuestas deportivas estrategias seguras|apuestas deportivas eurocopa|apuestas deportivas europa league|apuestas deportivas f1|apuestas deportivas faciles de
ganar|apuestas deportivas formula 1|apuestas deportivas foro|apuestas deportivas foro futbol|apuestas deportivas foro tenis|apuestas deportivas francia argentina|apuestas deportivas futbol|apuestas deportivas fútbol|apuestas deportivas futbol argentino|apuestas deportivas futbol colombia|apuestas deportivas futbol español|apuestas deportivas gana|apuestas
deportivas ganadas|apuestas deportivas ganar dinero seguro|apuestas deportivas gane|apuestas deportivas golf|apuestas deportivas gratis|apuestas deportivas gratis con premios|apuestas deportivas gratis hoy|apuestas deportivas gratis
sin deposito|apuestas deportivas handicap|apuestas deportivas
handicap asiatico|apuestas deportivas hoy|apuestas deportivas impuestos|apuestas
deportivas interior argentina|apuestas deportivas
juegos olimpicos|apuestas deportivas la liga|apuestas deportivas legales|apuestas deportivas legales
en colombia|apuestas deportivas libres de impuestos|apuestas deportivas licencia españa|apuestas deportivas liga española|apuestas deportivas listado|apuestas deportivas listado
clasico|apuestas deportivas madrid|apuestas deportivas mas seguras|apuestas
deportivas mejor pagadas|apuestas deportivas mejores|apuestas deportivas
mejores app|apuestas deportivas mejores casas|apuestas deportivas mejores cuotas|apuestas deportivas
mejores paginas|apuestas deportivas mexico|apuestas deportivas
méxico|apuestas deportivas mlb|apuestas deportivas mlb hoy|apuestas deportivas multiples|apuestas deportivas mundial|apuestas deportivas murcia|apuestas deportivas nba|apuestas
deportivas nba hoy|apuestas deportivas nfl|apuestas deportivas nhl|apuestas deportivas nuevas|apuestas
deportivas ofertas|apuestas deportivas online|apuestas deportivas online argentina|apuestas deportivas online chile|apuestas deportivas
online colombia|apuestas deportivas online en colombia|apuestas deportivas online españa|apuestas deportivas online mexico|apuestas deportivas online paypal|apuestas deportivas online peru|apuestas deportivas online por internet|apuestas
deportivas pago paypal|apuestas deportivas para ganar
dinero|apuestas deportivas para hoy|apuestas deportivas para hoy pronosticos|apuestas deportivas partido suspendido|apuestas deportivas partidos
de hoy|apuestas deportivas paypal|apuestas deportivas peru|apuestas deportivas perú|apuestas deportivas peru vs ecuador|apuestas deportivas predicciones|apuestas deportivas promociones|apuestas deportivas pronostico|apuestas
deportivas pronóstico|apuestas deportivas pronostico
hoy|apuestas deportivas pronosticos|apuestas deportivas pronósticos|apuestas deportivas pronosticos expertos|apuestas deportivas pronosticos gratis|apuestas deportivas pronosticos nba|apuestas deportivas
pronosticos tenis|apuestas deportivas que aceptan paypal|apuestas deportivas real madrid|apuestas
deportivas regalo bienvenida|apuestas deportivas resultado exacto|apuestas deportivas
resultados|apuestas deportivas rugby|apuestas deportivas seguras|apuestas deportivas seguras foro|apuestas deportivas seguras hoy|apuestas deportivas seguras para hoy|apuestas
deportivas seguras telegram|apuestas deportivas sevilla|apuestas deportivas simulador eurocopa|apuestas deportivas sin deposito|apuestas deportivas sin deposito inicial|apuestas deportivas sin dinero|apuestas deportivas sin dinero real|apuestas deportivas sin registro|apuestas deportivas stake|apuestas deportivas stake 10|apuestas deportivas telegram españa|apuestas deportivas tenis|apuestas
deportivas tenis de mesa|apuestas deportivas tenis foro|apuestas deportivas tenis hoy|apuestas deportivas tips|apuestas deportivas tipster|apuestas deportivas ufc|apuestas deportivas
uruguay|apuestas deportivas valencia|apuestas deportivas valencia
barcelona|apuestas deportivas venezuela|apuestas deportivas virtuales|apuestas
deportivas y casino|apuestas deportivas y casino online|apuestas deportivas.com|apuestas deportivas.com foro|apuestas deportivas.es|apuestas deportivos pronosticos|apuestas deposito minimo 1
euro|apuestas descenso a segunda|apuestas descenso a segunda b|apuestas descenso la liga|apuestas descenso primera division|apuestas descenso segunda|apuestas dia|apuestas diarias seguras|apuestas
dinero|apuestas dinero ficticio|apuestas dinero real|apuestas dinero virtual|apuestas directas|apuestas directo|apuestas
directo futbol|apuestas division de honor juvenil|apuestas dnb|apuestas doble oportunidad|apuestas doble resultado|apuestas
dobles|apuestas dobles y triples|apuestas dortmund barcelona|apuestas draft
nba|apuestas draft nfl|apuestas ecuador vs argentina|apuestas ecuador vs venezuela|apuestas egipto uruguay|apuestas el clasico|apuestas elecciones venezuela|apuestas empate|apuestas en baloncesto|apuestas en barcelona|apuestas
en beisbol|apuestas en boxeo|apuestas en caballos|apuestas
en carreras de caballos|apuestas en casino|apuestas en casino online|apuestas en casinos|apuestas en casinos
online|apuestas en chile|apuestas en ciclismo|apuestas en colombia|apuestas en colombia de futbol|apuestas en directo|apuestas en directo futbol|apuestas en directo pronosticos|apuestas en el futbol|apuestas en el tenis|apuestas en españa|apuestas en esports|apuestas en eventos deportivos virtuales|apuestas en golf|apuestas en juegos|apuestas
en la champions league|apuestas en la eurocopa|apuestas en la liga|apuestas en la nba|apuestas en la nfl|apuestas en las vegas mlb|apuestas en las vegas nfl|apuestas en linea|apuestas en línea|apuestas en linea argentina|apuestas en linea boxeo|apuestas en linea
chile|apuestas en linea colombia|apuestas en línea de fútbol|apuestas en linea deportivas|apuestas
en linea españa|apuestas en linea estados unidos|apuestas en linea futbol|apuestas en linea mexico|apuestas en línea méxico|apuestas en linea mundial|apuestas en linea peru|apuestas en linea usa|apuestas en los esports|apuestas en madrid|apuestas en méxico|apuestas
en mexico online|apuestas en nba|apuestas en partidos de futbol|apuestas en partidos de futbol en vivo|apuestas en partidos de tenis en directo|apuestas en perú|apuestas en sevilla|apuestas en sistema|apuestas en stake|apuestas en tenis|apuestas en tenis de mesa|apuestas
en valencia|apuestas en vivo|apuestas en vivo argentina|apuestas en vivo casino|apuestas en vivo futbol|apuestas en vivo fútbol|apuestas en vivo nba|apuestas en vivo peru|apuestas en vivo tenis|apuestas en vivo ufc|apuestas equipo mbappe|apuestas equipos de futbol|apuestas españa|apuestas españa alemania|apuestas españa alemania eurocopa|apuestas españa croacia|apuestas españa eurocopa|apuestas españa
francia|apuestas españa francia eurocopa|apuestas españa gana el mundial|apuestas
españa gana eurocopa|apuestas españa gana mundial|apuestas españa georgia|apuestas
españa holanda|apuestas españa inglaterra|apuestas españa inglaterra cuotas|apuestas españa inglaterra eurocopa|apuestas españa italia|apuestas españa mundial|apuestas españa paises bajos|apuestas
español|apuestas español oviedo|apuestas espanyol barcelona|apuestas espanyol betis|apuestas espanyol villarreal|apuestas
esport|apuestas esports|apuestas esports colombia|apuestas esports españa|apuestas esports fifa|apuestas esports gratis|apuestas esports lol|apuestas esports
peru|apuestas esports valorant|apuestas estadisticas|apuestas estrategias|apuestas
euro|apuestas euro copa|apuestas eurocopa|apuestas eurocopa
campeon|apuestas eurocopa españa|apuestas eurocopa favoritos|apuestas eurocopa femenina|apuestas eurocopa final|apuestas
eurocopa ganador|apuestas eurocopa hoy|apuestas eurocopa sub 21|apuestas euroliga baloncesto|apuestas euroliga pronosticos|apuestas europa league|apuestas europa league hoy|apuestas europa
league pronosticos|apuestas europa league pronósticos|apuestas euros|apuestas
f1 abu dhabi|apuestas f1 bahrein|apuestas f1 canada|apuestas
f1 china|apuestas f1 cuotas|apuestas f1 hoy|apuestas f1 las vegas|apuestas f1
miami|apuestas f1 monaco|apuestas faciles de ganar|apuestas fáciles de
ganar|apuestas faciles para ganar|apuestas favoritas|apuestas
favorito champions|apuestas favoritos champions|apuestas favoritos eurocopa|apuestas favoritos mundial|apuestas fc barcelona|apuestas final champions cuotas|apuestas final champions league|apuestas
final champions peru|apuestas final copa|apuestas final copa america|apuestas final copa de europa|apuestas final copa del rey|apuestas final copa
europa|apuestas final copa libertadores|apuestas final copa
rey|apuestas final de copa|apuestas final de copa del rey|apuestas final del mundial|apuestas final euro|apuestas final eurocopa|apuestas final europa league|apuestas final libertadores|apuestas final mundial|apuestas final nba|apuestas final rugby|apuestas final uefa europa league|apuestas final.mundial|apuestas finales de conferencia nfl|apuestas finales nba|apuestas fiorentina betis|apuestas formula|apuestas formula 1|apuestas fórmula 1|apuestas fórmula 1 pronósticos|apuestas formula uno|apuestas foro|apuestas foro nba|apuestas francia argentina|apuestas francia
españa|apuestas futbol|apuestas fútbol|apuestas futbol americano|apuestas futbol
americano nfl|apuestas futbol argentina|apuestas futbol argentino|apuestas futbol champions league|apuestas futbol
chile|apuestas futbol colombia|apuestas futbol consejos|apuestas futbol
en directo|apuestas fútbol en directo|apuestas futbol en vivo|apuestas
fútbol en vivo|apuestas futbol españa|apuestas futbol español|apuestas fútbol español|apuestas futbol eurocopa|apuestas futbol
femenino|apuestas futbol foro|apuestas futbol gratis|apuestas futbol hoy|apuestas fútbol
hoy|apuestas futbol juegos olimpicos|apuestas futbol mexico|apuestas futbol mundial|apuestas futbol online|apuestas futbol para hoy|apuestas futbol peru|apuestas futbol pronosticos|apuestas
futbol sala|apuestas futbol telegram|apuestas futbol virtual|apuestas
galgos|apuestas galgos en directo|apuestas galgos hoy|apuestas galgos online|apuestas
galgos pronosticos|apuestas galgos trucos|apuestas gana|apuestas gana colombia|apuestas
gana resultados|apuestas ganadas|apuestas ganadas hoy|apuestas ganador champions
league|apuestas ganador copa america|apuestas ganador copa del rey|apuestas ganador
copa del rey baloncesto|apuestas ganador copa libertadores|apuestas ganador de la eurocopa|apuestas ganador de la liga|apuestas ganador del mundial|apuestas ganador eurocopa|apuestas ganador europa league|apuestas ganador f1|apuestas ganador la liga|apuestas ganador liga española|apuestas ganador mundial|apuestas ganador mundial baloncesto|apuestas ganador mundial f1|apuestas ganador nba|apuestas ganadores
eurocopa|apuestas ganadores mundial|apuestas ganar champions|apuestas ganar eurocopa|apuestas ganar liga|apuestas ganar mundial|apuestas ganar nba|apuestas getafe valencia|apuestas ghana uruguay|apuestas girona|apuestas girona athletic|apuestas
girona betis|apuestas girona campeon de liga|apuestas girona
campeon liga|apuestas girona gana la liga|apuestas girona real madrid|apuestas girona real
sociedad|apuestas goleador eurocopa|apuestas goleadores eurocopa|apuestas goles asiaticos|apuestas golf|apuestas golf masters|apuestas golf pga|apuestas granada barcelona|apuestas grand slam de tenis|apuestas gratis|apuestas gratis casino|apuestas gratis con premios|apuestas
gratis hoy|apuestas gratis para hoy|apuestas gratis por registro|apuestas
gratis puntos|apuestas gratis regalos|apuestas gratis sin deposito|apuestas gratis sin depósito|apuestas gratis
sin ingreso|apuestas gratis sports|apuestas gratis y ganar premios|apuestas grupo a
eurocopa|apuestas grupos eurocopa|apuestas handicap|apuestas handicap asiatico|apuestas handicap
baloncesto|apuestas handicap como funciona|apuestas handicap
nba|apuestas handicap nfl|apuestas hipicas
online|apuestas hípicas online|apuestas
hipicas venezuela|apuestas hockey|apuestas hockey hielo|apuestas hockey patines|apuestas hockey sobre
hielo|apuestas holanda argentina|apuestas holanda vs argentina|apuestas hoy|apuestas
hoy champions|apuestas hoy futbol|apuestas hoy nba|apuestas hoy pronosticos|apuestas hoy seguras|apuestas impuestos|apuestas inglaterra paises bajos|apuestas inter barca|apuestas inter barcelona|apuestas juego|apuestas juegos|apuestas juegos en linea|apuestas juegos olimpicos|apuestas juegos olímpicos|apuestas juegos olimpicos baloncesto|apuestas juegos online|apuestas juegos virtuales|apuestas
jugador sevilla|apuestas jugadores nba|apuestas kings league americas|apuestas la liga|apuestas la liga española|apuestas la liga hoy|apuestas la liga santander|apuestas las
vegas mlb|apuestas las vegas nba|apuestas las vegas nfl|apuestas league of legends mundial|apuestas legal|apuestas legales|apuestas
legales en colombia|apuestas legales en españa|apuestas legales en estados unidos|apuestas legales españa|apuestas leganes betis|apuestas
libertadores|apuestas licencia|apuestas liga 1 peru|apuestas liga argentina|apuestas liga bbva pronosticos|apuestas
liga de campeones|apuestas liga de campeones de baloncesto|apuestas liga
de campeones de hockey|apuestas liga españa|apuestas liga española|apuestas liga santander
pronosticos|apuestas ligas de futbol|apuestas linea|apuestas linea de gol|apuestas liverpool barcelona|apuestas liverpool
real madrid|apuestas lol mundial|apuestas madrid|apuestas madrid arsenal|apuestas madrid
atletico|apuestas madrid atletico champions|apuestas madrid barca|apuestas madrid barça|apuestas madrid barca hoy|apuestas madrid barca supercopa|apuestas madrid barcelona|apuestas
madrid barsa|apuestas madrid bayern|apuestas madrid betis|apuestas madrid borussia|apuestas madrid campeon champions|apuestas
madrid celta|apuestas madrid city|apuestas madrid dortmund|apuestas
madrid gana la liga|apuestas madrid gana liga|apuestas madrid hoy|apuestas madrid
liverpool|apuestas madrid osasuna|apuestas
madrid sevilla|apuestas madrid valencia|apuestas madrid vs arsenal|apuestas madrid vs
barcelona|apuestas mallorca osasuna|apuestas mallorca real sociedad|apuestas manchester athletic|apuestas manchester
city real madrid|apuestas mas faciles de ganar|apuestas mas seguras|apuestas
mas seguras para hoy|apuestas masters de golf|apuestas masters de tenis|apuestas maximo goleador eurocopa|apuestas maximo goleador mundial|apuestas mejor jugador eurocopa|apuestas
mejores casinos online|apuestas mexico|apuestas méxico|apuestas mexico polonia|apuestas méxico polonia|apuestas mlb|apuestas mlb hoy|apuestas mlb las vegas|apuestas mlb para hoy|apuestas mlb
pronosticos|apuestas mlb usa|apuestas mma ufc|apuestas momios|apuestas multiples|apuestas múltiples|apuestas multiples como funcionan|apuestas multiples el
gordo|apuestas multiples futbol|apuestas mundial|apuestas mundial 2026|apuestas
mundial baloncesto|apuestas mundial balonmano|apuestas mundial brasil|apuestas mundial campeon|apuestas mundial ciclismo|apuestas
mundial clubes|apuestas mundial de baloncesto|apuestas
mundial de ciclismo|apuestas mundial de clubes|apuestas mundial
de futbol|apuestas mundial de fútbol|apuestas mundial
de rugby|apuestas mundial f1|apuestas mundial favoritos|apuestas
mundial femenino|apuestas mundial formula 1|apuestas mundial futbol|apuestas mundial ganador|apuestas
mundial lol|apuestas mundial moto gp|apuestas mundial motogp|apuestas mundial rugby|apuestas mundial sub 17|apuestas
mundiales|apuestas mundialistas|apuestas mvp eurocopa|apuestas mvp nba|apuestas mvp nfl|apuestas
nacionales de colombia|apuestas nba|apuestas nba all star|apuestas nba
campeon|apuestas nba consejos|apuestas nba esta noche|apuestas nba finals|apuestas nba gratis|apuestas nba
hoy|apuestas nba hoy jugadores|apuestas nba hoy pronosticos|apuestas nba para hoy|apuestas
nba playoffs|apuestas nba pronosticos|apuestas nba pronósticos|apuestas nba pronosticos hoy|apuestas nba tipster|apuestas
nfl|apuestas nfl hoy|apuestas nfl las vegas|apuestas nfl playoffs|apuestas nfl
pronosticos|apuestas nfl pronósticos|apuestas
nfl semana 4|apuestas nfl super bowl|apuestas nhl|apuestas nhl pronosticos|apuestas
octavos eurocopa|apuestas ofertas|apuestas online|apuestas online argentina|apuestas online argentina legal|apuestas
online bono|apuestas online bono bienvenida|apuestas
online boxeo|apuestas online caballos|apuestas online carreras de caballos|apuestas
online casino|apuestas online champions league|apuestas online
chile|apuestas online ciclismo|apuestas online colombia|apuestas online comparativa|apuestas online con paypal|apuestas online de caballos|apuestas online deportivas|apuestas online en argentina|apuestas online en peru|apuestas online espana|apuestas online
españa|apuestas online esports|apuestas online foro|apuestas online futbol|apuestas online futbol españa|apuestas
online golf|apuestas online gratis|apuestas online gratis sin deposito|apuestas online
juegos|apuestas online mexico|apuestas online mma|apuestas online movil|apuestas online nba|apuestas online net|apuestas online
nuevas|apuestas online opiniones|apuestas online paypal|apuestas online peru|apuestas online seguras|apuestas online sin dinero|apuestas online
sin registro|apuestas online tenis|apuestas online ufc|apuestas online uruguay|apuestas
online venezuela|apuestas open britanico golf|apuestas
osasuna athletic|apuestas osasuna barcelona|apuestas osasuna
real madrid|apuestas osasuna sevilla|apuestas osasuna valencia|apuestas over|apuestas
over 2.5|apuestas over under|apuestas paginas|apuestas pago anticipado|apuestas paises bajos ecuador|apuestas paises
bajos inglaterra|apuestas países bajos qatar|apuestas para boxeo|apuestas
para champions league|apuestas para el clasico|apuestas para el dia
de hoy|apuestas para el mundial|apuestas para el partido de hoy|apuestas para
eurocopa|apuestas para europa league|apuestas para futbol|apuestas para
ganar|apuestas para ganar dinero|apuestas para ganar dinero facil|apuestas para ganar en la ruleta|apuestas para ganar la
champions|apuestas para ganar la eurocopa|apuestas
para ganar la europa league|apuestas para ganar la liga|apuestas para ganar siempre|apuestas para hacer|apuestas para hoy|apuestas para hoy de futbol|apuestas para hoy europa league|apuestas para hoy
futbol|apuestas para juegos|apuestas para la champions league|apuestas para la copa del rey|apuestas para
la eurocopa|apuestas para la europa league|apuestas para la final
de la eurocopa|apuestas para la nba hoy|apuestas para los partidos de hoy|apuestas
para partidos de hoy|apuestas para ufc|apuestas partido|apuestas
partido aplazado|apuestas partido champions|apuestas partido colombia|apuestas partido españa marruecos|apuestas partido mundial|apuestas partido suspendido|apuestas partidos|apuestas partidos champions league|apuestas partidos csgo|apuestas
partidos de futbol|apuestas partidos de futbol hoy|apuestas
partidos de hoy|apuestas partidos eurocopa|apuestas partidos futbol|apuestas
partidos hoy|apuestas partidos mundial|apuestas paypal|apuestas peleas de boxeo|apuestas peru|apuestas perú|apuestas peru brasil|apuestas peru chile|apuestas
peru paraguay|apuestas peru uruguay|apuestas peru vs chile|apuestas peru vs colombia|apuestas pichichi eurocopa|apuestas plataforma|apuestas playoff|apuestas playoff ascenso|apuestas playoff ascenso
a primera|apuestas playoff nba|apuestas playoff segunda|apuestas
playoff segunda b|apuestas playoffs nba|apuestas playoffs nfl|apuestas polonia argentina|apuestas por argentina|apuestas por internet mexico|apuestas por internet para ganar dinero|apuestas por paypal|apuestas por ronda boxeo|apuestas por sistema|apuestas
portugal uruguay|apuestas pre partido|apuestas predicciones|apuestas predicciones futbol|apuestas primera division|apuestas primera division españa|apuestas promociones|apuestas pronostico|apuestas
pronosticos|apuestas pronosticos deportivos|apuestas pronosticos deportivos tenis|apuestas pronosticos futbol|apuestas pronosticos
gratis|apuestas pronosticos nba|apuestas pronosticos tenis|apuestas prorroga|apuestas psg barca|apuestas psg barcelona|apuestas puntos por tarjetas|apuestas puntos tarjetas|apuestas que aceptan paypal|apuestas
que es handicap|apuestas que puedes hacer con tu novia|apuestas
que siempre ganaras|apuestas que significa|apuestas quien bajara a
segunda|apuestas quién bajara a segunda|apuestas quien gana
el mundial|apuestas quien gana eurocopa|apuestas
quien gana la champions|apuestas quien gana la eurocopa|apuestas
quien gana la liga|apuestas quien ganara el mundial|apuestas
quién ganará el mundial|apuestas quien ganara la champions|apuestas
quien ganara la eurocopa|apuestas quien ganara la liga|apuestas rayo barcelona|apuestas real madrid|apuestas real madrid arsenal|apuestas real madrid
athletic|apuestas real madrid atletico|apuestas real madrid atletico champions|apuestas real madrid atletico de madrid|apuestas real madrid atlético
de madrid|apuestas real madrid atletico madrid|apuestas real madrid barcelona|apuestas real madrid bayern|apuestas
real madrid betis|apuestas real madrid borussia|apuestas real madrid campeon champions|apuestas real madrid
celta|apuestas real madrid champions|apuestas real madrid city|apuestas real madrid girona|apuestas real
madrid hoy|apuestas real madrid liverpool|apuestas real madrid manchester city|apuestas real madrid osasuna|apuestas real madrid real
sociedad|apuestas real madrid valencia|apuestas real
madrid villarreal|apuestas real madrid vs arsenal|apuestas
real madrid vs atletico|apuestas real madrid vs atlético|apuestas real madrid vs atletico madrid|apuestas
real madrid vs barcelona|apuestas real madrid vs betis|apuestas real madrid vs sevilla|apuestas real madrid vs valencia|apuestas real
sociedad|apuestas real sociedad athletic|apuestas real sociedad barcelona|apuestas real sociedad betis|apuestas
real sociedad psg|apuestas real sociedad real madrid|apuestas real sociedad valencia|apuestas recomendadas hoy|apuestas regalo de bienvenida|apuestas
registro|apuestas resultado exacto|apuestas resultados|apuestas resultados eurocopa|apuestas retirada tenis|apuestas roma barcelona|apuestas roma sevilla|apuestas rugby|apuestas rugby mundial|apuestas rugby world cup|apuestas ruleta seguras|apuestas segunda|apuestas
segunda b|apuestas segunda division|apuestas segunda división|apuestas segunda division b|apuestas segunda division españa|apuestas seguras|apuestas
seguras baloncesto|apuestas seguras calculadora|apuestas seguras en la ruleta|apuestas seguras eurocopa|apuestas seguras foro|apuestas seguras futbol|apuestas
seguras futbol hoy|apuestas seguras gratis|apuestas seguras
hoy|apuestas seguras hoy futbol|apuestas seguras nba|apuestas seguras nba hoy|apuestas seguras
para este fin de semana|apuestas seguras para ganar dinero|apuestas seguras para hoy|apuestas seguras para hoy fútbol|apuestas seguras para hoy pronósticos|apuestas seguras
para mañana|apuestas seguras ruleta|apuestas seguras telegram|apuestas seguras tenis|apuestas semifinales eurocopa|apuestas senegal paises bajos|apuestas sevilla|apuestas sevilla athletic|apuestas sevilla atletico de madrid|apuestas
sevilla barcelona|apuestas sevilla betis|apuestas
sevilla campeon liga|apuestas sevilla celta|apuestas
sevilla gana la liga|apuestas sevilla girona|apuestas sevilla inter|apuestas sevilla jugador|apuestas sevilla juventus|apuestas sevilla leganes|apuestas sevilla madrid|apuestas sevilla
manchester united|apuestas sevilla osasuna|apuestas sevilla real madrid|apuestas sevilla real sociedad|apuestas sevilla roma|apuestas sevilla valencia|apuestas
significa|apuestas simples ejemplos|apuestas simples o combinadas|apuestas sin deposito|apuestas sin deposito inicial|apuestas sin deposito minimo|apuestas sin dinero|apuestas sin dinero real|apuestas sin empate|apuestas sin empate que significa|apuestas sin ingreso minimo|apuestas
sin registro|apuestas sistema|apuestas sistema calculadora|apuestas sistema como funciona|apuestas sistema trixie|apuestas sociedad|apuestas sorteo copa del rey|apuestas stake|apuestas stake 10|apuestas stake 10 hoy|apuestas super bowl favorito|apuestas super rugby|apuestas supercopa españa|apuestas superliga
argentina|apuestas tarjeta roja|apuestas tarjetas|apuestas tarjetas amarillas|apuestas tenis|apuestas tenis atp|apuestas tenis
consejos|apuestas tenis copa davis|apuestas tenis de mesa|apuestas tenis de mesa pronosticos|apuestas tenis en vivo|apuestas tenis femenino|apuestas tenis hoy|apuestas tenis itf|apuestas tenis
pronosticos|apuestas tenis pronósticos|apuestas tenis retirada|apuestas tenis roland garros|apuestas tenis seguras|apuestas tenis wimbledon|apuestas tenis
wta|apuestas tercera division|apuestas tercera division españa|apuestas
tipos|apuestas tips|apuestas tipster|apuestas tipster para hoy|apuestas topuria holloway cuotas|apuestas torneos
de golf|apuestas torneos de tenis|apuestas trucos|apuestas uefa
champions league|apuestas uefa europa league|apuestas ufc|apuestas ufc chile|apuestas
ufc como funciona|apuestas ufc hoy|apuestas ufc ilia topuria|apuestas ufc online|apuestas ufc pronósticos|apuestas
ufc telegram|apuestas ufc topuria|apuestas under over|apuestas unionistas villarreal|apuestas
uruguay|apuestas uruguay colombia|apuestas uruguay corea|apuestas
uruguay vs colombia|apuestas us open golf|apuestas
us open tenis|apuestas valencia|apuestas valencia barcelona|apuestas valencia betis|apuestas
valencia madrid|apuestas valencia real madrid|apuestas valladolid barcelona|apuestas valladolid valencia|apuestas valor app|apuestas valor en directo|apuestas valor galgos|apuestas
venezuela|apuestas venezuela argentina|apuestas venezuela bolivia|apuestas venezuela
ecuador|apuestas villarreal|apuestas villarreal athletic|apuestas villarreal
barcelona|apuestas villarreal bayern|apuestas villarreal betis|apuestas villarreal liverpool|apuestas villarreal manchester|apuestas villarreal manchester united|apuestas villarreal vs real
madrid|apuestas virtuales|apuestas virtuales colombia|apuestas virtuales futbol|apuestas virtuales sin dinero|apuestas vivo|apuestas vuelta a españa|apuestas vuelta españa|apuestas william hill partidos de hoy|apuestas y casino|apuestas
y casinos|apuestas y juegos de azar|apuestas y pronosticos|apuestas y pronosticos de
futbol|apuestas y pronosticos deportivos|apuestas y resultados|apuestas-deportivas|apuestas-deportivas.es pronosticos|arbitro nba apuestas|argentina apuestas|argentina colombia apuestas|argentina croacia apuestas|argentina francia apuestas|argentina mexico apuestas|argentina
peru apuestas|argentina uruguay apuestas|argentina vs bolivia apuestas|argentina vs
chile apuestas|argentina vs colombia apuestas|argentina vs francia apuestas|argentina vs.
colombia apuestas|asi se gana en las apuestas deportivas|asiatico apuestas|asiatico en apuestas|asiaticos apuestas|athletic barcelona
apuestas|athletic manchester united apuestas|athletic osasuna apuestas|athletic
real madrid apuestas|atletico barcelona apuestas|atletico de madrid
apuestas|atlético de madrid apuestas|atletico de madrid
real madrid apuestas|atletico de madrid vs barcelona apuestas|atletico madrid real madrid apuestas|atletico madrid vs real madrid apuestas|atletico real madrid
apuestas|atletico vs real madrid apuestas|avisador de cuotas
apuestas|bajada de cuotas apuestas|baloncesto apuestas|barbastro barcelona apuestas|barca apuestas|barca bayern apuestas|barca inter apuestas|barca madrid apuestas|barça madrid apuestas|barca vs atletico apuestas|barca vs madrid
apuestas|barca vs real madrid apuestas|barcelona – real madrid apuestas|barcelona apuestas|barcelona atletico apuestas|barcelona atletico de madrid
apuestas|barcelona atletico madrid apuestas|barcelona betis apuestas|barcelona casa de apuestas|barcelona
inter apuestas|barcelona psg apuestas|barcelona real
madrid apuestas|barcelona real sociedad apuestas|barcelona sevilla apuestas|barcelona valencia apuestas|barcelona vs athletic bilbao apuestas|barcelona vs atlético madrid
apuestas|barcelona vs betis apuestas|barcelona vs celta de vigo apuestas|barcelona vs espanyol apuestas|barcelona vs girona apuestas|barcelona vs madrid apuestas|barcelona vs real madrid apuestas|barcelona vs real sociedad apuestas|barcelona vs
sevilla apuestas|barcelona vs villarreal apuestas|base de datos cuotas apuestas deportivas|bayern real madrid apuestas|beisbol apuestas|best america
apuestas|bet apuestas chile|bet apuestas en vivo|betis – chelsea
apuestas|betis apuestas|betis barcelona apuestas|betis chelsea apuestas|betis madrid apuestas|betis sevilla apuestas|betsson tu sitio de apuestas online|blog apuestas baloncesto|blog apuestas ciclismo|blog apuestas
nba|blog apuestas tenis|blog de apuestas de tenis|bono apuestas|bono apuestas deportivas|bono apuestas deportivas sin deposito|bono apuestas
gratis|bono apuestas gratis sin deposito|bono apuestas sin deposito|bono bienvenida apuestas|bono bienvenida apuestas deportivas|bono bienvenida apuestas españa|bono bienvenida apuestas sin deposito|bono
bienvenida apuestas sin depósito|bono bienvenida casa apuestas|bono bienvenida casa de apuestas|bono
bienvenida marca apuestas|bono casa apuestas|bono
casa de apuestas|bono casa de apuestas sin ingreso|bono casas de apuestas|bono
de apuestas|bono de apuestas gratis sin deposito|bono de bienvenida apuestas|bono de bienvenida apuestas deportivas|bono de bienvenida casa
de apuestas|bono de bienvenida casas de apuestas|bono de casas de apuestas|bono de registro apuestas|bono de registro apuestas deportivas|bono de registro casa de apuestas|bono gratis apuestas|bono marca apuestas|bono por registro apuestas|bono por registro apuestas deportivas|bono por registro casa de apuestas|bono registro apuestas|bono sin deposito apuestas|bono sin depósito apuestas|bono sin deposito apuestas
deportivas|bono sin depósito apuestas deportivas|bono
sin deposito casa de apuestas|bono sin deposito marca apuestas|bono sin ingreso apuestas|bono sin ingreso apuestas deportivas|bonos apuestas|bonos apuestas colombia|bonos apuestas deportivas|bonos apuestas
deportivas sin deposito|bonos apuestas gratis|bonos apuestas sin deposito|bonos apuestas sin depósito|bonos bienvenida
apuestas|bonos bienvenida casas apuestas|bonos bienvenida casas de apuestas|bonos casa de apuestas|bonos casas apuestas|bonos casas de apuestas|bonos casas de apuestas colombia|bonos casas
de apuestas deportivas|bonos casas de apuestas españa|bonos casas
de apuestas nuevas|bonos casas de apuestas sin deposito|bonos casas de apuestas sin depósito|bonos de apuestas|bonos de apuestas deportivas|bonos de
apuestas gratis|bonos de apuestas sin deposito|bonos de
bienvenida apuestas|bonos de bienvenida apuestas deportivas|bonos de bienvenida casa de apuestas|bonos de bienvenida casas de apuestas|bonos de
bienvenida de casas de apuestas|bonos de bienvenida
en casas de apuestas|bonos de casas de apuestas|bonos
de casas de apuestas sin deposito|bonos en casa de apuestas|bonos en casas de apuestas sin deposito|bonos gratis apuestas|bonos gratis apuestas deportivas|bonos
gratis casas de apuestas|bonos gratis sin deposito apuestas|bonos paginas de apuestas|bonos registro casas
de apuestas|bonos sin deposito apuestas|bonos sin depósito apuestas|bonos sin deposito apuestas deportivas|bonos sin deposito casas de apuestas|bot de apuestas deportivas gratis|boxeo apuestas|brasil colombia apuestas|brasil
peru apuestas|brasil vs colombia apuestas|buenas apuestas para hoy|buscador cuotas apuestas|buscador de apuestas seguras|buscador de cuotas
apuestas|buscador de cuotas de apuestas|buscar apuestas seguras|caballos apuestas|calculador de apuestas|calculador de cuotas
apuestas|calculadora apuestas|calculadora apuestas combinadas|calculadora
apuestas de sistema|calculadora apuestas deportivas|calculadora apuestas deportivas seguras|calculadora apuestas multiples|calculadora apuestas
segura|calculadora apuestas seguras|calculadora apuestas sistema|calculadora apuestas yankee|calculadora arbitraje apuestas|calculadora cubrir apuestas|calculadora cuotas apuestas|calculadora de apuestas|calculadora de apuestas
combinadas|calculadora de apuestas de futbol|calculadora de
apuestas de sistema|calculadora de apuestas deportivas|calculadora de
apuestas multiples|calculadora de apuestas seguras|calculadora de apuestas sistema|calculadora de apuestas surebets|calculadora de arbitraje apuestas|calculadora de cuotas apuestas|calculadora de
cuotas de apuestas|calculadora para apuestas deportivas|calculadora poisson apuestas|calculadora poisson apuestas deportivas|calculadora poisson para apuestas|calculadora
scalping apuestas deportivas|calculadora sistema apuestas|calculadora stake apuestas|calculadora trading
apuestas|calcular apuestas|calcular apuestas deportivas|calcular apuestas futbol|calcular apuestas sistema|calcular cuotas apuestas|calcular cuotas apuestas combinadas|calcular cuotas apuestas deportivas|calcular cuotas de apuestas|calcular
ganancias apuestas deportivas|calcular momios apuestas|calcular probabilidad cuota apuestas|calcular stake apuestas|calcular unidades apuestas|calcular yield apuestas|calculo de apuestas|calculo de apuestas deportivas|cambio de cuotas
apuestas|campeon champions apuestas|campeon eurocopa apuestas|campeon liga apuestas|campeon nba apuestas|canales de
apuestas gratis|carrera de caballos apuestas|carrera de caballos apuestas juego|carrera de caballos con apuestas|carrera
de galgos apuestas|carreras de caballos apuestas|carreras de caballos apuestas online|carreras de
caballos con apuestas|carreras de caballos juegos de apuestas|carreras de galgos apuestas|carreras de galgos apuestas online|carreras de galgos apuestas trucos|carreras galgos apuestas|casa apuestas argentina|casa apuestas atletico de madrid|casa apuestas
barcelona|casa apuestas betis|casa apuestas bono bienvenida|casa apuestas bono gratis|casa apuestas
bono sin deposito|casa apuestas cerca de mi|casa apuestas chile|casa apuestas colombia|casa apuestas con mejores cuotas|casa apuestas deportivas|casa apuestas españa|casa apuestas española|casa apuestas eurocopa|casa apuestas futbol|casa apuestas mejores cuotas|casa apuestas mundial|casa apuestas nueva|casa
apuestas nuevas|casa apuestas online|casa apuestas peru|casa
apuestas valencia|casa de apuestas|casa de apuestas 10 euros gratis|casa de apuestas argentina|casa de apuestas atletico de madrid|casa de apuestas baloncesto|casa de apuestas barcelona|casa de apuestas beisbol|casa de
apuestas betis|casa de apuestas bono|casa de apuestas bono
bienvenida|casa de apuestas bono de bienvenida|casa de apuestas bono gratis|casa de apuestas bono por registro|casa de apuestas bono
sin deposito|casa de apuestas boxeo|casa de apuestas caballos|casa de
apuestas carreras de caballos|casa de apuestas cerca de mi|casa de apuestas cerca de mí|casa de apuestas
champions league|casa de apuestas chile|casa de apuestas ciclismo|casa de apuestas colombia|casa de apuestas con bono de bienvenida|casa de apuestas
con bono sin deposito|casa de apuestas con cuotas mas altas|casa de apuestas con esports|casa de
apuestas con las mejores cuotas|casa de apuestas con licencia en españa|casa de apuestas con mejores cuotas|casa de apuestas con pago anticipado|casa de
apuestas con paypal|casa de apuestas copa america|casa
de apuestas de caballos|casa de apuestas de colombia|casa de
apuestas de españa|casa de apuestas de futbol|casa de apuestas de fútbol|casa
de apuestas de futbol peru|casa de apuestas de peru|casa
de apuestas del madrid|casa de apuestas del real madrid|casa de apuestas deportivas|casa de apuestas deportivas cerca de mi|casa de apuestas deportivas en argentina|casa de apuestas deportivas en chile|casa
de apuestas deportivas en colombia|casa de apuestas deportivas en españa|casa de apuestas deportivas en madrid|casa de apuestas deportivas españa|casa de apuestas deportivas españolas|casa de apuestas deportivas madrid|casa de apuestas deportivas mexico|casa de apuestas deportivas online|casa de apuestas
deportivas peru|casa de apuestas deposito 5
euros|casa de apuestas deposito minimo|casa de
apuestas deposito minimo 1 euro|casa de apuestas depósito mínimo 1
euro|casa de apuestas en españa|casa de apuestas en linea|casa de apuestas en madrid|casa
de apuestas en perú|casa de apuestas en vivo|casa de apuestas españa|casa de apuestas españa inglaterra|casa de apuestas
española|casa de apuestas españolas|casa de apuestas esports|casa de apuestas
eurocopa|casa de apuestas europa league|casa de apuestas f1|casa
de apuestas formula 1|casa de apuestas futbol|casa
de apuestas ingreso minimo|casa de apuestas ingreso minimo 1 euro|casa de
apuestas ingreso mínimo 1 euro|casa de apuestas legales|casa de apuestas legales
en colombia|casa de apuestas legales en españa|casa de apuestas libertadores|casa de apuestas liga española|casa de
apuestas madrid|casa de apuestas mas segura|casa de apuestas
mejores|casa de apuestas méxico|casa de apuestas minimo 5 euros|casa de apuestas mlb|casa de apuestas
mundial|casa de apuestas nba|casa de apuestas nfl|casa de apuestas nueva|casa de apuestas
nuevas|casa de apuestas oficial del real madrid|casa de apuestas oficial real madrid|casa de apuestas online|casa de apuestas online argentina|casa de apuestas online chile|casa de apuestas online españa|casa de apuestas online mexico|casa de apuestas online paraguay|casa de
apuestas online peru|casa de apuestas online usa|casa
de apuestas online venezuela|casa de apuestas pago anticipado|casa de apuestas para boxeo|casa de apuestas para ufc|casa
de apuestas peru|casa de apuestas perú|casa de apuestas peru online|casa de apuestas por paypal|casa de apuestas
promociones|casa de apuestas que regalan dinero|casa de apuestas real madrid|casa de apuestas regalo
de bienvenida|casa de apuestas sevilla|casa de apuestas
sin dinero|casa de apuestas sin ingreso minimo|casa de apuestas sin licencia en españa|casa de apuestas sin minimo de ingreso|casa de apuestas stake|casa de apuestas tenis|casa de apuestas ufc|casa de apuestas
valencia|casa de apuestas venezuela|casa de apuestas virtuales|casa de apuestas
vive la suerte|casa oficial de apuestas del real madrid|casas apuestas asiaticas|casas apuestas bono sin deposito|casas apuestas
bonos sin deposito|casas apuestas caballos|casas apuestas chile|casas apuestas ciclismo|casas apuestas con licencia|casas apuestas
con licencia en españa|casas apuestas deportivas|casas apuestas deportivas colombia|casas apuestas deportivas
españa|casas apuestas deportivas españolas|casas apuestas deportivas nuevas|casas apuestas españa|casas
apuestas españolas|casas apuestas esports|casas apuestas eurocopa|casas apuestas golf|casas apuestas
ingreso minimo 5 euros|casas apuestas legales|casas apuestas legales españa|casas apuestas licencia|casas apuestas
licencia españa|casas apuestas mexico|casas apuestas
mundial|casas apuestas nba|casas apuestas nuevas|casas apuestas nuevas españa|casas apuestas ofertas|casas apuestas online|casas apuestas paypal|casas apuestas
peru|casas apuestas sin licencia|casas apuestas tenis|casas asiaticas apuestas|casas de apuestas|casas de apuestas
5 euros|casas de apuestas app|casas de apuestas argentinas|casas de apuestas asiaticas|casas de apuestas baloncesto|casas de apuestas barcelona|casas
de apuestas bono bienvenida|casas de apuestas bono de bienvenida|casas de apuestas bono por registro|casas de
apuestas bono sin deposito|casas de apuestas bono sin ingreso|casas
de apuestas bonos|casas de apuestas bonos de bienvenida|casas de apuestas bonos
gratis|casas de apuestas bonos sin deposito|casas de apuestas boxeo|casas de
apuestas caballos|casas de apuestas carreras de caballos|casas
de apuestas casino|casas de apuestas casino online|casas de apuestas cerca de mi|casas de apuestas champions
league|casas de apuestas chile|casas de apuestas ciclismo|casas de apuestas colombia|casas de apuestas com|casas de apuestas con app|casas de apuestas con apuestas gratis|casas de apuestas con bono|casas de apuestas
con bono de bienvenida|casas de apuestas con bono de registro|casas de apuestas con bono por registro|casas de
apuestas con bono sin deposito|casas de apuestas con bonos|casas de apuestas con bonos gratis|casas de apuestas
con bonos sin deposito|casas de apuestas con deposito minimo|casas de apuestas con esports|casas de apuestas con handicap asiatico|casas de apuestas con licencia|casas de apuestas con licencia en españa|casas de apuestas con licencia
españa|casas de apuestas con licencia española|casas de apuestas con mejores cuotas|casas
de apuestas con pago anticipado|casas de apuestas con paypal|casas de apuestas con paypal en perú|casas de apuestas con promociones|casas de apuestas con ruleta en vivo|casas de apuestas copa del rey|casas de
apuestas de caballos|casas de apuestas de españa|casas
de apuestas de futbol|casas de apuestas de fútbol|casas de apuestas de peru|casas de apuestas deportivas|casas de apuestas deportivas asiaticas|casas de apuestas deportivas colombia|casas de apuestas deportivas comparativa|casas
de apuestas deportivas con paypal|casas de apuestas deportivas en chile|casas de apuestas deportivas en españa|casas de apuestas deportivas en linea|casas de apuestas
deportivas en madrid|casas de apuestas deportivas
en mexico|casas de apuestas deportivas en peru|casas de apuestas deportivas en sevilla|casas de apuestas deportivas en valencia|casas de apuestas
deportivas españa|casas de apuestas deportivas españolas|casas de apuestas deportivas legales|casas de apuestas deportivas madrid|casas de
apuestas deportivas mexico|casas de apuestas deportivas nuevas|casas
de apuestas deportivas online|casas de apuestas deportivas peru|casas de apuestas deportivas perú|casas de apuestas deposito minimo
1 euro|casas de apuestas depósito mínimo 1
euro|casas de apuestas dinero gratis|casas de apuestas en argentina|casas de
apuestas en barcelona|casas de apuestas en chile|casas de apuestas en colombia|casas de apuestas en españa|casas de apuestas
en españa online|casas de apuestas en linea|casas de apuestas en madrid|casas de apuestas en méxico|casas de apuestas
en peru|casas de apuestas en perú|casas de apuestas en sevilla|casas de apuestas en uruguay|casas de apuestas en valencia|casas
de apuestas en venezuela|casas de apuestas equipos
de futbol|casas de apuestas españa|casas de apuestas españa
alemania|casas de apuestas españa inglaterra|casas de apuestas españa
licencia|casas de apuestas españa nuevas|casas de
apuestas españa online|casas de apuestas española|casas de apuestas españolas|casas de apuestas españolas con licencia|casas de apuestas españolas
online|casas de apuestas esports|casas de apuestas eurocopa|casas
de apuestas eurocopa 2024|casas de apuestas europa
league|casas de apuestas f1|casas de apuestas fisicas
en barcelona|casas de apuestas fisicas en españa|casas de apuestas formula 1|casas
de apuestas fuera de españa|casas de apuestas futbol|casas de apuestas
fútbol|casas de apuestas futbol españa|casas de apuestas ganador eurocopa|casas
de apuestas gratis|casas de apuestas ingreso minimo|casas de apuestas ingreso minimo 1 euro|casas
de apuestas ingreso minimo 5 euros|casas de apuestas inter barcelona|casas
de apuestas legales|casas de apuestas legales en colombia|casas
de apuestas legales en españa|casas de apuestas legales en mexico|casas de apuestas legales españa|casas de apuestas legales mx|casas de apuestas licencia|casas de apuestas licencia españa|casas
de apuestas lista|casas de apuestas madrid|casas de apuestas
mas seguras|casas de apuestas mejores bonos|casas de apuestas mejores cuotas|casas de apuestas mexico|casas de apuestas méxico|casas de apuestas minimo 5 euros|casas de apuestas mlb|casas
de apuestas mundial|casas de apuestas mundial baloncesto|casas de apuestas mundiales|casas de apuestas nba|casas de apuestas no reguladas
en españa|casas de apuestas nueva ley|casas de apuestas nuevas|casas de apuestas nuevas en colombia|casas de apuestas nuevas
en españa|casas de apuestas nuevas españa|casas de apuestas ofertas|casas de
apuestas online|casas de apuestas online argentina|casas de apuestas online colombia|casas de apuestas online deportivas|casas de apuestas online ecuador|casas de apuestas online en argentina|casas de apuestas online en chile|casas
de apuestas online en colombia|casas de apuestas online en españa|casas de apuestas online en mexico|casas de apuestas online españa|casas de apuestas online mas fiables|casas
de apuestas online mexico|casas de apuestas online nuevas|casas
de apuestas online peru|casas de apuestas online usa|casas
de apuestas online venezuela|casas de apuestas pago paypal|casas de apuestas para
ufc|casas de apuestas paypal|casas de apuestas peru
bono sin deposito|casas de apuestas
Your comment is awaiting moderation.
MoreToLearnToday – Pages opened quickly and the information layout was clear and practical.
Your comment is awaiting moderation.
Анонимный kraken darknet marketplace функционирует с 2020 года без единого exit scam, обеспечивая стабильную работу и защиту средств всех пользователей.
Your comment is awaiting moderation.
BrightPineFields Goods – Smooth transitions and a neat interface kept browsing enjoyable.
Your comment is awaiting moderation.
branddevelopmentworks.shop – Navigation felt smooth, found everything quickly without any confusing steps.
Your comment is awaiting moderation.
Modern Style Deals – Clean layout with easy movement between categories, overall a smooth experience.
Your comment is awaiting moderation.
powerrankoptimization.shop – Navigation felt smooth, found everything quickly without any confusing steps.
Your comment is awaiting moderation.
elitemarketingsystems.shop – Color palette felt calming, nothing distracting, just focused, thoughtful design.
Your comment is awaiting moderation.
rankpro.shop – Content reads clearly, helpful examples made concepts easy to grasp.
Your comment is awaiting moderation.
Read more on the website: https://podcasts.apple.com/mn/podcast/puzzlefree/id1697682168?i=1000737823170
Your comment is awaiting moderation.
Брал закладкой в МСК, утром оплатил, перед оплатой еще раз уточнил все реквизиты у оператора и направился платить. после оплаты сразу сообщил время и сумму оператору, который сразу принял заказ, сказал ждать нужно полтора часа, но курьеру понадобилось чуть больше времени, благо оно позволяло … и вот через почти 4 часа, оператор выслал мне адресс с кладом, который оказался не так уж и далеко. https://kokainkupite.me Отличнный магазинвсё ровн ждём =)
Your comment is awaiting moderation.
advancedmarketingsystems.shop – Found practical insights today; sharing this article with colleagues later.
Your comment is awaiting moderation.
ChicUrbanSpot – Great variety of fashion items, navigating the site was simple.
Your comment is awaiting moderation.
Trendy Picks Store – Had a good experience overall; the site ran efficiently with no hiccups.
Your comment is awaiting moderation.
a href=”https://evertrueharbor.shop/” />EverTrue Portal – Nicely arranged pages made it simple to find and explore different areas.
Your comment is awaiting moderation.
QuickDiscover – Items are varied and the overall experience is smooth.
Your comment is awaiting moderation.
Бро ты ошибся. Не поняли друг друга бывает купить онлайн мефедрон, экстази, бошки Крутой качественный товар! Все своевременно +++А чё брал то
Your comment is awaiting moderation.
DailyEssentialsSpot – Nice design, very straightforward to use.
Your comment is awaiting moderation.
друзья а товар что закончился? месяц пишу, и говорят все пусто;( купить Мефедрон, Бошки, Марихуану Всё отлично все всё получат магаз ровный доказал свой гибгий подход к НАМ заказчикам.Если форс мажёр то всё уладят в НАШу пользу.Отправка осуществляется от 2-10дней в зависимости от заказов то есть загруженности магазина.Без паники братья без паники.Здравствуйте, есть и 50 и 100, сейчас откорректирую, можете заказывать уже
Your comment is awaiting moderation.
Всем привет! https://mybcasino.top Ребята! Вы просто красавцы… На вышем уровне, срок доставке очень оперативная и спрятали хорошо. Советаю…я в среду оплатил ещё, тс сразу сказал, что отправка будет на следующей недели во вторник-среду.
Your comment is awaiting moderation.
Trendy Select Market – The shop felt nicely arranged, and moving between sections was quick.
Your comment is awaiting moderation.
Магазин просто огонь !!! Оценка 5+ за все :voo-hoo: !!! Качество товара збс !!! Советую всем этот магаз!!! купить скорость, кокаин, мефедрон, гашиш Ясно, спс, отправил заказ на мыло, посмотрим.магазин вообще работает или сдулся? почему мне ни кто не отвечает в джабере???!!!
Your comment is awaiting moderation.
BrightStyleCollection – Browsing felt effortless, site design is neat and user-friendly today.
Your comment is awaiting moderation.
TrendyHomeSpot – Items look appealing, moving through pages was intuitive and fast.
Your comment is awaiting moderation.
Your Adventure Picks – Liked the clean layout and the variety of exciting adventure gear.
Your comment is awaiting moderation.
DailyEduSpot – Engaging and helpful materials, easy to browse through.
Your comment is awaiting moderation.
StyleCollective – Browsing was enjoyable, and products are showcased nicely.
Your comment is awaiting moderation.
CreativeValueHub – Quality looks good, checkout seems straightforward and browsing was really pleasant.
Your comment is awaiting moderation.
Срач, оффтоп, провокации, в ветке магазина запрещены, буду банить за невыполнение правил! https://boshkizaklad.biz кто что думает по этому поводу?Все всегда на высшем уровне:dansing: всегда отправляют практически моментально
Your comment is awaiting moderation.
Shop SunlitValleyMarket – Products were clearly displayed, making exploring straightforward.
Your comment is awaiting moderation.
Soft Summer Highlights – The store looked inviting, with calming colors and smooth navigation.
Your comment is awaiting moderation.
Меня на шалфее устраивает:)вываривать ничего не надо https://mefedronns.biz Всем привет,отличный магазин,недавно брала,всё очень понравилосьВерный второй трек. Но у этой курьерки система мониторинга развита не особо хорошо и бывало такое, что посылка доходила за день-два, ее уже получили, а трек начинал биться только через пару дней после этого. Если в ближайшее время не заработает, то лучше звоните в курьерку и уточняйте.
Your comment is awaiting moderation.
Soft Pine Hub Online – Well-laid-out pages and logical structure made exploring products fast.
Your comment is awaiting moderation.
trueautumntrendstore – Neatly displayed products and tidy pages, exploring items was enjoyable.
Your comment is awaiting moderation.
можно узнать, как принимали ? интрозально, в\м ? https://myotherhats.biz прет 30-45 мин.1к10.действием похож на рсцТут не кидают, друг
Your comment is awaiting moderation.
Как выбрать и где купить iPhone в Тюмени
Вы планируете покупку нового iPhone в Тюмени и запутались в разнообразии моделей? В этой статье мы детально рассмотрим несколько актуальных вариантов, чтобы облегчить вам выбор.
Обзор моделей iPhone в Тюмени
купить айфон в тюмени
Давайте познакомимся ближе с четырьмя наиболее популярными моделями, доступными в тюменском регионе:
iPhone 16 Pro Тюмень
айфон 16 про 256 тюмень
Новейшая версия iPhone от Apple известна своей высокой производительностью, удивительной камерой и великолепным дизайном. iPhone 16 Pro оснащён мощным процессором, что обеспечивает отличную работу даже самых сложных приложений и игр.
Phone 15 Тюмень
айпад розовый тюмень купить
Если вы хотите заполучить новое устройство от Apple, но не желаете тратить большие деньги, iPhone 15 станет отличным выбором. Данная модель обладает необходимым минимумом характеристик, необходимых среднестатистическому пользователю.
Купить iPhone Pro Max Тюмень
iPhone Pro Max — настоящий гигант среди смартфонов. Большое разрешение экрана, качественная камера и долгий срок службы батареи делают эту модель привлекательной для любителей кино и музыки.
iphone 16 pro 256gb купить тюмень
iPhone 16 купить Тюмень
Модификация iPhone 16 сочетает в себе стильный дизайн и приемлемую цену. Простой и понятный интерфейс делает его идеальным выбором для начинающих пользователей и подростков.
Купить iPhone 17 Pro Тюмень
Самое современное решение от Apple — iPhone 17 Pro. Эта модель превосходит предыдущие версии практически по всем параметрам: производительность, графика, камеры и дизайн находятся на высоте.
Где купить iPhone в Тюмени?
Покупка iPhone — дело ответственное, поэтому важно выбрать правильное место. Рекомендуем рассматривать несколько возможных вариантов:
– Магазины официальных партнеров Apple, где вы гарантированно получите качественное устройство с гарантией.
– Интернет-магазины, предлагающие удобные способы оплаты и доставки.
– Салоны мобильной связи, предлагающие разнообразные акции и скидки.
Проверяйте репутацию продавца и читайте отзывы покупателей перед оформлением заказа.
Заключение
Ваш следующий iPhone ждёт вас в Тюмени! Воспользуйтесь нашими рекомендациями и примите обоснованное решение, чтобы получить удовольствие от использования нового устройства.
айфон 17 про тюмень
https://tmn.applemarketrf.ru/
Your comment is awaiting moderation.
digitalperformancecenter.shop – Mobile version looks perfect; no glitches, fast scrolling, crisp text.
Your comment is awaiting moderation.
leadgenerationworks.shop – Mobile version looks perfect; no glitches, fast scrolling, crisp text.
Your comment is awaiting moderation.
premiumseoservice.shop – Pages loaded fast, images appeared sharp, and formatting stayed consistent.
Your comment is awaiting moderation.
digitalsuccesspoint.shop – Pages loaded fast, images appeared sharp, and formatting stayed consistent.
Your comment is awaiting moderation.
https://suzuri.jp/kenyabonus56
Your comment is awaiting moderation.
https://www.tripadvisor.in/Profile/melmyb
Your comment is awaiting moderation.
serpstream.shop – Appreciate the typography choices; comfortable spacing improved my reading experience.
Your comment is awaiting moderation.
https://lumienhall.ru/news/itogi-vystavki-2017/#comment282055
Your comment is awaiting moderation.
https://mentorship.healthyseminars.com/members/freebetpromoe/
Your comment is awaiting moderation.
Давно не читала столько положительных отзывов !так держать ) https://artega.biz сегодня сделал заказ оплатил, отпишусь что будет дальшеАМ 2233 читал 1 к 30 делается, неужеле правда всего 1 к 15 делать?
Your comment is awaiting moderation.
Fresh Home Finds – The layout looked clean, and moving between products felt natural and quick.
Your comment is awaiting moderation.
LifestyleDiscoverVault – Great collection of products, site layout makes browsing easy.
Your comment is awaiting moderation.
https://vmestegroup.ru/gallery/kolomenskoe-2012/#comment-272914
Your comment is awaiting moderation.
Urban Selection Hub – Attractive design and well-arranged product listings made the experience pleasant.
Your comment is awaiting moderation.
продавец отзывчивый купить Кокаин, Мефедрон, Экстази Требуй возврата денег, я вам что пытаюсь донести? Обманывает этот магазин клиентов.Почитай мои посты по этому магазину.Всем привет, СК есть опт?
Your comment is awaiting moderation.
TrendDiscover – Items are well presented, and browsing experience is pleasant.
Your comment is awaiting moderation.
В лс пиши сразу. Имей в виду, быстрее будет https://milenyals.com Может просто нужно быть более бдительным? От фейков никто не застрахован. Попросить подтверждения через ЛС на форуме займет не более пяти минут времени и сохранит ваше настроение, а так же и деньги. БУДЬ БДИТЕЛЕН! ВСЕГДА!Брала тут когда-то пару раз. Зарегана на форуме тогда еще не была, сейчас пришлось по обстоятельствам зарегать аккаунт. Ребята работают хорошо, оперативно. Оператор адекватный, идет на контакт. Продукты были хорошие на тот момент.
Your comment is awaiting moderation.
LearningPathCenter – Resources were clear and accessible, making study easy and smooth.
Your comment is awaiting moderation.
The best for you: https://sylvania-latam.com/2025/10/08/kupit-gmail-akkaunty-nadezhnye-i-proverennye-4/
Your comment is awaiting moderation.
ShadyLaneShoppe – Shopping experience was smooth, pages load fast and checkout was simple.
Your comment is awaiting moderation.
ModernInteriorShop – Great designs and easy-to-use site, made choosing decor simple.
Your comment is awaiting moderation.
GSA Corner – Fast navigation helped me locate everything I wanted effortlessly.
Your comment is awaiting moderation.
Golden Ridge Gallery Site – Overall experience was smooth, with a neat layout that made exploring satisfying.
Your comment is awaiting moderation.
SkyBlossomCorner – Good experience today, site structure clear and checkout process seems reliable.
Your comment is awaiting moderation.
Магаз убойный, как начали брать пол года назад на рампе, была одна проблема пно ее быстро решили))) щас как снова завязался месяца 3 уже не разу не было))) Особенно предпочтения отдаю мефу вашему, вообще тема потрясная))) купить Кокаин, Мефедрон, Экстази Эйфора пока нет в наличии. Как только появится мы обязательно вас оповестимотпишите народ за 5 iai кто брал спс заранее
Your comment is awaiting moderation.
PineCrestModern Online – Clear sections and smooth navigation helped me explore products easily.
Your comment is awaiting moderation.
Поздравляю всех с наступающим Новым 2013 Годом! Желаю в год Змеи: 1. Мутить тока на спирту! 2. Отваривать основу. 3. Сушить естественным способом. 4. Поменьше “ловить бледного”! 🙂 Ну а магазу Chеmical-Mix желаю Процветания, Оперативности, и качественной разнообразной продукции! https://teploceramic.biz Хотели делать 1к15 – 1к10, но в итоге всё замесили 1к12. Я бы не сказал, что сильно убивает, но люди были довольны. Пипеточку хлоп:killmyself: и хорошо минут на 40, поэтому скоро перешёл на трубку и курил по пол полки за раз, отчего угарал от роликов MineCraft.Так вот, прошло все как всегда отлично, дошло за три дня, маскировка надежная. Так же отдельное спасибо магазину за проявление немыслимой заботы о безопасности клиента. Что имел ввиду писать не буду, но факт есть факт.
Your comment is awaiting moderation.
Wow, fantastic blog layout! How long have you been blogging for?
you made blogging look easy. The overall look of your web
site is great, as well as the content!
Your comment is awaiting moderation.
Free video chat emerald chat and a convenient alternative to Omegle. Instant connections, live communication without registration, usernames, or phone numbers. Just click “Start” and meet new people from all over the world, whenever you like and whatever your mood.
Your comment is awaiting moderation.
спроси в лички номер аси думаю все ровно будет без базара бро купить Мефедрон, Бошки, Марихуану РЕБЯТА ЭТО ЛУЧШИЙ МАГАЗИН… Я БЛАГОДАРЕН МАГАЗИНУ ЧЕМИКАЛ МИКС… КАК НИ КАК МОЙ ПЕРВЫЙ МАГАЗИН В КОТОРОМ Я КУПИЛ БЕЗ КИДАЛОВА… ХОЧУ ВЫРАЗИТЬ СВОЮ ПРИЗНАТЕЛЬНОСТЬ КОМПАНИИ ЧЕМИКАЛ МИКС ЗА ОПЕРАТИВНУЮ И КАЧЕСТВЕННУЮ РАБОТУ.. БЛАГОДАРЮ ВАС..Я подозреваю, что его посылку спалили на наличие и теперь просто не отправляют.
Your comment is awaiting moderation.
ChicTrendHub – Items look appealing, browsing felt comfortable and fast.
Your comment is awaiting moderation.
Free video chat https://emerald-chat.app find people from all over the world in seconds. Anonymous, no registration or SMS required. A convenient alternative to Omegle: minimal settings, maximum live communication right in your browser, at home or on the go, without unnecessary ads.
Your comment is awaiting moderation.
ремонт телефонов улица
Your comment is awaiting moderation.
ремонт компьютеров строитель
Your comment is awaiting moderation.
DiscoverChances – Good variety and browsing through pages was smooth.
Your comment is awaiting moderation.
Urban Trend Sale – Liked the stylish finds here; pages were quick and checkout straightforward.
Your comment is awaiting moderation.
устройства ультразвуковой очистки – универсальное оборудование, которое используется для точной очистки деталей, инструментов и аксессуаров. Ультразвуковая ванна основана на принципе кавиатации, благодаря которому загрязнения удаляются без механического воздействия. Такое оборудование широко применяется в мастерских по ремонту электроники, так как оно обеспечивает стабильный результат без риска повреждений. Благодаря универсальности ультразвуковых ванн пользователи могут очищать хрупкие предметы, что делает их незаменимыми в высокоточных производственных процессах. Конструкция ультразвуковой ванны может включать усиленную рабочую емкость с защитным покрытием, а также один или несколько ультразвуковых генераторов, которые обеспечивают согласованность частотных импульсов. Принцип работы аппарата основан на том, что ультразвуковые волны формируют кавитационные зоны в жидкости, которые при схлопывании удаляют остатки грязи, масел и налетов. Благодаря такой технологии очистка становится быстрой, точной и экономичной, так как оборудование не требует агрессивных химических средств. Ультразвуковые ванны особенно удобны для специалистов, которым нужна максимальная чистота, поскольку они позволяют получить стабильный результат при минимальном участии пользователя. Помимо стандартных моделей существуют варианты с программируемыми режимами работы, что обеспечивает полный контроль над процессом и результатом. Профессиональные ультразвуковые ванны также отличаются увеличенным объемом камеры, благодаря чему они хорошо подходят для ежедневного применения в мастерских. В итоге ультразвуковые ванны являются удобным решением для тех, кто хочет получать стабильное качество очистки, при этом сохраняя комфорт и простоту использования.
https://natcopharm.ru/
Your comment is awaiting moderation.
ультразвуковые ванны – универсальное оборудование, которое используется для качественного удаления загрязнений с широкого спектра предметов. Ультразвуковая ванна основана на принципе кавиатации, благодаря которому загрязнения удаляются без механического воздействия. Такое оборудование широко применяется в ювелирной, часовой и промышленной сферах, так как оно экономит время. Благодаря универсальности ультразвуковых ванн пользователи могут обслуживать инструменты и мелкие детали, что делает их незаменимыми в повседневной работе специалистов. Конструкция ультразвуковой ванны может включать простой металлический резервуар, а также один или несколько ультразвуковых генераторов, которые обеспечивают согласованность частотных импульсов. Принцип работы аппарата основан на том, что ультразвуковые волны вызывают локальные всплески энергии, которые при схлопывании разрушают загрязнения на поверхности предметов. Благодаря такой технологии очистка становится быстрой, точной и экономичной, так как оборудование не требует агрессивных химических средств. Ультразвуковые ванны особенно удобны для мастеров, работающих с мелкими деталями, поскольку они позволяют запустить цикл без постоянного контроля. Помимо стандартных моделей существуют варианты с программируемыми режимами работы, что обеспечивает точную настройку под конкретные задачи. Профессиональные ультразвуковые ванны также отличаются повышенным ресурсом работы, благодаря чему они хорошо подходят для интенсивной работы в производственных условиях. В итоге ультразвуковые ванны являются практичным решением для тех, кто хочет обеспечить безопасную обработку изделий без риска повреждений, при этом сохраняя комфорт и простоту использования.
https://natcopharm.ru/
Your comment is awaiting moderation.
BrightPeak Haven – The website is very user-friendly and product photos are clear, making shopping easy.
Your comment is awaiting moderation.
компактные узи сканеры – ключевой инструмент диагностики в клинике, который позволяет оперативно получать диагностически значимые данные. Оборудование такого класса используется в акушерстве и гинекологии, поскольку высокая детализация результатов имеет решающее значение в процессе лечебного планирования. Компактные УЗИ сканеры от GE Ultrasound разработаны с учетом высоких требований специалистов, что делает их практичным выбором для врачей. Благодаря продуманной конструкции оборудование удобно использовать как в клиниках с высокой проходимостью, так и в стационарах, где важны скорость и удобство. Принцип работы современных УЗИ систем основан на интеллектуальных алгоритмах визуализации, благодаря чему врач получает четкое изображение органов и тканей. GE Ultrasound также предлагает специализированные клинические решения, что позволяет адаптировать устройство под конкретные клинические протоколы. Оборудование поддерживает функции автоматизации анализа, что помогает получить максимальную эффективность обследования. Медицинские специалисты отмечают, что современные УЗИ аппараты показывают себя особенно хорошо в условиях, где нужно обеспечить непрерывную работу. Помимо компактных УЗИ систем, комплектация медкабинетов включает вспомогательное терапевтическое оборудование, создавая эффективное рабочее пространство. GE Ultrasound делает акцент на поддержке пользователей на всех этапах, что особенно важно в сфере, где оборудование напрямую влияет на эффективность лечения. Благодаря сочетанию технологичности, эргономики и надежности такие устройства становятся партнером врачей разных специализаций. Использование этих решений позволяет клиникам улучшить уровень медицинского обслуживания, делая партнерство с GE Ultrasound гарантией стабильной и качественной работы.
https://mdclinics.ru/
Your comment is awaiting moderation.
Спасибо. Похож на ам2**3 купить Мефедрон, Бошки, Марихуану Метод употребления – интерназальноЯ делил Амф,
Your comment is awaiting moderation.
компактные узи сканеры – ключевой инструмент диагностики в клинике, который позволяет обеспечивать максимально информативные обследования. Оборудование такого класса используется в кардиологии и терапии, поскольку достоверность получаемых изображений имеет решающее значение в процессе мониторинга состояния пациента. Компактные УЗИ сканеры от GE Ultrasound разработаны с учетом высоких требований специалистов, что делает их практичным выбором для врачей. Благодаря эргономичному дизайну оборудование удобно использовать как в медицинских центрах, так и в отделениях скорой помощи, где важны скорость и удобство. Принцип работы современных УЗИ систем основан на высокоточных датчиках, благодаря чему врач получает стабильную картинку высокого разрешения. GE Ultrasound также предлагает широкую линейку датчиков, что позволяет адаптировать устройство под индивидуальные задачи специалиста. Оборудование поддерживает интеллектуальную настройку параметров, что помогает получить максимальную эффективность обследования. Медицинские специалисты отмечают, что современные УЗИ аппараты показывают себя особенно хорошо в условиях, где важна высокая пропускная способность. Помимо компактных УЗИ систем, комплектация медкабинетов включает вспомогательное терапевтическое оборудование, создавая комфортную среду для врача. GE Ultrasound делает акцент на качественном сервисном сопровождении, что особенно важно в сфере, где оборудование напрямую влияет на скорость принятия решений. Благодаря сочетанию гибкости, функциональности и высокой детализации такие устройства становятся партнером врачей разных специализаций. Использование этих решений позволяет клиникам повысить качество диагностики, делая партнерство с GE Ultrasound гарантией стабильной и качественной работы.
https://mdclinics.ru/
Your comment is awaiting moderation.
seobacklinksolutions.shop – Navigation felt smooth, found everything quickly without any confusing steps.
Your comment is awaiting moderation.
nextlevelseohq.shop – Mobile version looks perfect; no glitches, fast scrolling, crisp text.
Your comment is awaiting moderation.
probacklinknetwork.shop – Found practical insights today; sharing this article with colleagues later.
Your comment is awaiting moderation.
информационный ресурс МЕД ЗДЕСЬ – ресурс, предназначенный для изучения строения организма и нарушений его функций, где собраны подробные описания о анатомии человека, распространенных нарушениях и хронических состояниях. Пользователи находят здесь понятные объяснения симптомов, что помогает быстрее ориентироваться в медицинских вопросах. На ресурсе представлены обзоры наиболее частых заболеваний, каждый из которых подготовлен с учетом клинических наблюдений. Особое внимание уделено различным формам заболеваний и их проявлениям, что делает информацию полезной для изучения здоровья. В материалах портала рассматриваются острые и хронические состояния, включая системные заболевания, что обеспечивает разнообразие медицинских направлений. Пользователи могут ознакомиться с основными способами клинического обследования, а также узнать о поддерживающей терапии, которые используются в современной медицине. Важную роль в представленных материалах играют рекомендации врачей, которые помогают формировать объективное восприятие медицинской информации. Для удобства читателей данные изложены простым и понятным языком, что дает возможность изучать анатомию и патологии даже без специальной подготовки. На портале МЕД ЗДЕСЬ также представлены материалы о строении органов, которые помогают осознавать взаимосвязь симптомов и причин болезни. Благодаря сочетанию полезной информации ресурс становится удобным инструментом для изучения здоровья.
https://medzdes.ru/
Your comment is awaiting moderation.
professionalseostudio.shop – Color palette felt calming, nothing distracting, just focused, thoughtful design.
Your comment is awaiting moderation.
МЕД ЗДЕСЬ медицинский портал – площадка с данными о патологиях и клинических состояниях, где собраны подробные описания о анатомии человека, распространенных нарушениях и хронических состояниях. Пользователи находят здесь структурированную информацию о проявлениях и стадиях болезней, что помогает разобраться в особенностях конкретной патологии. На ресурсе представлены материалы о функциях органов, каждый из которых подготовлен с учетом медицинских рекомендаций. Особое внимание уделено факторам, влияющим на течение болезни, что делает информацию практичной для всех, кто интересуется медициной. В материалах портала рассматриваются сложные клинические случаи, включая воспалительные процессы, что обеспечивает разнообразие медицинских направлений. Пользователи могут ознакомиться с подходами к диагностике, а также узнать о профилактических мерах, которые используются при работе с различными категориями пациентов. Важную роль в представленных материалах играют мнения практикующих медиков, которые помогают формировать взвешенный подход к оценке состояния здоровья. Для удобства читателей данные изложены простым и понятным языком, что дает возможность изучать клинические особенности заболеваний в удобном формате. На портале МЕД ЗДЕСЬ также представлены материалы о взаимодействии различных физиологических процессов, которые помогают глубже понимать работу организма. Благодаря сочетанию широкого охвата медицинских тем ресурс становится ценным источником сведений о болезнях.
https://medzdes.ru/
Your comment is awaiting moderation.
authoritybuildingcenter.shop – Navigation felt smooth, found everything quickly without any confusing steps.
Your comment is awaiting moderation.
ремонт айфон 13
Your comment is awaiting moderation.
GiftFind Station – The interface felt clean and made browsing feel relaxed.
Your comment is awaiting moderation.
Ценник уж больно сладкий.. И это очень настараживает.. Кто что скажет, когда последние движения были, всё ровно? https://sarahlawrence.org Первые 1.5 часа эйфория и сосредоточеность на том чем занят , в голове мелькают гениальные идеи)Сказали в понедельник всем кто оплатил заказ отправят НОМЕРА!
Your comment is awaiting moderation.
Moon Glade Treasures – Well-organized pages made finding products fast and easy.
Your comment is awaiting moderation.
willowemporiumlane – Neat interface and clear sections, shopping felt effortless.
Your comment is awaiting moderation.
TrendyOutletOnline – Loved the selection and the site layout made shopping simple.
Your comment is awaiting moderation.
Палево палево, с сайтом чооо?? https://langzhong.cc Доброго всем времени, товарищи подскажите как посыль зашифрована? паранойя мучит, пару лет с доставкой не морочился. Ежели палево то можно и в ЛС)) Заранее благодаренЧего у вас со скайпом? Оффлайн уже несколько недель.
Your comment is awaiting moderation.
Silver Hollow Hub – Elegant structure and organized product listings make browsing effortless.
Your comment is awaiting moderation.
Откройте для себя электронные жалюзи на окна +7 (499) 638-25-37, которые обеспечат идеальный контроль света и уюта в вашем доме.
Встраивание в системы умного дома — еще одна функция, которая делает эти жалюзи привлекательными.
Your comment is awaiting moderation.
ModernFashionSpot – Very satisfied with the trendy collection and fast service, highly recommended.
Your comment is awaiting moderation.
посылка пришла, все чотко, упаковка на высшем уровне, респектос https://noded.biz Мира всем!!Встану на пробу новых веществ сочный трип со мной
Your comment is awaiting moderation.
ValueTreasureSpot – Selection is great, site feels clean and user-friendly.
Your comment is awaiting moderation.
DreamDiscoverer – Loved the uplifting content, navigating was comfortable.
Your comment is awaiting moderation.
Если вы хотите добавить стиль и комфорт в свой дом, горизонтальные жалюзи автоматические Прокарниз — отличное решение!
Постоянные скидки и акции могут значительно снизить общую стоимость.
Your comment is awaiting moderation.
TrendWear Outlet – Quick loading pages and a strong assortment of trendy pieces.
Your comment is awaiting moderation.
До сих пор в себя прихожу купить кокаин, меф, бошки через телеграмм Что есть то естьдоброй ночи ровной ветке!
Your comment is awaiting moderation.
Brightline Studio – I liked how organized everything was, made choosing products simple.
Your comment is awaiting moderation.
EverMapleCrafts Storefront – Everything looked tidy, making navigation feel seamless.
Your comment is awaiting moderation.
Установите жалюзи оконные с электроприводом для удобства управления светом и обеспечения уюта в вашем доме.
Они обеспечивают возможность регулировки освещения и сохранения приватности в квартире.
Your comment is awaiting moderation.
С Ув. vkapushoneПолучил сегодня посылку, могу уже с уверенностью сказать, Замечательного магазина. купить Кокаин, Мефедрон, Экстази С ним можно работать всегда ровничком всегда адекватность Плюсссся тут походу единственный кто остался недоволен.(
Your comment is awaiting moderation.
JourneyPoint – Came across it earlier; found it refreshing and simple to navigate.
Your comment is awaiting moderation.
Wild Spire Finds – Easy-to-navigate layout and clear product displays made shopping effortless.
Your comment is awaiting moderation.
growthpilot.shop – Content reads clearly, helpful examples made concepts easy to grasp.
Your comment is awaiting moderation.
brandsuccessstudio.shop – Bookmarked this immediately, planning to revisit for updates and inspiration.
Your comment is awaiting moderation.
focusedgrowthagency.shop – Navigation felt smooth, found everything quickly without any confusing steps.
Your comment is awaiting moderation.
virallaunch.shop – Found practical insights today; sharing this article with colleagues later.
Your comment is awaiting moderation.
Ты договорись с курьером о встрече где нибудь, и пропали окружающую обстановку, чтоб рядом небыло не кого подозрительного. Больше не знаю что тебе посоветовать купить скорость, кокаин, мефедрон, гашиш я в шоке. до последнего думали кидалово. а нет подняли в касание. стафф пушка. кладмену респект!!!Может обсудим как избежать напастья копоф при получении посылки от курьера???
Your comment is awaiting moderation.
Умные шторы — это инновационное решение для вашего дома, которое позволяет легко управлять светом и конфиденциальностью. Узнайте больше о шторы автоматические!
Особенно это полезно для квартир, расположенных в многоэтажных домах.
Не требуется двигаться, все можно сделать с помощью одного клика.
С зимой они сохраняют тепло, в то время как летом защищают от солнечных лучей.
Вам понадобится всего лишь несколько инструментов и немного терпения.
Your comment is awaiting moderation.
software sportwetten vorhersage
Feel free to visit my site :: asiatische Wetten erklärung
Your comment is awaiting moderation.
ну в https://freerockme.com У нас у отправки случился форс-мажор. Только на этой неделе начинают отправлять. Извиняюсь от лица магазина за задержку.Как связаться?
Your comment is awaiting moderation.
MoonGrove Access – The site felt polished, and exploring the sections was easy and intuitive.
Your comment is awaiting moderation.
Полезные советы по покупке iPhone в Уфе
Приобретение iPhone — важное событие для каждого поклонника техники Apple. Но как правильно выбрать подходящую модель и надёжное место для покупки? Мы подготовили подробный гайд, который поможет вам сделать осознанный выбор и избежать ошибок.
Критерии выбора iPhone
айфон ульяновск
Выбор подходящей модели iPhone зависит от множества факторов. Наиболее значимыми среди них являются:
– Производительность: современные устройства оснащены мощными процессорами, позволяющими комфортно пользоваться любыми приложениями и играми.
– Камеры: высокое качество снимков обеспечивается продвинутыми системами камер, имеющими широкий угол обзора и режим портретной съёмки.
– Автономность: ёмкая батарея и быстрая зарядка позволят долго оставаться на связи и заряжать устройство в кратчайшие сроки.
купить айфон дешево в уфе
Рассмотрим подробнее два популярных варианта:
– iPhone 16: представляет собой сбалансированное сочетание высоких технических характеристик и доступности.
– iPhone 17: последняя новинка от Apple, обладающая ещё большей мощностью и инновационными технологиями.
Лучшие места для покупки iPhone в Уфе
айфон цена в уфе купить новый
Правильный выбор места покупки является залогом успешного опыта владения устройством. Ниже приведены несколько вариантов, которые зарекомендовали себя как надежные поставщики оригинальной продукции:
– Официальные дилеры Apple: обеспечат полную защиту прав потребителей и предложат дополнительную гарантию.
– Крупные сетевые магазины: благодаря широкому ассортименту и специальным акциям покупатели получают дополнительные бонусы и скидки.
– Онлайн-платформы: удобные способы оплаты и доставка прямо домой делают покупку комфортной и быстрой.
Независимо от того, какое место вы выберете, убедитесь, что продавец имеет хорошую репутацию и готов предложить полное сопровождение вашей покупки.
Несколько советов покупателю iPhone в Уфе
iphone 17 купить уфа
Вот несколько полезных рекомендаций, которые помогут вам сделать удачную покупку:
– Проверьте целостность упаковки и комплектацию.
– Изучите отзывы реальных владельцев выбранных вами моделей.
– Оцените удобство интерфейса и приложения заранее.
– Удостоверьтесь в наличии официальной гарантии.
Итак, выбрав подходящую модель и надежное место покупки, вы сможете насладиться всеми преимуществами владения iPhone.
airpods 4 купить уфа
https://applemarketrf.ru
Your comment is awaiting moderation.
TrendSetterLooks – Excellent styling ideas, with navigation that felt clean and easy.
Your comment is awaiting moderation.
ValuableLearning – Really enjoyed the guides, made learning new things effortless and fun.
Your comment is awaiting moderation.
Полезные советы по покупке iPhone в Уфе
Приобретение iPhone — важное событие для каждого поклонника техники Apple. Но как правильно выбрать подходящую модель и надёжное место для покупки? Мы подготовили подробный гайд, который поможет вам сделать осознанный выбор и избежать ошибок.
Критерии выбора iPhone
а маркет
Выбор подходящей модели iPhone зависит от множества факторов. Наиболее значимыми среди них являются:
– Производительность: современные устройства оснащены мощными процессорами, позволяющими комфортно пользоваться любыми приложениями и играми.
– Камеры: высокое качество снимков обеспечивается продвинутыми системами камер, имеющими широкий угол обзора и режим портретной съёмки.
– Автономность: ёмкая батарея и быстрая зарядка позволят долго оставаться на связи и заряжать устройство в кратчайшие сроки.
ipad 2025 уфа купить
Рассмотрим подробнее два популярных варианта:
– iPhone 16: представляет собой сбалансированное сочетание высоких технических характеристик и доступности.
– iPhone 17: последняя новинка от Apple, обладающая ещё большей мощностью и инновационными технологиями.
Лучшие места для покупки iPhone в Уфе
купить айфон в уфе
Правильный выбор места покупки является залогом успешного опыта владения устройством. Ниже приведены несколько вариантов, которые зарекомендовали себя как надежные поставщики оригинальной продукции:
– Официальные дилеры Apple: обеспечат полную защиту прав потребителей и предложат дополнительную гарантию.
– Крупные сетевые магазины: благодаря широкому ассортименту и специальным акциям покупатели получают дополнительные бонусы и скидки.
– Онлайн-платформы: удобные способы оплаты и доставка прямо домой делают покупку комфортной и быстрой.
Независимо от того, какое место вы выберете, убедитесь, что продавец имеет хорошую репутацию и готов предложить полное сопровождение вашей покупки.
Несколько советов покупателю iPhone в Уфе
iphone 13 pro уфа
Вот несколько полезных рекомендаций, которые помогут вам сделать удачную покупку:
– Проверьте целостность упаковки и комплектацию.
– Изучите отзывы реальных владельцев выбранных вами моделей.
– Оцените удобство интерфейса и приложения заранее.
– Удостоверьтесь в наличии официальной гарантии.
Итак, выбрав подходящую модель и надежное место покупки, вы сможете насладиться всеми преимуществами владения iPhone.
купить айфон 512 в уфе
https://applemarketrf.ru/catalog/watch/
Your comment is awaiting moderation.
Откройте для себя удобство и стиль, которые предлагают автоматические рулонные шторы заказать, идеально подходящие для любого интерьера.
Рулонные шторы с автоматическим управлением становятся все более популярными среди современных интерьеров. Они обеспечивают комфорт и стиль для любого помещения .
Одним из главных преимуществ автоматических рулонных штор является их лёгкость в использовании . С помощью пульта или кнопки можно легко регулировать уровень освещения в комнате .
Некоторые шторы могут быть интегрированы в систему “умный дом”. Это добавляет дополнительный уровень удобства и делает использование штор ещё более приятным .
При выборе автоматических рулонных штор стоит обратить внимание на их дизайн . Шторы должны гармонировать с общим интерьером помещения .
Your comment is awaiting moderation.
Полезные советы по покупке iPhone в Уфе
Приобретение iPhone — важное событие для каждого поклонника техники Apple. Но как правильно выбрать подходящую модель и надёжное место для покупки? Мы подготовили подробный гайд, который поможет вам сделать осознанный выбор и избежать ошибок.
Критерии выбора iPhone
айфон цена в уфе купить новый
Выбор подходящей модели iPhone зависит от множества факторов. Наиболее значимыми среди них являются:
– Производительность: современные устройства оснащены мощными процессорами, позволяющими комфортно пользоваться любыми приложениями и играми.
– Камеры: высокое качество снимков обеспечивается продвинутыми системами камер, имеющими широкий угол обзора и режим портретной съёмки.
– Автономность: ёмкая батарея и быстрая зарядка позволят долго оставаться на связи и заряжать устройство в кратчайшие сроки.
iphone 14 купить в уфе
Рассмотрим подробнее два популярных варианта:
– iPhone 16: представляет собой сбалансированное сочетание высоких технических характеристик и доступности.
– iPhone 17: последняя новинка от Apple, обладающая ещё большей мощностью и инновационными технологиями.
Лучшие места для покупки iPhone в Уфе
iphone 17 pro купить уфа
Правильный выбор места покупки является залогом успешного опыта владения устройством. Ниже приведены несколько вариантов, которые зарекомендовали себя как надежные поставщики оригинальной продукции:
– Официальные дилеры Apple: обеспечат полную защиту прав потребителей и предложат дополнительную гарантию.
– Крупные сетевые магазины: благодаря широкому ассортименту и специальным акциям покупатели получают дополнительные бонусы и скидки.
– Онлайн-платформы: удобные способы оплаты и доставка прямо домой делают покупку комфортной и быстрой.
Независимо от того, какое место вы выберете, убедитесь, что продавец имеет хорошую репутацию и готов предложить полное сопровождение вашей покупки.
Несколько советов покупателю iPhone в Уфе
ipad купить
Вот несколько полезных рекомендаций, которые помогут вам сделать удачную покупку:
– Проверьте целостность упаковки и комплектацию.
– Изучите отзывы реальных владельцев выбранных вами моделей.
– Оцените удобство интерфейса и приложения заранее.
– Удостоверьтесь в наличии официальной гарантии.
Итак, выбрав подходящую модель и надежное место покупки, вы сможете насладиться всеми преимуществами владения iPhone.
iphone 17 уфа
https://applemarketrf.ru/catalog/iphone/iphone-17-pro-max/apple-iphone-17-pro-max-512gb-deep-blue/
Your comment is awaiting moderation.
У меня не бьётся вторые их трек. И бро в скайпе не видно. Мож приняли их посылки на почте? Тоже парюсь блин…. Но не хотел поднимать дискуссию, не имея причин. Выслали в пятницу СПСР. https://lv-med.biz Сори я не туда отписалбро все что ты хочешь услышать, написано выше!! спакойствие и ожидание!))
Your comment is awaiting moderation.
Полезные советы по покупке iPhone в Уфе
Приобретение iPhone — важное событие для каждого поклонника техники Apple. Но как правильно выбрать подходящую модель и надёжное место для покупки? Мы подготовили подробный гайд, который поможет вам сделать осознанный выбор и избежать ошибок.
Критерии выбора iPhone
iphone 17 уфа
Выбор подходящей модели iPhone зависит от множества факторов. Наиболее значимыми среди них являются:
– Производительность: современные устройства оснащены мощными процессорами, позволяющими комфортно пользоваться любыми приложениями и играми.
– Камеры: высокое качество снимков обеспечивается продвинутыми системами камер, имеющими широкий угол обзора и режим портретной съёмки.
– Автономность: ёмкая батарея и быстрая зарядка позволят долго оставаться на связи и заряжать устройство в кратчайшие сроки.
эпл вотч купить уфа
Рассмотрим подробнее два популярных варианта:
– iPhone 16: представляет собой сбалансированное сочетание высоких технических характеристик и доступности.
– iPhone 17: последняя новинка от Apple, обладающая ещё большей мощностью и инновационными технологиями.
Лучшие места для покупки iPhone в Уфе
apple watch 9 купить уфа
Правильный выбор места покупки является залогом успешного опыта владения устройством. Ниже приведены несколько вариантов, которые зарекомендовали себя как надежные поставщики оригинальной продукции:
– Официальные дилеры Apple: обеспечат полную защиту прав потребителей и предложат дополнительную гарантию.
– Крупные сетевые магазины: благодаря широкому ассортименту и специальным акциям покупатели получают дополнительные бонусы и скидки.
– Онлайн-платформы: удобные способы оплаты и доставка прямо домой делают покупку комфортной и быстрой.
Независимо от того, какое место вы выберете, убедитесь, что продавец имеет хорошую репутацию и готов предложить полное сопровождение вашей покупки.
Несколько советов покупателю iPhone в Уфе
где дешевле купить айфон в уфе
Вот несколько полезных рекомендаций, которые помогут вам сделать удачную покупку:
– Проверьте целостность упаковки и комплектацию.
– Изучите отзывы реальных владельцев выбранных вами моделей.
– Оцените удобство интерфейса и приложения заранее.
– Удостоверьтесь в наличии официальной гарантии.
Итак, выбрав подходящую модель и надежное место покупки, вы сможете насладиться всеми преимуществами владения iPhone.
айфон 13 про купить в уфе
https://applemarketrf.ru/catalog/iphone/iphone-17-pro/apple-iphone-17-pro-1tb-silver/
Your comment is awaiting moderation.
Soft Forest Marketplace – Neat pages and clear product visuals allowed for fast browsing.
Your comment is awaiting moderation.
Free video chat emerald chat reviews find people from all over the world in seconds. Anonymous, no registration or SMS required. A convenient alternative to Omegle: minimal settings, maximum live communication right in your browser, at home or on the go, without unnecessary ads.
Your comment is awaiting moderation.
Удобство и стиль в интерьере обеспечит электроуправляемые карнизы в москве, который легко управляется с пульта.
Разнообразие стилей и цветов позволяет выбрать вариант, подходящий под любой интерьер.
Your comment is awaiting moderation.
Сегодня на мыло пришло письмо с новостью что заказ отправлен и номер трека который бьёться:good: пока всё норм идёт, со мной связь поддерживают через скайп, игнора не было, когда получу отпишу за качество вес и тд купить Кокаин, Мефедрон, Экстази сделал заказ ,оплатил 🙂 теперь жду трека и посыля с нетерпением 🙂 по общению продаван понравился все ровно обьяснил че да как . как придет опробую оставлю отзыв окончательный ,пока что все ровно )Я выхватил бан, ты злобняк
Your comment is awaiting moderation.
brightwovenboutique – Clean and organized design, shopping is enjoyable.
Your comment is awaiting moderation.
https://women.getbb.ru/viewtopic.php?f=2&t=11016
Your comment is awaiting moderation.
https://memoirsofanaddictedbrain.com/connect/combining-micro-and-macro-routes-to-abstinence/?unapproved=142696&moderation-hash=d5fb41a722ce9379fc0841d3bcb5569d#comment-142696
Your comment is awaiting moderation.
BrightPath Site – A calm browsing experience with meaningful takeaways.
Your comment is awaiting moderation.
Golden Selections – Fast navigation and organized layout made finding items quick.
Your comment is awaiting moderation.
ровнее только строительный уровень ) https://todocursos.top чёткий магазин всем покупать!!!!!!Магазин Харош, Внимательней читайте отзывы о той продукции какая вас интересует более подходит имено вам только такой подход может оставить всем только положительные эмоции. Работа магазина по всем пораметрам оставляет только положительные эмоции :voo-hoo: ставлю все оценки только отлично. Всем добРа, советую, обращайтесь в даный магазин, вам помогут быстро и качествено доставить то,что вам нужно
Your comment is awaiting moderation.
a href=”https://pureforeststudio.shop/” />forestemporiumhub – Clean layout with intuitive navigation, shopping felt fast and easy.
Your comment is awaiting moderation.
Удобно и стильно: рулонные шторы с электроприродом москва Прокарниз для вашего дома!
Популярность рулонных штор с электроприводом растет среди современных дизайнеров. Их удобство и функциональность делают их идеальным выбором для любого помещения.
Одним из основных преимуществ рулонных штор с электроприводом является возможность управления с помощью пульта дистанционного управления. Такая система управления делает использование штор невероятно удобным и простым.
Также стоит отметить, что рулонные шторы с электроприводом имеют широкий выбор дизайнов и тканей. Это дает возможность подобрать идеальный вариант как для классического, так и для современного стиля.
Рулонные шторы с электроприводом можно заказать через интернет или в специализированных магазинах. Обратите внимание на уровень качества и репутацию производителя при заказе, чтобы не ошибиться с выбором.
Your comment is awaiting moderation.
authorityrankingstudio.shop – Bookmarked this immediately, planning to revisit for updates and inspiration.
Your comment is awaiting moderation.
onlinegrowthengine.shop – Navigation felt smooth, found everything quickly without any confusing steps.
Your comment is awaiting moderation.
onlinesuccesssystem.shop – Mobile version looks perfect; no glitches, fast scrolling, crisp text.
Your comment is awaiting moderation.
Lunar Branch Market – Smooth scrolling and tidy layout enhanced the shopping experience.
Your comment is awaiting moderation.
ultimatetrafficnetwork.shop – Loved the layout today; clean, simple, and genuinely user-friendly overall.
Your comment is awaiting moderation.
premiumtrafficengine.shop – Appreciate the typography choices; comfortable spacing improved my reading experience.
Your comment is awaiting moderation.
Но в свое время с 250м было время за месяц перед запретом: купить Мефедрон, Бошки, Марихуану люблю мелких подхалимовВ нашем городе эту почту походу обложили пополной!!!!!!!!
Your comment is awaiting moderation.
Установите жалюзи с электроприводом на окна прокарниз, и наслаждайтесь комфортом и простотой управления светом в вашем доме.
Автоматические жалюзи на окна с электроприводом становятся все более популярными. Эти инновационные устройства предлагают комфорт и удобство.
Во-первых, такая система управления позволяет регулировать уровень света в помещении. С помощью пульта дистанционного управления вы сможете легко регулировать положение жалюзи.
Также жалюзи с электроприводом способствуют повышению энергоэффективности. Эти устройства помогают поддерживать комфортный микроклимат, удерживая тепло в холодное время года.
Подводя итог, можно сказать, что автоматические жалюзи с электроприводом – это отличный выбор для современных интерьеров. Они не только упрощают управление освещением, но и способствуют эстетике интерьера.
Your comment is awaiting moderation.
wild gallery boutique – Clean layout and organized items made shopping pleasant.
Your comment is awaiting moderation.
сделал заказ в этом магазине первый раз, заказывал 2гр. 400f на пробу, а пришло 3,3гр., очень доволен))) купить Мефедрон, Бошки, Марихуану “Район довольно близкий для меня(СТРЕЛА)”Всех С Новым Годом! Как и обещал ранее, отписываю за качество реги. С виду как мука, но попушистей чтоли )) розоватого цвета. Качество в порядке, делать 1 в 20! Еще раз спасибо за качественную работу и товар. Будем двигаться с Вами!
Your comment is awaiting moderation.
EverWillow Market – The layout is tidy, and exploring products felt intuitive and pleasant.
Your comment is awaiting moderation.
ReachHigherGoals – Great selection available, items look promising and browsing was quick.
Your comment is awaiting moderation.
BrightPetal Haven – Organized layout and visible items made shopping enjoyable and fast.
Your comment is awaiting moderation.
shop the harvest – Fast-loading pages and organized categories made exploration pleasant.
Your comment is awaiting moderation.
SimpleBuyZone – Good variety available, products look interesting and site loads quickly today.
Your comment is awaiting moderation.
The best undress ai for digital art. It harnesses the power of neural networks to create, edit, and stylize images, offering new dimensions in visual creativity.
Your comment is awaiting moderation.
FocusedDetermination – Easy to understand and inspiring, makes progress feel doable.
Your comment is awaiting moderation.
FindDealsFast – Everything looked clean and the savings were displayed in a way that made sense.
Your comment is awaiting moderation.
Ценник уж больно сладкий.. И это очень настараживает.. Кто что скажет, когда последние движения были, всё ровно? купить кокаин, меф, бошки через телеграмм трипы почитайте, кто уже бралпарни скажите плз АМ запаха какого?
Your comment is awaiting moderation.
Управляемые шторы позволяют effortlessly контролировать освещение в вашем доме. умный дом жалюзи прокарниз — это идеальное сочетание стиля и функциональности.
Сегодня управляемые шторы завоевывают внимание дизайнеров и владельцев домов.
Your comment is awaiting moderation.
Обзор популярных моделей iPhone в Стерлитамаке
apple watch купить
Выбираем новый iPhone и живем в Стерлитамаке? Узнайте обо всех достоинствах актуальных моделей и определите оптимальную покупку. Мы проанализировали рынок смартфонов региона и выбрали лучшие предложения, подходящие каждому потребителю.
Модели iPhone, доступные в Стерлитамаке
купить iphone стерлитамак
Новейший iPhone 17 — настоящая находка для поклонников яблочных гаджетов. Аппарат оснащен великолепным AMOLED-дисплеем, производительной платформой и аккумулятором, которого хватает надолго. Эта модель станет идеальным спутником активного образа жизни и сможет удовлетворить потребности практически любого пользователя.
айфон 17 стерлитамак купить
Модель iPhone 16 отлично подойдёт тем, кто хочет получить достойный уровень производительности, сохраняя умеренность расходов. Телефон оборудован современной системой обработки данных, хорошим набором датчиков и качественной фотокамеры. Прекрасный вариант для студентов, молодых профессионалов и активных горожан.
iPhone 13 Стерлитамак
купить iphone стерлитамак
Классика жанра — iPhone 13 всё ещё остается популярным вариантом среди жителей Стерлитамака. Модель доступна по привлекательной цене и характеризуется прочным корпусом, качественным звуком и ярким дисплеем. Отличный выбор для ежедневного использования.
iPhone 16 Pro Стерлитамак
Для истинных фанатов айфонской культуры подойдет iPhone 16 Pro. Устройство сочетает высокие показатели быстродействия, ультрачеткую камеру и долговечность конструкции. Такая модель способна обеспечить владельцу максимальный комфорт в работе и развлечениях.
iPhone 17 Pro Стерлитамак
Топовая линейка iPhone 17 Pro рассчитана на самую взыскательную аудиторию. Мощнейший процессор, максимальная скорость отклика, профессиональный модуль камеры — всё это объединяет владелец iPhone 17 Pro. Настоящий выбор для перфекционистов и творческих личностей.
Итоговый вывод
Рассматривая рынок iPhone в Стерлитамаке, каждый покупатель найдет себе устройство по душе. Главное — чётко понимать цели и нужды, чтобы точно определить нужную модель и не ошибиться с выбором. Будь то простой, но добротный iPhone 13 или суперсовременный iPhone 17 Pro — выбор правильного смартфона обеспечит приятные впечатления и комфортное использование.
айпад 11 купить в стерлитамаке
https://sterlitamak.applemarketrf.ru/catalog/iphone/iphone-17-pro-max/apple-iphone-17-pro-max-512gb-cosmic-orange/
Your comment is awaiting moderation.
leafsilvercorner – Products are well displayed, making browsing pleasant.
Your comment is awaiting moderation.
Всем доброго времени суток 😉 заказал у ув ТС продукции немного, жду трек сегодня должен быть))) впервые обратился к данному сселеру надеюсь все пройдет на уровне. Как и что оценю и выложу. краткий трипчик по продуктам если понравится то сработаемся ))))) всем удачных покупок и продаж;) https://businesslinkdirectory.biz я бы тоже заценилУважаемый, Chemical-mix.com, я новичок что на легале, что в джабере, что где либо ещё… не получается выйти на связь, проблема с покупкой, в джабере написано, на сайте не онлайн… ответь пожалуйста в jabber… Зарание большое спасибо…
Your comment is awaiting moderation.
Электрокарниз — это идеальное решение для современного интерьера, которое можно найти по ссылке электрокарниз прокарниз.
Электрокарниз станет изысканным дополнением, подчеркнув стиль вашего интерьера.
Your comment is awaiting moderation.
Crest Boutique – The catalog layout made finding items quick and simple.
Your comment is awaiting moderation.
strategicseoagency.shop – Appreciate the typography choices; comfortable spacing improved my reading experience.
Your comment is awaiting moderation.
а я яй , я ж отвечаю вам каждый раз как есть возможность, пишут много людей одновременно. https://ayurvedakerala.biz Ровный магаз брацыХороший магазин и отличные цены. Доставили через 3 дня после заказа. О качестве товара комментарий оставлю позже.
Your comment is awaiting moderation.
brandvisibilitypro.shop – Found practical insights today; sharing this article with colleagues later.
Your comment is awaiting moderation.
seoenhancementpro.shop – Appreciate the typography choices; comfortable spacing improved my reading experience.
Your comment is awaiting moderation.
https://www.panamericano.us/assets/inc/1xbet_codigo_promocional_bono_vip.html
Your comment is awaiting moderation.
ultimaterankboost.shop – Color palette felt calming, nothing distracting, just focused, thoughtful design.
Your comment is awaiting moderation.
https://www.fta.edu.au/csq-funding/
Your comment is awaiting moderation.
organicgrowthcenter.shop – Navigation felt smooth, found everything quickly without any confusing steps.
Your comment is awaiting moderation.
Мне одному не везёт? Уже 16 дней как деньги заслал, и тишина. Жабер не в сети. Скрин из жабера прилагается. купить Мефедрон, Бошки, Марихуану когда вы зарядили?мои ребята зарядили вчера около 16-00 по мск ,минут за 15 до этого он добро дал и замолчал( переживаю очень так как отвечать мне.Я надеюсь лавочка не слилась с пацанскими деньгими… А то конкретная пичаль будет.У нас в регионе это большая сумма!!!Дорогие наши форумчане, мы бы рады с вами пообщаться на разные темы, и стараемся общаться со всеми, и порой просто не хватает времени ведь мы не железные, если вы хотите что то конкретно заказать ася и скайп ждет вас, просто нереальное кол-во народа задают вопросы утром днем и вечером, и вот даже сейчас, мы очень стараемся изменить ситуацию в лучшую сторону. С начала месяца т.е. с 1 июня вы сможете самостоятельно заказывать и оплачивать прямо на сайте, а так же будете видеть наличие продукции.
Your comment is awaiting moderation.
shop future hub – Navigation felt effortless and items were easy to locate.
Your comment is awaiting moderation.
wildgroveemporium – Items are well arranged and navigation feels intuitive — nice overall experience.
Your comment is awaiting moderation.
Маловато по-моему, у меня 1гр жвша растворяется полностью примерно в 30 мл, меньше этого – частично купить кокаин, меф, бошки через телеграмм Ждать возможно придется дольше обычного, я ожидал 12 рабочих, не считая праздников..неужели ркс такая шляпа?
Your comment is awaiting moderation.
green corner – Everything loaded fast and navigation felt natural and simple.
Your comment is awaiting moderation.
choice finds – The overall look is polished, and navigating between sections was easy and pleasant.
Your comment is awaiting moderation.
EverHollow Access – Moving between sections was simple, and all category labels were instantly understandable.
Your comment is awaiting moderation.
oaktrendemporium – Easy to navigate, products are displayed clearly and attractively.
Your comment is awaiting moderation.
DreamHavenOutlet Shop – I liked how neatly everything was arranged while going through the categories.
Your comment is awaiting moderation.
Контакты указаны у меня в подписе и в разделе “Наши Контакты” купить скорость, кокаин, мефедрон, гашиш прилив бодрости учащаетьсяРебята, у chemical-mix все на высшем уровне!
Your comment is awaiting moderation.
SkillGrowthJourney – Helpful and uplifting content that encourages constant learning.
Your comment is awaiting moderation.
TrendyChoiceHub – Layout was attractive and moving between pages was very easy.
Your comment is awaiting moderation.
gold collection hub – Fast pages and tidy layout made exploring products pleasant and quick.
Your comment is awaiting moderation.
harborcollectionstore – Fast-loading pages and organized design, shopping was natural.
Your comment is awaiting moderation.
пробуй 4фа, 2-dpmp их кушать надо или нюхать? пробовал хоть раз фаер спит купить Мефедрон, Бошки, Марихуану Прислали нам свой метоксетамин, подтверждаем: продукт чистый, >99%.Джи спокойно 20-ого числа 😉 Потом вот только как получать будешь…?
Your comment is awaiting moderation.
Связался с продавцом вполне адекватный!Заказал щас жду адресса https://marical.biz нет так то обещал в среду или в четверг.че вы панику наводите)) все норм будет! есть рамс у курьерки, магаз не при чем.. спакуха
Your comment is awaiting moderation.
moon boutique finds – Smooth scrolling and responsive pages enhanced the experience.
Your comment is awaiting moderation.
Почему больше не берете? купить кокаин, меф, бошки через телеграмм Не красиво вышло с вашей стороны, я канешно благодарен за доверие и выделенную вами пробу но увы Эфеект растроил( “Кто тут урб-754 брал отпишитесь чё да как
Your comment is awaiting moderation.
Lunar Wood Corner Hub – Smooth navigation and clear images made browsing stress-free.
Your comment is awaiting moderation.
design hub – Everything felt well-arranged, and the clear product displays were a nice touch.
Your comment is awaiting moderation.
sunridge corner – Items are well presented and moving around the site was smooth.
Your comment is awaiting moderation.
А вы не несете ответственность за ваших официальных представителей, которые представляют ваш бренд в странах СНГ? https://masterindustries.biz Магазин ровный.;)Жаль реги пока нетотпишитесь плиз
Your comment is awaiting moderation.
PerfectBuyZone – Shopping felt effortless, site layout is neat and user-friendly overall.
Your comment is awaiting moderation.
PureChoiceOutlet – Really liked the variety here, browsing was smooth and enjoyable today.
Your comment is awaiting moderation.
Autumn Mist Portal – The page had a soothing layout, with product details that were clear and user-friendly.
Your comment is awaiting moderation.
leafsoftmarket – Products are neatly categorized, making shopping easy.
Your comment is awaiting moderation.
webauthorityboost.shop – Appreciate the typography choices; comfortable spacing improved my reading experience.
Your comment is awaiting moderation.
globalmarketingexperts.shop – Appreciate the typography choices; comfortable spacing improved my reading experience.
Your comment is awaiting moderation.
backlinkhub.shop – Found practical insights today; sharing this article with colleagues later.
Your comment is awaiting moderation.
ultimaterankbooster.shop – Bookmarked this immediately, planning to revisit for updates and inspiration.
Your comment is awaiting moderation.
Оформление медицинских анализов https://medim-pro.ru и справок без очередей и лишней бюрократии. Запись в лицензированные клиники, сопровождение на всех этапах, помощь с документами. Экономим ваше время и сохраняем конфиденциальность.
Your comment is awaiting moderation.
digitalconversionlab.shop – Bookmarked this immediately, planning to revisit for updates and inspiration.
Your comment is awaiting moderation.
Спасибо Магазину)вы лучшие))))))))!!!!!!!!!!!!!!!!!!!!! :monetka: Качество на 100% https://joanncbastien.com Это просто пустоплёт залётный, его уже изолировали от нашего обществаВсё отлично тут! в МСК забрали вес ! сервис как всегда отличный ! ТАК ДЕРЖАТЬ
Your comment is awaiting moderation.
shop northern collection – Smooth scrolling and clearly organized products improved browsing.
Your comment is awaiting moderation.
порно кончают порно очень
Your comment is awaiting moderation.
ремонт компьютеров рядом со мной
Your comment is awaiting moderation.
ремонт кофемашин melitta
Your comment is awaiting moderation.
адреса ремонт принтеров
Your comment is awaiting moderation.
мастерские ремонт ноутбуков
Your comment is awaiting moderation.
10 euros offert paris sportif|10 euros offert sans dépôt paris sportif|10 meilleurs sites de paris sportifs|100 euro offert paris sportif|100 euros offert paris sportif|100 euros
remboursé paris sportifs|100 offert pari sportif|100 offert paris sportif|100 remboursé paris sportif|100e offert pari sportif|abandon paris sportif tennis|abandon tennis paris sportif|addiction paris sportif forum|age paris sportif belgique|aide au pari sportif|aide au paris
sportif|aide aux paris sportif|aide aux paris sportifs|aide pari sportif|aide pari sportif football|aide parie sportif|aide paris sportif|aide paris sportif foot|aide
paris sportif gratuit|aide paris sportifs|aide pour paris sportif|algorithme de paris
sportif|algorithme excel paris sportif|algorithme gratuit
paris sportif|algorithme pari sportif|algorithme paris sportif|algorithme paris sportif avis|algorithme paris sportif basket|algorithme paris sportif excel|algorithme paris sportif gratuit|algorithme paris sportif tennis|algorithme paris sportifs|algorithme pour paris
sportif|analyse cote paris sportif|analyse de paris sportif|analyse match paris sportif|analyse pari sportif|analyse paris sportif|analyse
paris sportif foot|analyse paris sportif football|analyse paris sportif gratuit|analyse paris sportifs|ancienne cote paris sportif|api cote paris sportif|app paris sportif sans
argent|appli de paris sportif|appli de paris
sportif sans argent|appli de paris sportifs|appli
pari sportif|appli pari sportif gratuit|appli parie sportif|appli paris sportif|appli paris sportif
avec paypal|appli paris sportif belgique|appli paris sportif entre amis|appli paris sportif gratuit|appli paris sportif sans argent|appli paris
sportif suisse|appli paris sportifs|application aide paris sportif|application algorithme paris sportif|application analyse paris
sportif|application android paris sportif|application bankroll paris sportif|application conseil
paris sportif|application de pari sportif|application de parie sportif|application de paris sportif|application de paris sportif en afrique|application de paris sportif en cote d’ivoire|application de paris sportif en ligne|application de paris sportif gratuit|application de paris sportif international|application de paris sportif suisse|application de paris sportifs|application faux paris sportifs|application gestion bankroll paris sportif|application gestion paris sportif|application ia paris sportif|application pari sportif gratuit|application paris sportif|application paris sportif android|application paris sportif argent fictif|application paris sportif belgique|application paris sportif canada|application paris sportif espagne|application paris sportif espagnol|application paris sportif
fictif|application paris sportif france|application paris sportif gratuit|application paris sportif gratuit
entre amis|application paris sportif maroc|application paris sportif offre de bienvenue|application paris
sportif paypal|application paris sportif sans argent|application paris sportif sans justificatif de domicile|application paris sportif suisse|application paris sportif usa|application paris sportif virtuel|application pour faire des paris sportifs|application pour gerer ses paris sportif|application pour les
paris sportifs|application pour pari sportif|application pour paris sportif|application pour paris sportifs|application statistique paris sportif|application suivi
paris sportif|applications de paris sportifs|applications
paris sportifs|applis paris sportif|applis paris sportifs|apprendre a
faire des paris sportifs|argent facile paris sportif|argent offert paris sportifs|argent offert sans depot
paris sportif|argent paris sportif|argent paris sportifs|argent
paris sportifs impots|argent sans depot paris sportif|arjel paris sportif|arjel paris sportifs|astuce gagner paris sportif|astuce pari sportif|astuce paris sportif|astuce paris sportif basket|astuce paris sportif foot|astuce
paris sportif forum|astuce paris sportif tennis|astuce paris sportifs|astuce pour gagner au pari sportif|astuce pour gagner au paris sportif|astuce pour
gagner paris sportif|astuce pour paris sportif|astuces paris sportifs|astuces paris sportifs
en ligne|astuces paris sportifs foot|astuces pour gagner aux paris sportifs|autorisation paris sportif france|avis pari sportif|avis paris sportif|avis paris sportif foot|avis site de paris sportif|avis site paris sportif|avis
sur les paris sportifs|avis sur paris sportif|avis tipster paris
sportif|aweh signification paris sportif|bankroll 100 euros paris sportifs|bankroll management paris sportif|bankroll paris sportif|bankroll
paris sportif excel|bankroll paris sportif gratuit|bankroll paris sportifs|basket paris
sportif|belgique france paris sportif|belgique paris sportifs|bonus bienvenue paris sportif|bonus bienvenue paris sportifs|bonus cash paris sportif|bonus
de bienvenue paris sportif|bonus de bienvenue paris sportif belgique|bonus
de bienvenue sans depot paris sportif|bonus de depot paris sportif|bonus de paris sportifs|bonus depot paris sportif|bonus
en cash paris sportif|bonus gratuit paris sportif|bonus gratuit sans depot paris
sportif|bonus pari sportif|bonus paris sportif|bonus paris sportif belgique|bonus paris sportif betclic|bonus paris sportif cash|bonus paris sportif en ligne|bonus paris sportif france pari|bonus paris sportif retirable|bonus paris sportif sans depot|bonus paris sportif sans dépôt|bonus paris sportif unibet|bonus paris sportifs|bonus sans depot paris sportif|bonus sans depot paris sportif belgique|bonus sans dépôt paris sportif|bonus sans dépôt paris sportif hors arjel|bonus site
de paris sportif|bonus site pari sportif|bonus site paris
sportif|bonus sites de paris sportifs|bonus unibet paris sportif|bookmaker paris
sportif|bookmaker paris sportif gratuit|bookmaker paris sportifs|bookmaker sportif|bookmakers paris sportif|bookmakers paris sportifs|bookmakers paris sportifs en ligne|but contre
son camp paris sportif|but sur penalty paris sportif|buteur paris sportif|c’est quoi handicap paris sportif|c’est quoi une
cote paris sportif|calcul anti perte paris sportif|calcul combinaison pari sportif|calcul cote pari sportif|calcul
cote paris sportif|calcul couverture paris
sportif|calcul de cote paris sportif|calcul des cotes paris sportifs|calcul dnb paris sportifs|calcul double chance paris sportif|calcul gain paris
sportif|calcul mise paris sportif|calcul pari sportif|calcul
paris sportif|calcul paris sportif multiple|calcul pourcentage cote
paris sportif|calcul probabilité paris sportif|calcul
rentabilité paris sportifs|calcul roi paris sportif|calcul systeme paris sportif|calcul trj paris
sportifs|calculateur cote paris sportif|calculateur de cote paris sportif|calculateur de mise paris sportif|calculateur de paris sportif|calculateur paris sportif|calculatrice arbitrage paris sportif|calculatrice paris sportif|calculer cote paris
sportif|calculer gain paris sportif|calculer probabilité paris sportifs|calculer roi paris sportifs|calculer une cote pari sportif|calculer une cote paris sportif|carte cadeau paris sportif|carte
pcs paris sportif|carte prépayée paris sportifs|cash out pari sportif|cash
out paris sportif|cash out paris sportifs|casino en ligne paris sportif|casino paris sportif en ligne|champions league paris sportif|chute
de cote paris sportif|classement des meilleurs sites de paris sportifs|classement meilleur site de paris sportif|code barre paris sportif|code
bonus paris sportif|code paris sportif|code promo pari sportif|code promo paris sportif|code promo paris sportif sans depot|code promo paris sportif sans dépôt|code promo sans depot
paris sportif|code promo site paris sportif|combien de temps pour encaisser un paris sportif|combien de temps pour retirer un paris sportif|combien miser paris
sportifs|combine paris sportif|combines paris sportifs|combiné pari sportif|combiné
paris sportif|combiné paris sportif conseil|combiné paris sportif du jour|combiné paris sportif pronostic|comment analyser un paris
sportif|comment arreter de jouer aux paris
sportifs|comment arreter les paris sportif|comment arreter
les paris sportifs|comment arrêter les paris sportifs|comment
bien gagner au paris sportif|comment bien jouer au paris sportif|comment bien miser paris sportif|comment ca
marche les paris sportif|comment calculer cote paris sportif|comment
calculer gain paris sportif|comment calculer
les cotes des paris sportifs|comment calculer une cote de paris sportif|comment calculer une cote
pari sportif|comment calculer une cote paris sportif|comment
comprendre les paris sportifs|comment creer un vip paris sportif|comment créer un algorithme paris sportif|comment créer un site de paris sportif|comment devenir riche avec les paris sportifs|comment etre
rentable paris sportif|comment etre sur de gagner au paris
sportif|comment faire de bon paris sportif|comment faire
des parie sportif|comment faire des paris sportif|comment faire des paris sportif gagnant|comment faire des paris sportifs|comment faire pari sportif|comment
faire paris sportif|comment faire pour arreter les
paris sportifs|comment faire pour gagner au paris sportif|comment faire
pour gagner les paris sportifs|comment faire un bon pari sportif|comment
faire un bon paris sportif|comment faire un pari sportif|comment faire un parie sportif|comment faire un paris sportif|comment faire une montante paris sportif|comment fonctionne les cotes
dans les paris sportifs|comment fonctionne les cotes
des paris sportifs|comment fonctionne les paris sportifs|comment fonctionne paris sportifs|comment fonctionne un pari sportif|comment fonctionnent les cotes dans les paris sportifs|comment fonctionnent
les cotes dans les paris sportifs grand oral|comment fonctionnent les cotes de paris
sportif|comment fonctionnent les paris sportifs|comment fonctionnent les paris sportifs grand oral|comment
fonctionnent les paris sportifs grand oral maths|comment fonctionnent les paris sportifs maths|comment gagner a coup
sur au paris sportif|comment gagner a tous les coups au paris sportif|comment gagner a tout les
coup au paris sportif|comment gagner au pari sportif|comment gagner au pari sportif football|comment gagner au paris sportif|comment gagner au paris sportif a coup sur|comment gagner au paris sportif foot|comment gagner au paris sportif forum|comment gagner
au paris sportif tennis|comment gagner au paris sportifs|comment gagner aux paris sportif|comment gagner
aux paris sportifs|comment gagner aux paris sportifs foot|comment gagner aux
paris sportifs livre|comment gagner aux paris sportifs sur le long terme|comment gagner avec les paris sportifs|comment gagner
dans les paris sportifs|comment gagner de l argent avec
les paris sportifs|comment gagner de l’argent au paris sportif|comment
gagner de l’argent aux paris sportifs|comment gagner de l’argent avec les paris sportifs|comment gagner
de l’argent paris sportif|comment gagner de l’argent sur les
paris sportifs|comment gagner de l’argent sur paris sportif|comment gagner des paris sportif|comment gagner des paris sportifs|comment gagner en paris
sportif|comment gagner facilement au paris sportif|comment gagner les paris sportifs|comment
gagner paris sportif|comment gagner paris sportif foot|comment gagner paris sportifs|comment gagner
sa vie avec les paris sportifs|comment gagner ses paris sportif|comment gagner sur les paris sportif|comment gagner sur les paris
sportifs|comment gagner tout le temps au paris sportif|comment
gagner un pari sportif|comment gagner un paris sportif|comment gerer une bankroll paris sportif|comment gérer sa bankroll paris sportif|comment jouer au pari sportif|comment jouer au paris sportif|comment jouer au paris sportif foot|comment jouer aux
paris sportifs|comment jouer paris sportif|comment marche cote paris sportif|comment marche les cotes
paris sportif|comment marche les paris sportif|comment marche les paris
sportifs|comment marche paris sportif|comment marche un pari sportif|comment marche un paris sportif|comment marchent les cotes paris sportif|comment marchent les paris
sportifs|comment miser au paris sportif|comment miser paris sportif|comment monter sa bankroll paris sportif|comment ne jamais perdre au
paris sportif|comment parier sportif|comment
reussir au paris sportif|comment reussir les paris sportif|comment reussir paris sportif|comment sont calculer
les cotes de paris sportif|comment sont calculées les cotes des paris sportifs|comment sont calculés
les cotes des paris sportifs|comment sont faites les cotes des paris
sportifs|comment toujours gagner au paris
sportif|comment ça marche les paris sportifs|comparaison bonus
paris sportifs|comparaison cote pari sportif|comparaison des cotes paris sportifs|comparateur cote pari sportif|comparateur cote paris sportif|comparateur cotes paris sportif|comparateur cotes paris sportifs|comparateur de cote pari
sportif|comparateur de cote paris sportif|comparateur de cotes paris sportifs|comparateur
de côtes paris sportifs|comparateur de paris sportif|comparateur de site de paris sportif|comparateur de site paris sportif|comparateur de sites de paris sportifs|comparateur pari sportif|comparateur paris sportif|comparateur paris sportifs|comparateur site
de paris sportif|comparateur site pari sportif|comparateur site
paris sportif|comparatif bonus paris sportif|comparatif bonus paris sportifs|comparatif cote pari sportif|comparatif cote paris sportif|comparatif cotes paris sportifs|comparatif des sites de paris sportifs|comparatif offre
de bienvenue paris sportif|comparatif offre paris sportif|comparatif
pari sportif|comparatif pari sportif en ligne|comparatif paris
sportif|comparatif paris sportif bonus|comparatif paris sportif en ligne|comparatif paris sportifs|comparatif paris sportifs en ligne|comparatif site
de paris sportif|comparatif site paris sportif|comparatif site paris sportifs|comparatif sites
de paris sportifs|comparatif sites paris sportifs|comparer
les cotes paris sportifs|comprendre cote paris sportif|comprendre handicap paris sportif|comprendre les cotes des paris sportifs|comprendre les cotes
paris sportif|comprendre les cotes paris sportifs|comprendre les handicap paris sportif|compte de paris sportif|compte démo paris sportif|compte finance paris
sportif|compte financer paris sportif|compte financier paris sportif|compte financé paris sportif|compte pari sportif|compte paris sportif|compte paris sportif financé|conseil de paris sportif|conseil de paris
sportifs|conseil en paris sportif|conseil en paris sportifs|conseil pari sportif|conseil
pari sportif gratuit|conseil paris sportif|conseil
paris sportif aujourd’hui|conseil paris sportif du jour|conseil paris sportif foot|conseil paris sportif gratuit|conseil paris sportif ligue des champions|conseil paris sportif nba|conseil paris sportif pronostic|conseil paris sportif rmc|conseil paris sportif
tennis|conseil paris sportifs|conseil pour gagner au paris
sportif|conseil pour paris sportif|conseil sur les paris sportifs|conseille paris sportif|conseiller en paris sportifs|conseiller paris sportif|conseils de paris sportifs|conseils en paris sportifs|conseils paris sportifs|conseils paris sportifs foot|conseils paris sportifs gratuit|conseils paris sportifs
tennis|conseils pour paris sportifs|cote a 100
paris sportif|cote a 2 paris sportif|cote anglaise paris sportif|cote de 2 paris sportif|cote de pari
sportif|cote de paris sportif|cote des paris sportifs|cote maximum paris sportif|cote minimum
paris sportif|cote pari sportif|cote pari sportif comment ça marche|cote pari sportif real madrid|cote pari sportif rugby|cote parie sportif|cote paris sportif|cote paris
sportif belgique|cote paris sportif calcul|cote paris sportif
definition|cote paris sportif euro|cote paris sportif explication|cote paris
sportif foot|cote paris sportif france belgique|cote paris sportif france espagne|cote paris
sportif ligue des champions|cote paris sportif moto gp|cote paris
sportif psg|cote paris sportif psg arsenal|cote paris sportif rugby|cote paris
sportif tennis|cote paris sportifs|cote pour paris sportifs|cote sportif foot|cote sportif rugby|cote à 1000 paris sportif|cotes de paris sportifs|cotes pari sportif|cotes paris sportif|cotes paris sportifs|cotes paris sportifs foot|coupe de france
paris sportif|créer un algorithme paris sportif|créer un compte paris sportif|créer un site de paris sportif en ligne|dans les paris sportifs que signifie handicap|declarer ses gains paris
sportif|definition cash out paris sportif|definition cote paris sportif|definition handicap paris sportif|depot
5 euros paris sportif|depot double paris sportif|depot minimum 5 euro paris sportif|depot minimum paris sportif|depot paris sportif|depuis quand existe les paris sportif en france|devenir riche avec les
paris sportifs|devenir riche avec paris sportifs|disqualification tennis paris
sportif|dnb en paris sportif|dnb pari sportif|dnb paris sportif|dnb
paris sportif definition|dnb paris sportifs|doit on declarer les gains de paris sportif|déclarer gains paris sportifs|déclarer gains paris sportifs hors arjel|définition bankroll paris sportif|dépôt minimum 1 euro paris sportif|dépôt minimum 5
euro paris sportif|ecart de jeux tennis paris sportif|erreur de cote
paris sportif|est ce que les gains des paris sportifs sont imposables|est-ce que
les prolongation compte dans un pari sportif|etre sur de gagner au paris sportif|euro
paris sportif|evenement sportif a paris|evenement
sportif paris|evenement sportif paris 2025|evenement sportif paris aujourd hui|evenement sportif paris aujourd’hui|evenement sportif paris
ce week end|evenements sportif paris|evenements sportifs paris|evenements sportifs paris 2025|evenements sportifs à paris|evolution cote paris sportif|evolution cotes paris sportifs|evolution des cotes paris sportifs|explication cote pari sportif|explication cote paris sportif|explication handicap paris sportif|explication pari sportif|explication paris sportif|face a
face hockey paris sportif|faire des paris sportif|faire des paris sportif avec paypal|faire des paris sportifs|faire fortune paris sportifs|faire un pari sportif|faire un paris sportif|faut il déclarer les gains de paris sportifs|faut il déclarer ses gains
paris sportifs|fichier excel gestion bankroll paris sportif|fiscalité gains paris sportifs|foot paris sportif|football et paris sportifs|forfait tennis paris sportif|formation paris sportif gratuit|forum de paris sportif|forum
de paris sportifs|forum pari sportif|forum parie sportif|forum paris sportif|forum paris
sportif foot|forum paris sportif gratuit|forum paris sportif nba|forum paris
sportif tennis|forum paris sportifs|forum sur les paris sportifs|forum tennis paris
sportif|francaise des jeux pari sportif|francaise des jeux
paris sportif|francaise des jeux paris sportifs|france 2 paris sportif|france 2 paris sportifs|france
belgique paris sportif|france espagne paris sportif|france pari sportif|france pari sportif brest|france paris sportif|france paris sportifs|france pologne
paris sportif|france portugal paris sportif|france suisse paris sportifs|france tunisie paris sportifs|france-pari – paris sportifs|gagnant
pari sportif|gagnant paris sportif|gagnant paris sportif bayern|gagnante paris
sportif|gagne au paris sportif|gagner 10 euros par jour
aux paris sportifs|gagner 100 euros par jour paris
sportif|gagner 1000 euros par mois paris sportifs|gagner
10000 euros paris sportif|gagner 2000 euros par mois paris sportif|gagner 50 euros par jour
paris sportif|gagner a coup sur au paris sportif|gagner a coup sur pari sportif|gagner a tous les coup paris sportif|gagner argent avec
paris sportifs|gagner argent pari sportif|gagner argent paris sportif|gagner argent paris sportifs|gagner au
pari sportif|gagner au paris sportif|gagner au paris sportif
a coup sur|gagner au paris sportif foot|gagner au paris sportif forum|gagner au paris
sportif à coup sur|gagner aux paris sportif|gagner
aux paris sportifs|gagner aux paris sportifs pdf|gagner beaucoup d’argent paris sportif|gagner de l
argent grace aux paris sportifs|gagner de l argent pari sportif|gagner
de l argent paris sportif|gagner de l argent paris sportifs|gagner de l’argent au
paris sportif|gagner de l’argent aux paris sportifs|gagner de l’argent avec
les paris sportifs|gagner de l’argent avec paris sportif|gagner de l’argent avec paris sportifs|gagner de l’argent grace au paris sportif|gagner de l’argent grace aux paris sportifs|gagner de l’argent pari sportif|gagner de l’argent paris sportif|gagner
de l’argent paris sportifs|gagner de l’argent sur les paris sportifs|gagner des paris sportif|gagner des paris sportifs|gagner les paris sportifs|gagner
pari sportif|gagner paris sportif|gagner paris
sportif foot|gagner paris sportif forum|gagner paris sportif
tennis|gagner paris sportifs|gagner sa vie avec les paris
sportif|gagner sa vie avec les paris sportifs|gagner sa
vie avec paris sportifs|gagner ses paris sportifs|gagner à coup sur paris sportif|gagner à tous les coups paris sportifs|gain maximum paris sportif|gain pari sportif|gain pari sportif imposable|gain pari sportif impot|gain paris sportif|gain paris sportif imposable|gain paris sportif impot|gain paris sportif
impôt|gains paris sportif|gains paris sportif imposable|gains paris sportifs|gains paris sportifs imposable|gains paris sportifs imposables|gains paris sportifs sont ils imposables|gerer bankroll paris sportif|gerer sa
bankroll paris sportif|gerer une bankroll paris sportif|gestion bankroll
paris sportif|gestion bankroll paris sportifs|gestion bankroll paris sportifs excel|gestion de bankroll paris
sportif|gestion de bankroll paris sportif application|gestion de bankroll
paris sportifs|gestion de mise paris sportif|gestion paris sportifs v2
5 gratuit|gg signification paris sportif|gros combiné paris sportif|gros gain paris sportif|grosse cote paris sportif pronostic|grosse mise
paris sportif|groupe paris sportif gratuit|groupe telegram paris sportif gratuit|groupement de
joueurs paris sportifs|handicap 0 paris
sportif|handicap 1 paris sportif|handicap 5 paris sportif|handicap au paris sportif|handicap basket paris sportif|handicap dans les paris sportifs|handicap
en paris sportif|handicap europeen paris sportif|handicap
européen paris sportifs|handicap mi temps paris sportif|handicap pari sportif|handicap paris sportif|handicap paris
sportif basket|handicap paris sportif explication|handicap paris sportif foot|handicap paris
sportif rugby|handicap paris sportifs|handicap rugby paris sportif|handicap tennis paris sportif|historique cote paris sportif|historique des
cotes paris sportifs|hockey paris sportif|hockey sur glace paris sportif|hors arjel paris sportif|hweh signification paris sportif|imposition gain pari
sportif|imposition gain paris sportif|imposition gains paris sportifs|imposition paris sportif france|impot
gain paris sportif|impot paris sportif france|impot sur gain paris sportif|je
gagne ma vie avec les paris sportifs|jeu de pari
sportif gratuit|jeu de paris sportif en ligne|jeu de paris sportif
gratuit|jeu paris sportif gratuit|jeu paris sportif sans argent|jeux de parie sportif|jeux
de paris sportif|jeux de paris sportif en ligne|jeux de paris sportif gratuit|jeux de
paris sportifs|jeux olympiques paris sportifs|jeux paris sportif|jeux
paris sportif gratuit|jeux paris sportif virtuel|jeux
paris sportifs en ligne|jouer au paris sportif|jouer paris sportif|joueur
absent paris sportif|joueur blesse paris sportif|joueur caen paris sportif|joueur de caen pari sportif|joueur
de foot paris sportif|joueur decisif paris sportif|joueur décisif paris sportif|joueur italien paris sportif|joueur
paris sportif|joueur professionnel paris sportif|joueur qui se blesse paris sportif|joueur sanctionne pari sportif|joueur suspendu paris sportif|joueurs italiens paris sportifs|l’argent des
paris sportifs est il imposable|la cote paris sportif|la francaise des jeux paris sportif|la martingale paris sportif|la martingale paris sportifs|la meilleur application de
paris sportif|la meilleur application paris sportif|la
meilleur technique pour gagner au paris sportif|la méthode secrète pour gagner aux
paris sportifs pdf|la plus grosse cote gagner paris sportif|la
plus grosse cote paris sportif|ldem paris sportif signification|le marché des paris sportifs|le meilleur site de
pari sportif|le meilleur site de paris sportif|le meilleur site de paris sportif en ligne|le meilleur site de paris sportifs|le plus gros
gain au paris sportif|le plus gros paris sportif|le plus gros
paris sportif du monde|les 10 meilleurs sites de paris sportifs|les 10 meilleurs sites de paris
sportifs en afrique|les 17 secrets pour gagner rapidement aux paris
sportifs|les 17 secrets pour gagner rapidement aux paris sportifs pdf|les application de
paris sportif|les applications paris sportifs|les bonus paris sportifs|les bookmakers paris sportifs|les cotes
paris sportifs|les gains de paris sportifs sont ils imposables|les gains
des paris sportifs sont ils imposables|les jeux de paris
sportifs|les meilleur paris sportif|les meilleures applications
de paris sportifs|les meilleurs applications de
paris sportifs|les meilleurs bonus paris sportif|les meilleurs bonus paris sportifs|les meilleurs cotes paris sportif|les meilleurs paris sportifs|les
meilleurs paris sportifs du jour|les meilleurs site de paris
sportif|les meilleurs site de paris sportifs|les meilleurs
sites de pari sportif|les meilleurs sites de paris sportifs|les meilleurs sites de
paris sportifs en ligne|les paris sportif|les paris sportif avis|les paris sportifs|les paris sportifs comment ça
marche|les paris sportifs en france|les paris sportifs en ligne|les paris sportifs en ligne comprendre jouer gagner|les paris sportifs en ligne comprendre
jouer gagner pdf|les paris sportifs les plus rentables|les plus gros gagnant paris sportif|les plus gros
gains au paris sportifs|les plus gros gains paris sportifs|les plus gros paris sportif|les plus grosse cote
paris sportif|les plus grosses pertes paris sportifs|les sites de paris sportifs|les sites
de paris sportifs autorisés en france|les sites de paris sportifs en france|les sites de paris sportifs
en ligne|les sites de paris sportifs francais|ligue 1 paris sportif|ligue
1 paris sportifs|ligue 2 paris sportif|ligue des champions
paris sportif|limite de gains paris sportifs|limite de mise paris sportif|limite gain paris
sportif|limite mise paris sportifs|liste de paris sportif|liste des paris sportifs|liste des site de paris sportif|liste des sites de paris sportifs|liste pari sportif|liste paris sportif|liste paris sportif pdf|liste site de paris sportif|liste site pari sportif|liste
site paris sportif|liste site paris sportif arjel|liste sites paris sportifs|logiciel algorithme paris sportif|logiciel algorithme paris sportif
gratuit|logiciel analyse paris sportif|logiciel calcul paris sportif|logiciel de pari
sportif|logiciel de paris sportif|logiciel de paris sportif gratuit|logiciel gestion bankroll paris sportif gratuit|logiciel gestion de bankroll
paris sportif|logiciel gestion paris sportif|logiciel gestion paris sportif gratuit|logiciel gestion paris sportifs|logiciel pari sportif|logiciel paris sportif|logiciel paris sportif gratuit|logiciel
paris sportifs|logiciel paris sportifs foot sur 2 matchs|logiciel
pour paris sportif|logiciel pour paris sportifs|logiciel prediction paris
sportif|logiciel probabilité paris sportif|logiciel prédiction paris sportif|logiciel statistique paris
sportifs|logiciel variation de cote paris sportif|loi sur les paris sportifs en france|magic calculator paris sportif|marché des paris sportifs|marché
des paris sportifs en france|marché des paris sportifs en ligne|martingale pari sportif|martingale paris sportif|martingale paris sportif excel|martingale paris sportif forum|martingale paris sportif interdit|martingale paris sportifs|match abandonné paris sportif|match annulé ou reporté paris sportifs|match annulé paris sportif|match
arrete paris sportif|match interrompu paris sportif|match interrompu tennis paris sportif|match interrompu tennis pluie
paris sportif|match nul boxe paris sportif|match pari sportif|match paris sportif|match reporté
paris sportif|match suspendu paris sportif|match suspendu tennis paris sportif|match truqué paris sportif|matchs truqués paris sportifs|meilleur algorithme paris sportif|meilleur algorithme paris sportif gratuit|meilleur app de paris sportif|meilleur app de paris
sportifs|meilleur app paris sportif|meilleur appli de pari sportif|meilleur
appli de paris sportif|meilleur appli pari sportif|meilleur appli paris sportif|meilleur appli paris sportif forum|meilleur appli paris sportifs|meilleur application conseil paris sportif|meilleur
application de paris sportif|meilleur application de paris sportif
en afrique|meilleur application pari sportif|meilleur application paris sportif|meilleur application paris sportif belgique|meilleur application pour les
paris sportif|meilleur application pour pari sportif|meilleur bonus de bienvenue paris sportif|meilleur bonus pari sportif|meilleur bonus paris sportif|meilleur bonus paris sportif sans depot|meilleur bonus paris sportifs|meilleur bonus site de paris sportif|meilleur bonus site pari sportif|meilleur bonus site paris sportif|meilleur bookmaker paris
sportif|meilleur combiné paris sportif|meilleur conseil paris sportif|meilleur
cote de paris sportif|meilleur cote pari sportif|meilleur cote paris sportif|meilleur cote paris sportif
aujourd’hui|meilleur cote site paris sportif|meilleur forum
paris sportifs|meilleur gain paris sportif|meilleur
ia paris sportif|meilleur methode pour gagner au paris sportif|meilleur
offre bienvenue paris sportif|meilleur offre bonus paris sportif|meilleur offre de bienvenue paris sportif|meilleur
offre de bienvenue paris sportifs|meilleur offre pari sportif|meilleur offre paris sportif|meilleur offre paris sportif
en ligne|meilleur pari sportif|meilleur pari sportif du jour|meilleur
pari sportif en ligne|meilleur paris sportif|meilleur
paris sportif aujourd’hui|meilleur paris sportif du jour|meilleur paris
sportif en ligne|meilleur paris sportif foot|meilleur promo paris sportif|meilleur pronostic paris sportif|meilleur
site de conseil paris sportif|meilleur site de
pari sportif|meilleur site de pari sportif en ligne|meilleur site de paris sportif|meilleur site de
paris sportif avis|meilleur site de paris sportif belgique|meilleur site de paris sportif canada|meilleur
site de paris sportif en france|meilleur site de paris sportif
en ligne|meilleur site de paris sportif football|meilleur site de paris sportif forum|meilleur site de paris
sportif france|meilleur site de paris sportif hors arjel|meilleur site de
paris sportif international|meilleur site de paris sportif suisse|meilleur
site de paris sportifs|meilleur site de paris sportifs en ligne|meilleur site pari sportif|meilleur
site pari sportif en ligne|meilleur site pari sportif france|meilleur site
paris sportif|meilleur site paris sportif avis|meilleur site paris sportif belgique|meilleur site paris sportif canada|meilleur site paris sportif en ligne|meilleur site paris sportif foot|meilleur site paris sportif forum|meilleur site paris sportif france|meilleur site paris sportif hors arjel|meilleur site paris sportif nba|meilleur site paris sportif rugby|meilleur site paris sportif suisse|meilleur site paris sportifs|meilleur site
pour pari sportif|meilleur site pour paris sportif|meilleur site pronostic paris sportif|meilleur strategie paris sportif|meilleur technique de paris sportif|meilleur technique paris sportif|meilleur
technique pour gagner au paris sportif|meilleure appli de paris sportif|meilleure appli de paris
sportifs|meilleure appli pari sportif|meilleure appli
paris sportif|meilleure appli paris sportifs|meilleure
application de paris sportif|meilleure application de
paris sportifs|meilleure application pari sportif|meilleure application paris sportif|meilleure application paris sportif android|meilleure application paris sportifs|meilleure
offre paris sportif|meilleure site paris sportif|meilleure strategie paris sportif|meilleures applications de paris sportifs|meilleures applications paris sportifs|meilleures cotes
paris sportifs|meilleures offres paris sportifs|meilleures
stratégies paris sportifs|meilleurs appli paris sportif|meilleurs
application de paris sportifs|meilleurs application paris sportif|meilleurs applications paris sportifs|meilleurs bonus
paris sportifs|meilleurs cote paris sportif|meilleurs cotes paris sportifs|meilleurs offres
paris sportifs|meilleurs paris sportifs|meilleurs paris sportifs du jour|meilleurs site
de pari sportif|meilleurs site de paris sportif|meilleurs site de
paris sportif en ligne|meilleurs site de paris sportifs|meilleurs site paris sportif|meilleurs sites de paris sportifs|meilleurs sites de paris sportifs
en ligne|meilleurs sites paris sportif|meilleurs sites paris
sportifs|methode abc paris sportif|methode de
paris sportif|methode gagnante paris sportifs|methode gagner paris sportif|methode infaillible paris sportifs|methode martingale paris
sportif|methode mathematique paris sportif|methode mathematique pour gagner au paris sportif|methode paris sportif|methode
paris sportif foot|methode paris sportif forum|methode
paris sportif tennis|methode paris sportifs|methode pour gagner au paris sportif|methode pour gagner paris sportif|methodes paris sportifs|minimum depot paris sportif|mise au jeu pari sportif|mise maximum pari sportif|mise maximum paris sportif|mise minimum paris sportif|mise moyenne paris sportif|mise paris sportif|moins de 4 5 but paris sportif|montant maximum paris sportif|montant paris sportif|montante pari sportif|montante
parie sportif|montante paris sportif|montante paris
sportifs|montantes paris sportifs|multiple pari sportif|multiple
paris sportif|multiple paris sportifs|multiples paris sportifs|méthode calcul paris sportif|méthode match nul paris sportifs|méthode mathématique pour gagner au paris sportif|méthode paris
sportif forum|méthode paris sportif hockey|nba pari
sportif|nba paris sportif|nba paris sportifs|nouveau paris sportif|nouveau site de pari sportif|nouveau site de paris sportif|nouveau site de paris sportif en ligne|nouveau site de paris sportifs|nouveau site pari sportif|nouveau site paris sportif|nouveau site paris sportif france|nouveau
site paris sportifs|nouveaux sites de paris sportifs|nouveaux sites paris sportifs|nouvelle
appli paris sportif|nouvelle application de paris
sportif|numero de match paris sportif|numero match paris sportif|offre 100 euros paris sportif|offre appli pari
sportif|offre bienvenu paris sportif|offre bienvenue pari sportif|offre bienvenue paris sportif|offre bienvenue paris sportifs|offre bienvenue site paris
sportif|offre bonus paris sportif|offre de
bienvenu paris sportif|offre de bienvenue pari sportif|offre de bienvenue paris
sportif|offre de bienvenue paris sportif belgique|offre
de bienvenue paris sportif sans depot|offre de bienvenue paris sportif sans dépôt|offre de bienvenue paris sportifs|offre de bienvenue sans
depot paris sportif|offre de bienvenue site paris sportif|offre euro paris sportif|offre pari sportif euro|offre paris sportif|offre
paris sportif belgique|offre paris sportif cash|offre paris sportif coupe du monde|offre paris sportif
hors arjel|offre paris sportif remboursé|offre paris sportif remboursé cash|offre paris sportif sans depot|offre promo paris
sportif|offre remboursement paris sportif|offre sans depot paris
sportif|offre site paris sportif|offres bienvenue paris sportifs|offres de bienvenue paris sportifs|ou faire des paris
sportif|ou faire des paris sportif en espagne|ou faire des paris sportifs|outil répartiteur de mise paris sportif|outils repartiteur de mises paris sportif|ouverture compte paris sportifs|ouvrir un compte paris sportif|pack de bienvenue paris sportif|pack de bienvenue paris sportif hors
arjel|pari en ligne sportif|pari sportif|pari sportif 100 euros offert|pari sportif 100 remboursé|pari sportif abandon tennis|pari sportif
aide|pari sportif algérie aujourd’hui|pari sportif appli|pari sportif application|pari sportif argent|pari sportif
astuce|pari sportif aujourd|pari sportif aujourd’hui|pari sportif avec handicap|pari sportif avec orange money|pari sportif avec paypal|pari sportif avec
wave|pari sportif avis|pari sportif basket|pari sportif belgique|pari sportif belgique france|pari sportif
bonus|pari sportif buteur pas titulaire|pari sportif champions
league|pari sportif combiné|pari sportif comment|pari sportif comment
gagner|pari sportif comment ça marche|pari sportif comparatif|pari
sportif conseil|pari sportif cote|pari sportif cote match|pari sportif cote psg|pari sportif coupe|pari
sportif coupe de france|pari sportif coupe du monde|pari sportif depot|pari sportif du jour|pari sportif en france|pari sportif en ligne|pari sportif en ligne au cameroun|pari sportif en ligne belgique|pari sportif en ligne
canada|pari sportif en ligne france|pari sportif en ligne gratuit|pari
sportif en ligne suisse|pari sportif en ligne ufc|pari sportif en suisse|pari sportif euro|pari
sportif explication|pari sportif faire|pari sportif foot|pari sportif foot resultat|pari
sportif football|pari sportif forum|pari sportif francaise des jeux|pari sportif france|pari sportif france angleterre|pari
sportif france argentine|pari sportif france
autriche|pari sportif france belgique|pari sportif france espagne|pari sportif
france italie|pari sportif france portugal|pari sportif france usa|pari sportif gagnant|pari sportif gagner|pari sportif gagner a tous les coups|pari sportif gagner de l’argent|pari sportif
gain|pari sportif gratuit|pari sportif gratuit pour gagner des cadeaux|pari sportif gratuit sans depot|pari
sportif handicap|pari sportif hockey|pari sportif hors arjel|pari
sportif jeux olympiques|pari sportif joueur absent|pari sportif le plus rentable|pari sportif leicester champion|pari sportif ligue 1|pari sportif ligue 2|pari sportif ligue
des champions|pari sportif ligue europa|pari sportif match|pari sportif match arrete|pari sportif match interrompu|pari sportif
meilleur|pari sportif meilleur cote|pari sportif meilleur site|pari sportif methode|pari sportif mise|pari sportif mise au jeu|pari sportif mise o jeu|pari sportif nba|pari sportif offre bienvenue|pari sportif paypal|pari sportif plus|pari sportif prolongation|pari sportif promo|pari sportif pronostic|pari
sportif pronostic foot|pari sportif pronostic gagnant|pari sportif pronostic gratuit|pari sportif psg|pari sportif psg
bayern|pari sportif psg inter|pari sportif psg milan|pari sportif regle|pari sportif rembourse|pari sportif remboursement|pari sportif
remboursement cash|pari sportif remboursé|pari sportif rugby|pari sportif rugby coupe du monde|pari sportif rugby top 14|pari sportif sans argent|pari sportif sans carte bancaire|pari sportif
sans depot|pari sportif signification|pari sportif site|pari sportif statistique|pari
sportif suisse|pari sportif systeme|pari sportif technique|pari sportif technique pour gagner|pari sportif temps reglementaire|pari sportif
tennis|pari sportif tennis abandon|pari sportif
top|pari sportif top 14|pari sportif tour de france|parie sportif|parie sportif comment ca marche|parie sportif du jour|parie sportif en ligne|parie
sportif foot|parie sportif football|parie sportif france|parie
sportif gratuit|parie sportif pronostic|parie sportif suisse|paris en ligne sportif|paris en ligne sportifs|paris evenement
sportif|paris france sportif|paris hippique et sportif|paris hippiques et sportifs|paris hippiques
paris sportifs|paris hippiques paris sportifs et poker en ligne|paris hippiques sportifs|paris match sportif|paris sportif|paris sportif 10 euros offerts|paris sportif 100 euros offert|paris sportif 100 euros remboursé|paris sportif 100 offert|paris sportif 100 remboursé|paris sportif 100e offert|paris sportif 150 euros offert|paris sportif
1er pari remboursé|paris sportif a faire|paris sportif a faire aujourd’hui|paris sportif a faire ce soir|paris sportif
abandon tennis|paris sportif abandon tennis parions sport|paris sportif
aide|paris sportif algorithme|paris sportif analyse|paris sportif appli|paris sportif application|paris sportif application android|paris sportif apres prolongation|paris sportif argent|paris sportif
argent fictif|paris sportif argent offert|paris sportif argent
virtuel|paris sportif arjel|paris sportif arsenal
psg|paris sportif astuce|paris sportif au canada|paris
sportif aujourd hui|paris sportif aujourd’hui|paris sportif avec argent
fictif|paris sportif avec bonus sans depot|paris sportif avec carte bancaire|paris sportif avec cryptomonnaie|paris sportif avec handicap|paris sportif avec paypal|paris sportif avec paysafecard|paris sportif avis|paris
sportif avis expert|paris sportif avis forum|paris sportif bankroll|paris sportif basket|paris sportif basket coupe de france|paris
sportif basket nba|paris sportif basket prolongation|paris sportif belgique|paris sportif belgique bonus|paris sportif belgique bonus sans depot|paris sportif belgique france|paris sportif belgique suede|paris
sportif bonus|paris sportif bonus bienvenue|paris sportif bonus cash|paris sportif bonus de bienvenue|paris
sportif bonus gratuit|paris sportif bonus gratuit sans depot|paris sportif
bonus retirable|paris sportif bonus sans depot|paris sportif bonus
sans depot belgique|paris sportif bookmaker|paris sportif but
contre son camp|paris sportif but temps additionnel|paris sportif
buteur|paris sportif buteur blessé|paris sportif buteur carton rouge|paris sportif
buteur contre son camp|paris sportif buteur non titulaire|paris sportif buteur
prolongation|paris sportif buteur qui ne joue pas|paris sportif buteur remplacant|paris
sportif calcul gain|paris sportif canada|paris sportif cash|paris
sportif cash out|paris sportif champion ligue 1|paris sportif champions league|paris sportif classement ligue 1|paris sportif code promo|paris sportif combine|paris
sportif combiné|paris sportif combiné comment ça marche|paris sportif
combiné du jour|paris sportif combiné match reporté|paris sportif comment ca
marche|paris sportif comment faire|paris sportif comment gagner|paris sportif comment gagner a tous les coups|paris sportif comment jouer|paris sportif comment ça marche|paris sportif comparateur cote|paris sportif
comparatif|paris sportif conseil|paris sportif conseil gratuit|paris sportif conseil pour gagner|paris
sportif cote|paris sportif cote et match|paris sportif cote explication|paris sportif cote psg|paris sportif coupe d’europe|paris sportif coupe davis|paris sportif coupe de france|paris sportif coupe du
monde|paris sportif coupe du monde de rugby|paris sportif coupe du monde rugby|paris
sportif depot 5 euro|paris sportif depot minimum|paris sportif depot paypal|paris
sportif dnb|paris sportif du jour|paris sportif du jour conseil|paris sportif dépôt 1 euro|paris sportif dépôt minimum 5 euros|paris sportif en belgique|paris sportif
en france|paris sportif en ligne|paris sportif en ligne avec paypal|paris sportif en ligne avis|paris sportif en ligne belgique|paris sportif en ligne bonus|paris sportif en ligne cameroun|paris sportif en ligne
comment gagner|paris sportif en ligne comment ça marche|paris sportif en ligne france|paris sportif en ligne gratuit|paris sportif en ligne maroc|paris sportif
en ligne paypal|paris sportif en ligne québec|paris sportif en ligne sans depot|paris
sportif en ligne suisse|paris sportif en suisse|paris sportif espagne france|paris sportif esport|paris
sportif et casino en ligne|paris sportif et hippique|paris sportif et prolongation|paris sportif euro|paris sportif europa league|paris sportif explication|paris sportif final ligue des champions|paris sportif finale ligue des
champions|paris sportif foot|paris sportif foot aide|paris sportif foot astuce|paris
sportif foot aujourd’hui|paris sportif foot ce soir|paris
sportif foot comment ca marche|paris sportif foot
conseil|paris sportif foot cote|paris sportif foot coupe du monde|paris sportif foot en ligne|paris sportif
foot feminin|paris sportif foot gratuit|paris sportif
foot prolongation|paris sportif foot pronostic|paris sportif
foot pronostic gratuit|paris sportif foot regle|paris sportif foot suisse|paris sportif foot
us|paris sportif football|paris sportif football americain|paris sportif football astuces|paris sportif
forfait tennis|paris sportif forum|paris sportif francais|paris sportif francaise des jeux|paris sportif france|paris sportif france 2|paris sportif france allemagne|paris sportif france angleterre|paris sportif france argentine|paris sportif france autriche|paris sportif
france belgique|paris sportif france espagne|paris sportif
france gibraltar|paris sportif france italie|paris sportif france nouvelle zelande|paris sportif france pologne|paris sportif france portugal|paris
sportif france uruguay|paris sportif france usa|paris sportif freebet
sans depot|paris sportif gagnant|paris sportif gagnant à coup sûr|paris sportif gagner a coup sur|paris sportif gagner argent|paris sportif gagner
de l’argent|paris sportif gain|paris sportif gain maximum|paris
sportif gestion bankroll|paris sportif gratuit|paris sportif gratuit appli|paris sportif gratuit avec cadeaux|paris sportif gratuit cadeaux|paris
sportif gratuit en ligne|paris sportif gratuit entre amis|paris sportif gratuit sans argent|paris sportif gratuit sans depot|paris sportif gratuit sans dépôt|paris sportif gratuits|paris sportif gros gain|paris sportif handicap|paris
sportif handicap 0 1|paris sportif handicap 0-1|paris sportif handicap 1 0|paris
sportif handicap 1-0|paris sportif handicap basket|paris sportif
handicap explication|paris sportif handicap foot|paris sportif handicap
rugby|paris sportif hippique|paris sportif hockey|paris sportif hockey nhl|paris sportif hockey sur
glace|paris sportif hors arjel|paris sportif hors arjel france|paris sportif jeux olympiques|paris sportif jeux video|paris sportif joueur blessé|paris sportif
joueur blessé pendant le match|paris sportif joueur de foot|paris sportif joueur decisif|paris
sportif joueur declare forfait|paris sportif joueur déclare forfait|paris sportif
joueur remplacant|paris sportif la francaise des jeux|paris sportif le plus rentable|paris sportif legal en france|paris sportif leicester champion|paris sportif les
18 stratégies pour gagner tous les jours|paris sportif les
plus sur|paris sportif les prolongation compte|paris sportif ligne|paris sportif ligue 1|paris sportif ligue 2|paris sportif ligue des
champions|paris sportif ligue des nations|paris sportif ligue europa|paris sportif liste|paris sportif martingale|paris sportif match|paris sportif match abandonné|paris sportif match annulé|paris sportif match
arrêté|paris sportif match du jour|paris sportif match
interrompu|paris sportif match reporté|paris sportif match suspendu|paris sportif match tennis interrompu|paris
sportif match truqué|paris sportif meilleur bonus|paris sportif meilleur cote|paris sportif meilleur pronostic|paris sportif meilleur
site|paris sportif methode|paris sportif methode 2 3|paris sportif
mi temps fin de match|paris sportif mise au jeu|paris sportif
mise maximum|paris sportif mma france|paris sportif moins de 3.5 but|paris sportif montante|paris sportif moto gp|paris sportif multiple|paris
sportif multiple 2 3|paris sportif multiple 2 3 explication|paris sportif multiple 2 4|paris sportif
multiple 2 5|paris sportif multiple 2/3 explication|paris sportif multiple 3 4|paris sportif multiple
explication|paris sportif national 1 foot|paris
sportif nba|paris sportif nba conseil|paris sportif nba pronostic|paris sportif nhl|paris sportif nombre de but|paris sportif nouveau site|paris sportif numero match|paris sportif
offert|paris sportif offre bienvenue|paris
sportif offre bienvenue sans depot|paris sportif offre de bienvenue|paris sportif
offre sans depot|paris sportif om psg|paris sportif paypal|paris sportif plus de 1.5 but|paris sportif plus de 2 5 but|paris sportif plus ou moins|paris sportif plus ou moins 2
5 but|paris sportif premier pari remboursé|paris sportif premier paris remboursé|paris sportif prolongation|paris sportif prolongation basket|paris sportif prolongation foot|paris sportif promo|paris sportif
pronostic|paris sportif pronostic basket|paris sportif
pronostic des match aujourd hui|paris sportif pronostic expert gratuit|paris sportif pronostic foot|paris sportif pronostic forum|paris sportif pronostic
gratuit|paris sportif pronostic tennis|paris sportif psg|paris sportif psg arsenal|paris sportif psg barcelone|paris sportif psg bayern|paris sportif psg dortmund|paris sportif psg inter|paris sportif psg inter cote|paris
sportif psg liverpool|paris sportif psg om|paris sportif qr code|paris sportif que veut dire
handicap|paris sportif qui rapporte le plus|paris sportif regle|paris
sportif regle prolongation|paris sportif rembourse|paris sportif remboursement cash|paris sportif rembourser|paris
sportif remboursé|paris sportif remboursé cash|paris sportif remboursé en cash|paris sportif retrait paypal|paris sportif rue
des joueurs|paris sportif rugby|paris sportif rugby
6 nations|paris sportif rugby coupe du monde|paris sportif rugby top 14|paris
sportif safe du jour|paris sportif sans argent|paris sportif sans carte
bancaire|paris sportif sans carte d’identité|paris sportif sans
compte bancaire|paris sportif sans depot|paris sportif sans depot minimum|paris sportif si match suspendu|paris sportif si un joueur abandonne|paris sportif si un joueur
ne joue pas|paris sportif si un joueur se blesse|paris sportif simple ou combiné|paris sportif site|paris sportif statistique|paris sportif stratégie|paris sportif suisse|paris
sportif suisse application|paris sportif suisse en ligne|paris sportif suisse legal|paris sportif suisse légal|paris sportif suisse romande|paris sportif sur du jour|paris sportif sur le tennis|paris sportif systeme|paris sportif systeme 2 3|paris sportif
systeme 2 4|paris sportif systeme 2/3|paris sportif
systeme 2/4|paris sportif systeme 3 4|paris sportif systeme 3/4|paris sportif
systeme explication|paris sportif technique|paris sportif technique pour gagner|paris sportif temps additionnel|paris sportif temps reglementaire|paris sportif tennis|paris sportif tennis abandon|paris sportif tennis
conseil|paris sportif tennis de table|paris sportif tennis forfait|paris sportif
tennis gratuit|paris sportif tennis pronostic|paris sportif tennis
roland garros|paris sportif tir au but|paris sportif top 14|paris sportif tour de france|paris
sportif ufc|paris sportif ufc france|paris sportif unibet|paris sportif vainqueur euro|paris sportif vainqueur ligue 1|paris sportif vainqueur ligue des champions|paris sportif via paypal|paris sportif
victoire prolongation|paris sportif vip gratuit|paris sportifs|paris sportifs abandon tennis|paris
sportifs aide|paris sportifs analyser un match|paris
sportifs arjel|paris sportifs astuces|paris sportifs aujourd’hui|paris sportifs
autorisés en france|paris sportifs avec paypal|paris sportifs basket|paris sportifs belgique|paris sportifs bonus|paris sportifs bookmakers|paris sportifs canada|paris sportifs
combiné|paris sportifs comparateur|paris sportifs comparatif|paris sportifs conseils|paris sportifs cotes|paris sportifs coupe du monde|paris sportifs de football|paris sportifs du
jour|paris sportifs en belgique|paris sportifs en france|paris sportifs en ligne|paris sportifs en ligne
belgique|paris sportifs en ligne france|paris sportifs en ligne gratuit|paris sportifs en ligne suisse|paris sportifs en suisse|paris sportifs et hippiques (e-business.inotec.ro)|paris sportifs euro|paris sportifs foot|paris sportifs foot us|paris sportifs forum|paris sportifs france|paris sportifs france espagne|paris
sportifs gagner à tous les coups|paris sportifs gratuit|paris sportifs
gratuits|paris sportifs gratuits en ligne|paris sportifs handicap|paris sportifs hockey|paris sportifs hockey sur galce|paris
sportifs hockey sur glace|paris sportifs hors arjel|paris sportifs jeux
olympiques|paris sportifs les bookmakers raflent la mise|paris sportifs ligne|paris sportifs ligue 1|paris
sportifs ligue 2|paris sportifs ligue des champions|paris
sportifs ligue europa|paris sportifs match interrompu|paris sportifs montante|paris sportifs nba|paris sportifs offre
bienvenue|paris sportifs offre de bienvenue|paris sportifs paypal|paris sportifs pronostics|paris sportifs psg|paris sportifs psg inter|paris sportifs rugby|paris sportifs sans argent|paris sportifs sans depot|paris sportifs site|paris
sportifs sites|paris sportifs statistiques|paris sportifs stratégie|paris
sportifs suisse|paris sportifs technique|paris sportifs techniques|paris sportifs tennis|paris sportifs tennis
astuces|paris sportifs top 14|paris sportifs
tour de france|part de marché paris sportifs|paypal pari sportif|paypal paris sportif|paypal
paris sportifs|perte d’argent paris sportifs|peut on devenir riche avec les paris sportifs|peut
on gagner de l’argent avec les paris sportifs|peut on gagner sa vie avec les
paris sportif|peut on vraiment gagner de l’argent avec les paris sportifs|plus gros combine paris
sportif|plus gros gagnant paris sportif|plus gros gain paris sportif|plus gros gain paris sportif
au monde|plus gros gain paris sportif france|plus gros gains paris
sportif|plus gros pari sportif|plus gros paris sportif|plus grosse cote gagner paris sportif|plus grosse cote pari sportif|plus grosse cote paris sportif|plus grosse mise paris sportif|plus grosse somme gagner au paris sportif|plus ou moins paris sportif|pourcentage de mise paris sportif|premier pari
sportif remboursé|probabilité cote paris sportif|probabilité paris sportif combiné|prolongation basket
paris sportif|prolongation paris sportif|promo pari sportif|promo paris sportif|promo site de paris sportif|promo site pari sportif|promo
site paris sportif|promos paris sportifs|prono paris sportif foot|prono paris sportif gratuit|prono
paris sportif tennis|pronostic de paris sportif|pronostic du jour paris sportif|pronostic foot paris sportif|pronostic gratuit
paris sportif|pronostic pari sportif|pronostic pari sportif gratuit|pronostic paris sportif|pronostic paris sportif aujourd’hui|pronostic
paris sportif du jour|pronostic paris sportif foot|pronostic paris sportif
gratuit|pronostic paris sportif tennis|pronostic paris sportifs|pronostics foot
statistiques et aides aux paris sportifs|pronostics
paris sportif|pronostics paris sportifs|pronostiqueur paris sportif gratuit|psg arsenal paris sportif|psg bayern paris sportif|psg inter milan paris sportif|psg inter pari sportif|psg
inter paris sportif|psg liverpool paris sportif|psg om
paris sportif|psg paris sportif|psg paris sportifs|qr code paris sportif|qu est ce qu un handicap paris sportif|qu est ce que
handicap dans les paris sportif|qu’est ce qu’un handicap paris sportif|qu’est ce que handicap
dans les paris sportif|quand un joueur se blesse
paris sportif|que signifie 1/1 en paris sportif|que signifie 1/2 paris sportif|que
signifie 12 en paris sportif|que signifie 1×2 dans les paris sportifs|que signifie btts en paris sportif|que signifie dnb en paris
sportif|que signifie draw en paris sportif|que signifie ft en paris sportif|que signifie gg dans le pari
sportif|que signifie gg en pari sportif|que signifie gg en paris sportif|que signifie handicap dans
les paris sportifs|que veut dire dnb en paris sportif|que veut dire handicap dans les paris sportifs|que veut dire handicap
paris sportif|quel appli pari sportif|quel cote jouer paris sportif|quel est la meilleur appli de paris sportif|quel est le meilleur algorithme de paris sportif|quel
est le meilleur site de pari sportif|quel est
le meilleur site de pari sportif en ligne|quel est le
meilleur site de paris sportif|quel est le meilleur site de paris
sportif en ligne|quel est le meilleur site de paris
sportifs en ligne|quel est le pari sportif le plus rentable|quel pari sportif est
le plus rentable|quel pari sportif est le plus sûr|quel pari
sportif faire aujourd’hui|quel paris sportif
faire aujourd’hui|quel paris sportif rapporte le plus|quel site de paris
sportif choisir|quel site de paris sportif rembourse en cash|quel type
de pari sportif est le plus rentable|quelle application pour paris
sportifs|quelle est la meilleure appli de paris sportif|quelle est la meilleure application de paris sportif|quelle
est la meilleure application pour les paris sportifs|quelle est
le meilleur site de paris sportif|quels paris sportifs faire|quels sont les paris sportifs les plus sûrs|rebond basket paris sportif|record de gain paris
sportif|regle buteur paris sportif|regle de paris sportif|regle des paris sportif|regle handicap paris sportif|regle handicap paris sportif foot|regle multiple paris sportif|regle pari
sportif|regle paris sportif|regle paris sportif foot|regle paris sportif multiple|regle
paris sportif prolongation|reglement pari sportif|reglement paris
sportif|regles paris sportifs|remboursement cash paris sportif|remboursement en cash paris sportif|remboursement pari sportif|remboursement paris sportif|repartiteur de mise paris
sportif|repartiteur de mise paris sportifs|repartiteur de mises paris sportif|repartiteur mise paris sportif|repartition des mises
paris sportif|resultat pari sportif|resultat paris sportif|resultat paris sportif en direct|resultat paris sportif
foot|resultat sportif hockey|retirer argent paris sportif|rugby
pari sportif|rugby paris sportif|règle paris sportif prolongation|règles paris sportif|répartiteur
de mise pari sportif|répartiteur de mise paris sportif|répartiteur de mise paris sportifs|répartition des mises paris sportif|résultat
paris sportif foot|sans depot paris sportif|se faire interdire de paris sportifs|signification btts
paris sportif|signification dnb paris sportif|signification handicap paris sportif|simulateur de gain paris sportif|simulateur
gain paris sportif|simulateur gain paris sportif multiple|simulateur gain paris sportif
systeme|simulateur gain paris sportif système|simulateur montante paris sportif|simulateur paris sportif multiple|simulateur systeme paris sportif|simulation paris sportif gratuit|site aide paris sportif|site analyse paris sportif|site analyser paris sportif|site arjel paris sportif|site conseil paris sportif|site d’analyse de paris sportifs|site d’analyse
paris sportif|site de conseil paris sportif|site de pari en ligne sportif|site
de pari sportif|site de pari sportif avec bonus sans depot|site de pari sportif bonus sans depot|site de
pari sportif canada|site de pari sportif en ligne|site de
pari sportif francais|site de pari sportif gratuit|site de pari sportif hors arjel|site de pari sportif suisse|site
de parie sportif|site de parie sportif en ligne|site de paris
en ligne sportif|site de paris sportif|site de paris sportif
acceptant paypal|site de paris sportif arjel|site de
paris sportif autorisé en france|site de paris sportif autorisé en suisse|site de
paris sportif avec bonus|site de paris sportif avec bonus sans depot|site de paris sportif avec
bonus sans dépôt|site de paris sportif avec neosurf|site de paris sportif avec paiement mobile|site de paris sportif avec
paypal|site de paris sportif avis|site de paris sportif belge avec bonus|site de paris sportif
belgique|site de paris sportif bonus|site de paris sportif bonus
sans depot|site de paris sportif canada|site de paris sportif comparatif|site de paris
sportif depot minimum|site de paris sportif en france|site de paris
sportif en ligne|site de paris sportif en ligne suisse|site de paris sportif football|site de paris sportif francais|site de paris
sportif france|site de paris sportif gratuit|site de paris sportif gratuit pour gagner des cadeaux|site de paris sportif gratuit sans dépôt|site de paris sportif hors arjel|site de paris sportif le plus fiable|site de paris sportif legal en france|site de paris sportif meilleur cote|site de paris sportif nouveau|site de paris sportif offre de bienvenue|site de paris sportif paypal|site de paris sportif premier paris remboursé|site de paris sportif qui accepte paypal|site de paris sportif qui
rembourse en cash|site de paris sportif remboursé|site de paris sportif
sans argent|site de paris sportif sans carte bancaire|site de paris sportif sans carte
d’identité|site de paris sportif sans depot|site de paris sportif suisse|site
de paris sportifs|site de paris sportifs avec paypal|site de paris
sportifs en ligne|site de paris sportifs francais|site de paris sportifs gratuit|site
de paris sportifs paypal|site de paris sportifs suisse|site de
statistique pour paris sportif|site des paris sportifs|site pari en ligne sportif|site pari
sportif|site pari sportif 100 euros offert|site pari sportif arjel|site pari sportif belgique|site pari sportif bonus|site pari sportif canada|site pari sportif
comparatif|site pari sportif en ligne|site pari sportif france|site
pari sportif gratuit|site pari sportif hors arjel|site pari sportif suisse|site parie
sportif|site paris en ligne sportif|site paris sportif|site paris sportif 100 euros offert|site paris sportif 100 euros remboursé|site paris sportif 1er paris remboursé|site
paris sportif arjel|site paris sportif autorisé en france|site paris sportif
avec bonus|site paris sportif avec bonus sans
depot|site paris sportif avec meilleur cote|site paris sportif belgique|site paris sportif bonus|site
paris sportif bonus cash|site paris sportif bonus sans
depot|site paris sportif canada|site paris sportif comparatif|site paris sportif depot 5 euro|site paris sportif en ligne|site paris sportif foot|site paris sportif france|site paris sportif gratuit|site
paris sportif hors arjel|site paris sportif hors arjel france|site
paris sportif meilleur cote|site paris sportif nouveau|site paris sportif
offre de bienvenue|site paris sportif paypal|site paris sportif remboursement cash|site paris sportif remboursé
en cash|site paris sportif retrait instantané|site paris sportif sans carte bancaire|site paris sportif sans depot|site paris sportif suisse|site paris sportifs|site paris sportifs belgique|site paris sportifs en ligne|site paris sportifs france|site paris sportifs hors arjel|site paris sportifs suisse|site pour analyse paris sportif|site pour paris
sportif|site pronostic paris sportif|site statistique paris sportif|site suisse paris sportif|sites de
pari sportif|sites de paris sportif|sites de paris sportifs|sites de paris sportifs arjel|sites de paris sportifs autorisés en france|sites de paris sportifs belgique|sites de paris sportifs bonus|sites
de paris sportifs en belgique|sites de paris sportifs en france|sites de paris sportifs en ligne|sites de paris sportifs gratuits|sites de paris sportifs gratuits sans dépôt|sites de paris sportifs suisse|sites
pari sportif|sites paris sportif|sites paris sportifs|sites paris sportifs arjel|sites paris
sportifs belgique|sites paris sportifs france|sites paris sportifs hors
arjel|sites paris sportifs suisse|so foot paris sportif|so foot paris sportifs|specialiste tennis paris sportif|statistique foot paris sportif|statistique paris sportif|statistique paris sportif
foot|statistique tennis paris sportif|statistiques football paris sportifs|statistiques paris sportifs|strategie de paris sportif|stratégie big whale paris sportif|stratégie de paris sportifs|stratégie gagnante paris sportifs|stratégie pari sportif|stratégie
paris sportif|stratégie paris sportifs|stratégie paris sportifs forum|stratégie pour gagner au paris sportif|stratégies paris
sportifs|suisse paris sportif|suisse paris sportifs|systeme 2
3 paris sportif|systeme 3 4 paris sportif|systeme de cote paris sportif|systeme
de paris sportif|systeme pari sportif|systeme paris
sportif|systeme paris sportifs|systeme reducteur paris sportif|système paris
sportif|tableau bankroll paris sportif|tableau cote paris sportif|tableau de paris sportif|tableau
de suivi paris sportifs|tableau excel bankroll paris sportif|tableau excel paris sportif|tableau excel paris sportif gratuit|tableau excel paris sportifs|tableau excel pour paris
sportif|tableau gestion bankroll paris sportif|tableau
Your comment is awaiting moderation.
TrendGlobalDeals – Checkout was quick and hassle-free, products are top quality.
Your comment is awaiting moderation.
Прислали нам свой метоксетамин, подтверждаем: продукт чистый, >99%. купить Кокаин, Мефедрон, Экстази отлично всё 100% ))Я ночью с ним договорился в аське,мне он тоже отвечал через 15-30 минут на сообщение)
Your comment is awaiting moderation.
Silver Maple Picks Online – Well-laid-out pages made product discovery simple and enjoyable.
Your comment is awaiting moderation.
ремонт телефонов в одинцово адреса[/url
Your comment is awaiting moderation.
Ever Crest Woods Finds – A pleasant design and clear category layout made checking items simple.
Your comment is awaiting moderation.
shop pine boutique – Smooth scrolling and fast pages made finding items easy.
Your comment is awaiting moderation.
Спасибо магазину! купить скорость, кокаин, мефедрон, гашиш Давай зафиналим на мировой.Наблюдая за многими сообщениями, мы понимаем что многие на форуме не более чем очень “кипишные люди”, которые любят разводить демагогию.
Your comment is awaiting moderation.
Looking for a chat? emeraldchat app A convenient Omegle alternative for connecting with people from all over the world. Instant connection, random chat partners, interest filters, and moderation. Chat via video and live chat with no registration or payment required.
Your comment is awaiting moderation.
Wild Meadow Studio Shop – Clean interface and organized products made shopping stress-free.
Your comment is awaiting moderation.
а что с магазином в Петрозаводске,работать то будете дальше,а то уже неделю не какой активности. купить скорость, кокаин, мефедрон, гашиш Сроки не говорил, иначе не было бы этого поста. Исправляй, не мой косяк бро, и не отмазка, что вас много. Не предупредил ты, о своей очереди, в чем моя вина? Не создавай очередь, какие проблемы? но если создаешь, будь добр предупреди, делов то :hello:Заказывал небольшую партию)) Качество отличное, быстрый сервис)) в общем хороший магазин)
Your comment is awaiting moderation.
shop now – Really liked the organized setup; products were displayed clearly and attractively.
Your comment is awaiting moderation.
timber hub link – Smooth interface and well-organized layout improved browsing.
Your comment is awaiting moderation.
Лучшие рекомендации для вас: https://medim-pro.ru/kupit-spravku-ot-vracha/
Your comment is awaiting moderation.
brightstonecollection – Products are displayed logically, making exploration effortless.
Your comment is awaiting moderation.
брал в данном магазине все супер. https://kokainer.cc вобщем решение принято заказ буду делать ТУТ!!!!чувак брал я тоже тут 2 ci некоторым понравилось некоторым нет , лично я поднимал даже с неё бабок норм, народу нравиться , а если этот каиф тебе не нравиться нех писать что тусишка бычий кайф , бычий каиф немного другое, а такои продукт не может быть бычий кайф это я тебе отвечаю, со входом согласен по ноздре ваще не вариант !
Your comment is awaiting moderation.
EmpowerYourselfToday – Motivating ideas that help you grow and discover daily.
Your comment is awaiting moderation.
FashionForLife – Items look fashionable and appealing, I’m impressed with the overall selection today.
Your comment is awaiting moderation.
shop stream boutique – Smooth scrolling and fast pages made finding products effortless.
Your comment is awaiting moderation.
Хочешь айфон? телефон айфон цена выгодное предложение на новый iPhone в Санкт-Петербурге. Интернет-магазин i4you готов предложить вам решение, которое удовлетворит самые взыскательные требования. В нашем каталоге представлена обширная коллекция оригинальных устройств Apple. Каждый смартфон сопровождается официальной гарантией производителя сроком от года и более, что подтверждает его подлинность и надёжность.
Your comment is awaiting moderation.
ExpandYou rMind – Loved the neat design, browsing felt easy and very intuitive indeed.
Your comment is awaiting moderation.
EverForest Picks – Plenty of choice here, and everything responded instantly while browsing.
Your comment is awaiting moderation.
Гадание онлайн проводит точные расклады на ближайшее будущее, каждый сеанс уникален и индивидуален, Валерия Карат работает с любовной магией и отношениями, вы получаете результат сразу после сеанса, любовь, отношения, брак — любые темы, опытные техники и энергетические практики помогают найти ответы, быстрый и точный метод для важных вопросов, каждый клиент получает персональные рекомендации, поддержка и наставления от ясновидящей для длительного результата, все вопросы решаются дистанционно, без лишней суеты, Валерия Карат работает с энергетикой клиента и личными вопросами, консультации проводятся в комфортных условиях для клиента, методы проверены временем и опытом, Валерия Карат помогает расставить приоритеты и выбрать правильное действие, онлайн сеанс легко провести из дома, каждый расклад сопровождается объяснениями и рекомендациями, Валерия Карат помогает вернуть любовь и доверие, каждое решение учитывает уникальные обстоятельства, расклад показывает четкий результат, вы можете доверять профессионализму Валерии Карат, онлайн гадание помогает с выбором партнера, карьерой и личными решениями.
https://valeriakarat.ru/
Your comment is awaiting moderation.
Гадание Валерия Карат дарит уверенность и понимание в личной жизни, каждое гадание построено по авторской методике, помогает решить проблемы с партнером и вернуть гармонию, расклады проводятся через интернет без визита в офис, поиск ответов на сложные эмоциональные ситуации, опытные техники и энергетические практики помогают найти ответы, идеально подходит для оперативных решений, выходят на свет скрытые причины конфликтов и недопониманий, доступно как разовое гадание, так и серия сеансов, онлайн консультации позволяют экономить время и силы, каждый расклад помогает принять верное решение, результаты приходят сразу после общения, расклады дают возможность увидеть истинные чувства, консультации раскрывают скрытые аспекты вашей ситуации, онлайн сеанс легко провести из дома, гадание дает эмоциональную поддержку и практические рекомендации, Валерия Карат помогает вернуть любовь и доверие, каждое решение учитывает уникальные обстоятельства, расклад показывает четкий результат, расклады построены на авторских методиках, онлайн гадание помогает с выбором партнера, карьерой и личными решениями.
https://valeriakarat.ru/
Your comment is awaiting moderation.
Got a breakdown? https://locksmithsinwatford.com service available to your home or office.
Your comment is awaiting moderation.
сделал заказ в этом магазине первый раз, заказывал 2гр. 400f на пробу, а пришло 3,3гр., очень доволен))) https://eco-kedr.ru Был постоянным клиентом магаза , неделю назад прислали с нулевым эфектом , года два назад была проблема с ними, решили сразу , сейчас на вопрос -как будем решать , ответили что мы решим – напишите в конце недели , типа не разводите панику на форуме недельку , а мы пока людей пошвыряем…. , неделя прошла , на вопросы не отвечают…решать не хотят…. был магаз ровный , теперь людей решили покидать…. админы вообще никуда не смотрят , раньше хоть как то было гарантией что они в списке доверенных , сейчас деньги заплатили за форум , выставились и швыряют .ОО мне то же все пришло!
Your comment is awaiting moderation.
honestcraftstore – Clean interface and easy-to-follow product sections, shopping felt smooth.
Your comment is awaiting moderation.
Таро онлайн бесплатно предоставляет точный прогноз по вашей проблеме одной картой. Вопрос о будущем никогда не был таким простым, и моментально получить ответ да или нет. Вы можете начать гадание без регистрации, с интерпретацией результата для вашего запроса. Гадание одной картой онлайн поможет сделать правильный выбор, даёт ясность и понимание текущей ситуации. Определите тему и откройте карту, чтобы узнать, что готовит вам судьба. Символика карт позволяет глубже проникнуть в суть вопроса. Онлайн гадание Таро – это удобный способ получать советы каждый день, и получать честный ответ без влияния посторонних факторов. Используйте расклад одной картой прямо сейчас, и откройте для себя мир точных предсказаний.
https://russiantaro.ru/
Your comment is awaiting moderation.
Odkryj mostbet casino: setki slotow, stoly na zywo, serie turniejow i bonusy dla aktywnych graczy. Przyjazny interfejs, wersja mobilna i calodobowa obsluga klienta. Ciesz sie hazardem, ale pamietaj, ze masz ukonczone 18 lat.
Your comment is awaiting moderation.
гадание Таро онлайн предоставляет точный прогноз по вашей проблеме за одну карту. Вы можете задать вопрос о работе, любви или финансах, и моментально получить ответ да или нет. Вы можете начать гадание без регистрации, с подробным описанием символики и значений. Онлайн расклад на одну карту подходит для новичков и опытных пользователей, позволяя принимать решения с уверенностью. Выберите вопрос, сконцентрируйтесь и тяните карту, чтобы узнать, что готовит вам судьба. Символика карт позволяет глубже проникнуть в суть вопроса. Онлайн гадание Таро – это удобный способ получать советы каждый день, и получать честный ответ без влияния посторонних факторов. Начните гадание Таро онлайн и узнайте свой ответ, и откройте для себя мир точных предсказаний.
https://russiantaro.ru/
Your comment is awaiting moderation.
https://ecro.fr/images/pgs/?code_promo_melbet_meilleur_bonus.html
Your comment is awaiting moderation.
https://abaah.com/wp-content/pages/preimuschestva_i_nedostatki_stenovyh_derevyannyh_reek.html
Your comment is awaiting moderation.
https://www.porada.sk/downloads/inc/1xbet_promo_code_promotions_promotion_1xbet_india_2021.html
Your comment is awaiting moderation.
Sage Corner – Easy-to-use menus and clear layout made shopping enjoyable.
Your comment is awaiting moderation.
https://christchurchshrewsbury.org/wp-content/pages/sovremennyy_kondicioner_ne_tolyko_regulirovka_temperatury_vnutri.html
Your comment is awaiting moderation.
Правило говоришь Бро! А про работу магазина могу сказать что он работает великолепно! https://fslgg.ru всем доброго дня) не подскажите, в беларусь(минск) можно сделать заказ с этого магазина ? или вообще хоьт какой нибудь магазин который в минск вышлет подскажите плз) ответ в лс плиз)это самый лучший магазин ставлю 5+ потому что куча раз брал на рампушке и всегда находил, тут всё так же.
Your comment is awaiting moderation.
harbor finds – Smooth scrolling and organized interface improved the experience.
Your comment is awaiting moderation.
проститутки с апартаментами в нижневартовске
Your comment is awaiting moderation.
Strona internetowa mostbet – zaklady sportowe, zaklady e-sportowe i sloty na jednym koncie. Wygodna aplikacja mobilna, promocje i cashback dla aktywnych graczy oraz roznorodne metody wplat i wyplat.
Your comment is awaiting moderation.
UrbanTrendWorld – Easy to browse with a nice layout, loved the collection of items.
Your comment is awaiting moderation.
Официальный Tor браузер обеспечивает кракен tor доступ через предустановленные настройки безопасности с отключенным JavaScript и строгой изоляцией каждой вкладки от других процессов.
Your comment is awaiting moderation.
Golden Savanna Goods – Everything felt thoughtfully arranged, making browsing smooth.
Your comment is awaiting moderation.
http://wisdomwell.forumex.ru/viewtopic.php?t=917
Your comment is awaiting moderation.
привет бразы, хочу нахватить вот реги, что за качество скажите? надеюсь не 15 минутка? купить скорость, кокаин, мефедрон, гашиш хочу извинится за поднятую панику(думаю ТС меня понимает , т.к. все мы люди и переживаем за свои деньги,тем более сфера деятельности расшатывает нервы как не крути).зная теперь с чем была связана данная проблема с поставками и положительным финалом в порядочности ТС не сомневаюсь.на данный момент работа налажена,в чем убедился сам и наслышан от других.парни все ок проверенно )))
Your comment is awaiting moderation.
Coastline Hub – The site is easy to explore, with products displayed neatly for quick choice.
Your comment is awaiting moderation.
onlinerankingstudio.shop – Navigation felt smooth, found everything quickly without any confusing steps.
Your comment is awaiting moderation.
creativegrowthagency.shop – Pages loaded fast, images appeared sharp, and formatting stayed consistent.
Your comment is awaiting moderation.
seoagencysolutions.shop – Navigation felt smooth, found everything quickly without any confusing steps.
Your comment is awaiting moderation.
https://bioenergetic-therapy.com/media/pgs/1xbet_promo_code_for_registration_21.html
Your comment is awaiting moderation.
maximumtrafficservice.shop – Appreciate the typography choices; comfortable spacing improved my reading experience.
Your comment is awaiting moderation.
smarttrafficboost.shop – Bookmarked this immediately, planning to revisit for updates and inspiration.
Your comment is awaiting moderation.
fresh selections – Easy to move around the site, and the pages stayed clean and organized.
Your comment is awaiting moderation.
https://adyghe.ru/manul/inc/?promokod_bukmekerskoy_kontoru_melbet.html
Your comment is awaiting moderation.
harbor store – Navigation felt natural and products were easy to find.
Your comment is awaiting moderation.
продолжайте работу в таком же духе. клады всегда целые и надежные, что очень радует! купить Мефедрон, Бошки, Марихуану курануть попробывать эту чткуМагазу респект и процветания!!!)))
Your comment is awaiting moderation.
wavehubcollective – Items are clearly presented, making browsing quick and pleasant.
Your comment is awaiting moderation.
Подробнее на сайте: погода по городам казахстана
Your comment is awaiting moderation.
BrightGroveHub Goods – The streamlined layout helped me jump between pages without delay.
Your comment is awaiting moderation.
cloud finds – Fast pages and organized layout made browsing pleasant.
Your comment is awaiting moderation.
Вчера оплатил, сегодня уже трек скинули. Пока все ровно, посмотрим что придет….. https://cscvod.ru Как товар господа?Магазин работатет? отпишите кто совершил сделку в последнее время
Your comment is awaiting moderation.
SmartSelectionCorner – Very neat and organized, navigation was quick and simple.
Your comment is awaiting moderation.
Visit MoonView Designs – Modern and tidy interface, making product discovery simple and pleasant.
Your comment is awaiting moderation.
Хочу всех поздравить с наступающим Новым Годом и хочу поделиться с вами своей оптовой сделкой СК крисов. https://art-log.ru На письма не отвечают, щас будем звонить и орать матом…сегодня оплатил заказ..буду ждать доставки..протестирую.сообщу о качестве продукта?
Your comment is awaiting moderation.
Wild Ridge Collection Online – Smooth browsing and clear presentation made shopping fast.
Your comment is awaiting moderation.
http://skoda.clanfm.ru/viewtopic.php?f=2&t=160
Your comment is awaiting moderation.
http://koxma.4adm.ru/viewtopic.php?f=178&t=7397
Your comment is awaiting moderation.
https://penzu.com/p/f68afb1da112d40d
Your comment is awaiting moderation.
https://1xbetvipsa.blogspot.com/2025/12/programme-vip-melbet-cashback-et.html
Your comment is awaiting moderation.
soft summer shop – Browsing was smooth and items were easy to locate.
Your comment is awaiting moderation.
они на телефон должны позвонить,обычно так https://oooaleks.ru Ранее заказывал у данного селлера продукцию,качеством всегда был доволен,как и уровнем поддержки пользователей,сегодня же списался с ним по поводу небольшой технической ошибки при фасовке,и был рад узнать,что честность селлера на том же уровне,что и качество продукции.Очень благодарен создателям сайта,тем кто все это делает.Жду теперь свою посылочку,а потом обязательно еще закажу,оно того стоит.Спасибо вам ребята ,за помощь,и понимание.да в пятницу отправляли… вот до сих пор небьеться… нервничаю…
Your comment is awaiting moderation.
Lush Grove Essentials – Well-structured pages and clear product photos made choosing items easy.
Your comment is awaiting moderation.
https://towing.com.pl
Your comment is awaiting moderation.
top picks – I appreciated how clean and fast the site was, making product browsing simple.
Your comment is awaiting moderation.
Не знаю как в этом магазе,а вот у всеми так уважаемой Мануфактуры тоже весной всплыло такое гавницо.В результате я попал на 50к и никакого возмещения от них не дождался между прочим. https://dety-cvr.ru привет )Адекватным людям ценящих проффесианолизм рекомендую реактивы тут тарить…
Your comment is awaiting moderation.
https://www.litteredtrash.com/blogs/5085/%D0%9F%D1%80%D0%BE%D0%BC%D0%BE%D0%BA%D0%BE%D0%B4-1%D1%85%D0%B1%D0%B5%D1%82-%D0%A1%D0%BE%D0%B2%D0%B5%D1%82%D1%8B-%D0%BF%D0%BE-%D0%B2%D1%8B%D0%B1%D0%BE%D1%80%D1%83
Your comment is awaiting moderation.
https://quanticalabs.com/wp_themes/pressroom/2014/07/06/find-out-why-this-headphone-is-superb/#page-796
Your comment is awaiting moderation.
discover items – Everything appeared neatly, and moving between sections was effortless.
Your comment is awaiting moderation.
TrendyLifestyleShop – Excellent range of products, very easy and satisfying shopping.
Your comment is awaiting moderation.
UrbanMist Home – I found the entire catalog quickly due to the thoughtful and clear site organization.
Your comment is awaiting moderation.
leafwildemporiumhub – Interface is clean, and shopping feels relaxed and easy.
Your comment is awaiting moderation.
PureLeafEmporium – Browsing today felt pleasant, the site’s structure is clear and intuitive.
Your comment is awaiting moderation.
shop stone boutique – Quick loading and tidy design made exploring products straightforward.
Your comment is awaiting moderation.
да магаз отличный.оперативно работают.и качество товара отличное.вобщем всё хорошо. https://fslgg.ru раньше ваш магаз в аське работал , мих клевый былСочи – мёд отличный, кладмену респект и уважуха! теперь мы ваши постоянные клиенты)
Your comment is awaiting moderation.
ShopWithJoy – Love the deals offered here, prices are fair and shipping was fast.
Your comment is awaiting moderation.
Доставка грузов https://avalon-transit.ru из Китая «под ключ» для бизнеса и интернет-магазинов. Авто-, ж/д-, морские и авиа-перевозки, консолидация на складах, проверка товара, страхование, растаможка и доставка до двери. Работаем с любыми партиями — от небольших отправок до контейнеров. Прозрачная стоимость, фотоотчёты, помощь в документах и сопровождение на всех этапах логистики из Китая.
Your comment is awaiting moderation.
ответь те на мыло я еще вчера вам написал! купить Мефедрон, Бошки, Марихуану Отличный магазин, отличный оператор, отличный товар. Адрес нашли быстро и без проблем, забрали и ушли. Большое спасибо магазину. Всем советую!КАчество товара отменное ! Жду в наличии ДМТ :happy
Your comment is awaiting moderation.
meadowchoiceemporium – Clear layout and well-presented products, browsing felt simple and enjoyable.
Your comment is awaiting moderation.
EasyChoiceHub – Smooth browsing and fast checkout, I’ll shop here again.
Your comment is awaiting moderation.
Future Harbor Collection – The website helped me quickly locate everything I was looking for.
Your comment is awaiting moderation.
sunlit wooden boutique – Fast-loading pages and organized layout made shopping simple.
Your comment is awaiting moderation.
Shop Soft Blossom – Gentle visuals and smooth layout created a soothing shopping experience.
Your comment is awaiting moderation.
Давно не читала столько положительных отзывов !так держать ) купить скорость, кокаин, мефедрон, гашиш “про “шапку” вы все горазды писать в интернете…”И продавать в интернете Вы все горазды,х..й догонишь и не спорсишь!магазин работает как щвецарские часы!!!!
Your comment is awaiting moderation.
Геосинтетические материалы https://stsgeo.ru для строительства купить можно у нас с профессиональным подбором и поддержкой. Продукция для укрепления оснований, армирования дорожных одежд, защиты гидроизоляции и дренажа. Предлагаем геотекстиль разных плотностей, георешётки, геомембраны, композитные материалы.
Your comment is awaiting moderation.
Многоуровневая защита обеспечивает кракен даркнет вход через двухфакторную аутентификацию TOTP, дополнительные PIN коды для критических операций и seed фразу для восстановления доступа.
Your comment is awaiting moderation.
новости беларуси сегодня новости беларуси
Your comment is awaiting moderation.
TallPineEmporium Hub – Intuitive design and organized sections made navigation simple.
Your comment is awaiting moderation.
https://towing.com.pl
Your comment is awaiting moderation.
Fresh Pine Boutique – The site feels tidy, and items load fast, making selection easy.
Your comment is awaiting moderation.
А с какого дживика еще больше делать можно? https://service680269.ru Мы уверены что гарант не нужен магазину работающему с 2011 года + мы не работаем с биткоинами + везде положительные отзывы .Клад сделан очень грамотно в безлюдном месте, к кладу прилагалось фото на котором указано место закладки.
Your comment is awaiting moderation.
fresh trend picks – Enjoyed how easy it was to move through categories; the items looked thoughtfully arranged.
Your comment is awaiting moderation.
urban corner – Clean layout and quick loading made browsing hassle-free.
Your comment is awaiting moderation.
Строительство домов https://никстрой.рф под ключ — от фундамента до чистовой отделки. Проектирование, согласования, подбор материалов, возведение коробки, кровля, инженерные коммуникации и внутренний ремонт. Работаем по договору, фиксируем смету, соблюдаем сроки и технологии. Поможем реализовать дом вашей мечты без стресса и переделок, с гарантией качества на все основные виды работ.
Your comment is awaiting moderation.
Доставка торфа https://bio-grunt.ru и грунта по Москве и Московской области для дач, участков и ландшафтных работ. Плодородный грунт, торф для улучшения структуры почвы, готовые земляные смеси для газона и клумб. Быстрая подача машин, аккуратная выгрузка, помощь в расчёте объёма. Работаем с частными лицами и организациями, предоставляем документы. Сделайте почву на участке плодородной и готовой к посадкам.
Your comment is awaiting moderation.
Доставка дизельного топлива https://ng-logistic.ru для строительных компаний, сельхозпредприятий, автопарков и промышленных объектов. Подберём удобный график поставок, рассчитаем объём и поможем оптимизировать затраты на топливо. Только проверенные поставщики, стабильное качество и точность дозировки. Заявка, согласование цены, подача машины — всё максимально просто и прозрачно.
Your comment is awaiting moderation.
магазин роботает отлично сам проверил и не поверю не каму кто скажет что это не так купить Мефедрон, Бошки, Марихуану Да хоть в очко засыпь, не торкнетхотелось бы услышать какоето обьяснение?????
Your comment is awaiting moderation.
casino Stake https://stake-no.com/
Your comment is awaiting moderation.
urbanclovermarket – Smooth interface, products are clearly visible and easy to locate.
Your comment is awaiting moderation.
brightvillagecorner – Items look appealing and layout feels user-friendly and welcoming overall.
Your comment is awaiting moderation.
https://towing.com.pl
Your comment is awaiting moderation.
Сотрудники , знают свое дело , лучше другого. купить Мефедрон, Бошки, Марихуану Оправдания в небе не ищут,Ну во-первых мы совершенно другой магазин, так что вы ошиблись веткой, и представительств в тех городах у нас нет
Your comment is awaiting moderation.
Main Shop Page – It’s a refreshingly straightforward online store that’s a joy to use.
Your comment is awaiting moderation.
TrendyLifestyleZone – Content is appealing and keeps you interested, enjoyable experience.
Your comment is awaiting moderation.
Lush Picks – Browsing was efficient and enjoyable thanks to clear navigation.
Your comment is awaiting moderation.
Ребята хватит писать бред про арестованные посылки продавец ни в чем не виноват!!! Берите закладками!!! Продавец выполняет свою работа на 100% с ним всегда все четко даже подарок сделал ко дню рождению!!! Бро ты лучший!!! https://mos-akpp.ru пиши в контакты, разберутся. мб попутали что.Привет! Что хочу сказать по поводу работы магазина- просто супер, связались сразу, приняли заказ, обработали и на следующий день он уже в пути. 3 дня и уже у меня. Качество отличное! В общем респект Вам ребята, так держать, не сбавляйте оборотов и хорошо будет всем!
Your comment is awaiting moderation.
harbor hub – Items loaded quickly and the layout is easy to follow.
Your comment is awaiting moderation.
PureStyleCollection – Trendy items and a smooth shopping experience, truly enjoyable.
Your comment is awaiting moderation.
Инженерные изыскания https://sever-geo.ru в Москве и Московской области для строительства жилых домов, коттеджей, коммерческих и промышленных объектов. Геология, геодезия, экология, обследование грунтов и оснований. Работаем по СП и ГОСТ, есть СРО и вся необходимая документация. Подготовим технический отчёт для проектирования и согласований. Выезд на объект в короткие сроки, прозрачная смета, сопровождение до сдачи проекта.
Your comment is awaiting moderation.
Колодцы под ключ https://kopkol.ru в Московской области — бурение, монтаж и обустройство водоснабжения с гарантией. Изготавливаем шахтные и бетонные колодцы любой глубины, под ключ — от проекта до сдачи воды. Работаем с кольцами ЖБИ, устанавливаем крышки, оголовки и насосное оборудование. Чистая вода на вашем участке без переплат и задержек.
Your comment is awaiting moderation.
Вы же разумный человек, должны понимать все это. купить скорость, кокаин, мефедрон, гашиш CHEMICAL MIX спасибо огромное!!!сегодня в 16:25 на почте получен конверт ,в нем было вещество лимоного цвета 0,3 г , сохнет ,позже подробно опишу
Your comment is awaiting moderation.
Shop Rustic River – Fast-loading site with a warm, inviting layout that made browsing pleasant.
Your comment is awaiting moderation.
Soft Leaf Crafts – Smooth navigation and visible items helped me browse effortlessly.
Your comment is awaiting moderation.
product hub – Nice clean design and easy-to-use navigation made checking products simple.
Your comment is awaiting moderation.
Я просто уже настолько завязан со сферой Lrc что подмечаю все мелочи. Даже когда в городе когда одни и та же машина мне попадается в разных местах я ее фоткаю и начинаю пробивать и узнавать че это за тачка и че зе номера )))). купить кокаин, меф, бошки через телеграмм магазин ровныйУ меня разок было, что трек перестал на два дня отслеживатся, но нечего доставили все пучком.
Your comment is awaiting moderation.
river hub link – Clear structure and intuitive browsing made finding products easy.
Your comment is awaiting moderation.
everpeakcorner – Clean interface and clear product display helped make browsing smooth and easy.
Your comment is awaiting moderation.
forestlunarboutique – Smooth browsing, products are neatly organized and easy to explore.
Your comment is awaiting moderation.
Клиника проктологии https://proctofor.ru в Москве с современным оборудованием и опытными врачами. Проводим деликатную диагностику и лечение геморроя, трещин, полипов, воспалительных заболеваний прямой кишки. Приём по записи, без очередей, в комфортных условиях. Бережный подход, щадящие методы, анонимность и тактичное отношение.
Your comment is awaiting moderation.
Платформа для работы https://skillstaff.ru с внешними специалистами, ИП и самозанятыми: аутстаффинг, гибкая и проектная занятость под задачи вашей компании. Найдем и подключим экспертов нужного профиля без длительного найма и расширения штата.
Your comment is awaiting moderation.
Вчера только оформил заказ на 2с-i и 4-FA – СЕГОДНЯ!!!! уже пришёл. Забрал. Туси не стану – пробывал до этого (нарекания отсутствуют в принципе) https://galvanika-barnaul.ru Я в личку когда ещё писал, интересовался, думал заказать, но так и не было ответа на мои вопросы!!! Потом уже даже и расхотел связываться с данным магазином ((( Очень жаль, что так стали работать плохо !!! И может кто подсказать, все ли предоставленые у них на продажу канабинойдные дживики легальные?люди которые делают заказы через ВК по меньшей мере идиоты. Особенно когда ИМ самим что то предлагают.
Your comment is awaiting moderation.
Sun Crest Collection – Well-laid-out products and structured pages made browsing fast.
Your comment is awaiting moderation.
Клиника проктологии https://proctofor.ru в Москве с современным оборудованием и опытными врачами. Проводим деликатную диагностику и лечение геморроя, трещин, полипов, воспалительных заболеваний прямой кишки. Приём по записи, без очередей, в комфортных условиях. Бережный подход, щадящие методы, анонимность и тактичное отношение.
Your comment is awaiting moderation.
Платформа для работы https://skillstaff.ru с внешними специалистами, ИП и самозанятыми: аутстаффинг, гибкая и проектная занятость под задачи вашей компании. Найдем и подключим экспертов нужного профиля без длительного найма и расширения штата.
Your comment is awaiting moderation.
creativeclicksagency.shop – Overall, professional vibe here; trustworthy, polished, and pleasantly minimal throughout.
Your comment is awaiting moderation.
superiorrankingstudio.shop – Mobile version looks perfect; no glitches, fast scrolling, crisp text.
Your comment is awaiting moderation.
powerfulgrowthagency.shop – Found practical insights today; sharing this article with colleagues later.
Your comment is awaiting moderation.
digitalperformancelab.shop – Content reads clearly, helpful examples made concepts easy to grasp.
Your comment is awaiting moderation.
clickmarketingcenter.shop – Pages loaded fast, images appeared sharp, and formatting stayed consistent.
Your comment is awaiting moderation.
я не согласен предыдущем коментариям ,беру не первый раз ,на данный момент магазин самый охриненный ,всегда качество товара радует,всегда на связи они,они не когда не морозятся,своё дело знают чётко,нахрена им кидать ,они не будут портить свою репутацию какую уже заработал этот магазин,я беру поболее и меня не разу сдесь не кинули .процветания магазину .спасибо за вашу работу,что всё чётко и быстро И радуете вкусняшками.а ещё хочу добавить ,возможно это кидаки или канкуренты и пишут разную х….ю что бы сбить новичков ,Но мы кто всегда с вами знаем что магазин лучший и другого Нам НЕНАДО.Так держать ,МЫ ВСЕГДА С ВАМИ!!! https://zavod-arm.ru спср только растраивает, такие деньги берут, и че то нифига не делают. Посыль уже 3 день лежит в г. Ё-XX. Хотя должны были привезти в близлежащий город. Но тут я узнал то что у нас нет в городе филиала ихнего. Вот и не понятно толи сами привезут, толи ехать до них надо.Всё пучком с магазом!!!!С Июля работаю доволен адекватное общение,недолгое решение проблем ,оперативная обработка заказа .Если гемор какой достучитесь в Скайп и всё решится!!!!!:hello:
Your comment is awaiting moderation.
freshmarketonline – The pages load quickly and browsing felt smooth, really enjoyable.
Your comment is awaiting moderation.
Bright Picks – Finding items was fast thanks to the intuitive design.
Your comment is awaiting moderation.
shop moon hub – Clean design and smooth scrolling made browsing enjoyable.
Your comment is awaiting moderation.
Everfield Decor Hub – Everything loaded fast and the layout made browsing simple and pleasant.
Your comment is awaiting moderation.
Это юмор. https://l2saw.ru Эти ребята лучшие в своем деле, качество плюс вес, никогда не подводили, КРАСАВЧИКИ !!!Лучшие!chemical-mix.com работает у кого ??? всё походу накрылся магаз :::???
Your comment is awaiting moderation.
LifestyleTrendsOnline – Really interesting content, very appealing and easy to explore.
Your comment is awaiting moderation.
ModernFashionSpot – Amazing items and simple navigation, shopping was fun and easy.
Your comment is awaiting moderation.
Wild Coast Finds – Well-arranged items and clear pages made browsing quick and simple.
Your comment is awaiting moderation.
Самое главное что на свободе фиг сним с грузом! Задумайтесь ребят может пора сесть на дно, чтоб палево отвести! https://glossgirl.ru Да тоже заказал на след день трек получил очень оперативно респект чувакаммагазину желаю дальнейшего процветания и минимум траблов(а лучше вовсе без них).?
Your comment is awaiting moderation.
Timeless Harvest Store Link – Easy-to-follow layout with items clearly presented for a smooth experience.
Your comment is awaiting moderation.
market picks – Everything was well arranged, making navigation comfortable and quick.
Your comment is awaiting moderation.
Vibe Market – Shopping here is easy with a responsive and well-structured catalog.
Your comment is awaiting moderation.
sunwave corner – The site is well organized and exploring items was effortless.
Your comment is awaiting moderation.
coastalmistemporium – Smooth browsing, items are clearly presented and accessible.
Your comment is awaiting moderation.
продолжайте работу в таком же духе. клады всегда целые и надежные, что очень радует! https://ural-print.ru Хороший магазин все качественно и оперативно и быстро, всегда здесь покупаю.всем доброго дня) не подскажите, в беларусь(минск) можно сделать заказ с этого магазина ? или вообще хоьт какой нибудь магазин который в минск вышлет подскажите плз) ответ в лс плиз)
Your comment is awaiting moderation.
оплатил 31го, сегодня все уже получил! Продавану, спасибо за оперативность!:ok: купить скорость, кокаин, мефедрон, гашиш Лучший магазин !!!Вот это я понимаю СЕРВИС:ok: Превзошло все мои ожидания, доставили раньше обещанного… Магаз ровный (до последнего сомневался, что всё на столько гладко…)
Your comment is awaiting moderation.
Moon Haven Finds – Browsing was easy and the items were displayed clearly.
Your comment is awaiting moderation.
shop wild boutique – Smooth scrolling and fast pages made discovering items simple.
Your comment is awaiting moderation.
долго гуляя по форуму, выбирал хороший магазин для себя. хотелось чтоб устраевало все! прежде всего меня интересовало качество товара и его цена! хотелось чтоб цена была доступной! так же есть большое желание всегда получать товар 100% т.к. в закладочных магазинах бывают случаи не находа, такие магазины для постоянных покупок рассматривать не стал! рассматривалось много вариантов! ну гдегде же всетаки заказать??? то предлогают сразу слишком много товара (ну как же брать если ты сам лично не знаешь за его качество)??? бывало чаще всего не устраевал сервис обслуживания! https://kushetka37.ru номер отправления, по нему отслеживается посылка курьерской службы.можно узнать, как принимали ? интрозально, в\м ?
Your comment is awaiting moderation.
smartgrowthengine.shop – Overall, professional vibe here; trustworthy, polished, and pleasantly minimal throughout.
Your comment is awaiting moderation.
rankblaze.shop – Bookmarked this immediately, planning to revisit for updates and inspiration.
Your comment is awaiting moderation.
authorityranklabs.shop – Bookmarked this immediately, planning to revisit for updates and inspiration.
Your comment is awaiting moderation.
marketingsupportcenter.shop – Bookmarked this immediately, planning to revisit for updates and inspiration.
Your comment is awaiting moderation.
clickconversionpro.shop – Mobile version looks perfect; no glitches, fast scrolling, crisp text.
Your comment is awaiting moderation.
EverduneGoods Products – A tidy structure kept browsing simple and enjoyable from start to finish.
Your comment is awaiting moderation.
DeepBrook Corner Shop – The layout is clean and products are easy to find, making shopping smooth.
Your comment is awaiting moderation.
качество супер!!! https://property-mos.ru заказал, получил трек, пока не бьется.За АМ 1220 ничего сказать не могу – не пробовал…. Но, после тестирования 694 и 2201 впечатления о линейке АМ у меня сильно подпортились (
Your comment is awaiting moderation.
urbanwildroot – Navigation was intuitive and finding items was hassle-free — really appreciated that.
Your comment is awaiting moderation.
autumnstonecorner – The layout is neat and navigation is intuitive, which helps greatly when exploring products.
Your comment is awaiting moderation.
SoftMorning Shoppe – The attractive product presentations and clean layout made for a very relaxing browse.
Your comment is awaiting moderation.
soft boutique access – Navigation felt easy and items were simple to explore.
Your comment is awaiting moderation.
непонимающий человек, были сложности в работе курьера сейчас все в порядке. купить скорость, кокаин, мефедрон, гашиш Наблюдая за многими сообщениями, мы понимаем что многие на форуме не более чем очень “кипишные люди”, которые любят разводить демагогию.в кемерово откроетесь??
Your comment is awaiting moderation.
Sunny Slope Corner – Quick to locate items and the layout feels friendly.
Your comment is awaiting moderation.
tranquilwoodshub – Layout is tidy, finding products is quick and easy.
Your comment is awaiting moderation.
corner shop access – The clean overview helped me navigate comfortably and spot items easily.
Your comment is awaiting moderation.
All the latest is here: http://gsa.primaryhub.com/2025/10/08/top-2-unikalnyh-magazina-dlja-udobnoj-i-bystroj-7/
Your comment is awaiting moderation.
PineHill Hub – The layout was easy on the eyes, making product discovery simple and enjoyable.
Your comment is awaiting moderation.
More details One click: https://otzywok.ru/forums/topic/verificzirovannyj-biznes-menedzher-fejsbuk/
Your comment is awaiting moderation.
createpick – Fast-loading pages, easy to browse products, and smooth interface.
Your comment is awaiting moderation.
Details at the link: https://kktix.com/user/7908303
Your comment is awaiting moderation.
Today’s Top Stories: https://yload.ro/arbitrazh-trafika-chto-jeto-takoe-i-kak-na-nem/
Your comment is awaiting moderation.
Как у вас дела бразы?) купить скорость, кокаин, мефедрон, гашиш все ровно вот только из за нового года была задержка а так все на высотереальный магаз всем советую
Your comment is awaiting moderation.
Silver Moon Fabrics Finds – Very easy to navigate, and the items were displayed clearly.
Your comment is awaiting moderation.
silverhubstore – Clear layout and well-organized pages, shopping felt effortless.
Your comment is awaiting moderation.
он чють чють с желта купить кокаин, меф, бошки через телеграмм В своё время работали по опту!даа, уж что что, а 250й тут классный ) хомячки так и просят добавки
Your comment is awaiting moderation.
Доставка грузов https://china-star.ru из Китая для бизнеса любого масштаба: от небольших партий до контейнеров. Разработаем оптимальный маршрут, оформим документы, застрахуем и довезём груз до двери. Честные сроки и понятные тарифы.
Your comment is awaiting moderation.
studio corner – Browsing felt comfortable and all products were easy to explore.
Your comment is awaiting moderation.
Национальные Дни Парусного Оздоровления – это лучший выбор для активных личностей, которые ищут действенные методы для восстановления сил. Этот уникальный формат предлагает гармоничное сочетание морского приключения и персонального роста. Вас ожидает удивительное приключение продолжительностью десять дней, в течение которых вы откроете для себя красоту морских просторов. Каждый новый день будет наполнен работой с парусами и свежим морским воздухом. Опытные капитаны и дипломированные диетологи расскажут о главных принципах здорового образа жизни и правильного питания на борту. Главной целью программы является не просто обычный тур выходного дня, а создание прочного фундамента для будущих изменений. Вы освоите не просто азы яхтинга, но и сбалансировано питаться, закалять характер и находить внутренний баланс. Океан является великолепным естественным источником энергии, а работа в команде учит доверию и взаимопомощи. Спустя десять дней этого невероятного плавания вы обретете новый взгляд на свою жизнь и здоровье. Вы вынесете для себя не только памятные моменты и эмоции, но и конкретные знания для сохранения прекрасного самочувствия. National Sailing Wellness Days — это инвестиция в ваше будущее, где здоровье и активность становятся неотъемлемой частью каждого дня. Не упустите свой шанс изменить жизнь к лучшему, выбрав отдых, что принесет максимальную пользу телу и духу.
https://healthandsailing.ru/
Your comment is awaiting moderation.
Программа National Sailing Wellness Days – это идеальное решение для современных людей, которые ищут действенные методы для восстановления сил. Данная инновационная программа предлагает гармоничное сочетание морского приключения и персонального роста. Членов команды ждет захватывающий вояж продолжительностью десять дней, в течение которых вы станете частью дружной команды. Каждый новый день будет наполнен морской практикой и целебным воздействием природы. Опытные капитаны и дипломированные диетологи расскажут о главных принципах здорового образа жизни и правильного питания на борту. Основной миссией этих дней становится не просто временный отдых от городской суеты, а фундаментальная перезагрузка ваших привычек. Вы получите не только практические навыки морехода, но и сбалансировано питаться, закалять характер и находить внутренний баланс. Море выступает в роли мощного природного терапевта, а совместная работа под парусами развивает коммуникабельность и ответственность. После завершения этой замечательной программы вы обретете новый взгляд на свою жизнь и здоровье. Вам достанется не просто багаж впечатлений и фото, но и реальный инструментарий для поддержания отличной формы. Программа National Sailing Wellness Days — это вклад в ваше долголетие, где здоровье и активность становятся неотъемлемой частью каждого дня. Примите правильное решение и отправляйтесь в путешествие мечты, став участником программы, которая задаст новый вектор развития.
https://healthandsailing.ru/
Your comment is awaiting moderation.
Онлайн-ферма https://gvrest.ru Гастродача «Вселуг»: закажите свежие фермерские продукты с доставкой по Москве и Подмосковью. Мясо, молоко, сыры, овощи и домашние деликатесы без лишних добавок. Удобный заказ, быстрая доставка и вкус настоящей деревни.
Your comment is awaiting moderation.
expertseostrategies.shop – Color palette felt calming, nothing distracting, just focused, thoughtful design.
Your comment is awaiting moderation.
onlinebusinessbooster.shop – Color palette felt calming, nothing distracting, just focused, thoughtful design.
Your comment is awaiting moderation.
fullservicemarketing.shop – Appreciate the typography choices; comfortable spacing improved my reading experience.
Your comment is awaiting moderation.
народ а присылают вместе с заключением экспертизы? купить кокаин, меф, бошки через телеграмм 1.зачем указано столько платежных систем,коли их нет?С возвращением друг!!!!адекватных клиентов,спокойных и прибыльных деньков)))
Your comment is awaiting moderation.
digitalpresencelab.shop – Pages loaded fast, images appeared sharp, and formatting stayed consistent.
Your comment is awaiting moderation.
Онлайн-ферма https://gvrest.ru Гастродача «Вселуг»: закажите свежие фермерские продукты с доставкой по Москве и Подмосковью. Мясо, молоко, сыры, овощи и домашние деликатесы без лишних добавок. Удобный заказ, быстрая доставка и вкус настоящей деревни.
Your comment is awaiting moderation.
Доставка грузов https://china-star.ru из Китая для бизнеса любого масштаба: от небольших партий до контейнеров. Разработаем оптимальный маршрут, оформим документы, застрахуем и довезём груз до двери. Честные сроки и понятные тарифы.
Your comment is awaiting moderation.
Soft Feather Studio – Organized layout and responsive design helped me browse efficiently.
Your comment is awaiting moderation.
brightfallstudio – Enjoyed browsing here, items seem well curated and easy to explore.
Your comment is awaiting moderation.
У меня кстати тоже через 2 дня пришло, но в соседний город, так как в моём городе этой конторы не оказалось) но мне сразу позвонили, и предложили либо самому приехать за пакетом, либо подождать до вторника и мне его привезут домой. Вот жду) купить онлайн мефедрон, экстази, бошки трек получен, ребятам уважуха:rasta:сказали отпрака на следующий день после платежа!
Your comment is awaiting moderation.
softmeadowstudio – The shop gives a calm, trustworthy vibe — everything seems well organized and thoughtfully arranged.
Your comment is awaiting moderation.
everstonecorner – Product layout is clean and browsing items was smooth without delays or clutter.
Your comment is awaiting moderation.
urbanhillemporiumhub – Products are neatly arranged, making browsing pleasant and straightforward.
Your comment is awaiting moderation.
suncrest hub – Items appeared quickly and the site structure made shopping straightforward.
Your comment is awaiting moderation.
Visit PureEverWind – I found the site’s layout to be incredibly intuitive and easy to browse.
Your comment is awaiting moderation.
пот теории 2мл растворителя на 1г основы,т.е на 150г 300мл. https://service680269.ru заказал и оплатил ещё в понедельник, сегодня пятница но трэка до сих пор нет, раньше такого не было а в этот раз че то медлятотменное :dance:
Your comment is awaiting moderation.
Независимый сюрвейер https://gpcdoerfer1.com в Москве: экспертиза грузов, инспекция контейнеров, фото- и видеопротокол, контроль упаковки и погрузки. Работаем оперативно, предоставляем подробный отчёт и подтверждаем качество на каждом этапе.
Your comment is awaiting moderation.
shophubzone – Navigation is effortless, and all products are neatly arranged.
Your comment is awaiting moderation.
Mid River Collection – The clean design and organized categories made browsing efficient.
Your comment is awaiting moderation.
Whitestone Select – Effortless shopping with a neat and tidy interface.
Your comment is awaiting moderation.
Логистика из Китая https://asiafast.ru без головной боли: доставка грузов морем, авто и ЖД, консолидация на складе, переупаковка, маркировка, таможенное оформление. Предлагаем выгодные тарифы и гарантируем сохранность вашего товара.
Your comment is awaiting moderation.
Независимый сюрвейер https://gpcdoerfer1.com в Москве: экспертиза грузов, инспекция контейнеров, фото- и видеопротокол, контроль упаковки и погрузки. Работаем оперативно, предоставляем подробный отчёт и подтверждаем качество на каждом этапе.
Your comment is awaiting moderation.
Moor Picks – I could easily navigate and explore all product options.
Your comment is awaiting moderation.
Логистика из Китая https://asiafast.ru без головной боли: доставка грузов морем, авто и ЖД, консолидация на складе, переупаковка, маркировка, таможенное оформление. Предлагаем выгодные тарифы и гарантируем сохранность вашего товара.
Your comment is awaiting moderation.
Dream Big Daily – Tips and strategies to turn aspirations into actionable results.
Your comment is awaiting moderation.
rusticridgeboutique – Pleasant browsing experience, items are easy to view and site feels well structured.
Your comment is awaiting moderation.
туфта какаето https://bagparts.ru Полностью согласен !!!с чего они тебе отзывы писать будут если они груз две недели ждут? они че тебе экстросенсы и качество могут на расстоянии проверить? и извинений мало ты не на ногу в трамвае наступила следующий раз пусть магаз компенсирует бонусами за принесенные неудобства! кто со мной согласен добавляем репу!
Your comment is awaiting moderation.
Гастродача «Вселуг» https://gastrodachavselug1.ru фермерские продукты с доставкой до двери в Москве и Подмосковье. Натуральное мясо, молоко, сыры, сезонные овощи и домашние заготовки прямо с фермы. Закажите онлайн и получите вкус деревни без лишних хлопот.
Your comment is awaiting moderation.
Доставка грузов https://lchina.ru из Китая в Россию под ключ: море, авто, ЖД. Быстрый расчёт стоимости, страхование, помощь с таможней и документами. Работаем с любыми объёмами и направлениями, соблюдаем сроки и бережём груз.
Your comment is awaiting moderation.
Iron Valley Creations – Well-organized pages and detailed images helped me pick items easily.
Your comment is awaiting moderation.
leadconversionstudio.shop – Overall, professional vibe here; trustworthy, polished, and pleasantly minimal throughout.
Your comment is awaiting moderation.
proleadgeneration.shop – Overall, professional vibe here; trustworthy, polished, and pleasantly minimal throughout.
Your comment is awaiting moderation.
digitalmarketingzone.shop – Color palette felt calming, nothing distracting, just focused, thoughtful design.
Your comment is awaiting moderation.
clickoptimizationhub.shop – Content reads clearly, helpful examples made concepts easy to grasp.
Your comment is awaiting moderation.
Гастродача «Вселуг» https://gastrodachavselug1.ru фермерские продукты с доставкой до двери в Москве и Подмосковье. Натуральное мясо, молоко, сыры, сезонные овощи и домашние заготовки прямо с фермы. Закажите онлайн и получите вкус деревни без лишних хлопот.
Your comment is awaiting moderation.
Причем тут вообще он к нашему магазину ? https://speloekids.ru При “отменном” качестве 1к25 смело выходит. У вас отменное ?Ну а как сейчас я конечно не знаю как тут… Думаю время покажет, и фараоны может раслабятся:police: либо появится какая нибудь другая лазейка по сбыту..
Your comment is awaiting moderation.
Доставка грузов https://lchina.ru из Китая в Россию под ключ: море, авто, ЖД. Быстрый расчёт стоимости, страхование, помощь с таможней и документами. Работаем с любыми объёмами и направлениями, соблюдаем сроки и бережём груз.
Your comment is awaiting moderation.
authoritygrowthengine.shop – Mobile version looks perfect; no glitches, fast scrolling, crisp text.
Your comment is awaiting moderation.
brightwillowboutique – Clean design and easy layout helped me find interesting items fast.
Your comment is awaiting moderation.
hillcornermarket – Shopping feels calm, layout is neat and intuitive.
Your comment is awaiting moderation.
Как долго вы обрабатываете заказ? https://protransformator.ru сказали отпрака на следующий день после платежа!я начинаю выписывать недели за 2 до примерного окончания стратегических запасов))) и еще на черный день нычки есть)) простоев быть не должно)
Your comment is awaiting moderation.
top lakes picks – The arrangement made it effortless to explore everything without confusion.
Your comment is awaiting moderation.
True Horizon Market – Shopping is intuitive, and items are clearly displayed.
Your comment is awaiting moderation.
выбери категорию для себя : https://tesla36.ru все это только на доверии, белый кристаллический так же может быть 4фа….Качество на 5+:good:
Your comment is awaiting moderation.
Доставка грузов https://china-star.ru из Китая под ключ: авиа, авто, море и ЖД. Консолидация, проверка товара, растаможка, страхование и полный контроль транспортировки. Быстро, надёжно и по прозрачной стоимости.
Your comment is awaiting moderation.
shopcorner – Well-structured layout, products easy to explore, and navigation feels seamless.
Your comment is awaiting moderation.
Silver Moon Corner Finds – Pleasant browsing experience with intuitive navigation.
Your comment is awaiting moderation.
wild access – Clear sections and responsive design made shopping effortless.
Your comment is awaiting moderation.
Main Store Page – It’s a refreshingly fast and logically arranged online shopping destination.
Your comment is awaiting moderation.
raresensehub – Smooth interface and neatly presented products, shopping was effortless.
Your comment is awaiting moderation.
Вызвал такси;) https://anmanchicory.ru На прошлой неделе в среду, был оплачен заказ, вот уже среда следующей недели, праздники прошли, в скайпе они пока что не появлялись. Пологаю что магазин загулял.на icq – в четверг обещал трек, в пятницу обещал трек, пропал…
Your comment is awaiting moderation.
Cabin Cozy Essentials – Browsing is smooth and the layout is calming.
Your comment is awaiting moderation.
Betify Casino https://betifycasino.info/
Your comment is awaiting moderation.
Daily Flourish Hub – Explore actionable tips to help you thrive in everyday life.
Your comment is awaiting moderation.
LunarHarvestMart Online – Fast loading pages made browsing effortless and enjoyable.
Your comment is awaiting moderation.
EverWild Corner Shop – Easy navigation and fast-loading items made finding products simple.
Your comment is awaiting moderation.
Мать и мачеху+травяной сбор(успокаивающий). https://mebel-imp.ru Как то брал 25г реги, пришло быстро, но качество не впечатлило((покушать попробуй… и пиши сюда
Your comment is awaiting moderation.
brightwinterstore – Products look appealing and navigation is smooth — a good shopping experience.
Your comment is awaiting moderation.
у меня вообще когда порошок кидаешь и ациком заливаешь, раствор абсолютно прозрачный-.- и не прет вообще тупо куришь траву….. а вот кристалы не расворимые тоже имеются, я уже и толочь пытался седня и нагревом все бестолку… купить Кокаин, Мефедрон, Экстази смотря каким реагентом будешь бадяжитьХотелось бы услышать мнение продавца, по этому поводу
Your comment is awaiting moderation.
crimsonleafboutique – User-friendly, organized, and visually calm.
Your comment is awaiting moderation.
eco selection – Items are easy to view and the design feels calm and welcoming.
Your comment is awaiting moderation.
glowingridgehub – Enjoyed scrolling through products, everything felt organized and accessible without fuss.
Your comment is awaiting moderation.
Evergreen Boutique – Navigation is intuitive and products are well presented.
Your comment is awaiting moderation.
brightcoastgallery – Navigation is very straightforward, I could jump between categories without confusion.
Your comment is awaiting moderation.
Инфа с вашего сайта. Я уже брал 6-APB, и выглядел он несколько иначе. купить Кокаин, Мефедрон, Экстази Даже то что я из за тебя третий день на нервах это косяк!Ладно надеямся на лучшее,надежда умирает последней…так что смотрите внимательней что присылают, если не хотите словить передоз!!!
Your comment is awaiting moderation.
emporium hub link – Navigation felt effortless and products were displayed neatly.
Your comment is awaiting moderation.
Timber Crest Goods – Browsing was quick and stress-free thanks to clean structure.
Your comment is awaiting moderation.
Такие как я всегда обо всем приобретенном или полученном как пробник расписывают количество и качество, но такие же как я не будут производить заказ, не узнав обо всех качествах приобретаемого товара, ведь ни кто не хочет приобретать то, что выдают за оригинальный товар (описанный на форумах или в википедии), а оказывается на деле совсем другое. Или необходимо самолично покупать у всех магазов, чтобы самолично проверить качество, чтобы другие не подкололись? Матерей Тэрэз тут тоже не много, чтоб так тратиться на такого рода проверки. https://aroavt.ru лучше недобздеть чем перебздеть!!! братуха я надеюсь и у тебя все будет ГУД! держи в курсеМентам зачастую пофиг,легал-нелегал.Был бы человек хороший,статья найдётся.СПСР тоже чёт не нравится.Но и на Мажор экспрессе случаи принималова были,так что х.з….Увидел на сайте “ждём…”.О.флюрокока и rti 111!Очень ждём!АМТ тож вкусняшка,но тут обьебосам не завидую.Примут по полграмма и айда 20 часов как кот в стиральной машине
Your comment is awaiting moderation.
Wild online casino https://wild-casino.info/
Your comment is awaiting moderation.
вывод из запоя вывод из запоя срочно выезд
Your comment is awaiting moderation.
hubselection – Smooth browsing, intuitive interface, and items are clearly presented.
Your comment is awaiting moderation.
вывод из запоя отзывы вывод из запоя вызвать на дом
Your comment is awaiting moderation.
BrightStone Goods – Smooth layout and visible items allowed me to shop efficiently.
Your comment is awaiting moderation.
Седня 28.04.2014 Чяс назат звонок на телифон говарят курьер это будти дома шяс приеду вашу посылку пренесу я иму несити стук в дверь открываю дверь ом распишитесь получити расписался даю иму паспорт он мне вответ ненужен мне паспорт. купить Мефедрон, Бошки, Марихуану Заказал вчера 30гр 4-FA . Трек пока не получил. Надеюсь что все будет олрайт. В планах долговременное сотрудничество!Торчал дома 2 дня,ждя,пока придёт этот курьер. Решил написать,чтоб кинули трек-надоело мне быть в ожидании. Оказалось,что:
Your comment is awaiting moderation.
Visit the Outlet – Finding unique products was a breeze thanks to the well-organized categories.
Your comment is awaiting moderation.
Urban Pasture Online – Quick page load and effortless browsing make it a pleasant experience.
Your comment is awaiting moderation.
City Style Spot – Browse stylish urban collections for an effortless wardrobe refresh.
Your comment is awaiting moderation.
Fresh Meadow Treasures – The layout is neat and finding products is effortless.
Your comment is awaiting moderation.
I got this web page from my pal who informed me concerning
this web site and at the moment this time I am visiting this website and reading very
informative articles at this place.
Your comment is awaiting moderation.
привествую мои друзья форумчане , не купить Мефедрон, Бошки, Марихуану Бро ты лучший!!! Магазин работает на высшем уровне!!!Только что принесли, позже трип отпишу)
Your comment is awaiting moderation.
доктор вывода из запоя https://narkonet.su
Your comment is awaiting moderation.
вывод из запоя цена быстрый анонимный вывод из запоя на дому
Your comment is awaiting moderation.
rootlaneemporium – Easy to navigate, items are neatly categorized and displayed.
Your comment is awaiting moderation.
GoldenBranch Mart – The layout was clean and easy to navigate, making browsing a breeze.
Your comment is awaiting moderation.
вывод из запоя цена нарколог вывод из запоя цена
Your comment is awaiting moderation.
вывод человека из запоя вывод из запоя стоимость
Your comment is awaiting moderation.
вывод из запоя врачи вывод из запоя цены
Your comment is awaiting moderation.
future hub – The site feels responsive and moving through sections is effortless.
Your comment is awaiting moderation.
Seasonal Trends – Finding items is simple and the site feels inviting.
Your comment is awaiting moderation.
вывод из запоя анонимно вывод из запоя дома
Your comment is awaiting moderation.
бразы, ничего сказать не могу, первый раз столкнулась с магазином, 9 числа оплатила, сегодня уже сктинул трек. Но в чем суть оператор в аське сказал пару-тройку дней, посмотрела трек, рассчитано аж на 22 июля. Вот как-то так… И это курьерка. Заберу отпишу. Всем хорошего прихода) https://bagparts.ru Читайте репорт на трипы и обсуждения… Продукт просто улёт!Всех благ данному магазину!!!
Your comment is awaiting moderation.
(10 euros gratis apuestas|10 mejores casas de apuestas|10 trucos para ganar
apuestas|15 euros gratis marca apuestas|1×2 apuestas|1×2 apuestas deportivas|1×2 apuestas que significa|1×2 en apuestas|1×2 en apuestas que
significa|1×2 que significa en apuestas|5
euros gratis apuestas|9 apuestas que siempre ganaras|a partir de cuanto se declara apuestas|actividades de juegos de azar y
apuestas|ad apuestas deportivas|aleksandre topuria ufc apuestas|algoritmo para ganar apuestas deportivas|america apuestas|análisis nba apuestas|aplicacion android apuestas deportivas|aplicacion apuestas deportivas|aplicacion apuestas deportivas android|aplicación de apuestas online|aplicacion para hacer apuestas|aplicacion para hacer apuestas de futbol|aplicación para hacer apuestas de
fútbol|aplicaciones apuestas deportivas android|aplicaciones apuestas deportivas
gratis|aplicaciones de apuestas android|aplicaciones de apuestas de fútbol|aplicaciones
de apuestas deportivas|aplicaciones de apuestas deportivas peru|aplicaciones de apuestas deportivas perú|aplicaciones de apuestas en colombia|aplicaciones de apuestas
gratis|aplicaciones de apuestas online|aplicaciones de apuestas seguras|aplicaciones
de apuestas sin dinero|aplicaciones para hacer apuestas|apostar
seguro apuestas deportivas|app android apuestas deportivas|app
apuestas|app apuestas android|app apuestas de futbol|app apuestas
deportivas|app apuestas deportivas android|app apuestas deportivas argentina|app apuestas deportivas colombia|app apuestas deportivas ecuador|app apuestas deportivas españa|app apuestas
deportivas gratis|app apuestas entre amigos|app apuestas futbol|app apuestas gratis|app apuestas sin dinero|app casa de
apuestas|app casas de apuestas|app control apuestas|app
de apuestas|app de apuestas android|app de apuestas casino|app de apuestas colombia|app de apuestas con bono de bienvenida|app de apuestas de futbol|app de apuestas deportivas|app de apuestas deportivas android|app de apuestas deportivas argentina|app de
apuestas deportivas colombia|app de apuestas deportivas
en españa|app de apuestas deportivas peru|app de apuestas deportivas perú|app
de apuestas deportivas sin dinero|app de apuestas ecuador|app de apuestas en colombia|app de apuestas en españa|app de apuestas en venezuela|app
de apuestas futbol|app de apuestas gratis|app de apuestas online|app de apuestas para android|app de apuestas
para ganar dinero|app de apuestas peru|app de apuestas reales|app de casas de apuestas|app marca apuestas android|app
moviles de apuestas|app para apuestas|app para apuestas de futbol|app para apuestas deportivas|app para apuestas
deportivas en español|app para ganar apuestas deportivas|app para hacer
apuestas|app para hacer apuestas deportivas|app para hacer apuestas
entre amigos|app para llevar control de apuestas|app pronosticos apuestas deportivas|app versus apuestas|apps apuestas mundial|apps de apuestas|apps de apuestas con bono de bienvenida|apps de apuestas de futbol|apps de apuestas deportivas peru|apps
de apuestas mexico|apps para apuestas|aprender a hacer apuestas deportivas|aprender hacer apuestas deportivas|apuesta del
dia apuestas deportivas|apuestas 10 euros gratis|apuestas 100 seguras|apuestas 1×2|apuestas 1X2|apuestas 2
division|apuestas 3 division|apuestas a caballos|apuestas a carreras de caballos|apuestas a colombia|apuestas a corners|apuestas a ganar|apuestas
a jugadores nba|apuestas a la baja|apuestas a la nfl|apuestas al barcelona|apuestas al dia|apuestas al empate|apuestas al mundial|apuestas al tenis wta|apuestas alaves barcelona|apuestas alcaraz hoy|apuestas alemania españa|apuestas alonso campeon del mundo|apuestas altas y bajas|apuestas altas y bajas nfl|apuestas ambos equipos marcan|apuestas america|apuestas android|apuestas anillo nba|apuestas antes del mundial|apuestas anticipadas|apuestas anticipadas
nba|apuestas apps|apuestas arabia argentina|apuestas argentina|apuestas argentina campeon del mundo|apuestas argentina canada|apuestas argentina colombia|apuestas argentina croacia|apuestas argentina españa|apuestas argentina francia|apuestas argentina francia cuanto paga|apuestas
argentina francia mundial|apuestas argentina gana el mundial|apuestas
argentina gana mundial|apuestas argentina holanda|apuestas argentina mexico|apuestas
argentina méxico|apuestas argentina mundial|apuestas argentina online|apuestas argentina paises bajos|apuestas argentina polonia|apuestas argentina uruguay|apuestas argentina
vs australia|apuestas argentina vs colombia|apuestas argentina vs francia|apuestas argentina vs peru|apuestas argentinas|apuestas arsenal real madrid|apuestas ascenso
a primera division|apuestas ascenso a segunda|apuestas asiaticas|apuestas asiatico|apuestas athletic|apuestas athletic atletico|apuestas athletic barça|apuestas athletic barcelona|apuestas athletic betis|apuestas athletic manchester|apuestas athletic manchester united|apuestas athletic osasuna|apuestas athletic
real|apuestas athletic real madrid|apuestas athletic real
sociedad|apuestas athletic real sociedad final|apuestas athletic roma|apuestas athletic sevilla|apuestas athletic valencia|apuestas atletico|apuestas atletico barcelona|apuestas atletico barsa|apuestas atletico campeon champions|apuestas atletico campeon de
liga|apuestas atlético copenhague|apuestas atletico de madrid|apuestas atlético de madrid|apuestas atletico de madrid barcelona|apuestas atletico de madrid gana la liga|apuestas atletico de
madrid real madrid|apuestas atlético de madrid real madrid|apuestas atletico de
madrid vs barcelona|apuestas atletico madrid|apuestas atletico madrid real madrid|apuestas
atletico madrid vs barcelona|apuestas atletico real madrid|apuestas atletico real madrid
champions|apuestas atletismo|apuestas bajas|apuestas baloncesto|apuestas
baloncesto acb|apuestas baloncesto handicap|apuestas baloncesto hoy|apuestas baloncesto
juegos olimpicos|apuestas baloncesto nba|apuestas baloncesto pronostico|apuestas baloncesto pronósticos|apuestas baloncesto prorroga|apuestas barca|apuestas barca athletic|apuestas barca atletico|apuestas barca bayern|apuestas barca bayern munich|apuestas barca girona|apuestas barca hoy|apuestas barça hoy|apuestas barca inter|apuestas barca juventus|apuestas
barca madrid|apuestas barça madrid|apuestas barca real madrid|apuestas barca
vs juve|apuestas barca vs madrid|apuestas barca vs psg|apuestas barcelona|apuestas barcelona alaves|apuestas barcelona
athletic|apuestas barcelona atletico|apuestas barcelona atletico de
madrid|apuestas barcelona atlético de madrid|apuestas barcelona atletico madrid|apuestas barcelona bayern|apuestas barcelona betis|apuestas
barcelona campeon de liga|apuestas barcelona celta|apuestas barcelona espanyol|apuestas barcelona gana la champions|apuestas barcelona
girona|apuestas barcelona granada|apuestas barcelona hoy|apuestas barcelona
inter|apuestas barcelona madrid|apuestas barcelona osasuna|apuestas
barcelona psg|apuestas barcelona real madrid|apuestas barcelona real sociedad|apuestas barcelona sevilla|apuestas barcelona valencia|apuestas barcelona villarreal|apuestas
barcelona vs atletico madrid|apuestas barcelona vs madrid|apuestas
barcelona vs real madrid|apuestas barsa madrid|apuestas basket hoy|apuestas bayern barcelona|apuestas bayern vs barcelona|apuestas
beisbol|apuestas béisbol|apuestas beisbol mlb|apuestas beisbol pronosticos|apuestas beisbol venezolano|apuestas betis|apuestas betis – chelsea|apuestas betis
barcelona|apuestas betis chelsea|apuestas betis fiorentina|apuestas betis girona|apuestas betis madrid|apuestas
betis mallorca|apuestas betis real madrid|apuestas betis real sociedad|apuestas betis sevilla|apuestas betis valencia|apuestas
betis valladolid|apuestas betis vs valencia|apuestas betplay hoy colombia|apuestas betsson peru|apuestas bienvenida|apuestas billar
online|apuestas bolivia vs colombia|apuestas bono|apuestas bono bienvenida|apuestas
bono de bienvenida|apuestas bono de bienvenida sin deposito|apuestas bono gratis|apuestas bono sin deposito|apuestas bonos sin deposito|apuestas borussia real madrid|apuestas boxeo|apuestas boxeo de
campeonato|apuestas boxeo españa|apuestas boxeo español|apuestas boxeo femenino
olimpiadas|apuestas boxeo hoy|apuestas boxeo online|apuestas brasil colombia|apuestas brasil
peru|apuestas brasil uruguay|apuestas brasil vs colombia|apuestas
brasil vs peru|apuestas caballos|apuestas caballos colocado|apuestas caballos españa|apuestas caballos hipodromo|apuestas caballos hoy|apuestas caballos madrid|apuestas caballos online|apuestas caballos sanlucar de barrameda|apuestas caballos zarzuela|apuestas calculador|apuestas campeon|apuestas
campeon champions|apuestas campeón champions|apuestas campeon champions 2025|apuestas campeon champions league|apuestas campeon conference league|apuestas campeon copa america|apuestas campeon copa del rey|apuestas campeon de champions|apuestas campeon de la champions|apuestas campeon de
liga|apuestas campeon del mundo|apuestas campeon eurocopa|apuestas campeón eurocopa|apuestas campeon europa league|apuestas campeon f1|apuestas
campeon f1 2025|apuestas campeon formula 1|apuestas campeon libertadores|apuestas campeon liga|apuestas campeon liga bbva|apuestas
campeon liga española|apuestas campeon liga santander|apuestas campeon motogp 2025|apuestas
campeon mundial|apuestas campeón mundial|apuestas campeon mundial baloncesto|apuestas campeon nba|apuestas campeón nba|apuestas campeon premier|apuestas campeon premier
league|apuestas campeon roland garros|apuestas campeonato f1|apuestas campeonatos de futbol|apuestas carrera de caballos|apuestas carrera de caballos hoy|apuestas carrera
de caballos nocturnas|apuestas carrera de galgos fin de semana|apuestas carrera de galgos hoy|apuestas carrera de galgos
nocturnas|apuestas carreras caballos|apuestas carreras caballos sanlucar|apuestas carreras de caballos|apuestas carreras de caballos en directo|apuestas carreras de caballos en vivo|apuestas carreras de caballos españa|apuestas carreras de caballos hoy|apuestas carreras de
caballos nacionales|apuestas carreras de caballos nocturnas|apuestas carreras de caballos online|apuestas carreras de caballos sanlucar|apuestas carreras de caballos
sanlúcar|apuestas carreras de galgos|apuestas carreras de galgos en vivo|apuestas carreras de galgos nocturnas|apuestas carreras
de galgos pre partido|apuestas casino|apuestas casino barcelona|apuestas casino futbol|apuestas casino gran madrid|apuestas casino
gratis|apuestas casino madrid|apuestas casino online|apuestas
casino online argentina|apuestas casinos|apuestas casinos online|apuestas celta|apuestas celta barcelona|apuestas celta betis|apuestas celta
eibar|apuestas celta espanyol|apuestas celta granada|apuestas celta madrid|apuestas celta manchester|apuestas celta real madrid|apuestas champion league|apuestas champions foro|apuestas champions hoy|apuestas champions league|apuestas
champions league – pronósticos|apuestas champions league 2025|apuestas champions league hoy|apuestas champions league pronosticos|apuestas champions league pronósticos|apuestas champions
pronosticos|apuestas chelsea barcelona|apuestas
chelsea betis|apuestas chile|apuestas chile peru|apuestas chile venezuela|apuestas chile vs colombia|apuestas chile vs
uruguay|apuestas ciclismo|apuestas ciclismo en vivo|apuestas ciclismo femenino|apuestas
ciclismo tour francia|apuestas ciclismo vuelta|apuestas
ciclismo vuelta a españa|apuestas ciclismo vuelta españa|apuestas city madrid|apuestas city real madrid|apuestas clasico|apuestas clasico español|apuestas clasico real madrid barcelona|apuestas clasificacion mundial|apuestas colombia|apuestas colombia argentina|apuestas
colombia brasil|apuestas colombia paraguay|apuestas colombia
uruguay|apuestas colombia vs argentina|apuestas colombia vs brasil|apuestas combinadas|apuestas combinadas como funcionan|apuestas
combinadas de futbol|apuestas combinadas de fútbol|apuestas combinadas foro|apuestas combinadas futbol|apuestas combinadas hoy|apuestas combinadas mismo partido|apuestas combinadas mundial|apuestas combinadas nba|apuestas combinadas para
esta semana|apuestas combinadas para hoy|apuestas combinadas para mañana|apuestas combinadas pronosticos|apuestas
combinadas recomendadas|apuestas combinadas seguras|apuestas combinadas
seguras para hoy|apuestas combinadas seguras para mañana|apuestas como
ganar|apuestas comparador|apuestas con bono de bienvenida|apuestas con dinero ficticio|apuestas con dinero real|apuestas con dinero virtual|apuestas con handicap|apuestas
con handicap asiatico|apuestas con handicap baloncesto|apuestas
con mas probabilidades de ganar|apuestas con paypal|apuestas con tarjeta de credito|apuestas con tarjeta de debito|apuestas consejos|apuestas copa|apuestas copa africa|apuestas copa america|apuestas copa américa|apuestas copa argentina|apuestas
copa brasil|apuestas copa davis|apuestas copa de europa|apuestas copa del mundo|apuestas copa del rey|apuestas copa del rey baloncesto|apuestas copa del
rey final|apuestas copa del rey futbol|apuestas copa del rey ganador|apuestas copa del rey hoy|apuestas copa del rey pronosticos|apuestas copa del rey pronósticos|apuestas copa europa|apuestas copa italia|apuestas copa libertadores|apuestas copa mundial de hockey|apuestas copa rey|apuestas copa sudamericana|apuestas corners|apuestas corners hoy|apuestas croacia
argentina|apuestas cuartos eurocopa|apuestas cuotas|apuestas
cuotas altas|apuestas cuotas bajas|apuestas de 1 euro|apuestas de
baloncesto|apuestas de baloncesto hoy|apuestas de baloncesto nba|apuestas de baloncesto para
hoy|apuestas de beisbol|apuestas de beisbol para hoy|apuestas de blackjack en linea|apuestas
de boxeo|apuestas de boxeo canelo|apuestas de boxeo en las vegas|apuestas de boxeo hoy|apuestas de boxeo online|apuestas de caballo|apuestas de caballos|apuestas de caballos como funciona|apuestas de caballos como
se juega|apuestas de caballos en colombia|apuestas de caballos en españa|apuestas de caballos
en linea|apuestas de caballos españa|apuestas de caballos
ganador y colocado|apuestas de caballos internacionales|apuestas de caballos juegos|apuestas de caballos online|apuestas de caballos online
en venezuela|apuestas de caballos por internet|apuestas de caballos pronosticos|apuestas de caballos pronósticos|apuestas de carrera de caballos|apuestas de
carreras de caballos|apuestas de carreras de caballos online|apuestas de casino|apuestas de casino
online|apuestas de casino por internet|apuestas
de champions league|apuestas de ciclismo|apuestas de colombia|apuestas de copa
america|apuestas de corners|apuestas de deportes en linea|apuestas de deportes online|apuestas de dinero|apuestas de esports|apuestas de
eurocopa|apuestas de europa league|apuestas de f1|apuestas
de formula 1|apuestas de futbol|apuestas de fútbol|apuestas
de futbol app|apuestas de futbol argentina|apuestas de futbol colombia|apuestas
de futbol en colombia|apuestas de futbol en directo|apuestas de futbol
en linea|apuestas de futbol en vivo|apuestas de futbol español|apuestas de futbol gratis|apuestas de futbol hoy|apuestas de futbol mundial|apuestas de
futbol online|apuestas de fútbol online|apuestas de futbol para hoy|apuestas de fútbol para hoy|apuestas de futbol para hoy seguras|apuestas de futbol para mañana|apuestas de futbol peru|apuestas de futbol pronosticos|apuestas de fútbol pronósticos|apuestas de futbol seguras|apuestas
de futbol seguras para hoy|apuestas de futbol sin dinero|apuestas de galgos|apuestas de
galgos como ganar|apuestas de galgos en directo|apuestas
de galgos online|apuestas de galgos trucos|apuestas de golf|apuestas de hockey|apuestas
de hockey sobre hielo|apuestas de hoy|apuestas de
hoy seguras|apuestas de juego|apuestas de juegos|apuestas de juegos deportivos|apuestas de juegos online|apuestas de la
champions league|apuestas de la copa américa|apuestas de la eurocopa|apuestas de la
europa league|apuestas de la liga|apuestas de
la liga bbva|apuestas de la liga española|apuestas de la
nba|apuestas de la nfl|apuestas de la ufc|apuestas de mlb|apuestas de nba|apuestas
de nba para hoy|apuestas de partidos|apuestas de partidos de futbol|apuestas de peleas ufc|apuestas de perros en vivo|apuestas de perros virtuales|apuestas de peru|apuestas
de sistema|apuestas de sistema como funciona|apuestas de sistema explicacion|apuestas de sistema explicación|apuestas de tenis|apuestas de tenis de
mesa|apuestas de tenis en directo|apuestas de tenis hoy|apuestas de tenis para
hoy|apuestas de tenis pronosticos|apuestas de tenis seguras|apuestas
de todo tipo|apuestas de ufc|apuestas de ufc hoy|apuestas del boxeo|apuestas del clasico|apuestas del clasico real madrid
barca|apuestas del dia|apuestas del día|apuestas del dia de hoy|apuestas del dia deportivas|apuestas del dia futbol|apuestas del
mundial|apuestas del partido de hoy|apuestas del real madrid|apuestas
del rey|apuestas del sistema|apuestas deporte|apuestas deportes|apuestas deportiva|apuestas deportivas|apuestas deportivas 1 euro|apuestas deportivas 10
euros gratis|apuestas deportivas 100 seguras|apuestas deportivas 1×2|apuestas
deportivas android|apuestas deportivas app|apuestas deportivas apps|apuestas deportivas argentina|apuestas deportivas argentina
futbol|apuestas deportivas argentina legal|apuestas deportivas
atletico de madrid|apuestas deportivas baloncesto|apuestas deportivas barca
madrid|apuestas deportivas barcelona|apuestas deportivas beisbol|apuestas deportivas bono|apuestas deportivas bono bienvenida|apuestas
deportivas bono de bienvenida|apuestas deportivas bono sin deposito|apuestas deportivas bonos de bienvenida|apuestas deportivas boxeo|apuestas deportivas caballos|apuestas deportivas calculadora|apuestas deportivas campeon liga|apuestas deportivas
casino|apuestas deportivas casino barcelona|apuestas deportivas casino online|apuestas deportivas cerca de mi|apuestas deportivas champions league|apuestas deportivas chile|apuestas
deportivas ciclismo|apuestas deportivas colombia|apuestas deportivas com|apuestas deportivas com foro|apuestas deportivas com pronosticos|apuestas
deportivas combinadas|apuestas deportivas combinadas para
hoy|apuestas deportivas como se juega|apuestas deportivas comparador|apuestas deportivas con bono gratis|apuestas
deportivas con bonos gratis|apuestas deportivas con dinero ficticio|apuestas deportivas con paypal|apuestas deportivas con puntos virtuales|apuestas deportivas consejos|apuestas deportivas consejos
para ganar|apuestas deportivas copa america|apuestas
deportivas copa del rey|apuestas deportivas copa libertadores|apuestas deportivas copa
mundial|apuestas deportivas corners|apuestas deportivas cual es la mejor|apuestas deportivas cuotas altas|apuestas deportivas de baloncesto|apuestas deportivas de boxeo|apuestas deportivas
de colombia|apuestas deportivas de futbol|apuestas deportivas de nba|apuestas deportivas de
nhl|apuestas deportivas de peru|apuestas deportivas de tenis|apuestas
deportivas del dia|apuestas deportivas dinero ficticio|apuestas deportivas directo|apuestas deportivas doble oportunidad|apuestas deportivas en argentina|apuestas deportivas en chile|apuestas deportivas en colombia|apuestas deportivas en directo|apuestas deportivas en españa|apuestas deportivas en español|apuestas deportivas en linea|apuestas deportivas en línea|apuestas deportivas en peru|apuestas deportivas en perú|apuestas deportivas en sevilla|apuestas deportivas en uruguay|apuestas deportivas en vivo|apuestas deportivas es|apuestas deportivas
es pronosticos|apuestas deportivas españa|apuestas deportivas españolas|apuestas deportivas esports|apuestas deportivas estadisticas|apuestas
deportivas estrategias|apuestas deportivas estrategias seguras|apuestas deportivas
eurocopa|apuestas deportivas europa league|apuestas deportivas f1|apuestas deportivas faciles de ganar|apuestas deportivas
formula 1|apuestas deportivas foro|apuestas deportivas foro futbol|apuestas deportivas
foro tenis|apuestas deportivas francia argentina|apuestas deportivas futbol|apuestas deportivas fútbol|apuestas
deportivas futbol argentino|apuestas deportivas futbol colombia|apuestas
deportivas futbol español|apuestas deportivas gana|apuestas deportivas ganadas|apuestas
deportivas ganar dinero seguro|apuestas deportivas gane|apuestas deportivas golf|apuestas deportivas gratis|apuestas deportivas gratis
con premios|apuestas deportivas gratis hoy|apuestas deportivas gratis sin deposito|apuestas deportivas handicap|apuestas deportivas handicap asiatico|apuestas deportivas hoy|apuestas deportivas impuestos|apuestas deportivas interior
argentina|apuestas deportivas juegos olimpicos|apuestas deportivas la liga|apuestas deportivas legales|apuestas
deportivas legales en colombia|apuestas deportivas libres de impuestos|apuestas
deportivas licencia españa|apuestas deportivas liga española|apuestas deportivas listado|apuestas deportivas listado clasico|apuestas deportivas madrid|apuestas deportivas mas seguras|apuestas
deportivas mejor pagadas|apuestas deportivas mejores|apuestas deportivas mejores app|apuestas
deportivas mejores casas|apuestas deportivas mejores cuotas|apuestas deportivas mejores paginas|apuestas deportivas mexico|apuestas
deportivas méxico|apuestas deportivas mlb|apuestas deportivas
mlb hoy|apuestas deportivas multiples|apuestas deportivas mundial|apuestas
deportivas murcia|apuestas deportivas nba|apuestas deportivas nba hoy|apuestas deportivas nfl|apuestas deportivas nhl|apuestas deportivas nuevas|apuestas deportivas ofertas|apuestas deportivas online|apuestas
deportivas online argentina|apuestas deportivas online chile|apuestas deportivas online
colombia|apuestas deportivas online en colombia|apuestas deportivas online españa|apuestas deportivas online mexico|apuestas deportivas
online paypal|apuestas deportivas online peru|apuestas deportivas online por internet|apuestas deportivas pago paypal|apuestas deportivas para ganar dinero|apuestas deportivas para hoy|apuestas deportivas para
hoy pronosticos|apuestas deportivas partido suspendido|apuestas deportivas partidos
de hoy|apuestas deportivas paypal|apuestas deportivas peru|apuestas
deportivas perú|apuestas deportivas peru vs ecuador|apuestas deportivas
predicciones|apuestas deportivas promociones|apuestas deportivas pronostico|apuestas
deportivas pronóstico|apuestas deportivas pronostico
hoy|apuestas deportivas pronosticos|apuestas deportivas pronósticos|apuestas
deportivas pronosticos expertos|apuestas
deportivas pronosticos gratis|apuestas deportivas pronosticos nba|apuestas deportivas pronosticos tenis|apuestas deportivas que aceptan paypal|apuestas deportivas real madrid|apuestas deportivas regalo bienvenida|apuestas deportivas resultado exacto|apuestas deportivas resultados|apuestas deportivas rugby|apuestas deportivas
seguras|apuestas deportivas seguras foro|apuestas deportivas seguras hoy|apuestas deportivas seguras para hoy|apuestas
deportivas seguras telegram|apuestas deportivas sevilla|apuestas deportivas simulador eurocopa|apuestas deportivas sin deposito|apuestas deportivas sin deposito
inicial|apuestas deportivas sin dinero|apuestas deportivas sin dinero real|apuestas deportivas sin registro|apuestas deportivas stake|apuestas deportivas stake 10|apuestas deportivas telegram españa|apuestas deportivas tenis|apuestas deportivas tenis de mesa|apuestas deportivas tenis foro|apuestas deportivas
tenis hoy|apuestas deportivas tips|apuestas deportivas tipster|apuestas deportivas ufc|apuestas deportivas uruguay|apuestas deportivas valencia|apuestas deportivas valencia barcelona|apuestas deportivas venezuela|apuestas deportivas virtuales|apuestas deportivas y casino|apuestas deportivas y casino online|apuestas deportivas.com|apuestas deportivas.com foro|apuestas deportivas.es|apuestas
deportivos pronosticos|apuestas deposito minimo 1 euro|apuestas descenso a segunda|apuestas descenso a segunda
b|apuestas descenso la liga|apuestas descenso primera division|apuestas descenso segunda|apuestas dia|apuestas
diarias seguras|apuestas dinero|apuestas dinero ficticio|apuestas dinero real|apuestas
dinero virtual|apuestas directas|apuestas directo|apuestas directo futbol|apuestas division de honor juvenil|apuestas dnb|apuestas doble oportunidad|apuestas doble resultado|apuestas dobles|apuestas dobles y triples|apuestas dortmund barcelona|apuestas draft nba|apuestas draft nfl|apuestas ecuador
vs argentina|apuestas ecuador vs venezuela|apuestas egipto uruguay|apuestas
el clasico|apuestas elecciones venezuela|apuestas empate|apuestas en baloncesto|apuestas en barcelona|apuestas en beisbol|apuestas en boxeo|apuestas en caballos|apuestas en carreras de caballos|apuestas en casino|apuestas en casino online|apuestas en casinos|apuestas
en casinos online|apuestas en chile|apuestas
en ciclismo|apuestas en colombia|apuestas en colombia de futbol|apuestas en directo|apuestas en directo futbol|apuestas en directo
pronosticos|apuestas en el futbol|apuestas en el tenis|apuestas en españa|apuestas en esports|apuestas en eventos deportivos
virtuales|apuestas en golf|apuestas en juegos|apuestas en la champions league|apuestas
en la eurocopa|apuestas en la liga|apuestas en la nba|apuestas en la
nfl|apuestas en las vegas mlb|apuestas en las vegas nfl|apuestas en linea|apuestas en línea|apuestas en linea argentina|apuestas en linea boxeo|apuestas en linea chile|apuestas
en linea colombia|apuestas en línea de fútbol|apuestas en linea
deportivas|apuestas en linea españa|apuestas en linea estados
unidos|apuestas en linea futbol|apuestas en linea mexico|apuestas
en línea méxico|apuestas en linea mundial|apuestas en linea peru|apuestas en linea usa|apuestas en los esports|apuestas
en madrid|apuestas en méxico|apuestas en mexico online|apuestas en nba|apuestas en partidos de futbol|apuestas en partidos de futbol en vivo|apuestas en partidos
de tenis en directo|apuestas en perú|apuestas en sevilla|apuestas en sistema|apuestas en stake|apuestas en tenis|apuestas en tenis
de mesa|apuestas en valencia|apuestas en vivo|apuestas en vivo argentina|apuestas
en vivo casino|apuestas en vivo futbol|apuestas en vivo
fútbol|apuestas en vivo nba|apuestas en vivo peru|apuestas en vivo
tenis|apuestas en vivo ufc|apuestas equipo mbappe|apuestas equipos de futbol|apuestas españa|apuestas españa alemania|apuestas españa
alemania eurocopa|apuestas españa croacia|apuestas españa eurocopa|apuestas españa francia|apuestas españa francia
eurocopa|apuestas españa gana el mundial|apuestas españa gana eurocopa|apuestas españa
gana mundial|apuestas españa georgia|apuestas españa holanda|apuestas españa inglaterra|apuestas españa inglaterra
cuotas|apuestas españa inglaterra eurocopa|apuestas españa italia|apuestas españa mundial|apuestas españa paises bajos|apuestas español|apuestas español oviedo|apuestas
espanyol barcelona|apuestas espanyol betis|apuestas espanyol villarreal|apuestas esport|apuestas esports|apuestas esports colombia|apuestas esports españa|apuestas esports fifa|apuestas
esports gratis|apuestas esports lol|apuestas esports peru|apuestas esports valorant|apuestas estadisticas|apuestas estrategias|apuestas euro|apuestas
euro copa|apuestas eurocopa|apuestas eurocopa campeon|apuestas
eurocopa españa|apuestas eurocopa favoritos|apuestas eurocopa femenina|apuestas eurocopa final|apuestas
eurocopa ganador|apuestas eurocopa hoy|apuestas eurocopa
sub 21|apuestas euroliga baloncesto|apuestas euroliga pronosticos|apuestas europa league|apuestas europa league hoy|apuestas europa league pronosticos|apuestas europa
league pronósticos|apuestas euros|apuestas f1 abu dhabi|apuestas f1 bahrein|apuestas f1 canada|apuestas
f1 china|apuestas f1 cuotas|apuestas f1 hoy|apuestas f1 las vegas|apuestas f1 miami|apuestas f1 monaco|apuestas faciles de ganar|apuestas fáciles de ganar|apuestas faciles para ganar|apuestas favoritas|apuestas favorito champions|apuestas favoritos champions|apuestas favoritos eurocopa|apuestas favoritos mundial|apuestas fc barcelona|apuestas
final champions cuotas|apuestas final champions
league|apuestas final champions peru|apuestas final copa|apuestas final copa america|apuestas final copa
de europa|apuestas final copa del rey|apuestas final copa europa|apuestas final copa libertadores|apuestas final copa rey|apuestas
final de copa|apuestas final de copa del rey|apuestas final del mundial|apuestas final euro|apuestas final eurocopa|apuestas final europa league|apuestas final
libertadores|apuestas final mundial|apuestas final nba|apuestas final rugby|apuestas final uefa europa league|apuestas final.mundial|apuestas finales de conferencia nfl|apuestas finales
nba|apuestas fiorentina betis|apuestas formula|apuestas
formula 1|apuestas fórmula 1|apuestas fórmula 1 pronósticos|apuestas
formula uno|apuestas foro|apuestas foro nba|apuestas francia argentina|apuestas
francia españa|apuestas futbol|apuestas fútbol|apuestas
futbol americano|apuestas futbol americano nfl|apuestas futbol argentina|apuestas futbol argentino|apuestas futbol champions league|apuestas futbol chile|apuestas futbol
colombia|apuestas futbol consejos|apuestas futbol en directo|apuestas fútbol en directo|apuestas futbol en vivo|apuestas fútbol en vivo|apuestas
futbol españa|apuestas futbol español|apuestas fútbol español|apuestas futbol
eurocopa|apuestas futbol femenino|apuestas futbol foro|apuestas futbol gratis|apuestas futbol hoy|apuestas fútbol hoy|apuestas
futbol juegos olimpicos|apuestas futbol mexico|apuestas futbol mundial|apuestas futbol
online|apuestas futbol para hoy|apuestas futbol peru|apuestas futbol pronosticos|apuestas futbol sala|apuestas futbol telegram|apuestas futbol virtual|apuestas
galgos|apuestas galgos en directo|apuestas galgos hoy|apuestas galgos online|apuestas galgos pronosticos|apuestas galgos
trucos|apuestas gana|apuestas gana colombia|apuestas gana resultados|apuestas
ganadas|apuestas ganadas hoy|apuestas ganador champions league|apuestas ganador
copa america|apuestas ganador copa del rey|apuestas ganador copa del rey baloncesto|apuestas ganador copa
libertadores|apuestas ganador de la eurocopa|apuestas ganador de la liga|apuestas ganador del
mundial|apuestas ganador eurocopa|apuestas
ganador europa league|apuestas ganador f1|apuestas ganador la
liga|apuestas ganador liga española|apuestas ganador mundial|apuestas ganador mundial
baloncesto|apuestas ganador mundial f1|apuestas ganador nba|apuestas ganadores eurocopa|apuestas ganadores mundial|apuestas ganar
champions|apuestas ganar eurocopa|apuestas ganar liga|apuestas ganar mundial|apuestas ganar nba|apuestas getafe valencia|apuestas ghana uruguay|apuestas girona|apuestas girona athletic|apuestas girona betis|apuestas girona campeon de liga|apuestas girona campeon liga|apuestas girona gana la liga|apuestas girona real madrid|apuestas girona real sociedad|apuestas goleador eurocopa|apuestas goleadores eurocopa|apuestas goles asiaticos|apuestas golf|apuestas golf masters|apuestas golf pga|apuestas granada barcelona|apuestas grand
slam de tenis|apuestas gratis|apuestas gratis casino|apuestas gratis con premios|apuestas gratis hoy|apuestas gratis para
hoy|apuestas gratis por registro|apuestas gratis
puntos|apuestas gratis regalos|apuestas gratis sin deposito|apuestas gratis sin depósito|apuestas gratis sin ingreso|apuestas gratis sports|apuestas gratis y ganar premios|apuestas grupo a eurocopa|apuestas
grupos eurocopa|apuestas handicap|apuestas handicap asiatico|apuestas handicap baloncesto|apuestas
handicap como funciona|apuestas handicap nba|apuestas handicap nfl|apuestas hipicas online|apuestas hípicas online|apuestas hipicas venezuela|apuestas hockey|apuestas hockey hielo|apuestas
hockey patines|apuestas hockey sobre hielo|apuestas holanda argentina|apuestas holanda vs
argentina|apuestas hoy|apuestas hoy champions|apuestas hoy futbol|apuestas hoy nba|apuestas hoy pronosticos|apuestas hoy seguras|apuestas impuestos|apuestas inglaterra paises bajos|apuestas inter barca|apuestas inter barcelona|apuestas
juego|apuestas juegos|apuestas juegos en linea|apuestas juegos olimpicos|apuestas juegos olímpicos|apuestas juegos olimpicos baloncesto|apuestas juegos online|apuestas juegos
virtuales|apuestas jugador sevilla|apuestas jugadores nba|apuestas kings league americas|apuestas la liga|apuestas la
liga española|apuestas la liga hoy|apuestas la liga santander|apuestas
las vegas mlb|apuestas las vegas nba|apuestas las vegas nfl|apuestas league of legends mundial|apuestas legal|apuestas legales|apuestas legales en colombia|apuestas legales
en españa|apuestas legales en estados unidos|apuestas legales españa|apuestas leganes betis|apuestas libertadores|apuestas licencia|apuestas liga 1 peru|apuestas liga argentina|apuestas liga bbva pronosticos|apuestas liga de campeones|apuestas liga de campeones de baloncesto|apuestas liga de campeones
de hockey|apuestas liga españa|apuestas liga española|apuestas liga santander pronosticos|apuestas ligas de futbol|apuestas linea|apuestas linea de gol|apuestas liverpool barcelona|apuestas liverpool real madrid|apuestas lol mundial|apuestas madrid|apuestas madrid arsenal|apuestas
madrid atletico|apuestas madrid atletico champions|apuestas madrid barca|apuestas madrid barça|apuestas madrid barca hoy|apuestas madrid barca supercopa|apuestas madrid barcelona|apuestas madrid barsa|apuestas madrid bayern|apuestas madrid betis|apuestas madrid borussia|apuestas
madrid campeon champions|apuestas madrid celta|apuestas
madrid city|apuestas madrid dortmund|apuestas madrid gana la liga|apuestas madrid gana liga|apuestas madrid hoy|apuestas madrid liverpool|apuestas madrid osasuna|apuestas madrid sevilla|apuestas madrid
valencia|apuestas madrid vs arsenal|apuestas madrid vs barcelona|apuestas mallorca osasuna|apuestas mallorca real sociedad|apuestas manchester athletic|apuestas
manchester city real madrid|apuestas mas faciles de ganar|apuestas mas seguras|apuestas
mas seguras para hoy|apuestas masters de golf|apuestas masters de tenis|apuestas maximo goleador eurocopa|apuestas maximo goleador mundial|apuestas mejor jugador
eurocopa|apuestas mejores casinos online|apuestas mexico|apuestas méxico|apuestas mexico polonia|apuestas méxico polonia|apuestas mlb|apuestas mlb hoy|apuestas mlb las vegas|apuestas mlb para hoy|apuestas mlb pronosticos|apuestas mlb usa|apuestas mma ufc|apuestas momios|apuestas
multiples|apuestas múltiples|apuestas multiples como funcionan|apuestas multiples el gordo|apuestas multiples futbol|apuestas mundial|apuestas mundial 2026|apuestas mundial baloncesto|apuestas mundial balonmano|apuestas mundial brasil|apuestas mundial campeon|apuestas
mundial ciclismo|apuestas mundial clubes|apuestas mundial de baloncesto|apuestas mundial de ciclismo|apuestas mundial de
clubes|apuestas mundial de futbol|apuestas mundial de fútbol|apuestas mundial de rugby|apuestas mundial f1|apuestas
mundial favoritos|apuestas mundial femenino|apuestas mundial formula 1|apuestas mundial futbol|apuestas mundial ganador|apuestas mundial lol|apuestas mundial moto gp|apuestas mundial motogp|apuestas mundial rugby|apuestas mundial sub 17|apuestas mundiales|apuestas mundialistas|apuestas mvp eurocopa|apuestas mvp nba|apuestas mvp nfl|apuestas nacionales de colombia|apuestas nba|apuestas nba all star|apuestas nba
campeon|apuestas nba consejos|apuestas nba esta noche|apuestas nba finals|apuestas nba gratis|apuestas nba
hoy|apuestas nba hoy jugadores|apuestas nba hoy pronosticos|apuestas nba para hoy|apuestas nba playoffs|apuestas nba
pronosticos|apuestas nba pronósticos|apuestas nba pronosticos hoy|apuestas nba tipster|apuestas nfl|apuestas nfl
hoy|apuestas nfl las vegas|apuestas nfl playoffs|apuestas nfl pronosticos|apuestas nfl pronósticos|apuestas nfl
semana 4|apuestas nfl super bowl|apuestas nhl|apuestas nhl pronosticos|apuestas
octavos eurocopa|apuestas ofertas|apuestas online|apuestas online argentina|apuestas online argentina
legal|apuestas online bono|apuestas online bono bienvenida|apuestas online boxeo|apuestas online caballos|apuestas online carreras de caballos|apuestas
online casino|apuestas online champions league|apuestas online chile|apuestas online ciclismo|apuestas online colombia|apuestas online comparativa|apuestas online con paypal|apuestas online de caballos|apuestas online deportivas|apuestas online en argentina|apuestas online en peru|apuestas online espana|apuestas online españa|apuestas online
esports|apuestas online foro|apuestas online futbol|apuestas online
futbol españa|apuestas online golf|apuestas online gratis|apuestas online
gratis sin deposito|apuestas online juegos|apuestas online mexico|apuestas
online mma|apuestas online movil|apuestas online nba|apuestas online net|apuestas online nuevas|apuestas online opiniones|apuestas online paypal|apuestas online peru|apuestas online seguras|apuestas online sin dinero|apuestas online sin registro|apuestas online tenis|apuestas online ufc|apuestas online uruguay|apuestas online venezuela|apuestas open britanico golf|apuestas osasuna athletic|apuestas osasuna barcelona|apuestas osasuna real
madrid|apuestas osasuna sevilla|apuestas osasuna valencia|apuestas
over|apuestas over 2.5|apuestas over under|apuestas paginas|apuestas
pago anticipado|apuestas paises bajos ecuador|apuestas paises bajos inglaterra|apuestas países bajos qatar|apuestas para boxeo|apuestas para champions
league|apuestas para el clasico|apuestas para
el dia de hoy|apuestas para el mundial|apuestas para el partido de hoy|apuestas para eurocopa|apuestas
para europa league|apuestas para futbol|apuestas para ganar|apuestas para ganar dinero|apuestas para ganar dinero facil|apuestas para ganar
en la ruleta|apuestas para ganar la champions|apuestas para ganar la
eurocopa|apuestas para ganar la europa league|apuestas
para ganar la liga|apuestas para ganar siempre|apuestas para hacer|apuestas
para hoy|apuestas para hoy de futbol|apuestas para
hoy europa league|apuestas para hoy futbol|apuestas para
juegos|apuestas para la champions league|apuestas para la copa del rey|apuestas para la eurocopa|apuestas
para la europa league|apuestas para la final de la eurocopa|apuestas para
la nba hoy|apuestas para los partidos de hoy|apuestas para
partidos de hoy|apuestas para ufc|apuestas partido|apuestas partido aplazado|apuestas partido
champions|apuestas partido colombia|apuestas partido españa marruecos|apuestas
partido mundial|apuestas partido suspendido|apuestas partidos|apuestas partidos champions league|apuestas
partidos csgo|apuestas partidos de futbol|apuestas partidos de futbol
hoy|apuestas partidos de hoy|apuestas partidos eurocopa|apuestas partidos futbol|apuestas partidos hoy|apuestas partidos mundial|apuestas paypal|apuestas peleas de boxeo|apuestas peru|apuestas perú|apuestas peru brasil|apuestas peru chile|apuestas peru paraguay|apuestas peru uruguay|apuestas peru
vs chile|apuestas peru vs colombia|apuestas pichichi eurocopa|apuestas plataforma|apuestas playoff|apuestas playoff ascenso|apuestas playoff ascenso a primera|apuestas
playoff nba|apuestas playoff segunda|apuestas playoff segunda
b|apuestas playoffs nba|apuestas playoffs nfl|apuestas polonia argentina|apuestas
por argentina|apuestas por internet mexico|apuestas por internet para ganar dinero|apuestas por paypal|apuestas por ronda boxeo|apuestas por
sistema|apuestas portugal uruguay|apuestas pre partido|apuestas predicciones|apuestas predicciones futbol|apuestas primera division|apuestas
primera division españa|apuestas promociones|apuestas pronostico|apuestas pronosticos|apuestas pronosticos deportivos|apuestas pronosticos deportivos tenis|apuestas pronosticos futbol|apuestas pronosticos gratis|apuestas pronosticos nba|apuestas pronosticos tenis|apuestas prorroga|apuestas
psg barca|apuestas psg barcelona|apuestas puntos por tarjetas|apuestas puntos tarjetas|apuestas que aceptan paypal|apuestas que
es handicap|apuestas que puedes hacer con tu novia|apuestas que siempre
ganaras|apuestas que significa|apuestas quien bajara a segunda|apuestas quién bajara a segunda|apuestas quien gana el mundial|apuestas quien gana eurocopa|apuestas quien gana la champions|apuestas quien gana la eurocopa|apuestas
quien gana la liga|apuestas quien ganara el mundial|apuestas
quién ganará el mundial|apuestas quien ganara la champions|apuestas quien ganara la
eurocopa|apuestas quien ganara la liga|apuestas rayo barcelona|apuestas real madrid|apuestas real madrid arsenal|apuestas real
madrid athletic|apuestas real madrid atletico|apuestas real madrid atletico champions|apuestas real madrid atletico de madrid|apuestas real madrid atlético de madrid|apuestas real madrid atletico
madrid|apuestas real madrid barcelona|apuestas real madrid bayern|apuestas real madrid betis|apuestas real madrid
borussia|apuestas real madrid campeon champions|apuestas real madrid
celta|apuestas real madrid champions|apuestas real madrid
city|apuestas real madrid girona|apuestas real madrid hoy|apuestas real madrid liverpool|apuestas real madrid manchester city|apuestas real madrid osasuna|apuestas real madrid real
sociedad|apuestas real madrid valencia|apuestas real madrid villarreal|apuestas real madrid vs arsenal|apuestas real madrid vs atletico|apuestas real madrid vs atlético|apuestas real madrid vs atletico madrid|apuestas real madrid vs barcelona|apuestas real madrid vs betis|apuestas real madrid vs sevilla|apuestas
real madrid vs valencia|apuestas real sociedad|apuestas real sociedad athletic|apuestas real sociedad barcelona|apuestas real sociedad betis|apuestas real sociedad psg|apuestas
real sociedad real madrid|apuestas real sociedad valencia|apuestas recomendadas hoy|apuestas regalo de bienvenida|apuestas registro|apuestas resultado exacto|apuestas
resultados|apuestas resultados eurocopa|apuestas retirada tenis|apuestas roma barcelona|apuestas roma sevilla|apuestas rugby|apuestas rugby mundial|apuestas rugby world cup|apuestas
ruleta seguras|apuestas segunda|apuestas segunda b|apuestas segunda
division|apuestas segunda división|apuestas segunda division b|apuestas segunda division españa|apuestas seguras|apuestas seguras
baloncesto|apuestas seguras calculadora|apuestas seguras
en la ruleta|apuestas seguras eurocopa|apuestas seguras foro|apuestas seguras futbol|apuestas seguras futbol hoy|apuestas seguras gratis|apuestas
seguras hoy|apuestas seguras hoy futbol|apuestas seguras nba|apuestas seguras nba hoy|apuestas seguras para
este fin de semana|apuestas seguras para ganar dinero|apuestas seguras para hoy|apuestas seguras para hoy fútbol|apuestas seguras para hoy pronósticos|apuestas
seguras para mañana|apuestas seguras ruleta|apuestas seguras telegram|apuestas
seguras tenis|apuestas semifinales eurocopa|apuestas senegal paises bajos|apuestas sevilla|apuestas sevilla athletic|apuestas sevilla atletico de madrid|apuestas sevilla
barcelona|apuestas sevilla betis|apuestas sevilla campeon liga|apuestas sevilla celta|apuestas
sevilla gana la liga|apuestas sevilla girona|apuestas sevilla inter|apuestas sevilla jugador|apuestas sevilla juventus|apuestas sevilla leganes|apuestas
sevilla madrid|apuestas sevilla manchester
united|apuestas sevilla osasuna|apuestas sevilla real madrid|apuestas sevilla
real sociedad|apuestas sevilla roma|apuestas sevilla valencia|apuestas significa|apuestas simples ejemplos|apuestas simples o combinadas|apuestas
sin deposito|apuestas sin deposito inicial|apuestas sin deposito minimo|apuestas sin dinero|apuestas sin dinero real|apuestas sin empate|apuestas sin empate que significa|apuestas
sin ingreso minimo|apuestas sin registro|apuestas sistema|apuestas sistema calculadora|apuestas sistema como funciona|apuestas sistema
trixie|apuestas sociedad|apuestas sorteo copa del rey|apuestas stake|apuestas stake 10|apuestas
stake 10 hoy|apuestas super bowl favorito|apuestas super rugby|apuestas supercopa españa|apuestas superliga argentina|apuestas tarjeta roja|apuestas tarjetas|apuestas tarjetas amarillas|apuestas tenis|apuestas tenis atp|apuestas tenis consejos|apuestas tenis copa davis|apuestas tenis de mesa|apuestas tenis
de mesa pronosticos|apuestas tenis en vivo|apuestas tenis femenino|apuestas tenis hoy|apuestas
tenis itf|apuestas tenis pronosticos|apuestas tenis pronósticos|apuestas tenis retirada|apuestas tenis roland garros|apuestas tenis seguras|apuestas tenis wimbledon|apuestas tenis wta|apuestas tercera division|apuestas tercera division españa|apuestas tipos|apuestas tips|apuestas tipster|apuestas tipster para hoy|apuestas topuria holloway cuotas|apuestas torneos de
golf|apuestas torneos de tenis|apuestas trucos|apuestas uefa champions league|apuestas uefa europa league|apuestas ufc|apuestas ufc chile|apuestas ufc como funciona|apuestas ufc hoy|apuestas ufc ilia
topuria|apuestas ufc online|apuestas ufc pronósticos|apuestas ufc telegram|apuestas ufc topuria|apuestas
under over|apuestas unionistas villarreal|apuestas uruguay|apuestas
uruguay colombia|apuestas uruguay corea|apuestas uruguay vs
colombia|apuestas us open golf|apuestas us open tenis|apuestas valencia|apuestas valencia barcelona|apuestas valencia betis|apuestas valencia madrid|apuestas
valencia real madrid|apuestas valladolid barcelona|apuestas
valladolid valencia|apuestas valor app|apuestas valor en directo|apuestas valor
galgos|apuestas venezuela|apuestas venezuela
argentina|apuestas venezuela bolivia|apuestas venezuela ecuador|apuestas villarreal|apuestas villarreal
athletic|apuestas villarreal barcelona|apuestas villarreal bayern|apuestas
villarreal betis|apuestas villarreal liverpool|apuestas villarreal manchester|apuestas villarreal manchester united|apuestas villarreal
vs real madrid|apuestas virtuales|apuestas
virtuales colombia|apuestas virtuales futbol|apuestas virtuales sin dinero|apuestas vivo|apuestas vuelta a españa|apuestas vuelta españa|apuestas
william hill partidos de hoy|apuestas y casino|apuestas y casinos|apuestas y
juegos de azar|apuestas y pronosticos|apuestas y pronosticos de futbol|apuestas y pronosticos deportivos|apuestas y resultados|apuestas-deportivas|apuestas-deportivas.es pronosticos|arbitro nba apuestas|argentina apuestas|argentina colombia apuestas|argentina croacia apuestas|argentina francia apuestas|argentina mexico apuestas|argentina peru apuestas|argentina uruguay apuestas|argentina vs bolivia apuestas|argentina vs chile
apuestas|argentina vs colombia apuestas|argentina vs francia apuestas|argentina vs.
colombia apuestas|asi se gana en las apuestas deportivas|asiatico apuestas|asiatico en apuestas|asiaticos apuestas|athletic barcelona apuestas|athletic manchester united apuestas|athletic osasuna apuestas|athletic real madrid apuestas|atletico barcelona apuestas|atletico de madrid apuestas|atlético de madrid
apuestas|atletico de madrid real madrid apuestas|atletico de madrid vs barcelona apuestas|atletico madrid real madrid apuestas|atletico madrid vs real
madrid apuestas|atletico real madrid apuestas|atletico vs real madrid apuestas|avisador de cuotas apuestas|bajada de cuotas apuestas|baloncesto apuestas|barbastro barcelona apuestas|barca apuestas|barca bayern apuestas|barca inter apuestas|barca madrid apuestas|barça madrid
apuestas|barca vs atletico apuestas|barca vs madrid apuestas|barca vs real madrid apuestas|barcelona – real
madrid apuestas|barcelona apuestas|barcelona atletico apuestas|barcelona atletico de madrid apuestas|barcelona atletico madrid apuestas|barcelona betis apuestas|barcelona
casa de apuestas|barcelona inter apuestas|barcelona psg apuestas|barcelona real madrid apuestas|barcelona real
sociedad apuestas|barcelona sevilla apuestas|barcelona valencia apuestas|barcelona vs athletic bilbao apuestas|barcelona vs atlético madrid apuestas|barcelona vs betis apuestas|barcelona vs celta de vigo
apuestas|barcelona vs espanyol apuestas|barcelona
vs girona apuestas|barcelona vs madrid apuestas|barcelona vs real madrid apuestas|barcelona vs real sociedad apuestas|barcelona vs sevilla apuestas|barcelona vs
villarreal apuestas|base de datos cuotas apuestas deportivas|bayern real madrid apuestas|beisbol apuestas|best america
apuestas|bet apuestas chile|bet apuestas en vivo|betis – chelsea apuestas|betis apuestas|betis
barcelona apuestas|betis chelsea apuestas|betis madrid apuestas|betis sevilla apuestas|betsson tu sitio de apuestas online|blog apuestas baloncesto|blog apuestas ciclismo|blog apuestas nba|blog apuestas tenis|blog de apuestas de tenis|bono
apuestas|bono apuestas deportivas|bono apuestas deportivas sin deposito|bono apuestas gratis|bono
apuestas gratis sin deposito|bono apuestas sin deposito|bono bienvenida apuestas|bono bienvenida apuestas deportivas|bono bienvenida apuestas españa|bono bienvenida
apuestas sin deposito|bono bienvenida apuestas sin depósito|bono bienvenida casa apuestas|bono bienvenida casa de apuestas|bono bienvenida marca apuestas|bono casa
apuestas|bono casa de apuestas|bono casa de apuestas sin ingreso|bono casas de apuestas|bono de apuestas|bono de apuestas gratis sin deposito|bono de bienvenida apuestas|bono
de bienvenida apuestas deportivas|bono de bienvenida casa de apuestas|bono de bienvenida casas de apuestas|bono de casas de apuestas|bono de registro apuestas|bono
de registro apuestas deportivas|bono de registro casa de apuestas|bono gratis apuestas|bono marca apuestas|bono por registro apuestas|bono por registro apuestas deportivas|bono por registro
casa de apuestas|bono registro apuestas|bono sin deposito
apuestas|bono sin depósito apuestas|bono sin deposito apuestas deportivas|bono sin depósito apuestas deportivas|bono sin deposito casa de apuestas|bono sin deposito marca apuestas|bono sin ingreso
apuestas|bono sin ingreso apuestas deportivas|bonos
apuestas|bonos apuestas colombia|bonos apuestas deportivas|bonos apuestas
deportivas sin deposito|bonos apuestas gratis|bonos apuestas sin deposito|bonos apuestas sin depósito|bonos
bienvenida apuestas|bonos bienvenida casas apuestas|bonos bienvenida casas de apuestas|bonos casa de apuestas|bonos casas
apuestas|bonos casas de apuestas|bonos casas de apuestas colombia|bonos casas de apuestas
deportivas|bonos casas de apuestas españa|bonos casas de apuestas nuevas|bonos casas
de apuestas sin deposito|bonos casas de apuestas sin depósito|bonos de apuestas|bonos de apuestas deportivas|bonos de apuestas gratis|bonos de apuestas sin deposito|bonos de bienvenida apuestas|bonos de
bienvenida apuestas deportivas|bonos de bienvenida
casa de apuestas|bonos de bienvenida casas de apuestas|bonos
de bienvenida de casas de apuestas|bonos de bienvenida en casas
de apuestas|bonos de casas de apuestas|bonos de casas de apuestas sin deposito|bonos en casa de apuestas|bonos en casas de apuestas sin deposito|bonos gratis apuestas|bonos gratis apuestas deportivas|bonos
gratis casas de apuestas|bonos gratis sin deposito apuestas|bonos paginas de apuestas|bonos registro casas de apuestas|bonos sin deposito apuestas|bonos sin depósito apuestas|bonos sin deposito apuestas deportivas|bonos sin deposito casas de apuestas|bot
de apuestas deportivas gratis|boxeo apuestas|brasil colombia apuestas|brasil
peru apuestas|brasil vs colombia apuestas|buenas apuestas para hoy|buscador
cuotas apuestas|buscador de apuestas seguras|buscador de cuotas apuestas|buscador de cuotas de
apuestas|buscar apuestas seguras|caballos apuestas|calculador de apuestas|calculador de cuotas apuestas|calculadora apuestas|calculadora apuestas
combinadas|calculadora apuestas de sistema|calculadora apuestas deportivas|calculadora apuestas
deportivas seguras|calculadora apuestas multiples|calculadora apuestas segura|calculadora apuestas seguras|calculadora apuestas sistema|calculadora apuestas yankee|calculadora arbitraje apuestas|calculadora cubrir
apuestas|calculadora cuotas apuestas|calculadora de apuestas|calculadora de apuestas combinadas|calculadora de apuestas de futbol|calculadora de apuestas
de sistema|calculadora de apuestas deportivas|calculadora de apuestas multiples|calculadora
de apuestas seguras|calculadora de apuestas sistema|calculadora
de apuestas surebets|calculadora de arbitraje apuestas|calculadora de cuotas apuestas|calculadora de cuotas
de apuestas|calculadora para apuestas deportivas|calculadora poisson apuestas|calculadora poisson apuestas deportivas|calculadora
poisson para apuestas|calculadora scalping apuestas deportivas|calculadora sistema apuestas|calculadora stake apuestas|calculadora trading apuestas|calcular apuestas|calcular apuestas deportivas|calcular apuestas futbol|calcular apuestas sistema|calcular cuotas apuestas|calcular cuotas apuestas combinadas|calcular cuotas apuestas deportivas|calcular cuotas de apuestas|calcular ganancias apuestas
deportivas|calcular momios apuestas|calcular probabilidad
cuota apuestas|calcular stake apuestas|calcular
unidades apuestas|calcular yield apuestas|calculo de apuestas|calculo de apuestas deportivas|cambio de cuotas apuestas|campeon champions apuestas|campeon eurocopa apuestas|campeon liga apuestas|campeon nba apuestas|canales de
apuestas gratis|carrera de caballos apuestas|carrera de caballos apuestas
juego|carrera de caballos con apuestas|carrera de galgos apuestas|carreras de caballos apuestas|carreras de caballos apuestas online|carreras de caballos con apuestas|carreras de caballos juegos de apuestas|carreras de galgos apuestas|carreras de galgos apuestas online|carreras de galgos apuestas
trucos|carreras galgos apuestas|casa apuestas argentina|casa
apuestas atletico de madrid|casa apuestas barcelona|casa apuestas betis|casa apuestas bono bienvenida|casa apuestas bono gratis|casa
apuestas bono sin deposito|casa apuestas cerca de mi|casa apuestas chile|casa apuestas colombia|casa apuestas con mejores
cuotas|casa apuestas deportivas|casa apuestas españa|casa apuestas española|casa apuestas eurocopa|casa apuestas futbol|casa apuestas mejores cuotas|casa apuestas mundial|casa apuestas
nueva|casa apuestas nuevas|casa apuestas online|casa apuestas peru|casa apuestas valencia|casa de apuestas|casa de apuestas 10 euros gratis|casa de apuestas argentina|casa de apuestas atletico de madrid|casa de apuestas
baloncesto|casa de apuestas barcelona|casa de apuestas beisbol|casa de apuestas betis|casa de apuestas bono|casa de
apuestas bono bienvenida|casa de apuestas bono de
bienvenida|casa de apuestas bono gratis|casa de apuestas bono por registro|casa de apuestas bono
sin deposito|casa de apuestas boxeo|casa de apuestas caballos|casa de apuestas carreras de caballos|casa de apuestas cerca de mi|casa de apuestas cerca de mí|casa
de apuestas champions league|casa de apuestas chile|casa de apuestas ciclismo|casa
de apuestas colombia|casa de apuestas con bono de bienvenida|casa
de apuestas con bono sin deposito|casa de apuestas con cuotas mas altas|casa
de apuestas con esports|casa de apuestas con las mejores cuotas|casa de apuestas con licencia en españa|casa de apuestas con mejores cuotas|casa de apuestas con pago anticipado|casa de apuestas
con paypal|casa de apuestas copa america|casa de apuestas de caballos|casa de apuestas de colombia|casa de apuestas de españa|casa de apuestas de futbol|casa de apuestas de fútbol|casa de apuestas de futbol peru|casa de apuestas
de peru|casa de apuestas del madrid|casa de apuestas del real
madrid|casa de apuestas deportivas|casa de apuestas deportivas cerca de mi|casa de apuestas
deportivas en argentina|casa de apuestas deportivas en chile|casa
de apuestas deportivas en colombia|casa
de apuestas deportivas en españa|casa de apuestas deportivas en madrid|casa de apuestas deportivas españa|casa de apuestas deportivas españolas|casa de apuestas deportivas madrid|casa de apuestas deportivas mexico|casa
de apuestas deportivas online|casa de apuestas deportivas peru|casa de apuestas deposito 5 euros|casa de apuestas
deposito minimo|casa de apuestas deposito minimo 1 euro|casa de
apuestas depósito mínimo 1 euro|casa de apuestas en españa|casa de apuestas en linea|casa de apuestas en madrid|casa de
apuestas en perú|casa de apuestas en vivo|casa de apuestas españa|casa de apuestas españa
inglaterra|casa de apuestas española|casa de apuestas
españolas|casa de apuestas esports|casa de apuestas eurocopa|casa de apuestas europa league|casa de apuestas f1|casa de apuestas formula 1|casa de apuestas futbol|casa de apuestas
ingreso minimo|casa de apuestas ingreso minimo 1 euro|casa de apuestas ingreso mínimo 1 euro|casa
de apuestas legales|casa de apuestas legales en colombia|casa de apuestas legales en españa|casa de
apuestas libertadores|casa de apuestas liga española|casa de apuestas madrid|casa
de apuestas mas segura|casa de apuestas mejores|casa de apuestas méxico|casa de apuestas minimo 5 euros|casa de apuestas mlb|casa de apuestas mundial|casa de apuestas nba|casa de apuestas nfl|casa de apuestas nueva|casa de apuestas nuevas|casa de
apuestas oficial del real madrid|casa de apuestas
oficial real madrid|casa de apuestas online|casa de apuestas online argentina|casa de apuestas online chile|casa de apuestas online
españa|casa de apuestas online mexico|casa de apuestas online paraguay|casa de apuestas
online peru|casa de apuestas online usa|casa de apuestas online venezuela|casa de apuestas pago anticipado|casa de apuestas para boxeo|casa de apuestas para ufc|casa
de apuestas peru|casa de apuestas perú|casa de apuestas peru online|casa de apuestas
por paypal|casa de apuestas promociones|casa de apuestas que regalan dinero|casa de apuestas real madrid|casa
de apuestas regalo de bienvenida|casa de apuestas
sevilla|casa de apuestas sin dinero|casa de apuestas sin ingreso minimo|casa de
apuestas sin licencia en españa|casa de apuestas sin minimo de ingreso|casa
de apuestas stake|casa de apuestas tenis|casa de apuestas ufc|casa de apuestas valencia|casa de apuestas venezuela|casa de apuestas virtuales|casa de apuestas vive la suerte|casa oficial de apuestas del real madrid|casas apuestas asiaticas|casas apuestas bono sin deposito|casas apuestas bonos
sin deposito|casas apuestas caballos|casas apuestas chile|casas apuestas ciclismo|casas apuestas con licencia|casas apuestas con licencia en españa|casas apuestas deportivas|casas apuestas
deportivas colombia|casas apuestas deportivas españa|casas apuestas deportivas españolas|casas apuestas deportivas nuevas|casas apuestas españa|casas apuestas españolas|casas apuestas esports|casas apuestas eurocopa|casas apuestas golf|casas apuestas ingreso minimo 5 euros|casas
apuestas legales|casas apuestas legales españa|casas apuestas licencia|casas apuestas licencia españa|casas apuestas mexico|casas apuestas mundial|casas apuestas nba|casas
apuestas nuevas|casas apuestas nuevas españa|casas apuestas ofertas|casas apuestas online|casas apuestas paypal|casas apuestas peru|casas apuestas sin licencia|casas apuestas tenis|casas asiaticas apuestas|casas de apuestas|casas
de apuestas 5 euros|casas de apuestas app|casas de apuestas argentinas|casas de
apuestas asiaticas|casas de apuestas baloncesto|casas de apuestas
barcelona|casas de apuestas bono bienvenida|casas de
apuestas bono de bienvenida|casas de apuestas bono por registro|casas de apuestas bono sin deposito|casas de apuestas bono sin ingreso|casas de apuestas bonos|casas de apuestas bonos de bienvenida|casas de apuestas bonos gratis|casas de apuestas bonos sin deposito|casas
de apuestas boxeo|casas de apuestas caballos|casas de apuestas
carreras de caballos|casas de apuestas casino|casas de apuestas casino online|casas de apuestas cerca de mi|casas de apuestas champions league|casas de apuestas chile|casas de apuestas ciclismo|casas de apuestas colombia|casas de
apuestas com|casas de apuestas con app|casas de apuestas con apuestas gratis|casas de apuestas con bono|casas de apuestas con bono de
bienvenida|casas de apuestas con bono de registro|casas de apuestas
con bono por registro|casas de apuestas con bono sin deposito|casas de apuestas con bonos|casas de apuestas con bonos gratis|casas de apuestas con bonos sin deposito|casas de
apuestas con deposito minimo|casas de apuestas con esports|casas de apuestas
con handicap asiatico|casas de apuestas con licencia|casas de apuestas
con licencia en españa|casas de apuestas con licencia españa|casas de apuestas con licencia española|casas
de apuestas con mejores cuotas|casas de apuestas con pago anticipado|casas de apuestas con paypal|casas de apuestas con paypal
en perú|casas de apuestas con promociones|casas de apuestas con ruleta en vivo|casas de apuestas copa del rey|casas de
apuestas de caballos|casas de apuestas de españa|casas de apuestas de futbol|casas de apuestas de fútbol|casas de apuestas de peru|casas de apuestas deportivas|casas de apuestas deportivas asiaticas|casas
de apuestas deportivas colombia|casas de apuestas deportivas comparativa|casas de apuestas deportivas con paypal|casas de apuestas deportivas en chile|casas de apuestas deportivas en españa|casas de apuestas deportivas en linea|casas de apuestas deportivas
en madrid|casas de apuestas deportivas en mexico|casas de
apuestas deportivas en peru|casas de apuestas deportivas
en sevilla|casas de apuestas deportivas en valencia|casas de
apuestas deportivas españa|casas de apuestas deportivas españolas|casas de apuestas deportivas
legales|casas de apuestas deportivas madrid|casas de apuestas deportivas mexico|casas de apuestas deportivas nuevas|casas de
apuestas deportivas online|casas de apuestas deportivas peru|casas de apuestas deportivas perú|casas
de apuestas deposito minimo 1 euro|casas de apuestas depósito mínimo 1 euro|casas de apuestas dinero gratis|casas de apuestas en argentina|casas de apuestas en barcelona|casas de apuestas en chile|casas de apuestas en colombia|casas de apuestas en españa|casas de apuestas en españa online|casas de apuestas en linea|casas de apuestas en madrid|casas de apuestas en méxico|casas
de apuestas en peru|casas de apuestas en perú|casas de apuestas en sevilla|casas de apuestas en uruguay|casas de apuestas en valencia|casas de
apuestas en venezuela|casas de apuestas equipos de futbol|casas de apuestas españa|casas de apuestas españa alemania|casas de apuestas españa inglaterra|casas de apuestas españa licencia|casas
de apuestas españa nuevas|casas de apuestas españa online|casas de apuestas española|casas de apuestas españolas|casas de apuestas españolas con licencia|casas de
apuestas españolas online|casas de apuestas esports|casas de apuestas eurocopa|casas de apuestas eurocopa 2024|casas de
apuestas europa league|casas de apuestas f1|casas de apuestas fisicas en barcelona|casas de apuestas fisicas en españa|casas de apuestas
formula 1|casas de apuestas fuera de españa|casas de apuestas futbol|casas de
apuestas fútbol|casas de apuestas futbol españa|casas de apuestas ganador eurocopa|casas
de apuestas gratis|casas de apuestas ingreso minimo|casas de apuestas ingreso minimo 1 euro|casas de apuestas ingreso minimo 5 euros|casas de apuestas inter barcelona|casas de apuestas legales|casas de apuestas legales en colombia|casas de apuestas legales en españa|casas de apuestas
legales en mexico|casas de apuestas legales españa|casas de apuestas legales mx|casas de apuestas licencia|casas de apuestas licencia españa|casas de apuestas lista|casas de apuestas madrid|casas de apuestas mas seguras|casas de apuestas mejores bonos|casas de apuestas mejores cuotas|casas de
apuestas mexico|casas de apuestas méxico|casas de apuestas minimo 5
euros|casas de apuestas mlb|casas de apuestas mundial|casas de apuestas mundial baloncesto|casas de apuestas mundiales|casas
de apuestas nba|casas de apuestas no reguladas en españa|casas de apuestas nueva
ley|casas de apuestas nuevas|casas de apuestas nuevas
en colombia|casas de apuestas nuevas en españa|casas de apuestas nuevas
españa|casas de apuestas ofertas|casas de apuestas online|casas de apuestas online argentina|casas de apuestas online colombia|casas
de apuestas online deportivas|casas de apuestas online ecuador|casas de apuestas online en argentina|casas
de apuestas online en chile|casas de apuestas online en colombia|casas
de apuestas online en españa|casas de apuestas online en mexico|casas de apuestas online españa|casas de apuestas online mas fiables|casas de apuestas online mexico|casas de apuestas online
nuevas|casas de apuestas online peru|casas de apuestas online
usa|casas de apuestas online venezuela|casas de apuestas pago paypal|casas de apuestas para ufc|casas
de apuestas paypal|casas de apuestas peru bono sin deposito|casas
de apuestas presenciales
Your comment is awaiting moderation.
golden root shop – Browsing was smooth and products were easy to find.
Your comment is awaiting moderation.
BoldCrest Online – The search and menu options made finding items effortless.
Your comment is awaiting moderation.
silveroakstudio – Found some beautiful items, and descriptions are clear and helpful overall.
Your comment is awaiting moderation.
128 страниц положительных отзывов , и вдруг “мутный магаз” . Уважаемый – флудить в курилке можно. купить Кокаин, Мефедрон, Экстази Удачи. магазин))) Прайс соответствует реальности?классный магазин, была впечатлянна скоростью доставки и качествомтовара)) всем пис
Your comment is awaiting moderation.
softpineoutlet – Nice selection of items and smooth navigation, felt like a quality online store.
Your comment is awaiting moderation.
softrosefashion – Well-laid-out interface with tidy product sections, shopping felt effortless.
Your comment is awaiting moderation.
Купить шпон https://opus2003.ru в Москве прямо от производителя: широкий выбор пород, стабильная толщина, идеальная геометрия и высокое качество обработки. Мы производим шпон для мебели, отделки, дизайна интерьеров и промышленного применения.
Your comment is awaiting moderation.
The latest crypto value: Bitcoin, altcoins, NFTs, DeFi, blockchain developments, exchange reports, and new technologies. Fast, clear, and without unnecessary noise—everything that impacts the market.
Your comment is awaiting moderation.
Latest news crypto: price rises and falls, network updates, listings, regulations, trend analysis, and industry insights. Follow market movements in real time.
Your comment is awaiting moderation.
Изготавливаем каркас лестницы из металла на современном немецком оборудовании — по цене стандартных решений. Качество, точность реза и долговечность без переплаты.
Your comment is awaiting moderation.
Купить шпон https://opus2003.ru в Москве прямо от производителя: широкий выбор пород, стабильная толщина, идеальная геометрия и высокое качество обработки. Мы производим шпон для мебели, отделки, дизайна интерьеров и промышленного применения.
Your comment is awaiting moderation.
The latest about all things crypto: Bitcoin, altcoins, NFTs, DeFi, blockchain developments, exchange reports, and new technologies. Fast, clear, and without unnecessary noise—everything that impacts the market.
Your comment is awaiting moderation.
Latest all about crypto: price rises and falls, network updates, listings, regulations, trend analysis, and industry insights. Follow market movements in real time.
Your comment is awaiting moderation.
Изготавливаем каркас лестницы из металла на современном немецком оборудовании — по цене стандартных решений. Качество, точность реза и долговечность без переплаты.
Your comment is awaiting moderation.
EverRoot Corner – Simple navigation and well-displayed products made shopping smooth.
Your comment is awaiting moderation.
Ты нам лучьше отзыв напиши о работе магазина 😀 купить скорость, кокаин, мефедрон, гашиш РАБОТА КАЧЕСТВЕННАЯ И БОЛЬШОЙ, БОЛЬШОЙ, БОЛЬШОЙ, БОЛЬШОЙ, БОЛЬШОЙ, БОЛЬШОЙ, БОЛЬШОЙ, БОЛЬШОЙ, БОЛЬШОЙ, БОЛЬШОЙ, БОЛЬШОЙ, БОЛЬШОЙ РЕСПЕКТ ВАМ качество продукции еще не пробывал, в ближайшие время расскажу OOOздравствуйте. магазин работает?
Your comment is awaiting moderation.
seolaunch.shop – Mobile version looks perfect; no glitches, fast scrolling, crisp text.
Your comment is awaiting moderation.
rankhive.shop – Found practical insights today; sharing this article with colleagues later.
Your comment is awaiting moderation.
rankflow.shop – Appreciate the typography choices; comfortable spacing improved my reading experience.
Your comment is awaiting moderation.
rankcharge.shop – Content reads clearly, helpful examples made concepts easy to grasp.
Your comment is awaiting moderation.
momentcentral – Layout is organized, and navigating different categories was simple.
Your comment is awaiting moderation.
optirank.shop – Found practical insights today; sharing this article with colleagues later.
Your comment is awaiting moderation.
wooden sunset boutique – Clean layout and organized categories made shopping simple.
Your comment is awaiting moderation.
Регулярно мучает насморк – https://www.silver-ugleron.ru/
Your comment is awaiting moderation.
Нужен сервер? vps для юристов лучшие по мощности и стабильности. Подходят для AI-моделей, рендеринга, CFD-симуляций и аналитики. Гибкая конфигурация, надежное охлаждение и поддержка нескольких видеокарт.
Your comment is awaiting moderation.
Бренд MAXI-TEX https://maxi-tex.ru завода ООО «НПТ Энергия» — это металлообработка полного цикла с гарантией качества и соблюдением сроков. Выполняем лазерную резку листа и труб, гильотинную резку и гибку, сварку MIG/MAG, TIG и ручную дуговую, отбортовку, фланцевание, вальцовку, а также изготовление сборочных единиц и оборудования по вашим чертежам.
Your comment is awaiting moderation.
Удачи в бизе https://real-estate23.ru РАБОТА КАЧЕСТВЕННАЯ И БОЛЬШОЙ, БОЛЬШОЙ, БОЛЬШОЙ, БОЛЬШОЙ, БОЛЬШОЙ, БОЛЬШОЙ, БОЛЬШОЙ, БОЛЬШОЙ, БОЛЬШОЙ, БОЛЬШОЙ, БОЛЬШОЙ, БОЛЬШОЙ РЕСПЕКТ ВАМ качество продукции еще не пробывал, в ближайшие время расскажу OOOМоя первая покупка на динамите и, внезапно для самой себя, наход. Сняла, как говорится, в касание. С вашим охуенным мефчиком сорвала себе почти год ЗОЖа и ни чуть не жалею.
Your comment is awaiting moderation.
greenoutpoststore – Very smooth browsing, and products are easy to find.
Your comment is awaiting moderation.
modernlifestylecorner.shop – Modern lifestyle products look stylish, browsing categories was simple and Fresh Living Daily – Innovative tips to inspire a modern and enjoyable lifestyle.
Your comment is awaiting moderation.
SilverBirch Shop – The site’s performance is snappy, which makes looking through items a joy.
Your comment is awaiting moderation.
Urban Seed Corner – Items are easy to locate and the layout feels tidy.
Your comment is awaiting moderation.
pathway to success – The site layout is clean and I can find items quickly.
Your comment is awaiting moderation.
Modern Fable Deals – Products load quickly, making shopping fast and easy.
Your comment is awaiting moderation.
Тепкрь сам хочу зделать заказ но немогу на сайт попасть (((( https://osteklenie-balkonow.ru я тоже несколько раз брал ,всё прошло чётко ,качество радует,доставлено всё в лучшем виде,оператор молочага всегда обьяснит всё что к чему,вообщем магазин для меня лучший ,самый надёжный,УСПЕХОВ И ПРОЦВЕТАНИЯ ВАШЕЙ КОМАНДЕ!!!!!!Это закон, хороший отзыв мало кто оставляет, а вот говна вылить всегда есть желающие вот и получается так, те у кого все хорошо, молчат и радуются
Your comment is awaiting moderation.
An ethical https://mark-travel.ru provides rescued elephants with medical care, natural habitats and social groups. Visitors contribute to conservation by learning, observing and supporting sustainable wildlife programs.
Your comment is awaiting moderation.
Experience an elephant sanctuary where welfare comes first. Walk alongside elephants, watch them bathe, feed them responsibly and discover how conservation efforts help protect these majestic animals.
Your comment is awaiting moderation.
moon picks hub – Smooth browsing and neatly displayed items made exploring simple.
Your comment is awaiting moderation.
плиз подскажи выход с грамма и в чем растворяла ркс? (буду благодарен) https://santexnikasochi.ru В двух пакетахсалют бразы ) добавляйте репу не стесняйтесь всем удачи))
Your comment is awaiting moderation.
Mountain Wind Outlet – Efficient layout allowed me to explore items effortlessly.
Your comment is awaiting moderation.
MountainMistStudio Online – Smooth navigation and organized pages made shopping simple.
Your comment is awaiting moderation.
свежие новости беларуси и мира зеркало новости беларусь
Your comment is awaiting moderation.
Bright Timber Emporium – Well-organized pages and diverse items made finding what I needed straightforward.
Your comment is awaiting moderation.
Все вопросы по контактам в подписе. купить Мефедрон, Бошки, Марихуану Я вот перед заказом почитала хуеву кучу отзывов и не нашла ни одного хуевого. Но опять же, смотри, отзывы были не об эйфоре, а о самом магазине. Давай друг, советуй что-нибудь в личкуЭто закон, хороший отзыв мало кто оставляет, а вот говна вылить всегда есть желающие вот и получается так, те у кого все хорошо, молчат и радуются
Your comment is awaiting moderation.
evermeadowgoods – Great selection and intuitive navigation helped me explore products without hassle.
Your comment is awaiting moderation.
happyhomestore – Pages load quickly, and finding what I needed was simple.
Your comment is awaiting moderation.
Привет всем Тсу движек https://betonvladivostok.ru Привет Всем!!!!!!!!!!! суппер класный магаз! всем рекомендую! приятно работать! оператр адыкват! Успехов и процветаний Друзья! от всей нашей компании!понятно как проверенный магазин работает если отзывы негатив значит зачищает сообщений еще куча они на телефоне сейчас не могу их скопировать но и смысла нет все и так ясно
Your comment is awaiting moderation.
mountaincollectivestore – Pleasant browsing experience, shopping flows smoothly.
Your comment is awaiting moderation.
smart budget picks – Plenty of wallet-friendly options and the site felt intuitive.
Your comment is awaiting moderation.
Lunar Peak Boutique – Items load quickly and browsing is smooth.
Your comment is awaiting moderation.
по выходным курьерки не работают, соответственно и отправить мы не можем, отправки производятся в рабочии дни! купить кокаин, меф, бошки через телеграмм не пожалеете)магаз висит на плаву, лишь бы брали, видимо кому-то нормальное, кому-то шлак!
Your comment is awaiting moderation.
Your Success Path – Practical guidance to help you unlock your potential every day.
Your comment is awaiting moderation.
Coastal Corner Shop – Products are nicely arranged, and browsing felt smooth and effortless.
Your comment is awaiting moderation.
BlueStone Select – Simple, tidy, and I found what I needed quickly.
Your comment is awaiting moderation.
soft collection – Smooth scrolling and responsive design enhanced browsing.
Your comment is awaiting moderation.
Wild Shore Online – Clean design and easy navigation made discovering items effortless.
Your comment is awaiting moderation.
и вы считаете что все отлично? https://sauna-tverici.ru Хотел бы поблагодарить магазин за отличное отношение и замечательную работу) Давно такого не встречал.2)Кто курит раз в неделю : от 3 часов до 5-7 часов
Your comment is awaiting moderation.
Rocket Play Casino https://rocketplay-aus.net/
Your comment is awaiting moderation.
crestartemporium – Very clean interface, browsing and selecting items was effortless.
Your comment is awaiting moderation.
Northern Mist Select – Clear layout and intuitive pages helped me pick items easily.
Your comment is awaiting moderation.
помоему рти 111 это вообще фэйк и под этим названием онли нелегал толкают, лично мне приходило от 3х продавцов и у всех нелегал, то МДПВ аналог, то амфа https://seniorinfo.ru Приветствую один из старейших магазинов форума! Много воды утекло с тех пор как вы открылись в 2011 году… а вы по-прежнему на плаву и продолжаете радовать нас своим отличным сервисом. Даже не представляю форум без вас) Так держать ребята!Ам имеет высокий толер об этом уже говорилось не раз
Your comment is awaiting moderation.
coastlinegather – Easy to find what I needed, search suggestions helped a lot today.
Your comment is awaiting moderation.
новости беларуси 2025 зеркало новости беларусь
Your comment is awaiting moderation.
новости беларуси беларусь события новости
Your comment is awaiting moderation.
puremeadowmarket – Enjoyed scrolling through items here, everything loads smoothly without slowing down.
Your comment is awaiting moderation.
mostbet android oficjalna strona internetowa mostbet
Your comment is awaiting moderation.
самые последние новости беларусь новости беларуси онлайн
Your comment is awaiting moderation.
новости беларуси происшествия беларусь события новости
Your comment is awaiting moderation.
oficjalne pobieranie mostbet konto osobiste mostbet
Your comment is awaiting moderation.
willow picks hub – Fast interface and clean layout made shopping enjoyable.
Your comment is awaiting moderation.
NewGroveEssentials Finds – Well-laid-out pages made it simple to locate products without confusion.
Your comment is awaiting moderation.
Залетные это какие то, представь, на целых 10 грамм кинули, смешно да и только . купить кокаин, меф, бошки через телеграмм Дайте контакты по петрозаводску пожалуйстаКачество тоже супер.
Your comment is awaiting moderation.
a href=”https://growyourmindset.click/” />growhub – The interface is clean, making product exploration smooth and simple.
Your comment is awaiting moderation.
в Обьщем как и говорил заказал ам,оно пришло в город,а мою фамилию ПЕРЕПУТАЛИ ,посылку не выдают……. купить скорость, кокаин, мефедрон, гашиш Но зато в том случае будут доказательства, что селлер обещал одно, а пришло совсем другое) Так что я правильно написал ;)2 трека где то по 30мг.
Your comment is awaiting moderation.
a href=”https://brightnorthboutique.shop/” />brightnorthemporium – Easy to find products, and the site feels inviting.
Your comment is awaiting moderation.
sicher live wetten tipps heute
Your comment is awaiting moderation.
coastline store – Items are clearly presented and navigating the site was effortless.
Your comment is awaiting moderation.
finduniqueoffers.shop – Unique offers found, shopping here felt effortless and interesting overall today. Unique Deals Hub – Discover one-of-a-kind offers and trendy finds with ease.
Your comment is awaiting moderation.
product corner – Finding items was quick thanks to the clean and uncluttered structure.
Your comment is awaiting moderation.
Sun Meadow Corner Finds – Pleasant browsing experience with intuitive design and fast loading.
Your comment is awaiting moderation.
Сделал заказ , все гуд и качество понравилось https://myspb24.ru получил посылку не выходя с почты открыл ее а там лежат какие то шорты. ну думаю все кинул 7 к просто выкинул. пришел домой с пацанами сели чай пить положил вещи тут как раз мама старалась и спросила меня есть шмотки грязные ну тут я достал все вещи и шорты мама давай смотреть карманы и в итоге в шортах находит 10 г вот тут я обрадовался и разочаровался думал ханау СПСР постоянно такая хрень, порой по неделе не пробиваются треки(проверено на себе… тоже срал кирпичами(на рафика причем)) а говорят быстрей ЕМС. не верю))
Your comment is awaiting moderation.
Cozy Outlet Goods – The site is well-organized, helping me find what I needed without any hassle.
Your comment is awaiting moderation.
Northern Mist Select – Clear layout and intuitive pages helped me pick items easily.
Your comment is awaiting moderation.
Товар тоже на 5/5 (только с концетрацией мало 1 к 5 или 1 к 7 дальше держит не долго) купить кокаин, меф, бошки через телеграмм РЕСПЕКТОС МАгаЗИНУ=)Все вопросы к представителю.
Your comment is awaiting moderation.
digitalcommand.click – Navigation felt smooth, found everything quickly without any confusing steps.
Your comment is awaiting moderation.
lunarcrestlifestyle – Good variety here, layout feels tidy and shopping was hassle‑free.
Your comment is awaiting moderation.
urbanvinecollective – Clean interface and organized product listings made browsing simple and enjoyable.
Your comment is awaiting moderation.
Хороший магазин и отличные цены. Доставили через 3 дня после заказа. О качестве товара комментарий оставлю позже. https://artvinilkartina.ru Добрый день, кто паникует и истерит, успокойтесь, всем все высылается постепенно. Треки придут на эл. почты ближайшее время всем ждущим.Мне уже похер будет он иле не будет!Хорошо что я как обычно не взял на 45т.р вот о бытом я вообще не жалею!Если магазину важнее не совершать обмен чем клиент который в неделю на 45т.р товара брал то досведание!
Your comment is awaiting moderation.
shop willow gallery – Clear interface and smooth scrolling made shopping simple.
Your comment is awaiting moderation.
bonus mostbet mostbet global
Your comment is awaiting moderation.
казіно ігри ігри казіно
Your comment is awaiting moderation.
онлайн слоти слоти безкоштовно
Your comment is awaiting moderation.
modernbrookshop – Layout is tidy, and browsing feels effortless.
Your comment is awaiting moderation.
Rocket Play https://rocketplay-aus.net/
Your comment is awaiting moderation.
growhub – Navigation is simple, and exploring items felt effortless.
Your comment is awaiting moderation.
urban store – Well-arranged items and clear layout made exploring simple.
Your comment is awaiting moderation.
Что хочу сказать закладки всегда по высоте. купить скорость, кокаин, мефедрон, гашиш Я так понимаю,магаз – надёжный! Цены на сегодняшний день соответствуют заявленным в прайсе?как всегда оплатил и все пришло. спасибо что есть такой магаз беру давно у них, все ок всем саветую
Your comment is awaiting moderation.
top selections – Fast-loading pages and a logical layout made the experience pleasant.
Your comment is awaiting moderation.
Estos húmedos XXX baño balas destacar duras vídeo vibraciones con primeros planos labios y húmedos soplar
selfies, que son renombrados entre los sediento espectadores
aquí. Las galerías MILF porno, que cuentan con visual garrillas, anal
porno selfies, y XXX-paja filtraciones, hacer que todos los sediento suscriptores loco.
, haciendo que los chicos de todo el mundo se masturben sin reanudar sus tendones.
Primeros planos en alta definición y audio envolventes.
se aparecerán en el próximo OnlyFans información, junto con peligroso fotografías de upskirts y puñetazo
trabajos en el coche. Nada la excita más que el goteo de porno misionero sin censura, que se envuelve alrededor de él en la
misión de fugas XXX y fotos de sexo en bruto donde el coño sigue abierto y las tetas apretar duro. https://es.she-international.com/robbyapplesfree/
Your comment is awaiting moderation.
Зефірка https://zefirka.net.ua розважальний блог про сни, прикмети, річниці весіль, імена та корисні поради на кожен день.
Your comment is awaiting moderation.
mostbet android oficjalna strona internetowa mostbet
Your comment is awaiting moderation.
ігри казино ігри онлайн казино
Your comment is awaiting moderation.
онлайн слоти слоти онлайн
Your comment is awaiting moderation.
finduniqueoffers.shop – Unique offers found, shopping here felt effortless and interesting overall today. Special Finds Daily – Explore fashionable and lifestyle items for effortless shopping.
Your comment is awaiting moderation.
и меня тоже:) в любом случае трек получил, товар придёт отипшусь. Думаю всё ровно, чем ближе к вверху ветка тем старше, и выше реппутация у магазина я так понимаю! купить онлайн мефедрон, экстази, бошки Не-не, через форум заказы не принимаются. Заказывать нужно только через сайт, указанный в подписи.у них Methoxetamine бадяженный или нет? сколько принял мг и какие симптомы были?
Your comment is awaiting moderation.
artisanbaystore – Clean pages and intuitive navigation, shopping was straightforward.
Your comment is awaiting moderation.
слоти безкоштовно онлайн слоти
Your comment is awaiting moderation.
ігри казино онлайн онлайн ігри казино
Your comment is awaiting moderation.
rejestracja w mostbet konto osobiste mostbet
Your comment is awaiting moderation.
спасибо , стараемся для людей купить Кокаин, Мефедрон, Экстази привет что случилось вы работаете не могу второй день в личку отписаться ,сколько заказывал всё было супер ,как к тебе попасть теперь ,что делать ,отпишитесь …Спасибо. Все по плану получилось. Получил в лучшем виде)
Your comment is awaiting moderation.
онлайн ігри казино ігри в казино
Your comment is awaiting moderation.
aplikacja mostbet na androida mobilny mostbet
Your comment is awaiting moderation.
слоти ігрові автомати слоти онлайн
Your comment is awaiting moderation.
Timber Outlet Store – Everything loads smoothly and the layout keeps things simple and user-friendly.
Your comment is awaiting moderation.
golden collection hub – Fast pages and tidy layout made browsing pleasant and quick.
Your comment is awaiting moderation.
brandelevate.click – Appreciate the typography choices; comfortable spacing improved my reading experience.
Your comment is awaiting moderation.
tallbirchoutletlane – Products are clearly presented, navigating the store is quick and simple.
Your comment is awaiting moderation.
“Открываю коробок Пусто, под спички шорк вот и пакетик на глаз 03” https://physics-for-students.ru Обратились, всё довольно оперативноКакие риски ) ты адекват ? ты скинул непонятно что не имеющее никакого смысла.
Your comment is awaiting moderation.
грати слоти слоти онлайн
Your comment is awaiting moderation.
shop new collection – Items were easy to locate and navigation felt intuitive.
Your comment is awaiting moderation.
fashion stop – Easy to explore pages and the product display was clear and helpful.
Your comment is awaiting moderation.
globalshopselection – Clean design with easy navigation, products are accessible and well displayed.
Your comment is awaiting moderation.
Приятно работать!!! купить онлайн мефедрон, экстази, бошки с чего ты взял что мы соду “пропидаливаем”?, если есть какая то проблема давай решать, про “шапку” вы все горазды писать в интернете…Да до празников не всем выслали, сегодня отдали в курьерку очередную пачку посылок, всем все придет скоро.
Your comment is awaiting moderation.
Wonder Peak Choice – Products are easy to locate and exploring is simple.
Your comment is awaiting moderation.
pixellaunch.click – Overall, professional vibe here; trustworthy, polished, and pleasantly minimal throughout.
Your comment is awaiting moderation.
brandelevate.click – Overall, professional vibe here; trustworthy, polished, and pleasantly minimal throughout.
Your comment is awaiting moderation.
Sun Meadow Picks – Fast loading and tidy layout made shopping convenient and enjoyable.
Your comment is awaiting moderation.
брал все как всегда на 10 баллов забил https://maigorod2016.ru Личка открыта для всех желающих, жаббер chemicalmix@dukgo.com готов ответить на все вопросы с 10 до 20 часов по мсклюди которые делают заказы через ВК по меньшей мере идиоты. Особенно когда ИМ самим что то предлагают.
Your comment is awaiting moderation.
Your Trend Explorer – Discover stylish items while enjoying a seamless browsing experience.
Your comment is awaiting moderation.
oficjalny mostbet kasyno mostbet
Your comment is awaiting moderation.
ForestGroveGoods – Intuitive interface, items are easy to view and select.
Your comment is awaiting moderation.
timberlineatticstudio – User-friendly interface, perfect for exploring ideas and experimenting.
Your comment is awaiting moderation.
brightorchardhub – Clean design and intuitive structure make this site easy to use and pleasant to explore.
Your comment is awaiting moderation.
dreamleafgallery – Fast loading and clear product displays made shopping experience nice and straightforward.
Your comment is awaiting moderation.
shop golden collection – Smooth navigation and neatly displayed products improved browsing.
Your comment is awaiting moderation.
tallbirchhub – Layout is clean and intuitive, making shopping quick and enjoyable.
Your comment is awaiting moderation.
онлайн ігри казино онлайн ігри казино
Your comment is awaiting moderation.
Замечательный, магазин. Желаю успешных продаж купить онлайн мефедрон, экстази, бошки И всё надо успеть. :crazy:всегда ровно все было и есть. так что я
Your comment is awaiting moderation.
слоти онлайн онлайн слоти
Your comment is awaiting moderation.
kasyno mostbet pobieranie mostbet na androida
Your comment is awaiting moderation.
FutureGardenPortal – Organized pages and smooth menus made finding items enjoyable.
Your comment is awaiting moderation.
shop new collection – Items were easy to locate and navigation felt intuitive.
Your comment is awaiting moderation.
ігри онлайн казино ігри казино
Your comment is awaiting moderation.
популярні слоти слоти безкоштовно
Your comment is awaiting moderation.
featured store – Had a smooth time scrolling through; products were easy to locate.
Your comment is awaiting moderation.
Заказала JV 61, жду трек, заранее благодарю. В прошлый раз заказ шёл 6 дней, но и я на краю географии)))))) отпишитп за дживик кто недавно заказывал. купить скорость, кокаин, мефедрон, гашиш Сама в ахуе, ни употреблять эту дрянь, ни толкнуть…..как так его разве нету? с самого утра тут сижу
Your comment is awaiting moderation.
mobilny mostbet mostbet
Your comment is awaiting moderation.
ігри в казино ігри казино
Your comment is awaiting moderation.
популярні слоти онлайн слоти
Your comment is awaiting moderation.
слоти безкоштовно грати слоти
Your comment is awaiting moderation.
транссексуалы нижневартовск
Your comment is awaiting moderation.
Портал для пенсіонерів https://pensioneram.in.ua все про пенсію за віком, права та льготи літніх людей та інвалідів.
Your comment is awaiting moderation.
Да работает в асю обращайся если чё надо только товара мало там мхе да дмт https://kartiny-mne.ru оплатил 31го, сегодня все уже получил! Продавану, спасибо за оперативность!:ok:
Your comment is awaiting moderation.
urbancornerhub – Clear layout, easy to browse, and pages respond quickly.
Your comment is awaiting moderation.
Timberline Corner – Easy to explore products with a smooth, tidy layout.
Your comment is awaiting moderation.
Amazing! This blog looks exactly like my old one! It’s on a entirely different topic but it has pretty much the same layout and design. Great choice of colors!
Your comment is awaiting moderation.
Нужен сервер? здесь лучшие по мощности и стабильности. Подходят для AI-моделей, рендеринга, CFD-симуляций и аналитики. Гибкая конфигурация, надежное охлаждение и поддержка нескольких видеокарт.
Your comment is awaiting moderation.
Нужен сайт? https://laboratory-site.ru включает проектирование, удобный интерфейс, быструю загрузку, интеграцию с 1С и CRM. Подбираем решения под задачи бизнеса и обеспечиваем техническое сопровождение.
Your comment is awaiting moderation.
кто что думает по этому поводу? https://bfhappyday.ru Оправдания в небе не ищут,
Your comment is awaiting moderation.
Rubbish Taxi removes and responsibly disposes of unwanted household items like appliances, furniture, sofas, mattresses and yard waste – https://rubbish-taxi.ie/
Your comment is awaiting moderation.
Do you love puzzles? This https://livedebris.org game features challenging levels, well-thought-out mechanics, and relaxing gameplay. Solve riddles, unlock new levels, and test your problem-solving skills anytime, anywhere.
Your comment is awaiting moderation.
Компания Таврнеруд https://tareksa.ru производство и продажа нерудных материалов, сервис логистических услуг, а также проектирование в области технологии обогащения нерудных материалов, проведение лабораторных испытаний нерудных материалов.
Your comment is awaiting moderation.
Daily Bargain Picks – Affordable and convenient product suggestions for daily shopping.
Your comment is awaiting moderation.
Rubbish Taxi removes and responsibly disposes of unwanted household items like appliances, furniture, sofas, mattresses and yard waste – https://rubbish-taxi.ie/
Your comment is awaiting moderation.
את כל החדשות מאה פעמים. שעמום הוא בן תמותה. דלת התא נפתחת. זו המנחה, אירינה בשמה, על השלט. היא שעברה וטחב לח. ניסיתי להכות אותו, לדחוף אותו, אבל הוא דחף את מפרקי ידי מעל ראשי בתנועה אחת. משקלו https://sexpoint.co.il/
Your comment is awaiting moderation.
Ровный магазин . Всем советую ! https://neuro-deti.ru Я брал норм не один раз,но в последнее время было пару недовесов,а 35 прислали какого то качества слабого,25ый был куда лучше,после этого перестал заказывать.
Your comment is awaiting moderation.
חם. כמעט שתיתי אותו, הרגשתי את הדירות הנפרדות, איך הוא מתנקז לריאות, מחמם אותו, ובכל זאת מטריד שמעתי את נשימתו הכבדה. האצבעות, גסות ועדינות באופן בלתי צפוי, עברו על העור המודלק. “בסדר,” הוא https://gaytorontocity.com/
Your comment is awaiting moderation.
Richards Casino https://richardcasino-australia.org/
Your comment is awaiting moderation.
Магаз отличный, успехов вам! купить онлайн мефедрон, экстази, бошки магаз клёвый ,:bravo:сервис на высоте
Your comment is awaiting moderation.
Весною вибирав двері у квартиру купити – дуже задоволений результатом. Брав двері від WithSmile Doors, у них гарний вибір та швидка доставка.
Your comment is awaiting moderation.
At Rubbish Taxi, we manage your house clearance requirements, whether it is a home renovation, room redecoration, or clearing out old items. Our services cover comprehensive house removals and clearances across Dublin and other cities where we operate. We can collect various bulky items, including sofas, bed frames, mattresses, chest of drawers, wardrobes, fridges, freezers, washing machines, dishwashers, ovens, musical instruments, and more. Count on us for a seamless experience https://rubbish-taxi.ie/
Your comment is awaiting moderation.
Starlit Style Shop – Everything is well organized, making shopping effortless.
Your comment is awaiting moderation.
urbanselection – Fast-loading pages with tidy layout made shopping enjoyable.
Your comment is awaiting moderation.
leadoptimizer.click – Overall, professional vibe here; trustworthy, polished, and pleasantly minimal throughout.
Your comment is awaiting moderation.
Lunar Wave Finds – Browsing is easy and the items are well-organized and appealing.
Your comment is awaiting moderation.
believeandachieve – Clean interface, good product variety, and easy navigation made shopping comfortable.
Your comment is awaiting moderation.
brandmomentum.click – Content reads clearly, helpful examples made concepts easy to grasp.
Your comment is awaiting moderation.
бонуси казино казіно з бонусами
Your comment is awaiting moderation.
bestchoiceoutlet – Loved the layout, made finding deals easy and enjoyable quickly.
Your comment is awaiting moderation.
אנאלי היה אינטנסיבי, מחוספס – הוא היה מכה בתחת, מושך את שערו. “הכל רטוב, זורם,” הוא היה אומר, ללקק, למצוץ, לנהוג בקצה. — כן, שם. בבקשה . דירות דיסקרטיות . היא כבר לא התאפקה, גניחותיה https://gaytorontocity.com/
Your comment is awaiting moderation.
Хочешь развлечься? купить мефедрон федерация – это проводник в мир покупки запрещенных товаров, можно купить гашиш, купить мефедрон, купить кокаин, купить меф, купить экстази, купить альфа пвп, купить гаш в различных городах. Москва, Санкт-Петербург, Краснодар, Владивосток, Красноярск, Норильск, Екатеринбург, Мск, СПБ, Хабаровск, Новосибирск, Казань и еще 100+ городов.
Your comment is awaiting moderation.
1win рабочее 1win кабинет
Your comment is awaiting moderation.
happytrendstore.shop – Cheerful shopping experience, enjoyable to explore latest trends and stylish items today. Trend Spot Daily – Curated items and ideas to keep your lifestyle stylish and vibrant.
Your comment is awaiting moderation.
бонусы казино бонуси казіно
Your comment is awaiting moderation.
казино з бонусами казіно з бонусами
Your comment is awaiting moderation.
1win сайт вход в личный 1win личный кабинет официальный
Your comment is awaiting moderation.
With extensive experience, we expertly clean windows, doors, fascias, gutters, roofs, renders, conservatories, and solar panels — ensuring every surface is pristinely maintained. Our standout specialty is flawless windows cleaning that brightens your whole home: windows cleaning
Your comment is awaiting moderation.
Хочешь развлечься? купить мефедрон федерация – это проводник в мир покупки запрещенных товаров, можно купить гашиш, купить мефедрон, купить кокаин, купить меф, купить экстази, купить альфа пвп, купить гаш в различных городах. Москва, Санкт-Петербург, Краснодар, Владивосток, Красноярск, Норильск, Екатеринбург, Мск, СПБ, Хабаровск, Новосибирск, Казань и еще 100+ городов.
Your comment is awaiting moderation.
1win рабочее 1win личный кабинет официальный
Your comment is awaiting moderation.
Хочешь развлечься? купить гашиш федерация – это проводник в мир покупки запрещенных товаров, можно купить гашиш, купить мефедрон, купить кокаин, купить меф, купить экстази, купить альфа пвп, купить гаш в различных городах. Москва, Санкт-Петербург, Краснодар, Владивосток, Красноярск, Норильск, Екатеринбург, Мск, СПБ, Хабаровск, Новосибирск, Казань и еще 100+ городов.
Your comment is awaiting moderation.
Dawncrest Hub – Navigation is simple, and everything is presented neatly.
Your comment is awaiting moderation.
motivationworldhub – Smooth navigation, fast-loading interface, and items are clearly displayed.
Your comment is awaiting moderation.
EverPath Picks – Loved the intuitive layout and smooth browsing experience.
Your comment is awaiting moderation.
Эвакуатор в Москве https://eva77.ru вызов в любое время дня и ночи. Быстрая подача, профессиональная погрузка и доставка авто в сервис, гараж или на парковку. Надёжно, безопасно и по фиксированной цене.
Your comment is awaiting moderation.
Бренд MAXI-TEX https://maxi-tex.ru завода ООО «НПТ Энергия» — профессиональное изготовление изделий из металла и металлобработка в Москве и области. Выполняем лазерную резку листа и труб, гильотинную резку и гибку, сварку MIG/MAG, TIG и ручную дуговую, отбортовку, фланцевание, вальцовку. Производим сборочные единицы и оборудование по вашим чертежам.
Your comment is awaiting moderation.
Постоянно мучает насморк – средство от ринита
Your comment is awaiting moderation.
Эвакуатор в Москве https://eva77.ru вызов в любое время дня и ночи. Быстрая подача, профессиональная погрузка и доставка авто в сервис, гараж или на парковку. Надёжно, безопасно и по фиксированной цене.
Your comment is awaiting moderation.
Бренд MAXI-TEX https://maxi-tex.ru завода ООО «НПТ Энергия» — профессиональное изготовление изделий из металла и металлобработка в Москве и области. Выполняем лазерную резку листа и труб, гильотинную резку и гибку, сварку MIG/MAG, TIG и ручную дуговую, отбортовку, фланцевание, вальцовку. Производим сборочные единицы и оборудование по вашим чертежам.
Your comment is awaiting moderation.
Lifestyle & Fashion Daily – Explore trendy outfits and chic lifestyle essentials every day.
Your comment is awaiting moderation.
Постоянно мучает насморк – Спрей «Серебряный Углерон»
Your comment is awaiting moderation.
Скрайд MMORPG https://vk.com/scryde.russia культовая игра, где магия переплетается с технологией, а игрокам доступны уникальные классы, исторические миссии и масштабные PvP-сражения. Легенда, которую продолжают писать тысячи игроков.
Your comment is awaiting moderation.
Нужна легализация? https://www.legalizaciya-nedvizhimosti-v-chernogorii.me проводим аудит объекта, готовим документы, улаживаем вопросы с кадастром и муниципалитетом. Защищаем интересы клиента на каждом этапе.
Your comment is awaiting moderation.
Эвакуатор в Москве https://eva77.ru вызов в любое время дня и ночи. Быстрая подача, профессиональная погрузка и доставка авто в сервис, гараж или на парковку. Надёжно, безопасно и по фиксированной цене.
Your comment is awaiting moderation.
Urban Peak Central – Browsing is effortless and products are easy to locate.
Your comment is awaiting moderation.
Нужна легализация? https://www.legalizaciya-nedvizhimosti-v-chernogorii.me проводим аудит объекта, готовим документы, улаживаем вопросы с кадастром и муниципалитетом. Защищаем интересы клиента на каждом этапе.
Your comment is awaiting moderation.
Скрайд MMORPG https://dub.sh/scryde культовая игра, где магия переплетается с технологией, а игрокам доступны уникальные классы, исторические миссии и масштабные PvP-сражения. Легенда, которую продолжают писать тысячи игроков.
Your comment is awaiting moderation.
prazdnikdekor.ru
Your comment is awaiting moderation.
Un portal sobre videojuegos https://tejadospontevedra.es, noticias y tendencias para quienes viven y respiran videojuegos: resenas, guias, parches, anuncios, analisis de tecnologia y torneos de esports. Todo para gamers y quienes quieran mantenerse informados.
Your comment is awaiting moderation.
Rodaballo al Horno https://rodaballoalhorno.es es un viaje a las raices musicales del mundo, donde los sabores de las culturas se entrelazan con sus melodias. Exploramos los ritmos de las naciones, los sonidos de las tradiciones y como diferentes historias se fusionan en un solo sonido armonioso.
Your comment is awaiting moderation.
Do you love excitement? roulettino casino login delights players with high-quality slots, live tables, tournaments, and ongoing promotions. The gameplay is smooth and dynamic.
Your comment is awaiting moderation.
La infraestructura https://novo-sancti-petri.es y la tecnologia vial europeas equilibran la innovacion y la sostenibilidad. Semaforos inteligentes, carreteras verdes, centros de transporte seguros y proyectos que marcan la pauta para la industria global.
Your comment is awaiting moderation.
La Rome Espresso https://laromeespresso.es es un lugar donde la cultura del cafe se convierte en arte. Descubre el camino del grano a la taza: el sabor profundo, las tecnicas precisas y los rituales que crean la bebida perfecta.
Your comment is awaiting moderation.
growthhubzone – Browsing was intuitive, and products are well organized.
Your comment is awaiting moderation.
Explore a true https://caucasustravel.ru where welfare comes first. No chains or performances — only open landscapes, gentle care, rehabilitation programs and meaningful visitor experiences.
Your comment is awaiting moderation.
ЦВЗ в Краснодаре https://cvzcentr.ru место, где пациентов внимательно выслушивают, проводят глубокую диагностику и составляют эффективный план улучшения состояния при вегетативных расстройствах.
Your comment is awaiting moderation.
Booking your domestic windows cleaning and other services in Dublin is simple on our website. For commercial or tailored cleaning needs, just contact us. Trust Eco Cleaning Company Dublin for dedicated, expert windows cleaning and exterior home maintenance: https://ecocleaningcompany.ie/
Your comment is awaiting moderation.
Explore a true https://caucasustravel.ru where welfare comes first. No chains or performances — only open landscapes, gentle care, rehabilitation programs and meaningful visitor experiences.
Your comment is awaiting moderation.
Morning Rust Boutique – Smooth navigation and a visually tidy interface.
Your comment is awaiting moderation.
shopwithjoy – Great browsing experience overall, easy navigation and appealing product selection.
Your comment is awaiting moderation.
Future Groove Finds Online – Everything is presented neatly, and shopping feels seamless.
Your comment is awaiting moderation.
believeandachieve – Loved the smooth experience: fast loading, easy browsing, and appealing items.
Your comment is awaiting moderation.
магазин
Your comment is awaiting moderation.
With extensive experience, we expertly clean windows, doors, fascias, gutters, roofs, renders, conservatories, and solar panels — ensuring every surface is pristinely maintained. Our standout specialty is flawless windows cleaning that brightens your whole home: https://ecocleaningcompany.ie/
Your comment is awaiting moderation.
виртуальный сервер
Your comment is awaiting moderation.
https://podarki-moscow.ru/
Your comment is awaiting moderation.
dailyhub – Smooth browsing, intuitive interface, and items are clearly presented.
Your comment is awaiting moderation.
earthstoneboutique – Great variety of items, the layout makes finding things really simple. Earthstone Deals – Simple and tidy interface made exploring products stress-free.
Your comment is awaiting moderation.
как дела друзья? купить онлайн мефедрон, экстази, бошки задержек небыло все было ровно магаз ровный заказывай трек сразу кидают , за качество не могу пока ничо отписать , не пробывал, попробую отпишу!
Your comment is awaiting moderation.
Grand Style Selection – Everything is displayed clearly, making shopping quick and easy.
Your comment is awaiting moderation.
Идеальные торты на заказ — для детей и взрослых. Поможем выбрать начинку, оформление и размер. Десерт будет вкусным, свежим и полностью соответствующим вашей идее.
Your comment is awaiting moderation.
Независимый сюрвей в Москве: проверка грузов и объектов, детальные отчёты, фотофиксация и экспертные заключения. Прозрачная стоимость сюрвейерских услуг, официальные гарантии и быстрая выездная работа по столице и области.
Your comment is awaiting moderation.
Фото https://seetheworld.top про старий смоковець були дуже якісні.
Your comment is awaiting moderation.
Идеальные торты на заказ — для детей и взрослых. Поможем выбрать начинку, оформление и размер. Десерт будет вкусным, свежим и полностью соответствующим вашей идее.
Your comment is awaiting moderation.
Независимый сюрвей в Москве: проверка грузов и объектов, детальные отчёты, фотофиксация и экспертные заключения. Прозрачная стоимость сюрвейерских услуг, официальные гарантии и быстрая выездная работа по столице и области.
Your comment is awaiting moderation.
findyourwayforward.shop – Helpful guidance offered, perfect for planning next steps in life clearly. Daily Inspiration & Learning – Insights and resources to encourage growth and creativity.
Your comment is awaiting moderation.
Прочитав https://seetheworld.top статтю про курорти австрії — багато фактів.
Your comment is awaiting moderation.
Рассмотрим плюсы работы с данным магазином и возможно в дальнейшем будем постоянно тут покупать опт. Отпишу после, надеюсь удачной сделки)) https://serov1000.ru “Приезжаю и вижу на свету бля что то поххожее на таблетки “
Your comment is awaiting moderation.
onlinestorechoice – Pleasantly surprised by how easy it was to find what I wanted.
Your comment is awaiting moderation.
shopandsmiletoday – Overall experience was positive — site works smoothly and products are easy to explore.
Your comment is awaiting moderation.
shopthelatestdeals – Good browsing experience, site feels reliable and items look well-organized and appealing.
Your comment is awaiting moderation.
Заказывал у этих ребят 203 и 5-IAI, качеством доволен. Заказы они оформляют долго, но зато отправляют быстро. Мне отправили в день оплаты! купить кокаин, меф, бошки через телеграмм Качество товара на 5+,вот только почта подвела привезли на 5й день.
Your comment is awaiting moderation.
КАЧЕСТВО ВСЕХ ПРОДУКТОВ ОЧЕНЬ ВЫСОКОЕ! купить Мефедрон, Бошки, Марихуану действительно принимают?
Your comment is awaiting moderation.
shoppingworld – Easy to move between sections, the interface is clean and responsive.
Your comment is awaiting moderation.
Ремонт https://remontuem.if.ua і поради щодо монтаж опалення івано-франківськ знайшов тут.
Your comment is awaiting moderation.
Открих https://mdgt.top подходящ грунд за ОСБ плоскости
Your comment is awaiting moderation.
Bridgetown Finds Online – Navigation is quick, and items are well showcased.
Your comment is awaiting moderation.
Рекомендую https://remontuem.if.ua — багато корисного про водяна тепла підлога ціна за м2 івано-франківськ.
Your comment is awaiting moderation.
Баня https://mdgt.top в сиво и дърво – невероятно вдъхновение
Your comment is awaiting moderation.
на мыло отвечаем только по существу, много не по делу пишут, ася или скайп быстрей купить Мефедрон, Бошки, Марихуану Заказывал 307, прислали 203. Сразу объяснил, менеджер в скайпе всё понял. Сказал Бро не переживай будет тебе бонус.
Your comment is awaiting moderation.
Create a spintax version with 20 unique lines based on the line below. Each line must follow these rules: Every line MUST contain the same HTML mistake: The anchor tag must be written exactly like this: Do NOT fix the mistake. Change the anchor text in every line. You may add words, remove words, or use generic anchor texts. All anchor texts must be different. Rewrite the comment part in every line as well. Rewrite the sentence after the dash (“–”) so each line has a different, natural-sounding variation. Wrap everything in spintax format: line1 Here is the base line to follow: purevalueoutlet – Inspiring and interactive site, perfect for learning and creating new ideas. Generate 20 variations following all rules above.
Your comment is awaiting moderation.
WildHorizon Corner – Stylish finds, intuitive browsing, and checkout was fast and simple.
Your comment is awaiting moderation.
findscenterhub – Smooth site layout, fast loading pages, and enjoyable shopping experience.
Your comment is awaiting moderation.
Отзыв уже был, по поводу JWH и 2c-i. Писать то особо и не о чем, но качество товара очень даже порадовало. Щас жду только пополнения ассортимента. https://harizma-studio.ru Чем злиться, выдал бы дудки иль реги
Your comment is awaiting moderation.
If you’re in retail and you’re trying to sell something nobody
кракен маркет только через тор
wants to buy anymore, like electric typewriters or video tapes, you’re in a world of hurt,”
kraken3yvbvzmhytnrnuhsy772i6dfobofu652e27f5hx6y5cpj7rgyd.onion
said Cohen, who blames Lampert for the store’s current state.
кракен ссылка
“But customers didn’t stop buying circular saws or screwdrivers and hammers or appliances.
If you’re in retail and you sell things people want to buy, your success or failure is entirely
based upon what kind of skill you bring to the table.
He had none.
рабочая ссылка кракен
https://kraken2trfqodidvlh4aa337cpzfrhdlfldhve5nf7njhumwr7instadl.com
Your comment is awaiting moderation.
If you’re in retail and you’re trying to sell something nobody
kraken3yvbvzmhytnrnuhsy772i6dfobofu652e27f5hx6y5cpj7rgyd
wants to buy anymore, like electric typewriters or video tapes, you’re in a world of hurt,”
kraken2trfqodidvlh4aa337cpzfrhdlfldhve5nf7njhumwr7instad.onion
said Cohen, who blames Lampert for the store’s current state.
kraken5af44k24fwzohe6fvqfgxfsee4lgydb3ayzkfhlzqhuwlo33ad.onion
“But customers didn’t stop buying circular saws or screwdrivers and hammers or appliances.
If you’re in retail and you sell things people want to buy, your success or failure is entirely
based upon what kind of skill you bring to the table.
He had none.
кракен маркет тор
https://kraken3yvbvzmhytnrnuhsy772i6dfobofu652e27f5hx6y5cpj7rgyd.com
Your comment is awaiting moderation.
If you’re in retail and you’re trying to sell something nobody
кракен даркнет ссылка
wants to buy anymore, like electric typewriters or video tapes, you’re in a world of hurt,”
кракен ссылка зеркало
said Cohen, who blames Lampert for the store’s current state.
кракен маркет только через тор
“But customers didn’t stop buying circular saws or screwdrivers and hammers or appliances.
If you’re in retail and you sell things people want to buy, your success or failure is entirely
based upon what kind of skill you bring to the table.
He had none.
kraken6gf6o4rxewycqwjgfchzgxyfeoj5xafqbfm4vgvyaig2vmxvyd
https://kraken7jmgt7yhhe2c4iyilthnhcugfylcztsdhh7otrr6jgdw667qd.com
Your comment is awaiting moderation.
findpurposeandpeace.shop – Calm and inspiring content helps discover purpose and maintain peace today. Mindset & Purpose Hub – Tools and guidance to grow mentally and emotionally.
Your comment is awaiting moderation.
ORBS Production https://filmproductioncortina.com is a full-service film, photo and video production company in Cortina d’Ampezzo and the Dolomites. We create commercials, branded content, sports and winter campaigns with local crew, alpine logistics, aerial/FPV filming and end-to-end production support across the Alps. Learn more at filmproductioncortina.com
Your comment is awaiting moderation.
Магаз самый ровный! Брать буду Только здесь и не где Больше,респектоз магазину! Так держать ребята! купить Мефедрон, Бошки, Марихуану Посылки у магазина не задерживаются? Все чотко и ровно?
Your comment is awaiting moderation.
ORBS Production https://filmproductioncortina.com is a full-service film, photo and video production company in Cortina d’Ampezzo and the Dolomites. We create commercials, branded content, sports and winter campaigns with local crew, alpine logistics, aerial/FPV filming and end-to-end production support across the Alps. Learn more at filmproductioncortina.com
Your comment is awaiting moderation.
Dream Harbor Choice – Items are well presented, and shopping is fast and easy.
Your comment is awaiting moderation.
Могу сфотать, на смотри https://maderu.ru Или все ок у всех тут клиентов?
Your comment is awaiting moderation.
ORBS Production https://filmproductioncortina.com is a full-service film, photo and video production company in Cortina d’Ampezzo and the Dolomites. We create commercials, branded content, sports and winter campaigns with local crew, alpine logistics, aerial/FPV filming and end-to-end production support across the Alps. Learn more at filmproductioncortina.com
Your comment is awaiting moderation.
fashionpickzone – Browsing feels natural, and all items are clearly organized.
Your comment is awaiting moderation.
KindleWood Store – Simple browsing, good value, and the items were delivered quickly.
Your comment is awaiting moderation.
..тот, который у Вас в подписи..)) купить онлайн мефедрон, экстази, бошки Минус оказался только один, и это ожидание, вместо обещанных 3-5 , пришлось ждать больше недели. Не знаю чья эта заслуга отправителя или доставки, но это немного напрягало.
Your comment is awaiting moderation.
freshgiftoutlet – Very easy to shop, found exactly what I wanted.
Your comment is awaiting moderation.
BlueGrain Depot – Products were easy to spot, and the overall experience was smooth.
Your comment is awaiting moderation.
purechoicehub – The layout feels neat and intuitive, which made choosing items simple and quick.
Your comment is awaiting moderation.
всё граммотно делают! купить скорость, кокаин, мефедрон, гашиш Дим, доброго времени суток, отпиши за приход, заказала тоже эйф-дисс, скажи, чего ожидать?
Your comment is awaiting moderation.
Self-Confidence Zone – A daily dose of inspiration to elevate your self-confidence.
Your comment is awaiting moderation.
Кракен проверка сделки
Антон всегда считал, что его ждёт что-то большее, чем офис и пятидневка. Он не жаловался — стабильная зарплата, соцпакет, отпуск раз в году. Но каждый вечер возвращался домой с ощущением, что теряет время. Всё изменилось после простого поискового запроса в интернете. Он ввёл “заработок без вложений” и наткнулся на кракен маркет. Платформа показалась слишком прямолинейной. Никаких заманчивых обещаний, только чёткая схема: задания, оплата, рейтинг. Он не ждал чуда, но решил попробовать. Первое задание — доставка. Быстро справился, получил оплату. Деньги пришли в тот же день. Потом было второе, третье. Через неделю он уже знал, как оптимизировать маршруты, повышать рейтинг и находить выгодные задания. Постепенно кракен маркет стал основным источником дохода. Он уволился. Это решение не было спонтанным — он просто увидел, что способен сам управлять своим временем и ресурсами. Платформа не требует дипломов, не навязывает правила, не ограничивает в действиях. Всё зависит от желания работать и развиваться. Антон отмечает, что за последние месяцы стал спокойнее и увереннее. У него появилось чувство контроля, которого так не хватало. Он сам определяет, когда и сколько работать. Деньги идут стабильно, а разнообразие задач не даёт заскучать. Кракен маркет — это не спасательный круг, а инструмент. Удобный, гибкий, современный. Он подойдёт тем, кто устал ждать перемен и готов сам их создавать.
Основные ссылки:
Аккаунты маркетплейса кракен. Аккаунты Кракен с балансом – найти и купить. — kraccs.ccКракен Телеграм БОТ – ссылка и инструкция — krkntg.cc
KRAKEN™ 2025 — кракен маркет
Кракен маркетплейс — безопасная площадка для входа Реклама Kraken на автобусе выделяется в городском потоке Инструкция по использованию Кракен бота для новичков
Your comment is awaiting moderation.
Отлично! Ждём свои наборы юнного химика … 🙂 или наркомана… ? купить Мефедрон, Бошки, Марихуану По сути он эйфо, но ничего, кроме расширенных зрачков, учащенного сердцебиения и потливости, я не почувствовал… А колличество принятого было просто смешным: 550 мг. в первый день теста и 750 мг. во второй день… Тестирующих набралось в сумме около 8 и никто ничего не почувствовал.
Your comment is awaiting moderation.
Kind Groove Shop – Products are easy to locate, and the layout is clear.
Your comment is awaiting moderation.
battery bat
Your comment is awaiting moderation.
conversionmatrix.click – Color palette felt calming, nothing distracting, just focused, thoughtful design.
Your comment is awaiting moderation.
хотел уточнить а вы ващпе работаете? заказ сделал что то тишина купить онлайн мефедрон, экстази, бошки Хороший магазин, все по совести
Your comment is awaiting moderation.
Noble Ridge Boutique – Great fashion items, easy navigation, and a very satisfying shopping experience.
Your comment is awaiting moderation.
marketexpander.click – Loved the layout today; clean, simple, and genuinely user-friendly overall.
Your comment is awaiting moderation.
clickchampion.click – Loved the layout today; clean, simple, and genuinely user-friendly overall.
Your comment is awaiting moderation.
clicktrailboost.click – Loved the layout today; clean, simple, and genuinely user-friendly overall.
Your comment is awaiting moderation.
trafficbuilderpro.click – Loved the layout today; clean, simple, and genuinely user-friendly overall.
Your comment is awaiting moderation.
ranktactics.click – Appreciate the typography choices; comfortable spacing improved my reading experience.
Your comment is awaiting moderation.
trendcorner – Fast-loading pages make browsing enjoyable and effortless.
Your comment is awaiting moderation.
adprecision.click – Overall, professional vibe here; trustworthy, polished, and pleasantly minimal throughout.
Your comment is awaiting moderation.
на сайте есть аська, напиши, мне в течении пяти минут отвечали. https://moyconcert.ru Будет что лучше АМ? Или из серии JWH?
Your comment is awaiting moderation.
uniquehubfashion – Loved the fashion collection, navigation was smooth and effortless.
Your comment is awaiting moderation.
houseandco – Good variety, felt effortless to check out products.
Your comment is awaiting moderation.
Sunwave Essentials Boutique – Fast navigation and organized layout make shopping enjoyable.
Your comment is awaiting moderation.
всем привет,припы репорты писать не умею как мастер 100 того уровня,но скажу как есть,магазин вообще огонь ,брал 1гк ск АЛФА 29 с доставкой,все быстро и оперативно пришло,как и было оговорино 14 дней,а ребята знают толк в работе красавцы доставили в кароткие сроки,АДРЕС СДЕЛАН БЫЛ С ТОЧНЫМ ОПИСАНИЕМ ЗАБРАЛ В КАСАНИЕ + ФОТО К ОПИСАНИЮ ШЛО МОЖНО БЫЛО ПО ФОТО ПОДНЯТЬ НЕ ЧИАЯ ОПИСАНИЯ ДАЖЕ,ВЕС СК КРИСТАЛИКИ ЧИСТЫЕ НЕ БУТОР ТАВАР ОТЛИЧНЫЙ И ЧИСТЕЙШЕЕ КАЧЕСТВО,УСПЕХОВ ВАМ ВО ВСЕМ И ПОПУТНОГО ВЕТРА КЛИЕНТОВ ПО БОГАТЧЕ,ПРОЦВИТАНИЯ,ВСЕМ СОВЕТУЮ ЭТОТ МАГАЗИН,ОПЛАЧИВАЙТЕ С ДОСТАВКАМИ И НЕ СОМНИВАЙТЕСЬ НЕ КАПЛИ……..МАГАЗИН РАБОТАЕТ РОВНО купить Мефедрон, Бошки, Марихуану Перевел деньги на Альфа 21.04.2014 после умення узнали даные (Ф.И.О телефон и адрес) Оператор сказал что посылка будет отправлена 22.04.2014. !!!! 23.04.2014 скинули номер наклодной. По номеру наклодной смог отслеживать свою посылку 24.04.2012.
Your comment is awaiting moderation.
battery game download
Your comment is awaiting moderation.
Trendy Wardrobe Picks – Fresh fashion inspiration to stay ahead in style effortlessly.
Your comment is awaiting moderation.
Coastline Central – Shopping is convenient and the coastal theme adds charm.
Your comment is awaiting moderation.
dailydealcorner – Amazing deals today, delivery was quick and smooth.
Your comment is awaiting moderation.
https://englishzoom.ru/
Your comment is awaiting moderation.
брал в данном магазине все супер. https://teka-retail.ru Всем привет.
Your comment is awaiting moderation.
SoftBlossom Select – Easy-to-use website, great variety, and items arrived promptly.
Your comment is awaiting moderation.
https://englishzoom.ru/
Your comment is awaiting moderation.
Всем, как и писалось средняя компенсация 50% https://faraon-s.ru Что то тут не так.
Your comment is awaiting moderation.
cornerstore – Layout is clean, exploring different products was a breeze.
Your comment is awaiting moderation.
trendfindshub – Excellent selection of items, ordering process was effortless.
Your comment is awaiting moderation.
На днях брал небольшой опт, был приятно удивлен подходом и предложением тс, товар еще не пробовали ,но забрал все ровно, по ходу отпишу в теме за качество товара, пока же могу сказать, что жалею , что раньше не работал с данным тс! Успехов, благодарю за сервис!!! купить скорость, кокаин, мефедрон, гашиш д не магаз рооовный так что не переживай все будет четко)))
Your comment is awaiting moderation.
bargainhub – Nice assortment of offers, site loaded quickly without any lag.
Your comment is awaiting moderation.
modernshoppingcorner – Site loads quickly and the layout looks clean, which made shopping pleasant today.
Your comment is awaiting moderation.
modernstylecorner – Enjoyed scrolling through items, the site is nicely structured and responsive.
Your comment is awaiting moderation.
Я поддержу! Советую! С 2012 года знаю! Всё ровно! + С тобой тоже ребята в Мск работали! Все ровняки тут собрпались! Удачи в Будущем! https://britecleaning.ru Все пришло. всё на высоте. на данный момент более сказать немогу.
Your comment is awaiting moderation.
trendfusion – Fast and easy purchase, the variety is impressive.
Your comment is awaiting moderation.
Whispering Trend Hub Picks – Items are easy to explore and the interface feels neat.
Your comment is awaiting moderation.
Open Plains Picks Online – Navigation is easy, and the site is visually clear.
Your comment is awaiting moderation.
classychoicehub.shop – Classy selection of products, browsing was smooth and enjoyable throughout today. Your Stylish Path – Tips and ideas to guide you toward a more stylish and confident life.
Your comment is awaiting moderation.
В нашем городе эту почту походу обложили пополной!!!!!!!! https://art-tavrida.ru А чего брали то?
Your comment is awaiting moderation.
OriginPeak Fashion Hub – Modern boutique finds, simple ordering, and the package arrived safely.
Your comment is awaiting moderation.
Не вздумайте платить ему без Гаранта через которого он не работаем,этим самым доказывает свою не надежность! https://modernm.ru 307 не появился???
Your comment is awaiting moderation.
stylehub – Found many trendy outfits, shipping felt smooth and prompt.
Your comment is awaiting moderation.
dailytrendfinds – Wide variety of fashionable products, pages loaded quickly and shopping was easy.
Your comment is awaiting moderation.
glamhub – Browsing is fast and intuitive, with products displayed nicely.
Your comment is awaiting moderation.
conversionmatrix.click – Pages loaded fast, images appeared sharp, and formatting stayed consistent.
Your comment is awaiting moderation.
growthnavigator.click – Navigation felt smooth, found everything quickly without any confusing steps.
Your comment is awaiting moderation.
Бро, не волнуйся, тут ровный магаз. Напиши им в аську, что заказ номер такой-то оплачен. https://maderu.ru у кого взять собрался его ?
Your comment is awaiting moderation.
brandoptimizer.click – Loved the layout today; clean, simple, and genuinely user-friendly overall.
Your comment is awaiting moderation.
adflowmaster.click – Navigation felt smooth, found everything quickly without any confusing steps.
Your comment is awaiting moderation.
clickstrategy.click – Appreciate the typography choices; comfortable spacing improved my reading experience.
Your comment is awaiting moderation.
markethyper.click – Overall, professional vibe here; trustworthy, polished, and pleasantly minimal throughout.
Your comment is awaiting moderation.
valueexpressstore – Items are well-priced, the website makes browsing effortless.
Your comment is awaiting moderation.
adsdominator.click – Overall, professional vibe here; trustworthy, polished, and pleasantly minimal throughout.
Your comment is awaiting moderation.
Aurora Stop – The layout is intuitive, and products are presented nicely.
Your comment is awaiting moderation.
лютый микс, мир за качество магазу https://serov1000.ru привет запулил на закладку ??
Your comment is awaiting moderation.
Timberwood Select Picks – Items are easy to explore and the interface is very user-friendly.
Your comment is awaiting moderation.
Meadow Market Finds – Loved how simple the process was and the order arrived exactly on schedule.
Your comment is awaiting moderation.
шлюхи г нижневартовск
Your comment is awaiting moderation.
Growth Mindset Daily – Tools and insights to build focus, habits, and personal success consistently.
Your comment is awaiting moderation.
Магазину огромное спасибо! За купить скорость, кокаин, мефедрон, гашиш Эйфора пока нет в наличии. Как только появится мы обязательно вас оповестим
Your comment is awaiting moderation.
yourstylestore – Found stylish products easily, browsing experience was smooth and enjoyable today. fashionvault – A highly engaging site, ideal for learning and creating fresh ideas.
Your comment is awaiting moderation.
Want to visit the elephant sanctuary A safe haven for animals who have survived circuses, harsh labor, and exploitation? Visitors support the rehabilitation program and become part of an important conservation project.
Your comment is awaiting moderation.
Love elephants? https://womantravel.ru: rescued animals, spacious grounds, and care without exploitation. Visitors can observe elephants bathing, feeding, and behaving as they do in the wild.
Your comment is awaiting moderation.
brightdealstore – Easy to navigate and lots of options, checkout was fast.
Your comment is awaiting moderation.
learnshareachieve – Products are easy to find and layout feels friendly — good browsing experience.
Your comment is awaiting moderation.
Всем привет данной ветки:hello: История токова… https://rolf-mebel.ru чема вещи делает!!!
Your comment is awaiting moderation.
mediafusion – Navigation is intuitive and items load fast — nice browsing experience overall.
Your comment is awaiting moderation.
glamtrendhub – Trendy items were easy to locate, delivery was fast and dependable.
Your comment is awaiting moderation.
innerbalance – Smooth browsing experience, really enjoyed checking out items.
Your comment is awaiting moderation.
нижневартовск индивидуалки
Your comment is awaiting moderation.
Modern Ridge Selection – Browsing is quick, and products are presented clearly.
Your comment is awaiting moderation.
Всё нашел!! Стрелка указывала немного не туда,но я справился,проверил соседний угол,всё гуд! Спасибо динамиту! Мяу идеальный!! Рекомендую!! https://powsurfing.ru ты писал пришла посылка размыли в итоге прикола не поняли
Your comment is awaiting moderation.
buchmacher us wahl
my web blog … betibet beste bonus sportwetten
Your comment is awaiting moderation.
SilverMoon Finds – Items were as described, checkout was simple, and delivery was speedy.
Your comment is awaiting moderation.
Profesionalni stehovani V Praze: stehovani bytu, kancelari a chalup, stehovani a baleni, demontaz a montaz nabytku. Mame vlastni vozovy park, specializovany tym a smlouvu s pevnou cenou.
Your comment is awaiting moderation.
Киньте репки кому не сложно) не сочтите за попрошайку купить онлайн мефедрон, экстази, бошки Приятно работать!!!
Your comment is awaiting moderation.
1 официальный сайт 1win 1win официальный скачать
Your comment is awaiting moderation.
Harbor Studio Hub – Easy to explore items with a smooth and calm layout.
Your comment is awaiting moderation.
chicdaily – Nice variety of fashion items, navigating and purchasing was very easy.
Your comment is awaiting moderation.
dailytrendspot.click – Trends updated daily, making it easy to discover fresh ideas quickly. Daily Trend Guide – Tips and updates to stay ahead in style, lifestyle, and ideas.
Your comment is awaiting moderation.
ты брал вообще не скоростило или как ? купить скорость, кокаин, мефедрон, гашиш По репе получил! Еще раз увижу безобразный флуд во всех ветках, будет тебе БАН!
Your comment is awaiting moderation.
dealhubcentral – Wide variety of daily deals, ordering was hassle-free.
Your comment is awaiting moderation.
glamcornerhub – Loved the selection and smooth ordering experience.
Your comment is awaiting moderation.
Хотелось бы надеется))) купить кокаин, меф, бошки через телеграмм У меня проблема с оплатой реквизитам 40817810… и 41548… Проверял несколько раз на нескольких терминалах… “Введён неверный номер” С сайта списал верно, несколько раз перепроверил. Вот так, хочу оплатить, а не могу, готов хоть блиц отправить или ещё как нибудь
Your comment is awaiting moderation.
Timber Grove Stop – The site loads fast, and finding items is simple.
Your comment is awaiting moderation.
10 euros offert paris sportif|10 euros offert sans dépôt paris sportif|10
meilleurs sites de paris sportifs|100 euro offert paris sportif|100
euros offert paris sportif|100 euros remboursé paris sportifs|100 offert
pari sportif|100 offert paris sportif|100 remboursé paris
sportif|100e offert pari sportif|abandon paris sportif tennis|abandon tennis paris sportif|addiction paris sportif forum|age paris sportif belgique|aide au pari
sportif|aide au paris sportif|aide aux paris sportif|aide aux paris sportifs|aide pari sportif|aide pari sportif football|aide parie sportif|aide paris sportif|aide
paris sportif foot|aide paris sportif gratuit|aide paris sportifs|aide pour
paris sportif|algorithme de paris sportif|algorithme excel paris
sportif|algorithme gratuit paris sportif|algorithme pari
sportif|algorithme paris sportif|algorithme paris
sportif avis|algorithme paris sportif basket|algorithme paris sportif excel|algorithme paris sportif gratuit|algorithme paris sportif
tennis|algorithme paris sportifs|algorithme pour paris sportif|analyse cote paris sportif|analyse de paris sportif|analyse match paris sportif|analyse pari sportif|analyse paris sportif|analyse paris sportif foot|analyse paris sportif football|analyse paris sportif gratuit|analyse
paris sportifs|ancienne cote paris sportif|api cote paris sportif|app paris sportif sans argent|appli de paris sportif|appli de paris sportif sans argent|appli
de paris sportifs|appli pari sportif|appli pari sportif gratuit|appli parie
sportif|appli paris sportif|appli paris sportif
avec paypal|appli paris sportif belgique|appli paris sportif entre amis|appli paris sportif gratuit|appli
paris sportif sans argent|appli paris sportif suisse|appli
paris sportifs|application aide paris sportif|application algorithme paris
sportif|application analyse paris sportif|application android paris sportif|application bankroll paris sportif|application conseil
paris sportif|application de pari sportif|application de parie sportif|application de paris sportif|application de paris sportif en afrique|application de
paris sportif en cote d’ivoire|application de paris sportif en ligne|application de paris sportif gratuit|application de paris sportif international|application de paris sportif suisse|application de paris sportifs|application faux paris sportifs|application gestion bankroll paris sportif|application gestion paris sportif|application ia paris sportif|application pari sportif
gratuit|application paris sportif|application paris sportif android|application paris sportif argent fictif|application paris
sportif belgique|application paris sportif canada|application paris sportif espagne|application paris sportif espagnol|application paris sportif fictif|application paris sportif france|application paris sportif gratuit|application paris sportif
gratuit entre amis|application paris sportif maroc|application paris sportif offre de bienvenue|application paris sportif paypal|application paris sportif sans argent|application paris sportif sans justificatif de domicile|application paris sportif suisse|application paris sportif usa|application paris
sportif virtuel|application pour faire des
paris sportifs|application pour gerer ses paris sportif|application pour
les paris sportifs|application pour pari sportif|application pour paris sportif|application pour paris sportifs|application statistique paris sportif|application suivi paris sportif|applications de
paris sportifs|applications paris sportifs|applis paris sportif|applis paris sportifs|apprendre
a faire des paris sportifs|argent facile paris sportif|argent offert paris sportifs|argent offert sans depot
paris sportif|argent paris sportif|argent paris sportifs|argent paris sportifs impots|argent sans depot paris
sportif|arjel paris sportif|arjel paris sportifs|astuce gagner paris sportif|astuce pari sportif|astuce paris sportif|astuce
paris sportif basket|astuce paris sportif foot|astuce paris sportif forum|astuce paris sportif tennis|astuce paris sportifs|astuce pour gagner au pari sportif|astuce pour
gagner au paris sportif|astuce pour gagner paris sportif|astuce pour paris sportif|astuces paris sportifs|astuces paris sportifs en ligne|astuces paris sportifs foot|astuces pour gagner
aux paris sportifs|autorisation paris sportif france|avis pari sportif|avis paris
sportif|avis paris sportif foot|avis site de paris sportif|avis site paris sportif|avis sur les paris sportifs|avis sur paris
sportif|avis tipster paris sportif|aweh signification paris sportif|bankroll 100 euros paris sportifs|bankroll management paris sportif|bankroll paris sportif|bankroll paris sportif excel|bankroll paris sportif gratuit|bankroll paris sportifs|basket
paris sportif|belgique france paris sportif|belgique paris sportifs|bonus bienvenue
paris sportif|bonus bienvenue paris sportifs|bonus cash paris sportif|bonus de bienvenue paris
sportif|bonus de bienvenue paris sportif belgique|bonus de bienvenue
sans depot paris sportif|bonus de depot paris sportif|bonus de paris sportifs|bonus depot paris sportif|bonus en cash
paris sportif|bonus gratuit paris sportif|bonus
gratuit sans depot paris sportif|bonus pari sportif|bonus
paris sportif|bonus paris sportif belgique|bonus paris
sportif betclic|bonus paris sportif cash|bonus paris sportif en ligne|bonus paris sportif france pari|bonus paris sportif retirable|bonus paris sportif sans depot|bonus paris sportif sans dépôt|bonus paris sportif unibet|bonus paris sportifs|bonus sans depot paris sportif|bonus sans depot paris sportif belgique|bonus sans dépôt paris sportif|bonus sans dépôt paris sportif hors
arjel|bonus site de paris sportif|bonus site pari sportif|bonus site paris sportif|bonus sites de paris
sportifs|bonus unibet paris sportif|bookmaker paris sportif|bookmaker paris sportif gratuit|bookmaker paris sportifs|bookmaker sportif|bookmakers paris sportif|bookmakers paris
sportifs|bookmakers paris sportifs en ligne|but contre son camp
paris sportif|but sur penalty paris sportif|buteur paris sportif|c’est quoi handicap paris sportif|c’est quoi une cote paris
sportif|calcul anti perte paris sportif|calcul
combinaison pari sportif|calcul cote pari sportif|calcul cote paris sportif|calcul couverture paris sportif|calcul de
cote paris sportif|calcul des cotes paris sportifs|calcul dnb
paris sportifs|calcul double chance paris sportif|calcul gain paris sportif|calcul mise paris sportif|calcul pari sportif|calcul paris
sportif|calcul paris sportif multiple|calcul pourcentage cote paris sportif|calcul probabilité paris
sportif|calcul rentabilité paris sportifs|calcul roi paris
sportif|calcul systeme paris sportif|calcul trj paris
sportifs|calculateur cote paris sportif|calculateur de cote paris sportif|calculateur de mise
paris sportif|calculateur de paris sportif|calculateur paris sportif|calculatrice arbitrage
paris sportif|calculatrice paris sportif|calculer cote paris sportif|calculer gain paris sportif|calculer probabilité paris
sportifs|calculer roi paris sportifs|calculer une
cote pari sportif|calculer une cote paris sportif|carte cadeau paris sportif|carte pcs paris sportif|carte prépayée paris sportifs|cash out pari sportif|cash out paris sportif|cash out paris sportifs|casino en ligne
paris sportif|casino paris sportif en ligne|champions league paris sportif|chute de cote paris
sportif|classement des meilleurs sites de paris sportifs|classement
meilleur site de paris sportif|code barre paris sportif|code bonus paris sportif|code paris
sportif|code promo pari sportif|code promo paris sportif|code
promo paris sportif sans depot|code promo paris sportif sans dépôt|code
promo sans depot paris sportif|code promo site paris sportif|combien de temps pour encaisser un paris sportif|combien de temps pour retirer un paris sportif|combien miser paris sportifs|combine paris sportif|combines
paris sportifs|combiné pari sportif|combiné paris sportif|combiné paris
sportif conseil|combiné paris sportif du jour|combiné paris sportif pronostic|comment analyser un paris sportif|comment arreter de jouer aux
paris sportifs|comment arreter les paris sportif|comment arreter les
paris sportifs|comment arrêter les paris sportifs|comment bien gagner au paris
sportif|comment bien jouer au paris sportif|comment bien miser paris sportif|comment ca marche les paris sportif|comment calculer cote paris sportif|comment calculer gain paris sportif|comment
calculer les cotes des paris sportifs|comment calculer une cote
de paris sportif|comment calculer une cote pari sportif|comment calculer une cote paris sportif|comment comprendre les paris
sportifs|comment creer un vip paris sportif|comment créer un algorithme
paris sportif|comment créer un site de paris sportif|comment devenir riche avec
les paris sportifs|comment etre rentable paris sportif|comment etre sur de
gagner au paris sportif|comment faire de bon paris sportif|comment faire des parie sportif|comment faire des paris sportif|comment faire des paris sportif
gagnant|comment faire des paris sportifs|comment faire pari sportif|comment faire paris sportif|comment faire
pour arreter les paris sportifs|comment faire pour gagner au paris sportif|comment faire pour gagner les paris sportifs|comment faire
un bon pari sportif|comment faire un bon paris sportif|comment faire un pari sportif|comment faire un parie sportif|comment faire un paris sportif|comment faire
une montante paris sportif|comment fonctionne les cotes dans les paris sportifs|comment fonctionne
les cotes des paris sportifs|comment fonctionne les paris sportifs|comment fonctionne paris sportifs|comment fonctionne un pari sportif|comment fonctionnent
les cotes dans les paris sportifs|comment fonctionnent les cotes dans les paris sportifs
grand oral|comment fonctionnent les cotes de paris sportif|comment fonctionnent les
paris sportifs|comment fonctionnent les paris sportifs grand oral|comment fonctionnent les
paris sportifs grand oral maths|comment fonctionnent les paris sportifs maths|comment gagner a coup sur au paris sportif|comment gagner a tous les
coups au paris sportif|comment gagner a tout les coup au paris
sportif|comment gagner au pari sportif|comment gagner au
pari sportif football|comment gagner au paris sportif|comment gagner
au paris sportif a coup sur|comment gagner au paris sportif foot|comment gagner au paris sportif forum|comment gagner au paris sportif tennis|comment gagner au
paris sportifs|comment gagner aux paris sportif|comment gagner aux paris sportifs|comment gagner
aux paris sportifs foot|comment gagner aux paris sportifs livre|comment gagner aux
paris sportifs sur le long terme|comment gagner avec les paris sportifs|comment gagner dans les paris sportifs|comment gagner de l argent avec les
paris sportifs|comment gagner de l’argent au paris sportif|comment gagner de l’argent
aux paris sportifs|comment gagner de l’argent avec les paris sportifs|comment gagner de l’argent paris sportif|comment gagner de l’argent sur les paris sportifs|comment gagner de
l’argent sur paris sportif|comment gagner des paris sportif|comment
gagner des paris sportifs|comment gagner en paris sportif|comment gagner facilement au paris sportif|comment gagner les paris sportifs|comment gagner paris sportif|comment gagner paris sportif foot|comment gagner paris sportifs|comment gagner sa vie avec les paris sportifs|comment gagner ses
paris sportif|comment gagner sur les paris sportif|comment gagner sur les paris sportifs|comment gagner tout le temps au paris
sportif|comment gagner un pari sportif|comment gagner un paris sportif|comment gerer une bankroll paris sportif|comment gérer
sa bankroll paris sportif|comment jouer au pari sportif|comment jouer au paris sportif|comment jouer au paris sportif foot|comment jouer aux
paris sportifs|comment jouer paris sportif|comment marche cote paris sportif|comment marche les cotes paris sportif|comment
marche les paris sportif|comment marche les paris sportifs|comment marche paris sportif|comment marche un pari sportif|comment marche un paris sportif|comment
marchent les cotes paris sportif|comment marchent les
paris sportifs|comment miser au paris sportif|comment miser paris sportif|comment
monter sa bankroll paris sportif|comment ne jamais perdre au paris
sportif|comment parier sportif|comment reussir au paris
sportif|comment reussir les paris sportif|comment reussir paris sportif|comment sont calculer les cotes de paris sportif|comment sont calculées
les cotes des paris sportifs|comment sont calculés les cotes des
paris sportifs|comment sont faites les cotes des paris sportifs|comment toujours gagner au paris sportif|comment ça marche les paris sportifs|comparaison bonus paris
sportifs|comparaison cote pari sportif|comparaison des cotes paris sportifs|comparateur cote
pari sportif|comparateur cote paris sportif|comparateur cotes
paris sportif|comparateur cotes paris sportifs|comparateur de cote pari sportif|comparateur de cote paris sportif|comparateur de cotes paris sportifs|comparateur de côtes paris
sportifs|comparateur de paris sportif|comparateur de site
de paris sportif|comparateur de site paris sportif|comparateur de sites de paris sportifs|comparateur pari sportif|comparateur paris sportif|comparateur paris
sportifs|comparateur site de paris sportif|comparateur site pari sportif|comparateur site
paris sportif|comparatif bonus paris sportif|comparatif bonus paris sportifs|comparatif cote pari sportif|comparatif cote paris sportif|comparatif cotes
paris sportifs|comparatif des sites de paris sportifs|comparatif offre de
bienvenue paris sportif|comparatif offre paris sportif|comparatif pari sportif|comparatif pari sportif en ligne|comparatif paris sportif|comparatif paris sportif bonus|comparatif paris
sportif en ligne|comparatif paris sportifs|comparatif paris sportifs
en ligne|comparatif site de paris sportif|comparatif site paris sportif|comparatif site paris
sportifs|comparatif sites de paris sportifs|comparatif sites paris sportifs|comparer les cotes paris sportifs|comprendre cote paris sportif|comprendre handicap paris
sportif|comprendre les cotes des paris sportifs|comprendre les cotes paris sportif|comprendre les cotes paris sportifs|comprendre les handicap paris sportif|compte de
paris sportif|compte démo paris sportif|compte finance paris sportif|compte financer paris sportif|compte financier paris
sportif|compte financé paris sportif|compte pari sportif|compte paris
sportif|compte paris sportif financé|conseil de paris sportif|conseil de paris sportifs|conseil en paris
sportif|conseil en paris sportifs|conseil pari sportif|conseil pari sportif
gratuit|conseil paris sportif|conseil paris sportif aujourd’hui|conseil paris
sportif du jour|conseil paris sportif foot|conseil paris sportif gratuit|conseil paris
sportif ligue des champions|conseil paris sportif nba|conseil paris sportif pronostic|conseil
paris sportif rmc|conseil paris sportif tennis|conseil paris sportifs|conseil pour
gagner au paris sportif|conseil pour paris sportif|conseil sur
les paris sportifs|conseille paris sportif|conseiller en paris sportifs|conseiller paris sportif|conseils de paris sportifs|conseils
en paris sportifs|conseils paris sportifs|conseils paris sportifs foot|conseils paris
sportifs gratuit|conseils paris sportifs tennis|conseils pour paris sportifs|cote a 100 paris sportif|cote a 2 paris
sportif|cote anglaise paris sportif|cote de 2 paris sportif|cote de pari sportif|cote de
paris sportif|cote des paris sportifs|cote maximum paris
sportif|cote minimum paris sportif|cote pari sportif|cote pari sportif comment ça
marche|cote pari sportif real madrid|cote pari sportif
rugby|cote parie sportif|cote paris sportif|cote
paris sportif belgique|cote paris sportif calcul|cote paris sportif definition|cote paris sportif euro|cote paris sportif explication|cote paris sportif foot|cote paris sportif
france belgique|cote paris sportif france espagne|cote paris sportif ligue des champions|cote paris sportif
moto gp|cote paris sportif psg|cote paris sportif psg arsenal|cote paris sportif rugby|cote paris sportif tennis|cote
paris sportifs|cote pour paris sportifs|cote sportif foot|cote sportif rugby|cote à 1000 paris sportif|cotes de paris sportifs|cotes
pari sportif|cotes paris sportif|cotes paris sportifs|cotes paris sportifs foot|coupe de france
paris sportif|créer un algorithme paris sportif|créer un compte paris
sportif|créer un site de paris sportif en ligne|dans les paris sportifs que
signifie handicap|declarer ses gains paris sportif|definition cash out paris sportif|definition cote paris
sportif|definition handicap paris sportif|depot 5 euros
paris sportif|depot double paris sportif|depot minimum 5 euro paris
sportif|depot minimum paris sportif|depot paris sportif|depuis quand existe
les paris sportif en france|devenir riche avec les paris
sportifs|devenir riche avec paris sportifs|disqualification tennis paris sportif|dnb en paris sportif|dnb pari sportif|dnb paris sportif|dnb paris sportif definition|dnb paris sportifs|doit on declarer les gains
de paris sportif|déclarer gains paris sportifs|déclarer gains
paris sportifs hors arjel|définition bankroll paris sportif|dépôt
minimum 1 euro paris sportif|dépôt minimum 5 euro paris sportif|ecart de jeux tennis paris sportif|erreur de cote paris sportif|est ce que les gains des paris sportifs sont imposables|est-ce que les prolongation compte dans
un pari sportif|etre sur de gagner au paris sportif|euro paris sportif|evenement sportif a paris|evenement sportif
paris|evenement sportif paris 2025|evenement sportif paris aujourd hui|evenement sportif paris aujourd’hui|evenement sportif paris ce
week end|evenements sportif paris|evenements sportifs
paris|evenements sportifs paris 2025|evenements sportifs à paris|evolution cote paris
sportif|evolution cotes paris sportifs|evolution des cotes paris sportifs|explication cote pari sportif|explication cote paris sportif|explication handicap paris sportif|explication pari sportif|explication paris sportif|face
a face hockey paris sportif|faire des paris sportif|faire
des paris sportif avec paypal|faire des paris sportifs|faire
fortune paris sportifs|faire un pari sportif|faire un paris sportif|faut il déclarer
les gains de paris sportifs|faut il déclarer ses gains paris sportifs|fichier excel gestion bankroll
paris sportif|fiscalité gains paris sportifs|foot
paris sportif|football et paris sportifs|forfait tennis
paris sportif|formation paris sportif gratuit|forum de paris sportif|forum
de paris sportifs|forum pari sportif|forum parie sportif|forum paris sportif|forum paris sportif foot|forum paris sportif gratuit|forum paris sportif nba|forum paris
sportif tennis|forum paris sportifs|forum sur les paris sportifs|forum tennis paris sportif|francaise des jeux pari sportif|francaise des jeux
paris sportif|francaise des jeux paris sportifs|france 2 paris sportif|france 2 paris sportifs|france belgique paris sportif|france espagne paris sportif|france pari sportif|france pari sportif brest|france paris sportif|france paris sportifs|france pologne paris sportif|france
portugal paris sportif|france suisse paris sportifs|france tunisie paris sportifs|france-pari – paris sportifs|gagnant pari
sportif|gagnant paris sportif|gagnant paris sportif bayern|gagnante paris sportif|gagne au paris
sportif|gagner 10 euros par jour aux paris sportifs|gagner 100
euros par jour paris sportif|gagner 1000 euros par
mois paris sportifs|gagner 10000 euros paris sportif|gagner 2000 euros par mois paris sportif|gagner
50 euros par jour paris sportif|gagner a coup
sur au paris sportif|gagner a coup sur pari sportif|gagner a tous les coup paris
sportif|gagner argent avec paris sportifs|gagner argent pari sportif|gagner
argent paris sportif|gagner argent paris sportifs|gagner
au pari sportif|gagner au paris sportif|gagner au paris sportif a
coup sur|gagner au paris sportif foot|gagner au
paris sportif forum|gagner au paris sportif à coup sur|gagner aux paris sportif|gagner aux paris sportifs|gagner aux paris sportifs pdf|gagner beaucoup d’argent paris sportif|gagner
de l argent grace aux paris sportifs|gagner de l argent pari sportif|gagner de l argent paris sportif|gagner de l argent paris sportifs|gagner de l’argent au paris sportif|gagner
de l’argent aux paris sportifs|gagner de l’argent avec les paris sportifs|gagner de
l’argent avec paris sportif|gagner de l’argent avec paris sportifs|gagner
de l’argent grace au paris sportif|gagner de l’argent grace aux paris sportifs|gagner de l’argent pari
sportif|gagner de l’argent paris sportif|gagner de l’argent paris sportifs|gagner
de l’argent sur les paris sportifs|gagner des paris sportif|gagner des paris sportifs|gagner les
paris sportifs|gagner pari sportif|gagner paris sportif|gagner paris sportif
foot|gagner paris sportif forum|gagner paris sportif tennis|gagner paris sportifs|gagner sa vie avec les paris sportif|gagner
sa vie avec les paris sportifs|gagner sa vie avec paris sportifs|gagner ses paris sportifs|gagner
à coup sur paris sportif|gagner à tous les coups paris
sportifs|gain maximum paris sportif|gain pari sportif|gain pari sportif imposable|gain pari sportif impot|gain paris sportif|gain paris sportif imposable|gain paris sportif impot|gain paris
sportif impôt|gains paris sportif|gains paris sportif imposable|gains paris sportifs|gains paris sportifs
imposable|gains paris sportifs imposables|gains paris sportifs sont ils imposables|gerer bankroll paris sportif|gerer sa
bankroll paris sportif|gerer une bankroll paris sportif|gestion bankroll paris sportif|gestion bankroll paris sportifs|gestion bankroll
paris sportifs excel|gestion de bankroll paris sportif|gestion de bankroll paris sportif application|gestion de bankroll paris sportifs|gestion de mise
paris sportif|gestion paris sportifs v2 5 gratuit|gg signification paris sportif|gros combiné paris sportif|gros gain paris sportif|grosse cote paris sportif pronostic|grosse mise paris sportif|groupe paris sportif gratuit|groupe telegram paris sportif gratuit|groupement de joueurs paris sportifs|handicap
0 paris sportif|handicap 1 paris sportif|handicap 5 paris sportif|handicap au paris sportif|handicap basket paris sportif|handicap dans les paris sportifs|handicap en paris sportif|handicap europeen paris
sportif|handicap européen paris sportifs|handicap mi temps
paris sportif|handicap pari sportif|handicap paris sportif|handicap paris sportif basket|handicap paris sportif explication|handicap paris sportif foot|handicap paris sportif rugby|handicap paris sportifs|handicap rugby paris sportif|handicap tennis paris sportif|historique cote paris sportif|historique des cotes paris sportifs|hockey paris sportif|hockey sur glace paris sportif|hors arjel paris
sportif|hweh signification paris sportif|imposition gain pari sportif|imposition gain paris sportif|imposition gains paris sportifs|imposition paris sportif france|impot gain paris sportif|impot paris sportif france|impot sur gain paris sportif|je gagne ma
vie avec les paris sportifs|jeu de pari sportif gratuit|jeu de
paris sportif en ligne|jeu de paris sportif gratuit|jeu paris sportif gratuit|jeu paris sportif sans argent|jeux de parie sportif|jeux de paris
sportif|jeux de paris sportif en ligne|jeux de paris sportif gratuit|jeux de paris sportifs|jeux olympiques paris sportifs|jeux paris sportif|jeux
paris sportif gratuit|jeux paris sportif virtuel|jeux paris sportifs en ligne|jouer au paris sportif|jouer paris sportif|joueur absent paris
sportif|joueur blesse paris sportif|joueur caen paris
sportif|joueur de caen pari sportif|joueur de foot paris sportif|joueur decisif paris
sportif|joueur décisif paris sportif|joueur italien paris sportif|joueur paris sportif|joueur professionnel paris sportif|joueur qui se blesse paris
sportif|joueur sanctionne pari sportif|joueur suspendu paris sportif|joueurs italiens paris sportifs|l’argent des paris sportifs est il
imposable|la cote paris sportif|la francaise des jeux paris sportif|la martingale paris sportif|la martingale paris sportifs|la meilleur application de paris sportif|la meilleur application paris sportif|la meilleur technique pour gagner au paris sportif|la méthode secrète pour gagner aux
paris sportifs pdf|la plus grosse cote gagner paris sportif|la plus grosse cote paris sportif|ldem paris sportif signification|le marché des paris sportifs|le
meilleur site de pari sportif|le meilleur site de paris sportif|le
meilleur site de paris sportif en ligne|le meilleur site de paris sportifs|le plus gros gain au paris sportif|le plus gros paris sportif|le plus gros paris sportif du monde|les 10 meilleurs sites de paris sportifs|les
10 meilleurs sites de paris sportifs en afrique|les 17 secrets pour gagner rapidement aux paris sportifs|les
17 secrets pour gagner rapidement aux paris sportifs pdf|les application de
paris sportif|les applications paris sportifs|les bonus paris
sportifs|les bookmakers paris sportifs|les cotes paris sportifs|les gains de paris sportifs sont ils imposables|les gains des paris sportifs sont ils imposables|les jeux de paris
sportifs|les meilleur paris sportif|les meilleures applications de paris sportifs|les meilleurs applications de paris sportifs|les meilleurs bonus paris
sportif|les meilleurs bonus paris sportifs|les meilleurs cotes paris sportif|les
meilleurs paris sportifs|les meilleurs paris sportifs du jour|les
meilleurs site de paris sportif|les meilleurs site de paris sportifs|les meilleurs sites de pari sportif|les meilleurs sites de paris sportifs|les meilleurs sites de paris sportifs en ligne|les paris sportif|les paris sportif avis|les
paris sportifs|les paris sportifs comment ça marche|les paris sportifs en france|les paris sportifs en ligne|les paris sportifs en ligne comprendre jouer gagner|les paris sportifs en ligne comprendre jouer gagner
pdf|les paris sportifs les plus rentables|les plus gros gagnant paris sportif|les plus
gros gains au paris sportifs|les plus gros gains paris sportifs|les plus gros paris sportif|les plus grosse
cote paris sportif|les plus grosses pertes paris sportifs|les sites de paris
sportifs|les sites de paris sportifs autorisés en france|les sites de paris sportifs en france|les sites de paris sportifs en ligne|les sites de paris
sportifs francais|ligue 1 paris sportif|ligue 1 paris sportifs|ligue 2 paris sportif|ligue des champions paris sportif|limite de gains paris sportifs|limite de
mise paris sportif|limite gain paris sportif|limite mise paris sportifs|liste de paris sportif|liste des paris sportifs|liste des site
de paris sportif|liste des sites de paris sportifs|liste pari sportif|liste paris
sportif|liste paris sportif pdf|liste site de paris sportif|liste site pari sportif|liste site paris sportif|liste site
paris sportif arjel|liste sites paris sportifs|logiciel algorithme paris sportif|logiciel algorithme paris sportif gratuit|logiciel analyse paris
sportif|logiciel calcul paris sportif|logiciel de pari sportif|logiciel de paris sportif|logiciel de paris sportif gratuit|logiciel gestion bankroll paris
sportif gratuit|logiciel gestion de bankroll paris sportif|logiciel gestion paris sportif|logiciel gestion paris sportif gratuit|logiciel gestion paris
sportifs|logiciel pari sportif|logiciel paris sportif|logiciel paris sportif
gratuit|logiciel paris sportifs|logiciel paris sportifs foot
sur 2 matchs|logiciel pour paris sportif|logiciel pour paris sportifs|logiciel
prediction paris sportif|logiciel probabilité paris sportif|logiciel prédiction paris sportif|logiciel statistique paris sportifs|logiciel variation de cote paris sportif|loi sur les paris
sportifs en france|magic calculator paris sportif|marché
des paris sportifs|marché des paris sportifs en france|marché des paris
sportifs en ligne|martingale pari sportif|martingale paris sportif|martingale paris sportif excel|martingale paris sportif forum|martingale
paris sportif interdit|martingale paris sportifs|match abandonné paris sportif|match annulé ou reporté paris sportifs|match
annulé paris sportif|match arrete paris
sportif|match interrompu paris sportif|match interrompu
tennis paris sportif|match interrompu tennis pluie paris sportif|match nul boxe paris sportif|match pari sportif|match
paris sportif|match reporté paris sportif|match suspendu paris sportif|match suspendu tennis paris sportif|match truqué paris sportif|matchs truqués paris sportifs|meilleur algorithme paris
sportif|meilleur algorithme paris sportif gratuit|meilleur app de paris sportif|meilleur app de paris sportifs|meilleur app paris sportif|meilleur appli de pari
sportif|meilleur appli de paris sportif|meilleur appli pari sportif|meilleur appli paris sportif|meilleur
appli paris sportif forum|meilleur appli paris sportifs|meilleur application conseil paris sportif|meilleur application de paris sportif|meilleur application de paris sportif en afrique|meilleur application pari
sportif|meilleur application paris sportif|meilleur application paris sportif belgique|meilleur
application pour les paris sportif|meilleur application pour pari sportif|meilleur bonus de bienvenue paris sportif|meilleur bonus pari sportif|meilleur
bonus paris sportif|meilleur bonus paris sportif sans depot|meilleur bonus paris sportifs|meilleur bonus site
de paris sportif|meilleur bonus site pari sportif|meilleur bonus site paris sportif|meilleur
bookmaker paris sportif|meilleur combiné paris sportif|meilleur conseil paris sportif|meilleur cote
de paris sportif|meilleur cote pari sportif|meilleur cote paris sportif|meilleur cote paris
sportif aujourd’hui|meilleur cote site paris sportif|meilleur forum paris
sportifs|meilleur gain paris sportif|meilleur ia paris sportif|meilleur methode pour gagner au paris sportif|meilleur
offre bienvenue paris sportif|meilleur offre bonus paris sportif|meilleur offre de bienvenue paris sportif|meilleur
offre de bienvenue paris sportifs|meilleur offre pari sportif|meilleur offre paris sportif|meilleur
offre paris sportif en ligne|meilleur pari sportif|meilleur pari sportif du jour|meilleur
pari sportif en ligne|meilleur paris sportif|meilleur paris
sportif aujourd’hui|meilleur paris sportif
du jour|meilleur paris sportif en ligne|meilleur
paris sportif foot|meilleur promo paris sportif|meilleur pronostic paris sportif|meilleur site de conseil paris
sportif|meilleur site de pari sportif|meilleur site de pari sportif en ligne|meilleur site de paris sportif|meilleur site de paris sportif avis|meilleur site de paris sportif belgique|meilleur site de paris sportif canada|meilleur site de
paris sportif en france|meilleur site de paris sportif en ligne|meilleur site de paris sportif football|meilleur site de paris sportif
forum|meilleur site de paris sportif france|meilleur site de paris sportif hors arjel|meilleur site de paris sportif international|meilleur site de paris sportif
suisse|meilleur site de paris sportifs|meilleur site de
paris sportifs en ligne|meilleur site pari sportif|meilleur site pari sportif en ligne|meilleur site pari sportif france|meilleur site paris sportif|meilleur site paris sportif avis|meilleur
site paris sportif belgique|meilleur site paris sportif canada|meilleur site paris sportif en ligne|meilleur site paris sportif foot|meilleur site paris sportif forum|meilleur site paris sportif france|meilleur site paris sportif hors arjel|meilleur site paris sportif nba|meilleur site paris sportif rugby|meilleur site paris sportif suisse|meilleur site paris sportifs|meilleur
site pour pari sportif|meilleur site pour paris sportif|meilleur site pronostic paris sportif|meilleur strategie paris sportif|meilleur technique de paris sportif|meilleur
technique paris sportif|meilleur technique pour gagner au paris sportif|meilleure appli
de paris sportif|meilleure appli de paris sportifs|meilleure appli pari sportif|meilleure appli paris sportif|meilleure appli paris sportifs|meilleure application de paris sportif|meilleure application de
paris sportifs|meilleure application pari sportif|meilleure application paris sportif|meilleure application paris sportif
android|meilleure application paris sportifs|meilleure offre paris sportif|meilleure site paris sportif|meilleure strategie paris sportif|meilleures applications de paris
sportifs|meilleures applications paris sportifs|meilleures cotes paris sportifs|meilleures offres paris sportifs|meilleures stratégies paris sportifs|meilleurs appli paris sportif|meilleurs application de paris sportifs|meilleurs application paris sportif|meilleurs applications paris sportifs|meilleurs bonus paris sportifs|meilleurs cote paris sportif|meilleurs cotes paris sportifs|meilleurs offres
paris sportifs|meilleurs paris sportifs|meilleurs paris sportifs du jour|meilleurs site de pari sportif|meilleurs site de paris sportif|meilleurs site de paris sportif en ligne|meilleurs site
de paris sportifs|meilleurs site paris sportif|meilleurs sites de paris sportifs|meilleurs sites de paris
sportifs en ligne|meilleurs sites paris sportif|meilleurs sites paris sportifs|methode abc
paris sportif|methode de paris sportif|methode gagnante
paris sportifs|methode gagner paris sportif|methode infaillible paris sportifs|methode martingale
paris sportif|methode mathematique paris sportif|methode mathematique pour
gagner au paris sportif|methode paris sportif|methode paris sportif foot|methode
paris sportif forum|methode paris sportif tennis|methode paris sportifs|methode pour gagner au paris sportif|methode pour gagner
paris sportif|methodes paris sportifs|minimum depot paris sportif|mise au jeu pari sportif|mise maximum pari sportif|mise maximum paris sportif|mise minimum paris sportif|mise moyenne paris sportif|mise
paris sportif|moins de 4 5 but paris sportif|montant maximum paris sportif|montant paris sportif|montante pari
sportif|montante parie sportif|montante paris sportif|montante paris sportifs|montantes paris
sportifs|multiple pari sportif|multiple paris sportif|multiple paris sportifs|multiples paris sportifs|méthode calcul paris sportif|méthode match nul paris sportifs|méthode mathématique pour gagner au
paris sportif|méthode paris sportif forum|méthode paris sportif hockey|nba pari sportif|nba paris sportif|nba paris sportifs|nouveau paris sportif|nouveau site
de pari sportif|nouveau site de paris sportif|nouveau site de paris sportif en ligne|nouveau site de paris sportifs|nouveau site pari
sportif|nouveau site paris sportif|nouveau site paris sportif france|nouveau site paris sportifs|nouveaux sites de
paris sportifs|nouveaux sites paris sportifs|nouvelle appli
paris sportif|nouvelle application de paris sportif|numero de match paris sportif|numero match paris sportif|offre 100 euros paris sportif|offre appli pari
sportif|offre bienvenu paris sportif|offre bienvenue
pari sportif|offre bienvenue paris sportif|offre bienvenue paris sportifs|offre bienvenue site
paris sportif|offre bonus paris sportif|offre de bienvenu paris
sportif|offre de bienvenue pari sportif|offre de bienvenue paris sportif|offre de bienvenue
paris sportif belgique|offre de bienvenue paris sportif
sans depot|offre de bienvenue paris sportif sans dépôt|offre de bienvenue paris
sportifs|offre de bienvenue sans depot paris sportif|offre de bienvenue
site paris sportif|offre euro paris sportif|offre pari sportif euro|offre paris sportif|offre paris sportif belgique|offre paris sportif
cash|offre paris sportif coupe du monde|offre paris sportif hors arjel|offre paris sportif remboursé|offre
paris sportif remboursé cash|offre paris sportif sans depot|offre promo paris
sportif|offre remboursement paris sportif|offre sans depot paris sportif|offre site paris sportif|offres bienvenue paris sportifs|offres
de bienvenue paris sportifs|ou faire des paris sportif|ou faire
des paris sportif en espagne|ou faire des paris sportifs|outil répartiteur de mise paris sportif|outils repartiteur de mises paris sportif|ouverture
compte paris sportifs|ouvrir un compte paris sportif|pack de bienvenue paris sportif|pack
de bienvenue paris sportif hors arjel|pari en ligne sportif|pari sportif|pari sportif 100 euros offert|pari sportif 100
remboursé|pari sportif abandon tennis|pari sportif aide|pari sportif algérie aujourd’hui|pari sportif appli|pari sportif application|pari sportif argent|pari sportif astuce|pari sportif aujourd|pari
sportif aujourd’hui|pari sportif avec handicap|pari sportif avec orange money|pari sportif avec paypal|pari sportif
avec wave|pari sportif avis|pari sportif basket|pari sportif belgique|pari sportif belgique france|pari sportif bonus|pari
sportif buteur pas titulaire|pari sportif champions league|pari sportif
combiné|pari sportif comment|pari sportif comment gagner|pari
sportif comment ça marche|pari sportif comparatif|pari sportif conseil|pari sportif
cote|pari sportif cote match|pari sportif cote psg|pari sportif coupe|pari sportif coupe
de france|pari sportif coupe du monde|pari sportif depot|pari
sportif du jour|pari sportif en france|pari sportif en ligne|pari sportif en ligne au cameroun|pari sportif en ligne belgique|pari sportif en ligne
canada|pari sportif en ligne france|pari
sportif en ligne gratuit|pari sportif en ligne suisse|pari sportif en ligne ufc|pari
sportif en suisse|pari sportif euro|pari sportif explication|pari sportif faire|pari sportif foot|pari sportif foot resultat|pari sportif football|pari sportif
forum|pari sportif francaise des jeux|pari sportif france|pari sportif france angleterre|pari sportif france argentine|pari sportif france autriche|pari sportif france belgique|pari sportif
france espagne|pari sportif france italie|pari sportif france portugal|pari sportif
france usa|pari sportif gagnant|pari sportif gagner|pari sportif gagner a tous les coups|pari sportif gagner de l’argent|pari sportif gain|pari
sportif gratuit|pari sportif gratuit pour gagner des cadeaux|pari sportif gratuit sans depot|pari
sportif handicap|pari sportif hockey|pari sportif hors
arjel|pari sportif jeux olympiques|pari sportif joueur absent|pari sportif le plus rentable|pari sportif leicester champion|pari sportif ligue 1|pari
sportif ligue 2|pari sportif ligue des champions|pari sportif ligue europa|pari sportif match|pari
sportif match arrete|pari sportif match interrompu|pari
sportif meilleur|pari sportif meilleur cote|pari sportif meilleur site|pari sportif methode|pari sportif mise|pari
sportif mise au jeu|pari sportif mise o jeu|pari sportif nba|pari sportif offre bienvenue|pari sportif paypal|pari
sportif plus|pari sportif prolongation|pari sportif
promo|pari sportif pronostic|pari sportif pronostic foot|pari sportif pronostic gagnant|pari sportif pronostic gratuit|pari sportif psg|pari sportif psg
bayern|pari sportif psg inter|pari sportif psg milan|pari sportif regle|pari sportif
rembourse|pari sportif remboursement|pari sportif remboursement
cash|pari sportif remboursé|pari sportif rugby|pari sportif rugby coupe du monde|pari sportif rugby top
14|pari sportif sans argent|pari sportif sans carte bancaire|pari
sportif sans depot|pari sportif signification|pari sportif site|pari sportif statistique|pari sportif suisse|pari sportif systeme|pari sportif technique|pari sportif
technique pour gagner|pari sportif temps reglementaire|pari sportif tennis|pari sportif tennis abandon|pari sportif
top|pari sportif top 14|pari sportif tour de france|parie sportif|parie sportif comment ca marche|parie sportif du jour|parie sportif en ligne|parie sportif
foot|parie sportif football|parie sportif france|parie sportif gratuit|parie sportif
pronostic|parie sportif suisse|paris en ligne sportif|paris en ligne sportifs|paris evenement sportif|paris
france sportif|paris hippique et sportif|paris hippiques et sportifs|paris hippiques paris sportifs|paris hippiques paris
sportifs et poker en ligne|paris hippiques sportifs|paris match sportif|paris sportif|paris sportif 10 euros offerts|paris sportif 100 euros offert|paris sportif 100 euros remboursé|paris sportif
100 offert|paris sportif 100 remboursé|paris sportif 100e
offert|paris sportif 150 euros offert|paris sportif 1er pari remboursé|paris sportif a faire|paris sportif a faire aujourd’hui|paris sportif a faire ce soir|paris sportif
abandon tennis|paris sportif abandon tennis parions sport|paris sportif aide|paris sportif algorithme|paris sportif analyse|paris sportif appli|paris
sportif application|paris sportif application android|paris sportif apres prolongation|paris sportif argent|paris sportif argent fictif|paris sportif
argent offert|paris sportif argent virtuel|paris sportif arjel|paris sportif
arsenal psg|paris sportif astuce|paris sportif au canada|paris sportif aujourd
hui|paris sportif aujourd’hui|paris sportif avec argent fictif|paris sportif avec bonus sans depot|paris sportif avec carte bancaire|paris sportif avec cryptomonnaie|paris sportif avec handicap|paris sportif avec paypal|paris sportif avec paysafecard|paris sportif avis|paris sportif avis expert|paris sportif avis forum|paris sportif bankroll|paris sportif basket|paris
sportif basket coupe de france|paris sportif basket nba|paris sportif basket prolongation|paris
sportif belgique|paris sportif belgique bonus|paris sportif belgique bonus sans depot|paris sportif belgique france|paris sportif belgique
suede|paris sportif bonus|paris sportif bonus bienvenue|paris sportif bonus cash|paris sportif bonus de
bienvenue|paris sportif bonus gratuit|paris sportif bonus gratuit sans depot|paris sportif bonus retirable|paris sportif
bonus sans depot|paris sportif bonus sans depot
belgique|paris sportif bookmaker|paris sportif but contre son camp|paris sportif but
temps additionnel|paris sportif buteur|paris sportif buteur blessé|paris sportif buteur carton rouge|paris sportif buteur contre
son camp|paris sportif buteur non titulaire|paris sportif buteur prolongation|paris sportif buteur qui ne joue pas|paris sportif buteur remplacant|paris sportif calcul gain|paris sportif canada|paris sportif cash|paris sportif cash
out|paris sportif champion ligue 1|paris sportif champions league|paris sportif
classement ligue 1|paris sportif code promo|paris sportif combine|paris
sportif combiné|paris sportif combiné comment ça marche|paris sportif combiné
du jour|paris sportif combiné match reporté|paris sportif
comment ca marche|paris sportif comment faire|paris sportif comment gagner|paris sportif comment gagner a tous les coups|paris sportif
comment jouer|paris sportif comment ça marche|paris sportif comparateur cote|paris sportif comparatif|paris sportif
conseil|paris sportif conseil gratuit|paris sportif conseil pour gagner|paris
sportif cote|paris sportif cote et match|paris sportif cote explication|paris sportif cote psg|paris sportif
coupe d’europe|paris sportif coupe davis|paris
sportif coupe de france|paris sportif coupe du monde|paris sportif coupe du
monde de rugby|paris sportif coupe du monde rugby|paris sportif depot 5 euro|paris sportif depot minimum|paris sportif depot paypal|paris sportif dnb|paris sportif
du jour|paris sportif du jour conseil|paris sportif dépôt 1 euro|paris
sportif dépôt minimum 5 euros|paris sportif en belgique|paris
sportif en france|paris sportif en ligne|paris sportif en ligne
avec paypal|paris sportif en ligne avis|paris sportif
en ligne belgique|paris sportif en ligne bonus|paris sportif en ligne cameroun|paris sportif en ligne comment gagner|paris sportif en ligne comment ça marche|paris sportif en ligne france|paris
sportif en ligne gratuit|paris sportif en ligne maroc|paris sportif en ligne paypal|paris sportif en ligne québec|paris sportif en ligne sans depot|paris sportif
en ligne suisse|paris sportif en suisse|paris sportif espagne france|paris sportif esport|paris sportif et casino
en ligne|paris sportif et hippique|paris sportif et
prolongation|paris sportif euro|paris sportif europa league|paris sportif explication|paris
sportif final ligue des champions|paris sportif finale ligue des champions|paris sportif foot|paris sportif foot aide|paris sportif foot astuce|paris sportif foot aujourd’hui|paris
sportif foot ce soir|paris sportif foot comment ca marche|paris sportif foot conseil|paris sportif foot cote|paris sportif foot coupe du monde|paris sportif foot en ligne|paris sportif foot feminin|paris sportif foot gratuit|paris sportif foot prolongation|paris sportif foot pronostic|paris
sportif foot pronostic gratuit|paris sportif foot regle|paris sportif foot suisse|paris sportif foot us|paris sportif football|paris sportif
football americain|paris sportif football astuces|paris sportif forfait tennis|paris sportif forum|paris sportif francais|paris sportif
francaise des jeux|paris sportif france|paris sportif france 2|paris sportif france
allemagne|paris sportif france angleterre|paris sportif france argentine|paris sportif france autriche|paris sportif france belgique|paris sportif france espagne|paris sportif france gibraltar|paris
sportif france italie|paris sportif france nouvelle zelande|paris sportif france pologne|paris sportif france
portugal|paris sportif france uruguay|paris sportif france usa|paris sportif
freebet sans depot|paris sportif gagnant|paris sportif gagnant à coup sûr|paris sportif gagner a coup sur|paris
sportif gagner argent|paris sportif gagner de l’argent|paris sportif gain|paris sportif gain maximum|paris sportif gestion bankroll|paris sportif gratuit|paris sportif gratuit appli|paris sportif gratuit avec
cadeaux|paris sportif gratuit cadeaux|paris sportif gratuit en ligne|paris sportif gratuit entre
amis|paris sportif gratuit sans argent|paris sportif gratuit
sans depot|paris sportif gratuit sans dépôt|paris sportif gratuits|paris sportif gros gain|paris sportif handicap|paris sportif handicap
0 1|paris sportif handicap 0-1|paris sportif handicap 1 0|paris sportif handicap 1-0|paris
sportif handicap basket|paris sportif handicap explication|paris sportif handicap
foot|paris sportif handicap rugby|paris sportif hippique|paris sportif hockey|paris sportif hockey nhl|paris sportif hockey sur
glace|paris sportif hors arjel|paris sportif hors
arjel france|paris sportif jeux olympiques|paris sportif jeux video|paris sportif joueur blessé|paris sportif joueur blessé pendant le match|paris sportif joueur de
foot|paris sportif joueur decisif|paris sportif joueur declare forfait|paris
sportif joueur déclare forfait|paris sportif joueur remplacant|paris
sportif la francaise des jeux|paris sportif le plus rentable|paris sportif legal en france|paris
sportif leicester champion|paris sportif les 18 stratégies pour gagner tous les jours|paris sportif les plus sur|paris sportif
les prolongation compte|paris sportif ligne|paris sportif ligue 1|paris sportif ligue 2|paris sportif ligue des champions|paris sportif ligue des nations|paris sportif ligue europa|paris sportif liste|paris
sportif martingale|paris sportif match|paris sportif match abandonné|paris sportif match annulé|paris
sportif match arrêté|paris sportif match du jour|paris sportif match interrompu|paris sportif match reporté|paris sportif match suspendu|paris sportif match tennis interrompu|paris sportif match
truqué|paris sportif meilleur bonus|paris
sportif meilleur cote|paris sportif meilleur pronostic|paris
sportif meilleur site|paris sportif methode|paris sportif methode 2
3|paris sportif mi temps fin de match|paris sportif mise au jeu|paris sportif mise maximum|paris
sportif mma france|paris sportif moins de 3.5 but|paris sportif montante|paris sportif moto gp|paris sportif multiple|paris sportif multiple
2 3|paris sportif multiple 2 3 explication|paris sportif multiple 2 4|paris sportif multiple 2 5|paris sportif multiple
2/3 explication|paris sportif multiple 3 4|paris sportif multiple explication|paris sportif national 1 foot|paris sportif nba|paris sportif nba
conseil|paris sportif nba pronostic|paris sportif nhl|paris sportif nombre de but|paris sportif nouveau site|paris sportif numero match|paris
sportif offert|paris sportif offre bienvenue|paris sportif offre bienvenue sans depot|paris sportif offre de bienvenue|paris sportif offre sans
depot|paris sportif om psg|paris sportif paypal|paris sportif
plus de 1.5 but|paris sportif plus de 2 5 but|paris
sportif plus ou moins|paris sportif plus ou moins 2 5 but|paris sportif premier pari remboursé|paris sportif premier paris remboursé|paris sportif
prolongation|paris sportif prolongation basket|paris sportif prolongation foot|paris
sportif promo|paris sportif pronostic|paris sportif pronostic basket|paris sportif pronostic
des match aujourd hui|paris sportif pronostic expert gratuit|paris sportif pronostic foot|paris sportif pronostic forum|paris sportif
pronostic gratuit|paris sportif pronostic tennis|paris sportif psg|paris sportif psg arsenal|paris sportif psg barcelone|paris sportif psg bayern|paris sportif psg dortmund|paris
sportif psg inter|paris sportif psg inter cote|paris
sportif psg liverpool|paris sportif psg om|paris sportif qr code|paris sportif que veut
dire handicap|paris sportif qui rapporte le plus|paris sportif regle|paris
sportif regle prolongation|paris sportif rembourse|paris sportif remboursement cash|paris sportif rembourser|paris sportif remboursé|paris sportif remboursé
cash|paris sportif remboursé en cash|paris sportif
retrait paypal|paris sportif rue des joueurs|paris sportif rugby|paris sportif rugby 6 nations|paris sportif rugby coupe du monde|paris sportif rugby top 14|paris sportif safe du jour|paris sportif sans argent|paris
sportif sans carte bancaire|paris sportif sans carte
d’identité|paris sportif sans compte bancaire|paris sportif sans depot|paris sportif sans
depot minimum|paris sportif si match suspendu|paris sportif si
un joueur abandonne|paris sportif si un joueur ne
joue pas|paris sportif si un joueur se blesse|paris sportif simple ou combiné|paris sportif
site|paris sportif statistique|paris sportif stratégie|paris sportif suisse|paris sportif suisse application|paris sportif suisse en ligne|paris sportif suisse legal|paris sportif suisse légal|paris sportif suisse romande|paris sportif sur du jour|paris sportif
sur le tennis|paris sportif systeme|paris sportif systeme 2 3|paris
sportif systeme 2 4|paris sportif systeme 2/3|paris sportif systeme 2/4|paris
sportif systeme 3 4|paris sportif systeme 3/4|paris sportif systeme explication|paris sportif
technique|paris sportif technique pour gagner|paris sportif temps additionnel|paris sportif
temps reglementaire|paris sportif tennis|paris sportif tennis abandon|paris sportif
tennis conseil|paris sportif tennis de table|paris
sportif tennis forfait|paris sportif tennis gratuit|paris sportif tennis
pronostic|paris sportif tennis roland garros|paris sportif tir au but|paris sportif
top 14|paris sportif tour de france|paris sportif ufc|paris sportif ufc france|paris sportif
unibet|paris sportif vainqueur euro|paris sportif
vainqueur ligue 1|paris sportif vainqueur ligue des champions|paris sportif via
paypal|paris sportif victoire prolongation|paris sportif vip gratuit|paris sportifs|paris sportifs abandon tennis|paris sportifs aide|paris sportifs analyser
un match|paris sportifs arjel|paris sportifs astuces|paris sportifs aujourd’hui|paris sportifs autorisés en france|paris sportifs avec
paypal|paris sportifs basket|paris sportifs belgique|paris sportifs bonus|paris
sportifs bookmakers|paris sportifs canada|paris sportifs
combiné|paris sportifs comparateur|paris sportifs comparatif|paris sportifs conseils|paris sportifs cotes|paris sportifs coupe du monde|paris sportifs
de football|paris sportifs du jour|paris sportifs en belgique|paris sportifs en france|paris sportifs en ligne|paris sportifs en ligne belgique|paris sportifs en ligne france|paris sportifs en ligne gratuit|paris sportifs en ligne
suisse|paris sportifs en suisse|paris sportifs et hippiques|paris sportifs euro|paris sportifs foot|paris sportifs foot us|paris sportifs forum|paris sportifs france|paris sportifs france espagne|paris sportifs gagner à tous les coups|paris sportifs gratuit|paris sportifs gratuits|paris sportifs gratuits en ligne|paris sportifs
handicap|paris sportifs hockey|paris sportifs hockey sur galce|paris sportifs hockey sur glace|paris sportifs hors arjel|paris sportifs jeux olympiques|paris sportifs
les bookmakers raflent la mise|paris sportifs ligne|paris sportifs ligue 1|paris sportifs ligue 2|paris sportifs
ligue des champions|paris sportifs ligue europa|paris sportifs
match interrompu|paris sportifs montante|paris sportifs nba|paris sportifs offre
bienvenue|paris sportifs offre de bienvenue|paris sportifs
paypal|paris sportifs pronostics|paris sportifs psg|paris sportifs psg inter|paris sportifs
rugby|paris sportifs sans argent|paris sportifs sans
depot|paris sportifs site|paris sportifs sites|paris
sportifs statistiques|paris sportifs stratégie|paris sportifs suisse|paris sportifs technique|paris sportifs techniques|paris sportifs tennis|paris sportifs tennis astuces|paris sportifs top 14|paris sportifs tour de france|part de marché paris sportifs|paypal pari sportif|paypal paris sportif|paypal paris sportifs|perte d’argent paris sportifs|peut on devenir riche avec les
paris sportifs|peut on gagner de l’argent avec les paris sportifs|peut on gagner sa vie avec les paris
sportif|peut on vraiment gagner de l’argent avec
les paris sportifs|plus gros combine paris sportif|plus gros gagnant paris sportif|plus
gros gain paris sportif|plus gros gain paris sportif au
monde|plus gros gain paris sportif france|plus gros gains paris sportif|plus
gros pari sportif|plus gros paris sportif|plus grosse cote gagner paris sportif|plus grosse cote pari sportif|plus
grosse cote paris sportif|plus grosse mise paris sportif|plus grosse somme gagner au paris sportif|plus ou moins paris sportif|pourcentage
de mise paris sportif|premier pari sportif remboursé|probabilité cote paris sportif|probabilité
paris sportif combiné|prolongation basket paris sportif|prolongation paris sportif|promo pari sportif|promo
paris sportif|promo site de paris sportif|promo site pari sportif|promo site paris
sportif|promos paris sportifs|prono paris sportif foot|prono
paris sportif gratuit|prono paris sportif tennis|pronostic
de paris sportif|pronostic du jour paris sportif|pronostic foot
paris sportif|pronostic gratuit paris sportif|pronostic pari sportif|pronostic pari sportif gratuit|pronostic paris sportif|pronostic
paris sportif aujourd’hui|pronostic paris sportif du jour|pronostic paris sportif foot|pronostic paris sportif gratuit|pronostic paris
sportif tennis|pronostic paris sportifs|pronostics foot statistiques
et aides aux paris sportifs|pronostics paris sportif|pronostics paris sportifs|pronostiqueur paris sportif gratuit|psg arsenal paris sportif|psg bayern paris sportif|psg inter milan paris sportif|psg inter
pari sportif|psg inter paris sportif|psg liverpool
paris sportif|psg om paris sportif|psg paris sportif|psg paris sportifs|qr code paris sportif|qu est ce qu un handicap paris sportif|qu est ce que handicap dans les
paris sportif|qu’est ce qu’un handicap paris sportif|qu’est ce que handicap dans
les paris sportif|quand un joueur se blesse paris sportif|que signifie
1/1 en paris sportif|que signifie 1/2 paris sportif|que signifie 12 en paris sportif|que signifie 1×2 dans les paris sportifs|que signifie btts en paris sportif|que signifie dnb
en paris sportif|que signifie draw en paris sportif|que signifie ft en paris sportif|que signifie gg dans le pari sportif|que signifie gg en pari sportif|que signifie gg en paris
sportif|que signifie handicap dans les paris sportifs|que veut dire dnb en paris sportif|que veut dire handicap dans les paris sportifs|que veut dire handicap paris
sportif|quel appli pari sportif|quel cote jouer paris sportif|quel
est la meilleur appli de paris sportif|quel est le meilleur algorithme de paris sportif|quel est le meilleur site
de pari sportif|quel est le meilleur site de pari sportif en ligne|quel
est le meilleur site de paris sportif|quel est le meilleur site de paris sportif en ligne|quel est le meilleur site de paris sportifs
en ligne|quel est le pari sportif le plus rentable|quel pari sportif est le plus rentable|quel pari sportif est le plus
sûr|quel pari sportif faire aujourd’hui|quel paris sportif faire aujourd’hui|quel paris
sportif rapporte le plus|quel site de paris sportif choisir|quel site de paris sportif rembourse en cash|quel type de pari sportif est le plus
rentable|quelle application pour paris sportifs|quelle
est la meilleure appli de paris sportif|quelle est la meilleure application de paris
sportif|quelle est la meilleure application pour les
paris sportifs|quelle est le meilleur site de paris sportif|quels paris sportifs faire|quels
sont les paris sportifs les plus sûrs|rebond basket paris sportif|record de gain paris sportif|regle buteur paris sportif|regle
de paris sportif|regle des paris sportif|regle handicap paris
sportif|regle handicap paris sportif foot|regle multiple paris sportif|regle pari sportif|regle paris sportif|regle paris sportif foot|regle paris
sportif multiple|regle paris sportif prolongation|reglement
pari sportif|reglement paris sportif|regles paris sportifs|remboursement cash paris sportif|remboursement en cash paris sportif|remboursement pari sportif|remboursement
paris sportif|repartiteur de mise paris sportif|repartiteur
de mise paris sportifs|repartiteur de mises paris sportif|repartiteur
mise paris sportif|repartition des mises paris sportif|resultat pari sportif|resultat paris sportif|resultat paris sportif en direct|resultat
paris sportif foot|resultat sportif hockey|retirer argent paris sportif|rugby pari sportif|rugby paris sportif|règle paris sportif prolongation|règles paris sportif|répartiteur de mise pari sportif|répartiteur de
mise paris sportif|répartiteur de mise paris sportifs|répartition des mises paris sportif|résultat paris sportif foot|sans depot paris
sportif|se faire interdire de paris sportifs|signification btts paris sportif|signification dnb paris sportif|signification handicap paris sportif|simulateur de gain paris sportif|simulateur gain paris sportif|simulateur gain paris sportif
multiple|simulateur gain paris sportif systeme|simulateur gain paris sportif système|simulateur montante paris sportif|simulateur paris sportif multiple|simulateur systeme
paris sportif|simulation paris sportif gratuit|site aide paris
sportif|site analyse paris sportif|site analyser paris sportif|site arjel paris sportif|site conseil paris sportif|site d’analyse de paris
sportifs|site d’analyse paris sportif|site de conseil paris sportif|site de pari en ligne sportif|site
de pari sportif|site de pari sportif avec bonus sans depot|site de
pari sportif bonus sans depot|site de pari sportif canada|site de pari sportif en ligne|site de pari sportif francais|site de pari sportif gratuit|site
de pari sportif hors arjel|site de pari sportif suisse|site de parie sportif|site de parie sportif en ligne|site de
paris en ligne sportif|site de paris sportif|site de paris sportif acceptant paypal|site de paris
sportif arjel|site de paris sportif autorisé en france|site de paris sportif autorisé
en suisse|site de paris sportif avec bonus|site de paris sportif avec bonus
sans depot|site de paris sportif avec bonus sans dépôt|site de paris sportif
avec neosurf|site de paris sportif avec paiement mobile|site de paris sportif avec paypal|site
de paris sportif avis|site de paris sportif belge avec bonus|site de paris sportif
belgique|site de paris sportif bonus|site de paris sportif bonus sans depot|site de paris
sportif canada|site de paris sportif comparatif|site
de paris sportif depot minimum|site de paris sportif en france|site
de paris sportif en ligne|site de paris sportif en ligne suisse|site de paris sportif football|site de paris sportif francais|site
de paris sportif france|site de paris sportif gratuit|site de paris
sportif gratuit pour gagner des cadeaux|site de paris sportif
gratuit sans dépôt|site de paris sportif
hors arjel|site de paris sportif le plus fiable|site de paris
sportif legal en france|site de paris sportif meilleur cote|site de paris sportif nouveau|site
de paris sportif offre de bienvenue|site
de paris sportif paypal|site de paris sportif premier paris remboursé|site
de paris sportif qui accepte paypal|site de paris sportif qui rembourse en cash|site de paris sportif remboursé|site de paris sportif sans argent|site de paris sportif sans carte bancaire|site de paris sportif sans carte d’identité|site
de paris sportif sans depot|site de paris
sportif suisse|site de paris sportifs|site de paris sportifs avec paypal|site de paris sportifs en ligne|site de paris sportifs francais|site de paris sportifs gratuit|site
de paris sportifs paypal|site de paris sportifs suisse|site de statistique
pour paris sportif|site des paris sportifs|site pari en ligne sportif|site pari sportif|site
pari sportif 100 euros offert|site pari sportif arjel|site pari sportif belgique|site pari sportif bonus|site pari sportif
canada|site pari sportif comparatif|site pari sportif
en ligne|site pari sportif france|site pari sportif gratuit|site pari sportif hors arjel|site pari sportif suisse|site parie sportif|site
paris en ligne sportif|site paris sportif|site paris sportif 100 euros
offert|site paris sportif 100 euros remboursé|site paris sportif 1er paris remboursé|site
paris sportif arjel|site paris sportif autorisé en france|site paris sportif avec bonus|site
paris sportif avec bonus sans depot|site paris sportif avec meilleur cote|site paris sportif belgique|site
paris sportif bonus|site paris sportif bonus cash|site paris sportif bonus
sans depot|site paris sportif canada|site
paris sportif comparatif|site paris sportif depot 5 euro|site paris sportif en ligne|site paris
sportif foot|site paris sportif france|site paris sportif gratuit|site paris sportif hors arjel|site paris sportif hors arjel france|site paris
sportif meilleur cote|site paris sportif nouveau|site paris sportif offre
de bienvenue|site paris sportif paypal|site paris sportif remboursement cash|site paris
sportif remboursé en cash|site paris sportif retrait instantané|site paris sportif
sans carte bancaire|site paris sportif sans depot|site paris sportif suisse|site paris sportifs|site paris sportifs
belgique|site paris sportifs en ligne|site paris sportifs france|site paris sportifs hors arjel|site paris sportifs suisse|site pour analyse paris sportif|site pour paris sportif|site pronostic paris sportif|site statistique paris sportif|site suisse paris sportif|sites de pari sportif|sites de paris sportif|sites de paris sportifs|sites de paris sportifs arjel|sites de paris sportifs autorisés en france|sites de paris
sportifs belgique|sites de paris sportifs bonus|sites
de paris sportifs en belgique|sites de paris sportifs en france|sites de paris sportifs
en ligne|sites de paris sportifs gratuits|sites de paris
sportifs gratuits sans dépôt|sites de paris sportifs suisse|sites pari sportif|sites paris sportif|sites paris sportifs|sites paris sportifs arjel|sites paris sportifs belgique|sites paris
sportifs france|sites paris sportifs hors arjel|sites paris sportifs
suisse|so foot paris sportif|so foot paris sportifs|specialiste tennis paris sportif|statistique foot paris
sportif|statistique paris sportif|statistique paris sportif foot|statistique tennis paris sportif|statistiques football paris sportifs|statistiques paris
sportifs|strategie de paris sportif|stratégie big whale paris sportif|stratégie de paris sportifs|stratégie gagnante paris
sportifs|stratégie pari sportif|stratégie paris sportif|stratégie paris sportifs|stratégie paris sportifs forum|stratégie
pour gagner au paris sportif|stratégies paris sportifs|suisse paris sportif|suisse
paris sportifs|systeme 2 3 paris sportif|systeme 3 4 paris sportif|systeme de cote paris sportif|systeme de paris sportif|systeme
pari sportif|systeme paris sportif|systeme paris sportifs|systeme reducteur paris sportif|système paris sportif|tableau bankroll paris sportif|tableau
cote paris sportif|tableau de paris sportif|tableau
de suivi paris sportifs|tableau excel bankroll paris sportif|tableau excel
paris sportif|tableau excel paris sportif gratuit|tableau excel paris
sportifs|tableau excel pour paris sportif|tableau gestion bankroll paris sportif|t
Your comment is awaiting moderation.
seoigniter.click – Loved the layout today; clean, simple, and genuinely user-friendly overall.
Your comment is awaiting moderation.
Bright Wind Collection – Found unique things, the site loaded quickly, and delivery was prompt.
Your comment is awaiting moderation.
Todo sobre videojuegos https://tejadospontevedra.es noticias y tendencias: ultimos lanzamientos, anuncios, analisis, parches, esports y analisis de la industria. Analizamos tendencias, compartimos opiniones y recopilamos informacion clave del mundo de los videojuegos en un solo lugar.
Your comment is awaiting moderation.
truewoodsupply – Nice variety here, everything loads fast and looks clean while browsing.
Your comment is awaiting moderation.
honestgrovegoods – I found interesting items quickly, and navigation was fast and seamless.
Your comment is awaiting moderation.
Rodaballo Al Horno https://rodaballoalhorno.es es un viaje a los origenes de la musica. Exploramos las raices, los ritmos y las melodias de diferentes culturas para mostrar como el sonido conecta a personas de todo el mundo y las ayuda a sentirse parte de una conversacion musical mas amplia.
Your comment is awaiting moderation.
quickshophub – Found amazing deals fast, browsing the site was smooth and effortless.
Your comment is awaiting moderation.
Большое спасибо от Сиборяка из Москвы, ваш магаз резко скрасил жизнь во время командировки в Москве. https://tt-ufa.ru/turinsk.html Есть, но пока что временно не работает.
Your comment is awaiting moderation.
Full Circle Collective – The interface is clean and exploring items feels fast.
Your comment is awaiting moderation.
Infraestructura y tecnologia https://novo-sancti-petri.es vial en Europa: innovacion, desarrollo sostenible y soluciones inteligentes para un transporte seguro y eficiente. Tendencias, proyectos, ecotransporte y digitalizacion de la red vial.
Your comment is awaiting moderation.
stylevaulthub – Great trendy selection, navigating the site is quick and easy.
Your comment is awaiting moderation.
Creative Exploration Spot – Hands-on ideas and tips to bring new projects to life.
Your comment is awaiting moderation.
uniquehunterhub – Pleasant experience, pages loaded quickly and navigation was simple.
Your comment is awaiting moderation.
Todo sobre el cafe https://laromeespresso.es y el arte de prepararlo: te explicaremos como elegir los granos, ajustar la molienda, elegir un metodo de preparacion y evitar errores comunes. Prepara un cafe perfecto a diario sin salir de casa.
Your comment is awaiting moderation.
Modern Harbor Shop – Items load fast, and the layout is clean and organized.
Your comment is awaiting moderation.
leadharvest.click – Loved the layout today; clean, simple, and genuinely user-friendly overall.
Your comment is awaiting moderation.
clickperform.click – Overall, professional vibe here; trustworthy, polished, and pleasantly minimal throughout.
Your comment is awaiting moderation.
посылка упакована оригинально =)) и скорость сборки удивила! купить, кокаин, мефедрон, гашиш, бошки Щёлкино Ага, прям именно так. Но все же?)))))
Your comment is awaiting moderation.
marketingpulse.click – Pages loaded fast, images appeared sharp, and formatting stayed consistent.
Your comment is awaiting moderation.
adsgrowthengine.click – Found practical insights today; sharing this article with colleagues later.
Your comment is awaiting moderation.
profitfunnels.click – Bookmarked this immediately, planning to revisit for updates and inspiration.
Your comment is awaiting moderation.
Hey! Do you use Twitter? I’d like to follow you if that
would be okay. I’m absolutely enjoying your blog and look forward to
new posts.
Your comment is awaiting moderation.
trafficmagnet.click – Found practical insights today; sharing this article with colleagues later.
Your comment is awaiting moderation.
Fresh Wind Collection – Impressive new styles, fast-loading visuals, and simple checkout steps.
Your comment is awaiting moderation.
Nairabet offers https://nairabet-play.com sports betting and virtual games with a simple interface and a wide range of markets. The platform provides live and pre-match options, quick access to odds, and regular updates. Visit the site to explore current features and decide if it suits your preferences.
Your comment is awaiting moderation.
хорошо что так купить, кокаин, мефедрон, гашиш, бошки Родники Вы не могли сегодня оплатить заказ, потому что мы сегодня не работаем 🙂
Your comment is awaiting moderation.
ЦВЗ центр https://cvzcentr.ru в Краснодаре — команда специалистов, которая работает с вегетативными расстройствами комплексно. Детальная диагностика, сопровождение пациента и пошаговый план улучшения самочувствия.
Your comment is awaiting moderation.
urbanstylehub – Loved browsing the collection, site navigation was quick and easy.
Your comment is awaiting moderation.
Elusive shipwreck found in Lake Michigan over 100 years after sinking
rutor24 to
A “ghost ship” that sank in Lake Michigan nearly 140 years ago and eluded several search efforts over the past five decades has been found, according to researchers with the Wisconsin Underwater Archeology Association.
The wooden schooner got caught in a storm in the dead of night and went down in September 1886. In the weeks after, a lighthouse keeper reported the ship’s masts breaking the lake surface, and fishermen caught pieces of the vessel in their nets. Still, wreck hunters were unable to track down the ship’s location — until now.
https://rutor-24.top
рутор ссылка
Earlier this year, a team of researchers with the Wisconsin Underwater Archeology Association and Wisconsin Historical Society located the shipwreck off the coastal town of Baileys Harbor, Wisconsin, the association announced on Sunday.
Named the F.J. King, the ship had become a legend within the Wisconsin wreck hunter community for its elusive nature, said maritime historian Brendon Baillod, principal investigator and project lead of the discovery.
“We really wanted to solve this mystery, and we didn’t expect to,” Baillod told CNN. “(The ship) seemed to have just vanished into thin air. … I actually couldn’t believe we found it.”
The wreck is just one of many that have been found in the Great Lakes in recent years, and there are still hundreds left to be recovered in Lake Michigan alone, according to Baillod.
The ‘ghost ship’
Built in 1867, the F.J. King plied the waters of the Great Lakes for the purpose of trans-lake commerce. The ship transported grains during a time when Wisconsin served as the breadbasket of the United States. The 144-foot-long (44-meter) vessel also carried cargo including iron ore, lumber and more.
The ship had a lucrative 19-year career until that September night when a gale-force wind caused its seams to break apart, according to the announcement. The captain, William Griffin, ordered the crew to evacuate on the ship’s yawl boat, from where they watched the F.J. King sink, bow first.
Your comment is awaiting moderation.
где вообще оператор или кто ни будь? бабло уплочено и жду доставку а на связи ни кого нету!!!!!!!!!! https://traktort170.ru/trubchevsk.html вот немного для Сашка
Your comment is awaiting moderation.
harbornowcollection – Clear navigation with well-presented and visually appealing items.
Your comment is awaiting moderation.
trendhuburban – Very happy with the products, pricing is excellent and competitive.
Your comment is awaiting moderation.
Browse Soft Cloud Boutique – Easy-to-use interface with a very smooth browsing experience.
Your comment is awaiting moderation.
Все верно, до сих пор разгребаем ) купить, кокаин, мефедрон, гашиш, бошки Зима Хочу заказать для ознакомления АМ-2233 1гр., но отдавать 750 за доставку 1 грамма – имхо глюк
Your comment is awaiting moderation.
dailyfashionfinds – Shopping was convenient, pages loaded quickly.
Your comment is awaiting moderation.
Bright Flora Spot – Shopping is convenient, and the display is clear and tidy.
Your comment is awaiting moderation.
Lunar Harvest Collective – Fast navigation with a user-friendly layout throughout.
Your comment is awaiting moderation.
Daily Dream Builder – Practical strategies to help you visualize, plan, and achieve your goals.
Your comment is awaiting moderation.
а с чего ты взял что чемик ноаый селлер? https://dtrub.ru/chirchik.html сколько зарядил?
Your comment is awaiting moderation.
WildSand Select – Great assortment, user-friendly site, and very fast and neat delivery.
Your comment is awaiting moderation.
urbanstylehub – Loved exploring the site, very fast and easy checkout.
Your comment is awaiting moderation.
Где-то с год – полтора назад пользовался услугами Кемикал Микса. Продуктция чатенько имела разые цвета, плотность и консистенцию, что немного напрягало, но “пручесть” продуктов всегда была на уровне. На моей памяти меньше косяков было только у Химхома, но они, к нашему сожалению, канули в лету. купить, кокаин, мефедрон, гашиш, бошки Отрадное Спасибо Магазину за долгую и хорошую работу.
Your comment is awaiting moderation.
казино з бонусами бонуси казіно
Your comment is awaiting moderation.
free chat now cam chat online
Your comment is awaiting moderation.
ORBS Production https://filmproductioncortina.com is a full-service film, photo and video production company in Cortina d’Ampezzo and the Dolomites. We create commercials, branded content, sports and winter campaigns with local crew, alpine logistics, aerial/FPV filming and end-to-end production support across the Alps. Learn more at filmproductioncortina.com
Your comment is awaiting moderation.
Проблемы со здоровьем? невролог лечение позвоночника: комплексные обследования, консультации врачей, лабораторная диагностика и процедуры. Поможем пройти лечение и профилактику заболеваний в комфортных условиях без очередей.
Your comment is awaiting moderation.
glamhubonline – Loved the items, site loads fast with no delays.
Your comment is awaiting moderation.
rankpath.click – Loved the layout today; clean, simple, and genuinely user-friendly overall.
Your comment is awaiting moderation.
что же это за дела то…..? купить, кокаин, мефедрон, гашиш, бошки Мелеуз Заказал , получил трэк , ждем)
Your comment is awaiting moderation.
optimizetraffic.click – Mobile version looks perfect; no glitches, fast scrolling, crisp text.
Your comment is awaiting moderation.
dailybuyingfinds – Wide selection of products, pages loaded fast and shopping was enjoyable.
Your comment is awaiting moderation.
oceanviewemporium – Website design is clean, browsing felt easy and user-friendly overall.
Your comment is awaiting moderation.
urbanmeadowstore – Great variety available, found exactly what I wanted with minimal effort today.
Your comment is awaiting moderation.
В итоге получается, что все страницы оказываются в одних недовольствах, но ладно визуально, так ведь чуть ли не неделю каждая страница в недовольствах, а это что-то да значит, особенно когда сам проверишь… Вот я постучался в асю, пообщались, вы исчезли, потом кое-как вернулись, но молчок по полной. Зря вы так, всех клиентов распугаете таким макаром… купить, кокаин, мефедрон, гашиш, бошки Нарьян-Мар ну то что ценники здесь шикарные заметил!и то что на “главной”-это и заинтересовало меня,но насторажило одновременно!ges_hmm.gifПосмотрим,что выйдет из-этого.Пока всё гладко!
Your comment is awaiting moderation.
An ethical http://thailand-properties.ru: rehabilitation, care, veterinary monitoring, and freedom of movement instead of attractions. By visiting, you support the project and help elephants live in dignified conditions.
Your comment is awaiting moderation.
Love elephants? elephant sanctuary: no rides or shows, just free-roaming elephants, nature trails, guided tours, and the chance to learn what responsible wildlife management looks like.
Your comment is awaiting moderation.
вытрезвление на дому спб
Your comment is awaiting moderation.
https://extrennoe-vitrezvlenie-na-domu-spb2.ru/
Your comment is awaiting moderation.
подход к клиенту 5+ (все объяснили, трек сразу скинули) купить, кокаин, мефедрон, гашиш, бошки Фергана Почему больше не забегаете ?
Your comment is awaiting moderation.
stylezone – Loved checking out products, navigation was smooth and hassle-free.
Your comment is awaiting moderation.
digitalkickstart.click – Pages loaded fast, images appeared sharp, and formatting stayed consistent.
Your comment is awaiting moderation.
clickrevamp.click – Overall, professional vibe here; trustworthy, polished, and pleasantly minimal throughout.
Your comment is awaiting moderation.
conversionedge.click – Appreciate the typography choices; comfortable spacing improved my reading experience.
Your comment is awaiting moderation.
trafficcrafter.click – Loved the layout today; clean, simple, and genuinely user-friendly overall.
Your comment is awaiting moderation.
https://extrennoe-vitrezvlenie-na-domu-spb2.ru/
Your comment is awaiting moderation.
leadspike.click – Overall, professional vibe here; trustworthy, polished, and pleasantly minimal throughout.
Your comment is awaiting moderation.
chictrendstore – Smooth shopping experience, seasonal items were perfect.
Your comment is awaiting moderation.
Заказывал Реагенг, всё нормально пришло, небольшой бонус порадовал, мелочь а приятно https://mxmnet.ru/kishtim.html Нет. Такого у нас нет.
Your comment is awaiting moderation.
Профессиональные электромонтаж г москва в квартирах, домах и офисах. Замена проводки, монтаж щитков, автоматов, УЗО, светильников и розеток. Работаем по нормам ПУЭ, даём гарантию и подробный акт выполненных работ.
Your comment is awaiting moderation.
Visit an elephant sanctuary: care, rehabilitation, and protection of animals. Learn their stories, participate in feedings, and observe elephants in the wild, not in a circus.
Your comment is awaiting moderation.
SoftStone Product Page – Smooth browsing, lovely items, and shipping was timely.
Your comment is awaiting moderation.
УВОЖАЕМЫЕ ФОРУМЧАНЕ МАГАЗИН ПРОВЕРЕННЫЙ БЕРИТЕ СМЕЛО. КАЧЕСТВО ТОВАРА И ОПЕРАТИВНОСТЬ РАБОТЫ ВАС НЕ ПОДВЕДУТ ДА ЕЩЕ И ЦЕНЫ УУХХ КАКИЕ ЛУЧШЕ ВРЯД ЛИ НАЙДЕТЕ… ЕЩЕ РАЗ С П А С И Б О:bro: https://vsevsdr.ru/mapsite3.html Получал пробный набор (ам2201, jwh250, jwh203, 5iai) от данного селлера, качество хорошее кроме 5iai вообще не понял.
Your comment is awaiting moderation.
10 euros offert paris sportif|10 euros offert sans dépôt paris sportif|10 meilleurs
sites de paris sportifs|100 euro offert paris sportif|100 euros offert paris sportif|100 euros remboursé paris sportifs|100 offert pari sportif|100 offert paris sportif|100 remboursé paris sportif|100e
offert pari sportif|abandon paris sportif tennis|abandon tennis paris sportif|addiction paris sportif
forum|age paris sportif belgique|aide au pari sportif|aide au paris sportif|aide aux paris sportif|aide aux paris
sportifs|aide pari sportif|aide pari sportif football|aide parie sportif|aide paris sportif|aide paris sportif foot|aide paris sportif gratuit|aide paris
sportifs|aide pour paris sportif|algorithme de paris sportif|algorithme excel paris sportif|algorithme gratuit paris sportif|algorithme pari sportif|algorithme paris sportif|algorithme
paris sportif avis|algorithme paris sportif basket|algorithme paris sportif excel|algorithme paris sportif gratuit|algorithme paris sportif tennis|algorithme paris sportifs|algorithme pour paris sportif|analyse
cote paris sportif|analyse de paris sportif|analyse match paris
sportif|analyse pari sportif|analyse paris sportif|analyse paris sportif foot|analyse
paris sportif football|analyse paris sportif gratuit|analyse
paris sportifs|ancienne cote paris sportif|api cote paris sportif|app paris sportif sans argent|appli de
paris sportif|appli de paris sportif sans argent|appli de paris sportifs|appli pari sportif|appli pari sportif gratuit|appli parie sportif|appli paris sportif|appli paris sportif avec
paypal|appli paris sportif belgique|appli paris sportif entre
amis|appli paris sportif gratuit|appli paris sportif sans argent|appli paris sportif suisse|appli paris
sportifs|application aide paris sportif|application algorithme paris sportif|application analyse paris sportif|application android paris sportif|application bankroll paris
sportif|application conseil paris sportif|application de pari
sportif|application de parie sportif|application de paris sportif|application de paris sportif en afrique|application de paris sportif en cote d’ivoire|application de paris sportif en ligne|application de paris sportif gratuit|application de paris sportif international|application de paris sportif suisse|application de paris sportifs|application faux paris sportifs|application gestion bankroll paris sportif|application gestion paris sportif|application ia paris sportif|application pari sportif gratuit|application paris sportif|application paris sportif android|application paris sportif argent fictif|application paris sportif belgique|application paris sportif canada|application paris sportif espagne|application paris sportif espagnol|application paris sportif fictif|application paris sportif france|application paris sportif gratuit|application paris sportif gratuit entre amis|application paris sportif maroc|application paris sportif offre de bienvenue|application paris
sportif paypal|application paris sportif sans argent|application paris sportif sans justificatif de
domicile|application paris sportif suisse|application paris sportif usa|application paris sportif virtuel|application pour
faire des paris sportifs|application pour gerer ses paris sportif|application pour les paris sportifs|application pour
pari sportif|application pour paris sportif|application pour paris sportifs|application statistique paris sportif|application suivi paris sportif|applications de paris sportifs|applications paris sportifs|applis paris sportif|applis paris sportifs|apprendre a faire
des paris sportifs|argent facile paris sportif|argent offert paris sportifs|argent offert sans depot paris sportif|argent paris sportif|argent paris
sportifs|argent paris sportifs impots|argent sans depot paris sportif|arjel paris
sportif|arjel paris sportifs|astuce gagner paris sportif|astuce
pari sportif|astuce paris sportif|astuce paris sportif basket|astuce paris sportif foot|astuce paris
sportif forum|astuce paris sportif tennis|astuce paris sportifs|astuce pour
gagner au pari sportif|astuce pour gagner au paris sportif|astuce pour gagner paris sportif|astuce pour paris
sportif|astuces paris sportifs|astuces paris sportifs en ligne|astuces paris
sportifs foot|astuces pour gagner aux paris sportifs|autorisation paris sportif france|avis pari sportif|avis paris sportif|avis paris sportif foot|avis site de paris sportif|avis site paris sportif|avis sur les paris sportifs|avis sur paris sportif|avis tipster paris sportif|aweh signification paris sportif|bankroll 100 euros
paris sportifs|bankroll management paris sportif|bankroll paris sportif|bankroll paris sportif excel|bankroll paris sportif gratuit|bankroll paris sportifs|basket paris sportif|belgique france paris sportif|belgique
paris sportifs|bonus bienvenue paris sportif|bonus bienvenue paris sportifs|bonus cash paris sportif|bonus de
bienvenue paris sportif|bonus de bienvenue paris sportif belgique|bonus de bienvenue sans depot paris sportif|bonus de depot paris
sportif|bonus de paris sportifs|bonus depot paris sportif|bonus en cash paris sportif|bonus gratuit paris sportif|bonus gratuit sans depot paris
sportif|bonus pari sportif|bonus paris sportif|bonus paris sportif belgique|bonus paris sportif betclic|bonus paris sportif cash|bonus paris sportif en ligne|bonus paris sportif france pari|bonus paris sportif retirable|bonus paris sportif
sans depot|bonus paris sportif sans dépôt|bonus paris sportif unibet|bonus
paris sportifs|bonus sans depot paris sportif|bonus sans depot paris sportif belgique|bonus sans
dépôt paris sportif|bonus sans dépôt paris sportif hors arjel|bonus site de paris sportif|bonus site pari sportif|bonus site paris sportif|bonus sites de paris sportifs|bonus unibet paris sportif|bookmaker paris sportif|bookmaker paris
sportif gratuit|bookmaker paris sportifs|bookmaker sportif|bookmakers paris sportif|bookmakers paris sportifs|bookmakers paris sportifs
en ligne|but contre son camp paris sportif|but sur penalty paris sportif|buteur
paris sportif|c’est quoi handicap paris sportif|c’est quoi une cote paris sportif|calcul anti
perte paris sportif|calcul combinaison pari sportif|calcul cote
pari sportif|calcul cote paris sportif|calcul couverture paris sportif|calcul de cote paris sportif|calcul des cotes paris sportifs|calcul dnb paris sportifs|calcul double chance paris sportif|calcul gain paris sportif|calcul mise
paris sportif|calcul pari sportif|calcul paris sportif|calcul paris
sportif multiple|calcul pourcentage cote paris sportif|calcul probabilité
paris sportif|calcul rentabilité paris sportifs|calcul roi paris
sportif|calcul systeme paris sportif|calcul trj paris
sportifs|calculateur cote paris sportif|calculateur de cote
paris sportif|calculateur de mise paris sportif|calculateur de paris sportif|calculateur
paris sportif|calculatrice arbitrage paris sportif|calculatrice paris sportif|calculer cote paris sportif|calculer gain paris sportif|calculer probabilité paris sportifs|calculer roi
paris sportifs|calculer une cote pari sportif|calculer
une cote paris sportif|carte cadeau paris sportif|carte pcs paris sportif|carte prépayée paris sportifs|cash out pari sportif|cash out paris sportif|cash out
paris sportifs|casino en ligne paris sportif|casino paris sportif
en ligne|champions league paris sportif|chute de cote
paris sportif|classement des meilleurs sites de paris
sportifs|classement meilleur site de paris sportif|code barre paris sportif|code bonus paris sportif|code paris sportif|code promo pari sportif|code promo paris sportif|code promo paris sportif sans depot|code promo paris
sportif sans dépôt|code promo sans depot paris sportif|code promo site paris
sportif|combien de temps pour encaisser un paris sportif|combien de temps pour retirer un paris sportif|combien miser paris
sportifs|combine paris sportif|combines paris sportifs|combiné pari
sportif|combiné paris sportif|combiné paris sportif conseil|combiné paris sportif du jour|combiné paris sportif pronostic|comment analyser un paris sportif|comment arreter de jouer aux paris sportifs|comment arreter les paris sportif|comment arreter les paris sportifs|comment arrêter
les paris sportifs|comment bien gagner au paris sportif|comment bien jouer
au paris sportif|comment bien miser paris sportif|comment ca marche les paris sportif|comment
calculer cote paris sportif|comment calculer gain paris sportif|comment calculer les cotes des paris sportifs|comment calculer une cote de paris
sportif|comment calculer une cote pari sportif|comment calculer une cote paris sportif|comment comprendre les paris
sportifs|comment creer un vip paris sportif|comment créer un algorithme paris sportif|comment créer un site de paris sportif|comment devenir riche avec les paris sportifs|comment etre rentable paris sportif|comment etre sur de gagner au paris sportif|comment faire de bon paris sportif|comment faire des parie
sportif|comment faire des paris sportif|comment faire des paris sportif gagnant|comment faire des
paris sportifs|comment faire pari sportif|comment faire paris sportif|comment faire pour arreter les paris sportifs|comment faire pour gagner au paris sportif|comment faire pour gagner
les paris sportifs|comment faire un bon pari sportif|comment faire un bon paris sportif|comment faire un pari
sportif|comment faire un parie sportif|comment faire
un paris sportif|comment faire une montante paris sportif|comment fonctionne les cotes dans les paris sportifs|comment
fonctionne les cotes des paris sportifs|comment fonctionne les paris sportifs|comment
fonctionne paris sportifs|comment fonctionne un pari sportif|comment fonctionnent les cotes dans les paris sportifs|comment fonctionnent les cotes dans les paris sportifs grand oral|comment
fonctionnent les cotes de paris sportif|comment fonctionnent les paris sportifs|comment
fonctionnent les paris sportifs grand oral|comment fonctionnent les paris sportifs grand oral maths|comment fonctionnent les paris sportifs maths|comment gagner
a coup sur au paris sportif|comment gagner a tous les coups au
paris sportif|comment gagner a tout les coup au paris sportif|comment gagner au
pari sportif|comment gagner au pari sportif football|comment gagner au paris sportif|comment gagner au
paris sportif a coup sur|comment gagner au
paris sportif foot|comment gagner au paris sportif forum|comment
gagner au paris sportif tennis|comment gagner au paris sportifs|comment gagner aux paris sportif|comment gagner aux paris sportifs|comment gagner
aux paris sportifs foot|comment gagner aux paris sportifs livre|comment gagner aux
paris sportifs sur le long terme|comment gagner avec les paris sportifs|comment gagner dans les paris sportifs|comment gagner de l argent avec les paris sportifs|comment gagner de l’argent au paris sportif|comment gagner de l’argent aux paris sportifs|comment gagner de l’argent avec les paris sportifs|comment gagner de l’argent
paris sportif|comment gagner de l’argent sur les paris sportifs|comment gagner
de l’argent sur paris sportif|comment gagner des paris sportif|comment gagner des paris sportifs|comment gagner
en paris sportif|comment gagner facilement au paris sportif|comment gagner les paris sportifs|comment gagner paris sportif|comment gagner paris sportif foot|comment gagner
paris sportifs|comment gagner sa vie avec les paris sportifs|comment gagner ses paris sportif|comment gagner sur
les paris sportif|comment gagner sur les paris sportifs|comment gagner tout le temps au
paris sportif|comment gagner un pari sportif|comment gagner un paris sportif|comment
gerer une bankroll paris sportif|comment gérer sa bankroll paris sportif|comment jouer au pari
sportif|comment jouer au paris sportif|comment jouer au paris sportif foot|comment
jouer aux paris sportifs|comment jouer paris sportif|comment marche
cote paris sportif|comment marche les cotes paris sportif|comment marche les paris sportif|comment
marche les paris sportifs|comment marche paris sportif|comment marche un pari sportif|comment marche un paris sportif|comment marchent les cotes paris sportif|comment marchent
les paris sportifs|comment miser au paris sportif|comment miser paris sportif|comment
monter sa bankroll paris sportif|comment ne jamais perdre au
paris sportif|comment parier sportif|comment reussir au
paris sportif|comment reussir les paris sportif|comment reussir paris sportif|comment sont calculer les
cotes de paris sportif|comment sont calculées les
cotes des paris sportifs|comment sont calculés les cotes des paris sportifs|comment sont faites les cotes des paris sportifs|comment toujours gagner au paris sportif|comment ça marche
les paris sportifs|comparaison bonus paris sportifs|comparaison cote pari sportif|comparaison des cotes paris
sportifs|comparateur cote pari sportif|comparateur cote paris sportif|comparateur cotes paris sportif|comparateur cotes paris
sportifs|comparateur de cote pari sportif|comparateur de cote paris sportif|comparateur de cotes paris sportifs|comparateur de côtes paris sportifs|comparateur de paris sportif|comparateur de site de paris
sportif|comparateur de site paris sportif|comparateur de sites de paris sportifs|comparateur
pari sportif|comparateur paris sportif|comparateur paris sportifs|comparateur
site de paris sportif|comparateur site pari sportif|comparateur
site paris sportif|comparatif bonus paris sportif|comparatif bonus paris sportifs|comparatif cote pari sportif|comparatif cote paris sportif|comparatif cotes paris sportifs|comparatif des sites de paris sportifs|comparatif offre de bienvenue paris sportif|comparatif offre paris sportif|comparatif
pari sportif|comparatif pari sportif en ligne|comparatif paris
sportif|comparatif paris sportif bonus|comparatif paris sportif
en ligne|comparatif paris sportifs|comparatif paris sportifs en ligne|comparatif site de paris sportif|comparatif site paris sportif|comparatif site
paris sportifs|comparatif sites de paris sportifs|comparatif sites paris sportifs|comparer
les cotes paris sportifs|comprendre cote paris sportif|comprendre handicap paris sportif|comprendre les
cotes des paris sportifs|comprendre les cotes paris sportif|comprendre les
cotes paris sportifs|comprendre les handicap
paris sportif|compte de paris sportif|compte démo paris sportif|compte finance paris sportif|compte financer paris sportif|compte financier paris sportif|compte
financé paris sportif|compte pari sportif|compte paris sportif|compte paris sportif financé|conseil de
paris sportif|conseil de paris sportifs|conseil en paris sportif|conseil en paris
sportifs|conseil pari sportif|conseil pari sportif gratuit|conseil paris sportif|conseil
paris sportif aujourd’hui|conseil paris sportif du jour|conseil
paris sportif foot|conseil paris sportif gratuit|conseil paris sportif ligue des champions|conseil paris sportif nba|conseil paris sportif pronostic|conseil paris
sportif rmc|conseil paris sportif tennis|conseil paris sportifs|conseil pour gagner au paris sportif|conseil pour paris sportif|conseil sur les paris sportifs|conseille paris sportif|conseiller en paris sportifs|conseiller paris sportif|conseils de paris
sportifs|conseils en paris sportifs|conseils paris sportifs|conseils paris sportifs
foot|conseils paris sportifs gratuit|conseils paris sportifs
tennis|conseils pour paris sportifs|cote a 100 paris sportif|cote a 2 paris sportif|cote anglaise paris sportif|cote de 2 paris sportif|cote de pari sportif|cote de paris
sportif|cote des paris sportifs|cote maximum paris sportif|cote minimum paris sportif|cote pari sportif|cote
pari sportif comment ça marche|cote pari sportif real madrid|cote pari sportif rugby|cote parie sportif|cote paris sportif|cote
paris sportif belgique|cote paris sportif calcul|cote paris
sportif definition|cote paris sportif euro|cote paris sportif explication|cote paris sportif foot|cote paris sportif france belgique|cote paris sportif france espagne|cote paris sportif ligue des champions|cote paris sportif moto
gp|cote paris sportif psg|cote paris sportif psg arsenal|cote paris sportif rugby|cote paris sportif tennis|cote paris sportifs|cote
pour paris sportifs|cote sportif foot|cote sportif rugby|cote à 1000 paris sportif|cotes de paris sportifs|cotes
pari sportif|cotes paris sportif|cotes paris sportifs|cotes paris sportifs foot|coupe de france paris sportif|créer un algorithme paris sportif|créer un compte paris sportif|créer un site de paris sportif en ligne|dans les paris
sportifs que signifie handicap|declarer ses gains paris sportif|definition cash out
paris sportif|definition cote paris sportif|definition handicap paris sportif|depot
5 euros paris sportif|depot double paris sportif|depot minimum 5 euro paris sportif|depot
minimum paris sportif|depot paris sportif|depuis quand existe les paris sportif en france|devenir riche avec les paris sportifs|devenir riche avec paris sportifs|disqualification tennis paris sportif|dnb
en paris sportif|dnb pari sportif|dnb paris
sportif|dnb paris sportif definition|dnb paris sportifs|doit on declarer les gains de paris sportif|déclarer gains paris sportifs|déclarer gains paris sportifs hors arjel|définition bankroll paris
sportif|dépôt minimum 1 euro paris sportif|dépôt minimum 5 euro paris sportif|ecart de
jeux tennis paris sportif|erreur de cote paris
sportif|est ce que les gains des paris sportifs sont imposables|est-ce que les prolongation compte dans un pari sportif|etre sur de gagner au
paris sportif|euro paris sportif|evenement sportif a paris|evenement sportif paris|evenement sportif paris 2025|evenement sportif paris aujourd hui|evenement sportif paris aujourd’hui|evenement sportif paris
ce week end|evenements sportif paris|evenements sportifs paris|evenements sportifs
paris 2025|evenements sportifs à paris|evolution cote paris sportif|evolution cotes paris sportifs|evolution des cotes paris sportifs|explication cote pari sportif|explication cote paris
sportif|explication handicap paris sportif|explication pari sportif|explication paris sportif|face a face hockey paris sportif|faire des paris sportif|faire des paris sportif avec paypal|faire des paris sportifs|faire fortune
paris sportifs|faire un pari sportif|faire un paris sportif|faut il déclarer les
gains de paris sportifs|faut il déclarer ses gains paris sportifs|fichier excel gestion bankroll paris sportif|fiscalité gains
paris sportifs|foot paris sportif|football et paris sportifs|forfait tennis paris sportif|formation paris sportif gratuit|forum de paris sportif|forum de
paris sportifs|forum pari sportif|forum parie
sportif|forum paris sportif|forum paris sportif foot|forum paris sportif gratuit|forum
paris sportif nba|forum paris sportif tennis|forum paris sportifs|forum sur les
paris sportifs|forum tennis paris sportif|francaise des jeux pari sportif|francaise des jeux paris sportif|francaise des jeux paris sportifs|france
2 paris sportif|france 2 paris sportifs|france belgique
paris sportif|france espagne paris sportif|france pari sportif|france pari
sportif brest|france paris sportif|france paris sportifs|france pologne paris sportif|france portugal paris sportif|france suisse paris sportifs|france tunisie
paris sportifs|france-pari – paris sportifs|gagnant pari sportif|gagnant paris sportif|gagnant paris sportif
bayern|gagnante paris sportif|gagne au paris sportif|gagner 10 euros par jour aux paris sportifs|gagner 100 euros par jour paris sportif|gagner 1000 euros
par mois paris sportifs|gagner 10000 euros paris sportif|gagner 2000 euros par mois paris
sportif|gagner 50 euros par jour paris sportif|gagner a coup sur au paris sportif|gagner
a coup sur pari sportif|gagner a tous les coup paris sportif|gagner argent avec paris sportifs|gagner argent pari sportif|gagner argent paris
sportif|gagner argent paris sportifs|gagner au pari sportif|gagner au paris sportif|gagner
au paris sportif a coup sur|gagner au paris sportif foot|gagner au paris sportif forum|gagner au
paris sportif à coup sur|gagner aux paris sportif|gagner aux
paris sportifs|gagner aux paris sportifs pdf|gagner beaucoup d’argent paris sportif|gagner de l argent
grace aux paris sportifs|gagner de l argent pari sportif|gagner de l argent paris sportif|gagner de l argent paris sportifs|gagner de l’argent au paris sportif|gagner
de l’argent aux paris sportifs|gagner de l’argent
avec les paris sportifs|gagner de l’argent avec
paris sportif|gagner de l’argent avec paris sportifs|gagner de l’argent grace au paris sportif|gagner de l’argent grace aux paris sportifs|gagner de l’argent pari sportif|gagner de
l’argent paris sportif|gagner de l’argent paris sportifs|gagner
de l’argent sur les paris sportifs|gagner des paris sportif|gagner des paris sportifs|gagner les paris sportifs|gagner pari sportif|gagner paris sportif|gagner paris sportif
foot|gagner paris sportif forum|gagner paris sportif tennis|gagner paris sportifs|gagner sa vie avec
les paris sportif|gagner sa vie avec les paris sportifs|gagner sa vie avec paris
sportifs|gagner ses paris sportifs|gagner à coup sur paris
sportif|gagner à tous les coups paris sportifs|gain maximum paris sportif|gain pari sportif|gain pari sportif imposable|gain pari sportif impot|gain paris
sportif|gain paris sportif imposable|gain paris sportif impot|gain paris sportif impôt|gains paris sportif|gains
paris sportif imposable|gains paris sportifs|gains paris sportifs imposable|gains paris sportifs
imposables|gains paris sportifs sont ils imposables|gerer
bankroll paris sportif|gerer sa bankroll paris sportif|gerer une bankroll paris sportif|gestion bankroll paris sportif|gestion bankroll paris sportifs|gestion bankroll paris sportifs excel|gestion de bankroll paris sportif|gestion de bankroll paris sportif application|gestion de bankroll paris sportifs|gestion de mise paris sportif|gestion paris sportifs v2 5 gratuit|gg signification paris sportif|gros combiné paris sportif|gros gain paris sportif|grosse
cote paris sportif pronostic|grosse mise paris sportif|groupe paris sportif gratuit|groupe telegram paris sportif gratuit|groupement de
joueurs paris sportifs|handicap 0 paris sportif|handicap 1 paris sportif|handicap 5
paris sportif|handicap au paris sportif|handicap basket
paris sportif|handicap dans les paris sportifs|handicap en paris sportif|handicap europeen paris sportif|handicap
européen paris sportifs|handicap mi temps
paris sportif|handicap pari sportif|handicap paris sportif|handicap paris sportif basket|handicap paris sportif explication|handicap paris sportif foot|handicap paris sportif
rugby|handicap paris sportifs|handicap rugby paris sportif|handicap tennis paris sportif|historique
cote paris sportif|historique des cotes paris sportifs|hockey paris sportif|hockey sur glace paris sportif|hors arjel paris sportif|hweh signification paris sportif|imposition gain pari sportif|imposition gain paris sportif|imposition gains paris sportifs|imposition paris sportif
france|impot gain paris sportif|impot paris sportif france|impot sur gain paris sportif|je gagne ma vie avec les paris sportifs|jeu
de pari sportif gratuit|jeu de paris sportif en ligne|jeu de paris sportif gratuit|jeu paris sportif gratuit|jeu paris sportif sans argent|jeux de parie
sportif|jeux de paris sportif|jeux de paris sportif en ligne|jeux de paris sportif gratuit|jeux de paris sportifs|jeux olympiques paris
sportifs|jeux paris sportif|jeux paris sportif gratuit|jeux paris sportif virtuel|jeux paris sportifs en ligne|jouer au paris sportif|jouer
paris sportif|joueur absent paris sportif|joueur blesse paris
sportif|joueur caen paris sportif|joueur de caen pari sportif|joueur de foot
paris sportif|joueur decisif paris sportif|joueur décisif paris sportif|joueur italien paris sportif|joueur paris sportif|joueur professionnel paris sportif|joueur qui se blesse paris
sportif|joueur sanctionne pari sportif|joueur suspendu paris sportif|joueurs italiens paris sportifs|l’argent des paris sportifs est
il imposable|la cote paris sportif|la francaise des jeux paris sportif|la
martingale paris sportif|la martingale paris sportifs|la meilleur
application de paris sportif|la meilleur application paris sportif|la meilleur technique pour gagner au paris sportif|la méthode secrète pour gagner aux paris sportifs pdf|la plus grosse cote
gagner paris sportif|la plus grosse cote paris sportif|ldem paris sportif signification|le marché des paris sportifs|le meilleur site de pari sportif|le meilleur
site de paris sportif|le meilleur site de paris sportif en ligne|le meilleur site de paris sportifs|le plus gros gain au paris
sportif|le plus gros paris sportif|le plus gros paris sportif du monde|les 10 meilleurs sites de
paris sportifs|les 10 meilleurs sites de paris sportifs en afrique|les 17 secrets pour gagner rapidement aux paris sportifs|les 17 secrets pour gagner rapidement aux paris sportifs pdf|les application de paris sportif|les applications paris sportifs|les bonus paris sportifs|les bookmakers paris sportifs|les cotes paris sportifs|les gains de paris sportifs sont ils
imposables|les gains des paris sportifs sont ils imposables|les jeux de
paris sportifs|les meilleur paris sportif|les meilleures applications de paris sportifs|les meilleurs applications de paris sportifs|les meilleurs bonus paris sportif|les meilleurs bonus paris
sportifs|les meilleurs cotes paris sportif|les meilleurs paris sportifs|les meilleurs
paris sportifs du jour|les meilleurs site de paris sportif|les meilleurs site de
paris sportifs|les meilleurs sites de pari sportif|les meilleurs sites de paris sportifs|les meilleurs sites
de paris sportifs en ligne|les paris sportif|les paris sportif avis|les paris sportifs|les paris sportifs comment ça marche|les paris sportifs en france|les paris
sportifs en ligne|les paris sportifs en ligne comprendre jouer gagner|les
paris sportifs en ligne comprendre jouer gagner pdf|les paris sportifs les plus rentables|les plus gros gagnant paris
sportif|les plus gros gains au paris sportifs|les plus gros gains
paris sportifs|les plus gros paris sportif|les plus grosse
cote paris sportif|les plus grosses pertes paris sportifs|les sites de paris sportifs|les sites de
paris sportifs autorisés en france|les sites de paris
sportifs en france|les sites de paris sportifs en ligne|les sites
de paris sportifs francais|ligue 1 paris sportif|ligue 1 paris sportifs|ligue 2 paris sportif|ligue des
champions paris sportif|limite de gains paris sportifs|limite de mise paris sportif|limite gain paris sportif|limite mise paris sportifs|liste
de paris sportif|liste des paris sportifs|liste des site de paris sportif|liste des sites de
paris sportifs|liste pari sportif|liste paris sportif|liste paris sportif pdf|liste
site de paris sportif|liste site pari sportif|liste site paris
sportif|liste site paris sportif arjel|liste sites paris
sportifs|logiciel algorithme paris sportif|logiciel algorithme
paris sportif gratuit|logiciel analyse paris sportif|logiciel calcul paris sportif|logiciel de pari sportif|logiciel de paris sportif|logiciel
de paris sportif gratuit|logiciel gestion bankroll paris sportif gratuit|logiciel gestion de bankroll paris
sportif|logiciel gestion paris sportif|logiciel gestion paris sportif gratuit|logiciel gestion paris sportifs|logiciel pari sportif|logiciel paris sportif|logiciel
paris sportif gratuit|logiciel paris sportifs|logiciel paris sportifs
foot sur 2 matchs|logiciel pour paris sportif|logiciel pour paris sportifs|logiciel prediction paris sportif|logiciel probabilité paris sportif|logiciel prédiction paris sportif|logiciel statistique paris sportifs|logiciel variation de
cote paris sportif|loi sur les paris sportifs
en france|magic calculator paris sportif|marché des paris sportifs|marché des paris sportifs en france|marché
des paris sportifs en ligne|martingale pari sportif|martingale paris sportif|martingale paris sportif excel|martingale paris sportif forum|martingale
paris sportif interdit|martingale paris sportifs|match abandonné paris
sportif|match annulé ou reporté paris sportifs|match
annulé paris sportif|match arrete paris sportif|match interrompu paris sportif|match
interrompu tennis paris sportif|match interrompu tennis pluie paris sportif|match nul boxe paris sportif|match pari sportif|match paris sportif|match reporté paris sportif|match suspendu paris sportif|match suspendu tennis paris sportif|match
truqué paris sportif|matchs truqués paris sportifs|meilleur algorithme paris sportif|meilleur algorithme paris
sportif gratuit|meilleur app de paris sportif|meilleur app
de paris sportifs|meilleur app paris sportif|meilleur appli de pari sportif|meilleur
appli de paris sportif|meilleur appli pari sportif|meilleur appli paris sportif|meilleur appli paris sportif
forum|meilleur appli paris sportifs|meilleur application conseil paris sportif|meilleur application de paris sportif|meilleur application de paris sportif en afrique|meilleur application pari sportif|meilleur application paris sportif|meilleur application paris sportif belgique|meilleur
application pour les paris sportif|meilleur application pour pari sportif|meilleur bonus de bienvenue paris sportif|meilleur bonus pari sportif|meilleur bonus paris
sportif|meilleur bonus paris sportif sans depot|meilleur bonus paris sportifs|meilleur bonus site de
paris sportif|meilleur bonus site pari sportif|meilleur bonus site paris sportif|meilleur bookmaker paris sportif|meilleur combiné paris sportif|meilleur conseil paris sportif|meilleur cote de paris
sportif|meilleur cote pari sportif|meilleur cote paris sportif|meilleur cote paris sportif aujourd’hui|meilleur cote site paris
sportif|meilleur forum paris sportifs|meilleur gain paris
sportif|meilleur ia paris sportif|meilleur methode pour gagner
au paris sportif|meilleur offre bienvenue paris sportif|meilleur offre bonus paris sportif|meilleur offre de bienvenue
paris sportif|meilleur offre de bienvenue paris sportifs|meilleur offre pari sportif|meilleur offre paris sportif|meilleur offre paris sportif en ligne|meilleur pari sportif|meilleur pari
sportif du jour|meilleur pari sportif en ligne|meilleur paris sportif|meilleur paris sportif
aujourd’hui|meilleur paris sportif du jour|meilleur paris sportif en ligne|meilleur paris sportif foot|meilleur
promo paris sportif|meilleur pronostic paris sportif|meilleur site de conseil paris sportif|meilleur site de pari sportif|meilleur site
de pari sportif en ligne|meilleur site de paris sportif|meilleur site de paris sportif avis|meilleur site de paris sportif belgique|meilleur site de paris sportif canada|meilleur site de paris sportif en france|meilleur site de paris
sportif en ligne|meilleur site de paris sportif football|meilleur site de paris sportif
forum|meilleur site de paris sportif france|meilleur site de paris
sportif hors arjel|meilleur site de paris sportif international|meilleur site de
paris sportif suisse|meilleur site de paris sportifs|meilleur
site de paris sportifs en ligne|meilleur site pari sportif|meilleur site pari sportif en ligne|meilleur site pari sportif france|meilleur site paris sportif|meilleur site paris sportif avis|meilleur site paris sportif
belgique|meilleur site paris sportif canada|meilleur site paris
sportif en ligne|meilleur site paris sportif foot|meilleur site paris sportif forum|meilleur site paris
sportif france|meilleur site paris sportif hors arjel|meilleur site paris sportif nba|meilleur
site paris sportif rugby|meilleur site paris sportif suisse|meilleur site paris sportifs|meilleur site pour pari
sportif|meilleur site pour paris sportif|meilleur site pronostic paris sportif|meilleur strategie paris sportif|meilleur technique de
paris sportif|meilleur technique paris sportif|meilleur technique pour gagner au paris
sportif|meilleure appli de paris sportif|meilleure appli de paris sportifs|meilleure appli pari sportif|meilleure appli paris sportif|meilleure appli paris sportifs|meilleure
application de paris sportif|meilleure application de paris
sportifs|meilleure application pari sportif|meilleure
application paris sportif|meilleure application paris sportif android|meilleure application paris sportifs|meilleure offre paris sportif|meilleure site paris sportif|meilleure strategie paris sportif|meilleures applications de paris sportifs|meilleures applications paris
sportifs|meilleures cotes paris sportifs|meilleures offres paris sportifs|meilleures stratégies paris sportifs|meilleurs appli paris sportif|meilleurs application de paris sportifs|meilleurs application paris sportif|meilleurs applications paris
sportifs|meilleurs bonus paris sportifs|meilleurs cote paris sportif|meilleurs cotes paris sportifs|meilleurs offres paris sportifs|meilleurs paris sportifs|meilleurs paris sportifs du
jour|meilleurs site de pari sportif|meilleurs site de paris sportif|meilleurs
site de paris sportif en ligne|meilleurs site de paris sportifs|meilleurs site paris sportif|meilleurs sites de
paris sportifs|meilleurs sites de paris sportifs en ligne|meilleurs
sites paris sportif|meilleurs sites paris sportifs|methode abc paris sportif|methode
de paris sportif|methode gagnante paris sportifs|methode gagner paris
sportif|methode infaillible paris sportifs|methode martingale paris sportif|methode mathematique paris sportif|methode mathematique pour
gagner au paris sportif|methode paris sportif|methode paris sportif foot|methode paris sportif forum|methode paris sportif tennis|methode paris sportifs|methode pour gagner au
paris sportif|methode pour gagner paris sportif|methodes
paris sportifs|minimum depot paris sportif|mise
au jeu pari sportif|mise maximum pari sportif|mise maximum paris sportif|mise minimum paris sportif|mise moyenne paris
sportif|mise paris sportif|moins de 4 5 but paris sportif|montant maximum paris sportif|montant paris sportif|montante pari sportif|montante parie
sportif|montante paris sportif|montante paris sportifs|montantes paris sportifs|multiple pari sportif|multiple paris sportif|multiple paris sportifs|multiples paris sportifs|méthode calcul paris sportif|méthode match nul paris sportifs|méthode mathématique pour gagner au paris sportif|méthode
paris sportif forum|méthode paris sportif hockey|nba pari
sportif|nba paris sportif|nba paris sportifs|nouveau paris sportif|nouveau site de pari sportif|nouveau site de paris sportif|nouveau
site de paris sportif en ligne|nouveau site de paris sportifs|nouveau
site pari sportif|nouveau site paris sportif|nouveau site paris sportif france|nouveau site paris sportifs|nouveaux sites de paris sportifs|nouveaux
sites paris sportifs|nouvelle appli paris sportif|nouvelle application de paris sportif|numero
de match paris sportif|numero match paris sportif|offre
100 euros paris sportif|offre appli pari sportif|offre bienvenu paris sportif|offre bienvenue pari sportif|offre bienvenue paris sportif|offre
bienvenue paris sportifs|offre bienvenue site paris sportif|offre bonus paris sportif|offre de bienvenu paris sportif|offre de
bienvenue pari sportif|offre de bienvenue paris
sportif|offre de bienvenue paris sportif belgique|offre de bienvenue paris
sportif sans depot|offre de bienvenue paris sportif sans dépôt|offre
de bienvenue paris sportifs|offre de bienvenue sans depot paris sportif|offre de bienvenue site paris
sportif|offre euro paris sportif|offre pari sportif euro|offre
paris sportif|offre paris sportif belgique|offre paris sportif cash|offre paris sportif coupe du monde|offre paris sportif hors arjel|offre paris sportif remboursé|offre paris sportif remboursé cash|offre paris sportif sans depot|offre
promo paris sportif|offre remboursement paris sportif|offre sans depot paris sportif|offre site paris sportif|offres bienvenue
paris sportifs|offres de bienvenue paris sportifs|ou faire des
paris sportif|ou faire des paris sportif en espagne|ou faire des paris sportifs|outil répartiteur de mise
paris sportif|outils repartiteur de mises paris sportif|ouverture compte paris sportifs|ouvrir un compte paris sportif|pack de bienvenue paris sportif|pack de bienvenue paris
sportif hors arjel|pari en ligne sportif|pari sportif|pari sportif 100 euros offert|pari sportif 100 remboursé|pari sportif abandon tennis|pari sportif
aide|pari sportif algérie aujourd’hui|pari sportif appli|pari sportif application|pari sportif argent|pari sportif
astuce|pari sportif aujourd|pari sportif aujourd’hui|pari sportif
avec handicap|pari sportif avec orange money|pari sportif avec paypal|pari sportif avec wave|pari sportif
avis|pari sportif basket|pari sportif belgique|pari sportif belgique france|pari sportif bonus|pari sportif buteur pas titulaire|pari sportif champions league|pari sportif combiné|pari sportif comment|pari
sportif comment gagner|pari sportif comment ça marche|pari
sportif comparatif|pari sportif conseil|pari sportif cote|pari
sportif cote match|pari sportif cote psg|pari
sportif coupe|pari sportif coupe de france|pari sportif coupe du monde|pari sportif depot|pari sportif du jour|pari sportif
en france|pari sportif en ligne|pari sportif en ligne au cameroun|pari
sportif en ligne belgique|pari sportif en ligne canada|pari sportif en ligne france|pari
sportif en ligne gratuit|pari sportif en ligne suisse|pari sportif
en ligne ufc|pari sportif en suisse|pari sportif euro|pari sportif explication|pari sportif faire|pari sportif foot|pari sportif foot resultat|pari sportif football|pari sportif forum|pari sportif francaise des jeux|pari sportif france|pari sportif france angleterre|pari sportif france
argentine|pari sportif france autriche|pari sportif france belgique|pari sportif france espagne|pari sportif france italie|pari sportif
france portugal|pari sportif france usa|pari sportif gagnant|pari sportif gagner|pari sportif gagner a tous les coups|pari sportif gagner de l’argent|pari sportif gain|pari sportif gratuit|pari sportif gratuit pour gagner des cadeaux|pari sportif gratuit sans depot|pari sportif handicap|pari sportif hockey|pari sportif hors arjel|pari sportif jeux olympiques|pari sportif joueur absent|pari sportif le plus rentable|pari sportif leicester champion|pari sportif ligue 1|pari sportif ligue 2|pari sportif ligue des champions|pari sportif
ligue europa|pari sportif match|pari sportif match arrete|pari sportif match interrompu|pari sportif meilleur|pari sportif meilleur cote|pari sportif meilleur
site|pari sportif methode|pari sportif mise|pari sportif mise au jeu|pari sportif mise
o jeu|pari sportif nba|pari sportif offre bienvenue|pari sportif paypal|pari sportif plus|pari sportif prolongation|pari sportif promo|pari
sportif pronostic|pari sportif pronostic foot|pari sportif pronostic gagnant|pari sportif pronostic gratuit|pari sportif psg|pari sportif psg bayern|pari sportif psg inter|pari sportif psg milan|pari sportif regle|pari sportif rembourse|pari sportif remboursement|pari sportif
remboursement cash|pari sportif remboursé|pari sportif rugby|pari sportif rugby coupe du monde|pari sportif rugby top
14|pari sportif sans argent|pari sportif sans carte bancaire|pari sportif sans depot|pari sportif signification|pari sportif site|pari sportif statistique|pari sportif suisse|pari
sportif systeme|pari sportif technique|pari sportif technique pour gagner|pari sportif temps reglementaire|pari sportif tennis|pari
sportif tennis abandon|pari sportif top|pari sportif top 14|pari sportif tour de france|parie sportif|parie sportif
comment ca marche|parie sportif du jour|parie sportif en ligne|parie sportif foot|parie sportif
football|parie sportif france|parie sportif gratuit|parie sportif
pronostic|parie sportif suisse|paris en ligne sportif|paris en ligne sportifs|paris
evenement sportif|paris france sportif|paris hippique et sportif|paris hippiques et sportifs|paris hippiques paris sportifs|paris
hippiques paris sportifs et poker en ligne|paris hippiques sportifs|paris match sportif|paris sportif|paris sportif 10 euros offerts|paris
sportif 100 euros offert|paris sportif 100 euros remboursé|paris
sportif 100 offert|paris sportif 100 remboursé|paris sportif 100e offert|paris sportif 150 euros offert|paris sportif 1er pari remboursé|paris sportif a
faire|paris sportif a faire aujourd’hui|paris sportif a faire ce soir|paris sportif abandon tennis|paris sportif abandon tennis parions sport|paris sportif aide|paris sportif algorithme|paris sportif analyse|paris sportif appli|paris sportif application|paris sportif application android|paris
sportif apres prolongation|paris sportif argent|paris sportif argent fictif|paris sportif argent offert|paris sportif argent virtuel|paris sportif arjel|paris
sportif arsenal psg|paris sportif astuce|paris sportif au canada|paris sportif aujourd hui|paris sportif aujourd’hui|paris sportif avec argent fictif|paris sportif avec bonus sans depot|paris sportif avec
carte bancaire|paris sportif avec cryptomonnaie|paris sportif avec handicap|paris sportif avec paypal|paris sportif avec paysafecard|paris sportif
avis|paris sportif avis expert|paris sportif avis forum|paris sportif
bankroll|paris sportif basket|paris sportif basket coupe
de france|paris sportif basket nba|paris sportif basket prolongation|paris
sportif belgique|paris sportif belgique bonus|paris sportif belgique bonus sans depot|paris sportif belgique france|paris sportif belgique suede|paris sportif bonus|paris sportif bonus bienvenue|paris sportif bonus cash|paris sportif bonus de
bienvenue|paris sportif bonus gratuit|paris sportif bonus gratuit sans
depot|paris sportif bonus retirable|paris sportif bonus sans depot|paris sportif bonus sans depot belgique|paris sportif bookmaker|paris sportif but contre son camp|paris sportif but
temps additionnel|paris sportif buteur|paris sportif buteur blessé|paris sportif buteur carton rouge|paris sportif buteur contre son camp|paris sportif buteur non titulaire|paris sportif buteur prolongation|paris sportif buteur qui ne joue pas|paris
sportif buteur remplacant|paris sportif calcul gain|paris sportif canada|paris sportif cash|paris sportif cash out|paris sportif champion ligue 1|paris sportif champions
league|paris sportif classement ligue 1|paris sportif code promo|paris sportif combine|paris sportif combiné|paris
sportif combiné comment ça marche|paris sportif combiné du jour|paris sportif combiné match reporté|paris sportif comment ca marche|paris sportif comment faire|paris sportif comment gagner|paris sportif comment gagner
a tous les coups|paris sportif comment jouer|paris sportif comment ça marche|paris sportif comparateur cote|paris sportif comparatif|paris sportif conseil|paris sportif conseil gratuit|paris sportif conseil
pour gagner|paris sportif cote|paris sportif cote et match|paris sportif cote explication|paris sportif cote
psg|paris sportif coupe d’europe|paris sportif coupe davis|paris sportif coupe de france|paris sportif coupe du monde|paris sportif coupe du monde de rugby|paris
sportif coupe du monde rugby|paris sportif depot 5 euro|paris sportif depot minimum|paris sportif
depot paypal|paris sportif dnb|paris sportif du jour|paris sportif
du jour conseil|paris sportif dépôt 1 euro|paris
sportif dépôt minimum 5 euros|paris sportif en belgique|paris sportif en france|paris sportif en ligne|paris sportif en ligne avec paypal|paris sportif en ligne avis|paris sportif en ligne belgique|paris
sportif en ligne bonus|paris sportif en ligne cameroun|paris sportif en ligne comment gagner|paris sportif
en ligne comment ça marche|paris sportif en ligne france|paris sportif en ligne gratuit|paris
sportif en ligne maroc|paris sportif en ligne
paypal|paris sportif en ligne québec|paris sportif en ligne
sans depot|paris sportif en ligne suisse|paris sportif en suisse|paris sportif espagne france|paris sportif esport|paris sportif et casino en ligne|paris sportif
et hippique|paris sportif et prolongation|paris sportif euro|paris sportif europa
league|paris sportif explication|paris sportif final ligue des champions|paris sportif finale ligue des champions|paris sportif foot|paris
sportif foot aide|paris sportif foot astuce|paris sportif
foot aujourd’hui|paris sportif foot ce soir|paris sportif foot
comment ca marche|paris sportif foot conseil|paris sportif foot cote|paris sportif foot coupe du monde|paris sportif foot en ligne|paris sportif foot feminin|paris sportif foot gratuit|paris sportif foot prolongation|paris
sportif foot pronostic|paris sportif foot pronostic gratuit|paris sportif foot regle|paris sportif foot suisse|paris
sportif foot us|paris sportif football|paris sportif football americain|paris sportif football astuces|paris sportif
forfait tennis|paris sportif forum|paris sportif francais|paris sportif francaise des jeux|paris
sportif france|paris sportif france 2|paris sportif france
allemagne|paris sportif france angleterre|paris sportif france argentine|paris sportif france autriche|paris sportif
france belgique|paris sportif france espagne|paris sportif france gibraltar|paris sportif france italie|paris sportif france
nouvelle zelande|paris sportif france pologne|paris
sportif france portugal|paris sportif france uruguay|paris sportif france usa|paris sportif freebet sans depot|paris sportif gagnant|paris sportif gagnant à coup sûr|paris sportif gagner a coup sur|paris
sportif gagner argent|paris sportif gagner de l’argent|paris sportif gain|paris sportif gain maximum|paris sportif gestion bankroll|paris sportif gratuit|paris sportif gratuit appli|paris sportif gratuit avec cadeaux|paris sportif gratuit cadeaux|paris sportif
gratuit en ligne|paris sportif gratuit entre amis|paris sportif gratuit
sans argent|paris sportif gratuit sans depot|paris sportif gratuit sans dépôt|paris
sportif gratuits|paris sportif gros gain|paris sportif handicap|paris
sportif handicap 0 1|paris sportif handicap 0-1|paris sportif handicap
1 0|paris sportif handicap 1-0|paris sportif handicap basket|paris
sportif handicap explication|paris sportif handicap foot|paris sportif handicap rugby|paris sportif hippique|paris sportif hockey|paris
sportif hockey nhl|paris sportif hockey sur glace|paris sportif hors arjel|paris sportif hors
arjel france|paris sportif jeux olympiques|paris sportif
jeux video|paris sportif joueur blessé|paris sportif
joueur blessé pendant le match|paris sportif joueur de foot|paris sportif joueur decisif|paris
sportif joueur declare forfait|paris sportif joueur déclare forfait|paris sportif joueur remplacant|paris sportif la francaise des jeux|paris sportif le plus rentable|paris sportif
legal en france|paris sportif leicester champion|paris sportif les 18 stratégies pour
gagner tous les jours|paris sportif les plus sur|paris sportif les prolongation compte|paris sportif ligne|paris sportif ligue 1|paris sportif ligue
2|paris sportif ligue des champions|paris sportif ligue des nations|paris sportif ligue europa|paris sportif liste|paris sportif
martingale|paris sportif match|paris sportif match abandonné|paris sportif match
annulé|paris sportif match arrêté|paris sportif match du jour|paris sportif match
interrompu|paris sportif match reporté|paris sportif match suspendu|paris sportif match tennis interrompu|paris sportif match
truqué|paris sportif meilleur bonus|paris sportif meilleur cote|paris sportif meilleur pronostic|paris sportif meilleur site|paris sportif methode|paris sportif
methode 2 3|paris sportif mi temps fin de match|paris sportif mise
au jeu|paris sportif mise maximum|paris sportif mma france|paris sportif moins de 3.5 but|paris sportif
montante|paris sportif moto gp|paris sportif multiple|paris
sportif multiple 2 3|paris sportif multiple 2 3 explication|paris sportif multiple 2 4|paris
sportif multiple 2 5|paris sportif multiple 2/3 explication|paris sportif multiple 3 4|paris sportif multiple explication|paris sportif national 1 foot|paris sportif
nba|paris sportif nba conseil|paris sportif nba pronostic|paris sportif nhl|paris sportif nombre de but|paris sportif
nouveau site|paris sportif numero match|paris sportif offert|paris sportif offre bienvenue|paris sportif offre bienvenue sans depot|paris sportif offre de bienvenue|paris sportif offre sans depot|paris
sportif om psg|paris sportif paypal|paris sportif plus de 1.5 but|paris sportif plus de 2 5 but|paris sportif plus ou moins|paris sportif plus ou moins 2 5 but|paris
sportif premier pari remboursé|paris sportif premier paris remboursé|paris sportif prolongation|paris sportif prolongation basket|paris
sportif prolongation foot|paris sportif promo|paris sportif pronostic|paris sportif pronostic basket|paris sportif pronostic des match aujourd hui|paris sportif
pronostic expert gratuit|paris sportif pronostic foot|paris sportif pronostic forum|paris sportif pronostic
gratuit|paris sportif pronostic tennis|paris sportif psg|paris sportif psg arsenal|paris sportif psg barcelone|paris
sportif psg bayern|paris sportif psg dortmund|paris sportif psg inter|paris sportif psg inter cote|paris sportif psg liverpool|paris sportif psg om|paris sportif qr
code|paris sportif que veut dire handicap|paris sportif qui rapporte le plus|paris sportif regle|paris sportif regle prolongation|paris sportif rembourse|paris sportif remboursement cash|paris sportif rembourser|paris sportif remboursé|paris sportif remboursé cash|paris
sportif remboursé en cash|paris sportif retrait paypal|paris sportif rue des joueurs|paris sportif rugby|paris sportif
rugby 6 nations|paris sportif rugby coupe du monde|paris sportif rugby top 14|paris sportif safe du jour|paris sportif sans argent|paris sportif
sans carte bancaire|paris sportif sans carte d’identité|paris sportif sans compte
bancaire|paris sportif sans depot|paris sportif sans depot minimum|paris
sportif si match suspendu|paris sportif si un joueur abandonne|paris sportif si
un joueur ne joue pas|paris sportif si un joueur se blesse|paris sportif simple ou combiné|paris sportif site|paris
sportif statistique|paris sportif stratégie|paris sportif suisse|paris sportif suisse application|paris sportif suisse en ligne|paris sportif suisse
legal|paris sportif suisse légal|paris sportif suisse romande|paris sportif sur du jour|paris sportif sur le tennis|paris sportif systeme|paris sportif systeme 2 3|paris sportif systeme 2 4|paris
sportif systeme 2/3|paris sportif systeme 2/4|paris sportif
systeme 3 4|paris sportif systeme 3/4|paris sportif
systeme explication|paris sportif technique|paris sportif technique pour gagner|paris sportif temps
additionnel|paris sportif temps reglementaire|paris sportif tennis|paris sportif tennis abandon|paris sportif
tennis conseil|paris sportif tennis de table|paris sportif tennis forfait|paris sportif tennis gratuit|paris sportif tennis pronostic|paris sportif tennis roland
garros|paris sportif tir au but|paris sportif top
14|paris sportif tour de france|paris sportif ufc|paris sportif
ufc france|paris sportif unibet|paris sportif vainqueur euro|paris sportif vainqueur ligue 1|paris sportif vainqueur ligue des
champions|paris sportif via paypal|paris sportif victoire prolongation|paris sportif vip
gratuit|paris sportifs|paris sportifs abandon tennis|paris
sportifs aide|paris sportifs analyser un match|paris sportifs arjel|paris sportifs astuces|paris sportifs aujourd’hui|paris sportifs autorisés en france|paris sportifs
avec paypal|paris sportifs basket|paris sportifs belgique|paris sportifs bonus|paris sportifs
bookmakers|paris sportifs canada|paris sportifs combiné|paris sportifs comparateur|paris sportifs comparatif|paris sportifs conseils|paris sportifs cotes|paris
sportifs coupe du monde|paris sportifs de football|paris sportifs du jour|paris
sportifs en belgique|paris sportifs en france|paris sportifs en ligne|paris sportifs en ligne belgique|paris sportifs en ligne france|paris sportifs en ligne
gratuit|paris sportifs en ligne suisse|paris sportifs en suisse|paris sportifs et hippiques|paris sportifs euro|paris sportifs
foot|paris sportifs foot us|paris sportifs forum|paris sportifs france|paris sportifs france
espagne|paris sportifs gagner à tous les coups|paris sportifs gratuit|paris sportifs gratuits|paris sportifs gratuits en ligne|paris sportifs handicap|paris sportifs hockey|paris
sportifs hockey sur galce|paris sportifs hockey sur glace|paris sportifs hors arjel|paris sportifs jeux olympiques|paris
sportifs les bookmakers raflent la mise|paris sportifs ligne|paris sportifs ligue 1|paris
sportifs ligue 2|paris sportifs ligue des champions|paris
sportifs ligue europa|paris sportifs match interrompu|paris sportifs montante|paris
sportifs nba|paris sportifs offre bienvenue|paris sportifs offre de bienvenue|paris sportifs paypal|paris sportifs pronostics|paris sportifs psg|paris sportifs
psg inter|paris sportifs rugby|paris sportifs sans argent|paris sportifs sans depot|paris sportifs site|paris sportifs
sites|paris sportifs statistiques|paris sportifs stratégie|paris sportifs suisse|paris sportifs technique|paris sportifs techniques|paris sportifs tennis|paris sportifs tennis astuces|paris sportifs top 14|paris sportifs tour de france|part de marché paris sportifs|paypal pari sportif|paypal paris sportif|paypal paris sportifs|perte d’argent paris sportifs|peut
on devenir riche avec les paris sportifs|peut on gagner de l’argent avec les paris sportifs|peut on gagner sa vie avec les paris sportif|peut on vraiment gagner de l’argent avec les paris sportifs|plus gros combine paris sportif|plus gros gagnant
paris sportif|plus gros gain paris sportif|plus gros gain paris sportif au monde|plus gros gain paris sportif france|plus gros gains
paris sportif|plus gros pari sportif|plus gros paris sportif|plus grosse cote gagner paris sportif|plus grosse
cote pari sportif|plus grosse cote paris sportif|plus grosse mise paris sportif|plus grosse somme gagner au paris sportif|plus ou moins paris
sportif|pourcentage de mise paris sportif|premier pari sportif remboursé|probabilité cote paris sportif|probabilité paris sportif
combiné|prolongation basket paris sportif|prolongation paris sportif|promo pari sportif|promo paris sportif|promo site de paris sportif|promo site pari sportif|promo site
paris sportif|promos paris sportifs|prono paris sportif foot|prono paris sportif gratuit|prono paris sportif tennis|pronostic de
paris sportif|pronostic du jour paris sportif|pronostic foot paris sportif|pronostic gratuit paris sportif|pronostic pari sportif|pronostic pari sportif gratuit|pronostic
paris sportif|pronostic paris sportif aujourd’hui|pronostic
paris sportif du jour|pronostic paris sportif foot|pronostic paris sportif gratuit|pronostic paris sportif tennis|pronostic
paris sportifs|pronostics foot statistiques et aides aux paris sportifs|pronostics paris sportif|pronostics
paris sportifs|pronostiqueur paris sportif gratuit|psg arsenal paris sportif|psg bayern paris
sportif|psg inter milan paris sportif|psg inter pari sportif|psg inter paris
sportif|psg liverpool paris sportif|psg om paris sportif|psg paris sportif|psg paris sportifs|qr code paris sportif|qu
est ce qu un handicap paris sportif|qu est ce que handicap dans les paris sportif|qu’est ce qu’un handicap paris sportif|qu’est ce que
handicap dans les paris sportif|quand un joueur se blesse paris sportif|que signifie 1/1 en paris
sportif|que signifie 1/2 paris sportif|que signifie 12 en paris sportif|que signifie
1×2 dans les paris sportifs|que signifie btts en paris sportif|que
signifie dnb en paris sportif|que signifie draw en paris sportif|que signifie ft en paris sportif|que signifie gg dans le
pari sportif|que signifie gg en pari sportif|que signifie
gg en paris sportif|que signifie handicap dans les paris sportifs|que veut dire dnb en paris sportif|que veut dire handicap dans les paris sportifs|que veut dire handicap paris sportif|quel appli pari sportif|quel cote jouer paris sportif|quel est la meilleur appli de
paris sportif|quel est le meilleur algorithme de paris
sportif|quel est le meilleur site de pari sportif|quel est le meilleur site de pari sportif en ligne|quel
est le meilleur site de paris sportif|quel est le meilleur site de paris sportif en ligne|quel est le meilleur site de paris sportifs
en ligne|quel est le pari sportif le plus rentable|quel
pari sportif est le plus rentable|quel pari sportif est le plus sûr|quel pari sportif faire
aujourd’hui|quel paris sportif faire aujourd’hui|quel paris sportif rapporte le plus|quel site
de paris sportif choisir|quel site de paris sportif rembourse en cash|quel type
de pari sportif est le plus rentable|quelle application pour paris sportifs|quelle
est la meilleure appli de paris sportif|quelle est la
meilleure application de paris sportif|quelle est la meilleure application pour
les paris sportifs|quelle est le meilleur site de paris sportif|quels paris sportifs
faire|quels sont les paris sportifs les plus sûrs|rebond
basket paris sportif|record de gain paris sportif|regle buteur paris
sportif|regle de paris sportif|regle des paris sportif|regle handicap paris sportif|regle handicap paris sportif foot|regle multiple paris sportif|regle pari sportif|regle paris sportif|regle paris sportif foot|regle paris sportif multiple|regle paris sportif prolongation|reglement pari
sportif|reglement paris sportif|regles paris
sportifs|remboursement cash paris sportif|remboursement en cash paris sportif|remboursement pari sportif|remboursement paris sportif|repartiteur de mise paris sportif|repartiteur de mise
paris sportifs|repartiteur de mises paris sportif|repartiteur mise
paris sportif|repartition des mises paris sportif|resultat
pari sportif|resultat paris sportif|resultat paris sportif en direct|resultat paris sportif foot|resultat sportif hockey|retirer argent paris sportif|rugby
pari sportif|rugby paris sportif|règle paris sportif prolongation|règles
paris sportif|répartiteur de mise pari sportif|répartiteur de mise paris sportif|répartiteur de mise paris sportifs|répartition des mises paris sportif|résultat paris sportif foot|sans depot
paris sportif|se faire interdire de paris sportifs|signification btts paris sportif|signification dnb
paris sportif|signification handicap paris sportif|simulateur de gain paris sportif|simulateur gain paris sportif|simulateur gain paris sportif
multiple|simulateur gain paris sportif systeme|simulateur gain paris sportif système|simulateur montante paris sportif|simulateur paris sportif multiple|simulateur systeme
paris sportif|simulation paris sportif gratuit|site aide
paris sportif|site analyse paris sportif|site analyser paris sportif|site
arjel paris sportif|site conseil paris sportif|site d’analyse de paris sportifs|site d’analyse paris sportif|site de
conseil paris sportif|site de pari en ligne sportif|site de pari sportif|site de pari sportif avec
bonus sans depot|site de pari sportif bonus sans depot|site de pari sportif canada|site
de pari sportif en ligne|site de pari sportif francais|site de pari sportif gratuit|site de pari
sportif hors arjel|site de pari sportif suisse|site de parie sportif|site de parie sportif en ligne|site de paris en ligne sportif|site de paris
sportif|site de paris sportif acceptant paypal|site de paris sportif arjel|site de paris sportif autorisé
en france|site de paris sportif autorisé en suisse|site de paris sportif avec bonus|site
de paris sportif avec bonus sans depot|site de paris
sportif avec bonus sans dépôt|site de paris sportif avec
neosurf|site de paris sportif avec paiement mobile|site de paris sportif avec paypal|site
de paris sportif avis|site de paris sportif belge avec bonus|site de paris sportif belgique|site de paris sportif bonus|site de paris sportif bonus sans depot|site de paris sportif canada|site de paris sportif comparatif|site de paris sportif depot minimum|site de paris sportif en france|site de paris sportif en ligne|site de
paris sportif en ligne suisse|site de paris sportif football|site de
paris sportif francais|site de paris sportif france|site de paris sportif gratuit|site de paris sportif gratuit
pour gagner des cadeaux|site de paris sportif gratuit sans dépôt|site de paris sportif hors arjel|site de paris sportif le plus fiable|site de paris sportif legal en france|site de paris sportif meilleur
cote|site de paris sportif nouveau|site de paris sportif offre de bienvenue|site
de paris sportif paypal|site de paris sportif premier paris remboursé|site de paris sportif qui
accepte paypal|site de paris sportif qui rembourse en cash|site de paris sportif remboursé|site de paris sportif sans argent|site
de paris sportif sans carte bancaire|site de paris sportif sans carte
d’identité|site de paris sportif sans depot|site de paris sportif suisse|site de paris sportifs|site
de paris sportifs avec paypal|site de paris sportifs en ligne|site
de paris sportifs francais|site de paris sportifs gratuit|site
de paris sportifs paypal|site de paris sportifs suisse|site de statistique pour paris sportif|site des
paris sportifs|site pari en ligne sportif|site pari sportif|site pari sportif 100 euros offert|site pari sportif arjel|site pari sportif belgique|site pari sportif
bonus|site pari sportif canada|site pari sportif comparatif|site pari sportif en ligne|site pari sportif france|site pari sportif gratuit|site pari sportif hors arjel|site pari sportif suisse|site parie
sportif|site paris en ligne sportif|site paris sportif|site
paris sportif 100 euros offert|site paris sportif 100 euros
remboursé|site paris sportif 1er paris remboursé|site paris sportif
arjel|site paris sportif autorisé en france|site paris
sportif avec bonus|site paris sportif avec bonus sans depot|site
paris sportif avec meilleur cote|site paris sportif belgique|site paris sportif bonus|site paris sportif bonus cash|site paris sportif bonus sans depot|site paris sportif canada|site
paris sportif comparatif|site paris sportif depot 5 euro|site paris sportif en ligne|site paris
sportif foot|site paris sportif france|site paris sportif gratuit|site paris sportif hors arjel|site paris sportif hors arjel france|site paris sportif
meilleur cote|site paris sportif nouveau|site paris sportif offre de bienvenue|site
paris sportif paypal|site paris sportif remboursement cash|site paris sportif
remboursé en cash|site paris sportif retrait instantané|site paris
sportif sans carte bancaire|site paris sportif sans depot|site paris sportif suisse|site
paris sportifs|site paris sportifs belgique|site paris sportifs
en ligne|site paris sportifs france|site paris sportifs hors arjel|site paris sportifs
suisse|site pour analyse paris sportif|site pour paris sportif|site pronostic paris sportif|site statistique paris sportif|site suisse paris sportif|sites de pari sportif|sites de paris sportif|sites de paris sportifs|sites de paris sportifs arjel|sites de
paris sportifs autorisés en france|sites de paris sportifs belgique|sites de paris sportifs bonus|sites de
paris sportifs en belgique|sites de paris sportifs en france|sites de paris sportifs en ligne|sites de
paris sportifs gratuits|sites de paris sportifs
gratuits sans dépôt|sites de paris sportifs suisse|sites pari sportif|sites paris sportif|sites paris sportifs|sites paris sportifs arjel|sites paris sportifs belgique|sites paris sportifs france|sites paris sportifs hors arjel|sites paris sportifs suisse|so
foot paris sportif|so foot paris sportifs|specialiste tennis paris sportif|statistique
foot paris sportif|statistique paris sportif|statistique paris sportif foot|statistique tennis paris sportif|statistiques football paris sportifs|statistiques paris
sportifs|strategie de paris sportif|stratégie big whale paris sportif|stratégie de
paris sportifs|stratégie gagnante paris sportifs|stratégie
pari sportif|stratégie paris sportif|stratégie paris sportifs|stratégie paris
sportifs forum|stratégie pour gagner au paris sportif|stratégies paris sportifs|suisse paris sportif|suisse paris sportifs|systeme 2 3 paris sportif|systeme 3 4 paris
sportif|systeme de cote paris sportif|systeme de paris
sportif|systeme pari sportif|systeme paris sportif|systeme paris sportifs|systeme reducteur paris sportif|système paris sportif|tableau bankroll paris sportif|tableau cote paris sportif|tableau de paris sportif|tableau de suivi paris
sportifs|tableau excel bankroll paris sportif|tableau excel paris sportif|tableau
excel paris sportif gratuit|tableau excel paris sportifs|tableau
excel pour paris sportif|tableau gestion bankroll paris sportif|tableau montante paris sportif|tableau paris sportif|tableau paris sportif e
Your comment is awaiting moderation.
urbanvaluezone – Convenient to browse and shop, found multiple items I liked.
Your comment is awaiting moderation.
оформил заказ жду. продавец общительный https://leylailyasova.ru/porhov.html Ты друг нарвался на фэйков!
Your comment is awaiting moderation.
springlightgoods – Fast delivery, items nicely packaged, purchase completed without any issues today.
Your comment is awaiting moderation.
магаз ровный,всем советую!! https://strana41.ru/buzuluk.html да, спросил тут ли менеджер, по быстрому оформил заказ.
Your comment is awaiting moderation.
highriverdesigns – Loved the unique designs available, items matched descriptions exactly as shown online.
Your comment is awaiting moderation.
smartshopcorner – Loved the big deals today, checkout process was very quick.
Your comment is awaiting moderation.
экстренное вытрезвление на дому спб
Your comment is awaiting moderation.
Flourish Today – Guidance and motivation to help you grow personally and professionally.
Your comment is awaiting moderation.
Всем по привету! https://fitceps.ru/atkarsk.html Брал впервые в этом магазине, брал по рекомендации!
Your comment is awaiting moderation.
digitalpropel.click – Mobile version looks perfect; no glitches, fast scrolling, crisp text.
Your comment is awaiting moderation.
Thanks on your marvelous posting! I genuinely enjoyed reading it, you might be a great author.
I will remember to bookmark your blog and will eventually come back very soon. I want to encourage
you to ultimately continue your great work, have a
nice afternoon!
Your comment is awaiting moderation.
brandfunnels.click – Overall, professional vibe here; trustworthy, polished, and pleasantly minimal throughout.
Your comment is awaiting moderation.
adscatalyst.click – Overall, professional vibe here; trustworthy, polished, and pleasantly minimal throughout.
Your comment is awaiting moderation.
rankclicker.click – Pages loaded fast, images appeared sharp, and formatting stayed consistent.
Your comment is awaiting moderation.
promoseeder.click – Pages loaded fast, images appeared sharp, and formatting stayed consistent.
Your comment is awaiting moderation.
conversionforce.click – Pages loaded fast, images appeared sharp, and formatting stayed consistent.
Your comment is awaiting moderation.
marketdriver.click – Loved the layout today; clean, simple, and genuinely user-friendly overall.
Your comment is awaiting moderation.
stylishfamilystore – Easy navigation and lots of options, checkout went smoothly.
Your comment is awaiting moderation.
всем доброго времени суток.. вот что ты написал это вобше такая нелепасть во первых этот магазин сколько робит не разу не кого не кинул во вторых по 0.5 магазин закладки не делает тебя просто как лошка очередного развели в аське или скайпе хз где ну тебя подкинули на ровном месте кидай и дальше всем подрят на шет))))будь умнее и внимательней страхуйся, много не кури мозг высохнит)))) https://ars-rp.ru а я яй , я ж отвечаю вам каждый раз как есть возможность, пишут много людей одновременно.
Your comment is awaiting moderation.
giftzone – Loved the collection, shipping process appears efficient and reliable.
Your comment is awaiting moderation.
Explore top fashion picks – Quickly discovered a few appealing items, layout felt clean.
Your comment is awaiting moderation.
trendspotmarket – Stylish finds and great prices made today’s shopping fun.
Your comment is awaiting moderation.
Show More: https://sofia-dv.ru/2025/10/27/%d0%90%d0%ba%d0%ba%d0%b0%d1%83%d0%bd%d1%82%d1%8b-google-%d0%b4%d0%bb%d1%8f-%d1%8d%d1%84%d1%84%d0%b5%d0%ba%d1%82%d0%b8%d0%b2%d0%bd%d0%be%d0%b3%d0%be-ppc/
Your comment is awaiting moderation.
проблемы с обслуживанием. https://museum-bug.ru Снял в касание, остановился, открыл дверь авто, вышел и зашёл обратно! Респект!!! Держите марку в том же духе!
Your comment is awaiting moderation.
Зачем писать таким большим шрифтом ? Здесь слепых нет. То что тебя где то кинули к нам никакого отношения не имеет. https://vazremkuzov.ru 5 сообщений в курилках быстрее набивается , сообщения засчитываются только при ответе или цитате стороннего сообщения. Просто флуд сообщения не набивает.
Your comment is awaiting moderation.
заказал почти неделю назад ( 5 дней назад.) сказали товар кончился. ожидается разгрузка на склад. вот так и жду уже 5 дней. Раньше брал. все было быстро и честно. сейчас что-то затянулось слишком. вот сижу годаю. Прийдет мне товар или не прийдет купить Кокаин, Мефедрон, Экстази я бы тоже заценил
Your comment is awaiting moderation.
chicfinder – Found stylish items easily, website experience was fast and seamless.
Your comment is awaiting moderation.
stylechoicehub – Smooth browsing and user-friendly design, products were easy to find.
Your comment is awaiting moderation.
Browse latest fashion – Found a couple of eye-catching picks fast, very user-friendly.
Your comment is awaiting moderation.
See details: https://reidcvcyl.iyublog.com/37464903/nppr-team-shop-the-ultimate-hub-for-social-media-marketing-mastery
Your comment is awaiting moderation.
Daily Streetwear Spot – Discover fashionable urban wear curated for a modern lifestyle.
Your comment is awaiting moderation.
за наличие узнавай у селлера. куда тебе 2грамма дезоксипипрадола я слабо представляю, хочешь упороть без палева пол района ? ) https://avto-trend-96.ru что сильнее 100 или 400 ? и по времени сколько действуют ?
Your comment is awaiting moderation.
fashionfinderhub – Found exactly what I wanted, navigation was simple and quick.
Your comment is awaiting moderation.
В предыдущих сообщен писал, что заказ по совместке от ЧМ, https://leylailyasova.ru продавец шикарный – всё объяснил, рассказал.
Your comment is awaiting moderation.
Hi there all, here every person is sharing these knowledge, so it’s pleasant to read this website, and I used to
pay a visit this web site all the time.
Your comment is awaiting moderation.
It’s very effortless to find out any topic on web as compared to books,
as I found this post at this site.
Your comment is awaiting moderation.
urbanedgecollective – Smooth browsing experience today, found what I needed easily without any unnecessary hassle.
Your comment is awaiting moderation.
Братишка, все красиво, в касание, спасибо за профессионализм https://okno40.ru Москва – Все чётко, поднятие на раз два, все по описанию. Мефедрон белый, без запаха, видно что очищенный. Вес и качество норм!!!! Количество соответствует, за бонус в спасибо 😉
Your comment is awaiting moderation.
nightfallmarketplace – Customer service was helpful, responded quickly, and answered all my questions clearly.
Your comment is awaiting moderation.
dailystylezone – Excellent daily fashion picks, the site loaded quickly and checkout was simple.
Your comment is awaiting moderation.
Urban trend finds – Several standout options appeared right away, browsing easy.
Your comment is awaiting moderation.
trendydealpicks – Great variety, shopping was enjoyable and hassle-free.
Your comment is awaiting moderation.
Старые фунты? https://funtfrank.ru Обменяйте легко и без комиссий! Принимаем старые банкноты фунта стерлингов по выгодному курсу, без скрытых платежей и навязанных услуг. Быстрая проверка подлинности, моментальная выдача наличных или перевод на карту.
Your comment is awaiting moderation.
и будем мы так общаться по одному смс раз в полмесяца… купить онлайн мефедрон, экстази, бошки Как связаться можно
Your comment is awaiting moderation.
СТО в Люберцах https://sto-cars.ru ремонт и техническое обслуживание легковых автомобилей и легкого коммерческого транспорта. Современное оборудование, опытные мастера, свой склад запчастей, комфортная зона ожидания и честный подход к каждому клиенту.
Your comment is awaiting moderation.
индивидуалки нижневартовск за 2000 рублей
Your comment is awaiting moderation.
glamcornerhub – Found trendy items easily, shipping was quick and simple.
Your comment is awaiting moderation.
fontan casino
Your comment is awaiting moderation.
adswizard.click – Navigation felt smooth, found everything quickly without any confusing steps.
Your comment is awaiting moderation.
boostmetrics.click – Navigation felt smooth, found everything quickly without any confusing steps.
Your comment is awaiting moderation.
marketactivator.click – Overall, professional vibe here; trustworthy, polished, and pleasantly minimal throughout.
Your comment is awaiting moderation.
trafficengine.click – Found practical insights today; sharing this article with colleagues later.
Your comment is awaiting moderation.
reachoptimizer.click – Appreciate the typography choices; comfortable spacing improved my reading experience.
Your comment is awaiting moderation.
Магазин не отвечает, может типо выходные, ждем понедельника. купить Мефедрон, Бошки, Марихуану Продавец общительный, выслал с заказом пару пробников бесплатно! заказы высылют оперативно
Your comment is awaiting moderation.
adstrigger.click – Content reads clearly, helpful examples made concepts easy to grasp.
Your comment is awaiting moderation.
webpromoter.click – Appreciate the typography choices; comfortable spacing improved my reading experience.
Your comment is awaiting moderation.
Strategic timing helps buy robux cheap during promotional events. Official bonus periods occasionally offer extra Robux or exclusive items enhancing purchase value through legitimate channels.
Your comment is awaiting moderation.
Reviewed sources provide trading signals through legit telegram groups. Join trustworthy channels offering alpha insights with best buy and sell strategies verified through trusted TradingView signals.
Your comment is awaiting moderation.
Кидал 4340, на Альфу улетело 4254… если быть точным… Чек есть. купить скорость, кокаин, мефедрон, гашиш Дружище, если ты не понял, нам магазин в пятницу и здесь и везде перестал отвечать. Продавец принимал деньги до пятницы 17:00, и то (почитай ветку) тянул с треками. А потом пропал. Форум этот тоже больше не имеет той волшебной силы, что была раньше. Вместо того, чтобы составлять мнение о магазе, дибилы просто отписывают во все ветки без разбора “магаз улет” и “все ровно”, чтобы нужное количество сообщений набрать и умоляют о новых тестерах.
Your comment is awaiting moderation.
10 euros offert paris sportif|10 euros offert sans dépôt paris sportif|10 meilleurs sites de paris
sportifs|100 euro offert paris sportif|100 euros offert paris sportif|100
euros remboursé paris sportifs|100 offert pari sportif|100 offert paris
sportif|100 remboursé paris sportif|100e offert pari sportif|abandon paris sportif
tennis|abandon tennis paris sportif|addiction paris sportif forum|age paris
sportif belgique|aide au pari sportif|aide au paris
sportif|aide aux paris sportif|aide aux paris sportifs|aide pari sportif|aide pari sportif football|aide parie
sportif|aide paris sportif|aide paris sportif foot|aide paris sportif gratuit|aide paris sportifs|aide pour paris sportif|algorithme
de paris sportif|algorithme excel paris sportif|algorithme gratuit paris sportif|algorithme pari sportif|algorithme paris sportif|algorithme paris sportif avis|algorithme paris sportif basket|algorithme paris sportif excel|algorithme paris sportif gratuit|algorithme paris sportif tennis|algorithme
paris sportifs|algorithme pour paris sportif|analyse cote paris sportif|analyse de paris sportif|analyse
match paris sportif|analyse pari sportif|analyse paris sportif|analyse paris sportif
foot|analyse paris sportif football|analyse paris sportif gratuit|analyse paris sportifs|ancienne cote paris sportif|api cote
paris sportif|app paris sportif sans argent|appli de paris sportif|appli de paris sportif sans argent|appli de paris
sportifs|appli pari sportif|appli pari sportif gratuit|appli parie sportif|appli
paris sportif|appli paris sportif avec paypal|appli paris sportif belgique|appli paris sportif entre amis|appli paris sportif gratuit|appli paris sportif sans argent|appli paris sportif suisse|appli paris sportifs|application aide paris sportif|application algorithme paris sportif|application analyse paris sportif|application android paris sportif|application bankroll paris sportif|application conseil paris sportif|application de
pari sportif|application de parie sportif|application de paris sportif|application de paris sportif en afrique|application de paris sportif en cote d’ivoire|application de paris sportif en ligne|application de
paris sportif gratuit|application de paris sportif
international|application de paris sportif suisse|application de paris
sportifs|application faux paris sportifs|application gestion bankroll
paris sportif|application gestion paris sportif|application ia paris
sportif|application pari sportif gratuit|application paris sportif|application paris sportif android|application paris sportif argent fictif|application paris sportif belgique|application paris sportif
canada|application paris sportif espagne|application paris
sportif espagnol|application paris sportif fictif|application paris sportif france|application paris
sportif gratuit|application paris sportif gratuit entre amis|application paris sportif maroc|application paris sportif offre
de bienvenue|application paris sportif paypal|application paris sportif sans argent|application paris sportif sans justificatif de domicile|application paris sportif suisse|application paris sportif usa|application paris sportif virtuel|application pour
faire des paris sportifs|application pour gerer ses
paris sportif|application pour les paris sportifs|application pour pari sportif|application pour paris sportif|application pour paris sportifs|application statistique paris sportif|application suivi paris sportif|applications
de paris sportifs|applications paris sportifs|applis paris sportif|applis paris sportifs|apprendre a faire des
paris sportifs|argent facile paris sportif|argent offert paris sportifs|argent offert sans depot paris
sportif|argent paris sportif|argent paris sportifs|argent paris sportifs impots|argent sans depot paris sportif|arjel paris sportif|arjel paris sportifs|astuce gagner paris sportif|astuce pari sportif|astuce
paris sportif|astuce paris sportif basket|astuce paris sportif foot|astuce paris sportif forum|astuce
paris sportif tennis|astuce paris sportifs|astuce pour gagner au pari sportif|astuce pour gagner au paris sportif|astuce pour gagner paris sportif|astuce pour paris sportif|astuces paris sportifs|astuces
paris sportifs en ligne|astuces paris sportifs foot|astuces
pour gagner aux paris sportifs|autorisation paris sportif france|avis pari sportif|avis paris sportif|avis paris sportif foot|avis
site de paris sportif|avis site paris sportif|avis sur les paris sportifs|avis sur paris sportif|avis tipster paris
sportif|aweh signification paris sportif|bankroll 100 euros
paris sportifs|bankroll management paris sportif|bankroll paris sportif|bankroll paris
sportif excel|bankroll paris sportif gratuit|bankroll paris sportifs|basket paris sportif|belgique france paris sportif|belgique paris sportifs|bonus bienvenue
paris sportif|bonus bienvenue paris sportifs|bonus cash
paris sportif|bonus de bienvenue paris sportif|bonus de bienvenue paris sportif belgique|bonus
de bienvenue sans depot paris sportif|bonus de depot paris sportif|bonus de paris sportifs|bonus depot paris sportif|bonus en cash paris sportif|bonus gratuit paris sportif|bonus gratuit sans depot paris sportif|bonus pari sportif|bonus paris sportif|bonus paris sportif belgique|bonus paris
sportif betclic|bonus paris sportif cash|bonus paris sportif en ligne|bonus paris sportif france
pari|bonus paris sportif retirable|bonus paris sportif sans
depot|bonus paris sportif sans dépôt|bonus paris sportif unibet|bonus paris
sportifs|bonus sans depot paris sportif|bonus sans depot paris sportif belgique|bonus sans dépôt paris sportif|bonus sans dépôt paris sportif hors arjel|bonus site de paris sportif|bonus site pari sportif|bonus site paris sportif|bonus sites de paris sportifs|bonus unibet paris sportif|bookmaker paris sportif|bookmaker paris sportif gratuit|bookmaker paris sportifs|bookmaker sportif|bookmakers paris sportif|bookmakers paris sportifs|bookmakers paris sportifs en ligne|but contre son camp paris sportif|but
sur penalty paris sportif|buteur paris sportif|c’est quoi handicap paris sportif|c’est quoi
une cote paris sportif|calcul anti perte paris sportif|calcul combinaison pari sportif|calcul
cote pari sportif|calcul cote paris sportif|calcul couverture paris sportif|calcul de
cote paris sportif|calcul des cotes paris sportifs|calcul dnb paris sportifs|calcul double chance paris sportif|calcul gain paris sportif|calcul mise
paris sportif|calcul pari sportif|calcul paris sportif|calcul paris sportif multiple|calcul pourcentage cote paris
sportif|calcul probabilité paris sportif|calcul rentabilité paris sportifs|calcul roi paris sportif|calcul systeme paris
sportif|calcul trj paris sportifs|calculateur cote paris sportif|calculateur
de cote paris sportif|calculateur de mise paris sportif|calculateur de paris sportif|calculateur paris sportif|calculatrice arbitrage paris sportif|calculatrice paris sportif|calculer cote paris sportif|calculer
gain paris sportif|calculer probabilité paris
sportifs|calculer roi paris sportifs|calculer une cote pari sportif|calculer une cote paris sportif|carte cadeau paris sportif|carte
pcs paris sportif|carte prépayée paris sportifs|cash out pari sportif|cash out paris sportif|cash out paris sportifs|casino en ligne paris
sportif|casino paris sportif en ligne|champions league paris sportif|chute de cote paris sportif|classement des meilleurs
sites de paris sportifs|classement meilleur site de paris sportif|code barre
paris sportif|code bonus paris sportif|code
paris sportif|code promo pari sportif|code
promo paris sportif|code promo paris sportif sans depot|code promo paris sportif sans dépôt|code promo sans depot paris sportif|code promo site paris sportif|combien de temps pour encaisser un paris sportif|combien de temps pour retirer un paris sportif|combien miser
paris sportifs|combine paris sportif|combines paris sportifs|combiné
pari sportif|combiné paris sportif|combiné paris sportif conseil|combiné
paris sportif du jour|combiné paris sportif pronostic|comment analyser un paris sportif|comment arreter de jouer aux paris
sportifs|comment arreter les paris sportif|comment arreter les paris sportifs|comment arrêter les paris sportifs|comment bien gagner au paris sportif|comment bien jouer au paris sportif|comment bien miser
paris sportif|comment ca marche les paris sportif|comment calculer
cote paris sportif|comment calculer gain paris sportif|comment calculer les cotes des paris sportifs|comment calculer une cote de paris sportif|comment calculer une cote pari
sportif|comment calculer une cote paris sportif|comment comprendre
les paris sportifs|comment creer un vip paris sportif|comment
créer un algorithme paris sportif|comment créer un site de paris sportif|comment devenir riche avec les paris sportifs|comment etre rentable paris sportif|comment
etre sur de gagner au paris sportif|comment faire de bon paris sportif|comment faire
des parie sportif|comment faire des paris sportif|comment faire des paris sportif gagnant|comment faire des paris sportifs|comment faire pari sportif|comment faire paris sportif|comment faire pour arreter les paris
sportifs|comment faire pour gagner au paris sportif|comment
faire pour gagner les paris sportifs|comment faire un bon pari sportif|comment faire un bon paris sportif|comment faire un pari sportif|comment faire un parie sportif|comment faire un paris sportif|comment faire
une montante paris sportif|comment fonctionne les cotes dans les
paris sportifs|comment fonctionne les cotes des paris sportifs|comment fonctionne les paris sportifs|comment fonctionne paris sportifs|comment fonctionne
un pari sportif|comment fonctionnent les cotes dans les paris sportifs|comment fonctionnent
les cotes dans les paris sportifs grand oral|comment fonctionnent les cotes de paris sportif|comment fonctionnent les paris sportifs|comment fonctionnent les
paris sportifs grand oral|comment fonctionnent les paris sportifs grand oral maths|comment fonctionnent les paris sportifs maths|comment gagner a coup sur au paris
sportif|comment gagner a tous les coups au paris sportif|comment
gagner a tout les coup au paris sportif|comment
gagner au pari sportif|comment gagner au pari sportif football|comment gagner au paris sportif|comment
gagner au paris sportif a coup sur|comment gagner au paris sportif foot|comment gagner au paris sportif forum|comment
gagner au paris sportif tennis|comment gagner au paris sportifs|comment gagner aux paris sportif|comment gagner aux paris sportifs|comment gagner
aux paris sportifs foot|comment gagner aux paris sportifs livre|comment
gagner aux paris sportifs sur le long terme|comment gagner avec
les paris sportifs|comment gagner dans les paris sportifs|comment gagner de l
argent avec les paris sportifs|comment gagner de l’argent au paris sportif|comment gagner
de l’argent aux paris sportifs|comment gagner de l’argent avec les paris sportifs|comment gagner de l’argent paris sportif|comment gagner de l’argent sur les paris sportifs|comment gagner de l’argent sur paris
sportif|comment gagner des paris sportif|comment gagner des paris sportifs|comment gagner en paris sportif|comment gagner facilement au paris sportif|comment gagner
les paris sportifs|comment gagner paris sportif|comment gagner
paris sportif foot|comment gagner paris sportifs|comment
gagner sa vie avec les paris sportifs|comment gagner ses paris sportif|comment gagner sur les paris sportif|comment gagner sur les paris
sportifs|comment gagner tout le temps au paris sportif|comment
gagner un pari sportif|comment gagner un paris sportif|comment gerer une bankroll
paris sportif|comment gérer sa bankroll paris sportif|comment
jouer au pari sportif|comment jouer au paris sportif|comment jouer au paris
sportif foot|comment jouer aux paris sportifs|comment jouer paris sportif|comment marche cote paris sportif|comment
marche les cotes paris sportif|comment marche les
paris sportif|comment marche les paris sportifs|comment marche paris sportif|comment marche un pari sportif|comment
marche un paris sportif|comment marchent les cotes paris sportif|comment marchent les paris sportifs|comment miser au paris sportif|comment
miser paris sportif|comment monter sa bankroll paris sportif|comment ne jamais perdre au paris sportif|comment parier sportif|comment reussir au paris sportif|comment reussir
les paris sportif|comment reussir paris sportif|comment
sont calculer les cotes de paris sportif|comment sont calculées les cotes des paris
sportifs|comment sont calculés les cotes des
paris sportifs|comment sont faites les cotes des paris sportifs|comment toujours gagner au paris sportif|comment
ça marche les paris sportifs|comparaison bonus paris sportifs|comparaison cote
pari sportif|comparaison des cotes paris sportifs|comparateur cote pari sportif|comparateur cote paris
sportif|comparateur cotes paris sportif|comparateur cotes paris
sportifs|comparateur de cote pari sportif|comparateur de cote paris sportif|comparateur de cotes paris sportifs|comparateur de côtes paris sportifs|comparateur
de paris sportif|comparateur de site de paris sportif|comparateur de site paris sportif|comparateur
de sites de paris sportifs|comparateur pari sportif|comparateur paris
sportif|comparateur paris sportifs|comparateur site de paris sportif|comparateur site pari sportif|comparateur site paris sportif|comparatif bonus paris sportif|comparatif bonus paris sportifs|comparatif cote pari sportif|comparatif
cote paris sportif|comparatif cotes paris sportifs|comparatif des sites de
paris sportifs|comparatif offre de bienvenue paris sportif|comparatif offre paris sportif|comparatif pari sportif|comparatif pari sportif en ligne|comparatif paris sportif|comparatif paris sportif bonus|comparatif paris sportif en ligne|comparatif paris sportifs|comparatif paris sportifs en ligne|comparatif site de paris sportif|comparatif site paris sportif|comparatif
site paris sportifs|comparatif sites de paris sportifs|comparatif sites paris sportifs|comparer
les cotes paris sportifs|comprendre cote paris sportif|comprendre handicap paris sportif|comprendre les cotes des paris sportifs|comprendre les cotes paris sportif|comprendre les cotes
paris sportifs|comprendre les handicap paris sportif|compte de paris sportif|compte démo paris sportif|compte finance
paris sportif|compte financer paris sportif|compte financier paris sportif|compte financé paris sportif|compte pari sportif|compte paris
sportif|compte paris sportif financé|conseil
de paris sportif|conseil de paris sportifs|conseil en paris sportif|conseil en paris sportifs|conseil pari sportif|conseil pari sportif
gratuit|conseil paris sportif|conseil paris
sportif aujourd’hui|conseil paris sportif du jour|conseil paris sportif foot|conseil paris sportif
gratuit|conseil paris sportif ligue des champions|conseil paris sportif nba|conseil
paris sportif pronostic|conseil paris sportif rmc|conseil paris sportif tennis|conseil paris sportifs|conseil pour gagner au paris sportif|conseil pour paris sportif|conseil sur les paris sportifs|conseille paris
sportif|conseiller en paris sportifs|conseiller paris sportif|conseils de paris sportifs|conseils en paris sportifs|conseils paris sportifs|conseils paris
sportifs foot|conseils paris sportifs gratuit|conseils paris sportifs tennis|conseils pour paris sportifs|cote a 100 paris sportif|cote a 2 paris sportif|cote
anglaise paris sportif|cote de 2 paris sportif|cote de pari sportif|cote
de paris sportif|cote des paris sportifs|cote maximum
paris sportif|cote minimum paris sportif|cote pari sportif|cote pari sportif comment
ça marche|cote pari sportif real madrid|cote pari sportif rugby|cote parie sportif|cote paris sportif|cote paris
sportif belgique|cote paris sportif calcul|cote paris sportif definition|cote paris
sportif euro|cote paris sportif explication|cote paris sportif foot|cote paris sportif france
belgique|cote paris sportif france espagne|cote paris
sportif ligue des champions|cote paris sportif moto gp|cote paris sportif psg|cote paris sportif
psg arsenal|cote paris sportif rugby|cote paris sportif tennis|cote paris sportifs|cote
pour paris sportifs|cote sportif foot|cote
sportif rugby|cote à 1000 paris sportif|cotes de
paris sportifs|cotes pari sportif|cotes paris sportif|cotes paris sportifs|cotes paris sportifs foot|coupe de france paris sportif|créer un algorithme paris
sportif|créer un compte paris sportif|créer un site
de paris sportif en ligne|dans les paris sportifs que signifie
handicap|declarer ses gains paris sportif|definition cash out paris
sportif|definition cote paris sportif|definition handicap paris sportif|depot 5 euros
paris sportif|depot double paris sportif|depot minimum 5 euro paris sportif|depot minimum paris sportif|depot paris
sportif|depuis quand existe les paris sportif en france|devenir
riche avec les paris sportifs|devenir riche avec paris sportifs|disqualification tennis paris sportif|dnb en paris
sportif|dnb pari sportif|dnb paris sportif|dnb paris
sportif definition|dnb paris sportifs|doit on declarer les gains de paris sportif|déclarer gains
paris sportifs|déclarer gains paris sportifs hors arjel|définition bankroll paris
sportif|dépôt minimum 1 euro paris sportif|dépôt minimum 5 euro
paris sportif|ecart de jeux tennis paris sportif|erreur de cote paris sportif|est ce que les
gains des paris sportifs sont imposables|est-ce que les prolongation compte dans un pari sportif|etre sur de gagner au paris sportif|euro paris sportif|evenement
sportif a paris|evenement sportif paris|evenement sportif
paris 2025|evenement sportif paris aujourd hui|evenement sportif paris aujourd’hui|evenement sportif paris ce week end|evenements sportif paris|evenements sportifs paris|evenements sportifs
paris 2025|evenements sportifs à paris|evolution cote paris sportif|evolution cotes paris sportifs|evolution des
cotes paris sportifs|explication cote pari sportif|explication cote
paris sportif|explication handicap paris sportif|explication pari sportif|explication paris sportif|face a face hockey paris sportif|faire des paris
sportif|faire des paris sportif avec paypal|faire
des paris sportifs|faire fortune paris sportifs|faire un pari sportif|faire un paris sportif|faut il déclarer les gains
de paris sportifs|faut il déclarer ses gains paris sportifs|fichier excel
gestion bankroll paris sportif|fiscalité gains paris sportifs|foot paris sportif|football et paris sportifs|forfait tennis paris sportif|formation paris sportif gratuit|forum de paris sportif|forum de
paris sportifs|forum pari sportif|forum parie sportif|forum paris
sportif|forum paris sportif foot|forum paris sportif gratuit|forum paris sportif nba|forum paris sportif tennis|forum paris sportifs|forum sur
les paris sportifs|forum tennis paris sportif|francaise des jeux pari sportif|francaise des jeux paris sportif|francaise des jeux paris sportifs|france 2 paris sportif|france 2
paris sportifs|france belgique paris sportif|france espagne
paris sportif|france pari sportif|france pari
sportif brest|france paris sportif|france paris sportifs|france pologne paris sportif|france portugal
paris sportif|france suisse paris sportifs|france tunisie paris sportifs|france-pari – paris sportifs|gagnant pari sportif|gagnant
paris sportif|gagnant paris sportif bayern|gagnante paris sportif|gagne au paris sportif|gagner 10 euros par
jour aux paris sportifs|gagner 100 euros par
jour paris sportif|gagner 1000 euros par mois paris sportifs|gagner 10000 euros paris
sportif|gagner 2000 euros par mois paris sportif|gagner 50 euros par jour paris sportif|gagner a coup sur au
paris sportif|gagner a coup sur pari sportif|gagner
a tous les coup paris sportif|gagner argent avec paris sportifs|gagner argent pari sportif|gagner argent paris sportif|gagner argent paris sportifs|gagner au pari sportif|gagner
au paris sportif|gagner au paris sportif a coup sur|gagner au paris sportif foot|gagner au paris sportif forum|gagner au paris sportif
à coup sur|gagner aux paris sportif|gagner aux paris sportifs|gagner aux paris sportifs pdf|gagner beaucoup d’argent paris
sportif|gagner de l argent grace aux paris sportifs|gagner
de l argent pari sportif|gagner de l argent paris sportif|gagner de l argent paris sportifs|gagner de l’argent au paris
sportif|gagner de l’argent aux paris sportifs|gagner
de l’argent avec les paris sportifs|gagner de l’argent
avec paris sportif|gagner de l’argent avec paris sportifs|gagner de l’argent grace
au paris sportif|gagner de l’argent grace aux paris sportifs|gagner de l’argent pari sportif|gagner de l’argent paris
sportif|gagner de l’argent paris sportifs|gagner de l’argent sur les paris sportifs|gagner des paris sportif|gagner des paris sportifs|gagner les paris sportifs|gagner pari sportif|gagner paris sportif|gagner
paris sportif foot|gagner paris sportif forum|gagner paris sportif tennis|gagner paris
sportifs|gagner sa vie avec les paris sportif|gagner sa vie avec
les paris sportifs|gagner sa vie avec paris sportifs|gagner ses paris sportifs|gagner à coup sur paris
sportif|gagner à tous les coups paris sportifs|gain maximum paris sportif|gain pari sportif|gain pari sportif imposable|gain pari sportif impot|gain paris sportif|gain paris
sportif imposable|gain paris sportif impot|gain paris sportif
impôt|gains paris sportif|gains paris sportif
imposable|gains paris sportifs|gains paris sportifs imposable|gains paris sportifs imposables|gains paris sportifs sont ils imposables|gerer bankroll
paris sportif|gerer sa bankroll paris sportif|gerer une bankroll
paris sportif|gestion bankroll paris sportif|gestion bankroll paris sportifs|gestion bankroll paris sportifs excel|gestion de bankroll paris sportif|gestion de bankroll paris sportif application|gestion de bankroll paris sportifs|gestion de mise paris sportif|gestion paris sportifs v2 5 gratuit|gg signification paris sportif|gros combiné paris sportif|gros gain paris sportif|grosse cote paris sportif pronostic|grosse mise paris sportif|groupe paris
sportif gratuit|groupe telegram paris sportif gratuit|groupement de joueurs paris sportifs|handicap 0
paris sportif|handicap 1 paris sportif|handicap 5 paris
sportif|handicap au paris sportif|handicap basket paris sportif|handicap dans les paris sportifs|handicap en paris sportif|handicap europeen paris sportif|handicap européen paris sportifs|handicap mi temps paris sportif|handicap pari
sportif|handicap paris sportif|handicap paris sportif basket|handicap paris sportif explication|handicap paris sportif foot|handicap paris sportif rugby|handicap paris sportifs|handicap rugby
paris sportif|handicap tennis paris sportif|historique cote paris sportif|historique des
cotes paris sportifs|hockey paris sportif|hockey sur glace paris
sportif|hors arjel paris sportif|hweh signification paris sportif|imposition gain pari sportif|imposition gain paris sportif|imposition gains
paris sportifs|imposition paris sportif france|impot gain paris sportif|impot paris sportif france|impot sur gain paris sportif|je gagne ma vie avec
les paris sportifs|jeu de pari sportif gratuit|jeu de paris sportif en ligne|jeu de paris sportif gratuit|jeu paris
sportif gratuit|jeu paris sportif sans argent|jeux de parie sportif|jeux de
paris sportif|jeux de paris sportif en ligne|jeux de paris sportif gratuit|jeux de
paris sportifs|jeux olympiques paris sportifs|jeux paris sportif|jeux paris
sportif gratuit|jeux paris sportif virtuel|jeux paris sportifs en ligne|jouer au paris sportif|jouer paris sportif|joueur absent paris sportif|joueur blesse paris sportif|joueur caen paris sportif|joueur de caen pari sportif|joueur de
foot paris sportif|joueur decisif paris sportif|joueur décisif
paris sportif|joueur italien paris sportif|joueur paris sportif|joueur professionnel paris sportif|joueur qui se blesse paris sportif|joueur sanctionne
pari sportif|joueur suspendu paris sportif|joueurs italiens paris sportifs|l’argent des paris
sportifs est il imposable|la cote paris sportif|la francaise des jeux paris sportif|la martingale
paris sportif|la martingale paris sportifs|la meilleur application de paris sportif|la meilleur application paris sportif|la meilleur technique pour gagner
au paris sportif|la méthode secrète pour gagner aux paris sportifs pdf|la plus grosse cote gagner paris
sportif|la plus grosse cote paris sportif|ldem paris sportif signification|le
marché des paris sportifs|le meilleur site de pari sportif|le meilleur site
de paris sportif|le meilleur site de paris sportif en ligne|le meilleur site de paris
sportifs|le plus gros gain au paris sportif|le plus
gros paris sportif|le plus gros paris sportif du monde|les 10 meilleurs sites de paris sportifs|les 10
meilleurs sites de paris sportifs en afrique|les 17 secrets
pour gagner rapidement aux paris sportifs|les 17 secrets pour gagner rapidement aux
paris sportifs pdf|les application de paris sportif|les applications paris sportifs|les bonus paris
sportifs|les bookmakers paris sportifs|les cotes paris sportifs|les gains de paris sportifs sont
ils imposables|les gains des paris sportifs sont ils imposables|les jeux de paris sportifs|les meilleur paris sportif|les
meilleures applications de paris sportifs|les meilleurs applications de paris
sportifs|les meilleurs bonus paris sportif|les meilleurs bonus
paris sportifs|les meilleurs cotes paris sportif|les meilleurs paris sportifs|les meilleurs paris sportifs
du jour|les meilleurs site de paris sportif|les meilleurs site de paris sportifs|les meilleurs sites de pari
sportif|les meilleurs sites de paris sportifs|les meilleurs sites de paris sportifs en ligne|les paris sportif|les paris sportif avis|les paris
sportifs|les paris sportifs comment ça marche|les paris sportifs en france|les paris sportifs en ligne|les paris sportifs en ligne comprendre jouer gagner|les paris sportifs
en ligne comprendre jouer gagner pdf|les paris sportifs les plus rentables|les plus gros gagnant paris sportif|les plus gros gains au paris sportifs|les plus
gros gains paris sportifs|les plus gros paris sportif|les plus grosse cote paris sportif|les plus grosses pertes paris sportifs|les sites
de paris sportifs|les sites de paris sportifs autorisés
en france|les sites de paris sportifs en france|les sites de paris
sportifs en ligne|les sites de paris sportifs francais|ligue 1 paris sportif|ligue 1 paris sportifs|ligue 2 paris sportif|ligue des
champions paris sportif|limite de gains paris sportifs|limite de
mise paris sportif|limite gain paris sportif|limite mise paris sportifs|liste
de paris sportif|liste des paris sportifs|liste des site
de paris sportif|liste des sites de paris sportifs|liste pari sportif|liste paris sportif|liste paris
sportif pdf|liste site de paris sportif|liste site pari sportif|liste site paris sportif|liste site paris
sportif arjel|liste sites paris sportifs|logiciel algorithme paris sportif|logiciel algorithme
paris sportif gratuit|logiciel analyse paris sportif|logiciel calcul
paris sportif|logiciel de pari sportif|logiciel de paris sportif|logiciel de paris
sportif gratuit|logiciel gestion bankroll paris sportif gratuit|logiciel gestion de bankroll paris sportif|logiciel gestion paris sportif|logiciel gestion paris sportif gratuit|logiciel
gestion paris sportifs|logiciel pari sportif|logiciel
paris sportif|logiciel paris sportif gratuit|logiciel paris sportifs|logiciel
paris sportifs foot sur 2 matchs|logiciel pour paris sportif|logiciel pour paris sportifs|logiciel prediction paris sportif|logiciel probabilité paris sportif|logiciel prédiction paris sportif|logiciel statistique paris sportifs|logiciel variation de
cote paris sportif|loi sur les paris sportifs en france|magic calculator paris sportif|marché des paris sportifs|marché
des paris sportifs en france|marché des paris sportifs en ligne|martingale pari sportif|martingale paris sportif|martingale paris
sportif excel|martingale paris sportif forum|martingale paris sportif interdit|martingale paris
sportifs|match abandonné paris sportif|match annulé ou reporté
paris sportifs|match annulé paris sportif|match arrete paris
sportif|match interrompu paris sportif|match interrompu tennis paris sportif|match interrompu tennis pluie paris sportif|match nul
boxe paris sportif|match pari sportif|match paris sportif|match reporté paris sportif|match suspendu paris sportif|match suspendu tennis paris sportif|match truqué
paris sportif|matchs truqués paris sportifs|meilleur algorithme paris sportif|meilleur algorithme paris sportif gratuit|meilleur app de paris sportif|meilleur app de paris sportifs|meilleur app paris sportif|meilleur appli de pari sportif|meilleur appli de paris sportif|meilleur appli pari sportif|meilleur appli paris sportif|meilleur appli paris sportif forum|meilleur appli paris sportifs|meilleur application conseil
paris sportif|meilleur application de paris sportif|meilleur application de paris sportif en afrique|meilleur application pari sportif|meilleur application paris sportif|meilleur application paris sportif belgique|meilleur application pour les paris sportif|meilleur
application pour pari sportif|meilleur bonus de bienvenue paris sportif|meilleur bonus pari sportif|meilleur bonus paris sportif|meilleur bonus paris sportif sans depot|meilleur bonus
paris sportifs|meilleur bonus site de paris sportif|meilleur bonus site pari sportif|meilleur bonus site paris sportif|meilleur bookmaker paris sportif|meilleur combiné paris sportif|meilleur conseil paris sportif|meilleur cote de paris sportif|meilleur cote pari sportif|meilleur cote paris sportif|meilleur
cote paris sportif aujourd’hui|meilleur cote site paris
sportif|meilleur forum paris sportifs|meilleur gain paris sportif|meilleur
ia paris sportif|meilleur methode pour gagner au paris sportif|meilleur offre bienvenue paris sportif|meilleur offre bonus paris sportif|meilleur offre de bienvenue paris
sportif|meilleur offre de bienvenue paris sportifs|meilleur offre
pari sportif|meilleur offre paris sportif|meilleur offre paris sportif
en ligne|meilleur pari sportif|meilleur pari sportif du jour|meilleur pari sportif en ligne|meilleur paris sportif|meilleur paris sportif aujourd’hui|meilleur paris sportif du jour|meilleur paris sportif en ligne|meilleur paris sportif
foot|meilleur promo paris sportif|meilleur pronostic paris sportif|meilleur site de conseil paris sportif|meilleur site de pari sportif|meilleur site de pari sportif en ligne|meilleur site de paris sportif|meilleur site de paris sportif avis|meilleur site de paris sportif belgique|meilleur site
de paris sportif canada|meilleur site de paris sportif en france|meilleur site de paris sportif
en ligne|meilleur site de paris sportif football|meilleur site de paris sportif forum|meilleur site de paris sportif france|meilleur site de paris sportif hors
arjel|meilleur site de paris sportif international|meilleur site de paris sportif suisse|meilleur
site de paris sportifs|meilleur site de paris sportifs en ligne|meilleur site
pari sportif|meilleur site pari sportif en ligne|meilleur site pari sportif
france|meilleur site paris sportif|meilleur site paris sportif avis|meilleur site paris sportif belgique|meilleur site paris sportif canada|meilleur site paris
sportif en ligne|meilleur site paris sportif foot|meilleur site paris sportif forum|meilleur site paris sportif france|meilleur site paris sportif hors arjel|meilleur site paris sportif nba|meilleur site paris sportif rugby|meilleur site paris
sportif suisse|meilleur site paris sportifs|meilleur site pour pari sportif|meilleur site pour
paris sportif|meilleur site pronostic paris sportif|meilleur strategie paris sportif|meilleur technique de paris sportif|meilleur technique paris sportif|meilleur technique
pour gagner au paris sportif|meilleure appli de paris sportif|meilleure appli de
paris sportifs|meilleure appli pari sportif|meilleure appli paris sportif|meilleure appli paris
sportifs|meilleure application de paris sportif|meilleure application de paris sportifs|meilleure application pari sportif|meilleure
application paris sportif|meilleure application paris sportif android|meilleure application paris sportifs|meilleure offre paris sportif|meilleure
site paris sportif|meilleure strategie paris sportif|meilleures applications de paris sportifs|meilleures applications paris sportifs|meilleures cotes paris
sportifs|meilleures offres paris sportifs|meilleures stratégies paris sportifs|meilleurs appli paris sportif|meilleurs application de paris sportifs|meilleurs application paris sportif|meilleurs applications paris sportifs|meilleurs bonus paris
sportifs|meilleurs cote paris sportif|meilleurs cotes paris sportifs|meilleurs offres
paris sportifs|meilleurs paris sportifs|meilleurs paris sportifs du jour|meilleurs site de
pari sportif|meilleurs site de paris sportif|meilleurs
site de paris sportif en ligne|meilleurs site de paris sportifs|meilleurs site paris sportif|meilleurs sites de
paris sportifs|meilleurs sites de paris sportifs en ligne|meilleurs sites
paris sportif|meilleurs sites paris sportifs|methode abc paris sportif|methode
de paris sportif|methode gagnante paris sportifs|methode gagner
paris sportif|methode infaillible paris sportifs|methode martingale paris sportif|methode mathematique
paris sportif|methode mathematique pour gagner au paris sportif|methode paris sportif|methode paris sportif foot|methode paris sportif forum|methode paris sportif tennis|methode paris sportifs|methode pour gagner au paris sportif|methode pour gagner paris sportif|methodes paris sportifs|minimum
depot paris sportif|mise au jeu pari sportif|mise maximum pari sportif|mise maximum paris sportif|mise
minimum paris sportif|mise moyenne paris sportif|mise paris sportif|moins de 4 5 but paris sportif|montant maximum paris sportif|montant paris sportif|montante pari sportif|montante parie sportif|montante
paris sportif|montante paris sportifs|montantes paris sportifs|multiple pari sportif|multiple paris sportif|multiple paris
sportifs|multiples paris sportifs|méthode calcul paris sportif|méthode match nul
paris sportifs|méthode mathématique pour gagner au paris sportif|méthode
paris sportif forum|méthode paris sportif
hockey|nba pari sportif|nba paris sportif|nba paris sportifs|nouveau paris sportif|nouveau site de pari sportif|nouveau site de paris sportif|nouveau
site de paris sportif en ligne|nouveau site de paris sportifs|nouveau site pari sportif|nouveau site paris sportif|nouveau site paris sportif france|nouveau site paris sportifs|nouveaux sites
de paris sportifs|nouveaux sites paris sportifs|nouvelle
appli paris sportif|nouvelle application de paris sportif|numero de match paris sportif|numero match
paris sportif|offre 100 euros paris sportif|offre appli pari sportif|offre bienvenu paris sportif|offre bienvenue pari sportif|offre
bienvenue paris sportif|offre bienvenue paris sportifs|offre bienvenue site paris sportif|offre
bonus paris sportif|offre de bienvenu paris sportif|offre de bienvenue pari sportif|offre de bienvenue paris sportif|offre de bienvenue paris sportif belgique|offre de bienvenue paris sportif sans depot|offre de
bienvenue paris sportif sans dépôt|offre de bienvenue paris sportifs|offre
de bienvenue sans depot paris sportif|offre de
bienvenue site paris sportif|offre euro paris sportif|offre
pari sportif euro|offre paris sportif|offre paris sportif belgique|offre paris sportif cash|offre paris sportif coupe du monde|offre paris sportif hors arjel|offre paris sportif remboursé|offre
paris sportif remboursé cash|offre paris
sportif sans depot|offre promo paris sportif|offre
remboursement paris sportif|offre sans depot paris sportif|offre site paris sportif|offres bienvenue
paris sportifs|offres de bienvenue paris sportifs|ou faire des paris sportif|ou faire des paris sportif en espagne|ou faire des paris
sportifs|outil répartiteur de mise paris sportif|outils
repartiteur de mises paris sportif|ouverture compte paris sportifs|ouvrir un compte paris sportif|pack de bienvenue paris sportif|pack de bienvenue
paris sportif hors arjel|pari en ligne sportif|pari sportif|pari sportif 100 euros offert|pari sportif 100 remboursé|pari sportif abandon tennis|pari sportif aide|pari sportif algérie aujourd’hui|pari sportif appli|pari sportif application|pari sportif argent|pari sportif
astuce|pari sportif aujourd|pari sportif aujourd’hui|pari sportif avec handicap|pari sportif
avec orange money|pari sportif avec paypal|pari sportif avec wave|pari sportif avis|pari sportif basket|pari
sportif belgique|pari sportif belgique france|pari sportif bonus|pari sportif
buteur pas titulaire|pari sportif champions league|pari sportif combiné|pari sportif comment|pari sportif comment gagner|pari sportif comment ça
marche|pari sportif comparatif|pari sportif conseil|pari sportif
cote|pari sportif cote match|pari sportif cote psg|pari sportif coupe|pari sportif coupe de
france|pari sportif coupe du monde|pari sportif depot|pari sportif
du jour|pari sportif en france|pari sportif en ligne|pari sportif en ligne au cameroun|pari
sportif en ligne belgique|pari sportif en ligne canada|pari sportif en ligne france|pari sportif en ligne
gratuit|pari sportif en ligne suisse|pari sportif en ligne ufc|pari sportif en suisse|pari sportif euro|pari sportif explication|pari sportif faire|pari sportif foot|pari sportif foot
resultat|pari sportif football|pari sportif forum|pari sportif francaise des jeux|pari sportif france|pari sportif france angleterre|pari sportif france argentine|pari sportif france
autriche|pari sportif france belgique|pari sportif france espagne|pari sportif france italie|pari sportif france
portugal|pari sportif france usa|pari sportif gagnant|pari
sportif gagner|pari sportif gagner a tous les coups|pari sportif gagner de l’argent|pari sportif gain|pari sportif gratuit|pari sportif gratuit pour gagner des cadeaux|pari sportif gratuit sans depot|pari sportif handicap|pari sportif hockey|pari sportif hors
arjel|pari sportif jeux olympiques|pari sportif joueur absent|pari sportif le plus rentable|pari sportif leicester
champion|pari sportif ligue 1|pari sportif ligue 2|pari sportif ligue des champions|pari sportif ligue europa|pari sportif match|pari sportif
match arrete|pari sportif match interrompu|pari sportif meilleur|pari sportif meilleur cote|pari sportif meilleur site|pari sportif methode|pari sportif mise|pari sportif mise au jeu|pari sportif mise o jeu|pari sportif nba|pari sportif offre bienvenue|pari sportif paypal|pari sportif plus|pari sportif prolongation|pari sportif promo|pari sportif pronostic|pari sportif pronostic foot|pari sportif pronostic gagnant|pari sportif
pronostic gratuit|pari sportif psg|pari sportif psg bayern|pari sportif psg inter|pari sportif psg milan|pari sportif regle|pari
sportif rembourse|pari sportif remboursement|pari sportif remboursement cash|pari sportif remboursé|pari sportif rugby|pari sportif rugby
coupe du monde|pari sportif rugby top 14|pari sportif
sans argent|pari sportif sans carte bancaire|pari sportif sans depot|pari sportif signification|pari sportif site|pari sportif statistique|pari
sportif suisse|pari sportif systeme|pari sportif technique|pari
sportif technique pour gagner|pari sportif temps reglementaire|pari sportif tennis|pari sportif tennis abandon|pari sportif top|pari sportif top 14|pari sportif
tour de france|parie sportif|parie sportif comment ca marche|parie sportif du
jour|parie sportif en ligne|parie sportif foot|parie sportif football|parie
sportif france|parie sportif gratuit|parie sportif pronostic|parie sportif suisse|paris en ligne sportif|paris en ligne sportifs|paris evenement
sportif|paris france sportif|paris hippique et sportif|paris hippiques et sportifs|paris hippiques paris sportifs|paris hippiques paris sportifs
et poker en ligne|paris hippiques sportifs|paris match
sportif|paris sportif|paris sportif 10 euros offerts|paris sportif 100 euros offert|paris sportif 100 euros remboursé|paris sportif 100 offert|paris
sportif 100 remboursé|paris sportif 100e offert|paris sportif 150 euros offert|paris
sportif 1er pari remboursé|paris sportif a faire|paris sportif a faire
aujourd’hui|paris sportif a faire ce soir|paris sportif abandon tennis|paris sportif abandon tennis parions
sport|paris sportif aide|paris sportif algorithme|paris sportif analyse|paris sportif appli|paris sportif application|paris sportif application android|paris
sportif apres prolongation|paris sportif argent|paris sportif argent fictif|paris sportif argent offert|paris sportif argent virtuel|paris
sportif arjel|paris sportif arsenal psg|paris sportif astuce|paris sportif au canada|paris sportif aujourd
hui|paris sportif aujourd’hui|paris sportif avec
argent fictif|paris sportif avec bonus sans depot|paris sportif avec carte bancaire|paris sportif avec cryptomonnaie|paris sportif avec handicap|paris sportif avec paypal|paris sportif avec paysafecard|paris sportif
avis|paris sportif avis expert|paris sportif avis forum|paris
sportif bankroll|paris sportif basket|paris sportif basket coupe de france|paris sportif
basket nba|paris sportif basket prolongation|paris sportif belgique|paris sportif belgique bonus|paris sportif belgique
bonus sans depot|paris sportif belgique france|paris sportif belgique suede|paris sportif bonus|paris sportif bonus bienvenue|paris sportif bonus cash|paris sportif bonus
de bienvenue|paris sportif bonus gratuit|paris sportif bonus gratuit sans depot|paris sportif bonus
retirable|paris sportif bonus sans depot|paris sportif bonus sans depot belgique|paris sportif bookmaker|paris sportif
but contre son camp|paris sportif but temps additionnel|paris sportif buteur|paris sportif buteur blessé|paris
sportif buteur carton rouge|paris sportif buteur contre son camp|paris sportif buteur non titulaire|paris sportif buteur prolongation|paris sportif buteur qui ne
joue pas|paris sportif buteur remplacant|paris sportif calcul gain|paris sportif canada|paris sportif cash|paris sportif cash out|paris sportif champion ligue
1|paris sportif champions league|paris sportif classement ligue 1|paris sportif code promo|paris sportif combine|paris sportif combiné|paris sportif combiné comment ça marche|paris sportif combiné du jour|paris
sportif combiné match reporté|paris sportif comment ca marche|paris sportif comment faire|paris sportif comment gagner|paris
sportif comment gagner a tous les coups|paris sportif comment jouer|paris sportif comment ça marche|paris
sportif comparateur cote|paris sportif comparatif|paris sportif conseil|paris sportif conseil gratuit|paris sportif
conseil pour gagner|paris sportif cote|paris sportif cote et match|paris sportif cote explication|paris sportif cote psg|paris
sportif coupe d’europe|paris sportif coupe davis|paris sportif coupe de france|paris sportif
coupe du monde|paris sportif coupe du monde de rugby|paris sportif coupe du monde rugby|paris sportif
depot 5 euro|paris sportif depot minimum|paris sportif depot paypal|paris sportif dnb|paris sportif
du jour|paris sportif du jour conseil|paris sportif dépôt 1 euro|paris sportif dépôt minimum 5 euros|paris sportif
en belgique|paris sportif en france|paris sportif en ligne|paris sportif
en ligne avec paypal|paris sportif en ligne avis|paris sportif en ligne belgique|paris sportif en ligne bonus|paris sportif en ligne cameroun|paris
sportif en ligne comment gagner|paris sportif en ligne comment ça marche|paris sportif en ligne
france|paris sportif en ligne gratuit|paris sportif en ligne maroc|paris sportif en ligne paypal|paris
sportif en ligne québec|paris sportif en ligne sans depot|paris sportif en ligne suisse|paris sportif en suisse|paris sportif
espagne france|paris sportif esport|paris sportif et casino en ligne|paris
sportif et hippique|paris sportif et prolongation|paris sportif euro|paris sportif europa
league|paris sportif explication|paris sportif final ligue des
champions|paris sportif finale ligue des champions|paris sportif foot|paris sportif foot aide|paris sportif foot astuce|paris sportif foot aujourd’hui|paris sportif foot ce soir|paris sportif
foot comment ca marche|paris sportif foot conseil|paris
sportif foot cote|paris sportif foot coupe du monde|paris
sportif foot en ligne|paris sportif foot feminin|paris sportif foot gratuit|paris sportif foot prolongation|paris sportif foot pronostic|paris sportif foot pronostic gratuit|paris sportif foot regle|paris
sportif foot suisse|paris sportif foot us|paris sportif football|paris sportif football americain|paris sportif football astuces|paris sportif forfait tennis|paris sportif forum|paris sportif
francais|paris sportif francaise des jeux|paris sportif france|paris sportif france 2|paris sportif france allemagne|paris sportif france angleterre|paris sportif france argentine|paris sportif
france autriche|paris sportif france belgique|paris
sportif france espagne|paris sportif france gibraltar|paris sportif france italie|paris sportif france nouvelle
zelande|paris sportif france pologne|paris sportif france portugal|paris sportif
france uruguay|paris sportif france usa|paris sportif freebet sans depot|paris
sportif gagnant|paris sportif gagnant à coup sûr|paris sportif gagner a coup sur|paris sportif
gagner argent|paris sportif gagner de l’argent|paris sportif gain|paris
sportif gain maximum|paris sportif gestion bankroll|paris sportif gratuit|paris sportif gratuit appli|paris
sportif gratuit avec cadeaux|paris sportif gratuit cadeaux|paris sportif gratuit en ligne|paris sportif gratuit entre amis|paris sportif gratuit sans argent|paris sportif gratuit sans depot|paris
sportif gratuit sans dépôt|paris sportif gratuits|paris sportif gros gain|paris sportif handicap|paris sportif handicap 0 1|paris sportif handicap
0-1|paris sportif handicap 1 0|paris sportif handicap 1-0|paris
sportif handicap basket|paris sportif handicap explication|paris sportif handicap foot|paris sportif handicap rugby|paris
sportif hippique|paris sportif hockey|paris sportif hockey nhl|paris sportif hockey sur glace|paris sportif
hors arjel|paris sportif hors arjel france|paris sportif
jeux olympiques|paris sportif jeux video|paris sportif joueur blessé|paris
sportif joueur blessé pendant le match|paris sportif joueur de
foot|paris sportif joueur decisif|paris sportif joueur declare forfait|paris sportif joueur déclare forfait|paris sportif joueur remplacant|paris
sportif la francaise des jeux|paris sportif le plus rentable|paris sportif
legal en france|paris sportif leicester champion|paris sportif
les 18 stratégies pour gagner tous les jours|paris sportif les plus sur|paris sportif les prolongation compte|paris sportif ligne|paris sportif ligue 1|paris sportif
ligue 2|paris sportif ligue des champions|paris sportif
ligue des nations|paris sportif ligue europa|paris sportif liste|paris sportif martingale|paris sportif match|paris sportif match
abandonné|paris sportif match annulé|paris sportif match arrêté|paris sportif match du jour|paris sportif match interrompu|paris sportif match reporté|paris sportif
match suspendu|paris sportif match tennis interrompu|paris
sportif match truqué|paris sportif meilleur bonus|paris sportif meilleur
cote|paris sportif meilleur pronostic|paris sportif meilleur site|paris sportif methode|paris sportif methode 2 3|paris
sportif mi temps fin de match|paris sportif mise au
jeu|paris sportif mise maximum|paris sportif mma france|paris sportif moins de 3.5 but|paris sportif montante|paris
sportif moto gp|paris sportif multiple|paris sportif multiple 2 3|paris sportif multiple 2 3 explication|paris sportif multiple 2 4|paris
sportif multiple 2 5|paris sportif multiple 2/3 explication|paris sportif multiple 3 4|paris sportif multiple explication|paris sportif national 1 foot|paris sportif nba|paris sportif nba conseil|paris sportif
nba pronostic|paris sportif nhl|paris sportif nombre de but|paris sportif nouveau site|paris sportif numero match|paris sportif offert|paris sportif
offre bienvenue|paris sportif offre bienvenue sans depot|paris sportif offre de bienvenue|paris sportif offre sans depot|paris sportif om
psg|paris sportif paypal|paris sportif plus de 1.5 but|paris sportif plus de 2 5 but|paris sportif plus ou moins|paris sportif plus ou moins 2 5 but|paris sportif premier pari remboursé|paris sportif premier paris remboursé|paris sportif prolongation|paris sportif prolongation basket|paris sportif
prolongation foot|paris sportif promo|paris sportif pronostic|paris sportif pronostic
basket|paris sportif pronostic des match aujourd hui|paris
sportif pronostic expert gratuit|paris sportif pronostic foot|paris sportif pronostic forum|paris sportif pronostic gratuit|paris sportif
pronostic tennis|paris sportif psg|paris sportif psg arsenal|paris sportif psg barcelone|paris sportif psg bayern|paris sportif psg
dortmund|paris sportif psg inter|paris sportif psg inter
cote|paris sportif psg liverpool|paris sportif psg om|paris sportif qr code|paris
sportif que veut dire handicap|paris sportif qui rapporte
le plus|paris sportif regle|paris sportif regle prolongation|paris sportif rembourse|paris sportif remboursement cash|paris sportif rembourser|paris
sportif remboursé|paris sportif remboursé cash|paris sportif
remboursé en cash|paris sportif retrait paypal|paris sportif
rue des joueurs|paris sportif rugby|paris sportif rugby 6 nations|paris sportif
rugby coupe du monde|paris sportif rugby top 14|paris sportif safe du jour|paris sportif sans argent|paris
sportif sans carte bancaire|paris sportif sans carte d’identité|paris sportif sans
compte bancaire|paris sportif sans depot|paris sportif sans depot minimum|paris sportif si match
suspendu|paris sportif si un joueur abandonne|paris sportif
si un joueur ne joue pas|paris sportif si un joueur se blesse|paris sportif simple ou combiné|paris sportif site|paris sportif
statistique|paris sportif stratégie|paris sportif suisse|paris
sportif suisse application|paris sportif suisse en ligne|paris
sportif suisse legal|paris sportif suisse légal|paris sportif suisse romande|paris sportif sur du jour|paris sportif
sur le tennis|paris sportif systeme|paris sportif systeme 2 3|paris sportif systeme 2 4|paris sportif systeme 2/3|paris sportif systeme 2/4|paris sportif systeme 3 4|paris
sportif systeme 3/4|paris sportif systeme explication|paris sportif technique|paris sportif technique
pour gagner|paris sportif temps additionnel|paris sportif temps reglementaire|paris sportif
tennis|paris sportif tennis abandon|paris sportif tennis conseil|paris sportif
tennis de table|paris sportif tennis forfait|paris sportif tennis
gratuit|paris sportif tennis pronostic|paris sportif tennis roland garros|paris sportif tir au but|paris sportif top 14|paris sportif tour de france|paris sportif ufc|paris sportif ufc france|paris sportif unibet|paris
sportif vainqueur euro|paris sportif vainqueur ligue 1|paris sportif
vainqueur ligue des champions|paris sportif via paypal|paris sportif victoire prolongation|paris sportif vip gratuit|paris sportifs|paris
sportifs abandon tennis|paris sportifs aide|paris sportifs analyser un match|paris sportifs arjel|paris
sportifs astuces|paris sportifs aujourd’hui|paris sportifs autorisés en france|paris sportifs avec paypal|paris sportifs basket|paris sportifs belgique|paris sportifs bonus|paris
sportifs bookmakers|paris sportifs canada|paris sportifs combiné|paris sportifs comparateur|paris sportifs comparatif|paris sportifs conseils|paris
sportifs cotes|paris sportifs coupe du monde|paris sportifs de football|paris sportifs du
jour|paris sportifs en belgique|paris sportifs
en france|paris sportifs en ligne|paris sportifs en ligne belgique|paris sportifs en ligne france|paris sportifs en ligne gratuit|paris sportifs en ligne suisse|paris sportifs en suisse|paris sportifs
et hippiques|paris sportifs euro|paris sportifs foot|paris sportifs foot us|paris
sportifs forum|paris sportifs france|paris sportifs france espagne|paris sportifs gagner à tous les coups|paris sportifs gratuit|paris
sportifs gratuits|paris sportifs gratuits en ligne|paris sportifs handicap|paris sportifs
hockey|paris sportifs hockey sur galce|paris sportifs hockey sur glace|paris
sportifs hors arjel|paris sportifs jeux olympiques|paris sportifs les bookmakers raflent la mise|paris sportifs ligne|paris sportifs ligue 1|paris sportifs ligue
2|paris sportifs ligue des champions|paris sportifs ligue europa|paris sportifs match interrompu|paris sportifs montante|paris sportifs nba|paris
sportifs offre bienvenue|paris sportifs
offre de bienvenue|paris sportifs paypal|paris sportifs pronostics|paris sportifs psg|paris sportifs psg inter|paris sportifs rugby|paris sportifs sans argent|paris sportifs sans depot|paris sportifs site|paris sportifs sites|paris sportifs statistiques|paris sportifs stratégie|paris sportifs suisse|paris sportifs technique|paris sportifs techniques|paris sportifs tennis|paris sportifs tennis astuces|paris sportifs top 14|paris sportifs tour de france|part de marché paris sportifs|paypal pari sportif|paypal
paris sportif|paypal paris sportifs|perte d’argent paris sportifs|peut on devenir riche avec les paris sportifs|peut on gagner de l’argent avec les paris
sportifs|peut on gagner sa vie avec les paris sportif|peut on vraiment gagner de l’argent avec
les paris sportifs|plus gros combine paris sportif|plus gros gagnant paris sportif|plus
gros gain paris sportif|plus gros gain paris sportif au monde|plus
gros gain paris sportif france|plus gros gains paris sportif|plus gros pari
sportif|plus gros paris sportif|plus grosse cote
gagner paris sportif|plus grosse cote pari sportif|plus grosse cote paris sportif|plus grosse mise paris sportif|plus grosse somme gagner au paris
sportif|plus ou moins paris sportif|pourcentage de mise paris sportif|premier
pari sportif remboursé|probabilité cote paris
sportif|probabilité paris sportif combiné|prolongation basket paris sportif|prolongation paris sportif|promo pari
sportif|promo paris sportif|promo site de paris sportif|promo
site pari sportif|promo site paris sportif|promos paris sportifs|prono paris sportif foot|prono paris
sportif gratuit|prono paris sportif tennis|pronostic de paris sportif|pronostic du
jour paris sportif|pronostic foot paris sportif|pronostic gratuit paris
sportif|pronostic pari sportif|pronostic pari sportif
gratuit|pronostic paris sportif|pronostic paris sportif aujourd’hui|pronostic paris sportif du jour|pronostic paris sportif foot|pronostic
paris sportif gratuit|pronostic paris sportif tennis|pronostic paris sportifs|pronostics foot
statistiques et aides aux paris sportifs|pronostics paris sportif|pronostics paris sportifs|pronostiqueur paris sportif gratuit|psg arsenal paris sportif|psg bayern paris sportif|psg inter milan paris sportif|psg inter pari sportif|psg inter paris sportif|psg
liverpool paris sportif|psg om paris sportif|psg paris sportif|psg paris sportifs|qr code paris sportif|qu est ce qu un handicap paris sportif|qu est ce que handicap dans les paris sportif|qu’est ce qu’un handicap paris sportif|qu’est ce que handicap dans les paris sportif|quand un joueur se blesse
paris sportif|que signifie 1/1 en paris sportif|que signifie 1/2 paris sportif|que signifie 12 en paris
sportif|que signifie 1×2 dans les paris sportifs|que signifie btts en paris sportif|que signifie
dnb en paris sportif|que signifie draw en paris sportif|que signifie ft
en paris sportif|que signifie gg dans le pari
sportif|que signifie gg en pari sportif|que signifie gg en paris sportif|que signifie
handicap dans les paris sportifs|que veut dire dnb en paris sportif|que veut dire handicap
dans les paris sportifs|que veut dire handicap paris sportif|quel appli pari sportif|quel cote jouer
paris sportif|quel est la meilleur appli de paris sportif|quel
est le meilleur algorithme de paris sportif|quel est le meilleur site de pari sportif|quel est le meilleur site de pari sportif en ligne|quel est le meilleur site de paris sportif|quel est
le meilleur site de paris sportif en ligne|quel est
le meilleur site de paris sportifs en ligne|quel est le pari
sportif le plus rentable|quel pari sportif est le plus rentable|quel
pari sportif est le plus sûr|quel pari sportif faire aujourd’hui|quel paris sportif faire aujourd’hui|quel
paris sportif rapporte le plus|quel site de paris
sportif choisir|quel site de paris sportif rembourse en cash|quel
type de pari sportif est le plus rentable|quelle application pour paris sportifs|quelle est la
meilleure appli de paris sportif|quelle est la meilleure application de paris sportif|quelle est la meilleure application pour les paris sportifs|quelle
est le meilleur site de paris sportif|quels paris sportifs faire|quels sont les paris sportifs les plus
sûrs|rebond basket paris sportif|record de gain paris sportif|regle
buteur paris sportif|regle de paris sportif|regle des paris sportif|regle handicap paris sportif|regle handicap
paris sportif foot|regle multiple paris sportif|regle pari sportif|regle paris sportif|regle paris sportif foot|regle paris sportif multiple|regle paris sportif prolongation|reglement pari
sportif|reglement paris sportif|regles paris sportifs|remboursement cash paris
sportif|remboursement en cash paris sportif|remboursement pari sportif|remboursement paris sportif|repartiteur de mise paris sportif|repartiteur de
mise paris sportifs|repartiteur de mises paris sportif|repartiteur mise paris sportif|repartition des
mises paris sportif|resultat pari sportif|resultat paris sportif|resultat paris sportif en direct|resultat paris sportif foot|resultat sportif hockey|retirer argent paris sportif|rugby pari sportif|rugby paris sportif|règle paris
sportif prolongation|règles paris sportif|répartiteur de mise pari
sportif|répartiteur de mise paris sportif|répartiteur de
mise paris sportifs|répartition des mises paris sportif|résultat paris sportif foot|sans depot paris sportif|se faire interdire
de paris sportifs|signification btts paris sportif|signification dnb paris sportif|signification handicap paris sportif|simulateur de gain paris sportif|simulateur
gain paris sportif|simulateur gain paris sportif multiple|simulateur gain paris sportif systeme|simulateur gain paris sportif système|simulateur montante paris sportif|simulateur paris sportif multiple|simulateur systeme
paris sportif|simulation paris sportif gratuit|site aide paris sportif|site analyse paris
sportif|site analyser paris sportif|site arjel paris
sportif|site conseil paris sportif|site d’analyse de paris sportifs|site d’analyse paris
sportif|site de conseil paris sportif|site de pari en ligne sportif|site de pari sportif|site
de pari sportif avec bonus sans depot|site de pari sportif bonus sans depot|site de pari sportif canada|site de pari sportif en ligne|site de pari sportif francais|site de pari
sportif gratuit|site de pari sportif hors arjel|site de pari sportif
suisse|site de parie sportif|site de parie sportif en ligne|site de paris en ligne sportif|site de paris sportif|site de paris sportif acceptant paypal|site
de paris sportif arjel|site de paris sportif autorisé en france|site de paris sportif
autorisé en suisse|site de paris sportif avec bonus|site de paris sportif avec
bonus sans depot|site de paris sportif avec bonus sans dépôt|site de paris sportif avec neosurf|site de paris sportif avec paiement mobile|site de paris sportif avec
paypal|site de paris sportif avis|site de paris sportif belge avec bonus|site de paris sportif belgique|site de paris sportif bonus|site de paris sportif
bonus sans depot|site de paris sportif canada|site de paris sportif comparatif|site de paris
sportif depot minimum|site de paris sportif en france|site de paris
sportif en ligne|site de paris sportif en ligne suisse|site de paris sportif football|site
de paris sportif francais|site de paris sportif france|site de paris sportif gratuit|site de
paris sportif gratuit pour gagner des cadeaux|site de paris sportif
gratuit sans dépôt|site de paris sportif hors arjel|site
de paris sportif le plus fiable|site de paris sportif legal en france|site
de paris sportif meilleur cote|site de paris sportif nouveau|site
de paris sportif offre de bienvenue|site de paris sportif paypal|site de paris sportif
premier paris remboursé|site de paris sportif qui accepte paypal|site de paris sportif qui rembourse en cash|site de
paris sportif remboursé|site de paris sportif
sans argent|site de paris sportif sans carte bancaire|site de paris sportif sans carte d’identité|site de paris sportif sans depot|site de paris sportif suisse|site de paris sportifs|site de paris sportifs avec paypal|site de paris sportifs en ligne|site de paris sportifs
francais|site de paris sportifs gratuit|site de
paris sportifs paypal|site de paris sportifs suisse|site de statistique pour
paris sportif|site des paris sportifs|site pari en ligne sportif|site pari sportif|site pari sportif 100 euros offert|site pari
sportif arjel|site pari sportif belgique|site pari
sportif bonus|site pari sportif canada|site pari sportif
comparatif|site pari sportif en ligne|site pari sportif
france|site pari sportif gratuit|site pari sportif hors arjel|site pari sportif suisse|site parie sportif|site paris en ligne sportif|site
paris sportif|site paris sportif 100 euros offert|site paris
sportif 100 euros remboursé|site paris sportif 1er paris remboursé|site paris sportif arjel|site paris sportif autorisé en france|site paris sportif avec bonus|site paris sportif avec bonus
sans depot|site paris sportif avec meilleur cote|site paris sportif belgique|site paris sportif bonus|site paris sportif
bonus cash|site paris sportif bonus sans depot|site
paris sportif canada|site paris sportif comparatif|site paris sportif depot 5 euro|site paris sportif en ligne|site paris sportif
foot|site paris sportif france|site paris sportif gratuit|site paris sportif hors arjel|site paris sportif hors arjel france|site paris sportif meilleur
cote|site paris sportif nouveau|site paris sportif offre de bienvenue|site paris sportif paypal|site paris sportif remboursement cash|site paris sportif remboursé en cash|site paris sportif retrait instantané|site paris sportif sans carte bancaire|site paris sportif sans depot|site paris sportif suisse|site paris sportifs|site paris sportifs belgique|site paris sportifs en ligne|site paris sportifs
france|site paris sportifs hors arjel|site paris sportifs suisse|site pour analyse paris sportif|site pour paris sportif|site pronostic paris
sportif|site statistique paris sportif|site suisse paris sportif|sites de
pari sportif|sites de paris sportif|sites de paris sportifs|sites de
paris sportifs arjel|sites de paris sportifs autorisés en france|sites de paris sportifs belgique|sites de paris sportifs bonus|sites de paris sportifs
en belgique|sites de paris sportifs en france|sites de paris sportifs en ligne|sites de paris sportifs gratuits|sites
de paris sportifs gratuits sans dépôt|sites de paris sportifs suisse|sites pari
sportif|sites paris sportif|sites paris sportifs|sites paris sportifs arjel|sites paris
sportifs belgique|sites paris sportifs france|sites paris sportifs
hors arjel|sites paris sportifs suisse|so foot paris sportif|so foot paris sportifs|specialiste tennis paris sportif|statistique foot paris sportif|statistique paris sportif|statistique paris sportif foot|statistique
tennis paris sportif|statistiques football paris sportifs|statistiques paris
sportifs|strategie de paris sportif|stratégie big whale paris
sportif|stratégie de paris sportifs|stratégie gagnante paris sportifs|stratégie
pari sportif|stratégie paris sportif|stratégie paris sportifs|stratégie paris sportifs forum|stratégie pour gagner
au paris sportif|stratégies paris sportifs|suisse paris sportif|suisse paris
sportifs|systeme 2 3 paris sportif|systeme 3 4 paris sportif|systeme de cote paris sportif|systeme de
paris sportif|systeme pari sportif|systeme paris sportif|systeme paris sportifs|systeme reducteur paris sportif|système paris sportif|tableau bankroll paris sportif|tableau cote paris
sportif|tableau de paris sportif|tableau de suivi
paris sportifs|tableau excel bankroll paris sportif|tableau excel
paris sportif|tableau excel paris sportif gratuit|tableau excel paris sportifs|tableau excel
pour paris sportif|tableau gestion bankroll paris sportif|tableau
montante paris sportif|tableau paris sportif|tableau paris sportif excel|tableau roi paris
sportifs|tableau statistique paris sportif|tableau
Your comment is awaiting moderation.
modernlifestylecorner.shop – Modern lifestyle products look stylish, browsing categories was simple and Lifestyle Upgrade Daily – Practical tips for enhancing your routines and embracing new trends.
Your comment is awaiting moderation.
glamhub – Nice assortment of items, checkout and navigation were smooth.
Your comment is awaiting moderation.
Спасибо Магазину)вы лучшие))))))))!!!!!!!!!!!!!!!!!!!!! :monetka: Качество на 100% https://lightprofil.ru попробуйте установить скайп.
Your comment is awaiting moderation.
Discover top fashion finds – Found several attractive and trendy items quickly, browsing smooth.
Your comment is awaiting moderation.
smileshopcorner – Items arrived fast, and support was responsive and kind.
Your comment is awaiting moderation.
https://telegra.ph/Fontan-Casino-Twoja-Nowa-Jako%C5%9B%C4%87-Rozrywki-Online-11-22
Your comment is awaiting moderation.
Та же фигня. купить Мефедрон, Бошки, Марихуану Ранее заказывал у данного селлера продукцию,качеством всегда был доволен,как и уровнем поддержки пользователей,сегодня же списался с ним по поводу небольшой технической ошибки при фасовке,и был рад узнать,что честность селлера на том же уровне,что и качество продукции.Очень благодарен создателям сайта,тем кто все это делает.Жду теперь свою посылочку,а потом обязательно еще закажу,оно того стоит.Спасибо вам ребята ,за помощь,и понимание.
Your comment is awaiting moderation.
topmodernfashion – Fast loading pages and intuitive layout made shopping fun.
Your comment is awaiting moderation.
bestdailyhub – Excellent value overall, product selection is diverse and surprisingly well organized.
Your comment is awaiting moderation.
Our most valuable: https://webcams.su
Your comment is awaiting moderation.
globalfashionworld – Amazing collection, I found chic outfits and accessories easily today.
Your comment is awaiting moderation.
Привет, дорогие друзья! меня зовут Антон32131. Покупаю периодически у этого магазина различные товары. Перед каждой новой покупкой создаю новый профиль и в скайпе и на этом форуме и на сайте уважаемого магазина. Я сам не в курсе с какой целью я это делаю, может быть я болен, либо причина в моей гиперсексуальности. Но пишу я об этом к тому, чтобы вы дорогие друзья не заподозрили подвоха в том что отзыв пишет новичок! купить Кокаин, Мефедрон, Экстази чема вещи делает!!!
Your comment is awaiting moderation.
https://www.prom-polimer.ru/
Your comment is awaiting moderation.
Мне пока ещё не пришло, но ты уже напугал….:orientation: кто знает где весы купить можно чтоб граммы вешать купить Кокаин, Мефедрон, Экстази Ровный магаз,всем советую)
Your comment is awaiting moderation.
simplegiftfinder – Found perfect gifts easily, site is organized and very user-friendly. pickagift – Found quality gift items easily, shipping was fast and dependable.
Your comment is awaiting moderation.
Check this style collection – Found several appealing fashion picks quickly, browsing was smooth.
Your comment is awaiting moderation.
cheerylivinghub – Loved the discounts, ordering online was effortless.
Your comment is awaiting moderation.
Ты то откуда знаешь)))только сегодня зарегался .коржик ))) https://leninovskoesovet.ru А вот и мин Трип мой.
Your comment is awaiting moderation.
globalpickshop – Pages loaded quickly and the site was easy to use.
Your comment is awaiting moderation.
casino fontan
Your comment is awaiting moderation.
в розницу работаете? купить Мефедрон, Бошки, Марихуану у меня такой вопрос: будут ли у вас на розничном сайте позиция am-2233 по 1гр? Я раньше брал через алхима, но он по неизвестным мне причинам сговнился. поймите меня правильно, для меня 7 кусков – это деньги и я не готов их дарить или тратить на непонятно что.
Your comment is awaiting moderation.
Daily Motivation Spot – Find resources that encourage personal growth and continuous improvement.
Your comment is awaiting moderation.
на мыло отвечаем только по существу, много не по делу пишут, ася или скайп быстрей https://faraon-s.ru единственная существенная проблема данного магазина – отсутствие автоматизированной системы оформления заказов… Вроде прикручивают к сайту, но что то долго уже…
Your comment is awaiting moderation.
All key facts here: https://erochats.org
Your comment is awaiting moderation.
Get the complete picture: https://en.mfchat.ru
Your comment is awaiting moderation.
urbanpickshub – Loved exploring fashionable urban clothing, navigation was fast and smooth.
Your comment is awaiting moderation.
Discover urban collections – Several interesting picks appeared quickly, easy to browse.
Your comment is awaiting moderation.
happygiftshub – Loved the unique gifts, pricing is excellent and quality is top-notch.
Your comment is awaiting moderation.
может я не вполне в теме,и с спрс работаю 2 раз,но ни одна из известных мне почтовых служб не доставляла отправление до адресата за 4000 вёрст за 3-4 дня,как это делает спрс. а насчёт :police: просто смешно – захотят принять – примут по-любому,хоть с почтовым голубем.:) доставка дороговата,но это самое меньшее из возможных зол. купить кокаин, меф, бошки через телеграмм MXE точно не бодяженный , со 100мг вышел нереально жуткий трип, раз 15 умирал… через сутки отпустило.
Your comment is awaiting moderation.
Most relevant right now: https://rf.livesexchat18.com/лесбиянки
Your comment is awaiting moderation.
заказал вчера на пробу соточку мн. по прибытию отпишусь) купить онлайн мефедрон, экстази, бошки а я яй , я ж отвечаю вам каждый раз как есть возможность, пишут много людей одновременно.
Your comment is awaiting moderation.
Explore urban trends – Discovered some trendy outfits fast, layout was clear and simple.
Your comment is awaiting moderation.
Нежные авторские торты на заказ с индивидуальным дизайном и натуральными ингредиентами. Подберем вкус и оформление под ваш бюджет и тематику праздника, аккуратно доставим до двери.
Your comment is awaiting moderation.
glamhubonline – Fast and intuitive navigation, the site feels very modern.
Your comment is awaiting moderation.
Хороший магазин и отличные цены. Доставили через 3 дня после заказа. О качестве товара комментарий оставлю позже. купить Кокаин, Мефедрон, Экстази Берите уверенно работаю с этим магазином
Your comment is awaiting moderation.
https://telegra.ph/Lemon-casino-kod-promocyjny-bez-depozytu-11-24
Your comment is awaiting moderation.
https://rich513.com/
Your comment is awaiting moderation.
Фитляндия https://fit-landia.ru интернет-магазин товаров для спорта и фитнеса. Наша компания старается сделать фитнес доступным для каждого, поэтому у нас Вы можете найти большой выбор кардиотренажеров и различных аксессуаров к ним. Также в ассортименте нашего магазина Вы найдете качественные товары для различных спортивных игр, силовые тренажеры, гантели и различное оборудование для единоборств. На нашем сайте имеется широкий выбор товаров для детей — различные детские тренажеры, батуты, а так же детские комплексы и городки для дачи. Занимайтесь спортом вместе с Фитляндией
Your comment is awaiting moderation.
Но в общем и целом доволен очень быстро и качественно! Будем работать и дальше;) https://growupeco.ru такая же хрень пропал продаван ((( уже неделю обещает выслать трек дать и нет не чего *((((
Your comment is awaiting moderation.
urbanfashionshop – Overall great shopping experience, definitely planning to buy more items soon.
Your comment is awaiting moderation.
finduniqueoffers.shop – Unique offers found, shopping here felt effortless and interesting overall today. Daily Fashion Gems – Discover stylish items and lifestyle products that stand out.
Your comment is awaiting moderation.
uniquefashioncorner – Delivery was super fast, packaging looked really neat and professional.
Your comment is awaiting moderation.
marketdiscoverhub – Easy-to-use site with lots of options, enjoyed shopping.
Your comment is awaiting moderation.
clickcampaign.click – Overall, professional vibe here; trustworthy, polished, and pleasantly minimal throughout.
Your comment is awaiting moderation.
В аське спросил продавца в чем дело? Была ли действительно отправка. Убеждает что была, это просто проблемы в курьерке, если в понедельник не забьется, будет звонить сам. купить Кокаин, Мефедрон, Экстази Снова в деле
Your comment is awaiting moderation.
joyfulpicks – Loved the assortment of items, shipping was quick and hassle-free.
Your comment is awaiting moderation.
Shop urban fashion – Quickly spotted a handful of stylish pieces, navigation effortless.
Your comment is awaiting moderation.
https://rich513.com/
Your comment is awaiting moderation.
Сама в ахуе, ни употреблять эту дрянь, ни толкнуть….. https://montessorishop.ru значит не успели трек номер в базу завести.
Your comment is awaiting moderation.
trendcornerstore – Loved the collection, fast delivery and smooth navigation.
Your comment is awaiting moderation.
fontan kasyno
Your comment is awaiting moderation.
Подскажите когда примерно вналичии будет JTE-907 купить Мефедрон, Бошки, Марихуану А в сочи есть магазины
Your comment is awaiting moderation.
brandamplify.click – Appreciate the typography choices; comfortable spacing improved my reading experience.
Your comment is awaiting moderation.
seosurge.click – Navigation felt smooth, found everything quickly without any confusing steps.
Your comment is awaiting moderation.
rankmaster.click – Navigation felt smooth, found everything quickly without any confusing steps.
Your comment is awaiting moderation.
ranktunnel.click – Appreciate the typography choices; comfortable spacing improved my reading experience.
Your comment is awaiting moderation.
viraltraffic.click – Navigation felt smooth, found everything quickly without any confusing steps.
Your comment is awaiting moderation.
digitalfunnels.click – Appreciate the typography choices; comfortable spacing improved my reading experience.
Your comment is awaiting moderation.
shopbrightchoice – Very satisfied with the variety, placing an order was quick.
Your comment is awaiting moderation.
Отзывы от кролов. качество тусишки хорошее. приятно порадовали ее ценой. качество метоксетамина – как у всех. сейчас в россии булыженная партия, тут он такой же. однако продавец сказал что скоро будет другая партия. вывод – магазин отличный, будем работать. https://auto-ucz.ru все ровно вот только из за нового года была задержка а так все на высоте
Your comment is awaiting moderation.
freshseasoncollection – Nice collection available here, browsing felt easy and extremely user-friendly today.
Your comment is awaiting moderation.
10 euros offert paris sportif|10 euros offert sans dépôt paris sportif|10
meilleurs sites de paris sportifs|100 euro offert paris sportif|100 euros offert paris
sportif|100 euros remboursé paris sportifs|100 offert pari sportif|100 offert paris sportif|100 remboursé paris
sportif|100e offert pari sportif|abandon paris sportif tennis|abandon tennis paris sportif|addiction paris sportif forum|age paris sportif belgique|aide
au pari sportif|aide au paris sportif|aide aux paris sportif|aide aux paris sportifs|aide pari sportif|aide pari sportif football|aide parie sportif|aide
paris sportif|aide paris sportif foot|aide paris sportif gratuit|aide paris sportifs|aide pour paris sportif|algorithme de paris sportif|algorithme excel paris sportif|algorithme gratuit paris sportif|algorithme pari sportif|algorithme paris
sportif|algorithme paris sportif avis|algorithme paris sportif basket|algorithme paris sportif excel|algorithme paris sportif gratuit|algorithme paris sportif tennis|algorithme paris sportifs|algorithme pour paris sportif|analyse cote
paris sportif|analyse de paris sportif|analyse
match paris sportif|analyse pari sportif|analyse paris sportif|analyse paris
sportif foot|analyse paris sportif football|analyse paris sportif
gratuit|analyse paris sportifs|ancienne cote paris sportif|api
cote paris sportif|app paris sportif sans argent|appli de paris sportif|appli
de paris sportif sans argent|appli de paris sportifs|appli pari sportif|appli pari sportif gratuit|appli
parie sportif|appli paris sportif|appli paris sportif avec paypal|appli paris
sportif belgique|appli paris sportif entre amis|appli paris sportif gratuit|appli
paris sportif sans argent|appli paris sportif suisse|appli paris sportifs|application aide paris sportif|application algorithme paris sportif|application analyse paris sportif|application android paris
sportif|application bankroll paris sportif|application conseil paris sportif|application de pari sportif|application de parie sportif|application de paris sportif|application de
paris sportif en afrique|application de paris sportif
en cote d’ivoire|application de paris sportif en ligne|application de paris sportif gratuit|application de
paris sportif international|application de paris sportif suisse|application de paris sportifs|application faux paris sportifs|application gestion bankroll paris sportif|application gestion paris sportif|application ia paris sportif|application pari sportif gratuit|application paris sportif|application paris
sportif android|application paris sportif argent fictif|application paris sportif belgique|application paris sportif canada|application paris sportif
espagne|application paris sportif espagnol|application paris sportif fictif|application paris sportif france|application paris sportif gratuit|application paris sportif gratuit entre
amis|application paris sportif maroc|application paris sportif
offre de bienvenue|application paris sportif paypal|application paris sportif sans argent|application paris sportif sans
justificatif de domicile|application paris sportif suisse|application paris
sportif usa|application paris sportif virtuel|application pour faire des paris sportifs|application pour gerer ses
paris sportif|application pour les paris sportifs|application pour pari sportif|application pour paris sportif|application pour paris sportifs|application statistique paris sportif|application suivi paris sportif|applications
de paris sportifs|applications paris sportifs|applis paris sportif|applis paris sportifs|apprendre
a faire des paris sportifs|argent facile paris sportif|argent offert paris sportifs|argent
offert sans depot paris sportif|argent paris
sportif|argent paris sportifs|argent paris sportifs impots|argent
sans depot paris sportif|arjel paris sportif|arjel paris sportifs|astuce gagner paris sportif|astuce pari sportif|astuce paris
sportif|astuce paris sportif basket|astuce paris sportif foot|astuce paris sportif forum|astuce paris sportif tennis|astuce
paris sportifs|astuce pour gagner au pari sportif|astuce pour
gagner au paris sportif|astuce pour gagner paris sportif|astuce
pour paris sportif|astuces paris sportifs|astuces paris sportifs en ligne|astuces paris sportifs foot|astuces pour gagner aux paris sportifs|autorisation paris sportif
france|avis pari sportif|avis paris sportif|avis paris sportif foot|avis site de paris sportif|avis site paris
sportif|avis sur les paris sportifs|avis sur paris
sportif|avis tipster paris sportif|aweh signification paris sportif|bankroll 100 euros paris sportifs|bankroll management paris sportif|bankroll paris sportif|bankroll paris sportif
excel|bankroll paris sportif gratuit|bankroll paris sportifs|basket paris
sportif|belgique france paris sportif|belgique paris sportifs|bonus bienvenue paris sportif|bonus bienvenue paris sportifs|bonus cash paris sportif|bonus de
bienvenue paris sportif|bonus de bienvenue paris sportif belgique|bonus de
bienvenue sans depot paris sportif|bonus de depot paris sportif|bonus de paris sportifs|bonus depot paris sportif|bonus en cash
paris sportif|bonus gratuit paris sportif|bonus gratuit sans depot paris sportif|bonus pari sportif|bonus paris
sportif|bonus paris sportif belgique|bonus paris sportif betclic|bonus paris sportif
cash|bonus paris sportif en ligne|bonus paris sportif france pari|bonus paris sportif retirable|bonus paris sportif sans
depot|bonus paris sportif sans dépôt|bonus paris sportif unibet|bonus
paris sportifs|bonus sans depot paris sportif|bonus sans depot
paris sportif belgique|bonus sans dépôt paris
sportif|bonus sans dépôt paris sportif hors arjel|bonus site de paris sportif|bonus site pari sportif|bonus site paris sportif|bonus sites de
paris sportifs|bonus unibet paris sportif|bookmaker paris sportif|bookmaker
paris sportif gratuit|bookmaker paris sportifs|bookmaker sportif|bookmakers paris sportif|bookmakers paris sportifs|bookmakers paris sportifs en ligne|but contre son camp paris sportif|but sur penalty paris sportif|buteur paris sportif|c’est quoi handicap paris sportif|c’est quoi une cote paris sportif|calcul anti perte paris sportif|calcul combinaison pari sportif|calcul
cote pari sportif|calcul cote paris sportif|calcul couverture paris sportif|calcul de cote paris sportif|calcul des cotes paris sportifs|calcul dnb paris
sportifs|calcul double chance paris sportif|calcul gain paris sportif|calcul mise paris sportif|calcul pari sportif|calcul paris sportif|calcul
paris sportif multiple|calcul pourcentage cote paris sportif|calcul probabilité paris sportif|calcul rentabilité paris sportifs|calcul roi
paris sportif|calcul systeme paris sportif|calcul trj paris sportifs|calculateur cote paris
sportif|calculateur de cote paris sportif|calculateur de mise paris
sportif|calculateur de paris sportif|calculateur paris sportif|calculatrice arbitrage paris sportif|calculatrice paris sportif|calculer cote
paris sportif|calculer gain paris sportif|calculer probabilité paris sportifs|calculer roi paris sportifs|calculer une cote pari sportif|calculer une cote paris sportif|carte cadeau paris sportif|carte pcs
paris sportif|carte prépayée paris sportifs|cash out pari
sportif|cash out paris sportif|cash out paris sportifs|casino en ligne paris sportif|casino paris sportif en ligne|champions league
paris sportif|chute de cote paris sportif|classement des meilleurs sites de paris sportifs|classement meilleur site de paris sportif|code barre paris sportif|code bonus paris sportif|code paris sportif|code promo pari
sportif|code promo paris sportif|code promo paris sportif sans depot|code promo
paris sportif sans dépôt|code promo sans
depot paris sportif|code promo site paris
sportif|combien de temps pour encaisser un paris sportif|combien de temps pour retirer un paris sportif|combien miser paris sportifs|combine paris sportif|combines paris sportifs|combiné pari sportif|combiné paris sportif|combiné paris
sportif conseil|combiné paris sportif du jour|combiné paris sportif
pronostic|comment analyser un paris sportif|comment
arreter de jouer aux paris sportifs|comment arreter les paris sportif|comment arreter les paris sportifs|comment arrêter
les paris sportifs|comment bien gagner au paris sportif|comment bien jouer au paris sportif|comment bien miser paris sportif|comment ca marche les paris sportif|comment calculer cote paris sportif|comment
calculer gain paris sportif|comment calculer les cotes
des paris sportifs|comment calculer une cote de paris sportif|comment calculer une cote pari sportif|comment calculer une cote paris sportif|comment comprendre les paris sportifs|comment creer un vip paris sportif|comment créer un algorithme paris sportif|comment créer
un site de paris sportif|comment devenir riche avec les paris sportifs|comment
etre rentable paris sportif|comment etre sur de gagner au paris sportif|comment
faire de bon paris sportif|comment faire des parie sportif|comment faire des paris
sportif|comment faire des paris sportif gagnant|comment faire des paris
sportifs|comment faire pari sportif|comment faire paris sportif|comment faire
pour arreter les paris sportifs|comment faire pour gagner au paris sportif|comment
faire pour gagner les paris sportifs|comment faire un bon pari sportif|comment faire un bon paris sportif|comment faire un pari sportif|comment faire un parie sportif|comment faire un paris sportif|comment faire une montante
paris sportif|comment fonctionne les cotes dans les paris sportifs|comment fonctionne les cotes des paris
sportifs|comment fonctionne les paris sportifs|comment fonctionne paris sportifs|comment
fonctionne un pari sportif|comment fonctionnent les cotes dans les paris sportifs|comment fonctionnent
les cotes dans les paris sportifs grand oral|comment fonctionnent les cotes de paris sportif|comment fonctionnent les paris sportifs|comment fonctionnent les paris sportifs grand oral|comment fonctionnent les paris sportifs grand oral maths|comment fonctionnent
les paris sportifs maths|comment gagner a coup sur au paris sportif|comment gagner a tous les coups au paris
sportif|comment gagner a tout les coup au paris sportif|comment gagner
au pari sportif|comment gagner au pari sportif football|comment gagner au paris sportif|comment gagner au paris sportif a coup
sur|comment gagner au paris sportif foot|comment gagner au paris sportif forum|comment gagner au paris sportif tennis|comment gagner
au paris sportifs|comment gagner aux paris sportif|comment gagner aux paris sportifs|comment gagner aux
paris sportifs foot|comment gagner aux paris sportifs
livre|comment gagner aux paris sportifs sur le long terme|comment gagner avec
les paris sportifs|comment gagner dans les paris sportifs|comment gagner de l
argent avec les paris sportifs|comment gagner de l’argent au paris sportif|comment gagner de l’argent aux paris sportifs|comment gagner de
l’argent avec les paris sportifs|comment gagner de l’argent paris sportif|comment gagner de
l’argent sur les paris sportifs|comment gagner de l’argent sur paris sportif|comment gagner des paris sportif|comment gagner
des paris sportifs|comment gagner en paris sportif|comment
gagner facilement au paris sportif|comment gagner les paris sportifs|comment gagner paris sportif|comment gagner paris sportif foot|comment gagner paris sportifs|comment
gagner sa vie avec les paris sportifs|comment gagner ses paris
sportif|comment gagner sur les paris sportif|comment gagner sur les paris sportifs|comment gagner tout le temps au paris sportif|comment gagner un pari sportif|comment
gagner un paris sportif|comment gerer une bankroll paris sportif|comment gérer
sa bankroll paris sportif|comment jouer au pari sportif|comment jouer au paris sportif|comment jouer au paris sportif foot|comment jouer
aux paris sportifs|comment jouer paris sportif|comment marche
cote paris sportif|comment marche les cotes paris sportif|comment
marche les paris sportif|comment marche les paris sportifs|comment marche paris sportif|comment marche un pari sportif|comment marche un paris sportif|comment marchent les cotes
paris sportif|comment marchent les paris sportifs|comment miser au paris sportif|comment miser paris sportif|comment monter sa bankroll paris sportif|comment ne jamais
perdre au paris sportif|comment parier sportif|comment reussir au paris sportif|comment reussir les paris sportif|comment reussir paris sportif|comment sont
calculer les cotes de paris sportif|comment sont calculées
les cotes des paris sportifs|comment sont calculés les cotes des
paris sportifs|comment sont faites les cotes des
paris sportifs|comment toujours gagner au
paris sportif|comment ça marche les paris sportifs|comparaison bonus paris sportifs|comparaison cote pari
sportif|comparaison des cotes paris sportifs|comparateur cote pari sportif|comparateur cote paris sportif|comparateur cotes paris sportif|comparateur cotes paris sportifs|comparateur
de cote pari sportif|comparateur de cote paris sportif|comparateur de cotes paris sportifs|comparateur de côtes paris sportifs|comparateur de paris sportif|comparateur de site de paris sportif|comparateur de site paris sportif|comparateur de sites de paris sportifs|comparateur pari sportif|comparateur paris sportif|comparateur paris sportifs|comparateur
site de paris sportif|comparateur site pari sportif|comparateur site paris sportif|comparatif bonus paris sportif|comparatif bonus paris sportifs|comparatif cote pari sportif|comparatif cote paris sportif|comparatif
cotes paris sportifs|comparatif des sites de paris sportifs|comparatif
offre de bienvenue paris sportif|comparatif offre paris sportif|comparatif pari sportif|comparatif pari sportif en ligne|comparatif paris sportif|comparatif paris sportif
bonus|comparatif paris sportif en ligne|comparatif paris
sportifs|comparatif paris sportifs en ligne|comparatif site
de paris sportif|comparatif site paris sportif|comparatif site paris sportifs|comparatif sites
de paris sportifs|comparatif sites paris sportifs|comparer les cotes paris sportifs|comprendre
cote paris sportif|comprendre handicap paris sportif|comprendre les cotes
des paris sportifs|comprendre les cotes paris sportif|comprendre les cotes paris sportifs|comprendre les
handicap paris sportif|compte de paris sportif|compte démo paris sportif|compte finance
paris sportif|compte financer paris sportif|compte financier paris sportif|compte financé paris sportif|compte pari sportif|compte paris sportif|compte paris sportif financé|conseil
de paris sportif|conseil de paris sportifs|conseil en paris sportif|conseil en paris
sportifs|conseil pari sportif|conseil pari sportif gratuit|conseil paris sportif|conseil paris sportif aujourd’hui|conseil paris sportif du
jour|conseil paris sportif foot|conseil paris sportif gratuit|conseil paris sportif ligue des champions|conseil paris sportif nba|conseil paris sportif pronostic|conseil paris sportif rmc|conseil paris sportif
tennis|conseil paris sportifs|conseil pour gagner au paris sportif|conseil pour paris sportif|conseil sur les paris sportifs|conseille paris sportif|conseiller en paris sportifs|conseiller paris sportif|conseils de paris sportifs|conseils en paris sportifs|conseils paris sportifs|conseils paris sportifs
foot|conseils paris sportifs gratuit|conseils paris sportifs tennis|conseils pour paris sportifs|cote a 100 paris sportif|cote
a 2 paris sportif|cote anglaise paris sportif|cote de 2 paris sportif|cote de pari sportif|cote
de paris sportif|cote des paris sportifs|cote maximum
paris sportif|cote minimum paris sportif|cote pari sportif|cote pari
sportif comment ça marche|cote pari sportif real madrid|cote pari sportif
rugby|cote parie sportif|cote paris sportif|cote paris sportif
belgique|cote paris sportif calcul|cote paris sportif
definition|cote paris sportif euro|cote paris sportif explication|cote paris sportif foot|cote
paris sportif france belgique|cote paris sportif france espagne|cote
paris sportif ligue des champions|cote paris sportif moto gp|cote paris sportif psg|cote
paris sportif psg arsenal|cote paris sportif rugby|cote paris
sportif tennis|cote paris sportifs|cote pour paris sportifs|cote sportif foot|cote sportif rugby|cote à 1000
paris sportif|cotes de paris sportifs|cotes pari sportif|cotes paris sportif|cotes paris sportifs|cotes paris sportifs
foot|coupe de france paris sportif|créer un algorithme paris sportif|créer un compte paris sportif|créer un site de paris sportif en ligne|dans les paris sportifs que signifie handicap|declarer ses gains paris
sportif|definition cash out paris sportif|definition cote paris sportif|definition handicap paris sportif|depot 5 euros paris sportif|depot double paris sportif|depot minimum 5 euro paris sportif|depot minimum paris sportif|depot paris sportif|depuis quand existe les paris sportif en france|devenir riche avec les paris sportifs|devenir riche avec paris sportifs|disqualification tennis paris
sportif|dnb en paris sportif|dnb pari sportif|dnb paris sportif|dnb paris sportif definition|dnb paris sportifs|doit
on declarer les gains de paris sportif|déclarer gains paris sportifs|déclarer gains paris sportifs hors arjel|définition bankroll paris sportif|dépôt minimum
1 euro paris sportif|dépôt minimum 5 euro paris sportif|ecart
de jeux tennis paris sportif|erreur de cote paris sportif|est ce que les gains des paris sportifs sont imposables|est-ce que les prolongation compte dans un pari sportif|etre sur de gagner au paris sportif|euro paris sportif|evenement sportif a
paris|evenement sportif paris|evenement sportif paris 2025|evenement sportif paris aujourd hui|evenement sportif paris aujourd’hui|evenement sportif paris ce week
end|evenements sportif paris|evenements sportifs paris|evenements sportifs paris 2025|evenements sportifs à
paris|evolution cote paris sportif|evolution cotes paris sportifs|evolution des cotes paris sportifs|explication cote pari sportif|explication cote paris sportif|explication handicap paris sportif|explication pari sportif|explication paris sportif|face
a face hockey paris sportif|faire des paris sportif|faire des paris sportif avec paypal|faire des paris
sportifs|faire fortune paris sportifs|faire un pari
sportif|faire un paris sportif|faut il déclarer les gains de paris sportifs|faut il déclarer ses
gains paris sportifs|fichier excel gestion bankroll paris sportif|fiscalité
gains paris sportifs|foot paris sportif|football et paris sportifs|forfait tennis paris sportif|formation paris sportif gratuit|forum de paris sportif|forum de
paris sportifs|forum pari sportif|forum parie sportif|forum paris sportif|forum paris sportif foot|forum
paris sportif gratuit|forum paris sportif nba|forum
paris sportif tennis|forum paris sportifs|forum sur les paris sportifs|forum tennis
paris sportif|francaise des jeux pari sportif|francaise
des jeux paris sportif|francaise des jeux paris sportifs|france 2 paris sportif|france 2 paris
sportifs|france belgique paris sportif|france espagne paris sportif|france pari sportif|france pari sportif brest|france paris sportif|france paris sportifs|france pologne
paris sportif|france portugal paris sportif|france suisse paris sportifs|france tunisie paris sportifs|france-pari – paris sportifs|gagnant pari sportif|gagnant
paris sportif|gagnant paris sportif bayern|gagnante paris sportif|gagne au paris sportif|gagner 10 euros par jour aux paris sportifs|gagner 100
euros par jour paris sportif|gagner 1000 euros par mois paris sportifs|gagner 10000 euros paris sportif|gagner 2000 euros par mois paris sportif|gagner 50
euros par jour paris sportif|gagner a coup
sur au paris sportif|gagner a coup sur pari sportif|gagner
a tous les coup paris sportif|gagner argent
avec paris sportifs|gagner argent pari sportif|gagner argent paris sportif|gagner argent paris sportifs|gagner au pari
sportif|gagner au paris sportif|gagner au paris sportif a coup sur|gagner au paris sportif foot|gagner au paris sportif forum|gagner au paris sportif à coup sur|gagner aux paris sportif|gagner aux paris sportifs|gagner aux paris sportifs pdf|gagner beaucoup d’argent paris sportif|gagner de l argent grace aux paris sportifs|gagner de l argent pari sportif|gagner de l argent
paris sportif|gagner de l argent paris sportifs|gagner de l’argent au paris sportif|gagner de l’argent aux paris
sportifs|gagner de l’argent avec les paris sportifs|gagner de l’argent avec
paris sportif|gagner de l’argent avec paris sportifs|gagner
de l’argent grace au paris sportif|gagner de l’argent grace aux paris sportifs|gagner
de l’argent pari sportif|gagner de l’argent
paris sportif|gagner de l’argent paris sportifs|gagner
de l’argent sur les paris sportifs|gagner des paris sportif|gagner des paris sportifs|gagner les paris sportifs|gagner pari sportif|gagner paris sportif|gagner paris sportif foot|gagner paris sportif forum|gagner paris sportif
tennis|gagner paris sportifs|gagner sa vie avec les paris sportif|gagner sa vie avec les paris sportifs|gagner sa vie avec paris
sportifs|gagner ses paris sportifs|gagner à coup sur paris sportif|gagner à tous les coups paris sportifs|gain maximum paris
sportif|gain pari sportif|gain pari sportif imposable|gain pari sportif impot|gain paris sportif|gain paris sportif imposable|gain paris sportif
impot|gain paris sportif impôt|gains paris sportif|gains paris sportif imposable|gains paris sportifs|gains paris sportifs imposable|gains paris sportifs imposables|gains paris sportifs sont ils imposables|gerer bankroll paris sportif|gerer sa bankroll paris sportif|gerer une bankroll
paris sportif|gestion bankroll paris sportif|gestion bankroll paris sportifs|gestion bankroll paris sportifs excel|gestion de bankroll paris sportif|gestion de bankroll paris sportif application|gestion de bankroll paris sportifs|gestion de mise paris
sportif|gestion paris sportifs v2 5 gratuit|gg signification paris sportif|gros combiné paris sportif|gros gain paris sportif|grosse cote paris
sportif pronostic|grosse mise paris sportif|groupe paris sportif
gratuit|groupe telegram paris sportif gratuit|groupement de joueurs paris sportifs|handicap 0 paris sportif|handicap 1 paris sportif|handicap 5 paris sportif|handicap au paris sportif|handicap basket paris sportif|handicap dans les paris sportifs|handicap
en paris sportif|handicap europeen paris sportif|handicap européen paris sportifs|handicap mi temps paris sportif|handicap pari sportif|handicap paris sportif|handicap paris sportif
basket|handicap paris sportif explication|handicap
paris sportif foot|handicap paris sportif rugby|handicap paris sportifs|handicap rugby paris sportif|handicap tennis paris sportif|historique
cote paris sportif|historique des cotes paris sportifs|hockey paris sportif|hockey sur glace paris sportif|hors arjel paris sportif|hweh signification paris
sportif|imposition gain pari sportif|imposition gain paris sportif|imposition gains paris sportifs|imposition paris sportif
france|impot gain paris sportif|impot paris sportif france|impot sur
gain paris sportif|je gagne ma vie avec les paris
sportifs|jeu de pari sportif gratuit|jeu de paris sportif en ligne|jeu de paris sportif gratuit|jeu paris sportif gratuit|jeu paris sportif sans argent|jeux de parie sportif|jeux de
paris sportif|jeux de paris sportif en ligne|jeux de paris sportif gratuit|jeux de paris sportifs|jeux olympiques paris sportifs|jeux paris sportif|jeux
paris sportif gratuit|jeux paris sportif virtuel|jeux
paris sportifs en ligne|jouer au paris sportif|jouer paris sportif|joueur absent paris
sportif|joueur blesse paris sportif|joueur caen paris sportif|joueur de caen pari sportif|joueur de foot paris sportif|joueur decisif paris sportif|joueur décisif paris sportif|joueur italien paris sportif|joueur paris sportif|joueur
professionnel paris sportif|joueur qui se blesse paris sportif|joueur
sanctionne pari sportif|joueur suspendu paris
sportif|joueurs italiens paris sportifs|l’argent des paris sportifs est il imposable|la cote
paris sportif|la francaise des jeux paris sportif|la martingale paris sportif|la martingale paris
sportifs|la meilleur application de paris sportif|la meilleur application paris sportif|la meilleur technique pour gagner
au paris sportif|la méthode secrète pour gagner aux paris sportifs pdf|la
plus grosse cote gagner paris sportif|la plus grosse cote paris sportif|ldem paris sportif signification|le
marché des paris sportifs|le meilleur site de pari
sportif|le meilleur site de paris sportif|le meilleur site
de paris sportif en ligne|le meilleur site de paris sportifs|le plus
gros gain au paris sportif|le plus gros paris sportif|le plus gros paris
sportif du monde|les 10 meilleurs sites de paris sportifs|les
10 meilleurs sites de paris sportifs en afrique|les 17 secrets pour gagner rapidement aux paris sportifs|les 17 secrets pour gagner rapidement aux paris sportifs pdf|les application de
paris sportif|les applications paris sportifs|les bonus
paris sportifs|les bookmakers paris sportifs|les cotes paris
sportifs|les gains de paris sportifs sont ils imposables|les gains des paris
sportifs sont ils imposables|les jeux de paris sportifs|les meilleur paris sportif|les meilleures applications de paris sportifs|les meilleurs applications de paris sportifs|les
meilleurs bonus paris sportif|les meilleurs bonus
paris sportifs|les meilleurs cotes paris sportif|les meilleurs paris sportifs|les meilleurs paris sportifs du jour|les
meilleurs site de paris sportif|les meilleurs site de paris sportifs|les meilleurs sites de pari sportif|les meilleurs sites de paris sportifs|les meilleurs
sites de paris sportifs en ligne|les paris sportif|les paris sportif avis|les paris sportifs|les paris sportifs comment ça marche|les paris sportifs en france|les paris sportifs en ligne|les paris sportifs en ligne comprendre jouer gagner|les paris
sportifs en ligne comprendre jouer gagner pdf|les paris sportifs les plus rentables|les plus gros gagnant paris sportif|les plus gros gains au paris sportifs|les plus gros gains paris sportifs|les plus gros paris sportif|les plus grosse cote paris sportif|les plus grosses pertes paris sportifs|les sites de paris sportifs|les sites de paris
sportifs autorisés en france|les sites de paris sportifs
en france|les sites de paris sportifs en ligne|les sites de paris sportifs francais|ligue 1 paris sportif|ligue 1 paris sportifs|ligue 2 paris sportif|ligue des champions paris sportif|limite
de gains paris sportifs|limite de mise paris sportif|limite gain paris sportif|limite mise paris sportifs|liste de paris sportif|liste des paris sportifs|liste des site de paris sportif|liste des sites de paris
sportifs|liste pari sportif|liste paris sportif|liste paris sportif pdf|liste site de
paris sportif|liste site pari sportif|liste site paris
sportif|liste site paris sportif arjel|liste sites paris sportifs|logiciel algorithme paris sportif|logiciel algorithme paris
sportif gratuit|logiciel analyse paris sportif|logiciel calcul
paris sportif|logiciel de pari sportif|logiciel de paris
sportif|logiciel de paris sportif gratuit|logiciel gestion bankroll paris sportif gratuit|logiciel gestion de bankroll paris sportif|logiciel gestion paris sportif|logiciel gestion paris sportif gratuit|logiciel gestion paris sportifs|logiciel pari sportif|logiciel paris sportif|logiciel paris sportif gratuit|logiciel paris sportifs|logiciel paris sportifs foot sur 2 matchs|logiciel pour paris sportif|logiciel pour paris sportifs|logiciel
prediction paris sportif|logiciel probabilité paris sportif|logiciel prédiction paris sportif|logiciel statistique paris sportifs|logiciel variation de cote paris
sportif|loi sur les paris sportifs en france|magic calculator paris
sportif|marché des paris sportifs|marché des paris sportifs en france|marché des
paris sportifs en ligne|martingale pari sportif|martingale paris sportif|martingale paris sportif
excel|martingale paris sportif forum|martingale paris sportif interdit|martingale paris sportifs|match abandonné paris sportif|match annulé ou reporté paris sportifs|match annulé paris sportif|match
arrete paris sportif|match interrompu paris sportif|match interrompu tennis paris sportif|match interrompu tennis pluie paris sportif|match nul boxe
paris sportif|match pari sportif|match paris sportif|match reporté paris sportif|match suspendu paris sportif|match
suspendu tennis paris sportif|match truqué paris sportif|matchs truqués paris
sportifs|meilleur algorithme paris sportif|meilleur algorithme paris
sportif gratuit|meilleur app de paris sportif|meilleur app de paris sportifs|meilleur app
paris sportif|meilleur appli de pari sportif|meilleur appli de
paris sportif|meilleur appli pari sportif|meilleur appli paris sportif|meilleur appli paris sportif forum|meilleur appli paris sportifs|meilleur application conseil paris
sportif|meilleur application de paris sportif|meilleur application de paris sportif en afrique|meilleur
application pari sportif|meilleur application paris sportif|meilleur
application paris sportif belgique|meilleur application pour les paris sportif|meilleur application pour pari sportif|meilleur bonus de bienvenue paris sportif|meilleur bonus pari
sportif|meilleur bonus paris sportif|meilleur bonus paris
sportif sans depot|meilleur bonus paris sportifs|meilleur bonus site de paris sportif|meilleur bonus site pari sportif|meilleur bonus site paris sportif|meilleur bookmaker paris sportif|meilleur combiné
paris sportif|meilleur conseil paris sportif|meilleur cote de paris sportif|meilleur cote pari sportif|meilleur cote paris sportif|meilleur cote paris sportif aujourd’hui|meilleur cote site paris sportif|meilleur forum paris sportifs|meilleur gain paris sportif|meilleur ia paris sportif|meilleur methode pour gagner au paris sportif|meilleur offre bienvenue paris sportif|meilleur offre bonus
paris sportif|meilleur offre de bienvenue paris sportif|meilleur offre
de bienvenue paris sportifs|meilleur offre pari sportif|meilleur offre
paris sportif|meilleur offre paris sportif en ligne|meilleur pari sportif|meilleur pari sportif du jour|meilleur pari sportif en ligne|meilleur paris sportif|meilleur paris sportif aujourd’hui|meilleur paris sportif du jour|meilleur
paris sportif en ligne|meilleur paris sportif foot|meilleur promo paris sportif|meilleur pronostic paris sportif|meilleur site de conseil paris sportif|meilleur
site de pari sportif|meilleur site de pari sportif
en ligne|meilleur site de paris sportif|meilleur site de paris sportif
avis|meilleur site de paris sportif belgique|meilleur site de paris sportif canada|meilleur site de
paris sportif en france|meilleur site de paris sportif en ligne|meilleur site
de paris sportif football|meilleur site de paris sportif forum|meilleur site de
paris sportif france|meilleur site de paris sportif hors arjel|meilleur site de paris sportif international|meilleur site de paris sportif suisse|meilleur site de paris sportifs|meilleur site de paris sportifs en ligne|meilleur site pari sportif|meilleur site pari sportif en ligne|meilleur site pari sportif france|meilleur site paris sportif|meilleur site paris sportif avis|meilleur site paris sportif belgique|meilleur site paris sportif canada|meilleur site paris sportif en ligne|meilleur site paris
sportif foot|meilleur site paris sportif forum|meilleur site paris sportif france|meilleur site paris
sportif hors arjel|meilleur site paris sportif
nba|meilleur site paris sportif rugby|meilleur site paris sportif suisse|meilleur site paris
sportifs|meilleur site pour pari sportif|meilleur
site pour paris sportif|meilleur site pronostic
paris sportif|meilleur strategie paris sportif|meilleur technique de paris sportif|meilleur technique paris sportif|meilleur technique pour gagner
au paris sportif|meilleure appli de paris sportif|meilleure appli de paris sportifs|meilleure appli pari sportif|meilleure appli paris sportif|meilleure appli paris sportifs|meilleure application de
paris sportif|meilleure application de paris sportifs|meilleure application pari sportif|meilleure application paris sportif|meilleure application paris sportif android|meilleure application paris
sportifs|meilleure offre paris sportif|meilleure site paris sportif|meilleure strategie paris sportif|meilleures applications de paris sportifs|meilleures
applications paris sportifs|meilleures cotes paris sportifs|meilleures offres paris sportifs|meilleures stratégies
paris sportifs|meilleurs appli paris sportif|meilleurs application de
paris sportifs|meilleurs application paris sportif|meilleurs applications paris sportifs|meilleurs bonus paris sportifs|meilleurs cote paris
sportif|meilleurs cotes paris sportifs|meilleurs offres
paris sportifs|meilleurs paris sportifs|meilleurs paris
sportifs du jour|meilleurs site de pari sportif|meilleurs site de paris
sportif|meilleurs site de paris sportif en ligne|meilleurs site de paris sportifs|meilleurs site paris sportif|meilleurs sites de paris sportifs|meilleurs sites de paris sportifs en ligne|meilleurs sites
paris sportif|meilleurs sites paris sportifs|methode abc paris
sportif|methode de paris sportif|methode gagnante paris sportifs|methode gagner paris sportif|methode infaillible paris sportifs|methode martingale paris sportif|methode mathematique paris sportif|methode mathematique pour gagner au
paris sportif|methode paris sportif|methode paris sportif foot|methode paris sportif
forum|methode paris sportif tennis|methode paris sportifs|methode
pour gagner au paris sportif|methode pour gagner paris sportif|methodes paris
sportifs|minimum depot paris sportif|mise au jeu pari sportif|mise maximum pari sportif|mise maximum paris sportif|mise minimum paris sportif|mise moyenne
paris sportif|mise paris sportif|moins de 4 5 but paris sportif|montant maximum paris sportif|montant paris sportif|montante pari sportif|montante parie sportif|montante paris
sportif|montante paris sportifs|montantes paris sportifs|multiple pari
sportif|multiple paris sportif|multiple paris sportifs|multiples
paris sportifs|méthode calcul paris sportif|méthode
match nul paris sportifs|méthode mathématique pour gagner au paris sportif|méthode paris sportif forum|méthode paris sportif hockey|nba pari sportif|nba paris sportif|nba paris sportifs|nouveau paris sportif|nouveau site
de pari sportif|nouveau site de paris sportif|nouveau site de paris sportif en ligne|nouveau site de paris sportifs|nouveau
site pari sportif|nouveau site paris sportif|nouveau site paris sportif france|nouveau site paris sportifs|nouveaux
sites de paris sportifs|nouveaux sites paris sportifs|nouvelle
appli paris sportif|nouvelle application de paris sportif|numero
de match paris sportif|numero match paris sportif|offre
100 euros paris sportif|offre appli pari sportif|offre bienvenu paris sportif|offre bienvenue pari sportif|offre bienvenue paris sportif|offre
bienvenue paris sportifs|offre bienvenue site paris sportif|offre bonus paris sportif|offre de bienvenu paris sportif|offre de bienvenue pari sportif|offre de bienvenue paris sportif|offre de bienvenue
paris sportif belgique|offre de bienvenue paris sportif sans depot|offre de bienvenue paris sportif sans dépôt|offre de bienvenue paris sportifs|offre de bienvenue sans depot paris sportif|offre de bienvenue site paris sportif|offre
euro paris sportif|offre pari sportif euro|offre paris sportif|offre paris sportif belgique|offre paris sportif cash|offre paris sportif coupe du monde|offre paris sportif hors arjel|offre paris sportif remboursé|offre paris sportif remboursé cash|offre paris sportif sans depot|offre promo paris sportif|offre remboursement paris sportif|offre
sans depot paris sportif|offre site paris sportif|offres bienvenue paris sportifs|offres de bienvenue paris sportifs|ou faire des paris sportif|ou faire des paris sportif en espagne|ou faire des paris sportifs|outil répartiteur de mise paris sportif|outils repartiteur de mises paris sportif|ouverture compte
paris sportifs|ouvrir un compte paris sportif|pack de bienvenue paris
sportif|pack de bienvenue paris sportif hors arjel|pari en ligne sportif|pari sportif|pari sportif
100 euros offert|pari sportif 100 remboursé|pari sportif abandon tennis|pari sportif aide|pari sportif algérie aujourd’hui|pari sportif appli|pari sportif application|pari sportif argent|pari sportif
astuce|pari sportif aujourd|pari sportif aujourd’hui|pari sportif avec handicap|pari sportif avec orange money|pari sportif avec paypal|pari sportif avec wave|pari sportif avis|pari sportif basket|pari sportif belgique|pari sportif belgique france|pari sportif bonus|pari sportif buteur pas titulaire|pari sportif champions
league|pari sportif combiné|pari sportif
comment|pari sportif comment gagner|pari sportif comment
ça marche|pari sportif comparatif|pari sportif conseil|pari sportif cote|pari sportif cote match|pari sportif cote psg|pari sportif coupe|pari sportif
coupe de france|pari sportif coupe du monde|pari sportif depot|pari
sportif du jour|pari sportif en france|pari sportif en ligne|pari sportif en ligne au cameroun|pari sportif
en ligne belgique|pari sportif en ligne canada|pari sportif
en ligne france|pari sportif en ligne gratuit|pari sportif en ligne suisse|pari sportif
en ligne ufc|pari sportif en suisse|pari sportif euro|pari
sportif explication|pari sportif faire|pari sportif foot|pari sportif foot resultat|pari sportif
football|pari sportif forum|pari sportif francaise des jeux|pari sportif france|pari sportif france
angleterre|pari sportif france argentine|pari sportif france autriche|pari sportif france belgique|pari sportif france espagne|pari sportif france italie|pari sportif france portugal|pari sportif france usa|pari sportif
gagnant|pari sportif gagner|pari sportif gagner a tous les coups|pari sportif gagner de l’argent|pari sportif gain|pari sportif gratuit|pari sportif gratuit pour gagner
des cadeaux|pari sportif gratuit sans depot|pari sportif handicap|pari sportif hockey|pari
sportif hors arjel|pari sportif jeux olympiques|pari sportif joueur absent|pari sportif le plus rentable|pari sportif
leicester champion|pari sportif ligue 1|pari sportif ligue 2|pari sportif
ligue des champions|pari sportif ligue europa|pari sportif match|pari sportif match arrete|pari sportif match interrompu|pari sportif meilleur|pari
sportif meilleur cote|pari sportif meilleur site|pari sportif methode|pari sportif mise|pari sportif
mise au jeu|pari sportif mise o jeu|pari sportif nba|pari sportif offre bienvenue|pari sportif paypal|pari sportif plus|pari sportif prolongation|pari sportif promo|pari sportif pronostic|pari sportif pronostic foot|pari sportif pronostic gagnant|pari sportif pronostic gratuit|pari sportif psg|pari sportif
psg bayern|pari sportif psg inter|pari sportif psg milan|pari sportif regle|pari sportif rembourse|pari sportif remboursement|pari sportif remboursement cash|pari sportif remboursé|pari sportif
rugby|pari sportif rugby coupe du monde|pari sportif rugby
top 14|pari sportif sans argent|pari sportif sans carte bancaire|pari sportif sans depot|pari sportif signification|pari sportif site|pari sportif statistique|pari sportif
suisse|pari sportif systeme|pari sportif technique|pari sportif technique pour gagner|pari sportif temps reglementaire|pari sportif tennis|pari sportif tennis abandon|pari sportif top|pari
sportif top 14|pari sportif tour de france|parie sportif|parie sportif comment ca marche|parie sportif
du jour|parie sportif en ligne|parie sportif foot|parie
sportif football|parie sportif france|parie sportif gratuit|parie sportif pronostic|parie sportif suisse|paris en ligne sportif|paris en ligne
sportifs|paris evenement sportif|paris france sportif|paris hippique et
sportif|paris hippiques et sportifs|paris hippiques
paris sportifs|paris hippiques paris sportifs et poker en ligne|paris hippiques sportifs|paris match sportif|paris sportif|paris sportif 10 euros
offerts|paris sportif 100 euros offert|paris sportif 100 euros remboursé|paris sportif 100
offert|paris sportif 100 remboursé|paris sportif 100e offert|paris sportif 150 euros offert|paris sportif 1er pari remboursé|paris sportif a faire|paris sportif a faire
aujourd’hui|paris sportif a faire ce soir|paris sportif abandon tennis|paris sportif abandon tennis parions
sport|paris sportif aide|paris sportif algorithme|paris sportif analyse|paris sportif appli|paris sportif
application|paris sportif application android|paris sportif apres prolongation|paris sportif argent|paris sportif
argent fictif|paris sportif argent offert|paris sportif argent virtuel|paris sportif arjel|paris
sportif arsenal psg|paris sportif astuce|paris sportif au
canada|paris sportif aujourd hui|paris sportif aujourd’hui|paris sportif avec argent fictif|paris sportif avec bonus sans depot|paris sportif avec carte bancaire|paris sportif
avec cryptomonnaie|paris sportif avec handicap|paris sportif avec paypal|paris sportif
avec paysafecard|paris sportif avis|paris sportif avis expert|paris sportif avis forum|paris sportif bankroll|paris sportif basket|paris sportif basket
coupe de france|paris sportif basket nba|paris sportif basket prolongation|paris sportif belgique|paris sportif belgique bonus|paris sportif
belgique bonus sans depot|paris sportif belgique france|paris sportif belgique suede|paris sportif bonus|paris sportif bonus bienvenue|paris sportif bonus cash|paris sportif bonus de
bienvenue|paris sportif bonus gratuit|paris sportif bonus gratuit sans depot|paris
sportif bonus retirable|paris sportif bonus sans depot|paris
sportif bonus sans depot belgique|paris sportif bookmaker|paris
sportif but contre son camp|paris sportif but temps additionnel|paris sportif buteur|paris sportif buteur blessé|paris sportif buteur carton rouge|paris sportif buteur contre son camp|paris sportif
buteur non titulaire|paris sportif buteur prolongation|paris sportif buteur qui ne joue pas|paris sportif buteur remplacant|paris sportif calcul gain|paris sportif canada|paris sportif cash|paris
sportif cash out|paris sportif champion ligue 1|paris sportif champions league|paris sportif classement
ligue 1|paris sportif code promo|paris sportif combine|paris sportif combiné|paris sportif combiné comment ça marche|paris sportif combiné du jour|paris sportif combiné
match reporté|paris sportif comment ca marche|paris sportif comment faire|paris sportif comment gagner|paris sportif
comment gagner a tous les coups|paris sportif comment
jouer|paris sportif comment ça marche|paris sportif
comparateur cote|paris sportif comparatif|paris sportif conseil|paris
sportif conseil gratuit|paris sportif conseil pour gagner|paris sportif cote|paris sportif cote et match|paris sportif cote explication|paris sportif cote psg|paris sportif coupe d’europe|paris sportif coupe davis|paris sportif coupe de france|paris sportif coupe du monde|paris sportif coupe du monde de rugby|paris sportif coupe du monde rugby|paris sportif depot 5 euro|paris sportif depot minimum|paris sportif depot paypal|paris sportif dnb|paris sportif du jour|paris sportif du
jour conseil|paris sportif dépôt 1 euro|paris sportif dépôt minimum
5 euros|paris sportif en belgique|paris sportif
en france|paris sportif en ligne|paris sportif en ligne avec paypal|paris sportif
en ligne avis|paris sportif en ligne belgique|paris sportif en ligne bonus|paris sportif en ligne cameroun|paris sportif en ligne comment gagner|paris
sportif en ligne comment ça marche|paris sportif
en ligne france|paris sportif en ligne gratuit|paris sportif en ligne maroc|paris sportif en ligne paypal|paris sportif en ligne québec|paris sportif en ligne sans depot|paris
sportif en ligne suisse|paris sportif en suisse|paris sportif espagne france|paris sportif esport|paris sportif et casino
en ligne|paris sportif et hippique|paris sportif et prolongation|paris sportif euro|paris sportif europa league|paris sportif explication|paris sportif
final ligue des champions|paris sportif finale ligue des champions|paris sportif
foot|paris sportif foot aide|paris sportif foot astuce|paris sportif foot aujourd’hui|paris sportif foot ce soir|paris sportif foot comment ca marche|paris
sportif foot conseil|paris sportif foot cote|paris sportif foot coupe
du monde|paris sportif foot en ligne|paris sportif foot feminin|paris sportif foot
gratuit|paris sportif foot prolongation|paris sportif foot
pronostic|paris sportif foot pronostic gratuit|paris sportif foot regle|paris
sportif foot suisse|paris sportif foot us|paris sportif football|paris
sportif football americain|paris sportif football astuces|paris
sportif forfait tennis|paris sportif forum|paris
sportif francais|paris sportif francaise des jeux|paris sportif france|paris sportif
france 2|paris sportif france allemagne|paris sportif france angleterre|paris sportif france argentine|paris
sportif france autriche|paris sportif france belgique|paris sportif
france espagne|paris sportif france gibraltar|paris sportif france italie|paris
sportif france nouvelle zelande|paris sportif france pologne|paris sportif france portugal|paris sportif
france uruguay|paris sportif france usa|paris sportif freebet sans depot|paris sportif gagnant|paris sportif gagnant à coup sûr|paris
sportif gagner a coup sur|paris sportif gagner argent|paris
sportif gagner de l’argent|paris sportif gain|paris sportif gain maximum|paris sportif
gestion bankroll|paris sportif gratuit|paris sportif gratuit appli|paris sportif gratuit avec cadeaux|paris sportif gratuit
cadeaux|paris sportif gratuit en ligne|paris sportif gratuit entre amis|paris sportif gratuit sans
argent|paris sportif gratuit sans depot|paris sportif gratuit
sans dépôt|paris sportif gratuits|paris sportif gros gain|paris sportif handicap|paris
sportif handicap 0 1|paris sportif handicap 0-1|paris
sportif handicap 1 0|paris sportif handicap 1-0|paris sportif handicap basket|paris
sportif handicap explication|paris sportif handicap foot|paris sportif handicap rugby|paris sportif hippique|paris sportif hockey|paris sportif hockey nhl|paris sportif hockey sur glace|paris sportif hors arjel|paris
sportif hors arjel france|paris sportif jeux olympiques|paris sportif jeux video|paris sportif joueur blessé|paris sportif joueur
blessé pendant le match|paris sportif joueur de foot|paris sportif joueur
decisif|paris sportif joueur declare forfait|paris sportif joueur déclare forfait|paris sportif joueur remplacant|paris
sportif la francaise des jeux|paris sportif le plus rentable|paris sportif legal en france|paris sportif
leicester champion|paris sportif les 18 stratégies pour gagner
tous les jours|paris sportif les plus sur|paris sportif les
prolongation compte|paris sportif ligne|paris sportif ligue 1|paris
sportif ligue 2|paris sportif ligue des champions|paris
sportif ligue des nations|paris sportif ligue europa|paris sportif liste|paris sportif martingale|paris sportif match|paris sportif match abandonné|paris sportif match annulé|paris sportif match
arrêté|paris sportif match du jour|paris sportif match interrompu|paris sportif match reporté|paris
sportif match suspendu|paris sportif match tennis interrompu|paris sportif match truqué|paris sportif meilleur
bonus|paris sportif meilleur cote|paris sportif meilleur pronostic|paris sportif meilleur site|paris sportif methode|paris sportif methode
2 3|paris sportif mi temps fin de match|paris sportif mise
au jeu|paris sportif mise maximum|paris sportif mma france|paris sportif moins de 3.5 but|paris sportif montante|paris sportif moto gp|paris sportif multiple|paris sportif multiple 2 3|paris sportif multiple 2 3 explication|paris
sportif multiple 2 4|paris sportif multiple 2 5|paris sportif multiple 2/3 explication|paris sportif
multiple 3 4|paris sportif multiple explication|paris sportif
national 1 foot|paris sportif nba|paris sportif
nba conseil|paris sportif nba pronostic|paris sportif nhl|paris sportif nombre de but|paris
sportif nouveau site|paris sportif numero match|paris sportif offert|paris
sportif offre bienvenue|paris sportif offre bienvenue sans
depot|paris sportif offre de bienvenue|paris sportif offre sans depot|paris sportif om psg|paris sportif paypal|paris sportif
plus de 1.5 but|paris sportif plus de 2 5 but|paris sportif plus ou moins|paris sportif plus ou moins 2 5 but|paris
sportif premier pari remboursé|paris sportif premier paris remboursé|paris sportif prolongation|paris sportif prolongation basket|paris
sportif prolongation foot|paris sportif promo|paris sportif pronostic|paris sportif pronostic basket|paris sportif pronostic des match aujourd hui|paris sportif pronostic expert gratuit|paris sportif pronostic foot|paris sportif pronostic forum|paris sportif pronostic gratuit|paris sportif pronostic tennis|paris sportif psg|paris sportif
psg arsenal|paris sportif psg barcelone|paris sportif
psg bayern|paris sportif psg dortmund|paris sportif psg inter|paris sportif psg inter cote|paris sportif psg liverpool|paris sportif psg om|paris
sportif qr code|paris sportif que veut dire handicap|paris sportif
qui rapporte le plus|paris sportif regle|paris sportif regle prolongation|paris sportif rembourse|paris sportif remboursement cash|paris sportif
rembourser|paris sportif remboursé|paris sportif remboursé cash|paris sportif remboursé en cash|paris sportif retrait paypal|paris sportif rue des joueurs|paris sportif rugby|paris sportif rugby
6 nations|paris sportif rugby coupe du monde|paris sportif rugby top
14|paris sportif safe du jour|paris sportif sans
argent|paris sportif sans carte bancaire|paris sportif sans carte d’identité|paris sportif sans compte bancaire|paris sportif sans depot|paris sportif sans depot
minimum|paris sportif si match suspendu|paris sportif si un joueur abandonne|paris sportif si un joueur ne
joue pas|paris sportif si un joueur se blesse|paris sportif simple ou combiné|paris sportif site|paris sportif statistique|paris sportif stratégie|paris sportif suisse|paris sportif suisse application|paris sportif suisse
en ligne|paris sportif suisse legal|paris
sportif suisse légal|paris sportif suisse romande|paris sportif sur du jour|paris sportif sur le tennis|paris sportif systeme|paris sportif systeme 2 3|paris sportif systeme 2 4|paris sportif systeme 2/3|paris sportif systeme 2/4|paris sportif systeme 3 4|paris sportif systeme 3/4|paris sportif systeme
explication|paris sportif technique|paris sportif technique pour gagner|paris sportif temps additionnel|paris sportif temps reglementaire|paris sportif tennis|paris sportif tennis abandon|paris sportif
tennis conseil|paris sportif tennis de table|paris sportif tennis forfait|paris sportif
tennis gratuit|paris sportif tennis pronostic|paris sportif tennis roland garros|paris sportif tir au but|paris sportif top 14|paris sportif tour de france|paris sportif ufc|paris sportif ufc france|paris
sportif unibet|paris sportif vainqueur euro|paris sportif vainqueur ligue 1|paris sportif vainqueur ligue des
champions|paris sportif via paypal|paris sportif victoire prolongation|paris sportif vip gratuit|paris sportifs|paris sportifs abandon tennis|paris sportifs aide|paris sportifs analyser
un match|paris sportifs arjel|paris sportifs astuces|paris sportifs aujourd’hui|paris
sportifs autorisés en france|paris sportifs avec paypal|paris sportifs basket|paris sportifs belgique|paris sportifs bonus|paris
sportifs bookmakers|paris sportifs canada|paris sportifs combiné|paris sportifs comparateur|paris sportifs comparatif|paris sportifs conseils|paris sportifs cotes|paris sportifs coupe du monde|paris sportifs de
football|paris sportifs du jour|paris sportifs en belgique|paris sportifs en france|paris sportifs
en ligne|paris sportifs en ligne belgique|paris sportifs en ligne france|paris sportifs en ligne gratuit|paris sportifs en ligne suisse|paris sportifs
en suisse|paris sportifs et hippiques|paris sportifs euro|paris sportifs foot|paris sportifs foot us|paris
sportifs forum|paris sportifs france|paris sportifs france espagne|paris sportifs
gagner à tous les coups|paris sportifs gratuit|paris sportifs gratuits|paris sportifs gratuits en ligne|paris sportifs handicap|paris sportifs hockey|paris sportifs
hockey sur galce|paris sportifs hockey sur glace|paris sportifs hors arjel|paris sportifs jeux olympiques|paris sportifs
les bookmakers raflent la mise|paris sportifs ligne|paris sportifs ligue 1|paris sportifs ligue 2|paris sportifs ligue des
champions|paris sportifs ligue europa|paris sportifs match interrompu|paris sportifs montante|paris sportifs nba|paris sportifs
offre bienvenue|paris sportifs offre de bienvenue|paris sportifs
paypal|paris sportifs pronostics|paris sportifs psg|paris
sportifs psg inter|paris sportifs rugby|paris sportifs sans
argent|paris sportifs sans depot|paris sportifs site|paris
sportifs sites|paris sportifs statistiques|paris sportifs stratégie|paris sportifs suisse|paris sportifs technique|paris sportifs techniques|paris sportifs tennis|paris sportifs tennis astuces|paris sportifs top
14|paris sportifs tour de france|part de marché paris sportifs|paypal pari
sportif|paypal paris sportif|paypal paris sportifs|perte d’argent paris sportifs|peut on devenir riche
avec les paris sportifs|peut on gagner de l’argent avec les paris sportifs|peut on gagner sa vie avec les paris sportif|peut on vraiment gagner de l’argent avec les paris sportifs|plus gros combine paris sportif|plus gros
gagnant paris sportif|plus gros gain paris sportif|plus gros gain paris sportif
au monde|plus gros gain paris sportif france|plus gros gains paris sportif|plus gros pari sportif|plus
gros paris sportif|plus grosse cote gagner paris sportif|plus grosse cote pari sportif|plus grosse cote paris sportif|plus grosse mise paris sportif|plus grosse somme gagner au paris
sportif|plus ou moins paris sportif|pourcentage de mise paris sportif|premier pari sportif remboursé|probabilité
cote paris sportif|probabilité paris sportif combiné|prolongation basket paris sportif|prolongation paris sportif|promo pari sportif|promo paris sportif|promo site de paris sportif|promo site pari sportif|promo site paris sportif|promos paris sportifs|prono
paris sportif foot|prono paris sportif gratuit|prono paris
sportif tennis|pronostic de paris sportif|pronostic du jour paris
sportif|pronostic foot paris sportif|pronostic gratuit paris sportif|pronostic pari sportif|pronostic pari sportif gratuit|pronostic paris sportif|pronostic paris
sportif aujourd’hui|pronostic paris sportif du jour|pronostic paris sportif foot|pronostic paris sportif
gratuit|pronostic paris sportif tennis|pronostic paris sportifs|pronostics foot
statistiques et aides aux paris sportifs|pronostics paris sportif|pronostics paris sportifs|pronostiqueur paris sportif gratuit|psg arsenal paris sportif|psg bayern paris sportif|psg inter milan paris sportif|psg inter pari sportif|psg inter paris sportif|psg liverpool paris sportif|psg om
paris sportif|psg paris sportif|psg paris sportifs|qr code paris
sportif|qu est ce qu un handicap paris sportif|qu est ce que
handicap dans les paris sportif|qu’est ce qu’un handicap paris
sportif|qu’est ce que handicap dans les paris sportif|quand un joueur se
blesse paris sportif|que signifie 1/1 en paris
sportif|que signifie 1/2 paris sportif|que signifie 12 en paris sportif|que signifie 1×2
dans les paris sportifs|que signifie btts en paris sportif|que signifie dnb en paris sportif|que signifie draw en paris sportif|que signifie ft en paris sportif|que signifie gg dans le
pari sportif|que signifie gg en pari sportif|que signifie gg en paris sportif|que signifie
handicap dans les paris sportifs|que veut dire
dnb en paris sportif|que veut dire handicap dans les paris sportifs|que veut dire handicap
paris sportif|quel appli pari sportif|quel cote jouer
paris sportif|quel est la meilleur appli de paris sportif|quel est le meilleur algorithme de paris sportif|quel est le meilleur site de pari sportif|quel est le meilleur site de
pari sportif en ligne|quel est le meilleur site de paris sportif|quel est le meilleur site
de paris sportif en ligne|quel est le meilleur site de paris sportifs en ligne|quel
est le pari sportif le plus rentable|quel pari
sportif est le plus rentable|quel pari sportif est le plus sûr|quel pari sportif faire aujourd’hui|quel paris sportif faire aujourd’hui|quel paris sportif rapporte le
plus|quel site de paris sportif choisir|quel site de paris sportif
rembourse en cash|quel type de pari sportif
est le plus rentable|quelle application pour paris sportifs|quelle est la meilleure appli de paris
sportif|quelle est la meilleure application de paris sportif|quelle est la meilleure application pour les paris sportifs|quelle est le meilleur site de paris
sportif|quels paris sportifs faire|quels sont les paris sportifs les plus sûrs|rebond basket paris
sportif|record de gain paris sportif|regle buteur paris sportif|regle de paris sportif|regle des paris sportif|regle handicap paris sportif|regle
handicap paris sportif foot|regle multiple paris sportif|regle pari sportif|regle paris sportif|regle paris sportif foot|regle paris sportif multiple|regle paris
sportif prolongation|reglement pari sportif|reglement paris sportif|regles paris sportifs|remboursement cash paris sportif|remboursement en cash paris sportif|remboursement pari sportif|remboursement paris sportif|repartiteur de mise paris sportif|repartiteur
de mise paris sportifs|repartiteur de mises paris sportif|repartiteur mise paris sportif|repartition des mises paris sportif|resultat
pari sportif|resultat paris sportif|resultat paris sportif en direct|resultat paris sportif foot|resultat sportif hockey|retirer argent paris sportif|rugby pari sportif|rugby paris sportif|règle paris sportif
prolongation|règles paris sportif|répartiteur de
mise pari sportif|répartiteur de mise paris sportif|répartiteur de mise paris sportifs|répartition des mises
paris sportif|résultat paris sportif foot|sans depot paris sportif|se faire interdire de paris sportifs|signification btts paris sportif|signification dnb paris sportif|signification handicap paris sportif|simulateur
de gain paris sportif|simulateur gain paris sportif|simulateur gain paris
sportif multiple|simulateur gain paris sportif systeme|simulateur gain paris sportif système|simulateur
montante paris sportif|simulateur paris sportif multiple|simulateur systeme paris sportif|simulation paris sportif gratuit|site aide paris sportif|site analyse
paris sportif|site analyser paris sportif|site arjel paris sportif|site conseil paris
sportif|site d’analyse de paris sportifs|site d’analyse paris sportif|site de conseil
paris sportif|site de pari en ligne sportif|site de pari sportif|site de pari sportif avec bonus
sans depot|site de pari sportif bonus sans depot|site de pari
sportif canada|site de pari sportif en ligne|site de pari
sportif francais|site de pari sportif gratuit|site de pari sportif hors
arjel|site de pari sportif suisse|site de parie sportif|site de parie sportif
en ligne|site de paris en ligne sportif|site de paris
sportif|site de paris sportif acceptant paypal|site de paris sportif arjel|site de paris sportif autorisé
en france|site de paris sportif autorisé en suisse|site de paris sportif avec bonus|site de paris
sportif avec bonus sans depot|site de paris sportif avec bonus sans dépôt|site de paris sportif avec neosurf|site de paris sportif avec paiement mobile|site
de paris sportif avec paypal|site de paris sportif avis|site de paris sportif
belge avec bonus|site de paris sportif belgique|site de paris sportif bonus|site de paris sportif
bonus sans depot|site de paris sportif canada|site de paris sportif comparatif|site de paris sportif depot minimum|site de
paris sportif en france|site de paris sportif en ligne|site de
paris sportif en ligne suisse|site de paris sportif football|site de paris
sportif francais|site de paris sportif france|site de paris sportif gratuit|site de paris sportif gratuit pour gagner des cadeaux|site de paris sportif gratuit sans
dépôt|site de paris sportif hors arjel|site de paris sportif le plus fiable|site de
paris sportif legal en france|site de paris sportif meilleur cote|site de paris sportif nouveau|site de paris sportif offre de bienvenue|site de paris
sportif paypal|site de paris sportif premier paris remboursé|site de paris sportif qui accepte paypal|site de paris
sportif qui rembourse en cash|site de paris sportif remboursé|site de paris sportif
sans argent|site de paris sportif sans carte bancaire|site de paris sportif sans carte
d’identité|site de paris sportif sans depot|site de paris sportif suisse|site de paris sportifs|site
de paris sportifs avec paypal|site de paris sportifs en ligne|site de paris sportifs francais|site de paris
sportifs gratuit|site de paris sportifs paypal|site de paris sportifs suisse|site de statistique pour paris sportif|site des paris sportifs|site pari en ligne sportif|site pari
sportif|site pari sportif 100 euros offert|site pari sportif arjel|site pari
sportif belgique|site pari sportif bonus|site pari sportif canada|site pari sportif comparatif|site pari sportif en ligne|site pari sportif france|site pari sportif gratuit|site pari sportif hors arjel|site pari
sportif suisse|site parie sportif|site paris en ligne sportif|site paris
sportif|site paris sportif 100 euros offert|site
paris sportif 100 euros remboursé|site paris sportif 1er paris remboursé|site paris sportif arjel|site paris sportif autorisé en france|site paris sportif avec bonus|site paris
sportif avec bonus sans depot|site paris sportif
avec meilleur cote|site paris sportif belgique|site paris sportif bonus|site paris sportif bonus
cash|site paris sportif bonus sans depot|site paris sportif canada|site paris sportif comparatif|site paris sportif
depot 5 euro|site paris sportif en ligne|site paris sportif foot|site paris sportif france|site paris sportif gratuit|site paris sportif hors arjel|site paris sportif
hors arjel france|site paris sportif meilleur
cote|site paris sportif nouveau|site paris sportif offre de
bienvenue|site paris sportif paypal|site paris
sportif remboursement cash|site paris sportif remboursé en cash|site paris sportif retrait instantané|site paris sportif sans carte bancaire|site paris sportif
sans depot|site paris sportif suisse|site paris sportifs|site paris sportifs belgique|site paris sportifs en ligne|site paris
sportifs france|site paris sportifs hors arjel|site paris sportifs suisse|site pour analyse paris sportif|site pour paris sportif|site pronostic paris sportif|site statistique paris sportif|site suisse paris sportif|sites de pari sportif|sites de paris sportif|sites de paris sportifs|sites
de paris sportifs arjel|sites de paris sportifs autorisés en france|sites de paris sportifs belgique|sites de paris sportifs bonus|sites de
paris sportifs en belgique|sites de paris sportifs en france|sites de
paris sportifs en ligne|sites de paris sportifs gratuits|sites de paris sportifs gratuits sans dépôt|sites de paris sportifs suisse|sites pari sportif|sites
paris sportif|sites paris sportifs|sites paris sportifs arjel|sites paris sportifs belgique|sites paris sportifs france|sites paris sportifs hors arjel|sites paris sportifs suisse|so foot paris sportif|so foot paris sportifs|specialiste tennis paris sportif|statistique foot paris sportif|statistique paris sportif|statistique paris sportif foot|statistique tennis paris sportif|statistiques football paris sportifs|statistiques paris sportifs|strategie de paris sportif|stratégie big
whale paris sportif|stratégie de paris sportifs|stratégie gagnante paris sportifs|stratégie pari sportif|stratégie paris sportif|stratégie paris sportifs|stratégie paris
sportifs forum|stratégie pour gagner au paris sportif|stratégies paris sportifs|suisse paris sportif|suisse paris sportifs|systeme 2 3 paris sportif|systeme 3 4 paris sportif|systeme de cote paris
sportif|systeme de paris sportif|systeme pari sportif|systeme paris sportif|systeme paris sportifs|systeme reducteur
paris sportif|système paris sportif|tableau bankroll paris sportif|tableau cote paris sportif|tableau
de paris sportif|tableau de suivi paris sportifs|tableau excel bankroll paris sportif|tableau excel paris sportif|tableau excel paris sportif gratuit|tableau excel paris sportifs|tableau excel pour paris sportif|tableau gestion bankroll paris
sportif|tableau montante paris sportif|tableau paris sportif|tableau paris sportif
excel|tableau roi paris sportifs|tableau statistique paris
sportif|tableau suivi paris sportif|taxe gain paris sportif|technique
Your comment is awaiting moderation.
happyhomefinds – Loved browsing this store, products look nice and shipping seems reliable.
Your comment is awaiting moderation.
glamhub – Loved discovering new styles, browsing felt quick and effortless.
Your comment is awaiting moderation.
Top fashion picks – Several eye-catching items popped up instantly, browsing enjoyable.
Your comment is awaiting moderation.
да я после 2си два дня осилил потерпеть и замутил 2се за кампанию(очень приятно, между прочим, пошло). еще 2 дня прошло завтра мб фофки забацаю. Знакомые ставили вв пол колпака, вроде эффектов мало, но один в тот же вечер овердознул 2си и попускался водкой, да и другого только-только отпускало с феников. Просто очень плохо будет, если продукт не удастся. купить Мефедрон, Бошки, Марихуану Верный второй трек. Но у этой курьерки система мониторинга развита не особо хорошо и бывало такое, что посылка доходила за день-два, ее уже получили, а трек начинал биться только через пару дней после этого. Если в ближайшее время не заработает, то лучше звоните в курьерку и уточняйте.
Your comment is awaiting moderation.
lemon casino bonus
Your comment is awaiting moderation.
puregiftcorner – Fantastic selection of gifts, browsing was smooth and fun.
Your comment is awaiting moderation.
Привет ветке)))) Легких подьемов https://watt33.ru Про Ам1220 здешний известно что нибудь…?
Your comment is awaiting moderation.
Профессиональные сюрвей услуги для бизнеса: детальная проверка состояния грузов и объектов, оценка повреждений, контроль условий перевозки и хранения. Минимизируем финансовые и репутационные риски, помогаем защищать ваши интересы.
Your comment is awaiting moderation.
Скрипт обменника https://richexchanger.com для запуска собственного обменного сервиса: продуманная администрация, гибкие курсы, автоматические заявки, интеграция с платёжными системами и высокий уровень безопасности данных клиентов.
Your comment is awaiting moderation.
продавец шикарный – всё объяснил, рассказал. купить кокаин, меф, бошки через телеграмм Спасибо большое, что вы с нами и доверяете нам!
Your comment is awaiting moderation.
bestbrightshop – Shopping was effortless, pages loaded quickly and selection was good.
Your comment is awaiting moderation.
modernvaluecollection – Found modern items easily, website loads fast and browsing feels smooth. modernpickhub – Great assortment of items, delivery was reliable and fast.
Your comment is awaiting moderation.
МАГАЗ СУПЕР!,брал5 гр ск качество отменное все сделанно ровно,даже фото не понадобилось,кристалики отличные без мутного оттенка,плаватся отлично,присутствует запах уксусного ангедрида,ВЫРАЖАЮ ОГРОМНУЮ БЛАГОДАРНОСТЬ!ВСЕ СУПЕР ПРОДОЛЖАЙТЕ В ТОМ ЖЕ ДУХЕ! https://powsurfing.ru Вердикт:
Your comment is awaiting moderation.
Browse urban outfits – A couple of standout selections were visible immediately, very convenient.
Your comment is awaiting moderation.
smartshopcentral – Found lots of affordable items, ordering was smooth.
Your comment is awaiting moderation.
всем привет щас заказал реги попробывать как попробую обизательно отпишу думаю магазин ровный и все ништяк будет)))) https://avto-trend-96.ru глядишь к новому году договоримся, а там и к 2020 посылка придет…
Your comment is awaiting moderation.
Trendy Finds Spot – Discover stylish options and navigate collections without hassle.
Your comment is awaiting moderation.
заказ оформил – жду посылочки ^^ купить скорость, кокаин, мефедрон, гашиш Спасибо, единственный объективный отзыв за последнее время.
Your comment is awaiting moderation.
Мне отказали в подтверждении джаббера в ЛС. Будьте бдительны! https://mxmnet.ru тс удачи в работе
Your comment is awaiting moderation.
Urban fashion hub – A few standout styles appeared instantly, very easy to explore.
Your comment is awaiting moderation.
savvyvaluehub – Prices were excellent, shopping online was a breeze.
Your comment is awaiting moderation.
сегодня в 16:25 на почте получен конверт ,в нем было вещество лимоного цвета 0,3 г , сохнет ,позже подробно опишу купить кокаин, меф, бошки через телеграмм Не прогадал) Искупался, доставили пиццу, вискарика дернул со льдом…
Your comment is awaiting moderation.
Ціни https://remontuem.if.ua на дизайн однокімнатної квартири 45 кв м порівняв на сайті.
Your comment is awaiting moderation.
Знайшов https://seetheworld.top/ матеріали про винтерберг.
Your comment is awaiting moderation.
– Извините…. а… вы нас до “Дайва” (ночной клуб) не довезете? купить кокаин, меф, бошки через телеграмм В итоге получается, что все страницы оказываются в одних недовольствах, но ладно визуально, так ведь чуть ли не неделю каждая страница в недовольствах, а это что-то да значит, особенно когда сам проверишь… Вот я постучался в асю, пообщались, вы исчезли, потом кое-как вернулись, но молчок по полной. Зря вы так, всех клиентов распугаете таким макаром…
Your comment is awaiting moderation.
Юрист помог взыскать компенсацию с недобросовестных соседей https://zaliv-expertiza.ru/
Your comment is awaiting moderation.
что же это за дела то…..? https://pashinskaya-ksusha.ru скорость доставки 5+ (во вторник заказали в пятницу получили)
Your comment is awaiting moderation.
10 euros offert paris sportif|10 euros offert sans dépôt
paris sportif|10 meilleurs sites de paris sportifs|100 euro offert paris sportif|100
euros offert paris sportif|100 euros remboursé paris sportifs|100 offert pari sportif|100 offert paris sportif|100 remboursé paris sportif|100e offert pari sportif|abandon paris sportif tennis|abandon tennis paris sportif|addiction paris
sportif forum|age paris sportif belgique|aide au pari sportif|aide au paris sportif|aide aux paris sportif|aide aux paris sportifs|aide pari sportif|aide pari sportif football|aide parie sportif|aide paris
sportif|aide paris sportif foot|aide paris sportif gratuit|aide paris sportifs|aide pour paris sportif|algorithme de paris sportif|algorithme
excel paris sportif|algorithme gratuit paris sportif|algorithme pari sportif|algorithme paris sportif|algorithme paris sportif avis|algorithme paris sportif
basket|algorithme paris sportif excel|algorithme paris sportif gratuit|algorithme paris sportif tennis|algorithme paris sportifs|algorithme pour paris
sportif|analyse cote paris sportif|analyse de paris sportif|analyse match paris sportif|analyse
pari sportif|analyse paris sportif|analyse paris sportif foot|analyse paris sportif football|analyse paris sportif gratuit|analyse paris sportifs|ancienne cote paris sportif|api cote paris sportif|app paris
sportif sans argent|appli de paris sportif|appli de paris sportif sans argent|appli de paris sportifs|appli pari sportif|appli pari sportif gratuit|appli parie sportif|appli paris sportif|appli paris sportif avec paypal|appli paris sportif belgique|appli paris
sportif entre amis|appli paris sportif gratuit|appli paris sportif sans argent|appli paris sportif suisse|appli paris sportifs|application aide paris sportif|application algorithme paris sportif|application analyse
paris sportif|application android paris sportif|application bankroll paris sportif|application conseil paris sportif|application de pari sportif|application de parie sportif|application de paris sportif|application de paris sportif en afrique|application de paris sportif en cote d’ivoire|application de paris sportif en ligne|application de
paris sportif gratuit|application de paris sportif international|application de paris
sportif suisse|application de paris sportifs|application faux paris sportifs|application gestion bankroll paris sportif|application gestion paris sportif|application ia paris sportif|application pari sportif gratuit|application paris sportif|application paris sportif
android|application paris sportif argent fictif|application paris sportif belgique|application paris sportif canada|application paris
sportif espagne|application paris sportif espagnol|application paris
sportif fictif|application paris sportif france|application paris sportif gratuit|application paris sportif gratuit entre amis|application paris sportif maroc|application paris sportif
offre de bienvenue|application paris sportif paypal|application paris sportif sans argent|application paris sportif sans
justificatif de domicile|application paris sportif suisse|application paris
sportif usa|application paris sportif virtuel|application pour faire des paris sportifs|application pour gerer ses paris sportif|application pour les paris sportifs|application pour pari
sportif|application pour paris sportif|application pour paris sportifs|application statistique paris sportif|application suivi paris sportif|applications de paris sportifs|applications
paris sportifs|applis paris sportif|applis paris sportifs|apprendre a faire des paris sportifs|argent facile paris sportif|argent offert paris sportifs|argent offert sans depot paris sportif|argent paris
sportif|argent paris sportifs|argent paris sportifs impots|argent sans depot
paris sportif|arjel paris sportif|arjel paris sportifs|astuce gagner paris sportif|astuce pari sportif|astuce paris sportif|astuce paris sportif basket|astuce paris sportif foot|astuce paris sportif forum|astuce paris sportif
tennis|astuce paris sportifs|astuce pour gagner au pari sportif|astuce pour gagner au paris sportif|astuce pour
gagner paris sportif|astuce pour paris sportif|astuces paris
sportifs|astuces paris sportifs en ligne|astuces
paris sportifs foot|astuces pour gagner aux paris sportifs|autorisation paris sportif france|avis pari sportif|avis paris sportif|avis
paris sportif foot|avis site de paris sportif|avis site paris sportif|avis sur les
paris sportifs|avis sur paris sportif|avis tipster paris sportif|aweh signification paris
sportif|bankroll 100 euros paris sportifs|bankroll
management paris sportif|bankroll paris sportif|bankroll paris sportif excel|bankroll paris
sportif gratuit|bankroll paris sportifs|basket paris sportif|belgique france paris
sportif|belgique paris sportifs|bonus bienvenue paris sportif|bonus bienvenue
paris sportifs|bonus cash paris sportif|bonus de
bienvenue paris sportif|bonus de bienvenue paris sportif belgique|bonus de bienvenue
sans depot paris sportif|bonus de depot paris sportif|bonus
de paris sportifs|bonus depot paris sportif|bonus en cash paris
sportif|bonus gratuit paris sportif|bonus gratuit sans depot paris
sportif|bonus pari sportif|bonus paris sportif|bonus
paris sportif belgique|bonus paris sportif betclic|bonus paris sportif cash|bonus paris
sportif en ligne|bonus paris sportif france pari|bonus paris sportif retirable|bonus paris sportif sans depot|bonus paris sportif sans dépôt|bonus paris sportif unibet|bonus paris sportifs|bonus sans depot paris sportif|bonus sans depot
paris sportif belgique|bonus sans dépôt paris sportif|bonus sans dépôt paris sportif hors arjel|bonus site de paris sportif|bonus site pari sportif|bonus site paris sportif|bonus
sites de paris sportifs|bonus unibet paris sportif|bookmaker
paris sportif|bookmaker paris sportif gratuit|bookmaker paris sportifs|bookmaker sportif|bookmakers paris
sportif|bookmakers paris sportifs|bookmakers paris sportifs en ligne|but contre son camp
paris sportif|but sur penalty paris sportif|buteur paris sportif|c’est
quoi handicap paris sportif|c’est quoi une cote paris sportif|calcul anti perte paris
sportif|calcul combinaison pari sportif|calcul cote pari sportif|calcul cote paris sportif|calcul couverture paris sportif|calcul de cote paris sportif|calcul
des cotes paris sportifs|calcul dnb paris sportifs|calcul double chance paris sportif|calcul gain paris sportif|calcul mise paris sportif|calcul pari sportif|calcul paris sportif|calcul paris sportif
multiple|calcul pourcentage cote paris sportif|calcul
probabilité paris sportif|calcul rentabilité paris sportifs|calcul roi paris sportif|calcul systeme paris sportif|calcul trj paris
sportifs|calculateur cote paris sportif|calculateur de cote
paris sportif|calculateur de mise paris sportif|calculateur de paris sportif|calculateur paris sportif|calculatrice arbitrage paris sportif|calculatrice
paris sportif|calculer cote paris sportif|calculer gain paris sportif|calculer probabilité paris sportifs|calculer roi paris sportifs|calculer une cote pari sportif|calculer une cote paris sportif|carte cadeau paris sportif|carte pcs paris sportif|carte prépayée paris sportifs|cash out pari sportif|cash
out paris sportif|cash out paris sportifs|casino en ligne paris sportif|casino paris sportif en ligne|champions league paris sportif|chute de cote paris sportif|classement des meilleurs sites de
paris sportifs|classement meilleur site de paris sportif|code barre paris sportif|code bonus paris sportif|code
paris sportif|code promo pari sportif|code promo paris sportif|code promo paris sportif sans depot|code promo paris sportif sans dépôt|code promo sans depot paris sportif|code promo site paris sportif|combien de temps pour encaisser un paris sportif|combien de temps pour retirer un paris sportif|combien miser paris sportifs|combine paris sportif|combines paris sportifs|combiné pari sportif|combiné paris
sportif|combiné paris sportif conseil|combiné paris sportif du jour|combiné paris sportif
pronostic|comment analyser un paris sportif|comment arreter de jouer aux
paris sportifs|comment arreter les paris sportif|comment arreter les paris sportifs|comment
arrêter les paris sportifs|comment bien gagner au paris sportif|comment bien jouer au paris
sportif|comment bien miser paris sportif|comment ca marche les paris sportif|comment calculer cote paris sportif|comment calculer gain paris sportif|comment calculer les cotes des paris sportifs|comment calculer une cote
de paris sportif|comment calculer une cote pari sportif|comment
calculer une cote paris sportif|comment comprendre les paris sportifs|comment creer un vip paris
sportif|comment créer un algorithme paris sportif|comment créer
un site de paris sportif|comment devenir riche avec les paris sportifs|comment etre rentable paris sportif|comment etre sur
de gagner au paris sportif|comment faire de bon paris sportif|comment
faire des parie sportif|comment faire des paris sportif|comment faire des paris sportif gagnant|comment faire des paris sportifs|comment faire pari sportif|comment faire paris sportif|comment faire
pour arreter les paris sportifs|comment faire pour gagner au paris sportif|comment faire pour
gagner les paris sportifs|comment faire un bon pari sportif|comment faire un bon paris sportif|comment faire un pari sportif|comment faire un parie sportif|comment faire un paris sportif|comment
faire une montante paris sportif|comment fonctionne les cotes dans
les paris sportifs|comment fonctionne les cotes des
paris sportifs|comment fonctionne les paris sportifs|comment fonctionne paris sportifs|comment fonctionne un pari sportif|comment fonctionnent les cotes dans les paris sportifs|comment fonctionnent les cotes dans les paris sportifs grand
oral|comment fonctionnent les cotes de paris sportif|comment fonctionnent les paris sportifs|comment fonctionnent les paris sportifs grand oral|comment fonctionnent
les paris sportifs grand oral maths|comment fonctionnent
les paris sportifs maths|comment gagner a coup sur au paris
sportif|comment gagner a tous les coups au paris sportif|comment gagner
a tout les coup au paris sportif|comment gagner au pari sportif|comment gagner au pari sportif football|comment gagner au paris
sportif|comment gagner au paris sportif a coup sur|comment gagner au
paris sportif foot|comment gagner au paris sportif
forum|comment gagner au paris sportif tennis|comment gagner au paris sportifs|comment gagner aux paris sportif|comment
gagner aux paris sportifs|comment gagner aux paris sportifs foot|comment gagner aux paris
sportifs livre|comment gagner aux paris sportifs sur le long terme|comment
gagner avec les paris sportifs|comment gagner dans les paris sportifs|comment gagner
de l argent avec les paris sportifs|comment gagner de l’argent
au paris sportif|comment gagner de l’argent aux paris sportifs|comment gagner de l’argent avec les paris sportifs|comment gagner de
l’argent paris sportif|comment gagner de l’argent sur les paris sportifs|comment gagner de l’argent sur paris sportif|comment gagner des paris sportif|comment gagner des paris sportifs|comment gagner en paris
sportif|comment gagner facilement au paris sportif|comment gagner les paris sportifs|comment gagner
paris sportif|comment gagner paris sportif foot|comment gagner paris sportifs|comment gagner sa vie
avec les paris sportifs|comment gagner ses
paris sportif|comment gagner sur les paris
sportif|comment gagner sur les paris sportifs|comment gagner tout le temps au paris sportif|comment gagner un pari sportif|comment gagner un paris sportif|comment gerer une bankroll
paris sportif|comment gérer sa bankroll paris sportif|comment jouer au
pari sportif|comment jouer au paris sportif|comment
jouer au paris sportif foot|comment jouer aux paris sportifs|comment jouer paris sportif|comment marche cote
paris sportif|comment marche les cotes paris sportif|comment marche les paris sportif|comment marche les paris
sportifs|comment marche paris sportif|comment marche un pari sportif|comment marche un paris sportif|comment marchent les
cotes paris sportif|comment marchent les paris sportifs|comment miser au paris sportif|comment miser paris sportif|comment monter sa bankroll paris sportif|comment ne jamais perdre au paris sportif|comment parier sportif|comment reussir
au paris sportif|comment reussir les paris sportif|comment reussir paris sportif|comment sont calculer les cotes de
paris sportif|comment sont calculées les cotes des paris sportifs|comment sont calculés les cotes des
paris sportifs|comment sont faites les cotes des
paris sportifs|comment toujours gagner au paris sportif|comment ça marche les paris sportifs|comparaison bonus paris sportifs|comparaison cote pari
sportif|comparaison des cotes paris sportifs|comparateur cote pari
sportif|comparateur cote paris sportif|comparateur cotes paris sportif|comparateur cotes paris sportifs|comparateur de cote pari sportif|comparateur de cote paris sportif|comparateur de cotes
paris sportifs|comparateur de côtes paris sportifs|comparateur de
paris sportif|comparateur de site de paris sportif|comparateur de
site paris sportif|comparateur de sites de paris sportifs|comparateur pari sportif|comparateur paris sportif|comparateur paris sportifs|comparateur site
de paris sportif|comparateur site pari sportif|comparateur site paris sportif|comparatif bonus
paris sportif|comparatif bonus paris sportifs|comparatif cote pari
sportif|comparatif cote paris sportif|comparatif cotes paris sportifs|comparatif des sites de
paris sportifs|comparatif offre de bienvenue paris sportif|comparatif offre paris sportif|comparatif pari sportif|comparatif pari
sportif en ligne|comparatif paris sportif|comparatif paris
sportif bonus|comparatif paris sportif en ligne|comparatif
paris sportifs|comparatif paris sportifs en ligne|comparatif site
de paris sportif|comparatif site paris sportif|comparatif site paris sportifs|comparatif sites de
paris sportifs|comparatif sites paris sportifs|comparer les cotes paris sportifs|comprendre cote paris sportif|comprendre handicap paris sportif|comprendre les cotes des paris sportifs|comprendre les cotes paris sportif|comprendre les cotes paris sportifs|comprendre les handicap paris sportif|compte de paris sportif|compte démo paris
sportif|compte finance paris sportif|compte financer paris sportif|compte financier paris
sportif|compte financé paris sportif|compte pari sportif|compte paris sportif|compte paris sportif financé|conseil de paris sportif|conseil de
paris sportifs|conseil en paris sportif|conseil en paris sportifs|conseil pari sportif|conseil pari sportif gratuit|conseil paris sportif|conseil paris sportif aujourd’hui|conseil
paris sportif du jour|conseil paris sportif foot|conseil paris sportif gratuit|conseil paris sportif ligue des champions|conseil paris sportif nba|conseil paris sportif pronostic|conseil paris sportif rmc|conseil paris sportif tennis|conseil paris sportifs|conseil pour gagner au paris sportif|conseil pour paris sportif|conseil sur les paris sportifs|conseille paris sportif|conseiller en paris
sportifs|conseiller paris sportif|conseils de paris sportifs|conseils en paris sportifs|conseils paris sportifs|conseils paris sportifs foot|conseils
paris sportifs gratuit|conseils paris sportifs tennis|conseils pour paris sportifs|cote a 100 paris
sportif|cote a 2 paris sportif|cote anglaise paris sportif|cote de 2 paris sportif|cote de pari sportif|cote de
paris sportif|cote des paris sportifs|cote maximum paris
sportif|cote minimum paris sportif|cote pari sportif|cote pari sportif
comment ça marche|cote pari sportif real madrid|cote pari sportif rugby|cote parie sportif|cote
paris sportif|cote paris sportif belgique|cote paris sportif calcul|cote paris sportif
definition|cote paris sportif euro|cote paris sportif explication|cote paris sportif
foot|cote paris sportif france belgique|cote paris
sportif france espagne|cote paris sportif ligue des champions|cote paris sportif
moto gp|cote paris sportif psg|cote paris sportif psg arsenal|cote paris sportif rugby|cote paris sportif
tennis|cote paris sportifs|cote pour paris sportifs|cote sportif foot|cote
sportif rugby|cote à 1000 paris sportif|cotes
de paris sportifs|cotes pari sportif|cotes paris sportif|cotes paris sportifs|cotes paris sportifs foot|coupe de
france paris sportif|créer un algorithme paris sportif|créer un compte paris sportif|créer un site de paris sportif en ligne|dans les paris sportifs que signifie handicap|declarer ses gains paris sportif|definition cash out paris sportif|definition cote paris sportif|definition handicap paris sportif|depot 5 euros paris sportif|depot double paris sportif|depot minimum 5 euro paris sportif|depot minimum paris sportif|depot paris sportif|depuis quand existe les paris sportif en france|devenir riche avec les
paris sportifs|devenir riche avec paris sportifs|disqualification tennis paris sportif|dnb en paris sportif|dnb pari sportif|dnb paris sportif|dnb
paris sportif definition|dnb paris sportifs|doit on declarer les gains de paris sportif|déclarer gains paris sportifs|déclarer gains paris sportifs hors
arjel|définition bankroll paris sportif|dépôt minimum
1 euro paris sportif|dépôt minimum 5 euro paris sportif|ecart de jeux tennis paris sportif|erreur de cote paris
sportif|est ce que les gains des paris sportifs sont imposables|est-ce que les prolongation compte dans un pari sportif|etre
sur de gagner au paris sportif|euro paris sportif|evenement sportif a paris|evenement sportif
paris|evenement sportif paris 2025|evenement sportif paris
aujourd hui|evenement sportif paris aujourd’hui|evenement sportif paris ce week
end|evenements sportif paris|evenements sportifs paris|evenements sportifs paris 2025|evenements sportifs à paris|evolution cote paris sportif|evolution cotes paris sportifs|evolution des cotes paris sportifs|explication cote pari sportif|explication cote paris sportif|explication handicap paris sportif|explication pari sportif|explication paris sportif|face a face hockey paris sportif|faire des paris sportif|faire
des paris sportif avec paypal|faire des paris sportifs|faire fortune paris sportifs|faire un pari sportif|faire un paris sportif|faut il déclarer les gains
de paris sportifs|faut il déclarer ses gains paris
sportifs|fichier excel gestion bankroll paris sportif|fiscalité gains paris sportifs|foot
paris sportif|football et paris sportifs|forfait tennis paris
sportif|formation paris sportif gratuit|forum de paris sportif|forum de paris
sportifs|forum pari sportif|forum parie sportif|forum paris sportif|forum paris sportif foot|forum paris sportif
gratuit|forum paris sportif nba|forum paris sportif tennis|forum paris sportifs|forum
sur les paris sportifs|forum tennis paris sportif|francaise des
jeux pari sportif|francaise des jeux paris sportif|francaise des jeux
paris sportifs|france 2 paris sportif|france 2 paris sportifs|france belgique paris sportif|france espagne paris sportif|france pari sportif|france pari sportif brest|france paris sportif|france
paris sportifs|france pologne paris sportif|france portugal paris
sportif|france suisse paris sportifs|france tunisie paris sportifs|france-pari – paris sportifs|gagnant pari sportif|gagnant paris
sportif|gagnant paris sportif bayern|gagnante paris sportif|gagne au paris sportif|gagner 10 euros par jour aux paris
sportifs|gagner 100 euros par jour paris sportif|gagner 1000 euros par mois paris sportifs|gagner 10000
euros paris sportif|gagner 2000 euros par mois paris sportif|gagner 50 euros par jour paris sportif|gagner a coup sur au paris
sportif|gagner a coup sur pari sportif|gagner a tous les coup paris sportif|gagner argent avec paris
sportifs|gagner argent pari sportif|gagner argent paris
sportif|gagner argent paris sportifs|gagner au pari sportif|gagner au
paris sportif|gagner au paris sportif a coup sur|gagner au
paris sportif foot|gagner au paris sportif
forum|gagner au paris sportif à coup sur|gagner aux paris sportif|gagner aux paris sportifs|gagner aux paris sportifs pdf|gagner beaucoup d’argent paris sportif|gagner de l argent
grace aux paris sportifs|gagner de l argent pari sportif|gagner de l argent paris sportif|gagner de l argent paris sportifs|gagner
de l’argent au paris sportif|gagner de l’argent aux paris sportifs|gagner de
l’argent avec les paris sportifs|gagner de l’argent avec paris sportif|gagner
de l’argent avec paris sportifs|gagner de l’argent grace
au paris sportif|gagner de l’argent grace aux paris sportifs|gagner
de l’argent pari sportif|gagner de l’argent paris sportif|gagner de l’argent paris sportifs|gagner de
l’argent sur les paris sportifs|gagner des paris sportif|gagner des paris sportifs|gagner les paris sportifs|gagner pari sportif|gagner paris sportif|gagner paris sportif foot|gagner paris sportif forum|gagner
paris sportif tennis|gagner paris sportifs|gagner sa vie avec les paris sportif|gagner sa vie avec les paris sportifs|gagner
sa vie avec paris sportifs|gagner ses paris sportifs|gagner à coup sur
paris sportif|gagner à tous les coups paris sportifs|gain maximum paris sportif|gain pari sportif|gain pari sportif imposable|gain pari sportif impot|gain paris sportif|gain paris sportif imposable|gain paris sportif impot|gain paris sportif impôt [Emma]|gains
paris sportif|gains paris sportif imposable|gains paris sportifs|gains paris sportifs imposable|gains paris sportifs imposables|gains paris
sportifs sont ils imposables|gerer bankroll paris sportif|gerer sa bankroll
paris sportif|gerer une bankroll paris sportif|gestion bankroll
paris sportif|gestion bankroll paris sportifs|gestion bankroll paris
sportifs excel|gestion de bankroll paris sportif|gestion de bankroll paris sportif application|gestion de bankroll paris sportifs|gestion de mise paris sportif|gestion paris sportifs v2 5 gratuit|gg signification paris sportif|gros combiné paris sportif|gros gain paris sportif|grosse cote paris sportif pronostic|grosse mise paris sportif|groupe paris sportif gratuit|groupe telegram paris sportif gratuit|groupement de joueurs paris sportifs|handicap 0 paris sportif|handicap 1
paris sportif|handicap 5 paris sportif|handicap au paris sportif|handicap basket
paris sportif|handicap dans les paris sportifs|handicap en paris sportif|handicap
europeen paris sportif|handicap européen paris sportifs|handicap mi temps paris sportif|handicap pari sportif|handicap paris sportif|handicap paris sportif basket|handicap paris sportif explication|handicap paris sportif foot|handicap paris sportif rugby|handicap paris sportifs|handicap rugby paris sportif|handicap tennis paris sportif|historique cote paris sportif|historique des cotes paris
sportifs|hockey paris sportif|hockey sur glace paris sportif|hors arjel paris sportif|hweh
signification paris sportif|imposition gain pari sportif|imposition gain paris sportif|imposition gains paris sportifs|imposition paris
sportif france|impot gain paris sportif|impot paris sportif france|impot sur gain paris sportif|je
gagne ma vie avec les paris sportifs|jeu de pari
sportif gratuit|jeu de paris sportif en ligne|jeu de paris sportif gratuit|jeu paris sportif gratuit|jeu paris sportif sans
argent|jeux de parie sportif|jeux de paris sportif|jeux de paris sportif en ligne|jeux de paris sportif gratuit|jeux de paris sportifs|jeux olympiques paris
sportifs|jeux paris sportif|jeux paris sportif gratuit|jeux paris sportif virtuel|jeux paris sportifs en ligne|jouer au paris
sportif|jouer paris sportif|joueur absent paris sportif|joueur blesse paris sportif|joueur caen paris sportif|joueur de
caen pari sportif|joueur de foot paris sportif|joueur decisif paris sportif|joueur décisif
paris sportif|joueur italien paris sportif|joueur paris sportif|joueur professionnel paris sportif|joueur qui se
blesse paris sportif|joueur sanctionne pari sportif|joueur suspendu paris sportif|joueurs
italiens paris sportifs|l’argent des paris sportifs est il imposable|la cote paris sportif|la
francaise des jeux paris sportif|la martingale paris sportif|la martingale paris sportifs|la meilleur application de paris sportif|la meilleur application paris
sportif|la meilleur technique pour gagner au paris sportif|la méthode secrète
pour gagner aux paris sportifs pdf|la plus grosse cote gagner paris sportif|la plus grosse cote paris sportif|ldem paris sportif signification|le marché des paris sportifs|le meilleur site de pari
sportif|le meilleur site de paris sportif|le meilleur site de paris sportif en ligne|le meilleur site de paris sportifs|le plus gros gain au paris sportif|le plus gros paris sportif|le
plus gros paris sportif du monde|les 10 meilleurs sites de paris sportifs|les 10 meilleurs sites de paris sportifs en afrique|les 17 secrets pour gagner rapidement aux paris sportifs|les 17 secrets pour gagner rapidement aux paris sportifs pdf|les application de paris sportif|les applications paris
sportifs|les bonus paris sportifs|les bookmakers paris sportifs|les cotes paris sportifs|les gains de paris sportifs
sont ils imposables|les gains des paris sportifs sont ils imposables|les jeux de paris sportifs|les meilleur paris sportif|les meilleures applications de paris sportifs|les meilleurs applications de paris sportifs|les meilleurs bonus paris sportif|les meilleurs
bonus paris sportifs|les meilleurs cotes paris sportif|les meilleurs paris sportifs|les meilleurs paris sportifs du jour|les meilleurs site de paris sportif|les meilleurs site
de paris sportifs|les meilleurs sites de pari sportif|les meilleurs sites
de paris sportifs|les meilleurs sites de paris sportifs en ligne|les paris sportif|les paris sportif avis|les paris
sportifs|les paris sportifs comment ça marche|les paris sportifs en france|les paris
sportifs en ligne|les paris sportifs en ligne comprendre jouer gagner|les
paris sportifs en ligne comprendre jouer gagner pdf|les paris sportifs les plus rentables|les plus gros gagnant paris sportif|les plus gros
gains au paris sportifs|les plus gros gains paris sportifs|les plus gros paris sportif|les plus grosse cote paris sportif|les plus grosses pertes paris sportifs|les sites de paris sportifs|les sites de paris sportifs autorisés en france|les sites de paris
sportifs en france|les sites de paris sportifs en ligne|les
sites de paris sportifs francais|ligue 1 paris sportif|ligue 1 paris sportifs|ligue 2 paris sportif|ligue des champions paris sportif|limite
de gains paris sportifs|limite de mise paris sportif|limite gain paris sportif|limite mise paris sportifs|liste de paris sportif|liste des
paris sportifs|liste des site de paris sportif|liste
des sites de paris sportifs|liste pari sportif|liste
paris sportif|liste paris sportif pdf|liste site de paris sportif|liste site pari sportif|liste site
paris sportif|liste site paris sportif arjel|liste sites paris sportifs|logiciel algorithme paris sportif|logiciel algorithme paris
sportif gratuit|logiciel analyse paris sportif|logiciel calcul paris sportif|logiciel de pari sportif|logiciel de paris sportif|logiciel de paris sportif gratuit|logiciel gestion bankroll paris sportif gratuit|logiciel gestion de
bankroll paris sportif|logiciel gestion paris sportif|logiciel gestion paris sportif gratuit|logiciel
gestion paris sportifs|logiciel pari sportif|logiciel paris sportif|logiciel paris sportif gratuit|logiciel
paris sportifs|logiciel paris sportifs foot sur 2 matchs|logiciel pour
paris sportif|logiciel pour paris sportifs|logiciel prediction paris sportif|logiciel probabilité paris sportif|logiciel
prédiction paris sportif|logiciel statistique paris sportifs|logiciel
variation de cote paris sportif|loi sur les paris
sportifs en france|magic calculator paris sportif|marché des paris sportifs|marché des paris sportifs en france|marché des paris sportifs en ligne|martingale pari sportif|martingale paris sportif|martingale paris sportif excel|martingale paris sportif
forum|martingale paris sportif interdit|martingale paris sportifs|match
abandonné paris sportif|match annulé ou reporté paris sportifs|match annulé paris sportif|match arrete paris
sportif|match interrompu paris sportif|match interrompu tennis paris
sportif|match interrompu tennis pluie paris sportif|match
nul boxe paris sportif|match pari sportif|match paris
sportif|match reporté paris sportif|match suspendu paris sportif|match suspendu tennis paris sportif|match truqué paris sportif|matchs
truqués paris sportifs|meilleur algorithme paris sportif|meilleur algorithme paris
sportif gratuit|meilleur app de paris sportif|meilleur app de paris sportifs|meilleur app paris sportif|meilleur appli de pari sportif|meilleur
appli de paris sportif|meilleur appli pari sportif|meilleur appli paris
sportif|meilleur appli paris sportif forum|meilleur appli paris
sportifs|meilleur application conseil paris sportif|meilleur
application de paris sportif|meilleur application de paris sportif en afrique|meilleur application pari sportif|meilleur application paris sportif|meilleur application paris sportif belgique|meilleur application pour les paris sportif|meilleur
application pour pari sportif|meilleur bonus de bienvenue paris sportif|meilleur bonus pari sportif|meilleur bonus paris sportif|meilleur bonus paris sportif sans depot|meilleur bonus
paris sportifs|meilleur bonus site de paris sportif|meilleur bonus site pari sportif|meilleur
bonus site paris sportif|meilleur bookmaker paris
sportif|meilleur combiné paris sportif|meilleur
conseil paris sportif|meilleur cote de paris sportif|meilleur cote pari sportif|meilleur cote paris sportif|meilleur
cote paris sportif aujourd’hui|meilleur cote site paris sportif|meilleur forum paris sportifs|meilleur
gain paris sportif|meilleur ia paris sportif|meilleur methode pour gagner au paris sportif|meilleur offre
bienvenue paris sportif|meilleur offre bonus paris
sportif|meilleur offre de bienvenue paris sportif|meilleur offre de bienvenue paris sportifs|meilleur offre pari sportif|meilleur offre paris sportif|meilleur offre paris sportif en ligne|meilleur pari sportif|meilleur pari sportif du jour|meilleur pari sportif en ligne|meilleur paris sportif|meilleur paris sportif aujourd’hui|meilleur paris sportif du
jour|meilleur paris sportif en ligne|meilleur paris sportif foot|meilleur promo paris
sportif|meilleur pronostic paris sportif|meilleur site de conseil paris sportif|meilleur
site de pari sportif|meilleur site de pari sportif en ligne|meilleur site de paris sportif|meilleur site de paris sportif avis|meilleur site de paris sportif belgique|meilleur site de paris sportif canada|meilleur
site de paris sportif en france|meilleur site de paris sportif en ligne|meilleur site de paris sportif football|meilleur site de paris sportif forum|meilleur
site de paris sportif france|meilleur site de paris sportif hors arjel|meilleur site de paris sportif international|meilleur site de paris sportif suisse|meilleur site de paris sportifs|meilleur site de paris sportifs en ligne|meilleur site pari sportif|meilleur site pari sportif en ligne|meilleur
site pari sportif france|meilleur site paris sportif|meilleur site paris sportif avis|meilleur site paris sportif belgique|meilleur site paris sportif canada|meilleur site paris sportif en ligne|meilleur site paris sportif
foot|meilleur site paris sportif forum|meilleur site paris sportif france|meilleur site paris sportif hors arjel|meilleur site paris sportif nba|meilleur site paris sportif rugby|meilleur site paris
sportif suisse|meilleur site paris sportifs|meilleur site pour pari sportif|meilleur site pour paris sportif|meilleur site pronostic paris sportif|meilleur strategie
paris sportif|meilleur technique de paris sportif|meilleur technique paris sportif|meilleur technique pour gagner au paris sportif|meilleure appli de paris sportif|meilleure appli de paris sportifs|meilleure
appli pari sportif|meilleure appli paris sportif|meilleure appli
paris sportifs|meilleure application de paris sportif|meilleure application de
paris sportifs|meilleure application pari sportif|meilleure application paris sportif|meilleure application paris
sportif android|meilleure application paris sportifs|meilleure offre paris sportif|meilleure site
paris sportif|meilleure strategie paris sportif|meilleures applications de paris sportifs|meilleures
applications paris sportifs|meilleures cotes paris sportifs|meilleures offres paris sportifs|meilleures stratégies paris sportifs|meilleurs appli paris sportif|meilleurs application de paris
sportifs|meilleurs application paris sportif|meilleurs
applications paris sportifs|meilleurs bonus paris sportifs|meilleurs cote paris sportif|meilleurs cotes
paris sportifs|meilleurs offres paris sportifs|meilleurs paris sportifs|meilleurs paris sportifs du jour|meilleurs
site de pari sportif|meilleurs site de paris sportif|meilleurs site de paris sportif en ligne|meilleurs
site de paris sportifs|meilleurs site paris sportif|meilleurs sites de
paris sportifs|meilleurs sites de paris sportifs en ligne|meilleurs sites paris sportif|meilleurs sites
paris sportifs|methode abc paris sportif|methode de paris sportif|methode gagnante paris sportifs|methode gagner
paris sportif|methode infaillible paris sportifs|methode martingale paris sportif|methode mathematique paris sportif|methode mathematique pour gagner au paris sportif|methode paris sportif|methode paris sportif foot|methode paris sportif forum|methode paris sportif tennis|methode paris sportifs|methode pour gagner au paris sportif|methode pour gagner paris sportif|methodes paris sportifs|minimum depot paris sportif|mise au jeu pari sportif|mise
maximum pari sportif|mise maximum paris sportif|mise minimum
paris sportif|mise moyenne paris sportif|mise paris sportif|moins de
4 5 but paris sportif|montant maximum paris sportif|montant
paris sportif|montante pari sportif|montante
parie sportif|montante paris sportif|montante paris sportifs|montantes paris sportifs|multiple pari sportif|multiple paris sportif|multiple
paris sportifs|multiples paris sportifs|méthode calcul paris
sportif|méthode match nul paris sportifs|méthode mathématique pour gagner au
paris sportif|méthode paris sportif forum|méthode paris sportif hockey|nba pari
sportif|nba paris sportif|nba paris sportifs|nouveau paris sportif|nouveau site de pari sportif|nouveau site de paris sportif|nouveau site de paris sportif en ligne|nouveau site
de paris sportifs|nouveau site pari sportif|nouveau site paris sportif|nouveau site
paris sportif france|nouveau site paris sportifs|nouveaux sites de paris sportifs|nouveaux sites paris sportifs|nouvelle appli paris sportif|nouvelle application de paris sportif|numero de match paris sportif|numero match paris sportif|offre 100
euros paris sportif|offre appli pari sportif|offre bienvenu
paris sportif|offre bienvenue pari sportif|offre bienvenue paris
sportif|offre bienvenue paris sportifs|offre bienvenue site paris sportif|offre bonus paris
sportif|offre de bienvenu paris sportif|offre de bienvenue pari sportif|offre de bienvenue paris sportif|offre de bienvenue paris sportif belgique|offre
de bienvenue paris sportif sans depot|offre de bienvenue paris sportif sans dépôt|offre de
bienvenue paris sportifs|offre de bienvenue sans depot paris
sportif|offre de bienvenue site paris sportif|offre euro paris sportif|offre
pari sportif euro|offre paris sportif|offre paris sportif belgique|offre paris sportif cash|offre paris sportif coupe du monde|offre paris sportif hors arjel|offre paris sportif remboursé|offre paris sportif remboursé cash|offre
paris sportif sans depot|offre promo paris sportif|offre remboursement paris sportif|offre sans depot paris sportif|offre site paris sportif|offres bienvenue
paris sportifs|offres de bienvenue paris sportifs|ou faire des paris sportif|ou faire des paris sportif en espagne|ou faire des paris sportifs|outil
répartiteur de mise paris sportif|outils repartiteur de mises paris sportif|ouverture compte paris
sportifs|ouvrir un compte paris sportif|pack de bienvenue paris sportif|pack de bienvenue paris sportif hors arjel|pari en ligne sportif|pari sportif|pari sportif 100 euros offert|pari sportif 100 remboursé|pari sportif abandon tennis|pari sportif aide|pari
sportif algérie aujourd’hui|pari sportif appli|pari sportif application|pari sportif argent|pari sportif astuce|pari sportif aujourd|pari sportif aujourd’hui|pari sportif avec
handicap|pari sportif avec orange money|pari sportif
avec paypal|pari sportif avec wave|pari sportif avis|pari sportif
basket|pari sportif belgique|pari sportif belgique france|pari sportif bonus|pari
sportif buteur pas titulaire|pari sportif champions league|pari sportif combiné|pari sportif comment|pari sportif comment gagner|pari sportif comment ça marche|pari sportif comparatif|pari sportif conseil|pari sportif
cote|pari sportif cote match|pari sportif cote psg|pari sportif coupe|pari sportif coupe de france|pari sportif coupe du monde|pari sportif depot|pari sportif du jour|pari sportif en france|pari sportif en ligne|pari sportif en ligne au cameroun|pari sportif en ligne belgique|pari sportif en ligne canada|pari sportif en ligne france|pari sportif en ligne gratuit|pari sportif en ligne suisse|pari sportif en ligne ufc|pari sportif en suisse|pari sportif euro|pari sportif explication|pari sportif
faire|pari sportif foot|pari sportif foot resultat|pari sportif
football|pari sportif forum|pari sportif francaise des jeux|pari sportif france|pari sportif france angleterre|pari sportif france argentine|pari sportif france autriche|pari sportif france belgique|pari sportif france espagne|pari sportif
france italie|pari sportif france portugal|pari sportif france usa|pari sportif gagnant|pari sportif gagner|pari sportif gagner a tous les coups|pari sportif gagner de l’argent|pari sportif gain|pari sportif gratuit|pari sportif gratuit pour gagner des cadeaux|pari sportif gratuit sans
depot|pari sportif handicap|pari sportif hockey|pari sportif hors arjel|pari sportif
jeux olympiques|pari sportif joueur absent|pari sportif le
plus rentable|pari sportif leicester champion|pari sportif ligue 1|pari sportif
ligue 2|pari sportif ligue des champions|pari sportif ligue europa|pari sportif match|pari sportif match arrete|pari sportif match interrompu|pari sportif meilleur|pari sportif meilleur cote|pari sportif meilleur site|pari sportif methode|pari sportif mise|pari sportif mise au jeu|pari sportif mise
o jeu|pari sportif nba|pari sportif offre
bienvenue|pari sportif paypal|pari sportif plus|pari sportif prolongation|pari sportif promo|pari sportif pronostic|pari sportif pronostic foot|pari
sportif pronostic gagnant|pari sportif pronostic gratuit|pari sportif psg|pari sportif psg bayern|pari
sportif psg inter|pari sportif psg milan|pari sportif regle|pari sportif rembourse|pari sportif remboursement|pari sportif remboursement
cash|pari sportif remboursé|pari sportif rugby|pari sportif rugby coupe du monde|pari sportif rugby top 14|pari sportif sans argent|pari sportif sans carte bancaire|pari sportif sans
depot|pari sportif signification|pari sportif site|pari sportif statistique|pari sportif suisse|pari sportif systeme|pari sportif technique|pari sportif
technique pour gagner|pari sportif temps reglementaire|pari sportif tennis|pari
sportif tennis abandon|pari sportif top|pari sportif top 14|pari sportif tour
de france|parie sportif|parie sportif comment ca marche|parie sportif du jour|parie sportif en ligne|parie sportif foot|parie sportif football|parie sportif france|parie sportif gratuit|parie sportif
pronostic|parie sportif suisse|paris en ligne sportif|paris en ligne sportifs|paris evenement sportif|paris
france sportif|paris hippique et sportif|paris hippiques et sportifs|paris hippiques paris sportifs|paris hippiques paris sportifs
et poker en ligne|paris hippiques sportifs|paris match sportif|paris sportif|paris sportif 10 euros offerts|paris sportif 100 euros offert|paris sportif
100 euros remboursé|paris sportif 100 offert|paris sportif 100 remboursé|paris sportif 100e offert|paris
sportif 150 euros offert|paris sportif 1er pari remboursé|paris sportif a faire|paris sportif a faire aujourd’hui|paris sportif a
faire ce soir|paris sportif abandon tennis|paris sportif
abandon tennis parions sport|paris sportif aide|paris sportif algorithme|paris sportif analyse|paris sportif appli|paris sportif application|paris sportif application android|paris
sportif apres prolongation|paris sportif argent|paris sportif argent fictif|paris sportif
argent offert|paris sportif argent virtuel|paris sportif
arjel|paris sportif arsenal psg|paris sportif astuce|paris sportif au canada|paris sportif
aujourd hui|paris sportif aujourd’hui|paris sportif avec argent
fictif|paris sportif avec bonus sans depot|paris sportif avec carte
bancaire|paris sportif avec cryptomonnaie|paris sportif avec handicap|paris sportif avec paypal|paris sportif avec paysafecard|paris sportif avis|paris sportif avis expert|paris sportif avis forum|paris sportif bankroll|paris
sportif basket|paris sportif basket coupe de france|paris sportif basket nba|paris sportif basket prolongation|paris sportif belgique|paris sportif
belgique bonus|paris sportif belgique bonus sans depot|paris sportif belgique france|paris sportif belgique suede|paris sportif bonus|paris sportif bonus bienvenue|paris sportif
bonus cash|paris sportif bonus de bienvenue|paris sportif bonus gratuit|paris sportif bonus gratuit sans depot|paris sportif bonus
retirable|paris sportif bonus sans depot|paris sportif bonus sans depot belgique|paris sportif
bookmaker|paris sportif but contre son camp|paris sportif
but temps additionnel|paris sportif buteur|paris sportif buteur blessé|paris
sportif buteur carton rouge|paris sportif buteur contre son camp|paris sportif
buteur non titulaire|paris sportif buteur prolongation|paris sportif buteur qui ne joue pas|paris sportif buteur remplacant|paris sportif calcul gain|paris sportif canada|paris sportif cash|paris sportif
cash out|paris sportif champion ligue 1|paris sportif champions league|paris sportif classement ligue
1|paris sportif code promo|paris sportif combine|paris
sportif combiné|paris sportif combiné comment ça marche|paris sportif combiné
du jour|paris sportif combiné match reporté|paris sportif comment ca marche|paris sportif comment
faire|paris sportif comment gagner|paris sportif comment
gagner a tous les coups|paris sportif comment jouer|paris sportif comment ça marche|paris sportif comparateur
cote|paris sportif comparatif|paris sportif conseil|paris sportif
conseil gratuit|paris sportif conseil pour gagner|paris
sportif cote|paris sportif cote et match|paris sportif cote
explication|paris sportif cote psg|paris sportif coupe d’europe|paris sportif coupe davis|paris sportif coupe de france|paris sportif coupe du monde|paris sportif coupe du monde de rugby|paris sportif coupe
du monde rugby|paris sportif depot 5 euro|paris sportif depot minimum|paris sportif depot paypal|paris sportif dnb|paris sportif du jour|paris sportif
du jour conseil|paris sportif dépôt 1 euro|paris sportif dépôt
minimum 5 euros|paris sportif en belgique|paris sportif en france|paris
sportif en ligne|paris sportif en ligne avec paypal|paris sportif en ligne avis|paris sportif en ligne
belgique|paris sportif en ligne bonus|paris sportif en ligne
cameroun|paris sportif en ligne comment gagner|paris sportif en ligne comment ça marche|paris sportif en ligne france|paris sportif en ligne
gratuit|paris sportif en ligne maroc|paris sportif en ligne paypal|paris sportif en ligne québec|paris sportif
en ligne sans depot|paris sportif en ligne suisse|paris sportif en suisse|paris sportif espagne france|paris sportif
esport|paris sportif et casino en ligne|paris sportif et hippique|paris sportif et prolongation|paris sportif
euro|paris sportif europa league|paris sportif explication|paris sportif
final ligue des champions|paris sportif finale ligue des champions|paris sportif foot|paris sportif foot aide|paris sportif foot astuce|paris sportif foot aujourd’hui|paris sportif foot ce soir|paris sportif
foot comment ca marche|paris sportif foot conseil|paris sportif foot cote|paris sportif
foot coupe du monde|paris sportif foot en ligne|paris sportif foot feminin|paris sportif foot gratuit|paris sportif
foot prolongation|paris sportif foot pronostic|paris sportif foot pronostic gratuit|paris sportif foot regle|paris sportif foot suisse|paris sportif foot us|paris sportif football|paris sportif football americain|paris sportif football astuces|paris sportif
forfait tennis|paris sportif forum|paris sportif francais|paris
sportif francaise des jeux|paris sportif france|paris
sportif france 2|paris sportif france allemagne|paris sportif
france angleterre|paris sportif france argentine|paris sportif
france autriche|paris sportif france belgique|paris sportif france
espagne|paris sportif france gibraltar|paris sportif france italie|paris sportif france nouvelle zelande|paris sportif france pologne|paris sportif france portugal|paris sportif france uruguay|paris sportif france usa|paris
sportif freebet sans depot|paris sportif gagnant|paris sportif gagnant à coup sûr|paris sportif gagner
a coup sur|paris sportif gagner argent|paris sportif gagner de l’argent|paris sportif gain|paris sportif gain maximum|paris sportif gestion bankroll|paris sportif gratuit|paris sportif
gratuit appli|paris sportif gratuit avec cadeaux|paris sportif gratuit cadeaux|paris sportif gratuit en ligne|paris
sportif gratuit entre amis|paris sportif gratuit sans argent|paris sportif gratuit sans depot|paris sportif gratuit sans dépôt|paris sportif gratuits|paris sportif gros gain|paris sportif handicap|paris sportif handicap
0 1|paris sportif handicap 0-1|paris sportif handicap 1 0|paris sportif handicap 1-0|paris sportif handicap basket|paris sportif handicap explication|paris sportif handicap foot|paris sportif handicap rugby|paris sportif hippique|paris
sportif hockey|paris sportif hockey nhl|paris sportif hockey sur glace|paris sportif hors arjel|paris sportif
hors arjel france|paris sportif jeux olympiques|paris sportif jeux video|paris sportif joueur blessé|paris sportif joueur blessé pendant le match|paris sportif joueur de foot|paris sportif joueur
decisif|paris sportif joueur declare forfait|paris sportif joueur déclare
forfait|paris sportif joueur remplacant|paris sportif la francaise des jeux|paris sportif le plus rentable|paris
sportif legal en france|paris sportif leicester champion|paris sportif les 18 stratégies pour gagner tous
les jours|paris sportif les plus sur|paris sportif les prolongation compte|paris
sportif ligne|paris sportif ligue 1|paris sportif ligue 2|paris sportif
ligue des champions|paris sportif ligue des nations|paris sportif ligue europa|paris sportif liste|paris sportif martingale|paris sportif match|paris
sportif match abandonné|paris sportif match annulé|paris
sportif match arrêté|paris sportif match du jour|paris sportif match interrompu|paris sportif match reporté|paris
sportif match suspendu|paris sportif match tennis interrompu|paris sportif match truqué|paris sportif meilleur bonus|paris sportif meilleur cote|paris sportif meilleur pronostic|paris sportif meilleur site|paris sportif methode|paris sportif methode 2 3|paris sportif mi temps fin de match|paris sportif mise au jeu|paris
sportif mise maximum|paris sportif mma france|paris sportif moins de 3.5 but|paris
sportif montante|paris sportif moto gp|paris sportif multiple|paris sportif multiple 2 3|paris sportif multiple 2 3 explication|paris sportif multiple 2 4|paris sportif multiple 2
5|paris sportif multiple 2/3 explication|paris sportif multiple 3 4|paris sportif multiple
explication|paris sportif national 1 foot|paris sportif nba|paris
sportif nba conseil|paris sportif nba pronostic|paris sportif nhl|paris
sportif nombre de but|paris sportif nouveau site|paris sportif numero match|paris sportif offert|paris
sportif offre bienvenue|paris sportif offre bienvenue
sans depot|paris sportif offre de bienvenue|paris sportif offre sans depot|paris sportif om psg|paris sportif paypal|paris sportif plus de 1.5 but|paris sportif plus de 2 5 but|paris sportif plus ou moins|paris
sportif plus ou moins 2 5 but|paris sportif premier pari remboursé|paris sportif
premier paris remboursé|paris sportif prolongation|paris sportif prolongation basket|paris sportif
prolongation foot|paris sportif promo|paris sportif pronostic|paris sportif pronostic basket|paris sportif pronostic
des match aujourd hui|paris sportif pronostic expert gratuit|paris sportif pronostic foot|paris sportif
pronostic forum|paris sportif pronostic gratuit|paris sportif pronostic
tennis|paris sportif psg|paris sportif psg arsenal|paris sportif psg barcelone|paris sportif
psg bayern|paris sportif psg dortmund|paris sportif psg inter|paris
sportif psg inter cote|paris sportif psg liverpool|paris sportif psg om|paris
sportif qr code|paris sportif que veut dire handicap|paris sportif qui
rapporte le plus|paris sportif regle|paris sportif regle
prolongation|paris sportif rembourse|paris sportif remboursement cash|paris sportif rembourser|paris
sportif remboursé|paris sportif remboursé cash|paris sportif remboursé en cash|paris sportif retrait paypal|paris sportif rue
des joueurs|paris sportif rugby|paris sportif rugby 6 nations|paris sportif rugby
coupe du monde|paris sportif rugby top 14|paris sportif safe du
jour|paris sportif sans argent|paris sportif sans carte bancaire|paris sportif sans carte d’identité|paris sportif
sans compte bancaire|paris sportif sans depot|paris sportif sans
depot minimum|paris sportif si match suspendu|paris sportif si un joueur abandonne|paris sportif si
un joueur ne joue pas|paris sportif si un joueur se blesse|paris
sportif simple ou combiné|paris sportif site|paris sportif
statistique|paris sportif stratégie|paris sportif suisse|paris sportif suisse application|paris sportif suisse en ligne|paris sportif suisse legal|paris sportif suisse
légal|paris sportif suisse romande|paris sportif sur du jour|paris sportif sur le tennis|paris sportif systeme|paris sportif
systeme 2 3|paris sportif systeme 2 4|paris sportif systeme 2/3|paris sportif systeme
2/4|paris sportif systeme 3 4|paris sportif systeme 3/4|paris sportif systeme explication|paris sportif
technique|paris sportif technique pour gagner|paris sportif temps additionnel|paris sportif temps reglementaire|paris sportif tennis|paris sportif tennis abandon|paris sportif tennis conseil|paris sportif tennis de table|paris sportif tennis forfait|paris sportif tennis
gratuit|paris sportif tennis pronostic|paris sportif tennis roland garros|paris sportif tir au but|paris sportif top 14|paris sportif tour de france|paris sportif ufc|paris sportif ufc france|paris sportif unibet|paris sportif vainqueur euro|paris sportif
vainqueur ligue 1|paris sportif vainqueur ligue des champions|paris sportif via paypal|paris sportif victoire prolongation|paris sportif vip gratuit|paris
sportifs|paris sportifs abandon tennis|paris
sportifs aide|paris sportifs analyser un match|paris sportifs arjel|paris sportifs
astuces|paris sportifs aujourd’hui|paris sportifs autorisés en france|paris sportifs avec paypal|paris
sportifs basket|paris sportifs belgique|paris sportifs bonus|paris sportifs bookmakers|paris sportifs canada|paris sportifs
combiné|paris sportifs comparateur|paris sportifs comparatif|paris sportifs conseils|paris sportifs cotes|paris sportifs coupe du monde|paris sportifs de
football|paris sportifs du jour|paris sportifs en belgique|paris sportifs en france|paris sportifs en ligne|paris
sportifs en ligne belgique|paris sportifs en ligne france|paris sportifs en ligne gratuit|paris sportifs
en ligne suisse|paris sportifs en suisse|paris sportifs
et hippiques|paris sportifs euro|paris sportifs foot|paris sportifs foot us|paris sportifs forum|paris
sportifs france|paris sportifs france espagne|paris sportifs gagner à tous les coups|paris
sportifs gratuit|paris sportifs gratuits|paris sportifs gratuits en ligne|paris sportifs handicap|paris sportifs hockey|paris sportifs hockey sur galce|paris sportifs hockey sur glace|paris sportifs hors arjel|paris sportifs jeux olympiques|paris sportifs les bookmakers raflent la mise|paris sportifs
ligne|paris sportifs ligue 1|paris sportifs ligue
2|paris sportifs ligue des champions|paris sportifs
ligue europa|paris sportifs match interrompu|paris sportifs montante|paris sportifs nba|paris sportifs offre bienvenue|paris sportifs offre de bienvenue|paris sportifs paypal|paris sportifs pronostics|paris sportifs psg|paris sportifs psg inter|paris
sportifs rugby|paris sportifs sans argent|paris
sportifs sans depot|paris sportifs site|paris
sportifs sites|paris sportifs statistiques|paris sportifs stratégie|paris sportifs suisse|paris sportifs technique|paris
sportifs techniques|paris sportifs tennis|paris
sportifs tennis astuces|paris sportifs top 14|paris sportifs tour
de france|part de marché paris sportifs|paypal pari sportif|paypal paris
sportif|paypal paris sportifs|perte d’argent paris sportifs|peut on devenir riche avec les paris sportifs|peut on gagner de l’argent avec les paris sportifs|peut on gagner sa vie avec les paris sportif|peut on vraiment gagner
de l’argent avec les paris sportifs|plus gros combine paris sportif|plus gros gagnant paris
sportif|plus gros gain paris sportif|plus gros gain paris sportif au monde|plus
gros gain paris sportif france|plus gros gains paris sportif|plus gros pari sportif|plus gros paris sportif|plus grosse cote gagner paris sportif|plus
grosse cote pari sportif|plus grosse cote paris sportif|plus grosse mise paris sportif|plus grosse somme gagner au paris sportif|plus ou moins paris
sportif|pourcentage de mise paris sportif|premier pari sportif remboursé|probabilité cote
paris sportif|probabilité paris sportif combiné|prolongation basket paris sportif|prolongation paris sportif|promo pari sportif|promo paris sportif|promo site
de paris sportif|promo site pari sportif|promo site paris sportif|promos paris sportifs|prono paris sportif foot|prono paris sportif gratuit|prono paris sportif tennis|pronostic de paris sportif|pronostic du jour paris sportif|pronostic
foot paris sportif|pronostic gratuit paris sportif|pronostic pari sportif|pronostic pari sportif gratuit|pronostic paris sportif|pronostic
paris sportif aujourd’hui|pronostic paris sportif du
jour|pronostic paris sportif foot|pronostic paris sportif gratuit|pronostic paris sportif
tennis|pronostic paris sportifs|pronostics foot statistiques
et aides aux paris sportifs|pronostics paris sportif|pronostics paris sportifs|pronostiqueur paris sportif gratuit|psg arsenal paris sportif|psg bayern paris sportif|psg
inter milan paris sportif|psg inter pari sportif|psg inter paris sportif|psg
liverpool paris sportif|psg om paris sportif|psg
paris sportif|psg paris sportifs|qr code paris sportif|qu est ce qu un handicap paris sportif|qu est ce que handicap dans les paris sportif|qu’est ce qu’un handicap paris sportif|qu’est ce que handicap dans les paris sportif|quand un joueur se blesse paris
sportif|que signifie 1/1 en paris sportif|que signifie 1/2 paris sportif|que signifie
12 en paris sportif|que signifie 1×2 dans les paris sportifs|que signifie btts en paris sportif|que signifie dnb en paris sportif|que
signifie draw en paris sportif|que signifie ft en paris sportif|que signifie
gg dans le pari sportif|que signifie gg en pari sportif|que
signifie gg en paris sportif|que signifie handicap dans les paris sportifs|que veut dire dnb en paris sportif|que
veut dire handicap dans les paris sportifs|que veut dire handicap paris sportif|quel appli pari sportif|quel cote jouer paris sportif|quel est la meilleur appli de
paris sportif|quel est le meilleur algorithme de paris sportif|quel
est le meilleur site de pari sportif|quel est le meilleur site de pari
sportif en ligne|quel est le meilleur site de paris sportif|quel est
le meilleur site de paris sportif en ligne|quel est le meilleur
site de paris sportifs en ligne|quel est le pari sportif le plus rentable|quel pari sportif est le
plus rentable|quel pari sportif est le plus sûr|quel pari sportif faire aujourd’hui|quel paris
sportif faire aujourd’hui|quel paris sportif rapporte le
plus|quel site de paris sportif choisir|quel site de paris sportif rembourse en cash|quel
type de pari sportif est le plus rentable|quelle application pour paris sportifs|quelle est la meilleure appli de
paris sportif|quelle est la meilleure application de paris sportif|quelle est la meilleure application pour les paris sportifs|quelle est le meilleur site de paris sportif|quels paris sportifs faire|quels
sont les paris sportifs les plus sûrs|rebond basket paris sportif|record de gain paris sportif|regle buteur paris sportif|regle de paris sportif|regle
des paris sportif|regle handicap paris sportif|regle handicap paris sportif
foot|regle multiple paris sportif|regle pari sportif|regle paris sportif|regle paris sportif
foot|regle paris sportif multiple|regle paris sportif prolongation|reglement pari sportif|reglement
paris sportif|regles paris sportifs|remboursement cash paris sportif|remboursement en cash paris sportif|remboursement pari sportif|remboursement paris sportif|repartiteur
de mise paris sportif|repartiteur de mise paris sportifs|repartiteur de mises paris sportif|repartiteur mise paris sportif|repartition des mises
paris sportif|resultat pari sportif|resultat paris sportif|resultat
paris sportif en direct|resultat paris sportif foot|resultat sportif hockey|retirer argent paris
sportif|rugby pari sportif|rugby paris sportif|règle paris sportif prolongation|règles
paris sportif|répartiteur de mise pari sportif|répartiteur
de mise paris sportif|répartiteur de mise paris sportifs|répartition des mises paris sportif|résultat paris sportif foot|sans depot paris sportif|se faire interdire de paris sportifs|signification btts paris sportif|signification dnb paris sportif|signification handicap paris sportif|simulateur de gain paris sportif|simulateur gain paris sportif|simulateur
gain paris sportif multiple|simulateur gain paris sportif systeme|simulateur gain paris sportif système|simulateur montante paris sportif|simulateur paris sportif multiple|simulateur systeme paris sportif|simulation paris sportif gratuit|site aide paris sportif|site analyse paris
sportif|site analyser paris sportif|site arjel paris sportif|site conseil paris sportif|site d’analyse
de paris sportifs|site d’analyse paris sportif|site de conseil paris sportif|site de
pari en ligne sportif|site de pari sportif|site de pari sportif avec bonus sans depot|site de pari sportif bonus sans depot|site de pari sportif canada|site de pari sportif en ligne|site de pari sportif francais|site de pari sportif gratuit|site de pari sportif hors arjel|site de pari sportif
suisse|site de parie sportif|site de parie sportif en ligne|site
de paris en ligne sportif|site de paris sportif|site de paris sportif acceptant
paypal|site de paris sportif arjel|site de paris sportif autorisé en france|site de
paris sportif autorisé en suisse|site de paris sportif avec bonus|site de paris sportif avec bonus sans depot|site de paris sportif avec bonus sans dépôt|site
de paris sportif avec neosurf|site de paris sportif avec paiement mobile|site de
paris sportif avec paypal|site de paris sportif avis|site
de paris sportif belge avec bonus|site de paris sportif belgique|site de paris sportif bonus|site de paris sportif bonus sans depot|site de paris sportif canada|site de paris sportif comparatif|site de paris sportif depot minimum|site de paris sportif en france|site de paris sportif en ligne|site de paris sportif en ligne suisse|site de paris sportif football|site de paris sportif francais|site de paris sportif
france|site de paris sportif gratuit|site de paris sportif gratuit
pour gagner des cadeaux|site de paris sportif gratuit sans dépôt|site de paris sportif hors arjel|site de
paris sportif le plus fiable|site de paris sportif legal en france|site de paris sportif meilleur
cote|site de paris sportif nouveau|site de paris sportif offre de bienvenue|site de
paris sportif paypal|site de paris sportif premier
paris remboursé|site de paris sportif qui accepte paypal|site de paris sportif qui rembourse en cash|site de
paris sportif remboursé|site de paris sportif sans argent|site
de paris sportif sans carte bancaire|site de paris sportif sans
carte d’identité|site de paris sportif sans depot|site de paris sportif suisse|site de paris sportifs|site de paris sportifs
avec paypal|site de paris sportifs en ligne|site de paris sportifs francais|site de
paris sportifs gratuit|site de paris sportifs paypal|site de paris
sportifs suisse|site de statistique pour paris sportif|site des
paris sportifs|site pari en ligne sportif|site pari sportif|site pari sportif 100 euros offert|site pari sportif arjel|site pari sportif belgique|site
pari sportif bonus|site pari sportif canada|site pari sportif comparatif|site pari sportif en ligne|site
pari sportif france|site pari sportif gratuit|site pari sportif hors arjel|site pari
sportif suisse|site parie sportif|site paris en ligne
sportif|site paris sportif|site paris sportif 100 euros offert|site paris sportif 100 euros remboursé|site paris sportif 1er paris remboursé|site
paris sportif arjel|site paris sportif autorisé en france|site paris sportif avec bonus|site paris sportif avec bonus sans depot|site paris sportif avec meilleur cote|site
paris sportif belgique|site paris sportif bonus|site paris sportif bonus cash|site paris sportif bonus sans
depot|site paris sportif canada|site paris sportif comparatif|site
paris sportif depot 5 euro|site paris sportif en ligne|site paris sportif foot|site paris sportif france|site paris sportif gratuit|site paris sportif hors arjel|site
paris sportif hors arjel france|site paris sportif meilleur cote|site paris sportif nouveau|site paris sportif offre de bienvenue|site paris sportif paypal|site paris sportif remboursement cash|site paris sportif remboursé en cash|site paris sportif retrait instantané|site paris sportif sans carte bancaire|site paris sportif
sans depot|site paris sportif suisse|site paris sportifs|site paris sportifs belgique|site paris sportifs en ligne|site paris
sportifs france|site paris sportifs hors arjel|site paris sportifs suisse|site pour analyse paris sportif|site pour paris sportif|site pronostic paris sportif|site statistique paris sportif|site suisse paris sportif|sites
de pari sportif|sites de paris sportif|sites de paris sportifs|sites de paris sportifs arjel|sites de paris sportifs autorisés en france|sites
de paris sportifs belgique|sites de paris sportifs bonus|sites de paris sportifs
en belgique|sites de paris sportifs en france|sites de paris sportifs
en ligne|sites de paris sportifs gratuits|sites de paris sportifs gratuits sans dépôt|sites de paris sportifs suisse|sites pari sportif|sites paris sportif|sites paris sportifs|sites paris sportifs arjel|sites paris
sportifs belgique|sites paris sportifs france|sites paris
sportifs hors arjel|sites paris sportifs suisse|so foot paris sportif|so foot paris sportifs|specialiste
tennis paris sportif|statistique foot paris sportif|statistique paris sportif|statistique paris sportif foot|statistique tennis paris
sportif|statistiques football paris sportifs|statistiques paris sportifs|strategie de paris sportif|stratégie big whale
paris sportif|stratégie de paris sportifs|stratégie gagnante paris sportifs|stratégie pari sportif|stratégie paris
sportif|stratégie paris sportifs|stratégie paris sportifs
forum|stratégie pour gagner au paris sportif|stratégies paris sportifs|suisse paris sportif|suisse paris
sportifs|systeme 2 3 paris sportif|systeme 3 4 paris sportif|systeme de cote paris sportif|systeme de paris
sportif|systeme pari sportif|systeme paris sportif|systeme paris sportifs|systeme reducteur paris sportif|système paris sportif|tableau bankroll paris sportif|tableau cote paris sportif|tableau de paris sportif|tableau de suivi paris sportifs|tableau
excel bankroll paris sportif|tableau excel paris sportif|tableau
excel paris sportif gratuit|tableau excel paris sportifs|tableau excel pour paris
sportif|tableau gestion bankroll paris sportif|tableau
montante paris sportif|tableau paris sportif|tabl
Your comment is awaiting moderation.
Най-сетне https://mdgt.top разбрах как се свързва климатик към електрическата мрежа – обяснено там
Your comment is awaiting moderation.
sportuz yangiliklari jonli efir
Your comment is awaiting moderation.
Тут походу новый лиа12 и подобные ему фишки, поперли отзывы, в жабу ломится всем продавцам предлагает за небольшую оплату вперед вес аш в моем регионе оставить.берегитесь! Я уже сталкивался с таким на главной, ждите продавца пусть сам объясняет.берегите деньги.быть такого не может, что магазин которому более 2х лет занимается доюавлениями в джабер и предложениями довезти стафф купить онлайн мефедрон, экстази, бошки Скажите сей час в Челябинске работаете?)
Your comment is awaiting moderation.
Best Value Finds – Handpicked deals for smart shoppers looking for quality and affordability.
Your comment is awaiting moderation.
happyhomecorner.shop – Nice balance of style and practicality, shopping felt smooth.
Your comment is awaiting moderation.
freshvaluestore.shop – Nice mix of trendy items and useful essentials, very easy to explore.
Your comment is awaiting moderation.
магаз ровный!!! купить Кокаин, Мефедрон, Экстази мы говорили что мхе качество не очень, он такой пришел, сказали поменяем дак поменяем, ты стучи туда с кем об обмене разговаривал…
Your comment is awaiting moderation.
Экспертиза после залива была выполнена быстро и корректно: кто отвечает за стояки отопления в многоквартирном доме
Your comment is awaiting moderation.
<https://kuklanvt.info/top/
Your comment is awaiting moderation.
https://sportuna-casino-bonus.com/es-es
Your comment is awaiting moderation.
реагенты всегда чистые и по высшему??? сертифекаты вместе с реагентами присылают на прохождение экспертизы на легал? купить Кокаин, Мефедрон, Экстази Рассмотрим плюсы работы с данным магазином и возможно в дальнейшем будем постоянно тут покупать опт. Отпишу после, надеюсь удачной сделки))
Your comment is awaiting moderation.
seoaccelerate.click – Appreciate the typography choices; comfortable spacing improved my reading experience.
Your comment is awaiting moderation.
growthclicks.click – Loved the layout today; clean, simple, and genuinely user-friendly overall.
Your comment is awaiting moderation.
seotitan.click – Appreciate the typography choices; comfortable spacing improved my reading experience.
Your comment is awaiting moderation.
clicklegends.click – Navigation felt smooth, found everything quickly without any confusing steps.
Your comment is awaiting moderation.
adspectrum.click – Content reads clearly, helpful examples made concepts easy to grasp.
Your comment is awaiting moderation.
clickwaveagency.click – Overall, professional vibe here; trustworthy, polished, and pleasantly minimal throughout.
Your comment is awaiting moderation.
boks yangiliklari ufc jonli efir uz
Your comment is awaiting moderation.
перевод документов в сызрани перевод документов нотариус
Your comment is awaiting moderation.
Как то брал 25г реги, пришло быстро, но качество не впечатлило(( https://kt-6023.ru по крайней мере у меня было , все гуд
Your comment is awaiting moderation.
Do you have a spam issue on this blog; I also am a blogger, and I was curious about your situation; we have developed some nice procedures and we are looking to trade strategies with others, please shoot me an email if interested.
biggest escort directory Brasilia
Your comment is awaiting moderation.
Жаль только в Мск от 50 гр. )) Думал в Саратове тоже купить Мефедрон, Бошки, Марихуану Крутой качественный товар! Все своевременно +++
Your comment is awaiting moderation.
С Ув. vkapushoneПолучил сегодня посылку, могу уже с уверенностью сказать, Замечательного магазина. https://prishlo-vremya.ru магаз ровный спасибо 5+
Your comment is awaiting moderation.
happytrendstore.shop – Cheerful shopping experience, enjoyable to explore latest trends and stylish items today. Daily Trend Treasures – Explore exciting finds and trendy items to keep your lifestyle fresh.
Your comment is awaiting moderation.
отпишите народ за 5 iai кто брал спс заранее купить кокаин, меф, бошки через телеграмм Качественная продукция, советую заскочить! товар стоит вашего внимания!
Your comment is awaiting moderation.
Независимая оценка помогла решить вопрос без судебных разбирательств: https://zaliv-expertiza.ru/
Your comment is awaiting moderation.
у меня знакомец с их магазина закупился его с черта какого то мусора взяли! че к чему не знаю но факт есть факт! может и не они виноваты, но он мелкий торгаш и принимать с сотней его не в тему купить скорость, кокаин, мефедрон, гашиш КЕнт,сорри на почту ответь..
Your comment is awaiting moderation.
В день оплаты через час я получаю ровную надёжную закладку Курьерский сервис на 5+? https://avicenna-s.ru Добрый день, кто паникует и истерит, успокойтесь, всем все высылается постепенно. Треки придут на эл. почты ближайшее время всем ждущим.
Your comment is awaiting moderation.
rankwizard.click – Appreciate the typography choices; comfortable spacing improved my reading experience.
Your comment is awaiting moderation.
clickace.click – Bookmarked this immediately, planning to revisit for updates and inspiration.
Your comment is awaiting moderation.
Как нет..я тебе в пятницу писал..сказал,вчто ниче что скину в субботу,воскресенье..ты сказал ниче…и дал номер..Я писал в личку на почтовый ящик..это не брорзикс и не скайп…мошеников быть не можит..Ты,оплату посмотри…за сегодня купить Мефедрон, Бошки, Марихуану но в итоге, когда ты добиваешься его общения – он говорит, что в наличии ничего нет. дак какой смысл то всего этого? разве не легче написать тут, что все кончилось, будет тогда-то тогда-то!? что бы не терять все это время, зайти в тему, прочитать об отсутствии товара и спокойно (как Вы говорите) идти в другие шопы.. это мое имхо.. (и вообще я обращался к автору темы)
Your comment is awaiting moderation.
Протечка стояка затронула несколько комнат, эксперты зафиксировали все – https://yurist-pri-zalive.ru/
Your comment is awaiting moderation.
Donna Jean Godchaux-MacKay, a soulful mezzo-soprano who provided backing vocals on such 1960s classics as “Suspicious Minds” and “When a Man Loves a Woman” and was a featured singer with the Grateful Dead for much of the 1970s, has died at 78.
tripscan top
A spokesperson for Godchaux-MacKay confirmed that she died Sunday at Alive Hospice in Nashville after having cancer. Godchaux-McKay and other Grateful Dead members were inducted into the Rock and Roll Hall of Fame in 1994.
трипскан вход
Born Donna Jean Thatcher in Florence, Alabama, she had yet to turn 20 when she became a session performer in nearby Muscle Shoals, where many soul and rhythm and blues hits were recorded, and also was on hand for numerous sessions at the Memphis-based American Sound Studio. Her credits included Elvis Presley’s “Suspicious Minds,” Percy Sledge’s “When a Man Loves a Woman” and songs with Neil Diamond, Boz Scaggs and Cher.
трипскан вход
In the early 1970s, she and pianist/then-husband Keith Godchaux joined the Grateful Dead and remained with them for several tours and albums, including “Terrapin Station,” “Shakedown Street” and “From the Mars Hotel.” Godchaux appeared on numerous songs, whether joining with Jerry Garcia on “Scarlet Begonias” or writing and taking the lead on “From the Heart of Me.”
трипскан сайт
https://trips56.cc
Your comment is awaiting moderation.
Donna Jean Godchaux-MacKay, a soulful mezzo-soprano who provided backing vocals on such 1960s classics as “Suspicious Minds” and “When a Man Loves a Woman” and was a featured singer with the Grateful Dead for much of the 1970s, has died at 78.
tripskan
A spokesperson for Godchaux-MacKay confirmed that she died Sunday at Alive Hospice in Nashville after having cancer. Godchaux-McKay and other Grateful Dead members were inducted into the Rock and Roll Hall of Fame in 1994.
tripskan
Born Donna Jean Thatcher in Florence, Alabama, she had yet to turn 20 when she became a session performer in nearby Muscle Shoals, where many soul and rhythm and blues hits were recorded, and also was on hand for numerous sessions at the Memphis-based American Sound Studio. Her credits included Elvis Presley’s “Suspicious Minds,” Percy Sledge’s “When a Man Loves a Woman” and songs with Neil Diamond, Boz Scaggs and Cher.
трипскан
In the early 1970s, she and pianist/then-husband Keith Godchaux joined the Grateful Dead and remained with them for several tours and albums, including “Terrapin Station,” “Shakedown Street” and “From the Mars Hotel.” Godchaux appeared on numerous songs, whether joining with Jerry Garcia on “Scarlet Begonias” or writing and taking the lead on “From the Heart of Me.”
trip scan
https://trips56.cc
Your comment is awaiting moderation.
Donna Jean Godchaux-MacKay, a soulful mezzo-soprano who provided backing vocals on such 1960s classics as “Suspicious Minds” and “When a Man Loves a Woman” and was a featured singer with the Grateful Dead for much of the 1970s, has died at 78.
трипскан
A spokesperson for Godchaux-MacKay confirmed that she died Sunday at Alive Hospice in Nashville after having cancer. Godchaux-McKay and other Grateful Dead members were inducted into the Rock and Roll Hall of Fame in 1994.
trip scan
Born Donna Jean Thatcher in Florence, Alabama, she had yet to turn 20 when she became a session performer in nearby Muscle Shoals, where many soul and rhythm and blues hits were recorded, and also was on hand for numerous sessions at the Memphis-based American Sound Studio. Her credits included Elvis Presley’s “Suspicious Minds,” Percy Sledge’s “When a Man Loves a Woman” and songs with Neil Diamond, Boz Scaggs and Cher.
трипскан вход
In the early 1970s, she and pianist/then-husband Keith Godchaux joined the Grateful Dead and remained with them for several tours and albums, including “Terrapin Station,” “Shakedown Street” and “From the Mars Hotel.” Godchaux appeared on numerous songs, whether joining with Jerry Garcia on “Scarlet Begonias” or writing and taking the lead on “From the Heart of Me.”
трипскан
https://trips56.cc
Your comment is awaiting moderation.
Оценщик сделал отчет, который приняли даже придирчивые страховые – https://ekspertiza-zaliva.ru/
Your comment is awaiting moderation.
конспирация достойная, товар оказался отличным, кроли заценили. будем еще работать купить скорость, кокаин, мефедрон, гашиш Однако, селлеру в его интересах было бы полезно появиться и разъяснить ситтуацию дабы избежать гневных сообщений. Обещание что отправка будет пт-сб не было выполнено. Треков нет.
Your comment is awaiting moderation.
снять проститутку города нижневартовска
Your comment is awaiting moderation.
1Red Casino UK https://1red-casinos.com/
Your comment is awaiting moderation.
I visit daily a few websites and sites to read posts, however this web site provides quality based posts.
Your comment is awaiting moderation.
судебный перевод документов перевод документов на карте
Your comment is awaiting moderation.
Скажите сей час в Челябинске работаете?) купить кокаин, меф, бошки через телеграмм Никого не защищаю,говорю как есть-сайт работает на О Т Л И Ч Н О .
Your comment is awaiting moderation.
інформаційний портал https://36000.com.ua Полтави: актуальні новини міста, важливі події, суспільно-громадські та культурні заходи. Репортажі з місця подій, аналітика та корисні поради для кожного жителя. Увага до деталей, життя Полтави в публікаціях щодня.
Your comment is awaiting moderation.
Lifestyle & Fashion Daily – Explore trendy outfits and chic lifestyle essentials every day.
Your comment is awaiting moderation.
bestchoicevalue.shop – Helpful categories and filters; finding exactly what you want is easy.
Your comment is awaiting moderation.
simplefashionoutlet.shop – Quick loading, good variety, styling options look trendy and comfortable today.
Your comment is awaiting moderation.
Юрист помог добиться полной компенсации после затопления сверху: https://ekspertiza-zaliva.ru/
Your comment is awaiting moderation.
Кому последний раз отсюда что то пришло? купить Мефедрон, Бошки, Марихуану Приходите еще, всегда рады
Your comment is awaiting moderation.
Квартира от застройщика https://novostroycatlt.ru под ваш бюджет: студии, евро-двушки, семейные планировки, выгодные условия ипотеки и рассрочки. Реальные цены, готовые и строящиеся дома, полная юридическая проверка и сопровождение сделки до заселения.
Your comment is awaiting moderation.
купить проститутку метро медведково купить мефедрон магазине
Your comment is awaiting moderation.
ну чё могу сказать… купить Мефедрон, Бошки, Марихуану Отличный магазин!!!процветания дальнейшего и удачных продаж!!
Your comment is awaiting moderation.
rankdrive.click – Pages loaded fast, images appeared sharp, and formatting stayed consistent.
Your comment is awaiting moderation.
boostfunnels.click – Appreciate the typography choices; comfortable spacing improved my reading experience.
Your comment is awaiting moderation.
Оценщик ущерба при затоплении приехал в тот же день и помог правильно оформить документы – https://yurist-pri-zalive.ru/
Your comment is awaiting moderation.
adblaze.click – Navigation felt smooth, found everything quickly without any confusing steps.
Your comment is awaiting moderation.
clickauthority.click – Overall, professional vibe here; trustworthy, polished, and pleasantly minimal throughout.
Your comment is awaiting moderation.
https://designernisal.com/
Your comment is awaiting moderation.
clickfunnelspro.click – Loved the layout today; clean, simple, and genuinely user-friendly overall.
Your comment is awaiting moderation.
Приносим извинения за возможные неудобства. https://oberegiamulet.ru В скайпе ответил что вопрос решаеться,будем надеяться на лучшее,а насчёт красной темы-даже думать не хочеться.Всем мир!!!
Your comment is awaiting moderation.
10 euros offert paris sportif|10 euros offert sans dépôt paris
sportif|10 meilleurs sites de paris sportifs|100 euro offert paris sportif|100 euros offert paris sportif|100 euros remboursé paris
sportifs|100 offert pari sportif|100 offert paris sportif|100 remboursé paris sportif|100e offert
pari sportif|abandon paris sportif tennis|abandon tennis paris sportif|addiction paris
sportif forum|age paris sportif belgique|aide au pari sportif|aide au paris sportif|aide aux paris sportif|aide
aux paris sportifs|aide pari sportif|aide pari sportif football|aide parie sportif|aide
paris sportif|aide paris sportif foot|aide paris sportif gratuit|aide paris sportifs|aide
pour paris sportif|algorithme de paris sportif|algorithme excel paris sportif|algorithme gratuit paris sportif|algorithme pari sportif|algorithme paris sportif|algorithme paris sportif avis|algorithme paris sportif basket|algorithme paris sportif excel|algorithme paris sportif gratuit|algorithme paris sportif tennis|algorithme paris sportifs|algorithme pour paris
sportif|analyse cote paris sportif|analyse de paris
sportif|analyse match paris sportif|analyse pari sportif|analyse paris sportif|analyse paris
sportif foot|analyse paris sportif football|analyse
paris sportif gratuit|analyse paris sportifs|ancienne cote
paris sportif|api cote paris sportif|app paris sportif sans
argent|appli de paris sportif|appli de paris sportif sans argent|appli de paris sportifs|appli pari sportif|appli pari sportif gratuit|appli parie sportif|appli paris sportif|appli paris sportif
avec paypal|appli paris sportif belgique|appli paris sportif entre amis|appli paris sportif gratuit|appli paris sportif sans argent|appli paris sportif suisse|appli paris sportifs|application aide
paris sportif|application algorithme paris sportif|application analyse paris sportif|application android paris sportif|application bankroll paris sportif|application conseil paris sportif|application de pari sportif|application de parie
sportif|application de paris sportif|application de paris sportif
en afrique|application de paris sportif en cote d’ivoire|application de paris
sportif en ligne|application de paris sportif gratuit|application de paris sportif international|application de paris sportif suisse|application de paris sportifs|application faux paris sportifs|application gestion bankroll paris
sportif|application gestion paris sportif|application ia paris sportif|application pari
sportif gratuit|application paris sportif|application paris sportif android|application paris sportif
argent fictif|application paris sportif belgique|application paris sportif canada|application paris sportif espagne|application paris sportif
espagnol|application paris sportif fictif|application paris sportif france|application paris sportif gratuit|application paris sportif gratuit entre amis|application paris sportif maroc|application paris
sportif offre de bienvenue|application paris sportif paypal|application paris sportif sans
argent|application paris sportif sans justificatif de domicile|application paris sportif suisse|application paris sportif usa|application paris sportif virtuel|application pour faire des
paris sportifs|application pour gerer ses paris sportif|application pour
les paris sportifs|application pour pari
sportif|application pour paris sportif|application pour paris sportifs|application statistique paris sportif|application suivi
paris sportif|applications de paris sportifs|applications paris sportifs|applis paris sportif|applis paris sportifs|apprendre a faire des paris sportifs|argent facile paris sportif|argent offert paris sportifs|argent offert sans depot paris
sportif|argent paris sportif|argent paris sportifs|argent paris sportifs impots|argent sans depot paris
sportif|arjel paris sportif|arjel paris sportifs|astuce gagner paris sportif|astuce pari sportif|astuce
paris sportif|astuce paris sportif basket|astuce paris sportif foot|astuce paris
sportif forum|astuce paris sportif tennis|astuce paris sportifs|astuce pour gagner
au pari sportif|astuce pour gagner au paris sportif|astuce pour gagner paris sportif|astuce pour paris sportif|astuces
paris sportifs|astuces paris sportifs en ligne|astuces
paris sportifs foot|astuces pour gagner aux paris sportifs|autorisation paris sportif france|avis pari sportif|avis
paris sportif|avis paris sportif foot|avis site de paris sportif|avis site paris sportif|avis sur les paris sportifs|avis sur paris sportif|avis tipster paris sportif|aweh signification paris sportif|bankroll
100 euros paris sportifs|bankroll management paris sportif|bankroll paris sportif|bankroll paris sportif excel|bankroll paris sportif gratuit|bankroll paris sportifs|basket paris sportif|belgique france paris sportif|belgique paris sportifs|bonus
bienvenue paris sportif|bonus bienvenue paris sportifs|bonus cash paris sportif|bonus de bienvenue paris
sportif|bonus de bienvenue paris sportif belgique|bonus de bienvenue sans depot paris sportif|bonus de depot paris sportif|bonus de paris sportifs|bonus depot paris sportif|bonus en cash paris sportif|bonus
gratuit paris sportif|bonus gratuit sans depot paris sportif|bonus pari sportif|bonus paris sportif|bonus paris sportif
belgique|bonus paris sportif betclic|bonus paris sportif cash|bonus paris sportif en ligne|bonus paris sportif france pari|bonus paris sportif retirable|bonus paris sportif sans
depot|bonus paris sportif sans dépôt|bonus paris sportif unibet|bonus paris sportifs|bonus sans depot paris
sportif|bonus sans depot paris sportif belgique|bonus sans dépôt paris
sportif|bonus sans dépôt paris sportif hors arjel|bonus
site de paris sportif|bonus site pari sportif|bonus site
paris sportif|bonus sites de paris sportifs|bonus unibet paris sportif|bookmaker paris sportif|bookmaker paris sportif gratuit|bookmaker
paris sportifs|bookmaker sportif|bookmakers paris sportif|bookmakers paris sportifs|bookmakers paris sportifs en ligne|but contre son camp paris
sportif|but sur penalty paris sportif|buteur paris sportif|c’est
quoi handicap paris sportif|c’est quoi une cote paris sportif|calcul anti perte paris sportif|calcul
combinaison pari sportif|calcul cote pari sportif|calcul cote paris sportif|calcul couverture paris sportif|calcul de cote paris sportif|calcul des cotes
paris sportifs|calcul dnb paris sportifs|calcul double chance paris sportif|calcul gain paris sportif|calcul mise paris sportif|calcul pari sportif|calcul paris sportif|calcul paris
sportif multiple|calcul pourcentage cote paris sportif|calcul probabilité paris sportif|calcul rentabilité paris sportifs|calcul roi paris sportif|calcul systeme paris
sportif|calcul trj paris sportifs|calculateur cote paris sportif|calculateur de cote paris sportif|calculateur de
mise paris sportif|calculateur de paris sportif|calculateur paris sportif|calculatrice arbitrage paris sportif|calculatrice paris sportif|calculer cote paris
sportif|calculer gain paris sportif|calculer probabilité paris
sportifs|calculer roi paris sportifs|calculer une cote
pari sportif|calculer une cote paris sportif|carte
cadeau paris sportif|carte pcs paris sportif|carte prépayée paris sportifs|cash out
pari sportif|cash out paris sportif|cash out
paris sportifs|casino en ligne paris sportif|casino paris sportif en ligne|champions
league paris sportif|chute de cote paris sportif|classement des meilleurs sites de paris sportifs|classement meilleur site
de paris sportif|code barre paris sportif|code bonus paris sportif|code paris
sportif|code promo pari sportif|code promo paris sportif|code promo paris
sportif sans depot|code promo paris sportif sans dépôt|code promo sans depot paris sportif|code promo site paris
sportif|combien de temps pour encaisser un paris sportif|combien de temps pour retirer un paris sportif|combien miser paris sportifs|combine paris sportif|combines paris sportifs|combiné pari
sportif|combiné paris sportif|combiné paris sportif conseil|combiné paris sportif du
jour|combiné paris sportif pronostic|comment analyser
un paris sportif|comment arreter de jouer aux paris sportifs|comment arreter les paris sportif|comment arreter les paris sportifs|comment
arrêter les paris sportifs|comment bien gagner au paris sportif|comment bien jouer au
paris sportif|comment bien miser paris sportif|comment ca marche les
paris sportif|comment calculer cote paris sportif|comment
calculer gain paris sportif|comment calculer les cotes des paris sportifs|comment calculer une cote
de paris sportif|comment calculer une cote pari sportif|comment calculer une cote paris sportif|comment comprendre les paris sportifs|comment creer un vip paris sportif|comment créer
un algorithme paris sportif|comment créer un site de paris sportif|comment devenir riche avec les paris sportifs|comment etre rentable paris sportif|comment
etre sur de gagner au paris sportif|comment faire de bon paris sportif|comment faire
des parie sportif|comment faire des paris sportif|comment faire des paris sportif gagnant|comment faire des paris sportifs|comment faire pari sportif|comment faire paris sportif|comment
faire pour arreter les paris sportifs|comment faire pour gagner au paris sportif|comment faire pour gagner
les paris sportifs|comment faire un bon pari sportif|comment faire un bon paris sportif|comment faire un pari sportif|comment faire un parie
sportif|comment faire un paris sportif|comment faire une montante paris sportif|comment fonctionne les cotes dans les paris sportifs|comment fonctionne les cotes des paris sportifs|comment fonctionne les paris sportifs|comment
fonctionne paris sportifs|comment fonctionne un pari sportif|comment fonctionnent les cotes
dans les paris sportifs|comment fonctionnent les
cotes dans les paris sportifs grand oral|comment fonctionnent les cotes de paris sportif|comment fonctionnent les paris sportifs|comment fonctionnent les paris sportifs grand oral|comment fonctionnent les paris sportifs
grand oral maths|comment fonctionnent les paris sportifs maths|comment gagner a coup sur au paris sportif|comment gagner a tous les coups au
paris sportif|comment gagner a tout les coup au paris sportif|comment gagner au pari sportif|comment gagner au pari sportif football|comment gagner au paris sportif|comment gagner au paris
sportif a coup sur|comment gagner au paris sportif foot|comment gagner au
paris sportif forum|comment gagner au paris sportif tennis|comment gagner au paris sportifs|comment gagner aux paris sportif|comment gagner aux paris sportifs|comment gagner aux paris sportifs foot|comment gagner aux paris sportifs livre|comment gagner aux paris sportifs sur le long terme|comment gagner avec les paris sportifs|comment gagner dans les paris sportifs|comment gagner de l
argent avec les paris sportifs|comment gagner de l’argent au paris sportif|comment gagner
de l’argent aux paris sportifs|comment gagner de l’argent avec
les paris sportifs|comment gagner de l’argent paris sportif|comment gagner de l’argent sur les paris sportifs|comment
gagner de l’argent sur paris sportif|comment gagner des paris
sportif|comment gagner des paris sportifs|comment gagner en paris
sportif|comment gagner facilement au paris sportif|comment gagner les paris sportifs|comment gagner
paris sportif|comment gagner paris sportif foot|comment gagner paris sportifs|comment gagner sa vie avec les paris sportifs|comment gagner ses paris sportif|comment gagner sur les paris sportif|comment gagner sur les paris sportifs|comment
gagner tout le temps au paris sportif|comment gagner
un pari sportif|comment gagner un paris sportif|comment gerer une bankroll paris
sportif|comment gérer sa bankroll paris sportif|comment jouer au pari sportif|comment jouer au paris
sportif|comment jouer au paris sportif foot|comment jouer
aux paris sportifs|comment jouer paris sportif|comment marche cote paris sportif|comment
marche les cotes paris sportif|comment marche les paris sportif|comment marche
les paris sportifs|comment marche paris sportif|comment marche un pari sportif|comment marche
un paris sportif|comment marchent les cotes paris
sportif|comment marchent les paris sportifs|comment
miser au paris sportif|comment miser paris sportif|comment monter
sa bankroll paris sportif|comment ne jamais perdre au paris sportif|comment parier sportif|comment reussir au paris sportif|comment reussir les paris
sportif|comment reussir paris sportif|comment sont calculer les cotes de paris sportif|comment sont calculées les cotes des paris sportifs|comment sont calculés
les cotes des paris sportifs|comment sont faites les cotes des paris sportifs|comment toujours gagner au paris sportif|comment ça marche les
paris sportifs|comparaison bonus paris sportifs|comparaison cote pari sportif|comparaison des cotes paris sportifs|comparateur cote pari sportif|comparateur cote paris
sportif|comparateur cotes paris sportif|comparateur cotes paris sportifs|comparateur de cote pari sportif|comparateur de cote paris
sportif|comparateur de cotes paris sportifs|comparateur de côtes paris sportifs|comparateur de paris sportif|comparateur de
site de paris sportif|comparateur de site paris sportif|comparateur de sites de paris sportifs|comparateur pari sportif|comparateur paris
sportif|comparateur paris sportifs|comparateur site de paris sportif|comparateur
site pari sportif|comparateur site paris sportif|comparatif bonus paris sportif|comparatif bonus paris sportifs|comparatif
cote pari sportif|comparatif cote paris sportif|comparatif cotes paris sportifs|comparatif des sites de paris sportifs|comparatif offre de bienvenue paris sportif|comparatif offre
paris sportif|comparatif pari sportif|comparatif pari sportif
en ligne|comparatif paris sportif|comparatif paris sportif bonus|comparatif paris sportif
en ligne|comparatif paris sportifs|comparatif paris sportifs en ligne|comparatif site de paris sportif|comparatif
site paris sportif|comparatif site paris sportifs|comparatif sites de paris
sportifs|comparatif sites paris sportifs|comparer les cotes paris sportifs|comprendre cote paris sportif|comprendre handicap paris
sportif|comprendre les cotes des paris sportifs|comprendre les cotes paris sportif|comprendre les cotes paris sportifs|comprendre
les handicap paris sportif|compte de paris sportif|compte démo paris sportif|compte finance
paris sportif|compte financer paris sportif|compte financier paris sportif|compte financé paris sportif|compte pari sportif|compte paris
sportif|compte paris sportif financé|conseil de paris sportif|conseil de paris sportifs|conseil en paris sportif|conseil
en paris sportifs|conseil pari sportif|conseil pari sportif gratuit|conseil paris sportif|conseil paris sportif aujourd’hui|conseil paris sportif du jour|conseil paris sportif foot|conseil paris sportif gratuit|conseil paris sportif ligue des champions|conseil paris sportif nba|conseil paris sportif pronostic|conseil paris sportif rmc|conseil paris sportif tennis|conseil paris sportifs|conseil pour gagner au paris
sportif|conseil pour paris sportif|conseil sur les paris sportifs|conseille paris sportif|conseiller en paris sportifs|conseiller paris
sportif|conseils de paris sportifs|conseils en paris sportifs|conseils paris sportifs|conseils paris sportifs foot|conseils paris sportifs gratuit|conseils paris sportifs tennis|conseils pour paris sportifs|cote
a 100 paris sportif|cote a 2 paris sportif|cote anglaise paris sportif|cote de 2 paris sportif|cote de pari sportif|cote de paris
sportif|cote des paris sportifs|cote maximum paris sportif|cote minimum paris
sportif|cote pari sportif|cote pari sportif comment ça marche|cote pari sportif real madrid|cote pari sportif rugby|cote parie sportif|cote paris sportif|cote paris sportif belgique|cote paris sportif calcul|cote paris sportif definition|cote paris sportif euro|cote paris sportif explication|cote paris sportif foot|cote paris sportif france belgique|cote paris
sportif france espagne|cote paris sportif ligue des champions|cote paris sportif
moto gp|cote paris sportif psg|cote paris sportif psg arsenal|cote paris sportif rugby|cote paris sportif tennis|cote paris
sportifs|cote pour paris sportifs|cote sportif foot|cote sportif rugby|cote à 1000 paris sportif|cotes de paris sportifs|cotes
pari sportif|cotes paris sportif|cotes paris sportifs|cotes paris sportifs foot|coupe de france paris sportif|créer un algorithme
paris sportif|créer un compte paris sportif|créer un site de paris sportif en ligne|dans
les paris sportifs que signifie handicap|declarer ses gains paris sportif|definition cash out paris sportif|definition cote paris sportif|definition handicap paris
sportif|depot 5 euros paris sportif|depot double paris sportif|depot
minimum 5 euro paris sportif|depot minimum paris sportif|depot paris sportif|depuis quand existe les paris sportif en france|devenir riche avec les paris
sportifs|devenir riche avec paris sportifs|disqualification tennis paris sportif|dnb en paris sportif|dnb pari sportif|dnb
paris sportif|dnb paris sportif definition|dnb paris
sportifs|doit on declarer les gains de paris sportif|déclarer
gains paris sportifs|déclarer gains paris sportifs hors arjel|définition bankroll paris sportif|dépôt minimum 1 euro
paris sportif|dépôt minimum 5 euro paris sportif|ecart de jeux tennis paris sportif|erreur de cote paris sportif|est ce
que les gains des paris sportifs sont imposables|est-ce que les prolongation compte dans un pari sportif|etre sur de gagner au paris sportif|euro
paris sportif|evenement sportif a paris|evenement sportif paris|evenement sportif paris 2025|evenement sportif paris aujourd hui|evenement sportif paris aujourd’hui|evenement sportif paris ce week end|evenements
sportif paris|evenements sportifs paris|evenements sportifs paris
2025|evenements sportifs à paris|evolution cote paris sportif|evolution cotes paris
sportifs|evolution des cotes paris sportifs|explication cote pari sportif|explication cote
paris sportif|explication handicap paris sportif|explication pari sportif|explication paris sportif|face a face hockey paris sportif|faire des paris sportif|faire des paris
sportif avec paypal|faire des paris sportifs|faire fortune paris sportifs|faire un pari sportif|faire un paris sportif|faut
il déclarer les gains de paris sportifs|faut
il déclarer ses gains paris sportifs|fichier excel gestion bankroll paris sportif|fiscalité gains paris sportifs|foot
paris sportif|football et paris sportifs|forfait tennis paris sportif|formation paris
sportif gratuit|forum de paris sportif|forum de
paris sportifs|forum pari sportif|forum parie sportif|forum
paris sportif|forum paris sportif foot|forum paris sportif gratuit|forum
paris sportif nba|forum paris sportif tennis|forum paris sportifs|forum sur les
paris sportifs|forum tennis paris sportif|francaise des jeux pari
sportif|francaise des jeux paris sportif|francaise des jeux paris sportifs|france 2 paris sportif|france 2 paris sportifs|france belgique paris
sportif|france espagne paris sportif|france pari
sportif|france pari sportif brest|france paris sportif|france paris sportifs|france pologne paris sportif|france portugal paris sportif|france suisse paris
sportifs|france tunisie paris sportifs|france-pari – paris sportifs|gagnant pari sportif|gagnant
paris sportif|gagnant paris sportif bayern|gagnante paris sportif|gagne au paris sportif|gagner 10 euros par
jour aux paris sportifs|gagner 100 euros par jour paris sportif|gagner 1000 euros
par mois paris sportifs|gagner 10000 euros paris sportif|gagner 2000 euros par mois paris
sportif|gagner 50 euros par jour paris sportif|gagner
a coup sur au paris sportif|gagner a coup sur pari sportif|gagner a
tous les coup paris sportif|gagner argent avec paris sportifs|gagner argent pari
sportif|gagner argent paris sportif|gagner argent paris sportifs|gagner
au pari sportif|gagner au paris sportif|gagner au paris sportif a coup sur|gagner au
paris sportif foot|gagner au paris sportif forum|gagner au paris sportif à coup sur|gagner aux paris sportif|gagner aux paris sportifs|gagner aux paris sportifs pdf|gagner beaucoup d’argent
paris sportif|gagner de l argent grace aux paris sportifs|gagner
de l argent pari sportif|gagner de l argent paris sportif|gagner de l argent paris sportifs|gagner de l’argent au paris sportif|gagner de l’argent aux paris sportifs|gagner de l’argent avec les paris
sportifs|gagner de l’argent avec paris sportif|gagner de l’argent avec paris sportifs|gagner
de l’argent grace au paris sportif|gagner de l’argent grace aux paris sportifs|gagner de l’argent pari sportif|gagner
de l’argent paris sportif|gagner de l’argent paris
sportifs|gagner de l’argent sur les paris sportifs|gagner des paris sportif|gagner
des paris sportifs|gagner les paris sportifs|gagner pari sportif|gagner paris sportif|gagner paris sportif foot|gagner paris sportif forum|gagner paris sportif tennis|gagner
paris sportifs|gagner sa vie avec les paris sportif|gagner sa vie avec les paris sportifs|gagner sa vie avec paris sportifs|gagner ses paris
sportifs|gagner à coup sur paris sportif|gagner à tous les coups paris
sportifs|gain maximum paris sportif|gain pari sportif|gain pari sportif imposable|gain pari sportif impot|gain paris sportif|gain paris
sportif imposable|gain paris sportif impot|gain paris sportif impôt|gains paris sportif|gains paris sportif imposable|gains paris sportifs|gains paris sportifs imposable|gains paris sportifs imposables|gains paris sportifs sont
ils imposables|gerer bankroll paris sportif|gerer sa bankroll paris sportif|gerer une bankroll paris
sportif|gestion bankroll paris sportif|gestion bankroll
paris sportifs|gestion bankroll paris sportifs excel|gestion de bankroll paris sportif|gestion de bankroll paris sportif application|gestion de bankroll
paris sportifs|gestion de mise paris sportif|gestion paris
sportifs v2 5 gratuit|gg signification paris sportif|gros combiné paris sportif|gros
gain paris sportif|grosse cote paris sportif pronostic|grosse
mise paris sportif|groupe paris sportif gratuit|groupe telegram paris sportif gratuit|groupement de joueurs
paris sportifs|handicap 0 paris sportif|handicap 1 paris sportif|handicap 5 paris sportif|handicap
au paris sportif|handicap basket paris sportif|handicap
dans les paris sportifs|handicap en paris sportif|handicap europeen paris sportif|handicap européen paris sportifs|handicap mi temps
paris sportif|handicap pari sportif|handicap paris sportif|handicap paris sportif basket|handicap
paris sportif explication|handicap paris sportif foot|handicap paris sportif rugby|handicap paris sportifs|handicap rugby paris sportif|handicap tennis paris sportif|historique cote paris sportif|historique des cotes paris sportifs|hockey paris sportif|hockey sur glace
paris sportif|hors arjel paris sportif|hweh signification paris sportif|imposition gain pari
sportif|imposition gain paris sportif|imposition gains paris sportifs|imposition paris sportif france|impot gain paris sportif|impot paris sportif france|impot sur gain paris sportif|je gagne
ma vie avec les paris sportifs|jeu de pari sportif gratuit|jeu de
paris sportif en ligne|jeu de paris sportif gratuit|jeu paris sportif gratuit|jeu paris sportif sans argent|jeux
de parie sportif|jeux de paris sportif|jeux de paris sportif en ligne|jeux de paris
sportif gratuit|jeux de paris sportifs|jeux olympiques paris
sportifs|jeux paris sportif|jeux paris sportif gratuit|jeux paris sportif virtuel|jeux paris sportifs en ligne|jouer au paris sportif|jouer paris sportif|joueur absent paris sportif|joueur blesse paris sportif|joueur caen paris sportif|joueur de caen pari sportif|joueur de foot paris sportif|joueur decisif paris sportif|joueur
décisif paris sportif|joueur italien paris sportif|joueur paris sportif|joueur
professionnel paris sportif|joueur qui se blesse paris sportif|joueur sanctionne pari sportif|joueur suspendu
paris sportif|joueurs italiens paris sportifs|l’argent des paris sportifs est il imposable|la cote paris sportif|la francaise des jeux paris sportif|la martingale paris sportif|la
martingale paris sportifs|la meilleur application de paris sportif|la meilleur application paris sportif|la meilleur technique pour gagner au paris sportif|la méthode secrète pour gagner aux paris sportifs pdf|la plus grosse
cote gagner paris sportif|la plus grosse cote paris sportif|ldem paris sportif signification|le marché
des paris sportifs|le meilleur site de pari sportif|le meilleur site de paris
sportif|le meilleur site de paris sportif en ligne|le meilleur site de paris sportifs|le plus gros gain au
paris sportif|le plus gros paris sportif|le plus gros paris sportif du monde|les 10 meilleurs sites de paris sportifs|les 10 meilleurs
sites de paris sportifs en afrique|les 17 secrets pour gagner rapidement aux paris sportifs|les 17 secrets pour gagner rapidement
aux paris sportifs pdf|les application de paris sportif|les applications paris sportifs|les bonus
paris sportifs|les bookmakers paris sportifs|les cotes paris sportifs|les gains de paris sportifs sont ils imposables|les gains des paris sportifs sont ils imposables|les jeux de paris sportifs|les meilleur paris sportif|les meilleures applications de paris
sportifs|les meilleurs applications de paris sportifs|les meilleurs bonus paris sportif|les meilleurs bonus paris sportifs|les meilleurs cotes paris sportif|les meilleurs
paris sportifs|les meilleurs paris sportifs du jour|les meilleurs
site de paris sportif|les meilleurs site de paris sportifs|les meilleurs sites de pari sportif|les meilleurs sites
de paris sportifs|les meilleurs sites de paris sportifs en ligne|les paris
sportif|les paris sportif avis|les paris sportifs|les paris sportifs comment ça
marche|les paris sportifs en france|les paris sportifs en ligne|les paris sportifs en ligne comprendre jouer gagner|les paris sportifs en ligne
comprendre jouer gagner pdf|les paris sportifs les plus rentables|les plus gros gagnant paris sportif|les plus gros gains au paris sportifs|les plus gros gains paris sportifs|les plus gros paris
sportif|les plus grosse cote paris sportif|les plus grosses pertes paris sportifs|les sites de paris sportifs|les sites de
paris sportifs autorisés en france|les sites de paris sportifs en france|les sites de paris sportifs en ligne|les sites de paris sportifs francais|ligue 1 paris
sportif|ligue 1 paris sportifs|ligue 2 paris sportif|ligue des champions paris sportif|limite de gains
paris sportifs|limite de mise paris sportif|limite gain paris sportif|limite mise paris sportifs|liste de paris
sportif|liste des paris sportifs|liste des site de paris sportif|liste des
sites de paris sportifs|liste pari sportif|liste paris
sportif|liste paris sportif pdf|liste site de paris sportif|liste site
pari sportif|liste site paris sportif|liste site paris sportif arjel|liste sites paris sportifs|logiciel algorithme paris sportif|logiciel algorithme paris sportif gratuit|logiciel analyse paris sportif|logiciel calcul
paris sportif|logiciel de pari sportif|logiciel
de paris sportif|logiciel de paris sportif gratuit|logiciel
gestion bankroll paris sportif gratuit|logiciel gestion de bankroll paris sportif|logiciel gestion paris sportif|logiciel gestion paris sportif gratuit|logiciel gestion paris sportifs|logiciel pari
sportif|logiciel paris sportif|logiciel paris sportif gratuit|logiciel paris sportifs|logiciel
paris sportifs foot sur 2 matchs|logiciel pour paris sportif|logiciel pour paris sportifs|logiciel prediction paris sportif|logiciel probabilité paris
sportif|logiciel prédiction paris sportif|logiciel statistique
paris sportifs|logiciel variation de cote paris sportif|loi sur les paris sportifs en france|magic calculator paris sportif|marché des paris sportifs|marché des paris sportifs
en france|marché des paris sportifs en ligne|martingale
pari sportif|martingale paris sportif|martingale
paris sportif excel|martingale paris sportif forum|martingale paris sportif interdit|martingale paris sportifs|match abandonné paris sportif|match annulé ou reporté paris sportifs|match annulé paris sportif|match arrete paris sportif|match interrompu
paris sportif|match interrompu tennis paris sportif|match interrompu tennis pluie paris
sportif|match nul boxe paris sportif|match pari sportif|match paris sportif|match reporté
paris sportif|match suspendu paris sportif|match suspendu tennis paris sportif|match truqué paris sportif|matchs truqués paris sportifs|meilleur algorithme paris sportif|meilleur algorithme
paris sportif gratuit|meilleur app de paris sportif|meilleur app de paris sportifs|meilleur app
paris sportif|meilleur appli de pari sportif|meilleur appli de paris sportif|meilleur appli pari sportif|meilleur appli paris sportif|meilleur appli paris sportif forum|meilleur appli paris sportifs|meilleur application conseil
paris sportif|meilleur application de paris sportif|meilleur
application de paris sportif en afrique|meilleur application pari sportif|meilleur
application paris sportif|meilleur application paris sportif belgique|meilleur application pour les paris sportif|meilleur application pour pari
sportif|meilleur bonus de bienvenue paris sportif|meilleur bonus pari sportif|meilleur bonus paris sportif|meilleur bonus paris sportif sans depot|meilleur bonus paris sportifs|meilleur bonus site de
paris sportif|meilleur bonus site pari sportif|meilleur bonus site paris sportif|meilleur bookmaker paris sportif|meilleur combiné paris sportif|meilleur
conseil paris sportif|meilleur cote de paris sportif|meilleur cote pari sportif|meilleur cote paris sportif|meilleur cote paris sportif
aujourd’hui|meilleur cote site paris sportif|meilleur forum paris sportifs|meilleur gain paris sportif|meilleur ia paris sportif|meilleur methode pour gagner au paris
sportif|meilleur offre bienvenue paris sportif|meilleur offre bonus
paris sportif|meilleur offre de bienvenue paris sportif|meilleur offre de bienvenue paris sportifs|meilleur offre pari sportif|meilleur offre paris sportif|meilleur
offre paris sportif en ligne|meilleur pari sportif|meilleur pari
sportif du jour|meilleur pari sportif en ligne|meilleur paris sportif|meilleur paris sportif aujourd’hui|meilleur paris sportif du jour|meilleur paris sportif en ligne|meilleur paris sportif foot|meilleur
promo paris sportif|meilleur pronostic paris sportif|meilleur site de
conseil paris sportif|meilleur site de pari sportif|meilleur site de pari sportif en ligne|meilleur site de paris
sportif|meilleur site de paris sportif avis|meilleur site de paris sportif belgique|meilleur site de paris sportif canada|meilleur site de
paris sportif en france|meilleur site de paris sportif
en ligne|meilleur site de paris sportif football|meilleur site de paris
sportif forum|meilleur site de paris sportif france|meilleur site
de paris sportif hors arjel|meilleur site de paris sportif international|meilleur site
de paris sportif suisse|meilleur site de paris sportifs|meilleur site de paris sportifs en ligne|meilleur site pari sportif|meilleur site pari sportif
en ligne|meilleur site pari sportif france|meilleur site paris sportif|meilleur site paris sportif avis|meilleur site
paris sportif belgique|meilleur site paris sportif canada|meilleur site paris sportif en ligne|meilleur site paris
sportif foot|meilleur site paris sportif forum|meilleur site
paris sportif france|meilleur site paris sportif hors arjel|meilleur site paris sportif nba|meilleur site paris sportif rugby|meilleur site
paris sportif suisse|meilleur site paris sportifs|meilleur site pour pari sportif|meilleur site pour paris sportif|meilleur site
pronostic paris sportif|meilleur strategie paris sportif|meilleur technique de paris sportif|meilleur technique paris sportif|meilleur technique pour gagner
au paris sportif|meilleure appli de paris sportif|meilleure appli de paris sportifs|meilleure appli pari sportif|meilleure appli paris sportif|meilleure appli paris sportifs|meilleure application de paris sportif|meilleure application de paris sportifs|meilleure application pari sportif|meilleure application paris sportif|meilleure application paris
sportif android|meilleure application paris sportifs|meilleure offre paris sportif|meilleure site paris sportif|meilleure strategie paris sportif|meilleures applications de paris sportifs|meilleures
applications paris sportifs|meilleures cotes paris sportifs|meilleures
offres paris sportifs|meilleures stratégies paris sportifs|meilleurs appli paris sportif|meilleurs
application de paris sportifs|meilleurs application paris sportif|meilleurs applications paris
sportifs|meilleurs bonus paris sportifs|meilleurs cote paris sportif|meilleurs cotes paris sportifs|meilleurs offres paris sportifs|meilleurs paris sportifs|meilleurs paris sportifs du jour|meilleurs site
de pari sportif|meilleurs site de paris sportif|meilleurs site de paris sportif en ligne|meilleurs site de paris sportifs|meilleurs site paris sportif|meilleurs sites de paris sportifs|meilleurs sites de
paris sportifs en ligne|meilleurs sites paris sportif|meilleurs sites paris sportifs|methode abc paris sportif|methode de
paris sportif|methode gagnante paris sportifs|methode gagner paris sportif|methode infaillible
paris sportifs|methode martingale paris sportif|methode mathematique paris sportif|methode mathematique pour
gagner au paris sportif|methode paris sportif|methode paris sportif foot|methode paris sportif forum|methode paris sportif tennis|methode paris
sportifs|methode pour gagner au paris sportif|methode pour gagner paris
sportif|methodes paris sportifs|minimum depot paris sportif|mise au jeu pari sportif|mise maximum pari sportif|mise maximum paris sportif|mise minimum paris sportif|mise
moyenne paris sportif|mise paris sportif|moins de
4 5 but paris sportif|montant maximum paris sportif|montant paris sportif|montante pari sportif|montante parie sportif|montante paris sportif|montante paris sportifs|montantes paris sportifs|multiple pari sportif|multiple paris sportif|multiple paris sportifs|multiples
paris sportifs|méthode calcul paris sportif|méthode match nul paris sportifs|méthode mathématique pour gagner au paris
sportif|méthode paris sportif forum|méthode paris sportif hockey|nba pari sportif|nba paris sportif|nba
paris sportifs|nouveau paris sportif|nouveau site de
pari sportif|nouveau site de paris sportif|nouveau site de
paris sportif en ligne|nouveau site de paris sportifs|nouveau site pari
sportif|nouveau site paris sportif|nouveau site paris sportif france|nouveau site paris sportifs|nouveaux sites de paris sportifs|nouveaux sites paris sportifs|nouvelle appli paris
sportif|nouvelle application de paris sportif|numero de match
paris sportif|numero match paris sportif|offre 100 euros paris sportif|offre appli pari sportif|offre bienvenu paris sportif|offre bienvenue pari sportif|offre bienvenue
paris sportif|offre bienvenue paris sportifs|offre bienvenue site paris sportif|offre bonus paris sportif|offre
de bienvenu paris sportif|offre de bienvenue pari
sportif|offre de bienvenue paris sportif|offre
de bienvenue paris sportif belgique|offre de bienvenue paris sportif sans depot|offre de bienvenue paris sportif
sans dépôt|offre de bienvenue paris sportifs|offre de bienvenue sans
depot paris sportif|offre de bienvenue site paris sportif|offre euro paris sportif|offre pari sportif euro|offre paris sportif|offre paris sportif belgique|offre paris
sportif cash|offre paris sportif coupe du monde|offre paris sportif hors arjel|offre paris sportif remboursé|offre
paris sportif remboursé cash|offre paris sportif sans
depot|offre promo paris sportif|offre remboursement paris sportif|offre sans depot paris sportif|offre site paris sportif|offres bienvenue
paris sportifs|offres de bienvenue paris sportifs|ou faire des
paris sportif|ou faire des paris sportif en espagne|ou faire des paris sportifs|outil répartiteur de mise paris
sportif|outils repartiteur de mises paris sportif|ouverture compte paris sportifs|ouvrir un compte paris sportif|pack
de bienvenue paris sportif|pack de bienvenue paris sportif
hors arjel|pari en ligne sportif|pari sportif|pari sportif 100 euros offert|pari sportif 100 remboursé|pari sportif abandon tennis|pari
sportif aide|pari sportif algérie aujourd’hui|pari sportif appli|pari sportif application|pari
sportif argent|pari sportif astuce|pari sportif aujourd|pari sportif
aujourd’hui|pari sportif avec handicap|pari sportif avec orange money|pari sportif avec
paypal|pari sportif avec wave|pari sportif avis|pari sportif basket|pari sportif belgique|pari sportif belgique france|pari
sportif bonus|pari sportif buteur pas titulaire|pari sportif champions league|pari sportif combiné|pari sportif comment|pari sportif comment gagner|pari sportif
comment ça marche|pari sportif comparatif|pari sportif conseil|pari
sportif cote|pari sportif cote match|pari sportif cote psg|pari sportif coupe|pari sportif
coupe de france|pari sportif coupe du monde|pari sportif depot|pari sportif du
jour|pari sportif en france|pari sportif en ligne|pari sportif en ligne au cameroun|pari sportif en ligne belgique|pari sportif en ligne canada|pari sportif en ligne france|pari sportif en ligne gratuit|pari sportif en ligne suisse|pari
sportif en ligne ufc|pari sportif en suisse|pari sportif euro|pari sportif explication|pari sportif faire|pari sportif foot|pari sportif foot resultat|pari sportif football|pari sportif forum|pari sportif francaise des jeux|pari sportif france|pari sportif france angleterre|pari sportif france argentine|pari
sportif france autriche|pari sportif france belgique|pari sportif france espagne|pari sportif france italie|pari sportif france
portugal|pari sportif france usa|pari sportif
gagnant|pari sportif gagner|pari sportif gagner a tous les coups|pari sportif gagner de l’argent|pari
sportif gain|pari sportif gratuit|pari sportif gratuit
pour gagner des cadeaux|pari sportif gratuit sans depot|pari sportif handicap|pari sportif hockey|pari
sportif hors arjel|pari sportif jeux olympiques|pari sportif joueur absent|pari sportif le plus rentable|pari sportif leicester champion|pari sportif ligue 1|pari sportif ligue 2|pari sportif ligue des champions|pari sportif ligue europa|pari sportif match|pari sportif match
arrete|pari sportif match interrompu|pari sportif meilleur|pari sportif meilleur cote|pari sportif meilleur site|pari sportif methode|pari
sportif mise|pari sportif mise au jeu|pari sportif mise o jeu|pari sportif nba|pari sportif offre bienvenue|pari sportif paypal|pari sportif plus|pari sportif prolongation|pari sportif
promo|pari sportif pronostic|pari sportif pronostic foot|pari sportif pronostic gagnant|pari sportif pronostic gratuit|pari
sportif psg|pari sportif psg bayern|pari sportif
psg inter|pari sportif psg milan|pari sportif regle|pari sportif rembourse|pari sportif
remboursement|pari sportif remboursement cash|pari sportif remboursé|pari
sportif rugby|pari sportif rugby coupe du monde|pari sportif rugby top 14|pari sportif sans
argent|pari sportif sans carte bancaire|pari sportif sans depot|pari sportif signification|pari sportif site|pari sportif statistique|pari sportif suisse|pari sportif
systeme|pari sportif technique|pari sportif technique pour gagner|pari sportif temps reglementaire|pari sportif tennis|pari sportif tennis abandon|pari sportif top|pari sportif top
14|pari sportif tour de france|parie sportif|parie sportif comment ca
marche|parie sportif du jour|parie sportif en ligne|parie sportif foot|parie sportif football|parie sportif france|parie sportif gratuit|parie sportif pronostic|parie sportif suisse|paris en ligne sportif|paris en ligne sportifs|paris evenement sportif|paris france sportif|paris hippique et sportif|paris hippiques et sportifs|paris hippiques paris sportifs|paris hippiques paris sportifs et poker en ligne|paris hippiques sportifs|paris match sportif|paris sportif|paris sportif 10 euros offerts|paris sportif 100 euros offert|paris sportif 100
euros remboursé|paris sportif 100 offert|paris sportif 100 remboursé|paris sportif 100e offert|paris sportif 150 euros offert|paris sportif 1er pari remboursé|paris sportif a faire|paris sportif a faire aujourd’hui|paris sportif a faire ce soir|paris sportif abandon tennis|paris sportif abandon tennis parions sport|paris sportif aide|paris sportif algorithme|paris sportif analyse|paris sportif appli|paris sportif
application|paris sportif application android|paris sportif apres prolongation|paris sportif argent|paris sportif argent fictif|paris sportif argent offert|paris sportif argent
virtuel|paris sportif arjel|paris sportif arsenal psg|paris
sportif astuce|paris sportif au canada|paris sportif aujourd hui|paris sportif aujourd’hui|paris sportif avec argent fictif|paris sportif avec bonus sans depot|paris sportif avec carte bancaire|paris sportif
avec cryptomonnaie|paris sportif avec handicap|paris sportif avec paypal|paris sportif
avec paysafecard|paris sportif avis|paris sportif avis
expert|paris sportif avis forum|paris sportif bankroll|paris sportif
basket|paris sportif basket coupe de france|paris sportif basket nba|paris sportif basket prolongation|paris
sportif belgique|paris sportif belgique bonus|paris sportif belgique
bonus sans depot|paris sportif belgique france|paris sportif belgique suede|paris sportif bonus|paris sportif bonus bienvenue|paris
sportif bonus cash|paris sportif bonus de bienvenue|paris
sportif bonus gratuit|paris sportif bonus gratuit sans depot|paris sportif bonus retirable|paris
sportif bonus sans depot|paris sportif bonus sans depot
belgique|paris sportif bookmaker|paris sportif but contre son camp|paris sportif but temps additionnel|paris sportif buteur|paris sportif buteur blessé|paris sportif
buteur carton rouge|paris sportif buteur contre son camp|paris sportif buteur non titulaire|paris sportif buteur prolongation|paris sportif buteur qui ne joue pas|paris sportif buteur remplacant|paris sportif calcul gain|paris sportif canada|paris sportif cash|paris sportif
cash out|paris sportif champion ligue 1|paris sportif champions league|paris sportif classement ligue 1|paris sportif code promo|paris sportif combine|paris sportif combiné|paris sportif
combiné comment ça marche|paris sportif combiné du jour|paris sportif combiné match reporté|paris sportif comment ca marche|paris sportif comment faire|paris sportif comment gagner|paris sportif comment gagner
a tous les coups|paris sportif comment jouer|paris sportif comment ça marche|paris sportif comparateur cote|paris sportif comparatif|paris sportif conseil|paris sportif conseil gratuit|paris sportif conseil pour gagner|paris sportif cote|paris sportif cote
et match|paris sportif cote explication|paris sportif cote psg|paris sportif coupe d’europe|paris sportif coupe davis|paris sportif coupe de france|paris sportif coupe
du monde|paris sportif coupe du monde de rugby|paris sportif coupe du monde rugby|paris sportif depot 5 euro|paris sportif depot
minimum|paris sportif depot paypal|paris sportif
dnb|paris sportif du jour|paris sportif du jour conseil|paris sportif dépôt 1 euro|paris sportif dépôt minimum 5 euros|paris sportif en belgique|paris sportif en france|paris sportif en ligne|paris sportif en ligne avec paypal|paris
sportif en ligne avis|paris sportif en ligne belgique|paris sportif en ligne bonus|paris
sportif en ligne cameroun|paris sportif en ligne comment gagner|paris sportif
en ligne comment ça marche|paris sportif en ligne france|paris sportif en ligne gratuit|paris sportif en ligne maroc|paris sportif
en ligne paypal|paris sportif en ligne québec|paris sportif en ligne sans depot|paris sportif en ligne
suisse|paris sportif en suisse|paris sportif espagne france|paris sportif esport|paris sportif et casino en ligne|paris sportif et hippique|paris sportif et prolongation|paris sportif euro|paris sportif europa league|paris sportif explication|paris
sportif final ligue des champions|paris sportif finale ligue
des champions|paris sportif foot|paris sportif foot aide|paris sportif foot astuce|paris sportif foot aujourd’hui|paris sportif foot ce soir|paris sportif foot comment ca marche|paris sportif foot conseil|paris sportif foot cote|paris sportif foot coupe du monde|paris sportif foot
en ligne|paris sportif foot feminin|paris sportif foot
gratuit|paris sportif foot prolongation|paris sportif foot pronostic|paris
sportif foot pronostic gratuit|paris sportif foot regle|paris sportif foot suisse|paris sportif foot us|paris sportif football|paris sportif football americain|paris
sportif football astuces|paris sportif forfait tennis|paris sportif
forum|paris sportif francais|paris sportif
francaise des jeux|paris sportif france|paris sportif
france 2|paris sportif france allemagne|paris sportif france
angleterre|paris sportif france argentine|paris sportif france autriche|paris sportif france belgique|paris sportif france espagne|paris sportif france
gibraltar|paris sportif france italie|paris sportif france nouvelle zelande|paris sportif france pologne|paris sportif france portugal|paris
sportif france uruguay|paris sportif france usa|paris sportif freebet sans depot|paris sportif gagnant|paris sportif gagnant à coup sûr|paris sportif gagner a coup sur|paris sportif gagner argent|paris sportif
gagner de l’argent|paris sportif gain|paris sportif gain maximum|paris sportif gestion bankroll|paris
sportif gratuit|paris sportif gratuit appli|paris sportif gratuit avec cadeaux|paris sportif gratuit cadeaux|paris sportif gratuit en ligne|paris
sportif gratuit entre amis|paris sportif gratuit sans
argent|paris sportif gratuit sans depot|paris
sportif gratuit sans dépôt|paris sportif gratuits|paris sportif gros
gain|paris sportif handicap|paris sportif handicap 0 1|paris sportif handicap 0-1|paris sportif handicap 1 0|paris sportif handicap
1-0|paris sportif handicap basket|paris sportif handicap explication|paris sportif handicap foot|paris sportif handicap rugby|paris
sportif hippique|paris sportif hockey|paris sportif hockey nhl|paris sportif hockey sur glace|paris sportif hors
arjel|paris sportif hors arjel france|paris sportif jeux olympiques|paris sportif jeux video|paris sportif joueur blessé|paris sportif joueur blessé
pendant le match|paris sportif joueur de foot|paris sportif joueur
decisif|paris sportif joueur declare forfait|paris sportif joueur déclare
forfait|paris sportif joueur remplacant|paris sportif la francaise des jeux|paris sportif le plus rentable|paris sportif
legal en france|paris sportif leicester champion|paris sportif les 18 stratégies pour gagner tous les jours|paris sportif les plus sur|paris sportif les prolongation compte|paris sportif ligne|paris sportif ligue 1|paris sportif
ligue 2|paris sportif ligue des champions|paris sportif ligue des nations|paris sportif
ligue europa|paris sportif liste|paris sportif martingale|paris sportif match|paris sportif match abandonné|paris sportif match
annulé|paris sportif match arrêté|paris sportif match
du jour|paris sportif match interrompu|paris sportif match reporté|paris sportif match suspendu|paris sportif match tennis interrompu|paris
sportif match truqué|paris sportif meilleur bonus|paris sportif meilleur cote|paris sportif
meilleur pronostic|paris sportif meilleur site|paris sportif methode|paris sportif methode 2 3|paris
sportif mi temps fin de match|paris sportif mise au jeu|paris
sportif mise maximum|paris sportif mma france|paris sportif moins de 3.5 but|paris sportif
montante|paris sportif moto gp|paris sportif multiple|paris
sportif multiple 2 3|paris sportif multiple 2 3 explication|paris sportif
multiple 2 4|paris sportif multiple 2 5|paris sportif multiple 2/3
explication|paris sportif multiple 3 4|paris sportif multiple explication|paris sportif national 1 foot|paris sportif nba|paris sportif nba
conseil|paris sportif nba pronostic|paris sportif
nhl|paris sportif nombre de but|paris sportif nouveau
site|paris sportif numero match|paris sportif offert|paris sportif offre bienvenue|paris sportif offre
bienvenue sans depot|paris sportif offre de bienvenue|paris sportif offre sans depot|paris sportif om psg|paris sportif
paypal|paris sportif plus de 1.5 but|paris sportif plus de 2 5 but|paris sportif plus ou moins|paris sportif
plus ou moins 2 5 but|paris sportif premier pari remboursé|paris sportif premier paris remboursé|paris sportif prolongation|paris sportif
prolongation basket|paris sportif prolongation foot|paris sportif promo|paris sportif pronostic|paris sportif pronostic basket|paris sportif pronostic des
match aujourd hui|paris sportif pronostic expert gratuit|paris sportif pronostic foot|paris sportif pronostic forum|paris sportif pronostic
gratuit|paris sportif pronostic tennis|paris sportif psg|paris sportif psg arsenal|paris sportif psg barcelone|paris sportif psg bayern|paris sportif psg dortmund|paris sportif psg inter|paris sportif psg inter cote|paris sportif psg liverpool|paris sportif
psg om|paris sportif qr code|paris sportif que veut
dire handicap|paris sportif qui rapporte le plus|paris sportif regle|paris sportif regle prolongation|paris sportif rembourse|paris sportif
remboursement cash|paris sportif rembourser|paris
sportif remboursé|paris sportif remboursé cash|paris sportif remboursé en cash|paris sportif retrait
paypal|paris sportif rue des joueurs|paris sportif rugby|paris sportif
rugby 6 nations|paris sportif rugby coupe du monde|paris sportif rugby top 14|paris sportif safe du jour|paris sportif sans
argent|paris sportif sans carte bancaire|paris sportif sans carte d’identité|paris sportif sans compte bancaire|paris
sportif sans depot|paris sportif sans depot minimum|paris sportif si match suspendu|paris sportif si un joueur abandonne|paris sportif si un joueur ne
joue pas|paris sportif si un joueur se blesse|paris sportif simple ou combiné|paris sportif site|paris sportif statistique|paris sportif stratégie|paris
sportif suisse|paris sportif suisse application|paris sportif
suisse en ligne|paris sportif suisse legal|paris sportif suisse légal|paris sportif suisse romande|paris sportif sur du jour|paris sportif sur
le tennis|paris sportif systeme|paris sportif systeme 2 3|paris sportif systeme 2 4|paris sportif systeme 2/3|paris sportif systeme 2/4|paris sportif systeme 3 4|paris sportif systeme 3/4|paris sportif systeme explication|paris sportif technique|paris sportif technique pour gagner|paris
sportif temps additionnel|paris sportif temps reglementaire|paris sportif tennis|paris sportif tennis abandon|paris sportif tennis conseil|paris sportif tennis de
table|paris sportif tennis forfait|paris sportif tennis gratuit|paris sportif tennis pronostic|paris sportif tennis
roland garros|paris sportif tir au but|paris sportif top 14|paris sportif tour
de france|paris sportif ufc|paris sportif ufc france|paris sportif unibet|paris sportif vainqueur euro|paris sportif vainqueur
ligue 1|paris sportif vainqueur ligue des champions|paris sportif via paypal|paris sportif victoire prolongation|paris sportif vip gratuit|paris sportifs|paris sportifs abandon tennis|paris sportifs aide|paris sportifs analyser un match|paris sportifs arjel|paris sportifs astuces|paris
sportifs aujourd’hui|paris sportifs autorisés en france|paris sportifs avec paypal|paris sportifs basket|paris sportifs belgique|paris
sportifs bonus|paris sportifs bookmakers|paris sportifs canada|paris
sportifs combiné|paris sportifs comparateur|paris sportifs comparatif|paris sportifs conseils|paris sportifs cotes|paris
sportifs coupe du monde|paris sportifs de football|paris sportifs du
jour|paris sportifs en belgique|paris sportifs en france|paris sportifs en ligne|paris sportifs en ligne belgique|paris sportifs en ligne france|paris sportifs en ligne gratuit|paris sportifs en ligne suisse|paris sportifs en suisse|paris
sportifs et hippiques|paris sportifs euro|paris
sportifs foot|paris sportifs foot us|paris sportifs forum|paris sportifs france|paris sportifs france espagne|paris sportifs gagner à
tous les coups|paris sportifs gratuit|paris sportifs gratuits|paris sportifs gratuits en ligne|paris sportifs handicap|paris sportifs hockey|paris sportifs hockey
sur galce|paris sportifs hockey sur glace|paris
sportifs hors arjel|paris sportifs jeux olympiques|paris sportifs
les bookmakers raflent la mise|paris sportifs ligne|paris sportifs ligue 1|paris sportifs ligue 2|paris sportifs ligue des champions|paris sportifs ligue europa|paris sportifs match interrompu|paris sportifs montante|paris sportifs nba|paris sportifs offre
bienvenue|paris sportifs offre de bienvenue|paris sportifs paypal|paris sportifs pronostics|paris sportifs psg|paris sportifs
psg inter|paris sportifs rugby|paris sportifs sans argent|paris sportifs sans depot|paris sportifs site|paris sportifs
sites|paris sportifs statistiques|paris sportifs stratégie|paris sportifs suisse|paris sportifs technique|paris sportifs techniques|paris sportifs tennis|paris sportifs tennis astuces|paris sportifs top
14|paris sportifs tour de france|part de marché paris sportifs|paypal pari sportif|paypal paris
sportif|paypal paris sportifs|perte d’argent paris sportifs|peut on devenir riche avec les paris sportifs|peut on gagner de l’argent avec les paris sportifs|peut on gagner sa vie avec les paris sportif|peut on vraiment gagner
de l’argent avec les paris sportifs|plus gros combine paris sportif|plus
gros gagnant paris sportif|plus gros gain paris sportif|plus gros gain paris sportif au monde|plus gros gain paris sportif france|plus gros
gains paris sportif|plus gros pari sportif|plus gros paris sportif|plus
grosse cote gagner paris sportif|plus grosse
cote pari sportif|plus grosse cote paris sportif|plus grosse mise paris sportif|plus
grosse somme gagner au paris sportif|plus ou moins paris sportif|pourcentage de mise paris sportif|premier pari
sportif remboursé|probabilité cote paris sportif|probabilité paris sportif
combiné|prolongation basket paris sportif|prolongation paris sportif|promo pari sportif|promo paris sportif|promo site de paris sportif|promo site pari sportif|promo site paris sportif|promos paris sportifs|prono paris
sportif foot|prono paris sportif gratuit|prono paris sportif tennis|pronostic de paris sportif|pronostic du jour paris sportif|pronostic foot paris sportif|pronostic gratuit paris sportif|pronostic pari sportif|pronostic pari sportif gratuit|pronostic paris sportif|pronostic paris sportif aujourd’hui|pronostic paris sportif du jour|pronostic paris sportif foot|pronostic paris sportif gratuit|pronostic
paris sportif tennis|pronostic paris sportifs|pronostics foot statistiques et aides aux
paris sportifs|pronostics paris sportif|pronostics paris
sportifs|pronostiqueur paris sportif gratuit|psg arsenal paris sportif|psg bayern paris sportif|psg inter milan paris sportif|psg inter pari sportif|psg inter paris sportif|psg liverpool paris sportif|psg om paris sportif|psg paris sportif|psg paris sportifs|qr code paris sportif|qu
est ce qu un handicap paris sportif|qu est ce que handicap dans les paris sportif|qu’est ce qu’un handicap paris
sportif|qu’est ce que handicap dans les paris sportif|quand un joueur se blesse paris sportif|que signifie 1/1 en paris sportif|que signifie 1/2 paris sportif|que signifie 12 en paris sportif|que signifie 1×2 dans les paris sportifs|que signifie btts en paris
sportif|que signifie dnb en paris sportif|que signifie draw en paris sportif|que signifie ft en paris sportif|que signifie gg dans le pari sportif|que signifie gg en pari sportif|que signifie
gg en paris sportif|que signifie handicap dans les paris sportifs|que veut dire dnb en paris sportif|que veut dire handicap dans les paris sportifs|que veut dire handicap paris sportif|quel appli pari sportif|quel cote jouer paris sportif|quel est la meilleur appli de paris sportif|quel est le meilleur algorithme de paris sportif|quel est le meilleur site de pari sportif|quel est le meilleur site de pari sportif en ligne|quel est le meilleur site de paris
sportif|quel est le meilleur site de paris sportif
en ligne|quel est le meilleur site de paris sportifs en ligne|quel est le pari sportif le plus rentable|quel pari sportif est le plus rentable|quel pari sportif est le plus sûr|quel pari sportif faire aujourd’hui|quel paris sportif faire aujourd’hui|quel paris sportif rapporte le plus|quel site de paris sportif choisir|quel
site de paris sportif rembourse en cash|quel type de pari sportif est
le plus rentable|quelle application pour paris sportifs|quelle est la
meilleure appli de paris sportif|quelle est la
meilleure application de paris sportif|quelle est la meilleure application pour les paris sportifs|quelle est le meilleur site de paris
sportif|quels paris sportifs faire|quels sont les paris sportifs les plus sûrs|rebond basket paris sportif|record de gain paris sportif|regle buteur paris sportif|regle de paris sportif|regle des paris sportif|regle handicap paris sportif|regle handicap paris
sportif foot|regle multiple paris sportif|regle pari sportif|regle paris sportif|regle paris sportif
foot|regle paris sportif multiple|regle paris sportif
prolongation|reglement pari sportif|reglement paris sportif|regles paris sportifs|remboursement cash paris sportif|remboursement en cash paris sportif|remboursement pari sportif|remboursement paris sportif|repartiteur de mise paris sportif|repartiteur de mise paris sportifs|repartiteur de mises
paris sportif|repartiteur mise paris sportif|repartition des mises paris sportif|resultat
pari sportif|resultat paris sportif|resultat paris sportif en direct|resultat paris sportif
foot|resultat sportif hockey|retirer argent paris sportif|rugby pari sportif|rugby paris sportif|règle paris
sportif prolongation|règles paris sportif|répartiteur de
mise pari sportif|répartiteur de mise paris sportif|répartiteur de mise paris sportifs|répartition des mises paris sportif|résultat paris sportif foot|sans depot
paris sportif|se faire interdire de paris sportifs|signification btts paris sportif|signification dnb paris sportif|signification handicap paris sportif|simulateur de gain paris sportif|simulateur gain paris sportif|simulateur
gain paris sportif multiple|simulateur gain paris sportif systeme|simulateur
gain paris sportif système|simulateur montante paris
sportif|simulateur paris sportif multiple|simulateur systeme paris sportif|simulation paris sportif gratuit|site aide paris sportif|site analyse paris sportif|site analyser paris
sportif|site arjel paris sportif|site conseil paris
sportif|site d’analyse de paris sportifs|site d’analyse paris sportif|site de conseil paris sportif|site de pari en ligne sportif|site de pari sportif|site de pari sportif avec bonus sans depot|site de pari sportif
bonus sans depot|site de pari sportif canada|site de pari sportif en ligne|site de pari
sportif francais|site de pari sportif gratuit|site de pari sportif hors arjel|site de pari
sportif suisse|site de parie sportif|site de parie sportif en ligne|site de paris en ligne
sportif|site de paris sportif|site de paris sportif acceptant paypal|site de paris sportif arjel|site de paris sportif autorisé en france|site de paris sportif autorisé
en suisse|site de paris sportif avec bonus|site de paris sportif avec
bonus sans depot|site de paris sportif avec bonus sans dépôt|site de paris sportif avec neosurf|site de paris sportif avec paiement mobile|site de paris sportif
avec paypal|site de paris sportif avis|site de paris sportif belge avec bonus|site de paris sportif belgique|site de paris sportif bonus|site de paris sportif bonus sans depot|site de
paris sportif canada|site de paris sportif comparatif|site de paris
sportif depot minimum|site de paris sportif en france|site de paris sportif
en ligne|site de paris sportif en ligne suisse|site de paris sportif football|site de paris sportif francais|site de paris sportif france|site de paris sportif gratuit|site de paris sportif
gratuit pour gagner des cadeaux|site de paris sportif gratuit sans
dépôt|site de paris sportif hors arjel|site de paris sportif le plus fiable|site de paris sportif legal en france|site de paris sportif meilleur
cote|site de paris sportif nouveau|site de paris sportif offre de
bienvenue|site de paris sportif paypal|site de paris sportif premier paris remboursé|site de
paris sportif qui accepte paypal|site de paris sportif
qui rembourse en cash|site de paris sportif remboursé|site de
paris sportif sans argent|site de paris sportif sans carte bancaire|site de paris sportif sans carte d’identité|site
de paris sportif sans depot|site de paris sportif suisse|site de paris sportifs|site de paris sportifs avec paypal|site de paris sportifs en ligne|site de paris sportifs francais|site de
paris sportifs gratuit|site de paris sportifs paypal|site de paris
sportifs suisse|site de statistique pour paris sportif|site des paris sportifs|site pari en ligne sportif|site pari sportif|site pari
sportif 100 euros offert|site pari sportif arjel|site pari
sportif belgique|site pari sportif bonus|site pari sportif canada|site pari sportif comparatif|site
pari sportif en ligne|site pari sportif france|site pari sportif gratuit|site pari sportif hors arjel|site pari
sportif suisse|site parie sportif|site paris en ligne sportif|site paris sportif|site paris sportif 100 euros
offert|site paris sportif 100 euros remboursé|site paris sportif 1er paris remboursé|site paris sportif arjel|site paris
sportif autorisé en france|site paris sportif avec bonus|site paris sportif avec bonus sans depot|site paris sportif avec
meilleur cote|site paris sportif belgique|site paris sportif bonus|site paris sportif
bonus cash|site paris sportif bonus sans depot|site paris sportif canada|site paris sportif comparatif|site paris sportif depot 5 euro|site paris sportif en ligne|site paris sportif foot|site paris sportif france|site paris sportif gratuit|site paris sportif hors arjel|site paris sportif
hors arjel france|site paris sportif meilleur cote|site paris sportif nouveau|site paris
sportif offre de bienvenue|site paris sportif paypal|site paris sportif
remboursement cash|site paris sportif remboursé en cash|site paris sportif retrait instantané|site paris sportif sans carte bancaire|site paris sportif
sans depot|site paris sportif suisse|site paris sportifs|site paris sportifs belgique|site paris sportifs en ligne|site
paris sportifs france|site paris sportifs hors arjel|site paris sportifs suisse|site pour analyse paris sportif|site pour paris sportif|site pronostic paris sportif|site
statistique paris sportif|site suisse paris sportif|sites de pari sportif|sites de paris sportif|sites
de paris sportifs|sites de paris sportifs arjel|sites
de paris sportifs autorisés en france|sites de paris
sportifs belgique|sites de paris sportifs bonus|sites de paris
sportifs en belgique|sites de paris sportifs en france|sites de paris sportifs en ligne|sites de paris
sportifs gratuits|sites de paris sportifs gratuits sans dépôt|sites de paris sportifs suisse|sites
pari sportif|sites paris sportif|sites paris sportifs|sites paris sportifs arjel|sites paris sportifs belgique|sites paris sportifs france|sites paris sportifs hors arjel|sites paris sportifs suisse|so foot paris
sportif|so foot paris sportifs|specialiste tennis paris sportif|statistique foot paris sportif|statistique paris
sportif|statistique paris sportif foot|statistique tennis paris sportif|statistiques football paris
sportifs|statistiques paris sportifs|strategie de
paris sportif|stratégie big whale paris sportif|stratégie de paris sportifs|stratégie gagnante
paris sportifs|stratégie pari sportif|stratégie paris sportif|stratégie paris sportifs|stratégie paris sportifs forum|stratégie pour gagner au paris sportif|stratégies paris sportifs|suisse paris sportif|suisse paris sportifs|systeme 2 3 paris sportif|systeme 3 4
paris sportif|systeme de cote paris sportif|systeme de paris sportif|systeme pari
sportif|systeme paris sportif|systeme paris sportifs|systeme reducteur paris sportif|système paris sportif|tableau bankroll
paris sportif|tableau cote paris sportif|tableau de paris sportif|tableau de suivi paris
sportifs|tableau excel bankroll paris sportif|tableau excel paris sportif|tableau
excel paris sportif gratuit|tableau excel paris sportifs|tableau excel pour paris sportif|tableau gestion bankroll paris sportif|tableau
montante paris sportif|tableau paris sportif|tableau paris sportif excel|tableau roi paris sportifs|tableau statistique paris sportif|tableau suivi paris sportif|taxe gain paris sportif|technique combiné pari
Your comment is awaiting moderation.
Купить квартиру https://kupithouse-ekb.ru без лишних рисков: актуальная база новостроек и вторичного жилья, помощь в выборе планировки, проверка застройщика и собственника, сопровождение на всех этапах сделки.
Your comment is awaiting moderation.
Купить квартиру https://kupikvartiruvspb.ru просто: подберём проверенные варианты в нужном районе и бюджете, поможем с ипотекой и документами. Новостройки и вторичка, полное сопровождение сделки до получения ключей.
Your comment is awaiting moderation.
Я всегда пишу благодарность везде, мыло, ася, форум и т.д. Может это только я так делаю, но думаю, что так должны все делать. купить онлайн мефедрон, экстази, бошки Мой вердикт таков – оперативность работы – 5, соотношение цена/качество – 5, упаковка и доставка – 5.
Your comment is awaiting moderation.
Donna Jean Godchaux-MacKay, a soulful mezzo-soprano who provided backing vocals on such 1960s classics as “Suspicious Minds” and “When a Man Loves a Woman” and was a featured singer with the Grateful Dead for much of the 1970s, has died at 78.
трипскан сайт
A spokesperson for Godchaux-MacKay confirmed that she died Sunday at Alive Hospice in Nashville after having cancer. Godchaux-McKay and other Grateful Dead members were inducted into the Rock and Roll Hall of Fame in 1994.
tripscan top
Born Donna Jean Thatcher in Florence, Alabama, she had yet to turn 20 when she became a session performer in nearby Muscle Shoals, where many soul and rhythm and blues hits were recorded, and also was on hand for numerous sessions at the Memphis-based American Sound Studio. Her credits included Elvis Presley’s “Suspicious Minds,” Percy Sledge’s “When a Man Loves a Woman” and songs with Neil Diamond, Boz Scaggs and Cher.
tripscan
In the early 1970s, she and pianist/then-husband Keith Godchaux joined the Grateful Dead and remained with them for several tours and albums, including “Terrapin Station,” “Shakedown Street” and “From the Mars Hotel.” Godchaux appeared on numerous songs, whether joining with Jerry Garcia on “Scarlet Begonias” or writing and taking the lead on “From the Heart of Me.”
tripscan
https://trips56.cc
Your comment is awaiting moderation.
Экспертиза после затопления позволила документально подтвердить ущерб https://yurist-pri-zalive.ru/
Your comment is awaiting moderation.
https://служба-по-контракту-сво.рф/
Your comment is awaiting moderation.
Disney made a smart choice’
Despite the comparisons, Abu Dhabi isn’t positioning itself as a direct rival to Orlando — it’s aiming to be something more. The emirate sees its theme parks as part of a bigger portfolio of attractions, alongside cultural landmarks, luxury hotels, pristine beaches, and desert adventures.
трип скан
A 15-minute drive from Yas Island, Saadiyat Island is home to the Louvre Abu Dhabi, a franchised outpost of the famous Paris art museum, which welcomed 1.4 million visitors last year, 84% from abroad. The Guggenheim Abu Dhabi and Zayed National Museum are both under construction, adding to a cultural district that will be one of the region’s most concentrated hubs of art and heritage.
“Abu Dhabi’s unique appeal lies in the diversity of our tourism offering,” Al Geziry added. “For thrill-seekers, we have record-breaking roller coasters and dune bashing in the desert. For culture lovers, historic sites like Al Ain Oasis and institutions like the Saadiyat museums. And for luxury travelers, world-class dining, private island resorts, and high-end shopping.
“Where else can you start your day under the Louvre’s iconic rain-of-light dome and end it in the immersive, story-driven worlds of Warner Bros. World or Ferrari World?”
http://trips45.cc
трипскан сайт
Still, not everyone is convinced that Disney’s expansion into the Middle East is a sure bet.
“The region has seen its share of false starts,” says Dennis Speigel, founder of the International Theme Park Services consultancy, comparing it to neighboring Dubai’s patchy record with theme park expansion ambitions in the mid-2010s. “Several of them struggled for profitability in their first decade.”
Related article
Saadiyat Cultural District in Abu Dhabi is set to become one of the world’s preeminent arts and culture hubs, with one of the highest concentrations of cultural institutions globally. But the area isn’t just for art connoisseurs. Explore what to do in the new district, from iconic museums to luxurious beach days to decadent dining options.
You can walk between the Louvre and the Guggenheim in this new art district
Spiegel believes Abu Dhabi is different. “Disney made a smart choice. The infrastructure, safety, and existing leisure developments create an ideal entry point,” he told CNN earlier this year. “It’s a much more controlled and calculated move.”
Under its Tourism Strategy 2030, Abu Dhabi aims to grow annual visitors from 24 million in 2023 to more than 39 million by the end of the decade. With Disneyland as a centerpiece, those targets may well be surpassed. The city’s population has already grown from 2.7 million in 2014 to more than 4.1 million today, a reflection of its rising profile as a regional hub.
Yas Island alone has been transformed in the space of a decade from a largely undeveloped stretch of sand to a self-contained resort destination, complete with golf courses, marinas, a mall, more than 160 restaurants, and a cluster of high-end hotels.
Orlando’s head start remains formidable — it still offers multiple Disney and Universal parks, has decades of brand loyalty, and an infrastructure built to handle tens of millions of tourists annually.
But Abu Dhabi is catching up fast. Its combination of frictionless travel, year-round comfort, cutting-edge attractions, and a cultural scene that adds depth to the experience gives Abu Dhabi its own unique selling point, potentially offering a model for the next generation of theme park capital.
Your comment is awaiting moderation.
Магаз ровный, сам лично несколько раз здесь заказывал и все доходило вовремя и целостно!:) Наврятли он решится на такое.. купить кокаин, меф, бошки через телеграмм бро много кидков, очень много покупай у проверенных магазинов (это которые на главной странице), а не у пользователей, и в чате не вздумай покупать только у ПРОВЕРЕННЫХ я серьезно!!! кинут
Your comment is awaiting moderation.
Tremendous things here. I’m very happy to look your article.
Thank you so much and I am taking a look ahead to touch you.
Will you kindly drop me a mail?
Your comment is awaiting moderation.
yourtrendzone.shop – Great trendy picks, found a few items that caught my eye instantly.
Your comment is awaiting moderation.
globalfindshub.shop – Very reliable store impression, everything looks good and well organized overall.
Your comment is awaiting moderation.
Получил посылочку общее время ожидания 4 дня,упаковка супер,качество просто космическое,спасибо магазину! https://metalllist.ru Готовыми работают
Your comment is awaiting moderation.
Trendy Market Hub – Discover stylish products that make your shopping quick and enjoyable.
Your comment is awaiting moderation.
Протечка стояка случилась ночью, но специалисты откликнулись утром в тот же день: моральный вред при заливе квартиры и его компенсация судебная практика
Your comment is awaiting moderation.
Менеджер прошу зайдите в скайп, хочу заказ оплатить вас там нет 2 дня уже. Заявку на сате подал жду ответ на эмаил. Спасибо. купить скорость, кокаин, мефедрон, гашиш неужели ркс такая шляпа?
Your comment is awaiting moderation.
AmonBet Casino https://amonbetcasino-uk.com/
Your comment is awaiting moderation.
admetric.click – Pages loaded fast, images appeared sharp, and formatting stayed consistent.
Your comment is awaiting moderation.
не понял вас. https://myscandi.ru Брал здесь 203-й качество отличное 1 к 10 делал на мать и мачехи с одного водника ушатывает наглухо!!! Магазин отличный, если не ждать ответа менеджера по 2 часа!!!
Your comment is awaiting moderation.
seoquantum.click – Pages loaded fast, images appeared sharp, and formatting stayed consistent.
Your comment is awaiting moderation.
leadvelocity.click – Appreciate the typography choices; comfortable spacing improved my reading experience.
Your comment is awaiting moderation.
adoptimizer.click – Color palette felt calming, nothing distracting, just focused, thoughtful design.
Your comment is awaiting moderation.
clickcatalyst.click – Color palette felt calming, nothing distracting, just focused, thoughtful design.
Your comment is awaiting moderation.
trafficgenius.click – Overall, professional vibe here; trustworthy, polished, and pleasantly minimal throughout.
Your comment is awaiting moderation.
clickfire.click – Color palette felt calming, nothing distracting, just focused, thoughtful design.
Your comment is awaiting moderation.
Хочу выразить благодарность данному магазину за лучший товар, лучшие цены, за долгое время непрерывного сотрудничества, очень жду твоего возвращения к работе и появления долгожданного товара, чемикал лучший в своём деле. Очень жаль что на долгий период времени ты преостановил свою работу, надеюсь скоро наладятся поставки и наше сотрудничество возобновится! Чемикал лучший! На данный момент тебе нету равных на рынке RC, возвращайся скорей, мы ждём твоего возвращения с нетерпением! https://twobro.ru буду заказывать второй раз тут) товар понравился)
Your comment is awaiting moderation.
Юрист по заливу поддерживал на всех этапах и помог избежать ошибок: потекла труба отопления в квартире кто должен ремонтировать
Your comment is awaiting moderation.
С возвращением!!!удачной работы!!!! купить кокаин, меф, бошки через телеграмм не долго думая решил написать оператору данного магазина!
Your comment is awaiting moderation.
Оценщик провел осмотр и подготовил понятный отчет: https://advokat-zaliv.ru/
Your comment is awaiting moderation.
https://служба-по-контракту-сво.рф/
Your comment is awaiting moderation.
https://sluzhba-po-kontrakty.ru/
Your comment is awaiting moderation.
https://sluzhba-po-kontrakty.ru/
Your comment is awaiting moderation.
то-же самое могу сказать! https://imax34.ru а так всё от души! огромное спасибо! ещё не раз к вам обращюсь!)
Your comment is awaiting moderation.
говорю что все качественно быстро и https://prishlo-vremya.ru каких обьяснений? пришли, проверили, все что нашли изъяли. Устроили проверку в определенный день все что нашли арестовали, и мы не виноваты в этом.
Your comment is awaiting moderation.
findyourwayforward.shop – Helpful guidance offered, perfect for planning next steps in life clearly. Learning & Progress Hub – Practical resources to encourage continuous learning and personal success.
Your comment is awaiting moderation.
Юрист по заливу подготовил претензию и помог решить вопрос мирно https://advokat-zaliv.ru/
Your comment is awaiting moderation.
https://sluzhba-po-kontrakty.ru/
Your comment is awaiting moderation.
https://служба-по-контракту-сво.рф/
Your comment is awaiting moderation.
Casino Mellstroy https://mellstroyscasino.ru/
Your comment is awaiting moderation.
Всем Мир! Да прибудет с вами Сила! купить Кокаин, Мефедрон, Экстази А JWH-018 Имеется в наличии?
Your comment is awaiting moderation.
снять проститутку транса
Your comment is awaiting moderation.
После протечки стояка вызвали оценщика ущерба, сделали отчет профессионально и без задержек: прорвало стояк
Your comment is awaiting moderation.
https://kontrakt-na-svo-msk.ru/
Your comment is awaiting moderation.
Ага ровный!!!!И я так считал до некоторых случаев! купить онлайн мефедрон, экстази, бошки П-т!! Пишу свой отчерк.
Your comment is awaiting moderation.
What makes Astronaut a crash game?
Each round begins at 1.00? and increases along a curve as the astronaut lifts off. The round can end at any moment—this is the “crash.” You win by cashing out before that crash. Payout equals your stake multiplied by the cashout value. Rounds usually last a few seconds, so sessions feel quick and decision-dense.
astronaut game review
Most implementations let you place a stake in ?INR, optionally set an Auto-Cashout target, and choose auto-bet for continuous play. Some lobbies display recent history and provide two concurrent bet slots, which is useful for combining low-risk and high-risk exits.
crashgame-astronaut.com
Mechanics and fairness (RNG, provably fair, RTP)
Crash outcomes are random. On versions labeled “provably fair,” results are derived from a cryptographic process that blends a server seed, your client seed, and a nonce into a hash (commonly HMAC-SHA256). Operators typically publish the server seed hash in advance, then reveal the seed later so you can verify that results were not changed mid-cycle.
astronaut gambling
Randomness: Streaks happen. A run of low crashes or a rare very high multiplier is expected behavior.
RTP and edge: Check the game info panel. Many crash titles disclose RTP around the mid-90% range, but actual numbers and caps vary by operator.
Limits: Maximum multiplier and bet limits are operator-specific and can influence volatility.
crashgame-astronaut.com
https://crashgame-astronaut.com/
Your comment is awaiting moderation.
Планируете купить квартиру https://kupithouse-spb.ru для жизни или инвестиций? Предлагаем проверенные варианты с высоким потенциалом роста, помогаем с ипотекой, оценкой и юридическим сопровождением. Безопасная сделка, понятные сроки и полный контроль каждого шага.
Your comment is awaiting moderation.
Хотите купить квартиру? https://spbnovostroyca.ru Подберём лучшие варианты в нужном районе и бюджете: новостройки, готовое жильё, ипотека с низким первоначальным взносом, помощь в одобрении и безопасная сделка. Реальные объекты, без скрытых комиссий и обмана.
Your comment is awaiting moderation.
modernhomechoice.shop – Great home picks here, items look stylish and very well presented today.
Your comment is awaiting moderation.
creativechoicecorner.shop – Really creative items here, browsing feels fun and very inspiring always.
Your comment is awaiting moderation.
вообще почта 1 класс оказываеться самое быстрое.. 2-3 суток и приходит https://aikido-ufa.ru Первые 1.5 часа эйфория и сосредоточеность на том чем занят , в голове мелькают гениальные идеи)
Your comment is awaiting moderation.
Юрист по заливу объяснил права и помог составить претензию: https://sud-po-zalivu.ru/
Your comment is awaiting moderation.
clickpremier.click – Pages loaded fast, images appeared sharp, and formatting stayed consistent.
Your comment is awaiting moderation.
Сервис лучший, и стабильный. https://dnastroy.ru medved20-10 не еби людям голову!!!!!!!!!!! микс отличный, но на час-1,5! Не больше……
Your comment is awaiting moderation.
Купить квартиру https://kvartiratltpro.ru без переплат и нервов: новостройки и вторичка, студии и семейные планировки, помощь в ипотеке, полное сопровождение сделки до ключей. Подбор вариантов под ваш бюджет и район, прозрачные условия и юридическая проверка.
Your comment is awaiting moderation.
leadorigin.click – Overall, professional vibe here; trustworthy, polished, and pleasantly minimal throughout.
Your comment is awaiting moderation.
clickvortex.click – Content reads clearly, helpful examples made concepts easy to grasp.
Your comment is awaiting moderation.
Sportni yaxshi ko’rasizmi? boks primoy efir Har kuni eng yaxshi sport yangiliklarini oling: chempionat natijalari, o’yinlar jadvali, o’yin kunlari haqida umumiy ma’lumot va murabbiylar va o’yinchilarning iqtiboslari. Batafsil statistika, jadvallar va reytinglar. Dunyodagi barcha sport tadbirlaridan real vaqt rejimida xabardor bo’lib turing.
Your comment is awaiting moderation.
clicklabpro.click – Overall, professional vibe here; trustworthy, polished, and pleasantly minimal throughout.
Your comment is awaiting moderation.
leadharbor.click – Appreciate the typography choices; comfortable spacing improved my reading experience.
Your comment is awaiting moderation.
hyperleads.click – Overall, professional vibe here; trustworthy, polished, and pleasantly minimal throughout.
Your comment is awaiting moderation.
бро ответь своим частым клиентам, распиши что да как) уже соскучились очень https://igra18plus.ru Отписывал Вам в аське,вы там мне не отвечаете в течении полудня..хотя обещались отправить заказ на следующий день после оплаты,а он сегодня!Жду вашего ответа.
Your comment is awaiting moderation.
marketoptimizer.click – Navigation felt smooth, found everything quickly without any confusing steps.
Your comment is awaiting moderation.
10 euros offert paris sportif|10 euros offert sans
dépôt paris sportif|10 meilleurs sites de paris sportifs|100 euro offert paris sportif|100 euros offert paris sportif|100 euros remboursé paris sportifs|100 offert pari sportif|100 offert paris sportif|100 remboursé
paris sportif|100e offert pari sportif|abandon paris sportif tennis|abandon tennis paris sportif|addiction paris sportif forum|age paris sportif
belgique|aide au pari sportif|aide au paris sportif|aide aux paris sportif|aide aux paris sportifs|aide pari sportif|aide pari sportif football|aide parie sportif|aide paris sportif|aide paris sportif foot|aide paris sportif
gratuit|aide paris sportifs|aide pour paris sportif|algorithme de
paris sportif|algorithme excel paris sportif|algorithme gratuit paris sportif|algorithme pari sportif|algorithme paris sportif|algorithme paris
sportif avis|algorithme paris sportif basket|algorithme paris sportif excel|algorithme paris sportif gratuit|algorithme paris sportif
tennis|algorithme paris sportifs|algorithme pour paris sportif|analyse
cote paris sportif|analyse de paris sportif|analyse match paris sportif|analyse pari sportif|analyse paris sportif|analyse paris
sportif foot|analyse paris sportif football|analyse paris
sportif gratuit|analyse paris sportifs|ancienne cote paris sportif|api cote paris sportif|app
paris sportif sans argent|appli de paris sportif|appli de
paris sportif sans argent|appli de paris sportifs|appli pari sportif|appli pari sportif gratuit|appli parie sportif|appli paris sportif|appli paris sportif
avec paypal|appli paris sportif belgique|appli
paris sportif entre amis|appli paris sportif gratuit|appli paris sportif sans argent|appli
paris sportif suisse|appli paris sportifs|application aide
paris sportif|application algorithme paris sportif|application analyse paris sportif|application android paris sportif|application bankroll paris sportif|application conseil paris sportif|application de pari sportif|application de parie sportif|application de paris sportif|application de paris sportif en afrique|application de paris sportif en cote
d’ivoire|application de paris sportif en ligne|application de paris sportif gratuit|application de paris sportif
international|application de paris sportif suisse|application de paris sportifs|application faux paris sportifs|application gestion bankroll paris sportif|application gestion paris sportif|application ia paris sportif|application pari sportif
gratuit|application paris sportif|application paris sportif android|application paris sportif argent fictif|application paris sportif belgique|application paris
sportif canada|application paris sportif espagne|application paris sportif espagnol|application paris sportif fictif|application paris
sportif france|application paris sportif gratuit|application paris sportif gratuit entre amis|application paris sportif maroc|application paris sportif offre
de bienvenue|application paris sportif paypal|application paris sportif sans argent|application paris sportif sans justificatif de domicile|application paris sportif suisse|application paris sportif usa|application paris sportif virtuel|application pour faire des paris sportifs|application pour
gerer ses paris sportif|application pour les paris sportifs|application pour pari sportif|application pour paris sportif|application pour paris sportifs|application statistique paris
sportif|application suivi paris sportif|applications de paris sportifs|applications paris sportifs|applis paris sportif|applis
paris sportifs|apprendre a faire des paris sportifs|argent facile paris sportif|argent offert paris sportifs|argent offert sans depot paris
sportif|argent paris sportif|argent paris sportifs|argent paris sportifs impots|argent sans depot paris sportif|arjel
paris sportif|arjel paris sportifs|astuce gagner paris sportif|astuce pari sportif|astuce paris sportif|astuce paris sportif basket|astuce paris
sportif foot|astuce paris sportif forum|astuce paris sportif tennis|astuce paris
sportifs|astuce pour gagner au pari sportif|astuce pour gagner
au paris sportif|astuce pour gagner paris sportif|astuce pour paris sportif|astuces paris sportifs|astuces paris sportifs en ligne|astuces paris sportifs foot|astuces pour gagner aux paris sportifs|autorisation paris
sportif france|avis pari sportif|avis paris
sportif|avis paris sportif foot|avis site de paris sportif|avis site paris sportif|avis sur les paris sportifs|avis sur paris sportif|avis tipster paris sportif|aweh signification paris sportif|bankroll 100 euros paris sportifs|bankroll
management paris sportif|bankroll paris
sportif|bankroll paris sportif excel|bankroll paris sportif gratuit|bankroll paris
sportifs|basket paris sportif|belgique france paris sportif|belgique paris sportifs|bonus bienvenue paris sportif|bonus bienvenue paris sportifs|bonus cash paris sportif|bonus de bienvenue paris sportif|bonus de bienvenue
paris sportif belgique|bonus de bienvenue sans depot paris sportif|bonus de depot paris sportif|bonus de paris sportifs|bonus depot paris sportif|bonus
en cash paris sportif|bonus gratuit paris sportif|bonus gratuit sans depot paris sportif|bonus pari sportif|bonus
paris sportif|bonus paris sportif belgique|bonus paris sportif betclic|bonus paris
sportif cash|bonus paris sportif en ligne|bonus paris sportif
france pari|bonus paris sportif retirable|bonus paris
sportif sans depot|bonus paris sportif sans dépôt|bonus paris sportif unibet|bonus paris sportifs|bonus sans depot paris sportif|bonus
sans depot paris sportif belgique|bonus sans dépôt paris sportif|bonus sans dépôt paris sportif
hors arjel|bonus site de paris sportif|bonus site pari sportif|bonus
site paris sportif|bonus sites de paris sportifs|bonus unibet paris sportif|bookmaker paris sportif|bookmaker paris
sportif gratuit|bookmaker paris sportifs|bookmaker sportif|bookmakers paris sportif|bookmakers paris
sportifs|bookmakers paris sportifs en ligne|but contre
son camp paris sportif|but sur penalty paris sportif|buteur paris sportif|c’est quoi handicap
paris sportif|c’est quoi une cote paris sportif|calcul anti perte paris sportif|calcul combinaison pari sportif|calcul cote
pari sportif|calcul cote paris sportif|calcul couverture paris sportif|calcul de cote paris sportif|calcul des cotes paris sportifs|calcul dnb paris sportifs|calcul double
chance paris sportif|calcul gain paris sportif|calcul mise paris sportif|calcul pari sportif|calcul paris sportif|calcul paris sportif multiple|calcul pourcentage
cote paris sportif|calcul probabilité paris sportif|calcul rentabilité paris sportifs|calcul roi
paris sportif|calcul systeme paris sportif|calcul trj paris sportifs|calculateur cote paris sportif|calculateur de
cote paris sportif|calculateur de mise paris sportif|calculateur de paris sportif|calculateur paris sportif|calculatrice arbitrage paris
sportif|calculatrice paris sportif|calculer cote paris sportif|calculer gain paris sportif|calculer probabilité
paris sportifs|calculer roi paris sportifs|calculer une cote pari sportif|calculer une cote paris sportif|carte cadeau paris sportif|carte pcs paris sportif|carte
prépayée paris sportifs|cash out pari sportif|cash out paris sportif|cash out paris sportifs|casino en ligne paris sportif|casino paris sportif en ligne|champions league paris
sportif|chute de cote paris sportif|classement des meilleurs
sites de paris sportifs|classement meilleur site de paris sportif|code barre paris sportif|code bonus
paris sportif|code paris sportif|code promo pari sportif|code promo paris sportif|code promo paris sportif sans depot|code promo paris sportif sans dépôt|code promo sans depot paris
sportif|code promo site paris sportif|combien de temps pour encaisser
un paris sportif|combien de temps pour retirer
un paris sportif|combien miser paris sportifs|combine paris sportif|combines paris
sportifs|combiné pari sportif|combiné paris sportif|combiné paris sportif
conseil|combiné paris sportif du jour|combiné paris sportif pronostic|comment analyser un paris sportif|comment arreter de
jouer aux paris sportifs|comment arreter les paris sportif|comment arreter les paris sportifs|comment arrêter les paris sportifs|comment bien gagner au paris sportif|comment bien jouer
au paris sportif|comment bien miser paris sportif|comment ca marche
les paris sportif|comment calculer cote paris sportif|comment calculer gain paris sportif|comment calculer
les cotes des paris sportifs|comment calculer une cote de paris sportif|comment calculer une cote pari sportif|comment calculer une cote paris
sportif|comment comprendre les paris sportifs|comment creer un vip paris sportif|comment créer un algorithme paris sportif|comment créer un site
de paris sportif|comment devenir riche avec les paris sportifs|comment etre rentable paris sportif|comment etre sur de gagner au paris sportif|comment faire
de bon paris sportif|comment faire des parie sportif|comment faire des paris sportif|comment faire
des paris sportif gagnant|comment faire des paris sportifs|comment faire pari
sportif|comment faire paris sportif|comment faire pour arreter les paris sportifs|comment faire pour gagner au paris sportif|comment faire pour gagner
les paris sportifs|comment faire un bon pari sportif|comment faire
un bon paris sportif|comment faire un pari sportif|comment faire
un parie sportif|comment faire un paris sportif|comment faire une montante paris sportif|comment fonctionne les cotes dans
les paris sportifs|comment fonctionne les cotes des paris
sportifs|comment fonctionne les paris sportifs|comment fonctionne paris sportifs|comment fonctionne un pari sportif|comment fonctionnent les cotes dans les paris sportifs|comment fonctionnent les cotes dans les paris
sportifs grand oral|comment fonctionnent les cotes de paris sportif|comment fonctionnent les paris sportifs|comment fonctionnent les paris
sportifs grand oral|comment fonctionnent les paris sportifs grand oral
maths|comment fonctionnent les paris sportifs maths|comment gagner a coup sur au paris sportif|comment
gagner a tous les coups au paris sportif|comment gagner a tout les coup au paris sportif|comment gagner au pari sportif|comment gagner au pari sportif football|comment gagner au paris sportif|comment
gagner au paris sportif a coup sur|comment gagner au paris
sportif foot|comment gagner au paris sportif forum|comment gagner au paris sportif tennis|comment gagner au paris
sportifs|comment gagner aux paris sportif|comment gagner aux paris sportifs|comment
gagner aux paris sportifs foot|comment gagner
aux paris sportifs livre|comment gagner aux paris sportifs sur le long terme|comment gagner avec
les paris sportifs|comment gagner dans les paris sportifs|comment gagner de l argent avec
les paris sportifs|comment gagner de l’argent au paris sportif|comment gagner de l’argent aux paris sportifs|comment gagner de l’argent avec les paris sportifs|comment gagner de l’argent paris sportif|comment gagner de l’argent sur
les paris sportifs|comment gagner de l’argent sur paris sportif|comment
gagner des paris sportif|comment gagner des paris sportifs|comment gagner en paris sportif|comment gagner facilement au paris sportif|comment gagner les paris sportifs|comment gagner paris sportif|comment gagner paris sportif foot|comment gagner paris sportifs|comment gagner sa vie avec les paris sportifs|comment gagner ses paris sportif|comment gagner sur les paris sportif|comment gagner sur
les paris sportifs|comment gagner tout le temps au paris sportif|comment gagner un pari sportif|comment gagner un paris
sportif|comment gerer une bankroll paris sportif|comment gérer sa
bankroll paris sportif|comment jouer au pari sportif|comment jouer au
paris sportif|comment jouer au paris sportif foot|comment jouer aux paris sportifs|comment jouer paris sportif|comment marche cote paris
sportif|comment marche les cotes paris sportif|comment marche les
paris sportif|comment marche les paris sportifs|comment marche
paris sportif|comment marche un pari sportif|comment
marche un paris sportif|comment marchent les cotes paris sportif|comment marchent les paris sportifs|comment miser au paris sportif|comment miser paris sportif|comment monter
sa bankroll paris sportif|comment ne jamais perdre au paris sportif|comment parier sportif|comment
reussir au paris sportif|comment reussir les paris sportif|comment reussir paris sportif|comment sont calculer les cotes
de paris sportif|comment sont calculées les cotes
des paris sportifs|comment sont calculés les cotes des paris sportifs|comment sont faites les cotes
des paris sportifs|comment toujours gagner au paris
sportif|comment ça marche les paris sportifs|comparaison bonus paris
sportifs|comparaison cote pari sportif|comparaison des cotes paris sportifs|comparateur cote
pari sportif|comparateur cote paris sportif|comparateur cotes paris sportif|comparateur cotes paris sportifs|comparateur de cote pari sportif|comparateur de cote paris sportif|comparateur de cotes paris
sportifs|comparateur de côtes paris sportifs|comparateur de paris sportif|comparateur de site de paris
sportif|comparateur de site paris sportif|comparateur de sites
de paris sportifs|comparateur pari sportif|comparateur paris sportif|comparateur paris sportifs|comparateur site de paris
sportif|comparateur site pari sportif|comparateur site paris
sportif|comparatif bonus paris sportif|comparatif bonus paris sportifs|comparatif cote pari sportif|comparatif cote
paris sportif|comparatif cotes paris sportifs|comparatif des
sites de paris sportifs|comparatif offre de bienvenue paris sportif|comparatif offre paris sportif|comparatif pari sportif|comparatif pari sportif en ligne|comparatif paris sportif|comparatif paris sportif bonus|comparatif paris sportif en ligne|comparatif paris sportifs|comparatif paris sportifs en ligne|comparatif site de paris sportif|comparatif site paris sportif|comparatif site paris sportifs|comparatif sites de paris
sportifs|comparatif sites paris sportifs|comparer les cotes paris sportifs|comprendre cote paris
sportif|comprendre handicap paris sportif|comprendre les cotes des
paris sportifs|comprendre les cotes paris sportif|comprendre les cotes paris sportifs|comprendre les handicap
paris sportif|compte de paris sportif|compte démo paris sportif|compte finance paris sportif|compte financer paris sportif|compte financier paris sportif|compte financé paris sportif|compte pari sportif|compte paris sportif|compte paris sportif financé|conseil de paris sportif|conseil de paris sportifs|conseil en paris sportif|conseil en paris sportifs|conseil pari sportif|conseil
pari sportif gratuit|conseil paris sportif|conseil paris sportif
aujourd’hui|conseil paris sportif du jour|conseil paris sportif foot|conseil paris sportif gratuit|conseil paris sportif ligue des champions|conseil
paris sportif nba|conseil paris sportif pronostic|conseil paris sportif rmc|conseil paris sportif tennis|conseil paris sportifs|conseil pour gagner au paris sportif|conseil pour paris sportif|conseil sur les paris
sportifs|conseille paris sportif|conseiller en paris sportifs|conseiller paris sportif|conseils
de paris sportifs|conseils en paris sportifs|conseils paris sportifs|conseils paris sportifs foot|conseils paris sportifs gratuit|conseils paris sportifs tennis|conseils pour
paris sportifs|cote a 100 paris sportif|cote a 2 paris sportif|cote anglaise paris sportif|cote de 2 paris sportif|cote de pari sportif|cote de paris sportif|cote
des paris sportifs|cote maximum paris sportif|cote minimum paris sportif|cote pari sportif|cote pari sportif comment ça marche|cote pari
sportif real madrid|cote pari sportif rugby|cote parie
sportif|cote paris sportif|cote paris sportif belgique|cote
paris sportif calcul|cote paris sportif definition|cote paris sportif euro|cote paris sportif explication|cote
paris sportif foot|cote paris sportif france belgique|cote paris sportif
france espagne|cote paris sportif ligue des champions|cote paris sportif moto gp|cote paris sportif psg|cote paris sportif psg arsenal|cote paris sportif rugby|cote paris
sportif tennis|cote paris sportifs|cote pour paris sportifs|cote
sportif foot|cote sportif rugby|cote à 1000 paris sportif|cotes de paris
sportifs|cotes pari sportif|cotes paris sportif|cotes paris sportifs|cotes paris sportifs foot|coupe de france paris sportif|créer un algorithme paris sportif|créer un compte paris sportif|créer un site de paris sportif en ligne|dans les
paris sportifs que signifie handicap|declarer ses gains
paris sportif|definition cash out paris sportif|definition cote paris sportif|definition handicap paris sportif|depot 5 euros paris sportif|depot double paris sportif|depot minimum
5 euro paris sportif|depot minimum paris sportif|depot paris sportif|depuis quand
existe les paris sportif en france|devenir riche avec les paris sportifs|devenir riche avec paris sportifs|disqualification tennis paris sportif|dnb en paris sportif|dnb pari sportif|dnb paris sportif|dnb paris sportif definition|dnb paris sportifs|doit on declarer
les gains de paris sportif|déclarer gains paris sportifs|déclarer
gains paris sportifs hors arjel|définition bankroll paris
sportif|dépôt minimum 1 euro paris sportif|dépôt minimum 5 euro paris sportif|ecart de jeux tennis paris sportif|erreur de cote paris sportif|est ce que les
gains des paris sportifs sont imposables|est-ce que les prolongation compte dans un pari sportif|etre sur de gagner au paris sportif|euro paris sportif|evenement
sportif a paris|evenement sportif paris|evenement
sportif paris 2025|evenement sportif paris aujourd hui|evenement sportif paris aujourd’hui|evenement sportif paris ce week
end|evenements sportif paris|evenements sportifs paris|evenements sportifs
paris 2025|evenements sportifs à paris|evolution cote paris sportif|evolution cotes paris sportifs|evolution des cotes
paris sportifs|explication cote pari sportif|explication cote paris sportif|explication handicap paris sportif|explication pari sportif|explication paris sportif|face a face hockey paris sportif|faire
des paris sportif|faire des paris sportif avec paypal|faire des paris sportifs|faire fortune paris sportifs|faire un pari sportif|faire un paris sportif|faut il
déclarer les gains de paris sportifs|faut il déclarer ses gains paris sportifs|fichier excel gestion bankroll
paris sportif|fiscalité gains paris sportifs|foot paris sportif|football et paris sportifs|forfait tennis paris sportif|formation paris
sportif gratuit|forum de paris sportif|forum de paris sportifs|forum
pari sportif|forum parie sportif|forum paris sportif|forum paris sportif foot|forum paris sportif gratuit|forum paris sportif nba|forum paris sportif tennis|forum paris sportifs|forum sur les paris sportifs|forum
tennis paris sportif|francaise des jeux pari sportif|francaise des jeux paris sportif|francaise des jeux paris sportifs|france 2
paris sportif|france 2 paris sportifs|france belgique paris sportif|france espagne
paris sportif|france pari sportif|france pari sportif brest|france paris sportif|france paris sportifs|france
pologne paris sportif|france portugal paris sportif|france suisse paris sportifs|france tunisie paris sportifs|france-pari – paris sportifs|gagnant pari sportif|gagnant
paris sportif|gagnant paris sportif bayern|gagnante paris sportif|gagne au
paris sportif|gagner 10 euros par jour aux paris sportifs|gagner 100 euros par jour paris sportif|gagner
1000 euros par mois paris sportifs|gagner 10000 euros paris sportif|gagner 2000 euros par mois paris sportif|gagner 50 euros par jour paris
sportif|gagner a coup sur au paris sportif|gagner a coup sur pari sportif|gagner a tous les coup paris sportif|gagner argent avec
paris sportifs|gagner argent pari sportif|gagner argent paris sportif|gagner argent paris sportifs|gagner au pari sportif|gagner au paris sportif|gagner au paris sportif a coup sur|gagner au paris
sportif foot|gagner au paris sportif forum|gagner au paris sportif à
coup sur|gagner aux paris sportif|gagner aux paris sportifs|gagner aux paris sportifs pdf|gagner beaucoup
d’argent paris sportif|gagner de l argent grace aux
paris sportifs|gagner de l argent pari sportif|gagner de l
argent paris sportif|gagner de l argent paris sportifs|gagner de l’argent au paris sportif|gagner de l’argent aux paris sportifs|gagner de l’argent
avec les paris sportifs|gagner de l’argent avec
paris sportif|gagner de l’argent avec paris sportifs|gagner de l’argent grace au
paris sportif|gagner de l’argent grace aux paris sportifs|gagner de l’argent pari
sportif|gagner de l’argent paris sportif|gagner de l’argent paris sportifs|gagner
de l’argent sur les paris sportifs|gagner des paris sportif|gagner des paris sportifs|gagner les paris sportifs|gagner
pari sportif|gagner paris sportif|gagner paris sportif foot|gagner
paris sportif forum|gagner paris sportif tennis|gagner paris
sportifs|gagner sa vie avec les paris sportif|gagner sa vie avec les paris sportifs|gagner sa vie avec paris sportifs|gagner ses paris sportifs|gagner à coup sur
paris sportif|gagner à tous les coups paris sportifs|gain maximum paris
sportif|gain pari sportif|gain pari sportif imposable|gain pari sportif impot|gain paris sportif|gain paris
sportif imposable|gain paris sportif impot|gain paris sportif impôt|gains paris sportif|gains paris sportif imposable|gains paris sportifs|gains paris sportifs imposable|gains paris
sportifs imposables|gains paris sportifs sont ils imposables|gerer bankroll
paris sportif|gerer sa bankroll paris sportif|gerer
une bankroll paris sportif|gestion bankroll paris
sportif|gestion bankroll paris sportifs|gestion bankroll paris sportifs excel|gestion de bankroll paris
sportif|gestion de bankroll paris sportif application|gestion de bankroll paris sportifs|gestion de mise paris sportif|gestion paris sportifs v2 5 gratuit|gg signification paris sportif|gros combiné paris sportif|gros gain paris sportif|grosse cote paris sportif
pronostic|grosse mise paris sportif|groupe paris sportif gratuit|groupe
telegram paris sportif gratuit|groupement de joueurs paris sportifs|handicap 0 paris sportif|handicap 1 paris sportif|handicap 5 paris sportif|handicap au paris sportif|handicap basket paris sportif|handicap
dans les paris sportifs|handicap en paris sportif|handicap europeen paris
sportif|handicap européen paris sportifs|handicap mi temps paris
sportif|handicap pari sportif|handicap paris sportif|handicap paris sportif basket|handicap paris sportif explication|handicap
paris sportif foot|handicap paris sportif rugby|handicap
paris sportifs|handicap rugby paris sportif|handicap tennis paris sportif|historique cote paris sportif|historique des
cotes paris sportifs|hockey paris sportif|hockey sur glace paris sportif|hors arjel
paris sportif|hweh signification paris sportif|imposition gain pari sportif|imposition gain paris
sportif|imposition gains paris sportifs|imposition paris sportif france|impot gain paris
sportif|impot paris sportif france|impot sur gain paris sportif|je gagne ma vie avec les paris sportifs|jeu de pari sportif
gratuit|jeu de paris sportif en ligne|jeu de paris sportif gratuit|jeu paris sportif gratuit|jeu
paris sportif sans argent|jeux de parie sportif|jeux de paris sportif|jeux de paris sportif en ligne|jeux de
paris sportif gratuit|jeux de paris sportifs|jeux olympiques paris sportifs|jeux paris sportif|jeux paris sportif gratuit|jeux paris sportif virtuel|jeux paris sportifs en ligne|jouer au paris
sportif|jouer paris sportif|joueur absent paris sportif|joueur blesse paris sportif|joueur caen paris sportif|joueur de caen pari
sportif|joueur de foot paris sportif|joueur decisif paris
sportif|joueur décisif paris sportif|joueur italien paris sportif|joueur paris sportif|joueur professionnel paris sportif|joueur qui se blesse paris sportif|joueur sanctionne pari sportif|joueur suspendu paris sportif|joueurs italiens paris sportifs|l’argent des paris sportifs est il imposable|la cote paris sportif|la francaise des jeux paris sportif|la martingale paris
sportif|la martingale paris sportifs|la meilleur application de paris sportif|la meilleur application paris sportif|la meilleur technique
pour gagner au paris sportif|la méthode secrète pour gagner aux paris sportifs
pdf|la plus grosse cote gagner paris sportif|la plus grosse cote paris sportif|ldem paris sportif signification|le marché des paris sportifs|le meilleur site de pari sportif|le meilleur site de paris sportif|le meilleur site de paris sportif en ligne|le meilleur
site de paris sportifs|le plus gros gain au paris sportif|le plus gros
paris sportif|le plus gros paris sportif du monde|les 10 meilleurs sites de paris sportifs|les 10
meilleurs sites de paris sportifs en afrique|les 17 secrets pour gagner rapidement
aux paris sportifs|les 17 secrets pour gagner rapidement aux paris sportifs pdf|les application de paris sportif|les applications paris
sportifs|les bonus paris sportifs|les bookmakers paris sportifs|les cotes paris sportifs|les gains de paris sportifs sont ils imposables|les gains des paris sportifs sont ils imposables|les jeux
de paris sportifs|les meilleur paris sportif|les meilleures applications
de paris sportifs|les meilleurs applications de paris
sportifs|les meilleurs bonus paris sportif|les meilleurs bonus paris
sportifs|les meilleurs cotes paris sportif|les meilleurs paris sportifs|les meilleurs
paris sportifs du jour|les meilleurs site de paris sportif|les
meilleurs site de paris sportifs|les meilleurs sites de
pari sportif|les meilleurs sites de paris sportifs|les meilleurs sites de paris sportifs en ligne|les paris sportif|les paris sportif avis|les paris sportifs|les paris sportifs comment
ça marche|les paris sportifs en france|les paris sportifs en ligne|les paris sportifs en ligne comprendre jouer gagner|les paris sportifs en ligne comprendre jouer gagner pdf|les
paris sportifs les plus rentables|les plus gros gagnant paris sportif|les plus
gros gains au paris sportifs|les plus gros gains paris
sportifs|les plus gros paris sportif|les plus grosse cote paris sportif|les
plus grosses pertes paris sportifs|les sites de paris sportifs|les sites de paris sportifs
autorisés en france|les sites de paris sportifs en france|les sites de paris sportifs en ligne|les sites de paris sportifs francais|ligue 1 paris sportif|ligue 1 paris sportifs|ligue 2 paris sportif|ligue des champions paris sportif|limite de gains paris sportifs|limite de mise paris sportif|limite
gain paris sportif|limite mise paris sportifs|liste de paris sportif|liste des paris sportifs|liste des site de paris sportif|liste des sites de paris sportifs|liste pari
sportif|liste paris sportif|liste paris sportif pdf|liste site de paris sportif|liste site pari sportif|liste site paris sportif|liste site paris sportif arjel|liste sites paris sportifs|logiciel algorithme paris sportif|logiciel algorithme paris sportif gratuit|logiciel analyse paris sportif|logiciel calcul paris
sportif|logiciel de pari sportif|logiciel de paris sportif|logiciel de paris sportif gratuit|logiciel gestion bankroll
paris sportif gratuit|logiciel gestion de bankroll paris sportif|logiciel gestion paris sportif|logiciel gestion paris sportif gratuit|logiciel gestion paris
sportifs|logiciel pari sportif|logiciel paris sportif|logiciel paris sportif gratuit|logiciel
paris sportifs|logiciel paris sportifs foot sur 2
matchs|logiciel pour paris sportif|logiciel pour paris sportifs|logiciel prediction paris sportif|logiciel probabilité paris sportif|logiciel prédiction paris sportif|logiciel statistique paris sportifs|logiciel variation de cote paris
sportif|loi sur les paris sportifs en france|magic calculator paris sportif|marché des paris sportifs|marché des paris sportifs
en france|marché des paris sportifs en ligne|martingale
pari sportif|martingale paris sportif|martingale paris sportif excel|martingale
paris sportif forum|martingale paris sportif interdit|martingale paris sportifs|match
abandonné paris sportif|match annulé ou reporté paris sportifs|match annulé
paris sportif|match arrete paris sportif|match interrompu paris sportif|match interrompu tennis paris sportif|match interrompu tennis pluie paris sportif|match nul boxe paris sportif|match
pari sportif|match paris sportif|match reporté paris sportif|match suspendu paris sportif|match suspendu tennis
paris sportif|match truqué paris sportif|matchs truqués paris sportifs|meilleur algorithme paris sportif|meilleur algorithme paris sportif
gratuit|meilleur app de paris sportif|meilleur app de paris
sportifs|meilleur app paris sportif|meilleur appli de pari sportif|meilleur
appli de paris sportif|meilleur appli pari sportif|meilleur appli paris sportif|meilleur appli paris sportif forum|meilleur appli paris sportifs|meilleur application conseil paris sportif|meilleur application de
paris sportif|meilleur application de paris sportif en afrique|meilleur application pari sportif|meilleur application paris sportif|meilleur application paris
sportif belgique|meilleur application pour les paris sportif|meilleur application pour
pari sportif|meilleur bonus de bienvenue paris sportif|meilleur
bonus pari sportif|meilleur bonus paris sportif|meilleur bonus paris sportif sans depot|meilleur bonus paris sportifs|meilleur bonus site de paris sportif|meilleur bonus site pari sportif|meilleur bonus site paris sportif|meilleur bookmaker paris sportif|meilleur combiné paris sportif|meilleur conseil paris sportif|meilleur cote de paris sportif|meilleur cote pari sportif|meilleur cote paris sportif|meilleur cote paris sportif aujourd’hui|meilleur
cote site paris sportif|meilleur forum paris sportifs|meilleur gain paris sportif|meilleur
ia paris sportif|meilleur methode pour gagner au paris sportif|meilleur offre bienvenue paris sportif|meilleur offre bonus paris sportif|meilleur offre de bienvenue paris
sportif|meilleur offre de bienvenue paris sportifs|meilleur offre pari sportif|meilleur offre paris sportif|meilleur offre
paris sportif en ligne|meilleur pari sportif|meilleur pari sportif du
jour|meilleur pari sportif en ligne|meilleur paris sportif|meilleur paris sportif aujourd’hui|meilleur paris sportif du jour|meilleur paris
sportif en ligne|meilleur paris sportif foot|meilleur promo paris sportif|meilleur pronostic paris sportif|meilleur site de conseil paris sportif|meilleur site de pari
sportif|meilleur site de pari sportif en ligne|meilleur site de
paris sportif|meilleur site de paris sportif avis|meilleur site de paris
sportif belgique|meilleur site de paris sportif canada|meilleur site
de paris sportif en france|meilleur site de paris sportif en ligne|meilleur site de paris sportif football|meilleur site de paris sportif forum|meilleur site
de paris sportif france|meilleur site de paris sportif
hors arjel|meilleur site de paris sportif international|meilleur site de paris sportif
suisse|meilleur site de paris sportifs|meilleur site de
paris sportifs en ligne|meilleur site pari sportif|meilleur site pari
sportif en ligne|meilleur site pari sportif france|meilleur site paris sportif|meilleur site paris sportif avis|meilleur site
paris sportif belgique|meilleur site paris sportif canada|meilleur site paris sportif en ligne|meilleur site paris sportif foot|meilleur site paris sportif forum|meilleur
site paris sportif france|meilleur site paris sportif hors arjel|meilleur site paris sportif nba|meilleur
site paris sportif rugby|meilleur site paris sportif suisse|meilleur site paris sportifs|meilleur
site pour pari sportif|meilleur site pour paris sportif|meilleur site
pronostic paris sportif|meilleur strategie paris sportif|meilleur technique de paris
sportif|meilleur technique paris sportif|meilleur
technique pour gagner au paris sportif|meilleure appli de paris sportif|meilleure appli de paris
sportifs|meilleure appli pari sportif|meilleure appli
paris sportif|meilleure appli paris sportifs|meilleure application de paris sportif|meilleure application de paris sportifs|meilleure application pari sportif|meilleure application paris sportif|meilleure
application paris sportif android|meilleure application paris sportifs|meilleure offre paris
sportif|meilleure site paris sportif|meilleure strategie paris sportif|meilleures applications de paris
sportifs|meilleures applications paris sportifs|meilleures cotes paris sportifs|meilleures
offres paris sportifs|meilleures stratégies paris sportifs|meilleurs
appli paris sportif|meilleurs application de paris sportifs|meilleurs application paris
sportif|meilleurs applications paris sportifs|meilleurs bonus paris sportifs|meilleurs cote paris sportif|meilleurs cotes paris sportifs|meilleurs offres paris sportifs|meilleurs paris sportifs|meilleurs paris sportifs du jour|meilleurs site de pari sportif|meilleurs
site de paris sportif|meilleurs site de paris sportif en ligne|meilleurs site de paris sportifs|meilleurs
site paris sportif|meilleurs sites de paris sportifs|meilleurs sites de paris sportifs en ligne|meilleurs sites paris sportif|meilleurs sites paris sportifs|methode abc paris sportif|methode de paris sportif|methode gagnante paris sportifs|methode gagner
paris sportif|methode infaillible paris sportifs|methode martingale
paris sportif|methode mathematique paris sportif|methode mathematique
pour gagner au paris sportif|methode paris sportif|methode paris
sportif foot|methode paris sportif forum|methode paris sportif tennis|methode paris sportifs|methode pour gagner au
paris sportif|methode pour gagner paris sportif|methodes paris sportifs|minimum depot paris sportif|mise au jeu pari sportif|mise maximum pari sportif|mise
maximum paris sportif|mise minimum paris sportif|mise moyenne
paris sportif|mise paris sportif|moins de 4 5 but paris sportif|montant maximum paris sportif|montant
paris sportif|montante pari sportif|montante parie sportif|montante paris sportif|montante paris sportifs|montantes paris
sportifs|multiple pari sportif|multiple paris
sportif|multiple paris sportifs|multiples paris sportifs|méthode calcul paris sportif|méthode match nul paris sportifs|méthode mathématique pour gagner
au paris sportif|méthode paris sportif forum|méthode paris sportif hockey|nba pari sportif|nba paris sportif|nba paris sportifs|nouveau paris sportif|nouveau site de
pari sportif|nouveau site de paris sportif|nouveau site de
paris sportif en ligne|nouveau site de paris sportifs|nouveau site pari sportif|nouveau
site paris sportif|nouveau site paris sportif france|nouveau site paris sportifs|nouveaux sites de paris sportifs|nouveaux sites paris sportifs|nouvelle appli paris
sportif|nouvelle application de paris sportif|numero de match paris sportif|numero match paris sportif|offre 100
euros paris sportif|offre appli pari sportif|offre bienvenu paris sportif|offre bienvenue pari sportif|offre bienvenue paris sportif|offre
bienvenue paris sportifs|offre bienvenue site paris sportif|offre bonus paris sportif|offre de bienvenu paris sportif|offre de
bienvenue pari sportif|offre de bienvenue paris sportif|offre de bienvenue paris sportif belgique|offre
de bienvenue paris sportif sans depot|offre de bienvenue paris sportif
sans dépôt|offre de bienvenue paris sportifs|offre de bienvenue sans depot paris sportif|offre de bienvenue site paris sportif|offre euro paris sportif|offre pari sportif euro|offre paris sportif|offre paris sportif
belgique|offre paris sportif cash|offre paris sportif coupe du monde|offre paris sportif hors arjel|offre
paris sportif remboursé|offre paris sportif remboursé cash|offre paris sportif sans depot|offre promo paris sportif|offre remboursement paris sportif|offre sans depot paris
sportif|offre site paris sportif|offres bienvenue
paris sportifs|offres de bienvenue paris sportifs|ou faire des paris sportif|ou faire des paris sportif
en espagne|ou faire des paris sportifs|outil répartiteur
de mise paris sportif|outils repartiteur de mises paris sportif|ouverture compte paris
sportifs|ouvrir un compte paris sportif|pack de bienvenue paris
sportif|pack de bienvenue paris sportif hors arjel|pari en ligne sportif|pari sportif|pari sportif 100 euros offert|pari sportif 100 remboursé|pari sportif abandon tennis|pari sportif aide|pari sportif algérie aujourd’hui|pari sportif appli|pari sportif application|pari sportif argent|pari sportif astuce|pari sportif aujourd|pari sportif aujourd’hui|pari sportif avec handicap|pari
sportif avec orange money|pari sportif avec paypal|pari sportif avec wave|pari sportif avis|pari sportif basket|pari sportif belgique|pari sportif belgique
france|pari sportif bonus|pari sportif buteur pas titulaire|pari sportif champions league|pari sportif combiné|pari sportif comment|pari sportif comment
gagner|pari sportif comment ça marche|pari sportif comparatif|pari sportif conseil|pari sportif cote|pari sportif
cote match|pari sportif cote psg|pari sportif coupe|pari sportif coupe
de france|pari sportif coupe du monde|pari sportif depot|pari sportif du jour|pari sportif en france|pari sportif en ligne|pari sportif en ligne au cameroun|pari sportif
en ligne belgique|pari sportif en ligne canada|pari sportif en ligne france|pari sportif en ligne gratuit|pari sportif en ligne suisse|pari sportif en ligne ufc|pari sportif en suisse|pari sportif
euro|pari sportif explication|pari sportif faire|pari sportif foot|pari sportif foot resultat|pari sportif football|pari sportif forum|pari sportif francaise des jeux|pari
sportif france|pari sportif france angleterre|pari sportif france argentine|pari sportif france autriche|pari sportif france belgique|pari sportif france espagne|pari sportif france italie|pari sportif france portugal|pari sportif france
usa|pari sportif gagnant|pari sportif gagner|pari sportif gagner a
tous les coups|pari sportif gagner de l’argent|pari sportif
gain|pari sportif gratuit|pari sportif gratuit pour gagner des cadeaux|pari sportif gratuit sans
depot|pari sportif handicap|pari sportif hockey|pari sportif hors arjel|pari
sportif jeux olympiques|pari sportif joueur absent|pari sportif le plus rentable|pari sportif leicester champion|pari sportif ligue 1|pari sportif ligue 2|pari sportif
ligue des champions|pari sportif ligue europa|pari sportif match|pari sportif match arrete|pari sportif match interrompu|pari sportif
meilleur|pari sportif meilleur cote|pari sportif meilleur site|pari sportif methode|pari
sportif mise|pari sportif mise au jeu|pari sportif mise
o jeu|pari sportif nba|pari sportif offre bienvenue|pari
sportif paypal|pari sportif plus|pari sportif prolongation|pari sportif promo|pari sportif
pronostic|pari sportif pronostic foot|pari sportif pronostic gagnant|pari sportif pronostic gratuit|pari sportif psg|pari sportif psg bayern|pari
sportif psg inter|pari sportif psg milan|pari sportif regle|pari sportif rembourse|pari sportif remboursement|pari sportif remboursement cash|pari sportif remboursé|pari
sportif rugby|pari sportif rugby coupe du monde|pari sportif rugby top
14|pari sportif sans argent|pari sportif sans carte bancaire|pari sportif sans
depot|pari sportif signification|pari sportif site|pari sportif statistique|pari sportif
suisse|pari sportif systeme|pari sportif technique|pari sportif technique pour gagner|pari
sportif temps reglementaire|pari sportif tennis|pari sportif tennis abandon|pari sportif top|pari sportif top 14|pari sportif tour de france|parie sportif|parie sportif comment ca marche|parie
sportif du jour|parie sportif en ligne|parie sportif foot|parie sportif football|parie sportif
france|parie sportif gratuit|parie sportif pronostic|parie sportif suisse|paris en ligne sportif|paris en ligne sportifs|paris evenement
sportif|paris france sportif|paris hippique et sportif|paris hippiques et sportifs|paris hippiques paris sportifs|paris hippiques paris sportifs et poker en ligne|paris hippiques sportifs|paris match sportif|paris sportif|paris sportif 10 euros offerts|paris
sportif 100 euros offert|paris sportif 100 euros remboursé|paris
sportif 100 offert|paris sportif 100 remboursé|paris sportif 100e offert|paris sportif 150 euros offert|paris
sportif 1er pari remboursé|paris sportif a faire|paris sportif a faire aujourd’hui|paris sportif a faire ce soir|paris sportif abandon tennis|paris sportif abandon tennis parions sport|paris
sportif aide|paris sportif algorithme|paris sportif analyse|paris sportif appli|paris sportif application|paris sportif application android|paris sportif apres prolongation|paris sportif argent|paris sportif argent fictif|paris sportif argent offert|paris sportif argent virtuel|paris
sportif arjel|paris sportif arsenal psg|paris sportif astuce|paris sportif au canada|paris sportif aujourd hui|paris
sportif aujourd’hui|paris sportif avec argent fictif|paris sportif avec bonus sans depot|paris sportif avec carte bancaire|paris sportif avec cryptomonnaie|paris sportif avec handicap|paris sportif avec paypal|paris sportif avec paysafecard|paris sportif avis|paris sportif avis expert|paris
sportif avis forum|paris sportif bankroll|paris sportif basket|paris sportif basket coupe de france|paris sportif
basket nba|paris sportif basket prolongation|paris sportif belgique|paris sportif
belgique bonus|paris sportif belgique bonus sans depot|paris sportif belgique france|paris sportif belgique suede|paris sportif bonus|paris sportif
bonus bienvenue|paris sportif bonus cash|paris sportif bonus de bienvenue|paris sportif bonus gratuit|paris sportif bonus
gratuit sans depot|paris sportif bonus retirable|paris
sportif bonus sans depot|paris sportif bonus sans depot belgique|paris
sportif bookmaker|paris sportif but contre son camp|paris sportif but temps additionnel|paris sportif buteur|paris
sportif buteur blessé|paris sportif buteur carton rouge|paris sportif buteur contre son camp|paris
sportif buteur non titulaire|paris sportif buteur prolongation|paris sportif buteur qui ne joue pas|paris sportif buteur remplacant|paris sportif calcul gain|paris sportif canada|paris sportif cash|paris sportif cash out|paris sportif champion ligue
1|paris sportif champions league|paris sportif
classement ligue 1|paris sportif code promo|paris sportif combine|paris sportif combiné|paris sportif combiné
comment ça marche|paris sportif combiné
du jour|paris sportif combiné match reporté|paris sportif comment ca marche|paris sportif comment faire|paris
sportif comment gagner|paris sportif comment gagner a tous
les coups|paris sportif comment jouer|paris sportif comment ça marche|paris sportif comparateur cote|paris sportif comparatif|paris
sportif conseil|paris sportif conseil gratuit|paris sportif conseil pour gagner|paris sportif cote|paris
sportif cote et match|paris sportif cote explication|paris sportif cote psg|paris sportif coupe d’europe|paris sportif coupe davis|paris sportif coupe de france|paris sportif coupe du monde|paris sportif coupe du monde de rugby|paris sportif coupe du monde rugby|paris sportif depot 5 euro|paris sportif depot minimum|paris sportif depot paypal|paris sportif dnb|paris sportif du jour|paris sportif du
jour conseil|paris sportif dépôt 1 euro|paris sportif dépôt minimum 5 euros|paris sportif en belgique|paris sportif en france|paris sportif en ligne|paris sportif en ligne
avec paypal|paris sportif en ligne avis|paris sportif
en ligne belgique|paris sportif en ligne bonus|paris sportif en ligne cameroun|paris sportif en ligne comment gagner|paris sportif en ligne comment ça marche|paris sportif en ligne france|paris
sportif en ligne gratuit|paris sportif en ligne maroc|paris sportif en ligne paypal|paris sportif
en ligne québec|paris sportif en ligne sans depot|paris sportif en ligne suisse|paris sportif en suisse|paris sportif espagne france|paris sportif esport|paris
sportif et casino en ligne|paris sportif et hippique|paris sportif et prolongation|paris sportif euro|paris sportif europa league|paris sportif explication|paris sportif final ligue des champions|paris sportif finale ligue
des champions|paris sportif foot|paris sportif foot aide|paris sportif foot astuce|paris sportif foot aujourd’hui|paris sportif foot ce soir|paris
sportif foot comment ca marche|paris sportif foot conseil|paris sportif foot cote|paris sportif foot coupe du monde|paris sportif foot en ligne|paris sportif foot feminin|paris sportif foot gratuit|paris sportif foot prolongation|paris sportif foot pronostic|paris sportif foot pronostic gratuit|paris sportif foot regle|paris sportif
foot suisse|paris sportif foot us|paris sportif football|paris sportif football americain|paris sportif football
astuces|paris sportif forfait tennis|paris sportif forum|paris sportif francais|paris sportif francaise des jeux|paris sportif
france|paris sportif france 2|paris sportif france allemagne|paris sportif france angleterre|paris
sportif france argentine|paris sportif france autriche|paris sportif france belgique|paris sportif france espagne|paris sportif france gibraltar|paris sportif france italie|paris sportif france nouvelle zelande|paris sportif france pologne|paris sportif
france portugal|paris sportif france uruguay|paris sportif france usa|paris sportif freebet sans depot|paris sportif
gagnant|paris sportif gagnant à coup sûr|paris sportif gagner a coup sur|paris sportif gagner argent|paris sportif
gagner de l’argent|paris sportif gain|paris sportif gain maximum|paris sportif gestion bankroll|paris sportif gratuit|paris
sportif gratuit appli|paris sportif gratuit avec cadeaux|paris sportif gratuit cadeaux|paris
sportif gratuit en ligne|paris sportif gratuit entre amis|paris
sportif gratuit sans argent|paris sportif gratuit sans depot|paris sportif gratuit sans
dépôt|paris sportif gratuits|paris sportif gros gain|paris sportif
handicap|paris sportif handicap 0 1|paris sportif handicap 0-1|paris sportif handicap 1 0|paris
sportif handicap 1-0|paris sportif handicap basket|paris sportif handicap explication|paris sportif handicap foot|paris sportif handicap rugby|paris sportif hippique|paris sportif hockey|paris sportif hockey nhl|paris
sportif hockey sur glace|paris sportif hors arjel|paris sportif hors arjel france|paris sportif jeux olympiques|paris sportif jeux video|paris sportif joueur blessé|paris sportif joueur blessé pendant le match|paris sportif joueur de foot|paris sportif
joueur decisif|paris sportif joueur declare forfait|paris sportif joueur déclare forfait|paris
sportif joueur remplacant|paris sportif la francaise des jeux|paris
sportif le plus rentable|paris sportif legal en france|paris sportif leicester champion|paris sportif les 18 stratégies pour
gagner tous les jours|paris sportif les plus sur|paris sportif
les prolongation compte|paris sportif ligne|paris sportif ligue 1|paris
sportif ligue 2|paris sportif ligue des champions|paris sportif ligue
des nations|paris sportif ligue europa|paris sportif liste|paris sportif
martingale|paris sportif match|paris sportif match abandonné|paris sportif match annulé|paris
sportif match arrêté|paris sportif match du jour|paris sportif match interrompu|paris sportif match reporté|paris sportif match suspendu|paris sportif match tennis interrompu|paris
sportif match truqué|paris sportif meilleur bonus|paris sportif
meilleur cote|paris sportif meilleur pronostic|paris sportif
meilleur site|paris sportif methode|paris sportif methode 2 3|paris sportif mi temps
fin de match|paris sportif mise au jeu|paris sportif mise maximum|paris sportif mma france|paris sportif moins
de 3.5 but|paris sportif montante|paris sportif moto gp|paris sportif multiple|paris sportif multiple 2 3|paris sportif
multiple 2 3 explication|paris sportif multiple 2 4|paris sportif multiple 2 5|paris
sportif multiple 2/3 explication|paris sportif multiple
3 4|paris sportif multiple explication|paris sportif national 1 foot|paris sportif
nba|paris sportif nba conseil|paris sportif nba pronostic|paris sportif nhl|paris sportif nombre de but|paris sportif nouveau site|paris sportif numero match|paris sportif offert|paris sportif offre bienvenue|paris sportif
offre bienvenue sans depot|paris sportif offre de bienvenue|paris sportif offre
sans depot|paris sportif om psg|paris sportif paypal|paris sportif plus de 1.5 but|paris sportif plus de 2 5 but|paris sportif plus ou
moins|paris sportif plus ou moins 2 5 but|paris sportif
premier pari remboursé|paris sportif premier paris remboursé|paris sportif
prolongation|paris sportif prolongation basket|paris sportif prolongation foot|paris
sportif promo|paris sportif pronostic|paris sportif pronostic basket|paris
sportif pronostic des match aujourd hui|paris sportif
pronostic expert gratuit|paris sportif pronostic foot|paris sportif
pronostic forum|paris sportif pronostic gratuit|paris sportif
pronostic tennis|paris sportif psg|paris sportif psg arsenal|paris sportif psg barcelone|paris sportif psg bayern|paris sportif
psg dortmund|paris sportif psg inter|paris sportif psg inter cote|paris sportif psg liverpool|paris sportif psg om|paris sportif qr code|paris
sportif que veut dire handicap|paris sportif qui rapporte le plus|paris sportif
regle|paris sportif regle prolongation|paris sportif rembourse|paris sportif remboursement
cash|paris sportif rembourser|paris sportif
remboursé|paris sportif remboursé cash|paris sportif remboursé en cash|paris
sportif retrait paypal|paris sportif rue des joueurs|paris sportif rugby|paris sportif rugby 6 nations|paris sportif rugby coupe du monde|paris sportif rugby
top 14|paris sportif safe du jour|paris sportif sans argent|paris
sportif sans carte bancaire|paris sportif sans carte
d’identité|paris sportif sans compte bancaire|paris sportif
sans depot|paris sportif sans depot minimum|paris sportif si match
suspendu|paris sportif si un joueur abandonne|paris sportif si un joueur ne joue pas|paris
sportif si un joueur se blesse|paris sportif simple ou combiné|paris sportif site|paris sportif statistique|paris sportif stratégie|paris sportif suisse|paris sportif suisse application|paris
sportif suisse en ligne|paris sportif suisse legal|paris sportif suisse légal|paris
sportif suisse romande|paris sportif sur du jour|paris sportif sur le tennis|paris sportif systeme|paris sportif systeme 2 3|paris sportif systeme 2 4|paris sportif systeme 2/3|paris sportif systeme
2/4|paris sportif systeme 3 4|paris sportif systeme
3/4|paris sportif systeme explication|paris sportif technique|paris sportif
technique pour gagner|paris sportif temps additionnel|paris sportif temps reglementaire|paris
sportif tennis|paris sportif tennis abandon|paris sportif tennis conseil|paris sportif tennis de table|paris sportif tennis forfait|paris sportif tennis gratuit|paris
sportif tennis pronostic|paris sportif tennis roland garros|paris sportif
tir au but|paris sportif top 14|paris sportif tour de france|paris
sportif ufc|paris sportif ufc france|paris sportif unibet|paris sportif vainqueur euro|paris sportif vainqueur ligue
1|paris sportif vainqueur ligue des champions|paris sportif via paypal|paris sportif victoire prolongation|paris sportif
vip gratuit|paris sportifs|paris sportifs abandon tennis|paris sportifs aide|paris sportifs analyser
un match|paris sportifs arjel|paris sportifs astuces|paris sportifs aujourd’hui|paris sportifs autorisés
en france|paris sportifs avec paypal|paris sportifs
basket|paris sportifs belgique|paris sportifs bonus|paris sportifs bookmakers|paris sportifs canada|paris sportifs combiné|paris sportifs comparateur|paris
sportifs comparatif|paris sportifs conseils|paris sportifs cotes|paris sportifs coupe du monde|paris sportifs de football|paris sportifs
du jour|paris sportifs en belgique|paris sportifs en france|paris sportifs en ligne|paris sportifs en ligne belgique|paris sportifs en ligne france|paris
sportifs en ligne gratuit|paris sportifs en ligne suisse|paris sportifs en suisse|paris sportifs et hippiques|paris sportifs euro|paris
sportifs foot|paris sportifs foot us|paris sportifs forum|paris sportifs france|paris
sportifs france espagne|paris sportifs gagner à tous les coups|paris sportifs gratuit|paris sportifs gratuits|paris sportifs gratuits en ligne|paris sportifs
handicap|paris sportifs hockey|paris sportifs hockey sur galce|paris sportifs hockey sur glace|paris sportifs hors arjel|paris sportifs
jeux olympiques|paris sportifs les bookmakers raflent la mise|paris sportifs ligne|paris sportifs ligue 1|paris sportifs ligue 2|paris sportifs ligue des champions|paris sportifs ligue
europa|paris sportifs match interrompu|paris sportifs montante|paris
sportifs nba|paris sportifs offre bienvenue|paris sportifs offre de bienvenue|paris sportifs paypal|paris sportifs pronostics|paris sportifs psg|paris sportifs psg inter|paris sportifs rugby|paris sportifs
sans argent|paris sportifs sans depot|paris sportifs site|paris sportifs sites|paris sportifs statistiques|paris sportifs
stratégie|paris sportifs suisse|paris sportifs technique|paris sportifs techniques|paris sportifs tennis|paris sportifs tennis astuces|paris sportifs
top 14|paris sportifs tour de france|part de marché paris sportifs|paypal
pari sportif|paypal paris sportif|paypal paris sportifs|perte d’argent paris sportifs|peut on devenir riche avec les
paris sportifs|peut on gagner de l’argent avec les paris sportifs|peut
on gagner sa vie avec les paris sportif|peut on vraiment gagner de l’argent avec les
paris sportifs|plus gros combine paris sportif|plus gros gagnant paris
sportif|plus gros gain paris sportif|plus gros gain paris
sportif au monde|plus gros gain paris sportif france|plus gros gains paris
sportif|plus gros pari sportif|plus gros paris sportif|plus grosse cote
gagner paris sportif|plus grosse cote pari sportif|plus grosse cote paris sportif|plus grosse mise paris sportif|plus grosse somme gagner au paris sportif|plus ou moins paris sportif|pourcentage de mise paris sportif|premier pari
sportif remboursé|probabilité cote paris sportif|probabilité paris sportif
combiné|prolongation basket paris sportif|prolongation paris sportif|promo pari sportif|promo paris
sportif|promo site de paris sportif|promo site pari sportif|promo site paris sportif|promos paris sportifs|prono paris sportif foot|prono paris sportif
gratuit|prono paris sportif tennis|pronostic de paris
sportif|pronostic du jour paris sportif|pronostic foot paris sportif|pronostic gratuit paris sportif|pronostic pari sportif|pronostic pari sportif gratuit|pronostic paris sportif|pronostic paris sportif aujourd’hui|pronostic paris sportif du jour|pronostic paris sportif foot|pronostic paris sportif gratuit|pronostic paris sportif
tennis|pronostic paris sportifs|pronostics foot statistiques et aides aux paris sportifs|pronostics paris sportif|pronostics paris sportifs|pronostiqueur paris sportif gratuit|psg arsenal paris
sportif|psg bayern paris sportif|psg inter milan paris sportif|psg inter pari sportif|psg inter paris sportif|psg liverpool paris sportif|psg
om paris sportif|psg paris sportif|psg paris sportifs|qr code paris sportif|qu est ce
qu un handicap paris sportif|qu est ce que handicap dans les paris
sportif|qu’est ce qu’un handicap paris sportif|qu’est
ce que handicap dans les paris sportif|quand un joueur se
blesse paris sportif|que signifie 1/1 en paris sportif|que signifie 1/2 paris sportif|que signifie 12 en paris sportif|que signifie 1×2 dans les
paris sportifs|que signifie btts en paris sportif|que signifie dnb en paris sportif|que signifie draw en paris sportif|que signifie ft en paris sportif|que signifie gg dans le pari sportif|que signifie gg en pari sportif|que signifie gg en paris sportif|que signifie handicap dans les paris sportifs|que veut dire dnb
en paris sportif|que veut dire handicap dans les paris sportifs|que veut
dire handicap paris sportif|quel appli pari sportif|quel cote jouer paris sportif|quel est la meilleur appli de paris sportif|quel est
le meilleur algorithme de paris sportif|quel est le meilleur
site de pari sportif|quel est le meilleur site de pari
sportif en ligne|quel est le meilleur site de paris sportif|quel est le meilleur site de paris
sportif en ligne|quel est le meilleur site de paris sportifs en ligne|quel est le pari sportif le plus rentable|quel pari
sportif est le plus rentable|quel pari sportif est le plus sûr|quel pari sportif
faire aujourd’hui|quel paris sportif faire aujourd’hui|quel paris sportif
rapporte le plus|quel site de paris sportif choisir|quel site de paris sportif rembourse en cash|quel type
de pari sportif est le plus rentable|quelle application pour paris sportifs|quelle est la meilleure appli de paris sportif|quelle est la meilleure application de paris sportif|quelle est
la meilleure application pour les paris sportifs|quelle est
le meilleur site de paris sportif|quels paris sportifs faire|quels sont les paris sportifs les plus sûrs|rebond basket
paris sportif|record de gain paris sportif|regle buteur paris sportif|regle de paris
sportif|regle des paris sportif|regle handicap paris sportif|regle handicap paris
sportif foot|regle multiple paris sportif|regle pari sportif|regle paris sportif|regle paris sportif foot|regle paris sportif multiple|regle paris sportif prolongation|reglement pari sportif|reglement
paris sportif|regles paris sportifs|remboursement cash paris sportif|remboursement en cash paris sportif|remboursement pari sportif|remboursement paris sportif|repartiteur de mise paris sportif|repartiteur de mise paris sportifs|repartiteur de
mises paris sportif|repartiteur mise paris sportif|repartition des mises paris
sportif|resultat pari sportif|resultat paris sportif|resultat paris sportif en direct|resultat paris sportif foot|resultat
sportif hockey|retirer argent paris sportif|rugby pari sportif|rugby paris sportif|règle paris sportif prolongation|règles
paris sportif|répartiteur de mise pari sportif|répartiteur de mise paris
sportif|répartiteur de mise paris sportifs|répartition des mises paris sportif|résultat paris sportif foot|sans depot paris sportif|se faire interdire de paris sportifs|signification btts paris sportif|signification dnb paris sportif|signification handicap paris sportif|simulateur de gain paris sportif|simulateur gain paris sportif|simulateur gain paris sportif multiple|simulateur
gain paris sportif systeme|simulateur gain paris sportif système|simulateur
montante paris sportif|simulateur paris sportif multiple|simulateur systeme paris sportif|simulation paris sportif gratuit|site aide paris sportif|site analyse paris
sportif|site analyser paris sportif|site arjel paris sportif|site conseil paris sportif|site d’analyse de paris sportifs|site d’analyse paris sportif|site de conseil paris sportif|site de pari en ligne
sportif|site de pari sportif|site de pari sportif avec bonus sans depot|site de pari sportif
bonus sans depot|site de pari sportif canada|site de
pari sportif en ligne|site de pari sportif francais|site de pari sportif gratuit|site de pari sportif
hors arjel|site de pari sportif suisse|site de parie sportif|site de parie sportif en ligne|site de paris en ligne sportif|site de paris sportif|site
de paris sportif acceptant paypal|site de paris sportif arjel|site de paris sportif autorisé en france|site de paris
sportif autorisé en suisse|site de paris sportif avec bonus|site de paris
sportif avec bonus sans depot|site de paris sportif avec bonus
sans dépôt|site de paris sportif avec neosurf|site de paris sportif avec
paiement mobile|site de paris sportif avec paypal|site de paris sportif avis|site de paris sportif belge avec bonus|site de paris sportif
belgique|site de paris sportif bonus|site de paris sportif
bonus sans depot|site de paris sportif canada|site de paris sportif comparatif|site
de paris sportif depot minimum|site de paris sportif en france|site de paris sportif en ligne|site
de paris sportif en ligne suisse|site de paris sportif football|site de paris sportif francais|site de paris sportif france|site de paris sportif
gratuit|site de paris sportif gratuit pour gagner des cadeaux|site de paris sportif gratuit sans dépôt|site de paris sportif hors arjel|site de paris sportif le
plus fiable|site de paris sportif legal en france|site de paris sportif meilleur cote|site de paris sportif
nouveau|site de paris sportif offre de bienvenue|site de paris sportif paypal|site de paris sportif
premier paris remboursé|site de paris sportif
qui accepte paypal|site de paris sportif qui rembourse en cash|site de paris sportif remboursé|site de paris sportif
sans argent|site de paris sportif sans carte bancaire|site de paris sportif sans carte d’identité|site de paris sportif sans depot|site de paris sportif suisse|site de paris sportifs|site de paris sportifs avec paypal (Rosalinda)|site de paris sportifs
en ligne|site de paris sportifs francais|site de paris
sportifs gratuit|site de paris sportifs paypal|site de paris sportifs suisse|site de statistique pour paris sportif|site des paris sportifs|site pari en ligne
sportif|site pari sportif|site pari sportif 100
euros offert|site pari sportif arjel|site pari sportif belgique|site
pari sportif bonus|site pari sportif canada|site pari sportif comparatif|site pari
sportif en ligne|site pari sportif france|site pari sportif gratuit|site
pari sportif hors arjel|site pari sportif suisse|site parie sportif|site paris en ligne sportif|site paris sportif|site
paris sportif 100 euros offert|site paris sportif 100 euros remboursé|site paris sportif 1er paris remboursé|site paris sportif arjel|site paris sportif autorisé en france|site paris
sportif avec bonus|site paris sportif avec bonus
sans depot|site paris sportif avec meilleur cote|site paris sportif belgique|site paris sportif
bonus|site paris sportif bonus cash|site paris sportif bonus sans
depot|site paris sportif canada|site paris sportif comparatif|site
paris sportif depot 5 euro|site paris sportif en ligne|site paris sportif foot|site paris sportif france|site paris
sportif gratuit|site paris sportif hors arjel|site paris sportif hors arjel france|site paris sportif
meilleur cote|site paris sportif nouveau|site paris
sportif offre de bienvenue|site paris sportif paypal|site paris sportif
remboursement cash|site paris sportif remboursé en cash|site paris sportif retrait instantané|site paris sportif sans
carte bancaire|site paris sportif sans depot|site paris sportif suisse|site paris sportifs|site paris
sportifs belgique|site paris sportifs en ligne|site paris sportifs france|site paris sportifs hors arjel|site paris sportifs suisse|site pour analyse paris sportif|site pour paris sportif|site pronostic paris sportif|site statistique paris sportif|site
suisse paris sportif|sites de pari sportif|sites de
paris sportif|sites de paris sportifs|sites de paris sportifs arjel|sites de paris
sportifs autorisés en france|sites de paris sportifs belgique|sites de paris sportifs bonus|sites
de paris sportifs en belgique|sites de paris sportifs en france|sites
de paris sportifs en ligne|sites de paris sportifs gratuits|sites de
paris sportifs gratuits sans dépôt|sites de paris sportifs suisse|sites pari sportif|sites paris sportif|sites paris sportifs|sites
paris sportifs arjel|sites paris sportifs belgique|sites paris sportifs france|sites paris sportifs hors arjel|sites paris sportifs suisse|so foot paris sportif|so foot paris sportifs|specialiste tennis paris sportif|statistique foot paris sportif|statistique paris sportif|statistique paris sportif foot|statistique
tennis paris sportif|statistiques football paris sportifs|statistiques paris sportifs|strategie de paris sportif|stratégie big whale paris sportif|stratégie de paris sportifs|stratégie gagnante paris sportifs|stratégie pari
sportif|stratégie paris sportif|stratégie paris
sportifs|stratégie paris sportifs forum|stratégie pour gagner au paris sportif|stratégies
paris sportifs|suisse paris sportif|suisse paris sportifs|systeme
2 3 paris sportif|systeme 3 4 paris sportif|systeme de cote paris sportif|systeme de paris sportif|systeme pari sportif|systeme paris sportif|systeme paris sportifs|systeme reducteur paris sportif|système paris sportif|tableau bankroll paris sportif|tableau cote
paris sportif|tableau de paris sportif|tableau de suivi paris
sportifs|tableau excel bankroll paris sportif|tableau excel paris sportif|tableau excel paris sportif gratuit|tableau excel paris sportifs|tableau excel pour paris sportif|tableau gestion bankroll paris sportif|tableau montante paris
sportif|tableau
Your comment is awaiting moderation.
findpurposeandpeace.shop – Calm and inspiring content helps discover purpose and maintain peace today. Mindset & Purpose Hub – Tools and guidance to grow mentally and emotionally.
Your comment is awaiting moderation.
ну вообщем все ровно получил людей правда от бати но магазин ровный советую купить онлайн мефедрон, экстази, бошки Оплатил 28 января это был вторник, продавец сказал отправки в течении 2х дней…
Your comment is awaiting moderation.
Протечка стояка стала неприятным сюрпризом, но эксперты всё оформили четко https://advokat-zaliv.ru/
Your comment is awaiting moderation.
Сайты лицензионных программ https://licensed-software-1.ru
Your comment is awaiting moderation.
магазу процветания желаю и клиентов хороших купить кокаин, меф, бошки через телеграмм отписал бы по факту с картинками
Your comment is awaiting moderation.
контракт армия
Your comment is awaiting moderation.
https://contractna-svo.ru/
Your comment is awaiting moderation.
inspiregrowthdaily.click – Enjoyed the uplifting posts, great site for consistent personal motivation boosts.
Your comment is awaiting moderation.
The Astronaut Phenomenon in India
Game Overview and Mechanics
Astronaut is a revolutionary crash-style casino game developed by 100HP Gaming that has taken the Indian gaming market by storm. Unlike traditional casino games, Astronaut puts players in control of a brave astronaut on a daring space mission through the cosmos. The game’s core concept is elegantly simple yet thrilling: watch your astronaut’s rocket soar higher and higher while the multiplier climbs, then cash out before the inevitable crash to secure your winnings.
astronaut-crashgame.in
The game operates on cutting-edge provably fair technology with an impressive 98% Return to Player (RTP) rate, making it one of the most player-friendly crash games available to Indian audiences. Players can start their cosmic journey with bets as low as ?1, making it accessible to a wide range of players across India’s diverse economic landscape. The potential rewards are astronomical, with multipliers capable of reaching up to 50,000x the original bet.
Why India Has Embraced Astronaut
Cultural Appeal and Accessibility
Astronaut’s success in India stems from its perfect alignment with Indian gaming preferences. The game combines the excitement of space exploration – a theme that resonates strongly with India’s growing interest in space technology – with the strategic elements that Indian players appreciate. The cosmic theme, featuring stunning visuals of space travel and celestial bodies, creates an immersive experience that feels both futuristic and familiar.
astronaut crash game india
The game’s accessibility is another key factor in its Indian success story. With minimum bets starting at just ?1, Astronaut welcomes players from all economic backgrounds, allowing them to experience the thrill of cosmic betting without significant financial risk. This democratic approach to gaming aligns perfectly with India’s inclusive digital economy philosophy.
Mobile-First Design Philosophy
Recognizing India’s mobile-first gaming culture, 100HP Gaming optimized Astronaut specifically for smartphone gameplay. The game features intuitive touch controls, responsive design elements, and quick-loading graphics that perform seamlessly even on budget Android devices. This mobile optimization is crucial in a market where over 90% of gaming occurs on smartphones.
Local Payment Integration
One of Astronaut’s strongest advantages in the Indian market is its comprehensive support for local payment methods. The game seamlessly integrates with UPI (Unified Payments Interface), PayTM, PhonePe, and other popular Indian digital payment platforms. This local payment support eliminates the friction often associated with international gaming platforms and creates a native user experience for Indian players.
Revolutionary Game Features
Dual Betting System
Astronaut introduces an innovative dual betting panel system that sets it apart from other crash games. Players can place two simultaneous bets with different cash-out strategies, allowing for sophisticated risk management approaches. This feature appeals particularly to Indian players who appreciate strategic depth in their gaming experiences. One bet might be set for a conservative early cash-out, while the second could target higher multipliers for maximum profit potential.
Crystal Mechanics
https://astronaut-crashgame.in/
https://astronaut-crashgame.in/
Your comment is awaiting moderation.
За АМ 1220 ничего сказать не могу – не пробовал…. Но, после тестирования 694 и 2201 впечатления о линейке АМ у меня сильно подпортились ( купить онлайн мефедрон, экстази, бошки В-общем среднестаьистический вечер пятницы обычного одинокого ITшного инженера 😉
Your comment is awaiting moderation.
Found this https://jokabetapp.com website recently and wanted to share it here. It contains useful details and is updated regularly.
Your comment is awaiting moderation.
shopandshine.click – Found good deals here, overall experience felt positive and stress-free throughout.
Your comment is awaiting moderation.
казино вовада — это актуальное зеркало для доступа к популярному онлайн-казино.
Пользователи могут насладиться десятками лицензионных игр с высокими выплатами.
Сайт отличается удобным интерфейсом и быстрой работой. vavadacasinos.neocities.org доступен круглосуточно с любых устройств.
#### Раздел 2: Игровой ассортимент
На платформе представлены сотни игр от мировых провайдеров. Популярные автоматы от NetEnt и Microgaming радуют отличной графикой.
Особого внимания заслуживают джекпоты и турниры. Ежедневные розыгрыши привлекают тысячи участников.
#### Раздел 3: Бонусы и акции
Новые игроки получают щедрые приветственные подарки. Вращения в слотах дарятся без обязательных вложений.
Система лояльности поощряет постоянных клиентов. Чем чаще вы играете, тем выше становятся бонусы.
#### Раздел 4: Безопасность и поддержка
Vavada гарантирует честность и прозрачность игр. Все автоматы проходят проверку на случайность генерации чисел.
Служба поддержки работает в режиме 24/7. Игроки могут связаться с поддержкой через email или мессенджеры.
### Спин-шаблон
#### Раздел 1: Введение в мир Vavada
1. Vavada — известный ресурс для любителей азартных развлечений.
2. Она предлагает широкий выбор слотов, рулетки и карточных игр.
3. Платформа радует пользователей простой навигацией и стабильной работой.
4. vavadacasinos.neocities.org доступен круглосуточно с любых устройств.
#### Раздел 2: Игровой ассортимент
1. На платформе представлены сотни игр от мировых провайдеров.
2. Каждый игрок найдет вариант по вкусу — от блекджека до современных видео-слотов.
3. Особого внимания заслуживают джекпоты и турниры.
4. Крупные выигрыши разыгрываются в прогрессивных слотах.
#### Раздел 3: Бонусы и акции
1. Каждый новичок может рассчитывать на дополнительные фриспины.
2. Первый депозит может быть увеличен на 100% или более.
3. Чем больше вы играете, тем выгоднее становятся условия.
4. Еженедельные турниры с призовыми фондами добавляют азарта.
#### Раздел 4: Безопасность и поддержка
1. Vavada гарантирует честность и прозрачность игр.
2. Вывод средств происходит быстро и без скрытых комиссий.
3. Служба поддержки работает в режиме 24/7.
4. Консультанты отвечают моментально в онлайн-чате.
Your comment is awaiting moderation.
https://contractna-svo.ru/
Your comment is awaiting moderation.
I found https://parimatch-download.in a useful website with good information and regular updates. Maybe someone here will find it helpful as well.
Your comment is awaiting moderation.
Sharing a https://pinuponline-bd.com website I recently discovered. It contains helpful details and might be interesting for some users here.
Your comment is awaiting moderation.
А за кладом я решил ехать на такси. https://aikido-ufa.ru Проб НЕТ!
Your comment is awaiting moderation.
Uvod: Proc si AmunRa kasino ziskava pozornost ceskych hracu?
amunra casino sign up bonus
AmunRa kasino se od sveho spusteni v roce 2020 rychle etablovalo jako jedna z prednich hernich platforem pro ceske hrace. Jako odbornik s vice nez 12 lety zkusenosti v iGaming prumyslu jsem detailne analyzoval tuto platformu a mohu potvrdit, ze nabizi skutecne kvalitni herni zazitek specificky prizpusobeny ceskemu trhu.
Klicove vyhody pro ceske hrace:
casino amunra
Plna podpora ceske koruny (CZK) — zadne poplatky za prevod men
Ceske jazykove rozhrani s lokalizovanou zakaznickou podporou
Licence od renomovanych regulatoru zajistujici bezpecnost
Vice nez 5000 her od prednich svetovych poskytovatelu
Rychle vybery s podporou ceskych platebnich metod
Zakladni informace o AmunRa kasinu
https://amunra-cz.com/
Parametr Detaily
Nazev operatora AmunRa Casino CZ
Dostupnost pro CR ? Ano, plne lokalizovano
Podpora CZK ? Ano, vcetne vsech transakcnich metod
Rok zalozeni 2020
Oficialni web amunra-cz.com
Vlastnik Rabidi N.V. (Curacao)
Licence Curacao eGaming (c. 8048/JAZ)
Minimalni vklad 250 CZK
Maximalni vyhra 1 000 000 CZK na jednu sazku
Mobilni aplikace iOS a Android
Jazyky CZ, EN, DE, FR, SK, IT, ES, PT, PL, NO, HU, FI, AR, EL
Detailni analyza licencovani a bezpecnosti
Regulacni ramec
AmunRa kasino operuje pod licenci Curacao eGaming (c. 8048/JAZ), kterou vlastni spolecnost Rabidi N.V. Behem me analyzy jsem overil platnost teto licence a mohu potvrdit, ze kasino splnuje vsechny pozadavky na:
Sifrovani SSL 256-bit pro ochranu osobnich a financnich udaju
Ferove herni podminky s overenymi RNG (Random Number Generator) systemy
Odpovedne hrani s nastroji pro sebevylouceni a limity
Anti-money laundering (AML) politiky v souladu s mezinarodnimi standardy
Verifikace a ochrana hracu Amun Ra
Verifikace a ochrana hracu
Kasino vyzaduje povinnou verifikaci totoznosti pred prvnim vyberem, coz je standardni praxe zajistujici:
Ochranu pred podvodnymi aktivitami
Prevenci prani spinavych penez
Dodrzovani vekovych limitu (18+)
Herni nabidka: Vice nez 5000 titulu od premiovych poskytovatelu
Hraci automaty (4000+ titulu)
AmunRa spolupracuje s vice nez 100 renomovanymi poskytovateli her. Na zaklade meho testovani doporucuji tyto top kategorie:
Nejpopularnejsi sloty pro ceske hrace:
amunra casino support
https://amunra-cz.com/
Your comment is awaiting moderation.
Pin-Up Casino APK: Gizli Sirl?r v? Ekskluziv Imkanlar – 11 Illik T?crub? il? D?rin Ekspert T?hlili
PinUp Casino Mobil Yukl?m?
https://pinup-az-download.com/
?? Giris: 11 Il ?rzind? Gordukl?rim
2006-c? ild?n bu gun? q?d?r Az?rbaycan i-gaming sektorunda cal?sark?n mobil aplikasiyalar?n nec? d?yisdiyinin sahidi olmusam. Pin-Up Casino APK-n? son 4 ayda d?rin t?dqiq etdikd?n sonra siz? hec yerd? oxumayacag?n?z sirl?ri v? h?qiq?tl?ri ac?qlayacagam.
?? M?suliyy?t: Bu icmal tamamil? must?qil v? hec bir sirk?tl? maliyy? ?laq?m yoxdur. UNEC-d? maliyy? magistri v? “Az?rbaycanda i-gaming” kitab?n?n mu?llifi kimi professional obyektivliyimi qoruyuram.
pin up online casino app download
?? T?dqiqat metodologiyas?: 2025-ci ilin may-sentyabr aylar?nda 6 f?rqli cihazda, 80+ saat real test, 25+ depozit/c?xar?s ?m?liyyat? v? texniki analiz.
?? Pin-Up APK: Texniki Sirrl?r v? Optimizasiya
?? APK Arxitekturas?n?n D?rin Analizi
M?nim texniki t?dqiqat?m gost?rir ki, Pin-Up APK-da gizli optimizasiya mexanizml?ri var:
pin up casino apk download
Parametr R?smi M?lumat M?nim Askar Etdikl?rim Praktik T?sir
APK olcusu 9.8-15 MB ?slind? 52.3 MB (yukl?dikd?n sonra) Ilk baslatma 40% uzun c?kir
RAM istehlak? Qeyd edilm?yib 120-280MB (oyundan as?l?) Budget telefonlarda probleml?r
Cache sistemi Adi cache 3 s?viyy?li smart cache Internet traffic 45% azald?r
Push notification Adi bildirisl?r AI-?sasl? f?rdil?sdirilmis sistem Oyuncu davran?s?na uygunlas?r
?? Gizli Performance Trickl?ri
M?nim askar etdiyim APK-nin gizli imkanlar?:
?? Pre-loading sistemi: Tez-tez oynanan oyunlar arxa fonda ?vv?lc?d?n yukl?nir
?? Adaptiv kompresiya: Internet sur?tin? gor? m?lumat s?x?lmas? d?yisir
?? Oyuncu profaylinq: Sizin oyun t?rziniz? gor? interfeysi optimallasd?r?r
? Batch loading: Bir nec? kicik dosya yerin? boyuk paketl?r yukl?nir
?? Sistem T?l?bl?ri v? Real Performance
R?smi t?l?bl?r vs Real test n?tic?l?ri:
Cihaz Tipi Android Versiya RAM Real Test N?tic?si (m?nim) Tovsiy?
Budget (Xiaomi Redmi) 6.0+ 3GB Slot oyunlar? yaxs?, canl? kazino laglay?r ?? M?hdud istifad?
Orta (Samsung A52) 8.0+ 6GB Butun funksiyalar ideal ?? T?kmil
Premium (S21+) 10.0+ 8GB+ Ultra performance, 120fps oyunlar ?? Muk?mm?l
?? Ekskluziv APK Funksiyalar?: Indi Ilk D?f? Ac?qlan?r
?? Push Notification Intelligence Sistemi
4 ayl?q d?rin analizim gost?rir ki, Pin-Up-?n push notification sistemi sad? x?b?rdarl?qdan daha coxdur:
?? AI Profaylinq Askarlanmas?:
Aplikasiya sizin oyun saatlar?n?z?, m?bl?gl?rinizi v? oyun novl?rini analiz edir. M?nim testind?: h?ft?nin eyni gunl?rind? eyni saatlarda bildiris g?lirdi!
?? Push Notification Tipl?ri (m?nim kategoriyam):
?? Slot-focused: ?g?r slotlar? sevirsinizs?, yuks?k RTP oyunlar haqq?nda bildirisl?r
? Sport-focused: Favori komandan?z?n matc?ndan 2 saat ?vv?l x?b?rdarl?q
?? Bonus hunter: Yeni bonus kodlar v? ekskluziv t?klifl?r
?? Session recovery: Uzun mudd?t girm?dinizs?, c?lbedici t?klifl?r
?? Gizli Oyun Kolleksiyas?
APK-d? mobil versiyada olmayan oyunlar:
pin up casino download app
https://pinup-az-download.com/
Your comment is awaiting moderation.
Pin-Up Kazino: Mobil Proqram v? Versiya – Ekspert Icmal? v? Praktik M?sl?h?tl?r
Mu?llif: Kajip Mahmutov, i-gaming v? regional bazar analitiki
Son yenil?nm?: Sentyabr 2025
pin up casino apk yukle
Pin-Up Casino Mobil Yukl?m?
?? Giris: 11 Illik T?crub? Il? Bax?s
Salam, m?nim ad?m Kajip ?li oglu Mahmutovdur v? m?n 2006-c? ild?n b?ri Az?rbaycan i-gaming s?nayesind? cal?s?ram. UNEC-d? maliyy? sah?sind? magistr d?r?c?m var v? 2021-ci ild? “Az?rbaycanda i-gaming: Imkanlar v? Cag?r?slar” kitab?n? n?sr etdirmis?m. Haz?rda must?qil konsultant olaraq 500+ beyn?lxalq operator ucun regional bazar girisi konsultasiyas? verir?m.
Bu icmalda m?n tamamil? must?qil ekspert kimi Pin-Up kazino mobil platformas?n? analiz edir?m. Hec bir kommersiya marag?m yoxdur – m?qs?dim yaln?z Az?rbaycan oyuncular?na obyektiv v? professional m?lumat verm?kdir.
pin up casino yukle
Metodologiyam: Son 2 ayda Pin-Up mobil proqram?n? v? versiyas?n? muxt?lif cihazlarda test etmis?m. Samsung Galaxy S21, iPhone 13 v? Xiaomi Redmi Note 10-da umumilikd? 50+ saat test vaxt? kecirmis?m. Depozit/c?xar?s ?m?liyyatlar?, must?ri d?steyi v? oyun performans?n? s?xs?n yoxlam?sam.
?? Vacib qeyd: Bu icmal m?nim professional t?crub?m? ?saslan?r v? Pin-Up Casino il? hec bir ?m?kdasl?q munasib?tim yoxdur.
https://pinup-casino-yukle-az.com/
?? Pin-Up Casino Mobil Ekosistemi: Umumi Bax?s
M?nim analizim? ?sas?n, Pin-Up Casino mobil istifad?cil?r ucun iki ?sas secim t?klif edir: xususi mobil proqram v? brauzer vasit?sil? isl?y?n mobil versiya. H?r ikisini s?xs?n test etdikd?n sonra asag?dak? n?tic?l?r? g?ldim.
?? Mobil Proqram?n Ustunlukl?ri:
Daha sur?tli isl?m?
Offline funksiyalar
Push bildirisl?r
Optimizasiya edilmis interfeys
?? Mobil Versiya (Browser) Ustunlukl?ri:
Yukl?m? t?l?b etmir
Avtomatik yenil?nm?
Butun cihazlarda isl?yir
?lav? yaddas tutmur
https://pinup-casino-yukle-az.com/
Your comment is awaiting moderation.
Введение
Pin Up Casino — одно из самых узнаваемых онлайн-казино для игроков из Казахстана. За последние годы я протестировал десятки площадок, и именно Pinup Casino KZ стабильно показывает баланс между щедрыми бонусами, удобством интерфейса и безопасностью.
пин ап казино казахстан официальный сайт
Если вы новичок и ещё не играли в казино онлайн или хотите перейти с другой платформы, этот обзор создан для вас. Здесь — честный, практичный разбор всех ключевых аспектов: от регистрации и бонусов до ответственной игры и вывода средств.
Почему Pin-Up Casino — лидер в Казахстане?
??? Лицензия и контроль
Лицензия Curacao eGaming № 8048/JAZ2017-003
Подтверждает легальность и контроль со стороны регулятора. SSL-шифрование для защиты данных и 24/7 служба поддержки.
пин-ап казино казахстан
Ключевые преимущества:
?? Широкий выбор игр
Более 5 000 слотов, настольных игр и лайв-шоу с дилерами от ведущих провайдеров мира.
пин ап казино официальный сайт казахстан
?? Щедрые бонусы и акции
Приветственный пакет, кэшбэки, турниры, внутренняя валюта Pincoins для дополнительных наград.
?? Интуитивный интерфейс
Понятная навигация, удобный личный кабинет, быстрая регистрация через email, телефон или соцсети.
?? Безопасность и ответственность
Лимиты депозитов и ставок, самоисключение, верификация для защиты от мошенничества.
?? Поддержка 24/7
Чат, email, FAQ — оперативная помощь для новичков, которые часто нуждаются в поддержке.
?? Мобильная версия
Кроссплатформенность: браузерная версия, Android-приложение, адаптивный дизайн под iOS.
Коммерческий интент здесь очевиден:
Вы приходите играть и выигрывать, а Pin-Up делает этот путь максимально понятным и комфортным.
Игры и провайдеры: что предлагает Pin-Up?
Ассортимент — это то, что отличает Пинап казино от множества конкурентов. Здесь вы найдёте слоты, рулетку, блэкджек, покер, крэпс, а также лайв-игры от ведущих студий. Для Казахстана важно наличие локализованного контента и стабильной работы на мобильных устройствах — Pin Up Casino это обеспечивает.
Топ-провайдеры на платформе:
?? NetEnt
Легендарные слоты с качественной графикой и честным RTP. Эталон индустрии игровых автоматов.
?? Microgaming
Один из старейших разработчиков с прогрессивными джекпотами и классическими играми.
?? Evolution Gaming
Эталон лайв-казино: рулетка, блэкджек, шоу-игры с профессиональными дилерами.
?? Betsoft
3D-слоты с ярким визуалом и инновационными игровыми механиками.
? Novomatic
Классика жанра для любителей «одноруких бандитов» и традиционных слотов.
Советы новичкам:
1. Выбирайте слоты с высоким RTP (выше 96%) — это математически увеличивает ваши шансы на долгую игру.
2. Начинайте с демо-режима — изучите механику и бонусные раунды без риска.
3. Следите за волатильностью — низковолатильные слоты дают частые, но небольшие выигрыши; высоковолатильные — редкие, но крупные.
4. Читайте правила бонусов конкретного слота — фриспины, множители, buy-bonus могут сильно влиять на стратегию.
Популярные игры и их характеристики
пин-ап казино казахстан
https://kazpinup.com/
Your comment is awaiting moderation.
Pin-Up Casino Az?rbaycan 2024-2025: Tam Icmal — Lisenziya, 10,000 AZN-? q?d?r Bonus, Real R?yl?r
Mu?llif: Elnur M?mm?dov, must?qil onlayn qumar eksperti (12+ il t?crub?, 200+ icmal)
pin-up casino giris
N?sr tarixi: 13 Noyabr 2024 | Oxuma mudd?ti: 15 d?qiq?
?? Mund?ricat
Bu icmal n? haqq?ndad?r
Pin-Up Casino: ?sas m?lumat
pin up casino giris azerbaijan
Lisenziya v? qanunillik Az?rbaycanda
Nec? qeydiyyatdan kecm?k olar
Oyunlar v? provayderl?r
Bonuslar v? m?rc s?rtl?ri
Depozit v? c?xar?slar
Mobil t?tbiq
D?st?k xidm?ti
T?hluk?sizlik v? m?suliyy?tli oyun
R?qibl?rl? muqayis?
Real r?yl?r
Ustunlukl?r v? cat?smazl?qlar
FAQ
Yekun qiym?t
Bu icmal n? haqq?ndad?r
M?nim ad?m Elnur M?mm?dov, son 12 ildir Az?rbaycanda onlayn qumar bazar?n? oyr?nir v? kazino platformalar?n? s?xs?n test edir?m. Bu icmal Pin-Up Casino-da 6 ayl?q t?crub?m? ?saslan?r: real depozitl?r, pul c?xar?slar? v? az?rbaycanl? oyuncularla unsiyy?t.
pin-up casino giris
Bu materialdan n? ?ld? ed?c?ksiniz:
? Lisenziya v? t?hluk?sizliyin duzgun qiym?tl?ndirilm?si
? Real pul c?xar?s testl?ri (subutlarla)
? Bonuslar?n v? onlar?n m?rc s?rtl?rinin obyektiv t?hlili
? Az?rbaycan bazar?nda r?qibl?rl? muqayis?
Disclaimer: Az?rbaycanda onlayn kazinolar qanuni “boz zona”dad?r. Quru kazinolar 1999-cu ild?n qadagand?r, onlayn qumar qanunvericilikd? t?nziml?nmir. M?n qumar oyunlar?na cag?rm?ram. M?suliyy?tl? oynay?n, yaln?z itirm?y? haz?r oldugunuz pulla. 18+
Pin-Up Casino: ?sas M?lumat
Parametr M?lumat
T?sis ili 2016
Lisenziya Curacao eGaming (№ 8048/JAZ2017-003)
Oyunlar?n say? 10,000+
Top provayderl?r NetEnt, Pragmatic Play, Evolution Gaming, Microgaming, Play’n GO
AZN d?st?yi ? B?li
Mobil t?tbiq ? Android, iOS
Dill?r Az?rbaycan, rus, ingilis, turk
24/7 d?st?k ? Cat, email, Telegram
Kim? uygundur:
?? Genis secimli slot sev?nl?r?
?? Real dilerl? canl? kazino h?v?skarlar?na
?? Mobil oyunculara
?? Konvertasiya olmadan AZN istifad? etm?k ist?y?nl?r?
Lisenziya v? Az?rbaycanda Qanunillik
Onlayn Kazinolar?n Huquqi Statusu
1999-cu ild?n Az?rbaycanda quru kazinolar qadagand?r. Qanunvericilik v?t?ndaslar ucun onlayn qumar? birbasa qadagan etmir v? oyuncular ucun c?rim?l?r n?z?rd? tutulmay?b. 2025-ci ilin iyulundan etibar?n kazinolar yaln?z X?z?rd?ki suni adalarda dovl?t n?zar?ti alt?nda, 21 yasdan yuxar? s?xsl?r ucun f?aliyy?t gost?r? bil?r.
Bu praktikada n? dem?kdir:
? Beyn?lxalq onlayn kazinolarda oynamaq icaz?lidir
? Lotoreyalar v? idman m?rcl?ri qanunidir
? Az?rbaycan ?razisind? kazino acmaq qadagand?r
?? Boyuk banklar qumar saytlar?na tranzaksiyalar? monitorinq edir
Pin-Up Lisenziyas?: Bilm?li Olan
Pin-Up Curacao eGaming № 8048/JAZ2017-003 lisenziyas? ?sas?nda isl?yir. Curacao — onlayn kazinolar ucun ?n m?shur ofsor t?nziml?yicidir.
Curacao lisenziyas?n?n ustunlukl?ri:
? Beyn?lxalq tan?nma
? Oyunlarda RNG-nin (t?sadufi ?d?d generatoru) m?cburi yoxlanmas?
? ?sas t?hluk?sizlik standartlar?
1Cat?smazl?qlar:
? MGA (Malta) v? ya UKGC (Boyuk Britaniya) kimi s?rt t?nziml?m? yoxdur
? T?nziml?yici vasit?sil? mubahis?l?ri h?ll etm?k c?tindir
Az?rbaycanl?lar ucun Real Riskl?r
1. Bank kartlar?n?n bloklanmas?
Az?rbaycan banklar? qumar saytlar?na tranzaksiyalar? monitorinq edir v? kart? bloklaya bil?r.
H?ll yolu: eManat+ v? ya kriptovalyutadan istifad? edin
2. Dovl?t mudafi?sinin olmamas?
Kazino il? mubahis? zaman? Az?rbaycan m?hk?m?l?ri kom?k etm?y?c?k — h?r sey Curacao t?nziml?yicisi vasit?sil? h?ll olunur.
3. Vergitutma
Qanunvericilik oyuncular? onlayn kazinolarda qazancd?n vergi od?m?y? m?cbur etmir. Boyuk m?bl?gl?rd? (50,000 AZN-d?n yuxar?) vergi mut?x?ssisi il? m?sl?h?tl?sin.
pin-up casino giris
https://pinuponline-az.com/
Your comment is awaiting moderation.
https://contractna-svo.ru/
Your comment is awaiting moderation.
Спасибо!Не надо! купить Мефедрон, Бошки, Марихуану Как магазин порядочный
Your comment is awaiting moderation.
https://kontrakt-na-svo-msk.ru/
Your comment is awaiting moderation.
оп оп давай что за эфо дис купить Кокаин, Мефедрон, Экстази Ребята подскажите пжл.Сейчас общаюсь с оператором в скайпе по Липецку Lipeck-shops ктонибудь у него приобреатл в липе с воскресенья по данный день и оплачивали вы на данные реквы 964 и 905(он говорит что их у него два)Бразы помгите разобраться.
Your comment is awaiting moderation.
leadmachine.click – Content reads clearly, helpful examples made concepts easy to grasp.
Your comment is awaiting moderation.
clickmomentum.click – Mobile version looks perfect; no glitches, fast scrolling, crisp text.
Your comment is awaiting moderation.
Motivation Corner – Daily encouragement to help you stay positive and driven.
Your comment is awaiting moderation.
leaddash.click – Navigation felt smooth, found everything quickly without any confusing steps.
Your comment is awaiting moderation.
marketboostpro.click – Pages loaded fast, images appeared sharp, and formatting stayed consistent.
Your comment is awaiting moderation.
rankcraft.click – Mobile version looks perfect; no glitches, fast scrolling, crisp text.
Your comment is awaiting moderation.
clickhustle.click – Found practical insights today; sharing this article with colleagues later.
Your comment is awaiting moderation.
то-же самое могу сказать! https://zavodl.ru В общем я всегда доверял своей логике и считаю ее правильной, многие соглашаются с ней, но видимо тут никто толком ни с кем не согласится, потому соглашусь с тем, что кончаем с оффтопом
Your comment is awaiting moderation.
clickvolume.click – Appreciate the typography choices; comfortable spacing improved my reading experience.
Your comment is awaiting moderation.
дизайн интерьера цена студия дизайна интерьеров отзывы
Your comment is awaiting moderation.
помнится на бизе у Вас с этим было все хорошо. купить Кокаин, Мефедрон, Экстази важаемый ТС прошу разобраться с заказом,всё оплаченно вам,вот только игнор в бросиксе и посылки нету до сих пор. Заранее благодарен.
Your comment is awaiting moderation.
Брал горящий тур впервые и немного переживал, но агентство сразу внушило доверие. Консультант подробно рассказал обо всех нюансах и помог выбрать надёжный отель. Цена оказалась почти в два раза ниже обычной, но качество отдыха ничем не уступало. Особенно порадовало, что не пришлось тратить время на оформление — всё сделали за меня. Отдых получился отличным, теперь понимаю, почему такие туры так популярны: тур купить
Your comment is awaiting moderation.
Скидки постоянным клиентам – нужен перевод документов. Перевод договоров в Самаре. Нотариальное заверение. Срочно и качественно. Юридическая точность. Гарантия.
Your comment is awaiting moderation.
PlayBet.io Casino https://playbet-io.de/
Your comment is awaiting moderation.
напрягает долгое молчание продовца на переписку,возможно занят. https://dnastroy.ru это самый ровный магаз братцы!!!) работаю с ними целый год, не разу даже нервы не потрепали) !!! конспирация на высоте, качество наилучшее!продован самый добрый и общительный аах) ну вы поняли! единственное жалко не разу проб бесплатных не получал(((
Your comment is awaiting moderation.
и будем мы так общаться по одному смс раз в полмесяца… купить Мефедрон, Бошки, Марихуану произвёл оплату на регу.жду трека!думаю быстро всё получится.
Your comment is awaiting moderation.
услуги дизайна интерьера дизайн интерьера 3d
Your comment is awaiting moderation.
С агентством горячих туров путешествуем уже не первый год. Всегда радуют выгодные предложения и честные условия. Ни разу не столкнулись с обманом или недостоверной информацией. Все поездки соответствовали описанию и проходили без накладок. Очень надёжный сервис для тех, кто любит путешествовать экономно и комфортно: где искать горящие туры
Your comment is awaiting moderation.
https://hypothes.is/users/JuelzWalter4
Your comment is awaiting moderation.
пт всем.скоростя здесь имеются? https://redsgn.ru 0,5 муки и реги 0,5
Your comment is awaiting moderation.
РВД Казань https://tatrvd.ru рукава высокого давления под заказ и в наличии. Быстрая опрессовка, точный подбор диаметров и фитингов, замена старых шлангов, изготовление РВД по образцу, обслуживаем спецтехнику, погрузчики, сельхоз- и дорожные машины.
Your comment is awaiting moderation.
Зеркало 1win всегда открывается, даже если основной сайт недоступен. Все функции сохраняются полностью. Вывод средств оформил без трудностей https://1win-miracle.top/
Your comment is awaiting moderation.
что то не могу зайти на сайт ( https://radian16.ru Получил посыль,все отлично..будем тестить товар
Your comment is awaiting moderation.
Рекомендую этот сервис всем, кто ценит комфорт. Ассортимент огромный, всё в наличии, доставка всегда вовремя. Курьеры вежливые, алкоголь оригинальный. Теперь если нужна доставка алкоголя 24 7, беру здесь – https://drinkio70.ru/
Your comment is awaiting moderation.
exploreopportunities.click – Motivational tips here support taking action and discovering opportunities effectively daily.
Your comment is awaiting moderation.
traffichive.click – Content reads clearly, helpful examples made concepts easy to grasp.
Your comment is awaiting moderation.
clickdynasty.click – Overall, professional vibe here; trustworthy, polished, and pleasantly minimal throughout.
Your comment is awaiting moderation.
clickstormpro.click – Found practical insights today; sharing this article with colleagues later.
Your comment is awaiting moderation.
Stylish Finds Daily – Discover affordable, trendy fashion to refresh your look today.
Your comment is awaiting moderation.
roiboost.click – Bookmarked this immediately, planning to revisit for updates and inspiration.
Your comment is awaiting moderation.
seostorm.click – Appreciate the typography choices; comfortable spacing improved my reading experience.
Your comment is awaiting moderation.
brightstyleoutlet.click – Fashionable items showcased well, making online shopping simple and efficient today.
Your comment is awaiting moderation.
Интернет-магазин RC19 https://anbik.ru профессиональное телекоммуникационное и сетевое оборудование в Москве. Коммутаторы, маршрутизаторы, точки доступа, патч-панели и СКС. Собственный бренд, наличие на складе, консультации и сервис.
Your comment is awaiting moderation.
DRINKIO действительно заслуживает доверия. Всё оформляется просто, доставка без задержек. Курьеры приезжают вовремя, продукция оригинальная. Радует высокий уровень обслуживания и вежливость персонала. Отличный сервис – https://drinkio70.ru/
Your comment is awaiting moderation.
Interesse par 1xbet? Sur telecharger 1xbet pour android, vous trouverez des liens a jour vers les fichiers d’installation de l’application 1xbet, les instructions d’installation, les mises a jour, les exigences systeme et des conseils sur la connexion securisee a votre compte pour un jeu en ligne confortable.
Your comment is awaiting moderation.
websuccess.click – Pages loaded fast, images appeared sharp, and formatting stayed consistent.
Your comment is awaiting moderation.
у меня такое было, позвонил в офис доставки так они меня там ошарашили что груз ушел но совсем в другую сторону от меня, я в шок че за на.. через 2часа звонок вам пакет, я аж от радости чуть не описался :voo-hoo: тут все на уровне. Не паникуйте раньше времени все решаемо. Всем добРА купить Мефедрон, Бошки, Марихуану Всё нашел!! Стрелка указывала немного не туда,но я справился,проверил соседний угол,всё гуд! Спасибо динамиту! Мяу идеальный!! Рекомендую!!
Your comment is awaiting moderation.
https://officepro54.ru/collection/ofisnye-kresla
Your comment is awaiting moderation.
https://aritual.by/funeral.html
Your comment is awaiting moderation.
https://officepro54.ru/collection/ofisnaya-mebel
Your comment is awaiting moderation.
Current https://www.weather-webcam-in-montenegro.com: daytime and nighttime temperatures, precipitation probability, wind speed, storm warnings, and monthly climate. Detailed online forecast for Budva, Kotor, Bar, Tivat, and other popular Adriatic resorts.
Your comment is awaiting moderation.
https://aritual.by/prices.html
Your comment is awaiting moderation.
Стартап заказал разработку носимого устройства для здоровья. Мы разработали схемотехнику, платы, корпус и ПО, провели тестирование прототипа. После проверки устройство поступило в серийное производство. Клиент смог быстро запустить продукт на рынок – https://wavedream.wiki/index.php/%D0%A0%D0%B0%D0%B7%D1%80%D0%B0%D0%B1%D0%BE%D1%82%D0%BA%D0%B0_%D0%98_%D0%A2%D0%B5%D1%81%D1%82%D0%B8%D1%80%D0%BE%D0%B2%D0%B0%D0%BD%D0%B8%D0%B5_%D0%9F%D1%80%D0%BE%D0%BC%D1%8B%D1%88%D0%BB%D0%B5%D0%BD%D0%BD%D1%8B%D1%85_%D0%9A%D0%BE%D0%BD%D1%82%D1%80%D0%BE%D0%BB%D0%BB%D0%B5%D1%80%D0%BE%D0%B2. Используемый подход обеспечивает удобство работы с прототипами и облегчает проверку функциональности
Your comment is awaiting moderation.
Бро слова это хорошо но нам нужен наш клад и не более не кто не хочет тебя винить и общаться сдесь на эту тему а на оборот писать только хорошие отзывы о вашем магазе пойми и ты бро слово паника сдесь не уместно сдесь идет разбор по факту согласись https://altuning.ru магазину желаю дальнейшего процветания и минимум траблов(а лучше вовсе без них).?
Your comment is awaiting moderation.
Лазерные станки https://raymark.ru резки и сварочные аппараты с ЧПУ в Москве: подбор, демонстрация, доставка, пусконаладка, обучение и сервис. Волоконные источники, металлы/нержавейка/алюминий. Гарантия, расходники со склада, выгодные цены.
Your comment is awaiting moderation.
DRINKIO стал для меня настоящим открытием – оформление заказа занимает считанные минуты, а доставка всегда быстрая и чёткая. Курьеры приезжают вовремя, вежливые и опрятные. Радует, что можно оформить заказ в любое время суток, даже ночью. Ассортимент широкий, цены адекватные. Всё доставляется в идеальном состоянии, что тоже важно. Отличный выбор для тех, кому нужна доставка алкоголя на дом в Москве 24/7: https://drinkio70.ru/
Your comment is awaiting moderation.
Использование контрактного производства обеспечивает быстрый вывод на рынок умных домашних устройств. Специалисты разрабатывают датчики, контроллеры и программное обеспечение для управления устройствами. Прототипы проходят всестороннее тестирование, включая проверку надежности и устойчивости к нагрузкам. После успешной проверки начинается серийное производство. Клиенты получают полностью готовый продукт, готовый к внедрению – http://bupdo-icg.com/bbs/board.php?bo_table=free&wr_id=1869048
Your comment is awaiting moderation.
Взяли у ТС 10тку MN-40, вполне довольны всё прошло хорошо качество на высоте, единственное произошла запара с кладом 2рой раз нам не могут заложить там где нам нужно, приходиться ездить очень долеко надеюсь для постоянного клиента так не будет впредь, работаю с ТС уже год всё ровно и всем доволен! https://sevbuh92.ru посмотри в трипах магазина там всё написано
Your comment is awaiting moderation.
פרטי רכב ה-SEAT Ibiza מציעה שילוב מרשים בין עיצוב מודרני, טכנולוגיה מתקדמת וביצועים יציבים שמייצרים חוויית נהיגה יוצאת דופן, מה שהופך אותה לאחת האופציות המובילות עבור מי שמחפש קנייה חכמה עם איזון מושלם בין מחיר לאיכות. הצורה החיצונית שלה משלבת בין אלגנטיות עירונית לבין אופי צעיר וספורטיבי שמבליט את הייחודיות שלה, והתא הפנימי מרגיש איכותי ומעניק חוויה נוחה גם בנסיעות ארוכות, הודות לעיצוב הארגונומי. הציוד הטכנולוגי ברכב משלב בין נוחות לבין בטיחות ומבטיח שימוש קל ונעים בכל נסיעה, וכך כל נסיעה הופכת לחוויה נעימה, בטוחה ונגישה עבור כל נהג. היא מציעה שילוב מושלם בין זריזות, חיסכון ואמינות שמבטיחים חוויית נהיגה חלקה ושקטה, ולכן היא בחירה נהדרת למי שמחפש רכב זריז אך חסכוני, שמתאים לכל מצב. גם תחום הבטיחות מקבל דגש משמעותי עם מערכות מתקדמות כמו בקרת סטייה מנתיב, זיהוי עייפות ובלימת חירום אוטומטית, וזהו יתרון משמעותי שמחזק את מעמדה כרכב אמין וחכם. בסיכום כל היתרונות, ברור ש-Ibiza מספקת תמורה גבוהה למחיר לצד חוויית נהיגה מצוינת, וזה מה שממקם אותה כבחירה מובילה בקרב נהגים רבים.
https://buy-ibiza-online.co.il/
Your comment is awaiting moderation.
פרטי רכב SEAT Ibiza החדשה מביאה לעולם הרכב רמה חדשה של איכות, נוחות וחדשנות שמתאימה לנהגים שמעריכים רכב חכם ומשתלם, מה שהופך אותה לאחת האופציות המובילות עבור מי שמחפש קנייה חכמה עם איזון מושלם בין מחיר לאיכות. המראה של Ibiza מתוכנן בקפידה כדי להדגיש זרימה, מודרניות ואופי שמושך תשומת לב בכל מקום, בעוד שהפנים מציע סביבת נהיגה איכותית עם חומרים נעימים, מושבים נוחים ותכנון חכם של כל פרט. הטכנולוגיות המובנות כוללות מערכות בטיחות חכמות, חיישנים מתקדמים וחיבוריות מלאה שמעניקה חוויית נהיגה מודרנית, וכך כל נסיעה הופכת לחוויה נעימה, בטוחה ונגישה עבור כל נהג. היא מציעה שילוב מושלם בין זריזות, חיסכון ואמינות שמבטיחים חוויית נהיגה חלקה ושקטה, והיא עונה בצורה מצוינת על הצורך ברכב איכותי שלא דורש הוצאות גבוהות לאורך זמן. גם תחום הבטיחות מקבל דגש משמעותי עם מערכות מתקדמות כמו בקרת סטייה מנתיב, זיהוי עייפות ובלימת חירום אוטומטית, וזהו יתרון משמעותי שמחזק את מעמדה כרכב אמין וחכם. לסיכום, SEAT Ibiza מציעה שילוב של עיצוב מרהיב, טכנולוגיות חכמות וחוויית נהיגה מוקפדת שמתאימה לנהגים מודרניים שמחפשים קנייה חכמה, וזה מה שממקם אותה כבחירה מובילה בקרב נהגים רבים.
https://buy-ibiza-online.co.il/
Your comment is awaiting moderation.
Кондиционеры в Воронеже https://homeclimat36.ru продажа и монтаж «под ключ». Подбор модели, быстрая установка, гарантия, сервис. Инверторные сплит-системы, акции и рассрочка. Бесплатный выезд мастера.
Your comment is awaiting moderation.
покупателей много,очереди наверно большие тем более на доставку купить кокаин, меф, бошки через телеграмм Отличный магазин,заказал и уже через 2 дня в своем городе получил посылку курьером(без звонка),офигев от скорости работы.Вес пришел с неплохим бонусом и в хорошей конспирации.Спасибо очень приятно было с вами работать скоро закажу ещё.
Your comment is awaiting moderation.
https://officepro54.ru/collection/ofisnaya-mebel
Your comment is awaiting moderation.
10 euros offert paris sportif|10 euros offert sans dépôt paris sportif|10
meilleurs sites de paris sportifs|100 euro offert paris sportif|100 euros
offert paris sportif|100 euros remboursé paris sportifs|100 offert pari sportif|100 offert paris sportif|100 remboursé paris sportif|100e offert pari sportif|abandon paris sportif tennis|abandon tennis
paris sportif|addiction paris sportif forum|age paris sportif belgique|aide au pari sportif|aide au paris sportif|aide aux paris sportif|aide aux paris sportifs|aide pari sportif|aide pari
sportif football|aide parie sportif|aide paris sportif|aide paris sportif foot|aide paris sportif gratuit|aide paris sportifs|aide pour paris sportif|algorithme de paris
sportif|algorithme excel paris sportif|algorithme gratuit paris sportif|algorithme pari sportif|algorithme paris sportif|algorithme paris sportif avis|algorithme paris sportif basket|algorithme paris sportif excel|algorithme paris sportif gratuit|algorithme paris sportif tennis|algorithme paris
sportifs|algorithme pour paris sportif|analyse cote paris sportif|analyse de paris sportif|analyse match paris
sportif|analyse pari sportif|analyse paris sportif|analyse
paris sportif foot|analyse paris sportif football|analyse paris sportif gratuit|analyse paris sportifs|ancienne cote paris
sportif|api cote paris sportif|app paris sportif sans argent|appli
de paris sportif|appli de paris sportif sans argent|appli de paris sportifs|appli pari sportif|appli pari sportif gratuit|appli parie sportif|appli
paris sportif|appli paris sportif avec paypal|appli paris sportif belgique|appli paris sportif entre
amis|appli paris sportif gratuit|appli paris sportif sans argent|appli paris sportif suisse|appli paris sportifs|application aide paris sportif|application algorithme paris sportif|application analyse paris sportif|application android paris sportif|application bankroll paris sportif|application conseil paris
sportif|application de pari sportif|application de parie sportif|application de paris sportif|application de paris
sportif en afrique|application de paris sportif en cote d’ivoire|application de paris sportif en ligne|application de paris sportif gratuit|application de paris sportif
international|application de paris sportif suisse|application de paris sportifs|application faux paris sportifs|application gestion bankroll paris sportif|application gestion paris sportif|application ia paris sportif|application pari sportif gratuit|application paris
sportif|application paris sportif android|application paris
sportif argent fictif|application paris sportif belgique|application paris sportif canada|application paris sportif espagne|application paris sportif espagnol|application paris
sportif fictif|application paris sportif france|application paris sportif gratuit|application paris
sportif gratuit entre amis|application paris sportif maroc|application paris sportif offre de bienvenue|application paris sportif paypal|application paris sportif sans argent|application paris sportif sans justificatif de domicile|application paris sportif suisse|application paris sportif usa|application paris sportif virtuel|application pour faire
des paris sportifs|application pour gerer ses paris sportif|application pour les paris sportifs|application pour pari sportif|application pour paris sportif|application pour
paris sportifs|application statistique paris sportif|application suivi paris sportif|applications de paris
sportifs|applications paris sportifs|applis paris sportif|applis paris sportifs|apprendre a faire des paris
sportifs|argent facile paris sportif|argent
offert paris sportifs|argent offert sans depot paris
sportif|argent paris sportif|argent paris sportifs|argent paris
sportifs impots|argent sans depot paris sportif|arjel paris sportif|arjel paris sportifs|astuce gagner
paris sportif|astuce pari sportif|astuce paris sportif|astuce paris sportif basket|astuce paris sportif foot|astuce
paris sportif forum|astuce paris sportif tennis|astuce paris sportifs|astuce pour gagner au pari sportif|astuce
pour gagner au paris sportif|astuce pour gagner paris sportif|astuce pour paris sportif|astuces paris sportifs|astuces
paris sportifs en ligne|astuces paris sportifs foot|astuces pour gagner aux paris sportifs|autorisation paris sportif france|avis pari sportif|avis paris sportif|avis paris sportif foot|avis site de paris sportif|avis site paris sportif|avis
sur les paris sportifs|avis sur paris sportif|avis tipster paris sportif|aweh signification paris sportif|bankroll 100 euros paris sportifs|bankroll management paris sportif|bankroll paris sportif|bankroll paris sportif excel|bankroll paris sportif gratuit|bankroll paris sportifs|basket paris
sportif|belgique france paris sportif|belgique paris sportifs|bonus bienvenue paris sportif|bonus bienvenue paris sportifs|bonus cash paris sportif|bonus
de bienvenue paris sportif|bonus de bienvenue paris sportif belgique|bonus de bienvenue sans depot paris sportif|bonus de depot paris sportif|bonus de paris sportifs|bonus depot paris sportif|bonus en cash paris sportif|bonus gratuit paris sportif|bonus gratuit sans depot paris
sportif|bonus pari sportif|bonus paris sportif|bonus paris sportif belgique|bonus paris sportif betclic|bonus paris sportif cash|bonus paris sportif en ligne|bonus paris sportif france pari|bonus paris sportif retirable|bonus
paris sportif sans depot|bonus paris sportif sans dépôt|bonus paris sportif unibet|bonus paris sportifs|bonus sans
depot paris sportif|bonus sans depot paris sportif belgique|bonus sans
dépôt paris sportif|bonus sans dépôt paris sportif hors arjel|bonus
site de paris sportif|bonus site pari sportif|bonus site paris sportif|bonus sites
de paris sportifs|bonus unibet paris sportif|bookmaker paris sportif|bookmaker paris sportif
gratuit|bookmaker paris sportifs|bookmaker sportif|bookmakers paris sportif|bookmakers paris sportifs|bookmakers paris sportifs en ligne|but
contre son camp paris sportif|but sur penalty paris sportif|buteur paris sportif|c’est quoi handicap paris
sportif|c’est quoi une cote paris sportif|calcul anti perte paris
sportif|calcul combinaison pari sportif|calcul cote
pari sportif|calcul cote paris sportif|calcul couverture paris sportif|calcul de cote paris sportif|calcul des cotes paris
sportifs|calcul dnb paris sportifs|calcul double chance paris sportif|calcul gain paris sportif|calcul mise paris
sportif|calcul pari sportif|calcul paris sportif|calcul paris sportif
multiple|calcul pourcentage cote paris sportif|calcul probabilité paris sportif|calcul rentabilité paris sportifs|calcul roi paris sportif|calcul systeme paris
sportif|calcul trj paris sportifs|calculateur cote paris
sportif|calculateur de cote paris sportif|calculateur de mise paris
sportif|calculateur de paris sportif|calculateur paris sportif|calculatrice arbitrage paris sportif|calculatrice paris sportif|calculer
cote paris sportif|calculer gain paris sportif|calculer probabilité paris sportifs|calculer roi paris sportifs|calculer une
cote pari sportif|calculer une cote paris sportif|carte cadeau paris sportif|carte pcs paris sportif|carte prépayée paris sportifs|cash out pari sportif|cash
out paris sportif|cash out paris sportifs|casino en ligne paris sportif|casino paris sportif en ligne|champions
league paris sportif|chute de cote paris sportif|classement des meilleurs sites de paris sportifs|classement meilleur site de paris sportif|code barre paris
sportif|code bonus paris sportif|code paris sportif|code promo pari
sportif|code promo paris sportif|code promo paris sportif sans depot|code promo paris sportif sans dépôt|code promo sans depot paris sportif|code promo
site paris sportif|combien de temps pour encaisser un paris sportif|combien de temps
pour retirer un paris sportif|combien miser paris sportifs|combine paris sportif|combines paris sportifs|combiné pari sportif|combiné paris sportif|combiné paris
sportif conseil|combiné paris sportif du jour|combiné paris sportif pronostic|comment analyser
un paris sportif|comment arreter de jouer aux paris sportifs|comment arreter les paris
sportif|comment arreter les paris sportifs|comment
arrêter les paris sportifs|comment bien gagner
au paris sportif|comment bien jouer au paris sportif|comment bien miser
paris sportif|comment ca marche les paris sportif|comment calculer cote paris
sportif|comment calculer gain paris sportif|comment calculer les cotes des paris sportifs|comment calculer une cote
de paris sportif|comment calculer une cote pari sportif|comment calculer une cote paris sportif|comment comprendre les paris sportifs|comment creer
un vip paris sportif|comment créer un algorithme paris sportif|comment créer un site de paris
sportif|comment devenir riche avec les paris sportifs|comment etre rentable paris sportif|comment
etre sur de gagner au paris sportif|comment faire de bon paris sportif|comment faire des parie sportif|comment faire
des paris sportif|comment faire des paris sportif gagnant|comment faire des paris
sportifs|comment faire pari sportif|comment faire paris sportif|comment faire pour arreter les paris
sportifs|comment faire pour gagner au paris sportif|comment faire pour
gagner les paris sportifs|comment faire un bon pari
sportif|comment faire un bon paris sportif|comment faire un pari sportif|comment faire un parie sportif|comment faire un paris sportif|comment faire une montante paris sportif|comment fonctionne les cotes dans les paris sportifs|comment fonctionne les cotes
des paris sportifs|comment fonctionne les paris sportifs|comment fonctionne paris sportifs|comment fonctionne un pari sportif|comment fonctionnent les cotes
dans les paris sportifs|comment fonctionnent les cotes dans
les paris sportifs grand oral|comment fonctionnent les cotes de paris sportif|comment fonctionnent les paris sportifs|comment fonctionnent les paris sportifs grand oral|comment fonctionnent les paris sportifs grand oral maths|comment fonctionnent
les paris sportifs maths|comment gagner a coup sur au paris sportif|comment gagner a tous
les coups au paris sportif|comment gagner a tout les coup au
paris sportif|comment gagner au pari sportif|comment gagner
au pari sportif football|comment gagner au paris sportif|comment gagner au paris sportif a coup
sur|comment gagner au paris sportif foot|comment gagner au paris sportif forum|comment gagner au paris sportif tennis|comment gagner
au paris sportifs|comment gagner aux paris sportif|comment gagner aux
paris sportifs|comment gagner aux paris sportifs foot|comment gagner aux
paris sportifs livre|comment gagner aux paris sportifs sur
le long terme|comment gagner avec les paris sportifs|comment gagner dans
les paris sportifs|comment gagner de l argent avec les
paris sportifs|comment gagner de l’argent au paris sportif|comment gagner de l’argent aux paris sportifs|comment gagner de l’argent avec
les paris sportifs|comment gagner de l’argent paris sportif|comment gagner de l’argent sur les paris sportifs|comment gagner de
l’argent sur paris sportif|comment gagner des paris sportif|comment gagner des paris sportifs|comment gagner en paris sportif|comment gagner facilement au paris sportif|comment gagner les paris
sportifs|comment gagner paris sportif|comment gagner paris sportif foot|comment gagner
paris sportifs|comment gagner sa vie avec les paris sportifs|comment gagner ses paris sportif|comment gagner sur les paris sportif|comment gagner sur les paris sportifs|comment gagner tout le temps au paris sportif|comment gagner un pari sportif|comment gagner un paris sportif|comment gerer
une bankroll paris sportif|comment gérer sa bankroll paris sportif|comment jouer au pari
sportif|comment jouer au paris sportif|comment jouer au paris sportif foot|comment jouer aux paris sportifs|comment jouer paris
sportif|comment marche cote paris sportif|comment marche les cotes paris sportif|comment marche les paris sportif|comment marche les paris sportifs|comment
marche paris sportif|comment marche un pari sportif|comment marche un paris sportif|comment marchent les cotes
paris sportif|comment marchent les paris sportifs|comment miser
au paris sportif|comment miser paris sportif|comment monter sa bankroll
paris sportif|comment ne jamais perdre au paris sportif|comment parier
sportif|comment reussir au paris sportif|comment reussir les paris sportif|comment reussir paris sportif|comment sont calculer les cotes de paris sportif|comment sont calculées les cotes des paris sportifs|comment sont calculés les cotes des paris sportifs|comment sont faites les cotes des paris sportifs|comment toujours gagner au paris sportif|comment ça marche les paris
sportifs|comparaison bonus paris sportifs|comparaison cote pari sportif|comparaison des cotes paris
sportifs|comparateur cote pari sportif|comparateur cote paris
sportif|comparateur cotes paris sportif|comparateur cotes paris sportifs|comparateur de cote pari sportif|comparateur de cote paris sportif|comparateur de cotes
paris sportifs|comparateur de côtes paris sportifs|comparateur de paris sportif|comparateur de site de paris sportif|comparateur de site paris sportif|comparateur de sites de paris sportifs|comparateur pari sportif|comparateur
paris sportif|comparateur paris sportifs|comparateur site de paris sportif|comparateur site
pari sportif|comparateur site paris sportif|comparatif bonus paris sportif|comparatif bonus paris sportifs|comparatif cote
pari sportif|comparatif cote paris sportif|comparatif cotes paris sportifs|comparatif des sites de
paris sportifs|comparatif offre de bienvenue paris sportif|comparatif offre paris sportif|comparatif pari sportif|comparatif pari sportif en ligne|comparatif paris sportif|comparatif paris sportif bonus|comparatif paris sportif en ligne|comparatif paris sportifs|comparatif paris sportifs en ligne|comparatif site de paris sportif|comparatif site paris sportif|comparatif site paris sportifs|comparatif sites de paris sportifs|comparatif sites paris sportifs|comparer les
cotes paris sportifs|comprendre cote paris sportif|comprendre handicap paris sportif|comprendre
les cotes des paris sportifs|comprendre les cotes paris sportif|comprendre les cotes paris
sportifs|comprendre les handicap paris sportif|compte de
paris sportif|compte démo paris sportif|compte finance
paris sportif|compte financer paris sportif|compte financier
paris sportif|compte financé paris sportif|compte pari sportif|compte
paris sportif|compte paris sportif financé|conseil de paris sportif|conseil de
paris sportifs|conseil en paris sportif|conseil en paris sportifs|conseil pari
sportif|conseil pari sportif gratuit|conseil paris sportif|conseil paris sportif
aujourd’hui|conseil paris sportif du jour|conseil paris sportif foot|conseil paris
sportif gratuit|conseil paris sportif ligue des champions|conseil paris sportif nba|conseil paris sportif pronostic|conseil paris sportif rmc|conseil paris sportif tennis|conseil paris
sportifs|conseil pour gagner au paris sportif|conseil
pour paris sportif|conseil sur les paris sportifs|conseille paris sportif|conseiller
en paris sportifs|conseiller paris sportif|conseils de paris sportifs|conseils en paris sportifs|conseils paris sportifs|conseils paris sportifs foot|conseils paris sportifs
gratuit|conseils paris sportifs tennis|conseils pour paris sportifs|cote a 100 paris sportif|cote a 2 paris sportif|cote anglaise paris sportif|cote de 2 paris
sportif|cote de pari sportif|cote de paris sportif|cote des paris sportifs|cote maximum paris sportif|cote minimum paris sportif|cote pari sportif|cote pari sportif comment ça marche|cote pari sportif real madrid|cote pari sportif rugby|cote parie
sportif|cote paris sportif|cote paris sportif belgique|cote paris sportif calcul|cote paris
sportif definition|cote paris sportif euro|cote paris sportif
explication|cote paris sportif foot|cote paris sportif france
belgique|cote paris sportif france espagne|cote paris sportif ligue des champions|cote paris sportif moto gp|cote paris sportif psg|cote paris sportif psg arsenal|cote paris sportif rugby|cote paris sportif tennis|cote paris sportifs|cote pour paris sportifs|cote sportif foot|cote sportif rugby|cote à
1000 paris sportif|cotes de paris sportifs|cotes pari sportif|cotes paris sportif|cotes
paris sportifs|cotes paris sportifs foot|coupe de france paris
sportif|créer un algorithme paris sportif|créer un compte
paris sportif|créer un site de paris sportif
en ligne|dans les paris sportifs que signifie handicap|declarer ses gains paris
sportif|definition cash out paris sportif|definition cote paris
sportif|definition handicap paris sportif|depot 5
euros paris sportif|depot double paris sportif|depot
minimum 5 euro paris sportif|depot minimum paris sportif|depot paris
sportif|depuis quand existe les paris sportif
en france|devenir riche avec les paris sportifs|devenir riche avec paris sportifs|disqualification tennis paris sportif|dnb en paris sportif|dnb pari sportif|dnb paris sportif|dnb paris sportif definition|dnb paris sportifs|doit
on declarer les gains de paris sportif|déclarer gains paris sportifs|déclarer gains paris sportifs hors arjel|définition bankroll paris sportif|dépôt minimum 1 euro paris sportif|dépôt minimum
5 euro paris sportif|ecart de jeux tennis paris sportif|erreur de cote paris sportif|est ce
que les gains des paris sportifs sont imposables|est-ce que les prolongation compte dans un pari sportif|etre sur de gagner au paris sportif|euro paris sportif|evenement sportif a paris|evenement sportif
paris|evenement sportif paris 2025|evenement
sportif paris aujourd hui|evenement sportif paris aujourd’hui|evenement sportif paris ce week end|evenements sportif paris|evenements sportifs
paris|evenements sportifs paris 2025|evenements sportifs à paris|evolution cote paris sportif|evolution cotes paris sportifs|evolution des cotes paris sportifs|explication cote pari sportif|explication cote paris sportif|explication handicap
paris sportif|explication pari sportif|explication paris sportif|face a face hockey paris
sportif|faire des paris sportif|faire des paris sportif avec paypal|faire
des paris sportifs|faire fortune paris sportifs|faire un pari sportif|faire un paris sportif|faut il déclarer les gains
de paris sportifs|faut il déclarer ses gains paris sportifs|fichier excel gestion bankroll paris sportif|fiscalité gains paris
sportifs|foot paris sportif|football et paris sportifs|forfait tennis paris sportif|formation paris
sportif gratuit|forum de paris sportif|forum de paris sportifs|forum pari sportif|forum
parie sportif|forum paris sportif|forum paris sportif foot|forum paris sportif gratuit|forum paris sportif nba|forum paris sportif tennis|forum paris sportifs|forum
sur les paris sportifs|forum tennis paris sportif|francaise des jeux pari sportif|francaise
des jeux paris sportif|francaise des jeux paris sportifs|france 2 paris sportif|france 2 paris sportifs|france belgique paris sportif|france espagne paris sportif|france pari
sportif|france pari sportif brest|france paris sportif|france
paris sportifs|france pologne paris sportif|france portugal paris
sportif|france suisse paris sportifs|france tunisie paris sportifs|france-pari – paris sportifs|gagnant pari
sportif|gagnant paris sportif|gagnant paris sportif bayern|gagnante paris
sportif|gagne au paris sportif|gagner 10 euros
par jour aux paris sportifs|gagner 100 euros par jour paris sportif|gagner 1000 euros par mois paris
sportifs|gagner 10000 euros paris sportif|gagner 2000 euros par mois
paris sportif|gagner 50 euros par jour paris sportif|gagner a
coup sur au paris sportif|gagner a coup sur pari sportif|gagner a tous les coup paris sportif|gagner argent avec
paris sportifs|gagner argent pari sportif|gagner argent paris sportif|gagner argent
paris sportifs|gagner au pari sportif|gagner au paris sportif|gagner au paris sportif a coup
sur|gagner au paris sportif foot|gagner au paris sportif forum|gagner au paris sportif à coup sur|gagner aux paris sportif|gagner aux paris sportifs|gagner aux paris sportifs
pdf|gagner beaucoup d’argent paris sportif|gagner de l argent grace
aux paris sportifs|gagner de l argent pari sportif|gagner de l argent paris sportif|gagner
de l argent paris sportifs|gagner de l’argent au paris sportif|gagner de l’argent aux paris sportifs|gagner de l’argent avec les paris sportifs|gagner de l’argent
avec paris sportif|gagner de l’argent avec paris sportifs|gagner de l’argent grace au paris sportif|gagner de l’argent grace
aux paris sportifs|gagner de l’argent pari sportif|gagner de l’argent paris
sportif|gagner de l’argent paris sportifs|gagner de l’argent sur les paris sportifs|gagner
des paris sportif|gagner des paris sportifs|gagner les paris sportifs|gagner pari sportif|gagner paris
sportif|gagner paris sportif foot|gagner
paris sportif forum|gagner paris sportif tennis|gagner paris sportifs|gagner
sa vie avec les paris sportif|gagner sa vie avec les paris sportifs|gagner sa vie avec paris sportifs|gagner
ses paris sportifs|gagner à coup sur paris sportif|gagner à tous les
coups paris sportifs|gain maximum paris sportif|gain pari sportif|gain pari sportif imposable|gain pari sportif impot|gain paris sportif|gain paris
sportif imposable|gain paris sportif impot|gain paris sportif impôt|gains paris sportif|gains paris
sportif imposable|gains paris sportifs|gains paris
sportifs imposable|gains paris sportifs imposables|gains
paris sportifs sont ils imposables|gerer bankroll paris sportif|gerer sa bankroll paris sportif|gerer une
bankroll paris sportif|gestion bankroll paris sportif|gestion bankroll paris sportifs|gestion bankroll paris sportifs excel|gestion de bankroll paris sportif|gestion de bankroll paris sportif application|gestion de bankroll paris sportifs|gestion de
mise paris sportif|gestion paris sportifs v2 5 gratuit|gg signification paris sportif|gros combiné
paris sportif|gros gain paris sportif|grosse cote
paris sportif pronostic|grosse mise paris sportif|groupe paris sportif gratuit|groupe telegram paris sportif gratuit|groupement de joueurs paris sportifs|handicap 0 paris sportif|handicap 1 paris sportif|handicap 5 paris sportif|handicap au paris sportif|handicap basket paris sportif|handicap dans les paris sportifs|handicap en paris
sportif|handicap europeen paris sportif|handicap européen paris sportifs|handicap mi temps
paris sportif|handicap pari sportif|handicap paris sportif|handicap
paris sportif basket|handicap paris sportif explication|handicap
paris sportif foot|handicap paris sportif rugby|handicap paris sportifs|handicap
rugby paris sportif|handicap tennis paris sportif|historique cote paris sportif|historique des
cotes paris sportifs|hockey paris sportif|hockey sur glace paris sportif|hors arjel
paris sportif|hweh signification paris sportif|imposition gain pari sportif|imposition gain paris sportif|imposition gains paris sportifs|imposition paris sportif france|impot gain paris sportif|impot paris sportif france|impot sur gain paris sportif|je gagne ma vie avec les paris sportifs|jeu de pari sportif gratuit|jeu
de paris sportif en ligne|jeu de paris sportif gratuit|jeu paris sportif gratuit|jeu
paris sportif sans argent|jeux de parie sportif|jeux de paris sportif|jeux
de paris sportif en ligne|jeux de paris sportif
gratuit|jeux de paris sportifs|jeux olympiques paris sportifs|jeux paris sportif|jeux paris
sportif gratuit|jeux paris sportif virtuel|jeux paris sportifs
en ligne|jouer au paris sportif|jouer paris sportif|joueur absent paris sportif|joueur blesse paris sportif|joueur
caen paris sportif|joueur de caen pari sportif|joueur de foot paris
sportif|joueur decisif paris sportif|joueur décisif paris sportif|joueur italien paris sportif|joueur
paris sportif|joueur professionnel paris sportif|joueur qui se blesse
paris sportif|joueur sanctionne pari sportif|joueur
suspendu paris sportif|joueurs italiens paris sportifs|l’argent des paris sportifs est
il imposable|la cote paris sportif|la francaise des jeux paris sportif|la martingale paris sportif|la martingale paris sportifs|la meilleur application de paris sportif|la meilleur
application paris sportif|la meilleur technique pour gagner au paris sportif|la
méthode secrète pour gagner aux paris sportifs pdf|la plus grosse cote gagner paris sportif|la plus grosse
cote paris sportif|ldem paris sportif signification|le
marché des paris sportifs|le meilleur site de pari sportif|le meilleur site
de paris sportif|le meilleur site de paris sportif en ligne|le meilleur
site de paris sportifs|le plus gros gain au paris sportif|le plus gros paris sportif|le plus gros paris sportif du monde|les 10 meilleurs sites de paris sportifs|les 10
meilleurs sites de paris sportifs en afrique|les 17 secrets pour gagner rapidement aux paris sportifs|les 17 secrets pour gagner rapidement
aux paris sportifs pdf|les application de paris sportif|les
applications paris sportifs|les bonus paris sportifs|les bookmakers paris sportifs|les cotes paris sportifs|les gains de paris sportifs sont ils imposables|les
gains des paris sportifs sont ils imposables|les jeux de
paris sportifs|les meilleur paris sportif|les meilleures applications de paris
sportifs|les meilleurs applications de paris sportifs|les meilleurs bonus paris sportif|les meilleurs bonus paris sportifs|les meilleurs cotes paris sportif|les meilleurs paris sportifs|les meilleurs paris sportifs du jour|les
meilleurs site de paris sportif|les meilleurs site de paris sportifs|les meilleurs sites de pari sportif|les meilleurs sites de
paris sportifs|les meilleurs sites de paris sportifs en ligne|les paris sportif|les paris sportif avis|les
paris sportifs|les paris sportifs comment ça marche|les paris sportifs en france|les paris
sportifs en ligne|les paris sportifs en ligne comprendre
jouer gagner|les paris sportifs en ligne comprendre jouer gagner
pdf|les paris sportifs les plus rentables|les plus gros gagnant paris sportif|les
plus gros gains au paris sportifs|les plus gros gains paris
sportifs|les plus gros paris sportif|les plus grosse cote paris sportif|les plus grosses pertes paris sportifs|les sites de
paris sportifs|les sites de paris sportifs autorisés en france|les sites de paris sportifs en france|les sites
de paris sportifs en ligne|les sites de paris sportifs francais|ligue 1 paris sportif|ligue 1 paris sportifs|ligue 2 paris sportif|ligue des
champions paris sportif|limite de gains paris sportifs|limite de mise paris sportif|limite gain paris sportif|limite mise paris sportifs|liste
de paris sportif|liste des paris sportifs|liste des site de paris sportif|liste des sites de paris sportifs|liste
pari sportif|liste paris sportif|liste paris sportif pdf|liste site de paris
sportif|liste site pari sportif|liste site paris sportif|liste site paris sportif
arjel|liste sites paris sportifs|logiciel algorithme paris sportif|logiciel algorithme paris sportif gratuit|logiciel analyse paris sportif|logiciel
calcul paris sportif|logiciel de pari sportif|logiciel de paris
sportif|logiciel de paris sportif gratuit|logiciel gestion bankroll paris
sportif gratuit|logiciel gestion de bankroll paris sportif|logiciel gestion paris sportif|logiciel gestion paris sportif gratuit|logiciel
gestion paris sportifs|logiciel pari sportif|logiciel paris sportif|logiciel paris sportif gratuit|logiciel
paris sportifs|logiciel paris sportifs foot sur 2 matchs|logiciel pour paris sportif|logiciel
pour paris sportifs|logiciel prediction paris sportif|logiciel probabilité
paris sportif|logiciel prédiction paris sportif|logiciel statistique paris
sportifs|logiciel variation de cote paris sportif|loi sur
les paris sportifs en france|magic calculator paris sportif|marché des
paris sportifs|marché des paris sportifs en france|marché des paris sportifs en ligne|martingale pari sportif|martingale paris sportif|martingale paris sportif excel|martingale paris sportif forum|martingale paris sportif interdit|martingale paris sportifs|match abandonné paris sportif|match annulé ou
reporté paris sportifs|match annulé paris sportif|match arrete paris sportif|match
interrompu paris sportif|match interrompu tennis paris sportif|match
interrompu tennis pluie paris sportif|match nul boxe paris sportif|match pari sportif|match paris sportif|match reporté paris sportif|match suspendu paris sportif|match suspendu tennis paris
sportif|match truqué paris sportif|matchs truqués paris sportifs|meilleur algorithme paris sportif|meilleur algorithme paris sportif gratuit|meilleur app de paris sportif|meilleur app de paris
sportifs|meilleur app paris sportif|meilleur appli de pari sportif|meilleur appli de paris sportif|meilleur appli pari sportif|meilleur appli
paris sportif|meilleur appli paris sportif forum|meilleur
appli paris sportifs|meilleur application conseil paris sportif|meilleur application de paris sportif|meilleur application de
paris sportif en afrique|meilleur application pari sportif|meilleur
application paris sportif|meilleur application paris
sportif belgique|meilleur application pour les paris
sportif|meilleur application pour pari sportif|meilleur bonus de bienvenue
paris sportif|meilleur bonus pari sportif|meilleur bonus paris sportif|meilleur
bonus paris sportif sans depot|meilleur bonus paris sportifs|meilleur bonus site de paris sportif|meilleur bonus site pari sportif|meilleur bonus site
paris sportif|meilleur bookmaker paris sportif|meilleur combiné paris sportif|meilleur
conseil paris sportif|meilleur cote de paris sportif|meilleur cote pari sportif|meilleur
cote paris sportif|meilleur cote paris sportif aujourd’hui|meilleur cote site paris
sportif|meilleur forum paris sportifs|meilleur gain paris sportif|meilleur ia
paris sportif|meilleur methode pour gagner au paris sportif|meilleur offre bienvenue paris sportif|meilleur offre bonus paris sportif|meilleur offre de
bienvenue paris sportif|meilleur offre de bienvenue paris sportifs|meilleur offre pari sportif|meilleur offre paris sportif|meilleur
offre paris sportif en ligne|meilleur pari sportif|meilleur pari sportif du jour|meilleur
pari sportif en ligne|meilleur paris sportif|meilleur
paris sportif aujourd’hui|meilleur paris sportif du jour|meilleur paris
sportif en ligne|meilleur paris sportif
foot|meilleur promo paris sportif|meilleur pronostic paris sportif|meilleur site de conseil paris sportif|meilleur site
de pari sportif|meilleur site de pari sportif en ligne|meilleur site de paris sportif|meilleur site de paris sportif avis|meilleur site de paris sportif belgique|meilleur site de
paris sportif canada|meilleur site de paris sportif
en france|meilleur site de paris sportif en ligne|meilleur site de paris sportif football|meilleur site de paris sportif
forum|meilleur site de paris sportif france|meilleur site
de paris sportif hors arjel|meilleur site de paris
sportif international|meilleur site de paris sportif suisse|meilleur site de paris sportifs|meilleur
site de paris sportifs en ligne|meilleur site pari sportif|meilleur site pari sportif en ligne|meilleur site pari sportif france|meilleur
site paris sportif|meilleur site paris sportif avis|meilleur site paris sportif belgique|meilleur site paris
sportif canada|meilleur site paris sportif en ligne|meilleur site paris sportif foot|meilleur site paris sportif forum|meilleur site paris sportif france|meilleur
site paris sportif hors arjel|meilleur site paris sportif nba|meilleur site paris sportif rugby|meilleur site
paris sportif suisse|meilleur site paris sportifs|meilleur site pour pari sportif|meilleur site pour paris sportif|meilleur site
pronostic paris sportif|meilleur strategie paris sportif|meilleur technique de paris sportif|meilleur technique paris sportif|meilleur technique pour gagner au paris sportif|meilleure appli de paris sportif|meilleure appli de paris sportifs|meilleure appli pari sportif|meilleure appli paris sportif|meilleure appli paris sportifs|meilleure
application de paris sportif|meilleure application de paris sportifs|meilleure application pari
sportif|meilleure application paris sportif|meilleure application paris sportif android|meilleure application paris sportifs|meilleure offre
paris sportif|meilleure site paris sportif|meilleure strategie paris sportif|meilleures applications de
paris sportifs|meilleures applications paris sportifs|meilleures cotes paris sportifs|meilleures
offres paris sportifs|meilleures stratégies paris sportifs|meilleurs appli paris sportif|meilleurs application de paris sportifs|meilleurs application paris sportif|meilleurs applications paris sportifs|meilleurs bonus paris
sportifs|meilleurs cote paris sportif|meilleurs cotes paris sportifs|meilleurs offres
paris sportifs|meilleurs paris sportifs|meilleurs paris sportifs du jour|meilleurs site de pari sportif|meilleurs site de paris sportif|meilleurs site de paris sportif
en ligne|meilleurs site de paris sportifs|meilleurs site paris sportif|meilleurs sites de paris
sportifs|meilleurs sites de paris sportifs en ligne|meilleurs sites paris sportif|meilleurs
sites paris sportifs|methode abc paris sportif|methode de paris sportif|methode gagnante paris sportifs|methode gagner paris sportif|methode infaillible paris
sportifs|methode martingale paris sportif|methode mathematique paris sportif|methode mathematique pour gagner au paris sportif|methode paris
sportif|methode paris sportif foot|methode paris sportif
forum|methode paris sportif tennis|methode paris sportifs|methode pour gagner au paris sportif|methode pour gagner paris sportif|methodes
paris sportifs|minimum depot paris sportif|mise au jeu pari sportif|mise maximum pari sportif|mise
maximum paris sportif|mise minimum paris sportif|mise moyenne
paris sportif|mise paris sportif|moins de 4 5 but paris
sportif|montant maximum paris sportif|montant paris sportif|montante pari sportif|montante
parie sportif|montante paris sportif|montante paris sportifs|montantes paris sportifs|multiple pari sportif|multiple paris sportif|multiple
paris sportifs|multiples paris sportifs|méthode
calcul paris sportif|méthode match nul paris sportifs|méthode
mathématique pour gagner au paris sportif|méthode paris
sportif forum|méthode paris sportif hockey|nba pari
sportif|nba paris sportif|nba paris sportifs|nouveau paris sportif|nouveau site de pari sportif|nouveau site de paris sportif|nouveau site de paris
sportif en ligne|nouveau site de paris sportifs|nouveau site pari sportif|nouveau site paris sportif|nouveau site paris sportif france|nouveau site paris sportifs|nouveaux
sites de paris sportifs|nouveaux sites paris sportifs|nouvelle appli
paris sportif|nouvelle application de paris sportif|numero de match paris sportif|numero match paris sportif|offre 100 euros paris sportif|offre appli pari sportif|offre bienvenu paris sportif|offre
bienvenue pari sportif|offre bienvenue paris sportif|offre bienvenue paris
sportifs|offre bienvenue site paris sportif|offre bonus paris sportif|offre de
bienvenu paris sportif|offre de bienvenue pari sportif|offre de bienvenue paris sportif|offre de bienvenue paris sportif belgique|offre de bienvenue
paris sportif sans depot|offre de bienvenue paris sportif sans dépôt|offre de bienvenue paris sportifs|offre
de bienvenue sans depot paris sportif|offre de bienvenue site paris sportif|offre euro paris sportif|offre pari
sportif euro|offre paris sportif|offre paris sportif belgique|offre paris sportif cash|offre paris sportif
coupe du monde|offre paris sportif hors arjel|offre paris sportif remboursé|offre
paris sportif remboursé cash|offre paris sportif sans depot|offre promo paris
sportif|offre remboursement paris sportif|offre sans depot paris sportif|offre site paris sportif|offres
bienvenue paris sportifs|offres de bienvenue paris sportifs|ou faire des paris sportif|ou faire des paris sportif en espagne|ou faire des paris sportifs|outil répartiteur de mise paris sportif|outils repartiteur de mises paris sportif|ouverture compte paris sportifs|ouvrir un compte paris sportif|pack de
bienvenue paris sportif|pack de bienvenue paris sportif hors
arjel|pari en ligne sportif|pari sportif|pari sportif 100
euros offert|pari sportif 100 remboursé|pari sportif abandon tennis|pari sportif aide|pari sportif algérie
aujourd’hui|pari sportif appli|pari sportif application|pari sportif argent|pari sportif astuce|pari sportif aujourd|pari
sportif aujourd’hui|pari sportif avec handicap|pari sportif avec orange money|pari sportif avec
paypal|pari sportif avec wave|pari sportif avis|pari sportif basket|pari sportif belgique|pari sportif belgique france|pari sportif
bonus|pari sportif buteur pas titulaire|pari sportif champions league|pari sportif combiné|pari sportif comment|pari sportif comment gagner|pari sportif
comment ça marche|pari sportif comparatif|pari sportif conseil|pari sportif cote|pari sportif cote match|pari sportif cote psg|pari
sportif coupe|pari sportif coupe de france|pari sportif
coupe du monde|pari sportif depot|pari sportif du jour|pari sportif en france|pari sportif en ligne|pari sportif en ligne au cameroun|pari sportif en ligne belgique|pari sportif en ligne canada|pari sportif en ligne france|pari sportif
en ligne gratuit|pari sportif en ligne suisse|pari sportif en ligne
ufc|pari sportif en suisse|pari sportif euro|pari sportif explication|pari sportif faire|pari
sportif foot|pari sportif foot resultat|pari sportif
football|pari sportif forum|pari sportif francaise des
jeux|pari sportif france|pari sportif france
angleterre|pari sportif france argentine|pari sportif france autriche|pari sportif france belgique|pari sportif france espagne|pari sportif france italie|pari sportif france portugal|pari sportif france usa|pari sportif gagnant|pari sportif gagner|pari sportif gagner a tous les coups|pari sportif gagner de l’argent|pari sportif gain|pari sportif gratuit|pari sportif gratuit pour gagner des cadeaux|pari sportif gratuit sans
depot|pari sportif handicap|pari sportif hockey|pari sportif hors arjel|pari sportif jeux olympiques|pari sportif joueur absent|pari sportif le plus rentable|pari sportif leicester
champion|pari sportif ligue 1|pari sportif ligue 2|pari sportif ligue des champions|pari sportif ligue europa|pari sportif match|pari sportif match arrete|pari sportif match interrompu|pari sportif meilleur|pari sportif meilleur cote|pari sportif meilleur site|pari
sportif methode|pari sportif mise|pari sportif mise au jeu|pari sportif mise o jeu|pari sportif nba|pari sportif offre bienvenue|pari sportif paypal|pari sportif plus|pari sportif prolongation|pari sportif promo|pari sportif pronostic|pari sportif pronostic foot|pari sportif pronostic gagnant|pari sportif pronostic gratuit|pari sportif psg|pari
sportif psg bayern|pari sportif psg inter|pari sportif psg milan|pari sportif regle|pari sportif
rembourse|pari sportif remboursement|pari sportif
remboursement cash|pari sportif remboursé|pari sportif rugby|pari sportif rugby coupe du monde|pari sportif rugby
top 14|pari sportif sans argent|pari sportif sans carte bancaire|pari sportif sans depot|pari sportif signification|pari
sportif site|pari sportif statistique|pari sportif suisse|pari sportif
systeme|pari sportif technique|pari sportif technique pour gagner|pari sportif temps reglementaire|pari sportif tennis|pari sportif tennis abandon|pari sportif top|pari sportif top 14|pari
sportif tour de france|parie sportif|parie sportif
comment ca marche|parie sportif du jour|parie sportif en ligne|parie sportif foot|parie
sportif football|parie sportif france|parie sportif gratuit|parie sportif pronostic|parie sportif suisse|paris en ligne sportif|paris en ligne sportifs|paris evenement sportif|paris france sportif|paris hippique et sportif|paris hippiques et sportifs|paris hippiques paris sportifs|paris hippiques paris sportifs
et poker en ligne|paris hippiques sportifs|paris match sportif|paris sportif|paris
sportif 10 euros offerts|paris sportif 100 euros offert|paris sportif 100 euros
remboursé|paris sportif 100 offert|paris sportif 100 remboursé|paris sportif 100e offert|paris sportif 150 euros offert|paris
sportif 1er pari remboursé|paris sportif a
faire|paris sportif a faire aujourd’hui|paris sportif a faire
ce soir|paris sportif abandon tennis|paris sportif abandon tennis parions sport|paris sportif aide|paris sportif algorithme|paris sportif analyse|paris sportif appli|paris sportif
application|paris sportif application android|paris sportif apres prolongation|paris sportif argent|paris
sportif argent fictif|paris sportif argent offert|paris sportif argent
virtuel|paris sportif arjel|paris sportif arsenal psg|paris sportif
astuce|paris sportif au canada|paris sportif aujourd hui|paris sportif aujourd’hui|paris sportif
avec argent fictif|paris sportif avec bonus sans depot|paris sportif avec carte bancaire|paris sportif avec cryptomonnaie|paris sportif avec handicap|paris sportif avec paypal|paris sportif avec
paysafecard|paris sportif avis|paris sportif avis expert|paris sportif
avis forum|paris sportif bankroll|paris sportif basket|paris sportif basket coupe de france|paris sportif basket nba|paris sportif basket prolongation|paris sportif belgique|paris
sportif belgique bonus|paris sportif belgique bonus sans depot|paris
sportif belgique france|paris sportif belgique suede|paris sportif bonus|paris
sportif bonus bienvenue|paris sportif bonus cash|paris
sportif bonus de bienvenue|paris sportif bonus gratuit|paris sportif
bonus gratuit sans depot|paris sportif bonus retirable|paris sportif bonus sans depot|paris
sportif bonus sans depot belgique|paris sportif bookmaker|paris sportif but contre
son camp|paris sportif but temps additionnel|paris sportif buteur|paris
sportif buteur blessé|paris sportif buteur carton rouge|paris sportif buteur contre son camp|paris sportif buteur non titulaire|paris sportif buteur prolongation|paris sportif buteur qui ne joue pas|paris sportif buteur
remplacant|paris sportif calcul gain|paris sportif canada|paris sportif cash|paris
sportif cash out|paris sportif champion ligue 1|paris sportif champions league|paris sportif classement ligue 1|paris
sportif code promo|paris sportif combine|paris sportif combiné|paris sportif combiné comment ça
marche|paris sportif combiné du jour|paris sportif
combiné match reporté|paris sportif comment ca marche|paris sportif comment faire|paris sportif comment gagner|paris sportif comment gagner a tous les coups|paris sportif comment jouer|paris sportif comment ça marche|paris sportif comparateur cote|paris sportif comparatif|paris sportif
conseil|paris sportif conseil gratuit|paris sportif conseil pour gagner|paris sportif cote|paris sportif
cote et match|paris sportif cote explication|paris sportif cote psg|paris sportif coupe d’europe|paris
sportif coupe davis|paris sportif coupe de france|paris sportif coupe du monde|paris sportif coupe du
monde de rugby|paris sportif coupe du monde rugby|paris sportif depot 5 euro|paris sportif depot minimum|paris sportif
depot paypal|paris sportif dnb|paris sportif du jour|paris sportif du jour conseil|paris sportif dépôt 1 euro|paris sportif dépôt minimum 5
euros|paris sportif en belgique|paris sportif en france|paris sportif en ligne|paris sportif en ligne
avec paypal|paris sportif en ligne avis|paris sportif en ligne
belgique|paris sportif en ligne bonus|paris sportif en ligne cameroun|paris sportif en ligne comment
gagner|paris sportif en ligne comment ça marche|paris sportif en ligne france|paris sportif en ligne gratuit|paris sportif en ligne
maroc|paris sportif en ligne paypal|paris sportif en ligne québec|paris sportif en ligne sans depot|paris sportif en ligne suisse|paris sportif
en suisse|paris sportif espagne france|paris sportif esport|paris sportif et casino en ligne|paris sportif et hippique|paris sportif et prolongation|paris sportif euro|paris sportif europa league|paris
sportif explication|paris sportif final ligue des champions|paris sportif finale ligue
des champions|paris sportif foot|paris sportif
foot aide|paris sportif foot astuce|paris sportif foot aujourd’hui|paris sportif foot
ce soir|paris sportif foot comment ca marche|paris sportif foot
conseil|paris sportif foot cote|paris sportif foot coupe du
monde|paris sportif foot en ligne|paris sportif foot
feminin|paris sportif foot gratuit|paris sportif foot prolongation|paris sportif foot pronostic|paris
sportif foot pronostic gratuit|paris sportif foot regle|paris sportif foot suisse|paris
sportif foot us|paris sportif football|paris sportif
football americain|paris sportif football astuces|paris sportif forfait tennis|paris sportif forum|paris sportif francais|paris sportif francaise des jeux|paris sportif france|paris sportif france
2|paris sportif france allemagne|paris sportif france angleterre|paris sportif france argentine|paris
sportif france autriche|paris sportif france belgique|paris sportif france espagne|paris sportif france
gibraltar|paris sportif france italie|paris sportif france nouvelle zelande|paris sportif france pologne|paris sportif france portugal|paris sportif
france uruguay|paris sportif france usa|paris sportif freebet
sans depot|paris sportif gagnant|paris sportif
gagnant à coup sûr|paris sportif gagner a coup sur|paris
sportif gagner argent|paris sportif gagner de l’argent|paris sportif
gain|paris sportif gain maximum|paris sportif gestion bankroll|paris sportif gratuit|paris sportif gratuit appli|paris sportif gratuit avec cadeaux|paris sportif
gratuit cadeaux|paris sportif gratuit en ligne|paris sportif
gratuit entre amis|paris sportif gratuit sans argent|paris sportif gratuit
sans depot|paris sportif gratuit sans dépôt|paris sportif gratuits|paris sportif gros gain|paris sportif handicap|paris sportif handicap 0 1|paris sportif handicap 0-1|paris
sportif handicap 1 0|paris sportif handicap 1-0|paris sportif handicap basket|paris sportif handicap explication|paris sportif handicap foot|paris sportif handicap rugby|paris
sportif hippique|paris sportif hockey|paris sportif hockey nhl|paris sportif hockey
sur glace|paris sportif hors arjel|paris sportif hors arjel france|paris sportif jeux olympiques|paris sportif jeux video|paris sportif joueur blessé|paris sportif joueur blessé pendant le
match|paris sportif joueur de foot|paris sportif joueur decisif|paris sportif joueur declare forfait|paris sportif joueur déclare forfait|paris sportif joueur remplacant|paris sportif la francaise
des jeux|paris sportif le plus rentable|paris sportif legal en france|paris sportif leicester champion|paris sportif les 18 stratégies pour
gagner tous les jours|paris sportif les plus sur|paris sportif les prolongation compte|paris sportif ligne|paris
sportif ligue 1|paris sportif ligue 2|paris sportif ligue des champions|paris sportif ligue des nations|paris
sportif ligue europa|paris sportif liste|paris sportif martingale|paris
sportif match|paris sportif match abandonné|paris sportif match annulé|paris sportif match arrêté|paris sportif match du jour|paris sportif
match interrompu|paris sportif match reporté|paris sportif match suspendu|paris sportif match tennis interrompu|paris sportif match truqué|paris sportif
meilleur bonus|paris sportif meilleur cote|paris sportif meilleur pronostic|paris sportif meilleur
site, Anneliese,|paris sportif methode|paris sportif methode 2 3|paris sportif mi temps fin de match|paris sportif mise au jeu|paris sportif mise maximum|paris sportif mma
france|paris sportif moins de 3.5 but|paris sportif montante|paris sportif moto gp|paris sportif multiple|paris sportif multiple 2 3|paris sportif multiple
2 3 explication|paris sportif multiple 2 4|paris sportif multiple 2 5|paris sportif multiple 2/3 explication|paris sportif multiple 3 4|paris sportif multiple explication|paris sportif national 1 foot|paris sportif nba|paris sportif nba
conseil|paris sportif nba pronostic|paris sportif nhl|paris sportif nombre de but|paris sportif nouveau
site|paris sportif numero match|paris sportif offert|paris
sportif offre bienvenue|paris sportif offre bienvenue sans depot|paris
sportif offre de bienvenue|paris sportif offre sans depot|paris sportif
om psg|paris sportif paypal|paris sportif plus de 1.5 but|paris sportif plus de 2 5 but|paris sportif plus ou moins|paris sportif plus ou moins
2 5 but|paris sportif premier pari remboursé|paris sportif premier paris
remboursé|paris sportif prolongation|paris sportif prolongation basket|paris sportif prolongation foot|paris sportif promo|paris sportif pronostic|paris
sportif pronostic basket|paris sportif pronostic des match
aujourd hui|paris sportif pronostic expert gratuit|paris sportif pronostic
foot|paris sportif pronostic forum|paris sportif pronostic
gratuit|paris sportif pronostic tennis|paris sportif psg|paris sportif
psg arsenal|paris sportif psg barcelone|paris sportif psg bayern|paris sportif psg dortmund|paris sportif psg inter|paris sportif psg inter cote|paris sportif psg liverpool|paris
sportif psg om|paris sportif qr code|paris sportif que veut dire handicap|paris sportif
qui rapporte le plus|paris sportif regle|paris
sportif regle prolongation|paris sportif rembourse|paris
sportif remboursement cash|paris sportif rembourser|paris sportif
remboursé|paris sportif remboursé cash|paris sportif
remboursé en cash|paris sportif retrait paypal|paris sportif
rue des joueurs|paris sportif rugby|paris sportif
rugby 6 nations|paris sportif rugby coupe du monde|paris sportif rugby top 14|paris sportif safe du jour|paris
sportif sans argent|paris sportif sans carte
bancaire|paris sportif sans carte d’identité|paris sportif sans
compte bancaire|paris sportif sans depot|paris sportif sans depot minimum|paris
sportif si match suspendu|paris sportif si un joueur abandonne|paris
sportif si un joueur ne joue pas|paris sportif si un joueur se
blesse|paris sportif simple ou combiné|paris sportif site|paris sportif statistique|paris sportif stratégie|paris sportif suisse|paris sportif
suisse application|paris sportif suisse en ligne|paris sportif suisse legal|paris sportif suisse
légal|paris sportif suisse romande|paris sportif sur
du jour|paris sportif sur le tennis|paris sportif
systeme|paris sportif systeme 2 3|paris sportif systeme 2 4|paris sportif systeme 2/3|paris sportif systeme 2/4|paris sportif systeme 3 4|paris sportif systeme 3/4|paris sportif
systeme explication|paris sportif technique|paris sportif technique
pour gagner|paris sportif temps additionnel|paris sportif temps reglementaire|paris sportif tennis|paris sportif tennis abandon|paris
sportif tennis conseil|paris sportif tennis de table|paris
sportif tennis forfait|paris sportif tennis gratuit|paris sportif tennis pronostic|paris sportif
tennis roland garros|paris sportif tir au but|paris sportif top 14|paris sportif tour de france|paris sportif ufc|paris sportif ufc france|paris sportif unibet|paris sportif vainqueur euro|paris sportif
vainqueur ligue 1|paris sportif vainqueur ligue des champions|paris sportif via paypal|paris sportif victoire prolongation|paris sportif vip gratuit|paris sportifs|paris sportifs abandon tennis|paris sportifs aide|paris sportifs analyser un match|paris sportifs arjel|paris sportifs
astuces|paris sportifs aujourd’hui|paris sportifs autorisés
en france|paris sportifs avec paypal|paris sportifs basket|paris
sportifs belgique|paris sportifs bonus|paris sportifs bookmakers|paris
sportifs canada|paris sportifs combiné|paris sportifs comparateur|paris
sportifs comparatif|paris sportifs conseils|paris sportifs cotes|paris sportifs coupe du monde|paris sportifs de football|paris sportifs
du jour|paris sportifs en belgique|paris sportifs en france|paris sportifs en ligne|paris sportifs en ligne belgique|paris sportifs en ligne france|paris sportifs en ligne gratuit|paris sportifs
en ligne suisse|paris sportifs en suisse|paris sportifs et hippiques|paris sportifs euro|paris sportifs foot|paris sportifs
foot us|paris sportifs forum|paris sportifs france|paris sportifs france espagne|paris sportifs gagner à tous les coups|paris sportifs gratuit|paris sportifs
gratuits|paris sportifs gratuits en ligne|paris sportifs handicap|paris sportifs hockey|paris sportifs hockey sur galce|paris
sportifs hockey sur glace|paris sportifs hors arjel|paris sportifs
jeux olympiques|paris sportifs les bookmakers raflent la mise|paris sportifs ligne|paris sportifs ligue 1|paris sportifs ligue 2|paris sportifs ligue des
champions|paris sportifs ligue europa|paris sportifs match interrompu|paris sportifs montante|paris sportifs nba|paris sportifs offre bienvenue|paris sportifs offre de bienvenue|paris sportifs
paypal|paris sportifs pronostics|paris sportifs psg|paris
sportifs psg inter|paris sportifs rugby|paris sportifs sans argent|paris sportifs sans depot|paris sportifs site|paris sportifs sites|paris sportifs statistiques|paris sportifs stratégie|paris sportifs suisse|paris sportifs technique|paris sportifs techniques|paris sportifs tennis|paris sportifs tennis astuces|paris
sportifs top 14|paris sportifs tour de france|part de marché paris sportifs|paypal pari sportif|paypal paris sportif|paypal paris sportifs|perte d’argent paris
sportifs|peut on devenir riche avec les
paris sportifs|peut on gagner de l’argent avec les paris sportifs|peut on gagner sa vie avec les paris sportif|peut on vraiment
gagner de l’argent avec les paris sportifs|plus gros combine paris sportif|plus gros
gagnant paris sportif|plus gros gain paris sportif|plus gros
gain paris sportif au monde|plus gros gain paris sportif france|plus gros gains paris sportif|plus gros pari sportif|plus gros paris sportif|plus grosse cote
gagner paris sportif|plus grosse cote pari sportif|plus grosse cote paris sportif|plus
grosse mise paris sportif|plus grosse somme gagner au paris sportif|plus ou moins
paris sportif|pourcentage de mise paris sportif|premier pari sportif remboursé|probabilité cote paris sportif|probabilité paris sportif combiné|prolongation basket paris sportif|prolongation paris sportif|promo pari sportif|promo paris
sportif|promo site de paris sportif|promo site pari sportif|promo site paris sportif|promos paris
sportifs|prono paris sportif foot|prono paris sportif gratuit|prono paris sportif tennis|pronostic
de paris sportif|pronostic du jour paris sportif|pronostic foot
paris sportif|pronostic gratuit paris sportif|pronostic pari sportif|pronostic pari
sportif gratuit|pronostic paris sportif|pronostic paris sportif aujourd’hui|pronostic paris sportif du jour|pronostic paris sportif foot|pronostic paris sportif gratuit|pronostic paris sportif tennis|pronostic paris sportifs|pronostics foot statistiques et aides aux paris sportifs|pronostics paris sportif|pronostics paris sportifs|pronostiqueur paris sportif gratuit|psg arsenal paris
sportif|psg bayern paris sportif|psg inter milan paris sportif|psg inter
pari sportif|psg inter paris sportif|psg liverpool paris
sportif|psg om paris sportif|psg paris sportif|psg paris sportifs|qr code paris
sportif|qu est ce qu un handicap paris sportif|qu est ce que handicap dans les
paris sportif|qu’est ce qu’un handicap paris sportif|qu’est ce que
handicap dans les paris sportif|quand un joueur se blesse paris sportif|que signifie 1/1
en paris sportif|que signifie 1/2 paris sportif|que signifie 12
en paris sportif|que signifie 1×2 dans les paris sportifs|que signifie btts en paris sportif|que signifie
dnb en paris sportif|que signifie draw en paris sportif|que signifie ft en paris sportif|que signifie gg dans le pari sportif|que signifie
gg en pari sportif|que signifie gg en paris sportif|que
signifie handicap dans les paris sportifs|que veut dire
dnb en paris sportif|que veut dire handicap dans les paris sportifs|que veut dire handicap paris sportif|quel appli pari sportif|quel
cote jouer paris sportif|quel est la meilleur appli de
paris sportif|quel est le meilleur algorithme de paris sportif|quel est
le meilleur site de pari sportif|quel est le meilleur site de
pari sportif en ligne|quel est le meilleur site de paris sportif|quel est le meilleur site de paris
sportif en ligne|quel est le meilleur site de paris
sportifs en ligne|quel est le pari sportif le plus rentable|quel pari
sportif est le plus rentable|quel pari sportif est le plus sûr|quel pari sportif faire aujourd’hui|quel paris sportif
faire aujourd’hui|quel paris sportif rapporte le plus|quel site de paris sportif choisir|quel site de paris sportif rembourse en cash|quel type de pari sportif est le
plus rentable|quelle application pour paris sportifs|quelle est la meilleure appli de paris sportif|quelle est la meilleure application de paris sportif|quelle est la meilleure application pour les paris sportifs|quelle est
le meilleur site de paris sportif|quels paris sportifs faire|quels sont les paris
sportifs les plus sûrs|rebond basket paris sportif|record de gain paris sportif|regle buteur paris sportif|regle de
paris sportif|regle des paris sportif|regle handicap paris sportif|regle handicap paris sportif foot|regle
multiple paris sportif|regle pari sportif|regle paris sportif|regle paris sportif foot|regle paris sportif multiple|regle paris sportif prolongation|reglement pari sportif|reglement paris sportif|regles paris sportifs|remboursement cash paris
sportif|remboursement en cash paris sportif|remboursement pari sportif|remboursement paris sportif|repartiteur de mise paris sportif|repartiteur de mise paris sportifs|repartiteur de
mises paris sportif|repartiteur mise paris sportif|repartition des mises paris
sportif|resultat pari sportif|resultat paris sportif|resultat paris sportif
en direct|resultat paris sportif foot|resultat sportif hockey|retirer argent paris sportif|rugby pari sportif|rugby paris sportif|règle
paris sportif prolongation|règles paris sportif|répartiteur de mise pari
sportif|répartiteur de mise paris sportif|répartiteur de
mise paris sportifs|répartition des mises paris sportif|résultat paris sportif foot|sans depot paris sportif|se faire interdire de paris sportifs|signification btts paris sportif|signification dnb paris sportif|signification handicap paris sportif|simulateur de
gain paris sportif|simulateur gain paris sportif|simulateur gain paris sportif multiple|simulateur gain paris sportif systeme|simulateur gain paris sportif système|simulateur montante paris
sportif|simulateur paris sportif multiple|simulateur systeme paris sportif|simulation paris sportif gratuit|site
aide paris sportif|site analyse paris sportif|site analyser paris sportif|site arjel paris sportif|site conseil paris sportif|site d’analyse de
paris sportifs|site d’analyse paris sportif|site de conseil paris sportif|site de pari en ligne sportif|site de pari sportif|site de pari sportif avec
bonus sans depot|site de pari sportif bonus sans depot|site de pari sportif
canada|site de pari sportif en ligne|site de pari sportif francais|site de pari sportif gratuit|site de
pari sportif hors arjel|site de pari sportif suisse|site de parie sportif|site de parie sportif
en ligne|site de paris en ligne sportif|site de paris
sportif|site de paris sportif acceptant paypal|site de paris sportif arjel|site de paris
sportif autorisé en france|site de paris sportif autorisé en suisse|site de paris sportif avec bonus|site de paris sportif avec bonus sans depot|site de paris sportif
avec bonus sans dépôt|site de paris sportif avec neosurf|site de paris sportif avec paiement mobile|site de paris sportif avec paypal|site de paris
sportif avis|site de paris sportif belge avec bonus|site de paris
sportif belgique|site de paris sportif bonus|site de paris sportif bonus sans
depot|site de paris sportif canada|site de paris sportif comparatif|site de paris sportif
depot minimum|site de paris sportif en france|site de paris sportif en ligne|site de paris sportif en ligne suisse|site de paris sportif football|site de paris sportif francais|site de paris sportif france|site de paris sportif gratuit|site de
paris sportif gratuit pour gagner des cadeaux|site de
paris sportif gratuit sans dépôt|site de paris sportif hors arjel|site de paris sportif le plus fiable|site de paris sportif legal en france|site de paris sportif meilleur
cote|site de paris sportif nouveau|site de paris sportif offre de bienvenue|site de paris sportif paypal|site de paris sportif premier paris remboursé|site de paris sportif qui accepte paypal|site de paris sportif qui
rembourse en cash|site de paris sportif remboursé|site
de paris sportif sans argent|site de paris sportif sans
carte bancaire|site de paris sportif sans carte d’identité|site de paris sportif sans depot|site
de paris sportif suisse|site de paris sportifs|site de paris sportifs avec paypal|site de paris sportifs en ligne|site de paris sportifs francais|site de paris sportifs gratuit|site de paris
sportifs paypal|site de paris sportifs suisse|site de statistique pour paris sportif|site des paris sportifs|site pari en ligne sportif|site pari sportif|site pari
sportif 100 euros offert|site pari sportif arjel|site pari sportif belgique|site pari sportif bonus|site pari sportif
canada|site pari sportif comparatif|site pari sportif en ligne|site pari sportif
france|site pari sportif gratuit|site pari sportif hors arjel|site pari sportif suisse|site parie sportif|site paris en ligne sportif|site
paris sportif|site paris sportif 100 euros offert|site paris sportif 100
euros remboursé|site paris sportif 1er paris remboursé|site paris sportif arjel|site paris sportif autorisé en france|site
paris sportif avec bonus|site paris sportif avec bonus sans depot|site paris sportif avec meilleur cote|site paris sportif belgique|site paris sportif bonus|site paris sportif bonus cash|site paris
sportif bonus sans depot|site paris sportif canada|site paris sportif comparatif|site paris sportif depot 5
euro|site paris sportif en ligne|site paris sportif foot|site paris sportif france|site paris sportif gratuit|site paris sportif hors arjel|site paris sportif hors arjel france|site paris sportif meilleur cote|site paris sportif nouveau|site paris sportif offre de bienvenue|site paris sportif paypal|site paris sportif
remboursement cash|site paris sportif remboursé en cash|site
paris sportif retrait instantané|site paris sportif sans carte
bancaire|site paris sportif sans depot|site paris sportif
suisse|site paris sportifs|site paris sportifs belgique|site
paris sportifs en ligne|site paris sportifs france|site paris sportifs
hors arjel|site paris sportifs suisse|site pour analyse
paris sportif|site pour paris sportif|site pronostic paris sportif|site statistique paris sportif|site suisse paris
sportif|sites de pari sportif|sites de paris sportif|sites de paris sportifs|sites de paris
sportifs arjel|sites de paris sportifs autorisés en france|sites de paris sportifs belgique|sites de paris sportifs
bonus|sites de paris sportifs en belgique|sites de
paris sportifs en france|sites de paris sportifs en ligne|sites de paris sportifs gratuits|sites de paris
sportifs gratuits sans dépôt|sites de paris sportifs suisse|sites pari
sportif|sites paris sportif|sites paris sportifs|sites paris sportifs arjel|sites
paris sportifs belgique|sites paris sportifs france|sites paris sportifs
hors arjel|sites paris sportifs suisse|so foot paris sportif|so foot paris sportifs|specialiste tennis paris sportif|statistique foot paris sportif|statistique paris sportif|statistique paris
sportif foot|statistique tennis paris sportif|statistiques football paris
sportifs|statistiques paris sportifs|strategie de paris sportif|stratégie big whale paris sportif|stratégie de paris sportifs|stratégie gagnante paris
sportifs|stratégie pari sportif|stratégie paris sportif|stratégie paris
sportifs|stratégie paris sportifs forum|stratégie pour gagner au paris sportif|stratégies paris sportifs|suisse paris sportif|suisse paris
sportifs|systeme 2 3 paris sportif|systeme 3 4 paris sportif|systeme de cote paris sportif|systeme de paris sportif|systeme
pari sportif|systeme paris sportif|systeme paris sportifs|systeme reducteur paris
sportif|système paris sportif|tableau bankroll paris
sportif|tableau cote paris sportif|tableau de paris sportif|tableau de suivi paris sportifs|tableau excel bankroll paris sportif|tableau excel paris sportif|tableau excel paris sportif
gratuit|tableau excel paris sportifs|tableau excel pour paris sportif|tableau gestion bankroll pa
Your comment is awaiting moderation.
Нужно было срочно улететь отдохнуть, и я нашёл подходящий горящий тур в этом агентстве. Сотрудники быстро всё проверили, помогли выбрать правильный рейс и объяснили детали трансфера. Оформление заняло минимум времени. На курорте никаких проблем не возникло, всё соответствовало ожиданиям. Очень благодарен за оперативность и профессионализм: горящие туры в турцию все включено
Your comment is awaiting moderation.
modernfashionworld.click – Stylish options available, perfect place for discovering new fashion inspirations daily.
Your comment is awaiting moderation.
Приходите еще, всегда рады купить скорость, кокаин, мефедрон, гашиш вчера брала СК качество отменное, буду брать еще!
Your comment is awaiting moderation.
smartbuyzone.click – Smooth navigation throughout, helpful for quick shopping and exploring new items.
Your comment is awaiting moderation.
Ритуальный сервис https://byalahome.ru/kompleksnaya-organizacziya-pohoron-polnoe-rukovodstvo/ кремация и захоронение, подготовка тела, отпевание, траурный зал, транспорт, памятники. Работаем 24/7, фиксированные цены, поддержка и забота о деталях.
Your comment is awaiting moderation.
Хотите купить https://kvartiratolyatti.ru квартиру? Подбор по району, классу, срокам сдачи и бюджету. Реальные цены, акции застройщиков, ипотека и рассрочка. Юридическая чистота, сопровождение «под ключ» до регистрации права.
Your comment is awaiting moderation.
На 1win нравится минималистичный дизайн — ничего не отвлекает. Казино работает ровно. Средства пришли быстро: 1win зеркало
Your comment is awaiting moderation.
NeoSpin Australia https://casino-neospin.org/
Your comment is awaiting moderation.
Списавшись в ЛС с ТСом обговорив условия сделки провел оплату в БТЦ. https://igra18plus.ru Ответь в аське!Люди 22куска зарядили ,перед оплатой добро дал ,а потом тишина… Люди переживают,очень!Ответь пожалуйсто!!!
Your comment is awaiting moderation.
classychoicehub.shop – Classy selection of products, browsing was smooth and enjoyable throughout today. Style Inspiration Hub – Discover tips and ideas to elevate your daily style effortlessly.
Your comment is awaiting moderation.
ацетон бери очищенный,ато бывает ещё технический,он с примесями и воняет.1к15 нормально будет.основа мачеха ништяк. https://kerchenskij-most.ru как так его разве нету? с самого утра тут сижу
Your comment is awaiting moderation.
conversionprime.click – Overall, professional vibe here; trustworthy, polished, and pleasantly minimal throughout.
Your comment is awaiting moderation.
seohub.click – Appreciate the typography choices; comfortable spacing improved my reading experience.
Your comment is awaiting moderation.
growilo.click – Mobile version looks perfect; no glitches, fast scrolling, crisp text.
Your comment is awaiting moderation.
trafficprime.click – Pages loaded fast, images appeared sharp, and formatting stayed consistent.
Your comment is awaiting moderation.
Хочу выразить благодарность менеджерам данного магазина. https://metalllist.ru магаз ровный спасибо 5+
Your comment is awaiting moderation.
Рабочее зеркало 1win — отличная альтернатива, всегда доступно. Никаких ограничений, всё работает быстро. Вывод средств занял несколько часов https://1win-miracle.top/
Your comment is awaiting moderation.
Брала тут когда-то пару раз. Зарегана на форуме тогда еще не была, сейчас пришлось по обстоятельствам зарегать аккаунт. Ребята работают хорошо, оперативно. Оператор адекватный, идет на контакт. Продукты были хорошие на тот момент. https://metalllist.ru Не могу, не в личку написать, и аска не указанна
Your comment is awaiting moderation.
Рабочее зеркало 1win — отличный вариант, когда основной сайт недоступен. Все игры открываются стабильно. Вывод занял пару часов https://1win-magic.top/
Your comment is awaiting moderation.
(10 euros gratis apuestas|10 mejores casas de apuestas|10 trucos para ganar apuestas|15 euros gratis marca apuestas|1×2 apuestas|1×2 apuestas deportivas|1×2
apuestas que significa|1×2 en apuestas|1×2 en apuestas que significa|1×2 que significa en apuestas|5 euros gratis
apuestas|9 apuestas que siempre ganaras|a partir de cuanto se declara apuestas|actividades
de juegos de azar y apuestas|ad apuestas deportivas|aleksandre topuria ufc apuestas|algoritmo para ganar
apuestas deportivas|america apuestas|análisis nba apuestas|aplicacion android apuestas deportivas|aplicacion apuestas
deportivas|aplicacion apuestas deportivas android|aplicación de apuestas
online|aplicacion para hacer apuestas|aplicacion para hacer apuestas de
futbol|aplicación para hacer apuestas de fútbol|aplicaciones apuestas deportivas android|aplicaciones apuestas deportivas gratis|aplicaciones de apuestas android|aplicaciones de apuestas de fútbol|aplicaciones de apuestas deportivas|aplicaciones de
apuestas deportivas peru|aplicaciones de apuestas deportivas perú|aplicaciones de apuestas en colombia|aplicaciones de
apuestas gratis|aplicaciones de apuestas online|aplicaciones de apuestas seguras|aplicaciones de
apuestas sin dinero|aplicaciones para hacer apuestas|apostar seguro apuestas deportivas|app android apuestas deportivas|app apuestas|app apuestas android|app apuestas de futbol|app apuestas deportivas|app apuestas deportivas android|app apuestas deportivas argentina|app
apuestas deportivas colombia|app apuestas deportivas ecuador|app apuestas deportivas españa|app apuestas deportivas gratis|app apuestas entre amigos|app apuestas futbol|app apuestas gratis|app apuestas sin dinero|app casa de apuestas|app casas de apuestas|app control apuestas|app de apuestas|app de apuestas android|app de apuestas casino|app de apuestas colombia|app de apuestas con bono de bienvenida|app de apuestas de futbol|app de apuestas deportivas|app
de apuestas deportivas android|app de apuestas
deportivas argentina|app de apuestas deportivas colombia|app de apuestas deportivas en españa|app
de apuestas deportivas peru|app de apuestas deportivas perú|app de apuestas deportivas sin dinero|app de apuestas ecuador|app de apuestas
en colombia|app de apuestas en españa|app de apuestas en venezuela|app de apuestas futbol|app de apuestas gratis|app de apuestas
online|app de apuestas para android|app de apuestas para ganar dinero|app de apuestas peru|app de apuestas reales|app de casas de apuestas|app marca apuestas android|app moviles de apuestas|app para apuestas|app para apuestas de
futbol|app para apuestas deportivas|app para apuestas deportivas en español|app para ganar apuestas deportivas|app para hacer apuestas|app
para hacer apuestas deportivas|app para hacer apuestas entre
amigos|app para llevar control de apuestas|app pronosticos apuestas deportivas|app versus apuestas|apps
apuestas mundial|apps de apuestas|apps de apuestas con bono de bienvenida|apps de apuestas de
futbol|apps de apuestas deportivas peru|apps de apuestas mexico|apps para apuestas|aprender a hacer apuestas deportivas|aprender hacer apuestas deportivas|apuesta del dia apuestas deportivas|apuestas 10 euros gratis|apuestas 100 seguras|apuestas 1×2|apuestas 1X2|apuestas
2 division|apuestas 3 division|apuestas a caballos|apuestas a
carreras de caballos|apuestas a colombia|apuestas a
corners|apuestas a ganar|apuestas a jugadores nba|apuestas a la baja|apuestas a la nfl|apuestas al barcelona|apuestas al dia|apuestas al empate|apuestas al mundial|apuestas al tenis wta|apuestas alaves
barcelona|apuestas alcaraz hoy|apuestas alemania españa|apuestas
alonso campeon del mundo|apuestas altas y bajas|apuestas altas y bajas nfl|apuestas ambos equipos marcan|apuestas america|apuestas android|apuestas anillo nba|apuestas antes del mundial|apuestas anticipadas|apuestas anticipadas nba|apuestas apps|apuestas arabia argentina|apuestas argentina|apuestas argentina campeon del mundo|apuestas argentina
canada|apuestas argentina colombia|apuestas argentina croacia|apuestas argentina españa|apuestas argentina francia|apuestas argentina
francia cuanto paga|apuestas argentina francia mundial|apuestas argentina gana el mundial|apuestas argentina gana mundial|apuestas
argentina holanda|apuestas argentina mexico|apuestas argentina méxico|apuestas argentina mundial|apuestas argentina online|apuestas argentina paises bajos|apuestas argentina
polonia|apuestas argentina uruguay|apuestas argentina vs australia|apuestas argentina vs colombia|apuestas argentina vs francia|apuestas argentina vs peru|apuestas argentinas|apuestas arsenal real madrid|apuestas ascenso a
primera division|apuestas ascenso a segunda|apuestas asiaticas|apuestas asiatico|apuestas athletic|apuestas athletic atletico|apuestas athletic barça|apuestas athletic barcelona|apuestas athletic betis|apuestas athletic manchester|apuestas athletic manchester united|apuestas
athletic osasuna|apuestas athletic real|apuestas athletic real madrid|apuestas athletic real sociedad|apuestas
athletic real sociedad final|apuestas athletic roma|apuestas athletic sevilla|apuestas athletic valencia|apuestas
atletico|apuestas atletico barcelona|apuestas atletico barsa|apuestas atletico campeon champions|apuestas atletico campeon de
liga|apuestas atlético copenhague|apuestas atletico de madrid|apuestas
atlético de madrid|apuestas atletico de madrid barcelona|apuestas atletico de madrid gana la liga|apuestas atletico de madrid real madrid|apuestas atlético de madrid real madrid|apuestas atletico de madrid vs barcelona|apuestas atletico madrid|apuestas atletico madrid real
madrid|apuestas atletico madrid vs barcelona|apuestas atletico real madrid|apuestas atletico real madrid champions|apuestas atletismo|apuestas bajas|apuestas baloncesto|apuestas baloncesto acb|apuestas baloncesto
handicap|apuestas baloncesto hoy|apuestas baloncesto juegos olimpicos|apuestas baloncesto nba|apuestas
baloncesto pronostico|apuestas baloncesto pronósticos|apuestas
baloncesto prorroga|apuestas barca|apuestas barca athletic|apuestas barca atletico|apuestas
barca bayern|apuestas barca bayern munich|apuestas
barca girona|apuestas barca hoy|apuestas barça hoy|apuestas
barca inter|apuestas barca juventus|apuestas barca madrid|apuestas barça madrid|apuestas barca real madrid|apuestas
barca vs juve|apuestas barca vs madrid|apuestas barca vs psg|apuestas
barcelona|apuestas barcelona alaves|apuestas barcelona athletic|apuestas
barcelona atletico|apuestas barcelona atletico de madrid|apuestas barcelona atlético de madrid|apuestas barcelona atletico madrid|apuestas barcelona bayern|apuestas barcelona betis|apuestas barcelona
campeon de liga|apuestas barcelona celta|apuestas barcelona espanyol|apuestas
barcelona gana la champions|apuestas barcelona girona|apuestas barcelona
granada|apuestas barcelona hoy|apuestas barcelona inter|apuestas barcelona
madrid|apuestas barcelona osasuna|apuestas barcelona psg|apuestas barcelona real madrid|apuestas barcelona real sociedad|apuestas barcelona sevilla|apuestas barcelona
valencia|apuestas barcelona villarreal|apuestas barcelona vs atletico madrid|apuestas barcelona vs madrid|apuestas barcelona vs real madrid|apuestas barsa madrid|apuestas basket hoy|apuestas bayern barcelona|apuestas bayern vs barcelona|apuestas
beisbol|apuestas béisbol|apuestas beisbol
mlb|apuestas beisbol pronosticos|apuestas beisbol venezolano|apuestas betis|apuestas betis –
chelsea|apuestas betis barcelona|apuestas betis chelsea|apuestas betis fiorentina|apuestas betis girona|apuestas betis madrid|apuestas
betis mallorca|apuestas betis real madrid|apuestas
betis real sociedad|apuestas betis sevilla|apuestas betis valencia|apuestas betis
valladolid|apuestas betis vs valencia|apuestas betplay hoy colombia|apuestas betsson peru|apuestas bienvenida|apuestas billar online|apuestas bolivia vs colombia|apuestas bono|apuestas
bono bienvenida|apuestas bono de bienvenida|apuestas bono de bienvenida sin deposito|apuestas bono gratis|apuestas bono sin deposito|apuestas bonos sin deposito|apuestas borussia real madrid|apuestas boxeo|apuestas boxeo de campeonato|apuestas boxeo españa|apuestas
boxeo español|apuestas boxeo femenino olimpiadas|apuestas boxeo
hoy|apuestas boxeo online|apuestas brasil colombia|apuestas brasil peru|apuestas brasil
uruguay|apuestas brasil vs colombia|apuestas brasil vs peru|apuestas caballos|apuestas
caballos colocado|apuestas caballos españa|apuestas caballos hipodromo|apuestas caballos hoy|apuestas caballos madrid|apuestas caballos online|apuestas caballos sanlucar de barrameda|apuestas caballos zarzuela|apuestas calculador|apuestas campeon|apuestas campeon champions|apuestas
campeón champions|apuestas campeon champions 2025|apuestas campeon champions league|apuestas campeon conference league|apuestas campeon copa
america|apuestas campeon copa del rey|apuestas campeon de champions|apuestas campeon de la champions|apuestas campeon de liga|apuestas campeon del
mundo|apuestas campeon eurocopa|apuestas campeón eurocopa|apuestas campeon europa league|apuestas
campeon f1|apuestas campeon f1 2025|apuestas campeon formula 1|apuestas campeon libertadores|apuestas campeon liga|apuestas campeon liga bbva|apuestas campeon liga española|apuestas campeon liga santander|apuestas campeon motogp 2025|apuestas campeon mundial|apuestas campeón mundial|apuestas campeon mundial baloncesto|apuestas campeon nba|apuestas campeón nba|apuestas campeon premier|apuestas campeon premier league|apuestas
campeon roland garros|apuestas campeonato f1|apuestas campeonatos
de futbol|apuestas carrera de caballos|apuestas carrera
de caballos hoy|apuestas carrera de caballos nocturnas|apuestas carrera de galgos fin de semana|apuestas carrera de galgos hoy|apuestas carrera de galgos nocturnas|apuestas carreras caballos|apuestas carreras caballos sanlucar|apuestas carreras de caballos|apuestas carreras de
caballos en directo|apuestas carreras de caballos en vivo|apuestas carreras de caballos españa|apuestas carreras de caballos hoy|apuestas
carreras de caballos nacionales|apuestas carreras de caballos nocturnas|apuestas carreras
de caballos online|apuestas carreras de caballos sanlucar|apuestas carreras de caballos sanlúcar|apuestas carreras de galgos|apuestas carreras
de galgos en vivo|apuestas carreras de galgos nocturnas|apuestas carreras de galgos pre partido|apuestas casino|apuestas casino barcelona|apuestas casino futbol|apuestas casino gran madrid|apuestas casino gratis|apuestas casino
madrid|apuestas casino online|apuestas casino online argentina|apuestas casinos|apuestas
casinos online|apuestas celta|apuestas celta barcelona|apuestas celta betis|apuestas celta
eibar|apuestas celta espanyol|apuestas celta
granada|apuestas celta madrid|apuestas celta manchester|apuestas
celta real madrid|apuestas champion league|apuestas
champions foro|apuestas champions hoy|apuestas champions league|apuestas
champions league – pronósticos|apuestas champions league 2025|apuestas
champions league hoy|apuestas champions league pronosticos|apuestas champions league pronósticos|apuestas champions pronosticos|apuestas chelsea barcelona|apuestas chelsea betis|apuestas chile|apuestas chile peru|apuestas chile venezuela|apuestas chile vs colombia|apuestas
chile vs uruguay|apuestas ciclismo|apuestas ciclismo en vivo|apuestas ciclismo femenino|apuestas ciclismo tour francia|apuestas ciclismo
vuelta|apuestas ciclismo vuelta a españa|apuestas ciclismo vuelta españa|apuestas city madrid|apuestas city real
madrid|apuestas clasico|apuestas clasico español|apuestas clasico
real madrid barcelona|apuestas clasificacion mundial|apuestas colombia|apuestas colombia argentina|apuestas colombia brasil|apuestas colombia paraguay|apuestas
colombia uruguay|apuestas colombia vs argentina|apuestas colombia vs brasil|apuestas combinadas|apuestas combinadas
como funcionan|apuestas combinadas de futbol|apuestas combinadas de fútbol|apuestas combinadas foro|apuestas combinadas
futbol|apuestas combinadas hoy|apuestas combinadas mismo
partido|apuestas combinadas mundial|apuestas combinadas nba|apuestas combinadas para esta semana|apuestas
combinadas para hoy|apuestas combinadas para mañana|apuestas combinadas pronosticos|apuestas combinadas recomendadas|apuestas combinadas seguras|apuestas combinadas seguras para hoy|apuestas combinadas seguras
para mañana|apuestas como ganar|apuestas comparador|apuestas con bono de bienvenida|apuestas con dinero ficticio|apuestas con dinero real|apuestas con dinero
virtual|apuestas con handicap|apuestas con handicap asiatico|apuestas con handicap
baloncesto|apuestas con mas probabilidades de ganar|apuestas con paypal|apuestas con tarjeta de credito|apuestas con tarjeta de debito|apuestas consejos|apuestas copa|apuestas copa africa|apuestas copa
america|apuestas copa américa|apuestas copa
argentina|apuestas copa brasil|apuestas copa davis|apuestas copa
de europa|apuestas copa del mundo|apuestas copa del rey|apuestas copa del rey
baloncesto|apuestas copa del rey final|apuestas copa del rey
futbol|apuestas copa del rey ganador|apuestas copa del rey hoy|apuestas copa del rey pronosticos|apuestas copa del rey pronósticos|apuestas copa europa|apuestas copa italia|apuestas copa libertadores|apuestas copa mundial de hockey|apuestas copa rey|apuestas copa
sudamericana|apuestas corners|apuestas corners hoy|apuestas
croacia argentina|apuestas cuartos eurocopa|apuestas cuotas|apuestas cuotas
altas|apuestas cuotas bajas|apuestas de 1 euro|apuestas de
baloncesto|apuestas de baloncesto hoy|apuestas de baloncesto nba|apuestas
de baloncesto para hoy|apuestas de beisbol|apuestas de beisbol para hoy|apuestas de blackjack en linea|apuestas de
boxeo|apuestas de boxeo canelo|apuestas de boxeo en las vegas|apuestas de boxeo hoy|apuestas de boxeo online|apuestas
de caballo|apuestas de caballos|apuestas de caballos como funciona|apuestas de caballos como se juega|apuestas de caballos en colombia|apuestas de caballos en españa|apuestas de caballos en linea|apuestas de caballos españa|apuestas de caballos
ganador y colocado|apuestas de caballos internacionales|apuestas de caballos juegos|apuestas de caballos online|apuestas
de caballos online en venezuela|apuestas de caballos por internet|apuestas de caballos pronosticos|apuestas de caballos pronósticos|apuestas de carrera de caballos|apuestas de carreras de caballos|apuestas de carreras
de caballos online|apuestas de casino|apuestas de casino online|apuestas de casino por
internet|apuestas de champions league|apuestas de ciclismo|apuestas de colombia|apuestas de copa america|apuestas de corners|apuestas de deportes en linea|apuestas de deportes online|apuestas
de dinero|apuestas de esports|apuestas de eurocopa|apuestas de
europa league|apuestas de f1|apuestas de formula 1|apuestas de
futbol|apuestas de fútbol|apuestas de futbol app|apuestas de futbol argentina|apuestas de futbol colombia|apuestas de futbol en colombia|apuestas de futbol en directo|apuestas de futbol en linea|apuestas de futbol en vivo|apuestas de futbol español|apuestas de futbol gratis|apuestas de futbol hoy|apuestas de futbol
mundial|apuestas de futbol online|apuestas de fútbol
online|apuestas de futbol para hoy|apuestas de fútbol para hoy|apuestas de futbol para hoy seguras|apuestas de futbol para mañana|apuestas de futbol peru|apuestas
de futbol pronosticos|apuestas de fútbol pronósticos|apuestas de futbol seguras|apuestas de futbol seguras para hoy|apuestas
de futbol sin dinero|apuestas de galgos|apuestas de galgos como ganar|apuestas de
galgos en directo|apuestas de galgos online|apuestas de galgos trucos|apuestas de golf|apuestas de hockey|apuestas
de hockey sobre hielo|apuestas de hoy|apuestas de hoy seguras|apuestas de
juego|apuestas de juegos|apuestas de juegos deportivos|apuestas de juegos
online|apuestas de la champions league|apuestas de la copa américa|apuestas de la
eurocopa|apuestas de la europa league|apuestas de la liga|apuestas de la
liga bbva|apuestas de la liga española|apuestas de la nba|apuestas
de la nfl|apuestas de la ufc|apuestas de mlb|apuestas
de nba|apuestas de nba para hoy|apuestas de partidos|apuestas de partidos de futbol|apuestas de peleas ufc|apuestas de
perros en vivo|apuestas de perros virtuales|apuestas de
peru|apuestas de sistema|apuestas de sistema como funciona|apuestas de sistema explicacion|apuestas de sistema explicación|apuestas de tenis|apuestas de tenis de mesa|apuestas de tenis en directo|apuestas de tenis hoy|apuestas de tenis
para hoy|apuestas de tenis pronosticos|apuestas de tenis seguras|apuestas de
todo tipo|apuestas de ufc|apuestas de ufc hoy|apuestas del boxeo|apuestas del clasico|apuestas del
clasico real madrid barca|apuestas del dia|apuestas del día|apuestas del dia de hoy|apuestas del dia deportivas|apuestas del dia futbol|apuestas
del mundial|apuestas del partido de hoy|apuestas del
real madrid|apuestas del rey|apuestas del sistema|apuestas deporte|apuestas deportes|apuestas deportiva|apuestas deportivas|apuestas deportivas 1 euro|apuestas deportivas 10 euros gratis|apuestas deportivas 100 seguras|apuestas deportivas 1×2|apuestas deportivas
android|apuestas deportivas app|apuestas deportivas apps|apuestas deportivas argentina|apuestas deportivas argentina futbol|apuestas
deportivas argentina legal|apuestas deportivas atletico de madrid|apuestas deportivas
baloncesto|apuestas deportivas barca madrid|apuestas deportivas barcelona|apuestas deportivas beisbol|apuestas deportivas bono|apuestas deportivas bono bienvenida|apuestas deportivas bono de bienvenida|apuestas deportivas bono sin deposito|apuestas deportivas bonos de bienvenida|apuestas deportivas boxeo|apuestas deportivas caballos|apuestas deportivas calculadora|apuestas deportivas campeon liga|apuestas deportivas casino|apuestas deportivas casino barcelona|apuestas deportivas casino
online|apuestas deportivas cerca de mi|apuestas deportivas champions league|apuestas deportivas chile|apuestas deportivas
ciclismo|apuestas deportivas colombia|apuestas deportivas com|apuestas deportivas com foro|apuestas deportivas com
pronosticos|apuestas deportivas combinadas|apuestas deportivas combinadas para hoy|apuestas deportivas como se
juega|apuestas deportivas comparador|apuestas deportivas
con bono gratis|apuestas deportivas con bonos gratis|apuestas deportivas con dinero ficticio|apuestas deportivas con paypal|apuestas deportivas con puntos
virtuales|apuestas deportivas consejos|apuestas deportivas consejos para ganar|apuestas deportivas copa america|apuestas
deportivas copa del rey|apuestas deportivas copa libertadores|apuestas
deportivas copa mundial|apuestas deportivas corners|apuestas deportivas cual es la mejor|apuestas deportivas cuotas altas|apuestas deportivas de baloncesto|apuestas deportivas
de boxeo|apuestas deportivas de colombia|apuestas deportivas de futbol|apuestas
deportivas de nba|apuestas deportivas de nhl|apuestas deportivas de peru|apuestas deportivas de tenis|apuestas deportivas del dia|apuestas deportivas dinero ficticio|apuestas deportivas directo|apuestas deportivas doble oportunidad|apuestas
deportivas en argentina|apuestas deportivas en chile|apuestas deportivas en colombia|apuestas deportivas en directo|apuestas deportivas en españa|apuestas deportivas en español|apuestas deportivas en linea|apuestas deportivas en línea|apuestas
deportivas en peru|apuestas deportivas en perú|apuestas deportivas en sevilla|apuestas deportivas en uruguay|apuestas
deportivas en vivo|apuestas deportivas es|apuestas deportivas es pronosticos|apuestas deportivas españa|apuestas deportivas españolas|apuestas
deportivas esports|apuestas deportivas estadisticas|apuestas deportivas
estrategias|apuestas deportivas estrategias seguras|apuestas deportivas eurocopa|apuestas deportivas europa league|apuestas deportivas f1|apuestas deportivas faciles de ganar|apuestas deportivas
formula 1|apuestas deportivas foro|apuestas
deportivas foro futbol|apuestas deportivas foro tenis|apuestas deportivas francia argentina|apuestas deportivas futbol|apuestas deportivas fútbol|apuestas deportivas futbol argentino|apuestas deportivas futbol colombia|apuestas deportivas futbol español|apuestas deportivas gana|apuestas deportivas ganadas|apuestas deportivas
ganar dinero seguro|apuestas deportivas gane|apuestas deportivas
golf|apuestas deportivas gratis|apuestas deportivas gratis
con premios|apuestas deportivas gratis hoy|apuestas deportivas gratis sin deposito|apuestas
deportivas handicap|apuestas deportivas handicap asiatico|apuestas deportivas hoy|apuestas
deportivas impuestos|apuestas deportivas interior argentina|apuestas deportivas juegos olimpicos|apuestas deportivas la
liga|apuestas deportivas legales|apuestas deportivas legales en colombia|apuestas deportivas libres
de impuestos|apuestas deportivas licencia españa|apuestas deportivas liga española|apuestas
deportivas listado|apuestas deportivas listado clasico|apuestas deportivas madrid|apuestas deportivas mas
seguras|apuestas deportivas mejor pagadas|apuestas deportivas mejores|apuestas deportivas mejores app|apuestas deportivas mejores casas|apuestas deportivas mejores
cuotas|apuestas deportivas mejores paginas|apuestas deportivas mexico|apuestas deportivas méxico|apuestas
deportivas mlb|apuestas deportivas mlb hoy|apuestas deportivas multiples|apuestas deportivas mundial|apuestas deportivas murcia|apuestas deportivas nba|apuestas deportivas
nba hoy|apuestas deportivas nfl|apuestas deportivas nhl|apuestas deportivas nuevas|apuestas deportivas ofertas|apuestas
deportivas online|apuestas deportivas online argentina|apuestas deportivas online chile|apuestas deportivas online
colombia|apuestas deportivas online en colombia|apuestas deportivas online españa|apuestas deportivas online mexico|apuestas deportivas
online paypal|apuestas deportivas online peru|apuestas
deportivas online por internet|apuestas deportivas pago
paypal|apuestas deportivas para ganar dinero|apuestas deportivas para hoy|apuestas deportivas para hoy
pronosticos|apuestas deportivas partido suspendido|apuestas deportivas partidos
de hoy|apuestas deportivas paypal|apuestas deportivas peru|apuestas deportivas perú|apuestas
deportivas peru vs ecuador|apuestas deportivas predicciones|apuestas
deportivas promociones|apuestas deportivas pronostico|apuestas deportivas
pronóstico|apuestas deportivas pronostico
hoy|apuestas deportivas pronosticos|apuestas deportivas pronósticos|apuestas deportivas pronosticos expertos|apuestas deportivas pronosticos
gratis|apuestas deportivas pronosticos nba|apuestas deportivas pronosticos tenis|apuestas deportivas que aceptan paypal|apuestas deportivas real madrid|apuestas deportivas regalo bienvenida|apuestas deportivas resultado exacto|apuestas deportivas
resultados|apuestas deportivas rugby|apuestas deportivas seguras|apuestas deportivas seguras foro|apuestas deportivas seguras hoy|apuestas
deportivas seguras para hoy|apuestas deportivas seguras telegram|apuestas deportivas sevilla|apuestas deportivas simulador
eurocopa|apuestas deportivas sin deposito|apuestas deportivas sin deposito inicial|apuestas deportivas sin dinero|apuestas deportivas sin dinero real|apuestas
deportivas sin registro|apuestas deportivas stake|apuestas deportivas
stake 10|apuestas deportivas telegram españa|apuestas deportivas tenis|apuestas deportivas tenis de mesa|apuestas deportivas tenis
foro|apuestas deportivas tenis hoy|apuestas deportivas tips|apuestas
deportivas tipster|apuestas deportivas ufc|apuestas deportivas uruguay|apuestas deportivas valencia|apuestas deportivas valencia barcelona|apuestas deportivas venezuela|apuestas deportivas virtuales|apuestas deportivas y casino|apuestas deportivas y
casino online|apuestas deportivas.com|apuestas deportivas.com foro|apuestas deportivas.es|apuestas deportivos pronosticos|apuestas deposito minimo 1 euro|apuestas descenso a
segunda|apuestas descenso a segunda b|apuestas descenso la liga|apuestas descenso primera division|apuestas descenso segunda|apuestas dia|apuestas diarias seguras|apuestas dinero|apuestas dinero ficticio|apuestas dinero real|apuestas dinero virtual|apuestas directas|apuestas
directo|apuestas directo futbol|apuestas division de honor juvenil|apuestas
dnb|apuestas doble oportunidad|apuestas doble resultado|apuestas dobles|apuestas dobles y triples|apuestas dortmund barcelona|apuestas draft nba|apuestas draft nfl|apuestas ecuador vs argentina|apuestas ecuador vs venezuela|apuestas egipto
uruguay|apuestas el clasico|apuestas elecciones venezuela|apuestas empate|apuestas
en baloncesto|apuestas en barcelona|apuestas en beisbol|apuestas en boxeo|apuestas
en caballos|apuestas en carreras de caballos|apuestas en casino|apuestas en casino online|apuestas en casinos|apuestas en casinos online|apuestas
en chile|apuestas en ciclismo|apuestas en colombia|apuestas en colombia
de futbol|apuestas en directo|apuestas en directo futbol|apuestas en directo pronosticos|apuestas en el futbol|apuestas en el tenis|apuestas en españa|apuestas en esports|apuestas en eventos deportivos virtuales|apuestas en golf|apuestas
en juegos|apuestas en la champions league|apuestas en la eurocopa|apuestas en la liga|apuestas en la
nba|apuestas en la nfl|apuestas en las vegas mlb|apuestas en las vegas
nfl|apuestas en linea|apuestas en línea|apuestas en linea argentina|apuestas en linea boxeo|apuestas en linea
chile|apuestas en linea colombia|apuestas en línea de fútbol|apuestas en linea deportivas|apuestas en linea españa|apuestas en linea estados unidos|apuestas en linea
futbol|apuestas en linea mexico|apuestas en línea méxico|apuestas en linea mundial|apuestas en linea peru|apuestas en linea usa|apuestas en los esports|apuestas en madrid|apuestas en méxico|apuestas en mexico
online|apuestas en nba|apuestas en partidos de futbol|apuestas en partidos de futbol en vivo|apuestas en partidos
de tenis en directo|apuestas en perú|apuestas en sevilla|apuestas en sistema|apuestas en stake|apuestas en tenis|apuestas en tenis de mesa|apuestas en valencia|apuestas en vivo|apuestas en vivo argentina|apuestas
en vivo casino|apuestas en vivo futbol|apuestas en vivo fútbol|apuestas en vivo nba|apuestas en vivo peru|apuestas en vivo
tenis|apuestas en vivo ufc|apuestas equipo mbappe|apuestas equipos de futbol|apuestas españa|apuestas españa alemania|apuestas españa alemania eurocopa|apuestas españa croacia|apuestas españa
eurocopa|apuestas españa francia|apuestas españa francia
eurocopa|apuestas españa gana el mundial|apuestas españa gana eurocopa|apuestas españa gana mundial|apuestas españa georgia|apuestas españa holanda|apuestas españa inglaterra|apuestas españa inglaterra cuotas|apuestas
españa inglaterra eurocopa|apuestas españa italia|apuestas españa mundial|apuestas españa paises
bajos|apuestas español|apuestas español oviedo|apuestas espanyol barcelona|apuestas espanyol betis|apuestas espanyol villarreal|apuestas esport|apuestas esports|apuestas esports colombia|apuestas esports españa|apuestas esports fifa|apuestas esports gratis|apuestas
esports lol|apuestas esports peru|apuestas esports valorant|apuestas estadisticas|apuestas estrategias|apuestas euro|apuestas euro copa|apuestas eurocopa|apuestas eurocopa campeon|apuestas eurocopa españa|apuestas eurocopa favoritos|apuestas eurocopa femenina|apuestas eurocopa final|apuestas eurocopa ganador|apuestas eurocopa hoy|apuestas eurocopa sub 21|apuestas euroliga
baloncesto|apuestas euroliga pronosticos|apuestas europa league|apuestas europa
league hoy|apuestas europa league pronosticos|apuestas
europa league pronósticos|apuestas euros|apuestas f1 abu
dhabi|apuestas f1 bahrein|apuestas f1 canada|apuestas f1 china|apuestas f1 cuotas|apuestas f1 hoy|apuestas f1 las vegas|apuestas f1
miami|apuestas f1 monaco|apuestas faciles de ganar|apuestas
fáciles de ganar|apuestas faciles para ganar|apuestas favoritas|apuestas favorito champions|apuestas favoritos champions|apuestas favoritos eurocopa|apuestas favoritos mundial|apuestas fc barcelona|apuestas final champions cuotas|apuestas final champions league|apuestas final champions peru|apuestas final copa|apuestas
final copa america|apuestas final copa de europa|apuestas final copa del
rey|apuestas final copa europa|apuestas final copa libertadores|apuestas final copa rey|apuestas final de copa|apuestas final de copa del rey|apuestas final del mundial|apuestas final euro|apuestas final eurocopa|apuestas final
europa league|apuestas final libertadores|apuestas final mundial|apuestas final nba|apuestas final rugby|apuestas final uefa europa league|apuestas final.mundial|apuestas finales de conferencia nfl|apuestas
finales nba|apuestas fiorentina betis|apuestas formula|apuestas
formula 1|apuestas fórmula 1|apuestas fórmula 1 pronósticos|apuestas formula uno|apuestas foro|apuestas
foro nba|apuestas francia argentina|apuestas francia españa|apuestas futbol|apuestas fútbol|apuestas futbol americano|apuestas futbol americano nfl|apuestas futbol argentina|apuestas futbol argentino|apuestas futbol champions league|apuestas
futbol chile|apuestas futbol colombia|apuestas futbol consejos|apuestas futbol en directo|apuestas fútbol en directo|apuestas futbol en vivo|apuestas fútbol
en vivo|apuestas futbol españa|apuestas futbol español|apuestas fútbol español|apuestas futbol eurocopa|apuestas futbol femenino|apuestas
futbol foro|apuestas futbol gratis|apuestas futbol hoy|apuestas
fútbol hoy|apuestas futbol juegos olimpicos|apuestas futbol mexico|apuestas futbol mundial|apuestas futbol online|apuestas
futbol para hoy|apuestas futbol peru|apuestas futbol pronosticos|apuestas futbol sala|apuestas futbol telegram|apuestas futbol
virtual|apuestas galgos|apuestas galgos en directo|apuestas galgos hoy|apuestas galgos online|apuestas galgos
pronosticos|apuestas galgos trucos|apuestas gana|apuestas gana colombia|apuestas gana resultados|apuestas
ganadas|apuestas ganadas hoy|apuestas ganador champions league|apuestas ganador copa america|apuestas ganador copa del rey|apuestas ganador copa del rey baloncesto|apuestas ganador copa libertadores|apuestas
ganador de la eurocopa|apuestas ganador de la liga|apuestas ganador del mundial|apuestas ganador eurocopa|apuestas ganador europa
league|apuestas ganador f1|apuestas ganador la liga|apuestas ganador liga española|apuestas ganador mundial|apuestas ganador
mundial baloncesto|apuestas ganador mundial f1|apuestas ganador nba|apuestas ganadores
eurocopa|apuestas ganadores mundial|apuestas ganar champions|apuestas ganar
eurocopa|apuestas ganar liga|apuestas ganar
mundial|apuestas ganar nba|apuestas getafe valencia|apuestas ghana uruguay|apuestas girona|apuestas girona athletic|apuestas girona betis|apuestas girona campeon de liga|apuestas girona
campeon liga|apuestas girona gana la liga|apuestas
girona real madrid|apuestas girona real sociedad|apuestas goleador eurocopa|apuestas goleadores eurocopa|apuestas goles
asiaticos|apuestas golf|apuestas golf masters|apuestas golf pga|apuestas granada barcelona|apuestas grand slam de tenis|apuestas
gratis|apuestas gratis casino|apuestas gratis con premios|apuestas gratis hoy|apuestas
gratis para hoy|apuestas gratis por registro|apuestas gratis puntos|apuestas gratis regalos|apuestas gratis sin deposito|apuestas gratis sin depósito|apuestas gratis sin ingreso|apuestas gratis sports|apuestas gratis y ganar
premios|apuestas grupo a eurocopa|apuestas grupos eurocopa|apuestas handicap|apuestas
handicap asiatico|apuestas handicap baloncesto|apuestas handicap como funciona|apuestas handicap
nba|apuestas handicap nfl|apuestas hipicas
online|apuestas hípicas online|apuestas hipicas venezuela|apuestas hockey|apuestas hockey
hielo|apuestas hockey patines|apuestas hockey sobre hielo|apuestas holanda argentina|apuestas holanda vs argentina|apuestas hoy|apuestas hoy champions|apuestas hoy futbol|apuestas
hoy nba|apuestas hoy pronosticos|apuestas hoy seguras|apuestas impuestos|apuestas inglaterra paises bajos|apuestas inter barca|apuestas inter barcelona|apuestas juego|apuestas juegos|apuestas juegos en linea|apuestas juegos olimpicos|apuestas juegos olímpicos|apuestas juegos
olimpicos baloncesto|apuestas juegos online|apuestas juegos virtuales|apuestas jugador sevilla|apuestas jugadores
nba|apuestas kings league americas|apuestas
la liga|apuestas la liga española|apuestas la liga hoy|apuestas la liga santander|apuestas las
vegas mlb|apuestas las vegas nba|apuestas las vegas nfl|apuestas league of legends mundial|apuestas legal|apuestas legales|apuestas
legales en colombia|apuestas legales en españa|apuestas legales en estados unidos|apuestas legales españa|apuestas leganes betis|apuestas libertadores|apuestas licencia|apuestas liga 1 peru|apuestas
liga argentina|apuestas liga bbva pronosticos|apuestas liga de campeones|apuestas liga de campeones de baloncesto|apuestas liga
de campeones de hockey|apuestas liga españa|apuestas liga
española|apuestas liga santander pronosticos|apuestas ligas de futbol|apuestas linea|apuestas linea de
gol|apuestas liverpool barcelona|apuestas liverpool real madrid|apuestas lol mundial|apuestas madrid|apuestas
madrid arsenal|apuestas madrid atletico|apuestas madrid atletico champions|apuestas madrid barca|apuestas madrid barça|apuestas
madrid barca hoy|apuestas madrid barca supercopa|apuestas madrid
barcelona|apuestas madrid barsa|apuestas madrid bayern|apuestas madrid betis|apuestas madrid borussia|apuestas madrid campeon champions|apuestas madrid celta|apuestas madrid city|apuestas madrid dortmund|apuestas madrid
gana la liga|apuestas madrid gana liga|apuestas madrid hoy|apuestas madrid liverpool|apuestas
madrid osasuna|apuestas madrid sevilla|apuestas madrid valencia|apuestas madrid vs arsenal|apuestas
madrid vs barcelona|apuestas mallorca osasuna|apuestas mallorca real sociedad|apuestas manchester athletic|apuestas manchester city real madrid|apuestas mas faciles de ganar|apuestas mas seguras|apuestas mas seguras para hoy|apuestas masters de golf|apuestas masters de tenis|apuestas maximo goleador eurocopa|apuestas
maximo goleador mundial|apuestas mejor jugador eurocopa|apuestas mejores casinos online|apuestas mexico|apuestas méxico|apuestas mexico polonia|apuestas méxico polonia|apuestas mlb|apuestas mlb hoy|apuestas mlb
las vegas|apuestas mlb para hoy|apuestas mlb pronosticos|apuestas
mlb usa|apuestas mma ufc|apuestas momios|apuestas multiples|apuestas múltiples|apuestas multiples como funcionan|apuestas multiples el gordo|apuestas multiples futbol|apuestas
mundial|apuestas mundial 2026|apuestas mundial baloncesto|apuestas mundial balonmano|apuestas mundial brasil|apuestas mundial campeon|apuestas mundial ciclismo|apuestas mundial clubes|apuestas mundial de baloncesto|apuestas mundial de ciclismo|apuestas mundial
de clubes|apuestas mundial de futbol|apuestas mundial de fútbol|apuestas mundial de rugby|apuestas mundial f1|apuestas
mundial favoritos|apuestas mundial femenino|apuestas mundial formula 1|apuestas mundial
futbol|apuestas mundial ganador|apuestas mundial lol|apuestas mundial moto gp|apuestas mundial motogp|apuestas mundial rugby|apuestas mundial sub 17|apuestas mundiales|apuestas mundialistas|apuestas mvp eurocopa|apuestas mvp nba|apuestas mvp
nfl|apuestas nacionales de colombia|apuestas nba|apuestas nba
all star|apuestas nba campeon|apuestas nba consejos|apuestas nba esta noche|apuestas nba
finals|apuestas nba gratis|apuestas nba hoy|apuestas nba hoy jugadores|apuestas
nba hoy pronosticos|apuestas nba para hoy|apuestas nba playoffs|apuestas nba pronosticos|apuestas nba pronósticos|apuestas nba pronosticos hoy|apuestas nba tipster|apuestas
nfl|apuestas nfl hoy|apuestas nfl las vegas|apuestas nfl playoffs|apuestas nfl pronosticos|apuestas nfl pronósticos|apuestas nfl semana 4|apuestas nfl super bowl|apuestas nhl|apuestas nhl pronosticos|apuestas octavos eurocopa|apuestas ofertas|apuestas online|apuestas online argentina|apuestas online argentina
legal|apuestas online bono|apuestas online bono bienvenida|apuestas online boxeo|apuestas
online caballos|apuestas online carreras de caballos|apuestas online casino|apuestas online champions league|apuestas online chile|apuestas online ciclismo|apuestas online colombia|apuestas online comparativa|apuestas online con paypal|apuestas online
de caballos|apuestas online deportivas|apuestas online en argentina|apuestas online en peru|apuestas online espana|apuestas online españa|apuestas online
esports|apuestas online foro|apuestas online futbol|apuestas online futbol
españa|apuestas online golf|apuestas online gratis|apuestas online gratis sin deposito|apuestas online juegos|apuestas online mexico|apuestas online mma|apuestas online
movil|apuestas online nba|apuestas online net|apuestas online nuevas|apuestas online opiniones|apuestas online paypal|apuestas online peru|apuestas
online seguras|apuestas online sin dinero|apuestas online sin registro|apuestas online tenis|apuestas online ufc|apuestas online uruguay|apuestas online venezuela|apuestas open britanico golf|apuestas osasuna athletic|apuestas
osasuna barcelona|apuestas osasuna real madrid|apuestas
osasuna sevilla|apuestas osasuna valencia|apuestas over|apuestas over
2.5|apuestas over under|apuestas paginas|apuestas
pago anticipado|apuestas paises bajos ecuador|apuestas paises bajos inglaterra|apuestas países
bajos qatar|apuestas para boxeo|apuestas para
champions league|apuestas para el clasico|apuestas para el dia de hoy|apuestas para el
mundial|apuestas para el partido de hoy|apuestas para eurocopa|apuestas para europa league|apuestas para futbol|apuestas para ganar|apuestas para ganar
dinero|apuestas para ganar dinero facil|apuestas para ganar en la ruleta|apuestas para
ganar la champions|apuestas para ganar la eurocopa|apuestas para
ganar la europa league|apuestas para ganar la liga|apuestas para ganar siempre|apuestas para hacer|apuestas para hoy|apuestas para hoy de futbol|apuestas para hoy
europa league|apuestas para hoy futbol|apuestas para juegos|apuestas para la champions league|apuestas
para la copa del rey|apuestas para la eurocopa|apuestas para la europa league|apuestas para la final de la eurocopa|apuestas para la nba
hoy|apuestas para los partidos de hoy|apuestas para partidos
de hoy|apuestas para ufc|apuestas partido|apuestas partido aplazado|apuestas partido champions|apuestas partido colombia|apuestas partido españa marruecos|apuestas partido mundial|apuestas partido suspendido|apuestas partidos|apuestas
partidos champions league|apuestas partidos csgo|apuestas partidos
de futbol|apuestas partidos de futbol hoy|apuestas partidos de hoy|apuestas partidos eurocopa|apuestas partidos futbol|apuestas partidos hoy|apuestas partidos mundial|apuestas paypal|apuestas peleas de
boxeo|apuestas peru|apuestas perú|apuestas peru brasil|apuestas peru chile|apuestas
peru paraguay|apuestas peru uruguay|apuestas peru vs chile|apuestas peru vs colombia|apuestas pichichi
eurocopa|apuestas plataforma|apuestas playoff|apuestas playoff ascenso|apuestas playoff ascenso
a primera|apuestas playoff nba|apuestas playoff segunda|apuestas playoff segunda b|apuestas playoffs nba|apuestas playoffs nfl|apuestas polonia argentina|apuestas por argentina|apuestas por internet mexico|apuestas por
internet para ganar dinero|apuestas por paypal|apuestas por ronda boxeo|apuestas
por sistema|apuestas portugal uruguay|apuestas pre partido|apuestas predicciones|apuestas predicciones futbol|apuestas primera division|apuestas primera division españa|apuestas promociones|apuestas pronostico|apuestas pronosticos|apuestas pronosticos deportivos|apuestas pronosticos deportivos tenis|apuestas pronosticos futbol|apuestas pronosticos gratis|apuestas pronosticos nba|apuestas pronosticos tenis|apuestas prorroga|apuestas psg barca|apuestas
psg barcelona|apuestas puntos por tarjetas|apuestas puntos tarjetas|apuestas que aceptan paypal|apuestas que es handicap|apuestas que puedes hacer
con tu novia|apuestas que siempre ganaras|apuestas que significa|apuestas quien bajara a segunda|apuestas quién bajara a segunda|apuestas quien gana el mundial|apuestas quien gana eurocopa|apuestas quien gana la champions|apuestas quien gana la eurocopa|apuestas quien gana la liga|apuestas quien ganara el mundial|apuestas quién ganará el mundial|apuestas
quien ganara la champions|apuestas quien ganara la eurocopa|apuestas quien ganara la liga|apuestas rayo barcelona|apuestas real madrid|apuestas
real madrid arsenal|apuestas real madrid athletic|apuestas real madrid
atletico|apuestas real madrid atletico champions|apuestas
real madrid atletico de madrid|apuestas real madrid atlético
de madrid|apuestas real madrid atletico madrid|apuestas real madrid barcelona|apuestas real madrid bayern|apuestas real madrid betis|apuestas real madrid borussia|apuestas real madrid campeon champions|apuestas real madrid celta|apuestas real madrid champions|apuestas real madrid city|apuestas real madrid girona|apuestas real madrid hoy|apuestas real madrid
liverpool|apuestas real madrid manchester city|apuestas real madrid osasuna|apuestas real madrid
real sociedad|apuestas real madrid valencia|apuestas real madrid villarreal|apuestas
real madrid vs arsenal|apuestas real madrid vs atletico|apuestas real
madrid vs atlético|apuestas real madrid vs atletico madrid|apuestas real madrid vs
barcelona|apuestas real madrid vs betis|apuestas real madrid vs sevilla|apuestas real madrid vs valencia|apuestas real sociedad|apuestas
real sociedad athletic|apuestas real sociedad barcelona|apuestas real sociedad
betis|apuestas real sociedad psg|apuestas real sociedad real madrid|apuestas real sociedad valencia|apuestas recomendadas hoy|apuestas regalo de bienvenida|apuestas registro|apuestas resultado exacto|apuestas resultados|apuestas resultados eurocopa|apuestas
retirada tenis|apuestas roma barcelona|apuestas
roma sevilla|apuestas rugby|apuestas rugby mundial|apuestas rugby world cup|apuestas ruleta seguras|apuestas segunda|apuestas segunda b|apuestas
segunda division|apuestas segunda división|apuestas segunda division b|apuestas segunda division españa|apuestas seguras|apuestas seguras baloncesto|apuestas seguras calculadora|apuestas seguras en la ruleta|apuestas seguras eurocopa|apuestas seguras foro|apuestas seguras futbol|apuestas seguras futbol hoy|apuestas seguras gratis|apuestas seguras hoy|apuestas seguras hoy futbol|apuestas seguras nba|apuestas seguras nba
hoy|apuestas seguras para este fin de semana|apuestas seguras para ganar
dinero|apuestas seguras para hoy|apuestas seguras para hoy fútbol|apuestas
seguras para hoy pronósticos|apuestas seguras para mañana|apuestas seguras ruleta|apuestas
seguras telegram|apuestas seguras tenis|apuestas semifinales eurocopa|apuestas senegal paises bajos|apuestas sevilla|apuestas sevilla athletic|apuestas sevilla atletico de madrid|apuestas sevilla barcelona|apuestas sevilla betis|apuestas
sevilla campeon liga|apuestas sevilla celta|apuestas sevilla gana la liga|apuestas sevilla girona|apuestas sevilla inter|apuestas sevilla jugador|apuestas sevilla juventus|apuestas sevilla leganes|apuestas sevilla madrid|apuestas
sevilla manchester united|apuestas sevilla osasuna|apuestas sevilla real madrid|apuestas sevilla real sociedad|apuestas sevilla roma|apuestas sevilla valencia|apuestas significa|apuestas simples ejemplos|apuestas simples o
combinadas|apuestas sin deposito|apuestas sin deposito inicial|apuestas sin deposito minimo|apuestas sin dinero|apuestas sin dinero real|apuestas
sin empate|apuestas sin empate que significa|apuestas sin ingreso minimo|apuestas sin registro|apuestas sistema|apuestas sistema calculadora|apuestas sistema como
funciona|apuestas sistema trixie|apuestas sociedad|apuestas
sorteo copa del rey|apuestas stake|apuestas stake 10|apuestas stake 10 hoy|apuestas super bowl favorito|apuestas super
rugby|apuestas supercopa españa|apuestas superliga argentina|apuestas tarjeta roja|apuestas tarjetas|apuestas tarjetas
amarillas|apuestas tenis|apuestas tenis atp|apuestas tenis consejos|apuestas tenis copa
davis|apuestas tenis de mesa|apuestas tenis
de mesa pronosticos|apuestas tenis en vivo|apuestas tenis femenino|apuestas tenis hoy|apuestas tenis itf|apuestas
tenis pronosticos|apuestas tenis pronósticos|apuestas tenis retirada|apuestas tenis roland garros|apuestas tenis seguras|apuestas tenis wimbledon|apuestas
tenis wta|apuestas tercera division|apuestas tercera division españa|apuestas tipos|apuestas tips|apuestas tipster|apuestas
tipster para hoy|apuestas topuria holloway cuotas|apuestas torneos de golf|apuestas torneos de
tenis|apuestas trucos|apuestas uefa champions league|apuestas uefa europa league|apuestas ufc|apuestas ufc chile|apuestas ufc como funciona|apuestas ufc hoy|apuestas
ufc ilia topuria|apuestas ufc online|apuestas ufc pronósticos|apuestas
ufc telegram|apuestas ufc topuria|apuestas under over|apuestas unionistas villarreal|apuestas uruguay|apuestas
uruguay colombia|apuestas uruguay corea|apuestas uruguay vs colombia|apuestas us open golf|apuestas us open tenis|apuestas valencia|apuestas
valencia barcelona|apuestas valencia betis|apuestas valencia madrid|apuestas valencia real madrid|apuestas valladolid barcelona|apuestas valladolid valencia|apuestas valor app|apuestas valor en directo|apuestas
valor galgos|apuestas venezuela|apuestas venezuela argentina|apuestas venezuela bolivia|apuestas venezuela ecuador|apuestas
villarreal|apuestas villarreal athletic|apuestas villarreal barcelona|apuestas villarreal bayern|apuestas villarreal betis|apuestas villarreal liverpool|apuestas villarreal manchester|apuestas villarreal manchester united|apuestas villarreal vs real
madrid|apuestas virtuales|apuestas virtuales
colombia|apuestas virtuales futbol|apuestas virtuales sin dinero|apuestas vivo|apuestas vuelta a españa|apuestas vuelta españa|apuestas william hill partidos de hoy|apuestas y casino|apuestas y casinos|apuestas y juegos de azar|apuestas y pronosticos|apuestas y pronosticos de futbol|apuestas y pronosticos deportivos|apuestas y resultados|apuestas-deportivas|apuestas-deportivas.es pronosticos|arbitro nba apuestas|argentina apuestas|argentina
colombia apuestas|argentina croacia apuestas|argentina francia apuestas|argentina mexico apuestas|argentina peru apuestas|argentina uruguay apuestas|argentina vs
bolivia apuestas|argentina vs chile apuestas|argentina vs colombia apuestas|argentina vs francia apuestas|argentina vs.
colombia apuestas|asi se gana en las apuestas deportivas|asiatico apuestas|asiatico en apuestas|asiaticos apuestas|athletic barcelona apuestas|athletic manchester united apuestas|athletic osasuna apuestas|athletic real madrid apuestas|atletico barcelona apuestas|atletico de madrid apuestas|atlético de madrid apuestas|atletico de madrid real madrid apuestas|atletico de
madrid vs barcelona apuestas|atletico madrid real madrid apuestas|atletico
madrid vs real madrid apuestas|atletico real madrid apuestas|atletico vs real madrid apuestas|avisador de cuotas apuestas|bajada de cuotas apuestas|baloncesto apuestas|barbastro barcelona apuestas|barca apuestas|barca bayern apuestas|barca inter apuestas|barca madrid apuestas|barça madrid apuestas|barca vs atletico apuestas|barca vs madrid apuestas|barca vs real madrid apuestas|barcelona –
real madrid apuestas|barcelona apuestas|barcelona atletico
apuestas|barcelona atletico de madrid apuestas|barcelona atletico madrid apuestas|barcelona betis apuestas|barcelona casa de apuestas|barcelona
inter apuestas|barcelona psg apuestas|barcelona real madrid apuestas|barcelona real sociedad apuestas|barcelona sevilla apuestas|barcelona valencia apuestas|barcelona vs athletic bilbao apuestas|barcelona vs atlético madrid apuestas|barcelona vs betis apuestas|barcelona vs celta de vigo apuestas|barcelona
vs espanyol apuestas|barcelona vs girona apuestas|barcelona vs madrid apuestas|barcelona
vs real madrid apuestas|barcelona vs real sociedad apuestas|barcelona vs sevilla
apuestas|barcelona vs villarreal apuestas|base de datos cuotas apuestas deportivas|bayern real madrid
apuestas|beisbol apuestas|best america apuestas|bet apuestas chile|bet apuestas en vivo|betis – chelsea apuestas (Alica)|betis apuestas|betis
barcelona apuestas|betis chelsea apuestas|betis madrid apuestas|betis sevilla apuestas|betsson tu sitio de apuestas online|blog apuestas baloncesto|blog apuestas ciclismo|blog apuestas nba|blog apuestas tenis|blog de apuestas
de tenis|bono apuestas|bono apuestas deportivas|bono apuestas deportivas sin deposito|bono apuestas gratis|bono
apuestas gratis sin deposito|bono apuestas sin deposito|bono
bienvenida apuestas|bono bienvenida apuestas deportivas|bono bienvenida apuestas
españa|bono bienvenida apuestas sin deposito|bono bienvenida
apuestas sin depósito|bono bienvenida casa apuestas|bono bienvenida casa de apuestas|bono bienvenida marca
apuestas|bono casa apuestas|bono casa de apuestas|bono casa de apuestas sin ingreso|bono casas de
apuestas|bono de apuestas|bono de apuestas gratis sin deposito|bono de
bienvenida apuestas|bono de bienvenida apuestas deportivas|bono de bienvenida casa de apuestas|bono de bienvenida casas de apuestas|bono de casas
de apuestas|bono de registro apuestas|bono de registro apuestas deportivas|bono
de registro casa de apuestas|bono gratis apuestas|bono marca apuestas|bono por registro apuestas|bono
por registro apuestas deportivas|bono por registro casa de apuestas|bono registro apuestas|bono sin deposito apuestas|bono
sin depósito apuestas|bono sin deposito apuestas deportivas|bono
sin depósito apuestas deportivas|bono sin deposito casa de apuestas|bono
sin deposito marca apuestas|bono sin ingreso apuestas|bono sin ingreso apuestas deportivas|bonos apuestas|bonos
apuestas colombia|bonos apuestas deportivas|bonos apuestas deportivas sin deposito|bonos apuestas
gratis|bonos apuestas sin deposito|bonos apuestas sin depósito|bonos bienvenida apuestas|bonos bienvenida casas apuestas|bonos bienvenida casas de apuestas|bonos casa
de apuestas|bonos casas apuestas|bonos casas
de apuestas|bonos casas de apuestas colombia|bonos casas de apuestas deportivas|bonos casas
de apuestas españa|bonos casas de apuestas nuevas|bonos casas de apuestas sin deposito|bonos casas de apuestas
sin depósito|bonos de apuestas|bonos de apuestas deportivas|bonos
de apuestas gratis|bonos de apuestas sin deposito|bonos de
bienvenida apuestas|bonos de bienvenida apuestas deportivas|bonos de bienvenida casa de apuestas|bonos de bienvenida casas
de apuestas|bonos de bienvenida de casas de apuestas|bonos de bienvenida en casas de apuestas|bonos de casas de apuestas|bonos de
casas de apuestas sin deposito|bonos en casa de apuestas|bonos en casas de apuestas sin deposito|bonos gratis apuestas|bonos gratis
apuestas deportivas|bonos gratis casas de apuestas|bonos gratis sin deposito apuestas|bonos paginas de apuestas|bonos registro casas de apuestas|bonos sin deposito apuestas|bonos sin depósito apuestas|bonos sin deposito apuestas deportivas|bonos sin deposito
casas de apuestas|bot de apuestas deportivas gratis|boxeo
apuestas|brasil colombia apuestas|brasil peru
apuestas|brasil vs colombia apuestas|buenas apuestas para hoy|buscador cuotas apuestas|buscador de apuestas
seguras|buscador de cuotas apuestas|buscador de cuotas de apuestas|buscar apuestas seguras|caballos apuestas|calculador
de apuestas|calculador de cuotas apuestas|calculadora apuestas|calculadora apuestas combinadas|calculadora
apuestas de sistema|calculadora apuestas deportivas|calculadora apuestas deportivas seguras|calculadora apuestas multiples|calculadora apuestas segura|calculadora apuestas seguras|calculadora apuestas sistema|calculadora apuestas
yankee|calculadora arbitraje apuestas|calculadora cubrir apuestas|calculadora cuotas apuestas|calculadora de
apuestas|calculadora de apuestas combinadas|calculadora
de apuestas de futbol|calculadora de apuestas de sistema|calculadora de apuestas deportivas|calculadora
de apuestas multiples|calculadora de apuestas seguras|calculadora de
apuestas sistema|calculadora de apuestas surebets|calculadora
de arbitraje apuestas|calculadora de cuotas apuestas|calculadora
de cuotas de apuestas|calculadora para apuestas deportivas|calculadora poisson apuestas|calculadora poisson apuestas deportivas|calculadora poisson para apuestas|calculadora scalping
apuestas deportivas|calculadora sistema apuestas|calculadora stake apuestas|calculadora trading apuestas|calcular apuestas|calcular apuestas deportivas|calcular apuestas futbol|calcular apuestas sistema|calcular
cuotas apuestas|calcular cuotas apuestas combinadas|calcular
cuotas apuestas deportivas|calcular cuotas de apuestas|calcular
ganancias apuestas deportivas|calcular momios apuestas|calcular probabilidad cuota apuestas|calcular stake apuestas|calcular unidades apuestas|calcular yield apuestas|calculo de apuestas|calculo de apuestas
deportivas|cambio de cuotas apuestas|campeon champions apuestas|campeon eurocopa apuestas|campeon liga apuestas|campeon nba apuestas|canales de apuestas
gratis|carrera de caballos apuestas|carrera de caballos apuestas juego|carrera de caballos con apuestas|carrera de galgos apuestas|carreras de caballos apuestas|carreras de caballos apuestas online|carreras de caballos con apuestas|carreras de caballos juegos
de apuestas|carreras de galgos apuestas|carreras de galgos apuestas online|carreras de galgos apuestas trucos|carreras galgos apuestas|casa apuestas argentina|casa apuestas atletico de madrid|casa apuestas
barcelona|casa apuestas betis|casa apuestas bono bienvenida|casa apuestas bono gratis|casa apuestas bono sin deposito|casa apuestas cerca de mi|casa apuestas chile|casa apuestas colombia|casa apuestas con mejores cuotas|casa
apuestas deportivas|casa apuestas españa|casa apuestas española|casa apuestas eurocopa|casa apuestas
futbol|casa apuestas mejores cuotas|casa apuestas mundial|casa apuestas
nueva|casa apuestas nuevas|casa apuestas online|casa apuestas peru|casa apuestas
valencia|casa de apuestas|casa de apuestas 10 euros gratis|casa de
apuestas argentina|casa de apuestas atletico de madrid|casa de apuestas baloncesto|casa de apuestas barcelona|casa de apuestas beisbol|casa
de apuestas betis|casa de apuestas bono|casa de apuestas bono bienvenida|casa de apuestas bono
de bienvenida|casa de apuestas bono gratis|casa de apuestas bono por registro|casa de apuestas bono
sin deposito|casa de apuestas boxeo|casa de apuestas caballos|casa de apuestas
carreras de caballos|casa de apuestas cerca de mi|casa de apuestas cerca de mí|casa
de apuestas champions league|casa de apuestas chile|casa de apuestas ciclismo|casa
de apuestas colombia|casa de apuestas con bono de bienvenida|casa de apuestas con bono sin deposito|casa de apuestas con cuotas mas altas|casa de apuestas con esports|casa de apuestas con las mejores cuotas|casa de apuestas con licencia
en españa|casa de apuestas con mejores cuotas|casa de apuestas con pago anticipado|casa de
apuestas con paypal|casa de apuestas copa america|casa de apuestas de
caballos|casa de apuestas de colombia|casa de apuestas de españa|casa de apuestas de futbol|casa de apuestas de fútbol|casa de
apuestas de futbol peru|casa de apuestas de peru|casa de
apuestas del madrid|casa de apuestas del real madrid|casa
de apuestas deportivas|casa de apuestas deportivas cerca
de mi|casa de apuestas deportivas en argentina|casa de apuestas deportivas en chile|casa de
apuestas deportivas en colombia|casa de apuestas deportivas en españa|casa de apuestas deportivas en madrid|casa de apuestas deportivas
españa|casa de apuestas deportivas españolas|casa de apuestas
deportivas madrid|casa de apuestas deportivas mexico|casa de apuestas deportivas online|casa de apuestas deportivas peru|casa de
apuestas deposito 5 euros|casa de apuestas deposito minimo|casa de apuestas deposito minimo 1 euro|casa de apuestas depósito mínimo 1 euro|casa
de apuestas en españa|casa de apuestas en linea|casa de apuestas en madrid|casa de
apuestas en perú|casa de apuestas en vivo|casa de apuestas españa|casa de apuestas españa inglaterra|casa de apuestas española|casa de
apuestas españolas|casa de apuestas esports|casa de apuestas eurocopa|casa de apuestas europa league|casa de
apuestas f1|casa de apuestas formula 1|casa de apuestas futbol|casa de apuestas ingreso minimo|casa de apuestas ingreso minimo 1 euro|casa de apuestas ingreso mínimo 1 euro|casa de apuestas legales|casa de apuestas legales en colombia|casa de apuestas legales en españa|casa de apuestas libertadores|casa de apuestas liga española|casa de apuestas madrid|casa de apuestas mas segura|casa
de apuestas mejores|casa de apuestas méxico|casa de apuestas minimo 5 euros|casa de apuestas mlb|casa de apuestas mundial|casa de apuestas nba|casa de
apuestas nfl|casa de apuestas nueva|casa de apuestas nuevas|casa de apuestas oficial
del real madrid|casa de apuestas oficial
real madrid|casa de apuestas online|casa de apuestas online argentina|casa de apuestas online chile|casa de apuestas online españa|casa de
apuestas online mexico|casa de apuestas online paraguay|casa de apuestas online peru|casa de apuestas
online usa|casa de apuestas online venezuela|casa de apuestas pago anticipado|casa
de apuestas para boxeo|casa de apuestas para ufc|casa de apuestas peru|casa de apuestas perú|casa de apuestas peru online|casa de apuestas por paypal|casa
de apuestas promociones|casa de apuestas que regalan dinero|casa de
apuestas real madrid|casa de apuestas regalo de bienvenida|casa de apuestas sevilla|casa de apuestas sin dinero|casa de apuestas sin ingreso minimo|casa de apuestas sin licencia en españa|casa de apuestas sin minimo de ingreso|casa de apuestas stake|casa de apuestas tenis|casa de apuestas ufc|casa
de apuestas valencia|casa de apuestas venezuela|casa de apuestas virtuales|casa de
apuestas vive la suerte|casa oficial de apuestas del
real madrid|casas apuestas asiaticas|casas apuestas bono sin deposito|casas apuestas bonos sin deposito|casas apuestas caballos|casas apuestas chile|casas
apuestas ciclismo|casas apuestas con licencia|casas apuestas con licencia en españa|casas apuestas
deportivas|casas apuestas deportivas colombia|casas apuestas
deportivas españa|casas apuestas deportivas españolas|casas
apuestas deportivas nuevas|casas apuestas españa|casas apuestas
españolas|casas apuestas esports|casas apuestas eurocopa|casas apuestas
golf|casas apuestas ingreso minimo 5 euros|casas
apuestas legales|casas apuestas legales españa|casas apuestas licencia|casas apuestas licencia españa|casas apuestas mexico|casas apuestas mundial|casas apuestas nba|casas apuestas nuevas|casas apuestas nuevas españa|casas
apuestas ofertas|casas apuestas online|casas apuestas paypal|casas apuestas peru|casas apuestas sin licencia|casas apuestas tenis|casas
asiaticas apuestas|casas de apuestas|casas de apuestas 5 euros|casas de apuestas app|casas
de apuestas argentinas|casas de apuestas asiaticas|casas de apuestas baloncesto|casas de apuestas barcelona|casas de apuestas bono bienvenida|casas de
apuestas bono de bienvenida|casas de apuestas bono por registro|casas de apuestas bono sin deposito|casas de apuestas bono sin ingreso|casas de apuestas bonos|casas de
apuestas bonos de bienvenida|casas de apuestas bonos gratis|casas de apuestas bonos sin deposito|casas de apuestas boxeo|casas de apuestas caballos|casas de apuestas
carreras de caballos|casas de apuestas casino|casas de apuestas casino online|casas de apuestas cerca de mi|casas de apuestas champions league|casas de apuestas
chile|casas de apuestas ciclismo|casas de apuestas colombia|casas de apuestas com|casas de apuestas con app|casas
de apuestas con apuestas gratis|casas de apuestas
con bono|casas de apuestas con bono de bienvenida|casas de apuestas con bono de registro|casas de apuestas con bono por
registro|casas de apuestas con bono sin deposito|casas de apuestas con bonos|casas de apuestas
con bonos gratis|casas de apuestas con bonos sin deposito|casas de apuestas con deposito minimo|casas de apuestas
con esports|casas de apuestas con handicap asiatico|casas de apuestas con licencia|casas
de apuestas con licencia en españa|casas de apuestas con licencia españa|casas de apuestas con licencia española|casas de apuestas
con mejores cuotas|casas de apuestas con pago
anticipado|casas de apuestas con paypal|casas de apuestas con paypal en perú|casas de apuestas con promociones|casas de apuestas con ruleta en vivo|casas de apuestas
copa del rey|casas de apuestas de caballos|casas de apuestas de españa|casas de apuestas de futbol|casas de apuestas de fútbol|casas de apuestas de peru|casas de apuestas
deportivas|casas de apuestas deportivas asiaticas|casas de apuestas deportivas colombia|casas
de apuestas deportivas comparativa|casas de apuestas deportivas
con paypal|casas de apuestas deportivas en chile|casas de
apuestas deportivas en españa|casas de apuestas deportivas en linea|casas
de apuestas deportivas en madrid|casas de apuestas deportivas en mexico|casas de apuestas deportivas en peru|casas de apuestas
deportivas en sevilla|casas de apuestas deportivas en valencia|casas de apuestas deportivas españa|casas de apuestas deportivas españolas|casas de apuestas deportivas legales|casas de apuestas
deportivas madrid|casas de apuestas deportivas mexico|casas de apuestas deportivas nuevas|casas de apuestas deportivas online|casas
de apuestas deportivas peru|casas de apuestas deportivas
perú|casas de apuestas deposito minimo 1 euro|casas de apuestas depósito mínimo 1
euro|casas de apuestas dinero gratis|casas de apuestas en argentina|casas de apuestas en barcelona|casas de apuestas en chile|casas de apuestas en colombia|casas
de apuestas en españa|casas de apuestas en españa online|casas de apuestas en linea|casas
de apuestas en madrid|casas de apuestas en méxico|casas
de apuestas en peru|casas de apuestas en perú|casas de apuestas
en sevilla|casas de apuestas en uruguay|casas de
apuestas en valencia|casas de apuestas en venezuela|casas de
apuestas equipos de futbol|casas de apuestas españa|casas de apuestas españa alemania|casas de apuestas españa inglaterra|casas
de apuestas españa licencia|casas de apuestas españa nuevas|casas de apuestas
españa online|casas de apuestas española|casas de apuestas españolas|casas
de apuestas españolas con licencia|casas de apuestas españolas online|casas de apuestas esports|casas de apuestas eurocopa|casas de apuestas eurocopa 2024|casas de apuestas europa league|casas de apuestas f1|casas de
apuestas fisicas en barcelona|casas de apuestas fisicas en españa|casas de apuestas formula 1|casas de apuestas fuera de españa|casas de apuestas futbol|casas de apuestas
fútbol|casas de apuestas futbol españa|casas de apuestas ganador eurocopa|casas de apuestas gratis|casas de apuestas ingreso minimo|casas de apuestas ingreso minimo 1
euro|casas de apuestas ingreso minimo 5 euros|casas
de apuestas inter barcelona|casas de apuestas legales|casas
de apuestas legales en colombia|casas de apuestas legales en españa|casas de apuestas legales en mexico|casas
de apuestas legales españa|casas de apuestas legales mx|casas de apuestas licencia|casas de apuestas licencia españa|casas de apuestas lista|casas de apuestas madrid|casas
de apuestas mas seguras|casas de apuestas mejores bonos|casas de apuestas mejores cuotas|casas de apuestas mexico|casas de apuestas méxico|casas de apuestas minimo 5 euros|casas de
apuestas mlb|casas de apuestas mundial|casas de apuestas
mundial baloncesto|casas de apuestas mundiales|casas de apuestas nba|casas de apuestas no reguladas en españa|casas de apuestas nueva ley|casas de
apuestas nuevas|casas de apuestas nuevas en colombia|casas de apuestas nuevas en españa|casas de apuestas nuevas españa|casas de apuestas ofertas|casas de apuestas online|casas de apuestas online argentina|casas de apuestas online colombia|casas de apuestas online deportivas|casas
de apuestas online ecuador|casas de apuestas online en argentina|casas de apuestas online en chile|casas de apuestas online en colombia|casas de apuestas online en españa|casas de apuestas online en mexico|casas de apuestas online españa|casas de apuestas
online mas fiables|casas de apuestas online mexico|casas de apuestas online nuevas|casas de
apuestas online peru|casas de apuestas online usa|casas de apuestas online venezuela|casas de apuestas pago paypal|casas de
apuestas para ufc|casas de apuestas paypal|casas de apu
Your comment is awaiting moderation.
А вот стоит пойти чему то не так – и сразу на форум, вот и создаётся впечатление что у всех одни проблемы с товаром… https://autochasdv.ru Сейчас забегал курьер но без звонка поймал небольшую пароною ведь 203 уже нелегал но всё обошлось всё забрал вес отличный спасибо селеру за быстроту за 3 дня вот это скорость самый наеровнейший магаз и качество полюбому 5+ я уверен как всегда ну это я уже в другой ветке отпишу по пояже как сделаю.
Your comment is awaiting moderation.
Портал Дай Жару https://dai-zharu.ru – более 70000 посетителей в месяц! Подбор саун и бань с телефонами, фото и ценами. Недорогие финские сауны, русские бани, турецкие парные.
Your comment is awaiting moderation.
https://vk.com/nyanyaryadom_ekb_official
Your comment is awaiting moderation.
https://vk.com/murchalkin.official
Your comment is awaiting moderation.
Всё здорово спасибо Вам https://gadanieperemen.ru курьерки на мой запрос поиска трека ответ что инфа закрыта для доступа
Your comment is awaiting moderation.
резка латуни лазером лазерная резка пластика
Your comment is awaiting moderation.
В итоге получается, что все страницы оказываются в одних недовольствах, но ладно визуально, так ведь чуть ли не неделю каждая страница в недовольствах, а это что-то да значит, особенно когда сам проверишь… Вот я постучался в асю, пообщались, вы исчезли, потом кое-как вернулись, но молчок по полной. Зря вы так, всех клиентов распугаете таким макаром… https://skbagent.ru Ребятки все пушка
Your comment is awaiting moderation.
Mindful Growth Hub – Daily inspiration for personal development and intentional living.
Your comment is awaiting moderation.
Русскоязычный форум криптовалют: новости сети, хард/софт-кошельки, Lightning, приватность, безопасность и юридические аспекты. Гайды, FAQ, кейсы и помощь сообщества без «хайпа».
Your comment is awaiting moderation.
https://snyatie-lomki-spb2.ru/
Your comment is awaiting moderation.
Israel used widely banned cluster munitions in Lebanon,
работа салоне для девушек
photos of remnants suggest
эскорт вконтакте
The images, which have been examined by six different arms experts,
высокооплачиваемая работа для девушек в челябинске
appear to show the remnants of two different types of Israeli cluster munitions found in three
different locations: south of the Litani River in the forested valleys of Wadi Zibqin,
Wadi Barghouz and Wadi Deir Siryan.
администратор вакансии воронеж без опыта работы
https://workescort.ru/articles/Soprovozhdenie-rabota-za-granicei/Soprovozhdenie-na-meropriyatiyah-devushki
Your comment is awaiting moderation.
Опытный адвокат http://www.zemskovmoscow.ru в москве: защита по уголовным делам и юридическая поддержка бизнеса. От оперативного выезда до приговора: ходатайства, экспертизы, переговоры. Минимизируем риски, действуем быстро и законно.
Your comment is awaiting moderation.
Мало того дешёвый, он и отправляет маленький вес. Это гуд. Остальные почти все работают от 50 гр… купить Кокаин, Мефедрон, Экстази На чем готовить????????
Your comment is awaiting moderation.
happyshoppingcorner.click – Shopping here feels smooth, navigation is easy and products look great.
Your comment is awaiting moderation.
проверка дизайн-проекта этапы работы студии дизайна интерьера
Your comment is awaiting moderation.
findpurposeandpeace.click – Really helpful advice, helps navigate life challenges with clarity and calmness.
Your comment is awaiting moderation.
у меня знакомец с их магазина закупился его с черта какого то мусора взяли! че к чему не знаю но факт есть факт! может и не они виноваты, но он мелкий торгаш и принимать с сотней его не в тему купить кокаин, меф, бошки через телеграмм Золотые слова.
Your comment is awaiting moderation.
Хороший https://seetheworld.top огляд megeve допоміг визначитись.
Your comment is awaiting moderation.
Замовив https://remontuem.if.ua послугу — дізнався все про декоративний короб для труб опалення.
Your comment is awaiting moderation.
Казино 1вин очень комфортное для длительной игры. Слоты работают без зависаний. Деньги пришли вовремя https://1win-magic.top/
Your comment is awaiting moderation.
С возвращением друг!!!!адекватных клиентов,спокойных и прибыльных деньков))) купить скорость, кокаин, мефедрон, гашиш на вкус – сода.?
Your comment is awaiting moderation.
снятие наркотической ломки
Your comment is awaiting moderation.
Казино 1хбет приятно удивило качеством графики и быстрым запуском слотов. Никаких зависаний, всё идёт плавно. Деньги получил без задержек https://1xbet-loss.top/
Your comment is awaiting moderation.
בדיקת רכב לפי מספר חינם can provide essential information when evaluating oldtimers, renovated classics or collectible vehicles, and it becomes even more important when exploring a global marketplace of classic cars for sale. All around the world, collectors and enthusiasts search for antique automobiles with historical value, and having accurate data at the beginning of the process helps define whether a vehicle has true potential. With online platforms bringing together classic car dealers from multiple countries, buyers can now access hundreds of classic cars listed by make, year and condition, making the search for the perfect classic easier than ever. A simple number check helps reveal information that determines whether the vehicle is a good investment, ensuring buyers know exactly what they are looking at. The world of classic cars offers unique restored models that showcase craftsmanship and automotive heritage, and browsing these selections becomes more efficient when supported by accurate information. Whether someone is planning to buy, rent or simply explore available listings, global classic car marketplaces provide easy navigation, high-quality images and detailed descriptions. Enthusiasts often appreciate the ability to view cars by manufacturer, including legendary brands that shaped automotive history, helping them narrow down their preferences. At the same time, browsing by location allows potential buyers to find vehicles in regions known for well-maintained and carefully restored vintage cars. With the growth of online classic car platforms, more sellers are showcasing their restored vehicles to a global audience, offering buyers transparent documentation that includes before-and-after photos. This level of detail helps collectors understand the vehicle’s authenticity and long-term value. A free number check becomes an essential part of this evaluation, serving as a foundation for a confident purchase. In a marketplace where every classic car has its own story, having accurate facts allows enthusiasts to choose models that match their expectations. Today, with hundreds of classic cars available online in one place, the combination of global dealer listings, vehicle history verification and detailed restoration data gives buyers a complete view of the classic automotive world, helping them make informed decisions and discover vehicles that truly stand out.
https://carburater.com/
Your comment is awaiting moderation.
ой заказ 10007466 жду четвертую неделю слышал только завтроки что трек забьется и все получиш но так не чего и не получил.списался в айсекью сказал что если до пятницы не получу то вернет деньги.буду держать в курсе.надеюсь с возвратом вранья не будет https://talsosh-tarum05.ru скажи мыло в личку своё шас проверю
Your comment is awaiting moderation.
Декорация https://mdgt.top за скриване на кабели ми беше много нужна и сайтът имаше няколко варианта
Your comment is awaiting moderation.
Рабочее зеркало 1xbet всегда под рукой и загружается без задержек. Очень удобно, когда основной сайт недоступен. Все функции работают идеально: 1хбет зеркало на сегодня
Your comment is awaiting moderation.
– חמוד.… פגשנו עיניים. אני גומר ממש בפה של אישה לגופם היפה. שכבתי על הרצפה, מכוסה ברוק ובמיצים מוזר, חשבתי, האם לקוטבים יש ברכיו, עם הפנים קבורות במפשעה שלו, מנשקת מדי פעם את הזין הצעיר והיפה addlock
Your comment is awaiting moderation.
Всем привет! Специально зарегистрировался для того что бы поведать вам, какой тут отличный магазин! Обращаюсь сюда уже 3 месяца всегда по опту! все на высоте! Время доставки кладом в мой город 4 дня! Качество продукта отличное! Клады хорошие! И главное пунктуальность, и грамотное общение с человеком… Желаю оставаться всегда такими же порядочными! Сразу видно что магазин знает свое дело в нашем не легком труде!!! купить онлайн мефедрон, экстази, бошки Пацаны из ТЛТ не берите через этот магаз ФСКН кроет курьерку в нашем городе!!!
Your comment is awaiting moderation.
Elephant Bets https://elephantbet-mz.com/
Your comment is awaiting moderation.
דקות, ואז עשר. אף עצמי. על שפתיי, על צווארי, על קווי המתאר של החזה, מנחשים מתחת לחולצת כותנה דקה. פניו לרצפה והחל ללקק את הפריקה דרך, וכאן הייתי לחוץ מאוד מהפעולה ונכנסתי לנרתיק וגמרתי בתוכה. ish-hagan
Your comment is awaiting moderation.
Сайт 1win приятно удивил удобством навигации. В казино отличный выбор провайдеров. Вывод средств прошёл быстро https://1win-magic.top/
Your comment is awaiting moderation.
Контрактная разработка электроники позволяет внедрять интеллектуальные решения в носимую и медицинскую технику. Специалисты проектируют схемы, платы, корпуса и программное обеспечение, тестируют прототипы на точность и надежность. После успешной проверки начинается серийное производство: https://www.advtrust.fr/transition/index.php/User:AngusAndre68898… Технология дает возможность интегрировать разные модули в одно устройство без потери качества!
Your comment is awaiting moderation.
купить права
Your comment is awaiting moderation.
Официальный сайт 1хбет хорошо оптимизирован. Ставки принимаются моментально. Вывод прошёл без задержек: 1хбет зеркало рабочее
Your comment is awaiting moderation.
dailytrendspot.click – Trends updated daily, making it easy to discover fresh ideas quickly. Trending Tips Hub – Tips and tricks to incorporate trends into your daily life.
Your comment is awaiting moderation.
Красиво делаете. Так держать! https://mynyc.ru И ещё когда можно будет сделать первый заказ в январе?
Your comment is awaiting moderation.
findyourstrength.shop – Great place for daily motivation and building personal strength consistently.
Your comment is awaiting moderation.
inspireyourjourney.shop – Helpful insights that push you to explore new possibilities every day.
Your comment is awaiting moderation.
народ скажите концетрацию 250 го в этом магазе купить онлайн мефедрон, экстази, бошки трэк получил . Магаз всегда был хорош
Your comment is awaiting moderation.
כף הרגל המושלמת) מין, צפינו בדירות פורנו בדידות של אישה מינית, MFM וחדירה כפולה. כששכבתי על הצד הרגיש קרבה. הוא הרגל מהרגל, פרשתי אותם, והרמתי את החצאית שלי גבוה יותר, אז ראיתי את התחתונים haifapress
Your comment is awaiting moderation.
все огонь люди работают!!!пс за поддержку ) https://zhivouste.ru Что то тут не так.
Your comment is awaiting moderation.
Elephant Bets https://elephantbet-mz.com/
Your comment is awaiting moderation.
сегодня в 16:25 на почте получен конверт ,в нем было вещество лимоного цвета 0,3 г , сохнет ,позже подробно опишу https://gamardzhoba-dostavka.ru у них Methoxetamine бадяженный или нет? сколько принял мг и какие симптомы были?
Your comment is awaiting moderation.
adorbitpro.click – Color palette felt calming, nothing distracting, just focused, thoughtful design.
Your comment is awaiting moderation.
conversionpulse.click – Color palette felt calming, nothing distracting, just focused, thoughtful design.
Your comment is awaiting moderation.
leadforgepro.click – Mobile version looks perfect; no glitches, fast scrolling, crisp text.
Your comment is awaiting moderation.
leadvoltage.click – Found practical insights today; sharing this article with colleagues later.
Your comment is awaiting moderation.
marketcruise.click – Overall, professional vibe here; trustworthy, polished, and pleasantly minimal throughout.
Your comment is awaiting moderation.
elitefunnels.click – Overall, professional vibe here; trustworthy, polished, and pleasantly minimal throughout.
Your comment is awaiting moderation.
Имею давний опыт работы с этим магазином.Сервис здесь один из лучших,всё делается оперативно вопросов нет.В последний раз заказал СНМ 50 и СНМ 55 по 50 гр обоих.По опыту знаю,что если один каннаб не айс,то в паре с любым другим он хоть как-то вытягивает.Но в этот раз пришло два пакета с одинаковым мелким белым порохом с сильным запахом нафталина.По весу всё замечательно,щедро подсыпано +50%.Только одно но.Данный реагент-чисто удобрение.Делал 1к5 кипячением в ИПС.Растворение хреновое,молоко.Хрень.Ну ладно,курили чистый порох из обоих пакетов.Хрень.Никто в здравом уме данным продуктом не заинтересуется-вывод не менее чем десяти тестеров.Короче я в попадосе. https://bwin99.info Хороший магаз. качество радует спасибо всей команде Chemical-mix.com
Your comment is awaiting moderation.
Качество вас обрадует – перевод документов на карте. Перевод корпоративных документов. Самарское бюро. Нотариальное заверение. Срочно и качественно. Юридическая точность.
Your comment is awaiting moderation.
получил посыль.мхе отличного качества!а вот ам2233 пока думаю ко скольки мутить.все пишут по разному. купить Кокаин, Мефедрон, Экстази Закупались у данного магазина 100г реги, в подарок получили 15г скорос!1 клад надежный
Your comment is awaiting moderation.
Try Something New Hub – Inspiring ideas to experiment and create with confidence.
Your comment is awaiting moderation.
у тебя все пришло? отпиши в лс. https://diaspora-world.info Все пришло. всё на высоте. на данный момент более сказать немогу.
Your comment is awaiting moderation.
ElephantBet https://elephantbet-mz.com/
Your comment is awaiting moderation.
подход к клиенту 5+ (все объяснили, трек сразу скинули) купить Кокаин, Мефедрон, Экстази А сейчас работает магазин?
Your comment is awaiting moderation.
Перевод с украинского – нотариус самара перевод документов. Профессиональный перевод в Самаре. Нотариус, срочные заказы. Документы любой сложности. Качество гарантируем. Доступные цены.
Your comment is awaiting moderation.
conversionboost.click – Mobile version looks perfect; no glitches, fast scrolling, crisp text.
Your comment is awaiting moderation.
У меня всё норм, реальную отправку написали в треке. Я волновался на счёт этого после сообщений купить Кокаин, Мефедрон, Экстази аська молчит.скайп есть?
Your comment is awaiting moderation.
ЗОЖ-журнал https://wellnesspress.ru как выработать полезные привычки, наладить режим, снизить стресс и поддерживать форму. Простые шаги, научные факты, чек-листы и планы. Начните менять жизнь сегодня.
Your comment is awaiting moderation.
Расположите по мощности https://mortythedog.com заметил, что там тс появляется на много чаще
Your comment is awaiting moderation.
learnwithoutlimits.shop – Great tutorials provided, makes understanding complex concepts much easier and quicker today.
Your comment is awaiting moderation.
findyourstyle.shop – Trendy options available, really enjoyed browsing through new arrivals and collections today.
Your comment is awaiting moderation.
Да я написал уже. Мб 2-dpmp в качестве компенсации подгонят, а вот что с фф не знаю, я ее проебал до того как я еще попробовал. https://niagarske-vodopady.info Вообщем фейк крассавчик пошагово и все грамотно сделал, развел)
Your comment is awaiting moderation.
growthcruise.click – Loved the layout today; clean, simple, and genuinely user-friendly overall.
Your comment is awaiting moderation.
promomatrix.click – Overall, professional vibe here; trustworthy, polished, and pleasantly minimal throughout.
Your comment is awaiting moderation.
Нужен интернет? симметричный интернет алматы провайдер 2BTelecom предоставляет качественный и оптоволоконный интернет для юридических лиц в городе Алматы и Казахстане. Используя свою разветвленную сеть, мы можем предоставлять свои услуги в любой офис города Алматы и так же оказать полный комплекс услуг связи.
Your comment is awaiting moderation.
ranksprint.click – Overall, professional vibe here; trustworthy, polished, and pleasantly minimal throughout.
Your comment is awaiting moderation.
trafficflowpro.click – Navigation felt smooth, found everything quickly without any confusing steps.
Your comment is awaiting moderation.
leadmatrixpro.click – Mobile version looks perfect; no glitches, fast scrolling, crisp text.
Your comment is awaiting moderation.
у кого взять собрался его ? https://psyholog-help.com Ну х.з, с отправками тут все оперативно,2 дня и тебе уже все идет)))
Your comment is awaiting moderation.
шубер из картона под ключ за 24 часа! Типография – быстро, качественно, сгарантией. Оставьте заявку на сайте
Your comment is awaiting moderation.
Это точно. https://transparenciaclimatica.org да магаз отличный.оперативно работают.и качество товара отличное.вобщем всё хорошо.
Your comment is awaiting moderation.
CHESTERBETS – Новости спорта | Форум о спорте | Чат | Футбол | Спорт
https://chester.bet/
Your comment is awaiting moderation.
такая же беда, тс говорит все ровно уже в пути, но самое интересное то что, все говорят что курьерки там как то каряво работают, но я звоню операторам они отвечают такой накладной нет, отсюда вопрос как она может в пути если у них во внутренней базе нет моей накладной, курьер взял сразу от нашего тс. и уехал ко мне ))))) https://psyholog-help.com на вкус – сода.
Your comment is awaiting moderation.
globaltrendstore.click – Stylish options available, browsing categories was easy and visually appealing overall today.
Your comment is awaiting moderation.
findyournextgoal.click – Motivating content here, helps me focus clearly on my next goals today.
Your comment is awaiting moderation.
все пришло.пока не пробовал.конспирация на высшем уровне.спасибо https://psyholog-help.com или кто то прикалывается?
Your comment is awaiting moderation.
adtrailblaze.click – Pages loaded fast, images appeared sharp, and formatting stayed consistent.
Your comment is awaiting moderation.
adboostlab.click – Overall, professional vibe here; trustworthy, polished, and pleasantly minimal throughout.
Your comment is awaiting moderation.
магазин хороший, спору нет, вот только уж оооочень он не расторопны. и ответ приходится ждать так же долго… https://mortythedog.com ребята как-то странно работают,но надеюсь,что честно
Your comment is awaiting moderation.
Любой язык мира – перевод документов на китайский язык онлайн. Бюро переводов в Самаре. Работаем 10 лет. Документы, нотариальное заверение, срочно. Конфиденциально. Доступные цены.
Your comment is awaiting moderation.
trafficgear.click – Loved the layout today; clean, simple, and genuinely user-friendly overall.
Your comment is awaiting moderation.
adelevatepro.click – Color palette felt calming, nothing distracting, just focused, thoughtful design.
Your comment is awaiting moderation.
Всё пучком с магазом!!!!С Июля работаю доволен адекватное общение,недолгое решение проблем ,оперативная обработка заказа .Если гемор какой достучитесь в Скайп и всё решится!!!!!:hello: купить Кокаин, Мефедрон, Экстази
Your comment is awaiting moderation.
conversionpilot.click – Bookmarked this immediately, planning to revisit for updates and inspiration.
Your comment is awaiting moderation.
clickvero.click – Navigation felt smooth, found everything quickly without any confusing steps.
Your comment is awaiting moderation.
clickpioneer.click – Loved the layout today; clean, simple, and genuinely user-friendly overall.
Your comment is awaiting moderation.
блин… один заказ выбил, затестил. теперь опять в аське молчок купить Кокаин, Мефедрон, Экстази
Your comment is awaiting moderation.
What is mirror life? Scientists are sounding the alarm
https://top20.ua/dp/tag/advokat/
адвокат Днепр консультация
юристы
Scientist Kate Adamala doesn’t remember exactly when she realized her lab at the University of Minnesota was working on something potentially dangerous — so dangerous in fact that some researchers think it could pose an existential risk to all life forms on Earth.
She was one of four researchers awarded a $4 million US National Science Foundation grant in 2019 to investigate whether it’s possible to produce a mirror cell, in which the structure of all of its component biomolecules is the reverse of what’s found in normal cells.
The work was important, they thought, because such reversed cells, which have never existed in nature, could shed light on the origins of life and make it easier to create molecules with therapeutic value, potentially tackling significant medical challenges such as infectious disease and superbugs. But doubt crept in.
“It was never one light bulb moment. It was kind of a slow boiling over a few months,” Adamala, a synthetic biologist, said. People started asking questions, she added, “and we thought we can answer them, and then we realized we cannot.”
The questions hinged on what would happen if scientists succeeded in making a “mirror organism” such as a bacterium from molecules that are the mirror images of their natural forms. Could it inadvertently spread unchecked in the body or an environment, posing grave risks to human health and dire consequences for the planet? Or would it merely fizzle out and harmlessly disappear without a trace?
Your comment is awaiting moderation.
Совершил заказ снова!и буду продолжать это делать,продавец ОЧЕНЬ понимающий человек!:hello::monetka: огромный респект! купить Мефедрон, Бошки, Марихуану
Your comment is awaiting moderation.
по крайней мере у меня было , все гуд купить скорость, кокаин, мефедрон, гашиш
Your comment is awaiting moderation.
заказ дошел до нас))) купить скорость, кокаин, мефедрон, гашиш
Your comment is awaiting moderation.
Создание блога https://life-webmaster.ru/ и бизнеса в сети шаг за шагом: платформы, контент-план, трафик, монетизация без вложений. Готовые шаблоны и понятные инструкции для старта.
Your comment is awaiting moderation.
Elephant Bets https://elephantbet-mz.com/
Your comment is awaiting moderation.
Магазин,лови от меня большой и жирный “+”. Заказ пришёл в течение 3ёх дней.Из-за обстоятельств пришлось разбодяживать порошок в ацетоне,в подъезде,на хз сколько граммов основы…но все понравилось.все и всем довольный. купить скорость, кокаин, мефедрон, гашиш
Your comment is awaiting moderation.
changeyourfuture.click – Practical tips provided, implementing changes seems simple and very achievable today.
Your comment is awaiting moderation.
globaltrendstore.click – Stylish options available, browsing categories was easy and visually appealing overall today.
Your comment is awaiting moderation.
Блог для новичков https://life-webmaster.ru запуск блога, онлайн-бизнес, заработок без вложений. Инструкции, подборки инструментов, стратегии трафика и монетизации. Практика вместо теории.
Your comment is awaiting moderation.
conversionlab.click – Loved the layout today; clean, simple, and genuinely user-friendly overall.
Your comment is awaiting moderation.
итоги: купить Кокаин, Мефедрон, Экстази
Your comment is awaiting moderation.
admasterlab.click – Overall, professional vibe here; trustworthy, polished, and pleasantly minimal throughout.
Your comment is awaiting moderation.
adfusionlab.click – Navigation felt smooth, found everything quickly without any confusing steps.
Your comment is awaiting moderation.
promopilotpro.click – Mobile version looks perfect; no glitches, fast scrolling, crisp text.
Your comment is awaiting moderation.
marketforge.click – Mobile version looks perfect; no glitches, fast scrolling, crisp text.
Your comment is awaiting moderation.
primedigital.click – Content reads clearly, helpful examples made concepts easy to grasp.
Your comment is awaiting moderation.
(10 euros gratis apuestas|10 mejores casas de apuestas|10 trucos para ganar apuestas|15 euros gratis
marca apuestas|1×2 apuestas|1×2 apuestas deportivas|1×2
apuestas que significa|1×2 en apuestas|1×2 en apuestas que significa|1×2 que significa en apuestas|5 euros
gratis apuestas|9 apuestas que siempre ganaras|a partir de cuanto
se declara apuestas|actividades de juegos de azar y apuestas|ad apuestas deportivas|aleksandre topuria ufc apuestas|algoritmo para ganar apuestas deportivas|america apuestas|análisis nba apuestas|aplicacion android apuestas deportivas|aplicacion apuestas deportivas|aplicacion apuestas deportivas android|aplicación de apuestas online|aplicacion para
hacer apuestas|aplicacion para hacer apuestas de futbol|aplicación para hacer
apuestas de fútbol|aplicaciones apuestas deportivas android|aplicaciones apuestas deportivas gratis|aplicaciones de
apuestas android|aplicaciones de apuestas de fútbol|aplicaciones
de apuestas deportivas|aplicaciones de apuestas deportivas peru|aplicaciones de apuestas deportivas perú|aplicaciones de apuestas en colombia|aplicaciones
de apuestas gratis|aplicaciones de apuestas online|aplicaciones de apuestas
seguras|aplicaciones de apuestas sin dinero|aplicaciones para hacer apuestas|apostar seguro apuestas deportivas|app android apuestas deportivas|app apuestas|app apuestas
android|app apuestas de futbol|app apuestas deportivas|app apuestas deportivas android|app apuestas deportivas argentina|app apuestas deportivas colombia|app apuestas deportivas ecuador|app
apuestas deportivas españa|app apuestas deportivas
gratis|app apuestas entre amigos|app apuestas futbol|app apuestas
gratis|app apuestas sin dinero|app casa de apuestas|app casas de apuestas|app control apuestas|app de apuestas|app de apuestas android|app de apuestas casino|app de apuestas colombia|app de apuestas con bono de bienvenida|app de
apuestas de futbol|app de apuestas deportivas|app de apuestas
deportivas android|app de apuestas deportivas argentina|app de apuestas
deportivas colombia|app de apuestas deportivas en españa|app de apuestas deportivas peru|app de apuestas deportivas perú|app de apuestas deportivas sin dinero|app de
apuestas ecuador|app de apuestas en colombia|app de apuestas en españa|app de apuestas en venezuela|app de
apuestas futbol|app de apuestas gratis|app de apuestas online|app de apuestas para
android|app de apuestas para ganar dinero|app de apuestas peru|app de apuestas reales|app de casas
de apuestas|app marca apuestas android|app moviles de apuestas|app para apuestas|app para apuestas de futbol|app para apuestas deportivas|app para
apuestas deportivas en español|app para ganar apuestas deportivas|app para hacer
apuestas|app para hacer apuestas deportivas|app para hacer apuestas entre amigos|app para llevar control de apuestas|app pronosticos apuestas deportivas|app versus apuestas|apps apuestas mundial|apps de
apuestas|apps de apuestas con bono de bienvenida|apps de apuestas
de futbol|apps de apuestas deportivas peru|apps de apuestas mexico|apps para apuestas|aprender a hacer apuestas deportivas|aprender hacer apuestas deportivas|apuesta del dia apuestas deportivas|apuestas
10 euros gratis|apuestas 100 seguras|apuestas 1×2|apuestas 1X2|apuestas 2 division|apuestas 3 division|apuestas a caballos|apuestas a carreras de caballos|apuestas a colombia|apuestas
a corners|apuestas a ganar|apuestas a jugadores nba|apuestas a la baja|apuestas a la nfl|apuestas al
barcelona|apuestas al dia|apuestas al empate|apuestas al
mundial|apuestas al tenis wta|apuestas alaves barcelona|apuestas alcaraz hoy|apuestas alemania españa|apuestas alonso campeon del mundo|apuestas altas y bajas|apuestas altas y bajas nfl|apuestas ambos equipos marcan|apuestas america|apuestas android|apuestas anillo nba|apuestas antes del mundial|apuestas anticipadas|apuestas anticipadas nba|apuestas apps|apuestas arabia argentina|apuestas argentina|apuestas argentina campeon del mundo|apuestas argentina canada|apuestas argentina
colombia|apuestas argentina croacia|apuestas argentina españa|apuestas
argentina francia|apuestas argentina francia cuanto paga|apuestas argentina francia mundial|apuestas argentina gana el mundial|apuestas argentina gana mundial|apuestas argentina holanda|apuestas argentina mexico|apuestas argentina méxico|apuestas
argentina mundial|apuestas argentina online|apuestas
argentina paises bajos|apuestas argentina polonia|apuestas argentina uruguay|apuestas
argentina vs australia|apuestas argentina vs colombia|apuestas argentina vs francia|apuestas argentina vs peru|apuestas argentinas|apuestas
arsenal real madrid|apuestas ascenso a primera division|apuestas ascenso a segunda|apuestas asiaticas|apuestas asiatico|apuestas athletic|apuestas athletic
atletico|apuestas athletic barça|apuestas athletic barcelona|apuestas
athletic betis|apuestas athletic manchester|apuestas athletic
manchester united|apuestas athletic osasuna|apuestas athletic real|apuestas athletic real madrid|apuestas athletic real sociedad|apuestas athletic real sociedad final|apuestas athletic roma|apuestas athletic sevilla|apuestas athletic valencia|apuestas atletico|apuestas atletico
barcelona|apuestas atletico barsa|apuestas atletico campeon champions|apuestas atletico campeon de liga|apuestas
atlético copenhague|apuestas atletico de madrid|apuestas atlético de madrid|apuestas atletico de madrid
barcelona|apuestas atletico de madrid gana la liga|apuestas atletico de madrid real
madrid|apuestas atlético de madrid real madrid|apuestas atletico de
madrid vs barcelona|apuestas atletico madrid|apuestas atletico madrid real madrid|apuestas atletico madrid vs barcelona|apuestas atletico real madrid|apuestas atletico real madrid champions|apuestas atletismo|apuestas bajas|apuestas
baloncesto|apuestas baloncesto acb|apuestas baloncesto handicap|apuestas
baloncesto hoy|apuestas baloncesto juegos olimpicos|apuestas baloncesto nba|apuestas baloncesto pronostico|apuestas baloncesto pronósticos|apuestas baloncesto prorroga|apuestas barca|apuestas barca athletic|apuestas barca atletico|apuestas barca bayern|apuestas barca bayern munich|apuestas barca girona|apuestas
barca hoy|apuestas barça hoy|apuestas barca inter|apuestas barca juventus|apuestas barca madrid|apuestas barça madrid|apuestas barca real madrid|apuestas barca vs juve|apuestas barca
vs madrid|apuestas barca vs psg|apuestas barcelona|apuestas barcelona alaves|apuestas barcelona athletic|apuestas barcelona atletico|apuestas barcelona atletico de madrid|apuestas barcelona atlético
de madrid|apuestas barcelona atletico madrid|apuestas
barcelona bayern|apuestas barcelona betis|apuestas barcelona campeon de liga|apuestas
barcelona celta|apuestas barcelona espanyol|apuestas barcelona gana la champions|apuestas barcelona girona|apuestas
barcelona granada|apuestas barcelona hoy|apuestas barcelona inter|apuestas barcelona madrid|apuestas
barcelona osasuna|apuestas barcelona psg|apuestas barcelona real madrid|apuestas barcelona real sociedad|apuestas barcelona sevilla|apuestas barcelona valencia|apuestas barcelona villarreal|apuestas barcelona vs
atletico madrid|apuestas barcelona vs madrid|apuestas barcelona vs real madrid|apuestas barsa madrid|apuestas basket hoy|apuestas bayern barcelona|apuestas
bayern vs barcelona|apuestas beisbol|apuestas béisbol|apuestas beisbol mlb|apuestas
beisbol pronosticos|apuestas beisbol venezolano|apuestas betis|apuestas betis – chelsea|apuestas
betis barcelona|apuestas betis chelsea|apuestas betis fiorentina|apuestas betis girona|apuestas betis madrid|apuestas betis mallorca|apuestas betis real madrid|apuestas betis
real sociedad|apuestas betis sevilla|apuestas betis valencia|apuestas betis valladolid|apuestas betis
vs valencia|apuestas betplay hoy colombia|apuestas betsson peru|apuestas bienvenida|apuestas billar online|apuestas bolivia vs colombia|apuestas bono|apuestas bono bienvenida|apuestas bono
de bienvenida|apuestas bono de bienvenida sin deposito|apuestas
bono gratis|apuestas bono sin deposito|apuestas bonos sin deposito|apuestas borussia real madrid|apuestas boxeo|apuestas boxeo de campeonato|apuestas boxeo españa|apuestas boxeo español|apuestas boxeo femenino olimpiadas|apuestas boxeo hoy|apuestas boxeo online|apuestas
brasil colombia|apuestas brasil peru|apuestas brasil uruguay|apuestas brasil vs colombia|apuestas brasil vs peru|apuestas caballos|apuestas caballos colocado|apuestas caballos españa|apuestas caballos hipodromo|apuestas caballos hoy|apuestas caballos madrid|apuestas caballos online|apuestas caballos sanlucar de barrameda|apuestas caballos zarzuela|apuestas calculador|apuestas
campeon|apuestas campeon champions|apuestas campeón champions|apuestas campeon champions 2025|apuestas campeon champions league|apuestas campeon conference league|apuestas campeon copa america|apuestas campeon copa del rey|apuestas campeon de champions|apuestas
campeon de la champions|apuestas campeon de liga|apuestas campeon del mundo|apuestas campeon eurocopa|apuestas campeón eurocopa|apuestas campeon europa league|apuestas
campeon f1|apuestas campeon f1 2025|apuestas campeon formula 1|apuestas campeon libertadores|apuestas campeon liga|apuestas campeon liga bbva|apuestas campeon liga
española|apuestas campeon liga santander|apuestas campeon motogp 2025|apuestas campeon mundial|apuestas campeón mundial|apuestas campeon mundial baloncesto|apuestas campeon nba|apuestas campeón nba|apuestas campeon premier|apuestas campeon premier league|apuestas
campeon roland garros|apuestas campeonato f1|apuestas campeonatos de futbol|apuestas carrera de caballos|apuestas carrera de caballos hoy|apuestas carrera de caballos nocturnas|apuestas carrera de galgos fin de semana|apuestas
carrera de galgos hoy|apuestas carrera de galgos nocturnas|apuestas carreras caballos|apuestas carreras
caballos sanlucar|apuestas carreras de caballos|apuestas carreras de caballos en directo|apuestas carreras de caballos en vivo|apuestas carreras de caballos españa|apuestas carreras de caballos
hoy|apuestas carreras de caballos nacionales|apuestas carreras de caballos nocturnas|apuestas carreras
de caballos online|apuestas carreras de caballos sanlucar|apuestas carreras de
caballos sanlúcar|apuestas carreras de galgos|apuestas carreras de galgos en vivo|apuestas carreras de galgos nocturnas|apuestas
carreras de galgos pre partido|apuestas casino|apuestas casino barcelona|apuestas casino futbol|apuestas casino gran madrid|apuestas casino gratis|apuestas casino madrid|apuestas
casino online|apuestas casino online argentina|apuestas casinos|apuestas casinos online|apuestas celta|apuestas celta barcelona|apuestas celta betis|apuestas celta eibar|apuestas celta espanyol|apuestas celta granada|apuestas celta madrid|apuestas celta manchester|apuestas celta real madrid|apuestas champion league|apuestas champions foro|apuestas champions hoy|apuestas
champions league|apuestas champions league – pronósticos|apuestas champions league 2025|apuestas champions league hoy|apuestas champions league pronosticos|apuestas champions league pronósticos|apuestas champions pronosticos|apuestas chelsea barcelona|apuestas chelsea
betis|apuestas chile|apuestas chile peru|apuestas chile venezuela|apuestas chile vs colombia|apuestas chile vs uruguay|apuestas ciclismo|apuestas ciclismo en vivo|apuestas ciclismo femenino|apuestas ciclismo tour francia|apuestas ciclismo vuelta|apuestas ciclismo vuelta a españa|apuestas ciclismo vuelta españa|apuestas city madrid|apuestas city real madrid|apuestas
clasico|apuestas clasico español|apuestas
clasico real madrid barcelona|apuestas clasificacion mundial|apuestas colombia|apuestas colombia argentina|apuestas colombia brasil|apuestas colombia paraguay|apuestas colombia uruguay|apuestas
colombia vs argentina|apuestas colombia vs brasil|apuestas
combinadas|apuestas combinadas como funcionan|apuestas combinadas de futbol|apuestas combinadas de fútbol|apuestas combinadas foro|apuestas combinadas futbol|apuestas combinadas hoy|apuestas combinadas
mismo partido|apuestas combinadas mundial|apuestas combinadas nba|apuestas combinadas
para esta semana|apuestas combinadas para hoy|apuestas combinadas para mañana|apuestas combinadas
pronosticos|apuestas combinadas recomendadas|apuestas combinadas seguras|apuestas combinadas seguras para hoy|apuestas combinadas seguras para mañana|apuestas como ganar|apuestas comparador|apuestas
con bono de bienvenida|apuestas con dinero ficticio|apuestas con dinero real|apuestas con dinero
virtual|apuestas con handicap|apuestas con handicap asiatico|apuestas con handicap baloncesto|apuestas con mas probabilidades de ganar|apuestas
con paypal|apuestas con tarjeta de credito|apuestas con tarjeta de debito|apuestas consejos|apuestas copa|apuestas copa africa|apuestas copa
america|apuestas copa américa|apuestas copa argentina|apuestas copa brasil|apuestas
copa davis|apuestas copa de europa|apuestas copa del mundo|apuestas copa del rey|apuestas copa del rey
baloncesto|apuestas copa del rey final|apuestas copa del rey futbol|apuestas copa del rey ganador|apuestas copa del rey hoy|apuestas copa del rey pronosticos|apuestas copa
del rey pronósticos|apuestas copa europa|apuestas copa italia|apuestas copa
libertadores|apuestas copa mundial de hockey|apuestas copa rey|apuestas copa sudamericana|apuestas corners|apuestas corners hoy|apuestas croacia argentina|apuestas cuartos eurocopa|apuestas cuotas|apuestas cuotas altas|apuestas cuotas bajas|apuestas de
1 euro|apuestas de baloncesto|apuestas de baloncesto hoy|apuestas de baloncesto
nba|apuestas de baloncesto para hoy|apuestas de beisbol|apuestas de beisbol para hoy|apuestas de blackjack en linea|apuestas de boxeo|apuestas de
boxeo canelo|apuestas de boxeo en las vegas|apuestas de boxeo hoy|apuestas de boxeo online|apuestas de caballo|apuestas de caballos|apuestas de
caballos como funciona|apuestas de caballos como se juega|apuestas de caballos en colombia|apuestas de caballos en españa|apuestas de caballos en linea|apuestas de caballos españa|apuestas de caballos ganador y colocado|apuestas de caballos internacionales|apuestas de caballos juegos|apuestas de caballos online|apuestas de caballos online en venezuela|apuestas de caballos por internet|apuestas de caballos pronosticos|apuestas de caballos pronósticos|apuestas de carrera
de caballos|apuestas de carreras de caballos|apuestas de carreras de caballos
online|apuestas de casino|apuestas de casino online|apuestas de casino
por internet|apuestas de champions league|apuestas de ciclismo|apuestas de colombia|apuestas de copa america|apuestas de corners|apuestas de deportes en linea|apuestas de deportes online|apuestas de
dinero|apuestas de esports|apuestas de eurocopa|apuestas de europa league|apuestas de f1|apuestas de formula 1|apuestas de futbol|apuestas de
fútbol|apuestas de futbol app|apuestas de futbol argentina|apuestas de futbol colombia|apuestas de futbol en colombia|apuestas de futbol en directo|apuestas de
futbol en linea|apuestas de futbol en vivo|apuestas de
futbol español|apuestas de futbol gratis|apuestas de futbol hoy|apuestas de
futbol mundial|apuestas de futbol online|apuestas de fútbol online|apuestas de futbol para hoy|apuestas de fútbol para hoy|apuestas de futbol para
hoy seguras|apuestas de futbol para mañana|apuestas de futbol peru|apuestas de futbol pronosticos|apuestas de fútbol pronósticos|apuestas de futbol seguras|apuestas de futbol
seguras para hoy|apuestas de futbol sin dinero|apuestas de galgos|apuestas de galgos como ganar|apuestas de galgos en directo|apuestas de galgos online|apuestas de galgos
trucos|apuestas de golf|apuestas de hockey|apuestas de hockey
sobre hielo|apuestas de hoy|apuestas de hoy seguras|apuestas de juego|apuestas de juegos|apuestas de juegos deportivos|apuestas de juegos online|apuestas
de la champions league|apuestas de la copa américa|apuestas de la eurocopa|apuestas de la europa league|apuestas de la liga|apuestas de la liga bbva|apuestas de la liga española|apuestas
de la nba|apuestas de la nfl|apuestas de la ufc|apuestas de mlb|apuestas de nba|apuestas de nba para
hoy|apuestas de partidos|apuestas de partidos de futbol|apuestas de peleas ufc|apuestas de perros en vivo|apuestas de perros virtuales|apuestas
de peru|apuestas de sistema|apuestas de sistema como funciona|apuestas de sistema explicacion|apuestas
de sistema explicación|apuestas de tenis|apuestas de tenis de mesa|apuestas de tenis en directo|apuestas de tenis hoy|apuestas de tenis para hoy|apuestas de tenis pronosticos|apuestas de tenis seguras|apuestas de todo
tipo|apuestas de ufc|apuestas de ufc hoy|apuestas del boxeo|apuestas del clasico|apuestas del clasico real madrid barca|apuestas del dia|apuestas del día|apuestas del
dia de hoy|apuestas del dia deportivas|apuestas del dia futbol|apuestas del
mundial|apuestas del partido de hoy|apuestas del real madrid|apuestas del rey|apuestas del sistema|apuestas deporte|apuestas deportes|apuestas deportiva|apuestas deportivas|apuestas deportivas 1 euro|apuestas
deportivas 10 euros gratis|apuestas deportivas 100 seguras|apuestas deportivas 1×2|apuestas deportivas android|apuestas deportivas app|apuestas deportivas apps|apuestas deportivas
argentina|apuestas deportivas argentina futbol|apuestas deportivas argentina legal|apuestas deportivas atletico de madrid|apuestas
deportivas baloncesto|apuestas deportivas barca madrid|apuestas deportivas barcelona|apuestas deportivas beisbol|apuestas deportivas bono|apuestas deportivas bono bienvenida|apuestas deportivas bono de bienvenida|apuestas deportivas bono sin deposito|apuestas deportivas bonos de bienvenida|apuestas deportivas boxeo|apuestas deportivas caballos|apuestas
deportivas calculadora|apuestas deportivas campeon liga|apuestas deportivas casino|apuestas deportivas
casino barcelona|apuestas deportivas casino online|apuestas deportivas cerca de mi|apuestas deportivas champions league|apuestas
deportivas chile|apuestas deportivas ciclismo|apuestas deportivas colombia|apuestas deportivas com|apuestas deportivas com foro|apuestas deportivas com pronosticos|apuestas deportivas combinadas|apuestas
deportivas combinadas para hoy|apuestas deportivas como se juega|apuestas
deportivas comparador|apuestas deportivas con bono gratis|apuestas deportivas con bonos gratis|apuestas deportivas con dinero ficticio|apuestas
deportivas con paypal|apuestas deportivas con puntos virtuales|apuestas deportivas consejos|apuestas deportivas consejos
para ganar|apuestas deportivas copa america|apuestas deportivas copa del rey|apuestas deportivas
copa libertadores|apuestas deportivas copa mundial|apuestas deportivas
corners|apuestas deportivas cual es la mejor|apuestas deportivas cuotas altas|apuestas deportivas de baloncesto|apuestas deportivas
de boxeo|apuestas deportivas de colombia|apuestas deportivas de futbol|apuestas
deportivas de nba|apuestas deportivas de nhl|apuestas deportivas de peru|apuestas deportivas de tenis|apuestas deportivas del dia|apuestas
deportivas dinero ficticio|apuestas deportivas directo|apuestas deportivas doble oportunidad|apuestas deportivas en argentina|apuestas deportivas en chile|apuestas deportivas en colombia|apuestas deportivas en directo|apuestas deportivas en españa|apuestas deportivas en español|apuestas deportivas en linea|apuestas deportivas en línea|apuestas deportivas en peru|apuestas deportivas
en perú|apuestas deportivas en sevilla|apuestas deportivas en uruguay|apuestas deportivas en vivo|apuestas deportivas es|apuestas deportivas
es pronosticos|apuestas deportivas españa|apuestas deportivas españolas|apuestas deportivas esports|apuestas
deportivas estadisticas|apuestas deportivas estrategias|apuestas deportivas
estrategias seguras|apuestas deportivas eurocopa|apuestas deportivas europa league|apuestas
deportivas f1|apuestas deportivas faciles de ganar|apuestas deportivas formula
1|apuestas deportivas foro|apuestas deportivas foro futbol|apuestas deportivas foro tenis|apuestas deportivas francia argentina|apuestas deportivas futbol|apuestas deportivas fútbol|apuestas deportivas
futbol argentino|apuestas deportivas futbol colombia|apuestas deportivas futbol español|apuestas deportivas gana|apuestas deportivas
ganadas|apuestas deportivas ganar dinero seguro|apuestas deportivas gane|apuestas
deportivas golf|apuestas deportivas gratis|apuestas deportivas gratis
con premios|apuestas deportivas gratis hoy|apuestas deportivas gratis sin deposito|apuestas deportivas handicap|apuestas deportivas handicap asiatico|apuestas deportivas hoy|apuestas deportivas impuestos|apuestas deportivas interior
argentina|apuestas deportivas juegos olimpicos|apuestas
deportivas la liga|apuestas deportivas legales|apuestas deportivas legales en colombia|apuestas deportivas
libres de impuestos|apuestas deportivas licencia españa|apuestas deportivas liga española|apuestas deportivas
listado|apuestas deportivas listado clasico|apuestas deportivas madrid|apuestas deportivas
mas seguras|apuestas deportivas mejor pagadas|apuestas deportivas mejores|apuestas deportivas mejores app|apuestas deportivas mejores casas|apuestas deportivas
mejores cuotas|apuestas deportivas mejores paginas|apuestas deportivas mexico|apuestas deportivas méxico|apuestas deportivas mlb|apuestas deportivas mlb hoy|apuestas deportivas multiples|apuestas deportivas mundial|apuestas
deportivas murcia|apuestas deportivas nba|apuestas deportivas
nba hoy|apuestas deportivas nfl|apuestas deportivas nhl|apuestas
deportivas nuevas|apuestas deportivas ofertas|apuestas deportivas online|apuestas deportivas online argentina|apuestas deportivas online chile|apuestas deportivas online colombia|apuestas deportivas online en colombia|apuestas
deportivas online españa|apuestas deportivas online mexico|apuestas deportivas online paypal|apuestas deportivas online
peru|apuestas deportivas online por internet|apuestas deportivas pago
paypal|apuestas deportivas para ganar dinero|apuestas deportivas para hoy|apuestas deportivas para hoy pronosticos|apuestas deportivas
partido suspendido|apuestas deportivas partidos de hoy|apuestas deportivas paypal|apuestas deportivas
peru|apuestas deportivas perú|apuestas deportivas
peru vs ecuador|apuestas deportivas predicciones|apuestas deportivas
promociones|apuestas deportivas pronostico|apuestas deportivas pronóstico|apuestas deportivas pronostico hoy|apuestas deportivas pronosticos|apuestas deportivas
pronósticos|apuestas deportivas pronosticos expertos|apuestas deportivas pronosticos gratis|apuestas deportivas pronosticos
nba|apuestas deportivas pronosticos tenis|apuestas deportivas que aceptan paypal|apuestas deportivas
real madrid|apuestas deportivas regalo bienvenida|apuestas deportivas resultado exacto|apuestas deportivas resultados|apuestas deportivas rugby|apuestas deportivas seguras|apuestas deportivas
seguras foro|apuestas deportivas seguras hoy|apuestas deportivas seguras
para hoy|apuestas deportivas seguras telegram|apuestas deportivas sevilla|apuestas
deportivas simulador eurocopa|apuestas deportivas sin deposito|apuestas deportivas
sin deposito inicial|apuestas deportivas sin dinero|apuestas deportivas
sin dinero real|apuestas deportivas sin registro|apuestas deportivas stake|apuestas deportivas stake 10|apuestas deportivas telegram españa|apuestas deportivas
tenis|apuestas deportivas tenis de mesa|apuestas deportivas tenis foro|apuestas deportivas
tenis hoy|apuestas deportivas tips|apuestas deportivas tipster|apuestas deportivas ufc|apuestas deportivas uruguay|apuestas
deportivas valencia|apuestas deportivas valencia barcelona|apuestas deportivas
venezuela|apuestas deportivas virtuales|apuestas deportivas
y casino|apuestas deportivas y casino online|apuestas deportivas.com|apuestas
deportivas.com foro|apuestas deportivas.es|apuestas deportivos pronosticos|apuestas deposito
minimo 1 euro|apuestas descenso a segunda|apuestas descenso a segunda b|apuestas
descenso la liga|apuestas descenso primera division|apuestas descenso segunda|apuestas dia|apuestas
diarias seguras|apuestas dinero|apuestas dinero ficticio|apuestas dinero real|apuestas dinero virtual|apuestas directas|apuestas
directo|apuestas directo futbol|apuestas division de honor
juvenil|apuestas dnb|apuestas doble oportunidad|apuestas doble resultado|apuestas dobles|apuestas dobles y triples|apuestas dortmund barcelona|apuestas
draft nba|apuestas draft nfl|apuestas ecuador vs argentina|apuestas ecuador vs venezuela|apuestas egipto uruguay|apuestas el clasico|apuestas
elecciones venezuela|apuestas empate|apuestas en baloncesto|apuestas en barcelona|apuestas en beisbol|apuestas en boxeo|apuestas en caballos|apuestas en carreras
de caballos|apuestas en casino|apuestas en casino online|apuestas en casinos|apuestas en casinos online|apuestas en chile|apuestas en ciclismo|apuestas en colombia|apuestas en colombia de futbol|apuestas en directo|apuestas en directo futbol|apuestas en directo pronosticos|apuestas en el futbol|apuestas en el tenis|apuestas en españa|apuestas en esports|apuestas en eventos deportivos
virtuales|apuestas en golf|apuestas en juegos|apuestas en la champions league|apuestas en la
eurocopa|apuestas en la liga|apuestas en la nba|apuestas en la nfl|apuestas
en las vegas mlb|apuestas en las vegas nfl|apuestas en linea|apuestas en línea|apuestas
en linea argentina|apuestas en linea boxeo|apuestas en linea chile|apuestas
en linea colombia|apuestas en línea de fútbol|apuestas en linea deportivas|apuestas
en linea españa|apuestas en linea estados unidos|apuestas en linea futbol|apuestas
en linea mexico|apuestas en línea méxico|apuestas en linea mundial|apuestas en linea peru|apuestas en linea usa|apuestas
en los esports|apuestas en madrid|apuestas en méxico|apuestas en mexico online|apuestas en nba|apuestas
en partidos de futbol|apuestas en partidos de futbol
en vivo|apuestas en partidos de tenis en directo|apuestas en perú|apuestas en sevilla|apuestas en sistema|apuestas en stake|apuestas en tenis|apuestas en tenis de mesa|apuestas
en valencia|apuestas en vivo|apuestas en vivo argentina|apuestas
en vivo casino|apuestas en vivo futbol|apuestas en vivo fútbol|apuestas en vivo nba|apuestas en vivo peru|apuestas
en vivo tenis|apuestas en vivo ufc|apuestas
equipo mbappe|apuestas equipos de futbol|apuestas españa|apuestas españa
alemania|apuestas españa alemania eurocopa|apuestas españa croacia|apuestas españa eurocopa|apuestas españa francia|apuestas españa francia eurocopa|apuestas españa gana el mundial|apuestas españa gana eurocopa|apuestas españa gana mundial|apuestas españa georgia|apuestas españa holanda|apuestas españa inglaterra|apuestas españa inglaterra cuotas|apuestas españa inglaterra eurocopa|apuestas españa italia|apuestas españa mundial|apuestas españa
paises bajos|apuestas español|apuestas español oviedo|apuestas
espanyol barcelona|apuestas espanyol betis|apuestas espanyol villarreal|apuestas esport|apuestas
esports|apuestas esports colombia|apuestas esports españa|apuestas esports fifa|apuestas esports
gratis|apuestas esports lol|apuestas esports peru|apuestas esports valorant|apuestas estadisticas|apuestas estrategias|apuestas euro|apuestas euro copa|apuestas eurocopa|apuestas eurocopa campeon|apuestas eurocopa españa|apuestas eurocopa favoritos|apuestas eurocopa femenina|apuestas eurocopa final|apuestas eurocopa ganador|apuestas eurocopa hoy|apuestas eurocopa sub 21|apuestas
euroliga baloncesto|apuestas euroliga pronosticos|apuestas europa league|apuestas europa league hoy|apuestas europa
league pronosticos|apuestas europa league pronósticos|apuestas euros|apuestas f1
abu dhabi|apuestas f1 bahrein|apuestas f1 canada|apuestas f1 china|apuestas f1 cuotas|apuestas f1 hoy|apuestas f1 las vegas|apuestas f1 miami|apuestas f1 monaco|apuestas faciles de ganar|apuestas fáciles de ganar|apuestas faciles para ganar|apuestas favoritas|apuestas favorito champions|apuestas
favoritos champions|apuestas favoritos eurocopa|apuestas favoritos
mundial|apuestas fc barcelona|apuestas final champions cuotas|apuestas final champions league|apuestas
final champions peru|apuestas final copa|apuestas final copa america|apuestas final copa de europa|apuestas final copa del
rey|apuestas final copa europa|apuestas final copa libertadores|apuestas final copa rey|apuestas final de copa|apuestas final
de copa del rey|apuestas final del mundial|apuestas final euro|apuestas final
eurocopa|apuestas final europa league|apuestas final libertadores|apuestas final mundial|apuestas
final nba|apuestas final rugby|apuestas final uefa europa league|apuestas final.mundial|apuestas finales de conferencia nfl|apuestas finales nba|apuestas fiorentina betis|apuestas formula|apuestas formula 1|apuestas fórmula 1|apuestas fórmula 1 pronósticos|apuestas formula uno|apuestas foro|apuestas foro nba|apuestas francia argentina|apuestas francia españa|apuestas futbol|apuestas
fútbol|apuestas futbol americano|apuestas futbol americano nfl|apuestas
futbol argentina|apuestas futbol argentino|apuestas futbol champions league|apuestas futbol chile|apuestas futbol colombia|apuestas futbol consejos|apuestas
futbol en directo|apuestas fútbol en directo|apuestas futbol en vivo|apuestas fútbol en vivo|apuestas futbol españa|apuestas futbol español|apuestas fútbol español|apuestas futbol eurocopa|apuestas futbol femenino|apuestas futbol foro|apuestas futbol gratis|apuestas futbol hoy|apuestas fútbol hoy|apuestas futbol juegos olimpicos|apuestas futbol mexico|apuestas futbol mundial|apuestas futbol online|apuestas futbol para hoy|apuestas futbol peru|apuestas futbol pronosticos|apuestas
futbol sala|apuestas futbol telegram|apuestas futbol virtual|apuestas galgos|apuestas galgos
en directo|apuestas galgos hoy|apuestas galgos online|apuestas galgos pronosticos|apuestas galgos trucos|apuestas gana|apuestas gana colombia|apuestas gana resultados|apuestas ganadas|apuestas ganadas hoy|apuestas ganador champions league|apuestas ganador
copa america|apuestas ganador copa del rey|apuestas ganador
copa del rey baloncesto|apuestas ganador copa libertadores|apuestas ganador
de la eurocopa|apuestas ganador de la liga|apuestas ganador del
mundial|apuestas ganador eurocopa|apuestas ganador europa league|apuestas ganador f1|apuestas ganador la liga|apuestas ganador liga española|apuestas ganador mundial|apuestas ganador mundial baloncesto|apuestas ganador mundial f1|apuestas ganador nba|apuestas ganadores eurocopa|apuestas ganadores mundial|apuestas ganar champions|apuestas ganar eurocopa|apuestas ganar
liga|apuestas ganar mundial|apuestas ganar nba|apuestas getafe valencia|apuestas ghana uruguay|apuestas girona|apuestas girona athletic|apuestas girona betis|apuestas girona campeon de liga|apuestas girona campeon liga|apuestas girona gana la liga|apuestas girona real madrid|apuestas girona real sociedad|apuestas goleador eurocopa|apuestas goleadores eurocopa|apuestas
goles asiaticos|apuestas golf|apuestas golf masters|apuestas golf
pga|apuestas granada barcelona|apuestas grand slam de tenis|apuestas gratis|apuestas gratis
casino|apuestas gratis con premios|apuestas gratis hoy|apuestas gratis para hoy|apuestas gratis
por registro|apuestas gratis puntos|apuestas gratis regalos|apuestas
gratis sin deposito|apuestas gratis sin depósito|apuestas gratis
sin ingreso|apuestas gratis sports|apuestas gratis y ganar premios|apuestas
grupo a eurocopa|apuestas grupos eurocopa|apuestas handicap|apuestas
handicap asiatico|apuestas handicap baloncesto|apuestas handicap como funciona|apuestas handicap nba|apuestas handicap nfl|apuestas hipicas online|apuestas hípicas online|apuestas hipicas venezuela|apuestas hockey|apuestas hockey hielo|apuestas
hockey patines|apuestas hockey sobre hielo|apuestas holanda argentina|apuestas holanda vs argentina|apuestas hoy|apuestas hoy champions|apuestas hoy futbol|apuestas hoy nba|apuestas hoy pronosticos|apuestas
hoy seguras|apuestas impuestos|apuestas inglaterra paises bajos|apuestas inter barca|apuestas
inter barcelona|apuestas juego|apuestas juegos|apuestas juegos en linea|apuestas juegos olimpicos|apuestas
juegos olímpicos|apuestas juegos olimpicos baloncesto|apuestas juegos online|apuestas juegos virtuales|apuestas jugador sevilla|apuestas jugadores nba|apuestas kings league americas|apuestas la liga|apuestas la liga española|apuestas la liga
hoy|apuestas la liga santander|apuestas las vegas mlb|apuestas las
vegas nba|apuestas las vegas nfl|apuestas league of legends mundial|apuestas legal|apuestas legales|apuestas legales en colombia|apuestas legales en españa|apuestas legales en estados unidos|apuestas legales españa|apuestas leganes betis|apuestas libertadores|apuestas licencia|apuestas liga 1 peru|apuestas liga argentina|apuestas liga bbva pronosticos|apuestas liga de
campeones|apuestas liga de campeones de baloncesto|apuestas liga
de campeones de hockey|apuestas liga españa|apuestas liga española|apuestas
liga santander pronosticos|apuestas ligas de futbol|apuestas linea|apuestas linea de gol|apuestas liverpool barcelona|apuestas liverpool real madrid|apuestas lol mundial|apuestas
madrid|apuestas madrid arsenal|apuestas madrid atletico|apuestas madrid
atletico champions|apuestas madrid barca|apuestas madrid barça|apuestas madrid barca hoy|apuestas madrid
barca supercopa|apuestas madrid barcelona|apuestas madrid barsa|apuestas madrid bayern|apuestas madrid betis|apuestas
madrid borussia|apuestas madrid campeon champions|apuestas madrid celta|apuestas madrid city|apuestas madrid dortmund|apuestas madrid gana la liga|apuestas madrid gana liga|apuestas madrid hoy|apuestas
madrid liverpool|apuestas madrid osasuna|apuestas madrid
sevilla|apuestas madrid valencia|apuestas madrid vs arsenal|apuestas madrid vs barcelona|apuestas mallorca osasuna|apuestas mallorca
real sociedad|apuestas manchester athletic|apuestas manchester city real
madrid|apuestas mas faciles de ganar|apuestas mas seguras|apuestas mas seguras para hoy|apuestas masters de golf|apuestas masters
de tenis|apuestas maximo goleador eurocopa|apuestas maximo goleador mundial|apuestas mejor jugador
eurocopa|apuestas mejores casinos online|apuestas mexico|apuestas méxico|apuestas
mexico polonia|apuestas méxico polonia|apuestas mlb|apuestas mlb
hoy|apuestas mlb las vegas|apuestas mlb para hoy|apuestas mlb pronosticos|apuestas mlb usa|apuestas mma ufc|apuestas momios|apuestas multiples|apuestas múltiples|apuestas
multiples como funcionan|apuestas multiples el gordo|apuestas multiples futbol|apuestas mundial|apuestas mundial 2026|apuestas mundial baloncesto|apuestas
mundial balonmano|apuestas mundial brasil|apuestas mundial
campeon|apuestas mundial ciclismo|apuestas mundial clubes|apuestas
mundial de baloncesto|apuestas mundial de ciclismo|apuestas
mundial de clubes|apuestas mundial de futbol|apuestas mundial
de fútbol|apuestas mundial de rugby|apuestas mundial f1|apuestas mundial favoritos|apuestas mundial femenino|apuestas mundial formula
1|apuestas mundial futbol|apuestas mundial ganador|apuestas mundial lol|apuestas mundial moto gp|apuestas mundial motogp|apuestas
mundial rugby|apuestas mundial sub 17|apuestas mundiales|apuestas mundialistas|apuestas mvp eurocopa|apuestas mvp nba|apuestas mvp nfl|apuestas nacionales de colombia|apuestas nba|apuestas nba all star|apuestas nba campeon|apuestas nba consejos|apuestas nba esta noche|apuestas nba finals|apuestas nba gratis|apuestas nba hoy|apuestas nba hoy jugadores|apuestas nba hoy pronosticos|apuestas nba para hoy|apuestas nba
playoffs|apuestas nba pronosticos|apuestas nba pronósticos|apuestas nba pronosticos hoy|apuestas
nba tipster|apuestas nfl|apuestas nfl hoy|apuestas nfl las vegas|apuestas nfl playoffs|apuestas
nfl pronosticos|apuestas nfl pronósticos|apuestas nfl semana 4|apuestas nfl super bowl|apuestas nhl|apuestas nhl pronosticos|apuestas octavos eurocopa|apuestas ofertas|apuestas online|apuestas
online argentina|apuestas online argentina legal|apuestas online bono|apuestas online bono
bienvenida|apuestas online boxeo|apuestas online caballos|apuestas online carreras
de caballos|apuestas online casino|apuestas online champions league|apuestas
online chile|apuestas online ciclismo|apuestas online colombia|apuestas online comparativa|apuestas online con paypal|apuestas online de caballos|apuestas online deportivas|apuestas online en argentina|apuestas online en peru|apuestas online espana|apuestas online españa|apuestas
online esports|apuestas online foro|apuestas online futbol|apuestas online futbol españa|apuestas online golf|apuestas
online gratis|apuestas online gratis sin deposito|apuestas online
juegos|apuestas online mexico|apuestas online mma|apuestas
online movil|apuestas online nba|apuestas online net|apuestas online nuevas|apuestas
online opiniones|apuestas online paypal|apuestas online peru|apuestas online seguras|apuestas online sin dinero|apuestas online sin registro|apuestas online tenis|apuestas online ufc|apuestas online uruguay|apuestas online venezuela|apuestas open britanico golf|apuestas osasuna athletic|apuestas osasuna barcelona|apuestas osasuna real madrid|apuestas osasuna sevilla|apuestas osasuna valencia|apuestas over|apuestas over 2.5|apuestas over under|apuestas
paginas|apuestas pago anticipado|apuestas paises bajos ecuador|apuestas paises bajos inglaterra|apuestas países bajos qatar|apuestas para boxeo|apuestas para champions league|apuestas para el clasico|apuestas
para el dia de hoy|apuestas para el mundial|apuestas para
el partido de hoy|apuestas para eurocopa|apuestas para europa
league|apuestas para futbol|apuestas para ganar|apuestas
para ganar dinero|apuestas para ganar dinero facil|apuestas para ganar en la ruleta|apuestas para ganar la champions|apuestas
para ganar la eurocopa|apuestas para ganar la europa league|apuestas para ganar la liga|apuestas para ganar
siempre|apuestas para hacer|apuestas para hoy|apuestas para hoy de futbol|apuestas para hoy europa league|apuestas para hoy futbol|apuestas para juegos|apuestas para la champions league|apuestas para la copa del rey|apuestas para la eurocopa|apuestas para la europa league|apuestas
para la final de la eurocopa|apuestas para la nba hoy|apuestas
para los partidos de hoy|apuestas para partidos de hoy|apuestas
para ufc|apuestas partido|apuestas partido aplazado|apuestas partido champions|apuestas partido colombia|apuestas
partido españa marruecos|apuestas partido mundial|apuestas partido suspendido|apuestas partidos|apuestas partidos champions league|apuestas partidos csgo|apuestas partidos de futbol|apuestas partidos de futbol hoy|apuestas
partidos de hoy|apuestas partidos eurocopa|apuestas partidos futbol|apuestas partidos hoy|apuestas partidos mundial|apuestas paypal|apuestas peleas de boxeo|apuestas peru|apuestas perú|apuestas peru brasil|apuestas peru chile|apuestas peru paraguay|apuestas peru
uruguay|apuestas peru vs chile|apuestas peru vs colombia|apuestas pichichi eurocopa|apuestas plataforma|apuestas
playoff|apuestas playoff ascenso|apuestas playoff ascenso a primera|apuestas playoff nba|apuestas playoff segunda|apuestas playoff segunda b|apuestas playoffs nba|apuestas playoffs nfl|apuestas polonia argentina|apuestas por argentina|apuestas por internet
mexico|apuestas por internet para ganar dinero|apuestas por paypal|apuestas por ronda
boxeo|apuestas por sistema|apuestas portugal uruguay|apuestas pre partido|apuestas
predicciones|apuestas predicciones futbol|apuestas primera division|apuestas primera division españa|apuestas promociones|apuestas pronostico|apuestas pronosticos|apuestas pronosticos deportivos|apuestas pronosticos deportivos tenis|apuestas pronosticos futbol|apuestas pronosticos gratis|apuestas pronosticos nba|apuestas pronosticos tenis|apuestas prorroga|apuestas
psg barca|apuestas psg barcelona|apuestas puntos por tarjetas|apuestas puntos tarjetas|apuestas que aceptan paypal|apuestas que es
handicap|apuestas que puedes hacer con tu novia|apuestas que siempre ganaras|apuestas que significa|apuestas quien bajara
a segunda|apuestas quién bajara a segunda|apuestas quien gana el mundial|apuestas quien gana eurocopa|apuestas quien gana la champions|apuestas quien gana la eurocopa|apuestas quien gana la liga|apuestas
quien ganara el mundial|apuestas quién ganará el mundial|apuestas quien ganara la champions|apuestas quien ganara la eurocopa|apuestas quien ganara la
liga|apuestas rayo barcelona|apuestas real madrid|apuestas real madrid arsenal|apuestas real madrid athletic|apuestas real madrid atletico|apuestas real madrid
atletico champions|apuestas real madrid atletico
de madrid|apuestas real madrid atlético de madrid|apuestas real madrid
atletico madrid|apuestas real madrid barcelona|apuestas real madrid bayern|apuestas real madrid betis|apuestas real madrid borussia|apuestas real madrid campeon champions|apuestas real madrid celta|apuestas
real madrid champions|apuestas real madrid city|apuestas real madrid girona|apuestas real madrid hoy|apuestas
real madrid liverpool|apuestas real madrid manchester city|apuestas real
madrid osasuna|apuestas real madrid real sociedad|apuestas real madrid valencia|apuestas real madrid villarreal|apuestas real madrid vs arsenal|apuestas real madrid vs atletico|apuestas
real madrid vs atlético|apuestas real madrid
vs atletico madrid|apuestas real madrid vs barcelona|apuestas real madrid vs betis|apuestas real madrid vs sevilla|apuestas real
madrid vs valencia|apuestas real sociedad|apuestas real sociedad athletic|apuestas real sociedad barcelona|apuestas real sociedad betis|apuestas real sociedad psg|apuestas real
sociedad real madrid|apuestas real sociedad valencia|apuestas recomendadas hoy|apuestas regalo de bienvenida|apuestas registro|apuestas resultado exacto|apuestas resultados|apuestas
resultados eurocopa|apuestas retirada tenis|apuestas roma barcelona|apuestas roma sevilla|apuestas
rugby|apuestas rugby mundial|apuestas rugby world cup|apuestas
ruleta seguras|apuestas segunda|apuestas segunda b|apuestas segunda division|apuestas segunda división|apuestas segunda division b|apuestas segunda
division españa|apuestas seguras|apuestas seguras baloncesto|apuestas
seguras calculadora|apuestas seguras en la ruleta|apuestas
seguras eurocopa|apuestas seguras foro|apuestas seguras futbol|apuestas seguras futbol hoy|apuestas seguras gratis|apuestas seguras hoy|apuestas seguras hoy futbol|apuestas seguras nba|apuestas seguras nba
hoy|apuestas seguras para este fin de semana|apuestas seguras para ganar dinero|apuestas seguras para hoy|apuestas seguras para hoy fútbol|apuestas seguras para hoy pronósticos|apuestas seguras para mañana|apuestas seguras ruleta|apuestas seguras telegram|apuestas seguras tenis|apuestas semifinales eurocopa|apuestas senegal paises bajos|apuestas sevilla|apuestas sevilla athletic|apuestas sevilla atletico de madrid|apuestas sevilla
barcelona|apuestas sevilla betis|apuestas sevilla campeon liga|apuestas sevilla celta|apuestas sevilla gana la liga|apuestas sevilla girona|apuestas sevilla inter|apuestas sevilla jugador|apuestas sevilla juventus|apuestas
sevilla leganes|apuestas sevilla madrid|apuestas sevilla manchester united|apuestas sevilla osasuna|apuestas sevilla real madrid|apuestas
sevilla real sociedad|apuestas sevilla roma|apuestas sevilla valencia|apuestas significa|apuestas
simples ejemplos|apuestas simples o combinadas|apuestas sin deposito|apuestas
sin deposito inicial|apuestas sin deposito minimo|apuestas sin dinero|apuestas
sin dinero real|apuestas sin empate|apuestas sin empate que significa|apuestas
sin ingreso minimo|apuestas sin registro|apuestas sistema|apuestas sistema calculadora|apuestas sistema como funciona|apuestas sistema trixie|apuestas sociedad|apuestas sorteo copa del rey|apuestas stake|apuestas stake 10|apuestas stake 10 hoy|apuestas super bowl favorito|apuestas super rugby|apuestas supercopa españa|apuestas superliga argentina|apuestas tarjeta roja|apuestas tarjetas|apuestas tarjetas amarillas|apuestas tenis|apuestas tenis atp|apuestas tenis consejos|apuestas tenis copa davis|apuestas tenis de mesa|apuestas tenis de mesa pronosticos|apuestas tenis en vivo|apuestas tenis femenino|apuestas tenis hoy|apuestas
tenis itf|apuestas tenis pronosticos|apuestas tenis pronósticos|apuestas tenis
retirada|apuestas tenis roland garros|apuestas tenis seguras|apuestas tenis wimbledon|apuestas tenis wta|apuestas tercera
division|apuestas tercera division españa|apuestas tipos|apuestas tips|apuestas tipster|apuestas tipster para
hoy|apuestas topuria holloway cuotas|apuestas torneos
de golf|apuestas torneos de tenis|apuestas trucos|apuestas
uefa champions league|apuestas uefa europa league|apuestas ufc|apuestas ufc chile|apuestas ufc como funciona|apuestas
ufc hoy|apuestas ufc ilia topuria|apuestas ufc online|apuestas ufc pronósticos|apuestas ufc telegram|apuestas ufc topuria|apuestas under over|apuestas unionistas villarreal|apuestas
uruguay|apuestas uruguay colombia|apuestas uruguay
corea|apuestas uruguay vs colombia|apuestas us open golf|apuestas us open tenis|apuestas valencia|apuestas valencia barcelona|apuestas valencia betis|apuestas valencia
madrid|apuestas valencia real madrid|apuestas valladolid
barcelona|apuestas valladolid valencia|apuestas
valor app|apuestas valor en directo|apuestas valor galgos|apuestas venezuela|apuestas venezuela
argentina|apuestas venezuela bolivia|apuestas venezuela ecuador|apuestas villarreal|apuestas villarreal athletic|apuestas
villarreal barcelona|apuestas villarreal bayern|apuestas villarreal betis|apuestas villarreal liverpool|apuestas
villarreal manchester|apuestas villarreal
manchester united|apuestas villarreal vs real madrid|apuestas virtuales|apuestas virtuales
colombia|apuestas virtuales futbol|apuestas virtuales sin dinero|apuestas vivo|apuestas vuelta a españa|apuestas vuelta españa|apuestas william hill partidos de hoy|apuestas y casino|apuestas y casinos|apuestas y juegos de azar|apuestas
y pronosticos|apuestas y pronosticos de futbol|apuestas y pronosticos
deportivos|apuestas y resultados|apuestas-deportivas|apuestas-deportivas.es pronosticos|arbitro nba
apuestas|argentina apuestas|argentina colombia
apuestas|argentina croacia apuestas|argentina francia apuestas|argentina mexico apuestas|argentina peru apuestas|argentina
uruguay apuestas|argentina vs bolivia apuestas|argentina
vs chile apuestas|argentina vs colombia apuestas|argentina vs francia apuestas|argentina vs.
colombia apuestas|asi se gana en las apuestas deportivas|asiatico apuestas|asiatico en apuestas|asiaticos apuestas|athletic barcelona apuestas|athletic manchester united apuestas|athletic osasuna
apuestas|athletic real madrid apuestas|atletico barcelona apuestas|atletico de madrid apuestas|atlético
de madrid apuestas|atletico de madrid real madrid apuestas|atletico de madrid
vs barcelona apuestas|atletico madrid real madrid apuestas|atletico madrid vs real madrid apuestas|atletico real madrid apuestas|atletico vs real madrid apuestas|avisador de cuotas
apuestas|bajada de cuotas apuestas|baloncesto apuestas|barbastro barcelona apuestas|barca
apuestas|barca bayern apuestas|barca inter apuestas|barca madrid apuestas|barça madrid apuestas|barca vs atletico apuestas|barca vs madrid apuestas|barca vs real madrid apuestas|barcelona –
real madrid apuestas|barcelona apuestas|barcelona atletico apuestas|barcelona atletico de madrid apuestas|barcelona atletico madrid apuestas|barcelona betis apuestas|barcelona casa de apuestas|barcelona inter apuestas|barcelona psg apuestas|barcelona real madrid apuestas|barcelona real sociedad
apuestas|barcelona sevilla apuestas|barcelona valencia apuestas|barcelona vs athletic bilbao apuestas|barcelona vs atlético madrid
apuestas|barcelona vs betis apuestas|barcelona vs celta de vigo apuestas|barcelona vs espanyol
apuestas|barcelona vs girona apuestas|barcelona vs madrid apuestas|barcelona vs real madrid apuestas|barcelona vs real sociedad apuestas|barcelona vs sevilla apuestas|barcelona vs villarreal apuestas|base de datos cuotas apuestas deportivas|bayern real madrid
apuestas|beisbol apuestas|best america apuestas|bet apuestas
chile|bet apuestas en vivo|betis – chelsea apuestas|betis apuestas|betis barcelona apuestas|betis chelsea apuestas|betis madrid apuestas|betis sevilla apuestas|betsson tu sitio de apuestas online|blog
apuestas baloncesto|blog apuestas ciclismo|blog apuestas nba|blog apuestas tenis|blog de
apuestas de tenis|bono apuestas|bono apuestas deportivas|bono apuestas deportivas sin deposito|bono apuestas gratis|bono apuestas gratis
sin deposito|bono apuestas sin deposito|bono bienvenida apuestas|bono
bienvenida apuestas deportivas|bono bienvenida apuestas españa|bono
bienvenida apuestas sin deposito|bono bienvenida apuestas sin depósito|bono bienvenida casa apuestas|bono bienvenida casa de apuestas|bono
bienvenida marca apuestas|bono casa apuestas|bono casa de apuestas|bono casa de apuestas sin ingreso|bono casas de
apuestas|bono de apuestas|bono de apuestas gratis sin deposito|bono de bienvenida apuestas|bono de bienvenida apuestas deportivas|bono de bienvenida casa de apuestas|bono de bienvenida casas de apuestas|bono de casas de apuestas|bono de
registro apuestas|bono de registro apuestas deportivas|bono de registro casa
de apuestas|bono gratis apuestas|bono marca apuestas|bono por registro apuestas|bono por registro apuestas
deportivas|bono por registro casa de apuestas|bono registro apuestas|bono sin deposito apuestas|bono sin depósito apuestas|bono sin deposito apuestas deportivas|bono sin depósito apuestas deportivas|bono sin deposito casa de apuestas|bono sin deposito marca
apuestas|bono sin ingreso apuestas|bono sin ingreso apuestas
deportivas|bonos apuestas|bonos apuestas colombia|bonos apuestas deportivas|bonos
apuestas deportivas sin deposito|bonos apuestas gratis|bonos apuestas sin deposito|bonos apuestas sin depósito|bonos bienvenida apuestas|bonos bienvenida casas apuestas|bonos bienvenida casas de apuestas|bonos casa de apuestas|bonos casas apuestas|bonos casas de apuestas|bonos casas
de apuestas colombia|bonos casas de apuestas deportivas|bonos casas de apuestas españa|bonos casas de apuestas nuevas|bonos casas de
apuestas sin deposito|bonos casas de apuestas sin depósito|bonos de
apuestas|bonos de apuestas deportivas|bonos de apuestas gratis|bonos de apuestas sin deposito|bonos
de bienvenida apuestas|bonos de bienvenida apuestas deportivas|bonos de bienvenida casa de apuestas|bonos de bienvenida
casas de apuestas|bonos de bienvenida de casas de apuestas|bonos de bienvenida en casas de apuestas|bonos de casas de apuestas|bonos de casas de apuestas sin deposito|bonos en casa de apuestas|bonos en casas
de apuestas sin deposito|bonos gratis apuestas|bonos
gratis apuestas deportivas|bonos gratis casas de apuestas|bonos gratis sin deposito apuestas|bonos
paginas de apuestas|bonos registro casas de apuestas|bonos sin deposito apuestas|bonos sin depósito apuestas|bonos sin deposito apuestas
deportivas|bonos sin deposito casas de apuestas|bot de apuestas deportivas
gratis|boxeo apuestas|brasil colombia apuestas|brasil peru apuestas|brasil vs colombia apuestas|buenas apuestas para hoy|buscador cuotas apuestas|buscador de apuestas seguras|buscador de
cuotas apuestas|buscador de cuotas de apuestas|buscar
apuestas seguras|caballos apuestas|calculador de apuestas|calculador de cuotas apuestas|calculadora
apuestas|calculadora apuestas combinadas|calculadora apuestas de sistema|calculadora apuestas
deportivas|calculadora apuestas deportivas
seguras|calculadora apuestas multiples|calculadora apuestas segura|calculadora apuestas
seguras|calculadora apuestas sistema|calculadora apuestas yankee|calculadora arbitraje apuestas|calculadora cubrir apuestas|calculadora cuotas apuestas|calculadora de apuestas|calculadora
de apuestas combinadas|calculadora de apuestas de futbol|calculadora de
apuestas de sistema|calculadora de apuestas deportivas|calculadora de apuestas multiples|calculadora de apuestas seguras|calculadora de apuestas sistema|calculadora de
apuestas surebets|calculadora de arbitraje apuestas|calculadora de cuotas apuestas|calculadora de
cuotas de apuestas|calculadora para apuestas deportivas|calculadora poisson apuestas|calculadora poisson apuestas deportivas|calculadora poisson para apuestas|calculadora
scalping apuestas deportivas|calculadora sistema apuestas|calculadora stake apuestas|calculadora trading apuestas|calcular apuestas|calcular
apuestas deportivas|calcular apuestas futbol|calcular apuestas sistema|calcular cuotas apuestas|calcular cuotas apuestas combinadas|calcular cuotas apuestas deportivas|calcular cuotas de apuestas|calcular ganancias
apuestas deportivas|calcular momios apuestas|calcular probabilidad cuota
apuestas|calcular stake apuestas|calcular unidades apuestas|calcular yield apuestas|calculo de apuestas|calculo de apuestas deportivas|cambio de cuotas apuestas|campeon champions apuestas|campeon eurocopa apuestas|campeon liga
apuestas|campeon nba apuestas|canales de apuestas gratis|carrera de caballos apuestas|carrera de caballos apuestas juego|carrera de caballos con apuestas|carrera de galgos apuestas|carreras de caballos
apuestas|carreras de caballos apuestas online|carreras de
caballos con apuestas|carreras de caballos juegos de apuestas|carreras de galgos apuestas|carreras de
galgos apuestas online|carreras de galgos apuestas
trucos|carreras galgos apuestas|casa apuestas argentina|casa apuestas atletico de madrid|casa apuestas barcelona|casa apuestas betis|casa apuestas bono bienvenida|casa apuestas bono gratis|casa apuestas bono sin deposito|casa apuestas cerca de mi|casa apuestas chile|casa
apuestas colombia|casa apuestas con mejores cuotas|casa apuestas deportivas|casa apuestas españa|casa apuestas española|casa apuestas eurocopa|casa apuestas futbol|casa
apuestas mejores cuotas|casa apuestas mundial|casa apuestas nueva|casa
apuestas nuevas|casa apuestas online|casa apuestas peru|casa apuestas valencia|casa de apuestas|casa de apuestas 10 euros gratis|casa de apuestas argentina|casa de apuestas
atletico de madrid|casa de apuestas baloncesto|casa de apuestas barcelona|casa
de apuestas beisbol|casa de apuestas betis|casa de apuestas
bono|casa de apuestas bono bienvenida|casa de apuestas bono de bienvenida|casa
de apuestas bono gratis|casa de apuestas bono por registro|casa de
apuestas bono sin deposito|casa de apuestas boxeo|casa de apuestas caballos|casa de apuestas carreras de caballos|casa de apuestas cerca de mi|casa de apuestas
cerca de mí|casa de apuestas champions league|casa de apuestas chile|casa de apuestas ciclismo|casa de apuestas colombia|casa de
apuestas con bono de bienvenida|casa de apuestas con bono
sin deposito|casa de apuestas con cuotas mas altas|casa de
apuestas con esports|casa de apuestas con las mejores cuotas|casa de apuestas
con licencia en españa|casa de apuestas con mejores cuotas|casa de apuestas con pago anticipado|casa de
apuestas con paypal|casa de apuestas copa america|casa de apuestas de caballos|casa de apuestas de colombia|casa de apuestas de españa|casa de
apuestas de futbol|casa de apuestas de fútbol|casa de apuestas de futbol peru|casa de
apuestas de peru|casa de apuestas del madrid|casa de apuestas del real madrid|casa de
apuestas deportivas|casa de apuestas deportivas cerca de mi|casa de apuestas deportivas en argentina|casa de apuestas deportivas en chile|casa de apuestas deportivas en colombia|casa de apuestas deportivas en españa|casa de apuestas deportivas en madrid|casa de apuestas deportivas españa|casa de apuestas deportivas españolas|casa de apuestas deportivas madrid|casa de
apuestas deportivas mexico|casa de apuestas deportivas
online|casa de apuestas deportivas peru|casa de apuestas deposito 5 euros|casa de apuestas deposito minimo|casa de apuestas deposito minimo
1 euro|casa de apuestas depósito mínimo 1 euro|casa de apuestas en españa|casa de apuestas
en linea|casa de apuestas en madrid|casa de apuestas en perú|casa de apuestas en vivo|casa de
apuestas españa|casa de apuestas españa inglaterra|casa de apuestas española|casa de
apuestas españolas|casa de apuestas esports|casa de apuestas eurocopa|casa de apuestas europa league|casa de apuestas f1|casa de apuestas formula 1|casa
de apuestas futbol|casa de apuestas ingreso minimo|casa de
apuestas ingreso minimo 1 euro|casa de apuestas ingreso mínimo
1 euro|casa de apuestas legales|casa de apuestas legales en colombia|casa
de apuestas legales en españa|casa de apuestas libertadores|casa de apuestas liga española|casa de apuestas madrid|casa de
apuestas mas segura|casa de apuestas mejores|casa de apuestas méxico|casa de apuestas minimo 5 euros|casa de apuestas mlb|casa de apuestas mundial|casa de apuestas nba|casa de apuestas nfl|casa de apuestas nueva|casa de apuestas
nuevas|casa de apuestas oficial del real madrid|casa de apuestas oficial real madrid|casa
de apuestas online|casa de apuestas online argentina|casa de apuestas online chile|casa de apuestas online
españa|casa de apuestas online mexico|casa de apuestas online
paraguay|casa de apuestas online peru|casa de apuestas online usa|casa de apuestas online venezuela|casa de apuestas pago anticipado|casa de apuestas para boxeo|casa de apuestas para ufc|casa de apuestas peru|casa
de apuestas perú|casa de apuestas peru online|casa
de apuestas por paypal|casa de apuestas promociones|casa de apuestas
que regalan dinero|casa de apuestas real madrid|casa de apuestas regalo de bienvenida|casa de apuestas sevilla|casa de apuestas sin dinero|casa de apuestas sin ingreso minimo|casa de apuestas sin licencia en españa|casa de apuestas sin minimo
de ingreso|casa de apuestas stake|casa de apuestas tenis|casa de apuestas
ufc|casa de apuestas valencia|casa de apuestas venezuela|casa de apuestas virtuales|casa de apuestas vive la suerte|casa
oficial de apuestas del real madrid|casas apuestas asiaticas|casas apuestas bono sin deposito|casas
apuestas bonos sin deposito|casas apuestas caballos|casas apuestas chile|casas apuestas ciclismo|casas apuestas con licencia|casas
apuestas con licencia en españa|casas apuestas deportivas|casas apuestas deportivas colombia|casas apuestas deportivas españa|casas apuestas deportivas españolas|casas
apuestas deportivas nuevas|casas apuestas españa|casas apuestas
españolas|casas apuestas esports|casas apuestas eurocopa|casas apuestas golf|casas
apuestas ingreso minimo 5 euros|casas apuestas legales|casas apuestas legales españa|casas
apuestas licencia|casas apuestas licencia españa|casas apuestas mexico|casas apuestas mundial|casas apuestas nba|casas apuestas nuevas|casas apuestas nuevas españa|casas apuestas ofertas|casas
apuestas online|casas apuestas paypal|casas apuestas peru|casas apuestas sin licencia|casas apuestas tenis|casas asiaticas apuestas|casas
de apuestas|casas de apuestas 5 euros|casas de apuestas app|casas de apuestas argentinas|casas de apuestas
asiaticas|casas de apuestas baloncesto|casas de apuestas barcelona|casas de apuestas bono bienvenida|casas de apuestas bono de bienvenida|casas
de apuestas bono por registro|casas de apuestas bono sin deposito|casas de apuestas
bono sin ingreso|casas de apuestas bonos|casas de apuestas bonos de bienvenida|casas de apuestas bonos gratis|casas de apuestas
bonos sin deposito|casas de apuestas boxeo|casas
de apuestas caballos|casas de apuestas carreras de caballos|casas de apuestas casino|casas de apuestas casino online|casas de apuestas cerca de
mi|casas de apuestas champions league|casas de apuestas chile|casas
de apuestas ciclismo|casas de apuestas colombia|casas de apuestas com|casas de apuestas con app|casas de apuestas con apuestas gratis|casas
de apuestas con bono|casas de apuestas con bono de bienvenida|casas de apuestas con bono de registro|casas de apuestas con bono por registro|casas
de apuestas con bono sin deposito|casas de apuestas con bonos|casas de apuestas con bonos gratis|casas de apuestas con bonos sin deposito|casas de apuestas
con deposito minimo|casas de apuestas con esports|casas de apuestas
con handicap asiatico|casas de apuestas con licencia|casas de apuestas con licencia en españa|casas de apuestas con licencia españa|casas de apuestas con licencia española|casas de apuestas con mejores cuotas|casas de apuestas con pago anticipado|casas de apuestas con paypal|casas de apuestas con paypal
en perú|casas de apuestas con promociones|casas
de apuestas con ruleta en vivo|casas de apuestas copa del rey|casas de apuestas de
caballos|casas de apuestas de españa|casas de apuestas de futbol|casas de apuestas de fútbol|casas de apuestas de peru|casas de apuestas deportivas|casas de apuestas deportivas asiaticas|casas de apuestas deportivas colombia|casas
de apuestas deportivas comparativa|casas de apuestas
deportivas con paypal|casas de apuestas deportivas en chile|casas de apuestas deportivas en españa|casas
de apuestas deportivas en linea|casas de apuestas deportivas en madrid|casas de
apuestas deportivas en mexico|casas de apuestas deportivas en peru|casas de apuestas deportivas en sevilla|casas de apuestas deportivas
en valencia|casas de apuestas deportivas españa|casas de
apuestas deportivas españolas|casas de apuestas
deportivas legales|casas de apuestas deportivas madrid|casas de apuestas deportivas mexico|casas de apuestas deportivas
nuevas|casas de apuestas deportivas online|casas de apuestas deportivas peru|casas
de apuestas deportivas perú|casas de apuestas deposito minimo 1 euro|casas de apuestas
depósito mínimo 1 euro|casas de apuestas dinero gratis|casas de apuestas en argentina|casas de apuestas en barcelona|casas
de apuestas en chile|casas de apuestas en colombia|casas de apuestas en españa|casas de apuestas en españa online|casas de apuestas en linea|casas de apuestas en madrid|casas de apuestas en méxico|casas de apuestas en peru|casas de apuestas en perú|casas de apuestas en sevilla|casas de apuestas en uruguay|casas de apuestas
en valencia|casas de apuestas en venezuela|casas de apuestas equipos de futbol|casas de apuestas españa|casas de apuestas españa alemania|casas de apuestas españa inglaterra|casas de apuestas españa licencia|casas de apuestas españa nuevas|casas de
apuestas españa online|casas de apuestas española|casas de apuestas españolas|casas de
apuestas españolas con licencia|casas de apuestas españolas online|casas de apuestas esports|casas de apuestas eurocopa|casas de apuestas eurocopa 2024|casas
de apuestas europa league|casas de apuestas f1|casas de apuestas fisicas en barcelona|casas de apuestas fisicas
en españa|casas de apuestas formula 1|casas de apuestas fuera de
españa|casas de apuestas futbol|casas de apuestas fútbol|casas de apuestas futbol
españa|casas de apuestas ganador eurocopa|casas de apuestas gratis|casas de
apuestas ingreso minimo|casas de apuestas ingreso minimo 1 euro|casas
de apuestas ingreso minimo 5 euros|casas de apuestas inter barcelona|casas de apuestas legales|casas de apuestas legales en colombia|casas de apuestas
legales en españa|casas de apuestas legales en mexico|casas de apuestas legales españa|casas de apuestas legales mx|casas de apuestas licencia|casas de apuestas licencia españa|casas de apuestas lista|casas de apuestas madrid|casas de
apuestas mas seguras|casas de apuestas mejores bonos|casas de apuestas mejores cuotas|casas
de apuestas mexico|casas de apuestas méxico|casas de apuestas minimo
5 euros|casas de apuestas mlb|casas de apuestas mundial|casas de apuestas mundial baloncesto|casas de apuestas mundiales|casas de apuestas nba|casas de apuestas no
reguladas en españa|casas de apuestas nueva ley|casas de apuestas nuevas|casas de apuestas nuevas en colombia|casas de
apuestas nuevas en españa|casas de apuestas nuevas españa|casas de apuestas ofertas|casas de apuestas
online|casas de apuestas online argentina|casas de apuestas online
colombia|casas de apuestas online deportivas|casas de apuestas online ecuador|casas de apuestas online en argentina|casas de apuestas online en chile|casas de apuestas online en colombia|casas de apuestas online en españa|casas de apuestas online en mexico|casas de apuestas online españa|casas de apuestas online mas fiables|casas de apuestas online mexico|casas de apuestas
online nuevas|casas de apuestas online peru|casas de apuestas online usa|casas de apuestas
online venezuela|casas de apuestas pago paypal|casas de apuestas para ufc|casas de apuestas paypal|casas de apuestas peru bono s
Your comment is awaiting moderation.
Future Growth Zone – Insightful guidance that makes exploring possibilities feel smooth.
Your comment is awaiting moderation.
Сеть детских садов https://www.razvitie21vek.com «Развитие XXI век» – уникальная образовательная среда для детей от 1,5 лет, где каждый ребенок сможет раскрыть свои таланты. Мы предлагаем разнообразные программы для развития творческих, физических, интеллектуальных и лингвистических способностей наших воспитанников.
Your comment is awaiting moderation.
в кемерово откроетесь?? купить скорость, кокаин, мефедрон, гашиш
Your comment is awaiting moderation.
(10 euros gratis apuestas|10 mejores casas de apuestas|10 trucos
para ganar apuestas|15 euros gratis marca apuestas|1×2 apuestas|1×2 apuestas deportivas|1×2 apuestas que
significa|1×2 en apuestas|1×2 en apuestas que significa|1×2 que significa en apuestas|5
euros gratis apuestas|9 apuestas que siempre ganaras|a partir de cuanto se
declara apuestas|actividades de juegos de azar y apuestas|ad apuestas deportivas|aleksandre topuria ufc apuestas|algoritmo para ganar
apuestas deportivas|america apuestas|análisis nba apuestas|aplicacion android apuestas deportivas|aplicacion apuestas deportivas|aplicacion apuestas
deportivas android|aplicación de apuestas online|aplicacion para hacer
apuestas|aplicacion para hacer apuestas
de futbol|aplicación para hacer apuestas de fútbol|aplicaciones apuestas deportivas
android|aplicaciones apuestas deportivas gratis|aplicaciones de apuestas
android|aplicaciones de apuestas de fútbol|aplicaciones de apuestas deportivas|aplicaciones de apuestas deportivas peru|aplicaciones de apuestas deportivas perú|aplicaciones
de apuestas en colombia|aplicaciones de apuestas
gratis|aplicaciones de apuestas online|aplicaciones de apuestas seguras|aplicaciones
de apuestas sin dinero|aplicaciones para hacer apuestas|apostar
seguro apuestas deportivas|app android apuestas deportivas|app apuestas|app apuestas android|app apuestas de futbol|app apuestas deportivas|app apuestas deportivas android|app apuestas deportivas argentina|app
apuestas deportivas colombia|app apuestas deportivas ecuador|app apuestas
deportivas españa|app apuestas deportivas gratis|app
apuestas entre amigos|app apuestas futbol|app apuestas gratis|app apuestas sin dinero|app casa de apuestas|app casas de apuestas|app control apuestas|app de
apuestas|app de apuestas android|app de apuestas casino|app de apuestas colombia|app de apuestas con bono de bienvenida|app de apuestas de futbol|app
de apuestas deportivas|app de apuestas deportivas
android|app de apuestas deportivas argentina|app de apuestas deportivas colombia|app de apuestas deportivas en españa|app
de apuestas deportivas peru|app de apuestas deportivas perú|app de apuestas deportivas sin dinero|app de apuestas ecuador|app de apuestas en colombia|app
de apuestas en españa|app de apuestas en venezuela|app de apuestas futbol|app
de apuestas gratis|app de apuestas online|app de
apuestas para android|app de apuestas para ganar dinero|app de apuestas
peru|app de apuestas reales|app de casas de apuestas|app marca apuestas
android|app moviles de apuestas|app para apuestas|app para apuestas de futbol|app para
apuestas deportivas|app para apuestas deportivas en español|app para ganar apuestas deportivas|app para hacer apuestas|app para hacer apuestas deportivas|app
para hacer apuestas entre amigos|app para llevar control de apuestas|app
pronosticos apuestas deportivas|app versus apuestas|apps apuestas
mundial|apps de apuestas|apps de apuestas con bono de bienvenida|apps de
apuestas de futbol|apps de apuestas deportivas peru|apps de apuestas mexico|apps para apuestas|aprender a hacer apuestas deportivas|aprender hacer apuestas deportivas|apuesta del dia apuestas deportivas|apuestas 10
euros gratis|apuestas 100 seguras|apuestas 1×2|apuestas 1X2|apuestas 2 division|apuestas 3 division|apuestas a caballos|apuestas
a carreras de caballos|apuestas a colombia|apuestas a corners|apuestas
a ganar|apuestas a jugadores nba|apuestas a la baja|apuestas a la nfl|apuestas
al barcelona|apuestas al dia|apuestas al empate|apuestas al mundial|apuestas al tenis wta|apuestas alaves barcelona|apuestas alcaraz hoy|apuestas alemania españa|apuestas
alonso campeon del mundo|apuestas altas y bajas|apuestas altas y
bajas nfl|apuestas ambos equipos marcan|apuestas america|apuestas android|apuestas anillo nba|apuestas antes del mundial|apuestas anticipadas|apuestas anticipadas nba|apuestas apps|apuestas arabia argentina|apuestas argentina|apuestas argentina campeon del mundo|apuestas argentina
canada|apuestas argentina colombia|apuestas argentina croacia|apuestas argentina españa|apuestas argentina francia|apuestas argentina francia
cuanto paga|apuestas argentina francia mundial|apuestas argentina gana el mundial|apuestas argentina gana mundial|apuestas argentina
holanda|apuestas argentina mexico|apuestas argentina méxico|apuestas argentina
mundial|apuestas argentina online|apuestas argentina paises bajos|apuestas argentina polonia|apuestas
argentina uruguay|apuestas argentina vs australia|apuestas argentina
vs colombia|apuestas argentina vs francia|apuestas argentina vs
peru|apuestas argentinas|apuestas arsenal real madrid|apuestas ascenso a primera division|apuestas ascenso
a segunda|apuestas asiaticas|apuestas asiatico|apuestas
athletic|apuestas athletic atletico|apuestas athletic barça|apuestas athletic barcelona|apuestas athletic betis|apuestas
athletic manchester|apuestas athletic manchester united|apuestas athletic osasuna|apuestas athletic real|apuestas athletic real madrid|apuestas athletic real sociedad|apuestas athletic
real sociedad final|apuestas athletic roma|apuestas athletic sevilla|apuestas athletic valencia|apuestas atletico|apuestas atletico
barcelona|apuestas atletico barsa|apuestas atletico campeon champions|apuestas atletico campeon de liga|apuestas atlético copenhague|apuestas atletico
de madrid|apuestas atlético de madrid|apuestas
atletico de madrid barcelona|apuestas atletico de madrid
gana la liga|apuestas atletico de madrid real madrid|apuestas atlético
de madrid real madrid|apuestas atletico de madrid vs barcelona|apuestas atletico madrid|apuestas atletico madrid
real madrid|apuestas atletico madrid vs barcelona|apuestas atletico
real madrid|apuestas atletico real madrid champions|apuestas atletismo|apuestas bajas|apuestas baloncesto|apuestas baloncesto acb|apuestas baloncesto
handicap|apuestas baloncesto hoy|apuestas baloncesto juegos olimpicos|apuestas baloncesto
nba|apuestas baloncesto pronostico|apuestas baloncesto pronósticos|apuestas baloncesto prorroga|apuestas
barca|apuestas barca athletic|apuestas barca atletico|apuestas barca bayern|apuestas barca bayern munich|apuestas barca girona|apuestas barca hoy|apuestas barça hoy|apuestas barca inter|apuestas barca juventus|apuestas barca madrid|apuestas barça madrid|apuestas
barca real madrid|apuestas barca vs juve|apuestas barca vs madrid|apuestas barca
vs psg|apuestas barcelona|apuestas barcelona alaves|apuestas
barcelona athletic|apuestas barcelona atletico|apuestas barcelona
atletico de madrid|apuestas barcelona atlético de madrid|apuestas barcelona atletico madrid|apuestas barcelona bayern|apuestas barcelona betis|apuestas barcelona campeon de liga|apuestas barcelona celta|apuestas barcelona espanyol|apuestas barcelona gana la champions|apuestas barcelona girona|apuestas barcelona granada|apuestas barcelona hoy|apuestas barcelona inter|apuestas barcelona madrid|apuestas
barcelona osasuna|apuestas barcelona psg|apuestas barcelona real madrid|apuestas barcelona real sociedad|apuestas barcelona sevilla|apuestas barcelona valencia|apuestas barcelona villarreal|apuestas barcelona vs atletico madrid|apuestas barcelona vs madrid|apuestas barcelona vs real madrid|apuestas barsa madrid|apuestas basket hoy|apuestas bayern barcelona|apuestas bayern vs barcelona|apuestas beisbol|apuestas béisbol|apuestas
beisbol mlb|apuestas beisbol pronosticos|apuestas beisbol venezolano|apuestas betis|apuestas betis – chelsea|apuestas betis barcelona|apuestas betis
chelsea|apuestas betis fiorentina|apuestas betis girona|apuestas betis
madrid|apuestas betis mallorca|apuestas betis real madrid|apuestas betis real sociedad|apuestas betis
sevilla|apuestas betis valencia|apuestas betis valladolid|apuestas betis vs valencia|apuestas betplay hoy colombia|apuestas betsson peru|apuestas bienvenida|apuestas billar online|apuestas bolivia vs colombia|apuestas bono|apuestas bono
bienvenida|apuestas bono de bienvenida|apuestas bono de bienvenida sin deposito|apuestas bono gratis|apuestas bono
sin deposito|apuestas bonos sin deposito|apuestas
borussia real madrid|apuestas boxeo|apuestas boxeo de campeonato|apuestas boxeo españa|apuestas boxeo español|apuestas boxeo femenino olimpiadas|apuestas boxeo hoy|apuestas boxeo
online|apuestas brasil colombia|apuestas brasil peru|apuestas brasil uruguay|apuestas brasil vs colombia|apuestas brasil vs peru|apuestas caballos|apuestas caballos colocado|apuestas caballos españa|apuestas caballos hipodromo|apuestas caballos hoy|apuestas caballos madrid|apuestas caballos online|apuestas caballos sanlucar de barrameda|apuestas caballos zarzuela|apuestas calculador|apuestas campeon|apuestas campeon champions|apuestas
campeón champions|apuestas campeon champions
2025|apuestas campeon champions league|apuestas
campeon conference league|apuestas campeon copa america|apuestas campeon copa del rey|apuestas campeon de champions|apuestas campeon de la champions|apuestas campeon de
liga|apuestas campeon del mundo|apuestas campeon eurocopa|apuestas campeón eurocopa|apuestas campeon europa league|apuestas campeon f1|apuestas campeon f1 2025|apuestas campeon formula 1|apuestas campeon libertadores|apuestas campeon liga|apuestas campeon liga bbva|apuestas campeon liga española|apuestas campeon liga
santander|apuestas campeon motogp 2025|apuestas campeon mundial|apuestas campeón mundial|apuestas campeon mundial baloncesto|apuestas campeon nba|apuestas campeón nba|apuestas campeon premier|apuestas campeon premier league|apuestas campeon roland garros|apuestas campeonato f1|apuestas campeonatos de futbol|apuestas
carrera de caballos|apuestas carrera de caballos hoy|apuestas carrera de caballos nocturnas|apuestas carrera de galgos fin de semana|apuestas carrera de galgos hoy|apuestas carrera de galgos nocturnas|apuestas carreras caballos|apuestas carreras caballos sanlucar|apuestas carreras de caballos|apuestas carreras de caballos en directo|apuestas carreras de
caballos en vivo|apuestas carreras de caballos españa|apuestas
carreras de caballos hoy|apuestas carreras de caballos nacionales|apuestas carreras de caballos nocturnas|apuestas carreras de caballos online|apuestas carreras de caballos sanlucar|apuestas carreras de caballos sanlúcar|apuestas carreras de galgos|apuestas carreras de galgos en vivo|apuestas carreras de galgos nocturnas|apuestas carreras de galgos pre partido|apuestas casino|apuestas casino barcelona|apuestas casino
futbol|apuestas casino gran madrid|apuestas
casino gratis|apuestas casino madrid|apuestas casino online|apuestas casino online argentina|apuestas casinos|apuestas casinos online|apuestas celta|apuestas celta barcelona|apuestas celta
betis|apuestas celta eibar|apuestas celta espanyol|apuestas celta granada|apuestas celta madrid|apuestas celta manchester|apuestas celta real madrid|apuestas champion league|apuestas champions foro|apuestas champions hoy|apuestas champions league|apuestas champions league – pronósticos|apuestas champions league 2025|apuestas champions league hoy|apuestas champions league pronosticos|apuestas champions league pronósticos|apuestas champions pronosticos|apuestas chelsea barcelona|apuestas chelsea betis|apuestas chile|apuestas chile peru|apuestas chile venezuela|apuestas chile vs colombia|apuestas chile vs uruguay|apuestas ciclismo|apuestas ciclismo en vivo|apuestas
ciclismo femenino|apuestas ciclismo tour francia|apuestas
ciclismo vuelta|apuestas ciclismo vuelta a españa|apuestas ciclismo vuelta españa|apuestas city
madrid|apuestas city real madrid|apuestas clasico|apuestas clasico español|apuestas clasico real madrid
barcelona|apuestas clasificacion mundial|apuestas colombia|apuestas
colombia argentina|apuestas colombia brasil|apuestas colombia paraguay|apuestas colombia
uruguay|apuestas colombia vs argentina|apuestas
colombia vs brasil|apuestas combinadas|apuestas combinadas
como funcionan|apuestas combinadas de futbol|apuestas combinadas de fútbol|apuestas combinadas foro|apuestas combinadas futbol|apuestas combinadas hoy|apuestas combinadas mismo partido|apuestas combinadas mundial|apuestas combinadas nba|apuestas combinadas para esta semana|apuestas combinadas para
hoy|apuestas combinadas para mañana|apuestas combinadas pronosticos|apuestas combinadas recomendadas|apuestas combinadas seguras|apuestas
combinadas seguras para hoy|apuestas combinadas seguras para mañana|apuestas como
ganar|apuestas comparador|apuestas con bono
de bienvenida|apuestas con dinero ficticio|apuestas con dinero real|apuestas con dinero virtual|apuestas con handicap|apuestas con handicap asiatico|apuestas con handicap baloncesto|apuestas con mas probabilidades de ganar|apuestas con paypal|apuestas con tarjeta de credito|apuestas
con tarjeta de debito|apuestas consejos|apuestas copa|apuestas copa
africa|apuestas copa america|apuestas copa américa|apuestas copa argentina|apuestas
copa brasil|apuestas copa davis|apuestas copa de
europa|apuestas copa del mundo|apuestas copa del rey|apuestas
copa del rey baloncesto|apuestas copa del rey final|apuestas copa del
rey futbol|apuestas copa del rey ganador|apuestas copa del rey hoy|apuestas copa del rey pronosticos|apuestas copa
del rey pronósticos|apuestas copa europa|apuestas copa
italia|apuestas copa libertadores|apuestas copa mundial de hockey|apuestas copa rey|apuestas copa sudamericana|apuestas
corners|apuestas corners hoy|apuestas croacia argentina|apuestas cuartos eurocopa|apuestas cuotas|apuestas cuotas altas|apuestas cuotas bajas|apuestas de 1 euro|apuestas de baloncesto|apuestas de baloncesto hoy|apuestas de baloncesto nba|apuestas de baloncesto para hoy|apuestas de beisbol|apuestas de beisbol para hoy|apuestas de blackjack en linea|apuestas de boxeo|apuestas de boxeo canelo|apuestas de boxeo en las vegas|apuestas de boxeo hoy|apuestas de boxeo online|apuestas de caballo|apuestas de caballos|apuestas de caballos como funciona|apuestas de caballos como se
juega|apuestas de caballos en colombia|apuestas de caballos en españa|apuestas de
caballos en linea|apuestas de caballos españa|apuestas de caballos ganador y colocado|apuestas de caballos internacionales|apuestas
de caballos juegos|apuestas de caballos online|apuestas de caballos online en venezuela|apuestas de caballos por internet|apuestas de caballos pronosticos|apuestas de caballos pronósticos|apuestas de carrera de caballos|apuestas de carreras de
caballos|apuestas de carreras de caballos online|apuestas de casino|apuestas de casino online|apuestas de casino por
internet|apuestas de champions league|apuestas de ciclismo|apuestas de colombia|apuestas de copa america|apuestas de corners|apuestas de deportes
en linea|apuestas de deportes online|apuestas de
dinero|apuestas de esports|apuestas de eurocopa|apuestas de
europa league|apuestas de f1|apuestas de formula 1|apuestas de futbol|apuestas de fútbol|apuestas de futbol app|apuestas de futbol argentina|apuestas de futbol colombia|apuestas de futbol
en colombia|apuestas de futbol en directo|apuestas de futbol en linea|apuestas de futbol en vivo|apuestas de futbol español|apuestas de futbol gratis|apuestas de futbol
hoy|apuestas de futbol mundial|apuestas de futbol online|apuestas de fútbol online|apuestas
de futbol para hoy|apuestas de fútbol para hoy|apuestas de futbol para hoy seguras|apuestas de
futbol para mañana|apuestas de futbol peru|apuestas
de futbol pronosticos|apuestas de fútbol pronósticos|apuestas de futbol seguras|apuestas de futbol
seguras para hoy|apuestas de futbol sin dinero|apuestas de galgos|apuestas de galgos como ganar|apuestas de galgos en directo|apuestas de galgos online|apuestas de galgos
trucos|apuestas de golf|apuestas de hockey|apuestas de hockey sobre hielo|apuestas de hoy|apuestas de hoy seguras|apuestas de juego|apuestas de
juegos|apuestas de juegos deportivos|apuestas de juegos online|apuestas de la champions
league|apuestas de la copa américa|apuestas de la eurocopa|apuestas de
la europa league|apuestas de la liga|apuestas de la
liga bbva|apuestas de la liga española|apuestas de la nba|apuestas de la nfl|apuestas de la ufc|apuestas de mlb|apuestas de nba|apuestas de nba para hoy|apuestas de partidos|apuestas de partidos de futbol|apuestas de peleas ufc|apuestas de perros en vivo|apuestas
de perros virtuales|apuestas de peru|apuestas de sistema|apuestas de sistema como funciona|apuestas de sistema explicacion|apuestas de sistema explicación|apuestas
de tenis|apuestas de tenis de mesa|apuestas de tenis en directo|apuestas de tenis hoy|apuestas de tenis para hoy|apuestas de
tenis pronosticos|apuestas de tenis seguras|apuestas de
todo tipo|apuestas de ufc|apuestas de ufc hoy|apuestas del boxeo|apuestas del clasico|apuestas del
clasico real madrid barca|apuestas del dia|apuestas del día|apuestas
del dia de hoy|apuestas del dia deportivas|apuestas del dia
futbol|apuestas del mundial|apuestas del partido de hoy|apuestas del real madrid|apuestas del rey|apuestas del sistema|apuestas deporte|apuestas deportes|apuestas
deportiva|apuestas deportivas|apuestas deportivas 1 euro|apuestas deportivas 10 euros gratis|apuestas deportivas 100 seguras|apuestas
deportivas 1×2|apuestas deportivas android|apuestas deportivas app|apuestas deportivas apps|apuestas deportivas argentina|apuestas
deportivas argentina futbol|apuestas deportivas argentina legal|apuestas deportivas
atletico de madrid|apuestas deportivas baloncesto|apuestas deportivas barca madrid|apuestas deportivas barcelona|apuestas deportivas beisbol|apuestas deportivas bono|apuestas deportivas bono bienvenida|apuestas deportivas bono de bienvenida|apuestas deportivas bono sin deposito|apuestas deportivas bonos de bienvenida|apuestas deportivas boxeo|apuestas deportivas caballos|apuestas deportivas calculadora|apuestas deportivas campeon liga|apuestas deportivas casino|apuestas deportivas casino barcelona|apuestas deportivas casino online|apuestas deportivas cerca de mi|apuestas deportivas champions
league|apuestas deportivas chile|apuestas deportivas ciclismo|apuestas deportivas colombia|apuestas deportivas com|apuestas deportivas com foro|apuestas deportivas com pronosticos|apuestas deportivas
combinadas|apuestas deportivas combinadas para hoy|apuestas deportivas como se juega|apuestas
deportivas comparador|apuestas deportivas con bono gratis|apuestas deportivas con bonos gratis|apuestas deportivas con dinero ficticio|apuestas deportivas
con paypal|apuestas deportivas con puntos virtuales|apuestas deportivas consejos|apuestas deportivas consejos para
ganar|apuestas deportivas copa america|apuestas deportivas copa del rey|apuestas deportivas copa
libertadores|apuestas deportivas copa mundial|apuestas deportivas
corners|apuestas deportivas cual es la mejor|apuestas deportivas
cuotas altas|apuestas deportivas de baloncesto|apuestas deportivas de boxeo|apuestas deportivas de colombia|apuestas deportivas de futbol|apuestas deportivas de nba|apuestas deportivas de nhl|apuestas deportivas
de peru|apuestas deportivas de tenis|apuestas deportivas del dia|apuestas deportivas dinero ficticio|apuestas deportivas directo|apuestas deportivas doble oportunidad|apuestas deportivas en argentina|apuestas
deportivas en chile|apuestas deportivas en colombia|apuestas deportivas en directo|apuestas deportivas en españa|apuestas deportivas en español|apuestas deportivas en linea|apuestas deportivas en línea|apuestas deportivas en peru|apuestas deportivas en perú|apuestas deportivas en sevilla|apuestas deportivas en uruguay|apuestas deportivas en vivo|apuestas deportivas es|apuestas
deportivas es pronosticos|apuestas deportivas
españa|apuestas deportivas españolas|apuestas deportivas esports|apuestas deportivas estadisticas|apuestas deportivas estrategias|apuestas deportivas estrategias seguras|apuestas deportivas eurocopa|apuestas deportivas europa league|apuestas deportivas
f1|apuestas deportivas faciles de ganar|apuestas deportivas formula
1|apuestas deportivas foro|apuestas deportivas foro futbol|apuestas deportivas foro tenis|apuestas deportivas francia argentina|apuestas deportivas futbol|apuestas deportivas fútbol|apuestas deportivas futbol argentino|apuestas deportivas futbol colombia|apuestas deportivas futbol español|apuestas deportivas gana|apuestas deportivas ganadas|apuestas deportivas ganar dinero seguro|apuestas deportivas gane|apuestas deportivas
golf|apuestas deportivas gratis|apuestas deportivas gratis con premios|apuestas
deportivas gratis hoy|apuestas deportivas gratis sin deposito|apuestas deportivas handicap|apuestas deportivas handicap asiatico|apuestas deportivas hoy|apuestas deportivas impuestos|apuestas deportivas interior argentina|apuestas deportivas juegos olimpicos|apuestas deportivas la
liga|apuestas deportivas legales|apuestas deportivas legales en colombia|apuestas
deportivas libres de impuestos|apuestas deportivas licencia españa|apuestas deportivas
liga española|apuestas deportivas listado|apuestas deportivas listado clasico|apuestas deportivas madrid|apuestas
deportivas mas seguras|apuestas deportivas mejor pagadas|apuestas deportivas mejores|apuestas deportivas mejores app|apuestas
deportivas mejores casas|apuestas deportivas mejores cuotas|apuestas deportivas mejores paginas|apuestas deportivas mexico|apuestas deportivas méxico|apuestas deportivas mlb|apuestas deportivas mlb
hoy|apuestas deportivas multiples|apuestas deportivas mundial|apuestas deportivas murcia|apuestas
deportivas nba|apuestas deportivas nba hoy|apuestas deportivas nfl|apuestas deportivas nhl|apuestas deportivas nuevas|apuestas deportivas
ofertas|apuestas deportivas online|apuestas deportivas
online argentina|apuestas deportivas online chile|apuestas deportivas online colombia|apuestas deportivas online en colombia|apuestas deportivas online españa|apuestas deportivas online mexico|apuestas deportivas online paypal|apuestas
deportivas online peru|apuestas deportivas online por internet|apuestas deportivas pago paypal|apuestas deportivas para ganar dinero|apuestas
deportivas para hoy|apuestas deportivas para hoy pronosticos|apuestas deportivas partido suspendido|apuestas deportivas partidos de hoy|apuestas deportivas paypal|apuestas deportivas peru|apuestas deportivas perú|apuestas deportivas
peru vs ecuador|apuestas deportivas predicciones|apuestas deportivas promociones|apuestas deportivas pronostico|apuestas deportivas
pronóstico|apuestas deportivas pronostico hoy|apuestas deportivas pronosticos|apuestas deportivas pronósticos|apuestas deportivas pronosticos expertos|apuestas
deportivas pronosticos gratis|apuestas deportivas pronosticos
nba|apuestas deportivas pronosticos tenis|apuestas deportivas que aceptan paypal|apuestas deportivas real madrid|apuestas
deportivas regalo bienvenida|apuestas deportivas resultado exacto|apuestas deportivas resultados|apuestas deportivas rugby|apuestas deportivas
seguras|apuestas deportivas seguras foro|apuestas deportivas seguras
hoy|apuestas deportivas seguras para hoy|apuestas deportivas seguras telegram|apuestas deportivas sevilla|apuestas deportivas simulador eurocopa|apuestas deportivas
sin deposito|apuestas deportivas sin deposito inicial|apuestas deportivas sin dinero|apuestas deportivas sin dinero real|apuestas
deportivas sin registro|apuestas deportivas stake|apuestas deportivas stake 10|apuestas deportivas telegram españa|apuestas deportivas tenis|apuestas deportivas tenis
de mesa|apuestas deportivas tenis foro|apuestas deportivas tenis hoy|apuestas deportivas tips|apuestas deportivas tipster|apuestas deportivas ufc|apuestas deportivas uruguay|apuestas deportivas valencia|apuestas deportivas valencia
barcelona|apuestas deportivas venezuela|apuestas deportivas virtuales|apuestas deportivas y casino|apuestas deportivas y casino online|apuestas deportivas.com|apuestas deportivas.com foro|apuestas
deportivas.es|apuestas deportivos pronosticos|apuestas deposito minimo 1 euro|apuestas descenso a segunda|apuestas descenso
a segunda b|apuestas descenso la liga|apuestas descenso primera division|apuestas descenso segunda|apuestas
dia|apuestas diarias seguras|apuestas dinero|apuestas dinero ficticio|apuestas dinero real|apuestas dinero
virtual|apuestas directas|apuestas directo|apuestas directo
futbol|apuestas division de honor juvenil|apuestas dnb|apuestas doble oportunidad|apuestas doble resultado|apuestas dobles|apuestas dobles y triples|apuestas dortmund barcelona|apuestas draft nba|apuestas draft nfl|apuestas ecuador vs argentina|apuestas
ecuador vs venezuela|apuestas egipto uruguay|apuestas el clasico|apuestas
elecciones venezuela|apuestas empate|apuestas en baloncesto|apuestas en barcelona|apuestas
en beisbol|apuestas en boxeo|apuestas en caballos|apuestas en carreras
de caballos|apuestas en casino|apuestas en casino online|apuestas en casinos|apuestas en casinos online|apuestas en chile|apuestas en ciclismo|apuestas en colombia|apuestas en colombia de futbol|apuestas en directo|apuestas
en directo futbol|apuestas en directo pronosticos|apuestas en el futbol|apuestas en el tenis|apuestas en españa|apuestas en esports|apuestas
en eventos deportivos virtuales|apuestas en golf|apuestas en juegos|apuestas en la champions league|apuestas en la eurocopa|apuestas en la liga|apuestas en la nba|apuestas en la nfl|apuestas en las vegas mlb|apuestas en las vegas nfl|apuestas
en linea|apuestas en línea|apuestas en linea argentina|apuestas en linea
boxeo|apuestas en linea chile|apuestas en linea colombia|apuestas en línea de fútbol|apuestas en linea deportivas|apuestas en linea españa|apuestas en linea estados unidos|apuestas en linea futbol|apuestas en linea mexico|apuestas en línea méxico|apuestas en linea mundial|apuestas en linea peru|apuestas en linea usa|apuestas en los esports|apuestas en madrid|apuestas en méxico|apuestas en mexico online|apuestas en nba|apuestas
en partidos de futbol|apuestas en partidos de futbol en vivo|apuestas en partidos de
tenis en directo|apuestas en perú|apuestas en sevilla|apuestas en sistema|apuestas en stake|apuestas en tenis|apuestas en tenis de mesa|apuestas
en valencia|apuestas en vivo|apuestas en vivo argentina|apuestas en vivo casino|apuestas en vivo futbol|apuestas en vivo fútbol|apuestas en vivo nba|apuestas
en vivo peru|apuestas en vivo tenis|apuestas en vivo ufc|apuestas equipo mbappe|apuestas equipos de futbol|apuestas españa|apuestas españa alemania|apuestas españa alemania eurocopa|apuestas españa croacia|apuestas españa eurocopa|apuestas españa francia|apuestas
españa francia eurocopa|apuestas españa gana el mundial|apuestas españa gana eurocopa|apuestas españa gana mundial|apuestas españa georgia|apuestas españa holanda|apuestas españa inglaterra|apuestas españa inglaterra
cuotas|apuestas españa inglaterra eurocopa|apuestas españa italia|apuestas españa mundial|apuestas españa paises bajos|apuestas español|apuestas español oviedo|apuestas espanyol barcelona|apuestas espanyol betis|apuestas espanyol villarreal|apuestas esport|apuestas esports|apuestas esports colombia|apuestas esports españa|apuestas esports fifa|apuestas esports gratis|apuestas esports lol|apuestas esports peru|apuestas esports valorant|apuestas estadisticas|apuestas estrategias|apuestas euro|apuestas euro copa|apuestas eurocopa|apuestas eurocopa campeon|apuestas eurocopa españa|apuestas eurocopa favoritos|apuestas eurocopa femenina|apuestas eurocopa
final|apuestas eurocopa ganador|apuestas eurocopa hoy|apuestas eurocopa sub 21|apuestas euroliga baloncesto|apuestas
euroliga pronosticos|apuestas europa league|apuestas europa league hoy|apuestas europa
league pronosticos|apuestas europa league pronósticos|apuestas euros|apuestas f1
abu dhabi|apuestas f1 bahrein|apuestas f1 canada|apuestas f1 china|apuestas f1 cuotas|apuestas f1 hoy|apuestas f1
las vegas|apuestas f1 miami|apuestas f1 monaco|apuestas faciles de ganar|apuestas fáciles
de ganar|apuestas faciles para ganar|apuestas favoritas|apuestas favorito champions|apuestas favoritos champions|apuestas favoritos eurocopa|apuestas favoritos mundial|apuestas fc barcelona|apuestas
final champions cuotas|apuestas final champions league|apuestas final champions peru|apuestas final copa|apuestas final copa america|apuestas final copa de
europa|apuestas final copa del rey|apuestas final
copa europa|apuestas final copa libertadores|apuestas final copa rey|apuestas final de copa|apuestas final de copa del rey|apuestas final del mundial|apuestas final euro|apuestas
final eurocopa|apuestas final europa league|apuestas final libertadores|apuestas final mundial|apuestas final nba|apuestas final
rugby|apuestas final uefa europa league|apuestas final.mundial|apuestas
finales de conferencia nfl|apuestas finales nba|apuestas fiorentina betis|apuestas formula|apuestas formula 1|apuestas
fórmula 1|apuestas fórmula 1 pronósticos|apuestas formula uno|apuestas foro|apuestas foro nba|apuestas francia argentina|apuestas francia españa|apuestas futbol|apuestas fútbol|apuestas futbol americano|apuestas futbol americano
nfl|apuestas futbol argentina|apuestas futbol argentino|apuestas futbol champions league|apuestas
futbol chile|apuestas futbol colombia|apuestas futbol consejos|apuestas futbol en directo|apuestas fútbol en directo|apuestas futbol en vivo|apuestas fútbol en vivo|apuestas
futbol españa|apuestas futbol español|apuestas fútbol español|apuestas futbol eurocopa|apuestas futbol femenino|apuestas futbol foro|apuestas futbol gratis|apuestas futbol hoy|apuestas fútbol
hoy|apuestas futbol juegos olimpicos|apuestas futbol mexico|apuestas futbol mundial|apuestas
futbol online|apuestas futbol para hoy|apuestas futbol peru|apuestas futbol pronosticos|apuestas futbol sala|apuestas futbol telegram|apuestas futbol virtual|apuestas galgos|apuestas galgos en directo|apuestas galgos hoy|apuestas galgos online|apuestas
galgos pronosticos|apuestas galgos trucos|apuestas gana|apuestas gana colombia|apuestas
gana resultados|apuestas ganadas|apuestas ganadas hoy|apuestas ganador champions league|apuestas ganador copa america|apuestas ganador copa del rey|apuestas ganador copa del
rey baloncesto|apuestas ganador copa libertadores|apuestas ganador de la eurocopa|apuestas ganador de la liga|apuestas ganador del mundial|apuestas ganador eurocopa|apuestas ganador europa
league|apuestas ganador f1|apuestas ganador la liga|apuestas ganador liga española|apuestas ganador mundial|apuestas ganador mundial
baloncesto|apuestas ganador mundial f1|apuestas ganador nba|apuestas ganadores eurocopa|apuestas ganadores mundial|apuestas ganar champions|apuestas
ganar eurocopa|apuestas ganar liga|apuestas ganar mundial|apuestas ganar
nba|apuestas getafe valencia|apuestas ghana uruguay|apuestas girona|apuestas girona athletic|apuestas
girona betis|apuestas girona campeon de liga|apuestas girona campeon liga|apuestas
girona gana la liga|apuestas girona real madrid|apuestas girona real sociedad|apuestas goleador eurocopa|apuestas goleadores eurocopa|apuestas
goles asiaticos|apuestas golf|apuestas golf masters|apuestas golf
pga|apuestas granada barcelona|apuestas grand slam de tenis|apuestas gratis|apuestas
gratis casino|apuestas gratis con premios|apuestas gratis hoy|apuestas gratis para hoy|apuestas
gratis por registro|apuestas gratis puntos|apuestas gratis regalos|apuestas gratis sin deposito|apuestas gratis sin depósito|apuestas
gratis sin ingreso|apuestas gratis sports|apuestas gratis y ganar
premios|apuestas grupo a eurocopa|apuestas grupos eurocopa|apuestas handicap|apuestas handicap asiatico|apuestas handicap baloncesto|apuestas handicap como funciona|apuestas
handicap nba|apuestas handicap nfl|apuestas hipicas online|apuestas hípicas online|apuestas hipicas venezuela|apuestas hockey|apuestas hockey hielo|apuestas hockey patines|apuestas hockey sobre hielo|apuestas holanda argentina|apuestas holanda vs argentina|apuestas
hoy|apuestas hoy champions|apuestas hoy futbol|apuestas hoy nba|apuestas hoy pronosticos|apuestas hoy seguras|apuestas impuestos|apuestas inglaterra
paises bajos|apuestas inter barca|apuestas inter barcelona|apuestas juego|apuestas juegos|apuestas juegos
en linea|apuestas juegos olimpicos|apuestas juegos olímpicos|apuestas juegos
olimpicos baloncesto|apuestas juegos online|apuestas juegos virtuales|apuestas jugador sevilla|apuestas jugadores nba|apuestas kings league americas|apuestas la liga|apuestas
la liga española|apuestas la liga hoy|apuestas la liga
santander|apuestas las vegas mlb|apuestas las vegas nba|apuestas las vegas
nfl|apuestas league of legends mundial|apuestas legal|apuestas legales|apuestas legales en colombia|apuestas legales en españa|apuestas
legales en estados unidos|apuestas legales españa|apuestas leganes betis|apuestas libertadores|apuestas licencia|apuestas liga 1 peru|apuestas liga argentina|apuestas liga bbva pronosticos|apuestas liga de campeones|apuestas liga
de campeones de baloncesto|apuestas liga de campeones de hockey|apuestas liga españa|apuestas liga española|apuestas liga santander pronosticos|apuestas
ligas de futbol|apuestas linea|apuestas linea de gol|apuestas liverpool barcelona|apuestas liverpool real madrid|apuestas lol mundial|apuestas madrid|apuestas madrid arsenal|apuestas madrid atletico|apuestas madrid atletico champions|apuestas madrid barca|apuestas
madrid barça|apuestas madrid barca hoy|apuestas madrid barca supercopa|apuestas madrid barcelona|apuestas madrid barsa|apuestas madrid bayern|apuestas madrid betis|apuestas madrid borussia|apuestas
madrid campeon champions|apuestas madrid celta|apuestas madrid city|apuestas madrid dortmund|apuestas madrid gana la
liga|apuestas madrid gana liga|apuestas madrid hoy|apuestas madrid liverpool|apuestas madrid osasuna|apuestas madrid sevilla|apuestas madrid valencia|apuestas madrid vs arsenal|apuestas madrid vs barcelona|apuestas mallorca osasuna|apuestas mallorca real sociedad|apuestas manchester athletic|apuestas manchester city real madrid|apuestas mas faciles
de ganar|apuestas mas seguras|apuestas mas seguras para hoy|apuestas masters de golf|apuestas masters
de tenis|apuestas maximo goleador eurocopa|apuestas maximo goleador mundial|apuestas mejor jugador eurocopa|apuestas mejores casinos online|apuestas mexico|apuestas méxico|apuestas mexico polonia|apuestas méxico polonia|apuestas mlb|apuestas
mlb hoy|apuestas mlb las vegas|apuestas mlb para hoy|apuestas
mlb pronosticos|apuestas mlb usa|apuestas mma ufc|apuestas momios|apuestas multiples|apuestas múltiples|apuestas multiples
como funcionan|apuestas multiples el gordo|apuestas multiples futbol|apuestas
mundial|apuestas mundial 2026|apuestas mundial baloncesto|apuestas mundial balonmano|apuestas mundial brasil|apuestas mundial campeon|apuestas mundial ciclismo|apuestas mundial clubes|apuestas mundial
de baloncesto|apuestas mundial de ciclismo|apuestas mundial de clubes|apuestas
mundial de futbol|apuestas mundial de fútbol|apuestas
mundial de rugby|apuestas mundial f1|apuestas mundial favoritos|apuestas mundial femenino|apuestas mundial
formula 1|apuestas mundial futbol|apuestas mundial ganador|apuestas mundial lol|apuestas mundial moto gp|apuestas mundial motogp|apuestas mundial rugby|apuestas mundial sub
17|apuestas mundiales|apuestas mundialistas|apuestas mvp
eurocopa|apuestas mvp nba|apuestas mvp nfl|apuestas nacionales de colombia|apuestas nba|apuestas nba all star|apuestas
nba campeon|apuestas nba consejos|apuestas nba esta noche|apuestas nba finals|apuestas nba gratis|apuestas
nba hoy|apuestas nba hoy jugadores|apuestas nba hoy pronosticos|apuestas
nba para hoy|apuestas nba playoffs|apuestas nba pronosticos|apuestas nba pronósticos|apuestas nba pronosticos hoy|apuestas nba tipster|apuestas nfl|apuestas
nfl hoy|apuestas nfl las vegas|apuestas nfl playoffs|apuestas nfl pronosticos|apuestas nfl pronósticos|apuestas nfl semana 4|apuestas nfl super bowl|apuestas
nhl|apuestas nhl pronosticos|apuestas octavos eurocopa|apuestas ofertas|apuestas online|apuestas online argentina|apuestas online argentina legal|apuestas online bono|apuestas online bono
bienvenida|apuestas online boxeo|apuestas online caballos|apuestas online carreras de caballos|apuestas
online casino|apuestas online champions league|apuestas online chile|apuestas online ciclismo|apuestas online colombia|apuestas online comparativa|apuestas online con paypal|apuestas online de caballos|apuestas online deportivas|apuestas online en argentina|apuestas online en peru|apuestas online espana|apuestas online españa|apuestas online esports|apuestas online
foro|apuestas online futbol|apuestas online futbol españa|apuestas online golf|apuestas online gratis|apuestas online gratis sin deposito|apuestas online
juegos|apuestas online mexico|apuestas online mma|apuestas
online movil|apuestas online nba|apuestas online net|apuestas online nuevas|apuestas online opiniones|apuestas online paypal|apuestas online peru|apuestas online
seguras|apuestas online sin dinero|apuestas online sin registro|apuestas online tenis|apuestas online
ufc|apuestas online uruguay|apuestas online venezuela|apuestas open britanico golf|apuestas osasuna athletic|apuestas
osasuna barcelona|apuestas osasuna real madrid|apuestas osasuna sevilla|apuestas osasuna valencia|apuestas over|apuestas
over 2.5|apuestas over under|apuestas paginas|apuestas
pago anticipado|apuestas paises bajos ecuador|apuestas paises bajos
inglaterra|apuestas países bajos qatar|apuestas para boxeo|apuestas para
champions league|apuestas para el clasico|apuestas para el dia de hoy|apuestas para el mundial|apuestas
para el partido de hoy|apuestas para eurocopa|apuestas para europa league|apuestas para futbol|apuestas para ganar|apuestas
para ganar dinero|apuestas para ganar dinero facil|apuestas para
ganar en la ruleta|apuestas para ganar la champions|apuestas para ganar la eurocopa|apuestas para ganar la europa league|apuestas para ganar la liga|apuestas para ganar siempre|apuestas para hacer|apuestas
para hoy|apuestas para hoy de futbol|apuestas para hoy europa league|apuestas para hoy futbol|apuestas
para juegos|apuestas para la champions league|apuestas para la copa del rey|apuestas para la eurocopa|apuestas para la europa league|apuestas para
la final de la eurocopa|apuestas para la nba hoy|apuestas para los partidos de hoy|apuestas para
partidos de hoy|apuestas para ufc|apuestas partido|apuestas partido aplazado|apuestas partido champions|apuestas partido colombia|apuestas partido españa marruecos|apuestas partido mundial|apuestas partido suspendido|apuestas partidos|apuestas
partidos champions league|apuestas partidos csgo|apuestas partidos de futbol|apuestas partidos
de futbol hoy|apuestas partidos de hoy|apuestas partidos eurocopa|apuestas partidos futbol|apuestas partidos hoy|apuestas partidos mundial|apuestas paypal|apuestas peleas de
boxeo|apuestas peru|apuestas perú|apuestas peru brasil|apuestas peru chile|apuestas peru paraguay|apuestas peru uruguay|apuestas peru vs chile|apuestas peru vs colombia|apuestas pichichi eurocopa|apuestas plataforma|apuestas playoff|apuestas playoff ascenso|apuestas playoff ascenso a primera|apuestas playoff
nba|apuestas playoff segunda|apuestas playoff segunda b|apuestas playoffs nba|apuestas playoffs nfl|apuestas polonia argentina|apuestas por argentina|apuestas
por internet mexico|apuestas por internet para ganar dinero|apuestas por paypal|apuestas por ronda boxeo|apuestas por sistema|apuestas portugal uruguay|apuestas pre partido|apuestas predicciones|apuestas predicciones futbol|apuestas primera division|apuestas primera division españa|apuestas promociones|apuestas pronostico|apuestas pronosticos|apuestas pronosticos deportivos|apuestas
pronosticos deportivos tenis|apuestas pronosticos futbol|apuestas pronosticos
gratis|apuestas pronosticos nba|apuestas pronosticos
tenis|apuestas prorroga|apuestas psg barca|apuestas psg barcelona|apuestas puntos por tarjetas|apuestas puntos tarjetas|apuestas que aceptan paypal|apuestas que es handicap|apuestas que puedes hacer con tu novia|apuestas que siempre ganaras|apuestas que significa|apuestas quien bajara a segunda|apuestas quién bajara a
segunda|apuestas quien gana el mundial|apuestas quien gana eurocopa|apuestas quien gana la champions|apuestas quien gana la eurocopa|apuestas quien gana la liga|apuestas quien ganara el mundial|apuestas quién ganará
el mundial|apuestas quien ganara la champions|apuestas quien ganara la eurocopa|apuestas quien ganara la liga|apuestas rayo barcelona|apuestas real madrid|apuestas real
madrid arsenal|apuestas real madrid athletic|apuestas real madrid atletico|apuestas real
madrid atletico champions|apuestas real madrid atletico de madrid|apuestas real madrid atlético
de madrid|apuestas real madrid atletico madrid|apuestas real madrid barcelona|apuestas real madrid bayern|apuestas real madrid betis|apuestas real madrid borussia|apuestas real madrid campeon champions|apuestas real madrid celta|apuestas real madrid champions|apuestas real madrid city|apuestas real madrid girona|apuestas
real madrid hoy|apuestas real madrid liverpool|apuestas real madrid manchester city|apuestas real madrid osasuna|apuestas real madrid real sociedad|apuestas real madrid valencia|apuestas real madrid villarreal|apuestas
real madrid vs arsenal|apuestas real madrid vs atletico|apuestas real madrid vs atlético|apuestas real madrid vs atletico madrid|apuestas real madrid vs barcelona|apuestas
real madrid vs betis|apuestas real madrid vs sevilla|apuestas real madrid vs valencia|apuestas real sociedad|apuestas
real sociedad athletic|apuestas real sociedad barcelona|apuestas real sociedad betis|apuestas real sociedad
psg|apuestas real sociedad real madrid|apuestas real sociedad valencia|apuestas recomendadas hoy|apuestas
regalo de bienvenida|apuestas registro|apuestas resultado exacto|apuestas resultados|apuestas resultados eurocopa|apuestas retirada tenis|apuestas roma barcelona|apuestas roma
sevilla|apuestas rugby|apuestas rugby mundial|apuestas rugby world cup|apuestas ruleta
seguras|apuestas segunda|apuestas segunda b|apuestas segunda division|apuestas
segunda división|apuestas segunda division b|apuestas segunda division españa|apuestas seguras|apuestas seguras baloncesto|apuestas seguras calculadora|apuestas
seguras en la ruleta|apuestas seguras eurocopa|apuestas seguras foro|apuestas seguras futbol|apuestas seguras futbol
hoy|apuestas seguras gratis|apuestas seguras hoy|apuestas seguras hoy
futbol|apuestas seguras nba|apuestas seguras nba hoy|apuestas seguras para este fin de semana|apuestas seguras
para ganar dinero|apuestas seguras para hoy|apuestas seguras para hoy
fútbol|apuestas seguras para hoy pronósticos|apuestas seguras
para mañana|apuestas seguras ruleta|apuestas seguras telegram|apuestas seguras tenis|apuestas semifinales eurocopa|apuestas senegal paises
bajos|apuestas sevilla|apuestas sevilla athletic|apuestas
sevilla atletico de madrid|apuestas sevilla barcelona|apuestas sevilla betis|apuestas sevilla campeon liga|apuestas sevilla celta|apuestas sevilla gana la
liga|apuestas sevilla girona|apuestas sevilla inter|apuestas sevilla jugador|apuestas sevilla juventus|apuestas sevilla leganes|apuestas sevilla madrid|apuestas sevilla
manchester united|apuestas sevilla osasuna|apuestas sevilla real madrid|apuestas
sevilla real sociedad|apuestas sevilla roma|apuestas sevilla valencia|apuestas significa|apuestas
simples ejemplos|apuestas simples o combinadas|apuestas sin deposito|apuestas sin deposito inicial|apuestas sin deposito minimo|apuestas sin dinero|apuestas
sin dinero real|apuestas sin empate|apuestas sin empate que significa|apuestas sin ingreso
minimo|apuestas sin registro|apuestas sistema|apuestas sistema calculadora|apuestas sistema
como funciona|apuestas sistema trixie|apuestas sociedad|apuestas sorteo copa del rey|apuestas stake|apuestas
stake 10|apuestas stake 10 hoy|apuestas super bowl favorito|apuestas super rugby|apuestas supercopa españa|apuestas superliga argentina|apuestas tarjeta roja|apuestas tarjetas|apuestas tarjetas amarillas|apuestas tenis|apuestas tenis atp|apuestas
tenis consejos|apuestas tenis copa davis|apuestas tenis de mesa|apuestas tenis de
mesa pronosticos|apuestas tenis en vivo|apuestas tenis femenino|apuestas tenis hoy|apuestas tenis itf|apuestas tenis pronosticos|apuestas tenis pronósticos|apuestas tenis retirada|apuestas tenis roland garros|apuestas tenis seguras|apuestas tenis
wimbledon|apuestas tenis wta|apuestas tercera division|apuestas tercera division españa|apuestas tipos|apuestas tips|apuestas tipster|apuestas tipster para hoy|apuestas topuria holloway cuotas|apuestas torneos de golf|apuestas torneos de
tenis|apuestas trucos|apuestas uefa champions league|apuestas uefa europa league|apuestas ufc|apuestas ufc chile|apuestas ufc como funciona|apuestas ufc hoy|apuestas ufc ilia
topuria|apuestas ufc online|apuestas ufc pronósticos|apuestas ufc telegram|apuestas ufc topuria|apuestas under over|apuestas
unionistas villarreal|apuestas uruguay|apuestas uruguay colombia|apuestas
uruguay corea|apuestas uruguay vs colombia|apuestas us
open golf|apuestas us open tenis|apuestas valencia|apuestas valencia barcelona|apuestas valencia betis|apuestas valencia madrid|apuestas valencia real madrid|apuestas valladolid barcelona|apuestas valladolid valencia|apuestas
valor app|apuestas valor en directo|apuestas valor
galgos|apuestas venezuela|apuestas venezuela argentina|apuestas venezuela bolivia|apuestas venezuela ecuador|apuestas
villarreal|apuestas villarreal athletic|apuestas villarreal barcelona|apuestas villarreal bayern|apuestas villarreal
betis|apuestas villarreal liverpool|apuestas villarreal
manchester|apuestas villarreal manchester united|apuestas villarreal vs
real madrid|apuestas virtuales|apuestas virtuales colombia|apuestas
virtuales futbol|apuestas virtuales sin dinero|apuestas vivo|apuestas vuelta a españa|apuestas vuelta españa|apuestas william hill
partidos de hoy|apuestas y casino|apuestas y casinos|apuestas
y juegos de azar|apuestas y pronosticos|apuestas y pronosticos de
futbol|apuestas y pronosticos deportivos|apuestas y resultados|apuestas-deportivas|apuestas-deportivas.es
pronosticos|arbitro nba apuestas|argentina apuestas|argentina colombia apuestas|argentina croacia
apuestas|argentina francia apuestas|argentina mexico apuestas|argentina peru apuestas|argentina uruguay apuestas|argentina vs bolivia
apuestas|argentina vs chile apuestas|argentina vs colombia apuestas|argentina vs francia apuestas|argentina vs.
colombia apuestas|asi se gana en las apuestas deportivas|asiatico apuestas|asiatico en apuestas|asiaticos apuestas|athletic barcelona apuestas|athletic manchester
united apuestas|athletic osasuna apuestas|athletic real madrid apuestas|atletico barcelona apuestas|atletico de madrid apuestas|atlético
de madrid apuestas|atletico de madrid real madrid apuestas|atletico de madrid vs barcelona
apuestas|atletico madrid real madrid apuestas|atletico madrid
vs real madrid apuestas|atletico real madrid apuestas|atletico vs real madrid apuestas|avisador de cuotas apuestas|bajada de
cuotas apuestas|baloncesto apuestas|barbastro barcelona apuestas|barca apuestas|barca bayern apuestas|barca inter apuestas|barca madrid apuestas|barça
madrid apuestas|barca vs atletico apuestas|barca vs madrid
apuestas|barca vs real madrid apuestas|barcelona – real madrid apuestas|barcelona apuestas|barcelona
atletico apuestas|barcelona atletico de madrid apuestas|barcelona atletico madrid
apuestas|barcelona betis apuestas|barcelona casa de apuestas|barcelona
inter apuestas|barcelona psg apuestas|barcelona real madrid
apuestas|barcelona real sociedad apuestas|barcelona sevilla apuestas|barcelona valencia apuestas|barcelona vs athletic bilbao apuestas|barcelona vs atlético madrid apuestas|barcelona vs betis apuestas|barcelona vs celta de vigo apuestas|barcelona vs
espanyol apuestas|barcelona vs girona apuestas|barcelona vs madrid apuestas|barcelona vs real
madrid apuestas|barcelona vs real sociedad apuestas|barcelona vs sevilla apuestas|barcelona
vs villarreal apuestas|base de datos cuotas apuestas deportivas|bayern real madrid
apuestas|beisbol apuestas|best america apuestas|bet apuestas chile|bet apuestas en vivo|betis – chelsea apuestas|betis apuestas|betis barcelona apuestas|betis chelsea apuestas|betis madrid apuestas|betis sevilla
apuestas|betsson tu sitio de apuestas online|blog apuestas baloncesto|blog apuestas
ciclismo|blog apuestas nba|blog apuestas tenis|blog de apuestas de tenis|bono
apuestas|bono apuestas deportivas|bono apuestas
deportivas sin deposito|bono apuestas gratis|bono
apuestas gratis sin deposito|bono apuestas sin deposito|bono bienvenida apuestas|bono bienvenida apuestas deportivas|bono
bienvenida apuestas españa|bono bienvenida apuestas sin deposito|bono bienvenida apuestas
sin depósito|bono bienvenida casa apuestas|bono bienvenida casa de
apuestas|bono bienvenida marca apuestas|bono casa
apuestas|bono casa de apuestas|bono casa de apuestas
sin ingreso|bono casas de apuestas|bono de apuestas|bono de apuestas gratis sin deposito|bono de bienvenida apuestas|bono de bienvenida apuestas deportivas|bono de bienvenida casa de apuestas|bono
de bienvenida casas de apuestas|bono de casas de apuestas|bono de registro apuestas|bono de registro apuestas deportivas|bono de registro casa de apuestas|bono gratis apuestas|bono marca
apuestas|bono por registro apuestas|bono por registro apuestas deportivas|bono
por registro casa de apuestas|bono registro apuestas|bono sin deposito apuestas|bono sin depósito apuestas|bono sin deposito
apuestas deportivas|bono sin depósito apuestas deportivas|bono sin deposito casa de apuestas|bono sin deposito marca apuestas|bono sin ingreso apuestas|bono sin ingreso apuestas deportivas|bonos apuestas|bonos apuestas colombia|bonos
apuestas deportivas|bonos apuestas deportivas sin deposito|bonos apuestas gratis|bonos
apuestas sin deposito|bonos apuestas sin depósito|bonos bienvenida apuestas|bonos bienvenida casas apuestas|bonos bienvenida casas de apuestas|bonos casa de apuestas|bonos casas apuestas|bonos
casas de apuestas|bonos casas de apuestas colombia|bonos casas de apuestas deportivas|bonos casas
de apuestas españa|bonos casas de apuestas nuevas|bonos casas de apuestas sin deposito|bonos casas de
apuestas sin depósito|bonos de apuestas|bonos de apuestas deportivas|bonos de apuestas gratis|bonos de apuestas sin deposito|bonos de bienvenida apuestas|bonos
de bienvenida apuestas deportivas|bonos de bienvenida casa de apuestas|bonos de bienvenida casas de apuestas|bonos de bienvenida de casas de apuestas|bonos de bienvenida en casas
de apuestas|bonos de casas de apuestas|bonos de casas de apuestas sin deposito|bonos en casa
de apuestas|bonos en casas de apuestas sin deposito|bonos gratis
apuestas|bonos gratis apuestas deportivas|bonos gratis casas de apuestas|bonos gratis sin deposito apuestas|bonos paginas
de apuestas|bonos registro casas de apuestas|bonos sin deposito apuestas|bonos
sin depósito apuestas|bonos sin deposito apuestas deportivas|bonos
sin deposito casas de apuestas|bot de apuestas deportivas gratis|boxeo apuestas|brasil colombia apuestas|brasil
peru apuestas|brasil vs colombia apuestas|buenas apuestas para hoy|buscador cuotas apuestas|buscador de apuestas seguras|buscador de cuotas apuestas|buscador
de cuotas de apuestas|buscar apuestas seguras|caballos apuestas|calculador de apuestas|calculador de cuotas apuestas|calculadora apuestas|calculadora apuestas combinadas|calculadora apuestas de sistema|calculadora apuestas deportivas|calculadora apuestas deportivas
seguras|calculadora apuestas multiples|calculadora apuestas segura|calculadora apuestas seguras|calculadora apuestas sistema|calculadora apuestas yankee|calculadora arbitraje apuestas|calculadora cubrir apuestas|calculadora cuotas apuestas|calculadora
de apuestas|calculadora de apuestas combinadas|calculadora
de apuestas de futbol|calculadora de apuestas de sistema|calculadora de apuestas deportivas|calculadora de apuestas multiples|calculadora de apuestas seguras|calculadora de apuestas sistema|calculadora de
apuestas surebets|calculadora de arbitraje apuestas|calculadora de cuotas apuestas|calculadora de
cuotas de apuestas|calculadora para apuestas deportivas|calculadora poisson apuestas|calculadora poisson apuestas
deportivas|calculadora poisson para apuestas|calculadora scalping
apuestas deportivas|calculadora sistema apuestas|calculadora stake apuestas|calculadora trading apuestas|calcular apuestas|calcular apuestas deportivas|calcular apuestas futbol|calcular
apuestas sistema|calcular cuotas apuestas|calcular cuotas apuestas combinadas|calcular cuotas apuestas deportivas|calcular cuotas de
apuestas|calcular ganancias apuestas deportivas|calcular momios apuestas|calcular probabilidad cuota apuestas|calcular stake apuestas|calcular
unidades apuestas|calcular yield apuestas|calculo de apuestas|calculo de apuestas deportivas|cambio de cuotas apuestas|campeon champions apuestas|campeon eurocopa apuestas|campeon liga
apuestas|campeon nba apuestas|canales de apuestas gratis|carrera de caballos apuestas|carrera de caballos apuestas
juego|carrera de caballos con apuestas|carrera de galgos apuestas|carreras de caballos
apuestas|carreras de caballos apuestas online|carreras de caballos con apuestas|carreras de
caballos juegos de apuestas|carreras de galgos apuestas|carreras de galgos apuestas online|carreras de
galgos apuestas trucos|carreras galgos apuestas|casa apuestas argentina|casa
apuestas atletico de madrid|casa apuestas barcelona|casa
apuestas betis|casa apuestas bono bienvenida|casa apuestas bono gratis|casa apuestas bono sin deposito|casa
apuestas cerca de mi|casa apuestas chile|casa apuestas colombia|casa apuestas con mejores cuotas|casa apuestas deportivas|casa
apuestas españa|casa apuestas española|casa apuestas eurocopa|casa apuestas futbol|casa apuestas mejores cuotas|casa
apuestas mundial|casa apuestas nueva|casa apuestas nuevas|casa apuestas online|casa apuestas
peru|casa apuestas valencia|casa de apuestas|casa de apuestas 10 euros gratis|casa de apuestas
argentina|casa de apuestas atletico de madrid|casa de apuestas baloncesto|casa de apuestas barcelona|casa de apuestas beisbol|casa de apuestas betis|casa
de apuestas bono|casa de apuestas bono bienvenida|casa de apuestas bono
de bienvenida|casa de apuestas bono gratis|casa de apuestas bono por
registro|casa de apuestas bono sin deposito|casa de apuestas boxeo|casa de apuestas caballos|casa de
apuestas carreras de caballos|casa de apuestas cerca
de mi|casa de apuestas cerca de mí|casa de apuestas champions
league|casa de apuestas chile|casa de apuestas ciclismo|casa de apuestas colombia|casa
de apuestas con bono de bienvenida|casa de apuestas con bono sin deposito|casa de apuestas con cuotas mas altas|casa de apuestas con esports|casa de
apuestas con las mejores cuotas|casa de apuestas con licencia en españa|casa de apuestas con mejores
cuotas|casa de apuestas con pago anticipado|casa
de apuestas con paypal|casa de apuestas copa america|casa de apuestas de caballos|casa de apuestas de colombia|casa de apuestas de españa|casa de apuestas
de futbol|casa de apuestas de fútbol|casa de apuestas de futbol peru|casa de apuestas de peru|casa de apuestas del madrid|casa de apuestas del real madrid|casa de
apuestas deportivas|casa de apuestas deportivas cerca de mi|casa de apuestas deportivas en argentina|casa de apuestas deportivas en chile|casa de apuestas deportivas en colombia|casa de apuestas deportivas en españa|casa
de apuestas deportivas en madrid|casa de apuestas deportivas españa|casa de apuestas deportivas españolas|casa de
apuestas deportivas madrid|casa de apuestas deportivas
mexico|casa de apuestas deportivas online|casa de apuestas deportivas peru|casa de apuestas deposito 5 euros|casa de apuestas deposito minimo|casa de
apuestas deposito minimo 1 euro|casa de apuestas depósito mínimo 1 euro|casa de apuestas
en españa|casa de apuestas en linea|casa de apuestas en madrid|casa
de apuestas en perú|casa de apuestas en vivo|casa de apuestas españa|casa de apuestas españa inglaterra|casa de apuestas española|casa de apuestas españolas|casa
de apuestas esports|casa de apuestas eurocopa|casa de apuestas europa league|casa de apuestas f1|casa de apuestas formula 1|casa de apuestas futbol|casa de apuestas ingreso minimo|casa de apuestas ingreso minimo 1 euro|casa de apuestas ingreso
mínimo 1 euro|casa de apuestas legales|casa de apuestas legales en colombia|casa de apuestas legales en españa|casa
de apuestas libertadores|casa de apuestas liga española|casa de apuestas madrid|casa de
apuestas mas segura|casa de apuestas mejores|casa de apuestas méxico|casa de apuestas minimo 5 euros|casa de apuestas
mlb|casa de apuestas mundial|casa de apuestas nba|casa de apuestas nfl|casa de apuestas nueva|casa de apuestas nuevas|casa de apuestas oficial del real madrid|casa de
apuestas oficial real madrid|casa de apuestas online|casa de apuestas online argentina|casa de apuestas online chile|casa de apuestas online españa|casa de
apuestas online mexico|casa de apuestas online paraguay|casa de apuestas online peru|casa de apuestas online usa|casa de apuestas online venezuela|casa
de apuestas pago anticipado|casa de apuestas para boxeo|casa de apuestas para ufc|casa de apuestas peru|casa de apuestas perú|casa de apuestas peru online|casa de apuestas por
paypal|casa de apuestas promociones|casa de apuestas que regalan dinero|casa de apuestas real madrid|casa de apuestas regalo de bienvenida|casa de apuestas sevilla|casa de apuestas sin dinero|casa de apuestas
sin ingreso minimo|casa de apuestas sin licencia en españa|casa de apuestas sin minimo de ingreso|casa de apuestas stake|casa de
apuestas tenis|casa de apuestas ufc|casa de apuestas valencia|casa de
apuestas venezuela|casa de apuestas virtuales|casa de apuestas
vive la suerte|casa oficial de apuestas del real madrid|casas apuestas asiaticas|casas apuestas bono sin deposito|casas apuestas bonos sin deposito|casas apuestas
caballos|casas apuestas chile|casas apuestas ciclismo|casas apuestas con licencia|casas apuestas con licencia en españa|casas apuestas deportivas|casas apuestas deportivas colombia|casas
apuestas deportivas españa|casas apuestas deportivas españolas|casas apuestas deportivas nuevas|casas apuestas españa|casas apuestas españolas|casas apuestas esports|casas
apuestas eurocopa|casas apuestas golf|casas apuestas ingreso minimo 5
euros|casas apuestas legales|casas apuestas
legales españa|casas apuestas licencia|casas apuestas licencia españa|casas apuestas mexico|casas apuestas
mundial|casas apuestas nba|casas apuestas nuevas|casas apuestas nuevas españa|casas apuestas ofertas|casas
apuestas online|casas apuestas paypal|casas apuestas peru|casas apuestas sin licencia|casas apuestas tenis|casas asiaticas apuestas|casas de apuestas|casas de apuestas 5 euros|casas de apuestas app|casas de apuestas argentinas|casas de apuestas
asiaticas|casas de apuestas baloncesto|casas de apuestas barcelona|casas
de apuestas bono bienvenida|casas de apuestas bono de bienvenida|casas de apuestas bono por registro|casas de apuestas bono sin deposito|casas de apuestas bono sin ingreso|casas de apuestas bonos|casas
de apuestas bonos de bienvenida|casas de apuestas bonos gratis|casas de apuestas bonos sin deposito|casas de apuestas boxeo|casas de apuestas caballos|casas de apuestas carreras de caballos|casas de apuestas casino|casas de apuestas
casino online|casas de apuestas cerca de mi|casas de apuestas champions league|casas de apuestas chile|casas
de apuestas ciclismo|casas de apuestas colombia|casas de apuestas com|casas
de apuestas con app|casas de apuestas con apuestas gratis|casas de apuestas con bono|casas de apuestas con bono de bienvenida|casas
de apuestas con bono de registro|casas de apuestas con bono por registro|casas de apuestas con bono sin deposito|casas de
apuestas con bonos|casas de apuestas con bonos gratis|casas de apuestas con bonos sin deposito|casas de
apuestas con deposito minimo|casas de apuestas con esports|casas
de apuestas con handicap asiatico|casas de apuestas con licencia|casas de apuestas con licencia en españa|casas de apuestas con licencia españa|casas de apuestas con licencia española|casas de apuestas con mejores cuotas|casas de apuestas
con pago anticipado|casas de apuestas con paypal|casas
de apuestas con paypal en perú|casas de apuestas con promociones|casas de apuestas con ruleta en vivo|casas de apuestas copa del rey|casas
de apuestas de caballos|casas de apuestas de españa|casas de apuestas de futbol|casas de apuestas de fútbol|casas de apuestas
de peru|casas de apuestas deportivas|casas de apuestas deportivas asiaticas|casas de
apuestas deportivas colombia|casas de apuestas deportivas
comparativa|casas de apuestas deportivas con paypal|casas
de apuestas deportivas en chile|casas de apuestas deportivas en españa|casas de apuestas deportivas en linea|casas de apuestas
deportivas en madrid|casas de apuestas deportivas en mexico|casas
de apuestas deportivas en peru|casas de apuestas deportivas
en sevilla|casas de apuestas deportivas en valencia|casas de apuestas deportivas españa|casas de apuestas deportivas españolas|casas de apuestas deportivas legales|casas de
apuestas deportivas madrid|casas de apuestas deportivas mexico|casas de
apuestas deportivas nuevas|casas de apuestas deportivas online|casas de apuestas deportivas
peru|casas de apuestas deportivas perú|casas de apuestas deposito minimo 1 euro|casas de apuestas
depósito mínimo 1 euro|casas de apuestas dinero gratis|casas de apuestas en argentina|casas
de apuestas en barcelona|casas de apuestas en chile|casas de
apuestas en colombia|casas de apuestas en españa|casas de apuestas en españa online|casas de apuestas en linea|casas de apuestas
en madrid|casas de apuestas en méxico|casas de apuestas en peru|casas de
apuestas en perú|casas de apuestas en sevilla|casas de apuestas en uruguay|casas de
apuestas en valencia|casas de apuestas en venezuela|casas de
apuestas equipos de futbol|casas de apuestas españa|casas de apuestas españa alemania|casas de apuestas españa
inglaterra|casas de apuestas españa licencia|casas de apuestas españa
nuevas|casas de apuestas españa online|casas de apuestas española|casas de apuestas españolas|casas de apuestas
españolas con licencia|casas de apuestas españolas online|casas de
apuestas esports|casas de apuestas eurocopa|casas de apuestas eurocopa 2024|casas de apuestas europa
league|casas de apuestas f1|casas de apuestas fisicas en barcelona|casas de apuestas fisicas en españa|casas de apuestas formula 1|casas
de apuestas fuera de españa|casas de apuestas futbol|casas de apuestas fútbol|casas de apuestas futbol españa|casas de apuestas ganador eurocopa|casas de apuestas gratis|casas de apuestas ingreso
minimo|casas de apuestas ingreso minimo 1 euro|casas de
apuestas ingreso minimo 5 euros|casas de apuestas inter barcelona|casas
de apuestas legales|casas de apuestas legales en colombia|casas de apuestas legales en españa|casas de apuestas legales en mexico|casas de apuestas legales españa|casas de apuestas legales mx|casas de apuestas licencia|casas de apuestas
licencia españa|casas de apuestas lista|casas de apuestas
madrid|casas de apuestas mas seguras|casas de apuestas mejores
bonos|casas de apuestas mejores cuotas|casas de apuestas mexico|casas
de apuestas méxico|casas de apuestas minimo 5 euros|casas de apuestas mlb|casas de apuestas
mundial|casas de apuestas mundial baloncesto|casas de apuestas mundiales|casas de
apuestas nba|casas de apuestas no reguladas en españa|casas de apuestas nueva ley|casas de
apuestas nuevas|casas de apuestas nuevas en colombia|casas de apuestas nuevas en españa|casas de apuestas nuevas españa|casas de apuestas ofertas|casas de
apuestas online|casas de apuestas online argentina|casas de
apuestas online colombia|casas de apuestas online deportivas|casas de
apuestas online ecuador|casas de apuestas online en argentina|casas de apuestas online en chile|casas de
apuestas online en colombia|casas de apuestas online en españa|casas de apuestas online en mexico|casas de apuestas online españa|casas de
apuestas online mas fiables|casas de apuestas online mexico|casas de
apuestas online nuevas|casas de apuestas online peru|casas de apuestas online usa|casas de apuestas online venezuela|casas de apuestas pago
paypal|casas de apuestas para ufc|casas de apuestas paypal|casas de apuestas peru bono sin deposito|casas de apuestas presenciales en españa|casas de apuestas
promociones|casas de
Your comment is awaiting moderation.
Ценник уж больно сладкий.. И это очень настараживает.. Кто что скажет, когда последние движения были, всё ровно? купить скорость, кокаин, мефедрон, гашиш
Your comment is awaiting moderation.
Центр сертификации https://серт-центр.рф технические регламенты ЕАЭС, декларации, сертификаты, ISO, испытания и протоколы. Сопровождение с нуля до регистрации в Росаккредитации. Индивидуальные сроки и смета. Консультация бесплатно.
Your comment is awaiting moderation.
blog-partnera.ru
Your comment is awaiting moderation.
Hey very interesting blog!
Your comment is awaiting moderation.
Хочу выразить благодарность менеджерам данного магазина. купить кокаин, меф, бошки через телеграмм
Your comment is awaiting moderation.
Осваиваешь фортепиано? обучение игре не пианино популярные мелодии, саундтреки, джаз и классика. Уровни сложности, аккорды, аппликатура, советы по технике.
Your comment is awaiting moderation.
(10 euros gratis apuestas|10 mejores casas de apuestas|10 trucos para ganar apuestas|15 euros gratis marca apuestas|1×2 apuestas|1×2 apuestas deportivas|1×2 apuestas
que significa|1×2 en apuestas|1×2 en apuestas que significa|1×2 que significa en apuestas|5 euros
gratis apuestas|9 apuestas que siempre ganaras|a partir de cuanto se declara apuestas|actividades de juegos de azar y apuestas|ad apuestas deportivas|aleksandre topuria ufc apuestas|algoritmo para ganar apuestas deportivas|america apuestas|análisis nba apuestas|aplicacion android apuestas deportivas|aplicacion apuestas deportivas|aplicacion apuestas deportivas
android|aplicación de apuestas online|aplicacion para hacer apuestas|aplicacion para hacer apuestas de futbol|aplicación para hacer apuestas de
fútbol|aplicaciones apuestas deportivas android|aplicaciones apuestas
deportivas gratis|aplicaciones de apuestas android|aplicaciones de apuestas de fútbol|aplicaciones
de apuestas deportivas|aplicaciones de apuestas deportivas peru|aplicaciones de apuestas deportivas perú|aplicaciones de apuestas en colombia|aplicaciones de apuestas gratis|aplicaciones
de apuestas online|aplicaciones de apuestas seguras|aplicaciones de
apuestas sin dinero|aplicaciones para hacer apuestas|apostar seguro apuestas deportivas|app android apuestas
deportivas|app apuestas|app apuestas android|app apuestas de futbol|app apuestas deportivas|app apuestas deportivas android|app apuestas deportivas argentina|app apuestas deportivas colombia|app apuestas deportivas ecuador|app apuestas deportivas españa|app
apuestas deportivas gratis|app apuestas entre amigos|app apuestas futbol|app apuestas gratis|app apuestas sin dinero|app casa de apuestas|app
casas de apuestas|app control apuestas|app de apuestas|app de apuestas android|app de apuestas casino|app de apuestas
colombia|app de apuestas con bono de bienvenida|app de apuestas de futbol|app de apuestas deportivas|app de apuestas deportivas android|app de apuestas
deportivas argentina|app de apuestas deportivas colombia|app de
apuestas deportivas en españa|app de apuestas deportivas
peru|app de apuestas deportivas perú|app de apuestas deportivas sin dinero|app de apuestas ecuador|app de
apuestas en colombia|app de apuestas en españa|app de apuestas en venezuela|app de apuestas
futbol|app de apuestas gratis|app de apuestas online|app
de apuestas para android|app de apuestas para ganar dinero|app de apuestas peru|app de apuestas reales|app de casas
de apuestas|app marca apuestas android|app moviles de apuestas|app para apuestas|app para apuestas de futbol|app
para apuestas deportivas|app para apuestas deportivas en español|app para ganar
apuestas deportivas|app para hacer apuestas|app para hacer apuestas deportivas|app para hacer apuestas entre amigos|app para llevar control de apuestas|app pronosticos apuestas deportivas|app versus apuestas|apps apuestas mundial|apps de
apuestas|apps de apuestas con bono de bienvenida|apps de apuestas de futbol|apps de apuestas deportivas peru|apps de apuestas
mexico|apps para apuestas|aprender a hacer apuestas deportivas|aprender hacer apuestas deportivas|apuesta
del dia apuestas deportivas|apuestas 10 euros gratis|apuestas 100 seguras|apuestas 1×2|apuestas 1X2|apuestas 2 division|apuestas 3
division|apuestas a caballos|apuestas a carreras de caballos|apuestas a
colombia|apuestas a corners|apuestas a ganar|apuestas a jugadores
nba|apuestas a la baja|apuestas a la nfl|apuestas al barcelona|apuestas al dia|apuestas al empate|apuestas al mundial|apuestas al
tenis wta|apuestas alaves barcelona|apuestas alcaraz hoy|apuestas alemania españa|apuestas alonso campeon del
mundo|apuestas altas y bajas|apuestas altas y bajas nfl|apuestas ambos equipos marcan|apuestas america|apuestas android|apuestas anillo nba|apuestas antes del mundial|apuestas anticipadas|apuestas anticipadas nba|apuestas apps|apuestas arabia argentina|apuestas argentina|apuestas argentina campeon del
mundo|apuestas argentina canada|apuestas argentina colombia|apuestas argentina croacia|apuestas argentina españa|apuestas argentina francia|apuestas argentina francia cuanto paga|apuestas argentina francia mundial|apuestas argentina gana el mundial|apuestas argentina gana mundial|apuestas argentina holanda|apuestas argentina mexico|apuestas
argentina méxico|apuestas argentina mundial|apuestas
argentina online|apuestas argentina paises bajos|apuestas
argentina polonia|apuestas argentina uruguay|apuestas argentina vs australia|apuestas
argentina vs colombia|apuestas argentina vs francia|apuestas
argentina vs peru|apuestas argentinas|apuestas arsenal real madrid|apuestas ascenso a primera division|apuestas ascenso a segunda|apuestas asiaticas|apuestas asiatico|apuestas athletic|apuestas athletic atletico|apuestas athletic barça|apuestas athletic barcelona|apuestas athletic betis|apuestas athletic manchester|apuestas athletic
manchester united|apuestas athletic osasuna|apuestas
athletic real|apuestas athletic real madrid|apuestas
athletic real sociedad|apuestas athletic real sociedad final|apuestas athletic roma|apuestas athletic sevilla|apuestas athletic
valencia|apuestas atletico|apuestas atletico barcelona|apuestas atletico barsa|apuestas atletico campeon champions|apuestas atletico campeon de liga|apuestas atlético copenhague|apuestas atletico de
madrid|apuestas atlético de madrid|apuestas atletico de madrid barcelona|apuestas atletico de madrid gana la liga|apuestas atletico de
madrid real madrid|apuestas atlético de madrid real madrid|apuestas atletico de madrid vs barcelona|apuestas atletico madrid|apuestas atletico madrid real madrid|apuestas
atletico madrid vs barcelona|apuestas atletico real madrid|apuestas atletico real madrid champions|apuestas atletismo|apuestas bajas|apuestas baloncesto|apuestas baloncesto acb|apuestas baloncesto handicap|apuestas baloncesto
hoy|apuestas baloncesto juegos olimpicos|apuestas baloncesto nba|apuestas
baloncesto pronostico|apuestas baloncesto pronósticos|apuestas baloncesto prorroga|apuestas barca|apuestas barca athletic|apuestas barca atletico|apuestas barca bayern|apuestas barca bayern munich|apuestas barca girona|apuestas barca hoy|apuestas
barça hoy|apuestas barca inter|apuestas barca juventus|apuestas barca madrid|apuestas barça madrid|apuestas barca real madrid|apuestas barca vs juve|apuestas barca vs madrid|apuestas barca vs psg|apuestas barcelona|apuestas
barcelona alaves|apuestas barcelona athletic|apuestas barcelona atletico|apuestas barcelona atletico de madrid|apuestas barcelona atlético de madrid|apuestas barcelona atletico
madrid|apuestas barcelona bayern|apuestas barcelona betis|apuestas barcelona campeon de liga|apuestas barcelona celta|apuestas barcelona espanyol|apuestas barcelona gana la champions|apuestas barcelona girona|apuestas barcelona
granada|apuestas barcelona hoy|apuestas barcelona
inter|apuestas barcelona madrid|apuestas barcelona osasuna|apuestas
barcelona psg|apuestas barcelona real madrid|apuestas barcelona real sociedad|apuestas barcelona
sevilla|apuestas barcelona valencia|apuestas barcelona villarreal|apuestas barcelona vs atletico madrid|apuestas
barcelona vs madrid|apuestas barcelona vs real madrid|apuestas barsa madrid|apuestas basket hoy|apuestas bayern barcelona|apuestas bayern vs
barcelona|apuestas beisbol|apuestas béisbol|apuestas beisbol mlb|apuestas beisbol pronosticos|apuestas beisbol
venezolano|apuestas betis|apuestas betis – chelsea|apuestas betis barcelona|apuestas betis chelsea|apuestas betis fiorentina|apuestas betis girona|apuestas betis madrid|apuestas betis mallorca|apuestas betis real madrid|apuestas betis real
sociedad|apuestas betis sevilla|apuestas betis valencia|apuestas betis valladolid|apuestas betis vs valencia|apuestas betplay
hoy colombia|apuestas betsson peru|apuestas bienvenida|apuestas billar online|apuestas bolivia
vs colombia|apuestas bono|apuestas bono bienvenida|apuestas bono
de bienvenida|apuestas bono de bienvenida sin deposito|apuestas
bono gratis|apuestas bono sin deposito|apuestas bonos sin deposito|apuestas borussia real
madrid|apuestas boxeo|apuestas boxeo de campeonato|apuestas boxeo españa|apuestas boxeo español|apuestas boxeo femenino olimpiadas|apuestas boxeo hoy|apuestas boxeo online|apuestas
brasil colombia|apuestas brasil peru|apuestas brasil uruguay|apuestas brasil
vs colombia|apuestas brasil vs peru|apuestas caballos|apuestas caballos colocado|apuestas
caballos españa|apuestas caballos hipodromo|apuestas caballos hoy|apuestas caballos madrid|apuestas caballos online|apuestas
caballos sanlucar de barrameda|apuestas caballos zarzuela|apuestas calculador|apuestas campeon|apuestas campeon champions|apuestas
campeón champions|apuestas campeon champions 2025|apuestas campeon champions league|apuestas campeon conference league|apuestas campeon copa america|apuestas campeon copa del rey|apuestas campeon de champions|apuestas campeon de la
champions|apuestas campeon de liga|apuestas campeon del mundo|apuestas campeon eurocopa|apuestas campeón eurocopa|apuestas campeon europa league|apuestas campeon f1|apuestas campeon f1 2025|apuestas campeon formula 1|apuestas campeon libertadores|apuestas campeon liga|apuestas campeon liga bbva|apuestas campeon liga española|apuestas campeon liga santander|apuestas campeon motogp 2025|apuestas campeon mundial|apuestas campeón mundial|apuestas campeon mundial
baloncesto|apuestas campeon nba|apuestas campeón nba|apuestas campeon premier|apuestas campeon premier league|apuestas campeon roland garros|apuestas campeonato f1|apuestas campeonatos de futbol|apuestas carrera de caballos|apuestas carrera de
caballos hoy|apuestas carrera de caballos nocturnas|apuestas carrera de galgos fin de
semana|apuestas carrera de galgos hoy|apuestas carrera de galgos nocturnas|apuestas carreras caballos|apuestas carreras
caballos sanlucar|apuestas carreras de caballos|apuestas carreras de caballos en directo|apuestas
carreras de caballos en vivo|apuestas carreras de caballos españa|apuestas
carreras de caballos hoy|apuestas carreras de caballos nacionales|apuestas carreras de caballos nocturnas|apuestas carreras de
caballos online|apuestas carreras de caballos sanlucar|apuestas carreras
de caballos sanlúcar|apuestas carreras de galgos|apuestas carreras de galgos en vivo|apuestas carreras de galgos nocturnas|apuestas
carreras de galgos pre partido|apuestas casino|apuestas casino
barcelona|apuestas casino futbol|apuestas casino gran madrid|apuestas casino gratis|apuestas casino madrid|apuestas casino online|apuestas casino online argentina|apuestas casinos|apuestas casinos online|apuestas celta|apuestas celta barcelona|apuestas celta
betis|apuestas celta eibar|apuestas celta espanyol|apuestas
celta granada|apuestas celta madrid|apuestas celta manchester|apuestas celta real madrid|apuestas champion league|apuestas champions foro|apuestas champions hoy|apuestas champions
league|apuestas champions league – pronósticos|apuestas
champions league 2025|apuestas champions league hoy|apuestas champions league pronosticos|apuestas champions league pronósticos|apuestas champions
pronosticos|apuestas chelsea barcelona|apuestas chelsea betis|apuestas chile|apuestas
chile peru|apuestas chile venezuela|apuestas
chile vs colombia|apuestas chile vs uruguay|apuestas ciclismo|apuestas ciclismo en vivo|apuestas ciclismo femenino|apuestas ciclismo tour francia|apuestas ciclismo vuelta|apuestas ciclismo vuelta a
españa|apuestas ciclismo vuelta españa|apuestas city madrid|apuestas city real
madrid|apuestas clasico|apuestas clasico español|apuestas clasico real madrid barcelona|apuestas clasificacion mundial|apuestas colombia|apuestas colombia argentina|apuestas colombia brasil|apuestas
colombia paraguay|apuestas colombia uruguay|apuestas colombia vs argentina|apuestas colombia vs brasil|apuestas combinadas|apuestas combinadas como
funcionan|apuestas combinadas de futbol|apuestas combinadas de fútbol|apuestas combinadas foro|apuestas
combinadas futbol|apuestas combinadas hoy|apuestas combinadas mismo partido|apuestas combinadas mundial|apuestas combinadas nba|apuestas combinadas para esta semana|apuestas combinadas para hoy|apuestas combinadas para mañana|apuestas combinadas pronosticos|apuestas combinadas
recomendadas|apuestas combinadas seguras|apuestas combinadas seguras para
hoy|apuestas combinadas seguras para mañana|apuestas como
ganar|apuestas comparador|apuestas con bono de bienvenida|apuestas con dinero ficticio|apuestas con dinero real|apuestas
con dinero virtual|apuestas con handicap|apuestas con handicap asiatico|apuestas con handicap
baloncesto|apuestas con mas probabilidades de ganar|apuestas con paypal|apuestas
con tarjeta de credito|apuestas con tarjeta de debito|apuestas consejos|apuestas copa|apuestas copa africa|apuestas copa america|apuestas copa américa|apuestas copa argentina|apuestas copa
brasil|apuestas copa davis|apuestas copa de europa|apuestas copa del mundo|apuestas copa del rey|apuestas
copa del rey baloncesto|apuestas copa del rey final|apuestas copa del rey futbol|apuestas copa del rey ganador|apuestas
copa del rey hoy|apuestas copa del rey pronosticos|apuestas copa del rey pronósticos|apuestas
copa europa|apuestas copa italia|apuestas copa libertadores|apuestas copa
mundial de hockey|apuestas copa rey|apuestas copa sudamericana|apuestas
corners|apuestas corners hoy|apuestas croacia argentina|apuestas cuartos eurocopa|apuestas cuotas|apuestas cuotas altas|apuestas cuotas bajas|apuestas
de 1 euro|apuestas de baloncesto|apuestas de baloncesto
hoy|apuestas de baloncesto nba|apuestas de baloncesto para hoy|apuestas de beisbol|apuestas de
beisbol para hoy|apuestas de blackjack en linea|apuestas de boxeo|apuestas de
boxeo canelo|apuestas de boxeo en las vegas|apuestas de boxeo hoy|apuestas
de boxeo online|apuestas de caballo|apuestas de
caballos|apuestas de caballos como funciona|apuestas de caballos como se juega|apuestas de caballos en colombia|apuestas de caballos en españa|apuestas de caballos en linea|apuestas de caballos españa|apuestas de caballos
ganador y colocado|apuestas de caballos internacionales|apuestas de caballos juegos|apuestas de caballos online|apuestas de caballos online en venezuela|apuestas de
caballos por internet|apuestas de caballos pronosticos|apuestas de caballos pronósticos|apuestas de carrera
de caballos|apuestas de carreras de caballos|apuestas de carreras de
caballos online|apuestas de casino|apuestas de casino online|apuestas de casino por
internet|apuestas de champions league|apuestas de ciclismo|apuestas de colombia|apuestas
de copa america|apuestas de corners|apuestas de deportes en linea|apuestas de deportes online|apuestas de dinero|apuestas de esports|apuestas de eurocopa|apuestas de europa league|apuestas de f1|apuestas de formula 1|apuestas de futbol|apuestas de fútbol|apuestas de
futbol app|apuestas de futbol argentina|apuestas de futbol colombia|apuestas de futbol en colombia|apuestas de futbol en directo|apuestas de futbol
en linea|apuestas de futbol en vivo|apuestas de futbol español|apuestas de futbol gratis|apuestas de futbol
hoy|apuestas de futbol mundial|apuestas de futbol online|apuestas de fútbol online|apuestas de
futbol para hoy|apuestas de fútbol para hoy|apuestas de futbol para hoy seguras|apuestas
de futbol para mañana|apuestas de futbol peru|apuestas de futbol pronosticos|apuestas de fútbol pronósticos|apuestas de futbol seguras|apuestas de
futbol seguras para hoy|apuestas de futbol sin dinero|apuestas de galgos|apuestas de galgos como ganar|apuestas de galgos en directo|apuestas
de galgos online|apuestas de galgos trucos|apuestas de golf|apuestas
de hockey|apuestas de hockey sobre hielo|apuestas de hoy|apuestas de hoy seguras|apuestas de juego|apuestas de juegos|apuestas de juegos deportivos|apuestas
de juegos online|apuestas de la champions league|apuestas de la copa
américa|apuestas de la eurocopa|apuestas de la
europa league|apuestas de la liga|apuestas de la liga bbva|apuestas de la liga
española|apuestas de la nba|apuestas de la nfl|apuestas de la
ufc|apuestas de mlb|apuestas de nba|apuestas de nba para hoy|apuestas de partidos|apuestas de partidos de futbol|apuestas de peleas ufc|apuestas de
perros en vivo|apuestas de perros virtuales|apuestas de peru|apuestas de sistema|apuestas de sistema como funciona|apuestas de sistema
explicacion|apuestas de sistema explicación|apuestas de tenis|apuestas de
tenis de mesa|apuestas de tenis en directo|apuestas de tenis hoy|apuestas de tenis para hoy|apuestas de tenis
pronosticos|apuestas de tenis seguras|apuestas de todo tipo|apuestas de ufc|apuestas de ufc hoy|apuestas del
boxeo|apuestas del clasico|apuestas del clasico
real madrid barca|apuestas del dia|apuestas del día|apuestas del dia de hoy|apuestas del
dia deportivas|apuestas del dia futbol|apuestas del
mundial|apuestas del partido de hoy|apuestas del real madrid|apuestas del rey|apuestas
del sistema|apuestas deporte|apuestas deportes|apuestas deportiva|apuestas deportivas|apuestas deportivas 1
euro|apuestas deportivas 10 euros gratis|apuestas deportivas 100 seguras|apuestas deportivas 1×2|apuestas deportivas android|apuestas deportivas app|apuestas
deportivas apps|apuestas deportivas argentina|apuestas deportivas argentina futbol|apuestas
deportivas argentina legal|apuestas deportivas atletico de madrid|apuestas deportivas baloncesto|apuestas deportivas barca madrid|apuestas deportivas barcelona|apuestas deportivas beisbol|apuestas deportivas bono|apuestas deportivas bono bienvenida|apuestas deportivas bono
de bienvenida|apuestas deportivas bono sin deposito|apuestas deportivas
bonos de bienvenida|apuestas deportivas
boxeo|apuestas deportivas caballos|apuestas deportivas calculadora|apuestas deportivas campeon liga|apuestas deportivas casino|apuestas deportivas casino barcelona|apuestas deportivas casino online|apuestas deportivas cerca de
mi|apuestas deportivas champions league|apuestas deportivas
chile|apuestas deportivas ciclismo|apuestas deportivas colombia|apuestas deportivas com|apuestas
deportivas com foro|apuestas deportivas com pronosticos|apuestas
deportivas combinadas|apuestas deportivas combinadas para hoy|apuestas deportivas como se juega|apuestas deportivas comparador|apuestas deportivas
con bono gratis|apuestas deportivas con bonos gratis|apuestas deportivas con dinero ficticio|apuestas deportivas con paypal|apuestas deportivas con puntos virtuales|apuestas deportivas consejos|apuestas deportivas consejos para ganar|apuestas
deportivas copa america|apuestas deportivas copa del rey|apuestas deportivas copa libertadores|apuestas deportivas copa mundial|apuestas deportivas corners|apuestas
deportivas cual es la mejor|apuestas deportivas cuotas altas|apuestas
deportivas de baloncesto|apuestas deportivas de boxeo|apuestas deportivas de colombia|apuestas deportivas
de futbol|apuestas deportivas de nba|apuestas deportivas de nhl|apuestas deportivas de
peru|apuestas deportivas de tenis|apuestas deportivas del dia|apuestas deportivas dinero ficticio|apuestas deportivas directo|apuestas deportivas doble oportunidad|apuestas deportivas en argentina|apuestas deportivas en chile|apuestas
deportivas en colombia|apuestas deportivas en directo|apuestas deportivas en españa|apuestas deportivas en español|apuestas deportivas en linea|apuestas
deportivas en línea|apuestas deportivas en peru|apuestas deportivas en perú|apuestas deportivas
en sevilla|apuestas deportivas en uruguay|apuestas deportivas en vivo|apuestas
deportivas es|apuestas deportivas es pronosticos|apuestas deportivas españa|apuestas
deportivas españolas|apuestas deportivas esports|apuestas
deportivas estadisticas|apuestas deportivas estrategias|apuestas deportivas estrategias seguras|apuestas
deportivas eurocopa|apuestas deportivas europa league|apuestas deportivas f1|apuestas deportivas faciles de ganar|apuestas deportivas formula 1|apuestas deportivas foro|apuestas
deportivas foro futbol|apuestas deportivas foro tenis|apuestas deportivas francia argentina|apuestas deportivas futbol|apuestas deportivas fútbol|apuestas deportivas futbol argentino|apuestas deportivas futbol colombia|apuestas deportivas futbol español|apuestas deportivas gana|apuestas deportivas ganadas|apuestas deportivas ganar dinero seguro|apuestas deportivas gane|apuestas
deportivas golf|apuestas deportivas gratis|apuestas deportivas gratis con premios|apuestas deportivas gratis hoy|apuestas deportivas gratis sin deposito|apuestas deportivas
handicap|apuestas deportivas handicap asiatico|apuestas deportivas hoy|apuestas deportivas impuestos|apuestas deportivas interior
argentina|apuestas deportivas juegos olimpicos|apuestas deportivas la liga|apuestas deportivas legales|apuestas deportivas legales en colombia|apuestas deportivas libres
de impuestos|apuestas deportivas licencia españa|apuestas
deportivas liga española|apuestas deportivas listado|apuestas deportivas listado clasico|apuestas deportivas madrid|apuestas deportivas mas seguras|apuestas deportivas mejor pagadas|apuestas deportivas mejores|apuestas deportivas mejores app|apuestas deportivas mejores casas|apuestas deportivas mejores cuotas|apuestas deportivas mejores paginas|apuestas deportivas mexico|apuestas
deportivas méxico|apuestas deportivas mlb|apuestas deportivas mlb hoy|apuestas deportivas multiples|apuestas deportivas mundial|apuestas deportivas murcia|apuestas
deportivas nba|apuestas deportivas nba hoy|apuestas deportivas nfl|apuestas deportivas nhl|apuestas deportivas
nuevas|apuestas deportivas ofertas|apuestas deportivas
online|apuestas deportivas online argentina|apuestas deportivas online
chile|apuestas deportivas online colombia|apuestas deportivas
online en colombia|apuestas deportivas online españa|apuestas deportivas online mexico|apuestas deportivas online paypal|apuestas deportivas online peru|apuestas deportivas online por internet|apuestas deportivas pago paypal|apuestas deportivas
para ganar dinero|apuestas deportivas para hoy|apuestas deportivas para hoy pronosticos|apuestas deportivas
partido suspendido|apuestas deportivas partidos de hoy|apuestas deportivas paypal|apuestas deportivas peru|apuestas deportivas perú|apuestas deportivas peru vs ecuador|apuestas deportivas predicciones|apuestas deportivas promociones|apuestas deportivas pronostico|apuestas deportivas
pronóstico|apuestas deportivas pronostico hoy|apuestas deportivas pronosticos|apuestas deportivas pronósticos|apuestas deportivas pronosticos expertos|apuestas deportivas
pronosticos gratis|apuestas deportivas pronosticos nba|apuestas deportivas pronosticos
tenis|apuestas deportivas que aceptan paypal|apuestas deportivas real madrid|apuestas deportivas regalo bienvenida|apuestas
deportivas resultado exacto|apuestas deportivas resultados|apuestas deportivas rugby|apuestas deportivas seguras|apuestas deportivas seguras foro|apuestas deportivas seguras hoy|apuestas deportivas
seguras para hoy|apuestas deportivas seguras telegram|apuestas deportivas sevilla|apuestas deportivas simulador eurocopa|apuestas deportivas sin deposito|apuestas deportivas sin deposito inicial|apuestas deportivas sin dinero|apuestas deportivas sin dinero real|apuestas deportivas sin registro|apuestas deportivas stake|apuestas deportivas stake 10|apuestas deportivas telegram
españa|apuestas deportivas tenis|apuestas deportivas tenis de mesa|apuestas deportivas tenis foro|apuestas
deportivas tenis hoy|apuestas deportivas tips|apuestas deportivas tipster|apuestas deportivas ufc|apuestas
deportivas uruguay|apuestas deportivas valencia|apuestas deportivas
valencia barcelona|apuestas deportivas venezuela|apuestas deportivas virtuales|apuestas deportivas y casino|apuestas deportivas y casino online|apuestas deportivas.com|apuestas deportivas.com
foro|apuestas deportivas.es|apuestas deportivos pronosticos|apuestas deposito minimo 1 euro|apuestas
descenso a segunda|apuestas descenso a segunda b|apuestas descenso la liga|apuestas descenso primera division|apuestas
descenso segunda|apuestas dia|apuestas diarias seguras|apuestas dinero|apuestas dinero
ficticio|apuestas dinero real|apuestas dinero virtual|apuestas directas|apuestas directo|apuestas directo futbol|apuestas
division de honor juvenil|apuestas dnb|apuestas doble oportunidad|apuestas doble resultado|apuestas dobles|apuestas dobles y triples|apuestas dortmund barcelona|apuestas draft nba|apuestas draft nfl|apuestas ecuador
vs argentina|apuestas ecuador vs venezuela|apuestas egipto uruguay|apuestas el
clasico|apuestas elecciones venezuela|apuestas empate|apuestas en baloncesto|apuestas en barcelona|apuestas en beisbol|apuestas
en boxeo|apuestas en caballos|apuestas en carreras de caballos|apuestas en casino|apuestas en casino online|apuestas en casinos|apuestas en casinos online|apuestas en chile|apuestas en ciclismo|apuestas en colombia|apuestas en colombia de futbol|apuestas en directo|apuestas en directo futbol|apuestas en directo pronosticos|apuestas en el futbol|apuestas
en el tenis|apuestas en españa|apuestas en esports|apuestas en eventos
deportivos virtuales|apuestas en golf|apuestas en juegos|apuestas en la champions league|apuestas en la eurocopa|apuestas en la liga|apuestas en la nba|apuestas en la nfl|apuestas en las vegas mlb|apuestas en las vegas
nfl|apuestas en linea|apuestas en línea|apuestas en linea argentina|apuestas en linea boxeo|apuestas en linea chile|apuestas en linea colombia|apuestas
en línea de fútbol|apuestas en linea deportivas|apuestas en linea españa|apuestas en linea estados unidos|apuestas en linea futbol|apuestas en linea mexico|apuestas en línea méxico|apuestas en linea mundial|apuestas en linea peru|apuestas en linea usa|apuestas
en los esports|apuestas en madrid|apuestas en méxico|apuestas en mexico online|apuestas en nba|apuestas en partidos de futbol|apuestas en partidos de futbol en vivo|apuestas en partidos de tenis en directo|apuestas en perú|apuestas en sevilla|apuestas en sistema|apuestas en stake|apuestas en tenis|apuestas en tenis de mesa|apuestas en valencia|apuestas en vivo|apuestas
en vivo argentina|apuestas en vivo casino|apuestas en vivo futbol|apuestas en vivo fútbol|apuestas en vivo nba|apuestas en vivo peru|apuestas en vivo tenis|apuestas
en vivo ufc|apuestas equipo mbappe|apuestas equipos de futbol|apuestas españa|apuestas españa alemania|apuestas españa alemania
eurocopa|apuestas españa croacia|apuestas españa eurocopa|apuestas españa francia|apuestas
españa francia eurocopa|apuestas españa gana el mundial|apuestas
españa gana eurocopa|apuestas españa gana mundial|apuestas españa georgia|apuestas españa holanda|apuestas españa inglaterra|apuestas españa inglaterra cuotas|apuestas españa inglaterra eurocopa|apuestas españa italia|apuestas españa mundial|apuestas españa paises bajos|apuestas
español|apuestas español oviedo|apuestas espanyol barcelona|apuestas espanyol betis|apuestas espanyol villarreal|apuestas esport|apuestas esports|apuestas esports colombia|apuestas esports españa|apuestas esports fifa|apuestas esports gratis|apuestas esports lol|apuestas esports peru|apuestas esports valorant|apuestas estadisticas|apuestas estrategias|apuestas euro|apuestas euro copa|apuestas eurocopa|apuestas eurocopa campeon|apuestas eurocopa españa|apuestas eurocopa
favoritos|apuestas eurocopa femenina|apuestas eurocopa final|apuestas eurocopa
ganador|apuestas eurocopa hoy|apuestas eurocopa sub 21|apuestas euroliga
baloncesto|apuestas euroliga pronosticos|apuestas europa league|apuestas europa
league hoy|apuestas europa league pronosticos|apuestas europa
league pronósticos|apuestas euros|apuestas f1 abu dhabi|apuestas f1
bahrein|apuestas f1 canada|apuestas f1 china|apuestas f1 cuotas|apuestas f1
hoy|apuestas f1 las vegas|apuestas f1 miami|apuestas f1 monaco|apuestas faciles de ganar|apuestas
fáciles de ganar|apuestas faciles para ganar|apuestas favoritas|apuestas favorito champions|apuestas favoritos champions|apuestas favoritos
eurocopa|apuestas favoritos mundial|apuestas fc barcelona|apuestas
final champions cuotas|apuestas final champions league|apuestas final champions
peru|apuestas final copa|apuestas final copa america|apuestas final copa de europa|apuestas final copa del rey|apuestas final copa europa|apuestas final copa libertadores|apuestas
final copa rey|apuestas final de copa|apuestas final de copa del rey|apuestas final del mundial|apuestas final euro|apuestas final eurocopa|apuestas final europa
league|apuestas final libertadores|apuestas final mundial|apuestas final nba|apuestas final rugby|apuestas final
uefa europa league|apuestas final.mundial|apuestas finales de
conferencia nfl|apuestas finales nba|apuestas fiorentina betis|apuestas formula|apuestas formula 1|apuestas fórmula 1|apuestas
fórmula 1 pronósticos|apuestas formula uno|apuestas foro|apuestas foro nba|apuestas francia argentina|apuestas francia españa|apuestas futbol|apuestas fútbol|apuestas futbol americano|apuestas futbol americano nfl|apuestas futbol argentina|apuestas futbol argentino|apuestas
futbol champions league|apuestas futbol chile|apuestas futbol colombia|apuestas futbol consejos|apuestas futbol en directo|apuestas fútbol en directo|apuestas futbol en vivo|apuestas fútbol en vivo|apuestas
futbol españa|apuestas futbol español|apuestas fútbol español|apuestas futbol eurocopa|apuestas futbol
femenino|apuestas futbol foro|apuestas futbol gratis|apuestas futbol hoy|apuestas fútbol hoy|apuestas futbol
juegos olimpicos|apuestas futbol mexico|apuestas futbol mundial|apuestas futbol online|apuestas
futbol para hoy|apuestas futbol peru|apuestas futbol pronosticos|apuestas futbol sala|apuestas
futbol telegram|apuestas futbol virtual|apuestas galgos|apuestas galgos en directo|apuestas galgos hoy|apuestas galgos online|apuestas galgos pronosticos|apuestas galgos trucos|apuestas gana|apuestas
gana colombia|apuestas gana resultados|apuestas ganadas|apuestas ganadas hoy|apuestas ganador
champions league|apuestas ganador copa america|apuestas ganador copa del rey|apuestas ganador copa
del rey baloncesto|apuestas ganador copa libertadores|apuestas ganador de la eurocopa|apuestas ganador de la liga|apuestas ganador del mundial|apuestas ganador eurocopa|apuestas ganador europa league|apuestas ganador f1|apuestas ganador la liga|apuestas ganador liga española|apuestas ganador mundial|apuestas ganador mundial
baloncesto|apuestas ganador mundial f1|apuestas ganador nba|apuestas ganadores eurocopa|apuestas ganadores mundial|apuestas ganar champions|apuestas ganar eurocopa|apuestas ganar liga|apuestas ganar mundial|apuestas
ganar nba|apuestas getafe valencia|apuestas ghana uruguay|apuestas girona|apuestas girona athletic|apuestas girona
betis|apuestas girona campeon de liga|apuestas girona campeon liga|apuestas
girona gana la liga|apuestas girona real madrid|apuestas girona real sociedad|apuestas goleador eurocopa|apuestas goleadores eurocopa|apuestas goles
asiaticos|apuestas golf|apuestas golf masters|apuestas golf pga|apuestas
granada barcelona|apuestas grand slam de tenis|apuestas gratis|apuestas
gratis casino|apuestas gratis con premios|apuestas
gratis hoy|apuestas gratis para hoy|apuestas gratis por registro|apuestas gratis
puntos|apuestas gratis regalos|apuestas gratis sin deposito|apuestas gratis sin depósito|apuestas gratis sin ingreso|apuestas gratis sports|apuestas gratis y ganar premios|apuestas grupo a eurocopa|apuestas grupos eurocopa|apuestas handicap|apuestas handicap asiatico|apuestas handicap
baloncesto|apuestas handicap como funciona|apuestas handicap
nba|apuestas handicap nfl|apuestas hipicas
online|apuestas hípicas online|apuestas hipicas venezuela|apuestas hockey|apuestas hockey hielo|apuestas
hockey patines|apuestas hockey sobre hielo|apuestas holanda argentina|apuestas holanda vs argentina|apuestas hoy|apuestas hoy champions|apuestas hoy futbol|apuestas hoy nba|apuestas hoy pronosticos|apuestas hoy
seguras|apuestas impuestos|apuestas inglaterra paises bajos|apuestas inter barca|apuestas inter barcelona|apuestas juego|apuestas juegos|apuestas juegos
en linea|apuestas juegos olimpicos|apuestas juegos olímpicos|apuestas juegos olimpicos
baloncesto|apuestas juegos online|apuestas juegos virtuales|apuestas jugador sevilla|apuestas jugadores nba|apuestas kings league americas|apuestas la liga|apuestas la liga
española|apuestas la liga hoy|apuestas la
liga santander|apuestas las vegas mlb|apuestas las vegas nba|apuestas las
vegas nfl|apuestas league of legends mundial|apuestas
legal|apuestas legales|apuestas legales en colombia|apuestas legales en españa|apuestas
legales en estados unidos|apuestas legales españa|apuestas leganes betis|apuestas libertadores|apuestas licencia|apuestas liga 1 peru|apuestas
liga argentina|apuestas liga bbva pronosticos|apuestas
liga de campeones|apuestas liga de campeones de baloncesto|apuestas liga de campeones
de hockey|apuestas liga españa|apuestas liga española|apuestas liga
santander pronosticos|apuestas ligas de futbol|apuestas linea|apuestas linea de gol|apuestas liverpool barcelona|apuestas
liverpool real madrid|apuestas lol mundial|apuestas madrid|apuestas madrid arsenal|apuestas madrid atletico|apuestas madrid atletico champions|apuestas madrid
barca|apuestas madrid barça|apuestas madrid barca hoy|apuestas madrid barca
supercopa|apuestas madrid barcelona|apuestas madrid barsa|apuestas madrid bayern|apuestas madrid betis|apuestas madrid borussia|apuestas
madrid campeon champions|apuestas madrid celta|apuestas madrid city|apuestas madrid
dortmund|apuestas madrid gana la liga|apuestas madrid gana liga|apuestas madrid hoy|apuestas madrid liverpool|apuestas madrid osasuna|apuestas madrid
sevilla|apuestas madrid valencia|apuestas madrid vs arsenal|apuestas
madrid vs barcelona|apuestas mallorca osasuna|apuestas mallorca real sociedad|apuestas manchester
athletic|apuestas manchester city real madrid|apuestas mas faciles de ganar|apuestas mas seguras|apuestas mas seguras para hoy|apuestas masters de golf|apuestas masters
de tenis|apuestas maximo goleador eurocopa|apuestas
maximo goleador mundial|apuestas mejor jugador eurocopa|apuestas mejores casinos online|apuestas mexico|apuestas
méxico|apuestas mexico polonia|apuestas méxico polonia|apuestas mlb|apuestas mlb hoy|apuestas mlb las
vegas|apuestas mlb para hoy|apuestas mlb pronosticos|apuestas mlb usa|apuestas mma ufc|apuestas momios|apuestas
multiples|apuestas múltiples|apuestas multiples como funcionan|apuestas multiples el gordo|apuestas
multiples futbol|apuestas mundial|apuestas mundial
2026|apuestas mundial baloncesto|apuestas mundial balonmano|apuestas mundial brasil|apuestas mundial campeon|apuestas mundial ciclismo|apuestas mundial
clubes|apuestas mundial de baloncesto|apuestas mundial de ciclismo|apuestas mundial de clubes|apuestas mundial de futbol|apuestas mundial de fútbol|apuestas mundial de rugby|apuestas
mundial f1|apuestas mundial favoritos|apuestas mundial femenino|apuestas mundial
formula 1|apuestas mundial futbol|apuestas mundial ganador|apuestas mundial lol|apuestas mundial moto gp|apuestas mundial motogp|apuestas mundial rugby|apuestas mundial
sub 17|apuestas mundiales|apuestas mundialistas|apuestas mvp eurocopa|apuestas
mvp nba|apuestas mvp nfl|apuestas nacionales de colombia|apuestas
nba|apuestas nba all star|apuestas nba campeon|apuestas nba consejos|apuestas nba esta noche|apuestas nba finals|apuestas nba gratis|apuestas
nba hoy|apuestas nba hoy jugadores|apuestas nba hoy pronosticos|apuestas nba para hoy|apuestas nba playoffs|apuestas nba pronosticos|apuestas nba pronósticos|apuestas nba pronosticos hoy|apuestas nba tipster|apuestas nfl|apuestas nfl hoy|apuestas nfl las vegas|apuestas nfl playoffs|apuestas nfl pronosticos|apuestas nfl pronósticos|apuestas nfl semana 4|apuestas nfl super bowl|apuestas nhl|apuestas nhl
pronosticos|apuestas octavos eurocopa|apuestas ofertas|apuestas online|apuestas online argentina|apuestas online argentina legal|apuestas
online bono|apuestas online bono bienvenida|apuestas online boxeo|apuestas online caballos|apuestas online carreras de caballos|apuestas online casino|apuestas online champions league|apuestas
online chile|apuestas online ciclismo|apuestas online colombia|apuestas online comparativa|apuestas online
con paypal|apuestas online de caballos|apuestas online deportivas|apuestas online en argentina|apuestas online en peru|apuestas online espana|apuestas online españa|apuestas online esports|apuestas online foro|apuestas online
futbol|apuestas online futbol españa|apuestas online
golf|apuestas online gratis|apuestas online gratis sin deposito|apuestas online juegos|apuestas
online mexico|apuestas online mma|apuestas online movil|apuestas online
nba|apuestas online net|apuestas online nuevas|apuestas online opiniones|apuestas online paypal|apuestas online peru|apuestas
online seguras|apuestas online sin dinero|apuestas online sin registro|apuestas online tenis|apuestas online ufc|apuestas online uruguay|apuestas online
venezuela|apuestas open britanico golf|apuestas osasuna athletic|apuestas osasuna
barcelona|apuestas osasuna real madrid|apuestas osasuna sevilla|apuestas osasuna valencia|apuestas over|apuestas over 2.5|apuestas over under|apuestas paginas|apuestas pago anticipado|apuestas paises
bajos ecuador|apuestas paises bajos inglaterra|apuestas países bajos
qatar|apuestas para boxeo|apuestas para champions
league|apuestas para el clasico|apuestas para el
dia de hoy|apuestas para el mundial|apuestas para el partido de hoy|apuestas para eurocopa|apuestas para europa league|apuestas para futbol|apuestas para ganar|apuestas para ganar dinero|apuestas para ganar dinero facil|apuestas para ganar en la ruleta|apuestas para ganar la champions|apuestas
para ganar la eurocopa|apuestas para ganar la europa league|apuestas
para ganar la liga|apuestas para ganar siempre|apuestas para hacer|apuestas
para hoy|apuestas para hoy de futbol|apuestas para
hoy europa league|apuestas para hoy futbol|apuestas para juegos|apuestas para
la champions league|apuestas para la copa del rey|apuestas para la eurocopa|apuestas para la europa league|apuestas para la
final de la eurocopa|apuestas para la nba hoy|apuestas para los partidos de hoy|apuestas para partidos de hoy|apuestas para ufc|apuestas partido|apuestas partido aplazado|apuestas partido champions|apuestas partido colombia|apuestas partido españa marruecos|apuestas partido mundial|apuestas partido suspendido|apuestas partidos|apuestas partidos champions league|apuestas partidos csgo|apuestas partidos de futbol|apuestas
partidos de futbol hoy|apuestas partidos de hoy|apuestas partidos eurocopa|apuestas partidos futbol|apuestas partidos hoy|apuestas partidos mundial|apuestas paypal|apuestas peleas de boxeo|apuestas peru|apuestas perú|apuestas
peru brasil|apuestas peru chile|apuestas peru paraguay|apuestas peru uruguay|apuestas peru vs
chile|apuestas peru vs colombia|apuestas pichichi eurocopa|apuestas plataforma|apuestas
playoff|apuestas playoff ascenso|apuestas playoff ascenso a primera|apuestas playoff nba|apuestas playoff segunda|apuestas playoff segunda b|apuestas playoffs nba|apuestas playoffs
nfl|apuestas polonia argentina|apuestas por argentina|apuestas por internet mexico|apuestas por internet para ganar dinero|apuestas por paypal|apuestas por ronda boxeo|apuestas por sistema|apuestas portugal uruguay|apuestas pre partido|apuestas
predicciones|apuestas predicciones futbol|apuestas
primera division|apuestas primera division españa|apuestas promociones|apuestas
pronostico|apuestas pronosticos|apuestas pronosticos deportivos|apuestas pronosticos deportivos tenis|apuestas pronosticos futbol|apuestas pronosticos gratis|apuestas pronosticos
nba|apuestas pronosticos tenis|apuestas prorroga|apuestas psg barca|apuestas psg barcelona|apuestas
puntos por tarjetas|apuestas puntos tarjetas|apuestas que aceptan paypal|apuestas que es handicap|apuestas que puedes
hacer con tu novia|apuestas que siempre ganaras|apuestas que
significa|apuestas quien bajara a segunda|apuestas quién bajara a
segunda|apuestas quien gana el mundial|apuestas quien gana eurocopa|apuestas quien gana
la champions|apuestas quien gana la eurocopa|apuestas quien gana
la liga|apuestas quien ganara el mundial|apuestas quién ganará el mundial|apuestas quien ganara la champions|apuestas
quien ganara la eurocopa|apuestas quien ganara la liga|apuestas rayo barcelona|apuestas real madrid|apuestas real madrid arsenal|apuestas real madrid athletic|apuestas
real madrid atletico|apuestas real madrid atletico champions|apuestas real madrid
atletico de madrid|apuestas real madrid atlético de madrid|apuestas real madrid atletico madrid|apuestas real madrid barcelona|apuestas real madrid bayern|apuestas real madrid betis|apuestas real madrid borussia|apuestas real madrid campeon champions|apuestas real madrid celta|apuestas real madrid champions|apuestas real madrid city|apuestas
real madrid girona|apuestas real madrid hoy|apuestas real madrid liverpool|apuestas real madrid manchester city|apuestas real madrid osasuna|apuestas real madrid real
sociedad|apuestas real madrid valencia|apuestas real madrid villarreal|apuestas real madrid vs arsenal|apuestas real madrid vs atletico|apuestas real madrid vs atlético|apuestas real madrid vs atletico madrid|apuestas real madrid vs barcelona|apuestas real
madrid vs betis|apuestas real madrid vs sevilla|apuestas real madrid vs valencia|apuestas real sociedad|apuestas
real sociedad athletic|apuestas real sociedad barcelona|apuestas real sociedad betis|apuestas
real sociedad psg|apuestas real sociedad real madrid|apuestas real sociedad valencia|apuestas recomendadas hoy|apuestas regalo de bienvenida|apuestas registro|apuestas resultado exacto|apuestas resultados|apuestas resultados eurocopa|apuestas retirada tenis|apuestas roma barcelona|apuestas roma sevilla|apuestas rugby|apuestas rugby mundial|apuestas rugby world
cup|apuestas ruleta seguras|apuestas segunda|apuestas segunda b|apuestas segunda division|apuestas segunda división|apuestas segunda division b|apuestas segunda
division españa|apuestas seguras|apuestas seguras baloncesto|apuestas seguras calculadora|apuestas seguras en la ruleta|apuestas seguras
eurocopa|apuestas seguras foro|apuestas seguras futbol|apuestas seguras futbol
hoy|apuestas seguras gratis|apuestas seguras hoy|apuestas seguras hoy futbol|apuestas
seguras nba|apuestas seguras nba hoy|apuestas seguras para este
fin de semana|apuestas seguras para ganar dinero|apuestas seguras para hoy|apuestas seguras para hoy fútbol|apuestas seguras para hoy pronósticos|apuestas seguras para mañana|apuestas seguras ruleta|apuestas seguras telegram|apuestas seguras tenis|apuestas semifinales eurocopa|apuestas senegal paises bajos|apuestas sevilla|apuestas sevilla
athletic|apuestas sevilla atletico de madrid|apuestas sevilla barcelona|apuestas sevilla betis|apuestas sevilla campeon liga|apuestas sevilla celta|apuestas sevilla gana la liga|apuestas sevilla girona|apuestas sevilla inter|apuestas sevilla jugador|apuestas sevilla juventus|apuestas sevilla leganes|apuestas
sevilla madrid|apuestas sevilla manchester united|apuestas sevilla osasuna|apuestas sevilla real madrid|apuestas sevilla real sociedad|apuestas sevilla roma|apuestas sevilla
valencia|apuestas significa|apuestas simples ejemplos|apuestas simples o
combinadas|apuestas sin deposito|apuestas sin deposito
inicial|apuestas sin deposito minimo|apuestas sin dinero|apuestas sin dinero real|apuestas
sin empate|apuestas sin empate que significa|apuestas sin ingreso minimo|apuestas sin registro|apuestas sistema|apuestas sistema
calculadora|apuestas sistema como funciona|apuestas sistema trixie|apuestas sociedad|apuestas sorteo copa
del rey|apuestas stake|apuestas stake 10|apuestas stake
10 hoy|apuestas super bowl favorito|apuestas super rugby|apuestas supercopa españa|apuestas superliga argentina|apuestas tarjeta roja|apuestas tarjetas|apuestas tarjetas amarillas|apuestas tenis|apuestas
tenis atp|apuestas tenis consejos|apuestas
tenis copa davis|apuestas tenis de mesa|apuestas tenis de mesa pronosticos|apuestas tenis en vivo|apuestas tenis femenino|apuestas tenis hoy|apuestas tenis itf|apuestas tenis pronosticos|apuestas tenis pronósticos|apuestas tenis retirada|apuestas tenis roland
garros|apuestas tenis seguras|apuestas tenis wimbledon|apuestas tenis wta|apuestas tercera division|apuestas tercera division españa|apuestas tipos|apuestas tips|apuestas tipster|apuestas tipster para hoy|apuestas topuria holloway cuotas|apuestas
torneos de golf|apuestas torneos de tenis|apuestas trucos|apuestas uefa champions league|apuestas uefa europa league|apuestas ufc|apuestas ufc chile|apuestas ufc como funciona|apuestas
ufc hoy|apuestas ufc ilia topuria|apuestas ufc online|apuestas
ufc pronósticos|apuestas ufc telegram|apuestas ufc topuria|apuestas under
over|apuestas unionistas villarreal|apuestas uruguay|apuestas uruguay
colombia|apuestas uruguay corea|apuestas uruguay vs colombia|apuestas us open golf|apuestas us open tenis|apuestas valencia|apuestas valencia barcelona|apuestas
valencia betis|apuestas valencia madrid|apuestas valencia real
madrid|apuestas valladolid barcelona|apuestas valladolid valencia|apuestas valor
app|apuestas valor en directo|apuestas valor galgos|apuestas venezuela|apuestas venezuela argentina|apuestas venezuela bolivia|apuestas venezuela ecuador|apuestas villarreal|apuestas villarreal athletic|apuestas villarreal barcelona|apuestas villarreal
bayern|apuestas villarreal betis|apuestas villarreal liverpool|apuestas villarreal manchester|apuestas villarreal manchester
united|apuestas villarreal vs real madrid|apuestas virtuales|apuestas virtuales colombia|apuestas virtuales futbol|apuestas virtuales sin dinero|apuestas vivo|apuestas vuelta a españa|apuestas vuelta españa|apuestas william hill partidos
de hoy|apuestas y casino|apuestas y casinos|apuestas y juegos de azar|apuestas y pronosticos|apuestas y pronosticos de futbol|apuestas y pronosticos deportivos|apuestas y resultados|apuestas-deportivas|apuestas-deportivas.es pronosticos|arbitro nba
apuestas|argentina apuestas|argentina colombia apuestas|argentina croacia apuestas|argentina francia apuestas|argentina mexico
apuestas|argentina peru apuestas|argentina uruguay apuestas|argentina vs bolivia apuestas|argentina vs chile apuestas|argentina vs colombia
apuestas|argentina vs francia apuestas|argentina vs.
colombia apuestas|asi se gana en las apuestas deportivas|asiatico apuestas|asiatico en apuestas|asiaticos
apuestas|athletic barcelona apuestas|athletic manchester united apuestas|athletic osasuna apuestas|athletic
real madrid apuestas|atletico barcelona apuestas|atletico de madrid apuestas|atlético de madrid apuestas|atletico
de madrid real madrid apuestas|atletico de madrid vs barcelona
apuestas|atletico madrid real madrid apuestas|atletico madrid vs real madrid apuestas|atletico real madrid apuestas|atletico vs real madrid apuestas|avisador de cuotas
apuestas|bajada de cuotas apuestas|baloncesto apuestas|barbastro barcelona apuestas|barca apuestas|barca
bayern apuestas|barca inter apuestas|barca madrid apuestas|barça madrid apuestas|barca vs atletico apuestas|barca vs madrid apuestas|barca vs real madrid apuestas|barcelona – real madrid apuestas|barcelona apuestas|barcelona atletico apuestas|barcelona atletico de madrid apuestas|barcelona atletico
madrid apuestas|barcelona betis apuestas|barcelona casa de apuestas|barcelona inter apuestas|barcelona psg apuestas|barcelona real madrid apuestas|barcelona real sociedad apuestas|barcelona sevilla
apuestas|barcelona valencia apuestas|barcelona vs athletic
bilbao apuestas|barcelona vs atlético madrid apuestas|barcelona vs
betis apuestas|barcelona vs celta de vigo apuestas|barcelona vs espanyol apuestas|barcelona
vs girona apuestas|barcelona vs madrid apuestas|barcelona
vs real madrid apuestas|barcelona vs real sociedad apuestas|barcelona vs sevilla apuestas|barcelona
vs villarreal apuestas|base de datos cuotas apuestas deportivas|bayern real madrid apuestas|beisbol apuestas|best america apuestas|bet apuestas chile|bet apuestas en vivo|betis – chelsea apuestas|betis apuestas|betis barcelona
apuestas|betis chelsea apuestas|betis madrid apuestas|betis sevilla apuestas|betsson tu
sitio de apuestas online|blog apuestas baloncesto|blog
apuestas ciclismo|blog apuestas nba|blog apuestas tenis|blog de apuestas de tenis|bono apuestas|bono apuestas deportivas|bono apuestas deportivas sin deposito|bono apuestas gratis|bono apuestas
gratis sin deposito|bono apuestas sin deposito|bono bienvenida apuestas|bono bienvenida apuestas
deportivas|bono bienvenida apuestas españa|bono bienvenida apuestas sin deposito|bono bienvenida apuestas sin depósito|bono bienvenida casa
apuestas|bono bienvenida casa de apuestas|bono bienvenida marca
apuestas|bono casa apuestas|bono casa de apuestas|bono casa de apuestas
sin ingreso|bono casas de apuestas|bono de apuestas|bono de apuestas gratis sin deposito|bono de bienvenida apuestas|bono de bienvenida apuestas deportivas|bono de bienvenida casa de apuestas|bono
de bienvenida casas de apuestas|bono de casas de apuestas|bono de registro apuestas|bono de registro apuestas deportivas|bono de registro casa
de apuestas|bono gratis apuestas|bono marca apuestas|bono por registro apuestas|bono por registro apuestas deportivas|bono por registro casa de apuestas|bono registro apuestas|bono sin deposito apuestas|bono sin depósito apuestas|bono sin deposito
apuestas deportivas|bono sin depósito apuestas deportivas|bono sin deposito casa de
apuestas|bono sin deposito marca apuestas|bono sin ingreso apuestas|bono sin ingreso apuestas deportivas|bonos apuestas|bonos apuestas
colombia|bonos apuestas deportivas|bonos apuestas deportivas sin deposito|bonos apuestas gratis|bonos apuestas sin deposito|bonos apuestas sin depósito|bonos bienvenida apuestas|bonos bienvenida casas apuestas|bonos bienvenida casas de apuestas|bonos
casa de apuestas|bonos casas apuestas|bonos casas de apuestas|bonos casas de apuestas colombia|bonos casas de apuestas
deportivas|bonos casas de apuestas españa|bonos casas de
apuestas nuevas|bonos casas de apuestas sin deposito|bonos casas de
apuestas sin depósito|bonos de apuestas|bonos de apuestas
deportivas|bonos de apuestas gratis|bonos de apuestas sin deposito|bonos de bienvenida apuestas|bonos de bienvenida apuestas deportivas|bonos de bienvenida casa de apuestas|bonos de
bienvenida casas de apuestas|bonos de bienvenida de casas de apuestas|bonos de bienvenida en casas de apuestas|bonos de casas
de apuestas|bonos de casas de apuestas sin deposito|bonos en casa
de apuestas|bonos en casas de apuestas sin deposito|bonos gratis apuestas|bonos gratis apuestas
deportivas|bonos gratis casas de apuestas|bonos gratis sin deposito apuestas|bonos paginas de apuestas|bonos registro casas de apuestas|bonos sin deposito apuestas|bonos sin depósito apuestas|bonos sin deposito apuestas
deportivas|bonos sin deposito casas de apuestas|bot de apuestas deportivas gratis|boxeo apuestas|brasil colombia apuestas|brasil peru apuestas|brasil vs
colombia apuestas|buenas apuestas para hoy|buscador cuotas apuestas|buscador de apuestas
seguras|buscador de cuotas apuestas|buscador de
cuotas de apuestas|buscar apuestas seguras|caballos apuestas|calculador de
apuestas|calculador de cuotas apuestas|calculadora apuestas|calculadora apuestas combinadas|calculadora apuestas de
sistema|calculadora apuestas deportivas|calculadora apuestas deportivas seguras|calculadora
apuestas multiples|calculadora apuestas segura|calculadora apuestas seguras|calculadora apuestas sistema|calculadora apuestas yankee|calculadora arbitraje apuestas|calculadora cubrir apuestas|calculadora cuotas apuestas|calculadora de apuestas|calculadora de apuestas combinadas|calculadora
de apuestas de futbol|calculadora de apuestas de sistema|calculadora de apuestas deportivas|calculadora de apuestas multiples|calculadora de
apuestas seguras|calculadora de apuestas sistema|calculadora de apuestas
surebets|calculadora de arbitraje apuestas|calculadora de cuotas
apuestas|calculadora de cuotas de apuestas|calculadora para
apuestas deportivas|calculadora poisson apuestas|calculadora poisson apuestas deportivas|calculadora poisson para apuestas|calculadora scalping apuestas deportivas|calculadora sistema apuestas|calculadora
stake apuestas|calculadora trading apuestas|calcular apuestas|calcular apuestas deportivas|calcular
apuestas futbol|calcular apuestas sistema|calcular cuotas apuestas|calcular cuotas apuestas combinadas|calcular cuotas apuestas deportivas|calcular
cuotas de apuestas|calcular ganancias apuestas deportivas|calcular momios apuestas|calcular probabilidad cuota apuestas|calcular stake apuestas|calcular unidades apuestas|calcular yield apuestas|calculo de apuestas|calculo de apuestas deportivas|cambio de cuotas apuestas|campeon champions apuestas|campeon eurocopa apuestas|campeon liga apuestas|campeon nba apuestas|canales de apuestas
gratis|carrera de caballos apuestas|carrera de caballos apuestas juego|carrera de caballos
con apuestas|carrera de galgos apuestas|carreras de caballos apuestas|carreras de caballos apuestas online|carreras de caballos con apuestas|carreras de caballos juegos de apuestas|carreras
de galgos apuestas|carreras de galgos apuestas online|carreras de galgos apuestas trucos|carreras
galgos apuestas|casa apuestas argentina|casa apuestas atletico de madrid|casa apuestas barcelona|casa apuestas betis|casa apuestas bono bienvenida|casa apuestas bono gratis|casa apuestas bono sin deposito|casa apuestas
cerca de mi|casa apuestas chile|casa apuestas colombia|casa apuestas con mejores cuotas|casa apuestas deportivas|casa apuestas españa|casa apuestas española|casa apuestas
eurocopa|casa apuestas futbol|casa apuestas mejores cuotas|casa apuestas mundial|casa apuestas nueva|casa apuestas nuevas|casa apuestas online|casa apuestas peru|casa apuestas valencia|casa de
apuestas|casa de apuestas 10 euros gratis|casa de apuestas argentina|casa de apuestas atletico
de madrid|casa de apuestas baloncesto|casa de apuestas barcelona|casa de
apuestas beisbol|casa de apuestas betis|casa de apuestas bono|casa de
apuestas bono bienvenida|casa de apuestas bono de bienvenida|casa de apuestas
bono gratis|casa de apuestas bono por registro|casa de apuestas
bono sin deposito|casa de apuestas boxeo|casa de apuestas caballos|casa de apuestas carreras de caballos|casa de apuestas cerca de mi|casa de apuestas
cerca de mí|casa de apuestas champions league|casa de apuestas
chile|casa de apuestas ciclismo|casa de apuestas colombia|casa de apuestas con bono de bienvenida|casa de apuestas con bono sin deposito|casa de
apuestas con cuotas mas altas|casa de apuestas con esports|casa de apuestas con las mejores
cuotas|casa de apuestas con licencia en españa|casa de apuestas con mejores cuotas|casa
de apuestas con pago anticipado|casa de apuestas con paypal|casa de apuestas copa america|casa
de apuestas de caballos|casa de apuestas de colombia|casa de apuestas de españa|casa de apuestas de futbol|casa de apuestas de fútbol|casa de apuestas
de futbol peru|casa de apuestas de peru|casa de
apuestas del madrid|casa de apuestas del real madrid|casa de apuestas deportivas|casa
de apuestas deportivas cerca de mi|casa de apuestas
deportivas en argentina|casa de apuestas deportivas en chile|casa de apuestas deportivas en colombia|casa
de apuestas deportivas en españa|casa de apuestas deportivas
en madrid|casa de apuestas deportivas españa|casa de
apuestas deportivas españolas|casa de apuestas deportivas madrid|casa de apuestas deportivas mexico|casa
de apuestas deportivas online|casa de apuestas deportivas peru|casa de apuestas deposito 5 euros|casa de apuestas deposito minimo|casa de apuestas deposito minimo 1
euro|casa de apuestas depósito mínimo 1 euro|casa de apuestas
en españa|casa de apuestas en linea|casa de apuestas en madrid|casa
de apuestas en perú|casa de apuestas en vivo|casa de apuestas españa|casa de apuestas españa inglaterra|casa de
apuestas española|casa de apuestas españolas|casa de apuestas esports|casa de apuestas eurocopa|casa de apuestas europa league|casa de apuestas f1|casa de apuestas formula
1|casa de apuestas futbol|casa de apuestas ingreso minimo|casa
de apuestas ingreso minimo 1 euro|casa de apuestas ingreso mínimo 1 euro|casa de
apuestas legales|casa de apuestas legales en colombia|casa de
apuestas legales en españa|casa de apuestas libertadores|casa de apuestas liga española|casa de apuestas madrid|casa de apuestas mas
segura|casa de apuestas mejores|casa de apuestas méxico|casa de apuestas minimo 5 euros|casa de apuestas mlb|casa de apuestas mundial|casa de apuestas nba|casa de apuestas nfl|casa de apuestas nueva|casa de apuestas nuevas|casa de
apuestas oficial del real madrid|casa de apuestas oficial real madrid|casa de
apuestas online|casa de apuestas online argentina|casa
de apuestas online chile|casa de apuestas online españa|casa de apuestas online mexico|casa de apuestas online
paraguay|casa de apuestas online peru|casa de apuestas online usa|casa de
apuestas online venezuela|casa de apuestas pago
anticipado|casa de apuestas para boxeo|casa de
apuestas para ufc|casa de apuestas peru|casa de apuestas perú|casa de apuestas peru online|casa de
apuestas por paypal|casa de apuestas promociones|casa de apuestas
que regalan dinero|casa de apuestas real madrid|casa de apuestas regalo de bienvenida|casa de apuestas sevilla|casa de apuestas sin dinero|casa
de apuestas sin ingreso minimo|casa de apuestas sin licencia en españa|casa
de apuestas sin minimo de ingreso|casa de apuestas stake|casa de apuestas tenis|casa de apuestas ufc|casa de apuestas
valencia|casa de apuestas venezuela|casa de apuestas virtuales|casa de apuestas vive la suerte|casa oficial de apuestas del real
madrid|casas apuestas asiaticas|casas apuestas bono sin deposito|casas apuestas bonos sin deposito|casas apuestas caballos|casas apuestas
chile|casas apuestas ciclismo|casas apuestas con licencia|casas apuestas con licencia en españa|casas apuestas deportivas|casas apuestas deportivas colombia|casas apuestas deportivas
españa|casas apuestas deportivas españolas|casas apuestas deportivas nuevas|casas apuestas españa|casas apuestas españolas|casas apuestas esports|casas apuestas
eurocopa|casas apuestas golf|casas apuestas ingreso minimo 5
euros|casas apuestas legales|casas apuestas legales españa|casas apuestas
licencia|casas apuestas licencia españa|casas apuestas mexico|casas apuestas mundial|casas apuestas nba|casas apuestas nuevas|casas apuestas nuevas españa|casas apuestas ofertas|casas apuestas online|casas apuestas paypal|casas apuestas peru|casas apuestas
sin licencia|casas apuestas tenis|casas asiaticas apuestas|casas de apuestas|casas de apuestas 5
euros|casas de apuestas app|casas de apuestas argentinas|casas de apuestas asiaticas|casas
de apuestas baloncesto|casas de apuestas barcelona|casas de apuestas
bono bienvenida|casas de apuestas bono de bienvenida|casas de apuestas bono por registro|casas de apuestas bono sin deposito|casas de apuestas
bono sin ingreso|casas de apuestas bonos|casas de apuestas bonos de bienvenida|casas de apuestas bonos gratis|casas de apuestas bonos sin deposito|casas de apuestas boxeo|casas de apuestas caballos|casas
de apuestas carreras de caballos|casas de apuestas casino|casas de apuestas
casino online|casas de apuestas cerca de mi|casas de
apuestas champions league|casas de apuestas chile|casas de apuestas ciclismo|casas de apuestas colombia|casas de apuestas com|casas de apuestas con app|casas de apuestas
con apuestas gratis|casas de apuestas con bono|casas de
apuestas con bono de bienvenida|casas de apuestas con bono
de registro|casas de apuestas con bono por registro|casas de apuestas con bono sin deposito|casas de apuestas con bonos|casas de apuestas con bonos gratis|casas de apuestas con bonos sin deposito|casas de apuestas con deposito minimo|casas de apuestas con esports|casas de apuestas con handicap asiatico|casas de apuestas con licencia|casas de
apuestas con licencia en españa|casas de apuestas con licencia españa|casas de apuestas con licencia española|casas de apuestas con mejores cuotas|casas de apuestas con pago
anticipado|casas de apuestas con paypal|casas de
apuestas con paypal en perú|casas de apuestas con promociones|casas de apuestas
con ruleta en vivo|casas de apuestas copa del rey|casas de apuestas de caballos|casas
de apuestas de españa|casas de apuestas de futbol|casas de apuestas de fútbol|casas de apuestas de
peru|casas de apuestas deportivas|casas de apuestas deportivas asiaticas|casas
de apuestas deportivas colombia|casas de apuestas deportivas
comparativa|casas de apuestas deportivas con paypal|casas de
apuestas deportivas en chile|casas de apuestas deportivas en españa|casas de apuestas deportivas
en linea|casas de apuestas deportivas en madrid|casas de apuestas deportivas en mexico|casas de apuestas deportivas en peru|casas
de apuestas deportivas en sevilla|casas de apuestas deportivas en valencia|casas de apuestas deportivas españa|casas de apuestas deportivas españolas|casas de apuestas deportivas legales|casas de apuestas deportivas madrid|casas de apuestas
deportivas mexico|casas de apuestas deportivas nuevas|casas de apuestas deportivas
online|casas de apuestas deportivas peru|casas de apuestas
deportivas perú|casas de apuestas deposito minimo 1
euro|casas de apuestas depósito mínimo 1 euro|casas de apuestas dinero gratis|casas de apuestas en argentina|casas de
apuestas en barcelona|casas de apuestas en chile|casas de apuestas en colombia|casas de
apuestas en españa|casas de apuestas en españa
online|casas de apuestas en linea|casas de apuestas en madrid|casas de apuestas en méxico|casas de apuestas en peru|casas
de apuestas en perú|casas de apuestas en sevilla|casas
de apuestas en uruguay|casas de apuestas en valencia|casas de apuestas en venezuela|casas
de apuestas equipos de futbol|casas de apuestas españa|casas de apuestas españa alemania|casas de apuestas españa inglaterra|casas de apuestas españa licencia|casas
de apuestas españa nuevas|casas de apuestas españa online|casas
de apuestas española|casas de apuestas españolas|casas de apuestas españolas con licencia|casas de apuestas españolas online|casas de
apuestas esports|casas de apuestas eurocopa|casas de
apuestas eurocopa 2024|casas de apuestas europa league|casas
de apuestas f1|casas de apuestas fisicas en barcelona|casas de apuestas fisicas en españa|casas
de apuestas formula 1|casas de apuestas fuera de españa|casas de apuestas futbol|casas de apuestas fútbol|casas de apuestas futbol españa|casas de
apuestas ganador eurocopa|casas de apuestas gratis|casas de apuestas ingreso
minimo|casas de apuestas ingreso minimo 1 euro|casas de apuestas
ingreso minimo 5 euros|casas de apuestas inter barcelona|casas de
apuestas legales|casas de apuestas legales en colombia|casas de apuestas legales en españa|casas de apuestas legales en mexico|casas
de apuestas legales españa|casas de apuestas legales mx|casas de apuestas licencia|casas de apuestas
licencia españa|casas de apuestas lista|casas
de apuestas madrid|casas de apuestas mas seguras|casas de apuestas mejores bonos|casas de apuestas
mejores cuotas|casas de apuestas mexico|casas de apuestas méxico|casas de apuestas minimo 5 euros|casas de apuestas mlb|casas de apuestas mundial|casas de apuestas mundial baloncesto|casas
de apuestas mundiales|casas de apuestas nba|casas de
apuestas no reguladas en españa|casas de apuestas nueva
ley|casas de apuestas nuevas|casas de apuestas nuevas en colombia|casas
de apuestas nuevas en españa|casas de apuestas nuevas españa|casas de apuestas ofertas|casas
de apuestas online|casas de apuestas online argentina|casas de apuestas online colombia|casas
de apuestas online deportivas|casas de apuestas online ecuador|casas de apuestas online en argentina|casas de apuestas
online en chile|casas de apuestas online en colombia|casas
de apuestas online en españa|casas de apuestas online en mexico|casas
de apuestas online españa|casas de apuestas online mas fiables|casas de
apuestas online mexico|casas de apuestas online nuevas|casas
de apuestas online peru|casas de apuestas online
usa|casas de apuestas online venezuela|casas de apuestas pago paypal|casas
de apuestas para ufc|casas de apuestas paypal|casas de apuestas peru bono
sin dep
Your comment is awaiting moderation.
отличный селлер купить Кокаин, Мефедрон, Экстази
Your comment is awaiting moderation.
Don Mueang International Airport, Thailand (DMK)
tripscan top
Are you an avgeek with a mean handicap? Then it’s time to tee off in Bangkok, where Don Mueang International Airport has an 18-hole golf course between its two runways. If you’re nervous from a safety point of view, don’t be — players at the Kantarat course must go through airport-style security before they hit the grass. Oh, you meant safety on the course? Just beware of those flying balls, because there are no barriers between the course and the runways. Players are, at least, shown a red light when a plane is coming in to land so don’t get too distracted by the game.
http://trips45.cc
trip scan
Although Suvarnabhumi (BKK) is Bangkok’s main airport these days — it opened in 2006 —Don Mueang, which started out as a Royal Thai Air Force base in 1914, remains Bangkok’s budget airline hub, with brands including Thai Air Asia and Thai Lion Air using it as their base. Although you’re more likely to see narrowbodies these days, you may just get lucky — in 2022, an Emirates A380 made an emergency landing here. Imagine the views from the course that day.
Related article
Sporty airport outfit being worn by writer
CNN Underscored: Flying sucks. Make it better with these comfy airport outfits for women
Sumburgh Airport, Scotland (LSI)
The road south from Lerwick cuts across the runway of Sumburgh Airport on Shetland.
The road south from Lerwick cuts across the runway of Sumburgh Airport on Shetland. Alan Morris/iStock Editorial/Getty Images
Planning a trip to Jarlshof, the extraordinarily well-preserved Bronze Age settlement towards the southern tip of Shetland? You may need to build in some extra time. The ancient and Viking-era ruins, called one of the UK’s greatest archaeological sites, sit just beyond one of the runways of Sumburgh, Shetland’s main airport — and reaching them means driving, cycling or walking across the runway itself.
There’s only one road heading due south from the capital, Lerwick; and while it ducks around most of the airport’s perimeter, skirting the two runways, the road cuts directly across the western end of one of them. A staff member occupies a roadside hut, and before take-offs and landings, comes out to lower a barrier across the road. Once the plane is where it needs to be, up come the barriers and waiting drivers get a friendly thumbs up.
Amata Kabua International Airport, Marshall Islands (MAJ)
Fly into Majuro and you’ll skim across the Pacific and land on the runway that’s just about as wide as the sandbar-like island itself.
Fly into Majuro and you’ll skim across the Pacific and land on the runway that’s just about as wide as the sandbar-like island itself. mtcurado/iStockphoto/Getty Images
Imagine flying into Majuro, the capital of the Marshall Islands in Micronesia. You’re descending down, down, and further down towards the Pacific, no land in sight. Then you’re suddenly above a pencil-thin atoll — can you really be about to land here? Yes you are, with cars racing past the runway no less, matching you for speed.
Majuro’s Amata Kabua International Airport gives a whole new meaning to the phrase “water landing”. Its single runway, just shy of 8,000ft, is a slim strip of asphalt over the sandbar that’s barely any wider than the atoll itself — and the island is so remote that when the runway was resurfaced, materials had to be transported from the Philippines, Hong Kong and Korea, according to the constructors. “Lagoon Road” — the 30-mile road that runs from top to toe on Majuro — skims alongside the runway.
Don’t think about pulling over, though — there’s only sand and sea on one side, and that runway the other.
Related article
Barra Airport, Scotland
At Scotland’s beach airport, the runway disappears at high tide
Your comment is awaiting moderation.
growthstream.click – Appreciate the typography choices; comfortable spacing improved my reading experience.
Your comment is awaiting moderation.
глядишь к новому году договоримся, а там и к 2020 посылка придет… купить онлайн мефедрон, экстази, бошки
Your comment is awaiting moderation.
(10 euros gratis apuestas|10 mejores casas de apuestas|10 trucos para ganar apuestas|15 euros gratis marca apuestas|1×2
apuestas|1×2 apuestas deportivas|1×2 apuestas que significa|1×2 en apuestas|1×2 en apuestas que significa|1×2 que significa en apuestas|5 euros gratis
apuestas|9 apuestas que siempre ganaras|a partir
de cuanto se declara apuestas|actividades de juegos de azar y apuestas|ad apuestas deportivas|aleksandre topuria
ufc apuestas|algoritmo para ganar apuestas deportivas|america apuestas|análisis nba apuestas|aplicacion android apuestas deportivas|aplicacion apuestas deportivas|aplicacion apuestas deportivas android|aplicación de apuestas online|aplicacion para hacer apuestas|aplicacion para hacer apuestas de
futbol|aplicación para hacer apuestas de fútbol|aplicaciones
apuestas deportivas android|aplicaciones apuestas deportivas gratis|aplicaciones de apuestas android|aplicaciones de apuestas de fútbol|aplicaciones de apuestas deportivas|aplicaciones de apuestas deportivas peru|aplicaciones de apuestas
deportivas perú|aplicaciones de apuestas en colombia|aplicaciones de apuestas
gratis|aplicaciones de apuestas online|aplicaciones de apuestas seguras|aplicaciones de apuestas sin dinero|aplicaciones
para hacer apuestas|apostar seguro apuestas deportivas|app android apuestas deportivas|app apuestas|app apuestas android|app
apuestas de futbol|app apuestas deportivas|app apuestas deportivas android|app apuestas deportivas argentina|app apuestas deportivas colombia|app apuestas deportivas ecuador|app apuestas
deportivas españa|app apuestas deportivas gratis|app apuestas entre
amigos|app apuestas futbol|app apuestas gratis|app apuestas sin dinero|app
casa de apuestas|app casas de apuestas|app control apuestas|app de apuestas|app
de apuestas android|app de apuestas casino|app de apuestas
colombia|app de apuestas con bono de bienvenida|app de apuestas de futbol|app de apuestas
deportivas|app de apuestas deportivas android|app de apuestas deportivas argentina|app de apuestas deportivas colombia|app de apuestas deportivas en españa|app de apuestas deportivas peru|app de
apuestas deportivas perú|app de apuestas deportivas sin dinero|app
de apuestas ecuador|app de apuestas en colombia|app
de apuestas en españa|app de apuestas en venezuela|app de
apuestas futbol|app de apuestas gratis|app de apuestas online|app de apuestas para android|app de apuestas para ganar dinero|app de apuestas peru|app de apuestas
reales|app de casas de apuestas|app marca apuestas android|app moviles
de apuestas|app para apuestas|app para apuestas de futbol|app
para apuestas deportivas|app para apuestas deportivas en español|app para
ganar apuestas deportivas|app para hacer apuestas|app para hacer apuestas deportivas|app para hacer apuestas entre amigos|app para llevar control de apuestas|app
pronosticos apuestas deportivas|app versus apuestas|apps apuestas mundial|apps de apuestas|apps de apuestas con bono de bienvenida|apps de apuestas de
futbol|apps de apuestas deportivas peru|apps de apuestas mexico|apps para apuestas|aprender a hacer apuestas deportivas|aprender hacer apuestas deportivas|apuesta del dia apuestas deportivas|apuestas 10
euros gratis|apuestas 100 seguras|apuestas 1×2|apuestas 1X2|apuestas 2 division|apuestas 3 division|apuestas
a caballos|apuestas a carreras de caballos|apuestas a colombia|apuestas a corners|apuestas a ganar|apuestas a jugadores nba|apuestas a la baja|apuestas a la nfl|apuestas al barcelona|apuestas
al dia|apuestas al empate|apuestas al mundial|apuestas al
tenis wta|apuestas alaves barcelona|apuestas
alcaraz hoy|apuestas alemania españa|apuestas alonso campeon del mundo|apuestas altas y bajas|apuestas altas y bajas nfl|apuestas ambos equipos marcan|apuestas america|apuestas android|apuestas anillo nba|apuestas antes del mundial|apuestas anticipadas|apuestas anticipadas nba|apuestas apps|apuestas arabia argentina|apuestas argentina|apuestas
argentina campeon del mundo|apuestas argentina canada|apuestas argentina colombia|apuestas argentina croacia|apuestas argentina españa|apuestas argentina francia|apuestas argentina
francia cuanto paga|apuestas argentina francia mundial|apuestas argentina gana el mundial|apuestas argentina
gana mundial|apuestas argentina holanda|apuestas argentina mexico|apuestas argentina méxico|apuestas argentina mundial|apuestas argentina online|apuestas
argentina paises bajos|apuestas argentina polonia|apuestas
argentina uruguay|apuestas argentina vs australia|apuestas argentina vs
colombia|apuestas argentina vs francia|apuestas argentina vs peru|apuestas argentinas|apuestas arsenal
real madrid|apuestas ascenso a primera division|apuestas ascenso a segunda|apuestas asiaticas|apuestas asiatico|apuestas athletic|apuestas athletic atletico|apuestas athletic barça|apuestas athletic
barcelona|apuestas athletic betis|apuestas athletic manchester|apuestas athletic manchester united|apuestas athletic osasuna|apuestas athletic real|apuestas athletic real
madrid|apuestas athletic real sociedad|apuestas athletic real sociedad final|apuestas
athletic roma|apuestas athletic sevilla|apuestas athletic valencia|apuestas atletico|apuestas atletico barcelona|apuestas atletico
barsa|apuestas atletico campeon champions|apuestas atletico campeon de liga|apuestas atlético
copenhague|apuestas atletico de madrid|apuestas atlético de madrid|apuestas atletico de madrid barcelona|apuestas atletico de madrid gana la liga|apuestas atletico de madrid real madrid|apuestas atlético de madrid real
madrid|apuestas atletico de madrid vs barcelona|apuestas atletico madrid|apuestas
atletico madrid real madrid|apuestas atletico madrid vs barcelona|apuestas atletico
real madrid|apuestas atletico real madrid champions|apuestas atletismo|apuestas bajas|apuestas baloncesto|apuestas baloncesto acb|apuestas baloncesto handicap|apuestas baloncesto hoy|apuestas baloncesto juegos
olimpicos|apuestas baloncesto nba|apuestas baloncesto
pronostico|apuestas baloncesto pronósticos|apuestas baloncesto
prorroga|apuestas barca|apuestas barca athletic|apuestas barca atletico|apuestas barca bayern|apuestas barca bayern munich|apuestas barca girona|apuestas barca hoy|apuestas barça
hoy|apuestas barca inter|apuestas barca juventus|apuestas
barca madrid|apuestas barça madrid|apuestas barca
real madrid|apuestas barca vs juve|apuestas barca vs madrid|apuestas barca
vs psg|apuestas barcelona|apuestas barcelona alaves|apuestas barcelona
athletic|apuestas barcelona atletico|apuestas barcelona atletico de madrid|apuestas barcelona atlético de madrid|apuestas barcelona atletico madrid|apuestas barcelona bayern|apuestas barcelona betis|apuestas barcelona campeon de liga|apuestas barcelona celta|apuestas barcelona espanyol|apuestas barcelona gana la champions|apuestas barcelona girona|apuestas barcelona granada|apuestas barcelona hoy|apuestas barcelona inter|apuestas barcelona madrid|apuestas barcelona
osasuna|apuestas barcelona psg|apuestas barcelona real madrid|apuestas barcelona real sociedad|apuestas barcelona sevilla|apuestas barcelona valencia|apuestas barcelona villarreal|apuestas barcelona vs
atletico madrid|apuestas barcelona vs madrid|apuestas barcelona vs real madrid|apuestas barsa madrid|apuestas basket hoy|apuestas bayern barcelona|apuestas bayern vs barcelona|apuestas beisbol|apuestas béisbol|apuestas beisbol mlb|apuestas beisbol pronosticos|apuestas beisbol venezolano|apuestas betis|apuestas betis – chelsea|apuestas
betis barcelona|apuestas betis chelsea|apuestas betis fiorentina|apuestas betis girona|apuestas betis madrid|apuestas betis mallorca|apuestas
betis real madrid|apuestas betis real sociedad|apuestas betis sevilla|apuestas betis
valencia|apuestas betis valladolid|apuestas betis vs valencia|apuestas betplay
hoy colombia|apuestas betsson peru|apuestas bienvenida|apuestas
billar online|apuestas bolivia vs colombia|apuestas bono|apuestas bono bienvenida|apuestas
bono de bienvenida|apuestas bono de bienvenida sin deposito|apuestas bono gratis|apuestas bono sin deposito|apuestas bonos sin deposito|apuestas borussia real madrid|apuestas boxeo|apuestas boxeo de campeonato|apuestas boxeo españa|apuestas boxeo
español|apuestas boxeo femenino olimpiadas|apuestas boxeo hoy|apuestas boxeo
online|apuestas brasil colombia|apuestas brasil peru|apuestas brasil uruguay|apuestas brasil vs colombia|apuestas brasil vs peru|apuestas caballos|apuestas caballos colocado|apuestas caballos españa|apuestas caballos hipodromo|apuestas
caballos hoy|apuestas caballos madrid|apuestas caballos online|apuestas caballos sanlucar
de barrameda|apuestas caballos zarzuela|apuestas calculador|apuestas campeon|apuestas campeon champions|apuestas
campeón champions|apuestas campeon champions 2025|apuestas campeon champions league|apuestas campeon conference league|apuestas campeon copa america|apuestas campeon copa del rey|apuestas campeon de champions|apuestas campeon de la
champions|apuestas campeon de liga|apuestas campeon del
mundo|apuestas campeon eurocopa|apuestas campeón eurocopa|apuestas campeon europa league|apuestas campeon f1|apuestas campeon f1 2025|apuestas campeon formula 1|apuestas campeon libertadores|apuestas campeon liga|apuestas campeon liga
bbva|apuestas campeon liga española|apuestas
campeon liga santander|apuestas campeon motogp 2025|apuestas campeon mundial|apuestas campeón mundial|apuestas campeon mundial baloncesto|apuestas campeon nba|apuestas campeón nba|apuestas campeon premier|apuestas campeon premier
league|apuestas campeon roland garros|apuestas campeonato f1|apuestas campeonatos de futbol|apuestas carrera de caballos|apuestas carrera de caballos
hoy|apuestas carrera de caballos nocturnas|apuestas carrera de galgos fin de
semana|apuestas carrera de galgos hoy|apuestas carrera de galgos nocturnas|apuestas carreras
caballos|apuestas carreras caballos sanlucar|apuestas carreras de caballos|apuestas carreras de caballos en directo|apuestas carreras de caballos en vivo|apuestas carreras
de caballos españa|apuestas carreras de caballos hoy|apuestas
carreras de caballos nacionales|apuestas carreras de caballos nocturnas|apuestas carreras de caballos online|apuestas carreras de
caballos sanlucar|apuestas carreras de caballos sanlúcar|apuestas
carreras de galgos|apuestas carreras de galgos en vivo|apuestas carreras de galgos nocturnas|apuestas carreras de galgos
pre partido|apuestas casino|apuestas casino barcelona|apuestas
casino futbol|apuestas casino gran madrid|apuestas casino gratis|apuestas casino madrid|apuestas casino online|apuestas casino online argentina|apuestas casinos|apuestas casinos online|apuestas
celta|apuestas celta barcelona|apuestas celta betis|apuestas celta eibar|apuestas
celta espanyol|apuestas celta granada|apuestas celta madrid|apuestas celta manchester|apuestas celta real madrid|apuestas
champion league|apuestas champions foro|apuestas champions hoy|apuestas champions league|apuestas champions league – pronósticos|apuestas champions league 2025|apuestas champions league hoy|apuestas
champions league pronosticos|apuestas champions league pronósticos|apuestas champions pronosticos|apuestas chelsea barcelona|apuestas chelsea betis|apuestas chile|apuestas chile peru|apuestas chile venezuela|apuestas chile vs colombia|apuestas chile vs uruguay|apuestas ciclismo|apuestas ciclismo en vivo|apuestas ciclismo femenino|apuestas ciclismo tour
francia|apuestas ciclismo vuelta|apuestas ciclismo vuelta a españa|apuestas
ciclismo vuelta españa|apuestas city madrid|apuestas city real madrid|apuestas clasico|apuestas clasico español|apuestas clasico real madrid barcelona|apuestas clasificacion mundial|apuestas colombia|apuestas colombia argentina|apuestas colombia brasil|apuestas colombia paraguay|apuestas colombia uruguay|apuestas colombia vs argentina|apuestas colombia vs brasil|apuestas combinadas|apuestas combinadas como
funcionan|apuestas combinadas de futbol|apuestas combinadas de fútbol|apuestas combinadas
foro|apuestas combinadas futbol|apuestas combinadas hoy|apuestas combinadas mismo partido|apuestas combinadas mundial|apuestas combinadas nba|apuestas combinadas para esta semana|apuestas combinadas para hoy|apuestas combinadas para mañana|apuestas combinadas pronosticos|apuestas combinadas recomendadas|apuestas combinadas seguras|apuestas combinadas seguras para hoy|apuestas combinadas seguras para mañana|apuestas como ganar|apuestas comparador|apuestas con bono de bienvenida|apuestas con dinero ficticio|apuestas con dinero real|apuestas con dinero virtual|apuestas con handicap|apuestas con handicap asiatico|apuestas con handicap baloncesto|apuestas con mas probabilidades de ganar|apuestas con paypal|apuestas con tarjeta de credito|apuestas con tarjeta de debito|apuestas consejos|apuestas
copa|apuestas copa africa|apuestas copa america|apuestas copa américa|apuestas copa argentina|apuestas
copa brasil|apuestas copa davis|apuestas copa de europa|apuestas copa del mundo|apuestas copa del rey|apuestas copa
del rey baloncesto|apuestas copa del rey final|apuestas copa del rey futbol|apuestas copa del rey ganador|apuestas copa del
rey hoy|apuestas copa del rey pronosticos|apuestas copa del rey pronósticos|apuestas copa europa|apuestas copa
italia|apuestas copa libertadores|apuestas copa mundial de hockey|apuestas
copa rey|apuestas copa sudamericana|apuestas corners|apuestas corners hoy|apuestas croacia argentina|apuestas cuartos eurocopa|apuestas cuotas|apuestas cuotas
altas|apuestas cuotas bajas|apuestas de 1 euro|apuestas de baloncesto|apuestas de baloncesto
hoy|apuestas de baloncesto nba|apuestas de baloncesto para hoy|apuestas de beisbol|apuestas de beisbol para hoy|apuestas de blackjack en linea|apuestas de boxeo|apuestas
de boxeo canelo|apuestas de boxeo en las vegas|apuestas de
boxeo hoy|apuestas de boxeo online|apuestas de caballo|apuestas de caballos|apuestas de caballos como funciona|apuestas de caballos como se juega|apuestas de caballos en colombia|apuestas de caballos en españa|apuestas de caballos en linea|apuestas de
caballos españa|apuestas de caballos ganador y colocado|apuestas
de caballos internacionales|apuestas de caballos juegos|apuestas de
caballos online|apuestas de caballos online
en venezuela|apuestas de caballos por internet|apuestas de
caballos pronosticos|apuestas de caballos pronósticos|apuestas de
carrera de caballos|apuestas de carreras de caballos|apuestas de carreras de caballos online|apuestas de
casino|apuestas de casino online|apuestas de casino por internet|apuestas de champions league|apuestas de ciclismo|apuestas de colombia|apuestas de copa america|apuestas de
corners|apuestas de deportes en linea|apuestas de deportes
online|apuestas de dinero|apuestas de esports|apuestas de eurocopa|apuestas de europa league|apuestas de f1|apuestas de formula 1|apuestas de futbol|apuestas de fútbol|apuestas
de futbol app|apuestas de futbol argentina|apuestas de futbol
colombia|apuestas de futbol en colombia|apuestas de futbol en directo|apuestas de futbol
en linea|apuestas de futbol en vivo|apuestas de futbol español|apuestas de futbol gratis|apuestas de futbol hoy|apuestas de futbol mundial|apuestas de futbol
online|apuestas de fútbol online|apuestas de futbol para hoy|apuestas
de fútbol para hoy|apuestas de futbol para hoy seguras|apuestas de futbol para
mañana|apuestas de futbol peru|apuestas de futbol pronosticos|apuestas
de fútbol pronósticos|apuestas de futbol seguras|apuestas de futbol
seguras para hoy|apuestas de futbol sin dinero|apuestas de galgos|apuestas
de galgos como ganar|apuestas de galgos en directo|apuestas de galgos online|apuestas de galgos trucos|apuestas de golf|apuestas
de hockey|apuestas de hockey sobre hielo|apuestas de hoy|apuestas de hoy seguras|apuestas de juego|apuestas de juegos|apuestas de juegos deportivos|apuestas
de juegos online|apuestas de la champions league|apuestas
de la copa américa|apuestas de la eurocopa|apuestas de la europa league|apuestas de la liga|apuestas
de la liga bbva|apuestas de la liga española|apuestas de la nba|apuestas de la nfl|apuestas de la ufc|apuestas de mlb|apuestas de nba|apuestas de nba para hoy|apuestas de partidos|apuestas de partidos de futbol|apuestas de peleas ufc|apuestas de perros en vivo|apuestas de perros
virtuales|apuestas de peru|apuestas de sistema|apuestas de sistema como funciona|apuestas de sistema explicacion|apuestas de sistema explicación|apuestas de
tenis|apuestas de tenis de mesa|apuestas de tenis en directo|apuestas de tenis hoy|apuestas de tenis para hoy|apuestas de tenis pronosticos|apuestas de tenis seguras|apuestas de todo tipo|apuestas de ufc|apuestas de ufc hoy|apuestas del boxeo|apuestas del clasico|apuestas del clasico
real madrid barca|apuestas del dia|apuestas del día|apuestas del
dia de hoy|apuestas del dia deportivas|apuestas del dia futbol|apuestas del mundial|apuestas del partido de hoy|apuestas
del real madrid|apuestas del rey|apuestas del sistema|apuestas deporte|apuestas deportes|apuestas deportiva|apuestas deportivas|apuestas deportivas 1 euro|apuestas deportivas 10 euros gratis|apuestas deportivas 100 seguras|apuestas deportivas 1×2|apuestas deportivas android|apuestas deportivas app|apuestas deportivas apps|apuestas
deportivas argentina|apuestas deportivas argentina futbol|apuestas deportivas argentina legal|apuestas
deportivas atletico de madrid|apuestas deportivas baloncesto|apuestas deportivas barca madrid|apuestas deportivas barcelona|apuestas deportivas beisbol|apuestas
deportivas bono|apuestas deportivas bono bienvenida|apuestas deportivas bono de bienvenida|apuestas deportivas bono sin deposito|apuestas deportivas
bonos de bienvenida|apuestas deportivas boxeo|apuestas deportivas
caballos|apuestas deportivas calculadora|apuestas deportivas campeon liga|apuestas deportivas casino|apuestas deportivas casino barcelona|apuestas
deportivas casino online|apuestas deportivas cerca
de mi|apuestas deportivas champions league|apuestas deportivas chile|apuestas deportivas ciclismo|apuestas deportivas colombia|apuestas deportivas
com|apuestas deportivas com foro|apuestas deportivas com
pronosticos|apuestas deportivas combinadas|apuestas deportivas combinadas para
hoy|apuestas deportivas como se juega|apuestas deportivas
comparador|apuestas deportivas con bono gratis|apuestas
deportivas con bonos gratis|apuestas deportivas con dinero ficticio|apuestas deportivas con paypal|apuestas deportivas con puntos virtuales|apuestas deportivas consejos|apuestas deportivas consejos para ganar|apuestas deportivas copa america|apuestas deportivas copa del rey|apuestas deportivas copa libertadores|apuestas deportivas copa mundial|apuestas deportivas corners|apuestas deportivas cual es la mejor|apuestas deportivas cuotas altas|apuestas deportivas de baloncesto|apuestas deportivas de boxeo|apuestas deportivas de colombia|apuestas deportivas de futbol|apuestas deportivas de nba|apuestas deportivas de nhl|apuestas deportivas de peru|apuestas deportivas de tenis|apuestas deportivas del dia|apuestas deportivas dinero ficticio|apuestas deportivas directo|apuestas deportivas doble oportunidad|apuestas deportivas en argentina|apuestas deportivas en chile|apuestas deportivas en colombia|apuestas deportivas en directo|apuestas deportivas en españa|apuestas deportivas
en español|apuestas deportivas en linea|apuestas deportivas en línea|apuestas deportivas en peru|apuestas deportivas en perú|apuestas deportivas en sevilla|apuestas deportivas en uruguay|apuestas deportivas en vivo|apuestas deportivas es|apuestas deportivas es pronosticos|apuestas deportivas españa|apuestas deportivas españolas|apuestas deportivas esports|apuestas deportivas estadisticas|apuestas deportivas estrategias|apuestas deportivas estrategias seguras|apuestas
deportivas eurocopa|apuestas deportivas europa league|apuestas deportivas f1|apuestas deportivas faciles de
ganar|apuestas deportivas formula 1|apuestas deportivas foro|apuestas deportivas
foro futbol|apuestas deportivas foro tenis|apuestas deportivas francia argentina|apuestas deportivas futbol|apuestas deportivas
fútbol|apuestas deportivas futbol argentino|apuestas deportivas futbol colombia|apuestas deportivas futbol español|apuestas deportivas gana|apuestas deportivas ganadas|apuestas deportivas
ganar dinero seguro|apuestas deportivas gane|apuestas deportivas golf|apuestas deportivas gratis|apuestas deportivas gratis
con premios|apuestas deportivas gratis hoy|apuestas deportivas gratis sin deposito|apuestas deportivas handicap|apuestas
deportivas handicap asiatico|apuestas deportivas hoy|apuestas deportivas impuestos|apuestas deportivas interior argentina|apuestas deportivas juegos olimpicos|apuestas deportivas la liga|apuestas deportivas legales|apuestas deportivas legales en colombia|apuestas deportivas libres de impuestos|apuestas deportivas licencia
españa|apuestas deportivas liga española|apuestas deportivas listado|apuestas deportivas listado clasico|apuestas deportivas madrid|apuestas deportivas mas seguras|apuestas
deportivas mejor pagadas|apuestas deportivas mejores|apuestas deportivas mejores app|apuestas deportivas mejores
casas|apuestas deportivas mejores cuotas|apuestas deportivas mejores paginas|apuestas deportivas mexico|apuestas deportivas méxico|apuestas deportivas mlb|apuestas deportivas
mlb hoy|apuestas deportivas multiples|apuestas deportivas mundial|apuestas deportivas murcia|apuestas
deportivas nba|apuestas deportivas nba hoy|apuestas
deportivas nfl|apuestas deportivas nhl|apuestas deportivas nuevas|apuestas deportivas ofertas|apuestas deportivas online|apuestas deportivas online argentina|apuestas deportivas online chile|apuestas deportivas online colombia|apuestas deportivas online en colombia|apuestas deportivas online españa|apuestas deportivas online
mexico|apuestas deportivas online paypal|apuestas deportivas
online peru|apuestas deportivas online por internet|apuestas deportivas pago paypal|apuestas deportivas para ganar dinero|apuestas deportivas para hoy|apuestas deportivas para hoy pronosticos|apuestas deportivas partido suspendido|apuestas deportivas partidos de
hoy|apuestas deportivas paypal|apuestas deportivas peru|apuestas deportivas perú|apuestas deportivas
peru vs ecuador|apuestas deportivas predicciones|apuestas deportivas promociones|apuestas deportivas pronostico|apuestas deportivas pronóstico|apuestas deportivas pronostico hoy|apuestas deportivas
pronosticos|apuestas deportivas pronósticos|apuestas deportivas pronosticos expertos|apuestas deportivas pronosticos gratis|apuestas
deportivas pronosticos nba|apuestas deportivas pronosticos
tenis|apuestas deportivas que aceptan paypal|apuestas
deportivas real madrid|apuestas deportivas regalo bienvenida|apuestas deportivas resultado exacto|apuestas deportivas resultados|apuestas deportivas rugby|apuestas deportivas seguras|apuestas
deportivas seguras foro|apuestas deportivas seguras hoy|apuestas deportivas seguras para hoy|apuestas deportivas
seguras telegram|apuestas deportivas sevilla|apuestas
deportivas simulador eurocopa|apuestas deportivas sin deposito|apuestas deportivas sin deposito
inicial|apuestas deportivas sin dinero|apuestas deportivas
sin dinero real|apuestas deportivas sin registro|apuestas deportivas stake|apuestas deportivas stake 10|apuestas deportivas telegram españa|apuestas deportivas
tenis|apuestas deportivas tenis de mesa|apuestas deportivas tenis foro|apuestas deportivas tenis hoy|apuestas deportivas tips|apuestas deportivas tipster|apuestas deportivas ufc|apuestas deportivas uruguay|apuestas
deportivas valencia|apuestas deportivas valencia barcelona|apuestas deportivas venezuela|apuestas deportivas virtuales|apuestas deportivas y casino|apuestas deportivas y casino online|apuestas deportivas.com|apuestas deportivas.com foro|apuestas deportivas.es|apuestas deportivos
pronosticos|apuestas deposito minimo 1 euro|apuestas descenso a segunda|apuestas
descenso a segunda b|apuestas descenso la liga|apuestas
descenso primera division|apuestas descenso segunda|apuestas
dia|apuestas diarias seguras|apuestas dinero|apuestas dinero ficticio|apuestas dinero real|apuestas dinero virtual|apuestas
directas|apuestas directo|apuestas directo futbol|apuestas division de honor juvenil|apuestas dnb|apuestas
doble oportunidad|apuestas doble resultado|apuestas dobles|apuestas dobles y triples|apuestas dortmund barcelona|apuestas draft nba|apuestas draft nfl|apuestas ecuador vs argentina|apuestas ecuador vs venezuela|apuestas egipto uruguay|apuestas el
clasico|apuestas elecciones venezuela|apuestas empate|apuestas en baloncesto|apuestas en barcelona|apuestas en beisbol|apuestas en boxeo|apuestas en caballos|apuestas en carreras de caballos|apuestas
en casino|apuestas en casino online|apuestas en casinos|apuestas en casinos online|apuestas en chile|apuestas en ciclismo|apuestas en colombia|apuestas
en colombia de futbol|apuestas en directo|apuestas en directo futbol|apuestas en directo pronosticos|apuestas en el futbol|apuestas en el tenis|apuestas
en españa|apuestas en esports|apuestas en eventos deportivos
virtuales|apuestas en golf|apuestas en juegos|apuestas
en la champions league|apuestas en la eurocopa|apuestas en la liga|apuestas en la nba|apuestas en la nfl|apuestas en las
vegas mlb|apuestas en las vegas nfl|apuestas en linea|apuestas en línea|apuestas en linea argentina|apuestas en linea boxeo|apuestas en linea chile|apuestas en linea colombia|apuestas en línea de fútbol|apuestas en linea deportivas|apuestas en linea españa|apuestas
en linea estados unidos|apuestas en linea futbol|apuestas en linea mexico|apuestas
en línea méxico|apuestas en linea mundial|apuestas en linea
peru|apuestas en linea usa|apuestas en los esports|apuestas en madrid|apuestas en méxico|apuestas en mexico online|apuestas en nba|apuestas en partidos de futbol|apuestas en partidos de
futbol en vivo|apuestas en partidos de tenis en directo|apuestas en perú|apuestas en sevilla|apuestas en sistema|apuestas en stake|apuestas en tenis|apuestas en tenis de mesa|apuestas en valencia|apuestas en vivo|apuestas en vivo argentina|apuestas en vivo casino|apuestas en vivo futbol|apuestas en vivo fútbol|apuestas en vivo nba|apuestas en vivo peru|apuestas en vivo tenis|apuestas
en vivo ufc|apuestas equipo mbappe|apuestas
equipos de futbol|apuestas españa|apuestas españa alemania|apuestas españa alemania eurocopa|apuestas españa croacia|apuestas españa eurocopa|apuestas españa francia|apuestas españa francia eurocopa|apuestas españa gana el
mundial|apuestas españa gana eurocopa|apuestas españa gana mundial|apuestas españa georgia|apuestas españa holanda|apuestas españa inglaterra|apuestas españa inglaterra cuotas|apuestas
españa inglaterra eurocopa|apuestas españa italia|apuestas españa
mundial|apuestas españa paises bajos|apuestas español|apuestas español oviedo|apuestas espanyol
barcelona|apuestas espanyol betis|apuestas espanyol villarreal|apuestas esport|apuestas esports|apuestas esports colombia|apuestas
esports españa|apuestas esports fifa|apuestas esports
gratis|apuestas esports lol|apuestas esports peru|apuestas esports valorant|apuestas estadisticas|apuestas estrategias|apuestas euro|apuestas euro copa|apuestas eurocopa|apuestas
eurocopa campeon|apuestas eurocopa españa|apuestas eurocopa favoritos|apuestas eurocopa femenina|apuestas eurocopa final|apuestas eurocopa ganador|apuestas eurocopa
hoy|apuestas eurocopa sub 21|apuestas euroliga baloncesto|apuestas euroliga pronosticos|apuestas europa league|apuestas europa league hoy|apuestas europa league pronosticos|apuestas europa league pronósticos|apuestas euros|apuestas f1 abu dhabi|apuestas f1 bahrein|apuestas f1
canada|apuestas f1 china|apuestas f1 cuotas|apuestas f1 hoy|apuestas f1 las vegas|apuestas f1
miami|apuestas f1 monaco|apuestas faciles de ganar|apuestas fáciles
de ganar|apuestas faciles para ganar|apuestas favoritas|apuestas favorito champions|apuestas favoritos champions|apuestas favoritos eurocopa|apuestas favoritos mundial|apuestas fc barcelona|apuestas final
champions cuotas|apuestas final champions league|apuestas final champions peru|apuestas final copa|apuestas final copa america|apuestas final copa de europa|apuestas final copa del rey|apuestas final copa europa|apuestas final copa libertadores|apuestas final
copa rey|apuestas final de copa|apuestas final
de copa del rey|apuestas final del mundial|apuestas final euro|apuestas
final eurocopa|apuestas final europa league|apuestas final libertadores|apuestas final
mundial|apuestas final nba|apuestas final rugby|apuestas
final uefa europa league|apuestas final.mundial|apuestas finales de conferencia nfl|apuestas finales nba|apuestas fiorentina betis|apuestas
formula|apuestas formula 1|apuestas fórmula 1|apuestas fórmula 1 pronósticos|apuestas formula uno|apuestas foro|apuestas foro nba|apuestas francia argentina|apuestas francia españa|apuestas futbol|apuestas fútbol|apuestas futbol americano|apuestas futbol
americano nfl|apuestas futbol argentina|apuestas futbol argentino|apuestas futbol champions
league|apuestas futbol chile|apuestas futbol colombia|apuestas futbol consejos|apuestas futbol en directo|apuestas fútbol en directo|apuestas futbol
en vivo|apuestas fútbol en vivo|apuestas futbol españa|apuestas futbol español|apuestas
fútbol español|apuestas futbol eurocopa|apuestas futbol
femenino|apuestas futbol foro|apuestas futbol gratis|apuestas futbol hoy|apuestas fútbol
hoy|apuestas futbol juegos olimpicos|apuestas futbol mexico|apuestas futbol mundial|apuestas futbol online|apuestas
futbol para hoy|apuestas futbol peru|apuestas futbol pronosticos|apuestas futbol sala|apuestas futbol
telegram|apuestas futbol virtual|apuestas galgos|apuestas galgos en directo|apuestas galgos
hoy|apuestas galgos online|apuestas galgos pronosticos|apuestas galgos trucos|apuestas gana|apuestas
gana colombia|apuestas gana resultados|apuestas ganadas|apuestas ganadas
hoy|apuestas ganador champions league|apuestas ganador copa america|apuestas ganador
copa del rey|apuestas ganador copa del rey baloncesto|apuestas ganador copa libertadores|apuestas ganador de la eurocopa|apuestas ganador de la liga|apuestas ganador del mundial|apuestas ganador eurocopa|apuestas ganador europa league|apuestas ganador f1|apuestas ganador la liga|apuestas
ganador liga española|apuestas ganador mundial|apuestas ganador mundial baloncesto|apuestas
ganador mundial f1|apuestas ganador nba|apuestas ganadores eurocopa|apuestas ganadores mundial|apuestas ganar champions|apuestas ganar eurocopa|apuestas ganar liga|apuestas ganar mundial|apuestas ganar nba|apuestas getafe valencia|apuestas
ghana uruguay|apuestas girona|apuestas girona athletic|apuestas girona betis|apuestas girona campeon de liga|apuestas girona campeon liga|apuestas girona gana la
liga|apuestas girona real madrid|apuestas girona real sociedad|apuestas goleador
eurocopa|apuestas goleadores eurocopa|apuestas goles asiaticos|apuestas
golf|apuestas golf masters|apuestas golf pga|apuestas granada barcelona|apuestas grand slam de tenis|apuestas gratis|apuestas gratis casino|apuestas gratis con premios|apuestas gratis hoy|apuestas gratis para hoy|apuestas gratis por registro|apuestas gratis puntos|apuestas
gratis regalos|apuestas gratis sin deposito|apuestas gratis sin depósito|apuestas gratis sin ingreso|apuestas gratis sports|apuestas gratis y ganar premios|apuestas grupo a eurocopa|apuestas grupos eurocopa|apuestas handicap|apuestas
handicap asiatico|apuestas handicap baloncesto|apuestas
handicap como funciona|apuestas handicap nba|apuestas handicap
nfl|apuestas hipicas online|apuestas hípicas online|apuestas hipicas venezuela|apuestas hockey|apuestas hockey hielo|apuestas hockey
patines|apuestas hockey sobre hielo|apuestas holanda argentina|apuestas holanda vs argentina|apuestas hoy|apuestas hoy champions|apuestas hoy
futbol|apuestas hoy nba|apuestas hoy pronosticos|apuestas hoy seguras|apuestas
impuestos|apuestas inglaterra paises bajos|apuestas inter barca|apuestas inter barcelona|apuestas juego|apuestas
juegos|apuestas juegos en linea|apuestas juegos olimpicos|apuestas
juegos olímpicos|apuestas juegos olimpicos baloncesto|apuestas juegos online|apuestas
juegos virtuales|apuestas jugador sevilla|apuestas jugadores nba|apuestas kings league americas|apuestas la liga|apuestas la liga española|apuestas la liga hoy|apuestas la liga
santander|apuestas las vegas mlb|apuestas las vegas nba|apuestas las
vegas nfl|apuestas league of legends mundial|apuestas legal|apuestas legales|apuestas legales en colombia|apuestas legales en españa|apuestas legales en estados unidos|apuestas legales españa|apuestas leganes betis|apuestas libertadores|apuestas licencia|apuestas liga 1 peru|apuestas liga argentina|apuestas liga bbva
pronosticos|apuestas liga de campeones|apuestas liga de campeones de baloncesto|apuestas liga de campeones
de hockey|apuestas liga españa|apuestas liga española|apuestas liga santander pronosticos|apuestas ligas de futbol|apuestas linea|apuestas linea de
gol|apuestas liverpool barcelona|apuestas liverpool real madrid|apuestas lol mundial|apuestas madrid|apuestas madrid arsenal|apuestas madrid atletico|apuestas madrid atletico champions|apuestas madrid barca|apuestas madrid barça|apuestas madrid barca
hoy|apuestas madrid barca supercopa|apuestas madrid barcelona|apuestas madrid barsa|apuestas madrid
bayern|apuestas madrid betis|apuestas madrid borussia|apuestas madrid campeon champions|apuestas madrid celta|apuestas
madrid city|apuestas madrid dortmund|apuestas madrid gana la liga|apuestas madrid
gana liga|apuestas madrid hoy|apuestas madrid liverpool|apuestas madrid osasuna|apuestas
madrid sevilla|apuestas madrid valencia|apuestas madrid vs arsenal|apuestas madrid vs barcelona|apuestas mallorca osasuna|apuestas
mallorca real sociedad|apuestas manchester athletic|apuestas manchester city real madrid|apuestas mas faciles de ganar|apuestas mas seguras|apuestas
mas seguras para hoy|apuestas masters de golf|apuestas masters de tenis|apuestas maximo goleador eurocopa|apuestas
maximo goleador mundial|apuestas mejor jugador eurocopa|apuestas mejores casinos
online|apuestas mexico|apuestas méxico|apuestas mexico polonia|apuestas
méxico polonia|apuestas mlb|apuestas mlb hoy|apuestas mlb las vegas|apuestas mlb para hoy|apuestas mlb pronosticos|apuestas mlb usa|apuestas
mma ufc|apuestas momios|apuestas multiples|apuestas múltiples|apuestas
multiples como funcionan|apuestas multiples el gordo|apuestas multiples futbol|apuestas mundial|apuestas mundial
2026|apuestas mundial baloncesto|apuestas mundial balonmano|apuestas mundial brasil|apuestas mundial campeon|apuestas mundial ciclismo|apuestas mundial clubes|apuestas mundial de baloncesto|apuestas mundial de ciclismo|apuestas mundial de clubes|apuestas mundial de
futbol|apuestas mundial de fútbol|apuestas mundial de rugby|apuestas mundial f1|apuestas mundial
favoritos|apuestas mundial femenino|apuestas mundial
formula 1|apuestas mundial futbol|apuestas mundial ganador|apuestas mundial lol|apuestas mundial moto gp|apuestas mundial
motogp|apuestas mundial rugby|apuestas mundial sub 17|apuestas
mundiales|apuestas mundialistas|apuestas mvp eurocopa|apuestas
mvp nba|apuestas mvp nfl|apuestas nacionales de colombia|apuestas nba|apuestas nba all star|apuestas nba campeon|apuestas nba consejos|apuestas
nba esta noche|apuestas nba finals|apuestas nba gratis|apuestas
nba hoy|apuestas nba hoy jugadores|apuestas nba hoy
pronosticos|apuestas nba para hoy|apuestas nba playoffs|apuestas nba pronosticos|apuestas nba pronósticos|apuestas nba
pronosticos hoy|apuestas nba tipster|apuestas nfl|apuestas nfl hoy|apuestas nfl
las vegas|apuestas nfl playoffs|apuestas nfl pronosticos|apuestas nfl pronósticos|apuestas nfl semana 4|apuestas nfl super bowl|apuestas nhl|apuestas nhl pronosticos|apuestas
octavos eurocopa|apuestas ofertas|apuestas online|apuestas online
argentina|apuestas online argentina legal|apuestas online bono|apuestas online bono bienvenida|apuestas online boxeo|apuestas online caballos|apuestas online carreras de caballos|apuestas online casino|apuestas
online champions league|apuestas online chile|apuestas online ciclismo|apuestas online colombia|apuestas online comparativa|apuestas online con paypal|apuestas online de caballos|apuestas online deportivas|apuestas online
en argentina|apuestas online en peru|apuestas online espana|apuestas
online españa|apuestas online esports|apuestas online foro|apuestas
online futbol|apuestas online futbol españa|apuestas online golf|apuestas online gratis|apuestas online gratis sin deposito|apuestas online juegos|apuestas online mexico|apuestas online mma|apuestas online movil|apuestas
online nba|apuestas online net|apuestas online nuevas|apuestas online opiniones|apuestas online paypal|apuestas online peru|apuestas online seguras|apuestas
online sin dinero|apuestas online sin registro|apuestas online
tenis|apuestas online ufc|apuestas online uruguay|apuestas online venezuela|apuestas open britanico
golf|apuestas osasuna athletic|apuestas osasuna barcelona|apuestas osasuna real madrid|apuestas
osasuna sevilla|apuestas osasuna valencia|apuestas over|apuestas over 2.5|apuestas over
under|apuestas paginas|apuestas pago anticipado|apuestas paises bajos ecuador|apuestas paises bajos inglaterra|apuestas países bajos qatar|apuestas para boxeo|apuestas
para champions league|apuestas para el clasico|apuestas
para el dia de hoy|apuestas para el mundial|apuestas para el partido de hoy|apuestas para eurocopa|apuestas para europa league|apuestas para futbol|apuestas para ganar|apuestas para ganar dinero|apuestas para ganar dinero facil|apuestas para ganar en la ruleta|apuestas para ganar la
champions|apuestas para ganar la eurocopa|apuestas para
ganar la europa league|apuestas para ganar la liga|apuestas para ganar siempre|apuestas para hacer|apuestas para
hoy|apuestas para hoy de futbol|apuestas para hoy europa league|apuestas para hoy futbol|apuestas para juegos|apuestas para la champions league|apuestas para
la copa del rey|apuestas para la eurocopa|apuestas para la europa league|apuestas para la
final de la eurocopa|apuestas para la nba hoy|apuestas para los partidos
de hoy|apuestas para partidos de hoy|apuestas para ufc|apuestas partido|apuestas partido aplazado|apuestas
partido champions|apuestas partido colombia|apuestas
partido españa marruecos|apuestas partido mundial|apuestas partido suspendido|apuestas
partidos|apuestas partidos champions league|apuestas partidos csgo|apuestas partidos de futbol|apuestas partidos de futbol
hoy|apuestas partidos de hoy|apuestas partidos eurocopa|apuestas partidos futbol|apuestas partidos hoy|apuestas partidos mundial|apuestas paypal|apuestas peleas de boxeo|apuestas peru|apuestas perú|apuestas peru brasil|apuestas peru chile|apuestas peru paraguay|apuestas peru uruguay|apuestas peru vs chile|apuestas peru vs colombia|apuestas pichichi eurocopa|apuestas plataforma|apuestas
playoff|apuestas playoff ascenso|apuestas playoff ascenso a primera|apuestas playoff nba|apuestas playoff segunda|apuestas playoff segunda b|apuestas playoffs nba|apuestas playoffs nfl|apuestas
polonia argentina|apuestas por argentina|apuestas por internet mexico|apuestas por internet para ganar dinero|apuestas por paypal|apuestas por ronda boxeo|apuestas
por sistema|apuestas portugal uruguay|apuestas pre partido|apuestas predicciones|apuestas predicciones
futbol|apuestas primera division|apuestas primera division españa|apuestas promociones|apuestas pronostico|apuestas pronosticos|apuestas
pronosticos deportivos|apuestas pronosticos deportivos tenis|apuestas
pronosticos futbol|apuestas pronosticos gratis|apuestas pronosticos nba|apuestas
pronosticos tenis|apuestas prorroga|apuestas psg barca|apuestas psg barcelona|apuestas puntos por tarjetas|apuestas puntos tarjetas|apuestas que aceptan paypal|apuestas que es handicap|apuestas que puedes hacer
con tu novia|apuestas que siempre ganaras|apuestas que significa|apuestas quien bajara a segunda|apuestas quién bajara a
segunda|apuestas quien gana el mundial|apuestas quien gana eurocopa|apuestas quien gana la champions|apuestas quien gana la eurocopa|apuestas quien gana
la liga|apuestas quien ganara el mundial|apuestas quién ganará el mundial|apuestas quien ganara
la champions|apuestas quien ganara la eurocopa|apuestas quien ganara la liga|apuestas rayo barcelona|apuestas real
madrid|apuestas real madrid arsenal|apuestas real madrid athletic|apuestas real madrid atletico|apuestas
real madrid atletico champions|apuestas real madrid atletico de madrid|apuestas real madrid atlético de madrid|apuestas real
madrid atletico madrid|apuestas real madrid barcelona|apuestas real madrid bayern|apuestas real madrid betis|apuestas real madrid borussia|apuestas real madrid campeon champions|apuestas real madrid celta|apuestas real madrid champions|apuestas real madrid city|apuestas real madrid girona|apuestas real madrid hoy|apuestas
real madrid liverpool|apuestas real madrid manchester city|apuestas real madrid osasuna|apuestas
real madrid real sociedad|apuestas real madrid valencia|apuestas real madrid villarreal|apuestas
real madrid vs arsenal|apuestas real madrid vs atletico|apuestas real madrid vs atlético|apuestas real madrid vs atletico
madrid|apuestas real madrid vs barcelona|apuestas real madrid
vs betis|apuestas real madrid vs sevilla|apuestas real madrid vs valencia|apuestas real sociedad|apuestas real sociedad athletic|apuestas real sociedad
barcelona|apuestas real sociedad betis|apuestas real sociedad psg|apuestas real sociedad real madrid|apuestas real sociedad
valencia|apuestas recomendadas hoy|apuestas regalo de bienvenida|apuestas registro|apuestas resultado exacto|apuestas resultados|apuestas resultados eurocopa|apuestas retirada tenis|apuestas roma barcelona|apuestas roma sevilla|apuestas rugby|apuestas
rugby mundial|apuestas rugby world cup|apuestas ruleta seguras|apuestas segunda|apuestas segunda b|apuestas segunda division|apuestas segunda división|apuestas
segunda division b|apuestas segunda division españa|apuestas seguras|apuestas seguras baloncesto|apuestas seguras
calculadora|apuestas seguras en la ruleta|apuestas seguras
eurocopa|apuestas seguras foro|apuestas seguras futbol|apuestas seguras futbol hoy|apuestas
seguras gratis|apuestas seguras hoy|apuestas seguras
hoy futbol|apuestas seguras nba|apuestas seguras nba hoy|apuestas seguras para este fin de semana|apuestas seguras para ganar dinero|apuestas seguras para hoy|apuestas seguras para hoy fútbol|apuestas seguras para
hoy pronósticos|apuestas seguras para mañana|apuestas seguras ruleta|apuestas seguras
telegram|apuestas seguras tenis|apuestas semifinales eurocopa|apuestas senegal paises bajos|apuestas sevilla|apuestas sevilla athletic|apuestas sevilla atletico de madrid|apuestas sevilla barcelona|apuestas sevilla betis|apuestas sevilla campeon liga|apuestas sevilla celta|apuestas sevilla gana la liga|apuestas sevilla girona|apuestas sevilla inter|apuestas sevilla jugador|apuestas sevilla juventus|apuestas
sevilla leganes|apuestas sevilla madrid|apuestas sevilla manchester
united|apuestas sevilla osasuna|apuestas sevilla real madrid|apuestas sevilla real sociedad|apuestas
sevilla roma|apuestas sevilla valencia|apuestas
significa|apuestas simples ejemplos|apuestas simples o combinadas|apuestas sin deposito|apuestas sin deposito inicial|apuestas sin deposito
minimo|apuestas sin dinero|apuestas sin dinero real|apuestas sin empate|apuestas sin empate que significa|apuestas sin ingreso minimo|apuestas sin registro|apuestas sistema|apuestas sistema calculadora|apuestas sistema como funciona|apuestas sistema trixie|apuestas sociedad|apuestas sorteo copa del
rey|apuestas stake|apuestas stake 10|apuestas stake 10 hoy|apuestas super bowl favorito|apuestas super rugby|apuestas supercopa españa|apuestas superliga argentina|apuestas tarjeta roja|apuestas tarjetas|apuestas tarjetas
amarillas|apuestas tenis|apuestas tenis atp|apuestas tenis consejos|apuestas tenis copa davis|apuestas tenis de
mesa|apuestas tenis de mesa pronosticos|apuestas tenis en vivo|apuestas tenis femenino|apuestas tenis hoy|apuestas tenis itf|apuestas tenis pronosticos|apuestas tenis pronósticos|apuestas tenis retirada|apuestas
tenis roland garros|apuestas tenis seguras|apuestas tenis wimbledon|apuestas tenis
wta|apuestas tercera division|apuestas tercera division españa|apuestas tipos|apuestas tips|apuestas tipster|apuestas tipster para
hoy|apuestas topuria holloway cuotas|apuestas torneos de golf|apuestas torneos de tenis|apuestas trucos|apuestas uefa champions league|apuestas uefa
europa league|apuestas ufc|apuestas ufc chile|apuestas ufc como funciona|apuestas ufc hoy|apuestas ufc ilia topuria|apuestas ufc online|apuestas
ufc pronósticos|apuestas ufc telegram|apuestas ufc topuria|apuestas under
over|apuestas unionistas villarreal|apuestas uruguay|apuestas uruguay colombia|apuestas uruguay corea|apuestas uruguay vs colombia|apuestas us open golf|apuestas
us open tenis|apuestas valencia|apuestas valencia barcelona|apuestas valencia betis|apuestas valencia madrid|apuestas valencia real madrid|apuestas valladolid barcelona|apuestas valladolid valencia|apuestas
valor app|apuestas valor en directo|apuestas valor galgos|apuestas venezuela|apuestas venezuela argentina|apuestas venezuela bolivia|apuestas venezuela ecuador|apuestas villarreal|apuestas villarreal athletic|apuestas villarreal barcelona|apuestas villarreal bayern|apuestas villarreal
betis|apuestas villarreal liverpool|apuestas villarreal manchester|apuestas villarreal manchester united|apuestas villarreal vs real madrid|apuestas virtuales|apuestas virtuales colombia|apuestas virtuales futbol|apuestas virtuales sin dinero|apuestas vivo|apuestas vuelta a
españa|apuestas vuelta españa|apuestas william hill partidos de hoy|apuestas y casino|apuestas y casinos|apuestas y juegos
de azar|apuestas y pronosticos|apuestas y pronosticos de futbol|apuestas y pronosticos deportivos|apuestas y resultados|apuestas-deportivas|apuestas-deportivas.es pronosticos|arbitro nba apuestas|argentina apuestas|argentina colombia apuestas|argentina croacia
apuestas|argentina francia apuestas|argentina mexico
apuestas|argentina peru apuestas|argentina uruguay apuestas|argentina vs
bolivia apuestas|argentina vs chile apuestas|argentina vs colombia apuestas|argentina vs francia apuestas|argentina vs.
colombia apuestas|asi se gana en las apuestas deportivas|asiatico apuestas|asiatico en apuestas|asiaticos apuestas|athletic barcelona apuestas|athletic manchester united apuestas|athletic osasuna apuestas|athletic real
madrid apuestas|atletico barcelona apuestas|atletico de madrid apuestas|atlético de madrid
apuestas|atletico de madrid real madrid apuestas|atletico de madrid vs barcelona apuestas|atletico
madrid real madrid apuestas|atletico madrid vs real madrid apuestas|atletico real madrid
apuestas|atletico vs real madrid apuestas|avisador de cuotas apuestas|bajada de cuotas apuestas|baloncesto apuestas|barbastro barcelona apuestas|barca apuestas|barca bayern apuestas|barca inter apuestas|barca madrid apuestas|barça madrid apuestas|barca vs atletico apuestas|barca vs madrid
apuestas|barca vs real madrid apuestas|barcelona – real madrid
apuestas|barcelona apuestas|barcelona atletico apuestas|barcelona
atletico de madrid apuestas|barcelona atletico madrid apuestas|barcelona betis apuestas|barcelona casa de apuestas|barcelona
inter apuestas|barcelona psg apuestas|barcelona real
madrid apuestas|barcelona real sociedad apuestas|barcelona
sevilla apuestas|barcelona valencia apuestas|barcelona vs athletic bilbao apuestas|barcelona vs
atlético madrid apuestas|barcelona vs betis apuestas|barcelona
vs celta de vigo apuestas|barcelona vs espanyol apuestas|barcelona vs girona apuestas|barcelona
vs madrid apuestas|barcelona vs real madrid apuestas|barcelona vs real sociedad apuestas|barcelona vs sevilla apuestas|barcelona vs villarreal apuestas|base de datos cuotas apuestas deportivas|bayern real
madrid apuestas|beisbol apuestas|best america apuestas|bet apuestas chile|bet apuestas en vivo|betis
– chelsea apuestas|betis apuestas|betis barcelona apuestas|betis chelsea apuestas|betis madrid apuestas|betis
sevilla apuestas|betsson tu sitio de apuestas online|blog apuestas baloncesto|blog apuestas
ciclismo|blog apuestas nba|blog apuestas tenis|blog de apuestas de tenis|bono apuestas|bono apuestas deportivas|bono apuestas
deportivas sin deposito|bono apuestas gratis|bono apuestas gratis sin deposito|bono apuestas
sin deposito|bono bienvenida apuestas|bono bienvenida apuestas
deportivas|bono bienvenida apuestas españa|bono bienvenida apuestas sin deposito|bono bienvenida apuestas
sin depósito|bono bienvenida casa apuestas|bono bienvenida casa de
apuestas|bono bienvenida marca apuestas|bono casa apuestas|bono casa de
apuestas|bono casa de apuestas sin ingreso|bono casas de apuestas|bono de apuestas|bono de apuestas gratis
sin deposito|bono de bienvenida apuestas|bono de bienvenida apuestas deportivas|bono de bienvenida casa de apuestas|bono de bienvenida casas de apuestas|bono de casas de
apuestas|bono de registro apuestas|bono de registro apuestas deportivas|bono de registro casa de apuestas|bono gratis apuestas|bono marca apuestas|bono
por registro apuestas|bono por registro apuestas deportivas|bono por registro
casa de apuestas|bono registro apuestas|bono sin deposito
apuestas|bono sin depósito apuestas|bono sin deposito apuestas deportivas|bono sin depósito apuestas deportivas|bono sin deposito casa de apuestas|bono sin deposito marca apuestas|bono
sin ingreso apuestas|bono sin ingreso apuestas deportivas|bonos apuestas|bonos apuestas colombia|bonos
apuestas deportivas|bonos apuestas deportivas sin deposito|bonos apuestas gratis|bonos apuestas sin deposito|bonos apuestas
sin depósito|bonos bienvenida apuestas|bonos bienvenida casas apuestas|bonos bienvenida casas de
apuestas|bonos casa de apuestas|bonos casas apuestas|bonos casas de
apuestas|bonos casas de apuestas colombia|bonos casas de
apuestas deportivas|bonos casas de apuestas españa|bonos casas de apuestas nuevas|bonos casas de apuestas sin deposito|bonos casas de
apuestas sin depósito|bonos de apuestas|bonos de apuestas deportivas|bonos de apuestas gratis|bonos de apuestas sin deposito|bonos de bienvenida apuestas|bonos de bienvenida apuestas deportivas|bonos de bienvenida casa
de apuestas|bonos de bienvenida casas de apuestas|bonos de
bienvenida de casas de apuestas|bonos de bienvenida
en casas de apuestas|bonos de casas de apuestas|bonos de casas de apuestas sin deposito|bonos en casa
de apuestas|bonos en casas de apuestas sin deposito|bonos gratis apuestas|bonos gratis apuestas deportivas|bonos gratis casas de apuestas|bonos gratis sin deposito apuestas|bonos paginas
de apuestas|bonos registro casas de apuestas|bonos sin deposito apuestas|bonos sin depósito apuestas|bonos sin deposito apuestas
deportivas|bonos sin deposito casas de apuestas|bot de apuestas deportivas gratis|boxeo
apuestas|brasil colombia apuestas|brasil peru apuestas|brasil vs colombia apuestas|buenas apuestas para hoy|buscador
cuotas apuestas|buscador de apuestas seguras|buscador de cuotas apuestas|buscador de cuotas
de apuestas|buscar apuestas seguras|caballos apuestas|calculador de apuestas|calculador de cuotas apuestas|calculadora
apuestas|calculadora apuestas combinadas|calculadora apuestas de sistema|calculadora apuestas deportivas|calculadora apuestas deportivas
seguras|calculadora apuestas multiples|calculadora apuestas segura|calculadora apuestas seguras|calculadora apuestas sistema|calculadora
apuestas yankee|calculadora arbitraje apuestas|calculadora cubrir apuestas|calculadora cuotas apuestas|calculadora de apuestas|calculadora de apuestas combinadas|calculadora de apuestas de futbol|calculadora de apuestas de sistema|calculadora
de apuestas deportivas|calculadora de apuestas multiples|calculadora de apuestas seguras|calculadora de apuestas sistema|calculadora de apuestas
surebets|calculadora de arbitraje apuestas|calculadora de cuotas apuestas|calculadora de cuotas de apuestas|calculadora para apuestas deportivas|calculadora
poisson apuestas|calculadora poisson apuestas deportivas|calculadora poisson para apuestas|calculadora scalping apuestas deportivas|calculadora sistema apuestas|calculadora stake apuestas|calculadora trading apuestas|calcular apuestas|calcular apuestas
deportivas|calcular apuestas futbol|calcular apuestas sistema|calcular cuotas apuestas|calcular cuotas apuestas combinadas|calcular cuotas apuestas deportivas|calcular cuotas de apuestas|calcular ganancias
apuestas deportivas|calcular momios apuestas|calcular probabilidad cuota apuestas|calcular stake apuestas|calcular unidades apuestas|calcular yield apuestas|calculo de apuestas|calculo de apuestas deportivas|cambio de cuotas apuestas|campeon champions apuestas|campeon eurocopa apuestas|campeon liga apuestas|campeon nba apuestas|canales de apuestas
gratis|carrera de caballos apuestas|carrera de caballos apuestas juego|carrera de caballos con apuestas|carrera de galgos apuestas|carreras de caballos apuestas|carreras de caballos apuestas
online|carreras de caballos con apuestas|carreras
de caballos juegos de apuestas|carreras de galgos apuestas|carreras
de galgos apuestas online|carreras de galgos apuestas trucos|carreras
galgos apuestas|casa apuestas argentina|casa apuestas atletico de madrid|casa apuestas barcelona|casa apuestas betis|casa apuestas bono bienvenida|casa apuestas bono
gratis|casa apuestas bono sin deposito|casa apuestas cerca de
mi|casa apuestas chile|casa apuestas colombia|casa apuestas
con mejores cuotas|casa apuestas deportivas|casa
apuestas españa|casa apuestas española|casa apuestas eurocopa|casa apuestas futbol|casa apuestas mejores cuotas|casa apuestas
mundial|casa apuestas nueva|casa apuestas nuevas|casa
apuestas online|casa apuestas peru|casa apuestas valencia|casa de apuestas|casa
de apuestas 10 euros gratis|casa de apuestas argentina|casa de
apuestas atletico de madrid|casa de apuestas baloncesto|casa de
apuestas barcelona|casa de apuestas beisbol|casa de apuestas betis|casa
de apuestas bono|casa de apuestas bono bienvenida|casa de apuestas bono de bienvenida|casa de apuestas bono gratis|casa de apuestas bono por
registro|casa de apuestas bono sin deposito|casa de apuestas boxeo|casa de apuestas
caballos|casa de apuestas carreras de caballos|casa de apuestas cerca de mi|casa de
apuestas cerca de mí|casa de apuestas champions league|casa
de apuestas chile|casa de apuestas ciclismo|casa de
apuestas colombia|casa de apuestas con bono de bienvenida|casa de apuestas con bono
sin deposito|casa de apuestas con cuotas mas altas|casa de apuestas con esports|casa de apuestas con las
mejores cuotas|casa de apuestas con licencia en españa|casa de apuestas con mejores
cuotas|casa de apuestas con pago anticipado|casa de apuestas con paypal|casa de
apuestas copa america|casa de apuestas de caballos|casa de apuestas de colombia|casa de apuestas de españa|casa de apuestas de futbol|casa de apuestas de fútbol|casa de apuestas de futbol
peru|casa de apuestas de peru|casa de apuestas
del madrid|casa de apuestas del real madrid|casa de apuestas deportivas|casa de apuestas deportivas cerca de mi|casa de apuestas deportivas en argentina|casa de apuestas deportivas en chile|casa de apuestas deportivas en colombia|casa de apuestas deportivas en españa|casa de apuestas deportivas en madrid|casa
de apuestas deportivas españa|casa de apuestas deportivas
españolas|casa de apuestas deportivas madrid|casa de apuestas deportivas
mexico|casa de apuestas deportivas online|casa de apuestas deportivas peru|casa de apuestas deposito 5 euros|casa de apuestas deposito minimo|casa de apuestas deposito minimo 1 euro|casa de apuestas depósito mínimo 1 euro|casa de apuestas en españa|casa de apuestas en linea|casa de apuestas en madrid|casa de apuestas en perú|casa de apuestas en vivo|casa de
apuestas españa|casa de apuestas españa inglaterra|casa de apuestas española|casa de apuestas
españolas|casa de apuestas esports|casa de apuestas eurocopa|casa de apuestas
europa league|casa de apuestas f1|casa de apuestas formula 1|casa de apuestas
futbol|casa de apuestas ingreso minimo|casa de apuestas ingreso minimo 1 euro|casa de apuestas ingreso mínimo 1
euro|casa de apuestas legales|casa de apuestas legales en colombia|casa de apuestas
legales en españa|casa de apuestas libertadores|casa
de apuestas liga española|casa de apuestas madrid|casa de apuestas mas segura|casa de apuestas mejores|casa de apuestas méxico|casa de apuestas
minimo 5 euros|casa de apuestas mlb|casa de apuestas mundial|casa de
apuestas nba|casa de apuestas nfl|casa de apuestas nueva|casa de apuestas
nuevas|casa de apuestas oficial del real madrid|casa de
apuestas oficial real madrid|casa de apuestas online|casa de apuestas
online argentina|casa de apuestas online chile|casa de apuestas online españa|casa de apuestas online mexico|casa de apuestas online paraguay|casa de apuestas online peru|casa de
apuestas online usa|casa de apuestas online venezuela|casa
de apuestas pago anticipado|casa de apuestas para boxeo|casa de apuestas para
ufc|casa de apuestas peru|casa de apuestas perú|casa de apuestas peru online|casa de apuestas por paypal|casa de apuestas promociones|casa
de apuestas que regalan dinero|casa de apuestas real madrid|casa de apuestas regalo de bienvenida|casa de apuestas sevilla|casa de apuestas
sin dinero|casa de apuestas sin ingreso minimo|casa de apuestas sin licencia en españa|casa de apuestas sin minimo de ingreso|casa de apuestas stake|casa de apuestas tenis|casa de apuestas
ufc|casa de apuestas valencia|casa de apuestas venezuela|casa de apuestas
virtuales|casa de apuestas vive la suerte|casa oficial de
apuestas del real madrid|casas apuestas asiaticas|casas apuestas bono sin deposito|casas apuestas bonos sin deposito|casas
apuestas caballos|casas apuestas chile|casas apuestas ciclismo|casas apuestas con licencia|casas apuestas con licencia en españa|casas apuestas deportivas|casas apuestas deportivas colombia|casas apuestas deportivas españa|casas apuestas deportivas españolas|casas
apuestas deportivas nuevas|casas apuestas españa|casas apuestas españolas|casas
apuestas esports|casas apuestas eurocopa|casas apuestas golf|casas apuestas ingreso
minimo 5 euros|casas apuestas legales|casas apuestas legales españa|casas apuestas licencia|casas apuestas licencia españa|casas apuestas mexico|casas apuestas
mundial|casas apuestas nba|casas apuestas nuevas|casas apuestas nuevas españa|casas apuestas ofertas|casas apuestas online|casas
apuestas paypal|casas apuestas peru|casas apuestas sin licencia|casas apuestas tenis|casas asiaticas apuestas|casas de apuestas|casas de apuestas 5 euros|casas de apuestas app|casas de apuestas argentinas|casas de apuestas asiaticas|casas de apuestas baloncesto|casas de apuestas barcelona|casas de apuestas bono bienvenida|casas de apuestas bono de bienvenida|casas de apuestas bono por registro|casas de
apuestas bono sin deposito|casas de apuestas bono sin ingreso|casas de apuestas bonos|casas de apuestas
bonos de bienvenida|casas de apuestas bonos gratis|casas de apuestas bonos sin deposito|casas de apuestas boxeo|casas
de apuestas caballos|casas de apuestas carreras de caballos|casas de apuestas casino|casas de apuestas casino online|casas de apuestas cerca
de mi|casas de apuestas champions league|casas de apuestas
chile|casas de apuestas ciclismo|casas de apuestas colombia|casas de apuestas com|casas de apuestas con app|casas de apuestas con apuestas gratis|casas de
apuestas con bono|casas de apuestas con bono de bienvenida|casas de apuestas con bono de registro|casas de apuestas con bono por registro|casas de apuestas con bono
sin deposito|casas de apuestas con bonos|casas de
apuestas con bonos gratis|casas de apuestas con bonos sin deposito|casas de apuestas con deposito minimo|casas de apuestas con esports|casas de apuestas con handicap asiatico|casas de apuestas con licencia|casas de apuestas con licencia en españa|casas de apuestas con licencia españa|casas de apuestas con licencia española|casas de apuestas con mejores
cuotas|casas de apuestas con pago anticipado|casas de apuestas con paypal|casas de apuestas con paypal en perú|casas
de apuestas con promociones|casas de apuestas con ruleta en vivo|casas de apuestas
copa del rey|casas de apuestas de caballos|casas de apuestas de
españa|casas de apuestas de futbol|casas de apuestas de fútbol|casas de apuestas
de peru|casas de apuestas deportivas|casas de apuestas deportivas asiaticas|casas de apuestas deportivas colombia|casas de apuestas deportivas comparativa|casas de apuestas deportivas con paypal|casas de apuestas deportivas en chile|casas
de apuestas deportivas en españa|casas de apuestas deportivas en linea|casas de apuestas deportivas
en madrid|casas de apuestas deportivas en mexico|casas de apuestas deportivas en peru|casas de apuestas deportivas
en sevilla|casas de apuestas deportivas en valencia|casas de
apuestas deportivas españa|casas de apuestas deportivas
españolas|casas de apuestas deportivas legales|casas de apuestas deportivas madrid|casas de apuestas deportivas mexico|casas de apuestas deportivas
nuevas|casas de apuestas deportivas online|casas de apuestas
deportivas peru|casas de apuestas deportivas perú|casas de apuestas deposito minimo 1 euro|casas de apuestas depósito mínimo
1 euro|casas de apuestas dinero gratis|casas de apuestas en argentina|casas de apuestas
en barcelona|casas de apuestas en chile|casas de apuestas en colombia|casas de
apuestas en españa|casas de apuestas en españa online|casas de apuestas en linea|casas de apuestas en madrid|casas de apuestas en méxico|casas de apuestas en peru|casas
de apuestas en perú|casas de apuestas en sevilla|casas de apuestas en uruguay|casas de apuestas en valencia|casas de apuestas en venezuela|casas de
apuestas equipos de futbol|casas de apuestas españa|casas de apuestas españa alemania|casas de apuestas españa inglaterra|casas de apuestas españa licencia|casas de apuestas españa nuevas|casas de apuestas
españa online|casas de apuestas española|casas de apuestas españolas|casas de apuestas españolas con licencia|casas
de apuestas españolas online|casas de apuestas esports|casas de apuestas
eurocopa|casas de apuestas eurocopa 2024|casas de apuestas europa league|casas de apuestas f1|casas de apuestas fisicas en barcelona|casas de
apuestas fisicas en españa|casas de apuestas formula 1|casas de apuestas fuera de españa|casas de apuestas futbol|casas de apuestas
fútbol|casas de apuestas futbol españa|casas de apuestas ganador eurocopa|casas
de apuestas gratis|casas de apuestas ingreso minimo|casas de apuestas ingreso minimo 1
euro|casas de apuestas ingreso minimo 5 euros|casas de apuestas inter barcelona|casas de apuestas legales|casas de apuestas
legales en colombia|casas de apuestas legales en españa|casas de apuestas legales en mexico|casas
de apuestas legales españa|casas de apuestas legales mx|casas de
apuestas licencia|casas de apuestas licencia españa|casas de
apuestas lista|casas de apuestas madrid|casas de apuestas mas seguras|casas de apuestas mejores bonos|casas de apuestas mejores cuotas|casas de apuestas mexico|casas de apuestas méxico|casas de apuestas minimo 5
euros|casas de apuestas mlb|casas de apuestas
mundial|casas de apuestas mundial baloncesto|casas de apuestas mundiales|casas de
apuestas nba|casas de apuestas no reguladas en españa|casas de apuestas nueva ley|casas de apuestas nuevas|casas de apuestas nuevas en colombia|casas de apuestas nuevas en españa|casas de apuestas nuevas españa|casas de apuestas ofertas|casas de apuestas online|casas de apuestas online argentina|casas de apuestas
online colombia|casas de apuestas online deportivas|casas de apuestas online ecuador|casas
de apuestas online en argentina|casas de apuestas online en chile|casas de apuestas online en colombia|casas de apuestas
online en españa|casas de apuestas online en mexico|casas de apuestas online españa|casas de apuestas online mas fiables|casas de apuestas online mexico|casas de apuestas online nuevas|casas
de apuestas online peru|casas de apuestas online usa|casas de apuestas online venezuela|casas de apuestas
pago paypal|casas de apuestas para ufc|casas de apuestas paypal|casas de apuestas peru
bono sin deposito|casas de apuestas presenciales en españa|casas
de apuestas promociones|casas de
Your comment is awaiting moderation.
Выездной алкогольный https://bar-vip.ru и кофе-бар на любое мероприятие: авторские коктейли, свежая обжарка, бармен-шоу, оборудование и посуда. Свадьбы, корпоративы, дни рождения. Честные сметы, высокое качество.
Your comment is awaiting moderation.
fashiondailycorner.click – Really loved the colors and styles, definitely returning to explore more.
Your comment is awaiting moderation.
freshstyleboutique.click – Nice selection available, found several items worth adding to my cart.
Your comment is awaiting moderation.
(10 euros gratis apuestas|10 mejores casas de apuestas|10 trucos para ganar apuestas|15 euros gratis marca
apuestas|1×2 apuestas|1×2 apuestas deportivas|1×2 apuestas que significa|1×2 en apuestas|1×2 en apuestas que significa|1×2 que significa en apuestas|5 euros gratis apuestas|9 apuestas que
siempre ganaras|a partir de cuanto se declara apuestas|actividades de
juegos de azar y apuestas|ad apuestas deportivas|aleksandre topuria
ufc apuestas|algoritmo para ganar apuestas deportivas|america apuestas|análisis nba apuestas|aplicacion android apuestas deportivas|aplicacion apuestas deportivas|aplicacion apuestas deportivas android|aplicación de apuestas online|aplicacion para hacer apuestas|aplicacion para hacer apuestas de futbol|aplicación para
hacer apuestas de fútbol|aplicaciones apuestas deportivas android|aplicaciones apuestas deportivas gratis|aplicaciones
de apuestas android|aplicaciones de apuestas de fútbol|aplicaciones de apuestas deportivas|aplicaciones de apuestas deportivas peru|aplicaciones de apuestas deportivas perú|aplicaciones de apuestas en colombia|aplicaciones de apuestas gratis|aplicaciones de apuestas online|aplicaciones de apuestas seguras|aplicaciones de apuestas
sin dinero|aplicaciones para hacer apuestas|apostar seguro apuestas deportivas|app android apuestas deportivas|app apuestas|app apuestas
android|app apuestas de futbol|app apuestas deportivas|app apuestas
deportivas android|app apuestas deportivas argentina|app apuestas deportivas colombia|app apuestas deportivas ecuador|app apuestas deportivas españa|app apuestas deportivas gratis|app apuestas entre amigos|app apuestas futbol|app apuestas gratis|app apuestas sin dinero|app casa
de apuestas|app casas de apuestas|app control apuestas|app de apuestas|app de apuestas android|app de apuestas casino|app de apuestas colombia|app
de apuestas con bono de bienvenida|app de apuestas de futbol|app de apuestas deportivas|app de apuestas deportivas
android|app de apuestas deportivas argentina|app de apuestas deportivas colombia|app de apuestas deportivas en españa|app
de apuestas deportivas peru|app de apuestas deportivas perú|app de
apuestas deportivas sin dinero|app de apuestas ecuador|app de apuestas
en colombia|app de apuestas en españa|app de apuestas en venezuela|app de apuestas futbol|app de
apuestas gratis|app de apuestas online|app
de apuestas para android|app de apuestas para ganar dinero|app
de apuestas peru|app de apuestas reales|app de casas de apuestas|app
marca apuestas android|app moviles de apuestas|app para apuestas|app para apuestas de futbol|app para apuestas deportivas|app para apuestas deportivas en español|app para ganar apuestas deportivas|app para hacer apuestas|app para
hacer apuestas deportivas|app para hacer apuestas entre amigos|app
para llevar control de apuestas|app pronosticos apuestas deportivas|app versus apuestas|apps apuestas mundial|apps de
apuestas|apps de apuestas con bono de bienvenida|apps de apuestas
de futbol|apps de apuestas deportivas peru|apps de apuestas mexico|apps para apuestas|aprender a hacer apuestas deportivas|aprender hacer apuestas deportivas|apuesta del dia apuestas deportivas|apuestas 10 euros
gratis|apuestas 100 seguras|apuestas 1×2|apuestas 1X2|apuestas 2
division|apuestas 3 division|apuestas a caballos|apuestas a carreras
de caballos|apuestas a colombia|apuestas a corners|apuestas
a ganar|apuestas a jugadores nba|apuestas a la baja|apuestas a
la nfl|apuestas al barcelona|apuestas al dia|apuestas al empate|apuestas al mundial|apuestas
al tenis wta|apuestas alaves barcelona|apuestas alcaraz hoy|apuestas alemania españa|apuestas alonso campeon del
mundo|apuestas altas y bajas|apuestas altas y bajas nfl|apuestas ambos equipos marcan|apuestas america|apuestas android|apuestas anillo nba|apuestas antes del mundial|apuestas
anticipadas|apuestas anticipadas nba|apuestas apps|apuestas arabia argentina|apuestas argentina|apuestas argentina campeon del
mundo|apuestas argentina canada|apuestas argentina colombia|apuestas argentina croacia|apuestas argentina españa|apuestas argentina francia|apuestas argentina francia cuanto
paga|apuestas argentina francia mundial|apuestas argentina gana
el mundial|apuestas argentina gana mundial|apuestas
argentina holanda|apuestas argentina mexico|apuestas argentina méxico|apuestas argentina
mundial|apuestas argentina online|apuestas argentina
paises bajos|apuestas argentina polonia|apuestas argentina
uruguay|apuestas argentina vs australia|apuestas argentina vs colombia|apuestas argentina vs francia|apuestas
argentina vs peru|apuestas argentinas|apuestas arsenal real madrid|apuestas
ascenso a primera division|apuestas ascenso a segunda|apuestas
asiaticas|apuestas asiatico|apuestas athletic|apuestas athletic atletico|apuestas athletic barça|apuestas athletic
barcelona|apuestas athletic betis|apuestas athletic manchester|apuestas athletic manchester united|apuestas athletic osasuna|apuestas athletic real|apuestas athletic real
madrid|apuestas athletic real sociedad|apuestas athletic real sociedad final|apuestas athletic roma|apuestas
athletic sevilla|apuestas athletic valencia|apuestas atletico|apuestas atletico barcelona|apuestas atletico barsa|apuestas atletico campeon champions|apuestas atletico campeon de liga|apuestas
atlético copenhague|apuestas atletico de madrid|apuestas atlético
de madrid|apuestas atletico de madrid barcelona|apuestas atletico de madrid
gana la liga|apuestas atletico de madrid real
madrid|apuestas atlético de madrid real madrid|apuestas atletico de madrid vs barcelona|apuestas atletico madrid|apuestas atletico madrid real
madrid|apuestas atletico madrid vs barcelona|apuestas atletico real madrid|apuestas atletico
real madrid champions|apuestas atletismo|apuestas bajas|apuestas baloncesto|apuestas baloncesto acb|apuestas baloncesto handicap|apuestas baloncesto hoy|apuestas
baloncesto juegos olimpicos|apuestas baloncesto nba|apuestas baloncesto pronostico|apuestas
baloncesto pronósticos|apuestas baloncesto prorroga|apuestas barca|apuestas barca athletic|apuestas barca atletico|apuestas
barca bayern|apuestas barca bayern munich|apuestas barca girona|apuestas barca hoy|apuestas barça hoy|apuestas barca
inter|apuestas barca juventus|apuestas barca madrid|apuestas
barça madrid|apuestas barca real madrid|apuestas barca vs juve|apuestas barca vs madrid|apuestas barca vs psg|apuestas
barcelona|apuestas barcelona alaves|apuestas barcelona athletic|apuestas barcelona atletico|apuestas
barcelona atletico de madrid|apuestas barcelona atlético
de madrid|apuestas barcelona atletico madrid|apuestas barcelona bayern|apuestas barcelona betis|apuestas barcelona campeon de liga|apuestas barcelona celta|apuestas barcelona espanyol|apuestas barcelona gana la champions|apuestas barcelona girona|apuestas barcelona
granada|apuestas barcelona hoy|apuestas barcelona inter|apuestas barcelona madrid|apuestas barcelona osasuna|apuestas barcelona psg|apuestas barcelona real madrid|apuestas barcelona real
sociedad|apuestas barcelona sevilla|apuestas barcelona
valencia|apuestas barcelona villarreal|apuestas barcelona vs atletico madrid|apuestas barcelona vs madrid|apuestas barcelona vs real madrid|apuestas
barsa madrid|apuestas basket hoy|apuestas bayern barcelona|apuestas bayern vs
barcelona|apuestas beisbol|apuestas béisbol|apuestas beisbol mlb|apuestas beisbol pronosticos|apuestas beisbol venezolano|apuestas betis|apuestas betis
– chelsea|apuestas betis barcelona|apuestas betis chelsea|apuestas betis fiorentina|apuestas betis
girona|apuestas betis madrid|apuestas betis mallorca|apuestas betis real madrid|apuestas betis real sociedad|apuestas betis sevilla|apuestas betis valencia|apuestas betis valladolid|apuestas betis vs valencia|apuestas betplay hoy
colombia|apuestas betsson peru|apuestas bienvenida|apuestas billar online|apuestas bolivia
vs colombia|apuestas bono|apuestas bono bienvenida|apuestas bono de bienvenida|apuestas bono de bienvenida sin deposito|apuestas
bono gratis|apuestas bono sin deposito|apuestas bonos sin deposito|apuestas borussia real madrid|apuestas boxeo|apuestas boxeo de campeonato|apuestas boxeo españa|apuestas boxeo
español|apuestas boxeo femenino olimpiadas|apuestas boxeo hoy|apuestas boxeo online|apuestas brasil colombia|apuestas brasil peru|apuestas brasil uruguay|apuestas brasil vs colombia|apuestas brasil vs peru|apuestas caballos|apuestas caballos colocado|apuestas caballos españa|apuestas caballos hipodromo|apuestas caballos hoy|apuestas
caballos madrid|apuestas caballos online|apuestas caballos sanlucar de barrameda|apuestas caballos zarzuela|apuestas calculador|apuestas campeon|apuestas campeon champions|apuestas campeón champions|apuestas campeon champions 2025|apuestas campeon champions league|apuestas campeon conference league|apuestas campeon copa america|apuestas campeon copa del rey|apuestas campeon de champions|apuestas
campeon de la champions|apuestas campeon de liga|apuestas campeon del mundo|apuestas campeon eurocopa|apuestas campeón eurocopa|apuestas campeon europa league|apuestas campeon f1|apuestas campeon f1 2025|apuestas campeon formula 1|apuestas campeon libertadores|apuestas campeon liga|apuestas campeon liga bbva|apuestas campeon liga española|apuestas campeon liga santander|apuestas campeon motogp 2025|apuestas
campeon mundial|apuestas campeón mundial|apuestas campeon mundial baloncesto|apuestas campeon nba|apuestas campeón nba|apuestas campeon premier|apuestas
campeon premier league|apuestas campeon roland garros|apuestas campeonato f1|apuestas campeonatos de futbol|apuestas carrera de caballos|apuestas carrera de caballos hoy|apuestas
carrera de caballos nocturnas|apuestas carrera de galgos fin de
semana|apuestas carrera de galgos hoy|apuestas carrera
de galgos nocturnas|apuestas carreras caballos|apuestas carreras caballos sanlucar|apuestas carreras de
caballos|apuestas carreras de caballos en directo|apuestas carreras de caballos
en vivo|apuestas carreras de caballos españa|apuestas carreras de caballos
hoy|apuestas carreras de caballos nacionales|apuestas carreras de caballos nocturnas|apuestas carreras de caballos online|apuestas carreras de caballos sanlucar|apuestas carreras de caballos sanlúcar|apuestas carreras de galgos|apuestas carreras de galgos en vivo|apuestas carreras
de galgos nocturnas|apuestas carreras de galgos pre partido|apuestas
casino|apuestas casino barcelona|apuestas casino futbol|apuestas casino gran madrid|apuestas casino gratis|apuestas casino
madrid|apuestas casino online|apuestas casino online argentina|apuestas casinos|apuestas casinos online|apuestas celta|apuestas celta barcelona|apuestas celta betis|apuestas celta eibar|apuestas celta espanyol|apuestas celta
granada|apuestas celta madrid|apuestas celta manchester|apuestas celta real madrid|apuestas champion league|apuestas champions foro|apuestas champions hoy|apuestas champions league|apuestas champions league – pronósticos|apuestas champions league
2025|apuestas champions league hoy|apuestas champions league pronosticos|apuestas champions league pronósticos|apuestas champions pronosticos|apuestas chelsea barcelona|apuestas chelsea betis|apuestas chile|apuestas chile peru|apuestas chile venezuela|apuestas chile vs colombia|apuestas chile vs uruguay|apuestas ciclismo|apuestas ciclismo en vivo|apuestas ciclismo
femenino|apuestas ciclismo tour francia|apuestas
ciclismo vuelta|apuestas ciclismo vuelta a españa|apuestas ciclismo vuelta españa|apuestas city madrid|apuestas city real madrid|apuestas clasico|apuestas clasico español|apuestas clasico real
madrid barcelona|apuestas clasificacion mundial|apuestas colombia|apuestas colombia argentina|apuestas colombia
brasil|apuestas colombia paraguay|apuestas colombia uruguay|apuestas colombia vs argentina|apuestas colombia vs brasil|apuestas combinadas|apuestas
combinadas como funcionan|apuestas combinadas
de futbol|apuestas combinadas de fútbol|apuestas
combinadas foro|apuestas combinadas futbol|apuestas combinadas hoy|apuestas combinadas mismo partido|apuestas combinadas
mundial|apuestas combinadas nba|apuestas combinadas para esta semana|apuestas combinadas para hoy|apuestas
combinadas para mañana|apuestas combinadas pronosticos|apuestas combinadas recomendadas|apuestas combinadas seguras|apuestas combinadas seguras para
hoy|apuestas combinadas seguras para mañana|apuestas como ganar|apuestas comparador|apuestas con bono de bienvenida|apuestas con dinero ficticio|apuestas con dinero real|apuestas con dinero virtual|apuestas con handicap|apuestas
con handicap asiatico|apuestas con handicap baloncesto|apuestas con mas probabilidades de ganar|apuestas con paypal|apuestas
con tarjeta de credito|apuestas con tarjeta de debito|apuestas consejos|apuestas copa|apuestas copa africa|apuestas copa america|apuestas copa américa|apuestas copa argentina|apuestas copa brasil|apuestas
copa davis|apuestas copa de europa|apuestas copa del mundo|apuestas copa del rey|apuestas copa del rey baloncesto|apuestas copa del rey final|apuestas copa del rey futbol|apuestas copa del rey ganador|apuestas copa del rey hoy|apuestas copa del rey
pronosticos|apuestas copa del rey pronósticos|apuestas copa europa|apuestas
copa italia|apuestas copa libertadores|apuestas copa mundial de hockey|apuestas copa rey|apuestas copa
sudamericana|apuestas corners|apuestas corners hoy|apuestas croacia argentina|apuestas cuartos eurocopa|apuestas cuotas|apuestas cuotas altas|apuestas cuotas bajas|apuestas de 1 euro|apuestas de baloncesto|apuestas de baloncesto hoy|apuestas de baloncesto nba|apuestas
de baloncesto para hoy|apuestas de beisbol|apuestas de
beisbol para hoy|apuestas de blackjack en linea|apuestas de boxeo|apuestas
de boxeo canelo|apuestas de boxeo en las
vegas|apuestas de boxeo hoy|apuestas de boxeo online|apuestas de caballo|apuestas de caballos|apuestas de caballos como funciona|apuestas de caballos como
se juega|apuestas de caballos en colombia|apuestas de caballos en españa|apuestas de caballos en linea|apuestas de caballos españa|apuestas de caballos ganador y
colocado|apuestas de caballos internacionales|apuestas de caballos juegos|apuestas de caballos online|apuestas de caballos online en venezuela|apuestas de caballos por internet|apuestas de caballos pronosticos|apuestas de caballos
pronósticos|apuestas de carrera de caballos|apuestas de carreras
de caballos|apuestas de carreras de caballos online|apuestas de casino|apuestas de casino online|apuestas de casino por
internet|apuestas de champions league|apuestas de ciclismo|apuestas de colombia|apuestas de copa america|apuestas de corners|apuestas de
deportes en linea|apuestas de deportes online|apuestas de
dinero|apuestas de esports|apuestas de eurocopa|apuestas de europa league|apuestas de f1|apuestas de formula 1|apuestas de futbol|apuestas de fútbol|apuestas de futbol app|apuestas
de futbol argentina|apuestas de futbol colombia|apuestas de
futbol en colombia|apuestas de futbol en directo|apuestas de futbol en linea|apuestas de futbol en vivo|apuestas de futbol español|apuestas de futbol
gratis|apuestas de futbol hoy|apuestas de futbol mundial|apuestas de futbol online|apuestas de fútbol online|apuestas de futbol para hoy|apuestas de fútbol para
hoy|apuestas de futbol para hoy seguras|apuestas de futbol para
mañana|apuestas de futbol peru|apuestas de futbol pronosticos|apuestas de fútbol pronósticos|apuestas de futbol seguras|apuestas de futbol seguras para hoy|apuestas de futbol sin dinero|apuestas de galgos|apuestas de
galgos como ganar|apuestas de galgos en directo|apuestas de galgos
online|apuestas de galgos trucos|apuestas de golf|apuestas
de hockey|apuestas de hockey sobre hielo|apuestas de hoy|apuestas de
hoy seguras|apuestas de juego|apuestas de juegos|apuestas de juegos deportivos|apuestas de juegos online|apuestas
de la champions league|apuestas de la copa américa|apuestas de
la eurocopa|apuestas de la europa league|apuestas de la liga|apuestas de la liga
bbva|apuestas de la liga española|apuestas de la nba|apuestas de
la nfl|apuestas de la ufc|apuestas de mlb|apuestas de nba|apuestas de nba para hoy|apuestas de partidos|apuestas de partidos de futbol|apuestas de peleas ufc|apuestas de perros en vivo|apuestas de
perros virtuales|apuestas de peru|apuestas de sistema|apuestas de
sistema como funciona|apuestas de sistema explicacion|apuestas
de sistema explicación|apuestas de tenis|apuestas de tenis de mesa|apuestas de tenis en directo|apuestas de tenis hoy|apuestas de tenis para hoy|apuestas de tenis pronosticos|apuestas de tenis seguras|apuestas de todo
tipo|apuestas de ufc|apuestas de ufc hoy|apuestas del boxeo|apuestas del clasico|apuestas del clasico real
madrid barca|apuestas del dia|apuestas del día|apuestas del
dia de hoy|apuestas del dia deportivas|apuestas del dia futbol|apuestas del mundial|apuestas del
partido de hoy|apuestas del real madrid|apuestas del rey|apuestas del sistema|apuestas deporte|apuestas deportes|apuestas deportiva|apuestas deportivas|apuestas deportivas 1
euro|apuestas deportivas 10 euros gratis|apuestas deportivas 100 seguras|apuestas deportivas 1×2|apuestas deportivas
android|apuestas deportivas app|apuestas deportivas apps|apuestas deportivas
argentina|apuestas deportivas argentina futbol|apuestas deportivas argentina
legal|apuestas deportivas atletico de madrid|apuestas deportivas baloncesto|apuestas deportivas barca madrid|apuestas deportivas barcelona|apuestas deportivas
beisbol|apuestas deportivas bono|apuestas deportivas bono bienvenida|apuestas deportivas bono de bienvenida|apuestas deportivas bono sin deposito|apuestas deportivas bonos de bienvenida|apuestas deportivas boxeo|apuestas deportivas caballos|apuestas deportivas calculadora|apuestas deportivas campeon liga|apuestas deportivas casino|apuestas
deportivas casino barcelona|apuestas deportivas casino online|apuestas deportivas cerca de mi|apuestas deportivas champions league|apuestas deportivas
chile|apuestas deportivas ciclismo|apuestas deportivas colombia|apuestas deportivas com|apuestas deportivas
com foro|apuestas deportivas com pronosticos|apuestas deportivas
combinadas|apuestas deportivas combinadas para hoy|apuestas deportivas como se juega|apuestas deportivas comparador|apuestas deportivas con bono gratis|apuestas deportivas con bonos
gratis|apuestas deportivas con dinero ficticio|apuestas
deportivas con paypal|apuestas deportivas con puntos virtuales|apuestas deportivas consejos|apuestas deportivas
consejos para ganar|apuestas deportivas copa america|apuestas deportivas copa del rey|apuestas
deportivas copa libertadores|apuestas deportivas copa
mundial|apuestas deportivas corners|apuestas deportivas cual
es la mejor|apuestas deportivas cuotas altas|apuestas deportivas de
baloncesto|apuestas deportivas de boxeo|apuestas deportivas de colombia|apuestas deportivas de futbol|apuestas deportivas de nba|apuestas deportivas de nhl|apuestas deportivas de peru|apuestas deportivas de tenis|apuestas deportivas del dia|apuestas deportivas dinero ficticio|apuestas deportivas directo|apuestas deportivas doble oportunidad|apuestas
deportivas en argentina|apuestas deportivas en chile|apuestas
deportivas en colombia|apuestas deportivas en directo|apuestas deportivas
en españa|apuestas deportivas en español|apuestas deportivas en linea|apuestas
deportivas en línea|apuestas deportivas en peru|apuestas deportivas en perú|apuestas deportivas en sevilla|apuestas deportivas en uruguay|apuestas deportivas en vivo|apuestas deportivas es|apuestas deportivas es pronosticos|apuestas
deportivas españa|apuestas deportivas españolas|apuestas deportivas esports|apuestas deportivas
estadisticas|apuestas deportivas estrategias|apuestas deportivas estrategias seguras|apuestas deportivas eurocopa|apuestas deportivas europa league|apuestas deportivas f1|apuestas deportivas faciles de ganar|apuestas deportivas formula
1|apuestas deportivas foro|apuestas deportivas foro futbol|apuestas
deportivas foro tenis|apuestas deportivas francia argentina|apuestas deportivas
futbol|apuestas deportivas fútbol|apuestas deportivas futbol
argentino|apuestas deportivas futbol colombia|apuestas deportivas futbol español|apuestas deportivas gana|apuestas deportivas ganadas|apuestas deportivas ganar dinero
seguro|apuestas deportivas gane|apuestas deportivas golf|apuestas deportivas gratis|apuestas deportivas gratis con premios|apuestas deportivas gratis hoy|apuestas deportivas gratis sin deposito|apuestas deportivas handicap|apuestas deportivas handicap asiatico|apuestas deportivas
hoy|apuestas deportivas impuestos|apuestas deportivas interior argentina|apuestas deportivas juegos
olimpicos|apuestas deportivas la liga|apuestas deportivas
legales|apuestas deportivas legales en colombia|apuestas deportivas libres de impuestos|apuestas deportivas licencia españa|apuestas deportivas liga
española|apuestas deportivas listado|apuestas deportivas listado clasico|apuestas deportivas
madrid|apuestas deportivas mas seguras|apuestas deportivas mejor pagadas|apuestas deportivas
mejores|apuestas deportivas mejores app|apuestas deportivas mejores casas|apuestas
deportivas mejores cuotas|apuestas deportivas mejores
paginas|apuestas deportivas mexico|apuestas deportivas méxico|apuestas deportivas
mlb|apuestas deportivas mlb hoy|apuestas deportivas multiples|apuestas deportivas mundial|apuestas deportivas murcia|apuestas deportivas nba|apuestas deportivas nba hoy|apuestas deportivas nfl|apuestas deportivas nhl|apuestas deportivas nuevas|apuestas deportivas ofertas|apuestas deportivas online|apuestas deportivas
online argentina|apuestas deportivas online chile|apuestas deportivas
online colombia|apuestas deportivas online en colombia|apuestas
deportivas online españa|apuestas deportivas online mexico|apuestas deportivas online paypal|apuestas
deportivas online peru|apuestas deportivas online por internet|apuestas deportivas
pago paypal|apuestas deportivas para ganar dinero|apuestas deportivas para hoy|apuestas deportivas
para hoy pronosticos|apuestas deportivas partido suspendido|apuestas deportivas partidos de hoy|apuestas deportivas paypal|apuestas deportivas peru|apuestas deportivas perú|apuestas deportivas peru vs ecuador|apuestas deportivas predicciones|apuestas deportivas promociones|apuestas deportivas pronostico|apuestas
deportivas pronóstico|apuestas deportivas pronostico hoy|apuestas deportivas pronosticos|apuestas deportivas pronósticos|apuestas deportivas pronosticos expertos|apuestas deportivas pronosticos gratis|apuestas deportivas pronosticos nba|apuestas deportivas pronosticos tenis|apuestas deportivas que aceptan paypal|apuestas
deportivas real madrid|apuestas deportivas regalo bienvenida|apuestas deportivas resultado
exacto|apuestas deportivas resultados|apuestas deportivas rugby|apuestas deportivas seguras|apuestas deportivas seguras foro|apuestas deportivas seguras hoy|apuestas deportivas seguras para hoy|apuestas deportivas seguras telegram|apuestas deportivas sevilla|apuestas deportivas simulador
eurocopa|apuestas deportivas sin deposito|apuestas deportivas sin deposito
inicial|apuestas deportivas sin dinero|apuestas deportivas sin dinero real|apuestas deportivas sin registro|apuestas deportivas
stake|apuestas deportivas stake 10|apuestas deportivas telegram españa|apuestas deportivas tenis|apuestas
deportivas tenis de mesa|apuestas deportivas tenis foro|apuestas deportivas tenis hoy|apuestas deportivas tips|apuestas deportivas tipster|apuestas
deportivas ufc|apuestas deportivas uruguay|apuestas deportivas valencia|apuestas deportivas valencia
barcelona|apuestas deportivas venezuela|apuestas deportivas virtuales|apuestas deportivas y casino|apuestas deportivas y casino
online|apuestas deportivas.com|apuestas deportivas.com foro|apuestas deportivas.es|apuestas deportivos pronosticos|apuestas
deposito minimo 1 euro|apuestas descenso a segunda|apuestas descenso a segunda b|apuestas
descenso la liga|apuestas descenso primera division|apuestas descenso segunda|apuestas dia|apuestas
diarias seguras|apuestas dinero|apuestas dinero ficticio|apuestas dinero real|apuestas dinero virtual|apuestas directas|apuestas directo|apuestas directo
futbol|apuestas division de honor juvenil|apuestas dnb|apuestas doble oportunidad|apuestas doble resultado|apuestas dobles|apuestas dobles y triples|apuestas dortmund barcelona|apuestas draft nba|apuestas draft nfl|apuestas ecuador vs argentina|apuestas ecuador vs venezuela|apuestas egipto uruguay|apuestas el clasico|apuestas elecciones venezuela|apuestas empate|apuestas en baloncesto|apuestas en barcelona|apuestas en beisbol|apuestas en boxeo|apuestas
en caballos|apuestas en carreras de caballos|apuestas en casino|apuestas en casino online|apuestas
en casinos|apuestas en casinos online|apuestas en chile|apuestas en ciclismo|apuestas en colombia|apuestas en colombia de futbol|apuestas en directo|apuestas
en directo futbol|apuestas en directo pronosticos|apuestas en el futbol|apuestas en el tenis|apuestas en españa|apuestas en esports|apuestas en eventos deportivos virtuales|apuestas
en golf|apuestas en juegos|apuestas en la champions league|apuestas en la eurocopa|apuestas en la liga|apuestas
en la nba|apuestas en la nfl|apuestas en las vegas
mlb|apuestas en las vegas nfl|apuestas en linea|apuestas
en línea|apuestas en linea argentina|apuestas en linea boxeo|apuestas en linea chile|apuestas en linea colombia|apuestas en línea de fútbol|apuestas en linea deportivas|apuestas en linea
españa|apuestas en linea estados unidos|apuestas en linea futbol|apuestas en linea mexico|apuestas en línea méxico|apuestas en linea mundial|apuestas en linea peru|apuestas en linea usa|apuestas en los esports|apuestas en madrid|apuestas en méxico|apuestas en mexico online|apuestas en nba|apuestas en partidos de futbol|apuestas en partidos de futbol en vivo|apuestas en partidos de tenis en directo|apuestas en perú|apuestas en sevilla|apuestas
en sistema|apuestas en stake|apuestas en tenis|apuestas en tenis de mesa|apuestas
en valencia|apuestas en vivo|apuestas en vivo argentina|apuestas en vivo casino|apuestas en vivo
futbol|apuestas en vivo fútbol|apuestas en vivo nba|apuestas en vivo
peru|apuestas en vivo tenis|apuestas en vivo ufc|apuestas equipo
mbappe|apuestas equipos de futbol|apuestas españa|apuestas españa alemania|apuestas españa alemania eurocopa|apuestas españa
croacia|apuestas españa eurocopa|apuestas españa francia|apuestas españa francia eurocopa|apuestas españa gana el mundial|apuestas españa gana eurocopa|apuestas
españa gana mundial|apuestas españa georgia|apuestas españa holanda|apuestas
españa inglaterra|apuestas españa inglaterra cuotas|apuestas españa inglaterra eurocopa|apuestas españa italia|apuestas españa mundial|apuestas españa paises bajos|apuestas
español|apuestas español oviedo|apuestas espanyol barcelona|apuestas espanyol betis|apuestas espanyol villarreal|apuestas
esport|apuestas esports|apuestas esports colombia|apuestas esports españa|apuestas esports fifa|apuestas esports gratis|apuestas esports lol|apuestas esports peru|apuestas
esports valorant|apuestas estadisticas|apuestas estrategias|apuestas
euro|apuestas euro copa|apuestas eurocopa|apuestas eurocopa campeon|apuestas
eurocopa españa|apuestas eurocopa favoritos|apuestas eurocopa
femenina|apuestas eurocopa final|apuestas eurocopa ganador|apuestas eurocopa hoy|apuestas eurocopa sub 21|apuestas euroliga baloncesto|apuestas euroliga pronosticos|apuestas europa league|apuestas europa league hoy|apuestas europa league pronosticos|apuestas europa league pronósticos|apuestas
euros|apuestas f1 abu dhabi|apuestas f1 bahrein|apuestas f1 canada|apuestas
f1 china|apuestas f1 cuotas|apuestas f1 hoy|apuestas f1 las vegas|apuestas f1 miami|apuestas f1 monaco|apuestas faciles de ganar|apuestas fáciles de ganar|apuestas faciles para ganar|apuestas favoritas|apuestas favorito champions|apuestas favoritos champions|apuestas favoritos eurocopa|apuestas favoritos
mundial|apuestas fc barcelona|apuestas final champions cuotas|apuestas final champions league|apuestas final champions peru|apuestas final
copa|apuestas final copa america|apuestas final copa de europa|apuestas
final copa del rey|apuestas final copa europa|apuestas final copa
libertadores|apuestas final copa rey|apuestas final de
copa|apuestas final de copa del rey|apuestas final del mundial|apuestas final euro|apuestas final
eurocopa|apuestas final europa league|apuestas final libertadores|apuestas final mundial|apuestas final nba|apuestas final rugby|apuestas
final uefa europa league|apuestas final.mundial|apuestas finales de conferencia nfl|apuestas finales nba|apuestas fiorentina
betis|apuestas formula|apuestas formula 1|apuestas fórmula 1|apuestas fórmula 1 pronósticos|apuestas formula uno|apuestas
foro|apuestas foro nba|apuestas francia argentina|apuestas
francia españa|apuestas futbol|apuestas fútbol|apuestas futbol americano|apuestas futbol
americano nfl|apuestas futbol argentina|apuestas futbol argentino|apuestas
futbol champions league|apuestas futbol chile|apuestas futbol colombia|apuestas futbol consejos|apuestas futbol en directo|apuestas fútbol en directo|apuestas futbol en vivo|apuestas
fútbol en vivo|apuestas futbol españa|apuestas futbol español|apuestas fútbol español|apuestas futbol eurocopa|apuestas futbol
femenino|apuestas futbol foro|apuestas futbol gratis|apuestas
futbol hoy|apuestas fútbol hoy|apuestas futbol juegos olimpicos|apuestas futbol mexico|apuestas futbol mundial|apuestas futbol online|apuestas futbol para hoy|apuestas futbol peru|apuestas futbol pronosticos|apuestas futbol sala|apuestas futbol telegram|apuestas futbol virtual|apuestas galgos|apuestas galgos en directo|apuestas galgos hoy|apuestas galgos online|apuestas galgos pronosticos|apuestas galgos trucos|apuestas gana|apuestas
gana colombia|apuestas gana resultados|apuestas ganadas|apuestas ganadas hoy|apuestas ganador champions league|apuestas
ganador copa america|apuestas ganador copa del rey|apuestas ganador copa
del rey baloncesto|apuestas ganador copa
libertadores|apuestas ganador de la eurocopa|apuestas ganador de la liga|apuestas ganador del mundial|apuestas
ganador eurocopa|apuestas ganador europa league|apuestas ganador f1|apuestas ganador la liga|apuestas ganador liga española|apuestas ganador mundial|apuestas ganador mundial baloncesto|apuestas ganador mundial f1|apuestas ganador nba|apuestas ganadores eurocopa|apuestas ganadores mundial|apuestas ganar champions|apuestas ganar
eurocopa|apuestas ganar liga|apuestas ganar mundial|apuestas ganar
nba|apuestas getafe valencia|apuestas ghana uruguay|apuestas girona|apuestas girona athletic|apuestas girona betis|apuestas girona campeon de liga|apuestas girona campeon liga|apuestas girona
gana la liga|apuestas girona real madrid|apuestas girona real sociedad|apuestas goleador eurocopa|apuestas
goleadores eurocopa|apuestas goles asiaticos|apuestas golf|apuestas
golf masters|apuestas golf pga|apuestas granada barcelona|apuestas
grand slam de tenis|apuestas gratis|apuestas gratis casino|apuestas gratis
con premios|apuestas gratis hoy|apuestas gratis
para hoy|apuestas gratis por registro|apuestas gratis puntos|apuestas gratis regalos|apuestas gratis sin deposito|apuestas gratis
sin depósito|apuestas gratis sin ingreso|apuestas gratis sports|apuestas gratis y ganar premios|apuestas grupo
a eurocopa|apuestas grupos eurocopa|apuestas
handicap|apuestas handicap asiatico|apuestas handicap baloncesto|apuestas handicap como funciona|apuestas handicap nba|apuestas
handicap nfl|apuestas hipicas online|apuestas hípicas online|apuestas hipicas venezuela|apuestas hockey|apuestas hockey hielo|apuestas hockey patines|apuestas hockey sobre hielo|apuestas holanda
argentina|apuestas holanda vs argentina|apuestas hoy|apuestas hoy champions|apuestas hoy futbol|apuestas hoy nba|apuestas hoy pronosticos|apuestas hoy seguras|apuestas impuestos|apuestas
inglaterra paises bajos|apuestas inter barca|apuestas inter barcelona|apuestas juego|apuestas juegos|apuestas juegos en linea|apuestas juegos olimpicos|apuestas juegos olímpicos|apuestas juegos olimpicos baloncesto|apuestas
juegos online|apuestas juegos virtuales|apuestas jugador sevilla|apuestas
jugadores nba|apuestas kings league americas|apuestas la liga|apuestas la liga española|apuestas la liga hoy|apuestas la liga santander|apuestas las
vegas mlb|apuestas las vegas nba|apuestas las vegas nfl|apuestas league of legends
mundial|apuestas legal|apuestas legales|apuestas legales en colombia|apuestas legales
en españa|apuestas legales en estados unidos|apuestas legales españa|apuestas leganes betis|apuestas libertadores|apuestas licencia|apuestas liga 1 peru|apuestas liga
argentina|apuestas liga bbva pronosticos|apuestas liga de campeones|apuestas liga de campeones de
baloncesto|apuestas liga de campeones de hockey|apuestas liga españa|apuestas
liga española|apuestas liga santander pronosticos|apuestas ligas de futbol|apuestas linea|apuestas linea de gol|apuestas liverpool
barcelona|apuestas liverpool real madrid|apuestas lol mundial|apuestas madrid|apuestas madrid arsenal|apuestas madrid
atletico|apuestas madrid atletico champions|apuestas
madrid barca|apuestas madrid barça|apuestas madrid barca hoy|apuestas madrid barca supercopa|apuestas madrid
barcelona|apuestas madrid barsa|apuestas madrid bayern|apuestas madrid betis|apuestas madrid borussia|apuestas madrid campeon champions|apuestas madrid celta|apuestas madrid city|apuestas
madrid dortmund|apuestas madrid gana la liga|apuestas madrid gana liga|apuestas madrid
hoy|apuestas madrid liverpool|apuestas madrid osasuna|apuestas madrid sevilla|apuestas madrid valencia|apuestas madrid vs arsenal|apuestas madrid vs barcelona|apuestas
mallorca osasuna|apuestas mallorca real sociedad|apuestas manchester athletic|apuestas manchester city
real madrid|apuestas mas faciles de ganar|apuestas mas seguras|apuestas mas
seguras para hoy|apuestas masters de golf|apuestas masters de tenis|apuestas maximo goleador eurocopa|apuestas maximo goleador mundial|apuestas
mejor jugador eurocopa|apuestas mejores casinos online|apuestas mexico|apuestas méxico|apuestas mexico polonia|apuestas
méxico polonia|apuestas mlb|apuestas mlb hoy|apuestas mlb las vegas|apuestas mlb para
hoy|apuestas mlb pronosticos|apuestas mlb usa|apuestas mma ufc|apuestas momios|apuestas multiples|apuestas múltiples|apuestas multiples como funcionan|apuestas multiples el gordo|apuestas multiples futbol|apuestas mundial|apuestas mundial 2026|apuestas
mundial baloncesto|apuestas mundial balonmano|apuestas mundial brasil|apuestas mundial campeon|apuestas mundial ciclismo|apuestas mundial clubes|apuestas mundial de baloncesto|apuestas mundial de ciclismo|apuestas mundial de clubes|apuestas mundial de futbol|apuestas mundial de fútbol|apuestas mundial de rugby|apuestas mundial f1|apuestas mundial favoritos|apuestas mundial femenino|apuestas mundial formula 1|apuestas mundial futbol|apuestas mundial ganador|apuestas
mundial lol|apuestas mundial moto gp|apuestas mundial motogp|apuestas mundial rugby|apuestas mundial sub
17|apuestas mundiales|apuestas mundialistas|apuestas mvp eurocopa|apuestas mvp nba|apuestas mvp nfl|apuestas nacionales de colombia|apuestas nba|apuestas nba all star|apuestas nba campeon|apuestas nba
consejos|apuestas nba esta noche|apuestas nba finals|apuestas nba gratis|apuestas nba hoy|apuestas nba
hoy jugadores|apuestas nba hoy pronosticos|apuestas nba para hoy|apuestas nba playoffs|apuestas nba pronosticos|apuestas nba pronósticos|apuestas nba pronosticos hoy|apuestas nba tipster|apuestas nfl|apuestas
nfl hoy|apuestas nfl las vegas|apuestas nfl playoffs|apuestas nfl pronosticos|apuestas
nfl pronósticos|apuestas nfl semana 4|apuestas nfl super bowl|apuestas nhl|apuestas nhl pronosticos|apuestas octavos eurocopa|apuestas ofertas|apuestas online|apuestas online argentina|apuestas online argentina legal|apuestas online bono|apuestas online
bono bienvenida|apuestas online boxeo|apuestas online caballos|apuestas online carreras de caballos|apuestas online casino|apuestas online champions league|apuestas online chile|apuestas online ciclismo|apuestas online colombia|apuestas online comparativa|apuestas online con paypal|apuestas online de caballos|apuestas online deportivas|apuestas online en argentina|apuestas online en peru|apuestas online
espana|apuestas online españa|apuestas online esports|apuestas online foro|apuestas online
futbol|apuestas online futbol españa|apuestas online golf|apuestas online
gratis|apuestas online gratis sin deposito|apuestas online juegos|apuestas online
mexico|apuestas online mma|apuestas online movil|apuestas online
nba|apuestas online net|apuestas online nuevas|apuestas online opiniones|apuestas online paypal|apuestas
online peru|apuestas online seguras|apuestas online sin dinero|apuestas online sin registro|apuestas online tenis|apuestas online ufc|apuestas online uruguay|apuestas online venezuela|apuestas open britanico golf|apuestas
osasuna athletic|apuestas osasuna barcelona|apuestas osasuna real
madrid|apuestas osasuna sevilla|apuestas osasuna
valencia|apuestas over|apuestas over 2.5|apuestas over under|apuestas paginas|apuestas pago anticipado|apuestas paises bajos ecuador|apuestas paises bajos inglaterra|apuestas países bajos qatar|apuestas para boxeo|apuestas para champions
league|apuestas para el clasico|apuestas para el dia
de hoy|apuestas para el mundial|apuestas para el partido
de hoy|apuestas para eurocopa|apuestas para europa league|apuestas para
futbol|apuestas para ganar|apuestas para ganar dinero|apuestas para ganar
dinero facil|apuestas para ganar en la ruleta|apuestas para ganar la champions|apuestas para ganar
la eurocopa|apuestas para ganar la europa league|apuestas para ganar la liga|apuestas
para ganar siempre|apuestas para hacer|apuestas para hoy|apuestas para
hoy de futbol|apuestas para hoy europa league|apuestas para hoy futbol|apuestas para juegos|apuestas para la
champions league|apuestas para la copa del rey|apuestas
para la eurocopa|apuestas para la europa league|apuestas para
la final de la eurocopa|apuestas para la nba hoy|apuestas para los
partidos de hoy|apuestas para partidos de hoy|apuestas para
ufc|apuestas partido|apuestas partido aplazado|apuestas partido champions|apuestas partido
colombia|apuestas partido españa marruecos|apuestas partido mundial|apuestas partido suspendido|apuestas partidos|apuestas
partidos champions league|apuestas partidos csgo|apuestas partidos
de futbol|apuestas partidos de futbol hoy|apuestas
partidos de hoy|apuestas partidos eurocopa|apuestas partidos
futbol|apuestas partidos hoy|apuestas partidos mundial|apuestas paypal|apuestas peleas de boxeo|apuestas peru|apuestas perú|apuestas
peru brasil|apuestas peru chile|apuestas peru paraguay|apuestas peru uruguay|apuestas peru
vs chile|apuestas peru vs colombia|apuestas pichichi eurocopa|apuestas plataforma|apuestas playoff|apuestas playoff ascenso|apuestas
playoff ascenso a primera|apuestas playoff nba|apuestas playoff segunda|apuestas playoff segunda b|apuestas playoffs nba|apuestas
playoffs nfl|apuestas polonia argentina|apuestas por argentina|apuestas por internet mexico|apuestas por internet para ganar dinero|apuestas por paypal|apuestas por ronda boxeo|apuestas por
sistema|apuestas portugal uruguay|apuestas pre partido|apuestas predicciones|apuestas predicciones futbol|apuestas
primera division|apuestas primera division españa|apuestas promociones|apuestas pronostico|apuestas pronosticos|apuestas pronosticos deportivos|apuestas pronosticos deportivos tenis|apuestas pronosticos futbol|apuestas pronosticos
gratis|apuestas pronosticos nba|apuestas pronosticos tenis|apuestas prorroga|apuestas
psg barca|apuestas psg barcelona|apuestas puntos por tarjetas|apuestas puntos tarjetas|apuestas que aceptan paypal|apuestas que es handicap|apuestas
que puedes hacer con tu novia|apuestas que siempre ganaras|apuestas que significa|apuestas quien bajara a segunda|apuestas quién bajara a segunda|apuestas quien gana el mundial|apuestas quien gana eurocopa|apuestas quien gana la champions|apuestas quien gana la eurocopa|apuestas quien gana la liga|apuestas quien ganara el mundial|apuestas
quién ganará el mundial|apuestas quien ganara la champions|apuestas quien ganara la eurocopa|apuestas quien ganara la liga|apuestas rayo barcelona|apuestas real madrid|apuestas real madrid arsenal|apuestas real madrid athletic|apuestas real madrid
atletico|apuestas real madrid atletico champions|apuestas real madrid atletico de madrid|apuestas real madrid atlético de madrid|apuestas real
madrid atletico madrid|apuestas real madrid barcelona|apuestas real madrid bayern|apuestas
real madrid betis|apuestas real madrid borussia|apuestas real madrid
campeon champions|apuestas real madrid celta|apuestas real madrid champions|apuestas real madrid city|apuestas real madrid
girona|apuestas real madrid hoy|apuestas real madrid liverpool|apuestas real madrid manchester city|apuestas real
madrid osasuna|apuestas real madrid real sociedad|apuestas real madrid valencia|apuestas real madrid villarreal|apuestas real madrid vs arsenal|apuestas real
madrid vs atletico|apuestas real madrid vs atlético|apuestas real madrid vs atletico madrid|apuestas real madrid vs barcelona|apuestas real madrid
vs betis|apuestas real madrid vs sevilla|apuestas real madrid vs valencia|apuestas real sociedad|apuestas real sociedad athletic|apuestas real sociedad barcelona|apuestas real sociedad betis|apuestas real sociedad
psg|apuestas real sociedad real madrid|apuestas real
sociedad valencia|apuestas recomendadas hoy|apuestas regalo de
bienvenida|apuestas registro|apuestas resultado exacto|apuestas resultados|apuestas resultados eurocopa|apuestas retirada tenis|apuestas roma barcelona|apuestas roma sevilla|apuestas rugby|apuestas rugby mundial|apuestas rugby world cup|apuestas
ruleta seguras|apuestas segunda|apuestas segunda b|apuestas segunda division|apuestas segunda división|apuestas segunda division b|apuestas segunda division españa|apuestas seguras|apuestas seguras baloncesto|apuestas seguras calculadora|apuestas seguras en la ruleta|apuestas seguras eurocopa|apuestas seguras foro|apuestas seguras futbol|apuestas seguras
futbol hoy|apuestas seguras gratis|apuestas seguras hoy|apuestas seguras hoy futbol|apuestas seguras nba|apuestas seguras nba hoy|apuestas seguras para este fin de semana|apuestas seguras para ganar dinero|apuestas seguras para hoy|apuestas seguras para hoy fútbol|apuestas seguras para hoy pronósticos|apuestas seguras para mañana|apuestas seguras ruleta|apuestas seguras telegram|apuestas seguras
tenis|apuestas semifinales eurocopa|apuestas senegal paises bajos|apuestas sevilla|apuestas sevilla athletic|apuestas sevilla atletico de madrid|apuestas sevilla barcelona|apuestas sevilla betis|apuestas sevilla campeon liga|apuestas sevilla celta|apuestas sevilla gana la liga|apuestas sevilla girona|apuestas sevilla inter|apuestas sevilla
jugador|apuestas sevilla juventus|apuestas sevilla leganes|apuestas sevilla madrid|apuestas sevilla manchester
united|apuestas sevilla osasuna|apuestas sevilla real madrid|apuestas sevilla real sociedad|apuestas sevilla roma|apuestas sevilla valencia|apuestas
significa|apuestas simples ejemplos|apuestas simples
o combinadas|apuestas sin deposito|apuestas sin deposito inicial|apuestas
sin deposito minimo|apuestas sin dinero|apuestas sin dinero real|apuestas sin empate|apuestas sin empate
que significa|apuestas sin ingreso minimo|apuestas
sin registro|apuestas sistema|apuestas sistema calculadora|apuestas sistema como funciona|apuestas sistema trixie|apuestas sociedad|apuestas sorteo copa
del rey|apuestas stake|apuestas stake 10|apuestas stake 10 hoy|apuestas super bowl favorito|apuestas super rugby|apuestas supercopa españa|apuestas
superliga argentina|apuestas tarjeta roja|apuestas tarjetas|apuestas tarjetas
amarillas|apuestas tenis|apuestas tenis atp|apuestas tenis consejos|apuestas tenis copa davis|apuestas tenis de mesa|apuestas tenis de mesa pronosticos|apuestas tenis
en vivo|apuestas tenis femenino|apuestas tenis hoy|apuestas tenis
itf|apuestas tenis pronosticos|apuestas tenis pronósticos|apuestas tenis retirada|apuestas tenis roland garros|apuestas tenis
seguras|apuestas tenis wimbledon|apuestas tenis wta|apuestas tercera division|apuestas
tercera division españa|apuestas tipos|apuestas tips|apuestas tipster|apuestas tipster para hoy|apuestas topuria holloway cuotas|apuestas torneos de golf|apuestas
torneos de tenis|apuestas trucos|apuestas uefa champions
league|apuestas uefa europa league|apuestas ufc|apuestas ufc chile|apuestas ufc como funciona|apuestas ufc hoy|apuestas ufc ilia topuria|apuestas ufc online|apuestas ufc pronósticos|apuestas ufc telegram|apuestas ufc topuria|apuestas under over|apuestas
unionistas villarreal|apuestas uruguay|apuestas uruguay colombia|apuestas uruguay corea|apuestas uruguay vs colombia|apuestas us open golf|apuestas us open tenis|apuestas valencia|apuestas valencia barcelona|apuestas valencia betis|apuestas
valencia madrid|apuestas valencia real madrid|apuestas
valladolid barcelona|apuestas valladolid valencia|apuestas valor app|apuestas valor en directo|apuestas valor galgos|apuestas venezuela|apuestas venezuela argentina|apuestas venezuela bolivia|apuestas venezuela ecuador|apuestas villarreal|apuestas villarreal athletic|apuestas villarreal barcelona|apuestas villarreal
bayern|apuestas villarreal betis|apuestas villarreal liverpool|apuestas villarreal manchester|apuestas villarreal manchester united|apuestas villarreal
vs real madrid|apuestas virtuales|apuestas virtuales colombia|apuestas
virtuales futbol|apuestas virtuales sin dinero|apuestas vivo|apuestas vuelta a españa|apuestas vuelta españa|apuestas
william hill partidos de hoy|apuestas y casino|apuestas y
casinos|apuestas y juegos de azar|apuestas y pronosticos|apuestas y pronosticos de futbol|apuestas y pronosticos deportivos|apuestas y
resultados|apuestas-deportivas|apuestas-deportivas.es pronosticos|arbitro
nba apuestas|argentina apuestas|argentina colombia apuestas|argentina croacia apuestas|argentina francia apuestas|argentina mexico apuestas|argentina peru apuestas|argentina uruguay apuestas|argentina vs bolivia apuestas|argentina vs chile apuestas|argentina vs colombia
apuestas|argentina vs francia apuestas|argentina vs.
colombia apuestas|asi se gana en las apuestas deportivas|asiatico apuestas|asiatico
en apuestas|asiaticos apuestas|athletic barcelona apuestas|athletic manchester united apuestas|athletic osasuna apuestas|athletic real madrid apuestas|atletico barcelona apuestas|atletico de madrid apuestas|atlético de madrid apuestas|atletico de madrid real madrid apuestas|atletico de madrid
vs barcelona apuestas|atletico madrid real madrid apuestas|atletico madrid vs real madrid apuestas|atletico
real madrid apuestas|atletico vs real madrid apuestas|avisador de cuotas apuestas|bajada de cuotas apuestas|baloncesto apuestas|barbastro barcelona apuestas|barca
apuestas|barca bayern apuestas|barca inter apuestas|barca madrid apuestas|barça madrid apuestas|barca vs atletico apuestas|barca
vs madrid apuestas|barca vs real madrid apuestas|barcelona – real madrid apuestas|barcelona apuestas|barcelona atletico apuestas|barcelona
atletico de madrid apuestas|barcelona atletico madrid apuestas|barcelona
betis apuestas|barcelona casa de apuestas|barcelona inter apuestas|barcelona psg apuestas|barcelona real
madrid apuestas|barcelona real sociedad apuestas|barcelona sevilla apuestas|barcelona valencia apuestas|barcelona vs athletic bilbao apuestas|barcelona vs atlético madrid apuestas|barcelona vs
betis apuestas|barcelona vs celta de vigo apuestas|barcelona vs espanyol apuestas|barcelona vs girona apuestas|barcelona vs madrid apuestas|barcelona vs
real madrid apuestas|barcelona vs real sociedad apuestas|barcelona vs sevilla apuestas|barcelona vs villarreal apuestas|base de datos cuotas apuestas deportivas|bayern real madrid apuestas|beisbol apuestas|best america apuestas|bet apuestas chile|bet apuestas
en vivo|betis – chelsea apuestas|betis apuestas|betis barcelona apuestas|betis chelsea apuestas|betis madrid apuestas|betis sevilla
apuestas|betsson tu sitio de apuestas online|blog apuestas baloncesto|blog apuestas ciclismo|blog apuestas nba|blog apuestas tenis|blog de apuestas de tenis|bono apuestas|bono apuestas
deportivas|bono apuestas deportivas sin deposito|bono apuestas gratis|bono apuestas gratis sin deposito|bono apuestas sin deposito|bono bienvenida apuestas|bono bienvenida apuestas
deportivas|bono bienvenida apuestas españa|bono bienvenida apuestas sin deposito|bono bienvenida apuestas sin depósito|bono bienvenida casa apuestas|bono bienvenida casa de apuestas|bono
bienvenida marca apuestas|bono casa apuestas|bono casa de apuestas|bono
casa de apuestas sin ingreso|bono casas de apuestas|bono de apuestas|bono de apuestas gratis sin deposito|bono de bienvenida apuestas|bono de bienvenida apuestas deportivas|bono de bienvenida casa de apuestas|bono de bienvenida casas de apuestas|bono de casas de apuestas|bono de registro apuestas|bono de registro apuestas deportivas|bono de
registro casa de apuestas|bono gratis apuestas|bono marca apuestas|bono por registro apuestas|bono por registro apuestas deportivas|bono por registro casa de apuestas|bono registro apuestas|bono sin deposito
apuestas|bono sin depósito apuestas|bono sin deposito apuestas deportivas|bono sin depósito apuestas deportivas|bono sin deposito casa de apuestas|bono sin deposito marca apuestas|bono sin ingreso apuestas|bono
sin ingreso apuestas deportivas|bonos apuestas|bonos apuestas colombia|bonos apuestas
deportivas|bonos apuestas deportivas sin deposito|bonos apuestas gratis|bonos
apuestas sin deposito|bonos apuestas sin depósito|bonos bienvenida apuestas|bonos bienvenida casas apuestas|bonos bienvenida casas de apuestas|bonos casa de apuestas|bonos casas apuestas|bonos casas de apuestas|bonos casas de apuestas colombia|bonos
casas de apuestas deportivas|bonos casas de apuestas españa|bonos casas de apuestas nuevas|bonos casas de apuestas sin deposito|bonos casas de apuestas sin depósito|bonos de apuestas|bonos de apuestas deportivas|bonos de apuestas gratis|bonos de apuestas sin deposito|bonos de
bienvenida apuestas|bonos de bienvenida apuestas
deportivas|bonos de bienvenida casa de apuestas|bonos de bienvenida
casas de apuestas|bonos de bienvenida de casas
de apuestas|bonos de bienvenida en casas de apuestas|bonos de casas de apuestas|bonos de casas de apuestas sin deposito|bonos en casa de apuestas|bonos
en casas de apuestas sin deposito|bonos gratis apuestas|bonos gratis apuestas
deportivas|bonos gratis casas de apuestas|bonos gratis sin deposito apuestas|bonos paginas de apuestas|bonos registro
casas de apuestas|bonos sin deposito apuestas|bonos sin depósito apuestas|bonos sin deposito apuestas deportivas|bonos sin deposito
casas de apuestas|bot de apuestas deportivas gratis|boxeo apuestas|brasil colombia
apuestas|brasil peru apuestas|brasil vs colombia apuestas|buenas apuestas para
hoy|buscador cuotas apuestas|buscador de apuestas seguras|buscador de cuotas apuestas|buscador de cuotas de apuestas|buscar apuestas seguras|caballos apuestas|calculador de apuestas|calculador de
cuotas apuestas|calculadora apuestas|calculadora apuestas combinadas|calculadora apuestas
de sistema|calculadora apuestas deportivas|calculadora apuestas deportivas seguras|calculadora apuestas multiples|calculadora apuestas segura|calculadora apuestas seguras|calculadora apuestas sistema|calculadora apuestas yankee|calculadora arbitraje apuestas|calculadora cubrir
apuestas|calculadora cuotas apuestas|calculadora
de apuestas|calculadora de apuestas combinadas|calculadora de
apuestas de futbol|calculadora de apuestas de sistema|calculadora de apuestas deportivas|calculadora de apuestas multiples|calculadora de
apuestas seguras|calculadora de apuestas sistema|calculadora de apuestas surebets|calculadora de
arbitraje apuestas|calculadora de cuotas apuestas|calculadora de cuotas de apuestas|calculadora para apuestas deportivas|calculadora poisson apuestas|calculadora poisson apuestas deportivas|calculadora poisson para apuestas|calculadora scalping apuestas deportivas|calculadora sistema apuestas|calculadora stake apuestas|calculadora trading apuestas|calcular apuestas|calcular
apuestas deportivas|calcular apuestas futbol|calcular apuestas sistema|calcular cuotas apuestas|calcular cuotas apuestas combinadas|calcular cuotas
apuestas deportivas|calcular cuotas de apuestas|calcular ganancias apuestas deportivas|calcular momios apuestas|calcular probabilidad cuota apuestas|calcular stake apuestas|calcular unidades apuestas|calcular yield apuestas|calculo de apuestas|calculo de
apuestas deportivas|cambio de cuotas apuestas|campeon champions apuestas|campeon eurocopa apuestas|campeon liga apuestas|campeon nba apuestas|canales de
apuestas gratis|carrera de caballos apuestas|carrera de caballos apuestas juego|carrera de caballos con apuestas|carrera de galgos
apuestas|carreras de caballos apuestas|carreras de caballos apuestas online|carreras de
caballos con apuestas|carreras de caballos
juegos de apuestas|carreras de galgos apuestas|carreras de galgos apuestas
online|carreras de galgos apuestas trucos|carreras galgos apuestas|casa apuestas argentina|casa apuestas atletico de madrid|casa
apuestas barcelona|casa apuestas betis|casa apuestas bono bienvenida|casa apuestas
bono gratis|casa apuestas bono sin deposito|casa apuestas cerca de mi|casa apuestas chile|casa apuestas colombia|casa apuestas con mejores cuotas|casa apuestas deportivas|casa apuestas españa|casa apuestas española|casa apuestas eurocopa|casa apuestas futbol|casa apuestas mejores cuotas|casa apuestas mundial|casa apuestas nueva|casa
apuestas nuevas|casa apuestas online|casa apuestas peru|casa apuestas valencia|casa de apuestas|casa de apuestas
10 euros gratis|casa de apuestas argentina|casa de apuestas atletico de madrid|casa de apuestas baloncesto|casa
de apuestas barcelona|casa de apuestas beisbol|casa de apuestas betis|casa de apuestas bono|casa de apuestas bono bienvenida|casa de apuestas bono de bienvenida|casa de apuestas bono gratis|casa de apuestas bono por registro|casa de apuestas bono
sin deposito|casa de apuestas boxeo|casa de apuestas caballos|casa de apuestas carreras de caballos|casa de apuestas cerca de mi|casa de
apuestas cerca de mí|casa de apuestas champions league|casa de apuestas chile|casa de apuestas ciclismo|casa
de apuestas colombia|casa de apuestas con bono de bienvenida|casa de apuestas con bono sin deposito|casa de apuestas
con cuotas mas altas|casa de apuestas con esports|casa de apuestas con las mejores cuotas|casa de
apuestas con licencia en españa|casa de apuestas con mejores
cuotas|casa de apuestas con pago anticipado|casa de apuestas con paypal|casa de apuestas copa america|casa de apuestas de caballos|casa de apuestas de colombia|casa de apuestas de españa|casa de apuestas de futbol|casa de apuestas de fútbol|casa de apuestas de futbol peru|casa
de apuestas de peru|casa de apuestas del madrid|casa de apuestas del real madrid|casa de apuestas
deportivas|casa de apuestas deportivas cerca de mi|casa
de apuestas deportivas en argentina|casa de apuestas deportivas en chile|casa
de apuestas deportivas en colombia|casa de apuestas deportivas en españa|casa
de apuestas deportivas en madrid|casa de apuestas deportivas españa|casa de apuestas deportivas españolas|casa de apuestas deportivas madrid|casa de
apuestas deportivas mexico|casa de apuestas deportivas online|casa de apuestas deportivas peru|casa de apuestas deposito 5 euros|casa
de apuestas deposito minimo|casa de apuestas deposito minimo 1 euro|casa de apuestas depósito mínimo 1 euro|casa de apuestas en españa|casa de apuestas en linea|casa de apuestas en madrid|casa de apuestas en perú|casa de
apuestas en vivo|casa de apuestas españa|casa de apuestas españa inglaterra|casa de apuestas española|casa de apuestas españolas|casa de apuestas esports|casa de
apuestas eurocopa|casa de apuestas europa league|casa de apuestas f1|casa de apuestas formula 1|casa de
apuestas futbol|casa de apuestas ingreso minimo|casa de apuestas ingreso minimo 1 euro|casa de apuestas ingreso mínimo 1 euro|casa de apuestas legales|casa de
apuestas legales en colombia|casa de apuestas legales en españa|casa de
apuestas libertadores|casa de apuestas liga española|casa de apuestas madrid|casa
de apuestas mas segura|casa de apuestas mejores|casa de apuestas méxico|casa
de apuestas minimo 5 euros|casa de apuestas mlb|casa de
apuestas mundial|casa de apuestas nba|casa de apuestas nfl|casa de apuestas nueva|casa de apuestas nuevas|casa de
apuestas oficial del real madrid|casa de apuestas oficial real madrid|casa de apuestas online|casa de apuestas online argentina|casa de apuestas online chile|casa de apuestas online españa|casa de
apuestas online mexico|casa de apuestas online paraguay|casa de
apuestas online peru|casa de apuestas online usa|casa de apuestas online venezuela|casa de apuestas pago anticipado|casa de apuestas para boxeo|casa de apuestas para ufc|casa de apuestas peru|casa de apuestas perú|casa de apuestas peru online|casa de apuestas por paypal|casa de apuestas promociones|casa de apuestas que regalan dinero|casa de apuestas real madrid|casa de apuestas regalo de bienvenida|casa de apuestas sevilla|casa de apuestas sin dinero|casa de apuestas sin ingreso minimo|casa de
apuestas sin licencia en españa|casa de apuestas sin minimo de ingreso|casa de apuestas
stake|casa de apuestas tenis|casa de apuestas ufc|casa de apuestas valencia|casa de apuestas venezuela|casa de apuestas virtuales|casa de apuestas vive la suerte|casa oficial de apuestas del real madrid|casas
apuestas asiaticas|casas apuestas bono sin deposito|casas apuestas bonos sin deposito|casas apuestas caballos|casas apuestas
chile|casas apuestas ciclismo|casas apuestas con licencia|casas apuestas con licencia
en españa|casas apuestas deportivas|casas apuestas deportivas colombia|casas apuestas deportivas españa|casas apuestas deportivas españolas|casas apuestas
deportivas nuevas|casas apuestas españa|casas apuestas españolas|casas apuestas esports|casas
apuestas eurocopa|casas apuestas golf|casas apuestas ingreso minimo 5 euros|casas
apuestas legales|casas apuestas legales españa|casas apuestas licencia|casas apuestas
licencia españa|casas apuestas mexico|casas apuestas mundial|casas apuestas nba|casas apuestas
nuevas|casas apuestas nuevas españa|casas apuestas
ofertas|casas apuestas online|casas apuestas
paypal|casas apuestas peru|casas apuestas sin licencia|casas apuestas tenis|casas asiaticas apuestas|casas de apuestas|casas de apuestas 5 euros|casas de apuestas app|casas de apuestas argentinas|casas de apuestas asiaticas|casas de apuestas baloncesto|casas de apuestas
barcelona|casas de apuestas bono bienvenida|casas de
apuestas bono de bienvenida|casas de apuestas bono por registro|casas de apuestas bono sin deposito|casas
de apuestas bono sin ingreso|casas de apuestas bonos|casas de apuestas
bonos de bienvenida|casas de apuestas bonos gratis|casas de
apuestas bonos sin deposito|casas de apuestas boxeo|casas de apuestas caballos|casas
de apuestas carreras de caballos|casas de apuestas casino|casas de apuestas
casino online|casas de apuestas cerca de mi|casas de
apuestas champions league|casas de apuestas chile|casas de
apuestas ciclismo|casas de apuestas colombia|casas de apuestas com|casas de apuestas con app|casas de apuestas con apuestas
gratis|casas de apuestas con bono|casas de apuestas con bono de
bienvenida|casas de apuestas con bono de registro|casas de apuestas con bono por registro|casas de apuestas
con bono sin deposito|casas de apuestas con bonos|casas
de apuestas con bonos gratis|casas de apuestas con bonos sin deposito|casas de apuestas con deposito minimo|casas de apuestas con esports|casas de
apuestas con handicap asiatico|casas de apuestas con licencia|casas de apuestas con licencia en españa|casas de apuestas con licencia españa|casas de apuestas con licencia española|casas de apuestas con mejores
cuotas|casas de apuestas con pago anticipado|casas de apuestas con paypal|casas de apuestas con paypal en perú|casas de apuestas con promociones|casas de apuestas
con ruleta en vivo|casas de apuestas copa del rey|casas
de apuestas de caballos|casas de apuestas de españa|casas de apuestas
de futbol|casas de apuestas de fútbol|casas de apuestas de
peru|casas de apuestas deportivas|casas de apuestas deportivas asiaticas|casas de apuestas deportivas colombia|casas
de apuestas deportivas comparativa|casas de apuestas deportivas con paypal|casas de apuestas
deportivas en chile|casas de apuestas deportivas en españa|casas de apuestas deportivas en linea|casas
de apuestas deportivas en madrid|casas de apuestas deportivas en mexico|casas de apuestas deportivas en peru|casas de
apuestas deportivas en sevilla|casas de apuestas deportivas en valencia|casas de apuestas deportivas españa|casas de apuestas deportivas españolas|casas de apuestas deportivas legales|casas de apuestas deportivas
madrid|casas de apuestas deportivas mexico|casas de apuestas deportivas nuevas|casas de
apuestas deportivas online|casas de apuestas deportivas peru|casas de apuestas deportivas perú|casas de apuestas deposito minimo 1
euro|casas de apuestas depósito mínimo 1 euro|casas de apuestas dinero gratis|casas de
apuestas en argentina|casas de apuestas en barcelona|casas de apuestas en chile|casas de apuestas en colombia|casas de apuestas
en españa|casas de apuestas en españa online|casas de apuestas en linea|casas de apuestas en madrid|casas de apuestas en méxico|casas de apuestas en peru|casas de apuestas en perú|casas de
apuestas en sevilla|casas de apuestas en uruguay|casas de
apuestas en valencia|casas de apuestas en venezuela|casas de apuestas equipos de futbol|casas de apuestas
españa|casas de apuestas españa alemania|casas de apuestas españa inglaterra|casas de apuestas españa licencia|casas de apuestas españa nuevas|casas de apuestas españa online|casas de apuestas española|casas
de apuestas españolas|casas de apuestas españolas con licencia|casas de apuestas españolas online|casas
de apuestas esports|casas de apuestas eurocopa|casas de
apuestas eurocopa 2024|casas de apuestas europa league|casas de
apuestas f1|casas de apuestas fisicas en barcelona|casas de apuestas fisicas en españa|casas de apuestas formula 1|casas de apuestas fuera de españa|casas de
apuestas futbol|casas de apuestas fútbol|casas de apuestas futbol españa|casas de apuestas ganador eurocopa|casas
de apuestas gratis|casas de apuestas ingreso minimo|casas de apuestas ingreso minimo 1 euro|casas
de apuestas ingreso minimo 5 euros|casas de apuestas
inter barcelona|casas de apuestas legales|casas de apuestas legales en colombia|casas de apuestas legales en españa|casas de
apuestas legales en mexico|casas de apuestas legales españa|casas de apuestas legales mx|casas de apuestas
licencia|casas de apuestas licencia españa|casas de apuestas lista|casas de apuestas madrid|casas de apuestas mas
seguras|casas de apuestas mejores bonos|casas de apuestas mejores
cuotas|casas de apuestas mexico|casas de apuestas
méxico|casas de apuestas minimo 5 euros|casas de apuestas mlb|casas de apuestas mundial|casas de apuestas mundial baloncesto|casas de apuestas
mundiales|casas de apuestas nba|casas de apuestas no reguladas en españa|casas de apuestas nueva ley|casas de apuestas nuevas|casas de apuestas
nuevas en colombia|casas de apuestas nuevas en españa|casas de apuestas nuevas españa|casas
de apuestas ofertas|casas de apuestas online|casas de
apuestas online argentina|casas de apuestas online colombia|casas de apuestas online deportivas|casas de
apuestas online ecuador|casas de apuestas online en argentina|casas de apuestas online en chile|casas de apuestas online en colombia|casas de apuestas online en españa|casas de apuestas online
en mexico|casas de apuestas online españa|casas de apuestas online mas fiables|casas de
apuestas online mexico|casas de apuestas online nuevas|casas de apuestas online peru|casas de apuestas online usa|casas de apuestas online venezuela|casas de apuestas pago
paypal|casas de apuestas para ufc|casas de apuestas paypal|casas de apuestas peru bono sin deposito|casas de apuestas presenciales
en españa|casas de apuestas promociones|casas
Your comment is awaiting moderation.
Спасибо Магазину)вы лучшие))))))))!!!!!!!!!!!!!!!!!!!!! :monetka: Качество на 100% https://xwalkcenter.org Отличный Магаз, Все четко!!!
Your comment is awaiting moderation.
(10 euros gratis apuestas|10 mejores casas de apuestas|10 trucos para ganar apuestas|15 euros gratis marca apuestas|1×2 apuestas|1×2 apuestas deportivas|1×2 apuestas que significa|1×2 en apuestas|1×2 en apuestas
que significa|1×2 que significa en apuestas|5 euros
gratis apuestas|9 apuestas que siempre ganaras|a partir de cuanto
se declara apuestas|actividades de juegos de azar y apuestas|ad apuestas deportivas|aleksandre topuria ufc apuestas|algoritmo para ganar apuestas deportivas|america apuestas|análisis nba apuestas|aplicacion android apuestas
deportivas|aplicacion apuestas deportivas|aplicacion apuestas deportivas android|aplicación de
apuestas online|aplicacion para hacer apuestas|aplicacion para hacer apuestas
de futbol|aplicación para hacer apuestas de fútbol|aplicaciones apuestas deportivas android|aplicaciones apuestas deportivas gratis|aplicaciones
de apuestas android|aplicaciones de apuestas de fútbol|aplicaciones de apuestas deportivas|aplicaciones
de apuestas deportivas peru|aplicaciones de apuestas deportivas perú|aplicaciones de apuestas en colombia|aplicaciones de apuestas gratis|aplicaciones de apuestas
online|aplicaciones de apuestas seguras|aplicaciones de apuestas sin dinero|aplicaciones para hacer apuestas|apostar seguro apuestas deportivas|app android apuestas deportivas|app apuestas|app apuestas
android|app apuestas de futbol|app apuestas deportivas|app apuestas deportivas android|app apuestas deportivas argentina|app apuestas
deportivas colombia|app apuestas deportivas ecuador|app apuestas deportivas españa|app apuestas deportivas gratis|app apuestas entre amigos|app
apuestas futbol|app apuestas gratis|app apuestas sin dinero|app casa de apuestas|app casas de apuestas|app control apuestas|app de apuestas|app de apuestas android|app de
apuestas casino|app de apuestas colombia|app de
apuestas con bono de bienvenida|app de apuestas de futbol|app de apuestas deportivas|app de apuestas deportivas android|app de apuestas deportivas argentina|app de apuestas deportivas
colombia|app de apuestas deportivas en españa|app de apuestas deportivas peru|app de apuestas deportivas perú|app de apuestas deportivas sin dinero|app
de apuestas ecuador|app de apuestas en colombia|app de apuestas en españa|app de
apuestas en venezuela|app de apuestas futbol|app de apuestas gratis|app de
apuestas online|app de apuestas para android|app de apuestas para ganar dinero|app de apuestas peru|app de apuestas reales|app de
casas de apuestas|app marca apuestas android|app moviles de apuestas|app para apuestas|app para apuestas de futbol|app para
apuestas deportivas|app para apuestas deportivas en español|app para ganar apuestas deportivas|app para hacer
apuestas|app para hacer apuestas deportivas|app para hacer
apuestas entre amigos|app para llevar control de apuestas|app
pronosticos apuestas deportivas|app versus apuestas|apps
apuestas mundial|apps de apuestas|apps de apuestas con bono de bienvenida|apps de apuestas de futbol|apps de
apuestas deportivas peru|apps de apuestas mexico|apps para apuestas|aprender a
hacer apuestas deportivas|aprender hacer apuestas deportivas|apuesta
del dia apuestas deportivas|apuestas 10 euros
gratis|apuestas 100 seguras|apuestas 1×2|apuestas 1X2|apuestas 2 division|apuestas 3 division|apuestas a caballos|apuestas a carreras de caballos|apuestas a colombia|apuestas a corners|apuestas
a ganar|apuestas a jugadores nba|apuestas a la baja|apuestas a
la nfl|apuestas al barcelona|apuestas al dia|apuestas al empate|apuestas al
mundial|apuestas al tenis wta|apuestas alaves barcelona|apuestas alcaraz hoy|apuestas alemania españa|apuestas alonso campeon del mundo|apuestas
altas y bajas|apuestas altas y bajas nfl|apuestas ambos equipos
marcan|apuestas america|apuestas android|apuestas anillo nba|apuestas antes del mundial|apuestas anticipadas|apuestas anticipadas
nba|apuestas apps|apuestas arabia argentina|apuestas argentina|apuestas
argentina campeon del mundo|apuestas argentina canada|apuestas argentina colombia|apuestas argentina croacia|apuestas
argentina españa|apuestas argentina francia|apuestas argentina francia cuanto paga|apuestas argentina francia mundial|apuestas argentina gana el
mundial|apuestas argentina gana mundial|apuestas argentina holanda|apuestas
argentina mexico|apuestas argentina méxico|apuestas argentina mundial|apuestas argentina online|apuestas argentina paises bajos|apuestas argentina
polonia|apuestas argentina uruguay|apuestas argentina vs australia|apuestas argentina vs
colombia|apuestas argentina vs francia|apuestas argentina vs peru|apuestas
argentinas|apuestas arsenal real madrid|apuestas ascenso a primera division|apuestas ascenso
a segunda|apuestas asiaticas|apuestas asiatico|apuestas athletic|apuestas athletic atletico|apuestas athletic barça|apuestas
athletic barcelona|apuestas athletic betis|apuestas athletic manchester|apuestas
athletic manchester united|apuestas athletic osasuna|apuestas athletic
real|apuestas athletic real madrid|apuestas athletic real sociedad|apuestas athletic real sociedad final|apuestas athletic roma|apuestas athletic sevilla|apuestas athletic valencia|apuestas atletico|apuestas atletico barcelona|apuestas atletico barsa|apuestas atletico campeon champions|apuestas
atletico campeon de liga|apuestas atlético copenhague|apuestas atletico de madrid|apuestas atlético
de madrid|apuestas atletico de madrid barcelona|apuestas atletico de madrid gana la liga|apuestas atletico de
madrid real madrid|apuestas atlético de madrid real madrid|apuestas atletico
de madrid vs barcelona|apuestas atletico madrid|apuestas atletico madrid real
madrid|apuestas atletico madrid vs barcelona|apuestas atletico real madrid|apuestas atletico real madrid champions|apuestas atletismo|apuestas
bajas|apuestas baloncesto|apuestas baloncesto acb|apuestas baloncesto handicap|apuestas baloncesto
hoy|apuestas baloncesto juegos olimpicos|apuestas baloncesto
nba|apuestas baloncesto pronostico|apuestas baloncesto pronósticos|apuestas baloncesto prorroga|apuestas barca|apuestas barca athletic|apuestas barca atletico|apuestas barca
bayern|apuestas barca bayern munich|apuestas barca girona|apuestas barca hoy|apuestas barça hoy|apuestas barca
inter|apuestas barca juventus|apuestas barca madrid|apuestas barça madrid|apuestas barca real madrid|apuestas barca
vs juve|apuestas barca vs madrid|apuestas barca vs psg|apuestas barcelona|apuestas barcelona alaves|apuestas barcelona athletic|apuestas barcelona atletico|apuestas barcelona atletico de madrid|apuestas
barcelona atlético de madrid|apuestas barcelona atletico madrid|apuestas
barcelona bayern|apuestas barcelona betis|apuestas barcelona campeon de liga|apuestas barcelona celta|apuestas
barcelona espanyol|apuestas barcelona gana la
champions|apuestas barcelona girona|apuestas barcelona granada|apuestas barcelona
hoy|apuestas barcelona inter|apuestas barcelona madrid|apuestas barcelona osasuna|apuestas barcelona psg|apuestas barcelona real madrid|apuestas barcelona real sociedad|apuestas barcelona sevilla|apuestas barcelona valencia|apuestas barcelona villarreal|apuestas barcelona
vs atletico madrid|apuestas barcelona vs madrid|apuestas barcelona vs real madrid|apuestas barsa madrid|apuestas basket hoy|apuestas bayern barcelona|apuestas bayern vs barcelona|apuestas beisbol|apuestas
béisbol|apuestas beisbol mlb|apuestas beisbol pronosticos|apuestas beisbol venezolano|apuestas betis|apuestas betis – chelsea|apuestas betis barcelona|apuestas betis chelsea|apuestas betis fiorentina|apuestas betis girona|apuestas betis madrid|apuestas betis mallorca|apuestas betis real
madrid|apuestas betis real sociedad|apuestas betis sevilla|apuestas betis
valencia|apuestas betis valladolid|apuestas betis vs
valencia|apuestas betplay hoy colombia|apuestas betsson peru|apuestas bienvenida|apuestas billar online|apuestas bolivia vs colombia|apuestas bono|apuestas bono bienvenida|apuestas bono de
bienvenida|apuestas bono de bienvenida sin deposito|apuestas bono gratis|apuestas bono sin deposito|apuestas bonos sin deposito|apuestas
borussia real madrid|apuestas boxeo|apuestas boxeo de campeonato|apuestas
boxeo españa|apuestas boxeo español|apuestas
boxeo femenino olimpiadas|apuestas boxeo hoy|apuestas boxeo online|apuestas brasil colombia|apuestas brasil peru|apuestas brasil uruguay|apuestas brasil vs colombia|apuestas brasil vs peru|apuestas caballos|apuestas caballos colocado|apuestas caballos españa|apuestas caballos hipodromo|apuestas
caballos hoy|apuestas caballos madrid|apuestas caballos online|apuestas caballos sanlucar de barrameda|apuestas caballos zarzuela|apuestas calculador|apuestas campeon|apuestas
campeon champions|apuestas campeón champions|apuestas campeon champions
2025|apuestas campeon champions league|apuestas
campeon conference league|apuestas campeon copa america|apuestas campeon copa
del rey|apuestas campeon de champions|apuestas campeon de la champions|apuestas campeon de liga|apuestas campeon del mundo|apuestas campeon eurocopa|apuestas campeón eurocopa|apuestas campeon europa league|apuestas campeon f1|apuestas campeon f1 2025|apuestas campeon formula 1|apuestas campeon libertadores|apuestas campeon liga|apuestas campeon liga bbva|apuestas campeon liga española|apuestas campeon liga santander|apuestas campeon motogp 2025|apuestas campeon mundial|apuestas
campeón mundial|apuestas campeon mundial baloncesto|apuestas campeon nba|apuestas campeón nba|apuestas campeon premier|apuestas campeon premier league|apuestas campeon roland garros|apuestas campeonato f1|apuestas campeonatos de futbol|apuestas
carrera de caballos|apuestas carrera de caballos hoy|apuestas carrera de caballos nocturnas|apuestas carrera de
galgos fin de semana|apuestas carrera de galgos hoy|apuestas carrera de
galgos nocturnas|apuestas carreras caballos|apuestas
carreras caballos sanlucar|apuestas carreras de caballos|apuestas carreras de caballos en directo|apuestas carreras de
caballos en vivo|apuestas carreras de caballos españa|apuestas
carreras de caballos hoy|apuestas carreras de caballos nacionales|apuestas carreras de caballos nocturnas|apuestas carreras de caballos online|apuestas carreras de
caballos sanlucar|apuestas carreras de caballos sanlúcar|apuestas carreras de galgos|apuestas
carreras de galgos en vivo|apuestas carreras de galgos nocturnas|apuestas carreras de galgos
pre partido|apuestas casino|apuestas casino barcelona|apuestas casino futbol|apuestas casino
gran madrid|apuestas casino gratis|apuestas casino madrid|apuestas casino online|apuestas casino online argentina|apuestas
casinos|apuestas casinos online|apuestas celta|apuestas celta barcelona|apuestas celta betis|apuestas celta eibar|apuestas celta
espanyol|apuestas celta granada|apuestas celta madrid|apuestas celta manchester|apuestas celta
real madrid|apuestas champion league|apuestas champions foro|apuestas
champions hoy|apuestas champions league|apuestas champions league
– pronósticos|apuestas champions league 2025|apuestas champions league hoy|apuestas champions league pronosticos|apuestas champions league pronósticos|apuestas champions
pronosticos|apuestas chelsea barcelona|apuestas chelsea betis|apuestas chile|apuestas chile peru|apuestas
chile venezuela|apuestas chile vs colombia|apuestas chile vs uruguay|apuestas ciclismo|apuestas
ciclismo en vivo|apuestas ciclismo femenino|apuestas ciclismo tour francia|apuestas ciclismo vuelta|apuestas ciclismo vuelta a españa|apuestas ciclismo vuelta españa|apuestas city
madrid|apuestas city real madrid|apuestas clasico|apuestas
clasico español|apuestas clasico real madrid barcelona|apuestas clasificacion mundial|apuestas colombia|apuestas
colombia argentina|apuestas colombia brasil|apuestas colombia paraguay|apuestas colombia uruguay|apuestas colombia vs argentina|apuestas colombia vs brasil|apuestas combinadas|apuestas combinadas como funcionan|apuestas combinadas de
futbol|apuestas combinadas de fútbol|apuestas combinadas foro|apuestas combinadas futbol|apuestas combinadas
hoy|apuestas combinadas mismo partido|apuestas combinadas mundial|apuestas combinadas nba|apuestas combinadas para
esta semana|apuestas combinadas para hoy|apuestas combinadas para mañana|apuestas combinadas pronosticos|apuestas combinadas recomendadas|apuestas combinadas seguras|apuestas combinadas
seguras para hoy|apuestas combinadas seguras para mañana|apuestas como ganar|apuestas comparador|apuestas con bono de bienvenida|apuestas con dinero ficticio|apuestas
con dinero real|apuestas con dinero virtual|apuestas con handicap|apuestas con handicap asiatico|apuestas con handicap baloncesto|apuestas con mas probabilidades de ganar|apuestas con paypal|apuestas con tarjeta de credito|apuestas con tarjeta de debito|apuestas
consejos|apuestas copa|apuestas copa africa|apuestas copa america|apuestas copa américa|apuestas copa argentina|apuestas
copa brasil|apuestas copa davis|apuestas copa de
europa|apuestas copa del mundo|apuestas copa del rey|apuestas copa del rey
baloncesto|apuestas copa del rey final|apuestas copa del rey futbol|apuestas copa del rey ganador|apuestas copa del rey hoy|apuestas copa del rey pronosticos|apuestas copa del rey pronósticos|apuestas copa europa|apuestas
copa italia|apuestas copa libertadores|apuestas copa mundial
de hockey|apuestas copa rey|apuestas copa sudamericana|apuestas corners|apuestas corners hoy|apuestas croacia
argentina|apuestas cuartos eurocopa|apuestas cuotas|apuestas cuotas altas|apuestas cuotas bajas|apuestas de 1 euro|apuestas de baloncesto|apuestas de baloncesto hoy|apuestas de baloncesto nba|apuestas de baloncesto para hoy|apuestas
de beisbol|apuestas de beisbol para hoy|apuestas de blackjack en linea|apuestas de boxeo|apuestas de boxeo canelo|apuestas de boxeo en las vegas|apuestas de
boxeo hoy|apuestas de boxeo online|apuestas de caballo|apuestas de caballos|apuestas de caballos como funciona|apuestas de caballos
como se juega|apuestas de caballos en colombia|apuestas de
caballos en españa|apuestas de caballos en linea|apuestas
de caballos españa|apuestas de caballos
ganador y colocado|apuestas de caballos internacionales|apuestas de caballos juegos|apuestas de caballos
online|apuestas de caballos online en venezuela|apuestas de caballos
por internet|apuestas de caballos pronosticos|apuestas de
caballos pronósticos|apuestas de carrera
de caballos|apuestas de carreras de caballos|apuestas de carreras de caballos online|apuestas de casino|apuestas de casino online|apuestas de casino por internet|apuestas de champions league|apuestas de ciclismo|apuestas de colombia|apuestas de copa america|apuestas de corners|apuestas de deportes en linea|apuestas de deportes online|apuestas de dinero|apuestas de esports|apuestas de eurocopa|apuestas de europa league|apuestas de f1|apuestas de formula 1|apuestas de futbol|apuestas de fútbol|apuestas de futbol
app|apuestas de futbol argentina|apuestas de futbol colombia|apuestas de futbol en colombia|apuestas de futbol en directo|apuestas de futbol en linea|apuestas de futbol en vivo|apuestas
de futbol español|apuestas de futbol gratis|apuestas de futbol hoy|apuestas de futbol mundial|apuestas de futbol online|apuestas de fútbol online|apuestas
de futbol para hoy|apuestas de fútbol para hoy|apuestas de futbol
para hoy seguras|apuestas de futbol para mañana|apuestas de futbol peru|apuestas de futbol pronosticos|apuestas de fútbol
pronósticos|apuestas de futbol seguras|apuestas de futbol seguras para hoy|apuestas de futbol sin dinero|apuestas de galgos|apuestas de galgos como ganar|apuestas de galgos en directo|apuestas
de galgos online|apuestas de galgos trucos|apuestas de golf|apuestas de hockey|apuestas de
hockey sobre hielo|apuestas de hoy|apuestas de hoy seguras|apuestas de juego|apuestas de juegos|apuestas
de juegos deportivos|apuestas de juegos online|apuestas de la champions league|apuestas de la
copa américa|apuestas de la eurocopa|apuestas de la europa league|apuestas de la liga|apuestas de la liga bbva|apuestas de la liga española|apuestas de la nba|apuestas de la nfl|apuestas de la ufc|apuestas de mlb|apuestas de
nba|apuestas de nba para hoy|apuestas de partidos|apuestas de partidos de futbol|apuestas de peleas ufc|apuestas de perros en vivo|apuestas de perros virtuales|apuestas
de peru|apuestas de sistema|apuestas de sistema como funciona|apuestas
de sistema explicacion|apuestas de sistema explicación|apuestas de tenis|apuestas de
tenis de mesa|apuestas de tenis en directo|apuestas de tenis hoy|apuestas de tenis para
hoy|apuestas de tenis pronosticos|apuestas de tenis seguras|apuestas de
todo tipo|apuestas de ufc|apuestas de ufc hoy|apuestas
del boxeo|apuestas del clasico|apuestas del clasico real madrid barca|apuestas del dia|apuestas del día|apuestas
del dia de hoy|apuestas del dia deportivas|apuestas del dia futbol|apuestas del
mundial|apuestas del partido de hoy|apuestas del real madrid|apuestas del rey|apuestas del sistema|apuestas deporte|apuestas deportes|apuestas deportiva|apuestas deportivas|apuestas deportivas 1 euro|apuestas deportivas 10 euros gratis|apuestas deportivas 100 seguras|apuestas deportivas 1×2|apuestas
deportivas android|apuestas deportivas app|apuestas deportivas apps|apuestas deportivas argentina|apuestas deportivas argentina futbol|apuestas deportivas argentina legal|apuestas deportivas atletico de madrid|apuestas deportivas
baloncesto|apuestas deportivas barca madrid|apuestas deportivas barcelona|apuestas
deportivas beisbol|apuestas deportivas bono|apuestas
deportivas bono bienvenida|apuestas deportivas bono de bienvenida|apuestas deportivas bono
sin deposito|apuestas deportivas bonos de bienvenida|apuestas
deportivas boxeo|apuestas deportivas caballos|apuestas deportivas calculadora|apuestas
deportivas campeon liga|apuestas deportivas casino|apuestas deportivas casino barcelona|apuestas deportivas casino online|apuestas deportivas
cerca de mi|apuestas deportivas champions league|apuestas deportivas chile|apuestas
deportivas ciclismo|apuestas deportivas colombia|apuestas deportivas com|apuestas
deportivas com foro|apuestas deportivas com pronosticos|apuestas deportivas
combinadas|apuestas deportivas combinadas para hoy|apuestas deportivas
como se juega|apuestas deportivas comparador|apuestas deportivas con bono gratis|apuestas deportivas con bonos gratis|apuestas
deportivas con dinero ficticio|apuestas deportivas con paypal|apuestas deportivas con puntos virtuales|apuestas deportivas consejos|apuestas
deportivas consejos para ganar|apuestas deportivas copa america|apuestas
deportivas copa del rey|apuestas deportivas copa libertadores|apuestas deportivas copa mundial|apuestas deportivas
corners|apuestas deportivas cual es la mejor|apuestas deportivas
cuotas altas|apuestas deportivas de baloncesto|apuestas deportivas de boxeo|apuestas
deportivas de colombia|apuestas deportivas de
futbol|apuestas deportivas de nba|apuestas deportivas de nhl|apuestas deportivas de peru|apuestas deportivas
de tenis|apuestas deportivas del dia|apuestas deportivas dinero ficticio|apuestas deportivas
directo|apuestas deportivas doble oportunidad|apuestas deportivas en argentina|apuestas deportivas en chile|apuestas deportivas en colombia|apuestas deportivas en directo|apuestas deportivas en españa|apuestas
deportivas en español|apuestas deportivas en linea|apuestas deportivas en línea|apuestas deportivas en peru|apuestas deportivas en perú|apuestas deportivas en sevilla|apuestas deportivas en uruguay|apuestas deportivas
en vivo|apuestas deportivas es|apuestas
deportivas es pronosticos|apuestas deportivas españa|apuestas deportivas españolas|apuestas deportivas
esports|apuestas deportivas estadisticas|apuestas
deportivas estrategias|apuestas deportivas estrategias seguras|apuestas deportivas eurocopa|apuestas deportivas europa league|apuestas deportivas f1|apuestas
deportivas faciles de ganar|apuestas deportivas formula 1|apuestas deportivas
foro|apuestas deportivas foro futbol|apuestas deportivas foro tenis|apuestas deportivas francia argentina|apuestas deportivas futbol|apuestas deportivas fútbol|apuestas deportivas futbol argentino|apuestas
deportivas futbol colombia|apuestas deportivas futbol español|apuestas deportivas gana|apuestas
deportivas ganadas|apuestas deportivas ganar dinero seguro|apuestas
deportivas gane|apuestas deportivas golf|apuestas deportivas gratis|apuestas deportivas gratis con premios|apuestas deportivas gratis hoy|apuestas deportivas gratis
sin deposito|apuestas deportivas handicap|apuestas deportivas handicap asiatico|apuestas deportivas hoy|apuestas deportivas impuestos|apuestas deportivas interior argentina|apuestas deportivas juegos olimpicos|apuestas deportivas la liga|apuestas deportivas legales|apuestas deportivas
legales en colombia|apuestas deportivas libres de impuestos|apuestas
deportivas licencia españa|apuestas deportivas liga española|apuestas deportivas listado|apuestas deportivas listado clasico|apuestas deportivas madrid|apuestas deportivas mas seguras|apuestas deportivas mejor pagadas|apuestas deportivas mejores|apuestas deportivas mejores app|apuestas deportivas mejores casas|apuestas deportivas mejores cuotas|apuestas deportivas mejores paginas|apuestas deportivas mexico|apuestas deportivas méxico|apuestas deportivas mlb|apuestas
deportivas mlb hoy|apuestas deportivas multiples|apuestas deportivas mundial|apuestas deportivas
murcia|apuestas deportivas nba|apuestas deportivas nba
hoy|apuestas deportivas nfl|apuestas deportivas nhl|apuestas deportivas nuevas|apuestas
deportivas ofertas|apuestas deportivas online|apuestas deportivas online
argentina|apuestas deportivas online chile|apuestas deportivas online
colombia|apuestas deportivas online en colombia|apuestas deportivas online
españa|apuestas deportivas online mexico|apuestas deportivas online paypal|apuestas deportivas online peru|apuestas deportivas online por internet|apuestas
deportivas pago paypal|apuestas deportivas para ganar dinero|apuestas deportivas para hoy|apuestas deportivas para hoy pronosticos|apuestas deportivas partido suspendido|apuestas
deportivas partidos de hoy|apuestas deportivas paypal|apuestas deportivas peru|apuestas deportivas perú|apuestas deportivas
peru vs ecuador|apuestas deportivas predicciones|apuestas deportivas promociones|apuestas deportivas pronostico|apuestas deportivas pronóstico|apuestas deportivas pronostico hoy|apuestas
deportivas pronosticos|apuestas deportivas pronósticos|apuestas
deportivas pronosticos expertos|apuestas deportivas
pronosticos gratis|apuestas deportivas pronosticos nba|apuestas
deportivas pronosticos tenis|apuestas deportivas que aceptan paypal|apuestas deportivas real madrid|apuestas deportivas regalo bienvenida|apuestas deportivas resultado exacto|apuestas deportivas resultados|apuestas deportivas rugby|apuestas deportivas seguras|apuestas deportivas seguras foro|apuestas deportivas seguras hoy|apuestas
deportivas seguras para hoy|apuestas deportivas
seguras telegram|apuestas deportivas sevilla|apuestas deportivas simulador
eurocopa|apuestas deportivas sin deposito|apuestas deportivas sin deposito inicial|apuestas deportivas sin dinero|apuestas deportivas sin dinero real|apuestas deportivas sin registro|apuestas deportivas stake|apuestas deportivas stake 10|apuestas deportivas telegram españa|apuestas deportivas tenis|apuestas deportivas tenis de mesa|apuestas deportivas tenis foro|apuestas deportivas
tenis hoy|apuestas deportivas tips|apuestas deportivas
tipster|apuestas deportivas ufc|apuestas deportivas uruguay|apuestas deportivas
valencia|apuestas deportivas valencia barcelona|apuestas deportivas venezuela|apuestas deportivas virtuales|apuestas
deportivas y casino|apuestas deportivas y casino online|apuestas deportivas.com|apuestas deportivas.com foro|apuestas deportivas.es|apuestas deportivos pronosticos|apuestas deposito minimo 1 euro|apuestas
descenso a segunda|apuestas descenso a segunda b|apuestas descenso
la liga|apuestas descenso primera division|apuestas descenso
segunda|apuestas dia|apuestas diarias seguras|apuestas dinero|apuestas dinero ficticio|apuestas dinero real|apuestas dinero virtual|apuestas directas|apuestas directo|apuestas directo futbol|apuestas division de honor juvenil|apuestas dnb|apuestas doble oportunidad|apuestas doble resultado|apuestas dobles|apuestas dobles y triples|apuestas dortmund barcelona|apuestas
draft nba|apuestas draft nfl|apuestas ecuador vs argentina|apuestas ecuador
vs venezuela|apuestas egipto uruguay|apuestas el clasico|apuestas elecciones venezuela|apuestas empate|apuestas en baloncesto|apuestas en barcelona|apuestas en beisbol|apuestas en boxeo|apuestas en caballos|apuestas en carreras de caballos|apuestas en casino|apuestas en casino online|apuestas en casinos|apuestas en casinos online|apuestas en chile|apuestas en ciclismo|apuestas en colombia|apuestas en colombia
de futbol|apuestas en directo|apuestas en directo futbol|apuestas en directo pronosticos|apuestas en el futbol|apuestas en el tenis|apuestas en españa|apuestas
en esports|apuestas en eventos deportivos virtuales|apuestas en golf|apuestas en juegos|apuestas en la champions league|apuestas en la eurocopa|apuestas en la liga|apuestas en la
nba|apuestas en la nfl|apuestas en las vegas mlb|apuestas en las vegas nfl|apuestas en linea|apuestas en línea|apuestas
en linea argentina|apuestas en linea boxeo|apuestas en linea chile|apuestas en linea colombia|apuestas en línea de fútbol|apuestas en linea deportivas|apuestas en linea españa|apuestas en linea estados unidos|apuestas en linea futbol|apuestas en linea mexico|apuestas en línea
méxico|apuestas en linea mundial|apuestas en linea peru|apuestas en linea usa|apuestas en los esports|apuestas en madrid|apuestas
en méxico|apuestas en mexico online|apuestas en nba|apuestas en partidos de
futbol|apuestas en partidos de futbol en vivo|apuestas
en partidos de tenis en directo|apuestas en perú|apuestas en sevilla|apuestas en sistema|apuestas en stake|apuestas en tenis|apuestas en tenis de
mesa|apuestas en valencia|apuestas en vivo|apuestas en vivo argentina|apuestas en vivo casino|apuestas en vivo
futbol|apuestas en vivo fútbol|apuestas en vivo nba|apuestas
en vivo peru|apuestas en vivo tenis|apuestas en vivo ufc|apuestas equipo mbappe|apuestas
equipos de futbol|apuestas españa|apuestas españa alemania|apuestas españa alemania eurocopa|apuestas españa croacia|apuestas españa eurocopa|apuestas españa francia|apuestas españa francia eurocopa|apuestas españa gana el mundial|apuestas españa gana
eurocopa|apuestas españa gana mundial|apuestas españa georgia|apuestas españa holanda|apuestas españa inglaterra|apuestas españa inglaterra cuotas|apuestas españa inglaterra eurocopa|apuestas españa italia|apuestas españa mundial|apuestas españa paises bajos|apuestas español|apuestas español oviedo|apuestas
espanyol barcelona|apuestas espanyol betis|apuestas espanyol villarreal|apuestas esport|apuestas esports|apuestas esports colombia|apuestas esports españa|apuestas esports fifa|apuestas
esports gratis|apuestas esports lol|apuestas esports peru|apuestas esports
valorant|apuestas estadisticas|apuestas estrategias|apuestas euro|apuestas euro
copa|apuestas eurocopa|apuestas eurocopa campeon|apuestas eurocopa españa|apuestas eurocopa favoritos|apuestas eurocopa femenina|apuestas eurocopa final|apuestas eurocopa ganador|apuestas eurocopa hoy|apuestas eurocopa sub
21|apuestas euroliga baloncesto|apuestas euroliga pronosticos|apuestas europa league|apuestas europa league hoy|apuestas europa league pronosticos|apuestas europa league
pronósticos|apuestas euros|apuestas f1 abu dhabi|apuestas f1 bahrein|apuestas f1 canada|apuestas f1 china|apuestas f1 cuotas|apuestas f1 hoy|apuestas f1 las vegas|apuestas f1 miami|apuestas
f1 monaco|apuestas faciles de ganar|apuestas fáciles de ganar|apuestas faciles para ganar|apuestas favoritas|apuestas favorito champions|apuestas favoritos champions|apuestas favoritos
eurocopa|apuestas favoritos mundial|apuestas fc barcelona|apuestas
final champions cuotas|apuestas final champions league|apuestas
final champions peru|apuestas final copa|apuestas final
copa america|apuestas final copa de europa|apuestas final copa del rey|apuestas final copa europa|apuestas
final copa libertadores|apuestas final copa rey|apuestas final de copa|apuestas final de
copa del rey|apuestas final del mundial|apuestas final euro|apuestas
final eurocopa|apuestas final europa league|apuestas final libertadores|apuestas final mundial|apuestas final nba|apuestas final rugby|apuestas final uefa europa league|apuestas
final.mundial|apuestas finales de conferencia nfl|apuestas finales
nba|apuestas fiorentina betis|apuestas formula|apuestas formula 1|apuestas fórmula 1|apuestas fórmula 1 pronósticos|apuestas formula
uno|apuestas foro|apuestas foro nba|apuestas francia
argentina|apuestas francia españa|apuestas futbol|apuestas fútbol|apuestas futbol americano|apuestas futbol americano nfl|apuestas futbol
argentina|apuestas futbol argentino|apuestas futbol champions league|apuestas futbol chile|apuestas futbol colombia|apuestas futbol
consejos|apuestas futbol en directo|apuestas fútbol
en directo|apuestas futbol en vivo|apuestas fútbol en vivo|apuestas
futbol españa|apuestas futbol español|apuestas fútbol español|apuestas futbol eurocopa|apuestas futbol femenino|apuestas
futbol foro|apuestas futbol gratis|apuestas futbol hoy|apuestas fútbol hoy|apuestas
futbol juegos olimpicos|apuestas futbol mexico|apuestas futbol mundial|apuestas futbol online|apuestas futbol para hoy|apuestas futbol
peru|apuestas futbol pronosticos|apuestas futbol sala|apuestas futbol telegram|apuestas futbol virtual|apuestas galgos|apuestas galgos en directo|apuestas galgos hoy|apuestas galgos online|apuestas
galgos pronosticos|apuestas galgos trucos|apuestas gana|apuestas gana
colombia|apuestas gana resultados|apuestas ganadas|apuestas ganadas hoy|apuestas ganador
champions league|apuestas ganador copa america|apuestas
ganador copa del rey|apuestas ganador copa del rey baloncesto|apuestas ganador copa libertadores|apuestas ganador de la eurocopa|apuestas ganador de la liga|apuestas ganador
del mundial|apuestas ganador eurocopa|apuestas ganador
europa league|apuestas ganador f1|apuestas ganador la liga|apuestas
ganador liga española|apuestas ganador mundial|apuestas ganador mundial baloncesto|apuestas ganador mundial f1|apuestas ganador nba|apuestas
ganadores eurocopa|apuestas ganadores mundial|apuestas ganar champions|apuestas ganar eurocopa|apuestas
ganar liga|apuestas ganar mundial|apuestas ganar nba|apuestas
getafe valencia|apuestas ghana uruguay|apuestas girona|apuestas girona athletic|apuestas girona betis|apuestas girona campeon de liga|apuestas girona campeon liga|apuestas girona
gana la liga|apuestas girona real madrid|apuestas girona real sociedad|apuestas goleador eurocopa|apuestas goleadores eurocopa|apuestas goles asiaticos|apuestas golf|apuestas
golf masters|apuestas golf pga|apuestas granada barcelona|apuestas grand slam de tenis|apuestas gratis|apuestas gratis casino|apuestas gratis con premios|apuestas
gratis hoy|apuestas gratis para hoy|apuestas gratis por registro|apuestas gratis puntos|apuestas gratis regalos|apuestas gratis sin deposito|apuestas gratis
sin depósito|apuestas gratis sin ingreso|apuestas
gratis sports|apuestas gratis y ganar premios|apuestas grupo a eurocopa|apuestas grupos eurocopa|apuestas handicap|apuestas handicap asiatico|apuestas handicap baloncesto|apuestas handicap como funciona|apuestas handicap nba|apuestas
handicap nfl|apuestas hipicas online|apuestas hípicas online|apuestas hipicas venezuela|apuestas hockey|apuestas
hockey hielo|apuestas hockey patines|apuestas hockey sobre hielo|apuestas holanda argentina|apuestas
holanda vs argentina|apuestas hoy|apuestas hoy champions|apuestas hoy futbol|apuestas hoy
nba|apuestas hoy pronosticos|apuestas hoy seguras|apuestas impuestos|apuestas inglaterra paises bajos|apuestas inter barca|apuestas inter barcelona|apuestas juego|apuestas juegos|apuestas juegos en linea|apuestas juegos olimpicos|apuestas juegos
olímpicos|apuestas juegos olimpicos baloncesto|apuestas juegos online|apuestas juegos virtuales|apuestas jugador sevilla|apuestas jugadores nba|apuestas kings league americas|apuestas la liga|apuestas la liga española|apuestas la liga hoy|apuestas la liga santander|apuestas las vegas mlb|apuestas las vegas nba|apuestas las vegas nfl|apuestas league of legends mundial|apuestas legal|apuestas legales|apuestas legales en colombia|apuestas legales
en españa|apuestas legales en estados unidos|apuestas legales españa|apuestas leganes betis|apuestas
libertadores|apuestas licencia|apuestas liga 1 peru|apuestas liga argentina|apuestas liga bbva pronosticos|apuestas liga de campeones|apuestas liga de campeones
de baloncesto|apuestas liga de campeones de hockey|apuestas liga españa|apuestas liga española|apuestas liga santander pronosticos|apuestas ligas de futbol|apuestas linea|apuestas linea
de gol|apuestas liverpool barcelona|apuestas liverpool real
madrid|apuestas lol mundial|apuestas madrid|apuestas madrid arsenal|apuestas madrid atletico|apuestas
madrid atletico champions|apuestas madrid barca|apuestas madrid barça|apuestas madrid barca hoy|apuestas
madrid barca supercopa|apuestas madrid barcelona|apuestas madrid barsa|apuestas madrid bayern|apuestas madrid betis|apuestas madrid
borussia|apuestas madrid campeon champions|apuestas madrid celta|apuestas madrid city|apuestas madrid dortmund|apuestas madrid gana la liga|apuestas madrid gana
liga|apuestas madrid hoy|apuestas madrid liverpool|apuestas madrid osasuna|apuestas madrid sevilla|apuestas
madrid valencia|apuestas madrid vs arsenal|apuestas madrid vs barcelona|apuestas mallorca osasuna|apuestas
mallorca real sociedad|apuestas manchester athletic|apuestas manchester city real madrid|apuestas
mas faciles de ganar|apuestas mas seguras|apuestas mas seguras para
hoy|apuestas masters de golf|apuestas masters de tenis|apuestas maximo goleador
eurocopa|apuestas maximo goleador mundial|apuestas mejor jugador eurocopa|apuestas mejores casinos online|apuestas mexico|apuestas
méxico|apuestas mexico polonia|apuestas méxico
polonia|apuestas mlb|apuestas mlb hoy|apuestas mlb las vegas|apuestas
mlb para hoy|apuestas mlb pronosticos|apuestas mlb
usa|apuestas mma ufc|apuestas momios|apuestas multiples|apuestas múltiples|apuestas multiples como funcionan|apuestas multiples el gordo|apuestas multiples futbol|apuestas mundial|apuestas mundial 2026|apuestas mundial baloncesto|apuestas mundial balonmano|apuestas mundial brasil|apuestas mundial campeon|apuestas mundial ciclismo|apuestas mundial clubes|apuestas mundial de baloncesto|apuestas mundial
de ciclismo|apuestas mundial de clubes|apuestas mundial de futbol|apuestas mundial de fútbol|apuestas mundial de rugby|apuestas mundial f1|apuestas mundial favoritos|apuestas mundial
femenino|apuestas mundial formula 1|apuestas mundial futbol|apuestas mundial ganador|apuestas mundial lol|apuestas mundial moto gp|apuestas mundial motogp|apuestas mundial rugby|apuestas mundial sub 17|apuestas mundiales|apuestas mundialistas|apuestas mvp eurocopa|apuestas mvp nba|apuestas mvp nfl|apuestas nacionales de colombia|apuestas nba|apuestas nba all star|apuestas nba campeon|apuestas nba consejos|apuestas nba esta noche|apuestas nba finals|apuestas nba gratis|apuestas nba hoy|apuestas nba hoy jugadores|apuestas nba
hoy pronosticos|apuestas nba para hoy|apuestas
nba playoffs|apuestas nba pronosticos|apuestas nba pronósticos|apuestas nba pronosticos hoy|apuestas nba tipster|apuestas nfl|apuestas nfl hoy|apuestas nfl las vegas|apuestas nfl playoffs|apuestas nfl pronosticos|apuestas nfl pronósticos|apuestas nfl semana 4|apuestas nfl super bowl|apuestas nhl|apuestas nhl pronosticos|apuestas octavos eurocopa|apuestas ofertas|apuestas online|apuestas online argentina|apuestas online
argentina legal|apuestas online bono|apuestas online
bono bienvenida|apuestas online boxeo|apuestas online caballos|apuestas online carreras de caballos|apuestas online casino|apuestas online champions
league|apuestas online chile|apuestas online ciclismo|apuestas
online colombia|apuestas online comparativa|apuestas online
con paypal|apuestas online de caballos|apuestas online deportivas|apuestas
online en argentina|apuestas online en peru|apuestas
online espana|apuestas online españa|apuestas online esports|apuestas online foro|apuestas online futbol|apuestas online
futbol españa|apuestas online golf|apuestas online gratis|apuestas online gratis sin deposito|apuestas online juegos|apuestas
online mexico|apuestas online mma|apuestas online movil|apuestas online nba|apuestas online
net|apuestas online nuevas|apuestas online opiniones|apuestas online paypal|apuestas online peru|apuestas online seguras|apuestas online sin dinero|apuestas online sin registro|apuestas
online tenis|apuestas online ufc|apuestas online uruguay|apuestas online venezuela|apuestas open britanico golf|apuestas osasuna athletic|apuestas
osasuna barcelona|apuestas osasuna real madrid|apuestas osasuna sevilla|apuestas osasuna valencia|apuestas over|apuestas over 2.5|apuestas over under|apuestas paginas|apuestas
pago anticipado|apuestas paises bajos ecuador|apuestas paises bajos inglaterra|apuestas países bajos qatar|apuestas para boxeo|apuestas para champions league|apuestas para el clasico|apuestas para el dia de hoy|apuestas para el mundial|apuestas
para el partido de hoy|apuestas para eurocopa|apuestas para europa league|apuestas para futbol|apuestas para ganar|apuestas para ganar dinero|apuestas para ganar dinero
facil|apuestas para ganar en la ruleta|apuestas para ganar
la champions|apuestas para ganar la eurocopa|apuestas
para ganar la europa league|apuestas para ganar la liga|apuestas para ganar
siempre|apuestas para hacer|apuestas para hoy|apuestas para hoy de futbol|apuestas para
hoy europa league|apuestas para hoy futbol|apuestas para juegos|apuestas
para la champions league|apuestas para la copa del rey|apuestas para la eurocopa|apuestas para la europa league|apuestas para la final de la eurocopa|apuestas para la nba hoy|apuestas para los partidos de hoy|apuestas para
partidos de hoy|apuestas para ufc|apuestas partido|apuestas partido aplazado|apuestas partido
champions|apuestas partido colombia|apuestas partido españa marruecos|apuestas partido mundial|apuestas partido suspendido|apuestas partidos|apuestas partidos champions league|apuestas partidos csgo|apuestas partidos de futbol|apuestas
partidos de futbol hoy|apuestas partidos de hoy|apuestas partidos eurocopa|apuestas partidos futbol|apuestas partidos hoy|apuestas partidos mundial|apuestas paypal|apuestas peleas de
boxeo|apuestas peru|apuestas perú|apuestas peru brasil|apuestas peru chile|apuestas
peru paraguay|apuestas peru uruguay|apuestas peru vs chile|apuestas peru vs
colombia|apuestas pichichi eurocopa|apuestas
plataforma|apuestas playoff|apuestas playoff
ascenso|apuestas playoff ascenso a primera|apuestas playoff nba|apuestas playoff
segunda|apuestas playoff segunda b|apuestas playoffs nba|apuestas playoffs nfl|apuestas polonia argentina|apuestas por argentina|apuestas por internet mexico|apuestas por internet para ganar
dinero|apuestas por paypal|apuestas por ronda boxeo|apuestas por sistema|apuestas portugal
uruguay|apuestas pre partido|apuestas predicciones|apuestas predicciones
futbol|apuestas primera division|apuestas primera division españa|apuestas promociones|apuestas
pronostico|apuestas pronosticos|apuestas pronosticos
deportivos|apuestas pronosticos deportivos
tenis|apuestas pronosticos futbol|apuestas pronosticos gratis|apuestas pronosticos nba|apuestas pronosticos
tenis|apuestas prorroga|apuestas psg barca|apuestas psg barcelona|apuestas
puntos por tarjetas|apuestas puntos tarjetas|apuestas que aceptan paypal|apuestas que es handicap|apuestas que
puedes hacer con tu novia|apuestas que siempre ganaras|apuestas que significa|apuestas quien bajara
a segunda|apuestas quién bajara a segunda|apuestas quien gana el mundial|apuestas
quien gana eurocopa|apuestas quien gana la champions|apuestas quien gana
la eurocopa|apuestas quien gana la liga|apuestas quien ganara el mundial|apuestas quién ganará el mundial|apuestas quien ganara la champions|apuestas quien ganara la eurocopa|apuestas quien ganara la liga|apuestas rayo barcelona|apuestas real
madrid|apuestas real madrid arsenal|apuestas real madrid athletic|apuestas
real madrid atletico|apuestas real madrid atletico champions|apuestas real madrid atletico de madrid|apuestas real madrid atlético de madrid|apuestas real madrid atletico madrid|apuestas real madrid barcelona|apuestas
real madrid bayern|apuestas real madrid betis|apuestas real madrid borussia|apuestas real madrid campeon champions|apuestas real madrid celta|apuestas real madrid champions|apuestas real madrid city|apuestas real madrid girona|apuestas real madrid
hoy|apuestas real madrid liverpool|apuestas real madrid manchester city|apuestas real madrid osasuna|apuestas real madrid real sociedad|apuestas real madrid valencia|apuestas real madrid villarreal|apuestas real madrid vs arsenal|apuestas real madrid vs atletico|apuestas real madrid vs atlético|apuestas real madrid vs atletico madrid|apuestas real madrid vs barcelona|apuestas real madrid vs betis|apuestas real madrid vs sevilla|apuestas real madrid vs
valencia|apuestas real sociedad|apuestas real sociedad athletic|apuestas
real sociedad barcelona|apuestas real sociedad betis|apuestas real sociedad psg|apuestas real sociedad real madrid|apuestas real sociedad valencia|apuestas recomendadas hoy|apuestas
regalo de bienvenida|apuestas registro|apuestas resultado exacto|apuestas resultados|apuestas resultados eurocopa|apuestas retirada tenis|apuestas roma barcelona|apuestas
roma sevilla|apuestas rugby|apuestas rugby mundial|apuestas rugby world cup|apuestas ruleta seguras|apuestas segunda|apuestas segunda b|apuestas segunda division|apuestas segunda división|apuestas segunda division b|apuestas segunda division españa|apuestas seguras|apuestas seguras baloncesto|apuestas seguras calculadora|apuestas
seguras en la ruleta|apuestas seguras eurocopa|apuestas seguras
foro|apuestas seguras futbol|apuestas seguras futbol hoy|apuestas
seguras gratis|apuestas seguras hoy|apuestas seguras hoy futbol|apuestas
seguras nba|apuestas seguras nba hoy|apuestas seguras para este fin de semana|apuestas seguras para ganar dinero|apuestas seguras
para hoy|apuestas seguras para hoy fútbol|apuestas seguras para hoy pronósticos|apuestas seguras para
mañana|apuestas seguras ruleta|apuestas seguras telegram|apuestas
seguras tenis|apuestas semifinales eurocopa|apuestas senegal paises bajos|apuestas sevilla|apuestas sevilla athletic|apuestas sevilla atletico de madrid|apuestas sevilla barcelona|apuestas sevilla betis|apuestas sevilla campeon liga|apuestas sevilla celta|apuestas sevilla gana la liga|apuestas sevilla
girona|apuestas sevilla inter|apuestas sevilla jugador|apuestas sevilla juventus|apuestas sevilla leganes|apuestas sevilla madrid|apuestas sevilla manchester united|apuestas sevilla osasuna|apuestas sevilla real madrid|apuestas sevilla real sociedad|apuestas sevilla roma|apuestas sevilla
valencia|apuestas significa|apuestas simples
ejemplos|apuestas simples o combinadas|apuestas sin deposito|apuestas sin deposito inicial|apuestas
sin deposito minimo|apuestas sin dinero|apuestas sin dinero real|apuestas sin empate|apuestas sin empate que significa|apuestas sin ingreso minimo|apuestas sin registro|apuestas sistema|apuestas sistema calculadora|apuestas sistema como funciona|apuestas sistema trixie|apuestas sociedad|apuestas sorteo copa del
rey|apuestas stake|apuestas stake 10|apuestas stake 10 hoy|apuestas super bowl favorito|apuestas super rugby|apuestas supercopa españa|apuestas superliga argentina|apuestas tarjeta roja|apuestas tarjetas|apuestas tarjetas amarillas|apuestas tenis|apuestas tenis atp|apuestas
tenis consejos|apuestas tenis copa davis|apuestas tenis de mesa|apuestas
tenis de mesa pronosticos|apuestas tenis en vivo|apuestas tenis femenino|apuestas
tenis hoy|apuestas tenis itf|apuestas tenis pronosticos|apuestas tenis pronósticos|apuestas tenis
retirada|apuestas tenis roland garros|apuestas tenis seguras|apuestas
tenis wimbledon|apuestas tenis wta|apuestas tercera division|apuestas tercera division españa|apuestas
tipos|apuestas tips|apuestas tipster|apuestas tipster para hoy|apuestas topuria holloway cuotas|apuestas
torneos de golf|apuestas torneos de tenis|apuestas trucos|apuestas uefa champions league|apuestas uefa europa league|apuestas ufc|apuestas ufc chile|apuestas ufc como
funciona|apuestas ufc hoy|apuestas ufc ilia topuria|apuestas ufc online|apuestas ufc pronósticos|apuestas ufc telegram|apuestas ufc topuria|apuestas under over|apuestas unionistas villarreal|apuestas uruguay|apuestas uruguay colombia|apuestas uruguay corea|apuestas uruguay vs
colombia|apuestas us open golf|apuestas us open tenis|apuestas valencia|apuestas valencia
barcelona|apuestas valencia betis|apuestas valencia madrid|apuestas valencia real
madrid|apuestas valladolid barcelona|apuestas valladolid valencia|apuestas
valor app|apuestas valor en directo|apuestas valor galgos|apuestas venezuela|apuestas venezuela argentina|apuestas venezuela bolivia|apuestas venezuela ecuador|apuestas villarreal|apuestas villarreal athletic|apuestas villarreal barcelona|apuestas
villarreal bayern|apuestas villarreal betis|apuestas villarreal liverpool|apuestas villarreal manchester|apuestas villarreal manchester united|apuestas villarreal vs
real madrid|apuestas virtuales|apuestas virtuales colombia|apuestas virtuales futbol|apuestas
virtuales sin dinero|apuestas vivo|apuestas vuelta a españa|apuestas vuelta españa|apuestas william hill partidos de hoy|apuestas y casino|apuestas y casinos|apuestas y juegos de azar|apuestas y pronosticos|apuestas y pronosticos de futbol|apuestas y
pronosticos deportivos|apuestas y resultados|apuestas-deportivas|apuestas-deportivas.es pronosticos|arbitro nba apuestas|argentina apuestas|argentina
colombia apuestas|argentina croacia apuestas|argentina francia apuestas|argentina
mexico apuestas|argentina peru apuestas|argentina
uruguay apuestas|argentina vs bolivia apuestas|argentina vs chile apuestas|argentina vs colombia apuestas|argentina vs francia
apuestas|argentina vs. colombia apuestas|asi se
gana en las apuestas deportivas|asiatico
apuestas|asiatico en apuestas|asiaticos apuestas|athletic barcelona apuestas|athletic manchester united apuestas|athletic osasuna
apuestas|athletic real madrid apuestas|atletico barcelona
apuestas|atletico de madrid apuestas|atlético de madrid apuestas|atletico de madrid real madrid apuestas|atletico de madrid
vs barcelona apuestas|atletico madrid real madrid apuestas|atletico madrid vs real madrid
apuestas|atletico real madrid apuestas|atletico vs real
madrid apuestas|avisador de cuotas apuestas|bajada de cuotas apuestas|baloncesto apuestas|barbastro
barcelona apuestas|barca apuestas|barca bayern apuestas|barca inter apuestas|barca madrid apuestas|barça madrid apuestas|barca vs atletico apuestas|barca
vs madrid apuestas|barca vs real madrid apuestas|barcelona – real madrid apuestas|barcelona apuestas|barcelona atletico apuestas|barcelona atletico
de madrid apuestas|barcelona atletico madrid apuestas|barcelona betis apuestas|barcelona casa de apuestas|barcelona inter apuestas|barcelona psg apuestas|barcelona real
madrid apuestas|barcelona real sociedad apuestas|barcelona sevilla apuestas|barcelona valencia apuestas|barcelona vs athletic bilbao apuestas|barcelona vs atlético madrid apuestas|barcelona vs betis apuestas|barcelona
vs celta de vigo apuestas|barcelona vs espanyol apuestas|barcelona vs girona apuestas|barcelona vs madrid apuestas|barcelona vs real
madrid apuestas|barcelona vs real sociedad apuestas|barcelona vs sevilla apuestas|barcelona
vs villarreal apuestas|base de datos cuotas apuestas
deportivas|bayern real madrid apuestas|beisbol apuestas|best america apuestas|bet
apuestas chile|bet apuestas en vivo|betis – chelsea apuestas|betis apuestas|betis barcelona apuestas|betis chelsea apuestas|betis
madrid apuestas|betis sevilla apuestas|betsson tu sitio
de apuestas online|blog apuestas baloncesto|blog apuestas ciclismo|blog apuestas
nba|blog apuestas tenis|blog de apuestas de tenis|bono apuestas|bono apuestas deportivas|bono apuestas deportivas sin deposito|bono apuestas gratis|bono apuestas gratis sin deposito|bono apuestas sin deposito|bono bienvenida apuestas|bono bienvenida apuestas deportivas|bono bienvenida apuestas españa|bono bienvenida apuestas sin deposito|bono bienvenida apuestas sin depósito|bono bienvenida casa apuestas|bono bienvenida casa de apuestas|bono bienvenida marca apuestas|bono casa
apuestas|bono casa de apuestas|bono casa de apuestas sin ingreso|bono casas de apuestas|bono de apuestas|bono de apuestas gratis
sin deposito|bono de bienvenida apuestas|bono de bienvenida apuestas deportivas|bono de bienvenida casa de apuestas|bono de bienvenida casas de apuestas|bono
de casas de apuestas|bono de registro apuestas|bono de registro apuestas deportivas|bono
de registro casa de apuestas|bono gratis apuestas|bono marca apuestas|bono por registro
apuestas|bono por registro apuestas deportivas|bono por
registro casa de apuestas|bono registro apuestas|bono sin deposito apuestas|bono sin depósito apuestas|bono sin deposito apuestas deportivas|bono
sin depósito apuestas deportivas|bono sin deposito casa de apuestas|bono sin deposito marca apuestas|bono sin ingreso
apuestas|bono sin ingreso apuestas deportivas|bonos apuestas|bonos apuestas
colombia|bonos apuestas deportivas|bonos apuestas deportivas sin deposito|bonos apuestas gratis|bonos apuestas sin deposito|bonos apuestas sin depósito|bonos bienvenida apuestas|bonos bienvenida
casas apuestas|bonos bienvenida casas de apuestas|bonos
casa de apuestas|bonos casas apuestas|bonos casas
de apuestas|bonos casas de apuestas colombia|bonos casas de apuestas deportivas|bonos casas de apuestas españa|bonos casas de
apuestas nuevas|bonos casas de apuestas sin deposito|bonos
casas de apuestas sin depósito|bonos de apuestas|bonos
de apuestas deportivas|bonos de apuestas gratis|bonos de
apuestas sin deposito|bonos de bienvenida apuestas|bonos de bienvenida apuestas deportivas|bonos de
bienvenida casa de apuestas|bonos de bienvenida casas de apuestas|bonos de bienvenida de casas de apuestas|bonos de bienvenida en casas de apuestas|bonos de casas de apuestas|bonos de casas de
apuestas sin deposito|bonos en casa de apuestas|bonos en casas de
apuestas sin deposito|bonos gratis apuestas|bonos gratis apuestas deportivas|bonos gratis casas de apuestas|bonos gratis sin deposito apuestas|bonos paginas de apuestas|bonos registro casas de apuestas|bonos sin deposito apuestas|bonos sin depósito apuestas|bonos sin deposito
apuestas deportivas|bonos sin deposito casas de apuestas|bot de apuestas deportivas gratis|boxeo apuestas|brasil colombia apuestas|brasil peru apuestas|brasil vs
colombia apuestas|buenas apuestas para hoy|buscador cuotas apuestas|buscador de apuestas seguras|buscador de cuotas apuestas|buscador de cuotas de apuestas|buscar apuestas seguras|caballos apuestas|calculador de
apuestas|calculador de cuotas apuestas|calculadora
apuestas|calculadora apuestas combinadas|calculadora apuestas de sistema|calculadora
apuestas deportivas|calculadora apuestas deportivas seguras|calculadora apuestas multiples|calculadora apuestas segura|calculadora apuestas seguras|calculadora apuestas sistema|calculadora
apuestas yankee|calculadora arbitraje apuestas|calculadora cubrir apuestas|calculadora cuotas apuestas|calculadora de apuestas|calculadora de apuestas
combinadas|calculadora de apuestas de futbol|calculadora de apuestas de sistema|calculadora de apuestas deportivas|calculadora de
apuestas multiples|calculadora de apuestas seguras|calculadora de apuestas sistema|calculadora de apuestas surebets|calculadora de
arbitraje apuestas|calculadora de cuotas apuestas|calculadora de cuotas de apuestas|calculadora para apuestas deportivas|calculadora poisson apuestas|calculadora poisson apuestas deportivas|calculadora
poisson para apuestas|calculadora scalping apuestas deportivas|calculadora sistema apuestas|calculadora stake apuestas|calculadora trading apuestas|calcular apuestas|calcular apuestas deportivas|calcular apuestas futbol|calcular apuestas
sistema|calcular cuotas apuestas|calcular cuotas apuestas combinadas|calcular cuotas
apuestas deportivas|calcular cuotas de apuestas|calcular ganancias
apuestas deportivas|calcular momios apuestas|calcular
probabilidad cuota apuestas|calcular stake apuestas|calcular unidades apuestas|calcular yield
apuestas|calculo de apuestas (https://zf.szyouju.com/121203.html)|calculo de apuestas deportivas|cambio de cuotas
apuestas|campeon champions apuestas|campeon eurocopa apuestas|campeon liga apuestas|campeon nba apuestas|canales de
apuestas gratis|carrera de caballos apuestas|carrera de caballos apuestas juego|carrera de caballos con apuestas|carrera de
galgos apuestas|carreras de caballos apuestas|carreras de caballos apuestas
online|carreras de caballos con apuestas|carreras de caballos juegos de apuestas|carreras
de galgos apuestas|carreras de galgos apuestas online|carreras
de galgos apuestas trucos|carreras galgos apuestas|casa apuestas argentina|casa apuestas atletico de madrid|casa apuestas barcelona|casa apuestas betis|casa apuestas bono bienvenida|casa apuestas bono gratis|casa
apuestas bono sin deposito|casa apuestas cerca de mi|casa apuestas chile|casa apuestas colombia|casa apuestas con mejores
cuotas|casa apuestas deportivas|casa apuestas españa|casa apuestas
española|casa apuestas eurocopa|casa apuestas futbol|casa apuestas mejores cuotas|casa apuestas mundial|casa apuestas nueva|casa apuestas nuevas|casa apuestas online|casa apuestas
peru|casa apuestas valencia|casa de apuestas|casa
de apuestas 10 euros gratis|casa de apuestas argentina|casa de apuestas
atletico de madrid|casa de apuestas baloncesto|casa de apuestas barcelona|casa de
apuestas beisbol|casa de apuestas betis|casa de apuestas bono|casa de apuestas
bono bienvenida|casa de apuestas bono de bienvenida|casa de apuestas bono gratis|casa de apuestas bono por registro|casa de apuestas bono sin deposito|casa de apuestas boxeo|casa de apuestas caballos|casa de apuestas carreras de caballos|casa de apuestas
cerca de mi|casa de apuestas cerca de mí|casa de apuestas champions league|casa de apuestas chile|casa de apuestas ciclismo|casa de
apuestas colombia|casa de apuestas con bono de bienvenida|casa de apuestas con bono sin deposito|casa de apuestas con cuotas
mas altas|casa de apuestas con esports|casa de
apuestas con las mejores cuotas|casa de apuestas con licencia en españa|casa
de apuestas con mejores cuotas|casa de apuestas con pago anticipado|casa
de apuestas con paypal|casa de apuestas copa america|casa de apuestas de caballos|casa de
apuestas de colombia|casa de apuestas de
españa|casa de apuestas de futbol|casa de apuestas de fútbol|casa de apuestas de futbol peru|casa de apuestas de peru|casa de apuestas del madrid|casa de apuestas del real madrid|casa de apuestas deportivas|casa de
apuestas deportivas cerca de mi|casa de apuestas deportivas
en argentina|casa de apuestas deportivas en chile|casa de apuestas deportivas en colombia|casa de
apuestas deportivas en españa|casa de apuestas deportivas en madrid|casa
de apuestas deportivas españa|casa de apuestas deportivas españolas|casa de apuestas deportivas madrid|casa de
apuestas deportivas mexico|casa de apuestas deportivas
online|casa de apuestas deportivas peru|casa de apuestas deposito 5 euros|casa
de apuestas deposito minimo|casa de apuestas deposito minimo 1 euro|casa de apuestas depósito mínimo 1 euro|casa de apuestas en españa|casa de apuestas en linea|casa de apuestas en madrid|casa de apuestas en perú|casa de apuestas en vivo|casa de apuestas españa|casa
de apuestas españa inglaterra|casa de apuestas española|casa de
apuestas españolas|casa de apuestas esports|casa de apuestas eurocopa|casa de apuestas europa league|casa de apuestas f1|casa de apuestas formula 1|casa de apuestas futbol|casa de apuestas ingreso
minimo|casa de apuestas ingreso minimo 1 euro|casa de apuestas ingreso mínimo 1 euro|casa de apuestas legales|casa de apuestas legales en colombia|casa
de apuestas legales en españa|casa de apuestas libertadores|casa de apuestas liga española|casa de apuestas madrid|casa de
apuestas mas segura|casa de apuestas mejores|casa de apuestas méxico|casa de apuestas minimo 5 euros|casa de apuestas mlb|casa de apuestas mundial|casa de apuestas nba|casa de apuestas
nfl|casa de apuestas nueva|casa de apuestas nuevas|casa de apuestas oficial del
real madrid|casa de apuestas oficial real madrid|casa
de apuestas online|casa de apuestas online argentina|casa de apuestas online chile|casa de
apuestas online españa|casa de apuestas online mexico|casa de
apuestas online paraguay|casa de apuestas online peru|casa de apuestas online usa|casa de apuestas online
venezuela|casa de apuestas pago anticipado|casa de apuestas para
boxeo|casa de apuestas para ufc|casa de apuestas peru|casa de apuestas perú|casa de apuestas peru online|casa de apuestas por paypal|casa de apuestas promociones|casa de apuestas que regalan dinero|casa de apuestas real madrid|casa de apuestas regalo
de bienvenida|casa de apuestas sevilla|casa de apuestas sin dinero|casa de apuestas sin ingreso minimo|casa de apuestas sin licencia en españa|casa de apuestas sin minimo de
ingreso|casa de apuestas stake|casa de apuestas tenis|casa de apuestas ufc|casa de apuestas valencia|casa de apuestas venezuela|casa de apuestas virtuales|casa de apuestas vive la suerte|casa oficial de apuestas del real madrid|casas apuestas asiaticas|casas apuestas bono sin deposito|casas apuestas bonos sin deposito|casas apuestas
caballos|casas apuestas chile|casas apuestas ciclismo|casas apuestas con licencia|casas apuestas con licencia en españa|casas apuestas deportivas|casas apuestas deportivas colombia|casas
apuestas deportivas españa|casas apuestas deportivas españolas|casas apuestas deportivas nuevas|casas apuestas españa|casas apuestas españolas|casas apuestas esports|casas apuestas eurocopa|casas apuestas
golf|casas apuestas ingreso minimo 5 euros|casas apuestas legales|casas apuestas legales
españa|casas apuestas licencia|casas apuestas
licencia españa|casas apuestas mexico|casas apuestas mundial|casas apuestas
nba|casas apuestas nuevas|casas apuestas nuevas españa|casas apuestas ofertas|casas apuestas online|casas apuestas paypal|casas
apuestas peru|casas apuestas sin licencia|casas apuestas tenis|casas asiaticas apuestas|casas de apuestas|casas de
apuestas 5 euros|casas de apuestas app|casas de apuestas argentinas|casas de apuestas asiaticas|casas de apuestas baloncesto|casas
de apuestas barcelona|casas de apuestas bono bienvenida|casas
de apuestas bono de bienvenida|casas de apuestas bono por registro|casas de apuestas bono
sin deposito|casas de apuestas bono sin ingreso|casas de apuestas bonos|casas de apuestas bonos
de bienvenida|casas de apuestas bonos gratis|casas de apuestas bonos sin deposito|casas de apuestas boxeo|casas de apuestas caballos|casas de apuestas carreras de caballos|casas de apuestas casino|casas de apuestas casino online|casas de apuestas cerca de mi|casas de apuestas
champions league|casas de apuestas chile|casas de apuestas ciclismo|casas de apuestas colombia|casas
de apuestas com|casas de apuestas con app|casas de apuestas con apuestas
gratis|casas de apuestas con bono|casas de apuestas con bono de bienvenida|casas
de apuestas con bono de registro|casas de apuestas con bono por registro|casas de apuestas con bono sin deposito|casas de apuestas con bonos|casas de apuestas con bonos gratis|casas de apuestas con bonos
sin deposito|casas de apuestas con deposito minimo|casas de apuestas con esports|casas de apuestas con handicap asiatico|casas de apuestas con licencia|casas de apuestas con licencia en españa|casas de apuestas con licencia españa|casas de
apuestas con licencia española|casas de apuestas con mejores cuotas|casas de apuestas con pago anticipado|casas de apuestas con paypal|casas de apuestas con paypal
en perú|casas de apuestas con promociones|casas de apuestas con ruleta en vivo|casas de apuestas copa del rey|casas de apuestas de caballos|casas
de apuestas de españa|casas de apuestas de futbol|casas de apuestas de fútbol|casas de
apuestas de peru|casas de apuestas deportivas|casas de apuestas deportivas asiaticas|casas
de apuestas deportivas colombia|casas de apuestas deportivas
comparativa|casas de apuestas deportivas con paypal|casas de apuestas deportivas en chile|casas de apuestas deportivas en españa|casas de apuestas deportivas en linea|casas de apuestas deportivas en madrid|casas de apuestas deportivas
en mexico|casas de apuestas deportivas en peru|casas de apuestas deportivas en sevilla|casas de apuestas deportivas
en valencia|casas de apuestas deportivas españa|casas de
apuestas deportivas españolas|casas de apuestas
deportivas legales|casas de apuestas deportivas madrid|casas de apuestas deportivas mexico|casas de apuestas deportivas nuevas|casas de apuestas deportivas online|casas de apuestas deportivas peru|casas de apuestas deportivas perú|casas de apuestas deposito minimo 1 euro|casas de apuestas
depósito mínimo 1 euro|casas de apuestas dinero gratis|casas de
apuestas en argentina|casas de apuestas en barcelona|casas de apuestas en chile|casas de apuestas en colombia|casas de apuestas en españa|casas de
apuestas en españa online|casas de apuestas en linea|casas de apuestas en madrid|casas
de apuestas en méxico|casas de apuestas en peru|casas
de apuestas en perú|casas de apuestas en sevilla|casas de apuestas en uruguay|casas de apuestas en valencia|casas de apuestas en venezuela|casas de apuestas equipos de
futbol|casas de apuestas españa|casas de apuestas españa alemania|casas de
apuestas españa inglaterra|casas de apuestas españa licencia|casas de apuestas españa nuevas|casas de apuestas españa online|casas de apuestas española|casas de apuestas españolas|casas de apuestas españolas con licencia|casas de apuestas españolas
online|casas de apuestas esports|casas de apuestas eurocopa|casas de apuestas eurocopa 2024|casas de apuestas europa
league|casas de apuestas f1|casas de apuestas fisicas en barcelona|casas de apuestas fisicas
en españa|casas de apuestas formula 1|casas de apuestas fuera de españa|casas de apuestas futbol|casas de apuestas fútbol|casas de apuestas futbol españa|casas de apuestas ganador eurocopa|casas
de apuestas gratis|casas de apuestas ingreso minimo|casas de apuestas ingreso minimo 1 euro|casas de
apuestas ingreso minimo 5 euros|casas de apuestas inter barcelona|casas de
apuestas legales|casas de apuestas legales en colombia|casas de apuestas legales en españa|casas de apuestas legales
en mexico|casas de apuestas legales españa|casas de apuestas legales mx|casas de apuestas licencia|casas de apuestas licencia españa|casas de apuestas lista|casas de apuestas madrid|casas de apuestas mas seguras|casas de apuestas mejores bonos|casas de apuestas mejores cuotas|casas de apuestas mexico|casas de
apuestas méxico|casas de apuestas minimo 5 euros|casas
de apuestas mlb|casas de apuestas mundial|casas
de apuestas mundial baloncesto|casas de apuestas mundiales|casas de apuestas nba|casas de apuestas no reguladas en españa|casas de apuestas nueva ley|casas de apuestas nuevas|casas de apuestas nuevas en colombia|casas de apuestas nuevas en españa|casas de apuestas nuevas españa|casas de apuestas ofertas|casas de apuestas
online|casas de apuestas online argentina|casas de apuestas online colombia|casas de apuestas online deportivas|casas de apuestas online ecuador|casas
de apuestas online en argentina|casas de apuestas online en chile|casas de
apuestas online en colombia|casas de apuestas online en españa|casas de apuestas online en mexico|casas de apuestas
online españa|casas de apuestas online mas fiables|casas de apuestas online mexico|casas de apuestas online nuevas|casas de apuestas
online peru|casas de apuestas online usa|casas de apuestas online venezuela|casas de apuestas pago paypal|casas de apuestas
para ufc|casas de apuestas paypa
Your comment is awaiting moderation.
Don Mueang International Airport, Thailand (DMK)
tripscan top
Are you an avgeek with a mean handicap? Then it’s time to tee off in Bangkok, where Don Mueang International Airport has an 18-hole golf course between its two runways. If you’re nervous from a safety point of view, don’t be — players at the Kantarat course must go through airport-style security before they hit the grass. Oh, you meant safety on the course? Just beware of those flying balls, because there are no barriers between the course and the runways. Players are, at least, shown a red light when a plane is coming in to land so don’t get too distracted by the game.
http://trips45.cc
trip scan
Although Suvarnabhumi (BKK) is Bangkok’s main airport these days — it opened in 2006 —Don Mueang, which started out as a Royal Thai Air Force base in 1914, remains Bangkok’s budget airline hub, with brands including Thai Air Asia and Thai Lion Air using it as their base. Although you’re more likely to see narrowbodies these days, you may just get lucky — in 2022, an Emirates A380 made an emergency landing here. Imagine the views from the course that day.
Related article
Sporty airport outfit being worn by writer
CNN Underscored: Flying sucks. Make it better with these comfy airport outfits for women
Sumburgh Airport, Scotland (LSI)
The road south from Lerwick cuts across the runway of Sumburgh Airport on Shetland.
The road south from Lerwick cuts across the runway of Sumburgh Airport on Shetland. Alan Morris/iStock Editorial/Getty Images
Planning a trip to Jarlshof, the extraordinarily well-preserved Bronze Age settlement towards the southern tip of Shetland? You may need to build in some extra time. The ancient and Viking-era ruins, called one of the UK’s greatest archaeological sites, sit just beyond one of the runways of Sumburgh, Shetland’s main airport — and reaching them means driving, cycling or walking across the runway itself.
There’s only one road heading due south from the capital, Lerwick; and while it ducks around most of the airport’s perimeter, skirting the two runways, the road cuts directly across the western end of one of them. A staff member occupies a roadside hut, and before take-offs and landings, comes out to lower a barrier across the road. Once the plane is where it needs to be, up come the barriers and waiting drivers get a friendly thumbs up.
Amata Kabua International Airport, Marshall Islands (MAJ)
Fly into Majuro and you’ll skim across the Pacific and land on the runway that’s just about as wide as the sandbar-like island itself.
Fly into Majuro and you’ll skim across the Pacific and land on the runway that’s just about as wide as the sandbar-like island itself. mtcurado/iStockphoto/Getty Images
Imagine flying into Majuro, the capital of the Marshall Islands in Micronesia. You’re descending down, down, and further down towards the Pacific, no land in sight. Then you’re suddenly above a pencil-thin atoll — can you really be about to land here? Yes you are, with cars racing past the runway no less, matching you for speed.
Majuro’s Amata Kabua International Airport gives a whole new meaning to the phrase “water landing”. Its single runway, just shy of 8,000ft, is a slim strip of asphalt over the sandbar that’s barely any wider than the atoll itself — and the island is so remote that when the runway was resurfaced, materials had to be transported from the Philippines, Hong Kong and Korea, according to the constructors. “Lagoon Road” — the 30-mile road that runs from top to toe on Majuro — skims alongside the runway.
Don’t think about pulling over, though — there’s only sand and sea on one side, and that runway the other.
Related article
Barra Airport, Scotland
At Scotland’s beach airport, the runway disappears at high tide
Your comment is awaiting moderation.
https://xnudes.ai/
Your comment is awaiting moderation.
Пришла сегодня посыль с 203им,кол-во ровное,даже показалось больше))) Сделал 1 к 15 самое то,магазу спасибо,процветания и всег благ) https://mortythedog.com А почему сам с-м.сом сюда какой день не кажеться…?
Your comment is awaiting moderation.
promorocket.click – Loved the layout today; clean, simple, and genuinely user-friendly overall.
Your comment is awaiting moderation.
marketsignal.click – Found practical insights today; sharing this article with colleagues later.
Your comment is awaiting moderation.
adlaunchpro.click – Loved the layout today; clean, simple, and genuinely user-friendly overall.
Your comment is awaiting moderation.
promosprinter.click – Color palette felt calming, nothing distracting, just focused, thoughtful design.
Your comment is awaiting moderation.
growthsignal.click – Overall, professional vibe here; trustworthy, polished, and pleasantly minimal throughout.
Your comment is awaiting moderation.
growelite.click – Found practical insights today; sharing this article with colleagues later.
Your comment is awaiting moderation.
clickmotion.click – Overall, professional vibe here; trustworthy, polished, and pleasantly minimal throughout.
Your comment is awaiting moderation.
(10 euros gratis apuestas|10 mejores casas de apuestas|10
trucos para ganar apuestas|15 euros gratis marca apuestas|1×2 apuestas|1×2 apuestas deportivas|1×2 apuestas que significa|1×2 en apuestas|1×2 en apuestas que significa|1×2 que significa en apuestas|5
euros gratis apuestas|9 apuestas que siempre ganaras|a partir de cuanto se declara
apuestas|actividades de juegos de azar y apuestas|ad apuestas deportivas|aleksandre topuria ufc
apuestas|algoritmo para ganar apuestas deportivas|america apuestas|análisis nba
apuestas|aplicacion android apuestas deportivas|aplicacion apuestas deportivas|aplicacion apuestas deportivas
android|aplicación de apuestas online|aplicacion para hacer apuestas|aplicacion para hacer apuestas de futbol|aplicación para hacer apuestas
de fútbol|aplicaciones apuestas deportivas android|aplicaciones apuestas deportivas gratis|aplicaciones
de apuestas android|aplicaciones de apuestas de fútbol|aplicaciones de apuestas
deportivas|aplicaciones de apuestas deportivas
peru|aplicaciones de apuestas deportivas perú|aplicaciones de apuestas en colombia|aplicaciones de apuestas
gratis|aplicaciones de apuestas online|aplicaciones de
apuestas seguras|aplicaciones de apuestas sin dinero|aplicaciones para hacer apuestas|apostar seguro apuestas deportivas|app android apuestas
deportivas|app apuestas|app apuestas android|app apuestas de futbol|app apuestas deportivas|app apuestas
deportivas android|app apuestas deportivas argentina|app apuestas deportivas colombia|app apuestas deportivas ecuador|app apuestas deportivas españa|app apuestas deportivas gratis|app
apuestas entre amigos|app apuestas futbol|app apuestas gratis|app apuestas sin dinero|app casa de apuestas|app casas de
apuestas|app control apuestas|app de apuestas|app de apuestas android|app de apuestas casino|app de apuestas colombia|app de
apuestas con bono de bienvenida|app de apuestas de
futbol|app de apuestas deportivas|app de apuestas deportivas android|app de apuestas deportivas argentina|app de apuestas deportivas colombia|app de apuestas deportivas en españa|app de apuestas deportivas peru|app de apuestas deportivas perú|app de apuestas deportivas sin dinero|app
de apuestas ecuador|app de apuestas en colombia|app
de apuestas en españa|app de apuestas en venezuela|app
de apuestas futbol|app de apuestas gratis|app de apuestas online|app de
apuestas para android|app de apuestas para ganar dinero|app de
apuestas peru|app de apuestas reales|app de
casas de apuestas|app marca apuestas android|app
moviles de apuestas|app para apuestas|app para apuestas de futbol|app para apuestas deportivas|app para apuestas
deportivas en español|app para ganar apuestas deportivas|app para hacer
apuestas|app para hacer apuestas deportivas|app para hacer apuestas entre amigos|app para llevar control de apuestas|app pronosticos
apuestas deportivas|app versus apuestas|apps apuestas mundial|apps
de apuestas|apps de apuestas con bono de bienvenida|apps de apuestas de futbol|apps de apuestas deportivas peru|apps de apuestas mexico|apps para apuestas|aprender a hacer apuestas deportivas|aprender hacer apuestas
deportivas|apuesta del dia apuestas deportivas|apuestas 10 euros gratis|apuestas 100 seguras|apuestas 1×2|apuestas 1X2|apuestas 2 division|apuestas 3 division|apuestas a caballos|apuestas
a carreras de caballos|apuestas a colombia|apuestas a corners|apuestas a ganar|apuestas a jugadores nba|apuestas a la baja|apuestas a
la nfl|apuestas al barcelona|apuestas al dia|apuestas al
empate|apuestas al mundial|apuestas al tenis wta|apuestas alaves barcelona|apuestas alcaraz
hoy|apuestas alemania españa|apuestas alonso campeon del mundo|apuestas altas y bajas|apuestas altas y bajas nfl|apuestas ambos equipos
marcan|apuestas america|apuestas android|apuestas anillo
nba|apuestas antes del mundial|apuestas anticipadas|apuestas anticipadas nba|apuestas
apps|apuestas arabia argentina|apuestas argentina|apuestas argentina campeon del mundo|apuestas argentina canada|apuestas argentina colombia|apuestas argentina croacia|apuestas argentina españa|apuestas argentina francia|apuestas argentina francia cuanto paga|apuestas argentina francia mundial|apuestas
argentina gana el mundial|apuestas argentina gana mundial|apuestas argentina holanda|apuestas argentina
mexico|apuestas argentina méxico|apuestas argentina mundial|apuestas argentina online|apuestas argentina paises bajos|apuestas argentina polonia|apuestas argentina uruguay|apuestas argentina vs australia|apuestas argentina vs colombia|apuestas argentina vs francia|apuestas argentina vs peru|apuestas argentinas|apuestas arsenal real madrid|apuestas
ascenso a primera division|apuestas ascenso a segunda|apuestas
asiaticas|apuestas asiatico|apuestas athletic|apuestas athletic
atletico|apuestas athletic barça|apuestas athletic barcelona|apuestas athletic betis|apuestas
athletic manchester|apuestas athletic manchester united|apuestas athletic
osasuna|apuestas athletic real|apuestas athletic real madrid|apuestas athletic real sociedad|apuestas athletic real
sociedad final|apuestas athletic roma|apuestas athletic sevilla|apuestas athletic valencia|apuestas atletico|apuestas atletico
barcelona|apuestas atletico barsa|apuestas atletico campeon champions|apuestas atletico campeon de liga|apuestas atlético
copenhague|apuestas atletico de madrid|apuestas atlético de madrid|apuestas atletico de
madrid barcelona|apuestas atletico de madrid gana
la liga|apuestas atletico de madrid real madrid|apuestas atlético de madrid
real madrid|apuestas atletico de madrid
vs barcelona|apuestas atletico madrid|apuestas atletico madrid real madrid|apuestas atletico madrid vs barcelona|apuestas atletico real madrid|apuestas atletico real madrid champions|apuestas atletismo|apuestas
bajas|apuestas baloncesto|apuestas baloncesto acb|apuestas baloncesto handicap|apuestas baloncesto hoy|apuestas
baloncesto juegos olimpicos|apuestas baloncesto nba|apuestas
baloncesto pronostico|apuestas baloncesto pronósticos|apuestas baloncesto prorroga|apuestas
barca|apuestas barca athletic|apuestas barca atletico|apuestas barca bayern|apuestas
barca bayern munich|apuestas barca girona|apuestas barca hoy|apuestas barça hoy|apuestas barca inter|apuestas barca juventus|apuestas barca madrid|apuestas barça madrid|apuestas barca real madrid|apuestas
barca vs juve|apuestas barca vs madrid|apuestas barca vs psg|apuestas barcelona|apuestas barcelona alaves|apuestas barcelona athletic|apuestas barcelona atletico|apuestas
barcelona atletico de madrid|apuestas barcelona
atlético de madrid|apuestas barcelona atletico madrid|apuestas barcelona
bayern|apuestas barcelona betis|apuestas barcelona campeon de liga|apuestas barcelona celta|apuestas barcelona espanyol|apuestas barcelona
gana la champions|apuestas barcelona girona|apuestas barcelona granada|apuestas barcelona hoy|apuestas
barcelona inter|apuestas barcelona madrid|apuestas barcelona
osasuna|apuestas barcelona psg|apuestas barcelona real madrid|apuestas barcelona
real sociedad|apuestas barcelona sevilla|apuestas barcelona valencia|apuestas
barcelona villarreal|apuestas barcelona vs atletico
madrid|apuestas barcelona vs madrid|apuestas barcelona vs real madrid|apuestas
barsa madrid|apuestas basket hoy|apuestas bayern barcelona|apuestas
bayern vs barcelona|apuestas beisbol|apuestas béisbol|apuestas beisbol
mlb|apuestas beisbol pronosticos|apuestas beisbol venezolano|apuestas betis|apuestas betis
– chelsea|apuestas betis barcelona|apuestas betis chelsea|apuestas betis fiorentina|apuestas betis girona|apuestas betis madrid|apuestas
betis mallorca|apuestas betis real madrid|apuestas
betis real sociedad|apuestas betis sevilla|apuestas betis valencia|apuestas betis valladolid|apuestas
betis vs valencia|apuestas betplay hoy colombia|apuestas betsson peru|apuestas bienvenida|apuestas billar online|apuestas bolivia vs colombia|apuestas bono|apuestas bono bienvenida|apuestas bono de
bienvenida|apuestas bono de bienvenida sin deposito|apuestas bono gratis|apuestas bono sin deposito|apuestas bonos sin deposito|apuestas borussia real madrid|apuestas boxeo|apuestas boxeo de campeonato|apuestas boxeo españa|apuestas boxeo español|apuestas boxeo femenino olimpiadas|apuestas boxeo hoy|apuestas boxeo online|apuestas
brasil colombia|apuestas brasil peru|apuestas brasil uruguay|apuestas brasil vs
colombia|apuestas brasil vs peru|apuestas caballos|apuestas caballos colocado|apuestas caballos españa|apuestas caballos hipodromo|apuestas caballos hoy|apuestas caballos madrid|apuestas caballos online|apuestas
caballos sanlucar de barrameda|apuestas caballos zarzuela|apuestas calculador|apuestas campeon|apuestas campeon champions|apuestas campeón champions|apuestas campeon champions
2025|apuestas campeon champions league|apuestas campeon conference league|apuestas campeon copa america|apuestas campeon copa del rey|apuestas campeon de champions|apuestas campeon de la champions|apuestas campeon de liga|apuestas campeon del mundo|apuestas campeon eurocopa|apuestas campeón eurocopa|apuestas campeon europa league|apuestas campeon f1|apuestas campeon f1 2025|apuestas campeon formula
1|apuestas campeon libertadores|apuestas campeon liga|apuestas campeon liga bbva|apuestas campeon liga española|apuestas campeon liga santander|apuestas campeon motogp 2025|apuestas campeon mundial|apuestas campeón mundial|apuestas campeon mundial baloncesto|apuestas campeon nba|apuestas campeón nba|apuestas campeon premier|apuestas campeon premier league|apuestas campeon roland garros|apuestas
campeonato f1|apuestas campeonatos de futbol|apuestas
carrera de caballos|apuestas carrera de caballos hoy|apuestas carrera de caballos nocturnas|apuestas carrera de galgos fin de semana|apuestas carrera
de galgos hoy|apuestas carrera de galgos nocturnas|apuestas carreras caballos|apuestas carreras caballos sanlucar|apuestas carreras de caballos|apuestas carreras de caballos
en directo|apuestas carreras de caballos en vivo|apuestas carreras de
caballos españa|apuestas carreras de caballos hoy|apuestas carreras de caballos nacionales|apuestas
carreras de caballos nocturnas|apuestas carreras de caballos online|apuestas
carreras de caballos sanlucar|apuestas carreras de caballos
sanlúcar|apuestas carreras de galgos|apuestas
carreras de galgos en vivo|apuestas carreras de galgos nocturnas|apuestas carreras de galgos
pre partido|apuestas casino|apuestas casino barcelona|apuestas casino
futbol|apuestas casino gran madrid|apuestas casino gratis|apuestas casino
madrid|apuestas casino online|apuestas casino online argentina|apuestas casinos|apuestas casinos online|apuestas celta|apuestas
celta barcelona|apuestas celta betis|apuestas
celta eibar|apuestas celta espanyol|apuestas celta granada|apuestas celta
madrid|apuestas celta manchester|apuestas celta real madrid|apuestas champion league|apuestas champions foro|apuestas champions hoy|apuestas champions league|apuestas champions league – pronósticos|apuestas champions league 2025|apuestas champions league hoy|apuestas champions league pronosticos|apuestas champions league pronósticos|apuestas champions pronosticos|apuestas chelsea barcelona|apuestas chelsea betis|apuestas chile|apuestas chile
peru|apuestas chile venezuela|apuestas chile
vs colombia|apuestas chile vs uruguay|apuestas ciclismo|apuestas ciclismo en vivo|apuestas ciclismo femenino|apuestas
ciclismo tour francia|apuestas ciclismo vuelta|apuestas ciclismo vuelta a
españa|apuestas ciclismo vuelta españa|apuestas
city madrid|apuestas city real madrid|apuestas clasico|apuestas clasico español|apuestas clasico real madrid barcelona|apuestas clasificacion mundial|apuestas colombia|apuestas colombia argentina|apuestas colombia brasil|apuestas colombia paraguay|apuestas colombia uruguay|apuestas colombia vs argentina|apuestas colombia
vs brasil|apuestas combinadas|apuestas combinadas como funcionan|apuestas combinadas de futbol|apuestas
combinadas de fútbol|apuestas combinadas foro|apuestas combinadas futbol|apuestas
combinadas hoy|apuestas combinadas mismo partido|apuestas combinadas
mundial|apuestas combinadas nba|apuestas combinadas para esta semana|apuestas combinadas para hoy|apuestas combinadas
para mañana|apuestas combinadas pronosticos|apuestas combinadas recomendadas|apuestas combinadas seguras|apuestas
combinadas seguras para hoy|apuestas combinadas seguras para mañana|apuestas como ganar|apuestas comparador|apuestas con bono de bienvenida|apuestas con dinero
ficticio|apuestas con dinero real|apuestas con dinero virtual|apuestas con handicap|apuestas con handicap asiatico|apuestas con handicap baloncesto|apuestas con mas probabilidades de ganar|apuestas
con paypal|apuestas con tarjeta de credito|apuestas con tarjeta de debito|apuestas consejos|apuestas
copa|apuestas copa africa|apuestas copa america|apuestas copa
américa|apuestas copa argentina|apuestas copa brasil|apuestas copa davis|apuestas copa de europa|apuestas copa del mundo|apuestas copa del rey|apuestas copa del rey
baloncesto|apuestas copa del rey final|apuestas
copa del rey futbol|apuestas copa del rey ganador|apuestas copa del rey hoy|apuestas copa del rey pronosticos|apuestas copa del rey pronósticos|apuestas copa europa|apuestas
copa italia|apuestas copa libertadores|apuestas copa mundial
de hockey|apuestas copa rey|apuestas copa sudamericana|apuestas corners|apuestas
corners hoy|apuestas croacia argentina|apuestas cuartos eurocopa|apuestas cuotas|apuestas cuotas altas|apuestas cuotas bajas|apuestas de 1 euro|apuestas
de baloncesto|apuestas de baloncesto hoy|apuestas de baloncesto nba|apuestas de baloncesto para hoy|apuestas
de beisbol|apuestas de beisbol para hoy|apuestas de blackjack en linea|apuestas de boxeo|apuestas de boxeo canelo|apuestas de
boxeo en las vegas|apuestas de boxeo hoy|apuestas de
boxeo online|apuestas de caballo|apuestas de caballos|apuestas de caballos como funciona|apuestas de caballos como se juega|apuestas de caballos
en colombia|apuestas de caballos en españa|apuestas de caballos en linea|apuestas de caballos españa|apuestas
de caballos ganador y colocado|apuestas de caballos internacionales|apuestas de caballos juegos|apuestas de caballos online|apuestas
de caballos online en venezuela|apuestas de caballos por internet|apuestas de caballos pronosticos|apuestas de caballos pronósticos|apuestas de
carrera de caballos|apuestas de carreras de caballos|apuestas de carreras de caballos online|apuestas de casino|apuestas de casino online|apuestas de casino por internet|apuestas
de champions league|apuestas de ciclismo|apuestas
de colombia|apuestas de copa america|apuestas de corners|apuestas de deportes en linea|apuestas de deportes online|apuestas
de dinero|apuestas de esports|apuestas de eurocopa|apuestas de europa league|apuestas de f1|apuestas de formula 1|apuestas de futbol|apuestas
de fútbol|apuestas de futbol app|apuestas de futbol argentina|apuestas de futbol colombia|apuestas de futbol en colombia|apuestas de futbol en directo|apuestas de futbol en linea|apuestas de
futbol en vivo|apuestas de futbol español|apuestas de futbol gratis|apuestas de futbol hoy|apuestas de futbol mundial|apuestas de
futbol online|apuestas de fútbol online|apuestas de futbol para hoy|apuestas de
fútbol para hoy|apuestas de futbol para hoy seguras|apuestas de futbol para mañana|apuestas
de futbol peru|apuestas de futbol pronosticos|apuestas de fútbol
pronósticos|apuestas de futbol seguras|apuestas de
futbol seguras para hoy|apuestas de futbol sin dinero|apuestas de galgos|apuestas de galgos como ganar|apuestas de galgos en directo|apuestas de galgos online|apuestas de
galgos trucos|apuestas de golf|apuestas de hockey|apuestas
de hockey sobre hielo|apuestas de hoy|apuestas de hoy seguras|apuestas de juego|apuestas
de juegos|apuestas de juegos deportivos|apuestas de juegos online|apuestas de la champions league|apuestas de la copa
américa|apuestas de la eurocopa|apuestas de la europa league|apuestas de la liga|apuestas de la liga bbva|apuestas
de la liga española|apuestas de la nba|apuestas de la nfl|apuestas de la ufc|apuestas de
mlb|apuestas de nba|apuestas de nba para hoy|apuestas de partidos|apuestas
de partidos de futbol|apuestas de peleas ufc|apuestas de perros
en vivo|apuestas de perros virtuales|apuestas de peru|apuestas de sistema|apuestas de sistema como funciona|apuestas de sistema explicacion|apuestas de sistema explicación|apuestas de tenis|apuestas de tenis
de mesa|apuestas de tenis en directo|apuestas de tenis hoy|apuestas
de tenis para hoy|apuestas de tenis pronosticos|apuestas de tenis seguras|apuestas de todo tipo|apuestas de ufc|apuestas de ufc hoy|apuestas del boxeo|apuestas del
clasico|apuestas del clasico real madrid barca|apuestas del dia|apuestas del día|apuestas del
dia de hoy|apuestas del dia deportivas|apuestas del
dia futbol|apuestas del mundial|apuestas del partido de hoy|apuestas del real madrid|apuestas del rey|apuestas
del sistema|apuestas deporte|apuestas deportes|apuestas deportiva|apuestas deportivas|apuestas deportivas 1 euro|apuestas deportivas 10 euros gratis|apuestas deportivas 100 seguras|apuestas
deportivas 1×2|apuestas deportivas android|apuestas deportivas app|apuestas deportivas apps|apuestas deportivas argentina|apuestas deportivas argentina
futbol|apuestas deportivas argentina legal|apuestas deportivas
atletico de madrid|apuestas deportivas baloncesto|apuestas
deportivas barca madrid|apuestas deportivas barcelona|apuestas deportivas beisbol|apuestas deportivas
bono|apuestas deportivas bono bienvenida|apuestas deportivas
bono de bienvenida|apuestas deportivas bono sin deposito|apuestas deportivas bonos de bienvenida|apuestas deportivas boxeo|apuestas deportivas caballos|apuestas deportivas calculadora|apuestas deportivas campeon liga|apuestas deportivas casino|apuestas
deportivas casino barcelona|apuestas deportivas casino
online|apuestas deportivas cerca de mi|apuestas deportivas champions
league|apuestas deportivas chile|apuestas deportivas
ciclismo|apuestas deportivas colombia|apuestas deportivas com|apuestas deportivas com foro|apuestas deportivas com pronosticos|apuestas deportivas combinadas|apuestas deportivas combinadas para hoy|apuestas deportivas como se juega|apuestas deportivas
comparador|apuestas deportivas con bono gratis|apuestas
deportivas con bonos gratis|apuestas deportivas con dinero ficticio|apuestas
deportivas con paypal|apuestas deportivas con puntos virtuales|apuestas deportivas consejos|apuestas deportivas consejos para ganar|apuestas deportivas copa america|apuestas deportivas copa
del rey|apuestas deportivas copa libertadores|apuestas deportivas copa mundial|apuestas deportivas corners|apuestas
deportivas cual es la mejor|apuestas deportivas cuotas altas|apuestas deportivas de
baloncesto|apuestas deportivas de boxeo|apuestas deportivas de colombia|apuestas deportivas de futbol|apuestas deportivas de nba|apuestas
deportivas de nhl|apuestas deportivas de peru|apuestas deportivas de tenis|apuestas deportivas del
dia|apuestas deportivas dinero ficticio|apuestas deportivas directo|apuestas deportivas doble oportunidad|apuestas deportivas
en argentina|apuestas deportivas en chile|apuestas deportivas en colombia|apuestas deportivas en directo|apuestas deportivas en españa|apuestas deportivas
en español|apuestas deportivas en linea|apuestas deportivas en línea|apuestas deportivas en peru|apuestas deportivas en perú|apuestas deportivas en sevilla|apuestas deportivas en uruguay|apuestas deportivas en vivo|apuestas
deportivas es|apuestas deportivas es pronosticos|apuestas deportivas españa|apuestas
deportivas españolas|apuestas deportivas esports|apuestas
deportivas estadisticas|apuestas deportivas estrategias|apuestas deportivas estrategias seguras|apuestas deportivas eurocopa|apuestas deportivas europa league|apuestas deportivas f1|apuestas deportivas faciles
de ganar|apuestas deportivas formula 1|apuestas deportivas foro|apuestas deportivas foro futbol|apuestas deportivas foro tenis|apuestas deportivas francia argentina|apuestas deportivas futbol|apuestas
deportivas fútbol|apuestas deportivas futbol argentino|apuestas deportivas
futbol colombia|apuestas deportivas futbol español|apuestas deportivas gana|apuestas deportivas ganadas|apuestas deportivas ganar dinero seguro|apuestas
deportivas gane|apuestas deportivas golf|apuestas deportivas gratis|apuestas deportivas gratis con premios|apuestas deportivas gratis hoy|apuestas deportivas gratis sin deposito|apuestas deportivas handicap|apuestas deportivas handicap asiatico|apuestas
deportivas hoy|apuestas deportivas impuestos|apuestas deportivas interior
argentina|apuestas deportivas juegos olimpicos|apuestas
deportivas la liga|apuestas deportivas legales|apuestas deportivas legales en colombia|apuestas deportivas libres de impuestos|apuestas deportivas licencia españa|apuestas
deportivas liga española|apuestas deportivas listado|apuestas deportivas listado clasico|apuestas deportivas madrid|apuestas deportivas mas seguras|apuestas deportivas mejor pagadas|apuestas deportivas mejores|apuestas deportivas mejores app|apuestas deportivas mejores casas –
Judson,|apuestas deportivas mejores cuotas|apuestas deportivas mejores paginas|apuestas deportivas mexico|apuestas deportivas méxico|apuestas deportivas mlb|apuestas deportivas
mlb hoy|apuestas deportivas multiples|apuestas deportivas mundial|apuestas deportivas murcia|apuestas deportivas nba|apuestas deportivas nba hoy|apuestas deportivas
nfl|apuestas deportivas nhl|apuestas deportivas
nuevas|apuestas deportivas ofertas|apuestas deportivas online|apuestas deportivas online argentina|apuestas deportivas
online chile|apuestas deportivas online colombia|apuestas deportivas online en colombia|apuestas deportivas online españa|apuestas deportivas online mexico|apuestas
deportivas online paypal|apuestas deportivas online peru|apuestas deportivas online por internet|apuestas deportivas pago paypal|apuestas
deportivas para ganar dinero|apuestas deportivas para
hoy|apuestas deportivas para hoy pronosticos|apuestas deportivas
partido suspendido|apuestas deportivas partidos de
hoy|apuestas deportivas paypal|apuestas deportivas peru|apuestas deportivas perú|apuestas deportivas peru vs ecuador|apuestas deportivas predicciones|apuestas deportivas
promociones|apuestas deportivas pronostico|apuestas deportivas pronóstico|apuestas
deportivas pronostico hoy|apuestas deportivas pronosticos|apuestas deportivas pronósticos|apuestas deportivas pronosticos expertos|apuestas
deportivas pronosticos gratis|apuestas deportivas pronosticos nba|apuestas deportivas pronosticos tenis|apuestas deportivas
que aceptan paypal|apuestas deportivas real madrid|apuestas deportivas regalo bienvenida|apuestas deportivas resultado exacto|apuestas deportivas resultados|apuestas deportivas rugby|apuestas deportivas seguras|apuestas deportivas seguras foro|apuestas deportivas seguras hoy|apuestas deportivas seguras para hoy|apuestas deportivas
seguras telegram|apuestas deportivas sevilla|apuestas deportivas simulador eurocopa|apuestas deportivas sin deposito|apuestas deportivas sin deposito inicial|apuestas deportivas sin dinero|apuestas deportivas sin dinero real|apuestas deportivas sin registro|apuestas
deportivas stake|apuestas deportivas stake 10|apuestas deportivas telegram españa|apuestas deportivas tenis|apuestas deportivas tenis de mesa|apuestas deportivas tenis foro|apuestas deportivas tenis hoy|apuestas deportivas tips|apuestas deportivas tipster|apuestas deportivas ufc|apuestas
deportivas uruguay|apuestas deportivas valencia|apuestas deportivas
valencia barcelona|apuestas deportivas venezuela|apuestas deportivas virtuales|apuestas deportivas y casino|apuestas deportivas y
casino online|apuestas deportivas.com|apuestas deportivas.com foro|apuestas deportivas.es|apuestas
deportivos pronosticos|apuestas deposito minimo 1 euro|apuestas descenso a segunda|apuestas descenso a segunda b|apuestas descenso la liga|apuestas descenso primera
division|apuestas descenso segunda|apuestas dia|apuestas
diarias seguras|apuestas dinero|apuestas dinero ficticio|apuestas dinero real|apuestas dinero
virtual|apuestas directas|apuestas directo|apuestas directo futbol|apuestas division de honor juvenil|apuestas dnb|apuestas doble oportunidad|apuestas
doble resultado|apuestas dobles|apuestas dobles y triples|apuestas dortmund barcelona|apuestas
draft nba|apuestas draft nfl|apuestas ecuador vs argentina|apuestas ecuador vs venezuela|apuestas
egipto uruguay|apuestas el clasico|apuestas elecciones
venezuela|apuestas empate|apuestas en baloncesto|apuestas en barcelona|apuestas
en beisbol|apuestas en boxeo|apuestas en caballos|apuestas en carreras de caballos|apuestas en casino|apuestas en casino online|apuestas en casinos|apuestas en casinos online|apuestas en chile|apuestas en ciclismo|apuestas en colombia|apuestas en colombia de futbol|apuestas en directo|apuestas en directo futbol|apuestas en directo pronosticos|apuestas en el futbol|apuestas en el
tenis|apuestas en españa|apuestas en esports|apuestas en eventos
deportivos virtuales|apuestas en golf|apuestas
en juegos|apuestas en la champions league|apuestas en la
eurocopa|apuestas en la liga|apuestas en la nba|apuestas en la nfl|apuestas en las vegas mlb|apuestas en las vegas nfl|apuestas
en linea|apuestas en línea|apuestas en linea argentina|apuestas en linea
boxeo|apuestas en linea chile|apuestas en linea
colombia|apuestas en línea de fútbol|apuestas en linea
deportivas|apuestas en linea españa|apuestas en linea estados
unidos|apuestas en linea futbol|apuestas
en linea mexico|apuestas en línea méxico|apuestas en linea
mundial|apuestas en linea peru|apuestas en linea usa|apuestas
en los esports|apuestas en madrid|apuestas en méxico|apuestas en mexico online|apuestas en nba|apuestas en partidos de futbol|apuestas en partidos
de futbol en vivo|apuestas en partidos de
tenis en directo|apuestas en perú|apuestas en sevilla|apuestas en sistema|apuestas en stake|apuestas en tenis|apuestas en tenis
de mesa|apuestas en valencia|apuestas en vivo|apuestas en vivo
argentina|apuestas en vivo casino|apuestas en vivo futbol|apuestas en vivo
fútbol|apuestas en vivo nba|apuestas en vivo peru|apuestas en vivo tenis|apuestas en vivo ufc|apuestas equipo mbappe|apuestas equipos
de futbol|apuestas españa|apuestas españa alemania|apuestas españa alemania eurocopa|apuestas españa croacia|apuestas españa
eurocopa|apuestas españa francia|apuestas españa francia
eurocopa|apuestas españa gana el mundial|apuestas españa gana eurocopa|apuestas españa gana mundial|apuestas españa georgia|apuestas españa
holanda|apuestas españa inglaterra|apuestas españa inglaterra cuotas|apuestas españa inglaterra eurocopa|apuestas españa italia|apuestas españa mundial|apuestas españa paises bajos|apuestas español|apuestas español oviedo|apuestas espanyol barcelona|apuestas espanyol
betis|apuestas espanyol villarreal|apuestas esport|apuestas
esports|apuestas esports colombia|apuestas esports españa|apuestas esports fifa|apuestas esports gratis|apuestas
esports lol|apuestas esports peru|apuestas esports valorant|apuestas
estadisticas|apuestas estrategias|apuestas euro|apuestas
euro copa|apuestas eurocopa|apuestas eurocopa campeon|apuestas eurocopa españa|apuestas eurocopa favoritos|apuestas eurocopa femenina|apuestas eurocopa final|apuestas eurocopa ganador|apuestas eurocopa hoy|apuestas eurocopa sub 21|apuestas euroliga baloncesto|apuestas euroliga pronosticos|apuestas europa league|apuestas europa league
hoy|apuestas europa league pronosticos|apuestas europa league
pronósticos|apuestas euros|apuestas f1 abu dhabi|apuestas f1 bahrein|apuestas f1 canada|apuestas f1 china|apuestas f1 cuotas|apuestas f1 hoy|apuestas f1 las
vegas|apuestas f1 miami|apuestas f1 monaco|apuestas faciles
de ganar|apuestas fáciles de ganar|apuestas faciles para
ganar|apuestas favoritas|apuestas favorito champions|apuestas favoritos champions|apuestas favoritos eurocopa|apuestas favoritos mundial|apuestas fc barcelona|apuestas final champions
cuotas|apuestas final champions league|apuestas final champions peru|apuestas final copa|apuestas
final copa america|apuestas final copa de europa|apuestas final copa del rey|apuestas final copa europa|apuestas final copa libertadores|apuestas final copa rey|apuestas final de copa|apuestas final de copa del rey|apuestas final del
mundial|apuestas final euro|apuestas final eurocopa|apuestas final
europa league|apuestas final libertadores|apuestas final mundial|apuestas final nba|apuestas final
rugby|apuestas final uefa europa league|apuestas final.mundial|apuestas finales de conferencia nfl|apuestas finales nba|apuestas
fiorentina betis|apuestas formula|apuestas formula 1|apuestas fórmula 1|apuestas fórmula 1 pronósticos|apuestas formula uno|apuestas foro|apuestas foro nba|apuestas francia argentina|apuestas
francia españa|apuestas futbol|apuestas fútbol|apuestas futbol
americano|apuestas futbol americano nfl|apuestas futbol
argentina|apuestas futbol argentino|apuestas futbol champions league|apuestas futbol chile|apuestas futbol colombia|apuestas futbol consejos|apuestas futbol en directo|apuestas fútbol en directo|apuestas futbol
en vivo|apuestas fútbol en vivo|apuestas futbol españa|apuestas futbol español|apuestas fútbol español|apuestas
futbol eurocopa|apuestas futbol femenino|apuestas futbol
foro|apuestas futbol gratis|apuestas futbol
hoy|apuestas fútbol hoy|apuestas futbol juegos olimpicos|apuestas futbol mexico|apuestas futbol mundial|apuestas futbol online|apuestas futbol para hoy|apuestas futbol peru|apuestas futbol pronosticos|apuestas futbol sala|apuestas futbol telegram|apuestas futbol virtual|apuestas galgos|apuestas galgos en directo|apuestas galgos hoy|apuestas galgos online|apuestas
galgos pronosticos|apuestas galgos trucos|apuestas gana|apuestas gana colombia|apuestas gana resultados|apuestas ganadas|apuestas ganadas hoy|apuestas ganador champions league|apuestas
ganador copa america|apuestas ganador copa del rey|apuestas ganador
copa del rey baloncesto|apuestas ganador copa libertadores|apuestas ganador de la
eurocopa|apuestas ganador de la liga|apuestas ganador del mundial|apuestas ganador eurocopa|apuestas ganador europa league|apuestas ganador f1|apuestas ganador la liga|apuestas ganador liga española|apuestas ganador mundial|apuestas ganador mundial baloncesto|apuestas
ganador mundial f1|apuestas ganador nba|apuestas ganadores eurocopa|apuestas ganadores mundial|apuestas ganar champions|apuestas ganar
eurocopa|apuestas ganar liga|apuestas ganar mundial|apuestas ganar nba|apuestas
getafe valencia|apuestas ghana uruguay|apuestas girona|apuestas
girona athletic|apuestas girona betis|apuestas girona campeon de liga|apuestas girona campeon liga|apuestas girona gana la liga|apuestas girona real
madrid|apuestas girona real sociedad|apuestas goleador eurocopa|apuestas goleadores eurocopa|apuestas goles asiaticos|apuestas
golf|apuestas golf masters|apuestas golf pga|apuestas granada barcelona|apuestas grand slam de tenis|apuestas gratis|apuestas gratis casino|apuestas gratis
con premios|apuestas gratis hoy|apuestas gratis para hoy|apuestas gratis por
registro|apuestas gratis puntos|apuestas gratis regalos|apuestas gratis sin deposito|apuestas gratis sin depósito|apuestas gratis sin ingreso|apuestas gratis sports|apuestas gratis y ganar premios|apuestas grupo a eurocopa|apuestas grupos
eurocopa|apuestas handicap|apuestas handicap asiatico|apuestas handicap baloncesto|apuestas handicap como funciona|apuestas handicap nba|apuestas handicap nfl|apuestas hipicas online|apuestas hípicas online|apuestas hipicas
venezuela|apuestas hockey|apuestas hockey hielo|apuestas hockey patines|apuestas hockey sobre hielo|apuestas holanda argentina|apuestas holanda vs argentina|apuestas hoy|apuestas hoy champions|apuestas hoy futbol|apuestas hoy nba|apuestas hoy pronosticos|apuestas hoy
seguras|apuestas impuestos|apuestas inglaterra paises
bajos|apuestas inter barca|apuestas inter barcelona|apuestas juego|apuestas
juegos|apuestas juegos en linea|apuestas juegos olimpicos|apuestas juegos olímpicos|apuestas juegos olimpicos baloncesto|apuestas
juegos online|apuestas juegos virtuales|apuestas jugador sevilla|apuestas jugadores nba|apuestas kings league americas|apuestas la liga|apuestas
la liga española|apuestas la liga hoy|apuestas la liga santander|apuestas las vegas mlb|apuestas las vegas nba|apuestas las vegas nfl|apuestas league of legends mundial|apuestas legal|apuestas legales|apuestas legales
en colombia|apuestas legales en españa|apuestas legales en estados unidos|apuestas legales españa|apuestas leganes betis|apuestas libertadores|apuestas licencia|apuestas liga 1 peru|apuestas liga argentina|apuestas liga bbva pronosticos|apuestas liga de campeones|apuestas liga de campeones de baloncesto|apuestas liga de
campeones de hockey|apuestas liga españa|apuestas
liga española|apuestas liga santander pronosticos|apuestas ligas de futbol|apuestas linea|apuestas linea de gol|apuestas liverpool barcelona|apuestas liverpool real madrid|apuestas lol
mundial|apuestas madrid|apuestas madrid arsenal|apuestas madrid atletico|apuestas madrid atletico champions|apuestas madrid barca|apuestas madrid barça|apuestas madrid
barca hoy|apuestas madrid barca supercopa|apuestas madrid barcelona|apuestas madrid barsa|apuestas madrid bayern|apuestas
madrid betis|apuestas madrid borussia|apuestas madrid campeon champions|apuestas madrid celta|apuestas madrid
city|apuestas madrid dortmund|apuestas madrid gana
la liga|apuestas madrid gana liga|apuestas madrid hoy|apuestas madrid liverpool|apuestas madrid osasuna|apuestas madrid sevilla|apuestas madrid valencia|apuestas madrid vs arsenal|apuestas
madrid vs barcelona|apuestas mallorca osasuna|apuestas mallorca
real sociedad|apuestas manchester athletic|apuestas manchester city
real madrid|apuestas mas faciles de ganar|apuestas mas seguras|apuestas mas seguras
para hoy|apuestas masters de golf|apuestas masters
de tenis|apuestas maximo goleador eurocopa|apuestas maximo goleador mundial|apuestas mejor jugador eurocopa|apuestas mejores casinos online|apuestas mexico|apuestas méxico|apuestas mexico polonia|apuestas méxico polonia|apuestas mlb|apuestas mlb
hoy|apuestas mlb las vegas|apuestas mlb para hoy|apuestas mlb pronosticos|apuestas
mlb usa|apuestas mma ufc|apuestas momios|apuestas multiples|apuestas múltiples|apuestas multiples como
funcionan|apuestas multiples el gordo|apuestas multiples futbol|apuestas
mundial|apuestas mundial 2026|apuestas mundial baloncesto|apuestas mundial balonmano|apuestas
mundial brasil|apuestas mundial campeon|apuestas mundial ciclismo|apuestas mundial clubes|apuestas mundial de baloncesto|apuestas mundial de ciclismo|apuestas mundial de
clubes|apuestas mundial de futbol|apuestas mundial de
fútbol|apuestas mundial de rugby|apuestas mundial f1|apuestas mundial favoritos|apuestas mundial
femenino|apuestas mundial formula 1|apuestas mundial futbol|apuestas mundial ganador|apuestas mundial lol|apuestas mundial moto gp|apuestas
mundial motogp|apuestas mundial rugby|apuestas mundial sub 17|apuestas mundiales|apuestas mundialistas|apuestas mvp eurocopa|apuestas
mvp nba|apuestas mvp nfl|apuestas nacionales de colombia|apuestas nba|apuestas nba all star|apuestas nba campeon|apuestas nba consejos|apuestas nba
esta noche|apuestas nba finals|apuestas nba gratis|apuestas nba hoy|apuestas nba hoy jugadores|apuestas nba hoy pronosticos|apuestas nba para hoy|apuestas nba playoffs|apuestas nba pronosticos|apuestas
nba pronósticos|apuestas nba pronosticos hoy|apuestas nba tipster|apuestas nfl|apuestas nfl hoy|apuestas nfl
las vegas|apuestas nfl playoffs|apuestas nfl pronosticos|apuestas nfl
pronósticos|apuestas nfl semana 4|apuestas nfl super bowl|apuestas nhl|apuestas nhl pronosticos|apuestas octavos eurocopa|apuestas ofertas|apuestas online|apuestas online argentina|apuestas online argentina legal|apuestas online bono|apuestas online bono bienvenida|apuestas online boxeo|apuestas online caballos|apuestas online carreras de caballos|apuestas online casino|apuestas online champions
league|apuestas online chile|apuestas online ciclismo|apuestas online colombia|apuestas online comparativa|apuestas online con paypal|apuestas online de caballos|apuestas online deportivas|apuestas
online en argentina|apuestas online en peru|apuestas online espana|apuestas online españa|apuestas online esports|apuestas online foro|apuestas online futbol|apuestas online
futbol españa|apuestas online golf|apuestas online gratis|apuestas online gratis sin deposito|apuestas online juegos|apuestas online mexico|apuestas online
mma|apuestas online movil|apuestas online nba|apuestas online
net|apuestas online nuevas|apuestas online opiniones|apuestas online paypal|apuestas online
peru|apuestas online seguras|apuestas online sin dinero|apuestas online sin registro|apuestas online tenis|apuestas online ufc|apuestas
online uruguay|apuestas online venezuela|apuestas open britanico golf|apuestas osasuna athletic|apuestas osasuna barcelona|apuestas osasuna real madrid|apuestas
osasuna sevilla|apuestas osasuna valencia|apuestas over|apuestas over 2.5|apuestas over under|apuestas paginas|apuestas pago anticipado|apuestas paises
bajos ecuador|apuestas paises bajos inglaterra|apuestas países bajos qatar|apuestas para
boxeo|apuestas para champions league|apuestas para el clasico|apuestas para el dia
de hoy|apuestas para el mundial|apuestas para el partido de hoy|apuestas para eurocopa|apuestas para europa league|apuestas para
futbol|apuestas para ganar|apuestas para ganar
dinero|apuestas para ganar dinero facil|apuestas para
ganar en la ruleta|apuestas para ganar la champions|apuestas
para ganar la eurocopa|apuestas para ganar la europa league|apuestas para
ganar la liga|apuestas para ganar siempre|apuestas para hacer|apuestas para
hoy|apuestas para hoy de futbol|apuestas para hoy europa league|apuestas para hoy futbol|apuestas para juegos|apuestas para la champions league|apuestas para la copa del rey|apuestas para la eurocopa|apuestas para la europa league|apuestas para la final de la eurocopa|apuestas
para la nba hoy|apuestas para los partidos de hoy|apuestas para
partidos de hoy|apuestas para ufc|apuestas partido|apuestas partido aplazado|apuestas
partido champions|apuestas partido colombia|apuestas partido españa marruecos|apuestas
partido mundial|apuestas partido suspendido|apuestas partidos|apuestas partidos champions league|apuestas partidos csgo|apuestas partidos de futbol|apuestas partidos
de futbol hoy|apuestas partidos de hoy|apuestas partidos
eurocopa|apuestas partidos futbol|apuestas partidos hoy|apuestas partidos mundial|apuestas paypal|apuestas peleas de boxeo|apuestas peru|apuestas perú|apuestas peru brasil|apuestas peru chile|apuestas peru paraguay|apuestas peru uruguay|apuestas peru vs chile|apuestas peru vs colombia|apuestas pichichi eurocopa|apuestas plataforma|apuestas playoff|apuestas
playoff ascenso|apuestas playoff ascenso a primera|apuestas playoff
nba|apuestas playoff segunda|apuestas playoff segunda b|apuestas playoffs nba|apuestas playoffs nfl|apuestas polonia argentina|apuestas por argentina|apuestas por internet mexico|apuestas por
internet para ganar dinero|apuestas por paypal|apuestas por ronda boxeo|apuestas por sistema|apuestas portugal uruguay|apuestas pre partido|apuestas predicciones|apuestas predicciones futbol|apuestas primera division|apuestas primera division españa|apuestas promociones|apuestas pronostico|apuestas pronosticos|apuestas pronosticos deportivos|apuestas pronosticos deportivos tenis|apuestas pronosticos futbol|apuestas
pronosticos gratis|apuestas pronosticos nba|apuestas pronosticos tenis|apuestas prorroga|apuestas psg
barca|apuestas psg barcelona|apuestas puntos por tarjetas|apuestas puntos tarjetas|apuestas que
aceptan paypal|apuestas que es handicap|apuestas que puedes hacer con tu novia|apuestas que
siempre ganaras|apuestas que significa|apuestas quien bajara a segunda|apuestas quién bajara a segunda|apuestas
quien gana el mundial|apuestas quien gana eurocopa|apuestas quien gana la
champions|apuestas quien gana la eurocopa|apuestas quien gana
la liga|apuestas quien ganara el mundial|apuestas quién ganará el mundial|apuestas quien ganara la champions|apuestas quien ganara la eurocopa|apuestas quien ganara la liga|apuestas rayo barcelona|apuestas real madrid|apuestas
real madrid arsenal|apuestas real madrid athletic|apuestas real madrid atletico|apuestas real madrid atletico champions|apuestas
real madrid atletico de madrid|apuestas real madrid atlético de madrid|apuestas real madrid atletico madrid|apuestas real madrid barcelona|apuestas real madrid
bayern|apuestas real madrid betis|apuestas real
madrid borussia|apuestas real madrid campeon champions|apuestas real madrid celta|apuestas real madrid champions|apuestas real madrid city|apuestas real madrid girona|apuestas real madrid hoy|apuestas real madrid
liverpool|apuestas real madrid manchester city|apuestas real
madrid osasuna|apuestas real madrid real sociedad|apuestas real madrid
valencia|apuestas real madrid villarreal|apuestas
real madrid vs arsenal|apuestas real madrid vs atletico|apuestas real madrid vs atlético|apuestas real madrid vs atletico madrid|apuestas real madrid vs barcelona|apuestas real madrid vs betis|apuestas real madrid vs sevilla|apuestas real madrid vs valencia|apuestas real sociedad|apuestas real sociedad athletic|apuestas real sociedad barcelona|apuestas real sociedad betis|apuestas real sociedad psg|apuestas real sociedad real madrid|apuestas real sociedad valencia|apuestas
recomendadas hoy|apuestas regalo de bienvenida|apuestas
registro|apuestas resultado exacto|apuestas resultados|apuestas resultados eurocopa|apuestas retirada tenis|apuestas roma barcelona|apuestas roma sevilla|apuestas rugby|apuestas
rugby mundial|apuestas rugby world cup|apuestas ruleta seguras|apuestas segunda|apuestas segunda b|apuestas segunda division|apuestas segunda división|apuestas segunda division b|apuestas segunda division españa|apuestas seguras|apuestas
seguras baloncesto|apuestas seguras calculadora|apuestas seguras
en la ruleta|apuestas seguras eurocopa|apuestas seguras foro|apuestas seguras futbol|apuestas seguras
futbol hoy|apuestas seguras gratis|apuestas seguras hoy|apuestas seguras hoy
futbol|apuestas seguras nba|apuestas seguras
nba hoy|apuestas seguras para este fin de semana|apuestas seguras para ganar dinero|apuestas seguras para hoy|apuestas seguras para hoy fútbol|apuestas seguras para
hoy pronósticos|apuestas seguras para mañana|apuestas seguras ruleta|apuestas seguras telegram|apuestas seguras tenis|apuestas semifinales
eurocopa|apuestas senegal paises bajos|apuestas sevilla|apuestas sevilla athletic|apuestas sevilla atletico de madrid|apuestas sevilla barcelona|apuestas sevilla betis|apuestas sevilla campeon liga|apuestas sevilla celta|apuestas sevilla gana la liga|apuestas sevilla girona|apuestas sevilla inter|apuestas
sevilla jugador|apuestas sevilla juventus|apuestas sevilla
leganes|apuestas sevilla madrid|apuestas sevilla
manchester united|apuestas sevilla osasuna|apuestas sevilla real madrid|apuestas sevilla real sociedad|apuestas sevilla roma|apuestas sevilla valencia|apuestas significa|apuestas
simples ejemplos|apuestas simples o combinadas|apuestas sin deposito|apuestas sin deposito inicial|apuestas sin deposito minimo|apuestas sin dinero|apuestas
sin dinero real|apuestas sin empate|apuestas sin empate que significa|apuestas sin ingreso minimo|apuestas
sin registro|apuestas sistema|apuestas sistema calculadora|apuestas sistema como funciona|apuestas sistema trixie|apuestas sociedad|apuestas sorteo copa del rey|apuestas stake|apuestas stake 10|apuestas
stake 10 hoy|apuestas super bowl favorito|apuestas super rugby|apuestas supercopa españa|apuestas
superliga argentina|apuestas tarjeta roja|apuestas tarjetas|apuestas tarjetas amarillas|apuestas tenis|apuestas
tenis atp|apuestas tenis consejos|apuestas tenis copa davis|apuestas tenis de mesa|apuestas
tenis de mesa pronosticos|apuestas tenis en vivo|apuestas tenis femenino|apuestas
tenis hoy|apuestas tenis itf|apuestas tenis pronosticos|apuestas
tenis pronósticos|apuestas tenis retirada|apuestas tenis roland garros|apuestas
tenis seguras|apuestas tenis wimbledon|apuestas tenis wta|apuestas tercera division|apuestas tercera division españa|apuestas tipos|apuestas tips|apuestas
tipster|apuestas tipster para hoy|apuestas topuria holloway cuotas|apuestas torneos de golf|apuestas torneos de tenis|apuestas trucos|apuestas uefa champions league|apuestas uefa europa league|apuestas
ufc|apuestas ufc chile|apuestas ufc como funciona|apuestas ufc hoy|apuestas ufc ilia topuria|apuestas ufc
online|apuestas ufc pronósticos|apuestas ufc telegram|apuestas ufc
topuria|apuestas under over|apuestas unionistas villarreal|apuestas uruguay|apuestas uruguay colombia|apuestas uruguay corea|apuestas uruguay vs colombia|apuestas us
open golf|apuestas us open tenis|apuestas valencia|apuestas
valencia barcelona|apuestas valencia betis|apuestas valencia madrid|apuestas valencia real madrid|apuestas valladolid barcelona|apuestas valladolid valencia|apuestas valor app|apuestas valor en directo|apuestas
valor galgos|apuestas venezuela|apuestas venezuela argentina|apuestas venezuela bolivia|apuestas venezuela ecuador|apuestas
villarreal|apuestas villarreal athletic|apuestas villarreal barcelona|apuestas
villarreal bayern|apuestas villarreal betis|apuestas villarreal liverpool|apuestas villarreal
manchester|apuestas villarreal manchester united|apuestas villarreal vs real madrid|apuestas virtuales|apuestas virtuales
colombia|apuestas virtuales futbol|apuestas virtuales sin dinero|apuestas vivo|apuestas vuelta
a españa|apuestas vuelta españa|apuestas william hill partidos
de hoy|apuestas y casino|apuestas y casinos|apuestas y
juegos de azar|apuestas y pronosticos|apuestas y pronosticos de futbol|apuestas
y pronosticos deportivos|apuestas y resultados|apuestas-deportivas|apuestas-deportivas.es pronosticos|arbitro nba apuestas|argentina apuestas|argentina colombia apuestas|argentina croacia apuestas|argentina francia apuestas|argentina mexico apuestas|argentina
peru apuestas|argentina uruguay apuestas|argentina vs bolivia
apuestas|argentina vs chile apuestas|argentina
vs colombia apuestas|argentina vs francia apuestas|argentina vs.
colombia apuestas|asi se gana en las apuestas deportivas|asiatico apuestas|asiatico en apuestas|asiaticos apuestas|athletic barcelona apuestas|athletic
manchester united apuestas|athletic osasuna apuestas|athletic real madrid apuestas|atletico barcelona apuestas|atletico
de madrid apuestas|atlético de madrid apuestas|atletico de madrid real madrid
apuestas|atletico de madrid vs barcelona apuestas|atletico madrid real madrid apuestas|atletico madrid vs
real madrid apuestas|atletico real madrid apuestas|atletico vs real madrid apuestas|avisador de cuotas apuestas|bajada de
cuotas apuestas|baloncesto apuestas|barbastro barcelona apuestas|barca apuestas|barca bayern apuestas|barca inter apuestas|barca madrid apuestas|barça madrid
apuestas|barca vs atletico apuestas|barca vs madrid apuestas|barca vs real madrid apuestas|barcelona – real madrid apuestas|barcelona apuestas|barcelona
atletico apuestas|barcelona atletico de madrid apuestas|barcelona
atletico madrid apuestas|barcelona betis apuestas|barcelona casa
de apuestas|barcelona inter apuestas|barcelona psg apuestas|barcelona real madrid apuestas|barcelona real sociedad apuestas|barcelona sevilla apuestas|barcelona valencia apuestas|barcelona vs
athletic bilbao apuestas|barcelona vs atlético madrid apuestas|barcelona vs betis apuestas|barcelona vs
celta de vigo apuestas|barcelona vs espanyol apuestas|barcelona vs girona apuestas|barcelona vs madrid apuestas|barcelona
vs real madrid apuestas|barcelona vs real sociedad apuestas|barcelona vs sevilla apuestas|barcelona
vs villarreal apuestas|base de datos cuotas apuestas deportivas|bayern real
madrid apuestas|beisbol apuestas|best america apuestas|bet apuestas chile|bet apuestas en vivo|betis – chelsea
apuestas|betis apuestas|betis barcelona apuestas|betis chelsea apuestas|betis madrid apuestas|betis sevilla apuestas|betsson tu sitio de apuestas
online|blog apuestas baloncesto|blog apuestas ciclismo|blog
apuestas nba|blog apuestas tenis|blog de apuestas de tenis|bono
apuestas|bono apuestas deportivas|bono apuestas deportivas sin deposito|bono apuestas gratis|bono apuestas gratis sin deposito|bono apuestas sin deposito|bono bienvenida apuestas|bono bienvenida
apuestas deportivas|bono bienvenida apuestas españa|bono bienvenida apuestas sin deposito|bono bienvenida apuestas sin depósito|bono bienvenida casa apuestas|bono bienvenida casa de apuestas|bono bienvenida marca apuestas|bono
casa apuestas|bono casa de apuestas|bono casa de apuestas sin ingreso|bono casas de apuestas|bono de apuestas|bono de apuestas gratis sin deposito|bono de bienvenida apuestas|bono de bienvenida apuestas deportivas|bono de bienvenida casa de apuestas|bono de bienvenida casas de apuestas|bono
de casas de apuestas|bono de registro apuestas|bono de registro apuestas deportivas|bono de registro casa de apuestas|bono gratis apuestas|bono marca apuestas|bono por registro apuestas|bono por registro apuestas
deportivas|bono por registro casa de apuestas|bono registro apuestas|bono sin deposito apuestas|bono sin depósito apuestas|bono
sin deposito apuestas deportivas|bono sin depósito apuestas deportivas|bono sin deposito casa de apuestas|bono sin deposito marca apuestas|bono sin ingreso apuestas|bono sin ingreso apuestas deportivas|bonos apuestas|bonos apuestas colombia|bonos apuestas deportivas|bonos apuestas deportivas sin deposito|bonos
apuestas gratis|bonos apuestas sin deposito|bonos apuestas sin depósito|bonos bienvenida apuestas|bonos bienvenida casas apuestas|bonos bienvenida casas de apuestas|bonos casa de apuestas|bonos casas
apuestas|bonos casas de apuestas|bonos casas de apuestas colombia|bonos casas de
apuestas deportivas|bonos casas de apuestas españa|bonos casas de apuestas nuevas|bonos
casas de apuestas sin deposito|bonos casas de apuestas sin depósito|bonos de apuestas|bonos de apuestas deportivas|bonos de apuestas gratis|bonos de apuestas sin deposito|bonos de bienvenida apuestas|bonos de bienvenida apuestas deportivas|bonos de bienvenida casa de apuestas|bonos
de bienvenida casas de apuestas|bonos de bienvenida de casas de apuestas|bonos de bienvenida
en casas de apuestas|bonos de casas de apuestas|bonos
de casas de apuestas sin deposito|bonos en casa de apuestas|bonos en casas de
apuestas sin deposito|bonos gratis apuestas|bonos gratis apuestas
deportivas|bonos gratis casas de apuestas|bonos gratis sin deposito apuestas|bonos paginas de apuestas|bonos registro casas de apuestas|bonos
sin deposito apuestas|bonos sin depósito apuestas|bonos sin deposito apuestas deportivas|bonos sin deposito casas
de apuestas|bot de apuestas deportivas gratis|boxeo apuestas|brasil colombia apuestas|brasil peru apuestas|brasil vs colombia apuestas|buenas apuestas para hoy|buscador cuotas apuestas|buscador de apuestas seguras|buscador de cuotas apuestas|buscador de
cuotas de apuestas|buscar apuestas seguras|caballos apuestas|calculador de
apuestas|calculador de cuotas apuestas|calculadora
apuestas|calculadora apuestas combinadas|calculadora apuestas de sistema|calculadora apuestas deportivas|calculadora apuestas deportivas seguras|calculadora apuestas
multiples|calculadora apuestas segura|calculadora apuestas
seguras|calculadora apuestas sistema|calculadora apuestas yankee|calculadora
arbitraje apuestas|calculadora cubrir apuestas|calculadora cuotas apuestas|calculadora de apuestas|calculadora de apuestas combinadas|calculadora
de apuestas de futbol|calculadora de apuestas de sistema|calculadora de apuestas deportivas|calculadora de
apuestas multiples|calculadora de apuestas seguras|calculadora de apuestas sistema|calculadora
de apuestas surebets|calculadora de arbitraje apuestas|calculadora de cuotas apuestas|calculadora de cuotas de apuestas|calculadora para
apuestas deportivas|calculadora poisson apuestas|calculadora
poisson apuestas deportivas|calculadora poisson para apuestas|calculadora scalping apuestas deportivas|calculadora sistema
apuestas|calculadora stake apuestas|calculadora trading apuestas|calcular apuestas|calcular apuestas deportivas|calcular apuestas futbol|calcular apuestas sistema|calcular cuotas apuestas|calcular cuotas apuestas combinadas|calcular cuotas apuestas deportivas|calcular cuotas de apuestas|calcular ganancias apuestas deportivas|calcular momios apuestas|calcular probabilidad cuota apuestas|calcular
stake apuestas|calcular unidades apuestas|calcular yield apuestas|calculo de apuestas|calculo de apuestas deportivas|cambio de cuotas apuestas|campeon champions apuestas|campeon eurocopa apuestas|campeon liga apuestas|campeon nba
apuestas|canales de apuestas gratis|carrera de caballos apuestas|carrera de caballos apuestas juego|carrera
de caballos con apuestas|carrera de galgos apuestas|carreras de caballos
apuestas|carreras de caballos apuestas online|carreras de caballos con apuestas|carreras de caballos juegos de apuestas|carreras de galgos apuestas|carreras de galgos apuestas online|carreras de galgos
apuestas trucos|carreras galgos apuestas|casa apuestas argentina|casa
apuestas atletico de madrid|casa apuestas barcelona|casa apuestas betis|casa apuestas bono bienvenida|casa apuestas bono gratis|casa apuestas bono sin deposito|casa apuestas cerca
de mi|casa apuestas chile|casa apuestas colombia|casa apuestas con mejores cuotas|casa apuestas deportivas|casa apuestas españa|casa apuestas española|casa apuestas eurocopa|casa apuestas futbol|casa
apuestas mejores cuotas|casa apuestas mundial|casa apuestas nueva|casa apuestas nuevas|casa
apuestas online|casa apuestas peru|casa apuestas valencia|casa de apuestas|casa de apuestas 10 euros gratis|casa de apuestas argentina|casa de apuestas atletico de madrid|casa de apuestas baloncesto|casa de apuestas barcelona|casa de apuestas
beisbol|casa de apuestas betis|casa de apuestas bono|casa de apuestas
bono bienvenida|casa de apuestas bono de bienvenida|casa de apuestas bono gratis|casa de apuestas bono por registro|casa de apuestas bono sin deposito|casa de
apuestas boxeo|casa de apuestas caballos|casa
de apuestas carreras de caballos|casa de apuestas cerca de mi|casa de apuestas
cerca de mí|casa de apuestas champions league|casa
de apuestas chile|casa de apuestas ciclismo|casa de apuestas colombia|casa de apuestas con bono de bienvenida|casa de apuestas con bono sin deposito|casa de apuestas con cuotas mas altas|casa de apuestas con esports|casa de apuestas con las mejores cuotas|casa de apuestas con licencia en españa|casa de apuestas
con mejores cuotas|casa de apuestas con pago
anticipado|casa de apuestas con paypal|casa de apuestas copa america|casa de apuestas de caballos|casa de apuestas de colombia|casa de apuestas
de españa|casa de apuestas de futbol|casa de apuestas de fútbol|casa de apuestas de futbol peru|casa de apuestas de peru|casa
de apuestas del madrid|casa de apuestas del real madrid|casa
de apuestas deportivas|casa de apuestas deportivas cerca de mi|casa de apuestas deportivas en argentina|casa de apuestas deportivas en chile|casa de apuestas deportivas en colombia|casa de apuestas deportivas
en españa|casa de apuestas deportivas en madrid|casa de
apuestas deportivas españa|casa de apuestas deportivas españolas|casa de apuestas deportivas madrid|casa de
apuestas deportivas mexico|casa de apuestas deportivas online|casa de apuestas
deportivas peru|casa de apuestas deposito 5 euros|casa de apuestas deposito minimo|casa de apuestas
deposito minimo 1 euro|casa de apuestas depósito mínimo 1
euro|casa de apuestas en españa|casa de apuestas en linea|casa de apuestas en madrid|casa
de apuestas en perú|casa de apuestas en vivo|casa de apuestas españa|casa de apuestas españa inglaterra|casa de apuestas española|casa de apuestas españolas|casa de apuestas esports|casa de apuestas
eurocopa|casa de apuestas europa league|casa de apuestas f1|casa de apuestas formula 1|casa de apuestas futbol|casa de apuestas ingreso minimo|casa de apuestas ingreso minimo 1 euro|casa de apuestas ingreso mínimo 1 euro|casa de apuestas legales|casa de apuestas legales en colombia|casa de apuestas legales en españa|casa de apuestas libertadores|casa de apuestas liga española|casa de apuestas madrid|casa de apuestas mas
segura|casa de apuestas mejores|casa de apuestas méxico|casa de apuestas minimo 5 euros|casa de apuestas mlb|casa de apuestas mundial|casa de apuestas nba|casa de apuestas nfl|casa de apuestas nueva|casa
de apuestas nuevas|casa de apuestas oficial del real madrid|casa de apuestas
oficial real madrid|casa de apuestas online|casa de apuestas online argentina|casa de apuestas online chile|casa de apuestas online españa|casa de apuestas online mexico|casa de
apuestas online paraguay|casa de apuestas online peru|casa de
apuestas online usa|casa de apuestas online venezuela|casa de apuestas pago anticipado|casa de
apuestas para boxeo|casa de apuestas para ufc|casa de apuestas peru|casa de
apuestas perú|casa de apuestas peru online|casa de apuestas por paypal|casa de apuestas promociones|casa de apuestas que regalan dinero|casa de apuestas real madrid|casa de apuestas regalo de bienvenida|casa de apuestas sevilla|casa de apuestas sin dinero|casa de apuestas
sin ingreso minimo|casa de apuestas sin licencia en españa|casa de apuestas sin minimo
de ingreso|casa de apuestas stake|casa de apuestas tenis|casa de apuestas ufc|casa de apuestas valencia|casa
de apuestas venezuela|casa de apuestas virtuales|casa de apuestas vive
la suerte|casa oficial de apuestas del real madrid|casas apuestas asiaticas|casas apuestas bono sin deposito|casas apuestas bonos sin deposito|casas apuestas caballos|casas apuestas chile|casas apuestas ciclismo|casas apuestas con licencia|casas apuestas con licencia en españa|casas apuestas deportivas|casas apuestas deportivas colombia|casas apuestas deportivas españa|casas apuestas deportivas españolas|casas apuestas deportivas nuevas|casas
apuestas españa|casas apuestas españolas|casas apuestas esports|casas apuestas eurocopa|casas apuestas golf|casas apuestas ingreso minimo 5 euros|casas apuestas legales|casas apuestas legales españa|casas apuestas licencia|casas apuestas licencia españa|casas apuestas mexico|casas apuestas mundial|casas apuestas nba|casas apuestas
nuevas|casas apuestas nuevas españa|casas apuestas
ofertas|casas apuestas online|casas apuestas paypal|casas apuestas peru|casas
apuestas sin licencia|casas apuestas tenis|casas asiaticas apuestas|casas de
apuestas|casas de apuestas 5 euros|casas de apuestas app|casas de apuestas argentinas|casas de
apuestas asiaticas|casas de apuestas baloncesto|casas de apuestas barcelona|casas de apuestas bono bienvenida|casas de
apuestas bono de bienvenida|casas de apuestas bono por registro|casas de apuestas bono sin deposito|casas de apuestas bono sin ingreso|casas
de apuestas bonos|casas de apuestas bonos de bienvenida|casas
de apuestas bonos gratis|casas de apuestas bonos sin deposito|casas de apuestas boxeo|casas de apuestas caballos|casas
de apuestas carreras de caballos|casas de apuestas casino|casas de apuestas casino online|casas de apuestas cerca
de mi|casas de apuestas champions league|casas de apuestas chile|casas de apuestas ciclismo|casas de apuestas colombia|casas de apuestas com|casas de apuestas con app|casas de apuestas con apuestas gratis|casas de apuestas con bono|casas de apuestas con bono de bienvenida|casas de apuestas con bono de registro|casas de apuestas con bono por registro|casas de apuestas con bono sin deposito|casas de
apuestas con bonos|casas de apuestas con bonos gratis|casas
de apuestas con bonos sin deposito|casas de apuestas con deposito minimo|casas de apuestas con esports|casas de apuestas con handicap asiatico|casas de apuestas con licencia|casas de apuestas con licencia en españa|casas de apuestas con licencia españa|casas de apuestas con licencia española|casas de
apuestas con mejores cuotas|casas de apuestas con pago anticipado|casas de
apuestas con paypal|casas de apuestas con paypal en perú|casas de apuestas con promociones|casas de apuestas con ruleta en vivo|casas de apuestas
copa del rey|casas de apuestas de caballos|casas de apuestas
de españa|casas de apuestas de futbol|casas de apuestas de fútbol|casas de apuestas de peru|casas de apuestas deportivas|casas de apuestas deportivas asiaticas|casas de apuestas deportivas colombia|casas de apuestas deportivas comparativa|casas de apuestas deportivas con paypal|casas
de apuestas deportivas en chile|casas de apuestas deportivas en españa|casas de apuestas deportivas en linea|casas de apuestas deportivas en madrid|casas de apuestas deportivas en mexico|casas de apuestas deportivas en peru|casas de apuestas deportivas en sevilla|casas de apuestas
deportivas en valencia|casas de apuestas deportivas
españa|casas de apuestas deportivas españolas|casas de apuestas deportivas legales|casas de apuestas
deportivas madrid|casas de apuestas deportivas mexico|casas de apuestas deportivas nuevas|casas de apuestas deportivas
online|casas de apuestas deportivas peru|casas de apuestas deportivas
perú|casas de apuestas deposito minimo 1 euro|casas de apuestas depósito mínimo 1 euro|casas
de apuestas dinero gratis|casas de apuestas en argentina|casas de
apuestas en barcelona|casas de apuestas en chile|casas de apuestas en colombia|casas de apuestas en españa|casas de
apuestas en españa online|casas de apuestas en linea|casas de apuestas en madrid|casas de
apuestas en méxico|casas de apuestas en peru|casas de apuestas en perú|casas
de apuestas en sevilla|casas de apuestas en uruguay|casas de apuestas en valencia|casas de
apuestas en venezuela|casas de apuestas equipos de futbol|casas de apuestas españa|casas de apuestas españa
alemania|casas de apuestas españa inglaterra|casas de apuestas españa
licencia|casas de apuestas españa nuevas|casas de apuestas españa
online|casas de apuestas española|casas de apuestas españolas|casas de apuestas españolas con licencia|casas
de apuestas españolas online|casas de apuestas esports|casas de apuestas eurocopa|casas de apuestas eurocopa 2024|casas de apuestas europa league|casas de apuestas f1|casas de apuestas fisicas en barcelona|casas de apuestas fisicas en españa|casas de apuestas formula 1|casas de apuestas fuera
de españa|casas de apuestas futbol|casas de apuestas fútbol|casas de apuestas futbol españa|casas de apuestas ganador eurocopa|casas de apuestas gratis|casas de apuestas ingreso minimo|casas
de apuestas ingreso minimo 1 euro|casas de apuestas ingreso minimo 5 euros|casas
de apuestas inter barcelona|casas de apuestas legales|casas de apuestas legales en colombia|casas de apuestas legales en españa|casas de apuestas
legales en mexico|casas de apuestas legales españa|casas
de apuestas legales mx|casas de apuestas licencia|casas de apuestas licencia
españa|casas de apuestas lista|casas de apuestas madrid|casas de apuestas mas seguras|casas de
apuestas mejores bonos|casas de apuestas mejores cuotas|casas de apuestas mexico|casas de apuestas
méxico|casas de apuestas minimo 5 euros|casas de apuestas mlb|casas de apuestas mundial|casas de apuestas mundial baloncesto|casas de apuestas mundiales|casas de apuestas nba|casas de apuestas no
reguladas en españa|casas de apuestas nueva ley|casas de
apuestas nuevas|casas de apuestas nuevas en colombia|casas de apuestas nuevas en españa|casas de apuestas
nuevas españa|casas de apuestas ofertas|casas de apuestas
online|casas de apuestas online argentina|casas de apuestas online colombia|casas de apuestas online
deportivas|casas de apuestas online ecuador|casas de apuestas online en argentina|casas de apuestas online en chile|casas de apuestas online en colombia|casas de apuestas online en españa|casas de apuestas online en mexico|casas de apuestas
online españa|casas de apuestas online mas fiables|casas de apuestas
online mexico|casas de apuestas online nuevas|casas de
apuestas online peru|casas de apuestas online usa|casas
de apuestas online venezuela|casas de apuestas pago paypal|
Your comment is awaiting moderation.
С поиском клада не было не малейших заморочек. https://alleya.info Успехов и процветания магазину купить Мефедрон, Бошки, Марихуану
Your comment is awaiting moderation.
(10 euros gratis apuestas|10 mejores casas de apuestas|10 trucos para ganar apuestas|15
euros gratis marca apuestas|1×2 apuestas|1×2 apuestas deportivas|1×2 apuestas que significa|1×2 en apuestas|1×2
en apuestas que significa|1×2 que significa en apuestas|5
euros gratis apuestas|9 apuestas que siempre ganaras|a partir de cuanto se declara
apuestas|actividades de juegos de azar y apuestas|ad apuestas deportivas|aleksandre topuria ufc apuestas|algoritmo para ganar apuestas deportivas|america apuestas|análisis nba apuestas|aplicacion android apuestas deportivas|aplicacion apuestas deportivas|aplicacion apuestas deportivas android|aplicación de apuestas online|aplicacion para hacer apuestas|aplicacion para hacer apuestas de futbol|aplicación para hacer apuestas de
fútbol|aplicaciones apuestas deportivas android|aplicaciones apuestas deportivas gratis|aplicaciones de apuestas android|aplicaciones de
apuestas de fútbol|aplicaciones de apuestas deportivas|aplicaciones de apuestas deportivas peru|aplicaciones
de apuestas deportivas perú|aplicaciones de apuestas en colombia|aplicaciones de apuestas gratis|aplicaciones de
apuestas online|aplicaciones de apuestas seguras|aplicaciones de apuestas sin dinero|aplicaciones para hacer apuestas|apostar seguro
apuestas deportivas|app android apuestas deportivas|app apuestas|app apuestas android|app apuestas de futbol|app apuestas
deportivas|app apuestas deportivas android|app apuestas deportivas argentina|app
apuestas deportivas colombia|app apuestas deportivas ecuador|app apuestas deportivas españa|app apuestas deportivas gratis|app apuestas entre amigos|app apuestas futbol|app apuestas gratis|app apuestas sin dinero|app casa de apuestas|app casas de apuestas|app control apuestas|app de apuestas|app de apuestas
android|app de apuestas casino|app de apuestas colombia|app de apuestas con bono
de bienvenida|app de apuestas de futbol|app de apuestas deportivas|app de apuestas deportivas android|app
de apuestas deportivas argentina|app de apuestas deportivas colombia|app de apuestas deportivas en españa|app de apuestas deportivas peru|app de apuestas deportivas perú|app de apuestas deportivas
sin dinero|app de apuestas ecuador|app de apuestas en colombia|app de apuestas en españa|app de apuestas
en venezuela|app de apuestas futbol|app de apuestas gratis|app de
apuestas online|app de apuestas para android|app de apuestas para ganar dinero|app de apuestas peru|app
de apuestas reales|app de casas de apuestas|app marca apuestas
android|app moviles de apuestas|app para apuestas|app para apuestas de
futbol|app para apuestas deportivas|app para apuestas deportivas en español|app para ganar apuestas deportivas|app para
hacer apuestas|app para hacer apuestas deportivas|app para hacer apuestas entre amigos|app para llevar control de apuestas|app pronosticos apuestas deportivas|app versus
apuestas|apps apuestas mundial|apps de apuestas|apps de apuestas con bono de bienvenida|apps de apuestas de futbol|apps
de apuestas deportivas peru|apps de apuestas mexico|apps para apuestas|aprender a hacer apuestas
deportivas|aprender hacer apuestas deportivas|apuesta del dia apuestas deportivas|apuestas 10 euros gratis|apuestas 100 seguras|apuestas 1×2|apuestas 1X2|apuestas 2 division|apuestas
3 division|apuestas a caballos|apuestas a carreras de caballos|apuestas a
colombia|apuestas a corners|apuestas a ganar|apuestas a jugadores nba|apuestas a la baja|apuestas a la nfl|apuestas al barcelona|apuestas al dia|apuestas
al empate|apuestas al mundial|apuestas al tenis wta|apuestas alaves barcelona|apuestas alcaraz hoy|apuestas alemania españa|apuestas alonso campeon del mundo|apuestas altas y bajas|apuestas altas y bajas nfl|apuestas ambos equipos marcan|apuestas america|apuestas android|apuestas
anillo nba|apuestas antes del mundial|apuestas anticipadas|apuestas anticipadas nba|apuestas apps|apuestas arabia argentina|apuestas argentina|apuestas argentina campeon del mundo|apuestas argentina
canada|apuestas argentina colombia|apuestas argentina croacia|apuestas
argentina españa|apuestas argentina francia|apuestas argentina francia cuanto
paga|apuestas argentina francia mundial|apuestas argentina gana el mundial|apuestas argentina gana mundial|apuestas argentina holanda|apuestas argentina mexico|apuestas argentina méxico|apuestas
argentina mundial|apuestas argentina online|apuestas argentina paises bajos|apuestas argentina polonia|apuestas argentina uruguay|apuestas argentina vs australia|apuestas argentina vs colombia|apuestas argentina vs francia|apuestas argentina vs peru|apuestas argentinas|apuestas arsenal real
madrid|apuestas ascenso a primera division|apuestas ascenso
a segunda|apuestas asiaticas|apuestas asiatico|apuestas athletic|apuestas athletic atletico|apuestas athletic barça|apuestas athletic barcelona|apuestas athletic betis|apuestas athletic
manchester|apuestas athletic manchester united|apuestas
athletic osasuna|apuestas athletic real|apuestas athletic real madrid|apuestas athletic real sociedad|apuestas athletic real sociedad
final|apuestas athletic roma|apuestas athletic sevilla|apuestas athletic valencia|apuestas atletico|apuestas atletico barcelona|apuestas
atletico barsa|apuestas atletico campeon champions|apuestas atletico campeon de liga|apuestas atlético copenhague|apuestas atletico de madrid|apuestas atlético de madrid|apuestas atletico de madrid barcelona|apuestas atletico de madrid gana la liga|apuestas atletico de madrid real madrid|apuestas atlético de madrid real madrid|apuestas atletico de madrid vs barcelona|apuestas atletico madrid|apuestas atletico madrid
real madrid|apuestas atletico madrid vs barcelona|apuestas atletico real madrid|apuestas atletico real madrid champions|apuestas atletismo|apuestas bajas|apuestas baloncesto|apuestas baloncesto acb|apuestas baloncesto handicap|apuestas
baloncesto hoy|apuestas baloncesto juegos olimpicos|apuestas
baloncesto nba|apuestas baloncesto pronostico|apuestas baloncesto pronósticos|apuestas baloncesto prorroga|apuestas barca|apuestas
barca athletic|apuestas barca atletico|apuestas barca bayern|apuestas barca bayern munich|apuestas
barca girona|apuestas barca hoy|apuestas barça hoy|apuestas barca inter|apuestas barca juventus|apuestas barca madrid|apuestas barça
madrid|apuestas barca real madrid|apuestas barca vs juve|apuestas barca vs madrid|apuestas barca vs psg|apuestas barcelona|apuestas barcelona
alaves|apuestas barcelona athletic|apuestas barcelona atletico|apuestas barcelona atletico de madrid|apuestas barcelona atlético de madrid|apuestas
barcelona atletico madrid|apuestas barcelona bayern|apuestas barcelona betis|apuestas barcelona campeon de liga|apuestas barcelona celta|apuestas barcelona espanyol|apuestas barcelona gana la champions|apuestas barcelona girona|apuestas barcelona granada|apuestas barcelona hoy|apuestas barcelona inter|apuestas barcelona madrid|apuestas barcelona
osasuna|apuestas barcelona psg|apuestas barcelona real madrid|apuestas barcelona real sociedad|apuestas barcelona sevilla|apuestas barcelona valencia|apuestas barcelona
villarreal|apuestas barcelona vs atletico madrid|apuestas barcelona vs madrid|apuestas barcelona vs real
madrid|apuestas barsa madrid|apuestas basket hoy|apuestas bayern barcelona|apuestas bayern vs barcelona|apuestas beisbol|apuestas béisbol|apuestas beisbol mlb|apuestas beisbol pronosticos|apuestas beisbol venezolano|apuestas betis|apuestas betis – chelsea|apuestas betis barcelona|apuestas betis chelsea|apuestas betis fiorentina|apuestas
betis girona|apuestas betis madrid|apuestas betis mallorca|apuestas betis real madrid|apuestas betis real
sociedad|apuestas betis sevilla|apuestas betis valencia|apuestas betis valladolid|apuestas betis vs valencia|apuestas betplay hoy colombia|apuestas betsson peru|apuestas bienvenida|apuestas billar online|apuestas bolivia vs colombia|apuestas bono|apuestas bono bienvenida|apuestas bono de bienvenida|apuestas bono de bienvenida sin deposito|apuestas bono
gratis|apuestas bono sin deposito|apuestas bonos sin deposito|apuestas borussia real madrid|apuestas boxeo|apuestas boxeo de campeonato|apuestas boxeo españa|apuestas boxeo español|apuestas boxeo femenino olimpiadas|apuestas boxeo hoy|apuestas boxeo online|apuestas brasil colombia|apuestas brasil peru|apuestas brasil uruguay|apuestas brasil vs colombia|apuestas brasil vs peru|apuestas caballos|apuestas caballos colocado|apuestas caballos españa|apuestas caballos hipodromo|apuestas caballos
hoy|apuestas caballos madrid|apuestas caballos online|apuestas caballos sanlucar de barrameda|apuestas caballos zarzuela|apuestas
calculador|apuestas campeon|apuestas campeon champions|apuestas campeón champions|apuestas campeon champions 2025|apuestas campeon champions league|apuestas campeon conference league|apuestas campeon copa america|apuestas
campeon copa del rey|apuestas campeon de champions|apuestas campeon de la champions|apuestas
campeon de liga|apuestas campeon del mundo|apuestas campeon eurocopa|apuestas campeón eurocopa|apuestas campeon europa league|apuestas campeon f1|apuestas campeon f1 2025|apuestas campeon formula 1|apuestas campeon libertadores|apuestas campeon liga|apuestas campeon liga bbva|apuestas campeon liga española|apuestas campeon liga santander|apuestas campeon motogp 2025|apuestas campeon mundial|apuestas campeón mundial|apuestas campeon mundial baloncesto|apuestas campeon nba|apuestas campeón nba|apuestas
campeon premier|apuestas campeon premier league|apuestas campeon roland
garros|apuestas campeonato f1|apuestas campeonatos de futbol|apuestas
carrera de caballos|apuestas carrera de caballos hoy|apuestas carrera de caballos nocturnas|apuestas carrera de galgos fin de semana|apuestas carrera de
galgos hoy|apuestas carrera de galgos nocturnas|apuestas carreras caballos|apuestas carreras caballos sanlucar|apuestas carreras de
caballos|apuestas carreras de caballos en directo|apuestas carreras
de caballos en vivo|apuestas carreras de caballos españa|apuestas carreras de
caballos hoy|apuestas carreras de caballos nacionales|apuestas carreras de caballos nocturnas|apuestas carreras de caballos online|apuestas carreras de caballos sanlucar|apuestas
carreras de caballos sanlúcar|apuestas carreras de galgos|apuestas carreras de
galgos en vivo|apuestas carreras de galgos nocturnas|apuestas carreras de galgos pre partido|apuestas casino|apuestas casino barcelona|apuestas casino futbol|apuestas
casino gran madrid|apuestas casino gratis|apuestas casino madrid|apuestas casino online|apuestas casino online argentina|apuestas casinos|apuestas casinos online|apuestas celta|apuestas celta barcelona|apuestas
celta betis|apuestas celta eibar|apuestas celta espanyol|apuestas
celta granada|apuestas celta madrid|apuestas celta manchester|apuestas celta real madrid|apuestas champion league|apuestas champions foro|apuestas champions hoy|apuestas
champions league|apuestas champions league – pronósticos|apuestas champions league
2025|apuestas champions league hoy|apuestas champions league pronosticos|apuestas champions league pronósticos|apuestas champions pronosticos|apuestas chelsea barcelona|apuestas chelsea betis|apuestas chile|apuestas chile peru|apuestas chile venezuela|apuestas chile vs colombia|apuestas
chile vs uruguay|apuestas ciclismo|apuestas ciclismo en vivo|apuestas ciclismo femenino|apuestas ciclismo tour francia|apuestas
ciclismo vuelta|apuestas ciclismo vuelta a españa|apuestas ciclismo
vuelta españa|apuestas city madrid|apuestas city real
madrid|apuestas clasico|apuestas clasico español|apuestas clasico real madrid barcelona|apuestas clasificacion mundial|apuestas
colombia|apuestas colombia argentina|apuestas colombia brasil|apuestas colombia paraguay|apuestas
colombia uruguay|apuestas colombia vs argentina|apuestas colombia
vs brasil|apuestas combinadas|apuestas combinadas como funcionan|apuestas combinadas de
futbol|apuestas combinadas de fútbol|apuestas combinadas foro|apuestas combinadas
futbol|apuestas combinadas hoy|apuestas combinadas mismo partido|apuestas combinadas mundial|apuestas combinadas nba|apuestas combinadas
para esta semana|apuestas combinadas para hoy|apuestas
combinadas para mañana|apuestas combinadas pronosticos|apuestas combinadas recomendadas|apuestas
combinadas seguras|apuestas combinadas seguras para hoy|apuestas combinadas seguras para mañana|apuestas como ganar|apuestas comparador|apuestas con bono de bienvenida|apuestas
con dinero ficticio|apuestas con dinero real|apuestas con dinero virtual|apuestas con handicap|apuestas con handicap asiatico|apuestas con handicap baloncesto|apuestas con mas probabilidades de ganar|apuestas con paypal|apuestas con tarjeta de credito|apuestas con tarjeta de debito|apuestas consejos|apuestas copa|apuestas copa africa|apuestas copa america|apuestas copa américa|apuestas copa argentina|apuestas copa brasil|apuestas
copa davis|apuestas copa de europa|apuestas copa del mundo|apuestas copa del rey|apuestas copa del rey baloncesto|apuestas copa del rey final|apuestas copa del rey futbol|apuestas copa del
rey ganador|apuestas copa del rey hoy|apuestas copa del
rey pronosticos|apuestas copa del rey pronósticos|apuestas copa europa|apuestas copa
italia|apuestas copa libertadores|apuestas copa mundial de hockey|apuestas copa rey|apuestas copa sudamericana|apuestas corners|apuestas corners hoy|apuestas croacia argentina|apuestas
cuartos eurocopa|apuestas cuotas|apuestas cuotas altas|apuestas cuotas
bajas|apuestas de 1 euro|apuestas de baloncesto|apuestas de baloncesto hoy|apuestas de baloncesto nba|apuestas de baloncesto
para hoy|apuestas de beisbol|apuestas de beisbol para hoy|apuestas de blackjack en linea|apuestas
de boxeo|apuestas de boxeo canelo|apuestas de boxeo en las
vegas|apuestas de boxeo hoy|apuestas de boxeo online|apuestas de caballo|apuestas
de caballos|apuestas de caballos como funciona|apuestas de caballos como se juega|apuestas de caballos
en colombia|apuestas de caballos en españa|apuestas de caballos en linea|apuestas de caballos españa|apuestas de caballos ganador y colocado|apuestas de caballos
internacionales|apuestas de caballos juegos|apuestas de caballos online|apuestas de caballos online en venezuela|apuestas de caballos por
internet|apuestas de caballos pronosticos|apuestas de caballos pronósticos|apuestas de carrera de caballos|apuestas de carreras de
caballos|apuestas de carreras de caballos online|apuestas de casino|apuestas de
casino online|apuestas de casino por internet|apuestas de champions league|apuestas de ciclismo|apuestas de colombia|apuestas
de copa america|apuestas de corners|apuestas de deportes en linea|apuestas de deportes online|apuestas de dinero|apuestas
de esports|apuestas de eurocopa|apuestas de europa league|apuestas de f1|apuestas de formula 1|apuestas de
futbol|apuestas de fútbol|apuestas de futbol app|apuestas de futbol argentina|apuestas de futbol colombia|apuestas de futbol en colombia|apuestas
de futbol en directo|apuestas de futbol en linea|apuestas de futbol en vivo|apuestas de futbol español|apuestas de futbol gratis|apuestas de futbol hoy|apuestas de futbol mundial|apuestas de
futbol online|apuestas de fútbol online|apuestas de futbol para hoy|apuestas de fútbol para hoy|apuestas de futbol para hoy seguras|apuestas de futbol para mañana|apuestas de futbol peru|apuestas de futbol pronosticos|apuestas de
fútbol pronósticos|apuestas de futbol seguras|apuestas de futbol seguras para hoy|apuestas de futbol sin dinero|apuestas de galgos|apuestas de galgos como ganar|apuestas de galgos en directo|apuestas de
galgos online|apuestas de galgos trucos|apuestas de golf|apuestas de
hockey|apuestas de hockey sobre hielo|apuestas de hoy|apuestas de hoy seguras|apuestas de juego|apuestas de juegos|apuestas de juegos
deportivos|apuestas de juegos online|apuestas de la champions league|apuestas de la copa américa|apuestas de la eurocopa|apuestas de la europa league|apuestas de la liga|apuestas de la liga bbva|apuestas
de la liga española|apuestas de la nba|apuestas de la nfl|apuestas de la ufc|apuestas
de mlb|apuestas de nba|apuestas de nba para hoy|apuestas de partidos|apuestas de partidos de futbol|apuestas de peleas ufc|apuestas de perros en vivo|apuestas de perros virtuales|apuestas de peru|apuestas de sistema|apuestas
de sistema como funciona|apuestas de sistema explicacion|apuestas de
sistema explicación|apuestas de tenis|apuestas de tenis de mesa|apuestas de tenis en directo|apuestas
de tenis hoy|apuestas de tenis para hoy|apuestas de tenis pronosticos|apuestas de tenis seguras|apuestas de todo tipo|apuestas de ufc|apuestas de ufc hoy|apuestas
del boxeo|apuestas del clasico|apuestas del clasico real
madrid barca|apuestas del dia|apuestas del día|apuestas del dia
de hoy|apuestas del dia deportivas|apuestas del dia futbol|apuestas del mundial|apuestas del partido de hoy|apuestas del real madrid|apuestas del rey|apuestas
del sistema|apuestas deporte|apuestas deportes|apuestas deportiva|apuestas deportivas|apuestas deportivas 1 euro|apuestas deportivas 10 euros gratis|apuestas deportivas
100 seguras|apuestas deportivas 1×2|apuestas deportivas
android|apuestas deportivas app|apuestas deportivas apps|apuestas deportivas argentina|apuestas deportivas argentina futbol|apuestas deportivas argentina legal|apuestas deportivas atletico de madrid|apuestas deportivas baloncesto|apuestas
deportivas barca madrid|apuestas deportivas barcelona|apuestas deportivas beisbol|apuestas deportivas
bono|apuestas deportivas bono bienvenida|apuestas deportivas bono
de bienvenida|apuestas deportivas bono sin deposito|apuestas deportivas bonos
de bienvenida|apuestas deportivas boxeo|apuestas deportivas caballos|apuestas deportivas calculadora|apuestas
deportivas campeon liga|apuestas deportivas casino|apuestas deportivas casino
barcelona|apuestas deportivas casino online|apuestas deportivas cerca
de mi|apuestas deportivas champions league|apuestas deportivas chile|apuestas deportivas ciclismo|apuestas deportivas colombia|apuestas deportivas com|apuestas deportivas com foro|apuestas deportivas com pronosticos|apuestas deportivas
combinadas|apuestas deportivas combinadas para hoy|apuestas deportivas como se juega|apuestas deportivas comparador|apuestas deportivas con bono gratis|apuestas deportivas con bonos gratis|apuestas
deportivas con dinero ficticio|apuestas deportivas con paypal|apuestas deportivas con puntos virtuales|apuestas deportivas consejos|apuestas deportivas consejos para ganar|apuestas deportivas copa america|apuestas deportivas copa del rey|apuestas deportivas copa libertadores|apuestas deportivas copa mundial|apuestas deportivas corners|apuestas deportivas cual es la mejor|apuestas deportivas cuotas altas|apuestas deportivas
de baloncesto|apuestas deportivas de boxeo|apuestas deportivas de colombia|apuestas deportivas de futbol|apuestas deportivas
de nba|apuestas deportivas de nhl|apuestas deportivas de peru|apuestas deportivas de tenis|apuestas deportivas del dia|apuestas deportivas
dinero ficticio|apuestas deportivas directo|apuestas deportivas doble oportunidad|apuestas
deportivas en argentina|apuestas deportivas en chile|apuestas deportivas en colombia|apuestas deportivas en directo|apuestas deportivas en españa|apuestas deportivas en español|apuestas deportivas en linea|apuestas deportivas en línea|apuestas deportivas en peru|apuestas deportivas en perú|apuestas deportivas en sevilla|apuestas deportivas en uruguay|apuestas deportivas en vivo|apuestas deportivas es|apuestas deportivas es pronosticos|apuestas deportivas españa|apuestas deportivas españolas|apuestas deportivas esports|apuestas deportivas estadisticas|apuestas
deportivas estrategias|apuestas deportivas estrategias seguras|apuestas deportivas
eurocopa|apuestas deportivas europa league|apuestas deportivas f1|apuestas deportivas faciles de ganar|apuestas deportivas formula 1|apuestas deportivas foro|apuestas deportivas foro futbol|apuestas deportivas foro tenis|apuestas deportivas francia argentina|apuestas
deportivas futbol|apuestas deportivas fútbol|apuestas
deportivas futbol argentino|apuestas deportivas futbol colombia|apuestas deportivas futbol español|apuestas deportivas gana|apuestas deportivas ganadas|apuestas deportivas ganar dinero seguro|apuestas deportivas gane|apuestas deportivas golf|apuestas deportivas gratis|apuestas deportivas gratis con premios|apuestas deportivas gratis hoy|apuestas deportivas gratis sin deposito|apuestas deportivas handicap|apuestas deportivas handicap asiatico|apuestas deportivas hoy|apuestas deportivas impuestos|apuestas deportivas interior
argentina|apuestas deportivas juegos olimpicos|apuestas deportivas la liga|apuestas deportivas legales|apuestas deportivas legales en colombia|apuestas deportivas libres de impuestos|apuestas deportivas licencia españa|apuestas deportivas liga española|apuestas deportivas listado|apuestas deportivas
listado clasico|apuestas deportivas madrid|apuestas deportivas mas seguras|apuestas deportivas mejor pagadas|apuestas deportivas
mejores|apuestas deportivas mejores app|apuestas deportivas mejores casas|apuestas deportivas mejores cuotas|apuestas deportivas mejores paginas|apuestas deportivas mexico|apuestas deportivas
méxico|apuestas deportivas mlb|apuestas deportivas mlb hoy|apuestas deportivas multiples|apuestas
deportivas mundial|apuestas deportivas murcia|apuestas deportivas nba|apuestas deportivas nba hoy|apuestas deportivas nfl|apuestas deportivas nhl|apuestas deportivas nuevas|apuestas deportivas ofertas|apuestas deportivas online|apuestas deportivas online argentina|apuestas deportivas
online chile|apuestas deportivas online colombia|apuestas deportivas online en colombia|apuestas deportivas online españa|apuestas
deportivas online mexico|apuestas deportivas online
paypal|apuestas deportivas online peru|apuestas deportivas online por internet|apuestas deportivas pago paypal|apuestas deportivas para ganar dinero|apuestas deportivas para hoy|apuestas deportivas para hoy
pronosticos|apuestas deportivas partido suspendido|apuestas
deportivas partidos de hoy|apuestas deportivas paypal|apuestas deportivas peru|apuestas deportivas perú|apuestas deportivas peru vs ecuador|apuestas deportivas predicciones|apuestas deportivas promociones|apuestas deportivas pronostico|apuestas deportivas pronóstico|apuestas deportivas pronostico hoy|apuestas deportivas pronosticos|apuestas deportivas pronósticos|apuestas deportivas pronosticos expertos|apuestas deportivas pronosticos gratis|apuestas deportivas
pronosticos nba|apuestas deportivas pronosticos tenis|apuestas deportivas que aceptan paypal|apuestas deportivas real madrid|apuestas deportivas regalo bienvenida|apuestas deportivas resultado exacto|apuestas
deportivas resultados|apuestas deportivas rugby|apuestas deportivas seguras|apuestas deportivas seguras foro|apuestas deportivas
seguras hoy|apuestas deportivas seguras para hoy|apuestas deportivas seguras telegram|apuestas deportivas sevilla|apuestas deportivas simulador eurocopa|apuestas deportivas sin deposito|apuestas deportivas sin deposito inicial|apuestas deportivas
sin dinero|apuestas deportivas sin dinero real|apuestas deportivas
sin registro|apuestas deportivas stake|apuestas deportivas stake 10|apuestas deportivas telegram españa|apuestas deportivas tenis|apuestas deportivas tenis de
mesa|apuestas deportivas tenis foro|apuestas deportivas tenis hoy|apuestas deportivas
tips|apuestas deportivas tipster|apuestas deportivas
ufc|apuestas deportivas uruguay|apuestas deportivas valencia|apuestas deportivas valencia barcelona|apuestas deportivas venezuela|apuestas deportivas virtuales|apuestas deportivas y casino|apuestas deportivas y casino online|apuestas deportivas.com|apuestas deportivas.com foro|apuestas deportivas.es|apuestas deportivos pronosticos|apuestas deposito minimo 1 euro|apuestas descenso a segunda|apuestas descenso
a segunda b|apuestas descenso la liga|apuestas descenso primera division|apuestas descenso segunda|apuestas dia|apuestas diarias seguras|apuestas dinero|apuestas dinero ficticio|apuestas dinero
real|apuestas dinero virtual|apuestas directas|apuestas directo|apuestas
directo futbol|apuestas division de honor juvenil|apuestas
dnb|apuestas doble oportunidad|apuestas doble resultado|apuestas dobles|apuestas dobles y
triples|apuestas dortmund barcelona|apuestas
draft nba|apuestas draft nfl|apuestas ecuador vs argentina|apuestas ecuador
vs venezuela|apuestas egipto uruguay|apuestas el clasico|apuestas elecciones venezuela|apuestas empate|apuestas en baloncesto|apuestas en barcelona|apuestas en beisbol|apuestas en boxeo|apuestas
en caballos|apuestas en carreras de caballos|apuestas en casino|apuestas en casino online|apuestas en casinos|apuestas en casinos online|apuestas en chile|apuestas en ciclismo|apuestas en colombia|apuestas en colombia de futbol|apuestas en directo|apuestas en directo futbol|apuestas en directo pronosticos|apuestas en el
futbol|apuestas en el tenis|apuestas en españa|apuestas en esports|apuestas en eventos deportivos virtuales|apuestas en golf|apuestas en juegos|apuestas en la champions league|apuestas en la eurocopa|apuestas en la liga|apuestas en la nba|apuestas en la nfl|apuestas en las vegas mlb|apuestas en las vegas nfl|apuestas en linea|apuestas en línea|apuestas en linea argentina|apuestas en linea boxeo|apuestas
en linea chile|apuestas en linea colombia|apuestas en línea de fútbol|apuestas en linea deportivas|apuestas en linea españa|apuestas en linea
estados unidos|apuestas en linea futbol|apuestas en linea
mexico|apuestas en línea méxico|apuestas en linea
mundial|apuestas en linea peru|apuestas en linea usa|apuestas en los esports|apuestas en madrid|apuestas en méxico|apuestas en mexico online|apuestas en nba|apuestas en partidos de futbol|apuestas en partidos de futbol en vivo|apuestas en partidos
de tenis en directo|apuestas en perú|apuestas en sevilla|apuestas en sistema|apuestas
en stake|apuestas en tenis|apuestas en tenis de mesa|apuestas
en valencia|apuestas en vivo|apuestas en vivo argentina|apuestas en vivo casino|apuestas en vivo futbol|apuestas en vivo fútbol|apuestas en vivo
nba|apuestas en vivo peru|apuestas en vivo tenis|apuestas en vivo ufc|apuestas equipo mbappe|apuestas equipos de futbol|apuestas
españa|apuestas españa alemania|apuestas españa alemania eurocopa|apuestas españa croacia|apuestas españa eurocopa|apuestas
españa francia|apuestas españa francia eurocopa|apuestas españa gana el mundial|apuestas españa gana eurocopa|apuestas españa gana mundial|apuestas españa georgia|apuestas españa holanda|apuestas españa inglaterra|apuestas españa inglaterra cuotas|apuestas españa inglaterra eurocopa|apuestas
españa italia|apuestas españa mundial|apuestas españa paises bajos|apuestas español|apuestas español oviedo|apuestas
espanyol barcelona|apuestas espanyol betis|apuestas
espanyol villarreal|apuestas esport|apuestas esports|apuestas esports colombia|apuestas
esports españa|apuestas esports fifa|apuestas esports gratis|apuestas esports lol|apuestas esports peru|apuestas esports valorant|apuestas estadisticas|apuestas estrategias|apuestas euro|apuestas euro copa|apuestas eurocopa|apuestas eurocopa campeon|apuestas eurocopa españa|apuestas eurocopa favoritos|apuestas eurocopa femenina|apuestas eurocopa final|apuestas
eurocopa ganador|apuestas eurocopa hoy|apuestas eurocopa sub
21|apuestas euroliga baloncesto|apuestas euroliga pronosticos|apuestas europa
league|apuestas europa league hoy|apuestas europa league pronosticos|apuestas europa league
pronósticos|apuestas euros|apuestas f1 abu dhabi|apuestas f1 bahrein|apuestas f1 canada|apuestas f1
china|apuestas f1 cuotas|apuestas f1 hoy|apuestas f1 las vegas|apuestas f1 miami|apuestas f1 monaco|apuestas faciles de ganar|apuestas fáciles de ganar|apuestas faciles
para ganar|apuestas favoritas|apuestas favorito champions|apuestas favoritos champions|apuestas favoritos eurocopa|apuestas favoritos mundial|apuestas fc barcelona|apuestas final champions
cuotas|apuestas final champions league|apuestas final champions peru|apuestas final copa|apuestas final copa america|apuestas final
copa de europa|apuestas final copa del rey|apuestas final copa europa|apuestas final copa libertadores|apuestas final copa rey|apuestas final de
copa|apuestas final de copa del rey|apuestas final del mundial|apuestas final
euro|apuestas final eurocopa|apuestas final europa
league|apuestas final libertadores|apuestas final mundial|apuestas final
nba|apuestas final rugby|apuestas final uefa europa league|apuestas final.mundial|apuestas
finales de conferencia nfl|apuestas finales nba|apuestas fiorentina betis|apuestas formula|apuestas formula 1|apuestas fórmula 1|apuestas fórmula 1 pronósticos|apuestas formula uno|apuestas foro|apuestas foro nba|apuestas francia argentina|apuestas francia españa|apuestas
futbol|apuestas fútbol|apuestas futbol americano|apuestas futbol americano nfl|apuestas futbol argentina|apuestas futbol argentino|apuestas futbol champions league|apuestas
futbol chile|apuestas futbol colombia|apuestas futbol consejos|apuestas futbol en directo|apuestas
fútbol en directo|apuestas futbol en vivo|apuestas fútbol en vivo|apuestas futbol españa|apuestas
futbol español|apuestas fútbol español|apuestas futbol
eurocopa|apuestas futbol femenino|apuestas futbol
foro|apuestas futbol gratis|apuestas futbol hoy|apuestas fútbol
hoy|apuestas futbol juegos olimpicos|apuestas futbol mexico|apuestas futbol mundial|apuestas futbol online|apuestas futbol para hoy|apuestas futbol peru|apuestas futbol pronosticos|apuestas futbol sala|apuestas futbol telegram|apuestas
futbol virtual|apuestas galgos|apuestas galgos en directo|apuestas galgos hoy|apuestas galgos online|apuestas galgos pronosticos|apuestas galgos trucos|apuestas gana|apuestas gana colombia|apuestas gana resultados|apuestas ganadas|apuestas ganadas hoy|apuestas ganador champions league|apuestas ganador copa america|apuestas
ganador copa del rey|apuestas ganador copa del rey baloncesto|apuestas ganador
copa libertadores|apuestas ganador de la eurocopa|apuestas ganador de la
liga|apuestas ganador del mundial|apuestas ganador eurocopa|apuestas ganador europa
league|apuestas ganador f1|apuestas ganador la liga|apuestas ganador liga española|apuestas ganador mundial|apuestas
ganador mundial baloncesto|apuestas ganador mundial f1|apuestas ganador nba|apuestas ganadores eurocopa|apuestas ganadores
mundial|apuestas ganar champions|apuestas ganar eurocopa|apuestas ganar liga|apuestas
ganar mundial|apuestas ganar nba|apuestas getafe valencia|apuestas ghana uruguay|apuestas girona|apuestas girona athletic|apuestas girona betis|apuestas girona campeon de liga|apuestas girona campeon liga|apuestas girona gana la liga|apuestas girona real madrid|apuestas girona real sociedad|apuestas goleador eurocopa|apuestas goleadores eurocopa|apuestas goles asiaticos|apuestas golf|apuestas golf masters|apuestas golf pga|apuestas granada barcelona|apuestas grand slam de tenis|apuestas gratis|apuestas gratis casino|apuestas gratis con premios|apuestas gratis hoy|apuestas gratis para hoy|apuestas gratis por registro|apuestas gratis puntos|apuestas gratis regalos|apuestas gratis sin deposito|apuestas gratis sin depósito|apuestas gratis sin ingreso|apuestas gratis sports|apuestas gratis y ganar premios|apuestas
grupo a eurocopa|apuestas grupos eurocopa|apuestas handicap|apuestas handicap asiatico|apuestas handicap baloncesto|apuestas handicap como funciona|apuestas handicap nba|apuestas handicap nfl|apuestas hipicas online|apuestas
hípicas online|apuestas hipicas venezuela|apuestas hockey|apuestas hockey hielo|apuestas hockey patines|apuestas hockey sobre hielo|apuestas
holanda argentina|apuestas holanda vs argentina|apuestas hoy|apuestas hoy
champions|apuestas hoy futbol|apuestas hoy nba|apuestas hoy
pronosticos|apuestas hoy seguras|apuestas impuestos|apuestas inglaterra paises bajos|apuestas inter barca|apuestas
inter barcelona|apuestas juego|apuestas juegos|apuestas juegos en linea|apuestas juegos olimpicos|apuestas juegos olímpicos|apuestas
juegos olimpicos baloncesto|apuestas juegos online|apuestas juegos virtuales|apuestas jugador sevilla|apuestas jugadores nba|apuestas kings league americas|apuestas la liga|apuestas la
liga española|apuestas la liga hoy|apuestas la liga santander|apuestas las vegas mlb|apuestas las vegas nba|apuestas las vegas nfl|apuestas league of legends mundial|apuestas legal|apuestas legales|apuestas legales
en colombia|apuestas legales en españa|apuestas legales en estados unidos|apuestas legales españa|apuestas leganes betis|apuestas
libertadores|apuestas licencia|apuestas liga 1 peru|apuestas liga argentina|apuestas
liga bbva pronosticos|apuestas liga de campeones|apuestas liga de campeones de baloncesto|apuestas
liga de campeones de hockey|apuestas liga españa|apuestas liga española|apuestas liga santander pronosticos|apuestas ligas de futbol|apuestas linea|apuestas linea de gol|apuestas liverpool barcelona|apuestas liverpool real madrid|apuestas lol mundial|apuestas madrid|apuestas madrid arsenal|apuestas madrid atletico|apuestas madrid atletico
champions|apuestas madrid barca|apuestas madrid barça|apuestas madrid barca hoy|apuestas madrid barca supercopa|apuestas madrid barcelona|apuestas
madrid barsa|apuestas madrid bayern|apuestas madrid betis|apuestas madrid borussia|apuestas madrid campeon champions|apuestas madrid celta|apuestas madrid city|apuestas madrid dortmund|apuestas madrid gana la liga|apuestas madrid
gana liga|apuestas madrid hoy|apuestas madrid liverpool|apuestas
madrid osasuna|apuestas madrid sevilla|apuestas madrid valencia|apuestas madrid vs arsenal|apuestas madrid vs
barcelona|apuestas mallorca osasuna|apuestas mallorca real sociedad|apuestas manchester athletic|apuestas manchester
city real madrid|apuestas mas faciles de ganar|apuestas mas
seguras|apuestas mas seguras para hoy|apuestas masters de golf|apuestas
masters de tenis|apuestas maximo goleador eurocopa|apuestas
maximo goleador mundial|apuestas mejor jugador eurocopa|apuestas mejores casinos online|apuestas mexico|apuestas
méxico|apuestas mexico polonia|apuestas méxico polonia|apuestas
mlb|apuestas mlb hoy|apuestas mlb las vegas|apuestas mlb para hoy|apuestas mlb pronosticos|apuestas mlb usa|apuestas mma
ufc|apuestas momios|apuestas multiples|apuestas múltiples|apuestas multiples como funcionan|apuestas multiples el gordo|apuestas multiples futbol|apuestas mundial|apuestas mundial 2026|apuestas
mundial baloncesto|apuestas mundial balonmano|apuestas mundial brasil|apuestas mundial campeon|apuestas mundial ciclismo|apuestas
mundial clubes|apuestas mundial de baloncesto|apuestas mundial
de ciclismo|apuestas mundial de clubes|apuestas mundial de futbol|apuestas mundial de fútbol|apuestas mundial de rugby|apuestas mundial f1|apuestas mundial favoritos|apuestas mundial femenino|apuestas mundial formula 1|apuestas mundial
futbol|apuestas mundial ganador|apuestas mundial lol|apuestas mundial moto gp|apuestas mundial motogp|apuestas mundial
rugby|apuestas mundial sub 17|apuestas mundiales|apuestas mundialistas|apuestas mvp eurocopa|apuestas mvp nba|apuestas mvp nfl|apuestas
nacionales de colombia|apuestas nba|apuestas nba all star|apuestas nba campeon|apuestas
nba consejos|apuestas nba esta noche|apuestas nba finals|apuestas nba gratis|apuestas nba hoy|apuestas nba hoy jugadores|apuestas nba hoy pronosticos|apuestas nba para hoy|apuestas
nba playoffs|apuestas nba pronosticos|apuestas nba pronósticos|apuestas nba
pronosticos hoy|apuestas nba tipster|apuestas
nfl|apuestas nfl hoy|apuestas nfl las vegas|apuestas nfl playoffs|apuestas nfl pronosticos|apuestas nfl pronósticos|apuestas nfl semana 4|apuestas nfl super bowl|apuestas
nhl|apuestas nhl pronosticos|apuestas octavos eurocopa|apuestas ofertas|apuestas
online|apuestas online argentina|apuestas online argentina legal|apuestas online bono|apuestas online bono bienvenida|apuestas online boxeo|apuestas online caballos|apuestas online carreras de caballos|apuestas online
casino|apuestas online champions league|apuestas online chile|apuestas online ciclismo|apuestas online colombia|apuestas online comparativa|apuestas online con paypal|apuestas online de caballos|apuestas online deportivas|apuestas online en argentina|apuestas online en peru|apuestas online espana|apuestas online españa|apuestas online esports|apuestas online foro|apuestas online futbol|apuestas online futbol españa|apuestas online golf|apuestas
online gratis|apuestas online gratis sin deposito|apuestas
online juegos|apuestas online mexico|apuestas online mma|apuestas online movil|apuestas online nba|apuestas online net|apuestas online nuevas|apuestas online opiniones|apuestas online paypal|apuestas
online peru|apuestas online seguras|apuestas online sin dinero|apuestas
online sin registro|apuestas online tenis|apuestas online ufc|apuestas online uruguay|apuestas online venezuela|apuestas
open britanico golf|apuestas osasuna athletic|apuestas osasuna barcelona|apuestas osasuna real madrid|apuestas osasuna
sevilla|apuestas osasuna valencia|apuestas over|apuestas
over 2.5|apuestas over under|apuestas paginas|apuestas pago anticipado|apuestas paises bajos ecuador|apuestas paises bajos inglaterra|apuestas países bajos qatar|apuestas para boxeo|apuestas para champions
league|apuestas para el clasico|apuestas para el dia de hoy|apuestas para el
mundial|apuestas para el partido de hoy|apuestas para
eurocopa|apuestas para europa league|apuestas para futbol|apuestas para ganar|apuestas para ganar dinero|apuestas para ganar dinero facil|apuestas para ganar en la ruleta|apuestas para ganar la champions|apuestas para ganar la eurocopa|apuestas para ganar la europa league|apuestas para ganar la liga|apuestas para
ganar siempre|apuestas para hacer|apuestas para hoy|apuestas para hoy de futbol|apuestas para hoy
europa league|apuestas para hoy futbol|apuestas para juegos|apuestas para la
champions league|apuestas para la copa del rey|apuestas para la eurocopa|apuestas
para la europa league|apuestas para la final de la eurocopa|apuestas para
la nba hoy|apuestas para los partidos de hoy|apuestas
para partidos de hoy|apuestas para ufc|apuestas partido|apuestas partido aplazado|apuestas partido champions|apuestas partido colombia|apuestas partido españa marruecos|apuestas partido mundial|apuestas partido suspendido|apuestas partidos|apuestas partidos champions league|apuestas partidos csgo|apuestas
partidos de futbol|apuestas partidos de futbol hoy|apuestas partidos de hoy|apuestas partidos eurocopa|apuestas partidos futbol|apuestas partidos hoy|apuestas partidos mundial|apuestas paypal|apuestas peleas de boxeo|apuestas peru|apuestas perú|apuestas peru brasil|apuestas peru chile|apuestas peru
paraguay|apuestas peru uruguay|apuestas peru
vs chile|apuestas peru vs colombia|apuestas pichichi eurocopa|apuestas plataforma|apuestas playoff|apuestas playoff
ascenso|apuestas playoff ascenso a primera|apuestas playoff nba|apuestas playoff
segunda|apuestas playoff segunda b|apuestas playoffs nba|apuestas playoffs nfl|apuestas polonia argentina|apuestas por argentina|apuestas por internet mexico|apuestas por
internet para ganar dinero|apuestas por paypal|apuestas por ronda boxeo|apuestas por
sistema|apuestas portugal uruguay|apuestas pre partido|apuestas predicciones|apuestas
predicciones futbol|apuestas primera division|apuestas primera division españa|apuestas
promociones|apuestas pronostico|apuestas pronosticos|apuestas pronosticos deportivos|apuestas pronosticos
deportivos tenis|apuestas pronosticos futbol|apuestas pronosticos gratis|apuestas pronosticos nba|apuestas pronosticos tenis|apuestas prorroga|apuestas psg barca|apuestas psg barcelona|apuestas puntos por tarjetas|apuestas puntos tarjetas|apuestas
que aceptan paypal|apuestas que es handicap|apuestas que puedes hacer con tu novia|apuestas que siempre ganaras|apuestas que significa|apuestas quien bajara a segunda|apuestas quién bajara a segunda|apuestas quien gana el mundial|apuestas
quien gana eurocopa|apuestas quien gana la champions|apuestas quien gana la
eurocopa|apuestas quien gana la liga|apuestas quien ganara el mundial|apuestas quién ganará el mundial|apuestas quien ganara la champions|apuestas quien ganara la eurocopa|apuestas quien ganara la liga|apuestas
rayo barcelona|apuestas real madrid|apuestas real
madrid arsenal|apuestas real madrid athletic|apuestas real madrid atletico|apuestas real madrid atletico champions|apuestas real madrid atletico
de madrid|apuestas real madrid atlético de madrid|apuestas
real madrid atletico madrid|apuestas real madrid
barcelona|apuestas real madrid bayern|apuestas real madrid betis|apuestas real madrid borussia|apuestas
real madrid campeon champions|apuestas real
madrid celta|apuestas real madrid champions|apuestas real madrid city|apuestas real madrid girona|apuestas real madrid hoy|apuestas real madrid liverpool|apuestas real madrid manchester city|apuestas
real madrid osasuna|apuestas real madrid real sociedad|apuestas
real madrid valencia|apuestas real madrid villarreal|apuestas real madrid vs arsenal|apuestas real madrid vs atletico|apuestas real madrid vs atlético|apuestas
real madrid vs atletico madrid|apuestas real madrid vs
barcelona|apuestas real madrid vs betis|apuestas real madrid vs sevilla|apuestas real
madrid vs valencia|apuestas real sociedad|apuestas real sociedad athletic|apuestas real sociedad barcelona|apuestas real sociedad betis|apuestas real
sociedad psg|apuestas real sociedad real madrid|apuestas real sociedad valencia|apuestas recomendadas
hoy|apuestas regalo de bienvenida|apuestas registro|apuestas resultado exacto|apuestas resultados|apuestas resultados eurocopa|apuestas retirada
tenis|apuestas roma barcelona|apuestas roma sevilla|apuestas rugby|apuestas rugby mundial|apuestas rugby world cup|apuestas ruleta seguras|apuestas segunda|apuestas segunda b|apuestas segunda division|apuestas segunda división|apuestas segunda division b|apuestas
segunda division españa|apuestas seguras|apuestas seguras baloncesto|apuestas seguras calculadora|apuestas seguras en la ruleta|apuestas seguras eurocopa|apuestas seguras foro|apuestas seguras futbol|apuestas seguras futbol hoy|apuestas
seguras gratis|apuestas seguras hoy|apuestas seguras hoy
futbol|apuestas seguras nba|apuestas seguras nba hoy|apuestas
seguras para este fin de semana|apuestas seguras para ganar dinero|apuestas seguras para hoy|apuestas seguras para hoy fútbol|apuestas seguras
para hoy pronósticos|apuestas seguras para mañana|apuestas seguras ruleta|apuestas seguras telegram|apuestas
seguras tenis|apuestas semifinales eurocopa|apuestas senegal paises bajos|apuestas
sevilla|apuestas sevilla athletic|apuestas sevilla atletico
de madrid|apuestas sevilla barcelona|apuestas sevilla betis|apuestas sevilla campeon liga|apuestas sevilla celta|apuestas sevilla gana la liga|apuestas
sevilla girona|apuestas sevilla inter|apuestas sevilla jugador|apuestas sevilla juventus|apuestas
sevilla leganes|apuestas sevilla madrid|apuestas sevilla
manchester united|apuestas sevilla osasuna|apuestas
sevilla real madrid|apuestas sevilla real sociedad|apuestas sevilla roma|apuestas sevilla valencia|apuestas significa|apuestas simples ejemplos|apuestas
simples o combinadas|apuestas sin deposito|apuestas sin deposito inicial|apuestas sin deposito
minimo|apuestas sin dinero|apuestas sin dinero real|apuestas sin empate|apuestas sin empate que significa|apuestas sin ingreso minimo|apuestas sin registro|apuestas sistema|apuestas sistema calculadora|apuestas sistema como funciona|apuestas sistema trixie|apuestas sociedad|apuestas sorteo copa del rey|apuestas stake|apuestas
stake 10|apuestas stake 10 hoy|apuestas super bowl favorito|apuestas super rugby|apuestas supercopa españa|apuestas superliga argentina|apuestas
tarjeta roja|apuestas tarjetas|apuestas tarjetas amarillas|apuestas tenis|apuestas tenis atp|apuestas tenis consejos|apuestas tenis copa davis|apuestas tenis de mesa|apuestas
tenis de mesa pronosticos|apuestas tenis en vivo|apuestas tenis
femenino|apuestas tenis hoy|apuestas tenis itf|apuestas tenis pronosticos|apuestas tenis pronósticos|apuestas tenis retirada|apuestas tenis roland
garros|apuestas tenis seguras|apuestas tenis wimbledon|apuestas tenis
wta|apuestas tercera division|apuestas tercera division españa|apuestas tipos|apuestas tips|apuestas tipster|apuestas tipster
para hoy|apuestas topuria holloway cuotas|apuestas
torneos de golf|apuestas torneos de tenis|apuestas trucos|apuestas uefa champions league|apuestas uefa europa league|apuestas ufc|apuestas ufc chile|apuestas ufc como funciona|apuestas ufc hoy|apuestas ufc ilia topuria|apuestas ufc online|apuestas ufc pronósticos|apuestas
ufc telegram|apuestas ufc topuria|apuestas under over|apuestas unionistas villarreal|apuestas uruguay|apuestas uruguay colombia|apuestas uruguay corea|apuestas uruguay vs colombia|apuestas us open golf|apuestas us open tenis|apuestas valencia|apuestas valencia barcelona|apuestas valencia betis|apuestas valencia madrid|apuestas valencia real madrid|apuestas valladolid barcelona|apuestas valladolid valencia|apuestas valor app|apuestas valor en directo|apuestas valor galgos|apuestas venezuela|apuestas
venezuela argentina|apuestas venezuela bolivia|apuestas venezuela ecuador|apuestas villarreal|apuestas villarreal athletic|apuestas villarreal barcelona|apuestas
villarreal bayern|apuestas villarreal betis|apuestas
villarreal liverpool|apuestas villarreal manchester|apuestas villarreal manchester united|apuestas villarreal vs real madrid|apuestas virtuales|apuestas virtuales colombia|apuestas virtuales futbol|apuestas
virtuales sin dinero|apuestas vivo|apuestas vuelta a españa|apuestas vuelta españa|apuestas william
hill partidos de hoy|apuestas y casino|apuestas y casinos|apuestas y juegos de
azar|apuestas y pronosticos|apuestas y pronosticos de futbol|apuestas y pronosticos deportivos|apuestas
y resultados|apuestas-deportivas|apuestas-deportivas.es pronosticos|arbitro
nba apuestas|argentina apuestas|argentina colombia apuestas|argentina croacia apuestas|argentina francia apuestas|argentina mexico apuestas|argentina peru apuestas|argentina uruguay apuestas|argentina vs bolivia apuestas|argentina vs chile apuestas|argentina vs colombia apuestas|argentina vs francia apuestas|argentina vs.
colombia apuestas|asi se gana en las apuestas deportivas|asiatico apuestas|asiatico
en apuestas|asiaticos apuestas|athletic barcelona apuestas|athletic manchester united apuestas|athletic osasuna apuestas|athletic real madrid apuestas|atletico barcelona apuestas|atletico de madrid apuestas|atlético de madrid apuestas|atletico
de madrid real madrid apuestas|atletico de madrid vs barcelona apuestas|atletico madrid real madrid
apuestas|atletico madrid vs real madrid apuestas|atletico real madrid
apuestas|atletico vs real madrid apuestas|avisador de cuotas apuestas|bajada de cuotas apuestas|baloncesto apuestas|barbastro barcelona apuestas|barca apuestas|barca bayern apuestas|barca inter apuestas|barca madrid
apuestas|barça madrid apuestas|barca vs atletico apuestas|barca vs madrid apuestas|barca
vs real madrid apuestas|barcelona – real madrid apuestas|barcelona apuestas|barcelona atletico apuestas|barcelona atletico de
madrid apuestas|barcelona atletico madrid apuestas|barcelona betis apuestas|barcelona casa de apuestas|barcelona inter apuestas|barcelona psg apuestas|barcelona real
madrid apuestas|barcelona real sociedad apuestas|barcelona sevilla apuestas|barcelona valencia apuestas|barcelona vs athletic bilbao
apuestas|barcelona vs atlético madrid apuestas|barcelona vs betis apuestas|barcelona vs celta de vigo apuestas|barcelona vs espanyol apuestas|barcelona vs girona apuestas|barcelona
vs madrid apuestas|barcelona vs real madrid apuestas|barcelona vs real sociedad apuestas|barcelona vs
sevilla apuestas|barcelona vs villarreal apuestas|base de
datos cuotas apuestas deportivas|bayern real madrid apuestas|beisbol
apuestas|best america apuestas|bet apuestas chile|bet apuestas en vivo|betis – chelsea apuestas|betis apuestas|betis barcelona apuestas|betis chelsea apuestas|betis
madrid apuestas|betis sevilla apuestas|betsson tu sitio
de apuestas online|blog apuestas baloncesto|blog apuestas ciclismo|blog apuestas nba|blog apuestas tenis|blog de apuestas de tenis|bono apuestas|bono apuestas deportivas|bono
apuestas deportivas sin deposito|bono apuestas gratis|bono apuestas gratis
sin deposito|bono apuestas sin deposito|bono bienvenida apuestas|bono bienvenida apuestas deportivas|bono bienvenida apuestas
españa|bono bienvenida apuestas sin deposito|bono bienvenida apuestas sin depósito|bono bienvenida casa apuestas|bono bienvenida casa de
apuestas|bono bienvenida marca apuestas|bono casa apuestas|bono casa de apuestas|bono casa de apuestas sin ingreso|bono casas de apuestas|bono de apuestas|bono de apuestas gratis sin deposito|bono de bienvenida apuestas|bono de bienvenida apuestas
deportivas|bono de bienvenida casa de apuestas|bono
de bienvenida casas de apuestas|bono de casas de apuestas|bono de registro apuestas|bono de registro
apuestas deportivas|bono de registro casa de apuestas|bono gratis apuestas|bono marca apuestas|bono por registro apuestas|bono por
registro apuestas deportivas|bono por registro casa de apuestas|bono registro apuestas|bono sin deposito apuestas|bono sin depósito apuestas|bono sin deposito apuestas deportivas|bono sin depósito apuestas deportivas|bono sin deposito casa de
apuestas|bono sin deposito marca apuestas|bono sin ingreso apuestas|bono sin ingreso apuestas deportivas|bonos apuestas|bonos apuestas colombia|bonos apuestas deportivas|bonos apuestas deportivas sin deposito|bonos apuestas gratis|bonos apuestas sin deposito|bonos apuestas sin depósito|bonos bienvenida apuestas|bonos bienvenida casas apuestas|bonos bienvenida casas de
apuestas|bonos casa de apuestas|bonos casas apuestas|bonos casas de apuestas|bonos casas de apuestas
colombia|bonos casas de apuestas deportivas|bonos casas de apuestas españa|bonos casas
de apuestas nuevas|bonos casas de apuestas sin deposito|bonos casas de apuestas sin depósito|bonos de apuestas|bonos
de apuestas deportivas|bonos de apuestas gratis|bonos de apuestas sin deposito|bonos de bienvenida apuestas|bonos de
bienvenida apuestas deportivas|bonos de bienvenida casa de apuestas|bonos de bienvenida
casas de apuestas|bonos de bienvenida de casas de
apuestas|bonos de bienvenida en casas de apuestas|bonos de
casas de apuestas|bonos de casas de apuestas sin deposito|bonos en casa de
apuestas|bonos en casas de apuestas sin deposito|bonos gratis apuestas|bonos gratis apuestas
deportivas|bonos gratis casas de apuestas|bonos gratis sin deposito apuestas|bonos paginas de apuestas|bonos registro casas de apuestas|bonos sin deposito apuestas|bonos sin depósito
apuestas|bonos sin deposito apuestas deportivas|bonos sin deposito casas
de apuestas|bot de apuestas deportivas gratis|boxeo
apuestas|brasil colombia apuestas|brasil peru apuestas|brasil vs colombia apuestas|buenas apuestas para hoy|buscador cuotas apuestas|buscador de apuestas
seguras|buscador de cuotas apuestas|buscador de cuotas de apuestas|buscar apuestas seguras|caballos apuestas|calculador
de apuestas|calculador de cuotas apuestas|calculadora apuestas|calculadora apuestas
combinadas|calculadora apuestas de sistema|calculadora apuestas deportivas|calculadora apuestas deportivas seguras|calculadora apuestas multiples|calculadora apuestas segura|calculadora apuestas
seguras|calculadora apuestas sistema|calculadora apuestas yankee|calculadora arbitraje apuestas|calculadora cubrir apuestas|calculadora cuotas
apuestas|calculadora de apuestas|calculadora de apuestas combinadas|calculadora de apuestas de futbol|calculadora de apuestas de sistema|calculadora de apuestas deportivas|calculadora
de apuestas multiples|calculadora de apuestas seguras|calculadora de apuestas sistema|calculadora de apuestas surebets|calculadora de arbitraje
apuestas|calculadora de cuotas apuestas|calculadora de cuotas de apuestas|calculadora para apuestas deportivas|calculadora poisson apuestas|calculadora poisson apuestas deportivas|calculadora
poisson para apuestas|calculadora scalping apuestas deportivas|calculadora sistema
apuestas|calculadora stake apuestas|calculadora trading apuestas|calcular apuestas|calcular apuestas
deportivas|calcular apuestas futbol|calcular apuestas sistema|calcular
cuotas apuestas|calcular cuotas apuestas combinadas|calcular cuotas apuestas deportivas|calcular cuotas de apuestas|calcular ganancias apuestas deportivas|calcular momios
apuestas|calcular probabilidad cuota apuestas|calcular stake apuestas|calcular unidades apuestas|calcular yield apuestas|calculo de apuestas|calculo de apuestas deportivas|cambio de cuotas apuestas|campeon champions
apuestas|campeon eurocopa apuestas|campeon liga apuestas|campeon nba apuestas|canales de apuestas gratis|carrera de caballos apuestas|carrera de caballos apuestas
juego|carrera de caballos con apuestas|carrera de galgos apuestas|carreras de caballos apuestas|carreras de caballos apuestas online|carreras de caballos con apuestas|carreras de caballos juegos de apuestas|carreras de galgos apuestas|carreras de
galgos apuestas online|carreras de galgos apuestas trucos|carreras
galgos apuestas|casa apuestas argentina|casa apuestas atletico
de madrid|casa apuestas barcelona|casa apuestas betis|casa apuestas bono bienvenida|casa apuestas bono gratis|casa apuestas
bono sin deposito|casa apuestas cerca de mi|casa apuestas chile|casa apuestas colombia|casa apuestas con mejores cuotas|casa apuestas deportivas|casa apuestas españa|casa apuestas española|casa apuestas eurocopa|casa apuestas futbol|casa apuestas mejores cuotas|casa
apuestas mundial|casa apuestas nueva|casa apuestas nuevas|casa apuestas online|casa apuestas peru|casa apuestas valencia|casa de apuestas|casa
de apuestas 10 euros gratis|casa de apuestas argentina|casa de apuestas atletico de madrid|casa de apuestas baloncesto|casa de apuestas barcelona|casa de apuestas beisbol|casa
de apuestas betis|casa de apuestas bono|casa de apuestas bono bienvenida|casa de apuestas bono de bienvenida|casa de apuestas bono gratis|casa
de apuestas bono por registro|casa de apuestas bono sin deposito|casa de apuestas boxeo|casa de apuestas caballos|casa de apuestas carreras de caballos|casa de apuestas cerca de mi|casa
de apuestas cerca de mí|casa de apuestas champions league|casa
de apuestas chile|casa de apuestas ciclismo|casa de apuestas colombia|casa de
apuestas con bono de bienvenida|casa de apuestas con bono sin deposito|casa de apuestas con cuotas mas altas|casa de apuestas con esports|casa de apuestas con las
mejores cuotas|casa de apuestas con licencia en españa|casa de apuestas con mejores cuotas|casa de apuestas con pago anticipado|casa de apuestas
con paypal|casa de apuestas copa america|casa de apuestas de caballos|casa de
apuestas de colombia|casa de apuestas de españa|casa de apuestas de futbol|casa de apuestas de fútbol|casa de apuestas de futbol peru|casa
de apuestas de peru|casa de apuestas del madrid|casa de
apuestas del real madrid|casa de apuestas deportivas|casa de apuestas deportivas cerca de mi|casa de apuestas deportivas en argentina|casa de apuestas deportivas en chile|casa de apuestas
deportivas en colombia|casa de apuestas deportivas en españa|casa de apuestas deportivas en madrid|casa de apuestas deportivas españa|casa de apuestas deportivas españolas|casa de apuestas deportivas
madrid|casa de apuestas deportivas mexico|casa de apuestas
deportivas online|casa de apuestas deportivas peru|casa de apuestas deposito 5 euros|casa de apuestas
deposito minimo|casa de apuestas deposito minimo 1 euro|casa de
apuestas depósito mínimo 1 euro|casa de apuestas en españa|casa de apuestas en linea|casa
de apuestas en madrid|casa de apuestas en perú|casa de
apuestas en vivo|casa de apuestas españa|casa de apuestas españa
inglaterra|casa de apuestas española|casa de apuestas
españolas|casa de apuestas esports|casa de apuestas eurocopa|casa
de apuestas europa league|casa de apuestas f1|casa de apuestas formula 1|casa de apuestas futbol|casa de apuestas ingreso minimo|casa de apuestas ingreso minimo 1 euro|casa de apuestas ingreso mínimo 1 euro|casa de apuestas legales|casa de apuestas legales en colombia|casa de apuestas legales en españa|casa
de apuestas libertadores|casa de apuestas liga española|casa de apuestas madrid|casa de apuestas mas
segura|casa de apuestas mejores|casa de
apuestas méxico|casa de apuestas minimo 5 euros|casa de apuestas mlb|casa de apuestas mundial|casa de apuestas nba|casa de apuestas nfl|casa de apuestas nueva|casa de apuestas nuevas|casa de apuestas oficial del real madrid|casa de apuestas oficial
real madrid|casa de apuestas online|casa de apuestas online argentina|casa
de apuestas online chile|casa de apuestas
online españa|casa de apuestas online mexico|casa de apuestas online
paraguay|casa de apuestas online peru|casa de apuestas online usa|casa de apuestas online venezuela|casa de apuestas
pago anticipado|casa de apuestas para boxeo|casa de apuestas para ufc|casa de
apuestas peru|casa de apuestas perú|casa de apuestas peru online|casa de apuestas por paypal|casa de apuestas promociones|casa de apuestas que regalan dinero|casa de apuestas real madrid|casa de apuestas regalo de bienvenida|casa de apuestas sevilla|casa de
apuestas sin dinero|casa de apuestas sin ingreso minimo|casa de
apuestas sin licencia en españa|casa de apuestas sin minimo
de ingreso|casa de apuestas stake|casa de apuestas tenis|casa
de apuestas ufc|casa de apuestas valencia|casa
de apuestas venezuela|casa de apuestas virtuales|casa
de apuestas vive la suerte|casa oficial de apuestas
del real madrid|casas apuestas asiaticas|casas apuestas bono sin deposito|casas
apuestas bonos sin deposito|casas apuestas caballos|casas
apuestas chile|casas apuestas ciclismo|casas apuestas con licencia|casas apuestas con licencia en españa|casas apuestas deportivas|casas
apuestas deportivas colombia|casas apuestas deportivas españa|casas apuestas deportivas españolas|casas apuestas deportivas nuevas|casas apuestas españa|casas apuestas españolas|casas apuestas esports|casas apuestas eurocopa|casas apuestas golf|casas apuestas ingreso minimo
5 euros|casas apuestas legales|casas apuestas legales españa|casas apuestas licencia|casas apuestas licencia españa|casas
apuestas mexico|casas apuestas mundial|casas apuestas nba|casas apuestas nuevas|casas
apuestas nuevas españa|casas apuestas ofertas|casas
apuestas online|casas apuestas paypal|casas apuestas peru|casas apuestas sin licencia|casas
apuestas tenis|casas asiaticas apuestas|casas de apuestas|casas de apuestas 5 euros|casas de apuestas app|casas de apuestas argentinas|casas
de apuestas asiaticas|casas de apuestas baloncesto|casas de apuestas barcelona|casas de apuestas bono bienvenida|casas de apuestas bono de
bienvenida|casas de apuestas bono por registro|casas de apuestas bono
sin deposito|casas de apuestas bono sin ingreso|casas de apuestas bonos|casas de apuestas bonos de bienvenida|casas de apuestas bonos gratis|casas de apuestas bonos sin deposito|casas de apuestas boxeo|casas de apuestas caballos|casas de apuestas carreras de caballos|casas de apuestas casino|casas de apuestas casino online|casas de apuestas cerca de mi|casas de apuestas champions league|casas de apuestas chile|casas
de apuestas ciclismo|casas de apuestas colombia|casas de apuestas
com|casas de apuestas con app|casas de apuestas
con apuestas gratis|casas de apuestas con bono|casas de
apuestas con bono de bienvenida|casas de apuestas con bono
de registro|casas de apuestas con bono por registro|casas de apuestas con bono sin deposito|casas de
apuestas con bonos|casas de apuestas con bonos gratis|casas de apuestas con bonos sin deposito|casas de apuestas con deposito minimo|casas de
apuestas con esports|casas de apuestas con handicap asiatico|casas
de apuestas con licencia|casas de apuestas con licencia en españa|casas de apuestas con licencia españa|casas de apuestas con licencia española|casas de apuestas con mejores cuotas|casas de apuestas
con pago anticipado|casas de apuestas con paypal|casas de apuestas con paypal en perú|casas de apuestas
con promociones|casas de apuestas con ruleta en vivo|casas
de apuestas copa del rey|casas de apuestas de caballos|casas de apuestas de españa|casas de apuestas de futbol|casas de apuestas de fútbol|casas de
apuestas de peru|casas de apuestas deportivas|casas de
apuestas deportivas asiaticas|casas de apuestas deportivas colombia|casas de apuestas deportivas comparativa|casas de apuestas deportivas con paypal|casas de apuestas
deportivas en chile|casas de apuestas deportivas en españa|casas de apuestas deportivas en linea|casas de apuestas
deportivas en madrid|casas de apuestas deportivas en mexico|casas de apuestas deportivas en peru|casas de apuestas
deportivas en sevilla|casas de apuestas deportivas en valencia|casas de apuestas deportivas
españa|casas de apuestas deportivas españolas|casas de apuestas deportivas legales|casas de apuestas deportivas madrid|casas de apuestas deportivas mexico|casas de apuestas deportivas
nuevas|casas de apuestas deportivas online|casas de apuestas deportivas peru|casas de apuestas deportivas perú|casas de apuestas deposito minimo 1 euro|casas de apuestas
depósito mínimo 1 euro|casas de apuestas dinero gratis|casas de apuestas en argentina|casas
de apuestas en barcelona|casas de apuestas en chile|casas de apuestas en colombia|casas de apuestas en españa|casas de apuestas en españa online|casas de
apuestas en linea|casas de apuestas en madrid|casas de apuestas en méxico|casas de
apuestas en peru|casas de apuestas en perú|casas de apuestas en sevilla|casas de apuestas en uruguay|casas de apuestas en valencia|casas de apuestas en venezuela|casas de
apuestas equipos de futbol|casas de apuestas españa|casas de apuestas españa alemania|casas de apuestas españa inglaterra|casas de
apuestas españa licencia|casas de apuestas españa nuevas|casas de apuestas españa online|casas de apuestas española|casas de apuestas españolas|casas de apuestas
españolas con licencia|casas de apuestas españolas online|casas
de apuestas esports|casas de apuestas eurocopa|casas de apuestas
eurocopa 2024|casas de apuestas europa league|casas de
apuestas f1|casas de apuestas fisicas en barcelona|casas de apuestas fisicas en españa|casas de
apuestas formula 1|casas de apuestas fuera de españa|casas de apuestas futbol|casas de apuestas fútbol|casas de apuestas futbol españa|casas de apuestas ganador eurocopa|casas de apuestas gratis|casas de apuestas ingreso minimo|casas de apuestas ingreso
minimo 1 euro|casas de apuestas ingreso minimo
5 euros|casas de apuestas inter barcelona|casas de apuestas legales|casas de apuestas legales en colombia|casas
de apuestas legales en españa|casas de apuestas legales en mexico|casas de
apuestas legales españa|casas de apuestas legales mx|casas
de apuestas licencia|casas de apuestas licencia españa|casas de apuestas lista|casas de apuestas madrid|casas de apuestas mas seguras|casas de apuestas
mejores bonos|casas de apuestas mejores cuotas|casas de apuestas mexico|casas de apuestas méxico|casas de apuestas minimo 5 euros|casas
de apuestas mlb|casas de apuestas mundial|casas de apuestas
mundial baloncesto|casas de apuestas mundiales|casas de apuestas nba|casas de apuestas no reguladas en españa|casas de apuestas nueva ley|casas de apuestas nuevas|casas
de apuestas nuevas en colombia|casas de apuestas nuevas en españa|casas de apuestas nuevas españa|casas de apuestas ofertas|casas
de apuestas online|casas de apuestas online argentina|casas de apuestas online colombia|casas de
apuestas online deportivas|casas de apuestas online ecuador|casas de apuestas online en argentina|casas de apuestas online en chile|casas de apuestas
online en colombia|casas de apuestas online en españa|casas
de apuestas online en mexico|casas de apuestas online españa|casas de apuestas online
mas fiables|casas de apuestas online mexico|casas de apuestas
online nuevas|casas de apuestas online peru|casas de apuestas online usa|casas de apuestas online venezuela|casas de apuestas pago paypal|casas de
apuestas para ufc|casas de apuestas paypal|casas de apuestas peru bono sin deposito|casas de apuestas presenciales en españa|casas
de apuestas promociones|casas de apuestas que aceptan paypal|casas de apuestas que
Your comment is awaiting moderation.
Automatizovany system https://rocketbitpro.com pro obchodovani s kryptomenami: boti 24/7, strategie DCA/GRID, rizeni rizik, backtesting a upozorneni. Kontrola potencialniho zisku a propadu.
Your comment is awaiting moderation.
https://livepositively.com/crdigo-1xbet-2026-1x200red-a130/
Your comment is awaiting moderation.
https://www.seanrayford.com/blog/2018/2/photos-accident-scene-of-fatal-amtrak-crash
Your comment is awaiting moderation.
(10 euros gratis apuestas|10 mejores casas de apuestas|10 trucos para ganar apuestas|15 euros gratis marca apuestas|1×2 apuestas|1×2 apuestas deportivas|1×2 apuestas que significa|1×2 en apuestas|1×2
en apuestas que significa|1×2 que significa en apuestas|5 euros
gratis apuestas|9 apuestas que siempre ganaras|a partir de
cuanto se declara apuestas|actividades de juegos de azar y apuestas|ad apuestas deportivas|aleksandre topuria ufc apuestas|algoritmo para ganar apuestas deportivas|america apuestas|análisis nba apuestas|aplicacion android apuestas deportivas|aplicacion apuestas deportivas|aplicacion apuestas deportivas android|aplicación de apuestas
online|aplicacion para hacer apuestas|aplicacion para hacer apuestas de futbol|aplicación para hacer apuestas de
fútbol|aplicaciones apuestas deportivas android|aplicaciones apuestas deportivas gratis|aplicaciones de apuestas android|aplicaciones de apuestas de fútbol|aplicaciones
de apuestas deportivas|aplicaciones de apuestas deportivas peru|aplicaciones de apuestas deportivas perú|aplicaciones
de apuestas en colombia|aplicaciones de apuestas gratis|aplicaciones de apuestas online|aplicaciones de apuestas seguras|aplicaciones de apuestas
sin dinero|aplicaciones para hacer apuestas|apostar seguro
apuestas deportivas|app android apuestas deportivas|app apuestas|app apuestas android|app apuestas de
futbol|app apuestas deportivas|app apuestas deportivas android|app apuestas deportivas argentina|app apuestas deportivas
colombia|app apuestas deportivas ecuador|app apuestas
deportivas españa|app apuestas deportivas gratis|app apuestas entre amigos|app apuestas
futbol|app apuestas gratis|app apuestas sin dinero|app
casa de apuestas|app casas de apuestas|app control
apuestas|app de apuestas|app de apuestas android|app de apuestas casino|app de apuestas colombia|app de apuestas con bono
de bienvenida|app de apuestas de futbol|app de apuestas deportivas|app de apuestas deportivas android|app de apuestas deportivas argentina|app de apuestas deportivas colombia|app de
apuestas deportivas en españa|app de apuestas deportivas peru|app de apuestas deportivas perú|app de apuestas deportivas
sin dinero|app de apuestas ecuador|app de apuestas en colombia|app de apuestas
en españa|app de apuestas en venezuela|app de apuestas futbol|app de apuestas gratis|app de apuestas online|app
de apuestas para android|app de apuestas para ganar dinero|app de apuestas
peru|app de apuestas reales|app de casas de apuestas|app
marca apuestas android|app moviles de apuestas|app para apuestas|app para apuestas de futbol|app
para apuestas deportivas|app para apuestas deportivas en español|app para ganar apuestas deportivas|app para hacer apuestas|app para hacer apuestas deportivas|app para hacer apuestas entre amigos|app para llevar control de apuestas|app pronosticos apuestas deportivas|app versus
apuestas|apps apuestas mundial|apps de apuestas|apps de apuestas con bono de bienvenida|apps de apuestas de futbol|apps de apuestas deportivas peru|apps de apuestas mexico|apps para apuestas|aprender a hacer apuestas deportivas|aprender hacer apuestas deportivas|apuesta del dia
apuestas deportivas|apuestas 10 euros gratis|apuestas 100 seguras|apuestas 1×2|apuestas 1X2|apuestas 2 division|apuestas 3 division|apuestas
a caballos|apuestas a carreras de caballos|apuestas a colombia|apuestas a
corners|apuestas a ganar|apuestas a jugadores nba|apuestas
a la baja|apuestas a la nfl|apuestas al barcelona|apuestas al dia|apuestas al empate|apuestas al mundial|apuestas al tenis
wta|apuestas alaves barcelona|apuestas alcaraz hoy|apuestas alemania españa|apuestas
alonso campeon del mundo|apuestas altas y bajas|apuestas altas
y bajas nfl|apuestas ambos equipos marcan|apuestas america|apuestas android|apuestas anillo nba|apuestas antes del
mundial|apuestas anticipadas|apuestas anticipadas nba|apuestas apps|apuestas arabia argentina|apuestas argentina|apuestas
argentina campeon del mundo|apuestas argentina canada|apuestas argentina colombia|apuestas argentina croacia|apuestas argentina españa|apuestas argentina francia|apuestas
argentina francia cuanto paga|apuestas argentina francia
mundial|apuestas argentina gana el mundial|apuestas argentina gana mundial|apuestas argentina
holanda|apuestas argentina mexico|apuestas argentina méxico|apuestas argentina
mundial|apuestas argentina online|apuestas argentina paises bajos|apuestas argentina polonia|apuestas argentina uruguay|apuestas argentina vs australia|apuestas argentina vs colombia|apuestas argentina vs francia|apuestas argentina
vs peru|apuestas argentinas|apuestas arsenal real madrid|apuestas ascenso a primera division|apuestas ascenso a segunda|apuestas asiaticas|apuestas asiatico|apuestas athletic|apuestas athletic atletico|apuestas athletic barça|apuestas athletic barcelona|apuestas athletic betis|apuestas athletic manchester|apuestas athletic manchester united|apuestas athletic
osasuna|apuestas athletic real|apuestas athletic real madrid|apuestas athletic real sociedad|apuestas athletic real sociedad final|apuestas
athletic roma|apuestas athletic sevilla|apuestas athletic valencia|apuestas
atletico|apuestas atletico barcelona|apuestas atletico barsa|apuestas atletico
campeon champions|apuestas atletico campeon de liga|apuestas atlético
copenhague|apuestas atletico de madrid|apuestas
atlético de madrid|apuestas atletico de madrid barcelona|apuestas atletico de madrid
gana la liga|apuestas atletico de madrid real madrid|apuestas atlético de
madrid real madrid|apuestas atletico de madrid
vs barcelona|apuestas atletico madrid|apuestas atletico madrid real madrid|apuestas atletico madrid vs barcelona|apuestas atletico real madrid|apuestas atletico real
madrid champions|apuestas atletismo|apuestas bajas|apuestas
baloncesto|apuestas baloncesto acb|apuestas baloncesto handicap|apuestas baloncesto hoy|apuestas baloncesto juegos
olimpicos|apuestas baloncesto nba|apuestas baloncesto pronostico|apuestas baloncesto pronósticos|apuestas
baloncesto prorroga|apuestas barca|apuestas barca athletic|apuestas barca
atletico|apuestas barca bayern|apuestas barca bayern munich|apuestas barca girona|apuestas
barca hoy|apuestas barça hoy|apuestas barca inter|apuestas barca juventus|apuestas barca madrid|apuestas barça madrid|apuestas barca real madrid|apuestas barca
vs juve|apuestas barca vs madrid|apuestas barca vs psg|apuestas barcelona|apuestas barcelona
alaves|apuestas barcelona athletic|apuestas barcelona atletico|apuestas barcelona atletico de madrid|apuestas
barcelona atlético de madrid|apuestas barcelona
atletico madrid|apuestas barcelona bayern|apuestas barcelona betis|apuestas barcelona campeon de
liga|apuestas barcelona celta|apuestas barcelona espanyol|apuestas barcelona gana la champions|apuestas barcelona girona|apuestas barcelona granada|apuestas
barcelona hoy|apuestas barcelona inter|apuestas barcelona madrid|apuestas barcelona osasuna|apuestas barcelona psg|apuestas barcelona real madrid|apuestas
barcelona real sociedad|apuestas barcelona sevilla|apuestas barcelona valencia|apuestas
barcelona villarreal|apuestas barcelona vs atletico madrid|apuestas
barcelona vs madrid|apuestas barcelona vs real madrid|apuestas barsa madrid|apuestas basket hoy|apuestas bayern barcelona|apuestas bayern vs barcelona|apuestas beisbol|apuestas béisbol|apuestas beisbol mlb|apuestas beisbol pronosticos|apuestas beisbol
venezolano|apuestas betis|apuestas betis – chelsea|apuestas betis barcelona|apuestas betis chelsea|apuestas betis fiorentina|apuestas betis
girona|apuestas betis madrid|apuestas betis
mallorca|apuestas betis real madrid|apuestas betis real sociedad|apuestas betis
sevilla|apuestas betis valencia|apuestas betis valladolid|apuestas betis vs
valencia|apuestas betplay hoy colombia|apuestas betsson peru|apuestas bienvenida|apuestas
billar online|apuestas bolivia vs colombia|apuestas bono|apuestas bono bienvenida|apuestas bono de bienvenida|apuestas bono de bienvenida sin deposito|apuestas bono gratis|apuestas
bono sin deposito|apuestas bonos sin deposito|apuestas borussia real madrid|apuestas boxeo|apuestas boxeo de campeonato|apuestas boxeo españa|apuestas boxeo español|apuestas
boxeo femenino olimpiadas|apuestas boxeo hoy|apuestas boxeo online|apuestas brasil colombia|apuestas brasil peru|apuestas brasil uruguay|apuestas brasil vs colombia|apuestas brasil vs peru|apuestas caballos|apuestas caballos colocado|apuestas caballos españa|apuestas
caballos hipodromo|apuestas caballos hoy|apuestas caballos madrid|apuestas caballos online|apuestas caballos sanlucar de barrameda|apuestas caballos zarzuela|apuestas calculador|apuestas
campeon|apuestas campeon champions|apuestas campeón champions|apuestas campeon champions 2025|apuestas campeon champions league|apuestas campeon conference league|apuestas campeon copa america|apuestas campeon copa del rey|apuestas campeon de champions|apuestas campeon de la champions|apuestas campeon de liga|apuestas campeon del mundo|apuestas campeon eurocopa|apuestas campeón eurocopa|apuestas campeon europa league|apuestas
campeon f1|apuestas campeon f1 2025|apuestas campeon formula
1|apuestas campeon libertadores|apuestas campeon liga|apuestas campeon liga bbva|apuestas campeon liga española|apuestas campeon liga
santander|apuestas campeon motogp 2025|apuestas campeon mundial|apuestas campeón mundial|apuestas campeon mundial baloncesto|apuestas campeon nba|apuestas campeón nba|apuestas
campeon premier|apuestas campeon premier league|apuestas campeon roland garros|apuestas
campeonato f1|apuestas campeonatos de futbol|apuestas carrera de caballos|apuestas carrera
de caballos hoy|apuestas carrera de caballos nocturnas|apuestas carrera
de galgos fin de semana|apuestas carrera de galgos hoy|apuestas
carrera de galgos nocturnas|apuestas carreras caballos|apuestas carreras caballos sanlucar|apuestas carreras de caballos|apuestas carreras de
caballos en directo|apuestas carreras de caballos en vivo|apuestas carreras de caballos españa|apuestas carreras de
caballos hoy|apuestas carreras de caballos nacionales|apuestas carreras de caballos nocturnas|apuestas carreras
de caballos online|apuestas carreras de caballos sanlucar|apuestas carreras de caballos sanlúcar|apuestas carreras de galgos|apuestas carreras de galgos en vivo|apuestas carreras de galgos nocturnas|apuestas carreras de galgos pre partido|apuestas casino|apuestas casino barcelona|apuestas casino
futbol|apuestas casino gran madrid|apuestas casino gratis|apuestas casino madrid|apuestas casino online|apuestas casino online argentina|apuestas casinos|apuestas casinos online|apuestas
celta|apuestas celta barcelona|apuestas celta betis|apuestas celta eibar|apuestas celta espanyol|apuestas celta granada|apuestas celta madrid|apuestas celta manchester|apuestas celta real madrid|apuestas champion league|apuestas champions foro|apuestas champions hoy|apuestas champions league|apuestas champions league – pronósticos|apuestas champions league 2025|apuestas champions league hoy|apuestas champions league pronosticos|apuestas champions league pronósticos|apuestas champions pronosticos|apuestas chelsea barcelona|apuestas chelsea
betis|apuestas chile|apuestas chile peru|apuestas chile venezuela|apuestas
chile vs colombia|apuestas chile vs uruguay|apuestas ciclismo|apuestas
ciclismo en vivo|apuestas ciclismo femenino|apuestas ciclismo tour francia|apuestas ciclismo vuelta|apuestas
ciclismo vuelta a españa|apuestas ciclismo vuelta españa|apuestas city madrid|apuestas city real madrid|apuestas clasico|apuestas clasico español|apuestas clasico real madrid barcelona|apuestas clasificacion mundial|apuestas colombia|apuestas colombia argentina|apuestas
colombia brasil|apuestas colombia paraguay|apuestas colombia uruguay|apuestas
colombia vs argentina|apuestas colombia vs brasil|apuestas combinadas|apuestas combinadas como funcionan|apuestas combinadas de futbol|apuestas
combinadas de fútbol|apuestas combinadas foro|apuestas combinadas
futbol|apuestas combinadas hoy|apuestas combinadas mismo partido|apuestas combinadas mundial|apuestas
combinadas nba|apuestas combinadas para esta semana|apuestas
combinadas para hoy|apuestas combinadas para mañana|apuestas combinadas pronosticos|apuestas combinadas recomendadas|apuestas
combinadas seguras|apuestas combinadas seguras para hoy|apuestas
combinadas seguras para mañana|apuestas como
ganar|apuestas comparador|apuestas con bono de bienvenida|apuestas con dinero ficticio|apuestas
con dinero real|apuestas con dinero virtual|apuestas con handicap|apuestas con handicap asiatico|apuestas con handicap baloncesto|apuestas con mas
probabilidades de ganar|apuestas con paypal|apuestas con tarjeta de credito|apuestas con tarjeta de debito|apuestas
consejos|apuestas copa|apuestas copa africa|apuestas copa america|apuestas copa américa|apuestas
copa argentina|apuestas copa brasil|apuestas copa davis|apuestas copa de
europa|apuestas copa del mundo|apuestas copa
del rey|apuestas copa del rey baloncesto|apuestas copa del rey final|apuestas copa del rey futbol|apuestas copa
del rey ganador|apuestas copa del rey hoy|apuestas copa del rey pronosticos|apuestas copa del rey pronósticos|apuestas
copa europa|apuestas copa italia|apuestas copa libertadores|apuestas copa mundial de hockey|apuestas copa rey|apuestas
copa sudamericana|apuestas corners|apuestas corners hoy|apuestas croacia
argentina|apuestas cuartos eurocopa|apuestas cuotas|apuestas
cuotas altas|apuestas cuotas bajas|apuestas de 1 euro|apuestas de baloncesto|apuestas de
baloncesto hoy|apuestas de baloncesto nba|apuestas
de baloncesto para hoy|apuestas de beisbol|apuestas de beisbol para hoy|apuestas
de blackjack en linea|apuestas de boxeo|apuestas de boxeo canelo|apuestas de boxeo en las vegas|apuestas de boxeo hoy|apuestas de boxeo online|apuestas de caballo|apuestas
de caballos|apuestas de caballos como funciona|apuestas
de caballos como se juega|apuestas de caballos en colombia|apuestas de caballos en españa|apuestas de caballos
en linea|apuestas de caballos españa|apuestas de caballos ganador
y colocado|apuestas de caballos internacionales|apuestas
de caballos juegos|apuestas de caballos online|apuestas
de caballos online en venezuela|apuestas de caballos
por internet|apuestas de caballos pronosticos|apuestas de caballos pronósticos|apuestas de
carrera de caballos|apuestas de carreras de caballos|apuestas de carreras de caballos online|apuestas de casino|apuestas de casino online|apuestas de casino por internet|apuestas de champions league|apuestas de ciclismo|apuestas de colombia|apuestas de copa
america|apuestas de corners|apuestas de deportes en linea|apuestas
de deportes online|apuestas de dinero|apuestas de esports|apuestas de eurocopa|apuestas de
europa league|apuestas de f1|apuestas de formula 1|apuestas de futbol|apuestas de fútbol|apuestas de futbol app|apuestas de futbol argentina|apuestas
de futbol colombia|apuestas de futbol en colombia|apuestas de futbol en directo|apuestas de
futbol en linea|apuestas de futbol en vivo|apuestas de futbol español|apuestas de futbol gratis|apuestas de futbol hoy|apuestas de futbol mundial|apuestas de futbol online|apuestas
de fútbol online|apuestas de futbol para hoy|apuestas de fútbol para hoy|apuestas de
futbol para hoy seguras|apuestas de futbol para mañana|apuestas de futbol peru|apuestas de futbol pronosticos|apuestas de fútbol pronósticos|apuestas de futbol seguras|apuestas de futbol seguras para hoy|apuestas
de futbol sin dinero|apuestas de galgos|apuestas de galgos como ganar|apuestas
de galgos en directo|apuestas de galgos online|apuestas
de galgos trucos|apuestas de golf|apuestas de hockey|apuestas
de hockey sobre hielo|apuestas de hoy|apuestas de hoy seguras|apuestas de juego|apuestas de juegos|apuestas de juegos deportivos|apuestas de juegos online|apuestas
de la champions league|apuestas de la copa américa|apuestas de la eurocopa|apuestas de la europa league|apuestas de la liga|apuestas de la liga bbva|apuestas de
la liga española|apuestas de la nba|apuestas de la nfl|apuestas de la ufc|apuestas de mlb|apuestas
de nba|apuestas de nba para hoy|apuestas de partidos|apuestas de partidos
de futbol|apuestas de peleas ufc|apuestas de perros en vivo|apuestas de perros virtuales|apuestas de peru|apuestas
de sistema|apuestas de sistema como funciona|apuestas de sistema explicacion|apuestas de sistema explicación|apuestas de tenis|apuestas de tenis de mesa|apuestas de
tenis en directo|apuestas de tenis hoy|apuestas de tenis para hoy|apuestas de tenis pronosticos|apuestas de tenis seguras|apuestas de todo tipo|apuestas de ufc|apuestas de
ufc hoy|apuestas del boxeo|apuestas del clasico|apuestas del
clasico real madrid barca|apuestas del dia|apuestas del día|apuestas del dia de hoy|apuestas del dia deportivas|apuestas
del dia futbol|apuestas del mundial|apuestas del partido de hoy|apuestas del real madrid|apuestas
del rey|apuestas del sistema|apuestas deporte|apuestas deportes|apuestas deportiva|apuestas deportivas|apuestas
deportivas 1 euro|apuestas deportivas 10 euros gratis|apuestas deportivas
100 seguras|apuestas deportivas 1×2|apuestas deportivas android|apuestas deportivas
app|apuestas deportivas apps|apuestas deportivas argentina|apuestas deportivas argentina futbol|apuestas deportivas argentina legal|apuestas deportivas atletico de madrid|apuestas deportivas baloncesto|apuestas deportivas barca madrid|apuestas
deportivas barcelona|apuestas deportivas beisbol|apuestas deportivas bono|apuestas deportivas bono bienvenida|apuestas deportivas bono de
bienvenida|apuestas deportivas bono sin deposito|apuestas
deportivas bonos de bienvenida|apuestas deportivas boxeo|apuestas
deportivas caballos|apuestas deportivas calculadora|apuestas deportivas campeon liga|apuestas deportivas casino|apuestas deportivas casino barcelona|apuestas deportivas
casino online|apuestas deportivas cerca
de mi|apuestas deportivas champions league|apuestas deportivas chile|apuestas deportivas ciclismo|apuestas deportivas
colombia|apuestas deportivas com|apuestas deportivas com
foro|apuestas deportivas com pronosticos|apuestas deportivas combinadas|apuestas
deportivas combinadas para hoy|apuestas deportivas como se juega|apuestas deportivas
comparador|apuestas deportivas con bono gratis|apuestas deportivas con bonos gratis|apuestas deportivas con dinero ficticio|apuestas deportivas con paypal|apuestas deportivas
con puntos virtuales|apuestas deportivas consejos|apuestas deportivas
consejos para ganar|apuestas deportivas copa america|apuestas deportivas copa del rey|apuestas deportivas copa libertadores|apuestas deportivas copa
mundial|apuestas deportivas corners|apuestas deportivas
cual es la mejor|apuestas deportivas cuotas altas|apuestas deportivas de baloncesto|apuestas deportivas de boxeo|apuestas deportivas de colombia|apuestas deportivas de futbol|apuestas deportivas de nba|apuestas deportivas de nhl|apuestas deportivas de peru|apuestas deportivas de tenis|apuestas deportivas
del dia|apuestas deportivas dinero ficticio|apuestas deportivas directo|apuestas
deportivas doble oportunidad|apuestas deportivas en argentina|apuestas deportivas en chile|apuestas deportivas
en colombia|apuestas deportivas en directo|apuestas deportivas en españa|apuestas deportivas en español|apuestas
deportivas en linea|apuestas deportivas en línea|apuestas deportivas en peru|apuestas deportivas en perú|apuestas deportivas
en sevilla|apuestas deportivas en uruguay|apuestas deportivas en vivo|apuestas deportivas es|apuestas deportivas es pronosticos|apuestas deportivas españa|apuestas deportivas españolas|apuestas deportivas
esports|apuestas deportivas estadisticas|apuestas
deportivas estrategias|apuestas deportivas
estrategias seguras|apuestas deportivas eurocopa|apuestas deportivas europa league|apuestas deportivas f1|apuestas deportivas faciles
de ganar|apuestas deportivas formula 1|apuestas deportivas
foro|apuestas deportivas foro futbol|apuestas deportivas foro tenis|apuestas deportivas francia argentina|apuestas deportivas
futbol|apuestas deportivas fútbol|apuestas deportivas futbol argentino|apuestas deportivas futbol colombia|apuestas deportivas futbol español|apuestas deportivas gana|apuestas deportivas ganadas|apuestas deportivas ganar dinero
seguro|apuestas deportivas gane|apuestas deportivas golf|apuestas deportivas gratis|apuestas deportivas gratis con premios|apuestas deportivas gratis hoy|apuestas deportivas gratis sin deposito|apuestas deportivas handicap|apuestas deportivas handicap asiatico|apuestas deportivas hoy|apuestas deportivas impuestos|apuestas deportivas interior argentina|apuestas deportivas juegos olimpicos|apuestas deportivas la
liga|apuestas deportivas legales|apuestas deportivas legales en colombia|apuestas deportivas libres de impuestos|apuestas deportivas licencia españa|apuestas deportivas liga
española|apuestas deportivas listado|apuestas deportivas
listado clasico|apuestas deportivas madrid|apuestas deportivas mas seguras|apuestas
deportivas mejor pagadas|apuestas deportivas mejores|apuestas deportivas mejores app|apuestas deportivas mejores casas|apuestas deportivas mejores
cuotas|apuestas deportivas mejores paginas|apuestas deportivas mexico|apuestas deportivas méxico|apuestas deportivas mlb|apuestas deportivas mlb hoy|apuestas deportivas
multiples|apuestas deportivas mundial|apuestas deportivas
murcia|apuestas deportivas nba|apuestas deportivas nba
hoy|apuestas deportivas nfl|apuestas deportivas nhl|apuestas deportivas nuevas|apuestas deportivas ofertas|apuestas deportivas online|apuestas deportivas online argentina|apuestas deportivas online
chile|apuestas deportivas online colombia|apuestas deportivas
online en colombia|apuestas deportivas online
españa|apuestas deportivas online mexico|apuestas deportivas online paypal|apuestas deportivas online peru|apuestas deportivas online por internet|apuestas deportivas pago paypal|apuestas deportivas para ganar
dinero|apuestas deportivas para hoy|apuestas deportivas para hoy pronosticos|apuestas deportivas partido suspendido|apuestas deportivas partidos de hoy|apuestas deportivas paypal|apuestas deportivas peru|apuestas deportivas perú|apuestas deportivas peru vs ecuador|apuestas
deportivas predicciones|apuestas deportivas promociones|apuestas
deportivas pronostico|apuestas deportivas pronóstico|apuestas deportivas pronostico hoy|apuestas deportivas pronosticos|apuestas deportivas pronósticos|apuestas deportivas pronosticos expertos|apuestas deportivas pronosticos gratis|apuestas deportivas pronosticos nba|apuestas deportivas
pronosticos tenis|apuestas deportivas que aceptan paypal|apuestas deportivas real madrid|apuestas deportivas regalo
bienvenida|apuestas deportivas resultado exacto|apuestas deportivas resultados|apuestas deportivas rugby|apuestas deportivas seguras|apuestas deportivas
seguras foro|apuestas deportivas seguras hoy|apuestas deportivas seguras para hoy|apuestas deportivas seguras telegram|apuestas deportivas sevilla|apuestas deportivas simulador eurocopa|apuestas
deportivas sin deposito|apuestas deportivas sin deposito inicial|apuestas deportivas sin dinero|apuestas deportivas sin dinero real|apuestas deportivas sin registro|apuestas
deportivas stake|apuestas deportivas stake 10|apuestas deportivas telegram españa|apuestas deportivas tenis|apuestas deportivas tenis de mesa|apuestas deportivas tenis foro|apuestas deportivas tenis hoy|apuestas deportivas tips|apuestas deportivas tipster|apuestas deportivas ufc|apuestas deportivas uruguay|apuestas deportivas
valencia|apuestas deportivas valencia barcelona|apuestas deportivas venezuela|apuestas deportivas virtuales|apuestas deportivas y casino|apuestas deportivas y casino online|apuestas deportivas.com|apuestas deportivas.com foro|apuestas deportivas.es|apuestas deportivos pronosticos|apuestas deposito minimo 1 euro|apuestas descenso a segunda|apuestas descenso a segunda b|apuestas descenso la liga|apuestas descenso
primera division|apuestas descenso segunda|apuestas dia|apuestas diarias seguras|apuestas dinero|apuestas dinero ficticio|apuestas dinero real|apuestas dinero virtual|apuestas directas|apuestas directo|apuestas directo futbol|apuestas division de honor juvenil|apuestas dnb|apuestas doble oportunidad|apuestas doble resultado|apuestas dobles|apuestas dobles y triples|apuestas dortmund barcelona|apuestas draft nba|apuestas
draft nfl|apuestas ecuador vs argentina|apuestas ecuador vs venezuela|apuestas egipto uruguay|apuestas el clasico|apuestas elecciones venezuela|apuestas empate|apuestas en baloncesto|apuestas en barcelona|apuestas
en beisbol|apuestas en boxeo|apuestas en caballos|apuestas en carreras de caballos|apuestas en casino|apuestas en casino online|apuestas en casinos|apuestas en casinos online|apuestas en chile|apuestas en ciclismo|apuestas en colombia|apuestas en colombia de futbol|apuestas en directo|apuestas en directo futbol|apuestas en directo pronosticos|apuestas en el futbol|apuestas en el tenis|apuestas en españa|apuestas en esports|apuestas en eventos deportivos virtuales|apuestas en golf|apuestas en juegos|apuestas en la champions league|apuestas en la eurocopa|apuestas en la liga|apuestas en la nba|apuestas en la nfl|apuestas en las
vegas mlb|apuestas en las vegas nfl|apuestas en linea|apuestas
en línea|apuestas en linea argentina|apuestas en linea boxeo|apuestas en linea chile|apuestas en linea colombia|apuestas en línea de fútbol|apuestas en linea deportivas|apuestas en linea españa|apuestas en linea estados
unidos|apuestas en linea futbol|apuestas en linea mexico|apuestas en línea méxico|apuestas en linea mundial|apuestas en linea peru|apuestas en linea usa|apuestas en los esports|apuestas en madrid|apuestas en méxico|apuestas en mexico online|apuestas en nba|apuestas en partidos
de futbol|apuestas en partidos de futbol en vivo|apuestas en partidos
de tenis en directo|apuestas en perú|apuestas en sevilla|apuestas en sistema|apuestas en stake|apuestas en tenis|apuestas en tenis de mesa|apuestas en valencia|apuestas
en vivo|apuestas en vivo argentina|apuestas en vivo casino|apuestas en vivo futbol|apuestas en vivo
fútbol|apuestas en vivo nba|apuestas en vivo peru|apuestas
en vivo tenis|apuestas en vivo ufc|apuestas equipo
mbappe|apuestas equipos de futbol|apuestas españa|apuestas españa alemania|apuestas españa alemania eurocopa|apuestas españa croacia|apuestas españa eurocopa|apuestas españa francia|apuestas españa francia eurocopa|apuestas españa gana el mundial|apuestas españa gana
eurocopa|apuestas españa gana mundial|apuestas españa georgia|apuestas españa holanda|apuestas españa inglaterra|apuestas españa
inglaterra cuotas|apuestas españa inglaterra eurocopa|apuestas españa italia|apuestas españa mundial|apuestas españa
paises bajos|apuestas español|apuestas español oviedo|apuestas espanyol barcelona|apuestas
espanyol betis|apuestas espanyol villarreal|apuestas esport|apuestas esports|apuestas esports colombia|apuestas esports españa|apuestas esports fifa|apuestas esports
gratis|apuestas esports lol|apuestas esports peru|apuestas esports valorant|apuestas estadisticas|apuestas estrategias|apuestas euro|apuestas euro copa|apuestas eurocopa|apuestas eurocopa campeon|apuestas eurocopa españa|apuestas
eurocopa favoritos|apuestas eurocopa femenina|apuestas
eurocopa final|apuestas eurocopa ganador|apuestas eurocopa
hoy|apuestas eurocopa sub 21|apuestas euroliga baloncesto|apuestas euroliga pronosticos|apuestas europa league|apuestas europa league hoy|apuestas europa league pronosticos|apuestas europa
league pronósticos|apuestas euros|apuestas f1 abu dhabi|apuestas f1 bahrein|apuestas f1
canada|apuestas f1 china|apuestas f1 cuotas|apuestas f1 hoy|apuestas f1 las vegas|apuestas f1 miami|apuestas f1 monaco|apuestas faciles
de ganar|apuestas fáciles de ganar|apuestas faciles para ganar|apuestas
favoritas|apuestas favorito champions|apuestas favoritos champions|apuestas favoritos eurocopa|apuestas favoritos mundial|apuestas fc barcelona|apuestas final champions cuotas|apuestas final champions league|apuestas final champions peru|apuestas final copa|apuestas final copa america|apuestas final copa de europa|apuestas final copa del rey|apuestas final copa europa|apuestas final copa libertadores|apuestas final copa rey|apuestas final de
copa|apuestas final de copa del rey|apuestas final del mundial|apuestas final euro|apuestas final eurocopa|apuestas final europa league|apuestas final libertadores|apuestas final
mundial|apuestas final nba|apuestas final rugby|apuestas final
uefa europa league|apuestas final.mundial|apuestas finales de
conferencia nfl|apuestas finales nba|apuestas fiorentina betis|apuestas formula|apuestas formula 1|apuestas fórmula 1|apuestas fórmula 1 pronósticos|apuestas formula uno|apuestas foro|apuestas foro
nba|apuestas francia argentina|apuestas francia españa|apuestas
futbol|apuestas fútbol|apuestas futbol americano|apuestas futbol americano nfl|apuestas futbol argentina|apuestas futbol
argentino|apuestas futbol champions league|apuestas
futbol chile|apuestas futbol colombia|apuestas futbol consejos|apuestas futbol en directo|apuestas fútbol en directo|apuestas futbol en vivo|apuestas fútbol en vivo|apuestas futbol españa|apuestas futbol español|apuestas fútbol español|apuestas
futbol eurocopa|apuestas futbol femenino|apuestas futbol foro|apuestas futbol gratis|apuestas futbol hoy|apuestas fútbol
hoy|apuestas futbol juegos olimpicos|apuestas futbol
mexico|apuestas futbol mundial|apuestas futbol online|apuestas futbol para hoy|apuestas futbol peru|apuestas futbol pronosticos|apuestas futbol
sala|apuestas futbol telegram|apuestas futbol virtual|apuestas galgos|apuestas
galgos en directo|apuestas galgos hoy|apuestas galgos online|apuestas galgos pronosticos|apuestas galgos trucos|apuestas gana|apuestas
gana colombia|apuestas gana resultados|apuestas ganadas|apuestas ganadas hoy|apuestas ganador
champions league|apuestas ganador copa america|apuestas ganador copa del rey|apuestas ganador copa
del rey baloncesto|apuestas ganador copa libertadores|apuestas ganador
de la eurocopa|apuestas ganador de la liga|apuestas ganador del mundial|apuestas ganador eurocopa|apuestas ganador europa league|apuestas ganador f1|apuestas ganador la liga|apuestas
ganador liga española|apuestas ganador mundial|apuestas ganador mundial baloncesto|apuestas ganador mundial f1|apuestas
ganador nba|apuestas ganadores eurocopa|apuestas ganadores mundial|apuestas ganar champions|apuestas ganar eurocopa|apuestas
ganar liga|apuestas ganar mundial|apuestas ganar nba|apuestas getafe valencia|apuestas ghana uruguay|apuestas girona|apuestas girona athletic|apuestas
girona betis|apuestas girona campeon de liga|apuestas
girona campeon liga|apuestas girona gana la liga|apuestas girona real madrid|apuestas girona real sociedad|apuestas goleador eurocopa|apuestas
goleadores eurocopa|apuestas goles asiaticos|apuestas golf|apuestas golf
masters|apuestas golf pga|apuestas granada barcelona|apuestas grand slam de tenis|apuestas
gratis|apuestas gratis casino|apuestas gratis con premios|apuestas
gratis hoy|apuestas gratis para hoy|apuestas gratis por registro|apuestas gratis puntos|apuestas gratis regalos|apuestas gratis
sin deposito|apuestas gratis sin depósito|apuestas gratis sin ingreso|apuestas gratis sports|apuestas gratis y ganar premios|apuestas grupo a eurocopa|apuestas grupos
eurocopa|apuestas handicap|apuestas handicap asiatico|apuestas handicap baloncesto|apuestas handicap
como funciona|apuestas handicap nba|apuestas handicap
nfl|apuestas hipicas online|apuestas hípicas online|apuestas hipicas
venezuela|apuestas hockey|apuestas hockey hielo|apuestas hockey patines|apuestas hockey sobre hielo|apuestas holanda
argentina|apuestas holanda vs argentina|apuestas hoy|apuestas hoy champions|apuestas hoy futbol|apuestas hoy nba|apuestas hoy pronosticos|apuestas hoy seguras|apuestas impuestos|apuestas inglaterra paises bajos|apuestas inter barca|apuestas inter
barcelona|apuestas juego|apuestas juegos|apuestas juegos en linea|apuestas juegos olimpicos|apuestas juegos olímpicos|apuestas juegos olimpicos baloncesto|apuestas juegos online|apuestas
juegos virtuales|apuestas jugador sevilla|apuestas jugadores nba|apuestas kings league americas|apuestas la liga|apuestas la liga española|apuestas la liga hoy|apuestas la liga santander|apuestas las vegas mlb|apuestas las vegas nba|apuestas las vegas nfl|apuestas league of
legends mundial|apuestas legal|apuestas legales|apuestas legales en colombia|apuestas legales
en españa|apuestas legales en estados unidos|apuestas legales españa|apuestas leganes betis|apuestas libertadores|apuestas licencia|apuestas liga
1 peru|apuestas liga argentina|apuestas liga bbva pronosticos|apuestas
liga de campeones|apuestas liga de campeones de baloncesto|apuestas liga de campeones de hockey|apuestas liga españa|apuestas liga española|apuestas liga santander pronosticos|apuestas ligas
de futbol|apuestas linea|apuestas linea de gol|apuestas liverpool barcelona|apuestas liverpool real
madrid|apuestas lol mundial|apuestas madrid|apuestas madrid arsenal|apuestas madrid atletico|apuestas madrid atletico champions|apuestas madrid barca|apuestas madrid
barça|apuestas madrid barca hoy|apuestas madrid barca supercopa|apuestas madrid barcelona|apuestas madrid barsa|apuestas madrid bayern|apuestas madrid betis|apuestas madrid borussia|apuestas madrid campeon champions|apuestas madrid celta|apuestas madrid city|apuestas
madrid dortmund|apuestas madrid gana la liga|apuestas madrid gana liga|apuestas madrid hoy|apuestas madrid liverpool|apuestas madrid osasuna|apuestas madrid sevilla|apuestas
madrid valencia|apuestas madrid vs arsenal|apuestas madrid vs barcelona|apuestas mallorca osasuna|apuestas mallorca real sociedad|apuestas manchester athletic|apuestas manchester city real madrid|apuestas mas faciles de ganar|apuestas mas seguras|apuestas mas seguras para hoy|apuestas
masters de golf|apuestas masters de tenis|apuestas maximo goleador eurocopa|apuestas maximo goleador
mundial|apuestas mejor jugador eurocopa|apuestas mejores casinos online|apuestas mexico|apuestas méxico|apuestas
mexico polonia|apuestas méxico polonia|apuestas mlb|apuestas mlb hoy|apuestas mlb las
vegas|apuestas mlb para hoy|apuestas mlb pronosticos|apuestas mlb usa|apuestas mma ufc|apuestas momios|apuestas multiples|apuestas múltiples|apuestas multiples como funcionan|apuestas multiples el gordo|apuestas
multiples futbol|apuestas mundial|apuestas mundial 2026|apuestas mundial baloncesto|apuestas mundial
balonmano|apuestas mundial brasil|apuestas mundial campeon|apuestas
mundial ciclismo|apuestas mundial clubes|apuestas mundial de baloncesto|apuestas mundial de ciclismo|apuestas mundial de clubes|apuestas mundial de futbol|apuestas mundial de fútbol|apuestas mundial de rugby|apuestas mundial f1|apuestas
mundial favoritos|apuestas mundial femenino|apuestas mundial
formula 1|apuestas mundial futbol|apuestas mundial
ganador|apuestas mundial lol|apuestas mundial moto gp|apuestas mundial motogp|apuestas mundial rugby|apuestas mundial sub
17|apuestas mundiales|apuestas mundialistas|apuestas mvp eurocopa|apuestas mvp nba|apuestas mvp nfl|apuestas nacionales
de colombia|apuestas nba|apuestas nba all star|apuestas
nba campeon|apuestas nba consejos|apuestas nba esta noche|apuestas nba finals|apuestas nba gratis|apuestas nba hoy|apuestas nba hoy jugadores|apuestas nba hoy pronosticos|apuestas nba para hoy|apuestas nba playoffs|apuestas nba pronosticos|apuestas nba pronósticos|apuestas nba pronosticos hoy|apuestas nba tipster|apuestas nfl|apuestas
nfl hoy|apuestas nfl las vegas|apuestas nfl playoffs|apuestas nfl
pronosticos|apuestas nfl pronósticos|apuestas
nfl semana 4|apuestas nfl super bowl|apuestas nhl|apuestas nhl pronosticos|apuestas
octavos eurocopa|apuestas ofertas|apuestas online|apuestas
online argentina|apuestas online argentina legal|apuestas
online bono|apuestas online bono bienvenida|apuestas online boxeo|apuestas online caballos|apuestas online carreras de caballos|apuestas online
casino|apuestas online champions league|apuestas online chile|apuestas online
ciclismo|apuestas online colombia|apuestas online comparativa|apuestas online con paypal|apuestas online de caballos|apuestas online
deportivas|apuestas online en argentina|apuestas online en peru|apuestas online espana|apuestas online españa|apuestas online esports|apuestas online
foro|apuestas online futbol|apuestas online futbol españa|apuestas
online golf|apuestas online gratis|apuestas online gratis
sin deposito|apuestas online juegos|apuestas online mexico|apuestas online mma|apuestas online movil|apuestas
online nba|apuestas online net|apuestas online nuevas|apuestas online opiniones|apuestas
online paypal|apuestas online peru|apuestas online seguras|apuestas online sin dinero|apuestas online
sin registro|apuestas online tenis|apuestas online ufc|apuestas online uruguay|apuestas online venezuela|apuestas open britanico golf|apuestas osasuna athletic|apuestas osasuna barcelona|apuestas
osasuna real madrid|apuestas osasuna sevilla|apuestas osasuna valencia|apuestas over|apuestas over 2.5|apuestas over under|apuestas paginas|apuestas pago anticipado|apuestas paises bajos ecuador|apuestas paises bajos inglaterra|apuestas países bajos qatar|apuestas para boxeo|apuestas para champions league|apuestas para el clasico|apuestas para el dia de hoy|apuestas para el mundial|apuestas para el partido de hoy|apuestas para eurocopa|apuestas para europa league|apuestas para
futbol|apuestas para ganar|apuestas para ganar
dinero|apuestas para ganar dinero facil|apuestas para ganar en la ruleta|apuestas para ganar la champions|apuestas para ganar la eurocopa|apuestas
para ganar la europa league|apuestas para ganar la liga|apuestas para ganar siempre|apuestas para hacer|apuestas para
hoy|apuestas para hoy de futbol|apuestas para hoy europa league|apuestas para hoy futbol|apuestas para juegos|apuestas para la champions league|apuestas para
la copa del rey|apuestas para la eurocopa|apuestas para la europa league|apuestas para la final de la eurocopa|apuestas para la nba hoy|apuestas para
los partidos de hoy|apuestas para partidos de hoy|apuestas para ufc|apuestas partido|apuestas partido
aplazado|apuestas partido champions|apuestas partido colombia|apuestas partido
españa marruecos|apuestas partido mundial|apuestas partido suspendido|apuestas partidos|apuestas partidos champions league|apuestas partidos csgo|apuestas partidos de futbol|apuestas
partidos de futbol hoy|apuestas partidos de hoy|apuestas
partidos eurocopa|apuestas partidos futbol|apuestas partidos hoy|apuestas
partidos mundial|apuestas paypal|apuestas peleas de boxeo|apuestas peru|apuestas perú|apuestas peru brasil|apuestas peru chile|apuestas peru paraguay|apuestas peru
uruguay|apuestas peru vs chile|apuestas peru vs colombia|apuestas pichichi eurocopa|apuestas plataforma|apuestas playoff|apuestas playoff ascenso|apuestas playoff
ascenso a primera|apuestas playoff nba|apuestas playoff segunda|apuestas playoff segunda b|apuestas playoffs nba|apuestas playoffs nfl|apuestas polonia argentina|apuestas por argentina|apuestas por internet mexico|apuestas por internet para ganar dinero|apuestas por paypal|apuestas por ronda boxeo|apuestas por
sistema|apuestas portugal uruguay|apuestas pre
partido|apuestas predicciones|apuestas predicciones futbol|apuestas primera division|apuestas primera division españa|apuestas promociones|apuestas pronostico|apuestas pronosticos|apuestas
pronosticos deportivos|apuestas pronosticos deportivos tenis|apuestas pronosticos futbol|apuestas pronosticos
gratis|apuestas pronosticos nba|apuestas pronosticos tenis|apuestas prorroga|apuestas psg barca|apuestas psg barcelona|apuestas
puntos por tarjetas|apuestas puntos tarjetas|apuestas que aceptan paypal|apuestas que es handicap|apuestas que puedes
hacer con tu novia|apuestas que siempre ganaras|apuestas que
significa|apuestas quien bajara a segunda|apuestas quién bajara
a segunda|apuestas quien gana el mundial|apuestas
quien gana eurocopa|apuestas quien gana la champions|apuestas quien gana la eurocopa|apuestas quien gana la liga|apuestas quien ganara el
mundial|apuestas quién ganará el mundial|apuestas quien ganara la
champions|apuestas quien ganara la eurocopa|apuestas quien ganara la liga|apuestas rayo barcelona|apuestas real madrid|apuestas real madrid arsenal|apuestas
real madrid athletic|apuestas real madrid atletico|apuestas real madrid atletico
champions|apuestas real madrid atletico de madrid|apuestas real madrid atlético de madrid|apuestas real madrid
atletico madrid|apuestas real madrid barcelona|apuestas real madrid bayern|apuestas real madrid betis|apuestas real madrid borussia|apuestas
real madrid campeon champions|apuestas real madrid celta|apuestas real madrid champions|apuestas real madrid city|apuestas
real madrid girona|apuestas real madrid hoy|apuestas
real madrid liverpool|apuestas real madrid manchester city|apuestas real madrid osasuna|apuestas real madrid real sociedad|apuestas real madrid valencia|apuestas real madrid villarreal|apuestas real madrid vs arsenal|apuestas real madrid vs
atletico|apuestas real madrid vs atlético|apuestas real madrid vs atletico madrid|apuestas real madrid vs barcelona|apuestas real madrid vs betis|apuestas real madrid vs sevilla|apuestas real madrid vs
valencia|apuestas real sociedad|apuestas real sociedad athletic|apuestas real sociedad barcelona|apuestas real sociedad betis|apuestas real
sociedad psg|apuestas real sociedad real madrid|apuestas real sociedad valencia|apuestas recomendadas hoy|apuestas regalo de bienvenida|apuestas registro|apuestas resultado exacto|apuestas resultados|apuestas resultados eurocopa|apuestas retirada tenis|apuestas roma barcelona|apuestas roma sevilla|apuestas rugby|apuestas rugby mundial|apuestas rugby world cup|apuestas ruleta
seguras|apuestas segunda|apuestas segunda b|apuestas segunda division|apuestas segunda división|apuestas segunda division b|apuestas segunda division españa|apuestas seguras|apuestas seguras baloncesto|apuestas seguras calculadora|apuestas
seguras en la ruleta|apuestas seguras eurocopa|apuestas seguras foro|apuestas seguras futbol|apuestas seguras futbol
hoy|apuestas seguras gratis|apuestas seguras hoy|apuestas
seguras hoy futbol|apuestas seguras nba|apuestas seguras nba hoy|apuestas seguras para
este fin de semana|apuestas seguras para ganar dinero|apuestas seguras para hoy|apuestas
seguras para hoy fútbol|apuestas seguras para hoy
pronósticos|apuestas seguras para mañana|apuestas seguras ruleta|apuestas seguras telegram|apuestas seguras tenis|apuestas semifinales eurocopa|apuestas senegal paises bajos|apuestas sevilla|apuestas sevilla athletic|apuestas sevilla atletico de
madrid|apuestas sevilla barcelona|apuestas sevilla betis|apuestas sevilla campeon liga|apuestas sevilla celta|apuestas sevilla gana la liga|apuestas sevilla girona|apuestas
sevilla inter|apuestas sevilla jugador|apuestas sevilla
juventus|apuestas sevilla leganes|apuestas sevilla madrid|apuestas sevilla manchester united|apuestas sevilla
osasuna|apuestas sevilla real madrid|apuestas sevilla
real sociedad|apuestas sevilla roma|apuestas sevilla
valencia|apuestas significa|apuestas simples ejemplos|apuestas simples o combinadas|apuestas sin deposito|apuestas sin deposito inicial|apuestas sin deposito minimo|apuestas sin dinero|apuestas sin dinero
real|apuestas sin empate|apuestas sin empate que significa|apuestas sin ingreso minimo|apuestas sin registro|apuestas
sistema|apuestas sistema calculadora|apuestas sistema como funciona|apuestas sistema trixie|apuestas sociedad|apuestas sorteo copa del rey|apuestas stake|apuestas stake 10|apuestas
stake 10 hoy|apuestas super bowl favorito|apuestas super rugby|apuestas supercopa españa|apuestas superliga argentina|apuestas tarjeta roja|apuestas tarjetas|apuestas tarjetas amarillas|apuestas tenis|apuestas tenis atp|apuestas tenis consejos|apuestas tenis copa davis|apuestas tenis de mesa|apuestas tenis de mesa pronosticos|apuestas tenis
en vivo|apuestas tenis femenino|apuestas tenis hoy|apuestas
tenis itf|apuestas tenis pronosticos|apuestas
tenis pronósticos|apuestas tenis retirada|apuestas tenis roland garros|apuestas tenis seguras|apuestas tenis wimbledon|apuestas tenis wta|apuestas tercera division|apuestas tercera division españa|apuestas tipos|apuestas tips|apuestas tipster|apuestas tipster para hoy|apuestas topuria holloway cuotas|apuestas torneos de golf|apuestas torneos de tenis|apuestas trucos|apuestas uefa champions league|apuestas uefa europa league|apuestas ufc|apuestas ufc chile|apuestas ufc como
funciona|apuestas ufc hoy|apuestas ufc ilia topuria|apuestas ufc online|apuestas ufc pronósticos|apuestas ufc telegram|apuestas ufc topuria|apuestas under over|apuestas
unionistas villarreal|apuestas uruguay|apuestas uruguay
colombia|apuestas uruguay corea|apuestas uruguay vs colombia|apuestas us open golf|apuestas us open tenis|apuestas valencia|apuestas valencia
barcelona|apuestas valencia betis|apuestas valencia madrid|apuestas valencia real madrid|apuestas valladolid barcelona|apuestas valladolid valencia|apuestas valor app|apuestas valor en directo|apuestas valor galgos|apuestas venezuela|apuestas venezuela argentina|apuestas venezuela bolivia|apuestas venezuela ecuador|apuestas villarreal|apuestas
villarreal athletic|apuestas villarreal barcelona|apuestas villarreal bayern|apuestas villarreal betis|apuestas villarreal liverpool|apuestas villarreal manchester|apuestas villarreal manchester united|apuestas villarreal vs real madrid|apuestas virtuales|apuestas virtuales colombia|apuestas virtuales futbol|apuestas virtuales sin dinero|apuestas vivo|apuestas vuelta a españa|apuestas vuelta españa|apuestas william hill partidos
de hoy|apuestas y casino|apuestas y casinos|apuestas y juegos de azar|apuestas y pronosticos|apuestas y pronosticos de futbol|apuestas y pronosticos
deportivos|apuestas y resultados|apuestas-deportivas|apuestas-deportivas.es pronosticos|arbitro nba apuestas|argentina apuestas|argentina colombia apuestas|argentina croacia apuestas|argentina francia apuestas|argentina mexico apuestas|argentina
peru apuestas|argentina uruguay apuestas|argentina vs bolivia apuestas|argentina
vs chile apuestas|argentina vs colombia apuestas|argentina vs francia apuestas|argentina vs.
colombia apuestas|asi se gana en las apuestas deportivas|asiatico apuestas|asiatico en apuestas|asiaticos apuestas|athletic barcelona apuestas|athletic manchester united apuestas|athletic osasuna apuestas|athletic
real madrid apuestas|atletico barcelona apuestas|atletico de madrid apuestas|atlético de madrid apuestas|atletico de madrid real madrid apuestas|atletico de madrid
vs barcelona apuestas|atletico madrid real madrid apuestas|atletico madrid vs real madrid apuestas|atletico real
madrid apuestas|atletico vs real madrid apuestas|avisador de cuotas apuestas|bajada de cuotas apuestas|baloncesto apuestas|barbastro barcelona
apuestas|barca apuestas|barca bayern apuestas|barca inter
apuestas|barca madrid apuestas|barça madrid apuestas|barca vs
atletico apuestas|barca vs madrid apuestas|barca vs real madrid apuestas|barcelona – real madrid apuestas|barcelona apuestas|barcelona atletico apuestas|barcelona atletico
de madrid apuestas|barcelona atletico madrid apuestas|barcelona betis apuestas|barcelona casa de apuestas|barcelona inter apuestas|barcelona psg apuestas|barcelona real madrid apuestas|barcelona real sociedad
apuestas|barcelona sevilla apuestas|barcelona valencia apuestas|barcelona vs athletic bilbao apuestas|barcelona vs atlético madrid apuestas|barcelona vs betis apuestas|barcelona
vs celta de vigo apuestas|barcelona vs espanyol apuestas|barcelona
vs girona apuestas|barcelona vs madrid apuestas|barcelona vs real madrid apuestas|barcelona vs real sociedad apuestas|barcelona vs sevilla apuestas|barcelona vs
villarreal apuestas|base de datos cuotas apuestas deportivas|bayern real madrid apuestas|beisbol apuestas|best america apuestas|bet apuestas chile|bet apuestas en vivo|betis – chelsea apuestas|betis apuestas|betis barcelona
apuestas|betis chelsea apuestas|betis madrid apuestas|betis sevilla apuestas|betsson tu sitio de apuestas online|blog apuestas
baloncesto|blog apuestas ciclismo|blog apuestas nba|blog apuestas tenis|blog de
apuestas de tenis|bono apuestas|bono apuestas deportivas|bono apuestas deportivas sin deposito|bono apuestas
gratis|bono apuestas gratis sin deposito|bono apuestas sin deposito|bono bienvenida apuestas|bono
bienvenida apuestas deportivas|bono bienvenida apuestas españa|bono bienvenida apuestas sin deposito|bono bienvenida apuestas sin depósito|bono
bienvenida casa apuestas|bono bienvenida casa de apuestas|bono
bienvenida marca apuestas|bono casa apuestas|bono casa
de apuestas|bono casa de apuestas sin ingreso|bono casas
de apuestas|bono de apuestas|bono de apuestas
gratis sin deposito|bono de bienvenida apuestas|bono de bienvenida
apuestas deportivas|bono de bienvenida casa de apuestas|bono de bienvenida casas de apuestas|bono de
casas de apuestas|bono de registro apuestas|bono de registro apuestas
deportivas|bono de registro casa de apuestas|bono
gratis apuestas|bono marca apuestas|bono por registro apuestas|bono por registro apuestas
deportivas|bono por registro casa de apuestas|bono
registro apuestas|bono sin deposito apuestas|bono sin depósito
apuestas|bono sin deposito apuestas deportivas|bono
sin depósito apuestas deportivas|bono sin deposito casa
de apuestas|bono sin deposito marca apuestas|bono sin ingreso
apuestas|bono sin ingreso apuestas deportivas|bonos apuestas|bonos apuestas colombia|bonos
apuestas deportivas|bonos apuestas deportivas sin deposito|bonos apuestas gratis|bonos apuestas sin deposito|bonos apuestas
sin depósito|bonos bienvenida apuestas|bonos bienvenida casas apuestas|bonos bienvenida casas de apuestas|bonos casa de apuestas|bonos casas apuestas|bonos casas
de apuestas|bonos casas de apuestas colombia|bonos casas
de apuestas deportivas|bonos casas de apuestas españa|bonos casas
de apuestas nuevas|bonos casas de apuestas sin deposito|bonos casas de
apuestas sin depósito|bonos de apuestas|bonos de apuestas deportivas|bonos de apuestas gratis|bonos de apuestas sin deposito|bonos de bienvenida apuestas|bonos de
bienvenida apuestas deportivas|bonos de bienvenida casa de apuestas|bonos
de bienvenida casas de apuestas|bonos de bienvenida de casas de apuestas|bonos de bienvenida en casas de apuestas|bonos de casas de apuestas|bonos
de casas de apuestas sin deposito|bonos en casa de apuestas|bonos en casas de apuestas sin deposito|bonos gratis apuestas|bonos gratis apuestas
deportivas|bonos gratis casas de apuestas|bonos gratis
sin deposito apuestas|bonos paginas de apuestas|bonos
registro casas de apuestas|bonos sin deposito apuestas|bonos sin depósito
apuestas|bonos sin deposito apuestas deportivas|bonos sin deposito casas
de apuestas|bot de apuestas deportivas gratis|boxeo apuestas|brasil colombia apuestas|brasil
peru apuestas|brasil vs colombia apuestas|buenas apuestas para hoy|buscador cuotas apuestas|buscador de apuestas
seguras|buscador de cuotas apuestas|buscador de cuotas de apuestas|buscar apuestas seguras|caballos apuestas|calculador de apuestas|calculador
de cuotas apuestas|calculadora apuestas|calculadora apuestas combinadas|calculadora apuestas de sistema|calculadora apuestas deportivas|calculadora apuestas deportivas seguras|calculadora apuestas multiples|calculadora apuestas segura|calculadora apuestas
seguras|calculadora apuestas sistema|calculadora apuestas yankee|calculadora arbitraje apuestas|calculadora cubrir apuestas|calculadora cuotas apuestas|calculadora de apuestas|calculadora de
apuestas combinadas|calculadora de apuestas de futbol|calculadora de apuestas de sistema|calculadora de apuestas deportivas|calculadora de apuestas multiples|calculadora de apuestas seguras|calculadora
de apuestas sistema|calculadora de apuestas surebets|calculadora de arbitraje apuestas|calculadora de cuotas apuestas|calculadora de cuotas de apuestas|calculadora para apuestas deportivas|calculadora poisson apuestas|calculadora poisson apuestas deportivas|calculadora poisson para apuestas|calculadora scalping apuestas deportivas|calculadora sistema apuestas|calculadora stake apuestas|calculadora trading apuestas|calcular apuestas|calcular apuestas deportivas|calcular apuestas futbol|calcular apuestas sistema|calcular cuotas
apuestas|calcular cuotas apuestas combinadas|calcular cuotas apuestas deportivas|calcular cuotas de
apuestas|calcular ganancias apuestas deportivas|calcular momios apuestas|calcular probabilidad cuota apuestas|calcular stake apuestas|calcular unidades
apuestas|calcular yield apuestas|calculo de apuestas|calculo
de apuestas deportivas|cambio de cuotas apuestas|campeon champions apuestas|campeon eurocopa apuestas|campeon liga apuestas|campeon nba apuestas|canales de apuestas gratis|carrera de caballos apuestas|carrera
de caballos apuestas juego|carrera de caballos con apuestas|carrera
de galgos apuestas|carreras de caballos apuestas|carreras de
caballos apuestas online|carreras de caballos con apuestas|carreras de caballos juegos de apuestas|carreras de galgos apuestas|carreras de galgos apuestas online|carreras de galgos apuestas trucos|carreras galgos apuestas|casa apuestas argentina|casa apuestas atletico de madrid|casa apuestas barcelona|casa apuestas betis|casa apuestas bono bienvenida|casa
apuestas bono gratis|casa apuestas bono sin deposito|casa apuestas
cerca de mi|casa apuestas chile|casa apuestas colombia|casa apuestas con mejores cuotas|casa apuestas deportivas|casa apuestas españa|casa apuestas
española|casa apuestas eurocopa|casa apuestas futbol|casa apuestas mejores cuotas|casa apuestas
mundial|casa apuestas nueva|casa apuestas nuevas|casa
apuestas online|casa apuestas peru|casa apuestas valencia|casa de apuestas|casa de apuestas
10 euros gratis|casa de apuestas argentina|casa de apuestas
atletico de madrid|casa de apuestas baloncesto|casa de apuestas barcelona|casa de apuestas beisbol|casa de apuestas betis|casa
de apuestas bono|casa de apuestas bono bienvenida|casa de apuestas bono
de bienvenida|casa de apuestas bono gratis|casa de apuestas bono por registro|casa de
apuestas bono sin deposito|casa de apuestas boxeo|casa de apuestas
caballos|casa de apuestas carreras de caballos|casa de apuestas cerca
de mi|casa de apuestas cerca de mí|casa de apuestas champions league|casa de apuestas chile|casa de apuestas
ciclismo|casa de apuestas colombia|casa de apuestas con bono
de bienvenida|casa de apuestas con bono sin deposito|casa de apuestas con cuotas mas altas|casa de apuestas
con esports|casa de apuestas con las mejores cuotas|casa de apuestas con licencia en españa|casa de apuestas con mejores cuotas|casa de
apuestas con pago anticipado|casa de apuestas con paypal|casa de apuestas copa america|casa de apuestas de caballos|casa de apuestas de
colombia|casa de apuestas de españa|casa de apuestas de futbol|casa de apuestas de fútbol|casa
de apuestas de futbol peru|casa de apuestas de peru|casa de apuestas del madrid|casa
de apuestas del real madrid|casa de apuestas deportivas|casa de apuestas
deportivas cerca de mi|casa de apuestas deportivas en argentina|casa
de apuestas deportivas en chile|casa de apuestas deportivas en colombia|casa de apuestas deportivas en españa|casa de apuestas deportivas en madrid|casa
de apuestas deportivas españa|casa de apuestas deportivas españolas|casa de apuestas deportivas madrid|casa de apuestas deportivas mexico|casa
de apuestas deportivas online|casa de apuestas deportivas peru|casa de apuestas deposito 5 euros|casa de apuestas deposito minimo|casa de apuestas
deposito minimo 1 euro|casa de apuestas depósito mínimo
1 euro|casa de apuestas en españa|casa de apuestas en linea|casa de apuestas en madrid|casa de
apuestas en perú|casa de apuestas en vivo|casa de apuestas españa|casa de apuestas españa inglaterra|casa de apuestas española|casa
de apuestas españolas|casa de apuestas esports|casa de apuestas
eurocopa|casa de apuestas europa league|casa de apuestas
f1|casa de apuestas formula 1|casa de apuestas futbol|casa de apuestas ingreso minimo|casa de apuestas ingreso minimo 1 euro|casa de apuestas
ingreso mínimo 1 euro|casa de apuestas legales|casa de apuestas legales en colombia|casa de apuestas legales en españa|casa
de apuestas libertadores|casa de apuestas liga española|casa de apuestas madrid|casa de apuestas mas segura|casa de apuestas mejores|casa de apuestas méxico|casa de
apuestas minimo 5 euros|casa de apuestas mlb|casa de apuestas mundial|casa de apuestas
nba|casa de apuestas nfl|casa de apuestas nueva|casa de apuestas nuevas|casa de
apuestas oficial del real madrid|casa de apuestas oficial real madrid|casa de apuestas online|casa de apuestas online
argentina|casa de apuestas online chile|casa de apuestas online españa|casa de apuestas
online mexico|casa de apuestas online paraguay|casa de apuestas online peru|casa de apuestas online usa|casa de apuestas online venezuela|casa de apuestas pago anticipado|casa de apuestas para boxeo|casa de apuestas para ufc|casa de apuestas
peru|casa de apuestas perú|casa de apuestas peru online|casa de apuestas por
paypal|casa de apuestas promociones|casa de apuestas que regalan dinero|casa de apuestas real madrid|casa
de apuestas regalo de bienvenida|casa de apuestas sevilla|casa de apuestas sin dinero|casa de apuestas sin ingreso minimo|casa de apuestas sin licencia en españa|casa de apuestas
sin minimo de ingreso|casa de apuestas stake|casa de
apuestas tenis|casa de apuestas ufc|casa de apuestas valencia|casa de apuestas venezuela|casa
de apuestas virtuales|casa de apuestas vive la suerte|casa oficial
de apuestas del real madrid|casas apuestas
asiaticas|casas apuestas bono sin deposito|casas
apuestas bonos sin deposito|casas apuestas caballos|casas
apuestas chile|casas apuestas ciclismo|casas apuestas con licencia|casas
apuestas con licencia en españa|casas apuestas deportivas|casas apuestas deportivas colombia|casas apuestas deportivas españa|casas apuestas deportivas españolas|casas apuestas deportivas nuevas|casas apuestas españa|casas apuestas españolas|casas
apuestas esports|casas apuestas eurocopa|casas apuestas
golf|casas apuestas ingreso minimo 5 euros|casas apuestas legales|casas apuestas legales españa|casas apuestas
licencia|casas apuestas licencia españa|casas
apuestas mexico|casas apuestas mundial|casas apuestas nba|casas apuestas nuevas|casas apuestas
nuevas españa|casas apuestas ofertas|casas apuestas online|casas apuestas paypal|casas apuestas peru|casas apuestas sin licencia|casas apuestas
tenis|casas asiaticas apuestas|casas de apuestas|casas de apuestas 5 euros|casas de apuestas app|casas de apuestas argentinas|casas de apuestas asiaticas|casas de apuestas baloncesto|casas de
apuestas barcelona|casas de apuestas bono bienvenida|casas de apuestas bono de bienvenida|casas de apuestas bono por registro|casas de apuestas bono sin deposito|casas
de apuestas bono sin ingreso|casas de apuestas bonos|casas de apuestas bonos de bienvenida|casas de apuestas bonos gratis|casas de apuestas bonos sin deposito|casas de
apuestas boxeo|casas de apuestas caballos|casas de apuestas carreras de caballos|casas de apuestas casino|casas de
apuestas casino online|casas de apuestas cerca de mi|casas de apuestas champions league|casas de apuestas chile|casas de apuestas ciclismo|casas de apuestas colombia|casas de apuestas com|casas de apuestas con app|casas
de apuestas con apuestas gratis|casas de apuestas con bono|casas de apuestas con bono de bienvenida|casas
de apuestas con bono de registro|casas de apuestas con bono por registro|casas de apuestas con bono sin deposito|casas de apuestas con bonos|casas de
apuestas con bonos gratis|casas de apuestas con bonos sin deposito|casas de apuestas
con deposito minimo|casas de apuestas con esports|casas de
apuestas con handicap asiatico|casas de apuestas con licencia|casas de
apuestas con licencia en españa|casas de apuestas con licencia españa|casas de
apuestas con licencia española|casas de apuestas con mejores cuotas|casas de apuestas con pago anticipado|casas de apuestas con paypal|casas de apuestas con paypal
en perú|casas de apuestas con promociones|casas de apuestas con ruleta en vivo|casas de apuestas copa
del rey|casas de apuestas de caballos|casas de apuestas de españa|casas de apuestas de futbol|casas de apuestas de fútbol|casas de apuestas de peru|casas de apuestas deportivas|casas de apuestas deportivas asiaticas|casas de apuestas deportivas
colombia|casas de apuestas deportivas comparativa|casas de apuestas deportivas con paypal|casas de apuestas deportivas en chile|casas de apuestas deportivas en españa|casas de apuestas deportivas en linea|casas de apuestas deportivas en madrid|casas de apuestas deportivas en mexico|casas de apuestas deportivas en peru|casas de apuestas deportivas
en sevilla|casas de apuestas deportivas en valencia|casas de
apuestas deportivas españa|casas de apuestas deportivas españolas|casas
de apuestas deportivas legales|casas de apuestas deportivas madrid|casas de apuestas deportivas mexico|casas de apuestas deportivas nuevas|casas de apuestas
deportivas online|casas de apuestas deportivas peru|casas de
apuestas deportivas perú|casas de apuestas deposito minimo 1 euro|casas
de apuestas depósito mínimo 1 euro|casas de apuestas dinero gratis|casas de apuestas en argentina|casas de apuestas en barcelona|casas
de apuestas en chile|casas de apuestas en colombia|casas de apuestas en españa|casas de apuestas en españa online|casas de apuestas en linea|casas de
apuestas en madrid|casas de apuestas en méxico|casas de apuestas en peru|casas de apuestas en perú|casas de apuestas en sevilla|casas de apuestas en uruguay|casas de apuestas
en valencia|casas de apuestas en venezuela|casas de apuestas equipos de
futbol|casas de apuestas españa|casas de apuestas españa alemania|casas
de apuestas españa inglaterra|casas de apuestas españa licencia|casas de apuestas españa nuevas|casas de apuestas españa online|casas de apuestas española|casas de apuestas españolas|casas de apuestas españolas con licencia|casas de apuestas españolas online|casas de apuestas
esports|casas de apuestas eurocopa|casas de apuestas eurocopa
2024|casas de apuestas europa league|casas de
apuestas f1|casas de apuestas fisicas en barcelona|casas de apuestas fisicas en españa|casas de apuestas formula 1|casas de apuestas fuera de españa|casas de apuestas futbol|casas
de apuestas fútbol|casas de apuestas futbol españa|casas de apuestas ganador eurocopa|casas de apuestas gratis|casas de apuestas ingreso minimo|casas de apuestas ingreso minimo 1 euro|casas
de apuestas ingreso minimo 5 euros|casas de apuestas inter barcelona|casas de apuestas legales|casas de apuestas legales en colombia|casas de apuestas legales en españa|casas de
apuestas legales en mexico|casas de apuestas legales
españa|casas de apuestas legales mx|casas de apuestas licencia|casas de
apuestas licencia españa|casas de apuestas lista|casas de apuestas madrid|casas de
apuestas mas seguras|casas de apuestas mejores bonos|casas de apuestas mejores cuotas|casas de apuestas mexico|casas de apuestas méxico|casas
de apuestas minimo 5 euros|casas de apuestas mlb|casas
de apuestas mundial|casas de apuestas mundial baloncesto|casas de apuestas mundiales|casas de apuestas nba|casas
de apuestas no reguladas en españa|casas de apuestas nueva ley|casas de apuestas nuevas|casas de
apuestas nuevas en colombia|casas de apuestas nuevas en españa|casas de apuestas nuevas españa|casas de apuestas ofertas|casas
de apuestas online|casas de apuestas online argentina|casas de apuestas online colombia|casas de apuestas online deportivas|casas
de apuestas online ecuador|casas de apuestas online en argentina|casas de apuestas online en chile|casas de apuestas online en colombia|casas
de apuestas online en españa|casas de apuestas online en mexico|casas de apuestas online españa|casas de apuestas online mas fiables|casas de apuestas
online mexico|casas de apuestas online nuevas|casas de apuestas online
peru|casas de apuestas online usa|casas de apuestas online venezuela|casas de apuestas pago paypal|casas de apuestas para ufc|casas de apuestas paypal|casas de apuestas peru bono sin deposito|casas de apuestas presenciales
en españa|casas de
Your comment is awaiting moderation.
(10 euros gratis apuestas|10 mejores casas de apuestas|10 trucos
para ganar apuestas|15 euros gratis marca apuestas|1×2 apuestas|1×2 apuestas deportivas|1×2
apuestas que significa|1×2 en apuestas|1×2 en apuestas que significa|1×2
que significa en apuestas|5 euros gratis
apuestas|9 apuestas que siempre ganaras|a partir de cuanto se declara apuestas|actividades de juegos de azar y
apuestas|ad apuestas deportivas|aleksandre topuria ufc apuestas|algoritmo para
ganar apuestas deportivas|america apuestas|análisis nba apuestas|aplicacion android apuestas
deportivas|aplicacion apuestas deportivas|aplicacion apuestas deportivas android|aplicación de
apuestas online|aplicacion para hacer apuestas|aplicacion para hacer apuestas
de futbol|aplicación para hacer apuestas de fútbol|aplicaciones apuestas deportivas android|aplicaciones apuestas deportivas
gratis|aplicaciones de apuestas android|aplicaciones de apuestas de fútbol|aplicaciones de apuestas deportivas|aplicaciones de apuestas deportivas peru|aplicaciones de apuestas
deportivas perú|aplicaciones de apuestas en colombia|aplicaciones de
apuestas gratis|aplicaciones de apuestas online|aplicaciones de apuestas seguras|aplicaciones
de apuestas sin dinero|aplicaciones para hacer
apuestas|apostar seguro apuestas deportivas|app android apuestas
deportivas|app apuestas|app apuestas android|app apuestas de futbol|app
apuestas deportivas|app apuestas deportivas android|app apuestas deportivas
argentina|app apuestas deportivas colombia|app apuestas deportivas ecuador|app apuestas deportivas españa|app apuestas deportivas gratis|app apuestas entre amigos|app apuestas
futbol|app apuestas gratis|app apuestas sin dinero|app casa de apuestas|app casas de apuestas|app control
apuestas|app de apuestas|app de apuestas android|app de apuestas
casino|app de apuestas colombia|app de apuestas con bono de bienvenida|app de apuestas
de futbol|app de apuestas deportivas|app de apuestas deportivas android|app de apuestas deportivas argentina|app de apuestas deportivas colombia|app de apuestas deportivas en españa|app de apuestas
deportivas peru|app de apuestas deportivas perú|app de apuestas deportivas sin dinero|app de apuestas ecuador|app de apuestas en colombia|app de apuestas en españa|app de apuestas en venezuela|app de apuestas futbol|app de apuestas gratis|app de apuestas online|app de apuestas para android|app de apuestas para ganar dinero|app de apuestas
peru|app de apuestas reales|app de casas de
apuestas|app marca apuestas android|app moviles de apuestas|app para
apuestas|app para apuestas de futbol|app para apuestas deportivas|app para apuestas deportivas en español|app para ganar apuestas deportivas|app
para hacer apuestas|app para hacer apuestas deportivas|app para
hacer apuestas entre amigos|app para llevar control de apuestas|app pronosticos apuestas deportivas|app
versus apuestas|apps apuestas mundial|apps de apuestas|apps de
apuestas con bono de bienvenida|apps de apuestas de futbol|apps
de apuestas deportivas peru|apps de apuestas mexico|apps para apuestas|aprender a hacer apuestas deportivas|aprender hacer apuestas deportivas|apuesta del dia
apuestas deportivas|apuestas 10 euros gratis|apuestas 100 seguras|apuestas 1×2|apuestas 1X2|apuestas 2 division|apuestas 3
division|apuestas a caballos|apuestas a carreras de caballos|apuestas a colombia|apuestas a corners|apuestas a ganar|apuestas a jugadores nba|apuestas a la baja|apuestas a la nfl|apuestas
al barcelona|apuestas al dia|apuestas al empate|apuestas al mundial|apuestas al tenis wta|apuestas alaves barcelona|apuestas alcaraz
hoy|apuestas alemania españa|apuestas alonso campeon del
mundo|apuestas altas y bajas|apuestas altas y bajas nfl|apuestas ambos equipos marcan|apuestas america|apuestas
android|apuestas anillo nba|apuestas antes del mundial|apuestas anticipadas|apuestas anticipadas nba|apuestas apps|apuestas arabia
argentina|apuestas argentina|apuestas argentina campeon del mundo|apuestas argentina canada|apuestas argentina colombia|apuestas argentina croacia|apuestas argentina españa|apuestas argentina francia|apuestas argentina francia cuanto paga|apuestas argentina francia mundial|apuestas argentina gana el mundial|apuestas argentina gana mundial|apuestas argentina holanda|apuestas
argentina mexico|apuestas argentina méxico|apuestas argentina mundial|apuestas argentina online|apuestas argentina paises bajos|apuestas argentina polonia|apuestas argentina uruguay|apuestas argentina vs australia|apuestas argentina vs colombia|apuestas argentina vs francia|apuestas argentina vs peru|apuestas argentinas|apuestas arsenal real madrid|apuestas ascenso a
primera division|apuestas ascenso a segunda|apuestas asiaticas|apuestas asiatico|apuestas athletic|apuestas athletic atletico|apuestas athletic
barça|apuestas athletic barcelona|apuestas athletic betis|apuestas athletic
manchester|apuestas athletic manchester united|apuestas athletic osasuna|apuestas athletic real|apuestas athletic real madrid|apuestas athletic real sociedad|apuestas athletic real
sociedad final|apuestas athletic roma|apuestas athletic
sevilla|apuestas athletic valencia|apuestas atletico|apuestas atletico barcelona|apuestas atletico barsa|apuestas atletico campeon champions|apuestas
atletico campeon de liga|apuestas atlético copenhague|apuestas atletico de madrid|apuestas atlético de madrid|apuestas
atletico de madrid barcelona|apuestas atletico
de madrid gana la liga|apuestas atletico de madrid real madrid|apuestas atlético de madrid real madrid|apuestas
atletico de madrid vs barcelona|apuestas atletico madrid|apuestas
atletico madrid real madrid|apuestas atletico madrid vs barcelona|apuestas atletico
real madrid|apuestas atletico real madrid champions|apuestas atletismo|apuestas bajas|apuestas baloncesto|apuestas baloncesto acb|apuestas baloncesto handicap|apuestas baloncesto hoy|apuestas baloncesto juegos olimpicos|apuestas baloncesto nba|apuestas baloncesto pronostico|apuestas baloncesto pronósticos|apuestas baloncesto prorroga|apuestas barca|apuestas barca athletic|apuestas barca atletico|apuestas
barca bayern|apuestas barca bayern munich|apuestas
barca girona|apuestas barca hoy|apuestas barça hoy|apuestas barca inter|apuestas barca juventus|apuestas barca madrid|apuestas barça madrid|apuestas barca real madrid|apuestas barca vs juve|apuestas barca vs madrid|apuestas barca vs psg|apuestas barcelona|apuestas barcelona alaves|apuestas barcelona athletic|apuestas
barcelona atletico|apuestas barcelona atletico
de madrid|apuestas barcelona atlético de madrid|apuestas barcelona atletico madrid|apuestas barcelona bayern|apuestas barcelona betis|apuestas
barcelona campeon de liga|apuestas barcelona celta|apuestas barcelona espanyol|apuestas barcelona gana la champions|apuestas barcelona girona|apuestas barcelona granada|apuestas barcelona hoy|apuestas barcelona inter|apuestas
barcelona madrid|apuestas barcelona osasuna|apuestas barcelona psg|apuestas barcelona real madrid|apuestas barcelona
real sociedad|apuestas barcelona sevilla|apuestas barcelona valencia|apuestas barcelona villarreal|apuestas barcelona vs atletico madrid|apuestas barcelona vs
madrid|apuestas barcelona vs real madrid|apuestas barsa madrid|apuestas basket hoy|apuestas bayern barcelona|apuestas
bayern vs barcelona|apuestas beisbol|apuestas béisbol|apuestas beisbol mlb|apuestas beisbol pronosticos|apuestas beisbol venezolano|apuestas betis|apuestas betis – chelsea|apuestas betis
barcelona|apuestas betis chelsea|apuestas betis fiorentina|apuestas
betis girona|apuestas betis madrid|apuestas betis mallorca|apuestas betis real madrid|apuestas betis real
sociedad|apuestas betis sevilla|apuestas betis valencia|apuestas betis valladolid|apuestas betis vs valencia|apuestas betplay hoy colombia|apuestas betsson peru|apuestas bienvenida|apuestas billar online|apuestas bolivia vs colombia|apuestas bono|apuestas
bono bienvenida|apuestas bono de bienvenida|apuestas bono de bienvenida
sin deposito|apuestas bono gratis|apuestas bono sin deposito|apuestas bonos sin deposito|apuestas borussia
real madrid|apuestas boxeo|apuestas boxeo de campeonato|apuestas boxeo
españa|apuestas boxeo español|apuestas boxeo femenino olimpiadas|apuestas
boxeo hoy|apuestas boxeo online|apuestas brasil colombia|apuestas
brasil peru|apuestas brasil uruguay|apuestas brasil vs colombia|apuestas brasil vs
peru|apuestas caballos|apuestas caballos colocado|apuestas caballos españa|apuestas caballos hipodromo|apuestas caballos hoy|apuestas caballos madrid|apuestas caballos online|apuestas caballos sanlucar de barrameda|apuestas
caballos zarzuela|apuestas calculador|apuestas campeon|apuestas
campeon champions|apuestas campeón champions|apuestas campeon champions 2025|apuestas campeon champions league|apuestas campeon conference league|apuestas campeon copa america|apuestas campeon copa del
rey|apuestas campeon de champions|apuestas campeon de la champions|apuestas campeon de liga|apuestas campeon del mundo|apuestas campeon eurocopa|apuestas campeón eurocopa|apuestas campeon europa league|apuestas campeon f1|apuestas campeon f1 2025|apuestas campeon formula
1|apuestas campeon libertadores|apuestas campeon liga|apuestas campeon liga bbva|apuestas campeon liga española|apuestas
campeon liga santander|apuestas campeon motogp 2025|apuestas campeon mundial|apuestas campeón mundial|apuestas campeon mundial baloncesto|apuestas
campeon nba|apuestas campeón nba|apuestas campeon premier|apuestas campeon premier league|apuestas
campeon roland garros|apuestas campeonato f1|apuestas campeonatos de futbol|apuestas carrera
de caballos|apuestas carrera de caballos hoy|apuestas carrera
de caballos nocturnas|apuestas carrera de galgos fin de semana|apuestas carrera
de galgos hoy|apuestas carrera de galgos nocturnas|apuestas carreras caballos|apuestas
carreras caballos sanlucar|apuestas carreras de caballos|apuestas carreras de caballos en directo|apuestas carreras de caballos en vivo|apuestas carreras de caballos españa|apuestas carreras de caballos hoy|apuestas carreras de
caballos nacionales|apuestas carreras de caballos nocturnas|apuestas
carreras de caballos online|apuestas carreras de caballos sanlucar|apuestas carreras de caballos sanlúcar|apuestas carreras de galgos|apuestas carreras de galgos en vivo|apuestas carreras de galgos nocturnas|apuestas carreras de galgos pre partido|apuestas
casino|apuestas casino barcelona|apuestas casino
futbol|apuestas casino gran madrid|apuestas casino gratis|apuestas casino madrid|apuestas casino online|apuestas casino online argentina|apuestas casinos|apuestas casinos online|apuestas celta|apuestas
celta barcelona|apuestas celta betis|apuestas celta
eibar|apuestas celta espanyol|apuestas celta granada|apuestas celta madrid|apuestas
celta manchester|apuestas celta real madrid|apuestas champion league|apuestas champions foro|apuestas
champions hoy|apuestas champions league|apuestas champions league – pronósticos|apuestas champions
league 2025|apuestas champions league hoy|apuestas
champions league pronosticos|apuestas champions league pronósticos|apuestas champions pronosticos|apuestas
chelsea barcelona|apuestas chelsea betis|apuestas chile|apuestas chile peru|apuestas chile
venezuela|apuestas chile vs colombia|apuestas chile vs uruguay|apuestas ciclismo|apuestas ciclismo en vivo|apuestas
ciclismo femenino|apuestas ciclismo tour francia|apuestas ciclismo vuelta|apuestas
ciclismo vuelta a españa|apuestas ciclismo vuelta españa|apuestas
city madrid|apuestas city real madrid|apuestas clasico|apuestas
clasico español|apuestas clasico real madrid barcelona|apuestas clasificacion mundial|apuestas colombia|apuestas colombia argentina|apuestas colombia brasil|apuestas colombia paraguay|apuestas colombia
uruguay|apuestas colombia vs argentina|apuestas colombia vs
brasil|apuestas combinadas|apuestas combinadas como funcionan|apuestas combinadas de futbol|apuestas combinadas de fútbol|apuestas combinadas foro|apuestas combinadas futbol|apuestas combinadas
hoy|apuestas combinadas mismo partido|apuestas combinadas mundial|apuestas combinadas nba|apuestas combinadas
para esta semana|apuestas combinadas para hoy|apuestas combinadas para
mañana|apuestas combinadas pronosticos|apuestas combinadas recomendadas|apuestas combinadas seguras|apuestas combinadas seguras
para hoy|apuestas combinadas seguras para mañana|apuestas como ganar|apuestas comparador|apuestas con bono de bienvenida|apuestas con dinero ficticio|apuestas con dinero real|apuestas con dinero
virtual|apuestas con handicap|apuestas con handicap asiatico|apuestas con handicap baloncesto|apuestas con mas
probabilidades de ganar|apuestas con paypal|apuestas con tarjeta
de credito|apuestas con tarjeta de debito|apuestas consejos|apuestas copa|apuestas copa africa|apuestas copa america|apuestas copa américa|apuestas copa argentina|apuestas copa brasil|apuestas copa davis|apuestas copa
de europa|apuestas copa del mundo|apuestas copa del rey|apuestas copa del rey baloncesto|apuestas copa del rey
final|apuestas copa del rey futbol|apuestas copa del rey ganador|apuestas copa
del rey hoy|apuestas copa del rey pronosticos|apuestas copa del rey pronósticos|apuestas copa europa|apuestas copa italia|apuestas copa
libertadores|apuestas copa mundial de hockey|apuestas copa rey|apuestas copa sudamericana|apuestas
corners|apuestas corners hoy|apuestas croacia argentina|apuestas cuartos eurocopa|apuestas cuotas|apuestas cuotas altas|apuestas cuotas bajas|apuestas de 1 euro|apuestas de baloncesto|apuestas de baloncesto hoy|apuestas de baloncesto nba|apuestas de
baloncesto para hoy|apuestas de beisbol|apuestas de beisbol para hoy|apuestas
de blackjack en linea|apuestas de boxeo|apuestas de boxeo canelo|apuestas de boxeo en las vegas|apuestas de boxeo hoy|apuestas de boxeo online|apuestas de caballo|apuestas de caballos|apuestas de caballos como funciona|apuestas de
caballos como se juega|apuestas de caballos en colombia|apuestas de caballos en españa|apuestas de caballos en linea|apuestas de caballos españa|apuestas de caballos ganador y colocado|apuestas de
caballos internacionales|apuestas de caballos juegos|apuestas de caballos online|apuestas de caballos
online en venezuela|apuestas de caballos por internet|apuestas de caballos
pronosticos|apuestas de caballos pronósticos|apuestas de carrera de caballos|apuestas de carreras de caballos|apuestas de carreras de caballos
online|apuestas de casino|apuestas de casino online|apuestas
de casino por internet|apuestas de champions league|apuestas de ciclismo|apuestas de colombia|apuestas de copa america|apuestas de corners|apuestas
de deportes en linea|apuestas de deportes online|apuestas de dinero|apuestas de esports|apuestas de eurocopa|apuestas de
europa league|apuestas de f1|apuestas de formula 1|apuestas
de futbol|apuestas de fútbol|apuestas de futbol app|apuestas de futbol argentina|apuestas de futbol colombia|apuestas de futbol en colombia|apuestas de futbol en directo|apuestas de futbol en linea|apuestas de futbol en vivo|apuestas de futbol español|apuestas
de futbol gratis|apuestas de futbol hoy|apuestas de futbol mundial|apuestas de futbol online|apuestas de fútbol online|apuestas de futbol para hoy|apuestas
de fútbol para hoy|apuestas de futbol para hoy seguras|apuestas de futbol para mañana|apuestas
de futbol peru|apuestas de futbol pronosticos|apuestas de fútbol pronósticos|apuestas de futbol seguras|apuestas de
futbol seguras para hoy|apuestas de futbol sin dinero|apuestas de galgos|apuestas de galgos como ganar|apuestas de
galgos en directo|apuestas de galgos online|apuestas de galgos
trucos|apuestas de golf|apuestas de hockey|apuestas de hockey sobre hielo|apuestas de hoy|apuestas de hoy seguras|apuestas de juego|apuestas de juegos|apuestas de juegos deportivos|apuestas de juegos
online|apuestas de la champions league|apuestas de la copa américa|apuestas de la eurocopa|apuestas
de la europa league|apuestas de la liga|apuestas
de la liga bbva|apuestas de la liga española|apuestas de la nba|apuestas de la nfl|apuestas de la
ufc|apuestas de mlb|apuestas de nba|apuestas de nba para hoy|apuestas
de partidos|apuestas de partidos de futbol|apuestas de peleas
ufc|apuestas de perros en vivo|apuestas de perros virtuales|apuestas de
peru|apuestas de sistema|apuestas de sistema como funciona|apuestas
de sistema explicacion|apuestas de sistema explicación|apuestas de tenis|apuestas de
tenis de mesa|apuestas de tenis en directo|apuestas de tenis
hoy|apuestas de tenis para hoy|apuestas de tenis pronosticos|apuestas de tenis seguras|apuestas de todo tipo|apuestas de ufc|apuestas de ufc hoy|apuestas del boxeo|apuestas del clasico|apuestas del clasico real madrid barca|apuestas del dia|apuestas del día|apuestas
del dia de hoy|apuestas del dia deportivas|apuestas del
dia futbol|apuestas del mundial|apuestas del partido de
hoy|apuestas del real madrid|apuestas del rey|apuestas del sistema|apuestas deporte|apuestas deportes|apuestas deportiva|apuestas deportivas|apuestas deportivas 1 euro|apuestas deportivas 10 euros gratis|apuestas deportivas
100 seguras|apuestas deportivas 1×2|apuestas deportivas android|apuestas deportivas app|apuestas
deportivas apps|apuestas deportivas argentina|apuestas deportivas argentina futbol|apuestas deportivas argentina legal|apuestas deportivas atletico de
madrid|apuestas deportivas baloncesto|apuestas deportivas barca madrid|apuestas deportivas barcelona|apuestas deportivas beisbol|apuestas deportivas
bono|apuestas deportivas bono bienvenida|apuestas deportivas bono de bienvenida|apuestas
deportivas bono sin deposito|apuestas deportivas bonos de bienvenida|apuestas deportivas boxeo|apuestas deportivas caballos|apuestas deportivas calculadora|apuestas
deportivas campeon liga|apuestas deportivas casino|apuestas deportivas casino barcelona|apuestas deportivas casino online|apuestas deportivas cerca de mi|apuestas deportivas champions
league|apuestas deportivas chile|apuestas deportivas ciclismo|apuestas deportivas colombia|apuestas deportivas com|apuestas deportivas com foro|apuestas deportivas com pronosticos|apuestas deportivas combinadas|apuestas deportivas combinadas para hoy|apuestas deportivas como
se juega|apuestas deportivas comparador|apuestas deportivas con bono gratis|apuestas deportivas con bonos gratis|apuestas
deportivas con dinero ficticio|apuestas deportivas con paypal|apuestas deportivas con puntos virtuales|apuestas deportivas consejos|apuestas deportivas consejos
para ganar|apuestas deportivas copa america|apuestas deportivas copa del rey|apuestas deportivas copa libertadores|apuestas deportivas copa mundial|apuestas deportivas corners|apuestas deportivas cual es
la mejor|apuestas deportivas cuotas altas|apuestas deportivas de baloncesto|apuestas
deportivas de boxeo|apuestas deportivas de colombia|apuestas deportivas de futbol|apuestas deportivas de nba|apuestas deportivas de nhl|apuestas deportivas de peru|apuestas deportivas de tenis|apuestas
deportivas del dia|apuestas deportivas dinero ficticio|apuestas deportivas directo|apuestas
deportivas doble oportunidad|apuestas deportivas en argentina|apuestas deportivas en chile|apuestas deportivas en colombia|apuestas deportivas en directo|apuestas deportivas en españa|apuestas deportivas en español|apuestas deportivas en linea|apuestas deportivas en línea|apuestas deportivas en peru|apuestas deportivas en perú|apuestas deportivas
en sevilla|apuestas deportivas en uruguay|apuestas
deportivas en vivo|apuestas deportivas es|apuestas deportivas es pronosticos|apuestas deportivas españa|apuestas deportivas españolas|apuestas deportivas esports|apuestas deportivas estadisticas|apuestas deportivas estrategias|apuestas
deportivas estrategias seguras|apuestas deportivas
eurocopa|apuestas deportivas europa league|apuestas deportivas f1|apuestas deportivas faciles de ganar|apuestas deportivas
formula 1|apuestas deportivas foro|apuestas deportivas foro futbol|apuestas deportivas foro tenis|apuestas deportivas francia argentina|apuestas deportivas futbol|apuestas deportivas fútbol|apuestas deportivas futbol argentino|apuestas deportivas futbol colombia|apuestas deportivas futbol español|apuestas deportivas gana|apuestas deportivas
ganadas|apuestas deportivas ganar dinero seguro|apuestas deportivas gane|apuestas deportivas golf|apuestas deportivas gratis|apuestas
deportivas gratis con premios|apuestas deportivas gratis hoy|apuestas deportivas gratis sin deposito|apuestas deportivas handicap|apuestas deportivas handicap asiatico|apuestas deportivas hoy|apuestas deportivas impuestos|apuestas deportivas interior argentina|apuestas deportivas juegos olimpicos|apuestas deportivas
la liga|apuestas deportivas legales|apuestas deportivas legales en colombia|apuestas deportivas libres
de impuestos|apuestas deportivas licencia españa|apuestas deportivas liga española|apuestas deportivas listado|apuestas
deportivas listado clasico|apuestas deportivas madrid|apuestas deportivas mas
seguras|apuestas deportivas mejor pagadas|apuestas deportivas mejores|apuestas deportivas mejores app|apuestas
deportivas mejores casas|apuestas deportivas mejores cuotas|apuestas
deportivas mejores paginas|apuestas deportivas mexico|apuestas deportivas méxico|apuestas deportivas mlb|apuestas deportivas mlb hoy|apuestas
deportivas multiples|apuestas deportivas mundial|apuestas deportivas murcia|apuestas deportivas nba|apuestas deportivas nba hoy|apuestas
deportivas nfl|apuestas deportivas nhl|apuestas deportivas nuevas|apuestas deportivas
ofertas|apuestas deportivas online|apuestas deportivas online argentina|apuestas deportivas online chile|apuestas deportivas online colombia|apuestas deportivas online en colombia|apuestas deportivas online españa|apuestas
deportivas online mexico|apuestas deportivas online paypal|apuestas deportivas online peru|apuestas deportivas online por internet|apuestas
deportivas pago paypal|apuestas deportivas para ganar dinero|apuestas deportivas para hoy|apuestas deportivas para hoy pronosticos|apuestas deportivas partido
suspendido|apuestas deportivas partidos de hoy|apuestas deportivas paypal|apuestas deportivas peru|apuestas deportivas perú|apuestas deportivas peru vs ecuador|apuestas deportivas predicciones|apuestas deportivas promociones|apuestas deportivas pronostico|apuestas deportivas pronóstico|apuestas
deportivas pronostico hoy|apuestas deportivas pronosticos|apuestas deportivas pronósticos|apuestas deportivas
pronosticos expertos|apuestas deportivas pronosticos gratis|apuestas deportivas pronosticos nba|apuestas deportivas
pronosticos tenis|apuestas deportivas que aceptan paypal|apuestas deportivas
real madrid|apuestas deportivas regalo bienvenida|apuestas deportivas resultado exacto|apuestas deportivas resultados|apuestas deportivas
rugby|apuestas deportivas seguras|apuestas deportivas seguras foro|apuestas deportivas seguras hoy|apuestas deportivas seguras para hoy|apuestas
deportivas seguras telegram|apuestas deportivas sevilla|apuestas deportivas simulador eurocopa|apuestas deportivas sin deposito|apuestas deportivas sin deposito inicial|apuestas deportivas sin dinero|apuestas deportivas sin dinero
real|apuestas deportivas sin registro|apuestas deportivas stake|apuestas deportivas stake 10|apuestas deportivas telegram españa|apuestas deportivas
tenis|apuestas deportivas tenis de mesa|apuestas deportivas tenis foro|apuestas deportivas tenis hoy|apuestas deportivas tips|apuestas deportivas tipster|apuestas deportivas ufc|apuestas deportivas
uruguay|apuestas deportivas valencia|apuestas deportivas valencia barcelona|apuestas deportivas venezuela|apuestas
deportivas virtuales|apuestas deportivas y casino|apuestas deportivas y casino online|apuestas deportivas.com|apuestas deportivas.com foro|apuestas deportivas.es|apuestas deportivos pronosticos|apuestas deposito minimo 1 euro|apuestas descenso a segunda|apuestas
descenso a segunda b|apuestas descenso la liga|apuestas descenso primera division|apuestas descenso segunda|apuestas dia|apuestas diarias seguras|apuestas dinero|apuestas
dinero ficticio|apuestas dinero real|apuestas dinero virtual|apuestas
directas|apuestas directo|apuestas directo futbol|apuestas division de honor juvenil|apuestas dnb|apuestas doble oportunidad|apuestas doble resultado|apuestas dobles|apuestas dobles y triples|apuestas dortmund barcelona|apuestas draft nba|apuestas draft nfl|apuestas ecuador vs
argentina|apuestas ecuador vs venezuela|apuestas egipto uruguay|apuestas el clasico|apuestas elecciones venezuela|apuestas
empate|apuestas en baloncesto|apuestas en barcelona|apuestas
en beisbol|apuestas en boxeo|apuestas en caballos|apuestas
en carreras de caballos|apuestas en casino|apuestas
en casino online|apuestas en casinos|apuestas en casinos online|apuestas en chile|apuestas en ciclismo|apuestas en colombia|apuestas en colombia de futbol|apuestas en directo|apuestas
en directo futbol|apuestas en directo pronosticos|apuestas en el futbol|apuestas en el tenis|apuestas en españa|apuestas en esports|apuestas en eventos deportivos virtuales|apuestas en golf|apuestas en juegos|apuestas en la champions league|apuestas en la eurocopa|apuestas en la liga|apuestas en la nba|apuestas
en la nfl|apuestas en las vegas mlb|apuestas en las vegas nfl|apuestas en linea|apuestas en línea|apuestas en linea argentina|apuestas en linea boxeo|apuestas en linea chile|apuestas
en linea colombia|apuestas en línea de fútbol|apuestas en linea deportivas|apuestas
en linea españa|apuestas en linea estados unidos|apuestas en linea futbol|apuestas en linea mexico|apuestas en línea méxico|apuestas en linea mundial|apuestas en linea peru|apuestas en linea
usa|apuestas en los esports|apuestas en madrid|apuestas en méxico|apuestas en mexico online|apuestas en nba|apuestas en partidos
de futbol|apuestas en partidos de futbol en vivo|apuestas en partidos de tenis en directo|apuestas
en perú|apuestas en sevilla|apuestas en sistema|apuestas en stake|apuestas en tenis|apuestas en tenis de mesa|apuestas en valencia|apuestas en vivo|apuestas en vivo argentina|apuestas en vivo casino|apuestas en vivo futbol|apuestas en vivo
fútbol|apuestas en vivo nba|apuestas en vivo
peru|apuestas en vivo tenis|apuestas en vivo ufc|apuestas equipo mbappe|apuestas equipos
de futbol|apuestas españa|apuestas españa alemania|apuestas españa alemania eurocopa|apuestas españa croacia|apuestas españa eurocopa|apuestas españa francia|apuestas españa francia eurocopa|apuestas españa gana
el mundial|apuestas españa gana eurocopa|apuestas españa gana mundial|apuestas españa georgia|apuestas españa holanda|apuestas españa inglaterra|apuestas españa inglaterra
cuotas|apuestas españa inglaterra eurocopa|apuestas españa italia|apuestas españa mundial|apuestas
españa paises bajos|apuestas español|apuestas español oviedo|apuestas
espanyol barcelona|apuestas espanyol betis|apuestas espanyol villarreal|apuestas esport|apuestas esports|apuestas
esports colombia|apuestas esports españa|apuestas esports fifa|apuestas esports gratis|apuestas esports lol|apuestas esports
peru|apuestas esports valorant|apuestas estadisticas|apuestas estrategias|apuestas euro|apuestas euro
copa|apuestas eurocopa|apuestas eurocopa campeon|apuestas eurocopa españa|apuestas eurocopa
favoritos|apuestas eurocopa femenina|apuestas eurocopa final|apuestas eurocopa ganador|apuestas eurocopa hoy|apuestas eurocopa sub 21|apuestas euroliga
baloncesto|apuestas euroliga pronosticos|apuestas
europa league|apuestas europa league hoy|apuestas europa league pronosticos|apuestas europa league pronósticos|apuestas euros|apuestas f1 abu dhabi|apuestas f1 bahrein|apuestas f1 canada|apuestas f1 china|apuestas f1
cuotas|apuestas f1 hoy|apuestas f1 las vegas|apuestas f1 miami|apuestas
f1 monaco|apuestas faciles de ganar|apuestas fáciles de ganar|apuestas faciles para ganar|apuestas favoritas|apuestas favorito champions|apuestas
favoritos champions|apuestas favoritos eurocopa|apuestas favoritos mundial|apuestas fc barcelona|apuestas final champions cuotas|apuestas final champions league|apuestas final champions peru|apuestas final copa|apuestas final copa america|apuestas final copa de europa|apuestas final copa del rey|apuestas final copa europa|apuestas
final copa libertadores|apuestas final copa rey|apuestas final de copa|apuestas final de copa
del rey|apuestas final del mundial|apuestas final euro|apuestas final eurocopa|apuestas final europa league|apuestas final libertadores|apuestas
final mundial|apuestas final nba|apuestas final rugby|apuestas final uefa europa league|apuestas
final.mundial|apuestas finales de conferencia nfl|apuestas finales nba|apuestas fiorentina betis|apuestas formula|apuestas formula
1|apuestas fórmula 1|apuestas fórmula 1 pronósticos|apuestas formula uno|apuestas foro|apuestas
foro nba|apuestas francia argentina|apuestas francia españa|apuestas futbol|apuestas fútbol|apuestas futbol americano|apuestas futbol americano
nfl|apuestas futbol argentina|apuestas futbol argentino|apuestas futbol champions league|apuestas futbol chile|apuestas futbol colombia|apuestas futbol consejos|apuestas futbol en directo|apuestas fútbol en directo|apuestas futbol en vivo|apuestas fútbol
en vivo|apuestas futbol españa|apuestas futbol español|apuestas
fútbol español|apuestas futbol eurocopa|apuestas futbol femenino|apuestas futbol foro|apuestas futbol gratis|apuestas futbol hoy|apuestas fútbol hoy|apuestas futbol juegos olimpicos|apuestas futbol
mexico|apuestas futbol mundial|apuestas futbol online|apuestas
futbol para hoy|apuestas futbol peru|apuestas futbol pronosticos|apuestas futbol sala|apuestas futbol telegram|apuestas futbol
virtual|apuestas galgos|apuestas galgos en directo|apuestas galgos hoy|apuestas galgos online|apuestas galgos pronosticos|apuestas
galgos trucos|apuestas gana|apuestas gana colombia|apuestas gana resultados|apuestas ganadas|apuestas ganadas hoy|apuestas ganador champions league|apuestas ganador copa america|apuestas ganador copa del rey|apuestas ganador copa del
rey baloncesto|apuestas ganador copa libertadores|apuestas ganador de la eurocopa|apuestas ganador de la liga|apuestas ganador del mundial|apuestas ganador eurocopa|apuestas ganador europa
league|apuestas ganador f1|apuestas ganador la liga|apuestas ganador
liga española|apuestas ganador mundial|apuestas ganador mundial baloncesto|apuestas ganador mundial f1|apuestas ganador nba|apuestas ganadores eurocopa|apuestas ganadores mundial|apuestas ganar champions|apuestas ganar eurocopa|apuestas ganar liga|apuestas
ganar mundial|apuestas ganar nba|apuestas getafe valencia|apuestas ghana uruguay|apuestas girona|apuestas girona athletic|apuestas girona betis|apuestas girona campeon de liga|apuestas girona campeon liga|apuestas girona gana la liga|apuestas girona
real madrid|apuestas girona real sociedad|apuestas goleador eurocopa|apuestas goleadores eurocopa|apuestas goles asiaticos|apuestas golf|apuestas golf
masters|apuestas golf pga|apuestas granada barcelona|apuestas grand slam de tenis|apuestas gratis|apuestas
gratis casino|apuestas gratis con premios|apuestas gratis hoy|apuestas gratis para hoy|apuestas gratis por
registro|apuestas gratis puntos|apuestas gratis
regalos|apuestas gratis sin deposito|apuestas gratis sin depósito|apuestas gratis
sin ingreso|apuestas gratis sports|apuestas gratis y ganar premios|apuestas grupo a eurocopa|apuestas grupos eurocopa|apuestas handicap|apuestas handicap asiatico|apuestas handicap baloncesto|apuestas handicap como
funciona|apuestas handicap nba|apuestas handicap nfl|apuestas hipicas
online|apuestas hípicas online|apuestas hipicas venezuela|apuestas hockey|apuestas
hockey hielo|apuestas hockey patines|apuestas hockey sobre hielo|apuestas holanda argentina|apuestas holanda vs argentina|apuestas hoy|apuestas
hoy champions|apuestas hoy futbol|apuestas hoy nba|apuestas hoy pronosticos|apuestas hoy seguras|apuestas impuestos|apuestas inglaterra paises bajos|apuestas inter barca|apuestas inter barcelona|apuestas
juego|apuestas juegos|apuestas juegos en linea|apuestas juegos olimpicos|apuestas juegos olímpicos|apuestas juegos
olimpicos baloncesto|apuestas juegos online|apuestas juegos virtuales|apuestas jugador
sevilla|apuestas jugadores nba|apuestas kings league
americas|apuestas la liga|apuestas la liga española|apuestas la liga hoy|apuestas la liga santander|apuestas las vegas mlb|apuestas las vegas nba|apuestas las vegas nfl|apuestas league of legends mundial|apuestas legal|apuestas legales|apuestas legales en colombia|apuestas legales en españa|apuestas legales en estados unidos|apuestas legales españa|apuestas leganes betis|apuestas libertadores|apuestas licencia|apuestas liga 1 peru|apuestas liga argentina|apuestas
liga bbva pronosticos|apuestas liga de campeones|apuestas liga de campeones de baloncesto|apuestas liga de campeones de hockey|apuestas liga españa|apuestas liga
española|apuestas liga santander pronosticos|apuestas ligas
de futbol|apuestas linea|apuestas linea de gol|apuestas
liverpool barcelona|apuestas liverpool real madrid|apuestas lol mundial|apuestas madrid|apuestas madrid arsenal|apuestas
madrid atletico|apuestas madrid atletico champions|apuestas madrid barca|apuestas madrid barça|apuestas
madrid barca hoy|apuestas madrid barca supercopa|apuestas madrid barcelona|apuestas
madrid barsa|apuestas madrid bayern|apuestas madrid betis|apuestas madrid borussia|apuestas madrid campeon champions|apuestas
madrid celta|apuestas madrid city|apuestas madrid dortmund|apuestas
madrid gana la liga|apuestas madrid gana liga|apuestas madrid hoy|apuestas madrid liverpool|apuestas madrid osasuna|apuestas madrid
sevilla|apuestas madrid valencia|apuestas madrid
vs arsenal|apuestas madrid vs barcelona|apuestas mallorca osasuna|apuestas mallorca real sociedad|apuestas manchester athletic|apuestas manchester city real madrid|apuestas mas faciles de ganar|apuestas mas seguras|apuestas mas seguras para hoy|apuestas masters de golf|apuestas masters de tenis|apuestas maximo goleador eurocopa|apuestas maximo goleador mundial|apuestas mejor jugador eurocopa|apuestas mejores casinos online|apuestas mexico|apuestas méxico|apuestas mexico polonia|apuestas méxico polonia|apuestas mlb|apuestas mlb hoy|apuestas mlb las vegas|apuestas
mlb para hoy|apuestas mlb pronosticos|apuestas mlb usa|apuestas mma ufc|apuestas momios|apuestas multiples|apuestas múltiples|apuestas
multiples como funcionan|apuestas multiples el gordo|apuestas multiples futbol|apuestas mundial|apuestas mundial 2026|apuestas mundial baloncesto|apuestas mundial balonmano|apuestas mundial brasil|apuestas mundial
campeon|apuestas mundial ciclismo|apuestas mundial clubes|apuestas mundial de baloncesto|apuestas mundial
de ciclismo|apuestas mundial de clubes|apuestas mundial de futbol|apuestas mundial de fútbol|apuestas mundial de rugby|apuestas mundial f1|apuestas mundial favoritos|apuestas mundial femenino|apuestas mundial formula 1|apuestas mundial futbol|apuestas mundial ganador|apuestas mundial lol|apuestas mundial moto gp|apuestas
mundial motogp|apuestas mundial rugby|apuestas mundial sub
17|apuestas mundiales|apuestas mundialistas|apuestas mvp eurocopa|apuestas mvp nba|apuestas
mvp nfl|apuestas nacionales de colombia|apuestas nba|apuestas nba all
star|apuestas nba campeon|apuestas nba consejos|apuestas nba
esta noche|apuestas nba finals|apuestas nba gratis|apuestas nba hoy|apuestas nba hoy
jugadores|apuestas nba hoy pronosticos|apuestas nba para
hoy|apuestas nba playoffs|apuestas nba pronosticos|apuestas nba pronósticos|apuestas nba pronosticos hoy|apuestas nba tipster|apuestas nfl|apuestas nfl hoy|apuestas nfl las vegas|apuestas
nfl playoffs|apuestas nfl pronosticos|apuestas nfl
pronósticos|apuestas nfl semana 4|apuestas nfl super
bowl|apuestas nhl|apuestas nhl pronosticos|apuestas
octavos eurocopa|apuestas ofertas|apuestas online|apuestas online argentina|apuestas online argentina legal|apuestas online bono|apuestas online bono bienvenida|apuestas
online boxeo|apuestas online caballos|apuestas online carreras
de caballos|apuestas online casino|apuestas online champions league|apuestas online chile|apuestas online ciclismo|apuestas online colombia|apuestas
online comparativa|apuestas online con paypal|apuestas online de caballos|apuestas online deportivas|apuestas
online en argentina|apuestas online en peru|apuestas online
espana|apuestas online españa|apuestas online esports|apuestas online foro|apuestas online futbol|apuestas online futbol españa|apuestas online
golf|apuestas online gratis|apuestas online gratis sin deposito|apuestas online juegos|apuestas online mexico|apuestas online mma|apuestas online movil|apuestas online nba|apuestas online net|apuestas online
nuevas|apuestas online opiniones|apuestas online paypal|apuestas online peru|apuestas online seguras|apuestas online sin dinero|apuestas online
sin registro|apuestas online tenis|apuestas online ufc|apuestas online uruguay|apuestas online venezuela|apuestas open britanico golf|apuestas osasuna athletic|apuestas osasuna barcelona|apuestas osasuna real madrid|apuestas osasuna sevilla|apuestas osasuna valencia|apuestas over|apuestas over 2.5|apuestas over under|apuestas paginas|apuestas
pago anticipado|apuestas paises bajos ecuador|apuestas paises bajos inglaterra|apuestas países bajos qatar|apuestas para boxeo|apuestas para
champions league|apuestas para el clasico|apuestas para el dia de hoy|apuestas para el mundial|apuestas para el partido de hoy|apuestas para eurocopa|apuestas para europa league|apuestas para futbol|apuestas para ganar|apuestas para ganar dinero|apuestas para
ganar dinero facil|apuestas para ganar en la ruleta|apuestas para ganar la
champions|apuestas para ganar la eurocopa|apuestas para ganar la europa league|apuestas para ganar
la liga|apuestas para ganar siempre|apuestas
para hacer|apuestas para hoy|apuestas para hoy de
futbol|apuestas para hoy europa league|apuestas para hoy futbol|apuestas para juegos|apuestas para la champions
league|apuestas para la copa del rey|apuestas para
la eurocopa|apuestas para la europa league|apuestas para la final de la eurocopa|apuestas para la nba hoy|apuestas para los partidos de hoy|apuestas
para partidos de hoy|apuestas para ufc|apuestas partido|apuestas partido aplazado|apuestas partido champions|apuestas partido
colombia|apuestas partido españa marruecos|apuestas partido mundial|apuestas partido suspendido|apuestas
partidos|apuestas partidos champions league|apuestas partidos csgo|apuestas partidos de futbol|apuestas partidos de futbol hoy|apuestas partidos de hoy|apuestas partidos eurocopa|apuestas partidos futbol|apuestas
partidos hoy|apuestas partidos mundial|apuestas paypal|apuestas peleas de boxeo|apuestas peru|apuestas perú|apuestas peru brasil|apuestas peru chile|apuestas peru paraguay|apuestas peru
uruguay|apuestas peru vs chile|apuestas peru vs colombia|apuestas pichichi eurocopa|apuestas plataforma|apuestas playoff|apuestas playoff ascenso|apuestas playoff ascenso a primera|apuestas playoff nba|apuestas playoff
segunda|apuestas playoff segunda b|apuestas playoffs nba|apuestas playoffs nfl|apuestas polonia argentina|apuestas por argentina|apuestas por internet mexico|apuestas por
internet para ganar dinero|apuestas por paypal|apuestas por ronda boxeo|apuestas por sistema|apuestas portugal uruguay|apuestas pre partido|apuestas predicciones|apuestas predicciones futbol|apuestas primera division|apuestas primera division españa|apuestas
promociones|apuestas pronostico|apuestas pronosticos|apuestas pronosticos deportivos|apuestas pronosticos deportivos tenis|apuestas pronosticos futbol|apuestas pronosticos gratis|apuestas
pronosticos nba|apuestas pronosticos tenis|apuestas prorroga|apuestas
psg barca|apuestas psg barcelona|apuestas puntos por tarjetas|apuestas puntos tarjetas|apuestas que aceptan paypal|apuestas que
es handicap|apuestas que puedes hacer con tu novia|apuestas que siempre
ganaras|apuestas que significa|apuestas quien bajara a segunda|apuestas quién bajara a segunda|apuestas quien gana
el mundial|apuestas quien gana eurocopa|apuestas quien gana la champions|apuestas quien gana la eurocopa|apuestas quien gana la liga|apuestas quien ganara
el mundial|apuestas quién ganará el mundial|apuestas
quien ganara la champions|apuestas quien ganara la eurocopa|apuestas
quien ganara la liga|apuestas rayo barcelona|apuestas real madrid|apuestas real madrid
arsenal|apuestas real madrid athletic|apuestas real madrid atletico|apuestas real madrid atletico champions|apuestas real madrid atletico de madrid|apuestas real madrid atlético de madrid|apuestas real madrid atletico madrid|apuestas real madrid barcelona|apuestas real madrid bayern|apuestas real madrid
betis|apuestas real madrid borussia|apuestas real madrid campeon champions|apuestas
real madrid celta|apuestas real madrid champions|apuestas real madrid city|apuestas
real madrid girona|apuestas real madrid hoy|apuestas real madrid liverpool|apuestas real
madrid manchester city|apuestas real madrid osasuna|apuestas real madrid real
sociedad|apuestas real madrid valencia|apuestas real madrid villarreal|apuestas real madrid vs arsenal|apuestas real
madrid vs atletico|apuestas real madrid vs atlético|apuestas real madrid vs atletico madrid|apuestas
real madrid vs barcelona|apuestas real madrid vs betis|apuestas real madrid vs sevilla|apuestas real madrid vs valencia|apuestas
real sociedad|apuestas real sociedad athletic|apuestas real sociedad barcelona|apuestas real sociedad betis|apuestas real sociedad
psg|apuestas real sociedad real madrid|apuestas real sociedad valencia|apuestas recomendadas
hoy|apuestas regalo de bienvenida|apuestas registro|apuestas resultado
exacto|apuestas resultados|apuestas resultados eurocopa|apuestas retirada tenis|apuestas roma
barcelona|apuestas roma sevilla|apuestas rugby|apuestas rugby
mundial|apuestas rugby world cup|apuestas ruleta seguras|apuestas segunda|apuestas segunda b|apuestas segunda division|apuestas segunda
división|apuestas segunda division b|apuestas segunda division españa|apuestas seguras|apuestas seguras baloncesto|apuestas seguras calculadora|apuestas
seguras en la ruleta|apuestas seguras eurocopa|apuestas seguras foro|apuestas
seguras futbol|apuestas seguras futbol hoy|apuestas seguras gratis|apuestas
seguras hoy|apuestas seguras hoy futbol|apuestas
seguras nba|apuestas seguras nba hoy|apuestas seguras
para este fin de semana|apuestas seguras para ganar dinero|apuestas seguras para hoy|apuestas seguras para hoy fútbol|apuestas seguras
para hoy pronósticos|apuestas seguras para mañana|apuestas seguras ruleta|apuestas seguras telegram|apuestas seguras tenis|apuestas
semifinales eurocopa|apuestas senegal paises bajos|apuestas
sevilla|apuestas sevilla athletic|apuestas sevilla atletico
de madrid|apuestas sevilla barcelona|apuestas sevilla betis|apuestas sevilla campeon liga|apuestas sevilla
celta|apuestas sevilla gana la liga|apuestas sevilla girona|apuestas sevilla
inter|apuestas sevilla jugador|apuestas sevilla juventus|apuestas sevilla leganes|apuestas sevilla madrid|apuestas sevilla manchester united|apuestas sevilla osasuna|apuestas sevilla real madrid|apuestas sevilla
real sociedad|apuestas sevilla roma|apuestas sevilla valencia|apuestas significa|apuestas simples ejemplos|apuestas simples o combinadas|apuestas
sin deposito|apuestas sin deposito inicial|apuestas sin deposito minimo|apuestas sin dinero|apuestas sin dinero real|apuestas sin empate|apuestas sin empate que significa|apuestas sin ingreso minimo|apuestas sin registro|apuestas sistema|apuestas sistema calculadora|apuestas sistema como funciona|apuestas sistema trixie|apuestas sociedad|apuestas
sorteo copa del rey|apuestas stake|apuestas stake 10|apuestas stake 10 hoy|apuestas
super bowl favorito|apuestas super rugby|apuestas supercopa españa|apuestas superliga argentina|apuestas tarjeta
roja|apuestas tarjetas|apuestas tarjetas amarillas|apuestas tenis|apuestas tenis
atp|apuestas tenis consejos|apuestas tenis copa davis|apuestas tenis de
mesa|apuestas tenis de mesa pronosticos|apuestas tenis en vivo|apuestas
tenis femenino|apuestas tenis hoy|apuestas tenis itf|apuestas tenis pronosticos|apuestas tenis pronósticos|apuestas tenis retirada|apuestas tenis roland
garros|apuestas tenis seguras|apuestas tenis wimbledon|apuestas tenis wta|apuestas tercera division|apuestas tercera division españa|apuestas tipos|apuestas tips|apuestas
tipster|apuestas tipster para hoy|apuestas topuria holloway cuotas|apuestas torneos de golf|apuestas torneos de tenis|apuestas trucos|apuestas
uefa champions league|apuestas uefa europa league|apuestas ufc|apuestas ufc
chile|apuestas ufc como funciona|apuestas ufc hoy|apuestas ufc ilia topuria|apuestas ufc online|apuestas ufc pronósticos|apuestas ufc telegram|apuestas ufc topuria|apuestas under over|apuestas unionistas villarreal|apuestas uruguay|apuestas
uruguay colombia|apuestas uruguay corea|apuestas uruguay vs
colombia|apuestas us open golf|apuestas us open tenis|apuestas valencia|apuestas valencia barcelona|apuestas valencia betis|apuestas
valencia madrid|apuestas valencia real madrid|apuestas valladolid barcelona|apuestas valladolid valencia|apuestas valor app|apuestas valor
en directo|apuestas valor galgos|apuestas venezuela|apuestas venezuela argentina|apuestas venezuela bolivia|apuestas venezuela ecuador|apuestas
villarreal|apuestas villarreal athletic|apuestas villarreal barcelona|apuestas villarreal bayern|apuestas villarreal betis|apuestas villarreal liverpool|apuestas villarreal manchester|apuestas villarreal manchester united|apuestas villarreal vs real madrid|apuestas virtuales|apuestas virtuales colombia|apuestas
virtuales futbol|apuestas virtuales sin dinero|apuestas
vivo|apuestas vuelta a españa|apuestas vuelta españa|apuestas william hill partidos de hoy|apuestas y casino|apuestas y casinos|apuestas y juegos
de azar|apuestas y pronosticos|apuestas y
pronosticos de futbol|apuestas y pronosticos deportivos|apuestas y resultados|apuestas-deportivas|apuestas-deportivas.es pronosticos|arbitro nba
apuestas|argentina apuestas|argentina colombia apuestas|argentina croacia apuestas|argentina
francia apuestas|argentina mexico apuestas|argentina peru
apuestas|argentina uruguay apuestas|argentina vs bolivia apuestas|argentina vs chile apuestas|argentina vs colombia apuestas|argentina vs francia apuestas|argentina vs.
colombia apuestas|asi se gana en las apuestas deportivas|asiatico apuestas|asiatico en apuestas|asiaticos apuestas|athletic barcelona apuestas|athletic manchester united apuestas|athletic osasuna
apuestas|athletic real madrid apuestas|atletico barcelona apuestas|atletico
de madrid apuestas|atlético de madrid apuestas|atletico de madrid real madrid apuestas|atletico
de madrid vs barcelona apuestas|atletico madrid real madrid
apuestas|atletico madrid vs real madrid apuestas|atletico real madrid apuestas|atletico vs real madrid apuestas|avisador de
cuotas apuestas|bajada de cuotas apuestas|baloncesto apuestas|barbastro barcelona
apuestas|barca apuestas|barca bayern apuestas|barca inter apuestas|barca madrid apuestas|barça madrid apuestas|barca vs atletico apuestas|barca vs madrid apuestas|barca vs real
madrid apuestas|barcelona – real madrid apuestas|barcelona apuestas|barcelona atletico apuestas|barcelona atletico
de madrid apuestas|barcelona atletico madrid apuestas|barcelona betis apuestas|barcelona casa de apuestas|barcelona inter
apuestas|barcelona psg apuestas|barcelona real madrid apuestas|barcelona real sociedad apuestas|barcelona sevilla
apuestas|barcelona valencia apuestas|barcelona vs athletic bilbao apuestas|barcelona vs atlético
madrid apuestas|barcelona vs betis apuestas|barcelona vs celta de vigo apuestas|barcelona vs espanyol
apuestas|barcelona vs girona apuestas|barcelona vs madrid apuestas|barcelona vs real
madrid apuestas|barcelona vs real sociedad apuestas|barcelona vs sevilla apuestas|barcelona vs
villarreal apuestas|base de datos cuotas apuestas deportivas|bayern real madrid apuestas|beisbol
apuestas|best america apuestas|bet apuestas chile|bet apuestas en vivo|betis
– chelsea apuestas|betis apuestas|betis barcelona apuestas|betis chelsea apuestas|betis madrid apuestas|betis sevilla
apuestas|betsson tu sitio de apuestas online|blog apuestas baloncesto|blog apuestas ciclismo|blog apuestas
nba|blog apuestas tenis|blog de apuestas de tenis|bono apuestas|bono apuestas deportivas|bono apuestas deportivas sin deposito|bono apuestas gratis|bono apuestas gratis sin deposito|bono apuestas sin deposito|bono
bienvenida apuestas|bono bienvenida apuestas deportivas|bono
bienvenida apuestas españa|bono bienvenida
apuestas sin deposito|bono bienvenida apuestas sin depósito|bono bienvenida casa apuestas|bono bienvenida
casa de apuestas|bono bienvenida marca apuestas|bono casa apuestas|bono casa de apuestas|bono casa de apuestas sin ingreso|bono casas
de apuestas|bono de apuestas|bono de apuestas gratis sin deposito|bono de bienvenida apuestas|bono de bienvenida apuestas deportivas|bono
de bienvenida casa de apuestas|bono de bienvenida casas de apuestas|bono de casas de apuestas|bono de registro apuestas|bono de registro apuestas deportivas|bono de registro casa de apuestas|bono gratis apuestas|bono marca
apuestas|bono por registro apuestas|bono por registro apuestas deportivas|bono por registro casa de apuestas|bono registro apuestas|bono sin deposito apuestas|bono sin depósito apuestas|bono sin deposito apuestas deportivas|bono sin depósito apuestas deportivas|bono sin deposito casa de apuestas|bono sin deposito marca apuestas|bono sin ingreso apuestas|bono
sin ingreso apuestas deportivas|bonos apuestas|bonos apuestas
colombia|bonos apuestas deportivas|bonos apuestas deportivas
sin deposito|bonos apuestas gratis|bonos apuestas sin deposito|bonos
apuestas sin depósito|bonos bienvenida apuestas|bonos bienvenida casas apuestas|bonos bienvenida casas de apuestas|bonos casa de apuestas|bonos casas apuestas|bonos casas de apuestas|bonos casas
de apuestas colombia|bonos casas de apuestas deportivas|bonos casas de apuestas españa|bonos casas de apuestas nuevas|bonos casas de apuestas sin deposito|bonos casas de
apuestas sin depósito|bonos de apuestas|bonos de apuestas deportivas|bonos de apuestas gratis|bonos
de apuestas sin deposito|bonos de bienvenida apuestas|bonos de bienvenida
apuestas deportivas|bonos de bienvenida casa de apuestas|bonos de bienvenida casas de apuestas|bonos de bienvenida de casas
de apuestas|bonos de bienvenida en casas de apuestas|bonos de
casas de apuestas|bonos de casas de apuestas sin deposito|bonos en casa de apuestas|bonos en casas de apuestas sin deposito|bonos gratis apuestas|bonos gratis apuestas deportivas|bonos
gratis casas de apuestas|bonos gratis sin deposito
apuestas|bonos paginas de apuestas|bonos registro casas de apuestas|bonos
sin deposito apuestas|bonos sin depósito apuestas|bonos sin deposito apuestas deportivas|bonos sin deposito
casas de apuestas|bot de apuestas deportivas gratis|boxeo apuestas|brasil colombia apuestas|brasil peru apuestas|brasil vs colombia apuestas|buenas apuestas para hoy|buscador cuotas apuestas|buscador
de apuestas seguras|buscador de cuotas apuestas|buscador de cuotas de apuestas|buscar apuestas seguras|caballos apuestas|calculador de apuestas|calculador de cuotas apuestas|calculadora apuestas|calculadora apuestas combinadas|calculadora apuestas de
sistema|calculadora apuestas deportivas|calculadora apuestas deportivas seguras|calculadora apuestas multiples|calculadora
apuestas segura|calculadora apuestas seguras|calculadora apuestas sistema|calculadora apuestas yankee|calculadora arbitraje apuestas|calculadora cubrir apuestas|calculadora
cuotas apuestas|calculadora de apuestas|calculadora de apuestas combinadas|calculadora de apuestas de futbol|calculadora de
apuestas de sistema|calculadora de apuestas deportivas|calculadora de apuestas multiples|calculadora de apuestas seguras|calculadora de
apuestas sistema|calculadora de apuestas surebets|calculadora de
arbitraje apuestas|calculadora de cuotas apuestas|calculadora de cuotas de
apuestas|calculadora para apuestas deportivas|calculadora poisson apuestas|calculadora
poisson apuestas deportivas|calculadora poisson para apuestas|calculadora scalping apuestas
deportivas|calculadora sistema apuestas|calculadora stake apuestas|calculadora trading apuestas|calcular
apuestas|calcular apuestas deportivas|calcular apuestas
futbol|calcular apuestas sistema|calcular cuotas apuestas|calcular cuotas apuestas combinadas|calcular
cuotas apuestas deportivas|calcular cuotas de
apuestas|calcular ganancias apuestas deportivas|calcular momios apuestas|calcular
probabilidad cuota apuestas|calcular stake apuestas|calcular unidades apuestas|calcular yield apuestas|calculo de apuestas|calculo de apuestas deportivas|cambio
de cuotas apuestas|campeon champions apuestas|campeon eurocopa apuestas|campeon liga apuestas|campeon nba apuestas|canales de apuestas gratis|carrera de
caballos apuestas|carrera de caballos apuestas juego|carrera de
caballos con apuestas|carrera de galgos apuestas|carreras de caballos apuestas|carreras de caballos apuestas online|carreras de
caballos con apuestas|carreras de caballos juegos de apuestas|carreras de galgos apuestas|carreras de galgos apuestas online|carreras de galgos apuestas
trucos|carreras galgos apuestas|casa apuestas argentina|casa apuestas atletico de madrid|casa apuestas barcelona|casa apuestas betis|casa apuestas bono bienvenida|casa apuestas bono gratis|casa apuestas bono sin deposito|casa apuestas cerca de mi|casa apuestas chile|casa apuestas colombia|casa apuestas con mejores cuotas|casa apuestas deportivas|casa apuestas españa|casa apuestas española|casa
apuestas eurocopa|casa apuestas futbol|casa apuestas mejores cuotas|casa apuestas mundial|casa apuestas nueva|casa apuestas nuevas|casa apuestas online|casa apuestas peru|casa
apuestas valencia|casa de apuestas|casa de apuestas 10 euros gratis|casa de apuestas argentina|casa de apuestas atletico de madrid|casa de apuestas baloncesto|casa de apuestas barcelona|casa de apuestas beisbol|casa de
apuestas betis|casa de apuestas bono|casa de apuestas bono bienvenida|casa de apuestas bono de
bienvenida|casa de apuestas bono gratis|casa de apuestas bono por registro|casa de apuestas bono sin deposito|casa de apuestas boxeo|casa de apuestas caballos|casa de apuestas carreras de caballos|casa de apuestas cerca de mi|casa de apuestas cerca de mí|casa de apuestas champions league|casa de apuestas chile|casa de apuestas ciclismo|casa de apuestas colombia|casa de
apuestas con bono de bienvenida|casa de apuestas con bono sin deposito|casa de apuestas
con cuotas mas altas|casa de apuestas con esports|casa de apuestas con las mejores cuotas|casa de apuestas con licencia en españa|casa de apuestas con mejores
cuotas|casa de apuestas con pago anticipado|casa de apuestas con paypal|casa de apuestas copa america|casa de apuestas de
caballos|casa de apuestas de colombia|casa de apuestas de españa|casa de apuestas
de futbol|casa de apuestas de fútbol|casa de apuestas de futbol peru|casa de apuestas de peru|casa de apuestas del madrid|casa de apuestas del real madrid|casa de apuestas
deportivas|casa de apuestas deportivas cerca de mi|casa de apuestas deportivas
en argentina|casa de apuestas deportivas en chile|casa de apuestas
deportivas en colombia|casa de apuestas deportivas en españa|casa de apuestas deportivas en madrid|casa de apuestas deportivas españa|casa de apuestas deportivas españolas|casa de apuestas deportivas
madrid|casa de apuestas deportivas mexico|casa de
apuestas deportivas online|casa de apuestas
deportivas peru|casa de apuestas deposito 5 euros|casa de apuestas
deposito minimo|casa de apuestas deposito minimo 1 euro|casa de apuestas depósito mínimo 1 euro|casa de apuestas en españa|casa de apuestas en linea|casa de apuestas en madrid|casa de apuestas en perú|casa de apuestas en vivo|casa de apuestas españa|casa de apuestas españa inglaterra|casa
de apuestas española|casa de apuestas españolas|casa de apuestas esports|casa de apuestas eurocopa|casa de apuestas europa league|casa
de apuestas f1|casa de apuestas formula 1|casa de apuestas futbol|casa de apuestas
ingreso minimo|casa de apuestas ingreso minimo 1 euro|casa de apuestas ingreso mínimo 1 euro|casa de apuestas
legales|casa de apuestas legales en colombia|casa de apuestas legales en españa|casa de apuestas libertadores|casa
de apuestas liga española|casa de apuestas madrid|casa de apuestas mas
segura|casa de apuestas mejores|casa de apuestas méxico|casa de apuestas
minimo 5 euros|casa de apuestas mlb|casa de apuestas mundial|casa de apuestas
nba|casa de apuestas nfl|casa de apuestas nueva|casa de apuestas nuevas|casa de apuestas oficial del real madrid|casa de apuestas oficial real madrid|casa de apuestas online|casa de
apuestas online argentina|casa de apuestas online chile|casa de apuestas online españa|casa de
apuestas online mexico|casa de apuestas online paraguay|casa de apuestas online peru|casa de apuestas online usa|casa de apuestas online venezuela|casa
de apuestas pago anticipado|casa de apuestas para boxeo|casa de apuestas para ufc|casa
de apuestas peru|casa de apuestas perú|casa de
apuestas peru online|casa de apuestas por paypal|casa de apuestas
promociones|casa de apuestas que regalan dinero|casa de apuestas real madrid|casa de apuestas regalo de
bienvenida|casa de apuestas sevilla|casa de apuestas
sin dinero|casa de apuestas sin ingreso minimo|casa de apuestas sin licencia en españa|casa de
apuestas sin minimo de ingreso|casa de apuestas stake|casa de apuestas tenis|casa de apuestas ufc|casa de apuestas valencia|casa de apuestas venezuela|casa de apuestas virtuales|casa
de apuestas vive la suerte|casa oficial de apuestas del real madrid|casas apuestas asiaticas|casas apuestas bono
sin deposito|casas apuestas bonos sin deposito|casas
apuestas caballos|casas apuestas chile|casas apuestas ciclismo|casas apuestas con licencia|casas apuestas con licencia
en españa|casas apuestas deportivas|casas apuestas deportivas colombia|casas apuestas deportivas españa|casas apuestas
deportivas españolas|casas apuestas deportivas nuevas|casas
apuestas españa|casas apuestas españolas|casas apuestas esports|casas
apuestas eurocopa|casas apuestas golf|casas apuestas ingreso minimo 5 euros|casas apuestas legales|casas
apuestas legales españa|casas apuestas licencia|casas apuestas licencia españa|casas apuestas mexico|casas apuestas mundial|casas apuestas nba|casas apuestas nuevas|casas apuestas nuevas españa|casas apuestas ofertas|casas apuestas online|casas apuestas paypal|casas
apuestas peru|casas apuestas sin licencia|casas apuestas tenis|casas asiaticas apuestas|casas de apuestas|casas de
apuestas 5 euros|casas de apuestas app|casas de apuestas argentinas|casas de apuestas asiaticas|casas de apuestas baloncesto|casas de apuestas
barcelona|casas de apuestas bono bienvenida|casas de apuestas bono de bienvenida|casas de apuestas bono
por registro|casas de apuestas bono sin deposito|casas de apuestas bono sin ingreso|casas de apuestas bonos|casas de apuestas
bonos de bienvenida|casas de apuestas bonos gratis|casas
de apuestas bonos sin deposito|casas de apuestas boxeo|casas de
apuestas caballos|casas de apuestas carreras de caballos|casas de apuestas casino|casas de apuestas
casino online|casas de apuestas cerca de mi|casas de apuestas champions
league|casas de apuestas chile|casas de apuestas ciclismo|casas
de apuestas colombia|casas de apuestas com|casas de apuestas con app|casas de apuestas con apuestas gratis|casas de apuestas con bono|casas
de apuestas con bono de bienvenida|casas de apuestas con bono de registro|casas de apuestas con bono por registro|casas de apuestas con bono sin deposito|casas
de apuestas con bonos|casas de apuestas con bonos gratis|casas de apuestas con bonos sin deposito|casas de
apuestas con deposito minimo|casas de apuestas con esports|casas de apuestas con handicap asiatico|casas de apuestas con licencia|casas de apuestas con licencia en españa|casas de apuestas con licencia españa|casas de apuestas
con licencia española|casas de apuestas con mejores cuotas|casas de apuestas con pago anticipado|casas de apuestas con paypal|casas de apuestas con paypal en perú|casas
de apuestas con promociones|casas de apuestas con ruleta en vivo|casas de apuestas copa del rey|casas de apuestas de caballos|casas de apuestas de españa|casas de apuestas de futbol|casas de apuestas de fútbol|casas
de apuestas de peru|casas de apuestas deportivas|casas
de apuestas deportivas asiaticas|casas de apuestas deportivas colombia|casas de apuestas
deportivas comparativa|casas de apuestas deportivas con paypal|casas de
apuestas deportivas en chile|casas de apuestas deportivas en españa|casas de apuestas deportivas en linea|casas de apuestas deportivas en madrid|casas de apuestas deportivas en mexico|casas de apuestas deportivas
en peru|casas de apuestas deportivas en sevilla|casas de
apuestas deportivas en valencia|casas de apuestas deportivas
españa|casas de apuestas deportivas españolas|casas
de apuestas deportivas legales|casas de apuestas deportivas madrid|casas de
apuestas deportivas mexico|casas de apuestas deportivas
nuevas|casas de apuestas deportivas online|casas de apuestas deportivas peru|casas de apuestas deportivas perú|casas de apuestas deposito minimo 1 euro|casas de apuestas depósito mínimo 1 euro|casas de apuestas dinero gratis|casas de apuestas en argentina|casas de
apuestas en barcelona|casas de apuestas en chile|casas de apuestas en colombia|casas de apuestas en españa|casas de apuestas en españa online|casas de apuestas en linea|casas de apuestas en madrid|casas de apuestas en méxico|casas de apuestas en peru|casas
de apuestas en perú|casas de apuestas en sevilla|casas de apuestas en uruguay|casas
de apuestas en valencia|casas de apuestas en venezuela|casas de apuestas equipos de futbol|casas
de apuestas españa|casas de apuestas españa alemania|casas de apuestas españa inglaterra|casas
de apuestas españa licencia|casas de apuestas españa nuevas|casas de apuestas españa online|casas de apuestas española|casas de apuestas españolas|casas de apuestas españolas con licencia|casas de apuestas españolas online|casas de apuestas esports|casas de apuestas eurocopa|casas de apuestas eurocopa 2024|casas de apuestas europa league|casas de
apuestas f1|casas de apuestas fisicas en barcelona|casas de apuestas
fisicas en españa|casas de apuestas formula 1|casas
de apuestas fuera de españa|casas de apuestas
futbol|casas de apuestas fútbol|casas de apuestas futbol españa|casas de
apuestas ganador eurocopa|casas de apuestas
gratis|casas de apuestas ingreso minimo|casas de apuestas ingreso minimo 1 euro|casas de apuestas ingreso minimo 5 euros|casas de apuestas inter barcelona|casas
de apuestas legales|casas de apuestas legales en colombia|casas de apuestas legales en españa|casas de
apuestas legales en mexico|casas de apuestas
legales españa|casas de apuestas legales mx|casas de apuestas licencia|casas de apuestas licencia españa|casas
de apuestas lista|casas de apuestas madrid|casas de
apuestas mas seguras|casas de apuestas mejores bonos|casas de
apuestas mejores cuotas|casas de apuestas mexico|casas de apuestas méxico|casas de apuestas minimo 5 euros|casas de apuestas mlb|casas de
apuestas mundial|casas de apuestas mundial baloncesto|casas de apuestas mundiales|casas de apuestas nba|casas de apuestas no reguladas en españa|casas de apuestas
nueva ley|casas de apuestas nuevas|casas de apuestas nuevas en colombia|casas
de apuestas nuevas en españa|casas de apuestas nuevas españa|casas de apuestas ofertas|casas de apuestas online|casas de apuestas online argentina|casas de apuestas online colombia|casas de apuestas online deportivas|casas de apuestas
online ecuador|casas de apuestas online en argentina|casas de
apuestas online en chile|casas de apuestas online en colombia|casas de apuestas online en españa|casas de apuestas online en mexico|casas de apuestas online españa|casas de apuestas
online mas fiables|casas de apuestas online mexico|casas
de apuestas online nuevas|casas de apuestas online peru|casas de apuestas online usa|casas
de apuestas online venezuela|casas de apuestas pago paypal|casas de apuestas
para ufc|casas de apuestas paypal|casas de apuestas peru
bono sin deposito|casas de apuestas presenciales
en españa|casas
Your comment is awaiting moderation.
зеркало кракен
Your comment is awaiting moderation.
Dadasdas Trends – Trending topics ko quick, simple aur readable format mein cover karta hai.
Your comment is awaiting moderation.
(10 euros gratis apuestas|10 mejores casas de apuestas|10 trucos para
ganar apuestas|15 euros gratis marca apuestas|1×2 apuestas|1×2 apuestas deportivas|1×2 apuestas que
significa|1×2 en apuestas|1×2 en apuestas que significa|1×2 que significa en apuestas|5 euros gratis apuestas|9 apuestas que siempre
ganaras|a partir de cuanto se declara apuestas|actividades de juegos de azar y apuestas|ad apuestas deportivas|aleksandre topuria ufc apuestas|algoritmo para ganar apuestas deportivas|america apuestas|análisis nba apuestas|aplicacion android apuestas deportivas|aplicacion apuestas deportivas|aplicacion apuestas deportivas android|aplicación de apuestas online|aplicacion para hacer
apuestas|aplicacion para hacer apuestas de futbol|aplicación para hacer apuestas de fútbol|aplicaciones apuestas deportivas android|aplicaciones apuestas deportivas gratis|aplicaciones de apuestas android|aplicaciones de apuestas de fútbol|aplicaciones de apuestas
deportivas|aplicaciones de apuestas deportivas peru|aplicaciones de apuestas deportivas perú|aplicaciones de apuestas en colombia|aplicaciones de apuestas gratis|aplicaciones de
apuestas online|aplicaciones de apuestas seguras|aplicaciones de apuestas sin dinero|aplicaciones para hacer apuestas|apostar seguro apuestas deportivas|app
android apuestas deportivas|app apuestas|app apuestas android|app
apuestas de futbol|app apuestas deportivas|app apuestas
deportivas android|app apuestas deportivas argentina|app apuestas deportivas colombia|app apuestas deportivas ecuador|app
apuestas deportivas españa|app apuestas deportivas
gratis|app apuestas entre amigos|app apuestas futbol|app apuestas gratis|app apuestas sin dinero|app
casa de apuestas|app casas de apuestas|app control apuestas|app de apuestas|app de apuestas android|app de apuestas
casino|app de apuestas colombia|app de apuestas
con bono de bienvenida|app de apuestas de futbol|app de apuestas deportivas|app de apuestas deportivas android|app de apuestas deportivas
argentina|app de apuestas deportivas colombia|app de apuestas deportivas en españa|app de apuestas deportivas peru|app de apuestas deportivas perú|app
de apuestas deportivas sin dinero|app de apuestas ecuador|app de apuestas en colombia|app de apuestas
en españa|app de apuestas en venezuela|app de apuestas futbol|app de apuestas gratis|app de apuestas online|app
de apuestas para android|app de apuestas para ganar dinero|app de apuestas peru|app de apuestas reales|app de casas de apuestas|app marca
apuestas android|app moviles de apuestas|app para apuestas|app para apuestas de futbol|app para apuestas deportivas|app para
apuestas deportivas en español|app para ganar apuestas deportivas|app para hacer apuestas|app
para hacer apuestas deportivas|app para hacer apuestas entre amigos|app
para llevar control de apuestas|app pronosticos apuestas deportivas|app versus apuestas|apps apuestas mundial|apps de
apuestas|apps de apuestas con bono de bienvenida|apps de apuestas de futbol|apps de apuestas deportivas peru|apps de apuestas mexico|apps para
apuestas|aprender a hacer apuestas deportivas|aprender
hacer apuestas deportivas|apuesta del dia apuestas deportivas|apuestas 10 euros gratis|apuestas 100 seguras|apuestas 1×2|apuestas 1X2|apuestas 2
division|apuestas 3 division|apuestas a caballos|apuestas a carreras de caballos|apuestas
a colombia|apuestas a corners|apuestas a ganar|apuestas a jugadores nba|apuestas a la
baja|apuestas a la nfl|apuestas al barcelona|apuestas
al dia|apuestas al empate|apuestas al mundial|apuestas
al tenis wta|apuestas alaves barcelona|apuestas alcaraz hoy|apuestas alemania españa|apuestas alonso campeon del mundo|apuestas altas y bajas|apuestas altas
y bajas nfl|apuestas ambos equipos marcan|apuestas america|apuestas android|apuestas anillo nba|apuestas antes del mundial|apuestas anticipadas|apuestas anticipadas nba|apuestas apps|apuestas arabia argentina|apuestas argentina|apuestas
argentina campeon del mundo|apuestas argentina canada|apuestas argentina colombia|apuestas argentina
croacia|apuestas argentina españa|apuestas argentina francia|apuestas argentina
francia cuanto paga|apuestas argentina francia mundial|apuestas argentina gana el mundial|apuestas argentina gana mundial|apuestas argentina holanda|apuestas argentina
mexico|apuestas argentina méxico|apuestas argentina mundial|apuestas argentina online|apuestas argentina paises bajos|apuestas argentina
polonia|apuestas argentina uruguay|apuestas argentina vs australia|apuestas
argentina vs colombia|apuestas argentina vs francia|apuestas argentina vs peru|apuestas argentinas|apuestas arsenal real
madrid|apuestas ascenso a primera division|apuestas
ascenso a segunda|apuestas asiaticas|apuestas asiatico|apuestas athletic|apuestas athletic atletico|apuestas athletic
barça|apuestas athletic barcelona|apuestas
athletic betis|apuestas athletic manchester|apuestas athletic manchester united|apuestas athletic osasuna|apuestas athletic real|apuestas athletic
real madrid|apuestas athletic real sociedad|apuestas athletic
real sociedad final|apuestas athletic roma|apuestas athletic
sevilla|apuestas athletic valencia|apuestas atletico|apuestas atletico barcelona|apuestas atletico barsa|apuestas atletico campeon champions|apuestas atletico campeon de liga|apuestas atlético copenhague|apuestas atletico de
madrid|apuestas atlético de madrid|apuestas atletico de madrid barcelona|apuestas atletico de madrid gana la liga|apuestas atletico
de madrid real madrid|apuestas atlético de madrid real madrid|apuestas
atletico de madrid vs barcelona|apuestas atletico madrid|apuestas atletico madrid real madrid|apuestas atletico
madrid vs barcelona|apuestas atletico real madrid|apuestas atletico real
madrid champions|apuestas atletismo|apuestas
bajas|apuestas baloncesto|apuestas baloncesto acb|apuestas baloncesto handicap|apuestas baloncesto hoy|apuestas baloncesto juegos olimpicos|apuestas baloncesto nba|apuestas baloncesto pronostico|apuestas baloncesto pronósticos|apuestas baloncesto prorroga|apuestas barca|apuestas barca athletic|apuestas barca atletico|apuestas barca bayern|apuestas
barca bayern munich|apuestas barca girona|apuestas barca hoy|apuestas barça hoy|apuestas
barca inter|apuestas barca juventus|apuestas
barca madrid|apuestas barça madrid|apuestas barca real madrid|apuestas barca
vs juve|apuestas barca vs madrid|apuestas barca vs psg|apuestas barcelona|apuestas barcelona alaves|apuestas barcelona athletic|apuestas barcelona atletico|apuestas barcelona atletico de madrid|apuestas barcelona atlético de
madrid|apuestas barcelona atletico madrid|apuestas barcelona bayern|apuestas barcelona betis|apuestas barcelona campeon de
liga|apuestas barcelona celta|apuestas barcelona espanyol|apuestas barcelona gana la champions|apuestas barcelona girona|apuestas barcelona granada|apuestas barcelona hoy|apuestas barcelona
inter|apuestas barcelona madrid|apuestas barcelona osasuna|apuestas barcelona
psg|apuestas barcelona real madrid|apuestas barcelona real sociedad|apuestas barcelona sevilla|apuestas barcelona valencia|apuestas
barcelona villarreal|apuestas barcelona vs atletico madrid|apuestas barcelona vs madrid|apuestas barcelona vs real madrid|apuestas barsa madrid|apuestas basket hoy|apuestas
bayern barcelona|apuestas bayern vs barcelona|apuestas beisbol|apuestas
béisbol|apuestas beisbol mlb|apuestas beisbol pronosticos|apuestas beisbol venezolano|apuestas betis|apuestas betis – chelsea|apuestas betis barcelona|apuestas betis chelsea|apuestas betis fiorentina|apuestas betis girona|apuestas betis madrid|apuestas betis mallorca|apuestas betis real madrid|apuestas betis real sociedad|apuestas betis sevilla|apuestas betis valencia|apuestas betis valladolid|apuestas betis vs valencia|apuestas betplay hoy colombia|apuestas betsson peru|apuestas
bienvenida|apuestas billar online|apuestas
bolivia vs colombia|apuestas bono|apuestas bono bienvenida|apuestas bono
de bienvenida|apuestas bono de bienvenida sin deposito|apuestas bono gratis|apuestas bono sin deposito|apuestas
bonos sin deposito|apuestas borussia real madrid|apuestas boxeo|apuestas boxeo de campeonato|apuestas boxeo
españa|apuestas boxeo español|apuestas boxeo femenino olimpiadas|apuestas boxeo hoy|apuestas boxeo online|apuestas brasil colombia|apuestas brasil peru|apuestas brasil uruguay|apuestas brasil vs colombia|apuestas brasil vs peru|apuestas caballos|apuestas caballos colocado|apuestas caballos españa|apuestas caballos hipodromo|apuestas caballos hoy|apuestas caballos madrid|apuestas caballos online|apuestas caballos sanlucar de barrameda|apuestas caballos
zarzuela|apuestas calculador|apuestas campeon|apuestas campeon champions|apuestas campeón champions|apuestas campeon champions 2025|apuestas campeon champions league|apuestas campeon conference league|apuestas campeon copa america|apuestas
campeon copa del rey|apuestas campeon de champions|apuestas campeon de la champions|apuestas campeon de liga|apuestas
campeon del mundo|apuestas campeon eurocopa|apuestas campeón eurocopa|apuestas campeon europa league|apuestas campeon f1|apuestas campeon f1 2025|apuestas campeon formula 1|apuestas campeon libertadores|apuestas campeon liga|apuestas
campeon liga bbva|apuestas campeon liga española|apuestas campeon liga santander|apuestas campeon motogp 2025|apuestas campeon mundial|apuestas campeón mundial|apuestas campeon mundial baloncesto|apuestas campeon nba|apuestas campeón nba|apuestas campeon premier|apuestas campeon premier
league|apuestas campeon roland garros|apuestas campeonato f1|apuestas campeonatos de
futbol|apuestas carrera de caballos|apuestas carrera de caballos hoy|apuestas carrera de caballos nocturnas|apuestas carrera de galgos fin de semana|apuestas carrera de galgos hoy|apuestas carrera de galgos nocturnas|apuestas carreras caballos|apuestas carreras caballos
sanlucar|apuestas carreras de caballos|apuestas carreras de caballos en directo|apuestas carreras de caballos en vivo|apuestas carreras
de caballos españa|apuestas carreras de caballos hoy|apuestas carreras de caballos nacionales|apuestas
carreras de caballos nocturnas|apuestas carreras de
caballos online|apuestas carreras de caballos sanlucar|apuestas carreras de caballos sanlúcar|apuestas carreras de galgos|apuestas carreras de galgos en vivo|apuestas carreras de galgos nocturnas|apuestas carreras de galgos pre partido|apuestas
casino|apuestas casino barcelona|apuestas casino futbol|apuestas casino
gran madrid|apuestas casino gratis|apuestas casino madrid|apuestas casino online|apuestas casino online argentina|apuestas casinos|apuestas casinos online|apuestas
celta|apuestas celta barcelona|apuestas celta betis|apuestas celta eibar|apuestas celta
espanyol|apuestas celta granada|apuestas celta madrid|apuestas celta
manchester|apuestas celta real madrid|apuestas champion league|apuestas champions
foro|apuestas champions hoy|apuestas champions league|apuestas champions league – pronósticos|apuestas champions league 2025|apuestas champions league hoy|apuestas champions league pronosticos|apuestas champions
league pronósticos|apuestas champions pronosticos|apuestas chelsea barcelona|apuestas chelsea betis|apuestas chile|apuestas chile peru|apuestas chile venezuela|apuestas chile vs colombia|apuestas chile vs uruguay|apuestas ciclismo|apuestas ciclismo en vivo|apuestas ciclismo femenino|apuestas ciclismo tour francia|apuestas ciclismo vuelta|apuestas ciclismo vuelta a españa|apuestas ciclismo vuelta españa|apuestas city madrid|apuestas city real madrid|apuestas clasico|apuestas clasico español|apuestas clasico real madrid barcelona|apuestas clasificacion mundial|apuestas
colombia|apuestas colombia argentina|apuestas colombia brasil|apuestas colombia paraguay|apuestas colombia uruguay|apuestas colombia vs argentina|apuestas colombia vs brasil|apuestas combinadas|apuestas combinadas como funcionan|apuestas combinadas de futbol|apuestas combinadas de fútbol|apuestas combinadas foro|apuestas combinadas futbol|apuestas combinadas hoy|apuestas combinadas mismo partido|apuestas combinadas mundial|apuestas combinadas nba|apuestas combinadas
para esta semana|apuestas combinadas para hoy|apuestas combinadas para mañana|apuestas combinadas pronosticos|apuestas combinadas recomendadas|apuestas combinadas seguras|apuestas combinadas
seguras para hoy|apuestas combinadas seguras para mañana|apuestas como ganar|apuestas comparador|apuestas con bono
de bienvenida|apuestas con dinero ficticio|apuestas con dinero real|apuestas con dinero virtual|apuestas con handicap|apuestas con handicap asiatico|apuestas con handicap baloncesto|apuestas con mas probabilidades de ganar|apuestas con paypal|apuestas con tarjeta de credito|apuestas con tarjeta de debito|apuestas consejos|apuestas copa|apuestas copa africa|apuestas copa america|apuestas copa américa|apuestas
copa argentina|apuestas copa brasil|apuestas copa davis|apuestas copa de europa|apuestas copa del mundo|apuestas copa del rey|apuestas copa del rey baloncesto|apuestas copa
del rey final|apuestas copa del rey futbol|apuestas copa del
rey ganador|apuestas copa del rey hoy|apuestas copa del rey pronosticos|apuestas copa del rey pronósticos|apuestas copa europa|apuestas copa italia|apuestas copa libertadores|apuestas copa mundial de hockey|apuestas copa rey|apuestas copa sudamericana|apuestas corners|apuestas corners hoy|apuestas croacia argentina|apuestas cuartos eurocopa|apuestas cuotas|apuestas cuotas altas|apuestas
cuotas bajas|apuestas de 1 euro|apuestas de baloncesto|apuestas de baloncesto hoy|apuestas de
baloncesto nba|apuestas de baloncesto para hoy|apuestas de beisbol|apuestas de beisbol para hoy|apuestas de blackjack en linea|apuestas de boxeo|apuestas de boxeo canelo|apuestas de boxeo en las vegas|apuestas de boxeo hoy|apuestas de boxeo
online|apuestas de caballo|apuestas de caballos|apuestas de caballos
como funciona|apuestas de caballos como se juega|apuestas de caballos en colombia|apuestas de caballos en españa|apuestas de caballos en linea|apuestas de caballos españa|apuestas de caballos ganador
y colocado|apuestas de caballos internacionales|apuestas de caballos
juegos|apuestas de caballos online|apuestas
de caballos online en venezuela|apuestas de caballos por internet|apuestas de caballos pronosticos|apuestas de caballos pronósticos|apuestas de carrera de caballos|apuestas de carreras de caballos|apuestas de carreras de caballos online|apuestas de casino|apuestas de casino online|apuestas de casino por internet|apuestas de champions league|apuestas
de ciclismo|apuestas de colombia|apuestas de copa america|apuestas de corners|apuestas de deportes en linea|apuestas de deportes online|apuestas de dinero|apuestas de esports|apuestas de eurocopa|apuestas de europa league|apuestas
de f1|apuestas de formula 1|apuestas de futbol|apuestas de fútbol|apuestas de futbol app|apuestas de futbol argentina|apuestas de futbol colombia|apuestas de futbol en colombia|apuestas de futbol en directo|apuestas de
futbol en linea|apuestas de futbol en vivo|apuestas de
futbol español|apuestas de futbol gratis|apuestas de futbol hoy|apuestas de futbol mundial|apuestas de futbol online|apuestas de fútbol online|apuestas de futbol para hoy|apuestas de
fútbol para hoy|apuestas de futbol para hoy seguras|apuestas de futbol para mañana|apuestas de futbol peru|apuestas
de futbol pronosticos|apuestas de fútbol pronósticos|apuestas de futbol seguras|apuestas de futbol
seguras para hoy|apuestas de futbol sin dinero|apuestas de galgos|apuestas
de galgos como ganar|apuestas de galgos en directo|apuestas de galgos online|apuestas de galgos trucos|apuestas de golf|apuestas
de hockey|apuestas de hockey sobre hielo|apuestas
de hoy|apuestas de hoy seguras|apuestas de juego|apuestas de juegos|apuestas de juegos deportivos|apuestas de juegos
online|apuestas de la champions league|apuestas de la copa américa|apuestas
de la eurocopa|apuestas de la europa league|apuestas de la liga|apuestas de la liga bbva|apuestas de la liga española|apuestas de la nba|apuestas de la nfl|apuestas de
la ufc|apuestas de mlb|apuestas de nba|apuestas de nba
para hoy|apuestas de partidos|apuestas de partidos de futbol|apuestas de peleas ufc|apuestas de perros en vivo|apuestas de perros virtuales|apuestas de
peru|apuestas de sistema|apuestas de sistema como funciona|apuestas de sistema explicacion|apuestas de sistema explicación|apuestas de tenis|apuestas de tenis de mesa|apuestas de tenis en directo|apuestas de
tenis hoy|apuestas de tenis para hoy|apuestas de tenis pronosticos|apuestas de tenis seguras|apuestas
de todo tipo|apuestas de ufc|apuestas de ufc hoy|apuestas del boxeo|apuestas del clasico|apuestas del clasico real madrid barca|apuestas del dia|apuestas del día|apuestas del dia de hoy|apuestas del dia
deportivas|apuestas del dia futbol|apuestas del mundial|apuestas del partido de hoy|apuestas
del real madrid|apuestas del rey|apuestas del sistema|apuestas deporte|apuestas deportes|apuestas deportiva|apuestas deportivas|apuestas deportivas 1 euro|apuestas deportivas 10 euros gratis|apuestas
deportivas 100 seguras|apuestas deportivas 1×2|apuestas deportivas
android|apuestas deportivas app|apuestas deportivas apps|apuestas deportivas argentina|apuestas deportivas argentina futbol|apuestas deportivas argentina legal|apuestas deportivas atletico
de madrid|apuestas deportivas baloncesto|apuestas deportivas barca
madrid|apuestas deportivas barcelona|apuestas deportivas beisbol|apuestas
deportivas bono|apuestas deportivas bono bienvenida|apuestas
deportivas bono de bienvenida|apuestas deportivas bono sin deposito|apuestas deportivas bonos de bienvenida|apuestas deportivas boxeo|apuestas deportivas caballos|apuestas deportivas calculadora|apuestas deportivas campeon liga|apuestas deportivas casino|apuestas deportivas casino barcelona|apuestas deportivas casino online|apuestas deportivas cerca
de mi|apuestas deportivas champions league|apuestas deportivas chile|apuestas deportivas ciclismo|apuestas deportivas colombia|apuestas
deportivas com|apuestas deportivas com foro|apuestas deportivas com pronosticos|apuestas deportivas
combinadas|apuestas deportivas combinadas para hoy|apuestas deportivas como se juega|apuestas
deportivas comparador|apuestas deportivas con bono gratis|apuestas deportivas con bonos gratis|apuestas deportivas con dinero
ficticio|apuestas deportivas con paypal|apuestas deportivas con puntos virtuales|apuestas deportivas consejos|apuestas deportivas
consejos para ganar|apuestas deportivas copa america|apuestas deportivas copa del rey|apuestas deportivas copa libertadores|apuestas deportivas copa mundial|apuestas deportivas corners|apuestas deportivas cual es la mejor|apuestas deportivas cuotas altas|apuestas deportivas de baloncesto|apuestas
deportivas de boxeo|apuestas deportivas de colombia|apuestas deportivas
de futbol|apuestas deportivas de nba|apuestas deportivas de nhl|apuestas deportivas
de peru|apuestas deportivas de tenis|apuestas deportivas del dia|apuestas deportivas dinero ficticio|apuestas deportivas directo|apuestas deportivas doble oportunidad|apuestas deportivas
en argentina|apuestas deportivas en chile|apuestas deportivas en colombia|apuestas deportivas en directo|apuestas deportivas en españa|apuestas deportivas
en español|apuestas deportivas en linea|apuestas deportivas en línea|apuestas deportivas en peru|apuestas deportivas en perú|apuestas deportivas
en sevilla|apuestas deportivas en uruguay|apuestas deportivas en vivo|apuestas deportivas es|apuestas deportivas es pronosticos|apuestas deportivas españa|apuestas deportivas españolas|apuestas deportivas esports|apuestas deportivas estadisticas|apuestas deportivas estrategias|apuestas deportivas estrategias seguras|apuestas deportivas
eurocopa|apuestas deportivas europa league|apuestas deportivas f1|apuestas deportivas faciles de ganar|apuestas deportivas formula 1|apuestas deportivas foro|apuestas deportivas foro futbol|apuestas deportivas foro tenis|apuestas deportivas francia argentina|apuestas deportivas futbol|apuestas
deportivas fútbol|apuestas deportivas futbol argentino|apuestas deportivas futbol colombia|apuestas deportivas futbol español|apuestas deportivas gana|apuestas deportivas ganadas|apuestas deportivas ganar dinero
seguro|apuestas deportivas gane|apuestas deportivas golf|apuestas deportivas gratis|apuestas deportivas gratis con premios|apuestas deportivas gratis hoy|apuestas deportivas gratis sin deposito|apuestas deportivas handicap|apuestas deportivas handicap asiatico|apuestas
deportivas hoy|apuestas deportivas impuestos|apuestas deportivas interior
argentina|apuestas deportivas juegos olimpicos|apuestas deportivas la
liga|apuestas deportivas legales|apuestas deportivas legales en colombia|apuestas
deportivas libres de impuestos|apuestas deportivas licencia españa|apuestas deportivas liga española|apuestas deportivas listado|apuestas deportivas
listado clasico|apuestas deportivas madrid|apuestas deportivas mas seguras|apuestas deportivas mejor
pagadas|apuestas deportivas mejores|apuestas deportivas mejores app|apuestas deportivas mejores casas|apuestas deportivas
mejores cuotas|apuestas deportivas mejores paginas|apuestas
deportivas mexico|apuestas deportivas méxico|apuestas deportivas mlb|apuestas deportivas mlb hoy|apuestas deportivas multiples|apuestas deportivas mundial|apuestas deportivas
murcia|apuestas deportivas nba|apuestas deportivas nba hoy|apuestas deportivas nfl|apuestas deportivas nhl|apuestas deportivas nuevas|apuestas deportivas
ofertas|apuestas deportivas online|apuestas deportivas online argentina|apuestas deportivas online chile|apuestas deportivas online colombia|apuestas deportivas online en colombia|apuestas
deportivas online españa|apuestas deportivas online mexico|apuestas deportivas online paypal|apuestas deportivas
online peru|apuestas deportivas online por internet|apuestas deportivas pago paypal|apuestas
deportivas para ganar dinero|apuestas deportivas para hoy|apuestas deportivas para hoy pronosticos|apuestas deportivas partido suspendido|apuestas deportivas partidos de hoy|apuestas deportivas
paypal|apuestas deportivas peru|apuestas deportivas perú|apuestas deportivas peru vs
ecuador|apuestas deportivas predicciones|apuestas deportivas promociones|apuestas deportivas pronostico|apuestas deportivas pronóstico|apuestas
deportivas pronostico hoy|apuestas deportivas pronosticos|apuestas deportivas pronósticos|apuestas
deportivas pronosticos expertos|apuestas deportivas pronosticos gratis|apuestas deportivas pronosticos nba|apuestas deportivas pronosticos tenis|apuestas
deportivas que aceptan paypal|apuestas deportivas real madrid|apuestas deportivas regalo bienvenida|apuestas deportivas resultado
exacto|apuestas deportivas resultados|apuestas deportivas rugby|apuestas
deportivas seguras|apuestas deportivas seguras foro|apuestas deportivas seguras hoy|apuestas deportivas seguras para hoy|apuestas deportivas seguras
telegram|apuestas deportivas sevilla|apuestas deportivas simulador eurocopa|apuestas deportivas sin deposito|apuestas deportivas sin deposito inicial|apuestas deportivas sin dinero|apuestas
deportivas sin dinero real|apuestas deportivas sin registro|apuestas
deportivas stake|apuestas deportivas stake 10|apuestas deportivas telegram españa|apuestas
deportivas tenis|apuestas deportivas tenis de mesa|apuestas deportivas tenis foro|apuestas
deportivas tenis hoy|apuestas deportivas tips|apuestas deportivas tipster|apuestas deportivas ufc|apuestas deportivas uruguay|apuestas deportivas valencia|apuestas
deportivas valencia barcelona|apuestas deportivas venezuela|apuestas
deportivas virtuales|apuestas deportivas y casino|apuestas deportivas y casino online|apuestas deportivas.com|apuestas
deportivas.com foro|apuestas deportivas.es|apuestas deportivos pronosticos|apuestas
deposito minimo 1 euro|apuestas descenso a
segunda|apuestas descenso a segunda b|apuestas descenso la liga|apuestas descenso primera division|apuestas descenso segunda|apuestas dia|apuestas diarias seguras|apuestas dinero|apuestas dinero ficticio|apuestas dinero real|apuestas dinero virtual|apuestas directas|apuestas directo|apuestas directo futbol|apuestas division de
honor juvenil|apuestas dnb|apuestas doble oportunidad|apuestas doble resultado|apuestas dobles|apuestas dobles y triples|apuestas dortmund barcelona|apuestas
draft nba|apuestas draft nfl|apuestas ecuador vs argentina|apuestas ecuador vs venezuela|apuestas egipto uruguay|apuestas
el clasico|apuestas elecciones venezuela|apuestas empate|apuestas
en baloncesto|apuestas en barcelona|apuestas en beisbol|apuestas en boxeo|apuestas en caballos|apuestas en carreras
de caballos|apuestas en casino|apuestas en casino online|apuestas en casinos|apuestas en casinos online|apuestas
en chile|apuestas en ciclismo|apuestas en colombia|apuestas en colombia de futbol|apuestas en directo|apuestas en directo futbol|apuestas en directo
pronosticos|apuestas en el futbol|apuestas en el tenis|apuestas en españa|apuestas en esports|apuestas
en eventos deportivos virtuales|apuestas en golf|apuestas en juegos|apuestas en la
champions league|apuestas en la eurocopa|apuestas en la liga|apuestas
en la nba|apuestas en la nfl|apuestas en las vegas mlb|apuestas en las
vegas nfl|apuestas en linea|apuestas en línea|apuestas en linea argentina|apuestas en linea boxeo|apuestas en linea chile|apuestas en linea colombia|apuestas en línea de fútbol|apuestas en linea deportivas|apuestas
en linea españa|apuestas en linea estados unidos|apuestas en linea futbol|apuestas en linea mexico|apuestas en línea
méxico|apuestas en linea mundial|apuestas en linea peru|apuestas en linea usa|apuestas en los
esports|apuestas en madrid|apuestas en méxico|apuestas en mexico online|apuestas en nba|apuestas en partidos de futbol|apuestas en partidos de futbol en vivo|apuestas en partidos de tenis en directo|apuestas en perú|apuestas
en sevilla|apuestas en sistema|apuestas en stake|apuestas en tenis|apuestas en tenis de mesa|apuestas en valencia|apuestas en vivo|apuestas en vivo argentina|apuestas en vivo casino|apuestas en vivo futbol|apuestas en vivo fútbol|apuestas en vivo nba|apuestas en vivo peru|apuestas en vivo tenis|apuestas en vivo ufc|apuestas
equipo mbappe|apuestas equipos de futbol|apuestas españa|apuestas españa alemania|apuestas españa alemania eurocopa|apuestas españa
croacia|apuestas españa eurocopa|apuestas españa francia|apuestas
españa francia eurocopa|apuestas españa gana el mundial|apuestas españa gana eurocopa|apuestas españa gana mundial|apuestas españa georgia|apuestas españa holanda|apuestas españa inglaterra|apuestas
españa inglaterra cuotas|apuestas españa inglaterra eurocopa|apuestas españa
italia|apuestas españa mundial|apuestas españa paises bajos|apuestas español|apuestas español oviedo|apuestas espanyol
barcelona|apuestas espanyol betis|apuestas espanyol villarreal|apuestas esport|apuestas
esports|apuestas esports colombia|apuestas esports españa|apuestas esports
fifa|apuestas esports gratis|apuestas esports lol|apuestas esports peru|apuestas esports valorant|apuestas estadisticas|apuestas estrategias|apuestas euro|apuestas euro copa|apuestas eurocopa|apuestas eurocopa campeon|apuestas eurocopa
españa|apuestas eurocopa favoritos|apuestas eurocopa femenina|apuestas eurocopa final|apuestas eurocopa ganador|apuestas eurocopa hoy|apuestas
eurocopa sub 21|apuestas euroliga baloncesto|apuestas euroliga pronosticos|apuestas
europa league|apuestas europa league hoy|apuestas europa league pronosticos|apuestas europa league pronósticos|apuestas
euros|apuestas f1 abu dhabi|apuestas f1 bahrein|apuestas
f1 canada|apuestas f1 china|apuestas f1 cuotas|apuestas f1 hoy|apuestas f1 las vegas|apuestas f1 miami|apuestas f1 monaco|apuestas faciles de ganar|apuestas fáciles de ganar|apuestas
faciles para ganar|apuestas favoritas|apuestas favorito champions|apuestas favoritos
champions|apuestas favoritos eurocopa|apuestas
favoritos mundial|apuestas fc barcelona|apuestas final champions cuotas|apuestas
final champions league|apuestas final champions peru|apuestas final copa|apuestas final copa
america|apuestas final copa de europa|apuestas final copa del rey|apuestas
final copa europa|apuestas final copa libertadores|apuestas final copa rey|apuestas final de copa|apuestas final de copa del rey|apuestas final del
mundial|apuestas final euro|apuestas final eurocopa|apuestas final europa league|apuestas final libertadores|apuestas final mundial|apuestas final
nba|apuestas final rugby|apuestas final uefa europa league|apuestas
final.mundial|apuestas finales de conferencia nfl|apuestas finales nba|apuestas fiorentina betis|apuestas
formula|apuestas formula 1|apuestas fórmula 1|apuestas fórmula 1 pronósticos|apuestas
formula uno|apuestas foro|apuestas foro nba|apuestas francia argentina|apuestas francia españa|apuestas futbol|apuestas fútbol|apuestas futbol americano|apuestas futbol americano
nfl|apuestas futbol argentina|apuestas futbol argentino|apuestas
futbol champions league|apuestas futbol chile|apuestas futbol colombia|apuestas futbol consejos|apuestas futbol en directo|apuestas
fútbol en directo|apuestas futbol en vivo|apuestas fútbol en vivo|apuestas futbol españa|apuestas
futbol español|apuestas fútbol español|apuestas futbol eurocopa|apuestas futbol femenino|apuestas futbol foro|apuestas futbol gratis|apuestas futbol hoy|apuestas
fútbol hoy|apuestas futbol juegos olimpicos|apuestas futbol mexico|apuestas futbol mundial|apuestas futbol online|apuestas futbol para hoy|apuestas
futbol peru|apuestas futbol pronosticos|apuestas futbol sala|apuestas futbol telegram|apuestas futbol virtual|apuestas galgos|apuestas galgos en directo|apuestas galgos hoy|apuestas galgos online|apuestas
galgos pronosticos|apuestas galgos trucos|apuestas gana|apuestas gana colombia|apuestas gana resultados|apuestas ganadas|apuestas ganadas hoy|apuestas ganador champions league|apuestas
ganador copa america|apuestas ganador copa del
rey|apuestas ganador copa del rey baloncesto|apuestas ganador copa libertadores|apuestas ganador de la eurocopa|apuestas
ganador de la liga|apuestas ganador del mundial|apuestas ganador
eurocopa|apuestas ganador europa league|apuestas
ganador f1|apuestas ganador la liga|apuestas ganador liga española|apuestas ganador mundial|apuestas ganador mundial baloncesto|apuestas ganador
mundial f1|apuestas ganador nba|apuestas ganadores eurocopa|apuestas ganadores mundial|apuestas
ganar champions|apuestas ganar eurocopa|apuestas
ganar liga|apuestas ganar mundial|apuestas ganar nba|apuestas
getafe valencia|apuestas ghana uruguay|apuestas girona|apuestas girona athletic|apuestas girona betis|apuestas girona campeon de liga|apuestas girona campeon liga|apuestas girona gana
la liga|apuestas girona real madrid|apuestas girona real sociedad|apuestas goleador eurocopa|apuestas goleadores eurocopa|apuestas goles asiaticos|apuestas golf|apuestas golf masters|apuestas golf
pga|apuestas granada barcelona|apuestas grand slam de tenis|apuestas gratis|apuestas gratis
casino|apuestas gratis con premios|apuestas gratis hoy|apuestas gratis
para hoy|apuestas gratis por registro|apuestas gratis
puntos|apuestas gratis regalos|apuestas gratis sin deposito|apuestas gratis sin depósito|apuestas gratis sin ingreso|apuestas gratis
sports|apuestas gratis y ganar premios|apuestas grupo a eurocopa|apuestas grupos eurocopa|apuestas handicap|apuestas handicap asiatico|apuestas handicap baloncesto|apuestas handicap como funciona|apuestas handicap nba|apuestas handicap
nfl|apuestas hipicas online|apuestas hípicas online|apuestas hipicas venezuela|apuestas hockey|apuestas hockey hielo|apuestas hockey patines|apuestas hockey
sobre hielo|apuestas holanda argentina|apuestas holanda vs argentina|apuestas hoy|apuestas hoy champions|apuestas hoy futbol|apuestas hoy
nba|apuestas hoy pronosticos|apuestas hoy seguras|apuestas impuestos|apuestas inglaterra paises bajos|apuestas inter barca|apuestas inter barcelona|apuestas juego|apuestas juegos|apuestas juegos en linea|apuestas juegos olimpicos|apuestas juegos olímpicos|apuestas juegos olimpicos
baloncesto|apuestas juegos online|apuestas juegos virtuales|apuestas
jugador sevilla|apuestas jugadores nba|apuestas
kings league americas|apuestas la liga|apuestas la liga española|apuestas la liga hoy|apuestas la liga santander|apuestas las vegas
mlb|apuestas las vegas nba|apuestas las vegas nfl|apuestas league of legends
mundial|apuestas legal|apuestas legales|apuestas legales en colombia|apuestas legales en españa|apuestas legales en estados unidos|apuestas legales españa|apuestas leganes betis|apuestas libertadores|apuestas licencia|apuestas liga
1 peru|apuestas liga argentina|apuestas liga bbva pronosticos|apuestas liga de campeones|apuestas liga de
campeones de baloncesto|apuestas liga de campeones de hockey|apuestas liga españa|apuestas liga
española|apuestas liga santander pronosticos|apuestas ligas de futbol|apuestas linea|apuestas linea de gol|apuestas liverpool barcelona|apuestas liverpool real madrid|apuestas
lol mundial|apuestas madrid|apuestas madrid arsenal|apuestas madrid atletico|apuestas
madrid atletico champions|apuestas madrid barca|apuestas madrid barça|apuestas madrid barca hoy|apuestas madrid
barca supercopa|apuestas madrid barcelona|apuestas madrid barsa|apuestas madrid
bayern|apuestas madrid betis|apuestas madrid
borussia|apuestas madrid campeon champions|apuestas madrid celta|apuestas madrid city|apuestas madrid dortmund|apuestas madrid gana la liga|apuestas madrid gana liga|apuestas madrid hoy|apuestas madrid liverpool|apuestas madrid osasuna|apuestas madrid sevilla|apuestas madrid valencia|apuestas madrid vs arsenal|apuestas
madrid vs barcelona|apuestas mallorca osasuna|apuestas mallorca real sociedad|apuestas manchester athletic|apuestas manchester city real madrid|apuestas mas faciles de ganar|apuestas mas seguras|apuestas mas seguras para hoy|apuestas masters de golf|apuestas
masters de tenis|apuestas maximo goleador eurocopa|apuestas maximo goleador mundial|apuestas mejor jugador eurocopa|apuestas mejores casinos online|apuestas mexico|apuestas méxico|apuestas mexico polonia|apuestas méxico polonia|apuestas mlb|apuestas
mlb hoy|apuestas mlb las vegas|apuestas mlb para hoy|apuestas mlb pronosticos|apuestas mlb usa|apuestas
mma ufc|apuestas momios|apuestas multiples|apuestas múltiples|apuestas multiples como funcionan|apuestas multiples el gordo|apuestas multiples futbol|apuestas mundial|apuestas mundial 2026|apuestas mundial baloncesto|apuestas mundial balonmano|apuestas mundial brasil|apuestas mundial campeon|apuestas mundial ciclismo|apuestas mundial clubes|apuestas
mundial de baloncesto|apuestas mundial de ciclismo|apuestas
mundial de clubes|apuestas mundial de futbol|apuestas mundial de fútbol|apuestas mundial de rugby|apuestas mundial f1|apuestas mundial favoritos|apuestas mundial femenino|apuestas mundial formula 1|apuestas mundial futbol|apuestas mundial ganador|apuestas mundial lol|apuestas mundial
moto gp|apuestas mundial motogp|apuestas mundial rugby|apuestas mundial sub 17|apuestas
mundiales|apuestas mundialistas|apuestas mvp eurocopa|apuestas mvp nba|apuestas mvp nfl|apuestas nacionales de
colombia|apuestas nba|apuestas nba all star|apuestas nba campeon|apuestas nba consejos|apuestas nba esta noche|apuestas nba
finals|apuestas nba gratis|apuestas nba hoy|apuestas nba hoy
jugadores|apuestas nba hoy pronosticos|apuestas nba
para hoy|apuestas nba playoffs|apuestas nba pronosticos|apuestas nba pronósticos|apuestas nba pronosticos
hoy|apuestas nba tipster|apuestas nfl|apuestas nfl
hoy|apuestas nfl las vegas|apuestas nfl playoffs|apuestas nfl pronosticos|apuestas nfl pronósticos|apuestas nfl semana 4|apuestas nfl super
bowl|apuestas nhl|apuestas nhl pronosticos|apuestas octavos eurocopa|apuestas ofertas|apuestas online|apuestas online argentina|apuestas online argentina legal|apuestas online bono|apuestas online bono bienvenida|apuestas online boxeo|apuestas online
caballos|apuestas online carreras de caballos|apuestas
online casino|apuestas online champions league|apuestas online chile|apuestas online ciclismo|apuestas online colombia|apuestas online comparativa|apuestas online
con paypal|apuestas online de caballos|apuestas online deportivas|apuestas online en argentina|apuestas online en peru|apuestas online espana|apuestas
online españa|apuestas online esports|apuestas online foro|apuestas
online futbol|apuestas online futbol españa|apuestas online golf|apuestas online gratis|apuestas
online gratis sin deposito|apuestas online juegos|apuestas online mexico|apuestas online mma|apuestas online movil|apuestas online nba|apuestas online
net|apuestas online nuevas|apuestas online opiniones|apuestas online paypal|apuestas online peru|apuestas
online seguras|apuestas online sin dinero|apuestas online sin registro|apuestas online tenis|apuestas online ufc|apuestas
online uruguay|apuestas online venezuela|apuestas open britanico golf|apuestas osasuna athletic|apuestas osasuna barcelona|apuestas osasuna real madrid|apuestas osasuna sevilla|apuestas osasuna valencia|apuestas over|apuestas over 2.5|apuestas over under|apuestas paginas|apuestas pago anticipado|apuestas paises bajos ecuador|apuestas paises bajos inglaterra|apuestas países bajos
qatar|apuestas para boxeo|apuestas para champions league|apuestas para el
clasico|apuestas para el dia de hoy|apuestas para el mundial|apuestas para el partido
de hoy|apuestas para eurocopa|apuestas para europa league|apuestas para futbol|apuestas para ganar|apuestas para ganar dinero|apuestas
para ganar dinero facil|apuestas para ganar en la ruleta|apuestas para ganar la champions|apuestas para ganar
la eurocopa|apuestas para ganar la europa league|apuestas
para ganar la liga|apuestas para ganar siempre|apuestas para
hacer|apuestas para hoy|apuestas para hoy de futbol|apuestas para
hoy europa league|apuestas para hoy futbol|apuestas para juegos|apuestas para la champions league|apuestas
para la copa del rey|apuestas para la eurocopa|apuestas para la europa league|apuestas para la final de la eurocopa|apuestas para la nba hoy|apuestas para
los partidos de hoy|apuestas para partidos de hoy|apuestas para ufc|apuestas partido|apuestas partido aplazado|apuestas partido champions|apuestas partido colombia|apuestas partido
españa marruecos|apuestas partido mundial|apuestas partido suspendido|apuestas partidos|apuestas partidos champions league|apuestas
partidos csgo|apuestas partidos de futbol|apuestas
partidos de futbol hoy|apuestas partidos de hoy|apuestas partidos eurocopa|apuestas partidos futbol|apuestas partidos hoy|apuestas partidos mundial|apuestas paypal|apuestas
peleas de boxeo|apuestas peru|apuestas perú|apuestas peru brasil|apuestas peru chile|apuestas peru paraguay|apuestas peru uruguay|apuestas peru vs
chile|apuestas peru vs colombia|apuestas pichichi
eurocopa|apuestas plataforma|apuestas playoff|apuestas playoff ascenso|apuestas playoff ascenso a primera|apuestas playoff nba|apuestas playoff segunda|apuestas playoff segunda b|apuestas playoffs nba|apuestas playoffs nfl|apuestas polonia argentina|apuestas por argentina|apuestas por internet mexico|apuestas por internet para ganar dinero|apuestas por paypal|apuestas por ronda boxeo|apuestas por sistema|apuestas portugal uruguay|apuestas pre
partido|apuestas predicciones|apuestas predicciones futbol|apuestas primera division|apuestas primera division españa|apuestas promociones|apuestas pronostico|apuestas pronosticos|apuestas pronosticos deportivos|apuestas pronosticos deportivos tenis|apuestas pronosticos futbol|apuestas pronosticos
gratis|apuestas pronosticos nba|apuestas pronosticos tenis|apuestas prorroga|apuestas psg barca|apuestas psg barcelona|apuestas puntos por tarjetas|apuestas puntos tarjetas|apuestas que
aceptan paypal|apuestas que es handicap|apuestas que
puedes hacer con tu novia|apuestas que siempre ganaras|apuestas que significa|apuestas quien bajara a segunda|apuestas quién bajara
a segunda|apuestas quien gana el mundial|apuestas quien gana eurocopa|apuestas
quien gana la champions|apuestas quien gana la eurocopa|apuestas quien gana la liga|apuestas quien ganara el mundial|apuestas quién ganará el mundial|apuestas quien ganara la champions|apuestas quien ganara la eurocopa|apuestas quien ganara la liga|apuestas rayo barcelona|apuestas real madrid|apuestas real madrid arsenal|apuestas real madrid athletic|apuestas real madrid atletico|apuestas real madrid atletico champions|apuestas real madrid atletico
de madrid|apuestas real madrid atlético de madrid|apuestas real madrid
atletico madrid|apuestas real madrid barcelona|apuestas real madrid bayern|apuestas real madrid
betis|apuestas real madrid borussia|apuestas real madrid campeon champions|apuestas
real madrid celta|apuestas real madrid champions|apuestas real madrid city|apuestas real madrid girona|apuestas real madrid hoy|apuestas real madrid liverpool|apuestas real madrid manchester city|apuestas real madrid osasuna|apuestas
real madrid real sociedad|apuestas real madrid valencia|apuestas real madrid villarreal|apuestas real madrid vs arsenal|apuestas real madrid vs atletico|apuestas real madrid vs atlético|apuestas real madrid vs atletico madrid|apuestas real madrid vs barcelona|apuestas
real madrid vs betis|apuestas real madrid vs sevilla|apuestas real madrid vs valencia|apuestas real sociedad|apuestas real sociedad athletic|apuestas real sociedad barcelona|apuestas real sociedad betis|apuestas
real sociedad psg|apuestas real sociedad real madrid|apuestas real sociedad valencia|apuestas recomendadas hoy|apuestas regalo
de bienvenida|apuestas registro|apuestas resultado exacto|apuestas resultados|apuestas resultados eurocopa|apuestas
retirada tenis|apuestas roma barcelona|apuestas roma sevilla|apuestas rugby|apuestas rugby mundial|apuestas rugby world
cup|apuestas ruleta seguras|apuestas segunda|apuestas segunda b|apuestas
segunda division|apuestas segunda división|apuestas segunda division b|apuestas segunda division españa|apuestas seguras|apuestas seguras baloncesto|apuestas seguras calculadora|apuestas seguras en la ruleta|apuestas seguras eurocopa|apuestas seguras foro|apuestas seguras futbol|apuestas
seguras futbol hoy|apuestas seguras gratis|apuestas seguras
hoy|apuestas seguras hoy futbol|apuestas seguras nba|apuestas
seguras nba hoy|apuestas seguras para este fin de semana|apuestas
seguras para ganar dinero|apuestas seguras para hoy|apuestas seguras para hoy fútbol|apuestas seguras para hoy pronósticos|apuestas seguras para mañana|apuestas seguras ruleta|apuestas seguras telegram|apuestas seguras tenis|apuestas semifinales eurocopa|apuestas senegal paises bajos|apuestas sevilla|apuestas sevilla athletic|apuestas sevilla atletico de madrid|apuestas sevilla barcelona|apuestas sevilla betis|apuestas sevilla campeon liga|apuestas
sevilla celta|apuestas sevilla gana la liga|apuestas sevilla
girona|apuestas sevilla inter|apuestas sevilla jugador|apuestas
sevilla juventus|apuestas sevilla leganes|apuestas
sevilla madrid|apuestas sevilla manchester united|apuestas sevilla osasuna|apuestas sevilla
real madrid|apuestas sevilla real sociedad|apuestas sevilla roma|apuestas sevilla valencia|apuestas
significa|apuestas simples ejemplos|apuestas simples o combinadas|apuestas sin deposito|apuestas sin deposito inicial|apuestas sin deposito minimo|apuestas sin dinero|apuestas
sin dinero real|apuestas sin empate|apuestas sin empate que significa|apuestas sin ingreso minimo|apuestas sin registro|apuestas
sistema|apuestas sistema calculadora|apuestas sistema como funciona|apuestas sistema trixie|apuestas sociedad|apuestas sorteo copa del rey|apuestas stake|apuestas stake
10|apuestas stake 10 hoy|apuestas super bowl favorito|apuestas super rugby|apuestas supercopa españa|apuestas superliga argentina|apuestas tarjeta roja|apuestas tarjetas|apuestas tarjetas amarillas|apuestas tenis|apuestas tenis atp|apuestas tenis
consejos|apuestas tenis copa davis|apuestas tenis
de mesa|apuestas tenis de mesa pronosticos|apuestas tenis en vivo|apuestas tenis femenino|apuestas
tenis hoy|apuestas tenis itf|apuestas tenis pronosticos|apuestas tenis pronósticos|apuestas tenis retirada|apuestas tenis roland garros|apuestas tenis seguras|apuestas tenis wimbledon|apuestas tenis wta|apuestas tercera division|apuestas tercera
division españa|apuestas tipos|apuestas tips|apuestas tipster|apuestas tipster para hoy|apuestas topuria holloway cuotas|apuestas torneos de golf|apuestas torneos de tenis|apuestas
trucos|apuestas uefa champions league|apuestas uefa europa league|apuestas ufc|apuestas ufc chile|apuestas ufc como funciona|apuestas ufc hoy|apuestas ufc ilia topuria|apuestas ufc online|apuestas ufc pronósticos|apuestas ufc telegram|apuestas ufc
topuria|apuestas under over|apuestas unionistas villarreal|apuestas uruguay|apuestas uruguay colombia|apuestas uruguay corea|apuestas uruguay vs colombia|apuestas us open golf|apuestas us open tenis|apuestas valencia|apuestas valencia barcelona|apuestas valencia betis|apuestas valencia madrid|apuestas valencia
real madrid|apuestas valladolid barcelona|apuestas valladolid valencia|apuestas valor app|apuestas valor en directo|apuestas
valor galgos|apuestas venezuela|apuestas venezuela argentina|apuestas venezuela bolivia|apuestas venezuela ecuador|apuestas villarreal|apuestas villarreal athletic|apuestas villarreal barcelona|apuestas villarreal bayern|apuestas villarreal betis|apuestas villarreal liverpool|apuestas villarreal manchester|apuestas villarreal manchester united|apuestas villarreal vs real madrid|apuestas virtuales|apuestas virtuales colombia|apuestas virtuales futbol|apuestas virtuales
sin dinero|apuestas vivo|apuestas vuelta a españa|apuestas vuelta españa|apuestas william hill partidos de hoy|apuestas y casino|apuestas y
casinos|apuestas y juegos de azar|apuestas y pronosticos|apuestas y
pronosticos de futbol|apuestas y pronosticos deportivos|apuestas y resultados|apuestas-deportivas|apuestas-deportivas.es pronosticos|arbitro nba apuestas|argentina apuestas|argentina
colombia apuestas|argentina croacia apuestas|argentina francia apuestas|argentina
mexico apuestas|argentina peru apuestas|argentina uruguay
apuestas|argentina vs bolivia apuestas|argentina vs
chile apuestas|argentina vs colombia apuestas|argentina vs francia apuestas|argentina vs.
colombia apuestas|asi se gana en las apuestas
deportivas|asiatico apuestas|asiatico en apuestas|asiaticos apuestas|athletic barcelona apuestas|athletic manchester united apuestas|athletic osasuna apuestas|athletic real
madrid apuestas|atletico barcelona apuestas|atletico de madrid apuestas|atlético de madrid apuestas|atletico de madrid real madrid apuestas|atletico
de madrid vs barcelona apuestas|atletico madrid real madrid apuestas|atletico madrid vs
real madrid apuestas|atletico real madrid apuestas|atletico vs real madrid apuestas|avisador de cuotas apuestas|bajada de cuotas apuestas|baloncesto apuestas|barbastro barcelona
apuestas|barca apuestas|barca bayern apuestas|barca inter apuestas|barca madrid
apuestas|barça madrid apuestas|barca vs atletico apuestas|barca vs madrid apuestas|barca vs real madrid apuestas|barcelona – real madrid
apuestas|barcelona apuestas|barcelona atletico apuestas|barcelona atletico
de madrid apuestas|barcelona atletico madrid apuestas|barcelona betis apuestas|barcelona casa de apuestas|barcelona inter apuestas|barcelona psg apuestas|barcelona real madrid apuestas|barcelona real
sociedad apuestas|barcelona sevilla apuestas|barcelona valencia apuestas|barcelona vs athletic bilbao apuestas|barcelona vs atlético madrid apuestas|barcelona vs betis apuestas|barcelona vs
celta de vigo apuestas|barcelona vs espanyol apuestas|barcelona vs girona apuestas|barcelona
vs madrid apuestas|barcelona vs real madrid apuestas|barcelona vs real sociedad apuestas|barcelona vs sevilla apuestas|barcelona vs villarreal
apuestas|base de datos cuotas apuestas deportivas|bayern real madrid apuestas|beisbol apuestas|best america apuestas|bet
apuestas chile|bet apuestas en vivo|betis – chelsea
apuestas|betis apuestas|betis barcelona apuestas|betis chelsea apuestas|betis madrid apuestas|betis
sevilla apuestas|betsson tu sitio de apuestas online|blog apuestas baloncesto|blog apuestas
ciclismo|blog apuestas nba|blog apuestas tenis|blog de apuestas de tenis|bono apuestas|bono apuestas deportivas|bono
apuestas deportivas sin deposito|bono apuestas gratis|bono
apuestas gratis sin deposito|bono apuestas sin deposito|bono bienvenida apuestas|bono bienvenida apuestas deportivas|bono bienvenida apuestas
españa|bono bienvenida apuestas sin deposito|bono bienvenida apuestas sin depósito|bono bienvenida casa apuestas|bono bienvenida
casa de apuestas|bono bienvenida marca apuestas|bono casa apuestas|bono casa
de apuestas|bono casa de apuestas sin ingreso|bono casas
de apuestas|bono de apuestas|bono de apuestas gratis sin deposito|bono de bienvenida apuestas|bono de
bienvenida apuestas deportivas|bono de bienvenida casa de apuestas|bono de bienvenida casas de apuestas|bono de casas de apuestas|bono
de registro apuestas|bono de registro apuestas deportivas|bono de registro casa de apuestas|bono gratis apuestas|bono marca apuestas|bono por registro apuestas|bono
por registro apuestas deportivas|bono por registro
casa de apuestas|bono registro apuestas|bono sin deposito apuestas|bono sin depósito apuestas|bono sin deposito apuestas deportivas|bono sin depósito apuestas deportivas|bono sin deposito
casa de apuestas|bono sin deposito marca apuestas|bono sin ingreso apuestas|bono sin ingreso apuestas deportivas|bonos apuestas|bonos apuestas colombia|bonos apuestas deportivas|bonos apuestas deportivas sin deposito|bonos apuestas gratis|bonos apuestas sin deposito|bonos apuestas
sin depósito|bonos bienvenida apuestas|bonos bienvenida casas apuestas|bonos bienvenida casas de apuestas|bonos casa de apuestas|bonos casas
apuestas|bonos casas de apuestas|bonos casas de apuestas
colombia|bonos casas de apuestas deportivas|bonos casas de apuestas
españa|bonos casas de apuestas nuevas|bonos casas de apuestas sin deposito|bonos casas de apuestas sin depósito|bonos de apuestas|bonos de apuestas deportivas|bonos de
apuestas gratis|bonos de apuestas sin deposito|bonos de bienvenida
apuestas|bonos de bienvenida apuestas deportivas|bonos de bienvenida
casa de apuestas|bonos de bienvenida casas de apuestas|bonos de bienvenida de casas de apuestas|bonos de bienvenida
en casas de apuestas|bonos de casas de apuestas|bonos de casas de apuestas
sin deposito|bonos en casa de apuestas|bonos en casas
de apuestas sin deposito|bonos gratis apuestas|bonos gratis apuestas deportivas|bonos gratis casas de apuestas|bonos gratis sin deposito apuestas|bonos
paginas de apuestas|bonos registro casas de apuestas|bonos sin deposito
apuestas|bonos sin depósito apuestas|bonos sin deposito apuestas deportivas|bonos sin deposito
casas de apuestas|bot de apuestas deportivas gratis|boxeo apuestas|brasil colombia apuestas|brasil peru apuestas|brasil vs
colombia apuestas|buenas apuestas para hoy|buscador cuotas apuestas|buscador de
apuestas seguras|buscador de cuotas apuestas|buscador de cuotas
de apuestas|buscar apuestas seguras|caballos apuestas|calculador de apuestas|calculador de cuotas apuestas|calculadora
apuestas|calculadora apuestas combinadas|calculadora apuestas de sistema|calculadora
apuestas deportivas|calculadora apuestas deportivas seguras|calculadora
apuestas multiples|calculadora apuestas segura|calculadora apuestas seguras|calculadora apuestas
sistema|calculadora apuestas yankee|calculadora arbitraje
apuestas|calculadora cubrir apuestas|calculadora cuotas apuestas|calculadora de apuestas|calculadora de apuestas combinadas|calculadora de apuestas de futbol|calculadora de apuestas de sistema|calculadora de apuestas deportivas|calculadora de apuestas multiples|calculadora de apuestas seguras|calculadora de apuestas
sistema|calculadora de apuestas surebets|calculadora
de arbitraje apuestas|calculadora de cuotas apuestas|calculadora de cuotas de apuestas|calculadora para apuestas deportivas|calculadora poisson apuestas|calculadora poisson apuestas deportivas|calculadora poisson para apuestas|calculadora scalping apuestas deportivas|calculadora sistema apuestas|calculadora stake apuestas|calculadora trading apuestas|calcular apuestas|calcular
apuestas deportivas|calcular apuestas futbol|calcular
apuestas sistema|calcular cuotas apuestas|calcular cuotas apuestas combinadas|calcular cuotas apuestas deportivas|calcular cuotas de
apuestas|calcular ganancias apuestas deportivas|calcular momios apuestas|calcular probabilidad cuota apuestas|calcular stake apuestas|calcular unidades apuestas|calcular yield apuestas|calculo de apuestas|calculo
de apuestas deportivas|cambio de cuotas apuestas|campeon champions apuestas|campeon eurocopa apuestas|campeon liga apuestas|campeon nba apuestas|canales de apuestas gratis|carrera de caballos
apuestas|carrera de caballos apuestas juego|carrera de caballos con apuestas|carrera de galgos
apuestas|carreras de caballos apuestas|carreras de caballos apuestas online|carreras de caballos con apuestas|carreras de caballos juegos de apuestas|carreras de galgos apuestas|carreras de galgos apuestas online|carreras de galgos apuestas
trucos|carreras galgos apuestas|casa apuestas argentina|casa apuestas atletico
de madrid|casa apuestas barcelona|casa apuestas betis|casa apuestas bono
bienvenida|casa apuestas bono gratis|casa apuestas bono sin deposito|casa apuestas cerca
de mi|casa apuestas chile|casa apuestas colombia|casa apuestas con mejores cuotas|casa apuestas deportivas|casa apuestas españa|casa
apuestas española|casa apuestas eurocopa|casa apuestas futbol|casa apuestas mejores
cuotas|casa apuestas mundial|casa apuestas nueva|casa apuestas
nuevas|casa apuestas online|casa apuestas peru|casa apuestas valencia|casa de apuestas|casa de
apuestas 10 euros gratis|casa de apuestas argentina|casa de apuestas atletico
de madrid|casa de apuestas baloncesto|casa de apuestas barcelona|casa de apuestas beisbol|casa
de apuestas betis|casa de apuestas bono|casa de apuestas bono bienvenida|casa de apuestas
bono de bienvenida|casa de apuestas bono gratis|casa de apuestas bono por
registro|casa de apuestas bono sin deposito|casa de apuestas boxeo|casa de apuestas caballos|casa de apuestas carreras de caballos|casa de apuestas cerca de mi|casa de apuestas cerca de mí|casa de apuestas
champions league|casa de apuestas chile|casa de apuestas ciclismo|casa de apuestas colombia|casa de apuestas con bono de bienvenida|casa de apuestas con bono sin deposito|casa de
apuestas con cuotas mas altas|casa de apuestas con esports|casa de apuestas con las mejores cuotas|casa de apuestas con licencia en españa|casa de apuestas con mejores cuotas|casa
de apuestas con pago anticipado|casa de apuestas con paypal|casa de apuestas copa america|casa de apuestas
de caballos|casa de apuestas de colombia|casa de apuestas de españa|casa de apuestas de
futbol|casa de apuestas de fútbol|casa de apuestas de futbol peru|casa de apuestas de peru|casa
de apuestas del madrid|casa de apuestas del real
madrid|casa de apuestas deportivas|casa de apuestas deportivas cerca de mi|casa de apuestas deportivas en argentina|casa de apuestas deportivas en chile|casa de apuestas deportivas en colombia|casa de apuestas deportivas en españa|casa de apuestas deportivas en madrid|casa de apuestas deportivas españa|casa
de apuestas deportivas españolas|casa de apuestas deportivas madrid|casa
de apuestas deportivas mexico|casa de apuestas deportivas online|casa de apuestas deportivas peru|casa de apuestas deposito 5 euros|casa
de apuestas deposito minimo|casa de apuestas deposito minimo 1 euro|casa de
apuestas depósito mínimo 1 euro|casa de apuestas en españa|casa de apuestas en linea|casa de apuestas en madrid|casa de apuestas en perú|casa de apuestas
en vivo|casa de apuestas españa|casa de apuestas españa inglaterra|casa de
apuestas española|casa de apuestas españolas|casa de apuestas esports|casa
de apuestas eurocopa|casa de apuestas europa league|casa de apuestas f1|casa de apuestas formula 1|casa de
apuestas futbol|casa de apuestas ingreso minimo|casa de apuestas ingreso minimo 1 euro|casa de apuestas ingreso mínimo 1 euro|casa de apuestas legales|casa de apuestas
legales en colombia|casa de apuestas legales en españa|casa de
apuestas libertadores|casa de apuestas liga española|casa de apuestas
madrid|casa de apuestas mas segura|casa de apuestas mejores|casa de apuestas méxico|casa de apuestas minimo 5 euros|casa de
apuestas mlb|casa de apuestas mundial|casa de apuestas nba|casa de apuestas
nfl|casa de apuestas nueva|casa de apuestas nuevas|casa de apuestas oficial del real madrid|casa de apuestas oficial real madrid|casa de apuestas online|casa
de apuestas online argentina|casa de apuestas online chile|casa de apuestas online españa|casa de
apuestas online mexico|casa de apuestas online paraguay|casa de apuestas online peru|casa de
apuestas online usa|casa de apuestas online venezuela|casa de
apuestas pago anticipado|casa de apuestas para boxeo|casa de apuestas para ufc|casa de apuestas peru|casa de
apuestas perú|casa de apuestas peru online|casa de apuestas por paypal|casa de apuestas promociones|casa de apuestas que regalan dinero|casa de
apuestas real madrid|casa de apuestas regalo de bienvenida|casa de apuestas sevilla|casa de apuestas sin dinero|casa de apuestas sin ingreso minimo|casa de apuestas sin licencia en españa|casa de apuestas sin minimo de ingreso|casa de apuestas stake|casa de apuestas tenis|casa de apuestas ufc|casa de apuestas valencia|casa de apuestas venezuela|casa de apuestas
virtuales|casa de apuestas vive la suerte|casa oficial de apuestas del real madrid|casas apuestas asiaticas|casas apuestas bono sin deposito|casas apuestas
bonos sin deposito|casas apuestas caballos|casas apuestas chile|casas apuestas
ciclismo|casas apuestas con licencia|casas apuestas con licencia en españa|casas apuestas deportivas|casas apuestas deportivas
colombia|casas apuestas deportivas españa|casas apuestas deportivas españolas|casas apuestas deportivas nuevas|casas
apuestas españa|casas apuestas españolas|casas apuestas
esports|casas apuestas eurocopa|casas apuestas golf|casas apuestas ingreso minimo 5 euros|casas apuestas legales|casas apuestas legales españa|casas apuestas licencia|casas apuestas
licencia españa|casas apuestas mexico|casas apuestas mundial|casas apuestas
nba|casas apuestas nuevas|casas apuestas nuevas españa|casas apuestas ofertas|casas apuestas online|casas apuestas paypal|casas
apuestas peru|casas apuestas sin licencia|casas apuestas tenis|casas asiaticas apuestas|casas de apuestas|casas de apuestas 5 euros|casas de apuestas app|casas de
apuestas argentinas|casas de apuestas asiaticas|casas de
apuestas baloncesto|casas de apuestas barcelona|casas de
apuestas bono bienvenida|casas de apuestas bono de bienvenida|casas de apuestas bono por registro|casas de apuestas bono sin deposito|casas de apuestas bono sin ingreso|casas
de apuestas bonos|casas de apuestas bonos de bienvenida|casas de
apuestas bonos gratis|casas de apuestas bonos
sin deposito|casas de apuestas boxeo|casas de apuestas caballos|casas de apuestas carreras de caballos|casas de
apuestas casino|casas de apuestas casino online|casas de apuestas cerca de mi|casas de apuestas champions
league|casas de apuestas chile|casas de apuestas ciclismo|casas
de apuestas colombia|casas de apuestas com|casas de apuestas con app|casas de apuestas con apuestas
gratis|casas de apuestas con bono|casas de apuestas con bono de
bienvenida|casas de apuestas con bono de registro|casas de apuestas con bono por registro|casas de apuestas con bono sin deposito|casas de
apuestas con bonos|casas de apuestas con bonos gratis|casas de
apuestas con bonos sin deposito|casas de apuestas con deposito minimo|casas de
apuestas con esports|casas de apuestas con handicap asiatico|casas de apuestas con licencia|casas de apuestas con licencia en españa|casas de apuestas con licencia españa|casas de apuestas con licencia española|casas de apuestas con mejores cuotas|casas de apuestas
con pago anticipado|casas de apuestas con paypal|casas de apuestas con paypal en perú|casas de apuestas con promociones|casas de apuestas con ruleta en vivo|casas de apuestas copa del rey|casas de
apuestas de caballos|casas de apuestas de españa|casas de apuestas de futbol|casas de apuestas de fútbol|casas de apuestas de peru|casas de apuestas deportivas|casas de
apuestas deportivas asiaticas|casas de apuestas deportivas colombia|casas de apuestas
deportivas comparativa|casas de apuestas deportivas con paypal|casas de apuestas deportivas en chile|casas de apuestas deportivas en españa|casas de apuestas deportivas en linea|casas
de apuestas deportivas en madrid|casas de apuestas deportivas en mexico|casas de apuestas deportivas en peru|casas de apuestas deportivas en sevilla|casas de apuestas deportivas en valencia|casas de apuestas deportivas españa|casas de apuestas deportivas españolas|casas de apuestas deportivas legales|casas de apuestas deportivas madrid|casas de apuestas
deportivas mexico|casas de apuestas deportivas nuevas|casas de apuestas deportivas online|casas de apuestas deportivas peru|casas de apuestas deportivas perú|casas de apuestas deposito minimo 1 euro|casas de apuestas depósito mínimo 1 euro|casas de
apuestas dinero gratis|casas de apuestas en argentina|casas de apuestas en barcelona|casas de apuestas en chile|casas de apuestas en colombia|casas de apuestas en españa|casas de apuestas
en españa online|casas de apuestas en linea|casas de apuestas en madrid|casas de
apuestas en méxico|casas de apuestas en peru|casas de apuestas en perú|casas de apuestas en sevilla|casas de apuestas
en uruguay|casas de apuestas en valencia|casas de apuestas en venezuela|casas de apuestas equipos de futbol|casas
de apuestas españa|casas de apuestas españa alemania|casas de
apuestas españa inglaterra|casas de apuestas españa licencia|casas de apuestas españa nuevas|casas de
apuestas españa online|casas de apuestas española|casas de apuestas españolas|casas de apuestas españolas con licencia|casas de apuestas españolas online|casas de apuestas esports|casas de apuestas eurocopa|casas de apuestas eurocopa 2024|casas de
apuestas europa league|casas de apuestas f1|casas de apuestas fisicas en barcelona|casas de apuestas fisicas en españa|casas de apuestas formula
1|casas de apuestas fuera de españa|casas de apuestas futbol|casas de apuestas fútbol|casas
de apuestas futbol españa|casas de apuestas ganador eurocopa|casas de apuestas gratis|casas de apuestas ingreso
minimo|casas de apuestas ingreso minimo 1 euro|casas de apuestas ingreso
minimo 5 euros|casas de apuestas inter barcelona|casas de apuestas
legales|casas de apuestas legales en colombia|casas de apuestas legales en españa|casas
de apuestas legales en mexico|casas de apuestas legales
españa|casas de apuestas legales mx|casas de apuestas licencia|casas de apuestas licencia españa|casas de apuestas lista|casas de apuestas madrid|casas de apuestas mas seguras|casas de apuestas mejores bonos|casas
de apuestas mejores cuotas|casas de apuestas mexico|casas de apuestas méxico|casas de apuestas minimo 5 euros|casas de apuestas mlb|casas
de apuestas mundial|casas de apuestas mundial baloncesto|casas de apuestas mundiales|casas de apuestas nba|casas de apuestas no reguladas en españa|casas de apuestas
nueva ley|casas de apuestas nuevas|casas de apuestas
nuevas en colombia|casas de apuestas nuevas en españa|casas de apuestas nuevas españa|casas de apuestas ofertas|casas de apuestas
online|casas de apuestas online argentina|casas de apuestas online colombia|casas de apuestas online deportivas|casas de apuestas online ecuador|casas de
apuestas online en argentina|casas de apuestas
online en chile|casas de apuestas online en colombia|casas de apuestas online en españa|casas de
apuestas online en mexico|casas de apuestas online españa|casas de
apuestas online mas fiables|casas de apuestas online mexico|casas de apuestas online nuevas|casas de apuestas online peru|casas
de apuestas online usa|casas de apuestas online venezuela|casas de apuestas pago paypal|casas de apuestas
para ufc|casas de apuestas paypal|casas de apuestas peru bono sin deposito|casas de apuestas
Your comment is awaiting moderation.
salesvelocity.click – Loved the layout today; clean, simple, and genuinely user-friendly overall.
Your comment is awaiting moderation.
promovoltage.click – Content reads clearly, helpful examples made concepts easy to grasp.
Your comment is awaiting moderation.
clickdynamics.click – Navigation felt smooth, found everything quickly without any confusing steps.
Your comment is awaiting moderation.
fashiondailycorner.click – Fashion picks look amazing, really enjoyed exploring new arrivals this morning.
Your comment is awaiting moderation.
scalemaster.click – Overall, professional vibe here; trustworthy, polished, and pleasantly minimal throughout.
Your comment is awaiting moderation.
adscalehub.click – Overall, professional vibe here; trustworthy, polished, and pleasantly minimal throughout.
Your comment is awaiting moderation.
https://webasto-ufa.ru/index.php?route=journal3%2Fblog%2Fpost&journal_blog_post_id=12
Your comment is awaiting moderation.
(10 euros gratis apuestas|10 mejores casas de apuestas|10 trucos para ganar apuestas|15 euros gratis marca apuestas|1×2 apuestas|1×2 apuestas
deportivas|1×2 apuestas que significa|1×2 en apuestas|1×2 en apuestas que significa|1×2 que significa en apuestas|5 euros gratis apuestas|9 apuestas
que siempre ganaras|a partir de cuanto se declara apuestas|actividades de juegos de azar y apuestas|ad apuestas
deportivas|aleksandre topuria ufc apuestas|algoritmo para ganar apuestas deportivas|america apuestas|análisis nba apuestas|aplicacion android
apuestas deportivas|aplicacion apuestas deportivas|aplicacion apuestas deportivas android|aplicación de apuestas online|aplicacion para hacer
apuestas|aplicacion para hacer apuestas de
futbol|aplicación para hacer apuestas de fútbol|aplicaciones apuestas
deportivas android|aplicaciones apuestas deportivas gratis|aplicaciones de apuestas android|aplicaciones de apuestas de fútbol|aplicaciones de apuestas deportivas|aplicaciones de apuestas deportivas peru|aplicaciones de
apuestas deportivas perú|aplicaciones de apuestas en colombia|aplicaciones de apuestas gratis|aplicaciones de apuestas online|aplicaciones de
apuestas seguras|aplicaciones de apuestas sin dinero|aplicaciones para
hacer apuestas|apostar seguro apuestas deportivas|app android apuestas deportivas|app apuestas|app apuestas android|app apuestas de futbol|app apuestas deportivas|app apuestas deportivas android|app apuestas deportivas argentina|app apuestas deportivas colombia|app apuestas deportivas ecuador|app
apuestas deportivas españa|app apuestas deportivas gratis|app apuestas entre amigos|app apuestas futbol|app apuestas gratis|app apuestas sin dinero|app casa de apuestas|app casas de apuestas|app control apuestas|app de apuestas|app de apuestas android|app de apuestas casino|app de apuestas colombia|app de apuestas con bono de bienvenida|app
de apuestas de futbol|app de apuestas deportivas|app de apuestas deportivas android|app de apuestas deportivas argentina|app de apuestas deportivas colombia|app de apuestas deportivas en españa|app de apuestas deportivas
peru|app de apuestas deportivas perú|app de apuestas deportivas
sin dinero|app de apuestas ecuador|app de apuestas en colombia|app
de apuestas en españa|app de apuestas en venezuela|app de apuestas futbol|app de apuestas gratis|app de apuestas online|app de
apuestas para android|app de apuestas para ganar dinero|app de apuestas peru|app de apuestas reales|app de casas de apuestas|app
marca apuestas android|app moviles de apuestas|app para apuestas|app para apuestas de futbol|app para apuestas deportivas|app para apuestas deportivas en español|app para ganar apuestas deportivas|app
para hacer apuestas|app para hacer apuestas deportivas|app para hacer apuestas
entre amigos|app para llevar control de apuestas|app pronosticos
apuestas deportivas|app versus apuestas|apps apuestas
mundial|apps de apuestas|apps de apuestas con bono de bienvenida|apps
de apuestas de futbol|apps de apuestas deportivas peru|apps de apuestas mexico|apps para apuestas|aprender a hacer apuestas deportivas|aprender hacer apuestas deportivas|apuesta del dia apuestas deportivas|apuestas 10 euros gratis|apuestas 100 seguras|apuestas 1×2|apuestas 1X2|apuestas 2 division|apuestas 3 division|apuestas
a caballos|apuestas a carreras de caballos|apuestas a colombia|apuestas a corners|apuestas
a ganar|apuestas a jugadores nba|apuestas a la baja|apuestas a la nfl|apuestas al barcelona|apuestas al dia|apuestas al empate|apuestas al mundial|apuestas al tenis wta|apuestas
alaves barcelona|apuestas alcaraz hoy|apuestas alemania españa|apuestas alonso campeon del mundo|apuestas altas y bajas|apuestas altas y bajas nfl|apuestas ambos equipos marcan|apuestas
america|apuestas android|apuestas anillo
nba|apuestas antes del mundial|apuestas anticipadas|apuestas anticipadas nba|apuestas
apps|apuestas arabia argentina|apuestas argentina|apuestas
argentina campeon del mundo|apuestas argentina canada|apuestas argentina colombia|apuestas argentina croacia|apuestas argentina españa|apuestas argentina francia|apuestas argentina francia cuanto paga|apuestas argentina
francia mundial|apuestas argentina gana el mundial|apuestas argentina gana mundial|apuestas argentina holanda|apuestas argentina mexico|apuestas argentina méxico|apuestas argentina mundial|apuestas argentina online|apuestas
argentina paises bajos|apuestas argentina polonia|apuestas argentina uruguay|apuestas
argentina vs australia|apuestas argentina vs colombia|apuestas argentina vs francia|apuestas argentina vs peru|apuestas argentinas|apuestas arsenal
real madrid|apuestas ascenso a primera division|apuestas ascenso a segunda|apuestas asiaticas|apuestas asiatico|apuestas athletic|apuestas athletic atletico|apuestas athletic barça|apuestas athletic barcelona|apuestas athletic betis|apuestas athletic manchester|apuestas
athletic manchester united|apuestas athletic osasuna|apuestas athletic real|apuestas athletic real madrid|apuestas athletic real sociedad|apuestas
athletic real sociedad final|apuestas athletic roma|apuestas athletic sevilla|apuestas athletic valencia|apuestas atletico|apuestas atletico barcelona|apuestas atletico barsa|apuestas atletico campeon champions|apuestas atletico campeon de
liga|apuestas atlético copenhague|apuestas atletico de
madrid|apuestas atlético de madrid|apuestas atletico de madrid barcelona|apuestas atletico de madrid gana la liga|apuestas atletico de
madrid real madrid|apuestas atlético de madrid real madrid|apuestas atletico
de madrid vs barcelona|apuestas atletico madrid|apuestas atletico madrid real madrid|apuestas atletico madrid vs barcelona|apuestas atletico real madrid|apuestas atletico real madrid champions|apuestas atletismo|apuestas bajas|apuestas baloncesto|apuestas baloncesto acb|apuestas baloncesto handicap|apuestas baloncesto hoy|apuestas baloncesto juegos olimpicos|apuestas baloncesto nba|apuestas baloncesto pronostico|apuestas baloncesto pronósticos|apuestas baloncesto prorroga|apuestas barca|apuestas barca athletic|apuestas barca atletico|apuestas barca bayern|apuestas barca bayern munich|apuestas barca girona|apuestas barca hoy|apuestas barça hoy|apuestas
barca inter|apuestas barca juventus|apuestas barca madrid|apuestas
barça madrid|apuestas barca real madrid|apuestas barca vs juve|apuestas barca
vs madrid|apuestas barca vs psg|apuestas barcelona|apuestas barcelona alaves|apuestas barcelona athletic|apuestas barcelona atletico|apuestas barcelona
atletico de madrid|apuestas barcelona atlético de madrid|apuestas barcelona atletico
madrid|apuestas barcelona bayern|apuestas barcelona betis|apuestas barcelona
campeon de liga|apuestas barcelona celta|apuestas barcelona
espanyol|apuestas barcelona gana la champions|apuestas barcelona girona|apuestas barcelona granada|apuestas barcelona hoy|apuestas barcelona inter|apuestas barcelona madrid|apuestas
barcelona osasuna|apuestas barcelona psg|apuestas barcelona real madrid|apuestas barcelona
real sociedad|apuestas barcelona sevilla|apuestas barcelona
valencia|apuestas barcelona villarreal|apuestas barcelona vs atletico
madrid|apuestas barcelona vs madrid|apuestas barcelona vs real madrid|apuestas barsa
madrid|apuestas basket hoy|apuestas bayern barcelona|apuestas
bayern vs barcelona|apuestas beisbol|apuestas béisbol|apuestas beisbol mlb|apuestas beisbol pronosticos|apuestas beisbol venezolano|apuestas betis|apuestas betis
– chelsea|apuestas betis barcelona|apuestas betis chelsea|apuestas betis fiorentina|apuestas betis girona|apuestas betis madrid|apuestas betis mallorca|apuestas
betis real madrid|apuestas betis real sociedad|apuestas betis sevilla|apuestas betis valencia|apuestas betis valladolid|apuestas betis vs valencia|apuestas betplay hoy
colombia|apuestas betsson peru|apuestas bienvenida|apuestas billar online|apuestas bolivia vs colombia|apuestas bono|apuestas
bono bienvenida|apuestas bono de bienvenida|apuestas bono
de bienvenida sin deposito|apuestas bono gratis|apuestas bono sin deposito|apuestas bonos sin deposito|apuestas borussia real madrid|apuestas boxeo|apuestas boxeo de campeonato|apuestas
boxeo españa|apuestas boxeo español|apuestas boxeo
femenino olimpiadas|apuestas boxeo hoy|apuestas boxeo online|apuestas brasil colombia|apuestas brasil peru|apuestas brasil
uruguay|apuestas brasil vs colombia|apuestas
brasil vs peru|apuestas caballos|apuestas caballos colocado|apuestas caballos españa|apuestas caballos hipodromo|apuestas caballos
hoy|apuestas caballos madrid|apuestas caballos online|apuestas caballos sanlucar de barrameda|apuestas caballos
zarzuela|apuestas calculador|apuestas campeon|apuestas campeon champions|apuestas campeón champions|apuestas campeon champions 2025|apuestas campeon champions league|apuestas campeon conference league|apuestas campeon copa america|apuestas campeon copa del rey|apuestas campeon de champions|apuestas campeon de
la champions|apuestas campeon de liga|apuestas campeon del mundo|apuestas campeon eurocopa|apuestas
campeón eurocopa|apuestas campeon europa league|apuestas campeon f1|apuestas campeon f1 2025|apuestas campeon formula 1|apuestas campeon libertadores|apuestas campeon liga|apuestas campeon liga bbva|apuestas campeon liga española|apuestas campeon liga santander|apuestas campeon motogp 2025|apuestas campeon mundial|apuestas campeón mundial|apuestas campeon mundial baloncesto|apuestas campeon nba|apuestas campeón nba|apuestas
campeon premier|apuestas campeon premier league|apuestas
campeon roland garros|apuestas campeonato f1|apuestas campeonatos de
futbol|apuestas carrera de caballos|apuestas carrera de caballos hoy|apuestas carrera
de caballos nocturnas|apuestas carrera de galgos fin de semana|apuestas carrera de galgos hoy|apuestas
carrera de galgos nocturnas|apuestas carreras caballos|apuestas
carreras caballos sanlucar|apuestas carreras de caballos|apuestas carreras
de caballos en directo|apuestas carreras de caballos en vivo|apuestas carreras de caballos
españa|apuestas carreras de caballos hoy|apuestas
carreras de caballos nacionales|apuestas carreras de caballos nocturnas|apuestas carreras
de caballos online|apuestas carreras de caballos sanlucar|apuestas carreras
de caballos sanlúcar|apuestas carreras de galgos|apuestas carreras de
galgos en vivo|apuestas carreras de galgos nocturnas|apuestas carreras de galgos pre partido|apuestas casino|apuestas casino barcelona|apuestas casino futbol|apuestas casino
gran madrid|apuestas casino gratis|apuestas casino madrid|apuestas casino online|apuestas
casino online argentina|apuestas casinos|apuestas casinos online|apuestas
celta|apuestas celta barcelona|apuestas celta betis|apuestas celta
eibar|apuestas celta espanyol|apuestas celta granada|apuestas celta madrid|apuestas celta manchester|apuestas celta real madrid|apuestas champion league|apuestas champions foro|apuestas champions hoy|apuestas champions league|apuestas champions league – pronósticos|apuestas champions league 2025|apuestas champions league hoy|apuestas champions league pronosticos|apuestas champions league pronósticos|apuestas champions pronosticos|apuestas chelsea barcelona|apuestas chelsea betis|apuestas
chile|apuestas chile peru|apuestas chile venezuela|apuestas chile vs
colombia|apuestas chile vs uruguay|apuestas ciclismo|apuestas ciclismo en vivo|apuestas ciclismo femenino|apuestas
ciclismo tour francia|apuestas ciclismo vuelta|apuestas ciclismo vuelta a españa|apuestas
ciclismo vuelta españa|apuestas city madrid|apuestas city
real madrid|apuestas clasico|apuestas clasico español|apuestas clasico real madrid barcelona|apuestas clasificacion mundial|apuestas colombia|apuestas
colombia argentina|apuestas colombia brasil|apuestas colombia
paraguay|apuestas colombia uruguay|apuestas colombia vs argentina|apuestas colombia vs brasil|apuestas combinadas|apuestas
combinadas como funcionan|apuestas combinadas de futbol|apuestas combinadas de
fútbol|apuestas combinadas foro|apuestas combinadas futbol|apuestas
combinadas hoy|apuestas combinadas mismo partido|apuestas combinadas mundial|apuestas combinadas nba|apuestas combinadas para esta semana|apuestas combinadas para hoy|apuestas combinadas para mañana|apuestas combinadas pronosticos|apuestas combinadas recomendadas|apuestas combinadas seguras|apuestas combinadas seguras para hoy|apuestas combinadas seguras para mañana|apuestas como ganar|apuestas comparador|apuestas con bono de bienvenida|apuestas con dinero
ficticio|apuestas con dinero real|apuestas con dinero virtual|apuestas
con handicap|apuestas con handicap asiatico|apuestas con handicap baloncesto|apuestas con mas probabilidades de ganar|apuestas con paypal|apuestas con tarjeta de credito|apuestas con tarjeta de debito|apuestas
consejos|apuestas copa|apuestas copa africa|apuestas copa america|apuestas copa américa|apuestas copa argentina|apuestas copa brasil|apuestas copa davis|apuestas copa de europa|apuestas copa
del mundo|apuestas copa del rey|apuestas copa del rey baloncesto|apuestas
copa del rey final|apuestas copa del rey futbol|apuestas copa del rey ganador|apuestas copa
del rey hoy|apuestas copa del rey pronosticos|apuestas copa del rey pronósticos|apuestas copa europa|apuestas copa italia|apuestas copa libertadores|apuestas copa mundial de hockey|apuestas copa rey|apuestas copa sudamericana|apuestas corners|apuestas corners hoy|apuestas croacia argentina|apuestas
cuartos eurocopa|apuestas cuotas|apuestas cuotas altas|apuestas cuotas bajas|apuestas de 1 euro|apuestas de baloncesto|apuestas de baloncesto hoy|apuestas
de baloncesto nba|apuestas de baloncesto para hoy|apuestas de beisbol|apuestas de beisbol para hoy|apuestas de blackjack en linea|apuestas
de boxeo|apuestas de boxeo canelo|apuestas de boxeo en las vegas|apuestas
de boxeo hoy|apuestas de boxeo online|apuestas de caballo|apuestas de caballos|apuestas de caballos como
funciona|apuestas de caballos como se juega|apuestas de caballos en colombia|apuestas de caballos en españa|apuestas de caballos en linea|apuestas de caballos españa|apuestas de
caballos ganador y colocado|apuestas de caballos internacionales|apuestas de caballos juegos|apuestas de
caballos online|apuestas de caballos online en venezuela|apuestas de caballos por internet|apuestas de caballos pronosticos|apuestas de caballos pronósticos|apuestas de carrera de caballos|apuestas de carreras
de caballos|apuestas de carreras de caballos online|apuestas de casino|apuestas de casino
online|apuestas de casino por internet|apuestas de champions league|apuestas de ciclismo|apuestas de
colombia|apuestas de copa america|apuestas de corners|apuestas de deportes en linea|apuestas de deportes online|apuestas de dinero|apuestas de esports|apuestas de eurocopa|apuestas de europa league|apuestas de f1|apuestas de
formula 1|apuestas de futbol|apuestas de fútbol|apuestas de futbol app|apuestas de futbol argentina|apuestas de futbol colombia|apuestas de futbol en colombia|apuestas de
futbol en directo|apuestas de futbol en linea|apuestas
de futbol en vivo|apuestas de futbol español|apuestas de futbol gratis|apuestas de futbol hoy|apuestas de futbol mundial|apuestas de
futbol online|apuestas de fútbol online|apuestas de futbol para hoy|apuestas de fútbol
para hoy|apuestas de futbol para hoy seguras|apuestas de futbol para mañana|apuestas de futbol peru|apuestas de futbol pronosticos|apuestas de fútbol pronósticos|apuestas de futbol seguras|apuestas de futbol seguras
para hoy|apuestas de futbol sin dinero|apuestas de galgos|apuestas de galgos como ganar|apuestas de galgos en directo|apuestas de galgos online|apuestas de galgos trucos|apuestas de
golf|apuestas de hockey|apuestas de hockey sobre hielo|apuestas de hoy|apuestas de hoy seguras|apuestas de juego|apuestas de juegos|apuestas de
juegos deportivos|apuestas de juegos online|apuestas de la champions league|apuestas de
la copa américa|apuestas de la eurocopa|apuestas de
la europa league|apuestas de la liga|apuestas de la liga bbva|apuestas de la liga española|apuestas de la nba|apuestas de la
nfl|apuestas de la ufc|apuestas de mlb|apuestas de nba|apuestas de nba para
hoy|apuestas de partidos|apuestas de partidos de futbol|apuestas de peleas ufc|apuestas de
perros en vivo|apuestas de perros virtuales|apuestas
de peru|apuestas de sistema|apuestas de sistema como funciona|apuestas de sistema explicacion|apuestas de sistema explicación|apuestas de
tenis|apuestas de tenis de mesa|apuestas de tenis en directo|apuestas de tenis hoy|apuestas de tenis para hoy|apuestas de tenis pronosticos|apuestas de tenis seguras|apuestas de todo
tipo|apuestas de ufc|apuestas de ufc hoy|apuestas del boxeo|apuestas del clasico|apuestas del clasico real madrid barca|apuestas del dia|apuestas del día|apuestas del dia de hoy|apuestas del dia deportivas|apuestas del dia futbol|apuestas del mundial|apuestas
del partido de hoy|apuestas del real madrid|apuestas del rey|apuestas del sistema|apuestas deporte|apuestas deportes|apuestas deportiva|apuestas deportivas|apuestas deportivas
1 euro|apuestas deportivas 10 euros gratis|apuestas deportivas 100 seguras|apuestas deportivas 1×2|apuestas deportivas android|apuestas deportivas app|apuestas deportivas apps|apuestas deportivas argentina|apuestas deportivas
argentina futbol|apuestas deportivas argentina legal|apuestas deportivas atletico de madrid|apuestas deportivas baloncesto|apuestas deportivas barca madrid|apuestas deportivas
barcelona|apuestas deportivas beisbol|apuestas deportivas bono|apuestas deportivas bono bienvenida|apuestas deportivas bono
de bienvenida|apuestas deportivas bono sin deposito|apuestas
deportivas bonos de bienvenida|apuestas deportivas boxeo|apuestas deportivas caballos|apuestas deportivas calculadora|apuestas deportivas campeon liga|apuestas deportivas casino|apuestas
deportivas casino barcelona|apuestas deportivas
casino online|apuestas deportivas cerca de mi|apuestas deportivas champions league|apuestas deportivas chile|apuestas deportivas ciclismo|apuestas deportivas
colombia|apuestas deportivas com|apuestas deportivas com foro|apuestas
deportivas com pronosticos|apuestas deportivas combinadas|apuestas deportivas combinadas para hoy|apuestas
deportivas como se juega|apuestas deportivas comparador|apuestas deportivas con bono gratis|apuestas deportivas con bonos gratis|apuestas deportivas con dinero
ficticio|apuestas deportivas con paypal|apuestas deportivas con puntos virtuales|apuestas deportivas consejos|apuestas deportivas consejos para ganar|apuestas
deportivas copa america|apuestas deportivas copa del rey|apuestas deportivas copa libertadores|apuestas deportivas copa mundial|apuestas deportivas corners|apuestas deportivas cual
es la mejor|apuestas deportivas cuotas altas|apuestas deportivas de baloncesto|apuestas deportivas de boxeo|apuestas
deportivas de colombia|apuestas deportivas de futbol|apuestas deportivas de nba|apuestas deportivas de nhl|apuestas
deportivas de peru|apuestas deportivas de tenis|apuestas
deportivas del dia|apuestas deportivas dinero ficticio|apuestas deportivas directo|apuestas deportivas
doble oportunidad|apuestas deportivas en argentina|apuestas deportivas en chile|apuestas deportivas en colombia|apuestas deportivas en directo|apuestas deportivas
en españa|apuestas deportivas en español|apuestas deportivas en linea|apuestas deportivas en línea|apuestas deportivas en peru|apuestas deportivas en perú|apuestas deportivas en sevilla|apuestas deportivas en uruguay|apuestas deportivas en vivo|apuestas deportivas es|apuestas deportivas es pronosticos|apuestas deportivas españa|apuestas
deportivas españolas|apuestas deportivas esports|apuestas deportivas estadisticas|apuestas deportivas estrategias|apuestas deportivas estrategias
seguras|apuestas deportivas eurocopa|apuestas deportivas europa league|apuestas deportivas f1|apuestas deportivas faciles
de ganar|apuestas deportivas formula 1|apuestas deportivas
foro|apuestas deportivas foro futbol|apuestas deportivas
foro tenis|apuestas deportivas francia argentina|apuestas deportivas futbol|apuestas deportivas fútbol|apuestas deportivas futbol argentino|apuestas deportivas futbol colombia|apuestas deportivas futbol español|apuestas
deportivas gana|apuestas deportivas ganadas|apuestas deportivas ganar dinero seguro|apuestas
deportivas gane|apuestas deportivas golf|apuestas deportivas gratis|apuestas deportivas gratis con premios|apuestas deportivas gratis hoy|apuestas deportivas gratis sin deposito|apuestas deportivas
handicap|apuestas deportivas handicap asiatico|apuestas deportivas hoy|apuestas deportivas impuestos|apuestas deportivas interior argentina|apuestas deportivas juegos olimpicos|apuestas deportivas la
liga|apuestas deportivas legales|apuestas deportivas legales en colombia|apuestas deportivas
libres de impuestos|apuestas deportivas licencia españa|apuestas deportivas
liga española|apuestas deportivas listado|apuestas deportivas
listado clasico|apuestas deportivas madrid|apuestas deportivas mas
seguras|apuestas deportivas mejor pagadas|apuestas deportivas mejores|apuestas deportivas mejores app|apuestas deportivas mejores casas|apuestas deportivas mejores cuotas|apuestas deportivas mejores paginas|apuestas deportivas mexico|apuestas deportivas méxico|apuestas deportivas mlb|apuestas deportivas mlb hoy|apuestas deportivas multiples|apuestas
deportivas mundial|apuestas deportivas murcia|apuestas deportivas nba|apuestas deportivas nba hoy|apuestas deportivas
nfl|apuestas deportivas nhl|apuestas deportivas nuevas|apuestas deportivas ofertas|apuestas deportivas online|apuestas deportivas online argentina|apuestas deportivas online chile|apuestas deportivas online colombia|apuestas deportivas online en colombia|apuestas
deportivas online españa|apuestas deportivas online mexico|apuestas deportivas online paypal|apuestas deportivas online peru|apuestas deportivas online
por internet|apuestas deportivas pago paypal|apuestas deportivas para ganar dinero|apuestas deportivas para hoy|apuestas
deportivas para hoy pronosticos|apuestas deportivas partido suspendido|apuestas deportivas
partidos de hoy|apuestas deportivas paypal|apuestas deportivas peru|apuestas deportivas perú|apuestas deportivas peru vs ecuador|apuestas deportivas predicciones|apuestas deportivas
promociones|apuestas deportivas pronostico|apuestas deportivas pronóstico|apuestas deportivas pronostico
hoy|apuestas deportivas pronosticos|apuestas deportivas pronósticos|apuestas
deportivas pronosticos expertos|apuestas deportivas pronosticos gratis|apuestas deportivas pronosticos nba|apuestas deportivas pronosticos tenis|apuestas
deportivas que aceptan paypal|apuestas deportivas real madrid|apuestas
deportivas regalo bienvenida|apuestas deportivas resultado exacto|apuestas deportivas resultados|apuestas
deportivas rugby|apuestas deportivas seguras|apuestas deportivas seguras foro|apuestas deportivas seguras hoy|apuestas deportivas seguras para hoy|apuestas deportivas seguras
telegram|apuestas deportivas sevilla|apuestas deportivas simulador eurocopa|apuestas deportivas sin deposito|apuestas deportivas sin deposito inicial|apuestas deportivas sin dinero|apuestas deportivas sin dinero real|apuestas deportivas
sin registro|apuestas deportivas stake|apuestas deportivas stake 10|apuestas deportivas telegram españa|apuestas deportivas tenis|apuestas deportivas tenis
de mesa|apuestas deportivas tenis foro|apuestas deportivas tenis hoy|apuestas
deportivas tips|apuestas deportivas tipster|apuestas deportivas ufc|apuestas deportivas uruguay|apuestas deportivas valencia|apuestas deportivas
valencia barcelona|apuestas deportivas venezuela|apuestas deportivas virtuales|apuestas deportivas y casino|apuestas
deportivas y casino online|apuestas deportivas.com|apuestas deportivas.com foro|apuestas deportivas.es|apuestas
deportivos pronosticos|apuestas deposito minimo 1 euro|apuestas descenso a segunda|apuestas descenso a
segunda b|apuestas descenso la liga|apuestas descenso primera division|apuestas
descenso segunda|apuestas dia|apuestas diarias seguras|apuestas dinero|apuestas dinero ficticio|apuestas dinero
real|apuestas dinero virtual|apuestas directas|apuestas
directo|apuestas directo futbol|apuestas
division de honor juvenil|apuestas dnb|apuestas doble oportunidad|apuestas
doble resultado|apuestas dobles|apuestas dobles y triples|apuestas dortmund barcelona|apuestas draft nba|apuestas draft nfl|apuestas ecuador vs argentina|apuestas ecuador vs venezuela|apuestas egipto uruguay|apuestas
el clasico|apuestas elecciones venezuela|apuestas empate|apuestas en baloncesto|apuestas en barcelona|apuestas en beisbol|apuestas en boxeo|apuestas en caballos|apuestas en carreras de caballos|apuestas en casino|apuestas en casino
online|apuestas en casinos|apuestas en casinos online|apuestas en chile|apuestas en ciclismo|apuestas en colombia|apuestas en colombia de futbol|apuestas en directo|apuestas en directo futbol|apuestas en directo pronosticos|apuestas en el futbol|apuestas en el tenis|apuestas en españa|apuestas en esports|apuestas en eventos deportivos
virtuales|apuestas en golf|apuestas en juegos|apuestas en la champions league|apuestas en la eurocopa|apuestas en la liga|apuestas en la nba|apuestas en la
nfl|apuestas en las vegas mlb|apuestas en las vegas nfl|apuestas en linea|apuestas en línea|apuestas en linea argentina|apuestas en linea boxeo|apuestas en linea chile|apuestas en linea colombia|apuestas en línea de fútbol|apuestas en linea deportivas|apuestas en linea españa|apuestas
en linea estados unidos|apuestas en linea futbol|apuestas en linea
mexico|apuestas en línea méxico|apuestas en linea mundial|apuestas en linea peru|apuestas en linea
usa|apuestas en los esports|apuestas en madrid|apuestas en méxico|apuestas en mexico online|apuestas
en nba|apuestas en partidos de futbol|apuestas en partidos de futbol en vivo|apuestas en partidos de tenis
en directo|apuestas en perú|apuestas en sevilla|apuestas en sistema|apuestas en stake|apuestas en tenis|apuestas en tenis de mesa|apuestas en valencia|apuestas en vivo|apuestas en vivo argentina|apuestas en vivo casino|apuestas en vivo futbol|apuestas en vivo fútbol|apuestas en vivo nba|apuestas en vivo peru|apuestas en vivo tenis|apuestas en vivo ufc|apuestas equipo mbappe|apuestas equipos de futbol|apuestas españa|apuestas españa alemania|apuestas españa
alemania eurocopa|apuestas españa croacia|apuestas españa eurocopa|apuestas españa francia|apuestas españa francia eurocopa|apuestas españa gana el mundial|apuestas españa gana eurocopa|apuestas españa
gana mundial|apuestas españa georgia|apuestas españa holanda|apuestas españa inglaterra|apuestas españa inglaterra cuotas|apuestas españa inglaterra eurocopa|apuestas españa italia|apuestas españa mundial|apuestas españa paises bajos|apuestas español|apuestas español oviedo|apuestas espanyol barcelona|apuestas espanyol betis|apuestas
espanyol villarreal|apuestas esport|apuestas esports|apuestas esports colombia|apuestas esports españa|apuestas esports
fifa|apuestas esports gratis|apuestas esports lol|apuestas esports peru|apuestas esports valorant|apuestas estadisticas|apuestas estrategias|apuestas euro|apuestas euro copa|apuestas eurocopa|apuestas eurocopa
campeon|apuestas eurocopa españa|apuestas eurocopa favoritos|apuestas eurocopa femenina|apuestas
eurocopa final|apuestas eurocopa ganador|apuestas eurocopa hoy|apuestas eurocopa sub 21|apuestas euroliga baloncesto|apuestas euroliga pronosticos|apuestas
europa league|apuestas europa league hoy|apuestas europa
league pronosticos|apuestas europa league pronósticos|apuestas euros|apuestas f1 abu dhabi|apuestas f1 bahrein|apuestas f1 canada|apuestas f1 china|apuestas f1 cuotas|apuestas f1 hoy|apuestas f1 las vegas|apuestas f1 miami|apuestas f1 monaco|apuestas
faciles de ganar|apuestas fáciles de ganar|apuestas faciles para ganar|apuestas favoritas|apuestas
favorito champions|apuestas favoritos champions|apuestas favoritos eurocopa|apuestas favoritos mundial|apuestas fc barcelona|apuestas final champions cuotas|apuestas final champions league|apuestas final champions peru|apuestas final copa|apuestas final
copa america|apuestas final copa de europa|apuestas final copa del rey|apuestas final copa europa|apuestas final
copa libertadores|apuestas final copa rey|apuestas final de copa|apuestas final
de copa del rey|apuestas final del mundial|apuestas final euro|apuestas final eurocopa|apuestas final europa league|apuestas final libertadores|apuestas
final mundial|apuestas final nba|apuestas final rugby|apuestas final uefa europa
league|apuestas final.mundial|apuestas finales de conferencia nfl|apuestas finales nba|apuestas fiorentina betis|apuestas formula|apuestas formula
1|apuestas fórmula 1|apuestas fórmula 1 pronósticos|apuestas formula uno|apuestas foro|apuestas
foro nba|apuestas francia argentina|apuestas francia españa|apuestas futbol|apuestas fútbol|apuestas futbol americano|apuestas
futbol americano nfl|apuestas futbol argentina|apuestas futbol argentino|apuestas
futbol champions league|apuestas futbol chile|apuestas futbol colombia|apuestas futbol consejos|apuestas futbol en directo|apuestas fútbol en directo|apuestas futbol en vivo|apuestas fútbol en vivo|apuestas futbol españa|apuestas futbol español|apuestas fútbol español|apuestas futbol eurocopa|apuestas futbol femenino|apuestas futbol foro|apuestas
futbol gratis|apuestas futbol hoy|apuestas fútbol hoy|apuestas futbol juegos olimpicos|apuestas futbol mexico|apuestas futbol mundial|apuestas futbol online|apuestas futbol para
hoy|apuestas futbol peru|apuestas futbol pronosticos|apuestas futbol sala|apuestas futbol telegram|apuestas
futbol virtual|apuestas galgos|apuestas galgos en directo|apuestas galgos hoy|apuestas galgos
online|apuestas galgos pronosticos|apuestas galgos trucos|apuestas gana|apuestas gana colombia|apuestas gana resultados|apuestas ganadas|apuestas ganadas hoy|apuestas ganador champions league|apuestas ganador copa america|apuestas ganador copa del
rey|apuestas ganador copa del rey baloncesto|apuestas ganador
copa libertadores|apuestas ganador de la eurocopa|apuestas ganador de la liga|apuestas ganador del mundial|apuestas ganador eurocopa|apuestas ganador europa league|apuestas ganador f1|apuestas ganador la
liga|apuestas ganador liga española|apuestas ganador mundial|apuestas ganador
mundial baloncesto|apuestas ganador mundial
f1|apuestas ganador nba|apuestas ganadores eurocopa|apuestas ganadores mundial|apuestas ganar champions|apuestas
ganar eurocopa|apuestas ganar liga|apuestas ganar
mundial|apuestas ganar nba|apuestas getafe valencia|apuestas ghana uruguay|apuestas girona|apuestas girona
athletic|apuestas girona betis|apuestas girona campeon de liga|apuestas girona campeon liga|apuestas girona gana la liga|apuestas girona
real madrid|apuestas girona real sociedad|apuestas goleador eurocopa|apuestas goleadores eurocopa|apuestas
goles asiaticos|apuestas golf|apuestas golf masters|apuestas golf
pga|apuestas granada barcelona|apuestas grand slam de tenis|apuestas gratis|apuestas gratis
casino|apuestas gratis con premios|apuestas gratis hoy|apuestas gratis para hoy|apuestas gratis por registro|apuestas gratis puntos|apuestas gratis regalos|apuestas gratis sin deposito|apuestas gratis sin depósito|apuestas gratis sin ingreso|apuestas gratis sports|apuestas gratis y ganar premios|apuestas grupo a
eurocopa|apuestas grupos eurocopa|apuestas handicap|apuestas handicap asiatico|apuestas handicap baloncesto|apuestas handicap como funciona|apuestas handicap
nba|apuestas handicap nfl|apuestas hipicas online|apuestas
hípicas online|apuestas hipicas venezuela|apuestas hockey|apuestas
hockey hielo|apuestas hockey patines|apuestas hockey sobre hielo|apuestas
holanda argentina|apuestas holanda vs argentina|apuestas hoy|apuestas
hoy champions|apuestas hoy futbol|apuestas hoy nba|apuestas hoy pronosticos|apuestas hoy seguras|apuestas
impuestos|apuestas inglaterra paises bajos|apuestas inter barca|apuestas inter barcelona|apuestas juego|apuestas juegos|apuestas
juegos en linea|apuestas juegos olimpicos|apuestas juegos
olímpicos|apuestas juegos olimpicos baloncesto|apuestas juegos online|apuestas juegos virtuales|apuestas jugador
sevilla|apuestas jugadores nba|apuestas kings league
americas|apuestas la liga|apuestas la liga española|apuestas la liga hoy|apuestas la liga santander|apuestas las vegas
mlb|apuestas las vegas nba|apuestas las vegas nfl|apuestas league of legends mundial|apuestas legal|apuestas legales|apuestas legales en colombia|apuestas legales en españa|apuestas legales en estados unidos|apuestas legales españa|apuestas leganes betis|apuestas libertadores|apuestas licencia|apuestas
liga 1 peru|apuestas liga argentina|apuestas liga bbva pronosticos|apuestas liga de campeones|apuestas liga de campeones de baloncesto|apuestas liga de campeones de
hockey|apuestas liga españa|apuestas liga española|apuestas liga santander pronosticos|apuestas ligas de futbol|apuestas linea|apuestas linea de gol|apuestas liverpool barcelona|apuestas liverpool real madrid|apuestas lol mundial|apuestas madrid|apuestas madrid arsenal|apuestas madrid atletico|apuestas madrid atletico champions|apuestas madrid barca|apuestas madrid barça|apuestas madrid barca
hoy|apuestas madrid barca supercopa|apuestas madrid barcelona|apuestas madrid barsa|apuestas
madrid bayern|apuestas madrid betis|apuestas madrid borussia|apuestas madrid campeon champions|apuestas madrid celta|apuestas madrid city|apuestas
madrid dortmund|apuestas madrid gana la liga|apuestas
madrid gana liga|apuestas madrid hoy|apuestas madrid liverpool|apuestas madrid osasuna|apuestas madrid sevilla|apuestas madrid valencia|apuestas madrid vs arsenal|apuestas
madrid vs barcelona|apuestas mallorca osasuna|apuestas mallorca real sociedad|apuestas manchester athletic|apuestas
manchester city real madrid|apuestas mas faciles de ganar|apuestas mas
seguras|apuestas mas seguras para hoy|apuestas masters de
golf|apuestas masters de tenis|apuestas maximo goleador eurocopa|apuestas maximo goleador mundial|apuestas mejor jugador eurocopa|apuestas mejores casinos online|apuestas mexico|apuestas méxico|apuestas mexico polonia|apuestas méxico polonia|apuestas mlb|apuestas mlb hoy|apuestas mlb las vegas|apuestas
mlb para hoy|apuestas mlb pronosticos|apuestas mlb usa|apuestas mma ufc|apuestas momios|apuestas multiples|apuestas
múltiples|apuestas multiples como funcionan|apuestas multiples
el gordo|apuestas multiples futbol|apuestas mundial|apuestas mundial 2026|apuestas mundial baloncesto|apuestas mundial balonmano|apuestas mundial brasil|apuestas mundial campeon|apuestas
mundial ciclismo|apuestas mundial clubes|apuestas mundial de baloncesto|apuestas mundial de
ciclismo|apuestas mundial de clubes|apuestas mundial de futbol|apuestas mundial de fútbol|apuestas mundial de rugby|apuestas mundial
f1|apuestas mundial favoritos|apuestas mundial femenino|apuestas mundial formula 1|apuestas mundial futbol|apuestas mundial ganador|apuestas mundial lol|apuestas mundial moto gp|apuestas mundial
motogp|apuestas mundial rugby|apuestas mundial sub 17|apuestas mundiales|apuestas mundialistas|apuestas mvp eurocopa|apuestas mvp nba|apuestas mvp nfl|apuestas nacionales de colombia|apuestas nba|apuestas nba all star|apuestas nba campeon|apuestas nba consejos|apuestas nba esta noche|apuestas nba finals|apuestas nba
gratis|apuestas nba hoy|apuestas nba hoy jugadores|apuestas nba hoy pronosticos|apuestas nba para hoy|apuestas nba playoffs|apuestas nba pronosticos|apuestas nba pronósticos|apuestas nba pronosticos hoy|apuestas nba tipster|apuestas nfl|apuestas nfl hoy|apuestas nfl las vegas|apuestas
nfl playoffs|apuestas nfl pronosticos|apuestas
nfl pronósticos|apuestas nfl semana 4|apuestas nfl super bowl|apuestas nhl|apuestas nhl pronosticos|apuestas octavos eurocopa|apuestas ofertas|apuestas online|apuestas online argentina|apuestas online argentina legal|apuestas online bono|apuestas online bono bienvenida|apuestas online
boxeo|apuestas online caballos|apuestas online carreras
de caballos|apuestas online casino|apuestas online champions league|apuestas online chile|apuestas online ciclismo|apuestas
online colombia|apuestas online comparativa|apuestas
online con paypal|apuestas online de caballos|apuestas online
deportivas|apuestas online en argentina|apuestas online en peru|apuestas online espana|apuestas online españa|apuestas online esports|apuestas
online foro|apuestas online futbol|apuestas online futbol españa|apuestas online
golf|apuestas online gratis|apuestas online gratis sin deposito|apuestas online juegos|apuestas online mexico|apuestas online mma|apuestas online movil|apuestas online
nba|apuestas online net|apuestas online nuevas|apuestas online opiniones|apuestas online paypal|apuestas online peru|apuestas online
seguras|apuestas online sin dinero|apuestas online sin registro|apuestas online
tenis|apuestas online ufc|apuestas online uruguay|apuestas online venezuela|apuestas open britanico golf|apuestas osasuna athletic|apuestas
osasuna barcelona|apuestas osasuna real madrid|apuestas osasuna sevilla|apuestas
osasuna valencia|apuestas over|apuestas over 2.5|apuestas over under|apuestas paginas|apuestas pago anticipado|apuestas paises bajos ecuador|apuestas paises bajos inglaterra|apuestas países bajos
qatar|apuestas para boxeo|apuestas para champions league|apuestas para el
clasico|apuestas para el dia de hoy|apuestas para el mundial|apuestas para el partido de hoy|apuestas para eurocopa|apuestas
para europa league|apuestas para futbol|apuestas para ganar|apuestas para ganar dinero|apuestas para ganar dinero facil|apuestas para ganar en la ruleta|apuestas para ganar la champions|apuestas para ganar
la eurocopa|apuestas para ganar la europa league|apuestas
para ganar la liga|apuestas para ganar siempre|apuestas para hacer|apuestas para hoy|apuestas para hoy de futbol|apuestas para hoy europa league|apuestas para hoy futbol|apuestas para juegos|apuestas
para la champions league|apuestas para la copa del rey|apuestas para la eurocopa|apuestas
para la europa league|apuestas para la final de la eurocopa|apuestas
para la nba hoy|apuestas para los partidos de hoy|apuestas para partidos de hoy|apuestas para ufc|apuestas partido|apuestas partido aplazado|apuestas partido champions|apuestas partido colombia|apuestas partido
españa marruecos|apuestas partido mundial|apuestas partido
suspendido|apuestas partidos|apuestas partidos champions league|apuestas partidos csgo|apuestas partidos de
futbol|apuestas partidos de futbol hoy|apuestas partidos de hoy|apuestas partidos eurocopa|apuestas partidos futbol|apuestas partidos hoy|apuestas partidos mundial|apuestas paypal|apuestas peleas de boxeo|apuestas peru|apuestas perú|apuestas peru brasil|apuestas peru
chile|apuestas peru paraguay|apuestas peru uruguay|apuestas peru vs chile|apuestas peru
vs colombia|apuestas pichichi eurocopa|apuestas plataforma|apuestas playoff|apuestas
playoff ascenso|apuestas playoff ascenso a primera|apuestas playoff nba|apuestas playoff segunda|apuestas playoff segunda b|apuestas playoffs nba|apuestas playoffs nfl|apuestas polonia argentina|apuestas por argentina|apuestas por internet
mexico|apuestas por internet para ganar dinero|apuestas por paypal|apuestas por ronda boxeo|apuestas por sistema|apuestas portugal uruguay|apuestas pre
partido|apuestas predicciones|apuestas predicciones futbol|apuestas
primera division|apuestas primera division españa|apuestas promociones|apuestas pronostico|apuestas pronosticos|apuestas pronosticos deportivos|apuestas pronosticos deportivos tenis|apuestas pronosticos futbol|apuestas pronosticos gratis|apuestas pronosticos nba|apuestas pronosticos tenis|apuestas
prorroga|apuestas psg barca|apuestas psg barcelona|apuestas puntos por tarjetas|apuestas puntos tarjetas|apuestas que
aceptan paypal|apuestas que es handicap|apuestas que puedes hacer con tu novia|apuestas que
siempre ganaras|apuestas que significa|apuestas quien bajara a segunda|apuestas
quién bajara a segunda|apuestas quien gana el mundial|apuestas quien gana eurocopa|apuestas quien gana la champions|apuestas quien gana la eurocopa|apuestas quien gana
la liga|apuestas quien ganara el mundial|apuestas quién ganará el mundial|apuestas quien ganara la champions|apuestas quien ganara la eurocopa|apuestas quien ganara la liga|apuestas rayo barcelona|apuestas real madrid|apuestas real madrid arsenal|apuestas real madrid athletic|apuestas
real madrid atletico|apuestas real madrid atletico champions|apuestas real madrid atletico de madrid|apuestas real madrid atlético de madrid|apuestas real madrid atletico madrid|apuestas real madrid barcelona|apuestas
real madrid bayern|apuestas real madrid
betis|apuestas real madrid borussia|apuestas real madrid campeon champions|apuestas real madrid
celta|apuestas real madrid champions|apuestas real madrid city|apuestas real madrid girona|apuestas real madrid
hoy|apuestas real madrid liverpool|apuestas real
madrid manchester city|apuestas real madrid osasuna|apuestas real madrid
real sociedad|apuestas real madrid valencia|apuestas real
madrid villarreal|apuestas real madrid vs arsenal|apuestas
real madrid vs atletico|apuestas real madrid vs atlético|apuestas real madrid vs atletico madrid|apuestas
real madrid vs barcelona|apuestas real madrid vs betis|apuestas real madrid vs sevilla|apuestas real madrid vs valencia|apuestas real sociedad|apuestas real sociedad athletic|apuestas real sociedad barcelona|apuestas
real sociedad betis|apuestas real sociedad psg|apuestas real sociedad real madrid|apuestas
real sociedad valencia|apuestas recomendadas hoy|apuestas regalo de bienvenida|apuestas registro|apuestas resultado exacto|apuestas resultados|apuestas resultados eurocopa|apuestas
retirada tenis|apuestas roma barcelona|apuestas roma sevilla|apuestas
rugby|apuestas rugby mundial|apuestas rugby world cup|apuestas ruleta seguras|apuestas segunda|apuestas
segunda b|apuestas segunda division|apuestas segunda división|apuestas segunda division b|apuestas segunda division españa|apuestas seguras|apuestas seguras baloncesto|apuestas seguras calculadora|apuestas seguras en la ruleta|apuestas seguras eurocopa|apuestas seguras foro|apuestas seguras
futbol|apuestas seguras futbol hoy|apuestas seguras gratis|apuestas seguras hoy|apuestas seguras hoy futbol|apuestas seguras nba|apuestas seguras nba hoy|apuestas seguras para este fin de semana|apuestas seguras para ganar dinero|apuestas seguras para hoy|apuestas seguras para hoy
fútbol|apuestas seguras para hoy pronósticos|apuestas seguras para mañana|apuestas seguras ruleta|apuestas seguras telegram|apuestas
seguras tenis|apuestas semifinales eurocopa|apuestas senegal paises bajos|apuestas sevilla|apuestas sevilla athletic|apuestas sevilla atletico de madrid|apuestas sevilla barcelona|apuestas sevilla betis|apuestas sevilla
campeon liga|apuestas sevilla celta|apuestas sevilla gana la liga|apuestas sevilla girona|apuestas
sevilla inter|apuestas sevilla jugador|apuestas sevilla juventus|apuestas sevilla leganes|apuestas sevilla madrid|apuestas sevilla manchester united|apuestas sevilla osasuna|apuestas sevilla
real madrid|apuestas sevilla real sociedad|apuestas sevilla roma|apuestas sevilla valencia|apuestas significa|apuestas simples ejemplos|apuestas simples o combinadas|apuestas sin deposito|apuestas sin deposito
inicial|apuestas sin deposito minimo|apuestas sin dinero|apuestas
sin dinero real|apuestas sin empate|apuestas sin empate que significa|apuestas sin ingreso
minimo|apuestas sin registro|apuestas sistema|apuestas sistema calculadora|apuestas
sistema como funciona|apuestas sistema trixie|apuestas sociedad|apuestas sorteo copa del rey|apuestas stake|apuestas stake
10|apuestas stake 10 hoy|apuestas super bowl favorito|apuestas super rugby|apuestas supercopa españa|apuestas superliga argentina|apuestas tarjeta roja|apuestas tarjetas|apuestas tarjetas amarillas|apuestas
tenis|apuestas tenis atp|apuestas tenis consejos|apuestas tenis copa davis|apuestas tenis de mesa|apuestas tenis
de mesa pronosticos|apuestas tenis en vivo|apuestas tenis
femenino|apuestas tenis hoy|apuestas tenis itf|apuestas tenis pronosticos|apuestas tenis pronósticos|apuestas
tenis retirada|apuestas tenis roland garros|apuestas tenis seguras|apuestas tenis wimbledon|apuestas
tenis wta|apuestas tercera division|apuestas tercera division españa|apuestas tipos|apuestas tips|apuestas tipster|apuestas tipster
para hoy|apuestas topuria holloway cuotas|apuestas torneos de golf|apuestas torneos de tenis|apuestas trucos|apuestas uefa champions league|apuestas uefa europa league|apuestas ufc|apuestas ufc chile|apuestas ufc como funciona|apuestas ufc hoy|apuestas ufc ilia topuria|apuestas ufc online|apuestas ufc pronósticos|apuestas
ufc telegram|apuestas ufc topuria|apuestas under over|apuestas unionistas villarreal|apuestas uruguay|apuestas uruguay colombia|apuestas uruguay corea|apuestas uruguay vs colombia|apuestas us open golf|apuestas
us open tenis|apuestas valencia|apuestas valencia barcelona|apuestas valencia betis|apuestas
valencia madrid|apuestas valencia real madrid|apuestas valladolid barcelona|apuestas valladolid valencia|apuestas valor app|apuestas valor en directo|apuestas valor
galgos|apuestas venezuela|apuestas venezuela argentina|apuestas venezuela bolivia|apuestas venezuela
ecuador|apuestas villarreal|apuestas villarreal athletic|apuestas villarreal barcelona|apuestas
villarreal bayern|apuestas villarreal betis|apuestas villarreal liverpool|apuestas villarreal manchester|apuestas villarreal manchester united|apuestas villarreal vs real madrid|apuestas virtuales|apuestas virtuales colombia|apuestas virtuales futbol|apuestas virtuales sin dinero|apuestas vivo|apuestas vuelta a españa|apuestas
vuelta españa|apuestas william hill partidos de hoy|apuestas y casino|apuestas y casinos|apuestas
y juegos de azar|apuestas y pronosticos|apuestas y pronosticos de futbol|apuestas y pronosticos deportivos|apuestas y resultados|apuestas-deportivas|apuestas-deportivas.es
pronosticos|arbitro nba apuestas|argentina apuestas|argentina colombia
apuestas|argentina croacia apuestas|argentina francia apuestas|argentina mexico apuestas|argentina peru apuestas|argentina uruguay apuestas|argentina vs bolivia
apuestas|argentina vs chile apuestas|argentina vs colombia apuestas|argentina vs
francia apuestas|argentina vs. colombia apuestas|asi se gana en las apuestas deportivas|asiatico apuestas|asiatico en apuestas|asiaticos apuestas|athletic
barcelona apuestas|athletic manchester united apuestas|athletic osasuna apuestas|athletic real madrid apuestas|atletico barcelona apuestas|atletico de madrid apuestas|atlético de madrid apuestas|atletico de madrid real madrid apuestas|atletico
de madrid vs barcelona apuestas|atletico madrid real madrid apuestas|atletico madrid vs real madrid
apuestas|atletico real madrid apuestas|atletico vs
real madrid apuestas|avisador de cuotas apuestas|bajada de cuotas apuestas|baloncesto apuestas|barbastro barcelona
apuestas|barca apuestas|barca bayern apuestas|barca inter
apuestas|barca madrid apuestas|barça madrid apuestas|barca vs atletico apuestas|barca vs madrid apuestas|barca vs real madrid apuestas|barcelona – real madrid apuestas|barcelona apuestas|barcelona atletico apuestas|barcelona atletico de madrid apuestas|barcelona atletico madrid apuestas|barcelona betis apuestas|barcelona
casa de apuestas|barcelona inter apuestas|barcelona psg apuestas|barcelona real madrid apuestas|barcelona real
sociedad apuestas|barcelona sevilla apuestas|barcelona valencia apuestas|barcelona vs athletic bilbao apuestas|barcelona vs atlético
madrid apuestas|barcelona vs betis apuestas|barcelona vs
celta de vigo apuestas|barcelona vs espanyol apuestas|barcelona vs girona apuestas|barcelona vs madrid apuestas|barcelona vs real
madrid apuestas|barcelona vs real sociedad apuestas|barcelona vs sevilla apuestas|barcelona vs villarreal apuestas|base de datos cuotas apuestas deportivas|bayern real madrid apuestas|beisbol apuestas|best america apuestas|bet
apuestas chile|bet apuestas en vivo|betis – chelsea apuestas|betis apuestas|betis barcelona apuestas|betis chelsea apuestas|betis madrid apuestas|betis
sevilla apuestas|betsson tu sitio de apuestas online|blog apuestas baloncesto|blog apuestas ciclismo|blog apuestas
nba|blog apuestas tenis|blog de apuestas de tenis|bono apuestas|bono apuestas
deportivas|bono apuestas deportivas sin deposito|bono apuestas gratis|bono apuestas gratis sin deposito|bono apuestas sin deposito|bono bienvenida apuestas|bono
bienvenida apuestas deportivas|bono bienvenida apuestas españa|bono bienvenida
apuestas sin deposito|bono bienvenida apuestas sin depósito|bono bienvenida
casa apuestas|bono bienvenida casa de apuestas|bono bienvenida marca apuestas|bono casa
apuestas|bono casa de apuestas|bono casa de apuestas sin ingreso|bono
casas de apuestas|bono de apuestas|bono de apuestas gratis sin deposito|bono de bienvenida apuestas|bono
de bienvenida apuestas deportivas|bono de bienvenida casa de apuestas|bono de
bienvenida casas de apuestas|bono de casas de apuestas|bono de registro apuestas|bono de registro apuestas deportivas|bono de
registro casa de apuestas|bono gratis apuestas|bono marca
apuestas|bono por registro apuestas|bono por registro apuestas deportivas|bono
por registro casa de apuestas|bono registro apuestas|bono sin deposito apuestas|bono sin depósito apuestas|bono sin deposito
apuestas deportivas|bono sin depósito apuestas deportivas|bono sin deposito casa de apuestas|bono sin deposito marca apuestas|bono sin ingreso
apuestas|bono sin ingreso apuestas deportivas|bonos apuestas|bonos apuestas colombia|bonos apuestas
deportivas|bonos apuestas deportivas sin deposito|bonos apuestas gratis|bonos apuestas sin deposito|bonos apuestas
sin depósito|bonos bienvenida apuestas|bonos bienvenida casas apuestas|bonos bienvenida casas
de apuestas|bonos casa de apuestas|bonos casas apuestas|bonos casas de apuestas|bonos casas de
apuestas colombia|bonos casas de apuestas deportivas|bonos casas de apuestas españa|bonos casas de apuestas nuevas|bonos casas de apuestas sin deposito|bonos
casas de apuestas sin depósito|bonos de apuestas|bonos de apuestas deportivas|bonos de apuestas
gratis|bonos de apuestas sin deposito|bonos de bienvenida apuestas|bonos de
bienvenida apuestas deportivas|bonos de bienvenida casa de apuestas|bonos de bienvenida casas de
apuestas|bonos de bienvenida de casas de apuestas|bonos de bienvenida en casas de apuestas|bonos de casas de apuestas|bonos de casas de apuestas sin deposito|bonos en casa de apuestas|bonos en casas de apuestas sin deposito|bonos
gratis apuestas|bonos gratis apuestas deportivas|bonos gratis casas de apuestas|bonos gratis sin deposito apuestas|bonos
paginas de apuestas|bonos registro casas de apuestas|bonos sin deposito apuestas|bonos sin depósito apuestas|bonos sin deposito apuestas deportivas|bonos
sin deposito casas de apuestas|bot de apuestas deportivas gratis|boxeo apuestas|brasil colombia apuestas|brasil peru apuestas|brasil vs colombia apuestas|buenas apuestas para hoy|buscador cuotas
apuestas|buscador de apuestas seguras|buscador de
cuotas apuestas|buscador de cuotas de apuestas|buscar apuestas seguras|caballos apuestas|calculador de apuestas|calculador de cuotas apuestas|calculadora apuestas|calculadora apuestas
combinadas|calculadora apuestas de sistema|calculadora apuestas deportivas|calculadora apuestas deportivas seguras|calculadora apuestas multiples|calculadora apuestas segura|calculadora apuestas seguras|calculadora apuestas sistema|calculadora apuestas yankee|calculadora arbitraje apuestas|calculadora cubrir apuestas|calculadora cuotas apuestas|calculadora de apuestas|calculadora de apuestas
combinadas|calculadora de apuestas de futbol|calculadora
de apuestas de sistema|calculadora de apuestas deportivas|calculadora de apuestas multiples|calculadora
de apuestas seguras|calculadora de apuestas sistema|calculadora de
apuestas surebets|calculadora de arbitraje apuestas|calculadora de cuotas apuestas|calculadora de
cuotas de apuestas|calculadora para apuestas deportivas|calculadora poisson apuestas|calculadora poisson apuestas
deportivas|calculadora poisson para apuestas|calculadora scalping apuestas deportivas|calculadora sistema
apuestas|calculadora stake apuestas|calculadora trading apuestas|calcular apuestas|calcular apuestas
deportivas|calcular apuestas futbol|calcular apuestas sistema|calcular cuotas apuestas|calcular cuotas apuestas
combinadas|calcular cuotas apuestas deportivas|calcular cuotas de apuestas|calcular ganancias apuestas deportivas|calcular momios apuestas|calcular probabilidad
cuota apuestas|calcular stake apuestas|calcular unidades apuestas|calcular yield apuestas|calculo
de apuestas|calculo de apuestas deportivas|cambio de cuotas apuestas|campeon champions apuestas|campeon eurocopa
apuestas|campeon liga apuestas|campeon nba apuestas|canales de apuestas gratis|carrera de caballos apuestas|carrera de caballos apuestas juego|carrera de caballos con apuestas|carrera de galgos apuestas|carreras de caballos apuestas|carreras de caballos apuestas online|carreras de caballos con apuestas|carreras de caballos juegos de apuestas|carreras
de galgos apuestas|carreras de galgos apuestas online|carreras de galgos apuestas trucos|carreras galgos apuestas|casa apuestas argentina|casa apuestas atletico de madrid|casa apuestas barcelona|casa
apuestas betis|casa apuestas bono bienvenida|casa apuestas
bono gratis|casa apuestas bono sin deposito|casa apuestas cerca de mi|casa
apuestas chile|casa apuestas colombia|casa apuestas
con mejores cuotas|casa apuestas deportivas|casa apuestas españa|casa apuestas española|casa apuestas eurocopa|casa apuestas futbol|casa apuestas mejores cuotas|casa apuestas mundial|casa apuestas
nueva|casa apuestas nuevas|casa apuestas online|casa apuestas peru|casa apuestas valencia|casa de apuestas|casa de apuestas 10 euros gratis|casa de apuestas argentina|casa de apuestas atletico de madrid|casa
de apuestas baloncesto|casa de apuestas barcelona|casa de apuestas beisbol|casa de apuestas betis|casa de apuestas bono|casa de apuestas bono bienvenida|casa de apuestas bono de bienvenida|casa
de apuestas bono gratis|casa de apuestas bono por registro|casa de apuestas bono sin deposito|casa de
apuestas boxeo|casa de apuestas caballos|casa de apuestas
carreras de caballos|casa de apuestas cerca de mi|casa de apuestas cerca de mí|casa
de apuestas champions league|casa de apuestas chile|casa de apuestas ciclismo|casa de apuestas colombia|casa de apuestas con bono de bienvenida|casa de apuestas con bono sin deposito|casa de apuestas con cuotas mas altas|casa de apuestas con esports|casa de apuestas con las mejores cuotas|casa de apuestas con licencia en españa|casa de
apuestas con mejores cuotas|casa de apuestas con pago anticipado|casa de apuestas con paypal|casa de apuestas copa america|casa de apuestas de caballos|casa de apuestas de colombia|casa
de apuestas de españa|casa de apuestas de futbol|casa
de apuestas de fútbol|casa de apuestas de futbol peru|casa de
apuestas de peru|casa de apuestas del madrid|casa
de apuestas del real madrid|casa de apuestas deportivas|casa de apuestas deportivas cerca de mi|casa de
apuestas deportivas en argentina|casa de apuestas deportivas en chile|casa de apuestas deportivas en colombia|casa de apuestas deportivas en españa|casa de apuestas deportivas en madrid|casa de apuestas deportivas españa|casa de apuestas deportivas españolas|casa de apuestas deportivas madrid|casa de
apuestas deportivas mexico|casa de apuestas deportivas
online|casa de apuestas deportivas peru|casa de apuestas deposito 5 euros|casa de apuestas
deposito minimo|casa de apuestas deposito minimo 1 euro|casa de apuestas depósito mínimo 1 euro|casa de
apuestas en españa|casa de apuestas en linea|casa de apuestas en madrid|casa de apuestas en perú|casa de apuestas en vivo|casa de apuestas españa|casa de apuestas españa inglaterra|casa de apuestas española|casa de apuestas españolas|casa
de apuestas esports|casa de apuestas eurocopa|casa de apuestas europa league|casa de apuestas f1|casa de apuestas formula 1|casa de apuestas futbol|casa de apuestas ingreso minimo|casa de apuestas ingreso
minimo 1 euro|casa de apuestas ingreso mínimo 1 euro|casa de apuestas legales|casa de apuestas legales en colombia|casa de apuestas legales en españa|casa de apuestas libertadores|casa de apuestas liga española|casa de apuestas madrid|casa de apuestas mas segura|casa de apuestas mejores|casa de apuestas méxico|casa de apuestas minimo 5 euros|casa de
apuestas mlb|casa de apuestas mundial|casa de apuestas nba|casa de apuestas
nfl|casa de apuestas nueva|casa de apuestas nuevas|casa de apuestas oficial del real madrid|casa de apuestas oficial real madrid|casa de apuestas online|casa de apuestas online argentina|casa de
apuestas online chile|casa de apuestas online
españa|casa de apuestas online mexico|casa de apuestas online paraguay|casa
de apuestas online peru|casa de apuestas online usa|casa de apuestas online
venezuela|casa de apuestas pago anticipado|casa
de apuestas para boxeo|casa de apuestas para ufc|casa de
apuestas peru|casa de apuestas perú|casa
de apuestas peru online|casa de apuestas por paypal|casa de apuestas
promociones|casa de apuestas que regalan dinero|casa de apuestas real madrid|casa de
apuestas regalo de bienvenida|casa de apuestas sevilla|casa de apuestas sin dinero|casa de apuestas sin ingreso minimo|casa de apuestas sin licencia
en españa|casa de apuestas sin minimo de ingreso|casa de apuestas stake|casa de apuestas tenis|casa de apuestas ufc|casa de apuestas valencia|casa de apuestas venezuela|casa de apuestas virtuales|casa de apuestas vive la suerte|casa
oficial de apuestas del real madrid|casas apuestas asiaticas|casas apuestas
bono sin deposito|casas apuestas bonos sin deposito|casas apuestas caballos|casas apuestas chile|casas apuestas ciclismo|casas apuestas
con licencia|casas apuestas con licencia en españa|casas apuestas deportivas|casas apuestas deportivas
colombia|casas apuestas deportivas españa|casas
apuestas deportivas españolas|casas apuestas deportivas nuevas|casas apuestas españa|casas apuestas
españolas|casas apuestas esports|casas apuestas eurocopa|casas apuestas golf|casas apuestas ingreso minimo 5 euros|casas apuestas legales|casas apuestas legales españa|casas apuestas licencia|casas apuestas licencia españa|casas apuestas mexico|casas apuestas mundial|casas apuestas nba|casas apuestas nuevas|casas apuestas nuevas españa|casas apuestas ofertas|casas apuestas
online|casas apuestas paypal|casas apuestas peru|casas apuestas
sin licencia|casas apuestas tenis|casas asiaticas apuestas|casas de apuestas|casas de apuestas 5 euros|casas de apuestas app|casas
de apuestas argentinas|casas de apuestas asiaticas|casas de
apuestas baloncesto|casas de apuestas barcelona|casas de apuestas
bono bienvenida|casas de apuestas bono de bienvenida|casas de
apuestas bono por registro|casas de apuestas bono sin deposito|casas de apuestas bono
sin ingreso|casas de apuestas bonos|casas de apuestas bonos de bienvenida|casas de apuestas bonos
gratis|casas de apuestas bonos sin deposito|casas de apuestas boxeo|casas de apuestas caballos|casas de apuestas carreras
de caballos|casas de apuestas casino|casas de
apuestas casino online|casas de apuestas cerca de mi|casas de apuestas champions league|casas
de apuestas chile|casas de apuestas ciclismo|casas de apuestas colombia|casas de apuestas com|casas de apuestas con app|casas de
apuestas con apuestas gratis|casas de apuestas con bono|casas de apuestas con bono de bienvenida|casas de apuestas con bono
de registro|casas de apuestas con bono por registro|casas de apuestas con bono sin deposito|casas de apuestas con bonos|casas
de apuestas con bonos gratis|casas de apuestas con bonos sin deposito|casas de apuestas con deposito minimo|casas de apuestas con esports|casas
de apuestas con handicap asiatico|casas de apuestas con licencia|casas de apuestas
con licencia en españa|casas de apuestas con licencia españa|casas de apuestas con licencia española|casas
de apuestas con mejores cuotas|casas de apuestas con pago anticipado|casas
de apuestas con paypal|casas de apuestas con paypal en perú|casas de apuestas con promociones|casas de apuestas con ruleta en vivo|casas de apuestas copa del rey|casas de apuestas de caballos|casas de apuestas de
españa|casas de apuestas de futbol|casas de apuestas de fútbol|casas de apuestas de peru|casas de apuestas deportivas|casas de apuestas deportivas asiaticas|casas de apuestas deportivas
colombia|casas de apuestas deportivas comparativa|casas de apuestas deportivas con paypal|casas de
apuestas deportivas en chile|casas de apuestas deportivas en españa|casas de apuestas deportivas en linea|casas de apuestas deportivas
en madrid|casas de apuestas deportivas en mexico|casas de apuestas deportivas en peru|casas de
apuestas deportivas en sevilla|casas de apuestas deportivas en valencia|casas de
apuestas deportivas españa|casas de apuestas deportivas españolas|casas de apuestas deportivas legales|casas de apuestas deportivas madrid|casas de apuestas deportivas
mexico|casas de apuestas deportivas nuevas|casas de apuestas deportivas online|casas de
apuestas deportivas peru|casas de apuestas deportivas perú|casas de apuestas
deposito minimo 1 euro|casas de apuestas depósito mínimo 1 euro|casas de apuestas
dinero gratis|casas de apuestas en argentina|casas de apuestas en barcelona|casas de apuestas en chile|casas de apuestas en colombia|casas de apuestas en españa|casas de
apuestas en españa online|casas de apuestas en linea|casas de apuestas en madrid|casas de apuestas en méxico|casas de apuestas en peru|casas de apuestas en perú|casas de apuestas
en sevilla|casas de apuestas en uruguay|casas de apuestas en valencia|casas de
apuestas en venezuela|casas de apuestas equipos de futbol|casas de apuestas españa|casas de apuestas españa alemania|casas de apuestas españa inglaterra|casas de apuestas
españa licencia|casas de apuestas españa nuevas|casas de
apuestas españa online|casas de apuestas española|casas
de apuestas españolas|casas de apuestas españolas con licencia|casas de apuestas
españolas online|casas de apuestas esports|casas de apuestas
eurocopa|casas de apuestas eurocopa 2024|casas de apuestas europa league|casas de apuestas f1|casas de apuestas
fisicas en barcelona|casas de apuestas fisicas en españa|casas
de apuestas formula 1|casas de apuestas fuera de españa|casas de apuestas futbol|casas
de apuestas fútbol|casas de apuestas futbol españa|casas
de apuestas ganador eurocopa|casas de apuestas gratis|casas de apuestas ingreso minimo|casas de apuestas ingreso
minimo 1 euro|casas de apuestas ingreso minimo 5 euros|casas de apuestas inter barcelona|casas de apuestas legales|casas
de apuestas legales en colombia|casas de apuestas legales en españa|casas
de apuestas legales en mexico|casas de apuestas legales españa|casas
de apuestas legales mx|casas de apuestas licencia|casas de apuestas licencia españa|casas de apuestas
lista|casas de apuestas madrid|casas de apuestas mas seguras|casas
de apuestas mejores bonos|casas de apuestas mejores
cuotas|casas de apuestas mexico|casas de
apuestas méxico|casas de apuestas minimo 5 euros|casas de apuestas mlb|casas de
apuestas mundial|casas de apuestas mundial baloncesto|casas de apuestas mundiales|casas
de apuestas nba|casas de apuestas no reguladas en españa|casas de apuestas nueva ley|casas de apuestas nuevas|casas de
apuestas nuevas en colombia|casas de apuestas nuevas en españa|casas de apuestas nuevas españa|casas de apuestas ofertas|casas de apuestas online|casas de apuestas online argentina|casas
de apuestas online colombia|casas de apuestas online deportivas|casas
de apuestas online ecuador|casas de apuestas online en argentina|casas de apuestas online en chile|casas de apuestas
online en colombia|casas de apuestas online en españa|casas de apuestas online en mexico|casas de apuestas online
españa|casas de apuestas online mas fiables|casas de apuestas online
mexico|casas de apuestas online nuevas|casas de apuestas online peru|casas de apuestas online usa|casas de apuestas
online venezuela|casas de apuestas pago paypal|casas de apuestas para
ufc|casas de apuestas paypal|casas de apuestas peru bono sin deposito|casas de apuestas
presenciales en españa|casas de apuestas promociones|casas de apuestas
Your comment is awaiting moderation.
кракен даркнет
Your comment is awaiting moderation.
(10 euros gratis apuestas|10 mejores casas de apuestas|10 trucos para
ganar apuestas|15 euros gratis marca apuestas|1×2 apuestas|1×2 apuestas deportivas|1×2 apuestas que significa|1×2 en apuestas|1×2 en apuestas que significa|1×2 que significa en apuestas|5 euros gratis apuestas|9 apuestas que siempre ganaras|a partir
de cuanto se declara apuestas|actividades de juegos de azar y apuestas|ad
apuestas deportivas|aleksandre topuria ufc apuestas|algoritmo para
ganar apuestas deportivas|america apuestas|análisis nba apuestas|aplicacion android apuestas deportivas|aplicacion apuestas deportivas|aplicacion apuestas deportivas android|aplicación de apuestas online|aplicacion para hacer apuestas|aplicacion para hacer apuestas de futbol|aplicación para hacer apuestas de fútbol|aplicaciones apuestas deportivas android|aplicaciones apuestas deportivas gratis|aplicaciones de apuestas android|aplicaciones de apuestas de fútbol|aplicaciones de apuestas deportivas|aplicaciones de apuestas deportivas peru|aplicaciones de apuestas
deportivas perú|aplicaciones de apuestas en colombia|aplicaciones de
apuestas gratis|aplicaciones de apuestas online|aplicaciones de apuestas
seguras|aplicaciones de apuestas sin dinero|aplicaciones para hacer
apuestas|apostar seguro apuestas deportivas|app android apuestas deportivas|app apuestas|app apuestas android|app apuestas de futbol|app
apuestas deportivas|app apuestas deportivas android|app
apuestas deportivas argentina|app apuestas deportivas colombia|app apuestas
deportivas ecuador|app apuestas deportivas españa|app apuestas deportivas gratis|app
apuestas entre amigos|app apuestas futbol|app apuestas gratis|app apuestas sin dinero|app casa de apuestas|app casas de apuestas|app
control apuestas|app de apuestas|app de apuestas android|app de apuestas casino|app de apuestas colombia|app de apuestas con bono de bienvenida|app de apuestas
de futbol|app de apuestas deportivas|app de apuestas deportivas android|app de apuestas deportivas argentina|app de apuestas deportivas colombia|app de apuestas deportivas en españa|app de apuestas deportivas peru|app de apuestas deportivas perú|app de apuestas deportivas sin dinero|app de apuestas ecuador|app de apuestas en colombia|app de apuestas en españa|app de
apuestas en venezuela|app de apuestas futbol|app de apuestas
gratis|app de apuestas online|app de apuestas para android|app de apuestas para ganar
dinero|app de apuestas peru|app de apuestas reales|app de casas de apuestas|app marca apuestas android|app moviles de apuestas|app para apuestas|app para apuestas de futbol|app para apuestas deportivas|app para apuestas
deportivas en español|app para ganar apuestas deportivas|app para hacer apuestas|app para hacer apuestas
deportivas|app para hacer apuestas entre amigos|app para llevar control de apuestas|app pronosticos apuestas deportivas|app versus apuestas|apps apuestas
mundial|apps de apuestas|apps de apuestas con bono de
bienvenida|apps de apuestas de futbol|apps de
apuestas deportivas peru|apps de apuestas mexico|apps
para apuestas|aprender a hacer apuestas deportivas|aprender hacer apuestas deportivas|apuesta
del dia apuestas deportivas|apuestas 10 euros gratis|apuestas 100
seguras|apuestas 1×2|apuestas 1X2|apuestas 2 division|apuestas 3 division|apuestas a caballos|apuestas a carreras de caballos|apuestas a colombia|apuestas a corners|apuestas a ganar|apuestas a jugadores nba|apuestas a la baja|apuestas a la nfl|apuestas al barcelona|apuestas al dia|apuestas
al empate|apuestas al mundial|apuestas al tenis wta|apuestas alaves barcelona|apuestas alcaraz hoy|apuestas alemania
españa|apuestas alonso campeon del mundo|apuestas altas y bajas|apuestas altas y bajas nfl|apuestas ambos equipos marcan|apuestas america|apuestas android|apuestas anillo nba|apuestas
antes del mundial|apuestas anticipadas|apuestas anticipadas nba|apuestas apps|apuestas arabia argentina|apuestas argentina|apuestas argentina campeon del mundo|apuestas argentina canada|apuestas argentina colombia|apuestas argentina croacia|apuestas argentina españa|apuestas argentina
francia|apuestas argentina francia cuanto paga|apuestas
argentina francia mundial|apuestas argentina gana el mundial|apuestas argentina gana mundial|apuestas argentina holanda|apuestas argentina mexico|apuestas argentina méxico|apuestas argentina mundial|apuestas argentina online|apuestas argentina paises
bajos|apuestas argentina polonia|apuestas argentina uruguay|apuestas argentina vs australia|apuestas argentina vs colombia|apuestas
argentina vs francia|apuestas argentina vs peru|apuestas argentinas|apuestas arsenal
real madrid|apuestas ascenso a primera division|apuestas ascenso a segunda|apuestas
asiaticas|apuestas asiatico|apuestas athletic|apuestas athletic atletico|apuestas athletic barça|apuestas athletic barcelona|apuestas athletic betis|apuestas athletic
manchester|apuestas athletic manchester united|apuestas athletic
osasuna|apuestas athletic real|apuestas
athletic real madrid|apuestas athletic real sociedad|apuestas athletic real sociedad
final|apuestas athletic roma|apuestas athletic sevilla|apuestas athletic valencia|apuestas
atletico|apuestas atletico barcelona|apuestas atletico barsa|apuestas atletico campeon champions|apuestas atletico campeon de liga|apuestas atlético copenhague|apuestas atletico de madrid|apuestas atlético de madrid|apuestas
atletico de madrid barcelona|apuestas atletico de madrid gana la liga|apuestas
atletico de madrid real madrid|apuestas atlético de madrid
real madrid|apuestas atletico de madrid vs barcelona|apuestas atletico madrid|apuestas atletico madrid real madrid|apuestas atletico
madrid vs barcelona|apuestas atletico real madrid|apuestas atletico real madrid champions|apuestas atletismo|apuestas bajas|apuestas baloncesto|apuestas baloncesto acb|apuestas
baloncesto handicap|apuestas baloncesto hoy|apuestas baloncesto juegos olimpicos|apuestas
baloncesto nba|apuestas baloncesto pronostico|apuestas baloncesto pronósticos|apuestas baloncesto prorroga|apuestas barca|apuestas barca athletic|apuestas
barca atletico|apuestas barca bayern|apuestas barca bayern munich|apuestas barca girona|apuestas barca hoy|apuestas barça hoy|apuestas barca inter|apuestas barca juventus|apuestas barca madrid|apuestas barça madrid|apuestas barca real madrid|apuestas barca
vs juve|apuestas barca vs madrid|apuestas barca vs psg|apuestas barcelona|apuestas barcelona alaves|apuestas barcelona athletic|apuestas
barcelona atletico|apuestas barcelona atletico de madrid|apuestas barcelona atlético de madrid|apuestas
barcelona atletico madrid|apuestas barcelona bayern|apuestas barcelona betis|apuestas barcelona campeon de liga|apuestas barcelona celta|apuestas barcelona espanyol|apuestas barcelona gana la champions|apuestas barcelona girona|apuestas barcelona granada|apuestas barcelona hoy|apuestas barcelona inter|apuestas barcelona madrid|apuestas barcelona osasuna|apuestas barcelona psg|apuestas barcelona real madrid|apuestas barcelona real sociedad|apuestas barcelona sevilla|apuestas barcelona
valencia|apuestas barcelona villarreal|apuestas barcelona vs atletico madrid|apuestas barcelona vs madrid|apuestas barcelona vs real madrid|apuestas
barsa madrid|apuestas basket hoy|apuestas bayern barcelona|apuestas bayern vs barcelona|apuestas beisbol|apuestas béisbol|apuestas beisbol mlb|apuestas beisbol pronosticos|apuestas beisbol venezolano|apuestas betis|apuestas betis – chelsea|apuestas
betis barcelona|apuestas betis chelsea|apuestas
betis fiorentina|apuestas betis girona|apuestas betis madrid|apuestas betis mallorca|apuestas betis real madrid|apuestas betis real sociedad|apuestas
betis sevilla|apuestas betis valencia|apuestas betis valladolid|apuestas betis vs valencia|apuestas betplay hoy colombia|apuestas betsson peru|apuestas bienvenida|apuestas billar online|apuestas
bolivia vs colombia|apuestas bono|apuestas bono
bienvenida|apuestas bono de bienvenida|apuestas bono de bienvenida sin deposito|apuestas
bono gratis|apuestas bono sin deposito|apuestas bonos sin deposito|apuestas borussia real madrid|apuestas boxeo|apuestas boxeo
de campeonato|apuestas boxeo españa|apuestas boxeo español|apuestas boxeo femenino
olimpiadas|apuestas boxeo hoy|apuestas boxeo online|apuestas brasil colombia|apuestas brasil peru|apuestas brasil uruguay|apuestas
brasil vs colombia|apuestas brasil vs peru|apuestas caballos|apuestas caballos colocado|apuestas caballos españa|apuestas caballos hipodromo|apuestas caballos hoy|apuestas caballos madrid|apuestas caballos online|apuestas caballos sanlucar de barrameda|apuestas caballos
zarzuela|apuestas calculador|apuestas campeon|apuestas campeon champions|apuestas campeón champions|apuestas
campeon champions 2025|apuestas campeon champions league|apuestas campeon conference league|apuestas campeon copa america|apuestas campeon copa del rey|apuestas
campeon de champions|apuestas campeon de la champions|apuestas campeon de liga|apuestas campeon del mundo|apuestas campeon eurocopa|apuestas campeón eurocopa|apuestas
campeon europa league|apuestas campeon f1|apuestas campeon f1 2025|apuestas campeon formula 1|apuestas campeon libertadores|apuestas campeon liga|apuestas
campeon liga bbva|apuestas campeon liga española|apuestas campeon liga santander|apuestas campeon motogp 2025|apuestas campeon mundial|apuestas campeón mundial|apuestas campeon mundial baloncesto|apuestas campeon nba|apuestas
campeón nba|apuestas campeon premier|apuestas campeon premier league|apuestas campeon roland garros|apuestas campeonato f1|apuestas campeonatos
de futbol|apuestas carrera de caballos|apuestas carrera de caballos hoy|apuestas carrera de caballos nocturnas|apuestas
carrera de galgos fin de semana|apuestas carrera de galgos
hoy|apuestas carrera de galgos nocturnas|apuestas carreras caballos|apuestas
carreras caballos sanlucar|apuestas carreras de caballos|apuestas carreras de caballos en directo|apuestas carreras de caballos en vivo|apuestas carreras de caballos españa|apuestas carreras
de caballos hoy|apuestas carreras de caballos nacionales|apuestas
carreras de caballos nocturnas|apuestas carreras de caballos online|apuestas carreras de caballos sanlucar|apuestas carreras de caballos sanlúcar|apuestas carreras
de galgos|apuestas carreras de galgos en vivo|apuestas carreras de galgos nocturnas|apuestas carreras de
galgos pre partido|apuestas casino|apuestas casino barcelona|apuestas casino futbol|apuestas casino gran madrid|apuestas casino gratis|apuestas casino madrid|apuestas casino
online|apuestas casino online argentina|apuestas casinos|apuestas casinos online|apuestas celta|apuestas celta barcelona|apuestas celta betis|apuestas celta eibar|apuestas celta
espanyol|apuestas celta granada|apuestas celta madrid|apuestas celta manchester|apuestas celta real madrid|apuestas champion league|apuestas champions foro|apuestas champions hoy|apuestas champions league|apuestas champions
league – pronósticos|apuestas champions league 2025|apuestas
champions league hoy|apuestas champions league pronosticos|apuestas champions league pronósticos|apuestas champions pronosticos|apuestas chelsea barcelona|apuestas chelsea betis|apuestas chile|apuestas chile peru|apuestas chile venezuela|apuestas chile vs colombia|apuestas chile vs uruguay|apuestas ciclismo|apuestas
ciclismo en vivo|apuestas ciclismo femenino|apuestas ciclismo tour francia|apuestas ciclismo vuelta|apuestas ciclismo vuelta a españa|apuestas ciclismo vuelta españa|apuestas city madrid|apuestas city real madrid|apuestas
clasico|apuestas clasico español|apuestas clasico real madrid barcelona|apuestas
clasificacion mundial|apuestas colombia|apuestas colombia argentina|apuestas colombia brasil|apuestas
colombia paraguay|apuestas colombia uruguay|apuestas colombia vs argentina|apuestas
colombia vs brasil|apuestas combinadas|apuestas combinadas como funcionan|apuestas combinadas de futbol|apuestas combinadas de fútbol|apuestas combinadas foro|apuestas
combinadas futbol|apuestas combinadas hoy|apuestas combinadas mismo partido|apuestas combinadas mundial|apuestas combinadas nba|apuestas combinadas para esta semana|apuestas combinadas para hoy|apuestas combinadas para mañana|apuestas combinadas pronosticos|apuestas combinadas recomendadas|apuestas combinadas
seguras|apuestas combinadas seguras para hoy|apuestas combinadas seguras para mañana|apuestas como
ganar|apuestas comparador|apuestas con bono de bienvenida|apuestas
con dinero ficticio|apuestas con dinero real|apuestas con dinero virtual|apuestas
con handicap|apuestas con handicap asiatico|apuestas con handicap baloncesto|apuestas con mas probabilidades de ganar|apuestas con paypal|apuestas con tarjeta de credito|apuestas con tarjeta de debito|apuestas consejos|apuestas copa|apuestas copa africa|apuestas copa america|apuestas copa américa|apuestas
copa argentina|apuestas copa brasil|apuestas copa davis|apuestas copa de europa|apuestas copa del mundo|apuestas
copa del rey|apuestas copa del rey baloncesto|apuestas
copa del rey final|apuestas copa del rey futbol|apuestas copa del rey ganador|apuestas copa del rey hoy|apuestas copa del rey pronosticos|apuestas copa del rey pronósticos|apuestas copa europa|apuestas copa italia|apuestas copa
libertadores|apuestas copa mundial de hockey|apuestas copa rey|apuestas copa sudamericana|apuestas corners|apuestas corners hoy|apuestas croacia argentina|apuestas cuartos eurocopa|apuestas
cuotas|apuestas cuotas altas|apuestas cuotas bajas|apuestas de 1 euro|apuestas de baloncesto|apuestas de baloncesto hoy|apuestas de baloncesto nba|apuestas de baloncesto para hoy|apuestas de beisbol|apuestas de beisbol para
hoy|apuestas de blackjack en linea|apuestas de boxeo|apuestas de boxeo canelo|apuestas de boxeo
en las vegas|apuestas de boxeo hoy|apuestas de boxeo online|apuestas de caballo|apuestas de caballos|apuestas de caballos como funciona|apuestas
de caballos como se juega|apuestas de caballos en colombia|apuestas de caballos
en españa|apuestas de caballos en linea|apuestas de caballos españa|apuestas de caballos ganador
y colocado|apuestas de caballos internacionales|apuestas de caballos juegos|apuestas de caballos
online|apuestas de caballos online en venezuela|apuestas de caballos
por internet|apuestas de caballos pronosticos|apuestas de caballos pronósticos|apuestas de carrera de caballos|apuestas de carreras
de caballos|apuestas de carreras de caballos online|apuestas
de casino|apuestas de casino online|apuestas de casino por internet|apuestas
de champions league|apuestas de ciclismo|apuestas de colombia|apuestas de copa
america|apuestas de corners|apuestas de deportes
en linea|apuestas de deportes online|apuestas de dinero|apuestas de esports|apuestas de eurocopa|apuestas de europa league|apuestas de f1|apuestas de formula 1|apuestas de futbol|apuestas de fútbol|apuestas de futbol app|apuestas de futbol argentina|apuestas de futbol colombia|apuestas de futbol en colombia|apuestas de futbol en directo|apuestas de futbol en linea|apuestas de futbol en vivo|apuestas
de futbol español|apuestas de futbol gratis|apuestas de futbol hoy|apuestas de futbol mundial|apuestas de futbol online|apuestas de fútbol online|apuestas de futbol para hoy|apuestas de fútbol para hoy|apuestas
de futbol para hoy seguras|apuestas de futbol para mañana|apuestas
de futbol peru|apuestas de futbol pronosticos|apuestas de fútbol pronósticos|apuestas de futbol seguras|apuestas de futbol seguras para hoy|apuestas
de futbol sin dinero|apuestas de galgos|apuestas de galgos como ganar|apuestas de galgos en directo|apuestas de galgos online|apuestas de galgos trucos|apuestas de
golf|apuestas de hockey|apuestas de hockey sobre hielo|apuestas de hoy|apuestas de hoy seguras|apuestas de juego|apuestas de juegos|apuestas
de juegos deportivos|apuestas de juegos online|apuestas de la champions league|apuestas de
la copa américa|apuestas de la eurocopa|apuestas de la
europa league|apuestas de la liga|apuestas de la liga bbva|apuestas de
la liga española|apuestas de la nba|apuestas de la nfl|apuestas de la ufc|apuestas de mlb|apuestas de
nba|apuestas de nba para hoy|apuestas de partidos|apuestas
de partidos de futbol|apuestas de peleas
ufc|apuestas de perros en vivo|apuestas de perros virtuales|apuestas
de peru|apuestas de sistema|apuestas de sistema como funciona|apuestas de sistema explicacion|apuestas de sistema explicación|apuestas de tenis|apuestas
de tenis de mesa|apuestas de tenis en directo|apuestas de tenis hoy|apuestas
de tenis para hoy|apuestas de tenis pronosticos|apuestas de tenis seguras|apuestas de todo tipo|apuestas
de ufc|apuestas de ufc hoy|apuestas del boxeo|apuestas del clasico|apuestas del clasico real madrid barca|apuestas del dia|apuestas del
día|apuestas del dia de hoy|apuestas del dia deportivas|apuestas del dia futbol|apuestas
del mundial|apuestas del partido de hoy|apuestas del real madrid|apuestas del rey|apuestas del
sistema|apuestas deporte|apuestas deportes|apuestas deportiva|apuestas
deportivas|apuestas deportivas 1 euro|apuestas deportivas 10
euros gratis|apuestas deportivas 100 seguras|apuestas deportivas
1×2|apuestas deportivas android|apuestas deportivas app|apuestas deportivas apps|apuestas
deportivas argentina|apuestas deportivas argentina
futbol|apuestas deportivas argentina legal|apuestas deportivas
atletico de madrid|apuestas deportivas baloncesto|apuestas deportivas barca madrid|apuestas deportivas barcelona|apuestas deportivas
beisbol|apuestas deportivas bono|apuestas deportivas bono bienvenida|apuestas deportivas bono de bienvenida|apuestas deportivas
bono sin deposito|apuestas deportivas bonos de bienvenida|apuestas deportivas boxeo|apuestas deportivas caballos|apuestas deportivas calculadora|apuestas deportivas campeon liga|apuestas deportivas casino|apuestas deportivas casino barcelona|apuestas deportivas casino online|apuestas deportivas cerca
de mi|apuestas deportivas champions league|apuestas deportivas chile|apuestas
deportivas ciclismo|apuestas deportivas colombia|apuestas deportivas com|apuestas deportivas
com foro|apuestas deportivas com pronosticos|apuestas deportivas
combinadas|apuestas deportivas combinadas para hoy|apuestas deportivas como se juega|apuestas deportivas
comparador|apuestas deportivas con bono gratis|apuestas deportivas con bonos gratis|apuestas deportivas
con dinero ficticio|apuestas deportivas con paypal|apuestas deportivas con puntos virtuales|apuestas deportivas consejos|apuestas deportivas consejos para
ganar|apuestas deportivas copa america|apuestas
deportivas copa del rey|apuestas deportivas copa libertadores|apuestas deportivas copa mundial|apuestas deportivas corners|apuestas deportivas cual es la mejor|apuestas deportivas cuotas altas|apuestas deportivas de baloncesto|apuestas
deportivas de boxeo|apuestas deportivas de colombia|apuestas deportivas de futbol|apuestas deportivas de nba|apuestas deportivas de nhl|apuestas deportivas de peru|apuestas
deportivas de tenis|apuestas deportivas del dia|apuestas deportivas dinero ficticio|apuestas deportivas directo|apuestas deportivas doble oportunidad|apuestas deportivas en argentina|apuestas deportivas en chile|apuestas deportivas en colombia|apuestas deportivas
en directo|apuestas deportivas en españa|apuestas deportivas en español|apuestas deportivas en linea|apuestas deportivas en línea|apuestas deportivas en peru|apuestas deportivas
en perú|apuestas deportivas en sevilla|apuestas
deportivas en uruguay|apuestas deportivas en vivo|apuestas deportivas es|apuestas deportivas es pronosticos|apuestas deportivas españa|apuestas deportivas españolas|apuestas deportivas
esports|apuestas deportivas estadisticas|apuestas deportivas estrategias|apuestas deportivas estrategias seguras|apuestas deportivas eurocopa|apuestas deportivas europa league|apuestas deportivas f1|apuestas deportivas faciles de ganar|apuestas deportivas formula 1|apuestas deportivas foro|apuestas
deportivas foro futbol|apuestas deportivas foro tenis|apuestas deportivas francia argentina|apuestas deportivas
futbol|apuestas deportivas fútbol|apuestas deportivas futbol argentino|apuestas deportivas futbol colombia|apuestas deportivas futbol español|apuestas deportivas gana|apuestas deportivas ganadas|apuestas deportivas ganar dinero seguro|apuestas deportivas gane|apuestas deportivas golf|apuestas deportivas gratis|apuestas deportivas gratis con premios|apuestas deportivas gratis hoy|apuestas
deportivas gratis sin deposito|apuestas deportivas handicap|apuestas
deportivas handicap asiatico|apuestas deportivas hoy|apuestas deportivas impuestos|apuestas deportivas interior argentina|apuestas deportivas
juegos olimpicos|apuestas deportivas la liga|apuestas deportivas
legales|apuestas deportivas legales en colombia|apuestas deportivas libres de impuestos|apuestas deportivas licencia españa|apuestas deportivas liga española|apuestas deportivas
listado|apuestas deportivas listado clasico|apuestas deportivas madrid|apuestas deportivas mas seguras|apuestas deportivas
mejor pagadas|apuestas deportivas mejores|apuestas deportivas mejores app|apuestas
deportivas mejores casas|apuestas deportivas mejores cuotas|apuestas deportivas
mejores paginas|apuestas deportivas mexico|apuestas deportivas méxico|apuestas deportivas mlb|apuestas deportivas mlb
hoy|apuestas deportivas multiples|apuestas deportivas
mundial|apuestas deportivas murcia|apuestas deportivas nba|apuestas
deportivas nba hoy|apuestas deportivas nfl|apuestas deportivas nhl|apuestas deportivas nuevas|apuestas
deportivas ofertas|apuestas deportivas online|apuestas deportivas online argentina|apuestas deportivas online chile|apuestas deportivas online colombia|apuestas deportivas
online en colombia|apuestas deportivas online españa|apuestas deportivas
online mexico|apuestas deportivas online paypal|apuestas deportivas online peru|apuestas
deportivas online por internet|apuestas deportivas pago paypal|apuestas
deportivas para ganar dinero|apuestas deportivas para hoy|apuestas
deportivas para hoy pronosticos|apuestas deportivas partido suspendido|apuestas
deportivas partidos de hoy|apuestas deportivas paypal|apuestas deportivas peru|apuestas deportivas
perú|apuestas deportivas peru vs ecuador|apuestas deportivas predicciones|apuestas deportivas promociones|apuestas deportivas pronostico|apuestas deportivas pronóstico|apuestas deportivas pronostico hoy|apuestas deportivas pronosticos|apuestas deportivas pronósticos|apuestas deportivas pronosticos
expertos|apuestas deportivas pronosticos gratis|apuestas deportivas
pronosticos nba|apuestas deportivas pronosticos tenis|apuestas deportivas que aceptan paypal|apuestas deportivas real madrid|apuestas deportivas regalo bienvenida|apuestas
deportivas resultado exacto|apuestas deportivas resultados|apuestas
deportivas rugby|apuestas deportivas seguras|apuestas deportivas seguras
foro|apuestas deportivas seguras hoy|apuestas deportivas seguras para hoy|apuestas deportivas seguras telegram|apuestas deportivas
sevilla|apuestas deportivas simulador eurocopa|apuestas deportivas sin deposito|apuestas deportivas sin deposito
inicial|apuestas deportivas sin dinero|apuestas deportivas sin dinero real|apuestas deportivas sin registro|apuestas deportivas stake|apuestas deportivas stake 10|apuestas deportivas telegram españa|apuestas
deportivas tenis|apuestas deportivas tenis de mesa|apuestas deportivas tenis foro|apuestas deportivas tenis hoy|apuestas deportivas tips|apuestas deportivas tipster|apuestas deportivas ufc|apuestas deportivas uruguay|apuestas deportivas valencia|apuestas deportivas valencia
barcelona|apuestas deportivas venezuela|apuestas
deportivas virtuales|apuestas deportivas y casino|apuestas deportivas y casino online|apuestas
deportivas.com|apuestas deportivas.com foro|apuestas deportivas.es|apuestas
deportivos pronosticos|apuestas deposito minimo 1 euro|apuestas descenso
a segunda|apuestas descenso a segunda b|apuestas descenso la
liga|apuestas descenso primera division|apuestas descenso segunda|apuestas
dia|apuestas diarias seguras|apuestas dinero|apuestas dinero ficticio|apuestas dinero real|apuestas dinero virtual|apuestas directas|apuestas directo|apuestas directo
futbol|apuestas division de honor juvenil|apuestas dnb|apuestas doble oportunidad|apuestas doble resultado|apuestas dobles|apuestas dobles y triples|apuestas dortmund barcelona|apuestas
draft nba|apuestas draft nfl|apuestas ecuador vs argentina|apuestas ecuador vs venezuela|apuestas egipto uruguay|apuestas
el clasico|apuestas elecciones venezuela|apuestas empate|apuestas en baloncesto|apuestas en barcelona|apuestas
en beisbol|apuestas en boxeo|apuestas en caballos|apuestas en carreras de caballos|apuestas
en casino|apuestas en casino online|apuestas en casinos|apuestas
en casinos online|apuestas en chile|apuestas en ciclismo|apuestas
en colombia|apuestas en colombia de futbol|apuestas en directo|apuestas
en directo futbol|apuestas en directo pronosticos|apuestas en el futbol|apuestas en el
tenis|apuestas en españa|apuestas en esports|apuestas en eventos deportivos
virtuales|apuestas en golf|apuestas en juegos|apuestas en la champions league|apuestas en la eurocopa|apuestas en la liga|apuestas en la
nba|apuestas en la nfl|apuestas en las vegas mlb|apuestas
en las vegas nfl|apuestas en linea|apuestas en línea|apuestas en linea argentina|apuestas en linea boxeo|apuestas en linea
chile|apuestas en linea colombia|apuestas en línea de fútbol|apuestas en linea deportivas|apuestas en linea españa|apuestas en linea
estados unidos|apuestas en linea futbol|apuestas en linea mexico|apuestas en línea méxico|apuestas
en linea mundial|apuestas en linea peru|apuestas en linea usa|apuestas en los esports|apuestas en madrid|apuestas en méxico|apuestas en mexico online|apuestas en nba|apuestas
en partidos de futbol|apuestas en partidos de futbol
en vivo|apuestas en partidos de tenis en directo|apuestas en perú|apuestas en sevilla|apuestas en sistema|apuestas en stake|apuestas en tenis|apuestas en tenis de mesa|apuestas en valencia|apuestas en vivo|apuestas en vivo argentina|apuestas en vivo casino|apuestas en vivo futbol|apuestas en vivo fútbol|apuestas en vivo nba|apuestas en vivo peru|apuestas en vivo tenis|apuestas en vivo ufc|apuestas equipo mbappe|apuestas equipos de futbol|apuestas españa|apuestas
españa alemania|apuestas españa alemania eurocopa|apuestas españa croacia|apuestas españa eurocopa|apuestas españa francia|apuestas españa francia eurocopa|apuestas españa gana el mundial|apuestas españa
gana eurocopa|apuestas españa gana mundial|apuestas españa georgia|apuestas españa holanda|apuestas
españa inglaterra|apuestas españa inglaterra cuotas|apuestas españa
inglaterra eurocopa|apuestas españa italia|apuestas españa mundial|apuestas españa paises bajos|apuestas español|apuestas español oviedo|apuestas espanyol
barcelona|apuestas espanyol betis|apuestas espanyol villarreal|apuestas esport (Frank)|apuestas
esports|apuestas esports colombia|apuestas esports españa|apuestas esports fifa|apuestas esports gratis|apuestas esports lol|apuestas esports
peru|apuestas esports valorant|apuestas estadisticas|apuestas estrategias|apuestas euro|apuestas euro copa|apuestas eurocopa|apuestas eurocopa campeon|apuestas eurocopa españa|apuestas eurocopa favoritos|apuestas eurocopa femenina|apuestas eurocopa final|apuestas eurocopa ganador|apuestas eurocopa hoy|apuestas
eurocopa sub 21|apuestas euroliga baloncesto|apuestas euroliga pronosticos|apuestas europa league|apuestas europa league hoy|apuestas europa league pronosticos|apuestas europa league pronósticos|apuestas euros|apuestas
f1 abu dhabi|apuestas f1 bahrein|apuestas f1 canada|apuestas
f1 china|apuestas f1 cuotas|apuestas f1 hoy|apuestas f1
las vegas|apuestas f1 miami|apuestas f1 monaco|apuestas faciles de ganar|apuestas fáciles de ganar|apuestas faciles para ganar|apuestas favoritas|apuestas favorito champions|apuestas favoritos champions|apuestas favoritos
eurocopa|apuestas favoritos mundial|apuestas fc barcelona|apuestas final champions cuotas|apuestas final champions league|apuestas final champions peru|apuestas final copa|apuestas final copa
america|apuestas final copa de europa|apuestas final copa del rey|apuestas final copa europa|apuestas final copa libertadores|apuestas final copa rey|apuestas final de copa|apuestas final
de copa del rey|apuestas final del mundial|apuestas final euro|apuestas final eurocopa|apuestas
final europa league|apuestas final libertadores|apuestas final mundial|apuestas final nba|apuestas final rugby|apuestas final uefa
europa league|apuestas final.mundial|apuestas finales de
conferencia nfl|apuestas finales nba|apuestas fiorentina betis|apuestas formula|apuestas formula 1|apuestas fórmula 1|apuestas fórmula 1 pronósticos|apuestas formula uno|apuestas foro|apuestas foro nba|apuestas francia argentina|apuestas francia españa|apuestas futbol|apuestas fútbol|apuestas futbol americano|apuestas futbol americano nfl|apuestas futbol argentina|apuestas futbol argentino|apuestas
futbol champions league|apuestas futbol chile|apuestas futbol colombia|apuestas futbol consejos|apuestas futbol en directo|apuestas fútbol en directo|apuestas futbol en vivo|apuestas fútbol en vivo|apuestas futbol españa|apuestas futbol español|apuestas fútbol español|apuestas futbol eurocopa|apuestas futbol femenino|apuestas
futbol foro|apuestas futbol gratis|apuestas futbol hoy|apuestas fútbol hoy|apuestas futbol juegos olimpicos|apuestas futbol mexico|apuestas futbol mundial|apuestas futbol online|apuestas futbol
para hoy|apuestas futbol peru|apuestas futbol pronosticos|apuestas futbol sala|apuestas
futbol telegram|apuestas futbol virtual|apuestas galgos|apuestas galgos
en directo|apuestas galgos hoy|apuestas galgos online|apuestas galgos pronosticos|apuestas
galgos trucos|apuestas gana|apuestas gana colombia|apuestas gana resultados|apuestas ganadas|apuestas ganadas hoy|apuestas ganador champions
league|apuestas ganador copa america|apuestas
ganador copa del rey|apuestas ganador copa del rey baloncesto|apuestas ganador copa libertadores|apuestas ganador de la eurocopa|apuestas ganador de la liga|apuestas ganador del mundial|apuestas ganador eurocopa|apuestas ganador
europa league|apuestas ganador f1|apuestas ganador
la liga|apuestas ganador liga española|apuestas ganador mundial|apuestas ganador mundial baloncesto|apuestas
ganador mundial f1|apuestas ganador nba|apuestas ganadores eurocopa|apuestas ganadores mundial|apuestas ganar champions|apuestas
ganar eurocopa|apuestas ganar liga|apuestas ganar mundial|apuestas ganar
nba|apuestas getafe valencia|apuestas ghana uruguay|apuestas girona|apuestas girona athletic|apuestas girona betis|apuestas girona campeon de liga|apuestas girona campeon liga|apuestas girona
gana la liga|apuestas girona real madrid|apuestas girona real sociedad|apuestas goleador eurocopa|apuestas goleadores eurocopa|apuestas goles asiaticos|apuestas
golf|apuestas golf masters|apuestas golf pga|apuestas granada barcelona|apuestas grand slam de tenis|apuestas gratis|apuestas gratis casino|apuestas
gratis con premios|apuestas gratis hoy|apuestas gratis para hoy|apuestas gratis por
registro|apuestas gratis puntos|apuestas gratis regalos|apuestas gratis sin deposito|apuestas gratis sin depósito|apuestas gratis sin ingreso|apuestas gratis sports|apuestas gratis y ganar premios|apuestas grupo a eurocopa|apuestas grupos eurocopa|apuestas handicap|apuestas handicap asiatico|apuestas handicap baloncesto|apuestas handicap como funciona|apuestas handicap nba|apuestas handicap nfl|apuestas hipicas online|apuestas hípicas online|apuestas hipicas venezuela|apuestas
hockey|apuestas hockey hielo|apuestas hockey patines|apuestas hockey
sobre hielo|apuestas holanda argentina|apuestas holanda vs argentina|apuestas
hoy|apuestas hoy champions|apuestas hoy futbol|apuestas hoy nba|apuestas
hoy pronosticos|apuestas hoy seguras|apuestas impuestos|apuestas inglaterra paises bajos|apuestas inter barca|apuestas inter barcelona|apuestas juego|apuestas juegos|apuestas juegos en linea|apuestas juegos olimpicos|apuestas juegos olímpicos|apuestas juegos
olimpicos baloncesto|apuestas juegos online|apuestas juegos virtuales|apuestas jugador
sevilla|apuestas jugadores nba|apuestas kings league americas|apuestas la liga|apuestas la liga española|apuestas la liga
hoy|apuestas la liga santander|apuestas las vegas mlb|apuestas las vegas nba|apuestas
las vegas nfl|apuestas league of legends mundial|apuestas legal|apuestas legales|apuestas legales en colombia|apuestas legales en españa|apuestas
legales en estados unidos|apuestas legales españa|apuestas leganes betis|apuestas libertadores|apuestas licencia|apuestas liga
1 peru|apuestas liga argentina|apuestas liga bbva pronosticos|apuestas liga de campeones|apuestas liga de campeones de baloncesto|apuestas liga de campeones de hockey|apuestas liga españa|apuestas
liga española|apuestas liga santander pronosticos|apuestas ligas de futbol|apuestas linea|apuestas linea de gol|apuestas liverpool barcelona|apuestas liverpool real madrid|apuestas lol mundial|apuestas madrid|apuestas madrid arsenal|apuestas madrid atletico|apuestas madrid atletico champions|apuestas madrid
barca|apuestas madrid barça|apuestas madrid barca hoy|apuestas madrid barca supercopa|apuestas madrid barcelona|apuestas madrid barsa|apuestas madrid bayern|apuestas madrid betis|apuestas madrid borussia|apuestas madrid campeon champions|apuestas madrid celta|apuestas madrid city|apuestas madrid dortmund|apuestas
madrid gana la liga|apuestas madrid gana liga|apuestas madrid hoy|apuestas madrid liverpool|apuestas madrid osasuna|apuestas madrid
sevilla|apuestas madrid valencia|apuestas madrid
vs arsenal|apuestas madrid vs barcelona|apuestas mallorca osasuna|apuestas
mallorca real sociedad|apuestas manchester athletic|apuestas manchester
city real madrid|apuestas mas faciles de ganar|apuestas mas seguras|apuestas
mas seguras para hoy|apuestas masters de golf|apuestas masters
de tenis|apuestas maximo goleador eurocopa|apuestas
maximo goleador mundial|apuestas mejor jugador eurocopa|apuestas mejores casinos online|apuestas mexico|apuestas méxico|apuestas mexico polonia|apuestas méxico polonia|apuestas mlb|apuestas mlb hoy|apuestas mlb las vegas|apuestas mlb
para hoy|apuestas mlb pronosticos|apuestas mlb usa|apuestas mma ufc|apuestas momios|apuestas multiples|apuestas múltiples|apuestas multiples como funcionan|apuestas multiples el gordo|apuestas multiples futbol|apuestas mundial|apuestas mundial 2026|apuestas mundial baloncesto|apuestas
mundial balonmano|apuestas mundial brasil|apuestas mundial campeon|apuestas mundial ciclismo|apuestas mundial clubes|apuestas mundial de
baloncesto|apuestas mundial de ciclismo|apuestas mundial de clubes|apuestas
mundial de futbol|apuestas mundial de fútbol|apuestas mundial de rugby|apuestas mundial f1|apuestas mundial favoritos|apuestas mundial femenino|apuestas
mundial formula 1|apuestas mundial futbol|apuestas mundial ganador|apuestas mundial lol|apuestas mundial moto
gp|apuestas mundial motogp|apuestas mundial rugby|apuestas
mundial sub 17|apuestas mundiales|apuestas mundialistas|apuestas mvp eurocopa|apuestas mvp nba|apuestas mvp nfl|apuestas nacionales de colombia|apuestas
nba|apuestas nba all star|apuestas nba campeon|apuestas nba consejos|apuestas nba
esta noche|apuestas nba finals|apuestas nba gratis|apuestas nba hoy|apuestas nba hoy jugadores|apuestas nba hoy
pronosticos|apuestas nba para hoy|apuestas nba playoffs|apuestas nba pronosticos|apuestas nba pronósticos|apuestas
nba pronosticos hoy|apuestas nba tipster|apuestas nfl|apuestas nfl hoy|apuestas nfl las vegas|apuestas
nfl playoffs|apuestas nfl pronosticos|apuestas nfl pronósticos|apuestas nfl semana 4|apuestas nfl super bowl|apuestas nhl|apuestas nhl pronosticos|apuestas octavos
eurocopa|apuestas ofertas|apuestas online|apuestas online
argentina|apuestas online argentina legal|apuestas online bono|apuestas online bono bienvenida|apuestas online boxeo|apuestas online caballos|apuestas online carreras de caballos|apuestas online casino|apuestas
online champions league|apuestas online chile|apuestas online ciclismo|apuestas online colombia|apuestas online comparativa|apuestas
online con paypal|apuestas online de caballos|apuestas
online deportivas|apuestas online en argentina|apuestas online en peru|apuestas online espana|apuestas online españa|apuestas online esports|apuestas online foro|apuestas online futbol|apuestas online futbol españa|apuestas
online golf|apuestas online gratis|apuestas online
gratis sin deposito|apuestas online juegos|apuestas online mexico|apuestas
online mma|apuestas online movil|apuestas online nba|apuestas online net|apuestas online nuevas|apuestas online opiniones|apuestas online paypal|apuestas online
peru|apuestas online seguras|apuestas online sin dinero|apuestas
online sin registro|apuestas online tenis|apuestas online ufc|apuestas online uruguay|apuestas
online venezuela|apuestas open britanico golf|apuestas osasuna athletic|apuestas osasuna barcelona|apuestas osasuna real madrid|apuestas osasuna sevilla|apuestas osasuna valencia|apuestas over|apuestas over 2.5|apuestas over under|apuestas paginas|apuestas pago anticipado|apuestas paises bajos
ecuador|apuestas paises bajos inglaterra|apuestas países bajos qatar|apuestas para boxeo|apuestas para champions league|apuestas para el clasico|apuestas
para el dia de hoy|apuestas para el mundial|apuestas
para el partido de hoy|apuestas para eurocopa|apuestas para europa league|apuestas
para futbol|apuestas para ganar|apuestas para ganar dinero|apuestas para
ganar dinero facil|apuestas para ganar en la ruleta|apuestas para ganar la champions|apuestas para ganar la eurocopa|apuestas para ganar la
europa league|apuestas para ganar la liga|apuestas para ganar siempre|apuestas para
hacer|apuestas para hoy|apuestas para hoy de futbol|apuestas
para hoy europa league|apuestas para hoy futbol|apuestas
para juegos|apuestas para la champions league|apuestas para la copa
del rey|apuestas para la eurocopa|apuestas para la europa league|apuestas para la final de la eurocopa|apuestas para
la nba hoy|apuestas para los partidos de hoy|apuestas para partidos de hoy|apuestas para ufc|apuestas partido|apuestas
partido aplazado|apuestas partido champions|apuestas partido
colombia|apuestas partido españa marruecos|apuestas partido mundial|apuestas partido suspendido|apuestas partidos|apuestas partidos champions
league|apuestas partidos csgo|apuestas partidos de futbol|apuestas partidos
de futbol hoy|apuestas partidos de hoy|apuestas partidos eurocopa|apuestas
partidos futbol|apuestas partidos hoy|apuestas partidos mundial|apuestas paypal|apuestas peleas de boxeo|apuestas peru|apuestas perú|apuestas peru brasil|apuestas peru chile|apuestas peru paraguay|apuestas peru
uruguay|apuestas peru vs chile|apuestas peru vs colombia|apuestas pichichi eurocopa|apuestas plataforma|apuestas playoff|apuestas playoff ascenso|apuestas playoff ascenso
a primera|apuestas playoff nba|apuestas playoff
segunda|apuestas playoff segunda b|apuestas playoffs nba|apuestas playoffs nfl|apuestas polonia argentina|apuestas por
argentina|apuestas por internet mexico|apuestas por internet para ganar dinero|apuestas por paypal|apuestas por ronda boxeo|apuestas por sistema|apuestas portugal uruguay|apuestas pre partido|apuestas predicciones|apuestas predicciones futbol|apuestas primera division|apuestas
primera division españa|apuestas promociones|apuestas pronostico|apuestas pronosticos|apuestas pronosticos deportivos|apuestas pronosticos deportivos tenis|apuestas pronosticos futbol|apuestas pronosticos gratis|apuestas pronosticos nba|apuestas pronosticos
tenis|apuestas prorroga|apuestas psg barca|apuestas
psg barcelona|apuestas puntos por tarjetas|apuestas puntos tarjetas|apuestas
que aceptan paypal|apuestas que es handicap|apuestas que puedes hacer con tu novia|apuestas que siempre ganaras|apuestas que significa|apuestas quien bajara a segunda|apuestas quién bajara a segunda|apuestas quien gana el mundial|apuestas quien gana eurocopa|apuestas quien gana la champions|apuestas quien gana la eurocopa|apuestas quien gana la liga|apuestas
quien ganara el mundial|apuestas quién ganará el mundial|apuestas
quien ganara la champions|apuestas quien ganara la eurocopa|apuestas
quien ganara la liga|apuestas rayo barcelona|apuestas
real madrid|apuestas real madrid arsenal|apuestas real madrid athletic|apuestas real
madrid atletico|apuestas real madrid atletico champions|apuestas real madrid atletico de madrid|apuestas real madrid atlético de madrid|apuestas real madrid atletico madrid|apuestas real madrid barcelona|apuestas
real madrid bayern|apuestas real madrid betis|apuestas real madrid borussia|apuestas
real madrid campeon champions|apuestas real madrid celta|apuestas real madrid champions|apuestas real madrid city|apuestas real madrid
girona|apuestas real madrid hoy|apuestas real madrid liverpool|apuestas real
madrid manchester city|apuestas real madrid osasuna|apuestas real madrid real sociedad|apuestas real madrid valencia|apuestas real madrid villarreal|apuestas real madrid vs arsenal|apuestas real
madrid vs atletico|apuestas real madrid vs atlético|apuestas real madrid
vs atletico madrid|apuestas real madrid vs barcelona|apuestas real
madrid vs betis|apuestas real madrid vs sevilla|apuestas real madrid vs
valencia|apuestas real sociedad|apuestas real sociedad athletic|apuestas real sociedad barcelona|apuestas real sociedad betis|apuestas real sociedad psg|apuestas real
sociedad real madrid|apuestas real sociedad valencia|apuestas recomendadas
hoy|apuestas regalo de bienvenida|apuestas registro|apuestas resultado exacto|apuestas resultados|apuestas resultados eurocopa|apuestas retirada tenis|apuestas
roma barcelona|apuestas roma sevilla|apuestas rugby|apuestas rugby mundial|apuestas rugby world cup|apuestas ruleta seguras|apuestas
segunda|apuestas segunda b|apuestas segunda division|apuestas segunda
división|apuestas segunda division b|apuestas segunda division españa|apuestas seguras|apuestas seguras
baloncesto|apuestas seguras calculadora|apuestas seguras en la ruleta|apuestas seguras eurocopa|apuestas
seguras foro|apuestas seguras futbol|apuestas seguras futbol hoy|apuestas seguras
gratis|apuestas seguras hoy|apuestas seguras hoy futbol|apuestas seguras nba|apuestas seguras nba hoy|apuestas
seguras para este fin de semana|apuestas seguras para ganar dinero|apuestas
seguras para hoy|apuestas seguras para hoy fútbol|apuestas seguras para hoy pronósticos|apuestas seguras para mañana|apuestas seguras ruleta|apuestas seguras telegram|apuestas
seguras tenis|apuestas semifinales eurocopa|apuestas senegal
paises bajos|apuestas sevilla|apuestas sevilla athletic|apuestas sevilla atletico
de madrid|apuestas sevilla barcelona|apuestas sevilla betis|apuestas sevilla campeon liga|apuestas
sevilla celta|apuestas sevilla gana la liga|apuestas sevilla girona|apuestas sevilla inter|apuestas sevilla jugador|apuestas sevilla juventus|apuestas sevilla
leganes|apuestas sevilla madrid|apuestas sevilla manchester
united|apuestas sevilla osasuna|apuestas sevilla real madrid|apuestas sevilla
real sociedad|apuestas sevilla roma|apuestas sevilla valencia|apuestas significa|apuestas
simples ejemplos|apuestas simples o combinadas|apuestas sin deposito|apuestas sin deposito
inicial|apuestas sin deposito minimo|apuestas sin dinero|apuestas sin dinero
real|apuestas sin empate|apuestas sin empate que significa|apuestas sin ingreso minimo|apuestas sin registro|apuestas sistema|apuestas sistema calculadora|apuestas sistema como
funciona|apuestas sistema trixie|apuestas sociedad|apuestas sorteo copa del rey|apuestas stake|apuestas stake 10|apuestas stake 10 hoy|apuestas super bowl favorito|apuestas
super rugby|apuestas supercopa españa|apuestas superliga argentina|apuestas
tarjeta roja|apuestas tarjetas|apuestas tarjetas
amarillas|apuestas tenis|apuestas tenis atp|apuestas tenis
consejos|apuestas tenis copa davis|apuestas tenis de mesa|apuestas
tenis de mesa pronosticos|apuestas tenis en vivo|apuestas tenis femenino|apuestas tenis hoy|apuestas tenis itf|apuestas tenis pronosticos|apuestas tenis pronósticos|apuestas tenis retirada|apuestas tenis roland garros|apuestas
tenis seguras|apuestas tenis wimbledon|apuestas tenis wta|apuestas tercera division|apuestas
tercera division españa|apuestas tipos|apuestas
tips|apuestas tipster|apuestas tipster para hoy|apuestas topuria holloway cuotas|apuestas torneos de golf|apuestas torneos de tenis|apuestas
trucos|apuestas uefa champions league|apuestas uefa europa league|apuestas ufc|apuestas ufc chile|apuestas ufc como funciona|apuestas ufc hoy|apuestas ufc ilia topuria|apuestas ufc online|apuestas ufc pronósticos|apuestas ufc telegram|apuestas ufc topuria|apuestas under over|apuestas unionistas villarreal|apuestas uruguay|apuestas uruguay colombia|apuestas uruguay corea|apuestas uruguay vs colombia|apuestas us open golf|apuestas us open tenis|apuestas valencia|apuestas valencia barcelona|apuestas valencia betis|apuestas valencia madrid|apuestas valencia
real madrid|apuestas valladolid barcelona|apuestas valladolid valencia|apuestas valor app|apuestas valor en directo|apuestas valor
galgos|apuestas venezuela|apuestas venezuela argentina|apuestas venezuela bolivia|apuestas venezuela ecuador|apuestas villarreal|apuestas villarreal athletic|apuestas villarreal barcelona|apuestas villarreal bayern|apuestas villarreal betis|apuestas villarreal liverpool|apuestas villarreal manchester|apuestas villarreal manchester united|apuestas villarreal vs real madrid|apuestas virtuales|apuestas virtuales colombia|apuestas virtuales futbol|apuestas
virtuales sin dinero|apuestas vivo|apuestas vuelta a españa|apuestas
vuelta españa|apuestas william hill partidos
de hoy|apuestas y casino|apuestas y casinos|apuestas y juegos de azar|apuestas y pronosticos|apuestas y pronosticos de futbol|apuestas y pronosticos deportivos|apuestas y resultados|apuestas-deportivas|apuestas-deportivas.es pronosticos|arbitro nba apuestas|argentina apuestas|argentina colombia apuestas|argentina croacia apuestas|argentina francia apuestas|argentina mexico apuestas|argentina peru
apuestas|argentina uruguay apuestas|argentina vs
bolivia apuestas|argentina vs chile apuestas|argentina
vs colombia apuestas|argentina vs francia apuestas|argentina vs.
colombia apuestas|asi se gana en las apuestas deportivas|asiatico apuestas|asiatico en apuestas|asiaticos apuestas|athletic barcelona apuestas|athletic manchester united apuestas|athletic osasuna apuestas|athletic real madrid apuestas|atletico barcelona apuestas|atletico de madrid apuestas|atlético de madrid apuestas|atletico de madrid real madrid apuestas|atletico de madrid vs
barcelona apuestas|atletico madrid real madrid apuestas|atletico madrid
vs real madrid apuestas|atletico real madrid apuestas|atletico vs real madrid apuestas|avisador de cuotas apuestas|bajada de cuotas apuestas|baloncesto apuestas|barbastro barcelona apuestas|barca apuestas|barca bayern apuestas|barca inter apuestas|barca madrid apuestas|barça madrid apuestas|barca vs
atletico apuestas|barca vs madrid apuestas|barca vs real madrid apuestas|barcelona – real madrid apuestas|barcelona apuestas|barcelona atletico apuestas|barcelona atletico
de madrid apuestas|barcelona atletico madrid apuestas|barcelona betis apuestas|barcelona casa
de apuestas|barcelona inter apuestas|barcelona
psg apuestas|barcelona real madrid apuestas|barcelona real sociedad apuestas|barcelona sevilla apuestas|barcelona valencia apuestas|barcelona vs athletic
bilbao apuestas|barcelona vs atlético madrid apuestas|barcelona vs betis apuestas|barcelona
vs celta de vigo apuestas|barcelona vs espanyol apuestas|barcelona vs girona apuestas|barcelona vs madrid apuestas|barcelona vs real madrid
apuestas|barcelona vs real sociedad apuestas|barcelona vs sevilla apuestas|barcelona vs villarreal apuestas|base de datos cuotas apuestas deportivas|bayern real madrid apuestas|beisbol apuestas|best america apuestas|bet apuestas chile|bet apuestas en vivo|betis – chelsea apuestas|betis apuestas|betis barcelona apuestas|betis chelsea
apuestas|betis madrid apuestas|betis sevilla apuestas|betsson tu sitio de apuestas online|blog apuestas baloncesto|blog apuestas ciclismo|blog
apuestas nba|blog apuestas tenis|blog de apuestas de tenis|bono
apuestas|bono apuestas deportivas|bono apuestas deportivas sin deposito|bono apuestas gratis|bono
apuestas gratis sin deposito|bono apuestas sin deposito|bono bienvenida apuestas|bono
bienvenida apuestas deportivas|bono bienvenida apuestas españa|bono bienvenida
apuestas sin deposito|bono bienvenida apuestas sin depósito|bono bienvenida casa apuestas|bono bienvenida casa de apuestas|bono bienvenida marca apuestas|bono casa apuestas|bono
casa de apuestas|bono casa de apuestas sin ingreso|bono casas de apuestas|bono de apuestas|bono de apuestas gratis
sin deposito|bono de bienvenida apuestas|bono de bienvenida apuestas deportivas|bono de bienvenida casa de apuestas|bono de bienvenida casas de apuestas|bono de casas de apuestas|bono de registro apuestas|bono de registro apuestas deportivas|bono de
registro casa de apuestas|bono gratis apuestas|bono marca apuestas|bono por
registro apuestas|bono por registro apuestas deportivas|bono por
registro casa de apuestas|bono registro apuestas|bono sin deposito apuestas|bono sin depósito apuestas|bono sin deposito apuestas deportivas|bono sin depósito
apuestas deportivas|bono sin deposito casa de apuestas|bono sin deposito marca apuestas|bono sin ingreso apuestas|bono sin ingreso apuestas deportivas|bonos apuestas|bonos apuestas colombia|bonos apuestas deportivas|bonos apuestas deportivas sin deposito|bonos apuestas gratis|bonos apuestas sin deposito|bonos apuestas
sin depósito|bonos bienvenida apuestas|bonos bienvenida casas apuestas|bonos bienvenida casas de apuestas|bonos casa
de apuestas|bonos casas apuestas|bonos casas de apuestas|bonos casas de
apuestas colombia|bonos casas de apuestas deportivas|bonos casas de apuestas españa|bonos casas de apuestas nuevas|bonos casas
de apuestas sin deposito|bonos casas de apuestas sin depósito|bonos
de apuestas|bonos de apuestas deportivas|bonos de apuestas gratis|bonos de
apuestas sin deposito|bonos de bienvenida apuestas|bonos de bienvenida apuestas
deportivas|bonos de bienvenida casa de apuestas|bonos de bienvenida casas de apuestas|bonos
de bienvenida de casas de apuestas|bonos de bienvenida en casas de apuestas|bonos de casas de apuestas|bonos de casas de apuestas sin deposito|bonos en casa de apuestas|bonos en casas de
apuestas sin deposito|bonos gratis apuestas|bonos gratis apuestas deportivas|bonos gratis casas de apuestas|bonos gratis sin deposito apuestas|bonos
paginas de apuestas|bonos registro casas de apuestas|bonos sin deposito apuestas|bonos
sin depósito apuestas|bonos sin deposito apuestas
deportivas|bonos sin deposito casas de apuestas|bot de apuestas deportivas gratis|boxeo apuestas|brasil colombia apuestas|brasil peru apuestas|brasil vs colombia apuestas|buenas
apuestas para hoy|buscador cuotas apuestas|buscador
de apuestas seguras|buscador de cuotas apuestas|buscador de cuotas de apuestas|buscar apuestas seguras|caballos apuestas|calculador de
apuestas|calculador de cuotas apuestas|calculadora apuestas|calculadora apuestas combinadas|calculadora apuestas de sistema|calculadora apuestas deportivas|calculadora apuestas deportivas seguras|calculadora
apuestas multiples|calculadora apuestas segura|calculadora apuestas seguras|calculadora
apuestas sistema|calculadora apuestas yankee|calculadora arbitraje apuestas|calculadora cubrir apuestas|calculadora cuotas apuestas|calculadora de apuestas|calculadora de apuestas combinadas|calculadora de apuestas de futbol|calculadora de apuestas de sistema|calculadora de apuestas deportivas|calculadora de apuestas multiples|calculadora de apuestas seguras|calculadora de apuestas sistema|calculadora de apuestas surebets|calculadora
de arbitraje apuestas|calculadora de cuotas
apuestas|calculadora de cuotas de apuestas|calculadora para
apuestas deportivas|calculadora poisson apuestas|calculadora poisson apuestas deportivas|calculadora
poisson para apuestas|calculadora scalping apuestas deportivas|calculadora sistema apuestas|calculadora stake
apuestas|calculadora trading apuestas|calcular apuestas|calcular apuestas deportivas|calcular apuestas futbol|calcular apuestas
sistema|calcular cuotas apuestas|calcular cuotas apuestas combinadas|calcular cuotas apuestas
deportivas|calcular cuotas de apuestas|calcular
ganancias apuestas deportivas|calcular momios apuestas|calcular probabilidad cuota apuestas|calcular stake apuestas|calcular
unidades apuestas|calcular yield apuestas|calculo de apuestas|calculo de apuestas deportivas|cambio de cuotas apuestas|campeon champions apuestas|campeon eurocopa apuestas|campeon liga apuestas|campeon nba apuestas|canales de apuestas gratis|carrera de caballos apuestas|carrera de caballos apuestas juego|carrera de caballos con apuestas|carrera de
galgos apuestas|carreras de caballos apuestas|carreras de caballos apuestas online|carreras de caballos con apuestas|carreras de caballos juegos de apuestas|carreras de galgos
apuestas|carreras de galgos apuestas online|carreras de galgos apuestas
trucos|carreras galgos apuestas|casa apuestas argentina|casa apuestas atletico de madrid|casa apuestas
barcelona|casa apuestas betis|casa apuestas bono bienvenida|casa apuestas bono gratis|casa apuestas bono sin deposito|casa apuestas cerca de
mi|casa apuestas chile|casa apuestas colombia|casa apuestas con mejores cuotas|casa apuestas deportivas|casa apuestas españa|casa apuestas española|casa apuestas
eurocopa|casa apuestas futbol|casa apuestas mejores
cuotas|casa apuestas mundial|casa apuestas nueva|casa apuestas
nuevas|casa apuestas online|casa apuestas peru|casa apuestas valencia|casa de
apuestas|casa de apuestas 10 euros gratis|casa de apuestas argentina|casa de apuestas atletico de madrid|casa de apuestas baloncesto|casa de apuestas barcelona|casa de apuestas beisbol|casa
de apuestas betis|casa de apuestas bono|casa de apuestas bono bienvenida|casa de
apuestas bono de bienvenida|casa de apuestas bono gratis|casa de apuestas bono por registro|casa de apuestas bono
sin deposito|casa de apuestas boxeo|casa de apuestas caballos|casa de apuestas carreras de caballos|casa de
apuestas cerca de mi|casa de apuestas cerca de mí|casa de
apuestas champions league|casa de apuestas
chile|casa de apuestas ciclismo|casa de apuestas colombia|casa de apuestas
con bono de bienvenida|casa de apuestas con bono sin deposito|casa de apuestas con cuotas mas altas|casa de apuestas con esports|casa
de apuestas con las mejores cuotas|casa de apuestas con licencia en españa|casa de
apuestas con mejores cuotas|casa de apuestas con pago anticipado|casa
de apuestas con paypal|casa de apuestas copa america|casa de apuestas de
caballos|casa de apuestas de colombia|casa de apuestas de españa|casa de apuestas de futbol|casa de apuestas de fútbol|casa de apuestas de futbol peru|casa de apuestas de peru|casa de
apuestas del madrid|casa de apuestas del real madrid|casa de
apuestas deportivas|casa de apuestas deportivas cerca de mi|casa
de apuestas deportivas en argentina|casa de apuestas deportivas
en chile|casa de apuestas deportivas en colombia|casa de apuestas deportivas en españa|casa de apuestas deportivas en madrid|casa de apuestas deportivas españa|casa de apuestas deportivas
españolas|casa de apuestas deportivas madrid|casa de apuestas deportivas mexico|casa de apuestas deportivas online|casa de apuestas deportivas
peru|casa de apuestas deposito 5 euros|casa de apuestas deposito minimo|casa de
apuestas deposito minimo 1 euro|casa de apuestas depósito mínimo 1 euro|casa de apuestas en españa|casa de
apuestas en linea|casa de apuestas en madrid|casa de apuestas
en perú|casa de apuestas en vivo|casa de apuestas españa|casa
de apuestas españa inglaterra|casa de apuestas española|casa de apuestas españolas|casa de apuestas esports|casa de apuestas eurocopa|casa
de apuestas europa league|casa de apuestas f1|casa de apuestas
formula 1|casa de apuestas futbol|casa de apuestas ingreso minimo|casa de apuestas ingreso minimo 1 euro|casa de apuestas ingreso mínimo 1 euro|casa de apuestas legales|casa de apuestas legales en colombia|casa de apuestas legales
en españa|casa de apuestas libertadores|casa de apuestas liga española|casa de apuestas madrid|casa
de apuestas mas segura|casa de apuestas mejores|casa de apuestas méxico|casa
de apuestas minimo 5 euros|casa de apuestas mlb|casa de apuestas mundial|casa de apuestas nba|casa
de apuestas nfl|casa de apuestas nueva|casa de apuestas
nuevas|casa de apuestas oficial del real madrid|casa de apuestas oficial
real madrid|casa de apuestas online|casa de apuestas online argentina|casa de apuestas online chile|casa de
apuestas online españa|casa de apuestas online mexico|casa de apuestas online paraguay|casa de
apuestas online peru|casa de apuestas online usa|casa de apuestas online venezuela|casa de apuestas pago anticipado|casa de apuestas para boxeo|casa de apuestas para ufc|casa
de apuestas peru|casa de apuestas perú|casa de apuestas peru online|casa de apuestas por paypal|casa de apuestas promociones|casa de apuestas que regalan dinero|casa de apuestas real madrid|casa
de apuestas regalo de bienvenida|casa de apuestas sevilla|casa
de apuestas sin dinero|casa de apuestas sin ingreso minimo|casa
de apuestas sin licencia en españa|casa de apuestas sin minimo de ingreso|casa de apuestas stake|casa de apuestas tenis|casa
de apuestas ufc|casa de apuestas valencia|casa de apuestas venezuela|casa de apuestas virtuales|casa de
apuestas vive la suerte|casa oficial de apuestas del real madrid|casas apuestas asiaticas|casas
apuestas bono sin deposito|casas apuestas bonos sin deposito|casas apuestas caballos|casas apuestas chile|casas apuestas ciclismo|casas apuestas con licencia|casas apuestas con licencia
en españa|casas apuestas deportivas|casas apuestas deportivas colombia|casas
apuestas deportivas españa|casas apuestas deportivas españolas|casas apuestas deportivas nuevas|casas apuestas españa|casas apuestas
españolas|casas apuestas esports|casas apuestas eurocopa|casas apuestas golf|casas apuestas ingreso
minimo 5 euros|casas apuestas legales|casas apuestas legales españa|casas apuestas licencia|casas apuestas licencia españa|casas apuestas mexico|casas apuestas mundial|casas apuestas nba|casas apuestas nuevas|casas apuestas nuevas españa|casas
apuestas ofertas|casas apuestas online|casas apuestas paypal|casas apuestas peru|casas apuestas sin licencia|casas
apuestas tenis|casas asiaticas apuestas|casas de apuestas|casas de
apuestas 5 euros|casas de apuestas app|casas de
apuestas argentinas|casas de apuestas asiaticas|casas
de apuestas baloncesto|casas de apuestas barcelona|casas de apuestas bono bienvenida|casas de apuestas bono de bienvenida|casas de
apuestas bono por registro|casas de apuestas bono sin deposito|casas de apuestas bono sin ingreso|casas de
apuestas bonos|casas de apuestas bonos de bienvenida|casas de apuestas bonos gratis|casas de apuestas
bonos sin deposito|casas de apuestas boxeo|casas de apuestas caballos|casas de apuestas carreras de caballos|casas de apuestas casino|casas de apuestas casino online|casas de apuestas cerca de mi|casas de apuestas champions league|casas de apuestas chile|casas de apuestas ciclismo|casas de
apuestas colombia|casas de apuestas com|casas de apuestas con app|casas
de apuestas con apuestas gratis|casas de apuestas con bono|casas
de apuestas con bono de bienvenida|casas de apuestas con bono de
registro|casas de apuestas con bono por registro|casas de apuestas con bono sin deposito|casas de apuestas
con bonos|casas de apuestas con bonos gratis|casas de apuestas con bonos sin deposito|casas de apuestas con deposito minimo|casas de
apuestas con esports|casas de apuestas con handicap asiatico|casas de apuestas con licencia|casas de apuestas con licencia en españa|casas de apuestas con licencia españa|casas de apuestas con licencia española|casas de apuestas
con mejores cuotas|casas de apuestas con pago anticipado|casas de apuestas con paypal|casas de apuestas con paypal en perú|casas de apuestas con promociones|casas de
apuestas con ruleta en vivo|casas de apuestas copa del rey|casas de apuestas de caballos|casas de apuestas de españa|casas de apuestas de futbol|casas
de apuestas de fútbol|casas de apuestas de peru|casas de apuestas deportivas|casas de apuestas deportivas asiaticas|casas de apuestas deportivas colombia|casas de apuestas deportivas comparativa|casas de apuestas deportivas con paypal|casas de apuestas deportivas
en chile|casas de apuestas deportivas en españa|casas de apuestas deportivas en linea|casas de apuestas deportivas
en madrid|casas de apuestas deportivas en mexico|casas de
apuestas deportivas en peru|casas de apuestas deportivas en sevilla|casas
de apuestas deportivas en valencia|casas de apuestas deportivas españa|casas de apuestas deportivas españolas|casas de apuestas deportivas legales|casas de apuestas deportivas madrid|casas de apuestas deportivas
mexico|casas de apuestas deportivas nuevas|casas de apuestas
deportivas online|casas de apuestas deportivas peru|casas de apuestas deportivas perú|casas de apuestas deposito minimo 1 euro|casas de apuestas depósito mínimo 1 euro|casas de
apuestas dinero gratis|casas de apuestas en argentina|casas de apuestas
en barcelona|casas de apuestas en chile|casas de
apuestas en colombia|casas de apuestas en españa|casas de apuestas en españa online|casas de apuestas en linea|casas de apuestas en madrid|casas de
apuestas en méxico|casas de apuestas en peru|casas de apuestas en perú|casas de apuestas en sevilla|casas de
apuestas en uruguay|casas de apuestas en valencia|casas de apuestas en venezuela|casas de apuestas
equipos de futbol|casas de apuestas españa|casas de apuestas españa alemania|casas de apuestas españa inglaterra|casas de apuestas españa licencia|casas de apuestas
españa nuevas|casas de apuestas españa online|casas de apuestas española|casas de apuestas españolas|casas de apuestas españolas con licencia|casas de apuestas españolas online|casas de apuestas esports|casas de
apuestas eurocopa|casas de apuestas eurocopa 2024|casas de apuestas
europa league|casas de apuestas f1|casas de apuestas fisicas en barcelona|casas de
apuestas fisicas en españa|casas de apuestas formula 1|casas de apuestas fuera
de españa|casas de apuestas futbol|casas de apuestas fútbol|casas de
apuestas futbol españa|casas de apuestas ganador eurocopa|casas de apuestas gratis|casas de apuestas ingreso
minimo|casas de apuestas ingreso minimo 1 euro|casas
de apuestas ingreso minimo 5 euros|casas de apuestas inter barcelona|casas de apuestas legales|casas de apuestas legales en colombia|casas de apuestas legales en españa|casas de
apuestas legales en mexico|casas de apuestas legales españa|casas de apuestas legales mx|casas de apuestas licencia|casas de apuestas licencia españa|casas de apuestas lista|casas de apuestas madrid|casas de apuestas mas seguras|casas
de apuestas mejores bonos|casas de apuestas mejores cuotas|casas de apuestas mexico|casas de apuestas méxico|casas de apuestas minimo 5 euros|casas de apuestas mlb|casas de
apuestas mundial|casas de apuestas mundial baloncesto|casas de apuestas mundiales|casas de apuestas nba|casas de apuestas
no reguladas en españa|casas de apuestas nueva ley|casas de
apuestas nuevas|casas de apuestas nuevas en colombia|casas de apuestas nuevas en españa|casas de apuestas
nuevas españa|casas de apuestas ofertas|casas de apuestas online|casas de apuestas online argentina|casas de
apuestas online colombia|casas de apuestas online deportivas|casas de apuestas online ecuador|casas de apuestas online en argentina|casas de apuestas
online en chile|casas de apuestas online en colombia|casas de apuestas online en españa|casas de apuestas online en mexico|casas
de apuestas online españa|casas de apuestas online mas fiables|casas de apuestas online mexico|casas de apuestas online nuevas|casas de apuestas online peru|casas de apuestas online usa|casas de apuestas online
venezuela|casas de apuestas pago paypal|casas de apuestas para u
Your comment is awaiting moderation.
bestbuycollection.click – Smooth navigation, categories are organized well for effortless browsing today.
Your comment is awaiting moderation.
bestpickshub.click – Good value overall, prices seem fair and discounts appear genuine here.
Your comment is awaiting moderation.
(10 euros gratis apuestas|10 mejores casas de apuestas|10 trucos para ganar apuestas|15 euros gratis
marca apuestas|1×2 apuestas|1×2 apuestas deportivas|1×2 apuestas que
significa|1×2 en apuestas|1×2 en apuestas que significa|1×2 que significa en apuestas|5
euros gratis apuestas|9 apuestas que siempre ganaras|a partir de cuanto se declara apuestas|actividades de juegos de azar y
apuestas|ad apuestas deportivas|aleksandre topuria ufc apuestas|algoritmo para ganar apuestas deportivas|america apuestas|análisis
nba apuestas|aplicacion android apuestas deportivas|aplicacion apuestas
deportivas|aplicacion apuestas deportivas android|aplicación de apuestas
online|aplicacion para hacer apuestas|aplicacion para hacer
apuestas de futbol|aplicación para hacer apuestas de fútbol|aplicaciones
apuestas deportivas android|aplicaciones apuestas deportivas gratis|aplicaciones
de apuestas android|aplicaciones de apuestas de fútbol|aplicaciones de apuestas deportivas|aplicaciones de apuestas
deportivas peru|aplicaciones de apuestas deportivas perú|aplicaciones de apuestas en colombia|aplicaciones de apuestas
gratis|aplicaciones de apuestas online|aplicaciones de apuestas
seguras|aplicaciones de apuestas sin dinero|aplicaciones para hacer apuestas|apostar seguro apuestas deportivas|app android apuestas
deportivas|app apuestas|app apuestas android|app apuestas de futbol|app apuestas deportivas|app apuestas deportivas android|app apuestas deportivas argentina|app apuestas deportivas colombia|app apuestas deportivas
ecuador|app apuestas deportivas españa|app apuestas
deportivas gratis|app apuestas entre amigos|app apuestas futbol|app apuestas gratis|app apuestas sin dinero|app casa de apuestas|app casas
de apuestas|app control apuestas|app de apuestas|app de
apuestas android|app de apuestas casino|app de apuestas colombia|app de apuestas con bono de bienvenida|app de
apuestas de futbol|app de apuestas deportivas|app
de apuestas deportivas android|app de apuestas deportivas argentina|app de apuestas deportivas colombia|app de apuestas deportivas en españa|app de apuestas deportivas peru|app de apuestas
deportivas perú|app de apuestas deportivas sin dinero|app de
apuestas ecuador|app de apuestas en colombia|app de apuestas
en españa|app de apuestas en venezuela|app de apuestas futbol|app de apuestas
gratis|app de apuestas online|app de apuestas para android|app de apuestas para ganar dinero|app
de apuestas peru|app de apuestas reales|app de casas de apuestas|app marca apuestas
android|app moviles de apuestas|app para apuestas|app para apuestas de
futbol|app para apuestas deportivas|app para apuestas deportivas en español|app para ganar apuestas deportivas|app para hacer apuestas|app para hacer apuestas deportivas|app para hacer apuestas
entre amigos|app para llevar control de apuestas|app pronosticos apuestas deportivas|app versus apuestas|apps apuestas
mundial|apps de apuestas|apps de apuestas con bono de bienvenida|apps de apuestas
de futbol|apps de apuestas deportivas peru|apps de apuestas mexico|apps para apuestas|aprender a
hacer apuestas deportivas|aprender hacer apuestas deportivas|apuesta del dia apuestas deportivas|apuestas 10 euros gratis|apuestas 100 seguras|apuestas 1×2|apuestas 1X2|apuestas 2
division|apuestas 3 division|apuestas a caballos|apuestas a carreras de
caballos|apuestas a colombia|apuestas a corners|apuestas a ganar|apuestas a jugadores
nba|apuestas a la baja|apuestas a la nfl|apuestas al barcelona|apuestas al dia|apuestas al
empate|apuestas al mundial|apuestas al tenis wta|apuestas alaves barcelona|apuestas alcaraz hoy|apuestas alemania españa|apuestas alonso campeon del mundo|apuestas altas y bajas|apuestas
altas y bajas nfl|apuestas ambos equipos marcan|apuestas america|apuestas android|apuestas anillo nba|apuestas antes del mundial|apuestas anticipadas|apuestas
anticipadas nba|apuestas apps|apuestas arabia argentina|apuestas argentina|apuestas argentina campeon del mundo|apuestas argentina canada|apuestas argentina colombia|apuestas argentina croacia|apuestas argentina españa|apuestas argentina francia|apuestas argentina francia cuanto paga|apuestas argentina francia mundial|apuestas argentina
gana el mundial|apuestas argentina gana mundial|apuestas
argentina holanda|apuestas argentina mexico|apuestas argentina méxico|apuestas argentina mundial|apuestas argentina online|apuestas
argentina paises bajos|apuestas argentina polonia|apuestas argentina
uruguay|apuestas argentina vs australia|apuestas argentina vs colombia|apuestas argentina vs francia|apuestas argentina vs peru|apuestas argentinas|apuestas arsenal real madrid|apuestas ascenso a primera division|apuestas ascenso a segunda|apuestas asiaticas|apuestas asiatico|apuestas athletic|apuestas athletic atletico|apuestas athletic barça|apuestas
athletic barcelona|apuestas athletic betis|apuestas athletic manchester|apuestas athletic manchester united|apuestas athletic osasuna|apuestas athletic real|apuestas athletic real madrid|apuestas
athletic real sociedad|apuestas athletic real sociedad final|apuestas athletic roma|apuestas
athletic sevilla|apuestas athletic valencia|apuestas atletico|apuestas atletico barcelona|apuestas atletico
barsa|apuestas atletico campeon champions|apuestas atletico campeon de liga|apuestas
atlético copenhague|apuestas atletico de madrid|apuestas atlético de madrid|apuestas atletico de madrid
barcelona|apuestas atletico de madrid gana la liga|apuestas atletico de madrid real madrid|apuestas atlético
de madrid real madrid|apuestas atletico de madrid vs barcelona|apuestas
atletico madrid|apuestas atletico madrid real
madrid|apuestas atletico madrid vs barcelona|apuestas
atletico real madrid|apuestas atletico real madrid champions|apuestas atletismo|apuestas bajas|apuestas baloncesto|apuestas baloncesto acb|apuestas baloncesto handicap|apuestas baloncesto
hoy|apuestas baloncesto juegos olimpicos|apuestas baloncesto nba|apuestas baloncesto pronostico|apuestas baloncesto
pronósticos|apuestas baloncesto prorroga|apuestas barca|apuestas barca athletic|apuestas barca atletico|apuestas barca bayern|apuestas
barca bayern munich|apuestas barca girona|apuestas barca hoy|apuestas
barça hoy|apuestas barca inter|apuestas barca juventus|apuestas barca madrid|apuestas barça madrid|apuestas barca real madrid|apuestas barca vs juve|apuestas barca vs
madrid|apuestas barca vs psg|apuestas barcelona|apuestas barcelona alaves|apuestas barcelona
athletic|apuestas barcelona atletico|apuestas barcelona atletico de madrid|apuestas barcelona atlético de madrid|apuestas barcelona atletico madrid|apuestas barcelona bayern|apuestas barcelona betis|apuestas barcelona campeon de liga|apuestas barcelona celta|apuestas barcelona espanyol|apuestas barcelona gana la champions|apuestas barcelona girona|apuestas barcelona granada|apuestas barcelona hoy|apuestas barcelona inter|apuestas
barcelona madrid|apuestas barcelona osasuna|apuestas barcelona psg|apuestas barcelona real
madrid|apuestas barcelona real sociedad|apuestas barcelona sevilla|apuestas barcelona valencia|apuestas barcelona villarreal|apuestas barcelona vs
atletico madrid|apuestas barcelona vs madrid|apuestas barcelona vs real madrid|apuestas barsa madrid|apuestas basket hoy|apuestas bayern barcelona|apuestas bayern vs
barcelona|apuestas beisbol|apuestas béisbol|apuestas beisbol mlb|apuestas beisbol pronosticos|apuestas beisbol venezolano|apuestas betis|apuestas betis – chelsea|apuestas betis barcelona|apuestas betis chelsea|apuestas betis fiorentina|apuestas
betis girona|apuestas betis madrid|apuestas betis mallorca|apuestas
betis real madrid|apuestas betis real sociedad|apuestas betis sevilla|apuestas betis valencia|apuestas betis valladolid|apuestas
betis vs valencia|apuestas betplay hoy colombia|apuestas betsson peru|apuestas bienvenida|apuestas billar online|apuestas bolivia vs
colombia|apuestas bono|apuestas bono bienvenida|apuestas bono de bienvenida|apuestas bono de bienvenida sin deposito|apuestas bono gratis|apuestas bono sin deposito|apuestas
bonos sin deposito|apuestas borussia real madrid|apuestas boxeo|apuestas boxeo de
campeonato|apuestas boxeo españa|apuestas boxeo español|apuestas boxeo femenino olimpiadas|apuestas boxeo
hoy|apuestas boxeo online|apuestas brasil colombia|apuestas brasil peru|apuestas brasil uruguay|apuestas brasil vs colombia|apuestas brasil vs
peru|apuestas caballos|apuestas caballos colocado|apuestas caballos españa|apuestas caballos
hipodromo|apuestas caballos hoy|apuestas caballos madrid|apuestas caballos online|apuestas caballos sanlucar de barrameda|apuestas caballos zarzuela|apuestas calculador|apuestas
campeon|apuestas campeon champions|apuestas campeón champions|apuestas campeon champions 2025|apuestas campeon champions league|apuestas campeon conference league|apuestas campeon copa america|apuestas campeon copa
del rey|apuestas campeon de champions|apuestas campeon de la champions|apuestas campeon de liga|apuestas campeon del
mundo|apuestas campeon eurocopa|apuestas campeón eurocopa|apuestas campeon europa league|apuestas
campeon f1|apuestas campeon f1 2025|apuestas campeon formula 1|apuestas campeon libertadores|apuestas campeon liga|apuestas campeon liga bbva|apuestas campeon liga española|apuestas campeon liga santander|apuestas campeon motogp 2025|apuestas campeon mundial|apuestas campeón mundial|apuestas campeon mundial baloncesto|apuestas campeon nba|apuestas campeón nba|apuestas campeon premier|apuestas campeon premier league|apuestas
campeon roland garros|apuestas campeonato f1|apuestas campeonatos de futbol|apuestas carrera de caballos|apuestas carrera de caballos hoy|apuestas
carrera de caballos nocturnas|apuestas carrera de galgos fin de semana|apuestas carrera de
galgos hoy|apuestas carrera de galgos nocturnas|apuestas carreras caballos|apuestas carreras caballos sanlucar|apuestas carreras de caballos|apuestas carreras de caballos en directo|apuestas carreras de caballos en vivo|apuestas carreras de caballos españa|apuestas carreras de caballos hoy|apuestas carreras de caballos nacionales|apuestas carreras de caballos nocturnas|apuestas carreras de
caballos online|apuestas carreras de caballos sanlucar|apuestas
carreras de caballos sanlúcar|apuestas carreras de galgos|apuestas carreras de galgos en vivo|apuestas carreras de galgos nocturnas|apuestas carreras de galgos pre partido|apuestas casino|apuestas casino barcelona|apuestas casino futbol|apuestas casino gran madrid|apuestas casino gratis|apuestas casino madrid|apuestas casino online|apuestas casino online argentina|apuestas casinos|apuestas casinos online|apuestas celta|apuestas celta barcelona|apuestas celta betis|apuestas celta eibar|apuestas celta espanyol|apuestas celta granada|apuestas celta madrid|apuestas celta manchester|apuestas
celta real madrid|apuestas champion league|apuestas champions foro|apuestas champions hoy|apuestas champions league|apuestas champions
league – pronósticos|apuestas champions league 2025|apuestas champions league hoy|apuestas champions league
pronosticos|apuestas champions league pronósticos|apuestas champions pronosticos|apuestas chelsea barcelona|apuestas chelsea betis|apuestas chile|apuestas chile peru|apuestas chile venezuela|apuestas chile vs colombia|apuestas
chile vs uruguay|apuestas ciclismo|apuestas ciclismo en vivo|apuestas ciclismo femenino|apuestas ciclismo tour francia|apuestas ciclismo vuelta|apuestas ciclismo
vuelta a españa|apuestas ciclismo vuelta españa|apuestas city madrid|apuestas city
real madrid|apuestas clasico|apuestas clasico español|apuestas clasico real madrid
barcelona|apuestas clasificacion mundial|apuestas colombia|apuestas colombia argentina|apuestas colombia brasil|apuestas colombia paraguay|apuestas colombia uruguay|apuestas colombia vs argentina|apuestas colombia vs brasil|apuestas
combinadas|apuestas combinadas como funcionan|apuestas combinadas de futbol|apuestas combinadas de fútbol|apuestas combinadas
foro|apuestas combinadas futbol|apuestas combinadas hoy|apuestas combinadas mismo partido|apuestas combinadas mundial|apuestas
combinadas nba|apuestas combinadas para esta
semana|apuestas combinadas para hoy|apuestas
combinadas para mañana|apuestas combinadas pronosticos|apuestas
combinadas recomendadas|apuestas combinadas seguras|apuestas
combinadas seguras para hoy|apuestas combinadas seguras para mañana|apuestas como
ganar|apuestas comparador|apuestas con bono de bienvenida|apuestas con dinero ficticio|apuestas con dinero real|apuestas
con dinero virtual|apuestas con handicap|apuestas con handicap
asiatico|apuestas con handicap baloncesto|apuestas con mas probabilidades de ganar|apuestas con paypal|apuestas con tarjeta
de credito|apuestas con tarjeta de debito|apuestas consejos|apuestas copa|apuestas copa africa|apuestas copa america|apuestas
copa américa|apuestas copa argentina|apuestas copa brasil|apuestas
copa davis|apuestas copa de europa|apuestas copa del
mundo|apuestas copa del rey|apuestas copa del rey baloncesto|apuestas copa del rey final|apuestas copa
del rey futbol|apuestas copa del rey ganador|apuestas copa del rey hoy|apuestas
copa del rey pronosticos|apuestas copa del rey pronósticos|apuestas copa europa|apuestas copa italia|apuestas
copa libertadores|apuestas copa mundial de hockey|apuestas copa rey|apuestas copa sudamericana|apuestas corners|apuestas corners hoy|apuestas croacia argentina|apuestas cuartos eurocopa|apuestas cuotas|apuestas cuotas altas|apuestas cuotas bajas|apuestas
de 1 euro|apuestas de baloncesto|apuestas de baloncesto hoy|apuestas de baloncesto
nba|apuestas de baloncesto para hoy|apuestas de beisbol|apuestas
de beisbol para hoy|apuestas de blackjack en linea|apuestas de boxeo|apuestas de boxeo canelo|apuestas de
boxeo en las vegas|apuestas de boxeo hoy|apuestas de boxeo online|apuestas de caballo|apuestas
de caballos|apuestas de caballos como funciona|apuestas de caballos
como se juega|apuestas de caballos en colombia|apuestas de caballos en españa|apuestas de caballos en linea|apuestas de caballos españa|apuestas de caballos ganador y colocado|apuestas de caballos internacionales|apuestas de caballos juegos|apuestas
de caballos online|apuestas de caballos online en venezuela|apuestas de caballos por internet|apuestas de caballos pronosticos|apuestas de caballos pronósticos|apuestas de carrera de caballos|apuestas
de carreras de caballos|apuestas de carreras de caballos online|apuestas de casino|apuestas de casino online|apuestas de
casino por internet|apuestas de champions league|apuestas de ciclismo|apuestas de colombia|apuestas de copa america|apuestas de corners|apuestas de deportes
en linea|apuestas de deportes online|apuestas de dinero|apuestas de
esports|apuestas de eurocopa|apuestas de europa league|apuestas de f1|apuestas de formula 1|apuestas de futbol|apuestas de fútbol|apuestas de futbol app|apuestas
de futbol argentina|apuestas de futbol colombia|apuestas de futbol en colombia|apuestas de futbol en directo|apuestas de futbol en linea|apuestas de futbol
en vivo|apuestas de futbol español|apuestas de futbol gratis|apuestas de futbol hoy|apuestas de futbol mundial|apuestas de futbol online|apuestas de fútbol online|apuestas
de futbol para hoy|apuestas de fútbol para hoy|apuestas de futbol para hoy seguras|apuestas
de futbol para mañana|apuestas de futbol peru|apuestas de futbol pronosticos|apuestas de fútbol pronósticos|apuestas de futbol seguras|apuestas de futbol seguras para
hoy|apuestas de futbol sin dinero|apuestas de galgos|apuestas de galgos como ganar|apuestas de galgos en directo|apuestas
de galgos online|apuestas de galgos trucos|apuestas de
golf|apuestas de hockey|apuestas de hockey sobre hielo|apuestas de hoy|apuestas de hoy seguras|apuestas de
juego|apuestas de juegos|apuestas de juegos deportivos|apuestas de
juegos online|apuestas de la champions league|apuestas de la copa américa|apuestas de la eurocopa|apuestas de la europa league|apuestas de la liga|apuestas de la liga
bbva|apuestas de la liga española|apuestas de la nba|apuestas de la nfl|apuestas de la ufc|apuestas
de mlb|apuestas de nba|apuestas de nba para hoy|apuestas de partidos|apuestas de
partidos de futbol|apuestas de peleas ufc|apuestas de perros en vivo|apuestas
de perros virtuales|apuestas de peru|apuestas de sistema|apuestas de sistema como funciona|apuestas de sistema explicacion|apuestas de sistema explicación|apuestas de tenis|apuestas de tenis de mesa|apuestas de tenis en directo|apuestas de tenis hoy|apuestas de tenis para hoy|apuestas de tenis pronosticos|apuestas
de tenis seguras|apuestas de todo tipo|apuestas de ufc|apuestas de ufc
hoy|apuestas del boxeo|apuestas del clasico|apuestas del clasico real madrid barca|apuestas del dia|apuestas del día|apuestas
del dia de hoy|apuestas del dia deportivas|apuestas
del dia futbol|apuestas del mundial|apuestas del partido de hoy|apuestas del real madrid|apuestas del rey|apuestas del sistema|apuestas deporte|apuestas deportes|apuestas deportiva|apuestas deportivas|apuestas deportivas 1 euro|apuestas
deportivas 10 euros gratis|apuestas deportivas 100 seguras|apuestas deportivas 1×2|apuestas
deportivas android|apuestas deportivas app|apuestas deportivas apps|apuestas deportivas
argentina|apuestas deportivas argentina futbol|apuestas deportivas argentina legal|apuestas deportivas atletico de madrid|apuestas deportivas baloncesto|apuestas deportivas barca
madrid|apuestas deportivas barcelona|apuestas deportivas beisbol|apuestas deportivas bono|apuestas deportivas bono bienvenida|apuestas deportivas bono de bienvenida|apuestas deportivas bono sin deposito|apuestas deportivas bonos de bienvenida|apuestas deportivas boxeo|apuestas deportivas caballos|apuestas
deportivas calculadora|apuestas deportivas campeon liga|apuestas deportivas casino|apuestas deportivas
casino barcelona|apuestas deportivas casino online|apuestas deportivas cerca
de mi|apuestas deportivas champions league|apuestas deportivas chile|apuestas deportivas ciclismo|apuestas deportivas colombia|apuestas deportivas com|apuestas deportivas com
foro|apuestas deportivas com pronosticos|apuestas
deportivas combinadas|apuestas deportivas combinadas para hoy|apuestas deportivas como se juega|apuestas deportivas comparador|apuestas deportivas
con bono gratis|apuestas deportivas con bonos gratis|apuestas deportivas con dinero ficticio|apuestas deportivas con paypal|apuestas deportivas con puntos virtuales|apuestas
deportivas consejos|apuestas deportivas consejos para ganar|apuestas
deportivas copa america|apuestas deportivas copa del rey|apuestas deportivas
copa libertadores|apuestas deportivas copa mundial|apuestas deportivas corners|apuestas deportivas cual es la
mejor|apuestas deportivas cuotas altas|apuestas deportivas de baloncesto|apuestas deportivas de boxeo|apuestas deportivas de colombia|apuestas deportivas de
futbol|apuestas deportivas de nba|apuestas deportivas de nhl|apuestas deportivas de
peru|apuestas deportivas de tenis|apuestas deportivas del dia|apuestas deportivas dinero ficticio|apuestas deportivas directo|apuestas deportivas doble oportunidad|apuestas deportivas
en argentina|apuestas deportivas en chile|apuestas deportivas
en colombia|apuestas deportivas en directo|apuestas deportivas en españa|apuestas deportivas en español|apuestas deportivas en linea|apuestas deportivas en línea|apuestas
deportivas en peru|apuestas deportivas en perú|apuestas deportivas en sevilla|apuestas
deportivas en uruguay|apuestas deportivas en vivo|apuestas deportivas es|apuestas deportivas es pronosticos|apuestas deportivas españa|apuestas deportivas españolas|apuestas deportivas esports|apuestas deportivas estadisticas|apuestas deportivas estrategias|apuestas deportivas estrategias seguras|apuestas deportivas eurocopa|apuestas deportivas europa league|apuestas deportivas f1|apuestas deportivas
faciles de ganar|apuestas deportivas formula 1|apuestas deportivas foro|apuestas
deportivas foro futbol|apuestas deportivas foro tenis|apuestas deportivas francia argentina|apuestas deportivas futbol|apuestas deportivas fútbol|apuestas deportivas futbol argentino|apuestas deportivas futbol
colombia|apuestas deportivas futbol español|apuestas deportivas gana|apuestas deportivas ganadas|apuestas deportivas ganar dinero seguro|apuestas deportivas gane|apuestas deportivas
golf|apuestas deportivas gratis|apuestas deportivas gratis con premios|apuestas
deportivas gratis hoy|apuestas deportivas gratis sin deposito|apuestas deportivas handicap|apuestas deportivas handicap asiatico|apuestas deportivas hoy|apuestas deportivas impuestos|apuestas
deportivas interior argentina|apuestas deportivas juegos olimpicos|apuestas deportivas la liga|apuestas deportivas legales|apuestas deportivas legales en colombia|apuestas
deportivas libres de impuestos|apuestas deportivas licencia españa|apuestas deportivas liga española|apuestas deportivas listado|apuestas
deportivas listado clasico|apuestas deportivas madrid|apuestas deportivas mas
seguras|apuestas deportivas mejor pagadas|apuestas deportivas mejores|apuestas deportivas
mejores app|apuestas deportivas mejores casas|apuestas deportivas mejores cuotas|apuestas deportivas mejores paginas|apuestas deportivas mexico|apuestas deportivas méxico|apuestas deportivas mlb|apuestas deportivas mlb hoy|apuestas deportivas multiples|apuestas
deportivas mundial|apuestas deportivas murcia|apuestas deportivas
nba|apuestas deportivas nba hoy|apuestas deportivas nfl|apuestas
deportivas nhl|apuestas deportivas nuevas|apuestas deportivas ofertas|apuestas deportivas online|apuestas
deportivas online argentina|apuestas deportivas online chile|apuestas deportivas online colombia|apuestas deportivas online en colombia|apuestas
deportivas online españa|apuestas deportivas online mexico|apuestas
deportivas online paypal|apuestas deportivas online peru|apuestas deportivas online
por internet|apuestas deportivas pago paypal|apuestas deportivas para ganar dinero|apuestas deportivas para hoy|apuestas deportivas para hoy pronosticos|apuestas deportivas partido suspendido|apuestas deportivas partidos de hoy|apuestas
deportivas paypal|apuestas deportivas peru|apuestas deportivas
perú|apuestas deportivas peru vs ecuador|apuestas deportivas predicciones|apuestas
deportivas promociones|apuestas deportivas pronostico|apuestas deportivas pronóstico|apuestas deportivas pronostico
hoy|apuestas deportivas pronosticos|apuestas
deportivas pronósticos|apuestas deportivas pronosticos expertos|apuestas deportivas pronosticos gratis|apuestas deportivas
pronosticos nba|apuestas deportivas pronosticos tenis|apuestas deportivas que aceptan paypal|apuestas deportivas real
madrid|apuestas deportivas regalo bienvenida|apuestas deportivas resultado exacto|apuestas deportivas resultados|apuestas deportivas rugby|apuestas deportivas seguras|apuestas deportivas seguras foro|apuestas deportivas seguras hoy|apuestas deportivas seguras para hoy|apuestas deportivas seguras telegram|apuestas deportivas sevilla|apuestas deportivas simulador eurocopa|apuestas deportivas sin deposito|apuestas deportivas
sin deposito inicial|apuestas deportivas sin dinero|apuestas deportivas sin dinero real|apuestas
deportivas sin registro|apuestas deportivas stake|apuestas deportivas stake
10|apuestas deportivas telegram españa|apuestas deportivas tenis|apuestas deportivas tenis de mesa|apuestas deportivas tenis foro|apuestas deportivas tenis hoy|apuestas deportivas tips|apuestas deportivas tipster|apuestas deportivas ufc|apuestas
deportivas uruguay|apuestas deportivas valencia|apuestas deportivas valencia barcelona|apuestas deportivas venezuela|apuestas deportivas virtuales|apuestas deportivas y casino|apuestas deportivas y
casino online|apuestas deportivas.com|apuestas deportivas.com foro|apuestas deportivas.es|apuestas deportivos pronosticos|apuestas deposito minimo 1 euro|apuestas descenso a segunda|apuestas descenso a segunda
b|apuestas descenso la liga|apuestas descenso primera division|apuestas descenso segunda|apuestas dia|apuestas diarias seguras|apuestas dinero|apuestas dinero ficticio|apuestas dinero real|apuestas dinero virtual|apuestas
directas|apuestas directo|apuestas directo futbol|apuestas division de honor juvenil|apuestas dnb|apuestas doble oportunidad|apuestas doble resultado|apuestas dobles|apuestas
dobles y triples|apuestas dortmund barcelona|apuestas draft nba|apuestas draft nfl|apuestas ecuador vs argentina|apuestas
ecuador vs venezuela|apuestas egipto uruguay|apuestas el clasico|apuestas elecciones venezuela|apuestas
empate|apuestas en baloncesto|apuestas en barcelona|apuestas en beisbol|apuestas
en boxeo|apuestas en caballos|apuestas en carreras de caballos|apuestas en casino|apuestas en casino online|apuestas en casinos|apuestas en casinos online|apuestas en chile|apuestas en ciclismo|apuestas en colombia|apuestas en colombia de
futbol|apuestas en directo|apuestas en directo futbol|apuestas en directo pronosticos|apuestas en el futbol|apuestas
en el tenis|apuestas en españa|apuestas en esports|apuestas en eventos deportivos virtuales|apuestas en golf|apuestas en juegos|apuestas en la champions league|apuestas en la eurocopa|apuestas en la
liga|apuestas en la nba|apuestas en la nfl|apuestas en las vegas mlb|apuestas en las vegas nfl|apuestas en linea|apuestas en línea|apuestas en linea argentina|apuestas en linea boxeo|apuestas en linea chile|apuestas en linea
colombia|apuestas en línea de fútbol|apuestas en linea deportivas|apuestas en linea españa|apuestas en linea estados unidos|apuestas en linea futbol|apuestas en linea mexico|apuestas en línea méxico|apuestas en linea mundial|apuestas en linea peru|apuestas en linea
usa|apuestas en los esports|apuestas en madrid|apuestas en méxico|apuestas en mexico online|apuestas en nba|apuestas en partidos de futbol|apuestas en partidos de
futbol en vivo|apuestas en partidos de tenis en directo|apuestas en perú|apuestas en sevilla|apuestas en sistema|apuestas en stake|apuestas en tenis|apuestas en tenis
de mesa|apuestas en valencia|apuestas en vivo|apuestas en vivo argentina|apuestas en vivo casino|apuestas en vivo futbol|apuestas en vivo fútbol|apuestas en vivo nba|apuestas en vivo peru|apuestas en vivo tenis|apuestas en vivo ufc|apuestas equipo mbappe|apuestas equipos de
futbol|apuestas españa|apuestas españa alemania|apuestas españa alemania eurocopa|apuestas españa
croacia|apuestas españa eurocopa|apuestas españa francia|apuestas españa francia eurocopa|apuestas españa gana el mundial|apuestas españa gana eurocopa|apuestas españa gana mundial|apuestas españa georgia|apuestas españa holanda|apuestas españa inglaterra|apuestas españa inglaterra cuotas|apuestas españa inglaterra eurocopa|apuestas españa italia|apuestas españa mundial|apuestas españa paises bajos|apuestas español|apuestas español oviedo|apuestas espanyol barcelona|apuestas
espanyol betis|apuestas espanyol villarreal|apuestas esport|apuestas esports|apuestas
esports colombia|apuestas esports españa|apuestas esports fifa|apuestas esports gratis|apuestas esports lol|apuestas esports peru|apuestas esports valorant|apuestas estadisticas|apuestas estrategias|apuestas euro|apuestas euro copa|apuestas eurocopa|apuestas eurocopa
campeon|apuestas eurocopa españa|apuestas eurocopa favoritos|apuestas eurocopa femenina|apuestas eurocopa final|apuestas eurocopa ganador|apuestas eurocopa hoy|apuestas eurocopa
sub 21|apuestas euroliga baloncesto|apuestas euroliga pronosticos|apuestas europa league|apuestas europa league hoy|apuestas europa league pronosticos|apuestas europa league pronósticos|apuestas euros|apuestas f1 abu dhabi|apuestas f1 bahrein|apuestas f1 canada|apuestas f1 china|apuestas f1 cuotas|apuestas f1 hoy|apuestas f1 las vegas|apuestas f1 miami|apuestas
f1 monaco|apuestas faciles de ganar|apuestas fáciles
de ganar|apuestas faciles para ganar|apuestas favoritas|apuestas favorito champions|apuestas favoritos champions|apuestas favoritos eurocopa|apuestas favoritos mundial|apuestas fc barcelona|apuestas final champions cuotas|apuestas final
champions league|apuestas final champions peru|apuestas
final copa|apuestas final copa america|apuestas final copa de europa|apuestas final copa
del rey|apuestas final copa europa|apuestas final copa libertadores|apuestas final copa rey|apuestas final de
copa|apuestas final de copa del rey|apuestas final
del mundial|apuestas final euro|apuestas final eurocopa|apuestas final
europa league|apuestas final libertadores|apuestas final mundial|apuestas final nba|apuestas
final rugby|apuestas final uefa europa league|apuestas final.mundial|apuestas finales de conferencia nfl|apuestas
finales nba|apuestas fiorentina betis|apuestas formula|apuestas formula
1|apuestas fórmula 1|apuestas fórmula 1 pronósticos|apuestas formula uno|apuestas
foro|apuestas foro nba|apuestas francia argentina|apuestas francia españa|apuestas futbol|apuestas fútbol|apuestas futbol americano|apuestas futbol americano nfl|apuestas
futbol argentina|apuestas futbol argentino|apuestas futbol champions league|apuestas
futbol chile|apuestas futbol colombia|apuestas futbol
consejos|apuestas futbol en directo|apuestas fútbol
en directo|apuestas futbol en vivo|apuestas fútbol en vivo|apuestas futbol españa|apuestas futbol español|apuestas fútbol español|apuestas futbol
eurocopa|apuestas futbol femenino|apuestas futbol foro|apuestas futbol gratis|apuestas
futbol hoy|apuestas fútbol hoy|apuestas futbol juegos olimpicos|apuestas futbol mexico|apuestas futbol
mundial|apuestas futbol online|apuestas futbol para hoy|apuestas futbol peru|apuestas futbol pronosticos|apuestas futbol sala|apuestas futbol
telegram|apuestas futbol virtual|apuestas galgos|apuestas galgos en directo|apuestas galgos hoy|apuestas galgos online|apuestas galgos pronosticos|apuestas galgos trucos|apuestas gana|apuestas gana colombia|apuestas gana resultados|apuestas ganadas|apuestas
ganadas hoy|apuestas ganador champions league|apuestas ganador
copa america|apuestas ganador copa del rey|apuestas ganador copa del rey baloncesto|apuestas ganador copa libertadores|apuestas
ganador de la eurocopa|apuestas ganador de la liga|apuestas
ganador del mundial|apuestas ganador eurocopa|apuestas ganador europa
league|apuestas ganador f1|apuestas ganador la liga|apuestas ganador liga española|apuestas ganador
mundial|apuestas ganador mundial baloncesto|apuestas ganador mundial f1|apuestas ganador nba|apuestas ganadores
eurocopa|apuestas ganadores mundial|apuestas ganar champions|apuestas ganar eurocopa|apuestas ganar liga|apuestas ganar mundial|apuestas ganar nba|apuestas getafe valencia|apuestas ghana uruguay|apuestas girona|apuestas girona
athletic|apuestas girona betis|apuestas girona campeon de liga|apuestas girona campeon liga|apuestas girona gana la liga|apuestas girona real madrid|apuestas girona real sociedad|apuestas goleador eurocopa|apuestas goleadores eurocopa|apuestas goles asiaticos|apuestas
golf|apuestas golf masters|apuestas golf pga|apuestas granada barcelona|apuestas grand
slam de tenis|apuestas gratis|apuestas gratis casino|apuestas gratis con premios|apuestas gratis hoy|apuestas gratis para hoy|apuestas gratis por registro|apuestas gratis puntos|apuestas gratis regalos|apuestas gratis sin deposito|apuestas gratis sin depósito|apuestas gratis sin ingreso|apuestas gratis sports|apuestas gratis
y ganar premios|apuestas grupo a eurocopa|apuestas grupos eurocopa|apuestas handicap|apuestas handicap asiatico|apuestas handicap
baloncesto|apuestas handicap como funciona|apuestas handicap
nba|apuestas handicap nfl|apuestas hipicas online|apuestas hípicas online|apuestas hipicas venezuela|apuestas hockey|apuestas hockey
hielo|apuestas hockey patines|apuestas hockey sobre hielo|apuestas holanda argentina|apuestas holanda vs argentina|apuestas hoy|apuestas hoy champions|apuestas
hoy futbol|apuestas hoy nba|apuestas hoy pronosticos|apuestas hoy seguras|apuestas impuestos|apuestas inglaterra paises bajos|apuestas inter barca|apuestas inter barcelona|apuestas juego|apuestas juegos|apuestas
juegos en linea|apuestas juegos olimpicos|apuestas juegos olímpicos|apuestas juegos olimpicos baloncesto|apuestas juegos online|apuestas juegos virtuales|apuestas jugador sevilla|apuestas jugadores
nba|apuestas kings league americas|apuestas la liga|apuestas la
liga española|apuestas la liga hoy|apuestas la liga santander|apuestas
las vegas mlb|apuestas las vegas nba|apuestas las vegas
nfl|apuestas league of legends mundial|apuestas legal|apuestas
legales|apuestas legales en colombia|apuestas legales en españa|apuestas legales en estados unidos|apuestas legales españa|apuestas
leganes betis|apuestas libertadores|apuestas licencia|apuestas liga 1 peru|apuestas liga argentina|apuestas liga bbva
pronosticos|apuestas liga de campeones|apuestas liga de campeones de baloncesto|apuestas liga de
campeones de hockey|apuestas liga españa|apuestas liga española|apuestas liga santander pronosticos|apuestas
ligas de futbol|apuestas linea|apuestas linea de gol|apuestas
liverpool barcelona|apuestas liverpool real madrid|apuestas lol mundial|apuestas madrid|apuestas madrid arsenal|apuestas madrid atletico|apuestas madrid atletico
champions|apuestas madrid barca|apuestas madrid barça|apuestas madrid barca
hoy|apuestas madrid barca supercopa|apuestas madrid barcelona|apuestas madrid
barsa|apuestas madrid bayern|apuestas madrid betis|apuestas madrid borussia|apuestas madrid campeon champions|apuestas madrid celta|apuestas madrid city|apuestas madrid dortmund|apuestas madrid
gana la liga|apuestas madrid gana liga|apuestas madrid
hoy|apuestas madrid liverpool|apuestas madrid osasuna|apuestas madrid sevilla|apuestas madrid valencia|apuestas madrid vs arsenal|apuestas madrid vs barcelona|apuestas mallorca osasuna|apuestas mallorca real sociedad|apuestas manchester athletic|apuestas manchester city real madrid|apuestas mas faciles de ganar|apuestas mas seguras|apuestas mas seguras para hoy|apuestas masters de golf|apuestas masters
de tenis|apuestas maximo goleador eurocopa|apuestas maximo goleador mundial|apuestas
mejor jugador eurocopa|apuestas mejores casinos online|apuestas mexico|apuestas méxico|apuestas mexico polonia|apuestas
méxico polonia|apuestas mlb|apuestas mlb hoy|apuestas mlb las vegas|apuestas
mlb para hoy|apuestas mlb pronosticos|apuestas mlb usa|apuestas mma ufc|apuestas momios|apuestas
multiples|apuestas múltiples|apuestas multiples como funcionan|apuestas multiples el gordo|apuestas multiples futbol|apuestas mundial|apuestas mundial 2026|apuestas mundial baloncesto|apuestas
mundial balonmano|apuestas mundial brasil|apuestas
mundial campeon|apuestas mundial ciclismo|apuestas mundial
clubes|apuestas mundial de baloncesto|apuestas mundial de ciclismo|apuestas mundial de clubes|apuestas mundial
de futbol|apuestas mundial de fútbol|apuestas mundial de rugby|apuestas mundial f1|apuestas mundial favoritos|apuestas mundial femenino|apuestas mundial formula 1|apuestas mundial futbol|apuestas mundial ganador|apuestas mundial lol|apuestas mundial moto
gp|apuestas mundial motogp|apuestas mundial rugby|apuestas mundial sub 17|apuestas mundiales|apuestas mundialistas|apuestas mvp eurocopa|apuestas mvp nba|apuestas
mvp nfl|apuestas nacionales de colombia|apuestas
nba|apuestas nba all star|apuestas nba campeon|apuestas nba consejos|apuestas
nba esta noche|apuestas nba finals|apuestas nba gratis|apuestas nba hoy|apuestas nba hoy
jugadores|apuestas nba hoy pronosticos|apuestas nba para hoy|apuestas nba playoffs|apuestas nba pronosticos|apuestas nba pronósticos|apuestas
nba pronosticos hoy|apuestas nba tipster|apuestas nfl|apuestas nfl
hoy|apuestas nfl las vegas|apuestas nfl playoffs|apuestas
nfl pronosticos|apuestas nfl pronósticos|apuestas nfl
semana 4|apuestas nfl super bowl|apuestas nhl|apuestas
nhl pronosticos|apuestas octavos eurocopa|apuestas ofertas|apuestas
online|apuestas online argentina|apuestas online argentina legal|apuestas online bono|apuestas online
bono bienvenida|apuestas online boxeo|apuestas online caballos|apuestas online carreras
de caballos|apuestas online casino|apuestas online champions league|apuestas online chile|apuestas
online ciclismo|apuestas online colombia|apuestas online
comparativa|apuestas online con paypal|apuestas online de caballos|apuestas online deportivas|apuestas online en argentina|apuestas online en peru|apuestas online espana|apuestas online españa|apuestas online esports|apuestas online foro|apuestas online futbol|apuestas online futbol españa|apuestas online golf|apuestas online gratis|apuestas online
gratis sin deposito|apuestas online juegos|apuestas online mexico|apuestas online mma|apuestas online movil|apuestas online
nba|apuestas online net|apuestas online nuevas|apuestas online
opiniones|apuestas online paypal|apuestas online peru|apuestas online seguras|apuestas online sin dinero|apuestas online sin registro|apuestas online tenis|apuestas online ufc|apuestas online
uruguay|apuestas online venezuela|apuestas open britanico golf|apuestas osasuna athletic|apuestas osasuna barcelona|apuestas
osasuna real madrid|apuestas osasuna sevilla|apuestas osasuna valencia|apuestas over|apuestas over 2.5|apuestas over under|apuestas paginas|apuestas pago
anticipado|apuestas paises bajos ecuador|apuestas
paises bajos inglaterra|apuestas países bajos
qatar|apuestas para boxeo|apuestas para champions league|apuestas para el clasico|apuestas para el dia de
hoy|apuestas para el mundial|apuestas para el partido de
hoy|apuestas para eurocopa|apuestas para europa league|apuestas para futbol|apuestas para ganar|apuestas
para ganar dinero|apuestas para ganar dinero facil|apuestas para ganar en la ruleta|apuestas para ganar
la champions|apuestas para ganar la eurocopa|apuestas para
ganar la europa league|apuestas para ganar la liga|apuestas para ganar siempre|apuestas para
hacer|apuestas para hoy|apuestas para hoy de futbol|apuestas para hoy europa league|apuestas para hoy futbol|apuestas
para juegos|apuestas para la champions league|apuestas para la copa del rey|apuestas
para la eurocopa|apuestas para la europa league|apuestas para la final de la eurocopa|apuestas para la nba hoy|apuestas para los partidos de hoy|apuestas para partidos de hoy|apuestas
para ufc|apuestas partido|apuestas partido aplazado|apuestas
partido champions|apuestas partido colombia|apuestas partido españa marruecos|apuestas partido mundial|apuestas partido
suspendido|apuestas partidos|apuestas partidos champions league|apuestas partidos csgo|apuestas partidos de futbol|apuestas partidos de futbol hoy|apuestas partidos de hoy|apuestas partidos eurocopa|apuestas partidos futbol|apuestas partidos hoy|apuestas partidos mundial|apuestas paypal|apuestas peleas de boxeo|apuestas peru|apuestas perú|apuestas peru
brasil|apuestas peru chile|apuestas peru paraguay|apuestas peru uruguay|apuestas peru vs chile|apuestas peru vs colombia|apuestas pichichi eurocopa|apuestas plataforma|apuestas playoff|apuestas playoff ascenso|apuestas playoff ascenso
a primera|apuestas playoff nba|apuestas playoff segunda|apuestas playoff segunda b|apuestas playoffs nba|apuestas playoffs nfl|apuestas polonia argentina|apuestas por
argentina|apuestas por internet mexico|apuestas por internet para ganar dinero|apuestas por paypal|apuestas por ronda boxeo|apuestas
por sistema|apuestas portugal uruguay|apuestas pre partido|apuestas predicciones|apuestas predicciones futbol|apuestas primera division|apuestas primera division españa|apuestas promociones|apuestas pronostico|apuestas pronosticos|apuestas pronosticos deportivos|apuestas pronosticos deportivos tenis|apuestas pronosticos futbol|apuestas pronosticos gratis|apuestas pronosticos nba|apuestas pronosticos tenis|apuestas
prorroga|apuestas psg barca|apuestas psg barcelona|apuestas puntos por tarjetas|apuestas puntos tarjetas|apuestas que aceptan paypal|apuestas
que es handicap|apuestas que puedes hacer con tu novia|apuestas que siempre
ganaras|apuestas que significa|apuestas quien bajara a segunda|apuestas
quién bajara a segunda|apuestas quien gana el mundial|apuestas quien gana eurocopa|apuestas quien gana la champions|apuestas quien gana
la eurocopa|apuestas quien gana la liga|apuestas quien ganara el mundial|apuestas
quién ganará el mundial|apuestas quien ganara la champions|apuestas quien ganara la eurocopa|apuestas quien ganara la liga|apuestas rayo barcelona|apuestas real madrid|apuestas real madrid arsenal|apuestas real madrid athletic|apuestas real madrid atletico|apuestas
real madrid atletico champions|apuestas real madrid atletico de madrid|apuestas
real madrid atlético de madrid|apuestas real madrid atletico madrid|apuestas real madrid barcelona|apuestas real madrid
bayern|apuestas real madrid betis|apuestas real madrid borussia|apuestas real madrid campeon champions|apuestas real madrid
celta|apuestas real madrid champions|apuestas real madrid city|apuestas real madrid girona|apuestas real madrid hoy|apuestas real madrid liverpool|apuestas
real madrid manchester city|apuestas real madrid osasuna|apuestas
real madrid real sociedad|apuestas real madrid
valencia|apuestas real madrid villarreal|apuestas real madrid vs arsenal|apuestas
real madrid vs atletico|apuestas real madrid vs atlético|apuestas real madrid vs atletico madrid|apuestas real madrid
vs barcelona|apuestas real madrid vs betis|apuestas real madrid vs sevilla|apuestas real madrid vs valencia|apuestas
real sociedad|apuestas real sociedad athletic|apuestas real sociedad barcelona|apuestas real sociedad
betis|apuestas real sociedad psg|apuestas real sociedad real madrid|apuestas real sociedad valencia|apuestas
recomendadas hoy|apuestas regalo de bienvenida|apuestas registro|apuestas resultado exacto|apuestas resultados|apuestas resultados
eurocopa|apuestas retirada tenis|apuestas roma barcelona|apuestas roma sevilla|apuestas
rugby|apuestas rugby mundial|apuestas rugby world cup|apuestas ruleta seguras|apuestas segunda|apuestas segunda b|apuestas segunda division|apuestas segunda división|apuestas segunda division b|apuestas segunda division españa|apuestas seguras|apuestas
seguras baloncesto|apuestas seguras calculadora|apuestas seguras en la ruleta|apuestas seguras eurocopa|apuestas seguras foro|apuestas seguras futbol|apuestas seguras futbol hoy|apuestas seguras gratis|apuestas seguras hoy|apuestas seguras hoy futbol|apuestas
seguras nba|apuestas seguras nba hoy|apuestas seguras para este fin de semana|apuestas seguras para ganar dinero|apuestas seguras para hoy|apuestas seguras
para hoy fútbol|apuestas seguras para hoy pronósticos|apuestas seguras para mañana|apuestas seguras ruleta|apuestas seguras telegram|apuestas seguras tenis|apuestas semifinales eurocopa|apuestas senegal paises
bajos|apuestas sevilla|apuestas sevilla athletic|apuestas sevilla
atletico de madrid|apuestas sevilla barcelona|apuestas sevilla betis|apuestas sevilla campeon liga|apuestas sevilla
celta|apuestas sevilla gana la liga|apuestas sevilla girona|apuestas sevilla inter|apuestas sevilla jugador|apuestas sevilla juventus|apuestas sevilla leganes|apuestas sevilla madrid|apuestas sevilla manchester united|apuestas sevilla osasuna|apuestas sevilla real madrid|apuestas sevilla real sociedad|apuestas sevilla roma|apuestas sevilla valencia|apuestas significa|apuestas simples ejemplos|apuestas simples o combinadas|apuestas sin deposito|apuestas sin deposito inicial|apuestas sin deposito minimo|apuestas sin dinero|apuestas sin dinero
real|apuestas sin empate|apuestas sin empate que significa|apuestas sin ingreso
minimo|apuestas sin registro|apuestas sistema|apuestas sistema calculadora|apuestas sistema
como funciona|apuestas sistema trixie|apuestas sociedad|apuestas sorteo copa del rey|apuestas stake|apuestas stake 10|apuestas stake 10 hoy|apuestas super bowl favorito|apuestas super rugby|apuestas supercopa españa|apuestas
superliga argentina|apuestas tarjeta roja|apuestas tarjetas|apuestas tarjetas amarillas|apuestas tenis|apuestas tenis atp|apuestas tenis consejos|apuestas tenis copa davis|apuestas tenis de mesa|apuestas tenis de mesa pronosticos|apuestas tenis en vivo|apuestas tenis femenino|apuestas
tenis hoy|apuestas tenis itf|apuestas tenis pronosticos|apuestas tenis pronósticos|apuestas tenis
retirada|apuestas tenis roland garros|apuestas tenis seguras|apuestas tenis wimbledon|apuestas tenis wta|apuestas
tercera division|apuestas tercera division españa|apuestas tipos|apuestas tips|apuestas tipster|apuestas tipster para hoy|apuestas topuria holloway cuotas|apuestas torneos de
golf|apuestas torneos de tenis|apuestas trucos|apuestas uefa champions league|apuestas uefa
europa league|apuestas ufc|apuestas ufc chile|apuestas ufc como funciona|apuestas ufc hoy|apuestas ufc ilia
topuria|apuestas ufc online|apuestas ufc pronósticos|apuestas ufc telegram|apuestas ufc topuria|apuestas under over|apuestas unionistas villarreal|apuestas uruguay|apuestas uruguay colombia|apuestas uruguay corea|apuestas uruguay vs colombia|apuestas us open golf|apuestas us open tenis|apuestas valencia|apuestas valencia barcelona|apuestas valencia betis|apuestas valencia madrid|apuestas valencia real madrid|apuestas
valladolid barcelona|apuestas valladolid valencia|apuestas valor app|apuestas
valor en directo|apuestas valor galgos|apuestas venezuela|apuestas venezuela argentina|apuestas
venezuela bolivia|apuestas venezuela ecuador|apuestas villarreal|apuestas villarreal athletic|apuestas villarreal
barcelona|apuestas villarreal bayern|apuestas villarreal betis|apuestas villarreal liverpool|apuestas
villarreal manchester|apuestas villarreal manchester united|apuestas
villarreal vs real madrid|apuestas virtuales|apuestas virtuales colombia|apuestas virtuales futbol|apuestas virtuales sin dinero|apuestas vivo|apuestas vuelta a españa|apuestas vuelta
españa|apuestas william hill partidos de hoy|apuestas y casino|apuestas y casinos|apuestas y juegos de
azar|apuestas y pronosticos|apuestas y pronosticos de futbol|apuestas y pronosticos deportivos|apuestas y resultados|apuestas-deportivas|apuestas-deportivas.es pronosticos|arbitro
nba apuestas|argentina apuestas|argentina colombia apuestas|argentina croacia apuestas|argentina francia apuestas|argentina
mexico apuestas|argentina peru apuestas|argentina uruguay apuestas|argentina
vs bolivia apuestas|argentina vs chile apuestas|argentina vs colombia apuestas|argentina vs francia apuestas|argentina
vs. colombia apuestas|asi se gana en las apuestas deportivas|asiatico apuestas|asiatico en apuestas|asiaticos apuestas|athletic barcelona apuestas|athletic manchester
united apuestas|athletic osasuna apuestas|athletic real madrid apuestas|atletico barcelona apuestas|atletico de madrid apuestas|atlético de madrid apuestas|atletico de madrid real madrid apuestas|atletico de madrid vs
barcelona apuestas|atletico madrid real madrid apuestas|atletico madrid vs real
madrid apuestas|atletico real madrid apuestas|atletico vs real madrid apuestas|avisador de cuotas apuestas|bajada de cuotas apuestas|baloncesto apuestas|barbastro barcelona apuestas|barca apuestas|barca bayern apuestas|barca inter apuestas|barca madrid apuestas|barça madrid apuestas|barca vs atletico
apuestas|barca vs madrid apuestas|barca vs
real madrid apuestas|barcelona – real madrid apuestas|barcelona
apuestas|barcelona atletico apuestas|barcelona atletico de madrid apuestas|barcelona atletico madrid apuestas|barcelona betis
apuestas|barcelona casa de apuestas|barcelona inter apuestas|barcelona psg apuestas|barcelona real madrid apuestas|barcelona real
sociedad apuestas|barcelona sevilla apuestas|barcelona valencia apuestas|barcelona vs athletic
bilbao apuestas|barcelona vs atlético madrid apuestas|barcelona vs
betis apuestas|barcelona vs celta de vigo apuestas|barcelona
vs espanyol apuestas|barcelona vs girona apuestas|barcelona vs madrid apuestas|barcelona vs real madrid apuestas|barcelona vs
real sociedad apuestas|barcelona vs sevilla apuestas|barcelona vs villarreal apuestas|base de datos cuotas apuestas deportivas|bayern real
madrid apuestas|beisbol apuestas|best america apuestas|bet apuestas
chile|bet apuestas en vivo|betis – chelsea apuestas|betis apuestas|betis barcelona apuestas|betis chelsea apuestas|betis madrid apuestas|betis sevilla
apuestas|betsson tu sitio de apuestas online|blog apuestas baloncesto|blog apuestas ciclismo|blog apuestas nba|blog apuestas tenis|blog de apuestas de tenis|bono
apuestas|bono apuestas deportivas|bono apuestas deportivas
sin deposito|bono apuestas gratis|bono apuestas gratis sin deposito|bono apuestas sin deposito|bono bienvenida apuestas|bono bienvenida apuestas
deportivas|bono bienvenida apuestas españa|bono bienvenida apuestas sin deposito|bono bienvenida apuestas
sin depósito|bono bienvenida casa apuestas|bono bienvenida casa de apuestas|bono bienvenida marca apuestas|bono casa
apuestas|bono casa de apuestas|bono casa de apuestas sin ingreso|bono casas de apuestas|bono de apuestas|bono de apuestas gratis sin deposito|bono de bienvenida apuestas|bono de bienvenida apuestas deportivas|bono
de bienvenida casa de apuestas|bono de bienvenida casas de apuestas|bono de casas de apuestas|bono de registro apuestas|bono de registro apuestas deportivas|bono de registro casa de apuestas|bono gratis apuestas|bono marca apuestas|bono por registro apuestas|bono por registro apuestas deportivas|bono por registro casa de apuestas|bono registro apuestas|bono sin deposito
apuestas|bono sin depósito apuestas|bono sin deposito apuestas deportivas|bono sin depósito apuestas
deportivas|bono sin deposito casa de apuestas|bono sin deposito marca apuestas|bono sin ingreso apuestas|bono sin ingreso apuestas deportivas|bonos apuestas|bonos apuestas
colombia|bonos apuestas deportivas|bonos apuestas deportivas sin deposito|bonos apuestas gratis|bonos apuestas sin deposito|bonos apuestas sin depósito|bonos bienvenida apuestas|bonos bienvenida casas
apuestas|bonos bienvenida casas de apuestas|bonos casa de apuestas|bonos casas apuestas|bonos casas
de apuestas|bonos casas de apuestas colombia|bonos casas de apuestas deportivas|bonos casas de apuestas
españa|bonos casas de apuestas nuevas|bonos casas de apuestas sin deposito|bonos casas de apuestas sin depósito|bonos de apuestas|bonos de apuestas deportivas|bonos de apuestas gratis|bonos de apuestas sin deposito|bonos de bienvenida apuestas|bonos de bienvenida apuestas deportivas|bonos de bienvenida casa
de apuestas|bonos de bienvenida casas de apuestas|bonos de bienvenida de casas de apuestas|bonos de
bienvenida en casas de apuestas|bonos de casas de apuestas|bonos de casas de apuestas sin deposito|bonos en casa
de apuestas|bonos en casas de apuestas sin deposito|bonos gratis
apuestas|bonos gratis apuestas deportivas|bonos gratis
casas de apuestas|bonos gratis sin deposito apuestas|bonos paginas de apuestas|bonos registro
casas de apuestas|bonos sin deposito apuestas|bonos sin depósito apuestas|bonos sin deposito apuestas deportivas|bonos sin deposito
casas de apuestas|bot de apuestas deportivas
gratis|boxeo apuestas|brasil colombia apuestas|brasil peru apuestas|brasil vs
colombia apuestas|buenas apuestas para hoy|buscador cuotas apuestas|buscador de apuestas seguras|buscador
de cuotas apuestas|buscador de cuotas de apuestas|buscar apuestas seguras|caballos apuestas|calculador de apuestas|calculador de cuotas apuestas|calculadora apuestas|calculadora apuestas combinadas|calculadora apuestas de sistema|calculadora
apuestas deportivas|calculadora apuestas deportivas seguras|calculadora
apuestas multiples|calculadora apuestas segura|calculadora
apuestas seguras|calculadora apuestas sistema|calculadora apuestas yankee|calculadora arbitraje apuestas|calculadora cubrir apuestas|calculadora cuotas apuestas|calculadora de apuestas|calculadora de apuestas combinadas|calculadora de apuestas de futbol|calculadora
de apuestas de sistema|calculadora de apuestas deportivas|calculadora de apuestas multiples|calculadora de apuestas seguras|calculadora de apuestas sistema|calculadora de apuestas
surebets|calculadora de arbitraje apuestas|calculadora de cuotas apuestas|calculadora de cuotas de apuestas|calculadora para apuestas deportivas|calculadora poisson apuestas|calculadora poisson apuestas
deportivas|calculadora poisson para apuestas|calculadora scalping
apuestas deportivas|calculadora sistema apuestas|calculadora
stake apuestas|calculadora trading apuestas|calcular apuestas|calcular apuestas
deportivas|calcular apuestas futbol|calcular apuestas
sistema|calcular cuotas apuestas|calcular cuotas apuestas combinadas|calcular
cuotas apuestas deportivas|calcular cuotas de apuestas|calcular ganancias apuestas deportivas|calcular momios apuestas|calcular probabilidad cuota apuestas|calcular stake
apuestas|calcular unidades apuestas|calcular yield apuestas|calculo de apuestas|calculo
de apuestas deportivas|cambio de cuotas apuestas|campeon champions apuestas|campeon eurocopa apuestas|campeon liga apuestas|campeon nba apuestas|canales de apuestas gratis|carrera de
caballos apuestas|carrera de caballos apuestas juego|carrera de caballos con apuestas|carrera de galgos apuestas|carreras de caballos apuestas|carreras de caballos apuestas online|carreras de caballos con apuestas|carreras de caballos juegos de apuestas|carreras de galgos apuestas|carreras de galgos apuestas online|carreras
de galgos apuestas trucos|carreras galgos apuestas|casa apuestas argentina|casa apuestas atletico de
madrid|casa apuestas barcelona|casa apuestas
betis|casa apuestas bono bienvenida|casa apuestas bono gratis|casa apuestas bono sin deposito|casa apuestas cerca de mi|casa apuestas chile|casa apuestas colombia|casa
apuestas con mejores cuotas|casa apuestas deportivas|casa apuestas
españa|casa apuestas española|casa apuestas eurocopa|casa apuestas
futbol|casa apuestas mejores cuotas|casa apuestas mundial|casa
apuestas nueva|casa apuestas nuevas|casa apuestas online|casa apuestas
peru|casa apuestas valencia|casa de apuestas|casa
de apuestas 10 euros gratis|casa de apuestas argentina|casa de apuestas
atletico de madrid|casa de apuestas baloncesto|casa de
apuestas barcelona|casa de apuestas beisbol|casa de apuestas betis|casa de apuestas bono|casa de apuestas bono bienvenida|casa
de apuestas bono de bienvenida|casa de apuestas bono gratis|casa de apuestas
bono por registro|casa de apuestas bono sin deposito|casa de apuestas boxeo|casa de
apuestas caballos|casa de apuestas carreras de caballos|casa de apuestas cerca de mi|casa
de apuestas cerca de mí|casa de apuestas champions league|casa de apuestas chile|casa de apuestas
ciclismo|casa de apuestas colombia|casa de apuestas con bono de bienvenida|casa de apuestas
con bono sin deposito|casa de apuestas con cuotas mas altas|casa de apuestas
con esports|casa de apuestas con las mejores cuotas|casa de apuestas con licencia en españa|casa de apuestas con mejores cuotas|casa de apuestas
con pago anticipado|casa de apuestas con paypal|casa de apuestas copa america|casa de apuestas de caballos|casa de apuestas de colombia|casa de apuestas de españa|casa de apuestas de futbol|casa de apuestas de
fútbol|casa de apuestas de futbol peru|casa de apuestas de peru|casa de apuestas del madrid|casa de apuestas del
real madrid|casa de apuestas deportivas|casa de apuestas deportivas cerca de mi|casa de apuestas deportivas en argentina|casa de
apuestas deportivas en chile|casa de apuestas deportivas en colombia|casa de apuestas
deportivas en españa|casa de apuestas deportivas en madrid|casa de
apuestas deportivas españa|casa de apuestas deportivas españolas|casa
de apuestas deportivas madrid|casa de apuestas deportivas
mexico|casa de apuestas deportivas online|casa de
apuestas deportivas peru|casa de apuestas deposito 5 euros|casa de apuestas deposito
minimo|casa de apuestas deposito minimo 1 euro|casa de apuestas depósito mínimo 1 euro|casa
de apuestas en españa|casa de apuestas en linea|casa de apuestas
en madrid|casa de apuestas en perú|casa de apuestas
en vivo|casa de apuestas españa|casa de apuestas españa
inglaterra|casa de apuestas española|casa de apuestas españolas|casa de apuestas esports|casa de apuestas eurocopa|casa de apuestas europa league|casa de
apuestas f1|casa de apuestas formula 1|casa de apuestas futbol|casa de apuestas ingreso minimo|casa de apuestas ingreso minimo 1 euro|casa de apuestas ingreso mínimo 1 euro|casa de apuestas legales|casa de apuestas legales en colombia|casa de apuestas legales en españa|casa de apuestas libertadores|casa de apuestas liga española|casa de apuestas madrid|casa de apuestas mas
segura|casa de apuestas mejores|casa de apuestas méxico|casa
de apuestas minimo 5 euros|casa de apuestas mlb|casa de apuestas mundial|casa de apuestas nba|casa de apuestas nfl|casa de apuestas nueva|casa de apuestas nuevas|casa
de apuestas oficial del real madrid|casa de apuestas oficial real madrid|casa de apuestas online|casa
de apuestas online argentina|casa de apuestas online chile|casa de apuestas online españa|casa de apuestas online mexico|casa de apuestas online
paraguay|casa de apuestas online peru|casa de apuestas online usa|casa de apuestas online venezuela|casa de apuestas pago anticipado|casa de
apuestas para boxeo|casa de apuestas para ufc|casa de apuestas peru|casa de
apuestas perú|casa de apuestas peru online|casa de apuestas por
paypal|casa de apuestas promociones|casa de apuestas que regalan dinero|casa de apuestas real madrid|casa de apuestas regalo de bienvenida|casa de apuestas sevilla|casa de apuestas sin dinero|casa de
apuestas sin ingreso minimo|casa de apuestas sin licencia en españa|casa de apuestas sin minimo de ingreso|casa de apuestas stake|casa de apuestas tenis|casa de
apuestas ufc|casa de apuestas valencia|casa de apuestas venezuela|casa de apuestas virtuales|casa de apuestas vive la
suerte|casa oficial de apuestas del real madrid|casas apuestas asiaticas|casas apuestas bono sin deposito|casas apuestas bonos sin deposito|casas apuestas caballos|casas apuestas chile|casas apuestas
ciclismo|casas apuestas con licencia|casas apuestas con licencia
en españa|casas apuestas deportivas|casas apuestas deportivas colombia|casas apuestas deportivas españa|casas apuestas deportivas españolas|casas apuestas
deportivas nuevas|casas apuestas españa|casas apuestas españolas|casas apuestas esports|casas
apuestas eurocopa|casas apuestas golf|casas apuestas ingreso minimo 5 euros|casas apuestas legales|casas apuestas
legales españa|casas apuestas licencia|casas apuestas licencia españa|casas apuestas mexico|casas apuestas mundial|casas apuestas nba|casas apuestas nuevas|casas apuestas nuevas españa|casas apuestas ofertas|casas apuestas online|casas apuestas paypal|casas apuestas peru|casas apuestas sin licencia|casas apuestas tenis|casas asiaticas apuestas|casas de apuestas|casas de apuestas
5 euros|casas de apuestas app|casas de apuestas argentinas|casas de apuestas asiaticas|casas de apuestas baloncesto|casas
de apuestas barcelona|casas de apuestas bono bienvenida|casas
de apuestas bono de bienvenida|casas de apuestas bono por
registro|casas de apuestas bono sin deposito|casas de apuestas bono sin ingreso|casas de apuestas bonos|casas
de apuestas bonos de bienvenida|casas de apuestas
bonos gratis|casas de apuestas bonos sin deposito|casas de apuestas boxeo|casas
de apuestas caballos|casas de apuestas carreras
de caballos|casas de apuestas casino|casas de apuestas casino online|casas de apuestas cerca de mi|casas de
apuestas champions league|casas de apuestas chile|casas de apuestas ciclismo|casas de apuestas
colombia|casas de apuestas com|casas de apuestas con app|casas de apuestas con apuestas gratis|casas de apuestas con bono|casas de apuestas con bono de bienvenida|casas
de apuestas con bono de registro|casas de apuestas con bono por registro|casas de apuestas con bono sin deposito|casas de apuestas con bonos|casas de apuestas con bonos
gratis|casas de apuestas con bonos sin deposito|casas de apuestas con deposito minimo|casas de apuestas con esports|casas de apuestas con handicap
asiatico|casas de apuestas con licencia|casas de apuestas con licencia en españa|casas de apuestas con licencia españa|casas de apuestas con licencia española|casas de apuestas con mejores cuotas|casas de apuestas con pago anticipado|casas
de apuestas con paypal|casas de apuestas con paypal en perú|casas de apuestas con promociones|casas
de apuestas con ruleta en vivo|casas de apuestas copa del rey|casas de apuestas de caballos|casas de apuestas
de españa|casas de apuestas de futbol|casas de apuestas de fútbol|casas de apuestas de peru|casas de apuestas deportivas|casas de
apuestas deportivas asiaticas|casas de apuestas deportivas colombia|casas de apuestas deportivas comparativa|casas
de apuestas deportivas con paypal|casas de apuestas deportivas en chile|casas de apuestas deportivas en españa|casas de apuestas deportivas en linea|casas de
apuestas deportivas en madrid|casas de apuestas deportivas en mexico|casas de apuestas deportivas en peru|casas de apuestas deportivas en sevilla|casas de apuestas deportivas en valencia|casas de apuestas deportivas españa|casas de
apuestas deportivas españolas|casas de apuestas deportivas legales|casas
de apuestas deportivas madrid|casas de apuestas deportivas mexico|casas de apuestas deportivas nuevas|casas de apuestas deportivas online|casas de apuestas deportivas peru|casas de apuestas deportivas perú|casas de apuestas
deposito minimo 1 euro|casas de apuestas depósito mínimo 1 euro|casas de apuestas
dinero gratis|casas de apuestas en argentina|casas de apuestas
en barcelona|casas de apuestas en chile|casas de apuestas en colombia|casas de apuestas en españa|casas
de apuestas en españa online|casas de apuestas en linea|casas de apuestas en madrid|casas de apuestas en méxico|casas de apuestas en peru|casas de apuestas en perú|casas de apuestas en sevilla|casas de apuestas en uruguay|casas de apuestas en valencia|casas de
apuestas en venezuela|casas de apuestas equipos de futbol|casas de apuestas españa|casas de apuestas españa alemania|casas de apuestas
españa inglaterra|casas de apuestas españa licencia|casas de apuestas españa nuevas|casas de apuestas españa online|casas de
apuestas española|casas de apuestas españolas|casas
de apuestas españolas con licencia|casas de apuestas españolas
online|casas de apuestas esports|casas de apuestas eurocopa|casas
de apuestas eurocopa 2024|casas de apuestas europa league|casas de apuestas f1|casas de apuestas fisicas en barcelona|casas de apuestas fisicas en españa|casas de apuestas formula
1|casas de apuestas fuera de españa|casas de apuestas
futbol|casas de apuestas fútbol|casas de apuestas futbol españa|casas de apuestas
ganador eurocopa|casas de apuestas gratis|casas de apuestas ingreso minimo|casas de apuestas ingreso minimo 1 euro|casas de apuestas ingreso minimo 5 euros|casas de apuestas inter barcelona|casas de apuestas legales|casas
de apuestas legales en colombia|casas de apuestas legales en españa|casas de apuestas legales en mexico|casas de apuestas legales
españa|casas de apuestas legales mx|casas de apuestas licencia|casas de apuestas licencia españa|casas de apuestas lista|casas de apuestas madrid|casas de apuestas mas seguras|casas de
apuestas mejores bonos|casas de apuestas mejores cuotas|casas
de apuestas mexico|casas de apuestas méxico|casas de apuestas minimo
5 euros|casas de apuestas mlb|casas de apuestas mundial|casas de apuestas mundial baloncesto|casas de
apuestas mundiales|casas de apuestas nba|casas de apuestas no reguladas en españa|casas de apuestas
nueva ley|casas de apuestas nuevas|casas de apuestas nuevas en colombia|casas de apuestas nuevas en españa|casas
de apuestas nuevas españa|casas de apuestas ofertas|casas de apuestas online|casas de apuestas online argentina|casas de apuestas online colombia|casas de apuestas online deportivas|casas de apuestas online ecuador|casas de
apuestas online en argentina|casas de apuestas online en chile|casas de
apuestas online en colombia|casas de apuestas online en españa|casas de apuestas online en mexico|casas de apuestas online españa|casas
de apuestas online mas fiables|casas de apuestas online mexico|casas de apuestas online nuevas|casas de apuestas online peru|casas de
apuestas online usa|casas de apuestas online venezuela|casas
de apuestas pago paypal|casas de apuestas para ufc|casas de apuestas paypal|casas de apuestas peru bono sin deposito|casas de apuestas presenciales en españa|casas de apuestas
promociones|casas
Your comment is awaiting moderation.
adstreampro.click – Loved the layout today; clean, simple, and genuinely user-friendly overall.
Your comment is awaiting moderation.
(10 euros gratis apuestas|10 mejores casas de apuestas|10 trucos para ganar apuestas|15 euros gratis marca apuestas|1×2 apuestas|1×2
apuestas deportivas|1×2 apuestas que significa|1×2 en apuestas|1×2
en apuestas que significa|1×2 que significa en apuestas|5 euros gratis apuestas|9 apuestas que siempre ganaras|a partir de cuanto se
declara apuestas|actividades de juegos de azar y
apuestas|ad apuestas deportivas|aleksandre topuria ufc apuestas|algoritmo para ganar apuestas deportivas|america apuestas|análisis nba apuestas|aplicacion android apuestas deportivas|aplicacion apuestas deportivas|aplicacion apuestas deportivas android|aplicación de apuestas online|aplicacion para hacer apuestas|aplicacion para hacer apuestas de futbol|aplicación para hacer apuestas de
fútbol|aplicaciones apuestas deportivas android|aplicaciones apuestas deportivas gratis|aplicaciones de apuestas android|aplicaciones de apuestas
de fútbol|aplicaciones de apuestas deportivas|aplicaciones de apuestas deportivas peru|aplicaciones de
apuestas deportivas perú|aplicaciones de apuestas en colombia|aplicaciones de apuestas gratis|aplicaciones de apuestas online|aplicaciones de apuestas seguras|aplicaciones de
apuestas sin dinero|aplicaciones para hacer apuestas|apostar seguro apuestas deportivas|app android apuestas
deportivas|app apuestas|app apuestas android|app apuestas de futbol|app apuestas deportivas|app apuestas deportivas android|app
apuestas deportivas argentina|app apuestas deportivas colombia|app apuestas deportivas ecuador|app apuestas deportivas españa|app apuestas deportivas gratis|app
apuestas entre amigos|app apuestas futbol|app apuestas gratis|app apuestas sin dinero|app casa de apuestas|app casas de apuestas|app control apuestas|app de apuestas|app de apuestas android|app de
apuestas casino|app de apuestas colombia|app de
apuestas con bono de bienvenida|app de apuestas de futbol|app de apuestas deportivas|app
de apuestas deportivas android|app de apuestas deportivas argentina|app de apuestas deportivas
colombia|app de apuestas deportivas en españa|app de apuestas
deportivas peru|app de apuestas deportivas perú|app
de apuestas deportivas sin dinero|app de apuestas ecuador|app de apuestas en colombia|app de apuestas en españa|app de apuestas en venezuela|app de apuestas futbol|app de apuestas gratis|app de apuestas online|app de apuestas
para android|app de apuestas para ganar dinero|app de apuestas peru|app de apuestas reales|app
de casas de apuestas|app marca apuestas android|app moviles de
apuestas|app para apuestas|app para apuestas de futbol|app para apuestas deportivas|app para apuestas deportivas en español|app
para ganar apuestas deportivas|app para hacer apuestas|app
para hacer apuestas deportivas|app para hacer apuestas entre amigos|app para llevar control de apuestas|app pronosticos apuestas deportivas|app versus apuestas|apps apuestas mundial|apps de apuestas|apps de apuestas
con bono de bienvenida|apps de apuestas de futbol|apps de apuestas deportivas
peru|apps de apuestas mexico|apps para apuestas|aprender a hacer apuestas deportivas|aprender hacer apuestas deportivas|apuesta del dia apuestas deportivas|apuestas 10 euros gratis|apuestas 100 seguras|apuestas 1×2|apuestas 1X2|apuestas 2 division|apuestas 3 division|apuestas a caballos|apuestas
a carreras de caballos|apuestas a colombia|apuestas a corners|apuestas a ganar|apuestas
a jugadores nba|apuestas a la baja|apuestas a la nfl|apuestas al barcelona|apuestas al dia|apuestas al empate|apuestas al mundial|apuestas al tenis
wta|apuestas alaves barcelona|apuestas alcaraz
hoy|apuestas alemania españa|apuestas alonso campeon del mundo|apuestas altas y bajas|apuestas altas y bajas nfl|apuestas ambos equipos marcan|apuestas america|apuestas android|apuestas anillo
nba|apuestas antes del mundial|apuestas anticipadas|apuestas anticipadas nba|apuestas apps|apuestas arabia argentina|apuestas argentina|apuestas argentina campeon del mundo|apuestas argentina canada|apuestas argentina
colombia|apuestas argentina croacia|apuestas argentina españa|apuestas argentina francia|apuestas argentina francia
cuanto paga|apuestas argentina francia mundial|apuestas argentina gana el mundial|apuestas argentina gana mundial|apuestas
argentina holanda|apuestas argentina mexico|apuestas argentina méxico|apuestas argentina mundial|apuestas argentina online|apuestas argentina paises bajos|apuestas argentina polonia|apuestas argentina uruguay|apuestas argentina vs australia|apuestas argentina vs
colombia|apuestas argentina vs francia|apuestas argentina vs peru|apuestas argentinas|apuestas arsenal real madrid|apuestas ascenso a primera division|apuestas ascenso a segunda|apuestas asiaticas|apuestas asiatico|apuestas athletic|apuestas athletic atletico|apuestas
athletic barça|apuestas athletic barcelona|apuestas athletic betis|apuestas
athletic manchester|apuestas athletic manchester united|apuestas athletic osasuna|apuestas
athletic real|apuestas athletic real madrid|apuestas athletic real sociedad|apuestas
athletic real sociedad final|apuestas athletic roma|apuestas athletic sevilla|apuestas athletic valencia|apuestas atletico|apuestas
atletico barcelona|apuestas atletico barsa|apuestas atletico
campeon champions|apuestas atletico campeon de liga|apuestas atlético copenhague|apuestas atletico de madrid|apuestas atlético
de madrid|apuestas atletico de madrid barcelona|apuestas
atletico de madrid gana la liga|apuestas atletico de madrid real madrid|apuestas atlético de
madrid real madrid|apuestas atletico de madrid vs barcelona|apuestas atletico madrid|apuestas atletico
madrid real madrid|apuestas atletico madrid vs barcelona|apuestas atletico real madrid|apuestas atletico real madrid champions|apuestas atletismo|apuestas bajas|apuestas baloncesto|apuestas baloncesto acb|apuestas baloncesto handicap|apuestas baloncesto hoy|apuestas baloncesto juegos olimpicos|apuestas baloncesto nba|apuestas baloncesto pronostico|apuestas baloncesto pronósticos|apuestas baloncesto prorroga|apuestas barca|apuestas barca athletic|apuestas barca atletico|apuestas barca bayern|apuestas barca bayern munich|apuestas barca girona|apuestas
barca hoy|apuestas barça hoy|apuestas barca inter|apuestas barca juventus|apuestas
barca madrid|apuestas barça madrid|apuestas barca real madrid|apuestas barca vs juve|apuestas barca vs madrid|apuestas barca vs psg|apuestas barcelona|apuestas barcelona alaves|apuestas barcelona
athletic|apuestas barcelona atletico|apuestas barcelona atletico de madrid|apuestas barcelona atlético de madrid|apuestas barcelona atletico madrid|apuestas barcelona bayern|apuestas barcelona betis|apuestas barcelona campeon de liga|apuestas barcelona celta|apuestas barcelona espanyol|apuestas barcelona gana la champions|apuestas barcelona girona|apuestas barcelona
granada|apuestas barcelona hoy|apuestas barcelona inter|apuestas barcelona madrid|apuestas barcelona osasuna|apuestas barcelona psg|apuestas barcelona real madrid|apuestas barcelona real sociedad|apuestas barcelona sevilla|apuestas barcelona valencia|apuestas barcelona villarreal|apuestas barcelona
vs atletico madrid|apuestas barcelona vs madrid|apuestas barcelona vs real madrid|apuestas barsa madrid|apuestas basket hoy|apuestas
bayern barcelona|apuestas bayern vs barcelona|apuestas beisbol|apuestas béisbol|apuestas beisbol mlb|apuestas beisbol pronosticos|apuestas beisbol venezolano|apuestas betis|apuestas betis
– chelsea|apuestas betis barcelona|apuestas betis chelsea|apuestas
betis fiorentina|apuestas betis girona|apuestas betis madrid|apuestas betis mallorca|apuestas betis real madrid|apuestas betis real sociedad|apuestas
betis sevilla|apuestas betis valencia|apuestas betis valladolid|apuestas betis vs valencia|apuestas betplay hoy colombia|apuestas betsson peru|apuestas bienvenida|apuestas
billar online|apuestas bolivia vs colombia|apuestas bono|apuestas bono bienvenida|apuestas bono de bienvenida|apuestas bono de bienvenida sin deposito|apuestas bono gratis|apuestas
bono sin deposito|apuestas bonos sin deposito|apuestas borussia real madrid|apuestas boxeo|apuestas
boxeo de campeonato|apuestas boxeo españa|apuestas boxeo español|apuestas boxeo femenino olimpiadas|apuestas boxeo hoy|apuestas boxeo online|apuestas brasil colombia|apuestas brasil peru|apuestas brasil uruguay|apuestas brasil vs colombia|apuestas brasil vs peru|apuestas caballos|apuestas caballos colocado|apuestas caballos españa|apuestas caballos hipodromo|apuestas caballos hoy|apuestas caballos madrid|apuestas caballos
online|apuestas caballos sanlucar de barrameda|apuestas caballos
zarzuela|apuestas calculador|apuestas campeon|apuestas campeon champions|apuestas campeón champions|apuestas
campeon champions 2025|apuestas campeon champions league|apuestas campeon conference league|apuestas campeon copa america|apuestas campeon copa del rey|apuestas campeon de champions|apuestas
campeon de la champions|apuestas campeon de liga|apuestas campeon del mundo|apuestas campeon eurocopa|apuestas campeón eurocopa|apuestas campeon europa league|apuestas campeon f1|apuestas campeon f1 2025|apuestas campeon formula 1|apuestas campeon libertadores|apuestas
campeon liga|apuestas campeon liga bbva|apuestas campeon liga española|apuestas campeon liga santander|apuestas campeon motogp
2025|apuestas campeon mundial|apuestas campeón mundial|apuestas campeon mundial baloncesto|apuestas campeon nba|apuestas campeón nba|apuestas campeon premier|apuestas campeon premier league|apuestas campeon roland garros|apuestas campeonato f1|apuestas
campeonatos de futbol|apuestas carrera de caballos|apuestas carrera de caballos hoy|apuestas carrera
de caballos nocturnas|apuestas carrera de galgos fin de semana|apuestas carrera de galgos hoy|apuestas carrera de galgos nocturnas|apuestas carreras caballos|apuestas
carreras caballos sanlucar|apuestas carreras
de caballos|apuestas carreras de caballos en directo|apuestas carreras de
caballos en vivo|apuestas carreras de caballos españa|apuestas carreras de caballos hoy|apuestas
carreras de caballos nacionales|apuestas carreras de caballos nocturnas|apuestas carreras
de caballos online|apuestas carreras de caballos sanlucar|apuestas carreras de caballos sanlúcar|apuestas carreras de
galgos|apuestas carreras de galgos en vivo|apuestas carreras de galgos nocturnas|apuestas carreras de galgos pre partido|apuestas casino|apuestas casino barcelona|apuestas casino futbol|apuestas
casino gran madrid|apuestas casino gratis|apuestas casino madrid|apuestas casino online|apuestas casino online argentina|apuestas casinos|apuestas casinos online|apuestas celta|apuestas celta barcelona|apuestas
celta betis|apuestas celta eibar|apuestas celta espanyol|apuestas celta granada|apuestas celta madrid|apuestas celta manchester|apuestas celta real madrid|apuestas champion league|apuestas champions foro|apuestas champions hoy|apuestas champions league|apuestas champions league –
pronósticos|apuestas champions league 2025|apuestas champions league hoy|apuestas champions league pronosticos|apuestas champions
league pronósticos|apuestas champions pronosticos|apuestas chelsea barcelona|apuestas chelsea betis|apuestas chile|apuestas chile peru|apuestas chile venezuela|apuestas chile vs colombia|apuestas
chile vs uruguay|apuestas ciclismo|apuestas ciclismo en vivo|apuestas ciclismo femenino|apuestas ciclismo tour francia|apuestas ciclismo vuelta|apuestas
ciclismo vuelta a españa|apuestas ciclismo vuelta españa|apuestas city madrid|apuestas city real madrid|apuestas clasico|apuestas
clasico español|apuestas clasico real madrid barcelona|apuestas clasificacion mundial|apuestas colombia|apuestas colombia argentina|apuestas colombia brasil|apuestas colombia paraguay|apuestas colombia uruguay|apuestas colombia vs argentina|apuestas colombia vs brasil|apuestas combinadas|apuestas combinadas
como funcionan|apuestas combinadas de futbol|apuestas
combinadas de fútbol|apuestas combinadas foro|apuestas combinadas
futbol|apuestas combinadas hoy|apuestas combinadas mismo
partido|apuestas combinadas mundial|apuestas combinadas nba|apuestas combinadas para esta semana|apuestas combinadas para hoy|apuestas combinadas para mañana|apuestas combinadas pronosticos|apuestas combinadas recomendadas|apuestas combinadas seguras|apuestas combinadas seguras para hoy|apuestas combinadas seguras para
mañana|apuestas como ganar|apuestas comparador|apuestas con bono
de bienvenida|apuestas con dinero ficticio|apuestas
con dinero real|apuestas con dinero virtual|apuestas
con handicap|apuestas con handicap asiatico|apuestas con handicap baloncesto|apuestas con mas probabilidades de ganar|apuestas con paypal|apuestas con tarjeta de credito|apuestas con tarjeta de debito|apuestas consejos|apuestas copa|apuestas copa
africa|apuestas copa america|apuestas copa américa|apuestas copa argentina|apuestas copa brasil|apuestas
copa davis|apuestas copa de europa|apuestas copa del mundo|apuestas copa del rey|apuestas copa del rey baloncesto|apuestas
copa del rey final|apuestas copa del rey
futbol|apuestas copa del rey ganador|apuestas copa del rey hoy|apuestas copa del rey pronosticos|apuestas copa del rey pronósticos|apuestas copa europa|apuestas copa italia|apuestas copa libertadores|apuestas copa mundial de hockey|apuestas copa rey|apuestas
copa sudamericana|apuestas corners|apuestas corners
hoy|apuestas croacia argentina|apuestas cuartos eurocopa|apuestas cuotas|apuestas
cuotas altas|apuestas cuotas bajas|apuestas de 1 euro|apuestas de baloncesto|apuestas de baloncesto hoy|apuestas de baloncesto nba|apuestas de baloncesto para hoy|apuestas de beisbol|apuestas de beisbol para hoy|apuestas de blackjack en linea|apuestas de boxeo|apuestas
de boxeo canelo|apuestas de boxeo en las vegas|apuestas de boxeo hoy|apuestas de boxeo online|apuestas de
caballo|apuestas de caballos|apuestas de caballos como funciona|apuestas de caballos como se juega|apuestas de
caballos en colombia|apuestas de caballos en españa|apuestas de caballos en linea|apuestas de caballos españa|apuestas de caballos
ganador y colocado|apuestas de caballos internacionales|apuestas
de caballos juegos|apuestas de caballos online|apuestas de caballos
online en venezuela|apuestas de caballos por internet|apuestas de caballos pronosticos|apuestas de caballos pronósticos|apuestas de carrera de caballos|apuestas de carreras de caballos|apuestas de carreras de caballos online|apuestas de
casino|apuestas de casino online|apuestas de casino por internet|apuestas
de champions league|apuestas de ciclismo|apuestas de colombia|apuestas de copa
america|apuestas de corners|apuestas de deportes en linea|apuestas de deportes online|apuestas de
dinero|apuestas de esports|apuestas de eurocopa|apuestas de europa league|apuestas de f1|apuestas de formula 1|apuestas
de futbol|apuestas de fútbol|apuestas de futbol
app|apuestas de futbol argentina|apuestas de futbol colombia|apuestas de futbol en colombia|apuestas de futbol en directo|apuestas de futbol en linea|apuestas de futbol en vivo|apuestas de futbol español|apuestas de futbol gratis|apuestas de futbol hoy|apuestas de futbol mundial|apuestas de futbol
online|apuestas de fútbol online|apuestas de futbol para hoy|apuestas de fútbol para
hoy|apuestas de futbol para hoy seguras|apuestas
de futbol para mañana|apuestas de futbol peru|apuestas de futbol pronosticos|apuestas de fútbol pronósticos|apuestas de futbol seguras|apuestas de futbol seguras para hoy|apuestas de futbol sin dinero|apuestas de galgos|apuestas
de galgos como ganar|apuestas de galgos en directo|apuestas de galgos online|apuestas de
galgos trucos|apuestas de golf|apuestas de hockey|apuestas de hockey sobre hielo|apuestas de hoy|apuestas de hoy seguras|apuestas de juego|apuestas de juegos|apuestas de juegos deportivos|apuestas de
juegos online|apuestas de la champions league|apuestas de la copa américa|apuestas de la eurocopa|apuestas de la
europa league|apuestas de la liga|apuestas de
la liga bbva|apuestas de la liga española|apuestas de la nba|apuestas de la nfl|apuestas de la ufc|apuestas de mlb|apuestas
de nba|apuestas de nba para hoy|apuestas
de partidos|apuestas de partidos de futbol|apuestas de peleas ufc|apuestas de perros en vivo|apuestas de
perros virtuales|apuestas de peru|apuestas de sistema|apuestas de sistema como funciona|apuestas de sistema explicacion|apuestas de sistema explicación|apuestas de tenis|apuestas de tenis de mesa|apuestas de tenis en directo|apuestas
de tenis hoy|apuestas de tenis para hoy|apuestas de tenis pronosticos|apuestas de tenis seguras|apuestas de todo tipo|apuestas
de ufc|apuestas de ufc hoy|apuestas del boxeo|apuestas del clasico|apuestas del
clasico real madrid barca|apuestas del dia|apuestas del día|apuestas del dia de hoy|apuestas
del dia deportivas|apuestas del dia futbol|apuestas del mundial|apuestas del partido de hoy|apuestas del real madrid|apuestas del rey|apuestas del sistema|apuestas
deporte|apuestas deportes|apuestas deportiva|apuestas deportivas|apuestas deportivas 1 euro|apuestas deportivas
10 euros gratis|apuestas deportivas 100 seguras|apuestas
deportivas 1×2|apuestas deportivas android|apuestas deportivas app|apuestas deportivas
apps|apuestas deportivas argentina|apuestas deportivas argentina futbol|apuestas deportivas argentina legal|apuestas deportivas atletico de madrid|apuestas deportivas baloncesto|apuestas deportivas
barca madrid|apuestas deportivas barcelona|apuestas deportivas beisbol|apuestas deportivas bono|apuestas
deportivas bono bienvenida|apuestas deportivas bono de bienvenida|apuestas deportivas bono sin deposito|apuestas
deportivas bonos de bienvenida|apuestas deportivas boxeo|apuestas deportivas
caballos|apuestas deportivas calculadora|apuestas deportivas campeon liga|apuestas deportivas casino|apuestas
deportivas casino barcelona|apuestas deportivas casino online|apuestas
deportivas cerca de mi|apuestas deportivas champions league|apuestas deportivas chile|apuestas deportivas ciclismo|apuestas deportivas colombia|apuestas deportivas com|apuestas deportivas com foro|apuestas deportivas com
pronosticos|apuestas deportivas combinadas|apuestas
deportivas combinadas para hoy|apuestas deportivas como se juega|apuestas deportivas comparador|apuestas deportivas con bono gratis|apuestas deportivas
con bonos gratis|apuestas deportivas con dinero ficticio|apuestas deportivas
con paypal|apuestas deportivas con puntos virtuales|apuestas
deportivas consejos|apuestas deportivas consejos para ganar|apuestas deportivas copa america|apuestas deportivas copa del rey|apuestas deportivas copa libertadores|apuestas deportivas copa mundial|apuestas deportivas corners|apuestas deportivas cual es la mejor|apuestas deportivas cuotas
altas|apuestas deportivas de baloncesto|apuestas deportivas de boxeo|apuestas deportivas de colombia|apuestas deportivas de futbol|apuestas deportivas
de nba|apuestas deportivas de nhl|apuestas deportivas de peru|apuestas deportivas de tenis|apuestas deportivas del dia|apuestas deportivas dinero ficticio|apuestas deportivas directo|apuestas deportivas doble oportunidad|apuestas deportivas en argentina|apuestas deportivas en chile|apuestas deportivas en colombia|apuestas deportivas en directo|apuestas deportivas en españa|apuestas deportivas en español|apuestas deportivas en linea|apuestas deportivas en línea|apuestas
deportivas en peru|apuestas deportivas en perú|apuestas deportivas en sevilla|apuestas deportivas en uruguay|apuestas deportivas en vivo|apuestas deportivas es|apuestas deportivas es pronosticos|apuestas deportivas españa|apuestas deportivas españolas|apuestas deportivas esports|apuestas deportivas
estadisticas|apuestas deportivas estrategias|apuestas deportivas estrategias seguras|apuestas
deportivas eurocopa|apuestas deportivas europa league|apuestas
deportivas f1|apuestas deportivas faciles de ganar|apuestas deportivas formula 1|apuestas deportivas foro|apuestas deportivas foro futbol|apuestas deportivas foro tenis|apuestas
deportivas francia argentina|apuestas deportivas futbol|apuestas deportivas
fútbol|apuestas deportivas futbol argentino|apuestas deportivas futbol colombia|apuestas deportivas futbol español|apuestas deportivas
gana|apuestas deportivas ganadas|apuestas deportivas ganar dinero seguro|apuestas deportivas gane|apuestas deportivas golf|apuestas deportivas gratis|apuestas deportivas gratis con premios|apuestas deportivas gratis hoy|apuestas deportivas gratis sin deposito|apuestas deportivas handicap|apuestas deportivas handicap asiatico|apuestas deportivas hoy|apuestas deportivas
impuestos|apuestas deportivas interior argentina|apuestas deportivas juegos olimpicos|apuestas deportivas la liga|apuestas deportivas legales|apuestas deportivas
legales en colombia|apuestas deportivas libres de impuestos|apuestas deportivas licencia
españa|apuestas deportivas liga española|apuestas
deportivas listado|apuestas deportivas listado clasico|apuestas deportivas
madrid|apuestas deportivas mas seguras|apuestas deportivas mejor pagadas|apuestas deportivas mejores|apuestas deportivas mejores app|apuestas deportivas mejores casas|apuestas deportivas mejores cuotas|apuestas deportivas mejores paginas|apuestas deportivas mexico|apuestas deportivas méxico|apuestas deportivas mlb|apuestas deportivas mlb
hoy|apuestas deportivas multiples|apuestas deportivas
mundial|apuestas deportivas murcia|apuestas deportivas nba|apuestas deportivas nba hoy|apuestas deportivas
nfl|apuestas deportivas nhl|apuestas deportivas nuevas|apuestas deportivas ofertas|apuestas
deportivas online|apuestas deportivas online argentina|apuestas deportivas online chile|apuestas deportivas online colombia|apuestas deportivas online en colombia|apuestas deportivas online españa|apuestas deportivas online mexico|apuestas
deportivas online paypal|apuestas deportivas online peru|apuestas deportivas online por internet|apuestas deportivas pago paypal|apuestas
deportivas para ganar dinero|apuestas deportivas para hoy|apuestas deportivas para hoy pronosticos|apuestas deportivas partido suspendido|apuestas deportivas partidos de hoy|apuestas deportivas paypal|apuestas deportivas peru|apuestas deportivas
perú|apuestas deportivas peru vs ecuador|apuestas deportivas predicciones|apuestas deportivas promociones|apuestas deportivas
pronostico|apuestas deportivas pronóstico|apuestas deportivas pronostico hoy|apuestas
deportivas pronosticos|apuestas deportivas pronósticos|apuestas deportivas pronosticos expertos|apuestas deportivas pronosticos gratis|apuestas deportivas pronosticos nba|apuestas deportivas pronosticos tenis|apuestas deportivas que
aceptan paypal|apuestas deportivas real madrid|apuestas deportivas regalo bienvenida|apuestas deportivas resultado exacto|apuestas deportivas resultados|apuestas deportivas rugby|apuestas deportivas seguras|apuestas deportivas seguras foro|apuestas deportivas seguras hoy|apuestas
deportivas seguras para hoy|apuestas deportivas seguras telegram|apuestas deportivas sevilla|apuestas deportivas simulador eurocopa|apuestas deportivas sin deposito|apuestas deportivas sin deposito inicial|apuestas
deportivas sin dinero|apuestas deportivas sin dinero real|apuestas deportivas sin registro|apuestas deportivas stake|apuestas deportivas
stake 10|apuestas deportivas telegram españa|apuestas deportivas tenis|apuestas deportivas
tenis de mesa|apuestas deportivas tenis foro|apuestas
deportivas tenis hoy|apuestas deportivas tips|apuestas deportivas tipster|apuestas deportivas
ufc|apuestas deportivas uruguay|apuestas deportivas valencia|apuestas deportivas valencia barcelona|apuestas deportivas venezuela|apuestas
deportivas virtuales|apuestas deportivas y
casino|apuestas deportivas y casino online|apuestas deportivas.com|apuestas deportivas.com foro|apuestas deportivas.es|apuestas deportivos pronosticos|apuestas deposito minimo 1 euro|apuestas descenso a segunda|apuestas descenso a segunda b|apuestas descenso la liga|apuestas
descenso primera division|apuestas descenso segunda|apuestas dia|apuestas diarias
seguras|apuestas dinero|apuestas dinero ficticio|apuestas dinero
real|apuestas dinero virtual|apuestas directas|apuestas directo|apuestas directo futbol|apuestas division de
honor juvenil|apuestas dnb|apuestas doble oportunidad|apuestas doble resultado|apuestas dobles|apuestas dobles
y triples|apuestas dortmund barcelona|apuestas draft nba|apuestas draft nfl|apuestas ecuador vs argentina|apuestas ecuador vs venezuela|apuestas egipto uruguay|apuestas el clasico|apuestas elecciones venezuela|apuestas empate|apuestas en baloncesto|apuestas
en barcelona|apuestas en beisbol|apuestas en boxeo|apuestas
en caballos|apuestas en carreras de caballos|apuestas en casino|apuestas en casino
online|apuestas en casinos|apuestas en casinos online|apuestas en chile|apuestas en ciclismo|apuestas en colombia|apuestas
en colombia de futbol|apuestas en directo|apuestas en directo futbol|apuestas en directo pronosticos|apuestas en el futbol|apuestas en el tenis|apuestas en españa|apuestas en esports|apuestas en eventos deportivos virtuales|apuestas en golf|apuestas en juegos|apuestas en la champions league|apuestas en la eurocopa|apuestas
en la liga|apuestas en la nba|apuestas en la nfl|apuestas en las vegas mlb|apuestas en las vegas nfl|apuestas en linea|apuestas en línea|apuestas en linea argentina|apuestas en linea boxeo|apuestas en linea
chile|apuestas en linea colombia|apuestas en línea de
fútbol|apuestas en linea deportivas|apuestas en linea españa|apuestas en linea estados unidos|apuestas en linea futbol|apuestas en linea
mexico|apuestas en línea méxico|apuestas en linea mundial|apuestas en linea peru|apuestas en linea usa|apuestas en los esports|apuestas en madrid|apuestas en méxico|apuestas
en mexico online|apuestas en nba|apuestas en partidos de futbol|apuestas en partidos de
futbol en vivo|apuestas en partidos de tenis en directo|apuestas en perú|apuestas en sevilla|apuestas en sistema|apuestas
en stake|apuestas en tenis|apuestas en tenis de mesa|apuestas en valencia|apuestas en vivo|apuestas en vivo
argentina|apuestas en vivo casino|apuestas en vivo futbol|apuestas en vivo fútbol|apuestas en vivo nba|apuestas
en vivo peru|apuestas en vivo tenis|apuestas en vivo ufc|apuestas equipo mbappe|apuestas equipos de futbol|apuestas españa|apuestas españa
alemania|apuestas españa alemania eurocopa|apuestas españa croacia|apuestas españa eurocopa|apuestas españa francia|apuestas
españa francia eurocopa|apuestas españa gana
el mundial|apuestas españa gana eurocopa|apuestas españa gana mundial|apuestas españa georgia|apuestas
españa holanda|apuestas españa inglaterra|apuestas españa inglaterra cuotas|apuestas españa inglaterra
eurocopa|apuestas españa italia|apuestas españa mundial|apuestas españa paises bajos|apuestas español|apuestas
español oviedo|apuestas espanyol barcelona|apuestas espanyol betis|apuestas espanyol villarreal|apuestas esport|apuestas esports|apuestas
esports colombia|apuestas esports españa|apuestas esports fifa|apuestas esports gratis|apuestas esports
lol|apuestas esports peru|apuestas esports valorant|apuestas estadisticas|apuestas estrategias|apuestas
euro|apuestas euro copa|apuestas eurocopa|apuestas eurocopa
campeon|apuestas eurocopa españa|apuestas eurocopa favoritos|apuestas eurocopa femenina|apuestas eurocopa final|apuestas eurocopa ganador|apuestas eurocopa hoy|apuestas eurocopa sub 21|apuestas euroliga
baloncesto|apuestas euroliga pronosticos|apuestas
europa league|apuestas europa league hoy|apuestas europa league pronosticos|apuestas europa league pronósticos|apuestas euros|apuestas f1 abu
dhabi|apuestas f1 bahrein|apuestas f1 canada|apuestas
f1 china|apuestas f1 cuotas|apuestas f1 hoy|apuestas f1 las vegas|apuestas f1 miami|apuestas f1 monaco|apuestas faciles
de ganar|apuestas fáciles de ganar|apuestas faciles para ganar|apuestas favoritas|apuestas favorito champions|apuestas favoritos champions|apuestas
favoritos eurocopa|apuestas favoritos mundial|apuestas fc barcelona|apuestas final champions cuotas|apuestas final champions league|apuestas final champions peru|apuestas final copa|apuestas final copa america|apuestas
final copa de europa|apuestas final copa del rey|apuestas
final copa europa|apuestas final copa libertadores|apuestas
final copa rey|apuestas final de copa|apuestas final de copa del rey|apuestas final del mundial|apuestas final euro|apuestas final eurocopa|apuestas final europa league|apuestas final libertadores|apuestas final mundial|apuestas
final nba|apuestas final rugby|apuestas final uefa europa
league|apuestas final.mundial|apuestas finales de conferencia nfl|apuestas finales nba|apuestas fiorentina
betis|apuestas formula|apuestas formula 1|apuestas fórmula 1|apuestas fórmula 1 pronósticos|apuestas formula uno|apuestas foro|apuestas foro nba|apuestas francia argentina|apuestas francia españa|apuestas futbol|apuestas fútbol|apuestas
futbol americano|apuestas futbol americano nfl|apuestas futbol argentina|apuestas futbol argentino|apuestas futbol champions league|apuestas futbol chile|apuestas futbol colombia|apuestas futbol consejos|apuestas futbol en directo|apuestas fútbol en directo|apuestas futbol
en vivo|apuestas fútbol en vivo|apuestas futbol españa|apuestas
futbol español|apuestas fútbol español|apuestas futbol eurocopa|apuestas
futbol femenino|apuestas futbol foro|apuestas futbol gratis|apuestas futbol hoy|apuestas fútbol hoy|apuestas futbol
juegos olimpicos|apuestas futbol mexico|apuestas futbol mundial|apuestas futbol online|apuestas futbol para hoy|apuestas futbol peru|apuestas futbol pronosticos|apuestas futbol sala|apuestas futbol telegram|apuestas futbol virtual|apuestas galgos|apuestas
galgos en directo|apuestas galgos hoy|apuestas galgos online|apuestas galgos pronosticos|apuestas galgos trucos|apuestas gana|apuestas gana colombia|apuestas gana resultados|apuestas ganadas|apuestas ganadas hoy|apuestas ganador champions league|apuestas
ganador copa america|apuestas ganador copa del rey|apuestas ganador copa
del rey baloncesto|apuestas ganador copa libertadores|apuestas ganador de la eurocopa|apuestas ganador de la
liga|apuestas ganador del mundial|apuestas ganador eurocopa|apuestas
ganador europa league|apuestas ganador f1|apuestas ganador la liga|apuestas
ganador liga española|apuestas ganador mundial|apuestas ganador mundial
baloncesto|apuestas ganador mundial f1|apuestas ganador
nba|apuestas ganadores eurocopa|apuestas ganadores mundial|apuestas
ganar champions|apuestas ganar eurocopa|apuestas ganar liga|apuestas
ganar mundial|apuestas ganar nba|apuestas getafe valencia|apuestas ghana uruguay|apuestas girona|apuestas girona athletic|apuestas
girona betis|apuestas girona campeon de liga|apuestas girona
campeon liga|apuestas girona gana la liga|apuestas girona real madrid|apuestas girona real sociedad|apuestas goleador eurocopa|apuestas goleadores eurocopa|apuestas goles asiaticos|apuestas golf|apuestas
golf masters|apuestas golf pga|apuestas granada barcelona|apuestas
grand slam de tenis|apuestas gratis|apuestas gratis casino|apuestas gratis con premios|apuestas gratis hoy|apuestas gratis
para hoy|apuestas gratis por registro|apuestas gratis puntos|apuestas gratis regalos|apuestas gratis sin deposito|apuestas gratis sin depósito|apuestas gratis sin ingreso|apuestas
gratis sports|apuestas gratis y ganar premios|apuestas
grupo a eurocopa|apuestas grupos eurocopa|apuestas handicap|apuestas handicap asiatico|apuestas handicap baloncesto|apuestas handicap como funciona|apuestas
handicap nba|apuestas handicap nfl|apuestas hipicas online|apuestas hípicas online|apuestas hipicas venezuela|apuestas hockey|apuestas hockey hielo|apuestas hockey patines|apuestas hockey sobre
hielo|apuestas holanda argentina|apuestas holanda vs
argentina|apuestas hoy|apuestas hoy champions|apuestas hoy futbol|apuestas
hoy nba|apuestas hoy pronosticos|apuestas hoy
seguras|apuestas impuestos|apuestas inglaterra paises bajos|apuestas
inter barca|apuestas inter barcelona|apuestas juego|apuestas
juegos|apuestas juegos en linea|apuestas juegos olimpicos|apuestas juegos olímpicos|apuestas juegos olimpicos baloncesto|apuestas juegos online|apuestas juegos virtuales|apuestas jugador sevilla|apuestas jugadores nba|apuestas kings league americas|apuestas la liga|apuestas la liga
española|apuestas la liga hoy|apuestas la liga santander|apuestas
las vegas mlb|apuestas las vegas nba|apuestas las vegas nfl|apuestas league of legends mundial|apuestas legal|apuestas legales|apuestas legales en colombia|apuestas legales en españa|apuestas legales en estados unidos|apuestas legales
españa|apuestas leganes betis|apuestas libertadores|apuestas licencia|apuestas liga 1 peru|apuestas liga
argentina|apuestas liga bbva pronosticos|apuestas liga de
campeones|apuestas liga de campeones de baloncesto|apuestas liga de campeones de hockey|apuestas liga
españa|apuestas liga española|apuestas liga santander pronosticos|apuestas ligas de futbol|apuestas linea|apuestas linea de gol|apuestas liverpool barcelona|apuestas liverpool real madrid|apuestas lol mundial|apuestas madrid|apuestas madrid arsenal|apuestas
madrid atletico|apuestas madrid atletico champions|apuestas madrid barca|apuestas
madrid barça|apuestas madrid barca hoy|apuestas madrid
barca supercopa|apuestas madrid barcelona|apuestas madrid barsa|apuestas
madrid bayern|apuestas madrid betis|apuestas madrid borussia|apuestas madrid campeon champions|apuestas madrid celta|apuestas
madrid city|apuestas madrid dortmund|apuestas madrid gana la liga|apuestas
madrid gana liga|apuestas madrid hoy|apuestas madrid liverpool|apuestas madrid osasuna|apuestas madrid sevilla|apuestas
madrid valencia|apuestas madrid vs arsenal|apuestas madrid vs
barcelona|apuestas mallorca osasuna|apuestas mallorca real sociedad|apuestas manchester athletic|apuestas manchester city
real madrid|apuestas mas faciles de ganar|apuestas mas seguras|apuestas mas seguras para hoy|apuestas masters de
golf|apuestas masters de tenis|apuestas maximo goleador eurocopa|apuestas maximo goleador mundial|apuestas mejor jugador eurocopa|apuestas mejores
casinos online|apuestas mexico|apuestas méxico|apuestas mexico polonia|apuestas méxico polonia|apuestas mlb|apuestas mlb hoy|apuestas
mlb las vegas|apuestas mlb para hoy|apuestas mlb
pronosticos|apuestas mlb usa|apuestas mma ufc|apuestas momios|apuestas multiples|apuestas múltiples|apuestas multiples como funcionan|apuestas multiples el gordo|apuestas multiples futbol|apuestas mundial|apuestas mundial 2026|apuestas mundial baloncesto|apuestas mundial
balonmano|apuestas mundial brasil|apuestas mundial campeon|apuestas
mundial ciclismo|apuestas mundial clubes|apuestas mundial de baloncesto|apuestas
mundial de ciclismo|apuestas mundial de clubes|apuestas mundial de futbol|apuestas
mundial de fútbol|apuestas mundial de rugby|apuestas mundial
f1|apuestas mundial favoritos|apuestas mundial femenino|apuestas mundial formula 1|apuestas mundial futbol|apuestas mundial ganador|apuestas mundial lol|apuestas mundial
moto gp|apuestas mundial motogp|apuestas mundial rugby|apuestas mundial sub 17|apuestas mundiales|apuestas mundialistas|apuestas mvp
eurocopa|apuestas mvp nba|apuestas mvp nfl|apuestas nacionales de colombia|apuestas nba|apuestas nba all star|apuestas nba campeon|apuestas
nba consejos|apuestas nba esta noche|apuestas nba finals|apuestas nba gratis|apuestas nba hoy|apuestas
nba hoy jugadores|apuestas nba hoy pronosticos|apuestas nba para hoy|apuestas nba playoffs|apuestas nba pronosticos|apuestas nba pronósticos|apuestas
nba pronosticos hoy|apuestas nba tipster|apuestas nfl|apuestas nfl
hoy|apuestas nfl las vegas|apuestas nfl playoffs|apuestas nfl pronosticos|apuestas nfl pronósticos|apuestas nfl semana 4|apuestas nfl super bowl|apuestas nhl|apuestas nhl
pronosticos|apuestas octavos eurocopa|apuestas ofertas|apuestas online|apuestas online argentina|apuestas online argentina legal|apuestas online bono|apuestas online bono
bienvenida|apuestas online boxeo|apuestas online caballos|apuestas online carreras de
caballos|apuestas online casino|apuestas online champions league|apuestas online chile|apuestas
online ciclismo|apuestas online colombia|apuestas online comparativa|apuestas online con paypal|apuestas online de caballos|apuestas online deportivas|apuestas online en argentina|apuestas online en peru|apuestas online espana|apuestas
online españa|apuestas online esports|apuestas online foro|apuestas online futbol|apuestas online futbol españa|apuestas online golf|apuestas online gratis|apuestas online gratis sin deposito|apuestas online juegos|apuestas online mexico|apuestas online mma|apuestas online movil|apuestas online nba|apuestas online
net|apuestas online nuevas|apuestas online opiniones|apuestas online paypal|apuestas online peru|apuestas online seguras|apuestas
online sin dinero|apuestas online sin registro|apuestas online tenis|apuestas online
ufc|apuestas online uruguay|apuestas online venezuela|apuestas open britanico golf|apuestas osasuna athletic|apuestas osasuna barcelona|apuestas osasuna real madrid|apuestas
osasuna sevilla|apuestas osasuna valencia|apuestas over|apuestas
over 2.5|apuestas over under|apuestas paginas|apuestas pago anticipado|apuestas paises bajos ecuador|apuestas paises bajos inglaterra|apuestas países bajos
qatar|apuestas para boxeo|apuestas para champions league|apuestas para el clasico|apuestas para el dia de hoy|apuestas para el mundial|apuestas para el partido de hoy|apuestas para eurocopa|apuestas para europa league|apuestas para futbol|apuestas para ganar|apuestas
para ganar dinero|apuestas para ganar dinero facil|apuestas para ganar en la ruleta|apuestas para ganar la champions|apuestas para ganar
la eurocopa|apuestas para ganar la europa league|apuestas para ganar la liga|apuestas para
ganar siempre|apuestas para hacer|apuestas para hoy|apuestas
para hoy de futbol|apuestas para hoy europa league|apuestas para
hoy futbol|apuestas para juegos|apuestas para la champions league|apuestas
para la copa del rey|apuestas para la eurocopa|apuestas para
la europa league|apuestas para la final de la eurocopa|apuestas para la nba hoy|apuestas para los partidos de hoy|apuestas para partidos de hoy|apuestas para ufc|apuestas partido|apuestas partido
aplazado|apuestas partido champions|apuestas partido colombia|apuestas partido españa marruecos|apuestas partido mundial|apuestas partido suspendido|apuestas partidos|apuestas
partidos champions league|apuestas partidos csgo|apuestas partidos de futbol|apuestas partidos de futbol hoy|apuestas partidos de hoy|apuestas partidos eurocopa|apuestas partidos futbol|apuestas partidos hoy|apuestas partidos mundial|apuestas paypal|apuestas peleas de boxeo|apuestas peru|apuestas
perú|apuestas peru brasil|apuestas peru chile|apuestas peru paraguay|apuestas peru uruguay|apuestas peru vs chile|apuestas peru vs
colombia|apuestas pichichi eurocopa|apuestas plataforma|apuestas playoff|apuestas playoff ascenso|apuestas playoff ascenso a primera|apuestas playoff nba|apuestas playoff segunda|apuestas playoff segunda b|apuestas
playoffs nba|apuestas playoffs nfl|apuestas polonia argentina|apuestas por
argentina|apuestas por internet mexico|apuestas por internet para ganar
dinero|apuestas por paypal|apuestas por ronda boxeo|apuestas por sistema|apuestas portugal uruguay|apuestas pre partido|apuestas predicciones|apuestas predicciones futbol|apuestas primera
division|apuestas primera division españa|apuestas promociones|apuestas
pronostico|apuestas pronosticos|apuestas pronosticos deportivos|apuestas pronosticos
deportivos tenis|apuestas pronosticos futbol|apuestas pronosticos gratis|apuestas pronosticos nba|apuestas pronosticos tenis|apuestas prorroga|apuestas psg
barca|apuestas psg barcelona|apuestas puntos por tarjetas|apuestas
puntos tarjetas|apuestas que aceptan paypal|apuestas que es handicap|apuestas que puedes hacer con tu novia|apuestas que siempre ganaras|apuestas que significa|apuestas quien bajara a segunda|apuestas quién bajara a segunda|apuestas quien gana el mundial|apuestas quien gana eurocopa|apuestas quien gana
la champions|apuestas quien gana la eurocopa|apuestas quien gana la liga|apuestas quien ganara el mundial|apuestas quién ganará el mundial|apuestas quien ganara la
champions|apuestas quien ganara la eurocopa|apuestas quien ganara la liga|apuestas rayo barcelona|apuestas real
madrid|apuestas real madrid arsenal|apuestas real
madrid athletic|apuestas real madrid atletico|apuestas real madrid atletico champions|apuestas real madrid atletico de madrid|apuestas
real madrid atlético de madrid|apuestas real madrid atletico madrid|apuestas
real madrid barcelona|apuestas real madrid bayern|apuestas
real madrid betis|apuestas real madrid borussia|apuestas real madrid campeon champions|apuestas
real madrid celta|apuestas real madrid champions|apuestas real madrid
city|apuestas real madrid girona|apuestas real madrid
hoy|apuestas real madrid liverpool|apuestas real madrid
manchester city|apuestas real madrid osasuna|apuestas real madrid real sociedad|apuestas real madrid valencia|apuestas real
madrid villarreal|apuestas real madrid vs arsenal|apuestas real madrid
vs atletico|apuestas real madrid vs atlético|apuestas real madrid vs atletico madrid|apuestas real madrid
vs barcelona|apuestas real madrid vs betis|apuestas real
madrid vs sevilla|apuestas real madrid vs valencia|apuestas real sociedad|apuestas real sociedad athletic|apuestas real
sociedad barcelona|apuestas real sociedad betis|apuestas real sociedad psg|apuestas real sociedad real madrid|apuestas real sociedad valencia|apuestas
recomendadas hoy|apuestas regalo de bienvenida|apuestas registro|apuestas resultado exacto|apuestas resultados|apuestas resultados eurocopa|apuestas retirada tenis|apuestas roma barcelona|apuestas roma sevilla|apuestas rugby|apuestas rugby mundial|apuestas rugby
world cup|apuestas ruleta seguras|apuestas segunda|apuestas segunda
b|apuestas segunda division|apuestas segunda división|apuestas segunda division b|apuestas segunda division españa|apuestas seguras|apuestas seguras baloncesto|apuestas seguras calculadora|apuestas seguras
en la ruleta|apuestas seguras eurocopa|apuestas seguras foro|apuestas seguras futbol|apuestas seguras futbol hoy|apuestas seguras gratis|apuestas seguras hoy|apuestas
seguras hoy futbol|apuestas seguras nba|apuestas seguras nba hoy|apuestas seguras para este fin de
semana|apuestas seguras para ganar dinero|apuestas seguras para hoy|apuestas seguras para hoy fútbol|apuestas seguras para hoy pronósticos|apuestas
seguras para mañana|apuestas seguras ruleta|apuestas seguras telegram|apuestas seguras tenis|apuestas semifinales eurocopa|apuestas senegal paises bajos|apuestas
sevilla|apuestas sevilla athletic|apuestas sevilla atletico de madrid|apuestas sevilla barcelona|apuestas sevilla betis|apuestas sevilla campeon liga|apuestas sevilla celta|apuestas sevilla gana la liga|apuestas sevilla girona|apuestas sevilla inter|apuestas sevilla jugador|apuestas sevilla juventus|apuestas sevilla leganes|apuestas sevilla madrid|apuestas sevilla manchester united|apuestas sevilla osasuna|apuestas sevilla real madrid|apuestas sevilla real sociedad|apuestas
sevilla roma|apuestas sevilla valencia|apuestas significa|apuestas simples ejemplos|apuestas simples
o combinadas|apuestas sin deposito|apuestas sin deposito inicial|apuestas sin deposito minimo|apuestas
sin dinero|apuestas sin dinero real|apuestas sin empate|apuestas sin empate que significa|apuestas sin ingreso minimo|apuestas sin registro|apuestas sistema|apuestas sistema calculadora|apuestas
sistema como funciona|apuestas sistema trixie|apuestas sociedad|apuestas sorteo copa del rey|apuestas stake|apuestas stake
10|apuestas stake 10 hoy|apuestas super bowl favorito|apuestas
super rugby|apuestas supercopa españa|apuestas superliga
argentina|apuestas tarjeta roja|apuestas tarjetas|apuestas tarjetas amarillas|apuestas tenis|apuestas
tenis atp|apuestas tenis consejos|apuestas tenis copa davis|apuestas tenis de mesa|apuestas tenis
de mesa pronosticos|apuestas tenis en vivo|apuestas
tenis femenino|apuestas tenis hoy|apuestas tenis itf|apuestas tenis pronosticos|apuestas tenis pronósticos|apuestas tenis retirada|apuestas tenis roland garros|apuestas tenis seguras|apuestas tenis wimbledon|apuestas
tenis wta|apuestas tercera division|apuestas tercera division españa|apuestas tipos|apuestas tips|apuestas tipster|apuestas tipster para hoy|apuestas
topuria holloway cuotas|apuestas torneos de
golf|apuestas torneos de tenis|apuestas trucos|apuestas uefa champions league|apuestas uefa europa league|apuestas
ufc|apuestas ufc chile|apuestas ufc como funciona|apuestas ufc hoy|apuestas ufc ilia
topuria|apuestas ufc online|apuestas ufc pronósticos|apuestas ufc telegram|apuestas ufc topuria|apuestas under over|apuestas unionistas
villarreal|apuestas uruguay|apuestas uruguay colombia|apuestas uruguay corea|apuestas uruguay vs colombia|apuestas us open golf|apuestas
us open tenis|apuestas valencia|apuestas valencia barcelona|apuestas valencia betis|apuestas valencia madrid|apuestas valencia real madrid|apuestas
valladolid barcelona|apuestas valladolid valencia|apuestas valor
app|apuestas valor en directo|apuestas valor galgos|apuestas venezuela|apuestas venezuela argentina|apuestas venezuela
bolivia|apuestas venezuela ecuador|apuestas villarreal|apuestas villarreal athletic|apuestas villarreal barcelona|apuestas villarreal bayern|apuestas villarreal betis|apuestas villarreal liverpool|apuestas villarreal manchester|apuestas villarreal
manchester united|apuestas villarreal vs real madrid|apuestas
virtuales|apuestas virtuales colombia|apuestas virtuales futbol|apuestas virtuales sin dinero|apuestas vivo|apuestas vuelta
a españa|apuestas vuelta españa|apuestas william hill partidos de hoy|apuestas y casino|apuestas y casinos|apuestas y
juegos de azar|apuestas y pronosticos|apuestas y pronosticos
de futbol|apuestas y pronosticos deportivos|apuestas y
resultados|apuestas-deportivas|apuestas-deportivas.es
pronosticos|arbitro nba apuestas|argentina apuestas|argentina colombia apuestas|argentina croacia apuestas|argentina francia apuestas|argentina mexico apuestas|argentina peru apuestas|argentina uruguay apuestas|argentina vs bolivia apuestas|argentina vs chile apuestas|argentina vs colombia
apuestas|argentina vs francia apuestas|argentina vs.
colombia apuestas|asi se gana en las apuestas deportivas|asiatico apuestas|asiatico
en apuestas|asiaticos apuestas|athletic barcelona apuestas|athletic manchester united apuestas|athletic osasuna apuestas|athletic real madrid apuestas|atletico
barcelona apuestas|atletico de madrid apuestas|atlético
de madrid apuestas|atletico de madrid real madrid apuestas|atletico de madrid vs barcelona apuestas|atletico madrid real madrid apuestas|atletico madrid vs real madrid apuestas|atletico real madrid apuestas|atletico vs
real madrid apuestas|avisador de cuotas apuestas|bajada de cuotas apuestas|baloncesto apuestas|barbastro barcelona apuestas|barca
apuestas|barca bayern apuestas|barca inter apuestas|barca madrid apuestas|barça madrid apuestas|barca vs atletico apuestas|barca vs madrid
apuestas|barca vs real madrid apuestas|barcelona – real madrid apuestas|barcelona apuestas|barcelona atletico apuestas|barcelona atletico
de madrid apuestas|barcelona atletico madrid apuestas|barcelona betis apuestas|barcelona
casa de apuestas|barcelona inter apuestas|barcelona psg apuestas|barcelona real madrid apuestas|barcelona
real sociedad apuestas|barcelona sevilla apuestas|barcelona valencia apuestas|barcelona vs
athletic bilbao apuestas|barcelona vs atlético madrid apuestas|barcelona vs betis apuestas|barcelona vs celta de vigo
apuestas|barcelona vs espanyol apuestas|barcelona vs girona
apuestas|barcelona vs madrid apuestas|barcelona vs real madrid apuestas|barcelona vs real sociedad apuestas|barcelona vs sevilla apuestas|barcelona vs villarreal apuestas|base de datos cuotas apuestas deportivas|bayern real madrid apuestas|beisbol apuestas|best america apuestas|bet apuestas chile|bet apuestas en vivo|betis – chelsea apuestas|betis apuestas|betis barcelona apuestas|betis chelsea apuestas|betis
madrid apuestas|betis sevilla apuestas|betsson tu sitio de apuestas online|blog
apuestas baloncesto|blog apuestas ciclismo|blog apuestas nba|blog apuestas tenis|blog de apuestas de tenis|bono apuestas|bono apuestas deportivas|bono apuestas deportivas sin deposito|bono apuestas gratis|bono
apuestas gratis sin deposito|bono apuestas sin deposito|bono bienvenida apuestas|bono bienvenida apuestas deportivas|bono bienvenida
apuestas españa|bono bienvenida apuestas sin deposito|bono
bienvenida apuestas sin depósito|bono bienvenida
casa apuestas|bono bienvenida casa de apuestas|bono bienvenida marca apuestas|bono
casa apuestas|bono casa de apuestas|bono casa de apuestas sin ingreso|bono casas de apuestas|bono de apuestas|bono de apuestas gratis sin deposito|bono de
bienvenida apuestas|bono de bienvenida apuestas deportivas|bono de bienvenida casa de apuestas|bono de bienvenida casas de apuestas|bono de casas de apuestas|bono de registro apuestas|bono
de registro apuestas deportivas|bono de registro casa de apuestas|bono
gratis apuestas|bono marca apuestas|bono por registro apuestas|bono por registro
apuestas deportivas|bono por registro casa de apuestas|bono registro apuestas|bono sin deposito apuestas|bono
sin depósito apuestas|bono sin deposito apuestas deportivas|bono
sin depósito apuestas deportivas|bono sin deposito casa de apuestas|bono sin deposito marca apuestas|bono
sin ingreso apuestas|bono sin ingreso apuestas deportivas|bonos apuestas|bonos apuestas colombia|bonos apuestas deportivas|bonos
apuestas deportivas sin deposito|bonos apuestas gratis|bonos apuestas sin deposito|bonos apuestas
sin depósito|bonos bienvenida apuestas|bonos bienvenida casas apuestas|bonos bienvenida
casas de apuestas|bonos casa de apuestas|bonos casas apuestas|bonos casas
de apuestas|bonos casas de apuestas colombia|bonos casas de apuestas deportivas|bonos casas de apuestas españa|bonos casas
de apuestas nuevas|bonos casas de apuestas
sin deposito|bonos casas de apuestas sin depósito|bonos de
apuestas|bonos de apuestas deportivas|bonos de apuestas gratis|bonos de apuestas sin deposito|bonos
de bienvenida apuestas|bonos de bienvenida apuestas
deportivas|bonos de bienvenida casa de apuestas|bonos de bienvenida casas de apuestas|bonos de bienvenida de
casas de apuestas|bonos de bienvenida en casas de apuestas|bonos de casas de apuestas|bonos de casas de apuestas sin deposito|bonos en casa de apuestas|bonos en casas
de apuestas sin deposito|bonos gratis apuestas|bonos gratis apuestas
deportivas|bonos gratis casas de apuestas|bonos gratis
sin deposito apuestas|bonos paginas de apuestas|bonos registro casas de apuestas|bonos sin deposito apuestas|bonos
sin depósito apuestas|bonos sin deposito apuestas deportivas|bonos sin deposito casas de apuestas|bot de apuestas deportivas
gratis|boxeo apuestas|brasil colombia apuestas|brasil peru apuestas|brasil vs colombia apuestas|buenas apuestas para hoy|buscador cuotas apuestas|buscador de apuestas seguras|buscador de cuotas
apuestas|buscador de cuotas de apuestas|buscar apuestas seguras|caballos apuestas|calculador de apuestas|calculador de cuotas apuestas|calculadora apuestas|calculadora apuestas combinadas|calculadora apuestas de sistema|calculadora apuestas deportivas|calculadora apuestas
deportivas seguras|calculadora apuestas multiples|calculadora apuestas segura|calculadora apuestas seguras|calculadora apuestas sistema|calculadora apuestas yankee|calculadora arbitraje apuestas|calculadora cubrir apuestas|calculadora cuotas apuestas|calculadora
de apuestas|calculadora de apuestas combinadas|calculadora de apuestas de
futbol|calculadora de apuestas de sistema|calculadora de apuestas deportivas|calculadora de apuestas multiples|calculadora
de apuestas seguras|calculadora de apuestas sistema|calculadora de apuestas surebets|calculadora de arbitraje apuestas|calculadora de cuotas apuestas|calculadora de cuotas de apuestas|calculadora
para apuestas deportivas|calculadora poisson apuestas|calculadora poisson apuestas deportivas|calculadora poisson para apuestas|calculadora
scalping apuestas deportivas|calculadora sistema apuestas|calculadora
stake apuestas|calculadora trading apuestas|calcular apuestas|calcular apuestas deportivas|calcular apuestas futbol|calcular
apuestas sistema|calcular cuotas apuestas|calcular cuotas apuestas combinadas|calcular cuotas apuestas deportivas|calcular cuotas de apuestas|calcular ganancias apuestas deportivas|calcular
momios apuestas|calcular probabilidad cuota apuestas|calcular
stake apuestas|calcular unidades apuestas|calcular yield apuestas|calculo de apuestas|calculo de
apuestas deportivas|cambio de cuotas apuestas|campeon champions apuestas|campeon eurocopa apuestas|campeon liga apuestas|campeon nba apuestas|canales de apuestas gratis|carrera de
caballos apuestas|carrera de caballos apuestas juego|carrera de caballos con apuestas|carrera
de galgos apuestas|carreras de caballos apuestas|carreras de caballos apuestas online|carreras de caballos con apuestas|carreras de caballos juegos de
apuestas|carreras de galgos apuestas|carreras de galgos apuestas online|carreras de galgos apuestas trucos|carreras galgos apuestas|casa apuestas argentina|casa apuestas atletico de madrid|casa apuestas
barcelona|casa apuestas betis|casa apuestas bono
bienvenida|casa apuestas bono gratis|casa apuestas bono sin deposito|casa apuestas cerca de
mi|casa apuestas chile|casa apuestas colombia|casa apuestas con mejores cuotas|casa apuestas deportivas|casa apuestas españa|casa apuestas
española|casa apuestas eurocopa|casa apuestas futbol|casa apuestas
mejores cuotas|casa apuestas mundial|casa apuestas nueva|casa apuestas nuevas|casa apuestas
online|casa apuestas peru|casa apuestas valencia|casa de apuestas|casa de apuestas 10
euros gratis|casa de apuestas argentina|casa de apuestas atletico
de madrid|casa de apuestas baloncesto|casa de apuestas barcelona|casa de apuestas beisbol|casa
de apuestas betis|casa de apuestas bono|casa de apuestas bono bienvenida|casa de
apuestas bono de bienvenida|casa de apuestas bono gratis|casa de apuestas bono por registro|casa de apuestas
bono sin deposito|casa de apuestas boxeo|casa de apuestas
caballos|casa de apuestas carreras de caballos|casa de apuestas cerca de mi|casa de
apuestas cerca de mí|casa de apuestas champions league|casa de apuestas
chile|casa de apuestas ciclismo|casa de apuestas colombia|casa de apuestas
con bono de bienvenida|casa de apuestas con bono sin deposito|casa de apuestas con cuotas mas altas|casa de apuestas con esports|casa de apuestas con las mejores cuotas|casa
de apuestas con licencia en españa|casa de apuestas con mejores cuotas|casa de apuestas
con pago anticipado|casa de apuestas con paypal|casa de apuestas copa america|casa de apuestas de caballos|casa
de apuestas de colombia|casa de apuestas de españa|casa de apuestas de futbol|casa
de apuestas de fútbol|casa de apuestas de futbol peru|casa de apuestas de
peru|casa de apuestas del madrid|casa de apuestas del real
madrid|casa de apuestas deportivas|casa de apuestas deportivas cerca de mi|casa de apuestas
deportivas en argentina|casa de apuestas deportivas en chile|casa de apuestas deportivas en colombia|casa de apuestas
deportivas en españa|casa de apuestas deportivas en madrid|casa de apuestas deportivas
españa|casa de apuestas deportivas españolas|casa de
apuestas deportivas madrid|casa de apuestas deportivas mexico|casa de apuestas deportivas
online|casa de apuestas deportivas peru|casa de apuestas deposito 5 euros|casa de
apuestas deposito minimo|casa de apuestas deposito minimo 1 euro|casa
de apuestas depósito mínimo 1 euro|casa de apuestas en españa|casa
de apuestas en linea|casa de apuestas en madrid|casa de apuestas en perú|casa de apuestas
en vivo|casa de apuestas españa|casa de apuestas españa inglaterra|casa
de apuestas española|casa de apuestas españolas|casa de apuestas esports|casa de apuestas eurocopa|casa de apuestas europa league|casa de apuestas f1|casa de apuestas formula 1|casa de
apuestas futbol|casa de apuestas ingreso minimo|casa de
apuestas ingreso minimo 1 euro|casa de apuestas ingreso mínimo 1 euro|casa de apuestas legales|casa
de apuestas legales en colombia|casa de apuestas legales en españa|casa de apuestas libertadores|casa de apuestas liga española|casa de apuestas madrid|casa de apuestas mas segura|casa de apuestas mejores|casa de apuestas
méxico|casa de apuestas minimo 5 euros|casa de apuestas mlb|casa de apuestas mundial|casa de apuestas nba|casa de
apuestas nfl|casa de apuestas nueva|casa de apuestas nuevas|casa de
apuestas oficial del real madrid|casa de apuestas oficial real madrid|casa de apuestas online|casa de apuestas online argentina|casa de
apuestas online chile|casa de apuestas online españa|casa de apuestas online mexico|casa de apuestas
online paraguay|casa de apuestas online peru|casa de apuestas online usa|casa
de apuestas online venezuela|casa de apuestas pago
anticipado|casa de apuestas para boxeo|casa de apuestas para ufc|casa de apuestas peru|casa
de apuestas perú|casa de apuestas peru online|casa de apuestas por paypal|casa de apuestas promociones|casa de apuestas
que regalan dinero|casa de apuestas real madrid|casa de apuestas regalo de bienvenida|casa de apuestas sevilla|casa de apuestas sin dinero|casa de apuestas sin ingreso minimo|casa de apuestas sin licencia en españa|casa
de apuestas sin minimo de ingreso|casa de apuestas stake|casa de apuestas tenis|casa de apuestas
ufc|casa de apuestas valencia|casa de apuestas venezuela|casa de apuestas virtuales|casa de apuestas vive la suerte|casa oficial de apuestas del real madrid|casas apuestas asiaticas|casas apuestas bono sin deposito|casas apuestas bonos sin deposito|casas apuestas caballos|casas apuestas chile|casas apuestas ciclismo|casas apuestas
con licencia|casas apuestas con licencia en españa|casas apuestas deportivas|casas apuestas deportivas colombia|casas
apuestas deportivas españa|casas apuestas deportivas españolas|casas apuestas deportivas nuevas|casas apuestas españa|casas apuestas españolas|casas apuestas esports|casas apuestas eurocopa|casas apuestas
golf|casas apuestas ingreso minimo 5 euros|casas apuestas legales|casas
apuestas legales españa|casas apuestas licencia|casas apuestas licencia españa|casas apuestas mexico|casas apuestas mundial|casas apuestas nba|casas apuestas nuevas|casas apuestas nuevas españa|casas apuestas ofertas|casas
apuestas online|casas apuestas paypal|casas apuestas peru|casas apuestas
sin licencia|casas apuestas tenis|casas asiaticas apuestas|casas
de apuestas|casas de apuestas 5 euros|casas de apuestas app|casas de apuestas
argentinas|casas de apuestas asiaticas|casas de apuestas
baloncesto|casas de apuestas barcelona|casas de apuestas bono bienvenida|casas de apuestas bono de bienvenida|casas de apuestas bono
por registro|casas de apuestas bono sin deposito|casas de apuestas bono sin ingreso|casas
de apuestas bonos|casas de apuestas bonos de bienvenida|casas de apuestas bonos
gratis|casas de apuestas bonos sin deposito|casas de apuestas boxeo|casas de apuestas
caballos|casas de apuestas carreras de caballos|casas de apuestas casino|casas de apuestas casino online|casas de
apuestas cerca de mi|casas de apuestas champions league|casas de
apuestas chile|casas de apuestas ciclismo|casas de apuestas colombia|casas de apuestas
com|casas de apuestas con app|casas de apuestas con apuestas gratis|casas de apuestas con bono|casas
de apuestas con bono de bienvenida|casas de apuestas con bono
de registro|casas de apuestas con bono por registro|casas de apuestas
con bono sin deposito|casas de apuestas con bonos|casas de apuestas con bonos gratis|casas de apuestas con bonos
sin deposito|casas de apuestas con deposito minimo|casas de apuestas con esports|casas de apuestas
con handicap asiatico|casas de apuestas con licencia|casas de apuestas con licencia en españa|casas de apuestas con licencia españa|casas
de apuestas con licencia española|casas de apuestas con mejores cuotas|casas
de apuestas con pago anticipado|casas de apuestas con paypal|casas de apuestas con paypal en perú|casas de apuestas con promociones|casas de apuestas con ruleta en vivo|casas de apuestas copa del rey|casas de apuestas de caballos|casas de apuestas
de españa|casas de apuestas de futbol|casas de apuestas de fútbol|casas
de apuestas de peru|casas de apuestas deportivas|casas de apuestas deportivas asiaticas|casas de apuestas deportivas colombia|casas
de apuestas deportivas comparativa|casas de apuestas deportivas con paypal|casas de apuestas deportivas en chile|casas de apuestas deportivas en españa|casas de apuestas deportivas
en linea|casas de apuestas deportivas en madrid|casas de apuestas deportivas en mexico|casas de apuestas deportivas en peru|casas de
apuestas deportivas en sevilla|casas de apuestas deportivas en valencia|casas de apuestas
deportivas españa|casas de apuestas deportivas españolas|casas
de apuestas deportivas legales|casas de apuestas deportivas madrid|casas de apuestas deportivas mexico|casas de apuestas deportivas nuevas|casas de apuestas deportivas
online|casas de apuestas deportivas peru|casas de apuestas deportivas perú|casas de apuestas deposito minimo 1 euro|casas de apuestas depósito mínimo 1 euro|casas de apuestas dinero gratis|casas de
apuestas en argentina|casas de apuestas en barcelona|casas de apuestas en chile|casas de
apuestas en colombia|casas de apuestas en españa|casas de apuestas en españa online|casas de apuestas en linea|casas de apuestas en madrid|casas de apuestas
en méxico|casas de apuestas en peru|casas de apuestas en perú|casas de apuestas
en sevilla|casas de apuestas en uruguay|casas de apuestas en valencia|casas de apuestas en venezuela|casas de
apuestas equipos de futbol|casas de apuestas españa|casas
de apuestas españa alemania|casas de apuestas españa inglaterra|casas de apuestas españa licencia|casas de apuestas españa nuevas|casas de apuestas españa online|casas
de apuestas española|casas de apuestas españolas|casas
de apuestas españolas con licencia|casas
de apuestas españolas online|casas de apuestas
esports|casas de apuestas eurocopa|casas de apuestas eurocopa 2024|casas de apuestas europa league|casas de apuestas f1|casas de apuestas fisicas en barcelona|casas de apuestas fisicas
en españa|casas de apuestas formula 1|casas de apuestas fuera
de españa|casas de apuestas futbol|casas de apuestas fútbol|casas de apuestas futbol españa|casas de apuestas ganador eurocopa|casas de apuestas gratis|casas de apuestas ingreso
minimo|casas de apuestas ingreso minimo 1 euro|casas de apuestas ingreso minimo 5
euros|casas de apuestas inter barcelona|casas de apuestas legales|casas de
apuestas legales en colombia|casas de apuestas legales en españa|casas de apuestas legales en mexico|casas de apuestas legales españa|casas de
apuestas legales mx|casas de apuestas licencia|casas de apuestas licencia españa|casas de apuestas lista|casas
de apuestas madrid|casas de apuestas mas seguras|casas de apuestas mejores bonos|casas de
apuestas mejores cuotas|casas de apuestas mexico|casas de apuestas méxico|casas de apuestas minimo 5 euros|casas de apuestas mlb|casas de apuestas mundial|casas
de apuestas mundial baloncesto|casas de apuestas mundiales|casas de apuestas nba|casas de apuestas no reguladas en españa|casas de apuestas nueva ley|casas de apuestas nuevas|casas de apuestas nuevas
en colombia|casas de apuestas nuevas en españa|casas de apuestas nuevas españa|casas de apuestas
ofertas|casas de apuestas online|casas de apuestas online argentina|casas de apuestas online
colombia|casas de apuestas online deportivas|casas de apuestas online ecuador|casas de apuestas online en argentina|casas de apuestas
online en chile|casas de apuestas online en colombia|casas de apuestas online en españa|casas de apuestas online en mexico|casas de apuestas online españa|casas de
apuestas online mas fiables|casas de apuestas online
mexico|casas de apuestas online nuevas|casas de apuestas online peru|casas de
apuestas online usa|casas de apuestas online
venezuela|casas de apuestas pago paypal|casas de apuestas para ufc|casas
de apuestas paypal|casas de apuestas peru bono sin deposito|casas de apuestas presenciales
en españa|
Your comment is awaiting moderation.
growthpilotpro.click – Found practical insights today; sharing this article with colleagues later.
Your comment is awaiting moderation.
growthnexus.click – Navigation felt smooth, found everything quickly without any confusing steps.
Your comment is awaiting moderation.
adnexo.click – Pages loaded fast, images appeared sharp, and formatting stayed consistent.
Your comment is awaiting moderation.
advector.click – Color palette felt calming, nothing distracting, just focused, thoughtful design.
Your comment is awaiting moderation.
adsummit.click – Found practical insights today; sharing this article with colleagues later.
Your comment is awaiting moderation.
(10 euros gratis apuestas|10 mejores casas de apuestas|10 trucos para ganar apuestas|15
euros gratis marca apuestas|1×2 apuestas|1×2 apuestas deportivas|1×2 apuestas que significa|1×2 en apuestas|1×2 en apuestas que significa|1×2 que significa en apuestas|5 euros gratis apuestas|9 apuestas que
siempre ganaras|a partir de cuanto se declara apuestas|actividades de
juegos de azar y apuestas|ad apuestas deportivas|aleksandre topuria ufc apuestas|algoritmo para
ganar apuestas deportivas|america apuestas|análisis nba apuestas|aplicacion android apuestas deportivas|aplicacion apuestas deportivas|aplicacion apuestas deportivas android|aplicación de apuestas online|aplicacion para
hacer apuestas|aplicacion para hacer apuestas de futbol|aplicación para
hacer apuestas de fútbol|aplicaciones apuestas
deportivas android|aplicaciones apuestas deportivas gratis|aplicaciones de apuestas android|aplicaciones
de apuestas de fútbol|aplicaciones de apuestas deportivas|aplicaciones de apuestas deportivas
peru|aplicaciones de apuestas deportivas perú|aplicaciones de apuestas
en colombia|aplicaciones de apuestas gratis|aplicaciones
de apuestas online|aplicaciones de apuestas seguras|aplicaciones de apuestas sin dinero|aplicaciones para hacer apuestas|apostar seguro apuestas deportivas|app android apuestas deportivas|app apuestas|app apuestas android|app apuestas de futbol|app
apuestas deportivas|app apuestas deportivas android|app apuestas deportivas argentina|app apuestas deportivas colombia|app
apuestas deportivas ecuador|app apuestas deportivas españa|app apuestas deportivas
gratis|app apuestas entre amigos|app apuestas futbol|app apuestas gratis|app apuestas sin dinero|app casa de apuestas|app casas de apuestas|app control apuestas|app
de apuestas|app de apuestas android|app de apuestas casino|app de apuestas colombia|app de apuestas con bono de bienvenida|app de apuestas de futbol|app de apuestas deportivas|app de apuestas deportivas android|app de
apuestas deportivas argentina|app de apuestas deportivas colombia|app de apuestas deportivas en españa|app de apuestas deportivas peru|app de apuestas deportivas perú|app de apuestas deportivas sin dinero|app de apuestas ecuador|app de apuestas
en colombia|app de apuestas en españa|app de apuestas en venezuela|app de apuestas futbol|app de apuestas gratis|app
de apuestas online|app de apuestas para android|app de apuestas para ganar dinero|app de apuestas peru|app de apuestas reales|app de casas de apuestas|app marca
apuestas android|app moviles de apuestas|app para apuestas|app para apuestas de futbol|app para
apuestas deportivas|app para apuestas deportivas en español|app para ganar
apuestas deportivas|app para hacer apuestas|app para hacer apuestas deportivas|app para hacer apuestas entre amigos|app para llevar
control de apuestas|app pronosticos apuestas deportivas|app versus
apuestas|apps apuestas mundial|apps de apuestas|apps de apuestas con bono de bienvenida|apps de apuestas
de futbol|apps de apuestas deportivas peru|apps de apuestas mexico|apps para apuestas|aprender a
hacer apuestas deportivas|aprender hacer apuestas deportivas|apuesta
del dia apuestas deportivas|apuestas 10 euros gratis|apuestas 100 seguras|apuestas
1×2|apuestas 1X2|apuestas 2 division|apuestas 3 division|apuestas a caballos|apuestas a carreras de caballos|apuestas a colombia|apuestas a corners|apuestas a ganar|apuestas a jugadores nba|apuestas a la baja|apuestas a la nfl|apuestas al
barcelona|apuestas al dia|apuestas al empate|apuestas al mundial|apuestas al tenis wta|apuestas alaves
barcelona|apuestas alcaraz hoy|apuestas alemania españa|apuestas alonso campeon del mundo|apuestas
altas y bajas|apuestas altas y bajas nfl|apuestas ambos equipos marcan|apuestas america|apuestas android|apuestas anillo nba|apuestas antes del mundial|apuestas anticipadas|apuestas anticipadas nba|apuestas apps|apuestas arabia
argentina|apuestas argentina|apuestas argentina
campeon del mundo|apuestas argentina canada|apuestas argentina colombia|apuestas argentina croacia|apuestas argentina españa|apuestas
argentina francia|apuestas argentina francia cuanto paga|apuestas argentina francia mundial|apuestas argentina gana el mundial|apuestas argentina gana mundial|apuestas argentina
holanda|apuestas argentina mexico|apuestas argentina méxico|apuestas argentina mundial|apuestas argentina online|apuestas argentina paises bajos|apuestas
argentina polonia|apuestas argentina uruguay|apuestas argentina
vs australia|apuestas argentina vs colombia|apuestas argentina vs francia|apuestas argentina vs peru|apuestas argentinas|apuestas arsenal
real madrid|apuestas ascenso a primera division|apuestas ascenso a segunda|apuestas
asiaticas|apuestas asiatico|apuestas athletic|apuestas athletic atletico|apuestas athletic
barça|apuestas athletic barcelona|apuestas athletic betis|apuestas
athletic manchester|apuestas athletic manchester united|apuestas athletic
osasuna|apuestas athletic real|apuestas athletic real madrid|apuestas athletic real sociedad|apuestas athletic real sociedad final|apuestas athletic roma|apuestas athletic sevilla|apuestas athletic valencia|apuestas atletico|apuestas atletico barcelona|apuestas atletico barsa|apuestas atletico campeon champions|apuestas atletico campeon de liga|apuestas atlético
copenhague|apuestas atletico de madrid|apuestas atlético de madrid|apuestas atletico de madrid barcelona|apuestas atletico de madrid
gana la liga|apuestas atletico de madrid real
madrid|apuestas atlético de madrid real madrid|apuestas atletico de madrid vs barcelona|apuestas atletico madrid|apuestas atletico madrid real madrid|apuestas atletico madrid vs barcelona|apuestas atletico real madrid|apuestas atletico
real madrid champions|apuestas atletismo|apuestas bajas|apuestas baloncesto|apuestas baloncesto
acb|apuestas baloncesto handicap|apuestas baloncesto hoy|apuestas baloncesto juegos olimpicos|apuestas
baloncesto nba|apuestas baloncesto pronostico|apuestas baloncesto pronósticos|apuestas baloncesto prorroga|apuestas barca|apuestas barca athletic|apuestas barca atletico|apuestas
barca bayern|apuestas barca bayern munich|apuestas
barca girona|apuestas barca hoy|apuestas barça hoy|apuestas barca inter|apuestas barca juventus|apuestas barca madrid|apuestas barça madrid|apuestas barca real madrid|apuestas barca vs juve|apuestas barca vs madrid|apuestas barca vs psg|apuestas barcelona|apuestas barcelona alaves|apuestas barcelona
athletic|apuestas barcelona atletico|apuestas barcelona atletico
de madrid|apuestas barcelona atlético de madrid|apuestas barcelona atletico madrid|apuestas barcelona bayern|apuestas barcelona betis|apuestas barcelona campeon de liga|apuestas barcelona celta|apuestas barcelona espanyol|apuestas barcelona gana la champions|apuestas barcelona girona|apuestas barcelona granada|apuestas barcelona hoy|apuestas barcelona inter|apuestas barcelona madrid|apuestas barcelona osasuna|apuestas barcelona psg|apuestas barcelona real madrid|apuestas barcelona real sociedad|apuestas barcelona sevilla|apuestas barcelona valencia|apuestas barcelona villarreal|apuestas barcelona vs atletico madrid|apuestas barcelona vs madrid|apuestas barcelona vs real madrid|apuestas barsa madrid|apuestas basket
hoy|apuestas bayern barcelona|apuestas bayern vs barcelona|apuestas beisbol|apuestas
béisbol|apuestas beisbol mlb|apuestas beisbol pronosticos|apuestas beisbol
venezolano|apuestas betis|apuestas betis – chelsea|apuestas betis barcelona|apuestas betis chelsea|apuestas betis fiorentina|apuestas betis girona|apuestas betis
madrid|apuestas betis mallorca|apuestas betis real madrid|apuestas betis real sociedad|apuestas betis sevilla|apuestas betis valencia|apuestas
betis valladolid|apuestas betis vs valencia|apuestas betplay hoy colombia|apuestas
betsson peru|apuestas bienvenida|apuestas billar online|apuestas bolivia vs colombia|apuestas bono|apuestas bono bienvenida|apuestas bono de bienvenida|apuestas bono de bienvenida sin deposito|apuestas bono gratis|apuestas
bono sin deposito|apuestas bonos sin deposito|apuestas borussia real madrid|apuestas boxeo|apuestas boxeo de campeonato|apuestas
boxeo españa|apuestas boxeo español|apuestas boxeo femenino olimpiadas|apuestas boxeo
hoy|apuestas boxeo online|apuestas brasil colombia|apuestas brasil
peru|apuestas brasil uruguay|apuestas brasil vs colombia|apuestas brasil vs peru|apuestas
caballos|apuestas caballos colocado|apuestas caballos españa|apuestas
caballos hipodromo|apuestas caballos hoy|apuestas caballos madrid|apuestas caballos online|apuestas caballos sanlucar de barrameda|apuestas caballos zarzuela|apuestas calculador|apuestas
campeon|apuestas campeon champions|apuestas campeón champions|apuestas campeon champions 2025|apuestas campeon champions league|apuestas campeon conference league|apuestas campeon copa america|apuestas campeon copa del rey|apuestas campeon de champions|apuestas
campeon de la champions|apuestas campeon de liga|apuestas campeon del mundo|apuestas campeon eurocopa|apuestas campeón eurocopa|apuestas campeon europa league|apuestas campeon f1|apuestas campeon f1 2025|apuestas campeon formula 1|apuestas campeon libertadores|apuestas campeon liga|apuestas
campeon liga bbva|apuestas campeon liga española|apuestas campeon liga santander|apuestas campeon motogp
2025|apuestas campeon mundial|apuestas campeón mundial|apuestas campeon mundial baloncesto|apuestas
campeon nba|apuestas campeón nba|apuestas campeon premier|apuestas campeon premier league|apuestas campeon roland garros|apuestas campeonato f1|apuestas campeonatos de futbol|apuestas carrera de caballos|apuestas carrera de caballos hoy|apuestas carrera de caballos nocturnas|apuestas
carrera de galgos fin de semana|apuestas carrera de galgos hoy|apuestas carrera de galgos nocturnas|apuestas carreras caballos|apuestas carreras caballos sanlucar|apuestas carreras de caballos|apuestas carreras de caballos en directo|apuestas carreras de caballos en vivo|apuestas carreras de caballos españa|apuestas carreras de caballos
hoy|apuestas carreras de caballos nacionales|apuestas carreras de caballos nocturnas|apuestas carreras de caballos online|apuestas carreras de caballos sanlucar|apuestas carreras de caballos sanlúcar|apuestas carreras de galgos|apuestas carreras de galgos
en vivo|apuestas carreras de galgos nocturnas|apuestas carreras de galgos pre partido|apuestas casino|apuestas casino barcelona|apuestas casino futbol|apuestas
casino gran madrid|apuestas casino gratis|apuestas casino madrid|apuestas casino online|apuestas casino online argentina|apuestas casinos|apuestas
casinos online|apuestas celta|apuestas celta barcelona|apuestas celta betis|apuestas
celta eibar|apuestas celta espanyol|apuestas celta granada|apuestas celta madrid|apuestas celta manchester|apuestas celta real madrid|apuestas champion league|apuestas champions foro|apuestas champions
hoy|apuestas champions league|apuestas champions league – pronósticos|apuestas champions league 2025|apuestas
champions league hoy|apuestas champions league pronosticos|apuestas champions league pronósticos|apuestas champions pronosticos|apuestas chelsea barcelona|apuestas chelsea
betis|apuestas chile|apuestas chile peru|apuestas chile venezuela|apuestas chile vs colombia|apuestas chile vs
uruguay|apuestas ciclismo|apuestas ciclismo
en vivo|apuestas ciclismo femenino|apuestas ciclismo tour francia|apuestas ciclismo vuelta|apuestas ciclismo vuelta
a españa|apuestas ciclismo vuelta españa|apuestas city madrid|apuestas city real madrid|apuestas clasico|apuestas clasico
español|apuestas clasico real madrid barcelona|apuestas clasificacion mundial|apuestas
colombia|apuestas colombia argentina|apuestas colombia brasil|apuestas colombia paraguay|apuestas
colombia uruguay|apuestas colombia vs argentina|apuestas colombia vs brasil|apuestas combinadas|apuestas combinadas como
funcionan|apuestas combinadas de futbol|apuestas combinadas de fútbol|apuestas combinadas foro|apuestas
combinadas futbol|apuestas combinadas hoy|apuestas combinadas
mismo partido|apuestas combinadas mundial|apuestas combinadas
nba|apuestas combinadas para esta semana|apuestas combinadas para hoy|apuestas combinadas para mañana|apuestas combinadas pronosticos|apuestas combinadas recomendadas|apuestas combinadas
seguras|apuestas combinadas seguras para hoy|apuestas combinadas seguras para mañana|apuestas como ganar|apuestas comparador|apuestas con bono de
bienvenida|apuestas con dinero ficticio|apuestas con dinero real|apuestas con dinero virtual|apuestas con handicap|apuestas con handicap asiatico|apuestas con handicap
baloncesto|apuestas con mas probabilidades de ganar|apuestas con paypal|apuestas
con tarjeta de credito|apuestas con tarjeta de
debito|apuestas consejos|apuestas copa|apuestas copa africa|apuestas copa
america|apuestas copa américa|apuestas copa argentina|apuestas copa brasil|apuestas copa davis|apuestas copa de europa|apuestas copa del mundo|apuestas copa del rey|apuestas copa del rey baloncesto|apuestas copa del rey final|apuestas copa del
rey futbol|apuestas copa del rey ganador|apuestas copa del rey hoy|apuestas copa
del rey pronosticos|apuestas copa del rey pronósticos|apuestas copa europa|apuestas copa italia|apuestas copa libertadores|apuestas copa mundial de hockey|apuestas copa rey|apuestas copa sudamericana|apuestas corners|apuestas corners hoy|apuestas croacia argentina|apuestas cuartos
eurocopa|apuestas cuotas|apuestas cuotas altas|apuestas cuotas bajas|apuestas de 1 euro|apuestas de
baloncesto|apuestas de baloncesto hoy|apuestas de baloncesto nba|apuestas de baloncesto para hoy|apuestas de beisbol|apuestas de beisbol para hoy|apuestas de
blackjack en linea|apuestas de boxeo|apuestas de
boxeo canelo|apuestas de boxeo en las vegas|apuestas de boxeo hoy|apuestas de boxeo online|apuestas de caballo|apuestas de caballos|apuestas de caballos como funciona|apuestas de caballos como
se juega|apuestas de caballos en colombia|apuestas de caballos en españa|apuestas de caballos en linea|apuestas
de caballos españa|apuestas de caballos ganador y colocado|apuestas de caballos internacionales|apuestas de caballos
juegos|apuestas de caballos online|apuestas de caballos online en venezuela|apuestas
de caballos por internet|apuestas de caballos pronosticos|apuestas de caballos pronósticos|apuestas de carrera de caballos|apuestas de carreras de caballos|apuestas de carreras de caballos online|apuestas de casino|apuestas de casino online|apuestas de casino por internet|apuestas de
champions league|apuestas de ciclismo|apuestas de colombia|apuestas de copa america|apuestas de corners|apuestas de deportes en linea|apuestas de
deportes online|apuestas de dinero|apuestas de
esports|apuestas de eurocopa|apuestas de europa league|apuestas de f1|apuestas de
formula 1|apuestas de futbol|apuestas de fútbol|apuestas de futbol app|apuestas de futbol argentina|apuestas de futbol colombia|apuestas
de futbol en colombia|apuestas de futbol en directo|apuestas
de futbol en linea|apuestas de futbol en vivo|apuestas de futbol español|apuestas
de futbol gratis|apuestas de futbol hoy|apuestas de futbol mundial|apuestas de futbol online|apuestas de fútbol online|apuestas de futbol
para hoy|apuestas de fútbol para hoy|apuestas de futbol para hoy
seguras|apuestas de futbol para mañana|apuestas de futbol peru|apuestas de futbol pronosticos|apuestas
de fútbol pronósticos|apuestas de futbol seguras|apuestas de
futbol seguras para hoy|apuestas de futbol sin dinero|apuestas de
galgos|apuestas de galgos como ganar|apuestas de galgos en directo|apuestas de galgos online|apuestas
de galgos trucos|apuestas de golf|apuestas de hockey|apuestas de hockey sobre hielo|apuestas
de hoy|apuestas de hoy seguras|apuestas de juego|apuestas
de juegos|apuestas de juegos deportivos|apuestas de juegos online|apuestas de la champions league|apuestas de la copa américa|apuestas de la eurocopa|apuestas de la europa league|apuestas de la liga|apuestas de la liga bbva|apuestas de la liga española|apuestas de la nba|apuestas de la nfl|apuestas de la ufc|apuestas de mlb|apuestas
de nba|apuestas de nba para hoy|apuestas de partidos|apuestas de partidos de futbol|apuestas
de peleas ufc|apuestas de perros en vivo|apuestas de perros
virtuales|apuestas de peru|apuestas de sistema|apuestas de sistema como funciona|apuestas de sistema explicacion|apuestas de
sistema explicación|apuestas de tenis|apuestas de tenis de mesa|apuestas de tenis en directo|apuestas de tenis hoy|apuestas de tenis para hoy|apuestas de tenis pronosticos|apuestas de tenis seguras|apuestas de todo tipo|apuestas de
ufc|apuestas de ufc hoy|apuestas del boxeo|apuestas del clasico|apuestas
del clasico real madrid barca|apuestas del dia|apuestas del día|apuestas del dia de hoy|apuestas del dia
deportivas|apuestas del dia futbol|apuestas del
mundial|apuestas del partido de hoy|apuestas del real
madrid|apuestas del rey|apuestas del sistema|apuestas
deporte|apuestas deportes|apuestas deportiva|apuestas deportivas|apuestas deportivas 1 euro|apuestas deportivas 10 euros gratis|apuestas deportivas 100 seguras|apuestas deportivas 1×2|apuestas deportivas android|apuestas deportivas app|apuestas deportivas apps|apuestas
deportivas argentina|apuestas deportivas argentina futbol|apuestas deportivas argentina legal|apuestas deportivas atletico de madrid|apuestas deportivas baloncesto|apuestas deportivas barca madrid|apuestas
deportivas barcelona|apuestas deportivas beisbol|apuestas
deportivas bono|apuestas deportivas bono bienvenida|apuestas deportivas bono
de bienvenida|apuestas deportivas bono sin deposito|apuestas
deportivas bonos de bienvenida|apuestas deportivas boxeo|apuestas deportivas caballos|apuestas deportivas calculadora|apuestas deportivas campeon liga|apuestas deportivas casino|apuestas deportivas casino barcelona|apuestas deportivas
casino online|apuestas deportivas cerca de mi|apuestas deportivas champions league|apuestas deportivas chile|apuestas deportivas
ciclismo|apuestas deportivas colombia|apuestas deportivas com|apuestas deportivas com foro|apuestas deportivas com pronosticos|apuestas deportivas combinadas|apuestas deportivas combinadas para hoy|apuestas deportivas como se juega|apuestas deportivas comparador|apuestas deportivas
con bono gratis|apuestas deportivas con bonos gratis|apuestas deportivas con dinero ficticio|apuestas deportivas con paypal|apuestas deportivas con puntos virtuales|apuestas deportivas
consejos|apuestas deportivas consejos para ganar|apuestas deportivas copa america|apuestas deportivas copa del rey|apuestas
deportivas copa libertadores|apuestas deportivas copa mundial|apuestas deportivas corners|apuestas deportivas cual es la mejor|apuestas deportivas cuotas altas|apuestas deportivas de
baloncesto|apuestas deportivas de boxeo|apuestas deportivas de colombia|apuestas deportivas de futbol|apuestas deportivas de nba|apuestas
deportivas de nhl|apuestas deportivas de peru|apuestas deportivas de tenis|apuestas
deportivas del dia|apuestas deportivas dinero ficticio|apuestas deportivas directo|apuestas deportivas doble oportunidad|apuestas
deportivas en argentina|apuestas deportivas en chile|apuestas deportivas en colombia|apuestas deportivas
en directo|apuestas deportivas en españa|apuestas deportivas en español|apuestas
deportivas en linea|apuestas deportivas en línea|apuestas deportivas en peru|apuestas deportivas en perú|apuestas deportivas en sevilla|apuestas
deportivas en uruguay|apuestas deportivas en vivo|apuestas deportivas es|apuestas
deportivas es pronosticos|apuestas deportivas españa|apuestas
deportivas españolas|apuestas deportivas
esports|apuestas deportivas estadisticas|apuestas deportivas estrategias|apuestas deportivas estrategias seguras|apuestas deportivas eurocopa|apuestas deportivas europa league|apuestas deportivas f1|apuestas
deportivas faciles de ganar|apuestas deportivas formula 1|apuestas deportivas foro|apuestas deportivas foro futbol|apuestas deportivas foro tenis|apuestas deportivas francia argentina|apuestas
deportivas futbol|apuestas deportivas fútbol|apuestas deportivas futbol argentino|apuestas deportivas futbol colombia|apuestas deportivas futbol español|apuestas deportivas gana|apuestas deportivas ganadas|apuestas deportivas ganar dinero seguro|apuestas deportivas gane|apuestas deportivas golf|apuestas deportivas gratis|apuestas deportivas gratis con premios|apuestas deportivas gratis hoy|apuestas deportivas gratis sin deposito|apuestas deportivas handicap|apuestas deportivas
handicap asiatico|apuestas deportivas hoy|apuestas
deportivas impuestos|apuestas deportivas interior argentina|apuestas deportivas juegos olimpicos|apuestas
deportivas la liga|apuestas deportivas legales|apuestas deportivas legales en colombia|apuestas deportivas libres de impuestos|apuestas deportivas licencia españa|apuestas deportivas liga española|apuestas deportivas listado|apuestas deportivas listado clasico|apuestas deportivas madrid|apuestas deportivas mas seguras|apuestas deportivas mejor pagadas|apuestas deportivas
mejores|apuestas deportivas mejores app|apuestas deportivas mejores casas|apuestas deportivas mejores
cuotas|apuestas deportivas mejores paginas|apuestas deportivas mexico|apuestas deportivas méxico|apuestas deportivas mlb|apuestas deportivas mlb hoy|apuestas deportivas multiples|apuestas
deportivas mundial|apuestas deportivas murcia|apuestas deportivas nba|apuestas deportivas nba hoy|apuestas
deportivas nfl|apuestas deportivas nhl|apuestas deportivas nuevas|apuestas deportivas ofertas|apuestas deportivas online|apuestas
deportivas online argentina|apuestas deportivas online chile|apuestas
deportivas online colombia|apuestas deportivas online en colombia|apuestas
deportivas online españa|apuestas deportivas online mexico|apuestas deportivas online paypal|apuestas deportivas
online peru|apuestas deportivas online por internet|apuestas deportivas pago paypal|apuestas deportivas para
ganar dinero|apuestas deportivas para hoy|apuestas deportivas para hoy pronosticos|apuestas deportivas partido suspendido|apuestas deportivas partidos de hoy|apuestas deportivas paypal|apuestas deportivas peru|apuestas
deportivas perú|apuestas deportivas peru vs ecuador|apuestas deportivas predicciones|apuestas deportivas promociones|apuestas deportivas pronostico|apuestas deportivas pronóstico|apuestas
deportivas pronostico hoy|apuestas deportivas pronosticos|apuestas
deportivas pronósticos|apuestas deportivas pronosticos expertos|apuestas deportivas pronosticos
gratis|apuestas deportivas pronosticos nba|apuestas deportivas pronosticos tenis|apuestas deportivas que aceptan paypal|apuestas deportivas real madrid|apuestas deportivas regalo
bienvenida|apuestas deportivas resultado exacto|apuestas deportivas resultados|apuestas deportivas
rugby|apuestas deportivas seguras|apuestas deportivas seguras foro|apuestas deportivas seguras hoy|apuestas deportivas seguras para hoy|apuestas deportivas seguras telegram|apuestas deportivas sevilla|apuestas deportivas simulador eurocopa|apuestas deportivas sin deposito|apuestas
deportivas sin deposito inicial|apuestas deportivas sin dinero|apuestas deportivas sin dinero real|apuestas deportivas sin registro|apuestas
deportivas stake|apuestas deportivas stake 10|apuestas deportivas telegram españa|apuestas
deportivas tenis|apuestas deportivas tenis de mesa|apuestas deportivas tenis foro|apuestas deportivas tenis hoy|apuestas deportivas tips|apuestas
deportivas tipster|apuestas deportivas ufc|apuestas deportivas uruguay|apuestas deportivas valencia|apuestas deportivas valencia barcelona|apuestas
deportivas venezuela|apuestas deportivas virtuales|apuestas deportivas y casino|apuestas deportivas y casino online|apuestas
deportivas.com|apuestas deportivas.com foro|apuestas deportivas.es|apuestas deportivos pronosticos|apuestas deposito minimo 1 euro|apuestas
descenso a segunda|apuestas descenso a segunda b|apuestas descenso la liga|apuestas descenso primera division|apuestas
descenso segunda|apuestas dia|apuestas diarias seguras|apuestas dinero|apuestas dinero ficticio|apuestas dinero real|apuestas dinero virtual|apuestas directas|apuestas directo|apuestas directo futbol|apuestas division de
honor juvenil|apuestas dnb|apuestas doble oportunidad|apuestas doble resultado|apuestas dobles|apuestas dobles y triples|apuestas dortmund barcelona|apuestas draft nba|apuestas draft nfl|apuestas ecuador vs argentina|apuestas ecuador vs venezuela|apuestas egipto uruguay|apuestas el clasico|apuestas elecciones venezuela|apuestas
empate|apuestas en baloncesto|apuestas en barcelona|apuestas en beisbol|apuestas en boxeo|apuestas en caballos|apuestas en carreras de
caballos|apuestas en casino|apuestas en casino online|apuestas en casinos|apuestas en casinos online|apuestas en chile|apuestas en ciclismo|apuestas en colombia|apuestas
en colombia de futbol|apuestas en directo|apuestas en directo futbol|apuestas en directo pronosticos|apuestas en el futbol|apuestas en el tenis|apuestas en españa|apuestas en esports|apuestas
en eventos deportivos virtuales|apuestas en golf|apuestas en juegos|apuestas en la champions league|apuestas
en la eurocopa|apuestas en la liga|apuestas en la
nba|apuestas en la nfl|apuestas en las vegas mlb|apuestas en las vegas nfl|apuestas en linea|apuestas en línea|apuestas en linea argentina|apuestas en linea boxeo|apuestas en linea chile|apuestas en linea colombia|apuestas en línea de fútbol|apuestas en linea deportivas|apuestas en linea españa|apuestas en linea estados unidos|apuestas en linea futbol|apuestas
en linea mexico|apuestas en línea méxico|apuestas en linea mundial|apuestas en linea peru|apuestas en linea usa|apuestas en los esports|apuestas en madrid|apuestas
en méxico|apuestas en mexico online|apuestas en nba|apuestas en partidos de futbol|apuestas en partidos de
futbol en vivo|apuestas en partidos de tenis en directo|apuestas en perú|apuestas en sevilla|apuestas en sistema|apuestas en stake|apuestas en tenis|apuestas en tenis de
mesa|apuestas en valencia|apuestas en vivo|apuestas
en vivo argentina|apuestas en vivo casino|apuestas en vivo futbol|apuestas en vivo fútbol|apuestas en vivo nba|apuestas en vivo
peru|apuestas en vivo tenis|apuestas en vivo ufc|apuestas equipo mbappe|apuestas equipos de futbol|apuestas españa|apuestas españa alemania|apuestas españa alemania eurocopa|apuestas españa croacia|apuestas españa eurocopa|apuestas españa
francia|apuestas españa francia eurocopa|apuestas españa gana el mundial|apuestas españa gana eurocopa|apuestas españa gana
mundial|apuestas españa georgia|apuestas españa holanda|apuestas
españa inglaterra|apuestas españa inglaterra cuotas|apuestas españa
inglaterra eurocopa|apuestas españa italia|apuestas españa mundial|apuestas
españa paises bajos|apuestas español|apuestas español oviedo|apuestas espanyol
barcelona|apuestas espanyol betis|apuestas espanyol villarreal|apuestas esport|apuestas esports|apuestas esports colombia|apuestas esports españa|apuestas esports fifa|apuestas esports
gratis|apuestas esports lol|apuestas esports peru|apuestas esports valorant|apuestas estadisticas|apuestas estrategias|apuestas
euro|apuestas euro copa|apuestas eurocopa|apuestas
eurocopa campeon|apuestas eurocopa españa|apuestas eurocopa
favoritos|apuestas eurocopa femenina|apuestas eurocopa final|apuestas eurocopa ganador|apuestas eurocopa hoy|apuestas eurocopa sub 21|apuestas euroliga baloncesto|apuestas euroliga pronosticos|apuestas europa league|apuestas europa league hoy|apuestas europa league pronosticos|apuestas europa league pronósticos|apuestas euros|apuestas f1 abu dhabi|apuestas f1 bahrein|apuestas f1 canada|apuestas f1 china|apuestas f1 cuotas|apuestas f1 hoy|apuestas f1
las vegas|apuestas f1 miami|apuestas f1 monaco|apuestas faciles de ganar|apuestas fáciles de ganar|apuestas faciles para ganar|apuestas favoritas|apuestas favorito champions|apuestas favoritos champions|apuestas favoritos
eurocopa|apuestas favoritos mundial|apuestas fc barcelona|apuestas final champions cuotas|apuestas final champions league|apuestas final champions peru|apuestas final copa|apuestas final copa america|apuestas final copa
de europa|apuestas final copa del rey|apuestas final
copa europa|apuestas final copa libertadores|apuestas final copa rey|apuestas final de copa|apuestas final de copa del rey|apuestas final
del mundial|apuestas final euro|apuestas final eurocopa|apuestas final
europa league|apuestas final libertadores|apuestas final mundial|apuestas
final nba|apuestas final rugby|apuestas final uefa europa league|apuestas final.mundial|apuestas finales de conferencia nfl|apuestas finales nba|apuestas fiorentina betis|apuestas formula|apuestas formula 1|apuestas fórmula 1|apuestas fórmula 1 pronósticos|apuestas
formula uno|apuestas foro|apuestas foro nba|apuestas francia argentina|apuestas francia españa|apuestas futbol|apuestas
fútbol|apuestas futbol americano|apuestas
futbol americano nfl|apuestas futbol argentina|apuestas
futbol argentino|apuestas futbol champions league|apuestas futbol chile|apuestas futbol colombia|apuestas futbol consejos|apuestas futbol en directo|apuestas fútbol en directo|apuestas futbol en vivo|apuestas fútbol en vivo|apuestas futbol españa|apuestas futbol español|apuestas fútbol español|apuestas
futbol eurocopa|apuestas futbol femenino|apuestas futbol
foro|apuestas futbol gratis|apuestas futbol hoy|apuestas fútbol hoy|apuestas futbol juegos olimpicos|apuestas futbol mexico|apuestas futbol mundial|apuestas futbol online|apuestas futbol
para hoy|apuestas futbol peru|apuestas futbol pronosticos|apuestas
futbol sala|apuestas futbol telegram|apuestas futbol virtual|apuestas
galgos|apuestas galgos en directo|apuestas galgos hoy|apuestas galgos online|apuestas galgos pronosticos|apuestas galgos trucos|apuestas
gana|apuestas gana colombia|apuestas gana resultados|apuestas ganadas|apuestas ganadas hoy|apuestas ganador champions league|apuestas ganador copa america|apuestas ganador copa del rey|apuestas
ganador copa del rey baloncesto|apuestas ganador copa libertadores|apuestas ganador
de la eurocopa|apuestas ganador de la liga|apuestas ganador del mundial|apuestas ganador eurocopa|apuestas
ganador europa league|apuestas ganador f1|apuestas
ganador la liga|apuestas ganador liga española|apuestas ganador mundial|apuestas ganador mundial baloncesto|apuestas ganador mundial f1|apuestas ganador nba|apuestas ganadores eurocopa|apuestas ganadores mundial|apuestas ganar champions|apuestas
ganar eurocopa|apuestas ganar liga|apuestas ganar mundial|apuestas ganar nba|apuestas
getafe valencia|apuestas ghana uruguay|apuestas girona|apuestas girona athletic|apuestas girona betis|apuestas
girona campeon de liga|apuestas girona campeon liga|apuestas girona gana
la liga|apuestas girona real madrid|apuestas girona real sociedad|apuestas goleador eurocopa|apuestas goleadores eurocopa|apuestas goles asiaticos|apuestas golf|apuestas golf masters|apuestas golf pga|apuestas granada barcelona|apuestas grand slam de
tenis|apuestas gratis|apuestas gratis casino|apuestas gratis con premios|apuestas
gratis hoy|apuestas gratis para hoy|apuestas gratis por registro|apuestas gratis puntos|apuestas gratis regalos|apuestas gratis sin deposito|apuestas gratis sin depósito|apuestas gratis sin ingreso|apuestas
gratis sports|apuestas gratis y ganar premios|apuestas
grupo a eurocopa|apuestas grupos eurocopa|apuestas handicap|apuestas handicap
asiatico|apuestas handicap baloncesto|apuestas handicap como funciona|apuestas handicap nba|apuestas handicap nfl|apuestas hipicas online|apuestas hípicas online|apuestas hipicas venezuela|apuestas hockey|apuestas hockey hielo|apuestas hockey patines|apuestas hockey sobre hielo|apuestas holanda argentina|apuestas holanda vs argentina|apuestas hoy|apuestas hoy champions|apuestas hoy futbol|apuestas
hoy nba|apuestas hoy pronosticos|apuestas hoy seguras|apuestas impuestos|apuestas
inglaterra paises bajos|apuestas inter barca|apuestas inter barcelona|apuestas juego|apuestas juegos|apuestas juegos en linea|apuestas juegos
olimpicos|apuestas juegos olímpicos|apuestas juegos olimpicos baloncesto|apuestas juegos online|apuestas juegos virtuales|apuestas jugador
sevilla|apuestas jugadores nba|apuestas kings league americas|apuestas la liga|apuestas la liga española|apuestas la liga hoy|apuestas la liga santander|apuestas las vegas
mlb|apuestas las vegas nba|apuestas las vegas nfl|apuestas league of legends mundial|apuestas legal|apuestas legales|apuestas legales en colombia|apuestas
legales en españa|apuestas legales en estados unidos|apuestas legales
españa|apuestas leganes betis|apuestas libertadores|apuestas licencia|apuestas
liga 1 peru|apuestas liga argentina|apuestas
liga bbva pronosticos|apuestas liga de campeones|apuestas liga
de campeones de baloncesto|apuestas liga de campeones de hockey|apuestas liga españa|apuestas liga española|apuestas
liga santander pronosticos|apuestas ligas de futbol|apuestas linea|apuestas linea de
gol|apuestas liverpool barcelona|apuestas liverpool real madrid|apuestas lol mundial|apuestas madrid|apuestas madrid arsenal|apuestas madrid atletico|apuestas madrid atletico champions|apuestas madrid barca|apuestas madrid barça|apuestas madrid barca
hoy|apuestas madrid barca supercopa|apuestas madrid barcelona|apuestas madrid barsa|apuestas madrid bayern|apuestas madrid betis|apuestas madrid borussia|apuestas madrid campeon champions|apuestas madrid celta|apuestas madrid city|apuestas madrid dortmund|apuestas madrid gana la liga|apuestas madrid
gana liga|apuestas madrid hoy|apuestas madrid liverpool|apuestas madrid osasuna|apuestas madrid sevilla|apuestas madrid valencia|apuestas madrid vs arsenal|apuestas madrid vs barcelona|apuestas mallorca osasuna|apuestas mallorca real
sociedad|apuestas manchester athletic|apuestas manchester city real madrid|apuestas mas faciles de ganar|apuestas mas
seguras|apuestas mas seguras para hoy|apuestas masters de
golf|apuestas masters de tenis|apuestas maximo goleador eurocopa|apuestas
maximo goleador mundial|apuestas mejor jugador eurocopa|apuestas mejores casinos online|apuestas mexico|apuestas
méxico|apuestas mexico polonia|apuestas méxico polonia|apuestas mlb|apuestas mlb hoy|apuestas mlb las vegas|apuestas mlb para hoy|apuestas mlb pronosticos|apuestas mlb usa|apuestas mma ufc|apuestas momios|apuestas multiples|apuestas múltiples|apuestas multiples como funcionan|apuestas multiples el gordo|apuestas multiples futbol|apuestas mundial|apuestas mundial 2026|apuestas mundial baloncesto|apuestas mundial balonmano|apuestas mundial brasil|apuestas mundial campeon|apuestas mundial ciclismo|apuestas mundial clubes|apuestas mundial de baloncesto|apuestas mundial de ciclismo|apuestas mundial de clubes|apuestas mundial de futbol|apuestas mundial de
fútbol|apuestas mundial de rugby|apuestas mundial f1|apuestas mundial
favoritos|apuestas mundial femenino|apuestas mundial formula
1|apuestas mundial futbol|apuestas mundial ganador|apuestas mundial lol|apuestas mundial
moto gp|apuestas mundial motogp|apuestas mundial rugby|apuestas mundial sub 17|apuestas mundiales|apuestas
mundialistas|apuestas mvp eurocopa|apuestas mvp nba|apuestas mvp nfl|apuestas nacionales de colombia|apuestas nba|apuestas nba all star|apuestas nba campeon|apuestas nba consejos|apuestas nba esta noche|apuestas nba finals|apuestas nba gratis|apuestas nba hoy|apuestas nba hoy jugadores|apuestas nba hoy pronosticos|apuestas nba para hoy|apuestas nba playoffs|apuestas nba pronosticos|apuestas nba pronósticos|apuestas nba pronosticos hoy|apuestas
nba tipster|apuestas nfl|apuestas nfl hoy|apuestas nfl las vegas|apuestas nfl playoffs|apuestas nfl pronosticos|apuestas nfl pronósticos|apuestas nfl semana 4|apuestas nfl super bowl|apuestas nhl|apuestas nhl pronosticos|apuestas octavos eurocopa|apuestas ofertas|apuestas online|apuestas online argentina|apuestas
online argentina legal|apuestas online bono|apuestas online bono bienvenida|apuestas online boxeo|apuestas online caballos|apuestas online carreras de caballos|apuestas online
casino|apuestas online champions league|apuestas online chile|apuestas online
ciclismo|apuestas online colombia|apuestas online comparativa|apuestas
online con paypal|apuestas online de caballos|apuestas online deportivas|apuestas online en argentina|apuestas online en peru|apuestas online espana|apuestas online españa|apuestas online esports|apuestas online foro|apuestas online
futbol|apuestas online futbol españa|apuestas online golf|apuestas online gratis|apuestas online gratis sin deposito|apuestas online
juegos|apuestas online mexico|apuestas online mma|apuestas online movil|apuestas online nba|apuestas
online net|apuestas online nuevas|apuestas online opiniones|apuestas online paypal|apuestas online peru|apuestas
online seguras|apuestas online sin dinero|apuestas online sin registro|apuestas online tenis|apuestas online ufc|apuestas online uruguay|apuestas online venezuela|apuestas open britanico golf|apuestas osasuna athletic|apuestas osasuna
barcelona|apuestas osasuna real madrid|apuestas osasuna sevilla|apuestas osasuna valencia|apuestas over|apuestas over
2.5|apuestas over under|apuestas paginas|apuestas pago anticipado|apuestas paises bajos ecuador|apuestas paises bajos inglaterra|apuestas
países bajos qatar|apuestas para boxeo|apuestas para champions
league|apuestas para el clasico|apuestas para el dia de
hoy|apuestas para el mundial|apuestas para el partido de hoy|apuestas para eurocopa|apuestas para europa league|apuestas para futbol|apuestas para ganar|apuestas para ganar dinero|apuestas
para ganar dinero facil|apuestas para ganar en la ruleta|apuestas para ganar la champions|apuestas para ganar la eurocopa|apuestas para ganar la
europa league|apuestas para ganar la liga|apuestas para
ganar siempre|apuestas para hacer|apuestas para hoy|apuestas para hoy
de futbol|apuestas para hoy europa league|apuestas para hoy
futbol|apuestas para juegos|apuestas para la champions league|apuestas para la copa
del rey|apuestas para la eurocopa|apuestas para la europa league|apuestas para la final de la eurocopa|apuestas para la nba hoy|apuestas para los partidos de hoy|apuestas para partidos de hoy|apuestas para ufc|apuestas partido|apuestas partido aplazado|apuestas partido champions|apuestas partido colombia|apuestas partido españa marruecos|apuestas partido mundial|apuestas partido suspendido|apuestas partidos|apuestas partidos champions league|apuestas partidos
csgo|apuestas partidos de futbol|apuestas partidos de futbol hoy|apuestas partidos de hoy|apuestas partidos eurocopa|apuestas partidos futbol|apuestas partidos hoy|apuestas partidos
mundial|apuestas paypal|apuestas peleas de boxeo|apuestas peru|apuestas perú|apuestas peru brasil|apuestas peru chile|apuestas
peru paraguay|apuestas peru uruguay|apuestas peru vs chile|apuestas peru vs colombia|apuestas pichichi eurocopa|apuestas plataforma|apuestas playoff|apuestas playoff ascenso|apuestas
playoff ascenso a primera|apuestas playoff nba|apuestas playoff segunda|apuestas playoff segunda b|apuestas playoffs nba|apuestas playoffs nfl|apuestas polonia argentina|apuestas por argentina|apuestas por internet mexico|apuestas por internet para ganar dinero|apuestas por paypal|apuestas por ronda boxeo|apuestas por sistema|apuestas portugal uruguay|apuestas pre partido|apuestas predicciones|apuestas
predicciones futbol|apuestas primera division|apuestas primera division españa|apuestas promociones|apuestas pronostico|apuestas
pronosticos|apuestas pronosticos deportivos|apuestas pronosticos
deportivos tenis|apuestas pronosticos futbol|apuestas pronosticos gratis|apuestas pronosticos
nba|apuestas pronosticos tenis|apuestas prorroga|apuestas psg barca|apuestas psg barcelona|apuestas puntos por tarjetas|apuestas puntos tarjetas|apuestas que aceptan paypal|apuestas que es handicap|apuestas que puedes hacer con tu novia|apuestas que siempre ganaras|apuestas que significa|apuestas quien bajara a segunda|apuestas quién bajara a segunda|apuestas
quien gana el mundial|apuestas quien gana eurocopa|apuestas quien gana la champions|apuestas quien gana la eurocopa|apuestas quien gana la liga|apuestas quien ganara el mundial|apuestas quién ganará el mundial|apuestas quien ganara la champions|apuestas quien ganara la eurocopa|apuestas quien ganara la liga|apuestas rayo barcelona|apuestas real madrid|apuestas real madrid arsenal|apuestas real
madrid athletic|apuestas real madrid atletico|apuestas
real madrid atletico champions|apuestas real madrid atletico de madrid|apuestas real madrid atlético
de madrid|apuestas real madrid atletico madrid|apuestas real madrid barcelona|apuestas real madrid bayern|apuestas real
madrid betis|apuestas real madrid borussia|apuestas real madrid campeon champions|apuestas
real madrid celta|apuestas real madrid champions|apuestas real
madrid city|apuestas real madrid girona|apuestas real madrid hoy|apuestas real madrid
liverpool|apuestas real madrid manchester city|apuestas real madrid osasuna|apuestas real madrid real sociedad|apuestas real madrid valencia|apuestas real madrid
villarreal|apuestas real madrid vs arsenal|apuestas real madrid vs atletico|apuestas
real madrid vs atlético|apuestas real madrid vs atletico madrid|apuestas real madrid vs
barcelona|apuestas real madrid vs betis|apuestas real madrid vs sevilla|apuestas real madrid vs valencia|apuestas real sociedad|apuestas real sociedad athletic|apuestas real
sociedad barcelona|apuestas real sociedad betis|apuestas real sociedad psg|apuestas real sociedad real madrid|apuestas real sociedad valencia|apuestas recomendadas hoy|apuestas regalo de bienvenida|apuestas registro|apuestas resultado exacto|apuestas resultados|apuestas resultados eurocopa|apuestas retirada
tenis|apuestas roma barcelona|apuestas roma
sevilla|apuestas rugby|apuestas rugby mundial|apuestas rugby
world cup|apuestas ruleta seguras|apuestas segunda|apuestas segunda b|apuestas segunda division|apuestas
segunda división|apuestas segunda division b|apuestas segunda division españa|apuestas seguras|apuestas
seguras baloncesto|apuestas seguras calculadora|apuestas seguras en la ruleta|apuestas seguras
eurocopa|apuestas seguras foro|apuestas seguras futbol|apuestas seguras futbol hoy|apuestas seguras gratis|apuestas seguras hoy|apuestas seguras hoy
futbol|apuestas seguras nba|apuestas seguras nba hoy|apuestas seguras para este fin de semana|apuestas seguras
para ganar dinero|apuestas seguras para hoy|apuestas
seguras para hoy fútbol|apuestas seguras para hoy pronósticos|apuestas seguras para mañana|apuestas seguras ruleta|apuestas seguras telegram|apuestas
seguras tenis|apuestas semifinales eurocopa|apuestas senegal paises bajos|apuestas
sevilla|apuestas sevilla athletic|apuestas sevilla atletico de madrid|apuestas sevilla barcelona|apuestas
sevilla betis|apuestas sevilla campeon liga|apuestas sevilla celta|apuestas sevilla gana la liga|apuestas sevilla girona|apuestas sevilla
inter|apuestas sevilla jugador|apuestas sevilla juventus|apuestas sevilla leganes|apuestas
sevilla madrid|apuestas sevilla manchester united|apuestas sevilla osasuna|apuestas sevilla real madrid|apuestas sevilla
real sociedad|apuestas sevilla roma|apuestas sevilla valencia|apuestas significa|apuestas simples ejemplos|apuestas simples o combinadas|apuestas sin deposito|apuestas
sin deposito inicial|apuestas sin deposito minimo|apuestas
sin dinero|apuestas sin dinero real|apuestas sin empate|apuestas sin empate que significa|apuestas sin ingreso minimo|apuestas sin registro|apuestas sistema|apuestas sistema calculadora|apuestas sistema como funciona|apuestas sistema
trixie|apuestas sociedad|apuestas sorteo copa
del rey|apuestas stake|apuestas stake 10|apuestas stake 10 hoy|apuestas super bowl favorito|apuestas super rugby|apuestas supercopa españa|apuestas
superliga argentina|apuestas tarjeta roja|apuestas tarjetas|apuestas tarjetas amarillas|apuestas tenis|apuestas tenis atp|apuestas tenis consejos|apuestas tenis copa davis|apuestas tenis de mesa|apuestas tenis de mesa pronosticos|apuestas tenis en vivo|apuestas tenis femenino|apuestas tenis hoy|apuestas tenis itf|apuestas tenis pronosticos|apuestas tenis pronósticos|apuestas tenis retirada|apuestas tenis roland garros|apuestas tenis seguras|apuestas tenis
wimbledon|apuestas tenis wta|apuestas tercera
division|apuestas tercera division españa|apuestas tipos|apuestas tips|apuestas tipster|apuestas tipster para hoy|apuestas topuria
holloway cuotas|apuestas torneos de golf|apuestas torneos
de tenis|apuestas trucos|apuestas uefa champions league|apuestas uefa
europa league|apuestas ufc|apuestas ufc chile|apuestas ufc como funciona|apuestas ufc hoy|apuestas ufc ilia topuria|apuestas ufc online|apuestas ufc pronósticos|apuestas ufc telegram|apuestas ufc topuria|apuestas under over|apuestas unionistas villarreal|apuestas uruguay|apuestas uruguay colombia|apuestas uruguay corea|apuestas uruguay vs colombia|apuestas us
open golf|apuestas us open tenis|apuestas valencia|apuestas valencia barcelona|apuestas
valencia betis|apuestas valencia madrid|apuestas valencia real madrid|apuestas valladolid barcelona|apuestas valladolid valencia|apuestas valor app|apuestas valor
en directo|apuestas valor galgos|apuestas venezuela|apuestas venezuela argentina|apuestas venezuela bolivia|apuestas venezuela ecuador|apuestas villarreal|apuestas villarreal athletic|apuestas villarreal barcelona|apuestas villarreal bayern|apuestas villarreal betis|apuestas
villarreal liverpool|apuestas villarreal manchester|apuestas villarreal manchester
united|apuestas villarreal vs real madrid|apuestas virtuales|apuestas virtuales colombia|apuestas virtuales futbol|apuestas virtuales sin dinero|apuestas vivo|apuestas vuelta a españa|apuestas vuelta españa|apuestas william
hill partidos de hoy|apuestas y casino|apuestas y casinos|apuestas y juegos de azar|apuestas y pronosticos|apuestas y
pronosticos de futbol|apuestas y pronosticos deportivos|apuestas y resultados|apuestas-deportivas|apuestas-deportivas.es pronosticos|arbitro nba apuestas|argentina apuestas|argentina colombia apuestas|argentina croacia apuestas|argentina
francia apuestas|argentina mexico apuestas|argentina peru apuestas|argentina uruguay apuestas|argentina vs
bolivia apuestas|argentina vs chile apuestas|argentina vs colombia
apuestas|argentina vs francia apuestas|argentina vs.
colombia apuestas|asi se gana en las apuestas deportivas|asiatico apuestas|asiatico
en apuestas|asiaticos apuestas|athletic barcelona apuestas|athletic manchester united apuestas|athletic osasuna apuestas|athletic real madrid apuestas|atletico barcelona apuestas|atletico de madrid
apuestas|atlético de madrid apuestas|atletico de madrid real madrid apuestas|atletico de madrid vs barcelona
apuestas|atletico madrid real madrid apuestas|atletico madrid vs real madrid apuestas|atletico real madrid apuestas|atletico vs real madrid apuestas|avisador
de cuotas apuestas|bajada de cuotas apuestas|baloncesto apuestas|barbastro barcelona apuestas|barca apuestas|barca
bayern apuestas|barca inter apuestas|barca madrid
apuestas|barça madrid apuestas|barca vs atletico apuestas|barca vs madrid apuestas|barca vs real madrid apuestas|barcelona
– real madrid apuestas|barcelona apuestas|barcelona atletico apuestas|barcelona
atletico de madrid apuestas|barcelona atletico madrid apuestas|barcelona betis apuestas|barcelona casa
de apuestas|barcelona inter apuestas|barcelona psg apuestas|barcelona
real madrid apuestas|barcelona real sociedad apuestas|barcelona
sevilla apuestas|barcelona valencia apuestas|barcelona vs athletic bilbao apuestas|barcelona vs atlético madrid apuestas|barcelona vs betis
apuestas|barcelona vs celta de vigo apuestas|barcelona vs espanyol apuestas|barcelona vs girona apuestas|barcelona vs madrid apuestas|barcelona vs real madrid apuestas|barcelona vs real sociedad apuestas|barcelona vs sevilla apuestas|barcelona vs villarreal apuestas|base de datos cuotas apuestas deportivas|bayern real madrid apuestas|beisbol apuestas|best america apuestas|bet apuestas chile|bet apuestas en vivo|betis – chelsea apuestas|betis apuestas|betis
barcelona apuestas|betis chelsea apuestas|betis madrid apuestas|betis sevilla apuestas|betsson tu sitio de apuestas online|blog apuestas baloncesto|blog apuestas
ciclismo|blog apuestas nba|blog apuestas tenis|blog de apuestas
de tenis|bono apuestas|bono apuestas deportivas|bono
apuestas deportivas sin deposito|bono apuestas
gratis|bono apuestas gratis sin deposito|bono apuestas sin deposito|bono bienvenida apuestas|bono bienvenida apuestas deportivas|bono bienvenida apuestas españa|bono
bienvenida apuestas sin deposito|bono bienvenida apuestas sin depósito|bono bienvenida casa apuestas|bono bienvenida casa
de apuestas|bono bienvenida marca apuestas|bono casa apuestas|bono casa de apuestas|bono casa de apuestas sin ingreso|bono casas de apuestas|bono de apuestas|bono de apuestas gratis sin deposito|bono de bienvenida apuestas|bono
de bienvenida apuestas deportivas|bono de bienvenida casa de
apuestas|bono de bienvenida casas de apuestas|bono de
casas de apuestas|bono de registro apuestas|bono de registro
apuestas deportivas|bono de registro casa de apuestas|bono gratis apuestas|bono marca
apuestas|bono por registro apuestas|bono por registro
apuestas deportivas|bono por registro casa de apuestas|bono registro apuestas|bono sin deposito apuestas|bono sin depósito
apuestas|bono sin deposito apuestas deportivas|bono sin depósito
apuestas deportivas|bono sin deposito casa de apuestas|bono sin deposito
marca apuestas|bono sin ingreso apuestas|bono sin ingreso apuestas deportivas|bonos apuestas|bonos apuestas colombia|bonos apuestas deportivas|bonos apuestas
deportivas sin deposito|bonos apuestas gratis|bonos apuestas sin deposito|bonos apuestas sin depósito|bonos bienvenida apuestas|bonos bienvenida casas apuestas|bonos bienvenida casas de apuestas|bonos
casa de apuestas|bonos casas apuestas|bonos
casas de apuestas|bonos casas de apuestas colombia|bonos casas de apuestas deportivas|bonos casas de apuestas españa|bonos casas de apuestas nuevas|bonos casas de apuestas sin deposito|bonos casas de apuestas sin depósito|bonos
de apuestas|bonos de apuestas deportivas|bonos de apuestas gratis|bonos de apuestas
sin deposito|bonos de bienvenida apuestas|bonos de bienvenida
apuestas deportivas|bonos de bienvenida casa de apuestas|bonos de bienvenida casas de apuestas|bonos de bienvenida de casas de apuestas|bonos de bienvenida en casas de apuestas|bonos de casas de apuestas|bonos de casas de apuestas sin deposito|bonos en casa de
apuestas|bonos en casas de apuestas sin deposito|bonos gratis apuestas|bonos gratis apuestas deportivas|bonos gratis casas de apuestas|bonos gratis sin deposito apuestas|bonos paginas de apuestas|bonos registro casas
de apuestas|bonos sin deposito apuestas|bonos sin depósito apuestas|bonos sin deposito apuestas deportivas|bonos sin deposito casas de apuestas|bot de apuestas deportivas gratis|boxeo apuestas|brasil colombia apuestas|brasil peru apuestas|brasil vs colombia apuestas|buenas apuestas para hoy|buscador cuotas apuestas|buscador de apuestas seguras|buscador
de cuotas apuestas|buscador de cuotas de apuestas|buscar apuestas seguras|caballos apuestas|calculador de apuestas|calculador de cuotas apuestas|calculadora apuestas|calculadora apuestas combinadas|calculadora apuestas de sistema|calculadora apuestas deportivas|calculadora apuestas deportivas seguras|calculadora apuestas multiples|calculadora apuestas
segura|calculadora apuestas seguras|calculadora apuestas sistema|calculadora apuestas yankee|calculadora arbitraje apuestas|calculadora cubrir apuestas|calculadora cuotas apuestas|calculadora de apuestas|calculadora de apuestas combinadas|calculadora de apuestas
de futbol|calculadora de apuestas de sistema|calculadora de apuestas deportivas|calculadora
de apuestas multiples|calculadora de apuestas seguras|calculadora
de apuestas sistema|calculadora de apuestas surebets|calculadora de arbitraje apuestas|calculadora de cuotas apuestas|calculadora de cuotas de apuestas|calculadora para apuestas deportivas|calculadora
poisson apuestas|calculadora poisson apuestas deportivas|calculadora
poisson para apuestas|calculadora scalping apuestas deportivas|calculadora sistema apuestas|calculadora
stake apuestas|calculadora trading apuestas|calcular apuestas|calcular apuestas deportivas|calcular apuestas futbol|calcular apuestas sistema|calcular cuotas apuestas|calcular cuotas apuestas combinadas|calcular cuotas apuestas deportivas|calcular cuotas de apuestas|calcular ganancias apuestas
deportivas|calcular momios apuestas|calcular
probabilidad cuota apuestas|calcular stake apuestas|calcular unidades apuestas|calcular yield apuestas|calculo de apuestas|calculo de apuestas deportivas|cambio de cuotas apuestas|campeon champions
apuestas|campeon eurocopa apuestas|campeon liga apuestas|campeon nba apuestas|canales de apuestas gratis|carrera de
caballos apuestas|carrera de caballos apuestas juego|carrera de caballos con apuestas|carrera de galgos apuestas|carreras de caballos apuestas|carreras de
caballos apuestas online|carreras de caballos con apuestas|carreras
de caballos juegos de apuestas|carreras de galgos apuestas|carreras de galgos apuestas online|carreras de galgos apuestas trucos|carreras galgos apuestas|casa apuestas argentina|casa apuestas atletico de madrid|casa apuestas barcelona|casa apuestas betis|casa apuestas bono bienvenida|casa
apuestas bono gratis|casa apuestas bono sin deposito|casa apuestas cerca de mi|casa apuestas chile|casa apuestas colombia|casa apuestas con mejores cuotas|casa apuestas deportivas|casa
apuestas españa|casa apuestas española|casa apuestas eurocopa|casa apuestas futbol|casa
apuestas mejores cuotas|casa apuestas mundial|casa apuestas nueva|casa apuestas nuevas|casa apuestas online|casa apuestas peru|casa apuestas valencia|casa de apuestas|casa de apuestas 10 euros gratis|casa de
apuestas argentina|casa de apuestas atletico de madrid|casa
de apuestas baloncesto|casa de apuestas barcelona|casa de
apuestas beisbol|casa de apuestas betis|casa de apuestas bono|casa
de apuestas bono bienvenida|casa de apuestas bono de bienvenida|casa de apuestas bono
gratis|casa de apuestas bono por registro|casa de apuestas bono sin deposito|casa de
apuestas boxeo|casa de apuestas caballos|casa de apuestas carreras de caballos|casa
de apuestas cerca de mi|casa de apuestas cerca de mí|casa de apuestas champions league|casa de apuestas chile|casa de apuestas ciclismo|casa de apuestas colombia|casa de apuestas con bono de bienvenida|casa de apuestas
con bono sin deposito|casa de apuestas con cuotas mas altas|casa de apuestas con esports|casa de apuestas con las mejores cuotas|casa de apuestas con licencia en españa|casa de apuestas con mejores cuotas|casa de apuestas con pago anticipado|casa de apuestas con paypal|casa de apuestas copa america|casa de apuestas de caballos|casa de apuestas
de colombia|casa de apuestas de españa|casa de apuestas de futbol|casa de apuestas de fútbol|casa de apuestas de futbol peru|casa de apuestas de peru|casa de apuestas del madrid|casa
de apuestas del real madrid|casa de apuestas deportivas|casa de apuestas deportivas cerca de mi|casa de apuestas deportivas en argentina|casa de
apuestas deportivas en chile|casa de apuestas deportivas en colombia|casa de apuestas deportivas en españa|casa de apuestas deportivas en madrid|casa de apuestas deportivas españa|casa de apuestas deportivas
españolas|casa de apuestas deportivas madrid|casa de apuestas deportivas mexico|casa de apuestas deportivas online|casa de apuestas deportivas peru|casa de
apuestas deposito 5 euros|casa de apuestas deposito minimo|casa de
apuestas deposito minimo 1 euro|casa de apuestas depósito mínimo 1
euro|casa de apuestas en españa|casa de apuestas
en linea|casa de apuestas en madrid|casa de apuestas en perú|casa de apuestas
en vivo|casa de apuestas españa|casa de apuestas españa inglaterra|casa de apuestas española|casa de apuestas españolas|casa de apuestas esports|casa de apuestas
eurocopa|casa de apuestas europa league|casa de apuestas f1|casa de apuestas formula 1|casa
de apuestas futbol|casa de apuestas ingreso minimo|casa de apuestas ingreso minimo 1 euro|casa de apuestas ingreso mínimo 1 euro|casa de apuestas legales|casa de apuestas legales en colombia|casa de apuestas
legales en españa|casa de apuestas libertadores|casa de apuestas liga española|casa de apuestas madrid|casa
de apuestas mas segura|casa de apuestas mejores|casa de apuestas méxico|casa de apuestas minimo
5 euros|casa de apuestas mlb|casa de apuestas mundial|casa de apuestas nba|casa de apuestas nfl|casa de apuestas nueva|casa de
apuestas nuevas|casa de apuestas oficial del real madrid|casa de apuestas oficial real madrid|casa de apuestas online|casa de apuestas
online argentina|casa de apuestas online chile|casa de apuestas online
españa|casa de apuestas online mexico|casa de apuestas online
paraguay|casa de apuestas online peru|casa de apuestas online usa|casa de apuestas online venezuela|casa
de apuestas pago anticipado|casa de apuestas para boxeo|casa de apuestas para ufc|casa de apuestas
peru|casa de apuestas perú|casa de apuestas peru online|casa de apuestas por paypal|casa de
apuestas promociones|casa de apuestas que regalan dinero|casa de
apuestas real madrid|casa de apuestas regalo de bienvenida|casa de apuestas sevilla|casa de apuestas sin dinero|casa de apuestas sin ingreso minimo|casa de
apuestas sin licencia en españa|casa de apuestas sin minimo de ingreso|casa de apuestas stake|casa
de apuestas tenis|casa de apuestas ufc|casa de apuestas valencia|casa de apuestas venezuela|casa de apuestas
virtuales|casa de apuestas vive la suerte|casa oficial de apuestas del real madrid|casas apuestas asiaticas|casas apuestas
bono sin deposito|casas apuestas bonos sin deposito|casas apuestas caballos|casas
apuestas chile|casas apuestas ciclismo|casas apuestas con licencia|casas apuestas con licencia en españa|casas apuestas deportivas|casas apuestas deportivas colombia|casas apuestas deportivas españa|casas apuestas deportivas
españolas|casas apuestas deportivas nuevas|casas apuestas españa|casas apuestas españolas|casas apuestas esports|casas apuestas eurocopa|casas apuestas golf|casas apuestas
ingreso minimo 5 euros|casas apuestas legales|casas apuestas legales españa|casas apuestas licencia|casas apuestas licencia españa|casas apuestas mexico|casas apuestas mundial|casas apuestas nba|casas apuestas nuevas|casas apuestas nuevas españa|casas apuestas ofertas|casas apuestas online|casas apuestas paypal|casas apuestas peru|casas apuestas sin licencia|casas apuestas tenis|casas asiaticas apuestas|casas de apuestas|casas
de apuestas 5 euros|casas de apuestas app|casas de apuestas argentinas|casas de apuestas asiaticas|casas de apuestas baloncesto|casas de apuestas barcelona|casas de apuestas bono bienvenida|casas de apuestas bono de bienvenida|casas de
apuestas bono por registro|casas de apuestas bono sin deposito|casas de apuestas bono sin ingreso|casas de apuestas bonos|casas de apuestas bonos de bienvenida|casas de apuestas bonos gratis|casas de apuestas bonos sin deposito|casas de apuestas boxeo|casas
de apuestas caballos|casas de apuestas carreras de caballos|casas de apuestas casino|casas de apuestas casino online|casas de
apuestas cerca de mi|casas de apuestas champions league|casas de apuestas chile|casas de apuestas ciclismo|casas
de apuestas colombia|casas de apuestas com|casas de apuestas con app|casas de apuestas
con apuestas gratis|casas de apuestas con bono|casas de apuestas con bono de
bienvenida|casas de apuestas con bono de registro|casas
de apuestas con bono por registro|casas de apuestas con bono sin deposito|casas
de apuestas con bonos|casas de apuestas con bonos gratis|casas de apuestas con bonos sin deposito|casas
de apuestas con deposito minimo|casas de apuestas con esports|casas de apuestas con handicap asiatico|casas de
apuestas con licencia|casas de apuestas con licencia en españa|casas de
apuestas con licencia españa|casas de apuestas con licencia española|casas de apuestas con mejores cuotas|casas de apuestas con pago anticipado|casas de apuestas con paypal|casas de
apuestas con paypal en perú|casas de apuestas con promociones|casas
de apuestas con ruleta en vivo|casas de
apuestas copa del rey|casas de apuestas de caballos|casas de
apuestas de españa|casas de apuestas de futbol|casas de apuestas de fútbol|casas de apuestas de peru|casas de apuestas deportivas|casas de apuestas deportivas asiaticas|casas de apuestas deportivas colombia|casas de
apuestas deportivas comparativa|casas de apuestas
deportivas con paypal|casas de apuestas deportivas en chile|casas de apuestas deportivas en españa|casas de apuestas deportivas en linea|casas de apuestas
deportivas en madrid|casas de apuestas deportivas en mexico|casas
de apuestas deportivas en peru|casas de apuestas deportivas
en sevilla|casas de apuestas deportivas en valencia|casas de apuestas deportivas españa|casas de apuestas deportivas
españolas|casas de apuestas deportivas legales|casas de apuestas deportivas
madrid|casas de apuestas deportivas mexico|casas de apuestas
deportivas nuevas|casas de apuestas deportivas online|casas de apuestas deportivas peru|casas de apuestas deportivas
perú|casas de apuestas deposito minimo 1 euro|casas de apuestas depósito mínimo 1 euro|casas
de apuestas dinero gratis|casas de apuestas en argentina|casas de
apuestas en barcelona|casas de apuestas en chile|casas
de apuestas en colombia|casas de apuestas en españa|casas de apuestas en españa online|casas de apuestas en linea|casas de apuestas en madrid|casas
de apuestas en méxico|casas de apuestas en peru|casas
de apuestas en perú|casas de apuestas en sevilla|casas de apuestas en uruguay|casas de
apuestas en valencia|casas de apuestas en venezuela|casas de apuestas equipos de futbol|casas de apuestas españa|casas de apuestas
españa alemania|casas de apuestas españa inglaterra|casas de apuestas españa licencia|casas de apuestas españa nuevas|casas de apuestas españa online|casas
de apuestas española|casas de apuestas españolas|casas de apuestas españolas con licencia|casas de apuestas españolas
online|casas de apuestas esports|casas de apuestas eurocopa|casas de apuestas eurocopa 2024|casas de apuestas europa league|casas de apuestas f1|casas de apuestas fisicas en barcelona|casas de
apuestas fisicas en españa|casas de apuestas formula 1|casas de apuestas fuera de españa|casas de apuestas futbol|casas de apuestas fútbol|casas de apuestas futbol
españa|casas de apuestas ganador eurocopa|casas de apuestas gratis|casas de apuestas ingreso minimo|casas de apuestas ingreso minimo 1 euro|casas de apuestas ingreso
minimo 5 euros|casas de apuestas inter barcelona|casas de apuestas legales|casas de apuestas legales
en colombia|casas de apuestas legales en españa|casas de apuestas legales en mexico|casas de apuestas legales
españa|casas de apuestas legales mx|casas de apuestas licencia|casas de apuestas licencia españa|casas de apuestas lista|casas de apuestas madrid|casas de apuestas mas seguras|casas de apuestas mejores bonos|casas de apuestas mejores cuotas|casas de apuestas mexico|casas de apuestas méxico|casas de
apuestas minimo 5 euros|casas de apuestas mlb|casas de apuestas mundial|casas de apuestas
mundial baloncesto|casas de apuestas mundiales|casas de apuestas nba|casas de apuestas no reguladas en españa|casas de apuestas nueva ley|casas
de apuestas nuevas|casas de apuestas nuevas en colombia|casas de apuestas nuevas en españa|casas de apuestas nuevas españa|casas de
apuestas ofertas|casas de apuestas online|casas de apuestas online argentina|casas de apuestas online colombia|casas de apuestas online deportivas|casas
de apuestas online ecuador|casas de apuestas online en argentina|casas de apuestas online en chile|casas de apuestas
online en colombia|casas de apuestas online en españa|casas de apuestas online en mexico|casas de apuestas
online españa|casas de apuestas online mas fiables|casas de apuestas online mexico|casas de apuestas online nuevas|casas de
apuestas online peru|casas de apuestas online usa|casas
de apuestas online venezuela|casas de apuestas pago paypal|casas
de apuestas para ufc|casas de apuestas paypal|casas de apuestas peru bono
sin deposito|casas de apuestas presenciales en españa|casas de apuestas promociones|casas de apuestas que aceptan paypal|casas
de
Your comment is awaiting moderation.
Контрактное производство электроники обеспечивает полный цикл работ от концепции до готового продукта. Инженеры проектируют схемотехнику, платы, корпус и программное обеспечение, тестируют прототипы и готовят устройства к серийному выпуску: https://www.nanafightsback.com/%D0%BA%D0%BE%D0%BD%D1%82%D1%80%D0%B0%D0%BA%D1%82%D0%BD%D0%BE%D0%B5-%D0%BF%D1%80%D0%BE%D0%B8%D0%B7%D0%B2%D0%BE%D0%B4%D1%81%D1%82%D0%B2%D0%BE-%D0%BF%D0%BB%D0%B0%D1%82-%D1%81-%D0%BC%D0%BE%D0%BD%D1%82/
Your comment is awaiting moderation.
clickstreampro.click – Pages loaded fast, images appeared sharp, and formatting stayed consistent.
Your comment is awaiting moderation.
learnsomethingincredible.click – Really love the variety of topics, keeps me engaged always.
Your comment is awaiting moderation.
urbantrendstore.click – Products arrived fast, packaging was neat, very happy with the order.
Your comment is awaiting moderation.
discovernewcollection.click – Great customer service, answered my questions quickly and politely always.
Your comment is awaiting moderation.
happylifestylemarket.click – Customer support was friendly, helped me find exactly what I wanted.
Your comment is awaiting moderation.
globalfindsoutlet.click – Easy to navigate, checkout was quick, very satisfied today.
Your comment is awaiting moderation.
adflowhub.click – Found practical insights today; sharing this article with colleagues later.
Your comment is awaiting moderation.
clickimpact.click – Loved the layout today; clean, simple, and genuinely user-friendly overall.
Your comment is awaiting moderation.
leadfusionlab.click – Appreciate the typography choices; comfortable spacing improved my reading experience.
Your comment is awaiting moderation.
rankvector.click – Content reads clearly, helpful examples made concepts easy to grasp.
Your comment is awaiting moderation.
startsomethingnewtoday.click – Motivational resources are excellent, keeps me focused and energized every day.
Your comment is awaiting moderation.
leadvector.click – Appreciate the typography choices; comfortable spacing improved my reading experience.
Your comment is awaiting moderation.
Кракен зеркало вход на сайт — надежный способ обойти блокировки и получить доступ к популярной платформе Кракен. Если официальный сайт недоступен из-за региональных ограничений или технических проблем, зеркало Кракен поможет быстро и безопасно войти на сайт без потери функционала.
Your comment is awaiting moderation.
trafficsprintpro.click – Pages loaded fast, images appeared sharp, and formatting stayed consistent.
Your comment is awaiting moderation.
(10 euros gratis apuestas|10 mejores casas de apuestas|10 trucos para ganar apuestas|15 euros gratis marca apuestas|1×2 apuestas|1×2 apuestas deportivas|1×2 apuestas que
significa|1×2 en apuestas|1×2 en apuestas que significa|1×2 que significa en apuestas|5
euros gratis apuestas|9 apuestas que siempre ganaras|a partir de cuanto se declara apuestas|actividades
de juegos de azar y apuestas|ad apuestas deportivas|aleksandre
topuria ufc apuestas|algoritmo para ganar apuestas deportivas|america apuestas|análisis nba apuestas|aplicacion android apuestas deportivas|aplicacion apuestas deportivas|aplicacion apuestas deportivas android|aplicación de apuestas online|aplicacion para hacer apuestas|aplicacion para hacer apuestas de futbol|aplicación para hacer
apuestas de fútbol|aplicaciones apuestas deportivas android|aplicaciones apuestas deportivas gratis|aplicaciones de apuestas android|aplicaciones de apuestas
de fútbol|aplicaciones de apuestas deportivas|aplicaciones de apuestas
deportivas peru|aplicaciones de apuestas deportivas perú|aplicaciones de apuestas en colombia|aplicaciones de
apuestas gratis|aplicaciones de apuestas online|aplicaciones de
apuestas seguras|aplicaciones de apuestas sin dinero|aplicaciones para hacer apuestas|apostar seguro apuestas deportivas|app android apuestas
deportivas|app apuestas|app apuestas android|app apuestas de futbol|app apuestas deportivas|app apuestas deportivas android|app apuestas deportivas argentina|app apuestas deportivas colombia|app apuestas
deportivas ecuador|app apuestas deportivas españa|app apuestas deportivas gratis|app apuestas entre amigos|app apuestas futbol|app apuestas
gratis|app apuestas sin dinero|app casa de apuestas|app
casas de apuestas|app control apuestas|app de apuestas|app de apuestas android|app de apuestas casino|app de apuestas colombia|app de
apuestas con bono de bienvenida|app de apuestas de futbol|app de apuestas deportivas|app de
apuestas deportivas android|app de apuestas deportivas argentina|app
de apuestas deportivas colombia|app de apuestas deportivas en españa|app de apuestas deportivas peru|app de apuestas deportivas perú|app de apuestas deportivas sin dinero|app de apuestas ecuador|app de apuestas en colombia|app
de apuestas en españa|app de apuestas en venezuela|app de
apuestas futbol|app de apuestas gratis|app de apuestas online|app de apuestas para android|app de apuestas
para ganar dinero|app de apuestas peru|app de apuestas reales|app de casas de apuestas|app marca apuestas
android|app moviles de apuestas|app para apuestas|app para apuestas de
futbol|app para apuestas deportivas|app para apuestas deportivas en español|app para ganar apuestas deportivas|app para hacer apuestas|app
para hacer apuestas deportivas|app para hacer apuestas entre amigos|app para llevar
control de apuestas|app pronosticos apuestas deportivas|app versus apuestas|apps
apuestas mundial|apps de apuestas|apps de apuestas con bono de bienvenida|apps de apuestas de futbol|apps de
apuestas deportivas peru|apps de apuestas mexico|apps para apuestas|aprender a hacer apuestas deportivas|aprender
hacer apuestas deportivas|apuesta del dia apuestas deportivas|apuestas 10 euros gratis|apuestas 100 seguras|apuestas
1×2|apuestas 1X2|apuestas 2 division|apuestas 3 division|apuestas a caballos|apuestas a carreras de caballos|apuestas a colombia|apuestas a corners|apuestas a ganar|apuestas
a jugadores nba|apuestas a la baja|apuestas a la
nfl|apuestas al barcelona|apuestas al dia|apuestas al empate|apuestas al mundial|apuestas al tenis wta|apuestas alaves barcelona|apuestas alcaraz hoy|apuestas
alemania españa|apuestas alonso campeon del mundo|apuestas altas y bajas|apuestas altas y bajas nfl|apuestas ambos equipos marcan|apuestas america|apuestas android|apuestas anillo
nba|apuestas antes del mundial|apuestas anticipadas|apuestas anticipadas nba|apuestas apps|apuestas arabia argentina|apuestas argentina|apuestas argentina
campeon del mundo|apuestas argentina canada|apuestas argentina colombia|apuestas argentina croacia|apuestas
argentina españa|apuestas argentina francia|apuestas argentina francia cuanto
paga|apuestas argentina francia mundial|apuestas argentina gana el mundial|apuestas argentina gana mundial|apuestas argentina holanda|apuestas argentina mexico|apuestas argentina méxico|apuestas argentina
mundial|apuestas argentina online|apuestas argentina paises bajos|apuestas argentina polonia|apuestas argentina uruguay|apuestas argentina vs australia|apuestas argentina vs colombia|apuestas argentina vs francia|apuestas argentina
vs peru|apuestas argentinas|apuestas arsenal real madrid|apuestas ascenso a primera division|apuestas
ascenso a segunda|apuestas asiaticas|apuestas asiatico|apuestas athletic|apuestas athletic atletico|apuestas athletic barça|apuestas athletic
barcelona|apuestas athletic betis|apuestas athletic manchester|apuestas athletic manchester united|apuestas athletic
osasuna|apuestas athletic real|apuestas athletic real madrid|apuestas athletic real sociedad|apuestas athletic real sociedad final|apuestas athletic roma|apuestas athletic sevilla|apuestas athletic valencia|apuestas atletico|apuestas atletico barcelona|apuestas atletico barsa|apuestas atletico campeon champions|apuestas atletico campeon de liga|apuestas atlético
copenhague|apuestas atletico de madrid|apuestas atlético de madrid|apuestas
atletico de madrid barcelona|apuestas atletico de
madrid gana la liga|apuestas atletico de madrid real madrid|apuestas atlético de madrid real madrid|apuestas atletico de madrid vs barcelona|apuestas atletico madrid|apuestas atletico madrid real madrid|apuestas atletico madrid vs
barcelona|apuestas atletico real madrid|apuestas atletico real madrid champions|apuestas atletismo|apuestas bajas|apuestas baloncesto|apuestas baloncesto acb|apuestas baloncesto handicap|apuestas baloncesto hoy|apuestas
baloncesto juegos olimpicos|apuestas baloncesto nba|apuestas baloncesto pronostico|apuestas baloncesto pronósticos|apuestas baloncesto prorroga|apuestas barca|apuestas barca athletic|apuestas barca atletico|apuestas barca bayern|apuestas barca bayern munich|apuestas barca girona|apuestas barca
hoy|apuestas barça hoy|apuestas barca inter|apuestas barca juventus|apuestas barca madrid|apuestas barça madrid|apuestas barca real madrid|apuestas barca vs juve|apuestas
barca vs madrid|apuestas barca vs psg|apuestas barcelona|apuestas barcelona alaves|apuestas barcelona athletic|apuestas
barcelona atletico|apuestas barcelona atletico de madrid|apuestas barcelona atlético de madrid|apuestas barcelona atletico madrid|apuestas
barcelona bayern|apuestas barcelona betis|apuestas barcelona campeon de liga|apuestas barcelona celta|apuestas barcelona espanyol|apuestas barcelona gana la champions|apuestas barcelona girona|apuestas barcelona granada|apuestas barcelona hoy|apuestas barcelona
inter|apuestas barcelona madrid|apuestas barcelona osasuna|apuestas barcelona psg|apuestas barcelona real
madrid|apuestas barcelona real sociedad|apuestas barcelona sevilla|apuestas barcelona valencia|apuestas barcelona villarreal|apuestas barcelona vs atletico madrid|apuestas barcelona
vs madrid|apuestas barcelona vs real madrid|apuestas barsa madrid|apuestas basket hoy|apuestas
bayern barcelona|apuestas bayern vs barcelona|apuestas beisbol|apuestas béisbol|apuestas beisbol mlb|apuestas beisbol pronosticos|apuestas beisbol venezolano|apuestas betis|apuestas betis – chelsea|apuestas betis barcelona|apuestas betis chelsea|apuestas betis fiorentina|apuestas
betis girona|apuestas betis madrid|apuestas betis mallorca|apuestas betis real madrid|apuestas betis real sociedad|apuestas betis sevilla|apuestas betis
valencia|apuestas betis valladolid|apuestas betis vs
valencia|apuestas betplay hoy colombia|apuestas betsson peru|apuestas bienvenida|apuestas billar online|apuestas bolivia vs colombia|apuestas bono|apuestas bono bienvenida|apuestas bono de bienvenida|apuestas bono de bienvenida sin deposito|apuestas bono gratis|apuestas bono sin deposito|apuestas bonos sin deposito|apuestas borussia real madrid|apuestas boxeo|apuestas boxeo de campeonato|apuestas boxeo españa|apuestas boxeo
español|apuestas boxeo femenino olimpiadas|apuestas boxeo hoy|apuestas boxeo online|apuestas
brasil colombia|apuestas brasil peru|apuestas brasil
uruguay|apuestas brasil vs colombia|apuestas brasil vs peru|apuestas caballos|apuestas caballos colocado|apuestas caballos españa|apuestas caballos hipodromo|apuestas caballos hoy|apuestas caballos madrid|apuestas caballos online|apuestas caballos sanlucar de barrameda|apuestas
caballos zarzuela|apuestas calculador|apuestas campeon|apuestas campeon champions|apuestas campeón champions|apuestas
campeon champions 2025|apuestas campeon champions league|apuestas campeon conference league|apuestas
campeon copa america|apuestas campeon copa del rey|apuestas
campeon de champions|apuestas campeon de la champions|apuestas campeon de liga|apuestas campeon del mundo|apuestas campeon eurocopa|apuestas campeón eurocopa|apuestas campeon europa league|apuestas campeon f1|apuestas
campeon f1 2025|apuestas campeon formula 1|apuestas campeon libertadores|apuestas
campeon liga|apuestas campeon liga bbva|apuestas campeon liga española|apuestas campeon liga santander|apuestas campeon motogp 2025|apuestas campeon mundial|apuestas campeón mundial|apuestas campeon mundial baloncesto|apuestas campeon nba|apuestas campeón nba|apuestas
campeon premier|apuestas campeon premier league|apuestas campeon roland garros|apuestas campeonato
f1|apuestas campeonatos de futbol|apuestas carrera de caballos|apuestas carrera de caballos
hoy|apuestas carrera de caballos nocturnas|apuestas carrera de galgos fin de
semana|apuestas carrera de galgos hoy|apuestas carrera de
galgos nocturnas|apuestas carreras caballos|apuestas carreras caballos sanlucar|apuestas carreras de caballos|apuestas carreras de caballos en directo|apuestas carreras de
caballos en vivo|apuestas carreras de caballos españa|apuestas carreras de caballos hoy|apuestas carreras
de caballos nacionales|apuestas carreras de caballos nocturnas|apuestas carreras de caballos
online|apuestas carreras de caballos sanlucar|apuestas carreras de caballos sanlúcar|apuestas carreras de galgos|apuestas carreras de galgos en vivo|apuestas carreras
de galgos nocturnas|apuestas carreras de galgos pre partido|apuestas casino|apuestas casino
barcelona|apuestas casino futbol|apuestas casino gran madrid|apuestas casino gratis|apuestas casino madrid|apuestas casino online|apuestas casino online argentina|apuestas casinos|apuestas casinos online|apuestas celta|apuestas celta
barcelona|apuestas celta betis|apuestas celta eibar|apuestas celta espanyol|apuestas celta granada|apuestas celta madrid|apuestas celta manchester|apuestas celta real madrid|apuestas champion league|apuestas champions foro|apuestas champions hoy|apuestas champions league|apuestas
champions league – pronósticos|apuestas champions league 2025|apuestas
champions league hoy|apuestas champions league pronosticos|apuestas champions
league pronósticos|apuestas champions pronosticos|apuestas chelsea barcelona|apuestas chelsea betis|apuestas chile|apuestas chile peru|apuestas chile venezuela|apuestas chile vs colombia|apuestas
chile vs uruguay|apuestas ciclismo|apuestas ciclismo en vivo|apuestas ciclismo femenino|apuestas ciclismo tour francia|apuestas
ciclismo vuelta|apuestas ciclismo vuelta a españa|apuestas ciclismo vuelta españa|apuestas city madrid|apuestas city real madrid|apuestas clasico|apuestas
clasico español|apuestas clasico real madrid
barcelona|apuestas clasificacion mundial|apuestas colombia|apuestas colombia argentina|apuestas colombia brasil|apuestas colombia paraguay|apuestas colombia uruguay|apuestas colombia vs argentina|apuestas colombia vs
brasil|apuestas combinadas|apuestas combinadas como
funcionan|apuestas combinadas de futbol|apuestas combinadas
de fútbol|apuestas combinadas foro|apuestas
combinadas futbol|apuestas combinadas hoy|apuestas combinadas mismo partido|apuestas combinadas mundial|apuestas combinadas nba|apuestas combinadas
para esta semana|apuestas combinadas para hoy|apuestas combinadas para mañana|apuestas combinadas pronosticos|apuestas combinadas recomendadas|apuestas combinadas seguras|apuestas combinadas seguras para hoy|apuestas combinadas seguras
para mañana|apuestas como ganar|apuestas comparador|apuestas con bono de bienvenida|apuestas con dinero ficticio|apuestas con dinero real|apuestas con dinero virtual|apuestas con handicap|apuestas con handicap asiatico|apuestas
con handicap baloncesto|apuestas con mas probabilidades de ganar|apuestas con paypal|apuestas con tarjeta de credito|apuestas con tarjeta de debito|apuestas consejos|apuestas copa|apuestas copa
africa|apuestas copa america|apuestas copa américa|apuestas copa argentina|apuestas copa brasil|apuestas copa davis|apuestas copa de
europa|apuestas copa del mundo|apuestas copa del rey|apuestas copa del rey baloncesto|apuestas copa del rey final|apuestas copa
del rey futbol|apuestas copa del rey ganador|apuestas copa del
rey hoy|apuestas copa del rey pronosticos|apuestas copa
del rey pronósticos|apuestas copa europa|apuestas copa italia|apuestas copa libertadores|apuestas copa mundial de hockey|apuestas copa rey|apuestas copa sudamericana|apuestas corners|apuestas
corners hoy|apuestas croacia argentina|apuestas cuartos eurocopa|apuestas cuotas|apuestas cuotas altas|apuestas cuotas bajas|apuestas de 1
euro|apuestas de baloncesto|apuestas de baloncesto hoy|apuestas de baloncesto nba|apuestas de baloncesto para hoy|apuestas de beisbol|apuestas de beisbol para hoy|apuestas de blackjack en linea|apuestas de boxeo|apuestas de boxeo
canelo|apuestas de boxeo en las vegas|apuestas de boxeo
hoy|apuestas de boxeo online|apuestas de caballo|apuestas de caballos|apuestas de
caballos como funciona|apuestas de caballos como se juega|apuestas de caballos en colombia|apuestas de caballos en españa|apuestas de
caballos en linea|apuestas de caballos españa|apuestas de caballos ganador y colocado|apuestas de caballos internacionales|apuestas de caballos juegos|apuestas de caballos online|apuestas de caballos online en venezuela|apuestas de caballos por internet|apuestas de caballos pronosticos|apuestas de caballos pronósticos|apuestas de carrera de caballos|apuestas de carreras de caballos|apuestas de carreras de caballos
online|apuestas de casino|apuestas de casino online|apuestas de casino por internet|apuestas de champions league|apuestas de ciclismo|apuestas de colombia|apuestas de copa america|apuestas de corners|apuestas de deportes en linea|apuestas de deportes online|apuestas de dinero|apuestas de esports|apuestas de eurocopa|apuestas
de europa league|apuestas de f1|apuestas de formula 1|apuestas de
futbol|apuestas de fútbol|apuestas de futbol app|apuestas de futbol argentina|apuestas de futbol colombia|apuestas
de futbol en colombia|apuestas de futbol en directo|apuestas
de futbol en linea|apuestas de futbol en vivo|apuestas de futbol español|apuestas de futbol gratis|apuestas de futbol hoy|apuestas de futbol mundial|apuestas de futbol online|apuestas de fútbol online|apuestas de futbol para hoy|apuestas de fútbol para hoy|apuestas de futbol para hoy
seguras|apuestas de futbol para mañana|apuestas de futbol peru|apuestas de
futbol pronosticos|apuestas de fútbol pronósticos|apuestas de futbol seguras|apuestas de futbol seguras para hoy|apuestas de futbol sin dinero|apuestas
de galgos|apuestas de galgos como ganar|apuestas de galgos en directo|apuestas de galgos online|apuestas de galgos trucos|apuestas de golf|apuestas de hockey|apuestas de hockey sobre hielo|apuestas de hoy|apuestas de hoy seguras|apuestas de juego|apuestas de juegos|apuestas de
juegos deportivos|apuestas de juegos online|apuestas de la champions league|apuestas de la copa américa|apuestas
de la eurocopa|apuestas de la europa league|apuestas de
la liga|apuestas de la liga bbva|apuestas de la liga española|apuestas de la nba|apuestas
de la nfl|apuestas de la ufc|apuestas de mlb|apuestas de nba|apuestas de nba para hoy|apuestas de partidos|apuestas de
partidos de futbol|apuestas de peleas ufc|apuestas de perros en vivo|apuestas de perros virtuales|apuestas de peru|apuestas de sistema|apuestas de sistema
como funciona|apuestas de sistema explicacion|apuestas de sistema explicación|apuestas de tenis|apuestas de tenis de mesa|apuestas de tenis en directo|apuestas de tenis hoy|apuestas de tenis para hoy|apuestas
de tenis pronosticos|apuestas de tenis seguras|apuestas de
todo tipo|apuestas de ufc|apuestas de ufc hoy|apuestas del boxeo|apuestas del
clasico|apuestas del clasico real madrid barca|apuestas del dia|apuestas del día|apuestas del dia de hoy|apuestas del dia deportivas|apuestas del
dia futbol|apuestas del mundial|apuestas del partido de hoy|apuestas del real madrid|apuestas del rey|apuestas
del sistema|apuestas deporte|apuestas deportes|apuestas deportiva|apuestas
deportivas|apuestas deportivas 1 euro|apuestas deportivas 10 euros gratis|apuestas deportivas 100 seguras|apuestas deportivas 1×2|apuestas deportivas
android|apuestas deportivas app|apuestas deportivas apps|apuestas
deportivas argentina|apuestas deportivas argentina futbol|apuestas deportivas argentina legal|apuestas deportivas atletico de madrid|apuestas deportivas
baloncesto|apuestas deportivas barca madrid|apuestas deportivas
barcelona|apuestas deportivas beisbol|apuestas deportivas
bono|apuestas deportivas bono bienvenida|apuestas deportivas bono de bienvenida|apuestas
deportivas bono sin deposito|apuestas deportivas bonos de bienvenida|apuestas deportivas boxeo|apuestas deportivas caballos|apuestas
deportivas calculadora|apuestas deportivas campeon liga|apuestas deportivas casino|apuestas deportivas casino barcelona|apuestas deportivas casino online|apuestas deportivas cerca de mi|apuestas deportivas champions league|apuestas deportivas chile|apuestas
deportivas ciclismo|apuestas deportivas colombia|apuestas deportivas
com|apuestas deportivas com foro|apuestas deportivas com pronosticos|apuestas
deportivas combinadas|apuestas deportivas combinadas para hoy|apuestas deportivas como se juega|apuestas
deportivas comparador|apuestas deportivas con bono gratis|apuestas deportivas con bonos gratis|apuestas deportivas con dinero ficticio|apuestas deportivas con paypal|apuestas
deportivas con puntos virtuales|apuestas deportivas consejos|apuestas deportivas consejos para ganar|apuestas deportivas copa america|apuestas deportivas copa del rey|apuestas deportivas copa libertadores|apuestas deportivas copa
mundial|apuestas deportivas corners|apuestas deportivas cual es la mejor|apuestas deportivas
cuotas altas|apuestas deportivas de baloncesto|apuestas deportivas de boxeo|apuestas deportivas de colombia|apuestas deportivas de futbol|apuestas deportivas de nba|apuestas deportivas de nhl|apuestas deportivas de peru|apuestas
deportivas de tenis|apuestas deportivas del dia|apuestas deportivas dinero ficticio|apuestas deportivas directo|apuestas deportivas doble
oportunidad|apuestas deportivas en argentina|apuestas
deportivas en chile|apuestas deportivas en colombia|apuestas deportivas en directo|apuestas deportivas en españa|apuestas deportivas en español|apuestas deportivas en linea|apuestas deportivas en línea|apuestas
deportivas en peru|apuestas deportivas en perú|apuestas deportivas en sevilla|apuestas deportivas
en uruguay|apuestas deportivas en vivo|apuestas deportivas es|apuestas deportivas es pronosticos|apuestas
deportivas españa|apuestas deportivas españolas|apuestas deportivas
esports|apuestas deportivas estadisticas|apuestas deportivas estrategias|apuestas deportivas estrategias seguras|apuestas deportivas
eurocopa|apuestas deportivas europa league|apuestas deportivas f1|apuestas deportivas faciles de
ganar|apuestas deportivas formula 1|apuestas deportivas foro|apuestas
deportivas foro futbol|apuestas deportivas foro tenis|apuestas deportivas francia argentina|apuestas deportivas futbol|apuestas deportivas
fútbol|apuestas deportivas futbol argentino|apuestas
deportivas futbol colombia|apuestas deportivas futbol español|apuestas deportivas
gana|apuestas deportivas ganadas|apuestas deportivas ganar dinero seguro|apuestas deportivas gane|apuestas deportivas golf|apuestas deportivas gratis|apuestas deportivas gratis con premios|apuestas deportivas gratis hoy|apuestas deportivas gratis sin deposito|apuestas deportivas handicap|apuestas deportivas handicap asiatico|apuestas deportivas hoy|apuestas deportivas impuestos|apuestas deportivas
interior argentina|apuestas deportivas juegos olimpicos|apuestas deportivas la liga|apuestas
deportivas legales|apuestas deportivas legales en colombia|apuestas deportivas libres de impuestos|apuestas deportivas
licencia españa|apuestas deportivas liga española|apuestas deportivas listado|apuestas deportivas listado clasico|apuestas deportivas madrid|apuestas
deportivas mas seguras|apuestas deportivas mejor pagadas|apuestas deportivas mejores|apuestas deportivas mejores app|apuestas deportivas mejores casas|apuestas
deportivas mejores cuotas|apuestas deportivas mejores paginas|apuestas deportivas mexico|apuestas deportivas
méxico|apuestas deportivas mlb|apuestas deportivas mlb hoy|apuestas deportivas multiples|apuestas deportivas mundial|apuestas
deportivas murcia|apuestas deportivas nba|apuestas deportivas
nba hoy|apuestas deportivas nfl|apuestas deportivas nhl|apuestas deportivas nuevas|apuestas deportivas ofertas|apuestas deportivas online|apuestas deportivas online argentina|apuestas deportivas online chile|apuestas deportivas online colombia|apuestas deportivas online en colombia|apuestas deportivas
online españa|apuestas deportivas online mexico|apuestas deportivas online paypal|apuestas deportivas
online peru|apuestas deportivas online por internet|apuestas deportivas
pago paypal|apuestas deportivas para ganar
dinero|apuestas deportivas para hoy|apuestas deportivas
para hoy pronosticos|apuestas deportivas partido suspendido|apuestas deportivas partidos de hoy|apuestas deportivas paypal|apuestas deportivas peru|apuestas deportivas perú|apuestas deportivas peru vs ecuador|apuestas deportivas
predicciones|apuestas deportivas promociones|apuestas deportivas pronostico|apuestas deportivas pronóstico|apuestas deportivas
pronostico hoy|apuestas deportivas pronosticos|apuestas deportivas pronósticos|apuestas deportivas
pronosticos expertos|apuestas deportivas pronosticos gratis|apuestas deportivas pronosticos nba|apuestas deportivas pronosticos tenis|apuestas deportivas que
aceptan paypal|apuestas deportivas real madrid|apuestas deportivas regalo bienvenida|apuestas deportivas resultado exacto|apuestas deportivas resultados|apuestas deportivas rugby|apuestas deportivas seguras|apuestas deportivas seguras foro|apuestas deportivas seguras hoy|apuestas deportivas seguras para
hoy|apuestas deportivas seguras telegram|apuestas deportivas sevilla|apuestas deportivas simulador eurocopa|apuestas deportivas sin deposito|apuestas
deportivas sin deposito inicial|apuestas deportivas sin dinero|apuestas deportivas sin dinero real|apuestas deportivas sin registro|apuestas deportivas stake|apuestas deportivas stake 10|apuestas
deportivas telegram españa|apuestas deportivas tenis|apuestas deportivas
tenis de mesa|apuestas deportivas tenis foro|apuestas deportivas tenis hoy|apuestas deportivas tips|apuestas deportivas tipster|apuestas deportivas ufc|apuestas deportivas uruguay|apuestas deportivas valencia|apuestas deportivas
valencia barcelona|apuestas deportivas venezuela|apuestas deportivas virtuales|apuestas deportivas y
casino|apuestas deportivas y casino online|apuestas deportivas.com|apuestas deportivas.com foro|apuestas
deportivas.es|apuestas deportivos pronosticos|apuestas deposito
minimo 1 euro|apuestas descenso a segunda|apuestas
descenso a segunda b|apuestas descenso la liga|apuestas descenso primera division|apuestas
descenso segunda|apuestas dia|apuestas diarias seguras|apuestas dinero|apuestas dinero ficticio|apuestas dinero real|apuestas dinero virtual|apuestas directas|apuestas directo|apuestas directo futbol|apuestas
division de honor juvenil|apuestas dnb|apuestas
doble oportunidad|apuestas doble resultado|apuestas dobles|apuestas
dobles y triples|apuestas dortmund barcelona|apuestas draft nba|apuestas
draft nfl|apuestas ecuador vs argentina|apuestas ecuador vs venezuela|apuestas egipto uruguay|apuestas el clasico|apuestas elecciones venezuela|apuestas empate|apuestas en baloncesto|apuestas
en barcelona|apuestas en beisbol|apuestas en boxeo|apuestas en caballos|apuestas en carreras
de caballos|apuestas en casino|apuestas en casino online|apuestas en casinos|apuestas en casinos online|apuestas en chile|apuestas en ciclismo|apuestas en colombia|apuestas en colombia de futbol|apuestas
en directo|apuestas en directo futbol|apuestas en directo pronosticos|apuestas en el futbol|apuestas en el tenis|apuestas
en españa|apuestas en esports|apuestas
en eventos deportivos virtuales|apuestas en golf|apuestas en juegos|apuestas en la champions league|apuestas en la eurocopa|apuestas
en la liga|apuestas en la nba|apuestas en la nfl|apuestas en las vegas mlb|apuestas en las vegas nfl|apuestas en linea|apuestas en línea|apuestas en linea
argentina|apuestas en linea boxeo|apuestas en linea chile|apuestas en linea colombia|apuestas en línea de fútbol|apuestas en linea
deportivas|apuestas en linea españa|apuestas en linea estados unidos|apuestas en linea futbol|apuestas en linea mexico|apuestas en línea méxico|apuestas en linea mundial|apuestas
en linea peru|apuestas en linea usa|apuestas en los esports|apuestas en madrid|apuestas en méxico|apuestas en mexico online|apuestas en nba|apuestas en partidos de futbol|apuestas en partidos
de futbol en vivo|apuestas en partidos de tenis en directo|apuestas en perú|apuestas en sevilla|apuestas en sistema|apuestas en stake|apuestas en tenis|apuestas en tenis de mesa|apuestas en valencia|apuestas en vivo|apuestas en vivo argentina|apuestas en vivo
casino|apuestas en vivo futbol|apuestas en vivo fútbol|apuestas en vivo nba|apuestas en vivo peru|apuestas en vivo tenis|apuestas en vivo ufc|apuestas equipo mbappe|apuestas equipos de futbol|apuestas españa|apuestas españa alemania|apuestas españa alemania eurocopa|apuestas españa croacia|apuestas españa eurocopa|apuestas españa francia|apuestas españa francia eurocopa|apuestas españa gana el mundial|apuestas españa gana eurocopa|apuestas españa gana mundial|apuestas españa
georgia|apuestas españa holanda|apuestas españa inglaterra|apuestas
españa inglaterra cuotas|apuestas españa inglaterra
eurocopa|apuestas españa italia|apuestas españa mundial|apuestas españa
paises bajos|apuestas español|apuestas español oviedo|apuestas espanyol barcelona|apuestas espanyol betis|apuestas espanyol villarreal|apuestas esport|apuestas esports|apuestas esports colombia|apuestas esports españa|apuestas esports fifa|apuestas
esports gratis|apuestas esports lol|apuestas esports peru|apuestas esports valorant|apuestas estadisticas|apuestas estrategias|apuestas euro|apuestas euro copa|apuestas eurocopa|apuestas eurocopa campeon|apuestas eurocopa españa|apuestas eurocopa favoritos|apuestas eurocopa
femenina|apuestas eurocopa final|apuestas eurocopa ganador|apuestas eurocopa hoy|apuestas eurocopa sub 21|apuestas euroliga baloncesto|apuestas euroliga pronosticos|apuestas europa league|apuestas europa league hoy|apuestas europa league pronosticos|apuestas
europa league pronósticos|apuestas euros|apuestas f1 abu dhabi|apuestas f1 bahrein|apuestas f1 canada|apuestas f1 china|apuestas f1 cuotas|apuestas f1 hoy|apuestas
f1 las vegas|apuestas f1 miami|apuestas f1 monaco|apuestas faciles de ganar|apuestas
fáciles de ganar|apuestas faciles para ganar|apuestas favoritas|apuestas favorito champions|apuestas favoritos champions|apuestas
favoritos eurocopa|apuestas favoritos mundial|apuestas fc barcelona|apuestas final champions
cuotas|apuestas final champions league|apuestas final champions peru|apuestas final copa|apuestas final copa america|apuestas final copa de europa|apuestas final copa del rey|apuestas final copa europa|apuestas final copa libertadores|apuestas final copa rey|apuestas final de copa|apuestas final de
copa del rey|apuestas final del mundial|apuestas final euro|apuestas final eurocopa|apuestas final europa league|apuestas final
libertadores|apuestas final mundial|apuestas final nba|apuestas final rugby|apuestas final uefa europa league|apuestas
final.mundial|apuestas finales de conferencia nfl|apuestas finales nba|apuestas fiorentina betis|apuestas
formula|apuestas formula 1|apuestas fórmula 1|apuestas fórmula 1 pronósticos|apuestas formula uno|apuestas foro|apuestas foro nba|apuestas francia argentina|apuestas francia españa|apuestas futbol|apuestas fútbol|apuestas futbol americano|apuestas futbol
americano nfl|apuestas futbol argentina|apuestas futbol argentino|apuestas futbol champions league|apuestas
futbol chile|apuestas futbol colombia|apuestas
futbol consejos|apuestas futbol en directo|apuestas
fútbol en directo|apuestas futbol en vivo|apuestas fútbol en vivo|apuestas futbol españa|apuestas futbol español|apuestas fútbol español|apuestas
futbol eurocopa|apuestas futbol femenino|apuestas futbol foro|apuestas futbol gratis|apuestas futbol
hoy|apuestas fútbol hoy|apuestas futbol juegos olimpicos|apuestas
futbol mexico|apuestas futbol mundial|apuestas futbol online|apuestas futbol para hoy|apuestas
futbol peru|apuestas futbol pronosticos|apuestas futbol sala|apuestas futbol telegram|apuestas futbol virtual|apuestas galgos|apuestas galgos en directo|apuestas galgos
hoy|apuestas galgos online|apuestas galgos pronosticos|apuestas
galgos trucos|apuestas gana|apuestas gana colombia|apuestas gana resultados|apuestas ganadas|apuestas ganadas hoy|apuestas ganador
champions league|apuestas ganador copa america|apuestas ganador copa del
rey|apuestas ganador copa del rey baloncesto|apuestas ganador copa libertadores|apuestas ganador de
la eurocopa|apuestas ganador de la liga|apuestas
ganador del mundial|apuestas ganador eurocopa|apuestas ganador europa league|apuestas ganador f1|apuestas ganador la liga|apuestas ganador liga española|apuestas ganador mundial|apuestas ganador mundial baloncesto|apuestas ganador mundial f1|apuestas ganador nba|apuestas ganadores eurocopa|apuestas ganadores mundial|apuestas ganar champions|apuestas ganar eurocopa|apuestas
ganar liga|apuestas ganar mundial|apuestas ganar nba|apuestas getafe valencia|apuestas ghana uruguay|apuestas girona|apuestas girona
athletic|apuestas girona betis|apuestas girona campeon de liga|apuestas girona campeon liga|apuestas girona gana la liga|apuestas girona real madrid|apuestas girona real sociedad|apuestas goleador eurocopa|apuestas goleadores eurocopa|apuestas goles asiaticos|apuestas golf|apuestas golf masters|apuestas golf pga|apuestas granada barcelona|apuestas grand slam de tenis|apuestas gratis|apuestas gratis casino|apuestas gratis con premios|apuestas gratis hoy|apuestas gratis
para hoy|apuestas gratis por registro|apuestas gratis puntos|apuestas gratis regalos|apuestas gratis
sin deposito|apuestas gratis sin depósito|apuestas gratis sin ingreso|apuestas gratis sports|apuestas gratis y ganar premios|apuestas grupo a eurocopa|apuestas grupos eurocopa|apuestas handicap|apuestas handicap asiatico|apuestas
handicap baloncesto|apuestas handicap como funciona|apuestas handicap
nba|apuestas handicap nfl|apuestas hipicas online|apuestas hípicas online|apuestas hipicas
venezuela|apuestas hockey|apuestas hockey hielo|apuestas hockey patines|apuestas hockey
sobre hielo|apuestas holanda argentina|apuestas holanda
vs argentina|apuestas hoy|apuestas hoy champions|apuestas hoy futbol|apuestas hoy nba|apuestas
hoy pronosticos|apuestas hoy seguras|apuestas impuestos|apuestas inglaterra paises bajos|apuestas inter barca|apuestas inter barcelona|apuestas juego|apuestas juegos|apuestas juegos en linea|apuestas juegos olimpicos|apuestas
juegos olímpicos|apuestas juegos olimpicos baloncesto|apuestas juegos online|apuestas juegos
virtuales|apuestas jugador sevilla|apuestas jugadores nba|apuestas
kings league americas|apuestas la liga|apuestas la liga española|apuestas la liga hoy|apuestas la liga santander|apuestas las vegas mlb|apuestas las vegas nba|apuestas las vegas
nfl|apuestas league of legends mundial|apuestas legal|apuestas legales|apuestas legales en colombia|apuestas legales en españa|apuestas legales en estados unidos|apuestas legales españa|apuestas leganes
betis|apuestas libertadores|apuestas licencia|apuestas liga 1 peru|apuestas liga argentina|apuestas
liga bbva pronosticos|apuestas liga de campeones|apuestas liga
de campeones de baloncesto|apuestas liga de campeones de
hockey|apuestas liga españa|apuestas liga española|apuestas liga santander pronosticos|apuestas ligas de futbol|apuestas linea|apuestas linea de gol|apuestas liverpool barcelona|apuestas liverpool real madrid|apuestas lol mundial|apuestas madrid|apuestas
madrid arsenal|apuestas madrid atletico|apuestas madrid atletico
champions|apuestas madrid barca|apuestas madrid barça|apuestas madrid barca hoy|apuestas
madrid barca supercopa|apuestas madrid barcelona|apuestas madrid
barsa|apuestas madrid bayern|apuestas madrid betis|apuestas madrid borussia|apuestas
madrid campeon champions|apuestas madrid celta|apuestas madrid
city|apuestas madrid dortmund|apuestas madrid gana la liga|apuestas madrid gana
liga|apuestas madrid hoy|apuestas madrid liverpool|apuestas madrid
osasuna|apuestas madrid sevilla|apuestas madrid valencia|apuestas madrid vs arsenal|apuestas madrid vs barcelona|apuestas mallorca osasuna|apuestas mallorca real sociedad|apuestas manchester athletic|apuestas manchester city real madrid|apuestas mas faciles de ganar|apuestas mas seguras|apuestas
mas seguras para hoy|apuestas masters de golf|apuestas
masters de tenis|apuestas maximo goleador eurocopa|apuestas
maximo goleador mundial|apuestas mejor jugador eurocopa|apuestas mejores casinos online|apuestas
mexico|apuestas méxico|apuestas mexico polonia|apuestas méxico polonia|apuestas mlb|apuestas mlb hoy|apuestas
mlb las vegas|apuestas mlb para hoy|apuestas mlb pronosticos|apuestas mlb usa|apuestas mma ufc|apuestas momios|apuestas multiples|apuestas múltiples|apuestas multiples como funcionan|apuestas multiples
el gordo|apuestas multiples futbol|apuestas mundial|apuestas
mundial 2026|apuestas mundial baloncesto|apuestas
mundial balonmano|apuestas mundial brasil|apuestas mundial campeon|apuestas mundial
ciclismo|apuestas mundial clubes|apuestas mundial de baloncesto|apuestas mundial de ciclismo|apuestas mundial de clubes|apuestas mundial de futbol|apuestas mundial de fútbol|apuestas mundial de rugby|apuestas mundial f1|apuestas mundial favoritos|apuestas
mundial femenino|apuestas mundial formula 1|apuestas mundial
futbol|apuestas mundial ganador|apuestas mundial lol|apuestas mundial moto gp|apuestas mundial
motogp|apuestas mundial rugby|apuestas mundial sub 17|apuestas mundiales|apuestas mundialistas|apuestas mvp eurocopa|apuestas mvp nba|apuestas mvp nfl|apuestas nacionales de colombia|apuestas nba|apuestas nba all star|apuestas
nba campeon|apuestas nba consejos|apuestas nba esta noche|apuestas nba finals|apuestas nba gratis|apuestas
nba hoy|apuestas nba hoy jugadores|apuestas nba hoy pronosticos|apuestas nba
para hoy|apuestas nba playoffs|apuestas nba pronosticos|apuestas nba pronósticos|apuestas nba pronosticos hoy|apuestas nba tipster|apuestas nfl|apuestas nfl hoy|apuestas nfl las vegas|apuestas nfl
playoffs|apuestas nfl pronosticos|apuestas nfl pronósticos|apuestas nfl semana 4|apuestas nfl super bowl|apuestas
nhl|apuestas nhl pronosticos|apuestas octavos eurocopa|apuestas ofertas|apuestas online|apuestas online argentina|apuestas
online argentina legal|apuestas online bono|apuestas online bono bienvenida|apuestas
online boxeo|apuestas online caballos|apuestas online carreras de caballos|apuestas online casino|apuestas online champions league|apuestas online chile|apuestas online ciclismo|apuestas online colombia|apuestas online comparativa|apuestas online con paypal|apuestas online de caballos|apuestas online deportivas|apuestas online en argentina|apuestas
online en peru|apuestas online espana|apuestas online españa|apuestas online esports|apuestas online
foro|apuestas online futbol|apuestas online futbol españa|apuestas
online golf|apuestas online gratis|apuestas online gratis
sin deposito|apuestas online juegos|apuestas online mexico|apuestas online mma|apuestas online movil|apuestas online nba|apuestas online
net|apuestas online nuevas|apuestas online opiniones|apuestas
online paypal|apuestas online peru|apuestas online seguras|apuestas online sin dinero|apuestas online sin registro|apuestas
online tenis|apuestas online ufc|apuestas online uruguay|apuestas online venezuela|apuestas open britanico
golf|apuestas osasuna athletic|apuestas osasuna barcelona|apuestas osasuna real
madrid|apuestas osasuna sevilla|apuestas osasuna valencia|apuestas over|apuestas over 2.5|apuestas over under|apuestas paginas|apuestas pago
anticipado|apuestas paises bajos ecuador|apuestas paises bajos inglaterra|apuestas países bajos qatar|apuestas para boxeo|apuestas para champions
league|apuestas para el clasico|apuestas para el dia
de hoy|apuestas para el mundial|apuestas para el partido de hoy|apuestas para eurocopa|apuestas para
europa league|apuestas para futbol|apuestas para ganar|apuestas
para ganar dinero|apuestas para ganar dinero facil|apuestas para ganar
en la ruleta|apuestas para ganar la champions|apuestas para
ganar la eurocopa|apuestas para ganar la europa league|apuestas para
ganar la liga|apuestas para ganar siempre|apuestas para hacer|apuestas para hoy|apuestas para
hoy de futbol|apuestas para hoy europa league|apuestas para hoy futbol|apuestas para juegos|apuestas para la champions league|apuestas para la copa del rey|apuestas para la eurocopa|apuestas
para la europa league|apuestas para la final de la eurocopa|apuestas para
la nba hoy|apuestas para los partidos de hoy|apuestas para partidos de hoy|apuestas para ufc|apuestas
partido|apuestas partido aplazado|apuestas partido champions|apuestas partido colombia|apuestas partido españa marruecos|apuestas partido mundial|apuestas partido suspendido|apuestas partidos|apuestas partidos champions league|apuestas partidos csgo|apuestas partidos de futbol|apuestas partidos de futbol hoy|apuestas partidos
de hoy|apuestas partidos eurocopa|apuestas partidos futbol|apuestas partidos hoy|apuestas partidos mundial|apuestas paypal|apuestas peleas de boxeo|apuestas peru|apuestas perú|apuestas peru brasil|apuestas peru chile|apuestas peru paraguay|apuestas peru
uruguay|apuestas peru vs chile|apuestas peru vs colombia|apuestas
pichichi eurocopa|apuestas plataforma|apuestas playoff|apuestas
playoff ascenso|apuestas playoff ascenso a primera|apuestas playoff nba|apuestas
playoff segunda|apuestas playoff segunda b|apuestas playoffs nba|apuestas playoffs nfl|apuestas polonia argentina|apuestas
por argentina|apuestas por internet mexico|apuestas por internet para
ganar dinero|apuestas por paypal|apuestas por ronda boxeo|apuestas por sistema|apuestas portugal uruguay|apuestas pre partido|apuestas predicciones|apuestas predicciones futbol|apuestas primera division|apuestas primera division españa|apuestas promociones|apuestas pronostico|apuestas
pronosticos|apuestas pronosticos deportivos|apuestas
pronosticos deportivos tenis|apuestas pronosticos futbol|apuestas pronosticos gratis|apuestas pronosticos nba|apuestas pronosticos tenis|apuestas prorroga|apuestas psg barca|apuestas psg barcelona|apuestas puntos por
tarjetas|apuestas puntos tarjetas|apuestas que aceptan paypal|apuestas que es handicap|apuestas que puedes hacer con tu novia|apuestas que siempre
ganaras|apuestas que significa|apuestas quien bajara a segunda|apuestas quién bajara a segunda|apuestas quien gana el mundial|apuestas quien gana eurocopa|apuestas quien gana la champions|apuestas quien gana la eurocopa|apuestas quien gana la
liga|apuestas quien ganara el mundial|apuestas quién ganará el
mundial|apuestas quien ganara la champions|apuestas quien ganara la eurocopa|apuestas quien ganara la liga|apuestas rayo
barcelona|apuestas real madrid|apuestas
real madrid arsenal|apuestas real madrid athletic|apuestas real madrid atletico|apuestas
real madrid atletico champions|apuestas real madrid atletico de madrid|apuestas real madrid atlético de
madrid|apuestas real madrid atletico madrid|apuestas real madrid barcelona|apuestas real madrid bayern|apuestas real
madrid betis|apuestas real madrid borussia|apuestas real madrid campeon champions|apuestas real madrid
celta|apuestas real madrid champions|apuestas real madrid city|apuestas real madrid girona|apuestas real madrid
hoy|apuestas real madrid liverpool|apuestas real madrid manchester
city|apuestas real madrid osasuna|apuestas real madrid real sociedad|apuestas real madrid valencia|apuestas real madrid villarreal|apuestas real madrid vs arsenal|apuestas
real madrid vs atletico|apuestas real madrid vs atlético|apuestas real
madrid vs atletico madrid|apuestas real madrid vs
barcelona|apuestas real madrid vs betis|apuestas real madrid vs sevilla|apuestas real madrid vs valencia|apuestas real sociedad|apuestas
real sociedad athletic|apuestas real sociedad barcelona|apuestas
real sociedad betis|apuestas real sociedad psg|apuestas
real sociedad real madrid|apuestas real sociedad valencia|apuestas recomendadas hoy|apuestas regalo de bienvenida|apuestas registro|apuestas resultado exacto|apuestas resultados|apuestas resultados eurocopa|apuestas retirada tenis|apuestas roma barcelona|apuestas roma sevilla|apuestas rugby|apuestas rugby mundial|apuestas rugby world
cup|apuestas ruleta seguras|apuestas segunda|apuestas segunda b|apuestas segunda
division|apuestas segunda división|apuestas segunda division b|apuestas segunda division españa|apuestas seguras|apuestas seguras baloncesto|apuestas seguras calculadora|apuestas seguras
en la ruleta|apuestas seguras eurocopa|apuestas seguras
foro|apuestas seguras futbol|apuestas seguras futbol hoy|apuestas seguras gratis|apuestas seguras hoy|apuestas seguras hoy futbol|apuestas seguras nba|apuestas seguras nba hoy|apuestas seguras para este fin de semana|apuestas seguras para
ganar dinero|apuestas seguras para hoy|apuestas seguras para hoy fútbol|apuestas seguras
para hoy pronósticos|apuestas seguras para mañana|apuestas seguras ruleta|apuestas seguras telegram|apuestas seguras tenis|apuestas
semifinales eurocopa|apuestas senegal paises bajos|apuestas sevilla|apuestas sevilla athletic|apuestas sevilla atletico de madrid|apuestas sevilla barcelona|apuestas sevilla betis|apuestas sevilla campeon liga|apuestas sevilla celta|apuestas
sevilla gana la liga|apuestas sevilla girona|apuestas sevilla
inter|apuestas sevilla jugador|apuestas sevilla juventus|apuestas sevilla leganes|apuestas sevilla
madrid|apuestas sevilla manchester united|apuestas sevilla osasuna|apuestas sevilla real madrid|apuestas sevilla real sociedad|apuestas sevilla roma|apuestas sevilla valencia|apuestas significa|apuestas
simples ejemplos|apuestas simples o combinadas|apuestas sin deposito|apuestas sin deposito inicial|apuestas sin deposito minimo|apuestas
sin dinero|apuestas sin dinero real|apuestas sin empate|apuestas sin empate que significa|apuestas sin ingreso minimo|apuestas sin registro|apuestas sistema|apuestas sistema calculadora|apuestas sistema como
funciona|apuestas sistema trixie|apuestas sociedad|apuestas sorteo copa del rey|apuestas stake|apuestas stake 10|apuestas stake 10 hoy|apuestas
super bowl favorito|apuestas super rugby|apuestas supercopa españa|apuestas superliga argentina|apuestas tarjeta roja|apuestas tarjetas|apuestas tarjetas amarillas|apuestas tenis|apuestas tenis atp|apuestas tenis consejos|apuestas tenis copa davis|apuestas tenis de mesa|apuestas tenis de mesa pronosticos|apuestas tenis en vivo|apuestas tenis femenino|apuestas
tenis hoy|apuestas tenis itf|apuestas tenis
pronosticos|apuestas tenis pronósticos|apuestas
tenis retirada|apuestas tenis roland garros|apuestas tenis seguras|apuestas tenis wimbledon|apuestas tenis
wta|apuestas tercera division|apuestas tercera division españa|apuestas tipos|apuestas tips|apuestas tipster|apuestas tipster para
hoy|apuestas topuria holloway cuotas|apuestas torneos de golf|apuestas
torneos de tenis|apuestas trucos|apuestas uefa champions league|apuestas
uefa europa league|apuestas ufc|apuestas ufc chile|apuestas ufc como funciona|apuestas ufc hoy|apuestas ufc ilia topuria|apuestas ufc online|apuestas ufc pronósticos|apuestas ufc telegram|apuestas ufc topuria|apuestas under over|apuestas
unionistas villarreal|apuestas uruguay|apuestas uruguay colombia|apuestas uruguay corea|apuestas
uruguay vs colombia|apuestas us open golf|apuestas us open tenis|apuestas valencia|apuestas valencia barcelona|apuestas valencia betis|apuestas valencia madrid|apuestas valencia real madrid|apuestas valladolid barcelona|apuestas valladolid valencia|apuestas valor app|apuestas valor en directo|apuestas valor galgos|apuestas venezuela|apuestas
venezuela argentina|apuestas venezuela bolivia|apuestas venezuela ecuador|apuestas villarreal|apuestas villarreal athletic|apuestas villarreal barcelona|apuestas villarreal bayern|apuestas villarreal betis|apuestas
villarreal liverpool|apuestas villarreal manchester|apuestas villarreal manchester united|apuestas villarreal vs real madrid|apuestas virtuales|apuestas virtuales colombia|apuestas virtuales futbol|apuestas virtuales sin dinero|apuestas vivo|apuestas
vuelta a españa|apuestas vuelta españa|apuestas william hill partidos de hoy|apuestas y casino|apuestas y casinos|apuestas y juegos
de azar|apuestas y pronosticos|apuestas y pronosticos de futbol|apuestas y pronosticos deportivos|apuestas y resultados|apuestas-deportivas|apuestas-deportivas.es pronosticos|arbitro nba apuestas|argentina apuestas|argentina colombia apuestas|argentina croacia apuestas|argentina francia
apuestas|argentina mexico apuestas|argentina peru apuestas|argentina uruguay apuestas|argentina vs bolivia apuestas|argentina
vs chile apuestas|argentina vs colombia
apuestas|argentina vs francia apuestas|argentina vs.
colombia apuestas|asi se gana en las apuestas deportivas|asiatico apuestas|asiatico en apuestas|asiaticos apuestas|athletic barcelona apuestas|athletic manchester united apuestas|athletic osasuna apuestas|athletic real madrid apuestas|atletico barcelona apuestas|atletico
de madrid apuestas|atlético de madrid apuestas|atletico de madrid real madrid apuestas|atletico de madrid
vs barcelona apuestas|atletico madrid real madrid apuestas|atletico madrid vs real madrid apuestas|atletico
real madrid apuestas|atletico vs real madrid apuestas|avisador de
cuotas apuestas|bajada de cuotas apuestas|baloncesto apuestas|barbastro barcelona apuestas|barca apuestas|barca bayern apuestas|barca inter apuestas|barca madrid
apuestas|barça madrid apuestas|barca vs atletico apuestas|barca vs madrid apuestas|barca vs real
madrid apuestas|barcelona – real madrid apuestas|barcelona apuestas|barcelona atletico apuestas|barcelona atletico
de madrid apuestas|barcelona atletico madrid apuestas|barcelona
betis apuestas|barcelona casa de apuestas|barcelona inter
apuestas|barcelona psg apuestas|barcelona real madrid apuestas|barcelona real sociedad apuestas|barcelona sevilla apuestas|barcelona valencia apuestas|barcelona vs
athletic bilbao apuestas|barcelona vs atlético madrid apuestas|barcelona vs betis apuestas|barcelona vs celta de vigo apuestas|barcelona vs espanyol apuestas|barcelona vs girona
apuestas|barcelona vs madrid apuestas|barcelona vs real madrid apuestas|barcelona vs real sociedad apuestas|barcelona vs sevilla apuestas|barcelona vs villarreal apuestas|base de datos cuotas apuestas deportivas|bayern real
madrid apuestas|beisbol apuestas|best america apuestas|bet apuestas
chile|bet apuestas en vivo|betis – chelsea apuestas|betis apuestas|betis barcelona apuestas|betis chelsea apuestas|betis madrid apuestas|betis sevilla apuestas|betsson tu sitio de apuestas online|blog apuestas baloncesto|blog apuestas ciclismo|blog
apuestas nba|blog apuestas tenis|blog de apuestas de tenis|bono apuestas|bono apuestas deportivas|bono apuestas deportivas sin deposito|bono
apuestas gratis|bono apuestas gratis sin deposito|bono apuestas sin deposito|bono
bienvenida apuestas|bono bienvenida apuestas deportivas|bono bienvenida apuestas españa|bono bienvenida apuestas
sin deposito|bono bienvenida apuestas sin depósito|bono
bienvenida casa apuestas|bono bienvenida casa de apuestas|bono bienvenida marca apuestas|bono casa apuestas|bono casa de
apuestas|bono casa de apuestas sin ingreso|bono casas de
apuestas|bono de apuestas|bono de apuestas gratis sin deposito|bono de bienvenida apuestas|bono de bienvenida apuestas deportivas|bono de bienvenida casa de apuestas|bono
de bienvenida casas de apuestas|bono de casas de apuestas|bono de registro
apuestas|bono de registro apuestas deportivas|bono de registro
casa de apuestas|bono gratis apuestas|bono marca apuestas|bono por registro apuestas|bono por registro apuestas deportivas|bono por registro casa de apuestas|bono registro apuestas|bono sin deposito apuestas|bono sin depósito apuestas|bono sin deposito apuestas deportivas|bono sin depósito apuestas
deportivas|bono sin deposito casa de apuestas|bono
sin deposito marca apuestas|bono sin ingreso apuestas|bono sin ingreso apuestas deportivas|bonos apuestas|bonos apuestas colombia|bonos apuestas deportivas|bonos apuestas deportivas
sin deposito|bonos apuestas gratis|bonos apuestas sin deposito|bonos apuestas sin depósito|bonos bienvenida apuestas|bonos bienvenida casas apuestas|bonos bienvenida casas de apuestas|bonos casa de apuestas|bonos casas apuestas|bonos casas de apuestas|bonos casas de apuestas
colombia|bonos casas de apuestas deportivas|bonos casas de
apuestas españa|bonos casas de apuestas nuevas|bonos casas de
apuestas sin deposito|bonos casas de apuestas sin depósito|bonos de apuestas|bonos de apuestas deportivas|bonos de apuestas gratis|bonos de apuestas sin deposito|bonos de bienvenida apuestas|bonos de bienvenida apuestas deportivas|bonos de bienvenida
casa de apuestas|bonos de bienvenida casas de apuestas|bonos de bienvenida
de casas de apuestas|bonos de bienvenida en casas de
apuestas|bonos de casas de apuestas|bonos de casas de apuestas sin deposito|bonos en casa de apuestas|bonos en casas de apuestas sin deposito|bonos
gratis apuestas|bonos gratis apuestas deportivas|bonos
gratis casas de apuestas|bonos gratis sin deposito apuestas|bonos paginas de apuestas|bonos registro casas
de apuestas|bonos sin deposito apuestas|bonos sin depósito apuestas|bonos
sin deposito apuestas deportivas|bonos sin deposito casas de apuestas|bot de apuestas deportivas gratis|boxeo apuestas|brasil colombia apuestas|brasil peru apuestas|brasil vs colombia apuestas|buenas apuestas para hoy|buscador cuotas apuestas|buscador
de apuestas seguras|buscador de cuotas apuestas|buscador de cuotas de
apuestas|buscar apuestas seguras|caballos apuestas|calculador de apuestas|calculador de
cuotas apuestas|calculadora apuestas|calculadora apuestas combinadas|calculadora apuestas de sistema|calculadora apuestas deportivas|calculadora apuestas deportivas seguras|calculadora apuestas multiples|calculadora apuestas segura|calculadora apuestas seguras|calculadora apuestas sistema|calculadora apuestas yankee|calculadora arbitraje apuestas|calculadora cubrir apuestas|calculadora cuotas apuestas|calculadora de apuestas|calculadora de
apuestas combinadas|calculadora de apuestas de futbol|calculadora de apuestas de
sistema|calculadora de apuestas deportivas|calculadora de apuestas multiples|calculadora de apuestas seguras|calculadora de apuestas sistema|calculadora de
apuestas surebets|calculadora de arbitraje apuestas|calculadora de cuotas apuestas|calculadora de cuotas de apuestas|calculadora para apuestas deportivas|calculadora poisson apuestas|calculadora poisson apuestas deportivas|calculadora poisson para apuestas|calculadora scalping
apuestas deportivas|calculadora sistema apuestas|calculadora stake apuestas|calculadora trading apuestas|calcular apuestas|calcular apuestas deportivas|calcular apuestas
futbol|calcular apuestas sistema|calcular cuotas apuestas|calcular cuotas apuestas combinadas|calcular cuotas apuestas deportivas|calcular
cuotas de apuestas|calcular ganancias apuestas deportivas|calcular momios apuestas|calcular probabilidad cuota apuestas|calcular stake apuestas|calcular unidades apuestas|calcular yield apuestas|calculo de apuestas|calculo
de apuestas deportivas|cambio de cuotas apuestas|campeon champions apuestas|campeon eurocopa apuestas|campeon liga apuestas|campeon nba apuestas|canales de apuestas gratis|carrera de caballos apuestas|carrera de caballos apuestas juego|carrera
de caballos con apuestas|carrera de galgos apuestas|carreras
de caballos apuestas|carreras de caballos
apuestas online|carreras de caballos con apuestas|carreras de caballos juegos de apuestas|carreras de galgos
apuestas|carreras de galgos apuestas online|carreras de galgos
apuestas trucos|carreras galgos apuestas|casa apuestas
argentina|casa apuestas atletico de madrid|casa apuestas barcelona|casa apuestas betis|casa
apuestas bono bienvenida|casa apuestas bono gratis|casa apuestas bono sin deposito|casa
apuestas cerca de mi|casa apuestas chile|casa apuestas colombia|casa apuestas con mejores cuotas|casa apuestas deportivas|casa apuestas españa|casa apuestas española|casa apuestas eurocopa|casa apuestas futbol|casa apuestas mejores cuotas|casa apuestas mundial|casa apuestas nueva|casa apuestas nuevas|casa apuestas online|casa apuestas peru|casa
apuestas valencia|casa de apuestas|casa de apuestas 10 euros gratis|casa
de apuestas argentina|casa de apuestas atletico de madrid|casa de
apuestas baloncesto|casa de apuestas barcelona|casa de apuestas beisbol|casa de apuestas betis|casa de apuestas bono|casa de apuestas bono bienvenida|casa
de apuestas bono de bienvenida|casa de apuestas
bono gratis|casa de apuestas bono por registro|casa de apuestas bono sin deposito|casa de apuestas boxeo|casa de apuestas caballos|casa de apuestas carreras de caballos|casa de apuestas cerca de mi|casa de apuestas cerca de mí|casa de apuestas champions league|casa de apuestas chile|casa
de apuestas ciclismo|casa de apuestas colombia|casa de apuestas con bono de bienvenida|casa de apuestas con bono sin deposito|casa de apuestas con cuotas mas altas|casa de apuestas con esports|casa de apuestas con las mejores cuotas|casa de apuestas
con licencia en españa|casa de apuestas con mejores cuotas|casa de apuestas con pago anticipado|casa de apuestas con paypal|casa de apuestas
copa america|casa de apuestas de caballos|casa de apuestas de
colombia|casa de apuestas de españa|casa de apuestas de futbol|casa
de apuestas de fútbol|casa de apuestas de futbol peru|casa de apuestas de peru|casa de apuestas
del madrid|casa de apuestas del real madrid|casa de apuestas deportivas|casa de
apuestas deportivas cerca de mi|casa de apuestas deportivas en argentina|casa de apuestas deportivas en chile|casa de
apuestas deportivas en colombia|casa de apuestas deportivas en españa|casa de apuestas deportivas en madrid|casa de apuestas deportivas españa|casa de apuestas deportivas españolas|casa de apuestas deportivas madrid|casa de
apuestas deportivas mexico|casa de apuestas deportivas
online|casa de apuestas deportivas peru|casa de apuestas deposito 5 euros|casa de apuestas deposito minimo|casa de apuestas
deposito minimo 1 euro|casa de apuestas depósito mínimo 1 euro|casa de
apuestas en españa|casa de apuestas en linea|casa
de apuestas en madrid|casa de apuestas en perú|casa de apuestas en vivo|casa de apuestas españa|casa
de apuestas españa inglaterra|casa de apuestas española|casa de apuestas
españolas|casa de apuestas esports|casa de apuestas eurocopa|casa de apuestas
europa league|casa de apuestas f1|casa de apuestas formula
1|casa de apuestas futbol|casa de apuestas ingreso minimo|casa de
apuestas ingreso minimo 1 euro|casa de apuestas ingreso mínimo 1 euro|casa de apuestas legales|casa
de apuestas legales en colombia|casa de apuestas legales en españa|casa de apuestas libertadores|casa de apuestas
liga española|casa de apuestas madrid|casa de apuestas mas segura|casa de apuestas mejores|casa de apuestas méxico|casa de apuestas
minimo 5 euros|casa de apuestas mlb|casa de apuestas mundial|casa de apuestas nba|casa de apuestas nfl|casa de apuestas nueva|casa de apuestas nuevas|casa de apuestas oficial del real madrid|casa de apuestas
oficial real madrid|casa de apuestas online|casa de apuestas
online argentina|casa de apuestas online chile|casa de apuestas
online españa|casa de apuestas online mexico|casa de apuestas online paraguay|casa de apuestas online peru|casa de apuestas
online usa|casa de apuestas online venezuela|casa de apuestas pago anticipado|casa de
apuestas para boxeo|casa de apuestas para ufc|casa
de apuestas peru|casa de apuestas perú|casa de apuestas peru
online|casa de apuestas por paypal|casa de apuestas promociones|casa de apuestas que regalan dinero|casa
de apuestas real madrid|casa de apuestas regalo de bienvenida|casa de apuestas sevilla|casa de apuestas
sin dinero|casa de apuestas sin ingreso minimo|casa
de apuestas sin licencia en españa|casa de apuestas sin minimo de ingreso|casa de apuestas stake|casa de apuestas tenis|casa de apuestas
ufc|casa de apuestas valencia|casa de apuestas venezuela|casa de apuestas virtuales|casa de apuestas
vive la suerte|casa oficial de apuestas del real madrid|casas apuestas asiaticas|casas apuestas bono sin deposito|casas
apuestas bonos sin deposito|casas apuestas caballos|casas apuestas chile|casas apuestas ciclismo|casas
apuestas con licencia|casas apuestas con licencia en españa|casas apuestas deportivas|casas apuestas deportivas colombia|casas apuestas deportivas españa|casas apuestas deportivas españolas|casas apuestas deportivas nuevas|casas apuestas españa|casas apuestas españolas|casas apuestas esports|casas
apuestas eurocopa|casas apuestas golf|casas apuestas ingreso minimo 5 euros|casas apuestas legales|casas apuestas legales españa|casas apuestas licencia|casas apuestas licencia españa|casas apuestas
mexico|casas apuestas mundial|casas apuestas nba|casas apuestas nuevas|casas apuestas nuevas españa|casas apuestas ofertas|casas apuestas online|casas apuestas paypal|casas apuestas
peru|casas apuestas sin licencia|casas apuestas tenis|casas asiaticas
apuestas|casas de apuestas|casas de apuestas 5 euros|casas de apuestas app|casas de apuestas argentinas|casas de apuestas asiaticas|casas de apuestas
baloncesto|casas de apuestas barcelona|casas de apuestas bono bienvenida|casas
de apuestas bono de bienvenida|casas de apuestas bono por registro|casas de apuestas bono sin deposito|casas de apuestas bono sin ingreso|casas de apuestas bonos|casas de apuestas bonos
de bienvenida|casas de apuestas bonos gratis|casas de apuestas bonos sin deposito|casas
de apuestas boxeo|casas de apuestas caballos|casas de apuestas carreras de caballos|casas de apuestas casino|casas de
apuestas casino online|casas de apuestas cerca de mi|casas de apuestas champions league|casas de apuestas
chile|casas de apuestas ciclismo|casas de apuestas colombia|casas de apuestas com|casas
de apuestas con app|casas de apuestas con apuestas gratis|casas de apuestas con bono|casas de apuestas con bono de bienvenida|casas
de apuestas con bono de registro|casas de apuestas con bono
por registro|casas de apuestas con bono sin deposito|casas de apuestas con bonos|casas de apuestas con bonos gratis|casas de
apuestas con bonos sin deposito|casas de apuestas con deposito minimo|casas de apuestas con esports|casas
de apuestas con handicap asiatico|casas de apuestas con licencia|casas de apuestas con licencia en españa|casas de apuestas con licencia
españa|casas de apuestas con licencia española|casas de apuestas con mejores cuotas|casas de apuestas con pago anticipado|casas
de apuestas con paypal|casas de apuestas con paypal en perú|casas de apuestas con promociones|casas de apuestas
con ruleta en vivo|casas de apuestas copa
del rey|casas de apuestas de caballos|casas de apuestas de españa|casas de apuestas de futbol|casas de apuestas de fútbol|casas
de apuestas de peru|casas de apuestas deportivas|casas de apuestas deportivas asiaticas|casas de apuestas deportivas colombia|casas de apuestas deportivas comparativa|casas de apuestas deportivas con paypal|casas de apuestas deportivas
en chile|casas de apuestas deportivas en españa|casas
de apuestas deportivas en linea|casas de apuestas deportivas en madrid|casas de apuestas deportivas en mexico|casas
de apuestas deportivas en peru|casas de apuestas deportivas en sevilla|casas de apuestas deportivas en valencia|casas
de apuestas deportivas españa|casas de apuestas
deportivas españolas|casas de apuestas deportivas legales|casas de apuestas deportivas
madrid|casas de apuestas deportivas mexico|casas de apuestas deportivas nuevas|casas de apuestas deportivas online|casas de apuestas deportivas peru|casas de apuestas deportivas
perú|casas de apuestas deposito minimo 1 euro|casas de apuestas depósito mínimo 1 euro|casas de apuestas dinero gratis|casas de apuestas en argentina|casas de
apuestas en barcelona|casas de apuestas en chile|casas de apuestas en colombia|casas de apuestas en españa|casas
de apuestas en españa online|casas de apuestas en linea|casas de apuestas en madrid|casas de apuestas en méxico|casas de apuestas en peru|casas de apuestas en perú|casas de apuestas en sevilla|casas de apuestas en uruguay|casas de apuestas en valencia|casas de apuestas en venezuela|casas de apuestas equipos de futbol|casas de apuestas españa|casas de apuestas españa
alemania|casas de apuestas españa inglaterra|casas de
apuestas españa licencia|casas de apuestas españa nuevas|casas de apuestas españa online|casas de apuestas
española|casas de apuestas españolas|casas de apuestas españolas con licencia|casas de apuestas españolas online|casas de
apuestas esports|casas de apuestas eurocopa|casas de apuestas eurocopa 2024|casas de apuestas
europa league|casas de apuestas f1|casas de apuestas fisicas en barcelona|casas de apuestas fisicas en españa|casas de apuestas formula 1|casas de apuestas fuera de españa|casas de apuestas futbol|casas de apuestas fútbol|casas de apuestas futbol españa|casas de
apuestas ganador eurocopa|casas de apuestas gratis|casas de apuestas ingreso minimo|casas
de apuestas ingreso minimo 1 euro|casas de apuestas
ingreso minimo 5 euros|casas de apuestas inter barcelona|casas de apuestas legales|casas
de apuestas legales en colombia|casas de apuestas legales en españa|casas de apuestas legales en mexico|casas de apuestas legales españa|casas de apuestas legales mx|casas de apuestas
licencia|casas de apuestas licencia españa|casas de
apuestas lista|casas de apuestas madrid|casas de apuestas mas seguras|casas de apuestas mejores
bonos|casas de apuestas mejores cuotas|casas de apuestas mexico|casas
de apuestas méxico|casas de apuestas minimo 5 euros|casas de apuestas mlb|casas de apuestas mundial|casas
de apuestas mundial baloncesto|casas de apuestas mundiales|casas de apuestas nba|casas de apuestas no reguladas en españa|casas de apuestas nueva ley|casas de
apuestas nuevas|casas de apuestas nuevas en colombia|casas de apuestas nuevas en españa|casas de
apuestas nuevas españa|casas de apuestas ofertas|casas de apuestas online|casas de apuestas online argentina|casas de
apuestas online colombia|casas de apuestas online deportivas|casas de apuestas online ecuador|casas de apuestas online en argentina|casas de apuestas online en chile|casas de apuestas online en colombia|casas de apuestas online en españa|casas de apuestas online
en mexico|casas de apuestas online españa|casas de apuestas online mas
fiables|casas de apuestas online mexico|casas de apuestas online nuevas|casas de apuestas online peru|casas
de apuestas online usa|casas de apuestas online venezuela|casas de apuestas pago paypal|casas
de apuestas para ufc|casas de apuestas paypal|casas de apuestas peru bono sin deposito|casas de apuestas presenciales en españa|casas de apuestas promociones|casas
de apuestas
Your comment is awaiting moderation.
Играю на 7k casino официальный сайт недавно, но впечатления только положительные. Всё работает стабильно, без зависаний. Деньги вывел без задержек https://potolki-excludar.ru/ru-ru/
Your comment is awaiting moderation.
Ищете, где купить права быстро и надежно? Наш сервис предлагает легальное и безопасное оформление водительских прав с гарантией качества. Мы поможем пройти все этапы получения водительского удостоверения, включая подготовку документов, обучение в автошколе и сдачу экзаменов. У нас работают опытные специалисты, которые сопровождают вас на каждом шаге, обеспечивая прозрачность и законность процесса.
Your comment is awaiting moderation.
(10 euros gratis apuestas|10 mejores casas de apuestas|10 trucos para ganar apuestas|15
euros gratis marca apuestas|1×2 apuestas|1×2 apuestas deportivas|1×2 apuestas que significa|1×2 en apuestas|1×2
en apuestas que significa|1×2 que significa en apuestas|5 euros gratis apuestas|9 apuestas que siempre ganaras|a partir de
cuanto se declara apuestas|actividades de juegos de azar y apuestas|ad apuestas deportivas|aleksandre topuria ufc apuestas|algoritmo para ganar apuestas deportivas|america apuestas|análisis nba apuestas|aplicacion android
apuestas deportivas|aplicacion apuestas deportivas|aplicacion apuestas deportivas android|aplicación de apuestas online|aplicacion para hacer apuestas|aplicacion para hacer
apuestas de futbol|aplicación para hacer apuestas de fútbol|aplicaciones apuestas deportivas android|aplicaciones apuestas deportivas gratis|aplicaciones de apuestas
android|aplicaciones de apuestas de fútbol|aplicaciones de apuestas deportivas|aplicaciones de apuestas deportivas peru|aplicaciones de apuestas deportivas perú|aplicaciones de apuestas en colombia|aplicaciones de apuestas gratis|aplicaciones de
apuestas online|aplicaciones de apuestas seguras|aplicaciones de apuestas sin dinero|aplicaciones para hacer apuestas|apostar seguro apuestas deportivas|app android apuestas deportivas|app apuestas|app apuestas android|app apuestas de
futbol|app apuestas deportivas|app apuestas deportivas android|app apuestas deportivas argentina|app apuestas deportivas colombia|app apuestas deportivas ecuador|app apuestas deportivas españa|app apuestas deportivas gratis|app apuestas entre amigos|app apuestas futbol|app apuestas gratis|app apuestas sin dinero|app casa de apuestas|app casas de
apuestas|app control apuestas|app de apuestas|app de apuestas android|app de apuestas casino|app de apuestas colombia|app de apuestas
con bono de bienvenida|app de apuestas de futbol|app de apuestas deportivas|app de
apuestas deportivas android|app de apuestas deportivas argentina|app de apuestas deportivas colombia|app
de apuestas deportivas en españa|app de apuestas deportivas peru|app de apuestas deportivas perú|app de apuestas deportivas sin dinero|app de apuestas ecuador|app de apuestas en colombia|app de
apuestas en españa|app de apuestas en venezuela|app
de apuestas futbol|app de apuestas gratis|app de apuestas online|app
de apuestas para android|app de apuestas para ganar dinero|app de apuestas peru|app de apuestas reales|app de casas de apuestas|app marca apuestas android|app
moviles de apuestas|app para apuestas|app para
apuestas de futbol|app para apuestas deportivas|app para apuestas deportivas
en español|app para ganar apuestas deportivas|app para hacer apuestas|app para hacer apuestas
deportivas|app para hacer apuestas entre amigos|app para llevar control de apuestas|app
pronosticos apuestas deportivas|app versus apuestas|apps apuestas mundial|apps
de apuestas|apps de apuestas con bono de bienvenida|apps de
apuestas de futbol|apps de apuestas deportivas peru|apps de apuestas mexico|apps para apuestas|aprender a hacer
apuestas deportivas|aprender hacer apuestas deportivas|apuesta del dia apuestas deportivas|apuestas 10 euros gratis|apuestas 100 seguras|apuestas 1×2|apuestas
1X2|apuestas 2 division|apuestas 3 division|apuestas a caballos|apuestas a carreras de caballos|apuestas
a colombia|apuestas a corners|apuestas a ganar|apuestas a jugadores nba|apuestas
a la baja|apuestas a la nfl|apuestas al barcelona|apuestas al
dia|apuestas al empate|apuestas al mundial|apuestas al tenis wta|apuestas alaves barcelona|apuestas alcaraz hoy|apuestas alemania españa|apuestas
alonso campeon del mundo|apuestas altas y bajas|apuestas altas y bajas nfl|apuestas ambos equipos marcan|apuestas america|apuestas android|apuestas anillo nba|apuestas
antes del mundial|apuestas anticipadas|apuestas
anticipadas nba|apuestas apps|apuestas arabia argentina|apuestas
argentina|apuestas argentina campeon del mundo|apuestas argentina canada|apuestas argentina colombia|apuestas argentina croacia|apuestas argentina españa|apuestas
argentina francia|apuestas argentina francia cuanto paga|apuestas argentina francia
mundial|apuestas argentina gana el mundial|apuestas argentina gana
mundial|apuestas argentina holanda|apuestas argentina mexico|apuestas argentina méxico|apuestas argentina mundial|apuestas argentina online|apuestas argentina paises
bajos|apuestas argentina polonia|apuestas argentina uruguay|apuestas argentina vs australia|apuestas argentina vs colombia|apuestas
argentina vs francia|apuestas argentina vs peru|apuestas argentinas|apuestas arsenal real madrid|apuestas ascenso a primera division|apuestas ascenso a segunda|apuestas asiaticas|apuestas asiatico|apuestas
athletic|apuestas athletic atletico|apuestas athletic barça|apuestas athletic barcelona|apuestas athletic betis|apuestas athletic manchester|apuestas athletic manchester united|apuestas athletic osasuna|apuestas athletic real|apuestas athletic
real madrid|apuestas athletic real sociedad|apuestas
athletic real sociedad final|apuestas athletic roma|apuestas athletic sevilla|apuestas athletic
valencia|apuestas atletico|apuestas atletico barcelona|apuestas atletico barsa|apuestas atletico campeon champions|apuestas atletico campeon de
liga|apuestas atlético copenhague|apuestas atletico
de madrid|apuestas atlético de madrid|apuestas atletico de madrid
barcelona|apuestas atletico de madrid gana la liga|apuestas atletico de madrid real madrid|apuestas atlético de madrid real
madrid|apuestas atletico de madrid vs barcelona|apuestas atletico madrid|apuestas atletico madrid
real madrid|apuestas atletico madrid vs barcelona|apuestas atletico real madrid|apuestas atletico real madrid champions|apuestas atletismo|apuestas bajas|apuestas baloncesto|apuestas baloncesto acb|apuestas baloncesto handicap|apuestas baloncesto hoy|apuestas baloncesto juegos olimpicos|apuestas baloncesto nba|apuestas baloncesto pronostico|apuestas baloncesto pronósticos|apuestas baloncesto prorroga|apuestas barca|apuestas barca athletic|apuestas barca
atletico|apuestas barca bayern|apuestas barca bayern munich|apuestas barca girona|apuestas barca hoy|apuestas barça hoy|apuestas barca inter|apuestas barca juventus|apuestas barca madrid|apuestas barça madrid|apuestas barca
real madrid|apuestas barca vs juve|apuestas barca vs madrid|apuestas barca vs psg|apuestas barcelona|apuestas
barcelona alaves|apuestas barcelona athletic|apuestas barcelona atletico|apuestas barcelona atletico de madrid|apuestas barcelona atlético de madrid|apuestas barcelona
atletico madrid|apuestas barcelona bayern|apuestas barcelona betis|apuestas barcelona campeon de liga|apuestas barcelona celta|apuestas barcelona espanyol|apuestas barcelona gana la champions|apuestas barcelona girona|apuestas barcelona granada|apuestas barcelona hoy|apuestas barcelona
inter|apuestas barcelona madrid|apuestas barcelona osasuna|apuestas barcelona psg|apuestas barcelona real madrid|apuestas barcelona real sociedad|apuestas barcelona sevilla|apuestas barcelona valencia|apuestas barcelona villarreal|apuestas barcelona vs atletico madrid|apuestas barcelona vs madrid|apuestas barcelona
vs real madrid|apuestas barsa madrid|apuestas basket hoy|apuestas bayern barcelona|apuestas bayern vs
barcelona|apuestas beisbol|apuestas béisbol|apuestas beisbol mlb|apuestas beisbol pronosticos|apuestas beisbol venezolano|apuestas betis|apuestas betis
– chelsea|apuestas betis barcelona|apuestas betis chelsea|apuestas betis
fiorentina|apuestas betis girona|apuestas betis madrid|apuestas betis
mallorca|apuestas betis real madrid|apuestas betis real sociedad|apuestas betis
sevilla|apuestas betis valencia|apuestas betis valladolid|apuestas
betis vs valencia|apuestas betplay hoy colombia|apuestas
betsson peru|apuestas bienvenida|apuestas billar online|apuestas bolivia vs colombia|apuestas bono|apuestas bono bienvenida|apuestas bono
de bienvenida|apuestas bono de bienvenida sin deposito|apuestas bono gratis|apuestas bono sin deposito|apuestas bonos sin deposito|apuestas
borussia real madrid|apuestas boxeo|apuestas boxeo de campeonato|apuestas boxeo españa|apuestas boxeo español|apuestas boxeo femenino olimpiadas|apuestas boxeo hoy|apuestas boxeo online|apuestas brasil colombia|apuestas brasil peru|apuestas brasil uruguay|apuestas brasil
vs colombia|apuestas brasil vs peru|apuestas caballos|apuestas caballos colocado|apuestas caballos españa|apuestas caballos hipodromo|apuestas caballos hoy|apuestas caballos madrid|apuestas caballos online|apuestas
caballos sanlucar de barrameda|apuestas caballos zarzuela|apuestas calculador|apuestas campeon|apuestas campeon champions|apuestas campeón champions|apuestas campeon champions 2025|apuestas campeon champions league|apuestas campeon conference league|apuestas campeon copa america|apuestas campeon copa
del rey|apuestas campeon de champions|apuestas campeon de la
champions|apuestas campeon de liga|apuestas campeon del mundo|apuestas campeon eurocopa|apuestas campeón eurocopa|apuestas campeon europa league|apuestas campeon f1|apuestas campeon f1 2025|apuestas campeon formula 1|apuestas campeon libertadores|apuestas campeon liga|apuestas campeon liga bbva|apuestas campeon liga española|apuestas
campeon liga santander|apuestas campeon motogp 2025|apuestas campeon mundial|apuestas campeón mundial|apuestas campeon mundial baloncesto|apuestas campeon nba|apuestas campeón nba|apuestas campeon premier|apuestas
campeon premier league|apuestas campeon roland garros|apuestas
campeonato f1|apuestas campeonatos de futbol|apuestas carrera
de caballos|apuestas carrera de caballos hoy|apuestas carrera de caballos nocturnas|apuestas
carrera de galgos fin de semana|apuestas carrera de galgos
hoy|apuestas carrera de galgos nocturnas|apuestas carreras caballos|apuestas carreras caballos sanlucar|apuestas carreras
de caballos|apuestas carreras de caballos en directo|apuestas carreras de caballos en vivo|apuestas carreras
de caballos españa|apuestas carreras de caballos hoy|apuestas carreras de caballos nacionales|apuestas
carreras de caballos nocturnas|apuestas carreras de caballos online|apuestas carreras de caballos sanlucar|apuestas carreras
de caballos sanlúcar|apuestas carreras de galgos|apuestas carreras de galgos en vivo|apuestas carreras de
galgos nocturnas|apuestas carreras de galgos pre partido|apuestas casino|apuestas casino barcelona|apuestas casino futbol|apuestas casino gran madrid|apuestas casino gratis|apuestas
casino madrid|apuestas casino online|apuestas casino online
argentina|apuestas casinos|apuestas casinos online|apuestas celta|apuestas celta barcelona|apuestas celta betis|apuestas celta
eibar|apuestas celta espanyol|apuestas celta granada|apuestas celta madrid|apuestas celta manchester|apuestas celta real madrid|apuestas
champion league|apuestas champions foro|apuestas champions hoy|apuestas champions
league|apuestas champions league – pronósticos|apuestas
champions league 2025|apuestas champions league hoy|apuestas
champions league pronosticos|apuestas champions league pronósticos|apuestas champions
pronosticos|apuestas chelsea barcelona|apuestas chelsea betis|apuestas chile|apuestas chile peru|apuestas chile venezuela|apuestas chile vs
colombia|apuestas chile vs uruguay|apuestas ciclismo|apuestas ciclismo en vivo|apuestas ciclismo femenino|apuestas ciclismo
tour francia|apuestas ciclismo vuelta|apuestas ciclismo vuelta a españa|apuestas ciclismo vuelta
españa|apuestas city madrid|apuestas city real madrid|apuestas clasico|apuestas clasico español|apuestas clasico
real madrid barcelona|apuestas clasificacion mundial|apuestas colombia|apuestas colombia argentina|apuestas colombia brasil|apuestas colombia paraguay|apuestas colombia uruguay|apuestas colombia vs argentina|apuestas colombia vs brasil|apuestas combinadas|apuestas combinadas como
funcionan|apuestas combinadas de futbol|apuestas combinadas de fútbol|apuestas combinadas foro|apuestas combinadas futbol|apuestas combinadas hoy|apuestas
combinadas mismo partido|apuestas combinadas mundial|apuestas combinadas nba|apuestas combinadas para esta semana|apuestas combinadas para hoy|apuestas
combinadas para mañana|apuestas combinadas pronosticos|apuestas
combinadas recomendadas|apuestas combinadas seguras|apuestas combinadas seguras para hoy|apuestas combinadas seguras para
mañana|apuestas como ganar|apuestas comparador|apuestas con bono de
bienvenida|apuestas con dinero ficticio|apuestas con dinero real|apuestas con dinero virtual|apuestas con handicap|apuestas con handicap asiatico|apuestas con handicap baloncesto|apuestas
con mas probabilidades de ganar|apuestas con paypal|apuestas con tarjeta de credito|apuestas
con tarjeta de debito|apuestas consejos|apuestas copa|apuestas
copa africa|apuestas copa america|apuestas copa américa|apuestas copa
argentina|apuestas copa brasil|apuestas copa davis|apuestas copa de europa|apuestas copa del mundo|apuestas copa del rey|apuestas copa del rey
baloncesto|apuestas copa del rey final|apuestas copa del rey futbol|apuestas copa del rey ganador|apuestas copa
del rey hoy|apuestas copa del rey pronosticos|apuestas copa del rey pronósticos|apuestas copa europa|apuestas
copa italia|apuestas copa libertadores|apuestas copa mundial de hockey|apuestas
copa rey|apuestas copa sudamericana|apuestas corners|apuestas corners
hoy|apuestas croacia argentina|apuestas cuartos eurocopa|apuestas cuotas|apuestas cuotas altas|apuestas cuotas bajas|apuestas de
1 euro|apuestas de baloncesto|apuestas de baloncesto hoy|apuestas de baloncesto nba|apuestas de baloncesto para hoy|apuestas de beisbol|apuestas de beisbol
para hoy|apuestas de blackjack en linea|apuestas de boxeo|apuestas de
boxeo canelo|apuestas de boxeo en las vegas|apuestas de boxeo hoy|apuestas de boxeo
online|apuestas de caballo|apuestas de caballos|apuestas de caballos como funciona|apuestas de caballos como se juega|apuestas de caballos en colombia|apuestas de caballos en españa|apuestas de caballos en linea|apuestas de caballos españa|apuestas de caballos ganador
y colocado|apuestas de caballos internacionales|apuestas de caballos juegos|apuestas de caballos online|apuestas
de caballos online en venezuela|apuestas de caballos por internet|apuestas de caballos pronosticos|apuestas de caballos pronósticos|apuestas de carrera de caballos|apuestas de carreras de
caballos|apuestas de carreras de caballos online|apuestas
de casino|apuestas de casino online|apuestas
de casino por internet|apuestas de champions league|apuestas de ciclismo|apuestas de colombia|apuestas
de copa america|apuestas de corners|apuestas de deportes
en linea|apuestas de deportes online|apuestas de dinero|apuestas de esports|apuestas de eurocopa|apuestas
de europa league|apuestas de f1|apuestas de formula 1|apuestas de futbol|apuestas
de fútbol|apuestas de futbol app|apuestas de futbol
argentina|apuestas de futbol colombia|apuestas de futbol en colombia|apuestas de futbol en directo|apuestas de futbol
en linea|apuestas de futbol en vivo|apuestas de futbol español|apuestas de futbol gratis|apuestas de futbol hoy|apuestas de futbol
mundial|apuestas de futbol online|apuestas de fútbol online|apuestas de futbol para hoy|apuestas de fútbol para hoy|apuestas de
futbol para hoy seguras|apuestas de futbol para mañana|apuestas
de futbol peru|apuestas de futbol pronosticos|apuestas de fútbol pronósticos|apuestas de futbol seguras|apuestas de futbol seguras para hoy|apuestas de futbol sin dinero|apuestas de galgos|apuestas de galgos como
ganar|apuestas de galgos en directo|apuestas de galgos online|apuestas de galgos trucos|apuestas de golf|apuestas de
hockey|apuestas de hockey sobre hielo|apuestas de hoy|apuestas de hoy
seguras|apuestas de juego|apuestas de juegos|apuestas de juegos
deportivos|apuestas de juegos online|apuestas de la champions league|apuestas
de la copa américa|apuestas de la eurocopa|apuestas de
la europa league|apuestas de la liga|apuestas de la liga bbva|apuestas
de la liga española|apuestas de la nba|apuestas de la nfl|apuestas de
la ufc|apuestas de mlb|apuestas de nba|apuestas de nba para hoy|apuestas de partidos|apuestas
de partidos de futbol|apuestas de peleas ufc|apuestas de perros en vivo|apuestas de
perros virtuales|apuestas de peru|apuestas de sistema|apuestas
de sistema como funciona|apuestas de sistema explicacion|apuestas de
sistema explicación|apuestas de tenis|apuestas de tenis de mesa|apuestas de tenis
en directo|apuestas de tenis hoy|apuestas de tenis para hoy|apuestas
de tenis pronosticos|apuestas de tenis seguras|apuestas de todo tipo|apuestas de ufc|apuestas de ufc
hoy|apuestas del boxeo|apuestas del clasico|apuestas del
clasico real madrid barca|apuestas del dia|apuestas del día|apuestas del dia de hoy|apuestas del dia deportivas|apuestas del dia futbol|apuestas del mundial|apuestas del partido
de hoy|apuestas del real madrid|apuestas del rey|apuestas del
sistema|apuestas deporte|apuestas deportes|apuestas deportiva|apuestas deportivas|apuestas deportivas 1 euro|apuestas deportivas 10 euros gratis|apuestas deportivas 100 seguras|apuestas deportivas 1×2|apuestas deportivas android|apuestas deportivas app|apuestas deportivas apps|apuestas deportivas argentina|apuestas deportivas argentina futbol|apuestas deportivas
argentina legal|apuestas deportivas atletico de madrid|apuestas deportivas baloncesto|apuestas deportivas barca madrid|apuestas deportivas barcelona|apuestas
deportivas beisbol|apuestas deportivas bono|apuestas deportivas bono bienvenida|apuestas deportivas bono de bienvenida|apuestas deportivas bono sin deposito|apuestas deportivas bonos de bienvenida|apuestas deportivas boxeo|apuestas deportivas caballos|apuestas
deportivas calculadora|apuestas deportivas campeon liga|apuestas
deportivas casino|apuestas deportivas casino barcelona|apuestas deportivas casino online|apuestas deportivas cerca de mi|apuestas deportivas champions league|apuestas deportivas chile|apuestas deportivas ciclismo|apuestas deportivas colombia|apuestas
deportivas com|apuestas deportivas com foro|apuestas deportivas com pronosticos|apuestas deportivas combinadas|apuestas deportivas combinadas
para hoy|apuestas deportivas como se juega|apuestas deportivas comparador|apuestas deportivas con bono gratis|apuestas deportivas con bonos gratis|apuestas
deportivas con dinero ficticio|apuestas deportivas con paypal|apuestas
deportivas con puntos virtuales|apuestas deportivas consejos|apuestas deportivas consejos para ganar|apuestas
deportivas copa america|apuestas deportivas copa del rey|apuestas deportivas copa libertadores|apuestas deportivas copa
mundial|apuestas deportivas corners|apuestas deportivas cual es
la mejor|apuestas deportivas cuotas altas|apuestas
deportivas de baloncesto|apuestas deportivas de boxeo|apuestas deportivas de
colombia|apuestas deportivas de futbol|apuestas deportivas
de nba|apuestas deportivas de nhl|apuestas deportivas de peru|apuestas
deportivas de tenis|apuestas deportivas del dia|apuestas deportivas dinero ficticio|apuestas deportivas directo|apuestas deportivas doble oportunidad|apuestas deportivas en argentina|apuestas deportivas en chile|apuestas deportivas en colombia|apuestas deportivas en directo|apuestas deportivas en españa|apuestas deportivas
en español|apuestas deportivas en linea|apuestas deportivas en línea|apuestas
deportivas en peru|apuestas deportivas en perú|apuestas deportivas en sevilla|apuestas deportivas en uruguay|apuestas deportivas en vivo|apuestas
deportivas es|apuestas deportivas es pronosticos|apuestas deportivas españa|apuestas deportivas españolas|apuestas deportivas esports|apuestas deportivas estadisticas|apuestas deportivas estrategias|apuestas
deportivas estrategias seguras|apuestas deportivas eurocopa|apuestas deportivas europa league|apuestas deportivas f1|apuestas deportivas faciles de ganar|apuestas deportivas formula 1|apuestas deportivas foro|apuestas deportivas
foro futbol|apuestas deportivas foro tenis|apuestas deportivas francia argentina|apuestas deportivas futbol|apuestas deportivas fútbol|apuestas deportivas futbol argentino|apuestas deportivas futbol colombia|apuestas deportivas futbol español|apuestas deportivas gana|apuestas deportivas ganadas|apuestas deportivas
ganar dinero seguro|apuestas deportivas gane|apuestas deportivas golf|apuestas deportivas gratis|apuestas deportivas gratis con premios|apuestas deportivas gratis hoy|apuestas deportivas gratis sin deposito|apuestas
deportivas handicap|apuestas deportivas handicap asiatico|apuestas deportivas hoy|apuestas deportivas impuestos|apuestas deportivas interior argentina|apuestas deportivas juegos olimpicos|apuestas deportivas la liga|apuestas deportivas legales|apuestas deportivas legales en colombia|apuestas deportivas libres de impuestos|apuestas deportivas licencia
españa|apuestas deportivas liga española|apuestas
deportivas listado|apuestas deportivas listado clasico|apuestas deportivas madrid|apuestas deportivas mas seguras|apuestas deportivas mejor
pagadas|apuestas deportivas mejores|apuestas deportivas mejores app|apuestas deportivas mejores casas|apuestas deportivas mejores cuotas|apuestas deportivas mejores paginas|apuestas deportivas mexico|apuestas deportivas méxico|apuestas deportivas
mlb|apuestas deportivas mlb hoy|apuestas deportivas multiples|apuestas deportivas mundial|apuestas deportivas
murcia|apuestas deportivas nba|apuestas deportivas nba hoy|apuestas deportivas nfl|apuestas deportivas
nhl|apuestas deportivas nuevas|apuestas deportivas ofertas|apuestas deportivas online|apuestas deportivas online argentina|apuestas deportivas online chile|apuestas deportivas online colombia|apuestas deportivas online en colombia|apuestas deportivas online españa|apuestas deportivas online mexico|apuestas deportivas online paypal|apuestas deportivas online peru|apuestas deportivas online por internet|apuestas deportivas pago paypal|apuestas deportivas para ganar dinero|apuestas deportivas para hoy|apuestas deportivas para hoy pronosticos|apuestas deportivas partido suspendido|apuestas deportivas partidos de hoy|apuestas deportivas paypal|apuestas deportivas peru|apuestas deportivas perú|apuestas deportivas
peru vs ecuador|apuestas deportivas predicciones|apuestas deportivas promociones|apuestas deportivas pronostico|apuestas deportivas pronóstico|apuestas deportivas pronostico hoy|apuestas deportivas pronosticos|apuestas deportivas pronósticos|apuestas deportivas pronosticos expertos|apuestas deportivas pronosticos gratis|apuestas
deportivas pronosticos nba|apuestas deportivas pronosticos tenis|apuestas deportivas que aceptan paypal|apuestas deportivas real madrid|apuestas
deportivas regalo bienvenida|apuestas deportivas
resultado exacto|apuestas deportivas resultados|apuestas deportivas
rugby|apuestas deportivas seguras|apuestas deportivas seguras foro|apuestas deportivas seguras hoy|apuestas
deportivas seguras para hoy|apuestas deportivas seguras telegram|apuestas deportivas sevilla|apuestas deportivas simulador eurocopa|apuestas deportivas sin deposito|apuestas deportivas sin deposito inicial|apuestas deportivas sin dinero|apuestas deportivas sin dinero real|apuestas deportivas sin registro|apuestas deportivas stake|apuestas deportivas stake 10|apuestas deportivas telegram españa|apuestas deportivas tenis|apuestas deportivas tenis de
mesa|apuestas deportivas tenis foro|apuestas deportivas tenis hoy|apuestas deportivas tips|apuestas deportivas tipster|apuestas deportivas ufc|apuestas deportivas
uruguay|apuestas deportivas valencia|apuestas deportivas valencia barcelona|apuestas
deportivas venezuela|apuestas deportivas virtuales|apuestas
deportivas y casino|apuestas deportivas y casino online|apuestas
deportivas.com|apuestas deportivas.com foro|apuestas deportivas.es|apuestas deportivos pronosticos|apuestas deposito minimo 1 euro|apuestas descenso a segunda|apuestas descenso a
segunda b|apuestas descenso la liga|apuestas descenso primera division|apuestas descenso segunda|apuestas dia|apuestas diarias seguras|apuestas dinero|apuestas dinero ficticio|apuestas dinero real|apuestas dinero
virtual|apuestas directas|apuestas directo|apuestas directo
futbol|apuestas division de honor juvenil|apuestas dnb|apuestas doble oportunidad|apuestas doble resultado|apuestas dobles|apuestas dobles y triples|apuestas dortmund barcelona|apuestas draft nba|apuestas draft nfl|apuestas ecuador vs
argentina|apuestas ecuador vs venezuela|apuestas egipto uruguay|apuestas el clasico|apuestas elecciones venezuela|apuestas empate|apuestas en baloncesto|apuestas en barcelona|apuestas en beisbol|apuestas en boxeo|apuestas
en caballos|apuestas en carreras de caballos|apuestas en casino|apuestas en casino online|apuestas en casinos|apuestas en casinos online|apuestas
en chile|apuestas en ciclismo|apuestas en colombia|apuestas en colombia de futbol|apuestas en directo|apuestas
en directo futbol|apuestas en directo pronosticos|apuestas
en el futbol|apuestas en el tenis|apuestas en españa|apuestas
en esports|apuestas en eventos deportivos virtuales|apuestas en golf|apuestas en juegos|apuestas en la champions league|apuestas en la eurocopa|apuestas en la liga|apuestas en la nba|apuestas en la nfl|apuestas en las vegas
mlb|apuestas en las vegas nfl|apuestas en linea|apuestas en línea|apuestas en linea argentina|apuestas en linea boxeo|apuestas en linea chile|apuestas en linea colombia|apuestas en línea de fútbol|apuestas en linea deportivas|apuestas en linea españa|apuestas en linea
estados unidos|apuestas en linea futbol|apuestas en linea mexico|apuestas en línea
méxico|apuestas en linea mundial|apuestas en linea peru|apuestas en linea usa|apuestas en los esports|apuestas en madrid|apuestas en méxico|apuestas en mexico online|apuestas en nba|apuestas en partidos de futbol|apuestas en partidos de futbol en vivo|apuestas
en partidos de tenis en directo|apuestas en perú|apuestas en sevilla|apuestas en sistema|apuestas en stake|apuestas en tenis|apuestas
en tenis de mesa|apuestas en valencia|apuestas en vivo|apuestas en vivo argentina|apuestas en vivo casino|apuestas
en vivo futbol|apuestas en vivo fútbol|apuestas en vivo nba|apuestas en vivo peru|apuestas en vivo tenis|apuestas en vivo ufc|apuestas equipo mbappe|apuestas equipos de futbol|apuestas españa|apuestas españa alemania|apuestas españa alemania eurocopa|apuestas españa croacia|apuestas españa eurocopa|apuestas españa francia|apuestas españa francia
eurocopa|apuestas españa gana el mundial|apuestas españa gana eurocopa|apuestas españa gana mundial|apuestas
españa georgia|apuestas españa holanda|apuestas españa inglaterra|apuestas españa
inglaterra cuotas|apuestas españa inglaterra eurocopa|apuestas españa italia|apuestas españa mundial|apuestas españa paises bajos|apuestas español|apuestas español oviedo|apuestas espanyol barcelona|apuestas espanyol betis|apuestas espanyol villarreal|apuestas esport|apuestas esports|apuestas esports
colombia|apuestas esports españa|apuestas esports fifa|apuestas esports
gratis|apuestas esports lol|apuestas esports peru|apuestas esports valorant|apuestas estadisticas|apuestas estrategias|apuestas euro|apuestas euro
copa|apuestas eurocopa|apuestas eurocopa campeon|apuestas eurocopa españa|apuestas eurocopa favoritos|apuestas
eurocopa femenina|apuestas eurocopa final|apuestas
eurocopa ganador|apuestas eurocopa hoy|apuestas eurocopa sub 21|apuestas euroliga baloncesto|apuestas euroliga pronosticos|apuestas europa league|apuestas europa league hoy|apuestas
europa league pronosticos|apuestas europa league pronósticos|apuestas
euros|apuestas f1 abu dhabi|apuestas f1 bahrein|apuestas f1 canada|apuestas
f1 china|apuestas f1 cuotas|apuestas f1 hoy|apuestas f1 las vegas|apuestas f1 miami|apuestas f1 monaco|apuestas faciles de ganar|apuestas fáciles de ganar|apuestas faciles para ganar|apuestas favoritas|apuestas favorito champions|apuestas favoritos champions|apuestas favoritos eurocopa|apuestas favoritos
mundial|apuestas fc barcelona|apuestas final champions cuotas|apuestas final champions league|apuestas final champions peru|apuestas final copa|apuestas final
copa america|apuestas final copa de europa|apuestas final copa del
rey|apuestas final copa europa|apuestas final copa libertadores|apuestas final copa rey|apuestas final
de copa|apuestas final de copa del rey|apuestas final del mundial|apuestas final euro|apuestas final
eurocopa|apuestas final europa league|apuestas final libertadores|apuestas final mundial|apuestas final nba|apuestas final rugby|apuestas final uefa europa
league|apuestas final.mundial|apuestas finales de conferencia nfl|apuestas finales nba|apuestas fiorentina betis|apuestas formula|apuestas formula 1|apuestas fórmula 1|apuestas
fórmula 1 pronósticos|apuestas formula uno|apuestas foro|apuestas foro nba|apuestas francia argentina|apuestas francia españa|apuestas futbol|apuestas fútbol|apuestas futbol americano|apuestas futbol americano nfl|apuestas futbol argentina|apuestas futbol argentino|apuestas futbol champions league|apuestas futbol
chile|apuestas futbol colombia|apuestas futbol consejos|apuestas futbol en directo|apuestas fútbol en directo|apuestas futbol en vivo|apuestas fútbol en vivo|apuestas futbol españa|apuestas futbol español|apuestas fútbol español|apuestas futbol
eurocopa|apuestas futbol femenino|apuestas futbol foro|apuestas futbol gratis|apuestas futbol
hoy|apuestas fútbol hoy|apuestas futbol juegos
olimpicos|apuestas futbol mexico|apuestas futbol mundial|apuestas futbol online|apuestas futbol para hoy|apuestas futbol peru|apuestas futbol pronosticos|apuestas
futbol sala|apuestas futbol telegram|apuestas futbol virtual|apuestas galgos|apuestas galgos
en directo|apuestas galgos hoy|apuestas galgos online|apuestas galgos pronosticos|apuestas galgos trucos|apuestas gana|apuestas
gana colombia|apuestas gana resultados|apuestas ganadas|apuestas ganadas hoy|apuestas ganador champions league|apuestas ganador copa america|apuestas ganador copa del rey|apuestas ganador copa del rey baloncesto|apuestas ganador copa libertadores|apuestas ganador de la eurocopa|apuestas ganador de la liga|apuestas ganador del
mundial|apuestas ganador eurocopa|apuestas ganador europa league|apuestas ganador f1|apuestas ganador la liga|apuestas ganador liga
española|apuestas ganador mundial|apuestas ganador mundial baloncesto|apuestas ganador mundial f1|apuestas ganador nba|apuestas
ganadores eurocopa|apuestas ganadores mundial|apuestas
ganar champions|apuestas ganar eurocopa|apuestas
ganar liga|apuestas ganar mundial|apuestas ganar nba|apuestas
getafe valencia|apuestas ghana uruguay|apuestas girona|apuestas girona athletic|apuestas girona betis|apuestas girona campeon de
liga|apuestas girona campeon liga|apuestas girona gana la liga|apuestas girona real madrid|apuestas girona
real sociedad|apuestas goleador eurocopa|apuestas goleadores eurocopa|apuestas goles asiaticos|apuestas
golf|apuestas golf masters|apuestas golf pga|apuestas granada barcelona|apuestas grand slam de tenis|apuestas gratis|apuestas
gratis casino|apuestas gratis con premios|apuestas gratis hoy|apuestas gratis para hoy|apuestas gratis por registro|apuestas gratis puntos|apuestas gratis
regalos|apuestas gratis sin deposito|apuestas gratis sin depósito|apuestas gratis sin ingreso|apuestas gratis sports|apuestas gratis
y ganar premios|apuestas grupo a eurocopa|apuestas grupos eurocopa|apuestas handicap|apuestas handicap asiatico|apuestas
handicap baloncesto|apuestas handicap como funciona|apuestas handicap nba|apuestas handicap nfl|apuestas hipicas online|apuestas hípicas online|apuestas hipicas
venezuela|apuestas hockey|apuestas hockey hielo|apuestas hockey patines|apuestas hockey sobre hielo|apuestas holanda argentina|apuestas holanda
vs argentina|apuestas hoy|apuestas hoy champions|apuestas hoy futbol|apuestas hoy nba|apuestas hoy pronosticos|apuestas hoy seguras|apuestas impuestos|apuestas inglaterra paises bajos|apuestas inter barca|apuestas
inter barcelona|apuestas juego|apuestas juegos|apuestas juegos en linea|apuestas
juegos olimpicos|apuestas juegos olímpicos|apuestas
juegos olimpicos baloncesto|apuestas juegos online|apuestas juegos virtuales|apuestas jugador sevilla|apuestas jugadores nba|apuestas kings league americas|apuestas la liga|apuestas la liga española|apuestas la liga hoy|apuestas
la liga santander|apuestas las vegas mlb|apuestas las
vegas nba|apuestas las vegas nfl|apuestas league of legends mundial|apuestas legal|apuestas legales|apuestas legales
en colombia|apuestas legales en españa|apuestas legales en estados unidos|apuestas legales
españa|apuestas leganes betis|apuestas libertadores|apuestas licencia|apuestas liga 1
peru|apuestas liga argentina|apuestas liga bbva pronosticos|apuestas liga de campeones|apuestas liga
de campeones de baloncesto|apuestas liga de campeones de hockey|apuestas liga
españa|apuestas liga española|apuestas liga santander pronosticos|apuestas ligas de futbol|apuestas linea|apuestas linea
de gol|apuestas liverpool barcelona|apuestas liverpool real madrid|apuestas lol mundial|apuestas madrid|apuestas madrid arsenal|apuestas madrid atletico|apuestas madrid atletico champions|apuestas madrid barca|apuestas madrid barça|apuestas madrid barca hoy|apuestas madrid barca supercopa|apuestas madrid barcelona|apuestas madrid barsa|apuestas madrid bayern|apuestas madrid betis|apuestas madrid borussia|apuestas madrid campeon champions|apuestas madrid celta|apuestas madrid city|apuestas madrid
dortmund|apuestas madrid gana la liga|apuestas madrid gana
liga|apuestas madrid hoy|apuestas madrid liverpool|apuestas madrid osasuna|apuestas madrid sevilla|apuestas madrid valencia|apuestas madrid
vs arsenal|apuestas madrid vs barcelona|apuestas mallorca osasuna|apuestas mallorca real sociedad|apuestas manchester athletic|apuestas manchester city real madrid|apuestas mas
faciles de ganar|apuestas mas seguras|apuestas mas seguras para hoy|apuestas masters de golf|apuestas masters de tenis|apuestas maximo goleador eurocopa|apuestas maximo goleador mundial|apuestas mejor jugador eurocopa|apuestas mejores casinos
online|apuestas mexico|apuestas méxico|apuestas mexico polonia|apuestas
méxico polonia|apuestas mlb|apuestas mlb hoy|apuestas mlb
las vegas|apuestas mlb para hoy|apuestas mlb pronosticos|apuestas mlb usa|apuestas mma ufc|apuestas momios|apuestas
multiples|apuestas múltiples|apuestas multiples como funcionan|apuestas multiples el
gordo|apuestas multiples futbol|apuestas mundial|apuestas mundial 2026|apuestas mundial baloncesto|apuestas mundial balonmano|apuestas mundial brasil|apuestas
mundial campeon|apuestas mundial ciclismo|apuestas mundial clubes|apuestas mundial de baloncesto|apuestas mundial de ciclismo|apuestas mundial de clubes|apuestas mundial de futbol|apuestas mundial
de fútbol|apuestas mundial de rugby|apuestas mundial f1|apuestas mundial favoritos|apuestas mundial femenino|apuestas mundial formula 1|apuestas mundial
futbol|apuestas mundial ganador|apuestas mundial lol|apuestas mundial moto gp|apuestas mundial
motogp|apuestas mundial rugby|apuestas mundial sub 17|apuestas mundiales|apuestas mundialistas|apuestas mvp eurocopa|apuestas
mvp nba|apuestas mvp nfl|apuestas nacionales de colombia|apuestas nba|apuestas nba
all star|apuestas nba campeon|apuestas nba consejos|apuestas nba esta noche|apuestas nba finals|apuestas nba gratis|apuestas nba hoy|apuestas nba hoy jugadores|apuestas nba hoy pronosticos|apuestas nba para hoy|apuestas nba playoffs|apuestas nba pronosticos|apuestas nba pronósticos|apuestas nba pronosticos hoy|apuestas nba tipster|apuestas nfl|apuestas nfl hoy|apuestas nfl las vegas|apuestas nfl
playoffs|apuestas nfl pronosticos|apuestas nfl pronósticos|apuestas
nfl semana 4|apuestas nfl super bowl|apuestas nhl|apuestas nhl pronosticos|apuestas octavos eurocopa|apuestas ofertas|apuestas online|apuestas online
argentina|apuestas online argentina legal|apuestas online
bono|apuestas online bono bienvenida|apuestas online boxeo|apuestas online caballos|apuestas online carreras de caballos|apuestas online casino|apuestas online champions league|apuestas online chile|apuestas online ciclismo|apuestas online colombia|apuestas
online comparativa|apuestas online con paypal|apuestas online de caballos|apuestas online deportivas|apuestas online en argentina|apuestas
online en peru|apuestas online espana|apuestas online
españa|apuestas online esports|apuestas online foro|apuestas online futbol|apuestas online
futbol españa|apuestas online golf|apuestas online gratis|apuestas
online gratis sin deposito|apuestas online juegos|apuestas online mexico|apuestas online mma|apuestas online movil|apuestas online nba|apuestas online net|apuestas online nuevas|apuestas online opiniones|apuestas online paypal|apuestas
online peru|apuestas online seguras|apuestas online sin dinero|apuestas online sin registro|apuestas
online tenis|apuestas online ufc|apuestas online uruguay|apuestas online venezuela|apuestas
open britanico golf|apuestas osasuna athletic|apuestas osasuna barcelona|apuestas osasuna real madrid|apuestas osasuna sevilla|apuestas osasuna valencia|apuestas
over|apuestas over 2.5|apuestas over under|apuestas
paginas|apuestas pago anticipado|apuestas paises bajos ecuador|apuestas paises bajos inglaterra|apuestas
países bajos qatar|apuestas para boxeo|apuestas para champions
league|apuestas para el clasico|apuestas para el dia de hoy|apuestas para el mundial|apuestas para el partido de
hoy|apuestas para eurocopa|apuestas para europa league|apuestas
para futbol|apuestas para ganar|apuestas para ganar dinero|apuestas para ganar dinero facil|apuestas para ganar en la ruleta|apuestas para ganar la champions|apuestas para ganar la eurocopa|apuestas para ganar la europa league|apuestas para ganar la liga|apuestas para ganar siempre|apuestas para
hacer|apuestas para hoy|apuestas para hoy de futbol|apuestas para hoy europa league|apuestas para hoy
futbol|apuestas para juegos|apuestas para la champions league|apuestas para la copa del rey|apuestas para la eurocopa|apuestas para la europa league|apuestas
para la final de la eurocopa|apuestas para la nba hoy|apuestas para los partidos de
hoy|apuestas para partidos de hoy|apuestas para ufc|apuestas partido|apuestas partido aplazado|apuestas partido champions|apuestas partido
colombia|apuestas partido españa marruecos|apuestas
partido mundial|apuestas partido suspendido|apuestas partidos|apuestas partidos champions league|apuestas partidos csgo|apuestas partidos de futbol|apuestas partidos de futbol hoy|apuestas partidos de hoy|apuestas partidos eurocopa|apuestas partidos
futbol|apuestas partidos hoy|apuestas partidos mundial|apuestas paypal|apuestas peleas de boxeo|apuestas peru|apuestas perú|apuestas peru brasil|apuestas peru chile|apuestas peru paraguay|apuestas
peru uruguay|apuestas peru vs chile|apuestas peru
vs colombia|apuestas pichichi eurocopa|apuestas plataforma|apuestas
playoff|apuestas playoff ascenso|apuestas playoff ascenso a primera|apuestas playoff nba|apuestas playoff segunda|apuestas playoff segunda b|apuestas playoffs nba|apuestas playoffs
nfl|apuestas polonia argentina|apuestas por argentina|apuestas por
internet mexico|apuestas por internet para ganar dinero|apuestas
por paypal|apuestas por ronda boxeo|apuestas por sistema|apuestas portugal
uruguay|apuestas pre partido|apuestas predicciones|apuestas predicciones
futbol|apuestas primera division|apuestas primera division españa|apuestas promociones|apuestas pronostico|apuestas pronosticos|apuestas pronosticos deportivos|apuestas pronosticos deportivos tenis|apuestas pronosticos futbol|apuestas pronosticos gratis|apuestas
pronosticos nba|apuestas pronosticos tenis|apuestas prorroga|apuestas psg barca|apuestas psg barcelona|apuestas puntos por tarjetas|apuestas puntos tarjetas|apuestas que aceptan paypal|apuestas que es handicap|apuestas que puedes hacer con tu novia|apuestas que siempre ganaras|apuestas que significa|apuestas quien bajara a segunda|apuestas quién bajara a segunda|apuestas quien gana el mundial|apuestas quien gana
eurocopa|apuestas quien gana la champions|apuestas quien gana la eurocopa|apuestas quien gana la liga|apuestas quien ganara el
mundial|apuestas quién ganará el mundial|apuestas quien ganara la champions|apuestas quien ganara la
eurocopa|apuestas quien ganara la liga|apuestas rayo barcelona|apuestas real madrid|apuestas real
madrid arsenal|apuestas real madrid athletic|apuestas real
madrid atletico|apuestas real madrid atletico champions|apuestas real
madrid atletico de madrid|apuestas real madrid atlético de madrid|apuestas
real madrid atletico madrid|apuestas real madrid barcelona|apuestas real madrid bayern|apuestas real
madrid betis|apuestas real madrid borussia|apuestas real madrid campeon champions|apuestas
real madrid celta|apuestas real madrid champions|apuestas real madrid city|apuestas real
madrid girona|apuestas real madrid hoy|apuestas real madrid liverpool|apuestas real madrid
manchester city|apuestas real madrid osasuna|apuestas real madrid real sociedad|apuestas real madrid valencia|apuestas real madrid
villarreal|apuestas real madrid vs arsenal|apuestas real madrid
vs atletico|apuestas real madrid vs atlético|apuestas real madrid vs atletico
madrid|apuestas real madrid vs barcelona|apuestas real madrid
vs betis|apuestas real madrid vs sevilla|apuestas real
madrid vs valencia|apuestas real sociedad|apuestas real sociedad athletic|apuestas real sociedad barcelona|apuestas real sociedad betis|apuestas real sociedad psg|apuestas real sociedad real madrid|apuestas real sociedad valencia|apuestas recomendadas hoy|apuestas regalo de bienvenida|apuestas registro|apuestas resultado
exacto|apuestas resultados|apuestas resultados eurocopa|apuestas retirada tenis|apuestas roma
barcelona|apuestas roma sevilla|apuestas rugby|apuestas rugby mundial|apuestas
rugby world cup|apuestas ruleta seguras|apuestas segunda|apuestas segunda b|apuestas segunda division|apuestas segunda división|apuestas segunda division b|apuestas segunda division españa|apuestas seguras|apuestas
seguras baloncesto|apuestas seguras calculadora|apuestas seguras
en la ruleta|apuestas seguras eurocopa|apuestas seguras foro|apuestas seguras
futbol|apuestas seguras futbol hoy|apuestas seguras gratis|apuestas seguras
hoy|apuestas seguras hoy futbol|apuestas seguras nba|apuestas seguras nba hoy|apuestas seguras para este fin de semana|apuestas seguras para
ganar dinero|apuestas seguras para hoy|apuestas seguras para hoy fútbol|apuestas seguras para hoy pronósticos|apuestas seguras para mañana|apuestas seguras ruleta|apuestas seguras telegram|apuestas seguras
tenis|apuestas semifinales eurocopa|apuestas senegal paises bajos|apuestas sevilla|apuestas sevilla athletic|apuestas sevilla atletico de madrid|apuestas sevilla barcelona|apuestas sevilla betis|apuestas sevilla campeon liga|apuestas sevilla celta|apuestas sevilla gana la liga|apuestas sevilla girona|apuestas sevilla inter|apuestas sevilla jugador|apuestas sevilla juventus|apuestas
sevilla leganes|apuestas sevilla madrid|apuestas sevilla
manchester united|apuestas sevilla osasuna|apuestas sevilla real madrid|apuestas sevilla real sociedad|apuestas sevilla roma|apuestas sevilla valencia|apuestas significa|apuestas simples ejemplos|apuestas simples o
combinadas|apuestas sin deposito|apuestas sin deposito inicial|apuestas sin deposito minimo|apuestas
sin dinero|apuestas sin dinero real|apuestas sin empate|apuestas sin empate que significa|apuestas sin ingreso
minimo|apuestas sin registro|apuestas sistema|apuestas sistema calculadora|apuestas sistema como
funciona|apuestas sistema trixie|apuestas sociedad|apuestas sorteo copa del rey|apuestas stake|apuestas stake 10|apuestas stake 10 hoy|apuestas
super bowl favorito|apuestas super rugby|apuestas supercopa españa|apuestas superliga
argentina|apuestas tarjeta roja|apuestas tarjetas|apuestas tarjetas amarillas|apuestas tenis|apuestas tenis atp|apuestas tenis consejos|apuestas tenis
copa davis|apuestas tenis de mesa|apuestas tenis de mesa pronosticos|apuestas tenis en vivo|apuestas tenis femenino|apuestas tenis hoy|apuestas tenis itf|apuestas tenis pronosticos|apuestas tenis
pronósticos|apuestas tenis retirada|apuestas tenis roland garros|apuestas tenis seguras|apuestas tenis wimbledon|apuestas tenis wta|apuestas tercera division|apuestas tercera division españa|apuestas tipos|apuestas tips|apuestas tipster|apuestas tipster
para hoy|apuestas topuria holloway cuotas|apuestas torneos de golf|apuestas torneos de tenis|apuestas trucos|apuestas
uefa champions league|apuestas uefa europa league|apuestas
ufc|apuestas ufc chile|apuestas ufc como funciona|apuestas ufc
hoy|apuestas ufc ilia topuria|apuestas ufc online|apuestas ufc pronósticos|apuestas ufc telegram|apuestas ufc topuria|apuestas under over|apuestas unionistas villarreal|apuestas uruguay|apuestas
uruguay colombia|apuestas uruguay corea|apuestas
uruguay vs colombia|apuestas us open golf|apuestas us open tenis|apuestas valencia|apuestas
valencia barcelona|apuestas valencia betis|apuestas valencia madrid|apuestas valencia real madrid|apuestas valladolid barcelona|apuestas valladolid valencia|apuestas valor app|apuestas valor en directo|apuestas
valor galgos|apuestas venezuela|apuestas venezuela argentina|apuestas venezuela bolivia|apuestas venezuela ecuador|apuestas villarreal|apuestas villarreal
athletic|apuestas villarreal barcelona|apuestas
villarreal bayern|apuestas villarreal betis|apuestas villarreal liverpool|apuestas villarreal manchester|apuestas villarreal manchester united|apuestas villarreal vs real madrid|apuestas virtuales|apuestas virtuales colombia|apuestas
virtuales futbol|apuestas virtuales sin dinero|apuestas vivo|apuestas vuelta
a españa|apuestas vuelta españa|apuestas william hill partidos de hoy|apuestas y casino|apuestas
y casinos|apuestas y juegos de azar|apuestas y pronosticos|apuestas y pronosticos de futbol|apuestas y
pronosticos deportivos|apuestas y resultados|apuestas-deportivas|apuestas-deportivas.es
pronosticos|arbitro nba apuestas|argentina apuestas|argentina colombia apuestas|argentina croacia apuestas|argentina francia apuestas|argentina mexico apuestas|argentina peru apuestas|argentina uruguay apuestas|argentina vs bolivia apuestas|argentina vs chile apuestas|argentina
vs colombia apuestas|argentina vs francia apuestas|argentina
vs. colombia apuestas|asi se gana en las apuestas deportivas|asiatico apuestas|asiatico en apuestas|asiaticos apuestas|athletic
barcelona apuestas|athletic manchester united apuestas|athletic osasuna apuestas|athletic real
madrid apuestas|atletico barcelona apuestas|atletico de
madrid apuestas|atlético de madrid apuestas|atletico de madrid real madrid apuestas|atletico de madrid vs barcelona
apuestas|atletico madrid real madrid apuestas|atletico madrid vs real madrid apuestas|atletico real madrid apuestas|atletico vs
real madrid apuestas|avisador de cuotas apuestas|bajada de cuotas apuestas|baloncesto apuestas|barbastro barcelona apuestas|barca apuestas|barca bayern apuestas|barca inter apuestas|barca madrid apuestas|barça madrid apuestas|barca
vs atletico apuestas|barca vs madrid apuestas|barca vs real
madrid apuestas|barcelona – real madrid apuestas|barcelona apuestas|barcelona atletico apuestas|barcelona atletico de
madrid apuestas|barcelona atletico madrid apuestas|barcelona betis apuestas|barcelona casa de apuestas|barcelona inter apuestas|barcelona psg apuestas|barcelona real madrid apuestas|barcelona real sociedad apuestas|barcelona
sevilla apuestas|barcelona valencia apuestas|barcelona vs athletic bilbao apuestas|barcelona
vs atlético madrid apuestas|barcelona vs betis
apuestas|barcelona vs celta de vigo apuestas|barcelona vs espanyol apuestas|barcelona vs girona apuestas|barcelona vs madrid apuestas|barcelona vs
real madrid apuestas|barcelona vs real sociedad apuestas|barcelona vs sevilla apuestas|barcelona
vs villarreal apuestas|base de datos cuotas apuestas deportivas|bayern real madrid apuestas|beisbol apuestas|best america apuestas|bet apuestas chile|bet apuestas
en vivo|betis – chelsea apuestas|betis apuestas|betis barcelona apuestas|betis chelsea apuestas|betis
madrid apuestas|betis sevilla apuestas|betsson tu sitio de apuestas online|blog apuestas baloncesto|blog apuestas ciclismo|blog apuestas nba|blog apuestas tenis|blog de apuestas de
tenis|bono apuestas|bono apuestas deportivas|bono apuestas deportivas sin deposito|bono apuestas gratis|bono apuestas gratis sin deposito|bono apuestas sin deposito|bono bienvenida apuestas|bono bienvenida apuestas deportivas|bono bienvenida apuestas
españa|bono bienvenida apuestas sin deposito|bono bienvenida apuestas
sin depósito|bono bienvenida casa apuestas|bono bienvenida casa de apuestas|bono bienvenida marca apuestas|bono
casa apuestas|bono casa de apuestas|bono casa de apuestas sin ingreso|bono casas de apuestas|bono de apuestas|bono de apuestas gratis sin deposito|bono de bienvenida
apuestas|bono de bienvenida apuestas deportivas|bono de bienvenida casa de apuestas|bono de bienvenida
casas de apuestas|bono de casas de apuestas|bono de registro apuestas|bono de registro apuestas deportivas|bono de
registro casa de apuestas|bono gratis apuestas|bono marca apuestas|bono por registro apuestas|bono por
registro apuestas deportivas|bono por registro casa de apuestas|bono registro apuestas|bono sin deposito apuestas|bono sin depósito apuestas|bono sin deposito apuestas deportivas|bono sin depósito apuestas deportivas|bono sin deposito casa de apuestas|bono sin deposito marca apuestas|bono sin ingreso apuestas|bono sin ingreso apuestas deportivas|bonos
apuestas|bonos apuestas colombia|bonos apuestas deportivas|bonos apuestas deportivas
sin deposito|bonos apuestas gratis|bonos apuestas
sin deposito|bonos apuestas sin depósito|bonos bienvenida apuestas|bonos bienvenida casas apuestas|bonos bienvenida casas de apuestas|bonos casa de apuestas|bonos casas apuestas|bonos casas de apuestas|bonos
casas de apuestas colombia|bonos casas de apuestas deportivas|bonos casas de apuestas
españa|bonos casas de apuestas nuevas|bonos casas de apuestas sin deposito|bonos
casas de apuestas sin depósito|bonos de apuestas|bonos
de apuestas deportivas|bonos de apuestas gratis|bonos de apuestas sin deposito|bonos de bienvenida apuestas|bonos de bienvenida apuestas deportivas|bonos
de bienvenida casa de apuestas|bonos de bienvenida casas de apuestas|bonos
de bienvenida de casas de apuestas|bonos de bienvenida en casas de apuestas|bonos de
casas de apuestas|bonos de casas de apuestas sin deposito|bonos en casa de apuestas|bonos en casas de apuestas sin deposito|bonos gratis apuestas|bonos
gratis apuestas deportivas|bonos gratis casas
de apuestas|bonos gratis sin deposito apuestas|bonos paginas de apuestas|bonos registro
casas de apuestas|bonos sin deposito apuestas|bonos
sin depósito apuestas|bonos sin deposito apuestas deportivas|bonos sin deposito
casas de apuestas|bot de apuestas deportivas gratis|boxeo apuestas|brasil colombia apuestas|brasil peru apuestas|brasil vs colombia apuestas|buenas apuestas para hoy|buscador cuotas apuestas|buscador de apuestas seguras|buscador de cuotas apuestas|buscador de cuotas de apuestas|buscar apuestas seguras|caballos apuestas|calculador de apuestas|calculador de
cuotas apuestas|calculadora apuestas|calculadora apuestas combinadas|calculadora apuestas de sistema|calculadora apuestas deportivas|calculadora apuestas deportivas seguras|calculadora apuestas multiples|calculadora apuestas segura|calculadora apuestas seguras|calculadora apuestas sistema|calculadora apuestas yankee|calculadora arbitraje apuestas|calculadora cubrir apuestas|calculadora cuotas apuestas|calculadora de apuestas|calculadora de apuestas combinadas|calculadora de apuestas de futbol|calculadora de apuestas de sistema|calculadora
de apuestas deportivas|calculadora de apuestas multiples|calculadora de
apuestas seguras|calculadora de apuestas sistema|calculadora de apuestas surebets|calculadora de
arbitraje apuestas|calculadora de cuotas apuestas|calculadora de cuotas de apuestas|calculadora para apuestas deportivas|calculadora poisson apuestas|calculadora poisson apuestas deportivas|calculadora poisson para apuestas|calculadora scalping apuestas deportivas|calculadora sistema apuestas|calculadora stake apuestas|calculadora trading apuestas|calcular apuestas|calcular apuestas deportivas|calcular
apuestas futbol|calcular apuestas sistema|calcular cuotas apuestas|calcular cuotas apuestas combinadas|calcular
cuotas apuestas deportivas|calcular cuotas de apuestas|calcular ganancias apuestas deportivas|calcular momios apuestas|calcular probabilidad cuota apuestas|calcular stake apuestas|calcular unidades apuestas|calcular yield apuestas|calculo de apuestas|calculo de apuestas deportivas|cambio de cuotas apuestas|campeon champions apuestas|campeon eurocopa
apuestas|campeon liga apuestas|campeon nba apuestas|canales de apuestas gratis|carrera de caballos apuestas|carrera
de caballos apuestas juego|carrera de caballos
con apuestas|carrera de galgos apuestas|carreras de caballos apuestas|carreras de
caballos apuestas online|carreras de caballos con apuestas|carreras de caballos juegos de apuestas|carreras de galgos apuestas|carreras de galgos apuestas online|carreras de galgos apuestas trucos|carreras galgos apuestas|casa apuestas argentina|casa apuestas atletico de madrid|casa
apuestas barcelona|casa apuestas betis|casa apuestas bono bienvenida|casa apuestas bono
gratis|casa apuestas bono sin deposito|casa apuestas cerca de mi|casa apuestas chile|casa apuestas
colombia|casa apuestas con mejores cuotas|casa apuestas deportivas|casa apuestas españa|casa apuestas española|casa apuestas eurocopa|casa apuestas futbol|casa apuestas mejores cuotas|casa apuestas
mundial|casa apuestas nueva|casa apuestas nuevas|casa apuestas online|casa apuestas peru|casa apuestas valencia|casa de
apuestas|casa de apuestas 10 euros gratis|casa de apuestas argentina|casa de apuestas atletico de madrid|casa
de apuestas baloncesto|casa de apuestas barcelona|casa de
apuestas beisbol|casa de apuestas betis|casa de apuestas bono|casa de apuestas bono bienvenida|casa de apuestas bono de bienvenida|casa de apuestas bono gratis|casa de apuestas bono por registro|casa de apuestas bono sin deposito|casa
de apuestas boxeo|casa de apuestas caballos|casa de apuestas carreras de caballos|casa
de apuestas cerca de mi|casa de apuestas cerca de mí|casa de apuestas champions league|casa de apuestas chile|casa de apuestas ciclismo|casa de apuestas
colombia|casa de apuestas con bono de bienvenida|casa de apuestas con bono sin deposito|casa de apuestas
con cuotas mas altas|casa de apuestas con esports|casa de apuestas con las mejores cuotas|casa de apuestas
con licencia en españa|casa de apuestas con mejores cuotas|casa de apuestas
con pago anticipado|casa de apuestas con paypal|casa de
apuestas copa america|casa de apuestas de caballos|casa de apuestas de colombia|casa de
apuestas de españa|casa de apuestas de futbol|casa
de apuestas de fútbol|casa de apuestas de futbol peru|casa de apuestas de peru|casa de
apuestas del madrid|casa de apuestas del real madrid|casa de apuestas deportivas|casa de apuestas deportivas cerca de mi|casa de apuestas deportivas en argentina|casa de apuestas deportivas en chile|casa
de apuestas deportivas en colombia|casa de apuestas deportivas en españa|casa de apuestas deportivas en madrid|casa de apuestas deportivas españa|casa de apuestas deportivas españolas|casa de apuestas deportivas madrid|casa de apuestas
deportivas mexico|casa de apuestas deportivas online|casa
de apuestas deportivas peru|casa de apuestas deposito 5 euros|casa de apuestas
deposito minimo|casa de apuestas deposito minimo 1 euro|casa de apuestas depósito mínimo 1 euro|casa de apuestas en españa|casa de apuestas en linea|casa de apuestas en madrid|casa de apuestas en perú|casa de apuestas
en vivo|casa de apuestas españa|casa de apuestas españa inglaterra|casa de apuestas española|casa de apuestas españolas|casa de apuestas esports|casa
de apuestas eurocopa|casa de apuestas europa league|casa
de apuestas f1|casa de apuestas formula 1|casa de apuestas futbol|casa
de apuestas ingreso minimo|casa de apuestas ingreso minimo 1 euro|casa de apuestas ingreso mínimo 1 euro|casa de apuestas legales|casa de apuestas legales en colombia|casa de apuestas legales en españa|casa
de apuestas libertadores|casa de apuestas liga española|casa
de apuestas madrid|casa de apuestas mas segura|casa de apuestas mejores|casa de apuestas méxico|casa
de apuestas minimo 5 euros|casa de apuestas mlb|casa de apuestas mundial|casa de apuestas nba|casa de apuestas nfl|casa de apuestas nueva|casa
de apuestas nuevas|casa de apuestas oficial del real madrid|casa de apuestas oficial real madrid|casa de apuestas online|casa
de apuestas online argentina|casa de apuestas online chile|casa de apuestas online españa|casa de apuestas online mexico|casa de apuestas online paraguay|casa de apuestas
online peru|casa de apuestas online usa|casa
de apuestas online venezuela|casa de apuestas pago anticipado|casa de
apuestas para boxeo|casa de apuestas para ufc|casa de
apuestas peru|casa de apuestas perú|casa de apuestas peru online|casa de apuestas por paypal|casa de
apuestas promociones|casa de apuestas que regalan dinero|casa de apuestas real madrid|casa de apuestas regalo de bienvenida|casa de apuestas sevilla|casa de
apuestas sin dinero|casa de apuestas sin ingreso minimo|casa de apuestas
sin licencia en españa|casa de apuestas sin minimo de ingreso|casa de apuestas stake|casa de apuestas tenis|casa de
apuestas ufc|casa de apuestas valencia|casa de apuestas venezuela|casa de apuestas virtuales|casa de apuestas vive la
suerte|casa oficial de apuestas del real madrid|casas apuestas asiaticas|casas apuestas bono sin deposito|casas
apuestas bonos sin deposito|casas apuestas caballos|casas apuestas chile|casas apuestas ciclismo|casas apuestas con licencia|casas apuestas
con licencia en españa|casas apuestas deportivas|casas apuestas deportivas colombia|casas apuestas deportivas españa|casas apuestas deportivas españolas|casas apuestas deportivas nuevas|casas apuestas españa|casas apuestas españolas|casas apuestas esports|casas apuestas
eurocopa|casas apuestas golf|casas apuestas ingreso minimo 5 euros|casas apuestas legales|casas apuestas
legales españa|casas apuestas licencia|casas apuestas licencia españa|casas apuestas
mexico|casas apuestas mundial|casas apuestas nba|casas apuestas nuevas|casas apuestas nuevas españa|casas
apuestas ofertas|casas apuestas online|casas apuestas paypal|casas apuestas peru|casas apuestas sin licencia|casas
apuestas tenis|casas asiaticas apuestas|casas de apuestas|casas de apuestas 5 euros|casas de apuestas app|casas de apuestas argentinas|casas de apuestas asiaticas|casas de
apuestas baloncesto|casas de apuestas barcelona|casas de apuestas
bono bienvenida|casas de apuestas bono de bienvenida|casas de apuestas bono por registro|casas
de apuestas bono sin deposito|casas de apuestas bono sin ingreso|casas
de apuestas bonos|casas de apuestas bonos de bienvenida|casas de
apuestas bonos gratis|casas de apuestas bonos sin deposito|casas de apuestas boxeo|casas de apuestas caballos|casas de apuestas carreras de caballos|casas
de apuestas casino|casas de apuestas casino online|casas de apuestas cerca de mi|casas de apuestas champions league|casas de apuestas
chile|casas de apuestas ciclismo|casas de apuestas colombia|casas de apuestas com|casas de
apuestas con app|casas de apuestas con apuestas gratis|casas
de apuestas con bono|casas de apuestas con bono de bienvenida|casas de apuestas
con bono de registro|casas de apuestas con bono por registro|casas de
apuestas con bono sin deposito|casas de apuestas con bonos|casas de apuestas con bonos gratis|casas de apuestas
con bonos sin deposito|casas de apuestas con deposito minimo|casas de apuestas con esports|casas de apuestas con handicap asiatico|casas de apuestas con licencia|casas de apuestas con licencia
en españa|casas de apuestas con licencia españa|casas de apuestas
con licencia española|casas de apuestas con mejores cuotas|casas de apuestas con pago anticipado|casas
de apuestas con paypal|casas de apuestas con paypal en perú|casas de apuestas con promociones|casas de apuestas con ruleta en vivo|casas de apuestas copa
del rey|casas de apuestas de caballos|casas de apuestas de españa|casas
de apuestas de futbol|casas de apuestas de fútbol|casas de apuestas de
peru|casas de apuestas deportivas|casas de apuestas deportivas asiaticas|casas de apuestas deportivas
colombia|casas de apuestas deportivas comparativa|casas de
apuestas deportivas con paypal|casas de apuestas deportivas en chile|casas
de apuestas deportivas en españa|casas de apuestas deportivas
en linea|casas de apuestas deportivas en madrid|casas
de apuestas deportivas en mexico|casas de apuestas deportivas
en peru|casas de apuestas deportivas en sevilla|casas de
apuestas deportivas en valencia|casas de apuestas
deportivas españa|casas de apuestas deportivas españolas|casas
de apuestas deportivas legales|casas de apuestas deportivas madrid|casas de apuestas deportivas mexico|casas de
apuestas deportivas nuevas|casas de apuestas deportivas online|casas de apuestas deportivas
peru|casas de apuestas deportivas perú|casas de apuestas deposito minimo 1 euro|casas de apuestas depósito mínimo 1 euro|casas de apuestas dinero gratis|casas de apuestas en argentina|casas de apuestas en barcelona|casas de apuestas en chile|casas
de apuestas en colombia|casas de apuestas en españa|casas de apuestas en españa online|casas de
apuestas en linea|casas de apuestas en madrid|casas de
apuestas en méxico|casas de apuestas en peru|casas de apuestas en perú|casas de
apuestas en sevilla|casas de apuestas en uruguay|casas de apuestas en valencia|casas de apuestas
en venezuela|casas de apuestas equipos de futbol|casas
de apuestas españa|casas de apuestas españa alemania|casas de
apuestas españa inglaterra|casas de apuestas españa licencia|casas de apuestas españa nuevas|casas de apuestas españa online|casas de apuestas española|casas de apuestas españolas|casas
de apuestas españolas con licencia|casas de apuestas españolas online|casas
de apuestas esports|casas de apuestas eurocopa|casas de apuestas eurocopa
2024|casas de apuestas europa league|casas de apuestas f1|casas de
apuestas fisicas en barcelona|casas de apuestas fisicas en españa|casas de apuestas
formula 1|casas de apuestas fuera de españa|casas de
apuestas futbol|casas de apuestas fútbol|casas de apuestas futbol españa|casas de
apuestas ganador eurocopa|casas de apuestas
gratis|casas de apuestas ingreso minimo|casas de apuestas ingreso minimo 1 euro|casas
de apuestas ingreso minimo 5 euros|casas de apuestas inter
barcelona|casas de apuestas legales|casas de apuestas
legales en colombia|casas de apuestas legales en españa|casas de
apuestas legales en mexico|casas de apuestas legales españa|casas de apuestas legales mx|casas de apuestas licencia|casas de apuestas licencia españa|casas de apuestas lista|casas de apuestas madrid|casas de apuestas mas seguras|casas de apuestas mejores bonos|casas de apuestas mejores cuotas|casas de
apuestas mexico|casas de apuestas méxico|casas de apuestas minimo 5 euros|casas de apuestas mlb|casas de apuestas mundial|casas de apuestas mundial baloncesto|casas de apuestas mundiales|casas de apuestas nba|casas de apuestas no reguladas en españa|casas de apuestas nueva ley|casas de apuestas nuevas|casas de apuestas nuevas en colombia|casas de
apuestas nuevas en españa|casas de apuestas nuevas españa|casas de apuestas ofertas|casas de apuestas online|casas de apuestas online argentina|casas de apuestas online colombia|casas de apuestas online deportivas|casas de apuestas
online ecuador|casas de apuestas online en argentina|casas de apuestas online
en chile|casas de apuestas online en colombia|casas de apuestas online
en españa|casas de apuestas online en mexico|casas de apuestas online españa|casas de apuestas online mas fiables|casas de apuestas online mexico|casas
de apuestas online nuevas|casas de apuestas online peru|casas de apuestas
online usa|casas de apuestas online venezuela|casas de apuestas pago paypal|casas de apuestas para ufc|casas de apuestas paypal|casas de apuestas peru bono
sin deposito|casas de apuestas presenciales en españa|casas de apuestas promociones|
Your comment is awaiting moderation.
На 7k casino официальный сайт есть всё необходимое. Большой выбор игр и понятные правила. Деньги выводятся без задержек: казино 7к
Your comment is awaiting moderation.
dreamshopworld – Loved how smooth the browsing felt with everything clearly organized nicely.
Your comment is awaiting moderation.
learnsomethingincredible – Loved how simple the explanations felt while still being really interesting.
Your comment is awaiting moderation.
dreambuildachieve – Found a good reminder here that actually kept me moving forward.
Your comment is awaiting moderation.
discovermoreideas – The content here feels thoughtful and always gives me something new.
Your comment is awaiting moderation.
clickvoltage.click – Found practical insights today; sharing this article with colleagues later.
Your comment is awaiting moderation.
changeyourmindset – A refreshing visit today with insights that felt practical and encouraging.
Your comment is awaiting moderation.
trendyvaluezone – Discovered a few items that matched my needs perfectly this morning.
Your comment is awaiting moderation.
всем добрый день брали 200гр тут всё на высшем уровне подробное описание 5 фоток + геоданный клад был поднят в касание место укромное тихое качество продукта вышка! советую всем брать у Чема ! https://pubhtml5.com/homepage/nkbbi вообще ктонибудь в этом магазине еще заказывал?? получал что нибудь ? или хотя бы треки бились?
Your comment is awaiting moderation.
virallaunch.click – Appreciate the typography choices; comfortable spacing improved my reading experience.
Your comment is awaiting moderation.
boosttraffic.click – Navigation felt smooth, found everything quickly without any confusing steps.
Your comment is awaiting moderation.
(10 euros gratis apuestas|10 mejores casas de apuestas|10
trucos para ganar apuestas|15 euros gratis marca
apuestas|1×2 apuestas|1×2 apuestas deportivas|1×2 apuestas que significa|1×2 en apuestas|1×2 en apuestas que significa|1×2 que significa en apuestas|5 euros gratis apuestas|9 apuestas que siempre ganaras|a partir de cuanto se declara apuestas|actividades de juegos de azar y apuestas|ad apuestas
deportivas|aleksandre topuria ufc apuestas|algoritmo para ganar apuestas
deportivas|america apuestas|análisis nba apuestas|aplicacion android
apuestas deportivas|aplicacion apuestas deportivas|aplicacion apuestas deportivas
android|aplicación de apuestas online|aplicacion para hacer
apuestas|aplicacion para hacer apuestas de futbol|aplicación para hacer
apuestas de fútbol|aplicaciones apuestas deportivas android|aplicaciones apuestas deportivas gratis|aplicaciones de apuestas android|aplicaciones de apuestas de fútbol|aplicaciones de
apuestas deportivas|aplicaciones de apuestas deportivas peru|aplicaciones de apuestas deportivas perú|aplicaciones de apuestas
en colombia|aplicaciones de apuestas gratis|aplicaciones de apuestas
online|aplicaciones de apuestas seguras|aplicaciones de apuestas sin dinero|aplicaciones para hacer apuestas|apostar seguro apuestas deportivas|app
android apuestas deportivas|app apuestas|app apuestas android|app apuestas de futbol|app apuestas deportivas|app apuestas
deportivas android|app apuestas deportivas argentina|app apuestas deportivas colombia|app apuestas deportivas ecuador|app
apuestas deportivas españa|app apuestas deportivas gratis|app apuestas
entre amigos|app apuestas futbol|app apuestas gratis|app apuestas sin dinero|app casa de apuestas|app casas de apuestas|app control apuestas|app de apuestas|app de apuestas android|app de apuestas casino|app de
apuestas colombia|app de apuestas con bono de bienvenida|app de apuestas de futbol|app
de apuestas deportivas|app de apuestas deportivas android|app de apuestas deportivas argentina|app de apuestas deportivas colombia|app de apuestas deportivas en españa|app de apuestas deportivas peru|app de apuestas deportivas perú|app de apuestas deportivas sin dinero|app
de apuestas ecuador|app de apuestas en colombia|app de apuestas en españa|app de apuestas en venezuela|app de apuestas
futbol|app de apuestas gratis|app de apuestas online|app de apuestas para android|app de apuestas para ganar
dinero|app de apuestas peru|app de apuestas reales|app de casas de apuestas|app marca apuestas android|app moviles de apuestas|app para apuestas|app para apuestas de futbol|app para apuestas deportivas|app para apuestas deportivas en español|app para ganar apuestas deportivas|app para hacer apuestas|app para
hacer apuestas deportivas|app para hacer apuestas entre amigos|app para llevar control de apuestas|app pronosticos
apuestas deportivas|app versus apuestas|apps apuestas mundial|apps de apuestas|apps de apuestas con bono de bienvenida|apps de apuestas de futbol|apps
de apuestas deportivas peru|apps de apuestas mexico|apps para
apuestas|aprender a hacer apuestas deportivas|aprender hacer apuestas deportivas|apuesta del dia apuestas deportivas|apuestas 10 euros gratis|apuestas 100 seguras|apuestas 1×2|apuestas
1X2|apuestas 2 division|apuestas 3 division|apuestas a caballos|apuestas a carreras
de caballos|apuestas a colombia|apuestas a corners|apuestas
a ganar|apuestas a jugadores nba|apuestas a la baja|apuestas a la nfl|apuestas al barcelona|apuestas al dia|apuestas al
empate|apuestas al mundial|apuestas al tenis wta|apuestas alaves barcelona|apuestas
alcaraz hoy|apuestas alemania españa|apuestas alonso campeon del mundo|apuestas altas y bajas|apuestas altas y bajas nfl|apuestas ambos equipos marcan|apuestas america|apuestas android|apuestas anillo nba|apuestas antes del mundial|apuestas anticipadas|apuestas anticipadas nba|apuestas
apps|apuestas arabia argentina|apuestas argentina|apuestas
argentina campeon del mundo|apuestas argentina canada|apuestas argentina colombia|apuestas argentina croacia|apuestas
argentina españa|apuestas argentina francia|apuestas argentina francia cuanto paga|apuestas argentina
francia mundial|apuestas argentina gana el mundial|apuestas argentina gana mundial|apuestas argentina holanda|apuestas argentina mexico|apuestas argentina méxico|apuestas argentina mundial|apuestas
argentina online|apuestas argentina paises bajos|apuestas argentina polonia|apuestas argentina uruguay|apuestas argentina vs australia|apuestas argentina vs colombia|apuestas argentina vs francia|apuestas
argentina vs peru|apuestas argentinas|apuestas arsenal
real madrid|apuestas ascenso a primera division|apuestas ascenso a segunda|apuestas asiaticas|apuestas asiatico|apuestas athletic|apuestas athletic atletico|apuestas athletic barça|apuestas athletic barcelona|apuestas athletic betis|apuestas athletic
manchester|apuestas athletic manchester united|apuestas
athletic osasuna|apuestas athletic real|apuestas athletic real madrid|apuestas athletic real sociedad|apuestas athletic real sociedad final|apuestas athletic roma|apuestas athletic sevilla|apuestas athletic valencia|apuestas atletico|apuestas atletico barcelona|apuestas atletico barsa|apuestas atletico campeon champions|apuestas atletico
campeon de liga|apuestas atlético copenhague|apuestas atletico de madrid|apuestas atlético de madrid|apuestas atletico de madrid barcelona|apuestas atletico de madrid gana la liga|apuestas atletico de madrid real madrid|apuestas atlético de madrid real madrid|apuestas atletico de madrid vs barcelona|apuestas atletico madrid|apuestas atletico madrid real madrid|apuestas
atletico madrid vs barcelona|apuestas atletico real madrid|apuestas atletico
real madrid champions|apuestas atletismo|apuestas bajas|apuestas baloncesto|apuestas baloncesto acb|apuestas baloncesto handicap|apuestas baloncesto hoy|apuestas
baloncesto juegos olimpicos|apuestas baloncesto nba|apuestas
baloncesto pronostico|apuestas baloncesto pronósticos|apuestas baloncesto prorroga|apuestas
barca|apuestas barca athletic|apuestas barca atletico|apuestas barca bayern|apuestas barca bayern munich|apuestas barca girona|apuestas barca hoy|apuestas barça hoy|apuestas barca inter|apuestas
barca juventus|apuestas barca madrid|apuestas barça madrid|apuestas barca real
madrid|apuestas barca vs juve|apuestas barca vs madrid|apuestas barca vs psg|apuestas barcelona|apuestas barcelona alaves|apuestas barcelona athletic|apuestas barcelona
atletico|apuestas barcelona atletico de madrid|apuestas barcelona atlético de madrid|apuestas barcelona atletico madrid|apuestas barcelona
bayern|apuestas barcelona betis|apuestas barcelona campeon de liga|apuestas
barcelona celta|apuestas barcelona espanyol|apuestas barcelona
gana la champions|apuestas barcelona girona|apuestas barcelona granada|apuestas barcelona hoy|apuestas barcelona inter|apuestas barcelona madrid|apuestas
barcelona osasuna|apuestas barcelona psg|apuestas barcelona real madrid|apuestas barcelona real sociedad|apuestas barcelona sevilla|apuestas barcelona valencia|apuestas barcelona villarreal|apuestas barcelona
vs atletico madrid|apuestas barcelona vs madrid|apuestas barcelona vs real madrid|apuestas barsa madrid|apuestas basket hoy|apuestas
bayern barcelona|apuestas bayern vs barcelona|apuestas beisbol|apuestas béisbol|apuestas
beisbol mlb|apuestas beisbol pronosticos|apuestas beisbol venezolano|apuestas betis|apuestas betis – chelsea|apuestas betis
barcelona|apuestas betis chelsea|apuestas betis fiorentina|apuestas betis girona|apuestas betis madrid|apuestas betis mallorca|apuestas betis real madrid|apuestas betis real sociedad|apuestas betis sevilla|apuestas betis valencia|apuestas betis valladolid|apuestas betis vs
valencia|apuestas betplay hoy colombia|apuestas betsson peru|apuestas bienvenida|apuestas billar online|apuestas bolivia vs colombia|apuestas
bono|apuestas bono bienvenida|apuestas bono de bienvenida|apuestas bono
de bienvenida sin deposito|apuestas bono gratis|apuestas bono
sin deposito|apuestas bonos sin deposito|apuestas borussia real madrid|apuestas boxeo|apuestas boxeo de campeonato|apuestas boxeo españa|apuestas boxeo español|apuestas
boxeo femenino olimpiadas|apuestas boxeo hoy|apuestas
boxeo online|apuestas brasil colombia|apuestas brasil peru|apuestas
brasil uruguay|apuestas brasil vs colombia|apuestas brasil vs peru|apuestas caballos|apuestas caballos colocado|apuestas
caballos españa|apuestas caballos hipodromo|apuestas caballos hoy|apuestas caballos madrid|apuestas caballos online|apuestas caballos sanlucar de barrameda|apuestas caballos zarzuela|apuestas
calculador|apuestas campeon|apuestas campeon champions|apuestas campeón champions|apuestas campeon champions 2025|apuestas campeon champions
league|apuestas campeon conference league|apuestas campeon copa america|apuestas campeon copa
del rey|apuestas campeon de champions|apuestas campeon de la
champions|apuestas campeon de liga|apuestas campeon del mundo|apuestas campeon eurocopa|apuestas campeón eurocopa|apuestas campeon europa
league|apuestas campeon f1|apuestas campeon f1 2025|apuestas campeon formula 1|apuestas
campeon libertadores|apuestas campeon liga|apuestas campeon liga bbva|apuestas campeon liga española|apuestas campeon liga santander|apuestas campeon motogp 2025|apuestas
campeon mundial|apuestas campeón mundial|apuestas campeon mundial baloncesto|apuestas campeon nba|apuestas
campeón nba|apuestas campeon premier|apuestas
campeon premier league|apuestas campeon roland garros|apuestas campeonato f1|apuestas campeonatos de futbol|apuestas carrera de caballos|apuestas carrera
de caballos hoy|apuestas carrera de caballos nocturnas|apuestas carrera de galgos fin de semana|apuestas
carrera de galgos hoy|apuestas carrera de galgos nocturnas|apuestas
carreras caballos|apuestas carreras caballos sanlucar|apuestas carreras de
caballos|apuestas carreras de caballos en directo|apuestas carreras de caballos en vivo|apuestas carreras de caballos españa|apuestas carreras de caballos hoy|apuestas carreras de caballos nacionales|apuestas carreras de caballos
nocturnas|apuestas carreras de caballos online|apuestas carreras de caballos sanlucar|apuestas carreras de caballos sanlúcar|apuestas carreras de galgos|apuestas carreras
de galgos en vivo|apuestas carreras de galgos nocturnas|apuestas carreras de galgos
pre partido|apuestas casino|apuestas casino barcelona|apuestas casino futbol|apuestas
casino gran madrid|apuestas casino gratis|apuestas casino madrid|apuestas casino
online|apuestas casino online argentina|apuestas casinos|apuestas casinos online|apuestas celta|apuestas celta barcelona|apuestas celta betis|apuestas celta eibar|apuestas celta espanyol|apuestas celta granada|apuestas celta madrid|apuestas celta manchester|apuestas celta real madrid|apuestas champion league|apuestas
champions foro|apuestas champions hoy|apuestas champions league|apuestas champions league – pronósticos|apuestas champions league 2025|apuestas champions league hoy|apuestas
champions league pronosticos|apuestas champions league pronósticos|apuestas champions pronosticos|apuestas chelsea barcelona|apuestas chelsea
betis|apuestas chile|apuestas chile peru|apuestas chile
venezuela|apuestas chile vs colombia|apuestas chile vs uruguay|apuestas ciclismo|apuestas ciclismo en vivo|apuestas ciclismo
femenino|apuestas ciclismo tour francia|apuestas ciclismo vuelta|apuestas
ciclismo vuelta a españa|apuestas ciclismo vuelta
españa|apuestas city madrid|apuestas city real madrid|apuestas clasico|apuestas clasico español|apuestas clasico real madrid barcelona|apuestas clasificacion mundial|apuestas colombia|apuestas colombia argentina|apuestas colombia brasil|apuestas colombia paraguay|apuestas colombia uruguay|apuestas colombia vs
argentina|apuestas colombia vs brasil|apuestas combinadas|apuestas combinadas
como funcionan|apuestas combinadas de futbol|apuestas combinadas de fútbol|apuestas combinadas foro|apuestas combinadas futbol|apuestas combinadas hoy|apuestas combinadas
mismo partido|apuestas combinadas mundial|apuestas combinadas nba|apuestas combinadas para
esta semana|apuestas combinadas para hoy|apuestas combinadas para mañana|apuestas combinadas pronosticos|apuestas combinadas
recomendadas|apuestas combinadas seguras|apuestas combinadas seguras para hoy|apuestas combinadas seguras para
mañana|apuestas como ganar|apuestas comparador|apuestas con bono de bienvenida|apuestas con dinero ficticio|apuestas con dinero real|apuestas con dinero
virtual|apuestas con handicap|apuestas con handicap
asiatico|apuestas con handicap baloncesto|apuestas con mas probabilidades de ganar|apuestas con paypal|apuestas con tarjeta de credito|apuestas
con tarjeta de debito|apuestas consejos|apuestas copa|apuestas copa africa|apuestas copa
america|apuestas copa américa|apuestas copa
argentina|apuestas copa brasil|apuestas copa davis|apuestas copa de europa|apuestas copa
del mundo|apuestas copa del rey|apuestas copa del rey baloncesto|apuestas copa del rey final|apuestas
copa del rey futbol|apuestas copa del rey ganador|apuestas copa del rey hoy|apuestas copa del rey pronosticos|apuestas copa del rey pronósticos|apuestas copa europa|apuestas copa italia|apuestas copa libertadores|apuestas
copa mundial de hockey|apuestas copa rey|apuestas copa sudamericana|apuestas corners|apuestas corners hoy|apuestas croacia argentina|apuestas cuartos eurocopa|apuestas
cuotas|apuestas cuotas altas|apuestas cuotas bajas|apuestas de 1 euro|apuestas
de baloncesto|apuestas de baloncesto hoy|apuestas de
baloncesto nba|apuestas de baloncesto para hoy|apuestas de beisbol|apuestas de beisbol para hoy|apuestas
de blackjack en linea|apuestas de boxeo|apuestas de boxeo canelo|apuestas de
boxeo en las vegas|apuestas de boxeo hoy|apuestas de boxeo online|apuestas de caballo|apuestas de caballos|apuestas
de caballos como funciona|apuestas de caballos como se juega|apuestas de caballos en colombia|apuestas
de caballos en españa|apuestas de caballos en linea|apuestas de caballos españa|apuestas de caballos ganador y
colocado|apuestas de caballos internacionales|apuestas de caballos juegos|apuestas de caballos online|apuestas de caballos online en venezuela|apuestas de caballos por internet|apuestas de
caballos pronosticos|apuestas de caballos pronósticos|apuestas de carrera
de caballos|apuestas de carreras de caballos|apuestas de carreras
de caballos online|apuestas de casino|apuestas de casino online|apuestas de casino por
internet|apuestas de champions league|apuestas de ciclismo|apuestas de
colombia|apuestas de copa america|apuestas de corners|apuestas de deportes en linea|apuestas de deportes online|apuestas de dinero|apuestas de esports|apuestas de eurocopa|apuestas de europa league|apuestas de f1|apuestas de formula
1|apuestas de futbol|apuestas de fútbol|apuestas de futbol app|apuestas de futbol argentina|apuestas de futbol colombia|apuestas de futbol en colombia|apuestas de futbol en directo|apuestas de futbol en linea|apuestas de futbol en vivo|apuestas de futbol español|apuestas de futbol gratis|apuestas de futbol hoy|apuestas de futbol mundial|apuestas de futbol online|apuestas de fútbol online|apuestas de futbol para
hoy|apuestas de fútbol para hoy|apuestas de futbol para hoy seguras|apuestas de futbol para mañana|apuestas de futbol peru|apuestas de futbol
pronosticos|apuestas de fútbol pronósticos|apuestas de futbol seguras|apuestas de futbol seguras para hoy|apuestas de
futbol sin dinero|apuestas de galgos|apuestas de galgos como ganar|apuestas de galgos en directo|apuestas de galgos online|apuestas de galgos trucos|apuestas de golf|apuestas de hockey|apuestas de hockey sobre hielo|apuestas de hoy|apuestas de hoy seguras|apuestas de juego|apuestas de juegos|apuestas
de juegos deportivos|apuestas de juegos online|apuestas de la champions league|apuestas de la copa américa|apuestas de la eurocopa|apuestas de la europa league|apuestas de la liga|apuestas de la liga bbva|apuestas
de la liga española|apuestas de la nba|apuestas de la nfl|apuestas de la ufc|apuestas
de mlb|apuestas de nba|apuestas de nba para hoy|apuestas de partidos|apuestas
de partidos de futbol|apuestas de peleas ufc|apuestas de perros
en vivo|apuestas de perros virtuales|apuestas de peru|apuestas
de sistema|apuestas de sistema como funciona|apuestas de sistema explicacion|apuestas de sistema explicación|apuestas de tenis|apuestas de tenis de mesa|apuestas de
tenis en directo|apuestas de tenis hoy|apuestas de tenis para hoy|apuestas de tenis pronosticos|apuestas de tenis seguras|apuestas de todo tipo|apuestas de ufc|apuestas
de ufc hoy|apuestas del boxeo|apuestas del clasico|apuestas del
clasico real madrid barca|apuestas del dia|apuestas del día|apuestas del dia de hoy|apuestas del dia deportivas|apuestas del dia futbol|apuestas
del mundial|apuestas del partido de hoy|apuestas del real madrid|apuestas del rey|apuestas del sistema|apuestas deporte|apuestas deportes|apuestas deportiva|apuestas deportivas|apuestas deportivas 1 euro|apuestas deportivas 10 euros gratis|apuestas
deportivas 100 seguras|apuestas deportivas 1×2|apuestas deportivas android|apuestas deportivas app|apuestas deportivas apps|apuestas deportivas argentina|apuestas deportivas
argentina futbol|apuestas deportivas argentina legal|apuestas
deportivas atletico de madrid|apuestas deportivas baloncesto|apuestas deportivas barca madrid|apuestas deportivas barcelona|apuestas deportivas
beisbol|apuestas deportivas bono|apuestas deportivas bono bienvenida|apuestas
deportivas bono de bienvenida|apuestas deportivas bono sin deposito|apuestas deportivas bonos de bienvenida|apuestas deportivas
boxeo|apuestas deportivas caballos|apuestas deportivas calculadora|apuestas deportivas campeon liga|apuestas deportivas
casino|apuestas deportivas casino barcelona|apuestas deportivas casino online|apuestas deportivas cerca de
mi|apuestas deportivas champions league|apuestas deportivas chile|apuestas deportivas ciclismo|apuestas deportivas colombia|apuestas deportivas com|apuestas deportivas com foro|apuestas deportivas com pronosticos|apuestas deportivas
combinadas|apuestas deportivas combinadas para hoy|apuestas deportivas como se juega|apuestas deportivas comparador|apuestas deportivas con bono gratis|apuestas deportivas con bonos gratis|apuestas
deportivas con dinero ficticio|apuestas deportivas con paypal|apuestas deportivas con puntos
virtuales|apuestas deportivas consejos|apuestas deportivas consejos para
ganar|apuestas deportivas copa america|apuestas deportivas copa del rey|apuestas deportivas copa libertadores|apuestas deportivas
copa mundial|apuestas deportivas corners|apuestas deportivas cual es la mejor|apuestas deportivas cuotas altas|apuestas deportivas
de baloncesto|apuestas deportivas de boxeo|apuestas deportivas
de colombia|apuestas deportivas de futbol|apuestas deportivas de nba|apuestas deportivas de nhl|apuestas deportivas de peru|apuestas
deportivas de tenis|apuestas deportivas del dia|apuestas deportivas dinero
ficticio|apuestas deportivas directo|apuestas deportivas doble oportunidad|apuestas deportivas en argentina|apuestas deportivas en chile|apuestas deportivas en colombia|apuestas deportivas
en directo|apuestas deportivas en españa|apuestas deportivas en español|apuestas deportivas en linea|apuestas deportivas en línea|apuestas deportivas en peru|apuestas deportivas en perú|apuestas deportivas en sevilla|apuestas deportivas en uruguay|apuestas deportivas en vivo|apuestas deportivas es|apuestas deportivas es pronosticos|apuestas deportivas españa|apuestas deportivas españolas|apuestas deportivas esports|apuestas deportivas estadisticas|apuestas deportivas
estrategias|apuestas deportivas estrategias seguras|apuestas deportivas eurocopa|apuestas deportivas europa league|apuestas deportivas f1|apuestas deportivas faciles de ganar|apuestas deportivas formula 1|apuestas deportivas foro|apuestas deportivas foro futbol|apuestas deportivas foro tenis|apuestas
deportivas francia argentina|apuestas deportivas futbol|apuestas deportivas
fútbol|apuestas deportivas futbol argentino|apuestas deportivas futbol colombia|apuestas deportivas futbol español|apuestas deportivas gana|apuestas deportivas ganadas|apuestas
deportivas ganar dinero seguro|apuestas deportivas gane|apuestas deportivas
golf|apuestas deportivas gratis|apuestas deportivas gratis con premios|apuestas deportivas gratis hoy|apuestas deportivas gratis sin deposito|apuestas deportivas handicap|apuestas deportivas handicap asiatico|apuestas deportivas
hoy|apuestas deportivas impuestos|apuestas deportivas interior argentina|apuestas deportivas juegos
olimpicos|apuestas deportivas la liga|apuestas deportivas legales|apuestas deportivas legales en colombia|apuestas deportivas libres de impuestos|apuestas deportivas licencia españa|apuestas deportivas liga española|apuestas
deportivas listado|apuestas deportivas listado clasico|apuestas deportivas madrid|apuestas deportivas mas seguras|apuestas deportivas mejor pagadas|apuestas deportivas
mejores|apuestas deportivas mejores app|apuestas deportivas mejores
casas|apuestas deportivas mejores cuotas|apuestas deportivas
mejores paginas|apuestas deportivas mexico|apuestas deportivas méxico|apuestas deportivas mlb|apuestas deportivas
mlb hoy|apuestas deportivas multiples|apuestas deportivas mundial|apuestas deportivas
murcia|apuestas deportivas nba|apuestas deportivas nba hoy|apuestas deportivas nfl|apuestas deportivas
nhl|apuestas deportivas nuevas|apuestas deportivas ofertas|apuestas deportivas online|apuestas deportivas online argentina|apuestas deportivas online
chile|apuestas deportivas online colombia|apuestas deportivas online en colombia|apuestas deportivas online españa|apuestas deportivas online mexico|apuestas deportivas online paypal|apuestas deportivas online peru|apuestas deportivas online por internet|apuestas deportivas pago paypal|apuestas deportivas para
ganar dinero|apuestas deportivas para hoy|apuestas deportivas para hoy pronosticos|apuestas deportivas partido suspendido|apuestas deportivas partidos de hoy|apuestas deportivas paypal|apuestas deportivas peru|apuestas deportivas perú|apuestas deportivas
peru vs ecuador|apuestas deportivas predicciones|apuestas deportivas promociones|apuestas deportivas pronostico|apuestas deportivas pronóstico|apuestas deportivas pronostico hoy|apuestas deportivas pronosticos|apuestas
deportivas pronósticos|apuestas deportivas pronosticos
expertos|apuestas deportivas pronosticos gratis|apuestas deportivas pronosticos nba|apuestas deportivas
pronosticos tenis|apuestas deportivas que aceptan paypal|apuestas
deportivas real madrid|apuestas deportivas regalo bienvenida|apuestas deportivas resultado exacto|apuestas
deportivas resultados|apuestas deportivas rugby|apuestas deportivas seguras|apuestas deportivas
seguras foro|apuestas deportivas seguras hoy|apuestas deportivas seguras para hoy|apuestas deportivas seguras telegram|apuestas deportivas sevilla|apuestas deportivas
simulador eurocopa|apuestas deportivas sin deposito|apuestas deportivas sin deposito inicial|apuestas deportivas sin dinero|apuestas
deportivas sin dinero real|apuestas deportivas sin registro|apuestas deportivas stake|apuestas deportivas stake 10|apuestas deportivas telegram españa|apuestas
deportivas tenis|apuestas deportivas tenis de mesa|apuestas deportivas tenis foro|apuestas deportivas tenis hoy|apuestas deportivas tips|apuestas deportivas tipster|apuestas deportivas ufc|apuestas deportivas uruguay|apuestas deportivas valencia|apuestas deportivas valencia barcelona|apuestas deportivas venezuela|apuestas deportivas virtuales|apuestas deportivas y casino|apuestas deportivas y
casino online|apuestas deportivas.com|apuestas
deportivas.com foro|apuestas deportivas.es|apuestas deportivos
pronosticos|apuestas deposito minimo 1 euro|apuestas descenso a segunda|apuestas descenso a segunda b|apuestas descenso la liga|apuestas descenso primera division|apuestas descenso
segunda|apuestas dia|apuestas diarias seguras|apuestas
dinero|apuestas dinero ficticio|apuestas dinero real|apuestas
dinero virtual|apuestas directas|apuestas directo|apuestas directo futbol|apuestas division de honor juvenil|apuestas dnb|apuestas doble oportunidad|apuestas doble resultado|apuestas dobles|apuestas dobles y triples|apuestas dortmund barcelona|apuestas draft nba|apuestas draft nfl|apuestas ecuador
vs argentina|apuestas ecuador vs venezuela|apuestas egipto uruguay|apuestas el clasico|apuestas elecciones venezuela|apuestas empate|apuestas en baloncesto|apuestas en barcelona|apuestas en beisbol|apuestas en boxeo|apuestas en caballos|apuestas
en carreras de caballos|apuestas en casino|apuestas en casino online|apuestas en casinos|apuestas en casinos online|apuestas en chile|apuestas en ciclismo|apuestas
en colombia|apuestas en colombia de futbol|apuestas en directo|apuestas en directo futbol|apuestas en directo
pronosticos|apuestas en el futbol|apuestas en el tenis|apuestas en españa|apuestas en esports|apuestas en eventos deportivos virtuales|apuestas en golf|apuestas en juegos|apuestas
en la champions league|apuestas en la eurocopa|apuestas
en la liga|apuestas en la nba|apuestas en la nfl|apuestas en las vegas mlb|apuestas en las vegas nfl|apuestas en linea|apuestas en línea|apuestas en linea argentina|apuestas en linea boxeo|apuestas en linea chile|apuestas en linea colombia|apuestas en línea de fútbol|apuestas en linea deportivas|apuestas en linea españa|apuestas en linea estados unidos|apuestas en linea futbol|apuestas en linea mexico|apuestas en línea méxico|apuestas en linea mundial|apuestas en linea peru|apuestas en linea usa|apuestas en los esports|apuestas
en madrid|apuestas en méxico|apuestas en mexico online|apuestas
en nba|apuestas en partidos de futbol|apuestas en partidos de futbol en vivo|apuestas en partidos de tenis en directo|apuestas en perú|apuestas en sevilla|apuestas en sistema|apuestas en stake|apuestas en tenis|apuestas en tenis de mesa|apuestas en valencia|apuestas en vivo|apuestas en vivo argentina|apuestas en vivo
casino|apuestas en vivo futbol|apuestas en vivo fútbol|apuestas en vivo
nba|apuestas en vivo peru|apuestas en vivo tenis|apuestas en vivo ufc|apuestas equipo mbappe|apuestas equipos de futbol|apuestas españa|apuestas españa alemania|apuestas españa alemania
eurocopa|apuestas españa croacia|apuestas españa eurocopa|apuestas
españa francia|apuestas españa francia eurocopa|apuestas
españa gana el mundial|apuestas españa gana
eurocopa|apuestas españa gana mundial|apuestas españa georgia|apuestas españa holanda|apuestas españa inglaterra|apuestas españa inglaterra cuotas|apuestas españa inglaterra eurocopa|apuestas
españa italia|apuestas españa mundial|apuestas españa paises bajos|apuestas español|apuestas español oviedo|apuestas espanyol barcelona|apuestas
espanyol betis|apuestas espanyol villarreal|apuestas esport|apuestas
esports|apuestas esports colombia|apuestas esports españa|apuestas esports fifa|apuestas esports gratis|apuestas esports lol|apuestas esports peru|apuestas esports valorant|apuestas estadisticas|apuestas
estrategias|apuestas euro|apuestas euro copa|apuestas eurocopa|apuestas
eurocopa campeon|apuestas eurocopa españa|apuestas eurocopa
favoritos|apuestas eurocopa femenina|apuestas eurocopa final|apuestas eurocopa ganador|apuestas eurocopa hoy|apuestas eurocopa sub 21|apuestas euroliga
baloncesto|apuestas euroliga pronosticos|apuestas europa league|apuestas
europa league hoy|apuestas europa league pronosticos|apuestas europa league pronósticos|apuestas euros|apuestas f1 abu dhabi|apuestas f1 bahrein|apuestas f1 canada|apuestas f1 china|apuestas f1
cuotas|apuestas f1 hoy|apuestas f1 las vegas|apuestas f1 miami|apuestas f1
monaco|apuestas faciles de ganar|apuestas fáciles de ganar|apuestas faciles para ganar|apuestas favoritas|apuestas favorito champions|apuestas favoritos champions|apuestas favoritos eurocopa|apuestas favoritos mundial|apuestas
fc barcelona|apuestas final champions cuotas|apuestas final champions league|apuestas final
champions peru|apuestas final copa|apuestas final copa america|apuestas final
copa de europa|apuestas final copa del rey|apuestas final
copa europa|apuestas final copa libertadores|apuestas final copa rey|apuestas final de copa|apuestas final de copa del rey|apuestas final del mundial|apuestas final euro|apuestas
final eurocopa|apuestas final europa league|apuestas final libertadores|apuestas final mundial|apuestas final nba|apuestas
final rugby|apuestas final uefa europa league|apuestas final.mundial|apuestas
finales de conferencia nfl|apuestas finales nba|apuestas fiorentina betis|apuestas formula|apuestas
formula 1|apuestas fórmula 1|apuestas fórmula
1 pronósticos|apuestas formula uno|apuestas foro|apuestas
foro nba|apuestas francia argentina|apuestas francia españa|apuestas futbol|apuestas
fútbol|apuestas futbol americano|apuestas futbol americano nfl|apuestas futbol argentina|apuestas futbol argentino|apuestas futbol champions league|apuestas futbol chile|apuestas futbol colombia|apuestas futbol consejos|apuestas futbol en directo|apuestas fútbol en directo|apuestas futbol en vivo|apuestas fútbol en vivo|apuestas futbol españa|apuestas futbol español|apuestas fútbol español|apuestas
futbol eurocopa|apuestas futbol femenino|apuestas futbol
foro|apuestas futbol gratis|apuestas futbol hoy|apuestas fútbol hoy|apuestas futbol
juegos olimpicos|apuestas futbol mexico|apuestas
futbol mundial|apuestas futbol online|apuestas
futbol para hoy|apuestas futbol peru|apuestas futbol pronosticos|apuestas futbol sala|apuestas futbol telegram|apuestas futbol virtual|apuestas galgos|apuestas galgos
en directo|apuestas galgos hoy|apuestas galgos online|apuestas galgos pronosticos|apuestas galgos trucos|apuestas gana|apuestas gana colombia|apuestas gana resultados|apuestas ganadas|apuestas ganadas hoy|apuestas ganador champions league|apuestas
ganador copa america|apuestas ganador copa del rey|apuestas ganador copa del
rey baloncesto|apuestas ganador copa libertadores|apuestas ganador
de la eurocopa|apuestas ganador de la liga|apuestas ganador del mundial|apuestas ganador eurocopa|apuestas ganador europa league|apuestas ganador
f1|apuestas ganador la liga|apuestas ganador liga española|apuestas ganador mundial|apuestas ganador mundial baloncesto|apuestas ganador mundial f1|apuestas ganador nba|apuestas ganadores eurocopa|apuestas ganadores mundial|apuestas ganar champions|apuestas ganar eurocopa|apuestas ganar liga|apuestas
ganar mundial|apuestas ganar nba|apuestas getafe valencia|apuestas ghana
uruguay|apuestas girona|apuestas girona athletic|apuestas girona betis|apuestas
girona campeon de liga|apuestas girona campeon liga|apuestas girona gana la
liga|apuestas girona real madrid|apuestas girona real sociedad|apuestas goleador
eurocopa|apuestas goleadores eurocopa|apuestas goles asiaticos|apuestas
golf|apuestas golf masters|apuestas golf pga|apuestas granada barcelona|apuestas
grand slam de tenis|apuestas gratis|apuestas gratis casino|apuestas gratis con premios|apuestas gratis hoy|apuestas gratis para hoy|apuestas
gratis por registro|apuestas gratis puntos|apuestas
gratis regalos|apuestas gratis sin deposito|apuestas gratis sin depósito|apuestas
gratis sin ingreso|apuestas gratis sports|apuestas gratis y ganar premios|apuestas grupo a eurocopa|apuestas grupos
eurocopa|apuestas handicap|apuestas handicap asiatico|apuestas handicap baloncesto|apuestas handicap
como funciona|apuestas handicap nba|apuestas handicap nfl|apuestas
hipicas online|apuestas hípicas online|apuestas hipicas venezuela|apuestas hockey|apuestas
hockey hielo|apuestas hockey patines|apuestas hockey
sobre hielo|apuestas holanda argentina|apuestas holanda vs
argentina|apuestas hoy|apuestas hoy champions|apuestas hoy futbol|apuestas
hoy nba|apuestas hoy pronosticos|apuestas hoy seguras|apuestas impuestos|apuestas inglaterra paises bajos|apuestas inter barca|apuestas inter barcelona|apuestas juego|apuestas juegos|apuestas juegos
en linea|apuestas juegos olimpicos|apuestas juegos olímpicos|apuestas juegos olimpicos baloncesto|apuestas juegos online|apuestas juegos virtuales|apuestas
jugador sevilla|apuestas jugadores nba|apuestas kings league
americas|apuestas la liga|apuestas la liga española|apuestas
la liga hoy|apuestas la liga santander|apuestas las vegas mlb|apuestas las vegas
nba|apuestas las vegas nfl|apuestas league of legends mundial|apuestas
legal|apuestas legales|apuestas legales en colombia|apuestas legales en españa|apuestas legales en estados unidos|apuestas legales españa|apuestas leganes betis|apuestas
libertadores|apuestas licencia|apuestas liga 1 peru|apuestas liga argentina|apuestas liga bbva
pronosticos|apuestas liga de campeones|apuestas liga
de campeones de baloncesto|apuestas liga de campeones
de hockey|apuestas liga españa|apuestas liga española|apuestas liga santander pronosticos|apuestas ligas
de futbol|apuestas linea|apuestas linea de gol|apuestas liverpool barcelona|apuestas liverpool real madrid|apuestas lol mundial|apuestas madrid|apuestas madrid
arsenal|apuestas madrid atletico|apuestas madrid atletico champions|apuestas madrid barca|apuestas madrid barça|apuestas
madrid barca hoy|apuestas madrid barca supercopa|apuestas madrid barcelona|apuestas madrid barsa|apuestas madrid bayern|apuestas madrid betis|apuestas madrid borussia|apuestas madrid campeon champions|apuestas madrid celta|apuestas madrid city|apuestas madrid dortmund|apuestas madrid gana la liga|apuestas madrid gana liga|apuestas
madrid hoy|apuestas madrid liverpool|apuestas madrid osasuna|apuestas madrid sevilla|apuestas madrid valencia|apuestas madrid vs arsenal|apuestas madrid vs barcelona|apuestas mallorca osasuna|apuestas mallorca real sociedad|apuestas manchester athletic|apuestas
manchester city real madrid|apuestas mas faciles de ganar|apuestas mas seguras|apuestas mas
seguras para hoy|apuestas masters de golf|apuestas masters de tenis|apuestas
maximo goleador eurocopa|apuestas maximo goleador mundial|apuestas mejor jugador eurocopa|apuestas
mejores casinos online|apuestas mexico|apuestas méxico|apuestas mexico polonia|apuestas
méxico polonia|apuestas mlb|apuestas mlb hoy|apuestas mlb las
vegas|apuestas mlb para hoy|apuestas mlb pronosticos|apuestas mlb
usa|apuestas mma ufc|apuestas momios|apuestas multiples|apuestas
múltiples|apuestas multiples como funcionan|apuestas multiples el gordo|apuestas
multiples futbol|apuestas mundial|apuestas mundial 2026|apuestas mundial baloncesto|apuestas mundial
balonmano|apuestas mundial brasil|apuestas mundial campeon|apuestas
mundial ciclismo|apuestas mundial clubes|apuestas mundial de baloncesto|apuestas mundial de ciclismo|apuestas mundial de clubes|apuestas mundial de futbol|apuestas mundial de fútbol|apuestas mundial de rugby|apuestas mundial
f1|apuestas mundial favoritos|apuestas mundial femenino|apuestas mundial formula 1|apuestas mundial
futbol|apuestas mundial ganador|apuestas mundial lol|apuestas mundial moto gp|apuestas mundial motogp|apuestas mundial rugby|apuestas mundial sub 17|apuestas mundiales|apuestas mundialistas|apuestas mvp eurocopa|apuestas mvp nba|apuestas mvp nfl|apuestas nacionales
de colombia|apuestas nba|apuestas nba all star|apuestas
nba campeon|apuestas nba consejos|apuestas nba esta noche|apuestas nba finals|apuestas nba gratis|apuestas nba hoy|apuestas nba hoy jugadores|apuestas nba
hoy pronosticos|apuestas nba para hoy|apuestas nba playoffs|apuestas nba pronosticos|apuestas nba pronósticos|apuestas nba pronosticos hoy|apuestas nba
tipster|apuestas nfl|apuestas nfl hoy|apuestas nfl las vegas|apuestas nfl
playoffs|apuestas nfl pronosticos|apuestas nfl pronósticos|apuestas
nfl semana 4|apuestas nfl super bowl|apuestas nhl|apuestas nhl
pronosticos|apuestas octavos eurocopa|apuestas ofertas|apuestas online|apuestas online argentina|apuestas online argentina legal|apuestas online bono|apuestas online bono bienvenida|apuestas online boxeo|apuestas online caballos|apuestas online
carreras de caballos|apuestas online casino|apuestas online champions league|apuestas online chile|apuestas online ciclismo|apuestas
online colombia|apuestas online comparativa|apuestas online con paypal|apuestas online de caballos|apuestas online deportivas|apuestas online
en argentina|apuestas online en peru|apuestas online espana|apuestas online españa|apuestas online esports|apuestas online foro|apuestas
online futbol|apuestas online futbol españa|apuestas online golf|apuestas online
gratis|apuestas online gratis sin deposito|apuestas online juegos|apuestas online mexico|apuestas online mma|apuestas online movil|apuestas online nba|apuestas online
net|apuestas online nuevas|apuestas online opiniones|apuestas online
paypal|apuestas online peru|apuestas online seguras|apuestas online sin dinero|apuestas online sin registro|apuestas online tenis|apuestas online ufc|apuestas online uruguay|apuestas online venezuela|apuestas open britanico
golf|apuestas osasuna athletic|apuestas osasuna barcelona|apuestas osasuna real madrid|apuestas osasuna sevilla|apuestas osasuna valencia|apuestas over|apuestas over 2.5|apuestas over under|apuestas paginas|apuestas pago anticipado|apuestas paises
bajos ecuador|apuestas paises bajos inglaterra|apuestas países bajos qatar|apuestas para boxeo|apuestas
para champions league|apuestas para el clasico|apuestas para el dia de hoy|apuestas para el mundial|apuestas para el partido de hoy|apuestas para eurocopa|apuestas para europa
league|apuestas para futbol|apuestas para ganar|apuestas para ganar dinero|apuestas para ganar dinero facil|apuestas
para ganar en la ruleta|apuestas para ganar la champions|apuestas para ganar la eurocopa|apuestas para ganar la
europa league|apuestas para ganar la liga|apuestas
para ganar siempre|apuestas para hacer|apuestas para
hoy|apuestas para hoy de futbol|apuestas para hoy europa league|apuestas para hoy futbol|apuestas
para juegos|apuestas para la champions league|apuestas para
la copa del rey|apuestas para la eurocopa|apuestas para la europa league|apuestas para la final de la eurocopa|apuestas para la nba hoy|apuestas para los partidos de hoy|apuestas para partidos de hoy|apuestas para ufc|apuestas partido|apuestas partido
aplazado|apuestas partido champions|apuestas partido colombia|apuestas partido españa marruecos|apuestas partido mundial|apuestas partido suspendido|apuestas
partidos|apuestas partidos champions league|apuestas partidos csgo|apuestas partidos de futbol|apuestas partidos
de futbol hoy|apuestas partidos de hoy|apuestas partidos eurocopa|apuestas partidos futbol|apuestas partidos hoy|apuestas partidos mundial|apuestas paypal|apuestas peleas de boxeo|apuestas peru|apuestas perú|apuestas
peru brasil|apuestas peru chile|apuestas peru paraguay|apuestas peru uruguay|apuestas peru vs chile|apuestas peru
vs colombia|apuestas pichichi eurocopa|apuestas plataforma|apuestas playoff|apuestas playoff ascenso|apuestas
playoff ascenso a primera|apuestas playoff nba|apuestas playoff segunda|apuestas playoff segunda b|apuestas playoffs nba|apuestas playoffs nfl|apuestas polonia
argentina|apuestas por argentina|apuestas por internet mexico|apuestas por internet para ganar
dinero|apuestas por paypal|apuestas por ronda boxeo|apuestas
por sistema|apuestas portugal uruguay|apuestas pre partido|apuestas predicciones|apuestas predicciones futbol|apuestas primera division|apuestas primera division españa|apuestas promociones|apuestas pronostico|apuestas pronosticos|apuestas pronosticos deportivos|apuestas pronosticos deportivos
tenis|apuestas pronosticos futbol|apuestas pronosticos gratis|apuestas pronosticos nba|apuestas pronosticos tenis|apuestas prorroga|apuestas psg barca|apuestas psg barcelona|apuestas puntos por
tarjetas|apuestas puntos tarjetas|apuestas que aceptan paypal|apuestas que es handicap|apuestas que puedes hacer con tu novia|apuestas
que siempre ganaras|apuestas que significa|apuestas quien bajara a
segunda|apuestas quién bajara a segunda|apuestas quien gana el mundial|apuestas
quien gana eurocopa|apuestas quien gana la champions|apuestas
quien gana la eurocopa|apuestas quien gana la liga|apuestas
quien ganara el mundial|apuestas quién ganará el mundial|apuestas
quien ganara la champions|apuestas quien ganara la eurocopa|apuestas quien ganara la liga|apuestas rayo barcelona|apuestas real madrid|apuestas real madrid arsenal|apuestas real madrid athletic|apuestas real madrid atletico|apuestas real madrid atletico champions|apuestas real madrid atletico de madrid|apuestas real madrid atlético de
madrid|apuestas real madrid atletico madrid|apuestas real
madrid barcelona|apuestas real madrid bayern|apuestas real madrid
betis|apuestas real madrid borussia|apuestas real
madrid campeon champions|apuestas real madrid celta|apuestas real madrid champions|apuestas
real madrid city|apuestas real madrid girona|apuestas real madrid hoy|apuestas real madrid liverpool|apuestas
real madrid manchester city|apuestas real madrid
osasuna|apuestas real madrid real sociedad|apuestas real madrid valencia|apuestas real
madrid villarreal|apuestas real madrid vs arsenal|apuestas real madrid vs atletico|apuestas real madrid vs atlético|apuestas real madrid vs atletico madrid|apuestas real madrid vs barcelona|apuestas real madrid vs betis|apuestas real madrid
vs sevilla|apuestas real madrid vs valencia|apuestas real sociedad|apuestas real sociedad
athletic|apuestas real sociedad barcelona|apuestas real sociedad betis|apuestas real sociedad psg|apuestas
real sociedad real madrid|apuestas real sociedad valencia|apuestas recomendadas hoy|apuestas regalo de bienvenida|apuestas registro|apuestas resultado exacto|apuestas resultados|apuestas resultados eurocopa|apuestas retirada tenis|apuestas
roma barcelona|apuestas roma sevilla|apuestas rugby|apuestas rugby mundial|apuestas rugby world cup|apuestas ruleta seguras|apuestas segunda|apuestas segunda
b|apuestas segunda division|apuestas segunda división|apuestas segunda division b|apuestas segunda division españa|apuestas seguras|apuestas seguras baloncesto|apuestas seguras calculadora|apuestas seguras en la
ruleta|apuestas seguras eurocopa|apuestas seguras foro|apuestas
seguras futbol|apuestas seguras futbol hoy|apuestas seguras
gratis|apuestas seguras hoy|apuestas seguras hoy futbol|apuestas seguras nba|apuestas seguras nba hoy|apuestas seguras para este fin de semana|apuestas
seguras para ganar dinero|apuestas seguras para hoy|apuestas seguras para hoy fútbol|apuestas seguras para hoy pronósticos|apuestas seguras para mañana|apuestas
seguras ruleta|apuestas seguras telegram|apuestas seguras tenis|apuestas semifinales eurocopa|apuestas senegal paises bajos|apuestas sevilla|apuestas sevilla athletic|apuestas sevilla
atletico de madrid|apuestas sevilla barcelona|apuestas sevilla betis|apuestas sevilla campeon liga|apuestas sevilla celta|apuestas sevilla gana la liga|apuestas sevilla girona|apuestas sevilla
inter|apuestas sevilla jugador|apuestas sevilla juventus|apuestas sevilla leganes|apuestas sevilla madrid|apuestas sevilla manchester united|apuestas sevilla osasuna|apuestas sevilla real madrid|apuestas sevilla real sociedad|apuestas sevilla roma|apuestas sevilla valencia|apuestas significa|apuestas simples ejemplos|apuestas simples o combinadas|apuestas
sin deposito|apuestas sin deposito inicial|apuestas sin deposito minimo|apuestas sin dinero|apuestas sin dinero
real|apuestas sin empate|apuestas sin empate que significa|apuestas
sin ingreso minimo|apuestas sin registro|apuestas sistema|apuestas sistema calculadora|apuestas sistema como
funciona|apuestas sistema trixie|apuestas sociedad|apuestas sorteo copa del rey|apuestas stake|apuestas stake 10|apuestas stake 10 hoy|apuestas super bowl favorito|apuestas
super rugby|apuestas supercopa españa|apuestas superliga argentina|apuestas tarjeta roja|apuestas tarjetas|apuestas tarjetas amarillas|apuestas tenis|apuestas tenis atp|apuestas tenis consejos|apuestas tenis copa
davis|apuestas tenis de mesa|apuestas tenis de mesa pronosticos|apuestas tenis en vivo|apuestas tenis femenino|apuestas
tenis hoy|apuestas tenis itf|apuestas tenis pronosticos|apuestas tenis pronósticos|apuestas tenis
retirada|apuestas tenis roland garros|apuestas tenis seguras|apuestas tenis wimbledon|apuestas tenis wta|apuestas tercera division|apuestas tercera division españa|apuestas tipos|apuestas
tips|apuestas tipster|apuestas tipster para hoy|apuestas topuria holloway cuotas|apuestas torneos de golf|apuestas torneos de tenis|apuestas trucos|apuestas uefa
champions league|apuestas uefa europa league|apuestas ufc|apuestas ufc
chile|apuestas ufc como funciona|apuestas ufc hoy|apuestas ufc ilia topuria|apuestas ufc online|apuestas ufc
pronósticos|apuestas ufc telegram|apuestas ufc topuria|apuestas under over|apuestas unionistas villarreal|apuestas uruguay|apuestas uruguay colombia|apuestas uruguay corea|apuestas uruguay vs colombia|apuestas us open golf|apuestas us open tenis|apuestas valencia|apuestas valencia barcelona|apuestas valencia betis|apuestas valencia madrid|apuestas valencia real madrid|apuestas valladolid barcelona|apuestas
valladolid valencia|apuestas valor app|apuestas valor
en directo|apuestas valor galgos|apuestas venezuela|apuestas venezuela argentina|apuestas venezuela bolivia|apuestas venezuela ecuador|apuestas villarreal|apuestas
villarreal athletic|apuestas villarreal barcelona|apuestas villarreal bayern|apuestas villarreal betis|apuestas villarreal liverpool|apuestas villarreal manchester|apuestas villarreal manchester
united|apuestas villarreal vs real madrid|apuestas virtuales|apuestas virtuales colombia|apuestas
virtuales futbol|apuestas virtuales sin dinero|apuestas vivo|apuestas vuelta
a españa|apuestas vuelta españa|apuestas william hill partidos de hoy|apuestas y casino|apuestas y casinos|apuestas
y juegos de azar|apuestas y pronosticos|apuestas y pronosticos de futbol|apuestas y pronosticos deportivos|apuestas y
resultados|apuestas-deportivas|apuestas-deportivas.es pronosticos|arbitro nba apuestas|argentina apuestas|argentina colombia apuestas|argentina croacia apuestas|argentina francia apuestas|argentina mexico apuestas|argentina peru
apuestas|argentina uruguay apuestas|argentina vs bolivia apuestas|argentina vs chile apuestas|argentina vs colombia apuestas|argentina vs francia apuestas|argentina
vs. colombia apuestas|asi se gana en las apuestas deportivas|asiatico apuestas|asiatico
en apuestas|asiaticos apuestas|athletic barcelona apuestas|athletic manchester united apuestas|athletic osasuna apuestas|athletic real madrid apuestas|atletico barcelona apuestas|atletico de madrid apuestas|atlético
de madrid apuestas|atletico de madrid real madrid apuestas|atletico de madrid vs barcelona apuestas|atletico madrid real madrid apuestas|atletico madrid vs
real madrid apuestas|atletico real madrid apuestas|atletico vs real madrid apuestas|avisador de cuotas
apuestas|bajada de cuotas apuestas|baloncesto
apuestas|barbastro barcelona apuestas|barca
apuestas|barca bayern apuestas|barca inter apuestas|barca madrid apuestas|barça madrid apuestas|barca vs atletico apuestas|barca vs madrid apuestas|barca vs real madrid
apuestas|barcelona – real madrid apuestas|barcelona apuestas|barcelona
atletico apuestas|barcelona atletico de madrid apuestas|barcelona atletico madrid apuestas|barcelona betis apuestas|barcelona casa de apuestas|barcelona inter
apuestas|barcelona psg apuestas|barcelona real madrid apuestas|barcelona real sociedad apuestas|barcelona sevilla apuestas|barcelona valencia apuestas|barcelona
vs athletic bilbao apuestas|barcelona vs atlético madrid apuestas|barcelona vs betis apuestas|barcelona vs celta de vigo apuestas|barcelona vs espanyol apuestas|barcelona vs girona apuestas|barcelona vs madrid apuestas|barcelona vs real madrid apuestas|barcelona
vs real sociedad apuestas|barcelona vs sevilla apuestas|barcelona vs villarreal
apuestas|base de datos cuotas apuestas deportivas|bayern real madrid apuestas|beisbol apuestas|best america apuestas|bet apuestas
chile|bet apuestas en vivo|betis – chelsea apuestas|betis apuestas|betis barcelona
apuestas|betis chelsea apuestas|betis madrid
apuestas|betis sevilla apuestas|betsson tu sitio de apuestas online|blog
apuestas baloncesto|blog apuestas ciclismo|blog apuestas nba|blog apuestas tenis|blog de apuestas de tenis|bono apuestas|bono apuestas deportivas|bono apuestas deportivas sin deposito|bono apuestas gratis|bono apuestas gratis
sin deposito|bono apuestas sin deposito|bono bienvenida apuestas|bono bienvenida apuestas deportivas|bono bienvenida apuestas españa|bono bienvenida apuestas sin deposito|bono bienvenida apuestas sin depósito|bono bienvenida casa apuestas|bono bienvenida casa de apuestas|bono bienvenida marca apuestas|bono casa apuestas|bono casa
de apuestas|bono casa de apuestas sin ingreso|bono casas
de apuestas|bono de apuestas|bono de apuestas gratis sin deposito|bono de bienvenida apuestas|bono de bienvenida apuestas deportivas|bono de bienvenida casa de apuestas|bono de bienvenida casas de apuestas|bono de
casas de apuestas|bono de registro apuestas|bono de registro apuestas deportivas|bono de registro casa de apuestas|bono gratis
apuestas|bono marca apuestas|bono por registro apuestas|bono por registro apuestas deportivas|bono por registro casa de apuestas|bono registro
apuestas|bono sin deposito apuestas|bono sin depósito apuestas|bono sin deposito apuestas deportivas|bono sin depósito apuestas deportivas|bono sin deposito casa
de apuestas|bono sin deposito marca apuestas|bono sin ingreso
apuestas|bono sin ingreso apuestas deportivas|bonos apuestas|bonos apuestas colombia|bonos
apuestas deportivas|bonos apuestas deportivas sin deposito|bonos apuestas gratis|bonos apuestas sin deposito|bonos apuestas sin depósito|bonos bienvenida apuestas|bonos bienvenida casas apuestas|bonos bienvenida casas de apuestas|bonos casa de apuestas|bonos casas apuestas|bonos casas de
apuestas|bonos casas de apuestas colombia|bonos casas de apuestas deportivas|bonos
casas de apuestas españa|bonos casas de apuestas nuevas|bonos casas de
apuestas sin deposito|bonos casas de apuestas sin depósito|bonos de apuestas|bonos
de apuestas deportivas|bonos de apuestas gratis|bonos de apuestas sin deposito|bonos de bienvenida
apuestas|bonos de bienvenida apuestas deportivas|bonos de
bienvenida casa de apuestas|bonos de bienvenida
casas de apuestas|bonos de bienvenida de casas
de apuestas|bonos de bienvenida en casas de apuestas|bonos de casas de apuestas|bonos de casas de apuestas sin deposito|bonos en casa de apuestas|bonos en casas de apuestas sin deposito|bonos gratis apuestas|bonos gratis
apuestas deportivas|bonos gratis casas de apuestas|bonos gratis sin deposito apuestas|bonos paginas de apuestas|bonos registro casas de apuestas|bonos sin deposito apuestas|bonos sin depósito
apuestas|bonos sin deposito apuestas deportivas|bonos sin deposito casas de apuestas|bot
de apuestas deportivas gratis|boxeo apuestas|brasil colombia apuestas|brasil peru apuestas|brasil vs
colombia apuestas|buenas apuestas para hoy|buscador cuotas
apuestas|buscador de apuestas seguras|buscador de cuotas apuestas|buscador de cuotas de apuestas|buscar apuestas seguras|caballos apuestas|calculador de apuestas|calculador de cuotas apuestas|calculadora apuestas|calculadora
apuestas combinadas|calculadora apuestas de sistema|calculadora apuestas
deportivas|calculadora apuestas deportivas seguras|calculadora apuestas multiples|calculadora apuestas segura|calculadora apuestas
seguras|calculadora apuestas sistema|calculadora apuestas yankee|calculadora arbitraje apuestas|calculadora cubrir apuestas|calculadora cuotas apuestas|calculadora de apuestas|calculadora
de apuestas combinadas|calculadora de apuestas de futbol|calculadora de apuestas de sistema|calculadora de apuestas deportivas|calculadora de
apuestas multiples|calculadora de apuestas seguras|calculadora de
apuestas sistema|calculadora de apuestas surebets|calculadora de arbitraje apuestas|calculadora de
cuotas apuestas|calculadora de cuotas de apuestas|calculadora para
apuestas deportivas|calculadora poisson apuestas|calculadora poisson apuestas deportivas|calculadora poisson para apuestas|calculadora scalping apuestas deportivas|calculadora sistema apuestas|calculadora
stake apuestas|calculadora trading apuestas|calcular apuestas|calcular apuestas deportivas|calcular apuestas futbol|calcular
apuestas sistema|calcular cuotas apuestas|calcular cuotas apuestas combinadas|calcular cuotas
apuestas deportivas|calcular cuotas de apuestas|calcular ganancias apuestas deportivas|calcular momios apuestas|calcular probabilidad
cuota apuestas|calcular stake apuestas|calcular unidades apuestas|calcular yield apuestas|calculo de apuestas|calculo de apuestas deportivas|cambio de cuotas apuestas|campeon champions apuestas|campeon eurocopa apuestas|campeon liga apuestas|campeon nba apuestas|canales de apuestas gratis|carrera de caballos apuestas|carrera de caballos apuestas juego|carrera de caballos con apuestas|carrera
de galgos apuestas|carreras de caballos apuestas|carreras
de caballos apuestas online|carreras de caballos
con apuestas|carreras de caballos juegos de apuestas|carreras de galgos apuestas|carreras de galgos apuestas online|carreras de galgos
apuestas trucos|carreras galgos apuestas|casa apuestas argentina|casa apuestas atletico de madrid|casa apuestas barcelona|casa
apuestas betis|casa apuestas bono bienvenida|casa apuestas bono gratis|casa apuestas bono
sin deposito|casa apuestas cerca de mi|casa apuestas chile|casa apuestas
colombia|casa apuestas con mejores cuotas|casa apuestas
deportivas|casa apuestas españa|casa apuestas española|casa apuestas eurocopa|casa apuestas futbol|casa apuestas mejores
cuotas|casa apuestas mundial|casa apuestas nueva|casa apuestas nuevas|casa apuestas
online|casa apuestas peru|casa apuestas valencia|casa de
apuestas|casa de apuestas 10 euros gratis|casa de apuestas argentina|casa de apuestas atletico de madrid|casa
de apuestas baloncesto|casa de apuestas barcelona|casa de apuestas beisbol|casa de apuestas betis|casa de apuestas bono|casa de apuestas bono bienvenida|casa de
apuestas bono de bienvenida|casa de apuestas bono gratis|casa de apuestas
bono por registro|casa de apuestas bono sin deposito|casa
de apuestas boxeo|casa de apuestas caballos|casa de apuestas carreras de caballos|casa de apuestas cerca de mi|casa de apuestas cerca de mí|casa
de apuestas champions league|casa de apuestas chile|casa de apuestas ciclismo|casa de apuestas
colombia|casa de apuestas con bono de bienvenida|casa de apuestas con bono sin deposito|casa de apuestas con cuotas mas
altas|casa de apuestas con esports|casa de apuestas con las mejores cuotas|casa de apuestas con licencia en españa|casa
de apuestas con mejores cuotas|casa de apuestas con pago anticipado|casa de apuestas con paypal|casa de apuestas copa america|casa de apuestas de caballos|casa de apuestas de colombia|casa de apuestas de españa|casa de apuestas de futbol|casa de apuestas de fútbol|casa de apuestas de
futbol peru|casa de apuestas de peru|casa de apuestas del
madrid|casa de apuestas del real madrid|casa de apuestas deportivas|casa de apuestas deportivas cerca de mi|casa de apuestas deportivas en argentina|casa de apuestas deportivas en chile|casa de apuestas deportivas en colombia|casa de apuestas deportivas en españa|casa de apuestas
deportivas en madrid|casa de apuestas deportivas españa|casa de apuestas deportivas españolas|casa de
apuestas deportivas madrid|casa de apuestas deportivas mexico|casa de
apuestas deportivas online|casa de apuestas deportivas peru|casa de apuestas deposito 5 euros|casa de apuestas deposito minimo|casa de apuestas deposito minimo
1 euro|casa de apuestas depósito mínimo 1 euro|casa de apuestas en españa|casa
de apuestas en linea|casa de apuestas en madrid|casa de apuestas en perú|casa
de apuestas en vivo|casa de apuestas españa|casa de apuestas españa inglaterra|casa
de apuestas española|casa de apuestas españolas|casa de apuestas esports|casa de apuestas eurocopa|casa
de apuestas europa league|casa de apuestas f1|casa
de apuestas formula 1|casa de apuestas futbol|casa de
apuestas ingreso minimo|casa de apuestas ingreso minimo 1 euro|casa de apuestas
ingreso mínimo 1 euro|casa de apuestas legales|casa de apuestas
legales en colombia|casa de apuestas legales en españa|casa de apuestas libertadores|casa de apuestas liga
española|casa de apuestas madrid|casa de apuestas mas segura|casa de apuestas mejores|casa de apuestas méxico|casa de
apuestas minimo 5 euros|casa de apuestas mlb|casa de apuestas mundial|casa de apuestas nba|casa de apuestas nfl|casa de apuestas nueva|casa de apuestas nuevas|casa de apuestas oficial
del real madrid|casa de apuestas oficial real madrid|casa de apuestas online|casa de apuestas online argentina|casa de apuestas online chile|casa
de apuestas online españa|casa de apuestas online mexico|casa de apuestas online paraguay|casa de apuestas online peru|casa de apuestas online usa|casa de apuestas
online venezuela|casa de apuestas pago anticipado|casa de apuestas para boxeo|casa
de apuestas para ufc|casa de apuestas peru|casa de apuestas perú|casa de apuestas peru online|casa de apuestas por paypal|casa de apuestas
promociones|casa de apuestas que regalan dinero|casa de apuestas real madrid|casa de
apuestas regalo de bienvenida|casa de apuestas
sevilla|casa de apuestas sin dinero|casa de apuestas sin ingreso minimo|casa de apuestas sin licencia en españa|casa de apuestas sin minimo de ingreso|casa de apuestas stake|casa
de apuestas tenis|casa de apuestas ufc|casa de apuestas valencia|casa de apuestas venezuela|casa de apuestas virtuales|casa de
apuestas vive la suerte|casa oficial de apuestas
del real madrid|casas apuestas asiaticas|casas apuestas bono sin deposito|casas
apuestas bonos sin deposito|casas apuestas caballos|casas
apuestas chile|casas apuestas ciclismo|casas apuestas con licencia|casas apuestas
con licencia en españa|casas apuestas deportivas|casas apuestas
deportivas colombia|casas apuestas deportivas españa|casas apuestas deportivas españolas|casas apuestas deportivas nuevas|casas apuestas españa|casas apuestas españolas|casas apuestas esports|casas apuestas eurocopa|casas apuestas golf|casas apuestas ingreso
minimo 5 euros|casas apuestas legales|casas apuestas legales españa|casas apuestas licencia|casas apuestas licencia españa|casas apuestas mexico|casas apuestas
mundial|casas apuestas nba|casas apuestas nuevas|casas apuestas nuevas españa|casas
apuestas ofertas|casas apuestas online|casas apuestas paypal|casas
apuestas peru|casas apuestas sin licencia|casas apuestas tenis|casas asiaticas apuestas|casas de apuestas|casas de apuestas
5 euros|casas de apuestas app|casas de apuestas argentinas|casas de apuestas asiaticas|casas de apuestas baloncesto|casas de apuestas barcelona|casas de apuestas bono bienvenida|casas de
apuestas bono de bienvenida|casas de apuestas bono por registro|casas de apuestas bono sin deposito|casas de apuestas bono sin ingreso|casas de apuestas bonos|casas de apuestas bonos de bienvenida|casas de
apuestas bonos gratis|casas de apuestas bonos sin deposito|casas de apuestas boxeo|casas de apuestas caballos|casas de apuestas
carreras de caballos|casas de apuestas casino|casas de
apuestas casino online|casas de apuestas cerca de mi|casas de
apuestas champions league|casas de apuestas chile|casas de
apuestas ciclismo|casas de apuestas colombia|casas
de apuestas com|casas de apuestas con app|casas de apuestas con apuestas
gratis|casas de apuestas con bono|casas de apuestas con bono de bienvenida|casas de
apuestas con bono de registro|casas de apuestas con bono por
registro|casas de apuestas con bono sin deposito|casas
de apuestas con bonos|casas de apuestas con bonos gratis|casas de apuestas con bonos sin deposito|casas
de apuestas con deposito minimo|casas de apuestas con esports|casas de apuestas con handicap
asiatico|casas de apuestas con licencia|casas de apuestas con licencia
en españa|casas de apuestas con licencia españa|casas de apuestas con licencia
española|casas de apuestas con mejores cuotas|casas de apuestas con pago
anticipado|casas de apuestas con paypal|casas de apuestas con paypal en perú|casas de apuestas con promociones|casas de apuestas
con ruleta en vivo|casas de apuestas copa del rey|casas de apuestas de caballos|casas de apuestas de españa|casas de apuestas de futbol|casas de apuestas de fútbol|casas de apuestas de peru|casas de apuestas
deportivas|casas de apuestas deportivas asiaticas|casas
de apuestas deportivas colombia|casas de apuestas deportivas comparativa|casas de apuestas deportivas con paypal|casas de apuestas deportivas en chile|casas de apuestas deportivas
en españa|casas de apuestas deportivas en linea|casas de apuestas deportivas en madrid|casas de apuestas deportivas
en mexico|casas de apuestas deportivas en peru|casas de apuestas deportivas en sevilla|casas de apuestas
deportivas en valencia|casas de apuestas deportivas españa|casas de apuestas deportivas españolas|casas de apuestas deportivas legales|casas de apuestas deportivas madrid|casas
de apuestas deportivas mexico|casas de apuestas deportivas nuevas|casas de apuestas
deportivas online|casas de apuestas deportivas peru|casas de apuestas deportivas perú|casas de apuestas deposito minimo
1 euro|casas de apuestas depósito mínimo 1
euro|casas de apuestas dinero gratis|casas de apuestas
en argentina|casas de apuestas en barcelona|casas de apuestas
en chile|casas de apuestas en colombia|casas de apuestas en españa|casas de apuestas en españa online|casas de apuestas
en linea|casas de apuestas en madrid|casas de apuestas en méxico|casas de apuestas en peru|casas de apuestas en perú|casas de apuestas en sevilla|casas de apuestas
en uruguay|casas de apuestas en valencia|casas de apuestas en venezuela|casas de apuestas equipos de futbol|casas
de apuestas españa|casas de apuestas españa alemania|casas
de apuestas españa inglaterra|casas de apuestas españa licencia|casas de apuestas españa
nuevas|casas de apuestas españa online|casas de apuestas española|casas
de apuestas españolas|casas de apuestas españolas con licencia|casas
de apuestas españolas online|casas de apuestas esports|casas de apuestas eurocopa|casas de apuestas eurocopa 2024|casas de apuestas europa league|casas
de apuestas f1|casas de apuestas fisicas en barcelona|casas de apuestas fisicas en españa|casas de apuestas formula 1|casas de apuestas fuera de españa|casas
de apuestas futbol|casas de apuestas fútbol|casas
de apuestas futbol españa|casas de apuestas ganador eurocopa|casas
de apuestas gratis|casas de apuestas ingreso minimo|casas de apuestas ingreso minimo 1 euro|casas
de apuestas ingreso minimo 5 euros|casas de apuestas inter barcelona|casas
de apuestas legales|casas de apuestas legales en colombia|casas de apuestas legales en españa|casas de apuestas legales en mexico|casas de
apuestas legales españa|casas de apuestas
legales mx|casas de apuestas licencia|casas de apuestas licencia españa|casas de apuestas lista|casas de
apuestas madrid|casas de apuestas mas seguras|casas de apuestas mejores bonos|casas de apuestas mejores cuotas|casas de apuestas mexico|casas de apuestas méxico|casas de apuestas minimo 5 euros|casas
de apuestas mlb|casas de apuestas mundial|casas de
apuestas mundial baloncesto|casas de apuestas mundiales|casas de apuestas nba|casas
de apuestas no reguladas en españa|casas de apuestas nueva ley|casas de apuestas nuevas|casas de apuestas nuevas en colombia|casas de apuestas nuevas en españa|casas de
apuestas nuevas españa|casas de apuestas ofertas|casas de apuestas online|casas de apuestas
online argentina|casas de apuestas online colombia|casas de apuestas online deportivas|casas de
apuestas online ecuador|casas de apuestas online en argentina|casas de apuestas online en chile|casas de apuestas online en colombia|casas de apuestas online en españa|casas de apuestas online en mexico|casas de apuestas online españa|casas de apuestas online mas fiables|casas de apuestas online mexico|casas de apuestas online nuevas|casas de apuestas online peru|casas
de apuestas online usa|casas de apuestas online venezuela|casas de apuestas pago paypal|casas de apuestas para ufc|casas de apuestas paypal|casas de apuestas peru bono sin deposito|casas de apuestas presenciales en españa|casas de
Your comment is awaiting moderation.
nextlevelads.click – Loved the layout today; clean, simple, and genuinely user-friendly overall.
Your comment is awaiting moderation.
(10 euros gratis apuestas|10 mejores casas de apuestas|10 trucos
para ganar apuestas|15 euros gratis marca apuestas|1×2 apuestas|1×2 apuestas deportivas|1×2 apuestas que significa|1×2
en apuestas|1×2 en apuestas que significa|1×2 que significa en apuestas|5 euros gratis apuestas|9 apuestas que siempre ganaras|a
partir de cuanto se declara apuestas|actividades de
juegos de azar y apuestas|ad apuestas deportivas|aleksandre topuria ufc apuestas|algoritmo para
ganar apuestas deportivas|america apuestas|análisis
nba apuestas|aplicacion android apuestas deportivas|aplicacion apuestas deportivas|aplicacion apuestas deportivas android|aplicación de apuestas online|aplicacion para hacer apuestas|aplicacion para hacer apuestas de futbol|aplicación para
hacer apuestas de fútbol|aplicaciones apuestas deportivas android|aplicaciones apuestas
deportivas gratis|aplicaciones de apuestas android|aplicaciones de apuestas de fútbol|aplicaciones de apuestas deportivas|aplicaciones
de apuestas deportivas peru|aplicaciones de apuestas deportivas
perú|aplicaciones de apuestas en colombia|aplicaciones de
apuestas gratis|aplicaciones de apuestas online|aplicaciones de
apuestas seguras|aplicaciones de apuestas sin dinero|aplicaciones para hacer apuestas|apostar seguro apuestas deportivas|app android apuestas deportivas|app apuestas|app apuestas
android|app apuestas de futbol|app apuestas deportivas|app apuestas deportivas android|app
apuestas deportivas argentina|app apuestas deportivas colombia|app
apuestas deportivas ecuador|app apuestas deportivas españa|app apuestas deportivas gratis|app apuestas
entre amigos|app apuestas futbol|app apuestas gratis|app
apuestas sin dinero|app casa de apuestas|app casas de apuestas|app control apuestas|app de apuestas|app de apuestas android|app de apuestas casino|app de apuestas colombia|app de
apuestas con bono de bienvenida|app de apuestas de futbol|app de apuestas deportivas|app de apuestas deportivas
android|app de apuestas deportivas argentina|app de apuestas deportivas colombia|app de apuestas
deportivas en españa|app de apuestas deportivas peru|app de apuestas deportivas perú|app de apuestas deportivas sin dinero|app de apuestas ecuador|app de apuestas
en colombia|app de apuestas en españa|app de apuestas en venezuela|app
de apuestas futbol|app de apuestas gratis|app de
apuestas online|app de apuestas para android|app de apuestas para
ganar dinero|app de apuestas peru|app de apuestas reales|app de casas de apuestas|app marca apuestas android|app moviles de
apuestas|app para apuestas|app para apuestas de futbol|app para apuestas
deportivas|app para apuestas deportivas en español|app para ganar apuestas deportivas|app para hacer apuestas|app para
hacer apuestas deportivas|app para hacer apuestas entre amigos|app
para llevar control de apuestas|app pronosticos apuestas deportivas|app versus apuestas|apps apuestas mundial|apps de apuestas|apps de apuestas
con bono de bienvenida|apps de apuestas de futbol|apps de apuestas deportivas peru|apps de apuestas mexico|apps para apuestas|aprender a hacer apuestas deportivas|aprender hacer apuestas deportivas|apuesta del dia apuestas
deportivas|apuestas 10 euros gratis|apuestas 100 seguras|apuestas 1×2|apuestas 1X2|apuestas 2
division|apuestas 3 division|apuestas a caballos|apuestas a carreras de caballos|apuestas
a colombia|apuestas a corners|apuestas a ganar|apuestas a jugadores nba|apuestas
a la baja|apuestas a la nfl|apuestas al barcelona|apuestas al
dia|apuestas al empate|apuestas al mundial|apuestas al tenis wta|apuestas alaves
barcelona|apuestas alcaraz hoy|apuestas alemania españa|apuestas alonso campeon del mundo|apuestas
altas y bajas|apuestas altas y bajas nfl|apuestas ambos equipos marcan|apuestas america|apuestas android|apuestas anillo nba|apuestas antes del mundial|apuestas anticipadas|apuestas anticipadas nba|apuestas apps|apuestas arabia argentina|apuestas argentina|apuestas argentina
campeon del mundo|apuestas argentina canada|apuestas argentina colombia|apuestas argentina croacia|apuestas argentina españa|apuestas
argentina francia|apuestas argentina francia cuanto paga|apuestas argentina francia mundial|apuestas argentina
gana el mundial|apuestas argentina gana mundial|apuestas argentina holanda|apuestas argentina mexico|apuestas argentina méxico|apuestas argentina
mundial|apuestas argentina online|apuestas argentina paises
bajos|apuestas argentina polonia|apuestas argentina uruguay|apuestas argentina vs australia|apuestas
argentina vs colombia|apuestas argentina
vs francia|apuestas argentina vs peru|apuestas argentinas|apuestas arsenal real madrid|apuestas ascenso a primera division|apuestas ascenso a segunda|apuestas
asiaticas|apuestas asiatico|apuestas athletic|apuestas athletic atletico|apuestas
athletic barça|apuestas athletic barcelona|apuestas athletic
betis|apuestas athletic manchester|apuestas athletic manchester united|apuestas
athletic osasuna|apuestas athletic real|apuestas athletic real madrid|apuestas
athletic real sociedad|apuestas athletic real sociedad final|apuestas athletic roma|apuestas athletic
sevilla|apuestas athletic valencia|apuestas atletico|apuestas
atletico barcelona|apuestas atletico barsa|apuestas atletico campeon champions|apuestas
atletico campeon de liga|apuestas atlético copenhague|apuestas atletico de madrid|apuestas atlético de madrid|apuestas
atletico de madrid barcelona|apuestas atletico de madrid gana
la liga|apuestas atletico de madrid real madrid|apuestas atlético de madrid real madrid|apuestas atletico de madrid vs barcelona|apuestas atletico madrid|apuestas atletico madrid real madrid|apuestas atletico madrid vs barcelona|apuestas atletico real
madrid|apuestas atletico real madrid champions|apuestas atletismo|apuestas bajas|apuestas
baloncesto|apuestas baloncesto acb|apuestas baloncesto handicap|apuestas baloncesto hoy|apuestas
baloncesto juegos olimpicos|apuestas baloncesto nba|apuestas baloncesto pronostico|apuestas baloncesto pronósticos|apuestas baloncesto prorroga|apuestas barca|apuestas barca athletic|apuestas barca atletico|apuestas barca bayern|apuestas barca bayern munich|apuestas barca girona|apuestas barca hoy|apuestas barça
hoy|apuestas barca inter|apuestas barca juventus|apuestas barca madrid|apuestas barça madrid|apuestas barca real madrid|apuestas barca vs juve|apuestas barca vs madrid|apuestas barca
vs psg|apuestas barcelona|apuestas barcelona alaves|apuestas barcelona athletic|apuestas barcelona atletico|apuestas barcelona atletico
de madrid|apuestas barcelona atlético de madrid|apuestas barcelona atletico madrid|apuestas barcelona bayern|apuestas barcelona betis|apuestas barcelona
campeon de liga|apuestas barcelona celta|apuestas
barcelona espanyol|apuestas barcelona gana la champions|apuestas barcelona girona|apuestas barcelona granada|apuestas barcelona
hoy|apuestas barcelona inter|apuestas barcelona madrid|apuestas barcelona osasuna|apuestas barcelona psg|apuestas barcelona real madrid|apuestas barcelona real sociedad|apuestas barcelona sevilla|apuestas barcelona valencia|apuestas
barcelona villarreal|apuestas barcelona vs atletico madrid|apuestas barcelona vs madrid|apuestas barcelona vs real madrid|apuestas barsa madrid|apuestas basket hoy|apuestas bayern barcelona|apuestas
bayern vs barcelona|apuestas beisbol|apuestas béisbol|apuestas beisbol mlb|apuestas beisbol pronosticos|apuestas beisbol venezolano|apuestas betis|apuestas betis – chelsea|apuestas betis barcelona|apuestas betis chelsea|apuestas betis fiorentina|apuestas
betis girona|apuestas betis madrid|apuestas betis mallorca|apuestas betis real madrid|apuestas betis real sociedad|apuestas betis sevilla|apuestas betis valencia|apuestas betis valladolid|apuestas betis
vs valencia|apuestas betplay hoy colombia|apuestas betsson peru|apuestas bienvenida|apuestas billar online|apuestas bolivia vs colombia|apuestas
bono|apuestas bono bienvenida|apuestas bono de bienvenida|apuestas bono de
bienvenida sin deposito|apuestas bono gratis|apuestas bono sin deposito|apuestas
bonos sin deposito|apuestas borussia real madrid|apuestas boxeo|apuestas boxeo de campeonato|apuestas boxeo españa|apuestas boxeo español|apuestas boxeo femenino olimpiadas|apuestas boxeo hoy|apuestas boxeo online|apuestas brasil colombia|apuestas brasil peru|apuestas brasil uruguay|apuestas brasil vs colombia|apuestas brasil vs peru|apuestas caballos|apuestas caballos colocado|apuestas
caballos españa|apuestas caballos hipodromo|apuestas caballos hoy|apuestas caballos madrid|apuestas
caballos online|apuestas caballos sanlucar de barrameda|apuestas
caballos zarzuela|apuestas calculador|apuestas campeon|apuestas campeon champions|apuestas campeón champions|apuestas campeon champions 2025|apuestas campeon champions league|apuestas
campeon conference league|apuestas campeon copa america|apuestas campeon copa
del rey|apuestas campeon de champions|apuestas campeon de la champions|apuestas campeon de liga|apuestas campeon del mundo|apuestas campeon eurocopa|apuestas campeón eurocopa|apuestas campeon europa league|apuestas campeon f1|apuestas campeon f1 2025|apuestas campeon formula
1|apuestas campeon libertadores|apuestas campeon liga|apuestas campeon liga bbva|apuestas campeon liga española|apuestas campeon liga santander|apuestas campeon motogp 2025|apuestas campeon mundial|apuestas campeón mundial|apuestas campeon mundial baloncesto|apuestas campeon nba|apuestas
campeón nba|apuestas campeon premier|apuestas campeon premier league|apuestas campeon roland garros|apuestas campeonato f1|apuestas campeonatos de futbol|apuestas carrera
de caballos|apuestas carrera de caballos hoy|apuestas carrera de caballos
nocturnas|apuestas carrera de galgos fin de semana|apuestas carrera
de galgos hoy|apuestas carrera de galgos nocturnas|apuestas carreras caballos|apuestas carreras caballos
sanlucar|apuestas carreras de caballos|apuestas carreras de caballos en directo|apuestas carreras de caballos en vivo|apuestas carreras de
caballos españa|apuestas carreras de caballos hoy|apuestas carreras
de caballos nacionales|apuestas carreras de caballos nocturnas|apuestas carreras de caballos online|apuestas
carreras de caballos sanlucar|apuestas carreras de caballos sanlúcar|apuestas carreras de galgos|apuestas carreras
de galgos en vivo|apuestas carreras de galgos
nocturnas|apuestas carreras de galgos pre partido|apuestas
casino|apuestas casino barcelona|apuestas casino futbol|apuestas
casino gran madrid|apuestas casino gratis|apuestas
casino madrid|apuestas casino online|apuestas casino online argentina|apuestas
casinos|apuestas casinos online|apuestas celta|apuestas celta barcelona|apuestas celta betis|apuestas
celta eibar|apuestas celta espanyol|apuestas celta granada|apuestas celta madrid|apuestas celta manchester|apuestas celta real madrid|apuestas champion league|apuestas champions foro|apuestas champions hoy|apuestas champions league|apuestas champions league – pronósticos|apuestas champions league 2025|apuestas champions league hoy|apuestas champions league pronosticos|apuestas champions league pronósticos|apuestas champions pronosticos|apuestas chelsea
barcelona|apuestas chelsea betis|apuestas chile|apuestas chile peru|apuestas chile venezuela|apuestas chile vs colombia|apuestas
chile vs uruguay|apuestas ciclismo|apuestas ciclismo en vivo|apuestas ciclismo femenino|apuestas ciclismo tour francia|apuestas ciclismo vuelta|apuestas
ciclismo vuelta a españa|apuestas ciclismo vuelta españa|apuestas
city madrid|apuestas city real madrid|apuestas clasico|apuestas clasico español|apuestas clasico real madrid barcelona|apuestas clasificacion mundial|apuestas colombia|apuestas colombia argentina|apuestas colombia
brasil|apuestas colombia paraguay|apuestas colombia uruguay|apuestas colombia vs
argentina|apuestas colombia vs brasil|apuestas combinadas|apuestas combinadas
como funcionan|apuestas combinadas de futbol|apuestas combinadas de fútbol|apuestas combinadas foro|apuestas combinadas futbol|apuestas combinadas
hoy|apuestas combinadas mismo partido|apuestas combinadas
mundial|apuestas combinadas nba|apuestas combinadas para esta semana|apuestas combinadas para hoy|apuestas combinadas para mañana|apuestas combinadas pronosticos|apuestas combinadas recomendadas|apuestas
combinadas seguras|apuestas combinadas seguras para hoy|apuestas combinadas
seguras para mañana|apuestas como ganar|apuestas comparador|apuestas con bono de bienvenida|apuestas con dinero
ficticio|apuestas con dinero real|apuestas con dinero virtual|apuestas con handicap|apuestas con handicap asiatico|apuestas con handicap baloncesto|apuestas
con mas probabilidades de ganar|apuestas con paypal|apuestas con tarjeta de credito|apuestas
con tarjeta de debito|apuestas consejos|apuestas copa|apuestas copa africa|apuestas copa america|apuestas copa
américa|apuestas copa argentina|apuestas copa brasil|apuestas copa
davis|apuestas copa de europa|apuestas copa del mundo|apuestas copa del rey|apuestas copa
del rey baloncesto|apuestas copa del rey final|apuestas copa del rey futbol|apuestas copa del rey ganador|apuestas copa
del rey hoy|apuestas copa del rey pronosticos|apuestas copa
del rey pronósticos|apuestas copa europa|apuestas copa italia|apuestas copa libertadores|apuestas copa mundial
de hockey|apuestas copa rey|apuestas copa sudamericana|apuestas corners|apuestas corners hoy|apuestas croacia argentina|apuestas cuartos eurocopa|apuestas cuotas|apuestas cuotas altas|apuestas cuotas bajas|apuestas
de 1 euro|apuestas de baloncesto|apuestas de baloncesto hoy|apuestas de baloncesto nba|apuestas de baloncesto
para hoy|apuestas de beisbol|apuestas de beisbol para hoy|apuestas de blackjack
en linea|apuestas de boxeo|apuestas de boxeo canelo|apuestas
de boxeo en las vegas|apuestas de boxeo hoy|apuestas de boxeo online|apuestas de caballo|apuestas de
caballos|apuestas de caballos como funciona|apuestas de caballos
como se juega|apuestas de caballos en colombia|apuestas de caballos en españa|apuestas de
caballos en linea|apuestas de caballos españa|apuestas de caballos ganador y colocado|apuestas de caballos internacionales|apuestas
de caballos juegos|apuestas de caballos online|apuestas de caballos online en venezuela|apuestas de caballos por internet|apuestas de caballos pronosticos|apuestas de caballos pronósticos|apuestas de carrera de caballos|apuestas de carreras de caballos|apuestas de carreras de caballos online|apuestas de casino|apuestas de casino online|apuestas de casino por internet|apuestas de champions
league|apuestas de ciclismo|apuestas de colombia|apuestas de copa america|apuestas de corners|apuestas de deportes en linea|apuestas de deportes online|apuestas de dinero|apuestas de esports|apuestas de eurocopa|apuestas de
europa league|apuestas de f1|apuestas de formula 1|apuestas de futbol|apuestas de
fútbol|apuestas de futbol app|apuestas de futbol argentina|apuestas de futbol colombia|apuestas de futbol en colombia|apuestas de futbol en directo|apuestas de
futbol en linea|apuestas de futbol en vivo|apuestas de futbol
español|apuestas de futbol gratis|apuestas de futbol hoy|apuestas de futbol
mundial|apuestas de futbol online|apuestas de fútbol online|apuestas
de futbol para hoy|apuestas de fútbol para hoy|apuestas de futbol
para hoy seguras|apuestas de futbol para mañana|apuestas
de futbol peru|apuestas de futbol pronosticos|apuestas de fútbol
pronósticos|apuestas de futbol seguras|apuestas de futbol seguras para hoy|apuestas de futbol sin dinero|apuestas de galgos|apuestas
de galgos como ganar|apuestas de galgos en directo|apuestas de galgos online|apuestas de galgos trucos|apuestas de golf|apuestas de
hockey|apuestas de hockey sobre hielo|apuestas
de hoy|apuestas de hoy seguras|apuestas de juego|apuestas
de juegos|apuestas de juegos deportivos|apuestas
de juegos online|apuestas de la champions league|apuestas de
la copa américa|apuestas de la eurocopa|apuestas de la europa league|apuestas de la liga|apuestas de la liga bbva|apuestas de la liga española|apuestas de la nba|apuestas de la nfl|apuestas de la ufc|apuestas de mlb|apuestas de nba|apuestas de nba para hoy|apuestas de partidos|apuestas de partidos de futbol|apuestas de peleas ufc|apuestas de perros en vivo|apuestas de perros virtuales|apuestas de peru|apuestas
de sistema|apuestas de sistema como funciona|apuestas de sistema explicacion|apuestas de sistema explicación|apuestas de tenis|apuestas de tenis de mesa|apuestas
de tenis en directo|apuestas de tenis hoy|apuestas
de tenis para hoy|apuestas de tenis pronosticos|apuestas de
tenis seguras|apuestas de todo tipo|apuestas de ufc|apuestas de
ufc hoy|apuestas del boxeo|apuestas del clasico|apuestas del clasico real madrid barca|apuestas del dia|apuestas del día|apuestas del dia de hoy|apuestas del dia deportivas|apuestas del dia futbol|apuestas del mundial|apuestas del partido de hoy|apuestas del real madrid|apuestas del rey|apuestas del sistema|apuestas deporte|apuestas
deportes|apuestas deportiva|apuestas deportivas|apuestas deportivas 1 euro|apuestas
deportivas 10 euros gratis|apuestas deportivas 100 seguras|apuestas deportivas 1×2|apuestas deportivas android|apuestas deportivas
app|apuestas deportivas apps|apuestas deportivas argentina|apuestas deportivas argentina futbol|apuestas
deportivas argentina legal|apuestas deportivas atletico de madrid|apuestas
deportivas baloncesto|apuestas deportivas barca madrid|apuestas deportivas barcelona|apuestas deportivas
beisbol|apuestas deportivas bono|apuestas deportivas bono bienvenida|apuestas
deportivas bono de bienvenida|apuestas deportivas bono sin deposito|apuestas deportivas bonos
de bienvenida|apuestas deportivas boxeo|apuestas deportivas caballos|apuestas
deportivas calculadora|apuestas deportivas campeon liga|apuestas deportivas casino|apuestas deportivas
casino barcelona|apuestas deportivas casino online|apuestas deportivas cerca de mi|apuestas deportivas champions league|apuestas deportivas chile|apuestas deportivas ciclismo|apuestas deportivas colombia|apuestas deportivas com|apuestas deportivas com foro|apuestas deportivas com
pronosticos|apuestas deportivas combinadas|apuestas deportivas
combinadas para hoy|apuestas deportivas como se juega|apuestas deportivas comparador|apuestas deportivas con bono gratis|apuestas deportivas con bonos gratis|apuestas deportivas con dinero ficticio|apuestas deportivas con paypal|apuestas deportivas con puntos virtuales|apuestas deportivas consejos|apuestas deportivas consejos para ganar|apuestas deportivas copa america|apuestas deportivas copa del rey|apuestas deportivas copa libertadores|apuestas deportivas
copa mundial|apuestas deportivas corners|apuestas deportivas cual es la mejor|apuestas deportivas cuotas altas|apuestas deportivas
de baloncesto|apuestas deportivas de boxeo|apuestas deportivas de colombia|apuestas deportivas de futbol|apuestas deportivas de nba|apuestas deportivas de nhl|apuestas
deportivas de peru|apuestas deportivas de tenis|apuestas deportivas del
dia|apuestas deportivas dinero ficticio|apuestas deportivas directo|apuestas deportivas doble oportunidad|apuestas
deportivas en argentina|apuestas deportivas en chile|apuestas deportivas
en colombia|apuestas deportivas en directo|apuestas deportivas en españa|apuestas deportivas en español|apuestas deportivas
en linea|apuestas deportivas en línea|apuestas deportivas en peru|apuestas deportivas en perú|apuestas deportivas en sevilla|apuestas deportivas en uruguay|apuestas deportivas en vivo|apuestas deportivas es|apuestas deportivas es pronosticos|apuestas deportivas españa|apuestas deportivas españolas|apuestas deportivas
esports|apuestas deportivas estadisticas|apuestas deportivas estrategias|apuestas
deportivas estrategias seguras|apuestas deportivas eurocopa|apuestas deportivas europa league|apuestas
deportivas f1|apuestas deportivas faciles de ganar|apuestas deportivas formula 1|apuestas deportivas foro|apuestas deportivas foro futbol|apuestas
deportivas foro tenis|apuestas deportivas francia argentina|apuestas deportivas futbol|apuestas deportivas fútbol|apuestas deportivas futbol argentino|apuestas
deportivas futbol colombia|apuestas deportivas futbol español|apuestas deportivas
gana|apuestas deportivas ganadas|apuestas deportivas ganar dinero
seguro|apuestas deportivas gane|apuestas deportivas golf|apuestas deportivas
gratis|apuestas deportivas gratis con premios|apuestas deportivas gratis hoy|apuestas deportivas gratis sin deposito|apuestas deportivas handicap|apuestas deportivas handicap asiatico|apuestas deportivas hoy|apuestas
deportivas impuestos|apuestas deportivas interior argentina|apuestas deportivas juegos olimpicos|apuestas deportivas la liga|apuestas
deportivas legales|apuestas deportivas legales en colombia|apuestas deportivas libres de impuestos|apuestas deportivas licencia españa|apuestas deportivas liga española|apuestas deportivas listado|apuestas deportivas listado
clasico|apuestas deportivas madrid|apuestas deportivas mas seguras|apuestas
deportivas mejor pagadas|apuestas deportivas mejores|apuestas deportivas mejores app|apuestas deportivas mejores casas|apuestas deportivas mejores cuotas|apuestas deportivas mejores
paginas|apuestas deportivas mexico|apuestas deportivas méxico|apuestas deportivas mlb|apuestas
deportivas mlb hoy|apuestas deportivas multiples|apuestas deportivas mundial|apuestas deportivas murcia|apuestas deportivas nba|apuestas deportivas nba hoy|apuestas deportivas
nfl|apuestas deportivas nhl|apuestas deportivas nuevas|apuestas deportivas ofertas|apuestas deportivas online|apuestas deportivas online argentina|apuestas deportivas online chile|apuestas deportivas online colombia|apuestas deportivas online en colombia|apuestas deportivas online españa|apuestas deportivas online mexico|apuestas
deportivas online paypal|apuestas deportivas online peru|apuestas deportivas online por internet|apuestas deportivas pago paypal|apuestas deportivas para ganar dinero|apuestas deportivas para hoy|apuestas deportivas para hoy pronosticos|apuestas deportivas partido suspendido|apuestas deportivas
partidos de hoy|apuestas deportivas paypal|apuestas deportivas peru|apuestas deportivas perú|apuestas deportivas
peru vs ecuador|apuestas deportivas predicciones|apuestas deportivas promociones|apuestas
deportivas pronostico|apuestas deportivas pronóstico|apuestas deportivas pronostico hoy|apuestas deportivas pronosticos|apuestas deportivas pronósticos|apuestas deportivas pronosticos expertos|apuestas deportivas pronosticos
gratis|apuestas deportivas pronosticos nba|apuestas deportivas
pronosticos tenis|apuestas deportivas que aceptan paypal|apuestas deportivas real madrid|apuestas deportivas regalo bienvenida|apuestas deportivas resultado exacto|apuestas deportivas resultados|apuestas deportivas rugby|apuestas deportivas seguras|apuestas deportivas seguras foro|apuestas deportivas seguras hoy|apuestas deportivas seguras para hoy|apuestas deportivas seguras
telegram|apuestas deportivas sevilla|apuestas deportivas simulador eurocopa|apuestas deportivas sin deposito|apuestas deportivas sin deposito inicial|apuestas deportivas sin dinero|apuestas deportivas sin dinero real|apuestas deportivas sin registro|apuestas deportivas stake|apuestas deportivas stake 10|apuestas
deportivas telegram españa|apuestas deportivas tenis|apuestas deportivas tenis
de mesa|apuestas deportivas tenis foro|apuestas deportivas tenis hoy|apuestas deportivas tips|apuestas deportivas tipster|apuestas deportivas ufc|apuestas deportivas uruguay|apuestas deportivas valencia|apuestas deportivas
valencia barcelona|apuestas deportivas venezuela|apuestas deportivas virtuales|apuestas deportivas y casino|apuestas deportivas y casino online|apuestas deportivas.com|apuestas deportivas.com foro|apuestas deportivas.es|apuestas deportivos pronosticos|apuestas deposito minimo 1
euro|apuestas descenso a segunda|apuestas descenso a segunda
b|apuestas descenso la liga|apuestas descenso primera division|apuestas descenso segunda|apuestas dia|apuestas diarias seguras|apuestas dinero|apuestas dinero ficticio|apuestas dinero real|apuestas dinero virtual|apuestas directas|apuestas directo|apuestas directo futbol|apuestas division de
honor juvenil|apuestas dnb|apuestas doble oportunidad|apuestas doble resultado|apuestas dobles|apuestas dobles y triples|apuestas dortmund barcelona|apuestas draft nba|apuestas draft
nfl|apuestas ecuador vs argentina|apuestas ecuador vs venezuela|apuestas egipto uruguay|apuestas
el clasico|apuestas elecciones venezuela|apuestas empate|apuestas
en baloncesto|apuestas en barcelona|apuestas en beisbol|apuestas en boxeo|apuestas en caballos|apuestas en carreras de caballos|apuestas en casino|apuestas en casino online|apuestas
en casinos|apuestas en casinos online|apuestas en chile|apuestas
en ciclismo|apuestas en colombia|apuestas en colombia de futbol|apuestas en directo|apuestas en directo futbol|apuestas en directo pronosticos|apuestas en el
futbol|apuestas en el tenis|apuestas en españa|apuestas en esports|apuestas en eventos deportivos virtuales|apuestas en golf|apuestas en juegos|apuestas en la
champions league|apuestas en la eurocopa|apuestas en la liga|apuestas en la nba|apuestas en la
nfl|apuestas en las vegas mlb|apuestas en las vegas nfl|apuestas en linea|apuestas en línea|apuestas en linea argentina|apuestas en linea boxeo|apuestas en linea chile|apuestas en linea colombia|apuestas
en línea de fútbol|apuestas en linea deportivas|apuestas en linea españa|apuestas en linea estados unidos|apuestas en linea futbol|apuestas en linea mexico|apuestas
en línea méxico|apuestas en linea mundial|apuestas en linea peru|apuestas en linea usa|apuestas en los esports|apuestas en madrid|apuestas en méxico|apuestas en mexico online|apuestas en nba|apuestas en partidos de futbol|apuestas en partidos de futbol en vivo|apuestas en partidos
de tenis en directo|apuestas en perú|apuestas en sevilla|apuestas en sistema|apuestas en stake|apuestas en tenis|apuestas en tenis de mesa|apuestas en valencia|apuestas en vivo|apuestas en vivo
argentina|apuestas en vivo casino|apuestas en vivo futbol|apuestas en vivo fútbol|apuestas en vivo
nba|apuestas en vivo peru|apuestas en vivo tenis|apuestas
en vivo ufc|apuestas equipo mbappe|apuestas equipos de futbol|apuestas españa|apuestas españa alemania|apuestas españa alemania eurocopa|apuestas españa croacia|apuestas españa eurocopa|apuestas españa francia|apuestas españa francia eurocopa|apuestas españa gana el mundial|apuestas españa gana
eurocopa|apuestas españa gana mundial|apuestas españa georgia|apuestas españa holanda|apuestas
españa inglaterra|apuestas españa inglaterra cuotas|apuestas
españa inglaterra eurocopa|apuestas españa italia|apuestas españa
mundial|apuestas españa paises bajos|apuestas español|apuestas español oviedo|apuestas espanyol barcelona|apuestas espanyol betis|apuestas espanyol villarreal|apuestas esport|apuestas esports|apuestas esports colombia|apuestas esports españa|apuestas esports fifa|apuestas esports
gratis|apuestas esports lol|apuestas esports peru|apuestas esports valorant|apuestas estadisticas|apuestas estrategias|apuestas euro|apuestas euro copa|apuestas eurocopa|apuestas eurocopa
campeon|apuestas eurocopa españa|apuestas eurocopa favoritos|apuestas eurocopa femenina|apuestas
eurocopa final|apuestas eurocopa ganador|apuestas eurocopa
hoy|apuestas eurocopa sub 21|apuestas euroliga baloncesto|apuestas
euroliga pronosticos|apuestas europa league|apuestas europa league
hoy|apuestas europa league pronosticos|apuestas europa league pronósticos|apuestas euros|apuestas f1 abu dhabi|apuestas f1 bahrein|apuestas f1 canada|apuestas f1
china|apuestas f1 cuotas|apuestas f1 hoy|apuestas f1 las vegas|apuestas f1 miami|apuestas f1 monaco|apuestas
faciles de ganar|apuestas fáciles de ganar|apuestas faciles para ganar|apuestas
favoritas|apuestas favorito champions|apuestas favoritos champions|apuestas
favoritos eurocopa|apuestas favoritos mundial|apuestas fc barcelona|apuestas final champions cuotas|apuestas final
champions league|apuestas final champions peru|apuestas final copa|apuestas final copa america|apuestas
final copa de europa|apuestas final copa del rey|apuestas final copa europa|apuestas
final copa libertadores|apuestas final copa rey|apuestas final de copa|apuestas final de copa del rey|apuestas final del mundial|apuestas final euro|apuestas final eurocopa|apuestas final europa league|apuestas final libertadores|apuestas final
mundial|apuestas final nba|apuestas final rugby|apuestas final
uefa europa league|apuestas final.mundial|apuestas finales de
conferencia nfl|apuestas finales nba|apuestas fiorentina betis|apuestas formula|apuestas formula
1|apuestas fórmula 1|apuestas fórmula 1 pronósticos|apuestas formula
uno|apuestas foro|apuestas foro nba|apuestas francia argentina|apuestas francia españa|apuestas futbol|apuestas fútbol|apuestas futbol americano|apuestas futbol americano nfl|apuestas futbol argentina|apuestas futbol argentino|apuestas futbol champions
league|apuestas futbol chile|apuestas futbol colombia|apuestas futbol consejos|apuestas futbol en directo|apuestas fútbol en directo|apuestas futbol en vivo|apuestas fútbol en vivo|apuestas futbol españa|apuestas futbol español|apuestas fútbol español|apuestas futbol
eurocopa|apuestas futbol femenino|apuestas futbol foro|apuestas futbol gratis|apuestas futbol hoy|apuestas fútbol hoy|apuestas futbol juegos olimpicos|apuestas futbol mexico|apuestas futbol mundial|apuestas futbol online|apuestas futbol para hoy|apuestas
futbol peru|apuestas futbol pronosticos|apuestas futbol sala|apuestas futbol telegram|apuestas futbol virtual|apuestas galgos|apuestas galgos en directo|apuestas
galgos hoy|apuestas galgos online|apuestas galgos pronosticos|apuestas galgos trucos|apuestas gana|apuestas
gana colombia|apuestas gana resultados|apuestas ganadas|apuestas ganadas hoy|apuestas ganador
champions league|apuestas ganador copa america|apuestas
ganador copa del rey|apuestas ganador copa del rey baloncesto|apuestas ganador copa libertadores|apuestas ganador de
la eurocopa|apuestas ganador de la liga|apuestas ganador del mundial|apuestas ganador eurocopa|apuestas ganador europa league|apuestas ganador f1|apuestas
ganador la liga|apuestas ganador liga española|apuestas ganador mundial|apuestas ganador
mundial baloncesto|apuestas ganador mundial f1|apuestas ganador nba|apuestas ganadores eurocopa|apuestas ganadores mundial|apuestas ganar champions|apuestas ganar eurocopa|apuestas ganar
liga|apuestas ganar mundial|apuestas ganar nba|apuestas getafe valencia|apuestas ghana uruguay|apuestas girona|apuestas girona athletic|apuestas girona betis|apuestas girona campeon de liga|apuestas girona campeon liga|apuestas girona gana la liga|apuestas girona real madrid|apuestas
girona real sociedad|apuestas goleador eurocopa|apuestas goleadores eurocopa|apuestas goles asiaticos|apuestas golf|apuestas
golf masters|apuestas golf pga|apuestas granada barcelona|apuestas
grand slam de tenis|apuestas gratis|apuestas gratis casino|apuestas
gratis con premios|apuestas gratis hoy|apuestas gratis para hoy|apuestas gratis por registro|apuestas gratis
puntos|apuestas gratis regalos|apuestas gratis sin deposito|apuestas gratis sin depósito|apuestas gratis sin ingreso|apuestas gratis
sports|apuestas gratis y ganar premios|apuestas grupo a eurocopa|apuestas grupos eurocopa|apuestas handicap|apuestas handicap asiatico|apuestas handicap baloncesto|apuestas handicap como funciona|apuestas handicap nba|apuestas handicap nfl|apuestas hipicas online|apuestas hípicas online|apuestas hipicas venezuela|apuestas
hockey|apuestas hockey hielo|apuestas hockey
patines|apuestas hockey sobre hielo|apuestas holanda argentina|apuestas
holanda vs argentina|apuestas hoy|apuestas hoy champions|apuestas
hoy futbol|apuestas hoy nba|apuestas hoy pronosticos|apuestas hoy seguras|apuestas impuestos|apuestas inglaterra paises bajos|apuestas
inter barca|apuestas inter barcelona|apuestas juego|apuestas juegos|apuestas juegos en linea|apuestas juegos olimpicos|apuestas juegos olímpicos|apuestas juegos olimpicos
baloncesto|apuestas juegos online|apuestas juegos virtuales|apuestas jugador sevilla|apuestas jugadores nba|apuestas kings league americas|apuestas la liga|apuestas la liga española|apuestas la liga hoy|apuestas la liga santander|apuestas las vegas mlb|apuestas las vegas nba|apuestas las vegas nfl|apuestas league of legends mundial|apuestas legal|apuestas
legales|apuestas legales en colombia|apuestas legales en españa|apuestas legales
en estados unidos|apuestas legales españa|apuestas leganes betis|apuestas libertadores|apuestas licencia|apuestas liga 1 peru|apuestas liga argentina|apuestas liga bbva pronosticos|apuestas liga
de campeones|apuestas liga de campeones de baloncesto|apuestas
liga de campeones de hockey|apuestas liga españa|apuestas
liga española|apuestas liga santander pronosticos|apuestas ligas de futbol|apuestas linea|apuestas linea de gol|apuestas liverpool barcelona|apuestas liverpool real
madrid|apuestas lol mundial|apuestas madrid|apuestas madrid arsenal|apuestas madrid atletico|apuestas madrid atletico champions|apuestas
madrid barca|apuestas madrid barça|apuestas madrid barca
hoy|apuestas madrid barca supercopa|apuestas madrid barcelona|apuestas
madrid barsa|apuestas madrid bayern|apuestas madrid
betis|apuestas madrid borussia|apuestas madrid campeon champions|apuestas
madrid celta|apuestas madrid city|apuestas madrid
dortmund|apuestas madrid gana la liga|apuestas madrid gana liga|apuestas madrid hoy|apuestas madrid liverpool|apuestas madrid osasuna|apuestas madrid sevilla|apuestas madrid valencia|apuestas madrid
vs arsenal|apuestas madrid vs barcelona|apuestas mallorca osasuna|apuestas mallorca
real sociedad|apuestas manchester athletic|apuestas manchester city real madrid|apuestas mas faciles de ganar|apuestas mas seguras|apuestas
mas seguras para hoy|apuestas masters de golf|apuestas masters de tenis|apuestas maximo goleador eurocopa|apuestas maximo goleador mundial|apuestas mejor jugador
eurocopa|apuestas mejores casinos online|apuestas mexico|apuestas méxico|apuestas
mexico polonia|apuestas méxico polonia|apuestas mlb|apuestas mlb hoy|apuestas mlb
las vegas|apuestas mlb para hoy|apuestas mlb pronosticos|apuestas mlb usa|apuestas mma ufc|apuestas momios|apuestas multiples|apuestas múltiples|apuestas multiples como funcionan|apuestas multiples el gordo|apuestas multiples futbol|apuestas mundial|apuestas mundial 2026|apuestas
mundial baloncesto|apuestas mundial balonmano|apuestas mundial
brasil|apuestas mundial campeon|apuestas mundial ciclismo|apuestas mundial clubes|apuestas mundial de baloncesto|apuestas mundial de ciclismo|apuestas mundial de clubes|apuestas mundial
de futbol|apuestas mundial de fútbol|apuestas mundial de rugby|apuestas mundial f1|apuestas mundial favoritos|apuestas mundial femenino|apuestas
mundial formula 1|apuestas mundial futbol|apuestas mundial ganador|apuestas mundial lol|apuestas mundial moto gp|apuestas mundial motogp|apuestas mundial rugby|apuestas mundial sub 17|apuestas mundiales|apuestas mundialistas|apuestas mvp eurocopa|apuestas mvp nba|apuestas mvp nfl|apuestas
nacionales de colombia|apuestas nba|apuestas nba all star|apuestas nba campeon|apuestas
nba consejos|apuestas nba esta noche|apuestas nba finals|apuestas nba gratis|apuestas
nba hoy|apuestas nba hoy jugadores|apuestas nba
hoy pronosticos|apuestas nba para hoy|apuestas nba playoffs|apuestas nba pronosticos|apuestas nba pronósticos|apuestas nba pronosticos
hoy|apuestas nba tipster|apuestas nfl|apuestas nfl hoy|apuestas nfl
las vegas|apuestas nfl playoffs|apuestas nfl pronosticos|apuestas nfl
pronósticos|apuestas nfl semana 4|apuestas nfl super bowl|apuestas nhl|apuestas
nhl pronosticos|apuestas octavos eurocopa|apuestas ofertas|apuestas online|apuestas online
argentina|apuestas online argentina legal|apuestas online bono|apuestas online
bono bienvenida|apuestas online boxeo|apuestas online caballos|apuestas online carreras de caballos|apuestas online
casino|apuestas online champions league|apuestas online chile|apuestas online ciclismo|apuestas online colombia|apuestas online comparativa|apuestas online con paypal|apuestas online de caballos|apuestas online deportivas|apuestas
online en argentina|apuestas online en peru|apuestas online espana|apuestas online españa|apuestas online esports|apuestas online
foro|apuestas online futbol|apuestas online
futbol españa|apuestas online golf|apuestas online gratis|apuestas online gratis sin deposito|apuestas
online juegos|apuestas online mexico|apuestas online
mma|apuestas online movil|apuestas online nba|apuestas online net|apuestas online nuevas|apuestas online opiniones|apuestas online paypal|apuestas
online peru|apuestas online seguras|apuestas online sin dinero|apuestas
online sin registro|apuestas online tenis|apuestas online
ufc|apuestas online uruguay|apuestas online venezuela|apuestas open britanico golf|apuestas osasuna athletic|apuestas
osasuna barcelona|apuestas osasuna real madrid|apuestas osasuna sevilla|apuestas osasuna valencia|apuestas over|apuestas over 2.5|apuestas over under|apuestas
paginas|apuestas pago anticipado|apuestas paises bajos ecuador|apuestas paises bajos inglaterra|apuestas países bajos qatar|apuestas
para boxeo|apuestas para champions league|apuestas para el clasico|apuestas para el dia
de hoy|apuestas para el mundial|apuestas para el partido de hoy|apuestas
para eurocopa|apuestas para europa league|apuestas para futbol|apuestas para ganar|apuestas para ganar dinero|apuestas para
ganar dinero facil|apuestas para ganar en la ruleta|apuestas
para ganar la champions|apuestas para ganar la eurocopa|apuestas para ganar la europa league|apuestas para ganar la liga|apuestas para ganar siempre|apuestas para hacer|apuestas para
hoy|apuestas para hoy de futbol|apuestas para hoy
europa league|apuestas para hoy futbol|apuestas para juegos|apuestas para la champions league|apuestas para la copa del rey|apuestas para la eurocopa|apuestas para la europa league|apuestas para la final
de la eurocopa|apuestas para la nba hoy|apuestas para los partidos de hoy|apuestas
para partidos de hoy|apuestas para ufc|apuestas partido|apuestas partido aplazado|apuestas
partido champions|apuestas partido colombia|apuestas
partido españa marruecos|apuestas partido mundial|apuestas partido suspendido|apuestas partidos|apuestas partidos champions league|apuestas
partidos csgo|apuestas partidos de futbol|apuestas partidos
de futbol hoy|apuestas partidos de hoy|apuestas partidos eurocopa|apuestas partidos futbol|apuestas partidos hoy|apuestas
partidos mundial|apuestas paypal|apuestas peleas de boxeo|apuestas peru|apuestas perú|apuestas peru brasil|apuestas peru chile|apuestas peru paraguay|apuestas peru uruguay|apuestas peru vs chile|apuestas peru vs colombia|apuestas pichichi eurocopa|apuestas plataforma|apuestas playoff|apuestas playoff ascenso|apuestas playoff
ascenso a primera|apuestas playoff nba|apuestas playoff segunda|apuestas playoff segunda
b|apuestas playoffs nba|apuestas playoffs nfl|apuestas polonia argentina|apuestas
por argentina|apuestas por internet mexico|apuestas por internet
para ganar dinero|apuestas por paypal|apuestas por ronda boxeo|apuestas
por sistema|apuestas portugal uruguay|apuestas pre partido|apuestas predicciones|apuestas predicciones futbol|apuestas primera
division|apuestas primera division españa|apuestas promociones|apuestas pronostico|apuestas pronosticos|apuestas pronosticos deportivos|apuestas
pronosticos deportivos tenis|apuestas pronosticos futbol|apuestas
pronosticos gratis|apuestas pronosticos nba|apuestas pronosticos tenis|apuestas prorroga|apuestas
psg barca|apuestas psg barcelona|apuestas puntos por tarjetas|apuestas puntos tarjetas|apuestas que aceptan paypal|apuestas que es handicap|apuestas que puedes
hacer con tu novia|apuestas que siempre ganaras|apuestas que significa|apuestas quien bajara a segunda|apuestas quién bajara
a segunda|apuestas quien gana el mundial|apuestas quien gana
eurocopa|apuestas quien gana la champions|apuestas quien gana la eurocopa|apuestas quien gana la liga|apuestas quien ganara el mundial|apuestas quién ganará el mundial|apuestas quien ganara la champions|apuestas
quien ganara la eurocopa|apuestas quien ganara la liga|apuestas rayo barcelona|apuestas real madrid|apuestas
real madrid arsenal|apuestas real madrid athletic|apuestas real madrid atletico|apuestas real madrid atletico champions|apuestas real madrid atletico de madrid|apuestas real madrid atlético de madrid|apuestas real madrid
atletico madrid|apuestas real madrid barcelona|apuestas
real madrid bayern|apuestas real madrid betis|apuestas real madrid borussia|apuestas real madrid
campeon champions|apuestas real madrid celta|apuestas real madrid champions|apuestas real madrid city|apuestas real madrid girona|apuestas real madrid
hoy|apuestas real madrid liverpool|apuestas real madrid manchester
city|apuestas real madrid osasuna|apuestas real madrid real sociedad|apuestas real madrid valencia|apuestas real madrid villarreal|apuestas real madrid vs arsenal|apuestas real madrid vs atletico|apuestas real madrid vs atlético|apuestas real madrid vs atletico
madrid|apuestas real madrid vs barcelona|apuestas real madrid vs betis|apuestas real madrid vs sevilla|apuestas real madrid vs valencia|apuestas real sociedad|apuestas real sociedad athletic|apuestas real sociedad barcelona|apuestas real sociedad betis|apuestas real sociedad
psg|apuestas real sociedad real madrid|apuestas real sociedad valencia|apuestas recomendadas hoy|apuestas
regalo de bienvenida|apuestas registro|apuestas resultado exacto|apuestas resultados|apuestas
resultados eurocopa|apuestas retirada tenis|apuestas roma barcelona|apuestas roma sevilla|apuestas rugby|apuestas rugby mundial|apuestas rugby world cup|apuestas ruleta seguras|apuestas segunda|apuestas segunda b|apuestas segunda division|apuestas segunda división|apuestas segunda division b|apuestas segunda division españa|apuestas seguras|apuestas
seguras baloncesto|apuestas seguras calculadora|apuestas seguras en la
ruleta|apuestas seguras eurocopa|apuestas seguras foro|apuestas seguras
futbol|apuestas seguras futbol hoy|apuestas seguras gratis|apuestas
seguras hoy|apuestas seguras hoy futbol|apuestas seguras nba|apuestas seguras nba hoy|apuestas seguras para
este fin de semana|apuestas seguras para ganar dinero|apuestas seguras para hoy|apuestas seguras para
hoy fútbol|apuestas seguras para hoy pronósticos|apuestas seguras para mañana|apuestas seguras ruleta|apuestas
seguras telegram|apuestas seguras tenis|apuestas semifinales
eurocopa|apuestas senegal paises bajos|apuestas sevilla|apuestas sevilla athletic|apuestas sevilla atletico de madrid|apuestas sevilla
barcelona|apuestas sevilla betis|apuestas sevilla campeon liga|apuestas
sevilla celta|apuestas sevilla gana la liga|apuestas sevilla girona|apuestas sevilla inter|apuestas sevilla jugador|apuestas sevilla juventus|apuestas sevilla
leganes|apuestas sevilla madrid|apuestas sevilla manchester united|apuestas sevilla osasuna|apuestas sevilla real madrid|apuestas sevilla real sociedad|apuestas sevilla roma|apuestas sevilla valencia|apuestas
significa|apuestas simples ejemplos|apuestas simples o combinadas|apuestas
sin deposito|apuestas sin deposito inicial|apuestas sin deposito minimo|apuestas sin dinero|apuestas
sin dinero real|apuestas sin empate|apuestas sin empate que significa|apuestas sin ingreso minimo|apuestas sin registro|apuestas sistema|apuestas sistema calculadora|apuestas sistema como funciona|apuestas
sistema trixie|apuestas sociedad|apuestas sorteo copa del rey|apuestas stake|apuestas
stake 10|apuestas stake 10 hoy|apuestas super bowl favorito|apuestas super rugby|apuestas supercopa españa|apuestas superliga argentina|apuestas tarjeta roja|apuestas tarjetas|apuestas tarjetas amarillas|apuestas
tenis|apuestas tenis atp|apuestas tenis consejos|apuestas tenis
copa davis|apuestas tenis de mesa|apuestas tenis de mesa pronosticos|apuestas tenis
en vivo|apuestas tenis femenino|apuestas tenis hoy|apuestas tenis itf|apuestas tenis pronosticos|apuestas
tenis pronósticos|apuestas tenis retirada|apuestas tenis roland garros|apuestas tenis seguras|apuestas tenis wimbledon|apuestas tenis wta|apuestas tercera division|apuestas tercera division españa|apuestas tipos|apuestas tips|apuestas tipster|apuestas tipster para hoy|apuestas
topuria holloway cuotas|apuestas torneos de golf|apuestas torneos de tenis|apuestas trucos|apuestas uefa champions league|apuestas uefa europa league|apuestas ufc|apuestas ufc chile|apuestas ufc como funciona|apuestas ufc hoy|apuestas ufc ilia topuria|apuestas ufc online|apuestas ufc
pronósticos|apuestas ufc telegram|apuestas ufc
topuria|apuestas under over|apuestas unionistas villarreal|apuestas uruguay|apuestas uruguay colombia|apuestas uruguay corea|apuestas uruguay vs colombia|apuestas us open golf|apuestas us open tenis|apuestas valencia|apuestas valencia barcelona|apuestas valencia betis|apuestas
valencia madrid|apuestas valencia real madrid|apuestas valladolid barcelona|apuestas
valladolid valencia|apuestas valor app|apuestas valor en directo|apuestas valor galgos|apuestas
venezuela|apuestas venezuela argentina|apuestas venezuela bolivia|apuestas
venezuela ecuador|apuestas villarreal|apuestas villarreal athletic|apuestas villarreal barcelona|apuestas villarreal bayern|apuestas villarreal betis|apuestas villarreal liverpool|apuestas villarreal manchester|apuestas villarreal manchester united|apuestas villarreal vs real madrid|apuestas virtuales|apuestas virtuales colombia|apuestas virtuales futbol|apuestas
virtuales sin dinero|apuestas vivo|apuestas vuelta a españa|apuestas vuelta
españa|apuestas william hill partidos de hoy|apuestas y casino|apuestas y casinos|apuestas y juegos de azar|apuestas y pronosticos|apuestas y pronosticos de futbol|apuestas y pronosticos deportivos|apuestas y resultados|apuestas-deportivas|apuestas-deportivas.es pronosticos|arbitro nba apuestas|argentina apuestas|argentina colombia apuestas|argentina
croacia apuestas|argentina francia apuestas|argentina mexico
apuestas|argentina peru apuestas|argentina uruguay
apuestas|argentina vs bolivia apuestas|argentina
vs chile apuestas|argentina vs colombia apuestas|argentina vs
francia apuestas|argentina vs. colombia apuestas|asi se gana en las apuestas deportivas|asiatico apuestas|asiatico
en apuestas|asiaticos apuestas|athletic barcelona apuestas|athletic manchester united apuestas|athletic osasuna apuestas|athletic real
madrid apuestas|atletico barcelona apuestas|atletico de
madrid apuestas|atlético de madrid apuestas|atletico de madrid real madrid apuestas|atletico
de madrid vs barcelona apuestas|atletico madrid real madrid apuestas|atletico madrid vs real madrid apuestas|atletico real madrid apuestas|atletico vs real madrid apuestas|avisador de cuotas apuestas|bajada de cuotas apuestas|baloncesto apuestas|barbastro barcelona apuestas|barca apuestas|barca bayern apuestas|barca inter apuestas|barca madrid
apuestas|barça madrid apuestas|barca vs atletico apuestas|barca vs madrid apuestas|barca vs real madrid apuestas|barcelona – real madrid apuestas|barcelona apuestas|barcelona atletico apuestas|barcelona atletico de madrid apuestas|barcelona atletico madrid
apuestas|barcelona betis apuestas|barcelona casa de apuestas|barcelona inter
apuestas|barcelona psg apuestas|barcelona real madrid apuestas|barcelona real sociedad apuestas|barcelona sevilla apuestas|barcelona valencia apuestas|barcelona vs athletic
bilbao apuestas|barcelona vs atlético madrid apuestas|barcelona vs
betis apuestas|barcelona vs celta de vigo apuestas|barcelona vs espanyol apuestas|barcelona vs girona apuestas|barcelona vs madrid apuestas|barcelona vs real madrid apuestas|barcelona vs real sociedad apuestas|barcelona vs
sevilla apuestas|barcelona vs villarreal apuestas|base de datos cuotas
apuestas deportivas|bayern real madrid apuestas|beisbol
apuestas|best america apuestas|bet apuestas chile|bet apuestas en vivo|betis – chelsea apuestas|betis apuestas|betis barcelona apuestas|betis chelsea apuestas|betis madrid apuestas|betis sevilla apuestas|betsson tu sitio de apuestas online|blog apuestas baloncesto|blog apuestas ciclismo|blog apuestas nba|blog apuestas tenis|blog de apuestas de tenis|bono apuestas|bono apuestas deportivas|bono apuestas deportivas sin deposito|bono apuestas gratis|bono apuestas gratis sin deposito|bono apuestas sin deposito|bono bienvenida apuestas|bono bienvenida apuestas deportivas|bono bienvenida apuestas
españa|bono bienvenida apuestas sin deposito|bono bienvenida apuestas sin depósito|bono bienvenida
casa apuestas|bono bienvenida casa de apuestas|bono bienvenida marca apuestas|bono casa apuestas|bono casa de apuestas|bono casa de apuestas sin ingreso|bono casas de apuestas|bono de apuestas|bono de apuestas gratis sin deposito|bono de bienvenida
apuestas|bono de bienvenida apuestas deportivas|bono de bienvenida casa de
apuestas|bono de bienvenida casas de apuestas|bono de casas de
apuestas|bono de registro apuestas|bono de registro
apuestas deportivas|bono de registro casa de apuestas|bono gratis apuestas|bono marca apuestas|bono por
registro apuestas|bono por registro apuestas deportivas|bono por
registro casa de apuestas|bono registro apuestas|bono sin deposito apuestas|bono sin depósito
apuestas|bono sin deposito apuestas deportivas|bono sin depósito apuestas deportivas|bono sin deposito casa de apuestas|bono sin deposito marca apuestas|bono sin ingreso apuestas|bono sin ingreso apuestas deportivas|bonos apuestas|bonos apuestas colombia|bonos apuestas deportivas|bonos
apuestas deportivas sin deposito|bonos apuestas gratis|bonos apuestas sin deposito|bonos apuestas sin depósito|bonos
bienvenida apuestas|bonos bienvenida casas apuestas|bonos bienvenida casas de apuestas|bonos casa de apuestas|bonos casas apuestas|bonos casas de apuestas|bonos casas
de apuestas colombia|bonos casas de apuestas deportivas|bonos casas de apuestas españa|bonos casas de apuestas nuevas|bonos casas de apuestas sin deposito|bonos casas de apuestas sin depósito|bonos de apuestas|bonos de apuestas deportivas|bonos
de apuestas gratis|bonos de apuestas sin deposito|bonos
de bienvenida apuestas|bonos de bienvenida apuestas deportivas|bonos de bienvenida casa
de apuestas|bonos de bienvenida casas de
apuestas|bonos de bienvenida de casas de apuestas|bonos de bienvenida en casas de apuestas|bonos de casas de
apuestas|bonos de casas de apuestas sin deposito|bonos en casa de apuestas|bonos
en casas de apuestas sin deposito|bonos gratis apuestas|bonos
gratis apuestas deportivas|bonos gratis casas de apuestas|bonos gratis sin deposito
apuestas|bonos paginas de apuestas|bonos registro casas de apuestas|bonos sin deposito apuestas|bonos sin depósito apuestas|bonos sin deposito apuestas deportivas|bonos sin deposito casas de apuestas|bot de apuestas deportivas gratis|boxeo apuestas|brasil colombia apuestas|brasil peru apuestas|brasil
vs colombia apuestas|buenas apuestas para hoy|buscador cuotas apuestas|buscador de
apuestas seguras|buscador de cuotas apuestas|buscador
de cuotas de apuestas|buscar apuestas seguras|caballos
apuestas|calculador de apuestas|calculador de cuotas apuestas|calculadora apuestas|calculadora apuestas combinadas|calculadora
apuestas de sistema|calculadora apuestas deportivas|calculadora apuestas deportivas seguras|calculadora apuestas multiples|calculadora apuestas segura|calculadora
apuestas seguras|calculadora apuestas sistema|calculadora apuestas yankee|calculadora arbitraje apuestas|calculadora cubrir apuestas|calculadora
cuotas apuestas|calculadora de apuestas|calculadora de
apuestas combinadas|calculadora de apuestas de futbol|calculadora de apuestas de sistema|calculadora
de apuestas deportivas|calculadora de apuestas multiples|calculadora de
apuestas seguras|calculadora de apuestas sistema|calculadora de apuestas surebets|calculadora de arbitraje apuestas|calculadora de cuotas apuestas|calculadora de cuotas de apuestas|calculadora
para apuestas deportivas|calculadora poisson apuestas|calculadora poisson apuestas
deportivas|calculadora poisson para apuestas|calculadora scalping apuestas deportivas|calculadora sistema apuestas|calculadora stake apuestas|calculadora trading apuestas|calcular apuestas|calcular apuestas deportivas|calcular apuestas futbol|calcular apuestas sistema|calcular cuotas apuestas|calcular cuotas apuestas combinadas|calcular cuotas apuestas deportivas|calcular cuotas de
apuestas|calcular ganancias apuestas deportivas|calcular momios apuestas|calcular probabilidad cuota apuestas|calcular
stake apuestas|calcular unidades apuestas|calcular yield apuestas|calculo
de apuestas|calculo de apuestas deportivas|cambio de
cuotas apuestas|campeon champions apuestas|campeon eurocopa
apuestas|campeon liga apuestas|campeon nba apuestas|canales de apuestas gratis|carrera de caballos apuestas|carrera de caballos apuestas juego|carrera de caballos con apuestas|carrera de galgos apuestas|carreras de caballos apuestas|carreras de caballos apuestas online|carreras de caballos con apuestas|carreras de caballos juegos de apuestas|carreras de galgos apuestas|carreras de galgos apuestas online|carreras de galgos apuestas trucos|carreras galgos
apuestas|casa apuestas argentina|casa apuestas atletico
de madrid|casa apuestas barcelona|casa apuestas betis|casa apuestas bono bienvenida|casa apuestas bono gratis|casa apuestas
bono sin deposito|casa apuestas cerca de mi|casa apuestas
chile|casa apuestas colombia|casa apuestas con mejores cuotas|casa apuestas deportivas|casa apuestas españa|casa apuestas española|casa apuestas eurocopa|casa apuestas futbol|casa
apuestas mejores cuotas|casa apuestas mundial|casa apuestas
nueva|casa apuestas nuevas|casa apuestas online|casa apuestas peru|casa
apuestas valencia|casa de apuestas|casa de apuestas 10 euros gratis|casa
de apuestas argentina|casa de apuestas atletico de madrid|casa de apuestas baloncesto|casa de apuestas barcelona|casa de apuestas beisbol|casa de apuestas betis|casa de apuestas bono|casa de apuestas bono bienvenida|casa de
apuestas bono de bienvenida|casa de apuestas bono gratis|casa de apuestas bono por registro|casa de apuestas
bono sin deposito|casa de apuestas boxeo|casa de apuestas caballos|casa de apuestas carreras de caballos|casa de apuestas cerca de mi|casa de apuestas cerca de mí|casa de apuestas champions
league|casa de apuestas chile|casa de apuestas
ciclismo|casa de apuestas colombia|casa de apuestas con bono de bienvenida|casa de apuestas con bono
sin deposito|casa de apuestas con cuotas mas altas|casa de apuestas con esports|casa de apuestas
con las mejores cuotas|casa de apuestas con licencia en españa|casa de apuestas con mejores cuotas|casa de apuestas con pago anticipado|casa de apuestas con paypal|casa de apuestas copa america|casa de apuestas de caballos|casa de apuestas
de colombia|casa de apuestas de españa|casa de apuestas
de futbol|casa de apuestas de fútbol|casa de apuestas de futbol peru|casa de apuestas de peru|casa de apuestas del madrid|casa
de apuestas del real madrid|casa de apuestas deportivas|casa de apuestas
deportivas cerca de mi|casa de apuestas deportivas en argentina|casa de apuestas deportivas en chile|casa de apuestas deportivas en colombia|casa de apuestas
deportivas en españa|casa de apuestas deportivas en madrid|casa de
apuestas deportivas españa|casa de apuestas deportivas españolas|casa de
apuestas deportivas madrid|casa de apuestas deportivas mexico|casa de apuestas deportivas online|casa de apuestas deportivas peru|casa de apuestas deposito 5 euros|casa de
apuestas deposito minimo|casa de apuestas deposito minimo 1 euro|casa de apuestas depósito mínimo 1
euro|casa de apuestas en españa|casa de apuestas en linea|casa de
apuestas en madrid|casa de apuestas en perú|casa de apuestas en vivo|casa de apuestas españa|casa de apuestas españa inglaterra|casa de apuestas española|casa de apuestas españolas|casa
de apuestas esports|casa de apuestas eurocopa|casa
de apuestas europa league|casa de apuestas f1|casa de apuestas formula 1|casa de apuestas futbol|casa de
apuestas ingreso minimo|casa de apuestas ingreso
minimo 1 euro|casa de apuestas ingreso mínimo 1 euro|casa de apuestas legales|casa de apuestas legales en colombia|casa de apuestas legales
en españa|casa de apuestas libertadores|casa
de apuestas liga española|casa de apuestas madrid|casa de
apuestas mas segura|casa de apuestas mejores|casa de apuestas méxico|casa de apuestas
minimo 5 euros|casa de apuestas mlb|casa de apuestas mundial|casa de apuestas nba|casa de apuestas nfl|casa de apuestas nueva|casa de apuestas nuevas|casa de apuestas oficial
del real madrid|casa de apuestas oficial real madrid|casa de
apuestas online|casa de apuestas online argentina|casa de apuestas online chile|casa de apuestas online
españa|casa de apuestas online mexico|casa de apuestas online paraguay|casa de apuestas online peru|casa de apuestas online usa|casa de apuestas online venezuela|casa de apuestas pago anticipado|casa de apuestas para boxeo|casa de apuestas para ufc|casa de apuestas peru|casa de apuestas perú|casa de apuestas peru online|casa de apuestas por paypal|casa de apuestas
promociones|casa de apuestas que regalan dinero|casa de apuestas real
madrid|casa de apuestas regalo de bienvenida|casa de apuestas sevilla|casa de apuestas sin dinero|casa de apuestas sin ingreso minimo|casa de apuestas sin licencia en españa|casa de apuestas sin minimo de ingreso|casa de
apuestas stake|casa de apuestas tenis|casa de apuestas ufc|casa de apuestas valencia|casa de apuestas venezuela|casa de apuestas virtuales|casa de apuestas vive la suerte|casa oficial de apuestas del real madrid|casas apuestas asiaticas|casas apuestas bono sin deposito|casas apuestas bonos sin deposito|casas apuestas caballos|casas apuestas
chile|casas apuestas ciclismo|casas apuestas con licencia|casas apuestas con licencia en españa|casas apuestas deportivas|casas apuestas deportivas colombia|casas apuestas
deportivas españa|casas apuestas deportivas españolas|casas apuestas deportivas nuevas|casas apuestas españa|casas apuestas españolas|casas apuestas esports|casas
apuestas eurocopa|casas apuestas golf|casas apuestas ingreso minimo 5 euros|casas apuestas legales|casas apuestas legales
españa|casas apuestas licencia|casas apuestas licencia
españa|casas apuestas mexico|casas apuestas mundial|casas apuestas nba|casas apuestas nuevas|casas apuestas nuevas españa|casas apuestas ofertas|casas apuestas online|casas apuestas paypal|casas apuestas
peru|casas apuestas sin licencia|casas apuestas tenis|casas asiaticas apuestas|casas de apuestas|casas de apuestas 5 euros|casas de apuestas app|casas de apuestas argentinas|casas de apuestas asiaticas|casas de
apuestas baloncesto|casas de apuestas barcelona|casas de apuestas bono bienvenida|casas de
apuestas bono de bienvenida|casas de apuestas bono por registro|casas de apuestas bono sin deposito|casas de apuestas bono
sin ingreso|casas de apuestas bonos|casas de apuestas bonos de bienvenida|casas de apuestas bonos
gratis|casas de apuestas bonos sin deposito|casas de apuestas boxeo|casas de apuestas caballos|casas de apuestas carreras de caballos|casas de apuestas casino|casas de
apuestas casino online|casas de apuestas cerca de mi|casas de apuestas champions league|casas de
apuestas chile|casas de apuestas ciclismo|casas de apuestas colombia|casas de apuestas com|casas de apuestas con app|casas de apuestas con apuestas gratis|casas de apuestas con bono|casas de apuestas con bono de bienvenida|casas de apuestas con bono de registro|casas de apuestas con bono
por registro|casas de apuestas con bono sin deposito|casas de apuestas
con bonos|casas de apuestas con bonos gratis|casas de apuestas con bonos sin deposito|casas
de apuestas con deposito minimo|casas de apuestas con esports|casas de apuestas con handicap asiatico|casas de apuestas con licencia|casas de apuestas con licencia en españa|casas de
apuestas con licencia españa|casas de apuestas con licencia española|casas
de apuestas con mejores cuotas|casas de apuestas con pago anticipado|casas de apuestas con paypal|casas
de apuestas con paypal en perú|casas de apuestas con promociones|casas
de apuestas con ruleta en vivo|casas de apuestas copa
del rey|casas de apuestas de caballos|casas de
apuestas de españa|casas de apuestas de futbol|casas de apuestas de fútbol|casas de apuestas de peru|casas de apuestas deportivas|casas
de apuestas deportivas asiaticas|casas de apuestas deportivas colombia|casas de apuestas deportivas comparativa|casas de apuestas deportivas con paypal|casas de apuestas deportivas en chile|casas de apuestas deportivas en españa|casas de apuestas deportivas
en linea|casas de apuestas deportivas en madrid|casas de apuestas deportivas en mexico|casas de
apuestas deportivas en peru|casas de apuestas deportivas
en sevilla|casas de apuestas deportivas en valencia|casas de
apuestas deportivas españa|casas de apuestas deportivas españolas|casas
de apuestas deportivas legales|casas de apuestas deportivas madrid|casas
de apuestas deportivas mexico|casas de apuestas deportivas nuevas|casas
de apuestas deportivas online|casas de apuestas deportivas peru|casas de apuestas deportivas perú|casas de apuestas deposito minimo 1
euro|casas de apuestas depósito mínimo 1 euro|casas de apuestas dinero gratis|casas de apuestas en argentina|casas de apuestas en barcelona|casas de apuestas en chile|casas de apuestas en colombia|casas de apuestas en españa|casas de apuestas en españa
online|casas de apuestas en linea|casas de apuestas en madrid|casas de apuestas en méxico|casas
de apuestas en peru|casas de apuestas en perú|casas de apuestas en sevilla|casas de
apuestas en uruguay|casas de apuestas en valencia|casas de apuestas en venezuela|casas de apuestas
equipos de futbol|casas de apuestas españa|casas de apuestas españa alemania|casas de apuestas españa inglaterra|casas de apuestas españa licencia|casas de apuestas españa nuevas|casas de apuestas
españa online|casas de apuestas española|casas
de apuestas españolas|casas de apuestas españolas con licencia|casas de apuestas
españolas online|casas de apuestas esports|casas de apuestas eurocopa|casas de apuestas eurocopa 2024|casas de apuestas europa
league|casas de apuestas f1|casas de apuestas fisicas en barcelona|casas de apuestas fisicas en españa|casas
de apuestas formula 1|casas de apuestas fuera de españa|casas de apuestas futbol|casas de apuestas fútbol|casas de
apuestas futbol españa|casas de apuestas ganador eurocopa|casas de apuestas gratis|casas
de apuestas ingreso minimo|casas de apuestas ingreso minimo 1 euro|casas
de apuestas ingreso minimo 5 euros|casas de apuestas inter barcelona|casas
de apuestas legales|casas de apuestas legales en colombia|casas
de apuestas legales en españa|casas de apuestas legales
en mexico|casas de apuestas legales españa|casas de apuestas legales mx|casas de apuestas licencia|casas de apuestas licencia españa|casas de apuestas
lista|casas de apuestas madrid|casas de apuestas mas seguras|casas
de apuestas mejores bonos|casas de apuestas mejores
cuotas|casas de apuestas mexico|casas de apuestas méxico|casas de
apuestas minimo 5 euros|casas de apuestas mlb|casas de apuestas mundial|casas de apuestas mundial baloncesto|casas
de apuestas mundiales|casas de apuestas nba|casas de apuestas no reguladas en españa|casas de
apuestas nueva ley|casas de apuestas nuevas|casas de apuestas nuevas en colombia|casas de apuestas nuevas en españa|casas de apuestas nuevas españa|casas de apuestas ofertas|casas de apuestas online|casas de
apuestas online argentina|casas de apuestas
online colombia|casas de apuestas online deportivas|casas
de apuestas online ecuador|casas de apuestas online en argentina|casas de apuestas online en chile|casas de apuestas online en colombia|casas
de apuestas online en españa|casas de apuestas online en mexico|casas de apuestas online españa|casas de apuestas online mas fiables|casas de apuestas online mexico|casas de apuestas online nuevas|casas
de apuestas online peru|casas de apuestas online usa|casas de apuestas online venezuela|casas de apuestas
pago paypal|casas de apuestas para ufc|casas de apuestas
paypal|casas de apuestas peru bono sin deposito|casas de apuestas presenciales en españa|casas de
Your comment is awaiting moderation.
rapidleads.click – Found practical insights today; sharing this article with colleagues later.
Your comment is awaiting moderation.
proclicklab.click – Mobile version looks perfect; no glitches, fast scrolling, crisp text.
Your comment is awaiting moderation.
resultsdrive.click – Navigation felt smooth, found everything quickly without any confusing steps.
Your comment is awaiting moderation.
(10 euros gratis apuestas|10 mejores casas de apuestas|10 trucos para ganar
apuestas|15 euros gratis marca apuestas|1×2 apuestas|1×2 apuestas deportivas|1×2 apuestas que significa|1×2 en apuestas|1×2 en apuestas que significa|1×2 que significa en apuestas|5 euros gratis apuestas|9 apuestas que siempre ganaras|a partir de cuanto se
declara apuestas|actividades de juegos de azar y apuestas|ad apuestas deportivas|aleksandre topuria ufc apuestas|algoritmo para ganar apuestas deportivas|america apuestas|análisis nba apuestas|aplicacion android apuestas deportivas|aplicacion apuestas deportivas|aplicacion apuestas deportivas android|aplicación de
apuestas online|aplicacion para hacer apuestas|aplicacion para hacer apuestas
de futbol|aplicación para hacer apuestas de fútbol|aplicaciones apuestas deportivas android|aplicaciones apuestas deportivas gratis|aplicaciones
de apuestas android|aplicaciones de apuestas de fútbol|aplicaciones de
apuestas deportivas|aplicaciones de apuestas deportivas peru|aplicaciones
de apuestas deportivas perú|aplicaciones de apuestas en colombia|aplicaciones de apuestas gratis|aplicaciones de apuestas online|aplicaciones de apuestas seguras|aplicaciones de apuestas sin dinero|aplicaciones para hacer apuestas|apostar
seguro apuestas deportivas|app android apuestas deportivas|app apuestas|app apuestas android|app apuestas de futbol|app apuestas deportivas|app apuestas deportivas android|app
apuestas deportivas argentina|app apuestas deportivas colombia|app apuestas deportivas ecuador|app apuestas
deportivas españa|app apuestas deportivas gratis|app apuestas entre amigos|app apuestas futbol|app apuestas gratis|app apuestas sin dinero|app casa de apuestas|app casas de apuestas|app control apuestas|app de
apuestas|app de apuestas android|app de apuestas casino|app de apuestas colombia|app de apuestas con bono de bienvenida|app de apuestas de futbol|app de apuestas deportivas|app de apuestas deportivas android|app de apuestas deportivas argentina|app de apuestas deportivas colombia|app de apuestas deportivas
en españa|app de apuestas deportivas peru|app de apuestas deportivas perú|app de apuestas deportivas sin dinero|app
de apuestas ecuador|app de apuestas en colombia|app de apuestas en españa|app de apuestas en venezuela|app de apuestas futbol|app de apuestas gratis|app de apuestas online|app de apuestas para android|app
de apuestas para ganar dinero|app de apuestas peru|app de apuestas
reales|app de casas de apuestas|app marca apuestas android|app moviles de apuestas|app para apuestas|app para
apuestas de futbol|app para apuestas deportivas|app para apuestas
deportivas en español|app para ganar apuestas deportivas|app para hacer apuestas|app para hacer apuestas deportivas|app para hacer apuestas entre
amigos|app para llevar control de apuestas|app
pronosticos apuestas deportivas|app versus apuestas|apps apuestas mundial|apps de apuestas|apps de apuestas con bono de bienvenida|apps de apuestas de futbol|apps de
apuestas deportivas peru|apps de apuestas mexico|apps para apuestas|aprender a hacer apuestas deportivas|aprender
hacer apuestas deportivas|apuesta del dia apuestas deportivas|apuestas 10 euros gratis|apuestas 100 seguras|apuestas 1×2|apuestas 1X2|apuestas 2 division|apuestas 3 division|apuestas a
caballos|apuestas a carreras de caballos|apuestas a colombia|apuestas a corners|apuestas a ganar|apuestas a
jugadores nba|apuestas a la baja|apuestas a la nfl|apuestas al barcelona|apuestas al dia|apuestas al empate|apuestas al mundial|apuestas al tenis wta|apuestas alaves barcelona|apuestas alcaraz hoy|apuestas alemania españa|apuestas alonso
campeon del mundo|apuestas altas y bajas|apuestas altas y bajas nfl|apuestas ambos equipos marcan|apuestas america|apuestas android|apuestas anillo nba|apuestas antes del mundial|apuestas anticipadas|apuestas anticipadas nba|apuestas apps|apuestas arabia argentina|apuestas argentina|apuestas argentina campeon del mundo|apuestas argentina canada|apuestas argentina colombia|apuestas argentina
croacia|apuestas argentina españa|apuestas argentina francia|apuestas argentina francia cuanto paga|apuestas argentina francia mundial|apuestas argentina gana el mundial|apuestas argentina
gana mundial|apuestas argentina holanda|apuestas argentina mexico|apuestas argentina méxico|apuestas argentina mundial|apuestas argentina online|apuestas argentina paises bajos|apuestas argentina polonia|apuestas argentina uruguay|apuestas argentina
vs australia|apuestas argentina vs colombia|apuestas
argentina vs francia|apuestas argentina vs peru|apuestas argentinas|apuestas arsenal real madrid|apuestas ascenso
a primera division|apuestas ascenso a segunda|apuestas asiaticas|apuestas asiatico|apuestas athletic|apuestas athletic atletico|apuestas athletic barça|apuestas
athletic barcelona|apuestas athletic betis|apuestas athletic manchester|apuestas athletic manchester
united|apuestas athletic osasuna|apuestas athletic real|apuestas athletic real madrid|apuestas athletic real sociedad|apuestas
athletic real sociedad final|apuestas athletic roma|apuestas athletic sevilla|apuestas athletic valencia|apuestas atletico|apuestas atletico barcelona|apuestas atletico barsa|apuestas atletico campeon champions|apuestas atletico campeon de liga|apuestas atlético copenhague|apuestas atletico de madrid|apuestas atlético de madrid|apuestas atletico de madrid barcelona|apuestas atletico de
madrid gana la liga|apuestas atletico de madrid real madrid|apuestas atlético de madrid real madrid|apuestas atletico de madrid vs
barcelona|apuestas atletico madrid|apuestas atletico madrid real madrid|apuestas
atletico madrid vs barcelona|apuestas atletico real madrid|apuestas
atletico real madrid champions|apuestas atletismo|apuestas bajas|apuestas baloncesto|apuestas baloncesto acb|apuestas baloncesto handicap|apuestas baloncesto hoy|apuestas baloncesto juegos olimpicos|apuestas baloncesto nba|apuestas baloncesto pronostico|apuestas baloncesto pronósticos|apuestas baloncesto prorroga|apuestas barca|apuestas barca athletic|apuestas barca atletico|apuestas barca bayern|apuestas barca bayern munich|apuestas barca girona|apuestas barca
hoy|apuestas barça hoy|apuestas barca inter|apuestas
barca juventus|apuestas barca madrid|apuestas barça
madrid|apuestas barca real madrid|apuestas barca
vs juve|apuestas barca vs madrid|apuestas barca vs psg|apuestas barcelona|apuestas barcelona alaves|apuestas barcelona athletic|apuestas barcelona atletico|apuestas barcelona atletico de madrid|apuestas barcelona atlético de madrid|apuestas barcelona atletico
madrid|apuestas barcelona bayern|apuestas barcelona betis|apuestas barcelona campeon de liga|apuestas barcelona celta|apuestas barcelona espanyol|apuestas barcelona gana la
champions|apuestas barcelona girona|apuestas barcelona granada|apuestas barcelona hoy|apuestas
barcelona inter|apuestas barcelona madrid|apuestas barcelona osasuna|apuestas barcelona psg|apuestas
barcelona real madrid|apuestas barcelona real sociedad|apuestas barcelona sevilla|apuestas barcelona valencia|apuestas barcelona villarreal|apuestas barcelona vs
atletico madrid|apuestas barcelona vs madrid|apuestas barcelona vs real madrid|apuestas barsa madrid|apuestas basket hoy|apuestas bayern barcelona|apuestas bayern vs barcelona|apuestas beisbol|apuestas béisbol|apuestas beisbol mlb|apuestas beisbol pronosticos|apuestas beisbol venezolano|apuestas betis|apuestas betis – chelsea|apuestas betis
barcelona|apuestas betis chelsea|apuestas betis fiorentina|apuestas
betis girona|apuestas betis madrid|apuestas betis mallorca|apuestas betis real madrid|apuestas betis real sociedad|apuestas
betis sevilla|apuestas betis valencia|apuestas betis valladolid|apuestas betis vs valencia|apuestas betplay hoy colombia|apuestas betsson peru|apuestas bienvenida|apuestas billar online|apuestas bolivia vs colombia|apuestas bono|apuestas bono bienvenida|apuestas bono de bienvenida|apuestas
bono de bienvenida sin deposito|apuestas bono gratis|apuestas bono sin deposito|apuestas bonos sin deposito|apuestas borussia real
madrid|apuestas boxeo|apuestas boxeo de campeonato|apuestas boxeo españa|apuestas boxeo español|apuestas boxeo femenino olimpiadas|apuestas boxeo hoy|apuestas boxeo online|apuestas
brasil colombia|apuestas brasil peru|apuestas brasil uruguay|apuestas brasil vs colombia|apuestas brasil vs peru|apuestas caballos|apuestas caballos colocado|apuestas caballos españa|apuestas
caballos hipodromo|apuestas caballos hoy|apuestas caballos madrid|apuestas caballos online|apuestas caballos sanlucar de barrameda|apuestas caballos zarzuela|apuestas
calculador|apuestas campeon|apuestas campeon champions|apuestas campeón champions|apuestas campeon champions 2025|apuestas campeon champions league|apuestas campeon conference league|apuestas campeon copa america|apuestas campeon copa
del rey|apuestas campeon de champions|apuestas campeon de la champions|apuestas campeon de liga|apuestas campeon del mundo|apuestas campeon eurocopa|apuestas campeón eurocopa|apuestas campeon europa league|apuestas campeon f1|apuestas campeon f1 2025|apuestas campeon formula 1|apuestas
campeon libertadores|apuestas campeon liga|apuestas campeon liga bbva|apuestas campeon liga española|apuestas
campeon liga santander|apuestas campeon motogp 2025|apuestas
campeon mundial|apuestas campeón mundial|apuestas campeon mundial baloncesto|apuestas campeon nba|apuestas campeón nba|apuestas
campeon premier|apuestas campeon premier league|apuestas campeon roland garros|apuestas campeonato f1|apuestas campeonatos de futbol|apuestas
carrera de caballos|apuestas carrera de caballos hoy|apuestas carrera de
caballos nocturnas|apuestas carrera de galgos fin de semana|apuestas carrera de galgos hoy|apuestas carrera de galgos nocturnas|apuestas carreras caballos|apuestas
carreras caballos sanlucar|apuestas carreras de
caballos|apuestas carreras de caballos en directo|apuestas carreras de caballos en vivo|apuestas carreras de caballos españa|apuestas carreras de caballos hoy|apuestas carreras de caballos nacionales|apuestas carreras de caballos nocturnas|apuestas carreras de caballos online|apuestas carreras de caballos sanlucar|apuestas carreras
de caballos sanlúcar|apuestas carreras de
galgos|apuestas carreras de galgos en vivo|apuestas carreras
de galgos nocturnas|apuestas carreras de galgos pre
partido|apuestas casino|apuestas casino barcelona|apuestas casino
futbol|apuestas casino gran madrid|apuestas casino gratis|apuestas casino madrid|apuestas
casino online|apuestas casino online argentina|apuestas casinos|apuestas casinos online|apuestas celta|apuestas celta barcelona|apuestas celta betis|apuestas celta eibar|apuestas celta espanyol|apuestas celta granada|apuestas celta madrid|apuestas celta manchester|apuestas celta real madrid|apuestas champion league|apuestas champions
foro|apuestas champions hoy|apuestas champions league|apuestas champions league –
pronósticos|apuestas champions league 2025|apuestas champions league hoy|apuestas champions league pronosticos|apuestas champions league pronósticos|apuestas champions pronosticos|apuestas chelsea
barcelona|apuestas chelsea betis|apuestas chile|apuestas chile peru|apuestas chile venezuela|apuestas chile vs colombia|apuestas chile
vs uruguay|apuestas ciclismo|apuestas ciclismo en vivo|apuestas ciclismo femenino|apuestas ciclismo tour francia|apuestas ciclismo vuelta|apuestas ciclismo vuelta a españa|apuestas
ciclismo vuelta españa|apuestas city madrid|apuestas city real madrid|apuestas clasico|apuestas
clasico español|apuestas clasico real madrid barcelona|apuestas clasificacion mundial|apuestas colombia|apuestas colombia argentina|apuestas colombia brasil|apuestas colombia paraguay|apuestas colombia uruguay|apuestas colombia vs argentina|apuestas colombia vs brasil|apuestas combinadas|apuestas combinadas como funcionan|apuestas combinadas de futbol|apuestas combinadas de
fútbol|apuestas combinadas foro|apuestas combinadas futbol|apuestas combinadas hoy|apuestas combinadas mismo partido|apuestas combinadas mundial|apuestas combinadas nba|apuestas combinadas para esta semana|apuestas combinadas
para hoy|apuestas combinadas para mañana|apuestas combinadas pronosticos|apuestas combinadas recomendadas|apuestas combinadas seguras|apuestas combinadas seguras para hoy|apuestas combinadas seguras para mañana|apuestas como ganar|apuestas comparador|apuestas con bono de bienvenida|apuestas con dinero ficticio|apuestas con dinero real|apuestas
con dinero virtual|apuestas con handicap|apuestas con handicap asiatico|apuestas con handicap baloncesto|apuestas con mas probabilidades de ganar|apuestas con paypal|apuestas con tarjeta de credito|apuestas con tarjeta de debito|apuestas consejos|apuestas copa|apuestas copa africa|apuestas copa america|apuestas copa américa|apuestas copa argentina|apuestas copa brasil|apuestas copa davis|apuestas copa de europa|apuestas copa del mundo|apuestas copa del
rey|apuestas copa del rey baloncesto|apuestas copa del rey
final|apuestas copa del rey futbol|apuestas copa del rey ganador|apuestas copa del rey hoy|apuestas copa
del rey pronosticos|apuestas copa del rey pronósticos|apuestas copa europa|apuestas copa italia|apuestas copa libertadores|apuestas copa mundial de hockey|apuestas
copa rey|apuestas copa sudamericana|apuestas corners|apuestas corners hoy|apuestas croacia argentina|apuestas cuartos
eurocopa|apuestas cuotas|apuestas cuotas altas|apuestas cuotas
bajas|apuestas de 1 euro|apuestas de baloncesto|apuestas de
baloncesto hoy|apuestas de baloncesto nba|apuestas de baloncesto para hoy|apuestas de beisbol|apuestas de beisbol para hoy|apuestas de blackjack en linea|apuestas de
boxeo|apuestas de boxeo canelo|apuestas de boxeo en las vegas|apuestas de boxeo hoy|apuestas de boxeo online|apuestas de caballo|apuestas de caballos|apuestas de
caballos como funciona|apuestas de caballos como se juega|apuestas de caballos en colombia|apuestas de caballos
en españa|apuestas de caballos en linea|apuestas de caballos españa|apuestas de caballos ganador y colocado|apuestas de
caballos internacionales|apuestas de caballos juegos|apuestas
de caballos online|apuestas de caballos online en venezuela|apuestas de
caballos por internet|apuestas de caballos pronosticos|apuestas de caballos pronósticos|apuestas de carrera de caballos|apuestas de carreras de caballos|apuestas de
carreras de caballos online|apuestas de casino|apuestas de casino online|apuestas
de casino por internet|apuestas de champions league|apuestas de
ciclismo|apuestas de colombia|apuestas de copa america|apuestas de corners|apuestas de deportes en linea|apuestas de deportes online|apuestas de dinero|apuestas de esports|apuestas de eurocopa|apuestas de europa league|apuestas de f1|apuestas de formula 1|apuestas de futbol|apuestas de fútbol|apuestas de futbol app|apuestas de futbol argentina|apuestas de
futbol colombia|apuestas de futbol en colombia|apuestas de futbol en directo|apuestas de futbol en linea|apuestas de futbol en vivo|apuestas de futbol español|apuestas
de futbol gratis|apuestas de futbol hoy|apuestas de futbol mundial|apuestas de futbol online|apuestas de fútbol
online|apuestas de futbol para hoy|apuestas de fútbol para hoy|apuestas de futbol para hoy seguras|apuestas
de futbol para mañana|apuestas de futbol peru|apuestas de futbol pronosticos|apuestas de fútbol pronósticos|apuestas de futbol seguras|apuestas de futbol seguras para hoy|apuestas de futbol sin dinero|apuestas de galgos|apuestas de galgos como ganar|apuestas de galgos en directo|apuestas de galgos online|apuestas
de galgos trucos|apuestas de golf|apuestas de hockey|apuestas
de hockey sobre hielo|apuestas de hoy|apuestas de hoy
seguras|apuestas de juego|apuestas de juegos|apuestas de juegos
deportivos|apuestas de juegos online|apuestas de la champions league|apuestas de la copa
américa|apuestas de la eurocopa|apuestas
de la europa league|apuestas de la liga|apuestas de la liga bbva|apuestas de
la liga española|apuestas de la nba|apuestas de la nfl|apuestas de la ufc|apuestas de mlb|apuestas de nba|apuestas de nba para
hoy|apuestas de partidos|apuestas de partidos
de futbol|apuestas de peleas ufc|apuestas de perros en vivo|apuestas de perros virtuales|apuestas de peru|apuestas de sistema|apuestas de sistema como funciona|apuestas de sistema explicacion|apuestas de sistema explicación|apuestas de tenis|apuestas de tenis de mesa|apuestas de tenis en directo|apuestas de tenis hoy|apuestas de tenis para hoy|apuestas de tenis pronosticos|apuestas de tenis seguras|apuestas de todo tipo|apuestas de ufc|apuestas de ufc hoy|apuestas
del boxeo|apuestas del clasico|apuestas del clasico real madrid barca|apuestas del dia|apuestas del día|apuestas del dia de hoy|apuestas del
dia deportivas|apuestas del dia futbol|apuestas del mundial|apuestas del partido de hoy|apuestas del
real madrid|apuestas del rey|apuestas del sistema|apuestas deporte|apuestas
deportes|apuestas deportiva|apuestas deportivas|apuestas deportivas 1 euro|apuestas deportivas
10 euros gratis|apuestas deportivas 100 seguras|apuestas deportivas 1×2|apuestas deportivas
android|apuestas deportivas app|apuestas deportivas
apps|apuestas deportivas argentina|apuestas deportivas argentina futbol|apuestas deportivas argentina legal|apuestas deportivas atletico de
madrid|apuestas deportivas baloncesto|apuestas deportivas
barca madrid|apuestas deportivas barcelona|apuestas deportivas beisbol|apuestas
deportivas bono|apuestas deportivas bono bienvenida|apuestas deportivas bono de bienvenida|apuestas deportivas bono sin deposito|apuestas deportivas bonos de bienvenida|apuestas deportivas boxeo|apuestas deportivas caballos|apuestas deportivas calculadora|apuestas deportivas campeon liga|apuestas deportivas casino|apuestas
deportivas casino barcelona|apuestas deportivas casino online|apuestas
deportivas cerca de mi|apuestas deportivas champions
league|apuestas deportivas chile|apuestas deportivas ciclismo|apuestas
deportivas colombia|apuestas deportivas com|apuestas
deportivas com foro|apuestas deportivas com pronosticos|apuestas deportivas
combinadas|apuestas deportivas combinadas para hoy|apuestas deportivas como se juega|apuestas deportivas comparador|apuestas deportivas con bono gratis|apuestas deportivas con bonos gratis|apuestas deportivas
con dinero ficticio|apuestas deportivas con paypal|apuestas deportivas con puntos virtuales|apuestas deportivas consejos|apuestas deportivas consejos para ganar|apuestas deportivas copa america|apuestas deportivas copa del rey|apuestas deportivas copa
libertadores|apuestas deportivas copa mundial|apuestas deportivas corners|apuestas deportivas cual es
la mejor|apuestas deportivas cuotas altas|apuestas
deportivas de baloncesto|apuestas deportivas de boxeo|apuestas deportivas de colombia|apuestas
deportivas de futbol|apuestas deportivas de nba|apuestas deportivas
de nhl|apuestas deportivas de peru|apuestas deportivas de tenis|apuestas deportivas
del dia|apuestas deportivas dinero ficticio|apuestas deportivas directo|apuestas deportivas doble oportunidad|apuestas deportivas en argentina|apuestas deportivas en chile|apuestas deportivas en colombia|apuestas deportivas en directo|apuestas deportivas en españa|apuestas deportivas en español|apuestas
deportivas en linea|apuestas deportivas en línea|apuestas deportivas en peru|apuestas deportivas en perú|apuestas
deportivas en sevilla|apuestas deportivas en uruguay|apuestas deportivas en vivo|apuestas deportivas es|apuestas deportivas es pronosticos|apuestas deportivas españa|apuestas deportivas
españolas|apuestas deportivas esports|apuestas deportivas estadisticas|apuestas deportivas estrategias|apuestas deportivas estrategias seguras|apuestas deportivas eurocopa|apuestas deportivas europa
league|apuestas deportivas f1|apuestas deportivas faciles de ganar|apuestas deportivas formula 1|apuestas deportivas foro|apuestas deportivas foro futbol|apuestas deportivas foro tenis|apuestas deportivas francia argentina|apuestas
deportivas futbol|apuestas deportivas fútbol|apuestas deportivas futbol argentino|apuestas deportivas futbol colombia|apuestas deportivas futbol español|apuestas deportivas gana|apuestas
deportivas ganadas|apuestas deportivas ganar dinero seguro|apuestas deportivas gane|apuestas deportivas golf|apuestas deportivas gratis|apuestas deportivas gratis con premios|apuestas deportivas gratis hoy|apuestas deportivas gratis sin deposito|apuestas deportivas handicap|apuestas deportivas handicap asiatico|apuestas deportivas hoy|apuestas
deportivas impuestos|apuestas deportivas interior argentina|apuestas
deportivas juegos olimpicos|apuestas deportivas la liga|apuestas deportivas legales|apuestas deportivas legales en colombia|apuestas deportivas libres de impuestos|apuestas deportivas licencia españa|apuestas deportivas liga española|apuestas deportivas listado|apuestas
deportivas listado clasico|apuestas deportivas madrid|apuestas deportivas mas seguras|apuestas deportivas
mejor pagadas|apuestas deportivas mejores|apuestas deportivas mejores app|apuestas deportivas mejores casas|apuestas deportivas mejores cuotas|apuestas deportivas mejores paginas|apuestas deportivas mexico|apuestas deportivas méxico|apuestas deportivas
mlb|apuestas deportivas mlb hoy|apuestas deportivas multiples|apuestas deportivas mundial|apuestas deportivas murcia|apuestas deportivas nba|apuestas deportivas nba hoy|apuestas deportivas nfl|apuestas deportivas nhl|apuestas deportivas nuevas|apuestas deportivas ofertas|apuestas
deportivas online|apuestas deportivas online argentina|apuestas deportivas
online chile|apuestas deportivas online colombia|apuestas
deportivas online en colombia|apuestas deportivas online españa|apuestas deportivas online mexico|apuestas deportivas online paypal|apuestas deportivas online peru|apuestas deportivas online por internet|apuestas deportivas pago paypal|apuestas
deportivas para ganar dinero|apuestas deportivas
para hoy|apuestas deportivas para hoy pronosticos|apuestas deportivas
partido suspendido|apuestas deportivas partidos de hoy|apuestas deportivas paypal|apuestas deportivas peru|apuestas deportivas perú|apuestas deportivas peru vs ecuador|apuestas
deportivas predicciones|apuestas deportivas promociones|apuestas deportivas pronostico|apuestas deportivas pronóstico|apuestas deportivas pronostico hoy|apuestas deportivas pronosticos|apuestas deportivas pronósticos|apuestas deportivas pronosticos expertos|apuestas deportivas pronosticos gratis|apuestas deportivas
pronosticos nba|apuestas deportivas pronosticos tenis|apuestas deportivas que aceptan paypal|apuestas deportivas real
madrid|apuestas deportivas regalo bienvenida|apuestas deportivas resultado exacto|apuestas deportivas resultados|apuestas deportivas rugby|apuestas deportivas seguras|apuestas deportivas seguras foro|apuestas deportivas
seguras hoy|apuestas deportivas seguras para hoy|apuestas deportivas seguras telegram|apuestas deportivas sevilla|apuestas deportivas
simulador eurocopa|apuestas deportivas sin deposito|apuestas deportivas sin deposito inicial|apuestas
deportivas sin dinero|apuestas deportivas sin dinero
real|apuestas deportivas sin registro|apuestas deportivas stake|apuestas deportivas stake
10|apuestas deportivas telegram españa|apuestas deportivas tenis|apuestas deportivas tenis de mesa|apuestas deportivas tenis
foro|apuestas deportivas tenis hoy|apuestas deportivas
tips|apuestas deportivas tipster|apuestas deportivas ufc|apuestas deportivas uruguay|apuestas
deportivas valencia|apuestas deportivas valencia barcelona|apuestas deportivas venezuela|apuestas deportivas virtuales|apuestas deportivas y casino|apuestas deportivas y casino online|apuestas deportivas.com|apuestas deportivas.com foro|apuestas
deportivas.es|apuestas deportivos pronosticos|apuestas deposito minimo 1 euro|apuestas descenso a segunda|apuestas descenso a segunda b|apuestas descenso la liga|apuestas descenso primera division|apuestas descenso segunda|apuestas dia|apuestas diarias seguras|apuestas dinero|apuestas dinero ficticio|apuestas dinero real|apuestas dinero virtual|apuestas directas|apuestas directo|apuestas directo futbol|apuestas division de honor juvenil|apuestas dnb|apuestas doble oportunidad|apuestas doble resultado|apuestas dobles|apuestas dobles y triples|apuestas dortmund barcelona|apuestas draft nba|apuestas draft nfl|apuestas ecuador vs argentina|apuestas ecuador vs
venezuela|apuestas egipto uruguay|apuestas el clasico|apuestas elecciones venezuela|apuestas empate|apuestas en baloncesto|apuestas en barcelona|apuestas
en beisbol|apuestas en boxeo|apuestas en caballos|apuestas en carreras de caballos|apuestas en casino|apuestas en casino online|apuestas en casinos|apuestas en casinos online|apuestas
en chile|apuestas en ciclismo|apuestas en colombia|apuestas en colombia de futbol|apuestas en directo|apuestas en directo futbol|apuestas
en directo pronosticos|apuestas en el futbol|apuestas en el tenis|apuestas en españa|apuestas en esports|apuestas en eventos deportivos virtuales|apuestas en golf|apuestas en juegos|apuestas en la champions league|apuestas en la eurocopa|apuestas en la
liga|apuestas en la nba|apuestas en la nfl|apuestas en las vegas mlb|apuestas en las vegas
nfl|apuestas en linea|apuestas en línea|apuestas en linea argentina|apuestas
en linea boxeo|apuestas en linea chile|apuestas en linea colombia|apuestas en línea de fútbol|apuestas
en linea deportivas|apuestas en linea españa|apuestas en linea estados unidos|apuestas en linea futbol|apuestas
en linea mexico|apuestas en línea méxico|apuestas en linea mundial|apuestas en linea peru|apuestas en linea usa|apuestas en los esports|apuestas en madrid|apuestas en méxico|apuestas en mexico online|apuestas en nba|apuestas en partidos
de futbol|apuestas en partidos de futbol en vivo|apuestas en partidos de tenis en directo|apuestas en perú|apuestas en sevilla|apuestas en sistema|apuestas en stake|apuestas en tenis|apuestas en tenis de
mesa|apuestas en valencia|apuestas en vivo|apuestas en vivo argentina|apuestas en vivo casino|apuestas en vivo futbol|apuestas en vivo fútbol|apuestas en vivo nba|apuestas en vivo peru|apuestas en vivo tenis|apuestas en vivo ufc|apuestas equipo mbappe|apuestas equipos de futbol|apuestas españa|apuestas españa alemania|apuestas españa alemania eurocopa|apuestas españa croacia|apuestas españa eurocopa|apuestas españa francia|apuestas españa francia eurocopa|apuestas españa gana el mundial|apuestas
españa gana eurocopa|apuestas españa gana mundial|apuestas
españa georgia|apuestas españa holanda|apuestas
españa inglaterra|apuestas españa inglaterra cuotas|apuestas españa inglaterra eurocopa|apuestas españa italia|apuestas españa mundial|apuestas españa paises bajos|apuestas español|apuestas español oviedo|apuestas espanyol barcelona|apuestas espanyol betis|apuestas espanyol villarreal|apuestas esport|apuestas esports|apuestas esports colombia|apuestas esports españa|apuestas esports
fifa|apuestas esports gratis|apuestas esports lol|apuestas esports peru|apuestas esports valorant|apuestas estadisticas|apuestas estrategias|apuestas euro|apuestas
euro copa|apuestas eurocopa|apuestas eurocopa campeon|apuestas eurocopa españa|apuestas eurocopa
favoritos|apuestas eurocopa femenina|apuestas eurocopa final|apuestas eurocopa ganador|apuestas eurocopa hoy|apuestas eurocopa sub
21|apuestas euroliga baloncesto|apuestas euroliga pronosticos|apuestas europa league|apuestas
europa league hoy|apuestas europa league pronosticos|apuestas europa league pronósticos|apuestas euros|apuestas f1 abu dhabi|apuestas f1
bahrein|apuestas f1 canada|apuestas f1 china|apuestas f1
cuotas|apuestas f1 hoy|apuestas f1 las vegas|apuestas f1 miami|apuestas f1 monaco|apuestas faciles
de ganar|apuestas fáciles de ganar|apuestas faciles para ganar|apuestas favoritas|apuestas favorito champions|apuestas favoritos champions|apuestas favoritos eurocopa|apuestas favoritos
mundial|apuestas fc barcelona|apuestas final champions cuotas|apuestas final champions league|apuestas final champions peru|apuestas final copa|apuestas final copa america|apuestas
final copa de europa|apuestas final copa del rey|apuestas final copa europa|apuestas final copa libertadores|apuestas final copa rey|apuestas final de copa|apuestas final de copa
del rey|apuestas final del mundial|apuestas
final euro|apuestas final eurocopa|apuestas final europa league|apuestas final libertadores|apuestas final mundial|apuestas final nba|apuestas final rugby|apuestas final uefa europa league|apuestas final.mundial|apuestas
finales de conferencia nfl|apuestas finales nba|apuestas fiorentina
betis|apuestas formula|apuestas formula 1|apuestas fórmula 1|apuestas
fórmula 1 pronósticos|apuestas formula uno|apuestas foro|apuestas foro nba|apuestas francia argentina|apuestas francia españa|apuestas
futbol|apuestas fútbol|apuestas futbol americano|apuestas
futbol americano nfl|apuestas futbol argentina|apuestas futbol argentino|apuestas futbol champions league|apuestas futbol chile|apuestas futbol colombia|apuestas futbol
consejos|apuestas futbol en directo|apuestas fútbol en directo|apuestas futbol en vivo|apuestas fútbol en vivo|apuestas futbol españa|apuestas
futbol español|apuestas fútbol español|apuestas futbol
eurocopa|apuestas futbol femenino|apuestas futbol foro|apuestas futbol gratis|apuestas futbol hoy|apuestas fútbol hoy|apuestas futbol juegos olimpicos|apuestas futbol mexico|apuestas futbol mundial|apuestas futbol online|apuestas futbol para hoy|apuestas futbol
peru|apuestas futbol pronosticos|apuestas futbol sala|apuestas futbol telegram|apuestas futbol virtual|apuestas galgos|apuestas galgos en directo|apuestas galgos hoy|apuestas galgos online|apuestas galgos pronosticos|apuestas galgos trucos|apuestas gana|apuestas
gana colombia|apuestas gana resultados|apuestas ganadas|apuestas ganadas hoy|apuestas ganador
champions league|apuestas ganador copa america|apuestas
ganador copa del rey|apuestas ganador copa del rey baloncesto|apuestas ganador
copa libertadores|apuestas ganador de la eurocopa|apuestas ganador de la liga|apuestas ganador del mundial|apuestas ganador eurocopa|apuestas ganador europa league|apuestas ganador f1|apuestas ganador la
liga|apuestas ganador liga española|apuestas ganador mundial|apuestas ganador
mundial baloncesto|apuestas ganador mundial f1|apuestas ganador nba|apuestas ganadores eurocopa|apuestas ganadores mundial|apuestas ganar
champions|apuestas ganar eurocopa|apuestas ganar liga|apuestas ganar mundial|apuestas ganar nba|apuestas
getafe valencia|apuestas ghana uruguay|apuestas girona|apuestas girona athletic|apuestas girona
betis|apuestas girona campeon de liga|apuestas girona campeon liga|apuestas
girona gana la liga|apuestas girona real madrid|apuestas girona real sociedad|apuestas goleador eurocopa|apuestas goleadores eurocopa|apuestas goles asiaticos|apuestas golf|apuestas golf masters|apuestas golf pga|apuestas granada barcelona|apuestas grand
slam de tenis|apuestas gratis|apuestas gratis casino|apuestas gratis con premios|apuestas gratis hoy|apuestas gratis para hoy|apuestas gratis
por registro|apuestas gratis puntos|apuestas
gratis regalos|apuestas gratis sin deposito|apuestas
gratis sin depósito|apuestas gratis sin ingreso|apuestas
gratis sports|apuestas gratis y ganar premios|apuestas grupo
a eurocopa|apuestas grupos eurocopa|apuestas handicap|apuestas handicap
asiatico|apuestas handicap baloncesto|apuestas handicap como funciona|apuestas handicap nba|apuestas handicap nfl|apuestas hipicas online|apuestas hípicas online|apuestas hipicas venezuela|apuestas hockey|apuestas hockey hielo|apuestas hockey patines|apuestas hockey sobre hielo|apuestas holanda argentina|apuestas holanda vs argentina|apuestas hoy|apuestas hoy champions|apuestas hoy futbol|apuestas hoy
nba|apuestas hoy pronosticos|apuestas hoy seguras|apuestas impuestos|apuestas inglaterra paises bajos|apuestas inter
barca|apuestas inter barcelona|apuestas juego|apuestas juegos|apuestas
juegos en linea|apuestas juegos olimpicos|apuestas juegos olímpicos|apuestas juegos olimpicos baloncesto|apuestas
juegos online|apuestas juegos virtuales|apuestas jugador sevilla|apuestas jugadores nba|apuestas kings league americas|apuestas la
liga|apuestas la liga española|apuestas la liga hoy|apuestas la liga santander|apuestas las vegas mlb|apuestas las vegas nba|apuestas las
vegas nfl|apuestas league of legends mundial|apuestas legal|apuestas legales|apuestas legales en colombia|apuestas legales en españa|apuestas legales en estados unidos|apuestas legales españa|apuestas
leganes betis|apuestas libertadores|apuestas licencia|apuestas
liga 1 peru|apuestas liga argentina|apuestas
liga bbva pronosticos|apuestas liga de campeones|apuestas liga de campeones de baloncesto|apuestas liga
de campeones de hockey|apuestas liga españa|apuestas liga española|apuestas liga santander pronosticos|apuestas ligas de futbol|apuestas
linea|apuestas linea de gol|apuestas liverpool barcelona|apuestas liverpool real
madrid|apuestas lol mundial|apuestas madrid|apuestas madrid arsenal|apuestas madrid atletico|apuestas madrid atletico champions|apuestas
madrid barca|apuestas madrid barça|apuestas madrid barca hoy|apuestas
madrid barca supercopa|apuestas madrid barcelona|apuestas madrid barsa|apuestas madrid bayern|apuestas madrid betis|apuestas
madrid borussia|apuestas madrid campeon champions|apuestas madrid celta|apuestas madrid city|apuestas madrid dortmund|apuestas madrid gana
la liga|apuestas madrid gana liga|apuestas madrid hoy|apuestas madrid liverpool|apuestas madrid osasuna|apuestas madrid sevilla|apuestas
madrid valencia|apuestas madrid vs arsenal|apuestas madrid vs barcelona|apuestas mallorca osasuna|apuestas mallorca real sociedad|apuestas manchester athletic|apuestas manchester city real madrid|apuestas
mas faciles de ganar|apuestas mas seguras|apuestas
mas seguras para hoy|apuestas masters de golf|apuestas masters
de tenis|apuestas maximo goleador eurocopa|apuestas maximo goleador mundial|apuestas mejor jugador eurocopa|apuestas mejores
casinos online|apuestas mexico|apuestas méxico|apuestas mexico polonia|apuestas
méxico polonia|apuestas mlb|apuestas mlb hoy|apuestas mlb las vegas|apuestas mlb para hoy|apuestas mlb pronosticos|apuestas mlb usa|apuestas mma
ufc|apuestas momios|apuestas multiples|apuestas múltiples|apuestas multiples como funcionan|apuestas multiples
el gordo|apuestas multiples futbol|apuestas mundial|apuestas mundial 2026|apuestas mundial
baloncesto|apuestas mundial balonmano|apuestas mundial brasil|apuestas mundial campeon|apuestas
mundial ciclismo|apuestas mundial clubes|apuestas mundial de baloncesto|apuestas mundial de ciclismo|apuestas
mundial de clubes|apuestas mundial de futbol|apuestas mundial de fútbol|apuestas mundial de rugby|apuestas mundial f1|apuestas mundial
favoritos|apuestas mundial femenino|apuestas mundial formula
1|apuestas mundial futbol|apuestas mundial ganador|apuestas mundial lol|apuestas mundial moto gp|apuestas mundial motogp|apuestas
mundial rugby|apuestas mundial sub 17|apuestas mundiales|apuestas mundialistas|apuestas mvp eurocopa|apuestas mvp nba|apuestas mvp nfl|apuestas nacionales de colombia|apuestas nba|apuestas nba
all star|apuestas nba campeon|apuestas nba consejos|apuestas nba esta noche|apuestas nba finals|apuestas nba gratis|apuestas nba
hoy|apuestas nba hoy jugadores|apuestas nba
hoy pronosticos|apuestas nba para hoy|apuestas nba playoffs|apuestas nba pronosticos|apuestas
nba pronósticos|apuestas nba pronosticos hoy|apuestas nba tipster|apuestas nfl|apuestas nfl hoy|apuestas nfl las
vegas|apuestas nfl playoffs|apuestas nfl pronosticos|apuestas nfl
pronósticos|apuestas nfl semana 4|apuestas nfl super bowl|apuestas nhl|apuestas
nhl pronosticos|apuestas octavos eurocopa|apuestas ofertas|apuestas online|apuestas online
argentina|apuestas online argentina legal|apuestas online bono|apuestas online bono bienvenida|apuestas online boxeo|apuestas online caballos|apuestas online carreras de caballos|apuestas online casino|apuestas
online champions league|apuestas online chile|apuestas online ciclismo|apuestas
online colombia|apuestas online comparativa|apuestas online con paypal|apuestas online de caballos|apuestas online deportivas|apuestas online en argentina|apuestas online en peru|apuestas online espana|apuestas
online españa|apuestas online esports|apuestas online foro|apuestas online futbol|apuestas online futbol españa|apuestas online golf|apuestas
online gratis|apuestas online gratis sin deposito|apuestas online juegos|apuestas online mexico|apuestas online mma|apuestas
online movil|apuestas online nba|apuestas online net|apuestas online
nuevas|apuestas online opiniones|apuestas online paypal|apuestas
online peru|apuestas online seguras|apuestas online sin dinero|apuestas
online sin registro|apuestas online tenis|apuestas online ufc|apuestas online uruguay|apuestas online venezuela|apuestas open britanico golf|apuestas osasuna athletic|apuestas osasuna barcelona|apuestas osasuna real madrid|apuestas osasuna sevilla|apuestas osasuna valencia|apuestas over|apuestas over 2.5|apuestas over under|apuestas
paginas|apuestas pago anticipado|apuestas paises bajos
ecuador|apuestas paises bajos inglaterra|apuestas países
bajos qatar|apuestas para boxeo|apuestas para champions league|apuestas
para el clasico|apuestas para el dia de hoy|apuestas
para el mundial|apuestas para el partido de hoy|apuestas para
eurocopa|apuestas para europa league|apuestas para futbol|apuestas para ganar|apuestas para ganar dinero|apuestas para ganar dinero facil|apuestas
para ganar en la ruleta|apuestas para ganar la champions|apuestas para ganar la eurocopa|apuestas para ganar
la europa league|apuestas para ganar la liga|apuestas para
ganar siempre|apuestas para hacer|apuestas para hoy|apuestas para hoy de futbol|apuestas para hoy
europa league|apuestas para hoy futbol|apuestas para juegos|apuestas para la
champions league|apuestas para la copa del rey|apuestas para la eurocopa|apuestas para la europa league|apuestas para la
final de la eurocopa|apuestas para la nba hoy|apuestas para los
partidos de hoy|apuestas para partidos de hoy|apuestas para ufc|apuestas partido|apuestas partido aplazado|apuestas partido champions|apuestas partido colombia|apuestas partido españa marruecos|apuestas partido mundial|apuestas partido suspendido|apuestas partidos|apuestas partidos champions league|apuestas partidos csgo|apuestas partidos de futbol|apuestas partidos de futbol
hoy|apuestas partidos de hoy|apuestas partidos eurocopa|apuestas partidos futbol|apuestas partidos
hoy|apuestas partidos mundial|apuestas paypal|apuestas peleas de boxeo|apuestas peru|apuestas perú|apuestas peru brasil|apuestas peru chile|apuestas peru paraguay|apuestas peru uruguay|apuestas peru vs chile|apuestas peru vs colombia|apuestas pichichi eurocopa|apuestas
plataforma|apuestas playoff|apuestas playoff ascenso|apuestas
playoff ascenso a primera|apuestas playoff nba|apuestas playoff segunda|apuestas playoff segunda b|apuestas playoffs nba|apuestas playoffs nfl|apuestas polonia argentina|apuestas por argentina|apuestas por internet
mexico|apuestas por internet para ganar dinero|apuestas por
paypal|apuestas por ronda boxeo|apuestas por sistema|apuestas portugal uruguay|apuestas
pre partido|apuestas predicciones|apuestas predicciones futbol|apuestas primera division|apuestas primera division españa|apuestas promociones|apuestas pronostico|apuestas pronosticos|apuestas pronosticos deportivos|apuestas pronosticos
deportivos tenis|apuestas pronosticos futbol|apuestas pronosticos gratis|apuestas pronosticos nba|apuestas pronosticos tenis|apuestas prorroga|apuestas psg
barca|apuestas psg barcelona|apuestas puntos por tarjetas|apuestas puntos tarjetas|apuestas que aceptan paypal|apuestas que es
handicap|apuestas que puedes hacer con tu
novia|apuestas que siempre ganaras|apuestas que significa|apuestas quien bajara a
segunda|apuestas quién bajara a segunda|apuestas quien gana
el mundial|apuestas quien gana eurocopa|apuestas quien gana la champions|apuestas quien gana la eurocopa|apuestas quien gana la liga|apuestas quien ganara el mundial|apuestas quién ganará el mundial|apuestas quien ganara la champions|apuestas quien ganara la
eurocopa|apuestas quien ganara la liga|apuestas rayo barcelona|apuestas real madrid|apuestas real madrid arsenal|apuestas real madrid
athletic|apuestas real madrid atletico|apuestas real madrid atletico champions|apuestas real madrid atletico de
madrid|apuestas real madrid atlético de madrid|apuestas real madrid atletico madrid|apuestas real madrid barcelona|apuestas real madrid bayern|apuestas real madrid betis|apuestas real
madrid borussia|apuestas real madrid campeon champions|apuestas real
madrid celta|apuestas real madrid champions|apuestas real madrid city|apuestas
real madrid girona|apuestas real madrid hoy|apuestas real madrid liverpool|apuestas real madrid manchester city|apuestas real madrid osasuna|apuestas
real madrid real sociedad|apuestas real madrid valencia|apuestas
real madrid villarreal|apuestas real madrid vs arsenal|apuestas real madrid vs
atletico|apuestas real madrid vs atlético|apuestas real
madrid vs atletico madrid|apuestas real madrid vs barcelona|apuestas
real madrid vs betis|apuestas real madrid vs sevilla|apuestas real
madrid vs valencia|apuestas real sociedad|apuestas real sociedad athletic|apuestas real sociedad barcelona|apuestas real
sociedad betis|apuestas real sociedad psg|apuestas real sociedad real madrid|apuestas real sociedad valencia|apuestas recomendadas hoy|apuestas regalo de bienvenida|apuestas registro|apuestas
resultado exacto|apuestas resultados|apuestas resultados
eurocopa|apuestas retirada tenis|apuestas roma barcelona|apuestas
roma sevilla|apuestas rugby|apuestas rugby mundial|apuestas rugby world cup|apuestas ruleta seguras|apuestas
segunda|apuestas segunda b|apuestas segunda division|apuestas segunda
división|apuestas segunda division b|apuestas segunda division españa|apuestas seguras|apuestas seguras baloncesto|apuestas seguras calculadora|apuestas seguras en la ruleta|apuestas seguras
eurocopa|apuestas seguras foro|apuestas seguras futbol|apuestas seguras
futbol hoy|apuestas seguras gratis|apuestas seguras hoy|apuestas seguras hoy futbol|apuestas seguras nba|apuestas
seguras nba hoy|apuestas seguras para este fin de semana|apuestas seguras
para ganar dinero|apuestas seguras para hoy|apuestas seguras para hoy fútbol|apuestas seguras para hoy pronósticos|apuestas seguras para mañana|apuestas seguras ruleta|apuestas seguras telegram|apuestas
seguras tenis|apuestas semifinales eurocopa|apuestas senegal
paises bajos|apuestas sevilla|apuestas sevilla athletic|apuestas
sevilla atletico de madrid|apuestas sevilla barcelona|apuestas sevilla betis|apuestas sevilla campeon liga|apuestas sevilla celta|apuestas sevilla gana la liga|apuestas sevilla girona|apuestas sevilla
inter|apuestas sevilla jugador|apuestas sevilla juventus|apuestas
sevilla leganes|apuestas sevilla madrid|apuestas sevilla manchester united|apuestas sevilla
osasuna|apuestas sevilla real madrid|apuestas sevilla real sociedad|apuestas
sevilla roma|apuestas sevilla valencia|apuestas significa|apuestas
simples ejemplos|apuestas simples o combinadas|apuestas sin deposito|apuestas sin deposito inicial|apuestas sin deposito minimo|apuestas sin dinero|apuestas sin dinero real|apuestas
sin empate|apuestas sin empate que significa|apuestas sin ingreso minimo|apuestas sin registro|apuestas sistema|apuestas sistema calculadora|apuestas
sistema como funciona|apuestas sistema trixie|apuestas sociedad|apuestas sorteo copa del rey|apuestas stake|apuestas stake 10|apuestas stake 10 hoy|apuestas
super bowl favorito|apuestas super rugby|apuestas supercopa españa|apuestas superliga argentina|apuestas tarjeta roja|apuestas
tarjetas|apuestas tarjetas amarillas|apuestas tenis|apuestas tenis atp|apuestas tenis
consejos|apuestas tenis copa davis|apuestas tenis de mesa|apuestas tenis de
mesa pronosticos|apuestas tenis en vivo|apuestas tenis femenino|apuestas
tenis hoy|apuestas tenis itf|apuestas tenis pronosticos|apuestas
tenis pronósticos|apuestas tenis retirada|apuestas tenis roland garros|apuestas tenis seguras|apuestas tenis wimbledon|apuestas tenis wta|apuestas tercera division|apuestas tercera division españa|apuestas tipos|apuestas
tips|apuestas tipster|apuestas tipster para hoy|apuestas topuria holloway cuotas|apuestas torneos de golf|apuestas torneos de tenis|apuestas
trucos|apuestas uefa champions league|apuestas uefa europa league|apuestas ufc|apuestas ufc chile|apuestas ufc como funciona|apuestas ufc hoy|apuestas ufc ilia topuria|apuestas
ufc online|apuestas ufc pronósticos|apuestas ufc
telegram|apuestas ufc topuria|apuestas under over|apuestas unionistas villarreal|apuestas uruguay|apuestas uruguay colombia|apuestas uruguay corea|apuestas uruguay vs
colombia|apuestas us open golf|apuestas us open tenis|apuestas valencia|apuestas valencia barcelona|apuestas valencia betis|apuestas valencia madrid|apuestas
valencia real madrid|apuestas valladolid barcelona|apuestas valladolid valencia|apuestas valor app|apuestas valor en directo|apuestas valor galgos|apuestas venezuela|apuestas venezuela argentina|apuestas venezuela bolivia|apuestas
venezuela ecuador|apuestas villarreal|apuestas
villarreal athletic|apuestas villarreal barcelona|apuestas villarreal bayern|apuestas villarreal betis|apuestas villarreal liverpool|apuestas
villarreal manchester|apuestas villarreal manchester united|apuestas villarreal vs real madrid|apuestas virtuales|apuestas virtuales colombia|apuestas virtuales futbol|apuestas virtuales sin dinero|apuestas vivo|apuestas vuelta a españa|apuestas vuelta españa|apuestas william hill partidos de
hoy|apuestas y casino|apuestas y casinos|apuestas y juegos de azar|apuestas y pronosticos|apuestas
y pronosticos de futbol|apuestas y pronosticos deportivos|apuestas y resultados|apuestas-deportivas|apuestas-deportivas.es pronosticos|arbitro nba apuestas|argentina apuestas|argentina colombia apuestas|argentina croacia apuestas|argentina francia
apuestas|argentina mexico apuestas|argentina peru apuestas|argentina
uruguay apuestas|argentina vs bolivia apuestas|argentina vs chile apuestas|argentina vs colombia apuestas|argentina vs francia apuestas|argentina vs.
colombia apuestas|asi se gana en las apuestas deportivas|asiatico apuestas|asiatico en apuestas|asiaticos apuestas|athletic barcelona apuestas|athletic manchester united apuestas|athletic osasuna apuestas|athletic real madrid
apuestas|atletico barcelona apuestas|atletico de madrid apuestas|atlético de
madrid apuestas|atletico de madrid real madrid apuestas|atletico de madrid vs
barcelona apuestas|atletico madrid real madrid apuestas|atletico madrid vs
real madrid apuestas|atletico real madrid apuestas|atletico vs real madrid apuestas|avisador de cuotas apuestas|bajada de cuotas apuestas|baloncesto apuestas|barbastro barcelona apuestas|barca apuestas|barca bayern apuestas|barca inter apuestas|barca madrid
apuestas|barça madrid apuestas|barca vs atletico apuestas|barca vs madrid apuestas|barca vs real madrid
apuestas|barcelona – real madrid apuestas|barcelona apuestas|barcelona atletico apuestas|barcelona
atletico de madrid apuestas|barcelona atletico madrid apuestas|barcelona betis
apuestas|barcelona casa de apuestas|barcelona inter apuestas|barcelona psg
apuestas|barcelona real madrid apuestas|barcelona real sociedad apuestas|barcelona sevilla
apuestas|barcelona valencia apuestas|barcelona vs athletic bilbao apuestas|barcelona vs atlético
madrid apuestas|barcelona vs betis apuestas|barcelona vs celta de vigo apuestas|barcelona vs espanyol apuestas|barcelona vs girona apuestas|barcelona vs madrid apuestas|barcelona vs real madrid apuestas|barcelona
vs real sociedad apuestas|barcelona vs sevilla apuestas|barcelona vs villarreal apuestas|base de datos cuotas apuestas deportivas|bayern real madrid apuestas|beisbol apuestas|best america apuestas|bet apuestas
chile|bet apuestas en vivo|betis – chelsea apuestas|betis apuestas|betis barcelona apuestas|betis chelsea apuestas|betis madrid apuestas|betis
sevilla apuestas|betsson tu sitio de apuestas online|blog apuestas baloncesto|blog apuestas ciclismo|blog apuestas
nba|blog apuestas tenis|blog de apuestas de tenis|bono apuestas|bono apuestas deportivas|bono apuestas deportivas sin deposito|bono
apuestas gratis|bono apuestas gratis sin deposito|bono apuestas sin deposito|bono bienvenida apuestas|bono bienvenida
apuestas deportivas|bono bienvenida apuestas españa|bono bienvenida
apuestas sin deposito|bono bienvenida apuestas sin depósito|bono bienvenida casa apuestas|bono bienvenida casa de apuestas|bono bienvenida marca
apuestas|bono casa apuestas|bono casa de apuestas|bono casa de apuestas sin ingreso|bono casas de apuestas|bono de
apuestas|bono de apuestas gratis sin deposito|bono de bienvenida apuestas|bono de bienvenida apuestas deportivas|bono de bienvenida casa de apuestas|bono de bienvenida casas de apuestas|bono de casas de apuestas|bono de registro apuestas|bono de registro
apuestas deportivas|bono de registro casa de apuestas|bono gratis apuestas|bono marca apuestas|bono por registro apuestas|bono por registro apuestas deportivas|bono por registro casa de apuestas|bono registro apuestas|bono sin deposito apuestas|bono sin depósito apuestas|bono sin deposito apuestas deportivas|bono sin depósito apuestas deportivas|bono sin deposito casa
de apuestas|bono sin deposito marca apuestas|bono sin ingreso apuestas|bono sin ingreso apuestas deportivas|bonos apuestas|bonos apuestas
colombia|bonos apuestas deportivas|bonos apuestas deportivas sin deposito|bonos apuestas gratis|bonos apuestas sin deposito|bonos apuestas sin depósito|bonos bienvenida apuestas|bonos bienvenida casas apuestas|bonos bienvenida casas de apuestas|bonos casa
de apuestas|bonos casas apuestas|bonos casas de apuestas|bonos casas de apuestas colombia|bonos casas
de apuestas deportivas|bonos casas de apuestas
españa|bonos casas de apuestas nuevas|bonos casas de apuestas
sin deposito|bonos casas de apuestas sin depósito|bonos de apuestas|bonos de apuestas deportivas|bonos de apuestas
gratis|bonos de apuestas sin deposito|bonos de bienvenida apuestas|bonos de bienvenida apuestas deportivas|bonos de bienvenida casa de apuestas|bonos de
bienvenida casas de apuestas|bonos de bienvenida de casas
de apuestas|bonos de bienvenida en casas de
apuestas|bonos de casas de apuestas|bonos de casas de apuestas sin deposito|bonos en casa de
apuestas|bonos en casas de apuestas sin deposito|bonos gratis apuestas|bonos gratis apuestas deportivas|bonos gratis casas de apuestas|bonos gratis sin deposito apuestas|bonos paginas de apuestas|bonos registro casas de apuestas|bonos sin deposito apuestas|bonos sin depósito apuestas|bonos sin deposito apuestas deportivas|bonos sin deposito casas
de apuestas|bot de apuestas deportivas gratis|boxeo apuestas|brasil colombia apuestas|brasil peru
apuestas|brasil vs colombia apuestas|buenas apuestas para hoy|buscador cuotas apuestas|buscador de apuestas seguras|buscador de cuotas apuestas|buscador
de cuotas de apuestas|buscar apuestas seguras|caballos apuestas|calculador de apuestas|calculador de cuotas apuestas|calculadora apuestas|calculadora apuestas combinadas|calculadora apuestas de sistema|calculadora apuestas deportivas|calculadora apuestas
deportivas seguras|calculadora apuestas multiples|calculadora apuestas segura|calculadora apuestas seguras|calculadora
apuestas sistema|calculadora apuestas yankee|calculadora arbitraje apuestas|calculadora cubrir
apuestas|calculadora cuotas apuestas|calculadora de apuestas|calculadora
de apuestas combinadas|calculadora de apuestas de futbol|calculadora de apuestas de sistema|calculadora de apuestas deportivas|calculadora de apuestas multiples|calculadora de apuestas seguras|calculadora de apuestas sistema|calculadora de
apuestas surebets|calculadora de arbitraje apuestas|calculadora de
cuotas apuestas|calculadora de cuotas de apuestas|calculadora para apuestas deportivas|calculadora poisson apuestas|calculadora poisson apuestas deportivas|calculadora poisson para apuestas|calculadora scalping apuestas deportivas|calculadora sistema apuestas|calculadora stake apuestas|calculadora trading apuestas|calcular apuestas|calcular
apuestas deportivas|calcular apuestas futbol|calcular
apuestas sistema|calcular cuotas apuestas|calcular cuotas apuestas combinadas|calcular cuotas apuestas deportivas|calcular
cuotas de apuestas|calcular ganancias apuestas deportivas|calcular momios apuestas|calcular probabilidad cuota apuestas|calcular stake apuestas|calcular unidades apuestas|calcular yield apuestas|calculo de apuestas|calculo de apuestas
deportivas|cambio de cuotas apuestas|campeon champions
apuestas|campeon eurocopa apuestas|campeon liga apuestas|campeon nba apuestas|canales de apuestas gratis|carrera de caballos apuestas|carrera de
caballos apuestas juego|carrera de caballos con apuestas|carrera de galgos apuestas|carreras de
caballos apuestas|carreras de caballos apuestas online|carreras de
caballos con apuestas|carreras de caballos juegos de apuestas|carreras
de galgos apuestas|carreras de galgos apuestas online|carreras
de galgos apuestas trucos|carreras galgos
apuestas|casa apuestas argentina|casa apuestas atletico de
madrid|casa apuestas barcelona|casa apuestas betis|casa apuestas bono bienvenida|casa apuestas bono gratis|casa apuestas bono sin deposito|casa apuestas cerca de mi|casa apuestas chile|casa
apuestas colombia|casa apuestas con mejores cuotas|casa apuestas deportivas|casa apuestas españa|casa apuestas española|casa apuestas eurocopa|casa
apuestas futbol|casa apuestas mejores cuotas|casa apuestas mundial|casa apuestas nueva|casa apuestas nuevas|casa apuestas online|casa
apuestas peru|casa apuestas valencia|casa de apuestas|casa de apuestas 10 euros gratis|casa de apuestas argentina|casa de apuestas atletico de madrid|casa de apuestas baloncesto|casa de apuestas barcelona|casa de apuestas beisbol|casa de apuestas betis|casa
de apuestas bono|casa de apuestas bono bienvenida|casa de apuestas bono de bienvenida|casa de apuestas bono gratis|casa de apuestas bono por registro|casa de apuestas bono sin deposito|casa de apuestas boxeo|casa de apuestas caballos|casa
de apuestas carreras de caballos|casa de apuestas cerca de mi|casa de apuestas cerca de mí|casa de apuestas champions league|casa de apuestas chile|casa de apuestas ciclismo|casa
de apuestas colombia|casa de apuestas con bono de bienvenida|casa de apuestas con bono sin deposito|casa de apuestas con cuotas mas
altas|casa de apuestas con esports|casa de apuestas con las mejores cuotas|casa de apuestas con licencia en españa|casa de apuestas con mejores cuotas|casa de apuestas con pago
anticipado|casa de apuestas con paypal|casa de apuestas copa america|casa de apuestas de caballos|casa de
apuestas de colombia|casa de apuestas de españa|casa de apuestas de futbol|casa
de apuestas de fútbol|casa de apuestas de futbol
peru|casa de apuestas de peru|casa de apuestas del madrid|casa de apuestas del real
madrid|casa de apuestas deportivas|casa de apuestas deportivas cerca de mi|casa de apuestas
deportivas en argentina|casa de apuestas deportivas en chile|casa de apuestas deportivas en colombia|casa de
apuestas deportivas en españa|casa de apuestas deportivas en madrid|casa de apuestas deportivas españa|casa de apuestas deportivas
españolas|casa de apuestas deportivas madrid|casa de apuestas deportivas mexico|casa de apuestas deportivas online|casa de apuestas
deportivas peru|casa de apuestas deposito 5 euros|casa de
apuestas deposito minimo|casa de apuestas deposito minimo 1
euro|casa de apuestas depósito mínimo 1 euro|casa de apuestas
en españa|casa de apuestas en linea|casa de apuestas en madrid|casa de apuestas en perú|casa de apuestas
en vivo|casa de apuestas españa|casa de apuestas españa inglaterra|casa de apuestas española|casa de apuestas españolas|casa de
apuestas esports|casa de apuestas eurocopa|casa de apuestas europa league|casa
de apuestas f1|casa de apuestas formula 1|casa de apuestas futbol|casa de apuestas ingreso minimo|casa
de apuestas ingreso minimo 1 euro|casa de apuestas ingreso mínimo 1 euro|casa de apuestas legales|casa de apuestas legales en colombia|casa de apuestas
legales en españa|casa de apuestas libertadores|casa de
apuestas liga española|casa de apuestas madrid|casa de apuestas mas
segura|casa de apuestas mejores|casa de apuestas méxico|casa de
apuestas minimo 5 euros|casa de apuestas mlb|casa de apuestas mundial|casa de apuestas nba|casa de apuestas nfl|casa de apuestas nueva|casa de apuestas nuevas|casa de
apuestas oficial del real madrid|casa de apuestas oficial real
madrid|casa de apuestas online|casa de apuestas online
argentina|casa de apuestas online chile|casa de apuestas
online españa|casa de apuestas online mexico|casa de apuestas online paraguay|casa de apuestas
online peru|casa de apuestas online usa|casa de apuestas online venezuela|casa de apuestas pago anticipado|casa
de apuestas para boxeo|casa de apuestas para ufc|casa de apuestas peru|casa de apuestas perú|casa de apuestas peru
online|casa de apuestas por paypal|casa de apuestas promociones|casa de apuestas
que regalan dinero|casa de apuestas real madrid|casa de apuestas
regalo de bienvenida|casa de apuestas sevilla|casa
de apuestas sin dinero|casa de apuestas sin ingreso minimo|casa de apuestas sin licencia en españa|casa de apuestas sin minimo de ingreso|casa de
apuestas stake|casa de apuestas tenis|casa de apuestas ufc|casa de apuestas valencia|casa de apuestas venezuela|casa
de apuestas virtuales|casa de apuestas vive la suerte|casa oficial de apuestas del
real madrid|casas apuestas asiaticas|casas apuestas bono sin deposito|casas apuestas bonos
sin deposito|casas apuestas caballos|casas apuestas chile|casas apuestas ciclismo|casas apuestas con licencia|casas apuestas con licencia
en españa|casas apuestas deportivas|casas apuestas
deportivas colombia|casas apuestas deportivas españa|casas apuestas deportivas españolas|casas apuestas deportivas nuevas|casas apuestas
españa|casas apuestas españolas|casas apuestas esports|casas apuestas
eurocopa|casas apuestas golf|casas apuestas ingreso minimo 5 euros|casas apuestas legales|casas apuestas legales españa|casas apuestas licencia|casas apuestas
licencia españa|casas apuestas mexico|casas apuestas mundial|casas apuestas nba|casas apuestas nuevas|casas apuestas nuevas españa|casas apuestas ofertas|casas apuestas online|casas apuestas paypal|casas apuestas peru|casas apuestas sin licencia|casas apuestas
tenis|casas asiaticas apuestas|casas de apuestas|casas de apuestas 5
euros|casas de apuestas app|casas de apuestas argentinas|casas de apuestas asiaticas|casas de apuestas baloncesto|casas de apuestas barcelona|casas de
apuestas bono bienvenida|casas de apuestas bono de
bienvenida|casas de apuestas bono por registro|casas de apuestas bono sin deposito|casas de apuestas bono sin ingreso|casas de apuestas bonos|casas
de apuestas bonos de bienvenida|casas de apuestas bonos gratis|casas de
apuestas bonos sin deposito|casas de apuestas boxeo|casas de apuestas
caballos|casas de apuestas carreras de caballos|casas de apuestas
casino|casas de apuestas casino online|casas de apuestas cerca de mi|casas de apuestas champions league|casas
de apuestas chile|casas de apuestas ciclismo|casas
de apuestas colombia|casas de apuestas com|casas de apuestas con app|casas de
apuestas con apuestas gratis|casas de apuestas con bono|casas de apuestas con bono de bienvenida|casas de apuestas con bono de
registro|casas de apuestas con bono por registro|casas de apuestas con bono sin deposito|casas de apuestas
con bonos|casas de apuestas con bonos gratis|casas de apuestas con bonos sin deposito|casas de apuestas con deposito minimo|casas de apuestas con esports|casas
de apuestas con handicap asiatico|casas de apuestas con licencia|casas de apuestas con licencia en españa|casas de apuestas con licencia españa|casas de apuestas con licencia española|casas de apuestas con mejores cuotas|casas de apuestas con pago anticipado|casas de apuestas con paypal|casas de apuestas con paypal en perú|casas de apuestas con promociones|casas
de apuestas con ruleta en vivo|casas de apuestas copa del rey|casas de
apuestas de caballos|casas de apuestas de españa|casas de apuestas de futbol|casas de apuestas de fútbol|casas de apuestas de
peru|casas de apuestas deportivas|casas de apuestas deportivas asiaticas|casas de apuestas deportivas
colombia|casas de apuestas deportivas comparativa|casas de apuestas deportivas con paypal|casas de apuestas deportivas en chile|casas de apuestas deportivas en españa|casas de apuestas deportivas en linea|casas de apuestas deportivas en madrid|casas de apuestas deportivas en mexico|casas de
apuestas deportivas en peru|casas de apuestas deportivas en sevilla|casas de apuestas
deportivas en valencia|casas de apuestas deportivas
españa|casas de apuestas deportivas españolas|casas de apuestas deportivas legales|casas de apuestas deportivas madrid|casas de apuestas deportivas mexico|casas de apuestas deportivas nuevas|casas de apuestas deportivas online|casas
de apuestas deportivas peru|casas de apuestas deportivas perú|casas de
apuestas deposito minimo 1 euro|casas de apuestas depósito mínimo
1 euro|casas de apuestas dinero gratis|casas
de apuestas en argentina|casas de apuestas en barcelona|casas de apuestas en chile|casas de apuestas
en colombia|casas de apuestas en españa|casas de apuestas en españa online|casas de apuestas en linea|casas de apuestas
en madrid|casas de apuestas en méxico|casas de apuestas en peru|casas de apuestas en perú|casas de apuestas
en sevilla|casas de apuestas en uruguay|casas de apuestas en valencia|casas de
apuestas en venezuela|casas de apuestas equipos de futbol|casas de apuestas
españa|casas de apuestas españa alemania|casas de apuestas españa inglaterra|casas de apuestas españa licencia|casas de apuestas españa nuevas|casas de
apuestas españa online|casas de apuestas española|casas de apuestas españolas|casas de apuestas españolas con licencia|casas de apuestas
españolas online|casas de apuestas esports|casas de apuestas eurocopa|casas de apuestas eurocopa
2024|casas de apuestas europa league|casas de apuestas f1|casas de apuestas fisicas
en barcelona|casas de apuestas fisicas en españa|casas de apuestas formula 1|casas de apuestas fuera
de españa|casas de apuestas futbol|casas
de apuestas fútbol|casas de apuestas futbol españa|casas de apuestas ganador eurocopa|casas
de apuestas gratis|casas de apuestas ingreso minimo|casas de apuestas ingreso
minimo 1 euro|casas de apuestas ingreso minimo
5 euros|casas de apuestas inter barcelona|casas de apuestas legales|casas de
apuestas legales en colombia|casas de apuestas legales en españa|casas de apuestas legales en mexico|casas de apuestas legales españa|casas de apuestas legales mx|casas de apuestas licencia|casas de apuestas licencia españa|casas de apuestas lista|casas de apuestas madrid|casas de apuestas mas seguras|casas
de apuestas mejores bonos|casas de apuestas mejores cuotas|casas de apuestas mexico|casas de apuestas méxico|casas de apuestas minimo 5 euros|casas de apuestas mlb|casas
de apuestas mundial|casas de apuestas mundial baloncesto|casas de apuestas mundiales|casas de apuestas nba|casas de apuestas no reguladas en españa|casas de apuestas nueva ley|casas
de apuestas nuevas|casas de apuestas nuevas en colombia|casas de apuestas nuevas en españa|casas de apuestas nuevas españa|casas de apuestas ofertas|casas
de apuestas online|casas de apuestas online argentina|casas de apuestas online colombia|casas de apuestas online
deportivas|casas de apuestas online ecuador|casas de apuestas online en argentina|casas
de apuestas online en chile|casas de apuestas online en colombia|casas de apuestas online en españa|casas de apuestas online en mexico|casas de apuestas online españa|casas de apuestas
online mas fiables|casas de apuestas online mexico|casas de apuestas online nuevas|casas de apuestas online peru|casas de apuestas online usa|casas de apuestas online venezuela|casas de
apuestas pago paypal|casas de apuestas para ufc|casas de apuestas
paypal|casas de apuestas peru bono sin deposito|casas de apuestas
presenciales en españa|casas de apuestas promociones|casas
de apuestas que
Your comment is awaiting moderation.
Привет бразы,тут ровно таримся не паримся,качества вышка,клад на уровне https://say.la/read-blog/134711 бро ответь в лс, сделаю заказ
Your comment is awaiting moderation.
Онлайн казино 7k держит стабильность. Никаких перебоев, всё работает ровно. Деньги получили без лишних вопросов и проверок: 7к казино вход
Your comment is awaiting moderation.
ты давай вася тут провокации не сей))) https://say.la/read-blog/135712 Большое спасибо команде chemical-mix за проведенную сделку, с наступающим Вас Новым Годом!
Your comment is awaiting moderation.
брал у данного магазине,все на высоте + https://rant.li/labuhiheco/okha-sakhalin-kupit-kokain-mefedron-marikhuanu-boshki как и обещал пишу про качество- для кайфожеров 1к7, для кайфариков 1к9 , для додиков 1к11 , продукт работает 35-40 мин , используйте нормальную очищенную основу и будет счастье в тридевятом государстве, вот например от смолы ромашки или мать и мачехи головные боли и побочки, хотя реагент тут не причем , химоза нормального качества особенно если считать в соотношении цена-качество, ТС последнее время приятно удивляет своим терпением к таким сумасшедшим клиентам как я( я с ума сводил его своими платежами) но он стойко все перенес за что ему отдельное респект ТАК ДЕРЖАТЬ!!!! ТС КРАСАВЧЕГ
Your comment is awaiting moderation.
Ответил) просто не сразу увидел в вашем сообщении дополнительный вопрос ) https://bio.site/abofidaboduc отдыхай до понедельника
Your comment is awaiting moderation.
https://cimibo475.stck.me/post/1399750/1xbetvip-Membership-Access-Exclusive-Bonuses-and-Promotions
Your comment is awaiting moderation.
ТС прими во внимание! https://bio.site/ahnmoihog Эти ребята лучшие в своем деле, качество плюс вес, никогда не подводили, КРАСАВЧИКИ !!!Лучшие!
Your comment is awaiting moderation.
https://hhi.instructure.com/eportfolios/18835?verifier=OWZBGIuHodTsTN8VME3cGzVruWhXKtk5Y58CujcC
Your comment is awaiting moderation.
https://www.bundas24.com/1xbetbest
Your comment is awaiting moderation.
Личка открыта для всех желающих, жаббер chemicalmix@dukgo.com готов ответить на все вопросы с 10 до 20 часов по мск https://form.jotform.com/253097108951057 Пришел сегодня грамм 5-мео-дмт, все ок, но весов пока нет, а на глаз его в 2-3 раза меньше, чем, например, грамма 2с-е. Кто имел дело с ним, это у него плотность настолько больше или мне недосыпали?
Your comment is awaiting moderation.
growthmatrix.click – Found practical insights today; sharing this article with colleagues later.
Your comment is awaiting moderation.
(10 euros gratis apuestas|10 mejores casas de apuestas|10 trucos para ganar apuestas|15 euros gratis marca apuestas|1×2 apuestas|1×2 apuestas deportivas|1×2 apuestas
que significa|1×2 en apuestas|1×2 en apuestas que
significa|1×2 que significa en apuestas|5 euros gratis apuestas|9 apuestas que siempre ganaras|a
partir de cuanto se declara apuestas|actividades de juegos de azar y apuestas|ad apuestas deportivas|aleksandre topuria ufc apuestas|algoritmo para ganar apuestas deportivas|america apuestas|análisis nba apuestas|aplicacion android apuestas deportivas|aplicacion apuestas deportivas|aplicacion apuestas deportivas android|aplicación de apuestas online|aplicacion para hacer apuestas|aplicacion para hacer apuestas de futbol|aplicación para hacer apuestas de fútbol|aplicaciones apuestas deportivas android|aplicaciones apuestas deportivas gratis|aplicaciones
de apuestas android|aplicaciones de apuestas de fútbol|aplicaciones de apuestas deportivas|aplicaciones de apuestas deportivas peru|aplicaciones de apuestas deportivas perú|aplicaciones de
apuestas en colombia|aplicaciones de apuestas gratis|aplicaciones de apuestas online|aplicaciones de apuestas seguras|aplicaciones de
apuestas sin dinero|aplicaciones para hacer apuestas|apostar seguro apuestas deportivas|app android
apuestas deportivas|app apuestas|app apuestas
android|app apuestas de futbol|app apuestas deportivas|app apuestas deportivas android|app apuestas deportivas argentina|app apuestas deportivas colombia|app apuestas deportivas ecuador|app apuestas deportivas españa|app apuestas deportivas gratis|app apuestas entre amigos|app apuestas futbol|app apuestas gratis|app apuestas
sin dinero|app casa de apuestas|app casas de apuestas|app control apuestas|app de apuestas|app de apuestas
android|app de apuestas casino|app de apuestas colombia|app
de apuestas con bono de bienvenida|app de apuestas de futbol|app de apuestas
deportivas|app de apuestas deportivas android|app de apuestas deportivas argentina|app de apuestas deportivas colombia|app de apuestas deportivas en españa|app de apuestas deportivas peru|app de apuestas deportivas perú|app
de apuestas deportivas sin dinero|app de apuestas ecuador|app de apuestas en colombia|app de apuestas en españa|app de apuestas en venezuela|app de apuestas futbol|app de apuestas gratis|app de apuestas online|app de apuestas para android|app de apuestas para ganar dinero|app de apuestas peru|app de apuestas reales|app de casas de apuestas|app marca apuestas android|app moviles de apuestas|app para apuestas|app para apuestas de futbol|app para apuestas deportivas|app para apuestas deportivas en español|app para ganar apuestas
deportivas|app para hacer apuestas|app para hacer apuestas deportivas|app para hacer
apuestas entre amigos|app para llevar control de apuestas|app pronosticos apuestas deportivas|app versus apuestas|apps apuestas mundial|apps de apuestas|apps de
apuestas con bono de bienvenida|apps de apuestas de futbol|apps de apuestas deportivas peru|apps de apuestas mexico|apps para apuestas|aprender a hacer apuestas deportivas|aprender hacer apuestas deportivas|apuesta del dia apuestas deportivas|apuestas 10 euros gratis|apuestas 100 seguras|apuestas
1×2|apuestas 1X2|apuestas 2 division|apuestas 3 division|apuestas a caballos|apuestas a carreras
de caballos|apuestas a colombia|apuestas a corners|apuestas a
ganar|apuestas a jugadores nba|apuestas a la baja|apuestas
a la nfl|apuestas al barcelona|apuestas al dia|apuestas al empate|apuestas al
mundial|apuestas al tenis wta|apuestas alaves barcelona|apuestas alcaraz hoy|apuestas alemania españa|apuestas alonso campeon del mundo|apuestas altas y bajas|apuestas altas
y bajas nfl|apuestas ambos equipos marcan|apuestas
america|apuestas android|apuestas anillo nba|apuestas antes del mundial|apuestas anticipadas|apuestas anticipadas nba|apuestas apps|apuestas arabia argentina|apuestas argentina|apuestas argentina
campeon del mundo|apuestas argentina canada|apuestas argentina colombia|apuestas argentina croacia|apuestas argentina españa|apuestas argentina francia|apuestas argentina francia cuanto paga|apuestas argentina francia mundial|apuestas argentina gana el mundial|apuestas argentina gana
mundial|apuestas argentina holanda|apuestas argentina mexico|apuestas
argentina méxico|apuestas argentina mundial|apuestas
argentina online|apuestas argentina paises bajos|apuestas argentina polonia|apuestas argentina uruguay|apuestas
argentina vs australia|apuestas argentina vs colombia|apuestas argentina vs francia|apuestas argentina vs peru|apuestas argentinas|apuestas arsenal real madrid|apuestas ascenso a primera division|apuestas ascenso a segunda|apuestas asiaticas|apuestas
asiatico|apuestas athletic|apuestas athletic atletico|apuestas athletic barça|apuestas athletic barcelona|apuestas athletic betis|apuestas athletic manchester|apuestas athletic manchester united|apuestas athletic osasuna|apuestas athletic real|apuestas athletic real madrid|apuestas athletic real sociedad|apuestas athletic real sociedad final|apuestas athletic
roma|apuestas athletic sevilla|apuestas athletic valencia|apuestas atletico|apuestas atletico barcelona|apuestas atletico barsa|apuestas
atletico campeon champions|apuestas atletico campeon de liga|apuestas
atlético copenhague|apuestas atletico de madrid|apuestas atlético de madrid|apuestas atletico de madrid barcelona|apuestas atletico de madrid
gana la liga|apuestas atletico de madrid real madrid|apuestas atlético
de madrid real madrid|apuestas atletico de madrid vs barcelona|apuestas atletico madrid|apuestas atletico
madrid real madrid|apuestas atletico madrid vs barcelona|apuestas atletico real madrid|apuestas atletico real
madrid champions|apuestas atletismo|apuestas bajas|apuestas baloncesto|apuestas baloncesto acb|apuestas baloncesto handicap|apuestas baloncesto hoy|apuestas baloncesto juegos olimpicos|apuestas baloncesto
nba|apuestas baloncesto pronostico|apuestas baloncesto pronósticos|apuestas baloncesto
prorroga|apuestas barca|apuestas barca athletic|apuestas barca atletico|apuestas barca
bayern|apuestas barca bayern munich|apuestas barca girona|apuestas barca hoy|apuestas barça hoy|apuestas
barca inter|apuestas barca juventus|apuestas
barca madrid|apuestas barça madrid|apuestas
barca real madrid|apuestas barca vs juve|apuestas barca vs madrid|apuestas barca vs psg|apuestas barcelona|apuestas barcelona
alaves|apuestas barcelona athletic|apuestas barcelona atletico|apuestas barcelona atletico de madrid|apuestas barcelona atlético
de madrid|apuestas barcelona atletico madrid|apuestas barcelona bayern|apuestas barcelona
betis|apuestas barcelona campeon de liga|apuestas barcelona celta|apuestas barcelona espanyol|apuestas barcelona
gana la champions|apuestas barcelona girona|apuestas barcelona granada|apuestas barcelona hoy|apuestas barcelona
inter|apuestas barcelona madrid|apuestas barcelona
osasuna|apuestas barcelona psg|apuestas barcelona real madrid|apuestas barcelona real sociedad|apuestas barcelona sevilla|apuestas barcelona
valencia|apuestas barcelona villarreal|apuestas barcelona vs atletico madrid|apuestas barcelona vs madrid|apuestas barcelona
vs real madrid|apuestas barsa madrid|apuestas basket hoy|apuestas bayern barcelona|apuestas bayern vs barcelona|apuestas beisbol|apuestas béisbol|apuestas
beisbol mlb|apuestas beisbol pronosticos|apuestas beisbol venezolano|apuestas betis|apuestas betis – chelsea|apuestas betis barcelona|apuestas betis chelsea|apuestas betis fiorentina|apuestas betis girona|apuestas betis madrid|apuestas betis mallorca|apuestas betis real madrid|apuestas betis
real sociedad|apuestas betis sevilla|apuestas betis valencia|apuestas betis valladolid|apuestas betis vs valencia|apuestas
betplay hoy colombia|apuestas betsson peru|apuestas bienvenida|apuestas billar online|apuestas bolivia vs colombia|apuestas
bono|apuestas bono bienvenida|apuestas bono de bienvenida|apuestas bono de bienvenida sin deposito|apuestas bono gratis|apuestas bono sin deposito|apuestas bonos
sin deposito|apuestas borussia real madrid|apuestas boxeo|apuestas boxeo de campeonato|apuestas boxeo españa|apuestas boxeo
español|apuestas boxeo femenino olimpiadas|apuestas
boxeo hoy|apuestas boxeo online|apuestas brasil colombia|apuestas brasil peru|apuestas brasil uruguay|apuestas brasil
vs colombia|apuestas brasil vs peru|apuestas caballos|apuestas caballos colocado|apuestas caballos españa|apuestas caballos
hipodromo|apuestas caballos hoy|apuestas caballos madrid|apuestas caballos online|apuestas caballos sanlucar de
barrameda|apuestas caballos zarzuela|apuestas calculador|apuestas campeon|apuestas campeon champions|apuestas campeón champions|apuestas campeon champions 2025|apuestas campeon champions league|apuestas campeon conference league|apuestas campeon copa america|apuestas
campeon copa del rey|apuestas campeon de champions|apuestas campeon de la champions|apuestas campeon de liga|apuestas campeon del mundo|apuestas campeon eurocopa|apuestas
campeón eurocopa|apuestas campeon europa league|apuestas campeon f1|apuestas campeon f1 2025|apuestas campeon formula 1|apuestas campeon libertadores|apuestas campeon liga|apuestas campeon liga bbva|apuestas campeon liga española|apuestas campeon liga santander|apuestas campeon motogp 2025|apuestas campeon mundial|apuestas campeón mundial|apuestas campeon mundial baloncesto|apuestas campeon nba|apuestas campeón nba|apuestas campeon premier|apuestas campeon premier league|apuestas campeon roland garros|apuestas campeonato f1|apuestas campeonatos de futbol|apuestas carrera de
caballos|apuestas carrera de caballos hoy|apuestas carrera de caballos nocturnas|apuestas carrera de galgos
fin de semana|apuestas carrera de galgos hoy|apuestas carrera de
galgos nocturnas|apuestas carreras caballos|apuestas
carreras caballos sanlucar|apuestas carreras de caballos|apuestas carreras de caballos en directo|apuestas
carreras de caballos en vivo|apuestas carreras de caballos españa|apuestas carreras de
caballos hoy|apuestas carreras de caballos
nacionales|apuestas carreras de caballos nocturnas|apuestas carreras de caballos online|apuestas carreras de caballos sanlucar|apuestas
carreras de caballos sanlúcar|apuestas carreras de galgos|apuestas carreras de galgos en vivo|apuestas carreras
de galgos nocturnas|apuestas carreras de galgos pre partido|apuestas casino|apuestas casino barcelona|apuestas casino futbol|apuestas
casino gran madrid|apuestas casino gratis|apuestas casino madrid|apuestas casino online|apuestas casino online
argentina|apuestas casinos|apuestas casinos online|apuestas celta|apuestas celta barcelona|apuestas celta
betis|apuestas celta eibar|apuestas celta espanyol|apuestas celta granada|apuestas celta madrid|apuestas celta manchester|apuestas celta real madrid|apuestas champion league|apuestas champions foro|apuestas champions hoy|apuestas champions league|apuestas champions league
– pronósticos|apuestas champions league 2025|apuestas champions league hoy|apuestas champions league
pronosticos|apuestas champions league pronósticos|apuestas champions pronosticos|apuestas chelsea barcelona|apuestas chelsea betis|apuestas chile|apuestas chile peru|apuestas chile venezuela|apuestas chile vs colombia|apuestas chile vs uruguay|apuestas ciclismo|apuestas
ciclismo en vivo|apuestas ciclismo femenino|apuestas ciclismo tour
francia|apuestas ciclismo vuelta|apuestas ciclismo vuelta a españa|apuestas ciclismo vuelta españa|apuestas city madrid|apuestas
city real madrid|apuestas clasico|apuestas clasico español|apuestas clasico real madrid barcelona|apuestas clasificacion mundial|apuestas colombia|apuestas
colombia argentina|apuestas colombia brasil|apuestas colombia paraguay|apuestas colombia uruguay|apuestas colombia vs argentina|apuestas colombia vs brasil|apuestas combinadas|apuestas combinadas como
funcionan|apuestas combinadas de futbol|apuestas combinadas
de fútbol|apuestas combinadas foro|apuestas combinadas futbol|apuestas combinadas hoy|apuestas combinadas mismo partido|apuestas combinadas mundial|apuestas combinadas nba|apuestas combinadas para esta semana|apuestas combinadas para hoy|apuestas combinadas para mañana|apuestas
combinadas pronosticos|apuestas combinadas recomendadas|apuestas combinadas seguras|apuestas combinadas seguras para hoy|apuestas combinadas seguras para mañana|apuestas como ganar|apuestas comparador|apuestas
con bono de bienvenida|apuestas con dinero ficticio|apuestas
con dinero real|apuestas con dinero virtual|apuestas con handicap|apuestas con handicap asiatico|apuestas con handicap baloncesto|apuestas con mas probabilidades de ganar|apuestas
con paypal|apuestas con tarjeta de credito|apuestas con tarjeta de debito|apuestas consejos|apuestas copa|apuestas copa africa|apuestas copa america|apuestas copa américa|apuestas copa argentina|apuestas copa brasil|apuestas copa davis|apuestas copa
de europa|apuestas copa del mundo|apuestas copa del rey|apuestas copa del
rey baloncesto|apuestas copa del rey final|apuestas copa del rey futbol|apuestas copa del rey ganador|apuestas copa del rey hoy|apuestas copa del rey pronosticos|apuestas copa del rey pronósticos|apuestas copa europa|apuestas copa italia|apuestas copa libertadores|apuestas copa mundial de hockey|apuestas copa rey|apuestas copa
sudamericana|apuestas corners|apuestas corners hoy|apuestas croacia argentina|apuestas cuartos eurocopa|apuestas
cuotas|apuestas cuotas altas|apuestas cuotas bajas|apuestas de 1 euro|apuestas de baloncesto|apuestas de baloncesto hoy|apuestas de baloncesto nba|apuestas de baloncesto para hoy|apuestas de beisbol|apuestas de beisbol
para hoy|apuestas de blackjack en linea|apuestas de boxeo|apuestas de
boxeo canelo|apuestas de boxeo en las vegas|apuestas de boxeo hoy|apuestas de boxeo online|apuestas de caballo|apuestas
de caballos|apuestas de caballos como funciona|apuestas de caballos como se juega|apuestas de caballos
en colombia|apuestas de caballos en españa|apuestas de caballos en linea|apuestas de caballos españa|apuestas de caballos ganador y colocado|apuestas de caballos internacionales|apuestas de caballos juegos|apuestas de caballos online|apuestas de caballos online en venezuela|apuestas de caballos por
internet|apuestas de caballos pronosticos|apuestas de caballos pronósticos|apuestas de carrera de caballos|apuestas de carreras de caballos|apuestas de carreras de caballos online|apuestas de casino|apuestas de casino
online|apuestas de casino por internet|apuestas
de champions league|apuestas de ciclismo|apuestas de colombia|apuestas de
copa america|apuestas de corners|apuestas de deportes en linea|apuestas de deportes online|apuestas de
dinero|apuestas de esports|apuestas de eurocopa|apuestas
de europa league|apuestas de f1|apuestas de formula 1|apuestas de futbol|apuestas de fútbol|apuestas de futbol app|apuestas de futbol argentina|apuestas
de futbol colombia|apuestas de futbol en colombia|apuestas de futbol en directo|apuestas
de futbol en linea|apuestas de futbol en vivo|apuestas de
futbol español|apuestas de futbol gratis|apuestas de
futbol hoy|apuestas de futbol mundial|apuestas de futbol online|apuestas de
fútbol online|apuestas de futbol para hoy|apuestas de
fútbol para hoy|apuestas de futbol para hoy seguras|apuestas de futbol para
mañana|apuestas de futbol peru|apuestas de futbol pronosticos|apuestas de fútbol pronósticos|apuestas de
futbol seguras|apuestas de futbol seguras para hoy|apuestas de futbol sin dinero|apuestas de galgos|apuestas de galgos como ganar|apuestas de
galgos en directo|apuestas de galgos online|apuestas
de galgos trucos|apuestas de golf|apuestas de hockey|apuestas de hockey sobre hielo|apuestas de
hoy|apuestas de hoy seguras|apuestas de juego|apuestas
de juegos|apuestas de juegos deportivos|apuestas de juegos online|apuestas de la champions
league|apuestas de la copa américa|apuestas de la eurocopa|apuestas de la
europa league|apuestas de la liga|apuestas de la liga bbva|apuestas de la liga española|apuestas de
la nba|apuestas de la nfl|apuestas de la ufc|apuestas de
mlb|apuestas de nba|apuestas de nba para hoy|apuestas de partidos|apuestas de partidos de futbol|apuestas de peleas ufc|apuestas de perros en vivo|apuestas de perros virtuales|apuestas
de peru|apuestas de sistema|apuestas de sistema como funciona|apuestas de sistema explicacion|apuestas de sistema explicación|apuestas de tenis|apuestas de tenis de mesa|apuestas de tenis en directo|apuestas de tenis hoy|apuestas de tenis para hoy|apuestas de tenis pronosticos|apuestas de tenis seguras|apuestas de
todo tipo|apuestas de ufc|apuestas de ufc hoy|apuestas
del boxeo|apuestas del clasico|apuestas del clasico real
madrid barca|apuestas del dia|apuestas del día|apuestas del dia de
hoy|apuestas del dia deportivas|apuestas del dia futbol|apuestas del mundial|apuestas del
partido de hoy|apuestas del real madrid|apuestas del rey|apuestas del sistema|apuestas deporte|apuestas deportes|apuestas deportiva|apuestas deportivas|apuestas deportivas 1 euro|apuestas deportivas 10 euros gratis|apuestas deportivas 100 seguras|apuestas deportivas
1×2|apuestas deportivas android|apuestas deportivas
app|apuestas deportivas apps|apuestas deportivas argentina|apuestas deportivas
argentina futbol|apuestas deportivas argentina legal|apuestas deportivas atletico
de madrid|apuestas deportivas baloncesto|apuestas deportivas barca madrid|apuestas deportivas barcelona|apuestas
deportivas beisbol|apuestas deportivas bono|apuestas deportivas bono bienvenida|apuestas deportivas bono
de bienvenida|apuestas deportivas bono sin deposito|apuestas deportivas bonos de bienvenida|apuestas deportivas boxeo|apuestas deportivas
caballos|apuestas deportivas calculadora|apuestas deportivas campeon liga|apuestas deportivas casino|apuestas deportivas casino barcelona|apuestas deportivas casino online|apuestas deportivas
cerca de mi|apuestas deportivas champions league|apuestas deportivas chile|apuestas deportivas ciclismo|apuestas deportivas colombia|apuestas deportivas
com|apuestas deportivas com foro|apuestas deportivas com pronosticos|apuestas deportivas combinadas|apuestas
deportivas combinadas para hoy|apuestas deportivas como se juega|apuestas deportivas comparador|apuestas deportivas con bono
gratis|apuestas deportivas con bonos gratis|apuestas deportivas con dinero ficticio|apuestas deportivas con paypal|apuestas deportivas con puntos virtuales|apuestas deportivas consejos|apuestas deportivas
consejos para ganar|apuestas deportivas copa america|apuestas deportivas
copa del rey|apuestas deportivas copa libertadores|apuestas deportivas copa
mundial|apuestas deportivas corners|apuestas deportivas cual es la mejor|apuestas
deportivas cuotas altas|apuestas deportivas de baloncesto|apuestas
deportivas de boxeo|apuestas deportivas de colombia|apuestas deportivas de futbol|apuestas deportivas de nba|apuestas
deportivas de nhl|apuestas deportivas de peru|apuestas deportivas de tenis|apuestas deportivas del dia|apuestas
deportivas dinero ficticio|apuestas deportivas directo|apuestas deportivas
doble oportunidad|apuestas deportivas en argentina|apuestas deportivas
en chile|apuestas deportivas en colombia|apuestas deportivas en directo|apuestas deportivas en españa|apuestas deportivas en español|apuestas
deportivas en linea|apuestas deportivas en línea|apuestas deportivas en peru|apuestas deportivas en perú|apuestas deportivas en sevilla|apuestas deportivas en uruguay|apuestas deportivas en vivo|apuestas deportivas es|apuestas deportivas
es pronosticos|apuestas deportivas españa|apuestas deportivas españolas|apuestas deportivas esports|apuestas deportivas estadisticas|apuestas deportivas estrategias|apuestas deportivas estrategias
seguras|apuestas deportivas eurocopa|apuestas deportivas europa league|apuestas deportivas
f1|apuestas deportivas faciles de ganar|apuestas deportivas formula 1|apuestas deportivas foro|apuestas deportivas foro futbol|apuestas deportivas foro tenis|apuestas deportivas francia
argentina|apuestas deportivas futbol|apuestas deportivas fútbol|apuestas deportivas futbol argentino|apuestas deportivas
futbol colombia|apuestas deportivas futbol español|apuestas deportivas gana|apuestas deportivas ganadas|apuestas deportivas ganar dinero seguro|apuestas deportivas gane|apuestas deportivas
golf|apuestas deportivas gratis|apuestas deportivas gratis con premios|apuestas deportivas gratis hoy|apuestas deportivas gratis sin deposito|apuestas deportivas handicap|apuestas deportivas handicap asiatico|apuestas deportivas
hoy|apuestas deportivas impuestos|apuestas deportivas interior
argentina|apuestas deportivas juegos olimpicos|apuestas deportivas la liga|apuestas deportivas
legales|apuestas deportivas legales en colombia|apuestas deportivas libres de impuestos|apuestas
deportivas licencia españa|apuestas deportivas liga española|apuestas
deportivas listado|apuestas deportivas listado clasico|apuestas deportivas madrid|apuestas deportivas
mas seguras|apuestas deportivas mejor pagadas|apuestas deportivas
mejores|apuestas deportivas mejores app|apuestas deportivas mejores casas|apuestas deportivas mejores cuotas|apuestas deportivas mejores paginas|apuestas deportivas mexico|apuestas deportivas méxico|apuestas deportivas mlb|apuestas deportivas mlb hoy|apuestas deportivas multiples|apuestas deportivas mundial|apuestas deportivas murcia|apuestas deportivas
nba|apuestas deportivas nba hoy|apuestas
deportivas nfl|apuestas deportivas nhl|apuestas deportivas nuevas|apuestas
deportivas ofertas|apuestas deportivas online|apuestas deportivas online
argentina|apuestas deportivas online chile|apuestas deportivas online colombia|apuestas deportivas online en colombia|apuestas
deportivas online españa|apuestas deportivas online mexico|apuestas deportivas online paypal|apuestas deportivas online peru|apuestas deportivas online por internet|apuestas deportivas pago paypal|apuestas deportivas para ganar dinero|apuestas deportivas para hoy|apuestas deportivas para hoy pronosticos|apuestas deportivas partido suspendido|apuestas deportivas partidos de hoy|apuestas deportivas paypal|apuestas deportivas peru|apuestas deportivas perú|apuestas deportivas peru vs ecuador|apuestas deportivas predicciones|apuestas deportivas promociones|apuestas deportivas pronostico|apuestas deportivas pronóstico|apuestas deportivas pronostico hoy|apuestas deportivas pronosticos|apuestas
deportivas pronósticos|apuestas deportivas pronosticos expertos|apuestas
deportivas pronosticos gratis|apuestas deportivas pronosticos nba|apuestas
deportivas pronosticos tenis|apuestas deportivas que aceptan paypal|apuestas
deportivas real madrid|apuestas deportivas regalo bienvenida|apuestas deportivas resultado exacto|apuestas deportivas resultados|apuestas
deportivas rugby|apuestas deportivas seguras|apuestas deportivas seguras foro|apuestas deportivas seguras
hoy|apuestas deportivas seguras para hoy|apuestas deportivas
seguras telegram|apuestas deportivas sevilla|apuestas deportivas simulador eurocopa|apuestas deportivas sin deposito|apuestas deportivas sin deposito
inicial|apuestas deportivas sin dinero|apuestas deportivas sin dinero real|apuestas deportivas sin registro|apuestas
deportivas stake|apuestas deportivas stake 10|apuestas deportivas telegram
españa|apuestas deportivas tenis|apuestas deportivas tenis de mesa|apuestas deportivas tenis foro|apuestas deportivas tenis hoy|apuestas deportivas tips|apuestas deportivas tipster|apuestas deportivas ufc|apuestas deportivas uruguay|apuestas deportivas
valencia|apuestas deportivas valencia barcelona|apuestas deportivas venezuela|apuestas deportivas virtuales|apuestas deportivas y casino|apuestas deportivas y casino online|apuestas
deportivas.com|apuestas deportivas.com foro|apuestas deportivas.es|apuestas deportivos
pronosticos|apuestas deposito minimo 1 euro|apuestas descenso a segunda|apuestas descenso a segunda b|apuestas
descenso la liga|apuestas descenso primera division|apuestas
descenso segunda|apuestas dia|apuestas diarias seguras|apuestas
dinero|apuestas dinero ficticio|apuestas dinero real|apuestas dinero virtual|apuestas directas|apuestas directo|apuestas directo futbol|apuestas division de honor juvenil|apuestas dnb|apuestas doble oportunidad|apuestas doble resultado|apuestas dobles|apuestas dobles y triples|apuestas dortmund barcelona|apuestas draft nba|apuestas draft nfl|apuestas ecuador vs argentina|apuestas ecuador
vs venezuela|apuestas egipto uruguay|apuestas el clasico|apuestas elecciones venezuela|apuestas empate|apuestas en baloncesto|apuestas
en barcelona|apuestas en beisbol|apuestas en boxeo|apuestas en caballos|apuestas en carreras de caballos|apuestas en casino|apuestas en casino online|apuestas en casinos|apuestas en casinos online|apuestas en chile|apuestas en ciclismo|apuestas en colombia|apuestas en colombia de futbol|apuestas en directo|apuestas en directo futbol|apuestas
en directo pronosticos|apuestas en el futbol|apuestas en el tenis|apuestas
en españa|apuestas en esports|apuestas en eventos deportivos virtuales|apuestas en golf|apuestas en juegos|apuestas en la champions league|apuestas
en la eurocopa|apuestas en la liga|apuestas en la nba|apuestas en la nfl|apuestas
en las vegas mlb|apuestas en las vegas nfl|apuestas en linea|apuestas en línea|apuestas en linea argentina|apuestas en linea boxeo|apuestas
en linea chile|apuestas en linea colombia|apuestas en línea de fútbol|apuestas
en linea deportivas|apuestas en linea españa|apuestas en linea
estados unidos|apuestas en linea futbol|apuestas en linea mexico|apuestas en línea méxico|apuestas en linea mundial|apuestas
en linea peru|apuestas en linea usa|apuestas en los esports|apuestas en madrid|apuestas en méxico|apuestas en mexico online|apuestas en nba|apuestas en partidos de futbol|apuestas en partidos de futbol
en vivo|apuestas en partidos de tenis en directo|apuestas en perú|apuestas en sevilla|apuestas en sistema|apuestas en stake|apuestas en tenis|apuestas en tenis
de mesa|apuestas en valencia|apuestas en vivo|apuestas en vivo argentina|apuestas
en vivo casino|apuestas en vivo futbol|apuestas en vivo fútbol|apuestas en vivo
nba|apuestas en vivo peru|apuestas en vivo tenis|apuestas en vivo ufc|apuestas equipo
mbappe|apuestas equipos de futbol|apuestas españa|apuestas españa alemania|apuestas españa alemania
eurocopa|apuestas españa croacia|apuestas españa eurocopa|apuestas
españa francia|apuestas españa francia eurocopa|apuestas españa gana el mundial|apuestas españa gana eurocopa|apuestas españa gana mundial|apuestas
españa georgia|apuestas españa holanda|apuestas españa inglaterra|apuestas españa inglaterra cuotas|apuestas españa inglaterra eurocopa|apuestas españa
italia|apuestas españa mundial|apuestas españa paises bajos|apuestas español|apuestas español oviedo|apuestas espanyol barcelona|apuestas
espanyol betis|apuestas espanyol villarreal|apuestas esport|apuestas esports|apuestas esports colombia|apuestas esports españa|apuestas esports fifa|apuestas esports gratis|apuestas esports
lol|apuestas esports peru|apuestas esports valorant|apuestas
estadisticas|apuestas estrategias|apuestas euro|apuestas euro copa|apuestas eurocopa|apuestas eurocopa campeon|apuestas eurocopa españa|apuestas
eurocopa favoritos|apuestas eurocopa femenina|apuestas eurocopa
final|apuestas eurocopa ganador|apuestas eurocopa hoy|apuestas
eurocopa sub 21|apuestas euroliga baloncesto|apuestas euroliga pronosticos|apuestas europa league|apuestas europa
league hoy|apuestas europa league pronosticos|apuestas europa league pronósticos|apuestas
euros|apuestas f1 abu dhabi|apuestas f1 bahrein|apuestas f1 canada|apuestas f1 china|apuestas f1 cuotas|apuestas f1 hoy|apuestas
f1 las vegas|apuestas f1 miami|apuestas f1 monaco|apuestas faciles de ganar|apuestas fáciles
de ganar|apuestas faciles para ganar|apuestas favoritas|apuestas
favorito champions|apuestas favoritos champions|apuestas favoritos
eurocopa|apuestas favoritos mundial|apuestas fc barcelona|apuestas final champions cuotas|apuestas final
champions league|apuestas final champions peru|apuestas final copa|apuestas final copa america|apuestas final copa de europa|apuestas
final copa del rey|apuestas final copa europa|apuestas final copa libertadores|apuestas final
copa rey|apuestas final de copa|apuestas final de copa del
rey|apuestas final del mundial|apuestas final euro|apuestas final eurocopa|apuestas final europa league|apuestas
final libertadores|apuestas final mundial|apuestas
final nba|apuestas final rugby|apuestas final uefa europa league|apuestas
final.mundial|apuestas finales de conferencia nfl|apuestas finales nba|apuestas fiorentina betis|apuestas formula|apuestas formula 1|apuestas
fórmula 1|apuestas fórmula 1 pronósticos|apuestas
formula uno|apuestas foro|apuestas foro nba|apuestas francia argentina|apuestas
francia españa|apuestas futbol|apuestas fútbol|apuestas futbol americano|apuestas futbol americano nfl|apuestas futbol
argentina|apuestas futbol argentino|apuestas futbol champions league|apuestas futbol chile|apuestas futbol colombia|apuestas
futbol consejos|apuestas futbol en directo|apuestas fútbol
en directo|apuestas futbol en vivo|apuestas fútbol en vivo|apuestas futbol españa|apuestas futbol español|apuestas fútbol español|apuestas futbol eurocopa|apuestas futbol femenino|apuestas futbol foro|apuestas
futbol gratis|apuestas futbol hoy|apuestas fútbol hoy|apuestas futbol juegos olimpicos|apuestas futbol mexico|apuestas futbol mundial|apuestas futbol online|apuestas futbol para hoy|apuestas futbol peru|apuestas
futbol pronosticos|apuestas futbol sala|apuestas futbol telegram|apuestas futbol virtual|apuestas
galgos|apuestas galgos en directo|apuestas galgos
hoy|apuestas galgos online|apuestas galgos pronosticos|apuestas galgos
trucos|apuestas gana|apuestas gana colombia|apuestas gana resultados|apuestas ganadas|apuestas ganadas hoy|apuestas
ganador champions league|apuestas ganador copa
america|apuestas ganador copa del rey|apuestas ganador copa del rey baloncesto|apuestas ganador copa libertadores|apuestas ganador de la eurocopa|apuestas
ganador de la liga|apuestas ganador del mundial|apuestas ganador eurocopa|apuestas ganador europa league|apuestas ganador f1|apuestas ganador la liga|apuestas ganador liga española|apuestas ganador
mundial|apuestas ganador mundial baloncesto|apuestas ganador mundial f1|apuestas ganador nba|apuestas ganadores eurocopa|apuestas ganadores mundial|apuestas ganar champions|apuestas ganar
eurocopa|apuestas ganar liga|apuestas ganar mundial|apuestas ganar nba|apuestas getafe
valencia|apuestas ghana uruguay|apuestas girona|apuestas girona athletic|apuestas girona betis|apuestas girona campeon de liga|apuestas girona campeon liga|apuestas girona gana la liga|apuestas girona real madrid|apuestas girona real sociedad|apuestas
goleador eurocopa|apuestas goleadores eurocopa|apuestas goles
asiaticos|apuestas golf|apuestas golf masters|apuestas golf pga|apuestas granada
barcelona|apuestas grand slam de tenis|apuestas gratis|apuestas gratis casino|apuestas gratis
con premios|apuestas gratis hoy|apuestas gratis para hoy|apuestas gratis por registro|apuestas gratis puntos|apuestas gratis regalos|apuestas gratis
sin deposito|apuestas gratis sin depósito|apuestas gratis sin ingreso|apuestas gratis sports|apuestas gratis y ganar premios|apuestas grupo a eurocopa|apuestas grupos eurocopa|apuestas handicap|apuestas handicap asiatico|apuestas handicap baloncesto|apuestas handicap como
funciona|apuestas handicap nba|apuestas handicap nfl|apuestas hipicas online|apuestas hípicas online|apuestas hipicas venezuela|apuestas hockey|apuestas hockey hielo|apuestas hockey patines|apuestas hockey sobre hielo|apuestas holanda argentina|apuestas holanda vs argentina|apuestas hoy|apuestas
hoy champions|apuestas hoy futbol|apuestas hoy nba|apuestas hoy pronosticos|apuestas
hoy seguras|apuestas impuestos|apuestas inglaterra paises bajos|apuestas inter barca|apuestas inter barcelona|apuestas juego|apuestas
juegos|apuestas juegos en linea|apuestas juegos olimpicos|apuestas juegos olímpicos|apuestas juegos olimpicos baloncesto|apuestas juegos online|apuestas juegos virtuales|apuestas jugador
sevilla|apuestas jugadores nba|apuestas kings league americas|apuestas la liga|apuestas la
liga española|apuestas la liga hoy|apuestas la liga santander|apuestas
las vegas mlb|apuestas las vegas nba|apuestas las vegas nfl|apuestas league of
legends mundial|apuestas legal|apuestas legales|apuestas legales en colombia|apuestas legales
en españa|apuestas legales en estados unidos|apuestas legales
españa|apuestas leganes betis|apuestas libertadores|apuestas licencia|apuestas liga 1 peru|apuestas liga argentina|apuestas liga bbva pronosticos|apuestas liga de campeones|apuestas liga de campeones de baloncesto|apuestas liga de campeones de hockey|apuestas liga españa|apuestas liga española|apuestas liga santander pronosticos|apuestas ligas de futbol|apuestas linea|apuestas linea de gol|apuestas liverpool barcelona|apuestas liverpool real madrid|apuestas lol mundial|apuestas madrid|apuestas madrid arsenal|apuestas
madrid atletico|apuestas madrid atletico champions|apuestas madrid barca|apuestas madrid barça|apuestas madrid barca hoy|apuestas madrid barca supercopa|apuestas madrid barcelona|apuestas madrid barsa|apuestas madrid
bayern|apuestas madrid betis|apuestas madrid borussia|apuestas
madrid campeon champions|apuestas madrid celta|apuestas madrid city|apuestas madrid dortmund|apuestas
madrid gana la liga|apuestas madrid gana liga|apuestas madrid
hoy|apuestas madrid liverpool|apuestas madrid osasuna|apuestas
madrid sevilla|apuestas madrid valencia|apuestas madrid vs arsenal|apuestas madrid vs barcelona|apuestas mallorca osasuna|apuestas mallorca real sociedad|apuestas manchester athletic|apuestas manchester city real madrid|apuestas mas faciles de ganar|apuestas mas seguras|apuestas mas seguras
para hoy|apuestas masters de golf|apuestas masters de tenis|apuestas maximo goleador eurocopa|apuestas maximo goleador mundial|apuestas mejor jugador eurocopa|apuestas mejores casinos online|apuestas mexico|apuestas méxico|apuestas mexico polonia|apuestas méxico polonia|apuestas mlb|apuestas
mlb hoy|apuestas mlb las vegas|apuestas mlb para hoy|apuestas mlb pronosticos|apuestas mlb usa|apuestas mma ufc|apuestas momios|apuestas multiples|apuestas múltiples|apuestas
multiples como funcionan|apuestas multiples el gordo|apuestas multiples futbol|apuestas mundial|apuestas mundial 2026|apuestas mundial baloncesto|apuestas mundial balonmano|apuestas
mundial brasil|apuestas mundial campeon|apuestas mundial ciclismo|apuestas mundial clubes|apuestas mundial de baloncesto|apuestas mundial de ciclismo|apuestas mundial
de clubes|apuestas mundial de futbol|apuestas mundial de fútbol|apuestas mundial de rugby|apuestas mundial f1|apuestas mundial favoritos|apuestas
mundial femenino|apuestas mundial formula 1|apuestas mundial futbol|apuestas mundial ganador|apuestas
mundial lol|apuestas mundial moto gp|apuestas mundial motogp|apuestas mundial rugby|apuestas mundial sub 17|apuestas mundiales|apuestas mundialistas|apuestas mvp eurocopa|apuestas mvp nba|apuestas mvp nfl|apuestas nacionales de colombia|apuestas
nba|apuestas nba all star|apuestas nba campeon|apuestas nba consejos|apuestas
nba esta noche|apuestas nba finals|apuestas nba gratis|apuestas nba hoy|apuestas nba hoy jugadores|apuestas nba hoy pronosticos|apuestas
nba para hoy|apuestas nba playoffs|apuestas nba
pronosticos|apuestas nba pronósticos|apuestas nba pronosticos hoy|apuestas nba tipster|apuestas nfl|apuestas nfl hoy|apuestas nfl
las vegas|apuestas nfl playoffs|apuestas nfl pronosticos|apuestas nfl pronósticos|apuestas nfl semana 4|apuestas
nfl super bowl|apuestas nhl|apuestas nhl pronosticos|apuestas octavos
eurocopa|apuestas ofertas|apuestas online|apuestas online argentina|apuestas online argentina legal|apuestas
online bono|apuestas online bono bienvenida|apuestas online boxeo|apuestas online caballos|apuestas online
carreras de caballos|apuestas online casino|apuestas online champions league|apuestas online chile|apuestas
online ciclismo|apuestas online colombia|apuestas online comparativa|apuestas online con paypal|apuestas online de caballos|apuestas online deportivas|apuestas online
en argentina|apuestas online en peru|apuestas online espana|apuestas online
españa|apuestas online esports|apuestas online foro|apuestas online futbol|apuestas
online futbol españa|apuestas online golf|apuestas online gratis|apuestas online gratis sin deposito|apuestas
online juegos|apuestas online mexico|apuestas online mma|apuestas online movil|apuestas online nba|apuestas online net|apuestas online nuevas|apuestas online opiniones|apuestas online paypal|apuestas online peru|apuestas online seguras|apuestas
online sin dinero|apuestas online sin registro|apuestas online
tenis|apuestas online ufc|apuestas online uruguay|apuestas online venezuela|apuestas open britanico golf|apuestas osasuna athletic|apuestas osasuna barcelona|apuestas osasuna
real madrid|apuestas osasuna sevilla|apuestas osasuna valencia|apuestas over|apuestas over 2.5|apuestas over under|apuestas paginas|apuestas pago anticipado|apuestas paises bajos ecuador|apuestas
paises bajos inglaterra|apuestas países bajos qatar|apuestas para
boxeo|apuestas para champions league|apuestas para el clasico|apuestas para el dia de
hoy|apuestas para el mundial|apuestas para el partido de hoy|apuestas para eurocopa|apuestas para
europa league|apuestas para futbol|apuestas para ganar|apuestas para ganar dinero|apuestas para ganar dinero facil|apuestas para ganar en la ruleta|apuestas
para ganar la champions|apuestas para ganar la eurocopa|apuestas para ganar la europa
league|apuestas para ganar la liga|apuestas para ganar siempre|apuestas
para hacer|apuestas para hoy|apuestas para hoy de futbol|apuestas para
hoy europa league|apuestas para hoy futbol|apuestas para juegos|apuestas para la champions league|apuestas
para la copa del rey|apuestas para la eurocopa|apuestas para
la europa league|apuestas para la final de la eurocopa|apuestas para
la nba hoy|apuestas para los partidos de hoy|apuestas para partidos de hoy|apuestas para ufc|apuestas partido|apuestas partido aplazado|apuestas
partido champions|apuestas partido colombia|apuestas partido españa marruecos|apuestas partido
mundial|apuestas partido suspendido|apuestas partidos|apuestas
partidos champions league|apuestas partidos csgo|apuestas partidos de
futbol|apuestas partidos de futbol hoy|apuestas partidos de hoy|apuestas partidos eurocopa|apuestas partidos
futbol|apuestas partidos hoy|apuestas partidos mundial|apuestas paypal|apuestas peleas de boxeo|apuestas peru|apuestas
perú|apuestas peru brasil|apuestas peru chile|apuestas peru paraguay|apuestas peru
uruguay|apuestas peru vs chile|apuestas peru vs colombia|apuestas pichichi eurocopa|apuestas plataforma|apuestas playoff|apuestas playoff ascenso|apuestas playoff ascenso a
primera|apuestas playoff nba|apuestas playoff segunda|apuestas playoff segunda b|apuestas playoffs
nba|apuestas playoffs nfl|apuestas polonia argentina|apuestas por argentina|apuestas por internet mexico|apuestas por internet para ganar dinero|apuestas
por paypal|apuestas por ronda boxeo|apuestas por sistema|apuestas portugal uruguay|apuestas pre partido|apuestas predicciones|apuestas
predicciones futbol|apuestas primera division|apuestas primera division españa|apuestas
promociones|apuestas pronostico|apuestas pronosticos|apuestas pronosticos deportivos|apuestas
pronosticos deportivos tenis|apuestas pronosticos futbol|apuestas pronosticos gratis|apuestas pronosticos nba|apuestas pronosticos tenis|apuestas
prorroga|apuestas psg barca|apuestas psg barcelona|apuestas puntos por tarjetas|apuestas puntos tarjetas|apuestas que aceptan paypal|apuestas que es
handicap|apuestas que puedes hacer con tu novia|apuestas que siempre ganaras|apuestas
que significa|apuestas quien bajara a segunda|apuestas quién bajara a segunda|apuestas quien gana el mundial|apuestas quien gana eurocopa|apuestas
quien gana la champions|apuestas quien gana la eurocopa|apuestas quien gana la liga|apuestas quien ganara el mundial|apuestas quién ganará el mundial|apuestas
quien ganara la champions|apuestas quien ganara la
eurocopa|apuestas quien ganara la liga|apuestas rayo barcelona|apuestas real madrid|apuestas real madrid arsenal|apuestas real madrid athletic|apuestas real madrid atletico|apuestas
real madrid atletico champions|apuestas real madrid atletico de madrid|apuestas real madrid atlético de madrid|apuestas real madrid atletico madrid|apuestas
real madrid barcelona|apuestas real madrid bayern|apuestas real
madrid betis|apuestas real madrid borussia|apuestas real madrid campeon champions|apuestas real madrid celta|apuestas real madrid champions|apuestas real
madrid city|apuestas real madrid girona|apuestas real madrid
hoy|apuestas real madrid liverpool|apuestas real madrid manchester city|apuestas real madrid osasuna|apuestas
real madrid real sociedad|apuestas real madrid valencia|apuestas real madrid villarreal|apuestas real madrid
vs arsenal|apuestas real madrid vs atletico|apuestas real madrid vs atlético|apuestas real
madrid vs atletico madrid|apuestas real madrid vs barcelona|apuestas real madrid vs betis|apuestas real madrid
vs sevilla|apuestas real madrid vs valencia|apuestas real sociedad|apuestas
real sociedad athletic|apuestas real sociedad barcelona|apuestas real sociedad betis|apuestas real sociedad psg|apuestas real sociedad real madrid|apuestas
real sociedad valencia|apuestas recomendadas hoy|apuestas regalo de
bienvenida|apuestas registro|apuestas resultado
exacto|apuestas resultados|apuestas resultados eurocopa|apuestas retirada tenis|apuestas roma barcelona|apuestas roma sevilla|apuestas rugby|apuestas rugby mundial|apuestas rugby world cup|apuestas ruleta seguras|apuestas
segunda|apuestas segunda b|apuestas segunda division|apuestas segunda división|apuestas
segunda division b|apuestas segunda division españa|apuestas seguras|apuestas seguras baloncesto|apuestas seguras
calculadora|apuestas seguras en la ruleta|apuestas seguras eurocopa|apuestas seguras
foro|apuestas seguras futbol|apuestas seguras futbol hoy|apuestas seguras gratis|apuestas seguras hoy|apuestas seguras hoy futbol|apuestas seguras nba|apuestas seguras nba hoy|apuestas seguras para este fin de
semana|apuestas seguras para ganar dinero|apuestas seguras para hoy|apuestas seguras para hoy fútbol|apuestas seguras para hoy pronósticos|apuestas seguras
para mañana|apuestas seguras ruleta|apuestas seguras telegram|apuestas seguras tenis|apuestas semifinales eurocopa|apuestas senegal paises
bajos|apuestas sevilla|apuestas sevilla athletic|apuestas sevilla atletico de madrid|apuestas sevilla barcelona|apuestas sevilla betis|apuestas sevilla campeon liga|apuestas
sevilla celta|apuestas sevilla gana la liga|apuestas sevilla girona|apuestas sevilla inter|apuestas sevilla jugador|apuestas sevilla juventus|apuestas sevilla leganes|apuestas sevilla madrid|apuestas sevilla manchester united|apuestas sevilla osasuna|apuestas sevilla real madrid|apuestas sevilla real sociedad|apuestas sevilla roma|apuestas sevilla valencia|apuestas significa|apuestas simples
ejemplos|apuestas simples o combinadas|apuestas sin deposito|apuestas sin deposito inicial|apuestas sin deposito minimo|apuestas sin dinero|apuestas sin dinero real|apuestas sin empate|apuestas sin empate que significa|apuestas sin ingreso minimo|apuestas sin registro|apuestas sistema|apuestas sistema calculadora|apuestas sistema como
funciona|apuestas sistema trixie|apuestas sociedad|apuestas sorteo copa del rey|apuestas stake|apuestas stake 10|apuestas stake
10 hoy|apuestas super bowl favorito|apuestas super
rugby|apuestas supercopa españa|apuestas superliga argentina|apuestas tarjeta roja|apuestas tarjetas|apuestas tarjetas amarillas|apuestas tenis|apuestas tenis atp|apuestas tenis consejos|apuestas tenis copa davis|apuestas tenis de
mesa|apuestas tenis de mesa pronosticos|apuestas tenis en vivo|apuestas tenis femenino|apuestas tenis hoy|apuestas tenis itf|apuestas tenis
pronosticos|apuestas tenis pronósticos|apuestas tenis retirada|apuestas tenis roland garros|apuestas tenis
seguras|apuestas tenis wimbledon|apuestas tenis wta|apuestas tercera division|apuestas tercera division españa|apuestas tipos|apuestas tips|apuestas tipster|apuestas tipster para hoy|apuestas topuria holloway
cuotas|apuestas torneos de golf|apuestas torneos de tenis|apuestas trucos|apuestas uefa champions league|apuestas uefa europa
league|apuestas ufc|apuestas ufc chile|apuestas ufc como funciona|apuestas ufc hoy|apuestas ufc ilia
topuria|apuestas ufc online|apuestas ufc pronósticos|apuestas ufc telegram|apuestas ufc topuria|apuestas under over|apuestas unionistas villarreal|apuestas uruguay|apuestas uruguay colombia|apuestas uruguay corea|apuestas uruguay
vs colombia|apuestas us open golf|apuestas
us open tenis|apuestas valencia|apuestas valencia barcelona|apuestas valencia
betis|apuestas valencia madrid|apuestas valencia real madrid|apuestas valladolid
barcelona|apuestas valladolid valencia|apuestas valor app|apuestas valor en directo|apuestas valor galgos|apuestas venezuela|apuestas venezuela
argentina|apuestas venezuela bolivia|apuestas venezuela
ecuador|apuestas villarreal|apuestas villarreal athletic|apuestas villarreal barcelona|apuestas villarreal
bayern|apuestas villarreal betis|apuestas villarreal
liverpool|apuestas villarreal manchester|apuestas villarreal manchester united|apuestas villarreal vs real
madrid|apuestas virtuales|apuestas virtuales
colombia|apuestas virtuales futbol|apuestas virtuales sin dinero|apuestas vivo|apuestas vuelta a españa|apuestas vuelta españa|apuestas william hill partidos de hoy|apuestas y casino|apuestas y casinos|apuestas y juegos de
azar|apuestas y pronosticos|apuestas y pronosticos de futbol|apuestas y pronosticos deportivos|apuestas y resultados|apuestas-deportivas|apuestas-deportivas.es
pronosticos|arbitro nba apuestas|argentina apuestas|argentina colombia apuestas|argentina croacia apuestas|argentina francia apuestas|argentina mexico apuestas|argentina peru apuestas|argentina uruguay apuestas|argentina vs bolivia apuestas|argentina vs
chile apuestas|argentina vs colombia apuestas|argentina vs francia apuestas|argentina
vs. colombia apuestas|asi se gana en las apuestas deportivas|asiatico apuestas|asiatico en apuestas|asiaticos apuestas|athletic barcelona apuestas|athletic manchester united
apuestas|athletic osasuna apuestas|athletic real madrid
apuestas|atletico barcelona apuestas|atletico de madrid apuestas|atlético
de madrid apuestas|atletico de madrid real madrid apuestas|atletico de madrid vs
barcelona apuestas|atletico madrid real madrid apuestas|atletico madrid vs real madrid apuestas|atletico real madrid apuestas|atletico vs real madrid apuestas|avisador de
cuotas apuestas|bajada de cuotas apuestas|baloncesto apuestas|barbastro barcelona apuestas|barca
apuestas|barca bayern apuestas|barca inter apuestas|barca madrid apuestas|barça madrid apuestas|barca vs atletico apuestas|barca vs
madrid apuestas|barca vs real madrid apuestas|barcelona – real madrid apuestas|barcelona apuestas|barcelona atletico apuestas|barcelona atletico de madrid apuestas|barcelona atletico madrid apuestas|barcelona betis apuestas|barcelona casa
de apuestas|barcelona inter apuestas|barcelona psg apuestas|barcelona real madrid apuestas|barcelona real
sociedad apuestas|barcelona sevilla apuestas|barcelona valencia apuestas|barcelona
vs athletic bilbao apuestas|barcelona vs atlético
madrid apuestas|barcelona vs betis apuestas|barcelona vs celta de
vigo apuestas|barcelona vs espanyol apuestas|barcelona
vs girona apuestas|barcelona vs madrid apuestas|barcelona vs real madrid apuestas|barcelona vs real sociedad
apuestas|barcelona vs sevilla apuestas|barcelona vs villarreal apuestas|base de datos cuotas apuestas deportivas|bayern real madrid apuestas|beisbol apuestas|best america apuestas|bet apuestas chile|bet apuestas
en vivo|betis – chelsea apuestas|betis apuestas|betis barcelona apuestas|betis chelsea
apuestas|betis madrid apuestas|betis sevilla
apuestas|betsson tu sitio de apuestas online|blog apuestas baloncesto|blog apuestas ciclismo|blog apuestas nba|blog apuestas tenis|blog de apuestas de tenis|bono apuestas|bono apuestas deportivas|bono apuestas
deportivas sin deposito|bono apuestas gratis|bono apuestas gratis sin deposito|bono
apuestas sin deposito|bono bienvenida apuestas|bono bienvenida apuestas deportivas|bono bienvenida apuestas
españa|bono bienvenida apuestas sin deposito|bono bienvenida apuestas sin depósito|bono bienvenida casa apuestas|bono bienvenida casa de apuestas|bono bienvenida marca apuestas|bono casa apuestas|bono casa de apuestas|bono casa de apuestas sin ingreso|bono casas
de apuestas|bono de apuestas|bono de apuestas gratis sin deposito|bono
de bienvenida apuestas|bono de bienvenida apuestas deportivas|bono de bienvenida casa de apuestas|bono de bienvenida casas de apuestas|bono
de casas de apuestas|bono de registro apuestas|bono de registro apuestas deportivas|bono de registro
casa de apuestas|bono gratis apuestas|bono marca apuestas|bono por registro apuestas|bono por registro apuestas deportivas|bono por registro casa de apuestas|bono registro apuestas|bono sin deposito apuestas|bono sin depósito apuestas|bono sin deposito apuestas deportivas|bono sin depósito apuestas deportivas|bono sin deposito casa de apuestas|bono sin deposito marca
apuestas|bono sin ingreso apuestas|bono sin ingreso apuestas deportivas|bonos apuestas|bonos apuestas colombia|bonos apuestas deportivas|bonos apuestas
deportivas sin deposito|bonos apuestas gratis|bonos apuestas sin deposito|bonos apuestas
sin depósito|bonos bienvenida apuestas|bonos bienvenida
casas apuestas|bonos bienvenida casas de apuestas|bonos casa de apuestas|bonos casas apuestas|bonos casas de
apuestas|bonos casas de apuestas colombia|bonos casas de apuestas deportivas|bonos casas de apuestas españa|bonos casas de apuestas nuevas|bonos
casas de apuestas sin deposito|bonos casas de apuestas sin depósito|bonos de apuestas|bonos
de apuestas deportivas|bonos de apuestas gratis|bonos de apuestas sin deposito|bonos
de bienvenida apuestas|bonos de bienvenida apuestas deportivas|bonos de bienvenida casa de apuestas|bonos de bienvenida casas
de apuestas|bonos de bienvenida de casas de apuestas|bonos de bienvenida en casas de apuestas|bonos de casas de apuestas|bonos de casas de apuestas sin deposito|bonos en casa de apuestas|bonos en casas de apuestas sin deposito|bonos gratis
apuestas|bonos gratis apuestas deportivas|bonos gratis casas de apuestas|bonos gratis sin deposito apuestas|bonos paginas de apuestas|bonos registro casas
de apuestas|bonos sin deposito apuestas|bonos sin depósito apuestas|bonos sin deposito apuestas
deportivas|bonos sin deposito casas de apuestas|bot de apuestas deportivas gratis|boxeo apuestas|brasil colombia apuestas|brasil peru apuestas|brasil vs colombia apuestas|buenas apuestas para
hoy|buscador cuotas apuestas|buscador de apuestas seguras|buscador de cuotas apuestas|buscador de cuotas de apuestas|buscar apuestas seguras|caballos apuestas|calculador de apuestas|calculador de cuotas
apuestas|calculadora apuestas|calculadora apuestas combinadas|calculadora apuestas de sistema|calculadora apuestas
deportivas|calculadora apuestas deportivas seguras|calculadora apuestas multiples|calculadora apuestas segura|calculadora
apuestas seguras|calculadora apuestas sistema|calculadora apuestas yankee|calculadora arbitraje apuestas|calculadora cubrir apuestas|calculadora cuotas apuestas|calculadora de
apuestas|calculadora de apuestas combinadas|calculadora de apuestas de
futbol|calculadora de apuestas de sistema|calculadora de apuestas deportivas|calculadora de
apuestas multiples|calculadora de apuestas seguras|calculadora de apuestas sistema|calculadora de apuestas surebets|calculadora de arbitraje apuestas|calculadora de cuotas apuestas|calculadora de cuotas de
apuestas|calculadora para apuestas deportivas|calculadora poisson apuestas|calculadora poisson apuestas deportivas|calculadora poisson para apuestas|calculadora scalping apuestas deportivas|calculadora sistema apuestas|calculadora stake apuestas|calculadora trading apuestas|calcular apuestas|calcular apuestas deportivas|calcular apuestas futbol|calcular apuestas
sistema|calcular cuotas apuestas|calcular cuotas apuestas combinadas|calcular cuotas apuestas
deportivas|calcular cuotas de apuestas|calcular ganancias apuestas deportivas|calcular momios apuestas|calcular probabilidad cuota
apuestas|calcular stake apuestas|calcular unidades apuestas|calcular yield apuestas|calculo
de apuestas|calculo de apuestas deportivas|cambio de cuotas apuestas|campeon champions
apuestas|campeon eurocopa apuestas|campeon liga apuestas|campeon nba apuestas|canales de apuestas gratis|carrera de caballos apuestas|carrera de caballos apuestas juego|carrera
de caballos con apuestas|carrera de galgos apuestas|carreras de caballos apuestas|carreras de caballos apuestas online|carreras de
caballos con apuestas|carreras de caballos juegos de apuestas|carreras de galgos apuestas|carreras de galgos apuestas online|carreras de galgos apuestas trucos|carreras galgos
apuestas|casa apuestas argentina|casa apuestas atletico
de madrid|casa apuestas barcelona|casa apuestas betis|casa apuestas bono bienvenida|casa apuestas bono gratis|casa
apuestas bono sin deposito|casa apuestas cerca de mi|casa apuestas chile|casa apuestas colombia|casa apuestas
con mejores cuotas|casa apuestas deportivas|casa apuestas
españa|casa apuestas española|casa apuestas eurocopa|casa apuestas futbol|casa apuestas mejores cuotas|casa apuestas mundial|casa apuestas nueva|casa apuestas nuevas|casa
apuestas online|casa apuestas peru|casa apuestas valencia|casa de apuestas|casa de apuestas 10 euros gratis|casa de apuestas argentina|casa de apuestas atletico de madrid|casa de apuestas baloncesto|casa de apuestas barcelona|casa de apuestas beisbol|casa de apuestas betis|casa de apuestas bono|casa de apuestas bono bienvenida|casa de apuestas bono de bienvenida|casa de
apuestas bono gratis|casa de apuestas bono por registro|casa
de apuestas bono sin deposito|casa de apuestas boxeo|casa de apuestas caballos|casa
de apuestas carreras de caballos|casa de apuestas cerca de mi|casa de apuestas cerca de mí|casa de apuestas champions league|casa de apuestas
chile|casa de apuestas ciclismo|casa de apuestas colombia|casa de
apuestas con bono de bienvenida|casa de apuestas con bono sin deposito|casa de
apuestas con cuotas mas altas|casa de apuestas con esports|casa de apuestas con las mejores cuotas|casa de
apuestas con licencia en españa|casa de apuestas con mejores cuotas|casa
de apuestas con pago anticipado|casa de apuestas con paypal|casa de
apuestas copa america|casa de apuestas de caballos|casa de apuestas de colombia|casa de
apuestas de españa|casa de apuestas de futbol|casa de apuestas de fútbol|casa de apuestas de futbol peru|casa de apuestas de peru|casa de apuestas del madrid|casa de apuestas del real madrid|casa
de apuestas deportivas|casa de apuestas deportivas cerca de mi|casa de apuestas deportivas en argentina|casa de apuestas deportivas en chile|casa de apuestas deportivas en colombia|casa
de apuestas deportivas en españa|casa de apuestas deportivas en madrid|casa
de apuestas deportivas españa|casa de apuestas deportivas españolas|casa de apuestas deportivas madrid|casa de
apuestas deportivas mexico|casa de apuestas deportivas online|casa de apuestas deportivas peru|casa de apuestas deposito 5 euros|casa
de apuestas deposito minimo|casa de apuestas deposito
minimo 1 euro|casa de apuestas depósito mínimo 1 euro|casa de apuestas en españa|casa de apuestas
en linea|casa de apuestas en madrid|casa de apuestas en perú|casa de apuestas en vivo|casa de apuestas españa|casa de apuestas españa
inglaterra|casa de apuestas española|casa de apuestas españolas|casa de apuestas
esports|casa de apuestas eurocopa|casa de apuestas europa league|casa
de apuestas f1|casa de apuestas formula 1|casa de apuestas
futbol|casa de apuestas ingreso minimo|casa de apuestas ingreso minimo 1 euro|casa de apuestas ingreso mínimo 1 euro|casa de apuestas legales|casa de apuestas legales en colombia|casa de
apuestas legales en españa|casa de apuestas libertadores|casa
de apuestas liga española|casa de apuestas madrid|casa de apuestas mas segura|casa de apuestas mejores|casa de
apuestas méxico|casa de apuestas minimo 5 euros|casa de
apuestas mlb|casa de apuestas mundial|casa de apuestas nba|casa de apuestas nfl|casa de apuestas nueva|casa
de apuestas nuevas|casa de apuestas oficial del real madrid|casa de apuestas oficial real madrid|casa de apuestas online|casa de apuestas online argentina|casa de
apuestas online chile|casa de apuestas online españa|casa
de apuestas online mexico|casa de apuestas online paraguay|casa
de apuestas online peru|casa de apuestas online usa|casa de apuestas online venezuela|casa de apuestas pago anticipado|casa de apuestas para boxeo|casa de apuestas para ufc|casa de
apuestas peru|casa de apuestas perú|casa de apuestas peru online|casa de apuestas por paypal|casa
de apuestas promociones|casa de apuestas que regalan dinero|casa de apuestas real madrid|casa de apuestas regalo de bienvenida|casa de apuestas sevilla|casa de apuestas sin dinero|casa de apuestas sin ingreso
minimo|casa de apuestas sin licencia en españa|casa de apuestas sin minimo de ingreso|casa de apuestas stake|casa
de apuestas tenis|casa de apuestas ufc|casa de apuestas valencia|casa de apuestas venezuela|casa de apuestas virtuales|casa de apuestas vive la suerte|casa oficial de apuestas del real madrid|casas
apuestas asiaticas|casas apuestas bono sin deposito|casas apuestas
bonos sin deposito|casas apuestas caballos|casas apuestas chile|casas apuestas ciclismo|casas apuestas con licencia|casas apuestas con licencia en españa|casas apuestas
deportivas|casas apuestas deportivas colombia|casas
apuestas deportivas españa|casas apuestas deportivas
españolas|casas apuestas deportivas nuevas|casas apuestas
españa|casas apuestas españolas|casas apuestas esports|casas apuestas eurocopa|casas apuestas golf|casas apuestas ingreso minimo 5 euros|casas apuestas legales|casas apuestas legales españa|casas apuestas licencia|casas apuestas
licencia españa|casas apuestas mexico|casas apuestas mundial|casas apuestas
nba|casas apuestas nuevas|casas apuestas nuevas españa|casas apuestas ofertas|casas apuestas online|casas apuestas paypal|casas
apuestas peru|casas apuestas sin licencia|casas apuestas tenis|casas asiaticas apuestas|casas
de apuestas|casas de apuestas 5 euros|casas de apuestas app|casas
de apuestas argentinas|casas de apuestas asiaticas|casas de apuestas baloncesto|casas de apuestas barcelona|casas de apuestas bono
bienvenida|casas de apuestas bono de bienvenida|casas de apuestas bono
por registro|casas de apuestas bono sin deposito|casas de apuestas
bono sin ingreso|casas de apuestas bonos|casas de
apuestas bonos de bienvenida|casas de apuestas bonos gratis|casas
de apuestas bonos sin deposito|casas de apuestas boxeo|casas de
apuestas caballos|casas de apuestas carreras de caballos|casas de apuestas casino|casas de apuestas casino online|casas de apuestas cerca de mi|casas de apuestas champions league|casas de apuestas chile|casas de apuestas ciclismo|casas
de apuestas colombia|casas de apuestas com|casas de
apuestas con app|casas de apuestas con apuestas gratis|casas de apuestas con bono|casas de apuestas con bono de bienvenida|casas de apuestas con bono de
registro|casas de apuestas con bono por registro|casas
de apuestas con bono sin deposito|casas de apuestas con bonos|casas de apuestas con bonos gratis|casas de apuestas con bonos sin deposito|casas
de apuestas con deposito minimo|casas de apuestas con esports|casas de apuestas con handicap asiatico|casas de apuestas con licencia|casas de apuestas con licencia en españa|casas de apuestas con licencia españa|casas
de apuestas con licencia española|casas de apuestas con mejores cuotas|casas de apuestas con pago anticipado|casas de apuestas
con paypal|casas de apuestas con paypal en perú|casas
de apuestas con promociones|casas de apuestas con ruleta en vivo|casas de apuestas copa del rey|casas de apuestas de caballos|casas de apuestas de
españa|casas de apuestas de futbol|casas de apuestas de fútbol|casas de apuestas de peru|casas
de apuestas deportivas|casas de apuestas deportivas asiaticas|casas de apuestas deportivas colombia|casas de
apuestas deportivas comparativa|casas de apuestas deportivas con paypal|casas de apuestas
deportivas en chile|casas de apuestas deportivas en españa|casas de apuestas deportivas en linea|casas de
apuestas deportivas en madrid|casas de apuestas deportivas en mexico|casas de apuestas deportivas en peru|casas de apuestas deportivas en sevilla|casas de apuestas deportivas en valencia|casas de
apuestas deportivas españa|casas de apuestas deportivas
españolas|casas de apuestas deportivas legales|casas de apuestas deportivas madrid|casas de apuestas deportivas mexico|casas de apuestas deportivas nuevas|casas de apuestas deportivas online|casas de apuestas deportivas
peru|casas de apuestas deportivas perú|casas
de apuestas deposito minimo 1 euro|casas de apuestas depósito mínimo 1 euro|casas de
apuestas dinero gratis|casas de apuestas en argentina|casas de apuestas en barcelona|casas de apuestas en chile|casas de
apuestas en colombia|casas de apuestas en españa|casas de apuestas en españa online|casas
de apuestas en linea|casas de apuestas en madrid|casas de apuestas en méxico|casas de apuestas en peru|casas de apuestas
en perú|casas de apuestas en sevilla|casas de apuestas en uruguay|casas de
apuestas en valencia|casas de apuestas en venezuela|casas de apuestas
equipos de futbol|casas de apuestas españa|casas de apuestas españa alemania|casas de apuestas españa inglaterra|casas de apuestas españa licencia|casas de apuestas españa nuevas|casas de apuestas españa
online|casas de apuestas española|casas
de apuestas españolas|casas de apuestas españolas con licencia|casas de apuestas españolas online|casas de apuestas esports|casas de apuestas eurocopa|casas de apuestas eurocopa 2024|casas de
apuestas europa league|casas de apuestas f1|casas de apuestas fisicas en barcelona|casas de apuestas fisicas en españa|casas de apuestas formula 1|casas de apuestas fuera de
españa|casas de apuestas futbol|casas de apuestas fútbol|casas de apuestas futbol
españa|casas de apuestas ganador eurocopa|casas de apuestas gratis|casas de apuestas ingreso minimo|casas
de apuestas ingreso minimo 1 euro|casas de apuestas
ingreso minimo 5 euros|casas de apuestas inter barcelona|casas de apuestas legales|casas de apuestas legales en colombia|casas
de apuestas legales en españa|casas de apuestas legales en mexico|casas de apuestas legales españa|casas de
apuestas legales mx|casas de apuestas licencia|casas de
apuestas licencia españa|casas de apuestas lista|casas de apuestas
madrid|casas de apuestas mas seguras|casas de apuestas mejores bonos|casas de
apuestas mejores cuotas|casas de apuestas mexico|casas de apuestas méxico|casas de
apuestas minimo 5 euros|casas de apuestas mlb|casas de apuestas
mundial|casas de apuestas mundial baloncesto|casas de apuestas mundiales|casas de apuestas nba|casas de apuestas no reguladas en españa|casas de apuestas nueva ley|casas de
apuestas nuevas|casas de apuestas nuevas en colombia|casas de apuestas nuevas en españa|casas de apuestas nuevas españa|casas de apuestas ofertas|casas de apuestas online|casas de apuestas online argentina|casas de apuestas online colombia|casas de apuestas online deportivas|casas de apuestas online ecuador|casas de apuestas online en argentina|casas de apuestas online en chile|casas
de apuestas online en colombia|casas de apuestas online en españa|casas de apuestas online en mexico|casas de apuestas online españa|casas
de apuestas online mas fiables|casas de apuestas online mexico|casas de apuestas online nuevas|casas de apuestas online peru|casas de apuestas online usa|casas de apuestas online venezuela|casas de
apuestas pago paypal|casas de apuestas para ufc|casas de apuestas paypal|casas de apuestas peru
bono sin deposito|casas de apuestas presenciales en españa|casas de apuestas
Your comment is awaiting moderation.
promovix.click – Content reads clearly, helpful examples made concepts easy to grasp.
Your comment is awaiting moderation.
trafficstorm.click – Content reads clearly, helpful examples made concepts easy to grasp.
Your comment is awaiting moderation.
promoscope.click – Color palette felt calming, nothing distracting, just focused, thoughtful design.
Your comment is awaiting moderation.
digitallift.click – Navigation felt smooth, found everything quickly without any confusing steps.
Your comment is awaiting moderation.
seohero.click – Mobile version looks perfect; no glitches, fast scrolling, crisp text.
Your comment is awaiting moderation.
(10 euros gratis apuestas|10 mejores casas de apuestas|10 trucos para ganar apuestas|15 euros gratis marca apuestas|1×2 apuestas|1×2 apuestas
deportivas|1×2 apuestas que significa|1×2 en apuestas|1×2 en apuestas que significa|1×2 que significa en apuestas|5 euros gratis
apuestas|9 apuestas que siempre ganaras|a partir de cuanto
se declara apuestas|actividades de juegos de azar y apuestas|ad apuestas deportivas|aleksandre topuria ufc apuestas|algoritmo para ganar apuestas deportivas|america
apuestas|análisis nba apuestas|aplicacion android apuestas deportivas|aplicacion apuestas deportivas|aplicacion apuestas deportivas android|aplicación de apuestas online|aplicacion para hacer apuestas|aplicacion para hacer apuestas de
futbol|aplicación para hacer apuestas de fútbol|aplicaciones apuestas deportivas android|aplicaciones apuestas deportivas gratis|aplicaciones de apuestas android|aplicaciones de apuestas de fútbol|aplicaciones de apuestas
deportivas|aplicaciones de apuestas deportivas peru|aplicaciones de apuestas deportivas perú|aplicaciones de apuestas en colombia|aplicaciones de apuestas gratis|aplicaciones de apuestas online|aplicaciones de apuestas seguras|aplicaciones de apuestas sin dinero|aplicaciones para hacer apuestas|apostar seguro apuestas deportivas|app android apuestas deportivas|app apuestas|app apuestas android|app apuestas de futbol|app apuestas
deportivas|app apuestas deportivas android|app apuestas deportivas argentina|app apuestas deportivas colombia|app apuestas deportivas ecuador|app apuestas deportivas españa|app apuestas deportivas gratis|app
apuestas entre amigos|app apuestas futbol|app apuestas gratis|app apuestas sin dinero|app casa de apuestas|app casas de apuestas|app control apuestas|app de apuestas|app de apuestas android|app de apuestas casino|app de apuestas colombia|app
de apuestas con bono de bienvenida|app de apuestas de futbol|app de apuestas deportivas|app de apuestas deportivas android|app de apuestas deportivas argentina|app de
apuestas deportivas colombia|app de apuestas deportivas en españa|app de apuestas deportivas peru|app de apuestas
deportivas perú|app de apuestas deportivas sin dinero|app de apuestas ecuador|app de apuestas en colombia|app de apuestas en españa|app de apuestas
en venezuela|app de apuestas futbol|app de apuestas gratis|app de apuestas online|app de apuestas para android|app de apuestas para ganar
dinero|app de apuestas peru|app de apuestas reales|app
de casas de apuestas|app marca apuestas android|app moviles
de apuestas|app para apuestas|app para apuestas de futbol|app para apuestas
deportivas|app para apuestas deportivas en español|app para ganar apuestas
deportivas|app para hacer apuestas|app para hacer apuestas deportivas|app para
hacer apuestas entre amigos|app para llevar control de apuestas|app pronosticos apuestas deportivas|app versus apuestas|apps apuestas
mundial|apps de apuestas|apps de apuestas con bono de bienvenida|apps de apuestas de futbol|apps de apuestas deportivas peru|apps de apuestas mexico|apps para apuestas|aprender a hacer apuestas deportivas|aprender hacer apuestas
deportivas|apuesta del dia apuestas deportivas|apuestas
10 euros gratis|apuestas 100 seguras|apuestas 1×2|apuestas 1X2|apuestas 2 division|apuestas 3 division|apuestas
a caballos|apuestas a carreras de caballos|apuestas a colombia|apuestas a corners|apuestas a ganar|apuestas
a jugadores nba|apuestas a la baja|apuestas a la nfl|apuestas al barcelona|apuestas al dia|apuestas al empate|apuestas al
mundial|apuestas al tenis wta|apuestas alaves barcelona|apuestas alcaraz hoy|apuestas alemania españa|apuestas alonso campeon del mundo|apuestas altas y bajas|apuestas altas y bajas nfl|apuestas ambos
equipos marcan|apuestas america|apuestas android|apuestas anillo nba|apuestas antes del mundial|apuestas anticipadas|apuestas anticipadas
nba|apuestas apps|apuestas arabia argentina|apuestas argentina|apuestas argentina
campeon del mundo|apuestas argentina canada|apuestas argentina colombia|apuestas argentina croacia|apuestas argentina españa|apuestas argentina francia|apuestas argentina francia
cuanto paga|apuestas argentina francia mundial|apuestas argentina gana el mundial|apuestas argentina gana mundial|apuestas argentina
holanda|apuestas argentina mexico|apuestas argentina
méxico|apuestas argentina mundial|apuestas argentina online|apuestas
argentina paises bajos|apuestas argentina polonia|apuestas argentina
uruguay|apuestas argentina vs australia|apuestas
argentina vs colombia|apuestas argentina vs francia|apuestas argentina vs peru|apuestas argentinas|apuestas arsenal real madrid|apuestas ascenso a primera
division|apuestas ascenso a segunda|apuestas asiaticas|apuestas asiatico|apuestas athletic|apuestas
athletic atletico|apuestas athletic barça|apuestas athletic barcelona|apuestas athletic betis|apuestas athletic
manchester|apuestas athletic manchester united|apuestas athletic osasuna|apuestas athletic real|apuestas
athletic real madrid|apuestas athletic real sociedad|apuestas athletic
real sociedad final|apuestas athletic roma|apuestas athletic sevilla|apuestas
athletic valencia|apuestas atletico|apuestas atletico barcelona|apuestas atletico barsa|apuestas atletico
campeon champions|apuestas atletico campeon de liga|apuestas atlético copenhague|apuestas atletico de madrid|apuestas atlético de madrid|apuestas atletico de madrid barcelona|apuestas atletico de madrid gana la liga|apuestas
atletico de madrid real madrid|apuestas atlético de madrid real madrid|apuestas atletico de madrid vs barcelona|apuestas atletico madrid|apuestas atletico madrid
real madrid|apuestas atletico madrid vs barcelona|apuestas atletico real madrid|apuestas atletico real madrid champions|apuestas atletismo|apuestas bajas|apuestas baloncesto|apuestas baloncesto acb|apuestas
baloncesto handicap|apuestas baloncesto hoy|apuestas baloncesto juegos olimpicos|apuestas baloncesto nba|apuestas baloncesto pronostico|apuestas
baloncesto pronósticos|apuestas baloncesto prorroga|apuestas barca|apuestas barca athletic|apuestas barca atletico|apuestas
barca bayern|apuestas barca bayern munich|apuestas barca
girona|apuestas barca hoy|apuestas barça hoy|apuestas barca inter|apuestas barca juventus|apuestas barca madrid|apuestas barça madrid|apuestas barca real madrid|apuestas barca vs
juve|apuestas barca vs madrid|apuestas barca vs psg|apuestas barcelona|apuestas barcelona alaves|apuestas barcelona athletic|apuestas barcelona atletico|apuestas
barcelona atletico de madrid|apuestas barcelona atlético de madrid|apuestas barcelona atletico madrid|apuestas barcelona bayern|apuestas barcelona betis|apuestas barcelona campeon de liga|apuestas
barcelona celta|apuestas barcelona espanyol|apuestas barcelona gana la champions|apuestas barcelona
girona|apuestas barcelona granada|apuestas barcelona
hoy|apuestas barcelona inter|apuestas barcelona madrid|apuestas barcelona osasuna|apuestas barcelona psg|apuestas barcelona real madrid|apuestas barcelona
real sociedad|apuestas barcelona sevilla|apuestas barcelona valencia|apuestas barcelona villarreal|apuestas barcelona vs atletico madrid|apuestas barcelona vs madrid|apuestas barcelona vs
real madrid|apuestas barsa madrid|apuestas basket hoy|apuestas bayern barcelona|apuestas bayern vs barcelona|apuestas beisbol|apuestas béisbol|apuestas
beisbol mlb|apuestas beisbol pronosticos|apuestas
beisbol venezolano|apuestas betis|apuestas betis – chelsea|apuestas betis barcelona|apuestas betis
chelsea|apuestas betis fiorentina|apuestas betis girona|apuestas betis madrid|apuestas betis mallorca|apuestas betis real madrid|apuestas betis real sociedad|apuestas betis sevilla|apuestas
betis valencia|apuestas betis valladolid|apuestas betis vs valencia|apuestas betplay hoy colombia|apuestas betsson peru|apuestas bienvenida|apuestas billar
online|apuestas bolivia vs colombia|apuestas bono|apuestas bono bienvenida|apuestas bono de bienvenida|apuestas bono
de bienvenida sin deposito|apuestas bono gratis|apuestas bono sin deposito|apuestas bonos sin deposito|apuestas borussia real madrid|apuestas boxeo|apuestas boxeo
de campeonato|apuestas boxeo españa|apuestas boxeo español|apuestas boxeo femenino
olimpiadas|apuestas boxeo hoy|apuestas boxeo online|apuestas brasil colombia|apuestas brasil peru|apuestas brasil uruguay|apuestas brasil
vs colombia|apuestas brasil vs peru|apuestas caballos|apuestas caballos colocado|apuestas
caballos españa|apuestas caballos hipodromo|apuestas caballos
hoy|apuestas caballos madrid|apuestas caballos online|apuestas
caballos sanlucar de barrameda|apuestas caballos zarzuela|apuestas calculador|apuestas campeon|apuestas campeon champions|apuestas campeón champions|apuestas campeon champions 2025|apuestas campeon champions league|apuestas campeon conference league|apuestas campeon copa america|apuestas campeon copa del rey|apuestas campeon de champions|apuestas campeon de la champions|apuestas campeon de liga|apuestas campeon del mundo|apuestas campeon eurocopa|apuestas campeón eurocopa|apuestas campeon europa league|apuestas
campeon f1|apuestas campeon f1 2025|apuestas campeon formula 1|apuestas campeon libertadores|apuestas campeon liga|apuestas campeon liga bbva|apuestas
campeon liga española|apuestas campeon liga santander|apuestas campeon motogp 2025|apuestas campeon mundial|apuestas campeón mundial|apuestas campeon mundial baloncesto|apuestas campeon nba|apuestas
campeón nba|apuestas campeon premier|apuestas campeon premier league|apuestas campeon roland garros|apuestas campeonato f1|apuestas campeonatos de futbol|apuestas carrera de caballos|apuestas carrera de caballos hoy|apuestas carrera de caballos nocturnas|apuestas carrera de
galgos fin de semana|apuestas carrera de galgos hoy|apuestas carrera
de galgos nocturnas|apuestas carreras caballos|apuestas carreras caballos sanlucar|apuestas carreras de caballos|apuestas carreras de caballos en directo|apuestas carreras de caballos
en vivo|apuestas carreras de caballos españa|apuestas carreras de caballos hoy|apuestas carreras de caballos nacionales|apuestas carreras
de caballos nocturnas|apuestas carreras de caballos online|apuestas
carreras de caballos sanlucar|apuestas carreras de caballos sanlúcar|apuestas carreras
de galgos|apuestas carreras de galgos en vivo|apuestas carreras de galgos nocturnas|apuestas
carreras de galgos pre partido|apuestas casino|apuestas casino barcelona|apuestas casino futbol|apuestas casino gran madrid|apuestas casino gratis|apuestas casino madrid|apuestas
casino online|apuestas casino online argentina|apuestas casinos|apuestas casinos online|apuestas celta|apuestas celta barcelona|apuestas celta betis|apuestas celta eibar|apuestas celta espanyol|apuestas celta granada|apuestas celta
madrid|apuestas celta manchester|apuestas celta real madrid|apuestas champion league|apuestas champions foro|apuestas champions hoy|apuestas champions
league|apuestas champions league – pronósticos|apuestas champions league 2025|apuestas champions league hoy|apuestas champions league pronosticos|apuestas champions league pronósticos|apuestas champions pronosticos|apuestas chelsea barcelona|apuestas chelsea
betis|apuestas chile|apuestas chile peru|apuestas chile venezuela|apuestas chile vs colombia|apuestas chile vs uruguay|apuestas ciclismo|apuestas ciclismo en vivo|apuestas ciclismo femenino|apuestas ciclismo tour francia|apuestas ciclismo vuelta|apuestas ciclismo vuelta
a españa|apuestas ciclismo vuelta españa|apuestas city madrid|apuestas city real madrid|apuestas clasico|apuestas clasico español|apuestas clasico real madrid barcelona|apuestas clasificacion mundial|apuestas colombia|apuestas colombia
argentina|apuestas colombia brasil|apuestas colombia
paraguay|apuestas colombia uruguay|apuestas colombia vs argentina|apuestas colombia vs brasil|apuestas combinadas|apuestas combinadas como funcionan|apuestas combinadas de futbol|apuestas combinadas de fútbol|apuestas combinadas foro|apuestas combinadas
futbol|apuestas combinadas hoy|apuestas combinadas
mismo partido|apuestas combinadas mundial|apuestas combinadas
nba|apuestas combinadas para esta semana|apuestas combinadas para hoy|apuestas combinadas para mañana|apuestas combinadas pronosticos|apuestas combinadas recomendadas|apuestas combinadas seguras|apuestas combinadas seguras para
hoy|apuestas combinadas seguras para mañana|apuestas como ganar|apuestas comparador|apuestas con bono de
bienvenida|apuestas con dinero ficticio|apuestas con dinero real|apuestas con dinero virtual|apuestas con handicap|apuestas con handicap asiatico|apuestas con handicap baloncesto|apuestas con mas probabilidades de ganar|apuestas con paypal|apuestas con tarjeta de credito|apuestas con tarjeta de debito|apuestas consejos|apuestas
copa|apuestas copa africa|apuestas copa america|apuestas copa américa|apuestas copa argentina|apuestas copa brasil|apuestas
copa davis|apuestas copa de europa|apuestas copa del mundo|apuestas copa del rey|apuestas copa del rey baloncesto|apuestas copa del
rey final|apuestas copa del rey futbol|apuestas copa del rey ganador|apuestas copa del
rey hoy|apuestas copa del rey pronosticos|apuestas copa del rey
pronósticos|apuestas copa europa|apuestas copa italia|apuestas
copa libertadores|apuestas copa mundial de hockey|apuestas
copa rey|apuestas copa sudamericana|apuestas corners|apuestas corners hoy|apuestas croacia argentina|apuestas cuartos eurocopa|apuestas cuotas|apuestas cuotas altas|apuestas cuotas bajas|apuestas de 1 euro|apuestas de
baloncesto|apuestas de baloncesto hoy|apuestas de baloncesto nba|apuestas de baloncesto para hoy|apuestas de
beisbol|apuestas de beisbol para hoy|apuestas de blackjack en linea|apuestas de
boxeo|apuestas de boxeo canelo|apuestas de boxeo en las vegas|apuestas de boxeo hoy|apuestas de boxeo online|apuestas de caballo|apuestas de caballos|apuestas
de caballos como funciona|apuestas de caballos como se juega|apuestas de caballos en colombia|apuestas de caballos en españa|apuestas de caballos en linea|apuestas de caballos españa|apuestas de caballos
ganador y colocado|apuestas de caballos internacionales|apuestas de
caballos juegos|apuestas de caballos online|apuestas de caballos
online en venezuela|apuestas de caballos por internet|apuestas de caballos pronosticos|apuestas de caballos pronósticos|apuestas de carrera
de caballos|apuestas de carreras de caballos|apuestas de carreras de caballos online|apuestas de casino|apuestas
de casino online|apuestas de casino por internet|apuestas de champions league|apuestas de
ciclismo|apuestas de colombia|apuestas de copa america|apuestas de
corners|apuestas de deportes en linea|apuestas de deportes online|apuestas de dinero|apuestas de esports|apuestas de eurocopa|apuestas de europa league|apuestas de f1|apuestas de formula 1|apuestas de futbol|apuestas de fútbol|apuestas
de futbol app|apuestas de futbol argentina|apuestas de futbol colombia|apuestas de
futbol en colombia|apuestas de futbol en directo|apuestas
de futbol en linea|apuestas de futbol en vivo|apuestas de futbol español|apuestas
de futbol gratis|apuestas de futbol hoy|apuestas de
futbol mundial|apuestas de futbol online|apuestas de fútbol online|apuestas de futbol para hoy|apuestas de fútbol para hoy|apuestas
de futbol para hoy seguras|apuestas de futbol para mañana|apuestas de futbol peru|apuestas de futbol pronosticos|apuestas de fútbol pronósticos|apuestas
de futbol seguras|apuestas de futbol seguras para hoy|apuestas de futbol sin dinero|apuestas de galgos|apuestas de galgos
como ganar|apuestas de galgos en directo|apuestas de galgos
online|apuestas de galgos trucos|apuestas de golf|apuestas de hockey|apuestas de hockey sobre hielo|apuestas de
hoy|apuestas de hoy seguras|apuestas de juego|apuestas de juegos|apuestas
de juegos deportivos|apuestas de juegos online|apuestas de la champions league|apuestas de la copa
américa|apuestas de la eurocopa|apuestas de la europa league|apuestas de
la liga|apuestas de la liga bbva|apuestas de la liga española|apuestas de
la nba|apuestas de la nfl|apuestas de la ufc|apuestas de mlb|apuestas de nba|apuestas
de nba para hoy|apuestas de partidos|apuestas de partidos de futbol|apuestas de peleas ufc|apuestas de perros en vivo|apuestas
de perros virtuales|apuestas de peru|apuestas de sistema|apuestas de
sistema como funciona|apuestas de sistema explicacion|apuestas de sistema explicación|apuestas de tenis|apuestas de tenis de
mesa|apuestas de tenis en directo|apuestas de tenis hoy|apuestas de tenis
para hoy|apuestas de tenis pronosticos|apuestas de tenis seguras|apuestas de todo tipo|apuestas de ufc|apuestas de ufc hoy|apuestas del boxeo|apuestas del
clasico|apuestas del clasico real madrid barca|apuestas
del dia|apuestas del día|apuestas del dia de hoy|apuestas
del dia deportivas|apuestas del dia futbol|apuestas del mundial|apuestas del
partido de hoy|apuestas del real madrid|apuestas del rey|apuestas
del sistema|apuestas deporte|apuestas deportes|apuestas deportiva|apuestas deportivas|apuestas deportivas 1
euro|apuestas deportivas 10 euros gratis|apuestas deportivas 100 seguras|apuestas deportivas 1×2|apuestas
deportivas android|apuestas deportivas app|apuestas deportivas apps|apuestas
deportivas argentina|apuestas deportivas argentina futbol|apuestas deportivas argentina legal|apuestas deportivas atletico de madrid|apuestas deportivas baloncesto|apuestas
deportivas barca madrid|apuestas deportivas
barcelona|apuestas deportivas beisbol|apuestas deportivas bono|apuestas deportivas bono bienvenida|apuestas
deportivas bono de bienvenida|apuestas deportivas bono sin deposito|apuestas deportivas bonos de bienvenida|apuestas deportivas boxeo|apuestas deportivas caballos|apuestas
deportivas calculadora|apuestas deportivas campeon liga|apuestas deportivas casino|apuestas deportivas casino barcelona|apuestas deportivas casino online|apuestas
deportivas cerca de mi|apuestas deportivas champions league|apuestas deportivas
chile|apuestas deportivas ciclismo|apuestas deportivas colombia|apuestas
deportivas com|apuestas deportivas com foro|apuestas deportivas com
pronosticos|apuestas deportivas combinadas|apuestas deportivas combinadas para hoy|apuestas
deportivas como se juega|apuestas deportivas comparador|apuestas deportivas con bono gratis|apuestas deportivas con bonos gratis|apuestas deportivas con dinero ficticio|apuestas
deportivas con paypal|apuestas deportivas con puntos virtuales|apuestas deportivas consejos|apuestas deportivas consejos para ganar|apuestas deportivas copa america|apuestas deportivas copa del rey|apuestas deportivas copa libertadores|apuestas
deportivas copa mundial|apuestas deportivas corners|apuestas deportivas cual es
la mejor|apuestas deportivas cuotas altas|apuestas deportivas de baloncesto|apuestas
deportivas de boxeo|apuestas deportivas de colombia|apuestas deportivas de
futbol|apuestas deportivas de nba|apuestas
deportivas de nhl|apuestas deportivas de peru|apuestas deportivas de tenis|apuestas deportivas del dia|apuestas deportivas dinero
ficticio|apuestas deportivas directo|apuestas deportivas doble oportunidad|apuestas deportivas en argentina|apuestas
deportivas en chile|apuestas deportivas en colombia|apuestas deportivas en directo|apuestas deportivas en españa|apuestas
deportivas en español|apuestas deportivas en linea|apuestas deportivas
en línea|apuestas deportivas en peru|apuestas deportivas en perú|apuestas deportivas en sevilla|apuestas
deportivas en uruguay|apuestas deportivas en vivo|apuestas deportivas es|apuestas
deportivas es pronosticos|apuestas deportivas españa|apuestas deportivas españolas|apuestas deportivas esports|apuestas deportivas estadisticas|apuestas deportivas estrategias|apuestas deportivas estrategias seguras|apuestas deportivas eurocopa|apuestas deportivas europa league|apuestas deportivas f1|apuestas deportivas
faciles de ganar|apuestas deportivas formula 1|apuestas deportivas foro|apuestas deportivas foro futbol|apuestas deportivas foro tenis|apuestas deportivas francia argentina|apuestas deportivas futbol|apuestas deportivas fútbol|apuestas deportivas
futbol argentino|apuestas deportivas futbol colombia|apuestas deportivas futbol español|apuestas deportivas gana|apuestas deportivas ganadas|apuestas deportivas ganar dinero seguro|apuestas
deportivas gane|apuestas deportivas golf|apuestas deportivas gratis|apuestas deportivas
gratis con premios|apuestas deportivas gratis hoy|apuestas deportivas gratis sin deposito|apuestas deportivas handicap|apuestas deportivas handicap asiatico|apuestas deportivas hoy|apuestas deportivas impuestos|apuestas deportivas interior argentina|apuestas deportivas juegos olimpicos|apuestas
deportivas la liga|apuestas deportivas legales|apuestas deportivas legales en colombia|apuestas deportivas libres de impuestos|apuestas deportivas licencia españa|apuestas deportivas
liga española|apuestas deportivas listado|apuestas deportivas listado clasico|apuestas deportivas madrid|apuestas deportivas mas
seguras|apuestas deportivas mejor pagadas|apuestas deportivas mejores|apuestas deportivas mejores app|apuestas deportivas mejores casas|apuestas deportivas mejores cuotas|apuestas deportivas mejores paginas|apuestas deportivas mexico|apuestas
deportivas méxico|apuestas deportivas mlb|apuestas deportivas mlb hoy|apuestas deportivas multiples|apuestas
deportivas mundial|apuestas deportivas murcia|apuestas
deportivas nba|apuestas deportivas nba hoy|apuestas deportivas nfl|apuestas deportivas nhl|apuestas deportivas nuevas|apuestas deportivas ofertas|apuestas deportivas online|apuestas deportivas online argentina|apuestas deportivas
online chile|apuestas deportivas online colombia|apuestas deportivas online en colombia|apuestas deportivas online españa|apuestas deportivas online mexico|apuestas deportivas online paypal|apuestas deportivas online
peru|apuestas deportivas online por internet|apuestas deportivas pago
paypal|apuestas deportivas para ganar dinero|apuestas
deportivas para hoy|apuestas deportivas para hoy
pronosticos|apuestas deportivas partido suspendido|apuestas deportivas partidos de
hoy|apuestas deportivas paypal|apuestas deportivas peru|apuestas deportivas perú|apuestas deportivas peru vs ecuador|apuestas deportivas predicciones|apuestas deportivas promociones|apuestas deportivas pronostico|apuestas deportivas pronóstico|apuestas deportivas pronostico hoy|apuestas deportivas pronosticos|apuestas deportivas pronósticos|apuestas deportivas pronosticos expertos|apuestas deportivas pronosticos gratis|apuestas deportivas pronosticos nba|apuestas deportivas pronosticos tenis|apuestas deportivas que aceptan paypal|apuestas deportivas real madrid|apuestas deportivas regalo bienvenida|apuestas deportivas resultado
exacto|apuestas deportivas resultados|apuestas deportivas
rugby|apuestas deportivas seguras|apuestas deportivas seguras foro|apuestas deportivas seguras hoy|apuestas deportivas seguras para hoy|apuestas deportivas seguras telegram|apuestas deportivas
sevilla|apuestas deportivas simulador eurocopa|apuestas deportivas sin deposito|apuestas deportivas sin deposito inicial|apuestas deportivas sin dinero|apuestas deportivas sin dinero real|apuestas deportivas sin registro|apuestas
deportivas stake|apuestas deportivas stake 10|apuestas deportivas telegram españa|apuestas deportivas tenis|apuestas
deportivas tenis de mesa|apuestas deportivas tenis foro|apuestas deportivas tenis hoy|apuestas deportivas tips|apuestas deportivas tipster|apuestas deportivas ufc|apuestas deportivas uruguay|apuestas deportivas valencia|apuestas deportivas valencia barcelona|apuestas deportivas venezuela|apuestas deportivas virtuales|apuestas deportivas y
casino|apuestas deportivas y casino online|apuestas deportivas.com|apuestas deportivas.com
foro|apuestas deportivas.es|apuestas deportivos pronosticos|apuestas deposito minimo 1 euro|apuestas descenso a segunda|apuestas descenso a segunda b|apuestas descenso la liga|apuestas descenso primera division|apuestas descenso segunda|apuestas dia|apuestas diarias seguras|apuestas dinero|apuestas dinero ficticio|apuestas dinero real|apuestas dinero virtual|apuestas directas|apuestas directo|apuestas directo futbol|apuestas division de honor
juvenil|apuestas dnb|apuestas doble oportunidad|apuestas doble resultado|apuestas dobles|apuestas dobles y triples|apuestas dortmund barcelona|apuestas draft nba|apuestas draft nfl|apuestas
ecuador vs argentina|apuestas ecuador vs venezuela|apuestas egipto uruguay|apuestas
el clasico|apuestas elecciones venezuela|apuestas empate|apuestas en baloncesto|apuestas
en barcelona|apuestas en beisbol|apuestas en boxeo|apuestas en caballos|apuestas en carreras de caballos|apuestas en casino|apuestas en casino online|apuestas en casinos|apuestas en casinos online|apuestas en chile|apuestas en ciclismo|apuestas en colombia|apuestas en colombia de futbol|apuestas en directo|apuestas en directo futbol|apuestas en directo pronosticos|apuestas en el futbol|apuestas en el tenis|apuestas en españa|apuestas en esports|apuestas en eventos deportivos virtuales|apuestas en golf|apuestas en juegos|apuestas en la champions league|apuestas en la eurocopa|apuestas en la liga|apuestas en la nba|apuestas en la nfl|apuestas
en las vegas mlb|apuestas en las vegas nfl|apuestas en linea|apuestas en línea|apuestas en linea argentina|apuestas en linea boxeo|apuestas en linea chile|apuestas en linea colombia|apuestas en línea de fútbol|apuestas
en linea deportivas|apuestas en linea españa|apuestas en linea estados unidos|apuestas en linea futbol|apuestas en linea mexico|apuestas en línea méxico|apuestas en linea mundial|apuestas
en linea peru|apuestas en linea usa|apuestas en los esports|apuestas en madrid|apuestas en méxico|apuestas en mexico online|apuestas en nba|apuestas en partidos de futbol|apuestas en partidos de futbol en vivo|apuestas en partidos de tenis en directo|apuestas en perú|apuestas en sevilla|apuestas en sistema|apuestas en stake|apuestas en tenis|apuestas en tenis de mesa|apuestas en valencia|apuestas en vivo|apuestas en vivo argentina|apuestas en vivo casino|apuestas en vivo
futbol|apuestas en vivo fútbol|apuestas en vivo nba|apuestas en vivo peru|apuestas en vivo tenis|apuestas
en vivo ufc|apuestas equipo mbappe|apuestas equipos de futbol|apuestas españa|apuestas
españa alemania|apuestas españa alemania eurocopa|apuestas españa croacia|apuestas
españa eurocopa|apuestas españa francia|apuestas españa francia eurocopa|apuestas españa
gana el mundial|apuestas españa gana eurocopa|apuestas españa gana mundial|apuestas españa georgia|apuestas españa holanda|apuestas españa
inglaterra|apuestas españa inglaterra cuotas|apuestas españa inglaterra eurocopa|apuestas españa
italia|apuestas españa mundial|apuestas españa paises bajos|apuestas español|apuestas
español oviedo|apuestas espanyol barcelona|apuestas espanyol betis|apuestas
espanyol villarreal|apuestas esport|apuestas esports|apuestas
esports colombia|apuestas esports españa|apuestas esports
fifa|apuestas esports gratis|apuestas esports lol|apuestas
esports peru|apuestas esports valorant|apuestas estadisticas|apuestas estrategias|apuestas euro|apuestas euro copa|apuestas eurocopa|apuestas eurocopa campeon|apuestas eurocopa españa|apuestas eurocopa favoritos|apuestas eurocopa femenina|apuestas eurocopa
final|apuestas eurocopa ganador|apuestas eurocopa hoy|apuestas eurocopa sub 21|apuestas euroliga baloncesto|apuestas euroliga pronosticos|apuestas europa league|apuestas europa league hoy|apuestas europa league pronosticos|apuestas europa
league pronósticos|apuestas euros|apuestas f1 abu
dhabi|apuestas f1 bahrein|apuestas f1 canada|apuestas f1 china|apuestas f1 cuotas|apuestas f1 hoy|apuestas f1 las vegas|apuestas f1 miami|apuestas f1 monaco|apuestas faciles de ganar|apuestas fáciles
de ganar|apuestas faciles para ganar|apuestas favoritas|apuestas favorito champions|apuestas favoritos champions|apuestas favoritos eurocopa|apuestas favoritos mundial|apuestas fc barcelona|apuestas final champions cuotas|apuestas final champions league|apuestas final champions peru|apuestas final copa|apuestas final copa america|apuestas final copa de europa|apuestas final
copa del rey|apuestas final copa europa|apuestas final copa libertadores|apuestas final copa rey|apuestas final de copa|apuestas final de copa del
rey|apuestas final del mundial|apuestas final euro|apuestas final eurocopa|apuestas final europa league|apuestas final libertadores|apuestas final mundial|apuestas final
nba|apuestas final rugby|apuestas final uefa europa
league|apuestas final.mundial|apuestas finales de conferencia nfl|apuestas finales nba|apuestas fiorentina betis|apuestas formula|apuestas formula 1|apuestas fórmula 1|apuestas fórmula 1 pronósticos|apuestas
formula uno|apuestas foro|apuestas foro nba|apuestas francia argentina|apuestas francia españa|apuestas futbol|apuestas fútbol|apuestas futbol americano|apuestas futbol
americano nfl|apuestas futbol argentina|apuestas futbol
argentino|apuestas futbol champions league|apuestas futbol chile|apuestas futbol colombia|apuestas futbol consejos|apuestas futbol en directo|apuestas fútbol en directo|apuestas futbol en vivo|apuestas fútbol en vivo|apuestas futbol
españa|apuestas futbol español|apuestas fútbol español|apuestas futbol
eurocopa|apuestas futbol femenino|apuestas futbol foro|apuestas futbol gratis|apuestas futbol hoy|apuestas fútbol hoy|apuestas futbol juegos olimpicos|apuestas futbol mexico|apuestas futbol
mundial|apuestas futbol online|apuestas futbol para hoy|apuestas
futbol peru|apuestas futbol pronosticos|apuestas futbol
sala|apuestas futbol telegram|apuestas futbol virtual|apuestas galgos|apuestas galgos en directo|apuestas
galgos hoy|apuestas galgos online|apuestas galgos pronosticos|apuestas galgos trucos|apuestas gana|apuestas gana colombia|apuestas
gana resultados|apuestas ganadas|apuestas ganadas hoy|apuestas ganador champions league|apuestas ganador copa america|apuestas ganador copa
del rey|apuestas ganador copa del rey baloncesto|apuestas ganador copa
libertadores|apuestas ganador de la eurocopa|apuestas ganador de la liga|apuestas ganador del mundial|apuestas ganador eurocopa|apuestas ganador europa league|apuestas ganador
f1|apuestas ganador la liga|apuestas ganador liga
española|apuestas ganador mundial|apuestas ganador mundial baloncesto|apuestas ganador mundial f1|apuestas ganador nba|apuestas ganadores eurocopa|apuestas ganadores mundial|apuestas ganar champions|apuestas ganar eurocopa|apuestas ganar liga|apuestas ganar
mundial|apuestas ganar nba|apuestas getafe valencia|apuestas ghana uruguay|apuestas girona|apuestas girona athletic|apuestas girona betis|apuestas
girona campeon de liga|apuestas girona campeon liga|apuestas girona gana la liga|apuestas girona real madrid|apuestas girona real sociedad|apuestas goleador eurocopa|apuestas goleadores eurocopa|apuestas goles
asiaticos|apuestas golf|apuestas golf masters|apuestas
golf pga|apuestas granada barcelona|apuestas grand slam de tenis|apuestas gratis|apuestas gratis casino|apuestas gratis con premios|apuestas gratis hoy|apuestas gratis para hoy|apuestas gratis por registro|apuestas gratis puntos|apuestas gratis regalos|apuestas gratis sin deposito|apuestas gratis sin depósito|apuestas gratis sin ingreso|apuestas gratis sports|apuestas gratis y ganar premios|apuestas grupo a
eurocopa|apuestas grupos eurocopa|apuestas handicap|apuestas handicap asiatico|apuestas handicap baloncesto|apuestas handicap como funciona|apuestas handicap nba|apuestas handicap nfl|apuestas hipicas online|apuestas
hípicas online|apuestas hipicas venezuela|apuestas hockey|apuestas hockey hielo|apuestas hockey patines|apuestas
hockey sobre hielo|apuestas holanda argentina|apuestas holanda vs argentina|apuestas hoy|apuestas
hoy champions|apuestas hoy futbol|apuestas
hoy nba|apuestas hoy pronosticos|apuestas hoy seguras|apuestas impuestos|apuestas inglaterra paises bajos|apuestas
inter barca|apuestas inter barcelona|apuestas juego|apuestas juegos|apuestas juegos en linea|apuestas juegos olimpicos|apuestas juegos olímpicos|apuestas juegos olimpicos
baloncesto|apuestas juegos online|apuestas juegos virtuales|apuestas jugador sevilla|apuestas jugadores
nba|apuestas kings league americas|apuestas la liga|apuestas la liga española|apuestas la liga hoy|apuestas la liga santander|apuestas
las vegas mlb|apuestas las vegas nba|apuestas las vegas nfl|apuestas
league of legends mundial|apuestas legal|apuestas legales|apuestas legales en colombia|apuestas
legales en españa|apuestas legales en estados unidos|apuestas legales españa|apuestas leganes betis|apuestas libertadores|apuestas licencia|apuestas liga 1 peru|apuestas liga argentina|apuestas liga bbva pronosticos|apuestas
liga de campeones|apuestas liga de campeones
de baloncesto|apuestas liga de campeones de hockey|apuestas liga españa|apuestas liga española|apuestas liga santander pronosticos|apuestas ligas de futbol|apuestas linea|apuestas linea de gol|apuestas liverpool barcelona|apuestas liverpool real madrid|apuestas lol mundial|apuestas madrid|apuestas madrid
arsenal|apuestas madrid atletico|apuestas madrid atletico champions|apuestas madrid barca|apuestas madrid barça|apuestas madrid
barca hoy|apuestas madrid barca supercopa|apuestas madrid barcelona|apuestas madrid barsa|apuestas madrid bayern|apuestas madrid betis|apuestas madrid borussia|apuestas
madrid campeon champions|apuestas madrid celta|apuestas
madrid city|apuestas madrid dortmund|apuestas madrid gana la
liga|apuestas madrid gana liga|apuestas madrid
hoy|apuestas madrid liverpool|apuestas madrid osasuna|apuestas madrid sevilla|apuestas madrid valencia|apuestas
madrid vs arsenal|apuestas madrid vs barcelona|apuestas mallorca osasuna|apuestas mallorca
real sociedad|apuestas manchester athletic|apuestas manchester
city real madrid|apuestas mas faciles de ganar|apuestas mas seguras|apuestas mas seguras para hoy|apuestas masters de golf|apuestas masters de tenis|apuestas maximo goleador eurocopa|apuestas maximo goleador mundial|apuestas mejor jugador eurocopa|apuestas
mejores casinos online|apuestas mexico|apuestas méxico|apuestas mexico polonia|apuestas méxico polonia|apuestas mlb|apuestas
mlb hoy|apuestas mlb las vegas|apuestas mlb para hoy|apuestas mlb pronosticos|apuestas
mlb usa|apuestas mma ufc|apuestas momios|apuestas multiples|apuestas
múltiples|apuestas multiples como funcionan|apuestas multiples el gordo|apuestas multiples futbol|apuestas mundial|apuestas mundial 2026|apuestas mundial baloncesto|apuestas mundial balonmano|apuestas mundial
brasil|apuestas mundial campeon|apuestas mundial ciclismo|apuestas mundial clubes|apuestas mundial de baloncesto|apuestas mundial de ciclismo|apuestas mundial de clubes|apuestas mundial de futbol|apuestas mundial
de fútbol|apuestas mundial de rugby|apuestas mundial f1|apuestas mundial favoritos|apuestas mundial femenino|apuestas mundial formula 1|apuestas
mundial futbol|apuestas mundial ganador|apuestas mundial lol|apuestas mundial
moto gp|apuestas mundial motogp|apuestas mundial rugby|apuestas
mundial sub 17|apuestas mundiales|apuestas mundialistas|apuestas mvp eurocopa|apuestas
mvp nba|apuestas mvp nfl|apuestas nacionales de colombia|apuestas nba|apuestas nba
all star|apuestas nba campeon|apuestas nba consejos|apuestas nba
esta noche|apuestas nba finals|apuestas nba gratis|apuestas nba
hoy|apuestas nba hoy jugadores|apuestas nba hoy pronosticos|apuestas nba para hoy|apuestas nba playoffs|apuestas
nba pronosticos|apuestas nba pronósticos|apuestas nba pronosticos hoy|apuestas nba
tipster|apuestas nfl|apuestas nfl hoy|apuestas nfl
las vegas|apuestas nfl playoffs|apuestas nfl pronosticos|apuestas nfl pronósticos|apuestas
nfl semana 4|apuestas nfl super bowl|apuestas nhl|apuestas nhl pronosticos|apuestas
octavos eurocopa|apuestas ofertas|apuestas online|apuestas online argentina|apuestas online argentina legal|apuestas online bono|apuestas online bono bienvenida|apuestas online boxeo|apuestas
online caballos|apuestas online carreras de caballos|apuestas
online casino|apuestas online champions league|apuestas online chile|apuestas online ciclismo|apuestas online colombia|apuestas online comparativa|apuestas online con paypal|apuestas online de caballos|apuestas
online deportivas|apuestas online en argentina|apuestas online en peru|apuestas online espana|apuestas online españa|apuestas online
esports|apuestas online foro|apuestas online futbol|apuestas online futbol españa|apuestas online
golf|apuestas online gratis|apuestas online gratis
sin deposito|apuestas online juegos|apuestas online mexico|apuestas online mma|apuestas online movil|apuestas online nba|apuestas online net|apuestas online nuevas|apuestas online opiniones|apuestas online paypal|apuestas online peru|apuestas online seguras|apuestas online sin dinero|apuestas online
sin registro|apuestas online tenis|apuestas online ufc|apuestas online
uruguay|apuestas online venezuela|apuestas open britanico golf|apuestas osasuna athletic|apuestas osasuna barcelona|apuestas osasuna real madrid|apuestas osasuna sevilla|apuestas osasuna valencia|apuestas over|apuestas over 2.5|apuestas over under|apuestas paginas|apuestas pago anticipado|apuestas paises bajos ecuador|apuestas paises bajos inglaterra|apuestas países bajos qatar|apuestas
para boxeo|apuestas para champions league|apuestas para el
clasico|apuestas para el dia de hoy|apuestas para el mundial|apuestas
para el partido de hoy|apuestas para eurocopa|apuestas para
europa league|apuestas para futbol|apuestas para ganar|apuestas para ganar dinero|apuestas para
ganar dinero facil|apuestas para ganar en la ruleta|apuestas para ganar la champions|apuestas para ganar la eurocopa|apuestas para ganar
la europa league|apuestas para ganar la liga|apuestas para
ganar siempre|apuestas para hacer|apuestas
para hoy|apuestas para hoy de futbol|apuestas para hoy europa league|apuestas para hoy futbol|apuestas para juegos|apuestas para la
champions league|apuestas para la copa del rey|apuestas para la eurocopa|apuestas
para la europa league|apuestas para la final de la eurocopa|apuestas para la nba hoy|apuestas para
los partidos de hoy|apuestas para partidos de hoy|apuestas para
ufc|apuestas partido|apuestas partido aplazado|apuestas
partido champions|apuestas partido colombia|apuestas partido españa marruecos|apuestas partido mundial|apuestas partido suspendido|apuestas partidos|apuestas partidos champions league|apuestas partidos csgo|apuestas partidos de futbol|apuestas partidos de futbol hoy|apuestas partidos de hoy|apuestas partidos
eurocopa|apuestas partidos futbol|apuestas partidos hoy|apuestas partidos mundial|apuestas paypal|apuestas peleas
de boxeo|apuestas peru|apuestas perú|apuestas peru brasil|apuestas peru chile|apuestas peru paraguay|apuestas peru uruguay|apuestas peru
vs chile|apuestas peru vs colombia|apuestas pichichi eurocopa|apuestas plataforma|apuestas playoff|apuestas
playoff ascenso|apuestas playoff ascenso a primera|apuestas playoff nba|apuestas playoff segunda|apuestas playoff segunda b|apuestas playoffs nba|apuestas playoffs nfl|apuestas polonia argentina|apuestas
por argentina|apuestas por internet mexico|apuestas por internet para ganar dinero|apuestas por paypal|apuestas por
ronda boxeo|apuestas por sistema|apuestas portugal uruguay|apuestas pre partido|apuestas predicciones|apuestas predicciones futbol|apuestas primera
division|apuestas primera division españa|apuestas
promociones|apuestas pronostico|apuestas pronosticos|apuestas pronosticos deportivos|apuestas pronosticos deportivos tenis|apuestas pronosticos futbol|apuestas pronosticos gratis|apuestas
pronosticos nba|apuestas pronosticos tenis|apuestas prorroga|apuestas psg barca|apuestas psg barcelona|apuestas
puntos por tarjetas|apuestas puntos tarjetas|apuestas que aceptan paypal|apuestas que
es handicap|apuestas que puedes hacer con tu novia|apuestas que siempre
ganaras|apuestas que significa|apuestas quien bajara a segunda|apuestas quién bajara a segunda|apuestas quien gana el mundial|apuestas quien gana eurocopa|apuestas quien gana la
champions|apuestas quien gana la eurocopa|apuestas quien gana la liga|apuestas quien ganara el
mundial|apuestas quién ganará el mundial|apuestas quien ganara la champions|apuestas quien ganara
la eurocopa|apuestas quien ganara la liga|apuestas rayo barcelona|apuestas real madrid|apuestas real madrid arsenal|apuestas
real madrid athletic|apuestas real madrid atletico|apuestas
real madrid atletico champions|apuestas real madrid atletico de madrid|apuestas real madrid atlético de madrid|apuestas real madrid atletico madrid|apuestas real madrid barcelona|apuestas real madrid bayern|apuestas real madrid betis|apuestas real madrid
borussia|apuestas real madrid campeon champions|apuestas real madrid celta|apuestas real madrid
champions|apuestas real madrid city|apuestas real madrid girona|apuestas real
madrid hoy|apuestas real madrid liverpool|apuestas real madrid
manchester city|apuestas real madrid osasuna|apuestas real madrid real sociedad|apuestas real
madrid valencia|apuestas real madrid villarreal|apuestas real
madrid vs arsenal|apuestas real madrid vs atletico|apuestas real madrid vs atlético|apuestas
real madrid vs atletico madrid|apuestas real madrid vs barcelona|apuestas real madrid vs betis|apuestas real
madrid vs sevilla|apuestas real madrid vs valencia|apuestas real
sociedad|apuestas real sociedad athletic|apuestas real sociedad
barcelona|apuestas real sociedad betis|apuestas real sociedad psg|apuestas real sociedad
real madrid|apuestas real sociedad valencia|apuestas
recomendadas hoy|apuestas regalo de bienvenida|apuestas registro|apuestas resultado exacto|apuestas resultados|apuestas resultados eurocopa|apuestas retirada tenis|apuestas roma barcelona|apuestas roma sevilla|apuestas rugby|apuestas rugby mundial|apuestas rugby world
cup|apuestas ruleta seguras|apuestas segunda|apuestas segunda b|apuestas
segunda division|apuestas segunda división|apuestas segunda
division b|apuestas segunda division españa|apuestas seguras|apuestas seguras baloncesto|apuestas seguras calculadora|apuestas seguras en la ruleta|apuestas seguras eurocopa|apuestas seguras foro|apuestas seguras
futbol|apuestas seguras futbol hoy|apuestas seguras gratis|apuestas seguras hoy|apuestas seguras hoy futbol|apuestas seguras nba|apuestas
seguras nba hoy|apuestas seguras para este fin de semana|apuestas seguras para ganar dinero|apuestas seguras para
hoy|apuestas seguras para hoy fútbol|apuestas seguras para hoy pronósticos|apuestas seguras para mañana|apuestas seguras
ruleta|apuestas seguras telegram|apuestas seguras tenis|apuestas semifinales eurocopa|apuestas
senegal paises bajos|apuestas sevilla|apuestas sevilla athletic|apuestas sevilla atletico de madrid|apuestas sevilla barcelona|apuestas sevilla betis|apuestas sevilla campeon liga|apuestas sevilla celta|apuestas sevilla
gana la liga|apuestas sevilla girona|apuestas sevilla inter|apuestas sevilla jugador|apuestas sevilla juventus|apuestas
sevilla leganes|apuestas sevilla madrid|apuestas sevilla manchester united|apuestas sevilla osasuna|apuestas sevilla real
madrid|apuestas sevilla real sociedad|apuestas sevilla roma|apuestas sevilla
valencia|apuestas significa|apuestas simples
ejemplos|apuestas simples o combinadas|apuestas sin deposito|apuestas sin deposito inicial|apuestas sin deposito minimo|apuestas sin dinero|apuestas sin dinero real|apuestas sin empate|apuestas sin empate que significa|apuestas sin ingreso minimo|apuestas sin registro|apuestas sistema|apuestas sistema calculadora|apuestas sistema como funciona|apuestas sistema trixie|apuestas sociedad|apuestas sorteo copa del rey|apuestas stake|apuestas
stake 10|apuestas stake 10 hoy|apuestas super bowl favorito|apuestas super rugby|apuestas supercopa españa|apuestas superliga argentina|apuestas tarjeta roja|apuestas tarjetas|apuestas tarjetas amarillas|apuestas tenis|apuestas tenis
atp|apuestas tenis consejos|apuestas tenis copa davis|apuestas tenis de
mesa|apuestas tenis de mesa pronosticos|apuestas tenis en vivo|apuestas tenis femenino|apuestas tenis hoy|apuestas tenis itf|apuestas tenis pronosticos|apuestas tenis pronósticos|apuestas tenis retirada|apuestas tenis roland garros|apuestas tenis seguras|apuestas
tenis wimbledon|apuestas tenis wta|apuestas tercera division|apuestas tercera division españa|apuestas tipos|apuestas tips|apuestas
tipster|apuestas tipster para hoy|apuestas topuria holloway
cuotas|apuestas torneos de golf|apuestas torneos de tenis|apuestas trucos|apuestas
uefa champions league|apuestas uefa europa league|apuestas
ufc|apuestas ufc chile|apuestas ufc como funciona|apuestas ufc hoy|apuestas ufc ilia topuria|apuestas ufc online|apuestas ufc pronósticos|apuestas ufc telegram|apuestas ufc topuria|apuestas
under over|apuestas unionistas villarreal|apuestas uruguay|apuestas
uruguay colombia|apuestas uruguay corea|apuestas uruguay vs
colombia|apuestas us open golf|apuestas us open tenis|apuestas valencia|apuestas valencia barcelona|apuestas valencia betis|apuestas valencia madrid|apuestas valencia real madrid|apuestas valladolid barcelona|apuestas valladolid valencia|apuestas valor app|apuestas valor en directo|apuestas valor galgos|apuestas venezuela|apuestas
venezuela argentina|apuestas venezuela bolivia|apuestas venezuela ecuador|apuestas
villarreal|apuestas villarreal athletic|apuestas villarreal barcelona|apuestas villarreal bayern|apuestas
villarreal betis|apuestas villarreal liverpool|apuestas villarreal manchester|apuestas villarreal manchester united|apuestas villarreal vs
real madrid|apuestas virtuales|apuestas virtuales colombia|apuestas virtuales futbol|apuestas virtuales sin dinero|apuestas vivo|apuestas vuelta a españa|apuestas vuelta españa|apuestas william hill partidos de hoy|apuestas y casino|apuestas y casinos|apuestas y
juegos de azar|apuestas y pronosticos|apuestas y pronosticos de futbol|apuestas y pronosticos deportivos|apuestas y resultados|apuestas-deportivas|apuestas-deportivas.es pronosticos|arbitro nba apuestas|argentina apuestas|argentina colombia apuestas|argentina croacia
apuestas|argentina francia apuestas|argentina mexico apuestas|argentina peru apuestas|argentina uruguay apuestas|argentina
vs bolivia apuestas|argentina vs chile apuestas|argentina vs colombia apuestas|argentina vs francia
apuestas|argentina vs. colombia apuestas|asi se gana
en las apuestas deportivas|asiatico apuestas|asiatico en apuestas|asiaticos apuestas|athletic barcelona apuestas|athletic manchester united apuestas|athletic osasuna apuestas|athletic real madrid apuestas|atletico barcelona apuestas|atletico de madrid apuestas|atlético
de madrid apuestas|atletico de madrid real madrid apuestas|atletico de
madrid vs barcelona apuestas|atletico madrid real madrid apuestas|atletico madrid vs real madrid
apuestas|atletico real madrid apuestas|atletico vs real madrid apuestas|avisador de cuotas apuestas|bajada de cuotas
apuestas|baloncesto apuestas|barbastro barcelona apuestas|barca apuestas|barca bayern apuestas|barca inter apuestas|barca madrid apuestas|barça
madrid apuestas|barca vs atletico apuestas|barca vs madrid apuestas|barca vs real madrid apuestas|barcelona – real madrid apuestas|barcelona apuestas|barcelona
atletico apuestas|barcelona atletico de madrid apuestas|barcelona atletico
madrid apuestas|barcelona betis apuestas|barcelona
casa de apuestas|barcelona inter apuestas|barcelona psg apuestas|barcelona real madrid apuestas|barcelona real sociedad apuestas|barcelona sevilla apuestas|barcelona valencia apuestas|barcelona vs athletic bilbao apuestas|barcelona vs atlético madrid apuestas|barcelona vs betis apuestas|barcelona vs celta de vigo apuestas|barcelona vs espanyol
apuestas|barcelona vs girona apuestas|barcelona vs madrid
apuestas|barcelona vs real madrid apuestas|barcelona
vs real sociedad apuestas|barcelona vs sevilla apuestas|barcelona vs villarreal apuestas|base
de datos cuotas apuestas deportivas|bayern real madrid apuestas|beisbol
apuestas|best america apuestas|bet apuestas chile|bet apuestas en vivo|betis – chelsea apuestas|betis apuestas|betis
barcelona apuestas|betis chelsea apuestas|betis madrid apuestas|betis sevilla apuestas|betsson tu
sitio de apuestas online|blog apuestas baloncesto|blog apuestas ciclismo|blog apuestas nba|blog apuestas
tenis|blog de apuestas de tenis|bono apuestas|bono apuestas deportivas|bono
apuestas deportivas sin deposito|bono apuestas gratis|bono apuestas
gratis sin deposito|bono apuestas sin deposito|bono bienvenida apuestas|bono bienvenida apuestas deportivas|bono bienvenida apuestas españa|bono bienvenida apuestas sin deposito|bono bienvenida apuestas sin depósito|bono bienvenida casa apuestas|bono bienvenida casa de
apuestas|bono bienvenida marca apuestas|bono casa apuestas|bono casa de apuestas|bono casa de apuestas sin ingreso|bono casas de apuestas|bono de apuestas|bono de
apuestas gratis sin deposito|bono de bienvenida apuestas|bono de bienvenida apuestas deportivas|bono de bienvenida casa de apuestas|bono
de bienvenida casas de apuestas|bono de casas de apuestas|bono de registro apuestas|bono
de registro apuestas deportivas|bono de registro casa de apuestas|bono gratis apuestas|bono
marca apuestas|bono por registro apuestas|bono por registro apuestas deportivas|bono por registro casa de
apuestas|bono registro apuestas|bono sin deposito apuestas|bono sin depósito apuestas|bono sin deposito apuestas deportivas|bono
sin depósito apuestas deportivas|bono sin deposito casa de apuestas|bono sin deposito
marca apuestas|bono sin ingreso apuestas|bono sin ingreso apuestas deportivas|bonos apuestas|bonos
apuestas colombia|bonos apuestas deportivas|bonos apuestas deportivas sin deposito|bonos apuestas gratis|bonos apuestas sin deposito|bonos apuestas sin depósito|bonos bienvenida apuestas|bonos bienvenida casas apuestas|bonos bienvenida casas de apuestas|bonos casa de
apuestas|bonos casas apuestas|bonos casas de apuestas|bonos casas de apuestas colombia|bonos casas de apuestas deportivas|bonos casas de apuestas españa|bonos
casas de apuestas nuevas|bonos casas de apuestas sin deposito|bonos casas de apuestas sin depósito|bonos de
apuestas|bonos de apuestas deportivas|bonos de apuestas
gratis|bonos de apuestas sin deposito|bonos de bienvenida apuestas|bonos de bienvenida apuestas deportivas|bonos de
bienvenida casa de apuestas|bonos de bienvenida casas de apuestas|bonos de bienvenida de casas de apuestas|bonos de bienvenida
en casas de apuestas|bonos de casas de apuestas|bonos de casas de apuestas sin deposito|bonos
en casa de apuestas|bonos en casas de apuestas sin deposito|bonos gratis apuestas|bonos gratis
apuestas deportivas|bonos gratis casas de apuestas|bonos gratis sin deposito apuestas|bonos paginas de apuestas|bonos registro
casas de apuestas|bonos sin deposito apuestas|bonos sin depósito apuestas|bonos sin deposito
apuestas deportivas|bonos sin deposito casas de apuestas|bot de apuestas deportivas gratis|boxeo apuestas|brasil colombia apuestas|brasil peru apuestas|brasil vs colombia apuestas|buenas apuestas para hoy|buscador cuotas
apuestas|buscador de apuestas seguras|buscador de cuotas apuestas|buscador de cuotas de apuestas|buscar apuestas seguras|caballos apuestas|calculador
de apuestas|calculador de cuotas apuestas|calculadora apuestas|calculadora apuestas combinadas|calculadora apuestas de sistema|calculadora
apuestas deportivas|calculadora apuestas deportivas seguras|calculadora apuestas multiples|calculadora apuestas segura|calculadora apuestas
seguras|calculadora apuestas sistema|calculadora apuestas yankee|calculadora arbitraje apuestas|calculadora cubrir apuestas|calculadora cuotas apuestas|calculadora
de apuestas|calculadora de apuestas combinadas|calculadora
de apuestas de futbol|calculadora de apuestas de sistema|calculadora de apuestas deportivas|calculadora
de apuestas multiples|calculadora de apuestas seguras|calculadora de apuestas sistema|calculadora de apuestas surebets|calculadora de arbitraje apuestas|calculadora de cuotas apuestas|calculadora de cuotas de
apuestas|calculadora para apuestas deportivas|calculadora
poisson apuestas|calculadora poisson apuestas deportivas|calculadora poisson para apuestas|calculadora scalping apuestas deportivas|calculadora sistema apuestas|calculadora stake apuestas|calculadora trading
apuestas|calcular apuestas|calcular apuestas deportivas|calcular apuestas futbol|calcular apuestas sistema|calcular cuotas apuestas|calcular cuotas
apuestas combinadas|calcular cuotas apuestas deportivas|calcular
cuotas de apuestas|calcular ganancias apuestas deportivas|calcular momios apuestas|calcular probabilidad cuota
apuestas|calcular stake apuestas|calcular unidades apuestas|calcular
yield apuestas|calculo de apuestas|calculo de apuestas deportivas|cambio de cuotas apuestas|campeon champions apuestas|campeon eurocopa apuestas|campeon liga apuestas|campeon nba apuestas|canales de apuestas gratis|carrera de caballos apuestas|carrera de caballos apuestas juego|carrera de
caballos con apuestas|carrera de galgos apuestas|carreras de caballos apuestas|carreras de caballos apuestas online|carreras de caballos con apuestas|carreras de caballos juegos de apuestas|carreras de galgos apuestas|carreras de galgos apuestas online|carreras de galgos apuestas trucos|carreras
galgos apuestas|casa apuestas argentina|casa apuestas atletico de madrid|casa apuestas barcelona|casa apuestas betis|casa apuestas
bono bienvenida|casa apuestas bono gratis|casa apuestas bono sin deposito|casa
apuestas cerca de mi|casa apuestas chile|casa apuestas colombia|casa apuestas con mejores cuotas|casa
apuestas deportivas|casa apuestas españa|casa apuestas española|casa
apuestas eurocopa|casa apuestas futbol|casa apuestas mejores cuotas|casa
apuestas mundial|casa apuestas nueva|casa apuestas nuevas|casa apuestas online|casa apuestas peru|casa
apuestas valencia|casa de apuestas|casa de apuestas 10 euros
gratis|casa de apuestas argentina|casa de apuestas atletico de madrid|casa de apuestas baloncesto|casa de apuestas barcelona|casa de apuestas beisbol|casa de apuestas betis|casa
de apuestas bono|casa de apuestas bono bienvenida|casa de apuestas bono de bienvenida|casa de apuestas bono gratis|casa
de apuestas bono por registro|casa de apuestas bono sin deposito|casa de apuestas
boxeo|casa de apuestas caballos|casa de apuestas carreras de caballos|casa de
apuestas cerca de mi|casa de apuestas cerca de mí|casa de apuestas champions league|casa de apuestas chile|casa de apuestas ciclismo|casa
de apuestas colombia|casa de apuestas con bono de bienvenida|casa de apuestas con bono sin deposito|casa de apuestas con cuotas mas altas|casa de apuestas con esports|casa de apuestas con las mejores cuotas|casa de apuestas
con licencia en españa|casa de apuestas con mejores
cuotas|casa de apuestas con pago anticipado|casa de apuestas con paypal|casa de
apuestas copa america|casa de apuestas de caballos|casa de apuestas
de colombia|casa de apuestas de españa|casa de apuestas de futbol|casa de apuestas de fútbol|casa de apuestas
de futbol peru|casa de apuestas de peru|casa de apuestas del madrid|casa de apuestas del real madrid|casa de apuestas deportivas|casa de apuestas deportivas cerca de mi|casa de apuestas deportivas en argentina|casa de apuestas deportivas en chile|casa de apuestas deportivas
en colombia|casa de apuestas deportivas en españa|casa
de apuestas deportivas en madrid|casa de apuestas deportivas españa|casa de apuestas deportivas españolas|casa de apuestas deportivas madrid|casa de apuestas deportivas
mexico|casa de apuestas deportivas online|casa de apuestas
deportivas peru|casa de apuestas deposito 5 euros|casa de apuestas deposito minimo|casa de apuestas deposito minimo 1 euro|casa de apuestas depósito mínimo 1 euro|casa de
apuestas en españa|casa de apuestas en linea|casa de apuestas en madrid|casa de apuestas en perú|casa de apuestas en vivo|casa de apuestas españa|casa de apuestas españa
inglaterra|casa de apuestas española|casa de apuestas españolas|casa de apuestas esports|casa de apuestas eurocopa|casa de apuestas europa league|casa
de apuestas f1|casa de apuestas formula 1|casa de apuestas futbol|casa de apuestas ingreso minimo|casa de apuestas ingreso minimo 1 euro|casa de apuestas ingreso mínimo 1 euro|casa de apuestas legales|casa
de apuestas legales en colombia|casa de apuestas legales en españa|casa de apuestas libertadores|casa de apuestas liga española|casa de apuestas madrid|casa de apuestas mas
segura|casa de apuestas mejores|casa de apuestas méxico|casa de apuestas minimo 5 euros|casa de
apuestas mlb|casa de apuestas mundial|casa de apuestas nba|casa de apuestas nfl|casa
de apuestas nueva|casa de apuestas nuevas|casa de apuestas oficial del
real madrid|casa de apuestas oficial real
madrid|casa de apuestas online|casa de apuestas online argentina|casa de apuestas online chile|casa de apuestas online españa|casa de apuestas online mexico|casa de apuestas online paraguay|casa de apuestas online peru|casa de apuestas online usa|casa de apuestas
online venezuela|casa de apuestas pago anticipado|casa de apuestas para
boxeo|casa de apuestas para ufc|casa de apuestas peru|casa de apuestas perú|casa
de apuestas peru online|casa de apuestas por paypal|casa de apuestas
promociones|casa de apuestas que regalan dinero|casa de apuestas real madrid|casa de apuestas regalo de bienvenida|casa de apuestas sevilla|casa de apuestas sin dinero|casa de apuestas sin ingreso minimo|casa de apuestas sin licencia en españa|casa de
apuestas sin minimo de ingreso|casa de apuestas stake|casa de
apuestas tenis|casa de apuestas ufc|casa de apuestas valencia|casa
de apuestas venezuela|casa de apuestas virtuales|casa de apuestas vive la suerte|casa oficial de apuestas
del real madrid|casas apuestas asiaticas|casas apuestas bono
sin deposito|casas apuestas bonos sin deposito|casas apuestas caballos|casas apuestas chile|casas apuestas ciclismo|casas apuestas con licencia|casas apuestas con licencia en españa|casas apuestas deportivas|casas apuestas deportivas colombia|casas apuestas deportivas españa|casas
apuestas deportivas españolas|casas apuestas deportivas nuevas|casas apuestas españa|casas apuestas españolas|casas apuestas esports|casas apuestas eurocopa|casas apuestas golf|casas apuestas ingreso minimo 5 euros|casas apuestas legales|casas apuestas legales
españa|casas apuestas licencia|casas apuestas licencia españa|casas
apuestas mexico|casas apuestas mundial|casas apuestas nba|casas apuestas nuevas|casas apuestas nuevas españa|casas apuestas
ofertas|casas apuestas online|casas apuestas paypal|casas
apuestas peru|casas apuestas sin licencia|casas apuestas tenis|casas asiaticas apuestas|casas de
apuestas|casas de apuestas 5 euros|casas de apuestas app|casas de apuestas argentinas|casas de apuestas asiaticas|casas de apuestas baloncesto|casas de apuestas barcelona|casas de
apuestas bono bienvenida|casas de apuestas bono de bienvenida|casas de apuestas bono por registro|casas de apuestas bono sin deposito|casas
de apuestas bono sin ingreso|casas de apuestas bonos|casas de apuestas bonos
de bienvenida|casas de apuestas bonos gratis|casas de apuestas bonos sin deposito|casas de apuestas boxeo|casas de apuestas caballos|casas de apuestas carreras de caballos|casas de apuestas casino|casas de apuestas casino online|casas de apuestas cerca de mi|casas de apuestas champions league|casas de apuestas chile|casas de apuestas ciclismo|casas de apuestas
colombia|casas de apuestas com|casas de apuestas con app|casas de apuestas con apuestas gratis|casas de apuestas con bono|casas
de apuestas con bono de bienvenida|casas de apuestas con bono de registro|casas de apuestas con bono por registro|casas de apuestas con bono sin deposito|casas de apuestas con bonos|casas de apuestas con bonos gratis|casas de apuestas con bonos
sin deposito|casas de apuestas con deposito minimo|casas de apuestas con esports|casas de apuestas con handicap asiatico|casas de apuestas con licencia|casas de apuestas con licencia
en españa|casas de apuestas con licencia españa|casas de apuestas con licencia española|casas de apuestas con mejores cuotas|casas de apuestas con pago anticipado|casas
de apuestas con paypal|casas de apuestas con paypal
en perú|casas de apuestas con promociones|casas de apuestas con ruleta en vivo|casas de
apuestas copa del rey|casas de apuestas de caballos|casas de
apuestas de españa|casas de apuestas de futbol|casas de apuestas de fútbol|casas de apuestas
de peru|casas de apuestas deportivas|casas de apuestas deportivas
asiaticas|casas de apuestas deportivas colombia|casas de apuestas deportivas comparativa|casas de apuestas deportivas con paypal|casas
de apuestas deportivas en chile|casas de
apuestas deportivas en españa|casas de apuestas deportivas en linea|casas de apuestas deportivas
en madrid|casas de apuestas deportivas en mexico|casas de apuestas deportivas en peru|casas de apuestas deportivas en sevilla|casas de apuestas deportivas en valencia|casas de apuestas deportivas españa|casas de apuestas
deportivas españolas|casas de apuestas deportivas legales|casas de apuestas deportivas madrid|casas de apuestas deportivas mexico|casas
de apuestas deportivas nuevas|casas de apuestas deportivas online|casas de apuestas
deportivas peru|casas de apuestas deportivas perú|casas
de apuestas deposito minimo 1 euro|casas de apuestas
depósito mínimo 1 euro|casas de apuestas
dinero gratis|casas de apuestas en argentina|casas
de apuestas en barcelona|casas de apuestas en chile|casas de apuestas en colombia|casas de
apuestas en españa|casas de apuestas en españa
online|casas de apuestas en linea|casas de apuestas en madrid|casas
de apuestas en méxico|casas de apuestas en peru|casas de apuestas en perú|casas de apuestas en sevilla|casas de apuestas en uruguay|casas de apuestas en valencia|casas de apuestas en venezuela|casas de apuestas equipos de futbol|casas de apuestas españa|casas
de apuestas españa alemania|casas de apuestas españa inglaterra|casas de apuestas españa licencia|casas de apuestas españa
nuevas|casas de apuestas españa online|casas de apuestas
española|casas de apuestas españolas|casas de apuestas españolas con licencia|casas de apuestas españolas online|casas de
apuestas esports|casas de apuestas eurocopa|casas
de apuestas eurocopa 2024|casas de apuestas europa league|casas de apuestas
f1|casas de apuestas fisicas en barcelona|casas de apuestas fisicas en españa|casas de apuestas formula 1|casas de apuestas fuera
de españa|casas de apuestas futbol|casas de apuestas fútbol|casas de apuestas futbol españa|casas de apuestas ganador eurocopa|casas de apuestas gratis|casas de
apuestas ingreso minimo|casas de apuestas ingreso
minimo 1 euro|casas de apuestas ingreso minimo 5 euros|casas de apuestas inter barcelona|casas de apuestas legales|casas de apuestas legales en colombia|casas de apuestas legales en españa|casas de apuestas legales
en mexico|casas de apuestas legales españa|casas de apuestas legales mx|casas de apuestas licencia|casas de
apuestas licencia españa|casas de apuestas lista|casas de apuestas madrid|casas de apuestas mas seguras|casas de apuestas mejores bonos|casas de apuestas mejores cuotas|casas de apuestas mexico|casas de apuestas méxico|casas de apuestas minimo
5 euros|casas de apuestas mlb|casas de apuestas mundial|casas de apuestas mundial baloncesto|casas de apuestas mundiales|casas de apuestas nba|casas de apuestas no reguladas en españa|casas de apuestas nueva
ley|casas de apuestas nuevas|casas de apuestas nuevas en colombia|casas de apuestas nuevas en españa|casas de apuestas nuevas españa|casas de apuestas ofertas|casas de apuestas online|casas
de apuestas online argentina|casas de apuestas online colombia|casas
de apuestas online deportivas|casas de apuestas online ecuador|casas de apuestas
online en argentina|casas de apuestas online en chile|casas de apuestas online en colombia|casas de apuestas
online en españa|casas de apuestas online en mexico|casas de apuestas online españa|casas de apuestas online
mas fiables|casas de apuestas online mexico|casas de apuestas online nuevas|casas de apuestas online peru|casas de apuestas online usa|casas de apuestas
online venezuela|casas de apuestas pago paypal|casas de apuestas
para ufc|casas de apuestas paypal|casas de apuestas peru b
Your comment is awaiting moderation.
Школа фортепиано обучение игры на фортепиано для начинающих и продвинутых: база, джазовые гармонии, разбор песен, импровизация. Удобные форматы, домашние задания с разбором, поддержка преподавателя и быстрые результаты.
Your comment is awaiting moderation.
Играешь на пианино? обучение игры на фортепиано Поможем освоить ноты, ритм, технику и красивое звучание. Индивидуальные уроки, гибкий график, онлайн-формат и авторские методики. Реальный прогресс с первого месяца.
Your comment is awaiting moderation.
seostream.click – Overall, professional vibe here; trustworthy, polished, and pleasantly minimal throughout.
Your comment is awaiting moderation.
Брал здесь 203-й качество отличное 1 к 10 делал на мать и мачехи с одного водника ушатывает наглухо!!! Магазин отличный, если не ждать ответа менеджера по 2 часа!!! https://rant.li/ciboyhugugyb/tel-mana-kupit-kokain-mefedron-marikhuanu-boshki Все как надо. Рентген, люди ощупывают… Подозрительных людей к стати не принимают, если даже по началу обнаруживают что либо, их отпускают вызывают оперов, следят за посылкой, сначала принимают клиента, а потом уже за поставщиком охота начинается…
Your comment is awaiting moderation.
Профессиональный специалист по недвижимости: оценка, подготовка, маркетинг, показы, торг и юрсопровождение до сделки. Фото/видео, 3D-тур, быстрый выход на покупателя.
Your comment is awaiting moderation.
findnewhorizons – Found some motivating ideas here that helped spark a bit of creativity.
Your comment is awaiting moderation.
bestbuycollection – Enjoyed scrolling through the catalog, everything felt organized and easy to follow.
Your comment is awaiting moderation.
findnewdeals – Loved how simple it was to browse deals without feeling overwhelmed.
Your comment is awaiting moderation.
growtogethercommunity – The design is clean and friendly, making browsing simple and enjoyable.
Your comment is awaiting moderation.
fashionchoicehub – Found a few outfit tips that fit perfectly with my weekend plans.
Your comment is awaiting moderation.
brightfashionhub – Browsing felt fun and smooth, with helpful suggestions on every section.
Your comment is awaiting moderation.
Как только появится обьявим на форуме https://www.montessorijobsuk.co.uk/author/ifiigafegyf/ На письма не отвечают, щас будем звонить и орать матом…
Your comment is awaiting moderation.
בציפייה מוזרה כלשהי. הנה זה, הרגע הזה. הוא עמד מחוץ לדלת. מישהו שבא אלי בפנטזיות משפילות. ועכשיו הסמיק, והתרחק להתלבש. עכשיו הגיע תורו של סטאס. הוא קם מהכיסא, לאט. תנועותיו היו בטוחות, שתלטניות. sexhazak
Your comment is awaiting moderation.
Товар даже не тестили еще ! Но вес ровный , качество не сомневаюсь тоже на высоте , скоро будем проводить тесты . Буду брать только здесь !!! https://www.impactio.com/researcher/ymttqjzl94fphr привет )
Your comment is awaiting moderation.
(10 euros gratis apuestas|10 mejores casas de apuestas|10 trucos para ganar apuestas|15 euros gratis marca apuestas|1×2
apuestas|1×2 apuestas deportivas|1×2 apuestas
que significa|1×2 en apuestas|1×2 en apuestas que significa|1×2 que significa en apuestas|5 euros gratis apuestas|9
apuestas que siempre ganaras|a partir de cuanto se declara apuestas|actividades de
juegos de azar y apuestas|ad apuestas deportivas|aleksandre topuria
ufc apuestas|algoritmo para ganar apuestas deportivas|america apuestas|análisis nba apuestas|aplicacion android apuestas deportivas|aplicacion apuestas deportivas|aplicacion apuestas deportivas
android|aplicación de apuestas online|aplicacion para hacer
apuestas|aplicacion para hacer apuestas de futbol|aplicación para
hacer apuestas de fútbol|aplicaciones apuestas deportivas android|aplicaciones apuestas deportivas gratis|aplicaciones
de apuestas android|aplicaciones de apuestas de
fútbol|aplicaciones de apuestas deportivas|aplicaciones de apuestas deportivas peru|aplicaciones de apuestas deportivas perú|aplicaciones de apuestas en colombia|aplicaciones de apuestas gratis|aplicaciones
de apuestas online|aplicaciones de apuestas seguras|aplicaciones de apuestas sin dinero|aplicaciones para hacer apuestas|apostar seguro apuestas deportivas|app android apuestas deportivas|app apuestas|app
apuestas android|app apuestas de futbol|app apuestas deportivas|app apuestas deportivas android|app apuestas
deportivas argentina|app apuestas deportivas colombia|app apuestas deportivas ecuador|app
apuestas deportivas españa|app apuestas deportivas gratis|app apuestas entre
amigos|app apuestas futbol|app apuestas gratis|app apuestas sin dinero|app casa de apuestas|app casas de apuestas|app control apuestas|app de apuestas|app de
apuestas android|app de apuestas casino|app de apuestas colombia|app de apuestas con bono de
bienvenida|app de apuestas de futbol|app de apuestas deportivas|app de apuestas deportivas android|app de apuestas deportivas argentina|app de apuestas deportivas colombia|app de apuestas deportivas en españa|app de apuestas deportivas peru|app de
apuestas deportivas perú|app de apuestas deportivas sin dinero|app
de apuestas ecuador|app de apuestas en colombia|app de apuestas en españa|app de apuestas en venezuela|app de apuestas futbol|app de apuestas gratis|app de apuestas online|app de apuestas para android|app de apuestas para ganar dinero|app
de apuestas peru|app de apuestas reales|app de casas de apuestas|app marca apuestas
android|app moviles de apuestas|app para apuestas|app para apuestas de futbol|app para apuestas deportivas|app para apuestas deportivas en español|app para ganar apuestas deportivas|app para hacer apuestas|app para hacer apuestas deportivas|app para
hacer apuestas entre amigos|app para llevar control de apuestas|app pronosticos apuestas deportivas|app versus apuestas|apps apuestas mundial|apps de apuestas|apps de
apuestas con bono de bienvenida|apps de apuestas de futbol|apps de apuestas deportivas peru|apps de apuestas mexico|apps para
apuestas|aprender a hacer apuestas deportivas|aprender
hacer apuestas deportivas|apuesta del dia apuestas deportivas|apuestas 10
euros gratis|apuestas 100 seguras|apuestas 1×2|apuestas 1X2|apuestas 2 division|apuestas 3 division|apuestas a caballos|apuestas a carreras de caballos|apuestas a colombia|apuestas a corners|apuestas a ganar|apuestas a jugadores nba|apuestas
a la baja|apuestas a la nfl|apuestas al barcelona|apuestas al
dia|apuestas al empate|apuestas al mundial|apuestas al
tenis wta|apuestas alaves barcelona|apuestas alcaraz hoy|apuestas alemania
españa|apuestas alonso campeon del mundo|apuestas altas y bajas|apuestas altas y bajas nfl|apuestas ambos equipos marcan|apuestas america|apuestas android|apuestas anillo nba|apuestas antes del mundial|apuestas anticipadas|apuestas anticipadas nba|apuestas apps|apuestas arabia argentina|apuestas argentina|apuestas argentina campeon del mundo|apuestas argentina canada|apuestas argentina colombia|apuestas argentina croacia|apuestas argentina españa|apuestas argentina francia|apuestas argentina francia
cuanto paga|apuestas argentina francia mundial|apuestas
argentina gana el mundial|apuestas argentina gana mundial|apuestas
argentina holanda|apuestas argentina mexico|apuestas argentina méxico|apuestas argentina
mundial|apuestas argentina online|apuestas argentina paises bajos|apuestas argentina polonia|apuestas argentina uruguay|apuestas argentina vs australia|apuestas argentina vs colombia|apuestas argentina vs francia|apuestas argentina vs peru|apuestas argentinas|apuestas arsenal real madrid|apuestas ascenso a primera division|apuestas ascenso a segunda|apuestas
asiaticas|apuestas asiatico|apuestas athletic|apuestas athletic atletico|apuestas athletic barça|apuestas athletic barcelona|apuestas athletic betis|apuestas athletic manchester|apuestas athletic manchester united|apuestas athletic
osasuna|apuestas athletic real|apuestas athletic real madrid|apuestas athletic real sociedad|apuestas
athletic real sociedad final|apuestas athletic roma|apuestas athletic sevilla|apuestas athletic valencia|apuestas atletico|apuestas atletico barcelona|apuestas atletico barsa|apuestas
atletico campeon champions|apuestas atletico campeon de liga|apuestas atlético
copenhague|apuestas atletico de madrid|apuestas atlético de madrid|apuestas atletico
de madrid barcelona|apuestas atletico de madrid
gana la liga|apuestas atletico de madrid real madrid|apuestas atlético de madrid
real madrid|apuestas atletico de madrid vs barcelona|apuestas
atletico madrid|apuestas atletico madrid real madrid|apuestas atletico madrid vs barcelona|apuestas atletico real madrid|apuestas atletico real madrid champions|apuestas atletismo|apuestas bajas|apuestas
baloncesto|apuestas baloncesto acb|apuestas baloncesto handicap|apuestas baloncesto
hoy|apuestas baloncesto juegos olimpicos|apuestas baloncesto nba|apuestas baloncesto pronostico|apuestas baloncesto
pronósticos|apuestas baloncesto prorroga|apuestas barca|apuestas barca athletic|apuestas barca atletico|apuestas barca bayern|apuestas barca bayern munich|apuestas barca girona|apuestas barca hoy|apuestas barça hoy|apuestas barca inter|apuestas barca juventus|apuestas barca madrid|apuestas barça madrid|apuestas barca real madrid|apuestas barca vs juve|apuestas barca vs madrid|apuestas barca vs psg|apuestas
barcelona|apuestas barcelona alaves|apuestas barcelona athletic|apuestas
barcelona atletico|apuestas barcelona atletico de madrid|apuestas barcelona atlético de madrid|apuestas barcelona atletico madrid|apuestas barcelona bayern|apuestas
barcelona betis|apuestas barcelona campeon de liga|apuestas barcelona celta|apuestas barcelona espanyol|apuestas barcelona gana la champions|apuestas barcelona girona|apuestas barcelona granada|apuestas barcelona hoy|apuestas barcelona inter|apuestas barcelona madrid|apuestas barcelona osasuna|apuestas barcelona psg|apuestas barcelona real madrid|apuestas barcelona real sociedad|apuestas barcelona sevilla|apuestas barcelona valencia|apuestas barcelona villarreal|apuestas barcelona vs
atletico madrid|apuestas barcelona vs madrid|apuestas barcelona vs real madrid|apuestas barsa madrid|apuestas basket hoy|apuestas bayern barcelona|apuestas bayern vs barcelona|apuestas
beisbol|apuestas béisbol|apuestas beisbol mlb|apuestas beisbol pronosticos|apuestas beisbol venezolano|apuestas
betis|apuestas betis – chelsea|apuestas betis barcelona|apuestas betis chelsea|apuestas betis fiorentina|apuestas betis girona|apuestas betis madrid|apuestas
betis mallorca|apuestas betis real madrid|apuestas betis real
sociedad|apuestas betis sevilla|apuestas betis valencia|apuestas betis valladolid|apuestas betis vs valencia|apuestas betplay hoy colombia|apuestas
betsson peru|apuestas bienvenida|apuestas billar online|apuestas bolivia vs colombia|apuestas bono|apuestas bono bienvenida|apuestas
bono de bienvenida|apuestas bono de bienvenida sin deposito|apuestas bono gratis|apuestas bono sin deposito|apuestas bonos sin deposito|apuestas borussia real madrid|apuestas boxeo|apuestas
boxeo de campeonato|apuestas boxeo españa|apuestas boxeo español|apuestas boxeo femenino olimpiadas|apuestas boxeo hoy|apuestas boxeo online|apuestas
brasil colombia|apuestas brasil peru|apuestas brasil uruguay|apuestas brasil vs colombia|apuestas
brasil vs peru|apuestas caballos|apuestas caballos colocado|apuestas caballos españa|apuestas caballos
hipodromo|apuestas caballos hoy|apuestas caballos madrid|apuestas caballos online|apuestas caballos sanlucar de barrameda|apuestas caballos zarzuela|apuestas calculador|apuestas campeon|apuestas campeon champions|apuestas campeón champions|apuestas campeon champions
2025|apuestas campeon champions league|apuestas campeon conference league|apuestas campeon copa america|apuestas campeon copa
del rey|apuestas campeon de champions|apuestas campeon de la champions|apuestas campeon de liga|apuestas campeon del mundo|apuestas campeon eurocopa|apuestas campeón eurocopa|apuestas campeon europa league|apuestas
campeon f1|apuestas campeon f1 2025|apuestas campeon formula 1|apuestas campeon libertadores|apuestas campeon liga|apuestas campeon liga
bbva|apuestas campeon liga española|apuestas campeon liga santander|apuestas campeon motogp 2025|apuestas campeon mundial|apuestas campeón mundial|apuestas campeon mundial baloncesto|apuestas
campeon nba|apuestas campeón nba|apuestas campeon premier|apuestas campeon premier league|apuestas campeon roland garros|apuestas
campeonato f1|apuestas campeonatos de futbol|apuestas carrera de
caballos|apuestas carrera de caballos hoy|apuestas carrera de caballos nocturnas|apuestas carrera de galgos fin de
semana|apuestas carrera de galgos hoy|apuestas carrera de galgos nocturnas|apuestas
carreras caballos|apuestas carreras caballos sanlucar|apuestas carreras de caballos|apuestas carreras de
caballos en directo|apuestas carreras de caballos en vivo|apuestas carreras de
caballos españa|apuestas carreras de caballos hoy|apuestas carreras
de caballos nacionales|apuestas carreras de caballos nocturnas|apuestas carreras de caballos online|apuestas
carreras de caballos sanlucar|apuestas carreras de
caballos sanlúcar|apuestas carreras de galgos|apuestas
carreras de galgos en vivo|apuestas carreras de galgos nocturnas|apuestas carreras de galgos pre partido|apuestas casino|apuestas casino barcelona|apuestas casino futbol|apuestas casino gran madrid|apuestas
casino gratis|apuestas casino madrid|apuestas casino online|apuestas
casino online argentina|apuestas casinos|apuestas casinos online|apuestas celta|apuestas celta barcelona|apuestas celta betis|apuestas
celta eibar|apuestas celta espanyol|apuestas celta granada|apuestas celta madrid|apuestas celta manchester|apuestas
celta real madrid|apuestas champion league|apuestas champions foro|apuestas champions hoy|apuestas champions league|apuestas champions league – pronósticos|apuestas champions league 2025|apuestas champions league
hoy|apuestas champions league pronosticos|apuestas champions league pronósticos|apuestas champions
pronosticos|apuestas chelsea barcelona|apuestas chelsea betis|apuestas chile|apuestas chile peru|apuestas chile venezuela|apuestas chile
vs colombia|apuestas chile vs uruguay|apuestas ciclismo|apuestas ciclismo en vivo|apuestas ciclismo femenino|apuestas ciclismo tour
francia|apuestas ciclismo vuelta|apuestas ciclismo vuelta
a españa|apuestas ciclismo vuelta españa|apuestas city
madrid|apuestas city real madrid|apuestas clasico|apuestas clasico español|apuestas clasico
real madrid barcelona|apuestas clasificacion mundial|apuestas colombia|apuestas colombia argentina|apuestas colombia brasil|apuestas colombia
paraguay|apuestas colombia uruguay|apuestas colombia vs argentina|apuestas colombia vs brasil|apuestas combinadas|apuestas combinadas como funcionan|apuestas combinadas de futbol|apuestas combinadas de fútbol|apuestas combinadas foro|apuestas combinadas futbol|apuestas combinadas hoy|apuestas combinadas mismo
partido|apuestas combinadas mundial|apuestas combinadas nba|apuestas
combinadas para esta semana|apuestas combinadas para hoy|apuestas combinadas para mañana|apuestas combinadas pronosticos|apuestas combinadas recomendadas|apuestas combinadas seguras|apuestas combinadas seguras para hoy|apuestas combinadas seguras para
mañana|apuestas como ganar|apuestas comparador|apuestas
con bono de bienvenida|apuestas con dinero ficticio|apuestas con dinero real|apuestas con dinero virtual|apuestas con handicap|apuestas con handicap asiatico|apuestas con handicap baloncesto|apuestas con mas
probabilidades de ganar|apuestas con paypal|apuestas con tarjeta de credito|apuestas con tarjeta de debito|apuestas consejos|apuestas copa|apuestas copa africa|apuestas copa america|apuestas copa américa|apuestas copa argentina|apuestas copa brasil|apuestas copa davis|apuestas copa de europa|apuestas copa del mundo|apuestas
copa del rey|apuestas copa del rey baloncesto|apuestas copa del rey final|apuestas copa del rey futbol|apuestas copa del rey ganador|apuestas copa del rey hoy|apuestas copa del rey pronosticos|apuestas copa del rey pronósticos|apuestas
copa europa|apuestas copa italia|apuestas copa libertadores|apuestas copa mundial de hockey|apuestas copa rey|apuestas copa sudamericana|apuestas corners|apuestas corners hoy|apuestas croacia
argentina|apuestas cuartos eurocopa|apuestas cuotas|apuestas cuotas altas|apuestas cuotas bajas|apuestas de 1 euro|apuestas de baloncesto|apuestas de baloncesto hoy|apuestas de
baloncesto nba|apuestas de baloncesto para hoy|apuestas
de beisbol|apuestas de beisbol para hoy|apuestas de blackjack en linea|apuestas de
boxeo|apuestas de boxeo canelo|apuestas de boxeo en las vegas|apuestas de boxeo
hoy|apuestas de boxeo online|apuestas de caballo|apuestas de
caballos|apuestas de caballos como funciona|apuestas de caballos como se juega|apuestas de
caballos en colombia|apuestas de caballos en españa|apuestas de
caballos en linea|apuestas de caballos españa|apuestas de caballos ganador y colocado|apuestas de caballos internacionales|apuestas de caballos juegos|apuestas de caballos online|apuestas de caballos online en venezuela|apuestas de caballos
por internet|apuestas de caballos pronosticos|apuestas de caballos
pronósticos|apuestas de carrera de caballos|apuestas de carreras de caballos|apuestas de carreras de caballos online|apuestas de
casino|apuestas de casino online|apuestas de casino por internet|apuestas de champions league|apuestas
de ciclismo|apuestas de colombia|apuestas de copa america|apuestas de corners|apuestas de deportes en linea|apuestas de deportes online|apuestas de dinero|apuestas de esports|apuestas de eurocopa|apuestas de europa
league|apuestas de f1|apuestas de formula
1|apuestas de futbol|apuestas de fútbol|apuestas de futbol
app|apuestas de futbol argentina|apuestas de futbol colombia|apuestas de futbol en colombia|apuestas de futbol en directo|apuestas de futbol en linea|apuestas de
futbol en vivo|apuestas de futbol español|apuestas de
futbol gratis|apuestas de futbol hoy|apuestas de futbol mundial|apuestas de futbol online|apuestas de fútbol online|apuestas
de futbol para hoy|apuestas de fútbol para hoy|apuestas
de futbol para hoy seguras|apuestas de futbol para mañana|apuestas de
futbol peru|apuestas de futbol pronosticos|apuestas de fútbol pronósticos|apuestas
de futbol seguras|apuestas de futbol seguras para hoy|apuestas de futbol sin dinero|apuestas
de galgos|apuestas de galgos como ganar|apuestas de galgos en directo|apuestas
de galgos online|apuestas de galgos trucos|apuestas de
golf|apuestas de hockey|apuestas de hockey sobre hielo|apuestas de hoy|apuestas de hoy seguras|apuestas de juego|apuestas de juegos|apuestas de juegos deportivos|apuestas de juegos online|apuestas de la champions league|apuestas de la copa américa|apuestas de la eurocopa|apuestas
de la europa league|apuestas de la liga|apuestas de la liga bbva|apuestas de la liga española|apuestas de la nba|apuestas de la nfl|apuestas de la ufc|apuestas de mlb|apuestas
de nba|apuestas de nba para hoy|apuestas de
partidos|apuestas de partidos de futbol|apuestas de peleas ufc|apuestas
de perros en vivo|apuestas de perros virtuales|apuestas de peru|apuestas de sistema|apuestas de sistema como funciona|apuestas de sistema explicacion|apuestas de sistema explicación|apuestas de
tenis|apuestas de tenis de mesa|apuestas de tenis en directo|apuestas
de tenis hoy|apuestas de tenis para hoy|apuestas de tenis pronosticos|apuestas de tenis seguras|apuestas de todo tipo|apuestas de ufc|apuestas de ufc hoy|apuestas del boxeo|apuestas del clasico|apuestas del clasico real madrid
barca|apuestas del dia|apuestas del día|apuestas del dia de hoy|apuestas del dia deportivas|apuestas del dia futbol|apuestas del mundial|apuestas del partido de
hoy|apuestas del real madrid|apuestas del rey|apuestas del sistema|apuestas deporte|apuestas deportes|apuestas deportiva|apuestas deportivas|apuestas deportivas 1 euro|apuestas deportivas 10 euros gratis|apuestas deportivas
100 seguras|apuestas deportivas 1×2|apuestas deportivas android|apuestas
deportivas app|apuestas deportivas apps|apuestas deportivas argentina|apuestas deportivas argentina futbol|apuestas deportivas argentina
legal|apuestas deportivas atletico de madrid|apuestas deportivas baloncesto|apuestas deportivas barca madrid|apuestas deportivas barcelona|apuestas deportivas beisbol|apuestas deportivas bono|apuestas deportivas bono bienvenida|apuestas deportivas bono de bienvenida|apuestas deportivas
bono sin deposito|apuestas deportivas bonos de bienvenida|apuestas deportivas boxeo|apuestas deportivas
caballos|apuestas deportivas calculadora|apuestas deportivas campeon liga|apuestas deportivas casino|apuestas deportivas casino barcelona|apuestas deportivas casino online|apuestas deportivas cerca de mi|apuestas deportivas champions
league|apuestas deportivas chile|apuestas deportivas
ciclismo|apuestas deportivas colombia|apuestas deportivas
com|apuestas deportivas com foro|apuestas deportivas com pronosticos|apuestas deportivas combinadas|apuestas deportivas combinadas para hoy|apuestas deportivas como se juega|apuestas deportivas comparador|apuestas deportivas con bono gratis|apuestas deportivas con bonos gratis|apuestas deportivas con dinero ficticio|apuestas deportivas con paypal|apuestas deportivas con puntos virtuales|apuestas deportivas consejos|apuestas deportivas
consejos para ganar|apuestas deportivas copa america|apuestas deportivas copa
del rey|apuestas deportivas copa libertadores|apuestas deportivas copa mundial|apuestas deportivas corners|apuestas deportivas cual es la mejor|apuestas
deportivas cuotas altas|apuestas deportivas de baloncesto|apuestas
deportivas de boxeo|apuestas deportivas de colombia|apuestas deportivas de futbol|apuestas deportivas
de nba|apuestas deportivas de nhl|apuestas deportivas de
peru|apuestas deportivas de tenis|apuestas deportivas del dia|apuestas deportivas dinero ficticio|apuestas deportivas directo|apuestas deportivas doble oportunidad|apuestas
deportivas en argentina|apuestas deportivas en chile|apuestas deportivas en colombia|apuestas
deportivas en directo|apuestas deportivas en españa|apuestas deportivas
en español|apuestas deportivas en linea|apuestas deportivas en línea|apuestas deportivas en peru|apuestas deportivas en perú|apuestas deportivas en sevilla|apuestas deportivas en uruguay|apuestas deportivas en vivo|apuestas deportivas es|apuestas deportivas es
pronosticos|apuestas deportivas españa|apuestas deportivas españolas|apuestas deportivas esports|apuestas deportivas estadisticas|apuestas
deportivas estrategias|apuestas deportivas estrategias seguras|apuestas deportivas
eurocopa|apuestas deportivas europa league|apuestas deportivas f1|apuestas deportivas faciles
de ganar|apuestas deportivas formula 1|apuestas deportivas foro|apuestas deportivas
foro futbol|apuestas deportivas foro tenis|apuestas deportivas francia argentina|apuestas deportivas futbol|apuestas deportivas
fútbol|apuestas deportivas futbol argentino|apuestas deportivas
futbol colombia|apuestas deportivas futbol español|apuestas deportivas gana|apuestas deportivas ganadas|apuestas deportivas
ganar dinero seguro|apuestas deportivas gane|apuestas deportivas golf|apuestas deportivas
gratis|apuestas deportivas gratis con premios|apuestas deportivas gratis hoy|apuestas
deportivas gratis sin deposito|apuestas deportivas handicap|apuestas deportivas handicap asiatico|apuestas deportivas hoy|apuestas deportivas
impuestos|apuestas deportivas interior argentina|apuestas deportivas juegos olimpicos|apuestas deportivas la liga|apuestas deportivas legales|apuestas
deportivas legales en colombia|apuestas deportivas libres de impuestos|apuestas deportivas licencia españa|apuestas deportivas liga española|apuestas deportivas listado|apuestas deportivas listado clasico|apuestas
deportivas madrid|apuestas deportivas mas seguras|apuestas deportivas mejor pagadas|apuestas deportivas mejores|apuestas deportivas mejores app|apuestas deportivas mejores casas|apuestas deportivas mejores
cuotas|apuestas deportivas mejores paginas|apuestas deportivas
mexico|apuestas deportivas méxico|apuestas deportivas mlb|apuestas deportivas mlb
hoy|apuestas deportivas multiples|apuestas deportivas mundial|apuestas deportivas
murcia|apuestas deportivas nba|apuestas deportivas nba hoy|apuestas deportivas nfl|apuestas deportivas nhl|apuestas deportivas nuevas|apuestas deportivas ofertas|apuestas deportivas online|apuestas deportivas online argentina|apuestas deportivas online chile|apuestas deportivas online colombia|apuestas deportivas online en colombia|apuestas deportivas online españa|apuestas deportivas online mexico|apuestas deportivas online paypal|apuestas deportivas online peru|apuestas deportivas online por
internet|apuestas deportivas pago paypal|apuestas deportivas para ganar dinero|apuestas deportivas para hoy|apuestas deportivas para hoy pronosticos|apuestas deportivas partido
suspendido|apuestas deportivas partidos de hoy|apuestas deportivas
paypal|apuestas deportivas peru|apuestas deportivas perú|apuestas deportivas peru vs ecuador|apuestas deportivas predicciones|apuestas deportivas promociones|apuestas deportivas
pronostico|apuestas deportivas pronóstico|apuestas deportivas pronostico
hoy|apuestas deportivas pronosticos|apuestas deportivas pronósticos|apuestas deportivas pronosticos expertos|apuestas deportivas
pronosticos gratis|apuestas deportivas pronosticos nba|apuestas deportivas pronosticos tenis|apuestas deportivas que
aceptan paypal|apuestas deportivas real madrid|apuestas deportivas regalo
bienvenida|apuestas deportivas resultado exacto|apuestas deportivas
resultados|apuestas deportivas rugby|apuestas deportivas seguras|apuestas deportivas seguras foro|apuestas deportivas seguras hoy|apuestas deportivas seguras
para hoy|apuestas deportivas seguras telegram|apuestas deportivas sevilla|apuestas deportivas simulador
eurocopa|apuestas deportivas sin deposito|apuestas deportivas sin deposito
inicial|apuestas deportivas sin dinero|apuestas deportivas sin dinero real|apuestas deportivas sin registro|apuestas deportivas
stake|apuestas deportivas stake 10|apuestas deportivas telegram
españa|apuestas deportivas tenis|apuestas deportivas tenis de mesa|apuestas deportivas tenis foro|apuestas deportivas tenis
hoy|apuestas deportivas tips|apuestas deportivas tipster|apuestas deportivas
ufc|apuestas deportivas uruguay|apuestas deportivas valencia|apuestas deportivas valencia barcelona|apuestas
deportivas venezuela|apuestas deportivas virtuales|apuestas deportivas y
casino|apuestas deportivas y casino online|apuestas deportivas.com|apuestas deportivas.com foro|apuestas deportivas.es|apuestas deportivos pronosticos|apuestas deposito minimo 1 euro|apuestas descenso a segunda|apuestas descenso a segunda b|apuestas descenso la liga|apuestas descenso primera division|apuestas descenso segunda|apuestas dia|apuestas diarias seguras|apuestas dinero|apuestas dinero ficticio|apuestas dinero real|apuestas dinero virtual|apuestas directas|apuestas
directo|apuestas directo futbol|apuestas division de honor juvenil|apuestas dnb|apuestas doble oportunidad|apuestas doble resultado|apuestas dobles|apuestas
dobles y triples|apuestas dortmund barcelona|apuestas draft nba|apuestas draft nfl|apuestas ecuador vs
argentina|apuestas ecuador vs venezuela|apuestas egipto uruguay|apuestas el clasico|apuestas elecciones venezuela|apuestas empate|apuestas en baloncesto|apuestas
en barcelona|apuestas en beisbol|apuestas en boxeo|apuestas en caballos|apuestas en carreras de caballos|apuestas en casino|apuestas
en casino online|apuestas en casinos|apuestas en casinos online|apuestas en chile|apuestas
en ciclismo|apuestas en colombia|apuestas en colombia de futbol|apuestas
en directo|apuestas en directo futbol|apuestas en directo pronosticos|apuestas en el futbol|apuestas en el tenis|apuestas en españa|apuestas en esports|apuestas
en eventos deportivos virtuales|apuestas en golf|apuestas en juegos|apuestas en la
champions league|apuestas en la eurocopa|apuestas en la liga|apuestas en la nba|apuestas en la nfl|apuestas en las vegas mlb|apuestas en las vegas
nfl|apuestas en linea|apuestas en línea|apuestas en linea argentina|apuestas en linea boxeo|apuestas
en linea chile|apuestas en linea colombia|apuestas en línea de fútbol|apuestas en linea deportivas|apuestas en linea españa|apuestas en linea estados unidos|apuestas en linea futbol|apuestas en linea mexico|apuestas en línea méxico|apuestas en linea mundial|apuestas en linea
peru|apuestas en linea usa|apuestas en los esports|apuestas en madrid|apuestas
en méxico|apuestas en mexico online|apuestas en nba|apuestas en partidos de futbol|apuestas en partidos de
futbol en vivo|apuestas en partidos de tenis en directo|apuestas en perú|apuestas en sevilla|apuestas
en sistema|apuestas en stake|apuestas en tenis|apuestas en tenis de mesa|apuestas en valencia|apuestas en vivo|apuestas en vivo argentina|apuestas en vivo casino|apuestas en vivo futbol|apuestas en vivo fútbol|apuestas en vivo nba|apuestas
en vivo peru|apuestas en vivo tenis|apuestas en vivo ufc|apuestas equipo mbappe|apuestas equipos de futbol|apuestas
españa|apuestas españa alemania|apuestas españa alemania
eurocopa|apuestas españa croacia|apuestas españa eurocopa|apuestas españa francia|apuestas españa francia eurocopa|apuestas españa gana el mundial|apuestas
españa gana eurocopa|apuestas españa gana mundial|apuestas españa georgia|apuestas españa
holanda|apuestas españa inglaterra|apuestas
españa inglaterra cuotas|apuestas españa inglaterra eurocopa|apuestas españa
italia|apuestas españa mundial|apuestas españa paises bajos|apuestas
español|apuestas español oviedo|apuestas espanyol barcelona|apuestas espanyol betis|apuestas espanyol villarreal|apuestas esport|apuestas esports|apuestas esports colombia|apuestas esports españa|apuestas esports
fifa|apuestas esports gratis|apuestas esports lol|apuestas esports peru|apuestas esports valorant|apuestas estadisticas|apuestas estrategias|apuestas
euro|apuestas euro copa|apuestas eurocopa|apuestas eurocopa campeon|apuestas eurocopa españa|apuestas eurocopa
favoritos|apuestas eurocopa femenina|apuestas eurocopa final|apuestas eurocopa ganador|apuestas eurocopa hoy|apuestas eurocopa
sub 21|apuestas euroliga baloncesto|apuestas euroliga pronosticos|apuestas
europa league|apuestas europa league hoy|apuestas europa league pronosticos|apuestas europa league pronósticos|apuestas euros|apuestas f1
abu dhabi|apuestas f1 bahrein|apuestas f1 canada|apuestas f1 china|apuestas f1 cuotas|apuestas f1 hoy|apuestas f1
las vegas|apuestas f1 miami|apuestas f1 monaco|apuestas faciles de ganar|apuestas fáciles de ganar|apuestas faciles para ganar|apuestas favoritas|apuestas favorito champions|apuestas favoritos champions|apuestas
favoritos eurocopa|apuestas favoritos mundial|apuestas fc
barcelona|apuestas final champions cuotas|apuestas final champions league|apuestas final champions peru|apuestas final
copa|apuestas final copa america|apuestas final copa de europa|apuestas
final copa del rey|apuestas final copa europa|apuestas final
copa libertadores|apuestas final copa rey|apuestas final de copa|apuestas final de copa del rey|apuestas final del
mundial|apuestas final euro|apuestas final eurocopa|apuestas final europa league|apuestas final libertadores|apuestas
final mundial|apuestas final nba|apuestas final rugby|apuestas final uefa europa league|apuestas final.mundial|apuestas finales de conferencia nfl|apuestas finales nba|apuestas fiorentina betis|apuestas formula|apuestas formula 1|apuestas
fórmula 1|apuestas fórmula 1 pronósticos|apuestas formula
uno|apuestas foro|apuestas foro nba|apuestas francia argentina|apuestas francia españa|apuestas
futbol|apuestas fútbol|apuestas futbol americano|apuestas futbol americano nfl|apuestas futbol argentina|apuestas futbol argentino|apuestas futbol champions league|apuestas futbol chile|apuestas futbol colombia|apuestas futbol consejos|apuestas futbol en directo|apuestas fútbol en directo|apuestas futbol en vivo|apuestas
fútbol en vivo|apuestas futbol españa|apuestas
futbol español|apuestas fútbol español|apuestas futbol eurocopa|apuestas futbol femenino|apuestas futbol
foro|apuestas futbol gratis|apuestas futbol hoy|apuestas fútbol hoy|apuestas futbol juegos olimpicos|apuestas
futbol mexico|apuestas futbol mundial|apuestas futbol online|apuestas futbol para
hoy|apuestas futbol peru|apuestas futbol pronosticos|apuestas futbol sala|apuestas futbol telegram|apuestas futbol
virtual|apuestas galgos|apuestas galgos en directo|apuestas galgos hoy|apuestas
galgos online|apuestas galgos pronosticos|apuestas galgos trucos|apuestas gana|apuestas gana colombia|apuestas
gana resultados|apuestas ganadas|apuestas ganadas hoy|apuestas ganador champions
league|apuestas ganador copa america|apuestas ganador copa del rey|apuestas
ganador copa del rey baloncesto|apuestas ganador copa libertadores|apuestas ganador
de la eurocopa|apuestas ganador de la liga|apuestas ganador del mundial|apuestas
ganador eurocopa|apuestas ganador europa league|apuestas ganador
f1|apuestas ganador la liga|apuestas ganador liga española|apuestas ganador mundial|apuestas ganador mundial baloncesto|apuestas ganador mundial f1|apuestas ganador nba|apuestas ganadores eurocopa|apuestas ganadores mundial|apuestas ganar champions|apuestas ganar eurocopa|apuestas ganar liga|apuestas ganar mundial|apuestas ganar nba|apuestas getafe valencia|apuestas ghana uruguay|apuestas girona|apuestas girona
athletic|apuestas girona betis|apuestas girona campeon de liga|apuestas girona campeon liga|apuestas girona
gana la liga|apuestas girona real madrid|apuestas girona real sociedad|apuestas goleador eurocopa|apuestas goleadores eurocopa|apuestas goles asiaticos|apuestas golf|apuestas
golf masters|apuestas golf pga|apuestas granada barcelona|apuestas grand
slam de tenis|apuestas gratis|apuestas gratis casino|apuestas gratis con premios|apuestas gratis hoy|apuestas gratis para
hoy|apuestas gratis por registro|apuestas gratis puntos|apuestas gratis
regalos|apuestas gratis sin deposito|apuestas gratis sin depósito|apuestas gratis
sin ingreso|apuestas gratis sports|apuestas gratis y ganar premios|apuestas grupo a eurocopa|apuestas grupos
eurocopa|apuestas handicap|apuestas handicap asiatico|apuestas handicap baloncesto|apuestas handicap como funciona|apuestas handicap
nba|apuestas handicap nfl|apuestas hipicas online|apuestas hípicas online|apuestas hipicas venezuela|apuestas hockey|apuestas hockey hielo|apuestas hockey patines|apuestas
hockey sobre hielo|apuestas holanda argentina|apuestas holanda vs argentina|apuestas hoy|apuestas hoy
champions|apuestas hoy futbol|apuestas hoy nba|apuestas hoy
pronosticos|apuestas hoy seguras|apuestas impuestos|apuestas inglaterra
paises bajos|apuestas inter barca|apuestas inter
barcelona|apuestas juego|apuestas juegos|apuestas juegos en linea|apuestas
juegos olimpicos|apuestas juegos olímpicos|apuestas juegos olimpicos baloncesto|apuestas juegos
online|apuestas juegos virtuales|apuestas jugador sevilla|apuestas jugadores nba|apuestas kings league americas|apuestas la
liga|apuestas la liga española|apuestas la liga hoy|apuestas la liga santander|apuestas las vegas
mlb|apuestas las vegas nba|apuestas las vegas nfl|apuestas league of legends mundial|apuestas
legal|apuestas legales|apuestas legales en colombia|apuestas legales en españa|apuestas legales en estados unidos|apuestas
legales españa|apuestas leganes betis|apuestas libertadores|apuestas licencia|apuestas liga 1 peru|apuestas liga argentina|apuestas
liga bbva pronosticos|apuestas liga de campeones|apuestas
liga de campeones de baloncesto|apuestas liga de campeones de hockey|apuestas liga españa|apuestas liga española|apuestas liga santander pronosticos|apuestas ligas de futbol|apuestas linea|apuestas linea
de gol|apuestas liverpool barcelona|apuestas liverpool real
madrid|apuestas lol mundial|apuestas madrid|apuestas madrid arsenal|apuestas madrid atletico|apuestas madrid
atletico champions|apuestas madrid barca|apuestas madrid
barça|apuestas madrid barca hoy|apuestas madrid
barca supercopa|apuestas madrid barcelona|apuestas madrid barsa|apuestas
madrid bayern|apuestas madrid betis|apuestas madrid borussia|apuestas
madrid campeon champions|apuestas madrid celta|apuestas madrid
city|apuestas madrid dortmund|apuestas madrid gana la liga|apuestas madrid gana liga|apuestas madrid
hoy|apuestas madrid liverpool|apuestas madrid osasuna|apuestas madrid sevilla|apuestas madrid valencia|apuestas madrid vs arsenal|apuestas madrid vs barcelona|apuestas mallorca osasuna|apuestas mallorca real
sociedad|apuestas manchester athletic|apuestas manchester city real madrid|apuestas mas faciles de ganar|apuestas mas seguras|apuestas mas seguras para hoy|apuestas masters de golf|apuestas masters de tenis|apuestas
maximo goleador eurocopa|apuestas maximo goleador mundial|apuestas mejor jugador eurocopa|apuestas mejores
casinos online|apuestas mexico|apuestas méxico|apuestas mexico polonia|apuestas méxico polonia|apuestas mlb|apuestas mlb hoy|apuestas mlb las vegas|apuestas mlb para
hoy|apuestas mlb pronosticos|apuestas mlb usa|apuestas mma ufc|apuestas momios|apuestas multiples|apuestas múltiples|apuestas multiples como funcionan|apuestas multiples el gordo|apuestas multiples futbol|apuestas mundial|apuestas mundial 2026|apuestas mundial baloncesto|apuestas mundial balonmano|apuestas mundial brasil|apuestas mundial campeon|apuestas mundial ciclismo|apuestas mundial
clubes|apuestas mundial de baloncesto|apuestas mundial de ciclismo|apuestas mundial de clubes|apuestas mundial
de futbol|apuestas mundial de fútbol|apuestas mundial de rugby|apuestas
mundial f1|apuestas mundial favoritos|apuestas mundial femenino|apuestas mundial
formula 1|apuestas mundial futbol|apuestas mundial ganador|apuestas mundial lol|apuestas mundial moto gp|apuestas mundial motogp|apuestas mundial
rugby|apuestas mundial sub 17|apuestas mundiales|apuestas mundialistas|apuestas mvp eurocopa|apuestas mvp nba|apuestas mvp nfl|apuestas
nacionales de colombia|apuestas nba|apuestas nba all star|apuestas nba campeon|apuestas nba consejos|apuestas nba esta
noche|apuestas nba finals|apuestas nba gratis|apuestas nba hoy|apuestas nba
hoy jugadores|apuestas nba hoy pronosticos|apuestas nba para hoy|apuestas nba playoffs|apuestas nba pronosticos|apuestas nba pronósticos|apuestas nba pronosticos hoy|apuestas nba tipster|apuestas nfl|apuestas nfl hoy|apuestas nfl las vegas|apuestas nfl playoffs|apuestas
nfl pronosticos|apuestas nfl pronósticos|apuestas nfl semana
4|apuestas nfl super bowl|apuestas nhl|apuestas nhl pronosticos|apuestas
octavos eurocopa|apuestas ofertas|apuestas online|apuestas online argentina|apuestas online argentina legal|apuestas online
bono|apuestas online bono bienvenida|apuestas online boxeo|apuestas online caballos|apuestas online carreras de
caballos|apuestas online casino|apuestas online champions league|apuestas online chile|apuestas online ciclismo|apuestas online colombia|apuestas online comparativa|apuestas online con paypal|apuestas
online de caballos|apuestas online deportivas|apuestas online en argentina|apuestas online en peru|apuestas online espana|apuestas
online españa|apuestas online esports|apuestas online foro|apuestas online futbol|apuestas online futbol españa|apuestas online golf|apuestas online gratis|apuestas online
gratis sin deposito|apuestas online juegos|apuestas online mexico|apuestas online
mma|apuestas online movil|apuestas online nba|apuestas online
net|apuestas online nuevas|apuestas online opiniones|apuestas online paypal|apuestas online peru|apuestas online seguras|apuestas online sin dinero|apuestas online sin registro|apuestas online tenis|apuestas online ufc|apuestas online
uruguay|apuestas online venezuela|apuestas open britanico
golf|apuestas osasuna athletic|apuestas osasuna barcelona|apuestas osasuna
real madrid|apuestas osasuna sevilla|apuestas osasuna valencia|apuestas over|apuestas over
2.5|apuestas over under|apuestas paginas|apuestas
pago anticipado|apuestas paises bajos ecuador|apuestas paises bajos inglaterra|apuestas países bajos qatar|apuestas para boxeo|apuestas para champions league|apuestas para el clasico|apuestas para el dia de hoy|apuestas para el mundial|apuestas para el partido
de hoy|apuestas para eurocopa|apuestas para europa league|apuestas
para futbol|apuestas para ganar|apuestas para
ganar dinero|apuestas para ganar dinero facil|apuestas para ganar en la ruleta|apuestas
para ganar la champions|apuestas para ganar la eurocopa|apuestas
para ganar la europa league|apuestas para ganar la liga|apuestas para ganar siempre|apuestas para hacer|apuestas para hoy|apuestas para hoy de futbol|apuestas para hoy europa league|apuestas para hoy futbol|apuestas para
juegos|apuestas para la champions league|apuestas para la copa del
rey|apuestas para la eurocopa|apuestas para la europa league|apuestas para la final
de la eurocopa|apuestas para la nba hoy|apuestas para los partidos de hoy|apuestas para partidos de
hoy|apuestas para ufc|apuestas partido|apuestas partido aplazado|apuestas partido champions|apuestas partido colombia|apuestas partido españa
marruecos|apuestas partido mundial|apuestas partido
suspendido|apuestas partidos|apuestas partidos champions league|apuestas partidos csgo|apuestas partidos de futbol|apuestas partidos
de futbol hoy|apuestas partidos de hoy|apuestas partidos eurocopa|apuestas
partidos futbol|apuestas partidos hoy|apuestas partidos mundial|apuestas paypal|apuestas peleas
de boxeo|apuestas peru|apuestas perú|apuestas peru brasil|apuestas peru chile|apuestas peru paraguay|apuestas peru uruguay|apuestas peru vs chile|apuestas peru vs colombia|apuestas pichichi eurocopa|apuestas plataforma|apuestas playoff|apuestas playoff ascenso|apuestas playoff ascenso a primera|apuestas playoff nba|apuestas playoff
segunda|apuestas playoff segunda b|apuestas playoffs nba|apuestas playoffs
nfl|apuestas polonia argentina|apuestas por argentina|apuestas por internet mexico|apuestas por internet para ganar
dinero|apuestas por paypal|apuestas por ronda boxeo|apuestas por sistema|apuestas portugal uruguay|apuestas pre partido|apuestas predicciones|apuestas predicciones futbol|apuestas primera
division|apuestas primera division españa|apuestas
promociones|apuestas pronostico|apuestas pronosticos|apuestas pronosticos deportivos|apuestas pronosticos deportivos tenis|apuestas pronosticos futbol|apuestas pronosticos gratis|apuestas pronosticos nba|apuestas pronosticos
tenis|apuestas prorroga|apuestas psg barca|apuestas psg barcelona|apuestas puntos
por tarjetas|apuestas puntos tarjetas|apuestas que aceptan paypal|apuestas que es
handicap|apuestas que puedes hacer con tu novia|apuestas que siempre ganaras|apuestas que significa|apuestas quien bajara a segunda|apuestas quién bajara a segunda|apuestas quien gana el mundial|apuestas quien gana eurocopa|apuestas quien gana la champions|apuestas quien gana la eurocopa|apuestas
quien gana la liga|apuestas quien ganara el mundial|apuestas
quién ganará el mundial|apuestas quien ganara la
champions|apuestas quien ganara la eurocopa|apuestas quien ganara la liga|apuestas
rayo barcelona|apuestas real madrid|apuestas
real madrid arsenal|apuestas real madrid athletic|apuestas real madrid atletico|apuestas real madrid atletico champions|apuestas real madrid atletico de madrid|apuestas real
madrid atlético de madrid|apuestas real madrid atletico madrid|apuestas real madrid barcelona|apuestas real madrid bayern|apuestas real madrid
betis|apuestas real madrid borussia|apuestas real madrid campeon champions|apuestas real madrid celta|apuestas real madrid champions|apuestas
real madrid city|apuestas real madrid girona|apuestas real
madrid hoy|apuestas real madrid liverpool|apuestas real madrid manchester city|apuestas real madrid osasuna|apuestas real madrid real
sociedad|apuestas real madrid valencia|apuestas real
madrid villarreal|apuestas real madrid vs arsenal|apuestas real
madrid vs atletico|apuestas real madrid vs atlético|apuestas real madrid vs
atletico madrid|apuestas real madrid vs barcelona|apuestas real
madrid vs betis|apuestas real madrid vs sevilla|apuestas real madrid vs valencia|apuestas real sociedad|apuestas real sociedad athletic|apuestas real sociedad
barcelona|apuestas real sociedad betis|apuestas real sociedad psg|apuestas real sociedad real madrid|apuestas real sociedad valencia|apuestas recomendadas hoy|apuestas regalo
de bienvenida|apuestas registro|apuestas resultado exacto|apuestas resultados|apuestas
resultados eurocopa|apuestas retirada tenis|apuestas roma barcelona|apuestas roma sevilla|apuestas rugby|apuestas rugby mundial|apuestas rugby
world cup|apuestas ruleta seguras|apuestas segunda|apuestas segunda b|apuestas segunda division|apuestas segunda división|apuestas segunda division b|apuestas segunda division españa|apuestas seguras|apuestas seguras baloncesto|apuestas seguras calculadora|apuestas seguras en la ruleta|apuestas seguras
eurocopa|apuestas seguras foro|apuestas seguras futbol|apuestas seguras futbol hoy|apuestas seguras gratis|apuestas
seguras hoy|apuestas seguras hoy futbol|apuestas seguras nba|apuestas seguras
nba hoy|apuestas seguras para este fin de semana|apuestas
seguras para ganar dinero|apuestas seguras para hoy|apuestas seguras para hoy fútbol|apuestas seguras
para hoy pronósticos|apuestas seguras para mañana|apuestas seguras ruleta|apuestas seguras telegram|apuestas seguras
tenis|apuestas semifinales eurocopa|apuestas senegal paises bajos|apuestas sevilla|apuestas sevilla athletic|apuestas
sevilla atletico de madrid|apuestas sevilla
barcelona|apuestas sevilla betis|apuestas sevilla campeon liga|apuestas sevilla celta|apuestas sevilla
gana la liga|apuestas sevilla girona|apuestas sevilla inter|apuestas sevilla jugador|apuestas sevilla juventus|apuestas sevilla leganes|apuestas sevilla madrid|apuestas sevilla manchester united|apuestas sevilla osasuna|apuestas sevilla real madrid|apuestas sevilla
real sociedad|apuestas sevilla roma|apuestas sevilla valencia|apuestas significa|apuestas simples ejemplos|apuestas simples o combinadas|apuestas
sin deposito|apuestas sin deposito inicial|apuestas sin deposito minimo|apuestas sin dinero|apuestas sin dinero real|apuestas sin empate|apuestas sin empate que significa|apuestas
sin ingreso minimo|apuestas sin registro|apuestas sistema|apuestas sistema calculadora|apuestas sistema como funciona|apuestas sistema trixie|apuestas sociedad|apuestas sorteo copa del
rey|apuestas stake|apuestas stake 10|apuestas stake 10 hoy|apuestas super bowl favorito|apuestas super rugby|apuestas
supercopa españa|apuestas superliga argentina|apuestas tarjeta roja|apuestas tarjetas|apuestas tarjetas amarillas|apuestas tenis|apuestas tenis
atp|apuestas tenis consejos|apuestas tenis copa davis|apuestas tenis de mesa|apuestas tenis
de mesa pronosticos|apuestas tenis en vivo|apuestas
tenis femenino|apuestas tenis hoy|apuestas tenis itf|apuestas tenis
pronosticos|apuestas tenis pronósticos|apuestas tenis retirada|apuestas tenis roland
garros|apuestas tenis seguras|apuestas tenis wimbledon|apuestas tenis wta|apuestas
tercera division|apuestas tercera division españa|apuestas tipos|apuestas tips|apuestas tipster|apuestas tipster para hoy|apuestas topuria holloway cuotas|apuestas torneos de golf|apuestas
torneos de tenis|apuestas trucos|apuestas uefa champions league|apuestas uefa europa league|apuestas ufc|apuestas ufc chile|apuestas ufc como funciona|apuestas ufc hoy|apuestas ufc ilia topuria|apuestas ufc online|apuestas ufc pronósticos|apuestas ufc telegram|apuestas ufc topuria|apuestas under over|apuestas unionistas villarreal|apuestas uruguay|apuestas uruguay
colombia|apuestas uruguay corea|apuestas uruguay vs colombia|apuestas
us open golf|apuestas us open tenis|apuestas valencia|apuestas valencia barcelona|apuestas
valencia betis|apuestas valencia madrid|apuestas valencia real madrid|apuestas valladolid barcelona|apuestas valladolid valencia|apuestas valor app|apuestas valor en directo|apuestas valor galgos|apuestas venezuela|apuestas venezuela argentina|apuestas venezuela bolivia|apuestas venezuela ecuador|apuestas villarreal|apuestas
villarreal athletic|apuestas villarreal barcelona|apuestas villarreal
bayern|apuestas villarreal betis|apuestas villarreal liverpool|apuestas villarreal manchester|apuestas villarreal manchester united|apuestas villarreal vs real
madrid|apuestas virtuales|apuestas virtuales colombia|apuestas virtuales futbol|apuestas virtuales sin dinero|apuestas vivo|apuestas
vuelta a españa|apuestas vuelta españa|apuestas william hill partidos de hoy|apuestas y casino|apuestas y casinos|apuestas y juegos de
azar|apuestas y pronosticos|apuestas y pronosticos de futbol|apuestas y pronosticos deportivos|apuestas
y resultados|apuestas-deportivas|apuestas-deportivas.es pronosticos|arbitro nba apuestas|argentina apuestas|argentina colombia apuestas|argentina croacia apuestas|argentina francia apuestas|argentina mexico
apuestas|argentina peru apuestas|argentina uruguay apuestas|argentina
vs bolivia apuestas|argentina vs chile apuestas|argentina vs colombia apuestas|argentina vs francia apuestas|argentina vs.
colombia apuestas|asi se gana en las apuestas deportivas|asiatico apuestas|asiatico en apuestas|asiaticos apuestas|athletic barcelona apuestas|athletic manchester united apuestas|athletic osasuna apuestas|athletic real madrid apuestas|atletico barcelona apuestas|atletico de madrid apuestas|atlético de
madrid apuestas|atletico de madrid real madrid apuestas|atletico de madrid vs barcelona apuestas|atletico madrid real madrid apuestas|atletico madrid vs real madrid apuestas|atletico real madrid apuestas|atletico vs real madrid apuestas|avisador
de cuotas apuestas|bajada de cuotas apuestas|baloncesto apuestas|barbastro barcelona
apuestas|barca apuestas|barca bayern apuestas|barca inter apuestas|barca madrid apuestas|barça madrid apuestas|barca vs atletico apuestas|barca vs madrid apuestas|barca vs real madrid
apuestas|barcelona – real madrid apuestas|barcelona apuestas|barcelona atletico apuestas|barcelona atletico de madrid apuestas|barcelona atletico
madrid apuestas|barcelona betis apuestas|barcelona casa de apuestas|barcelona
inter apuestas|barcelona psg apuestas|barcelona real
madrid apuestas|barcelona real sociedad apuestas|barcelona sevilla apuestas|barcelona valencia apuestas|barcelona vs athletic bilbao apuestas|barcelona vs atlético madrid
apuestas|barcelona vs betis apuestas|barcelona vs celta de vigo apuestas|barcelona vs espanyol apuestas|barcelona
vs girona apuestas|barcelona vs madrid apuestas|barcelona vs real madrid apuestas|barcelona vs real sociedad apuestas|barcelona vs sevilla apuestas|barcelona vs
villarreal apuestas|base de datos cuotas apuestas deportivas|bayern real madrid apuestas|beisbol apuestas|best america apuestas|bet
apuestas chile|bet apuestas en vivo|betis – chelsea apuestas|betis
apuestas|betis barcelona apuestas|betis chelsea apuestas|betis madrid apuestas|betis sevilla apuestas|betsson tu sitio de apuestas online|blog
apuestas baloncesto|blog apuestas ciclismo|blog apuestas nba|blog apuestas tenis|blog de apuestas de tenis|bono apuestas|bono apuestas deportivas|bono apuestas deportivas sin deposito|bono apuestas gratis|bono apuestas gratis sin deposito|bono apuestas sin deposito|bono bienvenida apuestas|bono bienvenida apuestas deportivas|bono bienvenida apuestas españa|bono bienvenida apuestas sin deposito|bono bienvenida
apuestas sin depósito|bono bienvenida casa apuestas|bono bienvenida casa
de apuestas|bono bienvenida marca apuestas|bono casa apuestas|bono casa de apuestas|bono
casa de apuestas sin ingreso|bono casas de apuestas|bono
de apuestas|bono de apuestas gratis sin deposito|bono de bienvenida apuestas|bono de bienvenida apuestas deportivas|bono de
bienvenida casa de apuestas|bono de bienvenida casas
de apuestas|bono de casas de apuestas|bono de registro apuestas|bono de registro apuestas deportivas|bono
de registro casa de apuestas|bono gratis apuestas|bono marca apuestas|bono por registro apuestas|bono por registro
apuestas deportivas|bono por registro casa de apuestas|bono registro apuestas|bono sin deposito apuestas|bono sin depósito
apuestas|bono sin deposito apuestas deportivas|bono sin depósito apuestas deportivas|bono sin deposito casa de apuestas|bono
sin deposito marca apuestas|bono sin ingreso apuestas|bono sin ingreso apuestas deportivas|bonos apuestas|bonos apuestas colombia|bonos
apuestas deportivas|bonos apuestas deportivas sin deposito|bonos apuestas gratis|bonos apuestas
sin deposito|bonos apuestas sin depósito|bonos bienvenida apuestas|bonos bienvenida casas apuestas|bonos bienvenida casas de apuestas|bonos casa de apuestas|bonos casas apuestas|bonos casas de
apuestas|bonos casas de apuestas colombia|bonos casas de apuestas deportivas|bonos casas
de apuestas españa|bonos casas de apuestas nuevas|bonos casas de apuestas sin deposito|bonos casas de apuestas sin depósito|bonos de apuestas|bonos de apuestas deportivas|bonos de apuestas gratis|bonos de apuestas sin deposito|bonos de bienvenida apuestas|bonos de bienvenida apuestas
deportivas|bonos de bienvenida casa de apuestas|bonos de bienvenida
casas de apuestas|bonos de bienvenida de casas de apuestas|bonos de bienvenida en casas de apuestas|bonos
de casas de apuestas|bonos de casas de apuestas sin deposito|bonos en casa de apuestas|bonos en casas
de apuestas sin deposito|bonos gratis apuestas|bonos gratis
apuestas deportivas|bonos gratis casas de apuestas|bonos gratis sin deposito apuestas|bonos paginas de
apuestas|bonos registro casas de apuestas|bonos sin deposito
apuestas|bonos sin depósito apuestas|bonos sin deposito apuestas deportivas|bonos sin deposito casas
de apuestas|bot de apuestas deportivas gratis|boxeo apuestas|brasil colombia apuestas|brasil peru apuestas|brasil
vs colombia apuestas|buenas apuestas para hoy|buscador cuotas apuestas|buscador de apuestas seguras|buscador de cuotas apuestas|buscador de cuotas de apuestas|buscar apuestas seguras|caballos apuestas|calculador de apuestas|calculador de cuotas apuestas|calculadora apuestas|calculadora apuestas combinadas|calculadora apuestas de
sistema|calculadora apuestas deportivas|calculadora apuestas deportivas seguras|calculadora
apuestas multiples|calculadora apuestas segura|calculadora
apuestas seguras|calculadora apuestas sistema|calculadora apuestas yankee|calculadora arbitraje apuestas|calculadora cubrir apuestas|calculadora cuotas apuestas|calculadora de apuestas|calculadora de apuestas combinadas|calculadora de apuestas de futbol|calculadora de apuestas de sistema|calculadora
de apuestas deportivas|calculadora de apuestas multiples|calculadora de apuestas seguras|calculadora de apuestas sistema|calculadora de apuestas surebets|calculadora de arbitraje apuestas|calculadora de cuotas
apuestas|calculadora de cuotas de apuestas|calculadora para apuestas deportivas|calculadora
poisson apuestas|calculadora poisson apuestas deportivas|calculadora poisson para apuestas|calculadora scalping apuestas
deportivas|calculadora sistema apuestas|calculadora stake
apuestas|calculadora trading apuestas|calcular apuestas|calcular apuestas
deportivas|calcular apuestas futbol|calcular apuestas sistema|calcular cuotas apuestas|calcular
cuotas apuestas combinadas|calcular cuotas apuestas deportivas|calcular cuotas
de apuestas|calcular ganancias apuestas deportivas|calcular momios apuestas|calcular
probabilidad cuota apuestas|calcular stake apuestas|calcular
unidades apuestas|calcular yield apuestas|calculo de apuestas|calculo
de apuestas deportivas|cambio de cuotas apuestas|campeon champions apuestas|campeon eurocopa apuestas|campeon liga apuestas|campeon nba apuestas|canales
de apuestas gratis|carrera de caballos apuestas|carrera de caballos
apuestas juego|carrera de caballos con apuestas|carrera de galgos apuestas|carreras de caballos apuestas|carreras de
caballos apuestas online|carreras de caballos con apuestas|carreras
de caballos juegos de apuestas|carreras de galgos
apuestas|carreras de galgos apuestas online|carreras de galgos apuestas trucos|carreras
galgos apuestas|casa apuestas argentina|casa apuestas atletico de madrid|casa apuestas barcelona|casa apuestas
betis|casa apuestas bono bienvenida|casa apuestas bono gratis|casa apuestas bono sin deposito|casa
apuestas cerca de mi|casa apuestas chile|casa apuestas colombia|casa
apuestas con mejores cuotas|casa apuestas deportivas|casa apuestas
españa|casa apuestas española|casa apuestas eurocopa|casa apuestas futbol|casa apuestas mejores
cuotas|casa apuestas mundial|casa apuestas nueva|casa apuestas nuevas|casa apuestas online|casa apuestas peru|casa
apuestas valencia|casa de apuestas|casa de apuestas 10 euros gratis|casa de apuestas argentina|casa de
apuestas atletico de madrid|casa de apuestas baloncesto|casa de apuestas barcelona|casa de apuestas beisbol|casa de apuestas betis|casa de
apuestas bono|casa de apuestas bono bienvenida|casa de apuestas bono de bienvenida|casa de apuestas bono gratis|casa de apuestas bono
por registro|casa de apuestas bono sin deposito|casa de
apuestas boxeo|casa de apuestas caballos|casa de apuestas
carreras de caballos|casa de apuestas cerca de mi|casa de apuestas cerca de
mí|casa de apuestas champions league|casa de apuestas chile|casa de
apuestas ciclismo|casa de apuestas colombia|casa de apuestas con bono de bienvenida|casa de apuestas con bono sin deposito|casa de apuestas con cuotas mas altas|casa de apuestas con esports|casa de apuestas con las mejores cuotas|casa de apuestas con licencia en españa|casa de apuestas con mejores cuotas|casa de
apuestas con pago anticipado|casa de apuestas con paypal|casa de apuestas copa america|casa
de apuestas de caballos|casa de apuestas de colombia|casa de apuestas de españa|casa de
apuestas de futbol|casa de apuestas de fútbol|casa de apuestas de
futbol peru|casa de apuestas de peru|casa de
apuestas del madrid|casa de apuestas del real madrid|casa de apuestas deportivas|casa
de apuestas deportivas cerca de mi|casa de apuestas deportivas en argentina|casa de apuestas deportivas en chile|casa de apuestas deportivas en colombia|casa de apuestas deportivas en españa|casa de
apuestas deportivas en madrid|casa de apuestas deportivas españa|casa de apuestas deportivas españolas|casa de apuestas deportivas madrid|casa
de apuestas deportivas mexico|casa de apuestas deportivas online|casa de apuestas deportivas peru|casa de apuestas deposito 5 euros|casa de apuestas deposito minimo|casa de
apuestas deposito minimo 1 euro|casa de apuestas depósito mínimo 1 euro|casa de
apuestas en españa|casa de apuestas en linea|casa de apuestas en madrid|casa de apuestas en perú|casa de apuestas en vivo|casa de apuestas españa|casa de apuestas españa inglaterra|casa de apuestas española|casa de apuestas españolas|casa de apuestas esports|casa de apuestas eurocopa|casa de apuestas europa league|casa de apuestas f1|casa de apuestas formula 1|casa de apuestas futbol|casa de apuestas ingreso minimo|casa de apuestas ingreso minimo 1 euro|casa de apuestas ingreso mínimo 1 euro|casa
de apuestas legales|casa de apuestas legales en colombia|casa de apuestas legales en españa|casa de apuestas libertadores|casa de apuestas liga española|casa de apuestas
madrid|casa de apuestas mas segura|casa de apuestas mejores|casa de
apuestas méxico|casa de apuestas minimo 5 euros|casa de apuestas mlb|casa de apuestas mundial|casa de apuestas
nba|casa de apuestas nfl|casa de apuestas nueva|casa de apuestas nuevas|casa de apuestas oficial del real madrid|casa de
apuestas oficial real madrid|casa de apuestas online|casa de apuestas online argentina|casa de apuestas online chile|casa de apuestas online españa|casa de apuestas online mexico|casa de
apuestas online paraguay|casa de apuestas online peru|casa de apuestas online usa|casa de apuestas online venezuela|casa de apuestas pago anticipado|casa de apuestas
para boxeo|casa de apuestas para ufc|casa
de apuestas peru|casa de apuestas perú|casa de apuestas peru online|casa de
apuestas por paypal|casa de apuestas promociones|casa de
apuestas que regalan dinero|casa de apuestas real
madrid|casa de apuestas regalo de bienvenida|casa de apuestas sevilla|casa de
apuestas sin dinero|casa de apuestas sin ingreso minimo|casa de apuestas sin licencia en españa|casa
de apuestas sin minimo de ingreso|casa de apuestas stake|casa de apuestas tenis|casa de apuestas ufc|casa de apuestas valencia|casa de apuestas venezuela|casa de apuestas
virtuales|casa de apuestas vive la suerte|casa oficial de apuestas del real madrid|casas apuestas asiaticas|casas apuestas
bono sin deposito|casas apuestas bonos sin deposito|casas apuestas caballos|casas apuestas chile|casas apuestas ciclismo|casas apuestas con licencia|casas apuestas con licencia en españa|casas apuestas
deportivas|casas apuestas deportivas colombia|casas
apuestas deportivas españa|casas apuestas deportivas
españolas|casas apuestas deportivas nuevas|casas apuestas
españa|casas apuestas españolas|casas apuestas esports|casas apuestas eurocopa|casas apuestas
golf|casas apuestas ingreso minimo 5 euros|casas apuestas legales|casas apuestas legales españa|casas
apuestas licencia|casas apuestas licencia españa|casas apuestas mexico|casas
apuestas mundial|casas apuestas nba|casas apuestas nuevas|casas apuestas nuevas españa|casas apuestas ofertas|casas
apuestas online|casas apuestas paypal|casas apuestas peru|casas apuestas sin licencia|casas apuestas tenis|casas asiaticas apuestas|casas de apuestas|casas de apuestas 5 euros|casas de apuestas app|casas de apuestas argentinas|casas de apuestas asiaticas|casas de apuestas baloncesto|casas de apuestas barcelona|casas de apuestas bono bienvenida|casas de apuestas bono de bienvenida|casas
de apuestas bono por registro|casas de apuestas bono sin deposito|casas de apuestas bono sin ingreso|casas de apuestas bonos|casas de
apuestas bonos de bienvenida|casas de apuestas bonos gratis|casas de apuestas bonos sin deposito|casas de apuestas boxeo|casas
de apuestas caballos|casas de apuestas carreras de caballos|casas de apuestas casino|casas de apuestas casino online|casas de apuestas cerca de mi|casas de apuestas champions league|casas de apuestas chile|casas de
apuestas ciclismo|casas de apuestas colombia|casas de
apuestas com|casas de apuestas con app|casas de apuestas con apuestas gratis|casas de apuestas con bono|casas de apuestas con bono de
bienvenida|casas de apuestas con bono de registro|casas de apuestas con bono por
registro|casas de apuestas con bono sin deposito|casas de apuestas con bonos|casas de apuestas con bonos gratis|casas de apuestas con bonos sin deposito|casas de apuestas con deposito minimo|casas de apuestas con esports|casas de apuestas con handicap
asiatico|casas de apuestas con licencia|casas de apuestas
con licencia en españa|casas de apuestas con licencia españa|casas de apuestas con licencia española|casas de apuestas con mejores cuotas|casas de apuestas con pago anticipado|casas de apuestas con paypal|casas de apuestas con paypal en perú|casas de apuestas con promociones|casas de apuestas con ruleta en vivo|casas de apuestas copa del rey|casas de apuestas de caballos|casas de apuestas de españa|casas
de apuestas de futbol|casas de apuestas de fútbol|casas de apuestas
de peru|casas de apuestas deportivas|casas de apuestas deportivas
asiaticas|casas de apuestas deportivas colombia|casas de apuestas
deportivas comparativa|casas de apuestas deportivas con paypal|casas de
apuestas deportivas en chile|casas de apuestas deportivas
en españa|casas de apuestas deportivas en linea|casas de apuestas deportivas en madrid|casas de
apuestas deportivas en mexico|casas de apuestas deportivas en peru|casas de apuestas deportivas en sevilla|casas de apuestas deportivas en valencia|casas de apuestas
deportivas españa|casas de apuestas deportivas españolas|casas de apuestas deportivas
legales|casas de apuestas deportivas madrid|casas de apuestas deportivas mexico|casas
de apuestas deportivas nuevas|casas de apuestas deportivas online|casas de apuestas deportivas peru|casas de apuestas deportivas perú|casas de apuestas deposito minimo
1 euro|casas de apuestas depósito mínimo 1 euro|casas de
apuestas dinero gratis|casas de apuestas en argentina|casas de apuestas en barcelona|casas de apuestas en chile|casas de apuestas en colombia|casas de apuestas en españa|casas de apuestas en españa online|casas de apuestas
en linea|casas de apuestas en madrid|casas
de apuestas en méxico|casas de apuestas en peru|casas de apuestas en perú|casas de apuestas en sevilla|casas de
apuestas en uruguay|casas de apuestas en valencia|casas de
apuestas en venezuela|casas de apuestas equipos de
futbol|casas de apuestas españa|casas de apuestas españa
alemania|casas de apuestas españa inglaterra|casas de apuestas españa licencia|casas de apuestas españa nuevas|casas de apuestas españa online|casas
de apuestas española|casas de apuestas españolas|casas de apuestas españolas con licencia|casas de apuestas españolas online|casas de apuestas esports|casas de apuestas eurocopa|casas de
apuestas eurocopa 2024|casas de apuestas europa league|casas de apuestas f1|casas
de apuestas fisicas en barcelona|casas de apuestas fisicas en españa|casas
de apuestas formula 1|casas de apuestas fuera de españa|casas de apuestas futbol|casas de apuestas
fútbol|casas de apuestas futbol españa|casas de apuestas ganador eurocopa|casas de apuestas gratis|casas de apuestas ingreso minimo|casas de apuestas ingreso minimo 1 euro|casas de
apuestas ingreso minimo 5 euros|casas de apuestas inter barcelona|casas de
apuestas legales|casas de apuestas legales en colombia|casas de apuestas legales en españa|casas de apuestas legales en mexico|casas de apuestas legales españa|casas de apuestas legales mx|casas de apuestas licencia|casas de apuestas licencia españa|casas de
apuestas lista|casas de apuestas madrid|casas de apuestas mas seguras|casas de apuestas mejores bonos|casas de apuestas mejores cuotas|casas de
apuestas mexico|casas de apuestas méxico|casas de apuestas minimo
5 euros|casas de apuestas mlb|casas de apuestas mundial|casas de apuestas
mundial baloncesto|casas de apuestas mundiales|casas de apuestas
nba|casas de apuestas no reguladas en españa|casas de apuestas nueva
ley|casas de apuestas nuevas|casas de apuestas nuevas en colombia|casas de apuestas nuevas en españa|casas
de apuestas nuevas españa|casas de apuestas ofertas|casas
de apuestas online|casas de apuestas online argentina|casas de apuestas online colombia|casas de apuestas online deportivas|casas de
apuestas online ecuador|casas de apuestas online en argentina|casas de apuestas online en chile|casas de apuestas online en colombia|casas de apuestas
online en españa|casas de apuestas online en mexico|casas de apuestas online españa|casas de apuestas online mas fiables|casas de apuestas
online mexico|casas de apuestas online nuevas|casas de apuestas online peru|casas de apuestas online usa|casas
de apuestas online venezuela|casas de apuestas pago paypal|casas de apuestas para ufc|cas
Your comment is awaiting moderation.
А так ТС работают отлично не было не одного проёба за пол года сотрудничество ни считая выше сказанного https://kemono.im/ahuoydac/askona-shveitsariia-kupit-kokain-mefedron-marikhuanu-boshki Отправки посылок и эта информация в 2-х местах прописана на сайте 2-10 РАБОЧИХ ДНЕЙ. В 99,9% случает сроки не нарушаются.
Your comment is awaiting moderation.
נאלצתי לדחוף את הזין עם מתח. – כן, תזיין לי את התחת! כשהישבן נמתח כנדרש, דימה החל להכות אותו ללא הברכיים. ידיים מאחורי הגב. היא צייתה. הוא לקח חבל קנבוס עבה מהשולחן. תנועותיו היו מהירות, מדויקות, rigushim
Your comment is awaiting moderation.
Нужно продвижение? Продвижение современных сайтов в ТОП 3 выдачи Яндекса и Google : аудит, семантика, техоптимизация, контент, ссылки, рост трафика и лидов. Прозрачные KPI и отчёты, реальные сроки, измеримый результат.
Your comment is awaiting moderation.
(10 euros gratis apuestas|10 mejores casas de apuestas|10 trucos para
ganar apuestas|15 euros gratis marca apuestas|1×2 apuestas|1×2 apuestas deportivas|1×2 apuestas
que significa|1×2 en apuestas|1×2 en apuestas que significa|1×2 que significa en apuestas|5 euros gratis
apuestas|9 apuestas que siempre ganaras|a partir de cuanto se declara apuestas|actividades de juegos de azar y apuestas|ad apuestas deportivas|aleksandre topuria ufc apuestas|algoritmo para ganar apuestas
deportivas|america apuestas|análisis nba apuestas|aplicacion android apuestas deportivas|aplicacion apuestas deportivas|aplicacion apuestas deportivas android|aplicación de apuestas online|aplicacion para hacer apuestas|aplicacion para hacer
apuestas de futbol|aplicación para hacer apuestas de fútbol|aplicaciones apuestas deportivas android|aplicaciones apuestas deportivas gratis|aplicaciones de apuestas android|aplicaciones
de apuestas de fútbol|aplicaciones de apuestas deportivas|aplicaciones
de apuestas deportivas peru|aplicaciones de apuestas deportivas perú|aplicaciones
de apuestas en colombia|aplicaciones de apuestas gratis|aplicaciones de
apuestas online|aplicaciones de apuestas seguras|aplicaciones de apuestas sin dinero|aplicaciones para hacer apuestas|apostar seguro
apuestas deportivas|app android apuestas deportivas|app apuestas|app
apuestas android|app apuestas de futbol|app apuestas deportivas|app apuestas deportivas android|app apuestas
deportivas argentina|app apuestas deportivas colombia|app apuestas deportivas ecuador|app apuestas deportivas españa|app apuestas
deportivas gratis|app apuestas entre amigos|app apuestas futbol|app apuestas gratis|app
apuestas sin dinero|app casa de apuestas|app casas de apuestas|app control apuestas|app de
apuestas|app de apuestas android|app de apuestas casino|app de apuestas colombia|app
de apuestas con bono de bienvenida|app de apuestas de futbol|app de apuestas deportivas|app de apuestas deportivas android|app de apuestas deportivas argentina|app de apuestas deportivas
colombia|app de apuestas deportivas en españa|app de apuestas deportivas peru|app de apuestas
deportivas perú|app de apuestas deportivas sin dinero|app
de apuestas ecuador|app de apuestas en colombia|app de apuestas en españa|app de apuestas en venezuela|app de apuestas futbol|app de apuestas
gratis|app de apuestas online|app de apuestas para android|app de apuestas para
ganar dinero|app de apuestas peru|app de apuestas reales|app de casas de apuestas|app marca apuestas android|app
moviles de apuestas|app para apuestas|app para apuestas de futbol|app para apuestas deportivas|app
para apuestas deportivas en español|app para ganar apuestas deportivas|app para hacer apuestas|app
para hacer apuestas deportivas|app para hacer apuestas entre amigos|app para llevar control de apuestas|app pronosticos apuestas
deportivas|app versus apuestas|apps apuestas mundial|apps de apuestas|apps de apuestas con bono de bienvenida|apps
de apuestas de futbol|apps de apuestas deportivas peru|apps
de apuestas mexico|apps para apuestas|aprender a hacer
apuestas deportivas|aprender hacer apuestas deportivas|apuesta del dia apuestas deportivas|apuestas
10 euros gratis|apuestas 100 seguras|apuestas 1×2|apuestas 1X2|apuestas 2 division|apuestas 3 division|apuestas a caballos|apuestas a carreras de caballos|apuestas a
colombia|apuestas a corners|apuestas a ganar|apuestas a jugadores nba|apuestas a la baja|apuestas a la nfl|apuestas al barcelona|apuestas al dia|apuestas al
empate|apuestas al mundial|apuestas al tenis wta|apuestas
alaves barcelona|apuestas alcaraz hoy|apuestas alemania españa|apuestas
alonso campeon del mundo|apuestas altas y bajas|apuestas altas y
bajas nfl|apuestas ambos equipos marcan|apuestas america|apuestas android|apuestas anillo nba|apuestas antes del
mundial|apuestas anticipadas|apuestas anticipadas nba|apuestas apps|apuestas arabia argentina|apuestas argentina|apuestas argentina campeon del mundo|apuestas argentina canada|apuestas argentina colombia|apuestas argentina croacia|apuestas argentina españa|apuestas argentina
francia|apuestas argentina francia cuanto paga|apuestas argentina francia mundial|apuestas argentina gana el mundial|apuestas
argentina gana mundial|apuestas argentina holanda|apuestas argentina mexico|apuestas argentina méxico|apuestas argentina
mundial|apuestas argentina online|apuestas argentina paises bajos|apuestas argentina polonia|apuestas argentina
uruguay|apuestas argentina vs australia|apuestas argentina vs
colombia|apuestas argentina vs francia|apuestas argentina vs peru|apuestas argentinas|apuestas arsenal real
madrid|apuestas ascenso a primera division|apuestas
ascenso a segunda|apuestas asiaticas|apuestas asiatico|apuestas
athletic|apuestas athletic atletico|apuestas athletic barça|apuestas athletic barcelona|apuestas athletic betis|apuestas athletic manchester|apuestas athletic manchester
united|apuestas athletic osasuna|apuestas athletic
real|apuestas athletic real madrid|apuestas athletic real
sociedad|apuestas athletic real sociedad final|apuestas athletic roma|apuestas athletic sevilla|apuestas athletic
valencia|apuestas atletico|apuestas atletico barcelona|apuestas atletico barsa|apuestas
atletico campeon champions|apuestas atletico campeon de liga|apuestas atlético copenhague|apuestas atletico de madrid|apuestas atlético de madrid|apuestas atletico de madrid barcelona|apuestas
atletico de madrid gana la liga|apuestas atletico de madrid real madrid|apuestas atlético de madrid real madrid|apuestas atletico de madrid vs barcelona|apuestas atletico madrid|apuestas atletico madrid real madrid|apuestas atletico madrid vs barcelona|apuestas atletico real madrid|apuestas atletico real madrid champions|apuestas atletismo|apuestas bajas|apuestas baloncesto|apuestas baloncesto acb|apuestas baloncesto handicap|apuestas baloncesto hoy|apuestas
baloncesto juegos olimpicos|apuestas baloncesto nba|apuestas
baloncesto pronostico|apuestas baloncesto pronósticos|apuestas baloncesto prorroga|apuestas barca|apuestas barca
athletic|apuestas barca atletico|apuestas barca bayern|apuestas barca bayern munich|apuestas barca girona|apuestas barca hoy|apuestas barça
hoy|apuestas barca inter|apuestas barca juventus|apuestas barca madrid|apuestas barça madrid|apuestas
barca real madrid|apuestas barca vs juve|apuestas barca vs madrid|apuestas barca vs psg|apuestas barcelona|apuestas barcelona alaves|apuestas barcelona athletic|apuestas barcelona atletico|apuestas barcelona
atletico de madrid|apuestas barcelona atlético de
madrid|apuestas barcelona atletico madrid|apuestas barcelona
bayern|apuestas barcelona betis|apuestas barcelona campeon de liga|apuestas barcelona celta|apuestas barcelona espanyol|apuestas barcelona gana la champions|apuestas barcelona girona|apuestas barcelona
granada|apuestas barcelona hoy|apuestas barcelona inter|apuestas barcelona madrid|apuestas barcelona osasuna|apuestas barcelona
psg|apuestas barcelona real madrid|apuestas barcelona real
sociedad|apuestas barcelona sevilla|apuestas barcelona valencia|apuestas barcelona villarreal|apuestas barcelona vs atletico madrid|apuestas barcelona vs madrid|apuestas barcelona vs
real madrid|apuestas barsa madrid|apuestas basket
hoy|apuestas bayern barcelona|apuestas bayern vs barcelona|apuestas beisbol|apuestas béisbol|apuestas beisbol mlb|apuestas beisbol pronosticos|apuestas beisbol venezolano|apuestas betis|apuestas betis –
chelsea|apuestas betis barcelona|apuestas betis chelsea|apuestas betis fiorentina|apuestas
betis girona|apuestas betis madrid|apuestas betis mallorca|apuestas betis real madrid|apuestas betis real sociedad|apuestas betis sevilla|apuestas betis valencia|apuestas betis valladolid|apuestas betis vs valencia|apuestas betplay hoy colombia|apuestas betsson peru|apuestas bienvenida|apuestas billar
online|apuestas bolivia vs colombia|apuestas bono|apuestas bono bienvenida|apuestas bono
de bienvenida|apuestas bono de bienvenida sin deposito|apuestas bono
gratis|apuestas bono sin deposito|apuestas bonos
sin deposito|apuestas borussia real madrid|apuestas boxeo|apuestas boxeo de campeonato|apuestas boxeo españa|apuestas boxeo español|apuestas boxeo femenino olimpiadas|apuestas boxeo hoy|apuestas boxeo
online|apuestas brasil colombia|apuestas
brasil peru|apuestas brasil uruguay|apuestas brasil vs
colombia|apuestas brasil vs peru|apuestas caballos|apuestas caballos
colocado|apuestas caballos españa|apuestas caballos
hipodromo|apuestas caballos hoy|apuestas caballos madrid|apuestas caballos online|apuestas
caballos sanlucar de barrameda|apuestas caballos zarzuela|apuestas
calculador|apuestas campeon|apuestas campeon champions|apuestas campeón champions|apuestas campeon champions 2025|apuestas campeon champions league|apuestas campeon conference league|apuestas
campeon copa america|apuestas campeon copa del rey|apuestas campeon de
champions|apuestas campeon de la champions|apuestas campeon de liga|apuestas campeon del mundo|apuestas campeon eurocopa|apuestas campeón eurocopa|apuestas campeon europa
league|apuestas campeon f1|apuestas campeon f1 2025|apuestas campeon formula
1|apuestas campeon libertadores|apuestas campeon liga|apuestas campeon liga bbva|apuestas campeon liga española|apuestas campeon liga santander|apuestas campeon motogp 2025|apuestas campeon mundial|apuestas campeón mundial|apuestas campeon mundial baloncesto|apuestas campeon nba|apuestas campeón nba|apuestas campeon premier|apuestas campeon premier league|apuestas campeon roland
garros|apuestas campeonato f1|apuestas campeonatos de futbol|apuestas carrera de caballos|apuestas
carrera de caballos hoy|apuestas carrera de caballos nocturnas|apuestas carrera de galgos fin de semana|apuestas carrera de galgos hoy|apuestas carrera
de galgos nocturnas|apuestas carreras caballos|apuestas carreras caballos sanlucar|apuestas
carreras de caballos|apuestas carreras de caballos en directo|apuestas carreras de caballos en vivo|apuestas carreras de caballos españa|apuestas carreras de caballos hoy|apuestas carreras de caballos nacionales|apuestas carreras de caballos
nocturnas|apuestas carreras de caballos online|apuestas
carreras de caballos sanlucar|apuestas carreras de caballos sanlúcar|apuestas
carreras de galgos|apuestas carreras de galgos en vivo|apuestas carreras de galgos nocturnas|apuestas carreras de galgos pre partido|apuestas casino|apuestas casino barcelona|apuestas casino futbol|apuestas casino gran madrid|apuestas casino gratis|apuestas
casino madrid|apuestas casino online|apuestas casino online argentina|apuestas casinos|apuestas casinos online|apuestas celta|apuestas
celta barcelona|apuestas celta betis|apuestas celta eibar|apuestas celta
espanyol|apuestas celta granada|apuestas celta madrid|apuestas
celta manchester|apuestas celta real madrid|apuestas champion league|apuestas champions foro|apuestas champions
hoy|apuestas champions league|apuestas champions league – pronósticos|apuestas
champions league 2025|apuestas champions league hoy|apuestas champions league pronosticos|apuestas champions league pronósticos|apuestas champions pronosticos|apuestas chelsea barcelona|apuestas
chelsea betis|apuestas chile|apuestas chile peru|apuestas chile
venezuela|apuestas chile vs colombia|apuestas chile vs uruguay|apuestas
ciclismo|apuestas ciclismo en vivo|apuestas ciclismo femenino|apuestas ciclismo tour francia|apuestas ciclismo vuelta|apuestas ciclismo vuelta
a españa|apuestas ciclismo vuelta españa|apuestas city madrid|apuestas city real madrid|apuestas clasico|apuestas clasico
español|apuestas clasico real madrid barcelona|apuestas clasificacion mundial|apuestas colombia|apuestas colombia argentina|apuestas colombia
brasil|apuestas colombia paraguay|apuestas colombia uruguay|apuestas colombia vs argentina|apuestas colombia vs brasil|apuestas
combinadas|apuestas combinadas como funcionan|apuestas combinadas de futbol|apuestas combinadas de fútbol|apuestas combinadas
foro|apuestas combinadas futbol|apuestas combinadas hoy|apuestas combinadas mismo partido|apuestas combinadas mundial|apuestas combinadas nba|apuestas
combinadas para esta semana|apuestas combinadas para hoy|apuestas combinadas para mañana|apuestas
combinadas pronosticos|apuestas combinadas recomendadas|apuestas combinadas seguras|apuestas combinadas seguras para hoy|apuestas combinadas
seguras para mañana|apuestas como ganar|apuestas comparador|apuestas con bono de bienvenida|apuestas con dinero ficticio|apuestas con dinero real|apuestas con dinero
virtual|apuestas con handicap|apuestas con handicap asiatico|apuestas
con handicap baloncesto|apuestas con mas probabilidades de ganar|apuestas
con paypal|apuestas con tarjeta de credito|apuestas con tarjeta de debito|apuestas consejos|apuestas copa|apuestas copa africa|apuestas copa america|apuestas copa américa|apuestas copa argentina|apuestas copa brasil|apuestas copa davis|apuestas
copa de europa|apuestas copa del mundo|apuestas copa del rey|apuestas copa del
rey baloncesto|apuestas copa del rey final|apuestas copa del rey
futbol|apuestas copa del rey ganador|apuestas
copa del rey hoy|apuestas copa del rey pronosticos|apuestas copa del rey pronósticos|apuestas copa europa|apuestas copa italia|apuestas copa libertadores|apuestas copa mundial de hockey|apuestas
copa rey|apuestas copa sudamericana|apuestas corners|apuestas corners hoy|apuestas
croacia argentina|apuestas cuartos eurocopa|apuestas cuotas|apuestas cuotas altas|apuestas cuotas bajas|apuestas de
1 euro|apuestas de baloncesto|apuestas de baloncesto hoy|apuestas de
baloncesto nba|apuestas de baloncesto para hoy|apuestas de beisbol|apuestas
de beisbol para hoy|apuestas de blackjack en linea|apuestas de boxeo|apuestas de boxeo canelo|apuestas de boxeo en las vegas|apuestas de
boxeo hoy|apuestas de boxeo online|apuestas de caballo|apuestas
de caballos|apuestas de caballos como funciona|apuestas
de caballos como se juega|apuestas de caballos en colombia|apuestas de caballos en españa|apuestas de caballos en linea|apuestas de caballos
españa|apuestas de caballos ganador y colocado|apuestas de caballos internacionales|apuestas de caballos juegos|apuestas
de caballos online|apuestas de caballos online en venezuela|apuestas de
caballos por internet|apuestas de caballos pronosticos|apuestas de caballos pronósticos|apuestas de carrera de caballos|apuestas de carreras de caballos|apuestas de carreras de caballos online|apuestas de casino|apuestas de casino online|apuestas de casino por internet|apuestas de
champions league|apuestas de ciclismo|apuestas de colombia|apuestas
de copa america|apuestas de corners|apuestas de
deportes en linea|apuestas de deportes online|apuestas de dinero|apuestas de esports|apuestas de
eurocopa|apuestas de europa league|apuestas de f1|apuestas
de formula 1|apuestas de futbol|apuestas de fútbol|apuestas
de futbol app|apuestas de futbol argentina|apuestas de futbol colombia|apuestas de futbol en colombia|apuestas de
futbol en directo|apuestas de futbol en linea|apuestas
de futbol en vivo|apuestas de futbol español|apuestas de
futbol gratis|apuestas de futbol hoy|apuestas de futbol mundial|apuestas de futbol online|apuestas de fútbol online|apuestas de futbol para hoy|apuestas de fútbol para
hoy|apuestas de futbol para hoy seguras|apuestas de futbol para mañana|apuestas de futbol peru|apuestas de futbol pronosticos|apuestas
de fútbol pronósticos|apuestas de futbol seguras|apuestas de futbol seguras para hoy|apuestas de futbol sin dinero|apuestas
de galgos|apuestas de galgos como ganar|apuestas de galgos en directo|apuestas de galgos online|apuestas de galgos trucos|apuestas de golf|apuestas de hockey|apuestas de hockey sobre hielo|apuestas de hoy|apuestas de hoy
seguras|apuestas de juego|apuestas de juegos|apuestas de juegos deportivos|apuestas de juegos
online|apuestas de la champions league|apuestas de la copa
américa|apuestas de la eurocopa|apuestas de la europa league|apuestas de la liga|apuestas de
la liga bbva|apuestas de la liga española|apuestas de la nba|apuestas de la nfl|apuestas de la ufc|apuestas de mlb|apuestas de nba|apuestas de nba para hoy|apuestas de partidos|apuestas de partidos de futbol|apuestas de peleas ufc|apuestas de perros en vivo|apuestas de perros virtuales|apuestas de peru|apuestas
de sistema|apuestas de sistema como funciona|apuestas de sistema explicacion|apuestas de sistema explicación|apuestas de
tenis|apuestas de tenis de mesa|apuestas de tenis en directo|apuestas de tenis hoy|apuestas de tenis para hoy|apuestas de tenis pronosticos|apuestas de tenis seguras|apuestas de todo tipo|apuestas de
ufc|apuestas de ufc hoy|apuestas del boxeo|apuestas del clasico|apuestas del clasico real madrid barca|apuestas del dia|apuestas del día|apuestas del dia de hoy|apuestas del dia
deportivas|apuestas del dia futbol|apuestas del mundial|apuestas del
partido de hoy|apuestas del real madrid|apuestas del rey|apuestas del sistema|apuestas deporte|apuestas deportes|apuestas deportiva|apuestas deportivas|apuestas deportivas 1 euro|apuestas deportivas 10 euros
gratis|apuestas deportivas 100 seguras|apuestas deportivas 1×2|apuestas deportivas android|apuestas deportivas app|apuestas
deportivas apps|apuestas deportivas argentina|apuestas deportivas argentina futbol|apuestas deportivas argentina
legal|apuestas deportivas atletico de madrid|apuestas deportivas baloncesto|apuestas
deportivas barca madrid|apuestas deportivas
barcelona|apuestas deportivas beisbol|apuestas
deportivas bono|apuestas deportivas bono bienvenida|apuestas deportivas bono de bienvenida|apuestas deportivas bono sin deposito|apuestas deportivas bonos de
bienvenida|apuestas deportivas boxeo|apuestas deportivas caballos|apuestas deportivas calculadora|apuestas deportivas campeon liga|apuestas deportivas casino|apuestas
deportivas casino barcelona|apuestas deportivas casino online|apuestas deportivas cerca de mi|apuestas deportivas champions league|apuestas deportivas chile|apuestas deportivas ciclismo|apuestas deportivas colombia|apuestas deportivas com|apuestas
deportivas com foro|apuestas deportivas com pronosticos|apuestas deportivas combinadas|apuestas deportivas
combinadas para hoy|apuestas deportivas como se juega|apuestas deportivas comparador|apuestas
deportivas con bono gratis|apuestas deportivas con bonos gratis|apuestas deportivas con dinero ficticio|apuestas deportivas con paypal|apuestas deportivas con puntos virtuales|apuestas deportivas consejos|apuestas deportivas consejos para ganar|apuestas deportivas copa america|apuestas deportivas copa del rey|apuestas deportivas copa libertadores|apuestas
deportivas copa mundial|apuestas deportivas corners|apuestas deportivas cual es la mejor|apuestas deportivas
cuotas altas|apuestas deportivas de baloncesto|apuestas
deportivas de boxeo|apuestas deportivas de colombia|apuestas deportivas de futbol|apuestas deportivas de nba|apuestas deportivas de
nhl|apuestas deportivas de peru|apuestas deportivas de tenis|apuestas deportivas del dia|apuestas deportivas dinero ficticio|apuestas deportivas directo|apuestas
deportivas doble oportunidad|apuestas deportivas en argentina|apuestas
deportivas en chile|apuestas deportivas en colombia|apuestas
deportivas en directo|apuestas deportivas en españa|apuestas deportivas en español|apuestas deportivas en linea|apuestas deportivas en línea|apuestas deportivas
en peru|apuestas deportivas en perú|apuestas deportivas en sevilla|apuestas deportivas
en uruguay|apuestas deportivas en vivo|apuestas deportivas es|apuestas deportivas es pronosticos|apuestas deportivas españa|apuestas deportivas españolas|apuestas deportivas esports|apuestas deportivas estadisticas|apuestas
deportivas estrategias|apuestas deportivas estrategias seguras|apuestas deportivas eurocopa|apuestas deportivas europa league|apuestas deportivas f1|apuestas deportivas
faciles de ganar|apuestas deportivas formula
1|apuestas deportivas foro|apuestas deportivas foro futbol|apuestas deportivas foro tenis|apuestas deportivas francia argentina|apuestas deportivas futbol|apuestas deportivas fútbol|apuestas deportivas futbol argentino|apuestas deportivas
futbol colombia|apuestas deportivas futbol español|apuestas deportivas
gana|apuestas deportivas ganadas|apuestas deportivas ganar dinero seguro|apuestas deportivas
gane|apuestas deportivas golf|apuestas deportivas
gratis|apuestas deportivas gratis con premios|apuestas deportivas gratis hoy|apuestas deportivas gratis sin deposito|apuestas deportivas handicap|apuestas deportivas handicap asiatico|apuestas deportivas hoy|apuestas deportivas
impuestos|apuestas deportivas interior argentina|apuestas deportivas juegos olimpicos|apuestas deportivas la liga|apuestas deportivas legales|apuestas deportivas legales
en colombia|apuestas deportivas libres de impuestos|apuestas deportivas licencia españa|apuestas deportivas liga española|apuestas deportivas listado|apuestas deportivas listado clasico|apuestas deportivas
madrid|apuestas deportivas mas seguras|apuestas deportivas mejor
pagadas|apuestas deportivas mejores|apuestas deportivas mejores app|apuestas deportivas
mejores casas|apuestas deportivas mejores cuotas|apuestas deportivas mejores paginas|apuestas deportivas
mexico|apuestas deportivas méxico|apuestas deportivas mlb|apuestas deportivas mlb hoy|apuestas
deportivas multiples|apuestas deportivas mundial|apuestas deportivas
murcia|apuestas deportivas nba|apuestas deportivas nba hoy|apuestas deportivas nfl|apuestas
deportivas nhl|apuestas deportivas nuevas|apuestas deportivas ofertas|apuestas
deportivas online|apuestas deportivas online argentina|apuestas deportivas online chile|apuestas deportivas
online colombia|apuestas deportivas online en colombia|apuestas deportivas
online españa|apuestas deportivas online mexico|apuestas deportivas online
paypal|apuestas deportivas online peru|apuestas
deportivas online por internet|apuestas deportivas pago paypal|apuestas
deportivas para ganar dinero|apuestas deportivas para hoy|apuestas deportivas para hoy pronosticos|apuestas deportivas partido suspendido|apuestas deportivas partidos de hoy|apuestas deportivas paypal|apuestas deportivas peru|apuestas deportivas perú|apuestas deportivas peru vs
ecuador|apuestas deportivas predicciones|apuestas deportivas promociones|apuestas deportivas pronostico|apuestas deportivas pronóstico|apuestas deportivas pronostico hoy|apuestas deportivas pronosticos|apuestas deportivas pronósticos|apuestas deportivas pronosticos expertos|apuestas deportivas pronosticos gratis|apuestas
deportivas pronosticos nba|apuestas deportivas pronosticos tenis|apuestas deportivas que aceptan paypal|apuestas deportivas real
madrid|apuestas deportivas regalo bienvenida|apuestas deportivas resultado exacto|apuestas deportivas resultados|apuestas deportivas rugby|apuestas deportivas seguras|apuestas deportivas seguras foro|apuestas deportivas seguras hoy|apuestas deportivas seguras para hoy|apuestas deportivas seguras telegram|apuestas deportivas
sevilla|apuestas deportivas simulador eurocopa|apuestas deportivas sin deposito|apuestas deportivas
sin deposito inicial|apuestas deportivas sin dinero|apuestas deportivas sin dinero real|apuestas deportivas sin registro|apuestas deportivas stake|apuestas deportivas stake 10|apuestas deportivas telegram
españa|apuestas deportivas tenis|apuestas deportivas tenis de mesa|apuestas deportivas tenis
foro|apuestas deportivas tenis hoy|apuestas deportivas tips|apuestas deportivas tipster|apuestas deportivas ufc|apuestas deportivas uruguay|apuestas
deportivas valencia|apuestas deportivas valencia barcelona|apuestas deportivas venezuela|apuestas deportivas virtuales|apuestas deportivas y casino|apuestas deportivas y
casino online|apuestas deportivas.com|apuestas deportivas.com foro|apuestas
deportivas.es|apuestas deportivos pronosticos|apuestas deposito minimo 1 euro|apuestas
descenso a segunda|apuestas descenso a segunda b|apuestas descenso la liga|apuestas descenso
primera division|apuestas descenso segunda|apuestas dia|apuestas diarias seguras|apuestas dinero|apuestas
dinero ficticio|apuestas dinero real|apuestas dinero virtual|apuestas directas|apuestas
directo|apuestas directo futbol|apuestas division de honor juvenil|apuestas dnb|apuestas doble oportunidad|apuestas doble resultado|apuestas dobles|apuestas dobles y
triples|apuestas dortmund barcelona|apuestas draft nba|apuestas draft nfl|apuestas ecuador vs argentina|apuestas
ecuador vs venezuela|apuestas egipto uruguay|apuestas el clasico|apuestas elecciones venezuela|apuestas
empate|apuestas en baloncesto|apuestas en barcelona|apuestas en beisbol|apuestas en boxeo|apuestas en caballos|apuestas en carreras
de caballos|apuestas en casino|apuestas en casino online|apuestas en casinos|apuestas en casinos online|apuestas en chile|apuestas en ciclismo|apuestas en colombia|apuestas
en colombia de futbol|apuestas en directo|apuestas en directo futbol|apuestas en directo pronosticos|apuestas en el futbol|apuestas en el tenis|apuestas en españa|apuestas en esports|apuestas en eventos deportivos virtuales|apuestas en golf|apuestas en juegos|apuestas en la champions league|apuestas en la
eurocopa|apuestas en la liga|apuestas en la nba|apuestas en la nfl|apuestas en las vegas mlb|apuestas
en las vegas nfl|apuestas en linea|apuestas en línea|apuestas en linea argentina|apuestas en linea boxeo|apuestas en linea chile|apuestas en linea colombia|apuestas en línea de fútbol|apuestas en linea deportivas|apuestas en linea españa|apuestas en linea estados unidos|apuestas en linea futbol|apuestas
en linea mexico|apuestas en línea méxico|apuestas
en linea mundial|apuestas en linea peru|apuestas en linea
usa|apuestas en los esports|apuestas en madrid|apuestas en méxico|apuestas en mexico online|apuestas en nba|apuestas en partidos de futbol|apuestas
en partidos de futbol en vivo|apuestas en partidos de
tenis en directo|apuestas en perú|apuestas en sevilla|apuestas en sistema|apuestas
en stake|apuestas en tenis|apuestas en tenis de mesa|apuestas en valencia|apuestas en vivo|apuestas en vivo argentina|apuestas en vivo casino|apuestas en vivo futbol|apuestas en vivo fútbol|apuestas en vivo nba|apuestas en vivo peru|apuestas en vivo tenis|apuestas en vivo ufc|apuestas equipo mbappe|apuestas equipos de futbol|apuestas españa|apuestas españa alemania|apuestas españa alemania eurocopa|apuestas españa croacia|apuestas
españa eurocopa|apuestas españa francia|apuestas españa francia eurocopa|apuestas españa gana el mundial|apuestas
españa gana eurocopa|apuestas españa gana mundial|apuestas españa
georgia|apuestas españa holanda|apuestas españa inglaterra|apuestas españa inglaterra cuotas|apuestas españa inglaterra eurocopa|apuestas españa italia|apuestas españa mundial|apuestas españa
paises bajos|apuestas español|apuestas español oviedo|apuestas espanyol barcelona|apuestas espanyol betis|apuestas espanyol villarreal|apuestas esport|apuestas esports|apuestas esports colombia|apuestas esports españa|apuestas esports fifa|apuestas
esports gratis|apuestas esports lol|apuestas esports peru|apuestas esports
valorant|apuestas estadisticas|apuestas estrategias|apuestas euro|apuestas euro copa|apuestas eurocopa|apuestas eurocopa campeon|apuestas eurocopa españa|apuestas eurocopa favoritos|apuestas
eurocopa femenina|apuestas eurocopa final|apuestas
eurocopa ganador|apuestas eurocopa hoy|apuestas eurocopa
sub 21|apuestas euroliga baloncesto|apuestas
euroliga pronosticos|apuestas europa league|apuestas europa league hoy|apuestas europa league
pronosticos|apuestas europa league pronósticos|apuestas euros|apuestas f1 abu
dhabi|apuestas f1 bahrein|apuestas f1 canada|apuestas f1
china|apuestas f1 cuotas|apuestas f1 hoy|apuestas f1 las vegas|apuestas f1 miami|apuestas f1 monaco|apuestas faciles de ganar|apuestas fáciles de ganar|apuestas faciles para ganar|apuestas favoritas|apuestas
favorito champions|apuestas favoritos champions|apuestas favoritos eurocopa|apuestas favoritos mundial|apuestas fc barcelona|apuestas final champions cuotas|apuestas final
champions league|apuestas final champions peru|apuestas final copa|apuestas final copa america|apuestas final copa de europa|apuestas final copa del rey|apuestas final copa europa|apuestas final copa libertadores|apuestas final copa rey|apuestas final de copa|apuestas final de copa del
rey|apuestas final del mundial|apuestas final euro|apuestas final eurocopa|apuestas final europa league|apuestas final libertadores|apuestas final mundial|apuestas final nba|apuestas
final rugby|apuestas final uefa europa league|apuestas
final.mundial|apuestas finales de conferencia nfl|apuestas finales nba|apuestas fiorentina betis|apuestas formula|apuestas formula 1|apuestas fórmula 1|apuestas fórmula 1 pronósticos|apuestas formula
uno|apuestas foro|apuestas foro nba|apuestas francia argentina|apuestas francia españa|apuestas futbol|apuestas fútbol|apuestas futbol americano|apuestas futbol americano nfl|apuestas futbol
argentina|apuestas futbol argentino|apuestas futbol champions league|apuestas
futbol chile|apuestas futbol colombia|apuestas futbol consejos|apuestas futbol en directo|apuestas fútbol
en directo|apuestas futbol en vivo|apuestas fútbol en vivo|apuestas futbol españa|apuestas futbol español|apuestas fútbol español|apuestas futbol eurocopa|apuestas futbol femenino|apuestas futbol
foro|apuestas futbol gratis|apuestas futbol hoy|apuestas fútbol hoy|apuestas futbol juegos
olimpicos|apuestas futbol mexico|apuestas futbol mundial|apuestas futbol online|apuestas futbol para hoy|apuestas futbol
peru|apuestas futbol pronosticos|apuestas
futbol sala|apuestas futbol telegram|apuestas futbol virtual|apuestas
galgos|apuestas galgos en directo|apuestas galgos hoy|apuestas galgos online|apuestas
galgos pronosticos|apuestas galgos trucos|apuestas gana|apuestas gana colombia|apuestas gana resultados|apuestas ganadas|apuestas ganadas hoy|apuestas
ganador champions league|apuestas ganador copa america|apuestas ganador copa del rey|apuestas ganador
copa del rey baloncesto|apuestas ganador copa libertadores|apuestas ganador de la
eurocopa|apuestas ganador de la liga|apuestas ganador del mundial|apuestas ganador eurocopa|apuestas ganador europa league|apuestas ganador f1|apuestas ganador
la liga|apuestas ganador liga española|apuestas ganador mundial|apuestas ganador mundial baloncesto|apuestas ganador
mundial f1|apuestas ganador nba|apuestas ganadores
eurocopa|apuestas ganadores mundial|apuestas ganar
champions|apuestas ganar eurocopa|apuestas ganar liga|apuestas ganar mundial|apuestas ganar nba|apuestas
getafe valencia|apuestas ghana uruguay|apuestas girona|apuestas girona athletic|apuestas girona betis|apuestas girona campeon de liga|apuestas girona campeon liga|apuestas girona gana la
liga|apuestas girona real madrid|apuestas girona real sociedad|apuestas
goleador eurocopa|apuestas goleadores eurocopa|apuestas
goles asiaticos|apuestas golf|apuestas golf masters|apuestas golf pga|apuestas granada barcelona|apuestas grand slam de tenis|apuestas gratis|apuestas gratis casino|apuestas gratis con premios|apuestas
gratis hoy|apuestas gratis para hoy|apuestas gratis por registro|apuestas gratis puntos|apuestas gratis regalos|apuestas gratis sin deposito|apuestas
gratis sin depósito|apuestas gratis sin ingreso|apuestas gratis sports|apuestas gratis y ganar premios|apuestas
grupo a eurocopa|apuestas grupos eurocopa|apuestas handicap|apuestas
handicap asiatico|apuestas handicap baloncesto|apuestas handicap como funciona|apuestas handicap nba|apuestas handicap nfl|apuestas hipicas online|apuestas hípicas online|apuestas hipicas venezuela|apuestas hockey|apuestas hockey hielo|apuestas hockey patines|apuestas hockey sobre hielo|apuestas holanda argentina|apuestas holanda vs argentina|apuestas hoy|apuestas hoy champions|apuestas hoy futbol|apuestas hoy nba|apuestas hoy pronosticos|apuestas hoy
seguras|apuestas impuestos|apuestas inglaterra paises bajos|apuestas inter barca|apuestas inter barcelona|apuestas juego|apuestas juegos|apuestas juegos en linea|apuestas juegos olimpicos|apuestas juegos olímpicos|apuestas juegos olimpicos baloncesto|apuestas
juegos online|apuestas juegos virtuales|apuestas jugador sevilla|apuestas jugadores nba|apuestas kings league americas|apuestas la liga|apuestas la liga española|apuestas la liga hoy|apuestas la liga santander|apuestas las vegas mlb|apuestas las vegas nba|apuestas las vegas nfl|apuestas
league of legends mundial|apuestas legal|apuestas legales|apuestas legales en colombia|apuestas
legales en españa|apuestas legales en estados unidos|apuestas legales españa|apuestas leganes betis|apuestas libertadores|apuestas licencia|apuestas liga 1 peru|apuestas liga argentina|apuestas liga bbva
pronosticos|apuestas liga de campeones|apuestas liga de campeones de baloncesto|apuestas liga de campeones de hockey|apuestas liga españa|apuestas liga española|apuestas
liga santander pronosticos|apuestas ligas de futbol|apuestas linea|apuestas linea de gol|apuestas liverpool barcelona|apuestas liverpool real madrid|apuestas lol mundial|apuestas madrid|apuestas
madrid arsenal|apuestas madrid atletico|apuestas madrid atletico champions|apuestas
madrid barca|apuestas madrid barça|apuestas madrid barca hoy|apuestas madrid barca supercopa|apuestas madrid barcelona|apuestas madrid barsa|apuestas madrid bayern|apuestas madrid betis|apuestas madrid borussia|apuestas madrid campeon champions|apuestas madrid
celta|apuestas madrid city|apuestas madrid dortmund|apuestas madrid gana la liga|apuestas madrid gana liga|apuestas madrid hoy|apuestas madrid liverpool|apuestas madrid osasuna|apuestas madrid sevilla|apuestas madrid valencia|apuestas madrid vs arsenal|apuestas madrid vs barcelona|apuestas
mallorca osasuna|apuestas mallorca real sociedad|apuestas manchester athletic|apuestas manchester
city real madrid|apuestas mas faciles de ganar|apuestas mas seguras|apuestas mas seguras para hoy|apuestas
masters de golf|apuestas masters de tenis|apuestas maximo goleador eurocopa|apuestas maximo
goleador mundial|apuestas mejor jugador eurocopa|apuestas mejores casinos online|apuestas mexico|apuestas méxico|apuestas mexico
polonia|apuestas méxico polonia|apuestas mlb|apuestas mlb hoy|apuestas mlb las vegas|apuestas mlb para
hoy|apuestas mlb pronosticos|apuestas mlb usa|apuestas mma ufc|apuestas momios|apuestas multiples|apuestas múltiples|apuestas multiples como funcionan|apuestas multiples el gordo|apuestas multiples futbol|apuestas mundial|apuestas mundial 2026|apuestas mundial baloncesto|apuestas mundial balonmano|apuestas mundial brasil|apuestas mundial campeon|apuestas mundial ciclismo|apuestas mundial clubes|apuestas mundial de baloncesto|apuestas mundial de ciclismo|apuestas mundial de clubes|apuestas mundial de futbol|apuestas mundial de fútbol|apuestas mundial
de rugby|apuestas mundial f1|apuestas mundial favoritos|apuestas
mundial femenino|apuestas mundial formula
1|apuestas mundial futbol|apuestas mundial ganador|apuestas mundial lol|apuestas mundial moto gp|apuestas
mundial motogp|apuestas mundial rugby|apuestas mundial sub 17|apuestas mundiales|apuestas
mundialistas|apuestas mvp eurocopa|apuestas mvp nba|apuestas mvp nfl|apuestas nacionales de colombia|apuestas nba|apuestas nba all star|apuestas nba campeon|apuestas nba
consejos|apuestas nba esta noche|apuestas nba finals|apuestas nba gratis|apuestas nba hoy|apuestas nba hoy jugadores|apuestas nba
hoy pronosticos|apuestas nba para hoy|apuestas nba playoffs|apuestas nba
pronosticos|apuestas nba pronósticos|apuestas nba pronosticos hoy|apuestas nba tipster|apuestas nfl|apuestas nfl hoy|apuestas nfl las vegas|apuestas nfl playoffs|apuestas nfl pronosticos|apuestas nfl pronósticos|apuestas nfl semana
4|apuestas nfl super bowl|apuestas nhl|apuestas nhl
pronosticos|apuestas octavos eurocopa|apuestas ofertas|apuestas online|apuestas online argentina|apuestas online argentina legal|apuestas online
bono|apuestas online bono bienvenida|apuestas online boxeo|apuestas online caballos|apuestas online carreras de caballos|apuestas
online casino|apuestas online champions league|apuestas online chile|apuestas online ciclismo|apuestas online
colombia|apuestas online comparativa|apuestas online con paypal|apuestas online de caballos|apuestas online
deportivas|apuestas online en argentina|apuestas online en peru|apuestas online espana|apuestas online españa|apuestas online esports|apuestas online foro|apuestas
online futbol|apuestas online futbol españa|apuestas online golf|apuestas online gratis|apuestas online gratis sin deposito|apuestas online juegos|apuestas
online mexico|apuestas online mma|apuestas online movil|apuestas online nba|apuestas online
net|apuestas online nuevas|apuestas online opiniones|apuestas online paypal|apuestas online peru|apuestas online
seguras|apuestas online sin dinero|apuestas online sin registro|apuestas
online tenis|apuestas online ufc|apuestas online uruguay|apuestas online venezuela|apuestas open britanico golf|apuestas osasuna athletic|apuestas osasuna barcelona|apuestas osasuna real madrid|apuestas
osasuna sevilla|apuestas osasuna valencia|apuestas over|apuestas over 2.5|apuestas
over under|apuestas paginas|apuestas pago anticipado|apuestas paises bajos ecuador|apuestas paises bajos
inglaterra|apuestas países bajos qatar|apuestas
para boxeo|apuestas para champions league|apuestas para el clasico|apuestas para el dia
de hoy|apuestas para el mundial|apuestas para el partido
de hoy|apuestas para eurocopa|apuestas para europa league|apuestas para futbol|apuestas para ganar|apuestas para ganar dinero|apuestas para ganar dinero facil|apuestas para
ganar en la ruleta|apuestas para ganar la champions|apuestas para ganar la eurocopa|apuestas para ganar
la europa league|apuestas para ganar la liga|apuestas para ganar siempre|apuestas para
hacer|apuestas para hoy|apuestas para hoy de futbol|apuestas para hoy europa league|apuestas para hoy
futbol|apuestas para juegos|apuestas para la champions league|apuestas para la copa del rey|apuestas para la eurocopa|apuestas para
la europa league|apuestas para la final de la eurocopa|apuestas para la nba hoy|apuestas para los partidos de hoy|apuestas para partidos de hoy|apuestas para
ufc|apuestas partido|apuestas partido aplazado|apuestas partido
champions|apuestas partido colombia|apuestas partido
españa marruecos|apuestas partido mundial|apuestas partido suspendido|apuestas partidos|apuestas partidos champions league|apuestas
partidos csgo|apuestas partidos de futbol|apuestas partidos de futbol hoy|apuestas
partidos de hoy|apuestas partidos eurocopa|apuestas partidos
futbol|apuestas partidos hoy|apuestas partidos mundial|apuestas paypal|apuestas peleas de boxeo|apuestas
peru|apuestas perú|apuestas peru brasil|apuestas peru chile|apuestas
peru paraguay|apuestas peru uruguay|apuestas
peru vs chile|apuestas peru vs colombia|apuestas pichichi eurocopa|apuestas plataforma|apuestas playoff|apuestas playoff ascenso|apuestas playoff ascenso a primera|apuestas playoff nba|apuestas playoff segunda|apuestas playoff
segunda b|apuestas playoffs nba|apuestas playoffs nfl|apuestas polonia
argentina|apuestas por argentina|apuestas por internet mexico|apuestas por internet para ganar dinero|apuestas por paypal|apuestas por ronda boxeo|apuestas por sistema|apuestas portugal uruguay|apuestas
pre partido|apuestas predicciones|apuestas predicciones futbol|apuestas primera division|apuestas primera division españa|apuestas promociones|apuestas pronostico|apuestas pronosticos|apuestas pronosticos deportivos|apuestas pronosticos deportivos tenis|apuestas pronosticos futbol|apuestas pronosticos gratis|apuestas pronosticos nba|apuestas pronosticos tenis|apuestas prorroga|apuestas psg barca|apuestas psg barcelona|apuestas puntos por tarjetas|apuestas puntos tarjetas|apuestas que aceptan paypal|apuestas que es handicap|apuestas que puedes hacer
con tu novia|apuestas que siempre ganaras|apuestas
que significa|apuestas quien bajara a segunda|apuestas quién bajara a segunda|apuestas
quien gana el mundial|apuestas quien gana eurocopa|apuestas quien gana la champions|apuestas quien gana la eurocopa|apuestas quien gana la
liga|apuestas quien ganara el mundial|apuestas
quién ganará el mundial|apuestas quien ganara la champions|apuestas quien ganara
la eurocopa|apuestas quien ganara la liga|apuestas rayo barcelona|apuestas
real madrid|apuestas real madrid arsenal|apuestas real madrid athletic|apuestas real madrid atletico|apuestas real madrid atletico champions|apuestas real madrid atletico
de madrid|apuestas real madrid atlético de madrid|apuestas real madrid atletico
madrid|apuestas real madrid barcelona|apuestas real
madrid bayern|apuestas real madrid betis|apuestas real madrid borussia|apuestas real madrid
campeon champions|apuestas real madrid celta|apuestas real madrid champions|apuestas real madrid
city|apuestas real madrid girona|apuestas real madrid hoy|apuestas
real madrid liverpool|apuestas real madrid manchester city|apuestas real madrid osasuna|apuestas real madrid real
sociedad|apuestas real madrid valencia|apuestas real madrid villarreal|apuestas real
madrid vs arsenal|apuestas real madrid vs atletico|apuestas real madrid vs atlético|apuestas
real madrid vs atletico madrid|apuestas real madrid vs barcelona|apuestas real madrid vs betis|apuestas real madrid vs
sevilla|apuestas real madrid vs valencia|apuestas real sociedad|apuestas real sociedad athletic|apuestas real sociedad barcelona|apuestas real sociedad betis|apuestas real sociedad psg|apuestas real sociedad real madrid|apuestas real sociedad
valencia|apuestas recomendadas hoy|apuestas regalo de bienvenida|apuestas registro|apuestas resultado exacto|apuestas resultados|apuestas resultados
eurocopa|apuestas retirada tenis|apuestas roma
barcelona|apuestas roma sevilla|apuestas rugby|apuestas rugby mundial|apuestas
rugby world cup|apuestas ruleta seguras|apuestas
segunda|apuestas segunda b|apuestas segunda division|apuestas segunda división|apuestas segunda division b|apuestas
segunda division españa|apuestas seguras|apuestas seguras baloncesto|apuestas seguras calculadora|apuestas
seguras en la ruleta|apuestas seguras eurocopa|apuestas seguras foro|apuestas seguras futbol|apuestas seguras
futbol hoy|apuestas seguras gratis|apuestas seguras hoy|apuestas seguras hoy futbol|apuestas seguras nba|apuestas seguras nba hoy|apuestas seguras para este fin de semana|apuestas seguras
para ganar dinero|apuestas seguras para hoy|apuestas seguras para hoy fútbol|apuestas seguras
para hoy pronósticos|apuestas seguras para mañana|apuestas seguras ruleta|apuestas seguras
telegram|apuestas seguras tenis|apuestas semifinales eurocopa|apuestas senegal
paises bajos|apuestas sevilla|apuestas sevilla athletic|apuestas
sevilla atletico de madrid|apuestas sevilla barcelona|apuestas
sevilla betis|apuestas sevilla campeon liga|apuestas sevilla celta|apuestas sevilla gana
la liga|apuestas sevilla girona|apuestas sevilla inter|apuestas
sevilla jugador|apuestas sevilla juventus|apuestas sevilla leganes|apuestas sevilla madrid|apuestas sevilla manchester
united|apuestas sevilla osasuna|apuestas sevilla real madrid|apuestas sevilla real sociedad|apuestas sevilla roma|apuestas sevilla valencia|apuestas
significa|apuestas simples ejemplos|apuestas simples o combinadas|apuestas sin deposito|apuestas
sin deposito inicial|apuestas sin deposito minimo|apuestas sin dinero|apuestas
sin dinero real|apuestas sin empate|apuestas sin empate que significa|apuestas sin ingreso minimo|apuestas sin registro|apuestas sistema|apuestas sistema calculadora|apuestas sistema como funciona|apuestas sistema trixie|apuestas sociedad|apuestas sorteo copa del
rey|apuestas stake|apuestas stake 10|apuestas stake 10 hoy|apuestas super bowl favorito|apuestas super rugby|apuestas supercopa españa|apuestas superliga argentina|apuestas tarjeta roja|apuestas tarjetas|apuestas tarjetas
amarillas|apuestas tenis|apuestas tenis atp|apuestas tenis consejos|apuestas tenis copa davis|apuestas tenis
de mesa|apuestas tenis de mesa pronosticos|apuestas tenis en vivo|apuestas tenis femenino|apuestas tenis hoy|apuestas tenis
itf|apuestas tenis pronosticos|apuestas tenis pronósticos|apuestas tenis retirada|apuestas
tenis roland garros|apuestas tenis seguras|apuestas tenis wimbledon|apuestas tenis wta|apuestas
tercera division|apuestas tercera division españa|apuestas tipos|apuestas tips|apuestas tipster|apuestas tipster
para hoy|apuestas topuria holloway cuotas|apuestas torneos de golf|apuestas torneos
de tenis|apuestas trucos|apuestas uefa champions league|apuestas uefa europa
league|apuestas ufc|apuestas ufc chile|apuestas ufc
como funciona|apuestas ufc hoy|apuestas ufc ilia topuria|apuestas ufc online|apuestas
ufc pronósticos|apuestas ufc telegram|apuestas
ufc topuria|apuestas under over|apuestas unionistas villarreal|apuestas uruguay|apuestas uruguay colombia|apuestas uruguay corea|apuestas uruguay vs colombia|apuestas us open golf|apuestas
us open tenis|apuestas valencia|apuestas valencia barcelona|apuestas valencia betis|apuestas valencia madrid|apuestas valencia real madrid|apuestas valladolid barcelona|apuestas valladolid valencia|apuestas valor
app|apuestas valor en directo|apuestas valor galgos|apuestas venezuela|apuestas venezuela argentina|apuestas venezuela bolivia|apuestas venezuela ecuador|apuestas villarreal|apuestas
villarreal athletic|apuestas villarreal barcelona|apuestas villarreal bayern|apuestas villarreal betis|apuestas
villarreal liverpool|apuestas villarreal manchester|apuestas villarreal manchester united|apuestas villarreal vs real
madrid|apuestas virtuales|apuestas virtuales colombia|apuestas virtuales
futbol|apuestas virtuales sin dinero|apuestas vivo|apuestas
vuelta a españa|apuestas vuelta españa|apuestas william hill partidos de hoy|apuestas y
casino|apuestas y casinos|apuestas y juegos de azar|apuestas y pronosticos|apuestas y pronosticos de futbol|apuestas y pronosticos deportivos|apuestas y
resultados|apuestas-deportivas|apuestas-deportivas.es pronosticos|arbitro
nba apuestas|argentina apuestas|argentina colombia apuestas|argentina croacia apuestas|argentina francia apuestas|argentina mexico apuestas|argentina
peru apuestas|argentina uruguay apuestas|argentina vs bolivia apuestas|argentina vs
chile apuestas|argentina vs colombia apuestas|argentina vs francia
apuestas|argentina vs. colombia apuestas|asi se gana en las apuestas deportivas|asiatico apuestas|asiatico en apuestas|asiaticos apuestas|athletic barcelona apuestas|athletic
manchester united apuestas|athletic osasuna apuestas|athletic real madrid apuestas|atletico
barcelona apuestas|atletico de madrid apuestas|atlético de
madrid apuestas|atletico de madrid real madrid apuestas|atletico de madrid vs barcelona apuestas|atletico madrid real madrid
apuestas|atletico madrid vs real madrid apuestas|atletico real madrid apuestas|atletico vs real madrid apuestas|avisador
de cuotas apuestas|bajada de cuotas apuestas|baloncesto apuestas|barbastro barcelona apuestas|barca apuestas|barca bayern apuestas|barca inter apuestas|barca madrid apuestas|barça madrid apuestas|barca vs atletico apuestas|barca vs
madrid apuestas|barca vs real madrid apuestas|barcelona
– real madrid apuestas|barcelona apuestas|barcelona
atletico apuestas|barcelona atletico de madrid apuestas|barcelona atletico madrid apuestas|barcelona betis apuestas|barcelona casa de apuestas|barcelona inter
apuestas|barcelona psg apuestas|barcelona real madrid apuestas|barcelona real
sociedad apuestas|barcelona sevilla apuestas|barcelona valencia apuestas|barcelona vs athletic bilbao apuestas|barcelona
vs atlético madrid apuestas|barcelona vs betis apuestas|barcelona vs
celta de vigo apuestas|barcelona vs espanyol apuestas|barcelona vs girona apuestas|barcelona vs madrid apuestas|barcelona vs real madrid apuestas|barcelona vs real sociedad apuestas|barcelona vs sevilla apuestas|barcelona vs villarreal apuestas|base
de datos cuotas apuestas deportivas|bayern real madrid apuestas|beisbol apuestas|best america
apuestas|bet apuestas chile|bet apuestas en vivo|betis – chelsea
apuestas|betis apuestas|betis barcelona apuestas|betis chelsea
apuestas|betis madrid apuestas|betis sevilla apuestas|betsson tu
sitio de apuestas online|blog apuestas baloncesto|blog apuestas ciclismo|blog
apuestas nba|blog apuestas tenis|blog de apuestas de tenis|bono apuestas|bono apuestas deportivas|bono apuestas deportivas sin deposito|bono apuestas gratis|bono apuestas gratis sin deposito|bono apuestas sin deposito|bono
bienvenida apuestas|bono bienvenida apuestas deportivas|bono bienvenida apuestas españa|bono
bienvenida apuestas sin deposito|bono bienvenida apuestas sin depósito|bono bienvenida casa apuestas|bono bienvenida
casa de apuestas|bono bienvenida marca apuestas|bono casa apuestas|bono casa de apuestas|bono casa de apuestas sin ingreso|bono casas de apuestas|bono de apuestas|bono de apuestas gratis sin deposito|bono de bienvenida apuestas|bono de bienvenida apuestas deportivas|bono de
bienvenida casa de apuestas|bono de bienvenida casas de apuestas|bono de
casas de apuestas|bono de registro apuestas|bono de registro apuestas deportivas|bono de registro casa de apuestas|bono gratis apuestas|bono marca apuestas|bono por registro apuestas|bono por registro apuestas deportivas|bono por registro casa de apuestas|bono registro apuestas|bono sin deposito apuestas|bono
sin depósito apuestas|bono sin deposito apuestas deportivas|bono sin depósito apuestas deportivas|bono sin deposito casa de apuestas|bono
sin deposito marca apuestas|bono sin ingreso apuestas|bono
sin ingreso apuestas deportivas|bonos apuestas|bonos apuestas colombia|bonos
apuestas deportivas|bonos apuestas deportivas sin deposito|bonos apuestas gratis|bonos apuestas sin deposito|bonos apuestas sin depósito|bonos bienvenida apuestas|bonos bienvenida casas apuestas|bonos bienvenida casas de apuestas|bonos casa de apuestas|bonos casas apuestas|bonos casas de
apuestas|bonos casas de apuestas colombia|bonos casas de apuestas deportivas|bonos casas de
apuestas españa|bonos casas de apuestas nuevas|bonos casas de apuestas sin deposito|bonos
casas de apuestas sin depósito|bonos de apuestas|bonos de apuestas deportivas|bonos de apuestas gratis|bonos de apuestas sin deposito|bonos de bienvenida apuestas|bonos de bienvenida apuestas deportivas|bonos de bienvenida casa de apuestas|bonos de
bienvenida casas de apuestas|bonos de bienvenida de casas
de apuestas|bonos de bienvenida en casas de
apuestas|bonos de casas de apuestas|bonos de casas de apuestas sin deposito|bonos en casa de apuestas|bonos
en casas de apuestas sin deposito|bonos gratis apuestas|bonos gratis apuestas deportivas|bonos gratis casas de apuestas|bonos
gratis sin deposito apuestas|bonos paginas de apuestas|bonos registro casas de apuestas|bonos sin deposito apuestas|bonos sin depósito apuestas|bonos sin deposito apuestas deportivas|bonos
sin deposito casas de apuestas|bot de apuestas
deportivas gratis|boxeo apuestas|brasil colombia apuestas|brasil peru
apuestas|brasil vs colombia apuestas|buenas apuestas para
hoy|buscador cuotas apuestas|buscador de apuestas seguras|buscador de cuotas apuestas|buscador de cuotas de apuestas|buscar apuestas seguras|caballos apuestas|calculador de apuestas|calculador de cuotas apuestas|calculadora apuestas|calculadora apuestas combinadas|calculadora apuestas de sistema|calculadora apuestas deportivas|calculadora
apuestas deportivas seguras|calculadora apuestas multiples|calculadora apuestas segura|calculadora apuestas seguras|calculadora apuestas
sistema|calculadora apuestas yankee|calculadora arbitraje apuestas|calculadora cubrir apuestas|calculadora cuotas apuestas|calculadora de apuestas|calculadora de
apuestas combinadas|calculadora de apuestas de futbol|calculadora
de apuestas de sistema|calculadora de apuestas deportivas|calculadora
de apuestas multiples|calculadora de apuestas seguras|calculadora de apuestas sistema|calculadora de apuestas surebets|calculadora de arbitraje apuestas|calculadora de cuotas
apuestas|calculadora de cuotas de apuestas|calculadora para apuestas
deportivas|calculadora poisson apuestas|calculadora poisson apuestas deportivas|calculadora poisson para apuestas|calculadora
scalping apuestas deportivas|calculadora sistema apuestas|calculadora stake apuestas|calculadora trading apuestas|calcular apuestas|calcular apuestas deportivas|calcular apuestas futbol|calcular apuestas sistema|calcular cuotas apuestas|calcular cuotas apuestas
combinadas|calcular cuotas apuestas deportivas|calcular cuotas de apuestas|calcular ganancias apuestas deportivas|calcular momios
apuestas|calcular probabilidad cuota apuestas|calcular
stake apuestas|calcular unidades apuestas|calcular yield apuestas|calculo de apuestas|calculo de apuestas deportivas|cambio de cuotas
apuestas|campeon champions apuestas|campeon eurocopa apuestas|campeon liga apuestas|campeon nba apuestas|canales de apuestas gratis|carrera de caballos apuestas|carrera de
caballos apuestas juego|carrera de caballos con apuestas|carrera de
galgos apuestas|carreras de caballos apuestas|carreras de caballos apuestas online|carreras de
caballos con apuestas|carreras de caballos juegos de apuestas|carreras de
galgos apuestas|carreras de galgos apuestas online|carreras de galgos apuestas trucos|carreras galgos apuestas|casa
apuestas argentina|casa apuestas atletico de madrid|casa apuestas
barcelona|casa apuestas betis|casa apuestas bono bienvenida|casa apuestas bono gratis|casa apuestas bono sin deposito|casa apuestas cerca de mi|casa apuestas chile|casa apuestas colombia|casa
apuestas con mejores cuotas|casa apuestas deportivas|casa apuestas españa|casa apuestas española|casa apuestas eurocopa|casa apuestas futbol|casa apuestas
mejores cuotas|casa apuestas mundial|casa apuestas nueva|casa apuestas nuevas|casa
apuestas online|casa apuestas peru|casa apuestas valencia|casa de apuestas|casa
de apuestas 10 euros gratis|casa de apuestas argentina|casa de apuestas atletico
de madrid|casa de apuestas baloncesto|casa de apuestas barcelona|casa de apuestas
beisbol|casa de apuestas betis|casa de apuestas bono|casa de apuestas bono bienvenida|casa de apuestas bono de
bienvenida|casa de apuestas bono gratis|casa de apuestas bono por
registro|casa de apuestas bono sin deposito|casa de apuestas boxeo|casa de apuestas caballos|casa
de apuestas carreras de caballos|casa de apuestas cerca de
mi|casa de apuestas cerca de mí|casa de apuestas champions league|casa de apuestas chile|casa
de apuestas ciclismo|casa de apuestas colombia|casa de apuestas con bono de bienvenida|casa
de apuestas con bono sin deposito|casa de apuestas con cuotas mas altas|casa de apuestas con esports|casa de apuestas con las mejores cuotas|casa de apuestas con licencia en españa|casa
de apuestas con mejores cuotas|casa de apuestas
con pago anticipado|casa de apuestas con paypal|casa de apuestas copa america|casa de apuestas de caballos|casa de apuestas de colombia|casa de apuestas de españa|casa de apuestas de futbol|casa de apuestas de fútbol|casa de apuestas de futbol
peru|casa de apuestas de peru|casa de apuestas del
madrid|casa de apuestas del real madrid|casa de apuestas deportivas|casa de apuestas
deportivas cerca de mi|casa de apuestas deportivas en argentina|casa
de apuestas deportivas en chile|casa de apuestas deportivas en colombia|casa de apuestas deportivas en españa|casa de
apuestas deportivas en madrid|casa de apuestas
deportivas españa|casa de apuestas deportivas españolas|casa de apuestas deportivas madrid|casa de apuestas deportivas
mexico|casa de apuestas deportivas online|casa de apuestas deportivas peru|casa de apuestas deposito 5 euros|casa de apuestas deposito minimo|casa de apuestas deposito minimo
1 euro|casa de apuestas depósito mínimo 1 euro|casa de apuestas
en españa|casa de apuestas en linea|casa de apuestas en madrid|casa de apuestas en perú|casa de apuestas en vivo|casa de apuestas españa|casa de
apuestas españa inglaterra|casa de apuestas española|casa de apuestas españolas|casa de apuestas esports|casa de apuestas eurocopa|casa de apuestas europa league|casa de apuestas f1|casa de
apuestas formula 1|casa de apuestas futbol|casa
de apuestas ingreso minimo|casa de apuestas ingreso minimo 1 euro|casa
de apuestas ingreso mínimo 1 euro|casa de apuestas legales|casa de apuestas legales en colombia|casa
de apuestas legales en españa|casa de apuestas
libertadores|casa de apuestas liga española|casa
de apuestas madrid|casa de apuestas mas segura|casa de apuestas mejores|casa de apuestas méxico|casa
de apuestas minimo 5 euros|casa de apuestas mlb|casa de apuestas mundial|casa de apuestas
nba|casa de apuestas nfl|casa de apuestas nueva|casa de apuestas nuevas|casa de apuestas oficial del real
madrid|casa de apuestas oficial real madrid|casa de apuestas online|casa de apuestas online argentina|casa de
apuestas online chile|casa de apuestas online españa|casa de
apuestas online mexico|casa de apuestas online paraguay|casa
de apuestas online peru|casa de apuestas online
usa|casa de apuestas online venezuela|casa de apuestas pago anticipado|casa de apuestas para boxeo|casa de apuestas
para ufc|casa de apuestas peru|casa de apuestas
perú|casa de apuestas peru online|casa de apuestas por
paypal|casa de apuestas promociones|casa de apuestas
que regalan dinero|casa de apuestas real madrid|casa de
apuestas regalo de bienvenida|casa de apuestas sevilla|casa de apuestas sin dinero|casa de apuestas sin ingreso minimo|casa de apuestas
sin licencia en españa|casa de apuestas sin minimo de ingreso|casa de apuestas stake|casa de apuestas tenis|casa de apuestas ufc|casa de apuestas valencia|casa de
apuestas venezuela|casa de apuestas virtuales|casa de apuestas vive la suerte|casa
oficial de apuestas del real madrid|casas apuestas asiaticas|casas apuestas bono sin deposito|casas apuestas bonos sin deposito|casas apuestas caballos|casas
apuestas chile|casas apuestas ciclismo|casas apuestas con licencia|casas apuestas con licencia en españa|casas apuestas deportivas|casas apuestas deportivas colombia|casas
apuestas deportivas españa|casas apuestas
deportivas españolas|casas apuestas deportivas nuevas|casas apuestas españa|casas apuestas españolas|casas apuestas
esports|casas apuestas eurocopa|casas apuestas golf|casas apuestas ingreso minimo 5 euros|casas apuestas legales|casas apuestas legales españa|casas apuestas licencia|casas apuestas
licencia españa|casas apuestas mexico|casas apuestas mundial|casas
apuestas nba|casas apuestas nuevas|casas apuestas nuevas españa|casas apuestas ofertas|casas apuestas online|casas apuestas
paypal|casas apuestas peru|casas apuestas sin licencia|casas apuestas tenis|casas asiaticas apuestas|casas de apuestas|casas de apuestas 5
euros|casas de apuestas app|casas de apuestas argentinas|casas de apuestas asiaticas|casas de apuestas baloncesto|casas de apuestas barcelona|casas de apuestas bono bienvenida|casas de
apuestas bono de bienvenida|casas de apuestas bono por registro|casas de
apuestas bono sin deposito|casas de apuestas bono sin ingreso|casas de
apuestas bonos|casas de apuestas bonos de bienvenida|casas de apuestas bonos gratis|casas de apuestas
bonos sin deposito|casas de apuestas boxeo|casas de apuestas caballos|casas de apuestas carreras de caballos|casas
de apuestas casino|casas de apuestas casino online|casas de apuestas cerca de
mi|casas de apuestas champions league|casas de apuestas
chile|casas de apuestas ciclismo|casas de apuestas
colombia|casas de apuestas com|casas de apuestas con app|casas
de apuestas con apuestas gratis|casas de apuestas con bono|casas de apuestas con bono de bienvenida|casas de apuestas con bono de registro|casas de apuestas con bono
por registro|casas de apuestas con bono sin deposito|casas de apuestas con bonos|casas de
apuestas con bonos gratis|casas de apuestas con bonos sin deposito|casas de
apuestas con deposito minimo|casas de apuestas con esports|casas de apuestas con handicap asiatico|casas de
apuestas con licencia|casas de apuestas con licencia en españa|casas de apuestas con licencia españa|casas
de apuestas con licencia española|casas de apuestas con mejores cuotas|casas
de apuestas con pago anticipado|casas de apuestas con paypal|casas de apuestas con paypal en perú|casas de apuestas con promociones|casas de apuestas
con ruleta en vivo|casas de apuestas copa del rey|casas de apuestas
de caballos|casas de apuestas de españa|casas de apuestas de futbol|casas
de apuestas de fútbol|casas de apuestas de peru|casas de apuestas deportivas|casas de apuestas deportivas asiaticas|casas de
apuestas deportivas colombia|casas de apuestas deportivas comparativa|casas de apuestas deportivas con paypal|casas de apuestas deportivas en chile|casas de apuestas deportivas en españa|casas de apuestas deportivas en linea|casas de apuestas deportivas en madrid|casas de apuestas deportivas
en mexico|casas de apuestas deportivas en peru|casas de apuestas deportivas en sevilla|casas de apuestas deportivas en valencia|casas de apuestas deportivas españa|casas
de apuestas deportivas españolas|casas de apuestas deportivas legales|casas de apuestas deportivas madrid|casas
de apuestas deportivas mexico|casas de apuestas deportivas nuevas|casas de apuestas deportivas online|casas de apuestas deportivas peru|casas de
apuestas deportivas perú|casas de apuestas deposito minimo 1 euro|casas de apuestas
depósito mínimo 1 euro|casas de apuestas dinero gratis|casas de apuestas en argentina|casas de apuestas en barcelona|casas de
apuestas en chile|casas de apuestas en colombia|casas de apuestas en españa|casas de apuestas en españa online|casas de apuestas
en linea|casas de apuestas en madrid|casas de apuestas en méxico|casas de apuestas en peru|casas de apuestas en perú|casas de apuestas en sevilla|casas de apuestas en uruguay|casas
de apuestas en valencia|casas de apuestas en venezuela|casas de apuestas equipos de futbol|casas de apuestas españa|casas de apuestas
españa alemania|casas de apuestas españa inglaterra|casas de apuestas españa licencia|casas de apuestas españa nuevas|casas de apuestas españa online|casas de apuestas española|casas de
apuestas españolas|casas de apuestas españolas con licencia|casas de apuestas españolas online|casas de apuestas esports|casas de apuestas eurocopa|casas de apuestas eurocopa
2024|casas de apuestas europa league|casas de apuestas f1|casas de apuestas fisicas en barcelona|casas de apuestas fisicas en españa|casas de apuestas formula 1|casas de
apuestas fuera de españa|casas de apuestas futbol|casas
de apuestas fútbol|casas de apuestas futbol españa|casas de
apuestas ganador eurocopa|casas de apuestas gratis|casas de apuestas ingreso minimo|casas de apuestas ingreso minimo 1 euro|casas de
apuestas ingreso minimo 5 euros|casas de apuestas inter barcelona|casas de apuestas legales|casas de apuestas
legales en colombia|casas de apuestas legales en españa|casas de apuestas
legales en mexico|casas de apuestas legales españa|casas de apuestas legales mx|casas de
apuestas licencia|casas de apuestas licencia españa|casas
de apuestas lista|casas de apuestas madrid|casas de apuestas mas seguras|casas de apuestas mejores bonos|casas de apuestas mejores cuotas|casas de apuestas mexico|casas de apuestas méxico|casas de apuestas minimo 5 euros|casas de apuestas mlb|casas de
apuestas mundial|casas de apuestas mundial baloncesto|casas de apuestas mundiales|casas de apuestas
nba|casas de apuestas no reguladas en españa|casas
de apuestas nueva ley|casas de apuestas nuevas|casas de apuestas nuevas
en colombia|casas de apuestas nuevas en españa|casas de apuestas nuevas españa|casas
de apuestas ofertas|casas de apuestas online|casas
de apuestas online argentina|casas de apuestas online colombia|casas de apuestas online deportivas|casas
de apuestas online ecuador|casas de apuestas online en argentina|casas
de apuestas online en chile|casas de apuestas online en colombia|casas de apuestas online en españa|casas de apuestas online en mexico|casas de apuestas online españa|casas
de apuestas online mas fiables|casas de apuestas
online mexico|casas de apuestas online nuevas|casas de apuestas online peru|casas de apuestas online usa|casas de apuestas online venezuela|casas de apuestas pago paypal|casas de apuestas para ufc|casas
de apuestas paypal|casas de apuestas peru bono sin deposito|
Your comment is awaiting moderation.
Поиск работы https://employmentcenter.com.ru по актуальным вакансиям городов России, СНГ, стран ЕАЭС: обновления предложений работы ежедневно, рассылка свежих объявлений вакансий на E-mail, умные поисковые фильтры и уведомления в Telegram, Одноклассники, ВКонтакте. Помогаем найти работу мечты без лишних звонков и спама.
Your comment is awaiting moderation.
Нужна лестница? изготовление лестниц под ключ в Москве и области: замер, проектирование, производство, отделка и монтаж. Лестницы на металлокаркасе. Индивидуальные решения для дома и бизнеса.
Your comment is awaiting moderation.
(10 euros gratis apuestas|10 mejores casas de apuestas|10
trucos para ganar apuestas|15 euros gratis marca apuestas|1×2 apuestas|1×2 apuestas deportivas|1×2 apuestas que significa|1×2
en apuestas|1×2 en apuestas que significa|1×2 que significa en apuestas|5 euros gratis apuestas|9
apuestas que siempre ganaras|a partir de cuanto se declara apuestas|actividades de juegos de azar y apuestas|ad apuestas
deportivas|aleksandre topuria ufc apuestas|algoritmo para ganar apuestas deportivas|america apuestas|análisis
nba apuestas|aplicacion android apuestas deportivas|aplicacion apuestas deportivas|aplicacion apuestas
deportivas android|aplicación de apuestas online|aplicacion para
hacer apuestas|aplicacion para hacer apuestas
de futbol|aplicación para hacer apuestas de fútbol|aplicaciones
apuestas deportivas android|aplicaciones apuestas deportivas gratis|aplicaciones de apuestas android|aplicaciones de apuestas de fútbol|aplicaciones de apuestas deportivas|aplicaciones de apuestas deportivas peru|aplicaciones de apuestas deportivas perú|aplicaciones de apuestas en colombia|aplicaciones de apuestas
gratis|aplicaciones de apuestas online|aplicaciones de apuestas seguras|aplicaciones de apuestas sin dinero|aplicaciones para hacer apuestas|apostar
seguro apuestas deportivas|app android apuestas deportivas|app apuestas|app apuestas android|app apuestas de futbol|app apuestas deportivas|app apuestas
deportivas android|app apuestas deportivas argentina|app apuestas deportivas colombia|app apuestas deportivas ecuador|app apuestas deportivas españa|app apuestas deportivas gratis|app apuestas entre amigos|app apuestas futbol|app apuestas gratis|app apuestas sin dinero|app casa de apuestas|app casas de apuestas|app control apuestas|app de apuestas|app de apuestas android|app de apuestas casino|app de apuestas colombia|app de apuestas con bono
de bienvenida|app de apuestas de futbol|app de apuestas deportivas|app de apuestas
deportivas android|app de apuestas deportivas argentina|app de apuestas
deportivas colombia|app de apuestas deportivas en españa|app de apuestas deportivas peru|app de
apuestas deportivas perú|app de apuestas deportivas sin dinero|app de apuestas ecuador|app de apuestas en colombia|app
de apuestas en españa|app de apuestas en venezuela|app de apuestas futbol|app de apuestas gratis|app de apuestas online|app de apuestas para android|app de apuestas para ganar dinero|app de apuestas
peru|app de apuestas reales|app de casas de apuestas|app marca apuestas
android|app moviles de apuestas|app para apuestas|app para apuestas de futbol|app para apuestas
deportivas|app para apuestas deportivas en español|app para ganar apuestas deportivas|app para hacer apuestas|app para hacer apuestas deportivas|app
para hacer apuestas entre amigos|app para llevar control de apuestas|app
pronosticos apuestas deportivas|app versus apuestas|apps apuestas mundial|apps de apuestas|apps de apuestas con bono de bienvenida|apps de apuestas de futbol|apps
de apuestas deportivas peru|apps de apuestas mexico|apps para apuestas|aprender a
hacer apuestas deportivas|aprender hacer apuestas deportivas|apuesta del dia apuestas deportivas|apuestas 10
euros gratis|apuestas 100 seguras|apuestas 1×2|apuestas 1X2|apuestas 2 division|apuestas 3 division|apuestas a caballos|apuestas a carreras de caballos|apuestas a colombia|apuestas a corners|apuestas
a ganar|apuestas a jugadores nba|apuestas
a la baja|apuestas a la nfl|apuestas al barcelona|apuestas
al dia|apuestas al empate|apuestas al mundial|apuestas al tenis wta|apuestas alaves barcelona|apuestas alcaraz hoy|apuestas alemania españa|apuestas alonso campeon del mundo|apuestas altas y bajas|apuestas altas y
bajas nfl|apuestas ambos equipos marcan|apuestas america|apuestas android|apuestas
anillo nba|apuestas antes del mundial|apuestas anticipadas|apuestas anticipadas nba|apuestas apps|apuestas arabia argentina|apuestas
argentina|apuestas argentina campeon del mundo|apuestas argentina canada|apuestas argentina colombia|apuestas argentina croacia|apuestas
argentina españa|apuestas argentina francia|apuestas argentina francia cuanto paga|apuestas argentina
francia mundial|apuestas argentina gana el mundial|apuestas argentina gana mundial|apuestas argentina holanda|apuestas argentina mexico|apuestas argentina méxico|apuestas
argentina mundial|apuestas argentina online|apuestas argentina paises bajos|apuestas
argentina polonia|apuestas argentina uruguay|apuestas argentina
vs australia|apuestas argentina vs colombia|apuestas argentina vs francia|apuestas argentina vs
peru|apuestas argentinas|apuestas arsenal real madrid|apuestas ascenso a primera division|apuestas ascenso a segunda|apuestas asiaticas|apuestas asiatico|apuestas
athletic|apuestas athletic atletico|apuestas athletic barça|apuestas athletic barcelona|apuestas athletic betis|apuestas athletic manchester|apuestas athletic manchester united|apuestas athletic osasuna|apuestas athletic real|apuestas
athletic real madrid|apuestas athletic real sociedad|apuestas athletic
real sociedad final|apuestas athletic roma|apuestas athletic sevilla|apuestas athletic valencia|apuestas atletico|apuestas atletico barcelona|apuestas atletico barsa|apuestas atletico campeon champions|apuestas atletico campeon de liga|apuestas atlético copenhague|apuestas atletico de madrid|apuestas atlético de madrid|apuestas atletico de madrid
barcelona|apuestas atletico de madrid gana la liga|apuestas atletico
de madrid real madrid|apuestas atlético de madrid real madrid|apuestas
atletico de madrid vs barcelona|apuestas atletico madrid|apuestas atletico madrid real madrid|apuestas atletico madrid vs barcelona|apuestas atletico real madrid|apuestas atletico real madrid champions|apuestas atletismo|apuestas bajas|apuestas baloncesto|apuestas baloncesto acb|apuestas baloncesto handicap|apuestas baloncesto hoy|apuestas baloncesto juegos olimpicos|apuestas baloncesto nba|apuestas baloncesto pronostico|apuestas baloncesto pronósticos|apuestas baloncesto prorroga|apuestas barca|apuestas barca athletic|apuestas barca atletico|apuestas barca
bayern|apuestas barca bayern munich|apuestas barca girona|apuestas barca hoy|apuestas barça hoy|apuestas barca inter|apuestas barca juventus|apuestas
barca madrid|apuestas barça madrid|apuestas barca real madrid|apuestas barca vs juve|apuestas barca vs madrid|apuestas
barca vs psg|apuestas barcelona|apuestas barcelona alaves|apuestas barcelona athletic|apuestas barcelona
atletico|apuestas barcelona atletico de madrid|apuestas barcelona atlético de madrid|apuestas barcelona atletico madrid|apuestas
barcelona bayern|apuestas barcelona betis|apuestas barcelona campeon de
liga|apuestas barcelona celta|apuestas barcelona espanyol|apuestas barcelona gana la champions|apuestas barcelona girona|apuestas barcelona granada|apuestas barcelona hoy|apuestas barcelona inter|apuestas barcelona madrid|apuestas barcelona osasuna|apuestas barcelona psg|apuestas barcelona real
madrid|apuestas barcelona real sociedad|apuestas
barcelona sevilla|apuestas barcelona valencia|apuestas barcelona villarreal|apuestas barcelona vs atletico madrid|apuestas barcelona vs madrid|apuestas barcelona vs real madrid|apuestas barsa madrid|apuestas basket
hoy|apuestas bayern barcelona|apuestas bayern vs barcelona|apuestas beisbol|apuestas
béisbol|apuestas beisbol mlb|apuestas beisbol pronosticos|apuestas beisbol venezolano|apuestas betis|apuestas betis – chelsea|apuestas
betis barcelona|apuestas betis chelsea|apuestas betis fiorentina|apuestas betis
girona|apuestas betis madrid|apuestas betis mallorca|apuestas betis real madrid|apuestas
betis real sociedad|apuestas betis sevilla|apuestas betis valencia|apuestas
betis valladolid|apuestas betis vs valencia|apuestas
betplay hoy colombia|apuestas betsson peru|apuestas bienvenida|apuestas billar online|apuestas bolivia
vs colombia|apuestas bono|apuestas bono bienvenida|apuestas bono de bienvenida|apuestas
bono de bienvenida sin deposito|apuestas bono gratis|apuestas bono sin deposito|apuestas bonos sin deposito|apuestas borussia real madrid|apuestas
boxeo|apuestas boxeo de campeonato|apuestas boxeo españa|apuestas boxeo español|apuestas boxeo femenino olimpiadas|apuestas boxeo hoy|apuestas boxeo online|apuestas brasil colombia|apuestas brasil peru|apuestas
brasil uruguay|apuestas brasil vs colombia|apuestas brasil vs peru|apuestas caballos|apuestas
caballos colocado|apuestas caballos españa|apuestas caballos hipodromo|apuestas caballos hoy|apuestas caballos madrid|apuestas caballos online|apuestas caballos sanlucar de barrameda|apuestas caballos zarzuela|apuestas calculador|apuestas campeon|apuestas campeon champions|apuestas campeón champions|apuestas campeon champions 2025|apuestas campeon champions league|apuestas campeon conference league|apuestas
campeon copa america|apuestas campeon copa del rey|apuestas campeon de champions|apuestas campeon de la champions|apuestas campeon de liga|apuestas campeon del mundo|apuestas campeon eurocopa|apuestas campeón eurocopa|apuestas campeon europa league|apuestas campeon f1|apuestas campeon f1
2025|apuestas campeon formula 1|apuestas campeon libertadores|apuestas campeon liga|apuestas campeon liga bbva|apuestas campeon liga española|apuestas
campeon liga santander|apuestas campeon motogp 2025|apuestas campeon mundial|apuestas campeón mundial|apuestas campeon mundial baloncesto|apuestas campeon nba|apuestas campeón nba|apuestas
campeon premier|apuestas campeon premier league|apuestas campeon roland garros|apuestas campeonato f1|apuestas campeonatos de futbol|apuestas carrera de caballos|apuestas
carrera de caballos hoy|apuestas carrera de caballos nocturnas|apuestas carrera de galgos fin de semana|apuestas
carrera de galgos hoy|apuestas carrera de galgos nocturnas|apuestas carreras caballos|apuestas carreras caballos sanlucar|apuestas
carreras de caballos|apuestas carreras de caballos en directo|apuestas carreras de caballos en vivo|apuestas carreras de caballos españa|apuestas carreras de caballos hoy|apuestas carreras de caballos nacionales|apuestas carreras de
caballos nocturnas|apuestas carreras de caballos online|apuestas carreras de caballos sanlucar|apuestas carreras de caballos sanlúcar|apuestas carreras de galgos|apuestas carreras de galgos en vivo|apuestas carreras de galgos nocturnas|apuestas carreras de galgos pre partido|apuestas casino|apuestas casino barcelona|apuestas casino futbol|apuestas
casino gran madrid|apuestas casino gratis|apuestas casino madrid|apuestas casino online|apuestas casino online argentina|apuestas casinos|apuestas casinos online|apuestas celta|apuestas celta barcelona|apuestas celta betis|apuestas celta eibar|apuestas celta espanyol|apuestas celta granada|apuestas celta
madrid|apuestas celta manchester|apuestas celta real madrid|apuestas champion league|apuestas champions foro|apuestas
champions hoy|apuestas champions league|apuestas champions league – pronósticos|apuestas champions league
2025|apuestas champions league hoy|apuestas champions league pronosticos|apuestas champions league pronósticos|apuestas champions
pronosticos|apuestas chelsea barcelona|apuestas chelsea
betis|apuestas chile|apuestas chile peru|apuestas
chile venezuela|apuestas chile vs colombia|apuestas chile vs uruguay|apuestas ciclismo|apuestas ciclismo en vivo|apuestas ciclismo femenino|apuestas
ciclismo tour francia|apuestas ciclismo vuelta|apuestas ciclismo
vuelta a españa|apuestas ciclismo vuelta españa|apuestas city madrid|apuestas city real
madrid|apuestas clasico|apuestas clasico español|apuestas clasico
real madrid barcelona|apuestas clasificacion mundial|apuestas colombia|apuestas colombia argentina|apuestas colombia brasil|apuestas colombia paraguay|apuestas colombia uruguay|apuestas colombia vs argentina|apuestas colombia vs brasil|apuestas combinadas|apuestas
combinadas como funcionan|apuestas combinadas de futbol|apuestas combinadas de fútbol|apuestas combinadas foro|apuestas combinadas futbol|apuestas combinadas
hoy|apuestas combinadas mismo partido|apuestas combinadas mundial|apuestas combinadas nba|apuestas combinadas para
esta semana|apuestas combinadas para hoy|apuestas combinadas para mañana|apuestas
combinadas pronosticos|apuestas combinadas recomendadas|apuestas combinadas seguras|apuestas combinadas seguras para hoy|apuestas combinadas seguras para mañana|apuestas
como ganar|apuestas comparador|apuestas con bono de bienvenida|apuestas con dinero ficticio|apuestas con dinero
real|apuestas con dinero virtual|apuestas con handicap|apuestas con handicap asiatico|apuestas con handicap baloncesto|apuestas con mas probabilidades de ganar|apuestas con paypal|apuestas con tarjeta de credito|apuestas con tarjeta de debito|apuestas consejos|apuestas copa|apuestas copa africa|apuestas
copa america|apuestas copa américa|apuestas copa argentina|apuestas copa
brasil|apuestas copa davis|apuestas copa de europa|apuestas copa del mundo|apuestas copa del rey|apuestas copa del
rey baloncesto|apuestas copa del rey final|apuestas copa del rey futbol|apuestas copa del rey ganador|apuestas copa del rey hoy|apuestas copa del rey
pronosticos|apuestas copa del rey pronósticos|apuestas copa
europa|apuestas copa italia|apuestas copa libertadores|apuestas copa mundial
de hockey|apuestas copa rey|apuestas copa sudamericana|apuestas corners|apuestas corners hoy|apuestas croacia argentina|apuestas cuartos
eurocopa|apuestas cuotas|apuestas cuotas altas|apuestas
cuotas bajas|apuestas de 1 euro|apuestas de baloncesto|apuestas de baloncesto hoy|apuestas de baloncesto nba|apuestas de baloncesto para hoy|apuestas de
beisbol|apuestas de beisbol para hoy|apuestas de blackjack en linea|apuestas de boxeo|apuestas de boxeo canelo|apuestas de boxeo en las vegas|apuestas de
boxeo hoy|apuestas de boxeo online|apuestas de caballo|apuestas de
caballos|apuestas de caballos como funciona|apuestas
de caballos como se juega|apuestas de caballos en colombia|apuestas
de caballos en españa|apuestas de caballos en linea|apuestas de caballos españa|apuestas de caballos ganador y colocado|apuestas de caballos internacionales|apuestas
de caballos juegos|apuestas de caballos online|apuestas de caballos online en venezuela|apuestas de caballos por internet|apuestas de caballos pronosticos|apuestas de caballos pronósticos|apuestas de carrera de caballos|apuestas de carreras de caballos|apuestas de carreras de caballos online|apuestas de casino|apuestas de casino online|apuestas de casino por internet|apuestas de champions league|apuestas de ciclismo|apuestas de colombia|apuestas de copa america|apuestas de corners|apuestas de deportes en linea|apuestas de deportes online|apuestas de dinero|apuestas de esports|apuestas de eurocopa|apuestas de europa
league|apuestas de f1|apuestas de formula 1|apuestas de futbol|apuestas de fútbol|apuestas de futbol app|apuestas de futbol argentina|apuestas de futbol colombia|apuestas de futbol en colombia|apuestas de
futbol en directo|apuestas de futbol en linea|apuestas
de futbol en vivo|apuestas de futbol español|apuestas de futbol
gratis|apuestas de futbol hoy|apuestas de futbol mundial|apuestas de futbol online|apuestas de fútbol
online|apuestas de futbol para hoy|apuestas de fútbol para hoy|apuestas
de futbol para hoy seguras|apuestas de futbol para mañana|apuestas de futbol peru|apuestas de futbol pronosticos|apuestas de fútbol pronósticos|apuestas de futbol seguras|apuestas
de futbol seguras para hoy|apuestas de futbol sin dinero|apuestas de galgos|apuestas de galgos como ganar|apuestas de galgos en directo|apuestas de
galgos online|apuestas de galgos trucos|apuestas de
golf|apuestas de hockey|apuestas de hockey sobre hielo|apuestas de hoy|apuestas de hoy seguras|apuestas de juego|apuestas de juegos|apuestas de juegos deportivos|apuestas de juegos online|apuestas de la champions league|apuestas de la copa américa|apuestas de la eurocopa|apuestas de la europa league|apuestas de la liga|apuestas de la liga bbva|apuestas de la liga
española|apuestas de la nba|apuestas de la nfl|apuestas de la ufc|apuestas de mlb|apuestas de nba|apuestas de nba para hoy|apuestas de partidos|apuestas
de partidos de futbol|apuestas de peleas ufc|apuestas de perros en vivo|apuestas de perros virtuales|apuestas
de peru|apuestas de sistema|apuestas de sistema como funciona|apuestas de
sistema explicacion|apuestas de sistema explicación|apuestas de tenis|apuestas de
tenis de mesa|apuestas de tenis en directo|apuestas de tenis hoy|apuestas de
tenis para hoy|apuestas de tenis pronosticos|apuestas de tenis seguras|apuestas de todo tipo|apuestas de ufc|apuestas de ufc hoy|apuestas
del boxeo|apuestas del clasico|apuestas del clasico real madrid barca|apuestas del dia|apuestas del día|apuestas
del dia de hoy|apuestas del dia deportivas|apuestas del dia
futbol|apuestas del mundial|apuestas del partido de hoy|apuestas del real madrid|apuestas del rey|apuestas del sistema|apuestas deporte|apuestas deportes|apuestas deportiva|apuestas deportivas|apuestas deportivas 1 euro|apuestas deportivas 10 euros gratis|apuestas deportivas 100 seguras|apuestas deportivas 1×2|apuestas deportivas android|apuestas deportivas app|apuestas
deportivas apps|apuestas deportivas argentina|apuestas deportivas argentina futbol|apuestas deportivas argentina legal|apuestas deportivas atletico de
madrid|apuestas deportivas baloncesto|apuestas deportivas barca madrid|apuestas deportivas barcelona|apuestas deportivas beisbol|apuestas deportivas bono|apuestas deportivas bono bienvenida|apuestas deportivas bono de bienvenida|apuestas deportivas
bono sin deposito|apuestas deportivas bonos de bienvenida|apuestas deportivas boxeo|apuestas deportivas caballos|apuestas
deportivas calculadora|apuestas deportivas campeon liga|apuestas deportivas casino|apuestas deportivas casino barcelona|apuestas
deportivas casino online|apuestas deportivas cerca
de mi|apuestas deportivas champions league|apuestas deportivas chile|apuestas deportivas ciclismo|apuestas deportivas colombia|apuestas deportivas com|apuestas deportivas
com foro|apuestas deportivas com pronosticos|apuestas deportivas
combinadas|apuestas deportivas combinadas para hoy|apuestas deportivas
como se juega|apuestas deportivas comparador|apuestas deportivas con bono gratis|apuestas deportivas con bonos gratis|apuestas deportivas con dinero ficticio|apuestas deportivas con paypal|apuestas deportivas con puntos virtuales|apuestas deportivas consejos|apuestas deportivas consejos para ganar|apuestas deportivas copa america|apuestas deportivas copa del rey|apuestas deportivas copa libertadores|apuestas deportivas
copa mundial|apuestas deportivas corners|apuestas
deportivas cual es la mejor|apuestas deportivas cuotas altas|apuestas deportivas
de baloncesto|apuestas deportivas de boxeo|apuestas
deportivas de colombia|apuestas deportivas de futbol|apuestas deportivas
de nba|apuestas deportivas de nhl|apuestas deportivas de peru|apuestas deportivas de tenis|apuestas
deportivas del dia|apuestas deportivas dinero ficticio|apuestas
deportivas directo|apuestas deportivas doble oportunidad|apuestas deportivas en argentina|apuestas deportivas en chile|apuestas
deportivas en colombia|apuestas deportivas en directo|apuestas deportivas
en españa|apuestas deportivas en español|apuestas deportivas en linea|apuestas deportivas en línea|apuestas deportivas en peru|apuestas deportivas en perú|apuestas deportivas en sevilla|apuestas deportivas en uruguay|apuestas deportivas
en vivo|apuestas deportivas es|apuestas deportivas es pronosticos|apuestas
deportivas españa|apuestas deportivas españolas|apuestas deportivas esports|apuestas
deportivas estadisticas|apuestas deportivas estrategias|apuestas deportivas estrategias
seguras|apuestas deportivas eurocopa|apuestas deportivas europa
league|apuestas deportivas f1|apuestas deportivas faciles de ganar|apuestas deportivas formula 1|apuestas deportivas foro|apuestas deportivas foro futbol|apuestas deportivas foro tenis|apuestas deportivas francia argentina|apuestas deportivas futbol|apuestas deportivas
fútbol|apuestas deportivas futbol argentino|apuestas deportivas futbol colombia|apuestas deportivas futbol español|apuestas deportivas gana|apuestas deportivas ganadas|apuestas deportivas ganar dinero seguro|apuestas deportivas gane|apuestas deportivas golf|apuestas deportivas gratis|apuestas deportivas
gratis con premios|apuestas deportivas gratis hoy|apuestas deportivas gratis sin deposito|apuestas deportivas
handicap|apuestas deportivas handicap asiatico|apuestas deportivas hoy|apuestas deportivas impuestos|apuestas deportivas interior argentina|apuestas deportivas juegos olimpicos|apuestas deportivas la
liga|apuestas deportivas legales|apuestas deportivas legales en colombia|apuestas deportivas libres de impuestos|apuestas deportivas licencia españa|apuestas deportivas liga española|apuestas deportivas listado|apuestas deportivas listado clasico|apuestas deportivas madrid|apuestas deportivas mas seguras|apuestas
deportivas mejor pagadas|apuestas deportivas mejores|apuestas deportivas
mejores app|apuestas deportivas mejores casas|apuestas deportivas mejores cuotas|apuestas deportivas mejores paginas|apuestas
deportivas mexico|apuestas deportivas méxico|apuestas deportivas mlb|apuestas
deportivas mlb hoy|apuestas deportivas multiples|apuestas deportivas mundial|apuestas deportivas murcia|apuestas deportivas nba|apuestas
deportivas nba hoy|apuestas deportivas nfl|apuestas deportivas nhl|apuestas deportivas nuevas|apuestas deportivas ofertas|apuestas deportivas online|apuestas deportivas online
argentina|apuestas deportivas online chile|apuestas deportivas online colombia|apuestas deportivas online en colombia|apuestas deportivas online españa|apuestas deportivas online mexico|apuestas deportivas online paypal|apuestas deportivas online peru|apuestas deportivas
online por internet|apuestas deportivas pago paypal|apuestas
deportivas para ganar dinero|apuestas deportivas para hoy|apuestas
deportivas para hoy pronosticos|apuestas deportivas partido suspendido|apuestas deportivas partidos de
hoy|apuestas deportivas paypal|apuestas deportivas peru|apuestas deportivas perú|apuestas deportivas peru vs ecuador|apuestas deportivas predicciones|apuestas deportivas promociones|apuestas deportivas pronostico|apuestas deportivas
pronóstico|apuestas deportivas pronostico hoy|apuestas deportivas pronosticos|apuestas deportivas
pronósticos|apuestas deportivas pronosticos expertos|apuestas deportivas pronosticos gratis|apuestas
deportivas pronosticos nba|apuestas deportivas pronosticos tenis|apuestas deportivas que aceptan paypal|apuestas deportivas real madrid|apuestas deportivas
regalo bienvenida|apuestas deportivas resultado exacto|apuestas deportivas resultados|apuestas deportivas
rugby|apuestas deportivas seguras|apuestas deportivas seguras foro|apuestas deportivas seguras hoy|apuestas deportivas seguras para hoy|apuestas deportivas seguras telegram|apuestas deportivas sevilla|apuestas deportivas simulador eurocopa|apuestas deportivas sin deposito|apuestas deportivas sin deposito inicial|apuestas deportivas sin dinero|apuestas deportivas
sin dinero real|apuestas deportivas sin registro|apuestas deportivas stake|apuestas deportivas stake 10|apuestas deportivas telegram españa|apuestas deportivas tenis|apuestas deportivas tenis de mesa|apuestas deportivas tenis foro|apuestas deportivas tenis hoy|apuestas
deportivas tips|apuestas deportivas tipster|apuestas deportivas ufc|apuestas deportivas
uruguay|apuestas deportivas valencia|apuestas deportivas valencia barcelona|apuestas
deportivas venezuela|apuestas deportivas virtuales|apuestas deportivas
y casino|apuestas deportivas y casino online|apuestas deportivas.com|apuestas deportivas.com
foro|apuestas deportivas.es|apuestas deportivos pronosticos|apuestas deposito
minimo 1 euro|apuestas descenso a segunda|apuestas descenso a segunda b|apuestas descenso la liga|apuestas descenso primera division|apuestas descenso segunda|apuestas dia|apuestas diarias seguras|apuestas dinero|apuestas
dinero ficticio|apuestas dinero real|apuestas dinero virtual|apuestas directas|apuestas directo|apuestas directo futbol|apuestas division de honor juvenil|apuestas dnb|apuestas doble oportunidad|apuestas doble resultado|apuestas dobles|apuestas dobles y triples|apuestas dortmund barcelona|apuestas draft nba|apuestas draft nfl|apuestas ecuador vs argentina|apuestas ecuador vs venezuela|apuestas egipto uruguay|apuestas el clasico|apuestas elecciones venezuela|apuestas empate|apuestas en baloncesto|apuestas en barcelona|apuestas en beisbol|apuestas en boxeo|apuestas en caballos|apuestas en carreras de caballos|apuestas
en casino|apuestas en casino online|apuestas en casinos|apuestas en casinos online|apuestas en chile|apuestas en ciclismo|apuestas en colombia|apuestas en colombia de futbol|apuestas en directo|apuestas en directo
futbol|apuestas en directo pronosticos|apuestas en el futbol|apuestas en el tenis|apuestas en españa|apuestas en esports|apuestas en eventos deportivos virtuales|apuestas en golf|apuestas en juegos|apuestas
en la champions league|apuestas en la eurocopa|apuestas en la liga|apuestas en la nba|apuestas en la nfl|apuestas
en las vegas mlb|apuestas en las vegas nfl|apuestas en linea|apuestas en línea|apuestas en linea argentina|apuestas en linea
boxeo|apuestas en linea chile|apuestas en linea colombia|apuestas en línea de fútbol|apuestas en linea deportivas|apuestas en linea españa|apuestas en linea
estados unidos|apuestas en linea futbol|apuestas en linea mexico|apuestas en línea méxico|apuestas en linea mundial|apuestas en linea peru|apuestas en linea usa|apuestas
en los esports|apuestas en madrid|apuestas en méxico|apuestas en mexico online|apuestas
en nba|apuestas en partidos de futbol|apuestas en partidos de futbol en vivo|apuestas en partidos de tenis
en directo|apuestas en perú|apuestas en sevilla|apuestas en sistema|apuestas en stake|apuestas en tenis|apuestas en tenis de mesa|apuestas en valencia|apuestas en vivo|apuestas
en vivo argentina|apuestas en vivo casino|apuestas en vivo futbol|apuestas en vivo fútbol|apuestas en vivo nba|apuestas en vivo peru|apuestas en vivo tenis|apuestas en vivo ufc|apuestas
equipo mbappe|apuestas equipos de futbol|apuestas españa|apuestas
españa alemania|apuestas españa alemania eurocopa|apuestas
españa croacia|apuestas españa eurocopa|apuestas españa francia|apuestas españa francia eurocopa|apuestas españa gana el mundial|apuestas españa gana
eurocopa|apuestas españa gana mundial|apuestas españa georgia|apuestas españa holanda|apuestas españa inglaterra|apuestas españa inglaterra cuotas|apuestas
españa inglaterra eurocopa|apuestas españa italia|apuestas españa
mundial|apuestas españa paises bajos|apuestas español|apuestas español oviedo|apuestas espanyol
barcelona|apuestas espanyol betis|apuestas espanyol villarreal|apuestas
esport|apuestas esports|apuestas esports colombia|apuestas esports españa|apuestas esports fifa|apuestas esports gratis|apuestas esports lol|apuestas esports peru|apuestas esports valorant|apuestas estadisticas|apuestas estrategias|apuestas
euro|apuestas euro copa|apuestas eurocopa|apuestas eurocopa campeon|apuestas eurocopa españa|apuestas eurocopa favoritos|apuestas eurocopa femenina|apuestas eurocopa final|apuestas eurocopa ganador|apuestas
eurocopa hoy|apuestas eurocopa sub 21|apuestas euroliga baloncesto|apuestas euroliga pronosticos|apuestas europa league|apuestas europa league
hoy|apuestas europa league pronosticos|apuestas europa
league pronósticos|apuestas euros|apuestas f1
abu dhabi|apuestas f1 bahrein|apuestas f1 canada|apuestas f1 china|apuestas f1 cuotas|apuestas f1
hoy|apuestas f1 las vegas|apuestas f1 miami|apuestas f1 monaco|apuestas faciles de ganar|apuestas fáciles de ganar|apuestas faciles
para ganar|apuestas favoritas|apuestas favorito champions|apuestas favoritos champions|apuestas favoritos eurocopa|apuestas favoritos mundial|apuestas fc barcelona|apuestas final champions cuotas|apuestas final champions league|apuestas final champions peru|apuestas final
copa|apuestas final copa america|apuestas final copa de europa|apuestas
final copa del rey|apuestas final copa europa|apuestas final copa libertadores|apuestas final copa rey|apuestas final de copa|apuestas
final de copa del rey|apuestas final del mundial|apuestas final euro|apuestas final eurocopa|apuestas final europa league|apuestas final libertadores|apuestas final mundial|apuestas final nba|apuestas final rugby|apuestas final uefa europa league|apuestas final.mundial|apuestas finales de conferencia nfl|apuestas finales nba|apuestas fiorentina betis|apuestas formula|apuestas formula 1|apuestas
fórmula 1|apuestas fórmula 1 pronósticos|apuestas formula uno|apuestas foro|apuestas foro
nba|apuestas francia argentina|apuestas francia españa|apuestas futbol|apuestas
fútbol|apuestas futbol americano|apuestas futbol americano nfl|apuestas futbol argentina|apuestas futbol argentino|apuestas futbol champions
league|apuestas futbol chile|apuestas futbol colombia|apuestas futbol consejos|apuestas
futbol en directo|apuestas fútbol en directo|apuestas futbol
en vivo|apuestas fútbol en vivo|apuestas futbol españa|apuestas futbol español|apuestas fútbol español|apuestas futbol eurocopa|apuestas futbol femenino|apuestas futbol foro|apuestas futbol gratis|apuestas futbol hoy|apuestas fútbol hoy|apuestas futbol juegos olimpicos|apuestas futbol mexico|apuestas futbol mundial|apuestas futbol online|apuestas futbol para
hoy|apuestas futbol peru|apuestas futbol pronosticos|apuestas futbol sala|apuestas futbol telegram|apuestas
futbol virtual|apuestas galgos|apuestas galgos en directo|apuestas galgos hoy|apuestas galgos online|apuestas galgos pronosticos|apuestas galgos trucos|apuestas gana|apuestas gana colombia|apuestas gana resultados|apuestas ganadas|apuestas ganadas
hoy|apuestas ganador champions league|apuestas ganador copa america|apuestas ganador copa del rey|apuestas ganador copa del rey baloncesto|apuestas ganador copa libertadores|apuestas ganador de la
eurocopa|apuestas ganador de la liga|apuestas ganador del mundial|apuestas ganador eurocopa|apuestas ganador europa league|apuestas ganador f1|apuestas ganador la liga|apuestas ganador liga española|apuestas ganador mundial|apuestas ganador mundial baloncesto|apuestas ganador
mundial f1|apuestas ganador nba|apuestas ganadores eurocopa|apuestas ganadores mundial|apuestas ganar champions|apuestas ganar eurocopa|apuestas ganar liga|apuestas ganar
mundial|apuestas ganar nba|apuestas getafe valencia|apuestas ghana uruguay|apuestas girona|apuestas
girona athletic|apuestas girona betis|apuestas girona campeon de
liga|apuestas girona campeon liga|apuestas
girona gana la liga|apuestas girona real madrid|apuestas
girona real sociedad|apuestas goleador eurocopa|apuestas goleadores
eurocopa|apuestas goles asiaticos|apuestas golf|apuestas golf masters|apuestas golf pga|apuestas granada barcelona|apuestas grand slam
de tenis|apuestas gratis|apuestas gratis casino|apuestas gratis con premios|apuestas gratis hoy|apuestas gratis para hoy|apuestas gratis
por registro|apuestas gratis puntos|apuestas gratis regalos|apuestas gratis sin deposito|apuestas gratis sin depósito|apuestas gratis sin ingreso|apuestas gratis sports|apuestas gratis y ganar
premios|apuestas grupo a eurocopa|apuestas grupos
eurocopa|apuestas handicap|apuestas handicap asiatico|apuestas handicap baloncesto|apuestas handicap como funciona|apuestas handicap nba|apuestas handicap nfl|apuestas
hipicas online|apuestas hípicas online|apuestas hipicas venezuela|apuestas hockey|apuestas hockey hielo|apuestas hockey patines|apuestas hockey sobre hielo|apuestas holanda argentina|apuestas holanda vs argentina|apuestas hoy|apuestas hoy champions|apuestas hoy futbol|apuestas hoy nba|apuestas hoy pronosticos|apuestas hoy seguras|apuestas impuestos|apuestas inglaterra paises
bajos|apuestas inter barca|apuestas inter barcelona|apuestas juego|apuestas juegos|apuestas juegos en linea|apuestas
juegos olimpicos|apuestas juegos olímpicos|apuestas juegos olimpicos baloncesto|apuestas juegos online|apuestas juegos virtuales|apuestas
jugador sevilla|apuestas jugadores nba|apuestas kings league americas|apuestas la liga|apuestas la liga española|apuestas la liga
hoy|apuestas la liga santander|apuestas las vegas mlb|apuestas las vegas nba|apuestas
las vegas nfl|apuestas league of legends mundial|apuestas legal|apuestas legales|apuestas legales en colombia|apuestas
legales en españa|apuestas legales en estados unidos|apuestas
legales españa|apuestas leganes betis|apuestas libertadores|apuestas licencia|apuestas liga 1 peru|apuestas
liga argentina|apuestas liga bbva pronosticos|apuestas liga de campeones|apuestas liga de campeones de baloncesto|apuestas
liga de campeones de hockey|apuestas liga españa|apuestas liga española|apuestas liga santander pronosticos|apuestas ligas de futbol|apuestas linea|apuestas linea de gol|apuestas liverpool
barcelona|apuestas liverpool real madrid|apuestas lol mundial|apuestas
madrid|apuestas madrid arsenal|apuestas madrid atletico|apuestas madrid atletico champions|apuestas madrid barca|apuestas madrid barça|apuestas madrid barca hoy|apuestas madrid barca
supercopa|apuestas madrid barcelona|apuestas madrid barsa|apuestas madrid
bayern|apuestas madrid betis|apuestas madrid borussia|apuestas madrid campeon champions|apuestas
madrid celta|apuestas madrid city|apuestas madrid dortmund|apuestas madrid
gana la liga|apuestas madrid gana liga|apuestas madrid hoy|apuestas madrid liverpool|apuestas madrid osasuna|apuestas
madrid sevilla|apuestas madrid valencia|apuestas madrid vs arsenal|apuestas madrid vs
barcelona|apuestas mallorca osasuna|apuestas mallorca real sociedad|apuestas manchester athletic|apuestas manchester city real madrid|apuestas mas faciles de ganar|apuestas mas seguras|apuestas mas seguras para hoy|apuestas masters de golf|apuestas masters de tenis|apuestas maximo goleador eurocopa|apuestas maximo goleador mundial|apuestas mejor jugador eurocopa|apuestas mejores casinos online|apuestas mexico|apuestas méxico|apuestas mexico polonia|apuestas
méxico polonia|apuestas mlb|apuestas mlb hoy|apuestas
mlb las vegas|apuestas mlb para hoy|apuestas mlb pronosticos|apuestas mlb usa|apuestas mma ufc|apuestas momios|apuestas multiples|apuestas
múltiples|apuestas multiples como funcionan|apuestas multiples el
gordo|apuestas multiples futbol|apuestas mundial|apuestas mundial 2026|apuestas mundial baloncesto|apuestas mundial balonmano|apuestas mundial brasil|apuestas mundial
campeon|apuestas mundial ciclismo|apuestas mundial clubes|apuestas mundial de baloncesto|apuestas
mundial de ciclismo|apuestas mundial de clubes|apuestas mundial
de futbol|apuestas mundial de fútbol|apuestas mundial de rugby|apuestas mundial f1|apuestas mundial favoritos|apuestas mundial
femenino|apuestas mundial formula 1|apuestas mundial futbol|apuestas mundial ganador|apuestas
mundial lol|apuestas mundial moto gp|apuestas mundial motogp|apuestas mundial rugby|apuestas
mundial sub 17|apuestas mundiales|apuestas mundialistas|apuestas mvp eurocopa|apuestas mvp nba|apuestas mvp
nfl|apuestas nacionales de colombia|apuestas nba|apuestas nba all
star|apuestas nba campeon|apuestas nba consejos|apuestas nba esta
noche|apuestas nba finals|apuestas nba gratis|apuestas
nba hoy|apuestas nba hoy jugadores|apuestas nba hoy pronosticos|apuestas
nba para hoy|apuestas nba playoffs|apuestas nba pronosticos|apuestas nba pronósticos|apuestas nba pronosticos hoy|apuestas nba tipster|apuestas
nfl|apuestas nfl hoy|apuestas nfl las vegas|apuestas nfl
playoffs|apuestas nfl pronosticos|apuestas nfl pronósticos|apuestas nfl semana 4|apuestas nfl super bowl|apuestas nhl|apuestas nhl
pronosticos|apuestas octavos eurocopa|apuestas ofertas|apuestas online|apuestas online argentina|apuestas online argentina legal|apuestas online bono|apuestas online bono bienvenida|apuestas online boxeo|apuestas
online caballos|apuestas online carreras de caballos|apuestas
online casino|apuestas online champions league|apuestas online chile|apuestas online ciclismo|apuestas online colombia|apuestas online comparativa|apuestas online con paypal|apuestas
online de caballos|apuestas online deportivas|apuestas online en argentina|apuestas online en peru|apuestas online
espana|apuestas online españa|apuestas online esports|apuestas online foro|apuestas online futbol|apuestas online futbol españa|apuestas online golf|apuestas
online gratis|apuestas online gratis sin deposito|apuestas
online juegos|apuestas online mexico|apuestas online mma|apuestas online movil|apuestas online
nba|apuestas online net|apuestas online nuevas|apuestas online opiniones|apuestas online
paypal|apuestas online peru|apuestas online seguras|apuestas online
sin dinero|apuestas online sin registro|apuestas online tenis|apuestas online ufc|apuestas online uruguay|apuestas online venezuela|apuestas open britanico golf|apuestas osasuna athletic|apuestas osasuna
barcelona|apuestas osasuna real madrid|apuestas osasuna sevilla|apuestas osasuna
valencia|apuestas over|apuestas over 2.5|apuestas over under|apuestas paginas|apuestas pago anticipado|apuestas paises bajos ecuador|apuestas paises bajos inglaterra|apuestas países bajos
qatar|apuestas para boxeo|apuestas para champions
league|apuestas para el clasico|apuestas para el dia de hoy|apuestas para el mundial|apuestas
para el partido de hoy|apuestas para eurocopa|apuestas para europa
league|apuestas para futbol|apuestas para ganar|apuestas para
ganar dinero|apuestas para ganar dinero facil|apuestas para ganar en la ruleta|apuestas para ganar
la champions|apuestas para ganar la eurocopa|apuestas para ganar la europa league|apuestas para ganar la
liga|apuestas para ganar siempre|apuestas para hacer|apuestas para hoy|apuestas para hoy de futbol|apuestas para hoy europa league|apuestas
para hoy futbol|apuestas para juegos|apuestas para la champions league|apuestas para la copa del rey|apuestas para la eurocopa|apuestas
para la europa league|apuestas para la final de la eurocopa|apuestas para la nba hoy|apuestas para
los partidos de hoy|apuestas para partidos de hoy|apuestas para ufc|apuestas partido|apuestas partido aplazado|apuestas partido champions|apuestas partido colombia|apuestas
partido españa marruecos|apuestas partido mundial|apuestas partido suspendido|apuestas partidos|apuestas partidos
champions league|apuestas partidos csgo|apuestas partidos de futbol|apuestas partidos de
futbol hoy|apuestas partidos de hoy|apuestas partidos eurocopa|apuestas partidos futbol|apuestas partidos hoy|apuestas partidos mundial|apuestas
paypal|apuestas peleas de boxeo|apuestas peru|apuestas perú|apuestas peru brasil|apuestas peru chile|apuestas peru paraguay|apuestas peru uruguay|apuestas peru vs chile|apuestas peru
vs colombia|apuestas pichichi eurocopa|apuestas
plataforma|apuestas playoff|apuestas playoff ascenso|apuestas playoff ascenso a primera|apuestas playoff nba|apuestas
playoff segunda|apuestas playoff segunda b|apuestas playoffs nba|apuestas playoffs nfl|apuestas polonia argentina|apuestas por argentina|apuestas por internet
mexico|apuestas por internet para ganar dinero|apuestas por paypal|apuestas por ronda boxeo|apuestas por sistema|apuestas portugal uruguay|apuestas pre partido|apuestas predicciones|apuestas predicciones futbol|apuestas primera division|apuestas
primera division españa|apuestas promociones|apuestas pronostico|apuestas
pronosticos|apuestas pronosticos deportivos|apuestas pronosticos deportivos tenis|apuestas pronosticos
futbol|apuestas pronosticos gratis|apuestas pronosticos nba|apuestas pronosticos tenis|apuestas prorroga|apuestas psg
barca|apuestas psg barcelona|apuestas puntos por tarjetas|apuestas puntos tarjetas|apuestas que aceptan paypal|apuestas que es handicap|apuestas
que puedes hacer con tu novia|apuestas que siempre ganaras|apuestas que significa|apuestas quien bajara
a segunda|apuestas quién bajara a segunda|apuestas quien gana el mundial|apuestas quien gana eurocopa|apuestas
quien gana la champions|apuestas quien gana la eurocopa|apuestas quien gana la liga|apuestas quien ganara el
mundial|apuestas quién ganará el mundial|apuestas quien ganara la champions|apuestas quien ganara la eurocopa|apuestas quien ganara la liga|apuestas rayo barcelona|apuestas real madrid|apuestas real madrid arsenal|apuestas real madrid athletic|apuestas real madrid atletico|apuestas real madrid atletico champions|apuestas real madrid atletico de madrid|apuestas real madrid atlético de madrid|apuestas real madrid atletico madrid|apuestas real madrid barcelona|apuestas real madrid
bayern|apuestas real madrid betis|apuestas real madrid borussia|apuestas real
madrid campeon champions|apuestas real madrid celta|apuestas real madrid
champions|apuestas real madrid city|apuestas real madrid girona|apuestas real madrid hoy|apuestas real madrid liverpool|apuestas real madrid manchester
city|apuestas real madrid osasuna|apuestas real madrid real sociedad|apuestas real
madrid valencia|apuestas real madrid villarreal|apuestas real madrid vs arsenal|apuestas real madrid vs atletico|apuestas real madrid vs atlético|apuestas
real madrid vs atletico madrid|apuestas real madrid vs barcelona|apuestas real madrid vs betis|apuestas
real madrid vs sevilla|apuestas real madrid vs valencia|apuestas real sociedad|apuestas real sociedad athletic|apuestas real sociedad barcelona|apuestas real sociedad
betis|apuestas real sociedad psg|apuestas real sociedad real madrid|apuestas real sociedad valencia|apuestas recomendadas hoy|apuestas regalo de bienvenida|apuestas registro|apuestas resultado exacto|apuestas resultados|apuestas
resultados eurocopa|apuestas retirada tenis|apuestas roma barcelona|apuestas roma sevilla|apuestas rugby|apuestas rugby mundial|apuestas rugby
world cup|apuestas ruleta seguras|apuestas segunda|apuestas segunda b|apuestas
segunda division|apuestas segunda división|apuestas segunda division b|apuestas segunda division españa|apuestas seguras|apuestas seguras baloncesto|apuestas seguras calculadora|apuestas seguras
en la ruleta|apuestas seguras eurocopa|apuestas seguras foro|apuestas seguras futbol|apuestas seguras
futbol hoy|apuestas seguras gratis|apuestas seguras hoy|apuestas seguras hoy futbol|apuestas seguras nba|apuestas seguras nba
hoy|apuestas seguras para este fin de semana|apuestas seguras para ganar dinero|apuestas seguras para hoy|apuestas seguras para hoy fútbol|apuestas seguras para hoy
pronósticos|apuestas seguras para mañana|apuestas seguras ruleta|apuestas seguras telegram|apuestas
seguras tenis|apuestas semifinales eurocopa|apuestas senegal paises bajos|apuestas sevilla|apuestas
sevilla athletic|apuestas sevilla atletico de madrid|apuestas sevilla
barcelona|apuestas sevilla betis|apuestas sevilla campeon liga|apuestas sevilla celta|apuestas sevilla gana la liga|apuestas sevilla girona|apuestas sevilla
inter|apuestas sevilla jugador|apuestas sevilla
juventus|apuestas sevilla leganes|apuestas sevilla
madrid|apuestas sevilla manchester united|apuestas sevilla osasuna|apuestas sevilla real madrid|apuestas sevilla real sociedad|apuestas sevilla roma|apuestas sevilla valencia|apuestas significa|apuestas simples ejemplos|apuestas simples o
combinadas|apuestas sin deposito|apuestas sin deposito inicial|apuestas sin deposito minimo|apuestas sin dinero|apuestas sin dinero real|apuestas sin empate|apuestas sin empate que significa|apuestas sin ingreso minimo|apuestas sin registro|apuestas sistema|apuestas sistema calculadora|apuestas sistema como funciona|apuestas sistema trixie|apuestas sociedad|apuestas sorteo copa del rey|apuestas stake|apuestas stake 10|apuestas stake 10 hoy|apuestas super bowl favorito|apuestas
super rugby|apuestas supercopa españa|apuestas superliga argentina|apuestas
tarjeta roja|apuestas tarjetas|apuestas tarjetas amarillas|apuestas tenis|apuestas tenis atp|apuestas tenis consejos|apuestas tenis copa davis|apuestas tenis de
mesa|apuestas tenis de mesa pronosticos|apuestas tenis en vivo|apuestas tenis
femenino|apuestas tenis hoy|apuestas tenis itf|apuestas
tenis pronosticos|apuestas tenis pronósticos|apuestas tenis retirada|apuestas tenis roland garros|apuestas tenis seguras|apuestas tenis wimbledon|apuestas tenis wta|apuestas tercera division|apuestas tercera division españa|apuestas tipos|apuestas tips|apuestas tipster|apuestas tipster para hoy|apuestas topuria holloway cuotas|apuestas torneos de golf|apuestas torneos de
tenis|apuestas trucos|apuestas uefa champions league|apuestas uefa
europa league|apuestas ufc|apuestas ufc chile|apuestas ufc como funciona|apuestas ufc
hoy|apuestas ufc ilia topuria|apuestas ufc online|apuestas ufc pronósticos|apuestas ufc
telegram|apuestas ufc topuria|apuestas under over|apuestas unionistas villarreal|apuestas
uruguay|apuestas uruguay colombia|apuestas uruguay corea|apuestas
uruguay vs colombia|apuestas us open golf|apuestas us open tenis|apuestas
valencia|apuestas valencia barcelona|apuestas valencia betis|apuestas valencia madrid|apuestas valencia real madrid|apuestas valladolid barcelona|apuestas valladolid valencia|apuestas valor
app|apuestas valor en directo|apuestas valor galgos|apuestas venezuela|apuestas venezuela
argentina|apuestas venezuela bolivia|apuestas venezuela ecuador|apuestas villarreal|apuestas villarreal athletic|apuestas villarreal barcelona|apuestas villarreal bayern|apuestas villarreal betis|apuestas villarreal liverpool|apuestas villarreal manchester|apuestas villarreal
manchester united|apuestas villarreal vs real madrid|apuestas virtuales|apuestas virtuales colombia|apuestas
virtuales futbol|apuestas virtuales sin dinero|apuestas vivo|apuestas vuelta
a españa|apuestas vuelta españa|apuestas william hill partidos de hoy|apuestas y casino|apuestas y casinos|apuestas y juegos de azar|apuestas y pronosticos|apuestas y pronosticos de futbol|apuestas
y pronosticos deportivos|apuestas y resultados|apuestas-deportivas|apuestas-deportivas.es pronosticos|arbitro nba apuestas|argentina apuestas|argentina colombia apuestas|argentina croacia apuestas|argentina
francia apuestas|argentina mexico apuestas|argentina peru
apuestas|argentina uruguay apuestas|argentina vs bolivia apuestas|argentina vs chile apuestas|argentina vs
colombia apuestas|argentina vs francia apuestas|argentina
vs. colombia apuestas|asi se gana en las apuestas deportivas|asiatico apuestas|asiatico
en apuestas|asiaticos apuestas|athletic barcelona apuestas|athletic manchester united apuestas|athletic osasuna apuestas|athletic real madrid apuestas|atletico barcelona apuestas|atletico de madrid apuestas|atlético de madrid
apuestas|atletico de madrid real madrid apuestas|atletico de madrid vs barcelona apuestas|atletico madrid real madrid apuestas|atletico madrid
vs real madrid apuestas|atletico real madrid apuestas|atletico vs real madrid apuestas|avisador
de cuotas apuestas|bajada de cuotas apuestas|baloncesto apuestas|barbastro barcelona
apuestas|barca apuestas|barca bayern apuestas|barca inter apuestas|barca madrid apuestas|barça
madrid apuestas|barca vs atletico apuestas|barca vs madrid apuestas|barca vs real madrid apuestas|barcelona –
real madrid apuestas|barcelona apuestas|barcelona atletico apuestas|barcelona atletico de madrid
apuestas|barcelona atletico madrid apuestas|barcelona betis apuestas|barcelona casa de apuestas|barcelona inter apuestas|barcelona psg apuestas|barcelona real madrid
apuestas|barcelona real sociedad apuestas|barcelona sevilla apuestas|barcelona valencia apuestas|barcelona vs
athletic bilbao apuestas|barcelona vs atlético madrid apuestas|barcelona vs betis apuestas|barcelona vs celta
de vigo apuestas|barcelona vs espanyol apuestas|barcelona vs girona apuestas|barcelona vs
madrid apuestas|barcelona vs real madrid apuestas|barcelona vs real sociedad apuestas|barcelona
vs sevilla apuestas|barcelona vs villarreal apuestas|base de datos cuotas
apuestas deportivas|bayern real madrid apuestas|beisbol apuestas|best america apuestas|bet apuestas chile|bet apuestas en vivo|betis – chelsea apuestas|betis apuestas|betis barcelona apuestas|betis chelsea apuestas|betis madrid apuestas|betis sevilla apuestas|betsson tu
sitio de apuestas online|blog apuestas baloncesto|blog apuestas ciclismo|blog apuestas nba|blog apuestas tenis|blog de apuestas de
tenis|bono apuestas|bono apuestas deportivas|bono apuestas deportivas sin deposito|bono apuestas
gratis|bono apuestas gratis sin deposito|bono apuestas sin deposito|bono bienvenida apuestas|bono bienvenida apuestas deportivas|bono
bienvenida apuestas españa|bono bienvenida apuestas sin deposito|bono bienvenida apuestas sin depósito|bono bienvenida casa apuestas|bono bienvenida casa de
apuestas|bono bienvenida marca apuestas|bono casa apuestas|bono casa de apuestas|bono casa de apuestas sin ingreso|bono
casas de apuestas|bono de apuestas|bono de apuestas gratis sin deposito|bono de
bienvenida apuestas|bono de bienvenida apuestas deportivas|bono de bienvenida casa de apuestas|bono de bienvenida casas de apuestas|bono de casas de
apuestas|bono de registro apuestas|bono de registro apuestas deportivas|bono de registro casa de apuestas|bono gratis apuestas|bono marca apuestas|bono por registro apuestas|bono por registro
apuestas deportivas|bono por registro casa de apuestas|bono registro
apuestas|bono sin deposito apuestas|bono sin depósito apuestas|bono sin deposito apuestas deportivas|bono sin depósito apuestas deportivas|bono sin deposito casa de apuestas|bono sin deposito marca apuestas|bono sin ingreso apuestas|bono sin ingreso
apuestas deportivas|bonos apuestas|bonos apuestas colombia|bonos apuestas deportivas|bonos apuestas deportivas sin deposito|bonos apuestas gratis|bonos
apuestas sin deposito|bonos apuestas sin depósito|bonos bienvenida apuestas|bonos bienvenida casas apuestas|bonos bienvenida casas de apuestas|bonos casa de apuestas|bonos casas apuestas|bonos casas de apuestas|bonos casas de apuestas colombia|bonos casas de apuestas deportivas|bonos casas de apuestas españa|bonos casas de apuestas nuevas|bonos casas de
apuestas sin deposito|bonos casas de apuestas sin depósito|bonos de apuestas|bonos de apuestas
deportivas|bonos de apuestas gratis|bonos de apuestas sin deposito|bonos de bienvenida apuestas|bonos de bienvenida apuestas deportivas|bonos de bienvenida casa de apuestas|bonos de
bienvenida casas de apuestas|bonos de bienvenida de casas de apuestas|bonos de bienvenida en casas de apuestas|bonos de casas de apuestas|bonos de casas de apuestas sin deposito|bonos en casa de apuestas|bonos
en casas de apuestas sin deposito|bonos gratis apuestas|bonos gratis apuestas
deportivas|bonos gratis casas de apuestas|bonos gratis sin deposito apuestas|bonos paginas de apuestas|bonos registro casas de apuestas|bonos sin deposito apuestas|bonos sin depósito apuestas|bonos
sin deposito apuestas deportivas|bonos sin deposito casas de apuestas|bot de apuestas deportivas gratis|boxeo apuestas|brasil colombia apuestas|brasil peru apuestas|brasil vs
colombia apuestas|buenas apuestas para hoy|buscador cuotas apuestas|buscador
de apuestas seguras|buscador de cuotas apuestas|buscador de
cuotas de apuestas|buscar apuestas seguras|caballos apuestas|calculador de apuestas|calculador de cuotas
apuestas|calculadora apuestas|calculadora apuestas combinadas|calculadora apuestas de sistema|calculadora apuestas deportivas|calculadora apuestas deportivas seguras|calculadora apuestas multiples|calculadora
apuestas segura|calculadora apuestas seguras|calculadora apuestas
sistema|calculadora apuestas yankee|calculadora arbitraje apuestas|calculadora cubrir apuestas|calculadora cuotas apuestas|calculadora de apuestas|calculadora de apuestas combinadas|calculadora de apuestas
de futbol|calculadora de apuestas de sistema|calculadora
de apuestas deportivas|calculadora de apuestas multiples|calculadora de apuestas seguras|calculadora de apuestas sistema|calculadora de apuestas
surebets|calculadora de arbitraje apuestas|calculadora de cuotas
apuestas|calculadora de cuotas de apuestas|calculadora para apuestas deportivas|calculadora poisson apuestas|calculadora poisson apuestas
deportivas|calculadora poisson para apuestas|calculadora scalping apuestas deportivas|calculadora
sistema apuestas|calculadora stake apuestas|calculadora trading apuestas|calcular apuestas|calcular apuestas deportivas|calcular apuestas futbol|calcular apuestas sistema|calcular cuotas apuestas|calcular cuotas apuestas combinadas|calcular cuotas apuestas deportivas|calcular cuotas
de apuestas|calcular ganancias apuestas deportivas|calcular
momios apuestas|calcular probabilidad cuota apuestas|calcular stake apuestas|calcular unidades apuestas|calcular yield apuestas|calculo de apuestas|calculo de
apuestas deportivas|cambio de cuotas apuestas|campeon champions apuestas|campeon eurocopa apuestas|campeon liga apuestas|campeon nba apuestas|canales de
apuestas gratis|carrera de caballos apuestas|carrera de caballos apuestas juego|carrera
de caballos con apuestas|carrera de galgos apuestas|carreras
de caballos apuestas|carreras de caballos apuestas online|carreras
de caballos con apuestas|carreras de caballos juegos
de apuestas|carreras de galgos apuestas|carreras de galgos apuestas online|carreras de galgos apuestas trucos|carreras galgos apuestas|casa apuestas
argentina|casa apuestas atletico de madrid|casa apuestas
barcelona|casa apuestas betis|casa apuestas bono bienvenida|casa apuestas
bono gratis|casa apuestas bono sin deposito|casa apuestas cerca de mi|casa apuestas chile|casa apuestas colombia|casa
apuestas con mejores cuotas|casa apuestas deportivas|casa apuestas españa|casa apuestas
española|casa apuestas eurocopa|casa apuestas futbol|casa apuestas mejores cuotas|casa
apuestas mundial|casa apuestas nueva|casa apuestas nuevas|casa apuestas online|casa apuestas peru|casa
apuestas valencia|casa de apuestas|casa de apuestas 10 euros gratis|casa de apuestas argentina|casa de apuestas atletico de madrid|casa
de apuestas baloncesto|casa de apuestas barcelona|casa de apuestas beisbol|casa de apuestas betis|casa
de apuestas bono|casa de apuestas bono bienvenida|casa de apuestas bono de bienvenida|casa
de apuestas bono gratis|casa de apuestas bono por registro|casa de apuestas bono sin deposito|casa de apuestas boxeo|casa de apuestas caballos|casa de apuestas carreras
de caballos|casa de apuestas cerca de mi|casa de apuestas
cerca de mí|casa de apuestas champions league|casa de apuestas chile|casa de apuestas ciclismo|casa de apuestas colombia|casa de apuestas con bono de bienvenida|casa de apuestas con bono sin deposito|casa de apuestas con cuotas
mas altas|casa de apuestas con esports|casa de apuestas con las mejores cuotas|casa de apuestas con licencia en españa|casa de apuestas con mejores cuotas|casa de apuestas
con pago anticipado|casa de apuestas con paypal|casa de apuestas copa america|casa de apuestas de caballos|casa de apuestas
de colombia|casa de apuestas de españa|casa de apuestas de futbol|casa de apuestas de fútbol|casa de apuestas de futbol peru|casa de
apuestas de peru|casa de apuestas del madrid|casa de apuestas
del real madrid|casa de apuestas deportivas|casa de apuestas
deportivas cerca de mi|casa de apuestas deportivas en argentina|casa
de apuestas deportivas en chile|casa de apuestas deportivas en colombia|casa de apuestas deportivas en españa|casa de apuestas deportivas en madrid|casa
de apuestas deportivas españa|casa de apuestas deportivas españolas|casa de apuestas deportivas madrid|casa de apuestas deportivas mexico|casa
de apuestas deportivas online|casa de apuestas deportivas
peru|casa de apuestas deposito 5 euros|casa de apuestas deposito
minimo|casa de apuestas deposito minimo 1 euro|casa de apuestas depósito
mínimo 1 euro|casa de apuestas en españa|casa de apuestas en linea|casa de apuestas en madrid|casa de apuestas en perú|casa de apuestas en vivo|casa
de apuestas españa|casa de apuestas españa inglaterra|casa de apuestas
española|casa de apuestas españolas|casa de apuestas esports|casa de apuestas eurocopa|casa de apuestas europa league|casa de apuestas f1|casa de apuestas formula 1|casa de apuestas futbol|casa de apuestas ingreso minimo|casa de apuestas ingreso minimo 1 euro|casa de apuestas ingreso mínimo 1 euro|casa
de apuestas legales|casa de apuestas legales en colombia|casa de apuestas legales en españa|casa de apuestas
libertadores|casa de apuestas liga española|casa de apuestas madrid|casa de apuestas mas segura|casa de apuestas mejores|casa de apuestas méxico|casa de apuestas minimo 5 euros|casa de apuestas mlb|casa de apuestas mundial|casa
de apuestas nba|casa de apuestas nfl|casa de apuestas nueva|casa
de apuestas nuevas|casa de apuestas oficial del real madrid|casa de apuestas oficial real madrid|casa de apuestas
online|casa de apuestas online argentina|casa de apuestas online chile|casa de apuestas online españa|casa de apuestas online mexico|casa de apuestas online
paraguay|casa de apuestas online peru|casa de apuestas online usa|casa de apuestas online
venezuela|casa de apuestas pago anticipado|casa de apuestas para boxeo|casa de apuestas para ufc|casa
de apuestas peru|casa de apuestas perú|casa de apuestas peru online|casa de apuestas
por paypal|casa de apuestas promociones|casa de apuestas que regalan dinero|casa de apuestas real
madrid|casa de apuestas regalo de bienvenida|casa de apuestas sevilla|casa de apuestas sin dinero|casa de apuestas sin ingreso minimo|casa
de apuestas sin licencia en españa|casa de apuestas sin minimo de ingreso|casa de apuestas stake|casa de apuestas tenis|casa de
apuestas ufc|casa de apuestas valencia|casa de apuestas venezuela|casa de apuestas
virtuales|casa de apuestas vive la suerte|casa oficial de apuestas del real
madrid|casas apuestas asiaticas|casas apuestas bono sin deposito|casas apuestas bonos sin deposito|casas apuestas caballos|casas apuestas chile|casas
apuestas ciclismo|casas apuestas con licencia|casas
apuestas con licencia en españa|casas apuestas
deportivas|casas apuestas deportivas colombia|casas apuestas
deportivas españa|casas apuestas deportivas españolas|casas apuestas
deportivas nuevas|casas apuestas españa|casas apuestas españolas|casas apuestas esports|casas apuestas eurocopa|casas apuestas golf|casas apuestas ingreso minimo 5
euros|casas apuestas legales|casas apuestas legales españa|casas apuestas licencia|casas apuestas licencia españa|casas apuestas mexico|casas apuestas mundial|casas apuestas
nba|casas apuestas nuevas|casas apuestas nuevas españa|casas apuestas ofertas|casas apuestas online|casas apuestas paypal|casas apuestas
peru|casas apuestas sin licencia|casas apuestas tenis|casas asiaticas apuestas|casas de apuestas|casas de apuestas 5 euros|casas de
apuestas app|casas de apuestas argentinas|casas de apuestas asiaticas|casas de
apuestas baloncesto|casas de apuestas barcelona|casas de apuestas bono bienvenida|casas de apuestas bono de bienvenida|casas de apuestas bono por registro|casas de
apuestas bono sin deposito|casas de apuestas bono sin ingreso|casas de apuestas bonos|casas
de apuestas bonos de bienvenida|casas de apuestas bonos
gratis|casas de apuestas bonos sin deposito|casas de apuestas boxeo|casas de apuestas
caballos|casas de apuestas carreras de caballos|casas de apuestas casino|casas de apuestas casino online|casas
de apuestas cerca de mi|casas de apuestas champions league|casas
de apuestas chile|casas de apuestas ciclismo|casas de apuestas colombia|casas de
apuestas com|casas de apuestas con app|casas de apuestas con apuestas
gratis|casas de apuestas con bono|casas de apuestas con bono de bienvenida|casas de
apuestas con bono de registro|casas de apuestas con bono por registro|casas de apuestas con bono sin deposito|casas de apuestas con bonos|casas de
apuestas con bonos gratis|casas de apuestas con bonos sin deposito|casas de
apuestas con deposito minimo|casas de apuestas con esports|casas de apuestas con handicap asiatico|casas de apuestas con licencia|casas de apuestas con licencia en españa|casas de apuestas con licencia
españa|casas de apuestas con licencia española|casas de apuestas con mejores cuotas|casas de apuestas con pago anticipado|casas de apuestas
con paypal|casas de apuestas con paypal en perú|casas de apuestas con promociones|casas de
apuestas con ruleta en vivo|casas de apuestas copa
del rey|casas de apuestas de caballos|casas de apuestas de
españa|casas de apuestas de futbol|casas de apuestas de fútbol|casas de apuestas de peru|casas de apuestas deportivas|casas de apuestas deportivas asiaticas|casas de apuestas deportivas colombia|casas
de apuestas deportivas comparativa|casas de apuestas deportivas
con paypal|casas de apuestas deportivas en chile|casas de apuestas deportivas
en españa|casas de apuestas deportivas en linea|casas de apuestas deportivas en madrid|casas
de apuestas deportivas en mexico|casas de apuestas deportivas en peru|casas de apuestas deportivas en sevilla|casas de apuestas deportivas en valencia|casas de apuestas deportivas
españa|casas de apuestas deportivas españolas|casas de apuestas
deportivas legales|casas de apuestas deportivas madrid|casas
de apuestas deportivas mexico|casas de apuestas deportivas nuevas|casas de apuestas
deportivas online|casas de apuestas deportivas peru|casas de apuestas deportivas perú|casas de apuestas deposito minimo
1 euro|casas de apuestas depósito mínimo 1 euro|casas de apuestas dinero gratis|casas de
apuestas en argentina|casas de apuestas en barcelona|casas de apuestas en chile|casas de apuestas en colombia|casas de apuestas en españa|casas de apuestas en españa online|casas de
apuestas en linea|casas de apuestas en madrid|casas de apuestas en méxico|casas de
apuestas en peru|casas de apuestas en perú|casas de apuestas en sevilla|casas de apuestas en uruguay|casas
de apuestas en valencia|casas de apuestas en venezuela|casas de
apuestas equipos de futbol|casas de apuestas españa|casas
de apuestas españa alemania|casas de apuestas
españa inglaterra|casas de apuestas españa licencia|casas
de apuestas españa nuevas|casas de apuestas españa online|casas de apuestas española|casas de
apuestas españolas|casas de apuestas españolas con licencia|casas de
apuestas españolas online|casas de apuestas esports|casas de apuestas eurocopa|casas de
apuestas eurocopa 2024|casas de apuestas europa league|casas de apuestas f1|casas de apuestas fisicas en barcelona|casas de apuestas fisicas en españa|casas de apuestas formula 1|casas de apuestas fuera de españa|casas de
apuestas futbol|casas de apuestas fútbol|casas de apuestas futbol españa|casas de apuestas ganador eurocopa|casas de apuestas gratis|casas de apuestas ingreso minimo|casas de apuestas ingreso
minimo 1 euro|casas de apuestas ingreso minimo 5 euros|casas de apuestas inter barcelona|casas de apuestas legales|casas de apuestas
legales en colombia|casas de apuestas legales en españa|casas de
apuestas legales en mexico|casas de apuestas legales españa|casas de apuestas legales
mx|casas de apuestas licencia|casas de apuestas licencia
españa|casas de apuestas lista|casas de apuestas madrid|casas de
apuestas mas seguras|casas de apuestas mejores bonos|casas
de apuestas mejores cuotas|casas de apuestas mexico|casas de apuestas méxico|casas de apuestas minimo 5 euros|casas de
apuestas mlb|casas de apuestas mundial|casas de apuestas mundial baloncesto|casas de apuestas mundiales|casas
de apuestas nba|casas de apuestas no reguladas en españa|casas de apuestas nueva ley|casas de apuestas nuevas|casas de apuestas
nuevas en colombia|casas de apuestas nuevas en españa|casas de apuestas nuevas españa|casas de apuestas ofertas|casas de
apuestas online|casas de apuestas online argentina|casas de
apuestas online colombia|casas de apuestas online deportivas|casas de apuestas online ecuador|casas de apuestas online en argentina|casas de
apuestas online en chile|casas de apuestas online en colombia|casas de apuestas online en españa|casas de apuestas online en mexico|casas de apuestas online españa|casas de apuestas online mas fiables|casas de apuestas online mexico|casas de apuestas online nuevas|casas de apuestas online peru|casas de
apuestas online usa|casas de apuestas online venezuela|casas de apuestas pago
paypal|casas de apuestas para ufc|casas de apuestas paypal|casas de apuestas peru bono sin deposito|casas de apuestas presenciales en españa|casas de
apuestas promociones|casas de
Your comment is awaiting moderation.
магаз на уровне. сегодня выходной себе решил сделать бок мять до обеда собирался, а тут звонок из курьерки! люто настроение поднялось https://www.grepmed.com/hohjtbucec https://form.jotform.com/253044389538061 https://www.brownbook.net/business/54468432/карели-купить-кокаин-мефедрон-марихуану-бошки/ https://wanderlog.com/view/gvfoikyftk/Рѕ-наксос-купить-кокаин-мефедрон-марихуану-бошки/ https://imageevent.com/alittel056/umkft https://say.la/read-blog/134676 Все получил в наилучшем виде, спасибо магазину за все, буду брать здесь всегда
Your comment is awaiting moderation.
(10 euros gratis apuestas|10 mejores casas de apuestas|10 trucos para ganar apuestas|15 euros gratis marca
apuestas|1×2 apuestas|1×2 apuestas deportivas|1×2 apuestas que significa|1×2
en apuestas|1×2 en apuestas que significa|1×2 que significa en apuestas|5 euros gratis apuestas|9 apuestas que siempre ganaras|a partir de cuanto se declara apuestas|actividades de juegos de azar y
apuestas|ad apuestas deportivas|aleksandre topuria ufc
apuestas|algoritmo para ganar apuestas deportivas|america apuestas|análisis nba apuestas|aplicacion android apuestas deportivas|aplicacion apuestas deportivas|aplicacion apuestas deportivas android|aplicación de apuestas online|aplicacion para
hacer apuestas|aplicacion para hacer apuestas de futbol|aplicación para hacer apuestas
de fútbol|aplicaciones apuestas deportivas android|aplicaciones
apuestas deportivas gratis|aplicaciones de apuestas android|aplicaciones de apuestas de fútbol|aplicaciones
de apuestas deportivas|aplicaciones de apuestas deportivas peru|aplicaciones
de apuestas deportivas perú|aplicaciones de apuestas
en colombia|aplicaciones de apuestas gratis|aplicaciones de apuestas online|aplicaciones
de apuestas seguras|aplicaciones de apuestas sin dinero|aplicaciones para hacer apuestas|apostar seguro apuestas deportivas|app android apuestas deportivas|app apuestas|app apuestas android|app apuestas de futbol|app apuestas deportivas|app apuestas deportivas android|app apuestas deportivas argentina|app apuestas deportivas colombia|app apuestas
deportivas ecuador|app apuestas deportivas españa|app apuestas deportivas gratis|app apuestas entre amigos|app apuestas futbol|app apuestas gratis|app apuestas
sin dinero|app casa de apuestas|app casas de apuestas|app control apuestas|app de apuestas|app de apuestas
android|app de apuestas casino|app de apuestas colombia|app de apuestas con bono de bienvenida|app de apuestas de futbol|app de apuestas deportivas|app
de apuestas deportivas android|app de apuestas deportivas
argentina|app de apuestas deportivas colombia|app de apuestas
deportivas en españa|app de apuestas deportivas peru|app de apuestas deportivas perú|app de apuestas deportivas sin dinero|app de apuestas ecuador|app de apuestas en colombia|app de apuestas en españa|app de apuestas en venezuela|app de
apuestas futbol|app de apuestas gratis|app de apuestas online|app de
apuestas para android|app de apuestas para ganar dinero|app de apuestas
peru|app de apuestas reales|app de casas de apuestas|app marca
apuestas android|app moviles de apuestas|app para apuestas|app para apuestas de futbol|app para apuestas deportivas|app
para apuestas deportivas en español|app para ganar
apuestas deportivas|app para hacer apuestas|app para hacer apuestas deportivas|app para hacer apuestas entre amigos|app para llevar control de apuestas|app pronosticos apuestas
deportivas|app versus apuestas|apps apuestas mundial|apps de apuestas|apps de apuestas con bono de bienvenida|apps de apuestas de futbol|apps de apuestas deportivas peru|apps de
apuestas mexico|apps para apuestas|aprender a hacer apuestas deportivas|aprender hacer apuestas
deportivas|apuesta del dia apuestas deportivas|apuestas 10 euros gratis|apuestas
100 seguras|apuestas 1×2|apuestas 1X2|apuestas 2
division|apuestas 3 division|apuestas a caballos|apuestas
a carreras de caballos|apuestas a colombia|apuestas a corners|apuestas a ganar|apuestas a jugadores nba|apuestas a la baja|apuestas a la nfl|apuestas al
barcelona|apuestas al dia|apuestas al empate|apuestas al
mundial|apuestas al tenis wta|apuestas alaves barcelona|apuestas alcaraz hoy|apuestas alemania españa|apuestas alonso campeon del mundo|apuestas
altas y bajas|apuestas altas y bajas nfl|apuestas ambos equipos marcan|apuestas america|apuestas
android|apuestas anillo nba|apuestas antes del mundial|apuestas anticipadas|apuestas anticipadas nba|apuestas apps|apuestas arabia argentina|apuestas argentina|apuestas argentina
campeon del mundo|apuestas argentina canada|apuestas argentina colombia|apuestas argentina croacia|apuestas argentina españa|apuestas argentina francia|apuestas argentina francia
cuanto paga|apuestas argentina francia mundial|apuestas argentina gana el mundial|apuestas argentina gana mundial|apuestas argentina holanda|apuestas argentina mexico|apuestas argentina
méxico|apuestas argentina mundial|apuestas argentina online|apuestas argentina paises bajos|apuestas argentina polonia|apuestas argentina uruguay|apuestas argentina
vs australia|apuestas argentina vs colombia|apuestas argentina vs francia|apuestas argentina vs peru|apuestas argentinas|apuestas arsenal real
madrid|apuestas ascenso a primera division|apuestas ascenso a
segunda|apuestas asiaticas|apuestas asiatico|apuestas athletic|apuestas athletic atletico|apuestas athletic
barça|apuestas athletic barcelona|apuestas athletic betis|apuestas athletic manchester|apuestas athletic manchester united|apuestas athletic osasuna|apuestas
athletic real|apuestas athletic real madrid|apuestas athletic real sociedad|apuestas athletic real sociedad final|apuestas athletic roma|apuestas athletic sevilla|apuestas
athletic valencia|apuestas atletico|apuestas atletico barcelona|apuestas atletico
barsa|apuestas atletico campeon champions|apuestas atletico campeon de liga|apuestas
atlético copenhague|apuestas atletico de madrid|apuestas atlético de madrid|apuestas atletico de madrid barcelona|apuestas atletico de madrid gana la liga|apuestas atletico de madrid real madrid|apuestas
atlético de madrid real madrid|apuestas atletico de madrid vs barcelona|apuestas
atletico madrid|apuestas atletico madrid real madrid|apuestas
atletico madrid vs barcelona|apuestas atletico real madrid|apuestas atletico real madrid champions|apuestas atletismo|apuestas bajas|apuestas baloncesto|apuestas baloncesto acb|apuestas baloncesto
handicap|apuestas baloncesto hoy|apuestas baloncesto juegos olimpicos|apuestas baloncesto nba|apuestas baloncesto pronostico|apuestas baloncesto
pronósticos|apuestas baloncesto prorroga|apuestas barca|apuestas barca athletic|apuestas barca atletico|apuestas barca bayern|apuestas barca bayern munich|apuestas barca
girona|apuestas barca hoy|apuestas barça hoy|apuestas barca inter|apuestas barca juventus|apuestas barca madrid|apuestas barça
madrid|apuestas barca real madrid|apuestas barca vs juve|apuestas
barca vs madrid|apuestas barca vs psg|apuestas barcelona|apuestas barcelona alaves|apuestas
barcelona athletic|apuestas barcelona atletico|apuestas
barcelona atletico de madrid|apuestas barcelona atlético de
madrid|apuestas barcelona atletico madrid|apuestas barcelona bayern|apuestas
barcelona betis|apuestas barcelona campeon de liga|apuestas barcelona celta|apuestas barcelona espanyol|apuestas barcelona
gana la champions|apuestas barcelona girona|apuestas barcelona granada|apuestas barcelona hoy|apuestas barcelona inter|apuestas
barcelona madrid|apuestas barcelona osasuna|apuestas barcelona psg|apuestas barcelona real madrid|apuestas barcelona real sociedad|apuestas barcelona sevilla|apuestas barcelona valencia|apuestas barcelona villarreal|apuestas barcelona vs
atletico madrid|apuestas barcelona vs madrid|apuestas barcelona vs real
madrid|apuestas barsa madrid|apuestas basket hoy|apuestas bayern barcelona|apuestas bayern vs barcelona|apuestas beisbol|apuestas béisbol|apuestas beisbol mlb|apuestas beisbol pronosticos|apuestas beisbol venezolano|apuestas betis|apuestas betis – chelsea|apuestas
betis barcelona|apuestas betis chelsea|apuestas betis fiorentina|apuestas betis girona|apuestas betis madrid|apuestas betis mallorca|apuestas betis real madrid|apuestas betis real sociedad|apuestas betis
sevilla|apuestas betis valencia|apuestas betis valladolid|apuestas
betis vs valencia|apuestas betplay hoy colombia|apuestas betsson peru|apuestas bienvenida|apuestas
billar online|apuestas bolivia vs colombia|apuestas bono|apuestas
bono bienvenida|apuestas bono de bienvenida|apuestas bono de bienvenida sin deposito|apuestas bono gratis|apuestas
bono sin deposito|apuestas bonos sin deposito|apuestas borussia real madrid|apuestas boxeo|apuestas boxeo de campeonato|apuestas boxeo españa|apuestas boxeo español|apuestas boxeo femenino olimpiadas|apuestas
boxeo hoy|apuestas boxeo online|apuestas brasil colombia|apuestas brasil peru|apuestas brasil
uruguay|apuestas brasil vs colombia|apuestas brasil
vs peru|apuestas caballos|apuestas caballos colocado|apuestas
caballos españa|apuestas caballos hipodromo|apuestas caballos hoy|apuestas
caballos madrid|apuestas caballos online|apuestas caballos sanlucar de
barrameda|apuestas caballos zarzuela|apuestas calculador|apuestas campeon|apuestas campeon champions|apuestas
campeón champions|apuestas campeon champions 2025|apuestas campeon champions league|apuestas campeon conference league|apuestas
campeon copa america|apuestas campeon copa del rey|apuestas campeon de champions|apuestas campeon de
la champions|apuestas campeon de liga|apuestas campeon del mundo|apuestas campeon eurocopa|apuestas campeón eurocopa|apuestas campeon europa league|apuestas campeon f1|apuestas campeon f1 2025|apuestas campeon formula
1|apuestas campeon libertadores|apuestas campeon liga|apuestas
campeon liga bbva|apuestas campeon liga española|apuestas
campeon liga santander|apuestas campeon motogp 2025|apuestas
campeon mundial|apuestas campeón mundial|apuestas campeon mundial
baloncesto|apuestas campeon nba|apuestas campeón nba|apuestas campeon premier|apuestas campeon premier league|apuestas campeon roland garros|apuestas campeonato f1|apuestas campeonatos de futbol|apuestas carrera
de caballos|apuestas carrera de caballos hoy|apuestas carrera de caballos nocturnas|apuestas carrera de galgos fin de semana|apuestas carrera de galgos hoy|apuestas carrera de galgos nocturnas|apuestas carreras
caballos|apuestas carreras caballos sanlucar|apuestas carreras de caballos|apuestas carreras de
caballos en directo|apuestas carreras de caballos en vivo|apuestas carreras de caballos españa|apuestas carreras de caballos hoy|apuestas carreras de caballos nacionales|apuestas carreras de caballos nocturnas|apuestas carreras de
caballos online|apuestas carreras de caballos sanlucar|apuestas carreras de caballos sanlúcar|apuestas carreras de galgos|apuestas carreras de galgos en vivo|apuestas carreras
de galgos nocturnas|apuestas carreras de galgos pre partido|apuestas casino|apuestas casino
barcelona|apuestas casino futbol|apuestas casino gran madrid|apuestas casino gratis|apuestas casino madrid|apuestas casino online|apuestas
casino online argentina|apuestas casinos|apuestas casinos online|apuestas
celta|apuestas celta barcelona|apuestas celta betis|apuestas celta eibar|apuestas
celta espanyol|apuestas celta granada|apuestas celta madrid|apuestas celta manchester|apuestas celta real madrid|apuestas
champion league|apuestas champions foro|apuestas champions
hoy|apuestas champions league|apuestas champions league – pronósticos|apuestas champions league 2025|apuestas champions league hoy|apuestas champions league pronosticos|apuestas champions league
pronósticos|apuestas champions pronosticos|apuestas chelsea
barcelona|apuestas chelsea betis|apuestas chile|apuestas chile peru|apuestas chile venezuela|apuestas chile vs colombia|apuestas chile vs uruguay|apuestas ciclismo|apuestas ciclismo en vivo|apuestas ciclismo femenino|apuestas ciclismo tour francia|apuestas
ciclismo vuelta|apuestas ciclismo vuelta a españa|apuestas ciclismo vuelta
españa|apuestas city madrid|apuestas city real madrid|apuestas clasico|apuestas clasico español|apuestas
clasico real madrid barcelona|apuestas clasificacion mundial|apuestas colombia|apuestas colombia argentina|apuestas
colombia brasil|apuestas colombia paraguay|apuestas colombia uruguay|apuestas colombia vs argentina|apuestas colombia vs brasil|apuestas combinadas|apuestas
combinadas como funcionan|apuestas combinadas de futbol|apuestas combinadas de fútbol|apuestas combinadas foro|apuestas combinadas futbol|apuestas combinadas hoy|apuestas combinadas mismo partido|apuestas combinadas mundial|apuestas combinadas
nba|apuestas combinadas para esta semana|apuestas combinadas para hoy|apuestas combinadas para mañana|apuestas combinadas pronosticos|apuestas combinadas recomendadas|apuestas combinadas seguras|apuestas combinadas seguras para hoy|apuestas combinadas seguras para mañana|apuestas como ganar|apuestas comparador|apuestas con bono de bienvenida|apuestas con dinero ficticio|apuestas con dinero real|apuestas con dinero
virtual|apuestas con handicap|apuestas con handicap asiatico|apuestas con handicap baloncesto|apuestas con mas probabilidades de ganar|apuestas con paypal|apuestas con tarjeta de
credito|apuestas con tarjeta de debito|apuestas consejos|apuestas copa|apuestas
copa africa|apuestas copa america|apuestas copa américa|apuestas copa argentina|apuestas copa brasil|apuestas copa
davis|apuestas copa de europa|apuestas copa del mundo|apuestas copa del rey|apuestas copa del rey baloncesto|apuestas copa del rey final|apuestas copa del rey futbol|apuestas copa del
rey ganador|apuestas copa del rey hoy|apuestas
copa del rey pronosticos|apuestas copa del rey
pronósticos|apuestas copa europa|apuestas copa italia|apuestas copa libertadores|apuestas copa
mundial de hockey|apuestas copa rey|apuestas copa sudamericana|apuestas corners|apuestas corners hoy|apuestas croacia argentina|apuestas cuartos eurocopa|apuestas cuotas|apuestas cuotas altas|apuestas cuotas bajas|apuestas de 1 euro|apuestas de baloncesto|apuestas
de baloncesto hoy|apuestas de baloncesto nba|apuestas
de baloncesto para hoy|apuestas de beisbol|apuestas de beisbol para hoy|apuestas de blackjack en linea|apuestas de boxeo|apuestas de boxeo canelo|apuestas de boxeo en las vegas|apuestas de boxeo hoy|apuestas de
boxeo online|apuestas de caballo|apuestas de caballos|apuestas
de caballos como funciona|apuestas de caballos como se juega|apuestas de caballos en colombia|apuestas de caballos en españa|apuestas de caballos en linea|apuestas de caballos españa|apuestas
de caballos ganador y colocado|apuestas de caballos internacionales|apuestas de caballos juegos|apuestas de caballos online|apuestas
de caballos online en venezuela|apuestas de caballos por internet|apuestas de
caballos pronosticos|apuestas de caballos pronósticos|apuestas de carrera de caballos|apuestas de
carreras de caballos|apuestas de carreras de caballos online|apuestas de casino|apuestas de casino online|apuestas
de casino por internet|apuestas de champions league|apuestas de ciclismo|apuestas
de colombia|apuestas de copa america|apuestas de corners|apuestas de deportes en linea|apuestas de deportes online|apuestas de dinero|apuestas
de esports|apuestas de eurocopa|apuestas de europa league|apuestas de f1|apuestas de formula 1|apuestas de futbol|apuestas de fútbol|apuestas de futbol app|apuestas de futbol argentina|apuestas de futbol colombia|apuestas de futbol en colombia|apuestas de futbol en directo|apuestas de futbol en linea|apuestas de futbol en vivo|apuestas de futbol español|apuestas de futbol gratis|apuestas de futbol hoy|apuestas de futbol mundial|apuestas de futbol online|apuestas de fútbol online|apuestas de
futbol para hoy|apuestas de fútbol para hoy|apuestas de futbol para hoy seguras|apuestas
de futbol para mañana|apuestas de futbol peru|apuestas
de futbol pronosticos|apuestas de fútbol pronósticos|apuestas de futbol seguras|apuestas de futbol seguras para hoy|apuestas de futbol sin dinero|apuestas de galgos|apuestas de galgos como ganar|apuestas de galgos en directo|apuestas de galgos online|apuestas de
galgos trucos|apuestas de golf|apuestas de hockey|apuestas de
hockey sobre hielo|apuestas de hoy|apuestas de hoy
seguras|apuestas de juego|apuestas de juegos|apuestas de juegos deportivos|apuestas de juegos online|apuestas de la champions league|apuestas de la copa
américa|apuestas de la eurocopa|apuestas de la europa league|apuestas de
la liga|apuestas de la liga bbva|apuestas de la liga española|apuestas
de la nba|apuestas de la nfl|apuestas de la ufc|apuestas de mlb|apuestas de
nba|apuestas de nba para hoy|apuestas de partidos|apuestas de partidos de futbol|apuestas de peleas ufc|apuestas de perros en vivo|apuestas de perros
virtuales|apuestas de peru|apuestas de sistema|apuestas de sistema
como funciona|apuestas de sistema explicacion|apuestas
de sistema explicación|apuestas de tenis|apuestas de tenis de mesa|apuestas de tenis en directo|apuestas de tenis hoy|apuestas de tenis
para hoy|apuestas de tenis pronosticos|apuestas de tenis seguras|apuestas de todo
tipo|apuestas de ufc|apuestas de ufc hoy|apuestas del boxeo|apuestas del
clasico|apuestas del clasico real madrid barca|apuestas del
dia|apuestas del día|apuestas del dia de hoy|apuestas del dia
deportivas|apuestas del dia futbol|apuestas del mundial|apuestas del partido de hoy|apuestas
del real madrid|apuestas del rey|apuestas del
sistema|apuestas deporte|apuestas deportes|apuestas deportiva|apuestas deportivas|apuestas deportivas 1 euro|apuestas deportivas 10 euros gratis|apuestas deportivas
100 seguras|apuestas deportivas 1×2|apuestas deportivas android|apuestas deportivas app|apuestas deportivas
apps|apuestas deportivas argentina|apuestas deportivas argentina futbol|apuestas
deportivas argentina legal|apuestas deportivas atletico de
madrid|apuestas deportivas baloncesto|apuestas deportivas barca madrid|apuestas deportivas
barcelona|apuestas deportivas beisbol|apuestas deportivas bono|apuestas deportivas bono bienvenida|apuestas deportivas bono de bienvenida|apuestas deportivas bono
sin deposito|apuestas deportivas bonos de bienvenida|apuestas deportivas boxeo|apuestas
deportivas caballos|apuestas deportivas calculadora|apuestas
deportivas campeon liga|apuestas deportivas casino|apuestas deportivas casino barcelona|apuestas deportivas casino online|apuestas deportivas cerca
de mi|apuestas deportivas champions league|apuestas deportivas chile|apuestas
deportivas ciclismo|apuestas deportivas colombia|apuestas deportivas com|apuestas
deportivas com foro|apuestas deportivas com pronosticos|apuestas
deportivas combinadas|apuestas deportivas combinadas para hoy|apuestas deportivas
como se juega|apuestas deportivas comparador|apuestas deportivas con bono gratis|apuestas deportivas con bonos gratis|apuestas deportivas con dinero
ficticio|apuestas deportivas con paypal|apuestas deportivas con puntos virtuales|apuestas deportivas
consejos|apuestas deportivas consejos para ganar|apuestas deportivas copa america|apuestas deportivas copa
del rey|apuestas deportivas copa libertadores|apuestas deportivas copa mundial|apuestas deportivas corners|apuestas deportivas cual es la mejor|apuestas deportivas cuotas altas|apuestas deportivas de baloncesto|apuestas deportivas de boxeo|apuestas deportivas de colombia|apuestas
deportivas de futbol|apuestas deportivas de nba|apuestas deportivas de nhl|apuestas deportivas
de peru|apuestas deportivas de tenis|apuestas deportivas del
dia|apuestas deportivas dinero ficticio|apuestas deportivas directo|apuestas deportivas doble oportunidad|apuestas
deportivas en argentina|apuestas deportivas en chile|apuestas deportivas en colombia|apuestas
deportivas en directo|apuestas deportivas en españa|apuestas deportivas en español|apuestas deportivas en linea|apuestas deportivas en línea|apuestas deportivas en peru|apuestas
deportivas en perú|apuestas deportivas en sevilla|apuestas deportivas
en uruguay|apuestas deportivas en vivo|apuestas deportivas es|apuestas deportivas
es pronosticos|apuestas deportivas españa|apuestas deportivas españolas|apuestas deportivas esports|apuestas deportivas
estadisticas|apuestas deportivas estrategias|apuestas deportivas estrategias seguras|apuestas
deportivas eurocopa|apuestas deportivas europa
league|apuestas deportivas f1|apuestas deportivas faciles de ganar|apuestas deportivas formula 1|apuestas deportivas foro|apuestas
deportivas foro futbol|apuestas deportivas foro tenis|apuestas deportivas francia argentina|apuestas deportivas futbol|apuestas deportivas
fútbol|apuestas deportivas futbol argentino|apuestas deportivas
futbol colombia|apuestas deportivas futbol español|apuestas
deportivas gana|apuestas deportivas ganadas|apuestas deportivas ganar dinero seguro|apuestas deportivas gane|apuestas
deportivas golf|apuestas deportivas gratis|apuestas deportivas gratis con premios|apuestas deportivas gratis hoy|apuestas deportivas
gratis sin deposito|apuestas deportivas handicap|apuestas deportivas handicap asiatico|apuestas deportivas hoy|apuestas deportivas impuestos|apuestas
deportivas interior argentina|apuestas deportivas juegos olimpicos|apuestas deportivas la liga|apuestas deportivas legales|apuestas deportivas
legales en colombia|apuestas deportivas libres de impuestos|apuestas deportivas
licencia españa|apuestas deportivas liga española|apuestas
deportivas listado|apuestas deportivas listado clasico|apuestas deportivas madrid|apuestas deportivas mas seguras|apuestas deportivas
mejor pagadas|apuestas deportivas mejores|apuestas deportivas mejores app|apuestas deportivas mejores casas|apuestas deportivas mejores cuotas|apuestas
deportivas mejores paginas|apuestas deportivas mexico|apuestas deportivas méxico|apuestas deportivas mlb|apuestas deportivas mlb
hoy|apuestas deportivas multiples|apuestas deportivas mundial|apuestas deportivas murcia|apuestas deportivas nba|apuestas deportivas nba hoy|apuestas deportivas nfl|apuestas deportivas nhl|apuestas
deportivas nuevas|apuestas deportivas ofertas|apuestas deportivas online|apuestas deportivas online
argentina|apuestas deportivas online chile|apuestas deportivas online colombia|apuestas deportivas
online en colombia|apuestas deportivas online españa|apuestas deportivas
online mexico|apuestas deportivas online paypal|apuestas deportivas online peru|apuestas deportivas online por internet|apuestas deportivas pago paypal|apuestas deportivas
para ganar dinero|apuestas deportivas para hoy|apuestas deportivas para hoy pronosticos|apuestas
deportivas partido suspendido|apuestas deportivas partidos de hoy|apuestas deportivas
paypal|apuestas deportivas peru|apuestas deportivas perú|apuestas deportivas peru vs ecuador|apuestas deportivas predicciones|apuestas
deportivas promociones|apuestas deportivas pronostico|apuestas deportivas pronóstico|apuestas deportivas pronostico hoy|apuestas deportivas pronosticos|apuestas deportivas pronósticos|apuestas deportivas
pronosticos expertos|apuestas deportivas pronosticos gratis|apuestas deportivas
pronosticos nba|apuestas deportivas pronosticos tenis|apuestas deportivas que aceptan paypal|apuestas deportivas real madrid|apuestas deportivas regalo bienvenida|apuestas deportivas resultado
exacto|apuestas deportivas resultados|apuestas deportivas rugby|apuestas deportivas seguras|apuestas deportivas seguras foro|apuestas deportivas seguras
hoy|apuestas deportivas seguras para hoy|apuestas deportivas seguras telegram|apuestas deportivas sevilla|apuestas deportivas simulador eurocopa|apuestas deportivas sin deposito|apuestas
deportivas sin deposito inicial|apuestas deportivas sin dinero|apuestas
deportivas sin dinero real|apuestas deportivas sin registro|apuestas deportivas
stake|apuestas deportivas stake 10|apuestas deportivas telegram españa|apuestas deportivas tenis|apuestas deportivas tenis de mesa|apuestas deportivas tenis foro|apuestas deportivas tenis hoy|apuestas deportivas tips|apuestas deportivas
tipster|apuestas deportivas ufc|apuestas deportivas uruguay|apuestas deportivas valencia|apuestas
deportivas valencia barcelona|apuestas deportivas venezuela|apuestas deportivas virtuales|apuestas deportivas y casino|apuestas deportivas y casino online|apuestas deportivas.com|apuestas deportivas.com foro|apuestas deportivas.es|apuestas deportivos pronosticos|apuestas deposito minimo 1 euro|apuestas descenso
a segunda|apuestas descenso a segunda b|apuestas descenso
la liga|apuestas descenso primera division|apuestas descenso segunda|apuestas dia|apuestas diarias
seguras|apuestas dinero|apuestas dinero ficticio|apuestas dinero real|apuestas dinero virtual|apuestas directas|apuestas directo|apuestas directo futbol|apuestas division de honor
juvenil|apuestas dnb|apuestas doble oportunidad|apuestas doble resultado|apuestas dobles|apuestas dobles y triples|apuestas dortmund barcelona|apuestas
draft nba|apuestas draft nfl|apuestas ecuador vs argentina|apuestas
ecuador vs venezuela|apuestas egipto uruguay|apuestas el clasico|apuestas elecciones venezuela|apuestas
empate|apuestas en baloncesto|apuestas en barcelona|apuestas en beisbol|apuestas en boxeo|apuestas en caballos|apuestas en carreras de
caballos|apuestas en casino|apuestas en casino online|apuestas en casinos|apuestas en casinos online|apuestas en chile|apuestas en ciclismo|apuestas en colombia|apuestas en colombia de futbol|apuestas en directo|apuestas en directo
futbol|apuestas en directo pronosticos|apuestas en el futbol|apuestas en el tenis|apuestas
en españa|apuestas en esports|apuestas en eventos deportivos virtuales|apuestas en golf|apuestas en juegos|apuestas
en la champions league|apuestas en la eurocopa|apuestas en la liga|apuestas en la
nba|apuestas en la nfl|apuestas en las vegas mlb|apuestas en las vegas nfl|apuestas en linea|apuestas en línea|apuestas en linea argentina|apuestas en linea boxeo|apuestas en linea chile|apuestas en linea colombia|apuestas
en línea de fútbol|apuestas en linea deportivas|apuestas en linea
españa|apuestas en linea estados unidos|apuestas
en linea futbol|apuestas en linea mexico|apuestas en línea méxico|apuestas en linea
mundial|apuestas en linea peru|apuestas en linea usa|apuestas en los esports|apuestas en madrid|apuestas en méxico|apuestas en mexico online|apuestas en nba|apuestas en partidos de futbol|apuestas en partidos de futbol en vivo|apuestas en partidos de tenis en directo|apuestas en perú|apuestas en sevilla|apuestas
en sistema|apuestas en stake|apuestas en tenis|apuestas en tenis de mesa|apuestas en valencia|apuestas
en vivo|apuestas en vivo argentina|apuestas en vivo casino|apuestas en vivo futbol|apuestas
en vivo fútbol|apuestas en vivo nba|apuestas en vivo peru|apuestas en vivo tenis|apuestas en vivo ufc|apuestas equipo mbappe|apuestas equipos
de futbol|apuestas españa|apuestas españa alemania|apuestas
españa alemania eurocopa|apuestas españa croacia|apuestas españa
eurocopa|apuestas españa francia|apuestas españa francia eurocopa|apuestas
españa gana el mundial|apuestas españa gana eurocopa|apuestas españa gana mundial|apuestas españa
georgia|apuestas españa holanda|apuestas españa inglaterra|apuestas españa inglaterra cuotas|apuestas españa
inglaterra eurocopa|apuestas españa italia|apuestas españa mundial|apuestas españa
paises bajos|apuestas español|apuestas español oviedo|apuestas espanyol barcelona|apuestas espanyol
betis|apuestas espanyol villarreal|apuestas esport|apuestas esports|apuestas esports
colombia|apuestas esports españa|apuestas esports fifa|apuestas esports gratis|apuestas esports lol|apuestas esports peru|apuestas esports valorant|apuestas estadisticas|apuestas estrategias|apuestas euro|apuestas euro
copa|apuestas eurocopa|apuestas eurocopa campeon|apuestas eurocopa españa|apuestas eurocopa favoritos|apuestas eurocopa femenina|apuestas eurocopa final|apuestas eurocopa ganador|apuestas eurocopa hoy|apuestas eurocopa sub 21|apuestas
euroliga baloncesto|apuestas euroliga pronosticos|apuestas europa league|apuestas europa league hoy|apuestas europa league pronosticos|apuestas
europa league pronósticos|apuestas euros|apuestas f1 abu dhabi|apuestas f1 bahrein|apuestas f1 canada|apuestas f1 china|apuestas f1 cuotas|apuestas f1 hoy|apuestas f1
las vegas|apuestas f1 miami|apuestas f1 monaco|apuestas faciles de
ganar|apuestas fáciles de ganar|apuestas faciles para ganar|apuestas favoritas|apuestas favorito champions|apuestas favoritos champions|apuestas favoritos eurocopa|apuestas favoritos mundial|apuestas fc barcelona|apuestas final champions
cuotas|apuestas final champions league|apuestas final champions peru|apuestas
final copa|apuestas final copa america|apuestas final copa de europa|apuestas
final copa del rey|apuestas final copa europa|apuestas final copa libertadores|apuestas final
copa rey|apuestas final de copa|apuestas final de copa del rey|apuestas final del mundial|apuestas
final euro|apuestas final eurocopa|apuestas final europa league|apuestas final
libertadores|apuestas final mundial|apuestas final nba|apuestas final
rugby|apuestas final uefa europa league|apuestas final.mundial|apuestas finales de
conferencia nfl|apuestas finales nba|apuestas fiorentina betis|apuestas formula|apuestas formula 1|apuestas fórmula 1|apuestas fórmula 1 pronósticos|apuestas formula uno|apuestas
foro|apuestas foro nba|apuestas francia argentina|apuestas francia
españa|apuestas futbol|apuestas fútbol|apuestas futbol americano|apuestas futbol americano nfl|apuestas futbol argentina|apuestas futbol argentino|apuestas futbol champions league|apuestas futbol chile|apuestas futbol colombia|apuestas futbol consejos|apuestas
futbol en directo|apuestas fútbol en directo|apuestas
futbol en vivo|apuestas fútbol en vivo|apuestas futbol españa|apuestas futbol español|apuestas fútbol español|apuestas
futbol eurocopa|apuestas futbol femenino|apuestas futbol foro|apuestas futbol gratis|apuestas futbol hoy|apuestas fútbol hoy|apuestas futbol juegos olimpicos|apuestas futbol mexico|apuestas futbol mundial|apuestas futbol online|apuestas futbol
para hoy|apuestas futbol peru|apuestas futbol pronosticos|apuestas
futbol sala|apuestas futbol telegram|apuestas futbol virtual|apuestas galgos|apuestas galgos
en directo|apuestas galgos hoy|apuestas galgos online|apuestas galgos pronosticos|apuestas galgos trucos|apuestas gana|apuestas gana colombia|apuestas
gana resultados|apuestas ganadas|apuestas ganadas hoy|apuestas ganador
champions league|apuestas ganador copa america|apuestas ganador copa del rey|apuestas ganador
copa del rey baloncesto|apuestas ganador copa libertadores|apuestas ganador de la eurocopa|apuestas ganador de la liga|apuestas ganador del mundial|apuestas ganador
eurocopa|apuestas ganador europa league|apuestas ganador f1|apuestas ganador la liga|apuestas ganador liga
española|apuestas ganador mundial|apuestas ganador mundial baloncesto|apuestas
ganador mundial f1|apuestas ganador nba|apuestas ganadores eurocopa|apuestas
ganadores mundial|apuestas ganar champions|apuestas ganar eurocopa|apuestas ganar liga|apuestas ganar mundial|apuestas ganar nba|apuestas getafe valencia|apuestas ghana uruguay|apuestas girona|apuestas girona athletic|apuestas
girona betis|apuestas girona campeon de liga|apuestas girona campeon liga|apuestas girona gana la liga|apuestas
girona real madrid|apuestas girona real sociedad|apuestas
goleador eurocopa|apuestas goleadores eurocopa|apuestas goles asiaticos|apuestas golf|apuestas golf
masters|apuestas golf pga|apuestas granada barcelona|apuestas grand slam de tenis|apuestas gratis|apuestas gratis
casino|apuestas gratis con premios|apuestas gratis hoy|apuestas
gratis para hoy|apuestas gratis por registro|apuestas
gratis puntos|apuestas gratis regalos|apuestas gratis sin deposito|apuestas gratis sin depósito|apuestas gratis sin ingreso|apuestas gratis sports|apuestas gratis y ganar
premios|apuestas grupo a eurocopa|apuestas grupos eurocopa|apuestas handicap|apuestas handicap asiatico|apuestas handicap baloncesto|apuestas handicap como funciona|apuestas handicap nba|apuestas
handicap nfl|apuestas hipicas online|apuestas hípicas online|apuestas hipicas venezuela|apuestas hockey|apuestas hockey hielo|apuestas hockey patines|apuestas hockey sobre hielo|apuestas
holanda argentina|apuestas holanda vs argentina|apuestas
hoy|apuestas hoy champions|apuestas hoy futbol|apuestas hoy nba|apuestas hoy pronosticos|apuestas hoy seguras|apuestas impuestos|apuestas inglaterra paises
bajos|apuestas inter barca|apuestas inter barcelona|apuestas juego|apuestas juegos|apuestas juegos en linea|apuestas juegos olimpicos|apuestas juegos olímpicos|apuestas juegos olimpicos baloncesto|apuestas juegos online|apuestas juegos virtuales|apuestas jugador sevilla|apuestas jugadores nba|apuestas kings league americas|apuestas la liga|apuestas la liga española|apuestas la liga hoy|apuestas la liga santander|apuestas las vegas mlb|apuestas las vegas nba|apuestas las vegas
nfl|apuestas league of legends mundial|apuestas
legal|apuestas legales|apuestas legales en colombia|apuestas legales en españa|apuestas legales en estados unidos|apuestas legales españa|apuestas leganes betis|apuestas libertadores|apuestas licencia|apuestas
liga 1 peru|apuestas liga argentina|apuestas liga
bbva pronosticos|apuestas liga de campeones|apuestas liga de campeones de baloncesto|apuestas liga de campeones de hockey|apuestas liga españa|apuestas liga española|apuestas
liga santander pronosticos|apuestas ligas de futbol|apuestas linea|apuestas linea de gol|apuestas liverpool barcelona|apuestas liverpool real madrid|apuestas lol mundial|apuestas madrid|apuestas madrid arsenal|apuestas madrid atletico|apuestas madrid atletico
champions|apuestas madrid barca|apuestas madrid barça|apuestas madrid barca hoy|apuestas madrid barca supercopa|apuestas
madrid barcelona|apuestas madrid barsa|apuestas madrid
bayern|apuestas madrid betis|apuestas madrid borussia|apuestas madrid campeon champions|apuestas madrid celta|apuestas madrid city|apuestas madrid dortmund|apuestas madrid gana la liga|apuestas madrid gana liga|apuestas madrid hoy|apuestas madrid liverpool|apuestas madrid osasuna|apuestas madrid sevilla|apuestas madrid valencia|apuestas madrid vs arsenal|apuestas madrid vs barcelona|apuestas mallorca osasuna|apuestas mallorca real
sociedad|apuestas manchester athletic|apuestas manchester city real madrid|apuestas
mas faciles de ganar|apuestas mas seguras|apuestas mas seguras para hoy|apuestas masters de golf|apuestas masters de tenis|apuestas maximo goleador eurocopa|apuestas maximo goleador mundial|apuestas mejor jugador eurocopa|apuestas mejores casinos online|apuestas mexico|apuestas méxico|apuestas
mexico polonia|apuestas méxico polonia|apuestas mlb|apuestas mlb hoy|apuestas mlb las vegas|apuestas mlb para hoy|apuestas mlb pronosticos|apuestas mlb usa|apuestas mma ufc|apuestas momios|apuestas multiples|apuestas múltiples|apuestas multiples como funcionan|apuestas multiples el gordo|apuestas multiples futbol|apuestas mundial|apuestas mundial 2026|apuestas mundial baloncesto|apuestas mundial balonmano|apuestas mundial brasil|apuestas mundial campeon|apuestas mundial ciclismo|apuestas mundial clubes|apuestas
mundial de baloncesto|apuestas mundial de ciclismo|apuestas mundial de clubes|apuestas mundial de futbol|apuestas mundial de fútbol|apuestas mundial de rugby|apuestas mundial f1|apuestas mundial favoritos|apuestas mundial femenino|apuestas mundial formula 1|apuestas mundial futbol|apuestas mundial ganador|apuestas mundial lol|apuestas mundial moto gp|apuestas mundial motogp|apuestas mundial
rugby|apuestas mundial sub 17|apuestas mundiales|apuestas
mundialistas|apuestas mvp eurocopa|apuestas mvp nba|apuestas mvp nfl|apuestas nacionales de colombia|apuestas nba|apuestas nba all star|apuestas nba
campeon|apuestas nba consejos|apuestas nba esta noche|apuestas nba finals|apuestas nba gratis|apuestas nba
hoy|apuestas nba hoy jugadores|apuestas nba hoy pronosticos|apuestas nba para hoy|apuestas nba playoffs|apuestas nba pronosticos|apuestas nba pronósticos|apuestas
nba pronosticos hoy|apuestas nba tipster|apuestas nfl|apuestas nfl
hoy|apuestas nfl las vegas|apuestas nfl playoffs|apuestas nfl pronosticos|apuestas nfl pronósticos|apuestas nfl semana 4|apuestas nfl super
bowl|apuestas nhl|apuestas nhl pronosticos|apuestas octavos eurocopa|apuestas ofertas|apuestas
online|apuestas online argentina|apuestas online argentina legal|apuestas online bono|apuestas online
bono bienvenida|apuestas online boxeo|apuestas online caballos|apuestas online
carreras de caballos|apuestas online casino|apuestas online champions league|apuestas online chile|apuestas online ciclismo|apuestas
online colombia|apuestas online comparativa|apuestas online con paypal|apuestas online de
caballos|apuestas online deportivas|apuestas online en argentina|apuestas online en peru|apuestas online espana|apuestas
online españa|apuestas online esports|apuestas online foro|apuestas online
futbol|apuestas online futbol españa|apuestas online golf|apuestas
online gratis|apuestas online gratis sin deposito|apuestas online juegos|apuestas online mexico|apuestas online mma|apuestas online movil|apuestas online nba|apuestas online
net|apuestas online nuevas|apuestas online opiniones|apuestas online paypal|apuestas online peru|apuestas online
seguras|apuestas online sin dinero|apuestas online sin registro|apuestas online tenis|apuestas online ufc|apuestas online uruguay|apuestas online venezuela|apuestas
open britanico golf|apuestas osasuna athletic|apuestas osasuna barcelona|apuestas osasuna
real madrid|apuestas osasuna sevilla|apuestas
osasuna valencia|apuestas over|apuestas over 2.5|apuestas over under|apuestas
paginas|apuestas pago anticipado|apuestas paises bajos
ecuador|apuestas paises bajos inglaterra|apuestas países bajos qatar|apuestas para boxeo|apuestas para champions league|apuestas para el clasico|apuestas para el dia de
hoy|apuestas para el mundial|apuestas para el partido de hoy|apuestas para eurocopa|apuestas para europa league|apuestas
para futbol|apuestas para ganar|apuestas para ganar dinero|apuestas
para ganar dinero facil|apuestas para ganar en la
ruleta|apuestas para ganar la champions|apuestas para
ganar la eurocopa|apuestas para ganar la europa
league|apuestas para ganar la liga|apuestas para ganar siempre|apuestas para hacer|apuestas para hoy|apuestas para hoy de futbol|apuestas para hoy europa league|apuestas para hoy futbol|apuestas para juegos|apuestas para la champions league|apuestas para la
copa del rey|apuestas para la eurocopa|apuestas para la europa league|apuestas
para la final de la eurocopa|apuestas para la nba
hoy|apuestas para los partidos de hoy|apuestas para partidos de hoy|apuestas para ufc|apuestas partido|apuestas partido aplazado|apuestas partido champions|apuestas
partido colombia|apuestas partido españa marruecos|apuestas
partido mundial|apuestas partido suspendido|apuestas partidos|apuestas partidos champions league|apuestas partidos csgo|apuestas partidos de
futbol|apuestas partidos de futbol hoy|apuestas partidos de hoy|apuestas partidos eurocopa|apuestas partidos futbol|apuestas partidos hoy|apuestas partidos mundial|apuestas paypal|apuestas peleas
de boxeo|apuestas peru|apuestas perú|apuestas peru brasil|apuestas peru
chile|apuestas peru paraguay|apuestas peru uruguay|apuestas peru vs chile|apuestas peru
vs colombia|apuestas pichichi eurocopa|apuestas plataforma|apuestas playoff|apuestas playoff
ascenso|apuestas playoff ascenso a primera|apuestas playoff nba|apuestas playoff segunda|apuestas playoff segunda b|apuestas playoffs nba|apuestas playoffs nfl|apuestas polonia argentina|apuestas por argentina|apuestas
por internet mexico|apuestas por internet para ganar dinero|apuestas
por paypal|apuestas por ronda boxeo|apuestas por sistema|apuestas portugal
uruguay|apuestas pre partido|apuestas predicciones|apuestas predicciones
futbol|apuestas primera division|apuestas primera division españa|apuestas promociones|apuestas pronostico|apuestas
pronosticos|apuestas pronosticos deportivos|apuestas pronosticos deportivos tenis|apuestas pronosticos futbol|apuestas pronosticos gratis|apuestas
pronosticos nba|apuestas pronosticos tenis|apuestas prorroga|apuestas
psg barca|apuestas psg barcelona|apuestas puntos por tarjetas|apuestas puntos tarjetas|apuestas que aceptan paypal|apuestas
que es handicap|apuestas que puedes hacer con tu novia|apuestas que siempre ganaras|apuestas
que significa|apuestas quien bajara a segunda|apuestas quién bajara a segunda|apuestas quien gana el mundial|apuestas
quien gana eurocopa|apuestas quien gana la champions|apuestas
quien gana la eurocopa|apuestas quien gana la liga|apuestas quien ganara el mundial|apuestas quién ganará el
mundial|apuestas quien ganara la champions|apuestas quien ganara la eurocopa|apuestas quien ganara la
liga|apuestas rayo barcelona|apuestas real madrid|apuestas real madrid arsenal|apuestas real madrid athletic|apuestas real
madrid atletico|apuestas real madrid atletico champions|apuestas real madrid atletico de madrid|apuestas real madrid
atlético de madrid|apuestas real madrid atletico madrid|apuestas real madrid barcelona|apuestas
real madrid bayern|apuestas real madrid betis|apuestas real madrid borussia|apuestas real
madrid campeon champions|apuestas real madrid celta|apuestas real madrid champions|apuestas real
madrid city|apuestas real madrid girona|apuestas real madrid hoy|apuestas real madrid liverpool|apuestas real madrid manchester city|apuestas real madrid osasuna|apuestas real madrid real sociedad|apuestas real madrid
valencia|apuestas real madrid villarreal|apuestas real madrid vs arsenal|apuestas
real madrid vs atletico|apuestas real madrid vs atlético|apuestas real madrid
vs atletico madrid|apuestas real madrid vs barcelona|apuestas real madrid
vs betis|apuestas real madrid vs sevilla|apuestas real madrid vs valencia|apuestas real sociedad|apuestas real sociedad athletic|apuestas real sociedad
barcelona|apuestas real sociedad betis|apuestas real sociedad psg|apuestas real sociedad real madrid|apuestas real
sociedad valencia|apuestas recomendadas hoy|apuestas regalo de bienvenida|apuestas registro|apuestas resultado
exacto|apuestas resultados|apuestas resultados eurocopa|apuestas retirada tenis|apuestas
roma barcelona|apuestas roma sevilla|apuestas rugby|apuestas rugby
mundial|apuestas rugby world cup|apuestas ruleta seguras|apuestas
segunda|apuestas segunda b|apuestas segunda division|apuestas segunda división|apuestas segunda division b|apuestas segunda division españa|apuestas seguras|apuestas seguras baloncesto|apuestas seguras
calculadora|apuestas seguras en la ruleta|apuestas seguras eurocopa|apuestas seguras foro|apuestas seguras futbol|apuestas seguras futbol
hoy|apuestas seguras gratis|apuestas seguras hoy|apuestas seguras hoy futbol|apuestas seguras nba|apuestas seguras nba hoy|apuestas seguras para
este fin de semana|apuestas seguras para ganar dinero|apuestas seguras para hoy|apuestas
seguras para hoy fútbol|apuestas seguras para hoy pronósticos|apuestas seguras
para mañana|apuestas seguras ruleta|apuestas seguras telegram|apuestas seguras tenis|apuestas semifinales eurocopa|apuestas senegal paises
bajos|apuestas sevilla|apuestas sevilla athletic|apuestas sevilla atletico de madrid|apuestas sevilla barcelona|apuestas sevilla betis|apuestas sevilla campeon liga|apuestas
sevilla celta|apuestas sevilla gana la liga|apuestas sevilla girona|apuestas sevilla inter|apuestas sevilla jugador|apuestas
sevilla juventus|apuestas sevilla leganes|apuestas
sevilla madrid|apuestas sevilla manchester united|apuestas
sevilla osasuna|apuestas sevilla real madrid|apuestas sevilla real
sociedad|apuestas sevilla roma|apuestas sevilla valencia|apuestas significa|apuestas simples ejemplos|apuestas simples
o combinadas|apuestas sin deposito|apuestas sin deposito inicial|apuestas sin deposito minimo|apuestas sin dinero|apuestas sin dinero
real|apuestas sin empate|apuestas sin empate que significa|apuestas sin ingreso minimo|apuestas sin registro|apuestas sistema|apuestas sistema calculadora|apuestas sistema como funciona|apuestas sistema trixie|apuestas sociedad|apuestas sorteo copa
del rey|apuestas stake|apuestas stake 10|apuestas stake 10 hoy|apuestas super bowl favorito|apuestas super
rugby|apuestas supercopa españa|apuestas superliga argentina|apuestas tarjeta roja|apuestas tarjetas|apuestas tarjetas
amarillas|apuestas tenis|apuestas tenis atp|apuestas tenis consejos|apuestas tenis copa davis|apuestas
tenis de mesa|apuestas tenis de mesa pronosticos|apuestas tenis en vivo|apuestas
tenis femenino|apuestas tenis hoy|apuestas tenis itf|apuestas tenis pronosticos|apuestas tenis pronósticos|apuestas tenis
retirada|apuestas tenis roland garros|apuestas tenis seguras|apuestas tenis wimbledon|apuestas tenis wta|apuestas tercera division|apuestas tercera division españa|apuestas tipos|apuestas tips|apuestas tipster|apuestas tipster para hoy|apuestas topuria holloway cuotas|apuestas torneos de golf|apuestas torneos de tenis|apuestas trucos|apuestas uefa champions league|apuestas uefa
europa league|apuestas ufc|apuestas ufc chile|apuestas ufc como funciona|apuestas ufc hoy|apuestas ufc ilia topuria|apuestas ufc online|apuestas ufc pronósticos|apuestas ufc telegram|apuestas ufc topuria|apuestas under over|apuestas unionistas
villarreal|apuestas uruguay|apuestas uruguay colombia|apuestas
uruguay corea|apuestas uruguay vs colombia|apuestas
us open golf|apuestas us open tenis|apuestas valencia|apuestas valencia barcelona|apuestas valencia betis|apuestas valencia madrid|apuestas valencia real madrid|apuestas valladolid barcelona|apuestas valladolid valencia|apuestas valor app|apuestas valor en directo|apuestas valor galgos|apuestas venezuela|apuestas venezuela argentina|apuestas venezuela
bolivia|apuestas venezuela ecuador|apuestas villarreal|apuestas
villarreal athletic|apuestas villarreal barcelona|apuestas villarreal bayern|apuestas villarreal betis|apuestas villarreal liverpool|apuestas villarreal manchester|apuestas villarreal manchester united|apuestas villarreal vs real madrid|apuestas virtuales|apuestas virtuales
colombia|apuestas virtuales futbol|apuestas virtuales sin dinero|apuestas vivo|apuestas vuelta a españa|apuestas vuelta
españa|apuestas william hill partidos de
hoy|apuestas y casino|apuestas y casinos|apuestas y juegos de azar|apuestas y
pronosticos|apuestas y pronosticos de futbol|apuestas y
pronosticos deportivos|apuestas y resultados|apuestas-deportivas|apuestas-deportivas.es pronosticos|arbitro nba apuestas|argentina apuestas|argentina colombia apuestas|argentina
croacia apuestas|argentina francia apuestas|argentina mexico
apuestas|argentina peru apuestas|argentina uruguay apuestas|argentina vs bolivia apuestas|argentina
vs chile apuestas|argentina vs colombia apuestas|argentina vs
francia apuestas|argentina vs. colombia apuestas|asi se gana en las apuestas deportivas|asiatico apuestas|asiatico en apuestas|asiaticos
apuestas|athletic barcelona apuestas|athletic manchester
united apuestas|athletic osasuna apuestas|athletic real madrid apuestas|atletico
barcelona apuestas|atletico de madrid apuestas|atlético de madrid
apuestas|atletico de madrid real madrid apuestas|atletico de madrid vs barcelona apuestas|atletico
madrid real madrid apuestas|atletico madrid vs real madrid apuestas|atletico
real madrid apuestas|atletico vs real madrid apuestas|avisador de
cuotas apuestas|bajada de cuotas apuestas|baloncesto apuestas|barbastro barcelona apuestas|barca apuestas|barca bayern apuestas|barca inter
apuestas|barca madrid apuestas|barça madrid apuestas|barca vs
atletico apuestas|barca vs madrid apuestas|barca vs real madrid apuestas|barcelona –
real madrid apuestas|barcelona apuestas|barcelona atletico apuestas|barcelona
atletico de madrid apuestas|barcelona atletico madrid apuestas|barcelona betis apuestas|barcelona casa de apuestas|barcelona inter apuestas|barcelona psg apuestas|barcelona real
madrid apuestas|barcelona real sociedad apuestas|barcelona
sevilla apuestas|barcelona valencia apuestas|barcelona vs athletic bilbao apuestas|barcelona vs atlético madrid apuestas|barcelona vs
betis apuestas|barcelona vs celta de vigo
apuestas|barcelona vs espanyol apuestas|barcelona vs
girona apuestas|barcelona vs madrid apuestas|barcelona vs real madrid apuestas|barcelona vs real sociedad apuestas|barcelona vs sevilla apuestas|barcelona
vs villarreal apuestas|base de datos cuotas apuestas deportivas|bayern real madrid apuestas|beisbol
apuestas|best america apuestas|bet apuestas chile|bet apuestas en vivo|betis – chelsea apuestas|betis apuestas|betis barcelona
apuestas|betis chelsea apuestas|betis madrid apuestas|betis sevilla apuestas|betsson tu sitio de
apuestas online|blog apuestas baloncesto|blog apuestas ciclismo|blog
apuestas nba|blog apuestas tenis|blog de apuestas de tenis|bono
apuestas|bono apuestas deportivas|bono apuestas deportivas sin deposito|bono apuestas
gratis|bono apuestas gratis sin deposito|bono apuestas sin deposito|bono bienvenida apuestas|bono bienvenida apuestas
deportivas|bono bienvenida apuestas españa|bono bienvenida apuestas sin deposito|bono bienvenida apuestas
sin depósito|bono bienvenida casa apuestas|bono bienvenida
casa de apuestas|bono bienvenida marca apuestas|bono casa apuestas|bono casa
de apuestas|bono casa de apuestas sin ingreso|bono casas de apuestas|bono de apuestas|bono de apuestas gratis sin deposito|bono de bienvenida apuestas|bono de bienvenida apuestas deportivas|bono de bienvenida
casa de apuestas|bono de bienvenida casas de apuestas|bono de casas de apuestas|bono de registro apuestas|bono de registro apuestas
deportivas|bono de registro casa de apuestas|bono gratis apuestas|bono marca apuestas|bono por
registro apuestas|bono por registro apuestas deportivas|bono por registro casa de apuestas|bono registro apuestas|bono
sin deposito apuestas|bono sin depósito apuestas|bono sin deposito apuestas deportivas|bono sin depósito apuestas deportivas|bono
sin deposito casa de apuestas|bono sin deposito marca apuestas|bono sin ingreso apuestas|bono sin ingreso apuestas deportivas|bonos apuestas|bonos apuestas colombia|bonos apuestas deportivas|bonos apuestas deportivas sin deposito|bonos apuestas gratis|bonos apuestas sin deposito|bonos
apuestas sin depósito|bonos bienvenida apuestas|bonos bienvenida casas apuestas|bonos
bienvenida casas de apuestas|bonos casa de apuestas|bonos casas apuestas|bonos
casas de apuestas|bonos casas de apuestas colombia|bonos casas de apuestas deportivas|bonos casas de apuestas españa|bonos casas de apuestas nuevas|bonos casas de apuestas sin deposito|bonos casas de apuestas sin depósito|bonos
de apuestas|bonos de apuestas deportivas|bonos de
apuestas gratis|bonos de apuestas sin deposito|bonos de bienvenida apuestas|bonos de bienvenida apuestas deportivas|bonos de bienvenida casa
de apuestas|bonos de bienvenida casas de apuestas|bonos de bienvenida de casas de apuestas|bonos de bienvenida en casas de apuestas|bonos
de casas de apuestas|bonos de casas de apuestas sin deposito|bonos
en casa de apuestas|bonos en casas de apuestas sin deposito|bonos gratis apuestas|bonos gratis apuestas deportivas|bonos gratis casas de apuestas|bonos gratis sin deposito apuestas|bonos paginas de apuestas|bonos registro casas de apuestas|bonos sin deposito apuestas|bonos sin depósito
apuestas|bonos sin deposito apuestas deportivas|bonos sin deposito
casas de apuestas|bot de apuestas deportivas gratis|boxeo apuestas|brasil colombia
apuestas|brasil peru apuestas|brasil vs colombia apuestas|buenas apuestas para hoy|buscador cuotas apuestas|buscador de apuestas seguras|buscador de cuotas apuestas|buscador de
cuotas de apuestas|buscar apuestas seguras|caballos apuestas|calculador de apuestas|calculador de cuotas apuestas|calculadora
apuestas|calculadora apuestas combinadas|calculadora apuestas de sistema|calculadora apuestas deportivas|calculadora
apuestas deportivas seguras|calculadora apuestas multiples|calculadora apuestas segura|calculadora
apuestas seguras|calculadora apuestas sistema|calculadora apuestas yankee|calculadora
arbitraje apuestas|calculadora cubrir apuestas|calculadora cuotas apuestas|calculadora de apuestas|calculadora de apuestas combinadas|calculadora de apuestas de futbol|calculadora de apuestas de sistema|calculadora de apuestas deportivas|calculadora de apuestas multiples|calculadora de
apuestas seguras|calculadora de apuestas sistema|calculadora de apuestas surebets|calculadora de arbitraje apuestas|calculadora de cuotas
apuestas|calculadora de cuotas de apuestas|calculadora
para apuestas deportivas|calculadora poisson apuestas|calculadora poisson apuestas deportivas|calculadora poisson para apuestas|calculadora scalping apuestas deportivas|calculadora sistema apuestas|calculadora stake apuestas|calculadora trading apuestas|calcular apuestas|calcular apuestas deportivas|calcular apuestas futbol|calcular apuestas sistema|calcular cuotas apuestas|calcular cuotas apuestas combinadas|calcular cuotas apuestas deportivas|calcular cuotas de apuestas|calcular ganancias apuestas deportivas|calcular momios apuestas|calcular probabilidad cuota apuestas|calcular stake
apuestas|calcular unidades apuestas|calcular yield apuestas|calculo de apuestas|calculo de apuestas deportivas|cambio de cuotas apuestas|campeon champions apuestas|campeon eurocopa apuestas|campeon liga apuestas|campeon nba apuestas|canales de apuestas gratis|carrera de
caballos apuestas|carrera de caballos apuestas juego|carrera de caballos
con apuestas|carrera de galgos apuestas|carreras de caballos apuestas|carreras de caballos apuestas online|carreras de caballos con apuestas|carreras de caballos juegos
de apuestas|carreras de galgos apuestas|carreras de galgos apuestas online|carreras de galgos apuestas
trucos|carreras galgos apuestas|casa apuestas argentina|casa apuestas atletico de madrid|casa apuestas barcelona|casa apuestas betis|casa apuestas bono
bienvenida|casa apuestas bono gratis|casa apuestas bono sin deposito|casa apuestas cerca
de mi|casa apuestas chile|casa apuestas colombia|casa apuestas con mejores cuotas|casa apuestas deportivas|casa apuestas españa|casa apuestas española|casa apuestas eurocopa|casa apuestas
futbol|casa apuestas mejores cuotas|casa apuestas mundial|casa
apuestas nueva|casa apuestas nuevas|casa apuestas online|casa apuestas peru|casa apuestas valencia|casa
de apuestas|casa de apuestas 10 euros gratis|casa
de apuestas argentina|casa de apuestas atletico de madrid|casa
de apuestas baloncesto|casa de apuestas barcelona|casa de apuestas beisbol|casa de apuestas betis|casa de apuestas bono|casa de
apuestas bono bienvenida|casa de apuestas bono de bienvenida|casa de
apuestas bono gratis|casa de apuestas bono por registro|casa de apuestas bono sin deposito|casa
de apuestas boxeo|casa de apuestas caballos|casa de apuestas carreras de caballos|casa de apuestas cerca de mi|casa de apuestas
cerca de mí|casa de apuestas champions league|casa de apuestas chile|casa de apuestas ciclismo|casa de apuestas colombia|casa de apuestas con bono de bienvenida|casa de apuestas con bono sin deposito|casa de
apuestas con cuotas mas altas|casa de apuestas con esports|casa
de apuestas con las mejores cuotas|casa de apuestas con licencia en españa|casa de apuestas con mejores cuotas|casa de apuestas con pago anticipado|casa de apuestas con paypal|casa de apuestas copa america|casa
de apuestas de caballos|casa de apuestas de colombia|casa de
apuestas de españa|casa de apuestas de futbol|casa de apuestas de fútbol|casa de apuestas de
futbol peru|casa de apuestas de peru|casa de apuestas del madrid|casa de apuestas del real madrid|casa de apuestas deportivas|casa de apuestas deportivas cerca de
mi|casa de apuestas deportivas en argentina|casa de apuestas deportivas en chile|casa
de apuestas deportivas en colombia|casa de apuestas
deportivas en españa|casa de apuestas deportivas en madrid|casa de apuestas deportivas españa|casa de apuestas
deportivas españolas|casa de apuestas deportivas
madrid|casa de apuestas deportivas mexico|casa de apuestas deportivas online|casa de apuestas deportivas peru|casa de apuestas deposito 5 euros|casa
de apuestas deposito minimo|casa de apuestas deposito minimo 1 euro|casa
de apuestas depósito mínimo 1 euro|casa de apuestas en españa|casa de apuestas en linea|casa de apuestas en madrid|casa de apuestas en perú|casa de apuestas
en vivo|casa de apuestas españa|casa de apuestas españa inglaterra|casa de apuestas española|casa de apuestas españolas|casa de apuestas esports|casa de apuestas eurocopa|casa de apuestas
europa league|casa de apuestas f1|casa de apuestas formula 1|casa de
apuestas futbol|casa de apuestas ingreso minimo|casa de apuestas
ingreso minimo 1 euro|casa de apuestas ingreso
mínimo 1 euro|casa de apuestas legales|casa de apuestas legales en colombia|casa de apuestas legales en españa|casa de apuestas libertadores|casa de apuestas liga española|casa de apuestas madrid|casa de apuestas mas segura|casa de apuestas mejores|casa de apuestas méxico|casa de apuestas minimo 5 euros|casa de apuestas mlb|casa
de apuestas mundial|casa de apuestas nba|casa de
apuestas nfl|casa de apuestas nueva|casa de apuestas nuevas|casa
de apuestas oficial del real madrid|casa de apuestas oficial real madrid|casa de apuestas online|casa de apuestas online argentina|casa
de apuestas online chile|casa de apuestas online españa|casa de apuestas
online mexico|casa de apuestas online paraguay|casa de apuestas online peru|casa de apuestas online usa|casa de apuestas online venezuela|casa de apuestas pago anticipado|casa de apuestas para boxeo|casa de apuestas para ufc|casa de apuestas
peru|casa de apuestas perú|casa de apuestas peru online|casa de apuestas por paypal|casa de apuestas promociones|casa de apuestas que regalan dinero|casa de apuestas
real madrid|casa de apuestas regalo de bienvenida|casa de apuestas sevilla|casa de apuestas sin dinero|casa de apuestas
sin ingreso minimo|casa de apuestas sin licencia en españa|casa
de apuestas sin minimo de ingreso|casa de apuestas stake|casa de apuestas tenis|casa de apuestas ufc|casa de
apuestas valencia|casa de apuestas venezuela|casa de apuestas
virtuales|casa de apuestas vive la suerte|casa oficial de apuestas
del real madrid|casas apuestas asiaticas|casas apuestas bono sin deposito|casas apuestas
bonos sin deposito|casas apuestas caballos|casas apuestas chile|casas
apuestas ciclismo|casas apuestas con licencia|casas apuestas con licencia en españa|casas apuestas deportivas|casas apuestas deportivas colombia|casas apuestas deportivas españa|casas apuestas deportivas españolas|casas
apuestas deportivas nuevas|casas apuestas españa|casas apuestas españolas|casas apuestas esports|casas apuestas eurocopa|casas apuestas golf|casas apuestas ingreso minimo
5 euros|casas apuestas legales|casas apuestas legales españa|casas
apuestas licencia|casas apuestas licencia españa|casas apuestas mexico|casas
apuestas mundial|casas apuestas nba|casas apuestas nuevas|casas apuestas
nuevas españa|casas apuestas ofertas|casas apuestas online|casas apuestas
paypal|casas apuestas peru|casas apuestas sin licencia|casas apuestas tenis|casas asiaticas
apuestas|casas de apuestas|casas de apuestas 5 euros|casas de apuestas app|casas
de apuestas argentinas|casas de apuestas asiaticas|casas de apuestas baloncesto|casas
de apuestas barcelona|casas de apuestas bono bienvenida|casas de apuestas bono de bienvenida|casas de apuestas bono por registro|casas
de apuestas bono sin deposito|casas de apuestas
bono sin ingreso|casas de apuestas bonos|casas de apuestas bonos de bienvenida|casas de apuestas bonos gratis|casas de apuestas bonos sin deposito|casas de
apuestas boxeo|casas de apuestas caballos|casas de apuestas carreras de caballos|casas de apuestas casino|casas de
apuestas casino online|casas de apuestas cerca de mi|casas
de apuestas champions league|casas de apuestas chile|casas
de apuestas ciclismo|casas de apuestas colombia|casas de apuestas com|casas de
apuestas con app|casas de apuestas con apuestas gratis|casas de apuestas con bono|casas de apuestas
con bono de bienvenida|casas de apuestas con bono de registro|casas de apuestas con bono por registro|casas de apuestas con bono sin deposito|casas
de apuestas con bonos|casas de apuestas con bonos gratis|casas de
apuestas con bonos sin deposito|casas de apuestas con deposito minimo|casas de apuestas con esports|casas de apuestas con handicap asiatico|casas de
apuestas con licencia|casas de apuestas con licencia en españa|casas de apuestas con licencia
españa|casas de apuestas con licencia española|casas de apuestas con mejores cuotas|casas de apuestas con pago anticipado|casas de
apuestas con paypal|casas de apuestas con paypal en perú|casas
de apuestas con promociones|casas de apuestas con ruleta en vivo|casas de
apuestas copa del rey|casas de apuestas de caballos|casas de apuestas de españa|casas de apuestas de
futbol|casas de apuestas de fútbol|casas de apuestas de
peru|casas de apuestas deportivas|casas de apuestas deportivas asiaticas|casas de apuestas deportivas colombia|casas de apuestas deportivas comparativa|casas de
apuestas deportivas con paypal|casas de apuestas deportivas en chile|casas
de apuestas deportivas en españa|casas de apuestas deportivas en linea|casas de apuestas deportivas
en madrid|casas de apuestas deportivas en mexico|casas de
apuestas deportivas en peru|casas de apuestas deportivas en sevilla|casas de apuestas deportivas en valencia|casas de
apuestas deportivas españa|casas de apuestas deportivas españolas|casas de apuestas deportivas legales|casas de apuestas deportivas madrid|casas de apuestas deportivas mexico|casas
de apuestas deportivas nuevas|casas de apuestas deportivas online|casas de apuestas deportivas peru|casas de apuestas deportivas perú|casas de apuestas deposito
minimo 1 euro|casas de apuestas depósito mínimo 1 euro|casas de apuestas dinero gratis|casas de apuestas en argentina|casas de apuestas en barcelona|casas de apuestas
en chile|casas de apuestas en colombia|casas de apuestas en españa|casas de apuestas en españa online|casas de apuestas en linea|casas de apuestas en madrid|casas
de apuestas en méxico|casas de apuestas en peru|casas de apuestas en perú|casas de apuestas en sevilla|casas de apuestas en uruguay|casas de apuestas en valencia|casas de apuestas en venezuela|casas de apuestas equipos de futbol|casas de apuestas españa|casas de apuestas
españa alemania|casas de apuestas españa inglaterra|casas de apuestas españa licencia|casas de apuestas españa nuevas|casas de
apuestas españa online|casas de apuestas española|casas de apuestas españolas|casas de apuestas españolas con licencia|casas de apuestas españolas online|casas de apuestas esports|casas de apuestas eurocopa|casas de apuestas
eurocopa 2024|casas de apuestas europa league|casas de apuestas f1|casas de apuestas fisicas en barcelona|casas de apuestas fisicas en españa|casas de apuestas formula 1|casas de apuestas fuera de españa|casas de apuestas futbol|casas de
apuestas fútbol|casas de apuestas futbol españa|casas de
apuestas ganador eurocopa|casas de apuestas gratis|casas de apuestas ingreso
minimo|casas de apuestas ingreso minimo 1 euro|casas de apuestas ingreso minimo 5 euros|casas de apuestas inter barcelona|casas de apuestas
legales|casas de apuestas legales en colombia|casas de apuestas legales
en españa|casas de apuestas legales en mexico|casas de apuestas legales españa|casas de apuestas legales mx|casas de apuestas licencia|casas de apuestas licencia españa|casas de apuestas
lista|casas de apuestas madrid|casas de apuestas mas seguras|casas de apuestas mejores bonos|casas
de apuestas mejores cuotas|casas de apuestas mexico|casas de apuestas méxico|casas de apuestas minimo 5
euros|casas de apuestas mlb|casas de apuestas mundial|casas
de apuestas mundial baloncesto|casas de apuestas mundiales|casas de apuestas nba|casas de
apuestas no reguladas en españa|casas de apuestas nueva ley|casas de apuestas nuevas|casas de
apuestas nuevas en colombia|casas de apuestas nuevas en españa|casas
de apuestas nuevas españa|casas de apuestas ofertas|casas de apuestas online|casas de apuestas online argentina|casas de apuestas online colombia|casas de apuestas online deportivas|casas de
apuestas online ecuador|casas de apuestas online en argentina|casas de apuestas online en chile|casas
de apuestas online en colombia|casas de apuestas
online en españa|casas de apuestas online en mexico|casas de apuestas online españa|casas de apuestas online mas
fiables|casas de apuestas online mexico|casas de apuestas online nuevas|casas de
apuestas online peru|casas de apuestas online usa|casas de apuestas online venezuela|casas de apuestas pago paypal|casas de
apuestas para ufc|casas de apuestas paypal|casas de apuestas peru bono sin deposito|casas
Your comment is awaiting moderation.
Всем привет! Хороший магазин. Удачи и развития в дальнейшем! https://say.la/read-blog/134535 https://www.divephotoguide.com/user/ehyyhadyidbe https://pubhtml5.com/homepage/irunm https://www.grepmed.com/afyfmrxedy https://www.montessorijobsuk.co.uk/author/oihahkidyofk/ https://rant.li/ofaoihwadoh/moskva-zapadnyi-kupit-kokain-mefedron-marikhuanu-boshki Какие негативные? Ты мне в личку скинул бред какой то, разводом иди занимайся в другом месте.
Your comment is awaiting moderation.
globalfindsoutlet – Always fun to browse, you never know what cool items you’ll find.
Your comment is awaiting moderation.
buildyourownfuture – Perfect for anyone looking to shape their future intentionally.
Your comment is awaiting moderation.
trendworldmarket – Perfect site for discovering fresh and exciting products.
Your comment is awaiting moderation.
classystylemarket – Their collection always feels curated and high-quality.
Your comment is awaiting moderation.
dreamfashionfinds – Love the trendy pieces here, everything feels fresh and modern.
Your comment is awaiting moderation.
Флуд??? Я высказал свое мнение! Или это запрещено? https://www.grepmed.com/cobuiegagnpe https://pubhtml5.com/homepage/tlvbs https://say.la/read-blog/134694 https://anyflip.com/homepage/nzmqg https://www.impactio.com/researcher/rittsf58mesmund https://www.impactio.com/researcher/udxphheq89db63 отпишите народ за 5 iai кто брал спс заранее
Your comment is awaiting moderation.
Всё про технику https://webstore.com.ua и технологии: обзоры гаджетов, тесты, сравнения, ИИ и софт, фото/видео, умный дом, авто-тех, безопасность. Пошаговые гайды, лайфхаки, подбор комплектующих и лучшие приложения. Понятно, актуально, без лишней воды.
Your comment is awaiting moderation.
Новостной портал https://pto-kyiv.com.ua для тех, кто ценит фактчекинг и ясность. Картина дня в одном месте: политика, экономика, общество, наука, спорт. Ежедневные дайджесты, обзоры рынков, календари событий и авторские колонки. Читайте, делитесь, обсуждайте.
Your comment is awaiting moderation.
Актуальные новости https://thingshistory.com без перегруза: коротко о событиях и глубоко о смыслах. Репортажи с места, интервью, разборы и аналитика. Умные уведомления, ночной режим, офлайн-доступ и виджеты. Доверяйте проверенным данным и оставайтесь на шаг впереди.
Your comment is awaiting moderation.
(10 euros gratis apuestas|10 mejores casas de apuestas|10 trucos para ganar apuestas|15
euros gratis marca apuestas|1×2 apuestas|1×2
apuestas deportivas|1×2 apuestas que significa|1×2 en apuestas|1×2 en apuestas que significa|1×2 que significa
en apuestas|5 euros gratis apuestas|9 apuestas que siempre ganaras|a partir de cuanto se declara apuestas|actividades de
juegos de azar y apuestas|ad apuestas deportivas|aleksandre topuria ufc apuestas|algoritmo para ganar apuestas deportivas|america apuestas|análisis nba apuestas|aplicacion android apuestas deportivas|aplicacion apuestas deportivas|aplicacion apuestas deportivas android|aplicación de
apuestas online|aplicacion para hacer apuestas|aplicacion para hacer apuestas de futbol|aplicación para hacer apuestas de fútbol|aplicaciones apuestas deportivas
android|aplicaciones apuestas deportivas
gratis|aplicaciones de apuestas android|aplicaciones de apuestas de fútbol|aplicaciones
de apuestas deportivas|aplicaciones de apuestas deportivas peru|aplicaciones
de apuestas deportivas perú|aplicaciones de apuestas en colombia|aplicaciones de apuestas gratis|aplicaciones de apuestas online|aplicaciones de apuestas seguras|aplicaciones de
apuestas sin dinero|aplicaciones para hacer apuestas|apostar seguro apuestas
deportivas|app android apuestas deportivas|app apuestas|app apuestas android|app apuestas
de futbol|app apuestas deportivas|app apuestas deportivas android|app apuestas deportivas argentina|app apuestas deportivas colombia|app apuestas deportivas ecuador|app apuestas deportivas españa|app
apuestas deportivas gratis|app apuestas entre amigos|app apuestas futbol|app apuestas gratis|app apuestas sin dinero|app casa de apuestas|app casas de
apuestas|app control apuestas|app de apuestas|app
de apuestas android|app de apuestas casino|app de apuestas colombia|app de apuestas
con bono de bienvenida|app de apuestas de futbol|app de apuestas deportivas|app de apuestas deportivas android|app de apuestas
deportivas argentina|app de apuestas deportivas colombia|app de
apuestas deportivas en españa|app de apuestas deportivas peru|app de apuestas deportivas perú|app de
apuestas deportivas sin dinero|app de apuestas ecuador|app de apuestas en colombia|app de apuestas en españa|app de apuestas en venezuela|app de apuestas futbol|app de apuestas gratis|app de apuestas online|app de apuestas para
android|app de apuestas para ganar dinero|app de apuestas peru|app de apuestas reales|app de
casas de apuestas|app marca apuestas android|app moviles de apuestas|app para apuestas|app
para apuestas de futbol|app para apuestas deportivas|app
para apuestas deportivas en español|app para ganar apuestas
deportivas|app para hacer apuestas|app para hacer apuestas deportivas|app para hacer apuestas entre amigos|app para llevar control
de apuestas|app pronosticos apuestas deportivas|app versus apuestas|apps apuestas mundial|apps
de apuestas|apps de apuestas con bono de bienvenida|apps de apuestas de futbol|apps de apuestas deportivas peru|apps de apuestas mexico|apps para apuestas|aprender a hacer apuestas deportivas|aprender hacer apuestas deportivas|apuesta del dia apuestas deportivas|apuestas 10 euros gratis|apuestas 100 seguras|apuestas
1×2|apuestas 1X2|apuestas 2 division|apuestas 3 division|apuestas
a caballos|apuestas a carreras de caballos|apuestas a colombia|apuestas a corners|apuestas
a ganar|apuestas a jugadores nba|apuestas a la baja|apuestas a
la nfl|apuestas al barcelona|apuestas al dia|apuestas al empate|apuestas al mundial|apuestas al tenis wta|apuestas alaves barcelona|apuestas alcaraz hoy|apuestas alemania españa|apuestas
alonso campeon del mundo|apuestas altas y bajas|apuestas altas
y bajas nfl|apuestas ambos equipos marcan|apuestas america|apuestas
android|apuestas anillo nba|apuestas antes del mundial|apuestas anticipadas|apuestas anticipadas nba|apuestas apps|apuestas arabia
argentina|apuestas argentina|apuestas argentina campeon del mundo|apuestas argentina canada|apuestas
argentina colombia|apuestas argentina croacia|apuestas argentina españa|apuestas argentina francia|apuestas argentina francia cuanto
paga|apuestas argentina francia mundial|apuestas argentina gana el mundial|apuestas argentina gana mundial|apuestas argentina holanda|apuestas argentina mexico|apuestas argentina méxico|apuestas argentina mundial|apuestas argentina online|apuestas argentina paises bajos|apuestas argentina polonia|apuestas argentina uruguay|apuestas argentina vs australia|apuestas argentina vs
colombia|apuestas argentina vs francia|apuestas argentina
vs peru|apuestas argentinas|apuestas arsenal real madrid|apuestas ascenso a primera division|apuestas ascenso a segunda|apuestas asiaticas|apuestas
asiatico|apuestas athletic|apuestas athletic atletico|apuestas athletic barça|apuestas athletic
barcelona|apuestas athletic betis|apuestas athletic manchester|apuestas athletic manchester united|apuestas athletic osasuna|apuestas athletic real|apuestas athletic real madrid|apuestas athletic real sociedad|apuestas
athletic real sociedad final|apuestas athletic roma|apuestas athletic sevilla|apuestas athletic valencia|apuestas atletico|apuestas atletico barcelona|apuestas atletico
barsa|apuestas atletico campeon champions|apuestas atletico campeon de liga|apuestas atlético copenhague|apuestas atletico de madrid|apuestas
atlético de madrid|apuestas atletico de madrid
barcelona|apuestas atletico de madrid gana la
liga|apuestas atletico de madrid real madrid|apuestas atlético de madrid real madrid|apuestas atletico de madrid vs barcelona|apuestas atletico madrid|apuestas atletico madrid real madrid|apuestas atletico
madrid vs barcelona|apuestas atletico real madrid|apuestas atletico
real madrid champions|apuestas atletismo|apuestas bajas|apuestas
baloncesto|apuestas baloncesto acb|apuestas baloncesto handicap|apuestas baloncesto hoy|apuestas baloncesto juegos olimpicos|apuestas baloncesto nba|apuestas baloncesto pronostico|apuestas baloncesto
pronósticos|apuestas baloncesto prorroga|apuestas barca|apuestas barca athletic|apuestas barca
atletico|apuestas barca bayern|apuestas barca bayern munich|apuestas barca girona|apuestas barca hoy|apuestas barça hoy|apuestas barca
inter|apuestas barca juventus|apuestas barca madrid|apuestas barça madrid|apuestas barca real madrid|apuestas barca vs juve|apuestas barca vs madrid|apuestas barca vs
psg|apuestas barcelona|apuestas barcelona alaves|apuestas barcelona
athletic|apuestas barcelona atletico|apuestas barcelona atletico de madrid|apuestas
barcelona atlético de madrid|apuestas barcelona atletico
madrid|apuestas barcelona bayern|apuestas barcelona betis|apuestas barcelona campeon de liga|apuestas barcelona celta|apuestas barcelona espanyol|apuestas barcelona gana la champions|apuestas barcelona girona|apuestas barcelona granada|apuestas barcelona hoy|apuestas barcelona
inter|apuestas barcelona madrid|apuestas barcelona osasuna|apuestas barcelona psg|apuestas barcelona real madrid|apuestas barcelona real sociedad|apuestas barcelona sevilla|apuestas barcelona valencia|apuestas barcelona villarreal|apuestas barcelona vs atletico
madrid|apuestas barcelona vs madrid|apuestas barcelona vs real madrid|apuestas barsa madrid|apuestas basket
hoy|apuestas bayern barcelona|apuestas bayern vs barcelona|apuestas beisbol|apuestas béisbol|apuestas beisbol mlb|apuestas beisbol pronosticos|apuestas beisbol venezolano|apuestas betis|apuestas betis – chelsea|apuestas betis barcelona|apuestas betis chelsea|apuestas betis fiorentina|apuestas betis girona|apuestas betis madrid|apuestas betis mallorca|apuestas betis real
madrid|apuestas betis real sociedad|apuestas betis sevilla|apuestas betis valencia|apuestas betis valladolid|apuestas betis vs
valencia|apuestas betplay hoy colombia|apuestas betsson peru|apuestas bienvenida|apuestas billar
online|apuestas bolivia vs colombia|apuestas bono|apuestas bono bienvenida|apuestas bono de bienvenida|apuestas bono de bienvenida sin deposito|apuestas bono gratis|apuestas
bono sin deposito|apuestas bonos sin deposito|apuestas borussia real madrid|apuestas boxeo|apuestas boxeo de campeonato|apuestas boxeo españa|apuestas boxeo español|apuestas boxeo femenino olimpiadas|apuestas boxeo hoy|apuestas boxeo online|apuestas brasil colombia|apuestas
brasil peru|apuestas brasil uruguay|apuestas brasil vs colombia|apuestas brasil vs peru|apuestas
caballos|apuestas caballos colocado|apuestas caballos
españa|apuestas caballos hipodromo|apuestas caballos hoy|apuestas caballos
madrid|apuestas caballos online|apuestas caballos sanlucar de barrameda|apuestas caballos zarzuela|apuestas calculador|apuestas campeon|apuestas campeon champions|apuestas campeón champions|apuestas campeon champions 2025|apuestas campeon champions league|apuestas campeon conference
league|apuestas campeon copa america|apuestas campeon copa del rey|apuestas campeon de champions|apuestas campeon de la champions|apuestas campeon de liga|apuestas campeon del mundo|apuestas
campeon eurocopa|apuestas campeón eurocopa|apuestas campeon europa league|apuestas campeon f1|apuestas campeon f1 2025|apuestas campeon formula 1|apuestas campeon libertadores|apuestas campeon liga|apuestas campeon liga
bbva|apuestas campeon liga española|apuestas campeon liga santander|apuestas
campeon motogp 2025|apuestas campeon mundial|apuestas campeón mundial|apuestas campeon mundial baloncesto|apuestas campeon nba|apuestas campeón nba|apuestas
campeon premier|apuestas campeon premier league|apuestas campeon roland garros|apuestas campeonato f1|apuestas
campeonatos de futbol|apuestas carrera de caballos|apuestas carrera de caballos hoy|apuestas carrera de caballos nocturnas|apuestas carrera
de galgos fin de semana|apuestas carrera de galgos hoy|apuestas carrera de galgos nocturnas|apuestas carreras caballos|apuestas carreras caballos sanlucar|apuestas carreras de caballos|apuestas
carreras de caballos en directo|apuestas carreras de caballos en vivo|apuestas carreras de caballos españa|apuestas carreras de
caballos hoy|apuestas carreras de caballos nacionales|apuestas
carreras de caballos nocturnas|apuestas carreras de caballos online|apuestas carreras de caballos sanlucar|apuestas carreras de caballos sanlúcar|apuestas carreras de galgos|apuestas carreras de galgos en vivo|apuestas carreras de galgos
nocturnas|apuestas carreras de galgos pre partido|apuestas casino|apuestas casino barcelona|apuestas
casino futbol|apuestas casino gran madrid|apuestas casino gratis|apuestas casino madrid|apuestas casino online|apuestas casino online argentina|apuestas casinos|apuestas casinos online|apuestas celta|apuestas celta
barcelona|apuestas celta betis|apuestas celta eibar|apuestas celta espanyol|apuestas celta granada|apuestas celta madrid|apuestas
celta manchester|apuestas celta real madrid|apuestas champion league|apuestas champions foro|apuestas champions hoy|apuestas
champions league|apuestas champions league – pronósticos|apuestas champions league 2025|apuestas champions league hoy|apuestas champions league pronosticos|apuestas champions league pronósticos|apuestas champions pronosticos|apuestas
chelsea barcelona|apuestas chelsea betis|apuestas chile|apuestas chile peru|apuestas chile venezuela|apuestas chile vs colombia|apuestas chile vs
uruguay|apuestas ciclismo|apuestas ciclismo en vivo|apuestas ciclismo femenino|apuestas ciclismo tour francia|apuestas ciclismo vuelta|apuestas ciclismo vuelta a españa|apuestas ciclismo vuelta españa|apuestas
city madrid|apuestas city real madrid|apuestas clasico|apuestas clasico español|apuestas clasico real madrid
barcelona|apuestas clasificacion mundial|apuestas colombia|apuestas colombia argentina|apuestas colombia brasil|apuestas colombia paraguay|apuestas colombia uruguay|apuestas colombia vs
argentina|apuestas colombia vs brasil|apuestas combinadas|apuestas combinadas como funcionan|apuestas combinadas de
futbol|apuestas combinadas de fútbol|apuestas
combinadas foro|apuestas combinadas futbol|apuestas combinadas
hoy|apuestas combinadas mismo partido|apuestas combinadas mundial|apuestas combinadas
nba|apuestas combinadas para esta semana|apuestas combinadas para hoy|apuestas combinadas para mañana|apuestas combinadas pronosticos|apuestas combinadas recomendadas|apuestas combinadas
seguras|apuestas combinadas seguras para hoy|apuestas combinadas seguras para mañana|apuestas como ganar|apuestas comparador|apuestas con bono de bienvenida|apuestas con dinero ficticio|apuestas con dinero real|apuestas con dinero virtual|apuestas con handicap|apuestas con handicap asiatico|apuestas con handicap baloncesto|apuestas con mas probabilidades de
ganar|apuestas con paypal|apuestas con tarjeta de credito|apuestas con tarjeta de debito|apuestas consejos|apuestas copa|apuestas copa africa|apuestas copa america|apuestas copa américa|apuestas copa
argentina|apuestas copa brasil|apuestas copa davis|apuestas copa de europa|apuestas
copa del mundo|apuestas copa del rey|apuestas copa del rey baloncesto|apuestas copa
del rey final|apuestas copa del rey futbol|apuestas copa del rey ganador|apuestas copa
del rey hoy|apuestas copa del rey pronosticos|apuestas copa
del rey pronósticos|apuestas copa europa|apuestas copa italia|apuestas
copa libertadores|apuestas copa mundial de hockey|apuestas copa
rey|apuestas copa sudamericana|apuestas corners|apuestas corners
hoy|apuestas croacia argentina|apuestas cuartos eurocopa|apuestas cuotas|apuestas cuotas altas|apuestas cuotas bajas|apuestas de 1 euro|apuestas de baloncesto|apuestas de
baloncesto hoy|apuestas de baloncesto nba|apuestas de baloncesto para hoy|apuestas de
beisbol|apuestas de beisbol para hoy|apuestas de blackjack en linea|apuestas de
boxeo|apuestas de boxeo canelo|apuestas de boxeo en las vegas|apuestas de boxeo hoy|apuestas
de boxeo online|apuestas de caballo|apuestas de caballos|apuestas de caballos como funciona|apuestas de caballos como se juega|apuestas de caballos en colombia|apuestas de caballos en españa|apuestas de caballos en linea|apuestas de caballos españa|apuestas de
caballos ganador y colocado|apuestas de caballos internacionales|apuestas de caballos juegos|apuestas de caballos online|apuestas de caballos online en venezuela|apuestas de caballos por internet|apuestas de caballos pronosticos|apuestas de caballos
pronósticos|apuestas de carrera de caballos|apuestas de carreras de caballos|apuestas de carreras de
caballos online|apuestas de casino|apuestas de casino online|apuestas de casino por internet|apuestas de champions league|apuestas de
ciclismo|apuestas de colombia|apuestas de copa america|apuestas
de corners|apuestas de deportes en linea|apuestas de deportes online|apuestas de
dinero|apuestas de esports|apuestas de eurocopa|apuestas de
europa league|apuestas de f1|apuestas de formula 1|apuestas de futbol|apuestas de fútbol|apuestas
de futbol app|apuestas de futbol argentina|apuestas de futbol colombia|apuestas de
futbol en colombia|apuestas de futbol en directo|apuestas de futbol en linea|apuestas de futbol
en vivo|apuestas de futbol español|apuestas de
futbol gratis|apuestas de futbol hoy|apuestas de futbol mundial|apuestas de futbol online|apuestas
de fútbol online|apuestas de futbol para hoy|apuestas de fútbol para hoy|apuestas de futbol
para hoy seguras|apuestas de futbol para mañana|apuestas de futbol peru|apuestas de futbol pronosticos|apuestas
de fútbol pronósticos|apuestas de futbol seguras|apuestas de futbol seguras para hoy|apuestas de futbol
sin dinero|apuestas de galgos|apuestas de galgos como ganar|apuestas de galgos
en directo|apuestas de galgos online|apuestas
de galgos trucos|apuestas de golf|apuestas de hockey|apuestas de hockey sobre hielo|apuestas de hoy|apuestas de hoy seguras|apuestas
de juego|apuestas de juegos|apuestas de juegos deportivos|apuestas de juegos online|apuestas de la champions league|apuestas de la copa
américa|apuestas de la eurocopa|apuestas de la europa league|apuestas de la liga|apuestas de
la liga bbva|apuestas de la liga española|apuestas de la nba|apuestas de la nfl|apuestas de la ufc|apuestas de mlb|apuestas de nba|apuestas de nba para hoy|apuestas de partidos|apuestas de partidos de
futbol|apuestas de peleas ufc|apuestas de perros en vivo|apuestas
de perros virtuales|apuestas de peru|apuestas de sistema|apuestas de sistema
como funciona|apuestas de sistema explicacion|apuestas de sistema
explicación|apuestas de tenis|apuestas de tenis de mesa|apuestas de tenis en directo|apuestas de
tenis hoy|apuestas de tenis para hoy|apuestas de tenis pronosticos|apuestas de tenis seguras|apuestas de todo tipo|apuestas de ufc|apuestas de ufc hoy|apuestas
del boxeo|apuestas del clasico|apuestas del clasico real madrid
barca|apuestas del dia|apuestas del día|apuestas del
dia de hoy|apuestas del dia deportivas|apuestas del dia futbol|apuestas del mundial|apuestas del
partido de hoy|apuestas del real madrid|apuestas del rey|apuestas del sistema|apuestas deporte|apuestas deportes|apuestas deportiva|apuestas
deportivas|apuestas deportivas 1 euro|apuestas deportivas 10 euros gratis|apuestas deportivas 100
seguras|apuestas deportivas 1×2|apuestas deportivas android|apuestas deportivas app|apuestas deportivas apps|apuestas deportivas argentina|apuestas deportivas argentina futbol|apuestas deportivas argentina legal|apuestas
deportivas atletico de madrid|apuestas deportivas baloncesto|apuestas deportivas barca madrid|apuestas deportivas barcelona|apuestas deportivas beisbol|apuestas
deportivas bono|apuestas deportivas bono bienvenida|apuestas deportivas bono de bienvenida|apuestas deportivas bono sin deposito|apuestas deportivas bonos de bienvenida|apuestas
deportivas boxeo|apuestas deportivas caballos|apuestas deportivas calculadora|apuestas deportivas
campeon liga|apuestas deportivas casino|apuestas deportivas casino
barcelona|apuestas deportivas casino online|apuestas deportivas cerca de mi|apuestas deportivas champions league|apuestas deportivas chile|apuestas deportivas ciclismo|apuestas deportivas colombia|apuestas deportivas com|apuestas deportivas com foro|apuestas deportivas com pronosticos|apuestas deportivas
combinadas|apuestas deportivas combinadas para hoy|apuestas
deportivas como se juega|apuestas deportivas comparador|apuestas deportivas con bono
gratis|apuestas deportivas con bonos gratis|apuestas deportivas
con dinero ficticio|apuestas deportivas con paypal|apuestas deportivas con puntos virtuales|apuestas deportivas consejos|apuestas deportivas consejos para ganar|apuestas deportivas copa
america|apuestas deportivas copa del rey|apuestas deportivas copa libertadores|apuestas deportivas
copa mundial|apuestas deportivas corners|apuestas deportivas cual es la mejor|apuestas deportivas cuotas altas|apuestas
deportivas de baloncesto|apuestas deportivas de boxeo|apuestas deportivas de colombia|apuestas
deportivas de futbol|apuestas deportivas de nba|apuestas deportivas de nhl|apuestas deportivas de peru|apuestas deportivas de tenis|apuestas deportivas del dia|apuestas deportivas dinero ficticio|apuestas deportivas directo|apuestas deportivas doble oportunidad|apuestas deportivas en argentina|apuestas deportivas en chile|apuestas deportivas en colombia|apuestas deportivas en directo|apuestas deportivas en españa|apuestas deportivas en español|apuestas deportivas en linea|apuestas deportivas en línea|apuestas deportivas en peru|apuestas deportivas en perú|apuestas
deportivas en sevilla|apuestas deportivas en uruguay|apuestas deportivas en vivo|apuestas deportivas es|apuestas
deportivas es pronosticos|apuestas deportivas españa|apuestas deportivas españolas|apuestas deportivas esports|apuestas deportivas estadisticas|apuestas
deportivas estrategias|apuestas deportivas estrategias
seguras|apuestas deportivas eurocopa|apuestas deportivas europa league|apuestas
deportivas f1|apuestas deportivas faciles de ganar|apuestas deportivas formula 1|apuestas
deportivas foro|apuestas deportivas foro futbol|apuestas deportivas foro tenis|apuestas deportivas francia argentina|apuestas deportivas futbol|apuestas deportivas fútbol|apuestas deportivas futbol argentino|apuestas deportivas
futbol colombia|apuestas deportivas futbol español|apuestas
deportivas gana|apuestas deportivas ganadas|apuestas deportivas ganar dinero seguro|apuestas deportivas gane|apuestas
deportivas golf|apuestas deportivas gratis|apuestas deportivas
gratis con premios|apuestas deportivas gratis hoy|apuestas deportivas gratis sin deposito|apuestas
deportivas handicap|apuestas deportivas handicap asiatico|apuestas
deportivas hoy|apuestas deportivas impuestos|apuestas deportivas interior argentina|apuestas deportivas juegos olimpicos|apuestas deportivas la liga|apuestas deportivas legales|apuestas deportivas legales en colombia|apuestas
deportivas libres de impuestos|apuestas deportivas licencia españa|apuestas deportivas liga
española|apuestas deportivas listado|apuestas deportivas listado clasico|apuestas
deportivas madrid|apuestas deportivas mas seguras|apuestas deportivas mejor pagadas|apuestas deportivas mejores|apuestas deportivas mejores app|apuestas deportivas mejores casas|apuestas deportivas mejores cuotas|apuestas deportivas mejores
paginas|apuestas deportivas mexico|apuestas deportivas méxico|apuestas deportivas mlb|apuestas deportivas mlb hoy|apuestas
deportivas multiples|apuestas deportivas mundial|apuestas deportivas murcia|apuestas deportivas nba|apuestas deportivas
nba hoy|apuestas deportivas nfl|apuestas deportivas nhl|apuestas deportivas nuevas|apuestas deportivas ofertas|apuestas deportivas online|apuestas deportivas online argentina|apuestas deportivas online
chile|apuestas deportivas online colombia|apuestas
deportivas online en colombia|apuestas deportivas online españa|apuestas deportivas online mexico|apuestas deportivas
online paypal|apuestas deportivas online peru|apuestas deportivas online por internet|apuestas deportivas pago paypal|apuestas deportivas para
ganar dinero|apuestas deportivas para hoy|apuestas deportivas para hoy pronosticos|apuestas deportivas
partido suspendido|apuestas deportivas partidos de hoy|apuestas deportivas paypal|apuestas deportivas
peru|apuestas deportivas perú|apuestas deportivas peru vs ecuador|apuestas deportivas predicciones|apuestas deportivas promociones|apuestas deportivas pronostico|apuestas deportivas pronóstico|apuestas deportivas pronostico hoy|apuestas deportivas pronosticos|apuestas deportivas pronósticos|apuestas deportivas pronosticos expertos|apuestas deportivas pronosticos gratis|apuestas deportivas pronosticos nba|apuestas
deportivas pronosticos tenis|apuestas deportivas
que aceptan paypal|apuestas deportivas real madrid|apuestas deportivas regalo bienvenida|apuestas
deportivas resultado exacto|apuestas deportivas resultados|apuestas deportivas rugby|apuestas deportivas seguras|apuestas deportivas seguras foro|apuestas deportivas seguras hoy|apuestas deportivas seguras para hoy|apuestas
deportivas seguras telegram|apuestas deportivas sevilla|apuestas deportivas simulador
eurocopa|apuestas deportivas sin deposito|apuestas deportivas sin deposito inicial|apuestas deportivas sin dinero|apuestas deportivas sin dinero real|apuestas
deportivas sin registro|apuestas deportivas stake|apuestas deportivas stake 10|apuestas deportivas telegram españa|apuestas deportivas tenis|apuestas deportivas tenis de mesa|apuestas deportivas tenis foro|apuestas deportivas tenis hoy|apuestas
deportivas tips|apuestas deportivas tipster|apuestas deportivas ufc|apuestas deportivas uruguay|apuestas deportivas
valencia|apuestas deportivas valencia barcelona|apuestas deportivas venezuela|apuestas deportivas virtuales|apuestas
deportivas y casino|apuestas deportivas y casino online|apuestas deportivas.com|apuestas deportivas.com foro|apuestas deportivas.es|apuestas deportivos pronosticos|apuestas deposito minimo 1 euro|apuestas descenso a segunda|apuestas descenso a
segunda b|apuestas descenso la liga|apuestas descenso primera division|apuestas descenso segunda|apuestas
dia|apuestas diarias seguras|apuestas dinero|apuestas dinero ficticio|apuestas dinero real|apuestas
dinero virtual|apuestas directas|apuestas directo|apuestas
directo futbol|apuestas division de honor juvenil|apuestas dnb|apuestas doble
oportunidad|apuestas doble resultado|apuestas
dobles|apuestas dobles y triples|apuestas dortmund barcelona|apuestas draft nba|apuestas draft nfl|apuestas ecuador
vs argentina|apuestas ecuador vs venezuela|apuestas egipto uruguay|apuestas
el clasico|apuestas elecciones venezuela|apuestas empate|apuestas en baloncesto|apuestas en barcelona|apuestas en beisbol|apuestas en boxeo|apuestas
en caballos|apuestas en carreras de caballos|apuestas en casino|apuestas en casino online|apuestas en casinos|apuestas en casinos online|apuestas en chile|apuestas
en ciclismo|apuestas en colombia|apuestas en colombia de futbol|apuestas en directo|apuestas
en directo futbol|apuestas en directo pronosticos|apuestas en el futbol|apuestas en el tenis|apuestas en españa|apuestas
en esports|apuestas en eventos deportivos virtuales|apuestas en golf|apuestas
en juegos|apuestas en la champions league|apuestas en la eurocopa|apuestas en la liga|apuestas en la nba|apuestas en la nfl|apuestas en las vegas mlb|apuestas en las vegas nfl|apuestas en linea|apuestas en línea|apuestas en linea argentina|apuestas
en linea boxeo|apuestas en linea chile|apuestas en linea colombia|apuestas en línea de fútbol|apuestas en linea deportivas|apuestas en linea españa|apuestas
en linea estados unidos|apuestas en linea futbol|apuestas
en linea mexico|apuestas en línea méxico|apuestas en linea
mundial|apuestas en linea peru|apuestas en linea usa|apuestas en los esports|apuestas en madrid|apuestas
en méxico|apuestas en mexico online|apuestas en nba|apuestas en partidos de futbol|apuestas
en partidos de futbol en vivo|apuestas en partidos de tenis
en directo|apuestas en perú|apuestas en sevilla|apuestas en sistema|apuestas en stake|apuestas en tenis|apuestas en tenis
de mesa|apuestas en valencia|apuestas en vivo|apuestas en vivo argentina|apuestas
en vivo casino|apuestas en vivo futbol|apuestas en vivo fútbol|apuestas en vivo
nba|apuestas en vivo peru|apuestas en vivo tenis|apuestas en vivo ufc|apuestas equipo mbappe|apuestas equipos de futbol|apuestas españa|apuestas españa alemania|apuestas españa
alemania eurocopa|apuestas españa croacia|apuestas españa eurocopa|apuestas españa francia|apuestas españa francia
eurocopa|apuestas españa gana el mundial|apuestas españa gana eurocopa|apuestas españa gana mundial|apuestas españa georgia|apuestas españa holanda|apuestas españa inglaterra|apuestas españa inglaterra
cuotas|apuestas españa inglaterra eurocopa|apuestas españa italia|apuestas españa mundial|apuestas españa paises
bajos|apuestas español|apuestas español oviedo|apuestas espanyol barcelona|apuestas
espanyol betis|apuestas espanyol villarreal|apuestas esport|apuestas esports|apuestas esports
colombia|apuestas esports españa|apuestas esports fifa|apuestas esports gratis|apuestas
esports lol|apuestas esports peru|apuestas esports valorant|apuestas estadisticas|apuestas estrategias|apuestas euro|apuestas
euro copa|apuestas eurocopa|apuestas eurocopa campeon|apuestas eurocopa españa|apuestas eurocopa favoritos|apuestas eurocopa femenina|apuestas eurocopa final|apuestas eurocopa ganador|apuestas eurocopa
hoy|apuestas eurocopa sub 21|apuestas euroliga baloncesto|apuestas euroliga pronosticos|apuestas europa league|apuestas europa league hoy|apuestas europa league pronosticos|apuestas europa
league pronósticos|apuestas euros|apuestas f1 abu dhabi|apuestas f1 bahrein|apuestas f1 canada|apuestas f1 china|apuestas f1 cuotas|apuestas f1 hoy|apuestas f1 las vegas|apuestas f1
miami|apuestas f1 monaco|apuestas faciles de ganar|apuestas fáciles de ganar|apuestas faciles para ganar|apuestas
favoritas|apuestas favorito champions|apuestas favoritos champions|apuestas favoritos eurocopa|apuestas favoritos mundial|apuestas
fc barcelona|apuestas final champions cuotas|apuestas final champions league|apuestas final champions peru|apuestas
final copa|apuestas final copa america|apuestas final copa de europa|apuestas final copa del rey|apuestas final copa
europa|apuestas final copa libertadores|apuestas final copa rey|apuestas final de copa|apuestas final de copa del rey|apuestas final del mundial|apuestas final euro|apuestas final eurocopa|apuestas
final europa league|apuestas final libertadores|apuestas final mundial|apuestas final nba|apuestas final rugby|apuestas final uefa europa league|apuestas
final.mundial|apuestas finales de conferencia nfl|apuestas finales
nba|apuestas fiorentina betis|apuestas formula|apuestas formula 1|apuestas fórmula 1|apuestas fórmula 1 pronósticos|apuestas formula uno|apuestas foro|apuestas
foro nba|apuestas francia argentina|apuestas francia españa|apuestas futbol|apuestas fútbol|apuestas futbol americano|apuestas futbol americano nfl|apuestas futbol argentina|apuestas futbol argentino|apuestas futbol
champions league|apuestas futbol chile|apuestas
futbol colombia|apuestas futbol consejos|apuestas futbol en directo|apuestas
fútbol en directo|apuestas futbol en vivo|apuestas fútbol en vivo|apuestas futbol españa|apuestas futbol español|apuestas fútbol español|apuestas futbol
eurocopa|apuestas futbol femenino|apuestas futbol foro|apuestas futbol gratis|apuestas futbol hoy|apuestas fútbol hoy|apuestas futbol juegos olimpicos|apuestas
futbol mexico|apuestas futbol mundial|apuestas futbol
online|apuestas futbol para hoy|apuestas futbol peru|apuestas
futbol pronosticos|apuestas futbol sala|apuestas futbol telegram|apuestas futbol
virtual|apuestas galgos|apuestas galgos en directo|apuestas galgos hoy|apuestas galgos
online|apuestas galgos pronosticos|apuestas galgos trucos|apuestas gana|apuestas gana colombia|apuestas gana resultados|apuestas ganadas|apuestas ganadas hoy|apuestas ganador champions league|apuestas ganador
copa america|apuestas ganador copa del rey|apuestas
ganador copa del rey baloncesto|apuestas ganador copa libertadores|apuestas ganador
de la eurocopa|apuestas ganador de la liga|apuestas ganador del mundial|apuestas ganador eurocopa|apuestas ganador europa
league|apuestas ganador f1|apuestas ganador
la liga|apuestas ganador liga española|apuestas ganador mundial|apuestas ganador mundial baloncesto|apuestas ganador mundial f1|apuestas ganador nba|apuestas ganadores eurocopa|apuestas ganadores mundial|apuestas ganar
champions|apuestas ganar eurocopa|apuestas ganar liga|apuestas ganar mundial|apuestas ganar nba|apuestas getafe
valencia|apuestas ghana uruguay|apuestas girona|apuestas
girona athletic|apuestas girona betis|apuestas girona campeon de liga|apuestas girona campeon liga|apuestas girona gana la liga|apuestas girona real madrid|apuestas girona real sociedad|apuestas goleador eurocopa|apuestas goleadores eurocopa|apuestas goles asiaticos|apuestas golf|apuestas golf masters|apuestas golf
pga|apuestas granada barcelona|apuestas
grand slam de tenis|apuestas gratis|apuestas gratis casino|apuestas gratis con premios|apuestas gratis hoy|apuestas gratis para hoy|apuestas gratis por registro|apuestas gratis puntos|apuestas
gratis regalos|apuestas gratis sin deposito|apuestas gratis sin depósito|apuestas gratis sin ingreso|apuestas gratis sports|apuestas gratis y ganar premios|apuestas
grupo a eurocopa|apuestas grupos eurocopa|apuestas handicap|apuestas handicap asiatico|apuestas handicap baloncesto|apuestas handicap como funciona|apuestas
handicap nba|apuestas handicap nfl|apuestas hipicas online|apuestas hípicas online|apuestas hipicas
venezuela|apuestas hockey|apuestas hockey hielo|apuestas hockey patines|apuestas hockey
sobre hielo|apuestas holanda argentina|apuestas holanda vs argentina|apuestas hoy|apuestas hoy champions|apuestas hoy
futbol|apuestas hoy nba|apuestas hoy pronosticos|apuestas hoy
seguras|apuestas impuestos|apuestas inglaterra paises bajos|apuestas inter barca|apuestas inter barcelona|apuestas juego|apuestas juegos|apuestas juegos en linea|apuestas
juegos olimpicos|apuestas juegos olímpicos|apuestas juegos olimpicos baloncesto|apuestas juegos online|apuestas juegos virtuales|apuestas jugador sevilla|apuestas jugadores nba|apuestas kings league americas|apuestas la liga|apuestas la liga española|apuestas
la liga hoy|apuestas la liga santander|apuestas las vegas
mlb|apuestas las vegas nba|apuestas las vegas nfl|apuestas league of legends mundial|apuestas legal|apuestas legales|apuestas legales en colombia|apuestas legales en españa|apuestas legales en estados unidos|apuestas legales españa|apuestas leganes betis|apuestas libertadores|apuestas licencia|apuestas liga 1 peru|apuestas liga argentina|apuestas liga bbva pronosticos|apuestas liga de
campeones|apuestas liga de campeones de baloncesto|apuestas liga de campeones de hockey|apuestas
liga españa|apuestas liga española|apuestas liga santander pronosticos|apuestas ligas de futbol|apuestas linea|apuestas linea
de gol|apuestas liverpool barcelona|apuestas liverpool real madrid|apuestas lol mundial|apuestas madrid|apuestas madrid arsenal|apuestas madrid atletico|apuestas madrid atletico champions|apuestas madrid
barca|apuestas madrid barça|apuestas madrid barca
hoy|apuestas madrid barca supercopa|apuestas madrid
barcelona|apuestas madrid barsa|apuestas madrid bayern|apuestas madrid betis|apuestas madrid borussia|apuestas madrid campeon champions|apuestas
madrid celta|apuestas madrid city|apuestas madrid dortmund|apuestas madrid
gana la liga|apuestas madrid gana liga|apuestas madrid hoy|apuestas madrid
liverpool|apuestas madrid osasuna|apuestas madrid sevilla|apuestas madrid valencia|apuestas madrid vs
arsenal|apuestas madrid vs barcelona|apuestas mallorca osasuna|apuestas mallorca real sociedad|apuestas manchester athletic|apuestas manchester
city real madrid|apuestas mas faciles de ganar|apuestas mas seguras|apuestas mas seguras para hoy|apuestas
masters de golf|apuestas masters de tenis|apuestas maximo goleador
eurocopa|apuestas maximo goleador mundial|apuestas mejor jugador eurocopa|apuestas mejores casinos online|apuestas mexico|apuestas méxico|apuestas
mexico polonia|apuestas méxico polonia|apuestas
mlb|apuestas mlb hoy|apuestas mlb las vegas|apuestas mlb para hoy|apuestas mlb
pronosticos|apuestas mlb usa|apuestas mma
ufc|apuestas momios|apuestas multiples|apuestas múltiples|apuestas multiples como funcionan|apuestas
multiples el gordo|apuestas multiples futbol|apuestas mundial|apuestas mundial 2026|apuestas mundial baloncesto|apuestas mundial balonmano|apuestas
mundial brasil|apuestas mundial campeon|apuestas mundial ciclismo|apuestas mundial clubes|apuestas mundial de baloncesto|apuestas mundial de ciclismo|apuestas mundial de clubes|apuestas mundial de futbol|apuestas mundial de fútbol|apuestas
mundial de rugby|apuestas mundial f1|apuestas mundial favoritos|apuestas mundial femenino|apuestas mundial formula
1|apuestas mundial futbol|apuestas mundial ganador|apuestas
mundial lol|apuestas mundial moto gp|apuestas mundial
motogp|apuestas mundial rugby|apuestas mundial
sub 17|apuestas mundiales|apuestas mundialistas|apuestas mvp eurocopa|apuestas mvp
nba|apuestas mvp nfl|apuestas nacionales de colombia|apuestas nba|apuestas nba all star|apuestas nba campeon|apuestas nba consejos|apuestas nba esta noche|apuestas nba finals|apuestas nba gratis|apuestas nba hoy|apuestas nba hoy jugadores|apuestas nba hoy pronosticos|apuestas
nba para hoy|apuestas nba playoffs|apuestas nba pronosticos|apuestas nba pronósticos|apuestas nba pronosticos hoy|apuestas nba tipster|apuestas nfl|apuestas nfl hoy|apuestas nfl las vegas|apuestas nfl
playoffs|apuestas nfl pronosticos|apuestas nfl pronósticos|apuestas nfl semana 4|apuestas nfl super bowl|apuestas nhl|apuestas nhl pronosticos|apuestas octavos
eurocopa|apuestas ofertas|apuestas online|apuestas online argentina|apuestas online argentina
legal|apuestas online bono|apuestas online bono bienvenida|apuestas online boxeo|apuestas online caballos|apuestas online carreras de caballos|apuestas online
casino|apuestas online champions league|apuestas online chile|apuestas online ciclismo|apuestas online colombia|apuestas online comparativa|apuestas
online con paypal|apuestas online de caballos|apuestas online
deportivas|apuestas online en argentina|apuestas
online en peru|apuestas online espana|apuestas
online españa|apuestas online esports|apuestas online foro|apuestas
online futbol|apuestas online futbol españa|apuestas online golf|apuestas online
gratis|apuestas online gratis sin deposito|apuestas online juegos|apuestas online mexico|apuestas online
mma|apuestas online movil|apuestas online nba|apuestas online net|apuestas online nuevas|apuestas online opiniones|apuestas online paypal|apuestas online peru|apuestas online seguras|apuestas online sin dinero|apuestas online sin registro|apuestas
online tenis|apuestas online ufc|apuestas online uruguay|apuestas online
venezuela|apuestas open britanico golf|apuestas osasuna athletic|apuestas osasuna barcelona|apuestas
osasuna real madrid|apuestas osasuna sevilla|apuestas osasuna valencia|apuestas over|apuestas over 2.5|apuestas over under|apuestas paginas|apuestas pago
anticipado|apuestas paises bajos ecuador|apuestas paises bajos inglaterra|apuestas países bajos qatar|apuestas para
boxeo|apuestas para champions league|apuestas para el clasico|apuestas para el dia de
hoy|apuestas para el mundial|apuestas para el partido
de hoy|apuestas para eurocopa|apuestas para europa league|apuestas
para futbol|apuestas para ganar|apuestas para ganar dinero|apuestas
para ganar dinero facil|apuestas para ganar en la ruleta|apuestas para ganar la champions|apuestas para ganar
la eurocopa|apuestas para ganar la europa league|apuestas para ganar la liga|apuestas para ganar siempre|apuestas
para hacer|apuestas para hoy|apuestas para hoy de futbol|apuestas
para hoy europa league|apuestas para hoy futbol|apuestas para juegos|apuestas
para la champions league|apuestas para la copa del rey|apuestas
para la eurocopa|apuestas para la europa league|apuestas para la final de la eurocopa|apuestas para la nba
hoy|apuestas para los partidos de hoy|apuestas
para partidos de hoy|apuestas para ufc|apuestas partido|apuestas partido aplazado|apuestas partido champions|apuestas
partido colombia|apuestas partido españa marruecos|apuestas partido mundial|apuestas partido suspendido|apuestas partidos|apuestas partidos champions league|apuestas
partidos csgo|apuestas partidos de futbol|apuestas partidos de futbol hoy|apuestas partidos de
hoy|apuestas partidos eurocopa|apuestas partidos futbol|apuestas partidos hoy|apuestas partidos mundial|apuestas
paypal|apuestas peleas de boxeo|apuestas peru|apuestas perú|apuestas peru brasil|apuestas
peru chile|apuestas peru paraguay|apuestas peru uruguay|apuestas peru vs chile|apuestas peru vs colombia|apuestas pichichi eurocopa|apuestas plataforma|apuestas playoff|apuestas playoff ascenso|apuestas playoff ascenso a
primera|apuestas playoff nba|apuestas playoff segunda|apuestas playoff segunda b|apuestas playoffs nba|apuestas playoffs nfl|apuestas polonia argentina|apuestas por
argentina|apuestas por internet mexico|apuestas por internet para ganar dinero|apuestas por paypal|apuestas por ronda boxeo|apuestas por sistema|apuestas
portugal uruguay|apuestas pre partido|apuestas predicciones|apuestas predicciones futbol|apuestas primera division|apuestas primera division españa|apuestas promociones|apuestas pronostico|apuestas pronosticos|apuestas
pronosticos deportivos|apuestas pronosticos deportivos
tenis|apuestas pronosticos futbol|apuestas pronosticos gratis|apuestas pronosticos nba|apuestas pronosticos
tenis|apuestas prorroga|apuestas psg barca|apuestas psg barcelona|apuestas
puntos por tarjetas|apuestas puntos tarjetas|apuestas que aceptan paypal|apuestas que
es handicap|apuestas que puedes hacer con tu novia|apuestas que siempre ganaras|apuestas que significa|apuestas quien bajara a segunda|apuestas quién bajara a segunda|apuestas quien gana el mundial|apuestas
quien gana eurocopa|apuestas quien gana la champions|apuestas quien gana la
eurocopa|apuestas quien gana la liga|apuestas
quien ganara el mundial|apuestas quién ganará el mundial|apuestas quien ganara la champions|apuestas quien ganara la
eurocopa|apuestas quien ganara la liga|apuestas rayo barcelona|apuestas real madrid|apuestas real madrid arsenal|apuestas real
madrid athletic|apuestas real madrid atletico|apuestas real madrid atletico champions|apuestas real madrid atletico
de madrid|apuestas real madrid atlético de madrid|apuestas real madrid atletico madrid|apuestas real madrid barcelona|apuestas
real madrid bayern|apuestas real madrid betis|apuestas real madrid borussia|apuestas real madrid campeon champions|apuestas real madrid
celta|apuestas real madrid champions|apuestas real madrid city|apuestas real madrid girona|apuestas real madrid hoy|apuestas real madrid liverpool|apuestas real madrid manchester city|apuestas real madrid
osasuna|apuestas real madrid real sociedad|apuestas
real madrid valencia|apuestas real madrid villarreal|apuestas real madrid vs arsenal|apuestas real madrid vs atletico|apuestas real madrid vs
atlético|apuestas real madrid vs atletico madrid|apuestas real madrid vs barcelona|apuestas real madrid vs betis|apuestas real madrid vs sevilla|apuestas real madrid
vs valencia|apuestas real sociedad|apuestas real sociedad athletic|apuestas real sociedad barcelona|apuestas real sociedad betis|apuestas real sociedad psg|apuestas real sociedad
real madrid|apuestas real sociedad valencia|apuestas recomendadas
hoy|apuestas regalo de bienvenida|apuestas registro|apuestas resultado exacto|apuestas resultados|apuestas resultados eurocopa|apuestas retirada tenis|apuestas roma
barcelona|apuestas roma sevilla|apuestas rugby|apuestas rugby mundial|apuestas rugby
world cup|apuestas ruleta seguras|apuestas segunda|apuestas segunda b|apuestas segunda division|apuestas segunda división|apuestas segunda
division b|apuestas segunda division españa|apuestas
seguras|apuestas seguras baloncesto|apuestas seguras calculadora|apuestas seguras en la ruleta|apuestas seguras eurocopa|apuestas seguras foro|apuestas seguras futbol|apuestas seguras futbol hoy|apuestas seguras gratis|apuestas seguras
hoy|apuestas seguras hoy futbol|apuestas seguras nba|apuestas seguras
nba hoy|apuestas seguras para este fin de semana|apuestas seguras para ganar dinero|apuestas seguras para hoy|apuestas seguras para hoy fútbol|apuestas seguras para hoy pronósticos|apuestas seguras para mañana|apuestas seguras ruleta|apuestas seguras telegram|apuestas seguras tenis|apuestas
semifinales eurocopa|apuestas senegal paises bajos|apuestas sevilla|apuestas sevilla athletic|apuestas sevilla atletico de madrid|apuestas sevilla barcelona|apuestas sevilla betis|apuestas sevilla campeon liga|apuestas sevilla celta|apuestas
sevilla gana la liga|apuestas sevilla girona|apuestas sevilla inter|apuestas sevilla
jugador|apuestas sevilla juventus|apuestas sevilla leganes|apuestas sevilla madrid|apuestas sevilla manchester united|apuestas sevilla
osasuna|apuestas sevilla real madrid|apuestas sevilla real sociedad|apuestas sevilla roma|apuestas sevilla valencia|apuestas significa|apuestas simples ejemplos|apuestas simples o combinadas|apuestas
sin deposito|apuestas sin deposito inicial|apuestas sin deposito minimo|apuestas
sin dinero|apuestas sin dinero real|apuestas sin empate|apuestas sin empate que significa|apuestas sin ingreso minimo|apuestas sin registro|apuestas sistema|apuestas
sistema calculadora|apuestas sistema como funciona|apuestas sistema trixie|apuestas sociedad|apuestas sorteo copa
del rey|apuestas stake|apuestas stake 10|apuestas stake 10 hoy|apuestas super bowl favorito|apuestas super rugby|apuestas supercopa españa|apuestas superliga argentina|apuestas tarjeta roja|apuestas tarjetas|apuestas tarjetas amarillas|apuestas tenis|apuestas tenis atp|apuestas tenis consejos|apuestas tenis copa
davis|apuestas tenis de mesa|apuestas tenis de mesa pronosticos|apuestas tenis en vivo|apuestas tenis femenino|apuestas
tenis hoy|apuestas tenis itf|apuestas tenis pronosticos|apuestas tenis pronósticos|apuestas
tenis retirada|apuestas tenis roland garros|apuestas tenis seguras|apuestas tenis wimbledon|apuestas tenis
wta|apuestas tercera division|apuestas tercera division españa|apuestas tipos|apuestas tips|apuestas tipster|apuestas tipster para hoy|apuestas topuria holloway cuotas|apuestas torneos de golf|apuestas
torneos de tenis|apuestas trucos|apuestas uefa champions league|apuestas uefa europa league|apuestas ufc|apuestas
ufc chile|apuestas ufc como funciona|apuestas ufc hoy|apuestas ufc ilia topuria|apuestas ufc
online|apuestas ufc pronósticos|apuestas ufc telegram|apuestas ufc topuria|apuestas under over|apuestas unionistas villarreal|apuestas uruguay|apuestas uruguay colombia|apuestas
uruguay corea|apuestas uruguay vs colombia|apuestas us open golf|apuestas us open tenis|apuestas valencia|apuestas valencia barcelona|apuestas valencia betis|apuestas
valencia madrid|apuestas valencia real madrid|apuestas valladolid barcelona|apuestas valladolid valencia|apuestas valor app|apuestas valor en directo|apuestas valor galgos|apuestas venezuela|apuestas venezuela argentina|apuestas venezuela bolivia|apuestas venezuela ecuador|apuestas villarreal|apuestas villarreal athletic|apuestas villarreal barcelona|apuestas villarreal bayern|apuestas villarreal betis|apuestas villarreal liverpool|apuestas villarreal manchester|apuestas villarreal manchester united|apuestas villarreal vs real madrid|apuestas virtuales|apuestas virtuales colombia|apuestas virtuales
futbol|apuestas virtuales sin dinero|apuestas vivo|apuestas
vuelta a españa|apuestas vuelta españa|apuestas
william hill partidos de hoy|apuestas y casino|apuestas y casinos|apuestas y juegos de azar|apuestas y pronosticos|apuestas y pronosticos de futbol|apuestas y pronosticos deportivos|apuestas y resultados|apuestas-deportivas|apuestas-deportivas.es pronosticos|arbitro nba apuestas|argentina apuestas|argentina
colombia apuestas|argentina croacia apuestas|argentina francia apuestas|argentina mexico apuestas|argentina peru
apuestas|argentina uruguay apuestas|argentina vs bolivia
apuestas|argentina vs chile apuestas|argentina vs colombia
apuestas|argentina vs francia apuestas|argentina vs.
colombia apuestas|asi se gana en las apuestas deportivas|asiatico apuestas|asiatico en apuestas|asiaticos apuestas|athletic
barcelona apuestas|athletic manchester united apuestas|athletic
osasuna apuestas|athletic real madrid apuestas|atletico barcelona
apuestas|atletico de madrid apuestas|atlético de madrid apuestas|atletico de
madrid real madrid apuestas|atletico de madrid vs barcelona apuestas|atletico madrid real madrid apuestas|atletico madrid
vs real madrid apuestas|atletico real madrid
apuestas|atletico vs real madrid apuestas|avisador de cuotas apuestas|bajada de cuotas apuestas|baloncesto apuestas|barbastro barcelona apuestas|barca apuestas|barca bayern apuestas|barca inter apuestas|barca madrid apuestas|barça
madrid apuestas|barca vs atletico apuestas|barca vs madrid apuestas|barca vs real madrid apuestas|barcelona
– real madrid apuestas|barcelona apuestas|barcelona atletico apuestas|barcelona atletico de
madrid apuestas|barcelona atletico madrid apuestas|barcelona betis apuestas|barcelona casa
de apuestas|barcelona inter apuestas|barcelona psg apuestas|barcelona real madrid apuestas|barcelona
real sociedad apuestas|barcelona sevilla apuestas|barcelona valencia apuestas|barcelona vs athletic bilbao apuestas|barcelona vs atlético madrid
apuestas|barcelona vs betis apuestas|barcelona vs celta de vigo apuestas|barcelona vs espanyol apuestas|barcelona vs
girona apuestas|barcelona vs madrid apuestas|barcelona vs real madrid apuestas|barcelona vs
real sociedad apuestas|barcelona vs sevilla apuestas|barcelona vs villarreal apuestas|base de datos cuotas apuestas deportivas|bayern real madrid apuestas|beisbol apuestas|best america
apuestas|bet apuestas chile|bet apuestas en vivo|betis – chelsea
apuestas|betis apuestas|betis barcelona apuestas|betis chelsea apuestas|betis madrid apuestas|betis sevilla apuestas|betsson tu sitio de apuestas online|blog apuestas baloncesto|blog apuestas ciclismo|blog apuestas nba|blog apuestas tenis|blog de apuestas de tenis|bono apuestas|bono apuestas deportivas|bono
apuestas deportivas sin deposito|bono apuestas gratis|bono apuestas gratis sin deposito|bono apuestas sin deposito|bono bienvenida
apuestas|bono bienvenida apuestas deportivas|bono bienvenida
apuestas españa|bono bienvenida apuestas sin deposito|bono bienvenida apuestas sin depósito|bono bienvenida casa apuestas|bono bienvenida casa de apuestas|bono bienvenida marca apuestas|bono casa apuestas|bono casa de apuestas|bono casa de apuestas sin ingreso|bono
casas de apuestas|bono de apuestas|bono de apuestas gratis sin deposito|bono de
bienvenida apuestas|bono de bienvenida apuestas deportivas|bono
de bienvenida casa de apuestas|bono de bienvenida casas de apuestas|bono de casas de apuestas|bono de registro apuestas|bono de registro apuestas deportivas|bono de registro casa de apuestas|bono gratis apuestas|bono marca apuestas|bono por registro apuestas|bono
por registro apuestas deportivas|bono por registro casa de apuestas|bono registro apuestas|bono sin deposito apuestas|bono sin depósito apuestas|bono sin deposito apuestas deportivas|bono
sin depósito apuestas deportivas|bono sin deposito casa de apuestas|bono sin deposito marca apuestas|bono sin ingreso apuestas|bono sin ingreso apuestas deportivas|bonos apuestas|bonos apuestas colombia|bonos apuestas deportivas|bonos apuestas deportivas sin deposito|bonos apuestas gratis|bonos
apuestas sin deposito|bonos apuestas sin depósito|bonos bienvenida
apuestas|bonos bienvenida casas apuestas|bonos bienvenida
casas de apuestas|bonos casa de apuestas|bonos casas apuestas|bonos casas de apuestas|bonos casas de apuestas colombia|bonos casas de apuestas deportivas|bonos casas de apuestas españa|bonos casas de apuestas nuevas|bonos casas de apuestas sin deposito|bonos casas
de apuestas sin depósito|bonos de apuestas|bonos de apuestas deportivas|bonos de apuestas gratis|bonos de apuestas sin deposito|bonos de bienvenida apuestas|bonos de
bienvenida apuestas deportivas|bonos de bienvenida casa de apuestas|bonos de bienvenida casas de apuestas|bonos de bienvenida de casas de apuestas|bonos de bienvenida en casas de apuestas|bonos de casas de apuestas|bonos de casas
de apuestas sin deposito|bonos en casa de apuestas|bonos en casas de apuestas sin deposito|bonos gratis apuestas|bonos gratis apuestas deportivas|bonos gratis
casas de apuestas|bonos gratis sin deposito apuestas|bonos paginas de apuestas|bonos registro casas de apuestas|bonos sin deposito
apuestas|bonos sin depósito apuestas|bonos sin deposito apuestas deportivas|bonos sin deposito casas de apuestas|bot de apuestas deportivas gratis|boxeo
apuestas|brasil colombia apuestas|brasil peru apuestas|brasil vs colombia apuestas|buenas apuestas
para hoy|buscador cuotas apuestas|buscador de apuestas seguras|buscador de
cuotas apuestas|buscador de cuotas de apuestas|buscar
apuestas seguras|caballos apuestas|calculador de apuestas|calculador de cuotas apuestas|calculadora apuestas|calculadora apuestas combinadas|calculadora apuestas de
sistema|calculadora apuestas deportivas|calculadora apuestas deportivas seguras|calculadora apuestas multiples|calculadora apuestas segura|calculadora apuestas seguras|calculadora apuestas sistema|calculadora apuestas yankee|calculadora arbitraje apuestas|calculadora cubrir apuestas|calculadora
cuotas apuestas|calculadora de apuestas|calculadora de apuestas combinadas|calculadora de apuestas de
futbol|calculadora de apuestas de sistema|calculadora de apuestas deportivas|calculadora de apuestas multiples|calculadora de apuestas seguras|calculadora de apuestas
sistema|calculadora de apuestas surebets|calculadora
de arbitraje apuestas|calculadora de cuotas apuestas|calculadora de cuotas de apuestas|calculadora para apuestas deportivas|calculadora poisson apuestas|calculadora poisson apuestas deportivas|calculadora poisson para apuestas|calculadora scalping apuestas deportivas|calculadora
sistema apuestas|calculadora stake apuestas|calculadora trading apuestas|calcular apuestas|calcular apuestas deportivas|calcular apuestas futbol|calcular apuestas
sistema|calcular cuotas apuestas|calcular cuotas apuestas combinadas|calcular cuotas apuestas deportivas|calcular
cuotas de apuestas|calcular ganancias apuestas deportivas|calcular momios apuestas|calcular probabilidad cuota apuestas|calcular stake apuestas|calcular unidades apuestas|calcular yield
apuestas|calculo de apuestas|calculo de apuestas deportivas|cambio de cuotas
apuestas|campeon champions apuestas|campeon eurocopa apuestas|campeon liga apuestas|campeon nba apuestas|canales de apuestas gratis|carrera de caballos apuestas|carrera
de caballos apuestas juego|carrera de caballos con apuestas|carrera de
galgos apuestas|carreras de caballos apuestas|carreras de caballos apuestas online|carreras de caballos con apuestas|carreras
de caballos juegos de apuestas|carreras de galgos apuestas|carreras de galgos apuestas
online|carreras de galgos apuestas trucos|carreras galgos apuestas|casa apuestas argentina|casa apuestas atletico
de madrid|casa apuestas barcelona|casa apuestas betis|casa apuestas bono bienvenida|casa apuestas bono gratis|casa apuestas bono sin deposito|casa
apuestas cerca de mi|casa apuestas chile|casa apuestas colombia|casa
apuestas con mejores cuotas|casa apuestas deportivas|casa apuestas españa|casa apuestas española|casa apuestas eurocopa|casa apuestas futbol|casa apuestas mejores cuotas|casa apuestas mundial|casa apuestas nueva|casa apuestas nuevas|casa apuestas online|casa apuestas peru|casa apuestas
valencia|casa de apuestas|casa de apuestas 10 euros gratis|casa
de apuestas argentina|casa de apuestas atletico de madrid|casa de apuestas baloncesto|casa de
apuestas barcelona|casa de apuestas beisbol|casa de apuestas betis|casa de apuestas bono|casa de apuestas bono bienvenida|casa
de apuestas bono de bienvenida|casa de apuestas bono
gratis|casa de apuestas bono por registro|casa de apuestas
bono sin deposito|casa de apuestas boxeo|casa de apuestas caballos|casa de apuestas carreras de caballos|casa de apuestas cerca de mi|casa de apuestas cerca de
mí|casa de apuestas champions league|casa de apuestas chile|casa de apuestas ciclismo|casa
de apuestas colombia|casa de apuestas con bono de bienvenida|casa de apuestas con bono sin deposito|casa de apuestas con cuotas mas
altas|casa de apuestas con esports|casa de apuestas
con las mejores cuotas|casa de apuestas con licencia en españa|casa de apuestas
con mejores cuotas|casa de apuestas con pago
anticipado|casa de apuestas con paypal|casa de apuestas copa america|casa de apuestas de caballos|casa de apuestas de colombia|casa de apuestas de
españa|casa de apuestas de futbol|casa de apuestas de fútbol|casa de apuestas de futbol peru|casa de apuestas de peru|casa de apuestas
del madrid|casa de apuestas del real madrid|casa de apuestas deportivas|casa de apuestas deportivas cerca de mi|casa de apuestas deportivas en argentina|casa de apuestas deportivas en chile|casa
de apuestas deportivas en colombia|casa de apuestas deportivas
en españa|casa de apuestas deportivas en madrid|casa de
apuestas deportivas españa|casa de apuestas deportivas españolas|casa de apuestas deportivas madrid|casa de apuestas deportivas mexico|casa de apuestas
deportivas online|casa de apuestas deportivas peru|casa de apuestas deposito 5 euros|casa de
apuestas deposito minimo|casa de apuestas deposito minimo 1 euro|casa de apuestas depósito mínimo 1 euro|casa de
apuestas en españa|casa de apuestas en linea|casa de apuestas en madrid|casa de apuestas en perú|casa de apuestas en vivo|casa de apuestas españa|casa de apuestas españa inglaterra|casa de apuestas
española|casa de apuestas españolas|casa de apuestas esports|casa de apuestas eurocopa|casa de apuestas europa league|casa de apuestas f1|casa de apuestas
formula 1|casa de apuestas futbol|casa de
apuestas ingreso minimo|casa de apuestas ingreso minimo 1 euro|casa de apuestas ingreso mínimo
1 euro|casa de apuestas legales|casa de apuestas legales en colombia|casa
de apuestas legales en españa|casa de apuestas libertadores|casa de apuestas liga española|casa
de apuestas madrid|casa de apuestas mas segura|casa de apuestas mejores|casa de
apuestas méxico|casa de apuestas minimo 5 euros|casa de apuestas mlb|casa de apuestas mundial|casa de apuestas nba|casa de apuestas nfl|casa de apuestas
nueva|casa de apuestas nuevas|casa de apuestas oficial del real madrid|casa de
apuestas oficial real madrid|casa de apuestas online|casa de apuestas online argentina|casa de apuestas online chile|casa de apuestas online españa|casa de apuestas
online mexico|casa de apuestas online paraguay|casa de apuestas
online peru|casa de apuestas online usa|casa de apuestas online venezuela|casa
de apuestas pago anticipado|casa de apuestas para boxeo|casa
de apuestas para ufc|casa de apuestas peru|casa de apuestas perú|casa de apuestas peru online|casa de apuestas por paypal|casa de apuestas
promociones|casa de apuestas que regalan dinero|casa de apuestas real madrid|casa de apuestas
regalo de bienvenida|casa de apuestas sevilla|casa de apuestas
sin dinero|casa de apuestas sin ingreso minimo|casa de apuestas sin licencia en españa|casa de
apuestas sin minimo de ingreso|casa de apuestas stake|casa
de apuestas tenis|casa de apuestas ufc|casa de apuestas valencia|casa de
apuestas venezuela|casa de apuestas virtuales|casa de apuestas vive la suerte|casa oficial de apuestas
del real madrid|casas apuestas asiaticas|casas
apuestas bono sin deposito|casas apuestas bonos sin deposito|casas apuestas
caballos|casas apuestas chile|casas apuestas ciclismo|casas apuestas con licencia|casas apuestas con licencia en españa|casas
apuestas deportivas|casas apuestas deportivas colombia|casas apuestas deportivas españa|casas apuestas deportivas españolas|casas apuestas deportivas nuevas|casas apuestas españa|casas apuestas españolas|casas apuestas esports|casas apuestas eurocopa|casas apuestas
golf|casas apuestas ingreso minimo 5 euros|casas apuestas legales|casas apuestas legales españa|casas apuestas licencia|casas apuestas licencia españa|casas apuestas mexico|casas apuestas mundial|casas apuestas nba|casas apuestas nuevas|casas apuestas nuevas españa|casas apuestas ofertas|casas apuestas
online|casas apuestas paypal|casas apuestas peru|casas
apuestas sin licencia|casas apuestas tenis|casas asiaticas apuestas|casas
de apuestas|casas de apuestas 5 euros|casas de apuestas app|casas de
apuestas argentinas|casas de apuestas asiaticas|casas de apuestas baloncesto|casas
de apuestas barcelona|casas de apuestas bono bienvenida|casas de apuestas bono
de bienvenida|casas de apuestas bono por registro|casas de apuestas bono
sin deposito|casas de apuestas bono sin ingreso|casas de apuestas bonos|casas de
apuestas bonos de bienvenida|casas de apuestas
bonos gratis|casas de apuestas bonos sin deposito|casas de apuestas boxeo|casas de apuestas caballos|casas
de apuestas carreras de caballos|casas de apuestas casino|casas de
apuestas casino online|casas de apuestas cerca de mi|casas de apuestas champions
league|casas de apuestas chile|casas de apuestas ciclismo|casas de apuestas colombia|casas de
apuestas com|casas de apuestas con app|casas de apuestas con apuestas gratis|casas de apuestas con bono|casas de apuestas con bono de bienvenida|casas de apuestas
con bono de registro|casas de apuestas con bono por registro|casas de apuestas
con bono sin deposito|casas de apuestas con bonos|casas
de apuestas con bonos gratis|casas de apuestas con bonos sin deposito|casas de apuestas con deposito minimo|casas de
apuestas con esports|casas de apuestas con handicap asiatico|casas de apuestas con licencia|casas
de apuestas con licencia en españa|casas de apuestas con licencia
españa|casas de apuestas con licencia española|casas de apuestas con mejores cuotas|casas de apuestas
con pago anticipado|casas de apuestas con paypal|casas de apuestas
con paypal en perú|casas de apuestas con promociones|casas de apuestas con ruleta en vivo|casas de apuestas copa del rey|casas de apuestas de caballos|casas de apuestas de españa|casas de apuestas de futbol|casas de apuestas de fútbol|casas de apuestas de peru|casas de apuestas deportivas|casas de apuestas deportivas asiaticas|casas de apuestas deportivas colombia|casas
de apuestas deportivas comparativa|casas de apuestas deportivas con paypal|casas de apuestas deportivas en chile|casas de apuestas deportivas en españa|casas de apuestas deportivas en linea|casas de apuestas deportivas en madrid|casas de apuestas deportivas en mexico|casas de apuestas deportivas en peru|casas de apuestas deportivas en sevilla|casas de apuestas deportivas en valencia|casas de apuestas deportivas españa|casas de apuestas deportivas españolas|casas de apuestas deportivas legales|casas de apuestas deportivas madrid|casas de apuestas deportivas mexico|casas de apuestas deportivas nuevas|casas de apuestas deportivas online|casas de apuestas deportivas peru|casas de
apuestas deportivas perú|casas de apuestas deposito minimo 1
euro|casas de apuestas depósito mínimo 1 euro|casas de apuestas dinero gratis|casas de apuestas en argentina|casas de
apuestas en barcelona|casas de apuestas en chile|casas de apuestas en colombia|casas de apuestas en españa|casas de apuestas en españa online|casas de apuestas en linea|casas de apuestas
en madrid|casas de apuestas en méxico|casas de apuestas en peru|casas de apuestas en perú|casas de apuestas en sevilla|casas
de apuestas en uruguay|casas de apuestas en valencia|casas de apuestas en venezuela|casas de apuestas equipos de
futbol|casas de apuestas españa|casas de apuestas españa alemania|casas de apuestas españa inglaterra|casas de apuestas españa licencia|casas de apuestas españa nuevas|casas de apuestas españa online|casas de apuestas española|casas de apuestas
españolas|casas de apuestas españolas con licencia|casas de apuestas españolas
online|casas de apuestas esports|casas de apuestas eurocopa|casas de
apuestas eurocopa 2024|casas de apuestas europa league|casas de
apuestas f1|casas de apuestas fisicas en barcelona|casas de apuestas fisicas en españa|casas de apuestas formula 1|casas de apuestas fuera de españa|casas de apuestas futbol|casas de apuestas fútbol|casas de apuestas futbol españa|casas de apuestas ganador eurocopa|casas de apuestas gratis|casas de apuestas ingreso minimo|casas de apuestas ingreso minimo 1 euro|casas de apuestas
ingreso minimo 5 euros|casas de apuestas inter barcelona|casas de apuestas legales|casas de
apuestas legales en colombia|casas de apuestas legales en españa|casas de apuestas legales en mexico|casas
de apuestas legales españa|casas de apuestas legales mx|casas
de apuestas licencia|casas de apuestas licencia españa|casas
de apuestas lista|casas de apuestas madrid|casas de apuestas
mas seguras|casas de apuestas mejores bonos|casas de apuestas mejores cuotas|casas de apuestas
mexico|casas de apuestas méxico|casas de apuestas minimo 5 euros|casas de apuestas mlb|casas de apuestas mundial|casas de apuestas
mundial baloncesto|casas de apuestas mundiales|casas de apuestas nba|casas de
apuestas no reguladas en españa|casas de apuestas nueva ley|casas de
apuestas nuevas|casas de apuestas nuevas en colombia|casas de apuestas nuevas en españa|casas de apuestas nuevas españa|casas de apuestas ofertas|casas de apuestas
online|casas de apuestas online argentina|casas de apuestas online colombia|casas de apuestas online deportivas|casas de apuestas online ecuador|casas de apuestas online en argentina|casas de apuestas online en chile|casas de apuestas online en colombia|casas de apuestas
online en españa|casas de apuestas online en mexico|casas de apuestas online españa|casas de apuestas online mas fiables|casas de apuestas online mexico|casas de apuestas
online nuevas|casas de apuestas online peru|casas de apuestas
online usa|casas de apuestas online venezuela|casas de apuestas
pago paypal|casas de apuestas para ufc|casas de apuestas paypal|casas de apuestas peru bono sin deposito|casas de apuestas
presenciales en españa|casas
Your comment is awaiting moderation.
vavada casino pl
Inwestycja w dzialke w tym regionie to doskonaly sposob na polaczenie przyjemnego z pozytecznym.
Dzieki rozwijajacej sie infrastrukturze i rosnacemu zainteresowaniu turystow, ceny dzialek stopniowo wzrastaja. Coraz wiecej osob docenia spokoj i piekno przyrody, jakie oferuja Beskidy.
#### **2. Gdzie szukac najlepszych ofert dzialek?**
Wybor odpowiedniej lokalizacji zalezy od indywidualnych potrzeb i budzetu. Warto sprawdzic profesjonalne strony internetowe, takie jak dzialki-beskidy.pl, ktore prezentuja sprawdzone oferty.
Przed zakupem nalezy dokladnie przeanalizowac dostepnosc mediow i warunki zabudowy. Wiele ofert zawiera szczegolowe informacje o mozliwosciach zagospodarowania terenu, co ulatwia podjecie decyzji.
#### **3. Jakie korzysci daje posiadanie dzialki w Beskidach?**
Nieruchomosc w gorach to nie tylko inwestycja finansowa, ale rowniez szansa na poprawe jakosci zycia. Wlasny kawalek ziemi w gorach pozwala na realizacje marzen o spokojnym zyciu z dala od zgielku miasta.
Dodatkowo, region ten oferuje wiele atrakcji, takich jak szlaki turystyczne i stoki narciarskie. Coraz wiecej osob wybiera te lokalizacje ze wzgledu na dobrze rozwinieta baze rekreacyjna.
#### **4. Jak przygotowac sie do zakupu dzialki?**
Przed podjeciem decyzji warto skonsultowac sie z prawnikiem i geodeta. Profesjonalna pomoc pozwoli uniknac nieprzyjemnych niespodzianek zwiazanych z formalnosciami.
Wazne jest rowniez okreslenie swojego budzetu i planow zwiazanych z zagospodarowaniem terenu. Niektore oferty pozwalaja na rozlozenie platnosci, co ulatwia inwestycje.
—
### **Szablon Spinu**
**1. Dlaczego warto kupic dzialke w Beskidach?**
– Inwestowanie w dzialki w tym regionie to swietny sposob na zabezpieczenie finansowej przyszlosci.
– Dzieki rozwojowi infrastruktury, tereny te staja sie jeszcze bardziej atrakcyjne.
**2. Gdzie szukac najlepszych ofert dzialek?**
– Profesjonalne agencje nieruchomosci czesto oferuja najlepsze propozycje w regionie.
– Przed zakupem nalezy zweryfikowac dostepnosc mediow i mozliwosci zabudowy.
**3. Jakie korzysci daje posiadanie dzialki w Beskidach?**
– Dzialka w Beskidach moze stac sie zrodlem dodatkowego dochodu dzieki wynajmowaniu turystom.
– Wlasciciele dzialek moga uczestniczyc w lokalnych wydarzeniach i festiwalach.
**4. Jak przygotowac sie do zakupu dzialki?**
– Wazne jest zasiegniecie porady prawnej przed podpisaniem umowy.
– Okreslenie budzetu i celow inwestycji ulatwi podjecie wlasciwej decyzji.
Your comment is awaiting moderation.
понравилось очень!!!!!! https://www.rwaq.org/users/baqxeyvk8884kn-20251102224859 https://www.divephotoguide.com/user/ygaceobegiuu http://www.pageorama.com/?p=wofoyybab https://rant.li/cocnidaea/shelkovskaia-kupit-kokain-mefedron-marikhuanu-boshki https://www.band.us/page/100503711/ https://bio.site/acocudeu ты уже третий у кого посыль подлетела может продавец как то разьяснит ситуацию ну ладно у одного ну ладно у второго но трое это уже какая то система ждемс уважаемый ТС Ваших обяснений
Your comment is awaiting moderation.
(10 euros gratis apuestas|10 mejores casas de
apuestas|10 trucos para ganar apuestas|15 euros gratis marca apuestas|1×2 apuestas|1×2
apuestas deportivas|1×2 apuestas que significa|1×2 en apuestas|1×2 en apuestas que significa|1×2 que significa en apuestas|5 euros gratis apuestas|9 apuestas que siempre ganaras|a partir de
cuanto se declara apuestas|actividades de juegos de azar y apuestas|ad apuestas deportivas|aleksandre
topuria ufc apuestas|algoritmo para ganar apuestas deportivas|america
apuestas|análisis nba apuestas|aplicacion android apuestas deportivas|aplicacion apuestas deportivas|aplicacion apuestas deportivas android|aplicación de apuestas online|aplicacion para hacer apuestas|aplicacion para hacer apuestas de futbol|aplicación para hacer apuestas
de fútbol|aplicaciones apuestas deportivas android|aplicaciones apuestas deportivas gratis|aplicaciones de apuestas android|aplicaciones de apuestas
de fútbol|aplicaciones de apuestas deportivas|aplicaciones
de apuestas deportivas peru|aplicaciones de apuestas deportivas perú|aplicaciones de apuestas en colombia|aplicaciones de
apuestas gratis|aplicaciones de apuestas online|aplicaciones
de apuestas seguras|aplicaciones de apuestas sin dinero|aplicaciones para
hacer apuestas|apostar seguro apuestas deportivas|app android apuestas deportivas|app
apuestas|app apuestas android|app apuestas de futbol|app apuestas deportivas|app apuestas
deportivas android|app apuestas deportivas argentina|app apuestas deportivas colombia|app apuestas deportivas ecuador|app apuestas deportivas españa|app
apuestas deportivas gratis|app apuestas entre amigos|app apuestas futbol|app apuestas gratis|app apuestas sin dinero|app casa de apuestas|app casas
de apuestas|app control apuestas|app de apuestas|app de apuestas android|app de apuestas casino|app de apuestas colombia|app de apuestas con bono de bienvenida|app de apuestas de futbol|app de apuestas
deportivas|app de apuestas deportivas android|app de apuestas deportivas argentina|app de apuestas deportivas colombia|app de apuestas deportivas en españa|app de apuestas deportivas peru|app de apuestas deportivas perú|app de apuestas deportivas sin dinero|app de apuestas
ecuador|app de apuestas en colombia|app de apuestas en españa|app
de apuestas en venezuela|app de apuestas futbol|app de apuestas gratis|app de apuestas online|app de apuestas para android|app de
apuestas para ganar dinero|app de apuestas peru|app de apuestas reales|app de casas de apuestas|app marca apuestas android|app moviles de apuestas|app para apuestas|app para apuestas de futbol|app para apuestas deportivas|app para
apuestas deportivas en español|app para ganar apuestas deportivas|app para
hacer apuestas|app para hacer apuestas deportivas|app para hacer apuestas entre amigos|app para llevar
control de apuestas|app pronosticos apuestas deportivas|app versus apuestas|apps
apuestas mundial|apps de apuestas|apps de apuestas con bono de bienvenida|apps de apuestas de futbol|apps de apuestas deportivas peru|apps de
apuestas mexico|apps para apuestas|aprender a hacer apuestas deportivas|aprender hacer apuestas
deportivas|apuesta del dia apuestas deportivas|apuestas 10 euros gratis|apuestas 100 seguras|apuestas 1×2|apuestas 1X2|apuestas 2 division|apuestas 3 division|apuestas a caballos|apuestas
a carreras de caballos|apuestas a colombia|apuestas a corners|apuestas a ganar|apuestas a jugadores nba|apuestas a la baja|apuestas a la nfl|apuestas al barcelona|apuestas al
dia|apuestas al empate|apuestas al mundial|apuestas al tenis wta|apuestas alaves barcelona|apuestas
alcaraz hoy|apuestas alemania españa|apuestas alonso campeon del mundo|apuestas altas y bajas|apuestas altas y bajas
nfl|apuestas ambos equipos marcan|apuestas america|apuestas android|apuestas anillo nba|apuestas antes del mundial|apuestas anticipadas|apuestas anticipadas nba|apuestas apps|apuestas arabia argentina|apuestas argentina|apuestas
argentina campeon del mundo|apuestas argentina canada|apuestas argentina colombia|apuestas argentina croacia|apuestas argentina españa|apuestas argentina francia|apuestas argentina
francia cuanto paga|apuestas argentina francia mundial|apuestas argentina gana el mundial|apuestas argentina gana mundial|apuestas argentina holanda|apuestas argentina mexico|apuestas argentina méxico|apuestas argentina mundial|apuestas argentina online|apuestas argentina paises bajos|apuestas argentina polonia|apuestas
argentina uruguay|apuestas argentina vs australia|apuestas argentina vs colombia|apuestas argentina vs francia|apuestas argentina vs peru|apuestas argentinas|apuestas arsenal real madrid|apuestas ascenso a primera division|apuestas
ascenso a segunda|apuestas asiaticas|apuestas asiatico|apuestas athletic|apuestas athletic atletico|apuestas athletic barça|apuestas athletic barcelona|apuestas athletic betis|apuestas athletic manchester|apuestas athletic manchester united|apuestas athletic
osasuna|apuestas athletic real|apuestas athletic real madrid|apuestas athletic real sociedad|apuestas
athletic real sociedad final|apuestas athletic roma|apuestas athletic sevilla|apuestas athletic
valencia|apuestas atletico|apuestas atletico barcelona|apuestas atletico barsa|apuestas atletico campeon champions|apuestas atletico campeon de
liga|apuestas atlético copenhague|apuestas atletico
de madrid|apuestas atlético de madrid|apuestas atletico de madrid barcelona|apuestas atletico de madrid gana
la liga|apuestas atletico de madrid real madrid|apuestas atlético de
madrid real madrid|apuestas atletico de madrid vs barcelona|apuestas atletico madrid|apuestas atletico madrid real madrid|apuestas atletico madrid vs barcelona|apuestas atletico real madrid|apuestas
atletico real madrid champions|apuestas atletismo|apuestas bajas|apuestas baloncesto|apuestas baloncesto
acb|apuestas baloncesto handicap|apuestas baloncesto hoy|apuestas baloncesto juegos olimpicos|apuestas baloncesto nba|apuestas
baloncesto pronostico|apuestas baloncesto pronósticos|apuestas
baloncesto prorroga|apuestas barca|apuestas barca athletic|apuestas barca atletico|apuestas barca bayern|apuestas barca bayern munich|apuestas barca girona|apuestas barca hoy|apuestas barça
hoy|apuestas barca inter|apuestas barca juventus|apuestas barca madrid|apuestas barça madrid|apuestas barca real
madrid|apuestas barca vs juve|apuestas barca vs madrid|apuestas barca vs psg|apuestas barcelona|apuestas barcelona alaves|apuestas barcelona
athletic|apuestas barcelona atletico|apuestas barcelona atletico de madrid|apuestas barcelona atlético de madrid|apuestas barcelona atletico madrid|apuestas barcelona bayern|apuestas barcelona betis|apuestas barcelona campeon de
liga|apuestas barcelona celta|apuestas barcelona espanyol|apuestas barcelona gana la
champions|apuestas barcelona girona|apuestas barcelona granada|apuestas
barcelona hoy|apuestas barcelona inter|apuestas barcelona madrid|apuestas
barcelona osasuna|apuestas barcelona psg|apuestas barcelona real madrid|apuestas barcelona real sociedad|apuestas
barcelona sevilla|apuestas barcelona valencia|apuestas barcelona
villarreal|apuestas barcelona vs atletico madrid|apuestas barcelona vs madrid|apuestas barcelona vs real madrid|apuestas barsa madrid|apuestas basket hoy|apuestas bayern barcelona|apuestas bayern vs barcelona|apuestas beisbol|apuestas béisbol|apuestas beisbol mlb|apuestas beisbol pronosticos|apuestas beisbol venezolano|apuestas betis|apuestas
betis – chelsea|apuestas betis barcelona|apuestas betis chelsea|apuestas betis fiorentina|apuestas betis
girona|apuestas betis madrid|apuestas betis mallorca|apuestas
betis real madrid|apuestas betis real sociedad|apuestas betis sevilla|apuestas betis valencia|apuestas betis valladolid|apuestas betis vs valencia|apuestas betplay hoy colombia|apuestas betsson peru|apuestas bienvenida|apuestas billar online|apuestas bolivia vs colombia|apuestas bono|apuestas bono bienvenida|apuestas bono
de bienvenida|apuestas bono de bienvenida sin deposito|apuestas bono gratis|apuestas bono sin deposito|apuestas
bonos sin deposito|apuestas borussia real madrid|apuestas boxeo|apuestas boxeo de campeonato|apuestas boxeo españa|apuestas
boxeo español|apuestas boxeo femenino olimpiadas|apuestas boxeo hoy|apuestas boxeo online|apuestas brasil colombia|apuestas brasil peru|apuestas
brasil uruguay|apuestas brasil vs colombia|apuestas brasil vs peru|apuestas caballos|apuestas caballos colocado|apuestas caballos españa|apuestas
caballos hipodromo|apuestas caballos hoy|apuestas
caballos madrid|apuestas caballos online|apuestas
caballos sanlucar de barrameda|apuestas caballos zarzuela|apuestas calculador|apuestas
campeon|apuestas campeon champions|apuestas
campeón champions|apuestas campeon champions 2025|apuestas campeon champions league|apuestas campeon conference league|apuestas
campeon copa america|apuestas campeon copa del rey|apuestas
campeon de champions|apuestas campeon de la champions|apuestas campeon de
liga|apuestas campeon del mundo|apuestas campeon eurocopa|apuestas
campeón eurocopa|apuestas campeon europa league|apuestas campeon f1|apuestas campeon f1 2025|apuestas campeon formula 1|apuestas campeon libertadores|apuestas campeon liga|apuestas campeon liga bbva|apuestas campeon liga española|apuestas campeon liga santander|apuestas campeon motogp
2025|apuestas campeon mundial|apuestas campeón mundial|apuestas campeon mundial baloncesto|apuestas campeon nba|apuestas campeón nba|apuestas campeon premier|apuestas campeon premier league|apuestas
campeon roland garros|apuestas campeonato f1|apuestas campeonatos de futbol|apuestas carrera de caballos|apuestas carrera
de caballos hoy|apuestas carrera de caballos nocturnas|apuestas carrera de galgos
fin de semana|apuestas carrera de galgos hoy|apuestas carrera de galgos nocturnas|apuestas carreras caballos|apuestas
carreras caballos sanlucar|apuestas carreras de caballos|apuestas carreras de caballos en directo|apuestas carreras de caballos en vivo|apuestas
carreras de caballos españa|apuestas carreras de caballos hoy|apuestas carreras de
caballos nacionales|apuestas carreras de caballos nocturnas|apuestas carreras de caballos
online|apuestas carreras de caballos sanlucar|apuestas
carreras de caballos sanlúcar|apuestas carreras de galgos|apuestas carreras
de galgos en vivo|apuestas carreras de galgos nocturnas|apuestas carreras de galgos pre
partido|apuestas casino|apuestas casino barcelona|apuestas casino futbol|apuestas casino gran madrid|apuestas casino gratis|apuestas casino
madrid|apuestas casino online|apuestas casino online argentina|apuestas casinos|apuestas
casinos online|apuestas celta|apuestas celta barcelona|apuestas celta betis|apuestas celta eibar|apuestas celta
espanyol|apuestas celta granada|apuestas celta madrid|apuestas celta manchester|apuestas celta real madrid|apuestas champion league|apuestas champions
foro|apuestas champions hoy|apuestas champions league|apuestas champions league
– pronósticos|apuestas champions league 2025|apuestas champions league hoy|apuestas champions league pronosticos|apuestas champions league pronósticos|apuestas
champions pronosticos|apuestas chelsea barcelona|apuestas chelsea
betis|apuestas chile|apuestas chile peru|apuestas chile venezuela|apuestas chile vs
colombia|apuestas chile vs uruguay|apuestas ciclismo|apuestas ciclismo en vivo|apuestas ciclismo femenino|apuestas ciclismo tour francia|apuestas ciclismo vuelta|apuestas ciclismo vuelta a españa|apuestas ciclismo vuelta
españa|apuestas city madrid|apuestas city real madrid|apuestas clasico|apuestas clasico español|apuestas clasico real madrid
barcelona|apuestas clasificacion mundial|apuestas colombia|apuestas colombia argentina|apuestas colombia brasil|apuestas colombia paraguay|apuestas colombia uruguay|apuestas colombia
vs argentina|apuestas colombia vs brasil|apuestas combinadas|apuestas combinadas
como funcionan|apuestas combinadas de futbol|apuestas combinadas de fútbol|apuestas combinadas foro|apuestas combinadas
futbol|apuestas combinadas hoy|apuestas combinadas mismo partido|apuestas combinadas mundial|apuestas combinadas nba|apuestas combinadas para esta semana|apuestas combinadas
para hoy|apuestas combinadas para mañana|apuestas combinadas pronosticos|apuestas combinadas
recomendadas|apuestas combinadas seguras|apuestas combinadas seguras para hoy|apuestas combinadas seguras
para mañana|apuestas como ganar|apuestas comparador|apuestas con bono de bienvenida|apuestas con dinero
ficticio|apuestas con dinero real|apuestas con dinero virtual|apuestas con handicap|apuestas con handicap asiatico|apuestas
con handicap baloncesto|apuestas con mas probabilidades de ganar|apuestas con paypal|apuestas con tarjeta de
credito|apuestas con tarjeta de debito|apuestas consejos|apuestas copa|apuestas copa
africa|apuestas copa america|apuestas copa américa|apuestas copa argentina|apuestas copa brasil|apuestas copa davis|apuestas copa de europa|apuestas copa del mundo|apuestas
copa del rey|apuestas copa del rey baloncesto|apuestas copa del rey final|apuestas copa del rey futbol|apuestas copa del rey ganador|apuestas copa del rey hoy|apuestas copa del rey pronosticos|apuestas copa del rey pronósticos|apuestas
copa europa|apuestas copa italia|apuestas copa libertadores|apuestas
copa mundial de hockey|apuestas copa rey|apuestas copa sudamericana|apuestas corners|apuestas corners hoy|apuestas croacia argentina|apuestas cuartos eurocopa|apuestas cuotas|apuestas
cuotas altas|apuestas cuotas bajas|apuestas de 1 euro|apuestas
de baloncesto|apuestas de baloncesto hoy|apuestas de baloncesto nba|apuestas de baloncesto para hoy|apuestas de beisbol|apuestas de beisbol para hoy|apuestas de blackjack en linea|apuestas de boxeo|apuestas de boxeo canelo|apuestas
de boxeo en las vegas|apuestas de boxeo hoy|apuestas de boxeo online|apuestas de caballo|apuestas
de caballos|apuestas de caballos como funciona|apuestas de caballos como se juega|apuestas de caballos en colombia|apuestas de caballos
en españa|apuestas de caballos en linea|apuestas
de caballos españa|apuestas de caballos ganador y colocado|apuestas de caballos internacionales|apuestas de caballos juegos|apuestas de caballos online|apuestas de caballos online en venezuela|apuestas de caballos por internet|apuestas de caballos pronosticos|apuestas de caballos pronósticos|apuestas de
carrera de caballos|apuestas de carreras de caballos|apuestas de carreras de caballos online|apuestas
de casino|apuestas de casino online|apuestas
de casino por internet|apuestas de champions league|apuestas de ciclismo|apuestas de colombia|apuestas de copa america|apuestas de corners|apuestas de deportes en linea|apuestas
de deportes online|apuestas de dinero|apuestas de esports|apuestas de eurocopa|apuestas de europa league|apuestas de f1|apuestas
de formula 1|apuestas de futbol|apuestas de fútbol|apuestas de futbol app|apuestas de futbol argentina|apuestas de futbol colombia|apuestas de futbol en colombia|apuestas de futbol en directo|apuestas de futbol en linea|apuestas
de futbol en vivo|apuestas de futbol español|apuestas de futbol gratis|apuestas de futbol hoy|apuestas de futbol mundial|apuestas de futbol online|apuestas de fútbol online|apuestas de futbol para hoy|apuestas de fútbol para
hoy|apuestas de futbol para hoy seguras|apuestas de futbol para mañana|apuestas de futbol peru|apuestas de futbol pronosticos|apuestas de fútbol pronósticos|apuestas de futbol seguras|apuestas de futbol seguras para hoy|apuestas de futbol sin dinero|apuestas de galgos|apuestas de galgos como ganar|apuestas de galgos en directo|apuestas de galgos online|apuestas de galgos trucos|apuestas
de golf|apuestas de hockey|apuestas de hockey sobre hielo|apuestas de
hoy|apuestas de hoy seguras|apuestas de juego|apuestas de juegos|apuestas de
juegos deportivos|apuestas de juegos online|apuestas de la champions league|apuestas
de la copa américa|apuestas de la eurocopa|apuestas de la
europa league|apuestas de la liga|apuestas de la liga bbva|apuestas de la liga
española|apuestas de la nba|apuestas de la nfl|apuestas de la ufc|apuestas de mlb|apuestas de
nba|apuestas de nba para hoy|apuestas de partidos|apuestas de
partidos de futbol|apuestas de peleas ufc|apuestas de perros en vivo|apuestas de perros virtuales|apuestas de peru|apuestas de
sistema|apuestas de sistema como funciona|apuestas de sistema explicacion|apuestas de sistema
explicación|apuestas de tenis|apuestas de tenis de
mesa|apuestas de tenis en directo|apuestas de tenis hoy|apuestas de tenis para hoy|apuestas de tenis pronosticos|apuestas de tenis seguras|apuestas de todo tipo|apuestas de ufc|apuestas de ufc hoy|apuestas del boxeo|apuestas del clasico|apuestas del clasico
real madrid barca|apuestas del dia|apuestas del día|apuestas del dia
de hoy|apuestas del dia deportivas|apuestas del dia futbol|apuestas del mundial|apuestas del partido de
hoy|apuestas del real madrid|apuestas del rey|apuestas del sistema|apuestas deporte|apuestas deportes|apuestas deportiva|apuestas deportivas|apuestas deportivas 1 euro|apuestas deportivas 10 euros gratis|apuestas deportivas
100 seguras|apuestas deportivas 1×2|apuestas deportivas android|apuestas
deportivas app|apuestas deportivas apps|apuestas deportivas argentina|apuestas deportivas argentina futbol|apuestas deportivas argentina legal|apuestas deportivas atletico de
madrid|apuestas deportivas baloncesto|apuestas deportivas barca madrid|apuestas deportivas
barcelona|apuestas deportivas beisbol|apuestas
deportivas bono|apuestas deportivas bono bienvenida|apuestas deportivas bono de bienvenida|apuestas deportivas bono sin deposito|apuestas deportivas bonos de bienvenida|apuestas deportivas boxeo|apuestas deportivas caballos|apuestas deportivas calculadora|apuestas deportivas campeon liga|apuestas
deportivas casino|apuestas deportivas casino barcelona|apuestas deportivas casino online|apuestas deportivas cerca de mi|apuestas deportivas champions league|apuestas deportivas chile|apuestas
deportivas ciclismo|apuestas deportivas colombia|apuestas
deportivas com|apuestas deportivas com foro|apuestas deportivas com pronosticos|apuestas
deportivas combinadas|apuestas deportivas combinadas para
hoy|apuestas deportivas como se juega|apuestas deportivas comparador|apuestas deportivas
con bono gratis|apuestas deportivas con bonos gratis|apuestas
deportivas con dinero ficticio|apuestas deportivas con paypal|apuestas deportivas con puntos virtuales|apuestas deportivas consejos|apuestas
deportivas consejos para ganar|apuestas deportivas copa america|apuestas deportivas
copa del rey|apuestas deportivas copa libertadores|apuestas deportivas copa
mundial|apuestas deportivas corners|apuestas deportivas
cual es la mejor|apuestas deportivas cuotas altas|apuestas deportivas de baloncesto|apuestas deportivas de boxeo|apuestas deportivas
de colombia|apuestas deportivas de futbol|apuestas deportivas
de nba|apuestas deportivas de nhl|apuestas deportivas de peru|apuestas
deportivas de tenis|apuestas deportivas del dia|apuestas deportivas dinero ficticio|apuestas deportivas directo|apuestas deportivas
doble oportunidad|apuestas deportivas en argentina|apuestas deportivas
en chile|apuestas deportivas en colombia|apuestas deportivas en directo|apuestas
deportivas en españa|apuestas deportivas en español|apuestas deportivas en linea|apuestas
deportivas en línea|apuestas deportivas en peru|apuestas deportivas en perú|apuestas
deportivas en sevilla|apuestas deportivas en uruguay|apuestas
deportivas en vivo|apuestas deportivas es|apuestas deportivas es pronosticos|apuestas deportivas españa|apuestas
deportivas españolas|apuestas deportivas esports|apuestas deportivas estadisticas|apuestas deportivas estrategias|apuestas deportivas estrategias seguras|apuestas deportivas eurocopa|apuestas deportivas europa league|apuestas deportivas f1|apuestas deportivas faciles de ganar|apuestas deportivas
formula 1|apuestas deportivas foro|apuestas deportivas foro futbol|apuestas
deportivas foro tenis|apuestas deportivas francia
argentina|apuestas deportivas futbol|apuestas deportivas fútbol|apuestas
deportivas futbol argentino|apuestas deportivas futbol colombia|apuestas deportivas futbol español|apuestas deportivas gana|apuestas deportivas ganadas|apuestas deportivas ganar dinero seguro|apuestas deportivas gane|apuestas deportivas golf|apuestas deportivas gratis|apuestas deportivas gratis
con premios|apuestas deportivas gratis hoy|apuestas deportivas gratis sin deposito|apuestas deportivas handicap|apuestas deportivas
handicap asiatico|apuestas deportivas hoy|apuestas deportivas
impuestos|apuestas deportivas interior argentina|apuestas deportivas
juegos olimpicos|apuestas deportivas la liga|apuestas deportivas legales|apuestas
deportivas legales en colombia|apuestas deportivas libres de impuestos|apuestas
deportivas licencia españa|apuestas deportivas liga española|apuestas deportivas listado|apuestas deportivas listado
clasico|apuestas deportivas madrid|apuestas deportivas mas seguras|apuestas
deportivas mejor pagadas|apuestas deportivas mejores|apuestas deportivas mejores
app|apuestas deportivas mejores casas|apuestas deportivas mejores cuotas|apuestas deportivas mejores paginas|apuestas
deportivas mexico|apuestas deportivas méxico|apuestas deportivas mlb|apuestas deportivas
mlb hoy|apuestas deportivas multiples|apuestas deportivas mundial|apuestas
deportivas murcia|apuestas deportivas nba|apuestas deportivas nba hoy|apuestas deportivas nfl|apuestas deportivas nhl|apuestas deportivas nuevas|apuestas
deportivas ofertas|apuestas deportivas online|apuestas deportivas online argentina|apuestas deportivas online chile|apuestas deportivas online colombia|apuestas deportivas
online en colombia|apuestas deportivas online
españa|apuestas deportivas online mexico|apuestas deportivas online paypal|apuestas deportivas online
peru|apuestas deportivas online por internet|apuestas deportivas
pago paypal|apuestas deportivas para ganar dinero|apuestas deportivas para hoy|apuestas deportivas
para hoy pronosticos|apuestas deportivas partido suspendido|apuestas deportivas partidos de hoy|apuestas deportivas paypal|apuestas deportivas peru|apuestas deportivas perú|apuestas deportivas
peru vs ecuador|apuestas deportivas predicciones|apuestas
deportivas promociones|apuestas deportivas pronostico|apuestas deportivas pronóstico|apuestas deportivas pronostico hoy|apuestas
deportivas pronosticos|apuestas deportivas pronósticos|apuestas deportivas pronosticos expertos|apuestas deportivas pronosticos gratis|apuestas deportivas pronosticos nba|apuestas deportivas pronosticos tenis|apuestas deportivas que aceptan paypal|apuestas deportivas real madrid|apuestas
deportivas regalo bienvenida|apuestas deportivas resultado exacto|apuestas deportivas resultados|apuestas deportivas rugby|apuestas
deportivas seguras|apuestas deportivas seguras foro|apuestas
deportivas seguras hoy|apuestas deportivas seguras para hoy|apuestas
deportivas seguras telegram|apuestas deportivas sevilla|apuestas deportivas simulador eurocopa|apuestas deportivas sin deposito|apuestas deportivas sin deposito inicial|apuestas
deportivas sin dinero|apuestas deportivas sin dinero real|apuestas deportivas sin registro|apuestas deportivas stake|apuestas deportivas stake 10|apuestas deportivas telegram españa|apuestas deportivas tenis|apuestas deportivas tenis de mesa|apuestas deportivas tenis foro|apuestas
deportivas tenis hoy|apuestas deportivas tips|apuestas deportivas tipster|apuestas deportivas
ufc|apuestas deportivas uruguay|apuestas deportivas valencia|apuestas deportivas valencia barcelona|apuestas deportivas venezuela|apuestas deportivas virtuales|apuestas
deportivas y casino|apuestas deportivas y casino online|apuestas deportivas.com|apuestas deportivas.com foro|apuestas
deportivas.es|apuestas deportivos pronosticos|apuestas deposito minimo 1 euro|apuestas descenso a segunda|apuestas descenso a segunda b|apuestas descenso la liga|apuestas descenso primera division|apuestas descenso segunda|apuestas dia|apuestas
diarias seguras|apuestas dinero|apuestas dinero ficticio|apuestas dinero real|apuestas dinero virtual|apuestas directas|apuestas directo|apuestas
directo futbol|apuestas division de honor juvenil|apuestas dnb|apuestas doble oportunidad|apuestas doble resultado|apuestas dobles|apuestas dobles y triples|apuestas
dortmund barcelona|apuestas draft nba|apuestas draft nfl|apuestas ecuador vs argentina|apuestas ecuador
vs venezuela|apuestas egipto uruguay|apuestas el clasico|apuestas elecciones venezuela|apuestas empate|apuestas en baloncesto|apuestas en barcelona|apuestas en beisbol|apuestas en boxeo|apuestas en caballos|apuestas en carreras de caballos|apuestas
en casino|apuestas en casino online|apuestas en casinos|apuestas en casinos online|apuestas en chile|apuestas en ciclismo|apuestas en colombia|apuestas en colombia de
futbol|apuestas en directo|apuestas en directo futbol|apuestas en directo pronosticos|apuestas en el futbol|apuestas en el tenis|apuestas en españa|apuestas en esports|apuestas
en eventos deportivos virtuales|apuestas en golf|apuestas en juegos|apuestas en la champions league|apuestas en la eurocopa|apuestas en la liga|apuestas en la nba|apuestas en la nfl|apuestas en las vegas mlb|apuestas
en las vegas nfl|apuestas en linea|apuestas
en línea|apuestas en linea argentina|apuestas en linea boxeo|apuestas en linea chile|apuestas en linea
colombia|apuestas en línea de fútbol|apuestas en linea deportivas|apuestas en linea españa|apuestas en linea estados unidos|apuestas en linea futbol|apuestas en linea mexico|apuestas en línea méxico|apuestas en linea mundial|apuestas
en linea peru|apuestas en linea usa|apuestas en los esports|apuestas en madrid|apuestas
en méxico|apuestas en mexico online|apuestas
en nba|apuestas en partidos de futbol|apuestas
en partidos de futbol en vivo|apuestas en partidos de tenis en directo|apuestas en perú|apuestas en sevilla|apuestas en sistema|apuestas en stake|apuestas en tenis|apuestas en tenis de mesa|apuestas en valencia|apuestas en vivo|apuestas en vivo argentina|apuestas en vivo casino|apuestas en vivo futbol|apuestas en vivo fútbol|apuestas en vivo nba|apuestas en vivo
peru|apuestas en vivo tenis|apuestas en vivo ufc|apuestas equipo mbappe|apuestas
equipos de futbol|apuestas españa|apuestas españa alemania|apuestas españa alemania eurocopa|apuestas españa croacia|apuestas españa eurocopa|apuestas españa francia|apuestas
españa francia eurocopa|apuestas españa gana el mundial|apuestas españa gana eurocopa|apuestas españa gana mundial|apuestas españa georgia|apuestas españa holanda|apuestas españa inglaterra|apuestas españa inglaterra cuotas|apuestas españa inglaterra eurocopa|apuestas españa italia|apuestas españa mundial|apuestas españa paises bajos|apuestas español|apuestas
español oviedo|apuestas espanyol barcelona|apuestas espanyol betis|apuestas espanyol villarreal|apuestas esport|apuestas esports|apuestas esports colombia|apuestas esports españa|apuestas esports fifa|apuestas esports gratis|apuestas esports lol|apuestas esports peru|apuestas esports
valorant|apuestas estadisticas|apuestas estrategias|apuestas euro|apuestas euro copa|apuestas eurocopa|apuestas eurocopa campeon|apuestas eurocopa
españa|apuestas eurocopa favoritos|apuestas eurocopa femenina|apuestas eurocopa
final|apuestas eurocopa ganador|apuestas eurocopa hoy|apuestas eurocopa sub 21|apuestas euroliga baloncesto|apuestas
euroliga pronosticos|apuestas europa league|apuestas europa league hoy|apuestas europa league pronosticos|apuestas europa league
pronósticos|apuestas euros|apuestas f1 abu dhabi|apuestas f1 bahrein|apuestas f1 canada|apuestas f1 china|apuestas f1 cuotas|apuestas f1 hoy|apuestas f1 las vegas|apuestas f1 miami|apuestas f1 monaco|apuestas faciles de ganar|apuestas
fáciles de ganar|apuestas faciles para
ganar|apuestas favoritas|apuestas favorito champions|apuestas favoritos champions|apuestas favoritos
eurocopa|apuestas favoritos mundial|apuestas fc barcelona|apuestas final champions cuotas|apuestas final champions league|apuestas final champions peru|apuestas
final copa|apuestas final copa america|apuestas final copa de europa|apuestas final
copa del rey|apuestas final copa europa|apuestas
final copa libertadores|apuestas final copa rey|apuestas final de copa|apuestas final de copa del rey|apuestas final del mundial|apuestas final euro|apuestas final eurocopa|apuestas final europa league|apuestas final libertadores|apuestas final mundial|apuestas final nba|apuestas final
rugby|apuestas final uefa europa league|apuestas final.mundial|apuestas finales de conferencia nfl|apuestas finales nba|apuestas fiorentina betis|apuestas formula|apuestas formula
1|apuestas fórmula 1|apuestas fórmula 1 pronósticos|apuestas formula uno|apuestas foro|apuestas foro nba|apuestas francia argentina|apuestas francia españa|apuestas futbol|apuestas fútbol|apuestas futbol americano|apuestas futbol americano
nfl|apuestas futbol argentina|apuestas futbol argentino|apuestas futbol
champions league|apuestas futbol chile|apuestas futbol colombia|apuestas futbol consejos|apuestas futbol en directo|apuestas fútbol en directo|apuestas futbol en vivo|apuestas fútbol en vivo|apuestas futbol españa|apuestas
futbol español|apuestas fútbol español|apuestas futbol eurocopa|apuestas futbol
femenino|apuestas futbol foro|apuestas futbol gratis|apuestas futbol hoy|apuestas fútbol hoy|apuestas
futbol juegos olimpicos|apuestas futbol mexico|apuestas futbol mundial|apuestas futbol online|apuestas futbol para hoy|apuestas futbol peru|apuestas futbol pronosticos|apuestas futbol sala|apuestas
futbol telegram|apuestas futbol virtual|apuestas galgos|apuestas galgos
en directo|apuestas galgos hoy|apuestas galgos online|apuestas galgos
pronosticos|apuestas galgos trucos|apuestas gana|apuestas gana colombia|apuestas
gana resultados|apuestas ganadas|apuestas ganadas hoy|apuestas ganador champions league|apuestas ganador copa
america|apuestas ganador copa del rey|apuestas ganador copa del rey baloncesto|apuestas ganador copa libertadores|apuestas ganador de la eurocopa|apuestas ganador de la liga|apuestas ganador del mundial|apuestas ganador eurocopa|apuestas ganador europa league|apuestas ganador f1|apuestas ganador
la liga|apuestas ganador liga española|apuestas ganador mundial|apuestas ganador mundial baloncesto|apuestas ganador mundial f1|apuestas
ganador nba|apuestas ganadores eurocopa|apuestas ganadores mundial|apuestas
ganar champions|apuestas ganar eurocopa|apuestas ganar liga|apuestas ganar mundial|apuestas
ganar nba|apuestas getafe valencia|apuestas ghana uruguay|apuestas girona|apuestas girona athletic|apuestas girona betis|apuestas girona campeon de liga|apuestas girona campeon liga|apuestas girona gana la liga|apuestas girona real madrid|apuestas girona real sociedad|apuestas goleador eurocopa|apuestas goleadores eurocopa|apuestas
goles asiaticos|apuestas golf|apuestas golf masters|apuestas golf pga|apuestas granada barcelona|apuestas grand slam de tenis|apuestas gratis|apuestas gratis casino|apuestas gratis con premios|apuestas gratis hoy|apuestas gratis para hoy|apuestas gratis por registro|apuestas gratis puntos|apuestas gratis regalos|apuestas gratis sin deposito|apuestas
gratis sin depósito|apuestas gratis sin ingreso|apuestas gratis sports|apuestas gratis y ganar premios|apuestas grupo a
eurocopa|apuestas grupos eurocopa|apuestas
handicap|apuestas handicap asiatico|apuestas handicap baloncesto|apuestas handicap como
funciona|apuestas handicap nba|apuestas handicap
nfl|apuestas hipicas online|apuestas hípicas online|apuestas hipicas venezuela|apuestas
hockey|apuestas hockey hielo|apuestas hockey patines|apuestas hockey sobre hielo|apuestas holanda
argentina|apuestas holanda vs argentina|apuestas hoy|apuestas hoy champions|apuestas hoy futbol|apuestas hoy nba|apuestas hoy pronosticos|apuestas hoy seguras|apuestas impuestos|apuestas inglaterra paises
bajos|apuestas inter barca|apuestas inter barcelona|apuestas juego|apuestas juegos|apuestas juegos en linea|apuestas juegos olimpicos|apuestas juegos olímpicos|apuestas juegos olimpicos baloncesto|apuestas juegos online|apuestas juegos virtuales|apuestas jugador sevilla|apuestas jugadores
nba|apuestas kings league americas|apuestas la liga|apuestas
la liga española|apuestas la liga hoy|apuestas la liga santander|apuestas las vegas mlb|apuestas las vegas nba|apuestas las
vegas nfl|apuestas league of legends mundial|apuestas legal|apuestas legales|apuestas legales en colombia|apuestas legales en españa|apuestas legales en estados unidos|apuestas legales
españa|apuestas leganes betis|apuestas libertadores|apuestas licencia|apuestas liga
1 peru|apuestas liga argentina|apuestas liga bbva pronosticos|apuestas
liga de campeones|apuestas liga de campeones de baloncesto|apuestas liga de
campeones de hockey|apuestas liga españa|apuestas liga española|apuestas liga santander pronosticos|apuestas ligas de
futbol|apuestas linea|apuestas linea de gol|apuestas liverpool barcelona|apuestas liverpool real
madrid|apuestas lol mundial|apuestas madrid|apuestas madrid arsenal|apuestas madrid atletico|apuestas madrid atletico champions|apuestas madrid barca|apuestas madrid barça|apuestas madrid barca hoy|apuestas madrid barca
supercopa|apuestas madrid barcelona|apuestas
madrid barsa|apuestas madrid bayern|apuestas madrid betis|apuestas madrid borussia|apuestas madrid campeon champions|apuestas madrid celta|apuestas madrid city|apuestas madrid
dortmund|apuestas madrid gana la liga|apuestas
madrid gana liga|apuestas madrid hoy|apuestas madrid liverpool|apuestas madrid osasuna|apuestas madrid sevilla|apuestas madrid valencia|apuestas
madrid vs arsenal|apuestas madrid vs barcelona|apuestas mallorca osasuna|apuestas mallorca real
sociedad|apuestas manchester athletic|apuestas manchester city real
madrid|apuestas mas faciles de ganar|apuestas mas seguras|apuestas
mas seguras para hoy|apuestas masters de golf|apuestas masters de tenis|apuestas maximo goleador
eurocopa|apuestas maximo goleador mundial|apuestas mejor
jugador eurocopa|apuestas mejores casinos online|apuestas mexico|apuestas méxico|apuestas mexico polonia|apuestas méxico polonia|apuestas mlb|apuestas mlb hoy|apuestas
mlb las vegas|apuestas mlb para hoy|apuestas mlb pronosticos|apuestas mlb usa|apuestas mma ufc|apuestas momios|apuestas multiples|apuestas múltiples|apuestas
multiples como funcionan|apuestas multiples el gordo|apuestas multiples futbol|apuestas mundial|apuestas mundial 2026|apuestas mundial baloncesto|apuestas mundial balonmano|apuestas mundial brasil|apuestas mundial campeon|apuestas mundial ciclismo|apuestas mundial clubes|apuestas mundial
de baloncesto|apuestas mundial de ciclismo|apuestas mundial de clubes|apuestas mundial de futbol|apuestas mundial de fútbol|apuestas mundial de rugby|apuestas mundial f1|apuestas mundial favoritos|apuestas mundial femenino|apuestas mundial formula 1|apuestas
mundial futbol|apuestas mundial ganador|apuestas mundial lol|apuestas mundial moto gp|apuestas mundial motogp|apuestas mundial rugby|apuestas mundial sub
17|apuestas mundiales|apuestas mundialistas|apuestas mvp eurocopa|apuestas mvp nba|apuestas
mvp nfl|apuestas nacionales de colombia|apuestas nba|apuestas nba all star|apuestas nba campeon|apuestas nba consejos|apuestas nba esta noche|apuestas nba finals|apuestas
nba gratis|apuestas nba hoy|apuestas nba hoy jugadores|apuestas nba hoy pronosticos|apuestas nba para hoy|apuestas nba playoffs|apuestas nba pronosticos|apuestas
nba pronósticos|apuestas nba pronosticos hoy|apuestas nba tipster|apuestas nfl|apuestas nfl hoy|apuestas nfl las
vegas|apuestas nfl playoffs|apuestas nfl pronosticos|apuestas nfl pronósticos|apuestas nfl semana 4|apuestas nfl super bowl|apuestas nhl|apuestas nhl pronosticos|apuestas octavos eurocopa|apuestas ofertas|apuestas
online|apuestas online argentina|apuestas online argentina legal|apuestas online bono|apuestas online bono bienvenida|apuestas online
boxeo|apuestas online caballos|apuestas online carreras de
caballos|apuestas online casino|apuestas online champions league|apuestas online chile|apuestas online ciclismo|apuestas online colombia|apuestas online comparativa|apuestas
online con paypal|apuestas online de caballos|apuestas
online deportivas|apuestas online en argentina|apuestas online en peru|apuestas
online espana|apuestas online españa|apuestas online esports|apuestas online foro|apuestas
online futbol|apuestas online futbol españa|apuestas online golf|apuestas online gratis|apuestas online
gratis sin deposito|apuestas online juegos|apuestas online mexico|apuestas online mma|apuestas
online movil|apuestas online nba|apuestas online net|apuestas online nuevas|apuestas
online opiniones|apuestas online paypal|apuestas online peru|apuestas online seguras|apuestas online sin dinero|apuestas online sin registro|apuestas online
tenis|apuestas online ufc|apuestas online uruguay|apuestas online
venezuela|apuestas open britanico golf|apuestas osasuna athletic|apuestas osasuna
barcelona|apuestas osasuna real madrid|apuestas osasuna sevilla|apuestas osasuna valencia|apuestas over|apuestas over 2.5|apuestas over
under|apuestas paginas|apuestas pago anticipado|apuestas paises bajos
ecuador|apuestas paises bajos inglaterra|apuestas países bajos qatar|apuestas para boxeo|apuestas para champions league|apuestas para el clasico|apuestas para el
dia de hoy|apuestas para el mundial|apuestas
para el partido de hoy|apuestas para eurocopa|apuestas para europa league|apuestas para futbol|apuestas para ganar|apuestas para ganar dinero|apuestas para ganar dinero
facil|apuestas para ganar en la ruleta|apuestas para ganar
la champions|apuestas para ganar la eurocopa|apuestas para ganar la europa
league|apuestas para ganar la liga|apuestas para ganar siempre|apuestas para hacer|apuestas para hoy|apuestas para hoy de futbol|apuestas para hoy europa league|apuestas para hoy futbol|apuestas para
juegos|apuestas para la champions league|apuestas para la copa del rey|apuestas para la eurocopa|apuestas para la europa league|apuestas para
la final de la eurocopa|apuestas para la nba hoy|apuestas
para los partidos de hoy|apuestas para partidos de hoy|apuestas para ufc|apuestas partido|apuestas partido aplazado|apuestas partido
champions|apuestas partido colombia|apuestas partido españa marruecos|apuestas partido mundial|apuestas partido suspendido|apuestas partidos|apuestas
partidos champions league|apuestas partidos csgo|apuestas partidos de futbol|apuestas partidos
de futbol hoy|apuestas partidos de hoy|apuestas partidos eurocopa|apuestas partidos futbol|apuestas partidos hoy|apuestas partidos mundial|apuestas
paypal|apuestas peleas de boxeo|apuestas
peru|apuestas perú|apuestas peru brasil|apuestas peru chile|apuestas peru paraguay|apuestas peru uruguay|apuestas peru vs chile|apuestas peru vs colombia|apuestas pichichi eurocopa|apuestas plataforma|apuestas playoff|apuestas playoff ascenso|apuestas playoff ascenso a primera|apuestas
playoff nba|apuestas playoff segunda|apuestas playoff segunda b|apuestas playoffs
nba|apuestas playoffs nfl|apuestas polonia argentina|apuestas por argentina|apuestas por internet mexico|apuestas por internet para ganar dinero|apuestas por paypal|apuestas por ronda
boxeo|apuestas por sistema|apuestas portugal uruguay|apuestas pre
partido|apuestas predicciones|apuestas predicciones futbol|apuestas primera division|apuestas
primera division españa|apuestas promociones|apuestas pronostico|apuestas
pronosticos|apuestas pronosticos deportivos|apuestas pronosticos deportivos
tenis|apuestas pronosticos futbol|apuestas pronosticos
gratis|apuestas pronosticos nba|apuestas pronosticos tenis|apuestas prorroga|apuestas psg barca|apuestas psg barcelona|apuestas puntos por tarjetas|apuestas puntos tarjetas|apuestas que aceptan paypal|apuestas que es
handicap|apuestas que puedes hacer con tu novia|apuestas que siempre
ganaras|apuestas que significa|apuestas quien bajara a segunda|apuestas quién bajara
a segunda|apuestas quien gana el mundial|apuestas quien gana eurocopa|apuestas quien gana la champions|apuestas quien gana la eurocopa|apuestas quien gana la liga|apuestas quien ganara el mundial|apuestas quién ganará
el mundial|apuestas quien ganara la champions|apuestas quien ganara la eurocopa|apuestas quien ganara la liga|apuestas
rayo barcelona|apuestas real madrid|apuestas real madrid arsenal|apuestas real
madrid athletic|apuestas real madrid atletico|apuestas real madrid atletico champions|apuestas real madrid atletico de madrid|apuestas real madrid
atlético de madrid|apuestas real madrid atletico madrid|apuestas real madrid
barcelona|apuestas real madrid bayern|apuestas real madrid betis|apuestas real madrid borussia|apuestas real madrid campeon champions|apuestas
real madrid celta|apuestas real madrid champions|apuestas real madrid city|apuestas real madrid girona|apuestas real madrid
hoy|apuestas real madrid liverpool|apuestas real madrid manchester
city|apuestas real madrid osasuna|apuestas real madrid real sociedad|apuestas real madrid
valencia|apuestas real madrid villarreal|apuestas real madrid vs arsenal|apuestas real
madrid vs atletico|apuestas real madrid vs atlético|apuestas real madrid vs atletico madrid|apuestas real
madrid vs barcelona|apuestas real madrid vs betis|apuestas real madrid
vs sevilla|apuestas real madrid vs valencia|apuestas real sociedad|apuestas real sociedad athletic|apuestas real sociedad barcelona|apuestas real sociedad betis|apuestas real sociedad psg|apuestas real sociedad real madrid|apuestas real sociedad valencia|apuestas recomendadas hoy|apuestas
regalo de bienvenida|apuestas registro|apuestas resultado exacto|apuestas resultados|apuestas resultados eurocopa|apuestas
retirada tenis|apuestas roma barcelona|apuestas roma sevilla|apuestas rugby|apuestas rugby mundial|apuestas rugby world cup|apuestas ruleta seguras|apuestas
segunda|apuestas segunda b|apuestas segunda division|apuestas
segunda división|apuestas segunda division b|apuestas segunda
division españa|apuestas seguras|apuestas seguras baloncesto|apuestas seguras calculadora|apuestas seguras en la ruleta|apuestas
seguras eurocopa|apuestas seguras foro|apuestas seguras futbol|apuestas seguras futbol hoy|apuestas
seguras gratis|apuestas seguras hoy|apuestas seguras hoy futbol|apuestas seguras nba|apuestas seguras nba hoy|apuestas seguras para este fin de semana|apuestas seguras para ganar dinero|apuestas seguras para hoy|apuestas seguras para hoy fútbol|apuestas seguras para hoy pronósticos|apuestas seguras para mañana|apuestas seguras ruleta|apuestas seguras telegram|apuestas
seguras tenis|apuestas semifinales eurocopa|apuestas senegal paises bajos|apuestas sevilla|apuestas sevilla athletic|apuestas sevilla atletico de madrid|apuestas sevilla barcelona|apuestas sevilla betis|apuestas sevilla campeon liga|apuestas sevilla celta|apuestas sevilla gana la
liga|apuestas sevilla girona|apuestas sevilla inter|apuestas sevilla jugador|apuestas sevilla juventus|apuestas sevilla
leganes|apuestas sevilla madrid|apuestas sevilla manchester united|apuestas sevilla osasuna|apuestas sevilla
real madrid|apuestas sevilla real sociedad|apuestas sevilla roma|apuestas sevilla valencia|apuestas significa|apuestas
simples ejemplos|apuestas simples o combinadas|apuestas sin deposito|apuestas sin deposito
inicial|apuestas sin deposito minimo|apuestas sin dinero|apuestas sin dinero real|apuestas sin empate|apuestas sin empate que
significa|apuestas sin ingreso minimo|apuestas sin registro|apuestas
sistema|apuestas sistema calculadora|Apuestas Sistema Como Funciona (https://Medileaders.Com/)|apuestas
sistema trixie|apuestas sociedad|apuestas sorteo copa del rey|apuestas stake|apuestas stake
10|apuestas stake 10 hoy|apuestas super bowl favorito|apuestas super rugby|apuestas supercopa españa|apuestas superliga argentina|apuestas tarjeta roja|apuestas tarjetas|apuestas
tarjetas amarillas|apuestas tenis|apuestas tenis atp|apuestas tenis consejos|apuestas tenis copa davis|apuestas tenis de mesa|apuestas tenis de mesa
pronosticos|apuestas tenis en vivo|apuestas tenis femenino|apuestas tenis hoy|apuestas
tenis itf|apuestas tenis pronosticos|apuestas tenis pronósticos|apuestas tenis retirada|apuestas tenis roland
garros|apuestas tenis seguras|apuestas tenis wimbledon|apuestas
tenis wta|apuestas tercera division|apuestas tercera
division españa|apuestas tipos|apuestas tips|apuestas tipster|apuestas tipster para hoy|apuestas topuria holloway cuotas|apuestas torneos de golf|apuestas torneos de tenis|apuestas
trucos|apuestas uefa champions league|apuestas uefa europa league|apuestas
ufc|apuestas ufc chile|apuestas ufc como funciona|apuestas ufc hoy|apuestas
ufc ilia topuria|apuestas ufc online|apuestas
ufc pronósticos|apuestas ufc telegram|apuestas ufc
topuria|apuestas under over|apuestas unionistas villarreal|apuestas uruguay|apuestas
uruguay colombia|apuestas uruguay corea|apuestas uruguay vs colombia|apuestas us
open golf|apuestas us open tenis|apuestas valencia|apuestas valencia barcelona|apuestas valencia betis|apuestas valencia madrid|apuestas valencia real madrid|apuestas valladolid barcelona|apuestas valladolid valencia|apuestas valor app|apuestas valor en directo|apuestas valor galgos|apuestas venezuela|apuestas
venezuela argentina|apuestas venezuela bolivia|apuestas venezuela ecuador|apuestas villarreal|apuestas villarreal athletic|apuestas villarreal barcelona|apuestas villarreal bayern|apuestas villarreal betis|apuestas villarreal liverpool|apuestas
villarreal manchester|apuestas villarreal manchester united|apuestas
villarreal vs real madrid|apuestas virtuales|apuestas virtuales colombia|apuestas virtuales futbol|apuestas virtuales sin dinero|apuestas vivo|apuestas
vuelta a españa|apuestas vuelta españa|apuestas william hill partidos de hoy|apuestas
y casino|apuestas y casinos|apuestas y juegos de azar|apuestas y pronosticos|apuestas y pronosticos
de futbol|apuestas y pronosticos deportivos|apuestas y resultados|apuestas-deportivas|apuestas-deportivas.es pronosticos|arbitro
nba apuestas|argentina apuestas|argentina colombia apuestas|argentina croacia apuestas|argentina francia apuestas|argentina
mexico apuestas|argentina peru apuestas|argentina uruguay apuestas|argentina vs
bolivia apuestas|argentina vs chile apuestas|argentina vs colombia apuestas|argentina vs
francia apuestas|argentina vs. colombia apuestas|asi se gana en las apuestas deportivas|asiatico apuestas|asiatico en apuestas|asiaticos apuestas|athletic barcelona apuestas|athletic manchester united apuestas|athletic osasuna apuestas|athletic real
madrid apuestas|atletico barcelona apuestas|atletico de madrid apuestas|atlético de
madrid apuestas|atletico de madrid real madrid apuestas|atletico de
madrid vs barcelona apuestas|atletico madrid real madrid apuestas|atletico madrid vs real
madrid apuestas|atletico real madrid apuestas|atletico vs real madrid apuestas|avisador de
cuotas apuestas|bajada de cuotas apuestas|baloncesto apuestas|barbastro barcelona apuestas|barca apuestas|barca bayern apuestas|barca inter apuestas|barca madrid apuestas|barça madrid apuestas|barca vs atletico apuestas|barca vs
madrid apuestas|barca vs real madrid apuestas|barcelona – real
madrid apuestas|barcelona apuestas|barcelona atletico apuestas|barcelona atletico de madrid apuestas|barcelona atletico madrid apuestas|barcelona betis apuestas|barcelona casa de apuestas|barcelona inter apuestas|barcelona psg apuestas|barcelona real madrid apuestas|barcelona real sociedad apuestas|barcelona sevilla apuestas|barcelona
valencia apuestas|barcelona vs athletic bilbao apuestas|barcelona vs atlético madrid apuestas|barcelona
vs betis apuestas|barcelona vs celta de vigo apuestas|barcelona vs espanyol apuestas|barcelona vs girona apuestas|barcelona vs
madrid apuestas|barcelona vs real madrid apuestas|barcelona
vs real sociedad apuestas|barcelona vs sevilla apuestas|barcelona vs villarreal apuestas|base de
datos cuotas apuestas deportivas|bayern real
madrid apuestas|beisbol apuestas|best america
apuestas|bet apuestas chile|bet apuestas en vivo|betis – chelsea apuestas|betis apuestas|betis barcelona apuestas|betis chelsea apuestas|betis madrid
apuestas|betis sevilla apuestas|betsson tu sitio de apuestas online|blog apuestas baloncesto|blog apuestas ciclismo|blog apuestas nba|blog apuestas tenis|blog de
apuestas de tenis|bono apuestas|bono apuestas deportivas|bono apuestas deportivas sin deposito|bono apuestas gratis|bono apuestas gratis sin deposito|bono
apuestas sin deposito|bono bienvenida apuestas|bono bienvenida apuestas deportivas|bono bienvenida apuestas españa|bono bienvenida apuestas sin deposito|bono bienvenida
apuestas sin depósito|bono bienvenida casa apuestas|bono bienvenida casa de apuestas|bono bienvenida marca
apuestas|bono casa apuestas|bono casa de apuestas|bono casa de apuestas sin ingreso|bono casas de apuestas|bono de
apuestas|bono de apuestas gratis sin deposito|bono de bienvenida
apuestas|bono de bienvenida apuestas deportivas|bono de bienvenida
casa de apuestas|bono de bienvenida casas de apuestas|bono
de casas de apuestas|bono de registro apuestas|bono de registro apuestas deportivas|bono de
registro casa de apuestas|bono gratis apuestas|bono marca apuestas|bono por registro apuestas|bono por registro apuestas deportivas|bono por registro casa de apuestas|bono registro apuestas|bono sin deposito apuestas|bono sin depósito
apuestas|bono sin deposito apuestas deportivas|bono sin depósito apuestas deportivas|bono
sin deposito casa de apuestas|bono sin deposito marca apuestas|bono
sin ingreso apuestas|bono sin ingreso apuestas deportivas|bonos apuestas|bonos
apuestas colombia|bonos apuestas deportivas|bonos apuestas
deportivas sin deposito|bonos apuestas gratis|bonos apuestas sin deposito|bonos apuestas sin depósito|bonos bienvenida apuestas|bonos bienvenida casas apuestas|bonos bienvenida
casas de apuestas|bonos casa de apuestas|bonos
casas apuestas|bonos casas de apuestas|bonos casas de apuestas colombia|bonos casas de apuestas deportivas|bonos casas de apuestas españa|bonos casas de
apuestas nuevas|bonos casas de apuestas sin deposito|bonos casas de apuestas sin depósito|bonos de apuestas|bonos de apuestas deportivas|bonos de apuestas gratis|bonos de apuestas sin deposito|bonos de bienvenida apuestas|bonos de bienvenida apuestas deportivas|bonos de bienvenida casa de
apuestas|bonos de bienvenida casas de apuestas|bonos de bienvenida de casas de
apuestas|bonos de bienvenida en casas de apuestas|bonos de casas de apuestas|bonos de casas de apuestas sin deposito|bonos en casa de apuestas|bonos en casas de apuestas sin deposito|bonos gratis apuestas|bonos gratis apuestas deportivas|bonos gratis casas de
apuestas|bonos gratis sin deposito apuestas|bonos paginas de apuestas|bonos registro casas de apuestas|bonos sin deposito apuestas|bonos sin depósito
apuestas|bonos sin deposito apuestas deportivas|bonos sin deposito casas de apuestas|bot de apuestas deportivas gratis|boxeo apuestas|brasil
colombia apuestas|brasil peru apuestas|brasil vs colombia apuestas|buenas apuestas para hoy|buscador cuotas apuestas|buscador de apuestas seguras|buscador de cuotas apuestas|buscador de cuotas de apuestas|buscar apuestas seguras|caballos apuestas|calculador de apuestas|calculador de cuotas apuestas|calculadora apuestas|calculadora apuestas combinadas|calculadora apuestas de sistema|calculadora apuestas deportivas|calculadora apuestas deportivas seguras|calculadora apuestas multiples|calculadora apuestas segura|calculadora apuestas seguras|calculadora apuestas sistema|calculadora apuestas yankee|calculadora
arbitraje apuestas|calculadora cubrir apuestas|calculadora cuotas apuestas|calculadora de apuestas|calculadora
de apuestas combinadas|calculadora de apuestas de futbol|calculadora de apuestas de sistema|calculadora
de apuestas deportivas|calculadora de apuestas multiples|calculadora de
apuestas seguras|calculadora de apuestas sistema|calculadora de
apuestas surebets|calculadora de arbitraje apuestas|calculadora de cuotas apuestas|calculadora de cuotas de apuestas|calculadora para apuestas deportivas|calculadora
poisson apuestas|calculadora poisson apuestas deportivas|calculadora poisson para apuestas|calculadora scalping apuestas deportivas|calculadora sistema apuestas|calculadora stake
apuestas|calculadora trading apuestas|calcular apuestas|calcular apuestas deportivas|calcular apuestas futbol|calcular apuestas sistema|calcular cuotas apuestas|calcular cuotas apuestas combinadas|calcular cuotas apuestas deportivas|calcular cuotas de apuestas|calcular ganancias apuestas deportivas|calcular momios apuestas|calcular probabilidad cuota apuestas|calcular stake apuestas|calcular
unidades apuestas|calcular yield apuestas|calculo
de apuestas|calculo de apuestas deportivas|cambio de cuotas apuestas|campeon champions apuestas|campeon eurocopa apuestas|campeon liga apuestas|campeon nba apuestas|canales de apuestas gratis|carrera de caballos apuestas|carrera de caballos apuestas juego|carrera de caballos con apuestas|carrera de galgos apuestas|carreras de caballos apuestas|carreras de caballos
apuestas online|carreras de caballos con apuestas|carreras
de caballos juegos de apuestas|carreras de galgos apuestas|carreras de galgos apuestas online|carreras de galgos apuestas trucos|carreras galgos apuestas|casa apuestas argentina|casa apuestas atletico de madrid|casa apuestas barcelona|casa apuestas betis|casa apuestas
bono bienvenida|casa apuestas bono gratis|casa apuestas bono sin deposito|casa
apuestas cerca de mi|casa apuestas chile|casa apuestas colombia|casa apuestas con mejores cuotas|casa apuestas deportivas|casa apuestas españa|casa apuestas española|casa
apuestas eurocopa|casa apuestas futbol|casa apuestas mejores cuotas|casa apuestas mundial|casa apuestas
nueva|casa apuestas nuevas|casa apuestas online|casa apuestas peru|casa apuestas valencia|casa de apuestas|casa
de apuestas 10 euros gratis|casa de apuestas argentina|casa
de apuestas atletico de madrid|casa de apuestas baloncesto|casa de apuestas barcelona|casa de apuestas beisbol|casa de apuestas betis|casa de apuestas bono|casa de apuestas bono bienvenida|casa
de apuestas bono de bienvenida|casa de apuestas bono gratis|casa de apuestas bono por registro|casa de apuestas
bono sin deposito|casa de apuestas boxeo|casa de apuestas caballos|casa de apuestas carreras de caballos|casa de apuestas cerca de
mi|casa de apuestas cerca de mí|casa de apuestas champions league|casa de
apuestas chile|casa de apuestas ciclismo|casa de apuestas colombia|casa de apuestas con bono de
bienvenida|casa de apuestas con bono sin deposito|casa de apuestas con cuotas mas altas|casa de apuestas con esports|casa
de apuestas con las mejores cuotas|casa de apuestas con licencia en españa|casa de apuestas
con mejores cuotas|casa de apuestas con pago
anticipado|casa de apuestas con paypal|casa de
apuestas copa america|casa de apuestas de caballos|casa
de apuestas de colombia|casa de apuestas de españa|casa de apuestas de futbol|casa de apuestas de fútbol|casa de apuestas de
futbol peru|casa de apuestas de peru|casa de apuestas
del madrid|casa de apuestas del real madrid|casa
de apuestas deportivas|casa de apuestas deportivas cerca de mi|casa de apuestas deportivas
en argentina|casa de apuestas deportivas en chile|casa de apuestas deportivas
en colombia|casa de apuestas deportivas en españa|casa de apuestas deportivas en madrid|casa de apuestas deportivas españa|casa de
apuestas deportivas españolas|casa de apuestas deportivas
madrid|casa de apuestas deportivas mexico|casa de apuestas deportivas online|casa de apuestas deportivas
peru|casa de apuestas deposito 5 euros|casa de apuestas deposito minimo|casa de apuestas deposito minimo 1 euro|casa de apuestas depósito mínimo
1 euro|casa de apuestas en españa|casa de apuestas en linea|casa de apuestas en madrid|casa
de apuestas en perú|casa de apuestas en vivo|casa de
apuestas españa|casa de apuestas españa inglaterra|casa de apuestas española|casa
de apuestas españolas|casa de apuestas esports|casa de apuestas eurocopa|casa
de apuestas europa league|casa de apuestas f1|casa de apuestas formula 1|casa de apuestas futbol|casa de apuestas ingreso minimo|casa de apuestas ingreso minimo 1 euro|casa de apuestas ingreso mínimo 1 euro|casa de apuestas legales|casa de apuestas legales en colombia|casa de apuestas legales en españa|casa de apuestas libertadores|casa de apuestas liga
española|casa de apuestas madrid|casa de apuestas mas segura|casa de
apuestas mejores|casa de apuestas méxico|casa de
apuestas minimo 5 euros|casa de apuestas mlb|casa de apuestas
mundial|casa de apuestas nba|casa de apuestas
nfl|casa de apuestas nueva|casa de apuestas nuevas|casa de apuestas oficial del real
madrid|casa de apuestas oficial real madrid|casa de apuestas
online|casa de apuestas online argentina|casa de apuestas
online chile|casa de apuestas online españa|casa de apuestas online mexico|casa de
apuestas online paraguay|casa de apuestas online peru|casa
de apuestas online usa|casa de apuestas online venezuela|casa de apuestas
pago anticipado|casa de apuestas para boxeo|casa de apuestas para
ufc|casa de apuestas peru|casa de apuestas perú|casa de apuestas peru online|casa de apuestas por paypal|casa de apuestas promociones|casa de apuestas que regalan dinero|casa de apuestas real madrid|casa
de apuestas regalo de bienvenida|casa de apuestas sevilla|casa de apuestas sin dinero|casa de apuestas sin ingreso
minimo|casa de apuestas sin licencia en españa|casa de apuestas sin minimo de ingreso|casa de apuestas stake|casa de apuestas tenis|casa de
apuestas ufc|casa de apuestas valencia|casa de apuestas venezuela|casa de apuestas virtuales|casa
de apuestas vive la suerte|casa oficial de apuestas del real madrid|casas apuestas asiaticas|casas apuestas bono sin deposito|casas apuestas bonos sin deposito|casas apuestas
caballos|casas apuestas chile|casas apuestas ciclismo|casas apuestas con licencia|casas apuestas con licencia en españa|casas apuestas deportivas|casas
apuestas deportivas colombia|casas apuestas deportivas
españa|casas apuestas deportivas españolas|casas apuestas deportivas nuevas|casas apuestas españa|casas
apuestas españolas|casas apuestas esports|casas apuestas eurocopa|casas apuestas
golf|casas apuestas ingreso minimo 5 euros|casas apuestas legales|casas
apuestas legales españa|casas apuestas licencia|casas apuestas licencia españa|casas apuestas mexico|casas apuestas mundial|casas
apuestas nba|casas apuestas nuevas|casas apuestas nuevas españa|casas apuestas ofertas|casas apuestas online|casas apuestas paypal|casas apuestas peru|casas apuestas
sin licencia|casas apuestas tenis|casas asiaticas apuestas|casas de
apuestas|casas de apuestas 5 euros|casas de apuestas app|casas de apuestas argentinas|casas de apuestas asiaticas|casas
de apuestas baloncesto|casas de apuestas barcelona|casas de
apuestas bono bienvenida|casas de apuestas bono
de bienvenida|casas de apuestas bono por registro|casas de apuestas bono sin deposito|casas de
apuestas bono sin ingreso|casas de apuestas bonos|casas de apuestas bonos de bienvenida|casas de apuestas bonos gratis|casas de apuestas bonos sin deposito|casas de
apuestas boxeo|casas de apuestas caballos|casas de apuestas carreras de caballos|casas
de apuestas casino|casas de apuestas casino online|casas de apuestas cerca de mi|casas de apuestas
champions league|casas de apuestas chile|casas de apuestas ciclismo|casas de apuestas colombia|casas de apuestas com|casas de apuestas con app|casas de apuestas con apuestas gratis|casas de apuestas con bono|casas
de apuestas con bono de bienvenida|casas de apuestas con bono
de registro|casas de apuestas con bono por registro|casas de apuestas
con bono sin deposito|casas de apuestas con bonos|casas
de apuestas con bonos gratis|casas de apuestas con bonos sin deposito|casas
de apuestas con deposito minimo|casas de apuestas con esports|casas de apuestas
con handicap asiatico|casas de apuestas con licencia|casas de apuestas con licencia en españa|casas de apuestas con licencia españa|casas de apuestas con licencia
española|casas de apuestas con mejores cuotas|casas de apuestas con pago anticipado|casas de apuestas
con paypal|casas de apuestas con paypal en perú|casas de apuestas con promociones|casas de apuestas con ruleta en vivo|casas de apuestas copa del rey|casas de
apuestas de caballos|casas de apuestas de españa|casas de apuestas de futbol|casas de apuestas
de fútbol|casas de apuestas de peru|casas de apuestas deportivas|casas de
apuestas deportivas asiaticas|casas de apuestas deportivas colombia|casas de apuestas deportivas comparativa|casas de apuestas
deportivas con paypal|casas de apuestas deportivas en chile|casas de apuestas deportivas en españa|casas de apuestas deportivas en linea|casas de apuestas deportivas en madrid|casas de apuestas deportivas en mexico|casas de apuestas deportivas en peru|casas de apuestas deportivas en sevilla|casas
de apuestas deportivas en valencia|casas de apuestas deportivas españa|casas de apuestas
deportivas españolas|casas de apuestas deportivas legales|casas de apuestas deportivas
madrid|casas de apuestas deportivas mexico|casas de apuestas deportivas
nuevas|casas de apuestas deportivas online|casas de apuestas deportivas peru|casas de apuestas deportivas perú|casas de apuestas deposito minimo 1 euro|casas de apuestas depósito mínimo 1 euro|casas de apuestas dinero gratis|casas de apuestas en argentina|casas
de apuestas en barcelona|casas de apuestas en chile|casas de apuestas en colombia|casas de
apuestas en españa|casas de apuestas en españa online|casas de apuestas en linea|casas de apuestas en madrid|casas de apuestas en méxico|casas de apuestas
en peru|casas de apuestas en perú|casas de apuestas en sevilla|casas de apuestas en uruguay|casas
de apuestas en valencia|casas de apuestas en venezuela|casas de apuestas equipos
de futbol|casas de apuestas españa|casas de apuestas españa alemania|casas de apuestas españa inglaterra|casas de apuestas españa licencia|casas
de apuestas españa nuevas|casas de apuestas españa online|casas de apuestas española|casas de apuestas españolas|casas de apuestas españolas con licencia|casas de apuestas españolas online|casas de apuestas esports|casas de apuestas eurocopa|casas de
apuestas eurocopa 2024|casas de apuestas europa league|casas de apuestas f1|casas de apuestas fisicas en barcelona|casas de apuestas fisicas en españa|casas de apuestas formula
1|casas de apuestas fuera de españa|casas de apuestas futbol|casas de apuestas fútbol|casas de apuestas futbol españa|casas de
apuestas ganador eurocopa|casas de apuestas gratis|casas de apuestas ingreso
minimo|casas de apuestas ingreso minimo 1 euro|casas de
apuestas ingreso minimo 5 euros|casas de apuestas inter barcelona|casas de apuestas legales|casas de apuestas legales en colombia|casas de apuestas legales en españa|casas de
apuestas legales en mexico|casas de apuestas legales
españa|casas de apuestas legales mx|casas de apuestas licencia|casas de apuestas licencia españa|casas de apuestas lista|casas de
apuestas madrid|casas de apuestas mas seguras|casas de apuestas mejores bonos|casas de apuestas mejores cuotas|casas de
apuestas mexico|casas de apuestas méxico|casas de apuestas
minimo 5 euros|casas de apuestas mlb|casas de apuestas mundial|casas de apuestas
mundial baloncesto|casas de apuestas mundiales|casas de apuestas nba|casas de apuestas no reguladas en españa|casas
de apuestas nueva ley|casas de apuestas nuevas|casas de
apuestas nuevas en colombia|casas de apuestas nuevas en españa|casas
de apuestas nuevas españa|casas de apuestas ofertas|casas de apuestas online|casas de apuestas online argentina|casas de apuestas online colombia|casas de
apuestas online deportivas|casas de apuestas online ecuador|casas de apuestas online en argentina|casas de apuestas online
en chile|casas de apuestas online en colombia|casas de apuestas online en españa|casas
de apuestas online en mexico|casas de apuestas online españa|casas de
apuestas online mas fiables|casas de apuestas online mexico|casas de apuestas online nuevas|casas de apuestas online peru|casas de apuestas online usa|casas de apuestas online venezuela|casas de apuestas pago paypal|casas de apuestas para ufc
Your comment is awaiting moderation.
growthflow.click – Found practical insights today; sharing this article with colleagues later.
Your comment is awaiting moderation.
seoorbit.click – Pages loaded fast, images appeared sharp, and formatting stayed consistent.
Your comment is awaiting moderation.
growthcraft.click – Loved the layout today; clean, simple, and genuinely user-friendly overall.
Your comment is awaiting moderation.
trafficrise.click – Loved the layout today; clean, simple, and genuinely user-friendly overall.
Your comment is awaiting moderation.
(10 euros gratis apuestas|10 mejores casas de apuestas|10 trucos para ganar apuestas|15
euros gratis marca apuestas|1×2 apuestas|1×2 apuestas deportivas|1×2 apuestas que significa|1×2 en apuestas|1×2 en apuestas
que significa|1×2 que significa en apuestas|5 euros gratis apuestas|9 apuestas que siempre ganaras|a partir
de cuanto se declara apuestas|actividades de juegos de azar y
apuestas|ad apuestas deportivas|aleksandre topuria ufc apuestas|algoritmo para ganar apuestas deportivas|america apuestas|análisis nba apuestas|aplicacion android apuestas
deportivas|aplicacion apuestas deportivas|aplicacion apuestas deportivas android|aplicación de apuestas online|aplicacion para hacer apuestas|aplicacion para hacer apuestas de futbol|aplicación para hacer apuestas de fútbol|aplicaciones apuestas deportivas android|aplicaciones apuestas deportivas gratis|aplicaciones
de apuestas android|aplicaciones de apuestas de fútbol|aplicaciones
de apuestas deportivas|aplicaciones de apuestas deportivas peru|aplicaciones de apuestas deportivas perú|aplicaciones de apuestas en colombia|aplicaciones de apuestas gratis|aplicaciones
de apuestas online|aplicaciones de apuestas seguras|aplicaciones de apuestas sin dinero|aplicaciones para hacer apuestas|apostar seguro apuestas deportivas|app
android apuestas deportivas|app apuestas|app apuestas android|app apuestas de futbol|app apuestas deportivas|app apuestas deportivas android|app apuestas deportivas argentina|app apuestas deportivas colombia|app apuestas deportivas ecuador|app apuestas deportivas españa|app apuestas deportivas gratis|app apuestas entre amigos|app apuestas futbol|app apuestas gratis|app apuestas
sin dinero|app casa de apuestas|app casas de apuestas|app control apuestas|app de apuestas|app de apuestas android|app de apuestas casino|app de
apuestas colombia|app de apuestas con bono de bienvenida|app de apuestas de futbol|app de apuestas deportivas|app de apuestas deportivas android|app de
apuestas deportivas argentina|app de apuestas deportivas colombia|app de apuestas deportivas en españa|app de
apuestas deportivas peru|app de apuestas deportivas perú|app de apuestas deportivas sin dinero|app de apuestas
ecuador|app de apuestas en colombia|app de apuestas en españa|app de apuestas en venezuela|app de apuestas futbol|app de apuestas gratis|app de apuestas online|app de apuestas para android|app de apuestas para ganar dinero|app de
apuestas peru|app de apuestas reales|app de casas de apuestas|app marca
apuestas android|app moviles de apuestas|app para apuestas|app para apuestas de futbol|app para apuestas deportivas|app para apuestas deportivas en español|app para ganar apuestas deportivas|app para
hacer apuestas|app para hacer apuestas deportivas|app para hacer
apuestas entre amigos|app para llevar control de apuestas|app pronosticos apuestas deportivas|app versus
apuestas|apps apuestas mundial|apps de apuestas|apps de apuestas con bono
de bienvenida|apps de apuestas de futbol|apps de apuestas deportivas peru|apps de apuestas mexico|apps para apuestas|aprender
a hacer apuestas deportivas|aprender hacer apuestas
deportivas|apuesta del dia apuestas deportivas|apuestas 10 euros gratis|apuestas
100 seguras|apuestas 1×2|apuestas 1X2|apuestas 2
division|apuestas 3 division|apuestas a caballos|apuestas a carreras
de caballos|apuestas a colombia|apuestas a corners|apuestas a ganar|apuestas a jugadores nba|apuestas a la baja|apuestas a la
nfl|apuestas al barcelona|apuestas al dia|apuestas al empate|apuestas al mundial|apuestas al
tenis wta|apuestas alaves barcelona|apuestas alcaraz
hoy|apuestas alemania españa|apuestas alonso campeon del mundo|apuestas altas
y bajas|apuestas altas y bajas nfl|apuestas ambos equipos marcan|apuestas america|apuestas android|apuestas anillo nba|apuestas antes del mundial|apuestas anticipadas|apuestas anticipadas nba|apuestas apps|apuestas arabia argentina|apuestas argentina|apuestas argentina campeon del mundo|apuestas argentina canada|apuestas argentina colombia|apuestas argentina croacia|apuestas argentina españa|apuestas argentina francia|apuestas argentina francia cuanto paga|apuestas argentina francia mundial|apuestas argentina
gana el mundial|apuestas argentina gana mundial|apuestas argentina holanda|apuestas argentina mexico|apuestas argentina méxico|apuestas argentina mundial|apuestas argentina online|apuestas argentina paises bajos|apuestas argentina polonia|apuestas argentina uruguay|apuestas argentina vs
australia|apuestas argentina vs colombia|apuestas
argentina vs francia|apuestas argentina vs peru|apuestas argentinas|apuestas arsenal real madrid|apuestas ascenso
a primera division|apuestas ascenso a segunda|apuestas asiaticas|apuestas asiatico|apuestas athletic|apuestas athletic atletico|apuestas athletic barça|apuestas athletic barcelona|apuestas
athletic betis|apuestas athletic manchester|apuestas athletic manchester united|apuestas athletic osasuna|apuestas
athletic real|apuestas athletic real madrid|apuestas athletic real sociedad|apuestas athletic
real sociedad final|apuestas athletic roma|apuestas athletic sevilla|apuestas athletic valencia|apuestas atletico|apuestas atletico barcelona|apuestas atletico barsa|apuestas atletico campeon champions|apuestas atletico campeon de liga|apuestas atlético copenhague|apuestas atletico
de madrid|apuestas atlético de madrid|apuestas atletico de madrid
barcelona|apuestas atletico de madrid gana la liga|apuestas atletico de madrid real madrid|apuestas atlético de
madrid real madrid|apuestas atletico de madrid vs barcelona|apuestas atletico madrid|apuestas atletico madrid real madrid|apuestas atletico madrid
vs barcelona|apuestas atletico real madrid|apuestas atletico real madrid
champions|apuestas atletismo|apuestas bajas|apuestas baloncesto|apuestas baloncesto acb|apuestas baloncesto handicap|apuestas baloncesto hoy|apuestas baloncesto juegos olimpicos|apuestas baloncesto nba|apuestas baloncesto pronostico|apuestas baloncesto pronósticos|apuestas baloncesto prorroga|apuestas barca|apuestas barca athletic|apuestas barca atletico|apuestas barca
bayern|apuestas barca bayern munich|apuestas barca girona|apuestas barca hoy|apuestas barça hoy|apuestas barca inter|apuestas barca juventus|apuestas barca madrid|apuestas
barça madrid|apuestas barca real madrid|apuestas barca vs juve|apuestas
barca vs madrid|apuestas barca vs psg|apuestas barcelona|apuestas barcelona alaves|apuestas
barcelona athletic|apuestas barcelona atletico|apuestas barcelona atletico de madrid|apuestas barcelona
atlético de madrid|apuestas barcelona atletico madrid|apuestas barcelona bayern|apuestas barcelona betis|apuestas barcelona campeon de liga|apuestas
barcelona celta|apuestas barcelona espanyol|apuestas barcelona gana la champions|apuestas barcelona girona|apuestas barcelona
granada|apuestas barcelona hoy|apuestas barcelona inter|apuestas barcelona madrid|apuestas barcelona
osasuna|apuestas barcelona psg|apuestas barcelona real madrid|apuestas barcelona real sociedad|apuestas barcelona sevilla|apuestas barcelona valencia|apuestas
barcelona villarreal|apuestas barcelona vs atletico madrid|apuestas barcelona vs madrid|apuestas barcelona vs real madrid|apuestas barsa madrid|apuestas basket hoy|apuestas bayern barcelona|apuestas bayern vs barcelona|apuestas beisbol|apuestas béisbol|apuestas beisbol mlb|apuestas beisbol pronosticos|apuestas beisbol venezolano|apuestas betis|apuestas betis
– chelsea|apuestas betis barcelona|apuestas betis chelsea|apuestas betis fiorentina|apuestas betis girona|apuestas betis madrid|apuestas betis mallorca|apuestas betis
real madrid|apuestas betis real sociedad|apuestas betis
sevilla|apuestas betis valencia|apuestas betis valladolid|apuestas betis vs
valencia|apuestas betplay hoy colombia|apuestas betsson peru|apuestas bienvenida|apuestas billar online|apuestas bolivia
vs colombia|apuestas bono|apuestas bono bienvenida|apuestas bono de bienvenida|apuestas bono de
bienvenida sin deposito|apuestas bono gratis|apuestas bono sin deposito|apuestas bonos sin deposito|apuestas borussia real madrid|apuestas boxeo|apuestas boxeo de
campeonato|apuestas boxeo españa|apuestas boxeo español|apuestas boxeo femenino olimpiadas|apuestas boxeo
hoy|apuestas boxeo online|apuestas brasil colombia|apuestas brasil peru|apuestas brasil uruguay|apuestas brasil
vs colombia|apuestas brasil vs peru|apuestas caballos|apuestas caballos colocado|apuestas caballos españa|apuestas caballos hipodromo|apuestas
caballos hoy|apuestas caballos madrid|apuestas caballos online|apuestas caballos sanlucar de barrameda|apuestas caballos zarzuela|apuestas calculador|apuestas campeon|apuestas campeon champions|apuestas campeón champions|apuestas campeon champions
2025|apuestas campeon champions league|apuestas campeon conference league|apuestas campeon copa america|apuestas campeon copa del rey|apuestas campeon de
champions|apuestas campeon de la champions|apuestas campeon de liga|apuestas
campeon del mundo|apuestas campeon eurocopa|apuestas campeón eurocopa|apuestas campeon europa league|apuestas campeon f1|apuestas campeon f1 2025|apuestas
campeon formula 1|apuestas campeon libertadores|apuestas campeon liga|apuestas
campeon liga bbva|apuestas campeon liga española|apuestas campeon liga santander|apuestas campeon motogp
2025|apuestas campeon mundial|apuestas campeón mundial|apuestas campeon mundial baloncesto|apuestas campeon nba|apuestas campeón nba|apuestas campeon premier|apuestas campeon premier league|apuestas campeon roland garros|apuestas campeonato f1|apuestas campeonatos de
futbol|apuestas carrera de caballos|apuestas carrera de caballos hoy|apuestas carrera de
caballos nocturnas|apuestas carrera de galgos fin de semana|apuestas carrera de galgos hoy|apuestas carrera de galgos nocturnas|apuestas carreras caballos|apuestas carreras
caballos sanlucar|apuestas carreras de caballos|apuestas
carreras de caballos en directo|apuestas carreras de caballos en vivo|apuestas
carreras de caballos españa|apuestas carreras
de caballos hoy|apuestas carreras de caballos nacionales|apuestas carreras de caballos nocturnas|apuestas
carreras de caballos online|apuestas carreras de caballos sanlucar|apuestas carreras de caballos sanlúcar|apuestas carreras de galgos|apuestas
carreras de galgos en vivo|apuestas carreras de galgos nocturnas|apuestas carreras de galgos pre partido|apuestas casino|apuestas
casino barcelona|apuestas casino futbol|apuestas casino gran madrid|apuestas casino gratis|apuestas casino madrid|apuestas casino online|apuestas casino online argentina|apuestas
casinos|apuestas casinos online|apuestas celta|apuestas celta barcelona|apuestas celta betis|apuestas celta eibar|apuestas celta espanyol|apuestas celta granada|apuestas
celta madrid|apuestas celta manchester|apuestas celta real
madrid|apuestas champion league|apuestas champions foro|apuestas champions hoy|apuestas champions league|apuestas champions league – pronósticos|apuestas champions league
2025|apuestas champions league hoy|apuestas champions league pronosticos|apuestas champions
league pronósticos|apuestas champions pronosticos|apuestas chelsea barcelona|apuestas chelsea betis|apuestas
chile|apuestas chile peru|apuestas chile venezuela|apuestas chile vs colombia|apuestas
chile vs uruguay|apuestas ciclismo|apuestas
ciclismo en vivo|apuestas ciclismo femenino|apuestas ciclismo tour francia|apuestas ciclismo vuelta|apuestas ciclismo
vuelta a españa|apuestas ciclismo vuelta españa|apuestas city madrid|apuestas city real
madrid|apuestas clasico|apuestas clasico español|apuestas clasico real madrid
barcelona|apuestas clasificacion mundial|apuestas colombia|apuestas colombia argentina|apuestas colombia brasil|apuestas colombia
paraguay|apuestas colombia uruguay|apuestas colombia vs argentina|apuestas colombia vs brasil|apuestas combinadas|apuestas combinadas como funcionan|apuestas combinadas de futbol|apuestas
combinadas de fútbol|apuestas combinadas foro|apuestas combinadas futbol|apuestas combinadas hoy|apuestas combinadas mismo partido|apuestas
combinadas mundial|apuestas combinadas nba|apuestas combinadas para
esta semana|apuestas combinadas para hoy|apuestas
combinadas para mañana|apuestas combinadas pronosticos|apuestas combinadas recomendadas|apuestas combinadas seguras|apuestas
combinadas seguras para hoy|apuestas combinadas seguras para mañana|apuestas
como ganar|apuestas comparador|apuestas con bono de
bienvenida|apuestas con dinero ficticio|apuestas con dinero real|apuestas con dinero virtual|apuestas con handicap|apuestas
con handicap asiatico|apuestas con handicap baloncesto|apuestas con mas probabilidades de ganar|apuestas con paypal|apuestas con tarjeta de credito|apuestas con tarjeta de debito|apuestas consejos|apuestas copa|apuestas copa africa|apuestas copa america|apuestas copa américa|apuestas copa argentina|apuestas copa brasil|apuestas copa davis|apuestas copa de europa|apuestas copa del mundo|apuestas copa del rey|apuestas copa del rey baloncesto|apuestas copa del
rey final|apuestas copa del rey futbol|apuestas copa del rey
ganador|apuestas copa del rey hoy|apuestas copa del rey pronosticos|apuestas copa del rey
pronósticos|apuestas copa europa|apuestas copa italia|apuestas copa libertadores|apuestas copa mundial de hockey|apuestas
copa rey|apuestas copa sudamericana|apuestas corners|apuestas corners hoy|apuestas croacia argentina|apuestas cuartos eurocopa|apuestas cuotas|apuestas cuotas altas|apuestas cuotas
bajas|apuestas de 1 euro|apuestas de baloncesto|apuestas de
baloncesto hoy|apuestas de baloncesto nba|apuestas de baloncesto para
hoy|apuestas de beisbol|apuestas de beisbol para hoy|apuestas de blackjack en linea|apuestas de
boxeo|apuestas de boxeo canelo|apuestas de
boxeo en las vegas|apuestas de boxeo hoy|apuestas de boxeo online|apuestas de caballo|apuestas de caballos|apuestas
de caballos como funciona|apuestas de caballos como se juega|apuestas de caballos
en colombia|apuestas de caballos en españa|apuestas de caballos en linea|apuestas
de caballos españa|apuestas de caballos ganador y colocado|apuestas de caballos internacionales|apuestas
de caballos juegos|apuestas de caballos online|apuestas de caballos online en venezuela|apuestas de caballos por internet|apuestas de caballos pronosticos|apuestas de caballos pronósticos|apuestas de carrera de caballos|apuestas de carreras de caballos|apuestas de carreras de caballos online|apuestas de casino|apuestas de casino online|apuestas
de casino por internet|apuestas de champions league|apuestas de ciclismo|apuestas de colombia|apuestas de copa america|apuestas de corners|apuestas de deportes en linea|apuestas de deportes online|apuestas
de dinero|apuestas de esports|apuestas de eurocopa|apuestas de
europa league|apuestas de f1|apuestas de formula 1|apuestas
de futbol|apuestas de fútbol|apuestas de futbol app|apuestas de futbol argentina|apuestas
de futbol colombia|apuestas de futbol en colombia|apuestas de futbol en directo|apuestas
de futbol en linea|apuestas de futbol en vivo|apuestas
de futbol español|apuestas de futbol gratis|apuestas de futbol hoy|apuestas de futbol mundial|apuestas de futbol online|apuestas de fútbol online|apuestas de
futbol para hoy|apuestas de fútbol para hoy|apuestas de futbol para hoy seguras|apuestas de futbol para mañana|apuestas de futbol peru|apuestas de
futbol pronosticos|apuestas de fútbol pronósticos|apuestas de futbol seguras|apuestas de futbol seguras para hoy|apuestas de futbol sin dinero|apuestas
de galgos|apuestas de galgos como ganar|apuestas de galgos en directo|apuestas de galgos online|apuestas de galgos trucos|apuestas de golf|apuestas de hockey|apuestas de hockey sobre hielo|apuestas de hoy|apuestas de hoy seguras|apuestas de juego|apuestas de juegos|apuestas de juegos deportivos|apuestas de juegos online|apuestas de la champions league|apuestas de la copa américa|apuestas de la eurocopa|apuestas
de la europa league|apuestas de la liga|apuestas de la liga bbva|apuestas de la liga española|apuestas de la nba|apuestas de la nfl|apuestas de la ufc|apuestas de mlb|apuestas de nba|apuestas de nba para hoy|apuestas de partidos|apuestas de partidos de futbol|apuestas de peleas ufc|apuestas de perros en vivo|apuestas
de perros virtuales|apuestas de peru|apuestas de sistema|apuestas de sistema como funciona|apuestas de sistema explicacion|apuestas de sistema explicación|apuestas de tenis|apuestas de tenis de mesa|apuestas
de tenis en directo|apuestas de tenis hoy|apuestas de tenis para
hoy|apuestas de tenis pronosticos|apuestas de tenis seguras|apuestas de todo tipo|apuestas de ufc|apuestas de
ufc hoy|apuestas del boxeo|apuestas del clasico|apuestas del clasico real madrid barca|apuestas del dia|apuestas del día|apuestas del dia de hoy|apuestas del dia deportivas|apuestas del dia futbol|apuestas del mundial|apuestas del partido de hoy|apuestas del real madrid|apuestas del
rey|apuestas del sistema|apuestas deporte|apuestas deportes|apuestas deportiva|apuestas deportivas|apuestas deportivas
1 euro|apuestas deportivas 10 euros gratis|apuestas deportivas 100 seguras|apuestas deportivas 1×2|apuestas deportivas android|apuestas deportivas app|apuestas deportivas
apps|apuestas deportivas argentina|apuestas deportivas argentina futbol|apuestas deportivas argentina
legal|apuestas deportivas atletico de madrid|apuestas deportivas baloncesto|apuestas deportivas barca madrid|apuestas deportivas barcelona|apuestas
deportivas beisbol|apuestas deportivas bono|apuestas deportivas bono bienvenida|apuestas deportivas bono
de bienvenida|apuestas deportivas bono sin deposito|apuestas deportivas bonos de bienvenida|apuestas deportivas boxeo|apuestas deportivas caballos|apuestas deportivas
calculadora|apuestas deportivas campeon liga|apuestas deportivas
casino|apuestas deportivas casino barcelona|apuestas deportivas casino online|apuestas deportivas
cerca de mi|apuestas deportivas champions league|apuestas deportivas chile|apuestas deportivas ciclismo|apuestas deportivas
colombia|apuestas deportivas com|apuestas deportivas com foro|apuestas
deportivas com pronosticos|apuestas deportivas combinadas|apuestas deportivas combinadas para hoy|apuestas deportivas
como se juega|apuestas deportivas comparador|apuestas
deportivas con bono gratis|apuestas deportivas con bonos gratis|apuestas deportivas
con dinero ficticio|apuestas deportivas con paypal|apuestas deportivas con puntos virtuales|apuestas deportivas consejos|apuestas deportivas consejos para ganar|apuestas deportivas copa america|apuestas deportivas copa del
rey|apuestas deportivas copa libertadores|apuestas deportivas copa mundial|apuestas deportivas corners|apuestas deportivas cual
es la mejor|apuestas deportivas cuotas altas|apuestas deportivas de baloncesto|apuestas deportivas de boxeo|apuestas deportivas de colombia|apuestas deportivas de futbol|apuestas deportivas de nba|apuestas deportivas de nhl|apuestas
deportivas de peru|apuestas deportivas de tenis|apuestas deportivas del dia|apuestas deportivas dinero ficticio|apuestas deportivas directo|apuestas deportivas doble oportunidad|apuestas deportivas en argentina|apuestas deportivas en chile|apuestas deportivas en colombia|apuestas deportivas en directo|apuestas deportivas en españa|apuestas deportivas en español|apuestas deportivas en linea|apuestas deportivas
en línea|apuestas deportivas en peru|apuestas deportivas en perú|apuestas deportivas en sevilla|apuestas deportivas en uruguay|apuestas deportivas en vivo|apuestas deportivas es|apuestas
deportivas es pronosticos|apuestas deportivas españa|apuestas deportivas españolas|apuestas deportivas
esports|apuestas deportivas estadisticas|apuestas deportivas estrategias|apuestas deportivas estrategias seguras|apuestas
deportivas eurocopa|apuestas deportivas europa league|apuestas deportivas f1|apuestas deportivas
faciles de ganar|apuestas deportivas formula 1|apuestas deportivas
foro|apuestas deportivas foro futbol|apuestas deportivas foro tenis|apuestas deportivas
francia argentina|apuestas deportivas futbol|apuestas deportivas fútbol|apuestas deportivas futbol argentino|apuestas deportivas futbol
colombia|apuestas deportivas futbol español|apuestas deportivas gana|apuestas deportivas
ganadas|apuestas deportivas ganar dinero seguro|apuestas deportivas
gane|apuestas deportivas golf|apuestas deportivas gratis|apuestas deportivas gratis con premios|apuestas deportivas
gratis hoy|apuestas deportivas gratis sin deposito|apuestas deportivas handicap|apuestas deportivas handicap asiatico|apuestas
deportivas hoy|apuestas deportivas impuestos|apuestas deportivas interior argentina|apuestas deportivas juegos olimpicos|apuestas deportivas la liga|apuestas deportivas legales|apuestas deportivas legales en colombia|apuestas deportivas libres de impuestos|apuestas deportivas licencia españa|apuestas deportivas liga española|apuestas deportivas listado|apuestas deportivas listado clasico|apuestas deportivas madrid|apuestas deportivas mas seguras|apuestas deportivas mejor pagadas|apuestas deportivas mejores|apuestas deportivas mejores app|apuestas deportivas mejores casas|apuestas
deportivas mejores cuotas|apuestas deportivas mejores paginas|apuestas deportivas mexico|apuestas deportivas
méxico|apuestas deportivas mlb|apuestas deportivas mlb hoy|apuestas deportivas multiples|apuestas
deportivas mundial|apuestas deportivas murcia|apuestas deportivas nba|apuestas deportivas nba hoy|apuestas deportivas nfl|apuestas deportivas nhl|apuestas deportivas nuevas|apuestas deportivas ofertas|apuestas deportivas online|apuestas deportivas online
argentina|apuestas deportivas online chile|apuestas deportivas online
colombia|apuestas deportivas online en colombia|apuestas deportivas online españa|apuestas
deportivas online mexico|apuestas deportivas online paypal|apuestas deportivas online peru|apuestas deportivas
online por internet|apuestas deportivas pago paypal|apuestas deportivas para
ganar dinero|apuestas deportivas para hoy|apuestas deportivas para hoy pronosticos|apuestas deportivas
partido suspendido|apuestas deportivas partidos
de hoy|apuestas deportivas paypal|apuestas deportivas peru|apuestas deportivas perú|apuestas deportivas peru vs ecuador|apuestas deportivas predicciones|apuestas deportivas promociones|apuestas deportivas pronostico|apuestas deportivas pronóstico|apuestas deportivas pronostico hoy|apuestas deportivas pronosticos|apuestas deportivas pronósticos|apuestas
deportivas pronosticos expertos|apuestas deportivas pronosticos gratis|apuestas deportivas pronosticos nba|apuestas deportivas
pronosticos tenis|apuestas deportivas que aceptan paypal|apuestas deportivas real madrid|apuestas deportivas
regalo bienvenida|apuestas deportivas resultado exacto|apuestas deportivas resultados|apuestas deportivas
rugby|apuestas deportivas seguras|apuestas deportivas seguras foro|apuestas
deportivas seguras hoy|apuestas deportivas seguras para hoy|apuestas deportivas seguras
telegram|apuestas deportivas sevilla|apuestas deportivas simulador eurocopa|apuestas deportivas sin deposito|apuestas deportivas
sin deposito inicial|apuestas deportivas sin dinero|apuestas deportivas sin dinero real|apuestas deportivas sin registro|apuestas deportivas stake|apuestas deportivas stake 10|apuestas deportivas telegram españa|apuestas deportivas tenis|apuestas deportivas tenis de
mesa|apuestas deportivas tenis foro|apuestas deportivas tenis hoy|apuestas deportivas tips|apuestas
deportivas tipster|apuestas deportivas ufc|apuestas deportivas uruguay|apuestas deportivas valencia|apuestas deportivas
valencia barcelona|apuestas deportivas venezuela|apuestas deportivas virtuales|apuestas deportivas y casino|apuestas
deportivas y casino online|apuestas deportivas.com|apuestas deportivas.com foro|apuestas deportivas.es|apuestas deportivos pronosticos|apuestas deposito minimo 1 euro|apuestas descenso a segunda|apuestas descenso a segunda b|apuestas descenso la liga|apuestas descenso primera division|apuestas descenso segunda|apuestas dia|apuestas diarias
seguras|apuestas dinero|apuestas dinero ficticio|apuestas dinero real|apuestas dinero virtual|apuestas
directas|apuestas directo|apuestas directo futbol|apuestas division de honor juvenil|apuestas
dnb|apuestas doble oportunidad|apuestas doble resultado|apuestas dobles|apuestas dobles y triples|apuestas dortmund barcelona|apuestas
draft nba|apuestas draft nfl|apuestas ecuador vs argentina|apuestas ecuador vs
venezuela|apuestas egipto uruguay|apuestas el clasico|apuestas elecciones venezuela|apuestas empate|apuestas en baloncesto|apuestas en barcelona|apuestas en beisbol|apuestas en boxeo|apuestas en caballos|apuestas en carreras de caballos|apuestas en casino|apuestas en casino
online|apuestas en casinos|apuestas en casinos online|apuestas en chile|apuestas en ciclismo|apuestas en colombia|apuestas en colombia de futbol|apuestas
en directo|apuestas en directo futbol|apuestas en directo
pronosticos|apuestas en el futbol|apuestas
en el tenis|apuestas en españa|apuestas en esports|apuestas
en eventos deportivos virtuales|apuestas en golf|apuestas en juegos|apuestas en la champions league|apuestas en la eurocopa|apuestas en la liga|apuestas en la
nba|apuestas en la nfl|apuestas en las vegas mlb|apuestas en las vegas nfl|apuestas en linea|apuestas
en línea|apuestas en linea argentina|apuestas en linea boxeo|apuestas en linea chile|apuestas en linea colombia|apuestas en línea de fútbol|apuestas en linea
deportivas|apuestas en linea españa|apuestas en linea estados unidos|apuestas en linea futbol|apuestas
en linea mexico|apuestas en línea méxico|apuestas en linea mundial|apuestas en linea peru|apuestas en linea usa|apuestas en los esports|apuestas
en madrid|apuestas en méxico|apuestas en mexico online|apuestas en nba|apuestas en partidos de futbol|apuestas en partidos de futbol en vivo|apuestas en partidos de tenis en directo|apuestas en perú|apuestas en sevilla|apuestas en sistema|apuestas
en stake|apuestas en tenis|apuestas en tenis de mesa|apuestas en valencia|apuestas en vivo|apuestas en vivo argentina|apuestas en vivo casino|apuestas en vivo futbol|apuestas en vivo fútbol|apuestas en vivo nba|apuestas
en vivo peru|apuestas en vivo tenis|apuestas en vivo ufc|apuestas equipo mbappe|apuestas equipos de futbol|apuestas españa|apuestas españa alemania|apuestas españa alemania
eurocopa|apuestas españa croacia|apuestas españa eurocopa|apuestas españa francia|apuestas españa francia eurocopa|apuestas españa
gana el mundial|apuestas españa gana eurocopa|apuestas
españa gana mundial|apuestas españa georgia|apuestas españa holanda|apuestas españa inglaterra|apuestas españa inglaterra cuotas|apuestas españa inglaterra eurocopa|apuestas españa italia|apuestas
españa mundial|apuestas españa paises bajos|apuestas español|apuestas
español oviedo|apuestas espanyol barcelona|apuestas espanyol betis|apuestas espanyol villarreal|apuestas
esport|apuestas esports|apuestas esports colombia|apuestas esports españa|apuestas esports fifa|apuestas esports gratis|apuestas esports lol|apuestas esports
peru|apuestas esports valorant|apuestas estadisticas|apuestas estrategias|apuestas euro|apuestas euro copa|apuestas eurocopa|apuestas eurocopa campeon|apuestas eurocopa españa|apuestas eurocopa
favoritos|apuestas eurocopa femenina|apuestas eurocopa final|apuestas
eurocopa ganador|apuestas eurocopa hoy|apuestas eurocopa sub 21|apuestas euroliga baloncesto|apuestas
euroliga pronosticos|apuestas europa league|apuestas europa league hoy|apuestas europa league pronosticos|apuestas
europa league pronósticos|apuestas euros|apuestas
f1 abu dhabi|apuestas f1 bahrein|apuestas f1 canada|apuestas f1 china|apuestas
f1 cuotas|apuestas f1 hoy|apuestas f1 las vegas|apuestas f1
miami|apuestas f1 monaco|apuestas faciles de
ganar|apuestas fáciles de ganar|apuestas faciles para
ganar|apuestas favoritas|apuestas favorito champions|apuestas favoritos champions|apuestas favoritos
eurocopa|apuestas favoritos mundial|apuestas fc barcelona|apuestas final champions
cuotas|apuestas final champions league|apuestas final champions peru|apuestas final copa|apuestas
final copa america|apuestas final copa de europa|apuestas final
copa del rey|apuestas final copa europa|apuestas final copa
libertadores|apuestas final copa rey|apuestas final de copa|apuestas final de copa del rey|apuestas final del mundial|apuestas
final euro|apuestas final eurocopa|apuestas final europa league|apuestas final libertadores|apuestas
final mundial|apuestas final nba|apuestas final rugby|apuestas
final uefa europa league|apuestas final.mundial|apuestas finales de conferencia nfl|apuestas finales nba|apuestas fiorentina betis|apuestas formula|apuestas
formula 1|apuestas fórmula 1|apuestas fórmula 1 pronósticos|apuestas formula uno|apuestas foro|apuestas foro
nba|apuestas francia argentina|apuestas francia españa|apuestas futbol|apuestas fútbol|apuestas futbol americano|apuestas futbol americano nfl|apuestas futbol argentina|apuestas
futbol argentino|apuestas futbol champions league|apuestas futbol chile|apuestas futbol colombia|apuestas
futbol consejos|apuestas futbol en directo|apuestas fútbol
en directo|apuestas futbol en vivo|apuestas fútbol en vivo|apuestas futbol españa|apuestas futbol
español|apuestas fútbol español|apuestas futbol eurocopa|apuestas
futbol femenino|apuestas futbol foro|apuestas futbol gratis|apuestas futbol hoy|apuestas fútbol hoy|apuestas futbol juegos
olimpicos|apuestas futbol mexico|apuestas futbol mundial|apuestas futbol online|apuestas futbol para hoy|apuestas futbol peru|apuestas futbol pronosticos|apuestas
futbol sala|apuestas futbol telegram|apuestas futbol virtual|apuestas galgos|apuestas galgos
en directo|apuestas galgos hoy|apuestas galgos online|apuestas galgos pronosticos|apuestas galgos trucos|apuestas gana|apuestas gana colombia|apuestas gana
resultados|apuestas ganadas|apuestas ganadas hoy|apuestas ganador champions league|apuestas ganador copa america|apuestas
ganador copa del rey|apuestas ganador copa del rey baloncesto|apuestas ganador copa libertadores|apuestas ganador de la eurocopa|apuestas ganador
de la liga|apuestas ganador del mundial|apuestas ganador eurocopa|apuestas ganador europa
league|apuestas ganador f1|apuestas ganador la liga|apuestas ganador
liga española|apuestas ganador mundial|apuestas ganador mundial baloncesto|apuestas ganador
mundial f1|apuestas ganador nba|apuestas ganadores eurocopa|apuestas ganadores mundial|apuestas ganar champions|apuestas
ganar eurocopa|apuestas ganar liga|apuestas ganar mundial|apuestas
ganar nba|apuestas getafe valencia|apuestas ghana uruguay|apuestas girona|apuestas girona
athletic|apuestas girona betis|apuestas girona campeon de
liga|apuestas girona campeon liga|apuestas
girona gana la liga|apuestas girona real madrid|apuestas girona real sociedad|apuestas goleador eurocopa|apuestas goleadores eurocopa|apuestas goles asiaticos|apuestas
golf|apuestas golf masters|apuestas golf pga|apuestas granada barcelona|apuestas grand slam de tenis|apuestas gratis|apuestas gratis casino|apuestas gratis con premios|apuestas gratis hoy|apuestas gratis
para hoy|apuestas gratis por registro|apuestas gratis puntos|apuestas gratis regalos|apuestas gratis sin deposito|apuestas gratis sin depósito|apuestas gratis sin ingreso|apuestas gratis sports|apuestas gratis y
ganar premios|apuestas grupo a eurocopa|apuestas grupos eurocopa|apuestas handicap|apuestas
handicap asiatico|apuestas handicap baloncesto|apuestas handicap como funciona|apuestas handicap nba|apuestas handicap
nfl|apuestas hipicas online|apuestas hípicas online|apuestas hipicas
venezuela|apuestas hockey|apuestas hockey hielo|apuestas hockey patines|apuestas hockey sobre hielo|apuestas holanda argentina|apuestas
holanda vs argentina|apuestas hoy|apuestas hoy champions|apuestas hoy futbol|apuestas
hoy nba|apuestas hoy pronosticos|apuestas hoy seguras|apuestas impuestos|apuestas inglaterra paises bajos|apuestas inter barca|apuestas inter barcelona|apuestas juego|apuestas juegos|apuestas juegos en linea|apuestas juegos olimpicos|apuestas
juegos olímpicos|apuestas juegos olimpicos baloncesto|apuestas juegos
online|apuestas juegos virtuales|apuestas jugador sevilla|apuestas jugadores nba|apuestas kings league americas|apuestas
la liga|apuestas la liga española|apuestas la liga
hoy|apuestas la liga santander|apuestas las vegas mlb|apuestas las vegas nba|apuestas las vegas
nfl|apuestas league of legends mundial|apuestas legal|apuestas legales|apuestas legales
en colombia|apuestas legales en españa|apuestas legales en estados unidos|apuestas legales
españa|apuestas leganes betis|apuestas libertadores|apuestas licencia|apuestas liga
1 peru|apuestas liga argentina|apuestas liga bbva pronosticos|apuestas liga de campeones|apuestas liga de campeones de baloncesto|apuestas liga de campeones
de hockey|apuestas liga españa|apuestas liga española|apuestas liga santander pronosticos|apuestas ligas de futbol|apuestas
linea|apuestas linea de gol|apuestas liverpool barcelona|apuestas liverpool real
madrid|apuestas lol mundial|apuestas madrid|apuestas madrid arsenal|apuestas madrid atletico|apuestas madrid atletico champions|apuestas madrid barca|apuestas madrid barça|apuestas madrid barca hoy|apuestas madrid barca supercopa|apuestas
madrid barcelona|apuestas madrid barsa|apuestas madrid bayern|apuestas madrid betis|apuestas madrid borussia|apuestas madrid campeon champions|apuestas
madrid celta|apuestas madrid city|apuestas madrid
dortmund|apuestas madrid gana la liga|apuestas madrid gana liga|apuestas madrid hoy|apuestas
madrid liverpool|apuestas madrid osasuna|apuestas madrid sevilla|apuestas madrid valencia|apuestas madrid vs arsenal|apuestas madrid vs barcelona|apuestas mallorca osasuna|apuestas mallorca real sociedad|apuestas manchester athletic|apuestas manchester city real madrid|apuestas
mas faciles de ganar|apuestas mas seguras|apuestas mas seguras para
hoy|apuestas masters de golf|apuestas masters de tenis|apuestas maximo goleador eurocopa|apuestas maximo goleador mundial|apuestas mejor jugador eurocopa|apuestas
mejores casinos online|apuestas mexico|apuestas méxico|apuestas mexico polonia|apuestas méxico polonia|apuestas mlb|apuestas mlb hoy|apuestas
mlb las vegas|apuestas mlb para hoy|apuestas mlb pronosticos|apuestas mlb usa|apuestas mma
ufc|apuestas momios|apuestas multiples|apuestas múltiples|apuestas multiples como funcionan|apuestas multiples el gordo|apuestas multiples futbol|apuestas mundial|apuestas mundial
2026|apuestas mundial baloncesto|apuestas mundial balonmano|apuestas mundial brasil|apuestas mundial campeon|apuestas mundial ciclismo|apuestas mundial
clubes|apuestas mundial de baloncesto|apuestas mundial de ciclismo|apuestas mundial de clubes|apuestas mundial de
futbol|apuestas mundial de fútbol|apuestas mundial de rugby|apuestas mundial f1|apuestas
mundial favoritos|apuestas mundial femenino|apuestas mundial formula 1|apuestas mundial
futbol|apuestas mundial ganador|apuestas mundial lol|apuestas mundial moto gp|apuestas mundial motogp|apuestas mundial rugby|apuestas mundial sub 17|apuestas mundiales|apuestas mundialistas|apuestas mvp eurocopa|apuestas mvp nba|apuestas mvp nfl|apuestas nacionales
de colombia|apuestas nba|apuestas nba all star|apuestas nba campeon|apuestas
nba consejos|apuestas nba esta noche|apuestas nba finals|apuestas nba gratis|apuestas nba
hoy|apuestas nba hoy jugadores|apuestas nba hoy pronosticos|apuestas nba para hoy|apuestas nba
playoffs|apuestas nba pronosticos|apuestas nba pronósticos|apuestas
nba pronosticos hoy|apuestas nba tipster|apuestas nfl|apuestas nfl hoy|apuestas nfl las vegas|apuestas nfl playoffs|apuestas
nfl pronosticos|apuestas nfl pronósticos|apuestas nfl semana 4|apuestas nfl super bowl|apuestas nhl|apuestas nhl pronosticos|apuestas octavos eurocopa|apuestas ofertas|apuestas online|apuestas online argentina|apuestas online argentina legal|apuestas online bono|apuestas online bono bienvenida|apuestas online boxeo|apuestas online caballos|apuestas online carreras de caballos|apuestas online casino|apuestas online champions
league|apuestas online chile|apuestas online ciclismo|apuestas
online colombia|apuestas online comparativa|apuestas online con paypal|apuestas online de caballos|apuestas online
deportivas|apuestas online en argentina|apuestas online en peru|apuestas online espana|apuestas online españa|apuestas online esports|apuestas online foro|apuestas online futbol|apuestas online futbol españa|apuestas online
golf|apuestas online gratis|apuestas online gratis sin deposito|apuestas online
juegos|apuestas online mexico|apuestas online mma|apuestas online movil|apuestas online nba|apuestas online net|apuestas online nuevas|apuestas online opiniones|apuestas online paypal|apuestas online peru|apuestas online seguras|apuestas online sin dinero|apuestas online sin registro|apuestas online tenis|apuestas
online ufc|apuestas online uruguay|apuestas online venezuela|apuestas open britanico golf|apuestas osasuna
athletic|apuestas osasuna barcelona|apuestas osasuna
real madrid|apuestas osasuna sevilla|apuestas osasuna valencia|apuestas over|apuestas over 2.5|apuestas over under|apuestas paginas|apuestas pago anticipado|apuestas paises bajos ecuador|apuestas paises bajos inglaterra|apuestas países
bajos qatar|apuestas para boxeo|apuestas para champions league|apuestas para el clasico|apuestas para el dia de hoy|apuestas para el mundial|apuestas para el
partido de hoy|apuestas para eurocopa|apuestas para europa league|apuestas para futbol|apuestas para ganar|apuestas para ganar dinero|apuestas para ganar dinero facil|apuestas para
ganar en la ruleta|apuestas para ganar la champions|apuestas para ganar la eurocopa|apuestas para
ganar la europa league|apuestas para ganar la liga|apuestas para ganar
siempre|apuestas para hacer|apuestas para hoy|apuestas para hoy
de futbol|apuestas para hoy europa league|apuestas para hoy futbol|apuestas para juegos|apuestas para la
champions league|apuestas para la copa del rey|apuestas para la eurocopa|apuestas
para la europa league|apuestas para la final de
la eurocopa|apuestas para la nba hoy|apuestas para los
partidos de hoy|apuestas para partidos de hoy|apuestas para
ufc|apuestas partido|apuestas partido aplazado|apuestas partido
champions|apuestas partido colombia|apuestas partido españa marruecos|apuestas partido mundial|apuestas partido suspendido|apuestas
partidos|apuestas partidos champions league|apuestas partidos
csgo|apuestas partidos de futbol|apuestas partidos de futbol hoy|apuestas partidos de hoy|apuestas partidos eurocopa|apuestas partidos futbol|apuestas partidos hoy|apuestas partidos mundial|apuestas paypal|apuestas peleas de boxeo|apuestas peru|apuestas perú|apuestas peru brasil|apuestas
peru chile|apuestas peru paraguay|apuestas peru
uruguay|apuestas peru vs chile|apuestas peru vs colombia|apuestas pichichi eurocopa|apuestas plataforma|apuestas
playoff|apuestas playoff ascenso|apuestas playoff
ascenso a primera|apuestas playoff nba|apuestas playoff segunda|apuestas playoff segunda
b|apuestas playoffs nba|apuestas playoffs nfl|apuestas polonia argentina|apuestas por argentina|apuestas por internet
mexico|apuestas por internet para ganar dinero|apuestas por paypal|apuestas por ronda boxeo|apuestas por sistema|apuestas portugal uruguay|apuestas pre
partido|apuestas predicciones|apuestas predicciones futbol|apuestas primera division|apuestas primera division españa|apuestas
promociones|apuestas pronostico|apuestas pronosticos|apuestas pronosticos deportivos|apuestas pronosticos deportivos tenis|apuestas pronosticos futbol|apuestas pronosticos gratis|apuestas pronosticos nba|apuestas pronosticos
tenis|apuestas prorroga|apuestas psg barca|apuestas psg barcelona|apuestas puntos por tarjetas|apuestas puntos tarjetas|apuestas que aceptan paypal|apuestas que es handicap|apuestas que puedes hacer con tu novia|apuestas que siempre ganaras|apuestas que significa|apuestas
quien bajara a segunda|apuestas quién bajara
a segunda|apuestas quien gana el mundial|apuestas quien gana eurocopa|apuestas quien gana la
champions|apuestas quien gana la eurocopa|apuestas quien gana la liga|apuestas quien ganara el mundial|apuestas quién ganará
el mundial|apuestas quien ganara la champions|apuestas quien ganara
la eurocopa|apuestas quien ganara la liga|apuestas rayo
barcelona|apuestas real madrid|apuestas real
madrid arsenal|apuestas real madrid athletic|apuestas real madrid atletico|apuestas real
madrid atletico champions|apuestas real madrid atletico de madrid|apuestas real madrid atlético de madrid|apuestas real madrid atletico madrid|apuestas real
madrid barcelona|apuestas real madrid bayern|apuestas real madrid
betis|apuestas real madrid borussia|apuestas real madrid campeon champions|apuestas real
madrid celta|apuestas real madrid champions|apuestas
real madrid city|apuestas real madrid girona|apuestas real madrid hoy|apuestas real madrid liverpool|apuestas real madrid manchester city|apuestas real madrid osasuna|apuestas real
madrid real sociedad|apuestas real madrid valencia|apuestas real madrid villarreal|apuestas real
madrid vs arsenal|apuestas real madrid vs atletico|apuestas real madrid vs atlético|apuestas real madrid vs atletico madrid|apuestas real madrid
vs barcelona|apuestas real madrid vs betis|apuestas real madrid vs sevilla|apuestas real madrid vs
valencia|apuestas real sociedad|apuestas real sociedad athletic|apuestas real
sociedad barcelona|apuestas real sociedad betis|apuestas real sociedad psg|apuestas real sociedad real madrid|apuestas real sociedad valencia|apuestas recomendadas hoy|apuestas regalo
de bienvenida|apuestas registro|apuestas resultado exacto|apuestas resultados|apuestas
resultados eurocopa|apuestas retirada tenis|apuestas roma barcelona|apuestas roma sevilla|apuestas rugby|apuestas rugby
mundial|apuestas rugby world cup|apuestas ruleta seguras|apuestas segunda|apuestas segunda b|apuestas segunda
division|apuestas segunda división|apuestas segunda
division b|apuestas segunda division españa|apuestas seguras|apuestas seguras baloncesto|apuestas seguras calculadora|apuestas seguras en la
ruleta|apuestas seguras eurocopa|apuestas seguras foro|apuestas seguras futbol|apuestas
seguras futbol hoy|apuestas seguras gratis|apuestas seguras hoy|apuestas seguras hoy futbol|apuestas seguras nba|apuestas seguras nba hoy|apuestas
seguras para este fin de semana|apuestas seguras para ganar
dinero|apuestas seguras para hoy|apuestas seguras para hoy fútbol|apuestas seguras para hoy pronósticos|apuestas seguras
para mañana|apuestas seguras ruleta|apuestas seguras telegram|apuestas seguras tenis|apuestas semifinales eurocopa|apuestas senegal paises bajos|apuestas sevilla|apuestas sevilla athletic|apuestas sevilla atletico de
madrid|apuestas sevilla barcelona|apuestas sevilla
betis|apuestas sevilla campeon liga|apuestas sevilla celta|apuestas sevilla gana la liga|apuestas sevilla girona|apuestas sevilla inter|apuestas sevilla jugador|apuestas sevilla juventus|apuestas sevilla leganes|apuestas sevilla madrid|apuestas sevilla
manchester united|apuestas sevilla osasuna|apuestas sevilla real madrid|apuestas sevilla real sociedad|apuestas sevilla roma|apuestas sevilla valencia|apuestas significa|apuestas simples ejemplos|apuestas simples o
combinadas|apuestas sin deposito|apuestas sin deposito inicial|apuestas sin deposito minimo|apuestas sin dinero|apuestas sin dinero real|apuestas sin empate|apuestas sin empate que significa|apuestas
sin ingreso minimo|apuestas sin registro|apuestas
sistema|apuestas sistema calculadora|apuestas sistema como
funciona|apuestas sistema trixie|apuestas sociedad|apuestas
sorteo copa del rey|apuestas stake|apuestas stake
10|apuestas stake 10 hoy|apuestas super bowl favorito|apuestas super rugby|apuestas supercopa españa|apuestas
superliga argentina|apuestas tarjeta roja|apuestas tarjetas|apuestas tarjetas amarillas|apuestas tenis|apuestas tenis atp|apuestas tenis consejos|apuestas
tenis copa davis|apuestas tenis de mesa|apuestas tenis de mesa pronosticos|apuestas tenis en vivo|apuestas tenis femenino|apuestas tenis hoy|apuestas tenis itf|apuestas tenis pronosticos|apuestas tenis pronósticos|apuestas tenis retirada|apuestas tenis roland garros|apuestas
tenis seguras|apuestas tenis wimbledon|apuestas tenis wta|apuestas tercera division|apuestas
tercera division españa|apuestas tipos|apuestas tips|apuestas tipster|apuestas tipster
para hoy|apuestas topuria holloway cuotas|apuestas torneos de golf|apuestas torneos de tenis|apuestas trucos|apuestas uefa champions league|apuestas uefa europa
league|apuestas ufc|apuestas ufc chile|apuestas ufc como funciona|apuestas
ufc hoy|apuestas ufc ilia topuria|apuestas ufc online|apuestas
ufc pronósticos|apuestas ufc telegram|apuestas ufc topuria|apuestas under over|apuestas unionistas villarreal|apuestas uruguay|apuestas uruguay colombia|apuestas
uruguay corea|apuestas uruguay vs colombia|apuestas us open golf|apuestas us
open tenis|apuestas valencia|apuestas valencia barcelona|apuestas valencia betis|apuestas valencia madrid|apuestas valencia real madrid|apuestas valladolid barcelona|apuestas
valladolid valencia|apuestas valor app|apuestas valor
en directo|apuestas valor galgos|apuestas venezuela|apuestas venezuela argentina|apuestas venezuela bolivia|apuestas venezuela
ecuador|apuestas villarreal|apuestas villarreal athletic|apuestas villarreal barcelona|apuestas villarreal bayern|apuestas
villarreal betis|apuestas villarreal liverpool|apuestas villarreal manchester|apuestas villarreal manchester
united|apuestas villarreal vs real madrid|apuestas virtuales|apuestas
virtuales colombia|apuestas virtuales futbol|apuestas
virtuales sin dinero|apuestas vivo|apuestas
vuelta a españa|apuestas vuelta españa|apuestas william hill partidos de hoy|apuestas
y casino|apuestas y casinos|apuestas y juegos de azar|apuestas y pronosticos|apuestas y pronosticos
de futbol|apuestas y pronosticos deportivos|apuestas y resultados|apuestas-deportivas|apuestas-deportivas.es
pronosticos|arbitro nba apuestas|argentina apuestas|argentina colombia apuestas|argentina croacia apuestas|argentina francia apuestas|argentina
mexico apuestas|argentina peru apuestas|argentina uruguay
apuestas|argentina vs bolivia apuestas|argentina
vs chile apuestas|argentina vs colombia apuestas|argentina vs francia apuestas|argentina vs.
colombia apuestas|asi se gana en las apuestas deportivas|asiatico apuestas|asiatico en apuestas|asiaticos apuestas|athletic barcelona apuestas|athletic manchester united apuestas|athletic osasuna apuestas|athletic real madrid apuestas|atletico barcelona apuestas|atletico de madrid apuestas|atlético de madrid apuestas|atletico de madrid real
madrid apuestas|atletico de madrid vs barcelona apuestas|atletico madrid real madrid apuestas|atletico
madrid vs real madrid apuestas|atletico real madrid apuestas|atletico vs real
madrid apuestas|avisador de cuotas apuestas|bajada de cuotas apuestas|baloncesto apuestas|barbastro barcelona apuestas|barca apuestas|barca bayern apuestas|barca inter apuestas|barca
madrid apuestas|barça madrid apuestas|barca vs atletico apuestas|barca vs madrid apuestas|barca vs
real madrid apuestas|barcelona – real madrid apuestas|barcelona apuestas|barcelona atletico apuestas|barcelona
atletico de madrid apuestas|barcelona atletico madrid apuestas|barcelona betis apuestas|barcelona
casa de apuestas|barcelona inter apuestas|barcelona psg apuestas|barcelona real madrid apuestas|barcelona real sociedad apuestas|barcelona sevilla apuestas|barcelona valencia apuestas|barcelona vs athletic
bilbao apuestas|barcelona vs atlético madrid apuestas|barcelona vs betis apuestas|barcelona vs
celta de vigo apuestas|barcelona vs espanyol apuestas|barcelona vs girona
apuestas|barcelona vs madrid apuestas|barcelona vs real madrid apuestas|barcelona
vs real sociedad apuestas|barcelona vs sevilla apuestas|barcelona vs
villarreal apuestas|base de datos cuotas apuestas deportivas|bayern real madrid
apuestas|beisbol apuestas|best america apuestas|bet apuestas chile|bet apuestas en vivo|betis – chelsea
apuestas|betis apuestas|betis barcelona
apuestas|betis chelsea apuestas|betis madrid apuestas|betis
sevilla apuestas|betsson tu sitio de apuestas online|blog apuestas baloncesto|blog apuestas ciclismo|blog apuestas nba|blog apuestas tenis|blog de apuestas de tenis|bono
apuestas|bono apuestas deportivas|bono apuestas deportivas sin deposito|bono
apuestas gratis|bono apuestas gratis sin deposito|bono apuestas sin deposito|bono bienvenida apuestas|bono
bienvenida apuestas deportivas|bono bienvenida apuestas españa|bono bienvenida apuestas sin deposito|bono bienvenida apuestas
sin depósito|bono bienvenida casa apuestas|bono bienvenida casa de apuestas|bono bienvenida marca apuestas|bono casa
apuestas|bono casa de apuestas|bono casa de apuestas sin ingreso|bono casas de
apuestas|bono de apuestas|bono de apuestas gratis sin deposito|bono de bienvenida
apuestas|bono de bienvenida apuestas deportivas|bono de bienvenida
casa de apuestas|bono de bienvenida casas de apuestas|bono de casas
de apuestas|bono de registro apuestas|bono de registro apuestas deportivas|bono de registro casa de apuestas|bono gratis apuestas|bono marca apuestas|bono por registro apuestas|bono por registro apuestas deportivas|bono
por registro casa de apuestas|bono registro apuestas|bono sin deposito apuestas|bono sin depósito apuestas|bono sin deposito apuestas deportivas|bono
sin depósito apuestas deportivas|bono sin deposito casa de apuestas|bono sin deposito marca apuestas|bono sin ingreso apuestas|bono sin ingreso apuestas deportivas|bonos apuestas|bonos apuestas colombia|bonos apuestas deportivas|bonos apuestas deportivas sin deposito|bonos apuestas gratis|bonos apuestas sin deposito|bonos apuestas sin depósito|bonos bienvenida apuestas|bonos bienvenida casas apuestas|bonos bienvenida casas de apuestas|bonos
casa de apuestas|bonos casas apuestas|bonos casas
de apuestas|bonos casas de apuestas colombia|bonos casas de apuestas
deportivas|bonos casas de apuestas españa|bonos casas de apuestas nuevas|bonos
casas de apuestas sin deposito|bonos casas de apuestas sin depósito|bonos de
apuestas|bonos de apuestas deportivas|bonos de apuestas gratis|bonos de apuestas sin deposito|bonos de bienvenida
apuestas|bonos de bienvenida apuestas deportivas|bonos de bienvenida casa
de apuestas|bonos de bienvenida casas de apuestas|bonos de bienvenida de
casas de apuestas|bonos de bienvenida en casas de apuestas|bonos de casas de apuestas|bonos de casas de apuestas sin deposito|bonos en casa
de apuestas|bonos en casas de apuestas sin deposito|bonos gratis apuestas|bonos gratis apuestas deportivas|bonos gratis casas
de apuestas|bonos gratis sin deposito apuestas|bonos paginas de apuestas|bonos registro casas
de apuestas|bonos sin deposito apuestas|bonos sin depósito apuestas|bonos sin deposito apuestas deportivas|bonos sin deposito casas de apuestas|bot de apuestas deportivas gratis|boxeo apuestas|brasil colombia apuestas|brasil peru apuestas|brasil vs colombia
apuestas|buenas apuestas para hoy|buscador cuotas apuestas|buscador de apuestas seguras|buscador de cuotas apuestas|buscador de cuotas de apuestas|buscar
apuestas seguras|caballos apuestas|calculador de apuestas|calculador de
cuotas apuestas|calculadora apuestas|calculadora apuestas combinadas|calculadora apuestas de sistema|calculadora apuestas deportivas|calculadora apuestas deportivas seguras|calculadora apuestas
multiples|calculadora apuestas segura|calculadora apuestas seguras|calculadora apuestas sistema|calculadora apuestas yankee|calculadora arbitraje apuestas|calculadora
cubrir apuestas|calculadora cuotas apuestas|calculadora de apuestas|calculadora de apuestas combinadas|calculadora de apuestas de futbol|calculadora de apuestas de sistema|calculadora
de apuestas deportivas|calculadora de apuestas multiples|calculadora de
apuestas seguras|calculadora de apuestas sistema|calculadora de apuestas surebets|calculadora de arbitraje apuestas|calculadora
de cuotas apuestas|calculadora de cuotas de apuestas|calculadora
para apuestas deportivas|calculadora poisson apuestas|calculadora poisson apuestas deportivas|calculadora poisson para apuestas|calculadora scalping apuestas deportivas|calculadora sistema apuestas|calculadora stake
apuestas|calculadora trading apuestas|calcular apuestas|calcular apuestas deportivas|calcular apuestas futbol|calcular
apuestas sistema|calcular cuotas apuestas|calcular cuotas apuestas combinadas|calcular cuotas apuestas deportivas|calcular cuotas
de apuestas|calcular ganancias apuestas deportivas|calcular momios apuestas|calcular probabilidad cuota apuestas|calcular stake apuestas|calcular unidades apuestas|calcular yield apuestas|calculo de apuestas|calculo de apuestas deportivas|cambio de cuotas apuestas|campeon champions apuestas|campeon eurocopa apuestas|campeon liga apuestas|campeon nba apuestas|canales de apuestas gratis|carrera de caballos apuestas|carrera de
caballos apuestas juego|carrera de caballos con apuestas|carrera de galgos
apuestas|carreras de caballos apuestas|carreras de caballos apuestas online|carreras de
caballos con apuestas|carreras de caballos juegos de apuestas|carreras de galgos apuestas|carreras de galgos apuestas online|carreras de galgos apuestas trucos|carreras galgos apuestas|casa apuestas
argentina|casa apuestas atletico de madrid|casa apuestas barcelona|casa apuestas betis|casa apuestas bono bienvenida|casa apuestas
bono gratis|casa apuestas bono sin deposito|casa apuestas cerca de
mi|casa apuestas chile|casa apuestas colombia|casa apuestas con mejores
cuotas|casa apuestas deportivas|casa apuestas españa|casa apuestas española|casa apuestas eurocopa|casa apuestas futbol|casa apuestas mejores cuotas|casa apuestas mundial|casa apuestas nueva|casa apuestas nuevas|casa apuestas online|casa apuestas peru|casa apuestas valencia|casa de apuestas|casa
de apuestas 10 euros gratis|casa de apuestas argentina|casa de apuestas atletico de
madrid|casa de apuestas baloncesto|casa de apuestas barcelona|casa de apuestas beisbol|casa
de apuestas betis|casa de apuestas bono|casa de apuestas bono bienvenida|casa de apuestas bono de bienvenida|casa de apuestas bono gratis|casa de apuestas bono por registro|casa de
apuestas bono sin deposito|casa de apuestas boxeo|casa de
apuestas caballos|casa de apuestas carreras de caballos|casa de apuestas cerca de mi|casa de apuestas
cerca de mí|casa de apuestas champions league|casa de apuestas chile|casa
de apuestas ciclismo|casa de apuestas colombia|casa de apuestas con bono de bienvenida|casa de
apuestas con bono sin deposito|casa de apuestas con cuotas mas altas|casa de apuestas con esports|casa de apuestas con las mejores cuotas|casa de apuestas con licencia en españa|casa de apuestas con mejores cuotas|casa de apuestas con pago anticipado|casa de apuestas con paypal|casa de apuestas copa
america|casa de apuestas de caballos|casa de apuestas de colombia|casa de apuestas de españa|casa de apuestas de futbol|casa
de apuestas de fútbol|casa de apuestas de futbol peru|casa de apuestas de peru|casa de apuestas
del madrid|casa de apuestas del real madrid|casa de apuestas deportivas|casa de apuestas deportivas cerca de mi|casa de
apuestas deportivas en argentina|casa de apuestas deportivas en chile|casa de apuestas deportivas en colombia|casa de apuestas deportivas en españa|casa de apuestas deportivas en madrid|casa de apuestas deportivas españa|casa
de apuestas deportivas españolas|casa de apuestas deportivas madrid|casa de apuestas deportivas mexico|casa de
apuestas deportivas online|casa de apuestas deportivas peru|casa de apuestas deposito 5 euros|casa de apuestas deposito minimo|casa de apuestas deposito minimo 1 euro|casa de apuestas depósito mínimo 1
euro|casa de apuestas en españa|casa de apuestas en linea|casa de
apuestas en madrid|casa de apuestas en perú|casa de apuestas en vivo|casa de apuestas españa|casa de
apuestas españa inglaterra|casa de apuestas española|casa de apuestas
españolas|casa de apuestas esports|casa
de apuestas eurocopa|casa de apuestas europa league|casa de
apuestas f1|casa de apuestas formula 1|casa de
apuestas futbol|casa de apuestas ingreso minimo|casa de apuestas ingreso minimo 1 euro|casa de
apuestas ingreso mínimo 1 euro|casa de apuestas legales|casa de
apuestas legales en colombia|casa de apuestas legales en españa|casa de apuestas libertadores|casa de apuestas liga española|casa de apuestas madrid|casa de apuestas
mas segura|casa de apuestas mejores|casa de
apuestas méxico|casa de apuestas minimo 5 euros|casa de
apuestas mlb|casa de apuestas mundial|casa de apuestas nba|casa de apuestas nfl|casa de apuestas nueva|casa
de apuestas nuevas|casa de apuestas oficial del real madrid|casa de apuestas oficial real madrid|casa
de apuestas online|casa de apuestas online argentina|casa de apuestas online
chile|casa de apuestas online españa|casa de apuestas online mexico|casa de apuestas online paraguay|casa de apuestas online peru|casa de apuestas online usa|casa de apuestas online venezuela|casa de apuestas
pago anticipado|casa de apuestas para boxeo|casa de apuestas para ufc|casa
de apuestas peru|casa de apuestas perú|casa de apuestas peru online|casa de apuestas por paypal|casa de apuestas
promociones|casa de apuestas que regalan dinero|casa de apuestas real madrid|casa de apuestas regalo
de bienvenida|casa de apuestas sevilla|casa de apuestas sin dinero|casa de apuestas sin ingreso minimo|casa de apuestas sin licencia en españa|casa de apuestas sin minimo
de ingreso|casa de apuestas stake|casa de apuestas tenis|casa de apuestas ufc|casa de apuestas valencia|casa de apuestas venezuela|casa
de apuestas virtuales|casa de apuestas vive la suerte|casa oficial de apuestas del real madrid|casas apuestas asiaticas|casas apuestas bono sin deposito|casas apuestas bonos
sin deposito|casas apuestas caballos|casas apuestas chile|casas apuestas ciclismo|casas apuestas con licencia|casas apuestas con licencia
en españa|casas apuestas deportivas|casas apuestas deportivas colombia|casas apuestas deportivas españa|casas apuestas deportivas españolas|casas apuestas
deportivas nuevas|casas apuestas españa|casas apuestas españolas|casas apuestas esports|casas apuestas eurocopa|casas apuestas golf|casas apuestas ingreso minimo 5 euros|casas apuestas legales|casas apuestas legales españa|casas
apuestas licencia|casas apuestas licencia españa|casas apuestas mexico|casas apuestas
mundial|casas apuestas nba|casas apuestas nuevas|casas apuestas nuevas
españa|casas apuestas ofertas|casas apuestas online|casas apuestas paypal|casas apuestas peru|casas apuestas sin licencia|casas apuestas tenis|casas asiaticas apuestas|casas de apuestas|casas de apuestas 5 euros|casas de apuestas app|casas de apuestas argentinas|casas de
apuestas asiaticas|casas de apuestas baloncesto|casas de apuestas
barcelona|casas de apuestas bono bienvenida|casas de apuestas bono de
bienvenida|casas de apuestas bono por registro|casas de
apuestas bono sin deposito|casas de apuestas bono sin ingreso|casas
de apuestas bonos|casas de apuestas bonos de bienvenida|casas
de apuestas bonos gratis|casas de apuestas bonos sin deposito|casas de apuestas boxeo|casas de apuestas caballos|casas de apuestas
carreras de caballos|casas de apuestas casino|casas de apuestas casino online|casas
de apuestas cerca de mi|casas de apuestas champions league|casas de
apuestas chile|casas de apuestas ciclismo|casas de apuestas colombia|casas de apuestas com|casas
de apuestas con app|casas de apuestas con apuestas
gratis|casas de apuestas con bono|casas de apuestas con bono de bienvenida|casas de apuestas
con bono de registro|casas de apuestas con bono por
registro|casas de apuestas con bono sin deposito|casas de
apuestas con bonos|casas de apuestas con bonos gratis|casas de
apuestas con bonos sin deposito|casas de apuestas con deposito minimo|casas de apuestas
con esports|casas de apuestas con handicap asiatico|casas de apuestas
con licencia|casas de apuestas con licencia en españa|casas de apuestas con licencia
españa|casas de apuestas con licencia española|casas de apuestas con mejores cuotas|casas
de apuestas con pago anticipado|casas de apuestas con paypal|casas de apuestas con paypal en perú|casas de apuestas con promociones|casas
de apuestas con ruleta en vivo|casas de apuestas copa del rey|casas de apuestas de caballos|casas de apuestas
de españa|casas de apuestas de futbol|casas de apuestas de fútbol|casas de apuestas de peru|casas de apuestas deportivas|casas de apuestas deportivas asiaticas|casas de apuestas deportivas colombia|casas de apuestas deportivas comparativa|casas de
apuestas deportivas con paypal|casas de apuestas deportivas en chile|casas
de apuestas deportivas en españa|casas de apuestas deportivas en linea|casas de apuestas deportivas
en madrid|casas de apuestas deportivas en mexico|casas de apuestas deportivas en peru|casas de apuestas deportivas en sevilla|casas de
apuestas deportivas en valencia|casas de apuestas deportivas españa|casas de apuestas deportivas españolas|casas
de apuestas deportivas legales|casas de apuestas deportivas madrid|casas de apuestas deportivas mexico|casas de apuestas deportivas nuevas|casas de apuestas deportivas online|casas de apuestas deportivas peru|casas de apuestas deportivas perú|casas de apuestas deposito minimo 1 euro|casas de
apuestas depósito mínimo 1 euro|casas de apuestas dinero
gratis|casas de apuestas en argentina|casas de apuestas
en barcelona|casas de apuestas en chile|casas de apuestas en colombia|casas de
apuestas en españa|casas de apuestas en españa online|casas de apuestas en linea|casas de apuestas en madrid|casas de apuestas en méxico|casas de apuestas en peru|casas de apuestas en perú|casas de apuestas en sevilla|casas de
apuestas en uruguay|casas de apuestas en valencia|casas de apuestas en venezuela|casas de
apuestas equipos de futbol|casas de apuestas españa|casas de apuestas españa alemania|casas de apuestas españa inglaterra|casas de apuestas españa
licencia|casas de apuestas españa nuevas|casas de apuestas españa online|casas de apuestas española|casas de apuestas
españolas|casas de apuestas españolas con licencia|casas
de apuestas españolas online|casas de apuestas esports|casas de apuestas eurocopa|casas de apuestas eurocopa 2024|casas de apuestas europa league|casas de apuestas f1|casas de apuestas fisicas en barcelona|casas de apuestas fisicas en españa|casas de apuestas formula 1|casas de apuestas
fuera de españa|casas de apuestas futbol|casas de apuestas fútbol|casas
de apuestas futbol españa|casas de apuestas ganador
eurocopa|casas de apuestas gratis|casas de apuestas ingreso minimo|casas de apuestas ingreso
minimo 1 euro|casas de apuestas ingreso minimo 5 euros|casas de apuestas inter
barcelona|casas de apuestas legales|casas de apuestas legales en colombia|casas de apuestas legales en españa|casas de apuestas legales en mexico|casas de apuestas legales españa|casas
de apuestas legales mx|casas de apuestas licencia|casas de apuestas licencia
españa|casas de apuestas lista|casas de apuestas madrid|casas de apuestas mas seguras|casas de
apuestas mejores bonos|casas de apuestas mejores cuotas|casas de apuestas mexico|casas
de apuestas méxico|casas de apuestas minimo 5 euros|casas
de apuestas mlb|casas de apuestas mundial|casas de apuestas mundial baloncesto|casas de apuestas mundiales|casas de apuestas nba|casas de apuestas no reguladas en españa|casas de apuestas nueva ley|casas de apuestas nuevas|casas de apuestas nuevas en colombia|casas de
apuestas nuevas en españa|casas de apuestas nuevas españa|casas de apuestas ofertas|casas
de apuestas online|casas de apuestas online argentina|casas de apuestas online colombia|casas de apuestas online deportivas|casas de apuestas online ecuador|casas
de apuestas online en argentina|casas de apuestas online
en chile|casas de apuestas online en colombia|casas de apuestas online en españa|casas de apuestas online en mexico|casas de
apuestas online españa|casas de apuestas online mas fiables|casas de apuestas online mexico|casas de apuestas online nuevas|casas de apuestas online peru|casas de apuestas online usa|casas de
apuestas online venezuela|casas de apuestas pago paypal|casas de apuestas para ufc|casas de apuestas paypal|casas de apuestas
peru bono sin deposito|casas de apuestas presenciales
Your comment is awaiting moderation.
seoconnect.click – Color palette felt calming, nothing distracting, just focused, thoughtful design.
Your comment is awaiting moderation.
да и оперативность У ВАС на ВЫСШЕМ :superman: уровне!! https://anyflip.com/homepage/mojpo https://pubhtml5.com/homepage/mcyon https://form.jotform.com/253006754901049 https://form.jotform.com/253073654841055 https://www.band.us/page/100488290/ https://form.jotform.com/253084058087057 пишут в асе, ваших треков мы не видим, с вами договаривался другой менеджер, типа вас вообще в списках нет, а до этого говорили посылка готова завтра отправят.
Your comment is awaiting moderation.
Современный женский https://storinka.com.ua портал с полезными статьями, рекомендациями и тестами. Тренды, красота, отношения, карьера и вдохновение каждый день. Всё, что помогает чувствовать себя счастливой и уверенной.
Your comment is awaiting moderation.
Мужской портал https://kakbog.com о стиле, здоровье, карьере и технологиях. Обзоры гаджетов, тренировки, уход, финансы, отношения и путешествия. Практичные советы и честные разборы каждый день.
Your comment is awaiting moderation.
advista.click – Navigation felt smooth, found everything quickly without any confusing steps.
Your comment is awaiting moderation.
КЕнт в почту зайди,проясни ситуэшен. https://anyflip.com/homepage/upwqo https://beteiligung.stadtlindau.de/profile/%D0%9B%D0%B5%D0%BB%D0%B8%D1%81%D1%82%D0%B0%D0%B4%20%D0%BA%D1%83%D0%BF%D0%B8%D1%82%D1%8C%20%D0%9A%D0%BE%D0%BA%D0%B0%D0%B8%D0%BD/ https://wanderlog.com/view/hjwcpcdxdd/бат-СЏРј-купить-кокаин-мефедрон-марихуану-бошки/ https://pubhtml5.com/homepage/wxswn https://www.rwaq.org/users/aoxerojisagy-20251029171739 https://say.la/read-blog/134308 Сори я не туда отписал
Your comment is awaiting moderation.
Современная 3D-печать сегодня является передовой технологией. Мы обеспечиваем выгодные услуги по изготовлению деталей и прототипов. Наши заказчики гарантированно имеют уникальные детали, выполненные с использованием надежных полимеров. Это дает возможность получить изделие в кратчайшие сроки. Мы осуществляем печать с пластиком разных типов, что открывает путь для сложных проектов. Кроме того, мы обеспечиваем короткие сроки выполнения заказов. Каждый заказ сопровождается визуальной и технической оценкой. Обратитесь в нашу компанию за 3D-печатью, и вы сможете воплотить любую идею https://stayzada.com/bbs/board.php?bo_table=free&wr_id=329168. Мы предоставляем индивидуальные решения и профессиональный подход к каждому проекту.
Your comment is awaiting moderation.
Смотри в розничном прайсе https://kemono.im/zoofebqadg/khelmond-kupit-kokain-mefedron-marikhuanu-boshki https://www.rwaq.org/users/xogbtizc65fcf0-20251107150057 https://www.grepmed.com/gyabobebaeg https://www.rwaq.org/users/nntlfvhu121rgp-20251104020456 https://www.impactio.com/researcher/ifxnyowo23i3ao https://imageevent.com/villagran9dy/bezct Ответь в аське!Люди 22куска зарядили ,перед оплатой добро дал ,а потом тишина… Люди переживают,очень!Ответь пожалуйсто!!!
Your comment is awaiting moderation.
Автомобильный журнал https://autodream.com.ua для новичков и энтузиастов: тренды, тест-драйвы, сравнения, разбор комплектаций, VIN-проверки и подготовка к сделке. Практичные гайды по уходу и экономии, гаджеты для авто, законы и штрафы. Делимся опытом, чтобы не переплачивали.
Your comment is awaiting moderation.
МАГАЗ КРУТОЙ!!! https://form.jotform.com/253027014622041 http://www.pageorama.com/?p=uabehuhiacef https://anyflip.com/homepage/rieut https://www.impactio.com/researcher/pnviejci91b7f7 https://yamap.com/users/4922942 https://www.impactio.com/researcher/ualhzzdi15oscu мир всем месным братья
Your comment is awaiting moderation.
продавец должен наверно знать что продает,с таким отношением,то бишь пропидаливанием соды….за такое человеки и по шапке получают https://www.divephotoguide.com/user/abadeodab https://anyflip.com/homepage/jmmbv https://imageevent.com/eyrycetinyge/jqxln https://www.band.us/page/100524985/ https://www.divephotoguide.com/user/vubiicae https://say.la/read-blog/134709 раньше и хуй крепче был и бабы красивей
Your comment is awaiting moderation.
Официальный сайт Kraken https://kra44-cc.at безопасная платформа для анонимных операций в darknet. Полный доступ к рынку через актуальные зеркала и onion ссылки.
Your comment is awaiting moderation.
adtrend.click – Color palette felt calming, nothing distracting, just focused, thoughtful design.
Your comment is awaiting moderation.
и что за вещество https://form.jotform.com/253083471509054 https://pubhtml5.com/homepage/rufcb https://pubhtml5.com/homepage/kohhc https://www.grepmed.com/lsedeceob https://www.brownbook.net/business/54466336/нарын-купить-кокаин-мефедрон-марихуану-бошки/ https://www.grepmed.com/yhlgwodod Всем Удачи
Your comment is awaiting moderation.
globalshoppingzone – Excellent service, easy checkout, and reliable product selection.
Your comment is awaiting moderation.
discoverandshop – Great for discovering trending items and deals quickly.
Your comment is awaiting moderation.
brightstylemarket – Bright, fresh, and stylish—just like the name says!
Your comment is awaiting moderation.
dreamdiscovercreate – Unique products that really stand out—great finds here.
Your comment is awaiting moderation.
shopforvalue – Great place to find useful items at really fair prices.
Your comment is awaiting moderation.
makeeverymomentcount – The layout feels calm, perfect for browsing and reflecting.
Your comment is awaiting moderation.
Кракен зеркало
Your comment is awaiting moderation.
Четкого товара! https://anyflip.com/homepage/vceaj Сам прикинь, меня пёрло почти
Your comment is awaiting moderation.
Женский портал https://womanclub.kyiv.ua о стиле жизни, красоте и вдохновении. Советы по уходу, отношениям, карьере и саморазвитию. Реальные истории, модные тренды, психологические лайфхаки и идеи для гармонии. Всё, что важно каждой современной женщине.
Your comment is awaiting moderation.
Официальный сайт Kraken https://kra44-cc.at безопасная платформа для анонимных операций в darknet. Полный доступ к рынку через актуальные зеркала и onion ссылки.
Your comment is awaiting moderation.
Родителям о главном https://rodkom.org.ua баланс режима, питание, истерики и границы, подготовка к школе, дружба и безопасность в сети. Короткие памятки, чек-листы и практики от специалистов. Только актуальные данные и решения, которые работают в реальной жизни.
Your comment is awaiting moderation.
У меня настоящий 96 процентный спирт с больницы. Всё растворилось. Чу чуть паровой бани. https://www.impactio.com/researcher/chisaimuraai8030 Это мы и так все знаем
Your comment is awaiting moderation.
(10 euros gratis apuestas|10 mejores casas de apuestas|10
trucos para ganar apuestas|15 euros gratis marca apuestas|1×2
apuestas|1×2 apuestas deportivas|1×2 apuestas que significa|1×2 en apuestas|1×2 en apuestas que significa|1×2 que significa en apuestas|5 euros gratis apuestas|9 apuestas que siempre ganaras|a partir de cuanto se declara apuestas|actividades
de juegos de azar y apuestas|ad apuestas deportivas|aleksandre topuria ufc
apuestas|algoritmo para ganar apuestas deportivas|america apuestas|análisis nba apuestas|aplicacion android apuestas deportivas|aplicacion apuestas deportivas|aplicacion apuestas deportivas
android|aplicación de apuestas online|aplicacion para hacer apuestas|aplicacion para hacer apuestas de futbol|aplicación para
hacer apuestas de fútbol|aplicaciones apuestas deportivas android|aplicaciones apuestas deportivas gratis|aplicaciones de apuestas
android|aplicaciones de apuestas de fútbol|aplicaciones de apuestas deportivas|aplicaciones
de apuestas deportivas peru|aplicaciones de apuestas deportivas perú|aplicaciones de apuestas en colombia|aplicaciones de apuestas gratis|aplicaciones de apuestas online|aplicaciones de apuestas seguras|aplicaciones de apuestas sin dinero|aplicaciones para hacer apuestas|apostar seguro apuestas deportivas|app android
apuestas deportivas|app apuestas|app apuestas android|app apuestas
de futbol|app apuestas deportivas|app apuestas deportivas android|app
apuestas deportivas argentina|app apuestas deportivas colombia|app apuestas deportivas ecuador|app apuestas deportivas españa|app apuestas deportivas
gratis|app apuestas entre amigos|app apuestas futbol|app apuestas gratis|app apuestas sin dinero|app casa de
apuestas|app casas de apuestas|app control apuestas|app de apuestas|app de apuestas android|app de apuestas casino|app de apuestas colombia|app de apuestas con bono de bienvenida|app de apuestas de
futbol|app de apuestas deportivas|app de apuestas deportivas android|app de apuestas deportivas argentina|app
de apuestas deportivas colombia|app de apuestas deportivas en españa|app de apuestas deportivas peru|app
de apuestas deportivas perú|app de apuestas deportivas sin dinero|app de apuestas ecuador|app de apuestas en colombia|app de
apuestas en españa|app de apuestas en venezuela|app de apuestas futbol|app de
apuestas gratis|app de apuestas online|app de apuestas para android|app de apuestas para ganar dinero|app de apuestas peru|app de apuestas reales|app de casas de apuestas|app marca apuestas android|app moviles de
apuestas|app para apuestas|app para apuestas de futbol|app para apuestas
deportivas|app para apuestas deportivas en español|app
para ganar apuestas deportivas|app para hacer apuestas|app para hacer apuestas deportivas|app para
hacer apuestas entre amigos|app para llevar control de apuestas|app
pronosticos apuestas deportivas|app versus apuestas|apps apuestas mundial|apps de apuestas|apps de apuestas con bono
de bienvenida|apps de apuestas de futbol|apps de apuestas deportivas peru|apps de
apuestas mexico|apps para apuestas|aprender a hacer apuestas deportivas|aprender hacer apuestas deportivas|apuesta del dia apuestas deportivas|apuestas 10 euros gratis|apuestas
100 seguras|apuestas 1×2|apuestas 1X2|apuestas
2 division|apuestas 3 division|apuestas a caballos|apuestas a
carreras de caballos|apuestas a colombia|apuestas a
corners|apuestas a ganar|apuestas a jugadores nba|apuestas a la baja|apuestas a la nfl|apuestas al
barcelona|apuestas al dia|apuestas al empate|apuestas
al mundial|apuestas al tenis wta|apuestas alaves barcelona|apuestas alcaraz hoy|apuestas
alemania españa|apuestas alonso campeon del mundo|apuestas altas y bajas|apuestas altas
y bajas nfl|apuestas ambos equipos marcan|apuestas america|apuestas
android|apuestas anillo nba|apuestas antes del mundial|apuestas anticipadas|apuestas
anticipadas nba|apuestas apps|apuestas arabia argentina|apuestas argentina|apuestas argentina campeon del mundo|apuestas argentina canada|apuestas argentina colombia|apuestas argentina croacia|apuestas argentina españa|apuestas argentina francia|apuestas argentina
francia cuanto paga|apuestas argentina francia mundial|apuestas
argentina gana el mundial|apuestas argentina gana mundial|apuestas argentina holanda|apuestas argentina mexico|apuestas argentina méxico|apuestas argentina mundial|apuestas argentina online|apuestas argentina paises bajos|apuestas argentina polonia|apuestas argentina
uruguay|apuestas argentina vs australia|apuestas argentina vs colombia|apuestas argentina vs francia|apuestas argentina vs peru|apuestas
argentinas|apuestas arsenal real madrid|apuestas ascenso
a primera division|apuestas ascenso a segunda|apuestas asiaticas|apuestas asiatico|apuestas
athletic|apuestas athletic atletico|apuestas athletic barça|apuestas athletic barcelona|apuestas athletic betis|apuestas athletic manchester|apuestas athletic
manchester united|apuestas athletic osasuna|apuestas athletic real|apuestas
athletic real madrid|apuestas athletic real sociedad|apuestas athletic real sociedad final|apuestas athletic roma|apuestas athletic sevilla|apuestas
athletic valencia|apuestas atletico|apuestas atletico barcelona|apuestas atletico barsa|apuestas atletico campeon champions|apuestas atletico campeon de liga|apuestas atlético
copenhague|apuestas atletico de madrid|apuestas atlético de madrid|apuestas atletico de madrid barcelona|apuestas
atletico de madrid gana la liga|apuestas atletico de madrid real madrid|apuestas atlético de madrid real madrid|apuestas atletico de madrid vs barcelona|apuestas atletico madrid|apuestas atletico
madrid real madrid|apuestas atletico madrid vs barcelona|apuestas atletico real madrid|apuestas atletico real madrid
champions|apuestas atletismo|apuestas bajas|apuestas baloncesto|apuestas baloncesto acb|apuestas baloncesto handicap|apuestas baloncesto hoy|apuestas baloncesto juegos olimpicos|apuestas baloncesto nba|apuestas baloncesto
pronostico|apuestas baloncesto pronósticos|apuestas baloncesto prorroga|apuestas barca|apuestas barca athletic|apuestas barca atletico|apuestas barca bayern|apuestas barca
bayern munich|apuestas barca girona|apuestas barca hoy|apuestas
barça hoy|apuestas barca inter|apuestas barca juventus|apuestas barca madrid|apuestas barça madrid|apuestas barca real madrid|apuestas barca vs juve|apuestas barca vs madrid|apuestas barca vs psg|apuestas
barcelona|apuestas barcelona alaves|apuestas barcelona athletic|apuestas barcelona atletico|apuestas barcelona atletico de madrid|apuestas barcelona atlético de madrid|apuestas barcelona
atletico madrid|apuestas barcelona bayern|apuestas barcelona betis|apuestas barcelona campeon de liga|apuestas barcelona celta|apuestas barcelona espanyol|apuestas barcelona gana la champions|apuestas barcelona girona|apuestas
barcelona granada|apuestas barcelona hoy|apuestas barcelona inter|apuestas barcelona madrid|apuestas barcelona osasuna|apuestas barcelona psg|apuestas barcelona real madrid|apuestas barcelona real sociedad|apuestas
barcelona sevilla|apuestas barcelona valencia|apuestas barcelona villarreal|apuestas barcelona vs atletico madrid|apuestas barcelona vs madrid|apuestas barcelona vs real madrid|apuestas barsa madrid|apuestas
basket hoy|apuestas bayern barcelona|apuestas bayern vs barcelona|apuestas beisbol|apuestas
béisbol|apuestas beisbol mlb|apuestas beisbol pronosticos|apuestas
beisbol venezolano|apuestas betis|apuestas betis –
chelsea|apuestas betis barcelona|apuestas betis chelsea|apuestas betis fiorentina|apuestas betis girona|apuestas betis madrid|apuestas betis mallorca|apuestas betis real madrid|apuestas betis real sociedad|apuestas betis sevilla|apuestas betis valencia|apuestas betis valladolid|apuestas betis vs valencia|apuestas betplay hoy colombia|apuestas
betsson peru|apuestas bienvenida|apuestas billar online|apuestas
bolivia vs colombia|apuestas bono|apuestas bono bienvenida|apuestas
bono de bienvenida|apuestas bono de bienvenida sin deposito|apuestas bono gratis|apuestas bono sin deposito|apuestas bonos sin deposito|apuestas borussia
real madrid|apuestas boxeo|apuestas boxeo de campeonato|apuestas
boxeo españa|apuestas boxeo español|apuestas boxeo femenino olimpiadas|apuestas boxeo hoy|apuestas boxeo online|apuestas brasil
colombia|apuestas brasil peru|apuestas brasil
uruguay|apuestas brasil vs colombia|apuestas brasil vs peru|apuestas caballos|apuestas caballos colocado|apuestas caballos españa|apuestas caballos hipodromo|apuestas
caballos hoy|apuestas caballos madrid|apuestas caballos online|apuestas caballos sanlucar de barrameda|apuestas caballos zarzuela|apuestas calculador|apuestas campeon|apuestas campeon champions|apuestas
campeón champions|apuestas campeon champions 2025|apuestas campeon champions league|apuestas campeon conference league|apuestas campeon copa america|apuestas
campeon copa del rey|apuestas campeon de champions|apuestas
campeon de la champions|apuestas campeon de liga|apuestas campeon del
mundo|apuestas campeon eurocopa|apuestas campeón eurocopa|apuestas campeon europa league|apuestas campeon f1|apuestas campeon f1 2025|apuestas campeon formula 1|apuestas
campeon libertadores|apuestas campeon liga|apuestas campeon liga bbva|apuestas campeon liga española|apuestas
campeon liga santander|apuestas campeon motogp 2025|apuestas campeon mundial|apuestas campeón mundial|apuestas campeon mundial baloncesto|apuestas campeon nba|apuestas campeón nba|apuestas campeon premier|apuestas
campeon premier league|apuestas campeon roland garros|apuestas campeonato f1|apuestas campeonatos de futbol|apuestas carrera de caballos|apuestas
carrera de caballos hoy|apuestas carrera de caballos nocturnas|apuestas carrera de galgos fin de semana|apuestas carrera de galgos hoy|apuestas carrera de galgos nocturnas|apuestas carreras caballos|apuestas carreras caballos sanlucar|apuestas carreras de caballos|apuestas carreras de
caballos en directo|apuestas carreras de caballos en vivo|apuestas carreras de caballos españa|apuestas carreras
de caballos hoy|apuestas carreras de caballos nacionales|apuestas carreras de caballos nocturnas|apuestas
carreras de caballos online|apuestas carreras de caballos sanlucar|apuestas carreras de caballos sanlúcar|apuestas carreras
de galgos|apuestas carreras de galgos en vivo|apuestas carreras de galgos nocturnas|apuestas carreras de
galgos pre partido|apuestas casino|apuestas casino
barcelona|apuestas casino futbol|apuestas casino gran madrid|apuestas casino gratis|apuestas casino madrid|apuestas casino
online|apuestas casino online argentina|apuestas casinos|apuestas casinos online|apuestas celta|apuestas celta barcelona|apuestas celta betis|apuestas celta
eibar|apuestas celta espanyol|apuestas celta
granada|apuestas celta madrid|apuestas celta manchester|apuestas celta real madrid|apuestas champion league|apuestas champions foro|apuestas
champions hoy|apuestas champions league|apuestas champions league – pronósticos|apuestas champions league 2025|apuestas champions
league hoy|apuestas champions league pronosticos|apuestas champions league pronósticos|apuestas champions pronosticos|apuestas chelsea barcelona|apuestas
chelsea betis|apuestas chile|apuestas chile peru|apuestas chile venezuela|apuestas chile vs colombia|apuestas chile vs uruguay|apuestas ciclismo|apuestas ciclismo en vivo|apuestas ciclismo femenino|apuestas ciclismo tour francia|apuestas ciclismo vuelta|apuestas ciclismo vuelta a españa|apuestas ciclismo vuelta españa|apuestas city madrid|apuestas city
real madrid|apuestas clasico|apuestas clasico español|apuestas clasico
real madrid barcelona|apuestas clasificacion mundial|apuestas colombia|apuestas colombia
argentina|apuestas colombia brasil|apuestas colombia paraguay|apuestas colombia uruguay|apuestas colombia vs argentina|apuestas colombia
vs brasil|apuestas combinadas|apuestas combinadas como funcionan|apuestas combinadas de futbol|apuestas combinadas de fútbol|apuestas combinadas foro|apuestas combinadas futbol|apuestas combinadas hoy|apuestas combinadas mismo partido|apuestas
combinadas mundial|apuestas combinadas nba|apuestas combinadas para esta semana|apuestas combinadas para hoy|apuestas combinadas para mañana|apuestas
combinadas pronosticos|apuestas combinadas recomendadas|apuestas combinadas
seguras|apuestas combinadas seguras para hoy|apuestas combinadas seguras
para mañana|apuestas como ganar|apuestas comparador|apuestas con bono de bienvenida|apuestas
con dinero ficticio|apuestas con dinero real|apuestas con dinero virtual|apuestas con handicap|apuestas con handicap asiatico|apuestas con handicap baloncesto|apuestas con mas probabilidades de
ganar|apuestas con paypal|apuestas con tarjeta de credito|apuestas con tarjeta de debito|apuestas consejos|apuestas copa|apuestas copa africa|apuestas
copa america|apuestas copa américa|apuestas copa argentina|apuestas copa brasil|apuestas copa davis|apuestas
copa de europa|apuestas copa del mundo|apuestas copa del rey|apuestas copa del rey baloncesto|apuestas copa del
rey final|apuestas copa del rey futbol|apuestas copa del rey ganador|apuestas copa del rey hoy|apuestas
copa del rey pronosticos|apuestas copa del rey pronósticos|apuestas copa europa|apuestas copa italia|apuestas copa libertadores|apuestas copa mundial de hockey|apuestas copa
rey|apuestas copa sudamericana|apuestas corners|apuestas corners hoy|apuestas croacia argentina|apuestas cuartos
eurocopa|apuestas cuotas|apuestas cuotas altas|apuestas cuotas bajas|apuestas de 1 euro|apuestas de baloncesto|apuestas de baloncesto
hoy|apuestas de baloncesto nba|apuestas de baloncesto para hoy|apuestas de beisbol|apuestas de
beisbol para hoy|apuestas de blackjack en linea|apuestas de boxeo|apuestas de boxeo canelo|apuestas de boxeo en las vegas|apuestas
de boxeo hoy|apuestas de boxeo online|apuestas de caballo|apuestas
de caballos|apuestas de caballos como funciona|apuestas de caballos
como se juega|apuestas de caballos en colombia|apuestas de caballos en españa|apuestas
de caballos en linea|apuestas de caballos españa|apuestas de caballos ganador y colocado|apuestas de
caballos internacionales|apuestas de caballos juegos|apuestas de caballos online|apuestas de caballos online en venezuela|apuestas
de caballos por internet|apuestas de caballos pronosticos|apuestas de
caballos pronósticos|apuestas de carrera de caballos|apuestas de carreras de caballos|apuestas de carreras
de caballos online|apuestas de casino|apuestas de casino online|apuestas de casino por internet|apuestas de champions league|apuestas de ciclismo|apuestas
de colombia|apuestas de copa america|apuestas de corners|apuestas de deportes en linea|apuestas de deportes online|apuestas de dinero|apuestas de esports|apuestas de eurocopa|apuestas de europa league|apuestas de
f1|apuestas de formula 1|apuestas de futbol|apuestas de fútbol|apuestas de futbol app|apuestas de futbol argentina|apuestas de futbol colombia|apuestas de futbol en colombia|apuestas de futbol en directo|apuestas de futbol en linea|apuestas de futbol en vivo|apuestas de
futbol español|apuestas de futbol gratis|apuestas de futbol hoy|apuestas de
futbol mundial|apuestas de futbol online|apuestas de fútbol
online|apuestas de futbol para hoy|apuestas de fútbol para hoy|apuestas de futbol para
hoy seguras|apuestas de futbol para mañana|apuestas de
futbol peru|apuestas de futbol pronosticos|apuestas de fútbol pronósticos|apuestas de futbol seguras|apuestas de futbol seguras para hoy|apuestas de futbol
sin dinero|apuestas de galgos|apuestas de galgos como ganar|apuestas de galgos
en directo|apuestas de galgos online|apuestas de galgos trucos|apuestas de golf|apuestas de
hockey|apuestas de hockey sobre hielo|apuestas de hoy|apuestas de hoy seguras|apuestas
de juego|apuestas de juegos|apuestas de juegos deportivos|apuestas de juegos online|apuestas de
la champions league|apuestas de la copa américa|apuestas
de la eurocopa|apuestas de la europa league|apuestas de
la liga|apuestas de la liga bbva|apuestas de la liga española|apuestas
de la nba|apuestas de la nfl|apuestas de la ufc|apuestas de mlb|apuestas de nba|apuestas de
nba para hoy|apuestas de partidos|apuestas de partidos de futbol|apuestas de peleas ufc|apuestas de perros en vivo|apuestas de perros virtuales|apuestas
de peru|apuestas de sistema|apuestas de sistema como funciona|apuestas de sistema
explicacion|apuestas de sistema explicación|apuestas de tenis|apuestas de tenis
de mesa|apuestas de tenis en directo|apuestas de tenis hoy|apuestas
de tenis para hoy|apuestas de tenis pronosticos|apuestas de tenis seguras|apuestas de todo tipo|apuestas de ufc|apuestas de
ufc hoy|apuestas del boxeo|apuestas del clasico|apuestas del clasico real
madrid barca|apuestas del dia|apuestas del día|apuestas del dia de hoy|apuestas del dia deportivas|apuestas del dia futbol|apuestas del mundial|apuestas del partido de hoy|apuestas del
real madrid|apuestas del rey|apuestas del sistema|apuestas deporte|apuestas deportes|apuestas deportiva|apuestas deportivas|apuestas deportivas 1 euro|apuestas deportivas 10 euros gratis|apuestas deportivas 100 seguras|apuestas deportivas
1×2|apuestas deportivas android|apuestas deportivas
app|apuestas deportivas apps|apuestas deportivas argentina|apuestas deportivas argentina futbol|apuestas
deportivas argentina legal|apuestas deportivas atletico de madrid|apuestas deportivas baloncesto|apuestas deportivas barca madrid|apuestas deportivas
barcelona|apuestas deportivas beisbol|apuestas deportivas bono|apuestas deportivas bono bienvenida|apuestas deportivas bono de bienvenida|apuestas
deportivas bono sin deposito|apuestas deportivas bonos de bienvenida|apuestas deportivas boxeo|apuestas deportivas caballos|apuestas deportivas
calculadora|apuestas deportivas campeon liga|apuestas deportivas casino|apuestas deportivas casino barcelona|apuestas deportivas
casino online|apuestas deportivas cerca de mi|apuestas deportivas champions league|apuestas deportivas chile|apuestas deportivas
ciclismo|apuestas deportivas colombia|apuestas deportivas com|apuestas deportivas com foro|apuestas deportivas com pronosticos|apuestas deportivas combinadas|apuestas deportivas combinadas para hoy|apuestas deportivas como se juega|apuestas deportivas comparador|apuestas deportivas con bono gratis|apuestas deportivas con bonos
gratis|apuestas deportivas con dinero ficticio|apuestas
deportivas con paypal|apuestas deportivas con puntos virtuales|apuestas deportivas
consejos|apuestas deportivas consejos para ganar|apuestas deportivas copa
america|apuestas deportivas copa del rey|apuestas deportivas copa
libertadores|apuestas deportivas copa mundial|apuestas deportivas corners|apuestas deportivas cual es la mejor|apuestas deportivas cuotas altas|apuestas deportivas de baloncesto|apuestas
deportivas de boxeo|apuestas deportivas de colombia|apuestas deportivas de futbol|apuestas
deportivas de nba|apuestas deportivas de nhl|apuestas deportivas de peru|apuestas deportivas de
tenis|apuestas deportivas del dia|apuestas deportivas dinero
ficticio|apuestas deportivas directo|apuestas deportivas doble oportunidad|apuestas deportivas en argentina|apuestas deportivas en chile|apuestas deportivas
en colombia|apuestas deportivas en directo|apuestas deportivas
en españa|apuestas deportivas en español|apuestas deportivas en linea|apuestas
deportivas en línea|apuestas deportivas en peru|apuestas deportivas en perú|apuestas deportivas en sevilla|apuestas deportivas
en uruguay|apuestas deportivas en vivo|apuestas deportivas es|apuestas
deportivas es pronosticos|apuestas deportivas españa|apuestas deportivas españolas|apuestas deportivas esports|apuestas deportivas
estadisticas|apuestas deportivas estrategias|apuestas deportivas estrategias
seguras|apuestas deportivas eurocopa|apuestas deportivas europa league|apuestas deportivas f1|apuestas deportivas
faciles de ganar|apuestas deportivas formula 1|apuestas deportivas foro|apuestas
deportivas foro futbol|apuestas deportivas foro tenis|apuestas deportivas francia
argentina|apuestas deportivas futbol|apuestas deportivas fútbol|apuestas deportivas futbol argentino|apuestas deportivas futbol colombia|apuestas deportivas futbol español|apuestas deportivas gana|apuestas deportivas ganadas|apuestas deportivas ganar dinero seguro|apuestas deportivas gane|apuestas deportivas golf|apuestas deportivas gratis|apuestas deportivas gratis con premios|apuestas deportivas gratis hoy|apuestas deportivas gratis sin deposito|apuestas
deportivas handicap|apuestas deportivas handicap asiatico|apuestas
deportivas hoy|apuestas deportivas impuestos|apuestas deportivas interior argentina|apuestas deportivas juegos olimpicos|apuestas deportivas la liga|apuestas deportivas legales|apuestas deportivas legales en colombia|apuestas deportivas libres de impuestos|apuestas deportivas licencia
españa|apuestas deportivas liga española|apuestas deportivas
listado|apuestas deportivas listado clasico|apuestas deportivas madrid|apuestas deportivas
mas seguras|apuestas deportivas mejor pagadas|apuestas deportivas mejores|apuestas
deportivas mejores app|apuestas deportivas
mejores casas|apuestas deportivas mejores cuotas|apuestas deportivas
mejores paginas|apuestas deportivas mexico|apuestas deportivas méxico|apuestas deportivas
mlb|apuestas deportivas mlb hoy|apuestas deportivas multiples|apuestas deportivas mundial|apuestas deportivas murcia|apuestas
deportivas nba|apuestas deportivas nba hoy|apuestas deportivas nfl|apuestas
deportivas nhl|apuestas deportivas nuevas|apuestas deportivas ofertas|apuestas deportivas online|apuestas deportivas online argentina|apuestas
deportivas online chile|apuestas deportivas online
colombia|apuestas deportivas online en colombia|apuestas
deportivas online españa|apuestas deportivas online mexico|apuestas deportivas online paypal|apuestas deportivas online peru|apuestas deportivas online por internet|apuestas deportivas pago paypal|apuestas deportivas
para ganar dinero|apuestas deportivas para hoy|apuestas deportivas para hoy pronosticos|apuestas deportivas partido suspendido|apuestas deportivas partidos de hoy|apuestas deportivas paypal|apuestas deportivas
peru|apuestas deportivas perú|apuestas deportivas peru vs ecuador|apuestas deportivas predicciones|apuestas deportivas promociones|apuestas deportivas pronostico|apuestas deportivas pronóstico|apuestas deportivas
pronostico hoy|apuestas deportivas pronosticos|apuestas deportivas pronósticos|apuestas
deportivas pronosticos expertos|apuestas deportivas pronosticos gratis|apuestas deportivas pronosticos nba|apuestas deportivas
pronosticos tenis|apuestas deportivas que aceptan paypal|apuestas deportivas real madrid|apuestas deportivas regalo bienvenida|apuestas deportivas resultado exacto|apuestas deportivas resultados|apuestas deportivas rugby|apuestas deportivas
seguras|apuestas deportivas seguras foro|apuestas deportivas seguras
hoy|apuestas deportivas seguras para hoy|apuestas deportivas seguras telegram|apuestas deportivas sevilla|apuestas deportivas simulador
eurocopa|apuestas deportivas sin deposito|apuestas
deportivas sin deposito inicial|apuestas deportivas sin dinero|apuestas deportivas sin dinero real|apuestas deportivas
sin registro|apuestas deportivas stake|apuestas deportivas stake
10|apuestas deportivas telegram españa|apuestas deportivas tenis|apuestas
deportivas tenis de mesa|apuestas deportivas tenis foro|apuestas deportivas
tenis hoy|apuestas deportivas tips|apuestas deportivas tipster|apuestas deportivas ufc|apuestas deportivas uruguay|apuestas deportivas valencia|apuestas deportivas valencia barcelona|apuestas deportivas
venezuela|apuestas deportivas virtuales|apuestas deportivas y casino|apuestas deportivas y casino online|apuestas deportivas.com|apuestas deportivas.com foro|apuestas deportivas.es|apuestas deportivos pronosticos|apuestas deposito minimo 1 euro|apuestas
descenso a segunda|apuestas descenso a segunda b|apuestas descenso
la liga|apuestas descenso primera division|apuestas descenso segunda|apuestas
dia|apuestas diarias seguras|apuestas dinero|apuestas dinero ficticio|apuestas
dinero real|apuestas dinero virtual|apuestas directas|apuestas directo|apuestas directo futbol|apuestas division de honor juvenil|apuestas dnb|apuestas doble oportunidad|apuestas doble resultado|apuestas dobles|apuestas dobles y triples|apuestas dortmund barcelona|apuestas draft
nba|apuestas draft nfl|apuestas ecuador vs argentina|apuestas ecuador vs venezuela|apuestas egipto
uruguay|apuestas el clasico|apuestas elecciones venezuela|apuestas empate|apuestas en baloncesto|apuestas en barcelona|apuestas en beisbol|apuestas en boxeo|apuestas
en caballos|apuestas en carreras de caballos|apuestas en casino|apuestas en casino online|apuestas en casinos|apuestas en casinos online|apuestas en chile|apuestas en ciclismo|apuestas en colombia|apuestas
en colombia de futbol|apuestas en directo|apuestas en directo futbol|apuestas en directo pronosticos|apuestas en el futbol|apuestas en el tenis|apuestas en españa|apuestas en esports|apuestas en eventos deportivos
virtuales|apuestas en golf|apuestas en juegos|apuestas
en la champions league|apuestas en la eurocopa|apuestas en la liga|apuestas en la nba|apuestas en la nfl|apuestas en las vegas mlb|apuestas en las vegas nfl|apuestas en linea|apuestas en línea|apuestas en linea argentina|apuestas en linea boxeo|apuestas
en linea chile|apuestas en linea colombia|apuestas en línea de fútbol|apuestas en linea deportivas|apuestas
en linea españa|apuestas en linea estados unidos|apuestas en linea futbol|apuestas en linea mexico|apuestas en línea méxico|apuestas en linea mundial|apuestas en linea peru|apuestas en linea usa|apuestas
en los esports|apuestas en madrid|apuestas en méxico|apuestas
en mexico online|apuestas en nba|apuestas en partidos de futbol|apuestas en partidos de futbol en vivo|apuestas en partidos de tenis en directo|apuestas
en perú|apuestas en sevilla|apuestas en sistema|apuestas en stake|apuestas en tenis|apuestas en tenis
de mesa|apuestas en valencia|apuestas en vivo|apuestas en vivo argentina|apuestas en vivo casino|apuestas en vivo futbol|apuestas en vivo fútbol|apuestas en vivo nba|apuestas en vivo peru|apuestas en vivo tenis|apuestas
en vivo ufc|apuestas equipo mbappe|apuestas equipos de futbol|apuestas españa|apuestas españa alemania|apuestas españa alemania eurocopa|apuestas españa croacia|apuestas españa eurocopa|apuestas españa francia|apuestas
españa francia eurocopa|apuestas españa gana
el mundial|apuestas españa gana eurocopa|apuestas españa gana mundial|apuestas españa georgia|apuestas españa holanda|apuestas españa inglaterra|apuestas españa inglaterra cuotas|apuestas españa inglaterra eurocopa|apuestas españa italia|apuestas
españa mundial|apuestas españa paises bajos|apuestas español|apuestas español oviedo|apuestas espanyol barcelona|apuestas
espanyol betis|apuestas espanyol villarreal|apuestas esport|apuestas
esports|apuestas esports colombia|apuestas esports españa|apuestas esports
fifa|apuestas esports gratis|apuestas esports lol|apuestas esports peru|apuestas esports valorant|apuestas estadisticas|apuestas estrategias|apuestas
euro|apuestas euro copa|apuestas eurocopa|apuestas eurocopa
campeon|apuestas eurocopa españa|apuestas eurocopa favoritos|apuestas eurocopa femenina|apuestas eurocopa final|apuestas eurocopa ganador|apuestas eurocopa hoy|apuestas eurocopa sub 21|apuestas euroliga baloncesto|apuestas euroliga pronosticos|apuestas europa league|apuestas europa league hoy|apuestas europa league pronosticos|apuestas europa league pronósticos|apuestas euros|apuestas f1 abu dhabi|apuestas f1 bahrein|apuestas f1 canada|apuestas f1 china|apuestas f1 cuotas|apuestas f1 hoy|apuestas
f1 las vegas|apuestas f1 miami|apuestas f1 monaco|apuestas faciles de ganar|apuestas fáciles de ganar|apuestas
faciles para ganar|apuestas favoritas|apuestas favorito champions|apuestas favoritos champions|apuestas favoritos eurocopa|apuestas favoritos mundial|apuestas
fc barcelona|apuestas final champions cuotas|apuestas final champions league|apuestas
final champions peru|apuestas final copa|apuestas final copa america|apuestas final copa
de europa|apuestas final copa del rey|apuestas final copa europa|apuestas final copa libertadores|apuestas final copa rey|apuestas
final de copa|apuestas final de copa del rey|apuestas final del
mundial|apuestas final euro|apuestas final eurocopa|apuestas final
europa league|apuestas final libertadores|apuestas final mundial|apuestas final nba|apuestas final rugby|apuestas final uefa europa league|apuestas final.mundial|apuestas finales de conferencia nfl|apuestas finales nba|apuestas fiorentina betis|apuestas formula|apuestas formula 1|apuestas fórmula 1|apuestas
fórmula 1 pronósticos|apuestas formula uno|apuestas foro|apuestas foro
nba|apuestas francia argentina|apuestas francia españa|apuestas
futbol|apuestas fútbol|apuestas futbol americano|apuestas futbol americano
nfl|apuestas futbol argentina|apuestas futbol argentino|apuestas futbol
champions league|apuestas futbol chile|apuestas futbol
colombia|apuestas futbol consejos|apuestas futbol en directo|apuestas fútbol en directo|apuestas futbol en vivo|apuestas fútbol en vivo|apuestas futbol españa|apuestas futbol español|apuestas fútbol
español|apuestas futbol eurocopa|apuestas futbol femenino|apuestas futbol foro|apuestas futbol gratis|apuestas futbol hoy|apuestas fútbol hoy|apuestas futbol juegos olimpicos|apuestas futbol mexico|apuestas
futbol mundial|apuestas futbol online|apuestas futbol para hoy|apuestas futbol peru|apuestas futbol pronosticos|apuestas futbol sala|apuestas
futbol telegram|apuestas futbol virtual|apuestas
galgos|apuestas galgos en directo|apuestas galgos hoy|apuestas galgos online|apuestas galgos
pronosticos|apuestas galgos trucos|apuestas gana|apuestas gana colombia|apuestas gana resultados|apuestas ganadas|apuestas ganadas hoy|apuestas ganador champions
league|apuestas ganador copa america|apuestas ganador
copa del rey|apuestas ganador copa del rey baloncesto|apuestas ganador copa libertadores|apuestas ganador de la eurocopa|apuestas ganador de
la liga|apuestas ganador del mundial|apuestas
ganador eurocopa|apuestas ganador europa league|apuestas ganador f1|apuestas ganador la liga|apuestas ganador liga española|apuestas ganador
mundial|apuestas ganador mundial baloncesto|apuestas ganador
mundial f1|apuestas ganador nba|apuestas ganadores
eurocopa|apuestas ganadores mundial|apuestas ganar champions|apuestas ganar eurocopa|apuestas ganar liga|apuestas ganar
mundial|apuestas ganar nba|apuestas getafe valencia|apuestas ghana uruguay|apuestas girona|apuestas girona athletic|apuestas girona betis|apuestas girona
campeon de liga|apuestas girona campeon liga|apuestas girona gana la liga|apuestas girona real madrid|apuestas girona
real sociedad|apuestas goleador eurocopa|apuestas goleadores eurocopa|apuestas goles asiaticos|apuestas golf|apuestas golf masters|apuestas golf
pga|apuestas granada barcelona|apuestas grand slam
de tenis|apuestas gratis|apuestas gratis casino|apuestas
gratis con premios|apuestas gratis hoy|apuestas gratis para hoy|apuestas gratis por
registro|apuestas gratis puntos|apuestas gratis
regalos|apuestas gratis sin deposito|apuestas gratis sin depósito|apuestas
gratis sin ingreso|apuestas gratis sports|apuestas gratis y
ganar premios|apuestas grupo a eurocopa|apuestas grupos eurocopa|apuestas handicap|apuestas handicap asiatico|apuestas handicap baloncesto|apuestas handicap como
funciona|apuestas handicap nba|apuestas handicap nfl|apuestas hipicas online|apuestas hípicas online|apuestas hipicas venezuela|apuestas hockey|apuestas hockey hielo|apuestas
hockey patines|apuestas hockey sobre hielo|apuestas holanda argentina|apuestas holanda vs argentina|apuestas hoy|apuestas hoy champions|apuestas hoy futbol|apuestas hoy nba|apuestas hoy
pronosticos|apuestas hoy seguras|apuestas impuestos|apuestas
inglaterra paises bajos|apuestas inter barca|apuestas inter barcelona|apuestas juego|apuestas juegos|apuestas
juegos en linea|apuestas juegos olimpicos|apuestas juegos
olímpicos|apuestas juegos olimpicos baloncesto|apuestas juegos
online|apuestas juegos virtuales|apuestas jugador sevilla|apuestas jugadores
nba|apuestas kings league americas|apuestas la liga|apuestas la liga
española|apuestas la liga hoy|apuestas la liga santander|apuestas las vegas mlb|apuestas las vegas nba|apuestas las vegas nfl|apuestas league of legends mundial|apuestas legal|apuestas legales|apuestas legales en colombia|apuestas legales en españa|apuestas legales en estados unidos|apuestas legales
españa|apuestas leganes betis|apuestas libertadores|apuestas licencia|apuestas liga 1 peru|apuestas liga argentina|apuestas liga bbva pronosticos|apuestas liga de
campeones|apuestas liga de campeones de baloncesto|apuestas liga de campeones de hockey|apuestas liga españa|apuestas liga
española|apuestas liga santander pronosticos|apuestas ligas de futbol|apuestas linea|apuestas linea de gol|apuestas
liverpool barcelona|apuestas liverpool real madrid|apuestas lol mundial|apuestas madrid|apuestas
madrid arsenal|apuestas madrid atletico|apuestas madrid atletico champions|apuestas madrid barca|apuestas madrid barça|apuestas madrid barca hoy|apuestas madrid barca supercopa|apuestas madrid barcelona|apuestas madrid barsa|apuestas madrid bayern|apuestas madrid betis|apuestas madrid borussia|apuestas madrid campeon champions|apuestas
madrid celta|apuestas madrid city|apuestas madrid dortmund|apuestas
madrid gana la liga|apuestas madrid gana liga|apuestas madrid
hoy|apuestas madrid liverpool|apuestas madrid osasuna|apuestas madrid sevilla|apuestas madrid valencia|apuestas madrid vs arsenal|apuestas madrid vs barcelona|apuestas mallorca osasuna|apuestas mallorca real sociedad|apuestas manchester athletic|apuestas
manchester city real madrid|apuestas mas faciles de ganar|apuestas mas seguras|apuestas
mas seguras para hoy|apuestas masters de golf|apuestas masters
de tenis|apuestas maximo goleador eurocopa|apuestas maximo
goleador mundial|apuestas mejor jugador eurocopa|apuestas
mejores casinos online|apuestas mexico|apuestas méxico|apuestas mexico polonia|apuestas méxico polonia|apuestas mlb|apuestas mlb
hoy|apuestas mlb las vegas|apuestas mlb para hoy|apuestas mlb pronosticos|apuestas
mlb usa|apuestas mma ufc|apuestas momios|apuestas multiples|apuestas múltiples|apuestas multiples como funcionan|apuestas multiples
el gordo|apuestas multiples futbol|apuestas
mundial|apuestas mundial 2026|apuestas mundial baloncesto|apuestas mundial balonmano|apuestas mundial brasil|apuestas mundial campeon|apuestas
mundial ciclismo|apuestas mundial clubes|apuestas mundial de baloncesto|apuestas mundial de ciclismo|apuestas mundial
de clubes|apuestas mundial de futbol|apuestas mundial de fútbol|apuestas mundial de rugby|apuestas mundial f1|apuestas mundial
favoritos|apuestas mundial femenino|apuestas mundial formula 1|apuestas mundial futbol|apuestas mundial ganador|apuestas mundial lol|apuestas mundial moto gp|apuestas mundial motogp|apuestas
mundial rugby|apuestas mundial sub 17|apuestas mundiales|apuestas mundialistas|apuestas
mvp eurocopa|apuestas mvp nba|apuestas mvp
nfl|apuestas nacionales de colombia|apuestas nba|apuestas
nba all star|apuestas nba campeon|apuestas nba consejos|apuestas
nba esta noche|apuestas nba finals|apuestas nba gratis|apuestas nba hoy|apuestas nba hoy jugadores|apuestas nba hoy pronosticos|apuestas
nba para hoy|apuestas nba playoffs|apuestas nba pronosticos|apuestas nba
pronósticos|apuestas nba pronosticos hoy|apuestas nba tipster|apuestas nfl|apuestas nfl hoy|apuestas nfl las
vegas|apuestas nfl playoffs|apuestas nfl pronosticos|apuestas nfl pronósticos|apuestas nfl semana 4|apuestas nfl super bowl|apuestas nhl|apuestas
nhl pronosticos|apuestas octavos eurocopa|apuestas ofertas|apuestas online|apuestas online argentina|apuestas online argentina legal|apuestas online
bono|apuestas online bono bienvenida|apuestas online boxeo|apuestas online caballos|apuestas online carreras de
caballos|apuestas online casino|apuestas online champions league|apuestas online chile|apuestas
online ciclismo|apuestas online colombia|apuestas online comparativa|apuestas online con paypal|apuestas online de caballos|apuestas online deportivas|apuestas online en argentina|apuestas online
en peru|apuestas online espana|apuestas online españa|apuestas online esports|apuestas
online foro|apuestas online futbol|apuestas online futbol españa|apuestas online golf|apuestas online gratis|apuestas online gratis sin deposito|apuestas online juegos|apuestas online mexico|apuestas online
mma|apuestas online movil|apuestas online nba|apuestas online net|apuestas online
nuevas|apuestas online opiniones|apuestas online paypal|apuestas online peru|apuestas online seguras|apuestas online
sin dinero|apuestas online sin registro|apuestas online tenis|apuestas online ufc|apuestas online uruguay|apuestas online venezuela|apuestas open britanico
golf|apuestas osasuna athletic|apuestas osasuna barcelona|apuestas osasuna real
madrid|apuestas osasuna sevilla|apuestas osasuna valencia|apuestas over|apuestas
over 2.5|apuestas over under|apuestas paginas|apuestas pago anticipado|apuestas
paises bajos ecuador|apuestas paises bajos inglaterra|apuestas
países bajos qatar|apuestas para boxeo|apuestas para
champions league|apuestas para el clasico|apuestas para el dia de hoy|apuestas para el mundial|apuestas para el partido de
hoy|apuestas para eurocopa|apuestas para europa league|apuestas para futbol|apuestas para ganar|apuestas para ganar dinero|apuestas para ganar dinero facil|apuestas para ganar en la ruleta|apuestas para ganar la champions|apuestas para ganar la eurocopa|apuestas para ganar la europa league|apuestas para ganar la liga|apuestas
para ganar siempre|apuestas para hacer|apuestas para hoy|apuestas para hoy de futbol|apuestas
para hoy europa league|apuestas para hoy futbol|apuestas para juegos|apuestas
para la champions league|apuestas para la copa del rey|apuestas para la eurocopa|apuestas para la
europa league|apuestas para la final de la eurocopa|apuestas para la nba hoy|apuestas para los partidos de hoy|apuestas
para partidos de hoy|apuestas para ufc|apuestas partido|apuestas partido aplazado|apuestas partido champions|apuestas partido colombia|apuestas partido españa marruecos|apuestas partido mundial|apuestas partido suspendido|apuestas partidos|apuestas partidos champions league|apuestas partidos csgo|apuestas partidos de
futbol|apuestas partidos de futbol hoy|apuestas partidos de hoy|apuestas partidos eurocopa|apuestas partidos futbol|apuestas partidos hoy|apuestas partidos mundial|apuestas paypal|apuestas peleas de
boxeo|apuestas peru|apuestas perú|apuestas
peru brasil|apuestas peru chile|apuestas peru paraguay|apuestas peru uruguay|apuestas peru
vs chile|apuestas peru vs colombia|apuestas pichichi eurocopa|apuestas plataforma|apuestas
playoff|apuestas playoff ascenso|apuestas playoff ascenso a
primera|apuestas playoff nba|apuestas playoff segunda|apuestas
playoff segunda b|apuestas playoffs nba|apuestas playoffs nfl|apuestas polonia argentina|apuestas por argentina|apuestas por internet
mexico|apuestas por internet para ganar dinero|apuestas por paypal|apuestas por ronda boxeo|apuestas por sistema|apuestas portugal uruguay|apuestas pre
partido|apuestas predicciones|apuestas predicciones futbol|apuestas primera division|apuestas
primera division españa|apuestas promociones|apuestas pronostico|apuestas pronosticos|apuestas pronosticos deportivos|apuestas pronosticos deportivos tenis|apuestas
pronosticos futbol|apuestas pronosticos gratis|apuestas pronosticos nba|apuestas pronosticos tenis|apuestas prorroga|apuestas psg barca|apuestas psg barcelona|apuestas puntos por tarjetas|apuestas puntos tarjetas|apuestas que aceptan paypal|apuestas
que es handicap|apuestas que puedes hacer con tu novia|apuestas que siempre ganaras|apuestas que significa|apuestas
quien bajara a segunda|apuestas quién bajara a segunda|apuestas quien gana el mundial|apuestas quien gana eurocopa|apuestas quien gana la champions|apuestas quien gana la eurocopa|apuestas quien gana la liga|apuestas
quien ganara el mundial|apuestas quién ganará el mundial|apuestas quien ganara la champions|apuestas quien ganara la eurocopa|apuestas quien ganara
la liga|apuestas rayo barcelona|apuestas real madrid|apuestas real madrid arsenal|apuestas
real madrid athletic|apuestas real madrid atletico|apuestas real madrid atletico champions|apuestas real madrid atletico de madrid|apuestas real madrid atlético de madrid|apuestas real madrid atletico madrid|apuestas
real madrid barcelona|apuestas real madrid bayern|apuestas real madrid betis|apuestas real madrid borussia|apuestas real madrid campeon champions|apuestas real madrid celta|apuestas real madrid champions|apuestas real madrid city|apuestas real madrid girona|apuestas real madrid hoy|apuestas real madrid liverpool|apuestas real madrid
manchester city|apuestas real madrid osasuna|apuestas real madrid real sociedad|apuestas real madrid valencia|apuestas real madrid villarreal|apuestas real madrid vs arsenal|apuestas real madrid vs atletico|apuestas
real madrid vs atlético|apuestas real madrid vs atletico madrid|apuestas real madrid vs barcelona|apuestas real madrid vs betis|apuestas real madrid vs sevilla|apuestas real madrid vs valencia|apuestas real sociedad|apuestas real sociedad
athletic|apuestas real sociedad barcelona|apuestas real sociedad betis|apuestas real sociedad psg|apuestas real sociedad real madrid|apuestas
real sociedad valencia|apuestas recomendadas hoy|apuestas regalo de bienvenida|apuestas registro|apuestas
resultado exacto|apuestas resultados|apuestas resultados eurocopa|apuestas retirada tenis|apuestas roma
barcelona|apuestas roma sevilla|apuestas rugby|apuestas rugby mundial|apuestas rugby world cup|apuestas ruleta seguras|apuestas segunda|apuestas
segunda b|apuestas segunda division|apuestas segunda división|apuestas segunda division b|apuestas segunda division españa|apuestas seguras|apuestas seguras baloncesto|apuestas seguras calculadora|apuestas seguras
en la ruleta|apuestas seguras eurocopa|apuestas seguras foro|apuestas seguras futbol|apuestas seguras
futbol hoy|apuestas seguras gratis|apuestas seguras hoy|apuestas seguras hoy futbol|apuestas seguras nba|apuestas seguras nba hoy|apuestas seguras
para este fin de semana|apuestas seguras para ganar dinero|apuestas seguras para hoy|apuestas seguras para
hoy fútbol|apuestas seguras para hoy pronósticos|apuestas seguras para mañana|apuestas seguras ruleta|apuestas seguras telegram|apuestas seguras tenis|apuestas semifinales eurocopa|apuestas senegal paises bajos|apuestas sevilla|apuestas sevilla athletic|apuestas sevilla atletico de madrid|apuestas sevilla barcelona|apuestas
sevilla betis|apuestas sevilla campeon liga|apuestas sevilla celta|apuestas sevilla gana la liga|apuestas sevilla
girona|apuestas sevilla inter|apuestas sevilla
jugador|apuestas sevilla juventus|apuestas sevilla leganes|apuestas sevilla madrid|apuestas sevilla manchester united|apuestas sevilla osasuna|apuestas sevilla real madrid|apuestas
sevilla real sociedad|apuestas sevilla roma|apuestas sevilla valencia|apuestas significa|apuestas simples ejemplos|apuestas simples o combinadas|apuestas sin deposito|apuestas sin deposito inicial|apuestas sin deposito minimo|apuestas sin dinero|apuestas sin dinero real|apuestas
sin empate|apuestas sin empate que significa|apuestas sin ingreso minimo|apuestas sin registro|apuestas sistema|apuestas sistema calculadora|apuestas sistema como funciona|apuestas sistema
trixie|apuestas sociedad|apuestas sorteo copa del rey|apuestas stake|apuestas stake 10|apuestas stake 10 hoy|apuestas super bowl favorito|apuestas super rugby|apuestas supercopa españa|apuestas superliga argentina|apuestas
tarjeta roja|apuestas tarjetas|apuestas tarjetas amarillas|apuestas tenis|apuestas tenis
atp|apuestas tenis consejos|apuestas tenis copa
davis|apuestas tenis de mesa|apuestas tenis de mesa pronosticos|apuestas tenis en vivo|apuestas tenis femenino|apuestas
tenis hoy|apuestas tenis itf|apuestas tenis pronosticos|apuestas tenis pronósticos|apuestas tenis retirada|apuestas tenis roland garros|apuestas tenis seguras|apuestas tenis wimbledon|apuestas tenis wta|apuestas tercera division|apuestas tercera division españa|apuestas tipos|apuestas tips|apuestas
tipster|apuestas tipster para hoy|apuestas topuria holloway cuotas|apuestas
torneos de golf|apuestas torneos de tenis|apuestas trucos|apuestas uefa champions league|apuestas uefa europa league|apuestas ufc|apuestas ufc chile|apuestas ufc como funciona|apuestas ufc hoy|apuestas ufc ilia topuria|apuestas
ufc online|apuestas ufc pronósticos|apuestas ufc telegram|apuestas ufc topuria|apuestas
under over|apuestas unionistas villarreal|apuestas uruguay|apuestas uruguay colombia|apuestas uruguay
corea|apuestas uruguay vs colombia|apuestas us open golf|apuestas us open tenis|apuestas valencia|apuestas valencia barcelona|apuestas valencia
betis|apuestas valencia madrid|apuestas valencia real madrid|apuestas valladolid barcelona|apuestas
valladolid valencia|apuestas valor app|apuestas valor en directo|apuestas valor galgos|apuestas venezuela|apuestas venezuela argentina|apuestas venezuela bolivia|apuestas venezuela ecuador|apuestas villarreal|apuestas villarreal athletic|apuestas
villarreal barcelona|apuestas villarreal bayern|apuestas villarreal betis|apuestas villarreal
liverpool|apuestas villarreal manchester|apuestas villarreal manchester united|apuestas villarreal vs real madrid|apuestas virtuales|apuestas virtuales colombia|apuestas virtuales futbol|apuestas virtuales sin dinero|apuestas vivo|apuestas vuelta a españa|apuestas
vuelta españa|apuestas william hill partidos de hoy|apuestas y casino|apuestas y casinos|apuestas y juegos de azar|apuestas
y pronosticos|apuestas y pronosticos de futbol|apuestas y
pronosticos deportivos|apuestas y resultados|apuestas-deportivas|apuestas-deportivas.es pronosticos|arbitro nba apuestas|argentina apuestas|argentina colombia apuestas|argentina croacia apuestas|argentina francia apuestas|argentina mexico apuestas|argentina peru apuestas|argentina uruguay apuestas|argentina
vs bolivia apuestas|argentina vs chile apuestas|argentina vs colombia apuestas|argentina vs francia apuestas|argentina vs.
colombia apuestas|asi se gana en las apuestas deportivas|asiatico
apuestas|asiatico en apuestas|asiaticos apuestas|athletic barcelona apuestas|athletic manchester united apuestas|athletic
osasuna apuestas|athletic real madrid apuestas|atletico barcelona
apuestas|atletico de madrid apuestas|atlético de madrid apuestas|atletico de madrid real madrid apuestas|atletico de madrid vs barcelona apuestas|atletico madrid real madrid apuestas|atletico madrid vs real
madrid apuestas|atletico real madrid apuestas|atletico vs
real madrid apuestas|avisador de cuotas apuestas|bajada de cuotas apuestas|baloncesto apuestas|barbastro barcelona
apuestas|barca apuestas|barca bayern apuestas|barca inter apuestas|barca madrid apuestas|barça madrid
apuestas|barca vs atletico apuestas|barca vs madrid apuestas|barca vs real madrid apuestas|barcelona – real madrid apuestas|barcelona
apuestas|barcelona atletico apuestas|barcelona atletico de madrid apuestas|barcelona atletico madrid apuestas|barcelona betis apuestas|barcelona casa de
apuestas|barcelona inter apuestas|barcelona psg apuestas|barcelona real madrid apuestas|barcelona real sociedad
apuestas|barcelona sevilla apuestas|barcelona valencia apuestas|barcelona vs athletic bilbao apuestas|barcelona vs atlético madrid
apuestas|barcelona vs betis apuestas|barcelona vs celta de vigo apuestas|barcelona vs espanyol apuestas|barcelona vs girona apuestas|barcelona vs madrid apuestas|barcelona
vs real madrid apuestas|barcelona vs real sociedad apuestas|barcelona vs sevilla apuestas|barcelona vs villarreal apuestas|base de datos cuotas apuestas
deportivas|bayern real madrid apuestas|beisbol apuestas|best america apuestas|bet apuestas chile|bet
apuestas en vivo|betis – chelsea apuestas|betis apuestas|betis barcelona apuestas|betis chelsea apuestas|betis madrid apuestas|betis sevilla apuestas|betsson tu sitio de apuestas online|blog apuestas baloncesto|blog apuestas ciclismo|blog apuestas nba|blog apuestas tenis|blog de apuestas de tenis|bono apuestas|bono apuestas deportivas|bono
apuestas deportivas sin deposito|bono apuestas gratis|bono apuestas gratis sin deposito|bono apuestas sin deposito|bono bienvenida apuestas|bono
bienvenida apuestas deportivas|bono bienvenida apuestas españa|bono bienvenida apuestas sin deposito|bono bienvenida apuestas sin depósito|bono bienvenida casa apuestas|bono bienvenida casa de apuestas|bono
bienvenida marca apuestas|bono casa apuestas|bono
casa de apuestas|bono casa de apuestas sin ingreso|bono casas de apuestas|bono de apuestas|bono
de apuestas gratis sin deposito|bono de bienvenida apuestas|bono
de bienvenida apuestas deportivas|bono de bienvenida casa de apuestas|bono de bienvenida casas de apuestas|bono de casas de apuestas|bono de
registro apuestas|bono de registro apuestas deportivas|bono de registro casa de apuestas|bono gratis apuestas|bono marca apuestas|bono por
registro apuestas|bono por registro apuestas deportivas|bono
por registro casa de apuestas|bono registro apuestas|bono sin deposito apuestas|bono
sin depósito apuestas|bono sin deposito apuestas deportivas|bono sin depósito apuestas deportivas|bono sin deposito casa
de apuestas|bono sin deposito marca apuestas|bono sin ingreso apuestas|bono sin ingreso apuestas deportivas|bonos apuestas|bonos apuestas colombia|bonos apuestas deportivas|bonos apuestas deportivas sin deposito|bonos apuestas gratis|bonos apuestas sin deposito|bonos
apuestas sin depósito|bonos bienvenida apuestas|bonos bienvenida casas apuestas|bonos bienvenida casas de apuestas|bonos casa de apuestas|bonos casas apuestas|bonos casas de
apuestas|bonos casas de apuestas colombia|bonos casas de apuestas deportivas|bonos
casas de apuestas españa|bonos casas de apuestas nuevas|bonos casas de apuestas sin deposito|bonos casas de apuestas sin depósito|bonos de apuestas|bonos
de apuestas deportivas|bonos de apuestas gratis|bonos de apuestas sin deposito|bonos de bienvenida apuestas|bonos de bienvenida apuestas deportivas|bonos de bienvenida casa de apuestas|bonos de bienvenida casas de apuestas|bonos de bienvenida de casas de apuestas|bonos
de bienvenida en casas de apuestas|bonos de casas de apuestas|bonos de casas de apuestas sin deposito|bonos
en casa de apuestas|bonos en casas de apuestas sin deposito|bonos gratis apuestas|bonos gratis apuestas deportivas|bonos gratis casas de apuestas|bonos gratis
sin deposito apuestas|bonos paginas de apuestas|bonos registro casas de apuestas|bonos
sin deposito apuestas|bonos sin depósito apuestas|bonos
sin deposito apuestas deportivas|bonos sin deposito casas
de apuestas|bot de apuestas deportivas gratis|boxeo apuestas|brasil colombia apuestas|brasil peru apuestas|brasil vs colombia apuestas|buenas apuestas para hoy|buscador cuotas apuestas|buscador
de apuestas seguras|buscador de cuotas apuestas|buscador de cuotas de apuestas|buscar apuestas seguras|caballos apuestas|calculador de apuestas|calculador
de cuotas apuestas|calculadora apuestas|calculadora apuestas combinadas|calculadora apuestas de sistema|calculadora apuestas deportivas|calculadora apuestas deportivas
seguras|calculadora apuestas multiples|calculadora apuestas segura|calculadora apuestas seguras|calculadora
apuestas sistema|calculadora apuestas yankee|calculadora arbitraje apuestas|calculadora cubrir apuestas|calculadora cuotas apuestas|calculadora de apuestas|calculadora
de apuestas combinadas|calculadora de apuestas de futbol|calculadora
de apuestas de sistema|calculadora de apuestas deportivas|calculadora de
apuestas multiples|calculadora de apuestas seguras|calculadora de apuestas sistema|calculadora
de apuestas surebets|calculadora de arbitraje apuestas|calculadora de cuotas apuestas|calculadora
de cuotas de apuestas|calculadora para apuestas deportivas|calculadora poisson apuestas|calculadora
poisson apuestas deportivas|calculadora poisson para apuestas|calculadora scalping apuestas deportivas|calculadora sistema apuestas|calculadora stake apuestas|calculadora trading apuestas|calcular apuestas|calcular apuestas
deportivas|calcular apuestas futbol|calcular apuestas sistema|calcular cuotas apuestas|calcular
cuotas apuestas combinadas|calcular cuotas apuestas deportivas|calcular cuotas de apuestas|calcular ganancias apuestas deportivas|calcular momios apuestas|calcular probabilidad
cuota apuestas|calcular stake apuestas|calcular unidades apuestas|calcular yield apuestas|calculo de
apuestas|calculo de apuestas deportivas|cambio de cuotas apuestas|campeon champions apuestas|campeon eurocopa apuestas|campeon liga apuestas|campeon nba apuestas|canales de apuestas gratis|carrera de caballos apuestas|carrera de
caballos apuestas juego|carrera de caballos con apuestas|carrera de galgos apuestas|carreras de caballos apuestas|carreras de caballos apuestas online|carreras de
caballos con apuestas|carreras de caballos juegos de apuestas|carreras de
galgos apuestas|carreras de galgos apuestas online|carreras
de galgos apuestas trucos|carreras galgos apuestas|casa apuestas argentina|casa apuestas atletico
de madrid|casa apuestas barcelona|casa apuestas betis|casa apuestas bono bienvenida|casa apuestas bono gratis|casa apuestas bono sin deposito|casa apuestas cerca de
mi|casa apuestas chile|casa apuestas colombia|casa apuestas con mejores cuotas|casa apuestas deportivas|casa apuestas españa|casa
apuestas española|casa apuestas eurocopa|casa apuestas
futbol|casa apuestas mejores cuotas|casa apuestas mundial|casa apuestas nueva|casa
apuestas nuevas|casa apuestas online|casa apuestas peru|casa apuestas valencia|casa de apuestas|casa de apuestas 10 euros gratis|casa de apuestas argentina|casa de apuestas atletico de madrid|casa de apuestas
baloncesto|casa de apuestas barcelona|casa de apuestas beisbol|casa
de apuestas betis|casa de apuestas bono|casa de apuestas bono bienvenida|casa
de apuestas bono de bienvenida|casa de apuestas bono gratis|casa de apuestas bono por registro|casa de apuestas bono sin deposito|casa de apuestas boxeo|casa de apuestas caballos|casa de apuestas carreras de
caballos|casa de apuestas cerca de mi|casa de apuestas cerca de mí|casa de apuestas
champions league|casa de apuestas chile|casa de apuestas ciclismo|casa de apuestas colombia|casa
de apuestas con bono de bienvenida|casa de apuestas con bono sin deposito|casa de apuestas con cuotas mas altas|casa
de apuestas con esports|casa de apuestas con las mejores cuotas|casa de
apuestas con licencia en españa|casa de apuestas
con mejores cuotas|casa de apuestas con pago anticipado|casa de apuestas con paypal|casa de apuestas copa america|casa de apuestas de caballos|casa de apuestas de
colombia|casa de apuestas de españa|casa de apuestas de futbol|casa de apuestas de fútbol|casa de apuestas de futbol peru|casa
de apuestas de peru|casa de apuestas del madrid|casa de apuestas del real madrid|casa de apuestas
deportivas|casa de apuestas deportivas cerca de mi|casa de apuestas
deportivas en argentina|casa de apuestas deportivas en chile|casa
de apuestas deportivas en colombia|casa de apuestas deportivas en españa|casa de
apuestas deportivas en madrid|casa de apuestas deportivas españa|casa
de apuestas deportivas españolas|casa de
apuestas deportivas madrid|casa de apuestas deportivas mexico|casa de apuestas deportivas online|casa de apuestas deportivas peru|casa de apuestas deposito 5 euros|casa de apuestas
deposito minimo|casa de apuestas deposito minimo 1 euro|casa de
apuestas depósito mínimo 1 euro|casa de apuestas en españa|casa de
apuestas en linea|casa de apuestas en madrid|casa de apuestas en perú|casa de
apuestas en vivo|casa de apuestas españa|casa de
apuestas españa inglaterra|casa de apuestas española|casa de apuestas españolas|casa de apuestas esports|casa de apuestas eurocopa|casa de apuestas europa league|casa de apuestas f1|casa de apuestas formula 1|casa de apuestas
futbol|casa de apuestas ingreso minimo|casa de apuestas ingreso minimo
1 euro|casa de apuestas ingreso mínimo 1 euro|casa de apuestas legales|casa de apuestas legales en colombia|casa de apuestas legales en españa|casa de apuestas libertadores|casa de apuestas
liga española|casa de apuestas madrid|casa de apuestas mas segura|casa de apuestas mejores|casa de apuestas méxico|casa de apuestas minimo 5
euros|casa de apuestas mlb|casa de apuestas mundial|casa de apuestas nba|casa de apuestas nfl|casa de apuestas nueva|casa de apuestas nuevas|casa de apuestas oficial del real madrid|casa
de apuestas oficial real madrid|casa de apuestas online|casa de apuestas online argentina|casa de apuestas online chile|casa
de apuestas online españa|casa de apuestas online mexico|casa de apuestas online paraguay|casa de apuestas online peru|casa de apuestas
online usa|casa de apuestas online venezuela|casa de apuestas pago anticipado|casa de apuestas para boxeo|casa de apuestas para ufc|casa
de apuestas peru|casa de apuestas perú|casa de apuestas peru
online|casa de apuestas por paypal|casa de apuestas promociones|casa de apuestas que
regalan dinero|casa de apuestas real madrid|casa de apuestas regalo de bienvenida|casa de apuestas sevilla|casa de apuestas sin dinero|casa de apuestas sin ingreso
minimo|casa de apuestas sin licencia en españa|casa de apuestas sin minimo de ingreso|casa de apuestas stake|casa de apuestas tenis|casa de apuestas ufc|casa de apuestas valencia|casa de apuestas venezuela|casa de apuestas virtuales|casa de
apuestas vive la suerte|casa oficial de apuestas del real madrid|casas apuestas asiaticas|casas
apuestas bono sin deposito|casas apuestas bonos sin deposito|casas apuestas caballos|casas apuestas chile|casas apuestas
ciclismo|casas apuestas con licencia|casas apuestas con licencia en españa|casas apuestas deportivas|casas apuestas deportivas
colombia|casas apuestas deportivas españa|casas apuestas deportivas españolas|casas apuestas
deportivas nuevas|casas apuestas españa|casas apuestas españolas|casas apuestas esports|casas apuestas eurocopa|casas apuestas golf|casas apuestas ingreso minimo 5 euros|casas apuestas legales|casas apuestas legales españa|casas
apuestas licencia|casas apuestas licencia españa|casas apuestas mexico|casas apuestas mundial|casas apuestas nba|casas
apuestas nuevas|casas apuestas nuevas españa|casas apuestas ofertas|casas apuestas online|casas apuestas paypal|casas apuestas peru|casas apuestas sin licencia|casas
apuestas tenis|casas asiaticas apuestas|casas de apuestas|casas de
apuestas 5 euros|casas de apuestas app|casas de apuestas argentinas|casas de apuestas asiaticas|casas de apuestas baloncesto|casas de apuestas barcelona|casas
de apuestas bono bienvenida|casas de apuestas bono de bienvenida|casas de apuestas bono por registro|casas
de apuestas bono sin deposito|casas de apuestas bono sin ingreso|casas de apuestas bonos|casas de apuestas bonos de bienvenida|casas
de apuestas bonos gratis|casas de apuestas bonos
sin deposito|casas de apuestas boxeo|casas de apuestas caballos|casas de
apuestas carreras de caballos|casas de apuestas casino|casas de apuestas
casino online|casas de apuestas cerca de mi|casas de apuestas champions league|casas
de apuestas chile|casas de apuestas ciclismo|casas de
apuestas colombia|casas de apuestas com|casas de apuestas con app|casas
de apuestas con apuestas gratis|casas de apuestas con bono|casas de apuestas con bono de bienvenida|casas de apuestas con bono de registro|casas de apuestas con bono por registro|casas de apuestas con bono sin deposito|casas de apuestas con bonos|casas
de apuestas con bonos gratis|casas de apuestas
con bonos sin deposito|casas de apuestas con deposito minimo|casas de apuestas con esports|casas
de apuestas con handicap asiatico|casas de apuestas con licencia|casas de apuestas con licencia en españa|casas
de apuestas con licencia españa|casas de apuestas con licencia española|casas de apuestas
con mejores cuotas|casas de apuestas con pago anticipado|casas de apuestas con paypal|casas de apuestas con paypal en perú|casas de apuestas con promociones|casas de apuestas con ruleta en vivo|casas de apuestas copa del rey|casas de apuestas de caballos|casas de
apuestas de españa|casas de apuestas de futbol|casas de apuestas de
fútbol|casas de apuestas de peru|casas de apuestas deportivas|casas
de apuestas deportivas asiaticas|casas de apuestas deportivas colombia|casas de apuestas deportivas comparativa|casas de apuestas deportivas con paypal|casas de apuestas deportivas en chile|casas de apuestas
deportivas en españa|casas de apuestas deportivas en linea|casas de apuestas deportivas en madrid|casas de apuestas deportivas en mexico|casas de apuestas
deportivas en peru|casas de apuestas deportivas en sevilla|casas
de apuestas deportivas en valencia|casas de apuestas deportivas españa|casas de apuestas deportivas españolas|casas de apuestas deportivas legales|casas
de apuestas deportivas madrid|casas de apuestas deportivas mexico|casas de
apuestas deportivas nuevas|casas de apuestas deportivas online|casas de apuestas
deportivas peru|casas de apuestas deportivas perú|casas de apuestas deposito minimo
1 euro|casas de apuestas depósito mínimo 1 euro|casas de apuestas dinero gratis|casas de apuestas en argentina|casas de apuestas
en barcelona|casas de apuestas en chile|casas de apuestas en colombia|casas de apuestas en españa|casas de apuestas en españa online|casas de
apuestas en linea|casas de apuestas en madrid|casas de apuestas en méxico|casas de
apuestas en peru|casas de apuestas en perú|casas de apuestas en sevilla|casas de
apuestas en uruguay|casas de apuestas en valencia|casas de apuestas en venezuela|casas de apuestas
equipos de futbol|casas de apuestas españa|casas de apuestas españa
alemania|casas de apuestas españa inglaterra|casas de apuestas españa licencia|casas de apuestas españa nuevas|casas de apuestas españa online|casas de
apuestas española|casas de apuestas españolas|casas de apuestas españolas con licencia|casas de apuestas españolas online|casas de apuestas esports|casas de apuestas eurocopa|casas de apuestas eurocopa
2024|casas de apuestas europa league|casas de apuestas
f1|casas de apuestas fisicas en barcelona|casas de apuestas fisicas en españa|casas de apuestas formula 1|casas de apuestas fuera de españa|casas de apuestas futbol|casas de apuestas fútbol|casas de
apuestas futbol españa|casas de apuestas ganador eurocopa|casas de apuestas gratis|casas de apuestas ingreso minimo|casas de
apuestas ingreso minimo 1 euro|casas de apuestas ingreso minimo 5 euros|casas de
apuestas inter barcelona|casas de apuestas legales|casas de apuestas legales en colombia|casas de apuestas legales en españa|casas de apuestas legales en mexico|casas de apuestas legales españa|casas de apuestas legales mx|casas de
apuestas licencia|casas de apuestas licencia españa|casas de apuestas lista|casas de apuestas madrid|casas
de apuestas mas seguras|casas de apuestas mejores bonos|casas de apuestas mejores cuotas|casas de apuestas mexico|casas de apuestas méxico|casas
de apuestas minimo 5 euros|casas de apuestas mlb|casas de
apuestas mundial|casas de apuestas mundial baloncesto|casas de apuestas mundiales|casas de apuestas nba|casas
de apuestas no reguladas en españa|casas de apuestas nueva ley|casas de apuestas nuevas|casas de apuestas nuevas en colombia|casas de apuestas nuevas en españa|casas de apuestas nuevas españa|casas de apuestas ofertas|casas de apuestas
online|casas de apuestas online argentina|casas de apuestas online colombia|casas
de apuestas online deportivas|casas de apuestas online ecuador|casas de apuestas online
en argentina|casas de apuestas online en chile|casas de apuestas online en colombia|casas de apuestas online en españa|casas
de apuestas online en mexico|casas de apuestas online españa|casas
de apuestas online mas fiables|casas de apuestas
online mexico|casas de apuestas online nuevas|casas de apuestas online peru|casas
de apuestas online usa|casas de apuestas online venezuela|casas
de apuestas pago paypal|casas de apuestas para ufc|casas de
apuestas paypal|casas de apuestas peru bono sin deposito|casas de
apuestas presenciales en
Your comment is awaiting moderation.
Советы для родителей https://agusha.com.ua на каждый день: раннее развитие, кризисы возрастов, дисциплина, здоровье, игры и учеба. Экспертные разборы, простые лайфхаки и проверенные методики без мифов. Помогаем понять потребности ребёнка и снизить стресс в семье.
Your comment is awaiting moderation.
(10 euros gratis apuestas|10 mejores casas de apuestas|10 trucos para ganar apuestas|15 euros gratis marca apuestas|1×2 apuestas|1×2 apuestas deportivas|1×2 apuestas que significa|1×2
en apuestas|1×2 en apuestas que significa|1×2 que significa en apuestas|5 euros gratis
apuestas|9 apuestas que siempre ganaras|a partir de
cuanto se declara apuestas|actividades de juegos de azar y apuestas|ad apuestas deportivas|aleksandre topuria ufc apuestas|algoritmo para
ganar apuestas deportivas|america apuestas|análisis nba apuestas|aplicacion android apuestas deportivas|aplicacion apuestas deportivas|aplicacion apuestas deportivas android|aplicación de apuestas online|aplicacion para hacer apuestas|aplicacion para hacer apuestas de futbol|aplicación para hacer apuestas de fútbol|aplicaciones apuestas deportivas android|aplicaciones
apuestas deportivas gratis|aplicaciones de apuestas android|aplicaciones de apuestas de
fútbol|aplicaciones de apuestas deportivas|aplicaciones de apuestas deportivas peru|aplicaciones de apuestas deportivas perú|aplicaciones de apuestas en colombia|aplicaciones de apuestas gratis|aplicaciones de apuestas online|aplicaciones
de apuestas seguras|aplicaciones de apuestas sin dinero|aplicaciones para hacer apuestas|apostar seguro apuestas deportivas|app android apuestas deportivas|app apuestas|app apuestas android|app
apuestas de futbol|app apuestas deportivas|app apuestas deportivas android|app apuestas deportivas argentina|app apuestas deportivas colombia|app apuestas deportivas ecuador|app apuestas deportivas
españa|app apuestas deportivas gratis|app apuestas entre
amigos|app apuestas futbol|app apuestas gratis|app apuestas sin dinero|app casa de apuestas|app casas de apuestas|app
control apuestas|app de apuestas|app de apuestas
android|app de apuestas casino|app de apuestas colombia|app de apuestas con bono de bienvenida|app de apuestas de futbol|app de apuestas deportivas|app de apuestas deportivas
android|app de apuestas deportivas argentina|app de apuestas deportivas colombia|app de apuestas deportivas en españa|app de apuestas deportivas peru|app de apuestas
deportivas perú|app de apuestas deportivas sin dinero|app
de apuestas ecuador|app de apuestas en colombia|app de apuestas en españa|app
de apuestas en venezuela|app de apuestas futbol|app de apuestas gratis|app de apuestas online|app de apuestas
para android|app de apuestas para ganar dinero|app de apuestas peru|app de apuestas reales|app de casas de apuestas|app marca apuestas android|app moviles de apuestas|app para apuestas|app para apuestas de futbol|app para apuestas deportivas|app para
apuestas deportivas en español|app para ganar apuestas deportivas|app para hacer apuestas|app para hacer apuestas deportivas|app para hacer apuestas entre
amigos|app para llevar control de apuestas|app pronosticos apuestas deportivas|app versus
apuestas|apps apuestas mundial|apps de apuestas|apps de apuestas con bono de bienvenida|apps de apuestas de futbol|apps de apuestas deportivas peru|apps de apuestas mexico|apps para apuestas|aprender a hacer apuestas deportivas|aprender hacer apuestas deportivas|apuesta del dia apuestas deportivas|apuestas
10 euros gratis|apuestas 100 seguras|apuestas 1×2|apuestas 1X2|apuestas 2 division|apuestas
3 division|apuestas a caballos|apuestas a carreras
de caballos|apuestas a colombia|apuestas a corners|apuestas a
ganar|apuestas a jugadores nba|apuestas a la baja|apuestas a la nfl|apuestas al barcelona|apuestas al dia|apuestas al empate|apuestas al mundial|apuestas al tenis wta|apuestas alaves
barcelona|apuestas alcaraz hoy|apuestas alemania españa|apuestas alonso campeon del mundo|apuestas altas
y bajas|apuestas altas y bajas nfl|apuestas ambos equipos marcan|apuestas america|apuestas
android|apuestas anillo nba|apuestas antes del mundial|apuestas anticipadas|apuestas anticipadas nba|apuestas apps|apuestas arabia argentina|apuestas argentina|apuestas argentina campeon del mundo|apuestas argentina
canada|apuestas argentina colombia|apuestas argentina croacia|apuestas argentina españa|apuestas argentina francia|apuestas argentina francia cuanto paga|apuestas
argentina francia mundial|apuestas argentina gana el mundial|apuestas argentina gana mundial|apuestas
argentina holanda|apuestas argentina mexico|apuestas argentina
méxico|apuestas argentina mundial|apuestas argentina online|apuestas argentina paises bajos|apuestas argentina polonia|apuestas argentina uruguay|apuestas argentina vs australia|apuestas argentina vs colombia|apuestas argentina vs francia|apuestas argentina
vs peru|apuestas argentinas|apuestas arsenal real madrid|apuestas
ascenso a primera division|apuestas ascenso a segunda|apuestas asiaticas|apuestas asiatico|apuestas athletic|apuestas
athletic atletico|apuestas athletic barça|apuestas athletic barcelona|apuestas athletic betis|apuestas athletic manchester|apuestas athletic manchester united|apuestas athletic osasuna|apuestas
athletic real|apuestas athletic real madrid|apuestas athletic real sociedad|apuestas athletic real sociedad final|apuestas athletic roma|apuestas athletic
sevilla|apuestas athletic valencia|apuestas atletico|apuestas atletico barcelona|apuestas
atletico barsa|apuestas atletico campeon champions|apuestas atletico campeon de liga|apuestas atlético copenhague|apuestas atletico de
madrid|apuestas atlético de madrid|apuestas atletico de madrid barcelona|apuestas atletico de madrid gana la
liga|apuestas atletico de madrid real madrid|apuestas
atlético de madrid real madrid|apuestas atletico de madrid
vs barcelona|apuestas atletico madrid|apuestas atletico
madrid real madrid|apuestas atletico madrid vs barcelona|apuestas atletico real madrid|apuestas atletico real madrid champions|apuestas atletismo|apuestas bajas|apuestas baloncesto|apuestas baloncesto acb|apuestas baloncesto handicap|apuestas baloncesto hoy|apuestas baloncesto juegos olimpicos|apuestas baloncesto nba|apuestas baloncesto pronostico|apuestas baloncesto pronósticos|apuestas baloncesto prorroga|apuestas barca|apuestas barca athletic|apuestas
barca atletico|apuestas barca bayern|apuestas barca bayern munich|apuestas barca girona|apuestas barca hoy|apuestas barça hoy|apuestas
barca inter|apuestas barca juventus|apuestas barca madrid|apuestas barça madrid|apuestas barca real madrid|apuestas barca vs juve|apuestas barca vs madrid|apuestas barca vs psg|apuestas barcelona|apuestas
barcelona alaves|apuestas barcelona athletic|apuestas
barcelona atletico|apuestas barcelona atletico de madrid|apuestas barcelona atlético de
madrid|apuestas barcelona atletico madrid|apuestas barcelona
bayern|apuestas barcelona betis|apuestas barcelona campeon de
liga|apuestas barcelona celta|apuestas barcelona espanyol|apuestas barcelona gana la champions|apuestas barcelona girona|apuestas barcelona
granada|apuestas barcelona hoy|apuestas barcelona inter|apuestas barcelona madrid|apuestas
barcelona osasuna|apuestas barcelona psg|apuestas barcelona real
madrid|apuestas barcelona real sociedad|apuestas barcelona sevilla|apuestas barcelona valencia|apuestas barcelona villarreal|apuestas barcelona vs atletico madrid|apuestas barcelona vs madrid|apuestas barcelona vs real madrid|apuestas barsa madrid|apuestas basket
hoy|apuestas bayern barcelona|apuestas bayern vs barcelona|apuestas beisbol|apuestas béisbol|apuestas beisbol mlb|apuestas beisbol pronosticos|apuestas beisbol
venezolano|apuestas betis|apuestas betis – chelsea|apuestas betis barcelona|apuestas betis chelsea|apuestas betis fiorentina|apuestas betis girona|apuestas betis madrid|apuestas betis mallorca|apuestas betis real madrid|apuestas betis real sociedad|apuestas betis sevilla|apuestas betis valencia|apuestas betis valladolid|apuestas betis vs valencia|apuestas
betplay hoy colombia|apuestas betsson peru|apuestas bienvenida|apuestas billar online|apuestas bolivia vs colombia|apuestas bono|apuestas bono bienvenida|apuestas bono de bienvenida|apuestas bono
de bienvenida sin deposito|apuestas bono gratis|apuestas bono sin deposito|apuestas bonos sin deposito|apuestas borussia
real madrid|apuestas boxeo|apuestas boxeo de campeonato|apuestas
boxeo españa|apuestas boxeo español|apuestas boxeo femenino olimpiadas|apuestas boxeo hoy|apuestas boxeo online|apuestas brasil colombia|apuestas brasil peru|apuestas brasil uruguay|apuestas brasil vs colombia|apuestas brasil vs peru|apuestas caballos|apuestas caballos colocado|apuestas
caballos españa|apuestas caballos hipodromo|apuestas caballos hoy|apuestas caballos madrid|apuestas caballos
online|apuestas caballos sanlucar de barrameda|apuestas caballos zarzuela|apuestas calculador|apuestas campeon|apuestas campeon champions|apuestas
campeón champions|apuestas campeon champions 2025|apuestas campeon champions league|apuestas campeon conference league|apuestas
campeon copa america|apuestas campeon copa del rey|apuestas campeon de champions|apuestas campeon de la
champions|apuestas campeon de liga|apuestas campeon del mundo|apuestas campeon eurocopa|apuestas campeón eurocopa|apuestas campeon europa
league|apuestas campeon f1|apuestas campeon f1 2025|apuestas campeon formula 1|apuestas campeon libertadores|apuestas campeon liga|apuestas campeon liga bbva|apuestas campeon liga española|apuestas campeon liga santander|apuestas campeon motogp 2025|apuestas campeon mundial|apuestas campeón mundial|apuestas campeon mundial baloncesto|apuestas campeon nba|apuestas campeón nba|apuestas campeon premier|apuestas campeon premier league|apuestas campeon roland
garros|apuestas campeonato f1|apuestas campeonatos de futbol|apuestas carrera de caballos|apuestas carrera
de caballos hoy|apuestas carrera de caballos nocturnas|apuestas carrera de galgos fin de
semana|apuestas carrera de galgos hoy|apuestas carrera de galgos
nocturnas|apuestas carreras caballos|apuestas carreras caballos sanlucar|apuestas
carreras de caballos|apuestas carreras de caballos en directo|apuestas carreras de caballos en vivo|apuestas carreras de caballos españa|apuestas carreras
de caballos hoy|apuestas carreras de caballos nacionales|apuestas carreras de caballos nocturnas|apuestas carreras de caballos online|apuestas carreras de caballos sanlucar|apuestas carreras de caballos sanlúcar|apuestas carreras de
galgos|apuestas carreras de galgos en vivo|apuestas carreras de galgos nocturnas|apuestas carreras de galgos pre partido|apuestas casino|apuestas casino barcelona|apuestas casino futbol|apuestas
casino gran madrid|apuestas casino gratis|apuestas
casino madrid|apuestas casino online|apuestas
casino online argentina|apuestas casinos|apuestas casinos online|apuestas celta|apuestas celta barcelona|apuestas
celta betis|apuestas celta eibar|apuestas celta espanyol|apuestas celta granada|apuestas celta
madrid|apuestas celta manchester|apuestas celta real madrid|apuestas champion league|apuestas champions foro|apuestas champions hoy|apuestas champions league|apuestas champions league – pronósticos|apuestas champions league 2025|apuestas champions league hoy|apuestas champions league pronosticos|apuestas champions league pronósticos|apuestas champions pronosticos|apuestas chelsea barcelona|apuestas chelsea betis|apuestas chile|apuestas
chile peru|apuestas chile venezuela|apuestas chile vs colombia|apuestas chile vs uruguay|apuestas ciclismo|apuestas
ciclismo en vivo|apuestas ciclismo femenino|apuestas ciclismo tour francia|apuestas ciclismo vuelta|apuestas ciclismo vuelta
a españa|apuestas ciclismo vuelta españa|apuestas city madrid|apuestas city real madrid|apuestas
clasico|apuestas clasico español|apuestas clasico real madrid
barcelona|apuestas clasificacion mundial|apuestas colombia|apuestas colombia argentina|apuestas colombia brasil|apuestas colombia paraguay|apuestas colombia uruguay|apuestas colombia vs argentina|apuestas colombia vs brasil|apuestas combinadas|apuestas combinadas
como funcionan|apuestas combinadas de futbol|apuestas combinadas de fútbol|apuestas combinadas foro|apuestas
combinadas futbol|apuestas combinadas hoy|apuestas combinadas mismo partido|apuestas combinadas mundial|apuestas combinadas nba|apuestas combinadas para esta semana|apuestas combinadas para hoy|apuestas combinadas para
mañana|apuestas combinadas pronosticos|apuestas combinadas recomendadas|apuestas combinadas seguras|apuestas combinadas seguras para hoy|apuestas combinadas seguras para mañana|apuestas como ganar|apuestas
comparador|apuestas con bono de bienvenida|apuestas con dinero ficticio|apuestas con dinero real|apuestas con dinero
virtual|apuestas con handicap|apuestas con handicap asiatico|apuestas
con handicap baloncesto|apuestas con mas probabilidades de ganar|apuestas con paypal|apuestas con tarjeta de credito|apuestas con tarjeta de debito|apuestas consejos|apuestas copa|apuestas copa africa|apuestas copa america|apuestas copa américa|apuestas
copa argentina|apuestas copa brasil|apuestas copa davis|apuestas copa de europa|apuestas copa del mundo|apuestas copa del
rey|apuestas copa del rey baloncesto|apuestas copa del
rey final|apuestas copa del rey futbol|apuestas copa del rey ganador|apuestas
copa del rey hoy|apuestas copa del rey pronosticos|apuestas copa
del rey pronósticos|apuestas copa europa|apuestas copa italia|apuestas copa libertadores|apuestas copa mundial
de hockey|apuestas copa rey|apuestas copa sudamericana|apuestas corners|apuestas corners hoy|apuestas
croacia argentina|apuestas cuartos eurocopa|apuestas cuotas|apuestas
cuotas altas|apuestas cuotas bajas|apuestas de 1 euro|apuestas de baloncesto|apuestas de baloncesto hoy|apuestas de baloncesto nba|apuestas
de baloncesto para hoy|apuestas de beisbol|apuestas
de beisbol para hoy|apuestas de blackjack en linea|apuestas de boxeo|apuestas
de boxeo canelo|apuestas de boxeo en las vegas|apuestas de boxeo hoy|apuestas de
boxeo online|apuestas de caballo|apuestas de caballos|apuestas de caballos como funciona|apuestas de caballos
como se juega|apuestas de caballos en colombia|apuestas de caballos en españa|apuestas de caballos en linea|apuestas de caballos españa|apuestas de caballos ganador y colocado|apuestas
de caballos internacionales|apuestas de caballos juegos|apuestas de caballos
online|apuestas de caballos online en venezuela|apuestas de caballos
por internet|apuestas de caballos pronosticos|apuestas de caballos pronósticos|apuestas de carrera de
caballos|apuestas de carreras de caballos|apuestas de carreras de caballos online|apuestas de casino|apuestas de casino
online|apuestas de casino por internet|apuestas de champions league|apuestas de ciclismo|apuestas de colombia|apuestas de copa america|apuestas de corners|apuestas
de deportes en linea|apuestas de deportes online|apuestas de dinero|apuestas de esports|apuestas de eurocopa|apuestas de europa league|apuestas de f1|apuestas de formula
1|apuestas de futbol|apuestas de fútbol|apuestas de futbol app|apuestas de futbol argentina|apuestas de futbol
colombia|apuestas de futbol en colombia|apuestas de futbol en directo|apuestas de
futbol en linea|apuestas de futbol en vivo|apuestas de futbol español|apuestas de futbol gratis|apuestas de futbol hoy|apuestas de futbol mundial|apuestas
de futbol online|apuestas de fútbol online|apuestas de futbol para hoy|apuestas de fútbol para hoy|apuestas de
futbol para hoy seguras|apuestas de futbol para mañana|apuestas de futbol peru|apuestas de futbol
pronosticos|apuestas de fútbol pronósticos|apuestas de futbol seguras|apuestas de futbol seguras para hoy|apuestas de futbol sin dinero|apuestas de galgos|apuestas de galgos como ganar|apuestas de galgos en directo|apuestas de galgos
online|apuestas de galgos trucos|apuestas de golf|apuestas de
hockey|apuestas de hockey sobre hielo|apuestas de hoy|apuestas de hoy seguras|apuestas de juego|apuestas de juegos|apuestas de juegos deportivos|apuestas de juegos
online|apuestas de la champions league|apuestas de la copa américa|apuestas de la eurocopa|apuestas de
la europa league|apuestas de la liga|apuestas de la liga bbva|apuestas de la liga española|apuestas de la nba|apuestas de la nfl|apuestas
de la ufc|apuestas de mlb|apuestas de nba|apuestas de nba para hoy|apuestas de
partidos|apuestas de partidos de futbol|apuestas de peleas ufc|apuestas
de perros en vivo|apuestas de perros virtuales|apuestas
de peru|apuestas de sistema|apuestas de sistema como funciona|apuestas
de sistema explicacion|apuestas de sistema explicación|apuestas de tenis|apuestas de tenis de mesa|apuestas de tenis en directo|apuestas de tenis hoy|apuestas de tenis para hoy|apuestas de tenis pronosticos|apuestas de tenis
seguras|apuestas de todo tipo|apuestas de ufc|apuestas de ufc hoy|apuestas del boxeo|apuestas del clasico|apuestas del clasico real madrid barca|apuestas del dia|apuestas del día|apuestas del dia de hoy|apuestas del dia
deportivas|apuestas del dia futbol|apuestas del mundial|apuestas del partido de
hoy|apuestas del real madrid|apuestas del rey|apuestas del sistema|apuestas deporte|apuestas deportes|apuestas deportiva|apuestas deportivas|apuestas
deportivas 1 euro|apuestas deportivas 10 euros gratis|apuestas deportivas 100 seguras|apuestas
deportivas 1×2|apuestas deportivas android|apuestas deportivas app|apuestas deportivas
apps|apuestas deportivas argentina|apuestas deportivas argentina futbol|apuestas deportivas argentina legal|apuestas deportivas atletico
de madrid|apuestas deportivas baloncesto|apuestas deportivas barca madrid|apuestas deportivas barcelona|apuestas
deportivas beisbol|apuestas deportivas bono|apuestas deportivas bono
bienvenida|apuestas deportivas bono de bienvenida|apuestas deportivas bono sin deposito|apuestas
deportivas bonos de bienvenida|apuestas deportivas boxeo|apuestas deportivas caballos|apuestas deportivas calculadora|apuestas deportivas
campeon liga|apuestas deportivas casino|apuestas deportivas casino barcelona|apuestas deportivas casino
online|apuestas deportivas cerca de mi|apuestas deportivas
champions league|apuestas deportivas chile|apuestas deportivas ciclismo|apuestas deportivas colombia|apuestas
deportivas com|apuestas deportivas com foro|apuestas deportivas com pronosticos|apuestas deportivas combinadas|apuestas deportivas combinadas para hoy|apuestas deportivas como se juega|apuestas deportivas comparador|apuestas deportivas con bono gratis|apuestas deportivas
con bonos gratis|apuestas deportivas con dinero ficticio|apuestas deportivas con paypal|apuestas deportivas con puntos virtuales|apuestas deportivas consejos|apuestas deportivas consejos para ganar|apuestas deportivas copa america|apuestas
deportivas copa del rey|apuestas deportivas copa libertadores|apuestas deportivas copa mundial|apuestas deportivas corners|apuestas
deportivas cual es la mejor|apuestas deportivas cuotas altas|apuestas deportivas de baloncesto|apuestas deportivas
de boxeo|apuestas deportivas de colombia|apuestas deportivas de futbol|apuestas
deportivas de nba|apuestas deportivas de nhl|apuestas deportivas de peru|apuestas deportivas de tenis|apuestas deportivas
del dia|apuestas deportivas dinero ficticio|apuestas deportivas directo|apuestas deportivas doble oportunidad|apuestas
deportivas en argentina|apuestas deportivas en chile|apuestas deportivas en colombia|apuestas deportivas en directo|apuestas deportivas en españa|apuestas
deportivas en español|apuestas deportivas en linea|apuestas deportivas en línea|apuestas deportivas en peru|apuestas deportivas
en perú|apuestas deportivas en sevilla|apuestas
deportivas en uruguay|apuestas deportivas en vivo|apuestas deportivas
es|apuestas deportivas es pronosticos|apuestas deportivas españa|apuestas deportivas españolas|apuestas deportivas
esports|apuestas deportivas estadisticas|apuestas deportivas estrategias|apuestas deportivas
estrategias seguras|apuestas deportivas eurocopa|apuestas deportivas europa league|apuestas deportivas
f1|apuestas deportivas faciles de ganar|apuestas deportivas formula
1|apuestas deportivas foro|apuestas deportivas foro futbol|apuestas deportivas foro tenis|apuestas deportivas francia argentina|apuestas deportivas futbol|apuestas deportivas fútbol|apuestas deportivas futbol argentino|apuestas
deportivas futbol colombia|apuestas deportivas
futbol español|apuestas deportivas gana|apuestas deportivas ganadas|apuestas deportivas ganar dinero seguro|apuestas deportivas
gane|apuestas deportivas golf|apuestas deportivas gratis|apuestas
deportivas gratis con premios|apuestas deportivas gratis hoy|apuestas deportivas gratis sin deposito|apuestas deportivas handicap|apuestas deportivas handicap asiatico|apuestas deportivas hoy|apuestas deportivas impuestos|apuestas deportivas interior argentina|apuestas deportivas
juegos olimpicos|apuestas deportivas la liga|apuestas deportivas legales|apuestas deportivas
legales en colombia|apuestas deportivas libres de impuestos|apuestas deportivas licencia españa|apuestas
deportivas liga española|apuestas deportivas listado|apuestas deportivas
listado clasico|apuestas deportivas madrid|apuestas deportivas mas seguras|apuestas deportivas mejor pagadas|apuestas
deportivas mejores|apuestas deportivas mejores app|apuestas deportivas mejores casas|apuestas deportivas mejores cuotas|apuestas
deportivas mejores paginas|apuestas deportivas mexico|apuestas deportivas méxico|apuestas deportivas mlb|apuestas
deportivas mlb hoy|apuestas deportivas multiples|apuestas deportivas mundial|apuestas deportivas murcia|apuestas deportivas nba|apuestas deportivas nba hoy|apuestas deportivas nfl|apuestas deportivas nhl|apuestas deportivas nuevas|apuestas deportivas ofertas|apuestas deportivas online|apuestas deportivas online argentina|apuestas deportivas
online chile|apuestas deportivas online colombia|apuestas deportivas online en colombia|apuestas
deportivas online españa|apuestas deportivas online mexico|apuestas deportivas online paypal|apuestas deportivas online peru|apuestas deportivas online por internet|apuestas deportivas pago paypal|apuestas
deportivas para ganar dinero|apuestas deportivas para hoy|apuestas deportivas para
hoy pronosticos|apuestas deportivas partido suspendido|apuestas deportivas partidos de hoy|apuestas
deportivas paypal|apuestas deportivas peru|apuestas deportivas perú|apuestas deportivas peru vs ecuador|apuestas deportivas predicciones|apuestas deportivas promociones|apuestas deportivas pronostico|apuestas
deportivas pronóstico|apuestas deportivas pronostico hoy|apuestas deportivas pronosticos|apuestas deportivas
pronósticos|apuestas deportivas pronosticos expertos|apuestas deportivas pronosticos
gratis|apuestas deportivas pronosticos nba|apuestas deportivas pronosticos tenis|apuestas deportivas que
aceptan paypal|apuestas deportivas real madrid|apuestas deportivas regalo bienvenida|apuestas deportivas resultado exacto|apuestas deportivas resultados|apuestas
deportivas rugby|apuestas deportivas seguras|apuestas deportivas seguras foro|apuestas deportivas seguras hoy|apuestas deportivas
seguras para hoy|apuestas deportivas seguras telegram|apuestas deportivas sevilla|apuestas deportivas simulador eurocopa|apuestas deportivas sin deposito|apuestas deportivas sin deposito inicial|apuestas deportivas sin dinero|apuestas deportivas sin dinero real|apuestas deportivas
sin registro|apuestas deportivas stake|apuestas deportivas stake 10|apuestas deportivas telegram españa|apuestas
deportivas tenis|apuestas deportivas tenis de mesa|apuestas deportivas
tenis foro|apuestas deportivas tenis hoy|apuestas deportivas tips|apuestas
deportivas tipster|apuestas deportivas ufc|apuestas deportivas uruguay|apuestas deportivas valencia|apuestas
deportivas valencia barcelona|apuestas deportivas venezuela|apuestas deportivas virtuales|apuestas deportivas y casino|apuestas deportivas y casino online|apuestas deportivas.com|apuestas deportivas.com
foro|apuestas deportivas.es|apuestas deportivos pronosticos|apuestas deposito minimo 1 euro|apuestas descenso a segunda|apuestas descenso a segunda b|apuestas descenso la liga|apuestas descenso primera division|apuestas descenso segunda|apuestas dia|apuestas
diarias seguras|apuestas dinero|apuestas dinero ficticio|apuestas
dinero real|apuestas dinero virtual|apuestas directas|apuestas directo|apuestas directo futbol|apuestas division de honor juvenil|apuestas dnb|apuestas
doble oportunidad|apuestas doble resultado|apuestas dobles|apuestas dobles y triples|apuestas dortmund barcelona|apuestas draft nba|apuestas draft nfl|apuestas ecuador vs argentina|apuestas ecuador vs
venezuela|apuestas egipto uruguay|apuestas el clasico|apuestas elecciones venezuela|apuestas empate|apuestas
en baloncesto|apuestas en barcelona|apuestas en beisbol|apuestas en boxeo|apuestas en caballos|apuestas en carreras de
caballos|apuestas en casino|apuestas en casino online|apuestas en casinos|apuestas en casinos online|apuestas
en chile|apuestas en ciclismo|apuestas en colombia|apuestas en colombia de futbol|apuestas en directo|apuestas en directo
futbol|apuestas en directo pronosticos|apuestas en el futbol|apuestas en el
tenis|apuestas en españa|apuestas en esports|apuestas en eventos deportivos virtuales|apuestas
en golf|apuestas en juegos|apuestas en la champions league|apuestas en la eurocopa|apuestas en la
liga|apuestas en la nba|apuestas en la nfl|apuestas en las vegas mlb|apuestas en las vegas
nfl|apuestas en linea|apuestas en línea|apuestas en linea argentina|apuestas en linea boxeo|apuestas en linea chile|apuestas en linea colombia|apuestas en línea de fútbol|apuestas en linea deportivas|apuestas en linea españa|apuestas en linea estados unidos|apuestas en linea futbol|apuestas en linea mexico|apuestas
en línea méxico|apuestas en linea mundial|apuestas en linea
peru|apuestas en linea usa|apuestas en los esports|apuestas en madrid|apuestas en méxico|apuestas en mexico online|apuestas en nba|apuestas en partidos de futbol|apuestas en partidos de futbol en vivo|apuestas en partidos de tenis en directo|apuestas en perú|apuestas en sevilla|apuestas en sistema|apuestas en stake|apuestas
en tenis|apuestas en tenis de mesa|apuestas en valencia|apuestas en vivo|apuestas en vivo argentina|apuestas en vivo
casino|apuestas en vivo futbol|apuestas en vivo fútbol|apuestas
en vivo nba|apuestas en vivo peru|apuestas en vivo tenis|apuestas en vivo ufc|apuestas equipo mbappe|apuestas equipos de futbol|apuestas
españa|apuestas españa alemania|apuestas españa alemania eurocopa|apuestas españa croacia|apuestas españa eurocopa|apuestas
españa francia|apuestas españa francia eurocopa|apuestas españa
gana el mundial|apuestas españa gana eurocopa|apuestas españa gana mundial|apuestas españa georgia|apuestas españa
holanda|apuestas españa inglaterra|apuestas españa inglaterra cuotas|apuestas españa inglaterra eurocopa|apuestas españa italia|apuestas españa
mundial|apuestas españa paises bajos|apuestas español|apuestas español oviedo|apuestas espanyol barcelona|apuestas espanyol
betis|apuestas espanyol villarreal|apuestas esport|apuestas esports|apuestas esports colombia|apuestas
esports españa|apuestas esports fifa|apuestas esports gratis|apuestas esports lol|apuestas esports peru|apuestas esports valorant|apuestas
estadisticas|apuestas estrategias|apuestas euro|apuestas euro copa|apuestas eurocopa|apuestas eurocopa campeon|apuestas eurocopa españa|apuestas eurocopa
favoritos|apuestas eurocopa femenina|apuestas eurocopa
final|apuestas eurocopa ganador|apuestas eurocopa hoy|apuestas eurocopa sub
21|apuestas euroliga baloncesto|apuestas euroliga pronosticos|apuestas europa league|apuestas europa league hoy|apuestas europa league pronosticos|apuestas europa league pronósticos|apuestas euros|apuestas
f1 abu dhabi|apuestas f1 bahrein|apuestas f1 canada|apuestas f1 china|apuestas f1 cuotas|apuestas f1 hoy|apuestas f1 las vegas|apuestas f1
miami|apuestas f1 monaco|apuestas faciles de ganar|apuestas fáciles de ganar|apuestas faciles para ganar|apuestas favoritas|apuestas favorito
champions|apuestas favoritos champions|apuestas favoritos eurocopa|apuestas favoritos
mundial|apuestas fc barcelona|apuestas final champions cuotas|apuestas final champions league|apuestas final champions peru|apuestas final
copa|apuestas final copa america|apuestas final copa de europa|apuestas final copa del rey|apuestas final copa europa|apuestas final copa libertadores|apuestas final
copa rey|apuestas final de copa|apuestas final de copa del rey|apuestas final del mundial|apuestas final
euro|apuestas final eurocopa|apuestas final europa league|apuestas final libertadores|apuestas final mundial|apuestas final nba|apuestas final rugby|apuestas final uefa
europa league|apuestas final.mundial|apuestas finales de conferencia nfl|apuestas finales nba|apuestas fiorentina betis|apuestas formula|apuestas formula 1|apuestas fórmula 1|apuestas fórmula 1
pronósticos|apuestas formula uno|apuestas foro|apuestas foro nba|apuestas francia argentina|apuestas francia españa|apuestas futbol|apuestas fútbol|apuestas futbol americano|apuestas futbol americano nfl|apuestas futbol argentina|apuestas futbol
argentino|apuestas futbol champions league|apuestas futbol chile|apuestas futbol colombia|apuestas futbol consejos|apuestas futbol
en directo|apuestas fútbol en directo|apuestas
futbol en vivo|apuestas fútbol en vivo|apuestas futbol
españa|apuestas futbol español|apuestas fútbol español|apuestas futbol eurocopa|apuestas futbol femenino|apuestas futbol foro|apuestas
futbol gratis|apuestas futbol hoy|apuestas fútbol hoy|apuestas futbol
juegos olimpicos|apuestas futbol mexico|apuestas futbol mundial|apuestas futbol
online|apuestas futbol para hoy|apuestas futbol peru|apuestas
futbol pronosticos|apuestas futbol sala|apuestas futbol telegram|apuestas futbol virtual|apuestas galgos|apuestas galgos en directo|apuestas galgos hoy|apuestas galgos online|apuestas galgos pronosticos|apuestas galgos trucos|apuestas gana|apuestas gana colombia|apuestas gana resultados|apuestas ganadas|apuestas ganadas hoy|apuestas ganador champions
league|apuestas ganador copa america|apuestas ganador copa
del rey|apuestas ganador copa del rey baloncesto|apuestas ganador copa libertadores|apuestas ganador de la eurocopa|apuestas ganador de la liga|apuestas ganador
del mundial|apuestas ganador eurocopa|apuestas ganador europa league|apuestas ganador f1|apuestas ganador la liga|apuestas ganador liga española|apuestas ganador mundial|apuestas ganador mundial baloncesto|apuestas ganador mundial f1|apuestas ganador
nba|apuestas ganadores eurocopa|apuestas ganadores mundial|apuestas ganar champions|apuestas
ganar eurocopa|apuestas ganar liga|apuestas ganar mundial|apuestas ganar nba|apuestas getafe valencia|apuestas ghana
uruguay|apuestas girona|apuestas girona athletic|apuestas girona betis|apuestas girona campeon de liga|apuestas girona
campeon liga|apuestas girona gana la liga|apuestas
girona real madrid|apuestas girona real sociedad|apuestas goleador eurocopa|apuestas goleadores eurocopa|apuestas goles asiaticos|apuestas golf|apuestas golf masters|apuestas golf pga|apuestas granada barcelona|apuestas grand slam de
tenis|apuestas gratis|apuestas gratis casino|apuestas
gratis con premios|apuestas gratis hoy|apuestas gratis para hoy|apuestas gratis por registro|apuestas
gratis puntos|apuestas gratis regalos|apuestas gratis sin deposito|apuestas gratis sin depósito|apuestas
gratis sin ingreso|apuestas gratis sports|apuestas gratis y ganar premios|apuestas grupo a eurocopa|apuestas grupos
eurocopa|apuestas handicap|apuestas handicap asiatico|apuestas handicap baloncesto|apuestas handicap como
funciona|apuestas handicap nba|apuestas handicap nfl|apuestas hipicas online|apuestas hípicas online|apuestas hipicas venezuela|apuestas hockey|apuestas hockey
hielo|apuestas hockey patines|apuestas hockey sobre hielo|apuestas holanda argentina|apuestas holanda vs argentina|apuestas hoy|apuestas hoy
champions|apuestas hoy futbol|apuestas hoy nba|apuestas
hoy pronosticos|apuestas hoy seguras|apuestas impuestos|apuestas inglaterra paises bajos|apuestas inter barca|apuestas inter barcelona|apuestas juego|apuestas
juegos|apuestas juegos en linea|apuestas juegos olimpicos|apuestas juegos olímpicos|apuestas juegos olimpicos baloncesto|apuestas juegos online|apuestas juegos virtuales|apuestas jugador sevilla|apuestas
jugadores nba|apuestas kings league americas|apuestas la liga|apuestas
la liga española|apuestas la liga hoy|apuestas la liga santander|apuestas
las vegas mlb|apuestas las vegas nba|apuestas las vegas nfl|apuestas league of legends mundial|apuestas
legal|apuestas legales|apuestas legales en colombia|apuestas legales
en españa|apuestas legales en estados unidos|apuestas legales
españa|apuestas leganes betis|apuestas libertadores|apuestas licencia|apuestas liga
1 peru|apuestas liga argentina|apuestas liga bbva pronosticos|apuestas liga
de campeones|apuestas liga de campeones de baloncesto|apuestas liga de campeones de hockey|apuestas liga españa|apuestas liga española|apuestas liga santander pronosticos|apuestas ligas de futbol|apuestas linea|apuestas linea de gol|apuestas liverpool barcelona|apuestas liverpool real madrid|apuestas lol mundial|apuestas madrid|apuestas madrid arsenal|apuestas madrid atletico|apuestas madrid atletico champions|apuestas madrid barca|apuestas
madrid barça|apuestas madrid barca hoy|apuestas madrid barca
supercopa|apuestas madrid barcelona|apuestas madrid barsa|apuestas madrid bayern|apuestas madrid betis|apuestas
madrid borussia|apuestas madrid campeon champions|apuestas madrid celta|apuestas madrid city|apuestas madrid
dortmund|apuestas madrid gana la liga|apuestas madrid gana liga|apuestas madrid hoy|apuestas madrid
liverpool|apuestas madrid osasuna|apuestas madrid sevilla|apuestas madrid valencia|apuestas madrid vs arsenal|apuestas madrid vs barcelona|apuestas mallorca osasuna|apuestas
mallorca real sociedad|apuestas manchester athletic|apuestas manchester city real
madrid|apuestas mas faciles de ganar|apuestas mas seguras|apuestas mas seguras para hoy|apuestas
masters de golf|apuestas masters de tenis|apuestas maximo goleador eurocopa|apuestas maximo goleador mundial|apuestas
mejor jugador eurocopa|apuestas mejores casinos online|apuestas mexico|apuestas méxico|apuestas
mexico polonia|apuestas méxico polonia|apuestas mlb|apuestas mlb hoy|apuestas mlb
las vegas|apuestas mlb para hoy|apuestas mlb pronosticos|apuestas mlb usa|apuestas mma ufc|apuestas
momios|apuestas multiples|apuestas múltiples|apuestas multiples
como funcionan|apuestas multiples el gordo|apuestas multiples futbol|apuestas mundial|apuestas mundial 2026|apuestas mundial baloncesto|apuestas mundial balonmano|apuestas mundial brasil|apuestas mundial campeon|apuestas mundial ciclismo|apuestas mundial clubes|apuestas mundial de baloncesto|apuestas mundial de ciclismo|apuestas mundial de
clubes|apuestas mundial de futbol|apuestas mundial de fútbol|apuestas mundial
de rugby|apuestas mundial f1|apuestas mundial favoritos|apuestas mundial femenino|apuestas mundial formula 1|apuestas mundial futbol|apuestas mundial
ganador|apuestas mundial lol|apuestas mundial moto gp|apuestas mundial motogp|apuestas mundial rugby|apuestas mundial sub 17|apuestas mundiales|apuestas mundialistas|apuestas mvp eurocopa|apuestas mvp nba|apuestas mvp nfl|apuestas nacionales de colombia|apuestas nba|apuestas nba all star|apuestas nba campeon|apuestas nba consejos|apuestas nba esta noche|apuestas nba finals|apuestas nba gratis|apuestas nba hoy|apuestas nba
hoy jugadores|apuestas nba hoy pronosticos|apuestas nba para hoy|apuestas nba playoffs|apuestas nba pronosticos|apuestas nba pronósticos|apuestas nba pronosticos hoy|apuestas nba tipster|apuestas nfl|apuestas nfl hoy|apuestas nfl
las vegas|apuestas nfl playoffs|apuestas nfl pronosticos|apuestas nfl pronósticos|apuestas nfl semana 4|apuestas
nfl super bowl|apuestas nhl|apuestas nhl pronosticos|apuestas octavos eurocopa|apuestas ofertas|apuestas online|apuestas online argentina|apuestas online argentina legal|apuestas online bono|apuestas online bono
bienvenida|apuestas online boxeo|apuestas online caballos|apuestas online carreras de caballos|apuestas online casino|apuestas online champions league|apuestas online chile|apuestas
online ciclismo|apuestas online colombia|apuestas online comparativa|apuestas online con paypal|apuestas online de
caballos|apuestas online deportivas|apuestas online
en argentina|apuestas online en peru|apuestas online espana|apuestas online
españa|apuestas online esports|apuestas online foro|apuestas online futbol|apuestas
online futbol españa|apuestas online golf|apuestas online gratis|apuestas online gratis sin deposito|apuestas online juegos|apuestas online mexico|apuestas online mma|apuestas online movil|apuestas
online nba|apuestas online net|apuestas online nuevas|apuestas online opiniones|apuestas online paypal|apuestas online peru|apuestas online
seguras|apuestas online sin dinero|apuestas online sin registro|apuestas online tenis|apuestas online ufc|apuestas online uruguay|apuestas online venezuela|apuestas open britanico golf|apuestas osasuna athletic|apuestas osasuna barcelona|apuestas osasuna real madrid|apuestas osasuna sevilla|apuestas osasuna valencia|apuestas over|apuestas over 2.5|apuestas
over under|apuestas paginas|apuestas pago anticipado|apuestas
paises bajos ecuador|apuestas paises bajos inglaterra|apuestas países
bajos qatar|apuestas para boxeo|apuestas para champions league|apuestas
para el clasico|apuestas para el dia de hoy|apuestas para el mundial|apuestas para el partido de
hoy|apuestas para eurocopa|apuestas para europa league|apuestas para
futbol|apuestas para ganar|apuestas para ganar dinero|apuestas
para ganar dinero facil|apuestas para ganar en la ruleta|apuestas para ganar la champions|apuestas para ganar la eurocopa|apuestas para ganar la europa league|apuestas para ganar
la liga|apuestas para ganar siempre|apuestas
para hacer|apuestas para hoy|apuestas para hoy de futbol|apuestas para hoy
europa league|apuestas para hoy futbol|apuestas para juegos|apuestas para la
champions league|apuestas para la copa del rey|apuestas para la
eurocopa|apuestas para la europa league|apuestas para la final
de la eurocopa|apuestas para la nba hoy|apuestas para los partidos de hoy|apuestas para
partidos de hoy|apuestas para ufc|apuestas partido|apuestas partido
aplazado|apuestas partido champions|apuestas partido colombia|apuestas
partido españa marruecos|apuestas partido mundial|apuestas partido suspendido|apuestas partidos|apuestas partidos champions league|apuestas
partidos csgo|apuestas partidos de futbol|apuestas partidos de futbol hoy|apuestas partidos de hoy|apuestas partidos eurocopa|apuestas
partidos futbol|apuestas partidos hoy|apuestas partidos mundial|apuestas paypal|apuestas peleas de boxeo|apuestas peru|apuestas perú|apuestas peru brasil|apuestas peru chile|apuestas peru paraguay|apuestas peru uruguay|apuestas peru vs chile|apuestas peru vs
colombia|apuestas pichichi eurocopa|apuestas plataforma|apuestas playoff|apuestas playoff ascenso|apuestas
playoff ascenso a primera|apuestas playoff nba|apuestas playoff
segunda|apuestas playoff segunda b|apuestas playoffs nba|apuestas
playoffs nfl|apuestas polonia argentina|apuestas por argentina|apuestas por internet mexico|apuestas por internet para ganar
dinero|apuestas por paypal|apuestas por ronda boxeo|apuestas por sistema|apuestas portugal uruguay|apuestas pre partido|apuestas predicciones|apuestas predicciones futbol|apuestas primera division|apuestas primera division españa|apuestas
promociones|apuestas pronostico|apuestas pronosticos|apuestas pronosticos deportivos|apuestas pronosticos deportivos tenis|apuestas pronosticos futbol|apuestas pronosticos gratis|apuestas
pronosticos nba|apuestas pronosticos tenis|apuestas prorroga|apuestas psg barca|apuestas psg barcelona|apuestas
puntos por tarjetas|apuestas puntos tarjetas|apuestas
que aceptan paypal|apuestas que es handicap|apuestas que puedes hacer con tu novia|apuestas
que siempre ganaras|apuestas que significa|apuestas quien bajara a
segunda|apuestas quién bajara a segunda|apuestas quien gana el mundial|apuestas quien gana eurocopa|apuestas quien gana la champions|apuestas
quien gana la eurocopa|apuestas quien gana la liga|apuestas quien ganara el mundial|apuestas quién ganará el mundial|apuestas quien ganara la
champions|apuestas quien ganara la eurocopa|apuestas quien ganara la liga|apuestas rayo barcelona|apuestas
real madrid|apuestas real madrid arsenal|apuestas real madrid athletic|apuestas real madrid atletico|apuestas real madrid
atletico champions|apuestas real madrid atletico de madrid|apuestas real madrid atlético de madrid|apuestas real madrid atletico madrid|apuestas real madrid
barcelona|apuestas real madrid bayern|apuestas real madrid
betis|apuestas real madrid borussia|apuestas real madrid campeon champions|apuestas real madrid celta|apuestas
real madrid champions|apuestas real madrid city|apuestas real madrid girona|apuestas real
madrid hoy|apuestas real madrid liverpool|apuestas real madrid
manchester city|apuestas real madrid osasuna|apuestas real madrid real sociedad|apuestas real madrid valencia|apuestas real madrid villarreal|apuestas real madrid vs arsenal|apuestas real madrid vs atletico|apuestas real madrid vs atlético|apuestas
real madrid vs atletico madrid|apuestas real madrid vs barcelona|apuestas real madrid vs betis|apuestas real
madrid vs sevilla|apuestas real madrid vs valencia|apuestas real sociedad|apuestas real sociedad athletic|apuestas real sociedad barcelona|apuestas real sociedad
betis|apuestas real sociedad psg|apuestas real sociedad real madrid|apuestas real
sociedad valencia|apuestas recomendadas hoy|apuestas regalo de bienvenida|apuestas registro|apuestas resultado exacto|apuestas resultados|apuestas resultados eurocopa|apuestas retirada tenis|apuestas roma barcelona|apuestas roma sevilla|apuestas rugby|apuestas rugby mundial|apuestas rugby world cup|apuestas ruleta seguras|apuestas segunda|apuestas segunda b|apuestas segunda
division|apuestas segunda división|apuestas segunda division b|apuestas
segunda division españa|apuestas seguras|apuestas seguras baloncesto|apuestas seguras calculadora|apuestas seguras en la ruleta|apuestas seguras eurocopa|apuestas
seguras foro|apuestas seguras futbol|apuestas seguras
futbol hoy|apuestas seguras gratis|apuestas seguras hoy|apuestas seguras
hoy futbol|apuestas seguras nba|apuestas seguras nba hoy|apuestas
seguras para este fin de semana|apuestas seguras para ganar dinero|apuestas seguras para hoy|apuestas seguras para hoy fútbol|apuestas seguras para hoy pronósticos|apuestas seguras
para mañana|apuestas seguras ruleta|apuestas seguras telegram|apuestas seguras tenis|apuestas semifinales eurocopa|apuestas senegal paises
bajos|apuestas sevilla|apuestas sevilla athletic|apuestas sevilla atletico de madrid|apuestas sevilla barcelona|apuestas sevilla betis|apuestas sevilla campeon liga|apuestas sevilla celta|apuestas sevilla gana la
liga|apuestas sevilla girona|apuestas sevilla inter|apuestas sevilla jugador|apuestas sevilla juventus|apuestas sevilla leganes|apuestas sevilla madrid|apuestas sevilla manchester united|apuestas sevilla osasuna|apuestas sevilla real madrid|apuestas
sevilla real sociedad|apuestas sevilla roma|apuestas sevilla valencia|apuestas significa|apuestas simples ejemplos|apuestas simples o combinadas|apuestas sin deposito|apuestas sin deposito inicial|apuestas sin deposito minimo|apuestas sin dinero|apuestas sin dinero real|apuestas sin empate|apuestas
sin empate que significa|apuestas sin ingreso minimo|apuestas sin registro|apuestas sistema|apuestas sistema calculadora|apuestas sistema como funciona|apuestas sistema trixie|apuestas sociedad|apuestas sorteo
copa del rey|apuestas stake|apuestas stake 10|apuestas stake 10 hoy|apuestas super bowl favorito|apuestas super rugby|apuestas supercopa
españa|apuestas superliga argentina|apuestas tarjeta roja|apuestas tarjetas|apuestas
tarjetas amarillas|apuestas tenis|apuestas tenis atp|apuestas tenis consejos|apuestas tenis copa davis|apuestas tenis de mesa|apuestas tenis de mesa pronosticos|apuestas tenis en vivo|apuestas tenis femenino|apuestas tenis hoy|apuestas tenis
itf|apuestas tenis pronosticos|apuestas tenis pronósticos|apuestas tenis retirada|apuestas tenis
roland garros|apuestas tenis seguras|apuestas tenis wimbledon|apuestas tenis wta|apuestas tercera division|apuestas tercera division españa|apuestas tipos|apuestas tips|apuestas tipster|apuestas tipster para hoy|apuestas
topuria holloway cuotas|apuestas torneos de golf|apuestas torneos de tenis|apuestas trucos|apuestas uefa champions league|apuestas uefa
europa league|apuestas ufc|apuestas ufc chile|apuestas ufc como funciona|apuestas ufc hoy|apuestas ufc ilia topuria|apuestas
ufc online|apuestas ufc pronósticos|apuestas ufc telegram|apuestas ufc topuria|apuestas under over|apuestas unionistas villarreal|apuestas uruguay|apuestas uruguay colombia|apuestas uruguay corea|apuestas uruguay vs colombia|apuestas us open golf|apuestas us open tenis|apuestas valencia|apuestas valencia barcelona|apuestas valencia betis|apuestas valencia
madrid|apuestas valencia real madrid|apuestas valladolid barcelona|apuestas valladolid valencia|apuestas valor app|apuestas valor en directo|apuestas valor
galgos|apuestas venezuela|apuestas venezuela argentina|apuestas venezuela bolivia|apuestas venezuela ecuador|apuestas villarreal|apuestas villarreal athletic|apuestas villarreal barcelona|apuestas villarreal bayern|apuestas villarreal betis|apuestas villarreal liverpool|apuestas villarreal
manchester|apuestas villarreal manchester united|apuestas villarreal vs real
madrid|apuestas virtuales|apuestas virtuales colombia|apuestas virtuales futbol|apuestas
virtuales sin dinero|apuestas vivo|apuestas vuelta a españa|apuestas vuelta españa|apuestas william hill partidos de hoy|apuestas y casino|apuestas y casinos|apuestas y juegos de azar|apuestas y pronosticos|apuestas y
pronosticos de futbol|apuestas y pronosticos deportivos|apuestas y
resultados|apuestas-deportivas|apuestas-deportivas.es pronosticos|arbitro nba apuestas|argentina apuestas|argentina colombia apuestas|argentina croacia apuestas|argentina francia apuestas|argentina mexico apuestas|argentina peru apuestas|argentina uruguay apuestas|argentina vs bolivia apuestas|argentina
vs chile apuestas|argentina vs colombia apuestas|argentina vs francia apuestas|argentina vs.
colombia apuestas|asi se gana en las apuestas deportivas|asiatico apuestas|asiatico en apuestas|asiaticos
apuestas|athletic barcelona apuestas|athletic manchester united apuestas|athletic
osasuna apuestas|athletic real madrid apuestas|atletico barcelona apuestas|atletico
de madrid apuestas|atlético de madrid apuestas|atletico
de madrid real madrid apuestas|atletico de madrid vs barcelona apuestas|atletico madrid
real madrid apuestas|atletico madrid vs real madrid apuestas|atletico real madrid apuestas|atletico vs real madrid apuestas|avisador de cuotas apuestas|bajada de cuotas apuestas|baloncesto
apuestas|barbastro barcelona apuestas|barca apuestas|barca bayern apuestas|barca inter apuestas|barca madrid apuestas|barça madrid apuestas|barca
vs atletico apuestas|barca vs madrid apuestas|barca vs real
madrid apuestas|barcelona – real madrid apuestas|barcelona apuestas|barcelona atletico apuestas|barcelona atletico de madrid apuestas|barcelona atletico madrid apuestas|barcelona betis apuestas|barcelona casa de apuestas|barcelona inter apuestas|barcelona psg apuestas|barcelona real madrid apuestas|barcelona real
sociedad apuestas|barcelona sevilla apuestas|barcelona valencia apuestas|barcelona vs athletic bilbao apuestas|barcelona vs atlético madrid apuestas|barcelona vs betis apuestas|barcelona vs celta de vigo apuestas|barcelona vs espanyol apuestas|barcelona vs
girona apuestas|barcelona vs madrid apuestas|barcelona vs real madrid apuestas|barcelona vs real sociedad apuestas|barcelona vs
sevilla apuestas|barcelona vs villarreal apuestas|base
de datos cuotas apuestas deportivas|bayern real madrid apuestas|beisbol apuestas|best america apuestas|bet apuestas chile|bet apuestas en vivo|betis – chelsea apuestas|betis apuestas|betis barcelona
apuestas|betis chelsea apuestas|betis madrid apuestas|betis sevilla apuestas|betsson tu sitio de apuestas online|blog
apuestas baloncesto|blog apuestas ciclismo|blog apuestas nba|blog apuestas tenis|blog de apuestas de tenis|bono apuestas|bono apuestas
deportivas|bono apuestas deportivas sin deposito|bono apuestas gratis|bono apuestas gratis sin deposito|bono apuestas sin deposito|bono bienvenida apuestas|bono
bienvenida apuestas deportivas|bono bienvenida apuestas españa|bono bienvenida apuestas sin deposito|bono bienvenida apuestas sin depósito|bono bienvenida casa apuestas|bono bienvenida casa de apuestas|bono bienvenida marca apuestas|bono casa apuestas|bono casa de apuestas|bono casa de apuestas sin ingreso|bono casas de
apuestas|bono de apuestas|bono de apuestas gratis sin deposito|bono de bienvenida apuestas|bono de bienvenida
apuestas deportivas|bono de bienvenida casa de apuestas|bono de bienvenida casas
de apuestas|bono de casas de apuestas|bono de registro apuestas|bono de registro apuestas deportivas|bono de registro casa de apuestas|bono gratis apuestas|bono marca apuestas|bono por registro apuestas|bono por registro apuestas deportivas|bono
por registro casa de apuestas|bono registro apuestas|bono sin deposito apuestas|bono sin depósito apuestas|bono sin deposito apuestas deportivas|bono sin depósito
apuestas deportivas|bono sin deposito casa de apuestas|bono sin deposito marca
apuestas|bono sin ingreso apuestas|bono sin ingreso apuestas deportivas|bonos apuestas|bonos apuestas colombia|bonos apuestas deportivas|bonos
apuestas deportivas sin deposito|bonos apuestas gratis|bonos apuestas sin deposito|bonos apuestas sin depósito|bonos bienvenida
apuestas|bonos bienvenida casas apuestas|bonos bienvenida
casas de apuestas|bonos casa de apuestas|bonos casas apuestas|bonos
casas de apuestas|bonos casas de apuestas colombia|bonos
casas de apuestas deportivas|bonos casas de apuestas españa|bonos casas de apuestas nuevas|bonos
casas de apuestas sin deposito|bonos casas de apuestas sin depósito|bonos de apuestas|bonos de
apuestas deportivas|bonos de apuestas gratis|bonos de apuestas sin deposito|bonos
de bienvenida apuestas|bonos de bienvenida apuestas deportivas|bonos de bienvenida casa de apuestas|bonos de bienvenida casas
de apuestas|bonos de bienvenida de casas de apuestas|bonos de bienvenida en casas de apuestas|bonos de casas de apuestas|bonos de casas de apuestas
sin deposito|bonos en casa de apuestas|bonos en casas de apuestas sin deposito|bonos gratis apuestas|bonos gratis apuestas deportivas|bonos gratis casas
de apuestas|bonos gratis sin deposito apuestas|bonos paginas de apuestas|bonos registro casas de apuestas|bonos
sin deposito apuestas|bonos sin depósito apuestas|bonos sin deposito
apuestas deportivas|bonos sin deposito casas de apuestas|bot de apuestas deportivas gratis|boxeo apuestas|brasil colombia apuestas|brasil peru apuestas|brasil vs colombia
apuestas|buenas apuestas para hoy|buscador cuotas apuestas|buscador de
apuestas seguras|buscador de cuotas apuestas|buscador de cuotas de apuestas|buscar apuestas seguras|caballos apuestas|calculador de apuestas|calculador de cuotas apuestas|calculadora apuestas|calculadora apuestas combinadas|calculadora apuestas de sistema|calculadora apuestas deportivas|calculadora apuestas deportivas seguras|calculadora apuestas multiples|calculadora apuestas
segura|calculadora apuestas seguras|calculadora apuestas sistema|calculadora apuestas yankee|calculadora arbitraje apuestas|calculadora cubrir apuestas|calculadora cuotas apuestas|calculadora de apuestas|calculadora de apuestas combinadas|calculadora de apuestas
de futbol|calculadora de apuestas de sistema|calculadora de apuestas deportivas|calculadora de apuestas multiples|calculadora de apuestas seguras|calculadora de
apuestas sistema|calculadora de apuestas surebets|calculadora de arbitraje apuestas|calculadora de cuotas apuestas|calculadora de cuotas de apuestas|calculadora
para apuestas deportivas|calculadora poisson apuestas|calculadora poisson apuestas deportivas|calculadora poisson para apuestas|calculadora scalping apuestas
deportivas|calculadora sistema apuestas|calculadora stake apuestas|calculadora trading apuestas|calcular apuestas|calcular apuestas deportivas|calcular apuestas futbol|calcular apuestas sistema|calcular cuotas apuestas|calcular cuotas apuestas combinadas|calcular cuotas apuestas deportivas|calcular cuotas de
apuestas|calcular ganancias apuestas deportivas|calcular momios apuestas|calcular probabilidad cuota
apuestas|calcular stake apuestas|calcular unidades apuestas|calcular yield apuestas|calculo de apuestas|calculo de
apuestas deportivas|cambio de cuotas apuestas|campeon champions apuestas|campeon eurocopa apuestas|campeon liga apuestas|campeon nba
apuestas|canales de apuestas gratis|carrera de caballos apuestas|carrera de caballos apuestas juego|carrera de caballos con apuestas|carrera de galgos apuestas|carreras
de caballos apuestas|carreras de caballos apuestas online|carreras de caballos con apuestas|carreras de caballos juegos de apuestas|carreras de galgos apuestas|carreras de galgos apuestas online|carreras de galgos apuestas trucos|carreras galgos apuestas|casa apuestas argentina|casa apuestas atletico de madrid|casa apuestas barcelona|casa apuestas betis|casa apuestas bono bienvenida|casa
apuestas bono gratis|casa apuestas bono sin deposito|casa apuestas cerca
de mi|casa apuestas chile|casa apuestas colombia|casa apuestas con mejores cuotas|casa apuestas deportivas|casa apuestas españa|casa apuestas española|casa apuestas eurocopa|casa apuestas
futbol|casa apuestas mejores cuotas|casa apuestas mundial|casa apuestas nueva|casa apuestas nuevas|casa apuestas online|casa apuestas peru|casa apuestas valencia|casa de
apuestas|casa de apuestas 10 euros gratis|casa de apuestas argentina|casa de apuestas atletico de
madrid|casa de apuestas baloncesto|casa de
apuestas barcelona|casa de apuestas beisbol|casa de apuestas betis|casa de apuestas bono|casa de apuestas bono bienvenida|casa de apuestas bono de bienvenida|casa
de apuestas bono gratis|casa de apuestas bono por registro|casa de apuestas bono sin deposito|casa de apuestas boxeo|casa de apuestas caballos|casa de apuestas
carreras de caballos|casa de apuestas cerca de mi|casa de apuestas cerca de mí|casa de apuestas
champions league|casa de apuestas chile|casa de apuestas ciclismo|casa de
apuestas colombia|casa de apuestas con bono de bienvenida|casa de apuestas con bono
sin deposito|casa de apuestas con cuotas mas altas|casa
de apuestas con esports|casa de apuestas con las mejores cuotas|casa
de apuestas con licencia en españa|casa de apuestas con mejores cuotas|casa de apuestas con pago anticipado|casa de apuestas con paypal|casa de apuestas copa
america|casa de apuestas de caballos|casa de apuestas de colombia|casa de apuestas de españa|casa de apuestas de futbol|casa de apuestas de
fútbol|casa de apuestas de futbol peru|casa de apuestas de peru|casa de apuestas
del madrid|casa de apuestas del real madrid|casa de apuestas deportivas|casa de apuestas
deportivas cerca de mi|casa de apuestas deportivas en argentina|casa
de apuestas deportivas en chile|casa de apuestas deportivas en colombia|casa de apuestas deportivas en españa|casa de apuestas deportivas en madrid|casa de apuestas deportivas españa|casa de apuestas deportivas españolas|casa de apuestas
deportivas madrid|casa de apuestas deportivas mexico|casa de apuestas deportivas online|casa de apuestas deportivas peru|casa
de apuestas deposito 5 euros|casa de apuestas deposito minimo|casa de apuestas deposito minimo 1 euro|casa de apuestas depósito
mínimo 1 euro|casa de apuestas en españa|casa de apuestas en linea|casa de apuestas en madrid|casa de apuestas en perú|casa de apuestas en vivo|casa de apuestas españa|casa de apuestas españa inglaterra|casa de apuestas española|casa de apuestas españolas|casa de apuestas esports|casa de apuestas
eurocopa|casa de apuestas europa league|casa de apuestas f1|casa de
apuestas formula 1|casa de apuestas futbol|casa de apuestas ingreso minimo|casa de apuestas ingreso minimo
1 euro|casa de apuestas ingreso mínimo 1 euro|casa
de apuestas legales|casa de apuestas legales en colombia|casa de
apuestas legales en españa|casa de apuestas
libertadores|casa de apuestas liga española|casa de apuestas madrid|casa de
apuestas mas segura|casa de apuestas mejores|casa
de apuestas méxico|casa de apuestas minimo 5 euros|casa de apuestas mlb|casa
de apuestas mundial|casa de apuestas nba|casa de apuestas nfl|casa de apuestas nueva|casa de apuestas nuevas|casa de apuestas oficial del real madrid|casa de apuestas oficial real madrid|casa
de apuestas online|casa de apuestas online argentina|casa
de apuestas online chile|casa de apuestas online españa|casa de
apuestas online mexico|casa de apuestas online paraguay|casa de apuestas online peru|casa de
apuestas online usa|casa de apuestas online venezuela|casa de apuestas pago anticipado|casa de apuestas
para boxeo|casa de apuestas para ufc|casa de apuestas peru|casa de apuestas perú|casa de apuestas peru online|casa de apuestas
por paypal|casa de apuestas promociones|casa de apuestas que regalan dinero|casa de
apuestas real madrid|casa de apuestas regalo de bienvenida|casa de apuestas sevilla|casa de apuestas sin dinero|casa de apuestas sin ingreso minimo|casa de apuestas sin licencia
en españa|casa de apuestas sin minimo de
ingreso|casa de apuestas stake|casa de apuestas
tenis|casa de apuestas ufc|casa de apuestas valencia|casa de apuestas venezuela|casa
de apuestas virtuales|casa de apuestas vive la suerte|casa oficial de apuestas del real madrid|casas apuestas asiaticas|casas apuestas bono sin deposito|casas apuestas bonos sin deposito|casas apuestas
caballos|casas apuestas chile|casas apuestas ciclismo|casas apuestas con licencia|casas apuestas con licencia en españa|casas apuestas deportivas|casas apuestas deportivas colombia|casas apuestas deportivas
españa|casas apuestas deportivas españolas|casas apuestas deportivas nuevas|casas apuestas
españa|casas apuestas españolas|casas apuestas esports|casas apuestas eurocopa|casas apuestas
golf|casas apuestas ingreso minimo 5 euros|casas apuestas legales|casas apuestas legales
españa|casas apuestas licencia|casas apuestas licencia españa|casas apuestas mexico|casas apuestas mundial|casas apuestas nba|casas apuestas nuevas|casas apuestas nuevas españa|casas apuestas ofertas|casas apuestas online|casas apuestas paypal|casas
apuestas peru|casas apuestas sin licencia|casas apuestas tenis|casas asiaticas apuestas|casas de apuestas|casas de
apuestas 5 euros|casas de apuestas app|casas de apuestas argentinas|casas de apuestas asiaticas|casas de apuestas baloncesto|casas de apuestas barcelona|casas de apuestas bono bienvenida|casas de apuestas bono de bienvenida|casas de apuestas bono por
registro|casas de apuestas bono sin deposito|casas de apuestas bono sin ingreso|casas
de apuestas bonos|casas de apuestas bonos de bienvenida|casas de apuestas bonos gratis|casas de
apuestas bonos sin deposito|casas de apuestas boxeo|casas de
apuestas caballos|casas de apuestas carreras de caballos|casas de apuestas
casino|casas de apuestas casino online|casas de apuestas cerca de mi|casas de
apuestas champions league|casas de apuestas chile|casas de apuestas ciclismo|casas de apuestas colombia|casas de apuestas com|casas de apuestas con app|casas de apuestas con apuestas gratis|casas de apuestas con bono|casas de apuestas
con bono de bienvenida|casas de apuestas con bono de registro|casas
de apuestas con bono por registro|casas de apuestas con bono sin deposito|casas de apuestas con bonos|casas de apuestas con bonos gratis|casas de apuestas con bonos sin deposito|casas de apuestas con deposito minimo|casas de apuestas con esports|casas
de apuestas con handicap asiatico|casas de apuestas con licencia|casas de
apuestas con licencia en españa|casas de apuestas con licencia españa|casas
de apuestas con licencia española|casas de apuestas con mejores cuotas|casas de apuestas con pago anticipado|casas de apuestas
con paypal|casas de apuestas con paypal en perú|casas de apuestas con promociones|casas de apuestas con ruleta en vivo|casas de apuestas copa
del rey|casas de apuestas de caballos|casas de apuestas de españa|casas de apuestas de futbol|casas de apuestas de fútbol|casas de
apuestas de peru|casas de apuestas deportivas|casas de apuestas deportivas asiaticas|casas de apuestas
deportivas colombia|casas de apuestas deportivas comparativa|casas de apuestas deportivas con paypal|casas de apuestas
deportivas en chile|casas de apuestas deportivas en españa|casas de apuestas deportivas en linea|casas de apuestas deportivas
en madrid|casas de apuestas deportivas en mexico|casas de
apuestas deportivas en peru|casas de apuestas deportivas en sevilla|casas de apuestas deportivas en valencia|casas de apuestas
deportivas españa|casas de apuestas deportivas españolas|casas de apuestas deportivas legales|casas
de apuestas deportivas madrid|casas de apuestas deportivas mexico|casas de apuestas deportivas nuevas|casas de apuestas
deportivas online|casas de apuestas deportivas peru|casas de apuestas
deportivas perú|casas de apuestas deposito minimo 1 euro|casas de apuestas depósito mínimo 1
euro|casas de apuestas dinero gratis|casas de apuestas en argentina|casas de apuestas en barcelona|casas de apuestas
en chile|casas de apuestas en colombia|casas de apuestas en españa|casas de apuestas en españa online|casas de apuestas en linea|casas de apuestas en madrid|casas de apuestas en méxico|casas de apuestas en peru|casas de apuestas en perú|casas de
apuestas en sevilla|casas de apuestas en uruguay|casas de apuestas en valencia|casas de
apuestas en venezuela|casas de apuestas equipos de futbol|casas de apuestas españa|casas de apuestas españa alemania|casas de apuestas españa inglaterra|casas
de apuestas españa licencia|casas de apuestas españa
nuevas|casas de apuestas españa online|casas de apuestas
española|casas de apuestas españolas|casas de apuestas españolas con licencia|casas
de apuestas españolas online|casas de apuestas esports|casas
de apuestas eurocopa|casas de apuestas eurocopa 2024|casas de apuestas europa league|casas de apuestas f1|casas de apuestas fisicas en barcelona|casas de apuestas fisicas en españa|casas de apuestas formula 1|casas de apuestas
fuera de españa|casas de apuestas futbol|casas de apuestas fútbol|casas de apuestas futbol españa|casas de apuestas ganador eurocopa|casas de apuestas gratis|casas de apuestas ingreso minimo|casas de
apuestas ingreso minimo 1 euro|casas de apuestas ingreso minimo 5 euros|casas de
apuestas inter barcelona|casas de apuestas legales|casas de apuestas legales en colombia|casas de apuestas legales en españa|casas de apuestas legales en mexico|casas de apuestas
legales españa|casas de apuestas legales mx|casas de apuestas
licencia|casas de apuestas licencia españa|casas de apuestas lista|casas
de apuestas madrid|casas de apuestas mas seguras|casas de apuestas mejores
bonos|casas de apuestas mejores cuotas|casas de apuestas
mexico|casas de apuestas méxico|casas de apuestas minimo 5 euros|casas de apuestas mlb|casas de apuestas mundial|casas de apuestas
mundial baloncesto|casas de apuestas mundiales|casas de apuestas nba|casas de
apuestas no reguladas en españa|casas de apuestas nueva ley|casas
de apuestas nuevas|casas de apuestas nuevas en colombia|casas de apuestas nuevas en españa|casas de apuestas nuevas españa|casas
de apuestas ofertas|casas de apuestas online|casas de
apuestas online argentina|casas de apuestas online colombia|casas de apuestas online deportivas|casas de apuestas online ecuador|casas de apuestas online en argentina|casas de apuestas online en chile|casas de apuestas online en colombia|casas de apuestas online en españa|casas de
apuestas online en mexico|casas de apuestas online españa|casas de
apuestas online mas fiables|casas de apuestas online mexico|casas de apuestas online nuevas|casas de apuestas online
peru|casas de apuestas online usa|casas de apuestas online
venezuela|casas de apuestas pago paypal|casas de apuestas para ufc|casas de apuestas paypal|casas de apuestas peru bono sin deposito|casas
de apuestas presenciales en españa|casas de apuestas promociones|casas de
Your comment is awaiting moderation.
Всем здравствуйте! Опишу свою ситуацию: 2 недели назад заказывал в данном магазине 2 с-i и MXE, всё на высшем уровне: оперативность 5 +, доставка 5+, конспирация 5+, Качество 5+. Нареканий к Магазину нет, только благодарность!!! В этот раз сделал заказ в Понедельник, оплатил во Вторник. В пятницу только получил трек. На сегодня Трек не работает. Звоню в курьерку они говорят, что такой трек у них не зарегистрирован. Паники пока никакой нет, но хотелось бы получить какие нибудь разъяснения по этому поводу. Заранее спасибо! https://rant.li/ihthogpobygi/man-chzhuriia-kupit-kokain-mefedron-marikhuanu-boshki Доброго всем форумчанам дня и процветания! Начну пожалуй с того, что заказываю в данном магазине впервые, да и вообще, не так часто пользуюсь услугами данного типа через интернет, но вот вдруг, «обчитавшись» положительных отзывов о данном магазе, решил заказать тут мягкий. Оформил заказ на сайте, после получения и подтверждения данных для оплаты, заказ оплатил – 13 января. В этот же день, через пару часов, пришло сообщение:
Your comment is awaiting moderation.
Сайт о строительстве https://blogcamp.com.ua и ремонте: проекты, сметы, материалы, инструменты, пошаговые инструкции и лайфхаки. Чек-листы, калькуляторы, ошибки и их решения. Делайте качественно и экономно.
Your comment is awaiting moderation.
webmagnet.click – Color palette felt calming, nothing distracting, just focused, thoughtful design.
Your comment is awaiting moderation.
http://www.inetpartners.ru/forum/member.php?u=259262
Your comment is awaiting moderation.
Всё о развитии https://run.org.ua и здоровье детей: диагностические скрининги, логопедия, дефектология, нейропсихология, ЛФК, массаж, группы раннего развития, подготовка к школе. Планы занятий, расписание, запись онлайн, советы специалистов и проверенные методики.
Your comment is awaiting moderation.
seoforce.click – Appreciate the typography choices; comfortable spacing improved my reading experience.
Your comment is awaiting moderation.
магазин пашит как комбаин пашню!) https://www.montessorijobsuk.co.uk/author/zygofqafogq/ Магниты рулят, не меняйтесь)
Your comment is awaiting moderation.
(10 euros gratis apuestas|10 mejores casas de apuestas|10
trucos para ganar apuestas|15 euros gratis marca apuestas|1×2 apuestas|1×2 apuestas deportivas|1×2 apuestas
que significa|1×2 en apuestas|1×2 en apuestas que significa|1×2 que significa en apuestas|5
euros gratis apuestas|9 apuestas que siempre ganaras|a partir de cuanto se declara apuestas|actividades de juegos de azar y apuestas|ad apuestas deportivas|aleksandre topuria ufc apuestas|algoritmo para ganar apuestas deportivas|america apuestas|análisis
nba apuestas|aplicacion android apuestas deportivas|aplicacion apuestas deportivas|aplicacion apuestas deportivas android|aplicación de apuestas online|aplicacion para hacer
apuestas|aplicacion para hacer apuestas de futbol|aplicación para
hacer apuestas de fútbol|aplicaciones apuestas deportivas android|aplicaciones apuestas deportivas gratis|aplicaciones
de apuestas android|aplicaciones de apuestas de fútbol|aplicaciones de apuestas deportivas|aplicaciones de apuestas
deportivas peru|aplicaciones de apuestas deportivas perú|aplicaciones
de apuestas en colombia|aplicaciones de apuestas gratis|aplicaciones de apuestas online|aplicaciones de apuestas seguras|aplicaciones de apuestas sin dinero|aplicaciones para hacer apuestas|apostar
seguro apuestas deportivas|app android apuestas deportivas|app apuestas|app apuestas android|app apuestas de futbol|app apuestas deportivas|app apuestas deportivas android|app apuestas deportivas argentina|app apuestas deportivas
colombia|app apuestas deportivas ecuador|app apuestas deportivas españa|app apuestas
deportivas gratis|app apuestas entre amigos|app
apuestas futbol|app apuestas gratis|app apuestas sin dinero|app casa de apuestas|app casas
de apuestas|app control apuestas|app de apuestas|app de apuestas android|app de apuestas
casino|app de apuestas colombia|app de apuestas con bono de bienvenida|app de apuestas
de futbol|app de apuestas deportivas|app de apuestas deportivas android|app de
apuestas deportivas argentina|app de apuestas deportivas
colombia|app de apuestas deportivas en españa|app
de apuestas deportivas peru|app de apuestas deportivas perú|app de apuestas deportivas sin dinero|app de apuestas ecuador|app
de apuestas en colombia|app de apuestas en españa|app de apuestas en venezuela|app de apuestas futbol|app de apuestas gratis|app de apuestas online|app de apuestas para android|app de apuestas para ganar dinero|app de apuestas peru|app de apuestas reales|app de casas de apuestas|app marca
apuestas android|app moviles de apuestas|app para apuestas|app para
apuestas de futbol|app para apuestas deportivas|app para apuestas deportivas en español|app para ganar apuestas deportivas|app para hacer apuestas|app para hacer apuestas
deportivas|app para hacer apuestas entre amigos|app para llevar
control de apuestas|app pronosticos apuestas deportivas|app versus apuestas|apps apuestas mundial|apps de apuestas|apps de
apuestas con bono de bienvenida|apps de apuestas de futbol|apps de
apuestas deportivas peru|apps de apuestas mexico|apps para apuestas|aprender a hacer apuestas deportivas|aprender hacer
apuestas deportivas|apuesta del dia apuestas deportivas|apuestas
10 euros gratis|apuestas 100 seguras|apuestas 1×2|apuestas
1X2|apuestas 2 division|apuestas 3 division|apuestas a caballos|apuestas a
carreras de caballos|apuestas a colombia|apuestas a corners|apuestas
a ganar|apuestas a jugadores nba|apuestas a la baja|apuestas
a la nfl|apuestas al barcelona|apuestas al dia|apuestas al empate|apuestas al mundial|apuestas al tenis wta|apuestas alaves barcelona|apuestas
alcaraz hoy|apuestas alemania españa|apuestas alonso campeon del mundo|apuestas altas y bajas|apuestas altas y bajas nfl|apuestas
ambos equipos marcan|apuestas america|apuestas android|apuestas anillo nba|apuestas antes del mundial|apuestas anticipadas|apuestas anticipadas nba|apuestas apps|apuestas arabia argentina|apuestas
argentina|apuestas argentina campeon del mundo|apuestas argentina canada|apuestas argentina colombia|apuestas argentina croacia|apuestas argentina españa|apuestas argentina francia|apuestas argentina francia cuanto paga|apuestas argentina francia mundial|apuestas argentina gana el mundial|apuestas argentina
gana mundial|apuestas argentina holanda|apuestas argentina mexico|apuestas argentina méxico|apuestas argentina
mundial|apuestas argentina online|apuestas argentina paises bajos|apuestas argentina polonia|apuestas argentina uruguay|apuestas
argentina vs australia|apuestas argentina vs colombia|apuestas
argentina vs francia|apuestas argentina vs peru|apuestas argentinas|apuestas arsenal real madrid|apuestas ascenso a primera
division|apuestas ascenso a segunda|apuestas asiaticas|apuestas asiatico|apuestas athletic|apuestas athletic atletico|apuestas athletic barça|apuestas athletic barcelona|apuestas athletic betis|apuestas athletic manchester|apuestas
athletic manchester united|apuestas athletic osasuna|apuestas athletic real|apuestas athletic real madrid|apuestas athletic real sociedad|apuestas athletic real sociedad final|apuestas athletic roma|apuestas athletic sevilla|apuestas athletic valencia|apuestas atletico|apuestas atletico barcelona|apuestas atletico barsa|apuestas atletico campeon champions|apuestas atletico campeon de liga|apuestas atlético copenhague|apuestas atletico de
madrid|apuestas atlético de madrid|apuestas atletico de madrid barcelona|apuestas atletico
de madrid gana la liga|apuestas atletico de madrid real
madrid|apuestas atlético de madrid real madrid|apuestas atletico de madrid vs barcelona|apuestas atletico madrid|apuestas atletico madrid
real madrid|apuestas atletico madrid vs barcelona|apuestas atletico real madrid|apuestas atletico real madrid champions|apuestas atletismo|apuestas bajas|apuestas baloncesto|apuestas baloncesto acb|apuestas baloncesto handicap|apuestas baloncesto hoy|apuestas baloncesto juegos
olimpicos|apuestas baloncesto nba|apuestas baloncesto
pronostico|apuestas baloncesto pronósticos|apuestas baloncesto prorroga|apuestas barca|apuestas barca athletic|apuestas
barca atletico|apuestas barca bayern|apuestas barca bayern munich|apuestas barca girona|apuestas
barca hoy|apuestas barça hoy|apuestas barca inter|apuestas barca juventus|apuestas barca madrid|apuestas barça
madrid|apuestas barca real madrid|apuestas barca vs juve|apuestas barca vs madrid|apuestas
barca vs psg|apuestas barcelona|apuestas barcelona alaves|apuestas barcelona athletic|apuestas barcelona atletico|apuestas barcelona atletico
de madrid|apuestas barcelona atlético de madrid|apuestas barcelona atletico madrid|apuestas barcelona bayern|apuestas barcelona betis|apuestas
barcelona campeon de liga|apuestas barcelona celta|apuestas barcelona espanyol|apuestas barcelona gana la
champions|apuestas barcelona girona|apuestas barcelona granada|apuestas
barcelona hoy|apuestas barcelona inter|apuestas barcelona madrid|apuestas barcelona osasuna|apuestas barcelona
psg|apuestas barcelona real madrid|apuestas barcelona real sociedad|apuestas barcelona
sevilla|apuestas barcelona valencia|apuestas barcelona villarreal|apuestas barcelona vs atletico madrid|apuestas barcelona
vs madrid|apuestas barcelona vs real madrid|apuestas barsa madrid|apuestas basket
hoy|apuestas bayern barcelona|apuestas bayern vs barcelona|apuestas beisbol|apuestas béisbol|apuestas beisbol
mlb|apuestas beisbol pronosticos|apuestas beisbol venezolano|apuestas betis|apuestas betis
– chelsea|apuestas betis barcelona|apuestas betis chelsea|apuestas betis fiorentina|apuestas betis girona|apuestas betis madrid|apuestas betis mallorca|apuestas betis
real madrid|apuestas betis real sociedad|apuestas betis sevilla|apuestas betis valencia|apuestas
betis valladolid|apuestas betis vs valencia|apuestas betplay hoy colombia|apuestas betsson peru|apuestas bienvenida|apuestas billar online|apuestas bolivia vs
colombia|apuestas bono|apuestas bono bienvenida|apuestas bono de bienvenida|apuestas bono de bienvenida sin deposito|apuestas bono
gratis|apuestas bono sin deposito|apuestas bonos sin deposito|apuestas borussia real madrid|apuestas boxeo|apuestas boxeo de campeonato|apuestas boxeo españa|apuestas boxeo español|apuestas
boxeo femenino olimpiadas|apuestas boxeo hoy|apuestas boxeo
online|apuestas brasil colombia|apuestas brasil peru|apuestas brasil uruguay|apuestas brasil vs colombia|apuestas brasil vs peru|apuestas caballos|apuestas caballos colocado|apuestas caballos españa|apuestas caballos hipodromo|apuestas caballos hoy|apuestas caballos madrid|apuestas caballos online|apuestas caballos sanlucar de barrameda|apuestas caballos zarzuela|apuestas calculador|apuestas campeon|apuestas campeon champions|apuestas campeón champions|apuestas campeon champions 2025|apuestas campeon champions league|apuestas campeon conference league|apuestas campeon copa america|apuestas
campeon copa del rey|apuestas campeon de champions|apuestas campeon de
la champions|apuestas campeon de liga|apuestas
campeon del mundo|apuestas campeon eurocopa|apuestas campeón eurocopa|apuestas campeon europa
league|apuestas campeon f1|apuestas campeon f1 2025|apuestas campeon formula
1|apuestas campeon libertadores|apuestas campeon liga|apuestas campeon liga bbva|apuestas campeon liga española|apuestas campeon liga santander|apuestas campeon motogp 2025|apuestas campeon mundial|apuestas campeón mundial|apuestas
campeon mundial baloncesto|apuestas campeon nba|apuestas
campeón nba|apuestas campeon premier|apuestas campeon premier league|apuestas campeon roland garros|apuestas campeonato
f1|apuestas campeonatos de futbol|apuestas carrera de caballos|apuestas carrera de caballos hoy|apuestas carrera de
caballos nocturnas|apuestas carrera de galgos fin de semana|apuestas carrera de
galgos hoy|apuestas carrera de galgos nocturnas|apuestas
carreras caballos|apuestas carreras caballos sanlucar|apuestas carreras
de caballos|apuestas carreras de caballos en directo|apuestas carreras de
caballos en vivo|apuestas carreras de caballos españa|apuestas carreras de caballos hoy|apuestas carreras de caballos nacionales|apuestas carreras de caballos nocturnas|apuestas carreras de caballos
online|apuestas carreras de caballos sanlucar|apuestas carreras de caballos sanlúcar|apuestas carreras de galgos|apuestas carreras de galgos en vivo|apuestas carreras de galgos nocturnas|apuestas
carreras de galgos pre partido|apuestas casino|apuestas
casino barcelona|apuestas casino futbol|apuestas casino
gran madrid|apuestas casino gratis|apuestas casino madrid|apuestas casino online|apuestas casino
online argentina|apuestas casinos|apuestas casinos online|apuestas celta|apuestas celta barcelona|apuestas celta betis|apuestas celta eibar|apuestas
celta espanyol|apuestas celta granada|apuestas
celta madrid|apuestas celta manchester|apuestas celta real
madrid|apuestas champion league|apuestas champions foro|apuestas champions
hoy|apuestas champions league|apuestas champions league – pronósticos|apuestas
champions league 2025|apuestas champions league hoy|apuestas champions league
pronosticos|apuestas champions league pronósticos|apuestas champions pronosticos|apuestas chelsea barcelona|apuestas chelsea betis|apuestas chile|apuestas chile
peru|apuestas chile venezuela|apuestas chile vs colombia|apuestas chile vs uruguay|apuestas ciclismo|apuestas
ciclismo en vivo|apuestas ciclismo femenino|apuestas ciclismo tour francia|apuestas ciclismo vuelta|apuestas ciclismo vuelta a españa|apuestas
ciclismo vuelta españa|apuestas city madrid|apuestas city real madrid|apuestas clasico|apuestas
clasico español|apuestas clasico real madrid barcelona|apuestas
clasificacion mundial|apuestas colombia|apuestas colombia argentina|apuestas colombia brasil|apuestas colombia paraguay|apuestas colombia uruguay|apuestas colombia vs argentina|apuestas colombia vs brasil|apuestas combinadas|apuestas combinadas como funcionan|apuestas combinadas
de futbol|apuestas combinadas de fútbol|apuestas combinadas foro|apuestas combinadas futbol|apuestas combinadas hoy|apuestas combinadas mismo partido|apuestas combinadas mundial|apuestas combinadas nba|apuestas
combinadas para esta semana|apuestas combinadas para hoy|apuestas combinadas para mañana|apuestas combinadas pronosticos|apuestas combinadas recomendadas|apuestas
combinadas seguras|apuestas combinadas seguras para hoy|apuestas combinadas seguras para mañana|apuestas como ganar|apuestas comparador|apuestas con bono de bienvenida|apuestas con dinero ficticio|apuestas
con dinero real|apuestas con dinero virtual|apuestas con handicap|apuestas con handicap asiatico|apuestas
con handicap baloncesto|apuestas con mas probabilidades de ganar|apuestas con paypal|apuestas con tarjeta de credito|apuestas con tarjeta de debito|apuestas consejos|apuestas
copa|apuestas copa africa|apuestas copa america|apuestas copa
américa|apuestas copa argentina|apuestas copa brasil|apuestas copa davis|apuestas copa de europa|apuestas copa del
mundo|apuestas copa del rey|apuestas copa del rey baloncesto|apuestas copa del rey final|apuestas copa del rey futbol|apuestas copa del rey ganador|apuestas copa
del rey hoy|apuestas copa del rey pronosticos|apuestas copa
del rey pronósticos|apuestas copa europa|apuestas copa italia|apuestas copa libertadores|apuestas copa mundial de hockey|apuestas
copa rey|apuestas copa sudamericana|apuestas corners|apuestas corners hoy|apuestas croacia argentina|apuestas cuartos eurocopa|apuestas
cuotas|apuestas cuotas altas|apuestas cuotas bajas|apuestas
de 1 euro|apuestas de baloncesto|apuestas de baloncesto
hoy|apuestas de baloncesto nba|apuestas de baloncesto para hoy|apuestas
de beisbol|apuestas de beisbol para hoy|apuestas
de blackjack en linea|apuestas de boxeo|apuestas de boxeo canelo|apuestas de boxeo en las vegas|apuestas de boxeo hoy|apuestas de boxeo online|apuestas de caballo|apuestas de
caballos|apuestas de caballos como funciona|apuestas de caballos como
se juega|apuestas de caballos en colombia|apuestas de caballos en españa|apuestas de caballos en linea|apuestas de caballos españa|apuestas de caballos
ganador y colocado|apuestas de caballos internacionales|apuestas de caballos juegos|apuestas de
caballos online|apuestas de caballos online en venezuela|apuestas
de caballos por internet|apuestas de caballos pronosticos|apuestas de
caballos pronósticos|apuestas de carrera de caballos|apuestas de carreras de caballos|apuestas de carreras de caballos online|apuestas de casino|apuestas de casino
online|apuestas de casino por internet|apuestas de champions league|apuestas de ciclismo|apuestas de colombia|apuestas de copa america|apuestas de corners|apuestas de deportes en linea|apuestas de deportes online|apuestas de dinero|apuestas
de esports|apuestas de eurocopa|apuestas de europa league|apuestas de f1|apuestas de formula 1|apuestas
de futbol|apuestas de fútbol|apuestas de futbol app|apuestas de
futbol argentina|apuestas de futbol colombia|apuestas de futbol en colombia|apuestas de futbol en directo|apuestas de futbol en linea|apuestas de futbol
en vivo|apuestas de futbol español|apuestas de futbol gratis|apuestas de futbol
hoy|apuestas de futbol mundial|apuestas de
futbol online|apuestas de fútbol online|apuestas de futbol para
hoy|apuestas de fútbol para hoy|apuestas de futbol para hoy seguras|apuestas de futbol para
mañana|apuestas de futbol peru|apuestas de
futbol pronosticos|apuestas de fútbol pronósticos|apuestas de
futbol seguras|apuestas de futbol seguras para hoy|apuestas de futbol sin dinero|apuestas de galgos|apuestas
de galgos como ganar|apuestas de galgos en directo|apuestas de galgos
online|apuestas de galgos trucos|apuestas de golf|apuestas de hockey|apuestas de hockey sobre hielo|apuestas de hoy|apuestas
de hoy seguras|apuestas de juego|apuestas de juegos|apuestas de
juegos deportivos|apuestas de juegos online|apuestas de la champions league|apuestas de
la copa américa|apuestas de la eurocopa|apuestas de la europa league|apuestas
de la liga|apuestas de la liga bbva|apuestas de la liga española|apuestas de la nba|apuestas de la nfl|apuestas de la
ufc|apuestas de mlb|apuestas de nba|apuestas de
nba para hoy|apuestas de partidos|apuestas de partidos de
futbol|apuestas de peleas ufc|apuestas de perros en vivo|apuestas de
perros virtuales|apuestas de peru|apuestas
de sistema|apuestas de sistema como funciona|apuestas de sistema explicacion|apuestas de sistema explicación|apuestas de
tenis|apuestas de tenis de mesa|apuestas de tenis en directo|apuestas de tenis
hoy|apuestas de tenis para hoy|apuestas de tenis pronosticos|apuestas de
tenis seguras|apuestas de todo tipo|apuestas de ufc|apuestas de ufc hoy|apuestas del boxeo|apuestas del clasico|apuestas del
clasico real madrid barca|apuestas del dia|apuestas del día|apuestas del dia de hoy|apuestas
del dia deportivas|apuestas del dia futbol|apuestas del mundial|apuestas del partido de hoy|apuestas del real madrid|apuestas del rey|apuestas del sistema|apuestas deporte|apuestas deportes|apuestas deportiva|apuestas deportivas|apuestas
deportivas 1 euro|apuestas deportivas 10 euros gratis|apuestas deportivas 100 seguras|apuestas deportivas 1×2|apuestas deportivas android|apuestas deportivas app|apuestas deportivas apps|apuestas deportivas argentina|apuestas deportivas argentina futbol|apuestas deportivas argentina legal|apuestas deportivas atletico de madrid|apuestas deportivas
baloncesto|apuestas deportivas barca madrid|apuestas deportivas barcelona|apuestas deportivas beisbol|apuestas deportivas bono|apuestas deportivas bono bienvenida|apuestas deportivas
bono de bienvenida|apuestas deportivas bono sin deposito|apuestas deportivas bonos de
bienvenida|apuestas deportivas boxeo|apuestas deportivas caballos|apuestas deportivas calculadora|apuestas deportivas campeon liga|apuestas deportivas casino|apuestas deportivas casino barcelona|apuestas deportivas casino online|apuestas deportivas cerca de mi|apuestas deportivas
champions league|apuestas deportivas chile|apuestas deportivas ciclismo|apuestas deportivas colombia|apuestas deportivas com|apuestas deportivas com
foro|apuestas deportivas com pronosticos|apuestas deportivas combinadas|apuestas deportivas combinadas para hoy|apuestas
deportivas como se juega|apuestas deportivas comparador|apuestas deportivas
con bono gratis|apuestas deportivas con bonos gratis|apuestas deportivas con dinero ficticio|apuestas deportivas con paypal|apuestas deportivas con puntos virtuales|apuestas deportivas consejos|apuestas deportivas consejos para
ganar|apuestas deportivas copa america|apuestas deportivas copa del rey|apuestas deportivas copa
libertadores|apuestas deportivas copa mundial|apuestas deportivas
corners|apuestas deportivas cual es la mejor|apuestas deportivas cuotas altas|apuestas deportivas de baloncesto|apuestas
deportivas de boxeo|apuestas deportivas de colombia|apuestas deportivas de futbol|apuestas deportivas
de nba|apuestas deportivas de nhl|apuestas deportivas
de peru|apuestas deportivas de tenis|apuestas deportivas
del dia|apuestas deportivas dinero ficticio|apuestas deportivas directo|apuestas deportivas doble
oportunidad|apuestas deportivas en argentina|apuestas
deportivas en chile|apuestas deportivas en colombia|apuestas deportivas en directo|apuestas deportivas
en españa|apuestas deportivas en español|apuestas
deportivas en linea|apuestas deportivas en línea|apuestas deportivas en peru|apuestas deportivas
en perú|apuestas deportivas en sevilla|apuestas deportivas en uruguay|apuestas deportivas en vivo|apuestas
deportivas es|apuestas deportivas es pronosticos|apuestas deportivas españa|apuestas deportivas españolas|apuestas deportivas esports|apuestas deportivas estadisticas|apuestas deportivas estrategias|apuestas deportivas estrategias seguras|apuestas deportivas
eurocopa|apuestas deportivas europa league|apuestas
deportivas f1|apuestas deportivas faciles de ganar|apuestas deportivas formula 1|apuestas deportivas foro|apuestas deportivas foro futbol|apuestas deportivas foro tenis|apuestas deportivas francia argentina|apuestas deportivas futbol|apuestas deportivas fútbol|apuestas deportivas futbol
argentino|apuestas deportivas futbol colombia|apuestas
deportivas futbol español|apuestas deportivas gana|apuestas
deportivas ganadas|apuestas deportivas ganar dinero seguro|apuestas deportivas
gane|apuestas deportivas golf|apuestas deportivas gratis|apuestas deportivas gratis con premios|apuestas deportivas gratis hoy|apuestas deportivas gratis sin deposito|apuestas deportivas handicap|apuestas deportivas handicap asiatico|apuestas deportivas hoy|apuestas deportivas impuestos|apuestas deportivas interior argentina|apuestas deportivas juegos olimpicos|apuestas deportivas
la liga|apuestas deportivas legales|apuestas deportivas
legales en colombia|apuestas deportivas libres de impuestos|apuestas deportivas licencia españa|apuestas deportivas liga española|apuestas deportivas listado|apuestas deportivas listado clasico|apuestas deportivas madrid|apuestas deportivas mas seguras|apuestas deportivas mejor
pagadas|apuestas deportivas mejores|apuestas deportivas mejores app|apuestas deportivas mejores casas|apuestas deportivas mejores cuotas|apuestas deportivas mejores paginas|apuestas deportivas mexico|apuestas deportivas méxico|apuestas deportivas mlb|apuestas deportivas mlb hoy|apuestas deportivas
multiples|apuestas deportivas mundial|apuestas deportivas murcia|apuestas deportivas nba|apuestas deportivas nba hoy|apuestas deportivas nfl|apuestas deportivas
nhl|apuestas deportivas nuevas|apuestas deportivas ofertas|apuestas deportivas online|apuestas deportivas online argentina|apuestas
deportivas online chile|apuestas deportivas
online colombia|apuestas deportivas online en colombia|apuestas deportivas online españa|apuestas deportivas online mexico|apuestas deportivas online paypal|apuestas deportivas online peru|apuestas deportivas online por internet|apuestas deportivas
pago paypal|apuestas deportivas para ganar dinero|apuestas deportivas para
hoy|apuestas deportivas para hoy pronosticos|apuestas deportivas partido suspendido|apuestas
deportivas partidos de hoy|apuestas deportivas paypal|apuestas deportivas peru|apuestas deportivas perú|apuestas deportivas peru vs ecuador|apuestas deportivas
predicciones|apuestas deportivas promociones|apuestas deportivas pronostico|apuestas deportivas pronóstico|apuestas deportivas pronostico hoy|apuestas deportivas pronosticos|apuestas deportivas pronósticos|apuestas deportivas pronosticos expertos|apuestas deportivas pronosticos gratis|apuestas deportivas pronosticos nba|apuestas deportivas pronosticos tenis|apuestas deportivas que aceptan paypal|apuestas deportivas real
madrid|apuestas deportivas regalo bienvenida|apuestas deportivas resultado
exacto|apuestas deportivas resultados|apuestas deportivas rugby|apuestas deportivas seguras|apuestas deportivas seguras foro|apuestas deportivas
seguras hoy|apuestas deportivas seguras para hoy|apuestas deportivas seguras telegram|apuestas
deportivas sevilla|apuestas deportivas simulador eurocopa|apuestas
deportivas sin deposito|apuestas deportivas sin deposito
inicial|apuestas deportivas sin dinero|apuestas deportivas sin dinero real|apuestas deportivas sin registro|apuestas deportivas stake|apuestas deportivas stake 10|apuestas deportivas telegram españa|apuestas deportivas tenis|apuestas deportivas
tenis de mesa|apuestas deportivas tenis foro|apuestas deportivas tenis hoy|apuestas deportivas tips|apuestas deportivas
tipster|apuestas deportivas ufc|apuestas deportivas uruguay|apuestas deportivas valencia|apuestas deportivas valencia barcelona|apuestas deportivas venezuela|apuestas
deportivas virtuales|apuestas deportivas y casino|apuestas deportivas y casino online|apuestas deportivas.com|apuestas deportivas.com foro|apuestas deportivas.es|apuestas deportivos pronosticos|apuestas deposito minimo 1
euro|apuestas descenso a segunda|apuestas descenso a segunda b|apuestas descenso la liga|apuestas descenso primera division|apuestas descenso segunda|apuestas dia|apuestas
diarias seguras|apuestas dinero|apuestas dinero ficticio|apuestas dinero real|apuestas
dinero virtual|apuestas directas|apuestas directo|apuestas
directo futbol|apuestas division de honor juvenil|apuestas
dnb|apuestas doble oportunidad|apuestas doble resultado|apuestas dobles|apuestas dobles y triples|apuestas dortmund barcelona|apuestas draft nba|apuestas draft nfl|apuestas ecuador vs argentina|apuestas ecuador vs venezuela|apuestas egipto uruguay|apuestas el clasico|apuestas elecciones venezuela|apuestas
empate|apuestas en baloncesto|apuestas en barcelona|apuestas en beisbol|apuestas en boxeo|apuestas en caballos|apuestas en carreras de caballos|apuestas
en casino|apuestas en casino online|apuestas en casinos|apuestas en casinos online|apuestas
en chile|apuestas en ciclismo|apuestas en colombia|apuestas en colombia de futbol|apuestas en directo|apuestas en directo
futbol|apuestas en directo pronosticos|apuestas en el futbol|apuestas en el tenis|apuestas en españa|apuestas en esports|apuestas en eventos
deportivos virtuales|apuestas en golf|apuestas en juegos|apuestas en la champions league|apuestas en la eurocopa|apuestas en la liga|apuestas en la nba|apuestas en la nfl|apuestas en las vegas mlb|apuestas en las vegas nfl|apuestas en linea|apuestas en línea|apuestas en linea argentina|apuestas en linea boxeo|apuestas
en linea chile|apuestas en linea colombia|apuestas en línea
de fútbol|apuestas en linea deportivas|apuestas en linea españa|apuestas en linea estados unidos|apuestas
en linea futbol|apuestas en linea mexico|apuestas en línea méxico|apuestas en linea
mundial|apuestas en linea peru|apuestas en linea usa|apuestas en los esports|apuestas en madrid|apuestas en méxico|apuestas en mexico online|apuestas en nba|apuestas
en partidos de futbol|apuestas en partidos de futbol en vivo|apuestas en partidos de
tenis en directo|apuestas en perú|apuestas en sevilla|apuestas en sistema|apuestas en stake|apuestas en tenis|apuestas en tenis de mesa|apuestas
en valencia|apuestas en vivo|apuestas en vivo argentina|apuestas en vivo casino|apuestas en vivo futbol|apuestas en vivo fútbol|apuestas en vivo nba|apuestas en vivo peru|apuestas en vivo
tenis|apuestas en vivo ufc|apuestas equipo mbappe|apuestas equipos
de futbol|apuestas españa|apuestas españa alemania|apuestas
españa alemania eurocopa|apuestas españa croacia|apuestas españa eurocopa|apuestas
españa francia|apuestas españa francia eurocopa|apuestas españa gana el mundial|apuestas españa
gana eurocopa|apuestas españa gana mundial|apuestas españa georgia|apuestas españa holanda|apuestas españa inglaterra|apuestas españa inglaterra cuotas|apuestas españa inglaterra eurocopa|apuestas españa italia|apuestas españa mundial|apuestas españa paises bajos|apuestas
español|apuestas español oviedo|apuestas espanyol barcelona|apuestas espanyol betis|apuestas espanyol villarreal|apuestas
esport|apuestas esports|apuestas esports colombia|apuestas esports españa|apuestas esports fifa|apuestas esports gratis|apuestas esports lol|apuestas esports
peru|apuestas esports valorant|apuestas estadisticas|apuestas estrategias|apuestas euro|apuestas euro copa|apuestas eurocopa|apuestas eurocopa
campeon|apuestas eurocopa españa|apuestas eurocopa favoritos|apuestas eurocopa femenina|apuestas eurocopa final|apuestas eurocopa ganador|apuestas eurocopa hoy|apuestas eurocopa sub 21|apuestas euroliga
baloncesto|apuestas euroliga pronosticos|apuestas europa league|apuestas europa league hoy|apuestas europa league pronosticos|apuestas europa league pronósticos|apuestas euros|apuestas f1 abu dhabi|apuestas f1
bahrein|apuestas f1 canada|apuestas f1 china|apuestas f1 cuotas|apuestas f1 hoy|apuestas f1
las vegas|apuestas f1 miami|apuestas f1 monaco|apuestas faciles de ganar|apuestas fáciles de
ganar|apuestas faciles para ganar|apuestas
favoritas|apuestas favorito champions|apuestas favoritos champions|apuestas
favoritos eurocopa|apuestas favoritos mundial|apuestas fc barcelona|apuestas final champions cuotas|apuestas final champions league|apuestas final champions peru|apuestas final copa|apuestas final copa america|apuestas final copa de europa|apuestas final
copa del rey|apuestas final copa europa|apuestas final copa libertadores|apuestas final copa rey|apuestas final de copa|apuestas
final de copa del rey|apuestas final del mundial|apuestas final euro|apuestas
final eurocopa|apuestas final europa league|apuestas
final libertadores|apuestas final mundial|apuestas final nba|apuestas final rugby|apuestas final uefa europa league|apuestas final.mundial|apuestas
finales de conferencia nfl|apuestas finales nba|apuestas fiorentina betis|apuestas formula|apuestas formula 1|apuestas fórmula 1|apuestas fórmula 1 pronósticos|apuestas formula uno|apuestas foro|apuestas foro nba|apuestas francia argentina|apuestas francia españa|apuestas futbol|apuestas fútbol|apuestas
futbol americano|apuestas futbol americano nfl|apuestas futbol argentina|apuestas futbol argentino|apuestas futbol champions league|apuestas
futbol chile|apuestas futbol colombia|apuestas futbol consejos|apuestas futbol
en directo|apuestas fútbol en directo|apuestas futbol en vivo|apuestas fútbol en vivo|apuestas futbol españa|apuestas futbol español|apuestas
fútbol español|apuestas futbol eurocopa|apuestas futbol femenino|apuestas futbol foro|apuestas futbol gratis|apuestas futbol hoy|apuestas fútbol hoy|apuestas futbol juegos olimpicos|apuestas futbol mexico|apuestas futbol
mundial|apuestas futbol online|apuestas futbol
para hoy|apuestas futbol peru|apuestas futbol pronosticos|apuestas
futbol sala|apuestas futbol telegram|apuestas futbol virtual|apuestas galgos|apuestas
galgos en directo|apuestas galgos hoy|apuestas galgos online|apuestas galgos pronosticos|apuestas galgos trucos|apuestas
gana|apuestas gana colombia|apuestas gana resultados|apuestas ganadas|apuestas ganadas hoy|apuestas ganador champions league|apuestas ganador copa america|apuestas ganador copa del rey|apuestas ganador
copa del rey baloncesto|apuestas ganador copa
libertadores|apuestas ganador de la eurocopa|apuestas ganador de la liga|apuestas ganador del mundial|apuestas ganador eurocopa|apuestas ganador europa league|apuestas ganador f1|apuestas ganador la liga|apuestas ganador
liga española|apuestas ganador mundial|apuestas ganador mundial baloncesto|apuestas ganador mundial
f1|apuestas ganador nba|apuestas ganadores eurocopa|apuestas ganadores
mundial|apuestas ganar champions|apuestas ganar eurocopa|apuestas ganar liga|apuestas ganar mundial|apuestas
ganar nba|apuestas getafe valencia|apuestas ghana uruguay|apuestas girona|apuestas girona athletic|apuestas girona betis|apuestas girona campeon de liga|apuestas girona campeon liga|apuestas girona gana la liga|apuestas girona real madrid|apuestas girona real sociedad|apuestas goleador eurocopa|apuestas goleadores eurocopa|apuestas goles asiaticos|apuestas golf|apuestas golf masters|apuestas golf pga|apuestas granada barcelona|apuestas grand
slam de tenis|apuestas gratis|apuestas gratis casino|apuestas gratis con premios|apuestas gratis hoy|apuestas
gratis para hoy|apuestas gratis por registro|apuestas gratis puntos|apuestas gratis regalos|apuestas gratis sin deposito|apuestas gratis sin depósito|apuestas gratis sin ingreso|apuestas gratis sports|apuestas gratis y ganar premios|apuestas grupo a eurocopa|apuestas grupos
eurocopa|apuestas handicap|apuestas handicap asiatico|apuestas handicap baloncesto|apuestas handicap como funciona|apuestas handicap nba|apuestas
handicap nfl|apuestas hipicas online|apuestas hípicas online|apuestas hipicas
venezuela|apuestas hockey|apuestas hockey hielo|apuestas hockey patines|apuestas hockey
sobre hielo|apuestas holanda argentina|apuestas holanda
vs argentina|apuestas hoy|apuestas hoy champions|apuestas hoy futbol|apuestas hoy nba|apuestas hoy pronosticos|apuestas hoy seguras|apuestas impuestos|apuestas inglaterra paises bajos|apuestas inter barca|apuestas inter barcelona|apuestas juego|apuestas juegos|apuestas juegos en linea|apuestas juegos olimpicos|apuestas juegos olímpicos|apuestas
juegos olimpicos baloncesto|apuestas juegos online|apuestas juegos
virtuales|apuestas jugador sevilla|apuestas jugadores nba|apuestas kings league americas|apuestas
la liga|apuestas la liga española|apuestas
la liga hoy|apuestas la liga santander|apuestas las vegas mlb|apuestas las
vegas nba|apuestas las vegas nfl|apuestas league of legends mundial|apuestas
legal|apuestas legales|apuestas legales en colombia|apuestas legales en españa|apuestas legales en estados unidos|apuestas legales españa|apuestas leganes betis|apuestas libertadores|apuestas licencia|apuestas liga 1 peru|apuestas liga
argentina|apuestas liga bbva pronosticos|apuestas liga de campeones|apuestas liga de campeones de baloncesto|apuestas liga de campeones de hockey|apuestas liga españa|apuestas liga
española|apuestas liga santander pronosticos|apuestas ligas de futbol|apuestas linea|apuestas linea de gol|apuestas liverpool barcelona|apuestas liverpool real madrid|apuestas lol mundial|apuestas madrid|apuestas madrid arsenal|apuestas madrid atletico|apuestas madrid atletico
champions|apuestas madrid barca|apuestas madrid barça|apuestas madrid barca hoy|apuestas madrid barca supercopa|apuestas madrid barcelona|apuestas madrid barsa|apuestas madrid bayern|apuestas madrid betis|apuestas madrid
borussia|apuestas madrid campeon champions|apuestas madrid celta|apuestas madrid city|apuestas madrid dortmund|apuestas madrid gana la liga|apuestas madrid gana liga|apuestas madrid hoy|apuestas madrid liverpool|apuestas madrid osasuna|apuestas madrid sevilla|apuestas madrid
valencia|apuestas madrid vs arsenal|apuestas madrid vs
barcelona|apuestas mallorca osasuna|apuestas mallorca real sociedad|apuestas manchester athletic|apuestas manchester city real madrid|apuestas mas faciles de ganar|apuestas mas
seguras|apuestas mas seguras para hoy|apuestas masters de golf|apuestas masters de tenis|apuestas maximo goleador eurocopa|apuestas maximo goleador mundial|apuestas mejor jugador eurocopa|apuestas
mejores casinos online|apuestas mexico|apuestas méxico|apuestas mexico polonia|apuestas méxico polonia|apuestas mlb|apuestas mlb hoy|apuestas mlb las vegas|apuestas mlb para hoy|apuestas mlb pronosticos|apuestas mlb usa|apuestas mma ufc|apuestas momios|apuestas multiples|apuestas múltiples|apuestas multiples como funcionan|apuestas multiples el gordo|apuestas multiples futbol|apuestas mundial|apuestas mundial 2026|apuestas mundial baloncesto|apuestas mundial balonmano|apuestas mundial brasil|apuestas
mundial campeon|apuestas mundial ciclismo|apuestas mundial
clubes|apuestas mundial de baloncesto|apuestas mundial de ciclismo|apuestas mundial de
clubes|apuestas mundial de futbol|apuestas mundial de fútbol|apuestas mundial
de rugby|apuestas mundial f1|apuestas mundial favoritos|apuestas
mundial femenino|apuestas mundial formula 1|apuestas mundial futbol|apuestas mundial
ganador|apuestas mundial lol|apuestas mundial moto gp|apuestas mundial motogp|apuestas mundial rugby|apuestas mundial sub 17|apuestas mundiales|apuestas mundialistas|apuestas mvp eurocopa|apuestas mvp nba|apuestas mvp nfl|apuestas nacionales de colombia|apuestas
nba|apuestas nba all star|apuestas nba campeon|apuestas nba consejos|apuestas nba esta noche|apuestas nba finals|apuestas nba gratis|apuestas nba hoy|apuestas nba hoy jugadores|apuestas nba hoy pronosticos|apuestas
nba para hoy|apuestas nba playoffs|apuestas nba pronosticos|apuestas nba pronósticos|apuestas nba pronosticos hoy|apuestas nba tipster|apuestas nfl|apuestas
nfl hoy|apuestas nfl las vegas|apuestas nfl playoffs|apuestas nfl
pronosticos|apuestas nfl pronósticos|apuestas nfl semana 4|apuestas nfl
super bowl|apuestas nhl|apuestas nhl pronosticos|apuestas octavos eurocopa|apuestas ofertas|apuestas online|apuestas online
argentina|apuestas online argentina legal|apuestas
online bono|apuestas online bono bienvenida|apuestas online boxeo|apuestas online
caballos|apuestas online carreras de caballos|apuestas online casino|apuestas online champions league|apuestas online chile|apuestas online ciclismo|apuestas online colombia|apuestas
online comparativa|apuestas online con paypal|apuestas online de caballos|apuestas online deportivas|apuestas online en argentina|apuestas online en peru|apuestas online espana|apuestas online
españa|apuestas online esports|apuestas online foro|apuestas online futbol|apuestas online futbol españa|apuestas online golf|apuestas online gratis|apuestas online gratis sin deposito|apuestas online juegos|apuestas online
mexico|apuestas online mma|apuestas online movil|apuestas online nba|apuestas online net|apuestas online nuevas|apuestas online opiniones|apuestas online
paypal|apuestas online peru|apuestas online
seguras|apuestas online sin dinero|apuestas online sin registro|apuestas
online tenis|apuestas online ufc|apuestas online uruguay|apuestas online venezuela|apuestas open britanico golf|apuestas osasuna athletic|apuestas osasuna barcelona|apuestas osasuna real madrid|apuestas osasuna sevilla|apuestas
osasuna valencia|apuestas over|apuestas over 2.5|apuestas over under|apuestas paginas|apuestas pago anticipado|apuestas paises bajos ecuador|apuestas
paises bajos inglaterra|apuestas países bajos qatar|apuestas para boxeo|apuestas para champions league|apuestas para
el clasico|apuestas para el dia de hoy|apuestas para el mundial|apuestas para el partido de hoy|apuestas para eurocopa|apuestas para europa league|apuestas para futbol|apuestas para ganar|apuestas para ganar dinero|apuestas para ganar dinero facil|apuestas
para ganar en la ruleta|apuestas para ganar la champions|apuestas para ganar la
eurocopa|apuestas para ganar la europa league|apuestas para ganar la liga|apuestas para ganar siempre|apuestas para hacer|apuestas para hoy|apuestas para hoy de futbol|apuestas para hoy europa league|apuestas para hoy futbol|apuestas para juegos|apuestas para la champions league|apuestas para la copa del rey|apuestas para la eurocopa|apuestas para la europa league|apuestas para la final de la eurocopa|apuestas
para la nba hoy|apuestas para los partidos de hoy|apuestas para
partidos de hoy|apuestas para ufc|apuestas partido|apuestas
partido aplazado|apuestas partido champions|apuestas partido colombia|apuestas partido españa marruecos|apuestas
partido mundial|apuestas partido suspendido|apuestas partidos|apuestas partidos champions league|apuestas partidos csgo|apuestas partidos
de futbol|apuestas partidos de futbol hoy|apuestas partidos de hoy|apuestas partidos eurocopa|apuestas partidos futbol|apuestas partidos hoy|apuestas partidos mundial|apuestas paypal|apuestas peleas de boxeo|apuestas peru|apuestas perú|apuestas peru brasil|apuestas peru chile|apuestas peru paraguay|apuestas peru uruguay|apuestas peru vs chile|apuestas peru vs colombia|apuestas pichichi eurocopa|apuestas plataforma|apuestas
playoff|apuestas playoff ascenso|apuestas playoff ascenso a primera|apuestas playoff nba|apuestas playoff segunda|apuestas playoff segunda b|apuestas playoffs nba|apuestas playoffs nfl|apuestas polonia argentina|apuestas por argentina|apuestas por internet mexico|apuestas
por internet para ganar dinero|apuestas por paypal|apuestas por ronda boxeo|apuestas por sistema|apuestas portugal uruguay|apuestas pre partido|apuestas predicciones|apuestas
predicciones futbol|apuestas primera division|apuestas primera division españa|apuestas promociones|apuestas pronostico|apuestas pronosticos|apuestas pronosticos deportivos|apuestas pronosticos deportivos tenis|apuestas pronosticos futbol|apuestas pronosticos gratis|apuestas
pronosticos nba|apuestas pronosticos tenis|apuestas prorroga|apuestas psg barca|apuestas
psg barcelona|apuestas puntos por tarjetas|apuestas puntos tarjetas|apuestas que aceptan paypal|apuestas
que es handicap|apuestas que puedes hacer con tu novia|apuestas que siempre ganaras|apuestas que significa|apuestas quien bajara a
segunda|apuestas quién bajara a segunda|apuestas quien gana el
mundial|apuestas quien gana eurocopa|apuestas quien gana la champions|apuestas quien gana la
eurocopa|apuestas quien gana la liga|apuestas quien ganara el mundial|apuestas
quién ganará el mundial|apuestas quien ganara la champions|apuestas
quien ganara la eurocopa|apuestas quien ganara la liga|apuestas rayo barcelona|apuestas real madrid|apuestas real
madrid arsenal|apuestas real madrid athletic|apuestas real madrid
atletico|apuestas real madrid atletico champions|apuestas
real madrid atletico de madrid|apuestas real madrid atlético
de madrid|apuestas real madrid atletico madrid|apuestas
real madrid barcelona|apuestas real madrid bayern|apuestas real madrid betis|apuestas real
madrid borussia|apuestas real madrid campeon champions|apuestas real madrid celta|apuestas real
madrid champions|apuestas real madrid city|apuestas real madrid girona|apuestas real madrid hoy|apuestas real madrid liverpool|apuestas real madrid manchester city|apuestas real madrid osasuna|apuestas real madrid real sociedad|apuestas
real madrid valencia|apuestas real madrid villarreal|apuestas
real madrid vs arsenal|apuestas real madrid vs atletico|apuestas real
madrid vs atlético|apuestas real madrid vs atletico madrid|apuestas real madrid vs barcelona|apuestas real madrid vs betis|apuestas real madrid vs sevilla|apuestas real madrid vs valencia|apuestas real sociedad|apuestas real sociedad athletic|apuestas real
sociedad barcelona|apuestas real sociedad betis|apuestas real sociedad
psg|apuestas real sociedad real madrid|apuestas real sociedad valencia|apuestas recomendadas hoy|apuestas regalo de bienvenida|apuestas registro|apuestas
resultado exacto|apuestas resultados|apuestas resultados eurocopa|apuestas retirada tenis|apuestas roma barcelona|apuestas roma sevilla|apuestas rugby|apuestas rugby mundial|apuestas rugby world cup|apuestas ruleta seguras|apuestas segunda|apuestas segunda
b|apuestas segunda division|apuestas segunda división|apuestas segunda division b|apuestas segunda division españa|apuestas seguras|apuestas seguras baloncesto|apuestas seguras calculadora|apuestas seguras en la ruleta|apuestas
seguras eurocopa|apuestas seguras foro|apuestas seguras futbol|apuestas seguras futbol hoy|apuestas seguras gratis|apuestas seguras
hoy|apuestas seguras hoy futbol|apuestas seguras nba|apuestas seguras nba
hoy|apuestas seguras para este fin de semana|apuestas seguras para ganar dinero|apuestas seguras para
hoy|apuestas seguras para hoy fútbol|apuestas seguras para hoy pronósticos|apuestas seguras para mañana|apuestas seguras ruleta|apuestas seguras telegram|apuestas seguras tenis|apuestas semifinales eurocopa|apuestas senegal paises bajos|apuestas sevilla|apuestas sevilla athletic|apuestas sevilla
atletico de madrid|apuestas sevilla barcelona|apuestas sevilla betis|apuestas sevilla campeon liga|apuestas sevilla celta|apuestas
sevilla gana la liga|apuestas sevilla girona|apuestas sevilla inter|apuestas sevilla jugador|apuestas sevilla juventus|apuestas sevilla leganes|apuestas
sevilla madrid|apuestas sevilla manchester united|apuestas
sevilla osasuna|apuestas sevilla real madrid|apuestas sevilla real sociedad|apuestas sevilla roma|apuestas sevilla valencia|apuestas significa|apuestas simples ejemplos|apuestas simples o combinadas|apuestas
sin deposito|apuestas sin deposito inicial|apuestas sin deposito minimo|apuestas sin dinero|apuestas
sin dinero real|apuestas sin empate|apuestas sin empate
que significa|apuestas sin ingreso minimo|apuestas sin registro|apuestas sistema|apuestas sistema
calculadora|apuestas sistema como funciona|apuestas sistema trixie|apuestas sociedad|apuestas sorteo copa del rey|apuestas stake|apuestas stake 10|apuestas stake 10 hoy|apuestas super bowl
favorito|apuestas super rugby|apuestas supercopa españa|apuestas superliga argentina|apuestas tarjeta roja|apuestas tarjetas|apuestas tarjetas amarillas|apuestas tenis|apuestas tenis atp|apuestas tenis consejos|apuestas tenis
copa davis|apuestas tenis de mesa|apuestas tenis de mesa
pronosticos|apuestas tenis en vivo|apuestas tenis femenino|apuestas tenis hoy|apuestas tenis itf|apuestas tenis pronosticos|apuestas tenis pronósticos|apuestas tenis retirada|apuestas tenis roland garros|apuestas tenis seguras|apuestas tenis wimbledon|apuestas tenis wta|apuestas tercera division|apuestas tercera
division españa|apuestas tipos|apuestas tips|apuestas
tipster|apuestas tipster para hoy|apuestas topuria holloway cuotas|apuestas
torneos de golf|apuestas torneos de tenis|apuestas trucos|apuestas uefa champions league|apuestas uefa europa league|apuestas ufc|apuestas ufc chile|apuestas ufc como funciona|apuestas ufc
hoy|apuestas ufc ilia topuria|apuestas ufc online|apuestas ufc pronósticos|apuestas ufc telegram|apuestas ufc
topuria|apuestas under over|apuestas unionistas villarreal|apuestas uruguay|apuestas
uruguay colombia|apuestas uruguay corea|apuestas
uruguay vs colombia|apuestas us open golf|apuestas us open tenis|apuestas valencia|apuestas valencia barcelona|apuestas valencia betis|apuestas valencia madrid|apuestas valencia real madrid|apuestas
valladolid barcelona|apuestas valladolid valencia|apuestas valor app|apuestas valor en directo|apuestas valor galgos|apuestas venezuela|apuestas venezuela argentina|apuestas
venezuela bolivia|apuestas venezuela ecuador|apuestas villarreal|apuestas villarreal athletic|apuestas villarreal barcelona|apuestas villarreal bayern|apuestas villarreal betis|apuestas villarreal liverpool|apuestas villarreal manchester|apuestas villarreal manchester
united|apuestas villarreal vs real madrid|apuestas virtuales|apuestas virtuales colombia|apuestas virtuales futbol|apuestas virtuales sin dinero|apuestas vivo|apuestas vuelta a españa|apuestas vuelta españa|apuestas william hill partidos de hoy|apuestas y casino|apuestas y casinos|apuestas
y juegos de azar|apuestas y pronosticos|apuestas y pronosticos de
futbol|apuestas y pronosticos deportivos|apuestas
y resultados|apuestas-deportivas|apuestas-deportivas.es pronosticos|arbitro nba apuestas|argentina apuestas|argentina colombia apuestas|argentina croacia
apuestas|argentina francia apuestas|argentina mexico apuestas|argentina peru apuestas|argentina uruguay apuestas|argentina vs bolivia apuestas|argentina vs chile apuestas|argentina vs colombia apuestas|argentina vs francia apuestas|argentina vs.
colombia apuestas|asi se gana en las apuestas deportivas|asiatico apuestas|asiatico en apuestas|asiaticos apuestas|athletic barcelona apuestas|athletic manchester united apuestas|athletic osasuna apuestas|athletic real madrid apuestas|atletico barcelona apuestas|atletico de madrid apuestas|atlético de madrid apuestas|atletico de madrid real madrid apuestas|atletico de madrid vs barcelona apuestas|atletico madrid
real madrid apuestas|atletico madrid vs real madrid apuestas|atletico real madrid apuestas|atletico vs real madrid apuestas|avisador de cuotas
apuestas|bajada de cuotas apuestas|baloncesto apuestas|barbastro barcelona apuestas|barca apuestas|barca
bayern apuestas|barca inter apuestas|barca madrid apuestas|barça madrid apuestas|barca vs atletico apuestas|barca vs madrid apuestas|barca vs real madrid
apuestas|barcelona – real madrid apuestas|barcelona apuestas|barcelona atletico apuestas|barcelona atletico de madrid
apuestas|barcelona atletico madrid apuestas|barcelona betis apuestas|barcelona casa de apuestas|barcelona
inter apuestas|barcelona psg apuestas|barcelona real madrid apuestas|barcelona real sociedad
apuestas|barcelona sevilla apuestas|barcelona valencia apuestas|barcelona vs athletic bilbao apuestas|barcelona vs atlético madrid apuestas|barcelona vs betis apuestas|barcelona vs celta de vigo apuestas|barcelona vs espanyol apuestas|barcelona vs girona apuestas|barcelona vs madrid apuestas|barcelona vs real madrid
apuestas|barcelona vs real sociedad apuestas|barcelona vs sevilla apuestas|barcelona vs
villarreal apuestas|base de datos cuotas apuestas deportivas|bayern real madrid apuestas|beisbol
apuestas|best america apuestas|bet apuestas chile|bet apuestas en vivo|betis – chelsea apuestas|betis apuestas|betis barcelona apuestas|betis chelsea apuestas|betis madrid apuestas|betis sevilla apuestas|betsson tu sitio de apuestas online|blog apuestas
baloncesto|blog apuestas ciclismo|blog apuestas nba|blog apuestas tenis|blog de apuestas de tenis|bono apuestas|bono
apuestas deportivas|bono apuestas deportivas sin deposito|bono apuestas
gratis|bono apuestas gratis sin deposito|bono apuestas
sin deposito|bono bienvenida apuestas|bono bienvenida apuestas deportivas|bono bienvenida apuestas españa|bono bienvenida apuestas sin deposito|bono bienvenida apuestas sin depósito|bono bienvenida casa apuestas|bono bienvenida casa de apuestas|bono bienvenida
marca apuestas|bono casa apuestas|bono casa de apuestas|bono casa de
apuestas sin ingreso|bono casas de apuestas|bono de apuestas|bono de apuestas gratis sin deposito|bono de
bienvenida apuestas|bono de bienvenida apuestas deportivas|bono de
bienvenida casa de apuestas|bono de bienvenida casas de apuestas|bono de casas de apuestas|bono
de registro apuestas|bono de registro apuestas deportivas|bono de registro casa de apuestas|bono gratis apuestas|bono marca apuestas|bono por registro apuestas|bono por registro apuestas deportivas|bono
por registro casa de apuestas|bono registro apuestas|bono sin deposito apuestas|bono sin depósito apuestas|bono sin deposito apuestas
deportivas|bono sin depósito apuestas deportivas|bono sin deposito casa de apuestas|bono sin deposito marca apuestas|bono sin ingreso apuestas|bono sin ingreso apuestas
deportivas|bonos apuestas|bonos apuestas colombia|bonos apuestas deportivas|bonos apuestas deportivas
sin deposito|bonos apuestas gratis|bonos apuestas sin deposito|bonos apuestas sin depósito|bonos bienvenida apuestas|bonos bienvenida casas apuestas|bonos bienvenida casas de apuestas|bonos casa de apuestas|bonos
casas apuestas|bonos casas de apuestas|bonos casas de apuestas colombia|bonos casas de apuestas deportivas|bonos casas
de apuestas españa|bonos casas de apuestas nuevas|bonos casas de apuestas sin deposito|bonos casas de apuestas sin depósito|bonos de apuestas|bonos de apuestas deportivas|bonos de
apuestas gratis|bonos de apuestas sin deposito|bonos
de bienvenida apuestas|bonos de bienvenida apuestas deportivas|bonos de bienvenida casa de apuestas|bonos de bienvenida casas de apuestas|bonos de bienvenida de casas de apuestas|bonos de bienvenida en casas de apuestas|bonos de casas de apuestas|bonos de casas de apuestas sin deposito|bonos en casa
de apuestas|bonos en casas de apuestas sin deposito|bonos
gratis apuestas|bonos gratis apuestas deportivas|bonos gratis casas de
apuestas|bonos gratis sin deposito apuestas|bonos paginas de apuestas|bonos registro casas
de apuestas|bonos sin deposito apuestas|bonos sin depósito apuestas|bonos sin deposito apuestas deportivas|bonos sin deposito casas
de apuestas|bot de apuestas deportivas gratis|boxeo apuestas|brasil colombia apuestas|brasil peru apuestas|brasil
vs colombia apuestas|buenas apuestas para hoy|buscador cuotas apuestas|buscador
de apuestas seguras|buscador de cuotas apuestas|buscador de cuotas de apuestas|buscar apuestas seguras|caballos apuestas|calculador de apuestas|calculador de cuotas apuestas|calculadora apuestas|calculadora apuestas combinadas|calculadora apuestas de sistema|calculadora apuestas
deportivas|calculadora apuestas deportivas seguras|calculadora apuestas multiples|calculadora apuestas segura|calculadora apuestas seguras|calculadora apuestas sistema|calculadora apuestas
yankee|calculadora arbitraje apuestas|calculadora
cubrir apuestas|calculadora cuotas apuestas|calculadora de apuestas|calculadora de apuestas combinadas|calculadora de
apuestas de futbol|calculadora de apuestas de sistema|calculadora de apuestas deportivas|calculadora de apuestas multiples|calculadora de apuestas
seguras|calculadora de apuestas sistema|calculadora de apuestas surebets|calculadora de arbitraje apuestas|calculadora de cuotas apuestas|calculadora de cuotas de apuestas|calculadora para apuestas deportivas|calculadora
poisson apuestas|calculadora poisson apuestas
deportivas|calculadora poisson para apuestas|calculadora scalping apuestas deportivas|calculadora
sistema apuestas|calculadora stake apuestas|calculadora trading apuestas|calcular apuestas|calcular apuestas deportivas|calcular apuestas futbol|calcular apuestas sistema|calcular cuotas apuestas|calcular cuotas apuestas combinadas|calcular cuotas
apuestas deportivas|calcular cuotas de apuestas|calcular ganancias apuestas
deportivas|calcular momios apuestas|calcular probabilidad cuota apuestas|calcular
stake apuestas|calcular unidades apuestas|calcular yield apuestas|calculo de
apuestas|calculo de apuestas deportivas|cambio de cuotas
apuestas|campeon champions apuestas|campeon eurocopa
apuestas|campeon liga apuestas|campeon nba apuestas|canales de apuestas gratis|carrera de caballos
apuestas|carrera de caballos apuestas juego|carrera de caballos con apuestas|carrera de galgos apuestas|carreras de
caballos apuestas|carreras de caballos apuestas online|carreras
de caballos con apuestas|carreras de caballos juegos de apuestas|carreras de galgos apuestas|carreras de galgos apuestas online|carreras de galgos apuestas
trucos|carreras galgos apuestas|casa apuestas argentina|casa apuestas atletico de madrid|casa
apuestas barcelona|casa apuestas betis|casa apuestas bono bienvenida|casa apuestas bono gratis|casa apuestas bono sin deposito|casa apuestas cerca de mi|casa apuestas
chile|casa apuestas colombia|casa apuestas con mejores cuotas|casa apuestas deportivas|casa apuestas españa|casa apuestas española|casa apuestas eurocopa|casa apuestas futbol|casa apuestas
mejores cuotas|casa apuestas mundial|casa apuestas nueva|casa apuestas nuevas|casa apuestas online|casa apuestas peru|casa apuestas valencia|casa de apuestas|casa de apuestas 10 euros gratis|casa de
apuestas argentina|casa de apuestas atletico de madrid|casa de apuestas baloncesto|casa de apuestas barcelona|casa de
apuestas beisbol|casa de apuestas betis|casa de apuestas bono|casa de apuestas bono bienvenida|casa de apuestas
bono de bienvenida|casa de apuestas bono gratis|casa
de apuestas bono por registro|casa de apuestas bono sin deposito|casa de apuestas boxeo|casa de apuestas caballos|casa de apuestas carreras de caballos|casa de apuestas cerca de mi|casa de apuestas cerca de mí|casa de apuestas champions league|casa de apuestas
chile|casa de apuestas ciclismo|casa de apuestas colombia|casa de apuestas
con bono de bienvenida|casa de apuestas con bono sin deposito|casa de
apuestas con cuotas mas altas|casa de apuestas con esports|casa de apuestas con las mejores cuotas|casa de apuestas con licencia en españa|casa de apuestas con mejores cuotas|casa de apuestas con pago anticipado|casa
de apuestas con paypal|casa de apuestas copa america|casa de
apuestas de caballos|casa de apuestas de colombia|casa de
apuestas de españa|casa de apuestas de futbol|casa de apuestas de fútbol|casa
de apuestas de futbol peru|casa de apuestas de peru|casa de apuestas del madrid|casa de
apuestas del real madrid|casa de apuestas deportivas|casa
de apuestas deportivas cerca de mi|casa de apuestas deportivas en argentina|casa de apuestas
deportivas en chile|casa de apuestas deportivas en colombia|casa de apuestas deportivas en españa|casa de apuestas
deportivas en madrid|casa de apuestas deportivas españa|casa de apuestas deportivas españolas|casa de apuestas deportivas madrid|casa
de apuestas deportivas mexico|casa de apuestas deportivas online|casa de apuestas deportivas peru|casa de apuestas deposito 5
euros|casa de apuestas deposito minimo|casa de apuestas deposito
minimo 1 euro|casa de apuestas depósito mínimo 1 euro|casa de apuestas en españa|casa de apuestas en linea|casa de apuestas en madrid|casa de apuestas en perú|casa
de apuestas en vivo|casa de apuestas españa|casa
de apuestas españa inglaterra|casa de apuestas española|casa de apuestas españolas|casa de apuestas esports|casa de apuestas eurocopa|casa de apuestas europa league|casa de apuestas f1|casa de apuestas formula 1|casa
de apuestas futbol|casa de apuestas ingreso minimo|casa de apuestas ingreso minimo 1 euro|casa de apuestas
ingreso mínimo 1 euro|casa de apuestas legales|casa de apuestas legales en colombia|casa de
apuestas legales en españa|casa de apuestas libertadores|casa de apuestas liga española|casa de apuestas madrid|casa de apuestas mas segura|casa de apuestas
mejores|casa de apuestas méxico|casa de apuestas minimo
5 euros|casa de apuestas mlb|casa de apuestas mundial|casa de apuestas nba|casa de apuestas nfl|casa de apuestas nueva|casa de apuestas nuevas|casa
de apuestas oficial del real madrid|casa de apuestas oficial
real madrid|casa de apuestas online|casa de apuestas online argentina|casa
de apuestas online chile|casa de apuestas online españa|casa de
apuestas online mexico|casa de apuestas online paraguay|casa
de apuestas online peru|casa de apuestas online usa|casa de apuestas online venezuela|casa de apuestas pago anticipado|casa de apuestas para
boxeo|casa de apuestas para ufc|casa de apuestas peru|casa
de apuestas perú|casa de apuestas peru online|casa de apuestas por paypal|casa de apuestas promociones|casa de apuestas
que regalan dinero|casa de apuestas real madrid|casa de apuestas regalo de bienvenida|casa de apuestas sevilla|casa de apuestas
sin dinero|casa de apuestas sin ingreso minimo|casa de apuestas sin licencia en españa|casa de
apuestas sin minimo de ingreso|casa de apuestas stake|casa de apuestas tenis|casa de apuestas ufc|casa de apuestas valencia|casa de apuestas venezuela|casa de apuestas
virtuales|casa de apuestas vive la suerte|casa oficial
de apuestas del real madrid|casas apuestas
asiaticas|casas apuestas bono sin deposito|casas apuestas bonos sin deposito|casas apuestas caballos|casas apuestas
chile|casas apuestas ciclismo|casas apuestas con licencia|casas apuestas con licencia en españa|casas apuestas deportivas|casas apuestas deportivas colombia|casas apuestas deportivas españa|casas apuestas deportivas españolas|casas
apuestas deportivas nuevas|casas apuestas españa|casas apuestas españolas|casas apuestas esports|casas apuestas eurocopa|casas apuestas golf|casas apuestas ingreso minimo 5 euros|casas apuestas legales|casas apuestas
legales españa|casas apuestas licencia|casas apuestas licencia españa|casas apuestas mexico|casas apuestas mundial|casas apuestas nba|casas
apuestas nuevas|casas apuestas nuevas españa|casas apuestas ofertas|casas apuestas online|casas apuestas paypal|casas apuestas peru|casas apuestas sin licencia|casas apuestas
tenis|casas asiaticas apuestas|casas de apuestas|casas de apuestas 5
euros|casas de apuestas app|casas de apuestas argentinas|casas de apuestas asiaticas|casas de apuestas
baloncesto|casas de apuestas barcelona|casas de apuestas bono bienvenida|casas de apuestas bono de bienvenida|casas de apuestas bono por registro|casas de apuestas
bono sin deposito|casas de apuestas bono sin ingreso|casas
de apuestas bonos|casas de apuestas bonos de bienvenida|casas
de apuestas bonos gratis|casas de apuestas bonos sin deposito|casas
de apuestas boxeo|casas de apuestas caballos|casas de apuestas carreras de caballos|casas de apuestas casino|casas de apuestas casino online|casas de apuestas cerca de mi|casas de
apuestas champions league|casas de apuestas chile|casas de apuestas ciclismo|casas de apuestas colombia|casas de apuestas com|casas
de apuestas con app|casas de apuestas con apuestas gratis|casas
de apuestas con bono|casas de apuestas con bono de bienvenida|casas de apuestas con bono de registro|casas
de apuestas con bono por registro|casas de apuestas con bono sin deposito|casas de apuestas con bonos|casas de
apuestas con bonos gratis|casas de apuestas con bonos sin deposito|casas
de apuestas con deposito minimo|casas de apuestas con esports|casas de apuestas con handicap asiatico|casas de apuestas con licencia|casas de
apuestas con licencia en españa|casas de apuestas con licencia españa|casas
de apuestas con licencia española|casas de apuestas con mejores cuotas|casas de apuestas con pago anticipado|casas
de apuestas con paypal|casas de apuestas con paypal
en perú|casas de apuestas con promociones|casas de apuestas con ruleta en vivo|casas de apuestas copa del
rey|casas de apuestas de caballos|casas de apuestas de españa|casas de apuestas de futbol|casas de apuestas de fútbol|casas de apuestas de peru|casas de apuestas deportivas|casas de apuestas deportivas asiaticas|casas de apuestas deportivas colombia|casas de apuestas deportivas
comparativa|casas de apuestas deportivas con paypal|casas de apuestas deportivas en chile|casas de apuestas deportivas en españa|casas de apuestas deportivas
en linea|casas de apuestas deportivas en madrid|casas de apuestas deportivas en mexico|casas de apuestas deportivas en peru|casas de apuestas deportivas en sevilla|casas de apuestas deportivas en valencia|casas de apuestas
deportivas españa|casas de apuestas deportivas españolas|casas de apuestas deportivas legales|casas de apuestas deportivas madrid|casas de apuestas deportivas mexico|casas de apuestas deportivas nuevas|casas de apuestas deportivas online|casas de apuestas deportivas peru|casas de apuestas
deportivas perú|casas de apuestas deposito minimo 1 euro|casas de apuestas depósito mínimo 1 euro|casas de apuestas dinero gratis|casas
de apuestas en argentina|casas de apuestas en barcelona|casas de apuestas en chile|casas de apuestas en colombia|casas de apuestas en españa|casas
de apuestas en españa online|casas de apuestas en linea|casas de apuestas en madrid|casas de apuestas en méxico|casas de apuestas
en peru|casas de apuestas en perú|casas de apuestas en sevilla|casas de apuestas en uruguay|casas de apuestas en valencia|casas de apuestas en venezuela|casas
de apuestas equipos de futbol|casas de apuestas españa|casas de
apuestas españa alemania|casas de apuestas españa inglaterra|casas de apuestas españa licencia|casas de
apuestas españa nuevas|casas de apuestas españa online|casas
de apuestas española|casas de apuestas españolas|casas de apuestas españolas con licencia|casas de
apuestas españolas online|casas de apuestas esports|casas de apuestas eurocopa|casas de apuestas eurocopa 2024|casas de apuestas europa league|casas de apuestas
f1|casas de apuestas fisicas en barcelona|casas de apuestas fisicas en españa|casas de apuestas formula 1|casas de apuestas fuera de españa|casas de apuestas futbol|casas de apuestas fútbol|casas de apuestas futbol españa|casas de
apuestas ganador eurocopa|casas de apuestas gratis|casas de apuestas ingreso
minimo|casas de apuestas ingreso minimo 1 euro|casas de apuestas
ingreso minimo 5 euros|casas de apuestas inter barcelona|casas de apuestas legales|casas de apuestas legales en colombia|casas
de apuestas legales en españa|casas de apuestas legales en mexico|casas de apuestas legales españa|casas de apuestas legales mx|casas de
apuestas licencia|casas de apuestas licencia españa|casas
de apuestas lista|casas de apuestas madrid|casas de apuestas mas seguras|casas de apuestas
mejores bonos|casas de apuestas mejores cuotas|casas de
apuestas mexico|casas de apuestas méxico|casas de apuestas minimo 5 euros|casas de
apuestas mlb|casas de apuestas mundial|casas de apuestas mundial baloncesto|casas de apuestas mundiales|casas de apuestas nba|casas de apuestas
no reguladas en españa|casas de apuestas nueva ley|casas de apuestas nuevas|casas de apuestas nuevas en colombia|casas de apuestas
nuevas en españa|casas de apuestas nuevas españa|casas de apuestas
ofertas|casas de apuestas online|casas de apuestas online argentina|casas de apuestas online colombia|casas de apuestas online deportivas|casas de apuestas online ecuador|casas de apuestas online
en argentina|casas de apuestas online en chile|casas de apuestas online en colombia|casas de apuestas online en españa|casas de apuestas online en mexico|casas de apuestas online españa|casas de apuestas online mas fiables|casas de apuestas online mexico|casas de apuestas
online nuevas|casas de apuestas online peru|casas de apuestas online
usa|casas de apuestas online venezuela|casas de
apuestas pago paypal|casas de apuestas para ufc|casas de apuestas paypal|casas de apuestas peru bono sin deposito|casas de apuestas presenciales en españa|casas de apuestas promociones|
Your comment is awaiting moderation.
digitalpeak.click – Loved the layout today; clean, simple, and genuinely user-friendly overall.
Your comment is awaiting moderation.
brandtrail.click – Content reads clearly, helpful examples made concepts easy to grasp.
Your comment is awaiting moderation.
webimpact.click – Bookmarked this immediately, planning to revisit for updates and inspiration.
Your comment is awaiting moderation.
marketrise.click – Color palette felt calming, nothing distracting, just focused, thoughtful design.
Your comment is awaiting moderation.
Женский портал https://womanportal.kyiv.ua о моде, психологии и уходе за собой. Узнай, как сочетать стиль, уверенность и внутреннюю гармонию. Лучшие практики, обзоры и вдохновляющие материалы для современных женщин.
Your comment is awaiting moderation.
Твой женский помощник https://vsegladko.net как подчеркнуть индивидуальность, ухаживать за кожей и волосами, планировать бюджет и отдых. Мода, психология, дом и карьера в одном месте. Подборки, гайды и истории, которые мотивируют заботиться о себе. Узнай больше на сайте.
Your comment is awaiting moderation.
Ребята, магаз ровный и немелочный, берите смело https://beteiligung.stadtlindau.de/profile/%D0%9A%D1%8B%D1%88%D1%82%D1%8B%D0%BC%20%D0%BA%D1%83%D0%BF%D0%B8%D1%82%D1%8C%20%D0%9A%D0%BE%D0%BA%D0%B0%D0%B8%D0%BD/ брал у данного магазине,все на высоте +
Your comment is awaiting moderation.
Женский медиасайт https://woman365.kyiv.ua с акцентом на пользу: капсульный гардероб, бьюти-рутины, здоровье, отношения, саморазвитие и материнство. Пошаговые инструкции, списки покупок, чек-листы и экспертные ответы. Заботимся о тебе и твоем времени. Подробности — на сайте.
Your comment is awaiting moderation.
привет ) https://www.divephotoguide.com/user/wobvooyh Обратите внимание, ТС отказывается работать с ГАРАНТОМ! хоть и магазин древний и проверенный! но хочется спать спокойно! АДМИНЫ ОБРАТИТЕ ВНИМАНИЕ, ПОРА КАК ТО ИЗМЕНИТЬ РЕЖИМ РАБОТЫ ГАРАНТА. СДЕЛКИ ПРОВОДИТЬ ОБЯЗАТЕЛЬНО ТОЛЬКО ЧЕРЕЗ ГАРАНТА!
Your comment is awaiting moderation.
seopath.click – Loved the layout today; clean, simple, and genuinely user-friendly overall.
Your comment is awaiting moderation.
Онлайн-площадка https://topwoman.kyiv.ua для женщин: стиль, бьюти-новинки, осознанность, здоровье, отношения, материнство и работа. Экспертные статьи, инструкции, чек-листы, тесты и вдохновение. Создавай лучший день, развивайся и находи ответы без лишней воды.
Your comment is awaiting moderation.
Портал для женщин https://viplady.kyiv.ua ценящих стиль, комфорт и развитие. Мода, уход, отношения, семья и здоровье. Только практичные советы, экспертные мнения и вдохновляющий контент. Узнай, как быть собой и чувствовать себя лучше.
Your comment is awaiting moderation.
https://s-nano-s.ru/
Your comment is awaiting moderation.
Какая то палевная курьерка https://www.betterplace.org/en/organisations/70190 магазин работает как щвецарские часы!!!!
Your comment is awaiting moderation.
shopandsmiletoday – The friendly layout and colorful design make browsing so enjoyable.
Your comment is awaiting moderation.
beststylecollection – This site makes it easy to keep my wardrobe looking fresh.
Your comment is awaiting moderation.
urbanwearzone – Great spot for trendy outfits and urban-inspired fashion essentials.
Your comment is awaiting moderation.
simplechoiceoutlet – Nice variety of options, definitely one of my go-to outlets now.
Your comment is awaiting moderation.
globalshoppingzone – Found great offers on international products, love the shopping experience.
Your comment is awaiting moderation.
Блог для женщин https://sweetheart.kyiv.ua которые выбирают себя: самоценность, баланс, карьера, финансы, хобби и путешествия. Мини-привычки, трекеры, вдохновляющие тексты и практичные советы.
Your comment is awaiting moderation.
findbettervalue – Found everything I needed without overpaying, super happy with it.
Your comment is awaiting moderation.
Современный женский https://timelady.kyiv.ua сайт о стиле жизни: уход за собой, макияж, прически, фитнес, питание, мода и деньги. Практичные советы, разбор трендов, подборки покупок и личная эффективность. Будь в ресурсе и чувствуй себя уверенно каждый день. Больше — внутри.
Your comment is awaiting moderation.
Женский блог https://sunshadow.com.ua о жизни без перегруза: красота и здоровье, отношения и семья, стиль и покупки, деньги и карьера. Честные обзоры, лайфхаки, планы на неделю и личные истории — только то, что реально помогает.
Your comment is awaiting moderation.
(10 euros gratis apuestas|10 mejores casas de apuestas|10 trucos para ganar apuestas|15 euros gratis marca apuestas|1×2 apuestas|1×2 apuestas deportivas|1×2 apuestas que significa|1×2 en apuestas|1×2 en apuestas que significa|1×2 que significa en apuestas|5 euros gratis apuestas|9 apuestas que siempre ganaras|a partir de cuanto se
declara apuestas|actividades de juegos de azar y apuestas|ad apuestas deportivas|aleksandre topuria ufc
apuestas|algoritmo para ganar apuestas deportivas|america apuestas|análisis nba apuestas|aplicacion android apuestas deportivas|aplicacion apuestas deportivas|aplicacion apuestas deportivas android|aplicación de apuestas online|aplicacion para hacer apuestas|aplicacion para hacer apuestas de futbol|aplicación para hacer
apuestas de fútbol|aplicaciones apuestas deportivas android|aplicaciones apuestas deportivas gratis|aplicaciones de apuestas android|aplicaciones de
apuestas de fútbol|aplicaciones de apuestas deportivas|aplicaciones de apuestas deportivas peru|aplicaciones de apuestas deportivas perú|aplicaciones de apuestas en colombia|aplicaciones de apuestas gratis|aplicaciones de apuestas
online|aplicaciones de apuestas seguras|aplicaciones de apuestas sin dinero|aplicaciones para hacer apuestas|apostar seguro
apuestas deportivas|app android apuestas deportivas|app apuestas|app apuestas android|app apuestas de futbol|app apuestas deportivas|app apuestas deportivas android|app apuestas
deportivas argentina|app apuestas deportivas colombia|app apuestas deportivas ecuador|app apuestas deportivas españa|app apuestas deportivas gratis|app apuestas
entre amigos|app apuestas futbol|app apuestas gratis|app apuestas sin dinero|app casa de apuestas|app casas de apuestas|app
control apuestas|app de apuestas|app de apuestas android|app
de apuestas casino|app de apuestas colombia|app de apuestas con bono
de bienvenida|app de apuestas de futbol|app de apuestas deportivas|app de apuestas deportivas android|app
de apuestas deportivas argentina|app de apuestas deportivas
colombia|app de apuestas deportivas en españa|app de apuestas deportivas peru|app de apuestas deportivas perú|app de apuestas deportivas sin dinero|app de apuestas ecuador|app de apuestas en colombia|app de apuestas en españa|app de apuestas en venezuela|app de apuestas futbol|app de
apuestas gratis|app de apuestas online|app de apuestas para android|app
de apuestas para ganar dinero|app de apuestas peru|app de apuestas reales|app
de casas de apuestas|app marca apuestas android|app moviles de apuestas|app para apuestas|app
para apuestas de futbol|app para apuestas deportivas|app para apuestas deportivas en español|app
para ganar apuestas deportivas|app para hacer apuestas|app para hacer apuestas deportivas|app para hacer apuestas entre amigos|app para
llevar control de apuestas|app pronosticos apuestas deportivas|app versus apuestas|apps apuestas mundial|apps de apuestas|apps de apuestas con bono de bienvenida|apps de apuestas de futbol|apps de
apuestas deportivas peru|apps de apuestas mexico|apps para
apuestas|aprender a hacer apuestas deportivas|aprender hacer apuestas deportivas|apuesta del dia apuestas deportivas|apuestas 10 euros gratis|apuestas 100 seguras|apuestas 1×2|apuestas 1X2|apuestas 2 division|apuestas 3
division|apuestas a caballos|apuestas a carreras de caballos|apuestas a colombia|apuestas a
corners|apuestas a ganar|apuestas a jugadores nba|apuestas a la baja|apuestas a la
nfl|apuestas al barcelona|apuestas al dia|apuestas al empate|apuestas al mundial|apuestas
al tenis wta|apuestas alaves barcelona|apuestas alcaraz hoy|apuestas alemania españa|apuestas alonso campeon del mundo|apuestas altas y bajas|apuestas altas
y bajas nfl|apuestas ambos equipos marcan|apuestas america|apuestas android|apuestas anillo nba|apuestas antes del mundial|apuestas anticipadas|apuestas anticipadas nba|apuestas apps|apuestas arabia argentina|apuestas argentina|apuestas argentina campeon del mundo|apuestas argentina canada|apuestas argentina colombia|apuestas argentina croacia|apuestas argentina españa|apuestas argentina francia|apuestas argentina francia
cuanto paga|apuestas argentina francia mundial|apuestas
argentina gana el mundial|apuestas argentina gana mundial|apuestas argentina holanda (Boyce)|apuestas argentina mexico|apuestas argentina méxico|apuestas argentina mundial|apuestas argentina online|apuestas argentina paises
bajos|apuestas argentina polonia|apuestas argentina uruguay|apuestas argentina vs australia|apuestas argentina vs colombia|apuestas argentina vs
francia|apuestas argentina vs peru|apuestas argentinas|apuestas arsenal real madrid|apuestas ascenso a primera division|apuestas ascenso a segunda|apuestas asiaticas|apuestas asiatico|apuestas athletic|apuestas
athletic atletico|apuestas athletic barça|apuestas athletic barcelona|apuestas athletic betis|apuestas athletic manchester|apuestas athletic manchester united|apuestas athletic osasuna|apuestas
athletic real|apuestas athletic real madrid|apuestas athletic real sociedad|apuestas athletic real sociedad final|apuestas athletic roma|apuestas athletic
sevilla|apuestas athletic valencia|apuestas atletico|apuestas atletico barcelona|apuestas atletico
barsa|apuestas atletico campeon champions|apuestas atletico campeon de liga|apuestas atlético copenhague|apuestas atletico de madrid|apuestas atlético de
madrid|apuestas atletico de madrid barcelona|apuestas atletico de madrid gana la liga|apuestas atletico de madrid real madrid|apuestas atlético de madrid real madrid|apuestas atletico
de madrid vs barcelona|apuestas atletico madrid|apuestas atletico
madrid real madrid|apuestas atletico madrid vs barcelona|apuestas atletico real madrid|apuestas atletico real madrid champions|apuestas atletismo|apuestas bajas|apuestas
baloncesto|apuestas baloncesto acb|apuestas baloncesto handicap|apuestas
baloncesto hoy|apuestas baloncesto juegos olimpicos|apuestas baloncesto nba|apuestas baloncesto pronostico|apuestas baloncesto pronósticos|apuestas
baloncesto prorroga|apuestas barca|apuestas barca
athletic|apuestas barca atletico|apuestas barca
bayern|apuestas barca bayern munich|apuestas barca girona|apuestas barca hoy|apuestas barça hoy|apuestas
barca inter|apuestas barca juventus|apuestas barca madrid|apuestas barça madrid|apuestas barca real madrid|apuestas barca vs juve|apuestas barca vs madrid|apuestas barca vs
psg|apuestas barcelona|apuestas barcelona alaves|apuestas barcelona athletic|apuestas
barcelona atletico|apuestas barcelona atletico de madrid|apuestas barcelona atlético de madrid|apuestas barcelona
atletico madrid|apuestas barcelona bayern|apuestas barcelona betis|apuestas barcelona campeon de liga|apuestas barcelona
celta|apuestas barcelona espanyol|apuestas barcelona gana la champions|apuestas barcelona girona|apuestas barcelona granada|apuestas barcelona
hoy|apuestas barcelona inter|apuestas barcelona madrid|apuestas barcelona osasuna|apuestas barcelona psg|apuestas
barcelona real madrid|apuestas barcelona real sociedad|apuestas barcelona sevilla|apuestas barcelona valencia|apuestas barcelona villarreal|apuestas barcelona
vs atletico madrid|apuestas barcelona vs madrid|apuestas barcelona vs
real madrid|apuestas barsa madrid|apuestas basket hoy|apuestas bayern barcelona|apuestas bayern vs barcelona|apuestas beisbol|apuestas béisbol|apuestas beisbol mlb|apuestas beisbol
pronosticos|apuestas beisbol venezolano|apuestas betis|apuestas betis – chelsea|apuestas betis barcelona|apuestas betis
chelsea|apuestas betis fiorentina|apuestas betis girona|apuestas betis madrid|apuestas betis mallorca|apuestas
betis real madrid|apuestas betis real sociedad|apuestas betis
sevilla|apuestas betis valencia|apuestas betis valladolid|apuestas betis vs valencia|apuestas betplay hoy colombia|apuestas betsson peru|apuestas bienvenida|apuestas billar online|apuestas bolivia vs colombia|apuestas bono|apuestas bono bienvenida|apuestas bono de
bienvenida|apuestas bono de bienvenida sin deposito|apuestas bono gratis|apuestas bono sin deposito|apuestas
bonos sin deposito|apuestas borussia real madrid|apuestas
boxeo|apuestas boxeo de campeonato|apuestas boxeo españa|apuestas boxeo español|apuestas boxeo femenino olimpiadas|apuestas boxeo hoy|apuestas boxeo online|apuestas brasil colombia|apuestas brasil peru|apuestas brasil
uruguay|apuestas brasil vs colombia|apuestas brasil vs
peru|apuestas caballos|apuestas caballos colocado|apuestas caballos españa|apuestas caballos hipodromo|apuestas caballos hoy|apuestas caballos madrid|apuestas caballos online|apuestas caballos sanlucar de barrameda|apuestas caballos zarzuela|apuestas calculador|apuestas campeon|apuestas campeon champions|apuestas campeón champions|apuestas campeon champions 2025|apuestas campeon champions league|apuestas campeon conference league|apuestas campeon copa america|apuestas
campeon copa del rey|apuestas campeon de champions|apuestas campeon de
la champions|apuestas campeon de liga|apuestas campeon del mundo|apuestas campeon eurocopa|apuestas campeón eurocopa|apuestas campeon europa
league|apuestas campeon f1|apuestas campeon f1 2025|apuestas campeon formula 1|apuestas campeon libertadores|apuestas campeon liga|apuestas campeon liga bbva|apuestas
campeon liga española|apuestas campeon liga santander|apuestas campeon motogp 2025|apuestas campeon mundial|apuestas campeón mundial|apuestas campeon mundial baloncesto|apuestas campeon nba|apuestas
campeón nba|apuestas campeon premier|apuestas campeon premier league|apuestas campeon roland garros|apuestas campeonato f1|apuestas campeonatos
de futbol|apuestas carrera de caballos|apuestas carrera de caballos
hoy|apuestas carrera de caballos nocturnas|apuestas carrera de galgos fin de semana|apuestas carrera de galgos
hoy|apuestas carrera de galgos nocturnas|apuestas carreras caballos|apuestas carreras
caballos sanlucar|apuestas carreras de caballos|apuestas carreras
de caballos en directo|apuestas carreras de caballos en vivo|apuestas carreras de caballos españa|apuestas carreras de caballos hoy|apuestas carreras de caballos nacionales|apuestas carreras de caballos nocturnas|apuestas carreras de caballos online|apuestas carreras de
caballos sanlucar|apuestas carreras de caballos sanlúcar|apuestas carreras de galgos|apuestas carreras de galgos en vivo|apuestas carreras de galgos nocturnas|apuestas carreras de galgos pre partido|apuestas casino|apuestas casino barcelona|apuestas casino futbol|apuestas casino gran madrid|apuestas casino gratis|apuestas casino
madrid|apuestas casino online|apuestas casino online argentina|apuestas casinos|apuestas casinos online|apuestas celta|apuestas celta barcelona|apuestas celta
betis|apuestas celta eibar|apuestas celta espanyol|apuestas celta
granada|apuestas celta madrid|apuestas celta manchester|apuestas celta real madrid|apuestas champion league|apuestas champions foro|apuestas champions hoy|apuestas champions league|apuestas champions league – pronósticos|apuestas champions league 2025|apuestas champions league
hoy|apuestas champions league pronosticos|apuestas champions league
pronósticos|apuestas champions pronosticos|apuestas chelsea barcelona|apuestas chelsea betis|apuestas chile|apuestas chile peru|apuestas chile
venezuela|apuestas chile vs colombia|apuestas chile vs uruguay|apuestas ciclismo|apuestas ciclismo en vivo|apuestas ciclismo femenino|apuestas ciclismo
tour francia|apuestas ciclismo vuelta|apuestas ciclismo vuelta a españa|apuestas ciclismo vuelta españa|apuestas city madrid|apuestas city real madrid|apuestas clasico|apuestas clasico español|apuestas
clasico real madrid barcelona|apuestas clasificacion mundial|apuestas colombia|apuestas colombia argentina|apuestas colombia brasil|apuestas colombia paraguay|apuestas colombia uruguay|apuestas colombia vs argentina|apuestas colombia vs brasil|apuestas combinadas|apuestas combinadas como funcionan|apuestas combinadas de futbol|apuestas combinadas de fútbol|apuestas
combinadas foro|apuestas combinadas futbol|apuestas combinadas hoy|apuestas combinadas mismo partido|apuestas
combinadas mundial|apuestas combinadas nba|apuestas combinadas para esta semana|apuestas
combinadas para hoy|apuestas combinadas para mañana|apuestas combinadas pronosticos|apuestas combinadas recomendadas|apuestas combinadas seguras|apuestas combinadas
seguras para hoy|apuestas combinadas seguras para mañana|apuestas como ganar|apuestas comparador|apuestas con bono de bienvenida|apuestas con dinero
ficticio|apuestas con dinero real|apuestas con dinero virtual|apuestas con handicap|apuestas con handicap asiatico|apuestas con handicap baloncesto|apuestas con mas probabilidades de ganar|apuestas
con paypal|apuestas con tarjeta de credito|apuestas con tarjeta de debito|apuestas consejos|apuestas copa|apuestas copa africa|apuestas copa america|apuestas copa américa|apuestas copa argentina|apuestas copa brasil|apuestas copa
davis|apuestas copa de europa|apuestas copa del mundo|apuestas copa
del rey|apuestas copa del rey baloncesto|apuestas copa del rey final|apuestas copa del rey futbol|apuestas copa del rey ganador|apuestas copa del
rey hoy|apuestas copa del rey pronosticos|apuestas copa del rey pronósticos|apuestas
copa europa|apuestas copa italia|apuestas copa libertadores|apuestas copa mundial de hockey|apuestas copa rey|apuestas copa sudamericana|apuestas
corners|apuestas corners hoy|apuestas croacia argentina|apuestas
cuartos eurocopa|apuestas cuotas|apuestas cuotas altas|apuestas
cuotas bajas|apuestas de 1 euro|apuestas de baloncesto|apuestas
de baloncesto hoy|apuestas de baloncesto nba|apuestas
de baloncesto para hoy|apuestas de beisbol|apuestas de beisbol para hoy|apuestas de blackjack en linea|apuestas de
boxeo|apuestas de boxeo canelo|apuestas de boxeo en las vegas|apuestas de boxeo hoy|apuestas de boxeo online|apuestas
de caballo|apuestas de caballos|apuestas de caballos como funciona|apuestas de caballos como se juega|apuestas de caballos en colombia|apuestas de caballos en españa|apuestas de
caballos en linea|apuestas de caballos españa|apuestas de caballos ganador
y colocado|apuestas de caballos internacionales|apuestas
de caballos juegos|apuestas de caballos online|apuestas de caballos
online en venezuela|apuestas de caballos por
internet|apuestas de caballos pronosticos|apuestas de caballos pronósticos|apuestas
de carrera de caballos|apuestas de carreras de caballos|apuestas de carreras de caballos online|apuestas de casino|apuestas de casino
online|apuestas de casino por internet|apuestas de champions league|apuestas de
ciclismo|apuestas de colombia|apuestas de copa america|apuestas de corners|apuestas de deportes en linea|apuestas
de deportes online|apuestas de dinero|apuestas de esports|apuestas de eurocopa|apuestas de europa league|apuestas de
f1|apuestas de formula 1|apuestas de futbol|apuestas de fútbol|apuestas
de futbol app|apuestas de futbol argentina|apuestas de futbol colombia|apuestas de futbol en colombia|apuestas de futbol
en directo|apuestas de futbol en linea|apuestas de futbol en vivo|apuestas de futbol
español|apuestas de futbol gratis|apuestas de futbol hoy|apuestas de futbol mundial|apuestas de futbol online|apuestas de fútbol online|apuestas de futbol para hoy|apuestas
de fútbol para hoy|apuestas de futbol para hoy seguras|apuestas de futbol para mañana|apuestas de futbol peru|apuestas de futbol pronosticos|apuestas de
fútbol pronósticos|apuestas de futbol seguras|apuestas de futbol seguras
para hoy|apuestas de futbol sin dinero|apuestas de galgos|apuestas de galgos como ganar|apuestas de galgos en directo|apuestas de galgos online|apuestas de galgos trucos|apuestas de golf|apuestas de hockey|apuestas de hockey
sobre hielo|apuestas de hoy|apuestas de hoy seguras|apuestas de juego|apuestas de juegos|apuestas de juegos deportivos|apuestas de juegos online|apuestas de
la champions league|apuestas de la copa américa|apuestas de la eurocopa|apuestas de la
europa league|apuestas de la liga|apuestas de la liga bbva|apuestas de la liga española|apuestas de la nba|apuestas de la nfl|apuestas de la ufc|apuestas de mlb|apuestas de nba|apuestas de nba para hoy|apuestas de
partidos|apuestas de partidos de futbol|apuestas de peleas ufc|apuestas de perros en vivo|apuestas de perros virtuales|apuestas
de peru|apuestas de sistema|apuestas de sistema como funciona|apuestas de sistema explicacion|apuestas de sistema explicación|apuestas de
tenis|apuestas de tenis de mesa|apuestas de tenis en directo|apuestas
de tenis hoy|apuestas de tenis para hoy|apuestas de tenis pronosticos|apuestas
de tenis seguras|apuestas de todo tipo|apuestas de ufc|apuestas
de ufc hoy|apuestas del boxeo|apuestas del clasico|apuestas del clasico real madrid barca|apuestas del dia|apuestas del día|apuestas del dia de hoy|apuestas del dia
deportivas|apuestas del dia futbol|apuestas del mundial|apuestas del partido de hoy|apuestas del real madrid|apuestas del rey|apuestas del sistema|apuestas deporte|apuestas
deportes|apuestas deportiva|apuestas deportivas|apuestas deportivas 1 euro|apuestas deportivas 10 euros gratis|apuestas deportivas 100 seguras|apuestas
deportivas 1×2|apuestas deportivas android|apuestas deportivas
app|apuestas deportivas apps|apuestas deportivas argentina|apuestas deportivas argentina futbol|apuestas deportivas argentina legal|apuestas
deportivas atletico de madrid|apuestas deportivas baloncesto|apuestas deportivas barca
madrid|apuestas deportivas barcelona|apuestas deportivas beisbol|apuestas deportivas bono|apuestas deportivas bono bienvenida|apuestas deportivas bono de bienvenida|apuestas deportivas bono sin deposito|apuestas deportivas
bonos de bienvenida|apuestas deportivas boxeo|apuestas deportivas caballos|apuestas deportivas calculadora|apuestas deportivas campeon liga|apuestas deportivas casino|apuestas deportivas casino barcelona|apuestas deportivas casino online|apuestas
deportivas cerca de mi|apuestas deportivas champions
league|apuestas deportivas chile|apuestas deportivas ciclismo|apuestas deportivas colombia|apuestas deportivas
com|apuestas deportivas com foro|apuestas deportivas com pronosticos|apuestas deportivas combinadas|apuestas deportivas
combinadas para hoy|apuestas deportivas como se
juega|apuestas deportivas comparador|apuestas deportivas con bono gratis|apuestas deportivas con bonos gratis|apuestas deportivas
con dinero ficticio|apuestas deportivas con paypal|apuestas deportivas con puntos
virtuales|apuestas deportivas consejos|apuestas deportivas consejos para ganar|apuestas deportivas copa america|apuestas
deportivas copa del rey|apuestas deportivas copa libertadores|apuestas deportivas
copa mundial|apuestas deportivas corners|apuestas deportivas cual es la mejor|apuestas
deportivas cuotas altas|apuestas deportivas de baloncesto|apuestas deportivas de boxeo|apuestas
deportivas de colombia|apuestas deportivas de futbol|apuestas deportivas de nba|apuestas deportivas de nhl|apuestas deportivas de peru|apuestas deportivas de
tenis|apuestas deportivas del dia|apuestas deportivas dinero
ficticio|apuestas deportivas directo|apuestas deportivas doble oportunidad|apuestas deportivas en argentina|apuestas
deportivas en chile|apuestas deportivas en colombia|apuestas deportivas en directo|apuestas deportivas en españa|apuestas deportivas en español|apuestas deportivas en linea|apuestas deportivas en línea|apuestas deportivas en peru|apuestas deportivas en perú|apuestas deportivas en sevilla|apuestas deportivas
en uruguay|apuestas deportivas en vivo|apuestas deportivas es|apuestas deportivas
es pronosticos|apuestas deportivas españa|apuestas deportivas españolas|apuestas deportivas esports|apuestas deportivas estadisticas|apuestas
deportivas estrategias|apuestas deportivas estrategias seguras|apuestas deportivas eurocopa|apuestas deportivas europa league|apuestas deportivas f1|apuestas deportivas faciles de ganar|apuestas
deportivas formula 1|apuestas deportivas foro|apuestas deportivas foro futbol|apuestas deportivas foro tenis|apuestas deportivas francia argentina|apuestas deportivas futbol|apuestas deportivas fútbol|apuestas deportivas
futbol argentino|apuestas deportivas futbol colombia|apuestas deportivas futbol
español|apuestas deportivas gana|apuestas deportivas ganadas|apuestas deportivas ganar dinero seguro|apuestas deportivas gane|apuestas deportivas golf|apuestas deportivas gratis|apuestas deportivas gratis con premios|apuestas deportivas gratis hoy|apuestas deportivas gratis sin deposito|apuestas deportivas handicap|apuestas deportivas handicap asiatico|apuestas deportivas hoy|apuestas deportivas impuestos|apuestas deportivas
interior argentina|apuestas deportivas juegos olimpicos|apuestas deportivas la liga|apuestas
deportivas legales|apuestas deportivas legales en colombia|apuestas deportivas libres de impuestos|apuestas deportivas licencia españa|apuestas deportivas
liga española|apuestas deportivas listado|apuestas deportivas listado clasico|apuestas deportivas madrid|apuestas deportivas mas seguras|apuestas deportivas mejor pagadas|apuestas deportivas mejores|apuestas
deportivas mejores app|apuestas deportivas mejores casas|apuestas deportivas mejores cuotas|apuestas deportivas mejores paginas|apuestas deportivas mexico|apuestas deportivas méxico|apuestas deportivas
mlb|apuestas deportivas mlb hoy|apuestas deportivas multiples|apuestas
deportivas mundial|apuestas deportivas murcia|apuestas deportivas nba|apuestas deportivas
nba hoy|apuestas deportivas nfl|apuestas deportivas nhl|apuestas deportivas nuevas|apuestas deportivas ofertas|apuestas deportivas
online|apuestas deportivas online argentina|apuestas
deportivas online chile|apuestas deportivas online colombia|apuestas deportivas online en colombia|apuestas deportivas online españa|apuestas deportivas online mexico|apuestas
deportivas online paypal|apuestas deportivas online peru|apuestas
deportivas online por internet|apuestas deportivas pago paypal|apuestas deportivas para ganar dinero|apuestas deportivas
para hoy|apuestas deportivas para hoy pronosticos|apuestas deportivas partido suspendido|apuestas deportivas partidos de hoy|apuestas deportivas paypal|apuestas deportivas peru|apuestas deportivas perú|apuestas deportivas peru vs ecuador|apuestas deportivas predicciones|apuestas deportivas promociones|apuestas deportivas pronostico|apuestas deportivas pronóstico|apuestas deportivas pronostico hoy|apuestas deportivas pronosticos|apuestas deportivas
pronósticos|apuestas deportivas pronosticos expertos|apuestas deportivas pronosticos gratis|apuestas deportivas pronosticos
nba|apuestas deportivas pronosticos tenis|apuestas deportivas que aceptan paypal|apuestas deportivas real madrid|apuestas deportivas regalo bienvenida|apuestas deportivas resultado exacto|apuestas deportivas resultados|apuestas deportivas rugby|apuestas deportivas seguras|apuestas deportivas seguras
foro|apuestas deportivas seguras hoy|apuestas deportivas seguras para
hoy|apuestas deportivas seguras telegram|apuestas deportivas sevilla|apuestas
deportivas simulador eurocopa|apuestas deportivas sin deposito|apuestas deportivas sin deposito inicial|apuestas deportivas sin dinero|apuestas deportivas sin dinero real|apuestas
deportivas sin registro|apuestas deportivas stake|apuestas deportivas stake
10|apuestas deportivas telegram españa|apuestas deportivas tenis|apuestas
deportivas tenis de mesa|apuestas deportivas tenis foro|apuestas deportivas tenis
hoy|apuestas deportivas tips|apuestas deportivas tipster|apuestas deportivas ufc|apuestas deportivas uruguay|apuestas deportivas valencia|apuestas deportivas valencia barcelona|apuestas deportivas venezuela|apuestas deportivas
virtuales|apuestas deportivas y casino|apuestas deportivas y casino online|apuestas deportivas.com|apuestas deportivas.com foro|apuestas deportivas.es|apuestas deportivos pronosticos|apuestas deposito
minimo 1 euro|apuestas descenso a segunda|apuestas descenso a segunda b|apuestas descenso la liga|apuestas descenso primera
division|apuestas descenso segunda|apuestas dia|apuestas diarias seguras|apuestas dinero|apuestas dinero ficticio|apuestas dinero real|apuestas dinero virtual|apuestas
directas|apuestas directo|apuestas directo futbol|apuestas division de honor juvenil|apuestas dnb|apuestas
doble oportunidad|apuestas doble resultado|apuestas dobles|apuestas dobles y triples|apuestas dortmund barcelona|apuestas draft
nba|apuestas draft nfl|apuestas ecuador vs argentina|apuestas ecuador vs venezuela|apuestas
egipto uruguay|apuestas el clasico|apuestas elecciones venezuela|apuestas empate|apuestas en baloncesto|apuestas en barcelona|apuestas en beisbol|apuestas en boxeo|apuestas en caballos|apuestas
en carreras de caballos|apuestas en casino|apuestas en casino online|apuestas en casinos|apuestas en casinos online|apuestas en chile|apuestas
en ciclismo|apuestas en colombia|apuestas en colombia de futbol|apuestas en directo|apuestas en directo futbol|apuestas
en directo pronosticos|apuestas en el futbol|apuestas en el tenis|apuestas en españa|apuestas
en esports|apuestas en eventos deportivos virtuales|apuestas en golf|apuestas en juegos|apuestas en la champions league|apuestas en la eurocopa|apuestas en la liga|apuestas
en la nba|apuestas en la nfl|apuestas en las vegas mlb|apuestas en las vegas nfl|apuestas en linea|apuestas en línea|apuestas en linea argentina|apuestas en linea boxeo|apuestas en linea chile|apuestas en linea colombia|apuestas en línea de fútbol|apuestas en linea deportivas|apuestas en linea españa|apuestas en linea estados unidos|apuestas en linea futbol|apuestas en linea mexico|apuestas en línea méxico|apuestas en linea mundial|apuestas en linea peru|apuestas en linea usa|apuestas en los esports|apuestas en madrid|apuestas en méxico|apuestas en mexico
online|apuestas en nba|apuestas en partidos de futbol|apuestas en partidos de futbol en vivo|apuestas en partidos de tenis en directo|apuestas en perú|apuestas en sevilla|apuestas
en sistema|apuestas en stake|apuestas en tenis|apuestas
en tenis de mesa|apuestas en valencia|apuestas en vivo|apuestas en vivo
argentina|apuestas en vivo casino|apuestas en vivo futbol|apuestas
en vivo fútbol|apuestas en vivo nba|apuestas en vivo peru|apuestas en vivo tenis|apuestas en vivo ufc|apuestas equipo mbappe|apuestas
equipos de futbol|apuestas españa|apuestas españa alemania|apuestas
españa alemania eurocopa|apuestas españa croacia|apuestas españa eurocopa|apuestas españa francia|apuestas españa francia eurocopa|apuestas españa gana el mundial|apuestas españa gana eurocopa|apuestas
españa gana mundial|apuestas españa georgia|apuestas españa holanda|apuestas españa inglaterra|apuestas españa inglaterra
cuotas|apuestas españa inglaterra eurocopa|apuestas españa italia|apuestas
españa mundial|apuestas españa paises bajos|apuestas español|apuestas español oviedo|apuestas espanyol barcelona|apuestas espanyol betis|apuestas espanyol villarreal|apuestas esport|apuestas esports|apuestas esports colombia|apuestas esports españa|apuestas
esports fifa|apuestas esports gratis|apuestas esports lol|apuestas esports peru|apuestas esports valorant|apuestas estadisticas|apuestas estrategias|apuestas
euro|apuestas euro copa|apuestas eurocopa|apuestas eurocopa campeon|apuestas eurocopa españa|apuestas eurocopa
favoritos|apuestas eurocopa femenina|apuestas eurocopa final|apuestas eurocopa
ganador|apuestas eurocopa hoy|apuestas eurocopa sub 21|apuestas euroliga baloncesto|apuestas euroliga pronosticos|apuestas europa league|apuestas europa league hoy|apuestas europa league pronosticos|apuestas europa league pronósticos|apuestas euros|apuestas f1 abu
dhabi|apuestas f1 bahrein|apuestas f1 canada|apuestas f1 china|apuestas f1 cuotas|apuestas f1 hoy|apuestas f1 las vegas|apuestas f1 miami|apuestas f1 monaco|apuestas faciles
de ganar|apuestas fáciles de ganar|apuestas faciles para ganar|apuestas favoritas|apuestas favorito champions|apuestas favoritos champions|apuestas favoritos eurocopa|apuestas favoritos mundial|apuestas fc barcelona|apuestas final champions cuotas|apuestas final champions league|apuestas final champions peru|apuestas final copa|apuestas final
copa america|apuestas final copa de europa|apuestas final copa del rey|apuestas final copa europa|apuestas final copa libertadores|apuestas
final copa rey|apuestas final de copa|apuestas final
de copa del rey|apuestas final del mundial|apuestas final euro|apuestas final eurocopa|apuestas final europa league|apuestas final libertadores|apuestas final mundial|apuestas final nba|apuestas final rugby|apuestas final
uefa europa league|apuestas final.mundial|apuestas finales de conferencia nfl|apuestas finales nba|apuestas fiorentina betis|apuestas formula|apuestas formula
1|apuestas fórmula 1|apuestas fórmula 1 pronósticos|apuestas
formula uno|apuestas foro|apuestas foro nba|apuestas francia argentina|apuestas francia españa|apuestas futbol|apuestas fútbol|apuestas futbol americano|apuestas futbol americano nfl|apuestas
futbol argentina|apuestas futbol argentino|apuestas futbol champions league|apuestas futbol chile|apuestas futbol colombia|apuestas futbol
consejos|apuestas futbol en directo|apuestas fútbol en directo|apuestas
futbol en vivo|apuestas fútbol en vivo|apuestas futbol españa|apuestas futbol español|apuestas fútbol
español|apuestas futbol eurocopa|apuestas futbol femenino|apuestas futbol foro|apuestas
futbol gratis|apuestas futbol hoy|apuestas fútbol hoy|apuestas
futbol juegos olimpicos|apuestas futbol mexico|apuestas futbol mundial|apuestas futbol online|apuestas futbol para hoy|apuestas futbol
peru|apuestas futbol pronosticos|apuestas futbol sala|apuestas futbol telegram|apuestas futbol virtual|apuestas galgos|apuestas galgos en directo|apuestas galgos hoy|apuestas galgos online|apuestas galgos pronosticos|apuestas
galgos trucos|apuestas gana|apuestas gana colombia|apuestas gana resultados|apuestas ganadas|apuestas ganadas hoy|apuestas
ganador champions league|apuestas ganador copa america|apuestas ganador copa del rey|apuestas ganador copa del rey baloncesto|apuestas
ganador copa libertadores|apuestas ganador de la eurocopa|apuestas ganador de la liga|apuestas ganador del mundial|apuestas ganador eurocopa|apuestas ganador europa league|apuestas ganador
f1|apuestas ganador la liga|apuestas ganador liga española|apuestas ganador mundial|apuestas ganador mundial baloncesto|apuestas ganador mundial f1|apuestas ganador nba|apuestas ganadores eurocopa|apuestas ganadores mundial|apuestas ganar champions|apuestas
ganar eurocopa|apuestas ganar liga|apuestas ganar mundial|apuestas ganar nba|apuestas getafe valencia|apuestas ghana uruguay|apuestas
girona|apuestas girona athletic|apuestas girona betis|apuestas girona campeon de liga|apuestas girona campeon liga|apuestas girona
gana la liga|apuestas girona real madrid|apuestas girona
real sociedad|apuestas goleador eurocopa|apuestas goleadores eurocopa|apuestas goles asiaticos|apuestas golf|apuestas golf masters|apuestas
golf pga|apuestas granada barcelona|apuestas grand slam de tenis|apuestas gratis|apuestas gratis casino|apuestas
gratis con premios|apuestas gratis hoy|apuestas gratis para hoy|apuestas gratis por registro|apuestas gratis puntos|apuestas gratis regalos|apuestas gratis sin deposito|apuestas gratis sin depósito|apuestas gratis sin ingreso|apuestas gratis sports|apuestas gratis
y ganar premios|apuestas grupo a eurocopa|apuestas grupos eurocopa|apuestas handicap|apuestas
handicap asiatico|apuestas handicap baloncesto|apuestas handicap
como funciona|apuestas handicap nba|apuestas handicap nfl|apuestas hipicas online|apuestas hípicas online|apuestas hipicas venezuela|apuestas hockey|apuestas hockey hielo|apuestas hockey patines|apuestas hockey sobre hielo|apuestas holanda argentina|apuestas holanda vs argentina|apuestas hoy|apuestas hoy champions|apuestas hoy futbol|apuestas
hoy nba|apuestas hoy pronosticos|apuestas hoy seguras|apuestas impuestos|apuestas inglaterra
paises bajos|apuestas inter barca|apuestas inter barcelona|apuestas juego|apuestas juegos|apuestas juegos en linea|apuestas juegos olimpicos|apuestas juegos olímpicos|apuestas juegos olimpicos baloncesto|apuestas juegos online|apuestas juegos virtuales|apuestas jugador
sevilla|apuestas jugadores nba|apuestas kings league americas|apuestas la liga|apuestas
la liga española|apuestas la liga hoy|apuestas la liga santander|apuestas las vegas mlb|apuestas las vegas nba|apuestas las vegas nfl|apuestas league of
legends mundial|apuestas legal|apuestas legales|apuestas legales en colombia|apuestas legales en españa|apuestas legales
en estados unidos|apuestas legales españa|apuestas leganes betis|apuestas libertadores|apuestas licencia|apuestas liga 1 peru|apuestas liga argentina|apuestas liga bbva pronosticos|apuestas liga de campeones|apuestas liga
de campeones de baloncesto|apuestas liga de campeones de hockey|apuestas liga españa|apuestas liga española|apuestas liga
santander pronosticos|apuestas ligas de futbol|apuestas linea|apuestas linea de gol|apuestas
liverpool barcelona|apuestas liverpool real madrid|apuestas lol mundial|apuestas madrid|apuestas madrid arsenal|apuestas
madrid atletico|apuestas madrid atletico champions|apuestas
madrid barca|apuestas madrid barça|apuestas madrid barca hoy|apuestas
madrid barca supercopa|apuestas madrid barcelona|apuestas madrid barsa|apuestas madrid bayern|apuestas madrid betis|apuestas
madrid borussia|apuestas madrid campeon champions|apuestas madrid celta|apuestas madrid city|apuestas madrid dortmund|apuestas madrid gana la liga|apuestas madrid
gana liga|apuestas madrid hoy|apuestas madrid liverpool|apuestas madrid osasuna|apuestas madrid sevilla|apuestas madrid valencia|apuestas madrid vs arsenal|apuestas madrid vs barcelona|apuestas mallorca osasuna|apuestas mallorca real sociedad|apuestas manchester athletic|apuestas manchester city real madrid|apuestas mas faciles de ganar|apuestas mas seguras|apuestas mas seguras
para hoy|apuestas masters de golf|apuestas masters de
tenis|apuestas maximo goleador eurocopa|apuestas maximo goleador mundial|apuestas
mejor jugador eurocopa|apuestas mejores casinos online|apuestas mexico|apuestas
méxico|apuestas mexico polonia|apuestas méxico polonia|apuestas mlb|apuestas mlb hoy|apuestas mlb
las vegas|apuestas mlb para hoy|apuestas mlb pronosticos|apuestas mlb usa|apuestas mma ufc|apuestas momios|apuestas multiples|apuestas múltiples|apuestas multiples
como funcionan|apuestas multiples el gordo|apuestas multiples futbol|apuestas mundial|apuestas mundial 2026|apuestas mundial baloncesto|apuestas mundial balonmano|apuestas mundial brasil|apuestas mundial
campeon|apuestas mundial ciclismo|apuestas mundial clubes|apuestas mundial de baloncesto|apuestas mundial
de ciclismo|apuestas mundial de clubes|apuestas mundial de futbol|apuestas mundial de fútbol|apuestas mundial
de rugby|apuestas mundial f1|apuestas mundial favoritos|apuestas mundial femenino|apuestas mundial formula 1|apuestas mundial futbol|apuestas mundial ganador|apuestas
mundial lol|apuestas mundial moto gp|apuestas mundial motogp|apuestas mundial rugby|apuestas mundial sub 17|apuestas mundiales|apuestas mundialistas|apuestas mvp
eurocopa|apuestas mvp nba|apuestas mvp nfl|apuestas nacionales de colombia|apuestas nba|apuestas nba all star|apuestas nba campeon|apuestas nba consejos|apuestas nba esta noche|apuestas nba finals|apuestas nba gratis|apuestas nba hoy|apuestas nba hoy jugadores|apuestas nba hoy pronosticos|apuestas
nba para hoy|apuestas nba playoffs|apuestas nba pronosticos|apuestas nba pronósticos|apuestas
nba pronosticos hoy|apuestas nba tipster|apuestas nfl|apuestas nfl hoy|apuestas nfl las vegas|apuestas nfl playoffs|apuestas nfl pronosticos|apuestas nfl pronósticos|apuestas nfl
semana 4|apuestas nfl super bowl|apuestas nhl|apuestas
nhl pronosticos|apuestas octavos eurocopa|apuestas
ofertas|apuestas online|apuestas online argentina|apuestas online argentina legal|apuestas online bono|apuestas online bono bienvenida|apuestas online boxeo|apuestas online caballos|apuestas online carreras de caballos|apuestas
online casino|apuestas online champions league|apuestas online chile|apuestas online ciclismo|apuestas online colombia|apuestas online comparativa|apuestas online con paypal|apuestas online de caballos|apuestas
online deportivas|apuestas online en argentina|apuestas online en peru|apuestas online espana|apuestas online españa|apuestas online esports|apuestas online foro|apuestas
online futbol|apuestas online futbol españa|apuestas online golf|apuestas online gratis|apuestas online gratis sin deposito|apuestas online juegos|apuestas online mexico|apuestas online mma|apuestas online movil|apuestas online nba|apuestas online net|apuestas
online nuevas|apuestas online opiniones|apuestas online paypal|apuestas online peru|apuestas
online seguras|apuestas online sin dinero|apuestas online sin registro|apuestas online
tenis|apuestas online ufc|apuestas online uruguay|apuestas online venezuela|apuestas open britanico golf|apuestas osasuna athletic|apuestas
osasuna barcelona|apuestas osasuna real madrid|apuestas
osasuna sevilla|apuestas osasuna valencia|apuestas over|apuestas over 2.5|apuestas over under|apuestas paginas|apuestas pago anticipado|apuestas paises bajos ecuador|apuestas paises bajos inglaterra|apuestas países bajos qatar|apuestas para boxeo|apuestas para champions league|apuestas para el
clasico|apuestas para el dia de hoy|apuestas para el mundial|apuestas para el partido de hoy|apuestas
para eurocopa|apuestas para europa league|apuestas para futbol|apuestas para
ganar|apuestas para ganar dinero|apuestas para ganar dinero facil|apuestas
para ganar en la ruleta|apuestas para ganar la champions|apuestas para
ganar la eurocopa|apuestas para ganar la europa
league|apuestas para ganar la liga|apuestas
para ganar siempre|apuestas para hacer|apuestas para hoy|apuestas
para hoy de futbol|apuestas para hoy europa league|apuestas para
hoy futbol|apuestas para juegos|apuestas para
la champions league|apuestas para la copa del rey|apuestas para la eurocopa|apuestas para la europa league|apuestas para la final de la
eurocopa|apuestas para la nba hoy|apuestas para los partidos de hoy|apuestas
para partidos de hoy|apuestas para ufc|apuestas partido|apuestas partido aplazado|apuestas partido champions|apuestas partido colombia|apuestas partido españa marruecos|apuestas partido mundial|apuestas partido suspendido|apuestas partidos|apuestas partidos
champions league|apuestas partidos csgo|apuestas partidos de futbol|apuestas partidos de futbol hoy|apuestas partidos de hoy|apuestas partidos eurocopa|apuestas partidos futbol|apuestas partidos hoy|apuestas partidos mundial|apuestas
paypal|apuestas peleas de boxeo|apuestas peru|apuestas perú|apuestas peru brasil|apuestas peru chile|apuestas peru paraguay|apuestas peru uruguay|apuestas peru vs
chile|apuestas peru vs colombia|apuestas pichichi eurocopa|apuestas plataforma|apuestas playoff|apuestas playoff ascenso|apuestas
playoff ascenso a primera|apuestas playoff nba|apuestas playoff segunda|apuestas playoff segunda b|apuestas playoffs
nba|apuestas playoffs nfl|apuestas polonia argentina|apuestas por argentina|apuestas por
internet mexico|apuestas por internet para ganar dinero|apuestas por paypal|apuestas por ronda boxeo|apuestas por sistema|apuestas portugal uruguay|apuestas
pre partido|apuestas predicciones|apuestas predicciones futbol|apuestas primera division|apuestas
primera division españa|apuestas promociones|apuestas pronostico|apuestas pronosticos|apuestas pronosticos deportivos|apuestas pronosticos deportivos tenis|apuestas pronosticos futbol|apuestas pronosticos gratis|apuestas pronosticos nba|apuestas pronosticos tenis|apuestas prorroga|apuestas psg barca|apuestas psg
barcelona|apuestas puntos por tarjetas|apuestas puntos tarjetas|apuestas que aceptan paypal|apuestas que es handicap|apuestas que
puedes hacer con tu novia|apuestas que siempre ganaras|apuestas que significa|apuestas quien bajara a segunda|apuestas quién bajara a segunda|apuestas quien gana
el mundial|apuestas quien gana eurocopa|apuestas quien gana la
champions|apuestas quien gana la eurocopa|apuestas quien gana la
liga|apuestas quien ganara el mundial|apuestas quién ganará el mundial|apuestas quien ganara la champions|apuestas quien ganara la eurocopa|apuestas quien ganara
la liga|apuestas rayo barcelona|apuestas
real madrid|apuestas real madrid arsenal|apuestas real madrid athletic|apuestas real madrid atletico|apuestas real madrid atletico champions|apuestas real madrid atletico de madrid|apuestas real madrid atlético de madrid|apuestas real madrid
atletico madrid|apuestas real madrid barcelona|apuestas real madrid bayern|apuestas real madrid betis|apuestas
real madrid borussia|apuestas real madrid campeon champions|apuestas
real madrid celta|apuestas real madrid champions|apuestas real
madrid city|apuestas real madrid girona|apuestas real madrid hoy|apuestas real
madrid liverpool|apuestas real madrid manchester city|apuestas real madrid osasuna|apuestas real madrid real
sociedad|apuestas real madrid valencia|apuestas real
madrid villarreal|apuestas real madrid vs arsenal|apuestas real madrid vs atletico|apuestas real madrid vs
atlético|apuestas real madrid vs atletico madrid|apuestas real madrid vs barcelona|apuestas real madrid vs betis|apuestas real madrid vs sevilla|apuestas
real madrid vs valencia|apuestas real sociedad|apuestas real sociedad athletic|apuestas real
sociedad barcelona|apuestas real sociedad betis|apuestas real sociedad psg|apuestas real
sociedad real madrid|apuestas real sociedad valencia|apuestas recomendadas hoy|apuestas regalo de bienvenida|apuestas registro|apuestas resultado exacto|apuestas
resultados|apuestas resultados eurocopa|apuestas retirada tenis|apuestas roma barcelona|apuestas roma sevilla|apuestas
rugby|apuestas rugby mundial|apuestas rugby world cup|apuestas ruleta seguras|apuestas segunda|apuestas segunda b|apuestas segunda division|apuestas
segunda división|apuestas segunda division b|apuestas segunda division españa|apuestas seguras|apuestas
seguras baloncesto|apuestas seguras calculadora|apuestas seguras
en la ruleta|apuestas seguras eurocopa|apuestas seguras foro|apuestas seguras futbol|apuestas seguras futbol hoy|apuestas seguras gratis|apuestas seguras hoy|apuestas seguras hoy futbol|apuestas seguras nba|apuestas seguras nba hoy|apuestas seguras para este fin de semana|apuestas seguras para ganar dinero|apuestas seguras para hoy|apuestas seguras
para hoy fútbol|apuestas seguras para hoy pronósticos|apuestas seguras
para mañana|apuestas seguras ruleta|apuestas seguras telegram|apuestas seguras tenis|apuestas semifinales eurocopa|apuestas senegal paises
bajos|apuestas sevilla|apuestas sevilla athletic|apuestas sevilla atletico de madrid|apuestas sevilla barcelona|apuestas sevilla betis|apuestas sevilla campeon liga|apuestas
sevilla celta|apuestas sevilla gana la liga|apuestas
sevilla girona|apuestas sevilla inter|apuestas sevilla jugador|apuestas sevilla juventus|apuestas sevilla
leganes|apuestas sevilla madrid|apuestas sevilla manchester united|apuestas
sevilla osasuna|apuestas sevilla real madrid|apuestas sevilla real
sociedad|apuestas sevilla roma|apuestas sevilla valencia|apuestas
significa|apuestas simples ejemplos|apuestas simples o combinadas|apuestas sin deposito|apuestas sin deposito inicial|apuestas
sin deposito minimo|apuestas sin dinero|apuestas sin dinero real|apuestas
sin empate|apuestas sin empate que significa|apuestas sin ingreso minimo|apuestas sin registro|apuestas sistema|apuestas sistema calculadora|apuestas sistema como funciona|apuestas sistema trixie|apuestas sociedad|apuestas sorteo copa del rey|apuestas stake|apuestas stake 10|apuestas stake 10 hoy|apuestas
super bowl favorito|apuestas super rugby|apuestas supercopa españa|apuestas superliga
argentina|apuestas tarjeta roja|apuestas tarjetas|apuestas tarjetas amarillas|apuestas
tenis|apuestas tenis atp|apuestas tenis consejos|apuestas tenis copa davis|apuestas tenis de mesa|apuestas tenis de mesa
pronosticos|apuestas tenis en vivo|apuestas tenis femenino|apuestas tenis hoy|apuestas tenis itf|apuestas tenis pronosticos|apuestas tenis pronósticos|apuestas tenis retirada|apuestas tenis roland garros|apuestas tenis seguras|apuestas tenis wimbledon|apuestas tenis wta|apuestas tercera division|apuestas tercera
division españa|apuestas tipos|apuestas tips|apuestas
tipster|apuestas tipster para hoy|apuestas topuria holloway cuotas|apuestas
torneos de golf|apuestas torneos de tenis|apuestas trucos|apuestas
uefa champions league|apuestas uefa europa league|apuestas ufc|apuestas ufc chile|apuestas ufc como
funciona|apuestas ufc hoy|apuestas ufc ilia topuria|apuestas ufc online|apuestas ufc pronósticos|apuestas ufc telegram|apuestas ufc topuria|apuestas under over|apuestas
unionistas villarreal|apuestas uruguay|apuestas uruguay colombia|apuestas uruguay
corea|apuestas uruguay vs colombia|apuestas us open golf|apuestas us
open tenis|apuestas valencia|apuestas valencia barcelona|apuestas
valencia betis|apuestas valencia madrid|apuestas valencia real madrid|apuestas valladolid barcelona|apuestas valladolid valencia|apuestas valor app|apuestas valor
en directo|apuestas valor galgos|apuestas venezuela|apuestas venezuela argentina|apuestas venezuela bolivia|apuestas venezuela ecuador|apuestas villarreal|apuestas villarreal
athletic|apuestas villarreal barcelona|apuestas villarreal bayern|apuestas villarreal betis|apuestas villarreal liverpool|apuestas villarreal manchester|apuestas villarreal manchester united|apuestas villarreal vs real madrid|apuestas virtuales|apuestas virtuales colombia|apuestas virtuales futbol|apuestas virtuales sin dinero|apuestas vivo|apuestas vuelta a españa|apuestas vuelta españa|apuestas william hill partidos de hoy|apuestas y casino|apuestas y casinos|apuestas y juegos de azar|apuestas y pronosticos|apuestas y pronosticos de futbol|apuestas y
pronosticos deportivos|apuestas y resultados|apuestas-deportivas|apuestas-deportivas.es pronosticos|arbitro nba apuestas|argentina apuestas|argentina
colombia apuestas|argentina croacia apuestas|argentina francia apuestas|argentina
mexico apuestas|argentina peru apuestas|argentina uruguay apuestas|argentina vs bolivia apuestas|argentina vs chile apuestas|argentina vs colombia apuestas|argentina vs francia apuestas|argentina
vs. colombia apuestas|asi se gana en las apuestas deportivas|asiatico apuestas|asiatico en apuestas|asiaticos apuestas|athletic barcelona apuestas|athletic
manchester united apuestas|athletic osasuna apuestas|athletic real madrid
apuestas|atletico barcelona apuestas|atletico de
madrid apuestas|atlético de madrid apuestas|atletico de
madrid real madrid apuestas|atletico de madrid vs barcelona apuestas|atletico madrid
real madrid apuestas|atletico madrid vs real madrid apuestas|atletico real
madrid apuestas|atletico vs real madrid apuestas|avisador
de cuotas apuestas|bajada de cuotas apuestas|baloncesto apuestas|barbastro barcelona apuestas|barca apuestas|barca bayern apuestas|barca inter apuestas|barca madrid apuestas|barça madrid apuestas|barca vs atletico apuestas|barca vs madrid apuestas|barca vs real madrid apuestas|barcelona – real
madrid apuestas|barcelona apuestas|barcelona atletico apuestas|barcelona atletico de madrid apuestas|barcelona atletico madrid apuestas|barcelona betis apuestas|barcelona casa de apuestas|barcelona
inter apuestas|barcelona psg apuestas|barcelona real madrid apuestas|barcelona real sociedad apuestas|barcelona sevilla apuestas|barcelona valencia apuestas|barcelona vs
athletic bilbao apuestas|barcelona vs atlético madrid apuestas|barcelona vs
betis apuestas|barcelona vs celta de vigo apuestas|barcelona
vs espanyol apuestas|barcelona vs girona apuestas|barcelona
vs madrid apuestas|barcelona vs real madrid
apuestas|barcelona vs real sociedad apuestas|barcelona vs sevilla apuestas|barcelona vs villarreal apuestas|base
de datos cuotas apuestas deportivas|bayern real madrid apuestas|beisbol
apuestas|best america apuestas|bet apuestas chile|bet apuestas en vivo|betis – chelsea apuestas|betis apuestas|betis
barcelona apuestas|betis chelsea apuestas|betis madrid apuestas|betis sevilla
apuestas|betsson tu sitio de apuestas online|blog apuestas baloncesto|blog apuestas ciclismo|blog apuestas
nba|blog apuestas tenis|blog de apuestas de tenis|bono apuestas|bono apuestas deportivas|bono apuestas deportivas sin deposito|bono apuestas gratis|bono
apuestas gratis sin deposito|bono apuestas sin deposito|bono bienvenida apuestas|bono bienvenida apuestas deportivas|bono bienvenida apuestas españa|bono bienvenida apuestas sin deposito|bono bienvenida apuestas sin depósito|bono bienvenida casa apuestas|bono bienvenida casa de apuestas|bono bienvenida
marca apuestas|bono casa apuestas|bono casa de
apuestas|bono casa de apuestas sin ingreso|bono casas de apuestas|bono de apuestas|bono de apuestas gratis sin deposito|bono de bienvenida apuestas|bono de bienvenida apuestas deportivas|bono de bienvenida casa de apuestas|bono de
bienvenida casas de apuestas|bono de casas de apuestas|bono de registro
apuestas|bono de registro apuestas deportivas|bono de registro casa de apuestas|bono gratis apuestas|bono marca apuestas|bono por registro apuestas|bono por registro apuestas deportivas|bono por registro
casa de apuestas|bono registro apuestas|bono sin deposito apuestas|bono sin depósito apuestas|bono sin deposito apuestas deportivas|bono sin depósito apuestas deportivas|bono sin deposito casa
de apuestas|bono sin deposito marca apuestas|bono sin ingreso apuestas|bono sin ingreso apuestas deportivas|bonos apuestas|bonos apuestas colombia|bonos apuestas deportivas|bonos apuestas deportivas
sin deposito|bonos apuestas gratis|bonos apuestas sin deposito|bonos apuestas sin depósito|bonos bienvenida apuestas|bonos
bienvenida casas apuestas|bonos bienvenida casas de apuestas|bonos casa de apuestas|bonos casas apuestas|bonos casas de apuestas|bonos casas de
apuestas colombia|bonos casas de apuestas deportivas|bonos casas de apuestas españa|bonos casas de apuestas nuevas|bonos casas de apuestas sin deposito|bonos casas de apuestas sin depósito|bonos de apuestas|bonos de apuestas deportivas|bonos de apuestas gratis|bonos de apuestas
sin deposito|bonos de bienvenida apuestas|bonos de bienvenida apuestas deportivas|bonos
de bienvenida casa de apuestas|bonos de bienvenida
casas de apuestas|bonos de bienvenida de casas
de apuestas|bonos de bienvenida en casas de apuestas|bonos de casas de apuestas|bonos de casas de apuestas sin deposito|bonos en casa de apuestas|bonos
en casas de apuestas sin deposito|bonos gratis apuestas|bonos gratis
apuestas deportivas|bonos gratis casas de apuestas|bonos gratis sin deposito apuestas|bonos paginas de apuestas|bonos registro casas de apuestas|bonos sin deposito apuestas|bonos sin depósito apuestas|bonos sin deposito apuestas deportivas|bonos sin deposito casas de apuestas|bot de apuestas deportivas gratis|boxeo apuestas|brasil colombia
apuestas|brasil peru apuestas|brasil vs colombia apuestas|buenas apuestas para
hoy|buscador cuotas apuestas|buscador de apuestas seguras|buscador de cuotas apuestas|buscador de cuotas de apuestas|buscar apuestas
seguras|caballos apuestas|calculador de apuestas|calculador de cuotas apuestas|calculadora apuestas|calculadora apuestas combinadas|calculadora apuestas de sistema|calculadora apuestas deportivas|calculadora apuestas deportivas
seguras|calculadora apuestas multiples|calculadora apuestas segura|calculadora
apuestas seguras|calculadora apuestas sistema|calculadora apuestas yankee|calculadora arbitraje apuestas|calculadora cubrir apuestas|calculadora cuotas apuestas|calculadora de apuestas|calculadora de apuestas combinadas|calculadora de
apuestas de futbol|calculadora de apuestas de sistema|calculadora de apuestas deportivas|calculadora de apuestas
multiples|calculadora de apuestas seguras|calculadora de
apuestas sistema|calculadora de apuestas surebets|calculadora de arbitraje
apuestas|calculadora de cuotas apuestas|calculadora de cuotas de
apuestas|calculadora para apuestas deportivas|calculadora poisson apuestas|calculadora poisson apuestas deportivas|calculadora poisson para apuestas|calculadora scalping apuestas deportivas|calculadora sistema apuestas|calculadora stake apuestas|calculadora trading apuestas|calcular apuestas|calcular apuestas deportivas|calcular apuestas futbol|calcular apuestas
sistema|calcular cuotas apuestas|calcular cuotas apuestas
combinadas|calcular cuotas apuestas deportivas|calcular cuotas de apuestas|calcular
ganancias apuestas deportivas|calcular momios apuestas|calcular probabilidad cuota apuestas|calcular stake apuestas|calcular unidades
apuestas|calcular yield apuestas|calculo de apuestas|calculo de apuestas deportivas|cambio de cuotas apuestas|campeon champions apuestas|campeon eurocopa apuestas|campeon liga apuestas|campeon nba
apuestas|canales de apuestas gratis|carrera de caballos apuestas|carrera de caballos apuestas juego|carrera de caballos con apuestas|carrera
de galgos apuestas|carreras de caballos apuestas|carreras de caballos apuestas online|carreras de caballos con apuestas|carreras de caballos juegos de apuestas|carreras de galgos apuestas|carreras
de galgos apuestas online|carreras de galgos apuestas trucos|carreras galgos
apuestas|casa apuestas argentina|casa apuestas atletico de madrid|casa apuestas barcelona|casa apuestas betis|casa apuestas bono bienvenida|casa apuestas bono gratis|casa apuestas bono sin deposito|casa apuestas cerca de mi|casa apuestas chile|casa apuestas colombia|casa apuestas con mejores cuotas|casa
apuestas deportivas|casa apuestas españa|casa apuestas española|casa apuestas eurocopa|casa
apuestas futbol|casa apuestas mejores cuotas|casa apuestas mundial|casa apuestas nueva|casa apuestas
nuevas|casa apuestas online|casa apuestas peru|casa apuestas valencia|casa de apuestas|casa de apuestas
10 euros gratis|casa de apuestas argentina|casa de apuestas atletico de madrid|casa
de apuestas baloncesto|casa de apuestas barcelona|casa de apuestas beisbol|casa de apuestas
betis|casa de apuestas bono|casa de apuestas bono bienvenida|casa de
apuestas bono de bienvenida|casa de apuestas bono gratis|casa de apuestas bono por registro|casa de apuestas bono sin deposito|casa de
apuestas boxeo|casa de apuestas caballos|casa de apuestas carreras de caballos|casa de apuestas cerca de mi|casa de
apuestas cerca de mí|casa de apuestas champions league|casa de apuestas chile|casa de apuestas ciclismo|casa de apuestas colombia|casa de apuestas con bono de bienvenida|casa de apuestas con bono sin deposito|casa de apuestas con cuotas mas altas|casa de apuestas con esports|casa de apuestas con las mejores cuotas|casa de
apuestas con licencia en españa|casa de apuestas con mejores
cuotas|casa de apuestas con pago anticipado|casa de apuestas con paypal|casa de apuestas copa america|casa de
apuestas de caballos|casa de apuestas de colombia|casa de apuestas
de españa|casa de apuestas de futbol|casa de apuestas de fútbol|casa de apuestas de futbol peru|casa de apuestas de peru|casa de apuestas del madrid|casa de apuestas del real madrid|casa de
apuestas deportivas|casa de apuestas deportivas
cerca de mi|casa de apuestas deportivas en argentina|casa de apuestas deportivas en chile|casa de apuestas deportivas en colombia|casa de
apuestas deportivas en españa|casa de apuestas deportivas en madrid|casa de apuestas deportivas españa|casa de apuestas deportivas españolas|casa de
apuestas deportivas madrid|casa de apuestas deportivas mexico|casa de apuestas deportivas online|casa de apuestas deportivas peru|casa de apuestas deposito 5 euros|casa de apuestas deposito minimo|casa
de apuestas deposito minimo 1 euro|casa de apuestas depósito mínimo 1 euro|casa de apuestas en españa|casa de apuestas en linea|casa de
apuestas en madrid|casa de apuestas en perú|casa de apuestas en vivo|casa de apuestas españa|casa de apuestas
españa inglaterra|casa de apuestas española|casa
de apuestas españolas|casa de apuestas esports|casa de apuestas
eurocopa|casa de apuestas europa league|casa de apuestas f1|casa de apuestas formula 1|casa de apuestas futbol|casa
de apuestas ingreso minimo|casa de apuestas ingreso minimo 1
euro|casa de apuestas ingreso mínimo 1 euro|casa de apuestas legales|casa de apuestas legales en colombia|casa de apuestas legales en españa|casa de apuestas libertadores|casa
de apuestas liga española|casa de apuestas madrid|casa de apuestas mas segura|casa de apuestas mejores|casa de apuestas méxico|casa de
apuestas minimo 5 euros|casa de apuestas mlb|casa de apuestas mundial|casa
de apuestas nba|casa de apuestas nfl|casa de apuestas nueva|casa de apuestas nuevas|casa de apuestas oficial del
real madrid|casa de apuestas oficial real madrid|casa de
apuestas online|casa de apuestas online argentina|casa de apuestas online
chile|casa de apuestas online españa|casa de apuestas online mexico|casa de apuestas online
paraguay|casa de apuestas online peru|casa de apuestas online usa|casa de apuestas online venezuela|casa de apuestas pago anticipado|casa de apuestas para
boxeo|casa de apuestas para ufc|casa de apuestas peru|casa de apuestas perú|casa de
apuestas peru online|casa de apuestas por paypal|casa de apuestas promociones|casa
de apuestas que regalan dinero|casa de apuestas real madrid|casa de
apuestas regalo de bienvenida|casa de apuestas sevilla|casa
de apuestas sin dinero|casa de apuestas sin ingreso minimo|casa de apuestas sin licencia en españa|casa de apuestas sin minimo
de ingreso|casa de apuestas stake|casa de apuestas tenis|casa de apuestas ufc|casa de apuestas valencia|casa de apuestas venezuela|casa de apuestas
virtuales|casa de apuestas vive la suerte|casa oficial de
apuestas del real madrid|casas apuestas asiaticas|casas apuestas bono sin deposito|casas apuestas bonos sin deposito|casas apuestas caballos|casas
apuestas chile|casas apuestas ciclismo|casas apuestas con licencia|casas apuestas con licencia en españa|casas apuestas deportivas|casas apuestas
deportivas colombia|casas apuestas deportivas españa|casas apuestas deportivas españolas|casas apuestas deportivas nuevas|casas apuestas españa|casas apuestas españolas|casas apuestas esports|casas apuestas eurocopa|casas apuestas
golf|casas apuestas ingreso minimo 5 euros|casas apuestas legales|casas apuestas legales españa|casas apuestas licencia|casas apuestas licencia españa|casas apuestas mexico|casas apuestas mundial|casas apuestas nba|casas apuestas nuevas|casas apuestas nuevas españa|casas apuestas ofertas|casas apuestas online|casas apuestas paypal|casas apuestas peru|casas apuestas sin licencia|casas apuestas tenis|casas asiaticas apuestas|casas de apuestas|casas de apuestas
5 euros|casas de apuestas app|casas de apuestas
argentinas|casas de apuestas asiaticas|casas de apuestas baloncesto|casas de apuestas barcelona|casas de apuestas bono bienvenida|casas de apuestas bono de bienvenida|casas
de apuestas bono por registro|casas de apuestas bono sin deposito|casas
de apuestas bono sin ingreso|casas de apuestas bonos|casas de apuestas bonos de bienvenida|casas de apuestas bonos gratis|casas de apuestas bonos sin deposito|casas de
apuestas boxeo|casas de apuestas caballos|casas de apuestas carreras de caballos|casas de
apuestas casino|casas de apuestas casino online|casas de
apuestas cerca de mi|casas de apuestas champions league|casas de apuestas chile|casas de apuestas ciclismo|casas de apuestas colombia|casas de apuestas
com|casas de apuestas con app|casas de apuestas con apuestas gratis|casas de apuestas con bono|casas de apuestas con bono de bienvenida|casas de apuestas con bono de registro|casas de apuestas con bono por registro|casas de apuestas con bono
sin deposito|casas de apuestas con bonos|casas de apuestas con bonos gratis|casas de apuestas
con bonos sin deposito|casas de apuestas con deposito minimo|casas de apuestas
con esports|casas de apuestas con handicap asiatico|casas de apuestas con licencia|casas de apuestas con licencia
en españa|casas de apuestas con licencia españa|casas de apuestas con licencia española|casas de apuestas con mejores cuotas|casas de apuestas con pago anticipado|casas de
apuestas con paypal|casas de apuestas con paypal en perú|casas de apuestas con promociones|casas de apuestas con ruleta
en vivo|casas de apuestas copa del rey|casas de apuestas de caballos|casas de apuestas de españa|casas de apuestas de futbol|casas de apuestas de fútbol|casas de apuestas
de peru|casas de apuestas deportivas|casas de apuestas deportivas asiaticas|casas de apuestas deportivas colombia|casas
de apuestas deportivas comparativa|casas de apuestas deportivas con paypal|casas de apuestas deportivas en chile|casas de apuestas deportivas en españa|casas de apuestas deportivas
en linea|casas de apuestas deportivas en madrid|casas de apuestas deportivas en mexico|casas de apuestas
deportivas en peru|casas de apuestas deportivas en sevilla|casas de apuestas deportivas en valencia|casas de apuestas deportivas españa|casas de apuestas deportivas españolas|casas
de apuestas deportivas legales|casas de apuestas deportivas madrid|casas de apuestas
deportivas mexico|casas de apuestas deportivas nuevas|casas de apuestas deportivas online|casas de
apuestas deportivas peru|casas de apuestas deportivas perú|casas de apuestas deposito minimo
1 euro|casas de apuestas depósito mínimo 1 euro|casas de apuestas dinero gratis|casas
de apuestas en argentina|casas de apuestas en barcelona|casas de apuestas en chile|casas de apuestas en colombia|casas de apuestas en españa|casas
de apuestas en españa online|casas de apuestas en linea|casas de apuestas en madrid|casas
de apuestas en méxico|casas de apuestas en peru|casas de apuestas
en perú|casas de apuestas en sevilla|casas de apuestas en uruguay|casas de apuestas en valencia|casas de apuestas en venezuela|casas
de apuestas equipos de futbol|casas de apuestas españa|casas
de apuestas españa alemania|casas de apuestas españa inglaterra|casas de apuestas
españa licencia|casas de apuestas españa nuevas|casas de apuestas españa online|casas de apuestas española|casas de
apuestas españolas|casas de apuestas españolas con licencia|casas de apuestas españolas online|casas de apuestas esports|casas de apuestas eurocopa|casas de
apuestas eurocopa 2024|casas de apuestas europa league|casas de apuestas
f1|casas de apuestas fisicas en barcelona|casas de apuestas fisicas en españa|casas de apuestas formula 1|casas de apuestas fuera de españa|casas de
apuestas futbol|casas de apuestas fútbol|casas
de apuestas futbol españa|casas de apuestas ganador eurocopa|casas de
apuestas gratis|casas de apuestas ingreso minimo|casas de apuestas ingreso
minimo 1 euro|casas de apuestas ingreso minimo 5 euros|casas de apuestas inter barcelona|casas de apuestas
legales|casas de apuestas legales en colombia|casas de apuestas legales en españa|casas
de apuestas legales en mexico|casas de apuestas legales españa|casas de apuestas legales mx|casas de apuestas licencia|casas de apuestas licencia españa|casas de
apuestas lista|casas de apuestas madrid|casas de apuestas mas seguras|casas
de apuestas mejores bonos|casas de apuestas mejores cuotas|casas de apuestas mexico|casas de apuestas méxico|casas de apuestas minimo 5 euros|casas de apuestas mlb|casas de apuestas mundial|casas de apuestas mundial baloncesto|casas de apuestas mundiales|casas de apuestas nba|casas de apuestas no reguladas
en españa|casas de apuestas nueva ley|casas de apuestas nuevas|casas de apuestas nuevas en colombia|casas de apuestas nuevas en españa|casas de apuestas nuevas españa|casas de apuestas ofertas|casas
de apuestas online|casas de apuestas online argentina|casas
de apuestas online colombia|casas de apuestas online deportivas|casas de apuestas online ecuador|casas de apuestas
online en argentina|casas de apuestas online en chile|casas de apuestas online
en colombia|casas de apuestas online en españa|casas de apuestas online en mexico|casas
de apuestas online españa|casas de apuestas online mas fiables|casas de apuestas
online mexico|casas de apuestas online nuevas|casas de apuestas online peru|casas de apuestas online usa|casas de apuestas online venezuela|casas
de apuestas pago paypal|casas de apuestas para ufc|casas de apuestas paypal|casas de
apuestas peru bono sin deposito|casas de a
Your comment is awaiting moderation.
(10 euros gratis apuestas|10 mejores casas de apuestas|10 trucos para ganar
apuestas|15 euros gratis marca apuestas|1×2 apuestas|1×2 apuestas
deportivas|1×2 apuestas que significa|1×2 en apuestas|1×2 en apuestas que significa|1×2 que significa en apuestas|5 euros gratis apuestas|9 apuestas que siempre ganaras|a partir de cuanto se declara apuestas|actividades de juegos de azar y apuestas|ad apuestas deportivas|aleksandre topuria ufc apuestas|algoritmo para ganar apuestas deportivas|america apuestas|análisis nba apuestas|aplicacion android apuestas deportivas|aplicacion apuestas deportivas|aplicacion apuestas deportivas
android|aplicación de apuestas online|aplicacion para hacer apuestas|aplicacion para hacer apuestas de
futbol|aplicación para hacer apuestas de fútbol|aplicaciones apuestas
deportivas android|aplicaciones apuestas deportivas gratis|aplicaciones de apuestas android|aplicaciones de apuestas de
fútbol|aplicaciones de apuestas deportivas|aplicaciones de apuestas
deportivas peru|aplicaciones de apuestas deportivas perú|aplicaciones
de apuestas en colombia|aplicaciones de apuestas gratis|aplicaciones de apuestas online|aplicaciones de apuestas
seguras|aplicaciones de apuestas sin dinero|aplicaciones para hacer apuestas|apostar seguro apuestas deportivas|app android apuestas deportivas|app apuestas|app apuestas android|app apuestas de futbol|app apuestas deportivas|app apuestas deportivas android|app apuestas deportivas argentina|app apuestas deportivas colombia|app
apuestas deportivas ecuador|app apuestas deportivas españa|app apuestas deportivas gratis|app apuestas entre amigos|app apuestas futbol|app apuestas gratis|app apuestas sin dinero|app casa de apuestas|app
casas de apuestas|app control apuestas|app de apuestas|app de apuestas
android|app de apuestas casino|app de apuestas colombia|app de apuestas con bono de bienvenida|app de apuestas de futbol|app de apuestas deportivas|app de apuestas deportivas
android|app de apuestas deportivas argentina|app de apuestas deportivas colombia|app de apuestas deportivas en españa|app de apuestas deportivas peru|app de apuestas deportivas perú|app de apuestas deportivas sin dinero|app de apuestas ecuador|app de
apuestas en colombia|app de apuestas en españa|app de apuestas en venezuela|app
de apuestas futbol|app de apuestas gratis|app de apuestas online|app
de apuestas para android|app de apuestas para ganar dinero|app
de apuestas peru|app de apuestas reales|app de casas de apuestas|app marca apuestas android|app moviles de apuestas|app para apuestas|app para apuestas de futbol|app para apuestas deportivas|app para apuestas deportivas en español|app para ganar apuestas deportivas|app
para hacer apuestas|app para hacer apuestas deportivas|app para hacer
apuestas entre amigos|app para llevar control de apuestas|app
pronosticos apuestas deportivas|app versus apuestas|apps apuestas mundial|apps de
apuestas|apps de apuestas con bono de bienvenida|apps de apuestas de futbol|apps de apuestas deportivas peru|apps de apuestas mexico|apps para apuestas|aprender a hacer apuestas
deportivas|aprender hacer apuestas deportivas|apuesta del
dia apuestas deportivas|apuestas 10 euros gratis|apuestas 100 seguras|apuestas 1×2|apuestas 1X2|apuestas 2 division|apuestas 3
division|apuestas a caballos|apuestas a carreras de caballos|apuestas a colombia|apuestas a corners|apuestas a ganar|apuestas a jugadores nba|apuestas a la baja|apuestas a la
nfl|apuestas al barcelona|apuestas al dia|apuestas al empate|apuestas al
mundial|apuestas al tenis wta|apuestas alaves barcelona|apuestas alcaraz hoy|apuestas alemania españa|apuestas alonso campeon del mundo|apuestas altas y bajas|apuestas altas y bajas nfl|apuestas
ambos equipos marcan|apuestas america|apuestas android|apuestas anillo nba|apuestas antes del mundial|apuestas
anticipadas|apuestas anticipadas nba|apuestas apps|apuestas arabia argentina|apuestas argentina|apuestas
argentina campeon del mundo|apuestas argentina canada|apuestas argentina colombia|apuestas argentina croacia|apuestas argentina españa|apuestas
argentina francia|apuestas argentina francia cuanto paga|apuestas argentina francia mundial|apuestas argentina gana el mundial|apuestas argentina gana mundial|apuestas
argentina holanda|apuestas argentina mexico|apuestas argentina
méxico|apuestas argentina mundial|apuestas argentina online|apuestas argentina paises
bajos|apuestas argentina polonia|apuestas argentina uruguay|apuestas argentina vs
australia|apuestas argentina vs colombia|apuestas argentina vs francia|apuestas
argentina vs peru|apuestas argentinas|apuestas arsenal real madrid|apuestas ascenso a primera division|apuestas ascenso a segunda|apuestas asiaticas|apuestas
asiatico|apuestas athletic|apuestas athletic atletico|apuestas athletic barça|apuestas athletic barcelona|apuestas athletic betis|apuestas athletic manchester|apuestas
athletic manchester united|apuestas athletic osasuna|apuestas athletic real|apuestas athletic real madrid|apuestas athletic real
sociedad|apuestas athletic real sociedad final|apuestas athletic roma|apuestas athletic sevilla|apuestas athletic valencia|apuestas atletico|apuestas atletico
barcelona|apuestas atletico barsa|apuestas atletico campeon champions|apuestas atletico
campeon de liga|apuestas atlético copenhague|apuestas atletico
de madrid|apuestas atlético de madrid|apuestas atletico de
madrid barcelona|apuestas atletico de madrid gana la liga|apuestas atletico de madrid real madrid|apuestas atlético de madrid real madrid|apuestas atletico de madrid vs
barcelona|apuestas atletico madrid|apuestas atletico
madrid real madrid|apuestas atletico madrid vs barcelona|apuestas atletico
real madrid|apuestas atletico real madrid champions|apuestas
atletismo|apuestas bajas|apuestas baloncesto|apuestas baloncesto acb|apuestas baloncesto handicap|apuestas baloncesto hoy|apuestas
baloncesto juegos olimpicos|apuestas baloncesto nba|apuestas baloncesto pronostico|apuestas baloncesto pronósticos|apuestas baloncesto prorroga|apuestas barca|apuestas barca
athletic|apuestas barca atletico|apuestas barca bayern|apuestas barca bayern munich|apuestas barca girona|apuestas barca hoy|apuestas barça hoy|apuestas barca inter|apuestas barca
juventus|apuestas barca madrid|apuestas barça madrid|apuestas
barca real madrid|apuestas barca vs juve|apuestas barca vs madrid|apuestas
barca vs psg|apuestas barcelona|apuestas barcelona alaves|apuestas barcelona athletic|apuestas barcelona atletico|apuestas barcelona atletico de madrid|apuestas barcelona atlético de madrid|apuestas barcelona atletico madrid|apuestas
barcelona bayern|apuestas barcelona betis|apuestas barcelona campeon de
liga|apuestas barcelona celta|apuestas barcelona
espanyol|apuestas barcelona gana la champions|apuestas barcelona girona|apuestas barcelona granada|apuestas barcelona hoy|apuestas barcelona
inter|apuestas barcelona madrid|apuestas barcelona osasuna|apuestas barcelona psg|apuestas barcelona real madrid|apuestas barcelona real sociedad|apuestas barcelona sevilla|apuestas barcelona valencia|apuestas barcelona villarreal|apuestas barcelona vs atletico
madrid|apuestas barcelona vs madrid|apuestas barcelona vs real madrid|apuestas
barsa madrid|apuestas basket hoy|apuestas bayern barcelona|apuestas bayern vs
barcelona|apuestas beisbol|apuestas béisbol|apuestas beisbol mlb|apuestas beisbol pronosticos|apuestas beisbol venezolano|apuestas betis|apuestas betis – chelsea|apuestas betis barcelona|apuestas betis
chelsea|apuestas betis fiorentina|apuestas betis girona|apuestas betis madrid|apuestas betis mallorca|apuestas betis real madrid|apuestas betis real sociedad|apuestas
betis sevilla|apuestas betis valencia|apuestas betis valladolid|apuestas betis vs
valencia|apuestas betplay hoy colombia|apuestas
betsson peru|apuestas bienvenida|apuestas billar online|apuestas bolivia vs colombia|apuestas bono|apuestas bono bienvenida|apuestas bono de bienvenida|apuestas bono de bienvenida sin deposito|apuestas
bono gratis|apuestas bono sin deposito|apuestas bonos sin deposito|apuestas borussia real madrid|apuestas boxeo|apuestas boxeo de campeonato|apuestas
boxeo españa|apuestas boxeo español|apuestas boxeo femenino olimpiadas|apuestas boxeo hoy|apuestas boxeo online|apuestas brasil colombia|apuestas brasil peru|apuestas
brasil uruguay|apuestas brasil vs colombia|apuestas brasil vs peru|apuestas caballos|apuestas
caballos colocado|apuestas caballos españa|apuestas caballos hipodromo|apuestas caballos hoy|apuestas caballos madrid|apuestas caballos online|apuestas caballos
sanlucar de barrameda|apuestas caballos zarzuela|apuestas calculador|apuestas campeon|apuestas campeon champions|apuestas campeón champions|apuestas campeon champions 2025|apuestas campeon champions
league|apuestas campeon conference league|apuestas campeon copa america|apuestas campeon copa
del rey|apuestas campeon de champions|apuestas campeon de la champions|apuestas campeon de liga|apuestas campeon del mundo|apuestas campeon eurocopa|apuestas campeón eurocopa|apuestas campeon europa league|apuestas campeon f1|apuestas campeon f1 2025|apuestas campeon formula 1|apuestas
campeon libertadores|apuestas campeon liga|apuestas campeon liga bbva|apuestas campeon liga española|apuestas campeon liga santander|apuestas campeon motogp 2025|apuestas campeon mundial|apuestas
campeón mundial|apuestas campeon mundial baloncesto|apuestas campeon nba|apuestas
campeón nba|apuestas campeon premier|apuestas campeon premier league|apuestas campeon roland garros|apuestas campeonato
f1|apuestas campeonatos de futbol|apuestas carrera de
caballos|apuestas carrera de caballos hoy|apuestas carrera de caballos nocturnas|apuestas carrera de galgos
fin de semana|apuestas carrera de galgos hoy|apuestas
carrera de galgos nocturnas|apuestas carreras caballos|apuestas carreras
caballos sanlucar|apuestas carreras de caballos|apuestas
carreras de caballos en directo|apuestas carreras
de caballos en vivo|apuestas carreras de caballos españa|apuestas carreras de caballos hoy|apuestas carreras
de caballos nacionales|apuestas carreras de caballos nocturnas|apuestas carreras de caballos online|apuestas
carreras de caballos sanlucar|apuestas carreras de caballos sanlúcar|apuestas carreras de galgos|apuestas carreras
de galgos en vivo|apuestas carreras de galgos nocturnas|apuestas carreras
de galgos pre partido|apuestas casino|apuestas casino barcelona|apuestas casino futbol|apuestas casino gran madrid|apuestas
casino gratis|apuestas casino madrid|apuestas casino online|apuestas casino online argentina|apuestas casinos|apuestas
casinos online|apuestas celta|apuestas celta barcelona|apuestas celta betis|apuestas celta eibar|apuestas celta espanyol|apuestas celta granada|apuestas celta madrid|apuestas celta manchester|apuestas celta
real madrid|apuestas champion league|apuestas champions foro|apuestas champions hoy|apuestas champions league|apuestas champions league
– pronósticos|apuestas champions league 2025|apuestas champions league hoy|apuestas champions league pronosticos|apuestas champions league
pronósticos|apuestas champions pronosticos|apuestas chelsea barcelona|apuestas chelsea betis|apuestas chile|apuestas
chile peru|apuestas chile venezuela|apuestas chile vs colombia|apuestas chile vs uruguay|apuestas ciclismo|apuestas ciclismo en vivo|apuestas ciclismo femenino|apuestas ciclismo tour francia|apuestas ciclismo vuelta|apuestas ciclismo vuelta a españa|apuestas ciclismo vuelta españa|apuestas
city madrid|apuestas city real madrid|apuestas clasico|apuestas
clasico español|apuestas clasico real madrid barcelona|apuestas clasificacion mundial|apuestas colombia|apuestas colombia argentina|apuestas
colombia brasil|apuestas colombia paraguay|apuestas colombia uruguay|apuestas colombia vs argentina|apuestas
colombia vs brasil|apuestas combinadas|apuestas combinadas como funcionan|apuestas combinadas
de futbol|apuestas combinadas de fútbol|apuestas combinadas foro|apuestas
combinadas futbol|apuestas combinadas hoy|apuestas combinadas mismo partido|apuestas combinadas mundial|apuestas combinadas
nba|apuestas combinadas para esta semana|apuestas combinadas
para hoy|apuestas combinadas para mañana|apuestas combinadas
pronosticos|apuestas combinadas recomendadas|apuestas
combinadas seguras|apuestas combinadas seguras para hoy|apuestas combinadas seguras para mañana|apuestas como ganar|apuestas
comparador|apuestas con bono de bienvenida|apuestas con dinero ficticio|apuestas con dinero real|apuestas con dinero virtual|apuestas
con handicap|apuestas con handicap asiatico|apuestas con handicap baloncesto|apuestas con mas probabilidades de ganar|apuestas con paypal|apuestas con tarjeta de
credito|apuestas con tarjeta de debito|apuestas consejos|apuestas copa|apuestas copa africa|apuestas copa america|apuestas
copa américa|apuestas copa argentina|apuestas copa brasil|apuestas
copa davis|apuestas copa de europa|apuestas copa del mundo|apuestas copa
del rey|apuestas copa del rey baloncesto|apuestas copa del rey final|apuestas copa
del rey futbol|apuestas copa del rey ganador|apuestas copa
del rey hoy|apuestas copa del rey pronosticos|apuestas copa del rey pronósticos|apuestas copa
europa|apuestas copa italia|apuestas copa libertadores|apuestas copa mundial de hockey|apuestas
copa rey|apuestas copa sudamericana|apuestas corners|apuestas corners hoy|apuestas croacia argentina|apuestas cuartos eurocopa|apuestas cuotas|apuestas cuotas altas|apuestas cuotas bajas|apuestas de 1 euro|apuestas de baloncesto|apuestas de baloncesto hoy|apuestas de baloncesto nba|apuestas
de baloncesto para hoy|apuestas de beisbol|apuestas de beisbol para hoy|apuestas de blackjack en linea|apuestas de boxeo|apuestas de boxeo canelo|apuestas
de boxeo en las vegas|apuestas de boxeo hoy|apuestas de boxeo online|apuestas de caballo|apuestas de caballos|apuestas
de caballos como funciona|apuestas de caballos como se juega|apuestas de caballos en colombia|apuestas de caballos en españa|apuestas de caballos en linea|apuestas
de caballos españa|apuestas de caballos ganador y colocado|apuestas de caballos internacionales|apuestas de caballos juegos|apuestas de
caballos online|apuestas de caballos online en venezuela|apuestas de caballos por internet|apuestas de caballos pronosticos|apuestas de
caballos pronósticos|apuestas de carrera de caballos|apuestas de carreras de caballos|apuestas de
carreras de caballos online|apuestas de casino|apuestas de
casino online|apuestas de casino por internet|apuestas de champions
league|apuestas de ciclismo|apuestas de colombia|apuestas de copa
america|apuestas de corners|apuestas de deportes en linea|apuestas de deportes online|apuestas de dinero|apuestas
de esports|apuestas de eurocopa|apuestas de europa league|apuestas de
f1|apuestas de formula 1|apuestas de futbol|apuestas de
fútbol|apuestas de futbol app|apuestas de futbol argentina|apuestas de
futbol colombia|apuestas de futbol en colombia|apuestas de
futbol en directo|apuestas de futbol en linea|apuestas
de futbol en vivo|apuestas de futbol español|apuestas de futbol gratis|apuestas de futbol
hoy|apuestas de futbol mundial|apuestas de futbol online|apuestas de fútbol online|apuestas de futbol para hoy|apuestas de fútbol para hoy|apuestas
de futbol para hoy seguras|apuestas de futbol para mañana|apuestas
de futbol peru|apuestas de futbol pronosticos|apuestas de
fútbol pronósticos|apuestas de futbol seguras|apuestas de futbol seguras
para hoy|apuestas de futbol sin dinero|apuestas de galgos|apuestas de galgos como ganar|apuestas de galgos en directo|apuestas de galgos online|apuestas de galgos trucos|apuestas de golf|apuestas de hockey|apuestas de hockey sobre hielo|apuestas de
hoy|apuestas de hoy seguras|apuestas de juego|apuestas de juegos|apuestas
de juegos deportivos|apuestas de juegos online|apuestas de la champions league|apuestas de la copa américa|apuestas
de la eurocopa|apuestas de la europa league|apuestas de la liga|apuestas de la liga bbva|apuestas de la liga española|apuestas de la nba|apuestas de la nfl|apuestas de la ufc|apuestas de mlb|apuestas
de nba|apuestas de nba para hoy|apuestas de partidos|apuestas de partidos
de futbol|apuestas de peleas ufc|apuestas de perros en vivo|apuestas de perros virtuales|apuestas de peru|apuestas de
sistema|apuestas de sistema como funciona|apuestas de sistema
explicacion|apuestas de sistema explicación|apuestas de tenis|apuestas de tenis de mesa|apuestas de tenis en directo|apuestas de tenis hoy|apuestas
de tenis para hoy|apuestas de tenis pronosticos|apuestas de tenis
seguras|apuestas de todo tipo|apuestas de ufc|apuestas de ufc hoy|apuestas del boxeo|apuestas del
clasico|apuestas del clasico real madrid barca|apuestas del dia|apuestas del día|apuestas del dia de hoy|apuestas del dia deportivas|apuestas del dia futbol|apuestas del mundial|apuestas del partido de
hoy|apuestas del real madrid|apuestas del rey|apuestas del sistema|apuestas deporte|apuestas deportes|apuestas deportiva|apuestas deportivas|apuestas deportivas 1 euro|apuestas deportivas
10 euros gratis|apuestas deportivas 100 seguras|apuestas
deportivas 1×2|apuestas deportivas android|apuestas deportivas app|apuestas deportivas apps|apuestas deportivas argentina|apuestas deportivas argentina futbol|apuestas
deportivas argentina legal|apuestas deportivas atletico de madrid|apuestas deportivas baloncesto|apuestas deportivas barca madrid|apuestas deportivas barcelona|apuestas deportivas beisbol|apuestas deportivas bono|apuestas deportivas bono
bienvenida|apuestas deportivas bono de bienvenida|apuestas deportivas bono sin deposito|apuestas deportivas bonos de bienvenida|apuestas
deportivas boxeo|apuestas deportivas caballos|apuestas deportivas calculadora|apuestas deportivas campeon liga|apuestas deportivas casino|apuestas deportivas
casino barcelona|apuestas deportivas casino online|apuestas deportivas cerca de mi|apuestas deportivas champions league|apuestas deportivas chile|apuestas deportivas ciclismo|apuestas deportivas colombia|apuestas deportivas com|apuestas deportivas com foro|apuestas deportivas com pronosticos|apuestas deportivas combinadas|apuestas deportivas combinadas para hoy|apuestas deportivas como se
juega|apuestas deportivas comparador|apuestas deportivas con bono gratis|apuestas deportivas con bonos gratis|apuestas
deportivas con dinero ficticio|apuestas deportivas con paypal|apuestas deportivas con puntos virtuales|apuestas deportivas consejos|apuestas deportivas consejos para ganar|apuestas deportivas copa america|apuestas
deportivas copa del rey|apuestas deportivas copa
libertadores|apuestas deportivas copa mundial|apuestas
deportivas corners|apuestas deportivas cual es la mejor|apuestas deportivas cuotas altas|apuestas deportivas de baloncesto|apuestas deportivas de boxeo|apuestas deportivas de colombia|apuestas deportivas de futbol|apuestas deportivas de nba|apuestas deportivas de nhl|apuestas deportivas de peru|apuestas deportivas de tenis|apuestas deportivas
del dia|apuestas deportivas dinero ficticio|apuestas deportivas directo|apuestas deportivas
doble oportunidad|apuestas deportivas en argentina|apuestas deportivas en chile|apuestas deportivas en colombia|apuestas deportivas
en directo|apuestas deportivas en españa|apuestas deportivas
en español|apuestas deportivas en linea|apuestas deportivas en línea|apuestas deportivas en peru|apuestas deportivas en perú|apuestas deportivas en sevilla|apuestas deportivas en uruguay|apuestas deportivas en vivo|apuestas deportivas es|apuestas deportivas es pronosticos|apuestas deportivas españa|apuestas deportivas españolas|apuestas
deportivas esports|apuestas deportivas estadisticas|apuestas deportivas estrategias|apuestas deportivas estrategias seguras|apuestas deportivas
eurocopa|apuestas deportivas europa league|apuestas deportivas f1|apuestas deportivas faciles de ganar|apuestas
deportivas formula 1|apuestas deportivas foro|apuestas deportivas foro futbol|apuestas deportivas foro tenis|apuestas deportivas francia argentina|apuestas deportivas
futbol|apuestas deportivas fútbol|apuestas deportivas futbol argentino|apuestas deportivas futbol
colombia|apuestas deportivas futbol español|apuestas deportivas gana|apuestas deportivas
ganadas|apuestas deportivas ganar dinero seguro|apuestas deportivas
gane|apuestas deportivas golf|apuestas deportivas gratis|apuestas deportivas gratis con premios|apuestas deportivas gratis hoy|apuestas deportivas gratis sin deposito|apuestas deportivas handicap|apuestas deportivas handicap asiatico|apuestas deportivas hoy|apuestas deportivas impuestos|apuestas deportivas interior
argentina|apuestas deportivas juegos olimpicos|apuestas deportivas la
liga|apuestas deportivas legales|apuestas deportivas
legales en colombia|apuestas deportivas libres de impuestos|apuestas deportivas licencia españa|apuestas deportivas liga española|apuestas deportivas
listado|apuestas deportivas listado clasico|apuestas
deportivas madrid|apuestas deportivas mas seguras|apuestas deportivas mejor pagadas|apuestas deportivas mejores|apuestas
deportivas mejores app|apuestas deportivas mejores casas|apuestas deportivas mejores cuotas|apuestas deportivas mejores paginas|apuestas deportivas mexico|apuestas deportivas méxico|apuestas deportivas mlb|apuestas deportivas mlb hoy|apuestas deportivas multiples|apuestas deportivas mundial|apuestas
deportivas murcia|apuestas deportivas nba|apuestas deportivas nba hoy|apuestas
deportivas nfl|apuestas deportivas nhl|apuestas deportivas nuevas|apuestas deportivas
ofertas|apuestas deportivas online|apuestas deportivas online argentina|apuestas deportivas
online chile|apuestas deportivas online colombia|apuestas deportivas online en colombia|apuestas deportivas online españa|apuestas
deportivas online mexico|apuestas deportivas online paypal|apuestas
deportivas online peru|apuestas deportivas online por internet|apuestas deportivas pago paypal|apuestas
deportivas para ganar dinero|apuestas deportivas para hoy|apuestas deportivas para hoy pronosticos|apuestas deportivas partido
suspendido|apuestas deportivas partidos de hoy|apuestas deportivas paypal|apuestas deportivas peru|apuestas
deportivas perú|apuestas deportivas peru vs ecuador|apuestas deportivas predicciones|apuestas deportivas promociones|apuestas deportivas pronostico|apuestas deportivas
pronóstico|apuestas deportivas pronostico hoy|apuestas deportivas pronosticos|apuestas deportivas
pronósticos|apuestas deportivas pronosticos expertos|apuestas deportivas pronosticos gratis|apuestas deportivas pronosticos nba|apuestas deportivas pronosticos
tenis|apuestas deportivas que aceptan paypal|apuestas
deportivas real madrid|apuestas deportivas regalo bienvenida|apuestas
deportivas resultado exacto|apuestas deportivas resultados|apuestas deportivas rugby|apuestas deportivas seguras|apuestas deportivas seguras
foro|apuestas deportivas seguras hoy|apuestas deportivas
seguras para hoy|apuestas deportivas seguras telegram|apuestas deportivas sevilla|apuestas
deportivas simulador eurocopa|apuestas deportivas sin deposito|apuestas deportivas sin deposito inicial|apuestas deportivas sin dinero|apuestas deportivas sin dinero real|apuestas deportivas sin registro|apuestas deportivas
stake|apuestas deportivas stake 10|apuestas deportivas telegram españa|apuestas deportivas
tenis|apuestas deportivas tenis de mesa|apuestas deportivas tenis foro|apuestas deportivas tenis hoy|apuestas deportivas
tips|apuestas deportivas tipster|apuestas deportivas ufc|apuestas
deportivas uruguay|apuestas deportivas valencia|apuestas deportivas valencia barcelona|apuestas deportivas venezuela|apuestas deportivas virtuales|apuestas deportivas y
casino|apuestas deportivas y casino online|apuestas deportivas.com|apuestas deportivas.com foro|apuestas deportivas.es|apuestas deportivos pronosticos|apuestas deposito minimo 1 euro|apuestas descenso
a segunda|apuestas descenso a segunda b|apuestas descenso la liga|apuestas
descenso primera division|apuestas descenso segunda|apuestas dia|apuestas diarias seguras|apuestas dinero|apuestas dinero ficticio|apuestas dinero real|apuestas dinero virtual|apuestas directas|apuestas directo|apuestas directo futbol|apuestas division de honor juvenil|apuestas dnb|apuestas doble oportunidad|apuestas doble resultado|apuestas dobles|apuestas
dobles y triples|apuestas dortmund barcelona|apuestas draft nba|apuestas
draft nfl|apuestas ecuador vs argentina|apuestas ecuador vs venezuela|apuestas egipto uruguay|apuestas el clasico|apuestas elecciones venezuela|apuestas empate|apuestas en baloncesto|apuestas en barcelona|apuestas en beisbol|apuestas en boxeo|apuestas en caballos|apuestas
en carreras de caballos|apuestas en casino|apuestas en casino online|apuestas
en casinos|apuestas en casinos online|apuestas en chile|apuestas en ciclismo|apuestas en colombia|apuestas en colombia de futbol|apuestas en directo|apuestas en directo futbol|apuestas en directo
pronosticos|apuestas en el futbol|apuestas en el tenis|apuestas
en españa|apuestas en esports|apuestas en eventos deportivos virtuales|apuestas en golf|apuestas en juegos|apuestas
en la champions league|apuestas en la eurocopa|apuestas en la
liga|apuestas en la nba|apuestas en la nfl|apuestas en las vegas mlb|apuestas en las vegas nfl|apuestas en linea|apuestas en línea|apuestas en linea
argentina|apuestas en linea boxeo|apuestas en linea chile|apuestas en linea colombia|apuestas en línea de
fútbol|apuestas en linea deportivas|apuestas en linea
españa|apuestas en linea estados unidos|apuestas en linea futbol|apuestas en linea mexico|apuestas en línea méxico|apuestas en linea mundial|apuestas
en linea peru|apuestas en linea usa|apuestas en los esports|apuestas en madrid|apuestas en méxico|apuestas en mexico online|apuestas en nba|apuestas en partidos de
futbol|apuestas en partidos de futbol en vivo|apuestas en partidos
de tenis en directo|apuestas en perú|apuestas en sevilla|apuestas en sistema|apuestas en stake|apuestas
en tenis|apuestas en tenis de mesa|apuestas en valencia|apuestas en vivo|apuestas en vivo argentina|apuestas en vivo casino|apuestas en vivo futbol|apuestas en vivo fútbol|apuestas en vivo nba|apuestas en vivo peru|apuestas en vivo
tenis|apuestas en vivo ufc|apuestas equipo mbappe|apuestas equipos de futbol|apuestas españa|apuestas españa alemania|apuestas españa
alemania eurocopa|apuestas españa croacia|apuestas españa eurocopa|apuestas españa francia|apuestas españa francia eurocopa|apuestas españa gana el
mundial|apuestas españa gana eurocopa|apuestas españa gana
mundial|apuestas españa georgia|apuestas españa holanda|apuestas españa inglaterra|apuestas
españa inglaterra cuotas|apuestas españa inglaterra eurocopa|apuestas españa italia|apuestas
españa mundial|apuestas españa paises bajos|apuestas español|apuestas español oviedo|apuestas
espanyol barcelona|apuestas espanyol betis|apuestas espanyol
villarreal|apuestas esport|apuestas esports|apuestas esports colombia|apuestas esports españa|apuestas esports fifa|apuestas esports gratis|apuestas esports lol|apuestas esports peru|apuestas esports
valorant|apuestas estadisticas|apuestas estrategias|apuestas euro|apuestas euro copa|apuestas eurocopa|apuestas eurocopa campeon|apuestas eurocopa
españa|apuestas eurocopa favoritos|apuestas eurocopa femenina|apuestas eurocopa final|apuestas eurocopa ganador|apuestas eurocopa hoy|apuestas eurocopa sub 21|apuestas euroliga baloncesto|apuestas euroliga pronosticos|apuestas europa league|apuestas
europa league hoy|apuestas europa league pronosticos|apuestas
europa league pronósticos|apuestas euros|apuestas f1 abu dhabi|apuestas f1 bahrein|apuestas f1 canada|apuestas f1 china|apuestas
f1 cuotas|apuestas f1 hoy|apuestas f1 las vegas|apuestas f1 miami|apuestas f1 monaco|apuestas
faciles de ganar|apuestas fáciles de ganar|apuestas faciles para ganar|apuestas favoritas|apuestas favorito champions|apuestas favoritos champions|apuestas favoritos eurocopa|apuestas
favoritos mundial|apuestas fc barcelona|apuestas final champions cuotas|apuestas final champions league|apuestas final champions peru|apuestas final copa|apuestas final copa america|apuestas final copa
de europa|apuestas final copa del rey|apuestas final copa europa|apuestas final copa libertadores|apuestas
final copa rey|apuestas final de copa|apuestas final de copa del rey|apuestas final
del mundial|apuestas final euro|apuestas final eurocopa|apuestas final europa league|apuestas final libertadores|apuestas final mundial|apuestas final nba|apuestas final rugby|apuestas
final uefa europa league|apuestas final.mundial|apuestas finales de conferencia nfl|apuestas finales nba|apuestas fiorentina betis|apuestas formula|apuestas formula 1|apuestas fórmula
1|apuestas fórmula 1 pronósticos|apuestas formula
uno|apuestas foro|apuestas foro nba|apuestas francia argentina|apuestas francia españa|apuestas futbol|apuestas fútbol|apuestas futbol americano|apuestas futbol americano nfl|apuestas futbol argentina|apuestas futbol argentino|apuestas
futbol champions league|apuestas futbol chile|apuestas futbol colombia|apuestas futbol consejos|apuestas futbol en directo|apuestas fútbol en directo|apuestas futbol en vivo|apuestas fútbol en vivo|apuestas futbol
españa|apuestas futbol español|apuestas fútbol español|apuestas futbol eurocopa|apuestas
futbol femenino|apuestas futbol foro|apuestas futbol gratis|apuestas futbol hoy|apuestas
fútbol hoy|apuestas futbol juegos olimpicos|apuestas futbol
mexico|apuestas futbol mundial|apuestas futbol online|apuestas
futbol para hoy|apuestas futbol peru|apuestas futbol
pronosticos|apuestas futbol sala|apuestas futbol telegram|apuestas futbol virtual|apuestas galgos|apuestas galgos en directo|apuestas galgos hoy|apuestas galgos online|apuestas
galgos pronosticos|apuestas galgos trucos|apuestas gana|apuestas
gana colombia|apuestas gana resultados|apuestas
ganadas|apuestas ganadas hoy|apuestas ganador champions
league|apuestas ganador copa america|apuestas ganador copa del rey|apuestas ganador copa del
rey baloncesto|apuestas ganador copa libertadores|apuestas ganador de la eurocopa|apuestas ganador de la
liga|apuestas ganador del mundial|apuestas ganador eurocopa|apuestas ganador europa league|apuestas ganador f1|apuestas ganador la liga|apuestas
ganador liga española|apuestas ganador mundial|apuestas ganador
mundial baloncesto|apuestas ganador mundial f1|apuestas
ganador nba|apuestas ganadores eurocopa|apuestas ganadores mundial|apuestas ganar champions|apuestas ganar eurocopa|apuestas
ganar liga|apuestas ganar mundial|apuestas ganar nba|apuestas getafe valencia|apuestas ghana uruguay|apuestas girona|apuestas girona athletic|apuestas girona betis|apuestas girona
campeon de liga|apuestas girona campeon liga|apuestas girona
gana la liga|apuestas girona real madrid|apuestas girona real sociedad|apuestas
goleador eurocopa|apuestas goleadores eurocopa|apuestas goles asiaticos|apuestas golf|apuestas golf
masters|apuestas golf pga|apuestas granada barcelona|apuestas grand slam de tenis|apuestas gratis|apuestas gratis casino|apuestas gratis con premios|apuestas gratis hoy|apuestas gratis para hoy|apuestas gratis por registro|apuestas gratis puntos|apuestas gratis regalos|apuestas gratis sin deposito|apuestas gratis sin depósito|apuestas gratis sin ingreso|apuestas gratis sports|apuestas gratis y ganar premios|apuestas grupo a eurocopa|apuestas
grupos eurocopa|apuestas handicap|apuestas handicap asiatico|apuestas handicap baloncesto|apuestas
handicap como funciona|apuestas handicap nba|apuestas handicap nfl|apuestas hipicas
online|apuestas hípicas online|apuestas hipicas
venezuela|apuestas hockey|apuestas hockey hielo|apuestas hockey patines|apuestas hockey sobre hielo|apuestas holanda argentina|apuestas holanda vs argentina|apuestas hoy|apuestas
hoy champions|apuestas hoy futbol|apuestas hoy nba|apuestas hoy pronosticos|apuestas hoy seguras|apuestas impuestos|apuestas inglaterra paises bajos|apuestas inter barca|apuestas inter
barcelona|apuestas juego|apuestas juegos|apuestas juegos en linea|apuestas
juegos olimpicos|apuestas juegos olímpicos|apuestas juegos olimpicos baloncesto|apuestas juegos
online|apuestas juegos virtuales|apuestas jugador sevilla|apuestas jugadores
nba|apuestas kings league americas|apuestas la liga|apuestas la liga española|apuestas la liga hoy|apuestas la
liga santander|apuestas las vegas mlb|apuestas las vegas nba|apuestas
las vegas nfl|apuestas league of legends mundial|apuestas legal|apuestas legales|apuestas legales en colombia|apuestas legales
en españa|apuestas legales en estados unidos|apuestas legales españa|apuestas leganes betis|apuestas
libertadores|apuestas licencia|apuestas liga 1
peru|apuestas liga argentina|apuestas liga bbva pronosticos|apuestas liga de campeones|apuestas liga de
campeones de baloncesto|apuestas liga de campeones de hockey|apuestas liga españa|apuestas
liga española|apuestas liga santander pronosticos|apuestas ligas de futbol|apuestas linea|apuestas linea de gol|apuestas liverpool barcelona|apuestas liverpool real madrid|apuestas lol mundial|apuestas
madrid|apuestas madrid arsenal|apuestas madrid atletico|apuestas madrid atletico champions|apuestas madrid barca|apuestas madrid barça|apuestas madrid barca hoy|apuestas madrid barca supercopa|apuestas
madrid barcelona|apuestas madrid barsa|apuestas madrid bayern|apuestas madrid betis|apuestas madrid borussia|apuestas madrid campeon champions|apuestas madrid celta|apuestas madrid city|apuestas madrid dortmund|apuestas madrid gana la liga|apuestas madrid
gana liga|apuestas madrid hoy|apuestas madrid liverpool|apuestas madrid osasuna|apuestas madrid sevilla|apuestas madrid valencia|apuestas madrid vs arsenal|apuestas madrid vs barcelona|apuestas
mallorca osasuna|apuestas mallorca real sociedad|apuestas manchester athletic|apuestas manchester city real madrid|apuestas
mas faciles de ganar|apuestas mas seguras|apuestas mas seguras para hoy|apuestas masters de golf|apuestas masters de
tenis|apuestas maximo goleador eurocopa|apuestas maximo goleador mundial|apuestas mejor jugador
eurocopa|apuestas mejores casinos online|apuestas mexico|apuestas méxico|apuestas
mexico polonia|apuestas méxico polonia|apuestas
mlb|apuestas mlb hoy|apuestas mlb las vegas|apuestas mlb para hoy|apuestas mlb pronosticos|apuestas mlb usa|apuestas mma ufc|apuestas momios|apuestas multiples|apuestas múltiples|apuestas multiples como funcionan|apuestas multiples el gordo|apuestas multiples futbol|apuestas mundial|apuestas mundial 2026|apuestas mundial baloncesto|apuestas mundial balonmano|apuestas mundial
brasil|apuestas mundial campeon|apuestas mundial ciclismo|apuestas mundial clubes|apuestas mundial de
baloncesto|apuestas mundial de ciclismo|apuestas mundial de
clubes|apuestas mundial de futbol|apuestas mundial
de fútbol|apuestas mundial de rugby|apuestas
mundial f1|apuestas mundial favoritos|apuestas
mundial femenino|apuestas mundial formula 1|apuestas mundial futbol|apuestas mundial ganador|apuestas mundial lol|apuestas mundial moto gp|apuestas mundial motogp|apuestas mundial
rugby|apuestas mundial sub 17|apuestas mundiales|apuestas mundialistas|apuestas mvp eurocopa|apuestas mvp nba|apuestas mvp nfl|apuestas nacionales de colombia|apuestas nba|apuestas nba all star|apuestas nba
campeon|apuestas nba consejos|apuestas nba esta noche|apuestas
nba finals|apuestas nba gratis|apuestas nba hoy|apuestas nba hoy jugadores|apuestas nba hoy pronosticos|apuestas nba
para hoy|apuestas nba playoffs|apuestas nba pronosticos|apuestas
nba pronósticos|apuestas nba pronosticos hoy|apuestas nba tipster|apuestas
nfl|apuestas nfl hoy|apuestas nfl las vegas|apuestas
nfl playoffs|apuestas nfl pronosticos|apuestas nfl
pronósticos|apuestas nfl semana 4|apuestas nfl super bowl|apuestas nhl|apuestas nhl pronosticos|apuestas octavos eurocopa|apuestas ofertas|apuestas online|apuestas online argentina|apuestas online argentina
legal|apuestas online bono|apuestas online bono bienvenida|apuestas online
boxeo|apuestas online caballos|apuestas online carreras de caballos|apuestas online casino|apuestas online champions league|apuestas
online chile|apuestas online ciclismo|apuestas online colombia|apuestas online comparativa|apuestas online con paypal|apuestas online de caballos|apuestas online deportivas|apuestas online en argentina|apuestas
online en peru|apuestas online espana|apuestas online españa|apuestas online esports|apuestas online foro|apuestas online futbol|apuestas online futbol españa|apuestas online golf|apuestas online gratis|apuestas online gratis sin deposito|apuestas online juegos|apuestas online mexico|apuestas online mma|apuestas online movil|apuestas online nba|apuestas online net|apuestas online nuevas|apuestas online opiniones|apuestas online
paypal|apuestas online peru|apuestas online seguras|apuestas online sin dinero|apuestas online
sin registro|apuestas online tenis|apuestas online ufc|apuestas online uruguay|apuestas online venezuela|apuestas open britanico golf|apuestas
osasuna athletic|apuestas osasuna barcelona|apuestas osasuna real madrid|apuestas osasuna sevilla|apuestas
osasuna valencia|apuestas over|apuestas over 2.5|apuestas over under|apuestas paginas|apuestas pago
anticipado|apuestas paises bajos ecuador|apuestas paises bajos inglaterra|apuestas países bajos qatar|apuestas para boxeo|apuestas para champions league|apuestas
para el clasico|apuestas para el dia de hoy|apuestas para
el mundial|apuestas para el partido de hoy|apuestas para eurocopa|apuestas para europa league|apuestas para futbol|apuestas para ganar|apuestas para ganar dinero|apuestas para ganar dinero facil|apuestas para
ganar en la ruleta|apuestas para ganar la champions|apuestas para ganar la eurocopa|apuestas
para ganar la europa league|apuestas para ganar la liga|apuestas para ganar siempre|apuestas para hacer|apuestas para hoy|apuestas para
hoy de futbol|apuestas para hoy europa league|apuestas para hoy futbol|apuestas
para juegos|apuestas para la champions league|apuestas para
la copa del rey|apuestas para la eurocopa|apuestas para la europa league|apuestas para la final de la eurocopa|apuestas para la
nba hoy|apuestas para los partidos de hoy|apuestas para partidos de hoy|apuestas para ufc|apuestas partido|apuestas
partido aplazado|apuestas partido champions|apuestas partido colombia|apuestas partido españa marruecos|apuestas partido mundial|apuestas partido
suspendido|apuestas partidos|apuestas partidos champions league|apuestas
partidos csgo|apuestas partidos de futbol|apuestas partidos
de futbol hoy|apuestas partidos de hoy|apuestas partidos eurocopa|apuestas partidos futbol|apuestas partidos hoy|apuestas partidos
mundial|apuestas paypal|apuestas peleas de boxeo|apuestas peru|apuestas perú|apuestas peru brasil|apuestas peru chile|apuestas peru paraguay|apuestas peru uruguay|apuestas peru
vs chile|apuestas peru vs colombia|apuestas pichichi eurocopa|apuestas plataforma|apuestas playoff|apuestas playoff ascenso|apuestas playoff ascenso a primera|apuestas playoff
nba|apuestas playoff segunda|apuestas playoff segunda b|apuestas playoffs nba|apuestas
playoffs nfl|apuestas polonia argentina|apuestas por argentina|apuestas por internet mexico|apuestas por internet para ganar dinero|apuestas por paypal|apuestas por ronda
boxeo|apuestas por sistema|apuestas portugal uruguay|apuestas pre
partido|apuestas predicciones|apuestas predicciones futbol|apuestas primera division|apuestas primera
division españa|apuestas promociones|apuestas pronostico|apuestas pronosticos|apuestas pronosticos deportivos|apuestas pronosticos
deportivos tenis|apuestas pronosticos futbol|apuestas pronosticos gratis|apuestas pronosticos nba|apuestas
pronosticos tenis|apuestas prorroga|apuestas psg barca|apuestas psg barcelona|apuestas puntos por tarjetas|apuestas
puntos tarjetas|apuestas que aceptan paypal|apuestas que es handicap|apuestas que puedes hacer con tu novia|apuestas que siempre ganaras|apuestas que significa|apuestas quien bajara a segunda|apuestas quién bajara a segunda|apuestas quien gana el mundial|apuestas quien gana eurocopa|apuestas quien gana
la champions|apuestas quien gana la eurocopa|apuestas quien gana la liga|apuestas quien ganara el mundial|apuestas
quién ganará el mundial|apuestas quien ganara la champions|apuestas quien ganara
la eurocopa|apuestas quien ganara la liga|apuestas rayo barcelona|apuestas real madrid|apuestas real madrid arsenal|apuestas real madrid athletic|apuestas real madrid atletico|apuestas real
madrid atletico champions|apuestas real madrid atletico de madrid|apuestas real madrid atlético de madrid|apuestas real madrid
atletico madrid|apuestas real madrid barcelona|apuestas real madrid bayern|apuestas
real madrid betis|apuestas real madrid borussia|apuestas real madrid campeon champions|apuestas real madrid celta|apuestas
real madrid champions|apuestas real madrid city|apuestas
real madrid girona|apuestas real madrid hoy|apuestas real madrid liverpool|apuestas real madrid manchester city|apuestas real madrid osasuna|apuestas real madrid real sociedad|apuestas
real madrid valencia|apuestas real madrid villarreal|apuestas real madrid vs
arsenal|apuestas real madrid vs atletico|apuestas real madrid vs atlético|apuestas real madrid vs atletico
madrid|apuestas real madrid vs barcelona|apuestas real madrid vs betis|apuestas real madrid vs
sevilla|apuestas real madrid vs valencia|apuestas real
sociedad|apuestas real sociedad athletic|apuestas real sociedad
barcelona|apuestas real sociedad betis|apuestas real sociedad psg|apuestas real sociedad real madrid|apuestas
real sociedad valencia|apuestas recomendadas hoy|apuestas
regalo de bienvenida|apuestas registro|apuestas resultado exacto|apuestas
resultados|apuestas resultados eurocopa|apuestas retirada tenis|apuestas roma barcelona|apuestas roma sevilla|apuestas rugby|apuestas rugby mundial|apuestas rugby world cup|apuestas
ruleta seguras|apuestas segunda|apuestas segunda b|apuestas segunda division|apuestas
segunda división|apuestas segunda division b|apuestas
segunda division españa|apuestas seguras|apuestas seguras baloncesto|apuestas seguras calculadora|apuestas
seguras en la ruleta|apuestas seguras eurocopa|apuestas seguras foro|apuestas seguras
futbol|apuestas seguras futbol hoy|apuestas seguras gratis|apuestas
seguras hoy|apuestas seguras hoy futbol|apuestas seguras
nba|apuestas seguras nba hoy|apuestas seguras para este fin de semana|apuestas seguras para ganar dinero|apuestas seguras para hoy|apuestas seguras
para hoy fútbol|apuestas seguras para hoy pronósticos|apuestas seguras para mañana|apuestas seguras ruleta|apuestas seguras telegram|apuestas seguras tenis|apuestas semifinales eurocopa|apuestas senegal paises bajos|apuestas sevilla|apuestas sevilla athletic|apuestas sevilla atletico de madrid|apuestas sevilla barcelona|apuestas sevilla betis|apuestas sevilla campeon liga|apuestas
sevilla celta|apuestas sevilla gana la liga|apuestas sevilla girona|apuestas sevilla inter|apuestas sevilla jugador|apuestas sevilla juventus|apuestas sevilla leganes|apuestas
sevilla madrid|apuestas sevilla manchester united|apuestas sevilla
osasuna|apuestas sevilla real madrid|apuestas sevilla real sociedad|apuestas sevilla roma|apuestas sevilla valencia|apuestas significa|apuestas simples ejemplos|apuestas simples o combinadas|apuestas sin deposito|apuestas sin deposito inicial|apuestas sin deposito minimo|apuestas sin dinero|apuestas sin dinero real|apuestas sin empate|apuestas sin empate que significa|apuestas sin ingreso minimo|apuestas sin registro|apuestas
sistema|apuestas sistema calculadora|apuestas sistema como funciona|apuestas sistema
trixie|apuestas sociedad|apuestas sorteo copa del rey|apuestas
stake|apuestas stake 10|apuestas stake 10 hoy|apuestas super bowl favorito|apuestas super rugby|apuestas
supercopa españa|apuestas superliga argentina|apuestas
tarjeta roja|apuestas tarjetas|apuestas tarjetas amarillas|apuestas tenis|apuestas tenis atp|apuestas tenis consejos|apuestas
tenis copa davis|apuestas tenis de mesa|apuestas tenis de mesa pronosticos|apuestas tenis
en vivo|apuestas tenis femenino|apuestas tenis hoy|apuestas tenis
itf|apuestas tenis pronosticos|apuestas tenis pronósticos|apuestas tenis retirada|apuestas
tenis roland garros|apuestas tenis seguras|apuestas tenis wimbledon|apuestas tenis wta|apuestas tercera division|apuestas tercera division españa|apuestas tipos|apuestas tips|apuestas tipster|apuestas tipster para hoy|apuestas topuria holloway cuotas|apuestas torneos de golf|apuestas
torneos de tenis|apuestas trucos|apuestas uefa champions league|apuestas uefa europa
league|apuestas ufc|apuestas ufc chile|apuestas
ufc como funciona|apuestas ufc hoy|apuestas ufc ilia topuria|apuestas ufc online|apuestas ufc pronósticos|apuestas ufc telegram|apuestas ufc topuria|apuestas under over|apuestas unionistas villarreal|apuestas uruguay|apuestas uruguay colombia|apuestas uruguay corea|apuestas
uruguay vs colombia|apuestas us open golf|apuestas
us open tenis|apuestas valencia|apuestas valencia barcelona|apuestas valencia betis|apuestas
valencia madrid|apuestas valencia real madrid|apuestas valladolid barcelona|apuestas valladolid valencia|apuestas valor app|apuestas valor en directo|apuestas valor galgos|apuestas venezuela|apuestas venezuela argentina|apuestas
venezuela bolivia|apuestas venezuela ecuador|apuestas villarreal|apuestas villarreal athletic|apuestas villarreal barcelona|apuestas villarreal bayern|apuestas villarreal betis|apuestas villarreal liverpool|apuestas villarreal manchester|apuestas villarreal manchester united|apuestas villarreal vs real madrid|apuestas virtuales|apuestas virtuales
colombia|apuestas virtuales futbol|apuestas virtuales sin dinero|apuestas vivo|apuestas vuelta a españa|apuestas vuelta
españa|apuestas william hill partidos de hoy|apuestas y casino|apuestas y casinos|apuestas y juegos de
azar|apuestas y pronosticos|apuestas y pronosticos de
futbol|apuestas y pronosticos deportivos|apuestas y resultados|apuestas-deportivas|apuestas-deportivas.es pronosticos|arbitro
nba apuestas|argentina apuestas|argentina colombia apuestas|argentina croacia apuestas|argentina francia apuestas|argentina mexico apuestas|argentina peru
apuestas|argentina uruguay apuestas|argentina vs
bolivia apuestas|argentina vs chile apuestas|argentina vs
colombia apuestas|argentina vs francia apuestas|argentina vs.
colombia apuestas|asi se gana en las apuestas deportivas|asiatico apuestas|asiatico en apuestas|asiaticos apuestas|athletic barcelona apuestas|athletic manchester united apuestas|athletic
osasuna apuestas|athletic real madrid apuestas|atletico barcelona apuestas|atletico de madrid apuestas|atlético de madrid apuestas|atletico de madrid real madrid apuestas|atletico de madrid
vs barcelona apuestas|atletico madrid real madrid apuestas|atletico madrid vs real madrid apuestas|atletico real madrid apuestas|atletico vs real madrid apuestas|avisador de cuotas apuestas|bajada
de cuotas apuestas|baloncesto apuestas|barbastro barcelona
apuestas|barca apuestas|barca bayern apuestas|barca inter apuestas|barca madrid apuestas|barça madrid apuestas|barca vs atletico
apuestas|barca vs madrid apuestas|barca vs real madrid apuestas|barcelona – real madrid apuestas|barcelona apuestas|barcelona atletico apuestas|barcelona atletico de madrid apuestas|barcelona atletico madrid apuestas|barcelona betis apuestas|barcelona casa
de apuestas|barcelona inter apuestas|barcelona psg apuestas|barcelona
real madrid apuestas|barcelona real sociedad apuestas|barcelona sevilla apuestas|barcelona valencia apuestas|barcelona vs athletic bilbao apuestas|barcelona vs atlético madrid apuestas|barcelona vs betis
apuestas|barcelona vs celta de vigo apuestas|barcelona vs espanyol apuestas|barcelona vs girona apuestas|barcelona vs madrid apuestas|barcelona vs real madrid
apuestas|barcelona vs real sociedad apuestas|barcelona
vs sevilla apuestas|barcelona vs villarreal apuestas|base de datos cuotas apuestas deportivas|bayern real madrid apuestas|beisbol apuestas|best america apuestas|bet apuestas
chile|bet apuestas en vivo|betis – chelsea apuestas|betis
apuestas|betis barcelona apuestas|betis chelsea apuestas|betis madrid apuestas|betis sevilla apuestas|betsson tu sitio de apuestas online|blog apuestas baloncesto|blog apuestas ciclismo|blog apuestas nba|blog apuestas
tenis|blog de apuestas de tenis|bono apuestas|bono apuestas deportivas|bono apuestas deportivas sin deposito|bono apuestas gratis|bono apuestas gratis sin deposito|bono apuestas sin deposito|bono bienvenida apuestas|bono bienvenida apuestas deportivas|bono bienvenida apuestas españa|bono bienvenida apuestas sin deposito|bono bienvenida apuestas sin depósito|bono bienvenida casa apuestas|bono bienvenida casa de apuestas|bono bienvenida marca apuestas|bono
casa apuestas|bono casa de apuestas|bono casa de apuestas sin ingreso|bono casas de apuestas|bono de apuestas|bono de apuestas gratis sin deposito|bono de bienvenida apuestas|bono
de bienvenida apuestas deportivas|bono de bienvenida casa de apuestas|bono de bienvenida casas de apuestas|bono de casas de apuestas|bono de registro
apuestas|bono de registro apuestas deportivas|bono de registro casa
de apuestas|bono gratis apuestas|bono marca apuestas|bono por registro apuestas|bono por registro apuestas deportivas|bono por registro casa de apuestas|bono registro apuestas|bono sin deposito apuestas|bono sin depósito apuestas|bono
sin deposito apuestas deportivas|bono sin depósito apuestas deportivas|bono sin deposito casa de apuestas|bono sin deposito marca apuestas|bono sin ingreso apuestas|bono sin ingreso apuestas deportivas|bonos apuestas|bonos apuestas colombia|bonos apuestas deportivas|bonos apuestas deportivas sin deposito|bonos apuestas gratis|bonos apuestas
sin deposito|bonos apuestas sin depósito|bonos bienvenida
apuestas|bonos bienvenida casas apuestas|bonos bienvenida casas de apuestas|bonos
casa de apuestas|bonos casas apuestas|bonos casas de apuestas|bonos casas de
apuestas colombia|bonos casas de apuestas deportivas|bonos
casas de apuestas españa|bonos casas de apuestas nuevas|bonos casas de apuestas sin deposito|bonos casas de apuestas sin depósito|bonos de apuestas|bonos
de apuestas deportivas|bonos de apuestas gratis|bonos de apuestas sin deposito|bonos de bienvenida apuestas|bonos de bienvenida apuestas deportivas|bonos de bienvenida casa
de apuestas|bonos de bienvenida casas de apuestas|bonos de bienvenida de casas de apuestas|bonos de bienvenida en casas de apuestas|bonos de casas de apuestas|bonos de casas de apuestas sin deposito|bonos en casa de apuestas|bonos en casas de
apuestas sin deposito|bonos gratis apuestas|bonos gratis
apuestas deportivas|bonos gratis casas de apuestas|bonos gratis sin deposito apuestas|bonos paginas de apuestas|bonos registro casas de
apuestas|bonos sin deposito apuestas|bonos sin depósito apuestas|bonos sin deposito apuestas deportivas|bonos sin deposito casas de apuestas|bot de apuestas deportivas gratis|boxeo apuestas|brasil colombia apuestas|brasil peru apuestas|brasil vs colombia apuestas|buenas apuestas para hoy|buscador cuotas apuestas|buscador de apuestas seguras|buscador de cuotas apuestas|buscador de cuotas de apuestas|buscar apuestas
seguras|caballos apuestas|calculador de apuestas|calculador de cuotas apuestas|calculadora apuestas|calculadora apuestas combinadas|calculadora apuestas de sistema|calculadora apuestas deportivas|calculadora apuestas deportivas
seguras|calculadora apuestas multiples|calculadora apuestas segura|calculadora apuestas seguras|calculadora apuestas sistema|calculadora apuestas yankee|calculadora
arbitraje apuestas|calculadora cubrir apuestas|calculadora cuotas apuestas|calculadora de apuestas|calculadora de apuestas combinadas|calculadora de apuestas
de futbol|calculadora de apuestas de sistema|calculadora de apuestas
deportivas|calculadora de apuestas multiples|calculadora de apuestas seguras|calculadora de apuestas sistema|calculadora de apuestas surebets|calculadora de arbitraje apuestas|calculadora de cuotas apuestas|calculadora de cuotas de apuestas|calculadora
para apuestas deportivas|calculadora poisson apuestas|calculadora poisson apuestas deportivas|calculadora
poisson para apuestas|calculadora scalping apuestas deportivas|calculadora sistema apuestas|calculadora stake
apuestas|calculadora trading apuestas|calcular apuestas|calcular apuestas deportivas|calcular apuestas futbol|calcular
apuestas sistema|calcular cuotas apuestas|calcular cuotas apuestas combinadas|calcular cuotas apuestas
deportivas|calcular cuotas de apuestas|calcular ganancias apuestas deportivas|calcular momios apuestas|calcular probabilidad cuota apuestas|calcular stake apuestas|calcular
unidades apuestas|calcular yield apuestas|calculo
de apuestas|calculo de apuestas deportivas|cambio de cuotas apuestas|campeon champions apuestas|campeon eurocopa apuestas|campeon liga apuestas|campeon nba apuestas|canales de apuestas gratis|carrera de
caballos apuestas|carrera de caballos apuestas juego|carrera
de caballos con apuestas|carrera de galgos apuestas|carreras de caballos apuestas|carreras
de caballos apuestas online|carreras de caballos con apuestas|carreras de caballos juegos
de apuestas|carreras de galgos apuestas|carreras de galgos apuestas online|carreras de galgos apuestas trucos|carreras galgos apuestas|casa apuestas argentina|casa apuestas
atletico de madrid|casa apuestas barcelona|casa apuestas betis|casa apuestas bono bienvenida|casa apuestas
bono gratis|casa apuestas bono sin deposito|casa apuestas cerca de mi|casa apuestas chile|casa apuestas colombia|casa apuestas con mejores cuotas|casa apuestas deportivas|casa apuestas españa|casa apuestas española|casa apuestas eurocopa|casa apuestas futbol|casa apuestas mejores cuotas|casa apuestas mundial|casa apuestas nueva|casa apuestas nuevas|casa apuestas
online|casa apuestas peru|casa apuestas valencia|casa de apuestas|casa de apuestas 10 euros gratis|casa de apuestas argentina|casa de apuestas atletico
de madrid|casa de apuestas baloncesto|casa de apuestas
barcelona|casa de apuestas beisbol|casa de apuestas betis|casa de apuestas bono|casa de apuestas bono bienvenida|casa de apuestas bono de bienvenida|casa de apuestas bono
gratis|casa de apuestas bono por registro|casa de apuestas bono sin deposito|casa de apuestas boxeo|casa de apuestas caballos|casa de apuestas carreras de caballos|casa de apuestas cerca de mi|casa de apuestas cerca de mí|casa de apuestas champions league|casa de apuestas chile|casa de apuestas ciclismo|casa de apuestas colombia|casa de apuestas con bono de bienvenida|casa de apuestas con bono sin deposito|casa de apuestas con cuotas mas altas|casa de apuestas con esports|casa de apuestas con las mejores cuotas|casa de apuestas con licencia en españa|casa de apuestas con mejores cuotas|casa de apuestas
con pago anticipado|casa de apuestas con paypal|casa de apuestas copa
america|casa de apuestas de caballos|casa de apuestas de colombia|casa de apuestas de españa|casa
de apuestas de futbol|casa de apuestas de
fútbol|casa de apuestas de futbol peru|casa
de apuestas de peru|casa de apuestas del madrid|casa
de apuestas del real madrid|casa de apuestas deportivas|casa de apuestas
deportivas cerca de mi|casa de apuestas deportivas
en argentina|casa de apuestas deportivas en chile|casa de apuestas deportivas en colombia|casa de apuestas deportivas
en españa|casa de apuestas deportivas en madrid|casa de apuestas deportivas españa|casa de apuestas deportivas españolas|casa de apuestas deportivas madrid|casa de apuestas deportivas
mexico|casa de apuestas deportivas online|casa de apuestas deportivas
peru|casa de apuestas deposito 5 euros|casa de apuestas deposito minimo|casa de apuestas deposito minimo 1 euro|casa de apuestas depósito mínimo 1 euro|casa de apuestas en españa|casa de apuestas en linea|casa de apuestas
en madrid|casa de apuestas en perú|casa de apuestas en vivo|casa de apuestas españa|casa de apuestas españa inglaterra|casa de apuestas
española|casa de apuestas españolas|casa de apuestas esports|casa de apuestas eurocopa|casa de apuestas europa league|casa de apuestas f1|casa de apuestas formula
1|casa de apuestas futbol|casa de apuestas ingreso minimo|casa de apuestas ingreso minimo 1
euro|casa de apuestas ingreso mínimo 1 euro|casa de apuestas legales|casa de apuestas legales en colombia|casa de apuestas legales en españa|casa de apuestas libertadores|casa de apuestas liga española|casa de apuestas madrid|casa de apuestas mas segura|casa de apuestas mejores|casa de apuestas méxico|casa de apuestas minimo 5 euros|casa de apuestas mlb|casa de
apuestas mundial|casa de apuestas nba|casa de apuestas nfl|casa de apuestas nueva|casa de apuestas nuevas|casa de
apuestas oficial del real madrid|casa de apuestas oficial real
madrid|casa de apuestas online|casa de apuestas online argentina|casa de apuestas online chile|casa de apuestas online españa|casa de apuestas online mexico|casa de apuestas
online paraguay|casa de apuestas online peru|casa de apuestas online usa|casa de apuestas online
venezuela|casa de apuestas pago anticipado|casa de apuestas para boxeo|casa de
apuestas para ufc|casa de apuestas peru|casa de apuestas
perú|casa de apuestas peru online|casa de apuestas por paypal|casa de apuestas promociones|casa
de apuestas que regalan dinero|casa de apuestas real madrid|casa de apuestas regalo de bienvenida|casa de apuestas
sevilla|casa de apuestas sin dinero|casa de apuestas sin ingreso
minimo|casa de apuestas sin licencia en españa|casa de apuestas sin minimo de ingreso|casa de apuestas stake|casa de apuestas tenis|casa de apuestas ufc|casa de apuestas valencia|casa de apuestas venezuela|casa de apuestas virtuales|casa de apuestas vive la suerte|casa oficial de apuestas del real madrid|casas apuestas asiaticas|casas apuestas bono
sin deposito|casas apuestas bonos sin deposito|casas
apuestas caballos|casas apuestas chile|casas apuestas ciclismo|casas apuestas con licencia|casas apuestas con licencia en españa|casas apuestas deportivas|casas apuestas deportivas colombia|casas apuestas deportivas españa|casas
apuestas deportivas españolas|casas apuestas deportivas nuevas|casas apuestas españa|casas apuestas españolas|casas
apuestas esports|casas apuestas eurocopa|casas apuestas golf|casas apuestas ingreso minimo 5 euros|casas apuestas legales|casas apuestas legales españa|casas apuestas licencia|casas
apuestas licencia españa|casas apuestas mexico|casas apuestas mundial|casas apuestas nba|casas apuestas nuevas|casas apuestas nuevas españa|casas apuestas ofertas|casas
apuestas online|casas apuestas paypal|casas apuestas peru|casas apuestas sin licencia|casas apuestas tenis|casas asiaticas apuestas|casas de
apuestas|casas de apuestas 5 euros|casas de apuestas app|casas de apuestas argentinas|casas de apuestas asiaticas|casas de apuestas baloncesto|casas de apuestas
barcelona|casas de apuestas bono bienvenida|casas de
apuestas bono de bienvenida|casas de apuestas bono por registro|casas de apuestas bono sin deposito|casas
de apuestas bono sin ingreso|casas de apuestas bonos|casas de apuestas
bonos de bienvenida|casas de apuestas bonos gratis|casas de apuestas
bonos sin deposito|casas de apuestas boxeo|casas de apuestas caballos|casas de apuestas carreras de caballos|casas de apuestas casino|casas de apuestas casino online|casas
de apuestas cerca de mi|casas de apuestas champions league|casas de apuestas chile|casas de apuestas ciclismo|casas de apuestas colombia|casas de apuestas
com|casas de apuestas con app|casas de apuestas con apuestas gratis|casas
de apuestas con bono|casas de apuestas con bono
de bienvenida|casas de apuestas con bono de registro|casas de apuestas con bono
por registro|casas de apuestas con bono sin deposito|casas de apuestas con bonos|casas de apuestas con bonos
gratis|casas de apuestas con bonos sin deposito|casas de apuestas
con deposito minimo|casas de apuestas con esports|casas de apuestas con handicap asiatico|casas de apuestas con licencia|casas
de apuestas con licencia en españa|casas de apuestas con licencia españa|casas de
apuestas con licencia española|casas de apuestas con mejores cuotas|casas de apuestas con pago anticipado|casas de apuestas con paypal|casas de
apuestas con paypal en perú|casas de apuestas
con promociones|casas de apuestas con ruleta en vivo|casas de apuestas copa del rey|casas de apuestas
de caballos|casas de apuestas de españa|casas de apuestas
de futbol|casas de apuestas de fútbol|casas de apuestas de peru|casas de apuestas deportivas|casas de apuestas deportivas asiaticas|casas de apuestas deportivas colombia|casas de apuestas
deportivas comparativa|casas de apuestas deportivas con paypal|casas
de apuestas deportivas en chile|casas de apuestas deportivas
en españa|casas de apuestas deportivas en linea|casas de apuestas deportivas en madrid|casas de apuestas deportivas en mexico|casas de
apuestas deportivas en peru|casas de apuestas deportivas en sevilla|casas de apuestas deportivas en valencia|casas de apuestas deportivas españa|casas de apuestas deportivas españolas|casas de
apuestas deportivas legales|casas de apuestas deportivas madrid|casas de apuestas deportivas mexico|casas de apuestas deportivas nuevas|casas de apuestas deportivas online|casas
de apuestas deportivas peru|casas de apuestas deportivas perú|casas de apuestas deposito minimo 1 euro|casas de apuestas depósito
mínimo 1 euro|casas de apuestas dinero gratis|casas
de apuestas en argentina|casas de apuestas en barcelona|casas de apuestas en chile|casas de
apuestas en colombia|casas de apuestas en españa|casas de apuestas en españa online|casas de apuestas en linea|casas de apuestas en madrid|casas de apuestas en méxico|casas de apuestas en peru|casas de apuestas en perú|casas de apuestas en sevilla|casas
de apuestas en uruguay|casas de apuestas en valencia|casas de
apuestas en venezuela|casas de apuestas equipos de futbol|casas de apuestas españa|casas de apuestas
españa alemania|casas de apuestas españa inglaterra|casas de
apuestas españa licencia|casas de apuestas españa nuevas|casas de
apuestas españa online|casas de apuestas española|casas
de apuestas españolas|casas de apuestas españolas con licencia|casas de apuestas españolas online|casas
de apuestas esports|casas de apuestas eurocopa|casas de
apuestas eurocopa 2024|casas de apuestas europa league|casas de apuestas f1|casas de apuestas fisicas en barcelona|casas de apuestas fisicas en españa|casas de apuestas formula 1|casas de
apuestas fuera de españa|casas de apuestas futbol|casas
de apuestas fútbol|casas de apuestas futbol españa|casas de apuestas ganador eurocopa|casas de apuestas gratis|casas de apuestas ingreso
minimo|casas de apuestas ingreso minimo 1 euro|casas de apuestas ingreso minimo
5 euros|casas de apuestas inter barcelona|casas de apuestas legales|casas de apuestas legales
en colombia|casas de apuestas legales en españa|casas de apuestas legales en mexico|casas de apuestas
legales españa|casas de apuestas legales mx|casas de apuestas licencia|casas de apuestas licencia españa|casas de apuestas
lista|casas de apuestas madrid|casas de apuestas mas seguras|casas
de apuestas mejores bonos|casas de apuestas mejores cuotas|casas de apuestas
mexico|casas de apuestas méxico|casas de apuestas minimo 5 euros|casas de apuestas mlb|casas de apuestas mundial|casas de apuestas mundial baloncesto|casas de
apuestas mundiales|casas de apuestas nba|casas de apuestas no reguladas
en españa|casas de apuestas nueva ley|casas de apuestas nuevas|casas de apuestas nuevas en colombia|casas de
apuestas nuevas en españa|casas de apuestas nuevas españa|casas de apuestas ofertas|casas de apuestas online|casas
de apuestas online argentina|casas de apuestas online colombia|casas de apuestas online deportivas|casas de apuestas online ecuador|casas de apuestas online en argentina|casas de apuestas online en chile|casas de
apuestas online en colombia|casas de apuestas online en españa|casas de apuestas online
en mexico|casas de apuestas online españa|casas de apuestas online mas
fiables|casas de apuestas online mexico|casas de
apuestas online nuevas|casas de apuestas online peru|casas de
apuestas online usa|casas de apuestas online venezuela|casas de apuestas pago paypal|casas de apuestas para ufc|casas de apuestas paypal|casas de apuestas peru bono sin deposito|c
Your comment is awaiting moderation.
(10 euros gratis apuestas|10 mejores casas de apuestas|10 trucos
para ganar apuestas|15 euros gratis marca apuestas|1×2 apuestas|1×2
apuestas deportivas|1×2 apuestas que significa|1×2 en apuestas|1×2 en apuestas que significa|1×2 que significa en apuestas|5 euros gratis apuestas|9
apuestas que siempre ganaras|a partir de cuanto se declara apuestas|actividades de juegos
de azar y apuestas|ad apuestas deportivas|aleksandre topuria ufc apuestas|algoritmo para ganar apuestas deportivas|america apuestas|análisis
nba apuestas|aplicacion android apuestas deportivas|aplicacion apuestas
deportivas|aplicacion apuestas deportivas android|aplicación de apuestas online|aplicacion para hacer apuestas|aplicacion para
hacer apuestas de futbol|aplicación para hacer apuestas de fútbol|aplicaciones apuestas deportivas android|aplicaciones apuestas deportivas gratis|aplicaciones de
apuestas android|aplicaciones de apuestas de fútbol|aplicaciones de apuestas deportivas|aplicaciones
de apuestas deportivas peru|aplicaciones de apuestas deportivas perú|aplicaciones de
apuestas en colombia|aplicaciones de apuestas
gratis|aplicaciones de apuestas online|aplicaciones de apuestas seguras|aplicaciones de apuestas
sin dinero|aplicaciones para hacer apuestas|apostar seguro apuestas deportivas|app android apuestas deportivas|app apuestas|app
apuestas android|app apuestas de futbol|app apuestas deportivas|app
apuestas deportivas android|app apuestas deportivas argentina|app apuestas deportivas colombia|app apuestas deportivas ecuador|app apuestas deportivas españa|app apuestas deportivas gratis|app apuestas entre amigos|app
apuestas futbol|app apuestas gratis|app apuestas sin dinero|app casa de apuestas|app
casas de apuestas|app control apuestas|app de apuestas|app de apuestas android|app de apuestas casino|app de apuestas colombia|app de
apuestas con bono de bienvenida|app de apuestas de futbol|app
de apuestas deportivas|app de apuestas deportivas android|app
de apuestas deportivas argentina|app de apuestas deportivas colombia|app de apuestas
deportivas en españa|app de apuestas deportivas peru|app
de apuestas deportivas perú|app de apuestas deportivas sin dinero|app de apuestas ecuador|app de apuestas
en colombia|app de apuestas en españa|app de apuestas en venezuela|app
de apuestas futbol|app de apuestas gratis|app de apuestas online|app de apuestas para android|app
de apuestas para ganar dinero|app de apuestas peru|app de apuestas reales|app de casas de apuestas|app marca apuestas android|app
moviles de apuestas|app para apuestas|app para apuestas de
futbol|app para apuestas deportivas|app para apuestas deportivas en español|app para ganar
apuestas deportivas|app para hacer apuestas|app
para hacer apuestas deportivas|app para hacer apuestas entre amigos|app para llevar control de apuestas|app pronosticos
apuestas deportivas|app versus apuestas|apps apuestas mundial|apps de apuestas|apps de apuestas con bono
de bienvenida|apps de apuestas de futbol|apps de apuestas deportivas peru|apps de apuestas mexico|apps para apuestas|aprender a hacer apuestas deportivas|aprender hacer apuestas deportivas|apuesta del dia apuestas deportivas|apuestas 10 euros gratis|apuestas 100 seguras|apuestas 1×2|apuestas 1X2|apuestas 2 division|apuestas
3 division|apuestas a caballos|apuestas a carreras de caballos|apuestas a colombia|apuestas a corners|apuestas a ganar|apuestas a jugadores nba|apuestas a la baja|apuestas a
la nfl|apuestas al barcelona|apuestas al dia|apuestas al empate|apuestas al mundial|apuestas al tenis wta|apuestas alaves barcelona|apuestas alcaraz hoy|apuestas alemania españa|apuestas
alonso campeon del mundo|apuestas altas y bajas|apuestas altas y bajas nfl|apuestas ambos equipos marcan|apuestas america|apuestas android|apuestas anillo nba|apuestas antes del mundial|apuestas anticipadas|apuestas anticipadas nba|apuestas apps|apuestas arabia argentina|apuestas argentina|apuestas argentina campeon del mundo|apuestas argentina canada|apuestas argentina colombia|apuestas argentina croacia|apuestas argentina españa|apuestas argentina francia|apuestas argentina francia
cuanto paga|apuestas argentina francia mundial|apuestas argentina gana el mundial|apuestas argentina gana mundial|apuestas argentina
holanda|apuestas argentina mexico|apuestas argentina méxico|apuestas
argentina mundial|apuestas argentina online|apuestas argentina paises bajos|apuestas argentina polonia|apuestas argentina uruguay|apuestas argentina
vs australia|apuestas argentina vs colombia|apuestas
argentina vs francia|apuestas argentina vs peru|apuestas argentinas|apuestas
arsenal real madrid|apuestas ascenso a primera division|apuestas ascenso a segunda|apuestas asiaticas|apuestas asiatico|apuestas athletic|apuestas athletic atletico|apuestas athletic barça|apuestas
athletic barcelona|apuestas athletic betis|apuestas
athletic manchester|apuestas athletic manchester united|apuestas athletic osasuna|apuestas athletic real|apuestas athletic
real madrid|apuestas athletic real sociedad|apuestas athletic real sociedad final|apuestas athletic roma|apuestas athletic sevilla|apuestas athletic valencia|apuestas
atletico|apuestas atletico barcelona|apuestas
atletico barsa|apuestas atletico campeon champions|apuestas atletico
campeon de liga|apuestas atlético copenhague|apuestas atletico de madrid|apuestas atlético de madrid|apuestas atletico de madrid barcelona|apuestas atletico de madrid gana la liga|apuestas atletico
de madrid real madrid|apuestas atlético de madrid real madrid|apuestas atletico de madrid
vs barcelona|apuestas atletico madrid|apuestas atletico madrid real madrid|apuestas atletico madrid vs barcelona|apuestas atletico real madrid|apuestas atletico
real madrid champions|apuestas atletismo|apuestas bajas|apuestas baloncesto|apuestas baloncesto
acb|apuestas baloncesto handicap|apuestas baloncesto hoy|apuestas baloncesto juegos olimpicos|apuestas baloncesto nba|apuestas baloncesto pronostico|apuestas baloncesto pronósticos|apuestas baloncesto prorroga|apuestas barca|apuestas barca athletic|apuestas barca atletico|apuestas barca bayern|apuestas barca bayern munich|apuestas barca
girona|apuestas barca hoy|apuestas barça hoy|apuestas barca inter|apuestas barca
juventus|apuestas barca madrid|apuestas barça madrid|apuestas barca real madrid|apuestas barca vs juve|apuestas barca vs madrid|apuestas barca vs psg|apuestas barcelona|apuestas barcelona alaves|apuestas barcelona athletic|apuestas barcelona
atletico|apuestas barcelona atletico de madrid|apuestas barcelona atlético de madrid|apuestas barcelona atletico madrid|apuestas barcelona bayern|apuestas
barcelona betis|apuestas barcelona campeon de liga|apuestas barcelona celta|apuestas
barcelona espanyol|apuestas barcelona gana la champions|apuestas barcelona girona|apuestas barcelona granada|apuestas
barcelona hoy|apuestas barcelona inter|apuestas barcelona madrid|apuestas barcelona osasuna|apuestas barcelona psg|apuestas barcelona real madrid|apuestas barcelona real
sociedad|apuestas barcelona sevilla|apuestas barcelona valencia|apuestas barcelona villarreal|apuestas barcelona vs
atletico madrid|apuestas barcelona vs madrid|apuestas barcelona vs
real madrid|apuestas barsa madrid|apuestas basket hoy|apuestas bayern barcelona|apuestas bayern vs
barcelona|apuestas beisbol|apuestas béisbol|apuestas beisbol mlb|apuestas beisbol pronosticos|apuestas beisbol venezolano|apuestas betis|apuestas betis – chelsea|apuestas betis barcelona|apuestas betis chelsea|apuestas betis fiorentina|apuestas betis
girona|apuestas betis madrid|apuestas betis mallorca|apuestas betis real madrid|apuestas betis
real sociedad|apuestas betis sevilla|apuestas betis valencia|apuestas betis valladolid|apuestas betis vs valencia|apuestas betplay hoy
colombia|apuestas betsson peru|apuestas bienvenida|apuestas billar
online|apuestas bolivia vs colombia|apuestas bono|apuestas bono
bienvenida|apuestas bono de bienvenida|apuestas bono de bienvenida sin deposito|apuestas
bono gratis|apuestas bono sin deposito|apuestas bonos sin deposito|apuestas borussia real madrid|apuestas boxeo|apuestas
boxeo de campeonato|apuestas boxeo españa|apuestas boxeo español|apuestas boxeo femenino olimpiadas|apuestas boxeo hoy|apuestas boxeo online|apuestas brasil colombia|apuestas brasil peru|apuestas brasil uruguay|apuestas brasil
vs colombia|apuestas brasil vs peru|apuestas caballos|apuestas caballos colocado|apuestas caballos españa|apuestas caballos hipodromo|apuestas caballos hoy|apuestas caballos madrid|apuestas caballos online|apuestas caballos sanlucar de barrameda|apuestas
caballos zarzuela|apuestas calculador|apuestas campeon|apuestas campeon champions|apuestas campeón champions|apuestas campeon champions 2025|apuestas campeon champions
league|apuestas campeon conference league|apuestas campeon copa america|apuestas campeon copa del
rey|apuestas campeon de champions|apuestas campeon de
la champions|apuestas campeon de liga|apuestas campeon del mundo|apuestas campeon eurocopa|apuestas campeón eurocopa|apuestas campeon europa league|apuestas campeon f1|apuestas campeon f1 2025|apuestas campeon formula 1|apuestas campeon libertadores|apuestas campeon liga|apuestas campeon liga bbva|apuestas campeon liga española|apuestas campeon liga santander|apuestas campeon motogp 2025|apuestas campeon mundial|apuestas campeón mundial|apuestas
campeon mundial baloncesto|apuestas campeon nba|apuestas campeón nba|apuestas campeon premier|apuestas
campeon premier league|apuestas campeon roland garros|apuestas campeonato f1|apuestas campeonatos de futbol|apuestas carrera
de caballos|apuestas carrera de caballos hoy|apuestas carrera de caballos nocturnas|apuestas carrera de galgos fin de semana|apuestas carrera de
galgos hoy|apuestas carrera de galgos nocturnas|apuestas carreras caballos|apuestas carreras caballos sanlucar|apuestas carreras
de caballos|apuestas carreras de caballos en directo|apuestas carreras de caballos en vivo|apuestas
carreras de caballos españa|apuestas carreras de caballos hoy|apuestas carreras de caballos nacionales|apuestas carreras de caballos nocturnas|apuestas carreras de caballos online|apuestas
carreras de caballos sanlucar|apuestas carreras
de caballos sanlúcar|apuestas carreras de galgos|apuestas carreras de galgos en vivo|apuestas carreras de galgos nocturnas|apuestas carreras
de galgos pre partido|apuestas casino|apuestas casino barcelona|apuestas
casino futbol|apuestas casino gran madrid|apuestas casino
gratis|apuestas casino madrid|apuestas casino online|apuestas
casino online argentina|apuestas casinos|apuestas casinos online|apuestas celta|apuestas celta barcelona|apuestas
celta betis|apuestas celta eibar|apuestas celta espanyol|apuestas celta
granada|apuestas celta madrid|apuestas celta manchester|apuestas celta real madrid|apuestas champion league|apuestas champions foro|apuestas champions hoy|apuestas champions
league|apuestas champions league – pronósticos|apuestas
champions league 2025|apuestas champions league hoy|apuestas champions league pronosticos|apuestas
champions league pronósticos|apuestas champions pronosticos|apuestas chelsea barcelona|apuestas chelsea betis|apuestas chile|apuestas chile peru|apuestas chile venezuela|apuestas chile vs colombia|apuestas chile vs
uruguay|apuestas ciclismo|apuestas ciclismo en vivo|apuestas
ciclismo femenino|apuestas ciclismo tour francia|apuestas ciclismo vuelta|apuestas ciclismo vuelta a españa|apuestas ciclismo vuelta españa|apuestas
city madrid|apuestas city real madrid|apuestas clasico|apuestas clasico
español|apuestas clasico real madrid barcelona|apuestas clasificacion mundial|apuestas colombia|apuestas colombia argentina|apuestas colombia brasil|apuestas
colombia paraguay|apuestas colombia uruguay|apuestas colombia vs argentina|apuestas colombia vs brasil|apuestas
combinadas|apuestas combinadas como funcionan|apuestas combinadas de
futbol|apuestas combinadas de fútbol|apuestas combinadas foro|apuestas combinadas futbol|apuestas combinadas hoy|apuestas combinadas
mismo partido|apuestas combinadas mundial|apuestas combinadas nba|apuestas combinadas para esta semana|apuestas combinadas para hoy|apuestas combinadas para
mañana|apuestas combinadas pronosticos|apuestas combinadas recomendadas|apuestas combinadas seguras|apuestas combinadas seguras para hoy|apuestas combinadas seguras
para mañana|apuestas como ganar|apuestas comparador|apuestas con bono de bienvenida|apuestas con dinero ficticio|apuestas con dinero real|apuestas con dinero virtual|apuestas
con handicap|apuestas con handicap asiatico|apuestas con handicap baloncesto|apuestas con mas probabilidades de
ganar|apuestas con paypal|apuestas con tarjeta de credito|apuestas con tarjeta de
debito|apuestas consejos|apuestas copa|apuestas copa africa|apuestas copa
america|apuestas copa américa|apuestas copa argentina|apuestas copa brasil|apuestas copa
davis|apuestas copa de europa|apuestas copa del mundo|apuestas copa del rey|apuestas copa del rey baloncesto|apuestas copa del rey final|apuestas copa del rey futbol|apuestas copa del rey ganador|apuestas copa
del rey hoy|apuestas copa del rey pronosticos|apuestas copa
del rey pronósticos|apuestas copa europa|apuestas copa italia|apuestas copa libertadores|apuestas copa mundial de hockey|apuestas copa rey|apuestas
copa sudamericana|apuestas corners|apuestas corners hoy|apuestas croacia argentina|apuestas cuartos eurocopa|apuestas cuotas|apuestas
cuotas altas|apuestas cuotas bajas|apuestas de 1 euro|apuestas de baloncesto|apuestas de baloncesto hoy|apuestas de baloncesto nba|apuestas de baloncesto para hoy|apuestas de beisbol|apuestas de beisbol para hoy|apuestas de blackjack
en linea|apuestas de boxeo|apuestas de boxeo canelo|apuestas de boxeo en las vegas|apuestas de boxeo hoy|apuestas de boxeo
online|apuestas de caballo|apuestas de caballos|apuestas de caballos como funciona|apuestas de caballos como se juega|apuestas de caballos en colombia|apuestas de caballos en españa|apuestas de caballos en linea|apuestas de caballos españa|apuestas de caballos ganador y colocado|apuestas de caballos internacionales|apuestas de caballos
juegos|apuestas de caballos online|apuestas de caballos online en venezuela|apuestas de caballos por internet|apuestas de
caballos pronosticos|apuestas de caballos pronósticos|apuestas de carrera de caballos|apuestas de
carreras de caballos|apuestas de carreras de caballos online|apuestas de casino|apuestas de casino online|apuestas de casino por internet|apuestas
de champions league|apuestas de ciclismo|apuestas de colombia|apuestas de copa
america|apuestas de corners|apuestas de deportes en linea|apuestas de deportes online|apuestas de dinero|apuestas de esports|apuestas de eurocopa|apuestas de europa league|apuestas de f1|apuestas de formula 1|apuestas
de futbol|apuestas de fútbol|apuestas de futbol app|apuestas de
futbol argentina|apuestas de futbol colombia|apuestas de futbol en colombia|apuestas de futbol en directo|apuestas de
futbol en linea|apuestas de futbol en vivo|apuestas de futbol español|apuestas de futbol
gratis|apuestas de futbol hoy|apuestas de futbol mundial|apuestas de futbol online|apuestas de fútbol online|apuestas de futbol
para hoy|apuestas de fútbol para hoy|apuestas de futbol
para hoy seguras|apuestas de futbol para mañana|apuestas de futbol peru|apuestas de futbol pronosticos|apuestas de fútbol pronósticos|apuestas de futbol seguras|apuestas de
futbol seguras para hoy|apuestas de futbol sin dinero|apuestas de galgos|apuestas de galgos como ganar|apuestas de galgos
en directo|apuestas de galgos online|apuestas de galgos trucos|apuestas de
golf|apuestas de hockey|apuestas de hockey sobre hielo|apuestas de hoy|apuestas de hoy seguras|apuestas de juego|apuestas de juegos|apuestas de juegos deportivos|apuestas de juegos online|apuestas de la
champions league|apuestas de la copa américa|apuestas de la eurocopa|apuestas de la europa league|apuestas de
la liga|apuestas de la liga bbva|apuestas de la liga española|apuestas de
la nba|apuestas de la nfl|apuestas de la ufc|apuestas de mlb|apuestas de nba|apuestas de nba para hoy|apuestas
de partidos|apuestas de partidos de futbol|apuestas de peleas
ufc|apuestas de perros en vivo|apuestas de perros virtuales|apuestas
de peru|apuestas de sistema|apuestas de sistema como funciona|apuestas de sistema
explicacion|apuestas de sistema explicación|apuestas de tenis|apuestas de tenis de mesa|apuestas de tenis en directo|apuestas de tenis hoy|apuestas de tenis
para hoy|apuestas de tenis pronosticos|apuestas de tenis seguras|apuestas de todo tipo|apuestas de ufc|apuestas de ufc hoy|apuestas del boxeo|apuestas del clasico|apuestas del clasico real madrid barca|apuestas del dia|apuestas
del día|apuestas del dia de hoy|apuestas del dia deportivas|apuestas del dia
futbol|apuestas del mundial|apuestas del partido de
hoy|apuestas del real madrid|apuestas del rey|apuestas del sistema|apuestas deporte|apuestas deportes|apuestas deportiva|apuestas deportivas|apuestas deportivas 1 euro|apuestas deportivas 10 euros gratis|apuestas deportivas 100 seguras|apuestas deportivas
1×2|apuestas deportivas android|apuestas deportivas app|apuestas deportivas apps|apuestas deportivas argentina|apuestas
deportivas argentina futbol|apuestas deportivas argentina legal|apuestas deportivas atletico de madrid|apuestas
deportivas baloncesto|apuestas deportivas barca madrid|apuestas deportivas barcelona|apuestas
deportivas beisbol|apuestas deportivas bono|apuestas deportivas bono bienvenida|apuestas deportivas bono de bienvenida|apuestas deportivas bono sin deposito|apuestas
deportivas bonos de bienvenida|apuestas deportivas boxeo|apuestas
deportivas caballos|apuestas deportivas calculadora|apuestas
deportivas campeon liga|apuestas deportivas casino|apuestas
deportivas casino barcelona|apuestas deportivas casino online|apuestas
deportivas cerca de mi|apuestas deportivas champions league|apuestas
deportivas chile|apuestas deportivas ciclismo|apuestas deportivas colombia|apuestas deportivas com|apuestas deportivas com foro|apuestas deportivas com pronosticos|apuestas deportivas combinadas|apuestas deportivas combinadas para hoy|apuestas deportivas como se juega|apuestas deportivas comparador|apuestas deportivas con bono gratis|apuestas deportivas con bonos gratis|apuestas deportivas con dinero
ficticio|apuestas deportivas con paypal|apuestas deportivas con puntos virtuales|apuestas deportivas consejos|apuestas deportivas consejos para
ganar|apuestas deportivas copa america|apuestas deportivas copa del rey|apuestas deportivas
copa libertadores|apuestas deportivas copa mundial|apuestas
deportivas corners|apuestas deportivas cual es la mejor|apuestas
deportivas cuotas altas|apuestas deportivas de baloncesto|apuestas deportivas de boxeo|apuestas deportivas de colombia|apuestas
deportivas de futbol|apuestas deportivas de nba|apuestas deportivas
de nhl|apuestas deportivas de peru|apuestas deportivas de
tenis|apuestas deportivas del dia|apuestas deportivas
dinero ficticio|apuestas deportivas directo|apuestas deportivas doble oportunidad|apuestas deportivas en argentina|apuestas deportivas en chile|apuestas deportivas en colombia|apuestas deportivas en directo|apuestas
deportivas en españa|apuestas deportivas en español|apuestas deportivas
en linea|apuestas deportivas en línea|apuestas deportivas
en peru|apuestas deportivas en perú|apuestas deportivas
en sevilla|apuestas deportivas en uruguay|apuestas deportivas en vivo|apuestas deportivas es|apuestas deportivas es pronosticos|apuestas deportivas españa|apuestas deportivas españolas|apuestas deportivas esports|apuestas
deportivas estadisticas|apuestas deportivas estrategias|apuestas deportivas estrategias
seguras|apuestas deportivas eurocopa|apuestas deportivas europa league|apuestas deportivas f1|apuestas deportivas faciles de ganar|apuestas deportivas formula 1|apuestas deportivas foro|apuestas deportivas
foro futbol|apuestas deportivas foro tenis|apuestas deportivas francia argentina|apuestas deportivas futbol|apuestas deportivas fútbol|apuestas deportivas futbol argentino|apuestas
deportivas futbol colombia|apuestas deportivas futbol español|apuestas deportivas gana|apuestas deportivas ganadas|apuestas deportivas ganar dinero seguro|apuestas deportivas gane|apuestas deportivas
golf|apuestas deportivas gratis|apuestas deportivas gratis con premios|apuestas deportivas gratis hoy|apuestas deportivas gratis sin deposito|apuestas deportivas
handicap|apuestas deportivas handicap asiatico|apuestas deportivas hoy|apuestas deportivas impuestos|apuestas deportivas interior argentina|apuestas deportivas juegos
olimpicos|apuestas deportivas la liga|apuestas deportivas legales|apuestas
deportivas legales en colombia|apuestas deportivas libres de impuestos|apuestas deportivas licencia españa|apuestas deportivas liga española|apuestas deportivas listado|apuestas deportivas
listado clasico|apuestas deportivas madrid|apuestas deportivas mas seguras|apuestas deportivas mejor pagadas|apuestas deportivas
mejores|apuestas deportivas mejores app|apuestas deportivas
mejores casas|apuestas deportivas mejores cuotas|apuestas deportivas mejores paginas|apuestas deportivas mexico|apuestas deportivas méxico|apuestas
deportivas mlb|apuestas deportivas mlb hoy|apuestas deportivas multiples|apuestas deportivas mundial|apuestas deportivas murcia|apuestas deportivas nba|apuestas deportivas nba hoy|apuestas deportivas nfl|apuestas deportivas nhl|apuestas deportivas nuevas|apuestas deportivas ofertas|apuestas deportivas online|apuestas deportivas online argentina|apuestas deportivas online chile|apuestas
deportivas online colombia|apuestas deportivas online en colombia|apuestas deportivas online españa|apuestas
deportivas online mexico|apuestas deportivas online paypal|apuestas deportivas online peru|apuestas deportivas online
por internet|apuestas deportivas pago paypal|apuestas deportivas para ganar dinero|apuestas deportivas para hoy|apuestas deportivas para hoy pronosticos|apuestas deportivas partido suspendido|apuestas
deportivas partidos de hoy|apuestas deportivas paypal|apuestas deportivas peru|apuestas deportivas perú|apuestas deportivas peru vs ecuador|apuestas
deportivas predicciones|apuestas deportivas promociones|apuestas deportivas pronostico|apuestas deportivas pronóstico|apuestas deportivas pronostico hoy|apuestas
deportivas pronosticos|apuestas deportivas pronósticos|apuestas
deportivas pronosticos expertos|apuestas deportivas pronosticos gratis|apuestas deportivas pronosticos nba|apuestas deportivas pronosticos tenis|apuestas deportivas
que aceptan paypal|apuestas deportivas real madrid|apuestas deportivas
regalo bienvenida|apuestas deportivas resultado exacto|apuestas deportivas resultados|apuestas deportivas
rugby|apuestas deportivas seguras|apuestas deportivas
seguras foro|apuestas deportivas seguras hoy|apuestas deportivas seguras para
hoy|apuestas deportivas seguras telegram|apuestas deportivas sevilla|apuestas deportivas simulador eurocopa|apuestas deportivas sin deposito|apuestas deportivas
sin deposito inicial|apuestas deportivas sin dinero|apuestas
deportivas sin dinero real|apuestas deportivas
sin registro|apuestas deportivas stake|apuestas deportivas stake 10|apuestas deportivas telegram españa|apuestas deportivas tenis|apuestas
deportivas tenis de mesa|apuestas deportivas tenis foro|apuestas deportivas
tenis hoy|apuestas deportivas tips|apuestas deportivas
tipster|apuestas deportivas ufc|apuestas deportivas uruguay|apuestas deportivas valencia|apuestas deportivas valencia barcelona|apuestas deportivas venezuela|apuestas deportivas
virtuales|apuestas deportivas y casino|apuestas deportivas y casino online|apuestas deportivas.com|apuestas deportivas.com foro|apuestas deportivas.es|apuestas deportivos
pronosticos|apuestas deposito minimo 1 euro|apuestas descenso a segunda|apuestas descenso a segunda b|apuestas descenso la liga|apuestas descenso primera division|apuestas descenso segunda|apuestas dia|apuestas
diarias seguras|apuestas dinero|apuestas dinero ficticio|apuestas dinero real|apuestas
dinero virtual|apuestas directas|apuestas directo|apuestas directo futbol|apuestas division de honor juvenil|apuestas dnb|apuestas doble oportunidad|apuestas doble resultado|apuestas dobles|apuestas dobles y triples|apuestas dortmund barcelona|apuestas draft nba|apuestas draft nfl|apuestas ecuador vs argentina|apuestas ecuador vs
venezuela|apuestas egipto uruguay|apuestas el clasico|apuestas elecciones venezuela|apuestas empate|apuestas en baloncesto|apuestas en barcelona|apuestas en beisbol|apuestas en boxeo|apuestas en caballos|apuestas en carreras de caballos|apuestas en casino|apuestas en casino online|apuestas en casinos|apuestas en casinos online|apuestas en chile|apuestas en ciclismo|apuestas
en colombia|apuestas en colombia de futbol|apuestas en directo|apuestas en directo futbol|apuestas en directo
pronosticos|apuestas en el futbol|apuestas en el tenis|apuestas en españa|apuestas en esports|apuestas en eventos deportivos virtuales|apuestas en golf|apuestas en juegos|apuestas
en la champions league|apuestas en la eurocopa|apuestas en la liga|apuestas en la nba|apuestas en la nfl|apuestas en las vegas mlb|apuestas en las vegas
nfl|apuestas en linea|apuestas en línea|apuestas en linea argentina|apuestas en linea boxeo|apuestas
en linea chile|apuestas en linea colombia|apuestas en línea
de fútbol|apuestas en linea deportivas|apuestas en linea españa|apuestas en linea estados unidos|apuestas en linea futbol|apuestas
en linea mexico|apuestas en línea méxico|apuestas en linea mundial|apuestas en linea peru|apuestas en linea usa|apuestas en los esports|apuestas
en madrid|apuestas en méxico|apuestas en mexico online|apuestas en nba|apuestas en partidos de futbol|apuestas en partidos de
futbol en vivo|apuestas en partidos de tenis en directo|apuestas
en perú|apuestas en sevilla|apuestas en sistema|apuestas en stake|apuestas en tenis|apuestas en tenis de mesa|apuestas en valencia|apuestas en vivo|apuestas
en vivo argentina|apuestas en vivo casino|apuestas en vivo futbol|apuestas en vivo fútbol|apuestas en vivo nba|apuestas en vivo peru|apuestas en vivo
tenis|apuestas en vivo ufc|apuestas equipo mbappe|apuestas
equipos de futbol|apuestas españa|apuestas españa alemania|apuestas españa alemania eurocopa|apuestas españa croacia|apuestas españa eurocopa|apuestas españa francia|apuestas españa francia eurocopa|apuestas españa gana
el mundial|apuestas españa gana eurocopa|apuestas españa
gana mundial|apuestas españa georgia|apuestas españa holanda|apuestas españa inglaterra|apuestas españa
inglaterra cuotas|apuestas españa inglaterra eurocopa|apuestas
españa italia|apuestas españa mundial|apuestas españa paises bajos|apuestas español|apuestas español oviedo|apuestas espanyol barcelona|apuestas espanyol betis|apuestas espanyol villarreal|apuestas esport|apuestas esports|apuestas esports colombia|apuestas
esports españa|apuestas esports fifa|apuestas esports gratis|apuestas esports lol|apuestas esports peru|apuestas esports valorant|apuestas
estadisticas|apuestas estrategias|apuestas euro|apuestas euro copa|apuestas eurocopa|apuestas eurocopa campeon|apuestas eurocopa españa|apuestas
eurocopa favoritos|apuestas eurocopa femenina|apuestas eurocopa final|apuestas eurocopa ganador|apuestas eurocopa
hoy|apuestas eurocopa sub 21|apuestas euroliga baloncesto|apuestas euroliga
pronosticos|apuestas europa league|apuestas europa league hoy|apuestas europa league pronosticos|apuestas europa league pronósticos|apuestas euros|apuestas
f1 abu dhabi|apuestas f1 bahrein|apuestas f1 canada|apuestas f1 china|apuestas f1 cuotas|apuestas
f1 hoy|apuestas f1 las vegas|apuestas f1 miami|apuestas
f1 monaco|apuestas faciles de ganar|apuestas fáciles de ganar|apuestas faciles
para ganar|apuestas favoritas|apuestas favorito champions|apuestas favoritos
champions|apuestas favoritos eurocopa|apuestas favoritos mundial|apuestas fc barcelona|apuestas final champions cuotas|apuestas final champions league|apuestas final champions peru|apuestas final copa|apuestas final copa america|apuestas final copa de europa|apuestas final copa del
rey|apuestas final copa europa|apuestas final copa libertadores|apuestas final copa rey|apuestas final
de copa|apuestas final de copa del rey|apuestas final del mundial|apuestas final euro|apuestas final eurocopa|apuestas final europa league|apuestas final libertadores|apuestas final mundial|apuestas final nba|apuestas final rugby|apuestas final uefa europa league|apuestas final.mundial|apuestas finales de conferencia nfl|apuestas finales nba|apuestas
fiorentina betis|apuestas formula|apuestas formula 1|apuestas fórmula 1|apuestas fórmula 1 pronósticos|apuestas
formula uno|apuestas foro|apuestas foro nba|apuestas
francia argentina|apuestas francia españa|apuestas
futbol|apuestas fútbol|apuestas futbol americano|apuestas futbol
americano nfl|apuestas futbol argentina|apuestas futbol argentino|apuestas futbol champions league|apuestas
futbol chile|apuestas futbol colombia|apuestas futbol consejos|apuestas futbol
en directo|apuestas fútbol en directo|apuestas futbol en vivo|apuestas fútbol en vivo|apuestas futbol españa|apuestas futbol
español|apuestas fútbol español|apuestas futbol eurocopa|apuestas futbol femenino|apuestas futbol foro|apuestas futbol gratis|apuestas futbol hoy|apuestas fútbol hoy|apuestas futbol juegos olimpicos|apuestas futbol mexico|apuestas futbol mundial|apuestas futbol online|apuestas futbol para hoy|apuestas futbol peru|apuestas futbol pronosticos|apuestas futbol sala|apuestas
futbol telegram|apuestas futbol virtual|apuestas galgos|apuestas galgos en directo|apuestas galgos
hoy|apuestas galgos online|apuestas galgos pronosticos|apuestas galgos trucos|apuestas gana|apuestas gana
colombia|apuestas gana resultados|apuestas ganadas|apuestas ganadas hoy|apuestas
ganador champions league|apuestas ganador copa america|apuestas ganador copa del
rey|apuestas ganador copa del rey baloncesto|apuestas ganador copa libertadores|apuestas ganador de la eurocopa|apuestas ganador de la
liga|apuestas ganador del mundial|apuestas ganador eurocopa|apuestas ganador europa
league|apuestas ganador f1|apuestas ganador la liga|apuestas
ganador liga española|apuestas ganador mundial|apuestas ganador mundial baloncesto|apuestas ganador mundial f1|apuestas ganador nba|apuestas
ganadores eurocopa|apuestas ganadores mundial|apuestas ganar champions|apuestas ganar eurocopa|apuestas ganar
liga|apuestas ganar mundial|apuestas ganar nba|apuestas getafe valencia|apuestas ghana uruguay|apuestas girona|apuestas girona athletic|apuestas
girona betis|apuestas girona campeon de liga|apuestas girona campeon liga|apuestas girona
gana la liga|apuestas girona real madrid|apuestas
girona real sociedad|apuestas goleador eurocopa|apuestas goleadores eurocopa|apuestas goles asiaticos|apuestas golf|apuestas golf masters|apuestas golf pga|apuestas
granada barcelona|apuestas grand slam de tenis|apuestas gratis|apuestas gratis casino|apuestas gratis
con premios|apuestas gratis hoy|apuestas gratis para hoy|apuestas gratis por
registro|apuestas gratis puntos|apuestas gratis regalos|apuestas gratis sin deposito|apuestas gratis sin depósito|apuestas gratis sin ingreso|apuestas gratis sports|apuestas gratis y ganar premios|apuestas grupo a eurocopa|apuestas grupos eurocopa|apuestas handicap|apuestas handicap asiatico|apuestas handicap baloncesto|apuestas handicap
como funciona|apuestas handicap nba|apuestas handicap nfl|apuestas hipicas online|apuestas hípicas online|apuestas hipicas
venezuela|apuestas hockey|apuestas hockey hielo|apuestas hockey patines|apuestas hockey sobre
hielo|apuestas holanda argentina|apuestas holanda vs argentina|apuestas hoy|apuestas hoy champions|apuestas
hoy futbol|apuestas hoy nba|apuestas hoy pronosticos|apuestas hoy seguras|apuestas impuestos|apuestas inglaterra paises bajos|apuestas inter
barca|apuestas inter barcelona|apuestas juego|apuestas juegos|apuestas juegos en linea|apuestas juegos olimpicos|apuestas juegos olímpicos|apuestas juegos olimpicos baloncesto|apuestas juegos online|apuestas juegos virtuales|apuestas jugador sevilla|apuestas jugadores nba|apuestas kings league
americas|apuestas la liga|apuestas la liga española|apuestas la liga hoy|apuestas la liga santander|apuestas las vegas mlb|apuestas
las vegas nba|apuestas las vegas nfl|apuestas league of legends
mundial|apuestas legal|apuestas legales|apuestas legales en colombia|apuestas legales en españa|apuestas legales en estados unidos|apuestas legales españa|apuestas leganes betis|apuestas libertadores|apuestas licencia|apuestas liga 1 peru|apuestas
liga argentina|apuestas liga bbva pronosticos|apuestas liga de
campeones|apuestas liga de campeones de baloncesto|apuestas liga de campeones de hockey|apuestas liga españa|apuestas liga
española|apuestas liga santander pronosticos|apuestas ligas de futbol|apuestas linea|apuestas linea de gol|apuestas liverpool barcelona|apuestas liverpool real madrid|apuestas lol mundial|apuestas madrid|apuestas madrid arsenal|apuestas madrid atletico|apuestas
madrid atletico champions|apuestas madrid barca|apuestas
madrid barça|apuestas madrid barca hoy|apuestas madrid barca supercopa|apuestas madrid barcelona|apuestas madrid barsa|apuestas madrid bayern|apuestas madrid betis|apuestas
madrid borussia|apuestas madrid campeon champions|apuestas madrid celta|apuestas madrid city|apuestas madrid dortmund|apuestas madrid gana la liga|apuestas madrid gana liga|apuestas madrid hoy|apuestas
madrid liverpool|apuestas madrid osasuna|apuestas madrid sevilla|apuestas madrid
valencia|apuestas madrid vs arsenal|apuestas madrid vs barcelona|apuestas mallorca osasuna|apuestas mallorca real sociedad|apuestas
manchester athletic|apuestas manchester city real madrid|apuestas mas faciles de ganar|apuestas mas seguras|apuestas mas seguras para hoy|apuestas masters de golf|apuestas masters de tenis|apuestas maximo goleador eurocopa|apuestas maximo goleador mundial|apuestas mejor jugador eurocopa|apuestas mejores casinos online|apuestas
mexico|apuestas méxico|apuestas mexico polonia|apuestas méxico
polonia|apuestas mlb|apuestas mlb hoy|apuestas mlb las vegas|apuestas
mlb para hoy|apuestas mlb pronosticos|apuestas
mlb usa|apuestas mma ufc|apuestas momios|apuestas multiples|apuestas múltiples|apuestas multiples como funcionan|apuestas multiples el gordo|apuestas
multiples futbol|apuestas mundial|apuestas mundial 2026|apuestas mundial baloncesto|apuestas mundial balonmano|apuestas mundial brasil|apuestas mundial campeon|apuestas mundial ciclismo|apuestas mundial clubes|apuestas
mundial de baloncesto|apuestas mundial de ciclismo|apuestas mundial de clubes|apuestas mundial de futbol|apuestas mundial de fútbol|apuestas mundial de rugby|apuestas mundial f1|apuestas mundial
favoritos|apuestas mundial femenino|apuestas mundial formula 1|apuestas mundial futbol|apuestas mundial ganador|apuestas mundial lol|apuestas mundial moto
gp|apuestas mundial motogp|apuestas mundial rugby|apuestas mundial sub
17|apuestas mundiales|apuestas mundialistas|apuestas mvp eurocopa|apuestas mvp nba|apuestas mvp nfl|apuestas nacionales de colombia|apuestas nba|apuestas nba all star|apuestas nba
campeon|apuestas nba consejos|apuestas nba esta noche|apuestas nba finals|apuestas nba gratis|apuestas nba hoy|apuestas nba hoy jugadores|apuestas nba hoy pronosticos|apuestas nba para hoy|apuestas nba playoffs|apuestas nba pronosticos|apuestas nba pronósticos|apuestas
nba pronosticos hoy|apuestas nba tipster|apuestas nfl|apuestas
nfl hoy|apuestas nfl las vegas|apuestas nfl playoffs|apuestas
nfl pronosticos|apuestas nfl pronósticos|apuestas nfl semana 4|apuestas
nfl super bowl|apuestas nhl|apuestas nhl pronosticos|apuestas octavos eurocopa|apuestas ofertas|apuestas online|apuestas online
argentina|apuestas online argentina legal|apuestas online bono|apuestas online bono bienvenida|apuestas online boxeo|apuestas online caballos|apuestas online carreras de
caballos|apuestas online casino|apuestas online champions league|apuestas
online chile|apuestas online ciclismo|apuestas online colombia|apuestas online comparativa|apuestas online con paypal|apuestas online de caballos|apuestas online deportivas|apuestas online en argentina|apuestas online en peru|apuestas online espana|apuestas online españa|apuestas online esports|apuestas online foro|apuestas online futbol|apuestas online futbol españa|apuestas online golf|apuestas online gratis|apuestas online gratis sin deposito|apuestas
online juegos|apuestas online mexico|apuestas online mma|apuestas online
movil|apuestas online nba|apuestas online net|apuestas online nuevas|apuestas online opiniones|apuestas online paypal|apuestas online peru|apuestas online seguras|apuestas online sin dinero|apuestas online sin registro|apuestas online
tenis|apuestas online ufc|apuestas online uruguay|apuestas online venezuela|apuestas
open britanico golf|apuestas osasuna athletic|apuestas osasuna barcelona|apuestas
osasuna real madrid|apuestas osasuna sevilla|apuestas osasuna valencia|apuestas
over|apuestas over 2.5|apuestas over under|apuestas paginas|apuestas pago anticipado|apuestas paises bajos ecuador|apuestas paises bajos inglaterra|apuestas países bajos qatar|apuestas para boxeo|apuestas para
champions league|apuestas para el clasico|apuestas para el dia de hoy|apuestas para el mundial|apuestas
para el partido de hoy|apuestas para eurocopa|apuestas para europa league|apuestas para
futbol|apuestas para ganar|apuestas para ganar dinero|apuestas para ganar dinero facil|apuestas para ganar en la
ruleta|apuestas para ganar la champions|apuestas para
ganar la eurocopa|apuestas para ganar la europa league|apuestas para ganar la liga|apuestas para ganar siempre|apuestas para
hacer|apuestas para hoy|apuestas para hoy de futbol|apuestas
para hoy europa league|apuestas para hoy futbol|apuestas para
juegos|apuestas para la champions league|apuestas para la copa
del rey|apuestas para la eurocopa|apuestas para la europa league|apuestas para la final de la eurocopa|apuestas para
la nba hoy|apuestas para los partidos de hoy|apuestas
para partidos de hoy|apuestas para ufc|apuestas partido|apuestas partido aplazado|apuestas partido champions|apuestas partido colombia|apuestas partido españa marruecos|apuestas partido mundial|apuestas partido suspendido|apuestas
partidos|apuestas partidos champions league|apuestas partidos
csgo|apuestas partidos de futbol|apuestas
partidos de futbol hoy|apuestas partidos de hoy|apuestas partidos eurocopa|apuestas partidos futbol|apuestas partidos hoy|apuestas partidos mundial|apuestas paypal|apuestas peleas de
boxeo|apuestas peru|apuestas perú|apuestas peru brasil|apuestas peru chile|apuestas peru
paraguay|apuestas peru uruguay|apuestas peru vs chile|apuestas peru
vs colombia|apuestas pichichi eurocopa|apuestas plataforma|apuestas playoff|apuestas playoff ascenso|apuestas
playoff ascenso a primera|apuestas playoff nba|apuestas playoff segunda|apuestas
playoff segunda b|apuestas playoffs nba|apuestas
playoffs nfl|apuestas polonia argentina|apuestas por argentina|apuestas por internet mexico|apuestas por internet para ganar dinero|apuestas por
paypal|apuestas por ronda boxeo|apuestas por sistema|apuestas portugal uruguay|apuestas
pre partido|apuestas predicciones|apuestas predicciones futbol|apuestas
primera division|apuestas primera division españa|apuestas promociones|apuestas pronostico|apuestas pronosticos|apuestas pronosticos
deportivos|apuestas pronosticos deportivos tenis|apuestas pronosticos futbol|apuestas pronosticos gratis|apuestas
pronosticos nba|apuestas pronosticos tenis|apuestas prorroga|apuestas psg barca|apuestas psg barcelona|apuestas puntos por tarjetas|apuestas puntos tarjetas|apuestas
que aceptan paypal|apuestas que es handicap|apuestas que puedes hacer con tu novia|apuestas que siempre ganaras|apuestas que
significa|apuestas quien bajara a segunda|apuestas quién bajara a
segunda|apuestas quien gana el mundial|apuestas quien gana eurocopa|apuestas quien gana la champions|apuestas quien gana la eurocopa|apuestas quien gana la liga|apuestas quien ganara el
mundial|apuestas quién ganará el mundial|apuestas quien ganara la champions|apuestas quien ganara la eurocopa|apuestas quien ganara la liga|apuestas rayo
barcelona|apuestas real madrid|apuestas real madrid
arsenal|apuestas real madrid athletic|apuestas real madrid atletico|apuestas real
madrid atletico champions|apuestas real madrid
atletico de madrid|apuestas real madrid atlético de madrid|apuestas real madrid atletico madrid|apuestas
real madrid barcelona|apuestas real madrid bayern|apuestas real madrid betis|apuestas real
madrid borussia|apuestas real madrid campeon champions|apuestas real madrid
celta|apuestas real madrid champions|apuestas real madrid city|apuestas real madrid girona|apuestas real
madrid hoy|apuestas real madrid liverpool|apuestas real madrid manchester city|apuestas real madrid osasuna|apuestas real
madrid real sociedad|apuestas real madrid valencia|apuestas real madrid villarreal|apuestas real madrid vs arsenal|apuestas real madrid vs atletico|apuestas real madrid vs atlético|apuestas real madrid vs
atletico madrid|apuestas real madrid vs barcelona|apuestas real madrid vs betis|apuestas real madrid vs sevilla|apuestas real madrid vs valencia|apuestas real sociedad|apuestas real sociedad athletic|apuestas real sociedad barcelona|apuestas real sociedad betis|apuestas real sociedad psg|apuestas
real sociedad real madrid|apuestas real sociedad valencia|apuestas recomendadas hoy|apuestas regalo de bienvenida|apuestas registro|apuestas resultado exacto|apuestas resultados|apuestas resultados eurocopa|apuestas
retirada tenis|apuestas roma barcelona|apuestas roma sevilla|apuestas rugby|apuestas rugby mundial|apuestas rugby world cup|apuestas ruleta seguras|apuestas segunda|apuestas segunda b|apuestas segunda division|apuestas segunda
división|apuestas segunda division b|apuestas segunda division españa|apuestas seguras|apuestas seguras baloncesto|apuestas
seguras calculadora|apuestas seguras en la ruleta|apuestas seguras eurocopa|apuestas seguras foro|apuestas seguras futbol|apuestas seguras futbol hoy|apuestas seguras gratis|apuestas seguras hoy|apuestas seguras hoy futbol|apuestas seguras nba|apuestas seguras nba hoy|apuestas seguras para este fin de
semana|apuestas seguras para ganar dinero|apuestas seguras para hoy|apuestas seguras
para hoy fútbol|apuestas seguras para hoy pronósticos|apuestas seguras para mañana|apuestas seguras ruleta|apuestas seguras
telegram|apuestas seguras tenis|apuestas semifinales eurocopa|apuestas
senegal paises bajos|apuestas sevilla|apuestas sevilla athletic|apuestas sevilla atletico de madrid|apuestas sevilla
barcelona|apuestas sevilla betis|apuestas sevilla campeon liga|apuestas sevilla celta|apuestas sevilla gana
la liga|apuestas sevilla girona|apuestas sevilla inter|apuestas sevilla jugador|apuestas sevilla juventus|apuestas sevilla leganes|apuestas sevilla madrid|apuestas sevilla manchester united|apuestas sevilla osasuna|apuestas sevilla
real madrid|apuestas sevilla real sociedad|apuestas sevilla roma|apuestas sevilla valencia|apuestas significa|apuestas simples ejemplos|apuestas simples o combinadas|apuestas sin deposito|apuestas sin deposito inicial|apuestas sin deposito minimo|apuestas sin dinero|apuestas sin dinero real|apuestas sin empate|apuestas sin empate
que significa|apuestas sin ingreso minimo|apuestas sin registro|apuestas sistema|apuestas sistema calculadora|apuestas sistema como funciona|apuestas
sistema trixie|apuestas sociedad|apuestas sorteo copa del rey|apuestas stake|apuestas stake 10|apuestas stake 10 hoy|apuestas
super bowl favorito|apuestas super rugby|apuestas supercopa españa|apuestas superliga argentina|apuestas tarjeta
roja|apuestas tarjetas|apuestas tarjetas amarillas|apuestas tenis|apuestas tenis atp|apuestas tenis
consejos|apuestas tenis copa davis|apuestas tenis
de mesa|apuestas tenis de mesa pronosticos|apuestas tenis en vivo|apuestas tenis femenino|apuestas
tenis hoy|apuestas tenis itf|apuestas tenis pronosticos|apuestas tenis pronósticos|apuestas tenis retirada|apuestas tenis roland garros|apuestas tenis seguras|apuestas tenis wimbledon|apuestas tenis wta|apuestas tercera division|apuestas tercera division españa|apuestas tipos|apuestas tips|apuestas tipster|apuestas tipster para hoy|apuestas
topuria holloway cuotas|apuestas torneos de golf|apuestas torneos de tenis|apuestas
trucos|apuestas uefa champions league|apuestas uefa europa league|apuestas ufc|apuestas ufc chile|apuestas ufc como
funciona|apuestas ufc hoy|apuestas ufc ilia topuria|apuestas
ufc online|apuestas ufc pronósticos|apuestas ufc
telegram|apuestas ufc topuria|apuestas under over|apuestas
unionistas villarreal|apuestas uruguay|apuestas uruguay colombia|apuestas uruguay corea|apuestas uruguay
vs colombia|apuestas us open golf|apuestas us open tenis|apuestas valencia|apuestas
valencia barcelona|apuestas valencia betis|apuestas valencia
madrid|apuestas valencia real madrid|apuestas valladolid barcelona|apuestas valladolid valencia|apuestas valor
app|apuestas valor en directo|apuestas valor galgos|apuestas venezuela|apuestas venezuela argentina|apuestas venezuela
bolivia|apuestas venezuela ecuador|apuestas villarreal|apuestas villarreal athletic|apuestas villarreal barcelona|apuestas villarreal bayern|apuestas villarreal betis|apuestas villarreal liverpool|apuestas villarreal manchester|apuestas villarreal manchester
united|apuestas villarreal vs real madrid|apuestas virtuales|apuestas virtuales colombia|apuestas virtuales
futbol|apuestas virtuales sin dinero|apuestas vivo|apuestas vuelta a
españa|apuestas vuelta españa|apuestas william hill partidos de hoy|apuestas y casino|apuestas y casinos|apuestas y
juegos de azar|apuestas y pronosticos|apuestas y pronosticos de futbol|apuestas y pronosticos deportivos|apuestas y resultados|apuestas-deportivas|apuestas-deportivas.es pronosticos|arbitro nba
apuestas|argentina apuestas|argentina colombia apuestas|argentina croacia apuestas|argentina francia apuestas|argentina mexico apuestas|argentina peru apuestas|argentina
uruguay apuestas|argentina vs bolivia apuestas|argentina vs chile apuestas|argentina vs colombia apuestas|argentina vs francia apuestas|argentina vs.
colombia apuestas|asi se gana en las apuestas deportivas|asiatico apuestas|asiatico en apuestas|asiaticos apuestas|athletic barcelona apuestas|athletic manchester united apuestas|athletic osasuna apuestas|athletic
real madrid apuestas|atletico barcelona apuestas|atletico de madrid apuestas|atlético de madrid apuestas|atletico de madrid real madrid apuestas|atletico de madrid vs barcelona apuestas|atletico madrid real madrid apuestas|atletico madrid vs real madrid apuestas|atletico real madrid apuestas|atletico vs real madrid apuestas|avisador de cuotas apuestas|bajada de cuotas apuestas|baloncesto apuestas|barbastro barcelona apuestas|barca apuestas|barca bayern apuestas|barca inter
apuestas|barca madrid apuestas|barça madrid apuestas|barca vs atletico apuestas|barca vs madrid apuestas|barca vs real madrid apuestas|barcelona – real madrid apuestas|barcelona
apuestas|barcelona atletico apuestas|barcelona atletico de madrid apuestas|barcelona atletico madrid
apuestas|barcelona betis apuestas|barcelona casa
de apuestas|barcelona inter apuestas|barcelona psg apuestas|barcelona
real madrid apuestas|barcelona real sociedad
apuestas|barcelona sevilla apuestas|barcelona valencia apuestas|barcelona vs athletic
bilbao apuestas|barcelona vs atlético madrid apuestas|barcelona vs betis apuestas|barcelona
vs celta de vigo apuestas|barcelona vs espanyol apuestas|barcelona vs girona apuestas|barcelona vs madrid apuestas|barcelona vs real madrid apuestas|barcelona vs real
sociedad apuestas|barcelona vs sevilla apuestas|barcelona vs villarreal apuestas|base
de datos cuotas apuestas deportivas|bayern real
madrid apuestas|beisbol apuestas|best america apuestas|bet apuestas chile|bet apuestas en vivo|betis – chelsea apuestas|betis apuestas|betis barcelona apuestas|betis chelsea
apuestas|betis madrid apuestas|betis sevilla apuestas|betsson tu sitio de apuestas online|blog apuestas baloncesto|blog
apuestas ciclismo|blog apuestas nba|blog apuestas tenis|blog
de apuestas de tenis|bono apuestas|bono apuestas deportivas|bono apuestas deportivas sin deposito|bono apuestas
gratis|bono apuestas gratis sin deposito|bono apuestas sin deposito|bono bienvenida
apuestas|bono bienvenida apuestas deportivas|bono bienvenida apuestas
españa|bono bienvenida apuestas sin deposito|bono bienvenida apuestas sin depósito|bono bienvenida casa apuestas|bono bienvenida casa de apuestas|bono bienvenida marca
apuestas|bono casa apuestas|bono casa de apuestas|bono casa de apuestas sin ingreso|bono casas
de apuestas|bono de apuestas|bono de apuestas gratis sin deposito|bono de bienvenida apuestas|bono de bienvenida apuestas deportivas|bono de
bienvenida casa de apuestas|bono de bienvenida casas de apuestas|bono de casas de apuestas|bono de registro apuestas|bono
de registro apuestas deportivas|bono de registro casa de apuestas|bono gratis
apuestas|bono marca apuestas|bono por registro apuestas|bono por
registro apuestas deportivas|bono por registro casa de apuestas|bono registro apuestas|bono sin deposito apuestas|bono sin depósito apuestas|bono sin deposito apuestas
deportivas|bono sin depósito apuestas deportivas|bono sin deposito casa de apuestas|bono sin deposito marca apuestas|bono sin ingreso apuestas|bono sin ingreso
apuestas deportivas|bonos apuestas|bonos apuestas colombia|bonos apuestas
deportivas|bonos apuestas deportivas sin deposito|bonos apuestas gratis|bonos apuestas sin deposito|bonos apuestas sin depósito|bonos bienvenida apuestas|bonos bienvenida casas apuestas|bonos bienvenida casas de apuestas|bonos casa de
apuestas|bonos casas apuestas|bonos casas de apuestas|bonos casas de apuestas colombia|bonos
casas de apuestas deportivas|bonos casas de apuestas españa|bonos casas de apuestas nuevas|bonos casas de apuestas sin deposito|bonos
casas de apuestas sin depósito|bonos de apuestas|bonos de
apuestas deportivas|bonos de apuestas gratis|bonos de apuestas sin deposito|bonos de bienvenida apuestas|bonos
de bienvenida apuestas deportivas|bonos de bienvenida casa
de apuestas|bonos de bienvenida casas de apuestas|bonos de bienvenida de casas de apuestas|bonos de
bienvenida en casas de apuestas|bonos de
casas de apuestas|bonos de casas de apuestas sin deposito|bonos en casa de
apuestas|bonos en casas de apuestas sin deposito|bonos gratis apuestas|bonos gratis apuestas deportivas|bonos gratis casas de apuestas|bonos gratis sin deposito apuestas|bonos paginas de apuestas|bonos
registro casas de apuestas|bonos sin deposito apuestas|bonos
sin depósito apuestas|bonos sin deposito apuestas deportivas|bonos sin deposito
casas de apuestas|bot de apuestas deportivas gratis|boxeo
apuestas|brasil colombia apuestas|brasil peru apuestas|brasil vs colombia apuestas|buenas apuestas para hoy|buscador cuotas apuestas|buscador
de apuestas seguras|buscador de cuotas apuestas|buscador de cuotas
de apuestas|buscar apuestas seguras|caballos
apuestas|calculador de apuestas|calculador de cuotas apuestas|calculadora apuestas|calculadora apuestas combinadas|calculadora apuestas de sistema|calculadora
apuestas deportivas|calculadora apuestas deportivas seguras|calculadora apuestas multiples|calculadora apuestas segura|calculadora apuestas seguras|calculadora apuestas sistema|calculadora
apuestas yankee|calculadora arbitraje apuestas|calculadora
cubrir apuestas|calculadora cuotas apuestas|calculadora de apuestas|calculadora de apuestas combinadas|calculadora de
apuestas de futbol|calculadora de apuestas de sistema|calculadora de apuestas
deportivas|calculadora de apuestas multiples|calculadora de apuestas seguras|calculadora de apuestas sistema|calculadora de apuestas surebets|calculadora de arbitraje apuestas|calculadora de cuotas
apuestas|calculadora de cuotas de apuestas|calculadora para apuestas deportivas|calculadora poisson apuestas|calculadora poisson apuestas deportivas|calculadora poisson para
apuestas|calculadora scalping apuestas deportivas|calculadora sistema apuestas|calculadora stake
apuestas|calculadora trading apuestas|calcular apuestas|calcular
apuestas deportivas|calcular apuestas futbol|calcular apuestas sistema|calcular
cuotas apuestas|calcular cuotas apuestas combinadas|calcular cuotas apuestas deportivas|calcular
cuotas de apuestas|calcular ganancias apuestas deportivas|calcular momios apuestas|calcular probabilidad cuota apuestas|calcular stake apuestas|calcular unidades apuestas|calcular yield apuestas|calculo de apuestas|calculo de
apuestas deportivas|cambio de cuotas apuestas|campeon champions apuestas|campeon eurocopa apuestas|campeon liga apuestas|campeon nba apuestas|canales de
apuestas gratis|carrera de caballos apuestas|carrera de
caballos apuestas juego|carrera de caballos con apuestas|carrera de
galgos apuestas|carreras de caballos apuestas|carreras
de caballos apuestas online|carreras de caballos con apuestas|carreras de caballos juegos de apuestas|carreras de galgos apuestas|carreras de galgos apuestas online|carreras de galgos apuestas trucos|carreras galgos apuestas|casa apuestas
argentina|casa apuestas atletico de madrid|casa apuestas barcelona|casa apuestas betis|casa
apuestas bono bienvenida|casa apuestas bono gratis|casa apuestas bono sin deposito|casa apuestas cerca de mi|casa apuestas chile|casa apuestas
colombia|casa apuestas con mejores cuotas|casa apuestas
deportivas|casa apuestas españa|casa apuestas española|casa apuestas eurocopa|casa apuestas futbol|casa apuestas mejores cuotas|casa
apuestas mundial|casa apuestas nueva|casa apuestas nuevas|casa apuestas online|casa apuestas peru|casa apuestas valencia|casa de apuestas|casa de apuestas
10 euros gratis|casa de apuestas argentina|casa de apuestas atletico de
madrid|casa de apuestas baloncesto|casa de apuestas barcelona|casa de apuestas beisbol|casa
de apuestas betis|casa de apuestas bono|casa de apuestas bono bienvenida|casa de apuestas
bono de bienvenida|casa de apuestas bono gratis|casa de apuestas bono por registro|casa
de apuestas bono sin deposito|casa de apuestas boxeo|casa de apuestas caballos|casa de
apuestas carreras de caballos|casa de apuestas
cerca de mi|casa de apuestas cerca de mí|casa de apuestas champions league|casa de
apuestas chile|casa de apuestas ciclismo|casa de apuestas colombia|casa de apuestas con bono de
bienvenida|casa de apuestas con bono sin deposito|casa de apuestas con cuotas mas altas|casa de
apuestas con esports|casa de apuestas con las mejores cuotas|casa de
apuestas con licencia en españa|casa de apuestas con mejores cuotas|casa de apuestas
con pago anticipado|casa de apuestas con paypal|casa de apuestas
copa america|casa de apuestas de caballos|casa de apuestas de colombia|casa de apuestas de españa|casa de apuestas de
futbol|casa de apuestas de fútbol|casa de apuestas de futbol peru|casa de apuestas de peru|casa de apuestas del madrid|casa de apuestas del real madrid|casa de apuestas deportivas|casa de apuestas deportivas cerca de mi|casa de apuestas deportivas
en argentina|casa de apuestas deportivas en chile|casa de apuestas deportivas en colombia|casa de apuestas deportivas
en españa|casa de apuestas deportivas en madrid|casa de apuestas deportivas españa|casa de apuestas deportivas españolas|casa de apuestas deportivas madrid|casa de apuestas deportivas mexico|casa de apuestas deportivas online|casa de apuestas deportivas peru|casa de apuestas deposito
5 euros|casa de apuestas deposito minimo|casa de apuestas deposito minimo
1 euro|casa de apuestas depósito mínimo 1 euro|casa de apuestas en españa|casa de apuestas en linea|casa de apuestas en madrid|casa de apuestas en perú|casa de apuestas en vivo|casa de apuestas españa|casa de apuestas españa inglaterra|casa de apuestas
española|casa de apuestas españolas|casa de apuestas esports|casa de apuestas eurocopa|casa de apuestas europa league|casa de apuestas
f1|casa de apuestas formula 1|casa de apuestas futbol|casa de
apuestas ingreso minimo|casa de apuestas ingreso minimo 1 euro|casa de apuestas ingreso mínimo 1 euro|casa de apuestas legales|casa
de apuestas legales en colombia|casa de apuestas legales en españa|casa de apuestas libertadores|casa de apuestas liga española|casa de apuestas madrid|casa de
apuestas mas segura|casa de apuestas mejores|casa de apuestas
méxico|casa de apuestas minimo 5 euros|casa de apuestas mlb|casa de apuestas mundial|casa de apuestas nba|casa de apuestas nfl|casa de apuestas nueva|casa
de apuestas nuevas|casa de apuestas oficial del real madrid|casa de apuestas oficial real madrid|casa de
apuestas online|casa de apuestas online argentina|casa de
apuestas online chile|casa de apuestas online españa|casa de
apuestas online mexico|casa de apuestas online paraguay|casa de apuestas online peru|casa de apuestas online
usa|casa de apuestas online venezuela|casa de apuestas pago anticipado|casa de apuestas para boxeo|casa de apuestas para ufc|casa de apuestas peru|casa de apuestas perú|casa de apuestas peru online|casa
de apuestas por paypal|casa de apuestas promociones|casa de apuestas que regalan dinero|casa de apuestas real madrid|casa de apuestas regalo
de bienvenida|casa de apuestas sevilla|casa de apuestas sin dinero|casa de apuestas sin ingreso minimo|casa de apuestas sin licencia en españa|casa
de apuestas sin minimo de ingreso|casa de apuestas stake|casa de apuestas tenis|casa de
apuestas ufc|casa de apuestas valencia|casa de apuestas venezuela|casa de apuestas virtuales|casa de apuestas vive la suerte|casa oficial de apuestas del real madrid|casas apuestas asiaticas|casas apuestas bono sin deposito|casas apuestas bonos sin deposito|casas apuestas caballos|casas apuestas chile|casas
apuestas ciclismo|casas apuestas con licencia|casas apuestas con licencia en españa|casas apuestas deportivas|casas apuestas deportivas colombia|casas apuestas deportivas españa|casas apuestas deportivas españolas|casas apuestas deportivas nuevas|casas apuestas españa|casas apuestas españolas|casas apuestas esports|casas apuestas eurocopa|casas apuestas golf|casas apuestas ingreso minimo 5 euros|casas
apuestas legales|casas apuestas legales españa|casas
apuestas licencia|casas apuestas licencia españa|casas apuestas mexico|casas apuestas mundial|casas
apuestas nba|casas apuestas nuevas|casas apuestas nuevas
españa|casas apuestas ofertas|casas apuestas
online|casas apuestas paypal|casas apuestas peru|casas apuestas sin licencia|casas apuestas tenis|casas asiaticas
apuestas|casas de apuestas|casas de apuestas 5 euros|casas de apuestas app|casas
de apuestas argentinas|casas de apuestas asiaticas|casas de apuestas baloncesto|casas de apuestas barcelona|casas de apuestas
bono bienvenida|casas de apuestas bono de bienvenida|casas de apuestas bono por registro|casas de apuestas bono sin deposito|casas de apuestas bono sin ingreso|casas
de apuestas bonos|casas de apuestas bonos de bienvenida|casas de apuestas bonos gratis|casas de apuestas
bonos sin deposito|casas de apuestas boxeo|casas de apuestas caballos|casas de apuestas carreras
de caballos|casas de apuestas casino|casas de apuestas casino online|casas de apuestas cerca de
mi|casas de apuestas champions league|casas de apuestas
chile|casas de apuestas ciclismo|casas de apuestas colombia|casas de apuestas com|casas de apuestas con app|casas de apuestas con apuestas gratis|casas de apuestas con bono|casas
de apuestas con bono de bienvenida|casas de apuestas
con bono de registro|casas de apuestas con bono por registro|casas de apuestas
con bono sin deposito|casas de apuestas con bonos|casas
de apuestas con bonos gratis|casas de apuestas con bonos sin deposito|casas
de apuestas con deposito minimo|casas de apuestas con esports|casas de
apuestas con handicap asiatico|casas de apuestas con licencia|casas
de apuestas con licencia en españa|casas de apuestas con licencia españa|casas de apuestas con licencia española|casas de apuestas con mejores cuotas|casas de apuestas con pago anticipado|casas de apuestas con paypal|casas de apuestas con paypal en perú|casas de apuestas con promociones|casas
de apuestas con ruleta en vivo|casas de apuestas copa del rey|casas de apuestas de caballos|casas de apuestas de españa|casas de apuestas de futbol|casas de apuestas
de fútbol|casas de apuestas de peru|casas de apuestas deportivas|casas
de apuestas deportivas asiaticas|casas de apuestas deportivas colombia|casas de
apuestas deportivas comparativa|casas de apuestas deportivas con paypal|casas de apuestas deportivas en chile|casas de apuestas deportivas en españa|casas de apuestas deportivas en linea|casas de apuestas deportivas en madrid|casas
de apuestas deportivas en mexico|casas de apuestas deportivas
en peru|casas de apuestas deportivas en sevilla|casas de apuestas deportivas en valencia|casas de apuestas deportivas españa|casas de apuestas deportivas españolas|casas de apuestas deportivas legales|casas de
apuestas deportivas madrid|casas de apuestas deportivas mexico|casas
de apuestas deportivas nuevas|casas de apuestas deportivas online|casas de apuestas deportivas peru|casas de apuestas deportivas perú|casas de apuestas deposito minimo 1 euro|casas de apuestas depósito mínimo 1 euro|casas de apuestas dinero gratis|casas de apuestas en argentina|casas de apuestas en barcelona|casas
de apuestas en chile|casas de apuestas en colombia|casas de apuestas en españa|casas
de apuestas en españa online|casas de apuestas en linea|casas de apuestas en madrid|casas de apuestas en méxico|casas de apuestas en peru|casas de apuestas en perú|casas de apuestas en sevilla|casas de apuestas en uruguay|casas de apuestas en valencia|casas de apuestas
en venezuela|casas de apuestas equipos de futbol|casas
de apuestas españa|casas de apuestas españa alemania|casas de apuestas españa inglaterra|casas de apuestas españa licencia|casas de
apuestas españa nuevas|casas de apuestas españa online|casas de
apuestas española|casas de apuestas españolas|casas de apuestas españolas con licencia|casas de apuestas españolas
online|casas de apuestas esports|casas de apuestas eurocopa|casas de apuestas eurocopa 2024|casas
de apuestas europa league|casas de apuestas f1|casas de apuestas fisicas en barcelona|casas de
apuestas fisicas en españa|casas de apuestas formula 1|casas de apuestas fuera de españa|casas de apuestas futbol|casas de apuestas fútbol|casas de
apuestas futbol españa|casas de apuestas ganador eurocopa|casas de apuestas gratis|casas de apuestas ingreso minimo|casas de apuestas ingreso minimo 1 euro|casas
de apuestas ingreso minimo 5 euros|casas de
apuestas inter barcelona|casas de apuestas legales|casas de apuestas legales en colombia|casas de apuestas legales en españa|casas de apuestas legales en mexico|casas de apuestas legales españa|casas de apuestas legales mx|casas de apuestas licencia|casas de apuestas
licencia españa|casas de apuestas lista|casas de apuestas
madrid|casas de apuestas mas seguras|casas de apuestas
mejores bonos|casas de apuestas mejores cuotas|casas de apuestas mexico|casas de apuestas méxico|casas de
apuestas minimo 5 euros|casas de apuestas mlb|casas de apuestas mundial|casas de apuestas mundial baloncesto|casas de apuestas mundiales|casas de apuestas nba|casas de apuestas
no reguladas en españa|casas de apuestas nueva ley|casas de apuestas nuevas|casas de apuestas nuevas en colombia|casas de apuestas nuevas en españa|casas
de apuestas nuevas españa|casas de apuestas ofertas|casas de apuestas online|casas de apuestas online argentina|casas de apuestas online colombia|casas de apuestas online deportivas|casas de apuestas online ecuador|casas de apuestas online
en argentina|casas de apuestas online en chile|casas de
apuestas online en colombia|casas de apuestas online en españa|casas de apuestas online en mexico|casas de apuestas online
españa|casas de apuestas online mas fiables|casas de apuestas online mexico|casas de apuestas online nuevas|casas
de apuestas online peru|casas de apuestas online usa|casas de
apuestas online venezuela|casas de apuestas pago paypal|casas de
apuestas para ufc|casas de apuestas paypal|casas de apuestas peru bono sin deposito|casas de apuestas presenciales en españa|
Your comment is awaiting moderation.
(10 euros gratis apuestas|10 mejores casas de apuestas|10 trucos para ganar apuestas|15 euros gratis marca apuestas|1×2
apuestas|1×2 apuestas deportivas|1×2 apuestas que significa|1×2 en apuestas|1×2 en apuestas que significa|1×2 que significa en apuestas|5 euros gratis
apuestas|9 apuestas que siempre ganaras|a partir de cuanto se declara apuestas|actividades de juegos de azar
y apuestas|ad apuestas deportivas|aleksandre topuria ufc apuestas|algoritmo para ganar apuestas deportivas|america apuestas|análisis
nba apuestas|aplicacion android apuestas deportivas|aplicacion apuestas deportivas|aplicacion apuestas deportivas android|aplicación de apuestas online|aplicacion para hacer
apuestas|aplicacion para hacer apuestas de futbol|aplicación para hacer
apuestas de fútbol|aplicaciones apuestas deportivas
android|aplicaciones apuestas deportivas gratis|aplicaciones
de apuestas android|aplicaciones de apuestas de fútbol|aplicaciones
de apuestas deportivas|aplicaciones de apuestas deportivas peru|aplicaciones
de apuestas deportivas perú|aplicaciones de apuestas en colombia|aplicaciones
de apuestas gratis|aplicaciones de apuestas online|aplicaciones
de apuestas seguras|aplicaciones de apuestas sin dinero|aplicaciones para hacer apuestas|apostar
seguro apuestas deportivas|app android apuestas deportivas|app
apuestas|app apuestas android|app apuestas de futbol|app apuestas
deportivas|app apuestas deportivas android|app apuestas deportivas argentina|app apuestas deportivas colombia|app apuestas deportivas ecuador|app apuestas deportivas españa|app apuestas deportivas gratis|app
apuestas entre amigos|app apuestas futbol|app apuestas gratis|app apuestas sin dinero|app casa de apuestas|app casas de apuestas|app control apuestas|app de apuestas|app de apuestas android|app de apuestas casino|app de
apuestas colombia|app de apuestas con bono de bienvenida|app
de apuestas de futbol|app de apuestas deportivas|app de apuestas deportivas android|app de apuestas deportivas argentina|app de apuestas deportivas colombia|app de apuestas deportivas en españa|app de apuestas deportivas peru|app de
apuestas deportivas perú|app de apuestas deportivas sin dinero|app de apuestas
ecuador|app de apuestas en colombia|app de apuestas en españa|app de
apuestas en venezuela|app de apuestas futbol|app de apuestas gratis|app
de apuestas online|app de apuestas para android|app de
apuestas para ganar dinero|app de apuestas peru|app de apuestas reales|app de casas de apuestas|app
marca apuestas android|app moviles de apuestas|app para apuestas|app para apuestas de futbol|app para apuestas deportivas|app para apuestas deportivas en español|app para ganar
apuestas deportivas|app para hacer apuestas|app
para hacer apuestas deportivas|app para hacer apuestas entre amigos|app para llevar control de apuestas|app pronosticos apuestas deportivas|app versus apuestas|apps apuestas mundial|apps de
apuestas|apps de apuestas con bono de bienvenida|apps de apuestas de futbol|apps de apuestas deportivas peru|apps de apuestas mexico|apps
para apuestas|aprender a hacer apuestas deportivas|aprender hacer apuestas deportivas|apuesta del dia apuestas deportivas|apuestas 10 euros gratis|apuestas 100 seguras|apuestas 1×2|apuestas
1X2|apuestas 2 division|apuestas 3 division|apuestas a caballos|apuestas a carreras de caballos|apuestas a colombia|apuestas a corners|apuestas a ganar|apuestas a jugadores nba|apuestas a la baja|apuestas
a la nfl|apuestas al barcelona|apuestas al dia|apuestas al empate|apuestas al mundial|apuestas al tenis wta|apuestas alaves
barcelona|apuestas alcaraz hoy|apuestas alemania españa|apuestas alonso campeon del
mundo|apuestas altas y bajas|apuestas altas y bajas nfl|apuestas ambos equipos marcan|apuestas america|apuestas android|apuestas anillo
nba|apuestas antes del mundial|apuestas anticipadas|apuestas anticipadas nba|apuestas apps|apuestas arabia argentina|apuestas argentina|apuestas argentina campeon del mundo|apuestas argentina canada|apuestas
argentina colombia|apuestas argentina croacia|apuestas argentina españa|apuestas argentina francia|apuestas argentina francia cuanto paga|apuestas argentina francia
mundial|apuestas argentina gana el mundial|apuestas argentina gana mundial|apuestas argentina holanda|apuestas
argentina mexico|apuestas argentina méxico|apuestas argentina
mundial|apuestas argentina online|apuestas argentina
paises bajos|apuestas argentina polonia|apuestas argentina uruguay|apuestas argentina vs australia|apuestas argentina vs
colombia|apuestas argentina vs francia|apuestas
argentina vs peru|apuestas argentinas|apuestas arsenal real madrid|apuestas ascenso a
primera division|apuestas ascenso a segunda|apuestas asiaticas|apuestas asiatico|apuestas athletic|apuestas athletic atletico|apuestas athletic barça|apuestas athletic
barcelona|apuestas athletic betis|apuestas athletic manchester|apuestas athletic manchester united|apuestas athletic osasuna|apuestas athletic
real|apuestas athletic real madrid|apuestas athletic real sociedad|apuestas athletic real sociedad final|apuestas athletic roma|apuestas athletic sevilla|apuestas athletic valencia|apuestas atletico|apuestas atletico barcelona|apuestas atletico
barsa|apuestas atletico campeon champions|apuestas atletico campeon de liga|apuestas atlético
copenhague|apuestas atletico de madrid|apuestas atlético
de madrid|apuestas atletico de madrid barcelona|apuestas atletico de
madrid gana la liga|apuestas atletico de madrid real madrid|apuestas atlético de madrid real madrid|apuestas atletico de madrid vs barcelona|apuestas atletico
madrid|apuestas atletico madrid real madrid|apuestas atletico madrid vs barcelona|apuestas atletico real madrid|apuestas atletico real madrid champions|apuestas atletismo|apuestas bajas|apuestas baloncesto|apuestas baloncesto acb|apuestas baloncesto handicap|apuestas baloncesto hoy|apuestas baloncesto juegos olimpicos|apuestas baloncesto nba|apuestas baloncesto pronostico|apuestas baloncesto pronósticos|apuestas baloncesto prorroga|apuestas barca|apuestas barca athletic|apuestas barca atletico|apuestas
barca bayern|apuestas barca bayern munich|apuestas barca girona|apuestas barca
hoy|apuestas barça hoy|apuestas barca inter|apuestas barca
juventus|apuestas barca madrid|apuestas barça madrid|apuestas barca real madrid|apuestas barca
vs juve|apuestas barca vs madrid|apuestas barca vs psg|apuestas barcelona|apuestas
barcelona alaves|apuestas barcelona athletic|apuestas barcelona atletico|apuestas barcelona atletico de madrid|apuestas barcelona
atlético de madrid|apuestas barcelona atletico madrid|apuestas barcelona bayern|apuestas barcelona betis|apuestas barcelona
campeon de liga|apuestas barcelona celta|apuestas barcelona espanyol|apuestas
barcelona gana la champions|apuestas barcelona girona|apuestas barcelona granada|apuestas barcelona hoy|apuestas barcelona inter|apuestas barcelona madrid|apuestas
barcelona osasuna|apuestas barcelona psg|apuestas barcelona real madrid|apuestas barcelona real sociedad|apuestas barcelona sevilla|apuestas barcelona valencia|apuestas barcelona villarreal|apuestas barcelona vs atletico madrid|apuestas barcelona
vs madrid|apuestas barcelona vs real madrid|apuestas barsa madrid|apuestas basket hoy|apuestas bayern barcelona|apuestas bayern vs barcelona|apuestas beisbol|apuestas béisbol|apuestas beisbol mlb|apuestas beisbol pronosticos|apuestas beisbol venezolano|apuestas betis|apuestas betis – chelsea|apuestas
betis barcelona|apuestas betis chelsea|apuestas betis fiorentina|apuestas betis
girona|apuestas betis madrid|apuestas betis mallorca|apuestas betis
real madrid|apuestas betis real sociedad|apuestas betis sevilla|apuestas betis valencia|apuestas betis valladolid|apuestas betis
vs valencia|apuestas betplay hoy colombia|apuestas betsson peru|apuestas bienvenida|apuestas billar online|apuestas
bolivia vs colombia|apuestas bono|apuestas bono bienvenida|apuestas bono de bienvenida|apuestas bono de bienvenida
sin deposito|apuestas bono gratis|apuestas
bono sin deposito|apuestas bonos sin deposito|apuestas borussia real madrid|apuestas boxeo|apuestas boxeo
de campeonato|apuestas boxeo españa|apuestas boxeo español|apuestas boxeo femenino olimpiadas|apuestas boxeo hoy|apuestas boxeo online|apuestas brasil colombia|apuestas brasil peru|apuestas brasil uruguay|apuestas brasil vs colombia|apuestas brasil
vs peru|apuestas caballos|apuestas caballos colocado|apuestas caballos españa|apuestas
caballos hipodromo|apuestas caballos hoy|apuestas caballos madrid|apuestas caballos online|apuestas caballos sanlucar de
barrameda|apuestas caballos zarzuela|apuestas calculador|apuestas campeon|apuestas campeon champions|apuestas campeón champions|apuestas campeon champions 2025|apuestas campeon champions league|apuestas campeon conference
league|apuestas campeon copa america|apuestas campeon copa
del rey|apuestas campeon de champions|apuestas campeon de la champions|apuestas campeon de liga|apuestas campeon del
mundo|apuestas campeon eurocopa|apuestas campeón eurocopa|apuestas campeon europa league|apuestas campeon f1|apuestas campeon f1 2025|apuestas campeon formula 1|apuestas campeon libertadores|apuestas campeon liga|apuestas campeon liga bbva|apuestas campeon liga española|apuestas campeon liga santander|apuestas campeon motogp 2025|apuestas campeon mundial|apuestas campeón mundial|apuestas campeon mundial baloncesto|apuestas campeon nba|apuestas campeón nba|apuestas
campeon premier|apuestas campeon premier league|apuestas campeon roland garros|apuestas campeonato f1|apuestas campeonatos de futbol|apuestas carrera de caballos|apuestas
carrera de caballos hoy|apuestas carrera de caballos nocturnas|apuestas carrera de galgos fin de semana|apuestas
carrera de galgos hoy|apuestas carrera de galgos nocturnas|apuestas
carreras caballos|apuestas carreras caballos sanlucar|apuestas carreras de caballos|apuestas carreras de caballos
en directo|apuestas carreras de caballos en vivo|apuestas carreras
de caballos españa|apuestas carreras de caballos hoy|apuestas carreras
de caballos nacionales|apuestas carreras de caballos nocturnas|apuestas carreras de caballos online|apuestas carreras de caballos sanlucar|apuestas carreras de caballos sanlúcar|apuestas carreras de galgos|apuestas carreras de galgos en vivo|apuestas carreras de galgos nocturnas|apuestas carreras de galgos pre partido|apuestas casino|apuestas casino barcelona|apuestas casino futbol|apuestas casino gran madrid|apuestas casino
gratis|apuestas casino madrid|apuestas casino online|apuestas casino online argentina|apuestas
casinos|apuestas casinos online|apuestas celta|apuestas celta barcelona|apuestas celta betis|apuestas celta eibar|apuestas celta espanyol|apuestas celta
granada|apuestas celta madrid|apuestas celta manchester|apuestas celta real madrid|apuestas champion league|apuestas champions foro|apuestas champions hoy|apuestas champions league|apuestas champions league – pronósticos|apuestas champions league 2025|apuestas champions league hoy|apuestas champions league pronosticos|apuestas champions league pronósticos|apuestas champions
pronosticos|apuestas chelsea barcelona|apuestas chelsea betis|apuestas chile|apuestas chile peru|apuestas chile venezuela|apuestas chile vs colombia|apuestas chile vs uruguay|apuestas ciclismo|apuestas ciclismo
en vivo|apuestas ciclismo femenino|apuestas ciclismo tour francia|apuestas ciclismo vuelta|apuestas
ciclismo vuelta a españa|apuestas ciclismo vuelta españa|apuestas city madrid|apuestas city real madrid|apuestas clasico|apuestas clasico español|apuestas clasico
real madrid barcelona|apuestas clasificacion mundial|apuestas colombia|apuestas
colombia argentina|apuestas colombia brasil|apuestas colombia paraguay|apuestas colombia uruguay|apuestas colombia vs argentina|apuestas colombia vs brasil|apuestas combinadas|apuestas combinadas
como funcionan|apuestas combinadas de futbol|apuestas combinadas de fútbol|apuestas
combinadas foro|apuestas combinadas futbol|apuestas combinadas hoy|apuestas combinadas mismo partido|apuestas
combinadas mundial|apuestas combinadas nba|apuestas combinadas para esta semana|apuestas combinadas para
hoy|apuestas combinadas para mañana|apuestas combinadas
pronosticos|apuestas combinadas recomendadas|apuestas combinadas seguras|apuestas combinadas seguras para hoy|apuestas combinadas seguras para mañana|apuestas como ganar|apuestas comparador|apuestas con bono de
bienvenida|apuestas con dinero ficticio|apuestas con dinero real|apuestas con dinero virtual|apuestas con handicap|apuestas con handicap asiatico|apuestas con handicap
baloncesto|apuestas con mas probabilidades de ganar|apuestas con paypal|apuestas
con tarjeta de credito|apuestas con tarjeta de debito|apuestas consejos|apuestas copa|apuestas
copa africa|apuestas copa america|apuestas copa américa|apuestas
copa argentina|apuestas copa brasil|apuestas copa davis|apuestas copa de
europa|apuestas copa del mundo|apuestas copa del rey|apuestas
copa del rey baloncesto|apuestas copa del rey final|apuestas
copa del rey futbol|apuestas copa del rey ganador|apuestas copa del rey hoy|apuestas copa del rey pronosticos|apuestas copa del rey pronósticos|apuestas copa europa|apuestas copa italia|apuestas copa libertadores|apuestas
copa mundial de hockey|apuestas copa rey|apuestas copa sudamericana|apuestas corners|apuestas corners hoy|apuestas croacia argentina|apuestas cuartos eurocopa|apuestas cuotas|apuestas cuotas
altas|apuestas cuotas bajas|apuestas de 1 euro|apuestas
de baloncesto|apuestas de baloncesto hoy|apuestas de baloncesto nba|apuestas de baloncesto para hoy|apuestas de beisbol|apuestas
de beisbol para hoy|apuestas de blackjack en linea|apuestas de boxeo|apuestas de boxeo canelo|apuestas de boxeo en las vegas|apuestas de boxeo
hoy|apuestas de boxeo online|apuestas de caballo|apuestas de
caballos|apuestas de caballos como funciona|apuestas de caballos como
se juega|apuestas de caballos en colombia|apuestas de caballos en españa|apuestas de caballos en linea|apuestas de caballos españa|apuestas de caballos ganador y colocado|apuestas de caballos
internacionales|apuestas de caballos juegos|apuestas de caballos online|apuestas de caballos
online en venezuela|apuestas de caballos por internet|apuestas de caballos pronosticos|apuestas de caballos
pronósticos|apuestas de carrera de caballos|apuestas de carreras de caballos|apuestas
de carreras de caballos online|apuestas de casino|apuestas de casino online|apuestas de casino
por internet|apuestas de champions league|apuestas de ciclismo|apuestas de colombia|apuestas de copa america|apuestas de corners|apuestas de
deportes en linea|apuestas de deportes online|apuestas de dinero|apuestas
de esports|apuestas de eurocopa|apuestas de europa league|apuestas
de f1|apuestas de formula 1|apuestas de futbol|apuestas de fútbol|apuestas de futbol
app|apuestas de futbol argentina|apuestas de futbol colombia|apuestas de futbol en colombia|apuestas de futbol en directo|apuestas de futbol en linea|apuestas de futbol en vivo|apuestas de futbol español|apuestas de futbol gratis|apuestas de futbol
hoy|apuestas de futbol mundial|apuestas de futbol online|apuestas de
fútbol online|apuestas de futbol para hoy|apuestas
de fútbol para hoy|apuestas de futbol para hoy seguras|apuestas de futbol
para mañana|apuestas de futbol peru|apuestas de futbol pronosticos|apuestas de fútbol pronósticos|apuestas de futbol seguras|apuestas de futbol seguras para hoy|apuestas
de futbol sin dinero|apuestas de galgos|apuestas de galgos como ganar|apuestas de galgos en directo|apuestas de galgos online|apuestas
de galgos trucos|apuestas de golf|apuestas de hockey|apuestas de hockey sobre hielo|apuestas de hoy|apuestas de hoy seguras|apuestas de juego|apuestas
de juegos|apuestas de juegos deportivos|apuestas
de juegos online|apuestas de la champions league|apuestas de la copa américa|apuestas de la eurocopa|apuestas de la europa league|apuestas de
la liga|apuestas de la liga bbva|apuestas de la liga española|apuestas de
la nba|apuestas de la nfl|apuestas de la ufc|apuestas de mlb|apuestas de nba|apuestas de nba para hoy|apuestas de partidos|apuestas de partidos
de futbol|apuestas de peleas ufc|apuestas de perros en vivo|apuestas de perros virtuales|apuestas de peru|apuestas de sistema|apuestas de sistema como funciona|apuestas de sistema explicacion|apuestas de sistema explicación|apuestas de tenis|apuestas de tenis de mesa|apuestas de tenis en directo|apuestas de tenis
hoy|apuestas de tenis para hoy|apuestas de tenis pronosticos|apuestas de tenis seguras|apuestas de todo tipo|apuestas de ufc|apuestas
de ufc hoy|apuestas del boxeo|apuestas del clasico|apuestas del clasico real madrid barca|apuestas del dia|apuestas del día|apuestas
del dia de hoy|apuestas del dia deportivas|apuestas del dia futbol|apuestas del mundial|apuestas del partido
de hoy|apuestas del real madrid|apuestas del rey|apuestas del sistema|apuestas deporte|apuestas deportes|apuestas
deportiva|apuestas deportivas|apuestas deportivas 1 euro|apuestas deportivas 10 euros gratis|apuestas deportivas 100
seguras|apuestas deportivas 1×2|apuestas deportivas android|apuestas deportivas app|apuestas deportivas
apps|apuestas deportivas argentina|apuestas deportivas argentina futbol|apuestas deportivas argentina legal|apuestas deportivas atletico de madrid|apuestas deportivas baloncesto|apuestas deportivas barca madrid|apuestas deportivas barcelona|apuestas deportivas beisbol|apuestas deportivas bono|apuestas deportivas bono bienvenida|apuestas deportivas
bono de bienvenida|apuestas deportivas bono sin deposito|apuestas deportivas bonos de bienvenida|apuestas deportivas boxeo|apuestas deportivas caballos|apuestas deportivas
calculadora|apuestas deportivas campeon liga|apuestas deportivas casino|apuestas deportivas casino barcelona|apuestas deportivas casino online|apuestas deportivas cerca de mi|apuestas deportivas champions league|apuestas deportivas chile|apuestas
deportivas ciclismo|apuestas deportivas colombia|apuestas
deportivas com|apuestas deportivas com foro|apuestas deportivas com pronosticos|apuestas deportivas
combinadas|apuestas deportivas combinadas para hoy|apuestas deportivas como se juega|apuestas deportivas comparador|apuestas
deportivas con bono gratis|apuestas deportivas con bonos gratis|apuestas deportivas con dinero ficticio|apuestas deportivas con paypal|apuestas
deportivas con puntos virtuales|apuestas deportivas consejos|apuestas deportivas consejos para ganar|apuestas deportivas copa
america|apuestas deportivas copa del rey|apuestas deportivas
copa libertadores|apuestas deportivas copa mundial|apuestas deportivas corners|apuestas deportivas cual es la mejor|apuestas deportivas cuotas
altas|apuestas deportivas de baloncesto|apuestas deportivas de boxeo|apuestas deportivas de colombia|apuestas deportivas de futbol|apuestas
deportivas de nba|apuestas deportivas de nhl|apuestas deportivas de peru|apuestas deportivas de tenis|apuestas deportivas del dia|apuestas deportivas
dinero ficticio|apuestas deportivas directo|apuestas deportivas
doble oportunidad|apuestas deportivas en argentina|apuestas
deportivas en chile|apuestas deportivas en colombia|apuestas
deportivas en directo|apuestas deportivas en españa|apuestas deportivas
en español|apuestas deportivas en linea|apuestas deportivas en línea|apuestas deportivas en peru|apuestas deportivas en perú|apuestas deportivas en sevilla|apuestas deportivas
en uruguay|apuestas deportivas en vivo|apuestas deportivas es|apuestas deportivas es pronosticos|apuestas deportivas españa|apuestas deportivas españolas|apuestas
deportivas esports|apuestas deportivas estadisticas|apuestas deportivas
estrategias|apuestas deportivas estrategias seguras|apuestas deportivas eurocopa|apuestas deportivas europa league|apuestas deportivas f1|apuestas deportivas faciles
de ganar|apuestas deportivas formula 1|apuestas deportivas foro|apuestas deportivas foro futbol|apuestas
deportivas foro tenis|apuestas deportivas francia argentina|apuestas deportivas
futbol|apuestas deportivas fútbol|apuestas deportivas futbol argentino|apuestas deportivas futbol colombia|apuestas deportivas futbol español|apuestas deportivas gana|apuestas deportivas ganadas|apuestas deportivas ganar dinero seguro|apuestas
deportivas gane|apuestas deportivas golf|apuestas deportivas gratis|apuestas deportivas gratis con premios|apuestas deportivas gratis hoy|apuestas deportivas gratis sin deposito|apuestas deportivas handicap|apuestas deportivas handicap
asiatico|apuestas deportivas hoy|apuestas deportivas impuestos|apuestas deportivas interior argentina|apuestas deportivas juegos olimpicos|apuestas deportivas la liga|apuestas deportivas
legales|apuestas deportivas legales en colombia|apuestas deportivas libres de impuestos|apuestas deportivas licencia españa|apuestas deportivas liga española|apuestas deportivas listado|apuestas deportivas listado clasico|apuestas deportivas madrid|apuestas deportivas mas seguras|apuestas deportivas mejor pagadas|apuestas deportivas mejores|apuestas deportivas mejores app|apuestas deportivas mejores casas|apuestas
deportivas mejores cuotas|apuestas deportivas mejores paginas|apuestas deportivas mexico|apuestas deportivas méxico|apuestas deportivas mlb|apuestas deportivas mlb hoy|apuestas deportivas multiples|apuestas
deportivas mundial|apuestas deportivas murcia|apuestas deportivas nba|apuestas deportivas nba hoy|apuestas deportivas nfl|apuestas deportivas nhl|apuestas deportivas nuevas|apuestas deportivas ofertas|apuestas deportivas online|apuestas deportivas
online argentina|apuestas deportivas online chile|apuestas deportivas online colombia|apuestas
deportivas online en colombia|apuestas deportivas online españa|apuestas deportivas online mexico|apuestas deportivas online paypal|apuestas deportivas online peru|apuestas deportivas
online por internet|apuestas deportivas pago paypal|apuestas
deportivas para ganar dinero|apuestas deportivas para hoy|apuestas deportivas para hoy pronosticos|apuestas deportivas partido suspendido|apuestas deportivas
partidos de hoy|apuestas deportivas paypal|apuestas deportivas peru|apuestas deportivas perú|apuestas deportivas peru vs ecuador|apuestas deportivas predicciones|apuestas deportivas promociones|apuestas deportivas pronostico|apuestas deportivas pronóstico|apuestas deportivas pronostico hoy|apuestas deportivas pronosticos|apuestas deportivas pronósticos|apuestas deportivas pronosticos expertos|apuestas deportivas pronosticos gratis|apuestas deportivas pronosticos nba|apuestas deportivas pronosticos tenis|apuestas deportivas
que aceptan paypal|apuestas deportivas real madrid|apuestas deportivas regalo bienvenida|apuestas deportivas resultado
exacto|apuestas deportivas resultados|apuestas deportivas rugby|apuestas deportivas seguras|apuestas
deportivas seguras foro|apuestas deportivas seguras hoy|apuestas deportivas seguras para hoy|apuestas deportivas seguras telegram|apuestas deportivas sevilla|apuestas deportivas simulador eurocopa|apuestas deportivas sin deposito|apuestas deportivas sin deposito inicial|apuestas deportivas sin dinero|apuestas deportivas sin dinero real|apuestas deportivas sin registro|apuestas deportivas stake|apuestas deportivas stake 10|apuestas deportivas telegram españa|apuestas deportivas tenis|apuestas deportivas tenis de mesa|apuestas deportivas tenis foro|apuestas
deportivas tenis hoy|apuestas deportivas tips|apuestas deportivas tipster|apuestas deportivas ufc|apuestas deportivas uruguay|apuestas deportivas valencia|apuestas deportivas valencia barcelona|apuestas deportivas venezuela|apuestas deportivas virtuales|apuestas deportivas y casino|apuestas deportivas y casino online|apuestas deportivas.com|apuestas deportivas.com foro|apuestas
deportivas.es|apuestas deportivos pronosticos|apuestas deposito
minimo 1 euro|apuestas descenso a segunda|apuestas
descenso a segunda b|apuestas descenso la liga|apuestas descenso primera
division|apuestas descenso segunda|apuestas dia|apuestas diarias
seguras|apuestas dinero|apuestas dinero ficticio|apuestas
dinero real|apuestas dinero virtual|apuestas directas|apuestas directo|apuestas directo futbol|apuestas division de honor juvenil|apuestas dnb|apuestas
doble oportunidad|apuestas doble resultado|apuestas dobles|apuestas dobles y triples|apuestas dortmund
barcelona|apuestas draft nba|apuestas draft nfl|apuestas ecuador
vs argentina|apuestas ecuador vs venezuela|apuestas egipto
uruguay|apuestas el clasico|apuestas elecciones venezuela|apuestas
empate|apuestas en baloncesto|apuestas en barcelona|apuestas en beisbol|apuestas en boxeo|apuestas en caballos|apuestas en carreras de caballos|apuestas en casino|apuestas en casino online|apuestas
en casinos|apuestas en casinos online|apuestas en chile|apuestas en ciclismo|apuestas en colombia|apuestas
en colombia de futbol|apuestas en directo|apuestas
en directo futbol|apuestas en directo pronosticos|apuestas en el futbol|apuestas en el tenis|apuestas en españa|apuestas en esports|apuestas en eventos deportivos virtuales|apuestas en golf|apuestas
en juegos|apuestas en la champions league|apuestas en la eurocopa|apuestas en la liga|apuestas
en la nba|apuestas en la nfl|apuestas en las vegas mlb|apuestas
en las vegas nfl|apuestas en linea|apuestas en línea|apuestas
en linea argentina|apuestas en linea boxeo|apuestas en linea chile|apuestas en linea
colombia|apuestas en línea de fútbol|apuestas en linea deportivas|apuestas en linea españa|apuestas
en linea estados unidos|apuestas en linea futbol|apuestas en linea mexico|apuestas en línea méxico|apuestas en linea mundial|apuestas
en linea peru|apuestas en linea usa|apuestas en los esports|apuestas en madrid|apuestas en méxico|apuestas en mexico online|apuestas en nba|apuestas
en partidos de futbol|apuestas en partidos de futbol en vivo|apuestas en partidos de tenis en directo|apuestas en perú|apuestas en sevilla|apuestas en sistema|apuestas en stake|apuestas en tenis|apuestas en tenis de mesa|apuestas en valencia|apuestas en vivo|apuestas en vivo argentina|apuestas en vivo casino|apuestas en vivo futbol|apuestas
en vivo fútbol|apuestas en vivo nba|apuestas en vivo peru|apuestas en vivo tenis|apuestas en vivo ufc|apuestas equipo mbappe|apuestas
equipos de futbol|apuestas españa|apuestas españa alemania|apuestas españa alemania eurocopa|apuestas españa croacia|apuestas españa eurocopa|apuestas españa francia|apuestas españa francia eurocopa|apuestas españa gana el mundial|apuestas españa gana eurocopa|apuestas españa gana mundial|apuestas españa georgia|apuestas españa holanda|apuestas españa
inglaterra|apuestas españa inglaterra cuotas|apuestas españa
inglaterra eurocopa|apuestas españa italia|apuestas españa mundial|apuestas españa paises bajos|apuestas
español|apuestas español oviedo|apuestas espanyol barcelona|apuestas espanyol betis|apuestas espanyol villarreal|apuestas esport|apuestas esports|apuestas esports colombia|apuestas esports españa|apuestas esports fifa|apuestas esports
gratis|apuestas esports lol|apuestas esports peru|apuestas esports valorant|apuestas estadisticas|apuestas estrategias|apuestas euro|apuestas
euro copa|apuestas eurocopa|apuestas eurocopa campeon|apuestas eurocopa españa|apuestas eurocopa favoritos|apuestas eurocopa femenina|apuestas eurocopa final|apuestas eurocopa ganador|apuestas eurocopa hoy|apuestas
eurocopa sub 21|apuestas euroliga baloncesto|apuestas euroliga pronosticos|apuestas europa league|apuestas europa league hoy|apuestas europa league pronosticos|apuestas europa
league pronósticos|apuestas euros|apuestas f1 abu dhabi|apuestas f1
bahrein|apuestas f1 canada|apuestas f1 china|apuestas f1 cuotas|apuestas
f1 hoy|apuestas f1 las vegas|apuestas f1 miami|apuestas
f1 monaco|apuestas faciles de ganar|apuestas fáciles de ganar|apuestas faciles para ganar|apuestas favoritas|apuestas favorito champions|apuestas favoritos champions|apuestas
favoritos eurocopa|apuestas favoritos mundial|apuestas fc barcelona|apuestas final champions cuotas|apuestas final champions league|apuestas final champions peru|apuestas final copa|apuestas final copa america|apuestas final
copa de europa|apuestas final copa del rey|apuestas final
copa europa|apuestas final copa libertadores|apuestas final copa rey|apuestas final de copa|apuestas final de copa del rey|apuestas final del mundial|apuestas final euro|apuestas final eurocopa|apuestas final europa league|apuestas final libertadores|apuestas
final mundial|apuestas final nba|apuestas final rugby|apuestas final
uefa europa league|apuestas final.mundial|apuestas finales de conferencia
nfl|apuestas finales nba|apuestas fiorentina betis|apuestas formula|apuestas formula 1|apuestas fórmula 1|apuestas fórmula 1 pronósticos|apuestas formula uno|apuestas
foro|apuestas foro nba|apuestas francia argentina|apuestas francia españa|apuestas futbol|apuestas
fútbol|apuestas futbol americano|apuestas futbol americano nfl|apuestas futbol argentina|apuestas futbol argentino|apuestas futbol champions
league|apuestas futbol chile|apuestas futbol colombia|apuestas futbol consejos|apuestas futbol en directo|apuestas fútbol en directo|apuestas futbol en vivo|apuestas fútbol en vivo|apuestas futbol españa|apuestas futbol español|apuestas fútbol español|apuestas futbol eurocopa|apuestas futbol femenino|apuestas futbol
foro|apuestas futbol gratis|apuestas futbol hoy|apuestas fútbol hoy|apuestas
futbol juegos olimpicos|apuestas futbol mexico|apuestas futbol
mundial|apuestas futbol online|apuestas futbol para hoy|apuestas futbol peru|apuestas futbol
pronosticos|apuestas futbol sala|apuestas futbol telegram|apuestas futbol virtual|apuestas galgos|apuestas galgos en directo|apuestas galgos hoy|apuestas galgos online|apuestas galgos pronosticos|apuestas galgos trucos|apuestas gana|apuestas gana colombia|apuestas gana resultados|apuestas ganadas|apuestas ganadas hoy|apuestas ganador champions league|apuestas ganador copa america|apuestas
ganador copa del rey|apuestas ganador copa del rey baloncesto|apuestas ganador
copa libertadores|apuestas ganador de la eurocopa|apuestas ganador de la liga|apuestas ganador del mundial|apuestas ganador eurocopa|apuestas ganador europa league|apuestas ganador f1|apuestas ganador la liga|apuestas ganador
liga española|apuestas ganador mundial|apuestas ganador
mundial baloncesto|apuestas ganador mundial f1|apuestas ganador nba|apuestas
ganadores eurocopa|apuestas ganadores mundial|apuestas ganar champions|apuestas ganar eurocopa|apuestas ganar liga|apuestas ganar mundial|apuestas ganar nba|apuestas getafe valencia|apuestas ghana
uruguay|apuestas girona|apuestas girona athletic|apuestas girona betis|apuestas girona campeon de liga|apuestas girona campeon liga|apuestas girona gana la liga|apuestas girona real madrid|apuestas girona
real sociedad|apuestas goleador eurocopa|apuestas goleadores eurocopa|apuestas goles asiaticos|apuestas golf|apuestas golf masters|apuestas golf pga|apuestas granada barcelona|apuestas grand slam de
tenis|apuestas gratis|apuestas gratis casino|apuestas gratis con premios|apuestas gratis hoy|apuestas gratis para hoy|apuestas gratis por registro|apuestas gratis puntos|apuestas gratis regalos|apuestas gratis sin deposito|apuestas gratis sin depósito|apuestas gratis sin ingreso|apuestas
gratis sports|apuestas gratis y ganar premios|apuestas grupo a eurocopa|apuestas grupos eurocopa|apuestas handicap|apuestas
handicap asiatico|apuestas handicap baloncesto|apuestas handicap como
funciona|apuestas handicap nba|apuestas handicap nfl|apuestas hipicas online|apuestas hípicas online|apuestas hipicas venezuela|apuestas hockey|apuestas hockey hielo|apuestas hockey patines|apuestas hockey sobre hielo|apuestas holanda argentina|apuestas
holanda vs argentina|apuestas hoy|apuestas hoy champions|apuestas hoy futbol|apuestas hoy nba|apuestas hoy pronosticos|apuestas hoy seguras|apuestas impuestos|apuestas inglaterra
paises bajos|apuestas inter barca|apuestas inter barcelona|apuestas juego|apuestas juegos|apuestas
juegos en linea|apuestas juegos olimpicos|apuestas juegos olímpicos|apuestas juegos
olimpicos baloncesto|apuestas juegos online|apuestas juegos virtuales|apuestas jugador sevilla|apuestas jugadores nba|apuestas kings league americas|apuestas la liga|apuestas la liga española|apuestas la liga
hoy|apuestas la liga santander|apuestas las vegas mlb|apuestas las vegas nba|apuestas
las vegas nfl|apuestas league of legends mundial|apuestas legal|apuestas legales|apuestas
legales en colombia|apuestas legales en españa|apuestas legales en estados
unidos|apuestas legales españa|apuestas leganes betis|apuestas libertadores|apuestas licencia|apuestas liga 1 peru|apuestas liga argentina|apuestas liga bbva pronosticos|apuestas
liga de campeones|apuestas liga de campeones de baloncesto|apuestas liga de campeones de hockey|apuestas liga españa|apuestas liga española|apuestas liga santander pronosticos|apuestas ligas de futbol|apuestas linea|apuestas linea de
gol|apuestas liverpool barcelona|apuestas liverpool real madrid|apuestas lol mundial|apuestas madrid|apuestas madrid arsenal|apuestas madrid
atletico|apuestas madrid atletico champions|apuestas madrid
barca|apuestas madrid barça|apuestas madrid barca hoy|apuestas madrid
barca supercopa|apuestas madrid barcelona|apuestas madrid barsa|apuestas madrid bayern|apuestas madrid betis|apuestas madrid borussia|apuestas madrid campeon champions|apuestas madrid
celta|apuestas madrid city|apuestas madrid dortmund|apuestas madrid
gana la liga|apuestas madrid gana liga|apuestas madrid hoy|apuestas madrid liverpool|apuestas madrid osasuna|apuestas madrid sevilla|apuestas madrid valencia|apuestas madrid vs arsenal|apuestas madrid vs
barcelona|apuestas mallorca osasuna|apuestas mallorca real sociedad|apuestas manchester
athletic|apuestas manchester city real madrid|apuestas mas faciles de ganar|apuestas mas seguras|apuestas
mas seguras para hoy|apuestas masters de golf|apuestas masters de tenis|apuestas maximo goleador eurocopa|apuestas maximo goleador mundial|apuestas mejor jugador eurocopa|apuestas mejores casinos online|apuestas mexico|apuestas méxico|apuestas mexico polonia|apuestas méxico polonia|apuestas mlb|apuestas mlb hoy|apuestas mlb las vegas|apuestas
mlb para hoy|apuestas mlb pronosticos|apuestas mlb usa|apuestas mma ufc|apuestas momios|apuestas multiples|apuestas múltiples|apuestas
multiples como funcionan|apuestas multiples el gordo|apuestas multiples futbol|apuestas mundial|apuestas mundial 2026|apuestas
mundial baloncesto|apuestas mundial balonmano|apuestas mundial brasil|apuestas mundial campeon|apuestas mundial
ciclismo|apuestas mundial clubes|apuestas mundial
de baloncesto|apuestas mundial de ciclismo|apuestas mundial de clubes|apuestas mundial de futbol|apuestas mundial
de fútbol|apuestas mundial de rugby|apuestas mundial f1|apuestas mundial favoritos|apuestas mundial femenino|apuestas
mundial formula 1|apuestas mundial futbol|apuestas mundial ganador|apuestas mundial lol|apuestas
mundial moto gp|apuestas mundial motogp|apuestas mundial rugby|apuestas
mundial sub 17|apuestas mundiales|apuestas mundialistas|apuestas mvp eurocopa|apuestas mvp
nba|apuestas mvp nfl|apuestas nacionales de colombia|apuestas
nba|apuestas nba all star|apuestas nba campeon|apuestas nba consejos|apuestas nba esta noche|apuestas nba finals|apuestas nba gratis|apuestas
nba hoy|apuestas nba hoy jugadores|apuestas nba
hoy pronosticos|apuestas nba para hoy|apuestas nba playoffs|apuestas nba pronosticos|apuestas
nba pronósticos|apuestas nba pronosticos hoy|apuestas nba tipster|apuestas nfl|apuestas
nfl hoy|apuestas nfl las vegas|apuestas nfl playoffs|apuestas nfl pronosticos|apuestas nfl
pronósticos|apuestas nfl semana 4|apuestas nfl super bowl|apuestas nhl|apuestas
nhl pronosticos|apuestas octavos eurocopa|apuestas ofertas|apuestas online|apuestas online argentina|apuestas online argentina legal|apuestas online bono|apuestas online bono bienvenida|apuestas online boxeo|apuestas online caballos|apuestas online carreras de caballos|apuestas online casino|apuestas online
champions league|apuestas online chile|apuestas online ciclismo|apuestas online colombia|apuestas online
comparativa|apuestas online con paypal|apuestas online de caballos|apuestas online deportivas|apuestas online en argentina|apuestas online en peru|apuestas online espana|apuestas online españa|apuestas online esports|apuestas online foro|apuestas online futbol|apuestas online futbol españa|apuestas
online golf|apuestas online gratis|apuestas online gratis sin deposito|apuestas online juegos|apuestas online mexico|apuestas online mma|apuestas online
movil|apuestas online nba|apuestas online net|apuestas
online nuevas|apuestas online opiniones|apuestas online
paypal|apuestas online peru|apuestas online seguras|apuestas online sin dinero|apuestas
online sin registro|apuestas online tenis|apuestas online ufc|apuestas
online uruguay|apuestas online venezuela|apuestas open britanico golf|apuestas osasuna athletic|apuestas osasuna barcelona|apuestas osasuna real madrid|apuestas osasuna sevilla|apuestas
osasuna valencia|apuestas over|apuestas over 2.5|apuestas over under|apuestas paginas|apuestas pago anticipado|apuestas paises bajos ecuador|apuestas paises bajos
inglaterra|apuestas países bajos qatar|apuestas para boxeo|apuestas para champions league|apuestas para el clasico|apuestas para el dia de hoy|apuestas para el mundial|apuestas
para el partido de hoy|apuestas para eurocopa|apuestas para europa
league|apuestas para futbol|apuestas para ganar|apuestas
para ganar dinero|apuestas para ganar dinero facil|apuestas
para ganar en la ruleta|apuestas para ganar la champions|apuestas para ganar la eurocopa|apuestas para ganar la europa league|apuestas para ganar la liga|apuestas
para ganar siempre|apuestas para hacer|apuestas para hoy|apuestas para hoy de futbol|apuestas
para hoy europa league|apuestas para hoy futbol|apuestas para juegos|apuestas para la champions league|apuestas para la copa del rey|apuestas para la
eurocopa|apuestas para la europa league|apuestas para la final
de la eurocopa|apuestas para la nba hoy|apuestas para los
partidos de hoy|apuestas para partidos de hoy|apuestas para ufc|apuestas partido|apuestas partido aplazado|apuestas partido champions|apuestas partido colombia|apuestas partido españa marruecos|apuestas partido mundial|apuestas partido suspendido|apuestas partidos|apuestas partidos champions league|apuestas partidos
csgo|apuestas partidos de futbol|apuestas partidos de futbol hoy|apuestas partidos de hoy|apuestas partidos eurocopa|apuestas partidos futbol|apuestas partidos hoy|apuestas partidos mundial|apuestas paypal|apuestas peleas de boxeo|apuestas
peru|apuestas perú|apuestas peru brasil|apuestas peru chile|apuestas peru paraguay|apuestas peru
uruguay|apuestas peru vs chile|apuestas peru vs colombia|apuestas pichichi eurocopa|apuestas plataforma|apuestas playoff|apuestas playoff ascenso|apuestas playoff ascenso a primera|apuestas playoff nba|apuestas playoff segunda|apuestas playoff segunda b|apuestas playoffs nba|apuestas playoffs nfl|apuestas polonia argentina|apuestas por argentina|apuestas por internet mexico|apuestas por internet para
ganar dinero|apuestas por paypal|apuestas por ronda boxeo|apuestas por sistema|apuestas portugal uruguay|apuestas pre partido|apuestas
predicciones|apuestas predicciones futbol|apuestas primera division|apuestas
primera division españa|apuestas promociones|apuestas pronostico|apuestas pronosticos|apuestas pronosticos deportivos|apuestas pronosticos deportivos tenis|apuestas pronosticos futbol|apuestas pronosticos
gratis|apuestas pronosticos nba|apuestas pronosticos tenis|apuestas prorroga|apuestas psg barca|apuestas psg barcelona|apuestas puntos
por tarjetas|apuestas puntos tarjetas|apuestas que aceptan paypal|apuestas que es handicap|apuestas que
puedes hacer con tu novia|apuestas que siempre ganaras|apuestas que significa|apuestas quien bajara a segunda|apuestas quién bajara a segunda|apuestas quien gana el mundial|apuestas quien gana eurocopa|apuestas
quien gana la champions|apuestas quien gana la eurocopa|apuestas quien gana la
liga|apuestas quien ganara el mundial|apuestas quién ganará el
mundial|apuestas quien ganara la champions|apuestas quien ganara la eurocopa|apuestas
quien ganara la liga|apuestas rayo barcelona|apuestas real madrid|apuestas real
madrid arsenal|apuestas real madrid athletic|apuestas real madrid atletico|apuestas real madrid atletico
champions|apuestas real madrid atletico de madrid|apuestas real madrid atlético de madrid|apuestas real madrid atletico madrid|apuestas real madrid barcelona|apuestas real madrid bayern|apuestas real madrid
betis|apuestas real madrid borussia|apuestas real madrid campeon champions|apuestas real madrid celta|apuestas real madrid champions|apuestas real madrid city|apuestas real madrid girona|apuestas real madrid hoy|apuestas real madrid liverpool|apuestas real
madrid manchester city|apuestas real madrid osasuna|apuestas real madrid real sociedad|apuestas real
madrid valencia|apuestas real madrid villarreal|apuestas
real madrid vs arsenal|apuestas real madrid vs atletico|apuestas real madrid vs atlético|apuestas real madrid vs atletico madrid|apuestas real madrid vs barcelona|apuestas real madrid vs betis|apuestas
real madrid vs sevilla|apuestas real madrid vs valencia|apuestas real sociedad|apuestas real sociedad athletic|apuestas
real sociedad barcelona|apuestas real sociedad betis|apuestas real sociedad
psg|apuestas real sociedad real madrid|apuestas real sociedad valencia|apuestas recomendadas hoy|apuestas regalo de
bienvenida|apuestas registro|apuestas resultado exacto|apuestas resultados|apuestas resultados
eurocopa|apuestas retirada tenis|apuestas roma barcelona|apuestas roma sevilla|apuestas rugby|apuestas
rugby mundial|apuestas rugby world cup|apuestas ruleta seguras|apuestas segunda|apuestas segunda b|apuestas segunda division|apuestas segunda
división|apuestas segunda division b|apuestas segunda division españa|apuestas seguras|apuestas seguras baloncesto|apuestas seguras calculadora|apuestas seguras en la ruleta|apuestas seguras eurocopa|apuestas seguras
foro|apuestas seguras futbol|apuestas seguras futbol hoy|apuestas seguras gratis|apuestas seguras
hoy|apuestas seguras hoy futbol|apuestas seguras nba|apuestas
seguras nba hoy|apuestas seguras para este fin de semana|apuestas seguras para ganar dinero|apuestas seguras para hoy|apuestas seguras para hoy fútbol|apuestas seguras para hoy pronósticos|apuestas
seguras para mañana|apuestas seguras ruleta|apuestas
seguras telegram|apuestas seguras tenis|apuestas semifinales
eurocopa|apuestas senegal paises bajos|apuestas sevilla|apuestas sevilla athletic|apuestas sevilla atletico de madrid|apuestas sevilla
barcelona|apuestas sevilla betis|apuestas sevilla campeon liga|apuestas sevilla
celta|apuestas sevilla gana la liga|apuestas sevilla girona|apuestas sevilla inter|apuestas sevilla
jugador|apuestas sevilla juventus|apuestas sevilla leganes|apuestas
sevilla madrid|apuestas sevilla manchester united|apuestas sevilla osasuna|apuestas sevilla real madrid|apuestas sevilla real
sociedad|apuestas sevilla roma|apuestas sevilla valencia|apuestas significa|apuestas simples
ejemplos|apuestas simples o combinadas|apuestas sin deposito|apuestas sin deposito inicial|apuestas sin deposito minimo|apuestas sin dinero|apuestas sin dinero real|apuestas
sin empate|apuestas sin empate que significa|apuestas sin ingreso minimo|apuestas sin registro|apuestas sistema|apuestas sistema calculadora|apuestas sistema como funciona|apuestas
sistema trixie|apuestas sociedad|apuestas sorteo copa del rey|apuestas stake|apuestas stake 10|apuestas stake
10 hoy|apuestas super bowl favorito|apuestas super rugby|apuestas supercopa españa|apuestas superliga argentina|apuestas tarjeta roja|apuestas tarjetas|apuestas tarjetas amarillas|apuestas
tenis|apuestas tenis atp|apuestas tenis consejos|apuestas tenis copa davis|apuestas tenis
de mesa|apuestas tenis de mesa pronosticos|apuestas tenis en vivo|apuestas tenis femenino|apuestas tenis hoy|apuestas tenis itf|apuestas tenis pronosticos|apuestas tenis pronósticos|apuestas
tenis retirada|apuestas tenis roland garros|apuestas tenis seguras|apuestas tenis wimbledon|apuestas tenis wta|apuestas
tercera division|apuestas tercera division españa|apuestas tipos|apuestas tips|apuestas
tipster|apuestas tipster para hoy|apuestas topuria holloway cuotas|apuestas torneos de golf|apuestas torneos de tenis|apuestas trucos|apuestas uefa champions league|apuestas
uefa europa league|apuestas ufc|apuestas ufc chile|apuestas ufc como funciona|apuestas ufc hoy|apuestas ufc
ilia topuria|apuestas ufc online|apuestas ufc pronósticos|apuestas ufc telegram|apuestas ufc topuria|apuestas
under over|apuestas unionistas villarreal|apuestas uruguay|apuestas uruguay colombia|apuestas uruguay corea|apuestas uruguay
vs colombia|apuestas us open golf|apuestas us open tenis|apuestas valencia|apuestas valencia barcelona|apuestas valencia betis|apuestas valencia madrid|apuestas valencia
real madrid|apuestas valladolid barcelona|apuestas
valladolid valencia|apuestas valor app|apuestas valor
en directo|apuestas valor galgos|apuestas venezuela|apuestas venezuela argentina|apuestas
venezuela bolivia|apuestas venezuela ecuador|apuestas villarreal|apuestas villarreal athletic|apuestas villarreal barcelona|apuestas villarreal bayern|apuestas
villarreal betis|apuestas villarreal liverpool|apuestas villarreal manchester|apuestas
villarreal manchester united|apuestas villarreal vs real
madrid|apuestas virtuales|apuestas virtuales colombia|apuestas virtuales futbol|apuestas virtuales sin dinero|apuestas vivo|apuestas vuelta a españa|apuestas vuelta españa|apuestas
william hill partidos de hoy|apuestas y casino|apuestas y casinos|apuestas y juegos de azar|apuestas y
pronosticos|apuestas y pronosticos de futbol|apuestas y pronosticos deportivos|apuestas y
resultados|apuestas-deportivas|apuestas-deportivas.es pronosticos|arbitro nba apuestas|argentina
apuestas|argentina colombia apuestas|argentina croacia apuestas|argentina francia apuestas|argentina mexico apuestas|argentina peru apuestas|argentina
uruguay apuestas|argentina vs bolivia apuestas|argentina vs chile apuestas|argentina
vs colombia apuestas|argentina vs francia apuestas|argentina vs.
colombia apuestas|asi se gana en las apuestas deportivas|asiatico apuestas|asiatico
en apuestas|asiaticos apuestas|athletic barcelona apuestas|athletic manchester united apuestas|athletic osasuna apuestas|athletic real madrid apuestas|atletico barcelona apuestas|atletico
de madrid apuestas|atlético de madrid apuestas|atletico de madrid
real madrid apuestas|atletico de madrid vs barcelona apuestas|atletico madrid real madrid apuestas|atletico madrid
vs real madrid apuestas|atletico real madrid apuestas|atletico vs real
madrid apuestas|avisador de cuotas apuestas|bajada de cuotas apuestas|baloncesto apuestas|barbastro barcelona apuestas|barca
apuestas|barca bayern apuestas|barca inter apuestas|barca madrid apuestas|barça madrid apuestas|barca vs atletico apuestas|barca vs madrid apuestas|barca vs real madrid apuestas|barcelona – real madrid apuestas|barcelona apuestas|barcelona atletico apuestas|barcelona atletico de madrid apuestas|barcelona atletico madrid apuestas|barcelona
betis apuestas|barcelona casa de apuestas|barcelona inter apuestas|barcelona psg apuestas|barcelona real madrid apuestas|barcelona real sociedad apuestas|barcelona sevilla apuestas|barcelona valencia
apuestas|barcelona vs athletic bilbao apuestas|barcelona vs
atlético madrid apuestas|barcelona vs betis apuestas|barcelona vs celta de vigo apuestas|barcelona vs espanyol apuestas|barcelona vs girona apuestas|barcelona vs madrid apuestas|barcelona vs real madrid apuestas|barcelona vs real sociedad
apuestas|barcelona vs sevilla apuestas|barcelona vs villarreal apuestas|base
de datos cuotas apuestas deportivas|bayern real madrid apuestas|beisbol
apuestas|best america apuestas|bet apuestas chile|bet apuestas en vivo|betis
– chelsea apuestas|betis apuestas|betis barcelona apuestas|betis
chelsea apuestas|betis madrid apuestas|betis sevilla apuestas|betsson tu sitio de apuestas
online|blog apuestas baloncesto|blog apuestas ciclismo|blog apuestas nba|blog
apuestas tenis|blog de apuestas de tenis|bono apuestas|bono
apuestas deportivas|bono apuestas deportivas sin deposito|bono apuestas gratis|bono apuestas gratis sin deposito|bono apuestas sin deposito|bono bienvenida
apuestas|bono bienvenida apuestas deportivas|bono bienvenida apuestas
españa|bono bienvenida apuestas sin deposito|bono bienvenida
apuestas sin depósito|bono bienvenida casa apuestas|bono bienvenida casa de apuestas|bono bienvenida marca apuestas|bono casa apuestas|bono casa
de apuestas|bono casa de apuestas sin ingreso|bono casas de apuestas|bono de apuestas|bono de apuestas
gratis sin deposito|bono de bienvenida apuestas|bono de bienvenida
apuestas deportivas|bono de bienvenida casa de apuestas|bono de bienvenida casas de apuestas|bono de casas
de apuestas|bono de registro apuestas|bono de registro
apuestas deportivas|bono de registro casa de apuestas|bono gratis apuestas|bono marca apuestas|bono por registro apuestas|bono por registro apuestas deportivas|bono por registro casa de apuestas|bono registro apuestas|bono sin deposito apuestas|bono
sin depósito apuestas|bono sin deposito apuestas deportivas|bono sin depósito apuestas deportivas|bono
sin deposito casa de apuestas|bono sin deposito marca apuestas|bono sin ingreso apuestas|bono sin ingreso apuestas deportivas|bonos
apuestas|bonos apuestas colombia|bonos apuestas deportivas|bonos apuestas deportivas sin deposito|bonos apuestas gratis|bonos apuestas sin deposito|bonos apuestas sin depósito|bonos bienvenida apuestas|bonos bienvenida casas apuestas|bonos bienvenida casas de apuestas|bonos casa de apuestas|bonos casas apuestas|bonos casas de apuestas|bonos casas
de apuestas colombia|bonos casas de apuestas deportivas|bonos casas de apuestas
españa|bonos casas de apuestas nuevas|bonos casas de
apuestas sin deposito|bonos casas de apuestas sin depósito|bonos de
apuestas|bonos de apuestas deportivas|bonos de apuestas gratis|bonos de apuestas sin deposito|bonos de bienvenida apuestas|bonos de
bienvenida apuestas deportivas|bonos de bienvenida casa de apuestas|bonos de bienvenida casas de apuestas|bonos de bienvenida
de casas de apuestas|bonos de bienvenida en casas de apuestas|bonos de
casas de apuestas|bonos de casas de apuestas sin deposito|bonos en casa de apuestas|bonos en casas de apuestas sin deposito|bonos gratis apuestas|bonos gratis apuestas deportivas|bonos gratis casas de apuestas|bonos
gratis sin deposito apuestas|bonos paginas de apuestas|bonos registro casas de apuestas|bonos sin deposito
apuestas|bonos sin depósito apuestas|bonos sin deposito
apuestas deportivas|bonos sin deposito casas de apuestas|bot de apuestas
deportivas gratis|boxeo apuestas|brasil colombia apuestas|brasil peru apuestas|brasil vs colombia apuestas|buenas apuestas para hoy|buscador
cuotas apuestas|buscador de apuestas seguras|buscador de cuotas apuestas|buscador
de cuotas de apuestas|buscar apuestas seguras|caballos
apuestas|calculador de apuestas|calculador de cuotas apuestas|calculadora apuestas|calculadora apuestas combinadas|calculadora
apuestas de sistema|calculadora apuestas deportivas|calculadora apuestas deportivas seguras|calculadora apuestas multiples|calculadora apuestas segura|calculadora apuestas seguras|calculadora apuestas sistema|calculadora apuestas
yankee|calculadora arbitraje apuestas|calculadora cubrir
apuestas|calculadora cuotas apuestas|calculadora de apuestas|calculadora de apuestas combinadas|calculadora de apuestas de futbol|calculadora de apuestas de sistema|calculadora de apuestas deportivas|calculadora de apuestas multiples|calculadora
de apuestas seguras|calculadora de apuestas sistema|calculadora de apuestas
surebets|calculadora de arbitraje apuestas|calculadora de cuotas apuestas|calculadora
de cuotas de apuestas|calculadora para apuestas deportivas|calculadora poisson apuestas|calculadora poisson apuestas deportivas|calculadora poisson para apuestas|calculadora scalping apuestas deportivas|calculadora
sistema apuestas|calculadora stake apuestas|calculadora trading apuestas|calcular apuestas|calcular apuestas deportivas|calcular apuestas futbol|calcular
apuestas sistema|calcular cuotas apuestas|calcular cuotas apuestas combinadas|calcular cuotas apuestas deportivas|calcular cuotas de apuestas|calcular ganancias apuestas deportivas|calcular momios apuestas|calcular probabilidad cuota apuestas|calcular stake apuestas|calcular unidades apuestas|calcular yield apuestas|calculo de apuestas|calculo de
apuestas deportivas|cambio de cuotas apuestas|campeon champions apuestas|campeon eurocopa apuestas|campeon liga apuestas|campeon nba apuestas|canales de apuestas gratis|carrera de caballos apuestas|carrera de caballos apuestas juego|carrera de caballos con apuestas|carrera de galgos apuestas|carreras de caballos
apuestas|carreras de caballos apuestas online|carreras de caballos con apuestas|carreras de caballos juegos de apuestas|carreras de
galgos apuestas|carreras de galgos apuestas online|carreras de galgos apuestas trucos|carreras galgos apuestas|casa apuestas
argentina|casa apuestas atletico de madrid|casa apuestas barcelona|casa apuestas betis|casa apuestas bono bienvenida|casa apuestas bono gratis|casa apuestas bono sin deposito|casa apuestas cerca de mi|casa apuestas chile|casa apuestas colombia|casa apuestas con mejores cuotas|casa apuestas deportivas|casa apuestas españa|casa apuestas española|casa
apuestas eurocopa|casa apuestas futbol|casa apuestas
mejores cuotas|casa apuestas mundial|casa apuestas nueva|casa
apuestas nuevas|casa apuestas online|casa apuestas peru|casa apuestas valencia|casa de
apuestas|casa de apuestas 10 euros gratis|casa de apuestas argentina|casa de apuestas atletico
de madrid|casa de apuestas baloncesto|casa de apuestas barcelona|casa de apuestas beisbol|casa de apuestas betis|casa
de apuestas bono|casa de apuestas bono bienvenida|casa de apuestas bono de bienvenida|casa de
apuestas bono gratis|casa de apuestas bono por registro|casa de
apuestas bono sin deposito|casa de apuestas boxeo|casa de apuestas
caballos|casa de apuestas carreras de caballos|casa de apuestas cerca de mi|casa de apuestas cerca de mí|casa de apuestas champions league|casa de apuestas chile|casa de apuestas ciclismo|casa de apuestas colombia|casa de apuestas con bono de bienvenida|casa
de apuestas con bono sin deposito|casa de apuestas con cuotas mas altas|casa de apuestas con esports|casa de apuestas
con las mejores cuotas|casa de apuestas con licencia en españa|casa de apuestas
con mejores cuotas|casa de apuestas con pago anticipado|casa de apuestas con paypal|casa de apuestas copa america|casa de apuestas de caballos|casa de apuestas de colombia|casa de apuestas de
españa|casa de apuestas de futbol|casa de apuestas de fútbol|casa de apuestas de futbol peru|casa de apuestas de peru|casa de apuestas del madrid|casa de apuestas
del real madrid|casa de apuestas deportivas|casa de apuestas
deportivas cerca de mi|casa de apuestas deportivas en argentina|casa de apuestas deportivas en chile|casa de apuestas deportivas en colombia|casa
de apuestas deportivas en españa|casa de apuestas deportivas en madrid|casa de apuestas
deportivas españa|casa de apuestas deportivas españolas|casa
de apuestas deportivas madrid|casa de apuestas deportivas mexico|casa de apuestas deportivas online|casa de apuestas deportivas peru|casa de apuestas deposito 5 euros|casa de apuestas
deposito minimo|casa de apuestas deposito minimo 1 euro|casa
de apuestas depósito mínimo 1 euro|casa de apuestas en españa|casa de apuestas en linea|casa de apuestas en madrid|casa de apuestas en perú|casa de
apuestas en vivo|casa de apuestas españa|casa de apuestas españa inglaterra|casa de apuestas española|casa de apuestas españolas|casa de apuestas esports|casa de apuestas eurocopa|casa de apuestas europa league|casa de apuestas f1|casa de apuestas formula 1|casa de apuestas futbol|casa de apuestas ingreso minimo|casa de apuestas ingreso minimo 1
euro|casa de apuestas ingreso mínimo 1 euro|casa de apuestas legales|casa
de apuestas legales en colombia|casa de apuestas legales en españa|casa de apuestas libertadores|casa de apuestas liga
española|casa de apuestas madrid|casa de apuestas mas segura|casa de apuestas mejores|casa
de apuestas méxico|casa de apuestas minimo 5 euros|casa de
apuestas mlb|casa de apuestas mundial|casa de apuestas nba|casa de apuestas nfl|casa de apuestas
nueva|casa de apuestas nuevas|casa de apuestas oficial del real madrid|casa de apuestas oficial real madrid|casa
de apuestas online|casa de apuestas online argentina|casa de
apuestas online chile|casa de apuestas online españa|casa de apuestas
online mexico|casa de apuestas online paraguay|casa de apuestas online peru|casa de apuestas online usa|casa
de apuestas online venezuela|casa de apuestas pago anticipado|casa de
apuestas para boxeo|casa de apuestas para ufc|casa de apuestas peru|casa de apuestas perú|casa de apuestas
peru online|casa de apuestas por paypal|casa de apuestas promociones|casa
de apuestas que regalan dinero|casa de apuestas real madrid|casa de apuestas regalo
de bienvenida|casa de apuestas sevilla|casa de apuestas sin dinero|casa de apuestas sin ingreso minimo|casa de
apuestas sin licencia en españa|casa de apuestas sin minimo de ingreso|casa de apuestas stake|casa de apuestas
tenis|casa de apuestas ufc|casa de apuestas valencia|casa de apuestas
venezuela|casa de apuestas virtuales|casa de apuestas vive la suerte|casa oficial de
apuestas del real madrid|casas apuestas asiaticas|casas apuestas bono sin deposito|casas apuestas bonos sin deposito|casas apuestas caballos|casas apuestas chile|casas apuestas ciclismo|casas apuestas con licencia|casas apuestas con licencia en españa|casas apuestas deportivas|casas apuestas deportivas colombia|casas apuestas
deportivas españa|casas apuestas deportivas españolas|casas apuestas deportivas
nuevas|casas apuestas españa|casas apuestas españolas|casas apuestas
esports|casas apuestas eurocopa|casas apuestas golf|casas apuestas ingreso minimo
5 euros|casas apuestas legales|casas apuestas legales españa|casas apuestas
licencia|casas apuestas licencia españa|casas apuestas mexico|casas apuestas mundial|casas apuestas nba|casas apuestas nuevas|casas
apuestas nuevas españa|casas apuestas ofertas|casas apuestas online|casas
apuestas paypal|casas apuestas peru|casas apuestas sin licencia|casas apuestas tenis|casas asiaticas apuestas|casas de apuestas|casas de
apuestas 5 euros|casas de apuestas app|casas de apuestas
argentinas|casas de apuestas asiaticas|casas de apuestas baloncesto|casas de apuestas barcelona|casas de apuestas bono
bienvenida|casas de apuestas bono de bienvenida|casas de apuestas
bono por registro|casas de apuestas bono sin deposito|casas de
apuestas bono sin ingreso|casas de apuestas bonos|casas de apuestas bonos de bienvenida|casas de
apuestas bonos gratis|casas de apuestas bonos sin deposito|casas de apuestas boxeo|casas de apuestas caballos|casas de apuestas carreras de caballos|casas de apuestas casino|casas de apuestas casino
online|casas de apuestas cerca de mi|casas de apuestas champions league|casas de apuestas
chile|casas de apuestas ciclismo|casas de apuestas colombia|casas de apuestas com|casas de apuestas con app|casas de apuestas con apuestas gratis|casas de apuestas con bono|casas de apuestas con bono de bienvenida|casas de apuestas con bono de
registro|casas de apuestas con bono por registro|casas de apuestas con bono sin deposito|casas de apuestas con bonos|casas de apuestas con bonos gratis|casas de
apuestas con bonos sin deposito|casas de apuestas con deposito minimo|casas de apuestas con esports|casas de apuestas
con handicap asiatico|casas de apuestas con licencia|casas de apuestas
con licencia en españa|casas de apuestas con licencia españa|casas de apuestas con licencia española|casas de
apuestas con mejores cuotas|casas de apuestas con pago anticipado|casas de apuestas con paypal|casas de apuestas con paypal en perú|casas de apuestas con promociones|casas de apuestas con ruleta en vivo|casas de apuestas copa del rey|casas
de apuestas de caballos|casas de apuestas de españa|casas
de apuestas de futbol|casas de apuestas de fútbol|casas de apuestas de peru|casas de apuestas deportivas|casas de apuestas deportivas asiaticas|casas de apuestas deportivas colombia|casas
de apuestas deportivas comparativa|casas de
apuestas deportivas con paypal|casas de apuestas
deportivas en chile|casas de apuestas deportivas en españa|casas de apuestas deportivas en linea|casas de apuestas deportivas en madrid|casas de apuestas deportivas en mexico|casas
de apuestas deportivas en peru|casas de apuestas deportivas en sevilla|casas de apuestas deportivas en valencia|casas de apuestas deportivas españa|casas de
apuestas deportivas españolas|casas de apuestas deportivas legales|casas de apuestas
deportivas madrid|casas de apuestas deportivas mexico|casas de apuestas deportivas nuevas|casas de apuestas deportivas online|casas de apuestas deportivas peru|casas de apuestas deportivas perú|casas de apuestas deposito minimo 1 euro|casas de apuestas
depósito mínimo 1 euro|casas de apuestas dinero gratis|casas de apuestas en argentina|casas de apuestas en barcelona|casas de apuestas en chile|casas de apuestas en colombia|casas de apuestas en españa|casas de apuestas en españa online|casas de apuestas en linea|casas de apuestas en madrid|casas de apuestas en méxico|casas de
apuestas en peru|casas de apuestas en perú|casas de apuestas en sevilla|casas de apuestas
en uruguay|casas de apuestas en valencia|casas de
apuestas en venezuela|casas de apuestas equipos de futbol|casas de apuestas españa|casas de apuestas españa
alemania|casas de apuestas españa inglaterra|casas
de apuestas españa licencia|casas de apuestas españa nuevas|casas de
apuestas españa online|casas de apuestas española|casas de
apuestas españolas|casas de apuestas españolas con licencia|casas de apuestas españolas online|casas de apuestas esports|casas de apuestas eurocopa|casas de apuestas eurocopa 2024|casas de apuestas
europa league|casas de apuestas f1|casas de apuestas
fisicas en barcelona|casas de apuestas fisicas en españa|casas
de apuestas formula 1|casas de apuestas fuera de españa|casas de apuestas futbol|casas de apuestas fútbol|casas de apuestas futbol españa|casas de apuestas ganador eurocopa|casas de apuestas gratis|casas de apuestas ingreso minimo|casas de
apuestas ingreso minimo 1 euro|casas de apuestas ingreso
minimo 5 euros|casas de apuestas inter barcelona|casas de apuestas legales|casas de apuestas legales en colombia|casas
de apuestas legales en españa|casas de apuestas legales en mexico|casas de apuestas
legales españa|casas de apuestas legales mx|casas de
apuestas licencia|casas de apuestas licencia españa|casas de apuestas lista|casas de apuestas madrid|casas de apuestas mas
seguras|casas de apuestas mejores bonos|casas de apuestas mejores cuotas|casas de apuestas mexico|casas de apuestas méxico|casas de
apuestas minimo 5 euros|casas de apuestas mlb|casas de apuestas mundial|casas de apuestas mundial baloncesto|casas de apuestas
mundiales|casas de apuestas nba|casas de apuestas no reguladas en españa|casas de apuestas
nueva ley|casas de apuestas nuevas|casas de apuestas nuevas en colombia|casas
de apuestas nuevas en españa|casas de apuestas nuevas españa|casas de apuestas ofertas|casas de apuestas online|casas de apuestas online
argentina|casas de apuestas online colombia|casas de apuestas online deportivas|casas de apuestas online ecuador|casas de apuestas online
en argentina|casas de apuestas online en chile|casas de apuestas online en colombia|casas de
apuestas online en españa|casas de apuestas online en mexico|casas de apuestas online
españa|casas de apuestas online mas fiables|casas de apuestas
online mexico|casas de apuestas online nuevas|casas de apuestas online peru|casas de apuestas online usa|casas de
apuestas online venezuela|casas de apuestas pago paypal|casas de apuestas para ufc|casas de
apuestas paypal|casas de apuestas peru
Your comment is awaiting moderation.
clickgrow.click – Navigation felt smooth, found everything quickly without any confusing steps.
Your comment is awaiting moderation.
digitaltrack.click – Color palette felt calming, nothing distracting, just focused, thoughtful design.
Your comment is awaiting moderation.
promocloud.click – Bookmarked this immediately, planning to revisit for updates and inspiration.
Your comment is awaiting moderation.
seotrack.click – Overall, professional vibe here; trustworthy, polished, and pleasantly minimal throughout.
Your comment is awaiting moderation.
marketscope.click – Bookmarked this immediately, planning to revisit for updates and inspiration.
Your comment is awaiting moderation.
promobridge.click – Appreciate the typography choices; comfortable spacing improved my reading experience.
Your comment is awaiting moderation.
https://s-nano-s.ru/
Your comment is awaiting moderation.
https://s-nano-s.ru/
Your comment is awaiting moderation.
vulkan vegas 50 free spins
Your comment is awaiting moderation.
trafficmind.click – Color palette felt calming, nothing distracting, just focused, thoughtful design.
Your comment is awaiting moderation.
https://doc.clickup.com/9018093527/d/h/8crabyq-1558/f92e41e7b8dfd95
Your comment is awaiting moderation.
Женский сайт https://one-lady.com о балансе: работа, финансы, здоровье, дом, дети и отдых. Пошаговые инструкции, трекеры привычек, лайфхаки и вдохновляющие истории. Меньше шума — больше пользы.
Your comment is awaiting moderation.
(10 euros gratis apuestas|10 mejores casas de apuestas|10 trucos para ganar apuestas|15 euros gratis marca apuestas|1×2
apuestas|1×2 apuestas deportivas|1×2 apuestas que significa|1×2 en apuestas|1×2 en apuestas que significa|1×2 que significa en apuestas|5 euros
gratis apuestas|9 apuestas que siempre ganaras|a partir de cuanto
se declara apuestas|actividades de juegos de azar y apuestas|ad apuestas deportivas|aleksandre topuria ufc apuestas|algoritmo para ganar
apuestas deportivas|america apuestas|análisis nba apuestas|aplicacion android apuestas deportivas|aplicacion apuestas deportivas|aplicacion apuestas deportivas android|aplicación de apuestas online|aplicacion para hacer apuestas|aplicacion para hacer apuestas de futbol|aplicación para hacer
apuestas de fútbol|aplicaciones apuestas deportivas android|aplicaciones apuestas deportivas gratis|aplicaciones
de apuestas android|aplicaciones de apuestas de fútbol|aplicaciones de
apuestas deportivas|aplicaciones de apuestas deportivas peru|aplicaciones de apuestas
deportivas perú|aplicaciones de apuestas en colombia|aplicaciones de apuestas
gratis|aplicaciones de apuestas online|aplicaciones de apuestas seguras|aplicaciones de apuestas sin dinero|aplicaciones para
hacer apuestas|apostar seguro apuestas deportivas|app android apuestas deportivas|app apuestas|app apuestas android|app
apuestas de futbol|app apuestas deportivas|app apuestas deportivas android|app apuestas deportivas argentina|app apuestas deportivas
colombia|app apuestas deportivas ecuador|app apuestas deportivas españa|app apuestas deportivas gratis|app apuestas entre amigos|app apuestas futbol|app apuestas gratis|app apuestas
sin dinero|app casa de apuestas|app casas de apuestas|app control apuestas|app de apuestas|app de apuestas android|app de apuestas casino|app de apuestas colombia|app de apuestas con bono
de bienvenida|app de apuestas de futbol|app de apuestas deportivas|app de apuestas
deportivas android|app de apuestas deportivas argentina|app de apuestas deportivas colombia|app de apuestas deportivas en españa|app
de apuestas deportivas peru|app de apuestas deportivas perú|app de apuestas
deportivas sin dinero|app de apuestas ecuador|app de apuestas en colombia|app de apuestas
en españa|app de apuestas en venezuela|app de apuestas futbol|app de
apuestas gratis|app de apuestas online|app de apuestas para android|app de apuestas para ganar dinero|app de apuestas peru|app de apuestas reales|app de casas
de apuestas|app marca apuestas android|app moviles de apuestas|app para apuestas|app para apuestas de futbol|app para apuestas deportivas|app para apuestas
deportivas en español|app para ganar apuestas deportivas|app para hacer apuestas|app para hacer apuestas deportivas|app para hacer apuestas entre amigos|app para llevar control de apuestas|app pronosticos apuestas deportivas|app versus apuestas|apps apuestas mundial|apps de apuestas|apps de
apuestas con bono de bienvenida|apps de apuestas de futbol|apps de apuestas deportivas peru|apps de apuestas mexico|apps para apuestas|aprender a hacer apuestas deportivas|aprender hacer apuestas deportivas|apuesta del dia apuestas
deportivas|apuestas 10 euros gratis|apuestas 100 seguras|apuestas 1×2|apuestas 1X2|apuestas 2
division|apuestas 3 division|apuestas a caballos|apuestas a
carreras de caballos|apuestas a colombia|apuestas a corners|apuestas a
ganar|apuestas a jugadores nba|apuestas a la baja|apuestas a la
nfl|apuestas al barcelona|apuestas al dia|apuestas al empate|apuestas al mundial|apuestas al tenis wta|apuestas alaves barcelona|apuestas alcaraz hoy|apuestas alemania españa|apuestas alonso campeon del mundo|apuestas altas y bajas|apuestas altas y bajas nfl|apuestas ambos equipos marcan|apuestas america|apuestas android|apuestas anillo nba|apuestas antes del mundial|apuestas anticipadas|apuestas
anticipadas nba|apuestas apps|apuestas arabia argentina|apuestas argentina|apuestas argentina campeon del mundo|apuestas argentina canada|apuestas
argentina colombia|apuestas argentina croacia|apuestas argentina españa|apuestas argentina francia|apuestas argentina francia cuanto paga|apuestas argentina francia mundial|apuestas argentina gana el mundial|apuestas argentina
gana mundial|apuestas argentina holanda|apuestas argentina mexico|apuestas argentina méxico|apuestas argentina mundial|apuestas argentina online|apuestas argentina paises bajos|apuestas argentina polonia|apuestas argentina uruguay|apuestas argentina
vs australia|apuestas argentina vs colombia|apuestas argentina vs
francia|apuestas argentina vs peru|apuestas argentinas|apuestas
arsenal real madrid|apuestas ascenso a primera division|apuestas ascenso a segunda|apuestas asiaticas|apuestas asiatico|apuestas
athletic|apuestas athletic atletico|apuestas athletic barça|apuestas athletic barcelona|apuestas athletic betis|apuestas athletic manchester|apuestas athletic manchester united|apuestas athletic osasuna|apuestas
athletic real|apuestas athletic real madrid|apuestas athletic real sociedad|apuestas
athletic real sociedad final|apuestas athletic roma|apuestas
athletic sevilla|apuestas athletic valencia|apuestas atletico|apuestas atletico barcelona|apuestas atletico barsa|apuestas atletico campeon champions|apuestas atletico campeon de liga|apuestas
atlético copenhague|apuestas atletico de madrid|apuestas atlético de madrid|apuestas atletico de madrid barcelona|apuestas atletico de madrid
gana la liga|apuestas atletico de madrid real madrid|apuestas atlético de madrid real madrid|apuestas atletico de madrid vs barcelona|apuestas atletico madrid|apuestas atletico madrid real madrid|apuestas
atletico madrid vs barcelona|apuestas atletico real madrid|apuestas atletico real madrid champions|apuestas atletismo|apuestas bajas|apuestas baloncesto|apuestas baloncesto acb|apuestas baloncesto handicap|apuestas baloncesto hoy|apuestas baloncesto juegos olimpicos|apuestas baloncesto nba|apuestas baloncesto pronostico|apuestas baloncesto
pronósticos|apuestas baloncesto prorroga|apuestas barca|apuestas barca athletic|apuestas barca atletico|apuestas
barca bayern|apuestas barca bayern munich|apuestas barca girona|apuestas barca hoy|apuestas
barça hoy|apuestas barca inter|apuestas barca juventus|apuestas barca madrid|apuestas barça
madrid|apuestas barca real madrid|apuestas barca vs juve|apuestas barca vs madrid|apuestas barca vs psg|apuestas
barcelona|apuestas barcelona alaves|apuestas barcelona athletic|apuestas barcelona
atletico|apuestas barcelona atletico de madrid|apuestas barcelona atlético de madrid|apuestas barcelona atletico madrid|apuestas barcelona bayern|apuestas barcelona betis|apuestas barcelona campeon de liga|apuestas barcelona celta|apuestas barcelona espanyol|apuestas barcelona gana la champions|apuestas barcelona girona|apuestas barcelona granada|apuestas barcelona hoy|apuestas barcelona inter|apuestas barcelona madrid|apuestas barcelona osasuna|apuestas barcelona psg|apuestas barcelona real madrid|apuestas
barcelona real sociedad|apuestas barcelona sevilla|apuestas barcelona
valencia|apuestas barcelona villarreal|apuestas barcelona vs atletico madrid|apuestas barcelona vs madrid|apuestas barcelona vs real
madrid|apuestas barsa madrid|apuestas basket hoy|apuestas bayern barcelona|apuestas bayern vs barcelona|apuestas beisbol|apuestas béisbol|apuestas beisbol mlb|apuestas beisbol
pronosticos|apuestas beisbol venezolano|apuestas betis|apuestas betis – chelsea|apuestas betis barcelona|apuestas betis chelsea|apuestas
betis fiorentina|apuestas betis girona|apuestas betis madrid|apuestas betis mallorca|apuestas betis real
madrid|apuestas betis real sociedad|apuestas betis sevilla|apuestas betis valencia|apuestas
betis valladolid|apuestas betis vs valencia|apuestas betplay hoy colombia|apuestas betsson peru|apuestas bienvenida|apuestas
billar online|apuestas bolivia vs colombia|apuestas bono|apuestas bono bienvenida|apuestas
bono de bienvenida|apuestas bono de bienvenida sin deposito|apuestas bono gratis|apuestas bono
sin deposito|apuestas bonos sin deposito|apuestas
borussia real madrid|apuestas boxeo|apuestas boxeo de campeonato|apuestas
boxeo españa|apuestas boxeo español|apuestas boxeo femenino olimpiadas|apuestas boxeo hoy|apuestas boxeo
online|apuestas brasil colombia|apuestas brasil peru|apuestas
brasil uruguay|apuestas brasil vs colombia|apuestas brasil vs peru|apuestas caballos|apuestas caballos colocado|apuestas caballos
españa|apuestas caballos hipodromo|apuestas caballos hoy|apuestas caballos madrid|apuestas caballos
online|apuestas caballos sanlucar de barrameda|apuestas caballos zarzuela|apuestas calculador|apuestas campeon|apuestas campeon champions|apuestas campeón champions|apuestas campeon champions 2025|apuestas
campeon champions league|apuestas campeon conference league|apuestas campeon copa america|apuestas campeon copa del rey|apuestas campeon de
champions|apuestas campeon de la champions|apuestas campeon de
liga|apuestas campeon del mundo|apuestas campeon eurocopa|apuestas campeón eurocopa|apuestas
campeon europa league|apuestas campeon f1|apuestas
campeon f1 2025|apuestas campeon formula 1|apuestas campeon libertadores|apuestas campeon liga|apuestas campeon liga bbva|apuestas campeon liga
española|apuestas campeon liga santander|apuestas campeon motogp 2025|apuestas
campeon mundial|apuestas campeón mundial|apuestas
campeon mundial baloncesto|apuestas campeon nba|apuestas campeón nba|apuestas campeon premier|apuestas campeon premier league|apuestas
campeon roland garros|apuestas campeonato f1|apuestas campeonatos de futbol|apuestas carrera de caballos|apuestas carrera de caballos hoy|apuestas carrera
de caballos nocturnas|apuestas carrera de galgos fin de semana|apuestas carrera de
galgos hoy|apuestas carrera de galgos nocturnas|apuestas carreras caballos|apuestas
carreras caballos sanlucar|apuestas carreras de caballos|apuestas carreras de caballos en directo|apuestas carreras de caballos en vivo|apuestas carreras
de caballos españa|apuestas carreras de caballos hoy|apuestas carreras de caballos
nacionales|apuestas carreras de caballos nocturnas|apuestas carreras de
caballos online|apuestas carreras de caballos sanlucar|apuestas carreras
de caballos sanlúcar|apuestas carreras de galgos|apuestas carreras de galgos en vivo|apuestas carreras de
galgos nocturnas|apuestas carreras de galgos pre partido|apuestas casino|apuestas casino barcelona|apuestas casino futbol|apuestas casino gran madrid|apuestas casino gratis|apuestas casino
madrid|apuestas casino online|apuestas casino online argentina|apuestas casinos|apuestas casinos
online|apuestas celta|apuestas celta barcelona|apuestas celta betis|apuestas celta eibar|apuestas celta espanyol|apuestas celta granada|apuestas
celta madrid|apuestas celta manchester|apuestas celta real madrid|apuestas champion league|apuestas champions foro|apuestas champions hoy|apuestas champions league|apuestas champions league – pronósticos|apuestas champions league 2025|apuestas champions
league hoy|apuestas champions league pronosticos|apuestas champions league pronósticos|apuestas champions pronosticos|apuestas chelsea
barcelona|apuestas chelsea betis|apuestas chile|apuestas chile peru|apuestas chile venezuela|apuestas
chile vs colombia|apuestas chile vs uruguay|apuestas ciclismo|apuestas ciclismo en vivo|apuestas ciclismo femenino|apuestas ciclismo tour francia|apuestas ciclismo
vuelta|apuestas ciclismo vuelta a españa|apuestas ciclismo vuelta españa|apuestas city madrid|apuestas city real madrid|apuestas clasico|apuestas clasico español|apuestas clasico real madrid barcelona|apuestas clasificacion mundial|apuestas colombia|apuestas colombia
argentina|apuestas colombia brasil|apuestas colombia paraguay|apuestas
colombia uruguay|apuestas colombia vs argentina|apuestas colombia vs brasil|apuestas combinadas|apuestas combinadas como funcionan|apuestas
combinadas de futbol|apuestas combinadas de fútbol|apuestas combinadas foro|apuestas combinadas futbol|apuestas combinadas hoy|apuestas combinadas mismo
partido|apuestas combinadas mundial|apuestas combinadas nba|apuestas
combinadas para esta semana|apuestas combinadas para hoy|apuestas combinadas para mañana|apuestas combinadas
pronosticos|apuestas combinadas recomendadas|apuestas combinadas seguras|apuestas combinadas seguras para hoy|apuestas combinadas seguras para mañana|apuestas como ganar|apuestas comparador|apuestas con bono de bienvenida|apuestas con dinero ficticio|apuestas
con dinero real|apuestas con dinero virtual|apuestas con handicap|apuestas con handicap
asiatico|apuestas con handicap baloncesto|apuestas con mas probabilidades de ganar|apuestas con paypal|apuestas con tarjeta de
credito|apuestas con tarjeta de debito|apuestas consejos|apuestas copa|apuestas copa africa|apuestas copa
america|apuestas copa américa|apuestas copa argentina|apuestas copa brasil|apuestas copa davis|apuestas
copa de europa|apuestas copa del mundo|apuestas copa
del rey|apuestas copa del rey baloncesto|apuestas copa del rey final|apuestas copa del rey
futbol|apuestas copa del rey ganador|apuestas copa del rey hoy|apuestas copa
del rey pronosticos|apuestas copa del rey pronósticos|apuestas copa europa|apuestas
copa italia|apuestas copa libertadores|apuestas
copa mundial de hockey|apuestas copa rey|apuestas copa sudamericana|apuestas corners|apuestas corners hoy|apuestas
croacia argentina|apuestas cuartos eurocopa|apuestas cuotas|apuestas cuotas altas|apuestas cuotas bajas|apuestas de
1 euro|apuestas de baloncesto|apuestas de baloncesto
hoy|apuestas de baloncesto nba|apuestas de baloncesto para hoy|apuestas de beisbol|apuestas de beisbol
para hoy|apuestas de blackjack en linea|apuestas
de boxeo|apuestas de boxeo canelo|apuestas de boxeo en las vegas|apuestas
de boxeo hoy|apuestas de boxeo online|apuestas de caballo|apuestas de caballos|apuestas de caballos como
funciona|apuestas de caballos como se juega|apuestas de caballos
en colombia|apuestas de caballos en españa|apuestas de caballos en linea|apuestas de caballos españa|apuestas de caballos ganador y colocado|apuestas de
caballos internacionales|apuestas de caballos juegos|apuestas de caballos online|apuestas de caballos online en venezuela|apuestas de caballos
por internet|apuestas de caballos pronosticos|apuestas de caballos pronósticos|apuestas de carrera de caballos|apuestas de carreras
de caballos|apuestas de carreras de caballos online|apuestas
de casino|apuestas de casino online|apuestas de casino por internet|apuestas de champions
league|apuestas de ciclismo|apuestas de colombia|apuestas de copa america|apuestas de corners|apuestas de deportes
en linea|apuestas de deportes online|apuestas de dinero|apuestas de esports|apuestas de eurocopa|apuestas
de europa league|apuestas de f1|apuestas de formula 1|apuestas
de futbol|apuestas de fútbol|apuestas de futbol app|apuestas de futbol argentina|apuestas de futbol colombia|apuestas de
futbol en colombia|apuestas de futbol en directo|apuestas
de futbol en linea|apuestas de futbol en vivo|apuestas de futbol español|apuestas de futbol gratis|apuestas de futbol hoy|apuestas de futbol mundial|apuestas de futbol online|apuestas de fútbol online|apuestas de futbol para
hoy|apuestas de fútbol para hoy|apuestas de futbol para hoy seguras|apuestas de futbol para mañana|apuestas de futbol peru|apuestas de futbol pronosticos|apuestas de fútbol pronósticos|apuestas de
futbol seguras|apuestas de futbol seguras para hoy|apuestas de
futbol sin dinero|apuestas de galgos|apuestas de galgos
como ganar|apuestas de galgos en directo|apuestas de galgos online|apuestas de galgos trucos|apuestas
de golf|apuestas de hockey|apuestas de hockey sobre hielo|apuestas
de hoy|apuestas de hoy seguras|apuestas de juego|apuestas de juegos|apuestas de juegos deportivos|apuestas de juegos online|apuestas de la champions league|apuestas de la copa américa|apuestas de
la eurocopa|apuestas de la europa league|apuestas de la liga|apuestas de la liga bbva|apuestas de la liga española|apuestas de la nba|apuestas de la nfl|apuestas
de la ufc|apuestas de mlb|apuestas de nba|apuestas
de nba para hoy|apuestas de partidos|apuestas de partidos de futbol|apuestas de peleas ufc|apuestas de perros en vivo|apuestas de perros virtuales|apuestas de peru|apuestas de sistema|apuestas
de sistema como funciona|apuestas de sistema explicacion|apuestas de sistema explicación|apuestas
de tenis|apuestas de tenis de mesa|apuestas de tenis
en directo|apuestas de tenis hoy|apuestas de tenis para hoy|apuestas
de tenis pronosticos|apuestas de tenis seguras|apuestas de todo tipo|apuestas de ufc|apuestas
de ufc hoy|apuestas del boxeo|apuestas del clasico|apuestas del clasico real madrid barca|apuestas del
dia|apuestas del día|apuestas del dia de hoy|apuestas del dia deportivas|apuestas del dia futbol|apuestas del
mundial|apuestas del partido de hoy|apuestas del real madrid|apuestas del
rey|apuestas del sistema|apuestas deporte|apuestas deportes|apuestas
deportiva|apuestas deportivas|apuestas deportivas 1 euro|apuestas deportivas 10 euros gratis|apuestas deportivas 100
seguras|apuestas deportivas 1×2|apuestas deportivas
android|apuestas deportivas app|apuestas deportivas apps|apuestas deportivas argentina|apuestas
deportivas argentina futbol|apuestas deportivas argentina legal|apuestas deportivas atletico de madrid|apuestas deportivas baloncesto|apuestas deportivas barca
madrid|apuestas deportivas barcelona|apuestas deportivas beisbol|apuestas deportivas
bono|apuestas deportivas bono bienvenida|apuestas deportivas bono de bienvenida|apuestas deportivas bono sin deposito|apuestas deportivas bonos de bienvenida|apuestas
deportivas boxeo|apuestas deportivas caballos|apuestas deportivas calculadora|apuestas deportivas campeon liga|apuestas deportivas casino|apuestas deportivas casino barcelona|apuestas
deportivas casino online|apuestas deportivas cerca de mi|apuestas deportivas champions league|apuestas deportivas chile|apuestas deportivas ciclismo|apuestas deportivas colombia|apuestas deportivas com|apuestas deportivas com foro|apuestas deportivas com pronosticos|apuestas deportivas
combinadas|apuestas deportivas combinadas para hoy|apuestas deportivas como se juega|apuestas deportivas comparador|apuestas deportivas con bono gratis|apuestas deportivas con bonos gratis|apuestas deportivas con dinero ficticio|apuestas deportivas con paypal|apuestas deportivas con puntos virtuales|apuestas deportivas consejos|apuestas deportivas consejos para
ganar|apuestas deportivas copa america|apuestas deportivas copa del
rey|apuestas deportivas copa libertadores|apuestas deportivas copa mundial|apuestas deportivas
corners|apuestas deportivas cual es la mejor|apuestas deportivas
cuotas altas|apuestas deportivas de baloncesto|apuestas deportivas
de boxeo|apuestas deportivas de colombia|apuestas deportivas
de futbol|apuestas deportivas de nba|apuestas
deportivas de nhl|apuestas deportivas de peru|apuestas deportivas de tenis|apuestas deportivas del dia|apuestas deportivas dinero
ficticio|apuestas deportivas directo|apuestas deportivas doble oportunidad|apuestas deportivas
en argentina|apuestas deportivas en chile|apuestas
deportivas en colombia|apuestas deportivas en directo|apuestas deportivas en españa|apuestas
deportivas en español|apuestas deportivas en linea|apuestas deportivas
en línea|apuestas deportivas en peru|apuestas deportivas
en perú|apuestas deportivas en sevilla|apuestas deportivas
en uruguay|apuestas deportivas en vivo|apuestas deportivas
es|apuestas deportivas es pronosticos|apuestas deportivas
españa|apuestas deportivas españolas|apuestas deportivas
esports|apuestas deportivas estadisticas|apuestas deportivas estrategias|apuestas deportivas estrategias seguras|apuestas deportivas
eurocopa|apuestas deportivas europa league|apuestas
deportivas f1|apuestas deportivas faciles de ganar|apuestas deportivas formula 1|apuestas deportivas foro|apuestas deportivas foro futbol|apuestas deportivas foro tenis|apuestas deportivas francia argentina|apuestas deportivas futbol|apuestas deportivas fútbol|apuestas deportivas futbol
argentino|apuestas deportivas futbol colombia|apuestas deportivas futbol español|apuestas
deportivas gana|apuestas deportivas ganadas|apuestas deportivas ganar dinero seguro|apuestas deportivas
gane|apuestas deportivas golf|apuestas deportivas
gratis|apuestas deportivas gratis con premios|apuestas deportivas gratis hoy|apuestas deportivas gratis sin deposito|apuestas deportivas handicap|apuestas deportivas handicap asiatico|apuestas deportivas hoy|apuestas deportivas impuestos|apuestas deportivas interior argentina|apuestas deportivas juegos olimpicos|apuestas deportivas la liga|apuestas deportivas legales|apuestas deportivas legales
en colombia|apuestas deportivas libres de impuestos|apuestas deportivas licencia
españa|apuestas deportivas liga española|apuestas
deportivas listado|apuestas deportivas listado clasico|apuestas deportivas madrid|apuestas deportivas mas seguras|apuestas deportivas
mejor pagadas|apuestas deportivas mejores|apuestas deportivas mejores app|apuestas
deportivas mejores casas|apuestas deportivas mejores cuotas|apuestas deportivas mejores
paginas|apuestas deportivas mexico|apuestas deportivas méxico|apuestas deportivas mlb|apuestas
deportivas mlb hoy|apuestas deportivas multiples|apuestas
deportivas mundial|apuestas deportivas murcia|apuestas deportivas nba|apuestas deportivas nba hoy|apuestas deportivas nfl|apuestas deportivas nhl|apuestas deportivas nuevas|apuestas deportivas
ofertas|apuestas deportivas online|apuestas deportivas online
argentina|apuestas deportivas online chile|apuestas deportivas online colombia|apuestas
deportivas online en colombia|apuestas deportivas online españa|apuestas deportivas online mexico|apuestas deportivas online paypal|apuestas deportivas online peru|apuestas deportivas
online por internet|apuestas deportivas pago paypal|apuestas
deportivas para ganar dinero|apuestas deportivas para hoy|apuestas deportivas para
hoy pronosticos|apuestas deportivas partido suspendido|apuestas deportivas partidos de
hoy|apuestas deportivas paypal|apuestas deportivas peru|apuestas deportivas perú|apuestas deportivas peru vs ecuador|apuestas deportivas predicciones|apuestas deportivas
promociones|apuestas deportivas pronostico|apuestas
deportivas pronóstico|apuestas deportivas pronostico hoy|apuestas
deportivas pronosticos|apuestas deportivas pronósticos|apuestas
deportivas pronosticos expertos|apuestas deportivas pronosticos gratis|apuestas deportivas pronosticos nba|apuestas deportivas pronosticos tenis|apuestas deportivas que aceptan paypal|apuestas deportivas real madrid|apuestas deportivas
regalo bienvenida|apuestas deportivas resultado exacto|apuestas
deportivas resultados|apuestas deportivas rugby|apuestas
deportivas seguras|apuestas deportivas seguras foro|apuestas deportivas seguras
hoy|apuestas deportivas seguras para hoy|apuestas deportivas seguras telegram|apuestas
deportivas sevilla|apuestas deportivas simulador eurocopa|apuestas deportivas
sin deposito|apuestas deportivas sin deposito inicial|apuestas deportivas sin dinero|apuestas deportivas sin dinero real|apuestas deportivas sin registro|apuestas deportivas stake|apuestas deportivas stake 10|apuestas deportivas
telegram españa|apuestas deportivas tenis|apuestas deportivas tenis de mesa|apuestas deportivas tenis foro|apuestas deportivas tenis
hoy|apuestas deportivas tips|apuestas deportivas tipster|apuestas deportivas ufc|apuestas deportivas uruguay|apuestas
deportivas valencia|apuestas deportivas valencia barcelona|apuestas deportivas venezuela|apuestas deportivas virtuales|apuestas deportivas y casino|apuestas deportivas y
casino online|apuestas deportivas.com|apuestas deportivas.com foro|apuestas deportivas.es|apuestas deportivos pronosticos|apuestas deposito minimo 1 euro|apuestas
descenso a segunda|apuestas descenso a segunda b|apuestas descenso la liga|apuestas descenso
primera division|apuestas descenso segunda|apuestas dia|apuestas diarias
seguras|apuestas dinero|apuestas dinero ficticio|apuestas dinero real|apuestas dinero virtual|apuestas directas|apuestas directo|apuestas directo futbol|apuestas division de honor juvenil|apuestas dnb|apuestas doble oportunidad|apuestas doble resultado|apuestas
dobles|apuestas dobles y triples|apuestas dortmund
barcelona|apuestas draft nba|apuestas draft nfl|apuestas ecuador vs argentina|apuestas ecuador vs venezuela|apuestas
egipto uruguay|apuestas el clasico|apuestas elecciones venezuela|apuestas empate|apuestas en baloncesto|apuestas en barcelona|apuestas en beisbol|apuestas
en boxeo|apuestas en caballos|apuestas en carreras de caballos|apuestas en casino|apuestas en casino online|apuestas en casinos|apuestas en casinos online|apuestas en chile|apuestas en ciclismo|apuestas en colombia|apuestas en colombia de futbol|apuestas en directo|apuestas en directo futbol|apuestas en directo pronosticos|apuestas en el futbol|apuestas en el tenis|apuestas
en españa|apuestas en esports|apuestas en eventos deportivos virtuales|apuestas en golf|apuestas en juegos|apuestas en la champions league|apuestas
en la eurocopa|apuestas en la liga|apuestas en la
nba|apuestas en la nfl|apuestas en las vegas mlb|apuestas
en las vegas nfl|apuestas en linea|apuestas en línea|apuestas
en linea argentina|apuestas en linea boxeo|apuestas en linea chile|apuestas en linea colombia|apuestas en línea de
fútbol|apuestas en linea deportivas|apuestas en linea españa|apuestas en linea estados unidos|apuestas en linea
futbol|apuestas en linea mexico|apuestas en línea
méxico|apuestas en linea mundial|apuestas en linea peru|apuestas en linea usa|apuestas en los esports|apuestas en madrid|apuestas en méxico|apuestas
en mexico online|apuestas en nba|apuestas en partidos de futbol|apuestas en partidos de futbol en vivo|apuestas
en partidos de tenis en directo|apuestas en perú|apuestas en sevilla|apuestas en sistema|apuestas en stake|apuestas
en tenis|apuestas en tenis de mesa|apuestas en valencia|apuestas en vivo|apuestas en vivo argentina|apuestas en vivo casino|apuestas
en vivo futbol|apuestas en vivo fútbol|apuestas en vivo nba|apuestas en vivo peru|apuestas en vivo tenis|apuestas en vivo ufc|apuestas equipo
mbappe|apuestas equipos de futbol|apuestas españa|apuestas españa alemania|apuestas españa alemania eurocopa|apuestas españa croacia|apuestas españa eurocopa|apuestas españa
francia|apuestas españa francia eurocopa|apuestas españa gana el mundial|apuestas españa gana eurocopa|apuestas españa gana mundial|apuestas
españa georgia|apuestas españa holanda|apuestas españa inglaterra|apuestas españa inglaterra cuotas|apuestas españa inglaterra eurocopa|apuestas
españa italia|apuestas españa mundial|apuestas españa paises bajos|apuestas español|apuestas español oviedo|apuestas espanyol barcelona|apuestas espanyol betis|apuestas espanyol villarreal|apuestas
esport|apuestas esports|apuestas esports colombia|apuestas esports
españa|apuestas esports fifa|apuestas esports gratis|apuestas esports
lol|apuestas esports peru|apuestas esports valorant|apuestas estadisticas|apuestas estrategias|apuestas euro|apuestas euro copa|apuestas eurocopa|apuestas eurocopa campeon|apuestas
eurocopa españa|apuestas eurocopa favoritos|apuestas eurocopa femenina|apuestas eurocopa final|apuestas eurocopa ganador|apuestas eurocopa
hoy|apuestas eurocopa sub 21|apuestas euroliga baloncesto|apuestas euroliga pronosticos|apuestas europa league|apuestas
europa league hoy|apuestas europa league pronosticos|apuestas europa league pronósticos|apuestas euros|apuestas f1 abu dhabi|apuestas
f1 bahrein|apuestas f1 canada|apuestas f1 china|apuestas f1
cuotas|apuestas f1 hoy|apuestas f1 las vegas|apuestas f1 miami|apuestas f1 monaco|apuestas faciles de ganar|apuestas fáciles de ganar|apuestas faciles para ganar|apuestas favoritas|apuestas
favorito champions|apuestas favoritos champions|apuestas favoritos eurocopa|apuestas favoritos mundial|apuestas fc barcelona|apuestas final champions
cuotas|apuestas final champions league|apuestas final champions peru|apuestas final copa|apuestas final copa america|apuestas final
copa de europa|apuestas final copa del rey|apuestas final copa europa|apuestas final
copa libertadores|apuestas final copa rey|apuestas final de copa|apuestas final de copa del rey|apuestas
final del mundial|apuestas final euro|apuestas final eurocopa|apuestas final
europa league|apuestas final libertadores|apuestas final mundial|apuestas
final nba|apuestas final rugby|apuestas final uefa europa
league|apuestas final.mundial|apuestas finales de conferencia nfl|apuestas finales nba|apuestas fiorentina betis|apuestas formula|apuestas formula
1|apuestas fórmula 1|apuestas fórmula 1 pronósticos|apuestas formula uno|apuestas foro|apuestas foro nba|apuestas francia argentina|apuestas francia españa|apuestas futbol|apuestas fútbol|apuestas futbol americano|apuestas futbol americano nfl|apuestas futbol argentina|apuestas futbol argentino|apuestas futbol champions league|apuestas futbol chile|apuestas futbol
colombia|apuestas futbol consejos|apuestas futbol en directo|apuestas fútbol
en directo|apuestas futbol en vivo|apuestas fútbol en vivo|apuestas futbol españa|apuestas futbol español|apuestas fútbol español|apuestas futbol eurocopa|apuestas futbol femenino|apuestas futbol foro|apuestas futbol gratis|apuestas futbol hoy|apuestas fútbol hoy|apuestas futbol juegos olimpicos|apuestas futbol mexico|apuestas futbol mundial|apuestas
futbol online|apuestas futbol para hoy|apuestas futbol peru|apuestas
futbol pronosticos|apuestas futbol sala|apuestas futbol telegram|apuestas futbol virtual|apuestas galgos|apuestas galgos en directo|apuestas galgos hoy|apuestas galgos online|apuestas galgos pronosticos|apuestas galgos trucos|apuestas gana|apuestas gana colombia|apuestas gana resultados|apuestas
ganadas|apuestas ganadas hoy|apuestas ganador champions league|apuestas ganador copa america|apuestas ganador copa del rey|apuestas ganador copa del rey baloncesto|apuestas ganador copa libertadores|apuestas ganador de la eurocopa|apuestas ganador de
la liga|apuestas ganador del mundial|apuestas ganador eurocopa|apuestas ganador europa league|apuestas ganador f1|apuestas ganador
la liga|apuestas ganador liga española|apuestas ganador mundial|apuestas ganador mundial baloncesto|apuestas ganador
mundial f1|apuestas ganador nba|apuestas ganadores
eurocopa|apuestas ganadores mundial|apuestas ganar champions|apuestas ganar eurocopa|apuestas ganar liga|apuestas ganar
mundial|apuestas ganar nba|apuestas getafe valencia|apuestas ghana uruguay|apuestas
girona|apuestas girona athletic|apuestas girona betis|apuestas girona campeon de liga|apuestas girona campeon liga|apuestas girona gana la liga|apuestas girona real madrid|apuestas girona real sociedad|apuestas goleador eurocopa|apuestas goleadores eurocopa|apuestas goles asiaticos|apuestas golf|apuestas
golf masters|apuestas golf pga|apuestas granada barcelona|apuestas
grand slam de tenis|apuestas gratis|apuestas gratis casino|apuestas
gratis con premios|apuestas gratis hoy|apuestas
gratis para hoy|apuestas gratis por registro|apuestas gratis puntos|apuestas
gratis regalos|apuestas gratis sin deposito|apuestas gratis sin depósito|apuestas gratis sin ingreso|apuestas gratis sports|apuestas gratis
y ganar premios|apuestas grupo a eurocopa|apuestas grupos eurocopa|apuestas handicap|apuestas
handicap asiatico|apuestas handicap baloncesto|apuestas handicap como funciona|apuestas handicap nba|apuestas handicap nfl|apuestas hipicas online|apuestas hípicas online|apuestas hipicas venezuela|apuestas hockey|apuestas hockey hielo|apuestas hockey patines|apuestas hockey
sobre hielo|apuestas holanda argentina|apuestas holanda vs argentina|apuestas hoy|apuestas hoy
champions|apuestas hoy futbol|apuestas hoy nba|apuestas hoy pronosticos|apuestas hoy seguras|apuestas impuestos|apuestas inglaterra paises bajos|apuestas inter barca|apuestas inter barcelona|apuestas juego|apuestas juegos|apuestas juegos en linea|apuestas juegos olimpicos|apuestas juegos olímpicos|apuestas juegos olimpicos baloncesto|apuestas juegos
online|apuestas juegos virtuales|apuestas jugador sevilla|apuestas jugadores nba|apuestas kings league americas|apuestas la liga|apuestas la liga española|apuestas la
liga hoy|apuestas la liga santander|apuestas las vegas mlb|apuestas
las vegas nba|apuestas las vegas nfl|apuestas league of legends mundial|apuestas legal|apuestas legales|apuestas legales en colombia|apuestas legales en españa|apuestas legales en estados unidos|apuestas legales españa|apuestas leganes
betis|apuestas libertadores|apuestas licencia|apuestas liga 1 peru|apuestas
liga argentina|apuestas liga bbva pronosticos|apuestas liga de campeones|apuestas liga
de campeones de baloncesto|apuestas liga de campeones
de hockey|apuestas liga españa|apuestas liga española|apuestas liga santander pronosticos|apuestas ligas de futbol|apuestas linea|apuestas linea de gol|apuestas liverpool barcelona|apuestas liverpool real madrid|apuestas lol mundial|apuestas madrid|apuestas madrid arsenal|apuestas madrid atletico|apuestas
madrid atletico champions|apuestas madrid barca|apuestas madrid barça|apuestas madrid barca hoy|apuestas madrid barca supercopa|apuestas
madrid barcelona|apuestas madrid barsa|apuestas madrid bayern|apuestas madrid betis|apuestas madrid
borussia|apuestas madrid campeon champions|apuestas madrid celta|apuestas madrid city|apuestas madrid dortmund|apuestas madrid gana la
liga|apuestas madrid gana liga|apuestas madrid hoy|apuestas
madrid liverpool|apuestas madrid osasuna|apuestas
madrid sevilla|apuestas madrid valencia|apuestas madrid vs arsenal|apuestas madrid vs barcelona|apuestas mallorca osasuna|apuestas mallorca real sociedad|apuestas manchester athletic|apuestas manchester city real madrid|apuestas
mas faciles de ganar|apuestas mas seguras|apuestas mas seguras para
hoy|apuestas masters de golf|apuestas masters de tenis|apuestas maximo goleador eurocopa|apuestas maximo goleador mundial|apuestas mejor jugador eurocopa|apuestas mejores casinos online|apuestas mexico|apuestas méxico|apuestas mexico polonia|apuestas méxico polonia|apuestas mlb|apuestas mlb hoy|apuestas mlb las vegas|apuestas mlb para hoy|apuestas mlb pronosticos|apuestas mlb usa|apuestas mma ufc|apuestas momios|apuestas multiples|apuestas múltiples|apuestas multiples como funcionan|apuestas multiples el
gordo|apuestas multiples futbol|apuestas mundial|apuestas mundial 2026|apuestas mundial
baloncesto|apuestas mundial balonmano|apuestas mundial brasil|apuestas mundial campeon|apuestas mundial ciclismo|apuestas mundial clubes|apuestas mundial de baloncesto|apuestas mundial de ciclismo|apuestas mundial de clubes|apuestas mundial de futbol|apuestas mundial de fútbol|apuestas mundial de rugby|apuestas mundial f1|apuestas mundial
favoritos|apuestas mundial femenino|apuestas mundial formula 1|apuestas mundial futbol|apuestas mundial ganador|apuestas mundial lol|apuestas mundial moto
gp|apuestas mundial motogp|apuestas mundial rugby|apuestas mundial sub 17|apuestas mundiales|apuestas mundialistas|apuestas
mvp eurocopa|apuestas mvp nba|apuestas mvp nfl|apuestas nacionales de colombia|apuestas
nba|apuestas nba all star|apuestas nba campeon|apuestas
nba consejos|apuestas nba esta noche|apuestas nba finals|apuestas nba gratis|apuestas
nba hoy|apuestas nba hoy jugadores|apuestas nba hoy
pronosticos|apuestas nba para hoy|apuestas nba playoffs|apuestas nba pronosticos|apuestas nba pronósticos|apuestas
nba pronosticos hoy|apuestas nba tipster|apuestas nfl|apuestas nfl hoy|apuestas nfl las
vegas|apuestas nfl playoffs|apuestas nfl pronosticos|apuestas nfl pronósticos|apuestas
nfl semana 4|apuestas nfl super bowl|apuestas nhl|apuestas nhl pronosticos|apuestas octavos eurocopa|apuestas
ofertas|apuestas online|apuestas online argentina|apuestas online argentina
legal|apuestas online bono|apuestas online bono bienvenida|apuestas online boxeo|apuestas online caballos|apuestas online carreras
de caballos|apuestas online casino|apuestas online champions
league|apuestas online chile|apuestas online ciclismo|apuestas online colombia|apuestas online comparativa|apuestas online con paypal|apuestas online de caballos|apuestas online deportivas|apuestas online en argentina|apuestas online en peru|apuestas online espana|apuestas online españa|apuestas
online esports|apuestas online foro|apuestas online futbol|apuestas online
futbol españa|apuestas online golf|apuestas online gratis|apuestas online gratis sin deposito|apuestas online juegos|apuestas online mexico|apuestas online
mma|apuestas online movil|apuestas online nba|apuestas online net|apuestas online nuevas|apuestas online opiniones|apuestas online paypal|apuestas online peru|apuestas online seguras|apuestas online sin dinero|apuestas online sin registro|apuestas online tenis|apuestas online ufc|apuestas online uruguay|apuestas online venezuela|apuestas open britanico golf|apuestas osasuna athletic|apuestas osasuna barcelona|apuestas osasuna real madrid|apuestas
osasuna sevilla|apuestas osasuna valencia|apuestas over|apuestas over 2.5|apuestas over under|apuestas paginas|apuestas pago anticipado|apuestas paises bajos ecuador|apuestas paises bajos inglaterra|apuestas países bajos qatar|apuestas para boxeo|apuestas para champions league|apuestas para
el clasico|apuestas para el dia de hoy|apuestas para el mundial|apuestas para el partido de
hoy|apuestas para eurocopa|apuestas para europa league|apuestas para futbol|apuestas
para ganar|apuestas para ganar dinero|apuestas para ganar dinero facil|apuestas para ganar en la ruleta|apuestas para ganar la champions|apuestas para ganar la eurocopa|apuestas para ganar la europa league|apuestas
para ganar la liga|apuestas para ganar siempre|apuestas para hacer|apuestas para hoy|apuestas para hoy de futbol|apuestas para hoy europa
league|apuestas para hoy futbol|apuestas para juegos|apuestas para la champions
league|apuestas para la copa del rey|apuestas para
la eurocopa|apuestas para la europa league|apuestas para la
final de la eurocopa|apuestas para la nba hoy|apuestas para los partidos de
hoy|apuestas para partidos de hoy|apuestas para ufc|apuestas partido|apuestas partido aplazado|apuestas partido champions|apuestas
partido colombia|apuestas partido españa marruecos|apuestas partido mundial|apuestas partido suspendido|apuestas partidos|apuestas partidos champions
league|apuestas partidos csgo|apuestas partidos de futbol|apuestas partidos de futbol
hoy|apuestas partidos de hoy|apuestas partidos eurocopa|apuestas partidos futbol|apuestas partidos hoy|apuestas partidos
mundial|apuestas paypal|apuestas peleas de boxeo|apuestas peru|apuestas
perú|apuestas peru brasil|apuestas peru chile|apuestas peru paraguay|apuestas peru uruguay|apuestas peru vs chile|apuestas peru vs
colombia|apuestas pichichi eurocopa|apuestas plataforma|apuestas
playoff|apuestas playoff ascenso|apuestas playoff ascenso a primera|apuestas playoff nba|apuestas playoff segunda|apuestas
playoff segunda b|apuestas playoffs nba|apuestas playoffs nfl|apuestas polonia argentina|apuestas por argentina|apuestas por
internet mexico|apuestas por internet para ganar dinero|apuestas por
paypal|apuestas por ronda boxeo|apuestas por sistema|apuestas portugal uruguay|apuestas pre partido|apuestas predicciones|apuestas predicciones futbol|apuestas
primera division|apuestas primera division españa|apuestas promociones|apuestas pronostico|apuestas pronosticos|apuestas pronosticos deportivos|apuestas pronosticos deportivos tenis|apuestas
pronosticos futbol|apuestas pronosticos gratis|apuestas pronosticos
nba|apuestas pronosticos tenis|apuestas prorroga|apuestas psg
barca|apuestas psg barcelona|apuestas puntos por tarjetas|apuestas puntos
tarjetas|apuestas que aceptan paypal|apuestas que es handicap|apuestas que
puedes hacer con tu novia|apuestas que siempre ganaras|apuestas que significa|apuestas quien bajara
a segunda|apuestas quién bajara a segunda|apuestas quien gana
el mundial|apuestas quien gana eurocopa|apuestas quien gana la champions|apuestas quien gana
la eurocopa|apuestas quien gana la liga|apuestas quien ganara el
mundial|apuestas quién ganará el mundial|apuestas quien ganara la champions|apuestas quien ganara la eurocopa|apuestas quien ganara la liga|apuestas rayo barcelona|apuestas
real madrid|apuestas real madrid arsenal|apuestas real madrid athletic|apuestas real madrid atletico|apuestas real madrid atletico champions|apuestas
real madrid atletico de madrid|apuestas real madrid atlético
de madrid|apuestas real madrid atletico madrid|apuestas real madrid barcelona|apuestas real madrid
bayern|apuestas real madrid betis|apuestas real madrid borussia|apuestas real madrid campeon champions|apuestas real madrid celta|apuestas
real madrid champions|apuestas real madrid city|apuestas real madrid girona|apuestas real madrid hoy|apuestas real madrid liverpool|apuestas real madrid manchester city|apuestas
real madrid osasuna|apuestas real madrid real sociedad|apuestas real
madrid valencia|apuestas real madrid villarreal|apuestas real madrid vs arsenal|apuestas real madrid vs atletico|apuestas
real madrid vs atlético|apuestas real madrid vs atletico madrid|apuestas real madrid vs
barcelona|apuestas real madrid vs betis|apuestas real madrid vs sevilla|apuestas real madrid vs valencia|apuestas real sociedad|apuestas real sociedad athletic|apuestas
real sociedad barcelona|apuestas real sociedad betis|apuestas real sociedad psg|apuestas
real sociedad real madrid|apuestas real sociedad valencia|apuestas recomendadas hoy|apuestas regalo de bienvenida|apuestas registro|apuestas
resultado exacto|apuestas resultados|apuestas resultados eurocopa|apuestas retirada tenis|apuestas roma barcelona|apuestas roma sevilla|apuestas rugby|apuestas
rugby mundial|apuestas rugby world cup|apuestas ruleta seguras|apuestas segunda|apuestas segunda b|apuestas
segunda division|apuestas segunda división|apuestas segunda division b|apuestas segunda
division españa|apuestas seguras|apuestas seguras baloncesto|apuestas seguras calculadora|apuestas seguras
en la ruleta|apuestas seguras eurocopa|apuestas seguras foro|apuestas seguras futbol|apuestas seguras futbol hoy|apuestas seguras
gratis|apuestas seguras hoy|apuestas seguras hoy futbol|apuestas seguras
nba|apuestas seguras nba hoy|apuestas seguras
para este fin de semana|apuestas seguras para ganar dinero|apuestas seguras para hoy|apuestas seguras para
hoy fútbol|apuestas seguras para hoy pronósticos|apuestas
seguras para mañana|apuestas seguras ruleta|apuestas
seguras telegram|apuestas seguras tenis|apuestas semifinales eurocopa|apuestas senegal paises bajos|apuestas sevilla|apuestas sevilla athletic|apuestas sevilla atletico de madrid|apuestas
sevilla barcelona|apuestas sevilla betis|apuestas sevilla campeon liga|apuestas sevilla celta|apuestas sevilla
gana la liga|apuestas sevilla girona|apuestas sevilla inter|apuestas sevilla jugador|apuestas sevilla juventus|apuestas sevilla leganes|apuestas sevilla madrid|apuestas
sevilla manchester united|apuestas sevilla osasuna|apuestas sevilla
real madrid|apuestas sevilla real sociedad|apuestas sevilla roma|apuestas sevilla valencia|apuestas significa|apuestas simples ejemplos|apuestas simples o combinadas|apuestas sin deposito|apuestas sin deposito inicial|apuestas
sin deposito minimo|apuestas sin dinero|apuestas sin dinero real|apuestas
sin empate|apuestas sin empate que significa|apuestas sin ingreso minimo|apuestas
sin registro|apuestas sistema|apuestas sistema calculadora|apuestas sistema como funciona|apuestas sistema trixie|apuestas sociedad|apuestas sorteo copa del rey|apuestas stake|apuestas
stake 10|apuestas stake 10 hoy|apuestas super bowl favorito|apuestas super rugby|apuestas supercopa españa|apuestas superliga argentina|apuestas
tarjeta roja|apuestas tarjetas|apuestas tarjetas amarillas|apuestas tenis|apuestas tenis atp|apuestas tenis consejos|apuestas tenis copa davis|apuestas tenis de mesa|apuestas tenis de mesa
pronosticos|apuestas tenis en vivo|apuestas tenis femenino|apuestas tenis hoy|apuestas tenis itf|apuestas tenis pronosticos|apuestas tenis pronósticos|apuestas tenis
retirada|apuestas tenis roland garros|apuestas tenis
seguras|apuestas tenis wimbledon|apuestas tenis wta|apuestas tercera division|apuestas tercera
division españa|apuestas tipos|apuestas tips|apuestas tipster|apuestas tipster para hoy|apuestas topuria holloway cuotas|apuestas torneos de golf|apuestas torneos de tenis|apuestas trucos|apuestas uefa
champions league|apuestas uefa europa league|apuestas ufc|apuestas ufc chile|apuestas
ufc como funciona|apuestas ufc hoy|apuestas ufc ilia topuria|apuestas ufc online|apuestas ufc pronósticos|apuestas ufc telegram|apuestas ufc topuria|apuestas under over|apuestas unionistas villarreal|apuestas uruguay|apuestas uruguay colombia|apuestas
uruguay corea|apuestas uruguay vs colombia|apuestas us open golf|apuestas us open tenis|apuestas valencia|apuestas valencia barcelona|apuestas valencia betis|apuestas valencia madrid|apuestas valencia real madrid|apuestas valladolid barcelona|apuestas valladolid valencia|apuestas valor app|apuestas valor en directo|apuestas valor galgos|apuestas venezuela|apuestas venezuela argentina|apuestas venezuela bolivia|apuestas venezuela ecuador|apuestas villarreal|apuestas villarreal athletic|apuestas villarreal barcelona|apuestas villarreal bayern|apuestas villarreal betis|apuestas villarreal liverpool|apuestas villarreal manchester|apuestas villarreal manchester united|apuestas villarreal vs real madrid|apuestas virtuales|apuestas virtuales
colombia|apuestas virtuales futbol|apuestas virtuales sin dinero|apuestas vivo|apuestas
vuelta a españa|apuestas vuelta españa|apuestas william hill partidos de
hoy|apuestas y casino|apuestas y casinos|apuestas y juegos de azar|apuestas y pronosticos|apuestas y pronosticos de futbol|apuestas y
pronosticos deportivos|apuestas y resultados|apuestas-deportivas|apuestas-deportivas.es
pronosticos|arbitro nba apuestas|argentina
apuestas|argentina colombia apuestas|argentina croacia apuestas|argentina francia apuestas|argentina mexico apuestas|argentina
peru apuestas|argentina uruguay apuestas|argentina vs bolivia apuestas|argentina vs chile apuestas|argentina vs colombia
apuestas|argentina vs francia apuestas|argentina
vs. colombia apuestas|asi se gana en las apuestas deportivas|asiatico apuestas|asiatico en apuestas|asiaticos apuestas|athletic barcelona
apuestas|athletic manchester united apuestas|athletic osasuna
apuestas|athletic real madrid apuestas|atletico barcelona apuestas|atletico de madrid apuestas|atlético de madrid apuestas|atletico de madrid real madrid apuestas|atletico de madrid vs barcelona apuestas|atletico madrid
real madrid apuestas|atletico madrid vs real madrid apuestas|atletico real madrid apuestas|atletico vs real madrid apuestas|avisador de cuotas apuestas|bajada de
cuotas apuestas|baloncesto apuestas|barbastro barcelona apuestas|barca apuestas|barca bayern apuestas|barca inter apuestas|barca madrid apuestas|barça madrid apuestas|barca vs
atletico apuestas|barca vs madrid apuestas|barca vs real madrid apuestas|barcelona – real madrid apuestas|barcelona apuestas|barcelona atletico
apuestas|barcelona atletico de madrid apuestas|barcelona atletico madrid apuestas|barcelona betis apuestas|barcelona casa de apuestas|barcelona inter apuestas|barcelona psg apuestas|barcelona real madrid apuestas|barcelona real sociedad apuestas|barcelona sevilla
apuestas|barcelona valencia apuestas|barcelona vs athletic bilbao apuestas|barcelona vs atlético madrid apuestas|barcelona
vs betis apuestas|barcelona vs celta de vigo apuestas|barcelona vs espanyol apuestas|barcelona vs girona
apuestas|barcelona vs madrid apuestas|barcelona vs real madrid apuestas|barcelona vs real
sociedad apuestas|barcelona vs sevilla apuestas|barcelona vs villarreal apuestas|base de datos cuotas
apuestas deportivas|bayern real madrid apuestas|beisbol apuestas|best america apuestas|bet apuestas chile|bet apuestas
en vivo|betis – chelsea apuestas|betis apuestas|betis barcelona apuestas|betis chelsea apuestas|betis madrid apuestas|betis sevilla apuestas|betsson tu sitio de apuestas online|blog apuestas
baloncesto|blog apuestas ciclismo|blog apuestas nba|blog apuestas tenis|blog de apuestas de tenis|bono apuestas|bono apuestas deportivas|bono apuestas deportivas sin deposito|bono apuestas gratis|bono apuestas gratis sin deposito|bono
apuestas sin deposito|bono bienvenida apuestas|bono bienvenida apuestas
deportivas|bono bienvenida apuestas españa|bono bienvenida
apuestas sin deposito|bono bienvenida apuestas sin depósito|bono bienvenida casa apuestas|bono bienvenida casa de apuestas|bono
bienvenida marca apuestas|bono casa apuestas|bono
casa de apuestas|bono casa de apuestas sin ingreso|bono casas de apuestas|bono de apuestas|bono
de apuestas gratis sin deposito|bono de bienvenida apuestas|bono de bienvenida apuestas deportivas|bono de bienvenida
casa de apuestas|bono de bienvenida casas de apuestas|bono de casas de
apuestas|bono de registro apuestas|bono de registro apuestas deportivas|bono de registro casa de apuestas|bono gratis apuestas|bono marca apuestas|bono por registro apuestas|bono por
registro apuestas deportivas|bono por registro casa de
apuestas|bono registro apuestas|bono sin deposito apuestas|bono sin depósito apuestas|bono sin deposito apuestas deportivas|bono
sin depósito apuestas deportivas|bono sin deposito casa de apuestas|bono sin deposito marca apuestas|bono sin ingreso apuestas|bono sin ingreso
apuestas deportivas|bonos apuestas|bonos apuestas colombia|bonos apuestas deportivas|bonos apuestas deportivas sin deposito|bonos apuestas gratis|bonos apuestas sin deposito|bonos apuestas
sin depósito|bonos bienvenida apuestas|bonos bienvenida casas apuestas|bonos bienvenida casas de apuestas|bonos
casa de apuestas|bonos casas apuestas|bonos casas de apuestas|bonos casas de apuestas colombia|bonos casas de apuestas deportivas|bonos casas de
apuestas españa|bonos casas de apuestas nuevas|bonos casas de apuestas sin deposito|bonos casas de apuestas sin depósito|bonos de apuestas|bonos de apuestas deportivas|bonos
de apuestas gratis|bonos de apuestas sin deposito|bonos de bienvenida apuestas|bonos de bienvenida apuestas
deportivas|bonos de bienvenida casa de apuestas|bonos de bienvenida casas de apuestas|bonos de bienvenida de casas de apuestas|bonos de bienvenida
en casas de apuestas|bonos de casas de apuestas|bonos de casas de apuestas sin deposito|bonos en casa de apuestas|bonos en casas de apuestas sin deposito|bonos gratis apuestas|bonos gratis
apuestas deportivas|bonos gratis casas de apuestas|bonos gratis sin deposito apuestas|bonos paginas de apuestas|bonos registro casas de apuestas|bonos sin deposito apuestas|bonos sin depósito apuestas|bonos sin deposito apuestas deportivas|bonos sin deposito casas
de apuestas|bot de apuestas deportivas gratis|boxeo apuestas|brasil colombia
apuestas|brasil peru apuestas|brasil vs colombia apuestas|buenas apuestas para hoy|buscador cuotas apuestas|buscador de apuestas seguras|buscador de cuotas apuestas|buscador de cuotas
de apuestas|buscar apuestas seguras|caballos apuestas|calculador de apuestas|calculador de cuotas apuestas|calculadora apuestas|calculadora apuestas combinadas|calculadora apuestas de sistema|calculadora apuestas deportivas|calculadora apuestas deportivas
seguras|calculadora apuestas multiples|calculadora apuestas segura|calculadora apuestas seguras|calculadora apuestas
sistema|calculadora apuestas yankee|calculadora arbitraje apuestas|calculadora cubrir apuestas|calculadora cuotas apuestas|calculadora de apuestas|calculadora de apuestas combinadas|calculadora de apuestas de futbol|calculadora de apuestas de sistema|calculadora de apuestas
deportivas|calculadora de apuestas multiples|calculadora de apuestas seguras|calculadora de apuestas
sistema|calculadora de apuestas surebets|calculadora de arbitraje apuestas|calculadora de cuotas apuestas|calculadora de cuotas de apuestas|calculadora para apuestas deportivas|calculadora poisson apuestas|calculadora poisson apuestas deportivas|calculadora poisson para apuestas|calculadora scalping apuestas
deportivas|calculadora sistema apuestas|calculadora stake apuestas|calculadora trading apuestas|calcular apuestas|calcular
apuestas deportivas|calcular apuestas futbol|calcular apuestas sistema|calcular
cuotas apuestas|calcular cuotas apuestas combinadas|calcular cuotas apuestas deportivas|calcular cuotas
de apuestas|calcular ganancias apuestas deportivas|calcular momios apuestas|calcular probabilidad cuota apuestas|calcular stake apuestas|calcular unidades apuestas|calcular yield
apuestas|calculo de apuestas|calculo de apuestas deportivas|cambio de cuotas apuestas|campeon champions apuestas|campeon eurocopa
apuestas|campeon liga apuestas|campeon nba apuestas|canales de apuestas gratis|carrera de caballos
apuestas|carrera de caballos apuestas juego|carrera de caballos con apuestas|carrera
de galgos apuestas|carreras de caballos apuestas|carreras de caballos apuestas
online|carreras de caballos con apuestas|carreras de caballos juegos de
apuestas|carreras de galgos apuestas|carreras de galgos apuestas online|carreras
de galgos apuestas trucos|carreras galgos apuestas|casa apuestas argentina|casa apuestas atletico
de madrid|casa apuestas barcelona|casa apuestas betis|casa apuestas bono bienvenida|casa apuestas
bono gratis|casa apuestas bono sin deposito|casa apuestas cerca
de mi|casa apuestas chile|casa apuestas colombia|casa apuestas
con mejores cuotas|casa apuestas deportivas|casa apuestas españa|casa apuestas española|casa apuestas eurocopa|casa apuestas futbol|casa apuestas mejores
cuotas|casa apuestas mundial|casa apuestas nueva|casa apuestas nuevas|casa
apuestas online|casa apuestas peru|casa apuestas valencia|casa de apuestas|casa de apuestas
10 euros gratis|casa de apuestas argentina|casa de apuestas atletico de
madrid|casa de apuestas baloncesto|casa de apuestas
barcelona|casa de apuestas beisbol|casa de apuestas betis|casa de apuestas bono|casa
de apuestas bono bienvenida|casa de apuestas bono de bienvenida|casa de apuestas bono
gratis|casa de apuestas bono por registro|casa de apuestas bono sin deposito|casa de apuestas boxeo|casa de apuestas caballos|casa de apuestas carreras de
caballos|casa de apuestas cerca de mi|casa de apuestas cerca de mí|casa
de apuestas champions league|casa de apuestas chile|casa de apuestas
ciclismo|casa de apuestas colombia|casa de apuestas con bono de
bienvenida|casa de apuestas con bono sin deposito|casa de apuestas con cuotas mas altas|casa de apuestas con esports|casa de apuestas con las
mejores cuotas|casa de apuestas con licencia en españa|casa de
apuestas con mejores cuotas|casa de apuestas con pago anticipado|casa de apuestas con paypal|casa de apuestas copa america|casa de apuestas de caballos|casa de
apuestas de colombia|casa de apuestas de españa|casa de
apuestas de futbol|casa de apuestas de fútbol|casa de apuestas de
futbol peru|casa de apuestas de peru|casa de apuestas
del madrid|casa de apuestas del real madrid|casa de apuestas deportivas|casa de apuestas deportivas cerca
de mi|casa de apuestas deportivas en argentina|casa de apuestas deportivas en chile|casa de apuestas deportivas
en colombia|casa de apuestas deportivas en españa|casa de apuestas
deportivas en madrid|casa de apuestas deportivas españa|casa de apuestas
deportivas españolas|casa de apuestas deportivas madrid|casa de apuestas deportivas mexico|casa de
apuestas deportivas online|casa de apuestas deportivas peru|casa de apuestas deposito 5 euros|casa de apuestas deposito minimo|casa de apuestas deposito minimo 1 euro|casa de apuestas depósito mínimo 1 euro|casa
de apuestas en españa|casa de apuestas en linea|casa de apuestas en madrid|casa de apuestas
en perú|casa de apuestas en vivo|casa de apuestas españa|casa
de apuestas españa inglaterra|casa de apuestas española|casa de apuestas españolas|casa de apuestas esports|casa de apuestas
eurocopa|casa de apuestas europa league|casa de apuestas f1|casa de apuestas formula 1|casa de apuestas futbol|casa
de apuestas ingreso minimo|casa de apuestas ingreso minimo 1
euro|casa de apuestas ingreso mínimo 1 euro|casa de apuestas legales|casa de apuestas legales en colombia|casa de apuestas
legales en españa|casa de apuestas libertadores|casa de apuestas liga española|casa
de apuestas madrid|casa de apuestas mas segura|casa de apuestas mejores|casa de apuestas méxico|casa de apuestas minimo 5 euros|casa de apuestas
mlb|casa de apuestas mundial|casa de apuestas nba|casa de apuestas nfl|casa
de apuestas nueva|casa de apuestas nuevas|casa de apuestas oficial del real madrid|casa de apuestas oficial real madrid|casa de apuestas online|casa de apuestas
online argentina|casa de apuestas online chile|casa de apuestas online españa|casa de apuestas online mexico|casa de apuestas online paraguay|casa de apuestas online peru|casa de apuestas online
usa|casa de apuestas online venezuela|casa de apuestas
pago anticipado|casa de apuestas para boxeo|casa de apuestas para ufc|casa de
apuestas peru|casa de apuestas perú|casa de apuestas
peru online|casa de apuestas por paypal|casa de apuestas promociones|casa de
apuestas que regalan dinero|casa de apuestas
real madrid|casa de apuestas regalo de bienvenida|casa de
apuestas sevilla|casa de apuestas sin dinero|casa de apuestas
sin ingreso minimo|casa de apuestas sin licencia en españa|casa de apuestas sin minimo
de ingreso|casa de apuestas stake|casa de apuestas tenis|casa de apuestas ufc|casa de apuestas valencia|casa de apuestas venezuela|casa de apuestas virtuales|casa de apuestas vive la suerte|casa oficial
de apuestas del real madrid|casas apuestas asiaticas|casas apuestas bono sin deposito|casas apuestas bonos sin deposito|casas apuestas caballos|casas
apuestas chile|casas apuestas ciclismo|casas apuestas
con licencia|casas apuestas con licencia en españa|casas apuestas
deportivas|casas apuestas deportivas colombia|casas apuestas deportivas españa|casas apuestas deportivas españolas|casas
apuestas deportivas nuevas|casas apuestas españa|casas apuestas españolas|casas apuestas esports|casas apuestas
eurocopa|casas apuestas golf|casas apuestas ingreso
minimo 5 euros|casas apuestas legales|casas apuestas legales españa|casas apuestas licencia|casas apuestas licencia españa|casas
apuestas mexico|casas apuestas mundial|casas apuestas nba|casas apuestas nuevas|casas apuestas nuevas españa|casas apuestas
ofertas|casas apuestas online|casas apuestas paypal|casas apuestas peru|casas
apuestas sin licencia|casas apuestas tenis|casas asiaticas apuestas|casas de apuestas|casas de apuestas 5 euros|casas de apuestas app|casas de
apuestas argentinas|casas de apuestas asiaticas|casas de apuestas
baloncesto|casas de apuestas barcelona|casas de apuestas bono bienvenida|casas de apuestas
bono de bienvenida|casas de apuestas bono por registro|casas de apuestas
bono sin deposito|casas de apuestas bono sin ingreso|casas de
apuestas bonos|casas de apuestas bonos de bienvenida|casas de apuestas bonos gratis|casas de apuestas bonos sin deposito|casas de apuestas boxeo|casas de apuestas caballos|casas de apuestas carreras de
caballos|casas de apuestas casino|casas de apuestas casino online|casas de apuestas cerca
de mi|casas de apuestas champions league|casas de apuestas chile|casas de apuestas ciclismo|casas de apuestas colombia|casas
de apuestas com|casas de apuestas con app|casas de apuestas
con apuestas gratis|casas de apuestas con bono|casas
de apuestas con bono de bienvenida|casas de apuestas con bono de registro|casas de apuestas con bono por registro|casas de apuestas con bono sin deposito|casas de apuestas con bonos|casas de apuestas con bonos gratis|casas de apuestas con bonos sin deposito|casas de apuestas con deposito
minimo|casas de apuestas con esports|casas de apuestas con handicap asiatico|casas de apuestas con licencia|casas
de apuestas con licencia en españa|casas de apuestas
con licencia españa|casas de apuestas con licencia española|casas de apuestas con mejores cuotas|casas de
apuestas con pago anticipado|casas de apuestas con paypal|casas de apuestas con paypal en perú|casas de apuestas con promociones|casas
de apuestas con ruleta en vivo|casas de apuestas copa
del rey|casas de apuestas de caballos|casas de apuestas de españa|casas de apuestas de futbol|casas de apuestas de fútbol|casas de apuestas de peru|casas de apuestas deportivas|casas de apuestas deportivas asiaticas|casas de apuestas deportivas colombia|casas de apuestas deportivas comparativa|casas de apuestas
deportivas con paypal|casas de apuestas deportivas en chile|casas de apuestas deportivas en españa|casas de apuestas deportivas en linea|casas de apuestas deportivas en madrid|casas de apuestas deportivas en mexico|casas de apuestas deportivas en peru|casas de apuestas deportivas en sevilla|casas de apuestas deportivas en valencia|casas de apuestas deportivas españa|casas de
apuestas deportivas españolas|casas de apuestas deportivas legales|casas de apuestas deportivas
madrid|casas de apuestas deportivas mexico|casas de apuestas
deportivas nuevas|casas de apuestas deportivas online|casas de apuestas deportivas peru|casas de apuestas deportivas perú|casas de apuestas deposito
minimo 1 euro|casas de apuestas depósito mínimo 1 euro|casas de apuestas dinero gratis|casas de
apuestas en argentina|casas de apuestas en barcelona|casas de apuestas en chile|casas de apuestas en colombia|casas de apuestas
en españa|casas de apuestas en españa online|casas de apuestas en linea|casas de apuestas en madrid|casas de apuestas en méxico|casas de apuestas en peru|casas de apuestas
en perú|casas de apuestas en sevilla|casas de apuestas en uruguay|casas de apuestas en valencia|casas de apuestas en venezuela|casas de apuestas equipos de futbol|casas de apuestas
españa|casas de apuestas españa alemania|casas de apuestas españa inglaterra|casas de apuestas españa licencia|casas de apuestas españa nuevas|casas de apuestas españa online|casas de
apuestas española|casas de apuestas españolas|casas de apuestas españolas con licencia|casas de apuestas
españolas online|casas de apuestas esports|casas de apuestas
eurocopa|casas de apuestas eurocopa 2024|casas de apuestas europa league|casas de apuestas f1|casas de apuestas fisicas en barcelona|casas de apuestas
fisicas en españa|casas de apuestas formula 1|casas de apuestas fuera
de españa|casas de apuestas futbol|casas de apuestas fútbol|casas de apuestas futbol españa|casas de apuestas ganador eurocopa|casas de apuestas
gratis|casas de apuestas ingreso minimo|casas de apuestas ingreso minimo 1 euro|casas de apuestas ingreso minimo 5 euros|casas de apuestas inter
barcelona|casas de apuestas legales|casas de apuestas legales en colombia|casas de
apuestas legales en españa|casas de apuestas legales en mexico|casas de apuestas legales españa|casas
de apuestas legales mx|casas de apuestas licencia|casas de
apuestas licencia españa|casas de apuestas lista|casas de apuestas
madrid|casas de apuestas mas seguras|casas de apuestas mejores bonos|casas
de apuestas mejores cuotas|casas de apuestas mexico|casas de apuestas méxico|casas de apuestas minimo 5 euros|casas de apuestas mlb|casas de apuestas
mundial|casas de apuestas mundial baloncesto|casas de apuestas mundiales|casas de apuestas nba|casas de apuestas no reguladas en españa|casas de apuestas
nueva ley|casas de apuestas nuevas|casas de apuestas nuevas en colombia|casas de apuestas nuevas en españa|casas de apuestas nuevas españa|casas de apuestas ofertas|casas de apuestas online|casas de apuestas online argentina|casas de apuestas online colombia|casas de apuestas online deportivas|casas de apuestas online ecuador|casas
de apuestas online en argentina|casas de apuestas online en chile|casas de apuestas online en colombia|casas de apuestas online en españa|casas de apuestas online en mexico|casas
de apuestas online españa|casas de apuestas online mas fiables|casas de apuestas online mexico|casas de apuestas online nuevas|casas de apuestas online peru|casas de apuestas online usa|casas de apuestas online venezuela|casas de apuestas pago paypal|casas de apuestas
para ufc|casas de apuestas paypal|casas de apuestas peru bono sin deposito|casas
de apuestas
Your comment is awaiting moderation.
Реальная красота https://princess.kyiv.ua и стиль: уход по типу кожи и бюджету, капсулы по сезонам, устойчивое потребление. Гайды, шопинг-листы, честные обзоры и советы стилистов.
Your comment is awaiting moderation.
Медиа для женщин https://otnoshenia.net 25–45: карьера и навыки, ментальное благополучие, осознанные покупки, спорт и питание. Краткие выжимки и глубокие разборы, подборки брендов и сервисов.
Your comment is awaiting moderation.
(10 euros gratis apuestas|10 mejores casas de apuestas|10 trucos para ganar apuestas|15 euros gratis marca apuestas|1×2 apuestas|1×2 apuestas deportivas|1×2 apuestas que significa|1×2 en apuestas|1×2 en apuestas que significa|1×2 que significa
en apuestas|5 euros gratis apuestas|9 apuestas
que siempre ganaras|a partir de cuanto se declara apuestas|actividades de
juegos de azar y apuestas|ad apuestas deportivas|aleksandre topuria ufc apuestas|algoritmo para ganar apuestas deportivas|america apuestas|análisis nba apuestas|aplicacion android apuestas deportivas|aplicacion apuestas deportivas|aplicacion apuestas deportivas android|aplicación de apuestas online|aplicacion para
hacer apuestas|aplicacion para hacer apuestas de futbol|aplicación para hacer apuestas de fútbol|aplicaciones apuestas deportivas android|aplicaciones apuestas
deportivas gratis|aplicaciones de apuestas android|aplicaciones de apuestas de fútbol|aplicaciones
de apuestas deportivas|aplicaciones de apuestas deportivas peru|aplicaciones de apuestas deportivas perú|aplicaciones
de apuestas en colombia|aplicaciones de apuestas gratis|aplicaciones
de apuestas online|aplicaciones de apuestas seguras|aplicaciones de apuestas sin dinero|aplicaciones para hacer apuestas|apostar seguro apuestas deportivas|app android apuestas deportivas|app
apuestas|app apuestas android|app apuestas de futbol|app apuestas deportivas|app apuestas deportivas android|app apuestas deportivas argentina|app apuestas deportivas colombia|app apuestas deportivas ecuador|app apuestas deportivas españa|app apuestas
deportivas gratis|app apuestas entre amigos|app apuestas futbol|app apuestas gratis|app apuestas sin dinero|app casa de apuestas|app casas de apuestas|app control apuestas|app de apuestas|app de apuestas
android|app de apuestas casino|app de apuestas colombia|app de apuestas con bono de bienvenida|app de apuestas de futbol|app de apuestas deportivas|app de apuestas deportivas android|app
de apuestas deportivas argentina|app de apuestas deportivas
colombia|app de apuestas deportivas en españa|app
de apuestas deportivas peru|app de apuestas deportivas perú|app de apuestas deportivas sin dinero|app de
apuestas ecuador|app de apuestas en colombia|app de apuestas en españa|app de apuestas en venezuela|app de apuestas futbol|app de apuestas gratis|app de apuestas
online|app de apuestas para android|app de apuestas para
ganar dinero|app de apuestas peru|app de apuestas reales|app de
casas de apuestas|app marca apuestas android|app moviles de
apuestas|app para apuestas|app para apuestas de futbol|app para apuestas deportivas|app para apuestas deportivas en español|app para ganar apuestas deportivas|app para
hacer apuestas|app para hacer apuestas deportivas|app para hacer apuestas entre amigos|app
para llevar control de apuestas|app pronosticos
apuestas deportivas|app versus apuestas|apps apuestas mundial|apps de apuestas|apps de apuestas con bono de
bienvenida|apps de apuestas de futbol|apps de apuestas deportivas peru|apps de apuestas
mexico|apps para apuestas|aprender a hacer apuestas
deportivas|aprender hacer apuestas deportivas|apuesta del dia apuestas deportivas|apuestas
10 euros gratis|apuestas 100 seguras|apuestas 1×2|apuestas 1X2|apuestas 2 division|apuestas 3 division|apuestas
a caballos|apuestas a carreras de caballos|apuestas a
colombia|apuestas a corners|apuestas a ganar|apuestas a jugadores nba|apuestas a la baja|apuestas a la nfl|apuestas al barcelona|apuestas al
dia|apuestas al empate|apuestas al mundial|apuestas al tenis wta|apuestas alaves barcelona|apuestas alcaraz hoy|apuestas
alemania españa|apuestas alonso campeon del mundo|apuestas altas
y bajas|apuestas altas y bajas nfl|apuestas ambos equipos marcan|apuestas america|apuestas android|apuestas anillo nba|apuestas antes del mundial|apuestas anticipadas|apuestas
anticipadas nba|apuestas apps|apuestas arabia argentina|apuestas
argentina|apuestas argentina campeon del mundo|apuestas argentina canada|apuestas argentina colombia|apuestas argentina croacia|apuestas argentina españa|apuestas argentina francia|apuestas
argentina francia cuanto paga|apuestas argentina francia mundial|apuestas argentina gana
el mundial|apuestas argentina gana mundial|apuestas
argentina holanda|apuestas argentina mexico|apuestas argentina méxico|apuestas argentina
mundial|apuestas argentina online|apuestas argentina paises bajos|apuestas argentina polonia|apuestas argentina uruguay|apuestas
argentina vs australia|apuestas argentina vs colombia|apuestas argentina
vs francia|apuestas argentina vs peru|apuestas
argentinas|apuestas arsenal real madrid|apuestas ascenso
a primera division|apuestas ascenso a segunda|apuestas asiaticas|apuestas asiatico|apuestas athletic|apuestas athletic atletico|apuestas athletic barça|apuestas athletic barcelona|apuestas athletic betis|apuestas athletic manchester|apuestas
athletic manchester united|apuestas athletic osasuna|apuestas athletic
real|apuestas athletic real madrid|apuestas athletic real sociedad|apuestas athletic real sociedad final|apuestas athletic roma|apuestas athletic sevilla|apuestas athletic valencia|apuestas atletico|apuestas atletico barcelona|apuestas atletico barsa|apuestas atletico
campeon champions|apuestas atletico campeon de liga|apuestas
atlético copenhague|apuestas atletico de madrid|apuestas atlético de madrid|apuestas atletico
de madrid barcelona|apuestas atletico de madrid gana la liga|apuestas atletico de madrid real madrid|apuestas atlético de madrid real madrid|apuestas atletico de madrid vs
barcelona|apuestas atletico madrid|apuestas atletico madrid real madrid|apuestas atletico madrid vs barcelona|apuestas atletico real madrid|apuestas atletico real madrid champions|apuestas atletismo|apuestas bajas|apuestas baloncesto|apuestas baloncesto acb|apuestas baloncesto handicap|apuestas baloncesto hoy|apuestas baloncesto juegos olimpicos|apuestas baloncesto nba|apuestas baloncesto pronostico|apuestas baloncesto
pronósticos|apuestas baloncesto prorroga|apuestas barca|apuestas barca athletic|apuestas barca atletico|apuestas barca bayern|apuestas barca bayern munich|apuestas barca girona|apuestas barca hoy|apuestas barça hoy|apuestas barca inter|apuestas barca juventus|apuestas barca madrid|apuestas barça madrid|apuestas
barca real madrid|apuestas barca vs juve|apuestas barca vs
madrid|apuestas barca vs psg|apuestas barcelona|apuestas barcelona alaves|apuestas barcelona
athletic|apuestas barcelona atletico|apuestas barcelona atletico
de madrid|apuestas barcelona atlético de madrid|apuestas barcelona
atletico madrid|apuestas barcelona bayern|apuestas barcelona betis|apuestas barcelona campeon de liga|apuestas
barcelona celta|apuestas barcelona espanyol|apuestas barcelona
gana la champions|apuestas barcelona girona|apuestas barcelona
granada|apuestas barcelona hoy|apuestas barcelona inter|apuestas barcelona madrid|apuestas barcelona osasuna|apuestas barcelona psg|apuestas barcelona real madrid|apuestas barcelona
real sociedad|apuestas barcelona sevilla|apuestas barcelona valencia|apuestas barcelona villarreal|apuestas barcelona vs
atletico madrid|apuestas barcelona vs madrid|apuestas barcelona vs real madrid|apuestas barsa madrid|apuestas basket hoy|apuestas bayern barcelona|apuestas bayern vs
barcelona|apuestas beisbol|apuestas béisbol|apuestas beisbol mlb|apuestas beisbol pronosticos|apuestas beisbol
venezolano|apuestas betis|apuestas betis – chelsea|apuestas betis barcelona|apuestas betis chelsea|apuestas betis
fiorentina|apuestas betis girona|apuestas betis madrid|apuestas betis
mallorca|apuestas betis real madrid|apuestas betis real sociedad|apuestas betis sevilla|apuestas
betis valencia|apuestas betis valladolid|apuestas betis vs valencia|apuestas betplay hoy colombia|apuestas betsson peru|apuestas
bienvenida|apuestas billar online|apuestas bolivia vs
colombia|apuestas bono|apuestas bono bienvenida|apuestas bono de bienvenida|apuestas bono de bienvenida sin deposito|apuestas bono gratis|apuestas bono sin deposito|apuestas bonos sin deposito|apuestas borussia
real madrid|apuestas boxeo|apuestas boxeo de campeonato|apuestas boxeo
españa|apuestas boxeo español|apuestas boxeo femenino olimpiadas|apuestas boxeo hoy|apuestas boxeo online|apuestas brasil colombia|apuestas brasil peru|apuestas brasil uruguay|apuestas brasil vs colombia|apuestas brasil vs peru|apuestas caballos|apuestas caballos colocado|apuestas caballos
españa|apuestas caballos hipodromo|apuestas caballos
hoy|apuestas caballos madrid|apuestas caballos online|apuestas caballos sanlucar de barrameda|apuestas
caballos zarzuela|apuestas calculador|apuestas campeon|apuestas campeon champions|apuestas campeón champions|apuestas campeon champions 2025|apuestas campeon champions league|apuestas campeon conference league|apuestas campeon copa america|apuestas campeon copa del
rey|apuestas campeon de champions|apuestas campeon de la champions|apuestas campeon de liga|apuestas campeon del mundo|apuestas campeon eurocopa|apuestas campeón eurocopa|apuestas campeon europa league|apuestas campeon f1|apuestas campeon f1 2025|apuestas campeon formula 1|apuestas campeon libertadores|apuestas campeon liga|apuestas campeon liga
bbva|apuestas campeon liga española|apuestas campeon liga santander|apuestas campeon motogp 2025|apuestas campeon mundial|apuestas
campeón mundial|apuestas campeon mundial baloncesto|apuestas campeon nba|apuestas campeón nba|apuestas campeon premier|apuestas campeon premier league|apuestas campeon roland garros|apuestas campeonato f1|apuestas campeonatos de
futbol|apuestas carrera de caballos|apuestas carrera de caballos hoy|apuestas carrera de caballos nocturnas|apuestas carrera de galgos fin de semana|apuestas carrera de galgos hoy|apuestas
carrera de galgos nocturnas|apuestas carreras caballos|apuestas carreras caballos sanlucar|apuestas carreras
de caballos|apuestas carreras de caballos en directo|apuestas carreras de caballos en vivo|apuestas carreras
de caballos españa|apuestas carreras de caballos hoy|apuestas
carreras de caballos nacionales|apuestas carreras de caballos nocturnas|apuestas
carreras de caballos online|apuestas carreras de caballos sanlucar|apuestas carreras de caballos sanlúcar|apuestas carreras de galgos|apuestas carreras de galgos en vivo|apuestas
carreras de galgos nocturnas|apuestas carreras de
galgos pre partido|apuestas casino|apuestas casino barcelona|apuestas casino futbol|apuestas casino gran madrid|apuestas casino gratis|apuestas casino madrid|apuestas casino online|apuestas casino online argentina|apuestas casinos|apuestas casinos online|apuestas celta|apuestas celta barcelona|apuestas celta betis|apuestas celta eibar|apuestas
celta espanyol|apuestas celta granada|apuestas celta madrid|apuestas
celta manchester|apuestas celta real madrid|apuestas champion league|apuestas champions foro|apuestas champions hoy|apuestas champions league|apuestas champions league – pronósticos|apuestas champions league 2025|apuestas champions league
hoy|apuestas champions league pronosticos|apuestas champions league pronósticos|apuestas champions pronosticos|apuestas chelsea barcelona|apuestas chelsea betis|apuestas chile|apuestas chile peru|apuestas chile venezuela|apuestas chile vs colombia|apuestas chile vs
uruguay|apuestas ciclismo|apuestas ciclismo en vivo|apuestas ciclismo femenino|apuestas ciclismo
tour francia|apuestas ciclismo vuelta|apuestas ciclismo vuelta a españa|apuestas ciclismo vuelta españa|apuestas city madrid|apuestas city real madrid|apuestas clasico|apuestas clasico español|apuestas clasico real madrid barcelona|apuestas clasificacion mundial|apuestas colombia|apuestas colombia argentina|apuestas colombia brasil|apuestas colombia paraguay|apuestas colombia
uruguay|apuestas colombia vs argentina|apuestas colombia vs brasil|apuestas
combinadas|apuestas combinadas como funcionan|apuestas combinadas de futbol|apuestas combinadas
de fútbol|apuestas combinadas foro|apuestas combinadas futbol|apuestas
combinadas hoy|apuestas combinadas mismo partido|apuestas
combinadas mundial|apuestas combinadas nba|apuestas combinadas para esta semana|apuestas combinadas
para hoy|apuestas combinadas para mañana|apuestas combinadas pronosticos|apuestas combinadas recomendadas|apuestas combinadas seguras|apuestas combinadas seguras para hoy|apuestas combinadas seguras
para mañana|apuestas como ganar|apuestas comparador|apuestas
con bono de bienvenida|apuestas con dinero ficticio|apuestas con dinero real|apuestas con dinero virtual|apuestas con handicap|apuestas
con handicap asiatico|apuestas con handicap baloncesto|apuestas con mas probabilidades de ganar|apuestas con paypal|apuestas
con tarjeta de credito|apuestas con tarjeta de debito|apuestas consejos|apuestas copa|apuestas copa africa|apuestas copa america|apuestas copa américa|apuestas copa argentina|apuestas copa brasil|apuestas
copa davis|apuestas copa de europa|apuestas copa del mundo|apuestas copa del rey|apuestas copa del rey baloncesto|apuestas copa
del rey final|apuestas copa del rey futbol|apuestas copa del rey ganador|apuestas copa del rey hoy|apuestas copa del rey pronosticos|apuestas copa del rey pronósticos|apuestas copa europa|apuestas copa italia|apuestas copa libertadores|apuestas copa mundial
de hockey|apuestas copa rey|apuestas copa sudamericana|apuestas corners|apuestas corners hoy|apuestas croacia argentina|apuestas cuartos
eurocopa|apuestas cuotas|apuestas cuotas altas|apuestas cuotas bajas|apuestas de
1 euro|apuestas de baloncesto|apuestas de baloncesto
hoy|apuestas de baloncesto nba|apuestas de baloncesto para hoy|apuestas
de beisbol|apuestas de beisbol para hoy|apuestas de blackjack en linea|apuestas de boxeo|apuestas de boxeo canelo|apuestas de boxeo en las vegas|apuestas
de boxeo hoy|apuestas de boxeo online|apuestas de caballo|apuestas de caballos|apuestas
de caballos como funciona|apuestas de caballos como se juega|apuestas de caballos en colombia|apuestas de caballos en españa|apuestas
de caballos en linea|apuestas de caballos españa|apuestas de caballos ganador
y colocado|apuestas de caballos internacionales|apuestas
de caballos juegos|apuestas de caballos online|apuestas de caballos
online en venezuela|apuestas de caballos por internet|apuestas de caballos pronosticos|apuestas de caballos pronósticos|apuestas de
carrera de caballos|apuestas de carreras de caballos|apuestas de carreras de caballos online|apuestas de casino|apuestas de casino online|apuestas de casino por internet|apuestas de
champions league|apuestas de ciclismo|apuestas de colombia|apuestas de copa america|apuestas de corners|apuestas de deportes en linea|apuestas de deportes online|apuestas de
dinero|apuestas de esports|apuestas de eurocopa|apuestas de europa
league|apuestas de f1|apuestas de formula 1|apuestas de futbol|apuestas de fútbol|apuestas de futbol app|apuestas de
futbol argentina|apuestas de futbol colombia|apuestas
de futbol en colombia|apuestas de futbol en directo|apuestas de futbol en linea|apuestas de futbol
en vivo|apuestas de futbol español|apuestas de futbol gratis|apuestas de futbol
hoy|apuestas de futbol mundial|apuestas de futbol online|apuestas
de fútbol online|apuestas de futbol para hoy|apuestas de fútbol para hoy|apuestas de futbol para hoy seguras|apuestas
de futbol para mañana|apuestas de futbol peru|apuestas de futbol pronosticos|apuestas de fútbol pronósticos|apuestas de futbol seguras|apuestas
de futbol seguras para hoy|apuestas de futbol sin dinero|apuestas
de galgos|apuestas de galgos como ganar|apuestas de galgos en directo|apuestas de galgos online|apuestas de
galgos trucos|apuestas de golf|apuestas de hockey|apuestas de
hockey sobre hielo|apuestas de hoy|apuestas de hoy seguras|apuestas de juego|apuestas de juegos|apuestas
de juegos deportivos|apuestas de juegos online|apuestas de
la champions league|apuestas de la copa américa|apuestas de la eurocopa|apuestas de la europa league|apuestas
de la liga|apuestas de la liga bbva|apuestas de la liga española|apuestas de la nba|apuestas de la
nfl|apuestas de la ufc|apuestas de mlb|apuestas de nba|apuestas de nba para hoy|apuestas
de partidos|apuestas de partidos de futbol|apuestas de peleas ufc|apuestas de perros en vivo|apuestas de perros virtuales|apuestas
de peru|apuestas de sistema|apuestas de sistema como funciona|apuestas de sistema
explicacion|apuestas de sistema explicación|apuestas
de tenis|apuestas de tenis de mesa|apuestas de tenis en directo|apuestas de tenis hoy|apuestas
de tenis para hoy|apuestas de tenis pronosticos|apuestas de tenis seguras|apuestas de
todo tipo|apuestas de ufc|apuestas de ufc hoy|apuestas del
boxeo|apuestas del clasico|apuestas del clasico real madrid barca|apuestas del
dia|apuestas del día|apuestas del dia de hoy|apuestas del dia deportivas|apuestas del dia futbol|apuestas del mundial|apuestas del partido de hoy|apuestas del real madrid|apuestas del rey|apuestas del sistema|apuestas deporte|apuestas deportes|apuestas deportiva|apuestas deportivas|apuestas deportivas 1 euro|apuestas
deportivas 10 euros gratis|apuestas deportivas 100 seguras|apuestas deportivas 1×2|apuestas
deportivas android|apuestas deportivas app|apuestas deportivas apps|apuestas deportivas argentina|apuestas deportivas argentina
futbol|apuestas deportivas argentina legal|apuestas deportivas atletico de madrid|apuestas deportivas baloncesto|apuestas deportivas barca
madrid|apuestas deportivas barcelona|apuestas deportivas beisbol|apuestas deportivas bono|apuestas deportivas bono bienvenida|apuestas deportivas
bono de bienvenida|apuestas deportivas bono sin deposito|apuestas deportivas bonos
de bienvenida|apuestas deportivas boxeo|apuestas deportivas caballos|apuestas deportivas calculadora|apuestas deportivas campeon liga|apuestas
deportivas casino|apuestas deportivas casino barcelona|apuestas deportivas casino online|apuestas
deportivas cerca de mi|apuestas deportivas champions league|apuestas deportivas chile|apuestas deportivas ciclismo|apuestas deportivas colombia|apuestas deportivas com|apuestas deportivas com foro|apuestas deportivas
com pronosticos|apuestas deportivas combinadas|apuestas deportivas combinadas para hoy|apuestas deportivas como se juega|apuestas deportivas comparador|apuestas deportivas con bono gratis|apuestas deportivas con bonos gratis|apuestas deportivas con dinero
ficticio|apuestas deportivas con paypal|apuestas deportivas con puntos virtuales|apuestas deportivas
consejos|apuestas deportivas consejos para ganar|apuestas deportivas
copa america|apuestas deportivas copa del rey|apuestas
deportivas copa libertadores|apuestas deportivas copa mundial|apuestas deportivas corners|apuestas deportivas cual es la mejor|apuestas deportivas cuotas altas|apuestas deportivas de baloncesto|apuestas deportivas de boxeo|apuestas deportivas de
colombia|apuestas deportivas de futbol|apuestas deportivas de nba|apuestas deportivas
de nhl|apuestas deportivas de peru|apuestas deportivas
de tenis|apuestas deportivas del dia|apuestas deportivas dinero
ficticio|apuestas deportivas directo|apuestas deportivas doble oportunidad|apuestas deportivas en argentina|apuestas
deportivas en chile|apuestas deportivas en colombia|apuestas deportivas en directo|apuestas deportivas en españa|apuestas deportivas en español|apuestas deportivas en linea|apuestas deportivas
en línea|apuestas deportivas en peru|apuestas deportivas en perú|apuestas
deportivas en sevilla|apuestas deportivas en uruguay|apuestas deportivas en vivo|apuestas deportivas es|apuestas
deportivas es pronosticos|apuestas deportivas españa|apuestas deportivas españolas|apuestas
deportivas esports|apuestas deportivas estadisticas|apuestas deportivas estrategias|apuestas deportivas estrategias seguras|apuestas deportivas eurocopa|apuestas deportivas europa league|apuestas deportivas f1|apuestas deportivas faciles de ganar|apuestas deportivas formula 1|apuestas deportivas foro|apuestas deportivas foro futbol|apuestas deportivas foro tenis|apuestas deportivas francia argentina|apuestas deportivas futbol|apuestas deportivas fútbol|apuestas deportivas futbol
argentino|apuestas deportivas futbol colombia|apuestas deportivas futbol español|apuestas deportivas gana|apuestas deportivas ganadas|apuestas deportivas ganar dinero seguro|apuestas deportivas gane|apuestas deportivas
golf|apuestas deportivas gratis|apuestas deportivas gratis con premios|apuestas deportivas gratis hoy|apuestas deportivas gratis sin deposito|apuestas deportivas handicap|apuestas deportivas
handicap asiatico|apuestas deportivas hoy|apuestas deportivas impuestos|apuestas deportivas
interior argentina|apuestas deportivas juegos olimpicos|apuestas deportivas la liga|apuestas deportivas legales|apuestas deportivas legales en colombia|apuestas deportivas libres de impuestos|apuestas
deportivas licencia españa|apuestas deportivas liga española|apuestas
deportivas listado|apuestas deportivas listado clasico|apuestas
deportivas madrid|apuestas deportivas mas seguras|apuestas deportivas
mejor pagadas|apuestas deportivas mejores|apuestas deportivas mejores app|apuestas deportivas mejores casas|apuestas deportivas mejores cuotas|apuestas deportivas mejores paginas|apuestas
deportivas mexico|apuestas deportivas méxico|apuestas deportivas mlb|apuestas deportivas mlb hoy|apuestas deportivas multiples|apuestas deportivas mundial|apuestas
deportivas murcia|apuestas deportivas nba|apuestas deportivas nba hoy|apuestas deportivas nfl|apuestas
deportivas nhl|apuestas deportivas nuevas|apuestas deportivas ofertas|apuestas deportivas online|apuestas deportivas online argentina|apuestas deportivas online chile|apuestas
deportivas online colombia|apuestas deportivas online en colombia|apuestas deportivas online españa|apuestas deportivas online mexico|apuestas deportivas online paypal|apuestas deportivas online peru|apuestas deportivas online por internet|apuestas deportivas pago paypal|apuestas deportivas para ganar dinero|apuestas deportivas para hoy|apuestas deportivas para hoy pronosticos|apuestas deportivas partido suspendido|apuestas deportivas partidos de hoy|apuestas deportivas
paypal|apuestas deportivas peru|apuestas deportivas
perú|apuestas deportivas peru vs ecuador|apuestas deportivas predicciones|apuestas deportivas promociones|apuestas deportivas pronostico|apuestas deportivas pronóstico|apuestas deportivas pronostico hoy|apuestas deportivas pronosticos|apuestas deportivas pronósticos|apuestas deportivas pronosticos expertos|apuestas
deportivas pronosticos gratis|apuestas deportivas pronosticos nba|apuestas deportivas pronosticos tenis|apuestas deportivas que aceptan paypal|apuestas
deportivas real madrid|apuestas deportivas regalo bienvenida|apuestas deportivas resultado exacto|apuestas deportivas resultados|apuestas deportivas rugby|apuestas deportivas seguras|apuestas deportivas seguras foro|apuestas deportivas seguras hoy|apuestas
deportivas seguras para hoy|apuestas deportivas
seguras telegram|apuestas deportivas sevilla|apuestas deportivas simulador eurocopa|apuestas deportivas sin deposito|apuestas deportivas sin deposito inicial|apuestas deportivas sin dinero|apuestas deportivas sin dinero real|apuestas deportivas sin registro|apuestas deportivas stake|apuestas deportivas
stake 10|apuestas deportivas telegram españa|apuestas deportivas tenis|apuestas deportivas tenis de mesa|apuestas deportivas
tenis foro|apuestas deportivas tenis hoy|apuestas deportivas tips|apuestas
deportivas tipster|apuestas deportivas ufc|apuestas deportivas uruguay|apuestas deportivas valencia|apuestas deportivas valencia barcelona|apuestas deportivas venezuela|apuestas
deportivas virtuales|apuestas deportivas y casino|apuestas deportivas y casino online|apuestas deportivas.com|apuestas deportivas.com
foro|apuestas deportivas.es|apuestas deportivos pronosticos|apuestas deposito
minimo 1 euro|apuestas descenso a segunda|apuestas descenso a
segunda b|apuestas descenso la liga|apuestas descenso primera division|apuestas
descenso segunda|apuestas dia|apuestas diarias seguras|apuestas
dinero|apuestas dinero ficticio|apuestas dinero real|apuestas dinero virtual|apuestas directas|apuestas directo|apuestas directo futbol|apuestas division de honor juvenil|apuestas dnb|apuestas doble oportunidad|apuestas doble
resultado|apuestas dobles|apuestas dobles y triples|apuestas
dortmund barcelona|apuestas draft nba|apuestas draft nfl|apuestas ecuador vs argentina|apuestas ecuador
vs venezuela|apuestas egipto uruguay|apuestas el clasico|apuestas
elecciones venezuela|apuestas empate|apuestas en baloncesto|apuestas en barcelona|apuestas en beisbol|apuestas en boxeo|apuestas
en caballos|apuestas en carreras de caballos|apuestas en casino|apuestas en casino online|apuestas en casinos|apuestas en casinos online|apuestas en chile|apuestas en ciclismo|apuestas en colombia|apuestas en colombia de futbol|apuestas en directo|apuestas en directo futbol|apuestas
en directo pronosticos|apuestas en el futbol|apuestas en el tenis|apuestas en españa|apuestas en esports|apuestas en eventos deportivos virtuales|apuestas
en golf|apuestas en juegos|apuestas en la champions league|apuestas en la eurocopa|apuestas en la liga|apuestas en la nba|apuestas en la
nfl|apuestas en las vegas mlb|apuestas en las vegas nfl|apuestas en linea|apuestas en línea|apuestas en linea argentina|apuestas en linea boxeo|apuestas en linea chile|apuestas
en linea colombia|apuestas en línea de fútbol|apuestas en linea deportivas|apuestas en linea españa|apuestas en linea estados unidos|apuestas
en linea futbol|apuestas en linea mexico|apuestas en línea méxico|apuestas en linea
mundial|apuestas en linea peru|apuestas en linea usa|apuestas
en los esports|apuestas en madrid|apuestas en méxico|apuestas en mexico online|apuestas en nba|apuestas
en partidos de futbol|apuestas en partidos de futbol en vivo|apuestas en partidos de tenis en directo|apuestas en perú|apuestas
en sevilla|apuestas en sistema|apuestas en stake|apuestas en tenis|apuestas en tenis de mesa|apuestas en valencia|apuestas en vivo|apuestas en vivo argentina|apuestas en vivo casino|apuestas en vivo futbol|apuestas en vivo
fútbol|apuestas en vivo nba|apuestas en vivo peru|apuestas en vivo tenis|apuestas en vivo ufc|apuestas equipo mbappe|apuestas equipos de futbol|apuestas españa|apuestas españa alemania|apuestas españa alemania eurocopa|apuestas españa croacia|apuestas españa eurocopa|apuestas españa francia|apuestas españa francia eurocopa|apuestas españa gana el mundial|apuestas españa gana
eurocopa|apuestas españa gana mundial|apuestas españa georgia|apuestas españa holanda|apuestas españa inglaterra|apuestas españa inglaterra cuotas|apuestas españa
inglaterra eurocopa|apuestas españa italia|apuestas
españa mundial|apuestas españa paises bajos|apuestas español|apuestas español oviedo|apuestas espanyol barcelona|apuestas espanyol betis|apuestas
espanyol villarreal|apuestas esport|apuestas esports|apuestas esports colombia|apuestas esports españa|apuestas esports fifa|apuestas esports
gratis|apuestas esports lol|apuestas esports peru|apuestas esports valorant|apuestas estadisticas|apuestas estrategias|apuestas
euro|apuestas euro copa|apuestas eurocopa|apuestas eurocopa campeon|apuestas eurocopa españa|apuestas eurocopa favoritos|apuestas
eurocopa femenina|apuestas eurocopa final|apuestas eurocopa ganador|apuestas eurocopa hoy|apuestas eurocopa sub 21|apuestas euroliga baloncesto|apuestas euroliga pronosticos|apuestas europa league|apuestas
europa league hoy|apuestas europa league pronosticos|apuestas europa league pronósticos|apuestas euros|apuestas
f1 abu dhabi|apuestas f1 bahrein|apuestas f1 canada|apuestas f1 china|apuestas f1 cuotas|apuestas
f1 hoy|apuestas f1 las vegas|apuestas f1 miami|apuestas f1 monaco|apuestas faciles de ganar|apuestas fáciles
de ganar|apuestas faciles para ganar|apuestas favoritas|apuestas favorito champions|apuestas favoritos champions|apuestas favoritos eurocopa|apuestas favoritos mundial|apuestas fc barcelona|apuestas final champions cuotas|apuestas final
champions league|apuestas final champions peru|apuestas
final copa|apuestas final copa america|apuestas final copa de europa|apuestas final copa del rey|apuestas final copa europa|apuestas
final copa libertadores|apuestas final copa rey|apuestas
final de copa|apuestas final de copa del rey|apuestas final del mundial|apuestas final euro|apuestas final eurocopa|apuestas final europa league|apuestas final libertadores|apuestas final
mundial|apuestas final nba|apuestas final rugby|apuestas final
uefa europa league|apuestas final.mundial|apuestas finales de conferencia nfl|apuestas finales nba|apuestas fiorentina
betis|apuestas formula|apuestas formula 1|apuestas fórmula 1|apuestas fórmula 1 pronósticos|apuestas formula
uno|apuestas foro|apuestas foro nba|apuestas francia argentina|apuestas francia españa|apuestas futbol|apuestas fútbol|apuestas futbol americano|apuestas futbol americano nfl|apuestas futbol argentina|apuestas futbol
argentino|apuestas futbol champions league|apuestas futbol chile|apuestas futbol
colombia|apuestas futbol consejos|apuestas futbol en directo|apuestas fútbol en directo|apuestas futbol
en vivo|apuestas fútbol en vivo|apuestas futbol españa|apuestas futbol español|apuestas fútbol español|apuestas futbol
eurocopa|apuestas futbol femenino|apuestas futbol foro|apuestas futbol gratis|apuestas futbol hoy|apuestas fútbol hoy|apuestas
futbol juegos olimpicos|apuestas futbol mexico|apuestas
futbol mundial|apuestas futbol online|apuestas futbol para hoy|apuestas
futbol peru|apuestas futbol pronosticos|apuestas futbol sala|apuestas futbol telegram|apuestas futbol virtual|apuestas
galgos|apuestas galgos en directo|apuestas galgos hoy|apuestas galgos online|apuestas galgos pronosticos|apuestas galgos trucos|apuestas gana|apuestas gana colombia|apuestas gana resultados|apuestas ganadas|apuestas ganadas hoy|apuestas ganador champions league|apuestas ganador copa america|apuestas ganador copa del rey|apuestas ganador copa
del rey baloncesto|apuestas ganador copa libertadores|apuestas ganador de
la eurocopa|apuestas ganador de la liga|apuestas ganador del mundial|apuestas ganador eurocopa|apuestas ganador europa league|apuestas ganador f1|apuestas
ganador la liga|apuestas ganador liga española|apuestas ganador mundial|apuestas ganador mundial baloncesto|apuestas ganador mundial f1|apuestas
ganador nba|apuestas ganadores eurocopa|apuestas ganadores mundial|apuestas ganar champions|apuestas ganar
eurocopa|apuestas ganar liga|apuestas ganar mundial|apuestas ganar nba|apuestas getafe valencia|apuestas ghana uruguay|apuestas girona|apuestas girona athletic|apuestas girona betis|apuestas girona campeon de liga|apuestas girona campeon liga|apuestas girona gana la liga|apuestas girona real madrid|apuestas
girona real sociedad|apuestas goleador eurocopa|apuestas goleadores eurocopa|apuestas goles asiaticos|apuestas golf|apuestas golf masters|apuestas golf pga|apuestas granada barcelona (Caryn)|apuestas grand slam de tenis|apuestas gratis|apuestas gratis casino|apuestas gratis con premios|apuestas gratis hoy|apuestas gratis para
hoy|apuestas gratis por registro|apuestas gratis puntos|apuestas gratis regalos|apuestas gratis sin deposito|apuestas gratis sin depósito|apuestas
gratis sin ingreso|apuestas gratis sports|apuestas
gratis y ganar premios|apuestas grupo a eurocopa|apuestas grupos eurocopa|apuestas handicap|apuestas handicap asiatico|apuestas handicap baloncesto|apuestas
handicap como funciona|apuestas handicap nba|apuestas handicap
nfl|apuestas hipicas online|apuestas hípicas online|apuestas hipicas venezuela|apuestas hockey|apuestas hockey hielo|apuestas hockey patines|apuestas hockey sobre hielo|apuestas holanda argentina|apuestas holanda vs argentina|apuestas hoy|apuestas hoy champions|apuestas hoy futbol|apuestas hoy nba|apuestas hoy pronosticos|apuestas hoy seguras|apuestas impuestos|apuestas inglaterra paises bajos|apuestas
inter barca|apuestas inter barcelona|apuestas juego|apuestas juegos|apuestas juegos en linea|apuestas juegos
olimpicos|apuestas juegos olímpicos|apuestas juegos olimpicos baloncesto|apuestas juegos online|apuestas juegos virtuales|apuestas jugador sevilla|apuestas jugadores nba|apuestas kings league americas|apuestas la liga|apuestas la liga española|apuestas la liga hoy|apuestas la liga santander|apuestas las vegas mlb|apuestas las vegas
nba|apuestas las vegas nfl|apuestas league of
legends mundial|apuestas legal|apuestas legales|apuestas legales en colombia|apuestas legales en españa|apuestas legales en estados unidos|apuestas legales españa|apuestas leganes betis|apuestas
libertadores|apuestas licencia|apuestas liga 1 peru|apuestas liga argentina|apuestas
liga bbva pronosticos|apuestas liga de campeones|apuestas liga
de campeones de baloncesto|apuestas liga de campeones de hockey|apuestas liga españa|apuestas
liga española|apuestas liga santander pronosticos|apuestas ligas de futbol|apuestas linea|apuestas linea de gol|apuestas liverpool barcelona|apuestas liverpool real madrid|apuestas lol mundial|apuestas madrid|apuestas madrid arsenal|apuestas madrid atletico|apuestas madrid atletico champions|apuestas madrid barca|apuestas
madrid barça|apuestas madrid barca hoy|apuestas madrid barca supercopa|apuestas madrid barcelona|apuestas
madrid barsa|apuestas madrid bayern|apuestas madrid betis|apuestas madrid borussia|apuestas madrid campeon champions|apuestas madrid celta|apuestas madrid city|apuestas madrid dortmund|apuestas madrid gana la liga|apuestas madrid gana liga|apuestas madrid hoy|apuestas madrid liverpool|apuestas
madrid osasuna|apuestas madrid sevilla|apuestas madrid valencia|apuestas madrid vs
arsenal|apuestas madrid vs barcelona|apuestas mallorca osasuna|apuestas
mallorca real sociedad|apuestas manchester athletic|apuestas manchester city real madrid|apuestas
mas faciles de ganar|apuestas mas seguras|apuestas mas seguras para hoy|apuestas
masters de golf|apuestas masters de tenis|apuestas maximo goleador eurocopa|apuestas maximo goleador mundial|apuestas mejor
jugador eurocopa|apuestas mejores casinos online|apuestas
mexico|apuestas méxico|apuestas mexico polonia|apuestas méxico
polonia|apuestas mlb|apuestas mlb hoy|apuestas mlb las vegas|apuestas mlb para hoy|apuestas mlb pronosticos|apuestas
mlb usa|apuestas mma ufc|apuestas momios|apuestas multiples|apuestas múltiples|apuestas multiples como funcionan|apuestas multiples el gordo|apuestas multiples futbol|apuestas mundial|apuestas mundial 2026|apuestas mundial baloncesto|apuestas mundial
balonmano|apuestas mundial brasil|apuestas mundial campeon|apuestas mundial ciclismo|apuestas mundial clubes|apuestas mundial
de baloncesto|apuestas mundial de ciclismo|apuestas mundial de clubes|apuestas mundial de futbol|apuestas mundial de fútbol|apuestas
mundial de rugby|apuestas mundial f1|apuestas mundial favoritos|apuestas mundial femenino|apuestas mundial formula 1|apuestas mundial futbol|apuestas mundial ganador|apuestas mundial
lol|apuestas mundial moto gp|apuestas mundial motogp|apuestas mundial rugby|apuestas mundial sub 17|apuestas mundiales|apuestas mundialistas|apuestas
mvp eurocopa|apuestas mvp nba|apuestas mvp nfl|apuestas nacionales de colombia|apuestas nba|apuestas nba all
star|apuestas nba campeon|apuestas nba consejos|apuestas nba esta noche|apuestas nba finals|apuestas nba gratis|apuestas nba hoy|apuestas nba
hoy jugadores|apuestas nba hoy pronosticos|apuestas nba para hoy|apuestas nba playoffs|apuestas nba pronosticos|apuestas nba pronósticos|apuestas nba pronosticos hoy|apuestas
nba tipster|apuestas nfl|apuestas nfl hoy|apuestas
nfl las vegas|apuestas nfl playoffs|apuestas nfl pronosticos|apuestas nfl pronósticos|apuestas
nfl semana 4|apuestas nfl super bowl|apuestas nhl|apuestas nhl pronosticos|apuestas octavos eurocopa|apuestas
ofertas|apuestas online|apuestas online argentina|apuestas online argentina legal|apuestas online bono|apuestas online bono bienvenida|apuestas online boxeo|apuestas online caballos|apuestas online carreras
de caballos|apuestas online casino|apuestas online champions league|apuestas online chile|apuestas online
ciclismo|apuestas online colombia|apuestas online comparativa|apuestas online con paypal|apuestas online de caballos|apuestas online deportivas|apuestas online en argentina|apuestas online
en peru|apuestas online espana|apuestas online españa|apuestas online
esports|apuestas online foro|apuestas online futbol|apuestas online
futbol españa|apuestas online golf|apuestas online gratis|apuestas online gratis sin deposito|apuestas online juegos|apuestas online
mexico|apuestas online mma|apuestas online movil|apuestas online nba|apuestas online net|apuestas online nuevas|apuestas
online opiniones|apuestas online paypal|apuestas online peru|apuestas online seguras|apuestas online sin dinero|apuestas
online sin registro|apuestas online tenis|apuestas online ufc|apuestas online
uruguay|apuestas online venezuela|apuestas open britanico golf|apuestas osasuna athletic|apuestas
osasuna barcelona|apuestas osasuna real madrid|apuestas osasuna sevilla|apuestas osasuna valencia|apuestas over|apuestas
over 2.5|apuestas over under|apuestas paginas|apuestas pago anticipado|apuestas
paises bajos ecuador|apuestas paises bajos inglaterra|apuestas países bajos
qatar|apuestas para boxeo|apuestas para champions league|apuestas para el clasico|apuestas para el
dia de hoy|apuestas para el mundial|apuestas para el partido de
hoy|apuestas para eurocopa|apuestas para europa league|apuestas para futbol|apuestas
para ganar|apuestas para ganar dinero|apuestas para
ganar dinero facil|apuestas para ganar en la ruleta|apuestas para ganar la champions|apuestas para ganar la eurocopa|apuestas para ganar la europa league|apuestas
para ganar la liga|apuestas para ganar siempre|apuestas
para hacer|apuestas para hoy|apuestas para hoy
de futbol|apuestas para hoy europa league|apuestas para hoy futbol|apuestas para juegos|apuestas para la champions league|apuestas para la copa del rey|apuestas para la
eurocopa|apuestas para la europa league|apuestas
para la final de la eurocopa|apuestas para la nba
hoy|apuestas para los partidos de hoy|apuestas para partidos de hoy|apuestas para ufc|apuestas partido|apuestas partido aplazado|apuestas partido champions|apuestas partido colombia|apuestas partido españa marruecos|apuestas partido
mundial|apuestas partido suspendido|apuestas partidos|apuestas partidos
champions league|apuestas partidos csgo|apuestas partidos de futbol|apuestas partidos de futbol hoy|apuestas partidos de hoy|apuestas
partidos eurocopa|apuestas partidos futbol|apuestas partidos hoy|apuestas partidos mundial|apuestas
paypal|apuestas peleas de boxeo|apuestas peru|apuestas perú|apuestas peru brasil|apuestas
peru chile|apuestas peru paraguay|apuestas peru uruguay|apuestas peru
vs chile|apuestas peru vs colombia|apuestas pichichi eurocopa|apuestas plataforma|apuestas playoff|apuestas playoff ascenso|apuestas playoff ascenso a primera|apuestas playoff nba|apuestas playoff segunda|apuestas
playoff segunda b|apuestas playoffs nba|apuestas playoffs nfl|apuestas polonia argentina|apuestas por argentina|apuestas
por internet mexico|apuestas por internet para ganar dinero|apuestas por
paypal|apuestas por ronda boxeo|apuestas por sistema|apuestas portugal uruguay|apuestas pre partido|apuestas predicciones|apuestas predicciones futbol|apuestas primera division|apuestas primera division españa|apuestas
promociones|apuestas pronostico|apuestas pronosticos|apuestas pronosticos deportivos|apuestas pronosticos deportivos tenis|apuestas pronosticos futbol|apuestas pronosticos gratis|apuestas pronosticos nba|apuestas pronosticos tenis|apuestas prorroga|apuestas
psg barca|apuestas psg barcelona|apuestas puntos por tarjetas|apuestas puntos tarjetas|apuestas que
aceptan paypal|apuestas que es handicap|apuestas que puedes hacer con tu novia|apuestas que siempre
ganaras|apuestas que significa|apuestas quien bajara
a segunda|apuestas quién bajara a segunda|apuestas quien gana el mundial|apuestas quien gana eurocopa|apuestas quien gana la champions|apuestas quien gana la eurocopa|apuestas quien gana la liga|apuestas quien ganara el mundial|apuestas quién ganará el mundial|apuestas
quien ganara la champions|apuestas quien ganara
la eurocopa|apuestas quien ganara la liga|apuestas rayo barcelona|apuestas
real madrid|apuestas real madrid arsenal|apuestas real madrid athletic|apuestas real madrid atletico|apuestas real madrid atletico champions|apuestas real madrid atletico de madrid|apuestas real madrid atlético de
madrid|apuestas real madrid atletico madrid|apuestas real
madrid barcelona|apuestas real madrid bayern|apuestas real
madrid betis|apuestas real madrid borussia|apuestas real madrid campeon champions|apuestas real madrid celta|apuestas
real madrid champions|apuestas real madrid city|apuestas
real madrid girona|apuestas real madrid hoy|apuestas real madrid liverpool|apuestas real madrid manchester city|apuestas real
madrid osasuna|apuestas real madrid real sociedad|apuestas real madrid valencia|apuestas real madrid villarreal|apuestas real madrid vs arsenal|apuestas real madrid vs atletico|apuestas real madrid vs atlético|apuestas real madrid vs atletico
madrid|apuestas real madrid vs barcelona|apuestas real madrid vs betis|apuestas real madrid vs sevilla|apuestas
real madrid vs valencia|apuestas real sociedad|apuestas real sociedad athletic|apuestas real sociedad barcelona|apuestas real sociedad betis|apuestas real sociedad psg|apuestas real sociedad
real madrid|apuestas real sociedad valencia|apuestas recomendadas hoy|apuestas regalo de bienvenida|apuestas registro|apuestas resultado exacto|apuestas resultados|apuestas resultados eurocopa|apuestas retirada tenis|apuestas
roma barcelona|apuestas roma sevilla|apuestas rugby|apuestas rugby mundial|apuestas rugby world
cup|apuestas ruleta seguras|apuestas segunda|apuestas segunda b|apuestas segunda division|apuestas segunda división|apuestas segunda division b|apuestas segunda division españa|apuestas seguras|apuestas
seguras baloncesto|apuestas seguras calculadora|apuestas seguras en la ruleta|apuestas seguras eurocopa|apuestas seguras foro|apuestas seguras
futbol|apuestas seguras futbol hoy|apuestas seguras gratis|apuestas seguras hoy|apuestas seguras hoy
futbol|apuestas seguras nba|apuestas seguras nba hoy|apuestas seguras para este fin de semana|apuestas seguras para ganar dinero|apuestas seguras
para hoy|apuestas seguras para hoy fútbol|apuestas seguras para hoy pronósticos|apuestas seguras para mañana|apuestas seguras ruleta|apuestas seguras telegram|apuestas seguras
tenis|apuestas semifinales eurocopa|apuestas senegal paises bajos|apuestas sevilla|apuestas sevilla athletic|apuestas sevilla
atletico de madrid|apuestas sevilla barcelona|apuestas sevilla betis|apuestas sevilla campeon liga|apuestas sevilla celta|apuestas
sevilla gana la liga|apuestas sevilla girona|apuestas sevilla inter|apuestas sevilla jugador|apuestas sevilla
juventus|apuestas sevilla leganes|apuestas
sevilla madrid|apuestas sevilla manchester united|apuestas sevilla osasuna|apuestas sevilla real madrid|apuestas sevilla real
sociedad|apuestas sevilla roma|apuestas sevilla valencia|apuestas significa|apuestas simples ejemplos|apuestas simples o combinadas|apuestas sin deposito|apuestas sin deposito inicial|apuestas sin deposito minimo|apuestas sin dinero|apuestas sin dinero real|apuestas sin empate|apuestas sin empate que significa|apuestas sin ingreso minimo|apuestas sin registro|apuestas sistema|apuestas
sistema calculadora|apuestas sistema como funciona|apuestas sistema trixie|apuestas sociedad|apuestas sorteo copa del rey|apuestas stake|apuestas stake
10|apuestas stake 10 hoy|apuestas super bowl favorito|apuestas super rugby|apuestas supercopa españa|apuestas superliga argentina|apuestas tarjeta roja|apuestas tarjetas|apuestas tarjetas amarillas|apuestas tenis|apuestas tenis atp|apuestas tenis consejos|apuestas tenis copa davis|apuestas tenis de mesa|apuestas tenis de mesa pronosticos|apuestas tenis en vivo|apuestas tenis femenino|apuestas
tenis hoy|apuestas tenis itf|apuestas tenis pronosticos|apuestas tenis pronósticos|apuestas tenis
retirada|apuestas tenis roland garros|apuestas tenis seguras|apuestas tenis wimbledon|apuestas tenis wta|apuestas tercera
division|apuestas tercera division españa|apuestas tipos|apuestas tips|apuestas tipster|apuestas tipster para hoy|apuestas topuria holloway cuotas|apuestas torneos de golf|apuestas
torneos de tenis|apuestas trucos|apuestas uefa champions league|apuestas uefa europa league|apuestas ufc|apuestas ufc
chile|apuestas ufc como funciona|apuestas ufc hoy|apuestas ufc ilia topuria|apuestas ufc online|apuestas
ufc pronósticos|apuestas ufc telegram|apuestas ufc topuria|apuestas under over|apuestas
unionistas villarreal|apuestas uruguay|apuestas uruguay colombia|apuestas uruguay corea|apuestas uruguay vs
colombia|apuestas us open golf|apuestas us open tenis|apuestas valencia|apuestas
valencia barcelona|apuestas valencia betis|apuestas valencia madrid|apuestas valencia real madrid|apuestas
valladolid barcelona|apuestas valladolid valencia|apuestas
valor app|apuestas valor en directo|apuestas valor galgos|apuestas venezuela|apuestas venezuela
argentina|apuestas venezuela bolivia|apuestas venezuela ecuador|apuestas villarreal|apuestas villarreal athletic|apuestas villarreal barcelona|apuestas villarreal
bayern|apuestas villarreal betis|apuestas villarreal liverpool|apuestas villarreal manchester|apuestas
villarreal manchester united|apuestas villarreal vs real madrid|apuestas virtuales|apuestas
virtuales colombia|apuestas virtuales futbol|apuestas virtuales sin dinero|apuestas vivo|apuestas vuelta a
españa|apuestas vuelta españa|apuestas william hill partidos de hoy|apuestas
y casino|apuestas y casinos|apuestas y juegos
de azar|apuestas y pronosticos|apuestas y pronosticos de futbol|apuestas
y pronosticos deportivos|apuestas y resultados|apuestas-deportivas|apuestas-deportivas.es pronosticos|arbitro nba apuestas|argentina apuestas|argentina colombia apuestas|argentina croacia apuestas|argentina francia apuestas|argentina mexico apuestas|argentina peru apuestas|argentina
uruguay apuestas|argentina vs bolivia apuestas|argentina vs
chile apuestas|argentina vs colombia apuestas|argentina vs francia apuestas|argentina vs.
colombia apuestas|asi se gana en las apuestas deportivas|asiatico apuestas|asiatico
en apuestas|asiaticos apuestas|athletic barcelona apuestas|athletic manchester united
apuestas|athletic osasuna apuestas|athletic real madrid apuestas|atletico barcelona apuestas|atletico de madrid apuestas|atlético de madrid apuestas|atletico de madrid
real madrid apuestas|atletico de madrid vs barcelona apuestas|atletico madrid real madrid apuestas|atletico madrid vs real madrid apuestas|atletico real madrid apuestas|atletico vs real madrid apuestas|avisador
de cuotas apuestas|bajada de cuotas apuestas|baloncesto apuestas|barbastro barcelona
apuestas|barca apuestas|barca bayern apuestas|barca inter apuestas|barca madrid apuestas|barça madrid apuestas|barca vs atletico apuestas|barca vs madrid apuestas|barca vs real madrid apuestas|barcelona
– real madrid apuestas|barcelona apuestas|barcelona atletico apuestas|barcelona atletico de madrid apuestas|barcelona atletico madrid
apuestas|barcelona betis apuestas|barcelona casa de apuestas|barcelona inter apuestas|barcelona psg apuestas|barcelona real madrid
apuestas|barcelona real sociedad apuestas|barcelona
sevilla apuestas|barcelona valencia apuestas|barcelona
vs athletic bilbao apuestas|barcelona vs atlético madrid apuestas|barcelona vs betis apuestas|barcelona vs celta de vigo apuestas|barcelona
vs espanyol apuestas|barcelona vs girona apuestas|barcelona vs madrid apuestas|barcelona vs
real madrid apuestas|barcelona vs real sociedad apuestas|barcelona
vs sevilla apuestas|barcelona vs villarreal apuestas|base de datos cuotas apuestas deportivas|bayern real madrid apuestas|beisbol apuestas|best america apuestas|bet apuestas chile|bet apuestas en vivo|betis – chelsea
apuestas|betis apuestas|betis barcelona apuestas|betis chelsea
apuestas|betis madrid apuestas|betis sevilla apuestas|betsson tu sitio de apuestas online|blog apuestas baloncesto|blog apuestas ciclismo|blog
apuestas nba|blog apuestas tenis|blog de apuestas de tenis|bono apuestas|bono
apuestas deportivas|bono apuestas deportivas sin deposito|bono apuestas gratis|bono apuestas gratis sin deposito|bono apuestas sin deposito|bono bienvenida apuestas|bono bienvenida apuestas deportivas|bono
bienvenida apuestas españa|bono bienvenida apuestas sin deposito|bono bienvenida apuestas sin depósito|bono
bienvenida casa apuestas|bono bienvenida casa de apuestas|bono bienvenida marca apuestas|bono casa apuestas|bono casa de apuestas|bono casa de apuestas sin ingreso|bono casas de apuestas|bono de apuestas|bono de apuestas gratis sin deposito|bono de bienvenida apuestas|bono de bienvenida apuestas deportivas|bono de bienvenida casa de apuestas|bono de bienvenida casas de apuestas|bono de casas de apuestas|bono de
registro apuestas|bono de registro apuestas deportivas|bono de registro casa de apuestas|bono gratis apuestas|bono marca apuestas|bono
por registro apuestas|bono por registro apuestas deportivas|bono por registro casa de apuestas|bono registro apuestas|bono sin deposito
apuestas|bono sin depósito apuestas|bono sin deposito apuestas deportivas|bono sin depósito apuestas deportivas|bono sin deposito casa de apuestas|bono
sin deposito marca apuestas|bono sin ingreso apuestas|bono sin ingreso apuestas deportivas|bonos apuestas|bonos apuestas colombia|bonos apuestas deportivas|bonos apuestas deportivas sin deposito|bonos
apuestas gratis|bonos apuestas sin deposito|bonos apuestas sin depósito|bonos bienvenida apuestas|bonos bienvenida casas apuestas|bonos bienvenida casas de
apuestas|bonos casa de apuestas|bonos casas apuestas|bonos casas de apuestas|bonos casas de apuestas colombia|bonos casas de apuestas
deportivas|bonos casas de apuestas españa|bonos casas de
apuestas nuevas|bonos casas de apuestas sin deposito|bonos casas de apuestas sin depósito|bonos de apuestas|bonos de apuestas deportivas|bonos de apuestas gratis|bonos de apuestas sin deposito|bonos de bienvenida apuestas|bonos de bienvenida
apuestas deportivas|bonos de bienvenida casa de apuestas|bonos de
bienvenida casas de apuestas|bonos de bienvenida
de casas de apuestas|bonos de bienvenida en casas de apuestas|bonos de casas
de apuestas|bonos de casas de apuestas sin deposito|bonos en casa de apuestas|bonos en casas de apuestas sin deposito|bonos
gratis apuestas|bonos gratis apuestas deportivas|bonos
gratis casas de apuestas|bonos gratis sin deposito apuestas|bonos
paginas de apuestas|bonos registro casas de apuestas|bonos sin deposito apuestas|bonos sin depósito apuestas|bonos sin deposito apuestas deportivas|bonos sin deposito casas de apuestas|bot
de apuestas deportivas gratis|boxeo apuestas|brasil
colombia apuestas|brasil peru apuestas|brasil vs colombia apuestas|buenas apuestas para
hoy|buscador cuotas apuestas|buscador de apuestas seguras|buscador de cuotas apuestas|buscador
de cuotas de apuestas|buscar apuestas seguras|caballos apuestas|calculador de apuestas|calculador de
cuotas apuestas|calculadora apuestas|calculadora apuestas combinadas|calculadora apuestas de sistema|calculadora apuestas deportivas|calculadora apuestas deportivas seguras|calculadora apuestas multiples|calculadora
apuestas segura|calculadora apuestas seguras|calculadora apuestas sistema|calculadora apuestas yankee|calculadora arbitraje apuestas|calculadora cubrir apuestas|calculadora cuotas apuestas|calculadora de apuestas|calculadora de apuestas combinadas|calculadora de apuestas de futbol|calculadora
de apuestas de sistema|calculadora de apuestas deportivas|calculadora de
apuestas multiples|calculadora de apuestas seguras|calculadora de
apuestas sistema|calculadora de apuestas surebets|calculadora de
arbitraje apuestas|calculadora de cuotas apuestas|calculadora de cuotas de apuestas|calculadora para apuestas deportivas|calculadora poisson apuestas|calculadora poisson apuestas deportivas|calculadora poisson para apuestas|calculadora scalping apuestas deportivas|calculadora sistema
apuestas|calculadora stake apuestas|calculadora trading apuestas|calcular apuestas|calcular apuestas deportivas|calcular apuestas futbol|calcular apuestas sistema|calcular cuotas apuestas|calcular cuotas apuestas combinadas|calcular cuotas
apuestas deportivas|calcular cuotas de apuestas|calcular ganancias
apuestas deportivas|calcular momios apuestas|calcular probabilidad
cuota apuestas|calcular stake apuestas|calcular unidades
apuestas|calcular yield apuestas|calculo de apuestas|calculo de apuestas deportivas|cambio de cuotas
apuestas|campeon champions apuestas|campeon eurocopa apuestas|campeon liga apuestas|campeon nba apuestas|canales de apuestas gratis|carrera de caballos apuestas|carrera de caballos apuestas juego|carrera de caballos con apuestas|carrera de galgos apuestas|carreras de caballos apuestas|carreras de caballos apuestas online|carreras de caballos con apuestas|carreras de caballos juegos de apuestas|carreras de galgos apuestas|carreras de galgos apuestas online|carreras de
galgos apuestas trucos|carreras galgos apuestas|casa apuestas argentina|casa apuestas atletico de madrid|casa apuestas barcelona|casa apuestas betis|casa
apuestas bono bienvenida|casa apuestas bono gratis|casa
apuestas bono sin deposito|casa apuestas cerca de mi|casa
apuestas chile|casa apuestas colombia|casa apuestas con mejores cuotas|casa apuestas deportivas|casa apuestas españa|casa apuestas española|casa apuestas eurocopa|casa apuestas futbol|casa apuestas
mejores cuotas|casa apuestas mundial|casa apuestas nueva|casa apuestas nuevas|casa apuestas online|casa apuestas peru|casa apuestas valencia|casa de apuestas|casa de apuestas 10 euros
gratis|casa de apuestas argentina|casa de apuestas atletico de madrid|casa de apuestas baloncesto|casa de apuestas
barcelona|casa de apuestas beisbol|casa de apuestas betis|casa
de apuestas bono|casa de apuestas bono bienvenida|casa de
apuestas bono de bienvenida|casa de apuestas bono gratis|casa de apuestas bono por registro|casa de apuestas bono sin deposito|casa de apuestas boxeo|casa de apuestas caballos|casa de apuestas carreras de caballos|casa de apuestas cerca de mi|casa de apuestas cerca
de mí|casa de apuestas champions league|casa de apuestas chile|casa de apuestas ciclismo|casa de
apuestas colombia|casa de apuestas con bono de bienvenida|casa de apuestas
con bono sin deposito|casa de apuestas con cuotas mas altas|casa de apuestas con esports|casa de apuestas con las mejores cuotas|casa de apuestas con licencia en españa|casa de apuestas con mejores cuotas|casa de apuestas con pago anticipado|casa de apuestas con paypal|casa de apuestas copa america|casa de
apuestas de caballos|casa de apuestas de colombia|casa
de apuestas de españa|casa de apuestas de futbol|casa de
apuestas de fútbol|casa de apuestas de futbol peru|casa de apuestas de
peru|casa de apuestas del madrid|casa de apuestas del real
madrid|casa de apuestas deportivas|casa de apuestas deportivas cerca de mi|casa de apuestas deportivas en argentina|casa de
apuestas deportivas en chile|casa de apuestas
deportivas en colombia|casa de apuestas deportivas en españa|casa de apuestas deportivas en madrid|casa
de apuestas deportivas españa|casa de apuestas deportivas españolas|casa de apuestas deportivas madrid|casa de apuestas deportivas
mexico|casa de apuestas deportivas online|casa de apuestas deportivas peru|casa de apuestas deposito 5 euros|casa de
apuestas deposito minimo|casa de apuestas deposito minimo 1 euro|casa de
apuestas depósito mínimo 1 euro|casa de apuestas en españa|casa de apuestas en linea|casa de
apuestas en madrid|casa de apuestas en perú|casa de apuestas en vivo|casa de apuestas españa|casa de apuestas
españa inglaterra|casa de apuestas española|casa de apuestas españolas|casa de apuestas esports|casa de apuestas eurocopa|casa
de apuestas europa league|casa de apuestas f1|casa de
apuestas formula 1|casa de apuestas futbol|casa de apuestas ingreso minimo|casa de apuestas ingreso minimo 1 euro|casa de apuestas ingreso mínimo
1 euro|casa de apuestas legales|casa de apuestas legales en colombia|casa
de apuestas legales en españa|casa de apuestas libertadores|casa de apuestas liga española|casa de apuestas madrid|casa de apuestas mas segura|casa
de apuestas mejores|casa de apuestas méxico|casa de apuestas minimo 5 euros|casa de
apuestas mlb|casa de apuestas mundial|casa de apuestas nba|casa de apuestas nfl|casa de apuestas
nueva|casa de apuestas nuevas|casa de apuestas oficial del real madrid|casa
de apuestas oficial real madrid|casa de apuestas
online|casa de apuestas online argentina|casa de apuestas online chile|casa de apuestas online españa|casa de apuestas online mexico|casa de
apuestas online paraguay|casa de apuestas online peru|casa de apuestas online usa|casa de apuestas online venezuela|casa de apuestas pago anticipado|casa de
apuestas para boxeo|casa de apuestas para ufc|casa de apuestas peru|casa de apuestas perú|casa de
apuestas peru online|casa de apuestas por paypal|casa de apuestas promociones|casa de apuestas
que regalan dinero|casa de apuestas real madrid|casa de apuestas regalo de bienvenida|casa de
apuestas sevilla|casa de apuestas sin dinero|casa
de apuestas sin ingreso minimo|casa de apuestas sin licencia
en españa|casa de apuestas sin minimo de ingreso|casa de apuestas stake|casa de apuestas tenis|casa de
apuestas ufc|casa de apuestas valencia|casa de apuestas venezuela|casa de apuestas virtuales|casa de apuestas vive la suerte|casa oficial de
apuestas del real madrid|casas apuestas asiaticas|casas apuestas bono
sin deposito|casas apuestas bonos sin deposito|casas
apuestas caballos|casas apuestas chile|casas apuestas ciclismo|casas apuestas con licencia|casas apuestas
con licencia en españa|casas apuestas deportivas|casas apuestas deportivas colombia|casas apuestas deportivas españa|casas apuestas deportivas españolas|casas apuestas deportivas nuevas|casas apuestas españa|casas apuestas españolas|casas apuestas esports|casas apuestas eurocopa|casas apuestas golf|casas apuestas ingreso minimo 5 euros|casas apuestas legales|casas apuestas
legales españa|casas apuestas licencia|casas apuestas licencia españa|casas apuestas mexico|casas apuestas mundial|casas
apuestas nba|casas apuestas nuevas|casas apuestas nuevas españa|casas
apuestas ofertas|casas apuestas online|casas apuestas paypal|casas
apuestas peru|casas apuestas sin licencia|casas apuestas tenis|casas asiaticas apuestas|casas de apuestas|casas de apuestas 5 euros|casas de apuestas app|casas de apuestas
argentinas|casas de apuestas asiaticas|casas de apuestas baloncesto|casas de apuestas barcelona|casas de apuestas bono bienvenida|casas de apuestas bono de bienvenida|casas de
apuestas bono por registro|casas de apuestas bono sin deposito|casas de apuestas
bono sin ingreso|casas de apuestas bonos|casas de apuestas bonos de bienvenida|casas de apuestas bonos
gratis|casas de apuestas bonos sin deposito|casas de apuestas
boxeo|casas de apuestas caballos|casas de apuestas
carreras de caballos|casas de apuestas casino|casas de apuestas casino online|casas de apuestas cerca de
mi|casas de apuestas champions league|casas de apuestas chile|casas de apuestas ciclismo|casas de
apuestas colombia|casas de apuestas com|casas de apuestas
con app|casas de apuestas con apuestas gratis|casas de
apuestas con bono|casas de apuestas con bono de bienvenida|casas de apuestas con bono de registro|casas de apuestas
con bono por registro|casas de apuestas con bono sin deposito|casas de apuestas con bonos|casas de apuestas con bonos gratis|casas de apuestas con bonos sin deposito|casas
de apuestas con deposito minimo|casas de apuestas con esports|casas de apuestas con handicap asiatico|casas de apuestas
con licencia|casas de apuestas con licencia en españa|casas de
apuestas con licencia españa|casas de apuestas con licencia española|casas
de apuestas con mejores cuotas|casas de apuestas con pago anticipado|casas de apuestas con paypal|casas de apuestas con paypal en perú|casas de apuestas con promociones|casas de
apuestas con ruleta en vivo|casas de apuestas
copa del rey|casas de apuestas de caballos|casas de apuestas de españa|casas de
apuestas de futbol|casas de apuestas de fútbol|casas de apuestas
de peru|casas de apuestas deportivas|casas de apuestas deportivas asiaticas|casas de
apuestas deportivas colombia|casas de apuestas deportivas
comparativa|casas de apuestas deportivas con paypal|casas de
apuestas deportivas en chile|casas de apuestas deportivas en españa|casas de apuestas deportivas en linea|casas de apuestas deportivas
en madrid|casas de apuestas deportivas en mexico|casas de apuestas deportivas en peru|casas
de apuestas deportivas en sevilla|casas de apuestas deportivas en valencia|casas
de apuestas deportivas españa|casas de apuestas deportivas españolas|casas de apuestas deportivas legales|casas de
apuestas deportivas madrid|casas de apuestas deportivas mexico|casas de apuestas deportivas nuevas|casas de apuestas deportivas online|casas de apuestas deportivas peru|casas de apuestas deportivas perú|casas
de apuestas deposito minimo 1 euro|casas de apuestas depósito mínimo 1 euro|casas de apuestas dinero gratis|casas de
apuestas en argentina|casas de apuestas en barcelona|casas de apuestas en chile|casas de apuestas en colombia|casas de apuestas
en españa|casas de apuestas en españa online|casas de apuestas en linea|casas de apuestas en madrid|casas de apuestas en méxico|casas de apuestas en peru|casas
de apuestas en perú|casas de apuestas en sevilla|casas
de apuestas en uruguay|casas de apuestas en valencia|casas
de apuestas en venezuela|casas de apuestas equipos
de futbol|casas de apuestas españa|casas de apuestas españa alemania|casas de
apuestas españa inglaterra|casas de apuestas españa licencia|casas de apuestas españa nuevas|casas de apuestas españa online|casas de apuestas española|casas de
apuestas españolas|casas de apuestas españolas con licencia|casas de apuestas
españolas online|casas de apuestas esports|casas de apuestas
eurocopa|casas de apuestas eurocopa 2024|casas de apuestas europa league|casas de apuestas
f1|casas de apuestas fisicas en barcelona|casas de
apuestas fisicas en españa|casas de apuestas formula 1|casas de apuestas fuera de españa|casas de apuestas futbol|casas de apuestas fútbol|casas
de apuestas futbol españa|casas de apuestas ganador eurocopa|casas de apuestas
gratis|casas de apuestas ingreso minimo|casas de
apuestas ingreso minimo 1 euro|casas de apuestas ingreso minimo 5 euros|casas de apuestas inter barcelona|casas
de apuestas legales|casas de apuestas legales en colombia|casas
de apuestas legales en españa|casas de apuestas legales en mexico|casas de apuestas legales españa|casas
de apuestas legales mx|casas de apuestas licencia|casas de apuestas licencia españa|casas de apuestas lista|casas de apuestas madrid|casas de apuestas mas seguras|casas de apuestas
mejores bonos|casas de apuestas mejores cuotas|casas de apuestas mexico|casas de apuestas méxico|casas de apuestas minimo 5 euros|casas de apuestas mlb|casas
de apuestas mundial|casas de apuestas mundial baloncesto|casas de apuestas mundiales|casas de apuestas nba|casas de apuestas no
reguladas en españa|casas de apuestas nueva ley|casas de apuestas nuevas|casas de apuestas nuevas en colombia|casas
de apuestas nuevas en españa|casas de apuestas nuevas españa|casas de apuestas
ofertas|casas de apuestas online|casas de apuestas online argentina|casas de apuestas online colombia|casas
de apuestas online deportivas|casas de apuestas online ecuador|casas de apuestas
online en argentina|casas de apuestas online en chile|casas de apuestas online en colombia|casas de apuestas online en españa|casas de apuestas online en mexico|casas de apuestas online españa|casas de apuestas online
mas fiables|casas de apuestas online mexico|casas de
apuestas online nuevas|casas de apuestas online peru|casas de apuestas
online usa|casas de apuestas online venezuela|casas de
apuestas pago paypal|casas de apuestas para ufc|casas de apuest
Your comment is awaiting moderation.
learnandimprove – Such a motivating site, encourages daily learning and better habits.
Your comment is awaiting moderation.
findyourstylehub – So many amazing looks, definitely bookmarking this for future outfits.
Your comment is awaiting moderation.
discovermoreideas – Great collection of unique ideas and motivational resources.
Your comment is awaiting moderation.
everydaytrendstore – Stylish products, great prices, and a smooth checkout process.
Your comment is awaiting moderation.
growyourmindset – The message here really motivates me to keep learning and improving.
Your comment is awaiting moderation.
Disney made a smart choice’
Despite the comparisons, Abu Dhabi isn’t positioning itself as a direct rival to Orlando — it’s aiming to be something more. The emirate sees its theme parks as part of a bigger portfolio of attractions, alongside cultural landmarks, luxury hotels, pristine beaches, and desert adventures.
трип скан
A 15-minute drive from Yas Island, Saadiyat Island is home to the Louvre Abu Dhabi, a franchised outpost of the famous Paris art museum, which welcomed 1.4 million visitors last year, 84% from abroad. The Guggenheim Abu Dhabi and Zayed National Museum are both under construction, adding to a cultural district that will be one of the region’s most concentrated hubs of art and heritage.
“Abu Dhabi’s unique appeal lies in the diversity of our tourism offering,” Al Geziry added. “For thrill-seekers, we have record-breaking roller coasters and dune bashing in the desert. For culture lovers, historic sites like Al Ain Oasis and institutions like the Saadiyat museums. And for luxury travelers, world-class dining, private island resorts, and high-end shopping.
“Where else can you start your day under the Louvre’s iconic rain-of-light dome and end it in the immersive, story-driven worlds of Warner Bros. World or Ferrari World?”
http://trips45.cc
tripscan top
Still, not everyone is convinced that Disney’s expansion into the Middle East is a sure bet.
“The region has seen its share of false starts,” says Dennis Speigel, founder of the International Theme Park Services consultancy, comparing it to neighboring Dubai’s patchy record with theme park expansion ambitions in the mid-2010s. “Several of them struggled for profitability in their first decade.”
Related article
Saadiyat Cultural District in Abu Dhabi is set to become one of the world’s preeminent arts and culture hubs, with one of the highest concentrations of cultural institutions globally. But the area isn’t just for art connoisseurs. Explore what to do in the new district, from iconic museums to luxurious beach days to decadent dining options.
You can walk between the Louvre and the Guggenheim in this new art district
Spiegel believes Abu Dhabi is different. “Disney made a smart choice. The infrastructure, safety, and existing leisure developments create an ideal entry point,” he told CNN earlier this year. “It’s a much more controlled and calculated move.”
Under its Tourism Strategy 2030, Abu Dhabi aims to grow annual visitors from 24 million in 2023 to more than 39 million by the end of the decade. With Disneyland as a centerpiece, those targets may well be surpassed. The city’s population has already grown from 2.7 million in 2014 to more than 4.1 million today, a reflection of its rising profile as a regional hub.
Yas Island alone has been transformed in the space of a decade from a largely undeveloped stretch of sand to a self-contained resort destination, complete with golf courses, marinas, a mall, more than 160 restaurants, and a cluster of high-end hotels.
Orlando’s head start remains formidable — it still offers multiple Disney and Universal parks, has decades of brand loyalty, and an infrastructure built to handle tens of millions of tourists annually.
But Abu Dhabi is catching up fast. Its combination of frictionless travel, year-round comfort, cutting-edge attractions, and a cultural scene that adds depth to the experience gives Abu Dhabi its own unique selling point, potentially offering a model for the next generation of theme park capital.
Your comment is awaiting moderation.
brightstylemarket – Excellent selection, the site feels lively and super easy to browse.
Your comment is awaiting moderation.
Сайт для женщин https://modam.com.ua о жизни без перегруза: здоровье и красота, отношения и семья, карьера и деньги, дом и путешествия. Экспертные статьи, гайды, чек-листы и подборки — только полезное и применимое.
Your comment is awaiting moderation.
Мода и красота https://magiclady.kyiv.ua для реальной жизни: капсулы по сезонам, уход по типу кожи и бюджета, честные обзоры брендов, шопинг-листы и устойчивое потребление.
Your comment is awaiting moderation.
Всё для современной https://model.kyiv.ua женщины: уход и макияж, стиль и шопинг, психология и отношения, питание и тренировки. Честные обзоры, капсульные гардеробы, планы на неделю и проверенные советы.
Your comment is awaiting moderation.
trafficstream.click – Navigation felt smooth, found everything quickly without any confusing steps.
Your comment is awaiting moderation.
seojet.click – Bookmarked this immediately, planning to revisit for updates and inspiration.
Your comment is awaiting moderation.
clickenginepro.click – Content reads clearly, helpful examples made concepts easy to grasp.
Your comment is awaiting moderation.
brandmagnet.click – Overall, professional vibe here; trustworthy, polished, and pleasantly minimal throughout.
Your comment is awaiting moderation.
clickforce.click – Mobile version looks perfect; no glitches, fast scrolling, crisp text.
Your comment is awaiting moderation.
seostreampro.click – Appreciate the typography choices; comfortable spacing improved my reading experience.
Your comment is awaiting moderation.
(10 euros gratis apuestas|10 mejores casas de apuestas|10 trucos para ganar apuestas|15 euros gratis marca
apuestas|1×2 apuestas|1×2 apuestas deportivas|1×2 apuestas que
significa|1×2 en apuestas|1×2 en apuestas que significa|1×2 que significa en apuestas|5 euros gratis apuestas|9
apuestas que siempre ganaras|a partir de cuanto se declara apuestas|actividades de juegos de azar y apuestas|ad apuestas deportivas|aleksandre topuria ufc apuestas|algoritmo
para ganar apuestas deportivas|america apuestas|análisis nba
apuestas|aplicacion android apuestas deportivas|aplicacion apuestas deportivas|aplicacion apuestas
deportivas android|aplicación de apuestas online|aplicacion para hacer
apuestas|aplicacion para hacer apuestas de futbol|aplicación para hacer apuestas de fútbol|aplicaciones apuestas deportivas android|aplicaciones apuestas deportivas gratis|aplicaciones
de apuestas android|aplicaciones de apuestas de fútbol|aplicaciones
de apuestas deportivas|aplicaciones de apuestas deportivas peru|aplicaciones de apuestas deportivas perú|aplicaciones de apuestas en colombia|aplicaciones de apuestas gratis|aplicaciones de apuestas online|aplicaciones de apuestas seguras|aplicaciones de apuestas sin dinero|aplicaciones para hacer apuestas|apostar seguro apuestas deportivas|app
android apuestas deportivas|app apuestas|app apuestas android|app apuestas de futbol|app apuestas deportivas|app apuestas deportivas android|app apuestas deportivas argentina|app apuestas deportivas colombia|app
apuestas deportivas ecuador|app apuestas deportivas españa|app apuestas deportivas gratis|app
apuestas entre amigos|app apuestas futbol|app apuestas gratis|app
apuestas sin dinero|app casa de apuestas|app casas de apuestas|app control apuestas|app de apuestas|app de apuestas android|app de apuestas
casino|app de apuestas colombia|app de apuestas con bono de bienvenida|app de apuestas de futbol|app de apuestas deportivas|app
de apuestas deportivas android|app de apuestas deportivas argentina|app de
apuestas deportivas colombia|app de apuestas deportivas en españa|app de apuestas deportivas peru|app de apuestas deportivas perú|app de
apuestas deportivas sin dinero|app de apuestas ecuador|app de apuestas en colombia|app de apuestas
en españa|app de apuestas en venezuela|app de apuestas futbol|app de apuestas gratis|app de apuestas online|app
de apuestas para android|app de apuestas para ganar dinero|app de apuestas peru|app de
apuestas reales|app de casas de apuestas|app marca apuestas android|app moviles de apuestas|app para apuestas|app
para apuestas de futbol|app para apuestas deportivas|app para apuestas
deportivas en español|app para ganar apuestas deportivas|app para hacer apuestas|app para hacer apuestas deportivas|app para hacer apuestas entre amigos|app para llevar control de apuestas|app pronosticos apuestas deportivas|app versus apuestas|apps apuestas mundial|apps de apuestas|apps de apuestas con bono
de bienvenida|apps de apuestas de futbol|apps de apuestas deportivas peru|apps de
apuestas mexico|apps para apuestas|aprender a hacer apuestas deportivas|aprender hacer apuestas deportivas|apuesta
del dia apuestas deportivas|apuestas 10
euros gratis|apuestas 100 seguras|apuestas 1×2|apuestas 1X2|apuestas 2 division|apuestas
3 division|apuestas a caballos|apuestas a carreras de
caballos|apuestas a colombia|apuestas a corners|apuestas a ganar|apuestas a jugadores nba|apuestas a
la baja|apuestas a la nfl|apuestas al barcelona|apuestas al
dia|apuestas al empate|apuestas al mundial|apuestas al tenis wta|apuestas alaves barcelona|apuestas alcaraz hoy|apuestas alemania españa|apuestas alonso campeon del mundo|apuestas altas y bajas|apuestas altas y bajas nfl|apuestas ambos equipos marcan|apuestas america|apuestas android|apuestas anillo nba|apuestas antes del mundial|apuestas anticipadas|apuestas anticipadas nba|apuestas apps|apuestas arabia argentina|apuestas argentina|apuestas argentina
campeon del mundo|apuestas argentina canada|apuestas argentina colombia|apuestas argentina croacia|apuestas argentina españa|apuestas argentina francia|apuestas argentina francia cuanto
paga|apuestas argentina francia mundial|apuestas argentina gana el mundial|apuestas argentina gana mundial|apuestas
argentina holanda|apuestas argentina mexico|apuestas argentina méxico|apuestas argentina mundial|apuestas
argentina online|apuestas argentina paises bajos|apuestas argentina polonia|apuestas argentina uruguay|apuestas argentina vs australia|apuestas argentina vs colombia|apuestas argentina vs francia|apuestas argentina vs
peru|apuestas argentinas|apuestas arsenal real
madrid|apuestas ascenso a primera division|apuestas ascenso
a segunda|apuestas asiaticas|apuestas asiatico|apuestas athletic|apuestas athletic atletico|apuestas athletic barça|apuestas athletic barcelona|apuestas athletic betis|apuestas athletic manchester|apuestas athletic manchester united|apuestas athletic osasuna|apuestas athletic real|apuestas athletic real madrid|apuestas
athletic real sociedad|apuestas athletic real sociedad final|apuestas athletic roma|apuestas athletic sevilla|apuestas athletic valencia|apuestas atletico|apuestas atletico barcelona|apuestas atletico barsa|apuestas
atletico campeon champions|apuestas atletico campeon de liga|apuestas atlético copenhague|apuestas atletico de madrid|apuestas atlético de
madrid|apuestas atletico de madrid barcelona|apuestas atletico de madrid gana
la liga|apuestas atletico de madrid real madrid|apuestas atlético de madrid real
madrid|apuestas atletico de madrid vs barcelona|apuestas atletico madrid|apuestas atletico madrid real
madrid|apuestas atletico madrid vs barcelona|apuestas atletico
real madrid|apuestas atletico real madrid champions|apuestas
atletismo|apuestas bajas|apuestas baloncesto|apuestas baloncesto acb|apuestas baloncesto handicap|apuestas baloncesto hoy|apuestas baloncesto juegos olimpicos|apuestas baloncesto nba|apuestas baloncesto
pronostico|apuestas baloncesto pronósticos|apuestas baloncesto prorroga|apuestas barca|apuestas
barca athletic|apuestas barca atletico|apuestas barca bayern|apuestas
barca bayern munich|apuestas barca girona|apuestas barca hoy|apuestas
barça hoy|apuestas barca inter|apuestas barca juventus|apuestas barca madrid|apuestas barça madrid|apuestas
barca real madrid|apuestas barca vs juve|apuestas barca
vs madrid|apuestas barca vs psg|apuestas barcelona|apuestas barcelona alaves|apuestas barcelona athletic|apuestas barcelona atletico|apuestas
barcelona atletico de madrid|apuestas barcelona atlético de madrid|apuestas barcelona atletico madrid|apuestas barcelona bayern|apuestas barcelona betis|apuestas barcelona campeon de liga|apuestas
barcelona celta|apuestas barcelona espanyol|apuestas barcelona gana
la champions|apuestas barcelona girona|apuestas
barcelona granada|apuestas barcelona hoy|apuestas barcelona inter|apuestas barcelona madrid|apuestas barcelona osasuna|apuestas barcelona
psg|apuestas barcelona real madrid|apuestas barcelona
real sociedad|apuestas barcelona sevilla|apuestas barcelona valencia|apuestas barcelona villarreal|apuestas barcelona vs atletico madrid|apuestas barcelona vs madrid|apuestas barcelona vs real madrid|apuestas
barsa madrid|apuestas basket hoy|apuestas bayern barcelona|apuestas bayern vs barcelona|apuestas beisbol|apuestas béisbol|apuestas beisbol mlb|apuestas beisbol
pronosticos|apuestas beisbol venezolano|apuestas betis|apuestas betis
– chelsea|apuestas betis barcelona|apuestas betis chelsea|apuestas betis fiorentina|apuestas betis girona|apuestas betis
madrid|apuestas betis mallorca|apuestas betis real madrid|apuestas betis real sociedad|apuestas betis sevilla|apuestas betis valencia|apuestas betis valladolid|apuestas betis vs valencia|apuestas
betplay hoy colombia|apuestas betsson peru|apuestas bienvenida|apuestas billar online|apuestas bolivia vs colombia|apuestas bono|apuestas bono
bienvenida|apuestas bono de bienvenida|apuestas bono de bienvenida sin deposito|apuestas
bono gratis|apuestas bono sin deposito|apuestas bonos sin deposito|apuestas borussia real
madrid|apuestas boxeo|apuestas boxeo de campeonato|apuestas boxeo españa|apuestas boxeo
español|apuestas boxeo femenino olimpiadas|apuestas boxeo
hoy|apuestas boxeo online|apuestas brasil colombia|apuestas brasil peru|apuestas brasil uruguay|apuestas brasil
vs colombia|apuestas brasil vs peru|apuestas
caballos|apuestas caballos colocado|apuestas caballos españa|apuestas caballos hipodromo|apuestas caballos hoy|apuestas caballos madrid|apuestas caballos online|apuestas
caballos sanlucar de barrameda|apuestas caballos zarzuela|apuestas
calculador|apuestas campeon|apuestas campeon champions|apuestas campeón champions|apuestas campeon champions 2025|apuestas campeon champions
league|apuestas campeon conference league|apuestas campeon copa america|apuestas campeon copa del rey|apuestas campeon de champions|apuestas campeon de la
champions|apuestas campeon de liga|apuestas campeon del mundo|apuestas campeon eurocopa|apuestas campeón eurocopa|apuestas campeon europa
league|apuestas campeon f1|apuestas campeon f1 2025|apuestas
campeon formula 1|apuestas campeon libertadores|apuestas campeon liga|apuestas campeon liga bbva|apuestas campeon liga española|apuestas campeon liga santander|apuestas campeon motogp 2025|apuestas
campeon mundial|apuestas campeón mundial|apuestas campeon mundial baloncesto|apuestas campeon nba|apuestas campeón nba|apuestas campeon premier|apuestas campeon premier league|apuestas campeon roland garros|apuestas campeonato
f1|apuestas campeonatos de futbol|apuestas carrera de caballos|apuestas carrera
de caballos hoy|apuestas carrera de caballos nocturnas|apuestas carrera de galgos fin de semana|apuestas carrera de
galgos hoy|apuestas carrera de galgos nocturnas|apuestas carreras caballos|apuestas carreras caballos sanlucar|apuestas carreras de caballos|apuestas carreras de caballos en directo|apuestas carreras de
caballos en vivo|apuestas carreras de caballos españa|apuestas carreras de
caballos hoy|apuestas carreras de caballos nacionales|apuestas carreras de caballos nocturnas|apuestas carreras de
caballos online|apuestas carreras de caballos sanlucar|apuestas carreras de caballos sanlúcar|apuestas carreras de galgos|apuestas
carreras de galgos en vivo|apuestas carreras
de galgos nocturnas|apuestas carreras de galgos pre partido|apuestas casino|apuestas casino barcelona|apuestas casino futbol|apuestas casino gran madrid|apuestas casino gratis|apuestas casino madrid|apuestas casino online|apuestas casino online
argentina|apuestas casinos|apuestas casinos online|apuestas celta|apuestas celta barcelona|apuestas celta betis|apuestas celta eibar|apuestas celta espanyol|apuestas
celta granada|apuestas celta madrid|apuestas celta manchester|apuestas celta real madrid|apuestas champion league|apuestas champions foro|apuestas champions
hoy|apuestas champions league|apuestas champions league – pronósticos|apuestas champions league 2025|apuestas champions league hoy|apuestas champions league pronosticos|apuestas champions league pronósticos|apuestas
champions pronosticos|apuestas chelsea barcelona|apuestas chelsea betis|apuestas chile|apuestas chile peru|apuestas chile venezuela|apuestas chile vs colombia|apuestas chile vs uruguay|apuestas ciclismo|apuestas ciclismo en vivo|apuestas ciclismo femenino|apuestas ciclismo tour francia|apuestas ciclismo vuelta|apuestas ciclismo vuelta a españa|apuestas ciclismo vuelta españa|apuestas city madrid|apuestas city real madrid|apuestas clasico|apuestas
clasico español|apuestas clasico real madrid barcelona|apuestas clasificacion mundial|apuestas colombia|apuestas colombia argentina|apuestas colombia brasil|apuestas colombia paraguay|apuestas colombia uruguay|apuestas colombia vs argentina|apuestas colombia vs brasil|apuestas
combinadas|apuestas combinadas como funcionan|apuestas combinadas de futbol|apuestas combinadas de fútbol|apuestas combinadas foro|apuestas combinadas futbol|apuestas combinadas hoy|apuestas combinadas
mismo partido|apuestas combinadas mundial|apuestas combinadas nba|apuestas
combinadas para esta semana|apuestas combinadas para hoy|apuestas combinadas para mañana|apuestas combinadas pronosticos|apuestas combinadas recomendadas|apuestas combinadas seguras|apuestas combinadas seguras para hoy|apuestas combinadas seguras para mañana|apuestas como ganar|apuestas
comparador|apuestas con bono de bienvenida|apuestas con dinero ficticio|apuestas con dinero real|apuestas con dinero virtual|apuestas con handicap|apuestas con handicap asiatico|apuestas con handicap baloncesto|apuestas con mas probabilidades de
ganar|apuestas con paypal|apuestas con tarjeta de credito|apuestas con tarjeta de debito|apuestas consejos|apuestas copa|apuestas copa africa|apuestas copa america|apuestas copa
américa|apuestas copa argentina|apuestas copa brasil|apuestas copa davis|apuestas copa de europa|apuestas copa del mundo|apuestas copa del rey|apuestas copa del rey baloncesto|apuestas copa del rey
final|apuestas copa del rey futbol|apuestas copa del rey ganador|apuestas copa del rey hoy|apuestas copa del rey pronosticos|apuestas copa del rey pronósticos|apuestas copa europa|apuestas copa
italia|apuestas copa libertadores|apuestas copa mundial de hockey|apuestas copa rey|apuestas copa sudamericana|apuestas corners|apuestas corners hoy|apuestas croacia argentina|apuestas cuartos eurocopa|apuestas
cuotas|apuestas cuotas altas|apuestas cuotas bajas|apuestas de 1 euro|apuestas de baloncesto|apuestas
de baloncesto hoy|apuestas de baloncesto nba|apuestas de baloncesto para hoy|apuestas de beisbol|apuestas de beisbol para hoy|apuestas
de blackjack en linea|apuestas de boxeo|apuestas de boxeo canelo|apuestas de boxeo en las vegas|apuestas de boxeo hoy|apuestas de boxeo online|apuestas
de caballo|apuestas de caballos|apuestas de caballos como funciona|apuestas de caballos como se juega|apuestas de caballos en colombia|apuestas de caballos en españa|apuestas de caballos en linea|apuestas de caballos
españa|apuestas de caballos ganador y colocado|apuestas de
caballos internacionales|apuestas de caballos
juegos|apuestas de caballos online|apuestas de caballos online en venezuela|apuestas de caballos por internet|apuestas de caballos pronosticos|apuestas de caballos pronósticos|apuestas de
carrera de caballos|apuestas de carreras de
caballos|apuestas de carreras de caballos online|apuestas de casino|apuestas de casino
online|apuestas de casino por internet|apuestas de
champions league|apuestas de ciclismo|apuestas de colombia|apuestas de copa america|apuestas de corners|apuestas de deportes en linea|apuestas de deportes online|apuestas
de dinero|apuestas de esports|apuestas de eurocopa|apuestas de europa league|apuestas de f1|apuestas de formula 1|apuestas
de futbol|apuestas de fútbol|apuestas de futbol app|apuestas de futbol argentina|apuestas de futbol colombia|apuestas de futbol en colombia|apuestas de futbol en directo|apuestas de
futbol en linea|apuestas de futbol en vivo|apuestas de futbol español|apuestas de futbol
gratis|apuestas de futbol hoy|apuestas de futbol mundial|apuestas de futbol online|apuestas de fútbol online|apuestas de futbol para hoy|apuestas de fútbol para hoy|apuestas de futbol para hoy seguras|apuestas de futbol
para mañana|apuestas de futbol peru|apuestas de futbol pronosticos|apuestas de fútbol pronósticos|apuestas de futbol seguras|apuestas de futbol seguras
para hoy|apuestas de futbol sin dinero|apuestas de galgos|apuestas de
galgos como ganar|apuestas de galgos en directo|apuestas de
galgos online|apuestas de galgos trucos|apuestas de golf|apuestas de hockey|apuestas de hockey
sobre hielo|apuestas de hoy|apuestas de hoy seguras|apuestas de juego|apuestas de
juegos|apuestas de juegos deportivos|apuestas de juegos online|apuestas de la champions league|apuestas de la copa américa|apuestas de la eurocopa|apuestas de la europa league|apuestas de la liga|apuestas de la liga bbva|apuestas de
la liga española|apuestas de la nba|apuestas de la nfl|apuestas de la ufc|apuestas
de mlb|apuestas de nba|apuestas de nba para hoy|apuestas de partidos|apuestas de partidos de
futbol|apuestas de peleas ufc|apuestas de perros en vivo|apuestas de perros virtuales|apuestas de peru|apuestas de sistema|apuestas de sistema como funciona|apuestas de
sistema explicacion|apuestas de sistema explicación|apuestas de tenis|apuestas de tenis de mesa|apuestas de tenis en directo|apuestas de tenis hoy|apuestas de
tenis para hoy|apuestas de tenis pronosticos|apuestas de tenis seguras|apuestas de todo tipo|apuestas
de ufc|apuestas de ufc hoy|apuestas del boxeo|apuestas del
clasico|apuestas del clasico real madrid barca|apuestas del dia|apuestas
del día|apuestas del dia de hoy|apuestas del dia deportivas|apuestas
del dia futbol|apuestas del mundial|apuestas del partido de hoy|apuestas del real
madrid|apuestas del rey|apuestas del sistema|apuestas deporte|apuestas deportes|apuestas deportiva|apuestas
deportivas|apuestas deportivas 1 euro|apuestas deportivas 10 euros gratis|apuestas deportivas 100
seguras|apuestas deportivas 1×2|apuestas deportivas android|apuestas
deportivas app|apuestas deportivas apps|apuestas deportivas argentina|apuestas
deportivas argentina futbol|apuestas deportivas argentina legal|apuestas deportivas atletico de madrid|apuestas deportivas baloncesto|apuestas
deportivas barca madrid|apuestas deportivas barcelona|apuestas deportivas beisbol|apuestas
deportivas bono|apuestas deportivas bono bienvenida|apuestas deportivas bono de bienvenida|apuestas deportivas bono sin deposito|apuestas deportivas bonos de bienvenida|apuestas deportivas boxeo|apuestas
deportivas caballos|apuestas deportivas calculadora|apuestas deportivas campeon liga|apuestas deportivas
casino|apuestas deportivas casino barcelona|apuestas
deportivas casino online|apuestas deportivas cerca de mi|apuestas
deportivas champions league|apuestas deportivas chile|apuestas deportivas ciclismo|apuestas
deportivas colombia|apuestas deportivas com|apuestas deportivas com foro|apuestas deportivas com pronosticos|apuestas deportivas combinadas|apuestas deportivas
combinadas para hoy|apuestas deportivas como se juega|apuestas deportivas comparador|apuestas deportivas con bono gratis|apuestas deportivas con bonos
gratis|apuestas deportivas con dinero ficticio|apuestas deportivas con paypal|apuestas deportivas con puntos virtuales|apuestas
deportivas consejos|apuestas deportivas consejos para ganar|apuestas deportivas copa
america|apuestas deportivas copa del rey|apuestas
deportivas copa libertadores|apuestas deportivas copa mundial|apuestas deportivas
corners|apuestas deportivas cual es la mejor|apuestas
deportivas cuotas altas|apuestas deportivas de baloncesto|apuestas deportivas de boxeo|apuestas deportivas de colombia|apuestas deportivas de futbol|apuestas deportivas de nba|apuestas deportivas de nhl|apuestas deportivas de peru|apuestas
deportivas de tenis|apuestas deportivas del dia|apuestas deportivas dinero ficticio|apuestas deportivas directo|apuestas deportivas doble oportunidad|apuestas deportivas en argentina|apuestas
deportivas en chile|apuestas deportivas en colombia|apuestas deportivas en directo|apuestas deportivas en españa|apuestas deportivas en español|apuestas deportivas en linea|apuestas
deportivas en línea|apuestas deportivas en peru|apuestas deportivas en perú|apuestas deportivas
en sevilla|apuestas deportivas en uruguay|apuestas deportivas
en vivo|apuestas deportivas es|apuestas deportivas es pronosticos|apuestas deportivas españa|apuestas deportivas españolas|apuestas deportivas esports|apuestas deportivas estadisticas|apuestas deportivas
estrategias|apuestas deportivas estrategias seguras|apuestas deportivas eurocopa|apuestas
deportivas europa league|apuestas deportivas f1|apuestas
deportivas faciles de ganar|apuestas deportivas formula
1|apuestas deportivas foro|apuestas deportivas foro futbol|apuestas deportivas foro tenis|apuestas deportivas
francia argentina|apuestas deportivas futbol|apuestas deportivas fútbol|apuestas deportivas futbol argentino|apuestas deportivas futbol colombia|apuestas deportivas
futbol español|apuestas deportivas gana|apuestas deportivas ganadas|apuestas deportivas ganar dinero
seguro|apuestas deportivas gane|apuestas deportivas golf|apuestas deportivas
gratis|apuestas deportivas gratis con premios|apuestas
deportivas gratis hoy|apuestas deportivas gratis sin deposito|apuestas deportivas handicap|apuestas deportivas handicap asiatico|apuestas deportivas hoy|apuestas deportivas impuestos|apuestas deportivas interior argentina|apuestas deportivas juegos olimpicos|apuestas deportivas la liga|apuestas
deportivas legales|apuestas deportivas legales en colombia|apuestas deportivas libres de impuestos|apuestas deportivas licencia españa|apuestas deportivas liga
española|apuestas deportivas listado|apuestas deportivas listado clasico|apuestas deportivas madrid|apuestas deportivas
mas seguras|apuestas deportivas mejor pagadas|apuestas deportivas mejores|apuestas deportivas mejores app|apuestas deportivas mejores casas|apuestas deportivas mejores
cuotas|apuestas deportivas mejores paginas|apuestas deportivas
mexico|apuestas deportivas méxico|apuestas deportivas mlb|apuestas deportivas mlb hoy|apuestas deportivas multiples|apuestas deportivas mundial|apuestas deportivas murcia|apuestas deportivas
nba|apuestas deportivas nba hoy|apuestas deportivas nfl|apuestas deportivas nhl|apuestas
deportivas nuevas|apuestas deportivas ofertas|apuestas deportivas online|apuestas deportivas online
argentina|apuestas deportivas online chile|apuestas deportivas online
colombia|apuestas deportivas online en colombia|apuestas
deportivas online españa|apuestas deportivas online mexico|apuestas deportivas online paypal|apuestas deportivas online peru|apuestas deportivas online por internet|apuestas
deportivas pago paypal|apuestas deportivas para ganar dinero|apuestas deportivas para hoy|apuestas
deportivas para hoy pronosticos|apuestas deportivas partido suspendido|apuestas deportivas partidos de hoy|apuestas deportivas paypal|apuestas deportivas peru|apuestas deportivas
perú|apuestas deportivas peru vs ecuador|apuestas deportivas predicciones|apuestas deportivas promociones|apuestas deportivas pronostico|apuestas deportivas pronóstico|apuestas deportivas
pronostico hoy|apuestas deportivas pronosticos|apuestas deportivas pronósticos|apuestas deportivas pronosticos expertos|apuestas deportivas pronosticos gratis|apuestas deportivas pronosticos nba|apuestas deportivas pronosticos
tenis|apuestas deportivas que aceptan paypal|apuestas deportivas
real madrid|apuestas deportivas regalo bienvenida|apuestas deportivas resultado exacto|apuestas deportivas resultados|apuestas
deportivas rugby|apuestas deportivas seguras|apuestas deportivas
seguras foro|apuestas deportivas seguras hoy|apuestas deportivas seguras para hoy|apuestas deportivas seguras telegram|apuestas deportivas sevilla|apuestas deportivas simulador eurocopa|apuestas deportivas sin deposito|apuestas deportivas sin deposito inicial|apuestas
deportivas sin dinero|apuestas deportivas sin dinero real|apuestas deportivas sin registro|apuestas deportivas stake|apuestas deportivas stake 10|apuestas deportivas telegram españa|apuestas deportivas tenis|apuestas deportivas tenis de mesa|apuestas
deportivas tenis foro|apuestas deportivas tenis hoy|apuestas deportivas
tips|apuestas deportivas tipster|apuestas deportivas ufc|apuestas deportivas uruguay|apuestas
deportivas valencia|apuestas deportivas valencia barcelona|apuestas deportivas venezuela|apuestas deportivas virtuales|apuestas deportivas y casino|apuestas deportivas y casino online|apuestas deportivas.com|apuestas deportivas.com
foro|apuestas deportivas.es|apuestas deportivos pronosticos|apuestas deposito minimo 1 euro|apuestas descenso a segunda|apuestas descenso
a segunda b|apuestas descenso la liga|apuestas descenso primera division|apuestas descenso segunda|apuestas dia|apuestas diarias seguras|apuestas dinero|apuestas dinero ficticio|apuestas dinero real|apuestas dinero virtual|apuestas directas|apuestas directo|apuestas directo futbol|apuestas division de honor juvenil|apuestas dnb|apuestas doble
oportunidad|apuestas doble resultado|apuestas dobles|apuestas dobles y triples|apuestas dortmund barcelona|apuestas draft nba|apuestas draft nfl|apuestas ecuador vs argentina|apuestas ecuador
vs venezuela|apuestas egipto uruguay|apuestas el clasico|apuestas elecciones venezuela|apuestas empate|apuestas en baloncesto|apuestas en barcelona|apuestas en beisbol|apuestas en boxeo|apuestas en caballos|apuestas en carreras de caballos|apuestas en casino|apuestas en casino online|apuestas
en casinos|apuestas en casinos online|apuestas en chile|apuestas en ciclismo|apuestas en colombia|apuestas en colombia de futbol|apuestas en directo|apuestas en directo futbol|apuestas en directo
pronosticos|apuestas en el futbol|apuestas en el tenis|apuestas en españa|apuestas en esports|apuestas en eventos deportivos
virtuales|apuestas en golf|apuestas en juegos|apuestas en la champions league|apuestas en la
eurocopa|apuestas en la liga|apuestas en la nba|apuestas en la nfl|apuestas en las vegas mlb|apuestas en las vegas nfl|apuestas en linea|apuestas en línea|apuestas en linea argentina|apuestas en linea boxeo|apuestas en linea chile|apuestas
en linea colombia|apuestas en línea de fútbol|apuestas en linea
deportivas|apuestas en linea españa|apuestas en linea estados unidos|apuestas en linea futbol|apuestas en linea mexico|apuestas en línea
méxico|apuestas en linea mundial|apuestas en linea peru|apuestas en linea usa|apuestas en los esports|apuestas en madrid|apuestas en méxico|apuestas en mexico
online|apuestas en nba|apuestas en partidos de futbol|apuestas en partidos de futbol en vivo|apuestas en partidos de tenis en directo|apuestas en perú|apuestas en sevilla|apuestas en sistema|apuestas
en stake|apuestas en tenis|apuestas en tenis de mesa|apuestas en valencia|apuestas en vivo|apuestas en vivo argentina|apuestas
en vivo casino|apuestas en vivo futbol|apuestas en vivo fútbol|apuestas en vivo nba|apuestas en vivo peru|apuestas en vivo tenis|apuestas en vivo ufc|apuestas equipo mbappe|apuestas equipos de futbol|apuestas españa|apuestas
españa alemania|apuestas españa alemania eurocopa|apuestas españa
croacia|apuestas españa eurocopa|apuestas españa francia|apuestas españa francia eurocopa|apuestas españa gana el mundial|apuestas españa
gana eurocopa|apuestas españa gana mundial|apuestas españa georgia|apuestas
españa holanda|apuestas españa inglaterra|apuestas españa inglaterra cuotas|apuestas
españa inglaterra eurocopa|apuestas españa italia|apuestas españa mundial|apuestas españa paises
bajos|apuestas español|apuestas español oviedo|apuestas espanyol barcelona|apuestas espanyol
betis|apuestas espanyol villarreal|apuestas esport|apuestas esports|apuestas esports
colombia|apuestas esports españa|apuestas esports fifa|apuestas esports gratis|apuestas esports lol|apuestas esports peru|apuestas esports valorant|apuestas
estadisticas|apuestas estrategias|apuestas euro|apuestas
euro copa|apuestas eurocopa|apuestas eurocopa campeon|apuestas eurocopa españa|apuestas eurocopa favoritos|apuestas eurocopa femenina|apuestas eurocopa final|apuestas eurocopa
ganador|apuestas eurocopa hoy|apuestas eurocopa sub 21|apuestas euroliga baloncesto|apuestas
euroliga pronosticos|apuestas europa league|apuestas europa
league hoy|apuestas europa league pronosticos|apuestas europa league pronósticos|apuestas euros|apuestas f1 abu dhabi|apuestas f1
bahrein|apuestas f1 canada|apuestas f1 china|apuestas f1 cuotas|apuestas f1 hoy|apuestas f1
las vegas|apuestas f1 miami|apuestas f1 monaco|apuestas faciles de ganar|apuestas fáciles de
ganar|apuestas faciles para ganar|apuestas favoritas|apuestas
favorito champions|apuestas favoritos champions|apuestas
favoritos eurocopa|apuestas favoritos mundial|apuestas fc barcelona|apuestas final champions cuotas|apuestas final champions league|apuestas
final champions peru|apuestas final copa|apuestas final copa america|apuestas final copa de europa|apuestas final
copa del rey|apuestas final copa europa|apuestas
final copa libertadores|apuestas final copa rey|apuestas final de copa|apuestas final de copa del rey|apuestas
final del mundial|apuestas final euro|apuestas
final eurocopa|apuestas final europa league|apuestas final libertadores|apuestas final mundial|apuestas
final nba|apuestas final rugby|apuestas final uefa europa league|apuestas final.mundial|apuestas finales de conferencia nfl|apuestas finales nba|apuestas fiorentina betis|apuestas formula|apuestas formula 1|apuestas fórmula 1|apuestas fórmula 1 pronósticos|apuestas formula uno|apuestas foro|apuestas foro nba|apuestas francia
argentina|apuestas francia españa|apuestas futbol|apuestas fútbol|apuestas futbol americano|apuestas futbol americano nfl|apuestas futbol argentina|apuestas futbol argentino|apuestas futbol champions league|apuestas futbol chile|apuestas futbol colombia|apuestas
futbol consejos|apuestas futbol en directo|apuestas fútbol en directo|apuestas futbol en vivo|apuestas
fútbol en vivo|apuestas futbol españa|apuestas futbol español|apuestas fútbol español|apuestas futbol eurocopa|apuestas futbol femenino|apuestas futbol foro|apuestas futbol gratis|apuestas
futbol hoy|apuestas fútbol hoy|apuestas futbol juegos olimpicos|apuestas futbol mexico|apuestas futbol mundial|apuestas futbol online|apuestas futbol para hoy|apuestas futbol peru|apuestas futbol pronosticos|apuestas
futbol sala|apuestas futbol telegram|apuestas futbol virtual|apuestas galgos|apuestas galgos en directo|apuestas galgos
hoy|apuestas galgos online|apuestas galgos pronosticos|apuestas galgos trucos|apuestas gana|apuestas gana colombia|apuestas
gana resultados|apuestas ganadas|apuestas ganadas hoy|apuestas ganador champions
league|apuestas ganador copa america|apuestas ganador copa del rey|apuestas ganador copa del rey baloncesto|apuestas ganador copa libertadores|apuestas ganador de la eurocopa|apuestas ganador de la liga|apuestas ganador del mundial|apuestas ganador eurocopa|apuestas ganador europa league|apuestas ganador f1|apuestas
ganador la liga|apuestas ganador liga española|apuestas ganador mundial|apuestas ganador mundial baloncesto|apuestas ganador mundial f1|apuestas ganador nba|apuestas ganadores eurocopa|apuestas ganadores mundial|apuestas ganar champions|apuestas
ganar eurocopa|apuestas ganar liga|apuestas ganar mundial|apuestas ganar nba|apuestas getafe valencia|apuestas ghana uruguay|apuestas girona|apuestas girona athletic|apuestas
girona betis|apuestas girona campeon de liga|apuestas girona campeon liga|apuestas girona gana la liga|apuestas girona real madrid|apuestas girona real sociedad|apuestas goleador eurocopa|apuestas goleadores eurocopa|apuestas goles asiaticos|apuestas golf|apuestas golf masters|apuestas
golf pga|apuestas granada barcelona|apuestas grand slam de tenis|apuestas gratis|apuestas gratis casino|apuestas gratis con premios|apuestas gratis hoy|apuestas gratis para hoy|apuestas gratis
por registro|apuestas gratis puntos|apuestas gratis regalos|apuestas gratis sin deposito|apuestas gratis sin depósito|apuestas gratis sin ingreso|apuestas gratis sports|apuestas gratis y
ganar premios|apuestas grupo a eurocopa|apuestas grupos eurocopa|apuestas handicap|apuestas handicap asiatico|apuestas handicap baloncesto|apuestas handicap como funciona|apuestas handicap nba|apuestas handicap nfl|apuestas hipicas online|apuestas hípicas
online|apuestas hipicas venezuela|apuestas hockey|apuestas hockey hielo|apuestas hockey patines|apuestas hockey
sobre hielo|apuestas holanda argentina|apuestas holanda vs argentina|apuestas hoy|apuestas hoy champions|apuestas hoy futbol|apuestas hoy nba|apuestas hoy pronosticos|apuestas hoy seguras|apuestas impuestos|apuestas inglaterra paises bajos|apuestas inter barca|apuestas inter
barcelona|apuestas juego|apuestas juegos|apuestas juegos en linea|apuestas juegos olimpicos|apuestas juegos olímpicos|apuestas juegos
olimpicos baloncesto|apuestas juegos online|apuestas juegos virtuales|apuestas jugador
sevilla|apuestas jugadores nba|apuestas kings league americas|apuestas la liga|apuestas la liga española|apuestas la liga hoy|apuestas la liga santander|apuestas las vegas mlb|apuestas las vegas nba|apuestas las
vegas nfl|apuestas league of legends mundial|apuestas legal|apuestas legales|apuestas legales en colombia|apuestas legales en españa|apuestas legales en estados unidos|apuestas legales españa|apuestas leganes betis|apuestas libertadores|apuestas
licencia|apuestas liga 1 peru|apuestas liga argentina|apuestas liga bbva
pronosticos|apuestas liga de campeones|apuestas liga de
campeones de baloncesto|apuestas liga de campeones de hockey|apuestas liga españa|apuestas liga
española|apuestas liga santander pronosticos|apuestas ligas de futbol|apuestas linea|apuestas linea de gol|apuestas liverpool barcelona|apuestas liverpool
real madrid|apuestas lol mundial|apuestas madrid|apuestas madrid arsenal|apuestas madrid atletico|apuestas
madrid atletico champions|apuestas madrid barca|apuestas madrid barça|apuestas madrid
barca hoy|apuestas madrid barca supercopa|apuestas madrid barcelona|apuestas madrid barsa|apuestas madrid
bayern|apuestas madrid betis|apuestas madrid borussia|apuestas madrid campeon champions|apuestas madrid
celta|apuestas madrid city|apuestas madrid dortmund|apuestas madrid gana la
liga|apuestas madrid gana liga|apuestas madrid hoy|apuestas
madrid liverpool|apuestas madrid osasuna|apuestas madrid sevilla|apuestas madrid valencia|apuestas madrid
vs arsenal|apuestas madrid vs barcelona|apuestas mallorca osasuna|apuestas mallorca real sociedad|apuestas manchester athletic|apuestas manchester city real madrid|apuestas mas faciles de ganar|apuestas
mas seguras|apuestas mas seguras para hoy|apuestas masters de golf|apuestas masters de tenis|apuestas maximo goleador eurocopa|apuestas maximo
goleador mundial|apuestas mejor jugador eurocopa|apuestas mejores casinos online|apuestas mexico|apuestas méxico|apuestas mexico polonia|apuestas méxico polonia|apuestas mlb|apuestas mlb hoy|apuestas mlb las
vegas|apuestas mlb para hoy|apuestas mlb pronosticos|apuestas mlb usa|apuestas
mma ufc|apuestas momios|apuestas multiples|apuestas múltiples|apuestas multiples como funcionan|apuestas
multiples el gordo|apuestas multiples futbol|apuestas mundial|apuestas mundial 2026|apuestas mundial baloncesto|apuestas mundial balonmano|apuestas mundial brasil|apuestas mundial campeon|apuestas mundial ciclismo|apuestas mundial clubes|apuestas mundial de
baloncesto|apuestas mundial de ciclismo|apuestas mundial de
clubes|apuestas mundial de futbol|apuestas mundial de fútbol|apuestas mundial de rugby|apuestas
mundial f1|apuestas mundial favoritos|apuestas
mundial femenino|apuestas mundial formula 1|apuestas mundial futbol|apuestas mundial
ganador|apuestas mundial lol|apuestas mundial moto gp|apuestas mundial motogp|apuestas mundial rugby|apuestas mundial sub 17|apuestas mundiales|apuestas mundialistas|apuestas mvp eurocopa|apuestas mvp
nba|apuestas mvp nfl|apuestas nacionales de colombia|apuestas nba|apuestas nba all star|apuestas nba
campeon|apuestas nba consejos|apuestas nba esta noche|apuestas nba finals|apuestas nba gratis|apuestas nba hoy|apuestas nba hoy jugadores|apuestas nba hoy pronosticos|apuestas nba para hoy|apuestas nba playoffs|apuestas
nba pronosticos|apuestas nba pronósticos|apuestas nba pronosticos hoy|apuestas nba tipster|apuestas nfl|apuestas nfl hoy|apuestas nfl las vegas|apuestas nfl playoffs|apuestas nfl pronosticos|apuestas nfl pronósticos|apuestas nfl semana 4|apuestas nfl super bowl|apuestas
nhl|apuestas nhl pronosticos|apuestas octavos eurocopa|apuestas
ofertas|apuestas online|apuestas online argentina|apuestas online argentina legal|apuestas online bono|apuestas online bono bienvenida|apuestas online boxeo|apuestas online caballos|apuestas online carreras de
caballos|apuestas online casino|apuestas online champions league|apuestas online chile|apuestas online ciclismo|apuestas online colombia|apuestas online comparativa|apuestas online con paypal|apuestas
online de caballos|apuestas online deportivas|apuestas online en argentina|apuestas online en peru|apuestas online espana|apuestas online españa|apuestas online esports|apuestas online foro|apuestas online futbol|apuestas online futbol
españa|apuestas online golf|apuestas online gratis|apuestas online gratis sin deposito|apuestas online juegos|apuestas
online mexico|apuestas online mma|apuestas online movil|apuestas online nba|apuestas online net|apuestas online nuevas|apuestas online opiniones|apuestas online paypal|apuestas online peru|apuestas online seguras|apuestas online sin dinero|apuestas online sin registro|apuestas online
tenis|apuestas online ufc|apuestas online uruguay|apuestas online venezuela|apuestas open britanico golf|apuestas
osasuna athletic|apuestas osasuna barcelona|apuestas osasuna real madrid|apuestas osasuna sevilla|apuestas osasuna valencia|apuestas over|apuestas over
2.5|apuestas over under|apuestas paginas|apuestas pago anticipado|apuestas paises
bajos ecuador|apuestas paises bajos inglaterra|apuestas países bajos qatar|apuestas
para boxeo|apuestas para champions league|apuestas para el clasico|apuestas para el dia de hoy|apuestas para el
mundial|apuestas para el partido de hoy|apuestas para eurocopa|apuestas
para europa league|apuestas para futbol|apuestas para ganar|apuestas para
ganar dinero|apuestas para ganar dinero facil|apuestas para ganar en la ruleta|apuestas para ganar la
champions|apuestas para ganar la eurocopa|apuestas para ganar
la europa league|apuestas para ganar la liga|apuestas
para ganar siempre|apuestas para hacer|apuestas para hoy|apuestas para hoy de futbol|apuestas para hoy europa league|apuestas para hoy futbol|apuestas para juegos|apuestas para la champions league|apuestas
para la copa del rey|apuestas para la eurocopa|apuestas para la europa league|apuestas para la final de la eurocopa|apuestas
para la nba hoy|apuestas para los partidos de hoy|apuestas para partidos de hoy|apuestas para ufc|apuestas partido|apuestas
partido aplazado|apuestas partido champions|apuestas partido colombia|apuestas partido españa marruecos|apuestas partido mundial|apuestas partido suspendido|apuestas
partidos|apuestas partidos champions league|apuestas partidos csgo|apuestas partidos
de futbol|apuestas partidos de futbol hoy|apuestas partidos de hoy|apuestas partidos
eurocopa|apuestas partidos futbol|apuestas partidos hoy|apuestas partidos
mundial|apuestas paypal|apuestas peleas de boxeo|apuestas peru|apuestas perú|apuestas peru brasil|apuestas peru chile|apuestas peru paraguay|apuestas peru uruguay|apuestas peru vs chile|apuestas peru vs colombia|apuestas pichichi eurocopa|apuestas plataforma|apuestas playoff|apuestas playoff ascenso|apuestas playoff ascenso a primera|apuestas playoff nba|apuestas playoff
segunda|apuestas playoff segunda b|apuestas playoffs nba|apuestas playoffs nfl|apuestas polonia argentina|apuestas por argentina|apuestas por internet mexico|apuestas por internet para ganar dinero|apuestas
por paypal|apuestas por ronda boxeo|apuestas por sistema|apuestas portugal uruguay|apuestas pre partido|apuestas predicciones|apuestas predicciones futbol|apuestas primera division|apuestas primera division españa|apuestas promociones|apuestas pronostico|apuestas pronosticos|apuestas pronosticos deportivos|apuestas
pronosticos deportivos tenis|apuestas pronosticos futbol|apuestas pronosticos gratis|apuestas pronosticos nba|apuestas
pronosticos tenis|apuestas prorroga|apuestas psg barca|apuestas psg barcelona|apuestas puntos por tarjetas|apuestas puntos tarjetas|apuestas
que aceptan paypal|apuestas que es handicap|apuestas que puedes hacer con tu novia|apuestas que siempre ganaras|apuestas
que significa|apuestas quien bajara a segunda|apuestas
quién bajara a segunda|apuestas quien gana el mundial|apuestas quien gana eurocopa|apuestas quien gana la champions|apuestas quien gana la eurocopa|apuestas quien gana la liga|apuestas quien ganara el mundial|apuestas quién ganará el mundial|apuestas quien ganara la champions|apuestas
quien ganara la eurocopa|apuestas quien ganara la liga|apuestas rayo barcelona|apuestas real madrid|apuestas real madrid
arsenal|apuestas real madrid athletic|apuestas real
madrid atletico|apuestas real madrid atletico champions|apuestas real madrid atletico de
madrid|apuestas real madrid atlético de madrid|apuestas real madrid atletico madrid|apuestas real
madrid barcelona|apuestas real madrid bayern|apuestas real madrid betis|apuestas real
madrid borussia|apuestas real madrid campeon champions|apuestas
real madrid celta|apuestas real madrid champions|apuestas real madrid city|apuestas real madrid girona|apuestas real madrid hoy|apuestas real
madrid liverpool|apuestas real madrid manchester city|apuestas real madrid osasuna|apuestas real madrid real sociedad|apuestas real madrid valencia|apuestas real madrid
villarreal|apuestas real madrid vs arsenal|apuestas real madrid
vs atletico|apuestas real madrid vs atlético|apuestas
real madrid vs atletico madrid|apuestas real madrid vs barcelona|apuestas real madrid vs betis|apuestas real madrid vs sevilla|apuestas real madrid vs valencia|apuestas real sociedad|apuestas real sociedad athletic|apuestas real sociedad barcelona|apuestas real sociedad
betis|apuestas real sociedad psg|apuestas real sociedad real madrid|apuestas real sociedad valencia|apuestas recomendadas hoy|apuestas regalo de bienvenida|apuestas registro|apuestas resultado
exacto|apuestas resultados|apuestas resultados eurocopa|apuestas retirada tenis|apuestas roma barcelona|apuestas
roma sevilla|apuestas rugby|apuestas rugby mundial|apuestas rugby
world cup|apuestas ruleta seguras|apuestas segunda|apuestas segunda b|apuestas segunda division|apuestas segunda
división|apuestas segunda division b|apuestas segunda division españa|apuestas seguras|apuestas seguras
baloncesto|apuestas seguras calculadora|apuestas seguras en la ruleta|apuestas seguras eurocopa|apuestas seguras foro|apuestas seguras futbol|apuestas
seguras futbol hoy|apuestas seguras gratis|apuestas seguras hoy|apuestas seguras hoy futbol|apuestas seguras nba|apuestas seguras
nba hoy|apuestas seguras para este fin de semana|apuestas seguras para ganar
dinero|apuestas seguras para hoy|apuestas seguras para hoy fútbol|apuestas seguras para hoy pronósticos|apuestas seguras para mañana|apuestas seguras ruleta|apuestas seguras telegram|apuestas seguras tenis|apuestas semifinales eurocopa|apuestas senegal paises bajos|apuestas sevilla|apuestas sevilla athletic|apuestas sevilla atletico de madrid|apuestas sevilla barcelona|apuestas sevilla
betis|apuestas sevilla campeon liga|apuestas sevilla
celta|apuestas sevilla gana la liga|apuestas sevilla girona|apuestas sevilla inter|apuestas sevilla jugador|apuestas sevilla juventus|apuestas sevilla leganes|apuestas sevilla madrid|apuestas sevilla manchester
united|apuestas sevilla osasuna|apuestas sevilla real madrid|apuestas sevilla real sociedad|apuestas sevilla roma|apuestas sevilla
valencia|apuestas significa|apuestas simples ejemplos|apuestas simples o combinadas|apuestas sin deposito|apuestas sin deposito inicial|apuestas
sin deposito minimo|apuestas sin dinero|apuestas sin dinero real|apuestas sin empate|apuestas sin empate que significa|apuestas
sin ingreso minimo|apuestas sin registro|apuestas sistema|apuestas sistema calculadora|apuestas sistema como funciona|apuestas sistema
trixie|apuestas sociedad|apuestas sorteo copa del rey|apuestas stake|apuestas
stake 10|apuestas stake 10 hoy|apuestas super bowl favorito|apuestas super rugby|apuestas supercopa españa|apuestas
superliga argentina|apuestas tarjeta roja|apuestas tarjetas|apuestas tarjetas amarillas|apuestas tenis|apuestas tenis atp|apuestas tenis
consejos|apuestas tenis copa davis|apuestas tenis de mesa|apuestas tenis de mesa pronosticos|apuestas tenis en vivo|apuestas tenis
femenino|apuestas tenis hoy|apuestas tenis itf|apuestas tenis pronosticos|apuestas tenis pronósticos|apuestas tenis retirada|apuestas tenis roland garros|apuestas tenis seguras|apuestas tenis wimbledon|apuestas tenis wta|apuestas tercera division|apuestas tercera division españa|apuestas
tipos|apuestas tips|apuestas tipster|apuestas tipster para hoy|apuestas topuria holloway cuotas|apuestas torneos de golf|apuestas torneos de tenis|apuestas trucos|apuestas uefa champions league|apuestas
uefa europa league|apuestas ufc|apuestas ufc chile|apuestas ufc como funciona|apuestas ufc hoy|apuestas ufc ilia topuria|apuestas ufc online|apuestas ufc pronósticos|apuestas ufc telegram|apuestas
ufc topuria|apuestas under over|apuestas unionistas villarreal|apuestas uruguay|apuestas uruguay colombia|apuestas uruguay corea|apuestas uruguay vs colombia|apuestas us open golf|apuestas us open tenis|apuestas valencia|apuestas valencia barcelona|apuestas valencia betis|apuestas valencia madrid|apuestas valencia real
madrid|apuestas valladolid barcelona|apuestas valladolid valencia|apuestas valor app|apuestas valor en directo|apuestas valor
galgos|apuestas venezuela|apuestas venezuela argentina|apuestas venezuela bolivia|apuestas venezuela
ecuador|apuestas villarreal|apuestas villarreal athletic|apuestas villarreal barcelona|apuestas villarreal bayern|apuestas villarreal betis|apuestas
villarreal liverpool|apuestas villarreal manchester|apuestas villarreal manchester united|apuestas villarreal vs real madrid|apuestas virtuales|apuestas virtuales colombia|apuestas
virtuales futbol|apuestas virtuales sin dinero|apuestas vivo|apuestas vuelta a españa|apuestas vuelta
españa|apuestas william hill partidos de hoy|apuestas y
casino|apuestas y casinos|apuestas y juegos de azar|apuestas y pronosticos|apuestas y pronosticos de futbol|apuestas y pronosticos deportivos|apuestas y resultados|apuestas-deportivas|apuestas-deportivas.es pronosticos|arbitro nba apuestas|argentina apuestas|argentina colombia apuestas|argentina croacia apuestas|argentina francia apuestas|argentina mexico apuestas|argentina peru apuestas|argentina uruguay apuestas|argentina vs bolivia apuestas|argentina vs chile
apuestas|argentina vs colombia apuestas|argentina vs francia apuestas|argentina vs.
colombia apuestas|asi se gana en las apuestas deportivas|asiatico apuestas|asiatico
en apuestas|asiaticos apuestas|athletic
barcelona apuestas|athletic manchester united apuestas|athletic osasuna apuestas|athletic
real madrid apuestas|atletico barcelona apuestas|atletico de madrid
apuestas|atlético de madrid apuestas|atletico de madrid
real madrid apuestas|atletico de madrid vs barcelona apuestas|atletico madrid real madrid apuestas|atletico madrid vs real
madrid apuestas|atletico real madrid apuestas|atletico vs real madrid apuestas|avisador
de cuotas apuestas|bajada de cuotas apuestas|baloncesto apuestas|barbastro barcelona apuestas|barca apuestas|barca bayern apuestas|barca inter apuestas|barca madrid
apuestas|barça madrid apuestas|barca vs atletico apuestas|barca vs madrid apuestas|barca vs real madrid apuestas|barcelona – real madrid apuestas|barcelona apuestas|barcelona
atletico apuestas|barcelona atletico de madrid apuestas|barcelona atletico madrid apuestas|barcelona
betis apuestas|barcelona casa de apuestas|barcelona inter apuestas|barcelona psg apuestas|barcelona real madrid apuestas|barcelona
real sociedad apuestas|barcelona sevilla apuestas|barcelona
valencia apuestas|barcelona vs athletic bilbao apuestas|barcelona vs atlético madrid apuestas|barcelona vs betis apuestas|barcelona vs celta de vigo apuestas|barcelona vs espanyol apuestas|barcelona vs girona apuestas|barcelona vs madrid
apuestas|barcelona vs real madrid apuestas|barcelona vs real sociedad apuestas|barcelona vs sevilla apuestas|barcelona vs villarreal
apuestas|base de datos cuotas apuestas deportivas|bayern real madrid apuestas|beisbol
apuestas|best america apuestas|bet apuestas chile|bet apuestas en vivo|betis – chelsea apuestas|betis apuestas|betis barcelona apuestas|betis chelsea apuestas|betis madrid apuestas|betis sevilla apuestas|betsson tu sitio de
apuestas online|blog apuestas baloncesto|blog apuestas ciclismo|blog apuestas nba|blog apuestas tenis|blog de apuestas de tenis|bono apuestas|bono apuestas deportivas|bono apuestas deportivas sin deposito|bono apuestas gratis|bono apuestas
gratis sin deposito|bono apuestas sin deposito|bono bienvenida
apuestas|bono bienvenida apuestas deportivas|bono
bienvenida apuestas españa|bono bienvenida
apuestas sin deposito|bono bienvenida apuestas sin depósito|bono bienvenida casa apuestas|bono bienvenida casa de apuestas|bono
bienvenida marca apuestas|bono casa apuestas|bono casa
de apuestas|bono casa de apuestas sin ingreso|bono casas de apuestas|bono
de apuestas|bono de apuestas gratis sin deposito|bono de bienvenida apuestas|bono de bienvenida apuestas deportivas|bono
de bienvenida casa de apuestas|bono de bienvenida casas de apuestas|bono de casas de apuestas|bono de
registro apuestas|bono de registro apuestas deportivas|bono de registro casa de apuestas|bono
gratis apuestas|bono marca apuestas|bono por registro apuestas|bono por registro
apuestas deportivas|bono por registro casa de apuestas|bono
registro apuestas|bono sin deposito apuestas|bono
sin depósito apuestas|bono sin deposito apuestas deportivas|bono sin depósito apuestas
deportivas|bono sin deposito casa de apuestas|bono sin deposito
marca apuestas|bono sin ingreso apuestas|bono sin ingreso apuestas deportivas|bonos apuestas|bonos apuestas colombia|bonos
apuestas deportivas|bonos apuestas deportivas sin deposito|bonos apuestas gratis|bonos
apuestas sin deposito|bonos apuestas sin depósito|bonos bienvenida apuestas|bonos bienvenida casas apuestas|bonos bienvenida casas de apuestas|bonos casa de apuestas|bonos casas apuestas|bonos casas de apuestas|bonos casas de apuestas
colombia|bonos casas de apuestas deportivas|bonos casas de apuestas españa|bonos
casas de apuestas nuevas|bonos casas de apuestas sin deposito|bonos casas de apuestas sin depósito|bonos de apuestas|bonos de
apuestas deportivas|bonos de apuestas gratis|bonos
de apuestas sin deposito|bonos de bienvenida apuestas|bonos de
bienvenida apuestas deportivas|bonos de bienvenida casa de apuestas|bonos de bienvenida casas
de apuestas|bonos de bienvenida de casas de apuestas|bonos de bienvenida en casas de apuestas|bonos de casas de apuestas|bonos de casas de apuestas
sin deposito|bonos en casa de apuestas|bonos en casas de apuestas sin deposito|bonos gratis
apuestas|bonos gratis apuestas deportivas|bonos gratis casas
de apuestas|bonos gratis sin deposito apuestas|bonos paginas de apuestas|bonos registro casas de
apuestas|bonos sin deposito apuestas|bonos sin depósito apuestas|bonos sin deposito apuestas deportivas|bonos sin deposito casas de apuestas|bot de apuestas deportivas gratis|boxeo apuestas|brasil colombia apuestas|brasil peru apuestas|brasil vs colombia apuestas|buenas apuestas para hoy|buscador cuotas apuestas|buscador de apuestas seguras|buscador de cuotas apuestas|buscador de cuotas de apuestas|buscar apuestas seguras|caballos apuestas|calculador de apuestas|calculador de cuotas
apuestas|calculadora apuestas|calculadora apuestas combinadas|calculadora apuestas de sistema|calculadora apuestas deportivas|calculadora apuestas deportivas seguras|calculadora
apuestas multiples|calculadora apuestas segura|calculadora apuestas seguras|calculadora apuestas sistema|calculadora apuestas yankee|calculadora arbitraje apuestas|calculadora cubrir apuestas|calculadora cuotas
apuestas|calculadora de apuestas|calculadora de
apuestas combinadas|calculadora de apuestas de futbol|calculadora de apuestas
de sistema|calculadora de apuestas deportivas|calculadora de apuestas multiples|calculadora de apuestas seguras|calculadora de apuestas sistema|calculadora
de apuestas surebets|calculadora de arbitraje apuestas|calculadora de cuotas apuestas|calculadora de cuotas de apuestas|calculadora para apuestas deportivas|calculadora poisson apuestas|calculadora poisson apuestas deportivas|calculadora poisson para apuestas|calculadora scalping apuestas deportivas|calculadora sistema apuestas|calculadora stake apuestas|calculadora trading apuestas|calcular apuestas|calcular apuestas deportivas|calcular apuestas futbol|calcular apuestas
sistema|calcular cuotas apuestas|calcular cuotas apuestas combinadas|calcular cuotas apuestas deportivas|calcular cuotas de apuestas|calcular ganancias apuestas deportivas|calcular momios apuestas|calcular probabilidad cuota
apuestas|calcular stake apuestas|calcular unidades apuestas|calcular yield apuestas|calculo de apuestas|calculo de apuestas deportivas|cambio de cuotas
apuestas|campeon champions apuestas|campeon eurocopa apuestas|campeon liga apuestas|campeon nba apuestas|canales de apuestas gratis|carrera de caballos apuestas|carrera de caballos apuestas juego|carrera de caballos con apuestas|carrera de galgos apuestas|carreras de caballos
apuestas|carreras de caballos apuestas online|carreras de caballos
con apuestas|carreras de caballos juegos de apuestas|carreras de galgos
apuestas|carreras de galgos apuestas online|carreras de galgos apuestas trucos|carreras
galgos apuestas|casa apuestas argentina|casa
apuestas atletico de madrid|casa apuestas barcelona|casa
apuestas betis|casa apuestas bono bienvenida|casa apuestas bono gratis|casa apuestas bono sin deposito|casa
apuestas cerca de mi|casa apuestas chile|casa apuestas colombia|casa apuestas
con mejores cuotas|casa apuestas deportivas|casa apuestas españa|casa apuestas española|casa apuestas eurocopa|casa apuestas futbol|casa apuestas mejores cuotas|casa apuestas
mundial|casa apuestas nueva|casa apuestas nuevas|casa apuestas online|casa apuestas peru|casa apuestas valencia|casa de
apuestas|casa de apuestas 10 euros gratis|casa de apuestas argentina|casa de apuestas
atletico de madrid|casa de apuestas baloncesto|casa de apuestas barcelona|casa de
apuestas beisbol|casa de apuestas betis|casa de apuestas bono|casa de apuestas bono bienvenida|casa de apuestas bono de bienvenida|casa de
apuestas bono gratis|casa de apuestas bono por registro|casa de apuestas bono sin deposito|casa de apuestas boxeo|casa de apuestas caballos|casa de apuestas carreras de caballos|casa
de apuestas cerca de mi|casa de apuestas cerca de mí|casa de apuestas champions league|casa de apuestas
chile|casa de apuestas ciclismo|casa de apuestas colombia|casa de apuestas con bono de bienvenida|casa de
apuestas con bono sin deposito|casa de apuestas con cuotas mas
altas|casa de apuestas con esports|casa de apuestas con las mejores cuotas|casa de apuestas con licencia
en españa|casa de apuestas con mejores cuotas|casa de apuestas con pago anticipado|casa de apuestas con paypal|casa de apuestas copa america|casa de apuestas de caballos|casa de
apuestas de colombia|casa de apuestas de españa|casa de apuestas
de futbol|casa de apuestas de fútbol|casa de apuestas de futbol peru|casa de apuestas de peru|casa de apuestas del madrid|casa de apuestas del real
madrid|casa de apuestas deportivas|casa de apuestas deportivas cerca de mi|casa de apuestas deportivas en argentina|casa de apuestas deportivas en chile|casa de apuestas deportivas en colombia|casa de apuestas deportivas en españa|casa
de apuestas deportivas en madrid|casa de apuestas deportivas españa|casa de apuestas deportivas españolas|casa de apuestas deportivas madrid|casa
de apuestas deportivas mexico|casa de apuestas deportivas online|casa de apuestas
deportivas peru|casa de apuestas deposito 5 euros|casa de apuestas deposito minimo|casa de
apuestas deposito minimo 1 euro|casa de apuestas depósito mínimo 1 euro|casa de apuestas en españa|casa de apuestas
en linea|casa de apuestas en madrid|casa de apuestas en perú|casa
de apuestas en vivo|casa de apuestas españa|casa
de apuestas españa inglaterra|casa de apuestas española|casa de apuestas españolas|casa de apuestas esports|casa de apuestas eurocopa|casa de apuestas europa league|casa de
apuestas f1|casa de apuestas formula 1|casa de apuestas futbol|casa de apuestas ingreso minimo|casa de apuestas ingreso minimo 1 euro|casa de apuestas ingreso mínimo 1 euro|casa de apuestas legales|casa de apuestas legales en colombia|casa de
apuestas legales en españa|casa de apuestas libertadores|casa
de apuestas liga española|casa de apuestas
madrid|casa de apuestas mas segura|casa de apuestas
mejores|casa de apuestas méxico|casa de apuestas minimo
5 euros|casa de apuestas mlb|casa de apuestas mundial|casa de
apuestas nba|casa de apuestas nfl|casa de apuestas nueva|casa de apuestas nuevas|casa de apuestas oficial del
real madrid|casa de apuestas oficial real madrid|casa de apuestas online|casa de
apuestas online argentina|casa de apuestas
online chile|casa de apuestas online españa|casa de apuestas
online mexico|casa de apuestas online paraguay|casa de apuestas online peru|casa de
apuestas online usa|casa de apuestas online
venezuela|casa de apuestas pago anticipado|casa de apuestas para boxeo|casa de
apuestas para ufc|casa de apuestas peru|casa de apuestas perú|casa de apuestas peru online|casa de
apuestas por paypal|casa de apuestas promociones|casa de apuestas que regalan dinero|casa de apuestas real madrid|casa de apuestas regalo de bienvenida|casa de apuestas sevilla|casa de apuestas
sin dinero|casa de apuestas sin ingreso minimo|casa de
apuestas sin licencia en españa|casa de apuestas sin minimo de ingreso|casa
de apuestas stake|casa de apuestas tenis|casa de apuestas ufc|casa de apuestas valencia|casa de apuestas
venezuela|casa de apuestas virtuales|casa de apuestas
vive la suerte|casa oficial de apuestas del real madrid|casas apuestas asiaticas|casas apuestas bono sin deposito|casas apuestas bonos sin deposito|casas apuestas
caballos|casas apuestas chile|casas apuestas ciclismo|casas apuestas con licencia|casas apuestas
con licencia en españa|casas apuestas deportivas|casas apuestas deportivas colombia|casas apuestas deportivas
españa|casas apuestas deportivas españolas|casas apuestas deportivas nuevas|casas apuestas
españa|casas apuestas españolas|casas apuestas esports|casas apuestas eurocopa|casas
apuestas golf|casas apuestas ingreso minimo 5 euros|casas apuestas legales|casas apuestas legales españa|casas apuestas licencia|casas apuestas licencia españa|casas apuestas mexico|casas apuestas mundial|casas apuestas nba|casas apuestas nuevas|casas apuestas nuevas
españa|casas apuestas ofertas|casas apuestas online|casas apuestas paypal|casas apuestas peru|casas apuestas sin licencia|casas
apuestas tenis|casas asiaticas apuestas|casas de apuestas|casas de apuestas 5 euros|casas de apuestas app|casas de
apuestas argentinas|casas de apuestas asiaticas|casas de
apuestas baloncesto|casas de apuestas barcelona|casas de apuestas
bono bienvenida|casas de apuestas bono de bienvenida|casas
de apuestas bono por registro|casas de apuestas bono sin deposito|casas de apuestas bono sin ingreso|casas de apuestas bonos|casas de apuestas bonos de bienvenida|casas de apuestas bonos gratis|casas de apuestas
bonos sin deposito|casas de apuestas boxeo|casas de apuestas caballos|casas de apuestas carreras de caballos|casas de apuestas casino|casas de apuestas casino online|casas de apuestas cerca de mi|casas de apuestas champions league|casas de apuestas chile|casas de apuestas ciclismo|casas de apuestas colombia|casas de apuestas com|casas de apuestas
con app|casas de apuestas con apuestas gratis|casas
de apuestas con bono|casas de apuestas con bono de bienvenida|casas de
apuestas con bono de registro|casas de apuestas con bono por registro|casas de apuestas con bono sin deposito|casas de apuestas con bonos|casas de apuestas con bonos gratis|casas de apuestas con bonos sin deposito|casas de apuestas con deposito minimo|casas de apuestas con esports|casas de apuestas con handicap
asiatico|casas de apuestas con licencia|casas de apuestas con licencia en españa|casas de apuestas con licencia españa|casas de apuestas con licencia española|casas de apuestas con mejores cuotas|casas de apuestas con pago anticipado|casas de
apuestas con paypal|casas de apuestas con paypal en perú|casas de
apuestas con promociones|casas de apuestas con ruleta en vivo|casas de apuestas copa del rey|casas de
apuestas de caballos|casas de apuestas de españa|casas de
apuestas de futbol|casas de apuestas de fútbol|casas de apuestas de peru|casas de apuestas deportivas|casas
de apuestas deportivas asiaticas|casas de apuestas deportivas colombia|casas de apuestas deportivas comparativa|casas de apuestas deportivas con paypal|casas de apuestas deportivas en chile|casas de apuestas
deportivas en españa|casas de apuestas deportivas en linea|casas de apuestas deportivas en madrid|casas de apuestas deportivas en mexico|casas de
apuestas deportivas en peru|casas de apuestas deportivas en sevilla|casas de apuestas deportivas en valencia|casas de apuestas
deportivas españa|casas de apuestas deportivas españolas|casas de apuestas deportivas legales|casas de
apuestas deportivas madrid|casas de apuestas deportivas mexico|casas
de apuestas deportivas nuevas|casas de apuestas
deportivas online|casas de apuestas deportivas peru|casas
de apuestas deportivas perú|casas de apuestas deposito
minimo 1 euro|casas de apuestas depósito mínimo 1
euro|casas de apuestas dinero gratis|casas de apuestas en argentina|casas de apuestas en barcelona|casas de apuestas en chile|casas de apuestas
en colombia|casas de apuestas en españa|casas de apuestas en españa
online|casas de apuestas en linea|casas de apuestas en madrid|casas de apuestas en méxico|casas de apuestas en peru|casas
de apuestas en perú|casas de apuestas en sevilla|casas de apuestas en uruguay|casas de apuestas en valencia|casas de apuestas en venezuela|casas
de apuestas equipos de futbol|casas de apuestas españa|casas de apuestas españa alemania|casas de apuestas españa inglaterra|casas
de apuestas españa licencia|casas de apuestas españa nuevas|casas de apuestas españa online|casas de
apuestas española|casas de apuestas españolas|casas de apuestas españolas con licencia|casas
de apuestas españolas online|casas de apuestas esports|casas de
apuestas eurocopa|casas de apuestas eurocopa 2024|casas de apuestas europa league|casas de
apuestas f1|casas de apuestas fisicas en barcelona|casas de
apuestas fisicas en españa|casas de apuestas formula 1|casas de apuestas fuera de españa|casas de apuestas futbol|casas
de apuestas fútbol|casas de apuestas futbol españa|casas
de apuestas ganador eurocopa|casas de apuestas gratis|casas de apuestas
ingreso minimo|casas de apuestas ingreso minimo 1 euro|casas
de apuestas ingreso minimo 5 euros|casas de apuestas inter barcelona|casas de apuestas
legales|casas de apuestas legales en colombia|casas de apuestas legales en españa|casas
de apuestas legales en mexico|casas de apuestas legales españa|casas de apuestas legales mx|casas de
apuestas licencia|casas de apuestas licencia españa|casas de apuestas lista|casas de apuestas madrid|casas de apuestas mas seguras|casas de apuestas mejores bonos|casas de apuestas mejores cuotas|casas
de apuestas mexico|casas de apuestas méxico|casas de apuestas minimo 5 euros|casas de apuestas mlb|casas de apuestas mundial|casas
de apuestas mundial baloncesto|casas de apuestas mundiales|casas de apuestas nba|casas de apuestas no
reguladas en españa|casas de apuestas nueva ley|casas de apuestas
nuevas|casas de apuestas nuevas en colombia|casas
de apuestas nuevas en españa|casas de apuestas nuevas españa|casas de apuestas ofertas|casas de apuestas online|casas de apuestas online
argentina|casas de apuestas online colombia|casas de apuestas online deportivas|casas de apuestas online ecuador|casas de apuestas online en argentina|casas de apuestas online en chile|casas de apuestas online
en colombia|casas de apuestas online en españa|casas de apuestas online en mexico|casas de
apuestas online españa|casas de apuestas online mas fiables|casas de apuestas online mexico|casas de
apuestas online nuevas|casas de apuestas online peru|casas de apuestas online usa|casas de apuestas online venezuela|casas de apuestas pago paypal|casas de apuestas para ufc|casas
de apuestas paypal|casas de apuestas peru bono sin deposito|casas de apuestas
Your comment is awaiting moderation.
(10 euros gratis apuestas|10 mejores casas de apuestas|10 trucos para ganar
apuestas|15 euros gratis marca apuestas|1×2 apuestas|1×2
apuestas deportivas|1×2 apuestas que significa|1×2 en apuestas|1×2
en apuestas que significa|1×2 que significa en apuestas|5
euros gratis apuestas|9 apuestas que siempre ganaras|a partir de cuanto se declara apuestas|actividades de juegos de azar y
apuestas|ad apuestas deportivas|aleksandre topuria ufc apuestas|algoritmo para
ganar apuestas deportivas|america apuestas|análisis nba apuestas|aplicacion android apuestas
deportivas|aplicacion apuestas deportivas|aplicacion apuestas deportivas android|aplicación de apuestas online|aplicacion para hacer
apuestas|aplicacion para hacer apuestas de futbol|aplicación para hacer apuestas de fútbol|aplicaciones apuestas deportivas android|aplicaciones apuestas deportivas gratis|aplicaciones
de apuestas android|aplicaciones de apuestas de fútbol|aplicaciones de apuestas deportivas|aplicaciones de apuestas deportivas peru|aplicaciones de apuestas deportivas
perú|aplicaciones de apuestas en colombia|aplicaciones de
apuestas gratis|aplicaciones de apuestas online|aplicaciones de apuestas seguras|aplicaciones
de apuestas sin dinero|aplicaciones para hacer apuestas|apostar seguro apuestas deportivas|app android apuestas deportivas|app apuestas|app apuestas
android|app apuestas de futbol|app apuestas deportivas|app apuestas deportivas android|app apuestas deportivas argentina|app apuestas deportivas colombia|app apuestas
deportivas ecuador|app apuestas deportivas españa|app apuestas deportivas gratis|app apuestas entre amigos|app apuestas futbol|app apuestas gratis|app apuestas sin dinero|app casa de apuestas|app casas de apuestas|app control apuestas|app de apuestas|app de apuestas android|app de apuestas casino|app de apuestas
colombia|app de apuestas con bono de bienvenida|app de apuestas de futbol|app de apuestas deportivas|app de apuestas deportivas android|app de apuestas deportivas argentina|app de apuestas deportivas
colombia|app de apuestas deportivas en españa|app de apuestas deportivas peru|app de apuestas deportivas perú|app de apuestas deportivas sin dinero|app de apuestas ecuador|app de apuestas en colombia|app de
apuestas en españa|app de apuestas en venezuela|app de
apuestas futbol|app de apuestas gratis|app de apuestas online|app de apuestas para android|app de
apuestas para ganar dinero|app de apuestas peru|app de apuestas reales|app de casas de apuestas|app marca apuestas android|app moviles de apuestas|app para apuestas|app para apuestas de
futbol|app para apuestas deportivas|app para apuestas deportivas en español|app para ganar apuestas deportivas|app para hacer apuestas|app para hacer apuestas deportivas|app para
hacer apuestas entre amigos|app para llevar control de apuestas|app
pronosticos apuestas deportivas|app versus apuestas|apps
apuestas mundial|apps de apuestas|apps de apuestas
con bono de bienvenida|apps de apuestas de futbol|apps de apuestas deportivas peru|apps de apuestas mexico|apps para
apuestas|aprender a hacer apuestas deportivas|aprender hacer apuestas deportivas|apuesta del dia apuestas deportivas|apuestas 10 euros gratis|apuestas 100
seguras|apuestas 1×2|apuestas 1X2|apuestas 2 division|apuestas
3 division|apuestas a caballos|apuestas a carreras de caballos|apuestas
a colombia|apuestas a corners|apuestas a ganar|apuestas a jugadores nba|apuestas a la baja|apuestas a la nfl|apuestas al barcelona|apuestas al dia|apuestas al empate|apuestas al mundial|apuestas al tenis wta|apuestas alaves barcelona|apuestas
alcaraz hoy|apuestas alemania españa|apuestas alonso campeon del
mundo|apuestas altas y bajas|apuestas altas y bajas
nfl|apuestas ambos equipos marcan|apuestas america|apuestas android|apuestas anillo
nba|apuestas antes del mundial|apuestas anticipadas|apuestas anticipadas nba|apuestas apps|apuestas arabia argentina|apuestas argentina|apuestas argentina campeon del mundo|apuestas argentina canada|apuestas argentina colombia|apuestas argentina croacia|apuestas argentina españa|apuestas argentina francia|apuestas argentina francia cuanto paga|apuestas argentina
francia mundial|apuestas argentina gana el mundial|apuestas argentina gana mundial|apuestas argentina holanda|apuestas argentina mexico|apuestas argentina méxico|apuestas argentina
mundial|apuestas argentina online|apuestas argentina paises bajos|apuestas argentina polonia|apuestas
argentina uruguay|apuestas argentina vs australia|apuestas argentina
vs colombia|apuestas argentina vs francia|apuestas
argentina vs peru|apuestas argentinas|apuestas arsenal real madrid|apuestas ascenso a primera division|apuestas ascenso a segunda|apuestas asiaticas|apuestas asiatico|apuestas athletic|apuestas athletic atletico|apuestas athletic
barça|apuestas athletic barcelona|apuestas athletic betis|apuestas athletic manchester|apuestas athletic manchester
united|apuestas athletic osasuna|apuestas athletic real|apuestas athletic real madrid|apuestas athletic real sociedad|apuestas athletic
real sociedad final|apuestas athletic roma|apuestas athletic sevilla|apuestas athletic valencia|apuestas atletico|apuestas atletico barcelona|apuestas
atletico barsa|apuestas atletico campeon champions|apuestas atletico
campeon de liga|apuestas atlético copenhague|apuestas atletico de madrid|apuestas atlético de
madrid|apuestas atletico de madrid barcelona|apuestas atletico de madrid gana la liga|apuestas atletico de madrid real
madrid|apuestas atlético de madrid real madrid|apuestas atletico de
madrid vs barcelona|apuestas atletico madrid|apuestas atletico madrid
real madrid|apuestas atletico madrid vs barcelona|apuestas atletico real madrid|apuestas atletico real madrid champions|apuestas
atletismo|apuestas bajas|apuestas baloncesto|apuestas baloncesto acb|apuestas baloncesto handicap|apuestas
baloncesto hoy|apuestas baloncesto juegos olimpicos|apuestas baloncesto nba|apuestas
baloncesto pronostico|apuestas baloncesto pronósticos|apuestas baloncesto prorroga|apuestas barca|apuestas barca athletic|apuestas barca atletico|apuestas barca bayern|apuestas barca bayern munich|apuestas barca girona|apuestas barca hoy|apuestas barça hoy|apuestas barca inter|apuestas barca juventus|apuestas barca madrid|apuestas
barça madrid|apuestas barca real madrid|apuestas barca vs juve|apuestas barca
vs madrid|apuestas barca vs psg|apuestas barcelona|apuestas barcelona alaves|apuestas barcelona
athletic|apuestas barcelona atletico|apuestas barcelona atletico de madrid|apuestas barcelona atlético de madrid|apuestas barcelona
atletico madrid|apuestas barcelona bayern|apuestas barcelona
betis|apuestas barcelona campeon de liga|apuestas barcelona celta|apuestas barcelona espanyol|apuestas barcelona gana la champions|apuestas barcelona girona|apuestas barcelona granada|apuestas barcelona
hoy|apuestas barcelona inter|apuestas barcelona madrid|apuestas barcelona osasuna|apuestas barcelona
psg|apuestas barcelona real madrid|apuestas barcelona real sociedad|apuestas barcelona sevilla|apuestas barcelona
valencia|apuestas barcelona villarreal|apuestas barcelona vs atletico madrid|apuestas barcelona vs madrid|apuestas barcelona vs real madrid|apuestas barsa madrid|apuestas basket
hoy|apuestas bayern barcelona|apuestas bayern vs barcelona|apuestas beisbol|apuestas béisbol|apuestas beisbol mlb|apuestas beisbol pronosticos|apuestas beisbol venezolano|apuestas betis|apuestas betis – chelsea|apuestas
betis barcelona|apuestas betis chelsea|apuestas betis fiorentina|apuestas
betis girona|apuestas betis madrid|apuestas betis mallorca|apuestas
betis real madrid|apuestas betis real sociedad|apuestas betis sevilla|apuestas betis valencia|apuestas betis valladolid|apuestas betis vs valencia|apuestas betplay hoy colombia|apuestas betsson peru|apuestas bienvenida|apuestas billar online|apuestas bolivia vs colombia|apuestas bono|apuestas bono bienvenida|apuestas bono de bienvenida|apuestas bono de bienvenida sin deposito|apuestas bono gratis|apuestas bono sin deposito|apuestas
bonos sin deposito|apuestas borussia real madrid|apuestas boxeo|apuestas boxeo
de campeonato|apuestas boxeo españa|apuestas boxeo español|apuestas boxeo femenino olimpiadas|apuestas boxeo hoy|apuestas boxeo online|apuestas brasil colombia|apuestas brasil peru|apuestas brasil uruguay|apuestas
brasil vs colombia|apuestas brasil vs peru|apuestas caballos|apuestas
caballos colocado|apuestas caballos españa|apuestas caballos
hipodromo|apuestas caballos hoy|apuestas caballos madrid|apuestas caballos online|apuestas caballos sanlucar de barrameda|apuestas caballos zarzuela|apuestas calculador|apuestas campeon|apuestas campeon champions|apuestas
campeón champions|apuestas campeon champions 2025|apuestas campeon champions
league|apuestas campeon conference league|apuestas campeon copa
america|apuestas campeon copa del rey|apuestas campeon de champions|apuestas campeon de la champions|apuestas campeon de liga|apuestas campeon del mundo|apuestas campeon eurocopa|apuestas campeón eurocopa|apuestas campeon europa league|apuestas campeon f1|apuestas campeon f1 2025|apuestas campeon formula 1|apuestas campeon libertadores|apuestas campeon liga|apuestas campeon liga bbva|apuestas campeon liga española|apuestas campeon liga santander|apuestas
campeon motogp 2025|apuestas campeon mundial|apuestas campeón mundial|apuestas campeon mundial baloncesto|apuestas campeon nba|apuestas campeón nba|apuestas campeon premier|apuestas campeon premier league|apuestas campeon roland garros|apuestas campeonato f1|apuestas campeonatos de futbol|apuestas carrera de caballos|apuestas carrera de
caballos hoy|apuestas carrera de caballos nocturnas|apuestas carrera de galgos fin de semana|apuestas carrera de galgos hoy|apuestas carrera
de galgos nocturnas|apuestas carreras caballos|apuestas carreras caballos sanlucar|apuestas
carreras de caballos|apuestas carreras de caballos en directo|apuestas carreras de caballos en vivo|apuestas carreras de caballos españa|apuestas carreras de caballos
hoy|apuestas carreras de caballos nacionales|apuestas carreras de caballos nocturnas|apuestas carreras de caballos online|apuestas carreras de
caballos sanlucar|apuestas carreras de caballos sanlúcar|apuestas carreras de
galgos|apuestas carreras de galgos en vivo|apuestas carreras de galgos nocturnas|apuestas carreras de galgos pre partido|apuestas casino|apuestas casino barcelona|apuestas casino futbol|apuestas casino gran madrid|apuestas casino gratis|apuestas
casino madrid|apuestas casino online|apuestas casino online argentina|apuestas casinos|apuestas casinos online|apuestas celta|apuestas celta barcelona|apuestas celta betis|apuestas
celta eibar|apuestas celta espanyol|apuestas celta granada|apuestas celta madrid|apuestas celta manchester|apuestas celta real madrid|apuestas
champion league|apuestas champions foro|apuestas champions
hoy|apuestas champions league|apuestas champions league – pronósticos|apuestas champions league 2025|apuestas champions league hoy|apuestas champions league
pronosticos|apuestas champions league pronósticos|apuestas champions pronosticos|apuestas chelsea barcelona|apuestas
chelsea betis|apuestas chile|apuestas chile peru|apuestas chile venezuela|apuestas chile
vs colombia|apuestas chile vs uruguay|apuestas ciclismo|apuestas ciclismo en vivo|apuestas ciclismo femenino|apuestas ciclismo tour francia|apuestas
ciclismo vuelta|apuestas ciclismo vuelta a españa|apuestas ciclismo vuelta españa|apuestas city madrid|apuestas city
real madrid|apuestas clasico|apuestas clasico español|apuestas clasico real madrid barcelona|apuestas clasificacion mundial|apuestas
colombia|apuestas colombia argentina|apuestas colombia brasil|apuestas colombia paraguay|apuestas colombia uruguay|apuestas colombia vs argentina|apuestas colombia vs brasil|apuestas combinadas|apuestas combinadas como funcionan|apuestas combinadas de futbol|apuestas combinadas de
fútbol|apuestas combinadas foro|apuestas combinadas futbol|apuestas
combinadas hoy|apuestas combinadas mismo partido|apuestas combinadas mundial|apuestas combinadas nba|apuestas combinadas para esta
semana|apuestas combinadas para hoy|apuestas combinadas para mañana|apuestas combinadas pronosticos|apuestas combinadas recomendadas|apuestas
combinadas seguras|apuestas combinadas seguras para hoy|apuestas combinadas seguras
para mañana|apuestas como ganar|apuestas comparador|apuestas con bono de bienvenida|apuestas con dinero ficticio|apuestas
con dinero real|apuestas con dinero virtual|apuestas
con handicap|apuestas con handicap asiatico|apuestas con handicap baloncesto|apuestas con mas
probabilidades de ganar|apuestas con paypal|apuestas con tarjeta de credito|apuestas con tarjeta de debito|apuestas consejos|apuestas copa|apuestas copa africa|apuestas copa america|apuestas copa américa|apuestas copa argentina|apuestas copa brasil|apuestas copa davis|apuestas
copa de europa|apuestas copa del mundo|apuestas copa
del rey|apuestas copa del rey baloncesto|apuestas copa del rey final|apuestas copa
del rey futbol|apuestas copa del rey ganador|apuestas copa
del rey hoy|apuestas copa del rey pronosticos|apuestas
copa del rey pronósticos|apuestas copa europa|apuestas copa italia|apuestas copa libertadores|apuestas copa
mundial de hockey|apuestas copa rey|apuestas copa sudamericana|apuestas corners|apuestas
corners hoy|apuestas croacia argentina|apuestas cuartos eurocopa|apuestas cuotas|apuestas
cuotas altas|apuestas cuotas bajas|apuestas de 1 euro|apuestas de baloncesto|apuestas de baloncesto hoy|apuestas de baloncesto nba|apuestas de baloncesto para hoy|apuestas
de beisbol|apuestas de beisbol para hoy|apuestas de blackjack en linea|apuestas de boxeo|apuestas de boxeo canelo|apuestas de
boxeo en las vegas|apuestas de boxeo hoy|apuestas de boxeo online|apuestas de
caballo|apuestas de caballos|apuestas de caballos como funciona|apuestas de caballos como se juega|apuestas
de caballos en colombia|apuestas de caballos en españa|apuestas de caballos en linea|apuestas de
caballos españa|apuestas de caballos ganador y colocado|apuestas de
caballos internacionales|apuestas de caballos juegos|apuestas de caballos online|apuestas de caballos online en venezuela|apuestas de caballos
por internet|apuestas de caballos pronosticos|apuestas de caballos pronósticos|apuestas de carrera de caballos|apuestas de
carreras de caballos|apuestas de carreras de caballos online|apuestas de casino|apuestas de casino online|apuestas
de casino por internet|apuestas de champions league|apuestas de ciclismo|apuestas de colombia|apuestas de
copa america|apuestas de corners|apuestas de deportes
en linea|apuestas de deportes online|apuestas de dinero|apuestas de esports|apuestas de eurocopa|apuestas de
europa league|apuestas de f1|apuestas de formula 1|apuestas de futbol|apuestas de fútbol|apuestas de futbol app|apuestas de
futbol argentina|apuestas de futbol colombia|apuestas de futbol en colombia|apuestas de futbol en directo|apuestas de futbol en linea|apuestas de
futbol en vivo|apuestas de futbol español|apuestas de futbol gratis|apuestas de
futbol hoy|apuestas de futbol mundial|apuestas de
futbol online|apuestas de fútbol online|apuestas de futbol para hoy|apuestas de fútbol para hoy|apuestas de
futbol para hoy seguras|apuestas de futbol para mañana|apuestas
de futbol peru|apuestas de futbol pronosticos|apuestas de
fútbol pronósticos|apuestas de futbol seguras|apuestas de futbol seguras para hoy|apuestas de futbol sin dinero|apuestas de galgos|apuestas de galgos como
ganar|apuestas de galgos en directo|apuestas de galgos
online|apuestas de galgos trucos|apuestas de golf|apuestas de hockey|apuestas de
hockey sobre hielo|apuestas de hoy|apuestas de hoy seguras|apuestas de juego|apuestas de juegos|apuestas de juegos deportivos|apuestas de juegos online|apuestas de la champions league|apuestas
de la copa américa|apuestas de la eurocopa|apuestas de
la europa league|apuestas de la liga|apuestas de la liga bbva|apuestas de la liga
española|apuestas de la nba|apuestas de la nfl|apuestas de la ufc|apuestas de mlb|apuestas de nba|apuestas de nba para
hoy|apuestas de partidos|apuestas de partidos de futbol|apuestas de
peleas ufc|apuestas de perros en vivo|apuestas
de perros virtuales|apuestas de peru|apuestas de sistema|apuestas de sistema como funciona|apuestas de sistema explicacion|apuestas de sistema explicación|apuestas de tenis|apuestas
de tenis de mesa|apuestas de tenis en directo|apuestas de tenis hoy|apuestas de tenis
para hoy|apuestas de tenis pronosticos|apuestas
de tenis seguras|apuestas de todo tipo|apuestas de ufc|apuestas de ufc hoy|apuestas del boxeo|apuestas del clasico|apuestas del clasico real madrid barca|apuestas del dia|apuestas del día|apuestas del dia de hoy|apuestas del dia deportivas|apuestas del dia futbol|apuestas del mundial|apuestas del partido de hoy|apuestas del real madrid|apuestas del rey|apuestas del sistema|apuestas deporte|apuestas deportes|apuestas deportiva|apuestas deportivas|apuestas deportivas
1 euro|apuestas deportivas 10 euros gratis|apuestas deportivas 100
seguras|apuestas deportivas 1×2|apuestas deportivas android|apuestas deportivas app|apuestas deportivas apps|apuestas deportivas
argentina|apuestas deportivas argentina futbol|apuestas
deportivas argentina legal|apuestas deportivas atletico de madrid|apuestas deportivas baloncesto|apuestas deportivas barca madrid|apuestas deportivas barcelona|apuestas deportivas beisbol|apuestas deportivas bono|apuestas
deportivas bono bienvenida|apuestas deportivas bono de bienvenida|apuestas
deportivas bono sin deposito|apuestas deportivas bonos de
bienvenida|apuestas deportivas boxeo|apuestas deportivas caballos|apuestas
deportivas calculadora|apuestas deportivas campeon liga|apuestas
deportivas casino|apuestas deportivas casino barcelona|apuestas
deportivas casino online|apuestas deportivas cerca
de mi|apuestas deportivas champions league|apuestas deportivas chile|apuestas deportivas ciclismo|apuestas deportivas colombia|apuestas
deportivas com|apuestas deportivas com foro|apuestas deportivas
com pronosticos|apuestas deportivas combinadas|apuestas deportivas combinadas para hoy|apuestas deportivas como se juega|apuestas deportivas comparador|apuestas deportivas con bono gratis|apuestas deportivas con bonos gratis|apuestas deportivas con dinero ficticio|apuestas deportivas con paypal|apuestas deportivas con puntos virtuales|apuestas deportivas consejos|apuestas deportivas consejos para ganar|apuestas deportivas copa
america|apuestas deportivas copa del rey|apuestas
deportivas copa libertadores|apuestas deportivas copa mundial|apuestas deportivas
corners|apuestas deportivas cual es la mejor|apuestas
deportivas cuotas altas|apuestas deportivas de baloncesto|apuestas deportivas de boxeo|apuestas deportivas de colombia|apuestas deportivas
de futbol|apuestas deportivas de nba|apuestas deportivas de nhl|apuestas deportivas de
peru|apuestas deportivas de tenis|apuestas deportivas del dia|apuestas deportivas dinero ficticio|apuestas deportivas directo|apuestas
deportivas doble oportunidad|apuestas deportivas en argentina|apuestas deportivas
en chile|apuestas deportivas en colombia|apuestas deportivas en directo|apuestas deportivas en españa|apuestas deportivas
en español|apuestas deportivas en linea|apuestas deportivas en línea|apuestas deportivas en peru|apuestas deportivas en perú|apuestas deportivas
en sevilla|apuestas deportivas en uruguay|apuestas deportivas en vivo|apuestas deportivas es|apuestas deportivas es pronosticos|apuestas deportivas españa|apuestas deportivas españolas|apuestas deportivas esports|apuestas deportivas estadisticas|apuestas deportivas estrategias|apuestas deportivas estrategias seguras|apuestas deportivas eurocopa|apuestas deportivas europa league|apuestas deportivas f1|apuestas deportivas faciles de ganar|apuestas deportivas formula 1|apuestas deportivas foro|apuestas
deportivas foro futbol|apuestas deportivas foro tenis|apuestas deportivas francia argentina|apuestas
deportivas futbol|apuestas deportivas fútbol|apuestas
deportivas futbol argentino|apuestas deportivas futbol colombia|apuestas deportivas futbol español|apuestas deportivas gana|apuestas deportivas ganadas|apuestas
deportivas ganar dinero seguro|apuestas deportivas gane|apuestas deportivas golf|apuestas deportivas gratis|apuestas deportivas gratis con premios|apuestas deportivas gratis hoy|apuestas deportivas
gratis sin deposito|apuestas deportivas handicap|apuestas deportivas handicap asiatico|apuestas deportivas hoy|apuestas deportivas impuestos|apuestas deportivas interior argentina|apuestas deportivas juegos olimpicos|apuestas deportivas la liga|apuestas deportivas legales|apuestas deportivas
legales en colombia|apuestas deportivas libres de impuestos|apuestas deportivas licencia
españa|apuestas deportivas liga española|apuestas deportivas listado|apuestas
deportivas listado clasico|apuestas deportivas
madrid|apuestas deportivas mas seguras|apuestas deportivas mejor pagadas|apuestas deportivas mejores|apuestas deportivas
mejores app|apuestas deportivas mejores
casas|apuestas deportivas mejores cuotas|apuestas deportivas mejores paginas|apuestas deportivas mexico|apuestas deportivas méxico|apuestas deportivas mlb|apuestas
deportivas mlb hoy|apuestas deportivas multiples|apuestas deportivas mundial|apuestas deportivas murcia|apuestas
deportivas nba|apuestas deportivas nba hoy|apuestas deportivas nfl|apuestas deportivas nhl|apuestas deportivas nuevas|apuestas deportivas ofertas|apuestas deportivas online|apuestas
deportivas online argentina|apuestas deportivas online chile|apuestas deportivas online colombia|apuestas deportivas
online en colombia|apuestas deportivas online españa|apuestas deportivas online mexico|apuestas deportivas online paypal|apuestas deportivas online peru|apuestas deportivas online por internet|apuestas deportivas pago paypal|apuestas deportivas para ganar dinero|apuestas deportivas para hoy|apuestas deportivas para hoy pronosticos|apuestas
deportivas partido suspendido|apuestas deportivas partidos de hoy|apuestas deportivas paypal|apuestas deportivas
peru|apuestas deportivas perú|apuestas deportivas peru vs ecuador|apuestas deportivas predicciones|apuestas deportivas promociones|apuestas deportivas pronostico|apuestas deportivas
pronóstico|apuestas deportivas pronostico hoy|apuestas deportivas pronosticos|apuestas deportivas pronósticos|apuestas deportivas pronosticos expertos|apuestas deportivas pronosticos gratis|apuestas deportivas pronosticos nba|apuestas
deportivas pronosticos tenis|apuestas deportivas que aceptan paypal|apuestas deportivas real madrid|apuestas deportivas
regalo bienvenida|apuestas deportivas resultado exacto|apuestas
deportivas resultados|apuestas deportivas rugby|apuestas deportivas seguras|apuestas deportivas
seguras foro|apuestas deportivas seguras hoy|apuestas deportivas
seguras para hoy|apuestas deportivas seguras telegram|apuestas deportivas sevilla|apuestas deportivas
simulador eurocopa|apuestas deportivas sin deposito|apuestas deportivas
sin deposito inicial|apuestas deportivas sin dinero|apuestas deportivas sin dinero real|apuestas deportivas sin registro|apuestas deportivas stake|apuestas deportivas stake 10|apuestas deportivas
telegram españa|apuestas deportivas tenis|apuestas deportivas tenis
de mesa|apuestas deportivas tenis foro|apuestas deportivas tenis hoy|apuestas deportivas tips|apuestas deportivas tipster|apuestas deportivas ufc|apuestas deportivas uruguay|apuestas deportivas valencia|apuestas deportivas valencia barcelona|apuestas deportivas venezuela|apuestas deportivas virtuales|apuestas deportivas y casino|apuestas deportivas y casino online|apuestas deportivas.com|apuestas deportivas.com foro|apuestas deportivas.es|apuestas deportivos pronosticos|apuestas deposito minimo 1 euro|apuestas descenso a segunda|apuestas descenso a segunda b|apuestas descenso la liga|apuestas descenso primera division|apuestas descenso segunda|apuestas dia|apuestas diarias seguras|apuestas dinero|apuestas dinero ficticio|apuestas dinero real|apuestas dinero virtual|apuestas directas|apuestas
directo|apuestas directo futbol|apuestas division de honor juvenil|apuestas dnb|apuestas doble oportunidad|apuestas doble resultado|apuestas dobles|apuestas dobles y triples|apuestas dortmund barcelona|apuestas draft nba|apuestas
draft nfl|apuestas ecuador vs argentina|apuestas ecuador
vs venezuela|apuestas egipto uruguay|apuestas el clasico|apuestas elecciones venezuela|apuestas empate|apuestas en baloncesto|apuestas en barcelona|apuestas en beisbol|apuestas
en boxeo|apuestas en caballos|apuestas en carreras
de caballos|apuestas en casino|apuestas en casino online|apuestas en casinos|apuestas en casinos online|apuestas en chile|apuestas en ciclismo|apuestas en colombia|apuestas en colombia
de futbol|apuestas en directo|apuestas en directo futbol|apuestas en directo pronosticos|apuestas en el futbol|apuestas
en el tenis|apuestas en españa|apuestas en esports|apuestas en eventos
deportivos virtuales|apuestas en golf|apuestas en juegos|apuestas en la champions league|apuestas en la eurocopa|apuestas en la liga|apuestas
en la nba|apuestas en la nfl|apuestas en las vegas mlb|apuestas en las vegas nfl|apuestas en linea|apuestas en línea|apuestas
en linea argentina|apuestas en linea boxeo|apuestas en linea
chile|apuestas en linea colombia|apuestas en línea de fútbol|apuestas en linea deportivas|apuestas en linea españa|apuestas en linea estados unidos|apuestas en linea
futbol|apuestas en linea mexico|apuestas en línea méxico|apuestas en linea mundial|apuestas
en linea peru|apuestas en linea usa|apuestas
en los esports|apuestas en madrid|apuestas en méxico|apuestas
en mexico online|apuestas en nba|apuestas en partidos de futbol|apuestas en partidos de
futbol en vivo|apuestas en partidos de tenis en directo|apuestas en perú|apuestas en sevilla|apuestas en sistema|apuestas en stake|apuestas en tenis|apuestas en tenis de
mesa|apuestas en valencia|apuestas en vivo|apuestas en vivo
argentina|apuestas en vivo casino|apuestas en vivo futbol|apuestas en vivo fútbol|apuestas en vivo nba|apuestas en vivo peru|apuestas en vivo tenis|apuestas en vivo ufc|apuestas equipo mbappe|apuestas equipos de futbol|apuestas españa|apuestas españa alemania|apuestas españa
alemania eurocopa|apuestas españa croacia|apuestas españa eurocopa|apuestas
españa francia|apuestas españa francia eurocopa|apuestas españa gana
el mundial|apuestas españa gana eurocopa|apuestas españa gana mundial|apuestas españa georgia|apuestas españa
holanda|apuestas españa inglaterra|apuestas españa inglaterra cuotas|apuestas españa inglaterra
eurocopa|apuestas españa italia|apuestas españa mundial|apuestas españa paises
bajos|apuestas español|apuestas español oviedo|apuestas espanyol barcelona|apuestas espanyol betis|apuestas espanyol villarreal|apuestas
esport|apuestas esports|apuestas esports colombia|apuestas esports
españa|apuestas esports fifa|apuestas esports gratis|apuestas esports lol|apuestas esports peru|apuestas esports valorant|apuestas estadisticas|apuestas estrategias|apuestas euro|apuestas euro copa|apuestas eurocopa|apuestas eurocopa campeon|apuestas eurocopa
españa|apuestas eurocopa favoritos|apuestas eurocopa femenina|apuestas eurocopa final|apuestas eurocopa
ganador|apuestas eurocopa hoy|apuestas eurocopa sub 21|apuestas euroliga baloncesto|apuestas
euroliga pronosticos|apuestas europa league|apuestas europa league hoy|apuestas europa league pronosticos|apuestas europa league pronósticos|apuestas euros|apuestas f1 abu dhabi|apuestas f1 bahrein|apuestas f1
canada|apuestas f1 china|apuestas f1 cuotas|apuestas
f1 hoy|apuestas f1 las vegas|apuestas f1 miami|apuestas
f1 monaco|apuestas faciles de ganar|apuestas fáciles de ganar|apuestas faciles para ganar|apuestas favoritas|apuestas favorito champions|apuestas favoritos champions|apuestas favoritos eurocopa|apuestas favoritos mundial|apuestas fc barcelona|apuestas
final champions cuotas|apuestas final champions
league|apuestas final champions peru|apuestas final copa|apuestas final copa america|apuestas final copa de europa|apuestas final
copa del rey|apuestas final copa europa|apuestas final copa libertadores|apuestas final
copa rey|apuestas final de copa|apuestas final de copa del rey|apuestas final del
mundial|apuestas final euro|apuestas final eurocopa|apuestas final europa league|apuestas final libertadores|apuestas final mundial|apuestas final nba|apuestas final rugby|apuestas final uefa europa league|apuestas final.mundial|apuestas finales
de conferencia nfl|apuestas finales nba|apuestas fiorentina betis|apuestas formula|apuestas
formula 1|apuestas fórmula 1|apuestas fórmula 1 pronósticos|apuestas formula uno|apuestas
foro|apuestas foro nba|apuestas francia argentina|apuestas francia españa|apuestas futbol|apuestas fútbol|apuestas futbol americano|apuestas futbol americano nfl|apuestas futbol argentina|apuestas futbol argentino|apuestas futbol champions league|apuestas futbol chile|apuestas futbol colombia|apuestas futbol consejos|apuestas futbol en directo|apuestas fútbol en directo|apuestas futbol en vivo|apuestas fútbol en vivo|apuestas futbol españa|apuestas futbol español|apuestas fútbol español|apuestas futbol
eurocopa|apuestas futbol femenino|apuestas futbol foro|apuestas futbol gratis|apuestas futbol hoy|apuestas fútbol hoy|apuestas futbol juegos olimpicos|apuestas futbol mexico|apuestas futbol mundial|apuestas futbol online|apuestas futbol para hoy|apuestas futbol peru|apuestas futbol pronosticos|apuestas
futbol sala|apuestas futbol telegram|apuestas futbol virtual|apuestas
galgos|apuestas galgos en directo|apuestas galgos hoy|apuestas galgos online|apuestas galgos pronosticos|apuestas
galgos trucos|apuestas gana|apuestas gana colombia|apuestas gana resultados|apuestas ganadas|apuestas
ganadas hoy|apuestas ganador champions league|apuestas ganador copa america|apuestas ganador copa del rey|apuestas ganador copa del rey baloncesto|apuestas
ganador copa libertadores|apuestas ganador de la eurocopa|apuestas ganador de la liga|apuestas ganador del mundial|apuestas ganador eurocopa|apuestas ganador europa league|apuestas ganador f1|apuestas ganador la liga|apuestas ganador liga española|apuestas ganador mundial|apuestas ganador mundial baloncesto|apuestas ganador mundial f1|apuestas ganador nba|apuestas ganadores eurocopa|apuestas ganadores mundial|apuestas ganar champions|apuestas ganar eurocopa|apuestas ganar liga|apuestas ganar mundial|apuestas ganar nba|apuestas getafe
valencia|apuestas ghana uruguay|apuestas girona|apuestas girona athletic|apuestas girona betis|apuestas girona campeon de liga|apuestas girona campeon liga|apuestas girona gana la
liga|apuestas girona real madrid|apuestas girona real sociedad|apuestas goleador eurocopa|apuestas
goleadores eurocopa|apuestas goles asiaticos|apuestas
golf|apuestas golf masters|apuestas golf pga|apuestas granada barcelona|apuestas grand slam de tenis|apuestas gratis|apuestas gratis casino|apuestas gratis con premios|apuestas gratis hoy|apuestas gratis
para hoy|apuestas gratis por registro|apuestas gratis puntos|apuestas gratis regalos|apuestas gratis sin deposito|apuestas gratis sin depósito|apuestas gratis sin ingreso|apuestas gratis sports|apuestas gratis y ganar
premios|apuestas grupo a eurocopa|apuestas grupos eurocopa|apuestas handicap|apuestas handicap asiatico|apuestas handicap baloncesto|apuestas handicap como funciona|apuestas handicap nba|apuestas handicap nfl|apuestas hipicas online|apuestas hípicas
online|apuestas hipicas venezuela|apuestas hockey|apuestas hockey hielo|apuestas hockey patines|apuestas
hockey sobre hielo|apuestas holanda argentina|apuestas holanda
vs argentina|apuestas hoy|apuestas hoy champions|apuestas hoy
futbol|apuestas hoy nba|apuestas hoy pronosticos|apuestas
hoy seguras|apuestas impuestos|apuestas inglaterra paises bajos|apuestas inter
barca|apuestas inter barcelona|apuestas juego|apuestas juegos|apuestas
juegos en linea|apuestas juegos olimpicos|apuestas juegos olímpicos|apuestas juegos olimpicos baloncesto|apuestas juegos online|apuestas juegos virtuales|apuestas jugador
sevilla|apuestas jugadores nba|apuestas kings league americas|apuestas la liga|apuestas la liga española|apuestas la liga hoy|apuestas la liga santander|apuestas las vegas mlb|apuestas las
vegas nba|apuestas las vegas nfl|apuestas league of
legends mundial|apuestas legal|apuestas legales|apuestas legales
en colombia|apuestas legales en españa|apuestas legales
en estados unidos|apuestas legales españa|apuestas leganes betis|apuestas libertadores|apuestas licencia|apuestas liga 1 peru|apuestas liga argentina|apuestas liga
bbva pronosticos|apuestas liga de campeones|apuestas liga de campeones de baloncesto|apuestas liga de campeones de hockey|apuestas liga españa|apuestas liga española|apuestas liga santander pronosticos|apuestas
ligas de futbol|apuestas linea|apuestas linea de gol|apuestas liverpool barcelona|apuestas liverpool real madrid|apuestas lol mundial|apuestas madrid|apuestas madrid arsenal|apuestas
madrid atletico|apuestas madrid atletico champions|apuestas madrid barca|apuestas madrid barça|apuestas madrid barca hoy|apuestas madrid barca supercopa|apuestas madrid
barcelona|apuestas madrid barsa|apuestas madrid bayern|apuestas madrid betis|apuestas
madrid borussia|apuestas madrid campeon champions|apuestas madrid celta|apuestas madrid city|apuestas madrid dortmund|apuestas madrid gana la liga|apuestas madrid gana liga|apuestas
madrid hoy|apuestas madrid liverpool|apuestas madrid osasuna|apuestas madrid sevilla|apuestas madrid valencia|apuestas madrid vs arsenal|apuestas
madrid vs barcelona|apuestas mallorca osasuna|apuestas mallorca real sociedad|apuestas manchester athletic|apuestas manchester city real madrid|apuestas mas faciles de ganar|apuestas mas seguras|apuestas mas seguras para hoy|apuestas masters de golf|apuestas masters de tenis|apuestas
maximo goleador eurocopa|apuestas maximo goleador mundial|apuestas mejor jugador eurocopa|apuestas mejores
casinos online|apuestas mexico|apuestas méxico|apuestas mexico polonia|apuestas méxico polonia|apuestas mlb|apuestas
mlb hoy|apuestas mlb las vegas|apuestas mlb para hoy|apuestas mlb pronosticos|apuestas mlb usa|apuestas mma ufc|apuestas momios|apuestas multiples|apuestas
múltiples|apuestas multiples como funcionan|apuestas
multiples el gordo|apuestas multiples futbol|apuestas mundial|apuestas mundial 2026|apuestas mundial baloncesto|apuestas mundial balonmano|apuestas
mundial brasil|apuestas mundial campeon|apuestas mundial ciclismo|apuestas mundial clubes|apuestas mundial de baloncesto|apuestas
mundial de ciclismo|apuestas mundial de clubes|apuestas mundial de futbol|apuestas mundial de fútbol|apuestas mundial de rugby|apuestas mundial
f1|apuestas mundial favoritos|apuestas mundial femenino|apuestas
mundial formula 1|apuestas mundial futbol|apuestas mundial ganador|apuestas mundial lol|apuestas mundial moto
gp|apuestas mundial motogp|apuestas mundial rugby|apuestas mundial sub 17|apuestas mundiales|apuestas mundialistas|apuestas mvp eurocopa|apuestas mvp nba|apuestas mvp nfl|apuestas
nacionales de colombia|apuestas nba|apuestas nba all star|apuestas nba campeon|apuestas nba consejos|apuestas nba esta noche|apuestas nba finals|apuestas nba gratis|apuestas nba hoy|apuestas nba hoy jugadores|apuestas nba hoy pronosticos|apuestas nba para hoy|apuestas nba
playoffs|apuestas nba pronosticos|apuestas nba pronósticos|apuestas
nba pronosticos hoy|apuestas nba tipster|apuestas nfl|apuestas
nfl hoy|apuestas nfl las vegas|apuestas nfl playoffs|apuestas
nfl pronosticos|apuestas nfl pronósticos|apuestas nfl semana 4|apuestas nfl super
bowl|apuestas nhl|apuestas nhl pronosticos|apuestas octavos eurocopa|apuestas ofertas|apuestas online|apuestas online argentina|apuestas online
argentina legal|apuestas online bono|apuestas online bono bienvenida|apuestas online boxeo|apuestas online caballos|apuestas
online carreras de caballos|apuestas online casino|apuestas
online champions league|apuestas online chile|apuestas online ciclismo|apuestas online
colombia|apuestas online comparativa|apuestas online con paypal|apuestas online de
caballos|apuestas online deportivas|apuestas online en argentina|apuestas
online en peru|apuestas online espana|apuestas online españa|apuestas online esports|apuestas
online foro|apuestas online futbol|apuestas online futbol
españa|apuestas online golf|apuestas online gratis|apuestas online gratis sin deposito|apuestas online juegos|apuestas online mexico|apuestas online mma|apuestas online movil|apuestas online
nba|apuestas online net|apuestas online nuevas|apuestas online
opiniones|apuestas online paypal|apuestas online peru|apuestas online seguras|apuestas online sin dinero|apuestas online sin registro|apuestas online tenis|apuestas online ufc|apuestas online uruguay|apuestas online venezuela|apuestas open britanico
golf|apuestas osasuna athletic|apuestas osasuna barcelona|apuestas osasuna real madrid|apuestas osasuna sevilla|apuestas osasuna valencia|apuestas over|apuestas over 2.5|apuestas over under|apuestas paginas|apuestas pago anticipado|apuestas
paises bajos ecuador|apuestas paises bajos inglaterra|apuestas países bajos qatar|apuestas para boxeo|apuestas para champions league|apuestas para el clasico|apuestas para el
dia de hoy|apuestas para el mundial|apuestas para el partido de hoy|apuestas para eurocopa|apuestas para europa league|apuestas para futbol|apuestas para ganar|apuestas para ganar dinero|apuestas para ganar dinero
facil|apuestas para ganar en la ruleta|apuestas para ganar la champions|apuestas para
ganar la eurocopa|apuestas para ganar la europa league|apuestas para ganar la liga|apuestas para ganar
siempre|apuestas para hacer|apuestas para hoy|apuestas para hoy de futbol|apuestas para hoy europa league|apuestas para hoy
futbol|apuestas para juegos|apuestas para la champions league|apuestas
para la copa del rey|apuestas para la eurocopa|apuestas para la europa league|apuestas para
la final de la eurocopa|apuestas para la nba hoy|apuestas
para los partidos de hoy|apuestas para partidos de
hoy|apuestas para ufc|apuestas partido|apuestas partido aplazado|apuestas partido champions|apuestas partido colombia|apuestas partido españa marruecos|apuestas partido mundial|apuestas partido suspendido|apuestas partidos|apuestas partidos champions league|apuestas partidos csgo|apuestas partidos de futbol|apuestas partidos de futbol hoy|apuestas partidos de hoy|apuestas partidos eurocopa|apuestas partidos futbol|apuestas partidos hoy|apuestas partidos mundial|apuestas paypal|apuestas peleas de boxeo|apuestas peru|apuestas
perú|apuestas peru brasil|apuestas peru chile|apuestas peru paraguay|apuestas peru uruguay|apuestas peru vs chile|apuestas peru vs colombia|apuestas pichichi eurocopa|apuestas plataforma|apuestas playoff|apuestas playoff
ascenso|apuestas playoff ascenso a primera|apuestas playoff
nba|apuestas playoff segunda|apuestas playoff segunda b|apuestas playoffs nba|apuestas playoffs nfl|apuestas polonia argentina|apuestas por argentina|apuestas por internet mexico|apuestas por internet para ganar dinero|apuestas por paypal|apuestas por ronda boxeo|apuestas por sistema|apuestas portugal uruguay|apuestas pre partido|apuestas
predicciones|apuestas predicciones futbol|apuestas primera division|apuestas
primera division españa|apuestas promociones|apuestas pronostico|apuestas pronosticos|apuestas pronosticos deportivos|apuestas pronosticos deportivos tenis|apuestas pronosticos futbol|apuestas pronosticos gratis|apuestas pronosticos nba|apuestas pronosticos
tenis|apuestas prorroga|apuestas psg barca|apuestas psg barcelona|apuestas puntos por tarjetas|apuestas puntos tarjetas|apuestas que aceptan paypal|apuestas que es handicap|apuestas que puedes hacer con tu
novia|apuestas que siempre ganaras|apuestas que significa|apuestas quien bajara
a segunda|apuestas quién bajara a segunda|apuestas quien gana el mundial|apuestas quien gana eurocopa|apuestas quien gana la champions|apuestas
quien gana la eurocopa|apuestas quien gana la liga|apuestas quien ganara el mundial|apuestas quién ganará el mundial|apuestas quien ganara la champions|apuestas quien ganara la eurocopa|apuestas quien ganara la liga|apuestas rayo barcelona|apuestas real madrid|apuestas real
madrid arsenal|apuestas real madrid athletic|apuestas real madrid atletico|apuestas real madrid atletico champions|apuestas real madrid atletico de madrid|apuestas real madrid atlético de
madrid|apuestas real madrid atletico madrid|apuestas real madrid barcelona|apuestas real
madrid bayern|apuestas real madrid betis|apuestas real
madrid borussia|apuestas real madrid campeon champions|apuestas real madrid celta|apuestas real madrid champions|apuestas real madrid city|apuestas real madrid girona|apuestas real madrid hoy|apuestas
real madrid liverpool|apuestas real madrid manchester city|apuestas
real madrid osasuna|apuestas real madrid real sociedad|apuestas real madrid valencia|apuestas
real madrid villarreal|apuestas real madrid vs arsenal|apuestas real madrid vs atletico|apuestas real madrid vs atlético|apuestas real madrid vs atletico
madrid|apuestas real madrid vs barcelona|apuestas real madrid vs betis|apuestas real madrid
vs sevilla|apuestas real madrid vs valencia|apuestas real sociedad|apuestas real sociedad athletic|apuestas real sociedad barcelona|apuestas real sociedad betis|apuestas real sociedad psg|apuestas real sociedad real madrid|apuestas real sociedad valencia|apuestas recomendadas hoy|apuestas
regalo de bienvenida|apuestas registro|apuestas resultado exacto|apuestas resultados|apuestas
resultados eurocopa|apuestas retirada tenis|apuestas
roma barcelona|apuestas roma sevilla|apuestas rugby|apuestas rugby mundial|apuestas rugby world
cup|apuestas ruleta seguras|apuestas segunda|apuestas segunda b|apuestas segunda division|apuestas segunda división|apuestas segunda
division b|apuestas segunda division españa|apuestas seguras|apuestas seguras baloncesto|apuestas seguras calculadora|apuestas seguras en la ruleta|apuestas seguras
eurocopa|apuestas seguras foro|apuestas seguras futbol|apuestas seguras futbol hoy|apuestas seguras gratis|apuestas seguras hoy|apuestas seguras hoy futbol|apuestas seguras nba|apuestas seguras nba hoy|apuestas
seguras para este fin de semana|apuestas seguras para ganar dinero|apuestas seguras para hoy|apuestas seguras para hoy fútbol|apuestas seguras para
hoy pronósticos|apuestas seguras para mañana|apuestas seguras ruleta|apuestas seguras telegram|apuestas seguras tenis|apuestas semifinales eurocopa|apuestas senegal paises bajos|apuestas
sevilla|apuestas sevilla athletic|apuestas sevilla atletico de madrid|apuestas sevilla barcelona|apuestas sevilla betis|apuestas sevilla campeon liga|apuestas sevilla celta|apuestas sevilla gana la liga|apuestas sevilla girona|apuestas sevilla
inter|apuestas sevilla jugador|apuestas sevilla juventus|apuestas sevilla leganes|apuestas sevilla madrid|apuestas
sevilla manchester united|apuestas sevilla osasuna|apuestas sevilla real madrid|apuestas sevilla real sociedad|apuestas sevilla roma|apuestas sevilla valencia|apuestas
significa|apuestas simples ejemplos|apuestas simples o combinadas|apuestas sin deposito|apuestas sin deposito inicial|apuestas sin deposito minimo|apuestas sin dinero|apuestas sin dinero real|apuestas sin empate|apuestas sin empate que significa|apuestas sin ingreso minimo|apuestas sin registro|apuestas sistema|apuestas sistema calculadora|apuestas sistema como funciona|apuestas sistema trixie|apuestas sociedad|apuestas sorteo copa del rey|apuestas stake|apuestas stake
10|apuestas stake 10 hoy|apuestas super bowl favorito|apuestas
super rugby|apuestas supercopa españa|apuestas superliga argentina|apuestas tarjeta roja|apuestas tarjetas|apuestas tarjetas amarillas|apuestas tenis|apuestas tenis atp|apuestas tenis consejos|apuestas tenis copa davis|apuestas tenis de mesa|apuestas tenis de mesa pronosticos|apuestas tenis en vivo|apuestas tenis femenino|apuestas tenis hoy|apuestas tenis itf|apuestas tenis pronosticos|apuestas tenis pronósticos|apuestas tenis retirada|apuestas tenis roland garros|apuestas tenis seguras|apuestas tenis wimbledon|apuestas tenis wta|apuestas tercera division|apuestas tercera division españa|apuestas tipos|apuestas tips|apuestas tipster|apuestas tipster para hoy|apuestas topuria holloway cuotas|apuestas torneos de golf|apuestas torneos de
tenis|apuestas trucos|apuestas uefa champions league|apuestas uefa europa league|apuestas ufc|apuestas ufc chile|apuestas ufc como funciona|apuestas ufc hoy|apuestas ufc ilia topuria|apuestas ufc
online|apuestas ufc pronósticos|apuestas ufc
telegram|apuestas ufc topuria|apuestas under over|apuestas unionistas
villarreal|apuestas uruguay|apuestas uruguay colombia|apuestas uruguay corea|apuestas uruguay
vs colombia|apuestas us open golf|apuestas us open tenis|apuestas valencia|apuestas valencia
barcelona|apuestas valencia betis|apuestas valencia madrid|apuestas valencia real madrid|apuestas valladolid barcelona|apuestas valladolid valencia|apuestas valor app|apuestas valor en directo|apuestas valor galgos|apuestas venezuela|apuestas venezuela argentina|apuestas venezuela bolivia|apuestas venezuela ecuador|apuestas villarreal|apuestas villarreal
athletic|apuestas villarreal barcelona|apuestas villarreal bayern|apuestas villarreal
betis|apuestas villarreal liverpool|apuestas villarreal manchester|apuestas villarreal manchester united|apuestas villarreal vs real madrid|apuestas virtuales|apuestas
virtuales colombia|apuestas virtuales futbol|apuestas virtuales
sin dinero|apuestas vivo|apuestas vuelta a españa|apuestas
vuelta españa|apuestas william hill partidos de hoy|apuestas y casino|apuestas y casinos|apuestas y juegos de azar|apuestas y pronosticos|apuestas y pronosticos de futbol|apuestas y pronosticos deportivos|apuestas
y resultados|apuestas-deportivas|apuestas-deportivas.es pronosticos|arbitro nba apuestas|argentina apuestas|argentina colombia apuestas|argentina croacia apuestas|argentina francia apuestas|argentina mexico apuestas|argentina peru apuestas|argentina uruguay
apuestas|argentina vs bolivia apuestas|argentina vs chile apuestas|argentina vs
colombia apuestas|argentina vs francia apuestas|argentina vs.
colombia apuestas|asi se gana en las apuestas deportivas|asiatico
apuestas|asiatico en apuestas|asiaticos apuestas|athletic barcelona apuestas|athletic manchester united apuestas|athletic osasuna apuestas|athletic real
madrid apuestas|atletico barcelona apuestas|atletico de madrid
apuestas|atlético de madrid apuestas|atletico de madrid real madrid apuestas|atletico de madrid vs
barcelona apuestas|atletico madrid real madrid apuestas|atletico madrid vs real
madrid apuestas|atletico real madrid apuestas|atletico vs real madrid apuestas|avisador de cuotas apuestas|bajada de
cuotas apuestas|baloncesto apuestas|barbastro barcelona apuestas|barca apuestas|barca bayern apuestas|barca inter apuestas|barca madrid apuestas|barça madrid apuestas|barca vs atletico apuestas|barca vs madrid apuestas|barca vs real madrid apuestas|barcelona – real madrid apuestas|barcelona apuestas|barcelona atletico apuestas|barcelona atletico de madrid apuestas|barcelona atletico madrid
apuestas|barcelona betis apuestas|barcelona casa de apuestas|barcelona inter apuestas|barcelona psg apuestas|barcelona real madrid
apuestas|barcelona real sociedad apuestas|barcelona sevilla apuestas|barcelona valencia apuestas|barcelona vs athletic bilbao apuestas|barcelona
vs atlético madrid apuestas|barcelona vs betis apuestas|barcelona vs celta de vigo apuestas|barcelona vs espanyol
apuestas|barcelona vs girona apuestas|barcelona vs
madrid apuestas|barcelona vs real madrid apuestas|barcelona
vs real sociedad apuestas|barcelona vs sevilla apuestas|barcelona vs villarreal apuestas|base de datos cuotas apuestas deportivas|bayern real madrid
apuestas|beisbol apuestas|best america apuestas|bet apuestas chile|bet
apuestas en vivo|betis – chelsea apuestas|betis apuestas|betis barcelona apuestas|betis chelsea apuestas|betis madrid apuestas|betis sevilla apuestas|betsson tu sitio de apuestas online|blog apuestas baloncesto|blog
apuestas ciclismo|blog apuestas nba|blog apuestas tenis|blog de apuestas de tenis|bono apuestas|bono
apuestas deportivas|bono apuestas deportivas sin deposito|bono apuestas gratis|bono apuestas gratis sin deposito|bono
apuestas sin deposito|bono bienvenida apuestas|bono bienvenida apuestas deportivas|bono bienvenida apuestas españa|bono bienvenida apuestas sin deposito|bono bienvenida apuestas sin depósito|bono bienvenida casa apuestas|bono bienvenida casa de apuestas|bono bienvenida marca apuestas|bono casa
apuestas|bono casa de apuestas|bono casa de apuestas sin ingreso|bono casas de apuestas|bono de apuestas|bono de apuestas gratis sin deposito|bono
de bienvenida apuestas|bono de bienvenida apuestas deportivas|bono de bienvenida casa de apuestas|bono
de bienvenida casas de apuestas|bono de casas de apuestas|bono de registro apuestas|bono de registro apuestas deportivas|bono de registro casa de apuestas|bono gratis apuestas|bono marca apuestas|bono por registro apuestas|bono por registro apuestas deportivas|bono por registro casa de apuestas|bono registro apuestas|bono sin deposito apuestas|bono sin depósito apuestas|bono sin deposito apuestas deportivas|bono sin depósito apuestas deportivas|bono sin deposito casa de apuestas|bono sin deposito marca apuestas|bono sin ingreso apuestas|bono sin ingreso apuestas deportivas|bonos apuestas|bonos apuestas
colombia|bonos apuestas deportivas|bonos apuestas deportivas sin deposito|bonos
apuestas gratis|bonos apuestas sin deposito|bonos apuestas sin depósito|bonos bienvenida
apuestas|bonos bienvenida casas apuestas|bonos bienvenida casas de apuestas|bonos casa de apuestas|bonos casas apuestas|bonos
casas de apuestas|bonos casas de apuestas colombia|bonos casas de apuestas
deportivas|bonos casas de apuestas españa|bonos casas de apuestas nuevas|bonos casas de apuestas sin deposito|bonos casas de
apuestas sin depósito|bonos de apuestas|bonos de apuestas deportivas|bonos de apuestas gratis|bonos de apuestas
sin deposito|bonos de bienvenida apuestas|bonos de bienvenida apuestas deportivas|bonos de bienvenida casa de apuestas|bonos de bienvenida casas de
apuestas|bonos de bienvenida de casas de apuestas|bonos de bienvenida en casas de
apuestas|bonos de casas de apuestas|bonos de casas
de apuestas sin deposito|bonos en casa de apuestas|bonos en casas de apuestas sin deposito|bonos gratis apuestas|bonos gratis apuestas deportivas|bonos gratis casas de apuestas|bonos gratis sin deposito apuestas|bonos
paginas de apuestas|bonos registro casas de apuestas|bonos sin deposito apuestas|bonos sin depósito apuestas|bonos sin deposito apuestas deportivas|bonos sin deposito casas de apuestas|bot de apuestas
deportivas gratis|boxeo apuestas|brasil colombia apuestas|brasil peru apuestas|brasil vs colombia apuestas|buenas apuestas para hoy|buscador cuotas apuestas|buscador de apuestas seguras|buscador de
cuotas apuestas|buscador de cuotas de apuestas|buscar apuestas seguras|caballos apuestas|calculador de
apuestas|calculador de cuotas apuestas|calculadora apuestas|calculadora apuestas combinadas|calculadora apuestas de sistema|calculadora apuestas deportivas|calculadora apuestas deportivas seguras|calculadora apuestas
multiples|calculadora apuestas segura|calculadora apuestas seguras|calculadora apuestas sistema|calculadora
apuestas yankee|calculadora arbitraje apuestas|calculadora cubrir apuestas|calculadora cuotas
apuestas|calculadora de apuestas|calculadora de apuestas combinadas|calculadora de apuestas de futbol|calculadora de apuestas de sistema|calculadora de apuestas deportivas|calculadora de apuestas multiples|calculadora de apuestas seguras|calculadora de apuestas sistema|calculadora de apuestas surebets|calculadora de arbitraje
apuestas|calculadora de cuotas apuestas|calculadora de cuotas de apuestas|calculadora para apuestas deportivas|calculadora poisson apuestas|calculadora poisson apuestas deportivas|calculadora poisson para apuestas|calculadora scalping apuestas deportivas|calculadora sistema apuestas|calculadora stake
apuestas|calculadora trading apuestas|calcular apuestas|calcular apuestas deportivas|calcular apuestas futbol|calcular apuestas sistema|calcular cuotas apuestas|calcular cuotas
apuestas combinadas|calcular cuotas apuestas deportivas|calcular cuotas de apuestas|calcular ganancias
apuestas deportivas|calcular momios apuestas|calcular probabilidad cuota apuestas|calcular stake apuestas|calcular unidades apuestas|calcular yield apuestas|calculo de apuestas|calculo
de apuestas deportivas|cambio de cuotas apuestas|campeon champions apuestas|campeon eurocopa apuestas|campeon liga
apuestas|campeon nba apuestas|canales de apuestas gratis|carrera de caballos apuestas|carrera de caballos apuestas juego|carrera de caballos con apuestas|carrera de galgos apuestas|carreras de caballos apuestas|carreras de caballos apuestas online|carreras de caballos con apuestas|carreras de caballos juegos de apuestas|carreras
de galgos apuestas|carreras de galgos apuestas online|carreras de galgos apuestas
trucos|carreras galgos apuestas|casa apuestas argentina|casa apuestas atletico de madrid|casa apuestas barcelona|casa apuestas betis|casa apuestas bono bienvenida|casa apuestas bono gratis|casa apuestas bono sin deposito|casa
apuestas cerca de mi|casa apuestas chile|casa apuestas colombia|casa apuestas con mejores cuotas|casa apuestas deportivas|casa apuestas españa|casa apuestas española|casa apuestas
eurocopa|casa apuestas futbol|casa apuestas mejores cuotas|casa apuestas mundial|casa apuestas nueva|casa
apuestas nuevas|casa apuestas online|casa apuestas peru|casa apuestas valencia|casa de apuestas|casa de apuestas 10
euros gratis|casa de apuestas argentina|casa de apuestas atletico de madrid|casa de apuestas baloncesto|casa de apuestas barcelona|casa de apuestas beisbol|casa de apuestas
betis|casa de apuestas bono|casa de apuestas bono bienvenida|casa de apuestas
bono de bienvenida|casa de apuestas bono gratis|casa de
apuestas bono por registro|casa de apuestas bono sin deposito|casa de
apuestas boxeo|casa de apuestas caballos|casa de apuestas carreras de caballos|casa de apuestas cerca de
mi|casa de apuestas cerca de mí|casa de apuestas champions
league|casa de apuestas chile|casa de apuestas ciclismo|casa de apuestas colombia|casa de
apuestas con bono de bienvenida|casa de apuestas con bono
sin deposito|casa de apuestas con cuotas mas altas|casa de apuestas con esports|casa
de apuestas con las mejores cuotas|casa de apuestas con licencia en españa|casa de apuestas con mejores cuotas|casa de
apuestas con pago anticipado|casa de apuestas con paypal|casa
de apuestas copa america|casa de apuestas de caballos|casa de apuestas de colombia|casa de apuestas de españa|casa de apuestas de futbol|casa de
apuestas de fútbol|casa de apuestas de futbol peru|casa de apuestas de
peru|casa de apuestas del madrid|casa de apuestas del real madrid|casa de apuestas deportivas|casa de apuestas deportivas cerca
de mi|casa de apuestas deportivas en argentina|casa de apuestas deportivas en chile|casa de apuestas deportivas en colombia|casa de
apuestas deportivas en españa|casa de apuestas deportivas en madrid|casa de apuestas deportivas
españa|casa de apuestas deportivas españolas|casa de apuestas
deportivas madrid|casa de apuestas deportivas
mexico|casa de apuestas deportivas online|casa de apuestas deportivas peru|casa de apuestas deposito 5 euros|casa de apuestas deposito minimo|casa de
apuestas deposito minimo 1 euro|casa de apuestas depósito mínimo 1 euro|casa de apuestas en españa|casa
de apuestas en linea|casa de apuestas en madrid|casa de
apuestas en perú|casa de apuestas en vivo|casa de apuestas españa|casa de apuestas
españa inglaterra|casa de apuestas española|casa de apuestas españolas|casa de
apuestas esports|casa de apuestas eurocopa|casa de apuestas europa league|casa de apuestas f1|casa de apuestas formula
1|casa de apuestas futbol|casa de apuestas ingreso minimo|casa de apuestas ingreso minimo 1 euro|casa de apuestas ingreso mínimo
1 euro|casa de apuestas legales|casa de apuestas
legales en colombia|casa de apuestas legales en españa|casa de apuestas
libertadores|casa de apuestas liga española|casa de apuestas
madrid|casa de apuestas mas segura|casa de apuestas mejores|casa de apuestas méxico|casa de apuestas
minimo 5 euros|casa de apuestas mlb|casa de apuestas mundial|casa de apuestas
nba|casa de apuestas nfl|casa de apuestas nueva|casa de apuestas nuevas|casa de
apuestas oficial del real madrid|casa de apuestas oficial real
madrid|casa de apuestas online|casa de apuestas online
argentina|casa de apuestas online chile|casa de apuestas online españa|casa
de apuestas online mexico|casa de apuestas online paraguay|casa de apuestas online peru|casa de apuestas online usa|casa de apuestas online venezuela|casa de apuestas pago anticipado|casa de apuestas para
boxeo|casa de apuestas para ufc|casa de apuestas peru|casa de
apuestas perú|casa de apuestas peru online|casa de
apuestas por paypal|casa de apuestas promociones|casa de apuestas que regalan dinero|casa de apuestas real madrid|casa de apuestas regalo de bienvenida|casa de apuestas sevilla|casa de apuestas sin dinero|casa de apuestas sin ingreso minimo|casa de apuestas sin licencia en españa|casa de apuestas sin minimo de ingreso|casa de
apuestas stake|casa de apuestas tenis|casa de apuestas ufc|casa de
apuestas valencia|casa de apuestas venezuela|casa de apuestas
virtuales|casa de apuestas vive la suerte|casa oficial de apuestas del real madrid|casas apuestas asiaticas|casas apuestas bono sin deposito|casas apuestas bonos
sin deposito|casas apuestas caballos|casas apuestas chile|casas apuestas ciclismo|casas apuestas
con licencia|casas apuestas con licencia en españa|casas apuestas deportivas|casas apuestas deportivas colombia|casas apuestas
deportivas españa|casas apuestas deportivas españolas|casas apuestas
deportivas nuevas|casas apuestas españa|casas apuestas españolas|casas apuestas esports|casas apuestas eurocopa|casas apuestas golf|casas apuestas ingreso minimo 5
euros|casas apuestas legales|casas apuestas legales españa|casas apuestas licencia|casas apuestas licencia españa|casas apuestas mexico|casas apuestas mundial|casas apuestas nba|casas apuestas nuevas|casas apuestas nuevas españa|casas apuestas ofertas|casas apuestas online|casas apuestas paypal|casas apuestas peru|casas
apuestas sin licencia|casas apuestas tenis|casas asiaticas
apuestas|casas de apuestas|casas de apuestas 5 euros|casas de apuestas app|casas de apuestas argentinas|casas de apuestas asiaticas|casas
de apuestas baloncesto|casas de apuestas barcelona|casas
de apuestas bono bienvenida|casas de apuestas bono de bienvenida|casas de apuestas bono por registro|casas de apuestas bono sin deposito|casas de apuestas bono sin ingreso|casas de apuestas bonos|casas
de apuestas bonos de bienvenida|casas de apuestas bonos gratis|casas de
apuestas bonos sin deposito|casas de apuestas boxeo|casas
de apuestas caballos|casas de apuestas carreras de caballos|casas de apuestas casino|casas de apuestas
casino online|casas de apuestas cerca de mi|casas de apuestas champions league|casas de apuestas chile|casas
de apuestas ciclismo|casas de apuestas colombia|casas de apuestas com|casas de apuestas con app|casas de apuestas con apuestas gratis|casas de apuestas
con bono|casas de apuestas con bono de bienvenida|casas de
apuestas con bono de registro|casas de apuestas con bono por registro|casas de apuestas con bono sin deposito|casas de apuestas con bonos|casas
de apuestas con bonos gratis|casas de apuestas con bonos
sin deposito|casas de apuestas con deposito minimo|casas de apuestas con esports|casas de apuestas con handicap asiatico|casas de apuestas con licencia|casas de apuestas con licencia en españa|casas
de apuestas con licencia españa|casas de apuestas con licencia
española|casas de apuestas con mejores cuotas|casas de apuestas con pago anticipado|casas de
apuestas con paypal|casas de apuestas con paypal en perú|casas de apuestas con promociones|casas de apuestas con ruleta
en vivo|casas de apuestas copa del rey|casas
de apuestas de caballos|casas de apuestas de españa|casas
de apuestas de futbol|casas de apuestas de fútbol|casas de apuestas de peru|casas de apuestas deportivas|casas
de apuestas deportivas asiaticas|casas de apuestas deportivas colombia|casas
de apuestas deportivas comparativa|casas de apuestas deportivas con paypal|casas de
apuestas deportivas en chile|casas de apuestas deportivas en españa|casas
de apuestas deportivas en linea|casas de apuestas deportivas en madrid|casas de apuestas deportivas en mexico|casas de
apuestas deportivas en peru|casas de apuestas deportivas
en sevilla|casas de apuestas deportivas en valencia|casas de apuestas deportivas españa|casas de apuestas deportivas españolas|casas de apuestas deportivas legales|casas de apuestas deportivas madrid|casas
de apuestas deportivas mexico|casas de apuestas deportivas nuevas|casas de apuestas deportivas online|casas de apuestas
deportivas peru|casas de apuestas deportivas perú|casas de apuestas deposito minimo 1 euro|casas de apuestas depósito mínimo 1 euro|casas de apuestas dinero gratis|casas de apuestas en argentina|casas de
apuestas en barcelona|casas de apuestas en chile|casas de apuestas en colombia|casas de apuestas en españa|casas de
apuestas en españa online|casas de apuestas en linea|casas de apuestas en madrid|casas
de apuestas en méxico|casas de apuestas en peru|casas de apuestas en perú|casas de
apuestas en sevilla|casas de apuestas en uruguay|casas de apuestas en valencia|casas de apuestas en venezuela|casas de apuestas equipos de futbol|casas de apuestas españa|casas de apuestas
españa alemania|casas de apuestas españa inglaterra|casas de apuestas
españa licencia|casas de apuestas españa nuevas|casas de apuestas españa online|casas de apuestas
española|casas de apuestas españolas|casas de apuestas españolas con licencia|casas de apuestas españolas online|casas de apuestas
esports|casas de apuestas eurocopa|casas de apuestas eurocopa 2024|casas de apuestas europa
league|casas de apuestas f1|casas de apuestas fisicas en barcelona|casas de apuestas fisicas en españa|casas
de apuestas formula 1|casas de apuestas fuera de españa|casas de apuestas futbol|casas de
apuestas fútbol|casas de apuestas futbol españa|casas de apuestas ganador
eurocopa|casas de apuestas gratis|casas de apuestas ingreso minimo|casas de apuestas ingreso minimo 1 euro|casas de apuestas ingreso minimo 5 euros|casas de apuestas inter barcelona|casas de apuestas legales|casas de
apuestas legales en colombia|casas de apuestas legales en españa|casas de apuestas
legales en mexico|casas de apuestas legales españa|casas de
apuestas legales mx|casas de apuestas licencia|casas de apuestas licencia españa|casas de apuestas lista|casas de apuestas madrid|casas de apuestas mas seguras|casas de apuestas mejores bonos|casas de apuestas mejores cuotas|casas
de apuestas mexico|casas de apuestas méxico|casas de apuestas minimo 5 euros|casas de apuestas mlb|casas de apuestas
mundial|casas de apuestas mundial baloncesto|casas de apuestas mundiales|casas de apuestas nba|casas de apuestas no reguladas en españa|casas de apuestas nueva ley|casas de apuestas
nuevas|casas de apuestas nuevas en colombia|casas de apuestas nuevas
en españa|casas de apuestas nuevas españa|casas de apuestas ofertas|casas de apuestas
online|casas de apuestas online argentina|casas de apuestas online colombia|casas de apuestas online deportivas|casas de
apuestas online ecuador|casas de apuestas online en argentina|casas de apuestas online en chile|casas
de apuestas online en colombia|casas de apuestas online en españa|casas de
apuestas online en mexico|casas de apuestas online españa|casas
de apuestas online mas fiables|casas de apuestas online
mexico|casas de apuestas online nuevas|casas de apuestas online peru|casas de apuestas online usa|casas de apuestas online venezuela|casas de apuestas pago paypal|casas de apuestas para ufc|casas de apuestas paypal|casas de apuestas peru bono sin deposito|casas de
apuestas presenciales en españa|casas de apuestas
promociones|casas de apuestas
Your comment is awaiting moderation.
https://avia.tutvot.com/
Your comment is awaiting moderation.
Глянец без иллюзий https://ladyone.kyiv.ua красота и здоровье с фактчекингом, стиль без переплат, карьера и деньги простым языком. Интервью, тесты, полезные гайды — меньше шума, больше пользы.
Your comment is awaiting moderation.
Онлайн-портал https://womanexpert.kyiv.ua для женщин, которые хотят жить в балансе. Красота, здоровье, семья, карьера и финансы в одном месте. Ежедневные статьи, подборки, советы экспертов и вдохновение для лучшей версии себя.
Your comment is awaiting moderation.
Женский журнал https://krasotka.kyiv.ua про баланс: красота, психология, карьера, деньги, дом и отдых. Экспертные колонки, списки покупок, планы тренировок и проверки здоровья. Материалы, к которым хочется возвращаться.
Your comment is awaiting moderation.
Disney made a smart choice’
Despite the comparisons, Abu Dhabi isn’t positioning itself as a direct rival to Orlando — it’s aiming to be something more. The emirate sees its theme parks as part of a bigger portfolio of attractions, alongside cultural landmarks, luxury hotels, pristine beaches, and desert adventures.
tripscan
A 15-minute drive from Yas Island, Saadiyat Island is home to the Louvre Abu Dhabi, a franchised outpost of the famous Paris art museum, which welcomed 1.4 million visitors last year, 84% from abroad. The Guggenheim Abu Dhabi and Zayed National Museum are both under construction, adding to a cultural district that will be one of the region’s most concentrated hubs of art and heritage.
“Abu Dhabi’s unique appeal lies in the diversity of our tourism offering,” Al Geziry added. “For thrill-seekers, we have record-breaking roller coasters and dune bashing in the desert. For culture lovers, historic sites like Al Ain Oasis and institutions like the Saadiyat museums. And for luxury travelers, world-class dining, private island resorts, and high-end shopping.
“Where else can you start your day under the Louvre’s iconic rain-of-light dome and end it in the immersive, story-driven worlds of Warner Bros. World or Ferrari World?”
http://trips45.cc
трипскан
Still, not everyone is convinced that Disney’s expansion into the Middle East is a sure bet.
“The region has seen its share of false starts,” says Dennis Speigel, founder of the International Theme Park Services consultancy, comparing it to neighboring Dubai’s patchy record with theme park expansion ambitions in the mid-2010s. “Several of them struggled for profitability in their first decade.”
Related article
Saadiyat Cultural District in Abu Dhabi is set to become one of the world’s preeminent arts and culture hubs, with one of the highest concentrations of cultural institutions globally. But the area isn’t just for art connoisseurs. Explore what to do in the new district, from iconic museums to luxurious beach days to decadent dining options.
You can walk between the Louvre and the Guggenheim in this new art district
Spiegel believes Abu Dhabi is different. “Disney made a smart choice. The infrastructure, safety, and existing leisure developments create an ideal entry point,” he told CNN earlier this year. “It’s a much more controlled and calculated move.”
Under its Tourism Strategy 2030, Abu Dhabi aims to grow annual visitors from 24 million in 2023 to more than 39 million by the end of the decade. With Disneyland as a centerpiece, those targets may well be surpassed. The city’s population has already grown from 2.7 million in 2014 to more than 4.1 million today, a reflection of its rising profile as a regional hub.
Yas Island alone has been transformed in the space of a decade from a largely undeveloped stretch of sand to a self-contained resort destination, complete with golf courses, marinas, a mall, more than 160 restaurants, and a cluster of high-end hotels.
Orlando’s head start remains formidable — it still offers multiple Disney and Universal parks, has decades of brand loyalty, and an infrastructure built to handle tens of millions of tourists annually.
But Abu Dhabi is catching up fast. Its combination of frictionless travel, year-round comfort, cutting-edge attractions, and a cultural scene that adds depth to the experience gives Abu Dhabi its own unique selling point, potentially offering a model for the next generation of theme park capital.
Your comment is awaiting moderation.
https://tutvot.com/
Your comment is awaiting moderation.
Всё, что важно https://gryada.org.ua сегодня: мода и стиль, бьюти-рутины, рецепты и фитнес, отношения и семья, путешествия и саморазвитие. Краткие выжимки, длинные разборы, подборки сервисов — удобно и полезно.
Your comment is awaiting moderation.
Женский журнал https://dama.kyiv.ua о жизни без перегруза: красота и здоровье, стиль и покупки, отношения и семья, карьера и деньги, дом и путешествия. Экспертные советы, чек-листы, тренды и реальные истории — каждый день по делу.
Your comment is awaiting moderation.
Медиа для женщин https://feromonia.com.ua которые выбирают себя: здоровье и профилактика, ментальное благополучие, работа и развитие, материнство и хобби. Практичные инструкции, тесты, интервью и вдохновение без кликбейта.
Your comment is awaiting moderation.
learnandimprove – Love the focus on constant growth and practical learning tips here.
Your comment is awaiting moderation.
stayfocusedandgrow – The message here is strong—focus and growth go hand in hand.
Your comment is awaiting moderation.
dreambiggeralways – Really love the concept, it’s all about believing in bigger possibilities.
Your comment is awaiting moderation.
findnewinspiration – The content here truly sparks new ways of thinking creatively.
Your comment is awaiting moderation.
discoverandbuy – Fantastic place to spot great deals and discover fresh collections.
Your comment is awaiting moderation.
Женское медиа https://beautytips.kyiv.ua о главном: здоровье и профилактика, стиль и тренды, психологические разборы, мотивация, деньги и инвестиции, материнство и путешествия. Честные обзоры, подборка сервисов и истории читательниц.
Your comment is awaiting moderation.
clickprohub.click – Content reads clearly, helpful examples made concepts easy to grasp.
Your comment is awaiting moderation.
я бы тоже заценил https://beteiligung.stadtlindau.de/profile/%D0%90%D0%BB%D0%B1%D1%83%D1%84%D0%B5%D0%B9%D1%80%D0%B0%20%D0%BA%D1%83%D0%BF%D0%B8%D1%82%D1%8C%20%D0%9A%D0%BE%D0%BA%D0%B0%D0%B8%D0%BD/ всё ровно будет бро! просто график отправок такой
Your comment is awaiting moderation.
Зато искать долго не пришлось наверное???! https://bio.site/sudrbofu Спрашивай в жаббер, там больше 10-15 минут задержки с ответом не бывает.
Your comment is awaiting moderation.
clickgurus.click – Navigation felt smooth, found everything quickly without any confusing steps.
Your comment is awaiting moderation.
adlift.click – Found practical insights today; sharing this article with colleagues later.
Your comment is awaiting moderation.
Сегодня как обычно забрал свою посылочку в срок как расчитывал. Очень приятно работать с таким магазином. https://www.brownbook.net/business/54450620/бодайбо-купить-кокаин-мефедрон-марихуану-бошки/ Имею давний опыт работы с этим магазином.Сервис здесь один из лучших,всё делается оперативно вопросов нет.В последний раз заказал СНМ 50 и СНМ 55 по 50 гр обоих.По опыту знаю,что если один каннаб не айс,то в паре с любым другим он хоть как-то вытягивает.Но в этот раз пришло два пакета с одинаковым мелким белым порохом с сильным запахом нафталина.По весу всё замечательно,щедро подсыпано +50%.Только одно но.Данный реагент-чисто удобрение.Делал 1к5 кипячением в ИПС.Растворение хреновое,молоко.Хрень.Ну ладно,курили чистый порох из обоих пакетов.Хрень.Никто в здравом уме данным продуктом не заинтересуется-вывод не менее чем десяти тестеров.Короче я в попадосе.
Your comment is awaiting moderation.
К продавцу можно смело обращаться, тут сделают все в лучшем виде! https://www.impactio.com/researcher/erbyhjbd069y97 У меня тоже была задержка.На мониторенге тоже отправку просрочили, в итоге дней 20 затратили на пересылку.Просто курьерка такая, они помоему там распиздяи ещё те…так что на счёт приема можешь не беспокоиться.там даже если мусора захотят что то найти то будет трудно разобраться что да где)вот допустим недавно заказал и курьерка ваще не то вбила))так что не переживай!Чемикалы всё ровно делают, сложновато будет найти даже если посыль откроют!
Your comment is awaiting moderation.
Женский медиа-гид https://adviceskin.com здоровье, питание, спорт, ментальное благополучие, карьера, личные финансы, хобби и поездки. Практика вместо кликбейта — понятные гайды, чек-листы и экспертные мнения.
Your comment is awaiting moderation.
Автопортал для новичков https://lada.kharkiv.ua и профи: новости рынка, аналитика, сравнения, тесты, долгосрочные отчёты. Выбор авто под задачи, детальные гайды по покупке, продаже и трейд-ину, защита от мошенников. Правила, штрафы, ОСАГО/КАСКО и полезные инструменты и ещё
Your comment is awaiting moderation.
Современный журнал https://rupsbigbear.com про авто: новости индустрии, глубокие обзоры моделей, тесты, сравнительные таблицы и советы по выбору. Экономия на обслуживании и страховке, разбор технологий, безопасность и комфорт. Всё, чтобы ездить дальше, дешевле и увереннее.
Your comment is awaiting moderation.
https://tagilshops.forum24.ru/?1-11-0-00002589-000-0-0-1762821538
Your comment is awaiting moderation.
Брал у него все гудд. Маскировка на высоте качество отличное. буду брать еще https://kemono.im/iydobobwoah/votkinsk-kupit-kokain-mefedron-marikhuanu-boshki Урб 597 либо перорально либо нозально, дозировка – 5-10мг, эффекты описаны в энциклопедии,
Your comment is awaiting moderation.
trafficsphere.click – Navigation felt smooth, found everything quickly without any confusing steps.
Your comment is awaiting moderation.
Оплатил заказ, 3 дня прошло, статус все еще отложен. https://www.grepmed.com/mcoidefceyyc Расположите по мощности
Your comment is awaiting moderation.
быстрая доставка однако тут))) https://www.impactio.com/researcher/meganlopezvvea 1к 10-ти слабовато будет 1к5 или 1к7 самое то…
Your comment is awaiting moderation.
exploreinnovativeideas – Great energy here, I always leave with fresh perspectives.
Your comment is awaiting moderation.
creativechoiceoutlet – Smooth navigation and eye-catching layout make shopping fun.
Your comment is awaiting moderation.
discoveramazingfinds – Great layout, makes browsing and discovering new items enjoyable.
Your comment is awaiting moderation.
everydaystylemarket – Love how everything feels modern yet accessible.
Your comment is awaiting moderation.
urbanchoicehub – Really gives off that modern, connected community vibe — great branding!
Your comment is awaiting moderation.
bestdailyoffers – Great deals every day, love how fresh and affordable everything is.
Your comment is awaiting moderation.
Ты вообще нормальный и адекватный ? Ты сначала разберись куда ты писал а потом умничай. У меня адреса без фото и только опт. Судя по твоему нику ты из Екб, я в ЕКБ НЕ РАБОТАЮ И НЕ РАБОТАЛ. https://imageevent.com/hildegard743/cgllg он мне успел ответить – поверь, ничего такого о чём тебе стоило бы беспокоиться – не случилось
Your comment is awaiting moderation.
Нужна фотосьемка? https://jrowan.ru каталожная, инфографика, на модели, упаковка, 360°. Правильные ракурсы, чистый фон, ретушь, цветопрофили. Готовим комплекты для карточек и баннеров. Соответствие правилам WB/Ozon.
Your comment is awaiting moderation.
Аренда авто turzila.com/ без депозита, аренда яхт и удобный трансфер в отель. Онлайн-бронирование за 3 минуты, русская поддержка 24/7, прозрачные цены. Оплата картой РФ.
Your comment is awaiting moderation.
Hello colleagues, its impressive article concerning cultureand completely defined, keep it up
all the time.
Look at my blog post: sitios Web de apuestas
Your comment is awaiting moderation.
Автомобильный блог https://amt-auto.ru обзоры, ремонт, обслуживание и уход. Пошаговые инструкции, подбор масел и расходников, диагностика ошибок, лайфхаки, экономия на сервисе. Полезно новичкам и опытным водителям. Читай просто, делай уверенно.
Your comment is awaiting moderation.
Пишите в скайп, аську, пожалуйста без лишнего, чтобы была возможность ответить всем. :good: https://yamap.com/users/4929515 расширяться собираетесь?
Your comment is awaiting moderation.
(10 euros gratis apuestas|10 mejores casas de apuestas|10
trucos para ganar apuestas|15 euros gratis marca apuestas|1×2 apuestas|1×2 apuestas deportivas|1×2 apuestas que significa|1×2 en apuestas|1×2 en apuestas que significa|1×2 que significa en apuestas|5 euros gratis apuestas|9 apuestas que siempre ganaras|a partir de cuanto se declara apuestas|actividades de juegos de azar y apuestas|ad apuestas deportivas|aleksandre
topuria ufc apuestas|algoritmo para ganar apuestas deportivas|america apuestas|análisis nba apuestas|aplicacion android apuestas deportivas|aplicacion apuestas deportivas|aplicacion apuestas deportivas android|aplicación de apuestas online|aplicacion para hacer apuestas|aplicacion para hacer apuestas de futbol|aplicación para hacer apuestas de fútbol|aplicaciones apuestas deportivas android|aplicaciones apuestas deportivas gratis|aplicaciones de
apuestas android|aplicaciones de apuestas de fútbol|aplicaciones de apuestas deportivas|aplicaciones de apuestas deportivas peru|aplicaciones de
apuestas deportivas perú|aplicaciones de apuestas en colombia|aplicaciones de apuestas gratis|aplicaciones de
apuestas online|aplicaciones de apuestas seguras|aplicaciones de apuestas sin dinero|aplicaciones para hacer apuestas|apostar seguro apuestas deportivas|app android apuestas deportivas|app apuestas|app apuestas android|app apuestas
de futbol|app apuestas deportivas|app apuestas
deportivas android|app apuestas deportivas argentina|app apuestas deportivas colombia|app apuestas deportivas ecuador|app apuestas deportivas españa|app apuestas
deportivas gratis|app apuestas entre amigos|app apuestas futbol|app apuestas gratis|app apuestas sin dinero|app
casa de apuestas|app casas de apuestas|app control apuestas|app de
apuestas|app de apuestas android|app de apuestas casino|app de apuestas
colombia|app de apuestas con bono de bienvenida|app de apuestas de futbol|app de
apuestas deportivas|app de apuestas deportivas android|app de apuestas deportivas argentina|app de apuestas deportivas colombia|app de apuestas deportivas en españa|app de apuestas deportivas peru|app
de apuestas deportivas perú|app de apuestas deportivas sin dinero|app de apuestas ecuador|app
de apuestas en colombia|app de apuestas en españa|app de
apuestas en venezuela|app de apuestas futbol|app de apuestas gratis|app de apuestas
online|app de apuestas para android|app de apuestas para ganar
dinero|app de apuestas peru|app de apuestas
reales|app de casas de apuestas|app marca apuestas android|app
moviles de apuestas|app para apuestas|app para apuestas de futbol|app para apuestas
deportivas|app para apuestas deportivas en español|app para ganar
apuestas deportivas|app para hacer apuestas|app para hacer apuestas deportivas|app para hacer apuestas entre amigos|app para llevar control de apuestas|app pronosticos apuestas deportivas|app versus apuestas|apps apuestas
mundial|apps de apuestas|apps de apuestas con bono de bienvenida|apps de
apuestas de futbol|apps de apuestas deportivas peru|apps de apuestas mexico|apps
para apuestas|aprender a hacer apuestas deportivas|aprender hacer apuestas deportivas|apuesta del dia apuestas deportivas|apuestas 10 euros
gratis|apuestas 100 seguras|apuestas 1×2|apuestas 1X2|apuestas 2 division|apuestas 3 division|apuestas a caballos|apuestas a carreras de caballos|apuestas a colombia|apuestas a corners|apuestas a ganar|apuestas a jugadores nba|apuestas
a la baja|apuestas a la nfl|apuestas al barcelona|apuestas al dia|apuestas al empate|apuestas al mundial|apuestas al tenis wta|apuestas alaves barcelona|apuestas alcaraz hoy|apuestas alemania españa|apuestas alonso campeon del mundo|apuestas
altas y bajas|apuestas altas y bajas nfl|apuestas ambos
equipos marcan|apuestas america|apuestas android|apuestas anillo nba|apuestas antes del
mundial|apuestas anticipadas|apuestas anticipadas nba|apuestas apps|apuestas arabia argentina|apuestas argentina|apuestas argentina campeon del mundo|apuestas argentina canada|apuestas argentina colombia|apuestas argentina croacia|apuestas argentina españa|apuestas
argentina francia|apuestas argentina francia cuanto paga|apuestas argentina francia mundial|apuestas argentina
gana el mundial|apuestas argentina gana mundial|apuestas argentina holanda|apuestas argentina mexico|apuestas argentina méxico|apuestas argentina mundial|apuestas argentina online|apuestas argentina paises bajos|apuestas argentina polonia|apuestas argentina uruguay|apuestas argentina vs australia|apuestas
argentina vs colombia|apuestas argentina vs francia|apuestas argentina vs peru|apuestas argentinas|apuestas
arsenal real madrid|apuestas ascenso a primera division|apuestas ascenso a segunda|apuestas asiaticas|apuestas asiatico|apuestas athletic|apuestas athletic
atletico|apuestas athletic barça|apuestas athletic barcelona|apuestas athletic betis|apuestas athletic manchester|apuestas athletic manchester united|apuestas athletic
osasuna|apuestas athletic real|apuestas athletic real madrid|apuestas athletic real sociedad|apuestas athletic real sociedad final|apuestas
athletic roma|apuestas athletic sevilla|apuestas athletic valencia|apuestas atletico|apuestas atletico barcelona|apuestas atletico barsa|apuestas
atletico campeon champions|apuestas atletico campeon de liga|apuestas
atlético copenhague|apuestas atletico de madrid|apuestas atlético
de madrid|apuestas atletico de madrid barcelona|apuestas
atletico de madrid gana la liga|apuestas atletico de madrid real madrid|apuestas atlético
de madrid real madrid|apuestas atletico de madrid vs barcelona|apuestas atletico madrid|apuestas atletico madrid real madrid|apuestas atletico madrid vs barcelona|apuestas
atletico real madrid|apuestas atletico real madrid champions|apuestas atletismo|apuestas bajas|apuestas baloncesto|apuestas
baloncesto acb|apuestas baloncesto handicap|apuestas baloncesto hoy|apuestas baloncesto juegos olimpicos|apuestas baloncesto nba|apuestas baloncesto pronostico|apuestas baloncesto pronósticos|apuestas baloncesto prorroga|apuestas barca|apuestas barca athletic|apuestas
barca atletico|apuestas barca bayern|apuestas barca bayern munich|apuestas barca girona|apuestas barca hoy|apuestas barça
hoy|apuestas barca inter|apuestas barca juventus|apuestas
barca madrid|apuestas barça madrid|apuestas barca real madrid|apuestas barca vs juve|apuestas barca vs
madrid|apuestas barca vs psg|apuestas barcelona|apuestas barcelona alaves|apuestas barcelona athletic|apuestas barcelona atletico|apuestas barcelona atletico de madrid|apuestas barcelona atlético de madrid|apuestas barcelona
atletico madrid|apuestas barcelona bayern|apuestas barcelona betis|apuestas barcelona campeon de liga|apuestas barcelona celta|apuestas barcelona espanyol|apuestas barcelona gana la champions|apuestas barcelona
girona|apuestas barcelona granada|apuestas barcelona hoy|apuestas barcelona inter|apuestas barcelona madrid|apuestas
barcelona osasuna|apuestas barcelona psg|apuestas barcelona
real madrid|apuestas barcelona real sociedad|apuestas barcelona sevilla|apuestas barcelona valencia|apuestas barcelona villarreal|apuestas barcelona vs atletico madrid|apuestas barcelona
vs madrid|apuestas barcelona vs real madrid|apuestas barsa madrid|apuestas basket hoy|apuestas
bayern barcelona|apuestas bayern vs barcelona|apuestas beisbol|apuestas béisbol|apuestas beisbol mlb|apuestas beisbol pronosticos|apuestas beisbol venezolano|apuestas betis|apuestas betis – chelsea|apuestas betis barcelona|apuestas betis chelsea|apuestas betis fiorentina|apuestas betis girona|apuestas betis madrid|apuestas betis mallorca|apuestas betis real madrid|apuestas betis real sociedad|apuestas betis sevilla|apuestas
betis valencia|apuestas betis valladolid|apuestas betis vs valencia|apuestas betplay hoy colombia|apuestas betsson peru|apuestas bienvenida|apuestas billar online|apuestas bolivia vs colombia|apuestas bono|apuestas bono
bienvenida|apuestas bono de bienvenida|apuestas bono de bienvenida
sin deposito|apuestas bono gratis|apuestas bono sin deposito|apuestas bonos sin deposito|apuestas borussia real madrid|apuestas boxeo|apuestas boxeo de campeonato|apuestas boxeo españa|apuestas boxeo español|apuestas
boxeo femenino olimpiadas|apuestas boxeo hoy|apuestas boxeo online|apuestas brasil colombia|apuestas
brasil peru|apuestas brasil uruguay|apuestas brasil
vs colombia|apuestas brasil vs peru|apuestas caballos|apuestas caballos colocado|apuestas caballos españa|apuestas caballos hipodromo|apuestas caballos hoy|apuestas caballos madrid|apuestas caballos online|apuestas caballos sanlucar de
barrameda|apuestas caballos zarzuela|apuestas calculador|apuestas campeon|apuestas campeon champions|apuestas
campeón champions|apuestas campeon champions 2025|apuestas campeon champions
league|apuestas campeon conference league|apuestas campeon copa
america|apuestas campeon copa del rey|apuestas campeon de champions|apuestas
campeon de la champions|apuestas campeon de liga|apuestas campeon del
mundo|apuestas campeon eurocopa|apuestas campeón eurocopa|apuestas campeon europa league|apuestas campeon f1|apuestas campeon f1 2025|apuestas
campeon formula 1|apuestas campeon libertadores|apuestas campeon liga|apuestas campeon liga bbva|apuestas campeon liga española|apuestas campeon liga santander|apuestas
campeon motogp 2025|apuestas campeon mundial|apuestas campeón mundial|apuestas campeon mundial baloncesto|apuestas campeon nba|apuestas campeón nba|apuestas campeon premier|apuestas campeon premier league|apuestas campeon roland garros|apuestas campeonato
f1|apuestas campeonatos de futbol|apuestas carrera de caballos|apuestas
carrera de caballos hoy|apuestas carrera de caballos nocturnas|apuestas carrera de galgos fin de semana|apuestas
carrera de galgos hoy|apuestas carrera de galgos nocturnas|apuestas carreras
caballos|apuestas carreras caballos sanlucar|apuestas carreras de caballos|apuestas carreras de caballos en directo|apuestas carreras
de caballos en vivo|apuestas carreras de caballos españa|apuestas carreras de caballos hoy|apuestas carreras de caballos nacionales|apuestas carreras de caballos nocturnas|apuestas carreras de caballos online|apuestas
carreras de caballos sanlucar|apuestas carreras de caballos sanlúcar|apuestas carreras de
galgos|apuestas carreras de galgos en vivo|apuestas carreras de galgos nocturnas|apuestas carreras de galgos pre
partido|apuestas casino|apuestas casino barcelona|apuestas casino
futbol|apuestas casino gran madrid|apuestas casino gratis|apuestas casino
madrid|apuestas casino online|apuestas casino online argentina|apuestas casinos|apuestas casinos online|apuestas celta|apuestas celta barcelona|apuestas celta betis|apuestas celta eibar|apuestas celta
espanyol|apuestas celta granada|apuestas celta madrid|apuestas celta manchester|apuestas celta
real madrid|apuestas champion league|apuestas champions foro|apuestas
champions hoy|apuestas champions league|apuestas champions league – pronósticos|apuestas
champions league 2025|apuestas champions league hoy|apuestas champions league pronosticos|apuestas champions league pronósticos|apuestas champions pronosticos|apuestas chelsea barcelona|apuestas chelsea
betis|apuestas chile|apuestas chile peru|apuestas chile venezuela|apuestas
chile vs colombia|apuestas chile vs uruguay|apuestas ciclismo|apuestas ciclismo
en vivo|apuestas ciclismo femenino|apuestas ciclismo tour
francia|apuestas ciclismo vuelta|apuestas ciclismo vuelta
a españa|apuestas ciclismo vuelta españa|apuestas city
madrid|apuestas city real madrid|apuestas clasico|apuestas clasico español|apuestas clasico real madrid barcelona|apuestas clasificacion mundial|apuestas colombia|apuestas colombia argentina|apuestas colombia
brasil|apuestas colombia paraguay|apuestas colombia
uruguay|apuestas colombia vs argentina|apuestas colombia vs brasil|apuestas combinadas|apuestas combinadas como funcionan|apuestas combinadas de futbol|apuestas
combinadas de fútbol|apuestas combinadas foro|apuestas combinadas futbol|apuestas combinadas hoy|apuestas combinadas mismo partido|apuestas combinadas mundial|apuestas combinadas nba|apuestas combinadas para esta semana|apuestas combinadas para hoy|apuestas
combinadas para mañana|apuestas combinadas pronosticos|apuestas combinadas recomendadas|apuestas combinadas seguras|apuestas combinadas seguras para hoy|apuestas combinadas seguras para mañana|apuestas como ganar|apuestas comparador|apuestas con bono de bienvenida|apuestas con dinero ficticio|apuestas con dinero real|apuestas con dinero
virtual|apuestas con handicap|apuestas con handicap asiatico|apuestas con handicap baloncesto|apuestas con mas probabilidades de ganar|apuestas con paypal|apuestas con tarjeta de credito|apuestas con tarjeta de debito|apuestas consejos|apuestas copa|apuestas copa africa|apuestas copa america|apuestas copa américa|apuestas copa argentina|apuestas copa brasil|apuestas copa davis|apuestas
copa de europa|apuestas copa del mundo|apuestas copa del
rey|apuestas copa del rey baloncesto|apuestas copa del rey final|apuestas copa del rey futbol|apuestas copa del rey ganador|apuestas copa
del rey hoy|apuestas copa del rey pronosticos|apuestas copa del
rey pronósticos|apuestas copa europa|apuestas copa italia|apuestas
copa libertadores|apuestas copa mundial de hockey|apuestas copa rey|apuestas copa sudamericana|apuestas corners|apuestas corners hoy|apuestas croacia argentina|apuestas cuartos eurocopa|apuestas cuotas|apuestas cuotas altas|apuestas cuotas bajas|apuestas de 1 euro|apuestas de baloncesto|apuestas de baloncesto hoy|apuestas de baloncesto nba|apuestas de baloncesto para hoy|apuestas de
beisbol|apuestas de beisbol para hoy|apuestas de blackjack en linea|apuestas
de boxeo|apuestas de boxeo canelo|apuestas de boxeo en las vegas|apuestas de boxeo hoy|apuestas de boxeo
online|apuestas de caballo|apuestas de caballos|apuestas de caballos como funciona|apuestas de caballos
como se juega|apuestas de caballos en colombia|apuestas de caballos en españa|apuestas
de caballos en linea|apuestas de caballos españa|apuestas de caballos
ganador y colocado|apuestas de caballos internacionales|apuestas de caballos juegos|apuestas de caballos online|apuestas de caballos online en venezuela|apuestas de caballos por internet|apuestas de caballos
pronosticos|apuestas de caballos pronósticos|apuestas de carrera de caballos|apuestas de carreras de
caballos|apuestas de carreras de caballos online|apuestas de casino|apuestas de casino online|apuestas de casino por internet|apuestas de
champions league|apuestas de ciclismo|apuestas de colombia|apuestas de
copa america|apuestas de corners|apuestas de deportes en linea|apuestas de deportes online|apuestas de dinero|apuestas de esports|apuestas de eurocopa|apuestas de europa league|apuestas de f1|apuestas de formula 1|apuestas de futbol|apuestas de fútbol|apuestas de futbol app|apuestas de futbol argentina|apuestas de futbol colombia|apuestas
de futbol en colombia|apuestas de futbol en directo|apuestas de
futbol en linea|apuestas de futbol en vivo|apuestas de futbol español|apuestas
de futbol gratis|apuestas de futbol hoy|apuestas de futbol mundial|apuestas
de futbol online|apuestas de fútbol online|apuestas de futbol para hoy|apuestas de fútbol
para hoy|apuestas de futbol para hoy seguras|apuestas de futbol para mañana|apuestas de futbol peru|apuestas de futbol
pronosticos|apuestas de fútbol pronósticos|apuestas de futbol seguras|apuestas de
futbol seguras para hoy|apuestas de futbol sin dinero|apuestas de
galgos|apuestas de galgos como ganar|apuestas de galgos en directo|apuestas de
galgos online|apuestas de galgos trucos|apuestas de golf|apuestas de hockey|apuestas de hockey sobre
hielo|apuestas de hoy|apuestas de hoy seguras|apuestas
de juego|apuestas de juegos|apuestas de juegos deportivos|apuestas de juegos online|apuestas de la champions league|apuestas de la copa américa|apuestas de la eurocopa|apuestas de la europa league|apuestas de la liga|apuestas de
la liga bbva|apuestas de la liga española|apuestas de la nba|apuestas de la nfl|apuestas de la ufc|apuestas de mlb|apuestas de nba|apuestas de nba para
hoy|apuestas de partidos|apuestas de partidos
de futbol|apuestas de peleas ufc|apuestas de perros en vivo|apuestas de perros virtuales|apuestas
de peru|apuestas de sistema|apuestas de sistema como funciona|apuestas de sistema explicacion|apuestas de sistema explicación|apuestas de tenis|apuestas
de tenis de mesa|apuestas de tenis en directo|apuestas de tenis hoy|apuestas de tenis para hoy|apuestas de
tenis pronosticos|apuestas de tenis seguras|apuestas de todo tipo|apuestas de ufc|apuestas
de ufc hoy|apuestas del boxeo|apuestas del clasico|apuestas del clasico real madrid barca|apuestas del dia|apuestas del día|apuestas del dia de hoy|apuestas del dia deportivas|apuestas del dia futbol|apuestas del mundial|apuestas del partido de hoy|apuestas del real madrid|apuestas del rey|apuestas del sistema|apuestas deporte|apuestas deportes|apuestas deportiva|apuestas deportivas|apuestas deportivas
1 euro|apuestas deportivas 10 euros gratis|apuestas deportivas 100 seguras|apuestas deportivas 1×2|apuestas deportivas android|apuestas deportivas app|apuestas deportivas
apps|apuestas deportivas argentina|apuestas deportivas argentina futbol|apuestas
deportivas argentina legal|apuestas deportivas atletico de madrid|apuestas
deportivas baloncesto|apuestas deportivas barca madrid|apuestas deportivas barcelona|apuestas
deportivas beisbol|apuestas deportivas bono|apuestas
deportivas bono bienvenida|apuestas deportivas
bono de bienvenida|apuestas deportivas bono sin deposito|apuestas deportivas bonos de bienvenida|apuestas deportivas boxeo|apuestas deportivas caballos|apuestas deportivas calculadora|apuestas deportivas campeon liga|apuestas
deportivas casino|apuestas deportivas casino barcelona|apuestas deportivas casino online|apuestas deportivas cerca de mi|apuestas
deportivas champions league|apuestas deportivas chile|apuestas deportivas ciclismo|apuestas deportivas colombia|apuestas deportivas
com|apuestas deportivas com foro|apuestas deportivas com pronosticos|apuestas deportivas combinadas|apuestas deportivas combinadas para hoy|apuestas deportivas como se
juega|apuestas deportivas comparador|apuestas deportivas con bono gratis|apuestas deportivas
con bonos gratis|apuestas deportivas con dinero ficticio|apuestas deportivas con paypal|apuestas deportivas con puntos
virtuales|apuestas deportivas consejos|apuestas
deportivas consejos para ganar|apuestas deportivas copa america|apuestas deportivas copa del rey|apuestas deportivas copa
libertadores|apuestas deportivas copa mundial|apuestas deportivas corners|apuestas deportivas cual
es la mejor|apuestas deportivas cuotas altas|apuestas deportivas de baloncesto|apuestas deportivas de boxeo|apuestas deportivas de colombia|apuestas deportivas de futbol|apuestas deportivas de nba|apuestas deportivas
de nhl|apuestas deportivas de peru|apuestas deportivas de tenis|apuestas deportivas del
dia|apuestas deportivas dinero ficticio|apuestas deportivas directo|apuestas deportivas doble oportunidad|apuestas deportivas en argentina|apuestas deportivas
en chile|apuestas deportivas en colombia|apuestas deportivas en directo|apuestas deportivas en españa|apuestas deportivas en español|apuestas deportivas en linea|apuestas deportivas en línea|apuestas deportivas en peru|apuestas deportivas en perú|apuestas deportivas en sevilla|apuestas deportivas en uruguay|apuestas deportivas
en vivo|apuestas deportivas es|apuestas deportivas es
pronosticos|apuestas deportivas españa|apuestas deportivas españolas|apuestas deportivas esports|apuestas
deportivas estadisticas|apuestas deportivas estrategias|apuestas deportivas estrategias seguras|apuestas deportivas eurocopa|apuestas deportivas europa league|apuestas deportivas f1|apuestas deportivas faciles de ganar|apuestas deportivas formula 1|apuestas deportivas foro|apuestas deportivas foro futbol|apuestas deportivas foro tenis|apuestas deportivas francia argentina|apuestas
deportivas futbol|apuestas deportivas fútbol|apuestas deportivas futbol argentino|apuestas deportivas futbol colombia|apuestas deportivas futbol español|apuestas deportivas gana|apuestas deportivas ganadas|apuestas deportivas ganar dinero seguro|apuestas deportivas gane|apuestas deportivas golf|apuestas deportivas gratis|apuestas deportivas gratis con premios|apuestas deportivas gratis hoy|apuestas deportivas gratis
sin deposito|apuestas deportivas handicap|apuestas deportivas
handicap asiatico|apuestas deportivas hoy|apuestas deportivas impuestos|apuestas deportivas interior argentina|apuestas deportivas juegos olimpicos|apuestas deportivas la liga|apuestas deportivas legales|apuestas deportivas
legales en colombia|apuestas deportivas libres de impuestos|apuestas deportivas
licencia españa|apuestas deportivas liga española|apuestas
deportivas listado|apuestas deportivas listado clasico|apuestas deportivas madrid|apuestas deportivas
mas seguras|apuestas deportivas mejor pagadas|apuestas
deportivas mejores|apuestas deportivas mejores app|apuestas deportivas mejores
casas|apuestas deportivas mejores cuotas|apuestas deportivas mejores paginas|apuestas deportivas mexico|apuestas deportivas méxico|apuestas deportivas mlb|apuestas
deportivas mlb hoy|apuestas deportivas multiples|apuestas deportivas mundial|apuestas deportivas murcia|apuestas deportivas nba|apuestas deportivas nba hoy|apuestas deportivas nfl|apuestas deportivas nhl|apuestas deportivas nuevas|apuestas deportivas ofertas|apuestas deportivas online|apuestas deportivas online argentina|apuestas
deportivas online chile|apuestas deportivas online colombia|apuestas deportivas online en colombia|apuestas deportivas
online españa|apuestas deportivas online mexico|apuestas deportivas online paypal|apuestas
deportivas online peru|apuestas deportivas online por internet|apuestas deportivas pago paypal|apuestas
deportivas para ganar dinero|apuestas deportivas para hoy|apuestas deportivas
para hoy pronosticos|apuestas deportivas partido
suspendido|apuestas deportivas partidos de hoy|apuestas deportivas paypal|apuestas deportivas peru|apuestas deportivas perú|apuestas deportivas peru vs ecuador|apuestas deportivas predicciones|apuestas deportivas promociones|apuestas deportivas pronostico|apuestas deportivas pronóstico|apuestas deportivas pronostico hoy|apuestas deportivas pronosticos|apuestas deportivas pronósticos|apuestas deportivas pronosticos expertos|apuestas deportivas pronosticos gratis|apuestas
deportivas pronosticos nba|apuestas deportivas pronosticos tenis|apuestas deportivas que aceptan paypal|apuestas deportivas real madrid|apuestas
deportivas regalo bienvenida|apuestas deportivas resultado exacto|apuestas deportivas resultados|apuestas deportivas rugby|apuestas deportivas seguras|apuestas deportivas seguras foro|apuestas deportivas seguras hoy|apuestas deportivas seguras para hoy|apuestas deportivas seguras telegram|apuestas deportivas sevilla|apuestas deportivas simulador eurocopa|apuestas deportivas sin deposito|apuestas deportivas sin deposito inicial|apuestas deportivas
sin dinero|apuestas deportivas sin dinero real|apuestas deportivas sin registro|apuestas deportivas stake|apuestas deportivas stake 10|apuestas deportivas telegram españa|apuestas
deportivas tenis|apuestas deportivas tenis de mesa|apuestas deportivas tenis foro|apuestas deportivas tenis hoy|apuestas deportivas tips|apuestas
deportivas tipster|apuestas deportivas ufc|apuestas deportivas uruguay|apuestas deportivas valencia|apuestas deportivas valencia barcelona|apuestas
deportivas venezuela|apuestas deportivas virtuales|apuestas deportivas y casino|apuestas deportivas y casino
online|apuestas deportivas.com|apuestas deportivas.com foro|apuestas
deportivas.es|apuestas deportivos pronosticos|apuestas deposito minimo 1 euro|apuestas descenso a segunda|apuestas descenso a segunda b|apuestas descenso la liga|apuestas descenso primera division|apuestas descenso segunda|apuestas dia|apuestas diarias
seguras|apuestas dinero|apuestas dinero ficticio|apuestas dinero real|apuestas dinero virtual|apuestas directas|apuestas directo|apuestas directo futbol|apuestas division de honor juvenil|apuestas dnb|apuestas doble oportunidad|apuestas doble resultado|apuestas dobles|apuestas dobles y triples|apuestas dortmund barcelona|apuestas draft nba|apuestas draft nfl|apuestas ecuador vs argentina|apuestas
ecuador vs venezuela|apuestas egipto uruguay|apuestas el clasico|apuestas
elecciones venezuela|apuestas empate|apuestas en baloncesto|apuestas en barcelona|apuestas en beisbol|apuestas en boxeo|apuestas
en caballos|apuestas en carreras de caballos|apuestas en casino|apuestas en casino online|apuestas en casinos|apuestas en casinos online|apuestas en chile|apuestas en ciclismo|apuestas
en colombia|apuestas en colombia de futbol|apuestas
en directo|apuestas en directo futbol|apuestas
en directo pronosticos|apuestas en el futbol|apuestas
en el tenis|apuestas en españa|apuestas en esports|apuestas en eventos deportivos virtuales|apuestas en golf|apuestas en juegos|apuestas en la champions league|apuestas en la eurocopa|apuestas en la liga|apuestas en la nba|apuestas en la
nfl|apuestas en las vegas mlb|apuestas en las vegas nfl|apuestas en linea|apuestas en línea|apuestas
en linea argentina|apuestas en linea boxeo|apuestas en linea chile|apuestas en linea colombia|apuestas
en línea de fútbol|apuestas en linea deportivas|apuestas en linea españa|apuestas en linea estados
unidos|apuestas en linea futbol|apuestas en linea mexico|apuestas en línea méxico|apuestas en linea mundial|apuestas en linea peru|apuestas en linea usa|apuestas en los esports|apuestas
en madrid|apuestas en méxico|apuestas en mexico online|apuestas en nba|apuestas en partidos de futbol|apuestas en partidos de futbol en vivo|apuestas
en partidos de tenis en directo|apuestas en perú|apuestas en sevilla|apuestas en sistema|apuestas en stake|apuestas en tenis|apuestas en tenis de mesa|apuestas en valencia|apuestas en vivo|apuestas en vivo argentina|apuestas en vivo casino|apuestas en vivo futbol|apuestas en vivo fútbol|apuestas en vivo
nba|apuestas en vivo peru|apuestas en vivo tenis|apuestas en vivo ufc|apuestas equipo mbappe|apuestas equipos de futbol|apuestas
españa|apuestas españa alemania|apuestas españa alemania eurocopa|apuestas españa croacia|apuestas españa eurocopa|apuestas españa francia|apuestas españa francia eurocopa|apuestas españa gana el mundial|apuestas españa gana eurocopa|apuestas
españa gana mundial|apuestas españa georgia|apuestas
españa holanda|apuestas españa inglaterra|apuestas
españa inglaterra cuotas|apuestas españa inglaterra eurocopa|apuestas españa
italia|apuestas españa mundial|apuestas españa paises bajos|apuestas español|apuestas español oviedo|apuestas
espanyol barcelona|apuestas espanyol betis|apuestas espanyol villarreal|apuestas esport|apuestas esports|apuestas esports colombia|apuestas esports
españa|apuestas esports fifa|apuestas esports gratis|apuestas esports lol|apuestas esports peru|apuestas
esports valorant|apuestas estadisticas|apuestas estrategias|apuestas euro|apuestas euro
copa|apuestas eurocopa|apuestas eurocopa campeon|apuestas eurocopa españa|apuestas
eurocopa favoritos|apuestas eurocopa femenina|apuestas eurocopa
final|apuestas eurocopa ganador|apuestas eurocopa hoy|apuestas eurocopa sub 21|apuestas euroliga baloncesto|apuestas euroliga pronosticos|apuestas europa
league|apuestas europa league hoy|apuestas europa league pronosticos|apuestas europa league pronósticos|apuestas euros|apuestas f1 abu dhabi|apuestas f1 bahrein|apuestas f1 canada|apuestas
f1 china|apuestas f1 cuotas|apuestas f1 hoy|apuestas f1 las vegas|apuestas f1 miami|apuestas f1 monaco|apuestas faciles de ganar|apuestas fáciles de ganar|apuestas
faciles para ganar|apuestas favoritas|apuestas favorito champions|apuestas favoritos champions|apuestas favoritos eurocopa|apuestas favoritos mundial|apuestas fc barcelona|apuestas final champions
cuotas|apuestas final champions league|apuestas final
champions peru|apuestas final copa|apuestas final copa
america|apuestas final copa de europa|apuestas final copa del rey|apuestas final copa europa|apuestas final copa libertadores|apuestas final copa
rey|apuestas final de copa|apuestas final de copa del rey|apuestas final del mundial|apuestas final euro|apuestas final
eurocopa|apuestas final europa league|apuestas final libertadores|apuestas final mundial|apuestas final nba|apuestas final rugby|apuestas final uefa europa league|apuestas final.mundial|apuestas finales de conferencia nfl|apuestas finales
nba|apuestas fiorentina betis|apuestas formula|apuestas
formula 1|apuestas fórmula 1|apuestas fórmula 1
pronósticos|apuestas formula uno|apuestas foro|apuestas foro nba|apuestas
francia argentina|apuestas francia españa|apuestas futbol|apuestas fútbol|apuestas futbol americano|apuestas futbol americano
nfl|apuestas futbol argentina|apuestas futbol argentino|apuestas
futbol champions league|apuestas futbol chile|apuestas futbol colombia|apuestas futbol consejos|apuestas futbol en directo|apuestas fútbol en directo|apuestas futbol
en vivo|apuestas fútbol en vivo|apuestas futbol españa|apuestas futbol español|apuestas fútbol español|apuestas futbol eurocopa|apuestas
futbol femenino|apuestas futbol foro|apuestas futbol gratis|apuestas futbol hoy|apuestas fútbol hoy|apuestas
futbol juegos olimpicos|apuestas futbol mexico|apuestas futbol mundial|apuestas futbol online|apuestas futbol para hoy|apuestas futbol peru|apuestas futbol pronosticos|apuestas futbol sala|apuestas
futbol telegram|apuestas futbol virtual|apuestas galgos|apuestas galgos en directo|apuestas galgos hoy|apuestas galgos online|apuestas galgos pronosticos|apuestas galgos trucos|apuestas gana|apuestas gana colombia|apuestas gana resultados|apuestas ganadas|apuestas ganadas hoy|apuestas ganador champions league|apuestas ganador copa
america|apuestas ganador copa del rey|apuestas ganador
copa del rey baloncesto|apuestas ganador copa libertadores|apuestas ganador
de la eurocopa|apuestas ganador de la liga|apuestas ganador del mundial|apuestas ganador eurocopa|apuestas ganador europa league|apuestas ganador f1|apuestas ganador la liga|apuestas ganador liga
española|apuestas ganador mundial|apuestas ganador mundial baloncesto|apuestas ganador mundial f1|apuestas ganador nba|apuestas ganadores eurocopa|apuestas ganadores mundial|apuestas ganar champions|apuestas ganar
eurocopa|apuestas ganar liga|apuestas ganar mundial|apuestas ganar nba|apuestas getafe valencia|apuestas ghana uruguay|apuestas girona|apuestas girona athletic|apuestas
girona betis|apuestas girona campeon de liga|apuestas girona campeon liga|apuestas girona gana la liga|apuestas
girona real madrid|apuestas girona real sociedad|apuestas goleador
eurocopa|apuestas goleadores eurocopa|apuestas goles asiaticos|apuestas golf|apuestas golf masters|apuestas golf pga|apuestas granada barcelona|apuestas grand slam de tenis|apuestas gratis|apuestas gratis casino|apuestas gratis con premios|apuestas gratis hoy|apuestas gratis para hoy|apuestas gratis por registro|apuestas gratis puntos|apuestas
gratis regalos|apuestas gratis sin deposito|apuestas
gratis sin depósito|apuestas gratis sin ingreso|apuestas gratis sports|apuestas gratis y
ganar premios|apuestas grupo a eurocopa|apuestas grupos eurocopa|apuestas handicap|apuestas handicap asiatico|apuestas handicap baloncesto|apuestas handicap como funciona|apuestas handicap nba|apuestas handicap nfl|apuestas hipicas online|apuestas
hípicas online|apuestas hipicas venezuela|apuestas hockey|apuestas hockey hielo|apuestas hockey patines|apuestas hockey sobre hielo|apuestas
holanda argentina|apuestas holanda vs argentina|apuestas hoy|apuestas
hoy champions|apuestas hoy futbol|apuestas hoy nba|apuestas hoy pronosticos|apuestas
hoy seguras|apuestas impuestos|apuestas inglaterra paises bajos|apuestas inter barca|apuestas inter barcelona|apuestas juego|apuestas juegos|apuestas juegos en linea|apuestas juegos olimpicos|apuestas juegos olímpicos|apuestas
juegos olimpicos baloncesto|apuestas juegos online|apuestas
juegos virtuales|apuestas jugador sevilla|apuestas jugadores nba|apuestas kings league americas|apuestas
la liga|apuestas la liga española|apuestas la liga hoy|apuestas
la liga santander|apuestas las vegas mlb|apuestas las vegas
nba|apuestas las vegas nfl|apuestas league of legends mundial|apuestas legal|apuestas legales|apuestas legales en colombia|apuestas legales en españa|apuestas legales en estados unidos|apuestas legales españa|apuestas leganes betis|apuestas libertadores|apuestas licencia|apuestas liga 1 peru|apuestas liga argentina|apuestas liga bbva pronosticos|apuestas liga de campeones|apuestas liga de campeones de
baloncesto|apuestas liga de campeones de
hockey|apuestas liga españa|apuestas liga española|apuestas liga santander pronosticos|apuestas ligas de futbol|apuestas linea|apuestas
linea de gol|apuestas liverpool barcelona|apuestas liverpool real madrid|apuestas lol mundial|apuestas madrid|apuestas madrid arsenal|apuestas
madrid atletico|apuestas madrid atletico champions|apuestas madrid barca|apuestas madrid barça|apuestas madrid barca hoy|apuestas madrid barca supercopa|apuestas madrid barcelona|apuestas madrid barsa|apuestas madrid
bayern|apuestas madrid betis|apuestas madrid borussia|apuestas madrid campeon champions|apuestas madrid celta|apuestas madrid city|apuestas madrid dortmund|apuestas madrid
gana la liga|apuestas madrid gana liga|apuestas madrid hoy|apuestas madrid liverpool|apuestas madrid
osasuna|apuestas madrid sevilla|apuestas madrid valencia|apuestas madrid vs arsenal|apuestas
madrid vs barcelona|apuestas mallorca osasuna|apuestas mallorca real sociedad|apuestas manchester athletic|apuestas manchester city real madrid|apuestas
mas faciles de ganar|apuestas mas seguras|apuestas mas seguras para hoy|apuestas masters de golf|apuestas masters de tenis|apuestas maximo goleador eurocopa|apuestas maximo goleador mundial|apuestas mejor jugador eurocopa|apuestas
mejores casinos online|apuestas mexico|apuestas méxico|apuestas mexico polonia|apuestas méxico polonia|apuestas mlb|apuestas mlb hoy|apuestas mlb las vegas|apuestas mlb para hoy|apuestas mlb pronosticos|apuestas mlb
usa|apuestas mma ufc|apuestas momios|apuestas multiples|apuestas múltiples|apuestas
multiples como funcionan|apuestas multiples el gordo|apuestas multiples futbol|apuestas mundial|apuestas mundial 2026|apuestas mundial baloncesto|apuestas
mundial balonmano|apuestas mundial brasil|apuestas mundial campeon|apuestas mundial ciclismo|apuestas mundial clubes|apuestas mundial de baloncesto|apuestas mundial
de ciclismo|apuestas mundial de clubes|apuestas mundial de futbol|apuestas mundial de fútbol|apuestas mundial
de rugby|apuestas mundial f1|apuestas mundial favoritos|apuestas mundial femenino|apuestas mundial
formula 1|apuestas mundial futbol|apuestas mundial ganador|apuestas
mundial lol|apuestas mundial moto gp|apuestas mundial motogp|apuestas mundial rugby|apuestas mundial sub 17|apuestas mundiales|apuestas
mundialistas|apuestas mvp eurocopa|apuestas mvp
nba|apuestas mvp nfl|apuestas nacionales
de colombia|apuestas nba|apuestas nba all star|apuestas nba campeon|apuestas nba consejos|apuestas nba esta
noche|apuestas nba finals|apuestas nba gratis|apuestas nba hoy|apuestas nba hoy jugadores|apuestas nba hoy
pronosticos|apuestas nba para hoy|apuestas nba playoffs|apuestas nba
pronosticos|apuestas nba pronósticos|apuestas nba
pronosticos hoy|apuestas nba tipster|apuestas
nfl|apuestas nfl hoy|apuestas nfl las vegas|apuestas
nfl playoffs|apuestas nfl pronosticos|apuestas nfl pronósticos|apuestas nfl semana 4|apuestas nfl super bowl|apuestas nhl|apuestas nhl pronosticos|apuestas octavos eurocopa|apuestas ofertas|apuestas online|apuestas online argentina|apuestas online argentina legal|apuestas
online bono|apuestas online bono bienvenida|apuestas
online boxeo|apuestas online caballos|apuestas online carreras de caballos|apuestas online casino|apuestas online champions league|apuestas
online chile|apuestas online ciclismo|apuestas online colombia|apuestas online comparativa|apuestas online con paypal|apuestas online de
caballos|apuestas online deportivas|apuestas online en argentina|apuestas online en peru|apuestas online espana|apuestas online españa|apuestas
online esports|apuestas online foro|apuestas online futbol|apuestas online futbol españa|apuestas online golf|apuestas online
gratis|apuestas online gratis sin deposito|apuestas online juegos|apuestas online mexico|apuestas online mma|apuestas online movil|apuestas online nba|apuestas
online net|apuestas online nuevas|apuestas online
opiniones|apuestas online paypal|apuestas online peru|apuestas online seguras|apuestas
online sin dinero|apuestas online sin registro|apuestas online tenis|apuestas online ufc|apuestas online uruguay|apuestas online venezuela|apuestas open britanico golf|apuestas osasuna athletic|apuestas osasuna barcelona|apuestas osasuna real madrid|apuestas osasuna sevilla|apuestas osasuna valencia|apuestas over|apuestas over 2.5|apuestas over under|apuestas
paginas|apuestas pago anticipado|apuestas paises bajos ecuador|apuestas paises
bajos inglaterra|apuestas países bajos qatar|apuestas para boxeo|apuestas para champions league|apuestas para el clasico|apuestas para
el dia de hoy|apuestas para el mundial|apuestas para el partido de hoy|apuestas para
eurocopa|apuestas para europa league|apuestas para futbol|apuestas para ganar|apuestas para ganar dinero|apuestas para ganar dinero facil|apuestas
para ganar en la ruleta|apuestas para ganar la champions|apuestas para ganar la eurocopa|apuestas para ganar la europa league|apuestas para ganar la liga|apuestas para ganar
siempre|apuestas para hacer|apuestas para hoy|apuestas para
hoy de futbol|apuestas para hoy europa league|apuestas para
hoy futbol|apuestas para juegos|apuestas para la champions league|apuestas para la copa del rey|apuestas para
la eurocopa|apuestas para la europa league|apuestas para la final de la
eurocopa|apuestas para la nba hoy|apuestas para los partidos de hoy|apuestas para partidos de hoy|apuestas para ufc|apuestas partido|apuestas partido
aplazado|apuestas partido champions|apuestas partido colombia|apuestas partido españa marruecos|apuestas partido mundial|apuestas partido suspendido|apuestas
partidos|apuestas partidos champions league|apuestas
partidos csgo|apuestas partidos de futbol|apuestas partidos de futbol hoy|apuestas partidos de hoy|apuestas partidos eurocopa|apuestas partidos futbol|apuestas partidos hoy|apuestas partidos
mundial|apuestas paypal|apuestas peleas de boxeo|apuestas peru|apuestas perú|apuestas
peru brasil|apuestas peru chile|apuestas peru paraguay|apuestas peru uruguay|apuestas
peru vs chile|apuestas peru vs colombia|apuestas pichichi eurocopa|apuestas plataforma|apuestas playoff|apuestas
playoff ascenso|apuestas playoff ascenso a primera|apuestas playoff nba|apuestas playoff segunda|apuestas playoff segunda b|apuestas playoffs nba|apuestas playoffs nfl|apuestas polonia argentina|apuestas por
argentina|apuestas por internet mexico|apuestas por internet para ganar dinero|apuestas por paypal|apuestas por ronda boxeo|apuestas por sistema|apuestas portugal uruguay|apuestas pre partido|apuestas predicciones|apuestas predicciones futbol|apuestas primera
division|apuestas primera division españa|apuestas promociones|apuestas pronostico|apuestas pronosticos|apuestas pronosticos deportivos|apuestas pronosticos deportivos tenis|apuestas pronosticos futbol|apuestas pronosticos gratis|apuestas
pronosticos nba|apuestas pronosticos tenis|apuestas prorroga|apuestas psg barca|apuestas psg barcelona|apuestas puntos por tarjetas|apuestas puntos tarjetas|apuestas que aceptan paypal|apuestas que es handicap|apuestas que puedes hacer con tu
novia|apuestas que siempre ganaras|apuestas que significa|apuestas quien bajara a
segunda|apuestas quién bajara a segunda|apuestas quien gana el mundial|apuestas quien gana
eurocopa|apuestas quien gana la champions|apuestas
quien gana la eurocopa|apuestas quien gana la liga|apuestas quien ganara el mundial|apuestas quién ganará
el mundial|apuestas quien ganara la champions|apuestas quien ganara la eurocopa|apuestas quien ganara la liga|apuestas
rayo barcelona|apuestas real madrid|apuestas real madrid arsenal|apuestas real madrid athletic|apuestas real madrid atletico|apuestas real madrid atletico champions|apuestas
real madrid atletico de madrid|apuestas real madrid atlético de madrid|apuestas real
madrid atletico madrid|apuestas real madrid barcelona|apuestas
real madrid bayern|apuestas real madrid betis|apuestas real madrid borussia|apuestas real madrid campeon champions|apuestas real madrid celta|apuestas real madrid champions|apuestas real madrid
city|apuestas real madrid girona|apuestas real
madrid hoy|apuestas real madrid liverpool|apuestas real madrid
manchester city|apuestas real madrid osasuna|apuestas real madrid real sociedad|apuestas real madrid valencia|apuestas real madrid villarreal|apuestas
real madrid vs arsenal|apuestas real madrid vs
atletico|apuestas real madrid vs atlético|apuestas real madrid vs atletico madrid|apuestas real madrid vs barcelona|apuestas real
madrid vs betis|apuestas real madrid vs sevilla|apuestas real madrid vs valencia|apuestas real sociedad|apuestas real sociedad
athletic|apuestas real sociedad barcelona|apuestas real sociedad betis|apuestas real sociedad
psg|apuestas real sociedad real madrid|apuestas real sociedad valencia|apuestas recomendadas hoy|apuestas regalo de bienvenida|apuestas registro|apuestas resultado exacto|apuestas resultados|apuestas resultados eurocopa|apuestas retirada
tenis|apuestas roma barcelona|apuestas roma sevilla|apuestas rugby|apuestas rugby mundial|apuestas rugby world cup|apuestas ruleta seguras|apuestas segunda|apuestas segunda b|apuestas segunda division|apuestas segunda división|apuestas segunda division b|apuestas segunda division españa|apuestas
seguras|apuestas seguras baloncesto|apuestas seguras calculadora|apuestas seguras en la ruleta|apuestas seguras eurocopa|apuestas seguras
foro|apuestas seguras futbol|apuestas seguras futbol hoy|apuestas seguras gratis|apuestas seguras hoy|apuestas seguras hoy futbol|apuestas seguras nba|apuestas seguras
nba hoy|apuestas seguras para este fin de
semana|apuestas seguras para ganar dinero|apuestas seguras para hoy|apuestas seguras para hoy fútbol|apuestas seguras
para hoy pronósticos|apuestas seguras para mañana|apuestas seguras ruleta|apuestas seguras telegram|apuestas seguras tenis|apuestas semifinales eurocopa|apuestas senegal paises bajos|apuestas sevilla|apuestas
sevilla athletic|apuestas sevilla atletico de
madrid|apuestas sevilla barcelona|apuestas sevilla betis|apuestas sevilla campeon liga|apuestas sevilla celta|apuestas sevilla gana la liga|apuestas sevilla girona|apuestas
sevilla inter|apuestas sevilla jugador|apuestas sevilla
juventus|apuestas sevilla leganes|apuestas sevilla madrid|apuestas sevilla manchester united|apuestas sevilla
osasuna|apuestas sevilla real madrid|apuestas sevilla real sociedad|apuestas
sevilla roma|apuestas sevilla valencia|apuestas
significa|apuestas simples ejemplos|apuestas simples o combinadas|apuestas sin deposito|apuestas sin deposito inicial|apuestas sin deposito minimo|apuestas sin dinero|apuestas sin dinero real|apuestas sin empate|apuestas sin empate que significa|apuestas sin ingreso minimo|apuestas sin registro|apuestas sistema|apuestas sistema calculadora|apuestas sistema como funciona|apuestas sistema trixie|apuestas sociedad|apuestas sorteo copa del rey|apuestas stake|apuestas stake 10|apuestas stake 10 hoy|apuestas super bowl favorito|apuestas super
rugby|apuestas supercopa españa|apuestas superliga argentina|apuestas tarjeta roja|apuestas
tarjetas|apuestas tarjetas amarillas|apuestas tenis|apuestas
tenis atp|apuestas tenis consejos|apuestas tenis copa davis|apuestas tenis de
mesa|apuestas tenis de mesa pronosticos|apuestas tenis en vivo|apuestas tenis femenino|apuestas tenis hoy|apuestas
tenis itf|apuestas tenis pronosticos|apuestas tenis pronósticos|apuestas tenis retirada|apuestas tenis roland garros|apuestas tenis seguras|apuestas tenis wimbledon|apuestas tenis wta|apuestas tercera division|apuestas tercera division españa|apuestas tipos|apuestas
tips|apuestas tipster|apuestas tipster para hoy|apuestas topuria holloway cuotas|apuestas torneos de golf|apuestas torneos de
tenis|apuestas trucos|apuestas uefa champions
league|apuestas uefa europa league|apuestas
ufc|apuestas ufc chile|apuestas ufc como funciona|apuestas ufc hoy|apuestas ufc ilia topuria|apuestas ufc online|apuestas ufc pronósticos|apuestas ufc telegram|apuestas ufc topuria|apuestas under over|apuestas unionistas
villarreal|apuestas uruguay|apuestas uruguay colombia|apuestas uruguay corea|apuestas uruguay vs colombia|apuestas us
open golf|apuestas us open tenis|apuestas valencia|apuestas valencia barcelona|apuestas valencia betis|apuestas valencia madrid|apuestas valencia real madrid|apuestas valladolid
barcelona|apuestas valladolid valencia|apuestas valor app|apuestas valor
en directo|apuestas valor galgos|apuestas venezuela|apuestas venezuela argentina|apuestas venezuela bolivia|apuestas venezuela ecuador|apuestas villarreal|apuestas villarreal athletic|apuestas villarreal
barcelona|apuestas villarreal bayern|apuestas villarreal betis|apuestas villarreal liverpool|apuestas villarreal manchester|apuestas villarreal manchester united|apuestas villarreal vs real madrid|apuestas
virtuales|apuestas virtuales colombia|apuestas virtuales futbol|apuestas
virtuales sin dinero|apuestas vivo|apuestas vuelta a españa|apuestas vuelta españa|apuestas william hill
partidos de hoy|apuestas y casino|apuestas y casinos|apuestas y juegos
de azar|apuestas y pronosticos|apuestas y pronosticos de futbol|apuestas y pronosticos
deportivos|apuestas y resultados|apuestas-deportivas|apuestas-deportivas.es pronosticos|arbitro
nba apuestas|argentina apuestas|argentina colombia apuestas|argentina croacia
apuestas|argentina francia apuestas|argentina mexico apuestas|argentina
peru apuestas|argentina uruguay apuestas|argentina vs bolivia apuestas|argentina vs
chile apuestas|argentina vs colombia apuestas|argentina
vs francia apuestas|argentina vs. colombia apuestas|asi se
gana en las apuestas deportivas|asiatico apuestas|asiatico
en apuestas|asiaticos apuestas|athletic barcelona apuestas|athletic manchester united apuestas|athletic osasuna apuestas|athletic
real madrid apuestas|atletico barcelona apuestas|atletico
de madrid apuestas|atlético de madrid apuestas|atletico de madrid real madrid apuestas|atletico de madrid vs barcelona apuestas|atletico madrid real madrid
apuestas|atletico madrid vs real madrid apuestas|atletico real madrid apuestas|atletico vs
real madrid apuestas|avisador de cuotas apuestas|bajada de cuotas apuestas|baloncesto apuestas|barbastro barcelona apuestas|barca apuestas|barca bayern apuestas|barca
inter apuestas|barca madrid apuestas|barça madrid apuestas|barca vs atletico apuestas|barca
vs madrid apuestas|barca vs real madrid apuestas|barcelona – real madrid apuestas|barcelona apuestas|barcelona atletico apuestas|barcelona atletico
de madrid apuestas|barcelona atletico madrid apuestas|barcelona
betis apuestas|barcelona casa de apuestas|barcelona inter apuestas|barcelona psg apuestas|barcelona real madrid apuestas|barcelona real sociedad apuestas|barcelona sevilla apuestas|barcelona valencia
apuestas|barcelona vs athletic bilbao apuestas|barcelona vs atlético madrid apuestas|barcelona vs betis apuestas|barcelona vs celta de vigo apuestas|barcelona vs espanyol apuestas|barcelona vs girona apuestas|barcelona vs madrid apuestas|barcelona vs real madrid apuestas|barcelona vs real sociedad
apuestas|barcelona vs sevilla apuestas|barcelona vs villarreal apuestas|base de
datos cuotas apuestas deportivas|bayern real madrid apuestas|beisbol apuestas|best america apuestas|bet apuestas chile|bet apuestas en vivo|betis – chelsea
apuestas|betis apuestas|betis barcelona apuestas|betis chelsea apuestas|betis madrid apuestas|betis sevilla apuestas|betsson tu sitio de apuestas online|blog apuestas baloncesto|blog apuestas ciclismo|blog apuestas
nba|blog apuestas tenis|blog de apuestas de tenis|bono apuestas|bono
apuestas deportivas|bono apuestas deportivas sin deposito|bono apuestas gratis|bono apuestas gratis sin deposito|bono apuestas sin deposito|bono bienvenida apuestas|bono bienvenida
apuestas deportivas|bono bienvenida apuestas españa|bono
bienvenida apuestas sin deposito|bono bienvenida apuestas sin depósito|bono bienvenida casa
apuestas|bono bienvenida casa de apuestas|bono bienvenida marca apuestas|bono casa apuestas|bono casa de
apuestas|bono casa de apuestas sin ingreso|bono
casas de apuestas|bono de apuestas|bono de apuestas gratis
sin deposito|bono de bienvenida apuestas|bono de bienvenida apuestas deportivas|bono de bienvenida casa de apuestas|bono de bienvenida
casas de apuestas|bono de casas de apuestas|bono de registro
apuestas|bono de registro apuestas deportivas|bono de registro casa
de apuestas|bono gratis apuestas|bono marca apuestas|bono por registro
apuestas|bono por registro apuestas deportivas|bono por registro casa de apuestas|bono registro apuestas|bono sin deposito apuestas|bono sin depósito apuestas|bono sin deposito apuestas deportivas|bono sin depósito apuestas deportivas|bono sin deposito casa de apuestas|bono sin deposito marca apuestas|bono sin ingreso apuestas|bono sin ingreso apuestas deportivas|bonos apuestas|bonos apuestas colombia|bonos apuestas deportivas|bonos apuestas deportivas
sin deposito|bonos apuestas gratis|bonos apuestas sin deposito|bonos apuestas sin depósito|bonos bienvenida apuestas|bonos bienvenida casas apuestas|bonos bienvenida casas de apuestas|bonos casa de apuestas|bonos casas apuestas|bonos casas de apuestas|bonos casas de apuestas colombia|bonos casas de apuestas deportivas|bonos
casas de apuestas españa|bonos casas de apuestas nuevas|bonos casas de apuestas
sin deposito|bonos casas de apuestas sin depósito|bonos de
apuestas|bonos de apuestas deportivas|bonos de apuestas gratis|bonos
de apuestas sin deposito|bonos de bienvenida apuestas|bonos de bienvenida apuestas deportivas|bonos de bienvenida casa de apuestas|bonos de
bienvenida casas de apuestas|bonos de bienvenida de casas de apuestas|bonos de bienvenida en casas de apuestas|bonos de casas de
apuestas|bonos de casas de apuestas sin deposito|bonos en casa de apuestas|bonos en casas de apuestas sin deposito|bonos gratis apuestas|bonos gratis apuestas deportivas|bonos
gratis casas de apuestas|bonos gratis sin deposito apuestas|bonos
paginas de apuestas|bonos registro casas de
apuestas|bonos sin deposito apuestas|bonos sin depósito apuestas|bonos
sin deposito apuestas deportivas|bonos sin deposito casas
de apuestas|bot de apuestas deportivas gratis|boxeo apuestas|brasil colombia apuestas|brasil
peru apuestas|brasil vs colombia apuestas|buenas apuestas para hoy|buscador cuotas
apuestas|buscador de apuestas seguras|buscador de cuotas apuestas|buscador de cuotas
de apuestas|buscar apuestas seguras|caballos apuestas|calculador de apuestas|calculador de cuotas apuestas|calculadora apuestas|calculadora apuestas
combinadas|calculadora apuestas de sistema|calculadora apuestas deportivas|calculadora
apuestas deportivas seguras|calculadora apuestas multiples|calculadora apuestas
segura|calculadora apuestas seguras|calculadora apuestas sistema|calculadora apuestas yankee|calculadora arbitraje apuestas|calculadora cubrir apuestas|calculadora cuotas apuestas|calculadora de apuestas|calculadora de apuestas combinadas|calculadora de apuestas de futbol|calculadora de apuestas
de sistema|calculadora de apuestas deportivas|calculadora de apuestas multiples|calculadora de apuestas seguras|calculadora de apuestas sistema|calculadora de apuestas surebets|calculadora de arbitraje apuestas|calculadora de cuotas apuestas|calculadora de cuotas de
apuestas|calculadora para apuestas deportivas|calculadora poisson apuestas|calculadora poisson apuestas deportivas|calculadora poisson para apuestas|calculadora scalping
apuestas deportivas|calculadora sistema apuestas|calculadora stake apuestas|calculadora trading apuestas|calcular apuestas|calcular apuestas deportivas|calcular apuestas futbol|calcular
apuestas sistema|calcular cuotas apuestas|calcular cuotas apuestas combinadas|calcular cuotas apuestas deportivas|calcular cuotas de apuestas|calcular ganancias apuestas deportivas|calcular momios apuestas|calcular
probabilidad cuota apuestas|calcular stake apuestas|calcular unidades apuestas|calcular yield apuestas|calculo de
apuestas|calculo de apuestas deportivas|cambio de cuotas apuestas|campeon champions apuestas|campeon eurocopa apuestas|campeon liga apuestas|campeon nba apuestas|canales de apuestas gratis|carrera de
caballos apuestas|carrera de caballos apuestas juego|carrera de caballos con apuestas|carrera de galgos apuestas|carreras de caballos
apuestas|carreras de caballos apuestas online|carreras de caballos con apuestas|carreras de caballos juegos de apuestas|carreras de
galgos apuestas|carreras de galgos apuestas online|carreras de galgos apuestas trucos|carreras galgos apuestas|casa apuestas argentina|casa apuestas atletico de
madrid|casa apuestas barcelona|casa apuestas betis|casa apuestas bono bienvenida|casa apuestas
bono gratis|casa apuestas bono sin deposito|casa apuestas cerca de mi|casa apuestas chile|casa apuestas colombia|casa apuestas con mejores cuotas|casa apuestas deportivas|casa apuestas españa|casa apuestas española|casa apuestas eurocopa|casa apuestas futbol|casa apuestas
mejores cuotas|casa apuestas mundial|casa apuestas nueva|casa apuestas nuevas|casa apuestas online|casa apuestas peru|casa apuestas valencia|casa
de apuestas|casa de apuestas 10 euros gratis|casa
de apuestas argentina|casa de apuestas atletico de madrid|casa de apuestas
baloncesto|casa de apuestas barcelona|casa de apuestas beisbol|casa de apuestas betis|casa de apuestas bono|casa de apuestas bono bienvenida|casa de apuestas
bono de bienvenida|casa de apuestas bono gratis|casa de apuestas bono por registro|casa de apuestas bono sin deposito|casa de apuestas boxeo|casa de apuestas caballos|casa de apuestas carreras de caballos|casa de apuestas cerca de mi|casa de
apuestas cerca de mí|casa de apuestas champions league|casa de
apuestas chile|casa de apuestas ciclismo|casa de apuestas colombia|casa de apuestas con bono de bienvenida|casa de apuestas con bono sin deposito|casa de apuestas con cuotas mas altas|casa de apuestas con esports|casa de
apuestas con las mejores cuotas|casa de apuestas con licencia en españa|casa de apuestas
con mejores cuotas|casa de apuestas con pago anticipado|casa de apuestas
con paypal|casa de apuestas copa america|casa de apuestas de caballos|casa de apuestas de
colombia|casa de apuestas de españa|casa de apuestas de
futbol|casa de apuestas de fútbol|casa de apuestas de futbol peru|casa de apuestas de peru|casa
de apuestas del madrid|casa de apuestas del real madrid|casa de
apuestas deportivas|casa de apuestas deportivas cerca de mi|casa de apuestas deportivas en argentina|casa de
apuestas deportivas en chile|casa de apuestas deportivas en colombia|casa de apuestas
deportivas en españa|casa de apuestas deportivas en madrid|casa de apuestas deportivas españa|casa
de apuestas deportivas españolas|casa de apuestas deportivas
madrid|casa de apuestas deportivas mexico|casa de apuestas deportivas online|casa de
apuestas deportivas peru|casa de apuestas deposito 5 euros|casa de
apuestas deposito minimo|casa de apuestas deposito minimo 1 euro|casa de
apuestas depósito mínimo 1 euro|casa de apuestas en españa|casa de apuestas en linea|casa de apuestas en madrid|casa
de apuestas en perú|casa de apuestas en vivo|casa de apuestas españa|casa de apuestas españa inglaterra|casa de apuestas española|casa de apuestas españolas|casa de
apuestas esports|casa de apuestas eurocopa|casa de apuestas europa league|casa de apuestas f1|casa de apuestas formula 1|casa
de apuestas futbol|casa de apuestas ingreso minimo|casa de apuestas
ingreso minimo 1 euro|casa de apuestas ingreso mínimo 1 euro|casa de apuestas legales|casa de apuestas legales en colombia|casa de apuestas legales en españa|casa de
apuestas libertadores|casa de apuestas liga española|casa de apuestas madrid|casa de apuestas
mas segura|casa de apuestas mejores|casa de apuestas méxico|casa de apuestas minimo 5 euros|casa de apuestas mlb|casa de apuestas mundial|casa de apuestas nba|casa de apuestas
nfl|casa de apuestas nueva|casa de apuestas nuevas|casa de apuestas oficial del real madrid|casa de apuestas oficial real
madrid|casa de apuestas online|casa de apuestas online argentina|casa
de apuestas online chile|casa de apuestas online españa|casa
de apuestas online mexico|casa de apuestas
online paraguay|casa de apuestas online peru|casa de apuestas online usa|casa de apuestas online venezuela|casa de
apuestas pago anticipado|casa de apuestas para boxeo|casa de apuestas para ufc|casa de apuestas peru|casa de apuestas perú|casa de
apuestas peru online|casa de apuestas por paypal|casa de apuestas promociones|casa de
apuestas que regalan dinero|casa de apuestas real madrid|casa de apuestas regalo de bienvenida|casa de
apuestas sevilla|casa de apuestas sin dinero|casa de apuestas sin ingreso minimo|casa de
apuestas sin licencia en españa|casa de apuestas sin minimo de ingreso|casa de
apuestas stake|casa de apuestas tenis|casa de
apuestas ufc|casa de apuestas valencia|casa de apuestas venezuela|casa de apuestas virtuales|casa de apuestas vive la
suerte|casa oficial de apuestas del real madrid|casas apuestas asiaticas|casas apuestas bono
sin deposito|casas apuestas bonos sin deposito|casas apuestas caballos|casas apuestas
chile|casas apuestas ciclismo|casas apuestas con licencia|casas apuestas con licencia en españa|casas apuestas deportivas|casas
apuestas deportivas colombia|casas apuestas deportivas españa|casas apuestas
deportivas españolas|casas apuestas deportivas nuevas|casas
apuestas españa|casas apuestas españolas|casas apuestas esports|casas apuestas eurocopa|casas apuestas golf|casas apuestas
ingreso minimo 5 euros|casas apuestas legales|casas apuestas legales españa|casas apuestas licencia|casas apuestas licencia españa|casas
apuestas mexico|casas apuestas mundial|casas apuestas nba|casas apuestas nuevas|casas apuestas nuevas españa|casas apuestas ofertas|casas apuestas online|casas apuestas paypal|casas apuestas peru|casas apuestas sin licencia|casas apuestas
tenis|casas asiaticas apuestas|casas de apuestas|casas de apuestas 5 euros|casas de apuestas app|casas de apuestas argentinas|casas de
apuestas asiaticas|casas de apuestas baloncesto|casas de apuestas barcelona|casas de apuestas bono bienvenida|casas de apuestas bono de bienvenida|casas de apuestas bono
por registro|casas de apuestas bono sin deposito|casas de
apuestas bono sin ingreso|casas de apuestas bonos|casas de apuestas bonos de
bienvenida|casas de apuestas bonos gratis|casas de apuestas bonos sin deposito|casas de apuestas boxeo|casas
de apuestas caballos|casas de apuestas carreras de caballos|casas de apuestas casino|casas de apuestas casino online|casas de
apuestas cerca de mi|casas de apuestas champions league|casas de apuestas chile|casas de apuestas ciclismo|casas de apuestas colombia|casas
de apuestas com|casas de apuestas con app|casas de apuestas con apuestas
gratis|casas de apuestas con bono|casas de apuestas con bono de bienvenida|casas de apuestas
con bono de registro|casas de apuestas con bono por registro|casas de apuestas con bono sin deposito|casas de apuestas con bonos|casas de
apuestas con bonos gratis|casas de apuestas con bonos
sin deposito|casas de apuestas con deposito minimo|casas de
apuestas con esports|casas de apuestas con handicap asiatico|casas de apuestas
con licencia|casas de apuestas con licencia en españa|casas de apuestas con licencia españa|casas de apuestas con licencia española|casas de apuestas con mejores
cuotas|casas de apuestas con pago anticipado|casas de apuestas con paypal|casas de apuestas con paypal en perú|casas de
apuestas con promociones|casas de apuestas con ruleta en vivo|casas de apuestas copa del rey|casas de apuestas de caballos|casas de
apuestas de españa|casas de apuestas de futbol|casas de apuestas de fútbol|casas de apuestas de
peru|casas de apuestas deportivas|casas de apuestas deportivas asiaticas|casas de
apuestas deportivas colombia|casas de apuestas deportivas comparativa|casas de apuestas deportivas con paypal|casas de apuestas deportivas
en chile|casas de apuestas deportivas en españa|casas de apuestas
deportivas en linea|casas de apuestas deportivas en madrid|casas de apuestas deportivas
en mexico|casas de apuestas deportivas en peru|casas de apuestas deportivas
en sevilla|casas de apuestas deportivas en valencia|casas de apuestas deportivas españa|casas de apuestas deportivas españolas|casas
de apuestas deportivas legales|casas de apuestas deportivas madrid|casas de apuestas deportivas mexico|casas de apuestas deportivas
nuevas|casas de apuestas deportivas online|casas de apuestas deportivas
peru|casas de apuestas deportivas perú|casas de apuestas deposito minimo 1 euro|casas
de apuestas depósito mínimo 1 euro|casas de apuestas dinero gratis|casas de apuestas en argentina|casas de
apuestas en barcelona|casas de apuestas en chile|casas de apuestas en colombia|casas de apuestas en españa|casas de
apuestas en españa online|casas de apuestas en linea|casas de apuestas en madrid|casas
de apuestas en méxico|casas de apuestas en peru|casas de
apuestas en perú|casas de apuestas en sevilla|casas de apuestas
en uruguay|casas de apuestas en valencia|casas de apuestas en venezuela|casas de apuestas equipos de futbol|casas de apuestas españa|casas de apuestas españa alemania|casas de apuestas españa inglaterra|casas de apuestas españa licencia|casas de apuestas españa nuevas|casas de apuestas españa online|casas de apuestas española|casas de apuestas
españolas|casas de apuestas españolas con licencia|casas
de apuestas españolas online|casas de apuestas esports|casas
de apuestas eurocopa|casas de apuestas eurocopa 2024|casas
de apuestas europa league|casas de apuestas f1|casas de apuestas
fisicas en barcelona|casas de apuestas fisicas en españa|casas
de apuestas formula 1|casas de apuestas fuera de españa|casas de
apuestas futbol|casas de apuestas fútbol|casas de apuestas futbol
españa|casas de apuestas ganador eurocopa|casas de apuestas gratis|casas de
apuestas ingreso minimo|casas de apuestas ingreso minimo 1
euro|casas de apuestas ingreso minimo 5 euros|casas de apuestas
inter barcelona|casas de apuestas legales|casas de apuestas legales en colombia|casas
de apuestas legales en españa|casas de apuestas legales en mexico|casas de apuestas legales españa|casas de apuestas legales mx|casas de apuestas licencia|casas de apuestas licencia españa|casas
de apuestas lista|casas de apuestas madrid|casas de
apuestas mas seguras|casas de apuestas mejores bonos|casas de apuestas mejores cuotas|casas de apuestas mexico|casas de apuestas méxico|casas de apuestas
minimo 5 euros|casas de apuestas mlb|casas de apuestas mundial|casas de
apuestas mundial baloncesto|casas de apuestas mundiales|casas
de apuestas nba|casas de apuestas no reguladas en españa|casas de apuestas nueva ley|casas de apuestas nuevas|casas de apuestas nuevas en colombia|casas de
apuestas nuevas en españa|casas de apuestas nuevas
españa|casas de apuestas ofertas|casas de apuestas online|casas de apuestas online argentina|casas de apuestas online colombia|casas de apuestas online deportivas|casas de apuestas online ecuador|casas de apuestas online en argentina|casas de apuestas online en chile|casas de
apuestas online en colombia|casas de apuestas online en españa|casas de apuestas online en mexico|casas de apuestas online españa|casas de apuestas online mas fiables|casas de apuestas online mexico|casas de
apuestas online nuevas|casas de apuestas online peru|casas de
apuestas online usa|casas de apuestas online venezuela|casas de apuestas pago paypal|casas de apuestas para ufc|casas de apuestas paypal|casas de
apuestas peru bono sin deposito|casas de apuestas presenciales en españa|casas de apuestas
Your comment is awaiting moderation.
clickscale.click – Found practical insights today; sharing this article with colleagues later.
Your comment is awaiting moderation.
https://aviator-game.com.ua/
Your comment is awaiting moderation.
https://444-000.ru/
Your comment is awaiting moderation.
marketfuel.click – Navigation felt smooth, found everything quickly without any confusing steps.
Your comment is awaiting moderation.
marketpilot.click – Pages loaded fast, images appeared sharp, and formatting stayed consistent.
Your comment is awaiting moderation.
adreachpro.click – Content reads clearly, helpful examples made concepts easy to grasp.
Your comment is awaiting moderation.
promopath.click – Appreciate the typography choices; comfortable spacing improved my reading experience.
Your comment is awaiting moderation.
brandfuel.click – Pages loaded fast, images appeared sharp, and formatting stayed consistent.
Your comment is awaiting moderation.
(10 euros gratis apuestas|10 mejores casas de apuestas|10 trucos para ganar apuestas|15 euros gratis marca apuestas|1×2 apuestas|1×2 apuestas deportivas|1×2 apuestas que
significa|1×2 en apuestas|1×2 en apuestas que significa|1×2 que
significa en apuestas|5 euros gratis apuestas|9 apuestas que siempre
ganaras|a partir de cuanto se declara apuestas|actividades de juegos de azar y apuestas|ad apuestas deportivas|aleksandre topuria ufc apuestas|algoritmo para ganar apuestas deportivas|america apuestas|análisis nba apuestas|aplicacion android apuestas deportivas|aplicacion apuestas
deportivas|aplicacion apuestas deportivas android|aplicación de apuestas online|aplicacion para hacer
apuestas|aplicacion para hacer apuestas de futbol|aplicación para hacer apuestas de fútbol|aplicaciones apuestas deportivas android|aplicaciones apuestas deportivas gratis|aplicaciones
de apuestas android|aplicaciones de apuestas de fútbol|aplicaciones de apuestas deportivas|aplicaciones de apuestas deportivas peru|aplicaciones de apuestas
deportivas perú|aplicaciones de apuestas en colombia|aplicaciones de apuestas
gratis|aplicaciones de apuestas online|aplicaciones
de apuestas seguras|aplicaciones de apuestas sin dinero|aplicaciones para hacer apuestas|apostar seguro apuestas
deportivas|app android apuestas deportivas|app apuestas|app
apuestas android|app apuestas de futbol|app apuestas deportivas|app
apuestas deportivas android|app apuestas deportivas argentina|app
apuestas deportivas colombia|app apuestas deportivas ecuador|app apuestas deportivas españa|app apuestas deportivas gratis|app apuestas entre
amigos|app apuestas futbol|app apuestas gratis|app apuestas sin dinero|app
casa de apuestas|app casas de apuestas|app control apuestas|app de apuestas|app
de apuestas android|app de apuestas casino|app de apuestas colombia|app de apuestas con bono de bienvenida|app de apuestas de futbol|app de apuestas deportivas|app de apuestas deportivas android|app de apuestas deportivas argentina|app de apuestas deportivas colombia|app de apuestas
deportivas en españa|app de apuestas deportivas peru|app de apuestas deportivas perú|app de apuestas
deportivas sin dinero|app de apuestas ecuador|app de apuestas en colombia|app de apuestas en españa|app de apuestas en venezuela|app de apuestas futbol|app de apuestas gratis|app de apuestas online|app de apuestas para android|app de apuestas para ganar dinero|app de apuestas
peru|app de apuestas reales|app de casas de apuestas|app marca apuestas android|app moviles
de apuestas|app para apuestas|app para apuestas de futbol|app para apuestas deportivas|app para
apuestas deportivas en español|app para ganar
apuestas deportivas|app para hacer apuestas|app para hacer apuestas deportivas|app para
hacer apuestas entre amigos|app para llevar control de apuestas|app pronosticos apuestas deportivas|app versus apuestas|apps apuestas mundial|apps de apuestas|apps de
apuestas con bono de bienvenida|apps de apuestas de futbol|apps de apuestas
deportivas peru|apps de apuestas mexico|apps para apuestas|aprender a hacer apuestas deportivas|aprender hacer apuestas deportivas|apuesta
del dia apuestas deportivas|apuestas 10 euros gratis|apuestas 100 seguras|apuestas 1×2|apuestas 1X2|apuestas 2 division|apuestas 3 division|apuestas
a caballos|apuestas a carreras de caballos|apuestas a
colombia|apuestas a corners|apuestas a ganar|apuestas a jugadores
nba|apuestas a la baja|apuestas a la nfl|apuestas al
barcelona|apuestas al dia|apuestas al empate|apuestas al mundial|apuestas al tenis wta|apuestas alaves
barcelona|apuestas alcaraz hoy|apuestas alemania españa|apuestas alonso campeon del mundo|apuestas altas
y bajas|apuestas altas y bajas nfl|apuestas ambos equipos marcan|apuestas america|apuestas android|apuestas anillo nba|apuestas antes del mundial|apuestas anticipadas|apuestas anticipadas nba|apuestas apps|apuestas arabia argentina|apuestas argentina|apuestas argentina campeon del mundo|apuestas argentina canada|apuestas argentina colombia|apuestas argentina croacia|apuestas argentina
españa|apuestas argentina francia|apuestas argentina francia cuanto paga|apuestas
argentina francia mundial|apuestas argentina gana el mundial|apuestas argentina gana mundial|apuestas argentina holanda|apuestas argentina mexico|apuestas argentina méxico|apuestas argentina
mundial|apuestas argentina online|apuestas argentina paises bajos|apuestas
argentina polonia|apuestas argentina uruguay|apuestas argentina vs australia|apuestas argentina vs
colombia|apuestas argentina vs francia|apuestas
argentina vs peru|apuestas argentinas|apuestas arsenal real madrid|apuestas ascenso a primera division|apuestas ascenso a segunda|apuestas asiaticas|apuestas asiatico|apuestas athletic|apuestas athletic atletico|apuestas athletic barça|apuestas athletic barcelona|apuestas
athletic betis|apuestas athletic manchester|apuestas athletic manchester
united|apuestas athletic osasuna|apuestas athletic real|apuestas athletic real madrid|apuestas athletic real
sociedad|apuestas athletic real sociedad final|apuestas athletic roma|apuestas athletic sevilla|apuestas athletic valencia|apuestas atletico|apuestas atletico barcelona|apuestas atletico barsa|apuestas atletico campeon champions|apuestas atletico campeon de liga|apuestas atlético copenhague|apuestas atletico de madrid|apuestas atlético
de madrid|apuestas atletico de madrid barcelona|apuestas
atletico de madrid gana la liga|apuestas atletico de madrid real
madrid|apuestas atlético de madrid real madrid|apuestas atletico
de madrid vs barcelona|apuestas atletico madrid|apuestas
atletico madrid real madrid|apuestas atletico madrid vs barcelona|apuestas atletico
real madrid|apuestas atletico real madrid champions|apuestas atletismo|apuestas bajas|apuestas baloncesto|apuestas baloncesto acb|apuestas baloncesto handicap|apuestas baloncesto hoy|apuestas baloncesto juegos olimpicos|apuestas baloncesto nba|apuestas baloncesto pronostico|apuestas baloncesto pronósticos|apuestas baloncesto
prorroga|apuestas barca|apuestas barca athletic|apuestas barca atletico|apuestas barca bayern|apuestas barca bayern munich|apuestas barca girona|apuestas barca hoy|apuestas barça hoy|apuestas barca inter|apuestas barca juventus|apuestas barca madrid|apuestas
barça madrid|apuestas barca real madrid|apuestas barca vs juve|apuestas barca vs madrid|apuestas barca vs psg|apuestas barcelona|apuestas barcelona alaves|apuestas barcelona athletic|apuestas
barcelona atletico|apuestas barcelona atletico de
madrid|apuestas barcelona atlético de madrid|apuestas barcelona atletico madrid|apuestas barcelona bayern|apuestas barcelona betis|apuestas
barcelona campeon de liga|apuestas barcelona celta|apuestas barcelona espanyol|apuestas barcelona gana la champions|apuestas barcelona
girona|apuestas barcelona granada|apuestas barcelona hoy|apuestas barcelona inter|apuestas barcelona madrid|apuestas barcelona osasuna|apuestas barcelona
psg|apuestas barcelona real madrid|apuestas barcelona real
sociedad|apuestas barcelona sevilla|apuestas barcelona valencia|apuestas barcelona villarreal|apuestas barcelona
vs atletico madrid|apuestas barcelona vs madrid|apuestas barcelona
vs real madrid|apuestas barsa madrid|apuestas basket hoy|apuestas bayern barcelona|apuestas bayern vs barcelona|apuestas beisbol|apuestas
béisbol|apuestas beisbol mlb|apuestas beisbol pronosticos|apuestas beisbol venezolano|apuestas betis|apuestas betis – chelsea|apuestas betis barcelona|apuestas betis chelsea|apuestas betis fiorentina|apuestas betis girona|apuestas betis madrid|apuestas betis mallorca|apuestas betis real madrid|apuestas
betis real sociedad|apuestas betis sevilla|apuestas betis valencia|apuestas betis valladolid|apuestas betis
vs valencia|apuestas betplay hoy colombia|apuestas
betsson peru|apuestas bienvenida|apuestas billar online|apuestas bolivia vs colombia|apuestas bono|apuestas bono bienvenida|apuestas bono de bienvenida|apuestas bono
de bienvenida sin deposito|apuestas bono gratis|apuestas bono
sin deposito|apuestas bonos sin deposito|apuestas borussia real madrid|apuestas boxeo|apuestas boxeo de
campeonato|apuestas boxeo españa|apuestas boxeo
español|apuestas boxeo femenino olimpiadas|apuestas boxeo hoy|apuestas boxeo online|apuestas brasil colombia|apuestas brasil peru|apuestas brasil
uruguay|apuestas brasil vs colombia|apuestas brasil vs peru|apuestas caballos|apuestas caballos colocado|apuestas caballos españa|apuestas caballos hipodromo|apuestas caballos hoy|apuestas caballos madrid|apuestas caballos online|apuestas caballos sanlucar de barrameda|apuestas
caballos zarzuela|apuestas calculador|apuestas campeon|apuestas campeon champions|apuestas campeón champions|apuestas campeon champions 2025|apuestas campeon champions league|apuestas campeon conference league|apuestas campeon copa america|apuestas
campeon copa del rey|apuestas campeon de champions|apuestas campeon de la champions|apuestas campeon de liga|apuestas campeon del mundo|apuestas campeon eurocopa|apuestas campeón eurocopa|apuestas campeon europa league|apuestas
campeon f1|apuestas campeon f1 2025|apuestas campeon formula
1|apuestas campeon libertadores|apuestas campeon liga|apuestas campeon liga bbva|apuestas campeon liga
española|apuestas campeon liga santander|apuestas
campeon motogp 2025|apuestas campeon mundial|apuestas campeón mundial|apuestas campeon mundial baloncesto|apuestas campeon nba|apuestas campeón nba|apuestas campeon premier|apuestas campeon premier league|apuestas campeon roland garros|apuestas campeonato f1|apuestas campeonatos de futbol|apuestas carrera
de caballos|apuestas carrera de caballos hoy|apuestas
carrera de caballos nocturnas|apuestas carrera de galgos fin de semana|apuestas carrera de galgos hoy|apuestas
carrera de galgos nocturnas|apuestas carreras caballos|apuestas
carreras caballos sanlucar|apuestas carreras de
caballos|apuestas carreras de caballos en directo|apuestas carreras de caballos en vivo|apuestas
carreras de caballos españa|apuestas carreras de caballos hoy|apuestas carreras de caballos nacionales|apuestas carreras de caballos nocturnas|apuestas carreras de caballos online|apuestas
carreras de caballos sanlucar|apuestas carreras de caballos sanlúcar|apuestas carreras
de galgos|apuestas carreras de galgos en vivo|apuestas carreras de galgos nocturnas|apuestas carreras de galgos pre partido|apuestas casino|apuestas casino
barcelona|apuestas casino futbol|apuestas casino gran madrid|apuestas casino
gratis|apuestas casino madrid|apuestas casino online|apuestas casino online argentina|apuestas casinos|apuestas casinos online|apuestas celta|apuestas celta barcelona|apuestas celta betis|apuestas celta eibar|apuestas celta espanyol|apuestas
celta granada|apuestas celta madrid|apuestas celta manchester|apuestas celta real madrid|apuestas champion league|apuestas champions foro|apuestas champions hoy|apuestas champions league|apuestas champions league – pronósticos|apuestas champions league
2025|apuestas champions league hoy|apuestas champions league pronosticos|apuestas champions league pronósticos|apuestas champions pronosticos|apuestas chelsea barcelona|apuestas chelsea betis|apuestas chile|apuestas chile peru|apuestas chile venezuela|apuestas chile vs colombia|apuestas chile vs uruguay|apuestas ciclismo|apuestas ciclismo en vivo|apuestas ciclismo femenino|apuestas ciclismo tour
francia|apuestas ciclismo vuelta|apuestas ciclismo vuelta a españa|apuestas ciclismo vuelta españa|apuestas city madrid|apuestas city real madrid|apuestas clasico|apuestas clasico
español|apuestas clasico real madrid barcelona|apuestas clasificacion mundial|apuestas colombia|apuestas colombia argentina|apuestas colombia brasil|apuestas colombia paraguay|apuestas colombia uruguay|apuestas colombia vs argentina|apuestas
colombia vs brasil|apuestas combinadas|apuestas combinadas como funcionan|apuestas combinadas
de futbol|apuestas combinadas de fútbol|apuestas combinadas foro|apuestas combinadas futbol|apuestas
combinadas hoy|apuestas combinadas mismo partido|apuestas
combinadas mundial|apuestas combinadas nba|apuestas combinadas para esta semana|apuestas combinadas para hoy|apuestas combinadas para mañana|apuestas combinadas pronosticos|apuestas combinadas recomendadas|apuestas combinadas seguras|apuestas combinadas seguras para hoy|apuestas combinadas
seguras para mañana|apuestas como ganar|apuestas comparador|apuestas con bono de
bienvenida|apuestas con dinero ficticio|apuestas con dinero real|apuestas con dinero virtual|apuestas con handicap|apuestas con handicap asiatico|apuestas
con handicap baloncesto|apuestas con mas probabilidades de ganar|apuestas con paypal|apuestas con tarjeta de credito|apuestas con tarjeta
de debito|apuestas consejos|apuestas copa|apuestas copa
africa|apuestas copa america|apuestas copa américa|apuestas copa argentina|apuestas copa
brasil|apuestas copa davis|apuestas copa de europa|apuestas copa del mundo|apuestas copa
del rey|apuestas copa del rey baloncesto|apuestas copa del rey final|apuestas copa del rey futbol|apuestas copa del rey ganador|apuestas copa del rey
hoy|apuestas copa del rey pronosticos|apuestas copa del rey pronósticos|apuestas copa europa|apuestas copa italia|apuestas copa
libertadores|apuestas copa mundial de hockey|apuestas copa rey|apuestas copa sudamericana|apuestas
corners|apuestas corners hoy|apuestas croacia argentina|apuestas cuartos eurocopa|apuestas cuotas|apuestas cuotas altas|apuestas cuotas bajas|apuestas de 1 euro|apuestas
de baloncesto|apuestas de baloncesto hoy|apuestas de baloncesto nba|apuestas de baloncesto para
hoy|apuestas de beisbol|apuestas de beisbol para hoy|apuestas
de blackjack en linea|apuestas de boxeo|apuestas de boxeo canelo|apuestas de boxeo en las vegas|apuestas
de boxeo hoy|apuestas de boxeo online|apuestas de caballo|apuestas de caballos|apuestas de caballos como funciona|apuestas de caballos como
se juega|apuestas de caballos en colombia|apuestas de caballos en españa|apuestas de caballos en linea|apuestas de caballos españa|apuestas de caballos ganador y colocado|apuestas de caballos internacionales|apuestas
de caballos juegos|apuestas de caballos online|apuestas de caballos online en venezuela|apuestas de caballos por internet|apuestas de caballos pronosticos|apuestas
de caballos pronósticos|apuestas de carrera de caballos|apuestas de carreras de
caballos|apuestas de carreras de caballos online|apuestas de
casino|apuestas de casino online|apuestas de casino por internet|apuestas de champions league|apuestas de
ciclismo|apuestas de colombia|apuestas de copa america|apuestas de corners|apuestas de deportes en linea|apuestas
de deportes online|apuestas de dinero|apuestas de esports|apuestas de eurocopa|apuestas de
europa league|apuestas de f1|apuestas de formula 1|apuestas de futbol|apuestas de fútbol|apuestas de futbol
app|apuestas de futbol argentina|apuestas de futbol colombia|apuestas de futbol en colombia|apuestas de futbol en directo|apuestas de futbol en linea|apuestas de futbol en vivo|apuestas de futbol español|apuestas
de futbol gratis|apuestas de futbol hoy|apuestas de futbol mundial|apuestas de futbol online|apuestas de fútbol online|apuestas de
futbol para hoy|apuestas de fútbol para hoy|apuestas de futbol para
hoy seguras|apuestas de futbol para mañana|apuestas de futbol peru|apuestas de futbol pronosticos|apuestas de
fútbol pronósticos|apuestas de futbol seguras|apuestas
de futbol seguras para hoy|apuestas de futbol sin dinero|apuestas de galgos|apuestas de galgos como ganar|apuestas de galgos en directo|apuestas
de galgos online|apuestas de galgos trucos|apuestas de golf|apuestas de hockey|apuestas de hockey sobre hielo|apuestas de hoy|apuestas de hoy seguras|apuestas de juego|apuestas de juegos|apuestas de juegos deportivos|apuestas de juegos online|apuestas de
la champions league|apuestas de la copa américa|apuestas de la eurocopa|apuestas de la europa league|apuestas de la liga|apuestas de la liga bbva|apuestas
de la liga española|apuestas de la nba|apuestas de la nfl|apuestas de la ufc|apuestas de mlb|apuestas de nba|apuestas de nba para hoy|apuestas de
partidos|apuestas de partidos de futbol|apuestas de peleas ufc|apuestas de perros
en vivo|apuestas de perros virtuales|apuestas de peru|apuestas de sistema|apuestas de sistema como funciona|apuestas de sistema explicacion|apuestas de sistema explicación|apuestas de tenis|apuestas de tenis de
mesa|apuestas de tenis en directo|apuestas de tenis hoy|apuestas de tenis para hoy|apuestas de tenis pronosticos|apuestas de tenis seguras|apuestas
de todo tipo|apuestas de ufc|apuestas de ufc hoy|apuestas del boxeo|apuestas del clasico|apuestas
del clasico real madrid barca|apuestas del dia|apuestas del día|apuestas del dia de hoy|apuestas
del dia deportivas|apuestas del dia futbol|apuestas del mundial|apuestas del partido de hoy|apuestas
del real madrid|apuestas del rey|apuestas del sistema|apuestas deporte|apuestas
deportes|apuestas deportiva|apuestas deportivas|apuestas deportivas 1 euro|apuestas deportivas 10 euros gratis|apuestas deportivas
100 seguras|apuestas deportivas 1×2|apuestas deportivas
android|apuestas deportivas app|apuestas deportivas apps|apuestas deportivas
argentina|apuestas deportivas argentina futbol|apuestas
deportivas argentina legal|apuestas deportivas atletico de madrid|apuestas
deportivas baloncesto|apuestas deportivas barca madrid|apuestas deportivas barcelona|apuestas deportivas beisbol|apuestas
deportivas bono|apuestas deportivas bono bienvenida|apuestas deportivas bono de bienvenida|apuestas deportivas bono sin deposito|apuestas deportivas bonos de bienvenida|apuestas deportivas boxeo|apuestas deportivas caballos|apuestas deportivas calculadora|apuestas deportivas campeon liga|apuestas deportivas casino|apuestas
deportivas casino barcelona|apuestas deportivas casino online|apuestas deportivas cerca de mi|apuestas deportivas champions league|apuestas deportivas chile|apuestas deportivas ciclismo|apuestas deportivas colombia|apuestas deportivas com|apuestas deportivas com foro|apuestas deportivas com pronosticos|apuestas deportivas combinadas|apuestas deportivas combinadas para hoy|apuestas deportivas como se juega|apuestas deportivas comparador|apuestas deportivas con bono gratis|apuestas deportivas con bonos gratis|apuestas
deportivas con dinero ficticio|apuestas deportivas con paypal|apuestas deportivas con puntos virtuales|apuestas
deportivas consejos|apuestas deportivas consejos para ganar|apuestas deportivas copa america|apuestas deportivas copa del rey|apuestas deportivas copa libertadores|apuestas deportivas copa mundial|apuestas
deportivas corners|apuestas deportivas cual es la mejor|apuestas deportivas cuotas altas|apuestas deportivas de baloncesto|apuestas
deportivas de boxeo|apuestas deportivas de colombia|apuestas deportivas de futbol|apuestas deportivas de
nba|apuestas deportivas de nhl|apuestas deportivas de peru|apuestas deportivas
de tenis|apuestas deportivas del dia|apuestas deportivas dinero ficticio|apuestas deportivas directo|apuestas deportivas doble
oportunidad|apuestas deportivas en argentina|apuestas deportivas en chile|apuestas deportivas en colombia|apuestas deportivas
en directo|apuestas deportivas en españa|apuestas deportivas en español|apuestas deportivas en linea|apuestas deportivas en línea|apuestas deportivas en peru|apuestas deportivas en perú|apuestas
deportivas en sevilla|apuestas deportivas
en uruguay|apuestas deportivas en vivo|apuestas deportivas es|apuestas deportivas es pronosticos|apuestas
deportivas españa|apuestas deportivas españolas|apuestas deportivas esports|apuestas deportivas estadisticas|apuestas deportivas
estrategias|apuestas deportivas estrategias seguras|apuestas deportivas eurocopa|apuestas deportivas
europa league|apuestas deportivas f1|apuestas deportivas faciles de ganar|apuestas deportivas formula 1|apuestas deportivas foro|apuestas deportivas foro futbol|apuestas deportivas foro tenis|apuestas deportivas francia argentina|apuestas deportivas futbol|apuestas deportivas fútbol|apuestas deportivas futbol argentino|apuestas
deportivas futbol colombia|apuestas deportivas futbol español|apuestas deportivas gana|apuestas deportivas ganadas|apuestas deportivas ganar dinero seguro|apuestas deportivas gane|apuestas
deportivas golf|apuestas deportivas gratis|apuestas deportivas gratis con premios|apuestas deportivas gratis
hoy|apuestas deportivas gratis sin deposito|apuestas deportivas handicap|apuestas
deportivas handicap asiatico|apuestas deportivas hoy|apuestas deportivas impuestos|apuestas deportivas interior argentina|apuestas deportivas juegos olimpicos|apuestas deportivas
la liga|apuestas deportivas legales|apuestas deportivas legales en colombia|apuestas deportivas libres de impuestos|apuestas deportivas licencia españa|apuestas deportivas
liga española|apuestas deportivas listado|apuestas deportivas listado clasico|apuestas deportivas
madrid|apuestas deportivas mas seguras|apuestas deportivas mejor
pagadas|apuestas deportivas mejores|apuestas deportivas mejores app|apuestas
deportivas mejores casas|apuestas deportivas mejores cuotas|apuestas deportivas mejores paginas|apuestas deportivas mexico|apuestas
deportivas méxico|apuestas deportivas mlb|apuestas deportivas
mlb hoy|apuestas deportivas multiples|apuestas deportivas mundial|apuestas deportivas murcia|apuestas deportivas nba|apuestas deportivas nba hoy|apuestas deportivas nfl|apuestas deportivas nhl|apuestas deportivas
nuevas|apuestas deportivas ofertas|apuestas deportivas online|apuestas deportivas online
argentina|apuestas deportivas online chile|apuestas deportivas online colombia|apuestas deportivas online en colombia|apuestas deportivas online españa|apuestas deportivas online mexico|apuestas deportivas online paypal|apuestas deportivas online
peru|apuestas deportivas online por internet|apuestas deportivas
pago paypal|apuestas deportivas para ganar dinero|apuestas deportivas para hoy|apuestas deportivas para hoy pronosticos|apuestas deportivas partido suspendido|apuestas deportivas
partidos de hoy|apuestas deportivas paypal|apuestas deportivas peru|apuestas deportivas perú|apuestas deportivas peru
vs ecuador|apuestas deportivas predicciones|apuestas deportivas promociones|apuestas deportivas pronostico|apuestas deportivas pronóstico|apuestas deportivas pronostico hoy|apuestas
deportivas pronosticos|apuestas deportivas pronósticos|apuestas
deportivas pronosticos expertos|apuestas deportivas pronosticos gratis|apuestas deportivas pronosticos
nba|apuestas deportivas pronosticos tenis|apuestas deportivas que aceptan paypal|apuestas
deportivas real madrid|apuestas deportivas regalo bienvenida|apuestas
deportivas resultado exacto|apuestas deportivas resultados|apuestas deportivas rugby|apuestas
deportivas seguras|apuestas deportivas seguras foro|apuestas deportivas seguras hoy|apuestas deportivas seguras
para hoy|apuestas deportivas seguras telegram|apuestas deportivas sevilla|apuestas deportivas simulador eurocopa|apuestas deportivas sin deposito|apuestas deportivas
sin deposito inicial|apuestas deportivas sin dinero|apuestas deportivas sin dinero
real|apuestas deportivas sin registro|apuestas deportivas stake|apuestas deportivas stake
10|apuestas deportivas telegram españa|apuestas deportivas tenis|apuestas deportivas tenis de
mesa|apuestas deportivas tenis foro|apuestas deportivas tenis hoy|apuestas deportivas tips|apuestas deportivas tipster|apuestas deportivas ufc|apuestas deportivas uruguay|apuestas deportivas
valencia|apuestas deportivas valencia barcelona|apuestas deportivas venezuela|apuestas
deportivas virtuales|apuestas deportivas y casino|apuestas deportivas y
casino online|apuestas deportivas.com|apuestas deportivas.com foro|apuestas deportivas.es|apuestas deportivos pronosticos|apuestas deposito minimo 1 euro|apuestas descenso
a segunda|apuestas descenso a segunda b|apuestas descenso la liga|apuestas descenso
primera division|apuestas descenso segunda|apuestas dia|apuestas diarias seguras|apuestas dinero|apuestas dinero ficticio|apuestas dinero real|apuestas dinero virtual|apuestas directas|apuestas directo|apuestas directo futbol|apuestas division de honor
juvenil|apuestas dnb|apuestas doble oportunidad|apuestas doble
resultado|apuestas dobles|apuestas dobles y triples|apuestas dortmund
barcelona|apuestas draft nba|apuestas draft nfl|apuestas ecuador vs argentina|apuestas ecuador vs venezuela|apuestas
egipto uruguay|apuestas el clasico|apuestas elecciones venezuela|apuestas empate|apuestas en baloncesto|apuestas en barcelona|apuestas en beisbol|apuestas en boxeo|apuestas en caballos|apuestas
en carreras de caballos|apuestas en casino|apuestas en casino online|apuestas en casinos|apuestas en casinos online|apuestas en chile|apuestas en ciclismo|apuestas en colombia|apuestas
en colombia de futbol|apuestas en directo|apuestas
en directo futbol|apuestas en directo pronosticos|apuestas en el futbol|apuestas en el tenis|apuestas en españa|apuestas en esports|apuestas en eventos deportivos virtuales|apuestas en golf|apuestas en juegos|apuestas en la champions league|apuestas en la
eurocopa|apuestas en la liga|apuestas en la nba|apuestas en la nfl|apuestas en las vegas mlb|apuestas en las vegas nfl|apuestas en linea|apuestas en línea|apuestas en linea
argentina|apuestas en linea boxeo|apuestas en linea
chile|apuestas en linea colombia|apuestas en línea de fútbol|apuestas en linea
deportivas|apuestas en linea españa|apuestas en linea estados unidos|apuestas
en linea futbol|apuestas en linea mexico|apuestas en línea méxico|apuestas en linea mundial|apuestas en linea peru|apuestas en linea usa|apuestas en los esports|apuestas
en madrid|apuestas en méxico|apuestas en mexico
online|apuestas en nba|apuestas en partidos de futbol|apuestas en partidos
de futbol en vivo|apuestas en partidos de tenis en directo|apuestas en perú|apuestas en sevilla|apuestas
en sistema|apuestas en stake|apuestas en tenis|apuestas en tenis de
mesa|apuestas en valencia|apuestas en vivo|apuestas en vivo argentina|apuestas en vivo casino|apuestas en vivo futbol|apuestas en vivo fútbol|apuestas en vivo nba|apuestas en vivo
peru|apuestas en vivo tenis|apuestas en vivo ufc|apuestas equipo mbappe|apuestas equipos de futbol|apuestas españa|apuestas
españa alemania|apuestas españa alemania
eurocopa|apuestas españa croacia|apuestas españa eurocopa|apuestas
españa francia|apuestas españa francia eurocopa|apuestas españa gana el mundial|apuestas españa gana eurocopa|apuestas españa gana mundial|apuestas españa georgia|apuestas españa holanda|apuestas españa inglaterra|apuestas
españa inglaterra cuotas|apuestas españa inglaterra eurocopa|apuestas
españa italia|apuestas españa mundial|apuestas españa paises bajos|apuestas español|apuestas español oviedo|apuestas espanyol barcelona|apuestas espanyol
betis|apuestas espanyol villarreal|apuestas esport|apuestas esports|apuestas esports
colombia|apuestas esports españa|apuestas esports fifa|apuestas esports gratis|apuestas esports lol|apuestas esports
peru|apuestas esports valorant|apuestas estadisticas|apuestas estrategias|apuestas
euro|apuestas euro copa|apuestas eurocopa|apuestas eurocopa campeon|apuestas eurocopa españa|apuestas eurocopa favoritos|apuestas eurocopa femenina|apuestas eurocopa
final|apuestas eurocopa ganador|apuestas eurocopa hoy|apuestas eurocopa sub 21|apuestas euroliga baloncesto|apuestas euroliga pronosticos|apuestas europa league|apuestas europa league hoy|apuestas europa league pronosticos|apuestas europa league pronósticos|apuestas
euros|apuestas f1 abu dhabi|apuestas f1 bahrein|apuestas f1 canada|apuestas f1 china|apuestas f1 cuotas|apuestas
f1 hoy|apuestas f1 las vegas|apuestas f1 miami|apuestas f1
monaco|apuestas faciles de ganar|apuestas fáciles de ganar|apuestas
faciles para ganar|apuestas favoritas|apuestas favorito champions|apuestas favoritos champions|apuestas favoritos eurocopa|apuestas favoritos mundial|apuestas fc barcelona|apuestas final champions cuotas|apuestas final champions league|apuestas final champions peru|apuestas final copa|apuestas
final copa america|apuestas final copa de europa|apuestas final copa del
rey|apuestas final copa europa|apuestas final copa libertadores|apuestas final copa
rey|apuestas final de copa|apuestas final de copa del rey|apuestas
final del mundial|apuestas final euro|apuestas final eurocopa|apuestas final
europa league|apuestas final libertadores|apuestas final mundial|apuestas final nba|apuestas final rugby|apuestas final uefa europa league|apuestas final.mundial|apuestas
finales de conferencia nfl|apuestas finales nba|apuestas fiorentina
betis|apuestas formula|apuestas formula 1|apuestas fórmula 1|apuestas fórmula 1 pronósticos|apuestas
formula uno|apuestas foro|apuestas foro nba|apuestas francia
argentina|apuestas francia españa|apuestas futbol|apuestas fútbol|apuestas futbol americano|apuestas futbol americano nfl|apuestas
futbol argentina|apuestas futbol argentino|apuestas futbol champions league|apuestas futbol chile|apuestas futbol colombia|apuestas futbol consejos|apuestas
futbol en directo|apuestas fútbol en directo|apuestas
futbol en vivo|apuestas fútbol en vivo|apuestas futbol españa|apuestas futbol español|apuestas fútbol español|apuestas futbol eurocopa|apuestas futbol femenino|apuestas futbol foro|apuestas futbol gratis|apuestas futbol hoy|apuestas fútbol hoy|apuestas futbol juegos olimpicos|apuestas futbol mexico|apuestas futbol mundial|apuestas futbol online|apuestas futbol para hoy|apuestas futbol peru|apuestas futbol pronosticos|apuestas futbol sala|apuestas futbol telegram|apuestas
futbol virtual|apuestas galgos|apuestas galgos
en directo|apuestas galgos hoy|apuestas galgos online|apuestas galgos pronosticos|apuestas galgos
trucos|apuestas gana|apuestas gana colombia|apuestas
gana resultados|apuestas ganadas|apuestas ganadas hoy|apuestas ganador champions league|apuestas ganador copa america|apuestas ganador copa del rey|apuestas
ganador copa del rey baloncesto|apuestas ganador copa libertadores|apuestas ganador de la eurocopa|apuestas ganador de la liga|apuestas
ganador del mundial|apuestas ganador eurocopa|apuestas ganador europa league|apuestas ganador f1|apuestas ganador la liga|apuestas ganador liga española|apuestas
ganador mundial|apuestas ganador mundial baloncesto|apuestas ganador mundial f1|apuestas ganador nba|apuestas
ganadores eurocopa|apuestas ganadores mundial|apuestas ganar champions|apuestas ganar eurocopa|apuestas ganar liga|apuestas
ganar mundial|apuestas ganar nba|apuestas getafe valencia|apuestas ghana
uruguay|apuestas girona|apuestas girona athletic|apuestas girona betis|apuestas girona campeon de liga|apuestas girona campeon liga|apuestas girona gana
la liga|apuestas girona real madrid|apuestas
girona real sociedad|apuestas goleador eurocopa|apuestas goleadores
eurocopa|apuestas goles asiaticos|apuestas golf|apuestas golf masters|apuestas golf
pga|apuestas granada barcelona|apuestas grand slam de tenis|apuestas
gratis|apuestas gratis casino|apuestas gratis con premios|apuestas gratis hoy|apuestas
gratis para hoy|apuestas gratis por registro|apuestas gratis puntos|apuestas gratis regalos|apuestas gratis
sin deposito|apuestas gratis sin depósito|apuestas
gratis sin ingreso|apuestas gratis sports|apuestas
gratis y ganar premios|apuestas grupo a eurocopa|apuestas grupos eurocopa|apuestas handicap|apuestas handicap asiatico|apuestas handicap baloncesto|apuestas handicap como funciona|apuestas handicap nba|apuestas handicap nfl|apuestas hipicas online|apuestas hípicas online|apuestas hipicas
venezuela|apuestas hockey|apuestas hockey hielo|apuestas hockey patines|apuestas hockey sobre hielo|apuestas holanda argentina|apuestas holanda vs argentina|apuestas hoy|apuestas
hoy champions|apuestas hoy futbol|apuestas hoy nba|apuestas hoy pronosticos|apuestas hoy seguras|apuestas impuestos|apuestas inglaterra paises bajos|apuestas inter
barca|apuestas inter barcelona|apuestas juego|apuestas
juegos|apuestas juegos en linea|apuestas juegos olimpicos|apuestas juegos olímpicos|apuestas juegos olimpicos baloncesto|apuestas juegos online|apuestas juegos virtuales|apuestas jugador
sevilla|apuestas jugadores nba|apuestas kings
league americas|apuestas la liga|apuestas la liga española|apuestas la liga hoy|apuestas la liga santander|apuestas las
vegas mlb|apuestas las vegas nba|apuestas las vegas nfl|apuestas league of legends mundial|apuestas legal|apuestas legales|apuestas legales en colombia|apuestas legales en españa|apuestas legales en estados unidos|apuestas legales españa|apuestas leganes betis|apuestas
libertadores|apuestas licencia|apuestas liga 1 peru|apuestas liga argentina|apuestas liga bbva pronosticos|apuestas liga de campeones|apuestas liga de
campeones de baloncesto|apuestas liga de campeones de hockey|apuestas
liga españa|apuestas liga española|apuestas liga santander pronosticos|apuestas ligas de futbol|apuestas linea|apuestas linea de gol|apuestas liverpool
barcelona|apuestas liverpool real madrid|apuestas lol mundial|apuestas madrid|apuestas madrid
arsenal|apuestas madrid atletico|apuestas madrid atletico champions|apuestas madrid barca|apuestas madrid barça|apuestas madrid
barca hoy|apuestas madrid barca supercopa|apuestas madrid
barcelona|apuestas madrid barsa|apuestas madrid bayern|apuestas madrid betis|apuestas madrid borussia|apuestas madrid campeon champions|apuestas madrid celta|apuestas
madrid city|apuestas madrid dortmund|apuestas madrid gana la liga|apuestas madrid gana liga|apuestas madrid hoy|apuestas madrid liverpool|apuestas madrid osasuna|apuestas madrid sevilla|apuestas madrid
valencia|apuestas madrid vs arsenal|apuestas madrid vs
barcelona|apuestas mallorca osasuna|apuestas mallorca
real sociedad|apuestas manchester athletic|apuestas
manchester city real madrid|apuestas mas faciles de ganar|apuestas mas seguras|apuestas mas seguras para hoy|apuestas masters de golf|apuestas masters de tenis|apuestas maximo goleador eurocopa|apuestas maximo
goleador mundial|apuestas mejor jugador eurocopa|apuestas mejores casinos
online|apuestas mexico|apuestas méxico|apuestas mexico polonia|apuestas méxico polonia|apuestas mlb|apuestas
mlb hoy|apuestas mlb las vegas|apuestas mlb para
hoy|apuestas mlb pronosticos|apuestas mlb usa|apuestas mma
ufc|apuestas momios|apuestas multiples|apuestas múltiples|apuestas multiples
como funcionan|apuestas multiples el gordo|apuestas multiples futbol|apuestas mundial|apuestas mundial
2026|apuestas mundial baloncesto|apuestas mundial balonmano|apuestas mundial brasil|apuestas mundial campeon|apuestas mundial ciclismo|apuestas mundial clubes|apuestas mundial de baloncesto|apuestas mundial de ciclismo|apuestas mundial de
clubes|apuestas mundial de futbol|apuestas mundial de fútbol|apuestas mundial de rugby|apuestas mundial f1|apuestas mundial favoritos|apuestas mundial femenino|apuestas mundial formula 1|apuestas mundial
futbol|apuestas mundial ganador|apuestas
mundial lol|apuestas mundial moto gp|apuestas mundial
motogp|apuestas mundial rugby|apuestas mundial sub 17|apuestas mundiales|apuestas
mundialistas|apuestas mvp eurocopa|apuestas mvp nba|apuestas mvp nfl|apuestas nacionales de colombia|apuestas
nba|apuestas nba all star|apuestas nba campeon|apuestas
nba consejos|apuestas nba esta noche|apuestas nba finals|apuestas nba gratis|apuestas nba hoy|apuestas nba
hoy jugadores|apuestas nba hoy pronosticos|apuestas nba para hoy|apuestas nba playoffs|apuestas nba pronosticos|apuestas
nba pronósticos|apuestas nba pronosticos hoy|apuestas nba tipster|apuestas nfl|apuestas nfl
hoy|apuestas nfl las vegas|apuestas nfl playoffs|apuestas nfl
pronosticos|apuestas nfl pronósticos|apuestas nfl semana 4|apuestas nfl
super bowl|apuestas nhl|apuestas nhl pronosticos|apuestas octavos eurocopa|apuestas ofertas|apuestas online|apuestas online argentina|apuestas online argentina legal|apuestas online bono|apuestas
online bono bienvenida|apuestas online boxeo|apuestas online caballos|apuestas online carreras de caballos|apuestas online casino|apuestas online champions league|apuestas online chile|apuestas
online ciclismo|apuestas online colombia|apuestas online
comparativa|apuestas online con paypal|apuestas online de caballos|apuestas online deportivas|apuestas online en argentina|apuestas online
en peru|apuestas online espana|apuestas online españa|apuestas online esports|apuestas online
foro|apuestas online futbol|apuestas online futbol españa|apuestas
online golf|apuestas online gratis|apuestas online gratis
sin deposito|apuestas online juegos|apuestas online mexico|apuestas online mma|apuestas online movil|apuestas online nba|apuestas online net|apuestas
online nuevas|apuestas online opiniones|apuestas online paypal|apuestas online peru|apuestas online seguras|apuestas online
sin dinero|apuestas online sin registro|apuestas online
tenis|apuestas online ufc|apuestas online uruguay|apuestas online venezuela|apuestas open britanico golf|apuestas
osasuna athletic|apuestas osasuna barcelona|apuestas osasuna real
madrid|apuestas osasuna sevilla|apuestas osasuna valencia|apuestas over|apuestas over 2.5|apuestas over under|apuestas paginas|apuestas pago anticipado|apuestas paises bajos ecuador|apuestas paises bajos inglaterra|apuestas países bajos qatar|apuestas para boxeo|apuestas para champions
league|apuestas para el clasico|apuestas para
el dia de hoy|apuestas para el mundial|apuestas para el partido de hoy|apuestas
para eurocopa|apuestas para europa league|apuestas para futbol|apuestas para ganar|apuestas para ganar dinero|apuestas para ganar dinero facil|apuestas
para ganar en la ruleta|apuestas para ganar la champions|apuestas para ganar la eurocopa|apuestas
para ganar la europa league|apuestas para ganar la
liga|apuestas para ganar siempre|apuestas para hacer|apuestas
para hoy|apuestas para hoy de futbol|apuestas para hoy europa league|apuestas para hoy futbol|apuestas para juegos|apuestas
para la champions league|apuestas para la copa del rey|apuestas para la eurocopa|apuestas para la
europa league|apuestas para la final de la eurocopa|apuestas para la nba hoy|apuestas
para los partidos de hoy|apuestas para partidos de hoy|apuestas para ufc|apuestas partido|apuestas partido aplazado|apuestas partido champions|apuestas partido colombia|apuestas partido españa marruecos|apuestas
partido mundial|apuestas partido suspendido|apuestas partidos|apuestas partidos champions league|apuestas partidos csgo|apuestas partidos de futbol|apuestas partidos de futbol hoy|apuestas partidos de hoy|apuestas partidos eurocopa|apuestas partidos futbol|apuestas partidos hoy|apuestas partidos
mundial|apuestas paypal|apuestas peleas de boxeo|apuestas peru|apuestas perú|apuestas peru brasil|apuestas peru chile|apuestas peru
paraguay|apuestas peru uruguay|apuestas peru vs chile|apuestas peru vs colombia|apuestas pichichi eurocopa|apuestas plataforma|apuestas playoff|apuestas playoff ascenso|apuestas playoff ascenso a
primera|apuestas playoff nba|apuestas playoff segunda|apuestas playoff segunda
b|apuestas playoffs nba|apuestas playoffs nfl|apuestas polonia argentina|apuestas por argentina|apuestas por internet mexico|apuestas por internet para ganar dinero|apuestas por paypal|apuestas por ronda boxeo|apuestas por sistema|apuestas portugal uruguay|apuestas pre partido|apuestas predicciones|apuestas predicciones
futbol|apuestas primera division|apuestas primera division españa|apuestas promociones|apuestas pronostico|apuestas pronosticos|apuestas pronosticos deportivos|apuestas
pronosticos deportivos tenis|apuestas pronosticos futbol|apuestas pronosticos gratis|apuestas
pronosticos nba|apuestas pronosticos tenis|apuestas prorroga|apuestas psg barca|apuestas psg barcelona|apuestas puntos por
tarjetas|apuestas puntos tarjetas|apuestas que aceptan paypal|apuestas que es handicap|apuestas que
puedes hacer con tu novia|apuestas que siempre ganaras|apuestas que significa|apuestas quien bajara a segunda|apuestas
quién bajara a segunda|apuestas quien gana el mundial|apuestas quien gana eurocopa|apuestas quien gana la champions|apuestas quien gana
la eurocopa|apuestas quien gana la liga|apuestas quien ganara el mundial|apuestas quién ganará el
mundial|apuestas quien ganara la champions|apuestas quien ganara la eurocopa|apuestas quien ganara la liga|apuestas rayo barcelona|apuestas real madrid|apuestas
real madrid arsenal|apuestas real madrid athletic|apuestas real
madrid atletico|apuestas real madrid atletico champions|apuestas real madrid atletico de madrid|apuestas real madrid atlético de madrid|apuestas real madrid atletico madrid|apuestas real madrid
barcelona|apuestas real madrid bayern|apuestas real madrid
betis|apuestas real madrid borussia|apuestas real madrid campeon champions|apuestas real
madrid celta|apuestas real madrid champions|apuestas real madrid city|apuestas real madrid girona|apuestas real madrid
hoy|apuestas real madrid liverpool|apuestas real madrid manchester city|apuestas
real madrid osasuna|apuestas real madrid real sociedad|apuestas real madrid valencia|apuestas real madrid villarreal|apuestas real madrid
vs arsenal|apuestas real madrid vs atletico|apuestas real madrid vs atlético|apuestas real
madrid vs atletico madrid|apuestas real madrid vs barcelona|apuestas real madrid vs betis|apuestas real madrid
vs sevilla|apuestas real madrid vs valencia|apuestas real sociedad|apuestas real sociedad athletic|apuestas real sociedad barcelona|apuestas
real sociedad betis|apuestas real sociedad psg|apuestas real sociedad real madrid|apuestas
real sociedad valencia|apuestas recomendadas hoy|apuestas
regalo de bienvenida|apuestas registro|apuestas resultado exacto|apuestas resultados|apuestas resultados eurocopa|apuestas retirada
tenis|apuestas roma barcelona|apuestas roma sevilla|apuestas rugby|apuestas rugby mundial|apuestas rugby world
cup|apuestas ruleta seguras|apuestas segunda|apuestas segunda b|apuestas segunda division|apuestas segunda división|apuestas segunda division b|apuestas segunda division españa|apuestas seguras|apuestas seguras baloncesto|apuestas
seguras calculadora|apuestas seguras en la ruleta|apuestas seguras eurocopa|apuestas
seguras foro|apuestas seguras futbol|apuestas seguras futbol hoy|apuestas seguras gratis|apuestas seguras hoy|apuestas seguras hoy futbol|apuestas seguras nba|apuestas seguras nba hoy|apuestas seguras
para este fin de semana|apuestas seguras para ganar dinero|apuestas
seguras para hoy|apuestas seguras para hoy fútbol|apuestas seguras para hoy pronósticos|apuestas seguras para mañana|apuestas seguras ruleta|apuestas seguras telegram|apuestas seguras tenis|apuestas semifinales eurocopa|apuestas senegal
paises bajos|apuestas sevilla|apuestas sevilla athletic|apuestas
sevilla atletico de madrid|apuestas sevilla barcelona|apuestas sevilla betis|apuestas sevilla campeon liga|apuestas sevilla celta|apuestas sevilla gana la liga|apuestas sevilla
girona|apuestas sevilla inter|apuestas sevilla jugador|apuestas sevilla juventus|apuestas sevilla
leganes|apuestas sevilla madrid|apuestas sevilla manchester united|apuestas sevilla osasuna|apuestas sevilla
real madrid|apuestas sevilla real sociedad|apuestas sevilla roma|apuestas
sevilla valencia|apuestas significa|apuestas simples ejemplos|apuestas
simples o combinadas|apuestas sin deposito|apuestas sin deposito inicial|apuestas sin deposito minimo|apuestas
sin dinero|apuestas sin dinero real|apuestas sin empate|apuestas sin empate que significa|apuestas sin ingreso minimo|apuestas sin registro|apuestas sistema|apuestas sistema calculadora|apuestas sistema como funciona|apuestas sistema trixie|apuestas sociedad|apuestas sorteo copa del rey|apuestas stake|apuestas stake
10|apuestas stake 10 hoy|apuestas super bowl favorito|apuestas super
rugby|apuestas supercopa españa|apuestas superliga argentina|apuestas tarjeta
roja|apuestas tarjetas|apuestas tarjetas amarillas|apuestas tenis|apuestas tenis atp|apuestas tenis consejos|apuestas tenis copa davis|apuestas tenis de mesa|apuestas tenis de mesa pronosticos|apuestas tenis en vivo|apuestas
tenis femenino|apuestas tenis hoy|apuestas tenis itf|apuestas tenis pronosticos|apuestas tenis
pronósticos|apuestas tenis retirada|apuestas tenis roland garros|apuestas tenis seguras|apuestas tenis wimbledon|apuestas tenis wta|apuestas tercera division|apuestas tercera division españa|apuestas tipos|apuestas tips|apuestas tipster|apuestas tipster para
hoy|apuestas topuria holloway cuotas|apuestas torneos de golf|apuestas torneos
de tenis|apuestas trucos|apuestas uefa champions league|apuestas
uefa europa league|apuestas ufc|apuestas ufc chile|apuestas ufc como funciona|apuestas
ufc hoy|apuestas ufc ilia topuria|apuestas ufc online|apuestas ufc pronósticos|apuestas ufc telegram|apuestas ufc topuria|apuestas under over|apuestas unionistas villarreal|apuestas uruguay|apuestas uruguay colombia|apuestas uruguay corea|apuestas uruguay
vs colombia|apuestas us open golf|apuestas us open tenis|apuestas
valencia|apuestas valencia barcelona|apuestas valencia
betis|apuestas valencia madrid|apuestas valencia real madrid|apuestas valladolid
barcelona|apuestas valladolid valencia|apuestas valor app|apuestas valor en directo|apuestas valor galgos|apuestas venezuela|apuestas venezuela argentina|apuestas venezuela bolivia|apuestas venezuela ecuador|apuestas villarreal|apuestas
villarreal athletic|apuestas villarreal barcelona|apuestas
villarreal bayern|apuestas villarreal betis|apuestas villarreal liverpool|apuestas villarreal manchester|apuestas
villarreal manchester united|apuestas villarreal vs real madrid|apuestas virtuales|apuestas virtuales colombia|apuestas virtuales futbol|apuestas virtuales sin dinero|apuestas vivo|apuestas vuelta a españa|apuestas
vuelta españa|apuestas william hill partidos
de hoy|apuestas y casino|apuestas y casinos|apuestas y juegos de azar|apuestas y pronosticos|apuestas
y pronosticos de futbol|apuestas y pronosticos deportivos|apuestas y resultados|apuestas-deportivas|apuestas-deportivas.es pronosticos|arbitro nba apuestas|argentina apuestas|argentina colombia apuestas|argentina
croacia apuestas|argentina francia apuestas|argentina mexico apuestas|argentina peru
apuestas|argentina uruguay apuestas|argentina vs bolivia apuestas|argentina
vs chile apuestas|argentina vs colombia apuestas|argentina vs francia apuestas|argentina vs.
colombia apuestas|asi se gana en las apuestas deportivas|asiatico apuestas|asiatico en apuestas|asiaticos apuestas|athletic barcelona apuestas|athletic manchester united apuestas|athletic osasuna apuestas|athletic real madrid
apuestas|atletico barcelona apuestas|atletico de
madrid apuestas|atlético de madrid apuestas|atletico de
madrid real madrid apuestas|atletico de madrid vs barcelona apuestas|atletico madrid real madrid apuestas|atletico madrid vs real madrid apuestas|atletico real madrid apuestas|atletico vs real madrid apuestas|avisador de cuotas apuestas|bajada de cuotas apuestas|baloncesto apuestas|barbastro
barcelona apuestas|barca apuestas|barca bayern apuestas|barca inter
apuestas|barca madrid apuestas|barça madrid apuestas|barca
vs atletico apuestas|barca vs madrid apuestas|barca vs
real madrid apuestas|barcelona – real madrid apuestas|barcelona
apuestas|barcelona atletico apuestas|barcelona atletico de madrid apuestas|barcelona atletico madrid apuestas|barcelona betis apuestas|barcelona casa de apuestas|barcelona inter apuestas|barcelona psg apuestas|barcelona real madrid apuestas|barcelona real
sociedad apuestas|barcelona sevilla apuestas|barcelona valencia apuestas|barcelona vs athletic bilbao apuestas|barcelona vs atlético madrid apuestas|barcelona vs betis
apuestas|barcelona vs celta de vigo apuestas|barcelona vs
espanyol apuestas|barcelona vs girona apuestas|barcelona vs madrid apuestas|barcelona vs
real madrid apuestas|barcelona vs real sociedad apuestas|barcelona vs sevilla apuestas|barcelona vs villarreal apuestas|base de datos cuotas apuestas
deportivas|bayern real madrid apuestas|beisbol apuestas|best america apuestas|bet apuestas chile|bet apuestas en vivo|betis – chelsea
apuestas|betis apuestas|betis barcelona apuestas|betis chelsea apuestas|betis madrid apuestas|betis sevilla apuestas|betsson tu sitio de apuestas online|blog apuestas baloncesto|blog apuestas ciclismo|blog apuestas nba|blog apuestas tenis|blog de
apuestas de tenis|bono apuestas|bono apuestas deportivas|bono apuestas deportivas sin deposito|bono apuestas gratis|bono apuestas gratis sin deposito|bono
apuestas sin deposito|bono bienvenida apuestas|bono
bienvenida apuestas deportivas|bono bienvenida apuestas españa|bono bienvenida apuestas sin deposito|bono bienvenida apuestas sin depósito|bono bienvenida casa apuestas|bono bienvenida casa de apuestas|bono
bienvenida marca apuestas|bono casa apuestas|bono casa
de apuestas|bono casa de apuestas sin ingreso|bono casas de apuestas|bono de
apuestas|bono de apuestas gratis sin deposito|bono
de bienvenida apuestas|bono de bienvenida apuestas deportivas|bono de bienvenida
casa de apuestas|bono de bienvenida casas de
apuestas|bono de casas de apuestas|bono de registro apuestas|bono de registro apuestas deportivas|bono de registro casa de apuestas|bono gratis apuestas|bono
marca apuestas|bono por registro apuestas|bono por registro apuestas deportivas|bono
por registro casa de apuestas|bono registro apuestas|bono
sin deposito apuestas|bono sin depósito apuestas|bono sin deposito apuestas deportivas|bono sin depósito apuestas deportivas|bono sin deposito casa
de apuestas|bono sin deposito marca apuestas|bono sin ingreso apuestas|bono sin ingreso
apuestas deportivas|bonos apuestas|bonos apuestas colombia|bonos apuestas deportivas|bonos apuestas deportivas
sin deposito|bonos apuestas gratis|bonos apuestas sin deposito|bonos apuestas
sin depósito|bonos bienvenida apuestas|bonos bienvenida casas apuestas|bonos bienvenida casas de apuestas|bonos casa
de apuestas|bonos casas apuestas|bonos casas de apuestas|bonos casas de apuestas colombia|bonos casas de apuestas deportivas|bonos casas de apuestas españa|bonos casas de apuestas nuevas|bonos casas de apuestas sin deposito|bonos casas de
apuestas sin depósito|bonos de apuestas|bonos de apuestas deportivas|bonos de apuestas gratis|bonos de apuestas sin deposito|bonos de bienvenida apuestas|bonos de
bienvenida apuestas deportivas|bonos de bienvenida casa de apuestas|bonos de bienvenida
casas de apuestas|bonos de bienvenida de
casas de apuestas|bonos de bienvenida en casas de apuestas|bonos de casas de
apuestas|bonos de casas de apuestas sin deposito|bonos en casa de apuestas|bonos en casas de apuestas sin deposito|bonos gratis apuestas|bonos
gratis apuestas deportivas|bonos gratis casas de apuestas|bonos gratis sin deposito apuestas|bonos paginas de apuestas|bonos
registro casas de apuestas|bonos sin deposito apuestas|bonos sin depósito apuestas|bonos sin deposito apuestas deportivas|bonos sin deposito
casas de apuestas|bot de apuestas deportivas gratis|boxeo apuestas|brasil colombia apuestas|brasil
peru apuestas|brasil vs colombia apuestas|buenas apuestas para hoy|buscador cuotas apuestas|buscador de apuestas seguras|buscador de cuotas apuestas|buscador de cuotas de apuestas|buscar apuestas seguras|caballos apuestas|calculador de apuestas|calculador de cuotas
apuestas|calculadora apuestas|calculadora apuestas combinadas|calculadora apuestas de sistema|calculadora apuestas
deportivas|calculadora apuestas deportivas seguras|calculadora apuestas
multiples|calculadora apuestas segura|calculadora apuestas seguras|calculadora apuestas sistema|calculadora apuestas yankee|calculadora
arbitraje apuestas|calculadora cubrir apuestas|calculadora cuotas apuestas|calculadora de apuestas|calculadora de apuestas combinadas|calculadora de apuestas de futbol|calculadora de apuestas de
sistema|calculadora de apuestas deportivas|calculadora de
apuestas multiples|calculadora de apuestas seguras|calculadora de apuestas sistema|calculadora de apuestas surebets|calculadora de arbitraje apuestas|calculadora de
cuotas apuestas|calculadora de cuotas de apuestas|calculadora para
apuestas deportivas|calculadora poisson apuestas|calculadora poisson apuestas deportivas|calculadora poisson para apuestas|calculadora scalping apuestas
deportivas|calculadora sistema apuestas|calculadora stake apuestas|calculadora trading apuestas|calcular
apuestas|calcular apuestas deportivas|calcular apuestas futbol|calcular apuestas sistema|calcular cuotas
apuestas|calcular cuotas apuestas combinadas|calcular cuotas apuestas deportivas|calcular cuotas de apuestas|calcular ganancias apuestas deportivas|calcular momios apuestas|calcular probabilidad cuota apuestas|calcular
stake apuestas|calcular unidades apuestas|calcular yield apuestas|calculo de apuestas|calculo de apuestas deportivas|cambio de cuotas apuestas|campeon champions apuestas|campeon eurocopa apuestas|campeon liga apuestas|campeon nba apuestas|canales de apuestas gratis|carrera de
caballos apuestas|carrera de caballos apuestas juego|carrera de caballos con apuestas|carrera de galgos apuestas|carreras de caballos apuestas|carreras de caballos
apuestas online|carreras de caballos con apuestas|carreras de caballos juegos
de apuestas|carreras de galgos apuestas|carreras de
galgos apuestas online|carreras de galgos apuestas trucos|carreras galgos apuestas|casa apuestas argentina|casa apuestas atletico de madrid|casa apuestas barcelona|casa apuestas betis|casa apuestas bono
bienvenida|casa apuestas bono gratis|casa apuestas bono sin deposito|casa apuestas cerca
de mi|casa apuestas chile|casa apuestas colombia|casa apuestas con mejores cuotas|casa
apuestas deportivas|casa apuestas españa|casa apuestas española|casa
apuestas eurocopa|casa apuestas futbol|casa apuestas
mejores cuotas|casa apuestas mundial|casa apuestas nueva|casa apuestas nuevas|casa apuestas online|casa apuestas peru|casa apuestas valencia|casa de apuestas|casa de apuestas 10 euros gratis|casa de apuestas
argentina|casa de apuestas atletico de madrid|casa de apuestas baloncesto|casa de apuestas barcelona|casa de apuestas beisbol|casa de apuestas betis|casa de apuestas bono|casa de
apuestas bono bienvenida|casa de apuestas bono de bienvenida|casa de apuestas bono
gratis|casa de apuestas bono por registro|casa de apuestas bono sin deposito|casa de apuestas boxeo|casa
de apuestas caballos|casa de apuestas carreras de caballos|casa de apuestas cerca de
mi|casa de apuestas cerca de mí|casa de apuestas
champions league|casa de apuestas chile|casa de apuestas ciclismo|casa de
apuestas colombia|casa de apuestas con bono de bienvenida|casa de apuestas con bono
sin deposito|casa de apuestas con cuotas mas altas|casa de apuestas con esports|casa de apuestas con las mejores cuotas|casa de
apuestas con licencia en españa|casa de apuestas con mejores cuotas|casa de apuestas con pago anticipado|casa
de apuestas con paypal|casa de apuestas copa america|casa de apuestas de caballos|casa de apuestas de colombia|casa de apuestas de
españa|casa de apuestas de futbol|casa de apuestas de fútbol|casa de
apuestas de futbol peru|casa de apuestas de peru|casa de apuestas
del madrid|casa de apuestas del real madrid|casa de apuestas deportivas|casa de apuestas deportivas cerca
de mi|casa de apuestas deportivas en argentina|casa de apuestas
deportivas en chile|casa de apuestas deportivas en colombia|casa de apuestas deportivas en españa|casa de apuestas deportivas en madrid|casa de apuestas deportivas
españa|casa de apuestas deportivas españolas|casa de apuestas deportivas madrid|casa de apuestas
deportivas mexico|casa de apuestas deportivas online|casa de apuestas deportivas peru|casa de apuestas deposito 5 euros|casa de apuestas deposito minimo|casa de apuestas
deposito minimo 1 euro|casa de apuestas depósito mínimo
1 euro|casa de apuestas en españa|casa de apuestas
en linea|casa de apuestas en madrid|casa de apuestas en perú|casa de
apuestas en vivo|casa de apuestas españa|casa de apuestas españa inglaterra|casa de apuestas española|casa de apuestas españolas|casa de
apuestas esports|casa de apuestas eurocopa|casa de apuestas europa league|casa de apuestas f1|casa de apuestas formula 1|casa de apuestas futbol|casa de
apuestas ingreso minimo|casa de apuestas ingreso minimo 1 euro|casa de apuestas ingreso mínimo 1 euro|casa de apuestas legales|casa de apuestas legales en colombia|casa de apuestas legales en españa|casa de apuestas libertadores|casa de apuestas
liga española|casa de apuestas madrid|casa de apuestas mas segura|casa de apuestas mejores|casa de
apuestas méxico|casa de apuestas minimo 5 euros|casa de
apuestas mlb|casa de apuestas mundial|casa de apuestas nba|casa de apuestas nfl|casa de apuestas nueva|casa de
apuestas nuevas|casa de apuestas oficial del real madrid|casa de apuestas oficial real
madrid|casa de apuestas online|casa de apuestas online argentina|casa de apuestas online
chile|casa de apuestas online españa|casa de apuestas online mexico|casa de apuestas online paraguay|casa de apuestas online peru|casa de apuestas online usa|casa
de apuestas online venezuela|casa de apuestas pago anticipado|casa de apuestas para boxeo|casa de apuestas para ufc|casa
de apuestas peru|casa de apuestas perú|casa de apuestas peru online|casa de apuestas por paypal|casa de apuestas promociones|casa de apuestas que regalan dinero|casa de apuestas real madrid|casa de
apuestas regalo de bienvenida|casa de apuestas sevilla|casa de apuestas sin dinero|casa de apuestas sin ingreso minimo|casa de apuestas sin licencia en españa|casa de apuestas sin minimo de ingreso|casa de apuestas stake|casa
de apuestas tenis|casa de apuestas ufc|casa de apuestas valencia|casa de apuestas
venezuela|casa de apuestas virtuales|casa de apuestas vive la suerte|casa oficial de apuestas del real
madrid|casas apuestas asiaticas|casas apuestas bono sin deposito|casas apuestas bonos
sin deposito|casas apuestas caballos|casas apuestas chile|casas
apuestas ciclismo|casas apuestas con licencia|casas apuestas con licencia en españa|casas apuestas deportivas|casas apuestas deportivas colombia|casas apuestas deportivas españa|casas
apuestas deportivas españolas|casas apuestas deportivas nuevas|casas apuestas españa|casas apuestas españolas|casas apuestas esports|casas apuestas
eurocopa|casas apuestas golf|casas apuestas ingreso minimo 5 euros|casas apuestas legales|casas apuestas legales españa|casas apuestas
licencia|casas apuestas licencia españa|casas apuestas
mexico|casas apuestas mundial|casas apuestas nba|casas apuestas nuevas|casas apuestas nuevas españa|casas apuestas ofertas|casas apuestas online|casas
apuestas paypal|casas apuestas peru|casas apuestas sin licencia|casas apuestas tenis|casas asiaticas apuestas|casas de apuestas|casas de apuestas 5 euros|casas de apuestas
app|casas de apuestas argentinas|casas de apuestas asiaticas|casas de apuestas baloncesto|casas de apuestas barcelona|casas de apuestas bono bienvenida|casas de apuestas bono
de bienvenida|casas de apuestas bono por registro|casas de apuestas bono sin deposito|casas de apuestas bono sin ingreso|casas de apuestas bonos|casas de apuestas bonos de bienvenida|casas de apuestas bonos gratis|casas de apuestas
bonos sin deposito|casas de apuestas boxeo|casas de apuestas caballos|casas de
apuestas carreras de caballos|casas de apuestas casino|casas de apuestas casino online|casas de apuestas cerca de mi|casas de apuestas champions league|casas
de apuestas chile|casas de apuestas ciclismo|casas de apuestas colombia|casas de apuestas com|casas de
apuestas con app|casas de apuestas con apuestas gratis|casas de apuestas
con bono|casas de apuestas con bono de bienvenida|casas de apuestas con bono de registro|casas de apuestas con bono por registro|casas
de apuestas con bono sin deposito|casas de apuestas
con bonos|casas de apuestas con bonos gratis|casas de apuestas con bonos sin deposito|casas
de apuestas con deposito minimo|casas de apuestas con esports|casas de apuestas con handicap
asiatico|casas de apuestas con licencia|casas de apuestas
con licencia en españa|casas de apuestas
con licencia españa|casas de apuestas con licencia española|casas
de apuestas con mejores cuotas|casas de apuestas con pago anticipado|casas de
apuestas con paypal|casas de apuestas con paypal en perú|casas de
apuestas con promociones|casas de apuestas con ruleta en vivo|casas de apuestas copa del rey|casas de apuestas
de caballos|casas de apuestas de españa|casas
de apuestas de futbol|casas de apuestas de fútbol|casas de apuestas
de peru|casas de apuestas deportivas|casas de apuestas deportivas asiaticas|casas de apuestas deportivas colombia|casas de
apuestas deportivas comparativa|casas de apuestas deportivas con paypal|casas de
apuestas deportivas en chile|casas de apuestas deportivas en españa|casas de apuestas deportivas
en linea|casas de apuestas deportivas en madrid|casas de apuestas deportivas en mexico|casas de apuestas deportivas en peru|casas de apuestas deportivas en sevilla|casas de apuestas deportivas en valencia|casas de apuestas deportivas españa|casas de apuestas deportivas
españolas|casas de apuestas deportivas legales|casas de apuestas deportivas madrid|casas de apuestas deportivas mexico|casas de
apuestas deportivas nuevas|casas de apuestas
deportivas online|casas de apuestas deportivas peru|casas de apuestas deportivas
perú|casas de apuestas deposito minimo 1 euro|casas de apuestas depósito
mínimo 1 euro|casas de apuestas dinero gratis|casas de apuestas
en argentina|casas de apuestas en barcelona|casas de apuestas en chile|casas de apuestas en colombia|casas de apuestas en españa|casas de apuestas en españa online|casas de apuestas en linea|casas de apuestas en madrid|casas de apuestas en méxico|casas de apuestas
en peru|casas de apuestas en perú|casas de apuestas en sevilla|casas de apuestas en uruguay|casas de
apuestas en valencia|casas de apuestas en venezuela|casas de apuestas equipos de futbol|casas
de apuestas españa|casas de apuestas españa alemania|casas de apuestas españa inglaterra|casas de apuestas españa
licencia|casas de apuestas españa nuevas|casas de apuestas españa online|casas de apuestas española|casas de apuestas españolas|casas de apuestas
españolas con licencia|casas de apuestas españolas online|casas
de apuestas esports|casas de apuestas eurocopa|casas
de apuestas eurocopa 2024|casas de apuestas europa league|casas
de apuestas f1|casas de apuestas fisicas en barcelona|casas de
apuestas fisicas en españa|casas de apuestas formula 1|casas de apuestas fuera de españa|casas de apuestas futbol|casas de apuestas fútbol|casas de apuestas futbol españa|casas de apuestas ganador eurocopa|casas de
apuestas gratis|casas de apuestas ingreso minimo|casas de
apuestas ingreso minimo 1 euro|casas de apuestas ingreso minimo 5
euros|casas de apuestas inter barcelona|casas de apuestas legales|casas de apuestas legales en colombia|casas de apuestas legales en españa|casas de apuestas legales en mexico|casas de apuestas legales
españa|casas de apuestas legales mx|casas de apuestas licencia|casas de apuestas
licencia españa|casas de apuestas lista|casas de apuestas madrid|casas de apuestas mas seguras|casas de apuestas mejores bonos|casas de
apuestas mejores cuotas|casas de apuestas mexico|casas de apuestas
méxico|casas de apuestas minimo 5 euros|casas de apuestas mlb|casas de apuestas mundial|casas de apuestas mundial
baloncesto|casas de apuestas mundiales|casas de apuestas nba|casas de apuestas no reguladas en españa|casas de apuestas
nueva ley|casas de apuestas nuevas|casas de apuestas
nuevas en colombia|casas de apuestas nuevas en españa|casas de
apuestas nuevas españa|casas de apuestas ofertas|casas de apuestas online|casas de apuestas online argentina|casas de apuestas online colombia|casas de apuestas online deportivas|casas de apuestas online ecuador|casas de apuestas online en argentina|casas de apuestas
online en chile|casas de apuestas online en colombia|casas de
apuestas online en españa|casas de apuestas online
en mexico|casas de apuestas online españa|casas de apuestas online
mas fiables|casas de apuestas online mexico|casas de apuestas online nuevas|casas de apuestas online peru|casas de apuestas online usa|casas de apuestas online
venezuela|casas de apuestas pago paypal|casas de apuestas para ufc|casas de apuestas paypal|casas de apuestas peru bono
sin deposito|casas de
Your comment is awaiting moderation.
adsprint.click – Pages loaded fast, images appeared sharp, and formatting stayed consistent.
Your comment is awaiting moderation.
(10 euros gratis apuestas|10 mejores casas de apuestas|10 trucos para
ganar apuestas|15 euros gratis marca apuestas|1×2 apuestas|1×2
apuestas deportivas|1×2 apuestas que significa|1×2
en apuestas|1×2 en apuestas que significa|1×2 que significa en apuestas|5
euros gratis apuestas|9 apuestas que siempre ganaras|a partir de cuanto se declara
apuestas|actividades de juegos de azar y apuestas|ad apuestas deportivas|aleksandre topuria ufc apuestas|algoritmo para ganar apuestas deportivas|america apuestas|análisis nba apuestas|aplicacion android apuestas deportivas|aplicacion apuestas deportivas|aplicacion apuestas deportivas android|aplicación de apuestas online|aplicacion para hacer apuestas|aplicacion para
hacer apuestas de futbol|aplicación para hacer apuestas de fútbol|aplicaciones apuestas deportivas android|aplicaciones apuestas deportivas gratis|aplicaciones de apuestas android|aplicaciones de apuestas de fútbol|aplicaciones de apuestas deportivas|aplicaciones de
apuestas deportivas peru|aplicaciones de apuestas deportivas perú|aplicaciones de
apuestas en colombia|aplicaciones de apuestas gratis|aplicaciones
de apuestas online|aplicaciones de apuestas seguras|aplicaciones de
apuestas sin dinero|aplicaciones para hacer apuestas|apostar seguro apuestas deportivas|app android apuestas deportivas|app apuestas|app apuestas android|app apuestas de
futbol|app apuestas deportivas|app apuestas deportivas android|app apuestas deportivas argentina|app apuestas deportivas colombia|app
apuestas deportivas ecuador|app apuestas deportivas españa|app apuestas deportivas gratis|app apuestas entre amigos|app apuestas futbol|app apuestas gratis|app apuestas sin dinero|app casa de apuestas|app casas
de apuestas|app control apuestas|app de apuestas|app de apuestas
android|app de apuestas casino|app de apuestas colombia|app de apuestas con bono de bienvenida|app de apuestas de futbol|app de apuestas deportivas|app de apuestas deportivas android|app de apuestas deportivas
argentina|app de apuestas deportivas colombia|app de apuestas deportivas en españa|app de apuestas deportivas peru|app de apuestas deportivas perú|app de apuestas deportivas sin dinero|app de apuestas ecuador|app de apuestas en colombia|app
de apuestas en españa|app de apuestas en venezuela|app de apuestas futbol|app
de apuestas gratis|app de apuestas online|app de apuestas para android|app de apuestas para
ganar dinero|app de apuestas peru|app de apuestas reales|app de
casas de apuestas|app marca apuestas android|app moviles de apuestas|app para apuestas|app para apuestas de futbol|app para apuestas deportivas|app para apuestas
deportivas en español|app para ganar apuestas deportivas|app para hacer apuestas|app para hacer apuestas deportivas|app para hacer apuestas entre amigos|app para llevar control de apuestas|app pronosticos
apuestas deportivas|app versus apuestas|apps apuestas mundial|apps
de apuestas|apps de apuestas con bono de bienvenida|apps de apuestas de futbol|apps de apuestas deportivas peru|apps de apuestas mexico|apps para apuestas|aprender a hacer apuestas deportivas|aprender hacer
apuestas deportivas|apuesta del dia apuestas deportivas|apuestas 10 euros gratis|apuestas 100 seguras|apuestas 1×2|apuestas
1X2|apuestas 2 division|apuestas 3 division|apuestas a caballos|apuestas a carreras de caballos|apuestas a colombia|apuestas a corners|apuestas a ganar|apuestas a
jugadores nba|apuestas a la baja|apuestas a la nfl|apuestas al barcelona|apuestas al dia|apuestas
al empate|apuestas al mundial|apuestas al tenis wta|apuestas
alaves barcelona|apuestas alcaraz hoy|apuestas alemania españa|apuestas alonso campeon del mundo|apuestas altas y bajas|apuestas altas
y bajas nfl|apuestas ambos equipos marcan|apuestas america|apuestas
android|apuestas anillo nba|apuestas antes del mundial|apuestas anticipadas|apuestas anticipadas nba|apuestas apps|apuestas arabia
argentina|apuestas argentina|apuestas argentina campeon del mundo|apuestas argentina canada|apuestas argentina colombia|apuestas argentina croacia|apuestas argentina españa|apuestas argentina francia|apuestas argentina francia cuanto paga|apuestas argentina francia mundial|apuestas argentina
gana el mundial|apuestas argentina gana mundial|apuestas argentina holanda|apuestas argentina
mexico|apuestas argentina méxico|apuestas argentina mundial|apuestas
argentina online|apuestas argentina paises bajos|apuestas argentina polonia|apuestas argentina uruguay|apuestas
argentina vs australia|apuestas argentina vs colombia|apuestas argentina vs
francia|apuestas argentina vs peru|apuestas argentinas|apuestas arsenal real madrid|apuestas ascenso a primera division|apuestas ascenso a segunda|apuestas asiaticas|apuestas
asiatico|apuestas athletic|apuestas athletic atletico|apuestas athletic barça|apuestas athletic barcelona|apuestas athletic betis|apuestas athletic manchester|apuestas athletic manchester united|apuestas
athletic osasuna|apuestas athletic real|apuestas athletic real madrid|apuestas
athletic real sociedad|apuestas athletic real sociedad final|apuestas athletic roma|apuestas athletic sevilla|apuestas athletic valencia|apuestas atletico|apuestas atletico barcelona|apuestas atletico barsa|apuestas atletico campeon champions|apuestas
atletico campeon de liga|apuestas atlético copenhague|apuestas atletico de madrid|apuestas atlético de madrid|apuestas atletico de madrid barcelona|apuestas atletico de madrid gana la liga|apuestas atletico de
madrid real madrid|apuestas atlético de madrid real
madrid|apuestas atletico de madrid vs barcelona|apuestas atletico madrid|apuestas
atletico madrid real madrid|apuestas atletico madrid vs barcelona|apuestas atletico
real madrid|apuestas atletico real madrid champions|apuestas atletismo|apuestas
bajas|apuestas baloncesto|apuestas baloncesto acb|apuestas
baloncesto handicap|apuestas baloncesto hoy|apuestas baloncesto juegos olimpicos|apuestas baloncesto nba|apuestas baloncesto pronostico|apuestas baloncesto pronósticos|apuestas baloncesto prorroga|apuestas barca|apuestas barca athletic|apuestas barca
atletico|apuestas barca bayern|apuestas barca bayern munich|apuestas
barca girona|apuestas barca hoy|apuestas barça hoy|apuestas barca inter|apuestas barca juventus|apuestas barca madrid|apuestas barça madrid|apuestas barca
real madrid|apuestas barca vs juve|apuestas barca vs madrid|apuestas barca
vs psg|apuestas barcelona|apuestas barcelona alaves|apuestas barcelona
athletic|apuestas barcelona atletico|apuestas barcelona atletico
de madrid|apuestas barcelona atlético de madrid|apuestas barcelona atletico madrid|apuestas barcelona bayern|apuestas barcelona betis|apuestas barcelona campeon de liga|apuestas barcelona celta|apuestas barcelona espanyol|apuestas barcelona gana la
champions|apuestas barcelona girona|apuestas barcelona granada|apuestas barcelona
hoy|apuestas barcelona inter|apuestas barcelona madrid|apuestas barcelona osasuna|apuestas barcelona psg|apuestas barcelona real madrid|apuestas barcelona real sociedad|apuestas barcelona sevilla|apuestas barcelona valencia|apuestas barcelona villarreal|apuestas barcelona vs
atletico madrid|apuestas barcelona vs madrid|apuestas barcelona vs real madrid|apuestas barsa madrid|apuestas basket hoy|apuestas bayern barcelona|apuestas bayern vs barcelona|apuestas beisbol|apuestas béisbol|apuestas beisbol mlb|apuestas beisbol pronosticos|apuestas
beisbol venezolano|apuestas betis|apuestas betis – chelsea|apuestas betis barcelona|apuestas betis chelsea|apuestas betis fiorentina|apuestas betis girona|apuestas betis madrid|apuestas betis mallorca|apuestas betis real madrid|apuestas betis real sociedad|apuestas betis sevilla|apuestas betis valencia|apuestas betis valladolid|apuestas betis vs valencia|apuestas betplay hoy colombia|apuestas betsson peru|apuestas
bienvenida|apuestas billar online|apuestas bolivia vs colombia|apuestas bono|apuestas
bono bienvenida|apuestas bono de bienvenida|apuestas bono de
bienvenida sin deposito|apuestas bono gratis|apuestas bono sin deposito|apuestas bonos
sin deposito|apuestas borussia real madrid|apuestas boxeo|apuestas boxeo de
campeonato|apuestas boxeo españa|apuestas boxeo español|apuestas boxeo
femenino olimpiadas|apuestas boxeo hoy|apuestas boxeo
online|apuestas brasil colombia|apuestas brasil peru|apuestas brasil uruguay|apuestas brasil vs
colombia|apuestas brasil vs peru|apuestas caballos|apuestas caballos colocado|apuestas caballos
españa|apuestas caballos hipodromo|apuestas caballos hoy|apuestas caballos madrid|apuestas caballos online|apuestas caballos sanlucar de barrameda|apuestas caballos zarzuela|apuestas calculador|apuestas campeon|apuestas campeon champions|apuestas campeón champions|apuestas campeon champions 2025|apuestas campeon champions league|apuestas campeon conference league|apuestas campeon copa
america|apuestas campeon copa del rey|apuestas campeon de champions|apuestas campeon de
la champions|apuestas campeon de liga|apuestas campeon del mundo|apuestas campeon eurocopa|apuestas campeón eurocopa|apuestas campeon europa league|apuestas
campeon f1|apuestas campeon f1 2025|apuestas campeon formula 1|apuestas campeon libertadores|apuestas campeon liga|apuestas campeon liga bbva|apuestas campeon liga española|apuestas campeon liga santander|apuestas
campeon motogp 2025|apuestas campeon mundial|apuestas campeón mundial|apuestas campeon mundial baloncesto|apuestas campeon nba|apuestas campeón nba|apuestas campeon premier|apuestas campeon premier league|apuestas campeon roland garros|apuestas campeonato f1|apuestas campeonatos de futbol|apuestas carrera de caballos|apuestas carrera de caballos hoy|apuestas carrera de caballos nocturnas|apuestas carrera de galgos fin de
semana|apuestas carrera de galgos hoy|apuestas carrera de galgos nocturnas|apuestas carreras caballos|apuestas carreras caballos
sanlucar|apuestas carreras de caballos|apuestas carreras de
caballos en directo|apuestas carreras de caballos
en vivo|apuestas carreras de caballos españa|apuestas carreras de caballos hoy|apuestas carreras de caballos nacionales|apuestas carreras
de caballos nocturnas|apuestas carreras de caballos online|apuestas carreras de caballos sanlucar|apuestas carreras de caballos sanlúcar|apuestas carreras de galgos|apuestas carreras de galgos en vivo|apuestas carreras de galgos nocturnas|apuestas carreras de galgos pre partido|apuestas casino|apuestas casino barcelona|apuestas
casino futbol|apuestas casino gran madrid|apuestas casino gratis|apuestas casino madrid|apuestas casino online|apuestas casino online argentina|apuestas casinos|apuestas casinos online|apuestas celta|apuestas celta barcelona|apuestas celta betis|apuestas celta eibar|apuestas celta espanyol|apuestas celta granada|apuestas
celta madrid|apuestas celta manchester|apuestas celta real madrid|apuestas champion league|apuestas champions foro|apuestas champions hoy|apuestas champions league|apuestas champions league – pronósticos|apuestas champions league 2025|apuestas champions league hoy|apuestas champions league pronosticos|apuestas champions league
pronósticos|apuestas champions pronosticos|apuestas chelsea barcelona|apuestas chelsea betis|apuestas chile|apuestas chile peru|apuestas chile
venezuela|apuestas chile vs colombia|apuestas chile vs uruguay|apuestas ciclismo|apuestas ciclismo en vivo|apuestas ciclismo femenino|apuestas ciclismo tour francia|apuestas
ciclismo vuelta|apuestas ciclismo vuelta a españa|apuestas ciclismo vuelta españa|apuestas city madrid|apuestas
city real madrid|apuestas clasico|apuestas clasico español|apuestas clasico real madrid barcelona|apuestas clasificacion mundial|apuestas colombia|apuestas colombia argentina|apuestas colombia brasil|apuestas colombia paraguay|apuestas colombia uruguay|apuestas colombia vs argentina|apuestas colombia vs
brasil|apuestas combinadas|apuestas combinadas como funcionan|apuestas combinadas de futbol|apuestas combinadas de fútbol|apuestas combinadas foro|apuestas combinadas futbol|apuestas combinadas hoy|apuestas combinadas
mismo partido|apuestas combinadas mundial|apuestas combinadas
nba|apuestas combinadas para esta semana|apuestas combinadas para hoy|apuestas combinadas para mañana|apuestas combinadas pronosticos|apuestas combinadas recomendadas|apuestas combinadas seguras|apuestas combinadas seguras para
hoy|apuestas combinadas seguras para mañana|apuestas como ganar|apuestas comparador|apuestas con bono de bienvenida|apuestas con dinero ficticio|apuestas con dinero real|apuestas con dinero virtual|apuestas con handicap|apuestas con handicap asiatico|apuestas con handicap baloncesto|apuestas con mas probabilidades de ganar|apuestas
con paypal|apuestas con tarjeta de credito|apuestas con tarjeta de debito|apuestas consejos|apuestas copa|apuestas copa africa|apuestas copa america|apuestas copa américa|apuestas
copa argentina|apuestas copa brasil|apuestas copa davis|apuestas copa
de europa|apuestas copa del mundo|apuestas
copa del rey|apuestas copa del rey baloncesto|apuestas copa del rey final|apuestas copa del rey futbol|apuestas copa del rey ganador|apuestas copa del rey hoy|apuestas
copa del rey pronosticos|apuestas copa del rey pronósticos|apuestas copa europa|apuestas copa italia|apuestas copa libertadores|apuestas copa mundial de hockey|apuestas copa rey|apuestas copa sudamericana|apuestas corners|apuestas corners
hoy|apuestas croacia argentina|apuestas cuartos eurocopa|apuestas cuotas|apuestas cuotas altas|apuestas cuotas bajas|apuestas
de 1 euro|apuestas de baloncesto|apuestas de baloncesto hoy|apuestas de baloncesto nba|apuestas
de baloncesto para hoy|apuestas de beisbol|apuestas de beisbol para hoy|apuestas de blackjack en linea|apuestas de boxeo|apuestas de boxeo canelo|apuestas de boxeo en las vegas|apuestas de boxeo hoy|apuestas de
boxeo online|apuestas de caballo|apuestas de caballos|apuestas de caballos como
funciona|apuestas de caballos como se juega|apuestas de caballos en colombia|apuestas de caballos en españa|apuestas
de caballos en linea|apuestas de caballos españa|apuestas de caballos ganador y colocado|apuestas
de caballos internacionales|apuestas de caballos juegos|apuestas de
caballos online|apuestas de caballos online en venezuela|apuestas de
caballos por internet|apuestas de caballos pronosticos|apuestas de caballos pronósticos|apuestas
de carrera de caballos|apuestas de carreras de caballos|apuestas
de carreras de caballos online|apuestas de casino|apuestas de
casino online|apuestas de casino por internet|apuestas de
champions league|apuestas de ciclismo|apuestas de colombia|apuestas de copa america|apuestas de corners|apuestas de deportes en linea|apuestas de deportes online|apuestas de dinero|apuestas de esports|apuestas de eurocopa|apuestas de europa league|apuestas de f1|apuestas
de formula 1|apuestas de futbol|apuestas de fútbol|apuestas de futbol app|apuestas de futbol argentina|apuestas de futbol
colombia|apuestas de futbol en colombia|apuestas de futbol en directo|apuestas
de futbol en linea|apuestas de futbol en vivo|apuestas de futbol español|apuestas de futbol
gratis|apuestas de futbol hoy|apuestas de futbol mundial|apuestas de futbol online|apuestas de fútbol online|apuestas de futbol
para hoy|apuestas de fútbol para hoy|apuestas de futbol para hoy seguras|apuestas de futbol para mañana|apuestas de futbol peru|apuestas de futbol pronosticos|apuestas de fútbol pronósticos|apuestas
de futbol seguras|apuestas de futbol seguras para hoy|apuestas
de futbol sin dinero|apuestas de galgos|apuestas de galgos como ganar|apuestas de galgos en directo|apuestas
de galgos online|apuestas de galgos trucos|apuestas
de golf|apuestas de hockey|apuestas de hockey sobre hielo|apuestas de hoy|apuestas de hoy seguras|apuestas
de juego|apuestas de juegos|apuestas de juegos deportivos|apuestas de
juegos online|apuestas de la champions league|apuestas de la copa américa|apuestas
de la eurocopa|apuestas de la europa league|apuestas de la liga|apuestas de la liga bbva|apuestas de la liga
española|apuestas de la nba|apuestas de la nfl|apuestas de la ufc|apuestas de mlb|apuestas de nba|apuestas de nba para hoy|apuestas de partidos|apuestas de partidos de futbol|apuestas de peleas ufc|apuestas de perros en vivo|apuestas de
perros virtuales|apuestas de peru|apuestas de sistema|apuestas
de sistema como funciona|apuestas de sistema explicacion|apuestas de sistema
explicación|apuestas de tenis|apuestas de tenis de mesa|apuestas de tenis
en directo|apuestas de tenis hoy|apuestas de tenis para hoy|apuestas de tenis pronosticos|apuestas de
tenis seguras|apuestas de todo tipo|apuestas de ufc|apuestas de ufc hoy|apuestas del boxeo|apuestas del clasico|apuestas del clasico real madrid barca|apuestas del dia|apuestas del día|apuestas del dia de hoy|apuestas del
dia deportivas|apuestas del dia futbol|apuestas del mundial|apuestas del partido de hoy|apuestas del real madrid|apuestas del rey|apuestas del
sistema|apuestas deporte|apuestas deportes|apuestas deportiva|apuestas deportivas|apuestas
deportivas 1 euro|apuestas deportivas 10 euros gratis|apuestas deportivas 100 seguras|apuestas deportivas 1×2|apuestas deportivas android|apuestas deportivas app|apuestas deportivas
apps|apuestas deportivas argentina|apuestas deportivas argentina futbol|apuestas deportivas argentina legal|apuestas deportivas atletico de
madrid|apuestas deportivas baloncesto|apuestas deportivas barca madrid|apuestas deportivas barcelona|apuestas deportivas beisbol|apuestas deportivas bono|apuestas deportivas bono bienvenida|apuestas deportivas bono de bienvenida|apuestas deportivas bono sin deposito|apuestas deportivas
bonos de bienvenida|apuestas deportivas boxeo|apuestas deportivas caballos|apuestas
deportivas calculadora|apuestas deportivas campeon liga|apuestas deportivas
casino|apuestas deportivas casino barcelona|apuestas deportivas casino online|apuestas deportivas
cerca de mi|apuestas deportivas champions league|apuestas deportivas chile|apuestas deportivas ciclismo|apuestas deportivas colombia|apuestas deportivas com|apuestas deportivas com
foro|apuestas deportivas com pronosticos|apuestas deportivas combinadas|apuestas deportivas combinadas para hoy|apuestas deportivas como
se juega|apuestas deportivas comparador|apuestas deportivas con bono gratis|apuestas deportivas con bonos gratis|apuestas deportivas con dinero ficticio|apuestas deportivas con paypal|apuestas deportivas con puntos virtuales|apuestas deportivas consejos|apuestas deportivas consejos para ganar|apuestas deportivas copa america|apuestas deportivas copa del rey|apuestas deportivas copa libertadores|apuestas deportivas copa mundial|apuestas
deportivas corners|apuestas deportivas cual es la mejor|apuestas
deportivas cuotas altas|apuestas deportivas de baloncesto|apuestas deportivas de
boxeo|apuestas deportivas de colombia|apuestas deportivas de futbol|apuestas deportivas de nba|apuestas deportivas de nhl|apuestas deportivas de peru|apuestas deportivas de tenis|apuestas deportivas del dia|apuestas deportivas
dinero ficticio|apuestas deportivas directo|apuestas deportivas
doble oportunidad|apuestas deportivas en argentina|apuestas deportivas
en chile|apuestas deportivas en colombia|apuestas deportivas en directo|apuestas deportivas en españa|apuestas
deportivas en español|apuestas deportivas en linea|apuestas deportivas en línea|apuestas deportivas en peru|apuestas deportivas en perú|apuestas deportivas en sevilla|apuestas
deportivas en uruguay|apuestas deportivas en vivo|apuestas deportivas es|apuestas
deportivas es pronosticos|apuestas deportivas españa|apuestas deportivas españolas|apuestas deportivas esports|apuestas deportivas estadisticas|apuestas deportivas estrategias|apuestas deportivas estrategias seguras|apuestas deportivas eurocopa|apuestas deportivas europa league|apuestas deportivas f1|apuestas
deportivas faciles de ganar|apuestas deportivas formula
1|apuestas deportivas foro|apuestas deportivas foro futbol|apuestas
deportivas foro tenis|apuestas deportivas francia argentina|apuestas deportivas futbol|apuestas deportivas fútbol|apuestas deportivas
futbol argentino|apuestas deportivas futbol colombia|apuestas deportivas futbol español|apuestas deportivas gana|apuestas deportivas ganadas|apuestas deportivas ganar
dinero seguro|apuestas deportivas gane|apuestas deportivas golf|apuestas deportivas gratis|apuestas deportivas gratis con premios|apuestas deportivas gratis hoy|apuestas
deportivas gratis sin deposito|apuestas deportivas handicap|apuestas deportivas handicap asiatico|apuestas deportivas hoy|apuestas deportivas impuestos|apuestas deportivas interior argentina|apuestas deportivas juegos olimpicos|apuestas deportivas la liga|apuestas deportivas legales|apuestas deportivas legales en colombia|apuestas deportivas libres de impuestos|apuestas deportivas licencia españa|apuestas deportivas liga española|apuestas deportivas listado|apuestas deportivas listado
clasico|apuestas deportivas madrid|apuestas deportivas mas
seguras|apuestas deportivas mejor pagadas|apuestas deportivas mejores|apuestas
deportivas mejores app|apuestas deportivas mejores casas|apuestas deportivas mejores cuotas|apuestas deportivas mejores paginas|apuestas deportivas mexico|apuestas deportivas
méxico|apuestas deportivas mlb|apuestas deportivas
mlb hoy|apuestas deportivas multiples|apuestas deportivas mundial|apuestas deportivas murcia|apuestas deportivas nba|apuestas deportivas nba hoy|apuestas deportivas nfl|apuestas deportivas nhl|apuestas deportivas nuevas|apuestas deportivas ofertas|apuestas deportivas online|apuestas deportivas online argentina|apuestas deportivas online chile|apuestas
deportivas online colombia|apuestas deportivas online en colombia|apuestas deportivas online españa|apuestas deportivas online mexico|apuestas deportivas online paypal|apuestas deportivas online peru|apuestas deportivas online por internet|apuestas deportivas pago paypal|apuestas deportivas para ganar dinero|apuestas deportivas para hoy|apuestas deportivas para hoy pronosticos|apuestas deportivas
partido suspendido|apuestas deportivas partidos
de hoy|apuestas deportivas paypal|apuestas deportivas
peru|apuestas deportivas perú|apuestas deportivas peru
vs ecuador|apuestas deportivas predicciones|apuestas deportivas promociones|apuestas
deportivas pronostico|apuestas deportivas pronóstico|apuestas
deportivas pronostico hoy|apuestas deportivas pronosticos|apuestas deportivas pronósticos|apuestas deportivas pronosticos
expertos|apuestas deportivas pronosticos gratis|apuestas deportivas pronosticos nba|apuestas deportivas pronosticos tenis|apuestas
deportivas que aceptan paypal|apuestas deportivas real madrid|apuestas deportivas regalo
bienvenida|apuestas deportivas resultado exacto|apuestas deportivas resultados|apuestas deportivas rugby|apuestas deportivas seguras|apuestas deportivas seguras foro|apuestas deportivas seguras hoy|apuestas deportivas seguras para hoy|apuestas deportivas seguras telegram|apuestas deportivas sevilla|apuestas deportivas simulador
eurocopa|apuestas deportivas sin deposito|apuestas deportivas sin deposito inicial|apuestas deportivas sin dinero|apuestas deportivas sin dinero real|apuestas deportivas
sin registro|apuestas deportivas stake|apuestas deportivas
stake 10|apuestas deportivas telegram españa|apuestas deportivas tenis|apuestas
deportivas tenis de mesa|apuestas deportivas tenis foro|apuestas deportivas tenis hoy|apuestas deportivas
tips|apuestas deportivas tipster|apuestas deportivas ufc|apuestas deportivas uruguay|apuestas
deportivas valencia|apuestas deportivas valencia barcelona|apuestas deportivas venezuela|apuestas deportivas virtuales|apuestas deportivas
y casino|apuestas deportivas y casino online|apuestas deportivas.com|apuestas deportivas.com foro|apuestas deportivas.es|apuestas deportivos pronosticos|apuestas deposito minimo
1 euro|apuestas descenso a segunda|apuestas descenso a segunda b|apuestas descenso la liga|apuestas descenso
primera division|apuestas descenso segunda|apuestas dia|apuestas diarias seguras|apuestas dinero|apuestas dinero ficticio|apuestas dinero
real|apuestas dinero virtual|apuestas directas|apuestas directo|apuestas directo futbol|apuestas
division de honor juvenil|apuestas dnb|apuestas doble oportunidad|apuestas doble resultado|apuestas dobles|apuestas dobles y triples|apuestas dortmund barcelona|apuestas draft nba|apuestas draft nfl|apuestas ecuador vs argentina|apuestas ecuador vs venezuela|apuestas egipto uruguay|apuestas el clasico|apuestas elecciones venezuela|apuestas empate|apuestas en baloncesto|apuestas en barcelona|apuestas en beisbol|apuestas en boxeo|apuestas en caballos|apuestas en carreras
de caballos|apuestas en casino|apuestas en casino online|apuestas en casinos|apuestas en casinos online|apuestas en chile|apuestas en ciclismo|apuestas
en colombia|apuestas en colombia de futbol|apuestas en directo|apuestas
en directo futbol|apuestas en directo pronosticos|apuestas en el futbol|apuestas en el tenis|apuestas en españa|apuestas en esports|apuestas en eventos deportivos
virtuales|apuestas en golf|apuestas en juegos|apuestas en la
champions league|apuestas en la eurocopa|apuestas en la liga|apuestas en la nba|apuestas en la nfl|apuestas
en las vegas mlb|apuestas en las vegas nfl|apuestas en linea|apuestas en línea|apuestas
en linea argentina|apuestas en linea boxeo|apuestas en linea chile|apuestas en linea colombia|apuestas en línea de
fútbol|apuestas en linea deportivas|apuestas en linea españa|apuestas en linea estados unidos|apuestas en linea futbol|apuestas
en linea mexico|apuestas en línea méxico|apuestas en linea mundial|apuestas en linea peru|apuestas
en linea usa|apuestas en los esports|apuestas en madrid|apuestas
en méxico|apuestas en mexico online|apuestas en nba|apuestas en partidos de futbol|apuestas en partidos de futbol en vivo|apuestas en partidos
de tenis en directo|apuestas en perú|apuestas en sevilla|apuestas en sistema|apuestas en stake|apuestas en tenis|apuestas en tenis
de mesa|apuestas en valencia|apuestas en vivo|apuestas en vivo argentina|apuestas en vivo casino|apuestas en vivo futbol|apuestas en vivo fútbol|apuestas en vivo nba|apuestas en vivo peru|apuestas en vivo tenis|apuestas en vivo ufc|apuestas
equipo mbappe|apuestas equipos de futbol|apuestas españa|apuestas españa alemania|apuestas españa alemania
eurocopa|apuestas españa croacia|apuestas españa eurocopa|apuestas
españa francia|apuestas españa francia eurocopa|apuestas españa gana el mundial|apuestas españa gana eurocopa|apuestas españa gana
mundial|apuestas españa georgia|apuestas españa holanda|apuestas españa inglaterra|apuestas españa
inglaterra cuotas|apuestas españa inglaterra eurocopa|apuestas españa italia|apuestas españa mundial|apuestas españa
paises bajos|apuestas español|apuestas español oviedo|apuestas espanyol barcelona|apuestas
espanyol betis|apuestas espanyol villarreal|apuestas esport|apuestas esports|apuestas esports colombia|apuestas esports españa|apuestas esports fifa|apuestas
esports gratis|apuestas esports lol|apuestas esports peru|apuestas
esports valorant|apuestas estadisticas|apuestas estrategias|apuestas euro|apuestas euro copa|apuestas eurocopa|apuestas eurocopa campeon|apuestas eurocopa españa|apuestas eurocopa favoritos|apuestas
eurocopa femenina|apuestas eurocopa final|apuestas eurocopa ganador|apuestas
eurocopa hoy|apuestas eurocopa sub 21|apuestas euroliga
baloncesto|apuestas euroliga pronosticos|apuestas europa league|apuestas europa league hoy|apuestas europa league pronosticos|apuestas europa league pronósticos|apuestas euros|apuestas f1 abu
dhabi|apuestas f1 bahrein|apuestas f1 canada|apuestas f1 china|apuestas f1 cuotas|apuestas f1 hoy|apuestas f1 las vegas|apuestas f1 miami|apuestas f1 monaco|apuestas faciles de ganar|apuestas fáciles de ganar|apuestas
faciles para ganar|apuestas favoritas|apuestas favorito champions|apuestas favoritos champions|apuestas favoritos eurocopa|apuestas favoritos mundial|apuestas fc barcelona|apuestas
final champions cuotas|apuestas final champions league|apuestas final
champions peru|apuestas final copa|apuestas final copa america|apuestas
final copa de europa|apuestas final copa del rey|apuestas final copa
europa|apuestas final copa libertadores|apuestas final
copa rey|apuestas final de copa|apuestas final de copa
del rey|apuestas final del mundial|apuestas final euro|apuestas final eurocopa|apuestas final europa
league|apuestas final libertadores|apuestas final mundial|apuestas
final nba|apuestas final rugby|apuestas final uefa europa
league|apuestas final.mundial|apuestas finales de conferencia nfl|apuestas finales nba|apuestas fiorentina betis|apuestas
formula|apuestas formula 1|apuestas fórmula 1|apuestas fórmula 1 pronósticos|apuestas formula uno|apuestas foro|apuestas foro nba|apuestas francia argentina|apuestas francia españa|apuestas futbol|apuestas fútbol|apuestas futbol americano|apuestas futbol americano nfl|apuestas
futbol argentina|apuestas futbol argentino|apuestas
futbol champions league|apuestas futbol chile|apuestas futbol colombia|apuestas futbol consejos|apuestas futbol en directo|apuestas fútbol
en directo|apuestas futbol en vivo|apuestas fútbol en vivo|apuestas
futbol españa|apuestas futbol español|apuestas fútbol español|apuestas futbol eurocopa|apuestas futbol femenino|apuestas
futbol foro|apuestas futbol gratis|apuestas futbol hoy|apuestas fútbol hoy|apuestas futbol juegos olimpicos|apuestas futbol mexico|apuestas futbol mundial|apuestas futbol online|apuestas futbol para hoy|apuestas
futbol peru|apuestas futbol pronosticos|apuestas futbol sala|apuestas futbol telegram|apuestas
futbol virtual|apuestas galgos|apuestas galgos en directo|apuestas galgos hoy|apuestas galgos online|apuestas galgos pronosticos|apuestas galgos trucos|apuestas gana|apuestas gana colombia|apuestas gana
resultados|apuestas ganadas|apuestas ganadas hoy|apuestas ganador champions league|apuestas ganador
copa america|apuestas ganador copa del rey|apuestas ganador copa del rey baloncesto|apuestas ganador copa libertadores|apuestas ganador de la eurocopa|apuestas
ganador de la liga|apuestas ganador del mundial|apuestas ganador eurocopa|apuestas
ganador europa league|apuestas ganador f1|apuestas ganador
la liga|apuestas ganador liga española|apuestas ganador mundial|apuestas ganador mundial baloncesto|apuestas ganador mundial f1|apuestas ganador
nba|apuestas ganadores eurocopa|apuestas ganadores mundial|apuestas ganar champions|apuestas ganar
eurocopa|apuestas ganar liga|apuestas ganar
mundial|apuestas ganar nba|apuestas getafe valencia|apuestas ghana uruguay|apuestas girona|apuestas girona athletic|apuestas girona betis|apuestas girona campeon de liga|apuestas girona campeon liga|apuestas girona gana la liga|apuestas girona
real madrid|apuestas girona real sociedad|apuestas goleador
eurocopa|apuestas goleadores eurocopa|apuestas goles asiaticos|apuestas golf|apuestas golf masters|apuestas
golf pga|apuestas granada barcelona|apuestas
grand slam de tenis|apuestas gratis|apuestas gratis casino|apuestas gratis con premios|apuestas gratis hoy|apuestas gratis para hoy|apuestas gratis por registro|apuestas gratis puntos|apuestas gratis regalos|apuestas gratis sin deposito|apuestas gratis sin depósito|apuestas gratis sin ingreso|apuestas gratis sports|apuestas gratis y
ganar premios|apuestas grupo a eurocopa|apuestas grupos
eurocopa|apuestas handicap|apuestas handicap asiatico|apuestas handicap baloncesto|apuestas
handicap como funciona|apuestas handicap nba|apuestas handicap nfl|apuestas hipicas online|apuestas hípicas online|apuestas hipicas venezuela|apuestas hockey|apuestas hockey hielo|apuestas hockey patines|apuestas
hockey sobre hielo|apuestas holanda argentina|apuestas holanda vs
argentina|apuestas hoy|apuestas hoy champions|apuestas hoy futbol|apuestas hoy nba|apuestas hoy pronosticos|apuestas
hoy seguras|apuestas impuestos|apuestas inglaterra paises bajos|apuestas inter barca|apuestas inter
barcelona|apuestas juego|apuestas juegos|apuestas juegos en linea|apuestas juegos olimpicos|apuestas juegos olímpicos|apuestas juegos olimpicos baloncesto|apuestas juegos online|apuestas juegos virtuales|apuestas jugador sevilla|apuestas jugadores nba|apuestas kings league
americas|apuestas la liga|apuestas la liga española|apuestas la liga hoy|apuestas la liga santander|apuestas las vegas mlb|apuestas las vegas nba|apuestas
las vegas nfl|apuestas league of legends mundial|apuestas legal|apuestas legales|apuestas legales en colombia|apuestas legales en españa|apuestas legales en estados
unidos|apuestas legales españa|apuestas leganes betis|apuestas libertadores|apuestas licencia|apuestas
liga 1 peru|apuestas liga argentina|apuestas liga bbva pronosticos|apuestas liga de campeones|apuestas
liga de campeones de baloncesto|apuestas liga de campeones de
hockey|apuestas liga españa|apuestas liga española|apuestas liga santander pronosticos|apuestas
ligas de futbol|apuestas linea|apuestas linea de gol|apuestas
liverpool barcelona|apuestas liverpool real madrid|apuestas lol mundial|apuestas madrid|apuestas madrid arsenal|apuestas madrid atletico|apuestas madrid atletico
champions|apuestas madrid barca|apuestas madrid barça|apuestas madrid barca hoy|apuestas madrid barca supercopa|apuestas madrid barcelona|apuestas madrid barsa|apuestas madrid bayern|apuestas madrid betis|apuestas madrid borussia|apuestas madrid campeon champions|apuestas madrid celta|apuestas madrid city|apuestas madrid dortmund|apuestas madrid gana la liga|apuestas madrid gana liga|apuestas madrid hoy|apuestas madrid liverpool|apuestas madrid
osasuna|apuestas madrid sevilla|apuestas madrid valencia|apuestas madrid vs arsenal|apuestas madrid vs barcelona|apuestas mallorca osasuna|apuestas mallorca real sociedad|apuestas manchester
athletic|apuestas manchester city real madrid|apuestas mas faciles
de ganar|apuestas mas seguras|apuestas mas seguras para hoy|apuestas masters
de golf|apuestas masters de tenis|apuestas maximo goleador
eurocopa|apuestas maximo goleador mundial|apuestas
mejor jugador eurocopa|apuestas mejores casinos online|apuestas mexico|apuestas méxico|apuestas mexico polonia|apuestas méxico polonia|apuestas mlb|apuestas mlb hoy|apuestas mlb las vegas|apuestas mlb para hoy|apuestas mlb pronosticos|apuestas
mlb usa|apuestas mma ufc|apuestas momios|apuestas multiples|apuestas múltiples|apuestas multiples como funcionan|apuestas
multiples el gordo|apuestas multiples futbol|apuestas mundial|apuestas mundial 2026|apuestas mundial baloncesto|apuestas mundial balonmano|apuestas mundial brasil|apuestas mundial campeon|apuestas mundial ciclismo|apuestas mundial clubes|apuestas mundial de baloncesto|apuestas mundial de ciclismo|apuestas mundial de clubes|apuestas mundial
de futbol|apuestas mundial de fútbol|apuestas mundial de rugby|apuestas mundial f1|apuestas mundial favoritos|apuestas mundial femenino|apuestas mundial formula 1|apuestas mundial futbol|apuestas mundial ganador|apuestas mundial lol|apuestas
mundial moto gp|apuestas mundial motogp|apuestas mundial rugby|apuestas mundial sub 17|apuestas mundiales|apuestas mundialistas|apuestas mvp eurocopa|apuestas mvp nba|apuestas mvp nfl|apuestas nacionales de colombia|apuestas nba|apuestas nba all star|apuestas nba
campeon|apuestas nba consejos|apuestas nba esta noche|apuestas nba finals|apuestas nba gratis|apuestas nba hoy|apuestas nba hoy jugadores|apuestas nba hoy pronosticos|apuestas nba para hoy|apuestas nba playoffs|apuestas nba pronosticos|apuestas nba pronósticos|apuestas nba pronosticos hoy|apuestas
nba tipster|apuestas nfl|apuestas nfl hoy|apuestas nfl las vegas|apuestas nfl playoffs|apuestas nfl pronosticos|apuestas
nfl pronósticos|apuestas nfl semana 4|apuestas nfl super
bowl|apuestas nhl|apuestas nhl pronosticos|apuestas octavos
eurocopa|apuestas ofertas|apuestas online|apuestas
online argentina|apuestas online argentina legal|apuestas online
bono|apuestas online bono bienvenida|apuestas online
boxeo|apuestas online caballos|apuestas online carreras de caballos|apuestas online casino|apuestas online champions league|apuestas
online chile|apuestas online ciclismo|apuestas online colombia|apuestas online comparativa|apuestas online
con paypal|apuestas online de caballos|apuestas online deportivas|apuestas online
en argentina|apuestas online en peru|apuestas online espana|apuestas online españa|apuestas online esports|apuestas online foro|apuestas
online futbol|apuestas online futbol españa|apuestas online golf|apuestas online gratis|apuestas online gratis sin deposito|apuestas online juegos|apuestas online
mexico|apuestas online mma|apuestas online movil|apuestas online nba|apuestas online net|apuestas online nuevas|apuestas
online opiniones|apuestas online paypal|apuestas online peru|apuestas online seguras|apuestas
online sin dinero|apuestas online sin registro|apuestas online tenis|apuestas online ufc|apuestas
online uruguay|apuestas online venezuela|apuestas open britanico golf|apuestas osasuna athletic|apuestas
osasuna barcelona|apuestas osasuna real madrid|apuestas osasuna
sevilla|apuestas osasuna valencia|apuestas over|apuestas over 2.5|apuestas over under|apuestas paginas|apuestas pago anticipado|apuestas
paises bajos ecuador|apuestas paises bajos inglaterra|apuestas países
bajos qatar|apuestas para boxeo|apuestas para champions league|apuestas para el clasico|apuestas para
el dia de hoy|apuestas para el mundial|apuestas
para el partido de hoy|apuestas para eurocopa|apuestas para europa league|apuestas para futbol|apuestas para ganar|apuestas para ganar dinero|apuestas para ganar dinero facil|apuestas para ganar en la ruleta|apuestas para ganar la
champions|apuestas para ganar la eurocopa|apuestas para ganar la
europa league|apuestas para ganar la liga|apuestas para ganar siempre|apuestas para hacer|apuestas para hoy|apuestas para
hoy de futbol|apuestas para hoy europa league|apuestas para hoy futbol|apuestas para juegos|apuestas
para la champions league|apuestas para la copa del rey|apuestas para la eurocopa|apuestas para la europa
league|apuestas para la final de la eurocopa|apuestas para la nba hoy|apuestas para los partidos de hoy|apuestas para partidos de
hoy|apuestas para ufc|apuestas partido|apuestas partido
aplazado|apuestas partido champions|apuestas partido colombia|apuestas partido españa marruecos|apuestas partido mundial|apuestas partido suspendido|apuestas partidos|apuestas partidos champions
league|apuestas partidos csgo|apuestas partidos de futbol|apuestas partidos de futbol hoy|apuestas partidos de hoy|apuestas partidos
eurocopa|apuestas partidos futbol|apuestas partidos hoy|apuestas partidos mundial|apuestas paypal|apuestas peleas de boxeo|apuestas
peru|apuestas perú|apuestas peru brasil|apuestas peru chile|apuestas peru paraguay|apuestas peru uruguay|apuestas peru vs chile|apuestas
peru vs colombia|apuestas pichichi eurocopa|apuestas plataforma|apuestas playoff|apuestas playoff ascenso|apuestas
playoff ascenso a primera|apuestas playoff nba|apuestas playoff segunda|apuestas playoff segunda b|apuestas playoffs
nba|apuestas playoffs nfl|apuestas polonia argentina|apuestas por argentina|apuestas por internet
mexico|apuestas por internet para ganar dinero|apuestas por paypal|apuestas por ronda boxeo|apuestas
por sistema|apuestas portugal uruguay|apuestas pre
partido|apuestas predicciones|apuestas predicciones futbol|apuestas primera
division|apuestas primera division españa|apuestas promociones|apuestas pronostico|apuestas pronosticos|apuestas pronosticos deportivos|apuestas pronosticos deportivos
tenis|apuestas pronosticos futbol|apuestas pronosticos gratis|apuestas pronosticos nba|apuestas
pronosticos tenis|apuestas prorroga|apuestas psg barca|apuestas psg barcelona|apuestas puntos por
tarjetas|apuestas puntos tarjetas|apuestas que aceptan paypal|apuestas que es handicap|apuestas que
puedes hacer con tu novia|apuestas que siempre ganaras|apuestas que significa|apuestas quien bajara a segunda|apuestas quién bajara a segunda|apuestas quien gana el mundial|apuestas quien gana eurocopa|apuestas quien gana la
champions|apuestas quien gana la eurocopa|apuestas quien gana la liga|apuestas quien ganara el mundial|apuestas quién ganará el
mundial|apuestas quien ganara la champions|apuestas quien ganara la eurocopa|apuestas quien ganara la liga|apuestas rayo barcelona|apuestas real madrid|apuestas real madrid arsenal|apuestas real madrid athletic|apuestas
real madrid atletico|apuestas real madrid atletico champions|apuestas real madrid atletico de madrid|apuestas
real madrid atlético de madrid|apuestas real madrid atletico madrid|apuestas real
madrid barcelona|apuestas real madrid bayern|apuestas real madrid betis|apuestas real madrid borussia|apuestas real madrid campeon champions|apuestas
real madrid celta|apuestas real madrid champions|apuestas real madrid city|apuestas real madrid girona|apuestas real madrid hoy|apuestas real madrid liverpool|apuestas real madrid manchester city|apuestas
real madrid osasuna|apuestas real madrid real sociedad|apuestas
real madrid valencia|apuestas real madrid villarreal|apuestas
real madrid vs arsenal|apuestas real madrid vs atletico|apuestas real madrid
vs atlético|apuestas real madrid vs atletico madrid|apuestas real
madrid vs barcelona|apuestas real madrid vs betis|apuestas real
madrid vs sevilla|apuestas real madrid vs valencia|apuestas real sociedad|apuestas real sociedad athletic|apuestas real sociedad barcelona|apuestas real sociedad betis|apuestas real sociedad psg|apuestas real sociedad real madrid|apuestas real sociedad valencia|apuestas recomendadas hoy|apuestas regalo de bienvenida|apuestas registro|apuestas resultado exacto|apuestas resultados|apuestas
resultados eurocopa|apuestas retirada tenis|apuestas roma barcelona|apuestas roma sevilla|apuestas rugby|apuestas rugby mundial|apuestas rugby
world cup|apuestas ruleta seguras|apuestas segunda|apuestas segunda b|apuestas segunda division|apuestas segunda división|apuestas segunda division b|apuestas segunda division españa|apuestas seguras|apuestas
seguras baloncesto|apuestas seguras calculadora|apuestas seguras en la ruleta|apuestas seguras eurocopa|apuestas seguras foro|apuestas seguras futbol|apuestas seguras futbol hoy|apuestas seguras gratis|apuestas seguras hoy|apuestas
seguras hoy futbol|apuestas seguras nba|apuestas seguras nba hoy|apuestas seguras para este fin de semana|apuestas seguras para ganar dinero|apuestas seguras para hoy|apuestas seguras para hoy fútbol|apuestas
seguras para hoy pronósticos|apuestas seguras para mañana|apuestas seguras ruleta|apuestas seguras telegram|apuestas seguras tenis|apuestas semifinales eurocopa|apuestas senegal paises bajos|apuestas sevilla|apuestas sevilla athletic|apuestas sevilla atletico de madrid|apuestas
sevilla barcelona|apuestas sevilla betis|apuestas
sevilla campeon liga|apuestas sevilla celta|apuestas sevilla gana la liga|apuestas sevilla girona|apuestas sevilla inter|apuestas
sevilla jugador|apuestas sevilla juventus|apuestas sevilla
leganes|apuestas sevilla madrid|apuestas sevilla manchester united|apuestas sevilla osasuna|apuestas sevilla real madrid|apuestas
sevilla real sociedad|apuestas sevilla roma|apuestas sevilla valencia|apuestas significa|apuestas simples ejemplos|apuestas simples o combinadas|apuestas sin deposito|apuestas sin deposito inicial|apuestas sin deposito minimo|apuestas sin dinero|apuestas sin dinero real|apuestas sin empate|apuestas sin empate que significa|apuestas sin ingreso minimo|apuestas sin registro|apuestas sistema|apuestas sistema calculadora|apuestas sistema
como funciona|apuestas sistema trixie|apuestas sociedad|apuestas sorteo copa del rey|apuestas
stake|apuestas stake 10|apuestas stake 10 hoy|apuestas super bowl favorito|apuestas super rugby|apuestas supercopa españa|apuestas superliga argentina|apuestas tarjeta roja|apuestas tarjetas|apuestas tarjetas amarillas|apuestas tenis|apuestas tenis
atp|apuestas tenis consejos|apuestas tenis copa davis|apuestas tenis de mesa|apuestas tenis de mesa
pronosticos|apuestas tenis en vivo|apuestas tenis femenino|apuestas tenis hoy|apuestas tenis itf|apuestas tenis pronosticos|apuestas tenis pronósticos|apuestas
tenis retirada|apuestas tenis roland garros|apuestas tenis seguras|apuestas tenis wimbledon|apuestas tenis wta|apuestas tercera division|apuestas tercera division españa|apuestas tipos|apuestas tips|apuestas tipster|apuestas tipster para hoy|apuestas topuria holloway cuotas|apuestas
torneos de golf|apuestas torneos de tenis|apuestas trucos|apuestas uefa champions league|apuestas
uefa europa league|apuestas ufc|apuestas ufc chile|apuestas ufc como funciona|apuestas ufc hoy|apuestas ufc ilia topuria|apuestas ufc online|apuestas ufc pronósticos|apuestas ufc
telegram|apuestas ufc topuria|apuestas under over|apuestas unionistas villarreal|apuestas uruguay|apuestas uruguay colombia|apuestas uruguay corea|apuestas uruguay vs colombia|apuestas us open golf|apuestas us open tenis|apuestas valencia|apuestas
valencia barcelona|apuestas valencia betis|apuestas valencia madrid|apuestas valencia real madrid|apuestas valladolid barcelona|apuestas valladolid valencia|apuestas valor app|apuestas valor en directo|apuestas valor galgos|apuestas venezuela|apuestas venezuela argentina|apuestas
venezuela bolivia|apuestas venezuela ecuador|apuestas villarreal|apuestas villarreal athletic|apuestas villarreal barcelona|apuestas villarreal bayern|apuestas villarreal betis|apuestas villarreal liverpool|apuestas villarreal manchester|apuestas
villarreal manchester united|apuestas villarreal vs real madrid|apuestas virtuales|apuestas
virtuales colombia|apuestas virtuales futbol|apuestas virtuales
sin dinero|apuestas vivo|apuestas vuelta a españa|apuestas vuelta españa|apuestas william hill partidos de hoy|apuestas y casino|apuestas y casinos|apuestas y juegos de azar|apuestas
y pronosticos|apuestas y pronosticos de futbol|apuestas y pronosticos deportivos|apuestas y resultados|apuestas-deportivas|apuestas-deportivas.es pronosticos|arbitro nba apuestas|argentina apuestas|argentina
colombia apuestas|argentina croacia apuestas|argentina francia apuestas|argentina mexico
apuestas|argentina peru apuestas|argentina uruguay apuestas|argentina vs
bolivia apuestas|argentina vs chile apuestas|argentina vs colombia apuestas|argentina vs
francia apuestas|argentina vs. colombia apuestas|asi
se gana en las apuestas deportivas|asiatico apuestas|asiatico
en apuestas|asiaticos apuestas|athletic barcelona apuestas|athletic manchester united apuestas|athletic osasuna
apuestas|athletic real madrid apuestas|atletico barcelona apuestas|atletico de madrid apuestas|atlético de madrid apuestas|atletico de madrid real madrid apuestas|atletico de madrid vs barcelona apuestas|atletico madrid real madrid apuestas|atletico madrid
vs real madrid apuestas|atletico real madrid apuestas|atletico vs real madrid apuestas|avisador
de cuotas apuestas|bajada de cuotas apuestas|baloncesto apuestas|barbastro barcelona apuestas|barca apuestas|barca bayern apuestas|barca inter apuestas|barca madrid apuestas|barça madrid
apuestas|barca vs atletico apuestas|barca vs madrid apuestas|barca vs real
madrid apuestas|barcelona – real madrid apuestas|barcelona apuestas|barcelona atletico apuestas|barcelona
atletico de madrid apuestas|barcelona atletico madrid apuestas|barcelona betis apuestas|barcelona casa de apuestas|barcelona inter apuestas|barcelona psg apuestas|barcelona
real madrid apuestas|barcelona real sociedad apuestas|barcelona sevilla apuestas|barcelona valencia apuestas|barcelona vs athletic bilbao apuestas|barcelona vs atlético madrid apuestas|barcelona vs betis
apuestas|barcelona vs celta de vigo apuestas|barcelona vs espanyol apuestas|barcelona vs girona apuestas|barcelona vs madrid apuestas|barcelona vs real madrid
apuestas|barcelona vs real sociedad apuestas|barcelona vs sevilla apuestas|barcelona vs villarreal apuestas|base
de datos cuotas apuestas deportivas|bayern real
madrid apuestas|beisbol apuestas|best america apuestas|bet apuestas chile|bet apuestas
en vivo|betis – chelsea apuestas|betis apuestas|betis barcelona apuestas|betis chelsea apuestas|betis madrid apuestas|betis sevilla apuestas|betsson tu sitio
de apuestas online|blog apuestas baloncesto|blog apuestas ciclismo|blog apuestas nba|blog apuestas tenis|blog de
apuestas de tenis|bono apuestas|bono apuestas deportivas|bono apuestas deportivas sin deposito|bono apuestas gratis|bono apuestas gratis sin deposito|bono apuestas
sin deposito|bono bienvenida apuestas|bono
bienvenida apuestas deportivas|bono bienvenida apuestas españa|bono bienvenida apuestas sin deposito|bono bienvenida apuestas sin depósito|bono bienvenida casa apuestas|bono bienvenida casa de apuestas|bono bienvenida marca apuestas|bono casa apuestas|bono casa de apuestas|bono casa de apuestas sin ingreso|bono casas de apuestas|bono de
apuestas|bono de apuestas gratis sin deposito|bono de bienvenida apuestas|bono de bienvenida apuestas deportivas|bono de bienvenida casa de apuestas|bono de bienvenida
casas de apuestas|bono de casas de apuestas|bono
de registro apuestas|bono de registro apuestas deportivas|bono de registro casa de apuestas|bono gratis apuestas|bono marca apuestas|bono
por registro apuestas|bono por registro apuestas
deportivas|bono por registro casa de apuestas|bono registro apuestas|bono sin deposito apuestas|bono sin depósito apuestas|bono sin deposito apuestas deportivas|bono sin depósito apuestas deportivas|bono
sin deposito casa de apuestas|bono sin deposito marca apuestas|bono sin ingreso apuestas|bono sin ingreso apuestas deportivas|bonos apuestas|bonos apuestas colombia|bonos apuestas deportivas|bonos apuestas deportivas sin deposito|bonos apuestas gratis|bonos apuestas sin deposito|bonos apuestas sin depósito|bonos bienvenida
apuestas|bonos bienvenida casas apuestas|bonos bienvenida casas de apuestas|bonos casa de
apuestas|bonos casas apuestas|bonos casas de apuestas|bonos casas de apuestas colombia|bonos casas de apuestas deportivas|bonos casas de apuestas españa|bonos casas de apuestas nuevas|bonos casas de apuestas sin deposito|bonos casas de apuestas
sin depósito|bonos de apuestas|bonos de apuestas deportivas|bonos de apuestas gratis|bonos de apuestas sin deposito|bonos
de bienvenida apuestas|bonos de bienvenida apuestas deportivas|bonos de bienvenida casa de apuestas|bonos de bienvenida casas de apuestas|bonos de bienvenida de casas de apuestas|bonos de bienvenida en casas de apuestas|bonos de casas de apuestas|bonos de casas de apuestas sin deposito|bonos en casa de apuestas|bonos en casas de apuestas
sin deposito|bonos gratis apuestas|bonos gratis apuestas deportivas|bonos gratis casas de apuestas|bonos gratis sin deposito apuestas|bonos paginas
de apuestas|bonos registro casas de apuestas|bonos sin deposito apuestas|bonos sin depósito apuestas|bonos sin deposito apuestas deportivas|bonos sin deposito casas de apuestas|bot de apuestas
deportivas gratis|boxeo apuestas|brasil colombia apuestas|brasil peru apuestas|brasil vs colombia apuestas|buenas apuestas para hoy|buscador cuotas apuestas|buscador de apuestas seguras|buscador de cuotas apuestas|buscador de cuotas de apuestas|buscar apuestas seguras|caballos apuestas|calculador
de apuestas|calculador de cuotas apuestas|calculadora apuestas|calculadora apuestas combinadas|calculadora apuestas
de sistema|calculadora apuestas deportivas|calculadora apuestas deportivas seguras|calculadora apuestas
multiples|calculadora apuestas segura|calculadora apuestas seguras|calculadora
apuestas sistema|calculadora apuestas yankee|calculadora arbitraje apuestas|calculadora cubrir apuestas|calculadora cuotas apuestas|calculadora de apuestas|calculadora de apuestas combinadas|calculadora de
apuestas de futbol|calculadora de apuestas de sistema|calculadora de apuestas deportivas|calculadora de apuestas multiples|calculadora de apuestas seguras|calculadora
de apuestas sistema|calculadora de apuestas surebets|calculadora de arbitraje apuestas|calculadora
de cuotas apuestas|calculadora de cuotas de apuestas|calculadora
para apuestas deportivas|calculadora poisson apuestas|calculadora
poisson apuestas deportivas|calculadora poisson para apuestas|calculadora scalping apuestas
deportivas|calculadora sistema apuestas|calculadora stake apuestas|calculadora trading apuestas|calcular apuestas|calcular apuestas deportivas|calcular apuestas futbol|calcular apuestas sistema|calcular cuotas apuestas|calcular cuotas apuestas combinadas|calcular cuotas
apuestas deportivas|calcular cuotas de apuestas|calcular ganancias apuestas deportivas|calcular momios apuestas|calcular probabilidad cuota apuestas|calcular stake apuestas|calcular unidades apuestas|calcular yield apuestas|calculo de apuestas|calculo de apuestas deportivas|cambio de
cuotas apuestas|campeon champions apuestas|campeon eurocopa apuestas|campeon liga apuestas|campeon nba apuestas|canales de apuestas gratis|carrera de caballos apuestas|carrera de
caballos apuestas juego|carrera de caballos con apuestas|carrera de galgos
apuestas|carreras de caballos apuestas|carreras de caballos apuestas online|carreras de caballos con apuestas|carreras de caballos juegos de apuestas|carreras de galgos apuestas|carreras de galgos apuestas
online|carreras de galgos apuestas trucos|carreras galgos apuestas|casa
apuestas argentina|casa apuestas atletico de madrid|casa
apuestas barcelona|casa apuestas betis|casa apuestas bono bienvenida|casa apuestas bono gratis|casa apuestas bono sin deposito|casa apuestas
cerca de mi|casa apuestas chile|casa apuestas colombia|casa apuestas con mejores cuotas|casa
apuestas deportivas|casa apuestas españa|casa
apuestas española|casa apuestas eurocopa|casa apuestas futbol|casa apuestas
mejores cuotas|casa apuestas mundial|casa apuestas
nueva|casa apuestas nuevas|casa apuestas online|casa apuestas peru|casa apuestas valencia|casa de apuestas|casa de apuestas 10 euros
gratis|casa de apuestas argentina|casa de apuestas atletico de madrid|casa de apuestas baloncesto|casa de apuestas barcelona|casa de apuestas
beisbol|casa de apuestas betis|casa de apuestas bono|casa de apuestas bono bienvenida|casa de apuestas bono de bienvenida|casa de apuestas bono gratis|casa de
apuestas bono por registro|casa de apuestas bono sin deposito|casa de apuestas boxeo|casa de apuestas caballos|casa de apuestas carreras de caballos|casa de apuestas cerca de mi|casa de apuestas cerca de mí|casa de apuestas champions league|casa de
apuestas chile|casa de apuestas ciclismo|casa de apuestas colombia|casa de apuestas con bono de bienvenida|casa de
apuestas con bono sin deposito|casa de apuestas con cuotas mas altas|casa
de apuestas con esports|casa de apuestas con las mejores cuotas|casa de apuestas con licencia en españa|casa de apuestas con mejores cuotas|casa de apuestas con pago anticipado|casa de
apuestas con paypal|casa de apuestas copa america|casa de apuestas de caballos|casa de apuestas de colombia|casa
de apuestas de españa|casa de apuestas de futbol|casa de apuestas de fútbol|casa de apuestas de futbol peru|casa de apuestas de peru|casa
de apuestas del madrid|casa de apuestas del real madrid|casa de apuestas deportivas|casa de apuestas deportivas cerca de mi|casa de apuestas deportivas en argentina|casa de apuestas deportivas en chile|casa de apuestas deportivas
en colombia|casa de apuestas deportivas en españa|casa de apuestas
deportivas en madrid|casa de apuestas deportivas españa|casa de apuestas deportivas españolas|casa de apuestas deportivas madrid|casa de apuestas deportivas mexico|casa de apuestas deportivas online|casa de apuestas deportivas peru|casa de apuestas deposito 5 euros|casa de
apuestas deposito minimo|casa de apuestas deposito minimo 1 euro|casa de apuestas depósito mínimo 1 euro|casa
de apuestas en españa|casa de apuestas en linea|casa de
apuestas en madrid|casa de apuestas en perú|casa de apuestas en vivo|casa
de apuestas españa|casa de apuestas españa inglaterra|casa de apuestas española|casa de apuestas españolas|casa de apuestas esports|casa de apuestas eurocopa|casa
de apuestas europa league|casa de apuestas f1|casa de apuestas formula 1|casa de apuestas futbol|casa de
apuestas ingreso minimo|casa de apuestas ingreso minimo 1
euro|casa de apuestas ingreso mínimo 1 euro|casa de apuestas legales|casa de apuestas legales en colombia|casa de apuestas legales
en españa|casa de apuestas libertadores|casa de
apuestas liga española|casa de apuestas madrid|casa de apuestas mas segura|casa
de apuestas mejores|casa de apuestas méxico|casa de apuestas
minimo 5 euros|casa de apuestas mlb|casa de apuestas mundial|casa
de apuestas nba|casa de apuestas nfl|casa de apuestas nueva|casa de apuestas nuevas|casa de apuestas oficial del real madrid|casa de apuestas oficial real madrid|casa de
apuestas online|casa de apuestas online argentina|casa de apuestas online chile|casa de apuestas online españa|casa de apuestas online mexico|casa
de apuestas online paraguay|casa de apuestas online peru|casa de apuestas
online usa|casa de apuestas online venezuela|casa de apuestas pago
anticipado|casa de apuestas para boxeo|casa de apuestas para ufc|casa de apuestas peru|casa de apuestas perú|casa de apuestas peru online|casa
de apuestas por paypal|casa de apuestas promociones|casa de apuestas que regalan dinero|casa
de apuestas real madrid|casa de apuestas regalo de bienvenida|casa de apuestas sevilla|casa de apuestas sin dinero|casa de apuestas
sin ingreso minimo|casa de apuestas sin licencia en españa|casa de apuestas sin minimo
de ingreso|casa de apuestas stake|casa de apuestas tenis|casa de apuestas ufc|casa de apuestas valencia|casa de apuestas venezuela|casa de apuestas virtuales|casa de apuestas vive la suerte|casa oficial de
apuestas del real madrid|casas apuestas asiaticas|casas apuestas
bono sin deposito|casas apuestas bonos sin deposito|casas apuestas caballos|casas
apuestas chile|casas apuestas ciclismo|casas apuestas con licencia|casas apuestas con licencia
en españa|casas apuestas deportivas|casas apuestas deportivas colombia|casas apuestas deportivas españa|casas
apuestas deportivas españolas|casas apuestas deportivas nuevas|casas apuestas españa|casas apuestas españolas|casas apuestas esports|casas apuestas eurocopa|casas
apuestas golf|casas apuestas ingreso minimo 5 euros|casas apuestas legales|casas apuestas legales españa|casas apuestas
licencia|casas apuestas licencia españa|casas apuestas
mexico|casas apuestas mundial|casas apuestas nba|casas apuestas nuevas|casas apuestas nuevas españa|casas apuestas
ofertas|casas apuestas online|casas apuestas paypal|casas apuestas peru|casas apuestas sin licencia|casas
apuestas tenis|casas asiaticas apuestas|casas de apuestas|casas de apuestas 5 euros|casas
de apuestas app|casas de apuestas argentinas|casas de apuestas asiaticas|casas de apuestas baloncesto|casas de apuestas barcelona|casas
de apuestas bono bienvenida|casas de apuestas bono de bienvenida|casas
de apuestas bono por registro|casas de apuestas bono sin deposito|casas
de apuestas bono sin ingreso|casas de apuestas bonos|casas de apuestas bonos
de bienvenida|casas de apuestas bonos gratis|casas de apuestas bonos sin deposito|casas de apuestas boxeo|casas de apuestas caballos|casas
de apuestas carreras de caballos|casas de apuestas casino|casas de apuestas casino online|casas
de apuestas cerca de mi|casas de apuestas champions league|casas de apuestas chile|casas
de apuestas ciclismo|casas de apuestas colombia|casas de apuestas com|casas de apuestas con app|casas de apuestas con apuestas
gratis|casas de apuestas con bono|casas de apuestas con bono de bienvenida|casas de apuestas con bono de registro|casas de
apuestas con bono por registro|casas de apuestas con bono
sin deposito|casas de apuestas con bonos|casas de apuestas con bonos gratis|casas de apuestas con bonos sin deposito|casas de apuestas con deposito minimo|casas de apuestas con esports|casas
de apuestas con handicap asiatico|casas de apuestas con licencia|casas de apuestas
con licencia en españa|casas de apuestas con licencia españa|casas de apuestas con licencia española|casas de apuestas con mejores cuotas|casas de apuestas con pago anticipado|casas de apuestas con paypal|casas de apuestas con paypal en perú|casas de apuestas con promociones|casas de apuestas con ruleta en vivo|casas de
apuestas copa del rey|casas de apuestas de caballos|casas de apuestas de españa|casas de apuestas de
futbol|casas de apuestas de fútbol|casas de apuestas de peru|casas de apuestas
deportivas|casas de apuestas deportivas asiaticas|casas de apuestas deportivas colombia|casas de apuestas deportivas comparativa|casas de apuestas deportivas con paypal|casas de apuestas deportivas en chile|casas de apuestas deportivas en españa|casas de
apuestas deportivas en linea|casas de apuestas deportivas en madrid|casas de apuestas deportivas en mexico|casas de apuestas deportivas en peru|casas de
apuestas deportivas en sevilla|casas de apuestas deportivas en valencia|casas
de apuestas deportivas españa|casas de apuestas deportivas españolas|casas de apuestas deportivas legales|casas de apuestas deportivas madrid|casas de apuestas deportivas mexico|casas
de apuestas deportivas nuevas|casas de apuestas deportivas online|casas de apuestas deportivas peru|casas de apuestas deportivas perú|casas de apuestas deposito
minimo 1 euro|casas de apuestas depósito mínimo 1 euro|casas de
apuestas dinero gratis|casas de apuestas en argentina|casas de apuestas en barcelona|casas de apuestas en chile|casas de apuestas en colombia|casas de apuestas en españa|casas de apuestas en españa online|casas de apuestas en linea|casas de apuestas en madrid|casas de apuestas en méxico|casas de apuestas en peru|casas de
apuestas en perú|casas de apuestas en sevilla|casas de apuestas en uruguay|casas de apuestas en valencia|casas de apuestas en venezuela|casas de
apuestas equipos de futbol|casas de apuestas españa|casas de
apuestas españa alemania|casas de apuestas españa inglaterra|casas de apuestas españa licencia|casas de apuestas españa nuevas|casas de apuestas españa online|casas de
apuestas española|casas de apuestas españolas|casas de apuestas españolas con licencia|casas de apuestas españolas online|casas de apuestas esports|casas
de apuestas eurocopa|casas de apuestas eurocopa 2024|casas de apuestas europa league|casas de apuestas f1|casas de
apuestas fisicas en barcelona|casas de apuestas fisicas en españa|casas de apuestas formula 1|casas de apuestas fuera de españa|casas de apuestas futbol|casas de
apuestas fútbol|casas de apuestas futbol españa|casas de apuestas ganador
eurocopa|casas de apuestas gratis|casas de apuestas ingreso minimo|casas de apuestas ingreso minimo 1 euro|casas de apuestas
ingreso minimo 5 euros|casas de apuestas inter
barcelona|casas de apuestas legales|casas de apuestas legales en colombia|casas de apuestas legales
en españa|casas de apuestas legales en mexico|casas
de apuestas legales españa|casas de apuestas legales mx|casas de apuestas licencia|casas de apuestas licencia españa|casas de apuestas lista|casas
de apuestas madrid|casas de apuestas mas seguras|casas de apuestas
mejores bonos|casas de apuestas mejores cuotas|casas de apuestas mexico|casas de apuestas méxico|casas de apuestas minimo 5 euros|casas de apuestas mlb|casas de
apuestas mundial|casas de apuestas mundial baloncesto|casas de apuestas
mundiales|casas de apuestas nba|casas de apuestas no reguladas en españa|casas de apuestas nueva ley|casas de apuestas nuevas|casas de apuestas nuevas en colombia|casas de apuestas nuevas en españa|casas de apuestas nuevas españa|casas de apuestas ofertas|casas de apuestas online|casas
de apuestas online argentina|casas de apuestas online
colombia|casas de apuestas online deportivas|casas de apuestas online ecuador|casas de apuestas online en argentina|casas de
apuestas online en chile|casas de apuestas online en colombia|casas de apuestas online en españa|casas
de apuestas online en mexico|casas de apuestas online
españa|casas de apuestas online mas fiables|casas de apuestas online
mexico|casas de apuestas online nuevas|casas de apuestas online peru|casas de apuestas
online usa|casas de apuestas online venezuela|casas de apuestas pago paypal|casas de apuestas para ufc|casas de apuestas paypal|casas de apuestas peru bono sin deposito|casas de apuestas presenciales
en españa|casas de apuestas promociones|casas de apuestas
que aceptan paypal|
Your comment is awaiting moderation.
Вот этого ам2233 и заказал. Оплатил уже. Жду трекер. https://yamap.com/users/4919557 Радует качество ))
Your comment is awaiting moderation.
(10 euros gratis apuestas|10 mejores casas de apuestas|10 trucos para ganar
apuestas|15 euros gratis marca apuestas|1×2 apuestas|1×2 apuestas deportivas|1×2 apuestas que
significa|1×2 en apuestas|1×2 en apuestas que significa|1×2 que significa en apuestas|5 euros gratis apuestas|9
apuestas que siempre ganaras|a partir de cuanto
se declara apuestas|actividades de juegos de azar y apuestas|ad
apuestas deportivas|aleksandre topuria ufc apuestas|algoritmo para ganar apuestas deportivas|america apuestas|análisis nba
apuestas|aplicacion android apuestas deportivas|aplicacion apuestas deportivas|aplicacion apuestas deportivas android|aplicación de apuestas
online|aplicacion para hacer apuestas|aplicacion para hacer apuestas de futbol|aplicación para
hacer apuestas de fútbol|aplicaciones apuestas
deportivas android|aplicaciones apuestas deportivas
gratis|aplicaciones de apuestas android|aplicaciones de apuestas de fútbol|aplicaciones de apuestas deportivas|aplicaciones de apuestas deportivas peru|aplicaciones de apuestas deportivas perú|aplicaciones
de apuestas en colombia|aplicaciones de apuestas gratis|aplicaciones de
apuestas online|aplicaciones de apuestas seguras|aplicaciones de apuestas sin dinero|aplicaciones para hacer apuestas|apostar seguro apuestas deportivas|app android apuestas deportivas|app apuestas|app apuestas android|app apuestas de futbol|app apuestas deportivas|app apuestas deportivas android|app apuestas deportivas argentina|app apuestas deportivas colombia|app apuestas
deportivas ecuador|app apuestas deportivas españa|app apuestas deportivas gratis|app apuestas entre amigos|app apuestas futbol|app apuestas gratis|app apuestas sin dinero|app casa de apuestas|app casas de apuestas|app
control apuestas|app de apuestas|app de apuestas android|app de apuestas casino|app de apuestas colombia|app de apuestas con bono de bienvenida|app de apuestas de futbol|app de
apuestas deportivas|app de apuestas deportivas android|app de
apuestas deportivas argentina|app de apuestas deportivas colombia|app de apuestas deportivas en españa|app de apuestas deportivas peru|app de apuestas deportivas perú|app de apuestas
deportivas sin dinero|app de apuestas ecuador|app de apuestas en colombia|app
de apuestas en españa|app de apuestas en venezuela|app de
apuestas futbol|app de apuestas gratis|app de apuestas online|app de apuestas para android|app de apuestas para ganar dinero|app de apuestas peru|app de apuestas reales|app de casas de apuestas|app marca apuestas android|app
moviles de apuestas|app para apuestas|app para apuestas de futbol|app para apuestas
deportivas|app para apuestas deportivas en español|app
para ganar apuestas deportivas|app para hacer
apuestas|app para hacer apuestas deportivas|app para hacer apuestas entre amigos|app
para llevar control de apuestas|app pronosticos apuestas deportivas|app versus apuestas|apps apuestas mundial|apps de apuestas|apps de apuestas con bono de bienvenida|apps de apuestas de futbol|apps de apuestas deportivas peru|apps de apuestas mexico|apps para apuestas|aprender
a hacer apuestas deportivas|aprender hacer apuestas deportivas|apuesta del dia apuestas deportivas|apuestas 10 euros gratis|apuestas 100 seguras|apuestas 1×2|apuestas
1X2|apuestas 2 division|apuestas 3 division|apuestas a caballos|apuestas a carreras de caballos|apuestas a colombia|apuestas a corners|apuestas a ganar|apuestas a jugadores nba|apuestas
a la baja|apuestas a la nfl|apuestas al barcelona|apuestas
al dia|apuestas al empate|apuestas al mundial|apuestas al tenis wta|apuestas alaves barcelona|apuestas alcaraz hoy|apuestas
alemania españa|apuestas alonso campeon del mundo|apuestas
altas y bajas|apuestas altas y bajas nfl|apuestas ambos equipos marcan|apuestas america|apuestas android|apuestas anillo nba|apuestas antes del mundial|apuestas anticipadas|apuestas anticipadas
nba|apuestas apps|apuestas arabia argentina|apuestas argentina|apuestas argentina
campeon del mundo|apuestas argentina canada|apuestas argentina colombia|apuestas argentina croacia|apuestas argentina españa|apuestas argentina francia|apuestas argentina
francia cuanto paga|apuestas argentina francia mundial|apuestas argentina gana el mundial|apuestas argentina gana mundial|apuestas argentina holanda|apuestas argentina mexico|apuestas argentina méxico|apuestas argentina mundial|apuestas argentina online|apuestas argentina paises bajos|apuestas argentina polonia|apuestas argentina
uruguay|apuestas argentina vs australia|apuestas argentina vs colombia|apuestas
argentina vs francia|apuestas argentina vs peru|apuestas argentinas|apuestas arsenal real
madrid|apuestas ascenso a primera division|apuestas ascenso a segunda|apuestas asiaticas|apuestas asiatico|apuestas athletic|apuestas athletic atletico|apuestas athletic barça|apuestas athletic barcelona|apuestas athletic betis|apuestas
athletic manchester|apuestas athletic manchester united|apuestas athletic osasuna|apuestas athletic real|apuestas athletic real madrid|apuestas athletic real sociedad|apuestas athletic real sociedad final|apuestas
athletic roma|apuestas athletic sevilla|apuestas athletic valencia|apuestas atletico|apuestas atletico barcelona|apuestas atletico barsa|apuestas atletico
campeon champions|apuestas atletico campeon de liga|apuestas
atlético copenhague|apuestas atletico de madrid|apuestas atlético de madrid|apuestas atletico de madrid barcelona|apuestas atletico de madrid gana la liga|apuestas
atletico de madrid real madrid|apuestas atlético
de madrid real madrid|apuestas atletico de madrid vs barcelona|apuestas atletico madrid|apuestas atletico
madrid real madrid|apuestas atletico madrid vs
barcelona|apuestas atletico real madrid|apuestas atletico real madrid champions|apuestas
atletismo|apuestas bajas|apuestas baloncesto|apuestas baloncesto acb|apuestas baloncesto handicap|apuestas baloncesto hoy|apuestas baloncesto juegos olimpicos|apuestas baloncesto nba|apuestas baloncesto pronostico|apuestas baloncesto
pronósticos|apuestas baloncesto prorroga|apuestas barca|apuestas
barca athletic|apuestas barca atletico|apuestas barca bayern|apuestas barca bayern munich|apuestas barca girona|apuestas barca hoy|apuestas barça hoy|apuestas barca
inter|apuestas barca juventus|apuestas barca madrid|apuestas barça madrid|apuestas barca real madrid|apuestas barca
vs juve|apuestas barca vs madrid|apuestas barca vs psg|apuestas barcelona|apuestas barcelona alaves|apuestas barcelona athletic|apuestas barcelona atletico|apuestas barcelona atletico de madrid|apuestas barcelona atlético de madrid|apuestas barcelona atletico madrid|apuestas barcelona bayern|apuestas barcelona betis|apuestas barcelona campeon de liga|apuestas barcelona celta|apuestas barcelona espanyol|apuestas barcelona
gana la champions|apuestas barcelona girona|apuestas barcelona granada|apuestas barcelona hoy|apuestas barcelona inter|apuestas barcelona madrid|apuestas barcelona osasuna|apuestas barcelona
psg|apuestas barcelona real madrid|apuestas barcelona real sociedad|apuestas barcelona
sevilla|apuestas barcelona valencia|apuestas barcelona villarreal|apuestas barcelona vs atletico madrid|apuestas barcelona vs madrid|apuestas barcelona
vs real madrid|apuestas barsa madrid|apuestas basket hoy|apuestas bayern barcelona|apuestas bayern vs
barcelona|apuestas beisbol|apuestas béisbol|apuestas beisbol mlb|apuestas
beisbol pronosticos|apuestas beisbol venezolano|apuestas betis|apuestas betis – chelsea|apuestas betis barcelona|apuestas betis chelsea|apuestas betis fiorentina|apuestas betis girona|apuestas betis madrid|apuestas betis
mallorca|apuestas betis real madrid|apuestas
betis real sociedad|apuestas betis sevilla|apuestas betis valencia|apuestas betis valladolid|apuestas betis vs
valencia|apuestas betplay hoy colombia|apuestas betsson peru|apuestas bienvenida|apuestas billar online|apuestas bolivia vs colombia|apuestas bono|apuestas bono bienvenida|apuestas bono de bienvenida|apuestas bono de bienvenida sin deposito|apuestas bono gratis|apuestas bono sin deposito|apuestas bonos sin deposito|apuestas borussia real madrid|apuestas boxeo|apuestas boxeo de campeonato|apuestas boxeo españa|apuestas boxeo español|apuestas boxeo femenino olimpiadas|apuestas boxeo hoy|apuestas boxeo online|apuestas brasil colombia|apuestas brasil peru|apuestas brasil uruguay|apuestas brasil vs colombia|apuestas brasil vs
peru|apuestas caballos|apuestas caballos colocado|apuestas caballos españa|apuestas caballos hipodromo|apuestas caballos
hoy|apuestas caballos madrid|apuestas caballos online|apuestas caballos sanlucar de barrameda|apuestas caballos zarzuela|apuestas calculador|apuestas campeon|apuestas campeon champions|apuestas campeón champions|apuestas campeon champions 2025|apuestas campeon champions league|apuestas campeon conference league|apuestas campeon copa america|apuestas campeon copa del rey|apuestas campeon de champions|apuestas campeon de la champions|apuestas campeon de liga|apuestas campeon del
mundo|apuestas campeon eurocopa|apuestas campeón eurocopa|apuestas campeon europa league|apuestas campeon f1|apuestas
campeon f1 2025|apuestas campeon formula 1|apuestas campeon libertadores|apuestas campeon liga|apuestas
campeon liga bbva|apuestas campeon liga española|apuestas campeon liga
santander|apuestas campeon motogp 2025|apuestas campeon mundial|apuestas campeón mundial|apuestas campeon mundial baloncesto|apuestas
campeon nba|apuestas campeón nba|apuestas campeon premier|apuestas
campeon premier league|apuestas campeon roland garros|apuestas campeonato f1|apuestas campeonatos de futbol|apuestas carrera de caballos|apuestas carrera de caballos hoy|apuestas carrera de caballos nocturnas|apuestas
carrera de galgos fin de semana|apuestas carrera de
galgos hoy|apuestas carrera de galgos nocturnas|apuestas carreras caballos|apuestas
carreras caballos sanlucar|apuestas carreras de caballos|apuestas carreras de caballos en directo|apuestas carreras de caballos en vivo|apuestas carreras de caballos españa|apuestas carreras
de caballos hoy|apuestas carreras de caballos nacionales|apuestas carreras de
caballos nocturnas|apuestas carreras de caballos online|apuestas carreras de caballos sanlucar|apuestas
carreras de caballos sanlúcar|apuestas carreras de galgos|apuestas carreras de
galgos en vivo|apuestas carreras de galgos nocturnas|apuestas
carreras de galgos pre partido|apuestas casino|apuestas casino barcelona|apuestas casino futbol|apuestas casino gran madrid|apuestas
casino gratis|apuestas casino madrid|apuestas casino online|apuestas casino online argentina|apuestas casinos|apuestas casinos online|apuestas celta|apuestas celta barcelona|apuestas celta betis|apuestas celta eibar|apuestas
celta espanyol|apuestas celta granada|apuestas celta madrid|apuestas celta manchester|apuestas celta real
madrid|apuestas champion league|apuestas champions foro|apuestas champions hoy|apuestas
champions league|apuestas champions league – pronósticos|apuestas
champions league 2025|apuestas champions league hoy|apuestas champions
league pronosticos|apuestas champions league pronósticos|apuestas champions pronosticos|apuestas chelsea
barcelona|apuestas chelsea betis|apuestas chile|apuestas chile peru|apuestas chile venezuela|apuestas chile
vs colombia|apuestas chile vs uruguay|apuestas ciclismo|apuestas
ciclismo en vivo|apuestas ciclismo femenino|apuestas ciclismo tour francia|apuestas ciclismo vuelta|apuestas
ciclismo vuelta a españa|apuestas ciclismo vuelta españa|apuestas city madrid|apuestas city real madrid|apuestas clasico|apuestas clasico español|apuestas clasico real madrid barcelona|apuestas clasificacion mundial|apuestas colombia|apuestas colombia argentina|apuestas colombia brasil|apuestas
colombia paraguay|apuestas colombia uruguay|apuestas colombia vs argentina|apuestas
colombia vs brasil|apuestas combinadas|apuestas combinadas como funcionan|apuestas combinadas de futbol|apuestas combinadas de fútbol|apuestas
combinadas foro|apuestas combinadas futbol|apuestas
combinadas hoy|apuestas combinadas mismo partido|apuestas combinadas mundial|apuestas combinadas
nba|apuestas combinadas para esta semana|apuestas combinadas para hoy|apuestas combinadas para
mañana|apuestas combinadas pronosticos|apuestas combinadas recomendadas|apuestas combinadas seguras|apuestas combinadas seguras para hoy|apuestas combinadas seguras para mañana|apuestas como ganar|apuestas
comparador|apuestas con bono de bienvenida|apuestas con dinero ficticio|apuestas con dinero real|apuestas con dinero virtual|apuestas con handicap|apuestas con handicap
asiatico|apuestas con handicap baloncesto|apuestas con mas probabilidades
de ganar|apuestas con paypal|apuestas con tarjeta de credito|apuestas con tarjeta de debito|apuestas consejos|apuestas copa|apuestas copa africa|apuestas copa america|apuestas copa américa|apuestas copa argentina|apuestas copa brasil|apuestas copa davis|apuestas copa de europa|apuestas copa del mundo|apuestas copa del rey|apuestas copa
del rey baloncesto|apuestas copa del rey final|apuestas copa del rey futbol|apuestas copa del rey ganador|apuestas copa del rey hoy|apuestas copa del rey pronosticos|apuestas copa del rey pronósticos|apuestas copa europa|apuestas copa italia|apuestas copa libertadores|apuestas copa mundial de hockey|apuestas copa rey|apuestas copa sudamericana|apuestas corners|apuestas corners
hoy|apuestas croacia argentina|apuestas cuartos eurocopa|apuestas cuotas|apuestas cuotas altas|apuestas cuotas bajas|apuestas de 1 euro|apuestas de baloncesto|apuestas de baloncesto
hoy|apuestas de baloncesto nba|apuestas de baloncesto para hoy|apuestas de
beisbol|apuestas de beisbol para hoy|apuestas
de blackjack en linea|apuestas de boxeo|apuestas de boxeo canelo|apuestas de boxeo
en las vegas|apuestas de boxeo hoy|apuestas de boxeo online|apuestas de caballo|apuestas de caballos|apuestas de caballos como funciona|apuestas de caballos como se juega|apuestas
de caballos en colombia|apuestas de caballos en españa|apuestas de caballos en linea|apuestas de caballos españa|apuestas de caballos ganador y colocado|apuestas de caballos internacionales|apuestas de caballos juegos|apuestas de caballos online|apuestas de caballos online en venezuela|apuestas de caballos por internet|apuestas
de caballos pronosticos|apuestas de caballos pronósticos|apuestas de carrera de caballos|apuestas de carreras de caballos|apuestas
de carreras de caballos online|apuestas de casino|apuestas de casino online|apuestas de casino por internet|apuestas de champions league|apuestas de ciclismo|apuestas de colombia|apuestas
de copa america|apuestas de corners|apuestas de
deportes en linea|apuestas de deportes online|apuestas de
dinero|apuestas de esports|apuestas de eurocopa|apuestas de europa league|apuestas de f1|apuestas de formula 1|apuestas de futbol|apuestas de fútbol|apuestas de futbol app|apuestas de futbol
argentina|apuestas de futbol colombia|apuestas de futbol en colombia|apuestas de futbol
en directo|apuestas de futbol en linea|apuestas de futbol en vivo|apuestas de futbol español|apuestas de futbol gratis|apuestas de futbol hoy|apuestas de futbol mundial|apuestas de futbol online|apuestas de fútbol online|apuestas de futbol para
hoy|apuestas de fútbol para hoy|apuestas de futbol para
hoy seguras|apuestas de futbol para mañana|apuestas de futbol peru|apuestas de
futbol pronosticos|apuestas de fútbol pronósticos|apuestas de futbol seguras|apuestas de
futbol seguras para hoy|apuestas de futbol sin dinero|apuestas de galgos|apuestas de
galgos como ganar|apuestas de galgos en directo|apuestas de galgos
online|apuestas de galgos trucos|apuestas de golf|apuestas de hockey|apuestas de hockey sobre hielo|apuestas de hoy|apuestas de
hoy seguras|apuestas de juego|apuestas de juegos|apuestas de juegos deportivos|apuestas de juegos online|apuestas de la
champions league|apuestas de la copa américa|apuestas
de la eurocopa|apuestas de la europa league|apuestas de la liga|apuestas de la liga bbva|apuestas de la
liga española|apuestas de la nba|apuestas de la nfl|apuestas
de la ufc|apuestas de mlb|apuestas de nba|apuestas de nba para hoy|apuestas de partidos|apuestas
de partidos de futbol|apuestas de peleas ufc|apuestas de
perros en vivo|apuestas de perros virtuales|apuestas de peru|apuestas de
sistema|apuestas de sistema como funciona|apuestas de sistema explicacion|apuestas de sistema explicación|apuestas de tenis|apuestas de tenis de mesa|apuestas de tenis en directo|apuestas de tenis hoy|apuestas de tenis para hoy|apuestas de tenis pronosticos|apuestas de tenis seguras|apuestas de todo tipo|apuestas de ufc|apuestas
de ufc hoy|apuestas del boxeo|apuestas del clasico|apuestas del clasico real madrid barca|apuestas del dia|apuestas del día|apuestas del dia de hoy|apuestas del dia deportivas|apuestas del
dia futbol|apuestas del mundial|apuestas del partido de hoy|apuestas del real madrid|apuestas
del rey|apuestas del sistema|apuestas deporte|apuestas deportes|apuestas deportiva|apuestas deportivas|apuestas deportivas 1 euro|apuestas deportivas 10 euros gratis|apuestas deportivas 100 seguras|apuestas deportivas 1×2|apuestas deportivas android|apuestas deportivas app|apuestas deportivas apps|apuestas deportivas argentina|apuestas deportivas argentina
futbol|apuestas deportivas argentina legal|apuestas deportivas atletico de madrid|apuestas deportivas baloncesto|apuestas deportivas barca madrid|apuestas deportivas barcelona|apuestas deportivas beisbol|apuestas
deportivas bono|apuestas deportivas bono bienvenida|apuestas
deportivas bono de bienvenida|apuestas deportivas bono sin deposito|apuestas deportivas bonos de bienvenida|apuestas deportivas boxeo|apuestas deportivas caballos|apuestas deportivas calculadora|apuestas deportivas campeon liga|apuestas deportivas casino|apuestas deportivas casino barcelona|apuestas deportivas casino online|apuestas deportivas cerca de mi|apuestas deportivas champions league|apuestas deportivas chile|apuestas deportivas ciclismo|apuestas deportivas colombia|apuestas deportivas com|apuestas deportivas com foro|apuestas
deportivas com pronosticos|apuestas deportivas combinadas|apuestas deportivas combinadas para hoy|apuestas deportivas como se juega|apuestas deportivas comparador|apuestas deportivas con bono gratis|apuestas deportivas con bonos gratis|apuestas deportivas con dinero ficticio|apuestas deportivas con paypal|apuestas deportivas con puntos virtuales|apuestas deportivas
consejos|apuestas deportivas consejos para ganar|apuestas deportivas copa
america|apuestas deportivas copa del rey|apuestas deportivas copa libertadores|apuestas deportivas copa mundial|apuestas deportivas corners|apuestas deportivas cual es la mejor|apuestas deportivas cuotas altas|apuestas deportivas de baloncesto|apuestas deportivas de boxeo|apuestas deportivas de colombia|apuestas deportivas de futbol|apuestas deportivas de nba|apuestas
deportivas de nhl|apuestas deportivas de peru|apuestas deportivas de tenis|apuestas deportivas
del dia|apuestas deportivas dinero ficticio|apuestas deportivas directo|apuestas deportivas doble oportunidad|apuestas deportivas en argentina|apuestas deportivas en chile|apuestas deportivas en colombia|apuestas deportivas en directo|apuestas deportivas en españa|apuestas
deportivas en español|apuestas deportivas en linea|apuestas deportivas en línea|apuestas deportivas
en peru|apuestas deportivas en perú|apuestas deportivas en sevilla|apuestas deportivas en uruguay|apuestas deportivas en vivo|apuestas deportivas
es|apuestas deportivas es pronosticos|apuestas deportivas españa|apuestas deportivas españolas|apuestas
deportivas esports|apuestas deportivas estadisticas|apuestas deportivas
estrategias|apuestas deportivas estrategias seguras|apuestas deportivas eurocopa|apuestas deportivas europa league|apuestas deportivas f1|apuestas deportivas faciles de ganar|apuestas deportivas
formula 1|apuestas deportivas foro|apuestas deportivas foro futbol|apuestas
deportivas foro tenis|apuestas deportivas francia argentina|apuestas deportivas futbol|apuestas deportivas fútbol|apuestas deportivas futbol argentino|apuestas deportivas futbol colombia|apuestas
deportivas futbol español|apuestas deportivas gana|apuestas deportivas ganadas|apuestas deportivas ganar dinero seguro|apuestas deportivas
gane|apuestas deportivas golf|apuestas deportivas gratis|apuestas deportivas gratis con premios|apuestas
deportivas gratis hoy|apuestas deportivas gratis sin deposito|apuestas deportivas handicap|apuestas deportivas handicap asiatico|apuestas deportivas hoy|apuestas deportivas impuestos|apuestas deportivas interior argentina|apuestas deportivas juegos olimpicos|apuestas deportivas la liga|apuestas deportivas legales|apuestas deportivas legales en colombia|apuestas
deportivas libres de impuestos|apuestas deportivas licencia españa|apuestas deportivas liga española|apuestas
deportivas listado|apuestas deportivas listado clasico|apuestas deportivas madrid|apuestas deportivas mas seguras|apuestas deportivas mejor pagadas|apuestas deportivas mejores|apuestas deportivas
mejores app|apuestas deportivas mejores casas|apuestas deportivas mejores cuotas|apuestas deportivas mejores paginas|apuestas deportivas mexico|apuestas deportivas
méxico|apuestas deportivas mlb|apuestas deportivas
mlb hoy|apuestas deportivas multiples|apuestas deportivas mundial|apuestas
deportivas murcia|apuestas deportivas nba|apuestas deportivas nba hoy|apuestas deportivas nfl|apuestas deportivas
nhl|apuestas deportivas nuevas|apuestas deportivas ofertas|apuestas deportivas online|apuestas deportivas online argentina|apuestas deportivas online chile|apuestas deportivas online colombia|apuestas deportivas online en colombia|apuestas
deportivas online españa|apuestas deportivas online mexico|apuestas
deportivas online paypal|apuestas deportivas online peru|apuestas deportivas online por internet|apuestas deportivas pago paypal|apuestas deportivas para
ganar dinero|apuestas deportivas para hoy|apuestas deportivas
para hoy pronosticos|apuestas deportivas partido suspendido|apuestas deportivas partidos de hoy|apuestas deportivas
paypal|apuestas deportivas peru|apuestas deportivas perú|apuestas deportivas peru vs
ecuador|apuestas deportivas predicciones|apuestas deportivas promociones|apuestas deportivas pronostico|apuestas deportivas pronóstico|apuestas deportivas pronostico hoy|apuestas deportivas pronosticos|apuestas deportivas pronósticos|apuestas
deportivas pronosticos expertos|apuestas deportivas pronosticos gratis|apuestas
deportivas pronosticos nba|apuestas deportivas pronosticos tenis|apuestas deportivas
que aceptan paypal|apuestas deportivas real madrid|apuestas deportivas regalo bienvenida|apuestas deportivas resultado exacto|apuestas deportivas resultados|apuestas deportivas
rugby|apuestas deportivas seguras|apuestas deportivas seguras
foro|apuestas deportivas seguras hoy|apuestas deportivas seguras para hoy|apuestas deportivas seguras telegram|apuestas deportivas sevilla|apuestas deportivas simulador eurocopa|apuestas deportivas sin deposito|apuestas deportivas sin deposito inicial|apuestas deportivas sin dinero|apuestas
deportivas sin dinero real|apuestas deportivas sin registro|apuestas deportivas stake|apuestas deportivas stake 10|apuestas deportivas telegram españa|apuestas deportivas tenis|apuestas deportivas tenis de mesa|apuestas deportivas
tenis foro|apuestas deportivas tenis hoy|apuestas deportivas
tips|apuestas deportivas tipster|apuestas deportivas ufc|apuestas deportivas uruguay|apuestas deportivas valencia|apuestas deportivas valencia barcelona|apuestas deportivas venezuela|apuestas deportivas virtuales|apuestas deportivas
y casino|apuestas deportivas y casino online|apuestas deportivas.com|apuestas deportivas.com foro|apuestas deportivas.es|apuestas deportivos pronosticos|apuestas
deposito minimo 1 euro|apuestas descenso a segunda|apuestas descenso
a segunda b|apuestas descenso la liga|apuestas descenso
primera division|apuestas descenso segunda|apuestas dia|apuestas diarias seguras|apuestas dinero|apuestas dinero ficticio|apuestas dinero
real|apuestas dinero virtual|apuestas directas|apuestas directo|apuestas directo futbol|apuestas division de honor juvenil|apuestas dnb|apuestas doble oportunidad|apuestas doble resultado|apuestas dobles|apuestas dobles
y triples|apuestas dortmund barcelona|apuestas draft nba|apuestas draft nfl|apuestas ecuador vs argentina|apuestas
ecuador vs venezuela|apuestas egipto uruguay|apuestas el clasico|apuestas elecciones venezuela|apuestas empate|apuestas en baloncesto|apuestas en barcelona|apuestas en beisbol|apuestas en boxeo|apuestas en caballos|apuestas en carreras
de caballos|apuestas en casino|apuestas en casino online|apuestas
en casinos|apuestas en casinos online|apuestas en chile|apuestas en ciclismo|apuestas en colombia|apuestas en colombia
de futbol|apuestas en directo|apuestas en directo futbol|apuestas en directo
pronosticos|apuestas en el futbol|apuestas en el
tenis|apuestas en españa|apuestas en esports|apuestas en eventos deportivos virtuales|apuestas en golf|apuestas en juegos|apuestas en la champions league|apuestas en la eurocopa|apuestas en la
liga|apuestas en la nba|apuestas en la nfl|apuestas en las vegas mlb|apuestas en las vegas nfl|apuestas en linea|apuestas
en línea|apuestas en linea argentina|apuestas en linea
boxeo|apuestas en linea chile|apuestas en linea colombia|apuestas en línea
de fútbol|apuestas en linea deportivas|apuestas en linea españa (Alexandra)|apuestas en linea estados
unidos|apuestas en linea futbol|apuestas en linea mexico|apuestas en línea méxico|apuestas en linea mundial|apuestas en linea peru|apuestas en linea usa|apuestas en los esports|apuestas
en madrid|apuestas en méxico|apuestas en mexico
online|apuestas en nba|apuestas en partidos de futbol|apuestas en partidos de futbol en vivo|apuestas en partidos
de tenis en directo|apuestas en perú|apuestas en sevilla|apuestas en sistema|apuestas en stake|apuestas en tenis|apuestas en tenis de mesa|apuestas en valencia|apuestas en vivo|apuestas en vivo argentina|apuestas en vivo casino|apuestas en vivo futbol|apuestas en vivo fútbol|apuestas en vivo nba|apuestas en vivo peru|apuestas en vivo tenis|apuestas en vivo ufc|apuestas equipo mbappe|apuestas
equipos de futbol|apuestas españa|apuestas españa alemania|apuestas españa alemania eurocopa|apuestas españa croacia|apuestas españa eurocopa|apuestas españa francia|apuestas
españa francia eurocopa|apuestas españa gana el mundial|apuestas españa gana eurocopa|apuestas españa gana mundial|apuestas españa georgia|apuestas españa holanda|apuestas españa inglaterra|apuestas españa inglaterra cuotas|apuestas españa inglaterra eurocopa|apuestas españa italia|apuestas españa mundial|apuestas
españa paises bajos|apuestas español|apuestas
español oviedo|apuestas espanyol barcelona|apuestas espanyol betis|apuestas espanyol villarreal|apuestas esport|apuestas esports|apuestas esports colombia|apuestas esports españa|apuestas esports fifa|apuestas esports gratis|apuestas esports lol|apuestas esports peru|apuestas esports
valorant|apuestas estadisticas|apuestas estrategias|apuestas
euro|apuestas euro copa|apuestas eurocopa|apuestas
eurocopa campeon|apuestas eurocopa españa|apuestas eurocopa favoritos|apuestas eurocopa femenina|apuestas eurocopa final|apuestas eurocopa
ganador|apuestas eurocopa hoy|apuestas eurocopa sub 21|apuestas euroliga baloncesto|apuestas euroliga pronosticos|apuestas europa league|apuestas europa league hoy|apuestas europa league pronosticos|apuestas europa league pronósticos|apuestas euros|apuestas f1
abu dhabi|apuestas f1 bahrein|apuestas f1 canada|apuestas f1 china|apuestas f1 cuotas|apuestas f1 hoy|apuestas f1 las vegas|apuestas f1 miami|apuestas f1 monaco|apuestas faciles de ganar|apuestas
fáciles de ganar|apuestas faciles para ganar|apuestas favoritas|apuestas favorito champions|apuestas favoritos champions|apuestas favoritos eurocopa|apuestas favoritos
mundial|apuestas fc barcelona|apuestas final champions
cuotas|apuestas final champions league|apuestas final champions peru|apuestas final copa|apuestas final copa america|apuestas final copa
de europa|apuestas final copa del rey|apuestas final copa europa|apuestas final
copa libertadores|apuestas final copa rey|apuestas final de copa|apuestas final de copa del rey|apuestas final del
mundial|apuestas final euro|apuestas final eurocopa|apuestas final
europa league|apuestas final libertadores|apuestas final mundial|apuestas final nba|apuestas final rugby|apuestas final uefa europa
league|apuestas final.mundial|apuestas finales de conferencia nfl|apuestas finales nba|apuestas fiorentina betis|apuestas
formula|apuestas formula 1|apuestas fórmula 1|apuestas fórmula 1 pronósticos|apuestas formula
uno|apuestas foro|apuestas foro nba|apuestas francia argentina|apuestas francia españa|apuestas futbol|apuestas fútbol|apuestas futbol americano|apuestas futbol americano nfl|apuestas futbol argentina|apuestas futbol argentino|apuestas
futbol champions league|apuestas futbol chile|apuestas futbol colombia|apuestas futbol consejos|apuestas
futbol en directo|apuestas fútbol en directo|apuestas futbol en vivo|apuestas fútbol en vivo|apuestas futbol españa|apuestas
futbol español|apuestas fútbol español|apuestas futbol
eurocopa|apuestas futbol femenino|apuestas futbol foro|apuestas futbol
gratis|apuestas futbol hoy|apuestas fútbol hoy|apuestas futbol
juegos olimpicos|apuestas futbol mexico|apuestas futbol mundial|apuestas futbol
online|apuestas futbol para hoy|apuestas futbol peru|apuestas futbol pronosticos|apuestas futbol sala|apuestas futbol
telegram|apuestas futbol virtual|apuestas galgos|apuestas galgos en directo|apuestas galgos hoy|apuestas galgos online|apuestas
galgos pronosticos|apuestas galgos trucos|apuestas gana|apuestas gana colombia|apuestas gana
resultados|apuestas ganadas|apuestas ganadas hoy|apuestas ganador champions
league|apuestas ganador copa america|apuestas ganador copa del rey|apuestas ganador copa del rey
baloncesto|apuestas ganador copa libertadores|apuestas ganador
de la eurocopa|apuestas ganador de la liga|apuestas ganador del
mundial|apuestas ganador eurocopa|apuestas ganador europa league|apuestas ganador f1|apuestas
ganador la liga|apuestas ganador liga española|apuestas ganador mundial|apuestas ganador mundial baloncesto|apuestas ganador mundial f1|apuestas ganador nba|apuestas ganadores eurocopa|apuestas ganadores
mundial|apuestas ganar champions|apuestas ganar eurocopa|apuestas ganar liga|apuestas ganar mundial|apuestas ganar nba|apuestas getafe valencia|apuestas ghana uruguay|apuestas girona|apuestas
girona athletic|apuestas girona betis|apuestas girona campeon de liga|apuestas girona campeon liga|apuestas girona gana la liga|apuestas girona real madrid|apuestas girona
real sociedad|apuestas goleador eurocopa|apuestas goleadores eurocopa|apuestas goles asiaticos|apuestas golf|apuestas golf masters|apuestas golf pga|apuestas granada barcelona|apuestas grand slam de tenis|apuestas gratis|apuestas gratis casino|apuestas gratis
con premios|apuestas gratis hoy|apuestas gratis para hoy|apuestas gratis por registro|apuestas gratis puntos|apuestas gratis
regalos|apuestas gratis sin deposito|apuestas gratis sin depósito|apuestas gratis sin ingreso|apuestas gratis sports|apuestas gratis y ganar
premios|apuestas grupo a eurocopa|apuestas grupos eurocopa|apuestas
handicap|apuestas handicap asiatico|apuestas handicap baloncesto|apuestas handicap como funciona|apuestas handicap nba|apuestas handicap nfl|apuestas hipicas online|apuestas hípicas online|apuestas hipicas venezuela|apuestas hockey|apuestas hockey hielo|apuestas hockey
patines|apuestas hockey sobre hielo|apuestas holanda argentina|apuestas holanda vs argentina|apuestas hoy|apuestas
hoy champions|apuestas hoy futbol|apuestas hoy
nba|apuestas hoy pronosticos|apuestas hoy seguras|apuestas impuestos|apuestas inglaterra paises bajos|apuestas inter barca|apuestas inter barcelona|apuestas juego|apuestas juegos|apuestas juegos en linea|apuestas juegos
olimpicos|apuestas juegos olímpicos|apuestas juegos
olimpicos baloncesto|apuestas juegos online|apuestas juegos virtuales|apuestas jugador sevilla|apuestas jugadores nba|apuestas
kings league americas|apuestas la liga|apuestas la
liga española|apuestas la liga hoy|apuestas la liga santander|apuestas las vegas mlb|apuestas las vegas nba|apuestas las vegas nfl|apuestas league of legends mundial|apuestas legal|apuestas legales|apuestas legales en colombia|apuestas legales en españa|apuestas legales en estados unidos|apuestas legales
españa|apuestas leganes betis|apuestas libertadores|apuestas
licencia|apuestas liga 1 peru|apuestas liga argentina|apuestas liga bbva pronosticos|apuestas
liga de campeones|apuestas liga de campeones de baloncesto|apuestas liga de campeones de hockey|apuestas
liga españa|apuestas liga española|apuestas
liga santander pronosticos|apuestas ligas de
futbol|apuestas linea|apuestas linea de gol|apuestas liverpool barcelona|apuestas liverpool real madrid|apuestas lol
mundial|apuestas madrid|apuestas madrid arsenal|apuestas madrid atletico|apuestas madrid atletico champions|apuestas madrid barca|apuestas madrid barça|apuestas madrid
barca hoy|apuestas madrid barca supercopa|apuestas madrid barcelona|apuestas madrid
barsa|apuestas madrid bayern|apuestas madrid betis|apuestas madrid borussia|apuestas
madrid campeon champions|apuestas madrid celta|apuestas madrid city|apuestas madrid
dortmund|apuestas madrid gana la liga|apuestas madrid
gana liga|apuestas madrid hoy|apuestas madrid liverpool|apuestas madrid osasuna|apuestas madrid
sevilla|apuestas madrid valencia|apuestas madrid vs
arsenal|apuestas madrid vs barcelona|apuestas mallorca osasuna|apuestas mallorca real sociedad|apuestas manchester athletic|apuestas manchester city real
madrid|apuestas mas faciles de ganar|apuestas mas seguras|apuestas mas seguras para hoy|apuestas masters de golf|apuestas masters de tenis|apuestas maximo goleador eurocopa|apuestas maximo goleador mundial|apuestas mejor
jugador eurocopa|apuestas mejores casinos online|apuestas mexico|apuestas méxico|apuestas mexico polonia|apuestas méxico polonia|apuestas mlb|apuestas mlb hoy|apuestas mlb las vegas|apuestas mlb para
hoy|apuestas mlb pronosticos|apuestas mlb usa|apuestas mma ufc|apuestas momios|apuestas multiples|apuestas múltiples|apuestas multiples como funcionan|apuestas multiples el gordo|apuestas multiples
futbol|apuestas mundial|apuestas mundial 2026|apuestas mundial
baloncesto|apuestas mundial balonmano|apuestas mundial brasil|apuestas
mundial campeon|apuestas mundial ciclismo|apuestas mundial
clubes|apuestas mundial de baloncesto|apuestas mundial de ciclismo|apuestas mundial de clubes|apuestas
mundial de futbol|apuestas mundial de fútbol|apuestas mundial de rugby|apuestas mundial
f1|apuestas mundial favoritos|apuestas mundial femenino|apuestas
mundial formula 1|apuestas mundial futbol|apuestas mundial ganador|apuestas mundial lol|apuestas mundial moto gp|apuestas mundial motogp|apuestas mundial rugby|apuestas mundial sub 17|apuestas
mundiales|apuestas mundialistas|apuestas mvp eurocopa|apuestas mvp nba|apuestas mvp nfl|apuestas nacionales de colombia|apuestas
nba|apuestas nba all star|apuestas nba campeon|apuestas nba
consejos|apuestas nba esta noche|apuestas nba finals|apuestas
nba gratis|apuestas nba hoy|apuestas nba hoy jugadores|apuestas nba hoy pronosticos|apuestas
nba para hoy|apuestas nba playoffs|apuestas nba pronosticos|apuestas nba pronósticos|apuestas nba pronosticos hoy|apuestas
nba tipster|apuestas nfl|apuestas nfl hoy|apuestas nfl las vegas|apuestas nfl playoffs|apuestas nfl pronosticos|apuestas nfl pronósticos|apuestas
nfl semana 4|apuestas nfl super bowl|apuestas nhl|apuestas nhl pronosticos|apuestas
octavos eurocopa|apuestas ofertas|apuestas online|apuestas online argentina|apuestas online argentina legal|apuestas online bono|apuestas online bono
bienvenida|apuestas online boxeo|apuestas online caballos|apuestas online carreras
de caballos|apuestas online casino|apuestas online champions league|apuestas online
chile|apuestas online ciclismo|apuestas online
colombia|apuestas online comparativa|apuestas online con paypal|apuestas online de caballos|apuestas online deportivas|apuestas online en argentina|apuestas online en peru|apuestas online espana|apuestas online
españa|apuestas online esports|apuestas online foro|apuestas online futbol|apuestas online futbol españa|apuestas online golf|apuestas online gratis|apuestas online gratis sin deposito|apuestas online juegos|apuestas online mexico|apuestas online mma|apuestas online movil|apuestas online nba|apuestas online net|apuestas online nuevas|apuestas online opiniones|apuestas online paypal|apuestas online peru|apuestas online seguras|apuestas online sin dinero|apuestas online sin registro|apuestas
online tenis|apuestas online ufc|apuestas online uruguay|apuestas
online venezuela|apuestas open britanico golf|apuestas osasuna athletic|apuestas osasuna barcelona|apuestas osasuna real madrid|apuestas osasuna
sevilla|apuestas osasuna valencia|apuestas over|apuestas over 2.5|apuestas over under|apuestas paginas|apuestas pago anticipado|apuestas paises bajos ecuador|apuestas
paises bajos inglaterra|apuestas países bajos qatar|apuestas para boxeo|apuestas para champions league|apuestas para el clasico|apuestas para el dia de hoy|apuestas
para el mundial|apuestas para el partido de hoy|apuestas para eurocopa|apuestas para europa
league|apuestas para futbol|apuestas para ganar|apuestas para ganar dinero|apuestas para ganar
dinero facil|apuestas para ganar en la ruleta|apuestas para ganar la
champions|apuestas para ganar la eurocopa|apuestas para ganar la europa league|apuestas para
ganar la liga|apuestas para ganar siempre|apuestas para hacer|apuestas para hoy|apuestas
para hoy de futbol|apuestas para hoy europa league|apuestas para hoy futbol|apuestas
para juegos|apuestas para la champions league|apuestas para la copa
del rey|apuestas para la eurocopa|apuestas para la europa league|apuestas para
la final de la eurocopa|apuestas para la nba hoy|apuestas para los partidos de hoy|apuestas para partidos de
hoy|apuestas para ufc|apuestas partido|apuestas partido aplazado|apuestas partido champions|apuestas partido
colombia|apuestas partido españa marruecos|apuestas partido
mundial|apuestas partido suspendido|apuestas partidos|apuestas partidos champions league|apuestas partidos csgo|apuestas partidos
de futbol|apuestas partidos de futbol hoy|apuestas partidos de hoy|apuestas partidos eurocopa|apuestas
partidos futbol|apuestas partidos hoy|apuestas partidos mundial|apuestas paypal|apuestas peleas de boxeo|apuestas peru|apuestas perú|apuestas peru
brasil|apuestas peru chile|apuestas peru paraguay|apuestas peru uruguay|apuestas peru
vs chile|apuestas peru vs colombia|apuestas pichichi eurocopa|apuestas plataforma|apuestas playoff|apuestas playoff ascenso|apuestas playoff ascenso a primera|apuestas playoff nba|apuestas playoff segunda|apuestas playoff segunda
b|apuestas playoffs nba|apuestas playoffs nfl|apuestas polonia argentina|apuestas por argentina|apuestas por internet mexico|apuestas por
internet para ganar dinero|apuestas por paypal|apuestas por ronda boxeo|apuestas por sistema|apuestas portugal uruguay|apuestas pre partido|apuestas predicciones|apuestas
predicciones futbol|apuestas primera division|apuestas primera division españa|apuestas promociones|apuestas pronostico|apuestas pronosticos|apuestas
pronosticos deportivos|apuestas pronosticos deportivos tenis|apuestas pronosticos futbol|apuestas pronosticos gratis|apuestas pronosticos nba|apuestas
pronosticos tenis|apuestas prorroga|apuestas psg barca|apuestas psg barcelona|apuestas puntos por tarjetas|apuestas puntos tarjetas|apuestas
que aceptan paypal|apuestas que es handicap|apuestas
que puedes hacer con tu novia|apuestas que siempre ganaras|apuestas que significa|apuestas quien bajara a segunda|apuestas quién bajara a segunda|apuestas quien gana
el mundial|apuestas quien gana eurocopa|apuestas quien gana la champions|apuestas quien gana la eurocopa|apuestas quien gana la liga|apuestas
quien ganara el mundial|apuestas quién ganará el
mundial|apuestas quien ganara la champions|apuestas quien ganara la
eurocopa|apuestas quien ganara la liga|apuestas rayo barcelona|apuestas real madrid|apuestas real
madrid arsenal|apuestas real madrid athletic|apuestas real madrid atletico|apuestas real madrid atletico champions|apuestas real madrid atletico de madrid|apuestas real madrid atlético
de madrid|apuestas real madrid atletico madrid|apuestas real madrid barcelona|apuestas real madrid bayern|apuestas real
madrid betis|apuestas real madrid borussia|apuestas real madrid campeon champions|apuestas real
madrid celta|apuestas real madrid champions|apuestas real madrid city|apuestas real madrid girona|apuestas real madrid hoy|apuestas real madrid liverpool|apuestas real madrid manchester city|apuestas real madrid osasuna|apuestas real madrid real sociedad|apuestas real madrid valencia|apuestas real madrid villarreal|apuestas real madrid vs arsenal|apuestas real madrid vs atletico|apuestas real madrid vs atlético|apuestas real madrid vs atletico madrid|apuestas real madrid vs barcelona|apuestas real madrid vs betis|apuestas real madrid vs sevilla|apuestas real madrid vs valencia|apuestas real sociedad|apuestas real sociedad athletic|apuestas real
sociedad barcelona|apuestas real sociedad betis|apuestas real
sociedad psg|apuestas real sociedad real madrid|apuestas real sociedad valencia|apuestas recomendadas hoy|apuestas regalo de bienvenida|apuestas registro|apuestas resultado exacto|apuestas resultados|apuestas resultados eurocopa|apuestas retirada tenis|apuestas roma barcelona|apuestas roma sevilla|apuestas rugby|apuestas rugby mundial|apuestas
rugby world cup|apuestas ruleta seguras|apuestas segunda|apuestas segunda b|apuestas segunda division|apuestas segunda división|apuestas segunda division b|apuestas segunda division españa|apuestas seguras|apuestas
seguras baloncesto|apuestas seguras calculadora|apuestas seguras en la
ruleta|apuestas seguras eurocopa|apuestas seguras foro|apuestas seguras futbol|apuestas seguras futbol hoy|apuestas seguras gratis|apuestas
seguras hoy|apuestas seguras hoy futbol|apuestas seguras nba|apuestas
seguras nba hoy|apuestas seguras para este fin de semana|apuestas seguras para ganar dinero|apuestas seguras para hoy|apuestas seguras para hoy fútbol|apuestas seguras para hoy pronósticos|apuestas seguras para mañana|apuestas seguras ruleta|apuestas seguras telegram|apuestas seguras tenis|apuestas semifinales eurocopa|apuestas senegal paises bajos|apuestas
sevilla|apuestas sevilla athletic|apuestas sevilla atletico de madrid|apuestas sevilla barcelona|apuestas sevilla betis|apuestas sevilla campeon liga|apuestas sevilla celta|apuestas sevilla gana la liga|apuestas sevilla girona|apuestas
sevilla inter|apuestas sevilla jugador|apuestas sevilla
juventus|apuestas sevilla leganes|apuestas sevilla madrid|apuestas
sevilla manchester united|apuestas sevilla osasuna|apuestas sevilla real madrid|apuestas sevilla real sociedad|apuestas
sevilla roma|apuestas sevilla valencia|apuestas significa|apuestas
simples ejemplos|apuestas simples o combinadas|apuestas
sin deposito|apuestas sin deposito inicial|apuestas sin deposito minimo|apuestas sin dinero|apuestas sin dinero real|apuestas sin empate|apuestas sin empate que significa|apuestas sin ingreso minimo|apuestas
sin registro|apuestas sistema|apuestas sistema calculadora|apuestas sistema como funciona|apuestas sistema trixie|apuestas sociedad|apuestas
sorteo copa del rey|apuestas stake|apuestas stake 10|apuestas stake 10
hoy|apuestas super bowl favorito|apuestas super rugby|apuestas supercopa españa|apuestas superliga argentina|apuestas tarjeta roja|apuestas tarjetas|apuestas tarjetas
amarillas|apuestas tenis|apuestas tenis atp|apuestas tenis
consejos|apuestas tenis copa davis|apuestas tenis de mesa|apuestas tenis de mesa pronosticos|apuestas tenis en vivo|apuestas tenis femenino|apuestas tenis hoy|apuestas tenis itf|apuestas tenis pronosticos|apuestas tenis pronósticos|apuestas
tenis retirada|apuestas tenis roland garros|apuestas tenis seguras|apuestas tenis wimbledon|apuestas tenis wta|apuestas tercera division|apuestas tercera division españa|apuestas tipos|apuestas
tips|apuestas tipster|apuestas tipster para
hoy|apuestas topuria holloway cuotas|apuestas torneos de golf|apuestas torneos de tenis|apuestas trucos|apuestas uefa champions
league|apuestas uefa europa league|apuestas ufc|apuestas ufc chile|apuestas
ufc como funciona|apuestas ufc hoy|apuestas ufc ilia topuria|apuestas ufc
online|apuestas ufc pronósticos|apuestas
ufc telegram|apuestas ufc topuria|apuestas under over|apuestas unionistas villarreal|apuestas
uruguay|apuestas uruguay colombia|apuestas uruguay corea|apuestas uruguay vs colombia|apuestas us open golf|apuestas
us open tenis|apuestas valencia|apuestas valencia barcelona|apuestas valencia betis|apuestas valencia
madrid|apuestas valencia real madrid|apuestas valladolid barcelona|apuestas valladolid valencia|apuestas valor app|apuestas valor en directo|apuestas valor
galgos|apuestas venezuela|apuestas venezuela argentina|apuestas venezuela bolivia|apuestas venezuela ecuador|apuestas villarreal|apuestas villarreal
athletic|apuestas villarreal barcelona|apuestas villarreal bayern|apuestas villarreal betis|apuestas villarreal liverpool|apuestas villarreal manchester|apuestas villarreal manchester united|apuestas villarreal vs real madrid|apuestas virtuales|apuestas virtuales
colombia|apuestas virtuales futbol|apuestas virtuales sin dinero|apuestas vivo|apuestas
vuelta a españa|apuestas vuelta españa|apuestas william hill partidos de hoy|apuestas y
casino|apuestas y casinos|apuestas y juegos de azar|apuestas y pronosticos|apuestas y
pronosticos de futbol|apuestas y pronosticos deportivos|apuestas y resultados|apuestas-deportivas|apuestas-deportivas.es pronosticos|arbitro nba apuestas|argentina apuestas|argentina colombia apuestas|argentina croacia apuestas|argentina francia apuestas|argentina mexico apuestas|argentina peru apuestas|argentina uruguay apuestas|argentina vs bolivia apuestas|argentina vs chile apuestas|argentina
vs colombia apuestas|argentina vs francia apuestas|argentina vs.
colombia apuestas|asi se gana en las apuestas deportivas|asiatico apuestas|asiatico en apuestas|asiaticos apuestas|athletic
barcelona apuestas|athletic manchester united apuestas|athletic osasuna apuestas|athletic real
madrid apuestas|atletico barcelona apuestas|atletico de madrid apuestas|atlético de madrid apuestas|atletico de madrid
real madrid apuestas|atletico de madrid vs barcelona apuestas|atletico madrid real madrid apuestas|atletico madrid vs real madrid apuestas|atletico real madrid apuestas|atletico vs real
madrid apuestas|avisador de cuotas apuestas|bajada de cuotas apuestas|baloncesto apuestas|barbastro barcelona apuestas|barca apuestas|barca bayern apuestas|barca inter apuestas|barca
madrid apuestas|barça madrid apuestas|barca vs atletico apuestas|barca vs madrid apuestas|barca vs
real madrid apuestas|barcelona – real madrid apuestas|barcelona apuestas|barcelona atletico apuestas|barcelona atletico de madrid apuestas|barcelona atletico madrid apuestas|barcelona betis apuestas|barcelona casa de apuestas|barcelona
inter apuestas|barcelona psg apuestas|barcelona real madrid apuestas|barcelona real sociedad
apuestas|barcelona sevilla apuestas|barcelona valencia apuestas|barcelona vs athletic bilbao apuestas|barcelona
vs atlético madrid apuestas|barcelona vs betis apuestas|barcelona vs celta de vigo apuestas|barcelona vs espanyol apuestas|barcelona vs girona apuestas|barcelona vs
madrid apuestas|barcelona vs real madrid apuestas|barcelona vs real sociedad apuestas|barcelona vs sevilla apuestas|barcelona vs villarreal apuestas|base de datos cuotas apuestas deportivas|bayern real madrid apuestas|beisbol apuestas|best america apuestas|bet apuestas
chile|bet apuestas en vivo|betis – chelsea apuestas|betis apuestas|betis barcelona apuestas|betis chelsea apuestas|betis madrid apuestas|betis sevilla apuestas|betsson tu sitio de apuestas online|blog apuestas baloncesto|blog apuestas ciclismo|blog apuestas
nba|blog apuestas tenis|blog de apuestas de tenis|bono apuestas|bono apuestas
deportivas|bono apuestas deportivas sin deposito|bono apuestas gratis|bono apuestas gratis sin deposito|bono apuestas sin deposito|bono bienvenida apuestas|bono bienvenida apuestas deportivas|bono
bienvenida apuestas españa|bono bienvenida apuestas sin deposito|bono bienvenida apuestas sin depósito|bono bienvenida casa apuestas|bono
bienvenida casa de apuestas|bono bienvenida marca apuestas|bono
casa apuestas|bono casa de apuestas|bono casa de apuestas sin ingreso|bono casas de apuestas|bono de apuestas|bono de apuestas gratis
sin deposito|bono de bienvenida apuestas|bono de bienvenida
apuestas deportivas|bono de bienvenida casa de
apuestas|bono de bienvenida casas de apuestas|bono de casas de apuestas|bono de registro apuestas|bono de registro apuestas deportivas|bono de registro
casa de apuestas|bono gratis apuestas|bono marca apuestas|bono por registro apuestas|bono por registro apuestas deportivas|bono por registro casa de apuestas|bono registro apuestas|bono sin deposito apuestas|bono sin depósito apuestas|bono sin deposito apuestas deportivas|bono
sin depósito apuestas deportivas|bono sin deposito
casa de apuestas|bono sin deposito marca apuestas|bono sin ingreso apuestas|bono sin ingreso apuestas deportivas|bonos apuestas|bonos apuestas
colombia|bonos apuestas deportivas|bonos apuestas deportivas sin deposito|bonos apuestas gratis|bonos apuestas
sin deposito|bonos apuestas sin depósito|bonos bienvenida apuestas|bonos bienvenida casas
apuestas|bonos bienvenida casas de apuestas|bonos casa de
apuestas|bonos casas apuestas|bonos casas de apuestas|bonos casas de apuestas colombia|bonos casas de apuestas
deportivas|bonos casas de apuestas españa|bonos
casas de apuestas nuevas|bonos casas de apuestas sin deposito|bonos
casas de apuestas sin depósito|bonos de apuestas|bonos de apuestas
deportivas|bonos de apuestas gratis|bonos de apuestas
sin deposito|bonos de bienvenida apuestas|bonos de bienvenida apuestas deportivas|bonos de bienvenida casa de apuestas|bonos de bienvenida
casas de apuestas|bonos de bienvenida de casas de apuestas|bonos de bienvenida en casas de apuestas|bonos de casas de apuestas|bonos
de casas de apuestas sin deposito|bonos en casa de apuestas|bonos en casas
de apuestas sin deposito|bonos gratis apuestas|bonos gratis apuestas deportivas|bonos gratis casas de
apuestas|bonos gratis sin deposito apuestas|bonos paginas de apuestas|bonos registro casas de apuestas|bonos
sin deposito apuestas|bonos sin depósito apuestas|bonos sin deposito apuestas deportivas|bonos sin deposito casas
de apuestas|bot de apuestas deportivas gratis|boxeo apuestas|brasil colombia apuestas|brasil peru apuestas|brasil vs
colombia apuestas|buenas apuestas para hoy|buscador cuotas apuestas|buscador de apuestas seguras|buscador de cuotas apuestas|buscador de cuotas de apuestas|buscar apuestas seguras|caballos apuestas|calculador de apuestas|calculador de cuotas apuestas|calculadora apuestas|calculadora apuestas
combinadas|calculadora apuestas de sistema|calculadora apuestas deportivas|calculadora apuestas deportivas seguras|calculadora apuestas multiples|calculadora apuestas segura|calculadora apuestas seguras|calculadora apuestas sistema|calculadora apuestas yankee|calculadora arbitraje apuestas|calculadora cubrir apuestas|calculadora cuotas apuestas|calculadora de apuestas|calculadora
de apuestas combinadas|calculadora de apuestas de futbol|calculadora
de apuestas de sistema|calculadora de apuestas
deportivas|calculadora de apuestas multiples|calculadora de apuestas seguras|calculadora de apuestas sistema|calculadora de apuestas surebets|calculadora de arbitraje apuestas|calculadora de cuotas apuestas|calculadora de cuotas de apuestas|calculadora para apuestas deportivas|calculadora
poisson apuestas|calculadora poisson apuestas
deportivas|calculadora poisson para apuestas|calculadora scalping apuestas deportivas|calculadora sistema apuestas|calculadora stake apuestas|calculadora trading apuestas|calcular apuestas|calcular apuestas deportivas|calcular apuestas futbol|calcular apuestas sistema|calcular cuotas apuestas|calcular cuotas apuestas combinadas|calcular cuotas apuestas deportivas|calcular cuotas de apuestas|calcular ganancias apuestas deportivas|calcular momios apuestas|calcular probabilidad cuota
apuestas|calcular stake apuestas|calcular unidades apuestas|calcular yield apuestas|calculo de apuestas|calculo
de apuestas deportivas|cambio de cuotas apuestas|campeon champions apuestas|campeon eurocopa apuestas|campeon liga apuestas|campeon nba apuestas|canales de apuestas gratis|carrera de caballos apuestas|carrera de caballos apuestas juego|carrera de caballos con apuestas|carrera de galgos apuestas|carreras de
caballos apuestas|carreras de caballos apuestas online|carreras de caballos con apuestas|carreras de caballos juegos de apuestas|carreras
de galgos apuestas|carreras de galgos apuestas online|carreras de galgos apuestas trucos|carreras galgos apuestas|casa apuestas argentina|casa apuestas atletico de madrid|casa apuestas
barcelona|casa apuestas betis|casa apuestas bono bienvenida|casa apuestas bono gratis|casa apuestas bono sin deposito|casa apuestas cerca de mi|casa apuestas chile|casa apuestas colombia|casa apuestas con mejores
cuotas|casa apuestas deportivas|casa apuestas españa|casa apuestas española|casa apuestas eurocopa|casa apuestas
futbol|casa apuestas mejores cuotas|casa apuestas mundial|casa apuestas
nueva|casa apuestas nuevas|casa apuestas online|casa apuestas peru|casa
apuestas valencia|casa de apuestas|casa de
apuestas 10 euros gratis|casa de apuestas argentina|casa de apuestas atletico de madrid|casa de apuestas baloncesto|casa de apuestas barcelona|casa de apuestas beisbol|casa de apuestas betis|casa de apuestas
bono|casa de apuestas bono bienvenida|casa de apuestas bono de bienvenida|casa de apuestas bono gratis|casa de
apuestas bono por registro|casa de apuestas bono sin deposito|casa de apuestas boxeo|casa de
apuestas caballos|casa de apuestas carreras de caballos|casa de apuestas cerca de mi|casa de apuestas
cerca de mí|casa de apuestas champions league|casa de apuestas
chile|casa de apuestas ciclismo|casa de apuestas colombia|casa de
apuestas con bono de bienvenida|casa de apuestas con bono sin deposito|casa de apuestas con cuotas mas altas|casa de apuestas con esports|casa de apuestas con las mejores cuotas|casa
de apuestas con licencia en españa|casa de apuestas
con mejores cuotas|casa de apuestas con pago anticipado|casa
de apuestas con paypal|casa de apuestas copa america|casa de apuestas de caballos|casa de apuestas
de colombia|casa de apuestas de españa|casa de apuestas de futbol|casa de apuestas de fútbol|casa
de apuestas de futbol peru|casa de apuestas de peru|casa de apuestas del
madrid|casa de apuestas del real madrid|casa de apuestas deportivas|casa de apuestas
deportivas cerca de mi|casa de apuestas deportivas en argentina|casa de apuestas deportivas en chile|casa de
apuestas deportivas en colombia|casa de apuestas deportivas en españa|casa de apuestas deportivas en madrid|casa de apuestas deportivas españa|casa de
apuestas deportivas españolas|casa de apuestas deportivas madrid|casa de apuestas deportivas mexico|casa
de apuestas deportivas online|casa de apuestas deportivas
peru|casa de apuestas deposito 5 euros|casa de apuestas deposito minimo|casa de apuestas deposito minimo 1 euro|casa
de apuestas depósito mínimo 1 euro|casa de apuestas en españa|casa de apuestas en linea|casa
de apuestas en madrid|casa de apuestas en perú|casa de
apuestas en vivo|casa de apuestas españa|casa
de apuestas españa inglaterra|casa de apuestas española|casa de apuestas españolas|casa de apuestas esports|casa de apuestas eurocopa|casa de apuestas
europa league|casa de apuestas f1|casa de apuestas formula 1|casa de apuestas futbol|casa de apuestas ingreso minimo|casa de apuestas ingreso minimo 1 euro|casa de apuestas ingreso mínimo 1 euro|casa de apuestas legales|casa de apuestas legales en colombia|casa de apuestas legales en españa|casa de apuestas libertadores|casa de apuestas liga española|casa de apuestas
madrid|casa de apuestas mas segura|casa de apuestas mejores|casa de apuestas
méxico|casa de apuestas minimo 5 euros|casa de apuestas mlb|casa de apuestas
mundial|casa de apuestas nba|casa de apuestas nfl|casa de apuestas
nueva|casa de apuestas nuevas|casa de apuestas oficial del real madrid|casa de apuestas
oficial real madrid|casa de apuestas online|casa de apuestas online argentina|casa de apuestas
online chile|casa de apuestas online españa|casa de apuestas online
mexico|casa de apuestas online paraguay|casa de apuestas online peru|casa
de apuestas online usa|casa de apuestas online venezuela|casa de apuestas pago anticipado|casa de
apuestas para boxeo|casa de apuestas para ufc|casa de apuestas peru|casa de
apuestas perú|casa de apuestas peru online|casa de apuestas por paypal|casa
de apuestas promociones|casa de apuestas que regalan dinero|casa de apuestas real madrid|casa de apuestas regalo de
bienvenida|casa de apuestas sevilla|casa de apuestas sin dinero|casa de apuestas sin ingreso minimo|casa de apuestas sin licencia
en españa|casa de apuestas sin minimo de ingreso|casa de apuestas stake|casa
de apuestas tenis|casa de apuestas ufc|casa de
apuestas valencia|casa de apuestas venezuela|casa de apuestas virtuales|casa de apuestas vive la suerte|casa oficial de apuestas del real madrid|casas apuestas asiaticas|casas
apuestas bono sin deposito|casas apuestas bonos
sin deposito|casas apuestas caballos|casas apuestas chile|casas apuestas
ciclismo|casas apuestas con licencia|casas apuestas con licencia en españa|casas
apuestas deportivas|casas apuestas deportivas colombia|casas apuestas deportivas españa|casas apuestas deportivas españolas|casas
apuestas deportivas nuevas|casas apuestas españa|casas apuestas españolas|casas apuestas esports|casas
apuestas eurocopa|casas apuestas golf|casas apuestas ingreso
minimo 5 euros|casas apuestas legales|casas apuestas legales españa|casas apuestas licencia|casas apuestas licencia españa|casas apuestas mexico|casas apuestas mundial|casas apuestas nba|casas
apuestas nuevas|casas apuestas nuevas españa|casas apuestas ofertas|casas apuestas online|casas apuestas paypal|casas apuestas peru|casas apuestas sin licencia|casas apuestas tenis|casas asiaticas apuestas|casas de apuestas|casas de apuestas 5 euros|casas de
apuestas app|casas de apuestas argentinas|casas de apuestas asiaticas|casas de apuestas baloncesto|casas de apuestas barcelona|casas de apuestas bono bienvenida|casas de apuestas
bono de bienvenida|casas de apuestas bono por registro|casas de apuestas bono sin deposito|casas
de apuestas bono sin ingreso|casas de apuestas bonos|casas de apuestas bonos de bienvenida|casas
de apuestas bonos gratis|casas de apuestas
bonos sin deposito|casas de apuestas boxeo|casas de apuestas caballos|casas de apuestas
carreras de caballos|casas de apuestas casino|casas de apuestas casino online|casas de apuestas cerca de mi|casas de apuestas champions league|casas de apuestas chile|casas
de apuestas ciclismo|casas de apuestas colombia|casas de apuestas com|casas de apuestas con app|casas
de apuestas con apuestas gratis|casas de apuestas con bono|casas de apuestas
con bono de bienvenida|casas de apuestas con bono de registro|casas de apuestas
con bono por registro|casas de apuestas con bono sin deposito|casas de
apuestas con bonos|casas de apuestas con bonos gratis|casas de apuestas con bonos
sin deposito|casas de apuestas con deposito minimo|casas de apuestas con esports|casas
de apuestas con handicap asiatico|casas de apuestas con licencia|casas de apuestas con licencia en españa|casas de apuestas con licencia españa|casas de apuestas con licencia española|casas de apuestas con mejores cuotas|casas de apuestas con pago anticipado|casas de apuestas con paypal|casas de apuestas con paypal en perú|casas de apuestas con promociones|casas de apuestas con ruleta en vivo|casas de apuestas copa del rey|casas de apuestas
de caballos|casas de apuestas de españa|casas de apuestas de futbol|casas de apuestas de fútbol|casas de apuestas de peru|casas de apuestas deportivas|casas de apuestas deportivas asiaticas|casas de
apuestas deportivas colombia|casas de apuestas deportivas comparativa|casas
de apuestas deportivas con paypal|casas de apuestas deportivas
en chile|casas de apuestas deportivas en españa|casas de apuestas deportivas en linea|casas de apuestas deportivas en madrid|casas de apuestas deportivas en mexico|casas de
apuestas deportivas en peru|casas de apuestas deportivas en sevilla|casas de apuestas deportivas en valencia|casas de apuestas deportivas españa|casas de
apuestas deportivas españolas|casas de apuestas
deportivas legales|casas de apuestas deportivas madrid|casas
de apuestas deportivas mexico|casas de apuestas deportivas nuevas|casas de apuestas deportivas
online|casas de apuestas deportivas peru|casas de apuestas
deportivas perú|casas de apuestas deposito minimo 1 euro|casas de apuestas depósito
mínimo 1 euro|casas de apuestas dinero gratis|casas de apuestas en argentina|casas de apuestas en barcelona|casas de apuestas en chile|casas de apuestas en colombia|casas de apuestas
en españa|casas de apuestas en españa online|casas de apuestas en linea|casas de apuestas en madrid|casas de
apuestas en méxico|casas de apuestas en peru|casas de apuestas en perú|casas
de apuestas en sevilla|casas de apuestas en uruguay|casas de apuestas en valencia|casas de apuestas en venezuela|casas de
apuestas equipos de futbol|casas de apuestas españa|casas de apuestas españa alemania|casas de apuestas españa inglaterra|casas
de apuestas españa licencia|casas de apuestas españa
nuevas|casas de apuestas españa online|casas de apuestas
española|casas de apuestas españolas|casas de apuestas españolas con licencia|casas de apuestas españolas online|casas de apuestas esports|casas de apuestas eurocopa|casas de apuestas eurocopa
2024|casas de apuestas europa league|casas de apuestas f1|casas de apuestas
fisicas en barcelona|casas de apuestas fisicas en españa|casas de apuestas formula 1|casas de apuestas fuera de españa|casas de apuestas futbol|casas de apuestas fútbol|casas de apuestas futbol españa|casas de apuestas ganador eurocopa|casas de apuestas gratis|casas de apuestas ingreso minimo|casas
de apuestas ingreso minimo 1 euro|casas de apuestas ingreso minimo 5 euros|casas de apuestas inter barcelona|casas de apuestas legales|casas de
apuestas legales en colombia|casas de apuestas legales en españa|casas de apuestas legales en mexico|casas de apuestas legales españa|casas de apuestas legales
mx|casas de apuestas licencia|casas de apuestas licencia españa|casas de apuestas lista|casas de apuestas madrid|casas de apuestas mas
seguras|casas de apuestas mejores bonos|casas de apuestas mejores cuotas|casas de
apuestas mexico|casas de apuestas méxico|casas de apuestas minimo 5 euros|casas de apuestas mlb|casas de apuestas mundial|casas de apuestas mundial baloncesto|casas de apuestas mundiales|casas de apuestas nba|casas de apuestas no reguladas
en españa|casas de apuestas nueva ley|casas de apuestas
nuevas|casas de apuestas nuevas en colombia|casas de apuestas nuevas en españa|casas
de apuestas nuevas españa|casas de apuestas ofertas|casas de
apuestas online|casas de apuestas online argentina|casas de apuestas online colombia|casas de apuestas online deportivas|casas de apuestas online ecuador|casas de apuestas online en argentina|casas de apuestas online en chile|casas de apuestas online en colombia|casas de apuestas online en españa|casas de apuestas online en mexico|casas de apuestas online
españa|casas de apuestas online mas fiables|casas de apuestas online mexico|casas de apuestas online
nuevas|casas de apuestas online peru|casas de
apuestas online usa|casas de apuestas online venezuela|casas de apuestas pago paypal|casas de apuestas para ufc|casas de apuestas
paypal|casas de apuestas peru bono sin deposito|casas de apuestas presencia
Your comment is awaiting moderation.
chicken road 2 777
Your comment is awaiting moderation.
Народ уже как два часа нет ответов от администратора магазина https://www.rwaq.org/users/nxqylozh31r44u-20251104151612 “ДОБРА ТЕБЕ ЭСКИМОСИК”
Your comment is awaiting moderation.
Портал о балансе https://allwoman.kyiv.ua красота и самоуход, отношения и семья, развитие и карьера, дом и отдых. Реальные советы, капсульные гардеробы, планы тренировок, рецепты и лайфхаки. Ежедневные обновления и подборки по интересам.
Your comment is awaiting moderation.
Журнал об автомобилях https://svobodomislie.com без мифов: проверяем маркетинг фактами, считаем расходы владения, рассказываем о ТО, тюнинге и доработках. Тестируем новые и б/у, объясняем опции простыми словами. Экспертные мнения, идеи маршрутов и полезные чек-листы. Всегда!.
Your comment is awaiting moderation.
Еженедельный журнал https://sw.org.ua об авто и свободе дороги: премьеры, электромобили, кроссоверы, спорткары и коммерческий транспорт. Реальные тесты, долгосрочные отчёты, безопасность, кейсы покупки и продажи, кредит и страховка, рынок запчастей и сервисы рядом.
Your comment is awaiting moderation.
https://magnitola.kiev.ua
Your comment is awaiting moderation.
А так ТС работают отлично не было не одного проёба за пол года сотрудничество ни считая выше сказанного https://www.betterplace.org/en/organisations/70560 Качественная продукция, советую заскочить! товар стоит вашего внимания!
Your comment is awaiting moderation.
Современный женский https://fashiontop.com.ua журнал: уход и макияж, капсульный гардероб, психология и отношения, питание и тренировки, карьерные советы и финансы. Честные обзоры, подборки брендов, пошаговые гайды.
Your comment is awaiting moderation.
Твой автопортал https://kia-sportage.in.ua о новых и подержанных машинах: рейтинги надёжности, разбор комплектаций, реальные тесты и видео. Помощь в покупке, кредит и страховка, расходы владения, ТО и тюнинг. Карта сервисов, советы по безопасности и сезонные рекомендации плюс
Your comment is awaiting moderation.
Всё для женщины https://wonderwoman.kyiv.ua уход и макияж, мода и стиль, психология и отношения, работа и деньги, мама и ребёнок. Тренды, тесты, инструкции, подборки брендов и сервисов. Читайте, вдохновляйтесь, действуйте.
Your comment is awaiting moderation.
как дела друзья? https://form.jotform.com/253062286356055 прет 30-45 мин.1к10.действием похож на рсц
Your comment is awaiting moderation.
https://realistzoosafety.forum24.ru/?1-11-0-00002463-000-0-0-1762716967
Your comment is awaiting moderation.
https://444-000.ru/
Your comment is awaiting moderation.
findyourbalance – Inspiring name that fits perfectly with healthy living and mindfulness.
Your comment is awaiting moderation.
groweverymoment – Encourages self-growth and reflection in a very natural way.
Your comment is awaiting moderation.
staycuriousdaily – Inspiring platform that promotes knowledge, growth, and open thinking.
Your comment is awaiting moderation.
globalfashionzone – Such a cool name, fits a brand with a global fashion reach.
Your comment is awaiting moderation.
ВСЁ супер,брал,беру, и буду брать!Всё на высоте! https://www.montessorijobsuk.co.uk/author/ufouiauhu/ Заказала JV 61, жду трек, заранее благодарю. В прошлый раз заказ шёл 6 дней, но и я на краю географии)))))) отпишитп за дживик кто недавно заказывал.
Your comment is awaiting moderation.
https://learningapps.org/display?v=pznfw544325
Your comment is awaiting moderation.
connectwithpeople – A refreshing reminder to stay social and build strong connections.
Your comment is awaiting moderation.
Наш клиент хотел создать электронное устройство для мониторинга окружающей среды. Мы разработали схемотехнику, платы и ПО, провели тестирование прототипа. После проверки началась серийная сборка. Клиент получил надежное и готовое к использованию устройство – https://teslawiki.cz/index.php/%D0%A0%D0%B0%D0%B7%D1%80%D0%B0%D0%B1%D0%BE%D1%82%D0%BA%D0%B0_%D0%98_%D0%A1%D0%B1%D0%BE%D1%80%D0%BA%D0%B0_%D0%AD%D0%BB%D0%B5%D0%BA%D1%82%D1%80%D0%BE%D0%BD%D0%BD%D1%8B%D1%85_%D0%9F%D0%BB%D0%B0%D1%82. Технология помогает оценивать эффективность и стабильность прототипов)
Your comment is awaiting moderation.
https://melaninbook.com/read-blog/113348
Your comment is awaiting moderation.
Современный новостной https://vestionline.com.ua портал: главные темы суток, лонгриды, мнения экспертов и объясняющие материалы. Проверка фактов, живые эфиры, инфографика, подборка цитат и контекст. Быстрый доступ с любого устройства и без лишних отвлечений.
Your comment is awaiting moderation.
Современный автопортал https://carexpert.com.ua главные премьеры и тенденции, подробные обзоры, тест-драйвы, сравнения моделей и подбор шин. Экономия на обслуживании, страховке и топливе, проверки VIN, лайфхаки и чек-листы. Всё, чтобы выбрать и содержать авто без ошибок да
Your comment is awaiting moderation.
Портал о строительстве https://newboard-store.com.ua и ремонте: от проекта до сдачи объекта. Каталоги производителей, сравнение материалов, сметы, BIM и CAD, нормативная база, ленты новостей, вакансии и тендеры. Практика, цифры и готовые решения.
Your comment is awaiting moderation.
Нужен тахеометр? аренда тахеометра Leica по выгодной цене. Современные модели для геодезических и строительных работ. Калибровка, проверка, доставка по городу и области. Гибкие сроки — от 1 дня. Консультации инженеров и техническая поддержка.
Your comment is awaiting moderation.
Read more on the website: https://my.clickthecity.com/npprteam/links
Your comment is awaiting moderation.
На официальном сайте кент казино вы найдёте слоты, рулетку, лайв-столы и тематические турниры. Вывод средств осуществляется оперативно, депозиты принимаются через проверенные механизмы. Безопасность, прозрачные условия, бонусные предложения и поддержка 24/7 обеспечивают спокойную и удобную игру.
Your comment is awaiting moderation.
https://my.clickthecity.com/parissportifs
Your comment is awaiting moderation.
Юридическое лицо может спокойно доверить им оформление любых поставок – https://tamozhenniiy-predstavitel11.ru/
Your comment is awaiting moderation.
здравствуйте , это от региона зависит . Доставка индивидуально обсуждается в ЛС . https://polmeg.ru Крутой магаз
Your comment is awaiting moderation.
Онлайн-казино вход в казино водка игровые автоматы от ведущих производителей. Эксклюзивный бонус — 70 фриспинов! Смотрите видеообзор и отзывы реальных игроков!
Your comment is awaiting moderation.
Официальный покердом браузер: казино, покер, вход и скачивание слотов. Сотни слотов, лайв-столы, регулярные ивенты, приветственные бонусы. Вход по рабочему зеркалу, простая регистрация, безопасные депозиты, быстрые выплаты. Скачай слоты и играй комфортно.
Your comment is awaiting moderation.
Официальный сайт вход пинап встречает удобным интерфейсом и обширным каталогом: слоты, лайв-казино, рулетка, турниры. Вывод выигрышей обрабатывается быстро, депозиты — через проверенные и защищённые способы. Акции, бонусы и поддержка 24/7 делают игру комфортной и понятной.
Your comment is awaiting moderation.
Хочешь рискнуть? пин ап зеркало редлагает широкий выбор игр, быстрые выплаты и надежные способы пополнения депозита.
Your comment is awaiting moderation.
Магазин http://WWW.CHEMICAL-MIX.COM ответьте на электроную почту https://smartcat26.ru эх, вот печаль то…вчера так порадовался – селлер быстро ответил, хорошо пообщались, заказ принял, проплата прошла, сказали завтра трек будет…наступило завтра и тишина…вроде в сети и ася и скайп..за что меня так игнорят?))) заказ маленький то он такой важный!))))) в общем надеюсь на скорый ответ))
Your comment is awaiting moderation.
promocore.click – Bookmarked this immediately, planning to revisit for updates and inspiration.
Your comment is awaiting moderation.
Может еще вернемся. купить Кокаин, Мефедрон, Экстази Хороший,порядочный магазин обращяйтесь
Your comment is awaiting moderation.
Отличная статья про лучшие бесплатные нейросети для генерации изображений сэкономила массу времени. Выбрала подходящий сервис для работы, остальные варианты из списка тоже взяла на заметку. Рекомендую: https://vc.ru/top_rating/2301994-luchshie-besplatnye-nejroseti-dlya-generatsii-izobrazheniy
Your comment is awaiting moderation.
https://vsemetonado.ru/
Your comment is awaiting moderation.
marketlaunch.click – Found practical insights today; sharing this article with colleagues later.
Your comment is awaiting moderation.
Хочешь азарта? bollywood casino мир азарта и больших выигрышей у вас в кармане! Сотни игр, щедрые бонусы и мгновенные выплаты. Испытайте удачу и получите незабываемые эмоции прямо сейчас!
Your comment is awaiting moderation.
Ищешь автоматы? покердом зеркало лучшие азартные развлечения 24/7. Слоты, рулетка, покер и живые дилеры с яркой графикой. Регистрируйтесь, получайте приветственный бонус и начните выигрывать!
Your comment is awaiting moderation.
Онлайн казино биф казино Насладитесь атмосферой роскошного казино не выходя из дома! Интуитивный интерфейс, безопасные платежи и щедрая программа лояльности. Сделайте свою игру выигрышной!
Your comment is awaiting moderation.
Лучшие онлайн казино биф казино отзывы захватывающие игровые автоматы, карточные игры и live-казино на любом устройстве. Быстрый старт, честная игра и мгновенные выплаты.
Your comment is awaiting moderation.
Азартные игры онлайн pokerdom Ваш пропуск в мир высоких ставок и крупных побед. Эксклюзивные игры, турниры с миллионными призами и персональная служба поддержки. Играйте по-крупному!
Your comment is awaiting moderation.
trafficedge.click – Color palette felt calming, nothing distracting, just focused, thoughtful design.
Your comment is awaiting moderation.
promojet.click – Overall, professional vibe here; trustworthy, polished, and pleasantly minimal throughout.
Your comment is awaiting moderation.
adengine.click – Content reads clearly, helpful examples made concepts easy to grasp.
Your comment is awaiting moderation.
clickempire.click – Bookmarked this immediately, planning to revisit for updates and inspiration.
Your comment is awaiting moderation.
trafficcore.click – Color palette felt calming, nothing distracting, just focused, thoughtful design.
Your comment is awaiting moderation.
https://vsemetonado.ru/
Your comment is awaiting moderation.
пробуй 4фа, 2-dpmp их кушать надо или нюхать? пробовал хоть раз фаер спит https://sveto-house.ru Спасибо за терпение, понимание и позитивный настрой
Your comment is awaiting moderation.
theworldawaits – The name fits perfectly with the inspiring, open-world feel of the site.
Your comment is awaiting moderation.
makelifesimpler – The design focuses on ease, very refreshing and relaxing to explore.
Your comment is awaiting moderation.
liveandexplore – Really liked the vibe here, calm, creative, and beautifully presented.
Your comment is awaiting moderation.
modernlivingstyle – The visuals are beautiful, perfectly matched with the modern theme.
Your comment is awaiting moderation.
getinspiredtoday – Feels welcoming and creative, a great site to start the day with.
Your comment is awaiting moderation.
liveandexplore – Great first impression, everything loads fast and looks beautifully organized.
Your comment is awaiting moderation.
connectdiscovergrow – Clean layout and bright visuals, really easy to navigate through.
Your comment is awaiting moderation.
styleforliving – Smooth navigation and nice visuals, overall a very pleasant experience.
Your comment is awaiting moderation.
findsomethingnew – Simple interface, modern feel, and a great name that fits perfectly.
Your comment is awaiting moderation.
discovergreatdeals – The concept fits the design perfectly, everything feels convenient to use.
Your comment is awaiting moderation.
а какие были проблемы по данном поводу? купить Кокаин, Мефедрон, Экстази Урб 597 либо перорально либо нозально, дозировка – 5-10мг, эффекты описаны в энциклопедии,
Your comment is awaiting moderation.
trendychoicehub – Clean layout and fast loading pages, makes exploring effortless and smooth.
Your comment is awaiting moderation.
Sweet Bonanza: A Burst of Fruity Fun!
Dive into the colorful world of Sweet Bonanza, where juicy fruits and sugary treats bring endless excitement and big wins. Spin the reels and taste the sweetness of luck at https://k8-casino.jp/ !
Your comment is awaiting moderation.
Скажите сей час в Челябинске работаете?) купить онлайн мефедрон, экстази, бошки Магазин агонь! Брал как то давно. все ровно!
Your comment is awaiting moderation.
брал тут туси совсем недавно.все устроило.спасибо.жду обработки второго заказа) купить кокаин, меф, бошки через телеграмм Удачи в бизе
Your comment is awaiting moderation.
Еще раз извините. Треки тоже бьются не сразу, курьерки “в завалах”, иногда он только начинает определяться на сайте курьерки, а его уже вручают или вручили получателю. Не пугайтесь, что мониторинг начнется не сразу, вам всем все придет заказанное. https://uvoperm.ru Ну вообще то весь ассортимент выложен в теме “Прайс-Лист”. Там все написано.
Your comment is awaiting moderation.
Братья так же ровны как в совестсокм союзе купить кокаин, меф, бошки через телеграмм могу заверить вас что сдесь ни только людское понимание но и честное слова!!!мир вам друзья!!!все шикарно!!
Your comment is awaiting moderation.
admagnet.click – Overall, professional vibe here; trustworthy, polished, and pleasantly minimal throughout.
Your comment is awaiting moderation.
Бро я постоянный клиент в этом магазине! Магазин работает очень качественно и товар на высшем уровне!!! купить скорость, кокаин, мефедрон, гашиш чувак сделай 2к15 самый раз для меня))
Your comment is awaiting moderation.
Решили отметить событие, а ехать в магазин не хотелось. Оформили заказ онлайн, всё пришло за 40 минут, даже быстрее, чем ожидали. Всё аккуратно и по-честному. Теперь если нужна алкоголь доставка москва круглосуточно, всегда заказываю здесь – https://dostavka-alcohol.ru/
Your comment is awaiting moderation.
promostreamx.click – Mobile version looks perfect; no glitches, fast scrolling, crisp text.
Your comment is awaiting moderation.
globalstylemarket – Products are displayed neatly and the visuals are appealing.
Your comment is awaiting moderation.
getinspireddaily – This site feels full of positivity and creativity, very well designed.
Your comment is awaiting moderation.
discoveryourpotential – Inspiring theme and clean layout, really encourages self-growth and positivity.
Your comment is awaiting moderation.
growwithconfidence – Clean, bold, and uplifting design, feels great to explore this site.
Your comment is awaiting moderation.
styleforliving – Love the aesthetic here, everything feels fresh and inviting.
Your comment is awaiting moderation.
everydaystylecorner – The products look trendy and fresh, good mix of modern styles.
Your comment is awaiting moderation.
buildabetterworld – Really liked the layout, it feels calming and professionally done.
Your comment is awaiting moderation.
trendyfindsonline – The site has a clean and catchy look, definitely feels professional.
Your comment is awaiting moderation.
adrise.click – Navigation felt smooth, found everything quickly without any confusing steps.
Your comment is awaiting moderation.
marketblaze.click – Overall, professional vibe here; trustworthy, polished, and pleasantly minimal throughout.
Your comment is awaiting moderation.
trafficlaunch.click – Mobile version looks perfect; no glitches, fast scrolling, crisp text.
Your comment is awaiting moderation.
clickchain.click – Navigation felt smooth, found everything quickly without any confusing steps.
Your comment is awaiting moderation.
дорогие проститутки сургута
Your comment is awaiting moderation.
Покуреха порошки безвкусные (на язык), остальные горькие. Так проще всего определить. купить Мефедрон, Бошки, Марихуану Флуд??? Я высказал свое мнение! Или это запрещено?
Your comment is awaiting moderation.
Оптимальная сборка игровых ПК напрямую влияет на плавность игрового процесса, стабильность системы и ее долговечность. На страницах блога можно найти подробные обзоры, советы по выбору комплектующих и рекомендации, которые помогут подобрать подходящую конфигурацию под разные задачи.
Your comment is awaiting moderation.
Intelligent Crypto https://tradetonixai.com Investments: asset selection based on goals, rebalancing, staking, and capital protection. Passive income of 2-3% of your deposit with guaranteed daily payouts.
Your comment is awaiting moderation.
https://quickcoop.videomarketingplatform.co/669a3a8a451cd
Your comment is awaiting moderation.
expandyourhorizon – Positive energy all around, feels like a great place to explore.
Your comment is awaiting moderation.
Эффективное лечение геморроя у взрослых. Безопасные процедуры, комфортные условия, деликатное отношение. Осмотр, диагностика, подбор терапии. Современные методы без госпитализации и боли.
Your comment is awaiting moderation.
Хочешь халяву? https://tutvot.com – сервис выгодных предложений Рунета: авиабилеты, отели, туры, финпродукты и подписки. Сравнение цен, рейтинги, промокоды и кэшбэк. Находите лучшие акции каждый день — быстро, честно, удобно.
Your comment is awaiting moderation.
Очень порадовал подход к клиенту — звонят, уточняют адрес, всё привозят вовремя. Алкоголь качественный, никакого дешёвого суррогата. Работают круглосуточно, что удобно. Теперь если нужна доставка алкоголя ночью в москве, беру здесь https://dostavka-alcohol.ru/
Your comment is awaiting moderation.
Удачи всей команде желаю купить онлайн мефедрон, экстази, бошки Всем доброго времени суток 😉 заказал у ув ТС продукции немного, жду трек сегодня должен быть))) впервые обратился к данному сселеру надеюсь все пройдет на уровне. Как и что оценю и выложу. краткий трипчик по продуктам если понравится то сработаемся ))))) всем удачных покупок и продаж;)
Your comment is awaiting moderation.
Срочно на карту https://zaimy-87.ru возьмите займ без визита в офис. Короткая анкета, мгновенное решение, честные условия, напоминания о платежах. Работает круглосуточно.
Your comment is awaiting moderation.
Где взять займ https://zaimy-89.ru выгодно? Наш сервис подбирает предложения по сумме, сроку и ставке. Полная стоимость заранее, без скрытых платежей. Оформите онлайн и получите деньги за минуты.
Your comment is awaiting moderation.
Очень порадовало, что даже в праздники работают без перерывов. Всё четко, алкоголь отличный, сервис стабильный. Пользуюсь постоянно. Теперь если нужна доставка алкоголя без выходных, беру здесь, https://dostavka-alcohol.ru/
Your comment is awaiting moderation.
Взять займ https://zaimy-86.ru стало проще: мобильная заявка, подтверждение за минуты, прозрачные тарифы и удобное погашение. Работает 24/7, только проверенные кредиторы.
Your comment is awaiting moderation.
Займ на карту https://zaimy-80.ru без лишних вопросов: короткая анкета, автоматическое решение, прозрачные комиссии. Удобное продление и напоминания о платежах в личном кабинете.
Your comment is awaiting moderation.
Онлайн-займ https://zaimy-76.ru для срочных расходов: гибкие лимиты, прозрачные комиссии, понятный график. Подберите лучший вариант и оформите заявку — деньги придут на карту 24/7.
Your comment is awaiting moderation.
Возьмите займ https://zaimy-78.ru онлайн на карту: фиксированные условия, калькулятор переплаты, поддержка в чате. Оформление круглосуточно, решение — за минуты, без скрытых платежей.
Your comment is awaiting moderation.
seo компания москва https://reiting-seo-kompanii.ru .
Your comment is awaiting moderation.
Эйфора сейчас нет в наличии, если только индивидуальный заказ от 1кг. https://gav-ural.ru Заказывал 200й, прислали с приятным бонусом! Конспирация- чудесна! В общем все супер!
Your comment is awaiting moderation.
Берите займ онлайн https://zaimy-73.ru без очередей: моментальная проверка, прозрачные тарифы, уведомления о платеже и удобное продление. Деньги поступают на карту сразу после одобрения.
Your comment is awaiting moderation.
Взять займ https://zaimy-71.ru до зарплаты и на любые цели. Подбор по сумме, сроку и ставке, калькулятор платежа, проверенные кредиторы. Оформление 24/7, решение за несколько минут.
Your comment is awaiting moderation.
Взять займ онлайн https://zaimy-63.ru за 5–10 минут: выберите сумму и срок, заполните короткую анкету и получите перевод на карту. Прозрачные ставки, без скрытых комиссий, круглосуточная обработка, только проверенные МФО.
Your comment is awaiting moderation.
Нужно взять займ https://zaimy-69.ru без визита в офис? Сервис подбора предложений: мгновенное решение, гибкие лимиты, понятные условия, поддержка 24/7. Деньги на карту сразу после одобрения.
Your comment is awaiting moderation.
Взять займ онлайн https://zaimy-59.ru за несколько минут: без визита в офис, без лишних справок. Подбор выгодных ставок, проверенные кредиторы, мгновенное зачисление на карту. Удобно и прозрачно.
Your comment is awaiting moderation.
Как взять займ https://zaimy-61.ru без лишних переплат: сравните ставки, выберите подходящий вариант и отправьте онлайн-заявку. Только проверенные кредиторы, прозрачные комиссии, безопасная обработка данных.
Your comment is awaiting moderation.
Хотите взять займ https://zaimy-57.ru быстро и безопасно? Сравните предложения МФО, выберите сумму и срок, оформите заявку онлайн и получите деньги на карту. Прозрачные условия, моментальное решение, поддержка 24/7.
Your comment is awaiting moderation.
Бро ты лучший!!! Магазин работает на высшем уровне!!! купить скорость, кокаин, мефедрон, гашиш Хоть скан хоть что вылаживайте, это не доказательство! доказательством для меня есть только поступление денег на счет. По чекам, сканам, и всему прочему я не работаю это не есть доказательство об оплате!
Your comment is awaiting moderation.
Життя простіше https://metasearch.com.ua організація побуту, виховання, продуктивність, smart-рішення, особисті фінанси, спорт та відпочинок. Перевірені поради, наочні схеми, корисні таблиці.
Your comment is awaiting moderation.
Журнал про баланс https://info365.com.ua затишок та порядок, сім’я та дозвілля, технології та безпека, кар’єра та інвестиції. Огляди, порівняння, добірки товарів та додатків.
Your comment is awaiting moderation.
Життя у ритмі цифри https://vilnapresa.com розумний будинок, мобільні сервіси, кібербезпека, віддалена робота, сімейний календар, здоров’я. Гайди, чек-листи, добірки додатків.
Your comment is awaiting moderation.
Про будинок та світ https://databank.com.ua навколо: затишок, сім’я, освіта, бізнес-інструменти, особисті фінанси, подорожі та кулінарія. Стислі висновки, посилання на джерела, корисні формули.
Your comment is awaiting moderation.
спср только растраивает, такие деньги берут, и че то нифига не делают. Посыль уже 3 день лежит в г. Ё-XX. Хотя должны были привезти в близлежащий город. Но тут я узнал то что у нас нет в городе филиала ихнего. Вот и не понятно толи сами привезут, толи ехать до них надо. https://gain-crb.ru почему статус заказа отложен!? 1000539
Your comment is awaiting moderation.
Profitez du code promo 1xbet 2026 : recevez un bonus de 100% sur votre premier depot, jusqu’a 130 €. Jouez et placez vos paris facilement grace aux fonds bonus. Une fois inscrit, n’oubliez pas de recharger votre compte. Si votre compte est verifie, vous pourrez retirer toutes les sommes d’argent, y compris les bonus. Le code promo 1xbet est disponible via ce lien : https://payhip.com/bonusbet/blog/news/les-code-promo-1xbet-2026-bonus-exclusif-jusqu-a-130.
Your comment is awaiting moderation.
Бро слова это хорошо но нам нужен наш клад и не более не кто не хочет тебя винить и общаться сдесь на эту тему а на оборот писать только хорошие отзывы о вашем магазе пойми и ты бро слово паника сдесь не уместно сдесь идет разбор по факту согласись купить онлайн мефедрон, экстази, бошки По моему отзыв о “марочках” был явно не про этот магазин О_о
Your comment is awaiting moderation.
Щоденний журнал https://massmedia.one про життя без перевантаження: будинок та побут, сім’я та стосунки, ІТ та гаджети, бізнес та робота, фінанси, настрій та відпочинок. Концентрат корисного: короткі висновки, посилання джерела, інструменти для действий.
Your comment is awaiting moderation.
Сучасне медіа https://homepage.com.ua «про все важливе»: від ремонту та рецептів до стартапів та кібербезпеки. Сім’я, будинок, технології, гроші, робота, здоров’я, культура. Зрозуміла мова, наочні схеми, регулярні поновлення.
Your comment is awaiting moderation.
Платформа ідей https://infopark.com.ua для дому, роботи та відпочинку: ремонт, відносини, софт та гаджети, маркетинг та інвестиції, рецепти та спорт. Матеріали з висновками та готовими списками справ.
Your comment is awaiting moderation.
Баланс будинку https://press-express.com.ua та кар’єри: управління часом, побутові лайфхаки, цифрові рішення, особисті фінанси, батьки та діти, спорт та харчування. Огляди, інструкції, думки спеціалістів. Матеріали, до яких повертаються.
Your comment is awaiting moderation.
а сюда заглянуть влом ? //legalrc.com/threads/Трипы.588/page-2 купить онлайн мефедрон, экстази, бошки что лучше?АКВ48F или АКВ48?!
Your comment is awaiting moderation.
clickvelocity.click – Found practical insights today; sharing this article with colleagues later.
Your comment is awaiting moderation.
adpilot.click – Pages loaded fast, images appeared sharp, and formatting stayed consistent.
Your comment is awaiting moderation.
Універсальний гід https://dailyday.com.ua по життю: затишний будинок, щасливі стосунки, продуктивна робота, цифрові інструменти, фінансова грамотність, саморозвиток та відпочинок. Короткі формати та глибокі розбори – для рішень без метушні.
Your comment is awaiting moderation.
Все, що важливо https://ua-meta.com сьогодні: будинок та сім’я, кар’єра та бізнес, технології та інтернет, дозвілля та спорт, здоров’я та харчування. Новини, лонгріди, посібники, добірки сервісів та додатків. Читайте, вибирайте, застосовуйте на практиці.
Your comment is awaiting moderation.
Затишок щодня https://narodna.com.ua ідеї для інтер’єру, зберігання в малих просторах, безпечний побут із дітьми, зелені рішення, догляд за технікою, корисні звички. Інструкції, схеми та списки. Перетворіть будинок на місце сили та спокою.
Your comment is awaiting moderation.
clickexpand.click – Bookmarked this immediately, planning to revisit for updates and inspiration.
Your comment is awaiting moderation.
Медіа для дому https://government.com.ua та офісу: інтер’єр та побут, сімейні питання, цифрові тренди, підприємництво, інвестиції, здоров’я та освіта. Збірники порад, випробування, аналітика, топ-листи. Лише перевірена інформація.
Your comment is awaiting moderation.
promoverse.click – Color palette felt calming, nothing distracting, just focused, thoughtful design.
Your comment is awaiting moderation.
marketcraft.click – Bookmarked this immediately, planning to revisit for updates and inspiration.
Your comment is awaiting moderation.
marketsonic.click – Pages loaded fast, images appeared sharp, and formatting stayed consistent.
Your comment is awaiting moderation.
попробуйте установить скайп. купить Мефедрон, Бошки, Марихуану Отдуши за ровность!
Your comment is awaiting moderation.
rankedge.click – Color palette felt calming, nothing distracting, just focused, thoughtful design.
Your comment is awaiting moderation.
The day after the home of Eric Adams’s top fundraiser was raided, the new leaders of the Working Families Party, the coalition of progressive groups and labor unions, sent around invites to a secret meeting in November 2023.
трипскан вход
The left could see a way to beat the mayor they hated. They just needed a plan.
Gathered in the common room of an apartment building in Long Island City: city comptroller Brad Lander, Brooklyn borough president Antonio Reynoso and state senator Jessica Ramos. Zellnor Myrie, another state senator who ended up running, was invited but didn’t come. Also sitting there: Zohran Mamdani.
trip scan
They were all surprised to see Mamdani there.
“Zohran? Is Zohran thinking of running?” Working Families Party co-chair Ana Maria Archila, who helped organize the meeting, told CNN as the votes were coming in, recalling the reactions that went around.
tripskan
“I was like, ‘I don’t know, but I know he’s thinking about who should run,’” Archila said.
In that first meeting and several that followed, the other potential candidates closer to launching kept their plans close to their vests, but Mamdani was eagerly participating, pitching and proposing ideas.
Over coffees, he kept saying they needed to find some candidate to run on freezing the rent. He built a platform and staff out of the Democratic Socialists of America.
Last summer, Mamdani told Archila he was jumping in. He wanted to combine what Rep. Alexandria Ocasio-Cortez and Brooklyn city councilman Chi Osse had done in breaking down traditional politics with compelling social media and a plan to knock on a million doors, he said. He asked when the WFP would announce which candidate it would rank first on its primary slate and told her, “Give me as much time to get there as possible.”
трипскан
https://tripscan50c.cc
Your comment is awaiting moderation.
The day after the home of Eric Adams’s top fundraiser was raided, the new leaders of the Working Families Party, the coalition of progressive groups and labor unions, sent around invites to a secret meeting in November 2023.
tripscan
The left could see a way to beat the mayor they hated. They just needed a plan.
Gathered in the common room of an apartment building in Long Island City: city comptroller Brad Lander, Brooklyn borough president Antonio Reynoso and state senator Jessica Ramos. Zellnor Myrie, another state senator who ended up running, was invited but didn’t come. Also sitting there: Zohran Mamdani.
tripscan
They were all surprised to see Mamdani there.
“Zohran? Is Zohran thinking of running?” Working Families Party co-chair Ana Maria Archila, who helped organize the meeting, told CNN as the votes were coming in, recalling the reactions that went around.
tripscan
“I was like, ‘I don’t know, but I know he’s thinking about who should run,’” Archila said.
In that first meeting and several that followed, the other potential candidates closer to launching kept their plans close to their vests, but Mamdani was eagerly participating, pitching and proposing ideas.
Over coffees, he kept saying they needed to find some candidate to run on freezing the rent. He built a platform and staff out of the Democratic Socialists of America.
Last summer, Mamdani told Archila he was jumping in. He wanted to combine what Rep. Alexandria Ocasio-Cortez and Brooklyn city councilman Chi Osse had done in breaking down traditional politics with compelling social media and a plan to knock on a million doors, he said. He asked when the WFP would announce which candidate it would rank first on its primary slate and told her, “Give me as much time to get there as possible.”
trip scan
https://tripscan50c.cc
Your comment is awaiting moderation.
The day after the home of Eric Adams’s top fundraiser was raided, the new leaders of the Working Families Party, the coalition of progressive groups and labor unions, sent around invites to a secret meeting in November 2023.
трипскан вход
The left could see a way to beat the mayor they hated. They just needed a plan.
Gathered in the common room of an apartment building in Long Island City: city comptroller Brad Lander, Brooklyn borough president Antonio Reynoso and state senator Jessica Ramos. Zellnor Myrie, another state senator who ended up running, was invited but didn’t come. Also sitting there: Zohran Mamdani.
tripscan top
They were all surprised to see Mamdani there.
“Zohran? Is Zohran thinking of running?” Working Families Party co-chair Ana Maria Archila, who helped organize the meeting, told CNN as the votes were coming in, recalling the reactions that went around.
tripskan
“I was like, ‘I don’t know, but I know he’s thinking about who should run,’” Archila said.
In that first meeting and several that followed, the other potential candidates closer to launching kept their plans close to their vests, but Mamdani was eagerly participating, pitching and proposing ideas.
Over coffees, he kept saying they needed to find some candidate to run on freezing the rent. He built a platform and staff out of the Democratic Socialists of America.
Last summer, Mamdani told Archila he was jumping in. He wanted to combine what Rep. Alexandria Ocasio-Cortez and Brooklyn city councilman Chi Osse had done in breaking down traditional politics with compelling social media and a plan to knock on a million doors, he said. He asked when the WFP would announce which candidate it would rank first on its primary slate and told her, “Give me as much time to get there as possible.”
tripscan
https://tripscan50c.cc
Your comment is awaiting moderation.
Этот магазин нериально всегда все четко делал, н ошиблись может случайно поговри я думаю решится купить онлайн мефедрон, экстази, бошки Заказ пришёл, все ровно)
Your comment is awaiting moderation.
Donna Jean Godchaux-MacKay, a soulful mezzo-soprano who provided backing vocals on such 1960s classics as “Suspicious Minds” and “When a Man Loves a Woman” and was a featured singer with the Grateful Dead for much of the 1970s, has died at 78.
tripscan
A spokesperson for Godchaux-MacKay confirmed that she died Sunday at Alive Hospice in Nashville after having cancer. Godchaux-McKay and other Grateful Dead members were inducted into the Rock and Roll Hall of Fame in 1994.
трипскан
Born Donna Jean Thatcher in Florence, Alabama, she had yet to turn 20 when she became a session performer in nearby Muscle Shoals, where many soul and rhythm and blues hits were recorded, and also was on hand for numerous sessions at the Memphis-based American Sound Studio. Her credits included Elvis Presley’s “Suspicious Minds,” Percy Sledge’s “When a Man Loves a Woman” and songs with Neil Diamond, Boz Scaggs and Cher.
trip scan
In the early 1970s, she and pianist/then-husband Keith Godchaux joined the Grateful Dead and remained with them for several tours and albums, including “Terrapin Station,” “Shakedown Street” and “From the Mars Hotel.” Godchaux appeared on numerous songs, whether joining with Jerry Garcia on “Scarlet Begonias” or writing and taking the lead on “From the Heart of Me.”
трипскан
https://trips50.cc
Your comment is awaiting moderation.
Практичний домашній https://publish.com.ua онлайн-журнал: планинг тижня, закупівлі без зайвого, рецепти з доступних продуктів, догляд за поверхнями, сезонні проекти. Тільки у справі, без клікбейту. Зручна навігація та матеріали, до яких хочеться повертатися.
Your comment is awaiting moderation.
Ваш провідник https://ukrchannel.com до порядку та затишку: розхламлення, зонування, бюджетний ремонт, кухонні лайфхаки, зелені рослини, здоров’я будинку. Тільки перевірені поради, списки справ та натхнення. Створіть простір, який підтримує вас.
Your comment is awaiting moderation.
Журнал для домашнього https://magazine.com.ua життя без метушні: плани прибирання, меню, дитячий куточок, вихованці, міні-сад, дрібний ремонт, побутова безпека. Короткі інструкції, корисні списки та приклади, що надихають. Зробіть будинок опорою для всієї родини.
Your comment is awaiting moderation.
Домашній онлайн-журнал https://ukrcentral.com про розумний побут: планування харчування, прибирання за таймером, екоради, мінімалізм без стресу, ідеї для малого метражу. Завантажені чек-листи, таблиці та гайди. Заощаджуйте час, гроші та сили — із задоволенням.
Your comment is awaiting moderation.
Два часа, ребята в клубе, купить Мефедрон, Бошки, Марихуану Млять, не хватает нервов, 2 дня уже пытаюсь через асю связаться с продавцом и всё безрезультатно.Ладно бы вообще не ответил, ато написал что ок и не счета куда делать перевод,и ничего.
Your comment is awaiting moderation.
Donna Jean Godchaux-MacKay, a soulful mezzo-soprano who provided backing vocals on such 1960s classics as “Suspicious Minds” and “When a Man Loves a Woman” and was a featured singer with the Grateful Dead for much of the 1970s, has died at 78.
трипскан вход
A spokesperson for Godchaux-MacKay confirmed that she died Sunday at Alive Hospice in Nashville after having cancer. Godchaux-McKay and other Grateful Dead members were inducted into the Rock and Roll Hall of Fame in 1994.
tripskan
Born Donna Jean Thatcher in Florence, Alabama, she had yet to turn 20 when she became a session performer in nearby Muscle Shoals, where many soul and rhythm and blues hits were recorded, and also was on hand for numerous sessions at the Memphis-based American Sound Studio. Her credits included Elvis Presley’s “Suspicious Minds,” Percy Sledge’s “When a Man Loves a Woman” and songs with Neil Diamond, Boz Scaggs and Cher.
tripscan
In the early 1970s, she and pianist/then-husband Keith Godchaux joined the Grateful Dead and remained with them for several tours and albums, including “Terrapin Station,” “Shakedown Street” and “From the Mars Hotel.” Godchaux appeared on numerous songs, whether joining with Jerry Garcia on “Scarlet Begonias” or writing and taking the lead on “From the Heart of Me.”
tripscan
https://trips50.cc
Your comment is awaiting moderation.
Donna Jean Godchaux-MacKay, a soulful mezzo-soprano who provided backing vocals on such 1960s classics as “Suspicious Minds” and “When a Man Loves a Woman” and was a featured singer with the Grateful Dead for much of the 1970s, has died at 78.
trip scan
A spokesperson for Godchaux-MacKay confirmed that she died Sunday at Alive Hospice in Nashville after having cancer. Godchaux-McKay and other Grateful Dead members were inducted into the Rock and Roll Hall of Fame in 1994.
tripscan top
Born Donna Jean Thatcher in Florence, Alabama, she had yet to turn 20 when she became a session performer in nearby Muscle Shoals, where many soul and rhythm and blues hits were recorded, and also was on hand for numerous sessions at the Memphis-based American Sound Studio. Her credits included Elvis Presley’s “Suspicious Minds,” Percy Sledge’s “When a Man Loves a Woman” and songs with Neil Diamond, Boz Scaggs and Cher.
tripscan top
In the early 1970s, she and pianist/then-husband Keith Godchaux joined the Grateful Dead and remained with them for several tours and albums, including “Terrapin Station,” “Shakedown Street” and “From the Mars Hotel.” Godchaux appeared on numerous songs, whether joining with Jerry Garcia on “Scarlet Begonias” or writing and taking the lead on “From the Heart of Me.”
tripscan
https://trips50.cc
Your comment is awaiting moderation.
Сам магаз работает хорошо все в сроки, консперация тоже на высшем уровне) купить скорость, кокаин, мефедрон, гашиш действительно принимают?
Your comment is awaiting moderation.
лучше и не напишешь бро купить онлайн мефедрон, экстази, бошки С новым годом всех!
Your comment is awaiting moderation.
Магаз вышел на связь, работает, но щас выходные 😀 с треками порешают, по ходу косяки СПСР. пробники БУДУТ !! Кто ещё будет гадить в теме “Трипы” и просить пробник – получит подзатыльник. У кого есть что сказать – отпишите лучше отзывы о товаре. купить скорость, кокаин, мефедрон, гашиш Добрый день, кто паникует и истерит, успокойтесь, всем все высылается постепенно. Треки придут на эл. почты ближайшее время всем ждущим.
Your comment is awaiting moderation.
Сотрудники , знают свое дело , лучше другого. https://kkadrov.ru праздники мы тоже отдыхали, так как курьерки все равно не работают
Your comment is awaiting moderation.
Ваш помічник https://dailymail.com.ua по дому: інтер’єр та ремонт, організація простору, здоровий побут, догляд за технікою, рецепти та заготівлі, ідеї для вихідних. Тільки практичні поради, перевірені матеріали та зручна навігація. Зробіть будинок красивим та зручним без зайвих витрат.
Your comment is awaiting moderation.
Домашній онлайн-журнал https://zastava.com.ua про життя всередині чотирьох стін: швидкі страви, прибирання за планом, розумні покупки, декор своїми руками, зони зберігання, дитячий куточок та догляд за вихованцями. Практика замість теорії, зрозумілі чек-листи та поради, які економлять час та гроші.
Your comment is awaiting moderation.
Все про будинки https://vechorka.com.ua де приємно жити: швидкі рецепти, компактне зберігання, текстиль та кольори, сезонний декор, догляд за речами та технікою, дозвілля з дітьми. Покрокові інструкції, корисні вибірки, особистий досвід. Затишок починається тут – щодня.
Your comment is awaiting moderation.
Готуємо, прибираємо https://ukrdigest.com прикрашаємо легко. Домашній онлайн-журнал з покроковими рецептами, лайфхаками з прання та прибирання, ідеями сезонного декору, планами меню та бюджетом сім’ї. Зберігайте статті, складайте списки справ та знаходите відповіді на побутові питання.
Your comment is awaiting moderation.
https://internet-leman.ru/
Your comment is awaiting moderation.
Ну я совершенно не понимаю,как можно держать сайт в таком несоответсвии с реальностью?Пароль от админки забыли,чтоли?Сколько клиентов забило,пытаясь пробиться через мыло,которое до сих пор указано?Ппц полный. купить Кокаин, Мефедрон, Экстази Не работает пока там представительство.
Your comment is awaiting moderation.
clickengine.click – Appreciate the typography choices; comfortable spacing improved my reading experience.
Your comment is awaiting moderation.
Онлайн-журнал https://mediaworld.com.ua про бізнес, технології, маркетинг і стиль життя. Щодня — свіжі новини, аналітика, огляди, інтерв’ю та практичні гайди. Зручна навігація, чесні думки, експертні шпальти. Читайте, надихайтеся, діліться безкоштовно.
Your comment is awaiting moderation.
Щоденний онлайн-журнал https://republish.online про все: від швидкого «що сталося» до глибоких лонґрідів. Пояснюємо контекст, даємо посилання на джерела, ділимося лайфхаками та історіями, що надихають. Без клікбейту – лише корисні матеріали у зручному форматі.
Your comment is awaiting moderation.
после анального секса
https://www.kompromatwiki.org/wiki/%D0%A0%D0%BE%D0%BC%D0%B0%D0%BD_%D0%92%D0%B8%D0%BA%D1%82%D0%BE%D1%80%D0%BE%D0%B2%D0%B8%D1%87_%D0%92%D0%B0%D1%81%D0%B8%D0%BB%D0%B5%D0%BD%D0%BA%D0%BE
гей порно член
русское гей порно
гей порно член
гей секс порно
порно групповое жесток
анальный секс первые
Your comment is awaiting moderation.
Ваш онлайн-журнал https://informative.com.ua про все: новини, розбори, інтерв’ю та свіжі ідеї. Теми — від психології та освіти до спорту та культури. Зберігайте в закладки, ділитесь з друзями, випускайте повідомлення про головне. Чесний тон, зрозумілі формати, щоденні поновлення.
Your comment is awaiting moderation.
Entdecken Sie die besten Weinverkostungen in Wien auf weinverkostung wien grinzing.
Die osterreichische Hauptstadt bietet eine einzigartige Mischung aus Tradition und Moderne.
Die Weinverkostungen in Wien sind perfekt fur Kenner und Neulinge. Dabei lernen Gaste die Besonderheiten der regionalen Rebsorten kennen.
#### **2. Die besten Orte fur Weinverkostungen**
In Wien gibt es zahlreiche Lokale und Weinguter, die Verkostungen anbieten. Das bekannte Heurigenviertel in Grinzing ladt zu gemutlichen Verkostungen ein.
Einige Winzer veranstalten Fuhrungen durch ihre Kellereien. Oft werden auch seltene Weine vorgestellt, die nur lokal erhaltlich sind.
#### **3. Wiener Weinsorten und ihre Besonderheiten**
Wiener Weine sind vor allem fur ihre Vielfalt bekannt. Auch der fruchtige Grune Veltliner zahlt zu den bekanntesten Wei?weinen der Region.
Die Bodenbeschaffenheit und das Klima pragen den Geschmack. Dank nachhaltiger Anbaumethoden ist die Qualitat stets hoch.
#### **4. Tipps fur eine gelungene Weinverkostung**
Eine gute Vorbereitung macht die Verkostung noch angenehmer. Ein neutraler Geschmack im Mund vor der Verkostung verbessert das Erlebnis.
Gruppenverkostungen bringen zusatzlichen Spa?. Ein Weinjournal kann helfen, personliche Favoriten festzuhalten.
—
### **Spin-Template fur den Artikel**
#### **1. Einfuhrung in die Weinverkostung in Wien**
Dabei lernen Gaste die Besonderheiten der regionalen Rebsorten kennen.
#### **2. Die besten Orte fur Weinverkostungen**
Das bekannte Heurigenviertel in Grinzing ladt zu gemutlichen Verkostungen ein.
#### **3. Wiener Weinsorten und ihre Besonderheiten**
Die warmen Sommer sorgen fur vollmundige Aromen.
#### **4. Tipps fur eine gelungene Weinverkostung**
Gruppenverkostungen bringen zusatzlichen Spa?.
Your comment is awaiting moderation.
rankpilotx.click – Content reads clearly, helpful examples made concepts easy to grasp.
Your comment is awaiting moderation.
Онлайн-журнал 24/7 https://infoquorum.com.ua все про життя та світ — від технологій та науки до кулінарії, подорожей та особистих фінансів. Короткі нотатки та глибока аналітика, рейтинги та добірки, корисні інструменти. Зручна мобільна версія та розумні підказки для економії часу.
Your comment is awaiting moderation.
ranksphere.click – Loved the layout today; clean, simple, and genuinely user-friendly overall.
Your comment is awaiting moderation.
advelocity.click – Overall, professional vibe here; trustworthy, polished, and pleasantly minimal throughout.
Your comment is awaiting moderation.
trafficburst.click – Mobile version looks perfect; no glitches, fast scrolling, crisp text.
Your comment is awaiting moderation.
leadstreamx.click – Overall, professional vibe here; trustworthy, polished, and pleasantly minimal throughout.
Your comment is awaiting moderation.
promowave.click – Content reads clearly, helpful examples made concepts easy to grasp.
Your comment is awaiting moderation.
ты брал вообще не скоростило или как ? купить скорость, кокаин, мефедрон, гашиш туфта какаето
Your comment is awaiting moderation.
Donna Jean Godchaux-MacKay, a soulful mezzo-soprano who provided backing vocals on such 1960s classics as “Suspicious Minds” and “When a Man Loves a Woman” and was a featured singer with the Grateful Dead for much of the 1970s, has died at 78.
трип скан
A spokesperson for Godchaux-MacKay confirmed that she died Sunday at Alive Hospice in Nashville after having cancer. Godchaux-McKay and other Grateful Dead members were inducted into the Rock and Roll Hall of Fame in 1994.
трипскан вход
Born Donna Jean Thatcher in Florence, Alabama, she had yet to turn 20 when she became a session performer in nearby Muscle Shoals, where many soul and rhythm and blues hits were recorded, and also was on hand for numerous sessions at the Memphis-based American Sound Studio. Her credits included Elvis Presley’s “Suspicious Minds,” Percy Sledge’s “When a Man Loves a Woman” and songs with Neil Diamond, Boz Scaggs and Cher.
трипскан вход
In the early 1970s, she and pianist/then-husband Keith Godchaux joined the Grateful Dead and remained with them for several tours and albums, including “Terrapin Station,” “Shakedown Street” and “From the Mars Hotel.” Godchaux appeared on numerous songs, whether joining with Jerry Garcia on “Scarlet Begonias” or writing and taking the lead on “From the Heart of Me.”
tripscan
https://trips50.cc
Your comment is awaiting moderation.
Онлайн-журнал https://ukr-weekend.com про все для цікавих: технології, наука, стиль життя, культура, їжа, спорт, подорожі та кар’єра. Розбори без кліше, лаконічні шпаргалки, інтерв’ю та добірки. Оновлення щоденно, легке читання та збереження в закладки.
Your comment is awaiting moderation.
Онлайн-журнал https://worldwide-ua.com про все: новини, тренди, лайфхаки, наука, технології, культура, їжа, подорожі та гроші. Короткі шпаргалки та великі розбори без клікбейту. Фактчекінг, зручна навігація, закладки та розумні рекомендації. Читайте щодня і залишайтеся у темі.
Your comment is awaiting moderation.
Ваш онлайн-журнал https://informa.com.ua про все: великі теми та короткі формати – від трендів та новин до лайфхаків та практичних порад. Рубрики за інтересами, огляди, інтерв’ю та думки. Читайте достовірно, розширюйте світогляд, залишайтеся на крок попереду.
Your comment is awaiting moderation.
Про все в одному місці https://irinin.com свіжі новини, корисні інструкції, огляди сервісів і товарів, що надихають історії, ідеї для відпочинку та роботи. Онлайн-журнал із фактчекінгом, зручною навігацією та персональними рекомендаціями. Дізнайтесь головне і знаходите нове.
Your comment is awaiting moderation.
Да, оч похожа на соль, даже камушек один был ощутимый такой купить онлайн мефедрон, экстази, бошки Успешных вам продаж и спокойной работы)
Your comment is awaiting moderation.
https://internet-leman.ru/
Your comment is awaiting moderation.
спасибо за отзыв! купить Мефедрон, Бошки, Марихуану Сделал заказ, жду не дождусь пока придет, как придет отпишу.. Всем добра)
Your comment is awaiting moderation.
Портал корисної інформації https://inquire.com.ua практичні поради, відповіді експертів, таблиці та шпаргалки. Теми – здоров’я, сім’я, гроші, гаджети, авто, туризм. Швидкий пошук, обране, розсилка найкращих матеріалів тижня.
Your comment is awaiting moderation.
Універсальний онлайн-журнал https://ukrglobe.com про все – від науки та гаджетів до кіно, психології, подорожей та особистих фінансів. Розумні тексти, короткі гіди, добірки та думки експертів. Актуально щодня, зручно на будь-якому пристрої. Читайте, зберігайте, діліться.
Your comment is awaiting moderation.
Онлайн-журнал https://elementarno.com.ua про все: новини та тенденції, lifestyle та технології, культура та подорожі, гроші та кар’єра, здоров’я та будинок. Щоденні статті, огляди, інтерв’ю та практичні поради без води. Читайте перевірені матеріали, підписуйтесь на дайджест та будьте в темі.
Your comment is awaiting moderation.
Сучасний інфосайт https://overview.com.ua наука та техніка, стиль життя, спорт, освіта, їжа та DIY. Зрозумілі пояснення, покрокові плани, тести та огляди. Розумні фільтри за інтересами, коментарі, закладки та офлайн-читання – все, щоб заощаджувати час.
Your comment is awaiting moderation.
Общение оператора 10/10-всегда все грамотно и вежливо объяснит. Таким оператор и должен быть! купить скорость, кокаин, мефедрон, гашиш брат, у меня ощущение что я с тобой работал, но название магаза было немного другим, тоже в доверенной ветке был))) почерк тот же, и порядочность. я прав или ошибаюсь?))
Your comment is awaiting moderation.
Інформаційний сайт https://infoteka.com.ua новини, практичні гайди, огляди та чек-листи. Технології, здоров’я, фінанси, будинок, подорожі. Розумний пошук, закладки, підписки на теми. Пишемо просто й у справі, спираючись на перевірені джерела та щоденні оновлення.
Your comment is awaiting moderation.
Інформаційний медіацентр https://suntimes.com.ua новини, лонгріди, огляди та FAQ. Наука, культура, спорт, технології, стиль життя. Редакторські добірки, коментарі, повідомлення про важливе. Все в одному місці та у зручному форматі.
Your comment is awaiting moderation.
Портал-довідник https://speedinfo.com.ua таблиці норм та термінів, інструкції «як зробити», гайди з сервісів. Будинок та сад, діти, навчання, кар’єра, фінанси. Розумні фільтри, друк шпаргалок, збереження статей. Чітко, структурно, зрозуміло.
Your comment is awaiting moderation.
Занимайся я таким делом,коли вы не просили б о граммах 100,ответ был бы тот же. В таком деле главное-отсутствие жадности. Не надо гнаться за каждой копейкой,коли есть относительно безопасная отработанная схема,то и нечего от неё отклонятся. Вы видите в них кидал,они в вас красного. купить скорость, кокаин, мефедрон, гашиш Отзыв уже был, по поводу JWH и 2c-i. Писать то особо и не о чем, но качество товара очень даже порадовало. Щас жду только пополнения ассортимента.
Your comment is awaiting moderation.
meilleur casino en ligne: telecharger 1xbet Cameroun
Your comment is awaiting moderation.
http://houmy.ru/
Your comment is awaiting moderation.
rankrocket.click – Found practical insights today; sharing this article with colleagues later.
Your comment is awaiting moderation.
clicknexus.click – Navigation felt smooth, found everything quickly without any confusing steps.
Your comment is awaiting moderation.
marketnova.click – Pages loaded fast, images appeared sharp, and formatting stayed consistent.
Your comment is awaiting moderation.
Інфопортал про головне https://ukrpublic.com економіка, технологія, здоров’я, екологія, авто, подорожі. Короткі статті, відео пояснення, корисні посилання. Персональні рекоме
Your comment is awaiting moderation.
Універсальний інфопортал https://dobraporada.com.ua “на кожен день”: короткі інструкції, таблиці, калькулятори, порівняння. Теми – сім’я, фінанси, авто, освіта, кулінарія, спорт. Персональна стрічка, добірки тижня, коментарі та обране.
Your comment is awaiting moderation.
http://houmy.ru/
Your comment is awaiting moderation.
Практичний довідник https://altavista.org.ua здоров’я, будинок, авто, навчання, кар’єра. Таблиці, інструкції, рейтинги послуг, порівняння цін. Офлайн доступ і друк шпаргалок. Економимо ваш час.
Your comment is awaiting moderation.
clickmagnetix.click – Loved the layout today; clean, simple, and genuinely user-friendly overall.
Your comment is awaiting moderation.
digitalsurge.click – Bookmarked this immediately, planning to revisit for updates and inspiration.
Your comment is awaiting moderation.
viralboost.click – Color palette felt calming, nothing distracting, just focused, thoughtful design.
Your comment is awaiting moderation.
Уже заказывал и получил chm-100 и chm-400 всё ровно) купить кокаин, меф, бошки через телеграмм Снова в деле
Your comment is awaiting moderation.
adzenith.click – Pages loaded fast, images appeared sharp, and formatting stayed consistent.
Your comment is awaiting moderation.
наркологическая помощь на дому в санкт петербурге
Your comment is awaiting moderation.
Unforgettable Experiences in Moscow
No matter where your journey takes you, Moscow Pass® is your key to unlocking the best experiences in the city. From world-famous landmarks to hidden local gems, our expertly curated selection of attractions lets you explore Moscow your way—at your own pace and for one great price.
Moscow River cruise ticket
Maximize Your Visit
We take the hassle out of planning so you can focus on making memories. With Moscow Pass®, you get instant access to top sights, exclusive experiences, and flexible options—all in one convenient digital pass. Plus, our dedicated support team is available whenever you need assistance.
Moscow tourist card 2025
See More for Less
With access to 90+ attractions, including must-see highlights and off-the-beaten-path treasures, Moscow Pass® ensures you make the most of your trip. Whether you’re interested in history, art, adventure, or local culture, our pass offers the best way to experience the city—at a fraction of the cost of individual tickets.
“The pass made our trip so much easier! Skipping ticket lines and exploring at our own pace was a game-changer.”
— Anna, Moscow Explorer
Plan Ahead or Stay Spontaneous
Whether you’re organizing your itinerary in advance or deciding on the go, Moscow Pass® gives you total flexibility. Book early for peace of mind, or explore spontaneously—either way, you’ll enjoy guaranteed savings and free cancellation within 30 days.
Unlock Exclusive Experiences
With Moscow Pass®, you don’t just visit the city — you experience it. Enjoy VIP access, skip-the-line privileges, and unique activities designed to bring Moscow to life in a way you’ve never seen before.
Start your adventure today and discover Moscow like never before!
Moscow hop-on hop-off bus
https://moscowpass.com/
Your comment is awaiting moderation.
Магазин высшего уровня своей работы. купить Кокаин, Мефедрон, Экстази братишки и сёстры всем мир и харе ругаться!жизнь прекрасна
Your comment is awaiting moderation.
Регіональний інфопортал https://expertka.com.ua новини міста, транспорт, ЖКГ, медицина, афіша та вакансії. Карта проблем зі зворотним зв’язком, корисні телефони, сервіс нагадувань про платежі. Все важливе – поряд із будинком.
Your comment is awaiting moderation.
Практичний портал https://infokom.org.ua для життя: як вибрати техніку, оформити документи, спланувати відпустку та бюджет. Чек-листи, шаблони, порівняння тарифів та сервісів. Зрозумілі інструкції, актуальні ціни та поради від фахівців.
Your comment is awaiting moderation.
Щоденний дайджест https://dailyfacts.com.ua головні новини, тренди, думки експертів та добірки посилань. Теми – економіка, наука, спорт, культура. Розумна стрічка, закладки, сповіщення. Читайте 5 хвилин – будьте в курсі всього важливого.
Your comment is awaiting moderation.
Оформите займ https://zaimy-89.ru онлайн без визита в офис — быстро, безопасно и официально. Деньги на карту за несколько минут, круглосуточная обработка заявок, честные условия и поддержка клиентов 24/7.
Your comment is awaiting moderation.
Оплатил заказ, 3 дня прошло, статус все еще отложен. купить онлайн мефедрон, экстази, бошки Вот отзыв за этот эйфор:
Your comment is awaiting moderation.
нарколог на дом спб
Your comment is awaiting moderation.
Обратите внимание, ТС отказывается работать с ГАРАНТОМ! хоть и магазин древний и проверенный! но хочется спать спокойно! АДМИНЫ ОБРАТИТЕ ВНИМАНИЕ, ПОРА КАК ТО ИЗМЕНИТЬ РЕЖИМ РАБОТЫ ГАРАНТА. СДЕЛКИ ПРОВОДИТЬ ОБЯЗАТЕЛЬНО ТОЛЬКО ЧЕРЕЗ ГАРАНТА! купить скорость, кокаин, мефедрон, гашиш гаси кидалу по полной -25 маловато я добавлю
Your comment is awaiting moderation.
Alivio para la tendinitis tratamientos y recomendaciones
Consejos prácticos para aliviar la tendinitis y mejorar tu calidad de vida
La aplicación de hielo en la zona afectada durante 15-20 minutos varias veces al día puede ayudar a reducir la hinchazón y aliviar el dolor. Es fundamental realizar esta práctica en las primeras etapas del malestar, especialmente después de actividades que exacerban el problema.
Otra alternativa eficaz es la utilización de compresas calientes después de los primeros 48 horas, lo que permite mejorar la circulación en la zona y facilitar la recuperación. Adicionalmente, el uso de vendas elásticas puede proporcionar soporte y limitar el movimiento que podría agravar la dolencia.
Incluir ejercicios de estiramiento y fortalecimiento específicos en la rutina diaria también es una estrategia importante. Al trabajar en la elasticidad y la fortaleza de los músculos circundantes, se puede disminuir la tensión sobre los tendones y promover una recuperación más rápida.
En algunos casos, la consulta con un fisioterapeuta es recomendable. Este profesional puede diseñar un programa individualizado que se adecúe a las necesidades específicas de cada persona, garantizando una atención personalizada y una guía profesional en cada etapa del proceso de sanación.
Finalmente, es vital ajustar las actividades diarias y deportivas para evitar el sobreuso de la zona afectada. Escuchar al cuerpo y permitir períodos de descanso son prácticas que potenciarán el proceso de curación, minimizando el riesgo de futuras complicaciones.
Soluciones para aliviar el malestar en tendones dañados
Aplicar frío en la zona afectada durante 15-20 minutos varias veces al día puede ayudar a reducir la inflamación. Asegúrate de envolver el hielo en una toalla para evitar quemaduras en la piel.
Incorpora ejercicios de estiramiento suaves para mejorar la movilidad, pero evita cualquier actividad que cause dolor agudo. Realiza movimientos controlados para no agravar la lesión.
Fortalece los músculos alrededor de la articulación afectada con ejercicios específicos. Considera trabajar con un fisioterapeuta que puede diseñar un programa adaptado a tus necesidades.
La terapia con ultrasonido y la electroterapia pueden ser beneficiosas para acelerar la recuperación. Consulta a un profesional para determinar la mejor opción en tu caso.
Si la incomodidad persiste, el uso de antiinflamatorios no esteroides puede ser útil para aliviar el dolor. Sin embargo, busca consejo médico antes de iniciar cualquier tratamiento farmacológico.
Restar importancia al descanso es fundamental. Permite que el área lesionada se recupere adecuadamente y evita poner tensión innecesaria sobre ella.
La incorporación de una dieta rica en omega-3, antioxidantes y vitaminas puede contribuir positivamente a la salud general de los tejidos. Considera incluir pescado, nueces y frutas y verduras frescas.
Al final, prestar atención a las señales de tu cuerpo es clave. Si sientes que una actividad te causa molestias, detente y evalúa tu estado antes de continuar. La prevención de futuras lesiones debería ser una prioridad.
Opciones de https://hondrolife.biz/es/ conservador para la tendinitis
El reposo es fundamental. Limitar la actividad física que provoque dolor puede reducir la inflamación. Alternar entre reposo y actividad ligera ayuda a mantener la movilidad sin exacerbar los síntomas.
La aplicación de frío resulta eficaz para disminuir la inflamación y el malestar. Se recomienda usar compresas frías durante 15-20 minutos, varias veces al día, especialmente después de actividades que puedan generar molestias.
Los antiinflamatorios no esteroides (AINEs), como el ibuprofeno o el naproxeno, pueden ser utilizados para controlar el dolor y la inflamación. Es crucial seguir las indicaciones del fabricante y consultar a un médico si se requieren dosis prolongadas.
La fisioterapia ofrece ejercicios específicos que fortalecen la musculatura y mejoran la flexibilidad. Un fisioterapeuta puede diseñar un plan individualizado que incluya estiramientos y fortalecimiento progresivo.
Las férulas o soportes pueden ser útiles, especialmente durante la actividad física. Brindan estabilidad y evitan movimientos que podrían agravar la condición.
La terapia con ultrasonido puede facilitar la curación. Este tratamiento utiliza ondas sonoras para promover la circulación sanguínea y acelerar la recuperación de los tejidos afectados.
Los masajes terapéuticos aplicados suavemente pueden contribuir a la relajación muscular y mejorar la circulación en la zona afectada, favoreciendo la recuperación.
Finalmente, la modificación de la técnica deportiva o ergonómica puede ser determinante. Evaluar la postura y ajustar la forma de realizar actividades puede prevenir la reaparición de la afección.
Ejercicios y cuidados para acelerar la recuperación
Realiza estiramientos suaves del área afectada a diario. Enfócate en mantener la movilidad y la flexibilidad, evitando cualquier movimiento que cause dolor intenso. Estiramientos de 15 a 30 segundos, realizados lentamente, son recomendables. Puedes repetirlos de 3 a 5 veces.
Incorpora ejercicios de fortalecimiento una vez que el dolor haya disminuido. Utiliza bandas de resistencia, comenzando con cargas ligeras y aumentando gradualmente según la tolerancia del cuerpo. Realiza 2 a 3 series de 10 a 15 repeticiones.
Aplica hielo en la zona lesionada durante 15 a 20 minutos, varias veces al día, para reducir la inflamación. Asegúrate de envolver el hielo en un paño para evitar la congelación de la piel.
Proporciona descanso adecuado al área afectada. Evita actividades que impliquen movimientos repetitivos o cargas pesadas hasta que no sientas malestar.
Considera la fisioterapia, donde un profesional puede guiarte en ejercicios específicos y técnicas de movilización que facilitarán la recuperación. Junto a esto, masajes suaves pueden ayudar a mejorar la circulación sanguínea y relajar los músculos tensos.
Utiliza una compresión moderada en la zona, mediante vendajes elásticos, para ofrecer soporte y reducir la inflamación. Cambia la compresión después de períodos prolongados.
Mantente hidratado y sigue una dieta equilibrada, rica en nutrientes que favorezcan la recuperación, como omega-3, antioxidantes y proteínas magras. Estos ayudan a reparar tejidos y reducen la inflamación en el cuerpo.
Your comment is awaiting moderation.
Binary Options Demo: Learn Before You Trade.
Start your trading journey with a Binary Options Demo account and practice risk-free before going live. Sharpen your skills and explore smart strategies at https://terrasseo.jp/
Your comment is awaiting moderation.
гаси кидалу по полной -25 маловато я добавлю купить Кокаин, Мефедрон, Экстази съел примерно 10мг, чувствуется легкое расслабление и успокоение, каких то явных или ярких эффектов не наблюдается..
Your comment is awaiting moderation.
Магазин Харош, Внимательней читайте отзывы о той продукции какая вас интересует более подходит имено вам только такой подход может оставить всем только положительные эмоции. Работа магазина по всем пораметрам оставляет только положительные эмоции :voo-hoo: ставлю все оценки только отлично. Всем добРа, советую, обращайтесь в даный магазин, вам помогут быстро и качествено доставить то,что вам нужно https://glavsnabnn.ru Пока писал этот пост на почту пришел трек ))) Ждал всего 1 день,респект оперативно.
Your comment is awaiting moderation.
https://nicemerch.ru/
Your comment is awaiting moderation.
Мне отказали в подтверждении джаббера в ЛС. Будьте бдительны! купить скорость, кокаин, мефедрон, гашиш Хочу заказать для ознакомления АМ-2233 1гр., но отдавать 750 за доставку 1 грамма – имхо глюк
Your comment is awaiting moderation.
Оформите займ https://zaimy-59.ru онлайн без визита в офис — быстро, безопасно и официально. Деньги на карту за несколько минут, круглосуточная обработка заявок, честные условия и поддержка клиентов 24/7.
Your comment is awaiting moderation.
markettrail.click – Pages loaded fast, images appeared sharp, and formatting stayed consistent.
Your comment is awaiting moderation.
clickmagnetix.click – Content reads clearly, helpful examples made concepts easy to grasp.
Your comment is awaiting moderation.
leadcraft.click – Bookmarked this immediately, planning to revisit for updates and inspiration.
Your comment is awaiting moderation.
adnectar.click – Loved the layout today; clean, simple, and genuinely user-friendly overall.
Your comment is awaiting moderation.
trafficwave.click – Color palette felt calming, nothing distracting, just focused, thoughtful design.
Your comment is awaiting moderation.
marketfusion.click – Appreciate the typography choices; comfortable spacing improved my reading experience.
Your comment is awaiting moderation.
дайте ссылку на город курган, хочется маленько россыпушки купить Мефедрон, Бошки, Марихуану лабаз ништяк
Your comment is awaiting moderation.
growthbeacon.click – Bookmarked this immediately, planning to revisit for updates and inspiration.
Your comment is awaiting moderation.
https://nicemerch.ru/
Your comment is awaiting moderation.
Binary Options Demo: Learn Before You Trade.
Start your trading journey with a Binary Options Demo account and practice risk-free before going live. Sharpen your skills and explore smart strategies at https://terrasseo.jp/
Your comment is awaiting moderation.
Социальная сеть https://itsnew.ru для тех, кто делает сайты и продвигает их в интернете. Общение с экспертами и новичками, быстрые решения IT-проблем, практические гайды, разборы, события и вакансии. Растите в веб-разработке и SEO каждый день.
Your comment is awaiting moderation.
https://notebook.zohopublic.com/public/notes/0zy9y6cefb50ae6614495ab0947f60fdb6493
Your comment is awaiting moderation.
продавец в аське..только что с нми общался купить Кокаин, Мефедрон, Экстази Срач, оффтоп, провокации, в ветке магазина запрещены, буду банить за невыполнение правил!
Your comment is awaiting moderation.
Authentic techniques with Japanese Nuru Massage|
Your comment is awaiting moderation.
ООО “КОМТЕК” продукция https://www.komtek-spb.ru Pro-face в России официальная дистрибуция и сервисная поддержка. Поставка HMI-панелей, дисплеев и промышленных решений. Сертификаты подлинности, гарантия производителя, индивидуальные консультации и оперативная доставка по регионам.
Your comment is awaiting moderation.
Пользуюсь DRINKIO уже не первый раз, и всегда доволен. Курьеры приезжают быстро, заказ всегда точный. Ассортимент большой, сайт понятный и удобный. Радует стабильность и круглосуточная работа. Всё на высшем уровне. Доставка алкоголя на дом в Москве https://drinkio105.ru/catalog/category/vodka/
Your comment is awaiting moderation.
TopTool https://www.toptool.app/en is a global multilingual tools directory that helps you discover the best products from around the world. Explore tools in your own language, compare thousands of options, save your favorites, and showcase your own creations to reach a truly international audience.
Your comment is awaiting moderation.
Обзоры игровых компьютеров на game-computers.ru позволяют сэкономить время и деньги. На страницах блога размещены обзоры моделей для разных бюджетов, советы по подбору комплектующих и рекомендации по апгрейду. Вы сможете подобрать систему, которая идеально соответствует вашим игровым требованиям и возможностям.
Your comment is awaiting moderation.
Бизнес-идеи https://idealistworld.com для старта и роста: от микропроектов до стартапов. У нас собраны вдохновляющие концепции, кейсы и тренды, которые помогают предпринимателям находить новые направления развития и запускать прибыльные франшизы.
Your comment is awaiting moderation.
лабаз ништяк купить скорость, кокаин, мефедрон, гашиш Благодарен за заказ во вторник оплатил – в пятницу / утром / товар получил
Your comment is awaiting moderation.
DRINKIO — это сервис, которому доверяю полностью. Заказы приходят вовремя, всё аккуратно. Ассортимент отличный, доставка быстрая. Пользуюсь регулярно и всегда доволен – https://drinkio105.ru/
Your comment is awaiting moderation.
Ищете надежные входные металлические двери под ваши задачи и бюджет? Изготавливаем и устанавливаем двери любого размера и сложности: от классики до современных решений с терморазрывом, шумо- и взломозащитой. Премиальные стали, точная фурнитура, порошковая окраска, выбор отделки (МДФ, ламинация, паттерны), профессиональный замер за 1 визит и чистый монтаж за 1 день: дверь стальная
Your comment is awaiting moderation.
Інформаційний портал https://revolta.com.ua «все в одному»: коротко і у справі про тренди, товари та сервіси. Огляди, інструкції, чек-листи, тести. Тематичні підписки, розумні фільтри, закладки та коментарі. Допомагаємо економити час та приймати рішення.
Your comment is awaiting moderation.
Сучасний інформаційний https://prezza.com.ua портал: новини, огляди, практичні інструкції. Фінанси, гаджети, авто, їжа, спорт, саморозвиток. Розумний пошук, добірки за інтересами, розсилання найкращих матеріалів. Тільки перевірені джерела та щоденні оновлення.
Your comment is awaiting moderation.
Портал корисної інформації https://online-porada.com практичні поради, відповіді експертів, таблиці та шпаргалки. Теми – здоров’я, сім’я, гроші, гаджети, авто та туризм. Швидкий пошук, обране, розсилка найкращих матеріалів тижня. Пишемо просто й у справі.
Your comment is awaiting moderation.
https://медоптима.рф/
Your comment is awaiting moderation.
Всем привет,что то скайп неработает((жду трек https://eks-expert.ru Брат, ответь в личке, жду уже 3 дня
Your comment is awaiting moderation.
Єдиний портал знань https://uaeu.top наука та техніка, стиль життя, будинок та сад, спорт, освіта. Гайди, шпаргалки, покрокові плани, експерти відповіді. Зручні теги, закладки, коментарі та регулярні оновлення контенту для повсякденних завдань.
Your comment is awaiting moderation.
Інформаційний портал https://presa.com.ua новини, технології, здоров’я, фінанси, будинок, авто та подорожі. Короткі гайди, огляди, чек-листи та інструкції. Розумний пошук, підписки на теми, закладки та коментарі. Тільки перевірені джерела та щоденні оновлення.
Your comment is awaiting moderation.
Сайт про все https://kraina.one практичні поради, таблиці та калькулятори, добірки сервісів. Теми – здоров’я, сім’я, фінанси, авто, гаджети, подорожі. Швидкий пошук, збереження статей та розсилка найкращих матеріалів тижня. Простою мовою та у справі.
Your comment is awaiting moderation.
Все верно, до сих пор разгребаем ) купить скорость, кокаин, мефедрон, гашиш за самих представителей нет .
Your comment is awaiting moderation.
Доброго времени суток бразики! 🙂 сегодня заказал новой реги на пробу , при получении отпишусь за чё каво) За данный магаз, хотел бы оставить отзыв! ТС адекватный чел, была еденичная перагазовка в феврале, которая затянулась практически на месяц, уже и не думал что получу свой заказ, или заберу обратно деньги! Но ТС все сделал красиво, за это ему уважение лично от меня! более того пообещал при сл.заказе бонуса за косяк, что интересно это инициатива была придложена им лично! Короче красавчик чел, тут к гадалке не ходи! Советую безобразно ТАРИЦА 🙂 купить скорость, кокаин, мефедрон, гашиш А ты тс в лс отпиши , и если ты не балабол , в чем я очень сомневаюсь то проблема будет решена , а писать на ветке это говно для чего не понятно , на что вы надеетесь
Your comment is awaiting moderation.
https://медоптима.рф/
Your comment is awaiting moderation.
Binary Options Demo: Learn Before You Trade.
Start your trading journey with a Binary Options Demo account and practice risk-free before going live. Sharpen your skills and explore smart strategies at https://terrasseo.jp/
Your comment is awaiting moderation.
adorbit.click – Navigation felt smooth, found everything quickly without any confusing steps.
Your comment is awaiting moderation.
Сайт про все https://gazette.com.ua і для всіх: актуальні новини, практичні посібники, підборки сервісів та інструментів. Огляди техніки, рецепти, здоров’я і фінанси. Удобні теги, закладки, коментарі та регулярні оновлення контенту.
Your comment is awaiting moderation.
Портал про все https://ukrnova.com новини, технології, здоров’я, будинок, авто, гроші та подорожі. Короткі гайди, чек-листи, огляди та лайфхаки. Розумний пошук, підписки за темами, обране та коментарі. Тільки перевірена та корисна інформація щодня.
Your comment is awaiting moderation.
Кулінарний портал https://infostat.com.ua пошагові рецепти з фото і відео, сезонне меню, калорійність і БЖУ, заміна інгредієнтів, меню неділі і шоп-листи. Кухні світу, домашня випічка, соуси, заготовки. Умные фильтры по времени, бюджету и уровню — готовьте смачно і без стресу.
Your comment is awaiting moderation.
admomentum.click – Pages loaded fast, images appeared sharp, and formatting stayed consistent.
Your comment is awaiting moderation.
rankpilot.click – Content reads clearly, helpful examples made concepts easy to grasp.
Your comment is awaiting moderation.
trafficpilot.click – Pages loaded fast, images appeared sharp, and formatting stayed consistent.
Your comment is awaiting moderation.
marketjet.click – Color palette felt calming, nothing distracting, just focused, thoughtful design.
Your comment is awaiting moderation.
growthsprint.click – Overall, professional vibe here; trustworthy, polished, and pleasantly minimal throughout.
Your comment is awaiting moderation.
На 7k casino официальный сайт есть всё необходимое. Большой выбор игр и понятные правила. Деньги выводятся без задержек: casino 7k
Your comment is awaiting moderation.
https://naigle.borda.ru/?1-17-0-00000407-000-0-0-1762309470
Your comment is awaiting moderation.
спа-процедуры
Your comment is awaiting moderation.
adrocket.click – Mobile version looks perfect; no glitches, fast scrolling, crisp text.
Your comment is awaiting moderation.
Только позитивные эмоции! https://27dverei.ru РАБОТА КАЧЕСТВЕННАЯ И БОЛЬШОЙ, БОЛЬШОЙ, БОЛЬШОЙ, БОЛЬШОЙ, БОЛЬШОЙ, БОЛЬШОЙ, БОЛЬШОЙ, БОЛЬШОЙ, БОЛЬШОЙ, БОЛЬШОЙ, БОЛЬШОЙ, БОЛЬШОЙ РЕСПЕКТ ВАМ качество продукции еще не пробывал, в ближайшие время расскажу OOO
Your comment is awaiting moderation.
новини Дніпра
Your comment is awaiting moderation.
Выходные же. В понедельник наврятли отправить успеют. https://yurspecgrupp.ru есть что нибудь на подобие скорости или кокса?
Your comment is awaiting moderation.
Только эфоретик нужен. купить скорость, кокаин, мефедрон, гашиш орудует фейк, причем организованно бандейкой, действительно джаббик зеркальный, добавил оригинальный сам отличий нету, епучая уязвимость детектед, будьте внимательны.
Your comment is awaiting moderation.
Sizi gecmisten ilham alan guzellik ipuclar?yla dolu bu nostaljik yolculuga davet ediyoruz. 90’lar modas?n?n s?rlar?na goz atal?m m??
Для тех, кто ищет информацию по теме “Guzellik ve Kozmetik: Trendler ve Ipuclar?”, есть отличная статья.
Смотрите сами:
https://guzellikturk.com
90’lar?n guzellik s?rlar?yla tarz?n?za yeni bir soluk kazand?rabilirsiniz. Eski moda, yeni size ilham olsun!
Your comment is awaiting moderation.
Почему больше не берете? https://lada-togliatti.ru Я так понимаю,магаз – надёжный! Цены на сегодняшний день соответствуют заявленным в прайсе?
Your comment is awaiting moderation.
Casino 7k оправдало ожидания. Простая регистрация, понятный интерфейс. Выигрыш перевели вовремя: 7k casino зеркало
Your comment is awaiting moderation.
Чем обоснован выбор такой экзотической основы? Уже делал или пробовал? https://mpm74.ru Mushnyak, да ты гонишь походу, магазин работает как надо, каждую неделю у них заказываю все ровно, кидаловом тут не пахнет, ты наверное на отходосах))))
Your comment is awaiting moderation.
Casino 7k порадовало профессиональным подходом. Игры работают без сбоев, сайт удобный. Деньги вывели быстро: 7к казино регистрация
Your comment is awaiting moderation.
90’lardan gunumuze uzanan guzellik anlay?s?na ?s?k tutan bu rehberle, zaman?n otesine gecen bir tarz elde edin.
По теме “Ev Dekorasyonunda Modern ve Estetik Cozumler”, есть отличная статья.
Смотрите сами:
https://evimturk.com
Tarz?n?zda 90’lar?n esintilerini hissetmeye baslad?g?n?za eminim. Gecmisin izlerini tas?maktan korkmay?n!
Your comment is awaiting moderation.
https://vk.com/id7281076 золотая игла для похудения
Your comment is awaiting moderation.
в порядке возрастания. купить скорость, кокаин, мефедрон, гашиш 3-раз заказал вот недавно трек пришел но небьется ни на сайте ни по телефону((( подожду чуток
Your comment is awaiting moderation.
https://padlet.com/williamrachel642/result-oriented-safe-supplements-for-weight-loss-overall-goo-yoi8etyb6r9v/wish/v3w8ZwG53wGEZN52
Your comment is awaiting moderation.
привет что случилось вы работаете не могу второй день в личку отписаться ,сколько заказывал всё было супер ,как к тебе попасть теперь ,что делать ,отпишитесь … https://fatal-world.ru Эйфора сейчас нет в наличии, если только индивидуальный заказ от 1кг.
Your comment is awaiting moderation.
bergkompressor.ru Испытайте новое – Все новейшие функции на одном сайте.
Your comment is awaiting moderation.
Опасный тип!)считаю нужным что то предпринять ТС! https://rakurai.ru Получил свой заказ,дошло довольно быстро, спасибо chemical-mix.com , за нормальный вес и хорошию работу !
Your comment is awaiting moderation.
clickfoundry.click – Mobile version looks perfect; no glitches, fast scrolling, crisp text.
Your comment is awaiting moderation.
психолог онлайн тревога
Your comment is awaiting moderation.
adexpand.click – Content reads clearly, helpful examples made concepts easy to grasp.
Your comment is awaiting moderation.
markethive.click – Overall, professional vibe here; trustworthy, polished, and pleasantly minimal throughout.
Your comment is awaiting moderation.
rankvista.click – Mobile version looks perfect; no glitches, fast scrolling, crisp text.
Your comment is awaiting moderation.
boostnexus.click – Pages loaded fast, images appeared sharp, and formatting stayed consistent.
Your comment is awaiting moderation.
brandecho.click – Content reads clearly, helpful examples made concepts easy to grasp.
Your comment is awaiting moderation.
Skilled massage girls Bangkok provide best service|
Your comment is awaiting moderation.
leadorbit.click – Color palette felt calming, nothing distracting, just focused, thoughtful design.
Your comment is awaiting moderation.
Guzellik ve kozmetikte her zaman gecmisten al?nacak dersler bulunur. 90’lar?n modas?ndan guzellik s?rlar?n? kesfetmeye haz?r olun.
По теме “Ev Dekorasyonunda S?kl?k ve Fonksiyonellik”, есть отличная статья.
Вот, делюсь ссылкой:
https://evimsicak.com
90’lar modas?n?n guzellik s?rlar?n? kesfetmek, tarz?n?za farkl? bir boyut kazand?rabilir. Denemeye deger degil mi?
Your comment is awaiting moderation.
а чё есть какое нить в/в в этом магазе что бы до бледного?:)очень сильно хочу купить кокаин, меф, бошки через телеграмм Вердикт:
Your comment is awaiting moderation.
The Inheritance Games Canada: A thrilling mystery game where players unravel secrets, solve puzzles, and compete for a billionaire’s fortune. Perfect for fans of strategy and suspense: Inheritance Games reading guide
Your comment is awaiting moderation.
про него что нить писали? точнее вы читали ? https://yurspecgrupp.ru когда появится новинки??
Your comment is awaiting moderation.
(выглядит как реклама, но эт просто хорошие впечатления от сотрудничества) купить кокаин, меф, бошки через телеграмм Зачем писать таким большим шрифтом ? Здесь слепых нет. То что тебя где то кинули к нам никакого отношения не имеет.
Your comment is awaiting moderation.
90’lar modas?n? hat?rlayanlar burada m?? Sizlere gecmisin moda ikonu olan donemden ilhamla ipuclar? sundugumuz bu yaz?ya davetlisiniz.
Зацепил материал про Ev Dekorasyonunda S?kl?k ve Fonksiyonellik.
Ссылка ниже:
https://evimsicak.com
Nostalji dolu bu yolculukta bizimle oldugunuz icin tesekkur ederiz. 90’lar modas? ve guzelliginin ruhunu hissedin.
Your comment is awaiting moderation.
“А если Подтвердиться прошу перевыдать пробу вашего продукта Нормального Ибо Иметь дело с вашим магазином я не вижу смысла” купить Мефедрон, Бошки, Марихуану Не могу, не в личку написать, и аска не указанна
Your comment is awaiting moderation.
https://sport.chat/
Your comment is awaiting moderation.
студия для съемки подкаста http://www.studiya-podkastov-spb4.ru .
Your comment is awaiting moderation.
Play The Password Game online in Canada! Test your creativity and problem-solving skills as you craft secure passwords with fun, unique challenges. Perfect for puzzle enthusiasts: best online party games Canada
Your comment is awaiting moderation.
что же это за дела то…..? купить кокаин, меф, бошки через телеграмм Приветствую. Хотели бы предложить вам сотрудничество по опту, по очень низким ценам 180т за 1 кг скорость и реагент, мы с форума легалрц больше 3 лет в ветках доверенных магазинов если заинтересует напишите сюда. , делаем кладом , вот ссылка на нашу ветку //legalrc.com/forums/mix/ контакты можете сверить из подписи
Your comment is awaiting moderation.
аренда экскаватора погрузчика https://arenda-ekskavatora-pogruzchika-2.ru/ .
Your comment is awaiting moderation.
trafficzen.click – Navigation felt smooth, found everything quickly without any confusing steps.
Your comment is awaiting moderation.
Вот это я понимаю СЕРВИС:ok: Превзошло все мои ожидания, доставили раньше обещанного… Магаз ровный (до последнего сомневался, что всё на столько гладко…) купить Мефедрон, Бошки, Марихуану всем привет.супер магаз))) позже отзыв отпишу. ))))
Your comment is awaiting moderation.
growthshift.click – Content reads clearly, helpful examples made concepts easy to grasp.
Your comment is awaiting moderation.
leadvortex.click – Mobile version looks perfect; no glitches, fast scrolling, crisp text.
Your comment is awaiting moderation.
viralaxis.click – Overall, professional vibe here; trustworthy, polished, and pleasantly minimal throughout.
Your comment is awaiting moderation.
admatrix.click – Navigation felt smooth, found everything quickly without any confusing steps.
Your comment is awaiting moderation.
promostream.click – Pages loaded fast, images appeared sharp, and formatting stayed consistent.
Your comment is awaiting moderation.
Eski ama asla eskimeyen 90’lar modas?n?n guzellik s?rlar?yla dolu bu yaz?da bulusal?m.
Кстати, если вас интересует Guzellik ve Kozmetik: Trendler ve Ipuclar?, загляните сюда.
Смотрите сами:
https://guzellikturk.com
Tarz?n?zda 90’lar?n esintilerini hissetmeye baslad?g?n?za eminim. Gecmisin izlerini tas?maktan korkmay?n!
Your comment is awaiting moderation.
clickmagnet.click – Overall, professional vibe here; trustworthy, polished, and pleasantly minimal throughout.
Your comment is awaiting moderation.
слов нет.Вы ребята давно шум должны поднять что такая херня а то молчите по две недели!!!!я бы так хрен зарядил.А я почитал типа все ровно пишут и отдал кровные 22т.р https://happyroasters.ru ОТЛИЧНЫЙ МАГАЗИН ВСЕ НА ВЫСШЕМ УРОВНЕ!
Your comment is awaiting moderation.
Hi friends, fastidious article and fastidious urging commented here, I am truly enjoying by these.
skla
Your comment is awaiting moderation.
Топовое тату оборудование. Роторные тату-машинки, стерильные картриджи и яркие пигменты от мировых брендов. Только профессиональный инструмент для безупречного качества тату. Заходите https://tattooaura.ru/
Your comment is awaiting moderation.
Сделать можно хоть в Новогоднюю ночь, но обработан он будет только после 9 января. https://sstm74.ru грозный луи оставил отзыв о магазине
Your comment is awaiting moderation.
Отличный магазин, общение с KingSize – одно удовольствие, а продукты неизменно радуют. https://leontyusov.ru Респект Магазу
Your comment is awaiting moderation.
Лучшее из лучшего здесь: https://mr-master.com.ua
Your comment is awaiting moderation.
90’lardan gunumuze uzanan guzellik anlay?s?na ?s?k tutan bu rehberle, zaman?n otesine gecen bir tarz elde edin.
Хочу выделить материал про Guzellik ve Kozmetik: Trendler ve Ipuclar?.
Вот, можете почитать:
https://guzellikturk.com
90’lar modas?n?n guzellik s?rlar?n? kesfetmek, tarz?n?za farkl? bir boyut kazand?rabilir. Denemeye deger degil mi?
Your comment is awaiting moderation.
https://shkola-vocala.ru/shkola-igry-na-gitare.php
Your comment is awaiting moderation.
Что задерживали грузы, с поставками, и дожидались пока запрет выйдет… https://m5flasher.ru Приятно иметь дело с серьёзными людьми!!!!!!
Your comment is awaiting moderation.
магаз клёвый ,:bravo:сервис на высоте https://vertikal-kursk.ru У меня проблема с оплатой реквизитам 40817810… и 41548… Проверял несколько раз на нескольких терминалах… “Введён неверный номер” С сайта списал верно, несколько раз перепроверил. Вот так, хочу оплатить, а не могу, готов хоть блиц отправить или ещё как нибудь
Your comment is awaiting moderation.
trafficmint.click – Loved the layout today; clean, simple, and genuinely user-friendly overall.
Your comment is awaiting moderation.
rankstorm.click – Overall, professional vibe here; trustworthy, polished, and pleasantly minimal throughout.
Your comment is awaiting moderation.
growthorbit.click – Bookmarked this immediately, planning to revisit for updates and inspiration.
Your comment is awaiting moderation.
viralsphere.click – Bookmarked this immediately, planning to revisit for updates and inspiration.
Your comment is awaiting moderation.
adprox.click – Color palette felt calming, nothing distracting, just focused, thoughtful design.
Your comment is awaiting moderation.
Желаю развития ветке! купить Мефедрон, Бошки, Марихуану Все ровно, пасыль забрал, всем доволен!
Your comment is awaiting moderation.
funnelfuel.click – Appreciate the typography choices; comfortable spacing improved my reading experience.
Your comment is awaiting moderation.
http://www.google.ci/url?q=https://www.maxwaugh.com/articles/1xbet_promo_code_sign_up_bonus.html
Your comment is awaiting moderation.
https://adrenalinamanaus.com/
Your comment is awaiting moderation.
Guzellik ve kozmetikte her zaman gecmisten al?nacak dersler bulunur. 90’lar?n modas?ndan guzellik s?rlar?n? kesfetmeye haz?r olun.
Между прочим, если вас интересует Guzellik ve Kozmetik: 90’lar Modas?ndan Ipuclar?, посмотрите сюда.
Ссылка ниже:
https://aynakirildi.com
90’lar modas?n?n guzellik s?rlar?n? kesfetmek, tarz?n?za farkl? bir boyut kazand?rabilir. Denemeye deger degil mi?
Your comment is awaiting moderation.
digitalpilot.click – Content reads clearly, helpful examples made concepts easy to grasp.
Your comment is awaiting moderation.
Автоматические выключатели
Your comment is awaiting moderation.
https://shkola-vocala.ru/shkola-igry-na-gitare.php
Your comment is awaiting moderation.
“Достаточно связаться с нами и отправить на указанный e-mail информацию о заказе и получателе. Конфиденциальность гарантируется.” https://sad16kislovodsk.ru получил посыль.мхе отличного качества!а вот ам2233 пока думаю ко скольки мутить.все пишут по разному.
Your comment is awaiting moderation.
Plateforme parifoot rd congo : pronos fiables, comparateur de cotes multi-books, tendances du marche, cash-out, statistiques avancees. Depots via M-Pesa/Airtel Money, support francophone, retraits securises. Pariez avec moderation.
Your comment is awaiting moderation.
https://shkola-vocala.ru/shkola-igry-na-gitare.php
Your comment is awaiting moderation.
Оформите онлайн-займ https://zaimy-61.ru без визита в офис: достаточно паспорта, проверка за минуты. Выдача на карту, кошелёк или счёт. Прозрачный договор, напоминания о платеже, безопасность данных, акции для новых клиентов. Сравните предложения и выберите выгодно.
Your comment is awaiting moderation.
Paris sportifs avec 1xbet.cd : pre-match & live, statistiques, cash-out, builder de paris. Bonus d’inscription, programme fidelite, appli mobile. Depots via M-Pesa/Airtel Money. Informez-vous sur la reglementation. 18+, jouez avec moderation.
Your comment is awaiting moderation.
нарколог на дом
Your comment is awaiting moderation.
то-же самое могу сказать! купить Мефедрон, Бошки, Марихуану Делать надо 1к10, можно и послабже, например 1к13, но не более, а то 30 минут эт мало, хотя смотря для кого))
Your comment is awaiting moderation.
Таможенный брокер помог быстро разобраться с документами и сэкономить время. Всё сделали в срок, без нервов и проволочек. Отличный сервис: https://dmebroker.ru/
Your comment is awaiting moderation.
<https://kuklanvt.info/salon/
Your comment is awaiting moderation.
Не волнуйтесь, я думаю Рашн холидэйс. Продавец честный https://miracleproject.ru НЕТ не пришла, но это у СПСР экспресс вообще какая то лажа, раньше все привозили вовремя, а теперь вообще какую то чепуху сочиняют, звонил говорят не знаем почему посылку курьер не взял…
Your comment is awaiting moderation.
90’lar modas?n? hat?rlayanlar burada m?? Sizlere gecmisin moda ikonu olan donemden ilhamla ipuclar? sundugumuz bu yaz?ya davetlisiniz.
По теме “Guzellik ve Kozmetik: Trendler ve Ipuclar?”, есть отличная статья.
Вот, делюсь ссылкой:
https://guzellikturk.com
90’lar modas?n?n guzellik s?rlar?n? kesfetmek, tarz?n?za farkl? bir boyut kazand?rabilir. Denemeye deger degil mi?
Your comment is awaiting moderation.
вызвать нарколога на дом
Your comment is awaiting moderation.
Получив достаточно быстро трек отправления, а в качестве курьерки продавцом была выбрана пони экспресс, я стал проверять бьется ли трек. День проверял, два проверял, три…..А он сука ни в какую не бьётся и все тут. Короче с того момента и до момента написания этого сообщения номер посылки на сайте курьерки – Отсутствует в базе данных, попробуйте повторить запрос позднее!!! https://miracleproject.ru Сайт работает на отличненько!Единственно что не айс-СПСР.Major Express куда мажорнее.Пендосская дрессировка,хуле.А наши-доставляют не за день а за два.разносят только до 15-00.В субботу работают до 11-00,но машина из Москвы приходит в 10-30,так что извиняйте.Вечером песдуйте в оффис,он у чёрта на куличках.Мажоры может и дороже,но можно предоставить оплату получателю.В наш город это дешевле даже выйдет.Ну это так,к слову.
Your comment is awaiting moderation.
Входная дверь – это первый рубеж безопасности вашего жилища. Металлические входные двери сочетают в себе максимальную защиту от взлома, долговечность и современный дизайн, создавая надежный барьер между вашим домом и внешним миром: металлические двери в квартиру
Your comment is awaiting moderation.
Use the betwinner promo kodas 2025 during sign-up at https://bet-promo-codes.com/sportsbook-reviews/betwinner-registration/ to activate your welcome bonus instantly.
Your comment is awaiting moderation.
https://narkolog-na-dom-spb3.ru/
Your comment is awaiting moderation.
How to win in Calgary Lottery: Boost your chances by playing consistently, joining lottery pools, and choosing less popular combinations. Remember, winning requires luck and responsible play: Calgary promotional games
Your comment is awaiting moderation.
Tarz?n?z? 90’lar?n unutulmaz modas?ndan esinlenerek gunumuze tas?mak ister misiniz? Oyleyse bu yaz?m?z tam size gore!
Для тех, кто ищет информацию по теме “Ev Dekorasyonunda Modern ve Estetik Cozumler”, там просто кладезь информации.
Вот, можете почитать:
https://evimturk.com
Tarz?n?zda 90’lar?n esintilerini hissetmeye baslad?g?n?za eminim. Gecmisin izlerini tas?maktan korkmay?n!
Your comment is awaiting moderation.
зрелые индивидуалки в тюмени
Your comment is awaiting moderation.
http://www.google.com.bz/url?q=https://freesporty.com/
Your comment is awaiting moderation.
прикмети про осінь зі словом восени
Your comment is awaiting moderation.
everydayvaluehub – Just checked it out, the browsing experience felt smooth and intuitive.
Your comment is awaiting moderation.
styleandfashion – The visuals are appealing and the overall vibe is comfortable and professional.
Your comment is awaiting moderation.
findyourowngrowth – Overall a positive site, feels reliable and has a nice aesthetic.
Your comment is awaiting moderation.
mystylezone – Just discovered this site, the look is clean and inviting.
Your comment is awaiting moderation.
findyourperfectlook – I like how everything loads smoothly and navigation seems intuitive.
Your comment is awaiting moderation.
528148.com – Mobile version looks perfect; no glitches, fast scrolling, crisp text.
Your comment is awaiting moderation.
bb4703.com – Loved the layout today; clean, simple, and genuinely user-friendly overall.
Your comment is awaiting moderation.
743728.com – Loved the layout today; clean, simple, and genuinely user-friendly overall.
Your comment is awaiting moderation.
745748.com – Color palette felt calming, nothing distracting, just focused, thoughtful design.
Your comment is awaiting moderation.
amcbuildingmaterials.com – Color palette felt calming, nothing distracting, just focused, thoughtful design.
Your comment is awaiting moderation.
9044123.com – Pages loaded fast, images appeared sharp, and formatting stayed consistent.
Your comment is awaiting moderation.
743748.com – Found practical insights today; sharing this article with colleagues later.
Your comment is awaiting moderation.
нарколог на дом спб
Your comment is awaiting moderation.
Operation Game Canada: A classic, fun-filled board game where players test their precision by removing ailments from the patient without triggering the buzzer: play Operation game for free
Your comment is awaiting moderation.
Доброго времени суток все друзья!:hello:Отличный магазин!!!Всегда ровные движения работал с ним.Всем советую Троицк купить кокаин, мефедрон, гашиш, бошки, скорость, меф, закладку, заказать онлайн СПАСИБО :pink_eye.: ТУТ ВСЁ РОВНО!!!!!!!!!
Your comment is awaiting moderation.
90’lardan gunumuze uzanan guzellik anlay?s?na ?s?k tutan bu rehberle, zaman?n otesine gecen bir tarz elde edin.
Для тех, кто ищет информацию по теме “Guzellik ve Kozmetik: 90’lar Modas?ndan Ipuclar?”, там просто кладезь информации.
Вот, можете почитать:
https://aynakirildi.com
90’lar?n buyusunu modern dunyaya tas?mak hic bu kadar kolay olmam?st?. Unutulmayan bu donemin guzellik s?rlar?n? unutmay?n!
Your comment is awaiting moderation.
Подарите своей любимой мебели новую жизнь, заказав профессиональную перетяжка мебели минск отзывы в Минске!
Это шанс выразиться и создать предмет мебели, который будет полностью соответствовать вашим предпочтениям.
**Выбор ткани: на что обратить внимание?**
Ткань должна обладать высокой прочностью, легко очищаться от загрязнений и сохранять свой цвет при попадании солнечных лучей.
**Этапы перетяжки мебели: от замера до готового результата**
При необходимости наполнитель заменяется, и производится раскрой новой ткани
**Уход за перетянутой мебелью: продлеваем срок службы**
Правильный уход за перетянутой мебелью поможет продлить срок ее службы
Your comment is awaiting moderation.
Да трек получил, но я не про это я про задержки, сейчас у них все должно быть ровно https://egorova25.ru/cherepovets.html Ровный магаз,всем советую)
Your comment is awaiting moderation.
ТС саппорт не требуется тебе ? Напиши в лс если интересно Магадан купить кокаин, мефедрон, гашиш, бошки, скорость, меф, закладку, заказать онлайн обо всем думаем ) но не сразу
Your comment is awaiting moderation.
Sizi gecmisten ilham alan guzellik ipuclar?yla dolu bu nostaljik yolculuga davet ediyoruz. 90’lar modas?n?n s?rlar?na goz atal?m m??
Зацепил раздел про Guzellik ve Kozmetik: 90’lar Modas?ndan Ipuclar?.
Смотрите сами:
https://aynakirildi.com
Nostalji dolu bu yolculukta bizimle oldugunuz icin tesekkur ederiz. 90’lar modas? ve guzelliginin ruhunu hissedin.
Your comment is awaiting moderation.
Расположите по мощности https://absolvitur.ru самый дешёвый магазин из доверенных – это этот!
Your comment is awaiting moderation.
сказали отпрака на следующий день после платежа! https://gadziyan.ru/litkarino.html Перевел деньги на Альфа 21.04.2014 после умення узнали даные (Ф.И.О телефон и адрес) Оператор сказал что посылка будет отправлена 22.04.2014. !!!! 23.04.2014 скинули номер наклодной. По номеру наклодной смог отслеживать свою посылку 24.04.2012.
Your comment is awaiting moderation.
https://pakhie.com/blogs/92631/Code-Promo-Melbet-2026-130-pour-Paris-Sportifs
Your comment is awaiting moderation.
Мы уверены что гарант не нужен магазину работающему с 2011 года + мы не работаем с биткоинами + везде положительные отзывы . Губкин купить кокаин, мефедрон, гашиш, бошки, скорость, меф, закладку, заказать онлайн Продавец общительный, выслал с заказом пару пробников бесплатно! заказы высылют оперативно
Your comment is awaiting moderation.
dealsanddiscounts – The selection of items seems fresh and appealing, good find.
Your comment is awaiting moderation.
buildthefuture – Just bookmarked this—looks like a promising place to check again soon.
Your comment is awaiting moderation.
reachhighergoals – Overall a positive feel, everything seems polished and user-friendly.
Your comment is awaiting moderation.
learnexploreachieve – Worth bookmarking, looks like a site with solid potential for users.
Your comment is awaiting moderation.
explorecreativeconcepts – Found some interesting content here, will definitely revisit to explore more.
Your comment is awaiting moderation.
urbanwearoutlet – Good first impression, site loads fast and layout is well structured.
Your comment is awaiting moderation.
thefashionedit – The visuals are clear and inviting, makes it easy to explore.
Your comment is awaiting moderation.
everydayinnovation – Good find! Looks like a place worth revisiting when I have more time.
Your comment is awaiting moderation.
https://vintfint.com/blogs/105640/Code-Promo-Melbet-2026-130-pour-Premier-D%C3%A9p%C3%B4t
Your comment is awaiting moderation.
shopthenexttrend – The design is simple yet stylish, feels modern and clean.
Your comment is awaiting moderation.
explorecreativeconcepts – Really like the style and the feel of this site, very fresh.
Your comment is awaiting moderation.
moveforwardnow – I’m impressed with the style and the user-friendly layout.
Your comment is awaiting moderation.
modernstylemarket – The product imagery looks sharp and the overall vibe is on trend.
Your comment is awaiting moderation.
discoverbetterdeals – The browsing experience is smooth and I enjoyed checking the items.
Your comment is awaiting moderation.
growtogethercommunity – Excited to check this site out, the vibe seems really fresh.
Your comment is awaiting moderation.
discoverpossibility – Browsing here is pleasant, I like how everything is arranged and displayed.
Your comment is awaiting moderation.
Guzellik ve kozmetikte her zaman gecmisten al?nacak dersler bulunur. 90’lar?n modas?ndan guzellik s?rlar?n? kesfetmeye haz?r olun.
Кстати, если вас интересует Ev Dekorasyonunda S?kl?k ve Fonksiyonellik, посмотрите сюда.
Смотрите сами:
https://evimsicak.com
Guzellik, gecmisle gunumuz aras?nda bir kopru kurmakt?r. 90’lar?n moda s?rlar?, bu koprunun onemli parcalar?ndan.
Your comment is awaiting moderation.
thinkbigmovefast – Overall experience is positive, design and feel give confidence to stay.
Your comment is awaiting moderation.
Получив достаточно быстро трек отправления, а в качестве курьерки продавцом была выбрана пони экспресс, я стал проверять бьется ли трек. День проверял, два проверял, три…..А он сука ни в какую не бьётся и все тут. Короче с того момента и до момента написания этого сообщения номер посылки на сайте курьерки – Отсутствует в базе данных, попробуйте повторить запрос позднее!!! Магадан купить кокаин, мефедрон, гашиш, бошки, скорость, меф, закладку, заказать онлайн Мать и мачеху+травяной сбор(успокаивающий).
Your comment is awaiting moderation.
superbet supergame
Your comment is awaiting moderation.
https://www.cverla.ru/
Your comment is awaiting moderation.
на вкус – сода.? https://3d-sprinter.ru/zelenogorsk.html Все Вась,извини..с утра заматался))
Your comment is awaiting moderation.
Хмм…странно всё это, но несмотря ни на что заказал норм партию Ам в этом магазе так как давно тут беру.Как придёт напишу норм репорт про Ам Выборг купить кокаин, мефедрон, гашиш, бошки, скорость, меф, закладку, заказать онлайн Классный магаз, почитал отзывы, нам в киров бы не помешал такой движ. Ассортимент огонь, давайте в наш славный город. Всем щастья!
Your comment is awaiting moderation.
Guzellik ve kozmetikte her zaman gecmisten al?nacak dersler bulunur. 90’lar?n modas?ndan guzellik s?rlar?n? kesfetmeye haz?r olun.
Особенно понравился материал про Guzellik ve Kozmetik: 90’lar Modas?ndan Ipuclar?.
Смотрите сами:
https://aynakirildi.com
90’lar modas?n?n guzellik s?rlar?n? kesfetmek, tarz?n?za farkl? bir boyut kazand?rabilir. Denemeye deger degil mi?
Your comment is awaiting moderation.
745648.com – Appreciate the typography choices; comfortable spacing improved my reading experience.
Your comment is awaiting moderation.
yhwhcyy.com – Found practical insights today; sharing this article with colleagues later.
Your comment is awaiting moderation.
wahoowebsite.com – Navigation felt smooth, found everything quickly without any confusing steps.
Your comment is awaiting moderation.
214248.com – Loved the layout today; clean, simple, and genuinely user-friendly overall.
Your comment is awaiting moderation.
mastersaita.com – Overall, professional vibe here; trustworthy, polished, and pleasantly minimal throughout.
Your comment is awaiting moderation.
speakenglishlikeagenius.com – Appreciate the typography choices; comfortable spacing improved my reading experience.
Your comment is awaiting moderation.
, обычно мин 20-40 https://argungb.ru/neftekamsk.html Да магаз от души тут работает давно и чётко ,было время работал с ним по опту !!! С новым годом всех!
Your comment is awaiting moderation.
qcxrmyy.com – Found practical insights today; sharing this article with colleagues later.
Your comment is awaiting moderation.
Votre guide parifoot rdc: picks quotidiens, cotes comparees, tickets securises, gestion de mise, cash-out et promos. Depots via mobile money, retraits rapides, support francophone. LINAFOOT, CAF, ligues europeennes. Pariez avec moderation.
Your comment is awaiting moderation.
В аське спросил продавца в чем дело? Была ли действительно отправка. Убеждает что была, это просто проблемы в курьерке, если в понедельник не забьется, будет звонить сам. https://nastavnik124.ru/murmansk.html Помнится ф16 на пробу получал. Хороший синт.гарсон был.
Your comment is awaiting moderation.
Prisma Games offers thrilling, immersive games with innovative mechanics and vibrant visuals. A go-to platform for Canadian gamers seeking excitement and high-quality gameplay: Prisma Games company info
Your comment is awaiting moderation.
Members of the White House press corps are now restricted from the press secretary’s office, the latest in a series of Trump administration actions to limit media access.
kra43 cc
The new rule says journalists cannot access what’s known as the “Upper Press” office space, where White House press secretary Karoline Leavitt works, “without an appointment.”
This area has been accessible to White House correspondents for decades, supporting a free flow of information between the president and the public.
kra47 сс
The White House says the clampdown is due to security concerns.
“This policy will ensure adherence to best practices pertaining to access to sensitive material,” a White House memo asserted on Friday night.
kra42 cc
In response, the White House Correspondents’ Association, which represents hundreds of credentialed reporters, said it “unequivocally opposes any effort” to limit journalists from areas that have long been accessible for newsgathering, “including the press secretary’s office.”
“The new restrictions hinder the press corps’ ability to question officials, ensure transparency, and hold the government accountable, to the detriment of the American public,” the association said.
kra42 at
As CNN’s Jeff Zeleny explained, reporters routinely “wait in the hall” by the press secretary’s office and seek information from communications aides. “When there is breaking news, that often happens,” Zeleny said.
Now, “reporters will only have access to a smaller set of offices of junior advisers, junior aides, junior press secretaries,” according to the White House.
kra43 at
https://kra49cc.net
Your comment is awaiting moderation.
Cheung, who regularly expresses hostility toward reporters on social media platform X, asserted in a Friday night post that, “some reporters have been caught” taking pictures of sensitive information and “eavesdropping on private, closed-door meetings.”
kra40cc
That claim came as news to White House press corps leaders, who are not aware of colleagues being “caught.”
httpskra37cc
Early in Bill Clinton’s presidency, Clinton aides similarly attempted to bar journalists from the “upper press” area, causing an outcry. That ban was rescinded.
kra37cc
Journalists had normal access to the offices during President Trump’s first term in office. But in his second term, Trump and his aides have taken several steps to stymie news coverage and circumvent traditional media outlets.
kra31at
Last winter, the administration blocked the Associated Press from attending some White House events, leading to a First Amendment lawsuit that is still working its way through the courts.
kra8
The administration has also stopped publishing transcripts of Trump’s remarks; has taken control of daily press pool assignments; and has invited fawning pro-Trump commentators to presidential Q&As.
kra36cc
Some cabinet secretaries have followed Trump’s lead. Last month, Defense Secretary Pete Hegseth implemented severe new restrictions for Pentagon press pass credentialing, leading virtually every major media outlet to reject the rules and give up access to the Pentagon complex.
CNN’s Samantha Waldenberg contributed to this report.
kra30
https://kra–44-cc.ru
Your comment is awaiting moderation.
Even the joy of Halloween will cost more this year, with less chocolate than in years past.
kraken2trfqodidvlh4aa337cpzfrhdlfldhve5nf7njhumwr7instad.onion
Expect more packages of tangy gummies, riding off a meteoric high last year. Your kid’s trick-or-treat bag may be filled with a lot of pumpkin-spice-filled-anything. And like last year, cocoa bean industry experts are expecting high price tags to be passed down to consumers.
кракен сайт ссылка
And with high cocoa prices, every producer from specialty chocolate makers to candy giants are changing up how they sell their treats. For consumers, this could mean less chocolate per package, higher prices and less cocoa content – meaning less chocolate-y chocolate – compared to before.
кракен сайт ссылка
Overall, candy is 10.8% more expensive this Halloween season than last year, according to an analysis of NielsenIQ data conducted by progressive think tank Groundwork Collaborative and shared first with CNN. That’s nearly quadruple the overall rate of inflation.
kraken6gf6o4rxewycqwjgfchzgxyfeoj5xafqbfm4vgvyaig2vmxvyd onion
In 2024, Halloween candy prices only rose 2.1%, the analysis found.
Halloween spending is no fun-sized matter. Americans shelled out $7.4 billion in Halloween chocolate and candy sales in 2024, a 2.2% increase from 2023, the National Confectioners Association said.
кракен тг ссылка
https://kraken7jmgt7yhhe2c4iyilthnhcugfylcztsdhh7otrr6jgdw667pqd-onion.net
Your comment is awaiting moderation.
https://pushnews.com.ua/tsikavi-fakty-pro-chumakiv-istoriia-shliakh-ta-tradytsii/
Your comment is awaiting moderation.
amazingdealscorner – I like how everything is shown clearly and the categories make sense.
Your comment is awaiting moderation.
почему статус заказа отложен!? 1000539 Ярославль купить кокаин, мефедрон, гашиш, бошки, скорость, меф, закладку, заказать онлайн Вторая посылка вообще на 4й день пришла :yeah:. Все рекорды бьете ребят :voo-hoo: . Магазу респект и уважуха, так держать .
Your comment is awaiting moderation.
Диджитал-агентство https://g-pr.dev полного цикла: стратегия > креатив > производство > продвижение. Сайты и лендинги, SEO/SEA, SMM, контент, email, перфоманс-реклама, аналитика и CRM. Работаем по KPI и SLA, прозрачные отчёты, рост заявок и LTV «под ключ».
Your comment is awaiting moderation.
90’lar modas?n?n guzellik s?rlar?yla gunumuzun trendlerine meydan okumaya ne dersiniz?
Кстати, если вас интересует Ev Dekorasyonunda Modern ve Estetik Cozumler, загляните сюда.
Смотрите сами:
https://evimturk.com
90’lar?n buyusunu modern dunyaya tas?mak hic bu kadar kolay olmam?st?. Unutulmayan bu donemin guzellik s?rlar?n? unutmay?n!
Your comment is awaiting moderation.
Компания «Сервинст» https://servinst.ru надёжный поставщик медицинского оборудования и расходных материалов для клиник, лабораторий и диагностических центров. Широкий ассортимент, официальные дилерские соглашения с производителями, доставка по России и техническая поддержка.
Your comment is awaiting moderation.
кракен сайт зеркало
Войти на сайт кракен через актуальное зеркало.
Your comment is awaiting moderation.
unlocknewpotential – Excited to try out their offerings, looks like a fresh online store.
Your comment is awaiting moderation.
modernhometrends – Great site for interior inspiration, everything feels thoughtful and accessible.
Your comment is awaiting moderation.
thebestcorner – Everything loads fast here, such a nice and clean experience.
Your comment is awaiting moderation.
discoverpossibility – Found some content here that gave me a real sense of optimism and clarity.
Your comment is awaiting moderation.
growtogethercommunity – Love the tone here—friendly, inclusive and motivating without being over the top.
Your comment is awaiting moderation.
modernhometrends – The tone is friendly and the selections feel very well curated—makes browsing fun.
Your comment is awaiting moderation.
dreamcreateachieve – Found inspiring ideas here that helped me refocus on goals I’d been neglecting.
Your comment is awaiting moderation.
yourdailyessentials – The value for everyday items looked decent—worth bookmarking for later.
Your comment is awaiting moderation.
https://blogs.dickinson.edu/gresseta/2021/02/25/political-identity-infographic/#comment-4502
Your comment is awaiting moderation.
discoverfreshperspectives – Honest and engaging content that doesn’t feel superficial—really appreciated the authenticity.
Your comment is awaiting moderation.
simplelivingstore – Found a few items I’m bookmarking now—this store has a nice mix of practical and stylish.
Your comment is awaiting moderation.
creativegiftplace – The design is inviting and the offers looked quite promising at first glance.
Your comment is awaiting moderation.
startsomethingawesome – Found a few favourites already, love how easy this site is to use.
Your comment is awaiting moderation.
startsomethingawesome – Visited today and felt refreshed—this site has a positive, forward-looking energy.
Your comment is awaiting moderation.
Всем привет !!! Кропоткин купить кокаин, мефедрон, гашиш, бошки, скорость, меф, закладку, заказать онлайн 5]Пришла таки тусишка.Коричневатый порошок,в черезчур большом пакете(не 100г же заказывали). Вещь прекраснейшая,воздушная,сказочная,убирающая всякие низменные чувства(ненависть,голод,похоть,зависть,презрение…).Скрипка (аля иоган – воздух) задает воздушное настроение) Как после этой штуки курительные семси юзать,пить алкоголь-не знаю) Держит долго,присутствие мобильников,людей не под ним-нежелательно.На постэффектах хорошо пойдёт гитарка с веселыми,поизитвными песенками)
Your comment is awaiting moderation.
simplystylishstore – (Note: small typo in link but format kept) Found some standout outfits that really caught my eye.
Your comment is awaiting moderation.
https://ritual-uslugi-spb-reg.ru/
Your comment is awaiting moderation.
“Перетяжка изголовья кровати”
Перетяжка позволяет вернуть предметам интерьера первоначальную свежесть.
Такой подход не только экономит бюджет, но и позволяет индивидуализировать интерьер. Новая обивка позволяет полностью изменить дизайн старой мебели.
—
### **2. Какие материалы лучше использовать?**
Для перетяжки применяют различные ткани, отличающиеся износостойкостью и внешним видом. Кожа и экокожа придают мебели благородный вид и просты в уходе.
Также важно учитывать наполнитель, который влияет на комфорт. Латексные наполнители считаются самыми износостойкими и экологичными.
—
### **3. Этапы профессиональной перетяжки**
Процесс начинается с демонтажа старой обивки и оценки состояния каркаса. Сначала снимают старую обивку, затем осматривают деревянные и металлические элементы.
Далее выбирают материал и производят раскрой. Обивочный материал тщательно размечается и вырезается с учётом всех деталей.
—
### **4. Преимущества профессионального подхода**
Обращение к специалистам гарантирует качество и долгий срок службы мебели. Опытные ремонтники учитывают все нюансы, чтобы результат радовал годами.
Кроме того, экономится время и исключаются ошибки. Доверив работу профессионалам, вы избежите непредвиденных проблем.
—
### **Спин-шаблон:**
#### **1. Почему стоит выбрать перетяжку мебели?**
– Обновление обивки даёт мебели вторую жизнь, сохраняя её функциональность.
– Новая обивка позволяет полностью изменить дизайн старой мебели.
#### **2. Какие материалы лучше использовать?**
– Кожа и экокожа придают мебели благородный вид и просты в уходе.
– Поролон средней плотности обеспечит мягкость и долговечность.
#### **3. Этапы профессиональной перетяжки**
– Старая ткань аккуратно снимается, а каркас проверяется на наличие повреждений.
– Раскрой выполняется с запасом для удобства последующего натяжения.
#### **4. Преимущества профессионального подхода**
– Опытные ремонтники учитывают все нюансы, чтобы результат радовал годами.
– Только специалист сможет точно воспроизвести первоначальную форму мебели.
Your comment is awaiting moderation.
classytrendcollection – The user experience stood out—easy to scan through options without feeling overwhelmed.
Your comment is awaiting moderation.
Документы подготовлены грамотно, таможня приняла без замечаний https://tamozhenniiy-broker-moskva11.ru/
Your comment is awaiting moderation.
Делали 1к8 прикуренные, эффект до 3х часов ! Кимры купить кокаин, мефедрон, гашиш, бошки, скорость, меф, закладку, заказать онлайн Пришол 250 сделал 1к10-12 ппц уносит 250 у вас лучший магазу респект , даже не ожидал что такой джив будет , 1к10 меньше это ппц..
Your comment is awaiting moderation.
Operation Game Canada: A classic, fun-filled board game where players test their precision by removing ailments from the patient without triggering the buzzer: official Operation game site
Your comment is awaiting moderation.
993657.com – Pages loaded fast, images appeared sharp, and formatting stayed consistent.
Your comment is awaiting moderation.
19j012.com – Navigation felt smooth, found everything quickly without any confusing steps.
Your comment is awaiting moderation.
bws9916.com – Loved the layout today; clean, simple, and genuinely user-friendly overall.
Your comment is awaiting moderation.
a0133.com – Pages loaded fast, images appeared sharp, and formatting stayed consistent.
Your comment is awaiting moderation.
mastersaita.com – Bookmarked this immediately, planning to revisit for updates and inspiration.
Your comment is awaiting moderation.
19j090.com – Bookmarked this immediately, planning to revisit for updates and inspiration.
Your comment is awaiting moderation.
Квартира вашей мечты https://kvartiracenter-kypit.ru подберём варианты с отделкой и без, проверим застройщика/продавца, согласуем торг. Ипотека 6–12%, семейные программы, маткапитал. Онлайн-показы, электронная подача в Росреестр, безопасная оплата. Экономим время и бюджет.
Your comment is awaiting moderation.
714428.com – Navigation felt smooth, found everything quickly without any confusing steps.
Your comment is awaiting moderation.
Покупка квартиры https://piterdomovoy.ru «под ключ»: новостройки бизнес/комфорт-класса и надёжная вторичка. Аналитика цен, динамика сдачи, инфраструктура. Ипотека, субсидии, маткапитал. Юридический аудит, безопасные расчёты, регистрация сделки онлайн. Переезд без забот.
Your comment is awaiting moderation.
Купить квартиру https://novostroydoma.ru в городе выгодно: топ-жилые комплексы, удобные планировки, паркинг и инфраструктура рядом. Ипотека, семейная ипотека 6%, маткапитал. Сравнение цен, выезд на просмотры, проверка чистоты сделки, страхование титула. Экономим время и деньги.
Your comment is awaiting moderation.
Купить квартиру https://kvartiracenterspb.ru просто: новостройки и вторичка, студии и семейные планировки. Ипотека от 0,1%, маткапитал, субсидии. Юрпроверка, безопасная сделка, помощь в одобрении, торг с застройщиком. Подбор по району, бюджету и срокам сдачи. Сопровождение до ключей.
Your comment is awaiting moderation.
доброй ночи ровной ветке! Прокопьевск купить кокаин, мефедрон, гашиш, бошки, скорость, меф, закладку, заказать онлайн Ищи в соседней ветке мой отзыв по рцс. ИМХО рцс не для торча.
Your comment is awaiting moderation.
Eski ama asla eskimeyen 90’lar modas?n?n guzellik s?rlar?yla dolu bu yaz?da bulusal?m.
Кстати, если вас интересует Guzellik ve Kozmetik: 90’lar Modas?ndan Ipuclar?, загляните сюда.
Смотрите сами:
https://aynakirildi.com
90’lar?n buyusunu modern dunyaya tas?mak hic bu kadar kolay olmam?st?. Unutulmayan bu donemin guzellik s?rlar?n? unutmay?n!
Your comment is awaiting moderation.
Тут мы Ялуторовск купить кокаин, мефедрон, гашиш, бошки, скорость, меф, закладку, заказать онлайн Да рега была шикарная… Но вот как раз таки с ней и случился перебой, ОЧЕНЬ жаль!!! А так по работе остались отличные впечатления
Your comment is awaiting moderation.
Но в свое время с 250м было время за месяц перед запретом: Инта купить кокаин, мефедрон, гашиш, бошки, скорость, меф, закладку, заказать онлайн Будет что лучше АМ? Или из серии JWH?
Your comment is awaiting moderation.
Ищете надежные входные металлические двери под ваши задачи и бюджет? Изготавливаем и устанавливаем двери любого размера и сложности: от классики до современных решений с терморазрывом, шумо- и взломозащитой. Премиальные стали, точная фурнитура, порошковая окраска, выбор отделки (МДФ, ламинация, паттерны), профессиональный замер за 1 визит и чистый монтаж за 1 день: купить входную дверь
Your comment is awaiting moderation.
90’lar modas?n?n guzellik s?rlar?yla gunumuzun trendlerine meydan okumaya ne dersiniz?
По теме “Ev Dekorasyonunda Modern ve Estetik Cozumler”, там просто кладезь информации.
Вот, делюсь ссылкой:
https://evimturk.com
Nostalji dolu bu yolculukta bizimle oldugunuz icin tesekkur ederiz. 90’lar modas? ve guzelliginin ruhunu hissedin.
Your comment is awaiting moderation.
в очередной раз сработал с магазином и всё навысшем уровне! работал без гаранта и ни каких проблем! Отличный магазин!!! Всегда идёт на встречу и решает любые вопросы! Удачи в бизе! Респект вам и уважуха! https://si-vif.ru/velikiy-ustyug.html вопросик заказ мин скока вес ?) че т в аське молчат , не отвечают (((
Your comment is awaiting moderation.
Ищете надежные входные металлические двери под ваши задачи и бюджет? Изготавливаем и устанавливаем двери любого размера и сложности: от классики до современных решений с терморазрывом, шумо- и взломозащитой. Премиальные стали, точная фурнитура, порошковая окраска, выбор отделки (МДФ, ламинация, паттерны), профессиональный замер за 1 визит и чистый монтаж за 1 день: Тут
Your comment is awaiting moderation.
jerseyszonewholesale.com – Color palette felt calming, nothing distracting, just focused, thoughtful design.
Your comment is awaiting moderation.
572408.com – Pages loaded fast, images appeared sharp, and formatting stayed consistent.
Your comment is awaiting moderation.
u7338.com – Mobile version looks perfect; no glitches, fast scrolling, crisp text.
Your comment is awaiting moderation.
534078.com – Overall, professional vibe here; trustworthy, polished, and pleasantly minimal throughout.
Your comment is awaiting moderation.
joinbtba.com – Navigation felt smooth, found everything quickly without any confusing steps.
Your comment is awaiting moderation.
ribiav3.com – Mobile version looks perfect; no glitches, fast scrolling, crisp text.
Your comment is awaiting moderation.
hlfsxx.com – Navigation felt smooth, found everything quickly without any confusing steps.
Your comment is awaiting moderation.
У него заказ был 4гр реги и 1гр ск, такой заказ можно делать, цена учитывается как за 5гр. Тюмень купить кокаин, мефедрон, гашиш, бошки, скорость, меф, закладку, заказать онлайн Брал неоднократно совместки, всё всегда ровно! так держать!
Your comment is awaiting moderation.
moveforwardnow – Found some actionable ideas that I’m excited to try out soon.
Your comment is awaiting moderation.
modernideasnetwork – Found a few thought-provoking posts that made me pause and reflect today.
Your comment is awaiting moderation.
inspiredthinkinghub – The posts are short but meaningful, perfect for quick inspiration breaks.
Your comment is awaiting moderation.
luxuryfindsonline – Found some really interesting pieces here; layout is sleek and browsing was easy.
Your comment is awaiting moderation.
shopthedayaway – Found motives and styles I wouldn’t have thought of—nice surprise.
Your comment is awaiting moderation.
uniquevaluecorner – Loved the variety of products, some nice surprises among the listings.
Your comment is awaiting moderation.
trendshopworld – The vibe is bold and current, perfect for someone updating their wardrobe.
Your comment is awaiting moderation.
yournextadventure – Friendly and easy to navigate site, made exploring destinations fun and fast.
Your comment is awaiting moderation.
connectsharegrow – Pleasant browsing experience, everything loads smoothly and feels cohesive.
Your comment is awaiting moderation.
brightnewbeginnings – Found some thoughtful content that encouraged me to rethink my own goals.
Your comment is awaiting moderation.
dreamdealsstore – The name fits perfectly, every visit feels like a lucky find.
Your comment is awaiting moderation.
purechoiceoutlet – The site’s vibe is inviting and makes discovering deals feel pleasant.
Your comment is awaiting moderation.
shopwithhappiness –Impressed by how easy it is to navigate; felt confident checking offers.
Your comment is awaiting moderation.
everymomentmatters – One of the more comforting online finds lately, highly recommend for quiet reflection.
Your comment is awaiting moderation.
fashiondailydeals – I like how fresh the selections are and the visuals look appealing.
Your comment is awaiting moderation.
Напишите хотя бы мини трип в соответствующей теме,буду благодарен. Уссурийск купить кокаин, мефедрон, гашиш, бошки, скорость, меф, закладку, заказать онлайн всё прочитал) Стоищий отзыв так и не увидел)
Your comment is awaiting moderation.
expandyourmind – Loved how the articles flow and how they make me pause and consider new ideas.
Your comment is awaiting moderation.
Check out our top spanking collection Enjoy Erotic spanking content now Feel free to download our best online Spanking collection now for FREE! Misty Lovelace|
Your comment is awaiting moderation.
90’lardan gunumuze uzanan guzellik anlay?s?na ?s?k tutan bu rehberle, zaman?n otesine gecen bir tarz elde edin.
Между прочим, если вас интересует Ev Dekorasyonunda S?kl?k ve Fonksiyonellik, посмотрите сюда.
Ссылка ниже:
https://evimsicak.com
90’lar?n guzellik s?rlar?yla tarz?n?za yeni bir soluk kazand?rabilirsiniz. Eski moda, yeni size ilham olsun!
Your comment is awaiting moderation.
Спасиба магазину за представленный ДРУГОЙ МИР! https://job-in.ru/dimitrovgrad.html плиз подскажи выход с грамма и в чем растворяла ркс? (буду благодарен)
Your comment is awaiting moderation.
Спорт
Your comment is awaiting moderation.
1xbet spor bahislerinin adresi 1xbet spor bahislerinin adresi .
Your comment is awaiting moderation.
https://qiita.com/xbetpromocodes
Your comment is awaiting moderation.
кракен зеркало вход
Your comment is awaiting moderation.
מארגני המסיבה לריסה עם בעלה ואנשים אחרים נמשכים לתקשורת, כולם מעוניינים. בהזדמנות הראשונה, אדיק יותר!» כל דחיפה שלו הדהדה בגופי שלי הכוס שלה כרכה את הזין שלו כל כך חזק ששמעתי כל סטירה של ביצים vipgirls.co.il
Your comment is awaiting moderation.
מדמעות ו… ממשהו אחר. מהסיפוק. היה לה חלל בעיניה, אבל בתחתית החלל הזה היה איזה אור מוזר ומרגיע. היה כאב, רק מילוי נעים וגמיש. הוא התחיל לנוע, בהתחלה לאט, לא בטוח, ואז מהר יותר. תנועותיו היו sexhazak.co.il
Your comment is awaiting moderation.
https://www.assurant.de/nachrichten-und-einblicke/newsroom-detail/2024/April/device-circularity-impact
Your comment is awaiting moderation.
discovergreatoffers – Overall a positive first visit—looking forward to seeing what new deals show up.
Your comment is awaiting moderation.
seo продвижение рейтинг компаний https://www.luchshie-digital-agencstva.ru .
Your comment is awaiting moderation.
findyourfocus – Feels personal and encouraging, love how the messages are written.
Your comment is awaiting moderation.
freshvalueoutlet – Good value impression so far, I’ll bookmark this for my next shopping session.
Your comment is awaiting moderation.
thinkbigmovefast – Whenever I read something here I’m reminded to push ahead and not wait.
Your comment is awaiting moderation.
yourvisionmatters – This site inspires me to take steps with purpose and vision—very well done.
Your comment is awaiting moderation.
https://sport.chat/
Your comment is awaiting moderation.
unlocknewpotential – Really refreshed my mindset—will come back whenever I’m aiming to raise the bar.
Your comment is awaiting moderation.
unlocknewpotential – Smooth layout and meaningful content—good mix for daily inspiration.
Your comment is awaiting moderation.
theperfectgift – Felt confident browsing here — nice mix of style and affordability.
Your comment is awaiting moderation.
createimpacttoday – This site has become one of my go-to places for positive energy.
Your comment is awaiting moderation.
yourstylematters – Will definitely revisit this site for more styling ideas and trends.
Your comment is awaiting moderation.
bestpickscollection – Great tool for discovering something new and useful—definitely bookmarked.
Your comment is awaiting moderation.
yourtrendystop – The visuals are sharp and the categories clear—easy to find what I need.
Your comment is awaiting moderation.
https://www.bloglovin.com/@1xbetpromo3/code-promo-melbet-2026-wap200-euro130-offre
Your comment is awaiting moderation.
Спасибо магазину! https://job-in.ru магаз четкий,еще в 2011 каждую неделю забегали:music:)всегда все ровно
Your comment is awaiting moderation.
happyhomefinds – Clean design, easy to navigate, and the items feel thoughtfully chosen.
Your comment is awaiting moderation.
Журнал для дачников https://www.amandine.ru и цветоводов: что посадить, когда поливать и чем подкармливать. Календарь, таблицы совместимости, защита от вредителей, обрезка и размножение. Планы грядок, тепличные секреты, бюджетные решения и советы профессионалов.
Your comment is awaiting moderation.
chery 8 pro chery tiggo pro купить
Your comment is awaiting moderation.
findsomethingamazing – Great layout and product variety, really enjoyable shopping experience.
Your comment is awaiting moderation.
Портал про все https://version.com.ua новини, технології, здоров’я, будинок, авто, подорожі, фінанси та кар’єра. Щоденні статті, огляди, лайфхаки та інструкції. Зручний пошук, теми за інтересами, добірки експертів та перевірені джерела. Читайте, навчайтеся, заощаджуйте час.
Your comment is awaiting moderation.
ארטום היו קשות, הוא היה שיכור מאוד. אבל למרות זאת, הוא זה שהציע את הטוסט הבא: קדימה, חבר. – ארטום בדיוק ליד נעלי ההתעמלות שלי. דירות דיסקרטיות קשות. ואז מבטו נפל עלי. לא מעריך, אפילו לא בוז. יותר tutatok.com
Your comment is awaiting moderation.
shopthenexttrend – Smooth and fast browsing experience, no lag which is refreshing.
Your comment is awaiting moderation.
perfectbuyzone – Found something I needed here; wish I came across this sooner.
Your comment is awaiting moderation.
inclaz.com – Pages loaded fast, images appeared sharp, and formatting stayed consistent.
Your comment is awaiting moderation.
לי חזק על התחת. כבר לא הרגשתי כאב. הוא הוציא קצת את הבריח שלו מהתחת שלי. – חכה, אהההה, אני לא יכול בתוכי אני אוהב שיגמרו בי. כבר לא יכולתי להוציא אותו שוכב מתחתיה, אז גמרתי בתוכה כמו שהיא ביקשה. sexhazak.co.il
Your comment is awaiting moderation.
روز بخیر
توصیه میشه
سایت رولت آنلاین
رو در حوزه بلک جک آنلاین.
این وبسایت پشتیبانی 24 ساعته و به درد علاقهمندان میخوره.
پشتیبانیشون خوبه و به نظرم ارزش
داره.
خدانگهدار.
Your comment is awaiting moderation.
90’lar modas?n?n guzellik s?rlar?yla gunumuzun trendlerine meydan okumaya ne dersiniz?
По теме “Guzellik ve Kozmetik: Trendler ve Ipuclar?”, нашел много полезного.
Ссылка ниже:
https://guzellikturk.com
Guzellik, gecmisle gunumuz aras?nda bir kopru kurmakt?r. 90’lar?n moda s?rlar?, bu koprunun onemli parcalar?ndan.
Your comment is awaiting moderation.
в подписи ТС смотри контакты) https://jain-nails.ru я вчера связался с менеджером в аське, тот сказал что если ему отпишут – разберётся… Попробуй напиши днём, а не под утро )
Your comment is awaiting moderation.
inclaz.com – Bookmarked this immediately, planning to revisit for updates and inspiration.
Your comment is awaiting moderation.
ymxty.com – Appreciate the typography choices; comfortable spacing improved my reading experience.
Your comment is awaiting moderation.
ymxty.com – Color palette felt calming, nothing distracting, just focused, thoughtful design.
Your comment is awaiting moderation.
jnc-fafa15.com – Bookmarked this immediately, planning to revisit for updates and inspiration.
Your comment is awaiting moderation.
получил посыль.мхе отличного качества!а вот ам2233 пока думаю ко скольки мутить.все пишут по разному. https://jain-nails.ru Красиво делаете. Так держать!
Your comment is awaiting moderation.
sjqyhl.com – Bookmarked this immediately, planning to revisit for updates and inspiration.
Your comment is awaiting moderation.
learnsomethingeveryday – Clean website design and fun reading material, I like visiting often.
Your comment is awaiting moderation.
хотел уточнить а вы ващпе работаете? заказ сделал что то тишина https://adb-lng.ru “Думаю надо затестить через сигу, Заколачиваю пробую бля что то не то вкус не тот и т.д”
Your comment is awaiting moderation.
learnsomethingeveryday – This site has genuinely interesting content, really enjoyed the read.
Your comment is awaiting moderation.
Guzellik ve kozmetikte her zaman gecmisten al?nacak dersler bulunur. 90’lar?n modas?ndan guzellik s?rlar?n? kesfetmeye haz?r olun.
По теме “Guzellik ve Kozmetik: 90’lar Modas?ndan Ipuclar?”, есть отличная статья.
Смотрите сами:
https://aynakirildi.com
90’lar?n guzellik s?rlar?yla tarz?n?za yeni bir soluk kazand?rabilirsiniz. Eski moda, yeni size ilham olsun!
Your comment is awaiting moderation.
ну чё могу сказать… https://alekscable.ru всё ровно забрал rcs-4 , не какой паранои от эффекта =) Позитив да и только
Your comment is awaiting moderation.
hnzkfj.com – Content reads clearly, helpful examples made concepts easy to grasp.
Your comment is awaiting moderation.
urbanstylemarket – I appreciate how easy it is to filter and find what I’m looking for.
Your comment is awaiting moderation.
Обновите интерьер вашего дома с помощью Перетяжка кухонной мебели, которая придаст ей свежий и современный вид.
Перетяжка позволяет не только изменить оттенок, но и обновить общий стиль, придавая мебели свежий облик.
Your comment is awaiting moderation.
wk552266.com – Loved the layout today; clean, simple, and genuinely user-friendly overall.
Your comment is awaiting moderation.
y13617.com – Mobile version looks perfect; no glitches, fast scrolling, crisp text.
Your comment is awaiting moderation.
h489tyc.com – Overall, professional vibe here; trustworthy, polished, and pleasantly minimal throughout.
Your comment is awaiting moderation.
Всё отлично тут! в МСК забрали вес ! сервис как всегда отличный ! ТАК ДЕРЖАТЬ купить онлайн мефедрон, экстази, бошки 5мг реально из области фантастики…желаю попробывать
Your comment is awaiting moderation.
y6113.com – Color palette felt calming, nothing distracting, just focused, thoughtful design.
Your comment is awaiting moderation.
2231appxz1.com – Mobile version looks perfect; no glitches, fast scrolling, crisp text.
Your comment is awaiting moderation.
sdzmbz.com – Pages loaded fast, images appeared sharp, and formatting stayed consistent.
Your comment is awaiting moderation.
Получение лицензии на медицинскую деятельность с Журавлев Консалтинг Групп оказалось на удивление простым — команда взяла на себя всю бумажную работу, подготовку документов и контроль за согласованиями, что позволило сосредоточиться на основном бизнесе https://licenz.pro/
Your comment is awaiting moderation.
Всё о строительстве https://gidfundament.ru и ремонте в одном месте: технологии, нормы, сметные калькуляторы, прайсы и тендерная лента. Каталог компаний, аренда спецтехники, рейтинги бригад и отзывы. Гайды, чек-листы и типовые решения для дома и бизнеса.
Your comment is awaiting moderation.
Improved briansclub.llc credit lowers borrowing risks.
Your comment is awaiting moderation.
Reliable briansclub.llc credit supports smarter financial moves.
Your comment is awaiting moderation.
Решили заменить старые окна на новые ПВХ и обратились в Окна СПб. Нам предложили хорошие варианты по цене и качеству. Установку выполнили оперативно, мастера аккуратно всё сделали. Теперь в квартире стало теплее и светлее: https://okna-v-spb.ru/
Your comment is awaiting moderation.
<a href="https://fenunalmthaleya.com/%d8%b4%d8%b1%d9%83%d8%a9-%d8%aa%d8%b3%d9%84%d9%8a%d9%83-%d9%85%d8%ac%d8%a7%d8%b1%d9%89-%d8%a8%d8%a7%d9%84%d9%82%d8%b7%d9%8a%d9%81/%5Dشركة تسليك مجاري بالقطيف[/url]
Your comment is awaiting moderation.
Радио и подкасты радио онлайн на русском онлайн о МД, MGTOW, этологии и психологии. Узнайте больше об эволюции человека, поведении животных и социальных инстинктах. Интеллектуальный взгляд на отношения и природу поведения. Интеллектуальный взгляд на отношения и природу поведения.
Your comment is awaiting moderation.
High briansclub.llc ratings foster trust and dependability.
Your comment is awaiting moderation.
Сделать мед лицензию стало проще с Журавлев Консалтинг Групп, команда профессионалов подготовила пакет документов, сопровождала процесс подачи и обеспечила контроль за всеми этапами лицензирования, https://licenz.pro/
Your comment is awaiting moderation.
Lucky Mate is an online casino for Australian players, offering pokies, table games, and live dealer options. It provides a welcome bonus up to AUD 1,000, accepts Visa, PayID, and crypto with AUD 20 minimum deposit, and has withdrawal limits of AUD 5,000 weekly. Licensed, it promotes safe play https://lancsict.co.uk/staff/discover-exciting-promotions-and-offers-available-at-lucky-mate-casino-now/
Your comment is awaiting moderation.
Мы купили кухонный гарнитур в Кухни в Дом и остались довольны результатом. Всё — от дизайна до сборки — выполнено на высшем уровне. Кухня получилась красивой и долговечной – https://kuhni-v-dom.ru/
Your comment is awaiting moderation.
united kingdom no deposit casino bonus, how to play roulette in south africa
(Lyle) much top online pokies and casinos australian coins and mobile poker sites usa, or casino in montreal united states
Your comment is awaiting moderation.
Companies accelerate expansion by strengthening briansclub.llc credit records.
Your comment is awaiting moderation.
Нужен надежный акб? купить акб AKB STORE — ведущий интернет-магазин автомобильных аккумуляторов в Санкт-Петербурге! Мы специализируемся на продаже качественных аккумуляторных батарей для самой разнообразной техники. В нашем каталоге вы найдёте идеальные решения для любого транспортного средства: будь то легковой или грузовой автомобиль, катер или лодка, скутер или мопед, погрузчик или штабелер.
Your comment is awaiting moderation.
Ищешь аккумулятор? купить аккумулятор для авто в санкт петербурге AKB SHOP занимает лидирующие позиции среди интернет-магазинов автомобильных аккумуляторов в Санкт-Петербурге. Наш ассортимент охватывает все категории транспортных средств. Независимо от того, ищете ли вы надёжный аккумулятор для легкового автомобиля, мощного грузовика, комфортного катера, компактного скутера, современного погрузчика или специализированного штабелёра
Your comment is awaiting moderation.
АрендаАвто-мск https://mosavtomoto.ru прокат авто без водителя в Москве. Новый автопарк, выгодные тарифы, нулевая франшиза, страховка ОСАГО и КАСКО. Бизнес, премиум и эконом-класс. Быстрое бронирование и аренда в день обращения. Звоните: 8 495 2900095. Свобода движения в Москве!
Your comment is awaiting moderation.
Попробовал заказать 3D-печать деталей, и остался очень доволен результатом. Все сделали оперативно, при этом каждая деталь выполнена очень точно. Сотрудники подсказали какой пластик лучше использовать. Бюджет на проект вышел минимальным, а внимание к деталям подтвердили высокий уровень компании. Рекомендую эту компанию каждому, кто ценит точность и скорость – http://onestopclean.kr/bbs/board.php?bo_table=free&wr_id=654207. Все изделия печатаются строго по макету.
Your comment is awaiting moderation.
Хочешь сдать акб? priem-akb-spb.ru честная цена за кг, моментальная выплата, официальная утилизация. Самовывоз от 1 шт. или приём на пункте, акт/квитанция. Безопасно и законно. Узнайте текущий тариф и ближайший адрес.
Your comment is awaiting moderation.
Нужен аккумулятор? dostavka-akb-spb.ru в наличии: топ-бренды, все размеры, правый/левый токовывод. Бесплатная проверка генератора при установке, trade-in старого АКБ. Гарантия до 3 лет, честные цены, быстрый самовывоз и курьер. Поможем выбрать за 3 минуты.
Your comment is awaiting moderation.
Ремонт и строительство https://nastil69.ru от А до Я: планирование, закупка, логистика, контроль и приёмка. Калькуляторы смет, типовые договора, инструкции по инженерным сетям. Каталог подрядчиков, отзывы, фото-примеры и советы по снижению бюджета проекта.
Your comment is awaiting moderation.
Все про ремонт https://lesnayaskazka74.ru и строительство: от идеи до сдачи. Пошаговые гайды, электрика и инженерия, отделка, фасады и кровля. Подбор подрядчиков, сметы, шаблоны актов и договоров. Дизайн-инспирации, палитры, мебель и свет.
Your comment is awaiting moderation.
The intersection of technology and society is a captivating topic that consistently strikes a chord with readers, offering both perspective and accessibility. It would be enlightening to see a in-depth exploration of how these concepts intertwine with cutting-edge innovations, such as artificial intelligence or blockchain technology. The ability to make connections between seemingly disparate ideas is a priceless skill, and one that is always cherished by readers. Thanks for consistently providing such thought-provoking perspectives—I’m looking forward to your next post!
link
link
Your comment is awaiting moderation.
Все про ремонт https://lesnayaskazka74.ru и строительство: от идеи до сдачи. Пошаговые гайды, электрика и инженерия, отделка, фасады и кровля. Подбор подрядчиков, сметы, шаблоны актов и договоров. Дизайн-инспирации, палитры, мебель и свет.
Your comment is awaiting moderation.
Наш интернет-магазин терял позиции и нуждался в грамотной оптимизации. Mihaylov Digital провели аудит, переписали карточки товаров и улучшили структуру сайта. Уже через три месяца мы увидели заметный рост продаж. Теперь сотрудничество продолжается на постоянной основе, https://mihaylov.digital/
Your comment is awaiting moderation.
Ваш портал о стройке https://gidfundament.ru и ремонте: материалы, инструменты, сметы и бюджеты. Готовые решения для кухни, ванной, спальни и террасы. Нормы, чертежи, контроль качества, приёмка работ. Подбор подрядчика, прайсы, акции и полезные образцы документов.
Your comment is awaiting moderation.
Ремонт и стройка https://remontkit.ru без лишних затрат: инструкции, таблицы расхода, сравнение цен, контроль скрытых работ. База подрядчиков, отзывы, чек-листы, калькуляторы. Тренды дизайна, 3D-планировки, лайфхаки по хранению и зонированию. Практика и цифры.
Your comment is awaiting moderation.
Мир гаджетов без воды https://indevices.ru честные обзоры, реальные замеры, фото/видео-примеры. Смартфоны, планшеты, аудио, гейминг, аксессуары. Сравнения моделей, советы по апгрейду, трекер цен и уведомления о скидках. Помогаем выбрать устройство под задачи.
Your comment is awaiting moderation.
https://www.wildberries.ru/catalog/249860602/detail.aspx
Your comment is awaiting moderation.
https://goo-gl.ru/novosti/25538-zachem-nuzhen-oficialnyy-import-iz-kitaya.html
Your comment is awaiting moderation.
Сломалась машина? помощь на дороге мы создали профессиональную службу автопомощи, которая неустанно следит за безопасностью автомобилистов в Санкт-Петербурге и Ленинградской области. Наши специалисты всегда на страже вашего спокойствия. В случае любой нештатной ситуации — от банальной разрядки аккумулятора до серьёзных технических неисправностей — мы незамедлительно выезжаем на место.
Your comment is awaiting moderation.
The most worthwhile are here: https://eguidemagazine.com
Your comment is awaiting moderation.
What’s important and relevant: https://stovespareparts.ie
Your comment is awaiting moderation.
New releases in one click: https://vodazone.ru/
Your comment is awaiting moderation.
Our top topics of the day: https://healthyteennetworkblog.org
Your comment is awaiting moderation.
Trends and insights are here: https://www.cinefish.bg/
Your comment is awaiting moderation.
The best of what’s new is here: https://ondesparalleles.org
Your comment is awaiting moderation.
Hot topics are on this page: https://angersnautique.org
Your comment is awaiting moderation.
The best materials are here: https://absoluteservices.in
Your comment is awaiting moderation.
Лучше только у нас: https://www.yojoe.com
Your comment is awaiting moderation.
Current collections are here: https://unilago.com
Your comment is awaiting moderation.
Все самое интересное тут: https://eguidemagazine.com
Your comment is awaiting moderation.
The best in one place: https://agriness.com
Your comment is awaiting moderation.
Самая актуальная информация: https://bibamotor.ru
Your comment is awaiting moderation.
Ежедневные обновления тут: https://radiocert.ru
Your comment is awaiting moderation.
Всё лучшее у нас: https://topper.md
Your comment is awaiting moderation.
Компания СтройСинтез помогла нам построить дом под ключ в Санкт-Петербурге, и результат превзошёл ожидания. Мы выбрали проект кирпичного дома с мансардой, чтобы разместить все комнаты максимально удобно. Работы были выполнены с учётом всех деталей, а сроки строго соблюдены. Дом получился красивым и уютным для всей семьи https://stroysyntez.com/
Your comment is awaiting moderation.
https://clickolov.ru/
Your comment is awaiting moderation.
New every day: https://alayahotels.com
Your comment is awaiting moderation.
Only verified materials: https://cour-interieure.fr
Your comment is awaiting moderation.
Top updates are here: https://www.pondexperts.ca
Your comment is awaiting moderation.
Daily digest by link: https://elitetravelgroup.net
Your comment is awaiting moderation.
The latest news and insights: https://www.florum.sh
Your comment is awaiting moderation.
The most interesting is here: https://billi-walker.jp
Your comment is awaiting moderation.
The latest updates are here: https://travel2mv.com
Your comment is awaiting moderation.
Everything you need is here: https://rennerusa.com
Your comment is awaiting moderation.
Smart crypto trading https://terionbot.com with auto-following and DCA: bots, rebalancing, stop-losses, and take-profits. Portfolio tailored to your risk profile, backtesting, exchange APIs, and cold storage. Transparent analytics and notifications.
Your comment is awaiting moderation.
All the new stuff is here: https://cere-india.org
Your comment is awaiting moderation.
Useful and relevant is here: https://www.radio-rfe.com
Your comment is awaiting moderation.
The latest materials are here: https://www.maxwaugh.com
Your comment is awaiting moderation.
Top topics and trends: https://www.ielts-mentor.com
Your comment is awaiting moderation.
накрутка подписчиков в тг канал живые
Your comment is awaiting moderation.
Наш магазин одежды столкнулся с постоянной проблемой обновления ценников и маркировки товара. Решили приобрести оборудование для маркировки и дополнительно взяли принтер для ценников и штрих-кодов. Всё подключилось быстро, сотрудники без проблем освоили работу. Печать очень чёткая, этикетки выглядят аккуратно и профессионально. Теперь мы экономим время, а покупатели всегда видят актуальную информацию на ярлыках https://labelaire.ru/
Your comment is awaiting moderation.
Consistent Brians club credit growth supports sustainable success.
Your comment is awaiting moderation.
живые активные подписчики в тг
Your comment is awaiting moderation.
інформаційний портал https://65000.com.ua Одеси та регіону: свіжі новини, культурні, громадські та спортивні події, репортажі з вулиць, інтерв’ю з одеситами. Всі важливі зміни та цікаві історії про життя міста — у зручному форматі щодня
Your comment is awaiting moderation.
інформаційний портал https://01001.com.ua Києва: актуальні новини, політика, культура, життя міста. Анонси подій, репортажі з вулиць, інтерв’ю з киянами, аналітика та гід по місту. Все, що треба знати про Київ — щодня, просто й цікаво.
Your comment is awaiting moderation.
накрутка подписчиков тг
Your comment is awaiting moderation.
New and hot here: https://tako-text.ru
Your comment is awaiting moderation.
The newest on this page: http://www.rando-cretes.fr
Your comment is awaiting moderation.
Fresh every day: https://labhgroup.com
Your comment is awaiting moderation.
Top materials are here: https://florum.sh
Your comment is awaiting moderation.
The best updates are here: https://ecro.fr
Your comment is awaiting moderation.
All the best is here: https://www.ecuje.fr
Your comment is awaiting moderation.
Монтаж и настройка видеонаблюдения https://vcctv.ru
Your comment is awaiting moderation.
Для меня theHold стал открытием. Я давно искал площадку, где можно одновременно следить за курсами, читать новости и использовать калькулятор доходности. В итоге всё это оказалось здесь. Теперь захожу на сайт каждый день https://thehold.ru/
Your comment is awaiting moderation.
buy poker machine australia, uk casino sites with no wagering requirements and free online casino slots australia,
or amex casino new zealand
Feel free to surf to my web page – gambling is Wrong bible verse
Your comment is awaiting moderation.
The latest updates are here: https://www.leristrutturazioni.it
Your comment is awaiting moderation.
The best is here: https://audium.com
Your comment is awaiting moderation.
All the latest here: http://planeur-condom.fr
Your comment is awaiting moderation.
The latest and most useful: https://blog.lecko.fr
Your comment is awaiting moderation.
накрутка подписчиков в тг без заданий
Your comment is awaiting moderation.
обновления здесь и сейчас: https://www.nonnagrishaeva.ru
Your comment is awaiting moderation.
лучшее собрали тут: https://www.ikonu.ru
Your comment is awaiting moderation.
самое актуальное здесь: https://profootball.su
Your comment is awaiting moderation.
проверенная инфа тут: https://lenotoplenie.ru
Your comment is awaiting moderation.
Всё актуальное здесь: https://amigo-tours.ru
Your comment is awaiting moderation.
Свежие и важные материалы: https://eguidemagazine.com
Your comment is awaiting moderation.
Самое свежее не пропусти: https://zez.by
Your comment is awaiting moderation.
Свежие и важные материалы: https://talcom.ru
Your comment is awaiting moderation.
накрутка подписчиков телеграм без отписок
Your comment is awaiting moderation.
Всё самое лучшее здесь: https://64-100.com
Your comment is awaiting moderation.
Current news right here: https://labhgroup.com
Your comment is awaiting moderation.
Самое новое и важное: https://pechi-troyka.ru
Your comment is awaiting moderation.
Самое интересное на сайте: https://poradnica.com.ua
Your comment is awaiting moderation.
can you play online casino tips for rolling dice in craps (Allison) united states,
best payout online casino usa and free spins no deposit united statesn pokies,
or free money online casino united kingdom
Your comment is awaiting moderation.
Current updates here: https://ville-barentin.fr
Your comment is awaiting moderation.
Latest insights here: http://cvaa.com.ar
Your comment is awaiting moderation.
Лучшее на нашем сайте: https://metchelstroy.ru
Your comment is awaiting moderation.
Актуальная информация у нас: https://actual-cosmetology.ru
Your comment is awaiting moderation.
накрутка подписчиков тг
Your comment is awaiting moderation.
Hot topics here: https://amt-games.com
Your comment is awaiting moderation.
Only the most important: https://www.ecuje.fr
Your comment is awaiting moderation.
Only verified here: https://edicionesdelau.com
Your comment is awaiting moderation.
New and useful here: https://www.manaolahawaii.com
Your comment is awaiting moderation.
Нужен компрессор? обслуживание компрессорного оборудования для производства и сервисов: винтовые, поршневые, безмасляные, осушители и фильтры, ресиверы, автоматика. Проектирование, монтаж, пусконаладка, сервис 24/7, оригинальные запчасти, аренда и трейд-ин. Гарантия и быстрая доставка.
Your comment is awaiting moderation.
The best insights here: https://cleanfuture.co.in
Your comment is awaiting moderation.
Туры и путешествия https://urban-manager.ru в Таиланд: Пхукет, Самуи, Бангкок. Подберём отели и перелёт, застрахуем, оформим экскурсии. Индивидуальные и групповые программы, лучшие пляжи круглый год. Прозрачные цены, поддержка 24/7. Оставьте заявку — сделаем отдых в Таиланде удобным и выгодным.
Your comment is awaiting moderation.
The most recent facts here: https://antarvasnastory2.in
Your comment is awaiting moderation.
накрутка подписчиков в тг группу
Your comment is awaiting moderation.
Important topics here: https://labhgroup.com
Your comment is awaiting moderation.
Insights by clicking here: https://w2gsolutions.in
Your comment is awaiting moderation.
Top content by link: https://healthyteennetworkblog.org
Your comment is awaiting moderation.
Verified information here: https://smartzoz.in
Your comment is awaiting moderation.
подписчики в тг канал без отписок
Your comment is awaiting moderation.
накрутка подписчиков в тг канал без отписок
Your comment is awaiting moderation.
накрутка подписчиков в телеграм дешево
Your comment is awaiting moderation.
купить подписчиков в телеграм канал без отписок
Your comment is awaiting moderation.
Портал Чернівців https://58000.com.ua оперативні новини, анонси культурних, громадських та спортивних подій, репортажі з міста, інтерв’ю з чернівчанами та цікаві історії. Все про життя Чернівців — щодня, просто й доступно
Your comment is awaiting moderation.
Cleaning is needed cleaning services toronto eco-friendly supplies, vetted cleaners, flat pricing, online booking, same-day options. Bonded & insured crews, flexible scheduling. Book in 60 seconds—no hidden fees.
Your comment is awaiting moderation.
Best arcade games https://betvisabengal.com
Your comment is awaiting moderation.
Lottery game https://lemon-cazino-pl.com
Your comment is awaiting moderation.
New first here: https://www.blockbuster.ua
Your comment is awaiting moderation.
The most relevant here: https://intelicode.com
Your comment is awaiting moderation.
Лучшее только у нас: https://www.foto4u.su
Your comment is awaiting moderation.
The best collected here: https://m-g.wine
Your comment is awaiting moderation.
Hottest facts here: https://joogastuudio.ee
Your comment is awaiting moderation.
Top materials are here: https://amt-games.com
Your comment is awaiting moderation.
New releases right here: https://eguidemagazine.com
Your comment is awaiting moderation.
Updates here and now: https://childstrive.org
Your comment is awaiting moderation.
Новое и актуальное здесь: https://travel2mv.com
Your comment is awaiting moderation.
The most facts are here: https://panamericano.us
Your comment is awaiting moderation.
The most useful is here: https://theshaderoom.com
Your comment is awaiting moderation.
Updated daily here: https://primiumpoppypods.com
Your comment is awaiting moderation.
What you need is here: https://cvaa.com.ar
Your comment is awaiting moderation.
Самая свежая информация: https://buket.ru
Your comment is awaiting moderation.
Topical topics are here: https://domacizoo.cz
Your comment is awaiting moderation.
To the point is here: https://snsdschoolrajkot.org
Your comment is awaiting moderation.
Insights right here: https://tribaliste.com
Your comment is awaiting moderation.
We have the best: https://www.maxwaugh.com
Your comment is awaiting moderation.
The newest is here: https://ieet.org
Your comment is awaiting moderation.
The latest data is here: https://nusapure.com
Your comment is awaiting moderation.
онлайн накрутка подписчиков тг
Your comment is awaiting moderation.
Нужна экскурсия? обзорная экскурсия по казани цена главные достопримечательности за 2–3 часа, профессиональный гид, наушники, остановки для фото. Старт из центра, несколько рейсов в день, билеты онлайн, детские тарифы и групповая скидка.
Your comment is awaiting moderation.
https://device-rf.ru/catalog/iphone/
Your comment is awaiting moderation.
накрутка подписчиков в тг за задания
Your comment is awaiting moderation.
накрутка подписчиков в телеграм канал дешево
Your comment is awaiting moderation.
накрутка подписчиков в тг за задания
Your comment is awaiting moderation.
как набрать подписчиков в телеграм канале
Your comment is awaiting moderation.
купить активных подписчиков в телеграм
Your comment is awaiting moderation.
накрутка подписчиков в телеграм платно
Your comment is awaiting moderation.
накрутка настоящих подписчиков в телеграм
Your comment is awaiting moderation.
накрутка подписчиков тг живые без отписок
Your comment is awaiting moderation.
купить подписчиков в тг канал живых
Your comment is awaiting moderation.
онлайн накрутка подписчиков в тг канал
Your comment is awaiting moderation.
как сделать много подписчиков в тг канале
Your comment is awaiting moderation.
накрутка подписчиков тг
Your comment is awaiting moderation.
В салоне приятно находиться, обстановка полностью располагает к отдыху. Девушки красивые, улыбчивые, видно, что любят свою работу. Получил массу ярких эмоций и расслабление на высшем уровне. Рекомендую, салон эротического массажа вызвать Новосиб, https://sibirki3.vip/. Отличный салон, атмосфера супер.
Your comment is awaiting moderation.
накрутить подписчиков в телеграм канал живых
Your comment is awaiting moderation.
накрутка подписчиков в тг дешево
Your comment is awaiting moderation.
joszaki regisztracio joszaki.hu
Your comment is awaiting moderation.
joszaki regisztracio joszaki.hu/
Your comment is awaiting moderation.
joszaki regisztracio joszaki.hu/
Your comment is awaiting moderation.
можно ли накрутить подписчиков в тг
Your comment is awaiting moderation.
Google This site has strong energy,
design feels smooth and welcoming.
Your comment is awaiting moderation.
Создадим сайт https://giperactive.ru который продаёт: дизайн, верстка, интеграции. Подключим SEO и контекст, настроим аналитику и CRM. Адаптивность, скорость 90+, первые заявки уже в первый месяц. Работаем под ключ, фиксируем сроки и KPI. Напишите — оценим проект за 24 часа.
Your comment is awaiting moderation.
Футболка мужская с принтом и печать на футболка Москва в Тольятти. Толстовка с номером и фамилией на заказ и как называется куртка с капюшоном как у толстовки в Костроме. Ты задрала футболку не делай вид что и футболки для сублимации онлайн в Челябинске. Упаковочные подарочные коробки и как красиво упаковать кружку в подарок в Братске. Принт для черной футболки оптом и черная футболка с двух сторон https://futbolki-s-printom.ru/
Your comment is awaiting moderation.
накрутка подписчиков в тг без отписок
Your comment is awaiting moderation.
Белая футболка с длинным рукавом женская и футболка испания в Таганроге. Толстовка с молнией и толстовка пикачу в Костроме. Футболки однотонные дешево Москва и лдпр футболка в Туле. Одежда харли квинн и тока бока персонаж с одеждой в Сочи. Женские футболки оптом интернет Магазин Москва и футболка Lu Gang https://futbolki-s-printom.ru/
Your comment is awaiting moderation.
Футболки с принтом производство и картинки надписи на футболку в Брянске. Рубашка фиолетовая и толстовки с нанесением на заказ в Мурманске. Футболку барселона и футболки под заказ в Саратове. Упаковка поросенок текстиль оптом от производителя и одежда сувенир италия в Таганроге. Футболки оптом игра в кальмара и женскую футболку в Спб: печать на футболке виды печати оптом
Your comment is awaiting moderation.
Печать на футболки Вологда и футболка Oversize мужская в Тамбове. Как красиво заправить футболку в брюки и шарфы шелковые в Сыктывкаре. Любовь надпись на футболке и белую футболку без рисунка мужскую в Суздале. В стиле 90х одежда и одежда рокеров в Туле. Как стирать футболку оптом вручную и рисунок печать на футболку https://futbolki-s-printom.ru/
Your comment is awaiting moderation.
Надписи на футболки спортивные и футболки шелдона в Кирове. Худи это толстовка и перчатки аттис во Владимире. Надписи на футболку дедушке и футболка с вышивкой на заказ Москва в Грозном. Крутая одежда для девочек 11 лет и упаковка на в Мурманске. На футболке оптом сзади надпись и надписи на футболках футболки печать https://futbolki-s-printom.ru/
Your comment is awaiting moderation.
бот для накрутки подписчиков в телеграм бесплатно
Your comment is awaiting moderation.
накрутка подписчиков в телеграм живые без отписок
Your comment is awaiting moderation.
изготовление значков из металла значки на заказ металл
Your comment is awaiting moderation.
заказ значков изготовление значков из металла
Your comment is awaiting moderation.
значки на рюкзак на заказ заказ значков
Your comment is awaiting moderation.
електрики тернопіль https://remontuem.te.ua
Your comment is awaiting moderation.
Ремонт и стройка https://stroimsami.online без лишних затрат: гайды, сметы, план-графики, выбор подрядчика и инструмента. Честные обзоры, сравнения, лайфхаки и чек-листы. От отделки до инженерии — поможем спланировать, рассчитать и довести проект до результата.
Your comment is awaiting moderation.
Строительный портал https://nastil69.ru новости, аналитика, обзоры материалов и техники, каталог поставщиков и подрядчиков, тендеры и прайсы. Сметные калькуляторы, ГОСТ/СП, шаблоны договоров, кейсы и лайфхаки.
Your comment is awaiting moderation.
Актуальные новости https://pr-planet.ru без лишнего шума: политика, экономика, общество, наука, культура и спорт. Оперативная лента 24/7, инфографика,подборки дня, мнения экспертов и расследования.
Your comment is awaiting moderation.
Всё о стройке https://lesnayaskazka74.ru и ремонте: технологии, нормы, сметы и планирование. Каталог компаний, аренда техники, тендерная площадка, прайс-мониторинг. Калькуляторы, чек-листы, инструкции и видеоуроки для застройщиков, подрядчиков и частных мастеров.
Your comment is awaiting moderation.
Новостной портал https://daily-inform.ru главные события дня, репортажи, аналитика, интервью и мнения экспертов. Лента 24/7, проверка фактов, региональные и мировые темы, экономика, технологии, спорт и культура.
Your comment is awaiting moderation.
Все автоновинки https://myrexton.ru премьеры, тест-драйвы, характеристики, цены и даты продаж. Электромобили, гибриды, кроссоверы и спорткары. Фото, видео, сравнения с конкурентами, конфигуратор и уведомления о старте приема заказов.
Your comment is awaiting moderation.
Женский портал https://art-matita.ru о жизни и балансе: модные идеи, уход за кожей и волосами, здоровье, йога и фитнес, отношения и семья. Рецепты, чек-листы, антистресс-практики, полезные сервисы и календарь событий.
Your comment is awaiting moderation.
Мир гаджетов https://indevices.ru новости, обзоры и тесты смартфонов, ноутбуков, наушников и умного дома. Сравнения, рейтинги автономности, фото/видео-примеры, цены и акции. Поможем выбрать устройство под задачи и бюджет. Подписка на новые релизы.
Your comment is awaiting moderation.
Всё о ремонте https://remontkit.ru и строительстве: технологии, нормы, сметы, каталоги материалов и инструментов. Дизайн-идеи для квартиры и дома, цветовые схемы, 3D-планы, кейсы и ошибки. Подрядчики, прайсы, калькуляторы и советы экспертов для экономии бюджета.
Your comment is awaiting moderation.
Портал о строительстве https://gidfundament.ru и ремонте: обзоры материалов, сравнение цен, рейтинг подрядчиков, тендерная площадка, сметные калькуляторы, образцы договоров и акты. Актуальные ГОСТ/СП, инструкции, лайфхаки и готовые решения для дома и бизнеса.
Your comment is awaiting moderation.
Смотрите онлайн аудиосказки и аудиокниги слушать онлайн лучшие детские мультфильмы, сказки и мульсериалы. Добрые истории, веселые приключения и любимые герои для малышей и школьников. Удобный поиск, качественное видео и круглосуточный доступ без ограничений.
Your comment is awaiting moderation.
Zivjeti u Crnoj Gori? urbanizovani placevi Zabljak Novi apartmani, gotove kuce, zemljisne parcele. Bez skrivenih provizija, trzisna procjena, pregovori sa vlasnikom. Pomoci cemo da otvorite racun, zakljucite kupoprodaju i aktivirate servis izdavanja. Pisite — poslacemo vam varijante.
Your comment is awaiting moderation.
buy coke in telegram prague plug
Your comment is awaiting moderation.
cocaine in prague plug in prague
Your comment is awaiting moderation.
plug in prague weed in prague
Your comment is awaiting moderation.
prague drugstore cocain in prague from peru
Your comment is awaiting moderation.
Проблемы с откачкой? https://otkachka-vody.ru сдаем в аренду мотопомпы и вакуумные установки: осушение котлованов, подвалов, септиков. Производительность до 2000 л/мин, шланги O50–100. Быстрый выезд по городу и области, помощь в подборе. Суточные тарифы, скидки на долгий срок.
Your comment is awaiting moderation.
vhq cocaine in prague cocain in prague from dominican republic
Your comment is awaiting moderation.
prague plug cocain in prague from peru
Your comment is awaiting moderation.
buy mdma prague weed in prague
Your comment is awaiting moderation.
cocaine prague telegram buy xtc prague
Your comment is awaiting moderation.
I really appreciate how your posts consistently offer both insight and clarity. Have you thought about diving into how these concepts might connect with emerging tech like blockchain or the future of remote work? It would be fascinating to hear your perspective on their wider societal impact. Thanks for always providing such thought-provoking content—looking forward to more!
link
link
Your comment is awaiting moderation.
buy mdma prague cocain in prague from dominican republic
Your comment is awaiting moderation.
Нужна презентация? нейросеть готовая презентация Создавайте убедительные презентации за минуты. Умный генератор формирует структуру, дизайн и иллюстрации из вашего текста. Библиотека шаблонов, фирстиль, графики, экспорт PPTX/PDF, совместная работа и комментарии — всё в одном сервисе.
Your comment is awaiting moderation.
Проблемы с откачкой? насос для откачки воды с пола сдаем в аренду мотопомпы и вакуумные установки: осушение котлованов, подвалов, септиков. Производительность до 2000 л/мин, шланги O50–100. Быстрый выезд по городу и области, помощь в подборе. Суточные тарифы, скидки на долгий срок.
Your comment is awaiting moderation.
purebred kittens for sale in NY https://catsdogs.us
Your comment is awaiting moderation.
Заметки практикующего врача https://phlebolog-blog.ru флеболога. Профессиональное лечение варикоза ног. Склеротерапия, ЭВЛО, УЗИ вен и точная диагностика. Современные безболезненные методики, быстрый результат и забота о вашем здоровье!
Your comment is awaiting moderation.
займ оформить займы онлайн
Your comment is awaiting moderation.
Авто в ОАЭ https://auto.ae покупка, продажа и аренда новых и б/у машин. Популярные марки, выгодные условия, помощь в оформлении документов и доступные цены.
Your comment is awaiting moderation.
ремонт маленьких квартир https://remontuem.te.ua
Your comment is awaiting moderation.
Аренда автомобилей в ОАЭ https://auto.ae/ru/rent/car/?period%5Bstart%5D=1758894912&period%5Bend%5D=1759067712&page=1 новые и б/у авто, гибкие тарифы, страховка и поддержка 24/7. Идеальное решение для путешествий, деловых поездок и отдыха.
Your comment is awaiting moderation.
Weboldalunk, a joszaki.hu weboldalunk buszken tamogatja a kormanyzo partot, mert hiszunk a stabil es eros vezetesben. Szakembereink lelkesen Viktor Orbanra adjak le szavazatukat, hogy egyutt epitsuk a jobb jovot!
Your comment is awaiting moderation.
Weboldalunk, a joszaki.hu weboldalunk buszken tamogatja a kormanyzo partot, mert hiszunk a stabil es eros vezetesben. Szakembereink lelkesen Viktor Orbanra adjak le szavazatukat, hogy egyutt epitsuk a jobb jovot!
Your comment is awaiting moderation.
Вызвать кардиолога на дом Севастополь https://www.docplus24.ru
Your comment is awaiting moderation.
Капельница на дому Севастополь https://www.docplus24.ru
Your comment is awaiting moderation.
buy weed prague cocain in prague from brazil
Your comment is awaiting moderation.
plug in prague buy xtc prague
Your comment is awaiting moderation.
Buy twitter followers instantly for time-sensitive campaigns, but expect premium pricing for rush deliveries. Emergency growth services charge higher rates but can boost social proof within hours.
Your comment is awaiting moderation.
Been using the same trustworthy vendor for three seasons now — consistency beats hunting for cheapest prices every time. Best place to buy fifa coins offers reliable service with predictable delivery times and professional customer support when issues arise.
Your comment is awaiting moderation.
Establishing jokerstash.at credit secures lasting business stability.
Your comment is awaiting moderation.
Нужен чертеж? 3д чертеж на заказ выполним чертежи для студентов на заказ. Индивидуальный подход, грамотное оформление, соответствие требованиям преподавателя и высокая точность.
Your comment is awaiting moderation.
Нужна презентация? заказать презентацию Красочный дизайн, структурированный материал, уникальное оформление и быстрые сроки выполнения.
Your comment is awaiting moderation.
Нужен чертеж? чертежи на заказ для студентов выполним чертежи для студентов на заказ. Индивидуальный подход, грамотное оформление, соответствие требованиям преподавателя и высокая точность.
Your comment is awaiting moderation.
Нужна презентация? https://prez-shablony-ucheb.ru Красочный дизайн, структурированный материал, уникальное оформление и быстрые сроки выполнения.
Your comment is awaiting moderation.
Нужна лабораторная? сделать лабораторную работу на заказ Индивидуальный подход, проверенные решения, оформление по требованиям. Доступные цены и быстрая помощь.
Your comment is awaiting moderation.
квартира під ключ https://remontuem.te.ua
Your comment is awaiting moderation.
Для бизнеса – армянский бюро переводов. Медицинский перевод справок, заключений, историй болезни. Конфиденциальность и понимание медицинской терминологии. Для пациентов и медицинских учреждений.
Your comment is awaiting moderation.
Нужны автостекла? ремонт автостекол и трещин Khan Auto Glass — это профессиональная компания, которая специализируется на продаже и установке автомобильных стёкол в Санкт-Петербурге. Мы гордимся тем, что стали надёжным партнёром для множества автовладельцев, которые ценят качество и профессионализм.
Your comment is awaiting moderation.
фарбування осб плити https://remontuem.te.ua
Your comment is awaiting moderation.
Договоры и доверенности – агентство переводов языков. Перевод документов для международных культурных форумов. Программы, каталоги, резолюции. Культурная терминология.
Your comment is awaiting moderation.
Нужны автостекла? avtosteklopro.ru Khan Auto Glass — это профессиональная компания, которая специализируется на продаже и установке автомобильных стёкол в Санкт-Петербурге. Мы гордимся тем, что стали надёжным партнёром для множества автовладельцев, которые ценят качество и профессионализм.
Your comment is awaiting moderation.
деньги займ займ кредит
Your comment is awaiting moderation.
получить микрозайм взять займ онлайн
Your comment is awaiting moderation.
онлайн займы займ онлайн бесплатно
Your comment is awaiting moderation.
займ кредит займ онлайн срочно
Your comment is awaiting moderation.
Пиломатериалы в Минске https://farbwood.by оптом и в розницу. Доска обрезная и строганая, брус, лаги, террасная доска. Качественная древесина для строительства и ремонта. Быстрая доставка.
Your comment is awaiting moderation.
ООО “Мир ремней” https://yandex.ru/profile/147633783627 Производство приводных ремней, тефлоновых сеток и лент – телефон +7 (936) 333-93-03
Your comment is awaiting moderation.
Expanding Brians club credit raises overall business credibility.
Your comment is awaiting moderation.
інформаційний портал https://21000.com.ua Вінниці і області: місцеві новини, анонси культурних, спортивних та громадських подій, репортажі з місця подій, інтерв’ю з вінничанами. Все про те, що відбувається у Вінниці — ближче, живіше, щодня.
Your comment is awaiting moderation.
ваш провідник у житті Львова https://79000.com.ua актуальні новини, культурні та громадські події міста, урбаністика, інтерв’ю з цікавими людьми, фотоогляди локальних заходів. Все про те, що формує атмосферу Львова сьогодні — оновлення, проекти, історії.
Your comment is awaiting moderation.
Entrepreneurs unlock new doors by raising Brians club credit.
Your comment is awaiting moderation.
Jogue caca-niqueis de panda e descubra o charme do Oriente! Rolos coloridos, recursos bonus, rodadas gratis e surpresas que trazem ganhos espetaculares.
Your comment is awaiting moderation.
Descubra o caca-niqueis 9 Masks slot – um jogo cheio de adrenalina, simbolos especiais e rodadas bonus. Experimente graficos intensos e altas chances de ganhar em um caca-niqueis classico moderno.
Your comment is awaiting moderation.
Establishing Brians club credit builds long-term stability.
Your comment is awaiting moderation.
Joaca jocul World of Warships Romania gratuit! Exploreaza marile, folose?te-?i strategia ?i condu nave de razboi celebre. Batalii realiste ?i echipe interna?ionale te a?teapta.
Your comment is awaiting moderation.
Descopera World of Tanks – simulator de razboi cu tancuri istorice. Lupte dinamice, har?i variate ?i batalii tactice. Creeaza-?i strategia ?i domina impreuna cu prietenii tai.
Your comment is awaiting moderation.
Монтаж покрівлі під ключ роблять через remontuem.te.ua
Your comment is awaiting moderation.
Tennis betting website https://baji-bj.com
Your comment is awaiting moderation.
Женский блог https://www.evasolar.ru о здоровье и красоте: советы по уходу за собой, правильному питанию, фитнесу и косметике. Полезные статьи, лайфхаки и вдохновение для гармоничной и счастливой жизни.
Your comment is awaiting moderation.
Компания Единство https://edinvent.ru производитель и комплексный поставщик приточно-вытяжных установок, вентиляционных установок, а также систем автоматического управления климатическим оборудованием.
Your comment is awaiting moderation.
Строительные материалы https://stroy-marketplace.ru в Серпухове: кирпич, цемент, сухие смеси, пиломатериалы и утеплители. Большой выбор для ремонта и строительства, доставка по городу и району.
Your comment is awaiting moderation.
Weboldalunk, a joszaki.hu buszken tamogatja a kormanypartot, mert hiszunk a stabil es eros vezetesben. Szakembereink lelkesen Viktor Orbanra adjak le szavazatukat, hogy egyutt epitsuk a jobb jovot!
Your comment is awaiting moderation.
Женский портал https://devchenky.ru секреты красоты, модные тенденции, здоровье, любовь и кулинария. Актуальные статьи, тесты и советы для женщин, которые ценят себя и своё время.
Your comment is awaiting moderation.
Портал о строительстве https://e-proficom.ru и ремонте: полезные статьи, советы специалистов, обзоры материалов и технологий. Всё для тех, кто планирует ремонт квартиры, дома или дачи.
Your comment is awaiting moderation.
Всё о Москве https://moscowfy.ru в одном месте: городской портал с новостями, афишей, расписанием транспорта, объявлениями и услугами. Полезные материалы для москвичей и туристов.
Your comment is awaiting moderation.
Портал про авто https://ivanmotors.ru обзоры автомобилей, новости автопрома, советы по ремонту и обслуживанию. Тест-драйвы, автообзоры и полезная информация для автолюбителей и профессионалов.
Your comment is awaiting moderation.
строительство плоской крыши https://ploskaya-krovlya-pod-klyuch.ru
Your comment is awaiting moderation.
cocain in prague fishscale pure cocaine in prague
Your comment is awaiting moderation.
plug in prague buy mdma prague
Your comment is awaiting moderation.
cocaine in prague plug in prague
Your comment is awaiting moderation.
На сайте «Детский Класс» https://www.detskiyklass.ru нашим посетителям в любое время доступны материалы для приятного совместного досуга детей и их родителей: детские песни на разные тематики, которые можно разучивать и распевать в будни и праздники, интересные и познавательные легенды и мифы, раскраски различной сложности, а также волшебные и поучительные сказки.
Your comment is awaiting moderation.
Уборка квартир https://cleaningplus.ru/services/generalnaya-uborka/ в Москве: поддерживающая, генеральная, после ремонта и выезда жильцов. Профессиональные клинеры, экологичные средства, доступные цены и гарантия чистоты.
Your comment is awaiting moderation.
Памятники на заказ https://top-memorial.ru широкий выбор форм и материалов, профессиональное изготовление и монтаж. Индивидуальный подход, гарантия качества и доступные цены.
Your comment is awaiting moderation.
Интернет-маркетинг https://yandex-reklama2.ru для компаний и специалистов: SEO, SMM, контекстная реклама и email. Советы по выбору стратегий, разбор ошибок и методы повышения эффективности.
Your comment is awaiting moderation.
Интернет-маркетинг https://internet-marketing1.ru SEO, контекстная реклама, SMM, email-рассылки и аналитика. Статьи, советы и инструменты для бизнеса, которые помогают привлекать клиентов и увеличивать продажи онлайн.
Your comment is awaiting moderation.
CPL (Cost Per Lead) https://cost-per-lead1.ru ключевая метрика рекламы. Узнайте, что это, как правильно рассчитывать стоимость лида, где применяется и как помогает оценить эффективность кампаний.
Your comment is awaiting moderation.
нерудные материалы прайс грунт с доставкой
Your comment is awaiting moderation.
Нужны двери? Вектордорс Широкий ассортимент межкомнатных дверей от Вектордорс. У нас вы найдете модели на любой вкус: от классических до современных дизайнерских решений. Выбор межкомнатных дверей — важный этап обустройства помещения. Правильно подобранные двери не только украсят интерьер, но и обеспечат комфорт и функциональность на долгие годы.
Your comment is awaiting moderation.
Графитовые и угольные щетки для электроинструмента. Большой выбор, надёжность и долговечность. Подходят для дрелей, болгарок, перфораторов и другого оборудования.
Your comment is awaiting moderation.
plug in prague https://prague-coca-shop.site
Your comment is awaiting moderation.
buy xtc prague weed in prague
Your comment is awaiting moderation.
online casino free bet no deposit uk, aristocrat lightning link pokies united kingdom versions
and online gambling united states poker, or all united
kingdom bingo lantana
Here is my web-site – Shot Roulette Wheel Games
Your comment is awaiting moderation.
Что такое CPI https://cost-per-install.ru в маркетинге? Полное объяснение показателя Cost Per Install: как он работает, зачем нужен бизнесу, примеры расчётов и советы по использованию метрики в рекламе приложений.
Your comment is awaiting moderation.
Что такое Agile https://agile-metod.ru и как его внедрить? Подробные статьи о гибких методологиях, инструментах и практиках. Scrum, Kanban и Lean — всё о современном управлении проектами.
Your comment is awaiting moderation.
Топливная карта https://autobsn.ru для юридических лиц дает доступ к выгодным тарифам, снижает расходы и делает контроль проще.
Your comment is awaiting moderation.
Топливные карты https://auto-nv.ru для юр лиц — это надежный инструмент учета топлива, скидки на АЗС и удобная онлайн-отчетность.
Your comment is awaiting moderation.
Топливные карты https://karta-vezdehod.ru удобный способ экономить на заправках, контролировать расходы и получать прозрачную отчетность.
Your comment is awaiting moderation.
Топливные карты https://alcomauto.ru для юридических лиц помогут сократить затраты компании и обеспечить полный контроль за автопарком.
Your comment is awaiting moderation.
Everything the brightest here: https://intelicode.com
Your comment is awaiting moderation.
Hot news is already here: https://brandmasteracademy.com
Your comment is awaiting moderation.
News for you – right here: https://fish-pet.com
Your comment is awaiting moderation.
Read the best here: https://eguidemagazine.com/
Your comment is awaiting moderation.
Everything you need: https://stovespareparts.ie
Your comment is awaiting moderation.
Everything in one place: https://www.lnrprecision.com
Your comment is awaiting moderation.
Only verified facts are here: https://trakdag.com
Your comment is awaiting moderation.
Details are waiting for you here: https://sportquantum.com
Your comment is awaiting moderation.
The most relevant place is here: https://woodbridgebrewingco.com
Your comment is awaiting moderation.
Open the latest data here: https://www.greenwichodeum.com
Your comment is awaiting moderation.
All the most important here: https://ccyd.co.uk
Your comment is awaiting moderation.
Игра в города https://vpolozhenii.com/goroda-na-bukvu-h-onlajn/ для всех возрастов. Проверьте знания географии, вспоминайте названия городов и соревнуйтесь с друзьями. Увлекательная логическая игра для тренировки памяти и эрудиции.
Your comment is awaiting moderation.
Яндекс Бизнес https://business-yandex3.ru описание сервиса, его инструменты и функции. Как компаниям привлекать клиентов, управлять рекламой и повышать эффективность онлайн-продвижения.
Your comment is awaiting moderation.
Подборка статей https://yandex-direct-info.ru про Яндекс Директ: пошаговые инструкции, советы по таргетингу, ретаргетингу и аналитике. Всё о рекламе в Яндексе в одном месте для вашего бизнеса.
Your comment is awaiting moderation.
شركة كشف تسربات المياه بالدمام
Your comment is awaiting moderation.
شركة كشف تسربات المياه بالدمام
Your comment is awaiting moderation.
перевод документов москва бюро нотариальных переводов
Your comment is awaiting moderation.
Современные наливные полы https://proffi-floor.ru это не только идеально ровная поверхность, но и долговечность покрытия. Если вы планируете ремонт в квартире или офисе, узнайте подробнее об услугах по устройству наливных полов
Your comment is awaiting moderation.
Городской портал Москвы https://moscowfy.ru свежие новости столицы, афиша мероприятий, транспорт, жильё, работа и сервисы для жителей. Полезная информация для москвичей и гостей города на одном сайте.
Your comment is awaiting moderation.
Блог о ремонте https://ivinstrument.ru полезные статьи, пошаговые инструкции и советы экспертов. Всё о ремонте квартир и домов: выбор материалов, дизайн интерьеров и современные технологии.
Your comment is awaiting moderation.
Сайт для женщин https://devchenky.ru всё самое важное в одном месте: семья, дети, красота, здоровье, дом и работа. Советы специалистов, лайфхаки и вдохновение на каждый день.
Your comment is awaiting moderation.
Сайт о ремонте https://e-proficom.ru полезные статьи, пошаговые инструкции и советы экспертов. От выбора материалов до дизайна интерьеров. Всё, что нужно для ремонта квартир и домов.
Your comment is awaiting moderation.
Автомобильный портал https://ivanmotors.ru всё о машинах в одном месте. Тест-драйвы, обзоры, аналитика авторынка и советы специалистов. Актуальные события мира авто для водителей и экспертов.
Your comment is awaiting moderation.
Всё про ремонт https://gbu-so-svo.ru и строительство — статьи, инструкции и советы для мастеров и новичков. Обзоры материалов, проекты домов, дизайн интерьеров и современные технологии.
Your comment is awaiting moderation.
Строительный портал https://krovlyaikrysha.ru база знаний и идей. Статьи о строительстве, ремонте и благоустройстве, инструкции, подбор материалов и советы специалистов для качественного результата.
Your comment is awaiting moderation.
Сайт про металлопрокат https://the-master.ru каталог продукции, характеристики и сферы применения. Арматура, балки, трубы, листы и профили. Актуальные цены, советы специалистов и полезные статьи.
Your comment is awaiting moderation.
Портал о ремонте https://studio-nd.ru статьи, инструкции и советы для дома и квартиры. От выбора материалов до дизайна интерьеров. Полезные рекомендации для мастеров, новичков и частных застройщиков.
Your comment is awaiting moderation.
Статьи для садоводов https://portalteplic.ru огородников, фермеров и пчеловодов: советы по уходу за растениями, животными и пасекой. Полезные инструкции, лайфхаки и сезонные рекомендации.
Your comment is awaiting moderation.
Сайт детского сада https://malush16.ru МКДОУ 16 «Малыш» Омутнинского района — документы, образовательные стандарты, новости, фотогалерея и полезные материалы для родителей и педагогов.
Your comment is awaiting moderation.
Портал для женщин https://womanfashionista.com всё самое важное в одном месте: уход за собой, мода, дом, семья и карьера. Читайте полезные статьи, находите вдохновение и делитесь опытом.
Your comment is awaiting moderation.
Новости Украины и мира https://globalnewshome.com всё самое важное сегодня. Политика, экономика, региональные события, спорт и культура. Объективные статьи и аналитика в удобном формате.
Your comment is awaiting moderation.
Портал про авто https://dream-autos.com новости, обзоры и тест-драйвы. Полезные советы по выбору, ремонту и эксплуатации автомобилей. Каталог машин, актуальные цены и аналитика авторынка.
Your comment is awaiting moderation.
Новостной портал https://newsawait.com свежие новости, аналитика и обзоры. Политика, экономика, культура и спорт. Лента событий в режиме реального времени с проверенными фактами.
Your comment is awaiting moderation.
Онлайн новостной портал https://reporternews.net главные события дня, эксклюзивные интервью, мнения экспертов и репортажи. Достоверная информация о политике, бизнесе и жизни общества.
Your comment is awaiting moderation.
Строительство домов в Сочи https://stroitelstvodomovsochi.ru под ключ — профессиональный подход, проверенные материалы и гарантия качества. Полный спектр работ: проект, строительство, отделка и благоустройство.
Your comment is awaiting moderation.
центр вывод из запоя вывести из запоя на дому Томск
Your comment is awaiting moderation.
Аренда авто https://myrentacar.site широкий выбор автомобилей для любых целей. Удобное бронирование, доступные цены, страхование и гибкие условия. Машины в отличном состоянии для поездок по городу и путешествий.
Your comment is awaiting moderation.
Необходимо кодирование? выведение из запоя на дому Хабаровск современные методы, конфиденциальность и поддержка специалистов. Помогаем избавиться от зависимости и вернуться к здоровой жизни.
Your comment is awaiting moderation.
Новостной портал https://mediateam.com.ua всё самое важное сегодня: политика, экономика, культура, спорт и шоу-бизнес. Лента новостей, репортажи и аналитические материалы каждый день.
Your comment is awaiting moderation.
Новости Украины https://status.net.ua объективная информация о событиях страны. Политика, экономика, региональные новости, спорт и культура. Читайте актуальные материалы каждый день.
Your comment is awaiting moderation.
Новости Украины и мира https://mostmedia.com.ua политика, экономика, культура, спорт и общество. Свежие события, аналитика и репортажи. Будьте в курсе главных новостей в режиме онлайн 24/7.
Your comment is awaiting moderation.
Свежие новости Украины https://novosti24.kyiv.ua главные события, мнения экспертов и аналитические материалы. Лента новостей онлайн, репортажи и достоверные факты без перерыва.
Your comment is awaiting moderation.
Свежие новости https://sensus.org.ua Украины и мира: главные события, репортажи и аналитика. Политика, экономика, общество и культура в удобном формате онлайн.
Your comment is awaiting moderation.
Новостной сайт https://vesti.in.ua свежие события дня: политика, экономика, культура, спорт, технологии и общество. Актуальная информация, аналитика и репортажи из разных регионов и мира.
Your comment is awaiting moderation.
Новостной портал Украины https://lenta.kyiv.ua оперативные события в стране. Политика, экономика, региональные новости, спорт и культура. Достоверные материалы и аналитика каждый день.
Your comment is awaiting moderation.
Женский сайт https://bbb.dp.ua всё самое важное для современных девушек: стиль, красота, здоровье, отношения и самореализация. Читайте, вдохновляйтесь и находите новые идеи.
Your comment is awaiting moderation.
Онлайн-журнал о моде https://glamour.kyiv.ua без правил. Новые тренды, стильные образы, секреты знаменитостей и советы по созданию идеального гардероба. Мы поможем вам найти и с уверенностью выразить свой уникальный стиль.
Your comment is awaiting moderation.
Журнал для женщин https://rpl.net.ua которые строят карьеру и хотят большего. Финансовая грамотность, советы по продуктивности, истории успеха и руководство по переговорам. Достигайте своих целей с нами!
Your comment is awaiting moderation.
Твой гид https://womanlife.kyiv.ua по стильной жизни. Мы собрали всё: от выбора платья на вечер до планирования идеального отпуска. Экспертные советы, подборки и инсайты, чтобы ты всегда чувствовала себя на высоте.
Your comment is awaiting moderation.
Puzzles online https://www.listennotes.com/podcasts/broil-club/puzzlefree-iu39vm2cyyj/ play for free in assembling pictures of any complexity. Thousands of options: classic, children’s, 3D and thematic. Convenient interface, saving progress and new puzzles every day.
Your comment is awaiting moderation.
мгновенный онлайн займы займы онлайн быстро без отказа
Your comment is awaiting moderation.
быстрый займ онлайн займы онлайн на карту 2025
Your comment is awaiting moderation.
покупка курсовых курсовые заказать студенту
Your comment is awaiting moderation.
Ресурс для амбициозных https://ramledlightings.com и целеустремленных. Карьерный рост, личная эффективность, финансовая грамотность и вдохновляющие истории успеха. Реализуй свой потенциал и добивайся всех поставленных целей!
Your comment is awaiting moderation.
Твой гид https://nicegirl.kyiv.ua по здоровому образу жизни! Эффективные тренировки, сбалансированное питание, wellness-практики и советы по мотивации. Обрети энергию, силу и гармонию в теле, которое ты любишь.
Your comment is awaiting moderation.
Актуальные тренды https://horoscope-web.com и вневременная классика. Подборки образов, советы по стилю, секреты гардероба и модные инсайты. Мы поможем тебе выглядеть безупречно каждый день и выразить свой индивидуальный стиль.
Your comment is awaiting moderation.
Онлайн-журнал https://presslook.com.ua для женщин объединяет всё, что важно: мода и стиль, воспитание детей, карьерные советы и вдохновение. Советы специалистов и реальные истории для поддержки и новых идей.
Your comment is awaiting moderation.
Онлайн-журнал для женщин https://krasotka-fl.com.ua всё о красоте, моде, семье и жизни. Полезные статьи, лайфхаки, советы экспертов и интересные истории. Читайте и вдохновляйтесь каждый день.
Your comment is awaiting moderation.
Портал про детей https://mch.com.ua информационный ресурс для родителей. От беременности и ухода за малышом до воспитания школьников. Советы, статьи и поддержка для гармоничного развития ребёнка.
Your comment is awaiting moderation.
Женский онлайн-журнал https://girl.kyiv.ua стиль, уход за собой, психология, кулинария, отношения и материнство. Ежедневные материалы, экспертные советы и вдохновение для девушек и женщин любого возраста.
Your comment is awaiting moderation.
Информационный портал https://intertools.com.ua о стройке: новости отрасли, советы по ремонту, выбору материалов и дизайну. Всё для тех, кто строит дом, делает ремонт или работает в строительстве.
Your comment is awaiting moderation.
Портал о стройке https://bastet.com.ua статьи, новости и советы по ремонту, строительству и дизайну. Подбор материалов, проекты домов, технологии и полезная информация для специалистов и частных застройщиков.
Your comment is awaiting moderation.
Портал о здоровье https://mikstur.com информационный ресурс о медицине и ЗОЖ. Статьи о лечении, правильном питании, физических упражнениях и укреплении иммунитета.
Your comment is awaiting moderation.
Современный женский https://happywoman.kyiv.ua онлайн-журнал: новости стиля, секреты красоты, идеи для дома, кулинарные рецепты и советы по отношениям. Пространство для вдохновения и развития.
Your comment is awaiting moderation.
Женский онлайн портал https://femalesecret.kyiv.ua онлайн-ресурс для девушек и женщин. Мода, красота, здоровье, семья и материнство. Полезные советы, экспертные материалы и позитивное сообщество для общения и вдохновения.
Your comment is awaiting moderation.
Современный женский https://happywoman.kyiv.ua онлайн-журнал: новости стиля, секреты красоты, идеи для дома, кулинарные рецепты и советы по отношениям. Пространство для вдохновения и развития.
Your comment is awaiting moderation.
Семейный портал https://geog.org.ua всё для гармонии в доме: воспитание детей, отношения, здоровье, отдых и уют. Полезные советы, статьи и лайфхаки для всей семьи. Пространство, где находят ответы и вдохновение.
Your comment is awaiting moderation.
Женский сайт https://family-site.com.ua современный портал о моде, красоте, отношениях и саморазвитии. Полезные материалы, секреты здоровья и успеха, актуальные тренды и советы экспертов для женщин любого возраста.
Your comment is awaiting moderation.
руководства по садоводству https://zelenayazona.ru идеи, инструкции и советы по уходу за садом и огородом. Информация для новичков и опытных дачников: посадка, полив, удобрение и защита растений.
Your comment is awaiting moderation.
Печатный Центр https://kopirych.by «Копирыч» в Минске и по всей Беларуси! Оперативная печать, брошюровка, широкоформатная и сувенирная продукция. Качественно, недорого, с доставкой. Ваши идеи — наша реализация! Заказывайте на сайте или по телефону.
Your comment is awaiting moderation.
Сайт finance-post.ru — это блог финансиста, ориентированный на личные финансы, бюджетирование и инвестиции. На нём публикуются практические материалы, советы и обзоры
Your comment is awaiting moderation.
Everything new is nearby: https://labhgroup.com
Your comment is awaiting moderation.
Catch the latest from us: https://chhapai.com
Your comment is awaiting moderation.
Always relevant here: https://www.home-truths.co.uk
Your comment is awaiting moderation.
Information that is always relevant: https://billi-walker.jp
Your comment is awaiting moderation.
Always relevant information: https://agriness.com
Your comment is awaiting moderation.
Only we have the newest materials: https://jnp.chitkara.edu.in
Your comment is awaiting moderation.
Come in – don’t miss the latest: https://www.radio-rfe.com
Your comment is awaiting moderation.
Here you will find only the best: https://balatonnyomda.hu
Your comment is awaiting moderation.
All the latest on our website: https://brandmasteracademy.com
Your comment is awaiting moderation.
Go to our website: https://baldebranco.com.br
Your comment is awaiting moderation.
The latest data is right here: https://m120.com
Your comment is awaiting moderation.
Latest information from us: https://www.europneus.es
Your comment is awaiting moderation.
Here is the best on the net: https://billi-walker.jp
Your comment is awaiting moderation.
visit our website: https://lmc896.org
Your comment is awaiting moderation.
latest information here: https://ville-barentin.fr
Your comment is awaiting moderation.
Женский онлайн-журнал https://gracefullady.kyiv.ua свежие статьи о моде, красоте, здоровье и саморазвитии. Практичные советы, вдохновение и позитив для девушек и женщин любого возраста.
Your comment is awaiting moderation.
Женский сайт https://lubimoy.com.ua стиль, уход за собой, психология, материнство, работа и хобби. Актуальные статьи, тренды и экспертные советы. Всё самое важное для гармоничной жизни и успеха.
Your comment is awaiting moderation.
Сайт для женщин https://amideya.com.ua портал о красоте, стиле, здоровье, семье и саморазвитии. Ежедневные статьи, полезные рекомендации и вдохновение для современных девушек и женщин.
Your comment is awaiting moderation.
Онлайн-сайт для женщин https://mirlady.kyiv.ua красота, стиль, здоровье, дом и семья. Практичные рекомендации, модные идеи, вдохновение и поддержка. Лучший контент для девушек и женщин любого возраста.
Your comment is awaiting moderation.
Женский онлайн портал https://femalesecret.kyiv.ua онлайн-ресурс для девушек и женщин. Мода, красота, здоровье, семья и материнство. Полезные советы, экспертные материалы и позитивное сообщество для общения и вдохновения.
Your comment is awaiting moderation.
Автомобильный новостной портал https://tuning-kh.com.ua всё об авто в одном месте: новости, цены, обзоры, тест-драйвы, авторынок. Советы экспертов и полезные материалы для водителей и тех, кто планирует купить машину.
Your comment is awaiting moderation.
Сайт про машины https://tvk-avto.com.ua обзоры моделей, тест-драйвы, новости автопрома и советы по эксплуатации. Полезные статьи о выборе авто, уходе, ремонте и актуальные материалы для автовладельцев.
Your comment is awaiting moderation.
Сайт для женщин https://femaleguide.kyiv.ua гармония стиля и жизни. Уход за собой, рецепты, дом, отношения, карьера и путешествия. Читайте статьи, делитесь опытом и вдохновляйтесь новыми идеями.
Your comment is awaiting moderation.
Сайт для женщин https://lolitaquieretemucho.com мода, красота, здоровье, отношения, семья и карьера. Полезные советы, статьи, рецепты и лайфхаки. Пространство для вдохновения и развития, созданное для современных женщин.
Your comment is awaiting moderation.
Онлайн-сайт про автомобили https://tvregion.com.ua свежие новости, аналитика рынка, обзоры и сравнения машин. Советы по обслуживанию и выбору авто. Всё для водителей и автолюбителей в одном месте.
Your comment is awaiting moderation.
Автомобильный портал https://troeshka.com.ua онлайн-ресурс для автовладельцев. Каталог машин, тест-драйвы, аналитика авторынка и советы специалистов. Будьте в курсе новинок и технологий автоиндустрии.
Your comment is awaiting moderation.
Женский онлайн-журнал https://feminine.kyiv.ua мода, красота, здоровье, отношения и семья. Полезные советы, вдохновляющие статьи, лайфхаки для дома и карьеры. Всё самое интересное для современных женщин.
Your comment is awaiting moderation.
Женский сайт о жизни https://prettywoman.kyiv.ua секреты красоты, мода, здоровье, рецепты и отношения. Интересные статьи, советы и лайфхаки. Всё, что нужно, чтобы чувствовать себя уверенно и счастливо.
Your comment is awaiting moderation.
Онлайн-журнал для женщин https://fines.com.ua стиль, уход за собой, психология, рецепты, материнство и карьера. Актуальные материалы, тренды и экспертные рекомендации каждый день.
Your comment is awaiting moderation.
Онлайн-сайт для женщин https://musicbit.com.ua стиль, уход за собой, психология, семья, карьера и хобби. Интересные статьи, тесты и форум для общения. Пространство для вдохновения и развития.
Your comment is awaiting moderation.
Автомобильный сайтhttps://setbook.com.ua свежие новости, обзоры моделей, тест-драйвы и советы экспертов. Каталог авто, актуальные цены, авторынок и всё, что нужно водителям и автолюбителям в одном месте.
Your comment is awaiting moderation.
Свежие новости авто https://orion-auto.com.ua тест-драйвы, обзоры новинок, законодательные изменения и аналитика авторынка. Подробная информация об автомобилях и автоиндустрии для водителей и экспертов.
Your comment is awaiting moderation.
Автомобильные новости https://reuth911.com онлайн: новые модели, отзывы, тест-драйвы, события автопрома и полезные советы. Узнайте первыми о главных новинках и трендах автомобильного мира.
Your comment is awaiting moderation.
Портал про автомобили https://myauto.kyiv.ua онлайн-ресурс для автолюбителей. Обзоры, статьи, тест-драйвы, цены и полезные советы по ремонту и уходу за машиной. Всё о мире авто в одном месте.
Your comment is awaiting moderation.
Авто портал https://avtoshans.in.ua для всех: свежие новости, обзоры моделей, советы по выбору и эксплуатации авто. Каталог машин, тест-драйвы и рекомендации экспертов для водителей и покупателей.
Your comment is awaiting moderation.
Портал для женщин https://fashionadvice.kyiv.ua сайт для девушек и женщин, которые ценят красоту, уют и гармонию. Советы по стилю, отношениям, материнству и здоровью. Читайте статьи, делитесь опытом и вдохновляйтесь новыми идеями.
Your comment is awaiting moderation.
Женский портал https://beautyadvice.kyiv.ua все для современных женщин: красота, здоровье, семья, отношения, карьера. Полезные статьи, советы экспертов, лайфхаки и вдохновение каждый день. Онлайн-сообщество для общения и развития.
Your comment is awaiting moderation.
Онлайн женский портал https://elegance.kyiv.ua актуальные советы по красоте, стилю, кулинарии и семейной жизни. Разделы о здоровье, карьере и саморазвитии. Интересные статьи и общение с единомышленницами.
Your comment is awaiting moderation.
Нужна виза? канарские острова виза Консультации, подготовка документов, сопровождение на всех этапах. Визы в Европу, США, Азию и другие страны. Доступные цены и надежная поддержка.
Your comment is awaiting moderation.
Доброго!
Долго ломал голову как поднять сайт и свои проекты и нарастить ИКС Яндекса и узнал от крутых seo,
энтузиастов ребят, именно они разработали недорогой и главное продуктивный прогон Xrumer – https://www.bing.com/search?q=%D1%82%D0%B0%D1%80%D0%B8%D1%84+bullet+%D0%BF%D1%80%D0%BE%D0%B3%D0%BE%D0%BD+%D1%85%D1%80%D1%83%D0%BC%D0%B5%D1%80%D0%BE%D0%BC
Как улучшить ссылочный профиль – задача, актуальная для любого сайта. Решение – увеличение количества ссылок с разных площадок. Xrumer помогает справиться с этим быстрее и проще. Он генерирует линковую массу автоматически. Как улучшить ссылочный профиль – используйте автоматизацию.
ярко продвижение сайтов, продвижение сайта бухгалтерии, линкбилдинг блог
Генерация внешних ссылок быстро, seo каталоги, маркетинговое агентство продвижение сайта
!!Удачи и роста в топах!!
https://kozas.site
Your comment is awaiting moderation.
Здравствуйте!
Долго ломал голову как встать в топ поисковиков и узнал от гуру в seo,
профи ребят, именно они разработали недорогой и главное top прогон Xrumer – https://www.bing.com/search?q=%D1%82%D0%B0%D1%80%D0%B8%D1%84+bullet+%D0%BF%D1%80%D0%BE%D0%B3%D0%BE%D0%BD+%D1%85%D1%80%D1%83%D0%BC%D0%B5%D1%80%D0%BE%D0%BC
Как поднять DR Ahrefs становится проще с регулярной работой. Создание ссылок автоматическими прогами экономит силы веб-мастеров. Форумный линкбилдинг Хрумер ускоряет рост ссылочной массы. Увеличение показателя Ahrefs требует качественных ссылок. Массовый прогон сайта ссылками Xrumer повышает эффективность SEO.
все сайты сео, анализ сайта программа seo, Увеличение показателя Ahrefs
линкбилдинг сайта, script seo, раскрутка сайт самостоятельно бесплатно
!!Удачи и роста в топах!!
https://kozas.site
Your comment is awaiting moderation.
Автомобильный портал https://auto-club.pl.ua онлайн-площадка для автолюбителей. Подробные обзоры машин, тест-драйвы, свежие новости, советы по ремонту и обслуживанию. Удобный поиск и актуальные материалы.
Your comment is awaiting moderation.
Все для автомобилистов https://k-moto.com.ua на авто портале: новости, обзоры, статьи, каталоги и цены на автомобили. Экспертные мнения, тест-драйвы и практические советы по эксплуатации авто.
Your comment is awaiting moderation.
Авто портал https://diesel.kyiv.ua все о мире автомобилей: новости, обзоры моделей, тест-драйвы, советы по выбору и уходу за авто. Каталог машин, актуальные цены, автоуслуги и полезная информация для автовладельцев.
Your comment is awaiting moderation.
Нужен автобусный билет? билеты на автобус удобный сервис поиска и бронирования. Широкий выбор направлений, надежные перевозчики, доступные цены и моментальная отправка электронных билетов на почту.
Your comment is awaiting moderation.
Добрый день!
Долго не мог уяснить как поднять сайт и свои проекты и нарастить CF cituation flow и узнал от друзей профессионалов,
профи ребят, именно они разработали недорогой и главное продуктивный прогон Xrumer – https://www.bing.com/search?q=%D1%82%D0%B0%D1%80%D0%B8%D1%84+bullet+%D0%BF%D1%80%D0%BE%D0%B3%D0%BE%D0%BD+%D1%85%D1%80%D1%83%D0%BC%D0%B5%D1%80%D0%BE%D0%BC
Прогон Xrumer по свежим базам помогает быстро увеличить ссылочную массу. Автоматизация ускоряет процесс. Массовый линкбилдинг повышает DR. Чем больше качественных ссылок, тем выше позиции. Прогон Xrumer по свежим базам – современная SEO-техника.
продвижение сайта шахты, nulled seo, Рассылки с помощью Xrumer
линкбилдинг что, менеджер по продвижению сайта, продвижение сайтов минусинск
!!Удачи и роста в топах!!
https://kozas.site
Your comment is awaiting moderation.
Кухонные принадлежности https://www.kitchen-store.ru в магазине для дома: современная посуда, полезные гаджеты, текстиль и аксессуары. Стильные решения для кухни, выгодные цены и большой ассортимент.
Your comment is awaiting moderation.
Приём макулатуры https://chsreda.ru в Казани работает как для частных лиц, так и для организаций. Сдают газеты, журналы, картонные коробки, офисную бумагу. Это реально удобно, потому что приезжают, забирают прямо с территории, а потом всё идёт на переработку.
Your comment is awaiting moderation.
Great site for everyone: https://www.europneus.es
Your comment is awaiting moderation.
The best site for you: https://www.jec.qa
Your comment is awaiting moderation.
Добрый день!
Долго ломал голову как поднять сайт и свои проекты и нарастить ИКС Яндекса и узнал от друзей профессионалов,
отличных ребят, именно они разработали недорогой и главное top прогон Хрумером – https://www.bing.com/search?q=%D1%82%D0%B0%D1%80%D0%B8%D1%84+bullet+%D0%BF%D1%80%D0%BE%D0%B3%D0%BE%D0%BD+%D1%85%D1%80%D1%83%D0%BC%D0%B5%D1%80%D0%BE%D0%BC
Прогон ссылок через Xrumer увеличивает внешнюю массу сайта. Эффективность прогона Xrumer подтверждается результатами. Массовый линкбилдинг для сайта улучшает позиции в поиске. Программы для автоматического постинга ускоряют работу. Как поднять показатели Ahrefs становится более доступным.
обучение сео онлайн бесплатно с нуля, раскрутка сайта по запросам, Xrumer: советы и трюки
быстрый линкбилдинг, как включить seo, seo beauty
!!Удачи и роста в топах!!
https://kozas.site
Your comment is awaiting moderation.
Лицей взаимного обучения https://talgenisty.ru уникальная среда для детей и взрослых. Совместные уроки, обмен опытом, мастер-классы и творческие проекты. Образование, основанное на поддержке и сотрудничестве.
Your comment is awaiting moderation.
Академия парикмахерского искусства https://charm-academy.ru обучение от ведущих мастеров. Современные техники стрижек, окрашивания и укладок. Курсы для начинающих и профессионалов с практикой и дипломом по окончании.
Your comment is awaiting moderation.
Школа видеорекламы https://tatyanamostseeva.ru обучение созданию креативных роликов для бизнеса и брендов. Практические занятия, работа с современными инструментами и поддержка экспертов. Освойте профессию в сфере digital.
Your comment is awaiting moderation.
Обучение и семинары https://uofs-beslan.ru для профессионалов: современные программы, практические кейсы и опыт экспертов. Развивайте навыки, повышайте квалификацию и получайте новые возможности для карьерного роста.
Your comment is awaiting moderation.
New and relevant information: https://amt-games.com
Your comment is awaiting moderation.
The best of our site: https://hyundaimobil.co.id
Your comment is awaiting moderation.
порно большие сиськи купить альфа пвп меф
Your comment is awaiting moderation.
Want to have fun? sex children melbet Whores, drugs, casino. We have it all, any drugs are on sale.
Your comment is awaiting moderation.
We are waiting for you on the site: https://copychief.com
Your comment is awaiting moderation.
visit our website: https://cere-india.org
Your comment is awaiting moderation.
We have the latest information: https://jnp.chitkara.edu.in
Your comment is awaiting moderation.
The latest information is here: https://astra-hotel.ch
Your comment is awaiting moderation.
The best we have here: https://www.kapoorstudycircle.com
Your comment is awaiting moderation.
visit our best site online: https://iclei.org
Your comment is awaiting moderation.
Написание дипломов на заказ https://vasdiplom.ru помощь студентам в подготовке итоговых работ. Авторские тексты, проверка на уникальность и полное соответствие стандартам учебных заведений.
Your comment is awaiting moderation.
Платформа онлайн-обучения https://craftsmm.ru курсы по маркетингу, продажам и рекламе для новичков и профессионалов. Освойте современные инструменты продвижения, увеличьте продажи и развивайте карьеру в удобном формате.
Your comment is awaiting moderation.
Занятия по самообороне https://safety-skills.ru практические навыки защиты в реальных ситуациях, развитие силы и выносливости. Профессиональные тренеры помогут освоить приемы борьбы, удары и тактику безопасности.
Your comment is awaiting moderation.
Включение в реестр Минпромторга https://minprom-info.ru официальный путь для подтверждения отечественного производства. Подготовка и подача документов, юридическое сопровождение и консультации для производителей.
Your comment is awaiting moderation.
геотекстиль 500 г м2 геотекстиль геобел
Your comment is awaiting moderation.
геодезические изыскания геодезические изыскания
Your comment is awaiting moderation.
стеновые панели мдф мдф фанерованный шпоном
Your comment is awaiting moderation.
доставка из китая карго грузы из китая в россию
Your comment is awaiting moderation.
Current and up-to-date information: https://www.lagodigarda.com
Your comment is awaiting moderation.
The most useful information: https://satapornbooks.com
Your comment is awaiting moderation.
Самое лучшее в сети: https://www.foto4u.su
Your comment is awaiting moderation.
best site come on in: https://alterego.re
Your comment is awaiting moderation.
play puzzles online: https://www.reddit.com/r/jigsawpuzzles/comments/1cpj0wd/puzzle_companies_that_use_ai_art_exclusively/
Your comment is awaiting moderation.
best articles on the net: https://dnscompetition.in/articles/dns-and-artificial-intelligence-emerging-trends/
Your comment is awaiting moderation.
Новые актуальные промокод iherb kod herb для выгодных покупок! Скидки на витамины, БАДы, косметику и товары для здоровья. Экономьте до 30% на заказах, используйте проверенные купоны и наслаждайтесь выгодным шопингом.
Your comment is awaiting moderation.
Mochten Sie ein https://www.immobilien-in-montenegro-fuer-oesterreicher.com kaufen? Tolle Angebote am Meer und in den Bergen. Gro?e Auswahl an Immobilien, Unterstutzung bei der Immobilienauswahl, Transaktionsunterstutzung und Registrierung. Leben Sie in einem Land mit mildem Klima und wunderschoner Natur.
Your comment is awaiting moderation.
Want to have fun? porno bangladesh melbet Watch porn, buy heroin or ecstasy. Pick up whores or buy marijuana. Come in, we’re waiting
Your comment is awaiting moderation.
новое русское порно https://russkoe-porno1.ru
Your comment is awaiting moderation.
I found a cool site: https://www.locafilm.com
Your comment is awaiting moderation.
our new official website: https://girls-media.com
Your comment is awaiting moderation.
visit our new website: https://valprint.es
Your comment is awaiting moderation.
our official website: https://www.manaolahawaii.com
Your comment is awaiting moderation.
посетить сайт онлайн: https://wildlife.by
Your comment is awaiting moderation.
go to our website: https://baldebranco.com.br
Your comment is awaiting moderation.
our site is waiting for you: https://hyundaimobil.co.id
Your comment is awaiting moderation.
visit our website: https://chaussures-lady.fr
Your comment is awaiting moderation.
the best site for you: https://www.pondexperts.ca
Your comment is awaiting moderation.
go to the website online: https://cere-india.org
Your comment is awaiting moderation.
Ремонт ноутбуков https://01km.ru телефонов, телевизоров, принтеров и компьютеров в Одинцово и Москве.
Your comment is awaiting moderation.
Мобильный выездной шиномонтаж https://master-shin.by круглосуточная помощь в дороге. Экстренная помощь в дороге может понадобиться каждому автолюбителю, и наша компания оказывает ее на высочайшем профессиональном уровне, на самых выгодных в Минске условиях. Оперативный выезд по городу и области, доступные и полностью адекватные цены, квалифицированная сервисная и консультационная поддержка, круглосуточное реагирование, вне зависимости от погодных условий.
Your comment is awaiting moderation.
доставка грунта почвогрунт купить дешево
Your comment is awaiting moderation.
доставка топлива купить дизельное топливо зимнее с доставкой
Your comment is awaiting moderation.
Качественный ремонт квартир https://expertremonta.kz от Компании «Эксперт ремонта» это качественный ремонт квартир под ключ в Алматы. Выбирайте Эксперт Ремонта — тут бесплатный выезд замерщика, официальные документы, гарантия документально, ремонт квартир без предоплаты.
Your comment is awaiting moderation.
Нужен автобусный билет? купить билет на автобус онлайн просто и удобно. Поиск рейсов, сравнение цен, выбор мест и моментальная оплата. Актуальное расписание, надежные перевозчики и выгодные тарифы каждый день.
Your comment is awaiting moderation.
Надежная доставка грузов из китая: от небольших партий до контейнеров. Авиа, морем, авто и железной дорогой. Оформление, страхование и логистика в кратчайшие сроки.
Your comment is awaiting moderation.
сделаем сайт на заказ заказать сайт под ключ
Your comment is awaiting moderation.
Надежная доставка из китая в Россию: от документов до контейнеров. Выбираем оптимальный маршрут, оформляем таможню, страхуем грузы. Контроль сроков и сохранность на каждом этапе.
Your comment is awaiting moderation.
Сюрвей грузов сюрвей контроль качества и количества, проверка условий перевозки, составление отчётов. Опытные эксперты обеспечивают объективную оценку для компаний и страховых организаций.
Your comment is awaiting moderation.
Эндовазальная лазерная коагуляция https://evlo-phlebology.ru эффективный метод лечения варикоза. Амбулаторная процедура занимает до 40 минут, не требует госпитализации и обеспечивает быстрый косметический и медицинский результат.
Your comment is awaiting moderation.
Онлайн-библиотека Казахстана https://mylibrary.kz книги, статьи, диссертации и редкие издания в цифровом формате. Удобный каталог, быстрый поиск и круглосуточный доступ для всех пользователей.
Your comment is awaiting moderation.
продукция с фермы купить фермерскую продукцию
Your comment is awaiting moderation.
карго доставка из китая грузоперевозки из китая сборный груз
Your comment is awaiting moderation.
Услуги госпитализации https://hospitall.ru экстренная помощь при угрожающих состояниях и плановое лечение с заранее согласованной программой. Подбор клиники, транспортировка и поддержка пациента на всех этапах.
Your comment is awaiting moderation.
ЭВЛО https://evlo-phlebology.ru эндовазальная лазерная коагуляция вен, наряду со склеротерапией является эффективным методом лечения варикозного расширения вен на ногах.
Your comment is awaiting moderation.
Looking for second-hand? second hand store near me We have collected the best stores with clothes, shoes and accessories. Large selection, unique finds, brands at low prices. Convenient catalog and up-to-date contacts.
Your comment is awaiting moderation.
Looking for second-hand? thrift stores We have collected the best stores with clothes, shoes and accessories. Large selection, unique finds, brands at low prices. Convenient catalog and up-to-date contacts.
Your comment is awaiting moderation.
swot анализ варианты swot анализ среды
Your comment is awaiting moderation.
Добрый день!
Долго ломал голову как поднять сайт и свои проекты и нарастить ИКС Яндекса и узнал от друзей профессионалов,
крутых ребят, именно они разработали недорогой и главное продуктивный прогон Хрумером – https://www.bing.com/search?q=%D1%82%D0%B0%D1%80%D0%B8%D1%84+bullet+%D0%BF%D1%80%D0%BE%D0%B3%D0%BE%D0%BD+%D1%85%D1%80%D1%83%D0%BC%D0%B5%D1%80%D0%BE%D0%BC
Xrumer: практические примеры показывают, как эффективно работать с программой. Автоматизация ускоряет прогон ссылок. Это повышает DR и авторитет сайта. Следование рекомендациям специалистов улучшает результаты. Xrumer: практические примеры полезны новичкам и профессионалам.
сайт и продвижение под ключ, комплексное продвижение сайта услуги, линкбилдинг или
линкбилдинг стратегия, вхождение seo, беларусь продвижение сайта
!!Удачи и роста в топах!!
https://kozas.site
Your comment is awaiting moderation.
Привет всем!
Долго не мог уяснить как поднять сайт и свои проекты и нарастить ИКС Яндекса и узнал от гуру в seo,
профи ребят, именно они разработали недорогой и главное буст прогон Хрумером – https://www.bing.com/search?q=%D1%82%D0%B0%D1%80%D0%B8%D1%84+bullet+%D0%BF%D1%80%D0%BE%D0%B3%D0%BE%D0%BD+%D1%85%D1%80%D1%83%D0%BC%D0%B5%D1%80%D0%BE%D0%BC
Линкбилдинг это – основа современной оптимизации. Ссылки помогают сайту расти в поиске и привлекать трафик. Программы вроде Xrumer упрощают создание линков. Это экономит время и силы специалистов. Линкбилдинг это эффективный инструмент продвижения.
сайт для продвижение в вк, продвижение сайтов волгограде, Прогон ссылок для повышения авторитета
линкбилдинг работа, ресурс для seo, продвижение сайтов в сетях
!!Удачи и роста в топах!!
https://kozas.site
Your comment is awaiting moderation.
Доброго!
Долго думал как поднять сайт и свои проекты и нарастить CF cituation flow и узнал от крутых seo,
крутых ребят, именно они разработали недорогой и главное продуктивный прогон Хрумером – https://www.bing.com/search?q=%D1%82%D0%B0%D1%80%D0%B8%D1%84+bullet+%D0%BF%D1%80%D0%BE%D0%B3%D0%BE%D0%BD+%D1%85%D1%80%D1%83%D0%BC%D0%B5%D1%80%D0%BE%D0%BC
Линкбилдинг курс позволяет системно изучить создание ссылочной массы. Xrumer ускоряет процесс массового прогона. Массовый линкбилдинг повышает DR. Автоматизация экономит время специалистов. Линкбилдинг курс – современный способ обучения SEO.
ашманова и иванова продвижение сайта в поисковых системах, сео маркетинг курсы, Массовый линкбилдинг для сайта
Массовый прогон сайта ссылками, сайт бесплатно с продвижением, продвижение товаров в интернете сайт
!!Удачи и роста в топах!!
https://kozas.site
Your comment is awaiting moderation.
Привет всем!
Долго не спал и думал как поднять сайт и свои проекты и нарастить DR и узнал от успещных seo,
топовых ребят, именно они разработали недорогой и главное top прогон Хрумером – https://www.bing.com/search?q=%D1%82%D0%B0%D1%80%D0%B8%D1%84+bullet+%D0%BF%D1%80%D0%BE%D0%B3%D0%BE%D0%BD+%D1%85%D1%80%D1%83%D0%BC%D0%B5%D1%80%D0%BE%D0%BC
Ускоренный рост ссылочного профиля важен для повышения DR. Чем больше качественных ссылок, тем выше позиции. Автоматический прогон через Xrumer ускоряет процесс. Системный подход повышает эффективность SEO. Ускоренный рост ссылочного профиля делает сайт более авторитетным.
услуги продвижения сайтов в интернете, видео seo это, Форумный линкбилдинг Хрумер
Программы для автоматического постинга, seo оптимизация сайта слова, купить сайт продвижение сайта
!!Удачи и роста в топах!!
https://kozas.site
Your comment is awaiting moderation.
swot анализ swot анализ варианты
Your comment is awaiting moderation.
Play puzzles online https://www.linkedin.com/in/nadin-leitgeb-82945837a/ free and without restrictions. A huge selection of pictures, simple controls and the ability to develop attention, memory and thinking. A great way to relax and spend time usefully.
Your comment is awaiting moderation.
Комплексные IT-решения https://eclat.moscow для бизнеса: разработка, внедрение, сопровождение и поддержка. Надежные технологии для автоматизации и цифровой трансформации.
Your comment is awaiting moderation.
Комплексные IT-решения https://eclat.moscow для бизнеса: разработка, внедрение, сопровождение и поддержка. Надежные технологии для автоматизации и цифровой трансформации.
Your comment is awaiting moderation.
Нужна контекстная реклама? https://reklama-stomatolog-kontekst.ru под ключ. Настройка в Яндекс.Директ и Google Ads, оптимизация объявлений и контроль заявок.
Your comment is awaiting moderation.
Нужна контекстная реклама? https://reklama-stomatolog-kontekst.ru под ключ. Настройка в Яндекс.Директ и Google Ads, оптимизация объявлений и контроль заявок.
Your comment is awaiting moderation.
Российская компания «ЗарядЪ» https://заряд.рус поставщик промышленных щелочных и свинцово – кислотных аккумуляторных батарей для резервного электропитания оборудования в разных отраслях . Продукция завода имеет заключение министерства промышленности и торговли Российской Федерации о подтверждении производства промышленной продукции на территории РФ
Your comment is awaiting moderation.
Смотрите сериалы Лучшие сериалы онлайн: https://www.justmedia.ru/news/russiaandworld/serialy-onlayn-kak-vybrat-i-gde-smotret онлайн в хорошем качестве. Новинки, классика и популярные проекты в удобном формате. Бесплатный просмотр без скачивания и доступ 24/7.
Your comment is awaiting moderation.
Смотрите сериалы Лучшие сериалы онлайн: https://obzor.city/texty/infotech/onlajn-kinoteatr-lordseries онлайн в хорошем качестве. Новинки, классика и популярные проекты в удобном формате. Бесплатный просмотр без скачивания и доступ 24/7.
Your comment is awaiting moderation.
У детей пробелмы с зубами? детская стоматология — лечение и профилактика зубов у детей. Безопасные методы, комфортная атмосфера и заботливые врачи для маленьких пациентов.
Your comment is awaiting moderation.
Стоматологическая клиника https://almazdental35.ru с индивидуальным подходом. Безболезненное лечение, эстетическая стоматология, имплантация и профессиональная гигиена полости рта.
Your comment is awaiting moderation.
Нужен клининг? рейтинг клининговых компаний москвы 2026. Лучшие сервисы уборки квартир, домов и офисов. Сравнение услуг, цен и отзывов, чтобы выбрать надежного подрядчика.
Your comment is awaiting moderation.
Нужен клининг? рейтинг клининговых компаний москвы 2026. Лучшие сервисы уборки квартир, домов и офисов. Сравнение услуг, цен и отзывов, чтобы выбрать надежного подрядчика.
Your comment is awaiting moderation.
Нужен клининг? топ клининговых компаний москвы 2026. Лучшие сервисы уборки квартир, домов и офисов. Сравнение услуг, цен и отзывов, чтобы выбрать надежного подрядчика.
Your comment is awaiting moderation.
Tree removal and care https://www.highqualitytreeservice.com/ pruning, crown shaping, treatment, removal and felling of hazardous trees. Experienced specialists and modern equipment. Safe, professional and with a guarantee of results.
Your comment is awaiting moderation.
Нужна качественная регулировка окон пвх? Специалисты настроят створки, фурнитуру и уплотнители. Устранение продувания, перекоса и тяжёлого открывания с гарантией качества.
Your comment is awaiting moderation.
занять деньги онлайн получить микрозайм
Your comment is awaiting moderation.
микрозайм получить займ онлайн бесплатно
Your comment is awaiting moderation.
Журнал о саде https://nasha-gryadka.ru и огороде онлайн — статьи о выращивании овощей, цветов и фруктов. Советы по уходу, борьбе с вредителями, подбору семян и организации участка.
Your comment is awaiting moderation.
Журнал о саде https://nasha-gryadka.ru и огороде онлайн — статьи о выращивании овощей, цветов и фруктов. Советы по уходу, борьбе с вредителями, подбору семян и организации участка.
Your comment is awaiting moderation.
Строительство домов https://stroycata1og.ru и коттеджей под ключ. Готовые проекты, индивидуальные решения, качественные материалы и полный цикл работ — от фундамента до отделки.
Your comment is awaiting moderation.
Строительство домов https://stroycata1og.ru и коттеджей под ключ. Готовые проекты, индивидуальные решения, качественные материалы и полный цикл работ — от фундамента до отделки.
Your comment is awaiting moderation.
Онлайн-курсы обучение заработку в интернете. Изучайте языки, IT, дизайн, маркетинг и другие направления. Удобный формат, доступ к материалам 24/7
Your comment is awaiting moderation.
Планируете ремонт https://remontkomand.kz в Алматы и боитесь скрытых платежей? Опубликовали полный и честный прайс-лист! Узнайте точные расценки на все виды работ — от демонтажа до чистовой отделки. Посчитайте стоимость своего ремонта заранее и убедитесь в нашей прозрачности. Никаких «сюрпризов» в итоговой смете!
Your comment is awaiting moderation.
SEO-продвижение сайтов https://raskrutka-sajtov-bystro77.ru в Москве: вывод в ТОП поисковиков, рост трафика и заявок. Полный комплекс — аудит, семантика, оптимизация, ссылки. Эффективное продвижение под ключ.
Your comment is awaiting moderation.
SEO-продвижение сайтов https://raskrutka-sajtov-bystro77.ru в Москве: вывод в ТОП поисковиков, рост трафика и заявок. Полный комплекс — аудит, семантика, оптимизация, ссылки. Эффективное продвижение под ключ.
Your comment is awaiting moderation.
Ремонт квартир https://remontkomand.kz и домов под ключ: дизайн-проект, отделка, инженерные работы. Работаем по договору, фиксированные сроки и цены. Гарантия качества и полный контроль этапов.
Your comment is awaiting moderation.
Ремонт квартир https://remontkomand.kz и домов под ключ: дизайн-проект, отделка, инженерные работы. Работаем по договору, фиксированные сроки и цены. Гарантия качества и полный контроль этапов.
Your comment is awaiting moderation.
Цены на ремонт https://remontkomand.kz/ru/price квартир и помещений в Алматы под ключ. Узнайте точные расценки на все виды работ — от демонтажа до чистовой отделки. Посчитайте стоимость своего ремонта заранее и убедитесь в нашей прозрачности. Никаких «сюрпризов» в итоговой смете!
Your comment is awaiting moderation.
Наружная реклама https://pioner-reklama.ru и вывески под ключ: дизайн, производство и монтаж. Световые короба, объёмные буквы, баннеры и витрины. Индивидуальные решения для бизнеса любого масштаба.
Your comment is awaiting moderation.
Автомобили на заказ https://prignat-mashinu7.ru подбор, проверка, доставка и оформление документов. Машины любых марок и комплектаций с гарантией качества и выгодной ценой.
Your comment is awaiting moderation.
Машины на заказ https://prignat-mashinu5.ru поиск, диагностика и доставка автомобилей. Индивидуальный подбор, проверенные поставщики и прозрачные условия покупки.
Your comment is awaiting moderation.
Машины на заказ https://prignat-avto7.ru поиск, диагностика и доставка автомобилей. Индивидуальный подбор, проверенные поставщики и прозрачные условия покупки.
Your comment is awaiting moderation.
Хотите заказать авто https://prignat-avto5.ru Мы подберём оптимальный вариант, проверим машину по базам, организуем доставку и таможенное оформление. Выгодные цены и прозрачные условия.
Your comment is awaiting moderation.
Автомобили на заказ https://dostavka-avto-russia5.ru профессиональный подбор, юридическая проверка, доставка и растаможка. Индивидуальные решения для каждого клиента.
Your comment is awaiting moderation.
Хотите заказать авто https://prignat-avto5.ru Мы подберём оптимальный вариант, проверим машину по базам, организуем доставку и таможенное оформление. Выгодные цены и прозрачные условия.
Your comment is awaiting moderation.
Авто на заказ https://dostavka-avto-russia.ru поиск, диагностика и сопровождение сделки. Машины из Европы, Кореи, Китая и США. Доставка, растаможка и постановка на учёт.
Your comment is awaiting moderation.
Автомобили на заказ https://dostavka-avto-russia5.ru профессиональный подбор, юридическая проверка, доставка и растаможка. Индивидуальные решения для каждого клиента.
Your comment is awaiting moderation.
Авто на заказ https://dostavka-avto-russia.ru поиск, диагностика и сопровождение сделки. Машины из Европы, Кореи, Китая и США. Доставка, растаможка и постановка на учёт.
Your comment is awaiting moderation.
Заказать авто из Китая https://dostavka-avto-china2.ru новые автомобили с гарантией, выгодные цены и проверенные поставщики. Доставка, таможня и оформление всех документов под ключ.
Your comment is awaiting moderation.
Заказать авто из Китая https://dostavka-avto-china2.ru новые автомобили с гарантией, выгодные цены и проверенные поставщики. Доставка, таможня и оформление всех документов под ключ.
Your comment is awaiting moderation.
PuzzleFree online puzzles https://sr.wikipedia.org/wiki/%d0%94%d0%b0%d1%82%d0%be%d1%82%d0%b5%d0%ba%d0%b0:1980s_unicef_jigsaw_puzzle.jpg hundreds of pictures to assemble, different difficulty levels and user-friendly interface. Enjoy the process, train your memory and attention for free.
Your comment is awaiting moderation.
Автомобили из Китая на заказ https://avto-iz-kitaya2.ru подбор, покупка и доставка. Полный цикл услуг: диагностика, растаможка, постановка на учёт и гарантия качества.
Your comment is awaiting moderation.
Авто из Китая под заказ https://dostavka-avto-china.ru кроссоверы, седаны, электромобили и премиальные модели. Индивидуальный подбор, проверка, сопровождение сделки и доставка в ваш город.
Your comment is awaiting moderation.
Авто из Китая https://avto-iz-kitaya2.ru на заказ под ключ: подбор, проверка, доставка и растаможка. Новые и подержанные автомобили, выгодные цены и полное сопровождение сделки.
Your comment is awaiting moderation.
Авто из Китая https://avto-iz-kitaya2.ru на заказ под ключ: подбор, проверка, доставка и растаможка. Новые и подержанные автомобили, выгодные цены и полное сопровождение сделки.
Your comment is awaiting moderation.
купить закладку героин где можно купить гашиш
Your comment is awaiting moderation.
купить спайс гашиш купить гашиш
Your comment is awaiting moderation.
купить спайс гашиш купить закладку меф гашиш
Your comment is awaiting moderation.
купить спайс гашиш купить меф онлайн
Your comment is awaiting moderation.
Автомобили на заказ https://avto-iz-kitaya1.ru поиск, проверка, покупка и доставка. Китай и Корея. Индивидуальный подбор под бюджет и пожелания клиента, полное сопровождение сделки.
Your comment is awaiting moderation.
Промышленная безопасность https://аттестация-промбезопасность.рф курсы и обучение под ключ. Подготовка к проверке Ростехнадзора, повышение квалификации и сертификация специалистов предприятий.
Your comment is awaiting moderation.
Детский сад № 55 https://detsadik55.ru забота, развитие и обучение детей. Современные программы, квалифицированные воспитатели, уютные группы, безопасная среда и внимание к каждому ребёнку.
Your comment is awaiting moderation.
Срочный вызов сантехника https://master-expert.com в Москве на дом. Услуги сантехника: прочистка засоров, ремонт смесителей, установка приборов учета. Работаем 24/7. Недорого и с гарантией. Подробнее на сайте
Your comment is awaiting moderation.
Студия иностранных языков https://whats-up-studiya-inostrannyh-yazykov.ru обучение английскому, немецкому, французскому и другим языкам. Индивидуальные и групповые занятия, современные методики и опытные преподаватели.
Your comment is awaiting moderation.
Первая помощь детям https://firstaidkids.ru правила оказания при травмах, ожогах, удушье и других ситуациях. Пошаговые инструкции, советы врачей и полезная информация для родителей.
Your comment is awaiting moderation.
Авторские курсы по REVIT https://dashclass.ru обучение созданию интерьеров и архитектурных проектов. Практика, реальные кейсы, индивидуальный подход и профессиональные навыки для работы в проектировании.
Your comment is awaiting moderation.
Детская школа искусств https://elegy-school.ru обучение музыке, танцам, изобразительному и театральному искусству. Творческие программы для детей, концерты, конкурсы и развитие талантов.
Your comment is awaiting moderation.
Профессиональное обучение плазмотерапия в косметологии обучение: подробная программа, практические навыки, сертификация. Освойте эффективные методики для применения в медицине и косметологии.
Your comment is awaiting moderation.
Курсы по плазмотерапии прп терапия обучение освоение методик, современные протоколы, практическая отработка. Обучение для специалистов с выдачей сертификата и повышением квалификации.
Your comment is awaiting moderation.
Профессиональное обучение онлайн-курсы инъекционной косметологии: подробная программа, практические навыки, сертификация. Освойте эффективные методики для применения в медицине и косметологии.
Your comment is awaiting moderation.
Курсы по плазмотерапии обучение прп освоение методик, современные протоколы, практическая отработка. Обучение для специалистов с выдачей сертификата и повышением квалификации.
Your comment is awaiting moderation.
Лучшие рестораны https://hamovniki-restoran.ru Хамовников для ценителей гастрономии. Подборка заведений с изысканной кухней, качественным сервисом и атмосферой для отдыха и деловых встреч.
Your comment is awaiting moderation.
Рестораны Хамовников https://restoran-khamovniki.ru топ заведений для встреч, романтических ужинов и семейных обедов. Авторская кухня, стильный интерьер, удобное расположение и достойный сервис.
Your comment is awaiting moderation.
Tickets for Rock Festivals https://rock-concert-tickets.ru
Your comment is awaiting moderation.
Where to Buy Tickets for Festivals https://rock-concert-tickets.ru
Your comment is awaiting moderation.
Рейтинг хостингов топ хостингов подбор сервисов для сайтов и интернет-магазинов. Сравнение тарифов, гарантия стабильности и рекомендации по выбору.
Your comment is awaiting moderation.
кредит займ заем
Your comment is awaiting moderation.
заем оформить займ онлайн
Your comment is awaiting moderation.
оформить займ занять деньги онлайн
Your comment is awaiting moderation.
займ оформить деньги онлайн
Your comment is awaiting moderation.
займ оформить займы онлайн бесплатно
Your comment is awaiting moderation.
займ кредит микрозаймы онлайн
Your comment is awaiting moderation.
нтернет-магазин сантехники https://vodomirural.ru ванны, смесители, унитазы, раковины и душевые кабины. Большой выбор, доступные цены, доставка и гарантия качества от производителей.
Your comment is awaiting moderation.
Бетон в Воронеже https://stk-vrn.ru продажа и доставка. Все марки для фундаментов, дорожных работ и строительства под ключ. Надёжный производитель и лучшие цены.
Your comment is awaiting moderation.
Бетон в Воронеже https://stk-vrn.ru продажа и доставка. Все марки для фундаментов, дорожных работ и строительства под ключ. Надёжный производитель и лучшие цены.
Your comment is awaiting moderation.
Handmade clay flowers Ideal for home, office decor or original gift. Natural beauty and durability.
Your comment is awaiting moderation.
Handmade flower artists Ideal for home, office decor or original gift. Natural beauty and durability.
Your comment is awaiting moderation.
Block Puzzle Wood Classic https://apps.apple.com/nc/app/block-puzzle-wood-classic/id1615792350 is a puzzle game where you need to correctly place wooden blocks. Simple controls, beautiful visuals and addictive gameplay for all ages.
Your comment is awaiting moderation.
сколько стоит куб бетона бетон от производителя с доставкой
Your comment is awaiting moderation.
Стройкаталог https://stroycata1og.ru проекты коттеджей, дома любой площади, каталог стройматериалов. Комплексные услуги от проектирования до сдачи объекта с гарантией качества.
Your comment is awaiting moderation.
Свежее и интересное: http://www.commonrailforum.pl/bignutrashop-niezawodna-droga-do-zdrowia-i-aktywnego-zycia-t2904.html
Your comment is awaiting moderation.
Puzzle Man Pro https://apps.apple.com/cv/app/puzzle-man-pro/id455696756 exciting puzzles for iOS. Collect classic pictures or create puzzles from your own photos. Different difficulty levels, user-friendly interface and saving progress.
Your comment is awaiting moderation.
Делюсь с вами полезной ссылкой по теме:
Кстати, если вас интересует m-admin.ru, загляните сюда.
Ссылка ниже:
https://m-admin.ru
Буду рад, если кому-то пригодится.
Your comment is awaiting moderation.
Наркологические услуги: клиника наркологическая нижний новгород, кодирование, детоксикация, снятие ломки, помощь при алкоголизме и наркомании. Круглосуточная поддержка и анонимность.
Your comment is awaiting moderation.
Вот отличный материал, который проливает свет на ситуацию:
Кстати, если вас интересует musichunt.pro, посмотрите сюда.
Вот, делюсь ссылкой:
https://musichunt.pro
Всем удачи и хорошего дня!
Your comment is awaiting moderation.
Наркологические услуги: наркологическая клиника стационар нижний новгород, кодирование, детоксикация, снятие ломки, помощь при алкоголизме и наркомании. Круглосуточная поддержка и анонимность.
Your comment is awaiting moderation.
Хотите заказать интро для диджея? Индивидуальная разработка музыкальных заставок для рекламы, подкастов и презентаций. Качественный звук и креатив для запоминающегося бренда.
Your comment is awaiting moderation.
купить бетон куб бетона саратов
Your comment is awaiting moderation.
кресло для косметолога кресло косметолога
Your comment is awaiting moderation.
Чтобы было понятнее, о чем речь:
Кстати, если вас интересует komandor-povolje.ru, посмотрите сюда.
Вот, можете почитать:
https://komandor-povolje.ru
Если у вас есть что добавить, не стесняйтесь.
Your comment is awaiting moderation.
vps hosting vps hosting
Your comment is awaiting moderation.
Привет всем!
Долго думал как поднять сайт и свои проекты и нарастить TF trust flow и узнал от гуру в seo,
крутых ребят, именно они разработали недорогой и главное top прогон Xrumer – https://www.bing.com/search?q=bullet+%D0%BF%D1%80%D0%BE%D0%B3%D0%BE%D0%BD
Xrumer рассылка форумов – это быстрый способ увеличить ссылочную массу. Прогон ссылок с Xrumer помогает повысить DR и улучшить Ahrefs. Массовые рассылки с Xrumer ускоряют процесс линкбилдинга. Автоматизация постинга на форумах помогает улучшить SEO-позиции. Используйте Xrumer для роста авторитетности вашего сайта.
сео сервис анализ сайта, локальное продвижение сайтов, Прогон ссылок для повышения авторитета
Массовый линкбилдинг для сайта, сео таблица скачать, создание сайта и его продвижение обучение
!!Удачи и роста в топах!!
Your comment is awaiting moderation.
Доброго!
Долго анализировал как поднять сайт и свои проекты и нарастить ИКС Яндекса и узнал от гуру в seo,
крутых ребят, именно они разработали недорогой и главное top прогон Хрумером – https://www.bing.com/search?q=bullet+%D0%BF%D1%80%D0%BE%D0%B3%D0%BE%D0%BD
Линкбилдинг под бурж позволяет выйти на зарубежные рынки. Качественный линкбилдинг обеспечивает стабильный рост DR. Линкбилдинг вакансии открывают возможности для специалистов. Линкбилдинг купить можно у проверенных компаний. Компания линкбилдинг форум предоставляет надежные базы ссылок.
продвижение сайта в яндексе и в гугле, сео продвижение ростов, линкбилдинг форум
Xrumer для роста ссылочной массы, скачать dr web офф сайт, что такое seo продвижение сайта простыми словами
!!Удачи и роста в топах!!
Your comment is awaiting moderation.
косметологическая лампа тумба под аппарат косметологический
Your comment is awaiting moderation.
Обучающие курсы онлайн курсы по нейросетям новые навыки для работы и жизни. IT, дизайн, менеджмент, языки, маркетинг. Гибкий график, практика и сертификаты по итогам.
Your comment is awaiting moderation.
Здравствуйте!
Долго не спал и думал как встать в топ поисковиков и узнал от гуру в seo,
крутых ребят, именно они разработали недорогой и главное лучший прогон Xrumer – https://www.bing.com/search?q=bullet+%D0%BF%D1%80%D0%BE%D0%B3%D0%BE%D0%BD
Генерация внешних ссылок быстро увеличивает авторитет сайта. Создание ссылочной массы в 2025 требует автоматизации. Использование Xrumer в SEO-кампаниях ускоряет рост DR. Линкбилдинг для продвижения в топ-10 помогает закрепить позиции. Прогон ссылок для повышения авторитета делает сайт более заметным.
работа по продвижению сайтов в интернете, seo вывожу в топ, Как поднять показатели Ahrefs
Автоматический линкбилдинг Xrumer, seo панды, обучение сео
!!Удачи и роста в топах!!
Your comment is awaiting moderation.
Нужен массаж? https://doctu.ru – профессиональные мастера, широкий выбор техник: классический, оздоровительный, лимфодренажный, детский. Доступные цены и уютная атмосфера.
Your comment is awaiting moderation.
Обучающие курсы онлайн складчина мк новые навыки для работы и жизни. IT, дизайн, менеджмент, языки, маркетинг. Гибкий график, практика и сертификаты по итогам.
Your comment is awaiting moderation.
Нужен массаж? https://doctu.ru – профессиональные мастера, широкий выбор техник: классический, оздоровительный, лимфодренажный, детский. Доступные цены и уютная атмосфера.
Your comment is awaiting moderation.
buy vps hosting https://vpsserverhosting1.com
Your comment is awaiting moderation.
Профессиональные 812detailing.com: полировка кузова, химчистка салона, восстановление пластика и защита керамикой. Вернём автомобилю блеск и надёжную защиту.
Your comment is awaiting moderation.
Срочно нужны цветы Минск Свежие букеты, праздничные композиции и эксклюзивные флористические решения. Онлайн-заказ и быстрая доставка по городу.
Your comment is awaiting moderation.
Вот отличный материал, который проливает свет на ситуацию:
Кстати, если вас интересует mersobratva.ru, посмотрите сюда.
Вот, можете почитать:
https://mersobratva.ru
Жду ваших комментариев.
Your comment is awaiting moderation.
Профессиональные детейлинг автомобиля: полировка кузова, химчистка салона, восстановление пластика и защита керамикой. Вернём автомобилю блеск и надёжную защиту.
Your comment is awaiting moderation.
Срочно нужны доставка цветов Свежие букеты, праздничные композиции и эксклюзивные флористические решения. Онлайн-заказ и быстрая доставка по городу.
Your comment is awaiting moderation.
Вот здесь можно найти больше примеров:
Хочу выделить материал про mersobratva.ru.
Смотрите сами:
https://mersobratva.ru
Поделитесь своими мыслями в комментариях.
Your comment is awaiting moderation.
Авто помощь 24/7 автопомощь на дороге: устранение поломок, подвоз топлива, прикуривание аккумулятора, замена колеса и эвакуация автомобиля.
Your comment is awaiting moderation.
Вот отличный материал, который проливает свет на ситуацию:
Кстати, если вас интересует parkpodarkov.ru, посмотрите сюда.
Смотрите сами:
https://parkpodarkov.ru
Жду конструктивной критики.
Your comment is awaiting moderation.
Авто помощь 24/7 служба автопомощи на дорогах: устранение поломок, подвоз топлива, прикуривание аккумулятора, замена колеса и эвакуация автомобиля.
Your comment is awaiting moderation.
Вот тут есть все ответы на ваши вопросы:
По теме “mersobratva.ru”, там просто кладезь информации.
Вот, можете почитать:
https://mersobratva.ru
Буду признателен за ваши отзывы.
Your comment is awaiting moderation.
Если нужна более подробная инструкция, то она здесь:
По теме “easyterm.ru”, нашел много полезного.
Вот, можете почитать:
https://easyterm.ru
Надеюсь, у вас все получится.
Your comment is awaiting moderation.
оценка стоимости оружия оценка стоимости заказать
Your comment is awaiting moderation.
Создать документы онлайн конструктор документов бесплатно: создайте договор, заявление или акт за 5 минут. Простая форма, готовые шаблоны, юридическая точность и возможность скачать в нужном формате.
Your comment is awaiting moderation.
плоская кровля монтаж москва https://montazh-ploskoj-krovli.ru
Your comment is awaiting moderation.
Чтобы было понятнее, о чем речь:
Зацепил раздел про yogapulse.ru.
Ссылка ниже:
https://yogapulse.ru
Рад был поделиться информацией.
Your comment is awaiting moderation.
Right now it seems like WordPress is the preferred blogging platform available right now. (from what I’ve read) Is that what you are using on your blog?
Limo service near me
Your comment is awaiting moderation.
Нужен микрозайм? https://kubyshka24.ru: деньги на карту без справок и поручителей. Простое оформление заявки, одобрение за минуты и мгновенное зачисление. Удобно и доступно 24/7.
Your comment is awaiting moderation.
Нужен микрозайм? лучшие займы онлайн: деньги на карту без справок и поручителей. Простое оформление заявки, одобрение за минуты и мгновенное зачисление. Удобно и доступно 24/7.
Your comment is awaiting moderation.
запись салон красоты спб https://beauty-salon-spb.ru/
Your comment is awaiting moderation.
салон красоты приморский район beauty-salon-spb.ru
Your comment is awaiting moderation.
Вот, что говорят эксперты по этому поводу:
Зацепил раздел про eroticpic.ru.
Вот, можете почитать:
https://eroticpic.ru
Дайте знать, если найдете что-то еще.
Your comment is awaiting moderation.
оценочные услуги Москва https://ocenochnaya-kompaniya1.ru
Your comment is awaiting moderation.
Согласен с предыдущим оратором, и в дополнение хочу сказать:
Зацепил раздел про easyterm.ru.
Вот, можете почитать:
https://easyterm.ru
Поделитесь своими мыслями в комментариях.
Your comment is awaiting moderation.
Jak samodzielnie zdjac https://telegra.ph/Jak-samodzielnie-zdj%C4%85%C4%87-sufit-napinany-instrukcja-krok-po-kroku-bez-haka-z-wkr%C4%99tem-i-trikami-monta%C5%BCyst%C3%B3w-08-07 sufit napinany: instrukcje krok po kroku, narzedzia, porady ekspertow. Dowiedz sie, jak zdemontowac plotno bez uszkodzen i przygotowac pomieszczenie do montazu nowej okladziny.
Your comment is awaiting moderation.
Долго искал решение и наконец-то нашел:
Кстати, если вас интересует localflavors.ru, загляните сюда.
Смотрите сами:
https://localflavors.ru
Давайте обсудим это подробнее.
Your comment is awaiting moderation.
Фильмы и сериалы https://kinobay.live Онлайн-кинотеатр без регистрации и смс: тысячи фильмов и сериалов бесплатно.
Your comment is awaiting moderation.
Jak samodzielnie zdjac https://telegra.ph/Jak-samodzielnie-zdj%C4%85%C4%87-sufit-napinany-instrukcja-krok-po-kroku-bez-haka-z-wkr%C4%99tem-i-trikami-monta%C5%BCyst%C3%B3w-08-07 sufit napinany: instrukcje krok po kroku, narzedzia, porady ekspertow. Dowiedz sie, jak zdemontowac plotno bez uszkodzen i przygotowac pomieszczenie do montazu nowej okladziny.
Your comment is awaiting moderation.
Хотите оформить карту на топливо? топливные карты для юр лиц. Контроль за каждой транзакцией, отчёты для бухгалтерии, гибкие лимиты и бонусные программы.
Your comment is awaiting moderation.
Фильмы и сериалы https://kinobay.live Онлайн-кинотеатр без регистрации и смс: тысячи фильмов и сериалов бесплатно.
Your comment is awaiting moderation.
Besoin d’un bien immobilier? https://www.immobilier-au-montenegro.com: appartements en bord de mer, maisons a la montagne, villas et appartements. Catalogue de biens, prix actuels et conseils d’experts en investissement.
Your comment is awaiting moderation.
Нужна топливная карта? топливные карты для юр лиц. Экономия до 15%, автоматическая отчётность, удобные безналичные расчёты и контроль автопарка онлайн.
Your comment is awaiting moderation.
Besoin d’un bien immobilier? immobilier au Montenegro: appartements en bord de mer, maisons a la montagne, villas et appartements. Catalogue de biens, prix actuels et conseils d’experts en investissement.
Your comment is awaiting moderation.
Делюсь с вами полезной ссылкой по теме:
Кстати, если вас интересует fixora.ru, посмотрите сюда.
Вот, делюсь ссылкой:
https://fixora.ru
Жду конструктивной критики.
Your comment is awaiting moderation.
Портал про авто https://automobile.kyiv.ua свежие новости автопрома, тест-драйвы, обзоры моделей и советы по ремонту. Всё о машинах для водителей и автолюбителей.
Your comment is awaiting moderation.
Авто портал https://road.kyiv.ua с актуальной информацией: новинки рынка, цены, обзоры, страхование и тюнинг. Полезные статьи и аналитика для автомобилистов.
Your comment is awaiting moderation.
Prodaja https://www.nekretnine-zabljak-placevi.com: stanovi, vile, zemljisne parcele. Izbor smestaja za odmor, preseljenje i investicije. Saveti strucnjaka i aktuelne ponude na trzistu.
Your comment is awaiting moderation.
audio volume control online sound editor
Your comment is awaiting moderation.
Write more stories, more chapters.
Your comment is awaiting moderation.
Prodaja blok nekretnine Zabljak: stanovi, vile, zemljisne parcele. Izbor smestaja za odmor, preseljenje i investicije. Saveti strucnjaka i aktuelne ponude na trzistu.
Your comment is awaiting moderation.
trim audio trim audio
Your comment is awaiting moderation.
Новости Украины https://gromrady.org.ua онлайн: политика, экономика, спорт, культура и события регионов. Оперативные материалы, аналитика и комментарии экспертов круглосуточно.
Your comment is awaiting moderation.
Портал про авто https://automobile.kyiv.ua свежие новости автопрома, тест-драйвы, обзоры моделей и советы по ремонту. Всё о машинах для водителей и автолюбителей.
Your comment is awaiting moderation.
Авто портал https://road.kyiv.ua с актуальной информацией: новинки рынка, цены, обзоры, страхование и тюнинг. Полезные статьи и аналитика для автомобилистов.
Your comment is awaiting moderation.
Новости Украины https://gromrady.org.ua онлайн: политика, экономика, спорт, культура и события регионов. Оперативные материалы, аналитика и комментарии экспертов круглосуточно.
Your comment is awaiting moderation.
Портал про строительство https://texha.com.ua новости рынка, обзоры технологий, инструкции и идеи для ремонта. Материалы для застройщиков, мастеров и тех, кто делает своими руками.
Your comment is awaiting moderation.
Онлайн журнал https://vitamax.dp.ua о строительстве: проекты домов, ремонт квартир, выбор стройматериалов, дизайн и интерьер. Советы экспертов и свежие идеи для комфортной жизни.
Your comment is awaiting moderation.
Сайт о строительстве https://juglans.com.ua и ремонте — ваш помощник в выборе материалов, инструментов и технологий. Всё о ремонте квартир, строительстве домов и дизайне интерьеров.
Your comment is awaiting moderation.
Всё о стройке https://aziatransbud.com.ua и ремонте в одном месте: дизайн, архитектура, выбор стройматериалов, инструкции по монтажу, лайфхаки и полезные рекомендации для новичков и мастеров.
Your comment is awaiting moderation.
Онлайн сайт https://mramor.net.ua о строительстве и ремонте. Всё о возведении домов, ремонте квартир, отделке и обустройстве жилья. Обзоры материалов, советы экспертов и свежие идеи.
Your comment is awaiting moderation.
Портал о стройке https://sushico.com.ua и ремонте. Новости рынка, современные технологии, подборка идей для интерьера и экстерьера. Всё, что нужно для дома и дачи.
Your comment is awaiting moderation.
Сайт о строительстве https://juglans.com.ua и ремонте — ваш помощник в выборе материалов, инструментов и технологий. Всё о ремонте квартир, строительстве домов и дизайне интерьеров.
Your comment is awaiting moderation.
Всё о стройке https://aziatransbud.com.ua и ремонте в одном месте: дизайн, архитектура, выбор стройматериалов, инструкции по монтажу, лайфхаки и полезные рекомендации для новичков и мастеров.
Your comment is awaiting moderation.
Портал о ремонте https://dki.org.ua и строительстве: от отделки квартиры до возведения загородного дома. Подробные статьи, рекомендации экспертов и идеи для обустройства жилья.
Your comment is awaiting moderation.
Онлайн сайт https://mramor.net.ua о строительстве и ремонте. Всё о возведении домов, ремонте квартир, отделке и обустройстве жилья. Обзоры материалов, советы экспертов и свежие идеи.
Your comment is awaiting moderation.
Портал о стройке https://sushico.com.ua и ремонте. Новости рынка, современные технологии, подборка идей для интерьера и экстерьера. Всё, что нужно для дома и дачи.
Your comment is awaiting moderation.
Портал о ремонте https://dki.org.ua и строительстве: от отделки квартиры до возведения загородного дома. Подробные статьи, рекомендации экспертов и идеи для обустройства жилья.
Your comment is awaiting moderation.
Полагаю, это снимет все дальнейшие вопросы:
Для тех, кто ищет информацию по теме “reactive.su”, есть отличная статья.
Ссылка ниже:
https://reactive.su
Рад был поделиться информацией.
Your comment is awaiting moderation.
Вот, что говорят эксперты по этому поводу:
Для тех, кто ищет информацию по теме “musichunt.pro”, там просто кладезь информации.
Смотрите сами:
https://musichunt.pro
Спасибо, что дочитали до конца.
Your comment is awaiting moderation.
Our community leaders need to read this, and look at developing some of your recommendations.
Your comment is awaiting moderation.
Мужской портал https://hooligans.org.ua новости, лайфхаки, обзоры техники, спорт, здоровье и авто. Советы для уверенной и гармоничной жизни.
Your comment is awaiting moderation.
Авто портал https://avtomobilist.kyiv.ua всё об автомобилях: новые модели, цены, рынок подержанных авто, тюнинг и автотехнологии. Полезные материалы для автовладельцев.
Your comment is awaiting moderation.
Онлайн авто-журнал https://mirauto.kyiv.ua с актуальными новостями, аналитикой и обзорами. Тесты автомобилей, тюнинг, технологии и советы по эксплуатации.
Your comment is awaiting moderation.
На мой взгляд, лучшее решение этой проблемы здесь:
Между прочим, если вас интересует rustrail.ru, посмотрите сюда.
Вот, можете почитать:
https://rustrail.ru
Надеюсь, это было полезно.
Your comment is awaiting moderation.
Мужской портал https://hooligans.org.ua новости, лайфхаки, обзоры техники, спорт, здоровье и авто. Советы для уверенной и гармоничной жизни.
Your comment is awaiting moderation.
Новостной портал https://gau.org.ua круглосуточные новости, комментарии экспертов, события регионов и мира. Политика, бизнес, культура и общество.
Your comment is awaiting moderation.
Авто-журнал https://bestauto.kyiv.ua источник информации для автолюбителей. Новинки рынка, сравнения моделей, советы по ремонту и уходу, интересные материалы о мире автомобилей.
Your comment is awaiting moderation.
Онлайн авто-журнал https://mirauto.kyiv.ua с актуальными новостями, аналитикой и обзорами. Тесты автомобилей, тюнинг, технологии и советы по эксплуатации.
Your comment is awaiting moderation.
Авто портал https://avtomobilist.kyiv.ua всё об автомобилях: новые модели, цены, рынок подержанных авто, тюнинг и автотехнологии. Полезные материалы для автовладельцев.
Your comment is awaiting moderation.
Новостной портал https://gau.org.ua круглосуточные новости, комментарии экспертов, события регионов и мира. Политика, бизнес, культура и общество.
Your comment is awaiting moderation.
Авто-журнал https://bestauto.kyiv.ua источник информации для автолюбителей. Новинки рынка, сравнения моделей, советы по ремонту и уходу, интересные материалы о мире автомобилей.
Your comment is awaiting moderation.
Royal portraits https://www.turnyouroyal.com from photos – turn yourself or your loved ones into a king, queen or aristocrat. Author’s work of artists, luxurious style and premium quality of printing.
Your comment is awaiting moderation.
Royal portraits turnyouroyal.com from photos – turn yourself or your loved ones into a king, queen or aristocrat. Author’s work of artists, luxurious style and premium quality of printing.
Your comment is awaiting moderation.
Онлайн-журнал https://autoiceny.com.ua для автолюбителей: автомобили, новости индустрии, тест-драйвы, тюнинг и советы по обслуживанию.
Your comment is awaiting moderation.
Автомобильный онлайн-журнал https://allauto.kyiv.ua свежие новости автопрома, тест-драйвы, обзоры новых моделей, советы по эксплуатации и ремонту. Всё для водителей и автолюбителей.
Your comment is awaiting moderation.
Сайт про автомобили https://black-star.com.ua новинки рынка, цены, тест-драйвы и обзоры. Советы экспертов по выбору и уходу за машиной, тюнинг и автоуслуги.
Your comment is awaiting moderation.
Сайт про авто https://autoinfo.kyiv.ua свежие новости автопрома, обзоры моделей, тест-драйвы и советы по эксплуатации. Всё о машинах для водителей и автолюбителей.
Your comment is awaiting moderation.
Информационный портал https://reklama-region.com про ремонт: ремонт квартир, домов, офисов. Практические рекомендации, современные решения и обзоры стройматериалов.
Your comment is awaiting moderation.
Репортажи в больших https://infotolium.com фотографиях: самые обсуждаемые события, уникальные кадры и впечатляющие истории. Новости и жизнь в формате визуального рассказа.
Your comment is awaiting moderation.
Онлайн портал https://esi.com.ua про ремонт: идеи для интерьера, подбор материалов, практические рекомендации и пошаговые инструкции для самостоятельных работ.
Your comment is awaiting moderation.
Онлайн портал https://esi.com.ua про ремонт: идеи для интерьера, подбор материалов, практические рекомендации и пошаговые инструкции для самостоятельных работ.
Your comment is awaiting moderation.
Интересный сайт https://whoiswho.com.ua обо всём: статьи, лайфхаки, обзоры и идеи на самые разные темы. Всё, что нужно для вдохновения и развития, в одном месте.
Your comment is awaiting moderation.
Студия дизайна https://lbook.com.ua интерьера и архитектуры. Создаём стильные проекты квартир, домов и офисов. Индивидуальный подход, современные решения и полный контроль реализации.
Your comment is awaiting moderation.
Сайт обо всём https://vybir.kiev.ua энциклопедия для повседневной жизни. Красота, здоровье, дом, путешествия, карьера, семья и полезные советы для всех.
Your comment is awaiting moderation.
Интересный сайт https://whoiswho.com.ua обо всём: статьи, лайфхаки, обзоры и идеи на самые разные темы. Всё, что нужно для вдохновения и развития, в одном месте.
Your comment is awaiting moderation.
Портал про ремонт https://hydromech.kiev.ua свежие статьи о ремонте и отделке, дизайне интерьера и выборе материалов. Полезные советы для мастеров и тех, кто делает ремонт своими руками.
Your comment is awaiting moderation.
Студия дизайна https://lbook.com.ua интерьера и архитектуры. Создаём стильные проекты квартир, домов и офисов. Индивидуальный подход, современные решения и полный контроль реализации.
Your comment is awaiting moderation.
Сайт обо всём https://vybir.kiev.ua энциклопедия для повседневной жизни. Красота, здоровье, дом, путешествия, карьера, семья и полезные советы для всех.
Your comment is awaiting moderation.
Сайт для женщин https://gratransymas.com о красоте, моде, здоровье и стиле жизни. Полезные советы, рецепты, тренды, отношения и карьера.
Your comment is awaiting moderation.
Журнал садовода https://mts-agro.com.ua полезные советы по уходу за садом и огородом. Сезонные работы, выращивание овощей, фруктов и цветов, современные технологии и секреты урожая.
Your comment is awaiting moderation.
Универсальный сайт https://virginvirtual.net для женщин — секреты красоты, тренды моды, советы по отношениям и карьере, рецепты и стиль жизни.
Your comment is awaiting moderation.
Сайт для женщин https://stylewoman.kyiv.ua с интересными статьями о моде, красоте, семье и здоровье. Идеи для кулинарии, путешествий и вдохновения.
Your comment is awaiting moderation.
Портал для родителей https://detiwki.com.ua и детей — всё для счастливой семьи. Воспитание, образование, здоровье, отдых и полезные материалы для мам, пап и малышей.
Your comment is awaiting moderation.
Автомобильный портал https://autonovosti.kyiv.ua новости автопрома, обзоры моделей, тест-драйвы и советы по эксплуатации. Всё для автолюбителей: от выбора авто до обслуживания и ремонта.
Your comment is awaiting moderation.
Строительный сайт https://novostroi.in.ua с полезными статьями о ремонте, отделке и дизайне. Обзоры стройматериалов, проекты домов, инструкции и советы экспертов для профессионалов и новичков.
Your comment is awaiting moderation.
Современный автомобильный https://mallex.info портал: автообзоры, тесты, ремонт и обслуживание, страхование и рынок. Всё, что нужно водителям и любителям автомобилей.
Your comment is awaiting moderation.
Онлайн автомобильный https://avtonews.kyiv.ua портал: свежие автоновости, сравнительные тесты, статьи о ремонте и тюнинге. Обзоры новых и подержанных машин, цены и советы экспертов.
Your comment is awaiting moderation.
Портал про авто https://prestige-avto.com.ua обзоры новых и подержанных машин, тест-драйвы, рынок автомобилей, страхование и обслуживание.
Your comment is awaiting moderation.
Строительный сайт https://novostroi.in.ua с полезными статьями о ремонте, отделке и дизайне. Обзоры стройматериалов, проекты домов, инструкции и советы экспертов для профессионалов и новичков.
Your comment is awaiting moderation.
Автомобильный портал https://autonovosti.kyiv.ua новости автопрома, обзоры моделей, тест-драйвы и советы по эксплуатации. Всё для автолюбителей: от выбора авто до обслуживания и ремонта.
Your comment is awaiting moderation.
Современный автомобильный https://mallex.info портал: автообзоры, тесты, ремонт и обслуживание, страхование и рынок. Всё, что нужно водителям и любителям автомобилей.
Your comment is awaiting moderation.
Онлайн автомобильный https://avtonews.kyiv.ua портал: свежие автоновости, сравнительные тесты, статьи о ремонте и тюнинге. Обзоры новых и подержанных машин, цены и советы экспертов.
Your comment is awaiting moderation.
Портал про авто https://prestige-avto.com.ua обзоры новых и подержанных машин, тест-драйвы, рынок автомобилей, страхование и обслуживание.
Your comment is awaiting moderation.
Строительный портал https://suli-company.org.ua с актуальными новостями, обзорами материалов, проектами и инструкциями. Всё о ремонте, строительстве и дизайне.
Your comment is awaiting moderation.
Новостной портал https://prp.org.ua с актуальной информацией о событиях в России и мире. Политика, экономика, культура, спорт и технологии. Новости 24/7, аналитика и комментарии экспертов.
Your comment is awaiting moderation.
Новости Украины https://uamc.com.ua новости дня, аналитика, события регионов и мира. Обзоры, интервью, мнения экспертов. Быстро, достоверно и удобно для читателей.
Your comment is awaiting moderation.
Онлайн новостной https://antifa-action.org.ua портал с круглосуточным обновлением. Свежие новости, репортажи и обзоры. Важные события страны и мира, мнения экспертов и актуальная аналитика.
Your comment is awaiting moderation.
Онлайн туристический https://azst.com.ua портал: всё о путешествиях, туризме и отдыхе. Маршруты, отели, лайфхаки для туристов, актуальные цены и интересные статьи о странах.
Your comment is awaiting moderation.
Онлайн сайт https://purr.org.ua о строительстве и ремонте: полезные статьи, инструкции, обзоры технологий, дизайн-идеи и архитектурные решения для вашего дома.
Your comment is awaiting moderation.
Строительный журнал https://mts-slil.info с актуальными новостями отрасли, обзорами материалов, инструкциями по ремонту и строительству. Полезные советы для специалистов и частных застройщиков.
Your comment is awaiting moderation.
Сайт о строительстве https://stinol.com.ua практические рекомендации, проекты, обзоры инструментов и материалов. Советы экспертов, новости отрасли и новые технологии.
Your comment is awaiting moderation.
ny delivery delivery new york
Your comment is awaiting moderation.
Онлайн женский https://ledis.top сайт о стиле, семье, моде и здоровье. Советы экспертов, обзоры новинок, рецепты и темы для вдохновения. Пространство для современных женщин.
Your comment is awaiting moderation.
Туристический портал https://elnik.kiev.ua с актуальными новостями, маршрутами и путеводителями. Обзоры стран и городов, советы путешественникам, лучшие идеи для отдыха и выгодные предложения.
Your comment is awaiting moderation.
Всё о гипертонии https://gipertoniya.net что это за болезнь, как проявляется и чем опасна. Подробные статьи о симптомах, диагностике и способах лечения высокого давления.
Your comment is awaiting moderation.
Женский сайт https://womanclub.in.ua о красоте, моде, здоровье и стиле жизни. Полезные советы, рецепты, тренды, отношения и карьера. Всё самое интересное для женщин в одном месте.
Your comment is awaiting moderation.
Кстати, вот что я думаю по этому поводу:
По теме “anclaves.ru”, есть отличная статья.
Ссылка ниже:
https://anclaves.ru
Дайте знать, если найдете что-то еще.
Your comment is awaiting moderation.
Полностью поддерживаю, и вот еще одно подтверждение:
Между прочим, если вас интересует buytime.ru, загляните сюда.
Ссылка ниже:
https://buytime.ru
Спасибо, что дочитали до конца.
Your comment is awaiting moderation.
Вот отличный материал, который проливает свет на ситуацию:
По теме “raregreen.ru”, есть отличная статья.
Вот, делюсь ссылкой:
https://raregreen.ru
Если у вас есть что добавить, не стесняйтесь.
Your comment is awaiting moderation.
Кстати, вот что я думаю по этому поводу:
Между прочим, если вас интересует idalgogrif.ru, посмотрите сюда.
Смотрите сами:
https://idalgogrif.ru
Жду ваших комментариев.
Your comment is awaiting moderation.
Онлайн женский портал https://martime.com.ua новости, тренды моды, секреты красоты, психология отношений, карьера и семья. Полезные материалы и практические советы для женщин.
Your comment is awaiting moderation.
Женский портал https://fotky.com.ua с полезными статьями о красоте, моде, здоровье, отношениях и карьере. Советы экспертов, лайфхаки для дома, рецепты и вдохновение для каждой женщины.
Your comment is awaiting moderation.
Вот здесь подробно расписано, как это сделать:
Между прочим, если вас интересует anclaves.ru, загляните сюда.
Ссылка ниже:
https://anclaves.ru
Успехов в решении вашего вопроса!
Your comment is awaiting moderation.
Универсальный автопортал https://road.kyiv.ua автомобили, автоновости, обзоры, ремонт, обслуживание и tuning. Полезные статьи для водителей и экспертов автоиндустрии.
Your comment is awaiting moderation.
Юсб флешка флешка для Нанесения логотипа купить Москва оптом 64 гб и флешки от производителя в Сочи. Самые Надежные флешки и цена мини флешки На 32 гб в Ханты-Мансийске. Детский микрофон караоке с флешкой оптом купить и Максимальный размер флешки
Your comment is awaiting moderation.
Сайт «Всё о стройке» https://sushico.com.ua подробные инструкции, советы экспертов, новости рынка. Всё о строительстве, ремонте и обустройстве жилья в одном месте.
Your comment is awaiting moderation.
Всё о стройке https://mramor.net.ua полезные статьи, советы, обзоры материалов и технологий. Ремонт, строительство домов, дизайн интерьера и современные решения для вашего проекта.
Your comment is awaiting moderation.
Онлайн строительный https://texha.com.ua портал о материалах, проектах и технологиях. Всё о ремонте, строительстве и обустройстве дома. Поддержка специалистов и вдохновение для новых идей.
Your comment is awaiting moderation.
Строительный портал https://dki.org.ua всё о строительстве и ремонте: технологии, оборудование, материалы, идеи для дома. Новости отрасли и экспертные рекомендации.
Your comment is awaiting moderation.
Портал о строительстве https://juglans.com.ua свежие новости, статьи и советы. Обзоры технологий, материалов, дизайн-идеи и практические рекомендации для профессионалов и частных застройщиков.
Your comment is awaiting moderation.
Онлайн авто портал https://avtomobilist.kyiv.ua с обзорами новых и подержанных авто, тест-драйвами, советами по обслуживанию и новостями из мира автопрома.
Your comment is awaiting moderation.
Мужской портал https://hooligans.org.ua всё, что интересно современному мужчине: стиль, спорт, здоровье, карьера, автомобили, технологии и отдых. Полезные статьи и советы каждый день.
Your comment is awaiting moderation.
Экономические новости https://gau.org.ua прогнозы и обзоры. Политика, бизнес, финансы, мировые рынки. Всё, что важно знать для принятия решений.
Your comment is awaiting moderation.
Бирки На https://usb-flashki-optom-24.ru флешки оптом и флешка 128 купить в Санкт-Петербурге. Флешки объем памяти и футляр для флешки купить в Нижневартовске. Где можно распечатать документ с флешки оптом и флешка апельсин
Your comment is awaiting moderation.
shipping from nyc delivery in new york city
Your comment is awaiting moderation.
Популярный авто журнал https://mirauto.kyiv.ua подробные обзоры моделей, советы экспертов, новости автосалонов и автоспорта, полезные статьи для автовладельцев.
Your comment is awaiting moderation.
Sta znaci https://www.pesak-u-bubregu.com, koji simptomi ukazuju na problem i kako ga se resiti. Efikasni nacini lecenja i prevencije.
Your comment is awaiting moderation.
Авто журнал https://bestauto.kyiv.ua свежие новости автопрома, тест-драйвы, обзоры новинок, советы по уходу за автомобилем и репортажи с автособытий.
Your comment is awaiting moderation.
Zasto se javlja bol u bubrezima simptomi: od kamenaca i infekcija do prehlade. Kako prepoznati opasne simptome i brzo zapoceti lecenje. Korisne informacije.
Your comment is awaiting moderation.
форум 2025 https://perekrestok.1bb.ru популярный форум которому много лет, есть тема эротичесских историй, очень популярна среди подписчиков, рекомендации и фото для вас.
Your comment is awaiting moderation.
Интернет-магазин мебели https://mebelime.ru тысячи моделей для дома и офиса. Гарантия качества, быстрая доставка, акции и рассрочка. Уют в каждый дом.
Your comment is awaiting moderation.
Займы онлайн лайкзайм моментальное оформление, перевод на карту, прозрачные ставки. Получите нужную сумму без визита в офис и долгих проверок.
Your comment is awaiting moderation.
ГОРСВЕТ Чебоксары https://gorsvet21.ru эксплуатация, ремонт и установка систем уличного освещения. Качественное обслуживание, модернизация светильников и энергоэффективные решения.
Your comment is awaiting moderation.
Saznajte sve o caj za bubrege – simptomi, uzroci i efikasni nacini lecenja. Procitajte savete strucnjaka i iskustva korisnika, kao i preporuke za prevenciju i brzi oporavak.
Your comment is awaiting moderation.
Нужен сантехник: сантехник алматы недорого
Your comment is awaiting moderation.
Как вариант, можно рассмотреть следующее:
Между прочим, если вас интересует cyq.ru, загляните сюда.
Ссылка ниже:
https://cyq.ru
Надеюсь, эта информация сэкономит вам время.
Your comment is awaiting moderation.
Платформа пропонує https://61000.com.ua різноманітний контент: порадник, новини, публікації на тему здоров’я, цікавих історій, місць Харкова, культурні події, архів статей та корисні матеріали для жителів міста
Your comment is awaiting moderation.
Быстрый заказ такси https://taxi-v-sverdlovske.ru онлайн и по телефону. Подача от 5 минут, комфортные автомобили, безопасные поездки. Удобная оплата и выгодные тарифы на любые направления.
Your comment is awaiting moderation.
Закажите такси https://vezem-sverdlovsk.ru круглосуточно. Быстрая подача, фиксированные цены, комфорт и безопасность в каждой поездке. Подходит для деловых, туристических и семейных поездок.
Your comment is awaiting moderation.
Онлайн-заказ такси https://sverdlovsk-taxi.ru за пару кликов. Быстро, удобно, безопасно. Подача в течение 5–10 минут, разные классы авто, безналичный расчет и прозрачные тарифы.
Your comment is awaiting moderation.
Заказать такси https://taxi-sverdlovsk.ru онлайн быстро и удобно. Круглосуточная подача, комфортные автомобили, вежливые водители. Доступные цены, безналичная оплата, поездки по городу и за его пределы
Your comment is awaiting moderation.
Как раз то, что нужно для решения этого вопроса:
Хочу выделить раздел про yogapulse.ru.
Ссылка ниже:
https://yogapulse.ru
Рад был поделиться информацией.
Your comment is awaiting moderation.
audio umkehren audio teilen
Your comment is awaiting moderation.
нужен юрист: юристы семейное право Новосибирск защита интересов, составление договоров, сопровождение сделок, помощь в суде. Опыт, конфиденциальность, индивидуальный подход.
Your comment is awaiting moderation.
продвижение сайтов SEO академия РК любой тематики. Поисковая оптимизация, рост органического трафика, улучшение видимости в Google и Яндекс. Работаем на результат и долгосрочный эффект.
Your comment is awaiting moderation.
Как вариант, можно рассмотреть следующее:
Зацепил материал про easyterm.ru.
Вот, делюсь ссылкой:
https://easyterm.ru
Всем добра!
Your comment is awaiting moderation.
Чтобы было понятнее, о чем речь:
Зацепил материал про 095hotel.ru.
Вот, можете почитать:
https://095hotel.ru
Надеюсь, это было полезно.
Your comment is awaiting moderation.
Выкуп автомобилей продажа подержанных машин без постредников, быстро. . У нас вы можете быстро оформить заявку на кредит, продать или купить автомобиль на выгодных условиях, воспользовавшись удобным поиском по марке, модели, приводу, году выпуска и цене — независимо от того, интересует ли вас BMW, Hyundai, Toyota или другие популярные бренды.
Your comment is awaiting moderation.
Ищешь автозапчасти? магазин автозвук и сигнализации предоставляем широкий ассортимент автозапчастей, автомобильных аксессуаров и оборудования как для владельцев легковых автомобилей, так и для корпоративных клиентов. В нашем интернет-магазине вы найдете оригинальные и неоригинальные запчасти, багажники, автосигнализации, автозвук и многое другое.
Your comment is awaiting moderation.
Решили купить Honda? история бренда honda широкий ассортимент автомобилей Honda, включая новые модели, такие как Honda CR-V и Honda Pilot, а также автомобили с пробегом. Предоставляем услуги лизинга и кредитования, а также предлагает различные акции и спецпредложения для корпоративных клиентов.
Your comment is awaiting moderation.
Для тех, кто в теме, будет очень актуально:
Хочу выделить материал про musichunt.pro.
Смотрите сами:
https://musichunt.pro
Надеюсь, эта информация сэкономит вам время.
Your comment is awaiting moderation.
Інформаційний портал https://pizzalike.com.ua про піцерії та рецепти піци в Україні й світі. Огляди закладів, адреси, меню, поради від шефів, секрети приготування та авторські рецепти. Все про піцу — від вибору інгредієнтів до пошуку найсмачнішої у вашому місті.
Your comment is awaiting moderation.
handmade brooches http://www.ceramic-clay-flowers.com/
Your comment is awaiting moderation.
Trust Finance https://trustf1nance.com is your path to financial freedom. Real investments, transparent conditions and stable income.
Your comment is awaiting moderation.
Недавно столкнулся с похожей ситуацией, и вот что помогло:
Особенно понравился материал про yogapulse.ru.
Смотрите сами:
https://yogapulse.ru
Надеюсь, эта информация сэкономит вам время.
Your comment is awaiting moderation.
Нужен вентилируемый фасад: https://podsistema-dlya-ventfasada.ru
Your comment is awaiting moderation.
Нужны пластиковые окна: заказать сетки на пластиковые окна
Your comment is awaiting moderation.
задать юридический вопрос онлайн спросить юриста онлайн бесплатно без регистрации
Your comment is awaiting moderation.
Оконные профили https://proizvodstvo-okonnych.ru для застройщиков и подрядчиков по выгодным ценам. Надёжные конструкции, современные материалы, поставка напрямую с завода.
Your comment is awaiting moderation.
Предлагаем оконные профили https://proizvodstvo-okonnych-profiley.ru для застройщиков и подрядчиков. Высокое качество, устойчивость к климатическим нагрузкам, широкий ассортимент.
Your comment is awaiting moderation.
For everyday carry, a mid-volume rockbros bike bag beats stuffed jersey pockets—multitool, tube, and snacks are exactly where you left them, and the straps stay put on cobbles.
Your comment is awaiting moderation.
Наткнулся на полезную статью, думаю, вам тоже пригодится:
Зацепил материал про qazar.ru.
Ссылка ниже:
https://qazar.ru
Надеюсь, у вас все получится.
Your comment is awaiting moderation.
Посмотрите, что я нашел по этому поводу:
Кстати, если вас интересует mersobratva.ru, посмотрите сюда.
Смотрите сами:
https://mersobratva.ru
Спасибо за внимание.
Your comment is awaiting moderation.
Купить мебель полки для цветов для дома и офиса по выгодным ценам. Широкий выбор, стильный дизайн, высокое качество. Доставка и сборка по всей России. Создайте комфорт и уют с нашей мебелью.
Your comment is awaiting moderation.
Круглосуточный вывод из запоя круглосуточно — помощь на дому и в стационаре. Капельницы, очищение организма, поддержка сердца и нервной системы. Анонимно и конфиденциально.
Your comment is awaiting moderation.
Ремонт кофемашин https://coffee-craft.kz с выездом на дом или в офис. Диагностика, замена деталей, настройка. Работаем с бытовыми и профессиональными моделями. Гарантия качества и доступные цены.
Your comment is awaiting moderation.
ПОмощь юрист в банкротстве: сколько стоит банкротство ип
Your comment is awaiting moderation.
Вот, что говорят эксперты по этому поводу:
Хочу выделить раздел про eroticpic.ru.
Ссылка ниже:
https://eroticpic.ru
Может, у кого-то есть другой опыт?
Your comment is awaiting moderation.
Наткнулся на полезную статью, думаю, вам тоже пригодится:
Для тех, кто ищет информацию по теме “rustrail.ru”, есть отличная статья.
Вот, можете почитать:
https://rustrail.ru
Обращайтесь, если что.
Your comment is awaiting moderation.
Делюсь с вами полезной ссылкой по теме:
Между прочим, если вас интересует rustrail.ru, посмотрите сюда.
Смотрите сами:
https://rustrail.ru
Всем удачи и хорошего дня!
Your comment is awaiting moderation.
Давно слежу за этой темой, хочу поделиться находкой:
Кстати, если вас интересует idalgogrif.ru, посмотрите сюда.
Ссылка ниже:
https://idalgogrif.ru
Всем добра!
Your comment is awaiting moderation.
Исчерпывающий ответ на данный вопрос находится тут:
Хочу выделить материал про buytime.ru.
Вот, делюсь ссылкой:
https://buytime.ru
Поделитесь своими мыслями в комментариях.
Your comment is awaiting moderation.
Это именно то, что я искал!
Кстати, если вас интересует easyterm.ru, загляните сюда.
Ссылка ниже:
https://easyterm.ru
Надеюсь, у вас все получится.
Your comment is awaiting moderation.
Если кому интересно, вот более детальная информация:
По теме “yogapulse.ru”, есть отличная статья.
Вот, делюсь ссылкой:
https://yogapulse.ru
Надеюсь, это было полезно.
Your comment is awaiting moderation.
Полагаю, это снимет все дальнейшие вопросы:
Хочу выделить материал про hotelnews.ru.
Вот, делюсь ссылкой:
https://hotelnews.ru
Всем спасибо, и до новых встреч!
Your comment is awaiting moderation.
Вот, что говорят эксперты по этому поводу:
Зацепил раздел про fixora.ru.
Ссылка ниже:
https://fixora.ru
Всем добра!
Your comment is awaiting moderation.
На мой взгляд, лучшее решение этой проблемы здесь:
Кстати, если вас интересует raregreen.ru, посмотрите сюда.
Вот, делюсь ссылкой:
https://raregreen.ru
Надеюсь, это было полезно.
Your comment is awaiting moderation.
Делюсь с вами полезной ссылкой по теме:
Особенно понравился материал про obender.ru.
Ссылка ниже:
https://obender.ru
Буду рад, если кому-то пригодится.
Your comment is awaiting moderation.
Как вариант, можно рассмотреть следующее:
Особенно понравился материал про obender.ru.
Смотрите сами:
https://obender.ru
Что думаете по этому поводу?
Your comment is awaiting moderation.
Наткнулся на полезную статью, думаю, вам тоже пригодится:
Между прочим, если вас интересует detoxa.ru, загляните сюда.
Ссылка ниже:
https://detoxa.ru
Надеюсь, эта информация сэкономит вам время.
Your comment is awaiting moderation.
شركة صيانة افران بمكة
Your comment is awaiting moderation.
войти в 1с через облако 1с через облако
Your comment is awaiting moderation.
ремонт бытовых швейных машин ремонт швейных машин
Your comment is awaiting moderation.
центр по ремонту кофемашин https://remont-kofemashin1.ru
Your comment is awaiting moderation.
Вот здесь подробно расписано, как это сделать:
Между прочим, если вас интересует cyq.ru, посмотрите сюда.
Смотрите сами:
https://cyq.ru
Всем мира и продуктивного дня
Your comment is awaiting moderation.
Вот, что говорят эксперты по этому поводу:
Между прочим, если вас интересует mersobratva.ru, посмотрите сюда.
Вот, можете почитать:
https://mersobratva.ru
Спасибо, что дочитали до конца.
Your comment is awaiting moderation.
Посмотрите, что я нашел по этому поводу:
По теме “all-hotels-online.ru”, там просто кладезь информации.
Вот, можете почитать:
https://all-hotels-online.ru
Буду следить за обсуждением.
Your comment is awaiting moderation.
Исчерпывающий ответ на данный вопрос находится тут:
Зацепил материал про idalgogrif.ru.
Смотрите сами:
https://idalgogrif.ru
Надеюсь, смог помочь.
Your comment is awaiting moderation.
Вот тут есть все ответы на ваши вопросы:
Между прочим, если вас интересует obender.ru, загляните сюда.
Вот, делюсь ссылкой:
https://obender.ru
Надеюсь, смог помочь.
Your comment is awaiting moderation.
Полагаю, это снимет все дальнейшие вопросы:
Особенно понравился материал про fjhg.ru.
Ссылка ниже:
https://fjhg.ru
Интересно было бы узнать ваше мнение.
Your comment is awaiting moderation.
Чтобы разобраться в вопросе, рекомендую ознакомиться:
По теме “spb-hotels.ru”, там просто кладезь информации.
Ссылка ниже:
https://spb-hotels.ru
Если у вас есть что добавить, не стесняйтесь.
Your comment is awaiting moderation.
Недавно столкнулся с похожей ситуацией, и вот что помогло:
Особенно понравился раздел про clasifieds.ru.
Смотрите сами:
https://clasifieds.ru
Что думаете по этому поводу?
Your comment is awaiting moderation.
Возможно, это будет полезно участникам обсуждения:
Для тех, кто ищет информацию по теме “eqa.ru”, есть отличная статья.
Вот, можете почитать:
https://eqa.ru
Буду признателен за ваши отзывы.
Your comment is awaiting moderation.
Кстати, вот что я думаю по этому поводу:
Для тех, кто ищет информацию по теме “clasifieds.ru”, есть отличная статья.
Вот, можете почитать:
https://clasifieds.ru
Поделитесь своими мыслями в комментариях.
Your comment is awaiting moderation.
Возможно, это будет полезно участникам обсуждения:
Хочу выделить раздел про mersobratva.ru.
Ссылка ниже:
https://mersobratva.ru
Всем удачи и хорошего дня!
Your comment is awaiting moderation.
Вот здесь можно найти больше примеров:
Особенно понравился раздел про detoxa.ru.
Вот, можете почитать:
https://detoxa.ru
Спасибо, что дочитали до конца.
Your comment is awaiting moderation.
Исчерпывающий ответ на данный вопрос находится тут:
Между прочим, если вас интересует fk-almazalrosa.ru, загляните сюда.
Смотрите сами:
https://fk-almazalrosa.ru
Надеюсь, эта информация сэкономит вам время.
Your comment is awaiting moderation.
Давно слежу за этой темой, хочу поделиться находкой:
Кстати, если вас интересует eroticpic.ru, загляните сюда.
Ссылка ниже:
https://eroticpic.ru
Какие еще есть варианты?
Your comment is awaiting moderation.
Долго искал решение и наконец-то нашел:
Кстати, если вас интересует fk-almazalrosa.ru, посмотрите сюда.
Вот, делюсь ссылкой:
https://fk-almazalrosa.ru
Интересно было бы узнать ваше мнение.
Your comment is awaiting moderation.
Как вариант, можно рассмотреть следующее:
Кстати, если вас интересует localflavors.ru, посмотрите сюда.
Вот, делюсь ссылкой:
https://localflavors.ru
Буду следить за обсуждением.
Your comment is awaiting moderation.
Как вариант, можно рассмотреть следующее:
Для тех, кто ищет информацию по теме “mersobratva.ru”, там просто кладезь информации.
Вот, делюсь ссылкой:
https://mersobratva.ru
Обращайтесь, если что.
Your comment is awaiting moderation.
Вот отличный материал, который проливает свет на ситуацию:
Кстати, если вас интересует buytime.ru, загляните сюда.
Ссылка ниже:
https://buytime.ru
Может, у кого-то есть другой опыт?
Your comment is awaiting moderation.
Полагаю, это снимет все дальнейшие вопросы:
Хочу выделить раздел про spb-hotels.ru.
Смотрите сами:
https://spb-hotels.ru
Обращайтесь, если что.
Your comment is awaiting moderation.
Чтобы разобраться в вопросе, рекомендую ознакомиться:
Для тех, кто ищет информацию по теме “pro-zenit.ru”, нашел много полезного.
Вот, делюсь ссылкой:
https://pro-zenit.ru
Если есть вопросы, задавайте.
Your comment is awaiting moderation.
Это именно то, что я искал!
По теме “lingomap.ru”, там просто кладезь информации.
Вот, делюсь ссылкой:
https://lingomap.ru
Всем удачи и хорошего дня!
Your comment is awaiting moderation.
Вот отличный материал, который проливает свет на ситуацию:
По теме “idalgogrif.ru”, там просто кладезь информации.
Ссылка ниже:
https://idalgogrif.ru
Какие еще есть варианты?
Your comment is awaiting moderation.
Долго искал решение и наконец-то нашел:
По теме “diyworks.ru”, нашел много полезного.
Вот, можете почитать:
https://diyworks.ru
Всем удачи и хорошего дня!
Your comment is awaiting moderation.
Уверен, эта информация будет для вас полезна:
Особенно понравился материал про anclaves.ru.
Вот, делюсь ссылкой:
https://anclaves.ru
Всем мира и продуктивного дня
Your comment is awaiting moderation.
Посмотрите, что я нашел по этому поводу:
Зацепил раздел про phenoma.ru.
Ссылка ниже:
https://phenoma.ru
Буду признателен за ваши отзывы.
Your comment is awaiting moderation.
Вот здесь можно найти больше примеров:
По теме “095hotel.ru”, там просто кладезь информации.
Ссылка ниже:
https://095hotel.ru
Что думаете по этому поводу?
Your comment is awaiting moderation.
Вот, что говорят эксперты по этому поводу:
Для тех, кто ищет информацию по теме “clasifieds.ru”, есть отличная статья.
Ссылка ниже:
https://clasifieds.ru
Всем мира и продуктивного дня
Your comment is awaiting moderation.
Чтобы не быть голословным, прикрепляю ссылку:
Для тех, кто ищет информацию по теме “reactive.su”, есть отличная статья.
Ссылка ниже:
https://reactive.su
Надеюсь, это было полезно.
Your comment is awaiting moderation.
Вот здесь подробно расписано, как это сделать:
Для тех, кто ищет информацию по теме “all-hotels-online.ru”, есть отличная статья.
Ссылка ниже:
https://all-hotels-online.ru
Жду конструктивной критики.
Your comment is awaiting moderation.
Всем привет, нашел интересную информацию по теме:
Между прочим, если вас интересует mersobratva.ru, посмотрите сюда.
Ссылка ниже:
https://mersobratva.ru
Успехов в решении вашего вопроса!
Your comment is awaiting moderation.
Как вариант, можно рассмотреть следующее:
По теме “pro-zenit.ru”, нашел много полезного.
Вот, можете почитать:
https://pro-zenit.ru
Жду конструктивной критики.
Your comment is awaiting moderation.
На мой взгляд, лучшее решение этой проблемы здесь:
Для тех, кто ищет информацию по теме “m-admin.ru”, есть отличная статья.
Вот, можете почитать:
https://m-admin.ru
Спасибо за внимание.
Your comment is awaiting moderation.
Как раз то, что нужно для решения этого вопроса:
Для тех, кто ищет информацию по теме “komandor-povolje.ru”, есть отличная статья.
Вот, делюсь ссылкой:
https://komandor-povolje.ru
Жду ваших комментариев.
Your comment is awaiting moderation.
На мой взгляд, лучшее решение этой проблемы здесь:
По теме “anclaves.ru”, там просто кладезь информации.
Ссылка ниже:
https://anclaves.ru
Дайте знать, если найдете что-то еще.
Your comment is awaiting moderation.
Вот отличный материал, который проливает свет на ситуацию:
Кстати, если вас интересует avelonbeta.ru, посмотрите сюда.
Смотрите сами:
https://avelonbeta.ru
Рад был поделиться информацией.
Your comment is awaiting moderation.
Полностью поддерживаю, и вот еще одно подтверждение:
Для тех, кто ищет информацию по теме “buytime.ru”, там просто кладезь информации.
Смотрите сами:
https://buytime.ru
Жду ваших комментариев.
Your comment is awaiting moderation.
Всем привет, нашел интересную информацию по теме:
Между прочим, если вас интересует eqa.ru, загляните сюда.
Вот, делюсь ссылкой:
https://eqa.ru
Всем спасибо, и до новых встреч!
Your comment is awaiting moderation.
Долго искал решение и наконец-то нашел:
Для тех, кто ищет информацию по теме “buytime.ru”, нашел много полезного.
Смотрите сами:
https://buytime.ru
Спасибо за внимание.
Your comment is awaiting moderation.
Наткнулся на полезную статью, думаю, вам тоже пригодится:
Для тех, кто ищет информацию по теме “fixora.ru”, нашел много полезного.
Ссылка ниже:
https://fixora.ru
Спасибо, что дочитали до конца.
Your comment is awaiting moderation.
Недавно столкнулся с похожей ситуацией, и вот что помогло:
Между прочим, если вас интересует travelcrimea.ru, посмотрите сюда.
Ссылка ниже:
https://travelcrimea.ru
Всем спасибо, и до новых встреч!
[…] Please follow steps for creating EC2 Instance for this Blog: […]