
Introduction
Amazon Elastic Compute Cloud (Amazon EC2) is a fundamental service offered by AWS that delivers scalable cloud computing resources. It allows businesses and developers to run applications without requiring physical servers. In this article, we will guide you through the basics of EC2 and how to get started.
What is Amazon EC2?
Amazon EC2, users are provided with virtual servers, or more commonly known as instances, on which to execute their applications. You have complete control over the resources allocated to your computer and can scale them up or down depending on your utilization needs with EC2. EC2 is very flexible to different workloads as it offers many instance types, operating systems, and pricing models.
Key Features of Amazon EC2
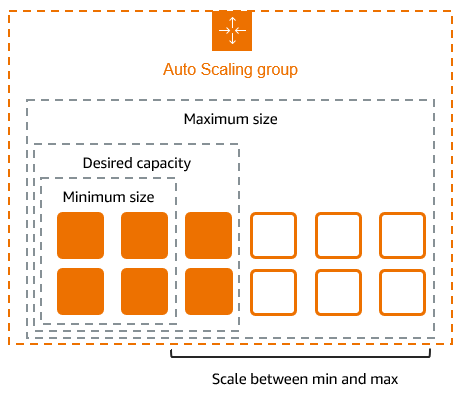
- Scalability: Change your instance type or capacity according to your needs with Auto Scaling.
- Cost Efficient: Cost can be minimized by selecting On-Demand, Reserved, or Spot Instances.
- OS Support: Users can run virtually any distribution of Linux, Windows, or even develop their own custom operating systems.
- Security: Utilize security groups, network access control lists, and encryption.
- Integration: Seamlessly integrate with other AWS services like S3, RDS, and CloudWatch.
EC2 Pricing Options
Amazon EC2 offers several pricing models to suit various use cases and budgets:
1. On-Demand Instances
- Description: Pay for compute capacity by the hour or second with no long-term commitments.
- Use Cases: Suitable for short-term, unpredictable workloads that cannot be interrupted.
2. Reserved Instances
- Description: Commit to using a specific instance type for 1 or 3 years in exchange for a significant discount.
- Use Cases: Ideal for steady-state workloads or applications with predictable usage patterns.
3. Spot Instances
- Description: Bid on unused EC2 capacity at discounted rates.
- Use Cases: Best for flexible, fault-tolerant workloads such as big data analysis or batch processing.
4. Savings Plans
- Description: Flexible pricing model that offers savings for using AWS compute services over a 1- or 3-year term.
- Use Cases: Suitable for consistent workloads across different compute services.
5. Dedicated Hosts
- Description: Physical servers dedicated for your use, helping meet compliance and regulatory requirements.
- Use Cases: Ideal for workloads requiring isolation or software with per-socket licensing.
6. Dedicated Instances
- Description: Instances that run on single-tenant hardware.
- Use Cases: Suitable for applications needing hardware isolation.
7. Free Tier
- Description: Includes 750 hours per month of t2.micro or t3.micro instances for the first 12 months.
- Use Cases: Perfect for new users exploring AWS.
Step-by-Step Guide to Get Started
Step 1: Create an AWS Account
If you do not possess an AWS account yet, sign up here. AWS provides a free tier featuring 750 hours each month of t2.micro instances for a duration of one year.
Step 2: Navigate to the EC2 Dashboard
- Log in to your AWS Management Console.
- Search for “EC2” in the search bar and click on the service.

3. You’ll be directed to the EC2 dashboard, where you can launch and manage instances.
Step 3: Launch your first instance
- Click on the Launch Instance, It will redirect into the Instance creation page.

2. Now you can name the instance on your naming convention and select the AMI as Amazon Linux 2 Image.

3. Select the instance type as t2.micro, and create a new key pair for launching the instance. Click on Create new key pair button.


4. Under Network Settings, click the Edit button. Leave the default VPC and set the Subnet to “No Preference.” Enable the Auto-assign IP option. Under Firewall, select Create a new Security Group, provide a name and description, and leave the default rules unchanged.


5. Click on the Launch Instance button and the EC2 Instance will be running.

Best Practices
- Secure Your Key Pair: Never share your .pem file and set appropriate permissions (chmod 400).
- Monitor Instance Usage: Use Amazon CloudWatch to track performance and usage.
- Stop Unused Instances: Avoid unnecessary charges by stopping instances when not in use.
Conclusion
Great job! We have successfully configured your initial EC2 instance. This vital skill opens up many possibilities within AWS, from hosting applications to building complex architectures. In future tutorials, we will explore more complex EC2 configurations and integrations. Keep visiting Devops Horizon for more Cloud and Devops Blogs.

1 Comment
Your comment is awaiting moderation.
Volvo в Україні https://telegra.ph/Kupit-spectehniku-Volvo-03-30 екскаватори, фронтальні навантажувачі та дорожні машини. Надійність, ефективність і сучасні рішення для будівництва. Продаж, підбір і обслуговування техніки для бізнесу.
Your comment is awaiting moderation.
смотреть кино в хорошем качестве новинки кино 2026 смотреть онлайн
Your comment is awaiting moderation.
Volvo спецтехніка https://novosti.stck.me/post/1800412/Kupit-spetstekhniku-SDLG-v-Ukraine/ екскаватори, фронтальні навантажувачі та дорожні машини. Надійність, ефективність і сучасні рішення для будівництва. Продаж, підбір і обслуговування техніки для бізнесу.
Your comment is awaiting moderation.
промокод алиэкспресс комбо промокод алиэкспресс на первую покупку
Your comment is awaiting moderation.
pin up casino online https://mybiz04.ru
Your comment is awaiting moderation.
Нужен займ? деньги займ онлайн взять деньги быстро и без справок. Удобное оформление заявки, быстрые выплаты и минимальные требования. Подберите надежную МФО и получите деньги на карту в короткие сроки.
Your comment is awaiting moderation.
Tarot readings tarot com az articles on card meanings, love readings, and daily predictions. Learn how to correctly perform readings and interpret the cards to get accurate answers.
Your comment is awaiting moderation.
Оформите заказ масла и смазки оптом на масло в бочках оптом и получите бесплатную доставку по Москве.
Your comment is awaiting moderation.
кредитный займ https://tvojbank.ru
Your comment is awaiting moderation.
Нужен займ? займ где взять взять деньги быстро и без справок. Удобное оформление заявки, быстрые выплаты и минимальные требования. Подберите надежную МФО и получите деньги на карту в короткие сроки.
Your comment is awaiting moderation.
Играешь на гитаре? легкие аккорды для гитары большая база аккордов, табулатур и разборов песен. Удобный поиск, схемы аккордов и тексты популярных композиций. Подходит для новичков и опытных гитаристов для обучения и игры.
Your comment is awaiting moderation.
Полиграфия Печать буклетов предлагает более структурный подход, позволяя организовать информацию по разделам, раскрывая тему постепенно и логично, словно открывая главы увлекательной истории. Печать визиток — это миниатюрное произведение искусства, несущее мощное послание о личности или бренде, где каждая деталь, от бумаги до тиснения, говорит о статусе и профессионализме.
Your comment is awaiting moderation.
кіно новинки 2026 безкоштовно дивитися фільм
Your comment is awaiting moderation.
Kent Casino kentcasino официальный сайт, регистрация и бонусы. Онлайн казино с быстрым выводом средств, слотами и играми от топ провайдеров. Получите фриспины и играйте на реальные деньги безопасно.
Your comment is awaiting moderation.
Промокоды Пятёрочки https://www.time-samara.ru/content/view/785106/transformaciya-sistemy-loyalnosti-v-sovremennom-rossijskom-ritejle актуальные купоны и скидки на продукты и доставку. Получайте бонусы, снижайте стоимость заказов и экономьте на покупках. Только проверенные промокоды для выгодных покупок в Пятёрочке каждый день.
Your comment is awaiting moderation.
Проверка авто по VIN https://dtf.ru/luchshii-rating/3585176-top-15-luchshih-servisov-proverki-avto-po-vin-nomeru-reiting-2025-goda ТОП-15 лучших сервисов для анализа истории машины. ДТП, пробег, владельцы и ограничения. Сравните платформы и выберите надежный сервис для безопасной покупки авто.
Your comment is awaiting moderation.
Все самое свежее здесь: https://interskol-shurupovert.ru
Your comment is awaiting moderation.
Обновления по теме: https://geforce-gt-730.ru
Your comment is awaiting moderation.
Самые актуальный новости свежие новости — свежие события, аналитика и репортажи. Политика, экономика, технологии и общество. Будьте в курсе последних новостей и ключевых событий каждый день.
Your comment is awaiting moderation.
Промокоды Пятёрочки https://www.time-samara.ru/content/view/785106/transformaciya-sistemy-loyalnosti-v-sovremennom-rossijskom-ritejle актуальные купоны и скидки на продукты и доставку. Получайте бонусы, снижайте стоимость заказов и экономьте на покупках. Только проверенные промокоды для выгодных покупок в Пятёрочке.
Your comment is awaiting moderation.
Мысли вслух Это авторский проект, посвящённый саморазвитию, финансовой грамотности и личным размышлениям о пути к успеху и благосостоянию.
Your comment is awaiting moderation.
Продвижение сообщества или страницы во ВКонтакте с помощью привлечения подписчиков. Услуга помогает быстро увеличить аудиторию, повысить активность и доверие к группе или профилю. Переходите по запросу привлечение подписчиков в вк. Возможна накрутка живых и заинтересованных пользователей, что улучшает видимость сообщества, помогает быстрее развивать бренд, проекты и продажи. Подходит для групп, пабликов и личных страниц.
Your comment is awaiting moderation.
Полная статья здесь: https://tsiklevka-parketa.ru
Your comment is awaiting moderation.
Все подробности по ссылке: шлифовка паркета без пыли
Your comment is awaiting moderation.
Самое интересное: https://tsiklevka-parketa.ru
Your comment is awaiting moderation.
Все самое свежее здесь: https://shlifovka-parketa.ru
Your comment is awaiting moderation.
paprasti pyragu receptai
Your comment is awaiting moderation.
discover24.ru
Your comment is awaiting moderation.
Заборы под ключ https://dachnie-zabory.ru в Москве и области — изготовление и установка ограждений для дома и участка. Профнастил, штакетник, сетка рабица и 3D заборы. Замер, доставка и монтаж с гарантией качества и соблюдением сроков.
Your comment is awaiting moderation.
Купить стройматериалы https://stroyrostov161.ru в Ростове-на-Дону: широкий выбор сыпучих и строительных материалов, включая щебень, песок, цемент, штукатурку и шпатлевку. Быстрая доставка и доступные цены для вашего объекта.
Your comment is awaiting moderation.
Modern ground fault sensor monitor the condition of electrical networks and protect equipment. They offer rapid fault detection, high accuracy, and reliability for industrial applications.
Your comment is awaiting moderation.
Подробности на странице: https://sergeygubanov.com/
Your comment is awaiting moderation.
Эко-бытовая химия http://reporter63.ru/content/view/784903/himiya-dlya-uborki-sekrety-effektivnosti-i-bezopasnosti в Санкт-Петербурге — средства для уборки без вредных компонентов. Эффективная очистка, безопасность для здоровья и окружающей среды. Широкий ассортимент и доставка по городу.
Your comment is awaiting moderation.
PUPIL OF FATE MOTORS https://auto.ae/pupiloffatemotors автосалон премиум авто в Дубае. Продажа роскошных автомобилей, эксклюзивные модели и индивидуальный подбор. Помогаем выбрать, оформить и доставить авто с гарантией качества и высоким уровнем сервиса.
Your comment is awaiting moderation.
Промокод Пятёрочка доставка http://reporter63.ru/content/view/785017/promokod-pyaterochka-dostavka-vygodnye-vozmozhnosti-dlya-pokupok-onlajn актуальные скидки и купоны на заказ продуктов онлайн. Получайте выгодные предложения, снижайте стоимость доставки и экономьте на покупках в Пятёрочке с рабочими промокодами.
Your comment is awaiting moderation.
Компания DARKLUM https://darklum.ru/catalogue предлагает широкий ассортимент светодиодных светильников различного назначения для коммерческих и жилых помещений как внутреннего, так и уличного освещения. В каталоге представлено более 5 000 моделей различных форм-факторов, среди которых Вы без труда сможете выбрать оптимальный вариант.
Your comment is awaiting moderation.
Менопауза и перименопауза https://menopower.ru симптомы, приливы и гормональные изменения. Полезные советы для женщин 45+, рекомендации по здоровью, образу жизни и управлению финансами для комфортного прохождения этого периода.
Your comment is awaiting moderation.
Проверенные адвокаты Москвы https://isk1.ru квалифицированная юридическая помощь и защита в суде. Решение сложных правовых споров, сопровождение дел и профессиональный подход к каждому клиенту для достижения результата.
Your comment is awaiting moderation.
Санитарные системы https://bio-ecopro.ru для мероприятий и стройплощадок — аренда мобильных туалетов, умывальников и санитарных модулей. Доставка, обслуживание и вывоз. Надежные решения для фестивалей, концертов, стройки и массовых событий.
Your comment is awaiting moderation.
1хбет промокод при регистрации свежий
Your comment is awaiting moderation.
Current recommendations: https://starsjacket.com/300-mb-as-much-as-6000-55-free-revolves/
Your comment is awaiting moderation.
Updates on the Topic: https://www.boschen-oetting.de/2026/03/18/international-online-casinos-your-guide-to-global-casinos-2025/
Your comment is awaiting moderation.
Details – by clicking: https://niceconstruction.co.uk/indian-mature-pornography-video-clips/
Your comment is awaiting moderation.
Learn More: https://courses.doctorsacademy.org.uk/MRCSBOnline/exam/?p=509418
Your comment is awaiting moderation.
All the details at the link: http://www.spanishtrainers.com/blog/finest-web-based-casinos-uk-greatest-uk-sites-incentives-to-have-2026/
Your comment is awaiting moderation.
Learn more here: https://pestkafilm.pl/300-match-incentive-as-much-as-7000-forty-five-totally-free-revolves/
Your comment is awaiting moderation.
Just what you need: https://cursos.institutofernandabenead.com.br/20-want-saree-poses-for-every-body-type-in-the-2024/
Your comment is awaiting moderation.
Fresh news on Page: https://www.laredtina.com/naughty-the-usa/
Your comment is awaiting moderation.
Старый паркет? шлифовка паркет сколько стоит профессиональное восстановление деревянного пола без пыли и лишних затрат. Удаляем царапины, потемнения и старое покрытие, возвращаем гладкость и естественный цвет. Используем современное оборудование, выполняем циклевку, шлифовку и лакировку паркета под ключ с гарантией качества и точным соблюдением сроков.
Your comment is awaiting moderation.
паркет под циклевку паркет циклевка покрытие спб
Your comment is awaiting moderation.
циклевка старого паркета https://tsiklevka-parketa.ru
Your comment is awaiting moderation.
печать металлических значков изготовление металлических значков в москве
Your comment is awaiting moderation.
значки круглые металлические изготовление значков из металла москва
Your comment is awaiting moderation.
mostbet mərc ləğv etmək https://www.mostbet2013.help
Your comment is awaiting moderation.
металлический значок доты изготовление металлических значков в москве
Your comment is awaiting moderation.
металлический значок пин https://metallicheskie-znachki213.ru/
Your comment is awaiting moderation.
значки на одежду металлические изготовление металлических значков в москве
Your comment is awaiting moderation.
mostbet kupon kodunu necə aktiv etmək http://mostbet2013.help/
Your comment is awaiting moderation.
dental problems? overseas dental treatment high-quality dental treatment abroad at affordable prices. Implants, veneers, prosthetics, and treatments with a guarantee. We select a clinic, organize your trip, and provide patient support throughout the entire process.
Your comment is awaiting moderation.
Zahnprobleme? vorteile von zahnbehandlung im ausland zahnbehandlung im Ausland mit bis zu 70 % Ersparnis. Implantate, Zahnersatz, asthetische Zahnheilkunde und Diagnostik in modernen Kliniken. Wir unterstutzen Sie bei der Wahl des Landes und der Klinik und organisieren Ihre Reise von A bis Z.
Your comment is awaiting moderation.
студия дизайна и интерьера дизайн интерьеров санкт петербург
Your comment is awaiting moderation.
дизайн предмета интерьера дизайн проект квартиры
Your comment is awaiting moderation.
<https://kuklanvt.info/salon/
Your comment is awaiting moderation.
Все самое свежее здесь: https://write.as/vgump9ol2pygb.md
Your comment is awaiting moderation.
дизайн проект частного дома цена дизайн проект частного дома
Your comment is awaiting moderation.
дизайнеров интерьера услуги по разработке дизайна
Your comment is awaiting moderation.
дизайн интерьера коттеджа https://dizayn-kottedzha.ru
Your comment is awaiting moderation.
дизайн студия интерьера дизайн проект для ремонта квартиры
Your comment is awaiting moderation.
дизайн студии спб интерьера дизайн спб
Your comment is awaiting moderation.
Trusted platform youtube account kaufen offers premium accounts with verified quality, complete credentials, and instant automated delivery. Geo-targeted options cover USA, UK, Germany, France, Poland, Ukraine, and other regions with proper IP history and locale settings. Smart account sourcing is the foundation of profitable advertising — start with verified profiles and scale with confidence.
Your comment is awaiting moderation.
Verified marketplace buy yahoo mail accounts provides access to a wide catalog of digital profiles for advertising and media buying. The team provides onboarding guidance for new buyers and ongoing operational support for teams managing high-volume campaign portfolios. Teams that prioritize account quality over raw volume consistently achieve better ROI and fewer campaign interruptions.
Your comment is awaiting moderation.
Professional service how does reddit karma work specializes in accounts optimized for paid campaigns with proper warming history and platform trust markers. Aged profiles with natural activity patterns consistently outperform fresh registrations in ad delivery quality and checkpoint avoidance rates. Experienced buyers return for the consistency — same quality standards, same fast delivery, same professional support every time.
Your comment is awaiting moderation.
Trusted platform protonmail competitors offers premium accounts with verified quality, complete credentials, and instant automated delivery. Product cards display exact specifications including account age, verification level, included assets, geo origin, and current stock availability. Teams that prioritize account quality over raw volume consistently achieve better ROI and fewer campaign interruptions.
Your comment is awaiting moderation.
Experienced supplier hotmail pop3 offers complete asset packages including login credentials, recovery access, 2FA codes, cookies, and user-agent data. Detailed usage guides help buyers understand the differences between softreg, selfreg, farmed, and reinstated account types before purchasing. Smart account sourcing is the foundation of profitable advertising — start with verified profiles and scale with confidence.
Your comment is awaiting moderation.
Trusted platform get old instagram account buy offers premium accounts with verified quality, complete credentials, and instant automated delivery. Detailed usage guides help buyers understand the differences between softreg, selfreg, farmed, and reinstated account types before purchasing. Marketplace standards ensure that every account performs as described — no surprises at checkout, login, or campaign launch.
Your comment is awaiting moderation.
Verified marketplace advertiser verification google ads reddit provides access to a wide catalog of digital profiles for advertising and media buying. Transparent replacement policy covers the first-login window and ensures buyers receive exactly what is described on the product card. Smart account sourcing is the foundation of profitable advertising — start with verified profiles and scale with confidence.
Your comment is awaiting moderation.
Expert-level shop buy gmail pva accounts in bulk combines automated delivery with manual verification to ensure every account meets strict quality benchmarks. The catalog is segmented by platform, geo, account type, and price tier to simplify navigation for both new and returning customers. Every order comes with clear documentation, replacement guarantees, and access to a growing knowledge base of operational resources.
Your comment is awaiting moderation.
Expert-level shop discord accounts purchase combines automated delivery with manual verification to ensure every account meets strict quality benchmarks. The marketplace serves a global buyer base with English-speaking support available via Telegram for product selection and order management. Smart account sourcing is the foundation of profitable advertising — start with verified profiles and scale with confidence.
Your comment is awaiting moderation.
Growth-focused store buy facebook business managers is built specifically for performance marketers who value transparency, speed, and predictable account quality. Aged profiles with natural activity patterns consistently outperform fresh registrations in ad delivery quality and checkpoint avoidance rates. Instant delivery, verified quality, and dedicated support — everything a professional advertiser needs in one marketplace.
Your comment is awaiting moderation.
Обновлено сегодня: https://sport-weekend.com/demontazh-doma-i-raschistka-uchastka-kak-osvobodit-zemlju-dlja-novogo-stroitelstva.htm
Your comment is awaiting moderation.
The best porn generator free ai porn video generator your fantasies remain strictly between you and the neural network. Instant, high-quality generation, extensive scenario and character customization.
Your comment is awaiting moderation.
Нужна накрутка соц сетей? вячеслав горбин увеличение подписчиков, лайков и просмотров для продвижения аккаунтов. Быстрый старт, безопасные методы и живая активность помогут развить профиль и повысить вовлеченность в популярных социальных платформах.
Your comment is awaiting moderation.
Компания FarbWood https://farbwood.by предлагает пиломатериалы из сибирской лиственницы для частного и коммерческого строительства в Минске и по всей территории Минска. Мы работаем только с лиственницей сибирской, сосна и ель используются как дополнение к основному ассортименту древесины.
Your comment is awaiting moderation.
Брендирование сувениров https://4youcreation.kz в Алматы по современным технологиям. Специалисты предлагают лазерную гравировку, УФ-печать и термоперенос на ткани, стекло, металл и пластик. Организуют доставку по всему Казахстану.
Your comment is awaiting moderation.
Нужен дизайн участка? ландшафтный дизайн под ключ стоимость проектирование и благоустройство участка с учетом рельефа, растений и стиля. Создаем красивые и функциональные решения для частных домов и дач, подбираем материалы и обеспечиваем качественную реализацию проекта.
Your comment is awaiting moderation.
Try this https://rentprivatejetfly.com for transparent private jet pricing with no hidden fees or surprise charges.
Your comment is awaiting moderation.
Reliable platform privatejetcharterfly provides access to verified charter fleet ranging from light to heavy jets.
Your comment is awaiting moderation.
Online tool see more provides peace of mind by verifying vehicle has no undisclosed damage history.
Your comment is awaiting moderation.
Car buyers best vin decoder benefit from instant VIN decoding that reveals hidden vehicle specifications.
Your comment is awaiting moderation.
Официальный сайт https://pokervip.ru: регистрация, вход, бонусы и игра в онлайн покер. Обзор возможностей, турниров, кеш-столов и мобильного приложения. Узнайте, как начать играть и выводить деньги на проверенной платформе.
Your comment is awaiting moderation.
Лучшие фриспины 2026 бездепозитный бонус за регистрацию: бесплатные вращения в онлайн казино без вложений. Подборка проверенных сайтов, бонусы за регистрацию, честные условия отыгрыша и возможность вывода выигрыша без риска для игроков.
Your comment is awaiting moderation.
Халява казино https://nodepositcasinofreespins.ru: фриспины за регистрацию, бонусы без пополнения и акции для новых игроков. Сравнивайте условия отыгрыша, выбирайте проверенные онлайн казино и начинайте играть бесплатно с возможностью вывода выигрыша.
Your comment is awaiting moderation.
Лучшие казино казино с оплатой через сбп: актуальный список онлайн казино с высоким рейтингом, быстрым выводом средств и выгодными бонусами. Обзор лицензий, игр и платежных методов поможет выбрать надежное казино для комфортной игры.
Your comment is awaiting moderation.
Хочешь казино бонус? https://t.me/s/casino_bonus_bezdep/25 всегда актуальные бонусы в онлайн казино. Получайте бонусы без вложений, фриспины и подарки за регистрацию. Актуальные предложения, честные условия отыгрыша и список проверенных казино с бонусами без депозита.
Your comment is awaiting moderation.
Последние изменения: https://l-parfum.ru/catalog/originaly/Givenchy/2314/
Your comment is awaiting moderation.
Need a multimedia system? equipment of meeting rooms We integrate multimedia systems for home and business. We install and configure audio and video systems, manage content, and integrate equipment into a single system. Modern solutions for comfortable and efficient use of technology.
Your comment is awaiting moderation.
сколько стоит ремонт в ванной ремонт ванных комнат в спб
Your comment is awaiting moderation.
лечение удаление зубов у детей лечение зубов под наркозом у детей спб
Your comment is awaiting moderation.
Quick pros:
+ Fast withdrawals
+ Mobile app works smooth
+ Good customer support responce
+ Lots of games available
goal11.ph
Your comment is awaiting moderation.
So my friend told me about this site like last week and I was skeptical at first but then I actually checked it out and started poking around and honestly its not bad like the whole thing is pretty straightforward to navigate and I’ve been going back gba777 app.
Your comment is awaiting moderation.
накрутка подписчиков в Телеграм https://nakrutka-podpischikov-telegram-1.ru
Your comment is awaiting moderation.
Your point of view caught my eye and was very interesting. Thanks. I have a question for you.
Your comment is awaiting moderation.
Can you be more specific about the content of your article? After reading it, I still have some doubts. Hope you can help me. https://accounts.binance.info/bg/register-person?ref=V2H9AFPY
Your comment is awaiting moderation.
навесы над крыльцом заказать навес для крыльца
Your comment is awaiting moderation.
Актуальные адреса Blacksprut
bs2best at
blsp at
bs2web at
Your comment is awaiting moderation.
Актуальные адреса Blacksprut
bs2best at
blsp at
bs2web at
Your comment is awaiting moderation.
Актуальные адреса Blacksprut
bs2best at
blsp at
bs2web at
Your comment is awaiting moderation.
Актуальные адреса Blacksprut
bs2best at
blsp at
bs2web at
Your comment is awaiting moderation.
Актуальные адреса Blacksprut
bs2best at
blsp at
bs2web at
Your comment is awaiting moderation.
Актуальные адреса Blacksprut
bs2best at
blsp at
bs2web at
Your comment is awaiting moderation.
Актуальные адреса Blacksprut
bs2best at
blsp at
bs2web at
Your comment is awaiting moderation.
сервис отправки sms от 30 копеек — это современное решение от U-SMS для тех, кто ценит экономию и стабильность связи. Система гарантирует надежную отправку сообщений по доступной стоимости с мобильных устройств iPhone и Windows Mobile. Цена на отправку стартует от 30 копеек, что делает предложение особенно привлекательным для активных пользователей. Главное преимущество — отправка с вашего собственного номера, благодаря чему сохраняется доверие и привычный формат общения. U-SMS работает на рынке более 14 лет, подтверждая надежность и устойчивость платформы. Сервис адаптирован для iPhone и смартфонов с Windows Mobile, обеспечивая удобный интерфейс и простую настройку. Оплатить услуги можно электронными деньгами, банковскими картами и через терминалы, что делает процесс максимально гибким. Сервис функционирует онлайн без установки дополнительного оборудования. Платформа удобна для частных сообщений и корпоративных рассылок. Надежная техническая база гарантирует оперативную отправку SMS. Сервис объединяет экономичность и многолетний опыт работы. Если вам важно отправлять SMS со своего номера дешевле стандартных тарифов операторов, U-SMS станет рациональным выбором. Начать пользоваться сервисом можно быстро и без сложных процедур, а гибкие условия позволяют контролировать расходы на связь. Выбирайте U-SMS для экономичной и удобной передачи SMS.
https://u-sms.ru/
Your comment is awaiting moderation.
скачать приложения Windows Phone 8 это информационный портал для владельцев смартфонов на базе операционной системы Windows Phone 8, где собраны популярные игровые новинки, полезные приложения и понятные руководства. На сайте вы можете подобрать интересные развлечения и установить приложения для работы и общения без лишних сложностей. Раздел с инструкциями поможет оптимизировать работу устройства, а также повысить производительность смартфона. Мы публикуем описания и советы, чтобы каждый пользователь смог найти подходящий софт. Отдельное внимание уделено разделу с темами оформления, где доступны оригинальные варианты интерфейса, позволяющие создать уникальный стиль устройства. В каталоге представлены развлекательные игры разных жанров, а также программы для учебы и бизнеса. Каждый материал сопровождается описанием возможностей, что облегчает выбор. Сообщество пользователей делится отзывами и опытом, формируя активную базу знаний по Windows Phone 8. Мы регулярно добавляем новые публикации, чтобы информация оставалась актуальной и полезной. Если вы ищете игры для Windows Phone 8, данный ресурс станет практичным гидом по платформе. Здесь собраны решения для начинающих пользователей, что делает сайт универсальным пространством для поклонников Windows Phone 8.
https://windows-phone-8.ru/
Your comment is awaiting moderation.
Обзор Nokia 5800 — это развернутый материал о легендарной модели, который получил широкую популярность среди любителей мобильной музыки. В этом материале вы найдете характеристики внешнего вида и интерфейса, а также основные спецификации модели. Nokia 5800 XpressMusic оснащен сенсорным экраном с компактным 3.2 дюймовым дисплеем, что делает работу с меню удобной. Аппарат позволяет увеличить объем памяти картой microSD и получил встроенную камеру для фото и видео, благодаря чему может использоваться для создания снимков и роликов. Отдельного внимания заслуживает звук и мультимедийные возможности, ведь модель создавалась как музыкальный телефон. Если вас интересует где приобрести Nokia 5800 XpressMusic, стоит обратить внимание на интернет магазины с хорошими отзывами, где можно найти выгодные предложения. Перед покупкой рекомендуется сравнить стоимость в разных магазинах, чтобы выбрать самое выгодное предложение. Сегодня эту модель можно найти среди объявлений о продаже телефонов, так как устройство ценится за надежность. Благодаря классическому дизайну и надежной платформе Nokia 5800 XpressMusic по прежнему вызывает интерес. Если вы ищете полную информацию о нокиа 5800, этот материал даст ответы на основные вопросы и найти подходящий вариант для покупки.
https://nokia5800.ru/
Your comment is awaiting moderation.
разработка интернет сайта
Your comment is awaiting moderation.
Apple iPhone новости — это актуальный сайт для поклонников устройств Apple, где регулярно выходят новые статьи и рекомендации о смартфонах, планшетах и компьютерах Apple. На страницах проекта вы найдете подробные обзоры устройств, честные мнения пользователей. Ресурс освещает релизы новых версий операционных систем Apple, помогает разобраться в работе облачных сервисов. Здесь публикуются инструкции по установке программ, а также подборки полезных приложений. Читатели узнают как защитить личные данные на устройствах Apple, получают рекомендации по покупке оригинальной техники. Портал регулярно рассказывает о ключевых событиях компании Apple, публикует аналитику рынка и тенденций. Отдельное внимание уделяется экосистеме Apple и интеграции устройств, что позволяет пользователям создать удобную цифровую среду. Материалы подходят как опытным владельцам техники Apple, поскольку контент сочетает понятные рекомендации на каждый день. Сайт станет полезным источником информации для тех, кто интересуется советами по работе с Mac и iMac и хочет всегда быть в курсе важных изменений в мире технологий Apple.
https://apple-blogger.ru/
Your comment is awaiting moderation.
Актуальные адреса Blacksprut
bs2best at
blsp at
bs2web at
Your comment is awaiting moderation.
поддержка сайта компании
Your comment is awaiting moderation.
Актуальные адреса Blacksprut
bs2best at
blsp at
bs2web at
Your comment is awaiting moderation.
информационные киоски
Your comment is awaiting moderation.
система управления электронной очередью
Your comment is awaiting moderation.
шумоизоляция дверей авто https://shumoizolyaciya-dverej-avto.ru
Your comment is awaiting moderation.
шумоизоляция торпеды https://shumoizolyaciya-torpedy-77.ru
Your comment is awaiting moderation.
https://ccgoodgamestation.online/code-promo-1xbet-nouvel-utilisateur-aujourdhui-130-e/
Your comment is awaiting moderation.
https://sysli.online/code-promo-1xbet-bonus-de-100-jusqua-130-e/
Your comment is awaiting moderation.
Актуальные адреса Blacksprut
bs2best at
blsp at
bs2web at
Your comment is awaiting moderation.
Актуальные адреса Blacksprut
bs2best at
blsp at
bs2web at
Your comment is awaiting moderation.
https://gravatar.com/puppyjolly1ea2916f83
Your comment is awaiting moderation.
Good afternoon!
Curate unique interesting mysterious stories that deliver valuable lessons daily now and inspire others with your narrative see on the website for storytelling workshops
Full information on the link – https://101flow.site
All the best and development in business!
Your comment is awaiting moderation.
https://xn—-xtbeeigk3B.xn--p1ai/user/umquesyemi
Your comment is awaiting moderation.
http://animationfixation.net/forums/user/meilleurbonus1xbet2/
Your comment is awaiting moderation.
https://welovewrinkles.com/codigo-promocional-sin-deposito-de-1xbet-2026-1xbro200/
Your comment is awaiting moderation.
https://maincoec.com/codigo-promocional-de-bono-de-1xbet-2026-1xbro200/
Your comment is awaiting moderation.
Актуальные адреса Blacksprut
bs2best at
blsp at
bs2web at
Your comment is awaiting moderation.
заборы в волоколамске и волоколамском районе
Your comment is awaiting moderation.
установка забора из профнастила московская область
Your comment is awaiting moderation.
https://3dwarehouse.sketchup.com/user/03ac83cf-d62a-4cbf-a0d9-86887fbf4d17
Your comment is awaiting moderation.
https://snippet.host/dvoban
Your comment is awaiting moderation.
кайтинг кайт
Your comment is awaiting moderation.
кайт школа кайтсёрфинг
Your comment is awaiting moderation.
SWeAR2033 Поэтому, когда речь заходит о “вайбовых” стримах, имя SWeAR2033 неизменно всплывает в числе первых, являясь синонимом отличного времяпрепровождения в интернете.
Your comment is awaiting moderation.
вайбовые стимы SWeAR2033 обладает уникальным талантом создавать вокруг себя комьюнити, где каждый чувствует себя частью большой и дружной семьи, объединенной любовью к качественному контенту.
Your comment is awaiting moderation.
заправка фреоном холодильника Львів
Your comment is awaiting moderation.
заміна помпи та електроніки кавоварки
Your comment is awaiting moderation.
кухни в классическом стиле фото в интерьере На «Кухне алгоритмов» мы раскрываем секреты создания по-настоящему «вкусных алгоритмов», где каждый шаг — это искусство, а результат — шедевр.
Your comment is awaiting moderation.
заказать кухню в Пскове Мы предлагаем полный спектр услуг: от создания уникального дизайна до установки готового кухонного гарнитура, чтобы ваша новая кухня стала не просто местом для готовки, а сердцем вашего дома, наполненным теплом и уютом. В нашей студии вы можете «заказать кухню в Пскове», которая будет полностью соответствовать вашим предпочтениям и бюджету, ведь «кухня на заказ Псков цены» всегда прозрачны и доступны.
Your comment is awaiting moderation.
https://open.mit.edu/profile/01KJFAYF6MXYBZ9ZX2FX47WKBH/
Your comment is awaiting moderation.
трансы пермь Каждый трек — это путешествие, построенное на постепенном нарастании напряжения и последующем катарсисе, приводящем к взрыву эмоций.
Your comment is awaiting moderation.
трансы омск Этот стиль, зародившийся в начале 90-х, продолжает волновать сердца клабберов по всему миру своей энергичностью и способностью создавать на танцполе атмосферу единения.
Your comment is awaiting moderation.
Sensory branding Strategy, scent technologies and successful implementation across all product stages by Aromamedia
Your comment is awaiting moderation.
https://www.pianational.org/home/default
Your comment is awaiting moderation.
http://www.citikliniken.com
Your comment is awaiting moderation.
https://www.citikliniken.com
Your comment is awaiting moderation.
http://www.studenternas.nu
Your comment is awaiting moderation.
Как выгодно купить Айфон в Уфе?
¦ Почему стоит выбрать покупку Айфона именно в Уфе?
айфон 17 про купить уфа
Выбирая устройство Apple, важно учитывать не только цену, но и удобство приобретения. Если вы находитесь в Уфе и хотите приобрести новый смартфон, предлагаем рассмотреть преимущества покупки прямо в вашем городе.
¦ Где лучше всего купить iPhone в Уфе?
купить айфон уфа
Существует несколько проверенных способов приобретения качественного устройства от Apple:
1. Официальные магазины: Например, фирменные точки продаж Apple позволяют убедиться в оригинальности товара и получить консультацию опытных продавцов-консультантов.
купить айфон 17
2. Крупные сетевые ритейлеры: Такие сети предлагают широкий ассортимент моделей и предоставляют гарантии качества продукции.
3. Интернет-магазины: Удобный способ покупки, позволяющий сравнить цены и характеристики устройств перед покупкой.
4. Местные торговые площадки: Некоторые небольшие местные продавцы также могут предложить выгодные условия приобретения гаджетов Apple.
¦ Советы по выбору оптимального варианта
При выборе места, где купить iPhone, обратите внимание на следующие моменты:
– Проверьте наличие гарантийного обслуживания и сервисных центров.
– Обратите внимание на дополнительные аксессуары и услуги, предоставляемые магазином.
– Оцените стоимость доставки и возможные скидки при покупке онлайн.
¦ Заключение
Таким образом, покупка нового смартфона от Apple становится проще благодаря разнообразию вариантов в Уфе. Воспользуйтесь нашим руководством, чтобы сделать правильный выбор и насладиться всеми преимуществами современных технологий!
¦ Ключи для SEO оптимизации:
– купить айфон в уфе
– купить айфон уфа
– iphone купить в уфе
– iphone купить уфа
– купить iphone уфа
купить айфон 17 в уфе
https://applemarketrf.ru/catalog/iphone/iphone-air/
Your comment is awaiting moderation.
семейная стоматология это комплексный подход к здоровью всей семьи где объединены терапия профилактика и эстетика. В нашей клинике проводится подробное обследование состояния зубов что позволяет своевременно выявить проблемы. Лечение кариеса любой сложности выполняется с применением надежных композитных систем обеспечивая эстетичный внешний вид зубов. При необходимости проводится обработка и пломбирование каналов что помогает устранить воспалительный процесс. Мы используем современное оборудование чтобы минимизировать риски осложнений. Особое внимание уделяется профилактическим осмотрам поскольку уход поддерживает здоровье десен. Для пациентов доступно профессиональное отбеливание эмали которое позволяет освежить внешний вид зубного ряда. Процедуры выполняются с учетом чувствительности зубов что обеспечивает бережное воздействие. Мы создаем дружелюбную атмосферу чтобы каждый пациент чувствовал заботу и внимание. Обращаясь к нам вы получаете комплексное сопровождение на всех этапах лечения и возможность предотвратить серьезные проблемы в будущем.
https://marugastom.ru
Your comment is awaiting moderation.
https://md.darmstadt.ccc.de/s/EGCKk5QwnE
Your comment is awaiting moderation.
http://www.bisound.com/forum/showthread.php?p=3039717#post3039717
Your comment is awaiting moderation.
домашний интернет провайдер Выбор подходящего тарифа интернета от Мегафон или другого провайдера важен для комфортного пользования услугами, будь то для работы, развлечений или телевидения.
Your comment is awaiting moderation.
bs2we at
Your comment is awaiting moderation.
1win apk https://www.1win52609.help
Your comment is awaiting moderation.
1win поддержка кыргызча 1win поддержка кыргызча
Your comment is awaiting moderation.
шумоизоляция авто https://vikar-auto.ru
Your comment is awaiting moderation.
Приветствую! Разберём самые актуальные — кровля для бизнес-центра. Дело в том, что: мокрые потолки — это убытки. Не хочешь проблем — вот надёжная компания: https://montazh-membrannoj-krovli-spb.ru. Лично я вижу, что коммерческие объекты нуждаются в гарантиях. Например арендаторы ждут — соответственно мембрану можно класть в любую погоду. Мы используем отражающие покрытия — крыша не перегревается. Что в итоге: один из самых эффективных способов сохранить здание.
Your comment is awaiting moderation.
доставка букета в москве – Сборные букеты из разных цветов яркие
Your comment is awaiting moderation.
1win как отыграть бонус http://www.1win52609.help
Your comment is awaiting moderation.
букет цветов заказать с доставкой в москве – Бесплатный самовывоз букетов на Электрозаводской
Your comment is awaiting moderation.
1win приложение Киргизия http://1win52609.help
Your comment is awaiting moderation.
букеты на заказ с доставкой москва недорого – Букеты в плетеных корзинах красивые
Your comment is awaiting moderation.
1win apk для Кыргызстана 1win apk для Кыргызстана
Your comment is awaiting moderation.
обслуживание интернет магазинов
Your comment is awaiting moderation.
заказать с доставкой цветы – Современные тренды флористики в наших композициях
Your comment is awaiting moderation.
москва заказать цветы – Нежные букеты для романтических моментов
Your comment is awaiting moderation.
цветы заказ с доставкой – Фотоотчет букета для подтверждения качества
Your comment is awaiting moderation.
1win рулетка онлайн https://1win59278.help/
Your comment is awaiting moderation.
1win илова кардани корт https://1win59278.help/
Your comment is awaiting moderation.
Привет всем! Рассмотрим, что работало ранее — почему течёт плоская кровля. Ценишь время — могу рекомендовать мастерам: https://montazh-membrannoj-krovli-spb.ru. В принципе рубероид и битум — это прошлый век. Скорее всего оптимальный вариант — ПВХ мембрана. Как это работает? швы спаиваются без щелей — опять же вода просто не проникает. Если решил сам: грунтовка. Что в итоге: кровля как монолит.
Your comment is awaiting moderation.
1win toʻlov usullari 1win toʻlov usullari
Your comment is awaiting moderation.
шумоизоляция авто https://vikar-auto.ru
Your comment is awaiting moderation.
1win sign up 1win sign up
Your comment is awaiting moderation.
1win telegram https://www.1win5769.help
Your comment is awaiting moderation.
1win tranzaksiya tarixi 1win tranzaksiya tarixi
Your comment is awaiting moderation.
чӣ гуна кэшбэк 1win гирифтан чӣ гуна кэшбэк 1win гирифтан
Your comment is awaiting moderation.
1win rasmiy mirror 1win rasmiy mirror
Your comment is awaiting moderation.
1win Тоҷикистон android 1win Тоҷикистон android
Your comment is awaiting moderation.
чӣ тавр 1win барои ios зеркашӣ кардан чӣ тавр 1win барои ios зеркашӣ кардан
Your comment is awaiting moderation.
1win пополнение через банк http://1win48762.help/
Your comment is awaiting moderation.
фриспины за регистрацию Желаешь начать игру в казино без риска? Открой для себя мир “казино без депозита”, где реальные деньги становятся твоими с первого шага.
Your comment is awaiting moderation.
мостбет не приходит код мостбет не приходит код
Your comment is awaiting moderation.
1win майнс игра https://www.1win48762.help
Your comment is awaiting moderation.
мостбет plinko Кыргызстан мостбет plinko Кыргызстан
Your comment is awaiting moderation.
mostbet apk Киргизия http://www.mostbet84736.help
Your comment is awaiting moderation.
мостбет KGS счет мостбет KGS счет
Your comment is awaiting moderation.
мостбет смс код не приходит http://mostbet84736.help/
Your comment is awaiting moderation.
Цветы красивые букеты Нежные букеты для романтических моментов
Your comment is awaiting moderation.
Букеты под заказ Открытость для предложений по улучшению букетов
Your comment is awaiting moderation.
Красивый букет фото дома Доверие клиентов на протяжении многих лет
Your comment is awaiting moderation.
Домашняя арена «Динамо» — место, где сопернику всегда сложнее, чем кажется. О роли болельщиков — подробнее здесь: https://rentry.co/8qxqdc6h
Your comment is awaiting moderation.
1win как вывести на DemirBank https://1win48762.help/
Your comment is awaiting moderation.
История ХК «Сибирь» особенно ярко раскрывается в домашних матчах: драматичные концовки, буллиты и победы на последних минутах. Родная арена стала символом силы команды. Узнайте больше о памятных встречах. Подробнее здесь: https://rentry.co/q49wppwd
Your comment is awaiting moderation.
1win не обновляется приложение http://www.1win48762.help
Your comment is awaiting moderation.
1вин официальный сайт Киргизия https://www.1win48762.help
Your comment is awaiting moderation.
1win Тоҷикистон боргирӣ http://www.1win93047.help
Your comment is awaiting moderation.
1win воридшавӣ бо почта 1win воридшавӣ бо почта
Your comment is awaiting moderation.
1win барои android зеркашӣ https://1win93047.help/
Your comment is awaiting moderation.
Зимняя программа СПБ: Чемпионат России по фигурному катанию 2026 и балет «Красная Жизель» подарят зрителям яркие эмоции. Подробнее: https://teletype.in/@concert/afisha-sankt-peterburga
Your comment is awaiting moderation.
Купить букет цветов дешево – Оперативная реакция на обращения по букетам
Your comment is awaiting moderation.
Цветы купить букет москва – Удобная транспортная доступность цветочного салона
Your comment is awaiting moderation.
1win пополнение в сомах 1win пополнение в сомах
Your comment is awaiting moderation.
1win хуруҷ ба Душанбе Сити Банк http://1win93047.help
Your comment is awaiting moderation.
Магазин цветов цены – Композиции для друзей и родных людей
Your comment is awaiting moderation.
1win пардохт бо TJS https://www.1win93047.help
Your comment is awaiting moderation.
Театры и концертные залы Москвы зимой предлагают драму и праздничные шоу: «Солнце Ландау» и «Уральские пельмени». Удобный выбор билетов онлайн позволит спланировать вечер. Подробнее: https://teletype.in/@concert/bilety-na-meropriyatiya-v-moskve
Your comment is awaiting moderation.
Hallo! Bei https://das-lolahome.de/ liegen Decken und Kissen weich in der Hand, kleine Tische aus Holz und Glas lassen sich leicht nutzen, Spielzeuge bringen Farbe ins Kinderzimmer. Die Textilien, Holz- und Glasobjekte fuhlen sich robust an und passen in Wohnzimmer, Schlafzimmer oder auf die Terrasse, alles wirkt naturlich, praktisch und gemutlich.
Your comment is awaiting moderation.
1win терминал balance kg http://1win08754.help
Your comment is awaiting moderation.
Онлайн-афиша помогает быстро выбрать концерт, спектакль или шоу, сравнить места и оформить билет за несколько минут прямо со смартфона. Подробнее здесь: https://justpaste.it/lhq4o
Your comment is awaiting moderation.
Hallo! Bei https://topfinel.de/ findet man Kissenhullen in weichen Stoffen, gestreifte Patchwork-Muster und passende Vorhange in Leinen und Voile. Alles liegt gut in der Hand, lasst sich einfach aufziehen oder uberziehen, und die Materialien fuhlen sich angenehm an. Ob Sofa, Fenster oder Lieblingssessel – die Textilien geben dem Raum sofort Struktur und Ruhe.
Your comment is awaiting moderation.
МХТ Чехова сезона 2025–2026 приглашает зрителей на спектакли с тонкой психологической работой актёров, живым диалогом и гармонией классики и современности. Подробнее: http://jobhop.co.uk/blog/452053/———20252026
Your comment is awaiting moderation.
Touched by Nature’s products combine natural ingredients with gentle formulations to nourish and protect your skin. Their wellness line supports holistic beauty. Discover their offerings at https://touchedbynatures.com.
Your comment is awaiting moderation.
1win лайв ставки http://1win08754.help/
Your comment is awaiting moderation.
1win aviator http://www.1win08754.help
Your comment is awaiting moderation.
aviator 1вин aviator 1вин
Your comment is awaiting moderation.
1win plinko на деньги http://1win04381.help/
Your comment is awaiting moderation.
1win не приходит вывод 1win04381.help
Your comment is awaiting moderation.
Зал Церковных Соборов в Москве — пространство духовной и классической музыки, где масштабные концерты звучат с особой силой и эмоциональностью. Подробнее: https://cont.ws/@sirgreensz/3165415
Your comment is awaiting moderation.
Цветы на дом москва дешево с бесплатной доставкой
Проверяем каждый букет перед доставкой курьером
Your comment is awaiting moderation.
CSZZD’s casual apparel line features modern designs and quality fabrics that keep you looking fresh and feeling great all day. Check out their collection at https://thecszzd.com.
Your comment is awaiting moderation.
Интернет магазин цветов
Создаем положительные эмоции каждым букетом цветов
Your comment is awaiting moderation.
1 вин слоты http://1win04381.help
Your comment is awaiting moderation.
Как отправить цветы
Нежные букеты для романтических моментов
Your comment is awaiting moderation.
Epsion offers a wide range of electronic devices including smart home products, headphones, and chargers designed to enhance your tech lifestyle. Explore their latest gadgets at https://theepsion.com.
Your comment is awaiting moderation.
1win о деньги пополнение https://1win04381.help/
Your comment is awaiting moderation.
Спектакли Евгения Гришковца — выбор для тех, кто ценит театр без пафоса, но с глубоким смыслом: личные истории, живое слово и честные эмоции создают особую атмосферу. Подробнее: https://kulturologia.ru/blogs/300126/67246/
Your comment is awaiting moderation.
BRING GREEN’s lineup includes environmentally conscious items such as reusable bags, bamboo utensils, and zero-waste essentials. Make a positive impact with BRING GREEN. Shop now at https://thebringgreen.com.
Your comment is awaiting moderation.
1win обход блокировки http://1win04381.help/
Your comment is awaiting moderation.
Livinia’s collection blends trendy designs with everyday comfort, offering versatile pieces perfect for work or leisure. Stay stylish effortlessly with Livinia. Discover more at https://thelivinia.com.
Your comment is awaiting moderation.
1вин игровые автоматы 1вин игровые автоматы
Your comment is awaiting moderation.
Атмосфера большого события начинается именно на ВТБ Арене, где каждый вечер становится запоминающимся. Подробнее здесь: https://kulturologia.ru/blogs/110226/67379/
Your comment is awaiting moderation.
1win легально ли в Киргизии 1win79230.help
Your comment is awaiting moderation.
mostbet confirmare tranzactie mostbet confirmare tranzactie
Your comment is awaiting moderation.
Концерты и спектакли в Барвиха Luxury Village проходят в атмосфере уюта и эстетики. Зал с идеальной акустикой и продуманной рассадкой делает каждый визит особенным. Подробнее здесь https://teletype.in/@concert/afisha-kz-barviha-luxury-village
Your comment is awaiting moderation.
mostbet Chișinău download mostbet Chișinău download
Your comment is awaiting moderation.
lucky jet pe mostbet lucky jet pe mostbet
Your comment is awaiting moderation.
Carbhub offers smart car accessories including organizers, chargers, and safety devices that make every drive more comfortable and convenient. Explore their range at https://thecarbhub.com.
Your comment is awaiting moderation.
mostbet retragere in euro http://mostbet42873.help/
Your comment is awaiting moderation.
1вин пополнение Киргизия http://1win79230.help
Your comment is awaiting moderation.
Доставка цветы на дом
Регулярное обновление каталога цветов еженедельно
Your comment is awaiting moderation.
cum functioneaza cashback la mostbet https://www.mostbet42873.help
Your comment is awaiting moderation.
Доставка цветы на дом
Свежесть и аромат настоящих живых цветов
Your comment is awaiting moderation.
1win регистрация 1win регистрация
Your comment is awaiting moderation.
Напряженная атмосфера, сильные роли и детективный сюжет — спектакль «8 разгневанных женщин» держит зал в ожидании до финального аккорда. Подробнее здесь: https://telegra.ph/8-razgnevannyh-zhenshchin-spektakl-kotoryj-derzhit-v-napryazhenii-do-finala-12-07
Your comment is awaiting moderation.
Покупка доставка цветов
Ответы на звонки в рабочее время мгновенно
Your comment is awaiting moderation.
1win вывод Киргизия 1win вывод Киргизия
Your comment is awaiting moderation.
Каждое шоу «LAB» превращается в яркое музыкальное событие с глубокой атмосферой и сильной эмоциональной отдачей. Подробнее здесь: https://kulturologia.ru/blogs/230126/67132/
Your comment is awaiting moderation.
1win быстрый вывод на элсом http://1win70163.help
Your comment is awaiting moderation.
1win экспресс 1win экспресс
Your comment is awaiting moderation.
недорогие но красивые букеты
Всегда в наличии популярные сорта живых цветов
Your comment is awaiting moderation.
Hallo Glanzliebhaber, willkommen in der Welt von https://das-abacus.de/, wo Sauberkeit fast von selbst passiert. ABACUS verwandelt Haus und Garten in gepflegte, sichere Orte. Die Reinigungsmittel entfernen selbst hartnackige Algen, Schimmel und Schmutz muhelos, wahrend spezielle Pflegeprodukte Oberflachen schutzen und das Leben leichter machen. Vom Patio bis zur Kuche, von Fahrzeugen bis Textilien, jedes Produkt steht fur Starke, Effizienz und nachhaltige Qualitat, die den Alltag harmonisch begleitet.
Your comment is awaiting moderation.
цены цветов
Закажите анонимную доставку букета любимой
Your comment is awaiting moderation.
букет недорогой и красивый
Купите цветы до 2000 рублей в Москве
Your comment is awaiting moderation.
1win условия фрибета https://www.1win70163.help
Your comment is awaiting moderation.
мостбет официальный http://mostbet20394.help/
Your comment is awaiting moderation.
Hallo! https://das-all4all.de/ verwandelt Raume in lebendige Oasen. Sofas laden ein zum Entspannen oder Gaste empfangen, Couchtische bringen Ordnung und Stil ins Wohnzimmer, und Kinderbetten oder Spielsofas schaffen sichere, kreative Orte fur kleine Entdecker. Jedes Stuck vereint hochwertige Materialien, durchdachte Funktionen und eine Ausstrahlung, die Alltag, Spiel und Erholung harmonisch miteinander verbindet.
Your comment is awaiting moderation.
1win вейджер бонуса https://1win70163.help/
Your comment is awaiting moderation.
1win мобильное приложение скачать 1win мобильное приложение скачать
Your comment is awaiting moderation.
Hallo Technikbegeisterte und Gartenfreunde! https://das-izabell.de/, bringt Leistung und Ordnung in jede Ecke. Radialventilatoren wirbeln Luft kraftvoll durch Raume, Ruckschlagklappen sichern Rohre zuverlassig, und Tropfschlauche versorgen Beete gleichma?ig mit Wasser. Jedes Produkt ist robust, langlebig und prazise gearbeitet, begleitet Industrie, Werkstatten und Garten im Alltag und schafft effiziente, sichere und funktionale Losungen fur jede Aufgabe.
Your comment is awaiting moderation.
мостбет не загружается сайт https://mostbet20394.help
Your comment is awaiting moderation.
Hallo und willkommen in der Welt von https://das-izabell.de/, wo Raume zu Geschichten werden. Weiche modulare Sofas laden zum Bauen, Kuscheln und Traumen ein. Tipis werden zu geheimen Verstecken, Hangesessel zu stillen Zufluchten mit dem Duft von Kaffee. Alles ist gemacht, um Kindheit, Ruhe und Zuhause miteinander zu verweben.
Your comment is awaiting moderation.
JDMCAR specializes in automotive accessories including performance parts, styling upgrades, and maintenance tools. Trusted by car lovers looking to improve their ride. Explore their range at https://thejdmcar.com.
Your comment is awaiting moderation.
шиномонтаж на выезд москва https://vyezdnoj-shinomontazh-77.ru
Your comment is awaiting moderation.
pinup az pinup az
Your comment is awaiting moderation.
pin-up oyun oynamaq https://pinup21680.help
Your comment is awaiting moderation.
шумоизоляция арок авто https://shumoizolyaciya-arok-avto-77.ru
Your comment is awaiting moderation.
pin-up depozit tarixçəsi https://pinup21680.help/
Your comment is awaiting moderation.
pin-up mobil promo kod pin-up mobil promo kod
Your comment is awaiting moderation.
мостбет верификация сколько дней http://mostbet20394.help/
Your comment is awaiting moderation.
pin-up mobil plinko pin-up mobil plinko
Your comment is awaiting moderation.
мостбет бонусы для Кыргызстана мостбет бонусы для Кыргызстана
Your comment is awaiting moderation.
мостбет как пополнить MasterCard мостбет как пополнить MasterCard
Your comment is awaiting moderation.
Hallo Raumgestalter und Heimliebhaber! https://srdcaim.de/ bietet alles, was Raume lebendig macht. Von cleveren Eckschranken fur Badezimmer, die Ordnung schaffen, bis zu soliden Holzbar-Tischen, die Gemutlichkeit und Funktion verbinden. Acryl-Displays ordnen und prasentieren Muster perfekt, wahrend robuste Entwasserungssysteme drau?en Sicherheit und Struktur bieten. Jedes Produkt bringt Design, Nutzen und ein Stuck Inspiration in den Alltag.
Your comment is awaiting moderation.
1вин хуруҷ наомад https://www.1win71839.help
Your comment is awaiting moderation.
ХК «Трактор» вступает в решающую фазу чемпионата. Впереди важные матчи, от которых зависит положение команды в таблице. Болельщиков ждет напряженная борьба и яркие эмоции. Подробнее здесь: https://telegra.ph/Predstoyashchie-igry-HK-Traktor-klyuchevye-vstrechi-sezona-i-interes-dlya-bolelshchikov-12-07
Your comment is awaiting moderation.
mostbet вход Казахстан http://www.mostbet46809.help
Your comment is awaiting moderation.
Михайловский театр приглашает пережить классику заново — через балет, оперу и магию сцены. Подробнее здесь: https://telegra.ph/Mihajlovskij-teatr-mesto-gde-klassika-ozhivaet-12-07
Your comment is awaiting moderation.
Михайловский театр проходит этап серьёзных преобразований, сохраняя верность оперным и балетным традициям. Подробности — здесь: https://teletype.in/@concert/bilety-v-mikhajlovskij-teatr
Your comment is awaiting moderation.
mostbet rasmiy bonus https://mostbet69573.help/
Your comment is awaiting moderation.
mostbet kod noto‘g‘ri https://mostbet69573.help/
Your comment is awaiting moderation.
1win логин http://1win74562.help/
Your comment is awaiting moderation.
1win дилер 1win дилер
Your comment is awaiting moderation.
1win ставки на теннис 1win ставки на теннис
Your comment is awaiting moderation.
Вахтанговский театр объединяет традиции психологического театра с современными постановками, предлагая зрителю прожить каждую эмоцию героев. Подробнее и билеты здесь: https://teletype.in/@concert/teatr-im-vahtangova
Your comment is awaiting moderation.
1вин пополнение 1win06284.help
Your comment is awaiting moderation.
Thanks for sharing. I read many of your blog posts, cool, your blog is very good.
Your comment is awaiting moderation.
Погрузитесь в атмосферу театра Вахтангова, где каждая сцена — живой опыт, классика звучит свежо, а премьеры удивляют. Подробнее здесь: https://kulturologia.ru/blogs/171225/66674/
Your comment is awaiting moderation.
1win фрибет за регистрацию https://1win06284.help/
Your comment is awaiting moderation.
1win киргизче расмий сайт http://www.1win45920.help
Your comment is awaiting moderation.
Новые показы и громкие спектакли формируют насыщенный репертуар Театра Вахтангова в 2026 году. Билеты на популярные постановки быстро раскупаются. Подробнее здесь https://cont.ws/@goevent/3164402
Your comment is awaiting moderation.
1win бонус активировать при регистрации http://www.1win45920.help
Your comment is awaiting moderation.
aviator 1вин https://www.1win45920.help
Your comment is awaiting moderation.
1win служба поддержки Бишкек 1win служба поддержки Бишкек
Your comment is awaiting moderation.
цветы по номеру телефона
Your comment is awaiting moderation.
виды подарочных цветов
Your comment is awaiting moderation.
расположение цветов
variant1
Your comment is awaiting moderation.
1вин скачать на ios https://www.1win87143.help
Your comment is awaiting moderation.
1win 1win
Your comment is awaiting moderation.
1win crash на деньги http://www.1win87143.help
Your comment is awaiting moderation.
Your article helped me a lot, is there any more related content? Thanks! https://www.binance.info/vi/register?ref=MFN0EVO1
Your comment is awaiting moderation.
Челябинский «Трактор» пережил кризис и выдал крупнейшую победу в истории КХЛ — 9:0. Впереди — сложная борьба за очки и стабильность. Подробнее здесь https://cont.ws/@goevent/3164410
Your comment is awaiting moderation.
Hallo! Bei https://das-aulos.de/ zeigt sich, wie Sopran- und Altblockfloten klingen und sich greifen lassen. Jede Flote fuhlt sich solide an, die Tone sind gleichma?ig und klar. Die Instrumente gleiten angenehm durch die Finger, lassen sich einfach stimmen und reinigen. Spieler erleben direkt, wie sich Musik muhelos formen lasst.
Your comment is awaiting moderation.
Hallo bei https://dasdasique.de/. Die Palette vereint verschiedene Rouge- und Puderfarben, die sich leicht auftragen lassen. Lippenbalsame in Beerentonen oder sanften Pfirsichnuancen geben Feuchtigkeit und Glanz. Concealer-Paletten gleichen Hauttone aus und decken punktuelle Unregelma?igkeiten ab. Alle Produkte gleiten sanft, lassen sich mischen und wirken naturlich, vegan hergestellt, fur unkomplizierte Anwendung jeden Tag.
Your comment is awaiting moderation.
Уральское дерби, громкие трибуны и упорная борьба — так играет «Трактор». Почувствуйте атмосферу челябинского хоккея. Подробнее здесь https://justpaste.it/c8i7x
Your comment is awaiting moderation.
мостбет Нарын мостбет Нарын
Your comment is awaiting moderation.
1win результаты 1win результаты
Your comment is awaiting moderation.
mostbet ios Кыргызстан http://mostbet51837.help
Your comment is awaiting moderation.
1win бонусы ставок http://1win17384.help/
Your comment is awaiting moderation.
mostbet пополнить счет Кыргызстан mostbet51837.help
Your comment is awaiting moderation.
Hallo an alle, die den Geruch von Farbe und den Klang klickender Teile lieben. https://das-aoshima.de/ erschafft kleine Wunder aus Plastik – vom kultigen Knight Rider bis zum legendaren DeLorean. Turen offnen sich, Lichter glimmen, Formen erwachen. Jedes Modell erzahlt Geschichten von Geschwindigkeit, Kino und Kindheit, eingefangen im Ma?stab 1:24.
Your comment is awaiting moderation.
1win apk скачать 1win apk скачать
Your comment is awaiting moderation.
Moonet’s collection focuses on casual pieces with clean lines and comfortable fabrics. Ideal for those who appreciate simple, versatile style. Discover the range at https://themoonet.com.
Your comment is awaiting moderation.
pin-up retiro a BancoEstado https://pinup2005.help/
Your comment is awaiting moderation.
pinup free spins http://www.pinup2005.help
Your comment is awaiting moderation.
pinup cuenta pinup cuenta
Your comment is awaiting moderation.
Афиша Лайв Арены впечатляет: рок-группа с мощным сетом, поп-дива с новой программой и электронный фестиваль. Подробнее по ссылке https://anotepad.com/notes/dc8n97w4
Your comment is awaiting moderation.
Aablexema’s accessories and fashion items stand out for their originality and quality. Perfect for those who want to add personality to their look. Check out their offerings at https://theaablexema.com.
Your comment is awaiting moderation.
От симфонических проектов до indie-лирики — в Лайв Арене каждый найдёт концерт по душе. Сезон обещает быть насыщенным. Подробнее по ссылке https://worldevents.mystrikingly.com/blog/3f1242f77a1
Your comment is awaiting moderation.
Lock and Love creates jewelry inspired by love and connection, perfect for special moments. Their designs include locks, keys, and heart motifs to symbolize affection. Discover their collection at https://thelockandlove.com.
Your comment is awaiting moderation.
Live Арена приглашает на концерты и шоу, а купить билеты можно всего в несколько кликов. Удобная навигация и прозрачные цены. Подробнее здесь https://rentry.co/5ucm8n85
Your comment is awaiting moderation.
Hallo bei https://das-bosca.de/. Die Auswahl reicht von elektrischen Fondues uber Raclette-Sets bis zu Pizza- und Schneidewerkzeugen. Fondue- und Raclette-Topfe sitzen stabil auf dem Tisch, die Messer schneiden Kase und Fleisch prazise, Boards tragen Snacks oder Tapas. Grillplatten, Pizzaheber und Pizzasteine erweitern die Moglichkeiten, alles aus robustem Holz und Edelstahl, einfach zu handhaben, direkt auf dem Tisch einsetzbar. Jede Komponente fuhlt sich vertraut an und erleichtert das gemeinsame Essen.
Your comment is awaiting moderation.
1win turnee sloturi 1win turnee sloturi
Your comment is awaiting moderation.
pin-up app http://pinup2001.help/
Your comment is awaiting moderation.
Концерты, ледовые шоу, фестивали и премии — всё это проходит на Live Арене. Просторный зал, передовые технологии и комфорт делают площадку одной из лучших в столице. Подробнее здесь https://justpaste.it/j5y84
Your comment is awaiting moderation.
1win dezactivare cont 1win5756.help
Your comment is awaiting moderation.
mostbet aviator стратегия mostbet12037.ru
Your comment is awaiting moderation.
Hey! Hier geht es um mehr als nur Farbe – https://das-bondex.de/ schutzt, nahrt und lasst Holz atmen. Ob wetterfeste Lasuren, seidig glanzende Lacke oder tief pflegende Ole, jede Formel ist gemacht, um Regen, Sonne und Zeit zu trotzen. Fur Zaune, Terrassen, Gartenhauser, fur alles, was drau?en steht und Charakter hat. Bondex halt, was Natur verspricht – Bestandigkeit mit Herz und Hand.
Your comment is awaiting moderation.
1win bonus ruleta 1win bonus ruleta
Your comment is awaiting moderation.
pin-up app ios no abre pinup2001.help
Your comment is awaiting moderation.
мостбет промокод Киргизия 2026 мостбет промокод Киргизия 2026
Your comment is awaiting moderation.
Hey everyone! If you’re planning an outdoor adventure, check out https://mycamelcrown.com/. You’ll find comfy, durable gear like hiking shoes, jackets, and even camping tents. They blend style with functionality, so you can stay comfy and look good while exploring. Definitely worth a look if you love the outdoors!
Your comment is awaiting moderation.
Семейная афиша Уголка дедушки Дурова включает экскурсионные представления и детские спектакли, которые знакомят зрителей с историей театра и миром сказки в доступной форме. Подробнее здесь: https://telegra.ph/Afisha-Ugolka-dedushki-Durova-samye-interesnye-spektakli-i-ehkskursii-sezona-12-21
Your comment is awaiting moderation.
pin-up jugar gratis https://www.pinup2001.help
Your comment is awaiting moderation.
мостбет промокод где взять http://www.mostbet12037.ru
Your comment is awaiting moderation.
Hallo an alle, die Taschen lieben. Bei https://bestou.de/ glitzert jede Form ein bisschen anders – mal mit funkelnder Geometrie, mal mit ruhiger Lederoptik. Gro?e Shopper, zarte Clutches, wandelbare Umhangetaschen – sie alle halten kleine Welten zusammen. Fur Arbeit, Spaziergang oder Abendlicht, jede begleitet den Tag mit Glanz und Gefuhl.
Your comment is awaiting moderation.
После новогоднего сезона «Уголок дедушки Дурова» остаётся одним из самых посещаемых семейных театров: спектакли, музей и экскурсии идут в регулярном режиме. Подробнее здесь: https://kulturologia.ru/blogs/041225/66485/
Your comment is awaiting moderation.
Печать брошюр
Your comment is awaiting moderation.
Hallo an alle, die gerne Neues entdecken. Bei https://sumeber.de/ treffen Bewegung und Alltag aufeinander – hier rollen Kinder auf leuchtenden Inlinern durch den Park, gleiten Jugendliche auf Waveboards durch die Stra?en, wahrend daheim Wasserhahne glanzen, Tische funkeln und Schirme Regen in Kunst verwandeln. Jedes Stuck bringt ein Stuck Freude in den Tag – leicht, clever, lebendig.
Your comment is awaiting moderation.
1вин не открывается http://1win85612.help
Your comment is awaiting moderation.
Hallo an alle, die den Duft junger Blatter lieben. Mit https://das-viparspectra.de/ erwacht jedes Pflanzchen zum Leben, sanft gefuhrt vom prazisen Spiel aus Licht und Schatten. Ob winziger Spross oder kraftige Blute – die Lampen schaffen ein Klima, das nahrt, starkt und wachsen lasst. Technik und Natur tanzen hier in leuchtender Harmonie.
Your comment is awaiting moderation.
1win вывод Киргизия https://1win85612.help/
Your comment is awaiting moderation.
1win экспресс расчет http://www.1win85612.help
Your comment is awaiting moderation.
В театре Дурова продолжаются семейные спектакли, открытые мероприятия и экскурсии. Впереди — обновление комплекса, которое улучшит условия для животных и зрителей. Подробнее здесь: https://cont.ws/@goevent/3164364
Your comment is awaiting moderation.
1win juegos http://1win5773.help/
Your comment is awaiting moderation.
Hallo, Freunde von Ordnung und Ideen! https://banborba.de/ steht fur Dinge, die funktionieren – stark, durchdacht, zuverlassig. Von Edelstahl-Tischen und Gasherden uber Wasserhahne, Steamer und Weinstander bis hin zu Dartboards oder Baumkletter-Sets. Hier zahlt jedes Detail, jedes Material, jede Schraube. Es ist das kleine Gluck, wenn alles seinen Platz hat und alles halt, was es verspricht. banborba – wo Alltag nicht kompliziert, sondern einfach gut gemacht ist.
Your comment is awaiting moderation.
1win marcadores https://www.1win5773.help
Your comment is awaiting moderation.
Театр зверей «Уголок дедушки Дурова» — это редкое сочетание циркового искусства и настоящей доброты. Отличный повод провести выходной всей семьей. Подробнее по ссылке: https://rentry.co/c3d8o5em
Your comment is awaiting moderation.
mostbet войти с телефона mostbet войти с телефона
Your comment is awaiting moderation.
Hallo! https://das-sparkfun.de/ zeigt, wie MicroPython- und RedBoard-Kits Technik greifbar machen. Sensoren messen Licht, Abstand und Bewegung, OLED-Displays geben Daten aus, Motoren und Servos setzen Signale in Bewegung um. Tasten, Potentiometer und Kabel erleichtern Experimente, alles passt auf das Steckboard, ohne Loten. Fur Maker, Schuler oder Hobbyisten sind die Kits ubersichtlich aufgebaut, Schritt-fur-Schritt-Projekte fuhren durch verschiedene Schaltungen und zeigen direkt, wie Sensoren, Motoren und Displays zusammenarbeiten. Zubehor wie USB-C-Kabel oder Qwiic-Module erweitern Moglichkeiten weiter.
Your comment is awaiting moderation.
Продать авастин Продать кадсила
Your comment is awaiting moderation.
juegos rapidos 1win http://www.1win5773.help
Your comment is awaiting moderation.
Willkommen beihttps://das-accakappa.de/ Virginia Rose. Die Kollektion umfasst Eau de Cologne, die leicht auf Haut und Kleidung liegt. Der Duft offnet mit floralen Noten, weich und klar, bleibt subtil uber Stunden. Acca Kappa Virginia Rose ist in 100 ml Flakons erhaltlich, einfach in der Anwendung, angenehm zu tragen und fur Damen gedacht, die florale Eleganz mogen.
Your comment is awaiting moderation.
мостбет баскетбол ставки mostbet72461.help
Your comment is awaiting moderation.
мостбет скачать на андроид Киргизия мостбет скачать на андроид Киргизия
Your comment is awaiting moderation.
1win sms kod kelmayapti https://1win5753.help/
Your comment is awaiting moderation.
1win Uzcard bilan to‘lash https://1win5753.help
Your comment is awaiting moderation.
1win download https://www.1win5753.help
Your comment is awaiting moderation.
https://FoldAds.com/537/posts/1/1/2023339.html
Your comment is awaiting moderation.
http://parlament.listbb.ru/viewtopic.php?f=2&t=29
Your comment is awaiting moderation.
Домашние матчи ЦСКА в Москве — это больше, чем хоккей: яркие эмоции, кричалки трибун, конкурсы и интерактивы между периодами, уютные зоны для отдыха и кафе. Атмосфера погружает с первых минут и дарит незабываемые впечатления. Подробности по ссылке: https://www.sostav.ru/blogs/271307/76336
Your comment is awaiting moderation.
удаленная работа на дому вакансии найти работу
Your comment is awaiting moderation.
казино промокоды Добро пожаловать в захватывающий мир онлайн-казино, где удача и азарт переплетаются, открывая двери к невероятным возможностям! Для всех ценителей острых ощущений и желающих испытать свою фортуну, мы подготовили эксклюзивные предложения, способные сделать ваш игровой опыт еще более ярким и прибыльным.
Your comment is awaiting moderation.
https://minusstar.rolka.me/viewtopic.php?id=11108#p71985
Your comment is awaiting moderation.
удаленная работа на дому удаленная работа отзывы
Your comment is awaiting moderation.
Укрытие защитное манжеты герметизирующей УЗМГ Для предотвращения эрозии и укрепления береговых линий доступен контейнер противоэрозионный КП. Для изоляции и защиты используются изоляторы.
Your comment is awaiting moderation.
Тройник нержавеющий В современном мире, где темпы строительства и развития инфраструктуры неуклонно растут, потребность в высококачественных строительных материалах и комплектующих становится все более острой. От надежности каждого компонента зависит долговечность, безопасность и функциональность возводимых объектов, будь то масштабные промышленные комплексы, жилые дома или критически важные инженерные сети. Мы стремимся обеспечить наших клиентов лучшими решениями, предлагая широкий ассортимент продукции, способный удовлетворить самые взыскательные требования.
Your comment is awaiting moderation.
Обсуждали походы на матчи ЦСКА, видел на форуме советы по выбору билетов и мест на «ЦСКА Арене». Может пригодиться тем, кто собирается впервые: https://ssa.ru/forum/kak-luchshe-vybrat-bilety-na-matchi-hk-cska-v-etom-sezone.html
Your comment is awaiting moderation.
1win espejo Perú 1win espejo Perú
Your comment is awaiting moderation.
Общаются Искал Ростов знакомства в телеграме — нашёл нормальный чат.
Your comment is awaiting moderation.
фриланс работа Фриланс — свобода выбора и самореализация
Your comment is awaiting moderation.
Задвижки стальные Для обслуживания и ремонта трубопроводов у нас есть специализированный инструмент и материалы: поролоновый поршень для прочистки труб ППЛ и поршень полиуретановый ППЛ-М для механической очистки, кольцевой подогреватель стыков труб ПСТ, опорно направляющие кольца ОНК и опорно направляющие кольца ПМТД для фиксации и защиты, диэлектрическое кольцо спейсер и СПЕЙСЕР кольцо диэлектрическое для предотвращения электрокоррозии. Также предлагаются манжеты герметизирующие МГ, манжеты резиновые ПМТД, герметизирующая манжета конусная ГМ, и защитные укрытия к ним: укрытие защитное манжеты герметизирующей УЗМГ, укрытие защитное манжеты герметизирующей У-ПМТД-С и укрытие защитное стеклопластиковое. Для работ в полевых условиях доступна палатка сварщика и укрытия для сварки.
Your comment is awaiting moderation.
найти работу Удаленная работа на дому — идеальный выбор для многих
Your comment is awaiting moderation.
договариваются о встречах Искал Ростов знакомства в телеграме — нашёл нормальный чат.
Your comment is awaiting moderation.
1win deposit methods https://1win5744.help/
Your comment is awaiting moderation.
Продать тецентрик Продать Перьета.
Your comment is awaiting moderation.
Продать лекарства объявления Хочу продать лекарства. Мы поможем осуществить вашу идею.
Your comment is awaiting moderation.
бонусы за регистрацию Казино бонус – это общее понятие, охватывающее все виды поощрений, предлагаемых казино. Это могут быть бонусы на депозит, кэшбэк, еженедельные акции и, конечно же, бездепозитные предложения.
Your comment is awaiting moderation.
Продать перьета Продать Мирклудекс. Препарат нового поколения для лечения хронического гепатита D. Шанс на здоровую жизнь.
Your comment is awaiting moderation.
промокод 1вин при регистрации
Your comment is awaiting moderation.
1win Uganda casino http://1win5744.help/
Your comment is awaiting moderation.
казино бонусы за регистрацию Фриспины за регистрацию – это приветственный бонус, который игроки получают просто за создание аккаунта в казино. Это прекрасная возможность попробовать различные игры и, возможно, выиграть реальные деньги.
Your comment is awaiting moderation.
фриспины з арегистрацию Казино бонусы за регистрацию – это широкий спектр предложений, включая фриспины, бонус на депозит и другие привилегии, которые казино дарит новым клиентам.
Your comment is awaiting moderation.
1win live casino app https://1win5744.help/
Your comment is awaiting moderation.
Продам лекарства форум Остались лекарства где продать. Мы знаем ответ. Воспользуйтесь нашим сервисом.
Your comment is awaiting moderation.
промокод в 1win
Your comment is awaiting moderation.
Продать Мавирет Выкуп лекарств. Быстро и профессионально.
Your comment is awaiting moderation.
бездепозитные фриспины Фриспины за регистрацию – это приветственный бонус, который игроки получают просто за создание аккаунта в казино. Это прекрасная возможность попробовать различные игры и, возможно, выиграть реальные деньги.
Your comment is awaiting moderation.
1win desbloquear cuenta 1win desbloquear cuenta
Your comment is awaiting moderation.
https://kremlevsk.kamrbb.ru/?x=read&razdel=8&tema=1045&start=0#new
Your comment is awaiting moderation.
dealers en vivo 1win dealers en vivo 1win
Your comment is awaiting moderation.
Обсуждали походы на домашние матчи ЦСКА, видел здесь полезные советы по билетам. Рекомендую ознакомиться: https://lobnya.myqip.ru/?1-4-0-00000485-000-0-0-1769756969
Your comment is awaiting moderation.
1xbet promo codes
Your comment is awaiting moderation.
https://www.google.com.gh/url?q=https://m120.com/themes/pages/1xbet_promo_code_india_today_bonus.html
Your comment is awaiting moderation.
промокод в joker
Your comment is awaiting moderation.
1xbet company promo code
Your comment is awaiting moderation.
1win página https://www.1win5774.help
Your comment is awaiting moderation.
промокод казино joker
Your comment is awaiting moderation.
http://autoforum.forumex.ru/viewtopic.php?f=2&t=3453
Your comment is awaiting moderation.
https://webcams.su/
Your comment is awaiting moderation.
Эту тему уже поднимали на форуме, много комментариев от тех, кто часто ходит на ЦСКА. Оставлю ссылку: https://www.forumsdrom.ru/groups/2307-8601.html#gmessage75662
Your comment is awaiting moderation.
https://pornochat24.ru/
Your comment is awaiting moderation.
1win registro con WhatsApp http://1win43218.help/
Your comment is awaiting moderation.
действующий промокод на 1xbet на сегодня
Your comment is awaiting moderation.
1win límites semanales 1win límites semanales
Your comment is awaiting moderation.
le meilleur code promo 1xbet
Your comment is awaiting moderation.
https://sexchat18.ru/
Your comment is awaiting moderation.
ЦСКА переживает напряженный момент чемпионата: ошибки дорого обходятся, а очки нужны здесь и сейчас. Ближайшие матчи обещают стать настоящей проверкой на прочность. Подробнее по ссылке https://postheaven.net/fvblc48jpj
Your comment is awaiting moderation.
???????????????????!https://lantu-jp.com/??????????????????????????????????????????????????????????????????????????????????????????????????????LANTU????????????????????
Your comment is awaiting moderation.
pin-up kart məlumatları pin-up kart məlumatları
Your comment is awaiting moderation.
Армейский клуб готов порадовать фанатов ярким хоккеем в новом сезоне. Домашние матчи ЦСКА — это скорость, техника и поддержка, которая ощущается с первых минут игры. Подробнее по ссылке https://rentry.co/o8vw5xrg
Your comment is awaiting moderation.
pin-up hesab təhlükəsizliyi pin-up hesab təhlükəsizliyi
Your comment is awaiting moderation.
создать рекламный сайт
Your comment is awaiting moderation.
pin-up ios üçün son versiya https://pinup2006.help
Your comment is awaiting moderation.
???????????????????!https://bettdow-jp.com/?????????????????????????????????????????????????????????????????????????????????????????????????????????????????????Bettdow???????????????????
Your comment is awaiting moderation.
1win о деньги пополнение http://www.1win30489.help
Your comment is awaiting moderation.
Пространство, созданное для вдумчивых событий. Здесь важны внимание к деталям, комфорт и ощущение спокойствия, в котором идеи звучат яснее — https://vnutrispace.ru/
Your comment is awaiting moderation.
1win последняя версия apk http://1win30489.help/
Your comment is awaiting moderation.
1win lucky jet на деньги https://www.1win30489.help
Your comment is awaiting moderation.
мостбет казино Тоҷикистон мостбет казино Тоҷикистон
Your comment is awaiting moderation.
mostbet app mostbet app
Your comment is awaiting moderation.
mostbet натиҷаҳо http://www.mostbet80573.help
Your comment is awaiting moderation.
free bet promo code 1xbet hong kong
Your comment is awaiting moderation.
https://gay24chat.com/
Your comment is awaiting moderation.
1xbet promo code no deposit kenya
Your comment is awaiting moderation.
https://en.mfchat.ru/
Your comment is awaiting moderation.
1 xbet no deposit promo code
Your comment is awaiting moderation.
вирт секс чат
Your comment is awaiting moderation.
1win depósito no acreditado 1win depósito no acreditado
Your comment is awaiting moderation.
1win_peru http://1win38941.help
Your comment is awaiting moderation.
1win estafa o real http://www.1win38941.help
Your comment is awaiting moderation.
https://vegacams.com/
Your comment is awaiting moderation.
Hallo! https://das-hyperlite.de/ zeigt die Ausrustung fur Wakeboarding und Wakesurfing. Bindungen wie Mystique oder Destroyer liegen sicher am Fu?, die Boards lassen sich gut kontrollieren, Torque- und Disorder-Finnen passen genau unter die Surfer, der CG Handle erleichtert das Ziehen am Seil. Alles ist robust, passt auf verschiedene Boards, unterstutzt Bewegungsfreiheit und sorgt fur prazise Kontrolle auf dem Wasser. Anfanger wie Fortgeschrittene finden passende Gro?en und komfortable Details fur jede Session.
Your comment is awaiting moderation.
Про хоккейные вечера, которые начинаются с выбора матча. Удобно, понятно и без ощущения перегруженности https://postheaven.net/tickethockey-com/bilety-na-hokkey .
Your comment is awaiting moderation.
mostbet istoric tranzacții mostbet istoric tranzacții
Your comment is awaiting moderation.
Hallo! https://paiaite.de/ Hundebekleidung zeigt, wie Shirts, Hoodies und Sweatshirts den Alltag der kleinen Hunde begleiten. Gestreifte Shirts liegen leicht auf dem Fell, Sweatshirts halten bei kuhlen Temperaturen warm, Hoodies passen bequem uber Rucken und Brust. Materialien aus weicher Baumwolle erlauben Bewegung und beluften zugleich. Jedes Kleidungsstuck ist fur kleine bis mittelgro?e Hunde zugeschnitten, robust, pflegeleicht und alltagstauglich, sodass die Hunde sich frei bewegen konnen, ohne eingeengt zu wirken.
Your comment is awaiting moderation.
mostbet mastercard Moldova mostbet2010.help
Your comment is awaiting moderation.
Большой драматический театр в Санкт-Петербурге: билеты Для тех, кто ценит своё время и впечатления. Удобный формат помогает выбрать постановку и заранее понять, каким будет ваш вечер в зале.
Your comment is awaiting moderation.
mostbet program loialitate mostbet program loialitate
Your comment is awaiting moderation.
1win плинко играть 1win плинко играть
Your comment is awaiting moderation.
https://fishtrade3000.ru/forum/user/4266/
Your comment is awaiting moderation.
lucky jet 1win https://1win74125.help
Your comment is awaiting moderation.
купить Zip пакеты с логотипом Zip пакеты – это современное и практичное решение для упаковки и хранения. Их популярность обусловлена простотой использования, многоразовостью и надежностью. Они стали неотъемлемой частью нашей повседневной жизни, значительно упрощая процессы упаковки и организации.
Your comment is awaiting moderation.
аренда Mercedes V class с водителем из Москвы в Ярославль v class аренда с водителем москва В столице, где ритм жизни подобен стремительной симфонии, услуга «v class аренда с водителем москва» становится тихой гаванью для избранных. Это не просто перемещение; это тонкое искусство прибытия, где пространство салона трансформируется в мобильный кабинет, салон для переговоров или островок уединения. Каждая деталь, от бесшумного хода до деликатного вождения профессионала, подчинена одной цели — вашему абсолютному комфорту и престижу.
Your comment is awaiting moderation.
Hallo an alle, die Raume lieben, die sprechen. Mit https://das-vailla.de/ wird eine schlichte Wand zu einer Buhne fur Traume – ob ein zarter Frauenumriss, das ruhige Relief der Berge oder ein Baum des Lebens aus warmem Holz. Jede Form tragt etwas Menschliches in sich und fullt das Zuhause mit sanfter Energie und Charakter.
Your comment is awaiting moderation.
crash 1win https://1win74125.help/
Your comment is awaiting moderation.
vavada cashback vavada2009.help
Your comment is awaiting moderation.
vavada limit uplate http://www.vavada2009.help
Your comment is awaiting moderation.
Купить билеты в Театр имени Пушкина Это пространство для спокойного театрального вечера. Сильная драматургия и живая актерская работа создают ощущение настоящей сцены без показной эффектности.
Your comment is awaiting moderation.
vavada live casino u aplikaciji vavada live casino u aplikaciji
Your comment is awaiting moderation.
CHAOREN’s casual wear offers relaxed fits and trendy designs suitable for any occasion. Their collections focus on quality fabrics and versatile pieces. Explore their range at https://thechaoren.com.
Your comment is awaiting moderation.
CHARTOU’s footwear collection includes sneakers, boots, and sandals crafted to keep you comfortable while looking great. Perfect for everyday wear or special occasions. Browse their styles at https://thechartou.com.
Your comment is awaiting moderation.
Купить билет в театр Одеон Это пространство для вдумчивого зрителя. Здесь ценят паузу, слово и жест, создавая ощущение глубины и честности.
Your comment is awaiting moderation.
HOMEYEE’s products help you organize and decorate your living space with style and ease. From storage solutions to decorative items, find everything you need at https://thehomeyee.com.
Your comment is awaiting moderation.
1win Ош катталуу http://1win21567.help/
Your comment is awaiting moderation.
Михайловский театр балет Балет в Петербурге — это не просто спектакль, а часть городской души. Здесь классика живёт рядом с экспериментом, а сцена Михайловского театра превращает танец в разговор о чувствах, времени и красоте, к которым хочется возвращаться снова и снова.
Your comment is awaiting moderation.
1win проверка личности при выводе http://www.1win21567.help
Your comment is awaiting moderation.
1win куда вводить промокод http://www.1win62940.help
Your comment is awaiting moderation.
1win как вывести на DemirBank http://1win21567.help
Your comment is awaiting moderation.
1win букмекерская контора Бишкек https://1win62940.help
Your comment is awaiting moderation.
1вин коэффициенты http://1win62940.help
Your comment is awaiting moderation.
Спектакли Театра Вахтангова и расписание показов За спектаклями Театра Вахтангова стоит огромная визуальная работа, которую зритель чувствует, даже не задумываясь о ней. В статье — как формируется этот мир и почему он так важен для живого театра.
Your comment is awaiting moderation.
Билеты в Live Arena (Лайв Арена / Лайф Арена) Live Арена уверенно закрепилась в списке самых громких площадок Москвы. В материале — концерты, ради которых стоит планировать зиму и весну: «Жара», 90-е, Агутин, Билан и Artik & Asti.
Your comment is awaiting moderation.
vavada oficjalna strona internetowa https://vavada2004.help/
Your comment is awaiting moderation.
Hallo, Lebensliebhaber! https://daslzy.de/ steht fur Bewegung, Ausdruck und Freude an jedem Detail. Mit Skateboards, Longboards und Waveboards wird der Asphalt zur Buhne, auf der Freiheit spurbar wird. Gleichzeitig verwandeln Spandex-Tischdecken, Hussen und feine Stoffservietten jedes Fest in ein stilvolles Erlebnis. LZY macht Raume lebendig und Momente unvergesslich – mit Energie, Farbe und Gefuhl.
Your comment is awaiting moderation.
Hallo kleine und gro?e Abenteurer! https://das-bluey.de/ bringt das frohliche Chaos des Spielens direkt ins Kinderzimmer. Ob mit der rollenden Feuerwehr, dem duftenden Foodtruck oder dem wusligen Supermarkt – jede Szene ladt zum Lachen, Erfinden und Staunen ein. Figuren, Gerausche und bunte Details machen jeden Tag zu einer neuen Geschichte voller Herz und Spa?.
Your comment is awaiting moderation.
jak wypłacić wygraną z vavada jak wypłacić wygraną z vavada
Your comment is awaiting moderation.
Это тот самый хоккей, за который мы его любим: плотный, эмоциональный и непредсказуемый. В статье — о февральских матчах КХЛ, где каждая игра превращается в настоящее испытание для команд. https://teletype.in/@allsportevents/feeriya-golov-i-drak .
Your comment is awaiting moderation.
vavada wpłata neteller vavada wpłata neteller
Your comment is awaiting moderation.
мостбет вход по номеру https://mostbet94620.help/
Your comment is awaiting moderation.
mostbet приложение не работает mostbet приложение не работает
Your comment is awaiting moderation.
mostbet вывести деньги mostbet вывести деньги
Your comment is awaiting moderation.
wobble light 360 degree light
WobbleLight: Rugged 360° Worksite Lighting
WobbleLight is a heavy-duty portable lighting solution built for construction sites, industrial facilities, emergency response, and mining operations. Its defining feature is a self-righting design: if the light is knocked over, it automatically returns upright and continues illuminating without downtime.
Each WobbleLight delivers 360-degree illumination, eliminating shadows across large work areas. High-output models reach up to 40,000 lumens, providing uniform, room-filling light suitable for demanding tasks and safety-critical environments.
Designed for harsh conditions, WobbleLights use a polycarbonate dome and reinforced housing to withstand impacts, kicks, and equipment contact. Despite their rugged build, they remain portable, with integrated handles for easy repositioning on site.
Available in multiple configurations, WobbleLights come in corded or battery-powered** versions, with LED or halide options depending on brightness and runtime needs. Many models stay cool to the touch and are rated for use in damp or wet locations.
Why professionals choose WobbleLight:
Continuous light even when knocked over
Full 360° area coverage
High lumen output for large spaces
Long service life and reduced replacement costs
Proven durability in real jobsite conditions
WobbleLight is built for crews that need reliable light, not fragile equipment. When visibility matters, it delivers consistent performance shift after shift.
Your comment is awaiting moderation.
«Трактор» снова играет так, что мимо не пройдёшь: жёстко, с характером и при полной поддержке трибун. В материале — о матчах сезона, атмосфере на арене и интересе болельщиков к каждому туру. Читать дальше — по ссылке https://telegra.ph/Hokkejnyj-klub-Traktor-sezon-napryazhennoj-borby-i-yarkih-matchej-01-21 .
Your comment is awaiting moderation.
pinup aviator juego pinup aviator juego
Your comment is awaiting moderation.
ЦСКА — команда, у которой всегда есть план. В статье рассказывается, как армейцы играют на скорости, зачем постоянно меняют схемы и почему их подход влияет на другие клубы. Если интересно разобраться — вот ссылка https://dzen.ru/a/aR1NlpKD9TZMOYu3 .
Your comment is awaiting moderation.
juego aviator pinup https://pinup2002.help/
Your comment is awaiting moderation.
slots pin-up Chile https://pinup2002.help/
Your comment is awaiting moderation.
pin-up sayt linki Azərbaycan http://www.pinup2008.help
Your comment is awaiting moderation.
pin-up qeydiyyat açmaq pin-up qeydiyyat açmaq
Your comment is awaiting moderation.
pin-up crash donur pin-up crash donur
Your comment is awaiting moderation.
лав арена афиша москва на 2026 «Live Арена» — пространство для артистов разных жанров: от ярких шоу до уютных акустических концертов. Цена билетов зависит от события и категории мест — партер, балконы, лаунжи, ложи или премиум-боксы. Купить билет можно онлайн: выберите мероприятие, отметьте места на схеме зала, укажите контакты и оплатите заказ. Электронные билеты придут на почту сразу после оплаты.
Your comment is awaiting moderation.
мостбет зеркало сегодня мостбет зеркало сегодня
Your comment is awaiting moderation.
vavada ios app vavada ios app
Your comment is awaiting moderation.
mostbet plinko 2026 https://www.mostbet2028.help
Your comment is awaiting moderation.
vavada plinko u aplikaciji http://vavada2010.help/
Your comment is awaiting moderation.
vavada live casino u aplikaciji vavada live casino u aplikaciji
Your comment is awaiting moderation.
мостбет депозит https://mostbet2028.help
Your comment is awaiting moderation.
1win минимальный депозит 1win минимальный депозит
Your comment is awaiting moderation.
vavada anulowanie wypłaty vavada anulowanie wypłaty
Your comment is awaiting moderation.
1win ELSOM https://www.1win12049.ru
Your comment is awaiting moderation.
vavada Polska apk https://www.vavada2003.help
Your comment is awaiting moderation.
1win бакай банк пополнение https://1win12049.ru
Your comment is awaiting moderation.
vavada metody płatności http://vavada2003.help
Your comment is awaiting moderation.
цветы москва дешево Букеты в офис доставка
Your comment is awaiting moderation.
цветы доставка бесплатно Быстро тюльпаны курьер офис
Your comment is awaiting moderation.
где в москве дешево купить цветы Быстрая курьерская доставка цветов
Your comment is awaiting moderation.
pin-up aviator donur pin-up aviator donur
Your comment is awaiting moderation.
pin-up qeydiyyat http://pinup2009.help
Your comment is awaiting moderation.
pin-up Pasha Bank pin-up Pasha Bank
Your comment is awaiting moderation.
BlackSprut marketplace сайт
bs2best at
Your comment is awaiting moderation.
BlackSprut marketplace сайт
bs2best at
Your comment is awaiting moderation.
vavada android app download http://vavada2007.help
Your comment is awaiting moderation.
vavada aircash http://vavada2007.help/
Your comment is awaiting moderation.
vavada revolut https://www.vavada2007.help
Your comment is awaiting moderation.
1вин aviator https://www.1win12050.ru
Your comment is awaiting moderation.
1win казино бонус Кыргызстан 1win казино бонус Кыргызстан
Your comment is awaiting moderation.
mostbet apk скачать http://www.mostbet2027.help
Your comment is awaiting moderation.
1win официальный apk https://www.1win12050.ru
Your comment is awaiting moderation.
букмекерские конторы кыргызстана букмекерские конторы кыргызстана
Your comment is awaiting moderation.
mostbet официальный сайт вход http://www.mostbet2027.help
Your comment is awaiting moderation.
мостбет войти в личный кабинет mostbet2026.help
Your comment is awaiting moderation.
mostbet mobile https://www.mostbet2026.help
Your comment is awaiting moderation.
скачать mostbet casino скачать mostbet casino
Your comment is awaiting moderation.
1win affiliate login 1win5745.help
Your comment is awaiting moderation.
download 1win apk https://1win5745.help
Your comment is awaiting moderation.
how to load bet code on 1win how to load bet code on 1win
Your comment is awaiting moderation.
https://svbeloglazov.ru/ svbeloglazov
Your comment is awaiting moderation.
みんなの FX
Your comment is awaiting moderation.
bs2site at
Your comment is awaiting moderation.
bsme at
Your comment is awaiting moderation.
affiliate network gambling CPA сеть беттинг предлагает уникальные возможности для монетизации спортивного трафика. Экспертиза в спорте, понимание беттинг-аудитории и умение прогнозировать тренды – залог успешной работы с беттинг-офферами. Сезонные акции, бонусы и эксклюзивные предложения могут значительно повысить конверсию трафика и увеличить прибыль вебмастера.
Your comment is awaiting moderation.
bs2best at не работает
Your comment is awaiting moderation.
легкая работа в корее Удаленная работа – это не просто тренд, это новая реальность, открывающая безграничные возможности для профессионалов в самых разных областях. От программистов и дизайнеров до маркетологов и консультантов, тысячи людей ежедневно выбирают свободу и гибкость, которые предоставляет удаленная работа. Больше не нужно тратить время на дорогу в офис, подстраиваться под строгий график и ограничивать себя рамками корпоративной культуры. Удаленная работа позволяет самостоятельно планировать свой день, выбирать проекты по душе и находить баланс между работой и личной жизнью.
Your comment is awaiting moderation.
онлайн работа дома для мам Удаленная работа – это символ новой эпохи, где географические границы становятся лишь формальностью. Это возможность создавать карьеру, не покидая уюта своего дома, или исследовать мир, зарабатывая на жизнь в любом уголке планеты. Она открывает двери к гибкости, автономности и балансу между личной жизнью и профессиональными амбициями. Это не просто работа, это стиль жизни, ориентированный на эффективность и самореализацию.
Your comment is awaiting moderation.
скачать тикток мод последняя версия TikTok Моды: Настраиваемый Опыт за Пределами Стандарта TikTok моды предлагают пользователям возможность настроить приложение под свои личные нужды. Они зачастую включают функции, позволяющие изменять интерфейс, добавлять новые фильтры и эффекты, а также получать доступ к контенту, недоступному в их регионе. Это создает более персонализированный и интересный опыт использования TikTok.
Your comment is awaiting moderation.
Обучение Xrumer 23 strong Обучение Xrumer
Your comment is awaiting moderation.
Can you be more specific about the content of your article? After reading it, I still have some doubts. Hope you can help me.
Your comment is awaiting moderation.
????? ??? ? ??????? ?????????. ????? ????? ?????? ??? ??????? https://russianmultimedia.ru/
Your comment is awaiting moderation.
Вывел деньги, всё пришло в течение дня. Поддержка реагирует моментально https://asterias-spa.ru/
Your comment is awaiting moderation.
У Кумы https://u-kumy.com женский сайт о моде, здоровье, уходе. Советы для хозяек на все случаи жизни.
Your comment is awaiting moderation.
У Кума https://u-kuma.com блог для чоловіків про армію, авто, ремонт та життя. Корисні поради на всі випадки життя.
Your comment is awaiting moderation.
Солоха женский сайт https://soloha.in.ua о моде, красоте, уходе. Полезные советы, рецепты, сонник и гороскопы.
Your comment is awaiting moderation.
News about Chernivtsi on https://u-misti.chernivtsi.ua covers the latest events in Chernivtsi and the surrounding region. The site U Misti features local news, transport updates, blogs, and city events.
Your comment is awaiting moderation.
News about Poltava on https://u-misti.poltava.ua covers the main and interesting events in Poltava and the surrounding region. The site features transport updates, blogs, and local events.
Your comment is awaiting moderation.
Новости Днепр https://u-misti.dp.ua последние события Днепра и области. Транспорт, обзоры, все о Днепре на одном сайте
Your comment is awaiting moderation.
События и проишествия в Днепре https://faine-misto.dp.ua на сайте Файне мисто. Оперативные новости, обзоры и много полезного из жизни города.
Your comment is awaiting moderation.
Житомир новости https://u-misti.zhitomir.ua на сайте у місті. Актуальные события и происшествия в Житомире и области. Авторские обзоры, расписание транспорта, мета и много полезного.
Your comment is awaiting moderation.
Последние события Винницы https://u-misti.vinnica.ua на портале у мисти. Следите за новостями Винницы и области, полезные обзоры, справочники и много интересного из жизни города.
Your comment is awaiting moderation.
Блог Жiнка https://zhinka.in.ua полезные статьи на каждый день. Мода, уход, женское здоровье. воспитание детей, отношения. Тысячи советов на все случаи жизни.
Your comment is awaiting moderation.
Черкассы новости https://u-misti.cherkasy.ua на городском портале у мисти. Последние события, обзоры, транспорт, много полезного и интересного
Your comment is awaiting moderation.
Автогид https://avtogid.in.ua портал для автовладельцев. Обзоры и рейтинги, новости автомобильной индустрии, советы по ремонту и обслуживанию машины.
Your comment is awaiting moderation.
Одесса новости на https://faine-misto.od.ua читайте о последних событиях на портале Файне Одесса. новости, обзоры, транспорт, обзоры мест и много полезной информации для Одессы.
Your comment is awaiting moderation.
Новостной портал Одессы https://u-misti.odesa.ua поможет вам быть в курсе последних новостей города и области. Интересные обзоры мест, компании, адреса, информация о транспорте. Все про Одессу на одном сайте.
Your comment is awaiting moderation.
Киев новости https://u-misti.kyiv.ua на сайте у мисти. События, обзоры, полезное и интресное.
Your comment is awaiting moderation.
События Львова https://u-misti.lviv.ua на сайте у мисти. Последние новости в городе и области. Транспорт, обзоры заведений, блоги и много полезного.
Your comment is awaiting moderation.
Новости Хмельницкий https://u-misti.khmelnytskyi.ua на сайте у мисти. Последние события в городе и области. Авторские обзоры, транспорт и много полезного.
Your comment is awaiting moderation.
Житомир новости https://faine-misto.zt.ua на сайте Файне мисто. События, обзоры и много полезного.
Your comment is awaiting moderation.
Сайт Львова https://faine-misto.lviv.ua новости Львова и области. События, обзоры, транспорт и много интересного.
Your comment is awaiting moderation.
Новости Киева https://infosite.kyiv.ua на сайте КиевИнфо. Читайте о последних событиях в столице и области.
Your comment is awaiting moderation.
Сайт Вінниця https://faine-misto.vinnica.ua новини Вінниці та області. Огляди, транспорт, місця та багато корисного.
Your comment is awaiting moderation.
Обзор популярных моделей iPhone в Стерлитамаке
айфон 15 256 стерлитамак купить
Выбираем новый iPhone и живем в Стерлитамаке? Узнайте обо всех достоинствах актуальных моделей и определите оптимальную покупку. Мы проанализировали рынок смартфонов региона и выбрали лучшие предложения, подходящие каждому потребителю.
Модели iPhone, доступные в Стерлитамаке
аирподс про 2 купить стерлитамак
Новейший iPhone 17 — настоящая находка для поклонников яблочных гаджетов. Аппарат оснащен великолепным AMOLED-дисплеем, производительной платформой и аккумулятором, которого хватает надолго. Эта модель станет идеальным спутником активного образа жизни и сможет удовлетворить потребности практически любого пользователя.
iphone 17 pro max стерлитамак
Модель iPhone 16 отлично подойдёт тем, кто хочет получить достойный уровень производительности, сохраняя умеренность расходов. Телефон оборудован современной системой обработки данных, хорошим набором датчиков и качественной фотокамеры. Прекрасный вариант для студентов, молодых профессионалов и активных горожан.
iPhone 13 Стерлитамак
купить iphone стерлитамак
Классика жанра — iPhone 13 всё ещё остается популярным вариантом среди жителей Стерлитамака. Модель доступна по привлекательной цене и характеризуется прочным корпусом, качественным звуком и ярким дисплеем. Отличный выбор для ежедневного использования.
iPhone 16 Pro Стерлитамак
Для истинных фанатов айфонской культуры подойдет iPhone 16 Pro. Устройство сочетает высокие показатели быстродействия, ультрачеткую камеру и долговечность конструкции. Такая модель способна обеспечить владельцу максимальный комфорт в работе и развлечениях.
iPhone 17 Pro Стерлитамак
Топовая линейка iPhone 17 Pro рассчитана на самую взыскательную аудиторию. Мощнейший процессор, максимальная скорость отклика, профессиональный модуль камеры — всё это объединяет владелец iPhone 17 Pro. Настоящий выбор для перфекционистов и творческих личностей.
Итоговый вывод
Рассматривая рынок iPhone в Стерлитамаке, каждый покупатель найдет себе устройство по душе. Главное — чётко понимать цели и нужды, чтобы точно определить нужную модель и не ошибиться с выбором. Будь то простой, но добротный iPhone 13 или суперсовременный iPhone 17 Pro — выбор правильного смартфона обеспечит приятные впечатления и комфортное использование.
iphone 17 pro max купить стерлитамак
https://sterlitamak.applemarketrf.ru
Your comment is awaiting moderation.
Game Overview and Mechanics
Chicken Road 2 is fundamentally a crash-style casino game that puts players in control of a brave cartoon chicken attempting to cross a dangerous highway filled with traffic. The core concept is deceptively simple: guide your chicken across multiple lanes of traffic, with each successful step increasing your potential winnings through a progressive multiplier system. However, the risk escalates with every move, as getting hit by a vehicle means losing your bet entirely.
chickenroad2-india.com
The game operates on a provably fair system with a 95.5% Return to Player (RTP) rate, ensuring transparency and fairness in outcomes. Players can place bets ranging from as low as ?1 to higher stakes, making it accessible to a wide demographic of Indian players. The maximum potential win can reach up to ?20,000 or even higher multipliers, with some reports suggesting multipliers reaching an incredible x3,608,855.
Why India Has Embraced Chicken Road 2
Cultural Resonance and Accessibility
The game’s popularity in India stems from several cultural and practical factors. Indian gaming audiences have traditionally favored games that are quick to learn, mobile-friendly, and offer genuine earning potential. Chicken Road 2 perfectly aligns with these preferences, providing an engaging experience that can be enjoyed during short breaks or commutes.
chicken road 2 indian
The minimum bet of ?1 makes the game particularly attractive to Indian players who prefer to start with minimal risk while gradually increasing their stakes. This approach resonates with the Indian gaming mindset, which often emphasizes careful risk management and gradual progression.
chicken road 2 game
Payment Integration and Local Support
One of the key factors driving Chicken Road 2’s success in India is its seamless integration with popular local payment methods. The game supports UPI (Unified Payments Interface), PayTM, and PhonePe – payment systems that are deeply embedded in Indian digital culture. This local payment integration removes barriers to entry and creates a smooth user experience that feels native to Indian players.
Mobile-First Gaming Culture
India’s mobile-first approach to gaming perfectly aligns with Chicken Road 2’s design philosophy. The game is optimized for mobile devices, recognizing that the majority of Indian gamers access online content through smartphones rather than desktop computers. This mobile optimization includes intuitive touch controls, responsive design, and gameplay sessions that can be completed quickly.
Enhanced Features in Chicken Road 2.0
Multiple Difficulty Levels
One of the standout features that sets Chicken Road 2 apart from its predecessor is the introduction of four distinct difficulty levels:
Easy Mode: Lower traffic density with safer crossing opportunities
Medium Mode: Balanced gameplay with moderate risk levels
Hard Mode: Increased traffic patterns requiring more strategic timing
Hardcore Mode: Maximum challenge with the highest potential rewards
Improved Graphics and Animation
chicken road 2 download
https://chickenroad2-india.com/
Your comment is awaiting moderation.
Портал для пенсіонерів https://pensioneram.in.ua все про пенсію за віком, права та льготи літніх людей та інвалідів.
Your comment is awaiting moderation.
Поддержка и авторский надзор
В зависимости от ваших потребностей и аспектов, внедряем, консультируем и помогаем подобрать подрядчиков для внедрения разработанной под вас стратегии.
Будапештов Аммарант
Мы:
Аркестрируем структуру компании и всех подрядчиков
Самостоятельно внедряем часть или всю стратегию
Помогаем подобрать персонал и подрядчиков
автоматизация бизнеса ии
Помогаем адаптировать бизнес-процессы под стратегию
Дорабатываем стратегию если возникли дополнительные пожелания
Сами внедряем
Разработать бизнес-стратегию
Аммарант HR
https://ammarant-group.com
Your comment is awaiting moderation.
Ваш дом – ваши правила:
дома из блоков под ключ проекты и цены
выбирайте, как быстро
хотите заехать
строительные компании частных домов в московской области
Вы сами решаете, на каком этапе завершить строительство. Дом можно получить в базовой комплектации, подготовленным к чистовой отделке или укомплектованным к заселению
Фиксированные сроки строительства и стоимость по договору для любого варианта готовности.
грузоперевозки по москве и московской области цены
https://ms-stroy.ru/ipoteka-na-stroitelstvo-doma/
[…] the previous blog, we have seen how to create EC2 Instance and follow the same steps for creating EC2 […]