Introduction
Working with AWS, you'll often encounter EC2 instances tucked away in private subnets. This architecture follows security best practices by isolating critical resources from direct internet access, but it creates a challenge: how do you access these instances from your local machine?
Whether you need to perform maintenance, troubleshoot issues, or deploy applications, connecting to private EC2 instances is an essential skill for DevOps engineers and cloud practitioners. In this guide, we'll explore four proven methods to securely access your private EC2 instances without compromising your AWS security posture.
Understanding Private Subnets in AWS
Before diving into the solutions, let's clarify why EC2 instances often reside in private subnets:
- Enhanced security: No direct internet exposure means reduced attack surface
- Network segmentation: Separating application tiers (web, application, database)
- Compliance requirements: Many standards require isolating sensitive data
A typical AWS VPC architecture includes both public subnets (with internet access via Internet Gateway) and private subnets (with optional outbound-only internet access via NAT Gateway).

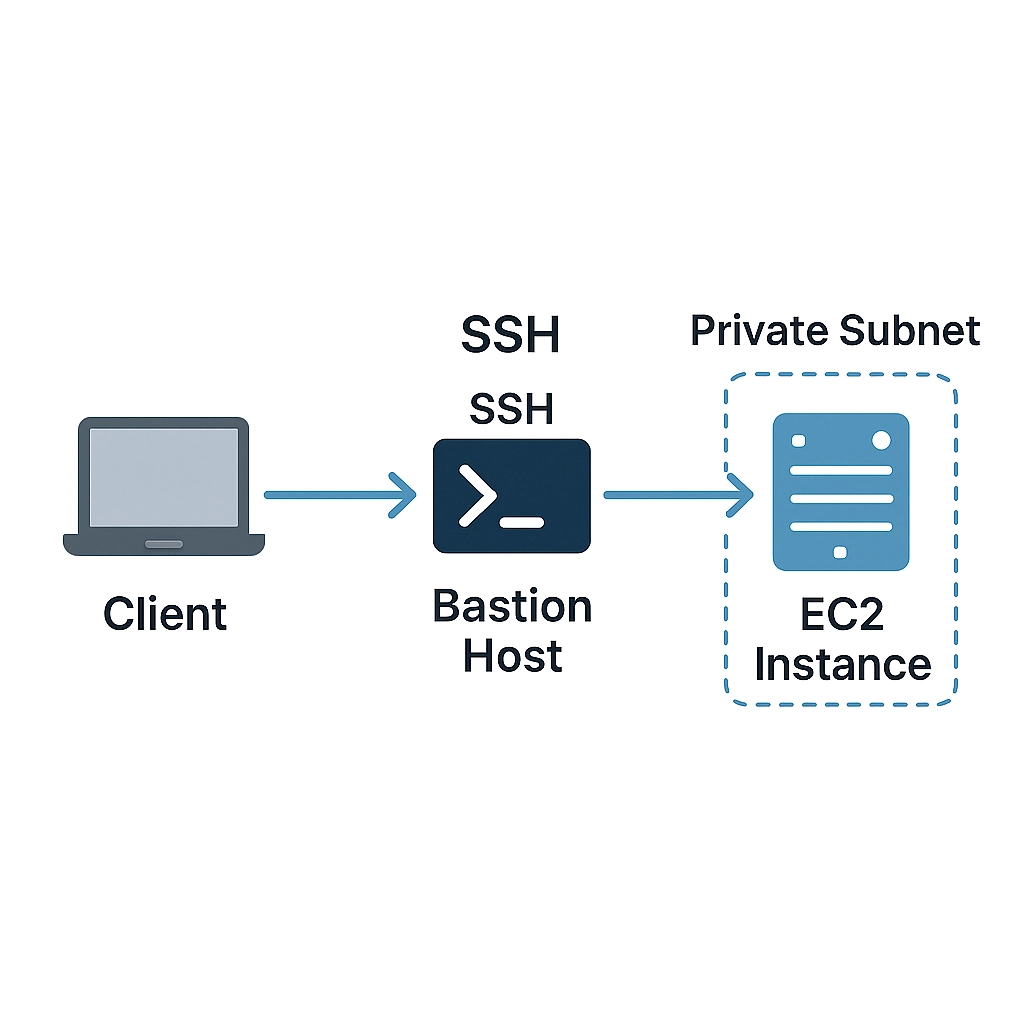
Method 1: SSH via Bastion Host (Jump Server)
The most traditional approach involves setting up a bastion host (also called a jump server) in a public subnet that acts as a gateway to your private instances.
How It Works
- You SSH into the publicly accessible bastion host
- From the bastion, you SSH into the private EC2 instance
- SSH agent forwarding allows you to use your local machine's private key without storing it on the bastion
Setup Instructions
1. Configure Your Bastion Host
First, launch an EC2 instance in a public subnet with the following settings:
- Use a minimal, hardened AMI (Amazon Linux 2 is a good choice)
- Configure a security group allowing SSH (port 22) from your IP address only
- Assign a public IP address or Elastic IP
2. Configure Your Private Instance Security Group
Ensure your private instance's security group allows SSH access from the bastion host's security group:
Type: SSH
Protocol: TCP
Port: 22
Source: Bastion's security group ID (sg-xxxxxxxx)
3. Set Up SSH Agent Forwarding
On your local machine:
# Start the SSH agent (if not already running)
eval "$(ssh-agent -s)"

# Add your private key to the agent
ssh-add ~/.ssh/your-private-key.pem

# Verify the key was added
ssh-add -L
4. Connect Through the Bastion
Now you can connect to your private instance through the bastion:
# Connect to the bastion with agent forwarding enabled (-A flag)
ssh -A ec2-user@bastion-public-ip

# From the bastion, connect to the private instance
ssh ec2-user@private-instance-ip
Pros and Cons
Pros:
- Works with any SSH client
- No need to store private keys on the bastion
- Simple to understand and implement
Cons:
- Requires maintaining a bastion host
- Additional cost for the bastion instance
- Potential security risks if the bastion is compromised
Method 2: AWS Systems Manager Session Manager
AWS Systems Manager Session Manager provides a browser-based shell or CLI-based connection to your EC2 instances without requiring open inbound ports, bastion hosts, or SSH keys.

How It Works
- The EC2 instance runs the SSM Agent and has an IAM role that allows Systems Manager connections
- You initiate a session through the AWS console or CLI
- The connection is established through AWS's service endpoints
Setup Instructions
1. Configure IAM Role for the EC2 Instance
Create or attach an IAM role with the following policies:
AmazonSSMManagedInstanceCore(managed policy)
2. Install SSM Agent on the EC2 Instance
The SSM Agent comes pre-installed on many Amazon AMIs. To verify or install:
# Check if agent is running
sudo systemctl status amazon-ssm-agent

# If not installed, install it (Amazon Linux 2)
sudo yum install -y amazon-ssm-agent
sudo systemctl enable amazon-ssm-agent
sudo systemctl start amazon-ssm-agent
3. Connect via AWS Console
- Navigate to the AWS Systems Manager console
- Select "Session Manager" from the left menu
- Click "Start session"
- Select your private EC2 instance and click "Start session"
4. Connect via AWS CLI
# Start a session to your instance
aws ssm start-session --target i-0123456789abcdef0

# For port forwarding (e.g., to access a web server on port 80)
aws ssm start-session \
--target i-0123456789abcdef0 \
--document-name AWS-StartPortForwardingSession \
--parameters '{"portNumber":["80"],"localPortNumber":["8080"]}'
After running the port forwarding command, you can access the web server at http://localhost:8080 from your local machine.
Pros and Cons
Pros:
- No need for bastion hosts or open inbound ports
- No SSH key management
- Activity logged in AWS CloudTrail
- Supports port forwarding for web applications
- Works through the AWS console (no SSH client needed)
Cons:
- Requires IAM permissions
- SSM Agent must be running on the instance
- Network path to AWS SSM endpoints required
Method 3: EC2 Instance Connect
EC2 Instance Connect allows you to connect to your instances using your IAM credentials without storing SSH keys on the instance long-term.
How It Works
- You generate an SSH key pair or use an existing one
- AWS temporarily pushes your public key to the instance (valid for 60 seconds)
- You connect using your private key
Setup Instructions
1. Install EC2 Instance Connect on Your EC2
For Amazon Linux 2:
sudo yum install -y ec2-instance-connect
For Ubuntu:
sudo apt-get update
sudo apt-get install -y ec2-instance-connect
2. Configure IAM Permissions
Create a policy allowing users to push SSH keys:
{
"Version": "2012-10-17",
"Statement": [
  {
    "Effect": "Allow",
    "Action": "ec2-instance-connect:SendSSHPublicKey",
    "Resource": "arn:aws:ec2:region:account-id:instance/instance-id"
  }
]
}
3. Connect Using EC2 Instance Connect CLI
Install the EC2 Instance Connect CLI:
pip install ec2instanceconnectcli
Connect to your instance:
mssh ec2-user@i-0123456789abcdef0
4. Connect Using AWS CLI and SSH Client
Push your public key to the instance:
aws ec2-instance-connect send-ssh-public-key \
--instance-id i-0123456789abcdef0 \
--availability-zone us-east-1a \
--instance-os-user ec2-user \
--ssh-public-key file://~/.ssh/id_rsa.pub
Then connect within 60 seconds using your SSH client:
ssh -i ~/.ssh/id_rsa ec2-user@private-ip-address
Pros and Cons
Pros:
- No permanent SSH keys stored on instances
- Integrates with IAM permissions
- Available through AWS console
Cons:
- Requires network connectivity to the EC2 Instance Connect API endpoint
- For private instances, requires connectivity to the private IP (VPN, Direct Connect, etc.)
- EC2 Instance Connect package must be installed on the instance
Method 4: EC2 Instance Connect Endpoint
EC2 Instance Connect Endpoint (EICE) is a newer service that allows secure connections to instances in private subnets without requiring bastion hosts, public IPs, or direct VPN connectivity.

How It Works
- You create an EC2 Instance Connect Endpoint in your VPC
- The endpoint acts as a secure tunnel between your local machine and the private instances
- Authentication is handled through IAM
Setup Instructions
1. Create an EC2 Instance Connect Endpoint
In the AWS Console:
- Navigate to the EC2 console
- Select "EC2 Instance Connect Endpoint" from the left menu
- Click "Create EC2 Instance Connect Endpoint"
- Select your VPC and subnet
- Configure security groups allowing traffic to your instances
Or using AWS CLI:
aws ec2 create-instance-connect-endpoint \
--subnet-id subnet-0123456789abcdef0 \
--security-group-ids sg-0123456789abcdef0
2. Configure IAM Permissions
Ensure users have the following permissions:
{
"Version": "2012-10-17",
"Statement": [
  {
    "Effect": "Allow",
    "Action": [
      "ec2-instance-connect:OpenTunnel",
      "ec2:DescribeInstances",
      "ec2:DescribeInstanceConnectEndpoints"
    ],
    "Resource": "*"
  }
]
}
3. Connect via AWS CLI
# Connect using SSH
aws ec2-instance-connect ssh \
--instance-id i-0123456789abcdef0 \
--private-key-file ~/.ssh/my-key.pem

# Connect using RDP (for Windows instances)
aws ec2-instance-connect open-tunnel \
--instance-id i-0123456789abcdef0 \
--remote-port 3389 \
--local-port 13389
For RDP connections, after running the open-tunnel command, connect to localhost:13389 using your RDP client.
Pros and Cons
Pros:
- No bastion hosts or public IPs required
- No VPN or Direct Connect needed
- Works through IAM authentication
- Supports both SSH and RDP
Cons:
- Currently only supports SSH (port 22) and RDP (port 3389)
- Limited to CLI-based connections
- Additional cost for EC2 Instance Connect Endpoint ($0.01 per hour)
Security Best Practices
Regardless of which method you choose, follow these security best practices:
- Limit access – Restrict who can connect using IAM policies and security groups
- Use strong keys – Generate 4096-bit RSA or ED25519 keys
- Implement logging – Enable CloudTrail and VPC Flow Logs to monitor connections
- Rotate credentials – Regularly update SSH keys and IAM credentials
- Use multi-factor authentication – Enable MFA for AWS console access
- Consider dedicated VPN – For teams requiring frequent access, set up AWS Client VPN
Choosing the Right Method
Each method has its use cases:
- Bastion Host: Good for organizations with existing SSH workflows and when you need access to multiple ports
- Systems Manager Session Manager: Ideal for organizations prioritizing security and auditability
- EC2 Instance Connect: Useful for temporary access without managing long-term SSH keys
- EC2 Instance Connect Endpoint: Best for modern environments needing secure access without bastion hosts or VPNs
Conclusion
Accessing EC2 instances in private subnets doesn't have to be complex or compromise security. AWS provides multiple options to fit various requirements and security postures.
For most DevOps teams at DevOps Horizon, we recommend Systems Manager Session Manager for day-to-day operations and EC2 Instance Connect Endpoint for environments where maximum security is required.
If you're looking to enhance your AWS skills, check out our AWS certification guides and DevOps roadmap to accelerate your cloud career!
Got questions about AWS networking, security, or other DevOps topics? Drop them in the comments below, and our team will help you out!