
Introduction Modern applications require little downtime, excellent scalability, and quick performance. Conventional relational databases frequently find it difficult to meet these demands, particularly when handling enormous volumes of unstructured data. Here’s when Amazon DynamoDB is useful. Amazon Web Services (AWS) offers a fully managed NoSQL database solution called DynamoDB. It is made to function well at any size without forcing developers to be concerned about infrastructure management. What is DynamoDB Amazon DynamoDB is a serverless, key-value, and document database. It can store and retrieve any amount of data while handling millions of requests per second. Being a managed service, AWS takes care of: This allows developers to focus on building applications rather than managing database operations. Key Features of DynamoDB Core Components To understand DynamoDB, let’s break down its structure: Step by Step procedure for creating DynamoDB Step1: Create the DynamDB Table 4. Table Name: Enter devopshorizontable 5. Primary key: Enter companyid and select Number 6. Add sort key: Enter name in the respective field and select String. 7. The combination of a Primary Key and a Sort Key uniquely identifies each item in a DynamoDB table. 8. Leave all the other settings as default and then click on Create table. Step2: Inserting Data into DynamoDB 3. Now click on the Create item button. 4. Add new primary key and sort key values. companyid : Enter 1 name : Enter John 5. After entering the data, click on the Create item button, present on the right bottom corner. 6. For testing purposes, add 4–5 items as shown in the above step and click on the Create item button. Step3: Search for Items in the Table 3. In the query window, enter the partition key and sort key which you want to search. 4. You will be able to see a result table with your filtered records. A sample screenshot is given below: Use Cases of DynamoDB DynamoDB is widely used in industries where scalability and speed are critical. Some common use cases include: Conclusion Applications that require dependable, quick performance at scale can benefit from Amazon DynamoDB, a robust, fully managed NoSQL database. Whether you’re developing an Internet of Things application, a gaming backend, or an e-commerce site, DynamoDB offers the simplicity, scalability, and dependability required to produce contemporary applications. For serverless and highly scalable solutions, DynamoDB is a fantastic database to investigate if you’re just getting started with cloud computing. Follow DevOps Horizon for more blogs on Cloud and DevOps.

Getting Started with AWS Elastic Beanstalk
Introduction Fast and efficient application deployment is a key concern in today’s fast-paced development environment. Developers can focus on writing code with Amazon Web Services’ Platform as a Service (PaaS) product, AWS Elastic Beanstalk. AWS takes care of infrastructure setup, scalability, and monitoring. Whether you’re creating a worker service, web application, or API backend, Elastic Beanstalk provides an easy way to manage and deploy apps. This lets you avoid concerns about the underlying infrastructure. What is Elastic BeanStalk AWS Elastic Beanstalk is a fully managed service that lets you deploy applications in various programming languages such as: You just upload your code, and Elastic Beanstalk automatically:1. Monitor the application’s health.2. Provisions the required infrastructure (EC2, Load Balancers, Auto Scaling, etc.).3. Deploy your application. Key Features of AWS Elastic Beanstalk 1. Fully Managed Environment Elastic Beanstalk takes care of everything, including provisioning, load balancing, scaling, and monitoring. You maintain full control over the underlying AWS resources. 2. Auto Scaling Your application can automatically scale up during high traffic and scale down when usage is low. This helps keep costs in check. 3. Health Monitoring Elastic Beanstalk works with AWS CloudWatch to check the health of your instances and applications. 4. Multi-Language Support It supports a wide variety of programming languages and frameworks. 5. Integration with Other AWS Services It works easily with RDS for databases, S3 for storage, and CloudFront for content delivery. Step by Step procedure for creating Elastic Beanstalk Step1: Create a Elastic BeanStalk 4. Under Platform: Choose Java and leave other options as default 5. Click on next 6. In Configure service access : 7. Click on Next 8. To Set up networking, database, and tags : 9. Keep rest things as default and Click on Next button. 10. Under Security Group, Select the default Security Group 11. Under Capacity: 12. Click on Next button 13. In Configuring updates, monitoring, and logging : 14.Keep rest things as default and click on Next button. 15. Review the details and click on Submit button 16. Once the above is completed, you will be able to see SampleApplication in the dashboard. 16. This is the main Elastic Beanstalk screen for your application. A sample screenshot is given below: 16. To test your application, copy the app URL and paste it into your browser. You will see your application is running successfully. A sample screenshot is given below: Conclusion AWS Elastic Beanstalk is a great option for developers who want to quickly and easily deploy apps without dealing with complicated infrastructure. It offers the right mix of control and automation, making it perfect for startups, testing environments, and production-ready workloads.If you want to concentrate on application functionality while letting AWS handle the infrastructure, consider adding Elastic Beanstalk to your options. Follow DevOps Horizon for more Cloud and DevOps Blogs.
AWS Auto Scaling Basics for Cloud Efficiency
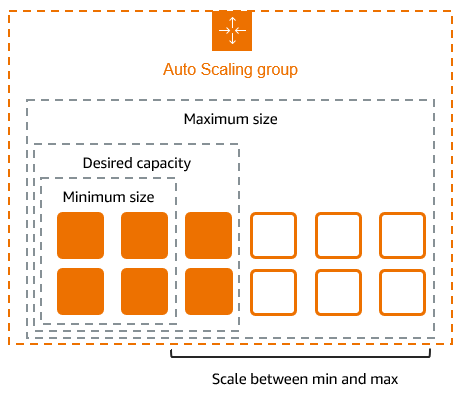
Introduction Applications must manage unpredictable workloads and provide steady performance in the current digital world without going over budget for infrastructure. Auto Scaling becomes important in this situation. Because it automatically adjusts the number of computing resources based on demand, it helps the application run smoothly. What Is Auto Scaling? Auto Scaling is a cloud computing feature that dynamically increases or decreases computing resources such as servers, containers, or virtual machines based on real-time traffic and workload requirements. Instead of manually adding or removing servers, auto scaling handles this automatically, ensuring optimal performance and cost efficiency. Why Is Auto Scaling Important? How Auto Scaling Works Auto scaling generally follows these steps: Types of Auto Scaling Step by Step procedure for creating Auto Scaling Step1: Creating Launch Template 3. Launch template name: Enter demoLT 4. Template version description: Enter Launch template version 1 5. Launch template contents: Amazon machine image (AMI): Select Amazon Linux 2023 kernel-6.1 AMI 6. Key pair (login): 7. Key pair name: Don’t include in the launch template 8. The launch template is now listed. 9. Network settings: 10. Security groups: Select the Default security group of Default VPC 11. Keep all the settings as default. 12. Now, click on the Create launch template button 13. The launch template is now created. 14. Click on the View Launch template button. Step2: Creating an Auto Scaling Group 3. Choose launch template or configuration 4. Auto Scaling group name: Enter demo-ASG 5. Launch template: Select demoLT 6. Click on the Next button. 7. Step 2: Choose instance launch options 8. VPC: Select the Default VPC from the list. 9. Subnet: Select all the subnets. 10. Click on the Next button. 11. Step 3: Integrate with other services 12. No changes are needed on this page, click on the Next button. 13.Step 4: Configure group size and scaling 14. Under Group size – optional 15. Desired capacity: Enter 2 16.Minimum capacity: Enter 2 17. Maximum capacity: Enter 2 18. Step 5: Add notifications 19. No changes are needed on this page, click on the Next button. 20. Step 6: Add tags 21. Enter tags in key-value pairs to identify your auto-scaling group. 22. Click on the Add tag button. 23. Key: Name 24. Value: ASG-EC2 Step3: Testing the Auto Scaling Group Conclusion Auto scaling is essential for modern systems that require flexibility, reliability, and cost efficiency. Auto scaling guarantees dependable performance and controls costs by automatically modifying resources according to demand.Utilizing auto scaling can greatly improve user satisfaction and operational efficiency, regardless of the size of your business solution or web app. Follow DevOps Horizon for more blogs on Cloud and DevOps
AWS ECS: The Beginner-Friendly Guide to Running Containers in the Cloud
Introduction: Why Should You Care About ECS? If you've been exploring the DevOps world, you've probably heard about containers and Docker. These technologies have revolutionized how we package and deploy applications. But running containers at scale? That's where AWS Elastic Container Service (ECS) comes in. ECS is Amazon's managed container orchestration service that takes the headache out of running containerized applications in the cloud. No more worrying about the underlying infrastructure or complex cluster management—ECS handles it all. In this guide, we'll walk through everything you need to know to get started with AWS ECS, from core concepts to a hands-on tutorial. What Is AWS ECS, Exactly? Amazon Elastic Container Service (ECS) is AWS's solution for running Docker containers in the cloud. Think of it as a control plane that manages where and how your containerized applications run. Here's why ECS matters: Simplified Operations: Deploy containers without managing servers Seamless AWS Integration: Works with other AWS services like IAM, CloudWatch, and ALB Cost Efficiency: Only pay for the resources your containers actually use Scalability: Easily scale from one container to thousands The Building Blocks: Core ECS Components Before diving into implementation, let's understand the key components that make up the ECS ecosystem: 1. Clusters A cluster is a logical grouping of container instances (EC2) or Fargate capacity where your tasks and services run. Think of it as your container playground. AWS ECS Cluster = Your Container Playground 2. Task Definitions Task definitions are like recipes for your application. They specify: Which Docker images to use How much CPU and memory to allocate Which ports to expose How containers should interact Here's a simplified example: { "family": "nginx-app", "containerDefinitions": [{ "name": "nginx", "image": "nginx:latest", "essential": true, "portMappings": [{ "containerPort": 80, "hostPort": 80 }], "memory": 512, "cpu": 256 }] } 3. Tasks Tasks are the actual running instances of your task definitions. You can run tasks: Directly (for batch jobs or one-off processes) As part of a service (for long-running applications) 4. Services Services maintain a specified number of task instances running simultaneously. If a task fails or stops, the service automatically replaces it—perfect for applications that need to be always available. Fargate vs. EC2 Launch Types: Which Should You Choose? When running containers on ECS, you have two primary options: Fargate (Serverless) With Fargate, you don't manage any underlying infrastructure—just define your containers and AWS handles everything else. Pros: Zero server management Pay only for what you use No capacity planning needed Quick setup Cons: Limited customization options Can be more expensive for steady workloads No direct host access EC2 Launch Type With the EC2 launch type, you manage a cluster of EC2 instances where ECS places your containers. Pros: More control over infrastructure Cost-effective for steady workloads Access to instance-level customizations Support for GPU workloads and custom AMIs Cons: You're responsible for EC2 capacity planning More complex setup and maintenance Need to manage instance scaling separately Decision Guide: Start with Fargate if you're new to containers or prioritize simplicity. Choose EC2 when you need maximum control or cost optimization for predictable workloads. Hands-On: Creating Your First ECS Deployment Let's walk through deploying a simple web application on ECS using Fargate. Step 1: Prepare Your Docker Image First, you need a Docker image. For this tutorial, we'll use a simple Nginx container, but the same principles apply to your custom applications. If you have a custom application, you'd: Create a Dockerfile Build your image Push it to Amazon ECR (Elastic Container Registry) For ECR upload: # Login to ECR aws ecr get-login-password –region us-east-1 | docker login –username AWS –password-stdin YOUR_AWS_ACCOUNT_ID.dkr.ecr.us-east-1.amazonaws.com # Create a repository aws ecr create-repository –repository-name my-nginx-app # Tag and push your image docker tag nginx:latest YOUR_AWS_ACCOUNT_ID.dkr.ecr.us-east-1.amazonaws.com/my-nginx-app:latest docker push YOUR_AWS_ACCOUNT_ID.dkr.ecr.us-east-1.amazonaws.com/my-nginx-app:latest Step 2: Create an ECS Cluster Open the AWS Management Console and navigate to ECS Click "Create Cluster" Select "Networking only" for Fargate Name your cluster (e.g., "my-first-cluster") Click "Create" Step 3: Create a Task Definition In the ECS console, go to "Task Definitions" and click "Create new Task Definition" Select "Fargate" Name your task definition (e.g., "nginx-task") Set Task Role and Execution Role to "ecsTaskExecutionRole" Choose memory (0.5GB) and CPU (0.25 vCPU) for starters Click "Add Container" and configure: Container name: "nginx" Image: Use the ECR URL or simply "nginx:latest" from Docker Hub Port mappings: 80:80 Click "Create" Step 4: Launch a Service Go to your cluster and click "Create" Select "Service" Configure the service: Launch type: "Fargate" Task definition: Choose the one you created Service name: "nginx-service" Number of tasks: 1 Configure networking: VPC: Choose your default VPC Subnets: Select at least two Security group: Create one that allows HTTP traffic (port 80) Auto-assign public IP: "ENABLED" Skip load balancer configuration for now Click "Next Step" and then "Create Service" Step 5: Verify Your Deployment Wait for the service to launch (usually takes 1-2 minutes) Once the task is running, click on it to find the "Public IP" Open that IP in your browser, and you should see the Nginx welcome page Congratulations! You've just deployed your first containerized application on AWS ECS. Advanced ECS Features Worth Exploring Once you're comfortable with the basics, here are some advanced features to explore: Load Balancing Distribute traffic across multiple tasks using an Application Load Balancer: Create an ALB in the EC2 console Update your service to use the ALB Enable service discovery for inter-service communication Auto Scaling Configure your service to scale based on metrics like CPU and memory usage: Service → Update → Service Auto Scaling → Configure Service Auto Scaling to adjust the desired count ECS Exec Debug running containers directly: aws ecs execute-command –cluster your-cluster –task task-id –container container-name –command "/bin/bash" –interactive Using ECS with CI/CD Integrate ECS with AWS CodePipeline for continuous deployment: Build your image with CodeBuild Push to ECR Deploy to ECS using CodeDeploy Common Challenges and Solutions Networking Issues Problem: Tasks not starting due to networking problems. Solution: Ensure security groups allow necessary traffic and your VPC has internet access
A Simple Guide to SSL/TLS Certificates: What They Are, How They Work, and How to Get One
Introduction Ever noticed the little padlock icon in your browser's address bar when you visit websites like your bank or an online store? That tiny symbol represents a powerful security mechanism that keeps your data safe while traveling across the internet. Behind that padlock is something called an SSL/TLS certificate. In today's digital world, where data breaches and privacy concerns dominate headlines, understanding the basics of web security isn't just for IT professionals anymore. Whether you're a website owner, a developer, or just someone who cares about online privacy, knowing how SSL/TLS certificates work can help you make better decisions about your digital safety. This guide breaks down what digital certificates are, why they're essential for website security, and how you can implement them yourself. No computer science degree required—promise! What is a Digital Certificate? A digital certificate is essentially an electronic document that serves two critical functions: It confirms that a website is who it claims to be (authentication) It enables encrypted connections between browsers and web servers (security) Think of it as a digital ID card that websites use to prove their identity to your browser. Without certificates, anyone could create a fake version of your bank's website, and you'd have no reliable way to tell the difference. When you visit a website that has a valid certificate, your browser displays "HTTPS" in the address bar (instead of just "HTTP") along with that reassuring padlock icon. This visual cue tells you that your connection to the site is encrypted and secure. What Is an SSL/TLS Certificate? SSL (Secure Sockets Layer) and its more modern successor TLS (Transport Layer Security) certificates are the standard technology for keeping internet connections secure and safeguarding sensitive data. Purpose: Identity Verification + Encryption SSL/TLS certificates serve two primary purposes: Identity Verification: They confirm that the website you're connecting to is legitimate and not an impostor. Encryption: They establish encrypted connections that prevent hackers from reading or modifying data as it travels between your browser and the website. Components of a Certificate A typical SSL/TLS certificate contains: Public Key: Used to establish the encrypted connection Subject: The identity of the website or organization (domain name, business name) Issuer: The Certificate Authority (CA) that verified and issued the certificate Validity Period: Start and expiry dates Digital Signature: From the issuing CA to prevent tampering Serial Number: A unique identifier for the certificate Types of SSL/TLS Certificates There are three main types of certificates, each with different levels of validation: Domain Validation (DV) Certificates: The most basic type, verifying only domain ownership. Quick to obtain but provide minimal trust signals to visitors. Organization Validation (OV) Certificates: Verify both domain ownership and some business information. Provide more trust than DV certificates. Extended Validation (EV) Certificates: The highest level of validation, requiring extensive verification of the organization's identity. These certificates used to turn the address bar green in browsers (though this visual indicator has been phased out in most modern browsers). Role of Certificate Authorities (CAs) Certificate Authorities are trusted third parties that issue certificates after verifying the requester's identity. Well-known CAs include: DigiCert Let's Encrypt (free) Comodo/Sectigo GoDaddy GlobalSign The entire system relies on browsers trusting these CAs. Your browser comes pre-loaded with a list of trusted root certificates from major CAs, which enables the chain of trust necessary for the system to work. How HTTPS Works with Certificates When you connect to a website using HTTPS, your browser and the web server perform a complex dance called the "TLS handshake." This process establishes a secure connection before any actual data is transmitted. TLS Handshake Overview The TLS handshake happens in milliseconds and involves several steps: Client Hello: Your browser sends a message to the server indicating it wants to establish a secure connection and listing the encryption methods it supports. Server Hello: The server responds by selecting an encryption method and sending its SSL/TLS certificate. Certificate Validation: Your browser verifies that the certificate is valid, trusted, and matches the domain you're trying to visit. Key Exchange: Both sides exchange information to create a shared secret key that will be used for encrypting the actual data. Secure Connection Established: Both sides confirm they're ready to begin encrypted communication. Public/Private Key Encryption Explained SSL/TLS uses a combination of asymmetric (public-private key) and symmetric encryption: Asymmetric Encryption: Uses two different but mathematically related keys. What one key encrypts, only the other can decrypt. This is used during the initial handshake. Symmetric Encryption: Uses a single key that both parties know. This is much faster than asymmetric encryption and is used for the actual data transfer after the handshake. The clever part is how these are combined: the certificate contains the server's public key, which is used to securely exchange the symmetric key that will be used for the rest of the session. What Is a Certificate Signing Request (CSR)? A Certificate Signing Request is the first step in obtaining an SSL/TLS certificate. It's a block of encoded text that contains information about the entity requesting the certificate and the public key that will be included in the certificate. Definition and Purpose A CSR is essentially an application for a digital certificate. When you generate a CSR, you're creating a request that contains all the information a CA needs to create a certificate specifically for your domain or organization. Information Included in a CSR A typical CSR includes: Common Name (CN): The fully qualified domain name (e.g., www.example.com) Organization (O): Your company or entity name Organizational Unit (OU): Department within the organization (e.g., IT, Marketing) Locality (L): City State/Province (ST): Full state or province name Country (C): Two-letter country code (e.g., US, UK) Email Address: Administrative contact Here's what a CSR might look like in encoded form: —–BEGIN CERTIFICATE REQUEST—– MIICzjCCAbYCAQAwgYgxCzAJBgNVBAYTAlVTMRMwEQYDVQQIDApDYWxpZm9ybmlh MRYwFAYDVQQHDA1TYW4gRnJhbmNpc2NvMRQwEgYDVQQKDAtFeGFtcGxlIEluYzEX MBUGA1UECwwOSVQgRGVwYXJ0bWVudDEdMBsGA1UEAwwUd3d3LmV4YW1wbGVjb21w YW55LmNvbTCCASIwDQYJKoZIhvcNAQEBBQADggEPADCCAQoCggEBAMzDlS+1OT9/ … (additional encoded data) … 9Qq1LqyNDnwCl5LyUxey+n6K2FRCMGzW5kBNUlpP4/SVVvP+H18aA3aOl3LN6Odl 56FaAU8= —–END CERTIFICATE REQUEST—– Why You Can't Use the Same CSR for Multiple Certificates In most cases, you can't reuse a CSR for multiple certificates because: The CSR contains

What to Do When Your CPU Credit Balance is Low in AWS: A Practical Guide
Understanding CPU Credits: The Lifeline of Burstable Instances If you're using AWS's T-series instances like T2, T3, or T4g, you've opted for what AWS calls "burstable performance instances." These cost-effective options operate on a CPU credit system that can sometimes feel like managing a bank account—you earn credits when your usage is low and spend them during high-demand periods. When your CPU credit balance runs low, it's not just a technical metric—it's a warning sign that your application's performance is about to hit a wall. Unlike traditional instances that maintain consistent performance, burstable instances will throttle down to their baseline performance (which can be as low as 5-10% of maximum capacity) when credits are exhausted. How CPU Credits Work Every burstable instance earns CPU credits continuously at a fixed rate determined by its size. For example, a t3.micro earns 12 credits per hour, while a t3.small earns 24. These credits accumulate when your instance operates below its baseline CPU utilization, and they're consumed when your instance needs to burst above baseline. The critical points to understand: Credits accumulate up to a maximum (typically 24 hours' worth) Credits are consumed on a 1:1 basis (1 credit = 1 minute of full CPU core usage) Once depleted, your instance is limited to baseline performance Baseline performance varies by instance size (e.g., 10% for t3.micro, 20% for t3.small) Detecting Low CPU Credit Balance Before It's Critical The first step in addressing low CPU credit balance is knowing when it's happening. AWS provides several CloudWatch metrics to help you monitor your credit status: CPUCreditBalance: The number of earned CPU credits your instance has available CPUCreditUsage: How many CPU credits your instance has consumed CPUSurplusCreditBalance: Tracks surplus credits used (unlimited mode only) CPUSurplusCreditsCharged: Tracks surplus credits that resulted in additional charges Setting Up Effective Alerts Don't wait until your application slows down to discover you're out of credits. Set up CloudWatch alarms to notify you when your credit balance falls below a safe threshold: aws cloudwatch put-metric-alarm \ –alarm-name LowCPUCreditBalance \ –alarm-description "Alarm when CPU credit balance falls below 20% of maximum" \ –metric-name CPUCreditBalance \ –namespace AWS/EC2 \ –statistic Average \ –period 300 \ –threshold 72 \ –comparison-operator LessThanThreshold \ –dimensions Name=InstanceId,Value=i-1234567890abcdef0 \ –evaluation-periods 3 \ –alarm-actions arn:aws:sns:region:account-id:topic-name For a t3.small instance with a maximum credit balance of 576 (24 × 24), setting a threshold at 72 (about 12.5%) gives you adequate warning before performance issues arise. Immediate Actions When CPU Credits Run Low When you receive an alert about low CPU credits, time is of the essence. Here are immediate steps to take: 1. Identify and Reduce CPU-Intensive Processes Log into your instance and use tools like top, htop, or the AWS CloudWatch agent to identify what's consuming CPU: # Sort processes by CPU usage top -o %CPU # Or for a snapshot view ps aux –sort=-%cpu | head -10 Temporarily stop or throttle non-critical processes to allow your credit balance to recover. 2. Leverage Temporary Scaling Options If your workload can't be reduced, consider these quick alternatives: Horizontal scaling: Add more instances and distribute the load Temporary instance upgrade: Stop your instance, change the instance type to a larger T-series, and restart (this preserves your EBS volumes and instance configuration) 3. Enable Unlimited Mode (With Caution) AWS offers an "unlimited" mode for T2, T3, and T4g instances that allows them to burst beyond their credit balance at an additional cost: aws ec2 modify-instance-credit-specification \ –region us-east-1 \ –instance-credit-specification "InstanceId=i-1234567890abcdef0,CpuCredits=unlimited" Remember that while unlimited mode prevents performance throttling, it can lead to unexpected costs if high CPU usage persists for extended periods. Long-Term Strategies to Maintain Healthy Credit Balance Repeatedly running into low CPU credit issues suggests a need for more permanent solutions: 1. Right-Size Your Instance Type The simplest solution is often to select an instance type that better matches your workload: Upgrade within T-series: Moving from t3.micro to t3.small doubles your credit earn rate Shift to compute-optimized: For CPU-bound applications, consider C-series instances Consider Graviton-based instances: T4g instances offer better price-performance ratio 2. Implement Intelligent Workload Management Optimize how and when you consume CPU resources: Schedule batch jobs during low-usage periods to avoid depleting credits during peak times Implement caching solutions to reduce redundant processing Distribute CPU-intensive tasks across multiple instances Refactor inefficient code that may be consuming excessive CPU 3. Create a Hybrid Architecture Not all components of your application have the same CPU requirements: Frontend (T-series) → Application Logic (M-series) → Data Processing (C-series) By matching instance families to specific workloads, you can optimize both performance and cost. When to Consider Unlimited Mode vs. Fixed Performance Instances Understanding Unlimited Mode in Depth In unlimited mode, your instance can use "surplus" credits when it exhausts its earned credits. These surplus credits are essentially a line of credit from AWS with specific terms: If your average CPU utilization over 24 hours is at or below baseline, these surplus credits are free If usage remains high, you'll be charged for surplus credits at a rate of approximately $0.05 per vCPU-hour (varies by region) The decision to use unlimited mode should consider: The predictability of your workload How long your high-CPU periods typically last Your tolerance for variable costs versus potential performance issues Signs You Should Abandon Burstable Instances Consider moving to fixed-performance instances (like M-series, C-series, or R-series) when: Your CloudWatch metrics consistently show high CPU utilization above baseline You're regularly exhausting your CPU credit balance despite optimization efforts The cost of running in unlimited mode is approaching or exceeding the cost of a similarly sized fixed-performance instance Your application requires predictable performance without throttling risks Practical Example: Solving a Real Low Credit Balance Scenario Let's walk through a practical example: You're running a t3.medium instance hosting a web application that suddenly shows declining CPU credit balance. Step 1: Diagnosis Checking CloudWatch, you notice: CPU utilization averaging 40% over the past week (above the 20% baseline) Credit balance steadily declining, now at 15% of maximum Spike in traffic during business hours
How to Access an EC2 Machine in a Private Subnet from Your Local Machine
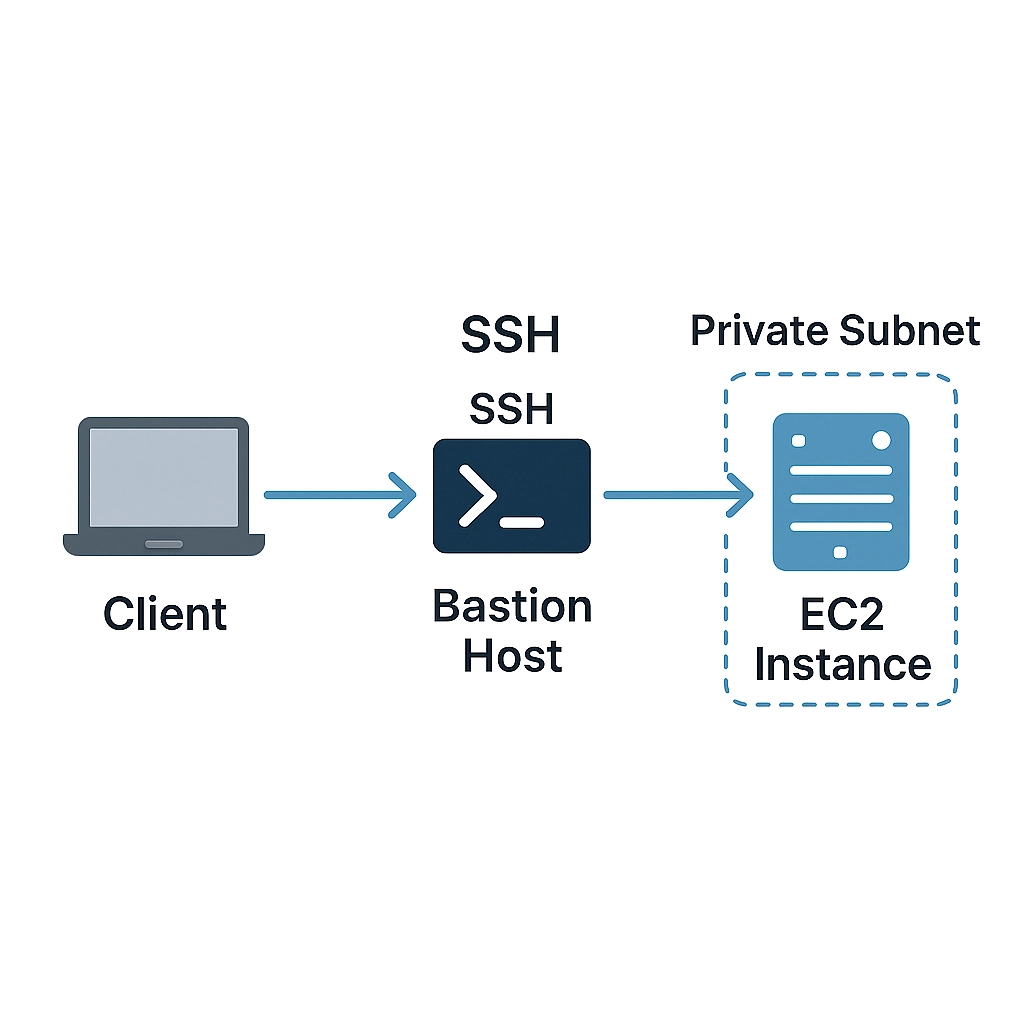
Introduction Working with AWS, you'll often encounter EC2 instances tucked away in private subnets. This architecture follows security best practices by isolating critical resources from direct internet access, but it creates a challenge: how do you access these instances from your local machine? Whether you need to perform maintenance, troubleshoot issues, or deploy applications, connecting to private EC2 instances is an essential skill for DevOps engineers and cloud practitioners. In this guide, we'll explore four proven methods to securely access your private EC2 instances without compromising your AWS security posture. Understanding Private Subnets in AWS Before diving into the solutions, let's clarify why EC2 instances often reside in private subnets: Enhanced security: No direct internet exposure means reduced attack surface Network segmentation: Separating application tiers (web, application, database) Compliance requirements: Many standards require isolating sensitive data A typical AWS VPC architecture includes both public subnets (with internet access via Internet Gateway) and private subnets (with optional outbound-only internet access via NAT Gateway). Method 1: SSH via Bastion Host (Jump Server) The most traditional approach involves setting up a bastion host (also called a jump server) in a public subnet that acts as a gateway to your private instances. How It Works You SSH into the publicly accessible bastion host From the bastion, you SSH into the private EC2 instance SSH agent forwarding allows you to use your local machine's private key without storing it on the bastion Setup Instructions 1. Configure Your Bastion Host First, launch an EC2 instance in a public subnet with the following settings: Use a minimal, hardened AMI (Amazon Linux 2 is a good choice) Configure a security group allowing SSH (port 22) from your IP address only Assign a public IP address or Elastic IP 2. Configure Your Private Instance Security Group Ensure your private instance's security group allows SSH access from the bastion host's security group: Type: SSH Protocol: TCP Port: 22 Source: Bastion's security group ID (sg-xxxxxxxx) 3. Set Up SSH Agent Forwarding On your local machine: # Start the SSH agent (if not already running) eval "$(ssh-agent -s)" # Add your private key to the agent ssh-add ~/.ssh/your-private-key.pem # Verify the key was added ssh-add -L 4. Connect Through the Bastion Now you can connect to your private instance through the bastion: # Connect to the bastion with agent forwarding enabled (-A flag) ssh -A ec2-user@bastion-public-ip # From the bastion, connect to the private instance ssh ec2-user@private-instance-ip Pros and Cons Pros: Works with any SSH client No need to store private keys on the bastion Simple to understand and implement Cons: Requires maintaining a bastion host Additional cost for the bastion instance Potential security risks if the bastion is compromised Method 2: AWS Systems Manager Session Manager AWS Systems Manager Session Manager provides a browser-based shell or CLI-based connection to your EC2 instances without requiring open inbound ports, bastion hosts, or SSH keys. How It Works The EC2 instance runs the SSM Agent and has an IAM role that allows Systems Manager connections You initiate a session through the AWS console or CLI The connection is established through AWS's service endpoints Setup Instructions 1. Configure IAM Role for the EC2 Instance Create or attach an IAM role with the following policies: AmazonSSMManagedInstanceCore (managed policy) 2. Install SSM Agent on the EC2 Instance The SSM Agent comes pre-installed on many Amazon AMIs. To verify or install: # Check if agent is running sudo systemctl status amazon-ssm-agent # If not installed, install it (Amazon Linux 2) sudo yum install -y amazon-ssm-agent sudo systemctl enable amazon-ssm-agent sudo systemctl start amazon-ssm-agent 3. Connect via AWS Console Navigate to the AWS Systems Manager console Select "Session Manager" from the left menu Click "Start session" Select your private EC2 instance and click "Start session" 4. Connect via AWS CLI # Start a session to your instance aws ssm start-session –target i-0123456789abcdef0 # For port forwarding (e.g., to access a web server on port 80) aws ssm start-session \ –target i-0123456789abcdef0 \ –document-name AWS-StartPortForwardingSession \ –parameters '{"portNumber":["80"],"localPortNumber":["8080"]}' After running the port forwarding command, you can access the web server at http://localhost:8080 from your local machine. Pros and Cons Pros: No need for bastion hosts or open inbound ports No SSH key management Activity logged in AWS CloudTrail Supports port forwarding for web applications Works through the AWS console (no SSH client needed) Cons: Requires IAM permissions SSM Agent must be running on the instance Network path to AWS SSM endpoints required Method 3: EC2 Instance Connect EC2 Instance Connect allows you to connect to your instances using your IAM credentials without storing SSH keys on the instance long-term. How It Works You generate an SSH key pair or use an existing one AWS temporarily pushes your public key to the instance (valid for 60 seconds) You connect using your private key Setup Instructions 1. Install EC2 Instance Connect on Your EC2 For Amazon Linux 2: sudo yum install -y ec2-instance-connect For Ubuntu: sudo apt-get update sudo apt-get install -y ec2-instance-connect 2. Configure IAM Permissions Create a policy allowing users to push SSH keys: { "Version": "2012-10-17", "Statement": [ { "Effect": "Allow", "Action": "ec2-instance-connect:SendSSHPublicKey", "Resource": "arn:aws:ec2:region:account-id:instance/instance-id" } ] } 3. Connect Using EC2 Instance Connect CLI Install the EC2 Instance Connect CLI: pip install ec2instanceconnectcli Connect to your instance: mssh ec2-user@i-0123456789abcdef0 4. Connect Using AWS CLI and SSH Client Push your public key to the instance: aws ec2-instance-connect send-ssh-public-key \ –instance-id i-0123456789abcdef0 \ –availability-zone us-east-1a \ –instance-os-user ec2-user \ –ssh-public-key file://~/.ssh/id_rsa.pub Then connect within 60 seconds using your SSH client: ssh -i ~/.ssh/id_rsa ec2-user@private-ip-address Pros and Cons Pros: No permanent SSH keys stored on instances Integrates with IAM permissions Available through AWS console Cons: Requires network connectivity to the EC2 Instance Connect API endpoint For private instances, requires connectivity to the private IP (VPN, Direct Connect, etc.) EC2 Instance Connect package must be installed on the instance Method 4: EC2 Instance Connect Endpoint EC2 Instance Connect Endpoint (EICE) is a newer service that allows secure connections to instances in
Deploy Containers on AWS Using ECS Fargate Easily
Introduction Containers have become the backbone of modern application delivery, but running and scaling container clusters can still feel like heavy lifting—especially if you’re also responsible for patching EC2 hosts, managing auto‑scaling groups, and worrying about kernel versions. AWS Fargate solves that problem by letting you launch Amazon ECS tasks without provisioning or managing servers. In this guide, you’ll learn what Fargate is, how it fits into Amazon Elastic Container Service (ECS), and how to deploy your first serverless container workload in minutes. What Is AWS Fargate AWS Fargate is a serverless compute engine for containers that works with both Amazon ECS and Amazon EKS. Instead of building a cluster of EC2 instances, you hand Fargate a task definition and AWS launches lightweight, fire‑and‑forget micro‑VMs behind the scenes. You pay only for vCPU, memory, and any optional EBS storage consumed while your task runs. Fargate vs. EC2 Launch Type When you create an ECS service you choose a launch type: EC2 – You provision and patch EC2 instances, install the ECS agent, handle scaling groups, etc. Steady workloads where you already have Reserved/Spot capacity or need GPU instances. Fargate – AWS provisions micro‑VMs on‑demand; no host management. Unpredictable, or small workloads, or when you never want to touch an OS again. Core ECS + Fargate Concepts Task Definition – JSON blueprint describing one or more containers, their images, CPU/memory, IAM role, networking mode, logs, etc. Task – A running instantiation of a task definition. In Fargate each task maps to an isolated compute unit. Service – Long‑running controller that maintains a specified number of tasks and can integrate with an Application/Network Load Balancer. Cluster – A logical namespace for grouping services and tasks. Fargate clusters don’t require EC2 instances. Step by Step for deploying container on Fargate Step1: Creating a Container 4. Under Cluster configuration, Enter Cluster name as democluster5. In Infrastructure select Fargate for serverless. 6. Click on Create. Step2: Create the task defintion file 3. Configure task definitions and containers 4. Under Infrastructure Requirements 5. Container -1 6. Click on the Create button. 7. The task definition will be created successfully. Step3: Creating a Service 2. You will be redirected to the service page. 3. Desired Tasks : Enter 1 4. Click on the Create button. Step4: Viewing the service 2. Navigate to the Tasks tab.3. Choose a task from the list of tasks in your service.4. Switch to the Networking tab. 5. Copy the Public IPv4 IP address and enter it in your web browser, and you should see a webpage that displays ”It works”. Best Practices Conclusion AWS Fargate brings true serverless operations to container workloads: no EC2 hosts, patching, or cluster capacity headaches—just define your application, set desired count, and ship. Whether you’re migrating monoliths into microservices or building net‑new event‑driven apps, Fargate plus ECS forms a robust, cost‑efficient platform to run containers at scale. Follow DevOps Horizon page for more blogs on Cloud and DevOps.

AWS Lambda Basics: Run Your First Function Fast
Introduction Serverless computing is completely changing how developers build and distribute applications. One of the most popular and efficient serverless cloud solutions for running code without worrying about server administration is AWS Lambda. In this blog we will explore what AWS Lambda is, Key benefits, how to create Lambda Functions and common use cases. What is AWS Lambda? AWS Lambda is a serverless compute service that lets you run code in response to events without provisioning or managing servers. You simply upload your code, and AWS handles the rest—from running and scaling the code to managing high availability. Key Features of AWS Lambda When to Use AWS Lambda AWS Lambda is ideal for: AWS Lambda Architecture Overview Step by Step for Creating AWS Lambda Function Step1: Go to AWS Lambda Console 3. Role: In the permissions section, click on Create a new role with basic Lambda permissions. 4. Click on the Create function button. 5. If you scroll down a little bit, you can see the Code source section. 6. Remove the existing code in AWS lambda lambda_function.py. Copy the below code and paste it into your lambda_function.py file. def lambda_handler(event, context): print(“Hello from Lambda!”) return { ‘statusCode’: 200, ‘body’: ‘Lambda executed successfully!’ } 7. Save the function by clicking on the Deploy button. Step 2: Test the Function 4. You should see the output: 5. Understanding the Code 6. The function returns a JSON response with: Step3: Triggering Lambda from S3 1. Create an S3 Bucket Go to S3 Console → Create a bucket (e.g., lambda-trigger-bucket). 2. Add Trigger to Lambda Now upload a file to your S3 bucket and see the Lambda logs 3. Viewing Logs in CloudWatch AWS Lambda automatically sends logs to Amazon CloudWatch. To view logs: 4. View logs for each invocation Best Practices for AWS Lambda Conclusion One of the most effective ways to create modern, scalable, and economical applications is with AWS Lambda. You can run microservices, automate processes, and react to real-time events with a few lines of code—all without having to worry about infrastructure management. We have seen how to create AWS Lambda Function using AWS SDK and trigger the function using S3 Bucket. For further posts about cloud and devops, follow DevOps Horizon.
AWS CI/CD Pipeline Explained: What It Is, How to Set Up, and How It Works
Introduction Ever wondered how companies like Netflix or Amazon push code updates multiple times a day without breaking everything? The secret sauce is a robust CI/CD pipeline. If you're looking to level up your DevOps game in 2025, understanding AWS CI/CD is non-negotiable. In this guide, we'll break down AWS CI/CD pipelines in plain English – what they are, how to set them up, and how they actually work in the real world. What Is an AWS CI/CD Pipeline? A CI/CD pipeline is essentially a series of steps that code changes go through from a developer's laptop to production. Think of it as an assembly line for your code. CI (Continuous Integration) is the practice of frequently merging code changes into a central repository, followed by automated builds and tests. Instead of working in isolation for weeks and then facing a "merge hell," developers integrate their changes daily, sometimes multiple times per day. CD (Continuous Delivery/Deployment) takes it a step further by automatically deploying all code changes to a testing or production environment after the build stage. AWS CI/CD pipelines leverage AWS's cloud infrastructure to automate this entire process, removing manual interventions and reducing the risk of human error. Core AWS CI/CD Services AWS offers a comprehensive suite of services that form the backbone of your CI/CD pipeline: AWS CodePipeline This is the orchestrator of your entire CI/CD workflow. CodePipeline automates the build, test, and deploy phases of your release process based on the release model you define. It's essentially the conveyor belt that moves your code through different stages. AWS CodeBuild CodeBuild is a fully managed build service that compiles your source code, runs tests, and produces software packages that are ready to deploy. It eliminates the need to provision, manage, and scale your own build servers. AWS CodeDeploy This service automates code deployments to any instance, including Amazon EC2 instances, on-premises servers, serverless Lambda functions, or Amazon ECS services. It makes software releases faster and more reliable. AWS CodeCommit A secure, highly scalable, managed source control service that hosts private Git repositories. Think of it as AWS's version of GitHub or GitLab. How to Set Up an AWS CI/CD Pipeline Setting up an AWS CI/CD pipeline might seem daunting at first, but it's actually quite straightforward when broken down into steps: Step 1: Set Up Your Source Repository First, you need a place to store your code. If you're going all-in on AWS, CodeCommit is your friend: # Create a CodeCommit repository aws codecommit create-repository –repository-name MyDemoRepo –repository-description "My demo application repository" Alternatively, you can use GitHub, Bitbucket, or other Git providers that integrate with AWS services. Step 2: Create a Build Project with CodeBuild Next, you need to define how your application gets built. Create a buildspec.yml file in your repository: version: 0.2 phases: install: runtime-versions: nodejs: 14 pre_build: commands: – echo Installing dependencies… – npm install build: commands: – echo Build started on `date` – npm run build post_build: commands: – echo Build completed on `date` artifacts: files: – build/**/* – appspec.yml discard-paths: no Then create your build project: aws codebuild create-project –name MyDemoBuild –source type=CODECOMMIT,location=https://git-codecommit.region.amazonaws.com/v1/repos/MyDemoRepo –artifacts type=S3,location=my-artifact-bucket,name=MyDemoApp.zip –environment type=LINUX_CONTAINER,image=aws/codebuild/amazonlinux2-x86_64-standard:3.0 Step 3: Set Up Deployment with CodeDeploy Create an appspec.yml file to instruct CodeDeploy how to deploy your application: version: 0.0 os: linux files: – source: / destination: /var/www/html/ hooks: BeforeInstall: – location: scripts/install_dependencies.sh timeout: 300 runas: root AfterInstall: – location: scripts/start_application.sh timeout: 300 runas: root Create your CodeDeploy application and deployment group: aws deploy create-application –application-name MyDemoApp aws deploy create-deployment-group –application-name MyDemoApp –deployment-group-name MyDemoDeploymentGroup –ec2-tag-filters Key=Name,Value=MyAppServer,Type=KEY_AND_VALUE –service-role-arn arn:aws:iam::account-id:role/CodeDeployServiceRole Step 4: Connect Everything with CodePipeline Finally, create a pipeline that ties everything together: aws codepipeline create-pipeline –cli-input-json file://pipeline.json Where pipeline.json defines your pipeline structure: { "pipeline": { "name": "MyDemoPipeline", "roleArn": "arn:aws:iam::account-id:role/service-role/AmazonCodePipelineServiceRole", "artifactStore": { "type": "S3", "location": "my-pipeline-artifact-bucket" }, "stages": [ { "name": "Source", "actions": [ { "name": "Source", "actionTypeId": { "category": "Source", "owner": "AWS", "provider": "CodeCommit", "version": "1" }, "configuration": { "RepositoryName": "MyDemoRepo", "BranchName": "main" }, "outputArtifacts": [ { "name": "SourceCode" } ] } ] }, { "name": "Build", "actions": [ { "name": "BuildAction", "actionTypeId": { "category": "Build", "owner": "AWS", "provider": "CodeBuild", "version": "1" }, "configuration": { "ProjectName": "MyDemoBuild" }, "inputArtifacts": [ { "name": "SourceCode" } ], "outputArtifacts": [ { "name": "BuildOutput" } ] } ] }, { "name": "Deploy", "actions": [ { "name": "DeployAction", "actionTypeId": { "category": "Deploy", "owner": "AWS", "provider": "CodeDeploy", "version": "1" }, "configuration": { "ApplicationName": "MyDemoApp", "DeploymentGroupName": "MyDemoDeploymentGroup" }, "inputArtifacts": [ { "name": "BuildOutput" } ] } ] } ] } } Alternatively, you can use the AWS Management Console to set up your pipeline with a more visual interface. How AWS CI/CD Pipelines Work Now that we've set up our pipeline, let's understand how it actually works in practice. The Flow of an AWS CI/CD Pipeline Trigger: A developer pushes code to the repository (CodeCommit in our example), which triggers the pipeline. Source Stage: CodePipeline detects the change and pulls the latest code from the repository. Build Stage: CodeBuild takes the source code, runs the commands specified in your buildspec.yml (installing dependencies, running tests, compiling code), and packages the application. Deploy Stage: CodeDeploy takes the built artifacts and deploys them to your target environment (EC2 instances, Lambda functions, ECS services) according to the instructions in your appspec.yml. Testing/Approval: Optionally, you can add automated testing stages or manual approval steps before deploying to production. Deep Dive: AWS CodePipeline CodePipeline is the backbone of your CI/CD process. It manages the flow between stages and provides visibility into the entire process. Key features: Parallel Actions: Run multiple actions concurrently within a stage Manual Approvals: Add approval actions for sensitive deployments Integrations: Works with third-party tools like GitHub, Jenkins, and more Notifications: Set up notifications for pipeline events via Amazon SNS Deep Dive: AWS CodeBuild CodeBuild handles all your build and test needs. It's fully managed, which means you don't need to worry about provisioning, managing, or scaling build servers. Key capabilities: Customizable Build Environment: Choose from various runtimes and container images Caching: Speed