

What is Jenkins and Why Should You Care? If you've dipped your toes into DevOps or continuous integration, you've probably heard of Jenkins. But what exactly is it? Simply put, Jenkins is an open-source automation server that helps automate the parts of software development related to building, testing, and deploying code. Think of it as the tireless worker who handles all the repetitive tasks in your software pipeline. In 2025, Jenkins remains one of the most widely used automation tools in the tech industry, powering the CI/CD pipelines of thousands of organizations worldwide. Whether you're a developer, a DevOps engineer, or simply someone looking to understand modern software delivery practices, Jenkins knowledge is incredibly valuable. A Brief History: From Hudson to Jenkins Jenkins wasn't always called Jenkins. It began life as Hudson, developed by Kohsuke Kawaguchi while working at Sun Microsystems in 2004. After Oracle acquired Sun in 2010, a dispute arose over the project's name and direction. The community forked the project, and Jenkins was born. Since then, Jenkins has grown exponentially, with a vibrant community of contributors and thousands of plugins that extend its functionality. This evolution has allowed Jenkins to adapt to changing technologies and remain relevant in the fast-paced world of software development. Core Concepts: Understanding the Jenkins Architecture At its heart, Jenkins follows a master-agent architecture: Master: The central coordination server that schedules jobs, distributes builds to agents, monitors agents, and presents results. Agents (Nodes): The worker machines that execute the builds as directed by the master. This distributed architecture allows Jenkins to scale horizontally, running builds across multiple machines simultaneously. In 2025, most organizations use Jenkins in a distributed setup, often with containerized agents that can be spun up and down as needed. Getting Started: Installing Jenkins Setting up Jenkins has become much simpler over the years. You have several options: Option 1: Docker Installation (Recommended for 2025) docker run -d -p 8080:8080 -p 50000:50000 –name jenkins jenkins/jenkins:lts This command pulls the official Jenkins LTS (Long Term Support) image and runs it in a container, mapping ports 8080 (web interface) and 50000 (agent connection). Option 2: Traditional Installation For Linux systems: sudo apt update sudo apt install openjdk-11-jre wget -q -O – https://pkg.jenkins.io/debian/jenkins.io.key | sudo apt-key add – sudo sh -c 'echo deb http://pkg.jenkins.io/debian-stable binary/ > /etc/apt/sources.list.d/jenkins.list' sudo apt update sudo apt install jenkins After installation, access Jenkins through your browser at http://localhost:8080. You'll be guided through an initial setup wizard where you'll: Unlock Jenkins using the initial admin password Install suggested plugins (or select custom plugins) Create your first admin user Configure the Jenkins URL Jenkins Pipeline: The Heart of Modern CI/CD In 2025, Jenkins Pipelines are the standard way to define your automation workflows. Pipelines are written in a domain-specific language based on Groovy, and they can be stored as code in your version control system—a practice known as "Pipeline as Code." There are two types of syntax for defining Jenkins Pipelines: Declarative Pipeline pipeline { agent any stages { stage('Build') { steps { echo 'Building the application…' sh 'mvn clean package' } } stage('Test') { steps { echo 'Running tests…' sh 'mvn test' } } stage('Deploy') { steps { echo 'Deploying the application…' // Deployment commands here } } } post { success { echo 'Pipeline executed successfully!' } failure { echo 'Pipeline execution failed!' } } } Scripted Pipeline node { stage('Build') { echo 'Building the application…' sh 'mvn clean package' } stage('Test') { echo 'Running tests…' sh 'mvn test' } stage('Deploy') { echo 'Deploying the application…' // Deployment commands here } } The declarative syntax is generally recommended for beginners due to its more structured and readable format. It provides a predefined structure that guides users in creating their pipelines. Essential Jenkins Plugins in 2025 One of Jenkins' greatest strengths is its extensibility through plugins. Here are some must-have plugins in 2025: Pipeline: Supports building continuous delivery pipelines Git Integration: Connects Jenkins with Git repositories Docker: Integrates Docker with Jenkins for containerized builds Blue Ocean: Provides a modern, visual interface for Jenkins Pipelines Kubernetes: Orchestrates Jenkins agents running in Kubernetes Credentials: Securely stores and manages credentials Configuration as Code (JCasC): Manages Jenkins configuration as code Installing plugins is straightforward through the Jenkins web interface: go to "Manage Jenkins" > "Manage Plugins" > "Available" tab, then search and install. Building Your First Jenkins Pipeline Let's create a simple pipeline for a web application: In Jenkins, click "New Item" Enter a name for your pipeline and select "Pipeline" Scroll down to the Pipeline section Enter the following script: pipeline { agent any stages { stage('Checkout') { steps { git 'https://github.com/yourusername/your-repo.git' } } stage('Build') { steps { sh 'npm install' } } stage('Test') { steps { sh 'npm test' } } stage('Deploy') { steps { sh 'echo "Deploying to staging environment…"' // Add deployment commands here } } } } Click "Save" and then "Build Now" to run your pipeline This pipeline checks out code from a Git repository, installs dependencies, runs tests, and simulates a deployment. In a real-world scenario, you'd replace the placeholder commands with actual build, test, and deployment commands specific to your application. Advanced Jenkins Features Multibranch Pipelines Multibranch pipelines automatically create and manage Jenkins pipelines for branches in your source control repository. This is perfect for teams using Git flow or GitHub flow workflows. // Jenkinsfile for a multibranch pipeline pipeline { agent any stages { stage('Build') { steps { echo "Building branch: ${env.BRANCH_NAME}" // Build commands } } stage('Test') { steps { // Test commands } } stage('Deploy') { when { branch 'main' // Only deploy from the main branch } steps { // Deployment commands } } } } Shared Libraries Shared libraries allow you to define reusable pipeline code that can be shared across multiple projects. This promotes code reuse and standardization across your organization. // Using a shared library @Library('my-shared-library') _ pipeline { agent any stages { stage('Build') { steps { // Call a function from the shared library mySharedBuildFunction() } }

The 2025 DevOps Career Roadmap: From Zero to Six Figures
Introduction: The DevOps Gold Rush of 2025 If you're reading this, you're probably eyeing those impressive six-figure DevOps salaries and wondering, "Can I get there too?" The answer is a resounding yes—even if you're starting from scratch. As we navigate through 2025, the DevOps landscape has evolved dramatically from its early days. Organizations aren't just adopting DevOps principles anymore; they're completely transforming around them. And with that transformation comes unprecedented demand for skilled professionals who can bridge development and operations. In this roadmap, I'll walk you through exactly how to go from absolute beginner to earning $100K+ in the DevOps field. No fluff, just actionable steps based on what's actually working in today's market. The Foundation: What You Need to Know Before You Start Before diving into tools and technologies, let's get something straight: DevOps isn't just a job title—it's a philosophy and a set of practices. At its core, DevOps is about breaking down silos between development and operations to deliver software faster and more reliably. If you're starting from zero, here's what you need to understand first: DevOps Core Principles: Automation, continuous integration/continuous delivery (CI/CD), infrastructure as code, monitoring, and feedback loops Business Value: How DevOps practices directly impact an organization's bottom line through faster delivery, reduced downtime, and improved quality Technical vs. Cultural Aspects: Both are crucial for success in this field Phase 1: Building Your Technical Foundation (0-6 Months) Your first six months should focus on developing foundational skills that all DevOps roles require: 1. Linux Administration Linux powers most cloud infrastructure, making it essential knowledge. Focus on: Command-line fluency System administration basics User and permission management Package management Shell scripting (Bash) 2. Networking Fundamentals You'll need to understand: IP addressing and subnetting DNS and how it works Firewalls and security groups Load balancing concepts Basic network troubleshooting 3. Programming Basics While you don't need to be a software developer, you should learn: Python fundamentals (the most versatile language for DevOps) Basic data structures and algorithms Version control with Git How to read and modify existing code 4. Cloud Fundamentals Choose one major cloud provider to start with (AWS, Azure, or GCP) and learn: Core services (compute, storage, networking) Identity and access management Basic cloud architecture patterns Cost optimization strategies Pro Tip: For hands-on cloud experience without breaking the bank, take advantage of the free tier on AWS or the $300 credit on Google Cloud Platform. Phase 2: DevOps-Specific Skills (6-12 Months) With the foundation in place, it's time to build DevOps-specific technical skills: 1. Infrastructure as Code (IaC) Learn to define infrastructure using code with: Terraform for multi-cloud provisioning CloudFormation (if AWS-focused) ARM templates (if Azure-focused) 2. Configuration Management Automate system configuration with: Ansible (most accessible starting point) Chef or Puppet (for enterprise environments) 3. Containerization & Orchestration The container revolution continues to dominate, so learn: Docker fundamentals and best practices Kubernetes basics (pods, deployments, services) Container security considerations 4. CI/CD Pipelines Automate software delivery with: Jenkins or GitLab CI/CD for pipeline creation GitHub Actions for code-centric workflows Understanding of pipeline security and best practices Check out our detailed guide on 5 DevOps Projects That Will Land You Your First Job to put these skills into practice. Phase 3: Specialization & Landing Your First Role (12-18 Months) After building core skills, it's time to specialize and position yourself for that first DevOps role: 1. Choose a Specialization The most in-demand specializations in 2025: Cloud-Native DevOps: Focus on Kubernetes, service meshes, and cloud-native security DevSecOps: Integrate security throughout the DevOps lifecycle Platform Engineering: Build internal developer platforms that abstract away complexity SRE (Site Reliability Engineering): Focus on system reliability and automation 2. Build a Project Portfolio Create 3-5 projects that demonstrate your skills: A fully automated CI/CD pipeline An infrastructure-as-code project that deploys a multi-tier application A monitoring solution using tools like Prometheus and Grafana A containerized application with Kubernetes deployment 3. Get Your First DevOps Role Entry-level positions to target: Junior DevOps Engineer Cloud Support Engineer Operations Engineer Release Engineer Expected Salary Range: $70,000-$90,000 depending on location and company size Phase 4: Climbing to Six Figures (18-36 Months) This is where your career really accelerates. Here's how to move from entry-level to six figures: 1. Master the Full DevOps Toolchain Deepen your expertise in: Advanced Kubernetes management and patterns Multi-cloud and hybrid cloud architectures GitOps workflows with tools like ArgoCD or Flux Observability platforms (not just monitoring) 2. Develop Soft Skills Technical skills alone won't get you to six figures. You need: Communication skills to explain complex concepts to non-technical stakeholders Project management capabilities Business acumen to align technical decisions with business goals Mentoring and leadership abilities 3. Pursue Strategic Certifications The most valuable certifications in 2025: Certified Kubernetes Administrator (CKA) AWS Certified DevOps Engineer – Professional HashiCorp Certified: Terraform Associate Google Professional Cloud DevOps Engineer The Six-Figure DevOps Roles By this point in your journey, you should be positioning yourself for these roles: 1. DevOps Engineer ($123,652/year) The core DevOps role, responsible for: Managing CI/CD pipelines Implementing and maintaining infrastructure as code Automating operational tasks Supporting development teams with tooling and infrastructure 2. DevOps Security Engineer ($158,441/year) Specializing in DevSecOps, focusing on: Implementing security controls in CI/CD pipelines Container and Kubernetes security Automated security testing and scanning Security as code practices 3. DevOps Release Manager ($151,845/year) Managing the entire release process: Coordinating releases across multiple teams Implementing deployment strategies (blue/green, canary, etc.) Release automation and orchestration Risk assessment and mitigation 4. DevOps Architect ($176,945/year) Designing the overall DevOps strategy: Creating reference architectures Selecting appropriate tools and technologies Designing scalable and resilient systems Aligning technical implementation with business goals Accelerating Your Journey: Practical Tips 1. Contribute to Open Source Projects This provides real-world experience and networking opportunities. Look for projects with "good first issue" labels to get started. 2. Join DevOps Communities Active participation in communities helps you stay current and build connections: DevOps/SRE focused Discord servers Local meetup groups (virtual or in-person) LinkedIn groups and Twitter communities 3. Practice Continuous Learning The field
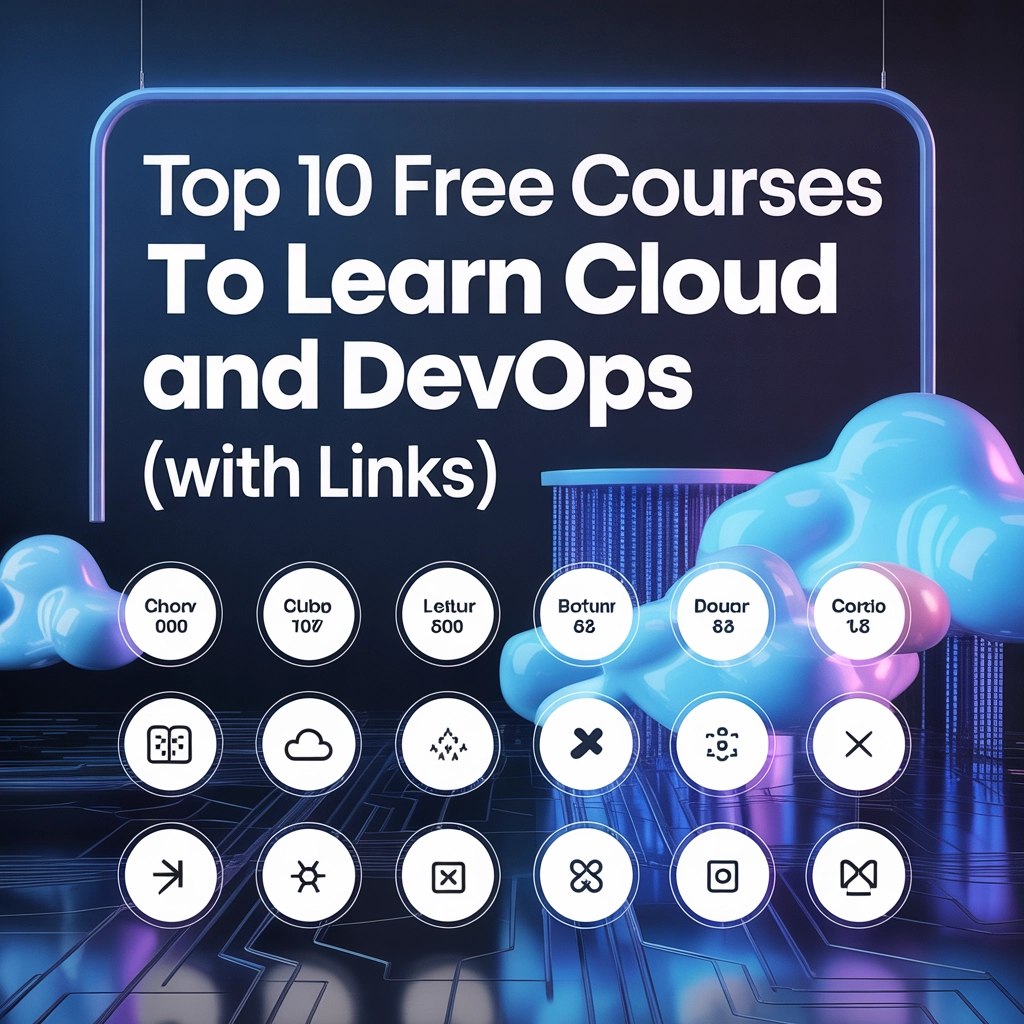
Top 10 Free Courses to Learn Cloud and DevOps
In today's fast-paced tech world, Cloud Computing and DevOps skills have become essential for IT professionals looking to advance their careers. Whether you're just starting out or looking to upskill, these technologies offer exciting opportunities with competitive salaries and growing demand. The good news? You don't need to spend thousands on bootcamps or certifications to begin your learning journey. There are plenty of high-quality, free resources available online from industry leaders and educational platforms. In this blog post, we've researched and compiled the top 10 free courses that will help you build solid foundations in Cloud Computing and DevOps. Let's dive in! Cloud Computing Courses 1. AWS Fundamentals with 2 Projects: Cloud for Beginners (Udemy) Link: AWS Fundamentals with 2 Projects This beginner-friendly course serves as an excellent introduction to Amazon Web Services, the leading cloud provider with over 33% market share. What makes this course stand out is its practical approach—you'll get hands-on experience through two real-world projects. What you'll learn: Core AWS services and concepts How to set up your first AWS account Infrastructure as a Service (IaaS) fundamentals Practical implementation through guided projects Basic cloud security concepts Duration: Approximately 5 hoursSkill Level: BeginnerCertificate: Yes (Course Completion) 2. Google Cloud Fundamentals: Core Infrastructure (Coursera) Link: Google Cloud Fundamentals Google Cloud Platform (GCP) is rapidly growing in popularity, especially for data science and machine learning workloads. This official Google course provides a comprehensive introduction to GCP's core services. What you'll learn: GCP computing and storage options Resource and policy management Key services like Compute Engine, Cloud Storage, and Kubernetes Engine How to choose the right Google Cloud services for your workloads Foundation for pursuing Google Cloud certifications Duration: 13.5 hoursSkill Level: BeginnerCertificate: Yes (available with completion) 3. Cloud Computing Basics (Cloud 101) by LearnQuest Link: Cloud Computing Basics This 8-hour course, taught by renowned instructor Jim Sullivan, provides an excellent overview of cloud computing fundamentals. It's perfect for those who want to understand the underlying concepts before diving into a specific cloud platform. What you'll learn: Cloud deployment models (public, private, hybrid) Service models (IaaS, PaaS, SaaS) Cloud architecture principles Essential cloud terminology Business benefits and considerations of cloud adoption Duration: 8 hoursSkill Level: BeginnerCertificate: Available upon completion 4. Microsoft Azure Fundamentals (Microsoft Learn) Link: Azure Fundamentals Microsoft Azure is one of the "big three" cloud providers alongside AWS and GCP. This free learning path from Microsoft offers a solid foundation for understanding Azure services and capabilities. What you'll learn: Azure core services and management tools General cloud concepts and service models Azure pricing, support, and service level agreements Core security, privacy, and compliance concepts Preparation for the optional AZ-900 certification exam Duration: 9-10 hoursSkill Level: BeginnerCertificate: Learning path completion badge 5. Introduction to Cloud Computing by Simplilearn Link: Introduction to Cloud Computing This self-paced course packs a lot of value into just over 2 hours of content. It's an excellent "crash course" for those who want to quickly understand cloud fundamentals across multiple platforms. What you'll learn: Cloud security fundamentals Various cloud models and deployment strategies Core concepts across AWS, Azure, and Google Cloud Advantages and challenges of cloud computing How cloud is transforming modern IT infrastructure Duration: 2+ hoursSkill Level: BeginnerCertificate: Yes (Course Completion) DevOps Courses 6. DevOps Essentials (Linux Foundation) Link: DevOps Essentials The Linux Foundation offers this free introductory course that covers the core principles and practices of DevOps. It's an excellent starting point for understanding how development and operations come together in modern software delivery. What you'll learn: DevOps culture and mindset Continuous Integration/Continuous Delivery (CI/CD) concepts Infrastructure as Code fundamentals Monitoring and observability principles DevOps toolchain overview Duration: 8 hoursSkill Level: BeginnerCertificate: Course completion certificate 7. Introduction to DevOps: Transforming and Improving Operations (edX) Link: Introduction to DevOps Another offering from the Linux Foundation, this time through edX, provides a deeper dive into how DevOps transforms traditional IT operations and development. What you'll learn: The business value of DevOps Key DevOps practices and methodologies How to build collaborative teams Automation principles Measuring DevOps success Duration: 6 weeks (2-3 hours per week)Skill Level: Beginner to IntermediateCertificate: Available for verified track 8. CI/CD with Jenkins (Codecademy) Link: CI/CD with Jenkins Jenkins is one of the most widely-used CI/CD tools in the industry. This course from Codecademy focuses on practical Jenkins skills that you can immediately apply in DevOps workflows. What you'll learn: Setting up and configuring Jenkins Creating and managing Jenkins pipelines Automating the build, test, and deploy process Integrating Jenkins with other tools Best practices for CI/CD implementation Duration: 5 hoursSkill Level: IntermediateCertificate: Course completion certificate 9. Docker Essentials (IBM Developer) Link: Docker Essentials Containerization is a core skill for modern DevOps practitioners, and Docker is the leading containerization platform. This course from IBM Developer provides a hands-on introduction to Docker. What you'll learn: Container concepts and benefits Creating and managing Docker images Running and orchestrating containers Docker networking and storage Docker Compose for multi-container applications Duration: 4 hoursSkill Level: Beginner to IntermediateCertificate: Digital badge upon completion 10. Introduction to Kubernetes (edX) Link: Introduction to Kubernetes Kubernetes has become the de facto standard for container orchestration. This course from the Linux Foundation on edX provides a comprehensive introduction to Kubernetes concepts and usage. What you'll learn: Kubernetes architecture and components Deploying applications on Kubernetes Managing containerized applications Kubernetes networking and storage Scaling and updating applications Duration: 4-5 weeks (2-3 hours per week)Skill Level: IntermediateCertificate: Available for verified track How to Get the Most from These Free Courses Learning Cloud Computing and DevOps is not just about completing courses—it's about building practical skills you can apply in real-world scenarios. Here are some tips to maximize your learning experience: 1. Follow a Strategic Learning Path If you're a complete beginner, start with the cloud computing basics and gradually move toward platform-specific courses. A recommended sequence might be: Cloud Computing Basics (Cloud 101) Introduction to DevOps Platform-specific courses (AWS, Azure, or GCP) Tool-specific courses (Docker, Jenkins, Kubernetes) 2. Set Up a Practice Environment Most cloud providers
Top Interview Questions and Answers on Networking, SSL/TLS, and DNS
Introduction Networking knowledge forms the backbone of modern IT infrastructure, and mastering concepts like DNS, SSL/TLS, and general networking principles is crucial for anyone in the tech industry. Whether you're preparing for a DevOps role, cloud engineering position, or system administration job, these topics consistently appear in technical interviews. At DevOps Horizon, we've compiled the most frequently asked interview questions on these subjects based on feedback from industry professionals and our own training experience. This comprehensive guide will help you prepare for your next technical interview with confidence. Networking Fundamentals What is a network and what are the different types of networks? Answer: A network is a collection of interconnected computing devices that communicate with each other to share resources and information. The main types include: LAN (Local Area Network): Covers a small area like an office or building WAN (Wide Area Network): Spans larger geographical areas, connecting multiple LANs MAN (Metropolitan Area Network): Covers a city or large campus WLAN (Wireless Local Area Network): Similar to LAN but connected wirelessly VPN (Virtual Private Network): Creates a secure connection over a public network What is the OSI model and its layers? Answer: The OSI (Open Systems Interconnection) model is a conceptual framework that standardizes the functions of a telecommunication or computing system into seven abstraction layers: Physical Layer: Deals with the physical connection between devices (cables, switches) Data Link Layer: Handles node-to-node data transfer and error detection/correction Network Layer: Manages packet forwarding, routing, and addressing Transport Layer: Provides end-to-end communication, segmentation, and flow control Session Layer: Establishes, maintains, and terminates connections Presentation Layer: Translates data between the application and network formats Application Layer: Provides network services directly to user applications What's the difference between TCP and UDP? Answer: TCP (Transmission Control Protocol): Connection-oriented, reliable protocol that guarantees delivery and correct ordering of packets. It uses handshaking, acknowledgments, and flow control to ensure reliability. Ideal for applications requiring accuracy like web browsing, email, and file transfers. UDP (User Datagram Protocol): Connectionless, unreliable protocol that prioritizes speed over reliability. It doesn't guarantee packet delivery or ordering but offers lower latency. Commonly used for real-time applications like video streaming, online gaming, and VoIP. What is DHCP and how does it work? Answer: DHCP (Dynamic Host Configuration Protocol) automatically assigns IP addresses and other network configuration parameters to devices on a network. The process works in four steps: Discovery: Client broadcasts a DHCPDISCOVER message Offer: DHCP server responds with a DHCPOFFER message containing an IP address Request: Client responds with a DHCPREQUEST message accepting the offer Acknowledgment: Server sends a DHCPACK message confirming the assignment This eliminates the need to manually configure each device on a network and helps prevent IP address conflicts. DNS Deep Dive What is DNS and why is it important? Answer: DNS (Domain Name System) is the internet's phonebook, translating human-readable domain names (like devopshorizon.com) into IP addresses (like 192.168.1.1) that computers use to identify each other. DNS is critical because: It makes the internet user-friendly by allowing us to use memorable domain names It enables load balancing and fault tolerance through multiple records It facilitates email routing through MX records It provides service discovery mechanisms through SRV records For a more detailed explanation, check out our AWS Route 53 guide. What are the different types of DNS records? Answer: DNS records serve different purposes in the domain name system: A Record: Maps a domain to an IPv4 address AAAA Record: Maps a domain to an IPv6 address CNAME Record: Creates an alias from one domain to another MX Record: Specifies mail servers for the domain TXT Record: Stores text information (often used for verification) NS Record: Delegates a DNS zone to specific name servers SOA Record: Contains administrative information about the zone PTR Record: Maps an IP address to a domain name (reverse lookup) SRV Record: Specifies services available in the domain Explain the DNS resolution process Answer: When you type a URL in your browser, the DNS resolution process follows these steps: Browser Cache Check: The browser first checks its cache for the domain OS Cache Check: If not found, it checks the operating system's cache Router Cache Check: Then it checks the router's cache ISP DNS Server: If still not found, the request goes to your ISP's DNS server Recursive DNS Resolution: The ISP's DNS server starts the recursive process: Queries root DNS servers Queries TLD (Top-Level Domain) servers (.com, .org, etc.) Queries authoritative name servers for the specific domain Response: The IP address is returned to your browser Caching: The result is cached at various levels for future requests SSL/TLS Security What is SSL/TLS and why is it important? Answer: SSL (Secure Sockets Layer) and its successor TLS (Transport Layer Security) are cryptographic protocols that provide secure communication over a computer network. They're important because they: Encrypt data transmitted between client and server Authenticate the identity of the server (and sometimes the client) Ensure data integrity by detecting tampering or forgery Build trust with users through visual security indicators For more details, see our comprehensive SSL/TLS guide. Explain the SSL/TLS handshake process Answer: The SSL/TLS handshake establishes a secure connection between client and server: Client Hello: Client sends supported cipher suites, TLS version, and random bytes Server Hello: Server selects cipher suite, TLS version, and sends its own random bytes Certificate: Server sends its digital certificate containing public key Key Exchange: Client generates a pre-master secret, encrypts it with server's public key, and sends it Server Verification: Client verifies server's certificate against trusted CAs Session Keys: Both sides generate the same session keys using the random values and pre-master secret Finished: Both sides send encrypted "Finished" messages to verify the handshake completed successfully Secure Communication: Further communication is encrypted with the session keys What are public and private keys in SSL/TLS? Answer: Public Key: A cryptographic key that can be freely shared and is used to encrypt data or verify digital signatures. It's included in the SSL certificate that servers present to clients. Private Key:
Everything You Need to Know About SSL/TLS Certificates: A Deep Dive into Secure Connections
Introduction: The Digital Security Layer Ever wondered why some websites show a little padlock icon in your browser? Or why your bank insists their site is "secure" when you log in? That's SSL/TLS at work – the silent guardian of your online data. At DevOps Horizon, we believe understanding these fundamental security technologies is crucial for anyone working in tech today. In this deep dive, we'll explore SSL/TLS certificates from the ground up – no previous knowledge required. We'll cover everything from basic encryption concepts to the nitty-gritty details of how the handshake process secures your connections. By the end, you'll understand why these certificates are the backbone of internet security. What Are SSL/TLS Certificates? SSL (Secure Sockets Layer) and its more modern successor TLS (Transport Layer Security) are cryptographic protocols designed to provide secure communication over a computer network. While most people still use the term "SSL certificates," what we're actually using today is TLS – but the name stuck around. These certificates serve two primary purposes: Encryption: They encrypt data traveling between a user's browser and a web server, preventing anyone from eavesdropping or tampering with the information. Authentication: They verify the identity of a website, ensuring users are connecting to the legitimate server and not an impostor. Think of an SSL/TLS certificate as a digital ID card for websites. Just like how your driver's license confirms your identity, these certificates confirm a website's identity to your browser. The Foundations: Cryptography and Keys Before diving into how SSL/TLS works, we need to understand the cryptographic concepts that make it possible. Symmetric vs. Asymmetric Encryption Symmetric encryption uses a single key for both encryption and decryption. It's like having one key that both locks and unlocks a door. This method is fast and efficient, but has one big problem: how do you securely share that key with someone over the internet? Asymmetric encryption (also called public-key cryptography) solves this problem by using a pair of mathematically related keys: The public key can be freely shared and is used to encrypt data The private key is kept secret and is used to decrypt data that was encrypted with the matching public key What Are Public and Private Keys? A public key is exactly what it sounds like – public. Anyone can have it. It's designed to be distributed widely without compromising security. When someone wants to send you encrypted data, they use your public key to lock (encrypt) the information. The private key is the secret half of the pair. It should be guarded carefully and never shared. Only the holder of the private key can decrypt information that was encrypted using the corresponding public key. The brilliant aspect of this system is that the public key cannot be used to figure out the private key, despite their mathematical relationship. It's a one-way street, mathematically speaking. How Does the SSL/TLS Handshake Work? The SSL/TLS handshake is the process where a client (usually a web browser) and a server establish a secure encrypted connection. It happens in milliseconds, but involves several critical steps: 1. Client Hello When you type "https://example.com" into your browser, the handshake begins with your browser (the client) sending a "Client Hello" message to the server. This message includes: The highest TLS protocol version the client supports A random number A list of cipher suites (encryption algorithms) the client can use 2. Server Hello and Certificate Presentation The server responds with: A "Server Hello" message confirming the TLS version and cipher suite Another random number Its SSL/TLS certificate, which contains the server's public key and identity information 3. Certificate Verification Your browser checks if the certificate is: Issued by a trusted Certificate Authority (CA) Currently valid (not expired) Actually issued for the website you're visiting Not revoked 4. Key Exchange Now comes the crucial part: Your browser generates a "pre-master secret" using the random numbers exchanged earlier This secret is encrypted using the server's public key (from the certificate) Only the server, with its private key, can decrypt this message Both sides use the pre-master secret to generate the same "master secret" From the master secret, symmetric session keys are created 5. Secure Connection Established Both sides send a "Finished" message encrypted with the session keys. If both can decrypt each other's messages, the handshake is complete, and secure communication begins. The Inner Workings of SSL/TLS Certificates Let's look at what's actually inside an SSL/TLS certificate: Certificate Structure Subject: The entity (website/organization) the certificate was issued to Issuer: The Certificate Authority that issued the certificate Valid From/To: The certificate's validity period Public Key: The public half of the asymmetric key pair Digital Signature: The CA's cryptographic signature verifying the certificate's authenticity Subject Alternative Names (SANs): Additional domains/subdomains the certificate covers Certificate Authorities (CAs) Certificate Authorities are trusted third parties that issue certificates after verifying the requester's identity. Your browser and operating system come pre-installed with a list of trusted root CA certificates. This creates a chain of trust: Your browser trusts the root CA The root CA vouches for intermediate CAs Intermediate CAs issue the end-entity certificates websites use This hierarchy is crucial because it allows your browser to trust millions of websites without having to know them individually. Types of SSL/TLS Certificates Several types of certificates exist, offering different levels of validation: Domain Validation (DV) Certificates Basic level of validation Only verifies domain ownership Quick and inexpensive to obtain Suitable for blogs, personal websites Organization Validation (OV) Certificates Moderate validation level Verifies organization details and domain ownership Takes longer to issue (1-3 days) Good for business websites Extended Validation (EV) Certificates Highest level of validation Rigorous verification of organization's legal existence Can take weeks to issue Used by banks, e-commerce, and financial institutions Wildcard Certificates Covers a domain and all its first-level subdomains (*.example.com) Convenient for managing multiple subdomains Multi-Domain (SAN) Certificates Covers multiple different domains in one certificate Useful for organizations with multiple websites The Trust Model: How Your Browser Validates Certificates When your browser
AWS Route 53 Explained: From DNS Basics to Expert Usage
Introduction: The Internet's Phone Book Ever wonder how typing "netflix.com" into your browser magically takes you to the right website? Behind this everyday internet miracle lies the Domain Name System (DNS) – essentially the internet's phone book. Without it, we'd all be memorizing IP addresses like 192.168.1.1 instead of human-friendly domain names. In today's cloud-centric world, AWS Route 53 has emerged as a powerhouse DNS service that does far more than simple domain name resolution. Whether you're a DevOps beginner or looking to level up your cloud infrastructure skills, understanding Route 53 is crucial for managing modern web applications. Let's dive into the world of DNS before exploring how AWS Route 53 takes these concepts to the next level. DNS Fundamentals: How the Internet's Navigation System Works What Exactly is DNS? The Domain Name System translates human-readable domain names (like devopshorizon.com) into machine-readable IP addresses (like 192.0.2.44). This translation is essential because while humans prefer memorable names, computers communicate using numerical IP addresses. The DNS Resolution Process When you type a URL into your browser, a surprisingly complex sequence of events occurs: Browser Cache Check: Your browser first checks if it already knows the IP address from a previous visit Operating System Check: If not found, your OS checks its local DNS cache Recursive DNS Resolver: Your request then goes to your ISP's DNS resolver Root Name Servers: The resolver queries the internet's root name servers TLD Name Servers: The root servers direct to the Top-Level Domain servers (like .com, .org) Authoritative Name Servers: The TLD servers point to the authoritative name servers for the specific domain Final Resolution: The authoritative server provides the IP address for the requested domain Caching: This information gets cached at various levels to speed up future requests This entire process typically happens in milliseconds, giving the illusion of instant connection. DNS Record Types: The Building Blocks DNS relies on various record types to function: A Records: Map a domain to an IPv4 address AAAA Records: Map a domain to an IPv6 address CNAME Records: Create domain aliases (pointing one domain to another) MX Records: Direct email to the correct mail servers TXT Records: Store text information (often for verification purposes) NS Records: Identify the authoritative name servers for a domain SOA Records: Contain administrative information about the DNS zone Understanding these record types is crucial when working with any DNS service, including AWS Route 53. Introducing AWS Route 53: Amazon's DNS Powerhouse AWS Route 53 is Amazon's scalable Domain Name System service designed to give developers and businesses a reliable way to route end users to internet applications. Named after TCP/UDP port 53 (where DNS server requests are addressed), Route 53 connects user requests to AWS infrastructure like EC2 instances, Elastic Load Balancers, or S3 buckets, as well as infrastructure outside of AWS. Route 53's Three Core Functions Domain Registration: Purchase and manage domain names directly through AWS DNS Routing: Direct traffic to your infrastructure based on various routing policies Health Checking: Monitor resource health and automatically reroute traffic around failures What sets Route 53 apart is its seamless integration with other AWS services and its global network of authoritative DNS servers, ensuring low-latency responses regardless of where your users are located. Diving Deeper: Route 53 Key Features Hosted Zones: Your Domain's Control Center A hosted zone is a container for all the DNS records related to a specific domain. Route 53 offers two types: Public Hosted Zones: Contain records that specify how internet traffic is routed Private Hosted Zones: Contain records that specify how traffic is routed within one or more VPCs Creating a hosted zone is your first step in using Route 53 for a domain, as it establishes the connection between your domain name and your resources. Health Checks: Ensuring Reliability Route 53's health checking capability is a powerful feature that: Monitors the health and performance of your web applications, web servers, and other resources Verifies that your endpoints are reachable, available, and functioning Enables automatic failover to backup resources when issues are detected Integrates with CloudWatch for alerts and notifications You can configure health checks based on: Endpoint Monitoring: Checking a specific URL, IP, or resource Status of Other Health Checks: Creating calculated health checks CloudWatch Alarms: Responding to metrics beyond simple connectivity Routing Policies: Traffic Management Reimagined Route 53 offers sophisticated routing capabilities through various policies: Simple Routing: Standard DNS routing with no special AWS features Weighted Routing: Split traffic based on assigned weights (useful for A/B testing) Latency-based Routing: Route users to the region with the lowest network latency Failover Routing: Direct traffic to a backup site when the primary site is unavailable Geolocation Routing: Route based on the geographic location of your users Geoproximity Routing: Route based on the geographic location of your resources and users Multivalue Answer Routing: Respond with multiple healthy resources to client queries These policies give you precise control over how traffic flows to your applications. Hands-On: Setting Up AWS Route 53 Domain Registration Process Sign in to the AWS Management Console Navigate to the Route 53 console Choose "Registered Domains" then "Register Domain" Search for your desired domain name and check availability Complete the registration with contact and payment information Verify your email address (required by ICANN) Wait for confirmation (can take up to 3 days, though often much faster) Once registered, AWS automatically creates a hosted zone for your domain with the necessary NS and SOA records. Configuring Your First DNS Records After setting up your hosted zone, you'll want to create records to direct traffic: # Example A record configuration: Name: example.com Type: A Value: 192.0.2.44 TTL: 300 For a typical website hosted on an EC2 instance: Navigate to your hosted zone in the Route 53 console Choose "Create Record" Enter the subdomain (or @ for root domain) Select record type (A for IPv4 address) Enter the IP address of your server Set a TTL (Time To Live) value Click "Create" For AWS resources, you can often use Alias
Terraform Guide: Provisioning Scalable EC2 Web Servers
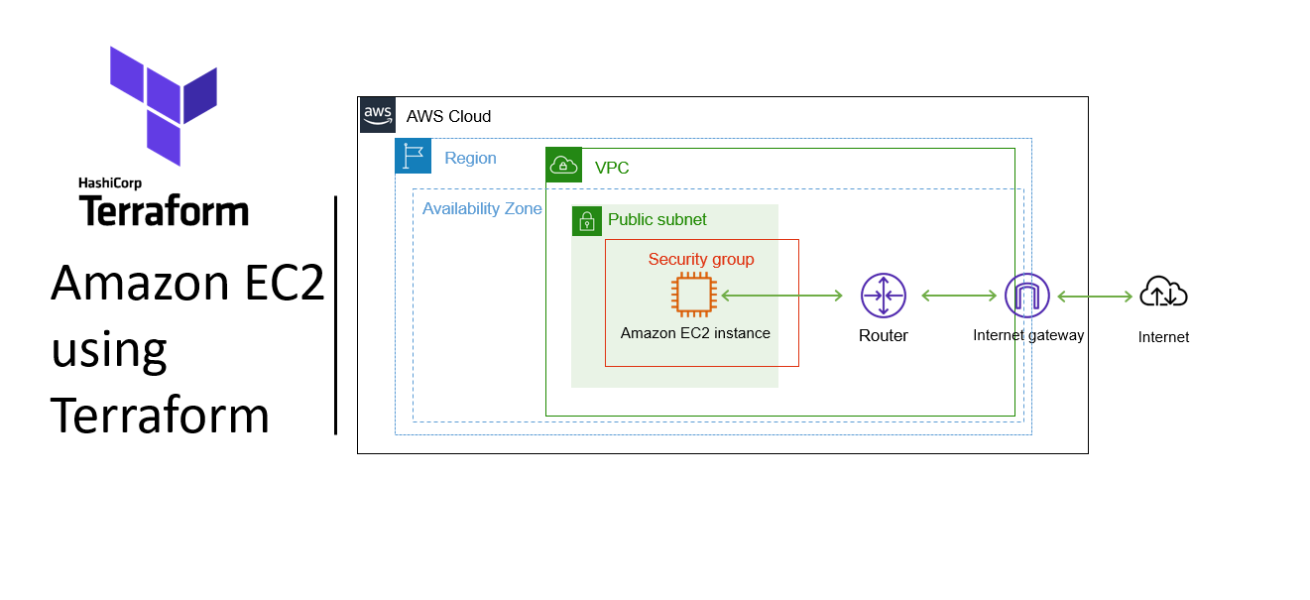
Introduction Terraform is an open-source Infrastructure as Code (IaC) program that makes it easier and more automatic to launch an EC2 instance on AWS. Terraform automates and defines deployments, assisting in effective infrastructure management. From preparation to deployment, this blog will guide you through the Terraform EC2 instance launch process. Step-by-step procedure for provisioning infrastructure using Terraform Step1: Set up the Terraform Project cd Desktop 6. Create a new folder by running the below command. mkdir terraform-ec2-instance 7. Change your present working directory to use the newly created folder by running the below command cd terraform-ec2-instance 8. Get the location of the present working directory by running the below command pwd 9. Get the location of the present working directory by running the below command Step2: Create a Variables File variable “access_key” { description = “Access key to AWS console” } variable “secret_key” { description = “Secret key to AWS console” } variable “region” { description = “Region of AWS VPC” } 3. After pasting the above contents, save the file by pressing ctrl + S. 4. Create a new file for terraform.tfvars and press enter to save it. 5. Paste the below code and click on ctrl s to save it. region = “us-east-1” access_key = “<YOUR AWS CONSOLE ACCESS ID>” secret_key = “<YOUR AWS CONSOLE SECRET KEY>” 6. Replace with your access key and secret key of your AWS Account Step 3: Create EC2 and its components in main.tf provider “aws” { region = “${var.region}” access_key = “${var.access_key}” secret_key = “${var.secret_key}” } 3. In the above code, we are defining the provider as aws. 4. We have to create a security group within EC2 and add the rules to allow the traffic on specific ports. 5. Make sure that instance can connect any outbound port, so we need to allow egress as well. 6. Paste the below code in the main.tf file resource “aws_security_group” “web-server” { name = “web-server” description = “Allow incoming HTTP Connections” ingress { from_port = 80 to_port = 80 protocol = “tcp” cidr_blocks = [“0.0.0.0/0”] } egress { from_port = 0 to_port = 0 protocol = “-1” cidr_blocks = [“0.0.0.0/0”] } } 7. Finally we are going create the EC2 Instance below the Security Group code. resource “aws_instance” “web-server” { ami = “ami-02e136e904f3da870” instance_type = “t2.micro” key_name = “devopshorizon-key” security_groups = [“${aws_security_group.web-server.name}”] user_data = <<-EOF #!/bin/bash sudo su yum update -y yum install httpd -y systemctl start httpd systemctl enable httpd echo “<html><h1> Welcome to DevOps Horizon </h1></html>” >> /var/www/html/index.html EOF tags = { Name = “web_instance” } } 8. In the above code, we have defined the Amazon Linux 2 AMI. The AMI ID mentioned above is for the us-east-1 region. 9. We have mentioned the resource which SSH key to use (which is already present in your AWS EC2 console). The security group ID is automatically taken by using the variable which will be set during the creation process. 10. We have added the user data to install the apache server. 11. We have provided tags for the EC2 instance. 12. Save the file by pressing Ctrl + S. Step4: Create an Output file output “web_instance_ip” { value = aws_instance.web-server.public_ip } 3. In the above code, we will extract the Public IP of the created EC2 instance and display it once the instance is created. Step5: Apply the configurations terraform version 2. Initialize Terraform by running the below command terraform init 3. To generate the action plans run the below command terraform plan 4. To create all the resources declared in main.tf configuration file, run the below command terraform apply 5. You will able to see the resources are getting deployed to AWS Console. 6. The output i.e Public IP of the EC2 instance is extracted and displayed. Copy the Public IP. Step5: Check the HTML page Step6: Cleanup the resources terraform destroy 2. Type yes to confirm the destruction. Best Practices Use Variables: Avoid hardcoding values. Store them in a variables.tf file:variable “region” { default = “us-east-1” } provider “aws” { region = var.region } State Management: Use remote state storage like AWS S3 to collaborate and maintain consistency. Version Control: Store Terraform configurations in a version control system like Git. Conclusion Launching an EC2 instance using Terraform is a straightforward process that underscores the power of Infrastructure as Code. By following these steps, you can deploy consistent, repeatable infrastructure while saving time and reducing manual errors. Expand on this by exploring advanced Terraform features like modules, workspaces, and state locking to manage your infrastructure at scale. Follow DevOps Horizon for more blogs on DevOps Horizon.
5 DevOps Projects That Will Land You Your First Job
Breaking into the DevOps world isn't just about knowing the theory—it's about showing what you can actually build. As someone who's helped dozens of beginners transition into tech careers, I can tell you that having real projects on your GitHub is worth more than a dozen certifications when you're starting out. The cold truth? Hiring managers spend less than 30 seconds scanning your resume, but they'll invest serious time reviewing your portfolio projects. These projects are your ticket to proving you can walk the walk, not just talk the talk. Let's dive into five hands-on DevOps projects that will not only teach you essential skills but also make recruiters actually want to interview you. These aren't just theoretical exercises—they're the same fundamental projects that working DevOps engineers tackle daily. 1. CI/CD Pipeline with GitHub Actions Nothing says "I understand modern development workflows" like a functioning CI/CD pipeline. This project is particularly impressive because it demonstrates automation skills that companies desperately need. What you'll build: A complete continuous integration and delivery pipeline that automatically tests, builds, and deploys code changes. Why employers love it: This project shows you understand the core DevOps principle of automating repetitive tasks and can implement solutions that save development teams countless hours. Tools you'll use: GitHub/GitLab for source control GitHub Actions for pipeline automation A simple web application (can be as basic as a "Hello World" app) Docker for containerization Implementation steps: Create a simple web application repository on GitHub Set up GitHub Actions workflow files (.github/workflows/main.yml) Configure automated testing whenever code is pushed Add build steps to create Docker images Configure automated deployment to a free hosting service like Heroku Pro tip: Add status badges to your README.md that show your tests are passing. This small detail shows attention to quality and documentation—traits employers value highly. Level up: Extend your pipeline to include security scanning using free tools like OWASP Dependency Check. Learning to integrate security into your automation makes you stand out from other candidates. 2. Infrastructure as Code with Terraform Manual server configuration is a thing of the past. Modern DevOps teams use Infrastructure as Code (IaC) to provision and manage their environments, and Terraform is one of the most in-demand tools for this purpose. What you'll build: A complete infrastructure setup using code that can be version-controlled, tested, and automatically deployed. Why employers love it: This project demonstrates you can create reproducible environments—solving one of the biggest headaches in IT operations. Tools you'll use: Terraform AWS (free tier) or DigitalOcean ($5/month) Git for version control Implementation steps: Install Terraform locally Set up a cloud provider account (AWS free tier works great) Write Terraform code to provision a web server Implement best practices like modularization and remote state Document your architecture with a simple diagram What to include in your portfolio: Show both the Terraform code and screenshots of the working infrastructure. Create a detailed README explaining your architecture decisions and how variables can be changed to scale the environment. Level up: Implement a multi-environment setup (dev/staging/prod) using Terraform workspaces or separate configuration files. This shows you understand real-world deployment patterns. 3. Containerization and Orchestration Project Containers have revolutionized application deployment, and Kubernetes has become the standard for orchestrating them at scale. This project demonstrates both skills in one impressive package. What you'll build: A containerized application deployed on a Kubernetes cluster with proper monitoring and scaling capabilities. Why employers love it: This project proves you understand modern application architecture and can implement scalable, resilient systems. Tools you'll use: Docker for containerization Kubernetes (using minikube locally or a managed service) A simple multi-component application (like a basic MEAN/MERN stack app) Implementation steps: Create Docker images for your application components Write Kubernetes manifests (deployments, services, etc.) Set up a local Kubernetes cluster using minikube Deploy your application to the cluster Implement basic monitoring and demonstrate scaling Portfolio highlight: Include your Dockerfiles, Kubernetes YAML files, and a diagram showing your application architecture. These artifacts demonstrate both technical skills and your ability to document solutions. Level up: Add Helm charts to your project to show you understand package management in Kubernetes. Check out our guide on Kubernetes orchestration fundamentals for best practices. 4. Monitoring and Observability Solution When systems fail (and they will), DevOps engineers are the first responders. Creating a monitoring solution shows you know how to prepare for the inevitable and respond effectively. What you'll build: A comprehensive monitoring system that tracks application health, system metrics, and provides alerting capabilities. Why employers love it: This project demonstrates you understand system reliability and can implement solutions that prevent downtime—directly impacting business continuity. Tools you'll use: Prometheus for metrics collection Grafana for visualization Alert Manager for notifications A simple application to monitor Implementation steps: Set up Prometheus to collect metrics from your application Configure Grafana dashboards to visualize the data Implement alerting rules for critical conditions Create runbooks for common issues Document your monitoring approach Portfolio highlight: Include screenshots of your dashboards and alert configurations. Create a presentation on what metrics you chose to monitor and why they matter from a business perspective. Level up: Implement log aggregation using the ELK stack (Elasticsearch, Logstash, Kibana) or Loki with Grafana. Multi-faceted observability demonstrates advanced understanding of system troubleshooting. 5. Automated Disaster Recovery Solution Disaster recovery isn't the flashiest topic, but it's critical for business continuity. Creating an automated disaster recovery solution shows you understand risk management—something that senior leaders deeply value. What you'll build: An automated system that backs up critical components and can restore them in case of failure. Why employers love it: This project demonstrates you think about worst-case scenarios and can implement systems that protect business assets—showing business acumen alongside technical skills. Tools you'll use: Bash or Python scripting AWS S3 or equivalent storage Terraform for infrastructure Scheduling tools (cron, AWS EventBridge) Implementation steps: Create scripts to back up application data and configurations Set up scheduled execution of backup routines Implement verification of backup integrity Create automated restoration processes Document your disaster recovery
Sudo, Chaining, and Efficiency: Level Up Your Bash Game with Power User Basics
Hey tech fam! Amartya here from DevOps Horizon. Ready to take your Linux skills to the next level? In our previous post, we covered file management basics in Ubuntu. Today, we're diving into some seriously cool power user techniques that'll have you commanding the terminal like a pro. Let's unlock the secrets of sudo, command chaining, and efficiency tricks that'll make your friends wonder how you got so good! What's the Big Deal About Sudo? Ever tried running a command in Linux only to get hit with that annoying "Permission denied" message? That's where sudo comes in—your passport to admin privileges without permanently logging in as the root user (which is a huge security no-no). The Sudo Superpower sudo stands for "superuser do" and it temporarily elevates your privileges to perform tasks that regular users can't. Think of it as borrowing the manager's key card to access restricted areas—you get the power, but only for specific tasks. sudo apt update When you run this command, you'll be prompted for your password. Enter it correctly, and boom—you've got temporary admin powers to update your system's package lists. 💡 Pro Tip: Your password isn't visible when typing it in the terminal—not even as asterisks. This is a security feature, not a bug! Beyond Basic Sudo: Configuration and Options Sudo isn't just a simple prefix—it's a sophisticated system with tons of options and configurations. Checking Sudo Status Wonder what commands you're allowed to run with sudo? Just ask: sudo -l This command lists all the commands you're permitted to execute with elevated privileges. The output might look intimidating at first, but it's super useful for understanding your system's security setup. Sudo Session Timeouts By default, sudo remembers your password for about 15 minutes. That means you can run multiple sudo commands without re-entering your password each time. When this grace period expires, you'll need to authenticate again. To explicitly end your sudo session: sudo -k This is handy when you're stepping away from your computer and want to ensure nobody can run privileged commands in your absence. Command Chaining: The Magic of Doing More with Less Why run one command when you can run several in sequence? Command chaining is like creating a playlist for your terminal—and it's a massive time-saver. The Classic Semicolon (;) The simplest way to chain commands is with a semicolon: sudo apt update; sudo apt upgrade -y; echo "All done!" This runs each command in sequence, regardless of whether previous commands succeed or fail. It's like a to-do list where you just plow through every item. The Logical AND (&&) For more control, use the && operator: sudo apt update && sudo apt upgrade -y && echo "Update successful!" With &&, each command only runs if the previous command succeeded (returned a zero exit status). This is perfect for scenarios where subsequent commands depend on earlier ones. The Logical OR (||) Sometimes you want a backup plan. Enter the || operator: ping -c 1 google.com || echo "Network seems to be down" Here, the second command only runs if the first one fails. Think of it as your "Plan B" in the terminal. Piping and Redirecting: The Data Superhighway One of the most powerful concepts in Linux is treating command output as a stream that can be directed wherever you want. Piping with | The pipe symbol (|) takes the output of one command and feeds it as input to another: sudo apt list –installed | grep firefox This lists all installed packages, then filters to show only lines containing "firefox"—perfect for finding specific packages on your system. Redirecting Output with > and >> Tired of information flashing by too quickly? Save it to a file: sudo apt update > update_log.txt The > operator redirects output to a file (overwriting any existing content), while >> appends to a file: echo "Update run on $(date)" >> system_maintenance.log sudo apt update >> system_maintenance.log This creates a timestamped log of your system updates you can refer to later. Sudo + Redirection: A Common Gotcha Here's something that trips up even experienced users: sudo echo "nameserver 8.8.8.8" > /etc/resolv.conf This might fail with "Permission denied" because the redirection (>) happens as your regular user, not with sudo privileges. The solution? Use tee: echo "nameserver 8.8.8.8" | sudo tee /etc/resolv.conf The tee command receives input from the pipe and writes it to both the specified file (with sudo privileges) and standard output. Efficiency Boosters: Keyboard Shortcuts and Aliases Life's too short for typing the same long commands repeatedly. Let's speed things up! Essential Keyboard Shortcuts Ctrl+R: Search your command history Ctrl+A/Ctrl+E: Jump to beginning/end of line Ctrl+U: Clear line before cursor Ctrl+K: Clear line after cursor Ctrl+W: Delete the word before the cursor Tab: Auto-complete commands, filenames, and directories Creating Custom Aliases Aliases are like custom shortcuts for commands you use frequently: # Add to your ~/.bashrc file alias update='sudo apt update && sudo apt upgrade -y' alias ll='ls -la' alias cls='clear' After adding these, either restart your terminal or run source ~/.bashrc, and you can just type update to run both update and upgrade commands in one go! Running Commands in the Background Need to run a command but don't want to wait for it to finish? Add an ampersand (&) at the end: sudo apt upgrade -y & This runs the command in the background, giving you back your terminal prompt immediately. To check on background jobs, use the jobs command. For even more detachment from the terminal, use nohup: nohup sudo apt upgrade -y & This keeps the command running even if you close your terminal session—perfect for long-running tasks. Supercharging Sudo: Advanced Techniques Ready for some advanced techniques? Let's go! Running a Command as a Different User Sudo isn't just for becoming root—you can become any user: sudo -u postgres psql This runs the PostgreSQL command-line client as the postgres user—super useful for database maintenance without switching users entirely. Opening a Root Shell Sometimes you need to run
File Management Like a Boss: Moving, Copying, and Navigating in Ubuntu
Hey there Ubuntu explorers! Welcome to the third installment of our Linux Zero to Hero series. In our previous post, we got comfortable with the Ubuntu terminal and basic commands. Today, we're leveling up your Linux game with essential file management skills that'll make you feel like a pro in no time. Why File Management Matters Think of your Linux system as a massive library. Without knowing how to find books, move them around, or organize new ones, you'd be pretty lost, right? The same goes for your Ubuntu system. Solid file management skills are the foundation for everything else you'll do in Linux—from basic tasks to advanced DevOps workflows. Understanding the Linux File System Before we start moving files around, let's get a quick lay of the land. Unlike Windows with its drive letters (C:, D:, etc.), Linux organizes everything in a single tree structure starting from the root directory, represented by a forward slash /. Here's a quick rundown of some key directories you'll be working with: /home – Where user directories live (like /home/yourusername) /etc – System configuration files /var – Variable data like logs and databases /usr – User programs and data /bin and /sbin – Essential system binaries /tmp – Temporary files When you open your terminal, you typically start in your home directory, which you can also refer to with the tilde symbol ~. Navigating Like a Pro Let's start with the basics of moving around your filesystem: Finding Your Way pwd # Print Working Directory – shows where you are This simple command is your "you are here" marker. Run it anytime you feel lost. Listing Files and Directories ls # List files in current directory ls -l # Long format with details ls -a # Show hidden files (those starting with .) ls -la # Combination of both ls /etc # List files in a specific directory Pro tip: Add some color to your listings with ls –color=auto. Better yet, most Ubuntu installations already have this set up as an alias, so just typing ls gives you colorized output. Changing Directories cd Documents # Move to Documents folder cd /etc # Move to /etc (absolute path) cd ../ # Move up one directory cd ~ # Go to your home directory cd – # Go back to previous directory The last one (cd -) is a little-known gem that toggles between your current and previous locations. Super handy when you're working in two directories! Creating Your Own Space Now that you can navigate around, let's learn how to create new directories: mkdir Projects # Create a directory mkdir -p Work/DevOps/Scripts # Create nested directories The -p flag is a lifesaver—it creates parent directories if they don't exist yet. Copying Files Like a Boss Time to copy some files around: cp original.txt copy.txt # Copy a file cp -r Projects/ Projects_Backup/ # Copy a directory recursively cp -i important.txt backup.txt # Ask before overwriting cp *.txt Documents/ # Copy all text files to Documents The -r (recursive) flag is essential when copying directories. Without it, cp will only try to copy the directory itself, not its contents. Moving and Renaming In Linux, moving and renaming use the same command: mv mv oldname.txt newname.txt # Rename a file mv file.txt ~/Documents/ # Move a file to Documents mv -i important.txt ~/Backup/ # Ask before overwriting mv *.jpg Images/ # Move all JPG files to Images folder Quick tip: When moving files to a different directory, if you want to keep the same filename, you can just specify the destination directory: mv report.pdf ~/Documents/ # This moves report.pdf to your Documents folder with the same name Removing Files and Directories With great power comes great responsibility. The rm command deletes files permanently—there's no Recycle Bin to recover from! rm unwanted.txt # Delete a file rm -i important.txt # Ask for confirmation before deleting rm -r OldProject/ # Delete a directory and its contents rm -rf TemporaryFiles/ # Force delete without asking (use with caution!) For empty directories, you can use the simpler rmdir command: rmdir EmptyFolder 🚨 WARNING: Be extremely careful with rm -rf commands, especially when used with wildcards or as superuser. There's a reason the joke goes that the most dangerous Linux command is rm -rf / (which would attempt to delete everything on your system). Understanding File Permissions One of Linux's superpowers is its robust permission system. Each file and directory has permissions for the owner, group, and others. To see permissions, use ls -l: $ ls -l script.sh -rwxr-xr– 1 amartya devops 1024 Jun 17 13:45 script.sh This cryptic output breaks down as: First character: file type (- for regular file, d for directory) Next three characters: owner permissions (read, write, execute) Next three: group permissions Last three: permissions for everyone else To change permissions: chmod +x script.sh # Make file executable for everyone chmod u+w,g-w file.txt # Add write permission for user, remove it for group chmod 755 important_script.sh # Set specific permissions using octal notation Power User Moves: Wildcards and Pattern Matching Wildcards supercharge your file management commands: cp *.py Python/ # Copy all Python files mv project_*.txt Projects/ # Move all files starting with "project_" rm temp_??.txt # Remove files like temp_01.txt, temp_42.txt Common wildcards: * – Matches any number of characters ? – Matches exactly one character [abc] – Matches any of the characters in brackets [a-z] – Matches any character in the range Chaining Commands for Efficiency Why run multiple commands when you can chain them together? # Create directory and move into it in one go mkdir NewProject && cd NewProject # Try to create a backup, but if it fails, show an error cp -r ~/Documents ~/Backup || echo "Backup failed!" # Chain multiple operations mkdir -p Projects/Website && cp *.html Projects/Website/ && echo "Files moved successfully!" Real-World Scenarios Let's put everything together with some practical examples: Scenario 1: Organizing Your Downloads Folder # Create organization directories cd ~/Downloads mkdir -p Documents Images